Reference Guide
624
• Read this document thoroughly before using the camera. • To ensure proper use of the camera, be sure to read “For your safety” (page 28). • After reading this document, keep it readily accessible for future reference. DIGITAL CAMERA Reference Guide
-
Upload
khangminh22 -
Category
Documents
-
view
0 -
download
0
Transcript of Reference Guide
• Read this document thoroughly before using the camera.• To ensure proper use of the camera, be sure to read “For
your safety” (page 28).• After reading this document, keep it readily accessible for
future reference.
DIGITAL CAMERA
Reference Guide

When your first photo can’t wait2
When your first photo can’t wait
Getting ready❚❚
1 Insert the battery and memory card (075).
For information on charging the battery, see “Charging the battery”
(074).
2 Attach a lens (078).
・Align the indicator on the camera body with the indicator on thelens (q) and rotate the lens in the direction shown (w).
・A strap can be attached to the camera. For more information, see
“Attaching the strap” (073).
3 Turn the camera on and then choose a language and set theclock (081).
Z fc Model Name: N2016

When your first photo can’t wait3
Take (085) and view (096) pictures❚❚
1 Rotate the mode selector to AUTO (b).
2 To focus, press the shutter-release button halfway (i.e, lightlypress the shutter-release button, stopping when it is pressedhalfway).
3 Without lifting your finger from the shutter-release button,press the button the rest of the way down to take the picture.
4 View the picture.

Package contents4
Package contentsBe sure all items listed here were included with your camera.❏Camera
❏BF-N1 body cap
❏DK-32 rubber eyecup (comes
attached to camera, 0564)
❏EN-EL25 rechargeable Li-ionbattery
❏MH-32 battery charger (plugadapter supplied in countries orregions where required; shapedepends on country of sale)
❏AN-DC23 strap (073)❏Warranty❏User’s Manual
・ Memory cards are sold separately.・ Purchasers of the lens kit option should confirm that the package
also includes a lens.
D The Nikon Download CenterVisit the Nikon download center to download firmware updates, NX Studioand other Nikon software, and documentation for Nikon products includingcameras, NIKKOR lenses, and flash units.https://downloadcenter.nikonimglib.com/

About this document5
About this document
Symbols❚❚This document employs the following symbols and conventions. Usethem to help locate the information you need.
D This icon marks notes, information that should be read before usingthis product.
A This icon marks tips, additional information you may find helpfulwhen using this product.
0 This icon marks references to other sections in this document.
Conventions❚❚・ This camera uses SD, SDHC, and SDXC memory cards, referred to
throughout this document as “memory cards”. SD, SDHC, and SDXCmay also on occasion be referred to as “SD memory cards”.
・ Throughout this document, battery chargers are referred to as“battery chargers” or “chargers”.
・ Throughout this document, the display in camera monitor andviewfinder during shooting is referred to as the “shooting display”; inmost cases, the illustrations show the monitor.
・ Throughout this document, smartphones and tablets are referred toas “smart devices”.
・ Throughout this document, the term “default settings” is used torefer to the settings in effect at shipment. The explanations in thisdocument assume that default settings are used.

About this document6
A For your safety“For your safety” contains important safety instructions. Be sure to read them
before using the camera. For more information, see “For your safety” (028).

Table of contents7
Table of contentsWhen your first photo can’t wait ..........................................................................2Package contents .......................................................................................................4About this document ............................................................................................... 5Menu list ..................................................................................................................... 22For your safety .......................................................................................................... 28Notices .........................................................................................................................33
Getting to know the camera 36Parts of the camera ................................................................................................. 36
Camera body .............................................................................. 36Control panel ..............................................................................40The monitor and viewfinder ................................................. 41
Camera controls ....................................................................................................... 44Viewfinder ....................................................................................44The M (monitor mode) button ........................................... 45The mode selector ....................................................................47The shutter-speed dial ............................................................ 47The command dials ..................................................................48The ISO sensitivity dial ............................................................ 49The exposure compensation dial ........................................50Monitor .........................................................................................50Touch controls ............................................................................54The DISP button ........................................................................ 61The X and W (Q) buttons ......................................................63The A (g) button ................................................................... 63The G button ......................................................................... 64The i button (the i menu) ....................................................68The Fn button .............................................................................71
First steps 73Attaching the strap ................................................................................................. 73

Table of contents8
Charging the battery .............................................................................................. 74Inserting the battery and a memory card .......................................................75
Battery level ................................................................................ 76Number of exposures remaining ........................................ 77
Attaching a lens ........................................................................................................78Detaching lenses .......................................................................79
Opening the monitor ............................................................................................. 80Turning on the camera .......................................................................................... 81
Basic photography and playback 85Taking photographs (b auto) ............................................................................. 85Recording videos (b auto) ...................................................................................90
Taking photos in video mode ...............................................92Viewing photos .........................................................................................................96
Viewing videos ...........................................................................96Deleting unwanted pictures ................................................. 98
Basic settings 100Focus ..........................................................................................................................100
Focus mode .............................................................................. 100AF-area mode .......................................................................... 102The touch shutter ...................................................................110Manual focus ............................................................................112
White balance .........................................................................................................116Adjusting white balance ......................................................116
Silent photography ...............................................................................................121Rating pictures ....................................................................................................... 123Protecting pictures from deletion ...................................................................125
Shooting controls 127The mode selector ................................................................................................ 127
Using the mode selector ..................................................... 127P (programmed auto) ........................................................... 128S (shutter-priority auto) ....................................................... 128

Table of contents9
A (aperture-priority auto) ....................................................130M (manual) ................................................................................131
The ISO sensitivity dial ........................................................................................ 137Adjusting ISO sensitivity ......................................................137
The exposure compensation dial ....................................................................139Adjusting exposure compensation ................................. 139
The A (g) button ............................................................................................... 142Exposure lock ...........................................................................142Focus lock ..................................................................................142Locking focus and exposure .............................................. 142
The i menu 145The i menu ............................................................................................................. 145Still images .............................................................................................................. 147
Set Picture Control .................................................................147White balance ..........................................................................153Image quality ...........................................................................160Image size ................................................................................. 161Flash mode ............................................................................... 162Metering .................................................................................... 162Wi-Fi connection .....................................................................164Active D-Lighting ................................................................... 164Release mode .......................................................................... 166Vibration reduction ............................................................... 171AF-area mode .......................................................................... 172Focus mode .............................................................................. 173
Videos ........................................................................................................................ 174Set Picture Control .................................................................175White balance ..........................................................................175Frame size and rate/Video quality ....................................175Microphone sensitivity .........................................................178Wind noise reduction ........................................................... 179Metering .................................................................................... 180

Table of contents10
Wi-Fi connection .....................................................................180Active D-Lighting ................................................................... 181Electronic VR ............................................................................ 181Vibration reduction ............................................................... 182AF-area mode .......................................................................... 182Focus mode .............................................................................. 182
Playback 183Viewing pictures ....................................................................................................183
Full-frame playback ............................................................... 183Thumbnail playback ..............................................................184Calendar playback ..................................................................184
Photo information ................................................................................................ 186File information .......................................................................187Exposure data .......................................................................... 188Highlight display .................................................................... 188RGB histogram .........................................................................189Shooting data .......................................................................... 192Location data ........................................................................... 196Overview ................................................................................... 197
The i button (playback mode) ........................................................................ 199Photos .........................................................................................199Videos ......................................................................................... 201Videos (playback paused) ................................................... 202
Playback zoom ....................................................................................................... 209Using playback zoom ............................................................209
Deleting pictures ...................................................................................................211Using the delete button .......................................................211Deleting multiple pictures .................................................. 212
Menu guide 215Defaults .....................................................................................................................215
Playback menu defaults .......................................................215

Table of contents11
Photo shooting menu defaults ......................................... 216Video recording menu defaults ........................................ 220Custom Settings menu defaults ....................................... 222Setup menu defaults .............................................................227
D The playback menu: Managing images ..................................................232Delete ................................................................................................................... 232Playback folder ..................................................................................................233Playback display options ...............................................................................233Picture review ....................................................................................................234Rotate tall ............................................................................................................234Slide show ...........................................................................................................234
Viewing slide shows .............................................................. 235Rating ................................................................................................................... 236
C The photo shooting menu: Shooting options ..................................... 237Reset photo shooting menu ........................................................................238Storage folder ....................................................................................................238
Renaming folders ................................................................... 239Select folder by number ...................................................... 239Select folder from list ............................................................241
File naming .........................................................................................................242Choose image area ..........................................................................................243Image quality .....................................................................................................244Image size ........................................................................................................... 244RAW recording .................................................................................................. 245ISO sensitivity settings ................................................................................... 245White balance ....................................................................................................248
The white balance menu: Fine-tuning ........................... 249The white balance menu: Choosing a colortemperature ............................................................................. 251Preset manual: Copying white balance from aphotograph .............................................................................. 252
Set Picture Control ...........................................................................................255Modifying Picture Controls from the menus ................255
Table of contents12
Manage Picture Control .................................................................................257Creating custom Picture Controls .................................... 258
Color space .........................................................................................................262Active D-Lighting ............................................................................................. 262Long exposure NR ............................................................................................262High ISO NR ........................................................................................................263Vignette control ................................................................................................264Diffraction compensation .............................................................................264Auto distortion control .................................................................................. 265Flicker reduction shooting ............................................................................265Metering ..............................................................................................................266Flash control .......................................................................................................267
Flash control mode ................................................................267Wireless flash options ........................................................... 268Group flash options ...............................................................268
Flash mode ......................................................................................................... 269Flash compensation ........................................................................................269Release mode .................................................................................................... 269Focus mode ........................................................................................................269AF-area mode ....................................................................................................270Vibration reduction ......................................................................................... 270Auto bracketing ................................................................................................270
Exposure and flash bracketing .......................................... 271White balance bracketing ................................................... 276ADL bracketing ........................................................................279
Multiple exposure ............................................................................................281Creating a multiple exposure ............................................ 283
HDR (high dynamic range) ........................................................................... 289Taking HDR photographs .................................................... 290
Interval timer shooting .................................................................................. 296Interval-timer photography ................................................300
Time-lapse video ..............................................................................................310Recording time-lapse videos ............................................. 311

Table of contents13
Focus shift shooting ........................................................................................319Focus shift photography ......................................................321
Silent photography ......................................................................................... 3271 The video recording menu: Video recording options ........................ 329
Reset video recording menu ........................................................................330File naming .........................................................................................................330Frame size/frame rate .....................................................................................330Video quality ......................................................................................................330Video file type ................................................................................................... 331ISO sensitivity settings ................................................................................... 331White balance ....................................................................................................332Set Picture Control ...........................................................................................333Manage Picture Control .................................................................................333Active D-Lighting ............................................................................................. 333High ISO NR ........................................................................................................334Vignette control ................................................................................................334Diffraction compensation .............................................................................334Auto distortion control .................................................................................. 334Flicker reduction ...............................................................................................334Metering ..............................................................................................................335Release mode (save frame) ...........................................................................335Focus mode ........................................................................................................336AF-area mode ....................................................................................................336Vibration reduction ......................................................................................... 336Electronic VR ......................................................................................................337Microphone sensitivity .................................................................................. 337Attenuator .......................................................................................................... 338Frequency response ........................................................................................338Wind noise reduction ..................................................................................... 339Timecode .............................................................................................................339
A Custom Settings: Fine-tuning camera settings .................................... 341Reset custom settings .................................................................................... 343a: Autofocus ....................................................................................................... 344

Table of contents14
a1: AF-C priority selection .................................................................... 344a2: AF-S priority selection .....................................................................344a3: Focus tracking with lock-on ......................................................... 345a4: Focus points used .............................................................................345a5: Store points by orientation ...........................................................346a6: AF activation ...................................................................................... 348
Out-of-focus release ..............................................................348a7: Limit AF-area mode selection ...................................................... 349a8: Focus point wrap-around ..............................................................349a9: Focus point options .........................................................................350
Manual focus mode ...............................................................350Dynamic-area AF assist ........................................................ 350
a10: Low-light AF .....................................................................................350a11: Built-in AF-assist illuminator ...................................................... 351a12: Manual focus ring in AF mode .................................................. 352
b: Metering/exposure .....................................................................................352b1: Easy exposure compensation ......................................................352b2: Center-weighted area .....................................................................353b3: Fine-tune optimal exposure .........................................................353b4: b mode exposure comp. .............................................................. 354
c: Timers/AE lock .............................................................................................. 354c1: Shutter-release button AE-L ......................................................... 354c2: Self-timer ............................................................................................. 355c3: Power off delay ..................................................................................355
d: Shooting/display ......................................................................................... 356d1: CL mode shooting speed .............................................................. 356d2: Maximum shots per burst .............................................................356d3: Exposure delay mode ..................................................................... 356d4: Shutter type ....................................................................................... 357d5: Extended shutter speeds (M) .......................................................357d6: File number sequence ....................................................................358d7: Apply settings to live view ............................................................359d8: Framing grid display ....................................................................... 360

Table of contents15
d9: Focus peaking ................................................................................... 360Peaking level ............................................................................ 360Peaking highlight color ........................................................360
d10: View all in continuous mode .....................................................361e: Bracketing/flash ........................................................................................... 361
e1: Flash sync speed ...............................................................................361e2: Flash shutter speed ..........................................................................362e3: Exposure comp. for flash ................................................................363e4: Auto c ISO sensitivity control ...................................................... 363e5: Auto bracketing (mode M) ............................................................364e6: Bracketing order ............................................................................... 365
f: Controls ............................................................................................................365f1: Customize i menu ..........................................................................365
Bluetooth connection ...........................................................366f2: Custom controls (shooting) ........................................................... 367f3: Custom controls (playback) ........................................................... 375f4: Customize command dials .............................................................377
Reverse rotation ......................................................................377Change main/sub ...................................................................378Menus and playback ............................................................. 378Sub-dial frame advance ....................................................... 379
f5: Release button to use dial ..............................................................380f6: Reverse indicators ............................................................................. 381
g: Video ................................................................................................................381g1: Customize i menu .........................................................................381
Bluetooth connection ...........................................................382g2: Custom controls ................................................................................382g3: AF speed ..............................................................................................388g4: AF tracking sensitivity .................................................................... 389g5: Highlight display .............................................................................. 389
Display pattern ........................................................................389Highlight display threshold ................................................390
B The setup menu: Camera setup ...................................................................391

Table of contents16
Format memory card ......................................................................................392Language ............................................................................................................ 393Time zone and date .........................................................................................393Monitor brightness ..........................................................................................394Monitor color balance .................................................................................... 394Viewfinder brightness .................................................................................... 396Viewfinder color balance ...............................................................................396Limit monitor mode selection .....................................................................397Information display ......................................................................................... 397AF fine-tuning options ...................................................................................397
Creating and saving fine-tuning values .........................399Choosing a default fine-tuning value .............................400
Non-CPU lens data .......................................................................................... 400Save focus position ......................................................................................... 401Image Dust Off ref photo ..............................................................................401
Acquiring Image Dust Off reference data ..................... 402Pixel mapping ....................................................................................................403Image comment ............................................................................................... 404
Input comment ....................................................................... 404Attach comment .....................................................................404
Copyright information ................................................................................... 405Artist/Copyright ...................................................................... 405Attach copyright information ............................................405
Beep options ......................................................................................................406Beep on/off ...............................................................................406Volume ....................................................................................... 407Pitch .............................................................................................407
Touch controls ...................................................................................................407Enable/disable touch controls ...........................................407Full-frame playback flicks .................................................... 407
Self-portrait mode ........................................................................................... 408HDMI .....................................................................................................................408Airplane mode .................................................................................................. 408

Table of contents17
Connect to smart device ............................................................................... 408Pairing (Bluetooth) .................................................................408Select for upload (Bluetooth) .............................................409Wi-Fi connection .....................................................................409Upload while off ..................................................................... 410Location data (smart device) ..............................................410
Connect to computer ..................................................................................... 411Wi-Fi connection .....................................................................411Network settings .................................................................... 411Options .......................................................................................412MAC address ............................................................................ 413
Wireless remote (ML-L7) options ................................................................413Wireless remote connection ...............................................414Save wireless remote controller ........................................414Delete wireless remote controller .................................... 414Assign Fn1 button/Assign Fn2 button ............................414
Conformity marking ........................................................................................415USB power delivery ......................................................................................... 415Energy saving (photo mode) ....................................................................... 417Slot empty release lock ..................................................................................418Save/load menu settings .............................................................................. 419
Save menu settings ............................................................... 422Load menu settings ...............................................................422
Reset all settings ...............................................................................................423Firmware version ..............................................................................................423
N The retouch menu: Creating retouched copies ................................... 424Creating retouched copies ................................................. 425
RAW processing: Converting RAW to JPEG .............................................428Trim ....................................................................................................................... 431Resize ....................................................................................................................432
Resizing multiple images .................................................... 432D-Lighting ...........................................................................................................436Red-eye correction .......................................................................................... 437

Table of contents18
Straighten ........................................................................................................... 438Distortion control .............................................................................................438Perspective control ..........................................................................................439Monochrome .....................................................................................................440Overlay pictures ................................................................................................441
Add .............................................................................................. 441Lighten and darken ............................................................... 445
Trim video ...........................................................................................................448O My Menu/m Recent settings .......................................................................449
O My Menu: Creating a custom menu ...........................449m Recent settings: Accessing recently-used settings.............................................................................................................. 455
Establishing wireless connections to computersor smart devices 456
Network options ....................................................................................................456Connecting to computers via Wi-Fi ................................................................457
What Wi-Fi can do for you ...................................................457The Wireless Transmitter Utility ........................................ 457Infrastructure and access-point modes ......................... 457Connecting in access-point mode ................................... 459Connecting in infrastructure mode .................................465Uploading pictures ................................................................ 473Disconnecting and reconnecting .....................................477
Connecting to smart devices ............................................................................479The SnapBridge app ..............................................................479What SnapBridge can do for you ......................................479Wireless connections ............................................................ 480Connecting via Bluetooth (pairing) ................................. 480Connecting via Wi-Fi (Wi-Fi mode) .................................. 483
Troubleshooting .................................................................................................... 488

Table of contents19
Cabled connections to computers and HDMIdevices 489
Connecting to computers via USB ..................................................................489Installing NX Studio ...............................................................489Copying pictures to a computer using NX Studio ......490
Connecting to HDMI devices ............................................................................494TVs ................................................................................................494Recorders ...................................................................................494
On-Camera flash photography 497“On-camera” versus “remote” ...........................................................................497
Camera-mounted flash units ............................................. 497Remote flash photography .................................................497
Using an on-camera flash .................................................................................. 498Flash control mode ...............................................................................................501Flash modes ............................................................................................................ 502Flash compensation ............................................................................................. 504FV lock ....................................................................................................................... 505
Remote flash photography 508What is remote flash photography? ...............................................................508Controlling remote flash units ..........................................................................509
Using optical AWL with the SB-500 ................................. 509
Troubleshooting 513Before contacting customer support .............................................................513Problems and solutions ...................................................................................... 515
Battery/display ........................................................................ 515Shooting .................................................................................... 516Playback .....................................................................................520Bluetooth and Wi-Fi (wireless networks) ....................... 522Miscellaneous .......................................................................... 523
Alerts and error messages ................................................................................. 524

Table of contents20
Alerts ...........................................................................................524Error messages ........................................................................ 526
Technical notes 529Compatible lenses and accessories ................................................................529Camera displays .....................................................................................................530
Monitor .......................................................................................530Viewfinder ................................................................................. 538
Compatible flash units ........................................................................................ 543The Nikon Creative Lighting System (CLS) ....................543Features available with CLS-compatible flash units .. 543Notes and tips for optional flash units ........................... 559
Other compatible accessories .......................................................................... 563Charging the camera with the charging AC adapter................................................................................................................ 565ML-L7 Remote Control ..........................................................567
Software ....................................................................................................................573Caring for the camera ..........................................................................................574
Storage ....................................................................................... 574Cleaning .....................................................................................574Manual cleaning ..................................................................... 575
Caring for the camera and battery: Cautions ..............................................578Camera care ..............................................................................578Battery care ...............................................................................581Using the charger ...................................................................583Using the charging AC adapter .........................................584
Specifications ..........................................................................................................585Nikon Z fc digital camera .....................................................585
Approved memory cards ....................................................................................598Portable chargers (power banks) .................................................................... 599Memory card capacity .........................................................................................600Battery endurance ................................................................................................ 602AF-assist illumination .......................................................................................... 604

Table of contents21
Trademarks and licenses .................................................................................... 605Notices ...................................................................................................................... 608Bluetooth and Wi-Fi (wireless LAN) ................................................................ 611
Index 617

Menu list22
Menu listThe camera offers the following menus. For a more completedescription of individual menu items, refer to the “Menu guide” chapter.
PLAYBACK MENU
Delete
Playback folder
Playback display options
Picture review
Rotate tall
Slide show
Rating
PHOTO SHOOTING MENU
Reset photo shooting menu
Storage folder
File naming
Choose image area
Image quality
Image size
RAW recording
ISO sensitivity settings
White balance
Set Picture Control
Manage Picture Control
Color space
Active D-Lighting
Long exposure NR
High ISO NR
Vignette control
Diffraction compensation
Auto distortion control
Flicker reduction shooting
Metering
Flash control
Flash mode
Flash compensation

Menu list23
PHOTO SHOOTING MENU
Release mode
Focus mode
AF-area mode
Vibration reduction
Auto bracketing
Multiple exposure
HDR (high dynamic range)
Interval timer shooting
Time-lapse video
Focus shift shooting
Silent photography
VIDEO RECORDING MENU
Reset video recording menu
File naming
Frame size/frame rate
Video quality
Video file type
ISO sensitivity settings
White balance
Set Picture Control
Manage Picture Control
Active D-Lighting
High ISO NR
Vignette control
Diffraction compensation
Auto distortion control
Flicker reduction
Metering
Release mode (save frame)
Focus mode
AF-area mode
Vibration reduction
Electronic VR
Microphone sensitivity
Attenuator
Frequency response
Wind noise reduction
Timecode

Menu list24
CUSTOM SETTINGS MENU
Reset custom settings
a Autofocus
a1 AF-C priority selection
a2 AF-S priority selection
a3 Focus tracking with lock-on
a4 Focus points used
a5 Store points by orientation
a6 AF activation
a7 Limit AF-area mode selection
a8 Focus point wrap-around
a9 Focus point options
a10 Low-light AF
a11 Built-in AF-assist illuminator
a12 Manual focus ring in AF mode
b Metering/exposure
b1 Easy exposure compensation
b2 Center-weighted area
b3 Fine-tune optimal exposure
b4 b mode exposure comp.
c Timers/AE lock
c1 Shutter-release button AE-L
c2 Self-timer
c3 Power off delay
d Shooting/display
d1 CL mode shooting speed
d2 Maximum shots per burst
CUSTOM SETTINGS MENU
d3 Exposure delay mode
d4 Shutter type
d5 Extended shutter speeds (M)
d6 File number sequence
d7 Apply settings to live view
d8 Framing grid display
d9 Focus peaking
d10 View all in continuous mode
e Bracketing/flash
e1 Flash sync speed
e2 Flash shutter speed
e3 Exposure comp. for flash
e4 Auto c ISO sensitivity control
e5 Auto bracketing (mode M)
e6 Bracketing order
f Controls
f1 Customize i menu
f2 Custom controls (shooting)
f3 Custom controls (playback)
f4 Customize command dials
f5 Release button to use dial
f6 Reverse indicators
g Video
g1 Customize i menu
g2 Custom controls
g3 AF speed

Menu list25
CUSTOM SETTINGS MENU
g4 AF tracking sensitivity
g5 Highlight display
SETUP MENU
Format memory card
Language
Time zone and date
Monitor brightness
Monitor color balance
Viewfinder brightness
Viewfinder color balance
Limit monitor mode selection
Information display
AF fine-tuning options
Non-CPU lens data
Save focus position
Image Dust Off ref photo
Pixel mapping
Image comment
Copyright information
Beep options
Touch controls
Self-portrait mode
HDMI
Airplane mode
Connect to smart device
Connect to computer
Wireless remote (ML-L7) options
Conformity marking
USB power delivery
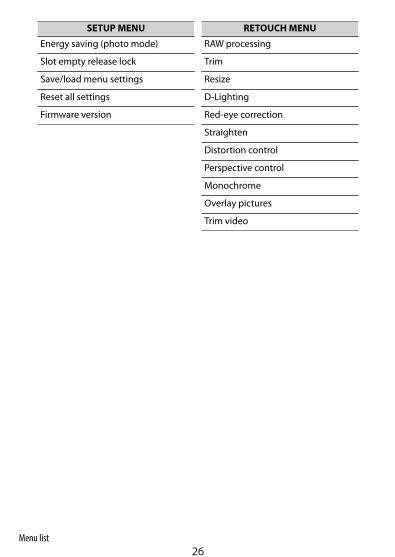
Menu list26
SETUP MENU
Energy saving (photo mode)
Slot empty release lock
Save/load menu settings
Reset all settings
Firmware version
RETOUCH MENU
RAW processing
Trim
Resize
D-Lighting
Red-eye correction
Straighten
Distortion control
Perspective control
Monochrome
Overlay pictures
Trim video

Menu list27
MY MENU
Add items
Remove items
Rank items
Choose tab

For your safety28
For your safetyTo prevent damage to property or injury to yourself or to others, read“For your safety” in its entirety before using this product.After reading these safety instructions, keep them readily accessible forfuture reference.
DANGER: Failure to observe the precautions marked with this iconcarries a high risk of death or severe injury.
WARNING: Failure to observe the precautions marked with this iconcould result in death or severe injury.
CAUTION: Failure to observe the precautions marked with this iconcould result in injury or property damage.
WARNING
Do not use while walking or operating a vehicle.Failure to observe this precaution could result in accidents or other injury.
Do not disassemble or modify this product. Do not touch internalparts that become exposed as the result of a fall or other accident.Failure to observe these precautions could result in electric shock or otherinjury.
Should you notice any abnormalities such as the product producingsmoke, heat, or unusual odors, immediately disconnect the battery orpower source.Continued operation could result in fire, burns or other injury.
Keep dry. Do not handle with wet hands. Do not handle the plug withwet hands.Failure to observe these precautions could result in fire or electric shock.
Do not let your skin remain in prolonged contact with this productwhile it is on or plugged in.Failure to observe this precaution could result in low-temperature burns.

For your safety29
Do not use this product in the presence of flammable dust or gas suchas propane, gasoline or aerosols.Failure to observe this precaution could result in explosion or fire.
Do not directly view the sun or other bright light source through thelens.Failure to observe this precaution could result in visual impairment.
Do not aim the flash or AF-assist illuminator at the operator of amotor vehicle.Failure to observe this precaution could result in accidents.
Keep this product out of reach of children.Failure to observe this precaution could result in injury or productmalfunction. In addition, note that small parts constitute a choking hazard.Should a child swallow any part of this product, seek immediate medicalattention.
Do not entangle, wrap or twist the straps around your neck.Failure to observe this precaution could result in accidents.
Do not use batteries, chargers, AC adapters, or USB cables notspecifically designated for use with this product. When usingbatteries, chargers, AC adapters, and USB cables designated for usewith this product, do not:・Damage, modify, forcibly tug or bend the cords or cables, place
them under heavy objects, or expose them to heat or flame.・Use travel converters or adapters designed to convert from one
voltage to another or with DC-to-AC inverters.Failure to observe these precautions could result in fire or electric shock.
Do not handle the plug when charging the product or using the ACadapter during thunderstorms.Failure to observe this precaution could result in electric shock.

For your safety30
Do not handle with bare hands in locations exposed to extremely highor low temperatures.Failure to observe this precaution could result in burns, or frostbite.
CAUTION
Do not leave the lens pointed at the sun or other strong light sources.Light focused by the lens could cause fire or damage to product’s internalparts. When shooting backlit subjects, keep the sun well out of the frame.Sunlight focused into the camera when the sun is close to the frame couldcause fire.
Turn this product off when its use is prohibited. Disable wirelessfeatures when the use of wireless equipment is prohibited.The radio-frequency emissions produced by this product could interferewith equipment onboard aircraft or in hospitals or other medical facilities.
Remove the battery and disconnect the AC adapter if this product willnot be used for an extended period.Failure to observe this precaution could result in fire or productmalfunction.
Do not fire the flash in contact with or in close proximity to the skin orobjects.Failure to observe this precaution could result in burns or fire.
Do not leave the product where it will be exposed to extremely hightemperatures, for an extended period such as in an enclosedautomobile or in direct sunlight.Failure to observe this precaution could result in fire or productmalfunction.
Do not look directly at the AF-assist illuminator.Failure to observe this precaution could have adverse effects on vision.

For your safety31
Do not transport cameras or lenses with tripods or similar accessoriesattached.Failure to observe this precaution could result in injury or productmalfunction.
DANGER (Batteries)
Do not mishandle batteries.Failure to observe the following precautions could result in the batteriesleaking, overheating, rupturing, or catching fire:・Use only rechargeable batteries approved for use in this product.・Do not expose batteries to flame or excessive heat.・Do not disassemble.・Do not short-circuit the terminals by touching them to necklaces,
hairpins, or other metal objects.・Do not expose batteries or the products in which they are inserted
to powerful physical shocks.・Do not step on batteries, pierce them with nails, or strike them with
hammers.
Charge only as indicated.Failure to observe this precaution could result in the batteries leaking,overheating, rupturing, or catching fire.
If battery liquid comes into contact with the eyes, rinse with plenty ofclean water and seek immediate medical attention.Delaying action could result in eye injuries.
Follow the instructions of airline personnel.Batteries left unattended at high altitudes in an unpressurizedenvironment may leak, overheat, rupture, or catch fire.

For your safety32
WARNING (Batteries)
Keep batteries out of reach of children.Should a child swallow a battery, seek immediate medical attention.
Keep batteries out of reach of household pets and other animals.The batteries could leak, overheat, rupture, or catch fire if bitten, chewed,or otherwise damaged by animals.
Do not immerse batteries in water or expose to rain.Failure to observe this precaution could result in fire or productmalfunction. Immediately dry the product with a towel or similar objectshould it become wet.
Discontinue use immediately should you notice any changes in thebatteries, such as discoloration or deformation. Cease charging EN-EL25 rechargeable batteries if they do not charge in the specifiedperiod of time.Failure to observe these precautions could result in the batteries leaking,overheating, rupturing, or catching fire.
When batteries are no longer needed, insulate the terminals withtape.Overheating, rupture, or fire may result should metal objects come intocontact with the terminals.
If battery liquid comes into contact with a person’s skin or clothing,immediately rinse the affected area with plenty of clean water.Failure to observe this precaution could result in skin irritation.

Notices33
Notices・ No part of the documentation included with this product may be
reproduced, transmitted, transcribed, stored in a retrieval system, ortranslated into any language in any form, by any means, withoutNikon’s prior written permission.
・ Nikon reserves the right to change the appearance and specificationsof the hardware and software described in this documentation at anytime and without prior notice.
・ Nikon will not be held liable for any damages resulting from the useof this product.
・ While every effort has been made to ensure that the information inthis documentation is accurate and complete, we would appreciate itwere you to bring any errors or omissions to the attention of theNikon representative in your area (address provided separately).
Notice concerning prohibition of copying or reproduction●Note that simply being in possession of material that has been digitallycopied or reproduced by means of a scanner, digital camera, or other devicemay be punishable by law.・ Items prohibited by law from being copied or reproduced
Do not copy or reproduce paper money, coins, securities, governmentbonds, or local government bonds, even if such copies or reproductions arestamped “Sample”.The copying or reproduction of paper money, coins, or securities which arecirculated in a foreign country is prohibited.Unless the prior permission of the government has been obtained, thecopying or reproduction of unused postage stamps or post cards issued bythe government is prohibited.The copying or reproduction of stamps issued by the government and ofcertified documents stipulated by law is prohibited.
・Cautions on certain copies and reproductionsThe government has issued cautions on copies or reproductions ofsecurities issued by private companies (shares, bills, checks, gift certificates,

Notices34
etc.), commuter passes, or coupon tickets, except when a minimum ofnecessary copies are to be provided for business use by a company. Also,do not copy or reproduce passports issued by the government, licensesissued by public agencies and private groups, ID cards, and tickets, such aspasses and meal coupons.
・Comply with copyright noticesUnder copyright law, photographs or recordings of copyrighted worksmade with the camera cannot be used without the permission of thecopyright holder. Exceptions apply to personal use, but note that evenpersonal use may be restricted in the case of photographs or recordings ofexhibits or live performances.
Use only Nikon brand electronic accessories●Nikon cameras are designed to the highest standards and include complexelectronic circuitry. Only Nikon brand electronic accessories (including lenses,chargers, batteries, AC adapters, and flash accessories) certified by Nikonspecifically for use with this Nikon digital camera are engineered and provento operate within the operational and safety requirements of this electroniccircuitry.The use of non-Nikon electronic accessories could damage the camera andmay void your Nikon warranty. The use of third-party rechargeable Li-ionbatteries not bearing the Nikon holographic seal shown below couldinterfere with normal operation of the camera or result in the batteriesoverheating, igniting, rupturing, or leaking.
For more information about Nikon brand accessories, contact a localauthorized Nikon dealer.
Memory cards●・ Memory cards may be hot after use. Observe due caution when
removing memory cards from the camera.・ Do not perform the following operations during formatting or while
data are being recorded, deleted, or copied to a computer or other

Notices35
device. Failure to observe these precautions could result in loss ofdata or in damage to the camera or card.- Do not remove or insert memory cards- Do not turn the camera off- Do not remove the battery
・ Do not touch the card terminals with your fingers or metal objects.・ Do not use excessive force when handling memory cards. Failure to
observe this precaution could damage the card.・ Do not bend or drop memory cards or subject them to strong
physical shocks.・ Do not expose memory cards to water, heat, or direct sunlight.・ Do not format memory cards in a computer.
D Before taking important picturesBefore taking pictures on important occasions (such as at weddings or beforetaking the camera on a trip), take a test shot to ensure that the camera isfunctioning normally. Nikon will not be held liable for damages or lost profitsthat may result from product malfunction.
D Life-long learningAs part of Nikon’s “Life-long learning” commitment to ongoing productsupport and education, continually-updated information is available on-lineat the following sites:・ For users in the U.S.A.: https://www.nikonusa.com/・ For users in Europe and Africa: https://www.europe-nikon.com/
support/・ For users in Asia, Oceania, and the Middle East: https://www.nikon-
asia.com/Visit these sites to keep up-to-date with the latest product information, tips,answers to frequently-asked questions (FAQs), and general advice on digitalimaging and photography. Additional information may be available from theNikon representative in your area. See the following URL for contactinformation: https://imaging.nikon.com/

Parts of the camera36
Getting to know the camera
Parts of the camera
Camera body
1 Eyelet for camera strap (073)
2 ISO sensitivity dial (049,
0137)
3 ISO sensitivity dial lock release
(049, 0137)
4 Stereo microphone (090)
5 Shutter-speed dial (047,
0128)
6 Shutter-speed dial lock release
(047, 0128)
7 Power switch (081)
8 Shutter-release button (085)
9 Video-record button (090)
10 E (focal plane mark; 0114)
11 Exposure compensation dial
(050, 0139)
12 Control panel (040)
13 Photo/video selector (085,
090)
14 Accessory shoe (for optional
flash unit; 0498, 0543)
15 Mode selector (047, 0127)
16 Speaker (097)

Parts of the camera37
1 Sub-command dial (048)
2 Image sensor (0575)
3 CPU contacts
4 Lens mounting mark (078)
5 AF-assist illuminator (088,
0351)
Red-eye reduction lamp (0162,
0502)
Self-timer lamp (0169)
6 Cover for HDMI, USB, andmicrophone connectors
7 HDMI connector (0494)
8 Charge lamp (0565)
9 USB connector (0415, 0489)
10 Connector for external
microphone (0565)
11 Lens release button (079)
12 Lens mount (078, 0114)
13 Fn button (071, 0116)
14 Body cap (078)

Parts of the camera38
1 Diopter adjustment control
(044)
2 A (g) button (063, 0125,
0142)
3 Main command dial (048)
4 i button (068, 0145)
5 J button (065)
6 Multi selector (065, 0106)
7 DISP button (061)
8 G button (064, 0215)
9 W (Q) button (063, 068,
0183, 0209)
10 Memory card access lamp
(088, 092)
11 X button (063, 0112, 0183,
0209)
12 Battery-chamber/memory cardslot cover
13 Battery-chamber/memory cardslot cover latch
14 Battery latch (075)
15 Memory card slot (075)
16 Tripod socket
17 Monitor (050, 054, 0110)
18 M button (045, 0397)
19 O button (098, 0211)
20 K button (096, 0183)
21 Eye sensor (044)
22 Viewfinder (044)
23 Rubber eyecup (0564)

Parts of the camera39
D Do not touch the image sensorUnder no circumstances should you exert pressure on the image sensor, pokeit with cleaning tools, or subject it to powerful air currents from a blower.These actions could scratch or otherwise damage the sensor. For information
on cleaning the image sensor, see “Manual cleaning” (0575).
D Product serial numberThe serial number for this product can be found by opening the monitor.

Parts of the camera40
Control panelWhen the camera is turned on, the control panel turns on.
The aperture (0130, 0131) is displayed in the control panel.
・ If the aperture is set to F0.95, [.95] is displayed in the control panel.・ If [Extended shutter speeds (M)] is set to [On], the display switches
to indicate that the shutter is open when shooting starts with theshutter speed set to 60 seconds or longer.
・ Depending on how the lens is mounted, a warning [--] may be
displayed (0524).・ When connecting to a computer or smartphone, [PC] may be
displayed to indicate that connection is in progress.

Parts of the camera41
The monitor and viewfinder
Photo mode❚❚At default settings, the following indicators appear in the monitor and
viewfinder; for a full list of indicators, see “Camera displays” (0530) in“Technical notes”.
Monitor Viewfinder
1 Shooting mode (0127)
2 Focus point (0102)
3 Release mode (0166)
4 Focus mode (0100)
5 AF-area mode (0102)
6 Active D-Lighting (0164)
7 Picture Control (0147, 0255)
8 White balance (0116, 0153,
0248)

Parts of the camera42
Monitor Viewfinder
9 Image area (0243)
10 Image size (0161)
11 Image quality (0160)
12 i icon (0145)
13 Exposure indicator
Exposure (0133)Exposure compensation
(0139)
14 “k” (appears when memoryremains for over 1000
exposures; 077)
15 Number of exposures
remaining (077, 0600)
16 ISO sensitivity (0137)
17 ISO sensitivity indicator (0137)Auto ISO sensitivity indicator
(0245)
18 Aperture (0130, 0131)
19 Shutter speed (0128, 0131)
20 Subject-tracking AF (0109)
21 Metering (0162)
22 Battery indicator (076)
23 Shutter type (0357)
24 “Clock not set” indicator
(084)
25 Vibration reduction indicator
(0171)
26 Touch shooting (0110)
27 AF-area brackets (0103)

Parts of the camera43
Video mode❚❚
Monitor Viewfinder
1 Recording indicator (090)
“No video” indicator (092)
2 Frame size and rate/Video
quality (0175)
3 Time remaining (090)
4 Release mode (still
photography; 0335)
5 Sound level (0178)
6 Microphone sensitivity (0178)
7 Frequency response (0338)

Camera controls44
Camera controls
Viewfinder・ Placing your eye to the viewfinder activates the eye sensor, switching
the display from the monitor to the viewfinder. Note that the eyesensor will also respond to other objects, such as your fingers.
・ The viewfinder can be used for menus and playback if desired.
D The diopter adjustment control・The viewfinder can be focused by rotating the diopter adjustment control.
・Be careful not to put your fingers or fingernails in your eye.
A Extended useWhen using the viewfinder for extended periods, you can select [Off] forCustom Setting d7 [Apply settings to live view] to ensure that viewfinderbrightness and hue are adjusted for ease of viewing.
Camera controls45
The M (monitor mode) buttonPress the M button to cycle between viewfinder and monitor displays.
Press the M button to cycle through the displays as follows.
[Automatic display switch]: The camera automatically switches betweenthe viewfinder and monitor displays based on information from the eyesensor.
[Viewfinder only]: The monitor remains blank. The viewfinder is used forshooting, menus, and playback.

Camera controls46
[Monitor only]: The monitor is used for shooting, menus, and playback. Theviewfinder display will remain blank even if you put your eye to theviewfinder.
[Prioritize viewfinder]: The camera functions in a manner similar toexisting digital SLR cameras.
・ During photo mode, placing your eye to the viewfinder turns theviewfinder on; the monitor remains off after you take your eye away.
・ During video mode or playback or while menus are displayed, the cameraautomatically switches between the viewfinder and the monitor basedon information from the eye sensor.
A Monitor modeYou can limit the choice of monitor modes available using the [Limitmonitor mode selection] item in the setup menu.

Camera controls47
The mode selectorUse the mode selector to choose a shooting mode.
Mode Description
AUTO (b) AutoA simple, “point-and-shoot” mode thatleaves the camera in charge of settings
(085, 090).
P Programmed autoThe camera sets shutter speed andaperture for optimal exposure.
SShutter-priorityauto
You choose the shutter speed; the cameraselects the aperture for best results.
AAperture-priorityauto
You choose the aperture; the cameraselects the shutter speed for best results.
M ManualYou control both shutter speed andaperture.
The shutter-speed dialIn mode S or M, you can rotate the shutter-speed dial to set the shutterspeed.

Camera controls48
To select [X] or [T], or to change from [1/3STEP], [X], [T], or [B], rotatewhile pressing the shutter-speed dial lock release.
1 1/4000 s–1/2 s
2 1–4 s (red text)
3 B (Bulb) (0134)
4 T (Time) (0134)
5 X (Flash sync) (0361)
6 1/3STEP (1/3 step) (0130)
The command dialsRotate the command dials to choose settings for aperture or thefunctions assigned to other camera controls.

Camera controls49
The ISO sensitivity dialYou can rotate the ISO sensitivity dial while pressing the ISO sensitivitydial lock release to adjust the camera’s sensitivity to light (ISO sensitivity)according to the amount of light available.
Photo mode❚❚ISO sensitivity can be adjusted by holding the ISO sensitivity dial lockrelease and rotating the ISO sensitivity dial.・ In b mode, the setting is fixed at ISO-A (AUTO), and the camera sets
the ISO sensitivity automatically.
Video mode❚❚You can set the ISO sensitivity only with the following settings. In allother cases, the camera sets the ISO sensitivity automatically.・ Mode: M・ [ISO sensitivity settings] > [Auto ISO control (mode M)] in the
video recording menu: [Off]ISO sensitivity can be adjusted by holding the ISO sensitivity dial lockrelease and rotating the ISO sensitivity dial.・ Select from values of from ISO 100 to 25600. If the ISO sensitivity dial
is set to any other value, it will be set to ISO 25600.

Camera controls50
The exposure compensation dialYou can rotate the exposure compensation dial to alter exposure fromthe value suggested by the camera. Exposure compensation can beused to make pictures brighter or darker.
−1 EV No exposurecompensation
+1 EV
・ Higher values make the subject brighter, lower values darker.
MonitorThe orientation and angle of the monitor can be adjusted.

Camera controls51
Normal shooting●When shooting normally, use the monitor so that it is facing out and setin the camera body.
Low angle shooting●Turn the monitor facing up to shoot with the camera at low positions.
High angle shooting●Turn the monitor facing down to shoot with the camera at highpositions.

Camera controls52
Self-portrait mode●When the monitor is facing the front of the camera, the camera changes
to self-portrait mode (052).
D Precautions for the monitor・ When rotating the monitor, rotate slowly within the allowable range.
Applying excessive force will result in damage to the camera body andmonitor.
・ When you are not using the monitor, turning it facing inward and settingit in the camera body is recommended to prevent damage and dirt.
・ Do not carry the camera by holding the monitor. This could result indamage to the camera.
Shooting in self-portrait mode❚❚If the monitor is set to the self-portrait mode position, it will switch toself-portrait mode.The monitor will display an image as if it were reflected on a mirror(inverted image), but the actual image is saved from the perspective ofthe camera.
・ In self-portrait mode, you can tap the monitor to set the self-timer.
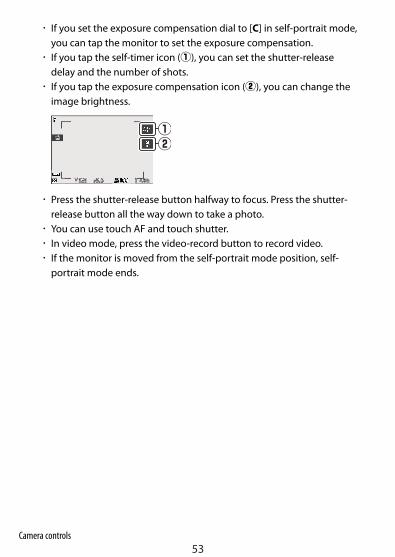
Camera controls53
・ If you set the exposure compensation dial to [C] in self-portrait mode,you can tap the monitor to set the exposure compensation.
・ If you tap the self-timer icon (q), you can set the shutter-releasedelay and the number of shots.
・ If you tap the exposure compensation icon (w), you can change theimage brightness.
・ Press the shutter-release button halfway to focus. Press the shutter-release button all the way down to take a photo.
・ You can use touch AF and touch shutter.・ In video mode, press the video-record button to record video.・ If the monitor is moved from the self-portrait mode position, self-
portrait mode ends.

Camera controls54
D Self-portrait modeIn self-portrait mode, note the following:・ During self-portrait mode, controls other than the power switch, shutter-
release button, video-record button, photo/video selector, mode selector,shutter-speed dial, ISO sensitivity dial, and exposure compensation dialare disabled.
・ If no operations are performed for about 1 minute when Custom Settingc3 [Power off delay] > [Standby timer] is set to less than 1 minute, or forthe specified time when set to 1 minute or more, the standby timer willexpire.
・ The following settings are fixed.- [Release mode]: [Self-timer]- [Focus mode] in the video recording menu: [Full-time AF]- [Touch controls] > [Enable/disable touch controls]: [Enable]
・ The viewfinder cannot be used.・ The following functions cannot be used.
- [Long exposure NR]- [Auto bracketing]- [HDR (high dynamic range)]- [Exposure delay mode]- [Extended shutter speeds (M)]
・ When [Self-portrait mode] (0408) in the setup menu is set to [Disable],the monitor will not switch to self-portrait mode even if it is set to the self-portrait mode position.
Touch controlsThe touch-sensitive monitor offers a variety of controls that can beoperated by touching the display with your fingers. During viewfinder
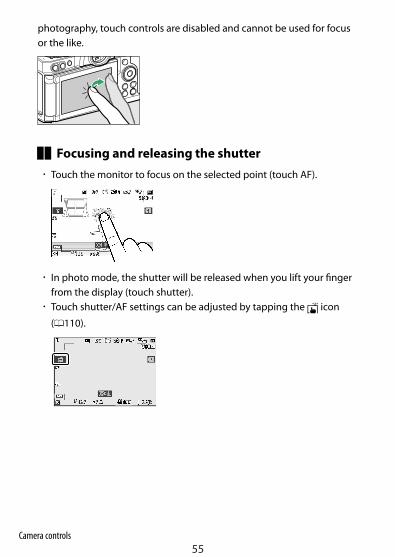
Camera controls55
photography, touch controls are disabled and cannot be used for focusor the like.
Focusing and releasing the shutter❚❚・ Touch the monitor to focus on the selected point (touch AF).
・ In photo mode, the shutter will be released when you lift your fingerfrom the display (touch shutter).
・ Touch shutter/AF settings can be adjusted by tapping the W icon
(0110).

Camera controls56
Adjusting settings❚❚・ Tap highlighted settings in the display.
・ You can then choose the desired option by tapping icons or sliders.・ Tap Z or press J to select the chosen option and return to the
previous display.
Playback❚❚・ Flick left or right to view other pictures during full-frame playback.

Camera controls57
・ In full-frame playback, touching the bottom of the display brings upa frame-advance bar. Slide your finger left or right over the bar toscroll rapidly to other pictures.
・ To zoom in on a picture displayed during full-frame playback, use astretch gesture or give the display two quick taps. You can adjust thezoom ratio using stretch gestures to zoom in and pinch gestures tozoom out.
・ Use slide gestures to view other parts of the image during zoom.・ Giving the display two quick taps while zoom is in effect cancels
zoom.・ To “zoom out” to a thumbnail view, use a pinch gesture during full-
frame playback. Use pinch and stretch to choose the number ofimages displayed from 4, 9, and 72 frames.
・ Using a pinch gesture when 72 frames are displayed selects calendarplayback. Use a stretch gesture to return to the 72-frame display.

Camera controls58
Viewing videos❚❚・ Videos are indicated by a 1 icon; to start playback, tap the on-screen
guide.
・ Tap the display to pause. Tap again to resume.・ Tap Z to exit to full-frame playback.
The i menu❚❚・ Tap the i icon to display the i menu during shooting (068,
0145).
・ Tap items to view and change options.

Camera controls59
Text entry❚❚・ When a keyboard is displayed, you can enter text by tapping the keys.
1 Text display area
2 Keyboard area
3 Keyboard selection
・ To position the cursor, tap e or f or tap directly in the text displayarea.
・ To cycle through the upper- and lower-case and symbol keyboards,tap the keyboard selection button.
Navigating the menus❚❚・ Slide up or down to scroll.
・ Tap a menu icon to choose a menu.

Camera controls60
・ Tap menu items to display options. You can then choose the desiredoption by tapping icons or sliders.
・ To exit without changing settings, tap Z.
D The touch screen・ The touch screen responds to static electricity. It may not respond when
touched with fingernails or gloved hands.・ Do not touch the screen with sharp objects.・ Do not use excessive force.・ The screen may not respond when covered with third-party protective
films.・ The screen may not respond when touched simultaneously in multiple
locations.
A Enabling or disabling touch controlsTouch controls can be enabled or disabled using the [Touch controls] item inthe setup menu.

Camera controls61
The DISP buttonUse the DISP button to cycle through the following displays:
Photo mode❚❚
1 Indicators on
2 Simplified display
3 Histogram 1, 2
4 Virtual horizon
5 Information display (0530)
1 Displayed when [On] is selected for Custom Setting d7 [Apply settingsto live view].
2 Not displayed if [On] is selected for [Overlay shooting] during multipleexposure photography.

Camera controls62
A The viewfinderThe DISP button can also be used to choose the information displayed in theviewfinder. Note, however, that the information display does not appear inthe viewfinder.
A Turning off the information displayIn Custom Setting f2 [Custom controls (shooting)], you can assign [Liveview info display off] to turn off the information display at the press of abutton. Press it again to turn on the display.
Video mode❚❚
1 Indicators on
2 Simplified display
3 Histogram
4 Virtual horizon

Camera controls63
The X and W (Q) buttonsZoom the display in the monitor in or out during shooting or playback.
Shooting❚❚Press X to zoom in on the view through the lens during shooting. PressX to increase the zoom ratio, W (Q) to zoom out.
Playback❚❚Press X to zoom in on pictures during full-frame playback. Press X toincrease the zoom ratio, W (Q) to zoom out. Pressing W (Q) when thepicture is displayed full frame “zooms out” to the thumbnail list. PressingW (Q) when 72 frames are displayed selects calendar playback.
The A (g) buttonLock the focus and exposure when shooting, or protect images duringplayback.
Shooting❚❚Lock the focus and exposure at the same time.

Camera controls64
Playback❚❚Protect the current image.
The G buttonPress the G button to view the menus.
1 D [PLAYBACK MENU] (0232)
2 C [PHOTO SHOOTING MENU]
(0237)
3 1 [VIDEO RECORDING MENU]
(0329)
4 A [CUSTOM SETTINGS MENU]
(0341)
5 B [SETUP MENU] (0391)
6 N [RETOUCH MENU] (0424)
7 O [MY MENU]/m [RECENT
SETTINGS]* (0449)
8 The d Help icon (068)
9 Current settings
* You can choose the menu displayed. The default is [MY MENU].

Camera controls65
Using the menus❚❚You can navigate the menus using the multi selector and J button.
1 Move cursor up
2 Select highlighted item
3 Display sub-menu, selecthighlighted item, or movecursor right
4 Move cursor down
5 Cancel and return to previousmenu, or move cursor left
1 Highlight the icon for the current menu.Press 4 to place the cursor in the menu-selection area.
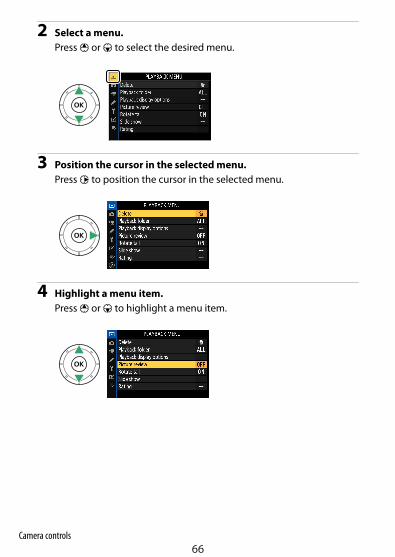
Camera controls66
2 Select a menu.Press 1 or 3 to select the desired menu.
3 Position the cursor in the selected menu.Press 2 to position the cursor in the selected menu.
4 Highlight a menu item.Press 1 or 3 to highlight a menu item.

Camera controls67
5 Display options.Press 2 to display options for the selected menu item.
6 Highlight an option.Press 1 or 3 to highlight an option.
7 Select the highlighted option.
・Press J to select the highlighted option.・To exit without making a selection, press the G button.・To exit the menus and return to shooting mode, press the shutter-
release button halfway.
D Grayed-out itemsSome items and menu options may be unavailable depending on the modeand camera status. Unavailable items are displayed in gray.

Camera controls68
A The d (help) icon・ Where available, a description of the currently-selected item can be
viewed by pressing the W (Q) button.・ Press 1 or 3 to scroll.・ Press W (Q) again to return to the menus.
A Touch controlsYou can also navigate the menus using touch controls (054).
The i button (the i menu)For quick access to frequently-used settings, press the i button or tapthe i icon to view the i menu.
・ Different menus are displayed during photo mode and video mode.

Camera controls69
・ Options can be viewed by tapping items in the display or byhighlighting items and pressing J; selections can then be madeusing the multi selector.
・ Items for which the camera displays an on-screen guide can beadjusted by highlighting them in the i menu and rotating acommand dial. In some cases, adjustments can be made using boththe main and sub-command dials.
A The playback i menuPressing the i button during playback displays a context-sensitive i menu offrequently-used playback options.
Customizing the i menu❚❚The items displayed in the photo-mode i menu can be chosen usingCustom Setting f1 or g1 [Customize i menu].

Camera controls70
1 Highlight Custom Setting f1 or g1 [Customize i menu] andpress J.
See “The G button” (064) for information on using the menus.
2 Highlight the position you want to change and press J.
A list of the items available for the selected position will bedisplayed.
3 Highlight the desired item and press J.
・The item will be assigned to the selected position and the optionsshown in Step 2 will be displayed.
・Repeat Steps 2 and 3 as desired.
4 Press the G button.Changes will be saved and the Custom Settings menu will bedisplayed.

Camera controls71
The Fn buttonUse the Fn button for quick access to selected settings.
・ By default, the Fn button is assigned white balance (0116).・ The assigned setting can be adjusted by holding the Fn button and
rotating the command dial. In some cases, adjustments can be madeusing both the main and sub-command dials.
Choosing roles for the Fn button❚❚The role played by the Fn button can be selected using Custom Settingf2 [Custom controls (shooting)] or g2 [Custom controls] > [Fnbutton].
1 Highlight Custom Setting f2 [Custom controls (shooting)] or g2[Custom controls] and press J.
See “The G button” (064) for information on using the menus.
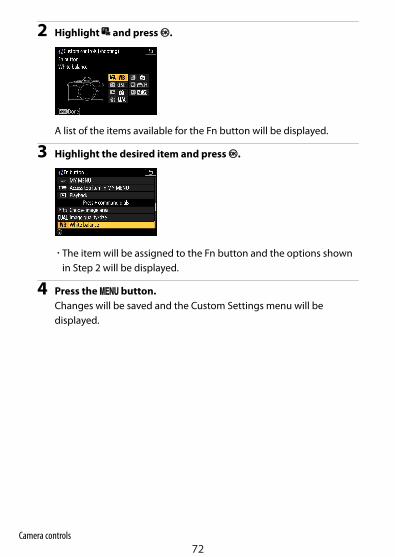
Camera controls72
2 Highlight 2 and press J.
A list of the items available for the Fn button will be displayed.
3 Highlight the desired item and press J.
・The item will be assigned to the Fn button and the options shownin Step 2 will be displayed.
4 Press the G button.Changes will be saved and the Custom Settings menu will bedisplayed.

Attaching the strap73
First steps
Attaching the strapTo attach a strap (whether the supplied strap or one that has beenpurchased separately):

Charging the battery74
Charging the batteryCharge the supplied EN-EL25 battery in the supplied MH-32 batterycharger before use.
D The battery and chargerRead and follow the warnings and cautions in “For your safety” (028) and
“Caring for the camera and battery: Cautions” (0578).
・ Plug the charger into a household outlet to charge it. In somecountries or regions, the charger may be supplied with the adapterconnected. The charger lamp flashes while charging, and lights upwhen charging is complete.
・ An exhausted battery will fully charge in about 2 hours and 30minutes.
D If the CHARGE lamp flashes rapidlyIf the CHARGE lamp flashes rapidly (8 times a second):・ A battery charging error has occurred: Unplug the charger and remove
and reinsert the battery.・ The ambient temperature is too hot or too cold: Use the battery
charger at temperatures within the designated temperature range (0–40°C/+32–104 °F).
If the problem persists, unplug the charger and end charging. Bring thebattery and charger to a Nikon-authorized service representative.

Inserting the battery and a memory card75
Inserting the battery and a memorycard・ Turn the camera off before inserting or removing the battery and
memory card.・ Using the battery to keep the orange battery latch pressed to one
side, slide the battery into the battery chamber until the latch locks itin place.
・ Holding the memory card in the orientation shown, slide it straightinto the slot until it clicks into place.

Inserting the battery and a memory card76
D Removing the batteryTo remove the battery, turn the camera off and open the battery-chamber/memory card slot cover. Press the battery latch in the direction shown by thearrow to release the battery and then remove the battery by hand.
D Removing the memory cardAfter confirming that the memory card access lamp is off, turn the camera offand open the battery-chamber/memory card slot cover. Press the memorycard in to eject it (q), and pull it out to remove it (w).
Battery level・ The battery level is shown in the shooting display while the camera is
on.
Monitor Viewfinder
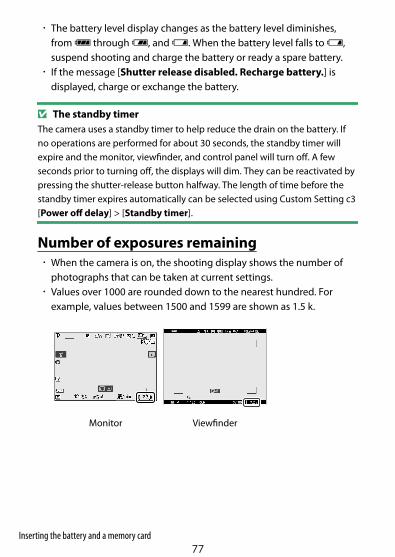
Inserting the battery and a memory card77
・ The battery level display changes as the battery level diminishes,from L through K, and H. When the battery level falls to H,suspend shooting and charge the battery or ready a spare battery.
・ If the message [Shutter release disabled. Recharge battery.] isdisplayed, charge or exchange the battery.
D The standby timerThe camera uses a standby timer to help reduce the drain on the battery. Ifno operations are performed for about 30 seconds, the standby timer willexpire and the monitor, viewfinder, and control panel will turn off. A fewseconds prior to turning off, the displays will dim. They can be reactivated bypressing the shutter-release button halfway. The length of time before thestandby timer expires automatically can be selected using Custom Setting c3[Power off delay] > [Standby timer].
Number of exposures remaining・ When the camera is on, the shooting display shows the number of
photographs that can be taken at current settings.・ Values over 1000 are rounded down to the nearest hundred. For
example, values between 1500 and 1599 are shown as 1.5 k.
Monitor Viewfinder

Attaching a lens78
Attaching a lens・ The camera can be used with Z mount lenses. The lens generally used
in this document for illustrative purposes is a NIKKOR Z DX 16–50mmf/3.5–6.3 VR.
・ Be careful to prevent dust entering the camera.・ Confirm that the camera is off before attaching the lens.
- Remove the camera body cap (q, w) and rear lens cap (e, r).
- Align the mounting marks on the camera (t) and lens (y). Do nottouch the image sensor or lens contacts.

Attaching a lens79
- Rotate the lens as shown until it clicks into place (u).
・ Remove the front lens cap before taking pictures.
D F mount lenses・ Be sure to attach the FTZ mount adapter (available separately) before
using F mount lenses.・ Attempting to attach F mount lenses directly to the camera could damage
the lens or image sensor.
Detaching lenses・ After turning the camera off, press and hold the lens release button
(q) while turning the lens in the direction shown (w).
・ After removing the lens, replace the lens caps and camera body cap.

Opening the monitor80
Opening the monitorSlowly rotate the monitor without using excessive force.

Turning on the camera81
Turning on the cameraWhen the camera is turned on for the first time, the language selectionscreen is displayed. Choose a language and then set the camera clock(no other operations can be performed until the clock is set).
1 Turn the camera on.
・The [Language] selection screen will be displayed.
2 Select a language.・Press 1 or 3 to highlight the desired language and press J (the
languages available vary with the country or region in which thecamera was originally purchased).
・The [Time zone] screen will be displayed.

Turning on the camera82
3 Choose a time zone.
・Press 1 or 3 to choose a time zone and press J.・The display shows the selected cities in the chosen zone and the
difference between the time in the chosen zone and UTC.・The [Date format] screen will be displayed.
4 Choose a date format.
・Highlight the desired date (year, month, and day) display orderand press J.
・The [Daylight saving time] screen will be displayed.

Turning on the camera83
5 Turn daylight saving time on or off.
・Highlight [On] (daylight saving time on) or [Off] (daylight savingtime off) and press J.
・Selecting [On] advances the clock one hour; to undo the effect,select [Off].
・The [Date and time] screen will be displayed.
6 Set the clock.
・Press 4 or 2 to highlight date and time items and press 1 or 3 tochange them.
・Press J to confirm the date and time setting.・The message [Done.] will be displayed and the camera switches to
shooting mode.

Turning on the camera84
D The 1 iconA flashing 1 icon in the shooting display indicates that the camera clock hasbeen reset. The date and time recorded with new photographs will not becorrect; use the [Time zone and date] > [Date and time] option in the setupmenu to set the clock to the correct time and date. The camera clock ispowered by an independent clock battery. The clock battery charges whenthe main battery is inserted in the camera. It takes about 2 days to charge.Once charged, it will power the clock for about a month.

Taking photographs (b auto)85
Basic photography andplayback
Taking photographs (b auto)Select b (auto) mode for simple “point-and-shoot” photography.
D Lenses with retractable barrelsLenses with retractable barrels must be extended before use. Rotate thezoom ring as shown until the lens clicks into the extended position.
1 Select photo mode by rotating the photo/video selector to C.
2 Rotate the mode selector to AUTO (b).

Taking photographs (b auto)86
3 Ready the camera.Holding the handgrip in your right hand and cradling the camerabody or lens with your left, bring your elbows in against the sides ofyour chest.
Landscape (wide)orientation
Portrait (tall) orientation
4 Frame the photograph.
Position the main subject in the AF-area brackets (5).・The AF-area brackets will disappear and a yellow border indicating
the focus point appears around the faces of human subjectsdetected by the camera. If the camera detects the subject’s eyes,the yellow focus point will instead appear over one or the other oftheir eyes.

Taking photographs (b auto)87
5 Press the shutter-release button halfway to focus.
・The focus point will be displayed in green when the camerafocuses. If the camera is unable to focus, the AF-area brackets willflash.
・The AF-assist illuminator may light to assist the focus operation ifthe subject is poorly lit.
・ If the camera detects human faces or eyes, the focus point willlight green when the subject is in focus. The focus point will flashin red when the camera does not focus.

Taking photographs (b auto)88
D The AF-assist illuminatorDo not obstruct the AF-assist illuminator while it is lit.
6 Smoothly press the shutter-release button the rest of the waydown to take the photograph.
D The memory card access lampThe memory card access lamp will light while the photograph is beingrecorded. Do not remove the memory card or battery.

Taking photographs (b auto)89
A The touch shutterYou can also take a photograph by touching the monitor. Touch your subjectto focus and lift your finger to release the shutter.
A Zooming in photo modePress the X button in photo mode to zoom in on the view (up to about 15×).・ The zoom ratio increases every time you press the X button, and
decreases every time you press the W (Q) button.・ When using zoom while shooting, a navigation window is displayed at the
bottom right of the monitor to show which part of the composition iszoomed in.
・ In playback zoom, use the multi selector to move to areas of the frame notvisible in the monitor.

Recording videos (b auto)90
Recording videos (b auto)b (auto) mode can also be used for simple, “point-and-shoot” videorecording.
1 Select video mode by rotating the photo/video selector to 1.
Note that optional flash units cannot be used when the camera is invideo mode.
2 Rotate the mode selector to AUTO (b).

Recording videos (b auto)91
3 Press the video-record button to start recording.
・A recording indicator will be displayed in the monitor. The monitoralso shows the time remaining, or in other words the approximateamount of new footage that can be recorded to the memory card.
1 Recording indicator
2 Time remaining
・Sound is recorded via the built-in microphone. Do not cover themicrophone during recording.
・ If you tap your subject in the monitor during recording, the focus
point will track the subject as it moves through the frame (0109).
4 Press the video-record button again to end recording.

Recording videos (b auto)92
D The memory card access lampThe memory card access lamp will light while the video is being recorded. Donot remove the memory card or battery.
D The 0 iconA 0 icon indicates that videos cannot be recorded.
D Recording videos・ Video recording will end automatically if:
- The maximum length is reached- Another mode is selected- The photo/video selector is rotated to C- The lens is removed
・ Sounds made by the camera may be audible in footage recorded:- During autofocus- During vibration reduction- When power aperture is used
Taking photos in video modePhotos can be taken in video mode by pressing the shutter-releasebutton all the way down. In [Release mode (save frame)] in the videorecording menu, you can select single frame or continuous shooting.

Recording videos (b auto)93
・ A C icon will flash in the display when a photo is taken.
・ The frame advance rate for [Continuous] in [Release mode (saveframe)] varies with the option selected for [Frame size/frame rate].
・ Photos can be taken while recording is in progress. Taking photosdoes not interrupt video recording. Note, however, that only onephoto will be taken each time the shutter-release button is pressed,even if [Continuous] is selected for [Release mode (save frame)] inthe video recording menu.

Recording videos (b auto)94
D Taking photos in video mode・ Photo-mode settings do not apply to photos taken in video mode.・ Up to 40 photographs can be taken with each video.・ Note that photos can be taken even when the subject is not in focus.・ Photos are recorded at the dimensions currently selected for video frame
size.・ Image quality is fixed at [JPEG fine].・ A N icon indicates that photos cannot be taken.
D Photography and video recording・ You may notice the following in the shooting display. These phenomena
will also be visible in any photos or footage recorded with the camera.- Flicker or banding in scenes lit by such sources as fluorescent, mercury
vapor, or sodium lamps- Moving objects in the display appear distorted (individual subjects such
as trains or cars moving at high speed through the frame may bedistorted, or the entire frame may appear distorted when the camera ispanned horizontally)
- Jagged edges, color fringing, moiré, and bright spots may appear in thedisplay
- Bright regions or bands may appear in scenes lit by flashing signs andother intermittent light sources or when the subject is brieflyilluminated by a strobe or other bright, momentary light source
- Flicker occurring when power aperture is used during video recording・ Note that noise (randomly-spaced bright pixels, fog, or lines) and
unexpected colors may appear if you use the X button to zoom in on theview through the lens during recording.
・ When recording, avoid pointing the camera at the sun or other stronglight sources. Failure to observe this precaution could result in damage tothe camera’s internal circuitry.
Recording videos (b auto)95
A Zooming in video modePress the X button in video mode to zoom in on the view (089). Press the Xbutton during video recording to display at 1:1 (100%). Press the W (Q)button to cancel zoom.

Viewing photos96
Viewing photosPress the K button to view photos and videos recorded with thecamera in the monitor or viewfinder.
・ Press 4 or 2, or flick left or right on the monitor to view otherimages.
・ Videos are indicated by a 1 icon at the upper left of the monitor.Press the J button, or tap the a icon in the monitor to play backvideos.
・ To end playback and return to shooting mode, press the shutter-release button halfway.
Viewing videosMonitor display and operation during video playback are as follows.

Viewing photos97
Monitor display during video playback❚❚The following information is displayed during video playback, allowingyou to confirm the video length and playback time. Your approximateposition in the video can also be confirmed from the video progress bar.
1 1 icon
2 Length
3 a icon
4 Current position/total length
5 Progress bar
6 Volume
7 Guide
Video playback operations❚❚You can perform the following during video playback.
To Description
Pause Press 3 to pause playback.
ResumePress the J button to resume playback when playback ispaused or during rewind/advance.
Rewind/advance
・ Press 4 to rewind, 2 to advance. Speed increases witheach press, from 2× to 4× to 8× to 16×.
・ Keep 4 or 2 pressed to skip respectively to the firstframe or last frame.
・ The first frame is indicated by a h in the top rightcorner of the display, the last frame by a i.

Viewing photos98
To Description
Start slow-motionplayback
Press 3 while the video is paused to start slow-motionplayback.
Jog rewind/advance
・ Press 4 or 2 while the video is paused to rewind oradvance one frame at a time.
・ Keep 4 or 2 pressed for continuous rewind oradvance.
Skip 10 sRotate the main command dial one stop to skip ahead orback 10 s.
Skip to last orfirst frame
Rotate the sub-command dial to skip to the last or firstframe.
Adjust volume Press X to increase volume, W (Q) to decrease.
Trim videoTo display the [EDIT VIDEO] menu, pause playback andpress the i button.
Exit Press 1 or K to exit to full-frame playback.
Resumeshooting
Press the shutter-release button halfway to return toshooting mode.
Deleting unwanted picturesPictures can be deleted as described below. Note that pictures cannotbe recovered once deleted.

Viewing photos99
1 Display the picture.
・Press the K button to start playback and press 4 or 2 until thedesired picture is displayed.
2 Delete the picture.
・Press the O button; a confirmation dialog will be displayed. Pressthe O button again to delete the image and return to playback.
・To exit without deleting the picture, press K.
A The playback menu [Delete] itemUse [Delete] in the playback menu to:・ Delete multiple pictures・ Delete pictures taken on selected dates・ Delete all pictures in selected folders

Focus100
Basic settings
Focus
Focus modeChoose how the camera focuses.
Choosing a focus mode❚❚・ The focus mode can be selected using the [Focus mode] items in the
i menu, photo shooting menu, and video recording menu (0173,
0269, 0336).
Option Description
AF-A[AF modeauto-switch]
・ The camera uses AF-S for stationary subjects, andAF-C for moving subjects.
・ Available only in photo mode.

Focus101
Option Description
AF-S [Single AF]
・ Use with stationary subjects. When you press theshutter-release button halfway to focus, the focuspoint will turn from red to green and focus willlock. If the camera fails to focus, the focus pointwill flash red and the shutter release will bedisabled.
・ At default settings, the shutter can only bereleased if the camera is able to focus (focuspriority).
AF-C[ContinuousAF]
・ For moving subjects. The camera adjusts focuscontinuously in response to changes in thedistance to the subject while the shutter-releasebutton is pressed halfway.
・ At default settings, the shutter can be releasedwhether or not the subject is in focus (releasepriority).
AF-F [Full-time AF]
・ The camera adjusts focus continuously inresponse to subject movement or changes incomposition.
・ When the shutter-release button is pressedhalfway, the focus point will turn from red togreen and focus will lock.
・ This option is only available in video mode.
MF [Manual focus]Focus manually (0112). The shutter can be releasedwhether or not the subject is in focus.

Focus102
D Autofocus・ The camera may be unable to focus if:
- The subject contains lines parallel to the long edge of the frame- The subject lacks contrast- The subject in the focus point contains areas of sharply contrasting
brightness- The focus point includes night-time spot lighting or a neon sign or other
light source that changes in brightness- Flicker or banding appears under fluorescent, mercury-vapor, sodium-
vapor, or similar lighting- A cross (star) filter or other special filter is used- The subject appears smaller than the focus point- The subject is dominated by regular geometric patterns (e.g., blinds or a
row of windows in a skyscraper)- The subject is moving
・ The monitor may brighten or darken while the camera focuses.・ The focus point may sometimes be displayed in green when the camera is
unable to focus.
A Focus position memoryTo save the focus position even when the camera is turned off, set [Savefocus position] in the setup menu to [On]. However, some time may berequired until the camera can be used after turning it on (depending onzoom operation and changes in temperature, the focus position after turningon the camera may change from the position before the camera was turnedoff).
AF-area modeChoose how the camera selects the focus point for autofocus.・ In modes other than [Auto-area AF], [Auto-area AF (people)], and
[Auto-area AF (animals)], the focus point can be positioned using
the multi selector (0106).

Focus103
Choosing an AF-area mode❚❚・ AF-area mode can be selected using the [AF-area mode] items in the
i menu, photo shooting menu, and video recording menu (0172,
0270, 0336).
Option Description
3[PinpointAF]
・ With a focus area smaller than that employed forsingle-point AF, pinpoint AF is used for pinpoint focuson a selected spot in the frame.
・ Focusing may be slower than with single-point AF.・ Recommended for shots involving static subjects,
such as buildings, in-studio product photography, orclose-ups.
・ This option is only available when photo mode isselected and [Single AF] is chosen for [Focus mode].
d[Single-point AF]
・ The camera focuses on a point selected by the user.・ Use with stationary subjects.
e[Dynamic-area AF]
・ The camera focuses on a point selected by the user. Ifthe subject briefly leaves the selected point, thecamera will focus based on information fromsurrounding focus points.
・ Use for photographs of athletes and other activesubjects that are hard to frame using single-point AF.
・ This option is only available when photo mode isselected and [AF mode auto-switch] or [ContinuousAF] is chosen for focus mode.

Focus104
Option Description
f[Wide-areaAF (S)]
・ As for single-point AF except that the camera focuseson a wider area.
・ Choose for snapshots, subjects that are in motion, andother subjects that are difficult to photograph usingsingle-point AF.
・ During video recording, wide-area AF can be used forsmooth focus when making panning or tilting shots orrecording moving subjects.
・ If the selected focus area contains subjects at differentdistances from the camera, the camera will assignpriority to the closest subject.
・ The focus areas for [Wide-area AF (L)] are larger thanthose for [Wide-area AF (S)].
・ If [Wide-area AF (L-people)] is selected, the cameradetects and focuses on human faces or eyes (eye-
detection AF/face-detection AF, 0106).・ If [Wide-area AF (L-animals)] is selected, the camera
detects and focuses on faces or eyes of dogs and cats
(animal-detection AF, 0108).
g[Wide-areaAF (L)]
1
[Wide-areaAF (L-people)]
2
[Wide-areaAF (L-animals)]

Focus105
Option Description
h[Auto-areaAF]
・ The camera automatically detects the subject andselects the focus area.
・ Use on occasions when you don’t have time to selectthe focus point yourself, for portraits, or for snapshotsand other spur-of-the-moment photos.
・ If [Auto-area AF (people)] is selected, the cameradetects and focuses on human faces or eyes (eye-
detection AF/face-detection AF, 0106).・ If [Auto-area AF (animals)] is selected, the camera
detects and focuses on faces or eyes of dogs and cats
(animal-detection AF, 0108).・ Subject tracking (0109) can be initiated by pressing
the J button. Custom Setting f2 [Custom controls(shooting)] or g2 [Custom controls] can be used toconfigure the Fn button to start subject-tracking AF
(0367, 0382). Subject-tracking AF can also beassigned to the lens Fn or Fn2 button.
5[Auto-areaAF (people)]
6
[Auto-areaAF(animals)]
A s: The center focus pointA dot appears in the focus point when it is in the center of the frame.
A Quick focus-point selection・ For quicker focus-point selection, choose [Alternating points] for Custom
Setting a4 [Focus points used] to use only a quarter of the available focuspoints. The number of points available for [Pinpoint AF], [Wide-area AF(L)], [Wide-area AF (L-people)], or [Wide-area AF (L-animals)] does notchange even if [Alternating points] is selected.
・ You can choose [Select center focus point] for Custom Setting f2[Custom controls (shooting)] > [OK button] to allow the J button to beused to quickly select the center focus point.

Focus106
Focus-point selection❚❚The multi selector can be used to choose the focus point when anoption other than [Auto-area AF], [Auto-area AF (people)], or [Auto-area AF (animals)] is selected for AF-area mode (0102).
Detecting faces or eyes of portrait subjects (face/eye-detection AF)
❚❚
If [Wide-area AF (L-people)] or [Auto-area AF (people)] is selected for[AF-area mode] in the photo shooting menu or video recording menu,the camera detects human faces and eyes (eye-detection AF/face-detection AF).
・ A yellow border indicating the focus point appears around the facesof human subjects detected by the camera. If the camera detects the

Focus107
subject’s eyes, the yellow focus point will instead appear over one orthe other of their eyes.
・ If AF-C is selected for focus mode or if AF-A is selected and thecamera is using AF-C, the focus point will light yellow when faces oreyes are detected.
・ If AF-S is selected for focus mode or if AF-A is selected and thecamera is using AF-S, the focus point will turn green when thecamera focuses.
・ If more than one human face or eye is detected when [Auto-area AF(people)] is selected, e and f icons will appear on the focus point.You will be able to position the focus point over a different face oreye by pressing 4 or 2.
・ If the subject looks away after their face is detected, the focus pointwill move to track their motion.
・ During playback, you can zoom in on the face or eye used for focusby pressing J.
D Face/eye-detection AFEye and face detection may not perform as expected if:・ the subject’s face occupies a very large or very small proportion of the
frame,・ the subject’s face is lit too brightly or too poorly,・ the subject is wearing glasses or sunglasses,・ the subject’s face or eyes are obscured by hair or other objects, or・ the subject moves excessively during shooting.

Focus108
Focusing on the faces or eyes of animals (animal-detection AF)
❚❚
If [Wide-area AF (L-animals)] or [Auto-area AF (animals)] is selectedfor [AF-area mode] in the photo shooting menu or video recordingmenu, the camera detects the faces and eyes of dogs and cats (animal-detection AF).
・ When the camera detects a face of a dog or cat, a yellow borderindicating the focus point will appear around the subject’s face. If thecamera detects the subject’s eyes, the yellow focus point will insteadappear over one or the other of their eyes.
・ If AF-C is selected for focus mode or if AF-A is selected and thecamera is using AF-C, the focus point will light yellow when faces oreyes are detected.
・ If AF-S is selected for focus mode or if AF-A is selected and thecamera is using AF-S, the focus point will turn green when thecamera focuses.
・ If [Auto-area AF (animals)] is selected and more than one portraitsubject or more than one eye is detected, e and f icons will appearon the focus point. You will be able to position the focus point over adifferent face or eye by pressing 4 or 2.

Focus109
・ During playback, you can zoom in on the face or eye used for focusby pressing J.
D Animal-detection AF・ Animal face- and eye-detection may not perform as expected if:
- the subject’s face occupies a very large or very small proportion of theframe,
- the subject’s face is lit too brightly or too poorly,- the subject’s face or eyes are obscured by fur or other objects,- the subject’s eyes are similar in color to the rest of their face, or- the subject moves excessively during shooting.
・ Depending on shooting conditions, the camera may fail to detect thefaces or eyes of some breeds when [Wide-area AF (L-animals)] or [Auto-area AF (animals)] is enabled. Alternatively, the camera may display aborder around subjects that are not the faces or eyes of dogs or cats.
・ The light from the AF-assist illuminator may adversely affect the eyes ofsome animals; select [Off] for Custom Setting a11 [Built-in AF-assistilluminator].
Subject-tracking AF❚❚When [Auto-area AF], [Auto-area AF (people)], or [Auto-area AF(animals)] is selected for AF-area mode, the camera can track thesubject in the selected focus point.・ Press J to enable focus tracking; the focus point will change to a
targeting reticle.
・ Position the reticle over the target and press J again to starttracking; the focus point will track the selected subject as it moves

Focus110
through the frame. To end tracking and select the center focus point,press J again. In photo mode, if subject tracking was initiated infocus mode AF-C or AF-A by pressing the shutter-release buttonhalfway, the camera will track the subject only while the shutter-release button is pressed; releasing the shutter-release button endstracking and restores the focus point selected before tracking started.
・ To exit subject-tracking mode, press the W (Q) button.
D Subject trackingThe camera may be unable to track subjects if they:・ are similar in color or brightness to the background,・ change visibly in size, color, or brightness,・ are too large or too small,・ are too dark or too bright,・ move quickly, or・ leave the frame or are obscured by other objects.
The touch shutterTouch the display to focus on the selected point. The shutter will bereleased when you lift your finger from the display.

Focus111
Tap the icon shown in the illustration to choose the operationperformed by tapping the display.
Option Description
W
[Touchshutter/touch AF]
・ Touch the display to focus on the selected point andlift your finger to release the shutter. If [Wide-area AF(L-people)], [Wide-area AF (L-animals)], [Auto-areaAF (people)], or [Auto-area AF (animals)] is selectedfor AF-area mode and the camera detects human facesor eyes or the faces or eyes of dogs or cats, the camerawill focus on the face or eye* closest to the selectedpoint.
・ Available only in photo mode.
V [Touch AF]
・ Touch the display to focus on the selected point.Lifting your finger from the display does not releasethe shutter.
・ If [Auto-area AF], [Auto-area AF (people)], or [Auto-area AF (animals)] is selected for AF-area mode, thecamera will track the selected subject as it movesthrough the frame. To switch to a different subject, tapit in the display. If the camera detects human faces oreyes or the faces or eyes of dogs or cats, the camerawill focus on and track the face or eye* closest to theselected point.
X [Off] Touch shutter disabled.
Focus112
Option Description
f
[Positionfocuspoint]
・ Touch the display to position the focus point. Thecamera will not focus and lifting your finger from thedisplay will not release the shutter.
・ If [Auto-area AF], [Auto-area AF (people)], or [Auto-area AF (animals)] is selected for AF-area mode, thecamera will track the selected subject as it movesthrough the frame. To switch to a different subject, tapit in the display. If the camera detects human faces oreyes or the faces or eyes of dogs or cats, the camerawill track the face or eye* closest to the selected point.
* When choosing an eye using touch controls, note that the camera maynot focus on the eye on the side you intend. Use the multi selector tochoose the desired eye.
D Taking pictures using touch shooting options・ Touch controls cannot be used for manual focus.・ The shutter-release button can be used to take pictures when the W icon
is displayed.・ Touch controls cannot be used to take photographs during video
recording.・ Even if the camera is set to a continuous release mode, touch controls can
be used only to take one picture at a time. Use the shutter-release buttonfor burst photography.
・ In self-timer mode, focus locks on the selected subject when you touchthe monitor and the shutter is released about 10 seconds after you liftyour finger from the display. If the number of shots selected is greaterthan 1, the remaining shots will be taken in a single burst.
Manual focusManual focus is available in manual focus mode. Use manual focuswhen, for example, autofocus does not produce the desired results.

Focus113
・ Position the focus point over your subject and rotate the focus orcontrol ring until the subject is in focus.
・ For greater precision, press the X button to zoom in on the viewthrough the lens.
・ The focus indicator (I) in the shooting display can be used toconfirm whether the subject in the selected focus point is in focus(electronic rangefinding). The focus point will also light green whenthe subject is in focus.
1 Focus distance indicator 2 Focus indicator
Focus indicator Description
(steady)The subject is in focus.

Focus114
Focus indicator Description
(steady)The focus point is in front of the subject.
(steady)The focus point is behind the subject.
(flashes)The camera is unable to focus.
・ When using manual focus with subjects not suited to autofocus, notethat the in-focus indicator (I) may be displayed when the subject isnot in focus. Zoom in on the view through the lens and check focus.Use of a tripod is recommended when the camera is having troublefocusing.
D Lenses with focus-mode selectionManual focus mode can be chosen using focus-mode selection controls onthe lens (where available).
D The focal plane mark and flange-back distanceFocus distance is measured from the focal plane mark (E) on the camerabody, which shows the position of the focal plane inside the camera (q). Usethis mark when measuring the distance to your subject for manual focus ormacro photography. The distance between the focal plane and the lensmounting flange is known as the “flange-back distance” (w). On this camera,the flange-back distance is 16 mm (0.63 in.).

Focus115
A Focus peaking・ If an option other than [Off] is selected for Custom Setting d9 [Focus
peaking], objects that are in focus will be indicated by colored outlinesthat appear when focus is adjusted manually (focus peaking).
・ Note that focus peaking may not be displayed if the camera is unable todetect outlines. Check focus in the shooting display.

White balance116
White balanceWhite balance ensures that white objects appear white, regardless ofthe color of the light source. The default setting (auto white balance, orj) is recommended with most light sources; if the desired resultscannot be achieved with auto white balance, choose another option asdescribed below.
Adjusting white balance・ White balance can be selected using the [White balance] items in
the i menu and the photo shooting menu or video recording menu
(0153, 0248, 0332).
・ At default settings, white balance can also be selected by holding the
Fn button and rotating the main command dial (071).

White balance117
・ When 4 [Auto] or I [Fluorescent] is selected, you can choose asub-option by holding the Fn button and rotating the sub-commanddial.
OptionColor
temperature* Description
4 [Auto]
White balance is adjustedautomatically for optimal resultswith most light sources. If anoptional flash unit is used, whitebalance will be adjusted in accordwith the conditions in effect whenthe flash fires.
i [Keep white(reduce warmcolors)]
Approx. 3500–8000 K
Eliminate the warm color castproduced by incandescent lighting.
j [Keepoverallatmosphere]
Approx. 3500–8000 K
Partially preserve the warm colorcast produced by incandescentlighting.
k [Keep warmlighting colors]
Approx. 3500–8000 K
Preserve the warm color castproduced by incandescent lighting.
D [Natural lightauto]
Approx. 4500–8000 K
When used under natural light inplace of 4 [Auto], this optionproduces colors closer to thoseseen by the naked eye.

White balance118
OptionColor
temperature* Description
H [Directsunlight]
Approx. 5200 KUse with subjects lit by directsunlight.
G [Cloudy] Approx. 6000 KUse in daylight under overcastskies.
M [Shade] Approx. 8000 KUse in daylight with subjects inshade.
J [Incandescent] Approx. 3000 K Use under incandescent lighting.
I [Fluorescent]
Use under fluorescent lighting;choose the bulb type according tothe light source.
[Cool-whitefluorescent]
Approx. 4200 K
[Day whitefluorescent]
Approx. 5000 K
[Daylightfluorescent]
Approx. 6500 K
5 [Flash] Approx. 5400 K Use for flash photography.
K [Choose colortemperature]
Approx. 2500–10000 K
・ Choose the color temperaturedirectly.
・ To choose a color temperature,hold the Fn button and rotatethe sub-command dial.

White balance119
OptionColor
temperature* Description
L [Preset manual]
・ Measure white balance for thesubject or light source or copywhite balance from an existingphotograph.
・ To choose a white balancepreset, hold the Fn button androtate the sub-command dial.
・ To enter direct measurementmode, press and hold the Fn
button (0156).
* Values when fine-tuning is set to 0.
D D [Natural light auto]D [Natural light auto] may not produce the desired results under artificiallight. Choose 4 [Auto] or an option that matches the light source.
D White balance fine-tuningAt settings other than K [Choose color temperature], white balance can befine-tuned. Use the [White balance] items in the i menu, the photo shooting
menu, or video recording menu (0154, 0249).
D Studio flash lighting4 [Auto] may not produce the desired results with large studio flash units.Use preset manual white balance or set white balance to 5 [Flash] and usefine-tuning to adjust white balance.

White balance120
A Color temperature when shooting with 4 or D・ The photo info for pictures shot using 4 [Auto] or D [Natural light
auto] lists the color temperature selected by the camera at the time thepicture was taken. You can use this as reference when choosing a value forK [Choose color temperature].
・ To view shooting data during playback, select [Playback displayoptions] > [Additional photo info] in the playback menu and place acheck (M) next to [Shooting data].
A Color temperatureThe perceived color of a light source varies with the viewer; some may have ared cast while others appear blue. Color temperature is an objective measureof the color of a light source, expressed in Kelvins (K). The lower the colortemperature, the redder the cast (q); the higher the temperature, the bluerthe cast (w).
A Choosing a color temperatureIn general, choose lower values if your pictures have a red cast or tointentionally make pictures bluer, higher values if your pictures are tingedblue or to intentionally make pictures redder.

Silent photography121
Silent photographyTo enable the electronic shutter and eliminate the noise and vibrationcaused by operation of the mechanical shutter, select [On] for [Silentphotography] in the photo shooting menu.
・ An icon is displayed while silent photography is in effect.
・ The electronic shutter is used, regardless of the option selected forCustom Setting d4 [Shutter type].
・ If a release mode other than [Continuous H (extended)] is selected,the display will briefly go dark when the shutter is released. Thissignals that a photo has been taken.
・ Regardless of the settings selected for [Beep options] in the setupmenu, beeps will not sound when the camera focuses or while theself-timer is in operation.
・ Enabling silent photography disables some features, including:- the flash,- long exposure noise reduction,- flicker reduction, and- high ISO sensitivities (Hi 1, Hi 2).

Silent photography122
D Silent photography・ Selecting [On] for [Silent photography] does not completely silence the
camera. Camera sounds may still be audible, for example duringautofocus or aperture adjustment, in the latter case most noticeably atapertures smaller (i.e., at f-numbers higher) than f/5.6.
・ You may notice the following in photographs and in the shooting display:- Flicker or banding in scenes lit by such sources as fluorescent, mercury
vapor, or sodium lamps- Distortion associated with motion (moving subjects may be distorted,
or the entire frame may appear distorted if the camera is moved duringshooting)
- Jagged edges, color fringing, moiré, and bright spots in the display- Bright regions or bands in scenes lit by flashing signs and other
intermittent light sources or when the subject is briefly illuminated by astrobe or other bright, momentary light source
・ The frame advance rate for burst photography changes when [On] is
selected for [Silent photography] (0168).・ Silent photography mutes the shutter, but this does not absolve
photographers of the need to respect their subjects’ privacy and imagerights.

Rating pictures123
Rating picturesSelected pictures can be rated or marked as candidates for laterdeletion. Ratings can also be viewed in NX Studio. Protected picturescannot be rated.
1 Press the K button to start playback.
2 Select the desired picture and press the i button.
The playback i menu will be displayed.
3 Highlight [Rating] and press J.

Rating pictures124
4 Choose a rating.
・Rotate the main command dial to choose a rating of from zero tofive stars, or select d to mark the picture as a candidate for laterdeletion.
・Press J to select the highlighted option.

Protecting pictures from deletion125
Protecting pictures from deletionPictures can be protected to prevent their being deleted accidentally.Protected pictures will however be deleted when the memory card isformatted.
1 Press the K button to start playback.
2 Select the desired picture and press the A (g) button.
・Protected pictures are marked with a P icon.
・To remove protection, display or highlight the picture and pressthe A (g) button again.

Protecting pictures from deletion126
A Removing protection from all picturesTo remove protection from all pictures in the folder or folders currentlyselected for [Playback folder] in the playback menu, select [Unprotect all]in the i menu.

The mode selector127
Shooting controls
The mode selectorUse the mode selector to choose whether shutter speed and/or aperturecan be adjusted manually or are set automatically by the camera.
Using the mode selectorUse the mode selector to choose a shooting mode.
Mode Description
AUTO(b)
AutoA simple, “point-and-shoot” mode that leaves
the camera in charge of settings (085, 090).
PProgrammedauto
The camera sets shutter speed and aperturefor optimal exposure.
SShutter-priorityauto
Use to freeze or blur motion. You choose theshutter speed; the camera selects theaperture for best results.
AAperture-priority auto
Use to blur backgrounds or bring bothforeground and background into focus. Youchoose the aperture; the camera selects theshutter speed for best results.

The mode selector128
Mode Description
M ManualYou control both shutter speed and aperture.Set shutter speed to “bulb” or “time” for longtime-exposures.
P (programmed auto)・ In this mode, the camera automatically adjusts shutter speed and
aperture according to a built-in program to ensure optimal exposurein most situations.
・ Different combinations of shutter speed and aperture that producethe same exposure can be selected by rotating the main commanddial (“flexible program”).- While flexible program is in effect, a flexible program indicator (U) is
displayed.
- To restore default shutter speed and aperture settings, rotate themain command dial until the indicator is no longer displayed.Flexible program also ends when the mode dial is rotated toanother setting or the camera is turned off.
S (shutter-priority auto)・ In shutter-priority auto, you choose the shutter speed while the
camera automatically adjusts aperture for optimal exposure. Choose

The mode selector129
fast shutter speeds to “freeze” motion, slow shutter speeds tosuggest motion by blurring moving objects.
・ Rotate the shutter-speed dial to set the shutter speed.・ To select [X] or [T], or to change from [1/3STEP], [X], [T], or [B], rotate
while pressing the shutter-speed dial lock release.
1 1/4000 s–1/2 s
2 1–4 s (red text)
3 X (Flash sync) (0361)
4 1/3STEP (1/3 step) (0130)
・ In mode S, long exposures (0134) are not available even if theshutter-speed dial is set to [B] (Bulb) or [T] (Time). To perform longexposures, select mode M.
The mode selector130
Selecting shutter speed in step sizes of 1/3 (modesS and M)
❚❚
If the shutter-speed dial is set to [1/3STEP], you can use the maincommand dial to change the shutter speed.
・ Shutter speed can be set to values between 1/4000 and 30 s in stepsizes of 1/3, or [X]. In mode M, you can also select [B] (Bulb) or [T](Time).
・ You can set the shutter speed by means other than the shutter-speeddial as follows.- Touch controls (054)- Touch controls in self-portrait mode (052)
A (aperture-priority auto)・ In aperture-priority auto, you choose the aperture while the camera
automatically adjusts shutter speed for optimal exposure.
・ Aperture can be adjusted by rotating the sub-command dial.・ The minimum and maximum values for aperture vary with the lens.

The mode selector131
A Video mode exposure settingsThe following video settings can be adjusted during recording:
Mode Aperture Speed ISO sensitivity
P, S1 — — —2
A 4 — —2
M 4 4 43
1 Exposure control in shooting mode S is the same as in mode P.2 The upper limit for ISO sensitivity can be selected using the [ISO
sensitivity settings] > [Maximum sensitivity] item in the videorecording menu.
3 If [On] is selected for [ISO sensitivity settings] > [Auto ISO control(mode M)] in the video recording menu, the upper limit for ISO sensitivitycan be selected using [Maximum sensitivity].
M (manual)・ You control both shutter speed and aperture. Choose this mode for
long time-exposures of such subjects as fireworks or the night sky
(“Bulb” or “Time” photography, 0134).・ Shutter speed (w) and aperture (e) can be adjusted with reference
to the exposure indicators (q).
Shutter speed❚❚・ Rotate the shutter-speed dial to set the shutter speed.

The mode selector132
・ To select [X] or [T], or to change from [1/3STEP], [X], [T], or [B], rotatewhile pressing the shutter-speed dial lock release.
・ If the shutter-speed dial is set to [1/3STEP], you can use the maincommand dial to change the shutter speed. Shutter speed can also
be set to 15 s or 30 s (0130).
1 1/4000 s–1/2 s
2 1–4 s (red text)
3 B (Bulb) (0134)
4 T (Time) (0134)
5 X (Flash sync) (0361)
6 1/3STEP (1/3 step) (0130)
Aperture❚❚・ Aperture can be adjusted by rotating the sub-command dial.・ The minimum and maximum values for aperture vary with the lens.

The mode selector133
D Exposure indicators・ The difference between the exposure value resulting from your setting
combination of the shutter speed, aperture, and ISO sensitivity, and theappropriate exposure value measured by the camera, is displayed in themonitor and viewfinder. These “exposure indicators” are displayed asfollows.
Display Optimal exposureUnderexposed by
1/3 EVOverexposed by
over 3 1/3 EV
Monitor
Viewfinder
・ If exposure compensation was performed in mode M, the reference valuefor proper exposure in the exposure indicator changes.
D Exposure warningThe displays will flash if the selected settings exceed the limits of theexposure metering system.

The mode selector134
A Shutter speed extensionIf Custom Setting d5 [Extended shutter speeds (M)] is set to [On], you canselect a shutter speed of up to 900 s (15 min) in mode M when the shutter-speed dial is set to [1/3STEP].・ If you extend the shutter speed, the exposure indicator will not be
displayed.
A Auto ISO sensitivity control (mode M)If auto ISO sensitivity control (0245, 0331) is enabled, ISO sensitivity willautomatically be adjusted for optimal exposure at the selected shutter speedand aperture.
Long time-exposures❚❚The camera offers two options for long time-exposures: “Bulb” and“Time”. Long time-exposures can be used for pictures of fireworks, nightscenery, the stars, or moving lights.
A 35-second exposureshot at a shutter speed of“Bulb” and an aperture of
f/25
Shutterspeed
Description
BulbThe shutter remains open while the shutter-release button isheld down.

The mode selector135
Shutterspeed
Description
TimeThe exposure starts when the shutter-release button ispressed and ends when the button is pressed a second time.
1 Keep the camera steady, for example by using a tripod.
2 Rotate the mode selector to M.
3 Rotate the shutter-speed dial and set the shutter speed to Bulb(“Bulb”) or Time (“Time”).
Bulb Time
・ If the shutter-speed dial is set to [1/3STEP], use the maincommand dial to set it to Bulb or Time.

The mode selector136
4 Focus and start the exposure.・“Bulb”: Press the shutter-release button all the way down to start
the exposure. Keep the shutter-release button pressed during theexposure.
・“Time”: Press the shutter-release button all the way down to startthe exposure.
5 End the exposure.・“Bulb”: Lift your finger from the shutter-release button.・“Time”: Press the shutter-release button all the way down a
second time.
D Long time-exposures・ Note that “noise” (bright spots, randomly-spaced bright pixels or fog) may
be present in long exposures.・ Bright spots and fog can be reduced by choosing [On] for [Long
exposure NR] in the photo shooting menu.・ Nikon recommends using a fully-charged battery or an optional charging
AC adapter to prevent loss of power during long exposures.・ Use of a tripod is recommended to reduce blur.・ If you are using the optional ML-L7 Remote Control, time photography
will be performed even during bulb photography.

The ISO sensitivity dial137
The ISO sensitivity dialThe camera’s sensitivity to light (ISO sensitivity) can be adjustedaccording to the amount of light available. In general, choosing highervalues allows faster shutter speeds at the same aperture.
Adjusting ISO sensitivity・ Hold the ISO sensitivity dial lock release and rotate the ISO sensitivity
dial.
・ The option currently selected is shown in the display duringshooting.
Photo mode❚❚・ Choose from values of from ISO 100 to 51200. You can set the ISO
sensitivity dial to [H1] (Hi 1) for about one step higher, or [H2] (Hi 2)for about two steps higher from ISO 51200.
・ In mode b, the setting is fixed at ISO-A (AUTO), and the cameraautomatically adjusts ISO sensitivity.
・ If [Silent photography] in the photo shooting menu is set to [On],ISO sensitivities [H1] (Hi 1) and [H2] (Hi 2) cannot be used. If the ISO

The ISO sensitivity dial138
sensitivity dial is set to [H1] or [H2], the ISO sensitivity will be set toISO 51200.
A Auto ISO sensitivity control when taking photosIf you set [ISO sensitivity settings] (0245) > [Auto ISO sensitivity control]in the photo shooting menu to [On], the camera will automatically changethe ISO sensitivity when proper exposure cannot be obtained with the ISOsensitivity set in modes P, S, A, and M.
Video mode❚❚・ You can adjust the ISO sensitivity only under the following settings. In
all other cases, the camera automatically adjusts ISO sensitivity.- Mode: M- [ISO sensitivity settings] > [Auto ISO control (mode M)] in the
video recording menu: [Off]・ Choose from values of from ISO 100 to 25600. If the ISO sensitivity
dial is set to any other value, it will be set to ISO 25600.
D High ISO sensitivitiesThe higher the ISO sensitivity, the less light needed to make an exposure,allowing pictures to be taken when lighting is poor and helping prevent blurwhen the subject is in motion. Note, however, that the higher the sensitivity,the more likely the image is to be affected by “noise” in the form ofrandomly-spaced bright pixels, fog, or lines.
D H1 and H2A setting of [H1] (Hi 1) corresponds to an ISO sensitivity approximately 1 EVhigher than ISO 51200 (equivalent to ISO 102400) and [H2] (Hi 2) to an ISOsensitivity approximately 2 EV higher (equivalent to ISO 204800). Note thatpictures taken at these settings are particularly prone to “noise” in the formof randomly-spaced bright pixels, fog, or lines.

The exposure compensation dial139
The exposure compensation dialUse this button to alter exposure from the value suggested by thecamera. Exposure compensation can be used to make pictures brighteror darker.
−1 EV No exposurecompensation
+1 EV
Adjusting exposure compensation・ Rotate the exposure compensation dial.
・ Exposure compensation can be adjusted in the range −3 to +3 EV insteps of 1/3 EV.
・ Higher values make the subject brighter, lower values darker.・ To cancel exposure compensation, set the exposure compensation
dial to [0].・ At values other than ±0.0, the camera displays a E icon and the
exposure indicator (0133) in photo mode or a E icon in video mode.You can check the compensation value on the information display
(061) or i menu when taking photos, and on the i menu whenrecording videos. To check the compensation value in the i menu,

The exposure compensation dial140
select Custom Setting f1 or g1 [Customize i menu] and assign
[Exposure compensation] to the i menu (069).
Monitor Viewfinder
Setting through means other than the exposurecompensation dial
❚❚
If you set the exposure compensation dial to [C], you can adjust theexposure compensation through other means as follows.Values between –5 EV and +5 EV are available for photos, and between –3 EV and +3 EV for videos.・ [Easy exposure compensation] (0352)・ i menu (0145)・ Touch controls in self-portrait mode (052)・ Lens control ring (0367, 0382)

The exposure compensation dial141
D Mode M・ In mode M, exposure compensation affects only the exposure indicator;
shutter speed, aperture, and ISO sensitivity do not change. The overallbrightness of the image also does not change.
・ When auto ISO sensitivity control (0245, 0331) is in effect, ISO sensitivityis automatically adjusted according to the value selected for exposurecompensation, and the overall brightness of the image changes.
D Using a flashWhen an optional flash unit is used, exposure compensation affects bothflash level and exposure, altering the brightness of both the main subject andthe background. Custom Setting e3 [Exposure comp. for flash] can be usedto restrict the effects of exposure compensation to the background only.

The A (g) button142
The A (g) buttonLocks focus and exposure at the same time.
Exposure lock・ Exposure lock can be used to recompose shots after metering a
subject that will not be in the selected focus area in the finalcomposition.
・ Exposure lock is particularly effective with spot and center-weightedmetering.
Focus lock・ Use focus lock to lock focus on the current subject when AF-C is
selected for focus mode.・ When using focus lock, choose an AF-area mode other than [Auto-
area AF], [Auto-area AF (people)], or [Auto-area AF (animals)].
Locking focus and exposure
1 Position the subject in the selected focus point and press theshutter-release button halfway to set focus and exposure.

The A (g) button143
2 Press the A (g) button.
・Focus and exposure will lock while pressing the A (g) button.Exposure will not change even when the composition is altered.
・An AE-L icon will be displayed in the monitors.
3 Keeping the A (g) button pressed, recompose the photographand shoot.
Do not change the distance between the camera and the subject. Ifthe distance to the subject changes, release the lock and focus againat the new distance.

The A (g) button144
D Locking focus when AF-S is selected for focus mode or when AF-A is selected and you are shooting in AF-S
Focus locks while the shutter-release button is pressed halfway. You can alsolock focus by pressing the A (g) button.
D Locking exposure with the shutter-release buttonIf [On (half press)] is selected for Custom Setting c1 [Shutter-release buttonAE-L], exposure will lock while the shutter-release button is pressed halfway.
D Taking multiple shots at the same focus distance・ If you locked focus by pressing the A (g) button, focus will remain
locked between shots if you keep the A (g) button pressed.・ Focus will also remain locked if you keep the shutter-release button
pressed halfway between shots.

The i menu145
The i menu
The i menuThis menu is used for quick access to frequently-used settings. To viewthe menu, press the i button.
・ Highlight items using the multi selector and press J to view options.Highlight the desired option and press J to select and return to thei menu.
・ To cancel and return to the previous display, press the i button.
The i menu146
A The command dials・ In some cases, the setting for the item currently highlighted in the i
menu can be chosen by rotating the main command dial. Options for theselected setting, if any, can be selected by rotating the sub-command dial.
・ Some items can be adjusted by rotating either dial.・ Press J to save changes. You can also save changes by pressing the
shutter-release button halfway or highlighting another item.

Still images147
Still images
1 Set Picture Control (0147)
2 White balance (0153)
3 Image quality (0160)
4 Image size (0161)
5 Flash mode (0162)
6 Metering (0162)
7 Wi-Fi connection (0164)
8 Active D-Lighting (0164)
9 Release mode (0166)
10 Vibration reduction (0171)
11 AF-area mode (0172)
12 Focus mode (0173)
Set Picture ControlChoose image processing (“Picture Control”) options for new photosaccording to the scene or your creative intent.

Still images148
Option Description
n [Auto]
・ The camera automatically adjusts hues andtones based on the [Standard] PictureControl.
・ The complexions of portrait subjects willappear softer than in pictures taken with the[Standard] Picture Control.
・ In outdoor shots, elements such as the foliageand sky will appear more vivid than inpictures taken with the [Standard] PictureControl.
Q [Standard]Standard processing for balanced results.Recommended for most situations.
R [Neutral]Minimal processing for natural results. Choosefor photographs that will later be processed orretouched.
S [Vivid]Pictures are enhanced for a vivid, photoprinteffect. Choose for photographs that emphasizeprimary colors.
T [Monochrome] Take monochrome photographs.
o [Portrait]Smooth complexions for natural-lookingportraits.
p [Landscape] Shoot vibrant landscapes and cityscapes.
q [Flat]
Details are preserved over a wide tone range,from highlights to shadows. Choose forphotographs that will later be extensivelyprocessed or retouched.

Still images149
Option Description
k01–k20
[Creative PictureControl](Creative PictureControl)
・ Creative Picture Controls offer uniquecombinations of hue, tone, saturation, andother settings tuned for particular effects.
・ Choose the type from [Dream], [Morning],[Pop], [Sunday], [Somber], [Dramatic],[Silence], [Bleached], [Melancholic], [Pure],[Denim], [Toy], [Sepia], [Blue], [Red], [Pink],[Charcoal], [Graphite], [Binary], or [Carbon].
・ To view Picture Control settings, highlight a Picture Control and press3. Any changes to fine-tuning options can be previewed in the
display (0150).
・ The option currently selected is shown in the display duringshooting.

Still images150
Modifying Picture Controls❚❚Highlighting [Set Picture Control] in the i menu and pressing Jdisplays a Picture Control list. Highlight a Picture Control and press 3 topreview the effect in the display.
・ Press 1 or 3 to highlight settings. Press 4 or 2 to choose a value inincrements of 1, or rotate the sub-command dial to choose a value inincrements of 0.25.
・ The options available vary with the Picture Control selected.・ To abandon any changes and start over from default settings, press
the O button.・ Press J to save changes and return to the i menu.・ Picture Controls that have been modified from default settings are
indicated by an asterisk (“U”).

Still images151
D The j indicatorThe j indicator under the value display in the Picture Control setting menuindicates the previous value for the setting.
D [A] (auto)・ Selecting the A (auto) option available for some settings lets the camera
adjust the setting automatically.・ Results vary with exposure and the position of the subject in the frame.
A The “n Auto” Picture ControlSettings can be adjusted in the range [A−2] to [A+2].
Picture Control settings❚❚Option Description
[Effect level]Mute or heighten the effect of Creative PictureControls.
[Quick sharp]Quickly adjust levels for balanced [Sharpening],[Mid-range sharpening], and [Clarity]. Theseparameters can also be adjusted individually.
[Sharpening] Control the sharpness of details and outlines.
[Mid-rangesharpening]
Adjust the sharpness of patterns and lines in therange between [Sharpening] and [Clarity].
[Clarity]Adjust overall sharpness and the sharpness ofthicker outlines without affecting brightness ordynamic range.

Still images152
Option Description
[Contrast] Adjust contrast.
[Brightness]Raise or lower brightness without loss of detail inhighlights or shadows.
[Saturation] Control the vividness of colors.
[Hue] Adjust hue.
[Filter effects]Simulate the effect of color filters onmonochrome pictures.
[Toning]
Choose the tint used in monochrome pictures.Pressing 3 when an option other than [B&W](black-and-white) is selected displays saturationoptions.
[Toning] (CreativePicture Control)
Choose the shade of color used for CreativePicture Controls.
D [Filter effects]Choose from the following [Filter effects]:
Option Description
[Y] (yellow)* These options enhance contrast and can be used to tonedown the brightness of the sky in landscape photographs.Orange [O] produces more contrast than yellow [Y], red [R]more contrast than orange.
[O] (orange)*
[R] (red)*
[G] (green)* Green softens skin tones. Use for portraits and the like.
* The term in parentheses is the name of the corresponding third-partycolor filter for black-and-white photography.

Still images153
White balanceAdjust white balance. For more information, see “White balance” in
“Basic settings” (0116).Option
4 [Auto]
i [Keep white (reduce warmcolors)]
j [Keep overall atmosphere]
k [Keep warm lighting colors]
D [Natural light auto]
H [Direct sunlight]
G [Cloudy]
M [Shade]
Option
J [Incandescent]
I [Fluorescent]
[Cool-white fluorescent]
[Day white fluorescent]
[Daylight fluorescent]
5 [Flash]
K [Choose color temperature]
L [Preset manual]
・ Pressing 3 when 4 [Auto] or I [Fluorescent] is highlighteddisplays sub-options for the highlighted item.

Still images154
・ The option currently selected is shown in the display duringshooting.
Fine-tuning white balance❚❚Pressing J when [White balance] is highlighted in the i menu displaysa list of white balance options. If an option other than K [Choose colortemperature] is highlighted, fine-tuning options can be displayed bypressing 3. Any changes to fine-tuning options can be previewed in thedisplay.
G Increase green
B Increase blue
A Increase amber
M Increase magenta

Still images155
・ Tap the arrows in the display or use the multi selector to fine-tunewhite balance.
・ Press J to save changes and return to the i menu.・ If white balance has been fine-tuned, an asterisk (“U”) will be
displayed in the white balance icon.
Choosing a color temperature❚❚Pressing J when [White balance] is highlighted in the i menu displaysa list of white balance options. When K [Choose color temperature] ishighlighted, color temperature options can be viewed by pressing 3.
Value for Amber–Blue axis Value for Green–Magenta axis
・ Press 4 or 2 to highlight digits on the A–B (amber–blue) axis. Youcan also highlight the G–M (green–magenta) axis.
・ Press 1 or 3 to edit the selected item.・ Press J to save changes and return to the i menu.・ If a value other than 0 is selected for the green (G)–magenta (M) axis,
an asterisk (“U”) will appear in the white balance icon.

Still images156
D Color-temperature selection・ Do not use color-temperature selection with fluorescent light sources;
instead, use the I [Fluorescent] option.・ When using color-temperature selection with other light sources, take a
test shot to determine if the selected value is appropriate.
Preset manual❚❚White balance settings such as 4 [Auto], J [Incandescent], and K[Choose color temperature] may fail to produce the desired resultsunder mixed lighting or lighting with a strong color cast. Should thisoccur, white balance can be set to a value measured under the lightsource used in the final photograph. The camera can store up to sixvalues for preset manual white balance.
1 Select [White balance] in the i menu, then highlight L [Presetmanual] and press 3.
2 Select a preset.
・Select from presets [d-1] through [d-6].・Press J to save changes and return to the i menus.

Still images157
3 Highlight [White balance] in the i menu and hold the J buttonto initiate direct measurement mode.
・A L indicator will flash in the shooting display.
・The white balance target (r) appears in the center of the frame.

Still images158
4 Position the white balance target (r) over a white or gray objectand measure a value for preset manual white balance.
・Position the target (r) using the multi selector.・To measure white balance, press the shutter-release button all the
way down or press J.・You can also position the target and measure white balance by
tapping the display.・You cannot move r if an optional flash unit is attached. Frame the
shot so that the white or gray reference object is in the center ofthe display.
・ If the camera is unable to measure white balance, a message willbe displayed and the camera will return to direct measurementmode. Try measuring white balance again, for example with thetarget (r) positioned over a different area of the subject.
5 Press the i button to exit direct measurement mode.

Still images159
D The preset manual white balance menuThe preset manual white balance menu can be accessed by selecting [Whitebalance] > L [Preset manual] in the photo shooting menu. The presetmanual white balance menu offers options for copying values for presetmanual white balance from an existing photograph or adding comments toor protecting white balance presets.
D Protected presetsWhite balance presets indicated by g icons are protected and cannot bechanged.
D Preset manual: Selecting a preset・ At shipment, presets d-1 through d-6 are set to 5200 K, equivalent to theH [Direct sunlight] white balance option.
・ White balance presets can be viewed by selecting [White balance] > L[Preset manual] in the photo shooting menu. To recall a stored value,highlight a preset using the multi selector and press J.
D Direct measurement modeDirect measurement mode will end if no operations are performed in thetime selected for Custom Setting c3 [Power off delay] > [Standby timer].
D Measuring white balancePreset manual white balance cannot be measured during multiple exposures.

Still images160
Image qualityChoose a file format for photographs.
Option Description
[RAW +JPEG fine] ・ Record two copies of each photo: a RAW image and a JPEG
copy.・ Only the JPEG copy is displayed during playback. The RAW
copies can only be viewed using a computer.・ Deleting the JPEG copies on the camera also deletes the
RAW images.
[RAW +JPEGnormal]
[RAW +JPEG basic]
[RAW]
RAW images have the highest quality, and the qualitydecreases from “fine”, to “normal”, and to “basic”.
[JPEG fine]
[JPEGnormal]
[JPEG basic]
The option currently selected is shown in the display during shooting.

Still images161
A RAW・ RAW files have the extension “*.nef”.・ The process of converting RAW files to JPEG and other widely-supported
formats is referred to as “RAW processing”. A variety of settings can beadjusted during this process, including exposure compensation, whitebalance, and Picture Controls.
・ RAW processing has no effect on the original RAW data, meaning that itcan be repeated as often and using as many different combinations ofsettings as desired while maintaining image quality.
・ RAW processing can be performed in-camera using the [RAW processing]item in the retouch menu or on a computer using Nikon’s NX Studiosoftware. NX Studio is available free-of-charge from the Nikon DownloadCenter.
A “RAW + JPEG”・ The camera displays only the JPEG copies of photos recorded at image
quality settings of “RAW + JPEG”. The RAW copies can only be viewedusing a computer.
・ Deleting the JPEG copies on the camera also deletes the RAW images.
Image sizeChoose the size at which photographs are recorded. The optioncurrently selected is shown in the display during shooting.
Image size versus number of pixels❚❚The physical dimensions of the photos in pixels vary with the optionselected for [Choose image area] in the photo shooting menu.

Still images162
Image areaImage size
Large Medium Small
[DX (24×16)] 5568×3712 4176×2784 2784×1856
[1:1 (16×16)] 3712×3712 2784×2784 1856×1856
[16:9 (24×14)] 5568×3128 4176×2344 2784×1560
Flash modeChoose a flash mode for optional flash units. The options available varywith the shooting mode.
Option Available in
I [Fill flash] b, P, S, A, M
J [Red-eye reduction] b, P, S, A, M
L [Slow sync] P, A
K [Slow sync + red-eye] P, A
M [Rear-curtain sync] P, S, A, M
s [Flash off] b, P, S, A, M
The option currently selected is shown in the display during shooting.
MeteringMetering determines how the camera sets exposure.
Still images163
Option Description
L[Matrixmetering]
The camera meters a wide area of the frame and setsexposure according to tone distribution, color,composition, and distance for results close to those seenby the naked eye.
M
[Center-weightedmetering]
・ The camera assigns the greatest weight to the centerof the frame. It can be used with subjects thatdominate the composition, for example.
・ Center-weighted metering is also recommendedwhen using filters with an exposure factor (filterfactor) over 1×.
・ The size of the area assigned the greatest weight canbe selected using Custom Setting b2 [Center-weighted area].
N[Spotmetering]
・ The camera meters a circle with a diameter of 3.5 mm/0.14 in. (equivalent to approximately 2.5% of theframe). This ensures that the subject will be correctlyexposed even when the background is much brighteror darker.
・ The metered area is centered on the current focus
point. If AF-area mode (0102) is set to [Auto-areaAF], [Auto-area AF (people)], or [Auto-area AF(animals)], the camera will instead meter the centerfocus point.
t
[Highlight-weightedmetering]
The camera assigns the greatest weight to highlights.Use this option to reduce loss of detail in highlights, forexample when photographing spotlit performers onstage.

Still images164
The option currently selected is shown in the display during shooting.
Wi-Fi connectionEnable or disable Wi-Fi.・ Enable Wi-Fi to establish wireless connections to computers or
between the camera and smartphones or tablets (smart devices)
running the SnapBridge app (0483).・ The camera displays a Wi-Fi icon when Wi-Fi is enabled.
・ To turn Wi-Fi off, highlight [Wi-Fi connection] in the i menu andpress J; if Wi-Fi is currently enabled, a [Close Wi-Fi connection]prompt will be displayed. Press J to end the connection.
Active D-LightingPreserve details in highlights and shadows, creating pictures withnatural contrast. Use for high-contrast scenes, for example whenphotographing brightly-lit outdoor scenery through a door or window

Still images165
or taking pictures of shaded subjects on a sunny day. Active D-Lightingis most effective when used with matrix metering.
[Off] [Y Auto]
Option Description
Y [Auto]The camera automatically adjusts Active D-Lighting inresponse to shooting conditions.
Z [Extra high]
Choose the amount of Active D-Lighting performedfrom [Extra high], [High], [Normal], and [Low].
P [High]
Q [Normal]
R [Low]
c [Off] Active D-Lighting off.
The option currently selected is shown in the display during shooting.

Still images166
D Active D-Lighting・ “Noise” in the form of randomly-spaced bright pixels, fog, or lines may
appear in photos taken with Active D-Lighting.・ In mode M, [Y Auto] is equivalent to [Q Normal].・ Uneven shading may be visible with some subjects.・ This function does not apply at high ISO sensitivities (Hi 1, Hi 2), including
high sensitivities selected via auto ISO sensitivity control.
Release modeChoose the operation performed when the shutter is released.
Option Description
U [Single frame]The camera takes one photograph each time theshutter-release button is pressed.
V [Continuous L]
・ The camera takes photographs at a selected ratewhile the shutter-release button is pressed.
・ The frame advance rate can be chosen byrotating the sub-command dial when continuousL is selected in the release-mode menu.
・ Choose from rates of from 1 to 4 fps.
W [Continuous H]The camera takes photos at up to 5 fps while theshutter-release button is pressed.
X[Continuous H(extended)]
・ The camera takes photos at up to 11 fps while theshutter-release button is pressed.
・ Optional flash units will not fire.・ Flicker reduction does not take effect.
E [Self-timer] Take pictures with the self-timer (0169).

Still images167
・ Pressing 3 when [Continuous L] is highlighted displays frameadvance rate options.
・ The option currently selected is shown in the display duringshooting.

Still images168
D The shooting displayIn continuous low-speed and continuous high-speed modes, the display isupdated in real time even while shooting is in progress.
D Frame advance rateFrame advance rate varies with camera settings.
Release modeImagequality
RAW bitdepth
Silent photographyOff On
[Continuous L]
JPEG —
User-selected frame advance rateRAW
12 bit
14 bit
[Continuous H]
JPEG —
Approx. 5 fpsApprox. 4.5 fps
RAW12 bit
14 bit Approx. 4 fps
[Continuous H(extended)]
JPEG —Approx. 11 fps* Approx. 11 fps
RAW12 bit
14 bit Approx. 9 fps Approx. 8.5 fps
* Approx. 10 fps if [Electronic front-curtain shutter] is selected forCustom Setting d4 [Shutter type].
D Burst photography・ Depending on shooting conditions and memory card performance, the
memory card access lamp may light for anywhere from a few tens ofseconds to around a minute. Do not remove the memory card while thememory card access lamp is lit. Not only could any unrecorded images belost, but the camera or memory card could be damaged.
・ If the camera is switched off while the memory card access lamp is lit, itwill not power off until all images in the buffer have been recorded.

Still images169
・ If the battery is exhausted while images remain in the buffer, the shutterrelease will be disabled and the images transferred to the memory card.
D Continuous H (extended)Depending on the camera settings, continuous photography may result inapparent variations in exposure. If you notice changes in exposure, perform
exposure lock (0142) to lock the exposure during burst photography.
D The memory buffer・ While the shutter-release button is pressed halfway, the frame-count
display will show the number of pictures that can be stored in thememory buffer.
・ When the buffer is full, the display will show r00 and the frame rate willdrop.
・ The number shown is approximate. The actual number of photos that canbe stored in the memory buffer varies with camera settings and shootingconditions.
The self-timer❚❚In self-timer mode, pressing the shutter-release button starts a timer,and a photo is taken when the timer expires.

Still images170
1 In [Release mode] in the i menu, highlight [Self-timer] and press3.
2 Choose the desired shutter-release delay and number of shots.
Press J to select the highlighted option.
3 Frame the photograph and focus.
The timer will not start if the shutter cannot be released, as may bethe case, for example, if the camera is unable to focus when AF-S isselected for focus mode.

Still images171
4 Start the timer.・A E icon appears in the shooting display when the self-timer is
enabled.・Press the shutter-release button all the way down to start the
timer; the self-timer lamp will begin to flash. The lamp stopsflashing two seconds before the timer expires.
D Taking multiple shotsThe number of shots taken and the interval between shots can be selectedusing Custom Setting c2 [Self-timer].
Vibration reductionChoose whether to enable vibration reduction. The options availablevary with the lens.
Option Description
C[On] Choose for enhanced vibration reduction when
photographing static subjects.[Normal]
D [Sport]Choose when photographing athletes and other subjectsthat are moving rapidly and unpredictably.
E [Off] Vibration reduction is disabled.

Still images172
An icon appears in the display when a setting other than [Off] isselected.
D Using vibration reduction: Notes・ Vibration reduction may be unavailable with some lenses.・ We recommend that you wait for the image in the display to stabilize
before shooting.・ Depending on the lens, when vibration reduction is active, the image in
the viewfinder may jiggle after the shutter is released, but this does notindicate a malfunction.
・ [Normal] or [Sport] is recommended for panning shots. In [Normal] or[Sport] mode, vibration reduction applies only to motion that is not partof the pan. If the camera is panned horizontally, for example, vibrationreduction will be applied only to vertical shake.
・ If you will use a tripod or monopod with a VR lens camera, the settingsmay differ depending on the lens. Consult the lens documentation beforeuse for more information.
AF-area modeAF-area mode controls how the camera selects the focus-point forautofocus. For more information, see “AF-area mode” in the “Focus”
section of “Basic settings” (0102).Option
3 [Pinpoint AF]
d [Single-point AF]
e [Dynamic-area AF]
Option
f [Wide-area AF (S)]
g [Wide-area AF (L)]
1 [Wide-area AF (L-people)]

Still images173
Option
2 [Wide-area AF (L-animals)]
h [Auto-area AF]
Option
5 [Auto-area AF (people)]
6 [Auto-area AF (animals)]
The option currently selected is shown in the display during shooting.
Focus modeFocus mode controls how the camera focuses. For more information, see
“Focus mode” in the “Focus” section of “Basic settings” (0100).Option
AF-A [AF mode auto-switch]
AF-S [Single AF]
Option
AF-C [Continuous AF]
MF [Manual focus]
The option currently selected is shown in the display during shooting.

Videos174
Videos
1 Set Picture Control (0175)
2 White balance (0175)
3 Frame size and rate/Video
quality (0175)
4 Microphone sensitivity (0178)
5 Wind noise reduction (0179)
6 Metering (0180)
7 Wi-Fi connection (0180)
8 Active D-Lighting (0181)
9 Electronic VR (0181)
10 Vibration reduction (0182)
11 AF-area mode (0182)
12 Focus mode (0182)
A [Same as photo settings]If [Same as photo settings] is selected for [Set Picture Control], [Whitebalance], [Active D-Lighting], or [Vibration reduction] in the videorecording menu, a h icon will appear at the top left corner of the i menu.Changes made to the setting from the i menu in photo mode will also applyin video mode and vice-versa.

Videos175
Set Picture ControlChoose a Picture Control for video recording. For more information, see
“Still images” (0147).
White balanceAdjust white balance for video recording. For more information, see “Still
images” (0153).
Frame size and rate/Video qualitySelect the video frame size (in pixels), frame rate, and video quality.
Video quality❚❚Choose from [High quality] and [Normal]. A star (“m”) appears in theicon for [Frame size/frame rate] when [High quality] is selected. Someframe size/rate options only support [High quality].
Frame size/frame rate❚❚The maximum bit rate and recording time for each [Frame size/framerate] option are shown below. The bit rate varies with the optionselected for video quality.
Option1Max. bit rate
Max. recording timeHigh quality Normal
r [3840×2160; 30p]2
144 Mbps —3
29 min. 59 s5
s [3840×2160; 25p]2
t [3840×2160; 24p]2
w [1920×1080; 120p]4
x [1920×1080; 100p]4
y/y [1920×1080; 60p] 56 Mbps 28 Mbps

Videos176
Option1Max. bit rate
Max. recording timeHigh quality Normal
z/z 56 Mbps 28 Mbps
29 min. 59 s5
[1920×1080; 50p]
1/1 [1920×1080; 30p]
28 Mbps 14 Mbps2/2 [1920×1080; 25p]
3/3 [1920×1080; 24p]
A[1920×1080; 30p ×4(slow-motion)]4
36 Mbps
—3 3 min.B[1920×1080; 25p ×4(slow-motion)]4
C[1920×1080; 24p ×5(slow-motion)]4
29 Mbps
1 The frame rates for 120p, 100p, 60p, 50p, 30p, 25p, and 24p arerespectively 119.88 fps, 100 fps, 59.94 fps, 50 fps, 29.97 fps, 25 fps, and23.976 fps.
2 Videos are recorded in 4K UHD.3 Video quality fixed at [High quality].4 The following features cannot be used.
・Detection of human, dog, or cat faces or eyes when [Wide-area AF (L-people)], [Wide-area AF (L-animals)], [Auto-area AF (people)], or[Auto-area AF (animals)] is selected for [AF-area mode].
・Flicker reduction・Electronic VR・HDMI output while recording videos
5 If you use a memory card that has a capacity over 32 GB, you can recordup to the maximum length with one video recording. For memory cards32 GB or less, you can record up to the maximum length, but the videomay be divided between up to 8 files. Each divided file may be up to 4 GBin size. The number of files and the length of each file vary with theoptions selected for [Frame size/frame rate] and [Video quality].

Videos177
The option currently selected for [Frame size/frame rate] is shown inthe display during shooting.
Slow motion videos❚❚You can record slow motion videos by selecting [1920×1080; 30p ×4(slow-motion)], [1920×1080; 25p ×4 (slow-motion)], or [1920×1080;24p ×5 (slow-motion)] for [Frame size/frame rate]. Sound is notrecorded.・ In [1920×1080; 30p ×4 (slow-motion)] for example, images read at
a frame rate of 120p are recorded as a video in 30p. A video recordedfor about 10 seconds will be played back for about 40 seconds. Youcan see momentary actions in slow motion, such as the impact of aball in sports.
・ The frame rates when reading images and when recording andplaying back videos are as follows.
Frame size/frame rateFrame rate
when readingimages*
Frame rate whenrecording and
playing back videos*
1920×1080; 30p ×4 (slow-motion)
120p 30p

Videos178
Frame size/frame rateFrame rate
when readingimages*
Frame rate whenrecording and
playing back videos*
1920×1080; 25p ×4 (slow-motion)
100p 25p
1920×1080; 24p ×5 (slow-motion)
120p 24p
* 120p: 119.88 fps, 100p: 100 fps, 30p: 29.97 fps, 25p: 25 fps, 24p: 23.976fps
D When recording slow motion videosThe following features cannot be used when recording slow motion videos.・ Flicker reduction・ Electronic VR・ Recording timecodes・ HDMI output while recording videos
Microphone sensitivityTurn built-in or external microphones on or off or adjust microphonesensitivity.
Option Description
bA Adjust microphone sensitivity automatically.
[Microphone off] Turn sound recording off.
b1–b20
Adjust microphone sensitivity manually. Choose fromvalues of from [1] to [20]. The higher the value, thehigher the sensitivity; the lower the value, the lower thesensitivity.

Videos179
・ At settings other than bA, the option currently selected is shown inthe display.
・ If the sound level is displayed in red, the volume is too high. Reducemicrophone sensitivity.
D Videos without soundVideos recorded with [Microphone off] selected for microphone sensitivityare indicated by a 2 icon.
Wind noise reductionChoose whether to use wind noise reduction when recording videos.

Videos180
Option Description
[On]Enables the low-cut filter, reducing noise produced by wind blowingover the built-in microphone. Note that other sounds may also beaffected.
[Off] Disables wind noise reduction.
An icon appears in the display when [On] is selected.
Selecting [On] for [Wind noise reduction] has no effect on optionalstereo microphones. Wind-noise reduction for optional stereomicrophones that support this feature can be enabled or disabled usingmicrophone controls.
MeteringChoose how the camera sets exposure during video recording. For more
information, see “Still images” (0162).
D Metering[Spot metering] is not available in video mode.
Wi-Fi connectionEnable or disable Wi-Fi. For more information, see “Still images” (0164)or see “Wi-Fi connection” in the “Connect to smart device” section of the
“Menu guide” (0409).
Videos181
Active D-LightingPreserve details in highlights and shadows, creating videos with naturalcontrast. Select [Same as photo settings] to use the option currentlyselected for photos. For more information about Active D-Lighting, see
“Still images” (0164).
D [Same as photo settings]Note that if [Same as photo settings] is selected for Active D-Lighting in thevideo recording menu and [Auto] is selected in the photo shooting menu,videos will be shot at a setting equivalent to [Normal].
Electronic VRChoose whether to enable electronic vibration reduction in video mode.
Option Description
[On]
・ Enable electronic vibration reduction during video recording.・ If the video frame size and rate is set to 1920×1080 120p,
1920×1080 100p, or 1920×1080 slow-motion, electronic vibrationreduction is disabled.
・ Note that when [On] is selected, the angle of view will bereduced, slightly increasing the apparent focal length.
[Off] Electronic vibration reduction is disabled.
An icon appears in the display when [On] is selected.

Videos182
Vibration reductionChoose whether to enable vibration reduction in video mode. For more
information, see “Still images” (0171).
AF-area modeAF-area mode controls how the camera selects the focus-point forautofocus. For more information, see “AF-area mode” in the “Focus”
section of “Basic settings” (0102).Option
d [Single-point AF]
f [Wide-area AF (S)]
g [Wide-area AF (L)]
1 [Wide-area AF (L-people)]
Option
2 [Wide-area AF (L-animals)]
h [Auto-area AF]
5 [Auto-area AF (people)]
6 [Auto-area AF (animals)]
Focus modeFocus mode controls how the camera focuses. For more information, see
“Focus mode” in the “Focus” section of “Basic settings” (0100).Option
AF-S [Single AF]
AF-C [Continuous AF]
Option
AF-F [Full-time AF]
MF [Manual focus]

Viewing pictures183
Playback
Viewing pictures
Full-frame playbackPress the K button to view the most recent picture full frame in thedisplay.
・ Press 4 to return to the previous frame, 2 to skip to the next frame.・ Press 1, 3, or the DISP button to view more information on the
current picture (0186).

Viewing pictures184
Thumbnail playbackTo view multiple pictures, press the W (Q) button when a picture isdisplayed full frame.
・ The number of pictures displayed increases from 4 to 9 to 72 eachtime the W (Q) button is pressed, and decreases with each press ofthe X button.
・ Highlight pictures using 1, 3, 4, or 2.
Calendar playbackTo view images taken on a selected date, press the W (Q) button when72 images are displayed.
・ Use the multi selector (1, 3, 4, or 2) to highlight a date in the datelist (q) and press W (Q) to place the cursor in the thumbnail list (w).

Viewing pictures185
Press 1 or 3 to highlight pictures in the thumbnail list. To return tothe date list, press the W (Q) button a second time.
・ To zoom in on the picture highlighted in the thumbnail list, press andhold the X button.
・ To exit to thumbnail playback, press X when the cursor is in the datelist.
D Touch controlsTouch controls can be used when pictures are displayed in the monitor
(056).
D Rotate tallTo display “tall” (portrait-orientation) photographs in tall orientation, select[On] for [Rotate tall] in the playback menu.
D Picture reviewWhen [On] is selected for [Picture review] in the playback menu,photographs are automatically displayed after shooting; there is no need foryou to press the K button.・ If [On (monitor only)] is selected, photos will not be displayed in the
viewfinder.・ In continuous release modes, display begins when shooting ends, with
the first photograph in the current series displayed.・ Images are not rotated automatically during picture review even when
[On] is selected for [Rotate tall] in the playback menu.

Photo information186
Photo informationPhoto information is superimposed on images displayed in full-frameplayback. Press 1, 3, or the DISP button to cycle through photoinformation as shown below.
1 File information
2 Exposure data1
3 Highlight display1
4 RGB histogram1
5 Shooting data1, 2
6 Location data3
7 Overview data1
8 None (picture only)1
1 Displayed only if the corresponding option is selected for [Playbackdisplay options] in the playback menu.
2 The shooting data list has multiple pages, which can be viewed bypressing 1 or 3.
3 Location data are displayed only if embedded in the picture at the time itwas taken.

Photo information187
File information
1 Protect status (0125)
2 Retouch indicator (0424)
3 Upload marking (0202)
4 Focus point* (085)
5 Frame number/total number offrames
6 Image quality (0160)
7 Image size (0161)
8 Image area (0243)
9 Time of recording (0393)
10 Date of recording (0393)
11 Rating (0123)
12 Folder name (0238)
13 File name (0242)
* Displayed only if [Focus point] is selected for [Playback display options]in the playback menu.

Photo information188
Exposure data
1 Folder number–frame number
(0238)
2 Shooting mode (0127)
3 Shutter speed (0128, 0131)
4 Aperture (0130, 0131)
5 Exposure compensation value
(0139)
6 ISO sensitivity* (0137)
* Displayed in red if the picture was taken in mode P, S, A, or M with autoISO sensitivity control enabled.
Highlight display
1 Highlights (areas that may beoverexposed)
2 Folder number–frame number
(0238)

Photo information189
RGB histogram
1 Folder number–frame number
(0238)
2 White balance (0116, 0153,
0248)
Color temperature (0155)
Preset manual (0156)White balance fine-tuning
(0154)
3 Histogram (RGB channel)
4 Histogram (red channel)
5 Histogram (green channel)
6 Histogram (blue channel)

Photo information190
D Playback zoomTo zoom in on the picture in the histogram display, press X. The histogramwill be updated to show only the data for the portion of the image visible inthe display. Use the multi selector to scroll to areas of the frame not visible inthe monitor. Press W (Q) to zoom out.
D HistogramsHistograms show tone distribution. Pixel brightness (tone) is plotted on thehorizontal axis and the number of pixels on the vertical axis.・ If the image contains objects with a wide range of brightnesses, the
distribution of tones will be relatively even.
・ If the image is dark, the distribution will be shifted to the left.
・ If the image is bright, the distribution will be shifted to the right.
Increasing exposure compensation shifts the distribution of tones to theright, while decreasing exposure compensation shifts the distribution to the

Photo information191
left. Histograms can provide a rough idea of overall exposure when brightambient lighting makes it difficult to see pictures in the monitor.
D The histogram display・ RGB histograms show tone distribution.・ Camera histograms may differ from those displayed in imaging
applications. Use them as a guide to actual tone distribution.

Photo information192
Shooting dataView the settings in effect at the time the picture was taken. Theshooting data list has multiple pages, which can be viewed by pressing1 or 3.
Basic shooting data❚❚
1 Metering (0162)
Shutter type (0357)
Shutter speed (0128, 0131)
Aperture (0130, 0131)
2 Shooting mode (0127)
ISO sensitivity1 (0137)
3 Exposure compensation value
(0139)Optimal exposure tuning2
(0353)
4 Focal lengths
5 Lens data
6 Focus mode (0100)
AF-area mode (0102)
7 Vibration reduction (0171)
8 White balance3 (0116, 0153,
0248)
9 White balance fine-tuning
(0154)
10 Color space (0262)
11 Camera name
12 Image area (0243)
13 Folder number–frame number
(0238)
1 Displayed in red if the picture was taken in mode P, S, A, or M with autoISO sensitivity control enabled.
2 Displayed if Custom Setting b3 [Fine-tune optimal exposure] has beenset to a value other than zero for any metering method.

Photo information193
3 Also includes the color temperature for pictures taken using 4 [Auto].

Photo information194
Flash data❚❚Flash data are displayed only for pictures taken with optional flash units
(0497, 0508).
1 Flash type
2 Remote flash control
3 Flash mode (0502)
4 Flash control mode (0501)
Flash compensation (0504)
Picture Control data❚❚The items displayed vary with the Picture Control in effect when thepicture was taken.
1 Picture Control (0147, 0255)

Photo information195
Other shooting data❚❚
1 High ISO noise reduction
(0263)Long exposure noise reduction
(0262)
2 Active D-Lighting (0164)
3 HDR exposure differential
(0289)
HDR smoothing (0289)
4 Vignette control (0264)
5 Retouch history (0424)Changes are listed in the orderapplied.
6 Image comment (0404)
Copyright information❚❚Copyright information is only displayed if recorded using the[Copyright information] item in the setup menu at the time the picturewas taken.
1 Photographer (0405) 2 Copyright holder (0405)

Photo information196
Location dataThe location data page lists the latitude, longitude, and other locationdata downloaded from smartphones or tablets.・ The items listed vary with the device supplying the location data.・ The location data displayed with videos are those reported at the
start of recording.

Photo information197
Overview
1 Frame number/total number offrames
2 Upload marking (0202)
3 Protect status (0125)
4 Retouch indicator (0424)
5 Camera name
6 Image comment indicator
(0404)
7 Location data indicator
8 Histogram (0190)
9 Image quality (0160)
10 Image size (0161)
11 Image area (0243)
12 File name (0242)
13 Time of recording (0393)
14 Date of recording (0393)
15 Folder name (0238)
16 Rating (0123)

Photo information198
1 Metering (0162)
2 Shooting mode (0127)
3 Shutter speed (0128, 0131)
4 Aperture (0130, 0131)
5 ISO sensitivity1 (0137)
6 Focal lengths
7 Active D-Lighting (0164)
8 Picture Control (0147, 0255)
9 Color space (0262)
10 Flash mode2 (0502)
11 White balance (0116, 0153,
0248)
Color temperature (0155)
Preset manual (0156)White balance fine-tuning
(0154)
12 Flash compensation2 (0504)Commander mode2
13 Exposure compensation value
(0139)
1 Displayed in red if the picture was taken in mode P, S, A, or M with autoISO sensitivity control enabled.
2 Flash data are displayed only for pictures taken with optional flash units
(0497, 0508).
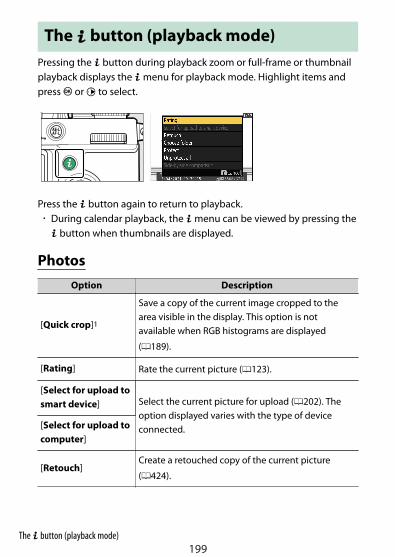
The i button (playback mode)199
The i button (playback mode)Pressing the i button during playback zoom or full-frame or thumbnailplayback displays the i menu for playback mode. Highlight items andpress J or 2 to select.
Press the i button again to return to playback.・ During calendar playback, the i menu can be viewed by pressing thei button when thumbnails are displayed.
PhotosOption Description
[Quick crop]1
Save a copy of the current image cropped to thearea visible in the display. This option is notavailable when RGB histograms are displayed
(0189).
[Rating] Rate the current picture (0123).
[Select for upload tosmart device] Select the current picture for upload (0202). The
option displayed varies with the type of deviceconnected.[Select for upload to
computer]
[Retouch]Create a retouched copy of the current picture
(0424).

The i button (playback mode)200
Option Description
[Choose folder]Select a folder. You can then highlight a folder andpress J to view the pictures it contains.
[Protect]Add protection to or remove protection from the
current picture (0125).
[Unprotect all] 2Remove protection from all pictures in the foldercurrently selected for [Playback folder] in theplayback menu.
[Side-by-sidecomparison]3
Compare retouched copies to the originals.
1 Available only during playback zoom.2 Not available during playback zoom.3 Available only when a retouched copy (indicated by a p icon) or the
source picture for a retouched copy is selected.

The i button (playback mode)201
A [Side-by-side comparison]Choose [Side-by-side comparison] to compare retouched copies with theunretouched originals.
1 Options used to create copy
2 Source image
3 Retouched copy
・ The source image is displayed on the left, the retouched copy on theright.
・ The options used to create the copy listed at the top of the display.・ Press 4 or 2 to switch between the source image and the retouched
copy.・ If the copy is an overlay created from multiple source images, press 1 or3 to view the other images.
・ If the source has been copied multiple times, press 1 or 3 to view theother copies.
・ To view the highlighted picture zoomed in, press and hold the X button.・ Press J to return to playback with the highlighted image displayed full-
frame.・ To exit to playback, press the K button.・ The source image will not be displayed if the copy was created from a
photograph that is now protected.・ The source image will not be displayed if the copy was created from a
photograph that has since been deleted.
VideosOption Description
[Rating] Rate the current video (0123).

The i button (playback mode)202
Option Description
[Select for uploadto computer]
Select the current video for upload (0202).
[Volume control] Adjust playback volume.
[Trim video]Trim footage from the current video and save the
edited copy in a new file (0204).
[Choose folder]Select a folder. You can then highlight a folder andpress J to view the pictures it contains.
[Protect]Add protection to or remove protection from the
current picture (0125).
[Unprotect all]Remove protection from all pictures in the foldercurrently selected for [Playback folder] in theplayback menu.
Videos (playback paused)Option Description
9[Choose start/endpoint]
Trim footage from the current video and save the
edited copy in a new file (0204).
4[Save currentframe]
Save a selected frame as a JPEG still (0207).
Select for upload❚❚Follow the steps below to select the current picture for upload to asmart device or computer.・ The i menu items used to select pictures for upload vary with the
type of device connected:

The i button (playback mode)203
- [Select for upload to smart device]: Displayed when the camera isconnected to a smart device via built-in Bluetooth using [Connectto smart device] in the setup menu (0408).
- [Select for upload to computer]: Displayed when the camera isconnected to a computer via built-in Wi-Fi using [Connect tocomputer] in the setup menu (0411).
・ Videos cannot be selected for upload when the camera is connectedto a smart device via the SnapBridge app.
・ The maximum file size for videos uploaded by other means is 4 GB.
1 Select the desired picture and press the i button.
2 Highlight [Select for upload to smart device] or [Select forupload to computer] and press J.
The picture will be marked with a W icon.
D Removing upload markingTo remove upload marking, repeat Steps 1 and 2.

The i button (playback mode)204
Choose start/end point❚❚Trim footage from the current video and save the edited copy in a newfile.
1 Display a video full frame.
2 Pause the video on the new opening frame.・Press the J button to start playback videos. Press 3 to pause.・Your approximate position in the video can be ascertained from
the video progress bar.
・Press 4 or 2 or rotate the main command dial to locate thedesired frame.
3 Select [Choose start/end point].
Press the i button, highlight [Choose start/end point], and pressJ.

The i button (playback mode)205
4 Choose the start point.
To create a copy that begins from the current frame, highlight [Startpoint] and press J.
5 Confirm the new start point.
・ If the desired frame is not currently displayed, press 4 or 2 toadvance or rewind.
・Rotate the main command dial one stop to skip ahead or back 10 s.・Rotate the sub-command dial to skip to the last or first frame.
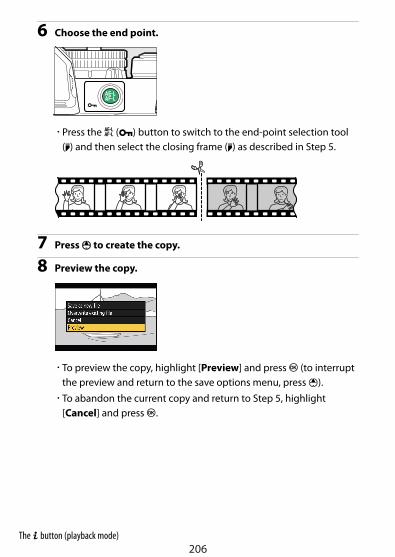
The i button (playback mode)206
6 Choose the end point.
・Press the A (g) button to switch to the end-point selection tool(x) and then select the closing frame (x) as described in Step 5.
7 Press 1 to create the copy.
8 Preview the copy.
・To preview the copy, highlight [Preview] and press J (to interruptthe preview and return to the save options menu, press 1).
・To abandon the current copy and return to Step 5, highlight[Cancel] and press J.

The i button (playback mode)207
9 Choose a save option.
・Choose [Save as new file] and press the J button to save theedited copy as a new file.
・To replace the original video with the edited copy, highlight[Overwrite existing file], press J, and then highlight [Yes] andpress J.
D Trimming videos・ The copy will not be saved if there is insufficient space available on the
memory card.・ Videos less than two seconds long cannot be edited using [Choose
start/end point].・ Copies have the same time and date of creation as the original.
D Removing opening or closing footage・ To remove only the closing footage from a video, choose [End point] in
Step 4, press the J button, and proceed to Step 7 without pressing the A(g) button in Step 6.
・ To remove only the opening footage, proceed to Step 7 without pressingthe A (g) button in Step 6.
D The [Trim video] option (retouch menu)Videos can also be edited using the [Trim video] item in the retouch menu.
Save current frame❚❚Save a selected frame as a JPEG still.

The i button (playback mode)208
1 Pause the video on the desired frame.
・Press 3 to pause playback.・Press 4 or 2 to locate the desired frame.
2 Choose [Save current frame].
Press the i button, then highlight [Save current frame] and press Jto create a JPEG copy of the current frame.
D [Save current frame]・ Stills are saved at the dimensions selected for [Frame size/frame rate] in
the video recording menu when the video was recorded.・ They cannot be retouched.・ Some categories of photo information are not displayed during playback.

Playback zoom209
Playback zoomPress X or J to zoom in on photos displayed in full-frame playback. [DX(24×16)]-format images can be zoomed in to a maximum ofapproximately 21× for Large, 16× for Medium, or 10× for Small.
Using playback zoomTo Description
Zoom in/zoomout
・ Press the X button oruse stretch gesturesto zoom in.
・ To zoom out, pressW (Q) or use pinchgestures.
A navigation window is displayedduring the zoom ratio is altered, withthe area currently visible indicated by ayellow border. A bar below thenavigation window shows the zoomratio, turning green at 1:1. Thenavigation window clears from thedisplay after a few seconds.
Viewotherareas ofimage
Use the multi selector or glide gestures to view areas of imagenot visible in the monitor. Keep the multi selector pressed toscroll rapidly to other areas of frame.
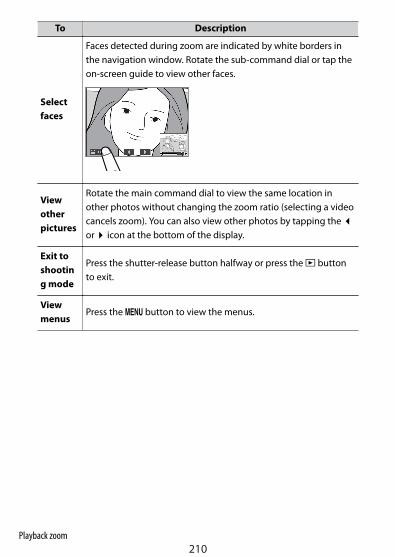
Playback zoom210
To Description
Selectfaces
Faces detected during zoom are indicated by white borders inthe navigation window. Rotate the sub-command dial or tap theon-screen guide to view other faces.
Viewotherpictures
Rotate the main command dial to view the same location inother photos without changing the zoom ratio (selecting a videocancels zoom). You can also view other photos by tapping the eor f icon at the bottom of the display.
Exit toshooting mode
Press the shutter-release button halfway or press the K buttonto exit.
Viewmenus
Press the G button to view the menus.

Deleting pictures211
Deleting picturesFollow the steps below to delete pictures from memory cards. Note thatpictures cannot be recovered once deleted. Pictures that are protected,however, cannot be deleted.
Using the delete buttonPress the O button to delete the current picture.
1 Select the desired picture with the multi selector and press theO button.
・A confirmation dialog will be displayed.・To exit without deleting the picture, press K.
2 Press the O button again.
The picture will be deleted.
A Calendar playbackDuring calendar playback, you can delete all photographs taken on aselected date by highlighting the date in the date list and pressing the Obutton.

Deleting pictures212
Deleting multiple picturesUse [Delete] in the playback menu to delete multiple pictures at once.Note that depending on the number of images, some time may berequired for deletion.
Option Description
Q [Selected pictures] Delete selected pictures.
i[Pictures shot onselected dates]
Delete all pictures taken on selected dates
(0213).
R [All pictures]Delete all pictures in the folder currentlyselected for [Playback folder] in the playbackmenu.
Deleting selected pictures❚❚
1 Select pictures.・Highlight pictures using the multi selector and press the W (Q)
button to select; selected pictures are marked with O icons.Selected pictures can be deselected by pressing the W (Q) buttonagain.
・Repeat until all the desired pictures are selected.・To view the highlighted picture zoomed in, press and hold the X
button.

Deleting pictures213
2 Delete the pictures.
・Press J; a confirmation dialog will be displayed.・Highlight [Yes] and press J to delete the selected pictures.
Pictures shot on selected dates❚❚
1 Select dates.
・Highlight dates using the multi selector and press 2 to select;selected dates are marked with M icons. Selected dates can bedeselected by pressing 2 again.
・Repeat until you have selected all the desired dates.

Deleting pictures214
2 Delete the pictures.
・Press J; a confirmation dialog will be displayed.・Highlight [Yes] and press J to delete all the pictures taken on the
selected dates.

Defaults215
Menu guide
DefaultsThe defaults for the playback, photo shooting, video recording, CustomSettings, and setup menus are listed below.
Playback menu defaultsPlayback menu option Default
[Delete] —
[Playback folder] All
[Playback display options]
[Focus point] U
[Exposure info] U
[Highlights] U
[RGB histogram] U
[Shooting data] U
[Overview] U
[None (picture only)] U
[Picture review] Off
[Rotate tall] On
[Slide show]
[Picture type] Photos and videos
[Frame interval] 2 s

Defaults216
Playback menu option Default
[Rating] —
Photo shooting menu defaultsPhoto shooting menu option Default
[Reset photo shooting menu] —
[Storage folder]
[Rename] NZ_FC
[Select folder by number] 100
[Select folder from list] —
[File naming] DSC
[Choose image area] DX (24×16)
[Image quality] JPEG normal
[Image size] Large
[RAW recording] 14-bit
[ISO sensitivity settings]
[ISO sensitivity] —
[Auto ISO sensitivity control] Off
[Maximum sensitivity] 51200
[Maximum sensitivity with c] Same as without flash
[Minimum shutter speed] Auto
[White balance] j: Keep overall atmosphere
Fine-tune A-B: 0, G-M: 0
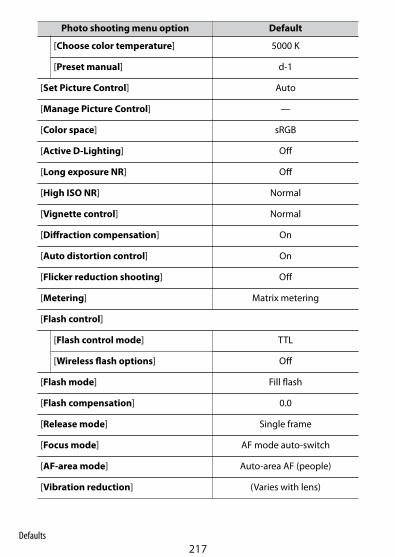
Defaults217
Photo shooting menu option Default
[Choose color temperature] 5000 K
[Preset manual] d-1
[Set Picture Control] Auto
[Manage Picture Control] —
[Color space] sRGB
[Active D-Lighting] Off
[Long exposure NR] Off
[High ISO NR] Normal
[Vignette control] Normal
[Diffraction compensation] On
[Auto distortion control] On
[Flicker reduction shooting] Off
[Metering] Matrix metering
[Flash control]
[Flash control mode] TTL
[Wireless flash options] Off
[Flash mode] Fill flash
[Flash compensation] 0.0
[Release mode] Single frame
[Focus mode] AF mode auto-switch
[AF-area mode] Auto-area AF (people)
[Vibration reduction] (Varies with lens)

Defaults218
Photo shooting menu option Default
[Auto bracketing]
[Auto bracketing set] AE & flash bracketing
[Number of shots] 0
[Increment] 1.0
[Multiple exposure]
[Multiple exposure mode] Off
[Number of shots] 2
[Overlay mode] Average
[Save individual pictures (RAW)] On
[Overlay shooting] On
[Select first exposure (RAW)] —
[HDR (high dynamic range)]
[HDR mode] Off
[Exposure differential] Auto
[Smoothing] Normal
[Save individual pictures (RAW)] Off
[Interval timer shooting]
[Choose start day/time] Now
[Interval] 1 min.
[Intervals×shots/interval] 0001×1
[Exposure smoothing] On
[Silent photography] On

Defaults219
Photo shooting menu option Default
[Interval priority] Off
[Focus before each shot] Off
[Options] Off
[Starting storage folder]
[New folder] U
[Reset file numbering] U
[Time-lapse video]
[Interval] 5 s
[Shooting time] 25 min.
[Exposure smoothing] On
[Silent photography] On
[Frame size/frame rate] 1920×1080; 60p
[Interval priority] Off
[Focus before each shot] Off
[Focus shift shooting]
[No. of shots] 100
[Focus step width] 5
[Interval until next shot] 0
[First-frame exposure lock] On
[Silent photography] On
[Starting storage folder]
[New folder] U

Defaults220
Photo shooting menu option Default
[Reset file numbering] U
[Silent photography] Off
Video recording menu defaultsVideo recording menu option Default
[Reset video recording menu] —
[File naming] DSC
[Frame size/frame rate] 1920×1080; 60p
[Video quality] High quality
[Video file type] MOV
[ISO sensitivity settings]
[Maximum sensitivity] 25600
[Auto ISO control (mode M)] On
[ISO sensitivity (mode M)] —
[White balance] Same as photo settings
Fine-tune A-B: 0, G-M: 0
[Choose color temperature] 5000 K
[Preset manual] d-1
[Set Picture Control] Same as photo settings
[Manage Picture Control] —
[Active D-Lighting] Off
[High ISO NR] Normal

Defaults221
Video recording menu option Default
[Vignette control] Normal
[Diffraction compensation] On
[Auto distortion control] On
[Flicker reduction] Auto
[Metering] Matrix metering
[Release mode (save frame)] Single frame
[Focus mode] Full-time AF
[AF-area mode] Auto-area AF (people)
[Vibration reduction] Same as photo settings
[Electronic VR] Off
[Microphone sensitivity] Auto
[Attenuator] Disable
[Frequency response] Wide range
[Wind noise reduction] Off
[Timecode]
[Record timecodes] Off
[Count-up method] Record run
[Timecode origin] —
[Drop frame] On

Defaults222
Custom Settings menu defaultsCustom Settings menu option Default
[Reset custom settings] —
a1 [AF-C priority selection] Release
a2 [AF-S priority selection] Focus
a3 [Focus tracking with lock-on] 3
a4 [Focus points used] All points
a5 [Store points by orientation] No
a6 [AF activation] Shutter/AF-ON
a7
[Limit AF-area mode selection]
[Pinpoint AF] M
[Single-point AF] L(cannot be deselected)
[Dynamic-area AF] M
[Wide-area AF (S)] M
[Wide-area AF (L)] M
[Wide-area AF (L-people)] M
[Wide-area AF (L-animals)] M
[Auto-area AF] M
[Auto-area AF (people)] M
[Auto-area AF (animals)] M
a8 [Focus point wrap-around] No wrap
a9[Focus point options]
[Manual focus mode] On

Defaults223
Custom Settings menu option Default
a9 [Dynamic-area AF assist] On
a10 [Low-light AF] On
a11 [Built-in AF-assist illuminator] On
a12[Manual focus ring in AFmode]
Enable
b1 [Easy exposure compensation] On
b2 [Center-weighted area] Φ 8 mm
b3
[Fine-tune optimal exposure]
[Matrix metering] 0
[Center-weighted metering] 0
[Spot metering] 0
[Highlight-weightedmetering]
0
b4 [b mode exposure comp.] Enable
c1 [Shutter-release button AE-L] Off
c2
[Self-timer]
[Self-timer delay] 10 s
[Number of shots] 1
[Interval between shots] 0.5 s
c3
[Power off delay]
[Playback] 10 s
[Menus] 1 min
[Picture review] 4 s

Defaults224
Custom Settings menu option Default
c3 [Standby timer] 30 s
d1 [CL mode shooting speed] 3 fps
d2 [Maximum shots per burst] 100
d3 [Exposure delay mode] Off
d4 [Shutter type] Auto
d5 [Extended shutter speeds (M)] Off
d6 [File number sequence] On
d7 [Apply settings to live view] On
d8 [Framing grid display] Off
d9
[Focus peaking]
[Peaking level] Off
[Peaking highlight color] Red
d10 [View all in continuous mode] On
e1 [Flash sync speed] 1/200 s
e2 [Flash shutter speed] 1/60 s
e3 [Exposure comp. for flash] Entire frame
e4 [Auto c ISO sensitivity control] Subject and background
e5 [Auto bracketing (mode M)] Flash/speed
e6 [Bracketing order] MTR > under > over

Defaults225
Custom Settings menu option Default
f1 [Customize i menu]
Set Picture Control,White balance,Image quality,
Image size,Flash mode,
Metering,Wi-Fi connection,Active D-Lighting,
Release mode,Vibration reduction,
AF-area mode,Focus mode
f2
[Custom controls (shooting)]
[Fn button] White balance
[AE-L/AF-L button] AE/AF lock
[OK button] Select center focus point
[Video record button] Live view info display off
[Lens Fn button] AE/AF lock
[Lens Fn2 button] AF-ON
[Lens control ring] (Varies with lens)
f3
[Custom controls (playback)]
[AE-L/AF-L button] Protect
[OK button] Zoom on/off
f4
[Customize command dials]
[Reverse rotation]Exposure compensation: U, Shutter
speed/aperture: U

Defaults226
Custom Settings menu option Default
f4
[Change main/sub]Exposure setting: Off, Autofocus
setting: Off
[Menus and playback] Off
[Sub-dial frame advance] 10 frames
f5 [Release button to use dial] No
f6 [Reverse indicators]
g1 [Customize i menu]
Set Picture Control,White balance,
Frame size and rate/Video quality,Microphone sensitivity,Wind noise reduction,
Metering,Wi-Fi connection,Active D-Lighting,
Electronic VR,Vibration reduction,
AF-area mode,Focus mode
g2
[Custom controls]
[Fn button] White balance
[AE-L/AF-L button] AE/AF lock
[OK button] Select center focus point
[Shutter-release button] Take photos
[Lens Fn button] AE/AF lock
[Lens Fn2 button] AF-ON

Defaults227
Custom Settings menu option Default
g2 [Lens control ring] (Varies with lens)
g3[AF speed] 0
[When to apply] Always
g4 [AF tracking sensitivity] 4
g5
[Highlight display]
[Display pattern] Off
[Highlight displaythreshold]
248
Setup menu defaultsSetup menu option Default
[Format memory card] —
[Language](Default varies with country of
purchase)
[Time zone and date]
[Time zone](Default varies with country of
purchase)
[Date and time] —
[Date format](Default varies with country of
purchase)
[Daylight saving time] Off
[Monitor brightness] 0
[Monitor color balance] A-B: 0, G-M: 0

Defaults228
Setup menu option Default
[Viewfinder brightness] Auto
[Viewfinder color balance] A-B: 0, G-M: 0
[Limit monitor mode selection]
[Automatic display switch] M
[Viewfinder only] M
[Monitor only] M
[Prioritize viewfinder] M
[Information display] Dark on light
[AF fine-tuning options]
[AF fine-tune] Off
[Fine-tune and save lens] —
[Default] —
[List saved values] —
[Non-CPU lens data]
[Lens number] 1
[Focal length (mm)] —
[Maximum aperture] —
[Save focus position] Off
[Image Dust Off ref photo] —
[Pixel mapping] —
[Image comment]
[Attach comment] U

Defaults229
Setup menu option Default
[Copyright information]
[Attach copyright information] U
[Beep options]
[Beep on/off] Off
[Volume] 2
[Pitch] Low
[Touch controls]
[Enable/disable touch controls] Enable
[Full-frame playback flicks] LeftVRight
[Self-portrait mode] Enable
[HDMI]
[Output resolution] Auto
[Advanced]
[Output range] Auto
[External recording control] Off
[Airplane mode] Disable
[Connect to smart device]
[Pairing (Bluetooth)]
[Bluetooth connection] Disable
[Select for upload (Bluetooth)]
[Auto select for upload] Off
[Wi-Fi connection] —

Defaults230
Setup menu option Default
[Upload while off] On
[Location data (smart device)]
[Latitude] —
[Longitude] —
[Altitude] —
[UTC] —
[Connect to computer]
[Wi-Fi connection] Disable
[Network settings] —
[Options]
[Auto upload] Off
[Delete after upload] No
[Upload file as] RAW + JPEG
[Deselect all?] —
[MAC address] —
[Wireless remote (ML-L7) options]
[Wireless remote connection] Disable
[Save wireless remote controller] —
[Delete wireless remote controller] —
[Assign Fn1 button] Same as camera K button
[Assign Fn2 button] Same as camera G button
[Conformity marking] —

Defaults231
Setup menu option Default
[USB power delivery] Enable
[Energy saving (photo mode)] Enable
[Slot empty release lock] Enable release
[Save/load menu settings] —
[Reset all settings] —
[Firmware version] —

D The playback menu: Managing images232
D The playback menu: Managingimages
To display the playback menu, select the D (playback menu) tab in thecamera menus.
The playback menu contains the following items:Item 0
[Delete] 232
[Playback folder] 233
[Playback display options] 233
[Picture review] 234
Item 0
[Rotate tall] 234
[Slide show] 234
[Rating] 236
D See also“Playback menu defaults” (0215)
Delete
G button U D playback menu
Delete multiple images. For more information, see “Deleting multiple
pictures” (0212).
Option Description
Q [Selected pictures] Delete selected pictures.

D The playback menu: Managing images233
Option Description
i[Pictures shot onselected dates]
Delete all pictures taken on selected dates.
R [All pictures]Delete all pictures in the folder currentlyselected for [Playback folder] in the playbackmenu.
Playback folder
G button U D playback menu
Choose a folder for playback.
Option Description
(Folder name)Pictures in all folders with the selected name will be visibleduring playback. Folders can be renamed using the [Storagefolder] > [Rename] option in the photo shooting menu.
[All] Pictures in all folders will be visible during playback.
[Current]Only pictures in the current folder will be visible duringplayback.
Playback display options
G button U D playback menu
Choose whether the focus points used when the photograph was takenare displayed during full-frame playback. You can also choose the typesof photo information that can be viewed during full-frame playback.・ Highlight an option and press 2 to select (M) or deselect (U).・ To complete the operation, press J.

D The playback menu: Managing images234
Picture review
G button U D playback menu
Choose whether pictures are automatically displayed in the monitorimmediately after shooting.
Option Description
[On]Pictures appear in the currently-selected display (monitoror viewfinder) as they are taken.
[On (monitoronly)]
Pictures are displayed after shooting only when themonitor is used to frame shots. Pictures are not displayed inthe viewfinder when [Viewfinder only] is selected formonitor mode.
[Off] Pictures can only be viewed by pressing the K button.
Rotate tall
G button U D playback menu
When [On] is selected, “tall” (portrait-orientation) pictures will beautomatically rotated for display during playback.
D Rotate tallImages are not rotated automatically during picture review even when [On]is selected for [Rotate tall].
Slide show
G button U D playback menu
View a slide show; pictures are displayed in the order recorded. The
pictures in the folder currently selected for [Playback folder] (0233)will be displayed one-by-one in the order recorded.

D The playback menu: Managing images235
Option Description
[Start] Start the slide show.
[Picture type]
・ Choose the type of picture displayed.・ Select [By rating] to view only pictures with selected
ratings. Highlight ratings and press 2 to select (M) ordeselect (U).
[Frameinterval]
Choose how long each picture will be displayed.
Viewing slide showsTo start the slide show, highlight [Start] and press J. The followingoperations can be performed while the slide show is in progress:
To Description
Skip back/skipahead
Press 4 to return to the previous frame, 2 to skip tothe next frame.
View additionalphoto info
Press 1 or 3 to choose the photo info displayed. Tohide photo info, select [None (picture only)].
PausePress J to pause the slide show. To restart, highlight[Restart] and press J.
Adjust volume Press X to increase volume, W (Q) to decrease.
Exit to the playbackmenu
Press G to end the slide show and return to theplayback menu.

D The playback menu: Managing images236
To Description
Exit to playbackmode
Press K to end the slide show and return to theplayback display.
Resume shootingPress the shutter-release button halfway to return toshooting mode.
A dialog is displayed when the show ends. To restart, highlight [Restart]and press J. To end the show, highlight [Exit] and press J.
Rating
G button U D playback menu
Rate pictures.
・ Highlight pictures using the multi selector 4 or 2.・ Press 1 or 3 to choose a rating of from zero to five stars, or select d
to mark the picture as a candidate for later deletion.・ To view the highlighted picture zoomed in, press and hold the X
button.・ Press J to save changes.

C The photo shooting menu: Shooting options237
C The photo shooting menu: Shootingoptions
To view the photo shooting menu, select the C tab in the cameramenus.
The photo shooting menu contains the following items:Item 0
[Reset photo shooting menu] 238
[Storage folder] 238
[File naming] 242
[Choose image area] 243
[Image quality] 244
[Image size] 244
[RAW recording] 245
[ISO sensitivity settings] 245
[White balance] 248
[Set Picture Control] 255
[Manage Picture Control] 257
[Color space] 262
Item 0
[Active D-Lighting] 262
[Long exposure NR] 262
[High ISO NR] 263
[Vignette control] 264
[Diffraction compensation] 264
[Auto distortion control] 265
[Flicker reduction shooting] 265
[Metering] 266
[Flash control] 267
[Flash mode] 269
[Flash compensation] 269
[Release mode] 269

C The photo shooting menu: Shooting options238
Item 0
[Focus mode] 269
[AF-area mode] 270
[Vibration reduction] 270
[Auto bracketing] 270
[Multiple exposure] 281
Item 0
[HDR (high dynamic range)] 289
[Interval timer shooting] 296
[Time-lapse video] 310
[Focus shift shooting] 319
[Silent photography] 327
D See also“Photo shooting menu defaults” (0216)
Reset photo shooting menu
G button U C photo shooting menu
Restore photo shooting menu options to their default values.・ Photo shooting menu reset is not available while a multiple exposure
is in progress.
Storage folder
G button U C photo shooting menu
Choose the folder in which subsequent pictures will be stored.
1 Folder
2 Folder number
3 Folder name

C The photo shooting menu: Shooting options239
Renaming foldersThe default folder name, which appears after the folder number, is“NZ_FC”. To change the name assigned to new folders, select [Rename].・ Existing folders cannot be renamed.・ If desired, the default name can be restored for subsequent folders by
pressing and holding the O button while the keyboard is displayed.
D Text entryA keyboard is displayed when text entry is required.・ Tap letters on the screen to insert them at the current cursor position. You
can also enter characters by highlighting them with the multi selector andpressing J.
1 Text display area 2 Keyboard area
・ To move the cursor to a new position, tap the display or rotate the maincommand dial.
・ If a character is entered when the text display area is full, the rightmostcharacter will be deleted.
・ To delete the character under the cursor, press the O button.・ To complete entry, press X.・ To exit without completing text entry, press G.
Select folder by numberThe folder in which subsequent pictures will be stored can be selectedby number. If a folder with the specified number does not already exist,a new folder will be created.

C The photo shooting menu: Shooting options240
1 Choose [Select folder by number].
・Highlight [Select folder by number] and press 2 to display the[Select folder by number] dialog.
2 Choose a folder number.・Press 4 or 2 to highlight digits.・To change the highlighted digit, press 1 or 3.
3 Save changes and exit.・ If a folder with the selected number already exists, a W, X, or Y
icon will be displayed to the left of the folder number. Press J tocomplete the operation and return to the main menu; if you chosea folder marked W or X it will be selected as the folder for newpictures.
・ If you chose a folder number that does not already exist, a newfolder will be created with that number when you press J.
・ In either case, subsequent pictures will be stored in the chosenfolder.
・To exit without changing the storage folder, press the G button.
D Folder iconsFolders in the [Select folder by number] dialog are shown by W if empty, byY if full (containing either 5000 pictures or a picture numbered 9999), or byX if partially full. A Y icon indicates that no further pictures can be stored inthe folder.
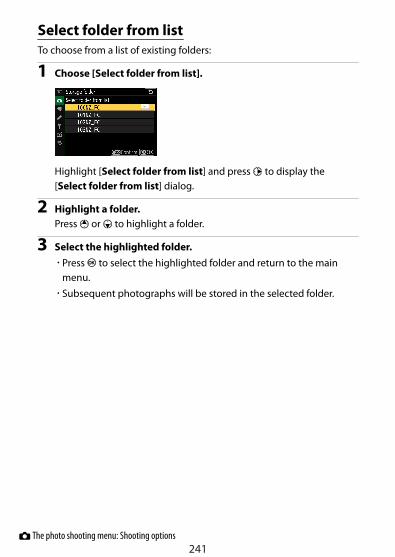
C The photo shooting menu: Shooting options241
Select folder from listTo choose from a list of existing folders:
1 Choose [Select folder from list].
Highlight [Select folder from list] and press 2 to display the[Select folder from list] dialog.
2 Highlight a folder.Press 1 or 3 to highlight a folder.
3 Select the highlighted folder.・Press J to select the highlighted folder and return to the main
menu.・Subsequent photographs will be stored in the selected folder.

C The photo shooting menu: Shooting options242
D Folder and file numbers・ Once the folder number has reached 999, the camera will stop creating
new folders automatically and disable the shutter release if:- the current folder contains 5000 pictures (in addition, video recording
will be disabled if the camera calculates that the number of files neededto record a video of the maximum length would result in the foldercontaining over 5000 files), or
- the current folder contains a picture numbered 9999 (in addition,video recording will be disabled if the camera calculates that thenumber of files needed to record a video of the maximum length wouldresult in a file numbered over 9999).
・ If there is space on the memory card, you will nevertheless be able tocontinue shooting by:- creating a folder with a number less than 999 and selecting it as the
storage folder, or- changing the options selected for [Frame size/frame rate] and [Video
quality] before recording videos.
D Startup timeAdditional time may be required for camera startup if the memory cardcontains a very large number of files or folders.
File naming
G button U C photo shooting menu
Pictures are saved using file names consisting of “DSC_” followed by afour-digit number and a three-letter extension. [File naming] is used toselect three letters to replace the “DSC” portion of the file name. For
information on text entry, see “Text entry” (0239).

C The photo shooting menu: Shooting options243
D File names・ File names take the form “DSC_nnnn.xxx”. nnnn is a number from 0001 to
9999. xxx is one of the following extensions, assigned according to theoptions selected for image quality and file type:- NEF: RAW photos- JPG: JPEG (fine, normal, or basic) photos- MOV: MOV videos- MP4: MP4 videos- NDF: Dust off reference data
・ Images created with [Adobe RGB] selected for [Color space] have filenames of the form “_DSCnnnn.xxx”.
・ In each pair of photographs recorded at image-quality settings ofRAW+JPEG, the RAW and JPEG images have the same file names butdifferent extensions.
Choose image area
G button U C photo shooting menu
The camera offers a choice of the following image areas:
Option Description
a [DX (24×16)]Pictures are recorded with an image area of 23.5×15.7mm (DX format). To calculate the approximate focallength of the lens in 35mm format, multiply by 1.5.
m [1:1 (16×16)] Pictures are recorded with an aspect ratio of 1:1.
Z [16:9 (24×14)] Pictures are recorded with an aspect ratio of 16:9.

C The photo shooting menu: Shooting options244
Image quality
G button U C photo shooting menu
Choose a file format for photographs. For more information, see “Image
quality” in “The i menu” (0160).
Image size
G button U C photo shooting menu
Choose the size, in pixels, of pictures recorded with the camera. Notethat image size varies with the option selected for image area.
Image area Image sizeSize (cm/in.) when printed at 300
dpi*
[DX (24×16)]
Large (5568 × 3712pixels)
Approx. 47.1 × 31.4 cm/18.6 × 12.4in.
Medium (4176 × 2784pixels)
Approx. 35.4 × 23.6 cm/13.9 × 9.3in.
Small (2784 × 1856pixels)
Approx. 23.6 × 15.7 cm/9.3 × 6.2 in.
[1:1 (16×16)]
Large (3712 × 3712pixels)
Approx. 31.4 × 31.4 cm/12.4 × 12.4in.
Medium (2784 × 2784pixels)
Approx. 23.6 × 23.6 cm/9.3 × 9.3 in.
Small (1856 × 1856pixels)
Approx. 15.7 × 15.7 cm/6.2 × 6.2 in.
[16:9 (24×14)]Large (5568 × 3128
pixels)Approx. 47.1 × 26.5 cm/18.6 × 10.4
in.

C The photo shooting menu: Shooting options245
Image area Image sizeSize (cm/in.) when printed at 300
dpi*
[16:9 (24×14)]
Medium (4176 × 2344pixels)
Approx. 35.4 × 19.8 cm/13.9 × 7.8in.
Small (2784 × 1560pixels)
Approx. 23.6 × 13.2 cm/9.3 × 5.2 in.
* Print size in inches equals image size in pixels divided by printerresolution in dots per inch (dpi; 1 inch = 2.54 cm).
RAW recording
G button U C photo shooting menu
Choose a bit depth for RAW pictures.
Option Description
q [12-bit] RAW pictures are recorded at a bit depth of 12 bits.
r [14-bit]
RAW pictures are recorded at a bit depth of 14 bits. Filesrecorded at a bit depth of 14 bits contain more color datathan pictures recorded using [12-bit]. Files recorded at a bitdepth of 14 bits are also larger than pictures recorded using[12-bit].
ISO sensitivity settings
G button U C photo shooting menu
Adjust the auto ISO sensitivity control settings for photographs. AutoISO sensitivity control automatically adjusts ISO sensitivity if optimal

C The photo shooting menu: Shooting options246
exposure cannot be achieved at the value selected by the user in modesP, S, A, and M.
Option Description
[ISOsensitivity]
The ISO sensitivity selected with the ISO sensitivity dial isdisplayed.
[Auto ISOsensitivity
control]
Highlight [On] and press J to enable auto ISOsensitivity control. If [Off] is selected, the ISOsensitivity will remain fixed at the value selected withthe ISO sensitivity dial.
[Maximumsensitivity]
Choose the upper limit for auto ISO sensitivity controlto prevent it being raised too high.
[Maximumsensitivity with
c]
Choose the upper ISO sensitivity limit for photos takenusing an optional flash unit.

C The photo shooting menu: Shooting options247
Option Description
[Minimumshutter speed]
Choose the shutter speed (1/4000 to 30 s) belowwhich auto ISO sensitivity control will kick in toprevent underexposure in modes P and A. If [Auto] isselected, the camera will choose the minimum shutterspeed based on lens focal length. For example, thecamera will automatically choose faster minimumshutter speeds to prevent blur caused by camerashake when a long lens is attached.・ To view auto shutter-speed selection options, highlight
[Auto] and press 2. Auto shutter-speed selection canbe fine-tuned by choosing faster or slower minimums.Faster settings can be used to reduce blur whenphotographing fast-moving subjects.
・ Shutter speeds may drop below the selected minimumif optimal exposure cannot be achieved at the ISOsensitivity chosen for [Maximum sensitivity].
・ When auto ISO sensitivity control is enabled, the shooting display willshow ISO AUTO. When sensitivity is altered from the value selectedby the user, the ISO sensitivity will be shown in the displays.

C The photo shooting menu: Shooting options248
D Auto ISO sensitivity control・ If the ISO sensitivity selected with the ISO sensitivity dial is higher than
that set in [Maximum sensitivity], the value selected with the ISOsensitivity dial will serve as the maximum sensitivity.
・ During flash photography, shutter speed is limited to the range definedby the values selected for Custom Settings e1 [Flash sync speed] and e2[Flash shutter speed].
White balance
G button U C photo shooting menu
Adjust white balance to match the color of the light source. For more
information, see “White balance” in “Basic settings” (0116) and “White
balance” in “The i menu” (0153).

C The photo shooting menu: Shooting options249
The white balance menu: Fine-tuning
1 Select [White balance] in the photo shooting menu, highlightthe desired option, and press 2 as often as necessary to displayfine-tuning options.
For information on fine-tuning L [Preset manual] white balance,
see “Fine-tuning preset manual white balance” (0254).
2 Fine-tune white balance.
・The multi selector can be used to move the cursor up to six stepsfrom the center of the grid along either of the A (amber)–B (blue)and G (green)–M (magenta) axes. The selected value is displayed tothe right of the grid.
・The A (amber)–B (blue) axis corresponds to color temperature andis ruled in increments of 0.5. A change of 1 is equivalent toapproximately 5 mired.
・The G (green)–M (magenta) axis has effects similar to colorcompensation filters and is ruled in increments of 0.25. A changeof 1 is equivalent to approximately 0.05 diffuse density units.
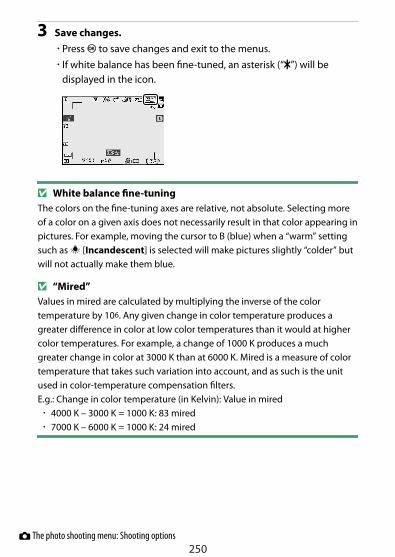
C The photo shooting menu: Shooting options250
3 Save changes.・Press J to save changes and exit to the menus.・ If white balance has been fine-tuned, an asterisk (“U”) will be
displayed in the icon.
D White balance fine-tuningThe colors on the fine-tuning axes are relative, not absolute. Selecting moreof a color on a given axis does not necessarily result in that color appearing inpictures. For example, moving the cursor to B (blue) when a “warm” settingsuch as J [Incandescent] is selected will make pictures slightly “colder” butwill not actually make them blue.
D “Mired”Values in mired are calculated by multiplying the inverse of the colortemperature by 106. Any given change in color temperature produces agreater difference in color at low color temperatures than it would at highercolor temperatures. For example, a change of 1000 K produces a muchgreater change in color at 3000 K than at 6000 K. Mired is a measure of colortemperature that takes such variation into account, and as such is the unitused in color-temperature compensation filters.E.g.: Change in color temperature (in Kelvin): Value in mired・ 4000 K – 3000 K = 1000 K: 83 mired・ 7000 K – 6000 K = 1000 K: 24 mired

C The photo shooting menu: Shooting options251
The white balance menu: Choosing a colortemperatureChoose a color temperature by entering values for the A (amber)–B(blue) and G (green)–M (magenta) axes.
1 Select [White balance] in the photo shooting menu, thenhighlight K [Choose color temperature] and press 2.
2 Choose a color temperature.・Press 4 or 2 to highlight digits on the A–B (amber–blue) axis. You
can also highlight the G–M (green–magenta) axis.・Press 1 or 3 to edit the selected item.
A–B (amber–blue) axis G–M (green–magenta)axis
3 Save changes.・Press J to save changes and exit to the menus.・ If a value other than 0 is selected for the green (G)–magenta (M)
axis, an asterisk (“U”) will appear in the icon.

C The photo shooting menu: Shooting options252
D Color-temperature selection・ Do not use color-temperature selection with fluorescent light sources;
instead, use the I [Fluorescent] option.・ When using color-temperature selection with other light sources, take a
test shot to determine if the selected value is appropriate.
Preset manual: Copying white balance from aphotographThe white balance values for existing photographs can be copied toselected presets. For information on measuring new values for preset
manual white balance, see “Preset manual” (0156).
1 Select [White balance] in the photo shooting menu, thenhighlight L [Preset manual] and press 2.
2 Select a destination.
・Using the multi selector, highlight the destination preset (d-1 tod-6).
・Press X; a confirmation dialog will be displayed.

C The photo shooting menu: Shooting options253
3 Choose [Select picture].
Highlight [Select picture] and press 2 to view the pictures on thememory card.
4 Highlight the source image.
・Use the multi selector to highlight the desired picture.・To view the highlighted picture zoomed in, press and hold the X
button.
5 Copy white balance.・Press J to copy the white balance value for the highlighted
photograph to the selected preset.・ If the highlighted photograph has a comment, the comment will
be copied to the comment for the selected preset.

C The photo shooting menu: Shooting options254
D Fine-tuning preset manual white balanceThe selected preset can be fine-tuned by selecting [Fine-tune] in the preset
manual white balance menu (0249).
D “Edit comment”To enter a descriptive comment of up to 36 characters for the current white-balance preset, select [Edit comment] in the preset manual white balancemenu.
D “Protect”To protect the current white-balance preset, select [Protect] in the presetmanual white balance menu. Highlight [On] and press J; the current whitebalance preset is now protected. Protected presets cannot be modified.

C The photo shooting menu: Shooting options255
Set Picture Control
G button U C photo shooting menu
Choose image processing (“Picture Control”) options for new photosaccording to the scene or your creative intent. For more information, see
“Set Picture Control” in “The i menu” (0147).
Modifying Picture Controls from the menusExisting preset or custom Picture Controls can be modified to suit thescene or the user’s creative intent.
1 Select a Picture Control.
Highlight the desired Picture Control in the Picture Control list andpress 2.

C The photo shooting menu: Shooting options256
2 Edit the selected Picture Control.
・Press 1 or 3 to highlight settings (0151). Press 4 or 2 to choosea value in increments of 1, or rotate the sub-command dial tochoose a value in increments of 0.25.
・The options available vary with the Picture Control selected.・To quickly adjust levels for balanced [Sharpening], [Mid-range
sharpening], and [Clarity], highlight [Quick sharp] and press 4or 2.
・To abandon any changes and start over from default settings, pressthe O button.
3 Save changes and exit.Press J to save changes.

C The photo shooting menu: Shooting options257
D The i menu・ To select Picture Controls in the i menu, highlight [Set Picture Control]
and press J.
・ Press 4 and 2 to choose a Picture Control and press 3 to display PictureControl settings. The effect of any changes can be previewed in thedisplay.
D [Manage Picture Control]Modifications to existing Picture Controls can be saved using the [ManagePicture Control] item in the photo shooting menu or video recording menu,creating custom Picture Controls that can then be copied to a memory cardand used in compatible software or shared among cameras of the samemodel.
Manage Picture Control
G button U C photo shooting menu
Save modified Picture Controls as custom Picture Controls.
Option Description
[Save/edit]Create a new custom Picture Control based on an existingpreset or custom Picture Control, or edit existing customPicture Controls.
[Rename] Rename custom Picture Controls.
[Delete] Delete custom Picture Controls.
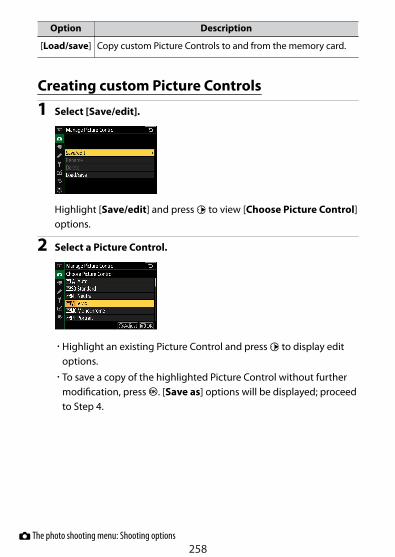
C The photo shooting menu: Shooting options258
Option Description
[Load/save] Copy custom Picture Controls to and from the memory card.
Creating custom Picture Controls
1 Select [Save/edit].
Highlight [Save/edit] and press 2 to view [Choose Picture Control]options.
2 Select a Picture Control.
・Highlight an existing Picture Control and press 2 to display editoptions.
・To save a copy of the highlighted Picture Control without furthermodification, press J. [Save as] options will be displayed; proceedto Step 4.

C The photo shooting menu: Shooting options259
3 Edit the selected Picture Control.
・The settings available and the techniques for editing them are thesame as for [Set Picture Control].
・Press J to display [Save as] options when settings are complete.・To abandon any changes and start over from default settings, press
the O button.
4 Select a destination.
Choose a destination for the custom Picture Control (C-1 throughC-9).
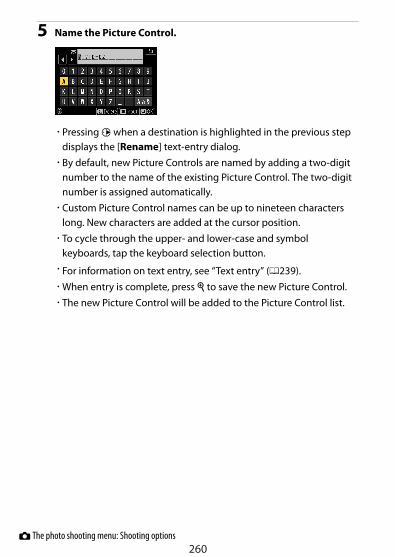
C The photo shooting menu: Shooting options260
5 Name the Picture Control.
・Pressing 2 when a destination is highlighted in the previous stepdisplays the [Rename] text-entry dialog.
・By default, new Picture Controls are named by adding a two-digitnumber to the name of the existing Picture Control. The two-digitnumber is assigned automatically.
・Custom Picture Control names can be up to nineteen characterslong. New characters are added at the cursor position.
・To cycle through the upper- and lower-case and symbolkeyboards, tap the keyboard selection button.
・For information on text entry, see “Text entry” (0239).・When entry is complete, press X to save the new Picture Control.・The new Picture Control will be added to the Picture Control list.
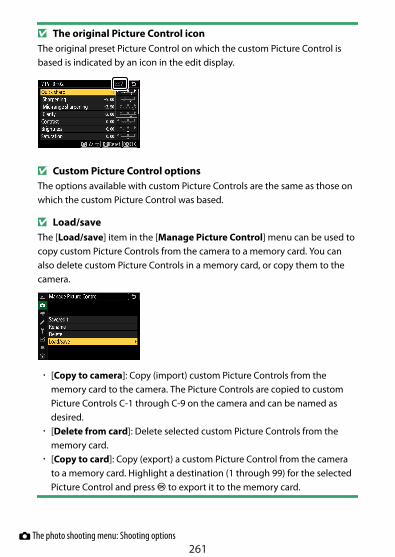
C The photo shooting menu: Shooting options261
D The original Picture Control iconThe original preset Picture Control on which the custom Picture Control isbased is indicated by an icon in the edit display.
D Custom Picture Control optionsThe options available with custom Picture Controls are the same as those onwhich the custom Picture Control was based.
D Load/saveThe [Load/save] item in the [Manage Picture Control] menu can be used tocopy custom Picture Controls from the camera to a memory card. You canalso delete custom Picture Controls in a memory card, or copy them to thecamera.
・ [Copy to camera]: Copy (import) custom Picture Controls from thememory card to the camera. The Picture Controls are copied to customPicture Controls C-1 through C-9 on the camera and can be named asdesired.
・ [Delete from card]: Delete selected custom Picture Controls from thememory card.
・ [Copy to card]: Copy (export) a custom Picture Control from the camerato a memory card. Highlight a destination (1 through 99) for the selectedPicture Control and press J to export it to the memory card.

C The photo shooting menu: Shooting options262
Color space
G button U C photo shooting menu
The color space determines the gamut of colors available for colorreproduction. [sRGB] is recommended for general-purpose printing anddisplay. With a broader gamut of colors than [sRGB], [Adobe RGB] is abetter choice for professional publication and commercial printing.
D Color spaceThird-party image viewing or editing software may substitute other colorspaces for the color space selected on the camera. The color space selectedon the camera can be used when pictures are opened in NX Studio.
D Adobe RGBFor accurate color reproduction, Adobe RGB images require applications,displays, and printers that support color management.
Active D-Lighting
G button U C photo shooting menu
Preserve details in highlights and shadows, creating pictures withnatural contrast. For more information, see “Active D-Lighting” in “The i
menu” (0164).
Long exposure NR
G button U C photo shooting menu
Reduce “noise” (bright spots or fog) in photographs taken at slowshutter speeds.

C The photo shooting menu: Shooting options263
Option Description
[On]Reduce noise in photographs taken at shutter speeds slower than 1s.
[Off] Long-exposure noise reduction disabled.
Long-exposure noise reduction is performed after the photo is taken.During processing, [Performing noise reduction] will appear in theshooting display. Pictures cannot be taken until the message has clearedfrom the display. The time required to process photos after shootingroughly doubles.
D Long-exposure noise reductionIf the camera is turned off before processing is complete, the picture will besaved but noise reduction will not be performed.
High ISO NR
G button U C photo shooting menu
Photographs taken at high ISO sensitivities can be processed to reduce“noise” (randomly-spaced bright pixels).
Option Description
[High]Reduce noise in photographs taken at all ISO sensitivities. Thehigher the sensitivity, the greater the effect. Choose the amountof noise reduction performed from [High], [Normal], and [Low].
[Normal]
[Low]

C The photo shooting menu: Shooting options264
Option Description
[Off]Noise reduction is performed only as required. The amount ofnoise reduction performed is always lower than when [Low] isselected.
Vignette control
G button U C photo shooting menu
Vignette control reduces “vignetting”—a drop in brightness at theedges of a photograph—by an amount that varies from lens to lens. Itseffects are most noticeable at maximum aperture.
Option Description
e [High]Choose the amount of vignette control performed from (inorder from high to low) [High], [Normal], and [Low].
g [Normal]
f [Low]
[Off] Vignette control disabled.
D Vignette controlDepending on the scene, shooting conditions, and type of lens, JPEG imagesmay exhibit “noise” (fog) or over-processing at the edge of the frame thatintroduces variations in peripheral brightness. In addition, custom PictureControls and preset Picture Controls that have been modified from defaultsettings may not produce the desired effect. Take test shots and view theresults in the monitor.
Diffraction compensation
G button U C photo shooting menu
Select [On] to reduce diffraction at small apertures (high f/-numbers).

C The photo shooting menu: Shooting options265
Auto distortion control
G button U C photo shooting menu
Select [On] as required to reduce barrel distortion when shooting withwide-angle lenses and to reduce pin-cushion distortion when shootingwith long lenses. Note that [On] may be selected automatically withsome lenses, in which case this item will be grayed out and unavailable.
Flicker reduction shooting
G button U C photo shooting menu
When [On] is selected, reduce the effects of flicker from such lightsources as fluorescent or mercury-vapor lamps.・ Flicker can cause uneven exposure or (in photographs taken in
continuous release modes) inconsistent exposure or coloration.・ Note that the frame rate for burst shooting may drop or become
erratic when [On] is selected.

C The photo shooting menu: Shooting options266
D Flicker reduction shooting in the photo shooting menu・ Depending on the light source, flicker reduction may slightly delay shutter
response.・ Flicker reduction can detect flicker at 100 and 120 Hz (associated
respectively with AC power supplies of 50 and 60 Hz). The desired resultsmay not be achieved if the frequency of the power supply changes duringburst photography.
・ Flicker may not be detected or the desired results may not be achieveddepending on the light source and shooting conditions, for example withscenes that are brightly lit or feature dark backgrounds.
・ The desired results may also not be achieved with decorative lightingdisplays and other non-standard lighting.
D [Flicker reduction shooting] in the photo shooting menu:Restrictions
The [Flicker reduction shooting] item in the photo shooting menu does nottake effect under some conditions, including when:・ [Continuous H (extended)] is selected for the release mode・ [On] is selected for [Silent photography] in the photo shooting menu・ [On] is selected for [Silent photography] in the respective sub-menu
during interval-timer photography, time-lapse video recording, or focusshift
・ HDR is enabled・ Exposure delay mode is on
Metering
G button U C photo shooting menu
Metering determines how the camera sets exposure. For more
information, see “Metering” in “The i menu” (0162).

C The photo shooting menu: Shooting options267
Flash control
G button U C photo shooting menu
Adjust settings for wireless remote flash units or optional flash unitsmounted on the camera accessory shoe.
・ For information on adjusting settings for optional flash unitsmounted on the camera accessory shoe, see “On-Camera flash
photography” (0497).・ For information on adjusting settings for wireless remote flash units,
see “Remote flash photography” (0508).
Flash control modeChoose a flash control mode and flash level and adjust other settings forSB-500, SB-400, or SB-300 flash units mounted on the camera accessoryshoe.
・ Settings for flash units other than the SB-500, SB-400, and SB-300 canonly be adjusted using flash unit controls.
Option Description
[TTL]Flash output is adjusted automatically in response to shootingconditions.

C The photo shooting menu: Shooting options268
Option Description
[Manual] Choose the flash level manually.
Wireless flash optionsAdjust settings for simultaneous wireless control of multiple remoteflash units. This option is available only when an SB-500 flash unit ismounted on the camera.
Option Description
Y [Optical AWL]The remote flash units are controlled using low-
intensity flashes emitted by the master flash (0509).
[Off] Remote flash photography disabled.
Group flash optionsSet flash options for each group when shooting with remote flash
photography using an optional flash unit (0508). This option isavailable only when an SB-500 flash unit is mounted on the camera.

C The photo shooting menu: Shooting options269
Flash mode
G button U C photo shooting menu
Choose a flash mode for optional flash units. For more information, see
“Flash modes” in “On-Camera flash photography” (0502).
Flash compensation
G button U C photo shooting menu
Adjust flash output to control the brightness of the main subject relativeto the background. Flash output can be increased to make the mainsubject appear brighter, reduced to prevent glare, or otherwise fine-
tuned to produce the desired result (0504).
Release mode
G button U C photo shooting menu
Choose the operation performed when the shutter is released. For moreinformation about release modes, see “Release mode” in “The i menu”
(0166).
Focus mode
G button U C photo shooting menu
Focus mode controls how the camera focuses. For more information, see
“Focus mode” in the “Focus” section of “Basic settings” (0100).

C The photo shooting menu: Shooting options270
AF-area mode
G button U C photo shooting menu
Choose how the camera selects the focus point for autofocus. For moreinformation, see “AF-area mode” in the “Focus” section of “Basic
settings” (0102).
Vibration reduction
G button U C photo shooting menu
Choose whether to enable vibration reduction. For more information,
see “Vibration reduction” in “The i menu” (0171).
Auto bracketing
G button U C photo shooting menu
Vary exposure, flash level, Active D-Lighting (ADL), or white balanceslightly with each shot, “bracketing” the current value. Bracketing can beused in situations in which getting the right settings is difficult and thereis not time to check results and adjust settings with each shot, or toexperiment with different settings for the same subject.
Option Description
[Autobracketing set]
Choose the setting or settings bracketed when autobracketing is in effect.・ [AE & flash bracketing]: Perform both exposure and
flash-level bracketing.・ [AE bracketing]: Bracket only exposure.・ [Flash bracketing]: Perform only flash-level bracketing.・ [WB bracketing]: Perform white-balance bracketing.・ [ADL bracketing]: Perform bracketing using Active D-
Lighting.

C The photo shooting menu: Shooting options271
Option Description
[Number ofshots]
Choose the number of shots in the bracketing sequence.
[Increment]Choose the amount the selected settings vary with eachshot when an option other than [ADL bracketing] isselected for [Auto bracketing set].
[Amount]Choose how Active D-Lighting varies with each shot when[ADL bracketing] is selected for [Auto bracketing set].
Exposure and flash bracketing
No exposurecompensation
Exposure modified by: –1EV
Exposure modified by:+1 EV
1 Select [AE & flash bracketing], [AE bracketing], or [Flashbracketing] for [Auto bracketing set].[Number of shots] and [Increment] options will be displayed.

C The photo shooting menu: Shooting options272
2 Choose the number of shots.・Highlight [Number of shots] and press 4 or 2 to choose the
number of shots in the bracketing sequence.
・At settings other than [0F], a bracketing icon will appear in thedisplay.

C The photo shooting menu: Shooting options273
3 Select an exposure increment.・Highlight [Increment] and press 4 or 2 to choose the bracketing
increment.・The size of the increment can be chosen from 0.3 (1/3 step), 0.7
(2/3 step), 1.0 (1 step), 2.0 (2 steps), or 3.0 (3 steps). Bracketingprograms with an increment of 2.0 or 3.0 EV offer a maximum of 5shots. If a value of 7 or 9 was selected in Step 2, the number ofshots will automatically be set to 5.
・The bracketing programs with an increment of 0.3 EV are listedbelow.
[Numberof shots]
Exposure and flashbracketing indicator
No. ofshots
Bracketing order (EVs)
0F 0 0
+3F 3 0/+0.3/+0.7
-3F 3 0/-0.7/-0.3
+2F 2 0/+0.3
-2F 2 0/-0.3
3F 3 0/-0.3/+0.3
5F 5 0/-0.7/-0.3/+0.3/+0.7
7F 70/-1.0/-0.7/-0.3/+0.3/
+0.7/+1.0

C The photo shooting menu: Shooting options274
[Numberof shots]
Exposure and flashbracketing indicator
No. ofshots
Bracketing order (EVs)
9F 90/-1.3/-1.0/-0.7/-0.3/+0.3/
+0.7/+1.0/+1.3
4 Take pictures.・Take the number of pictures in the bracketing program.・The modified values for shutter speed and aperture are shown in
the display.・While bracketing is in effect, the display shows a bracketing icon, a
bracketing progress indicator, and the number of shots remainingin the bracketing sequence. After each shot, a segment willdisappear from the indicator and the number of shots remainingwill be reduced by one.
No. shots: 3Increment: 0.7
Display after first shot
・Exposure changes due to bracketing are added to those madewith exposure compensation.
Cancelling bracketing❚❚To cancel bracketing, select [0F] for [Number of shots].

C The photo shooting menu: Shooting options275
D Bracketing optionsWhen [AE & flash bracketing] is selected, the camera varies both exposureand flash level. Select [AE bracketing] to vary only exposure, [Flashbracketing] to vary only flash level. Note that flash bracketing is available ini-TTL and, where supported, auto aperture (qA) flash control modes only
(0499, 0543).
D Exposure and flash bracketing・ In continuous release modes, shooting will pause after the number of
shots specified in the bracketing program have been taken. Shooting willresume the next time the shutter-release button is pressed.
・ If the camera is turned off before all shots in the sequence have beentaken, bracketing will resume from the first shot in the sequence whenthe camera is turned on.
・ If the memory card fills before all shots in the sequence have been taken,shooting can be resumed from the next shot in the sequence after thememory card has been replaced.
D Exposure bracketingThe settings (shutter speed and/or aperture) altered during exposurebracketing vary with the shooting mode.
Mode Setting
P Shutter speed and aperture1
S Aperture 1
A Shutter speed1
M Shutter speed2, 3
1 If [On] is selected for [ISO sensitivity settings] > [Auto ISO sensitivitycontrol] in the photo shooting menu, the camera will automatically varyISO sensitivity for optimum exposure when the limits of the cameraexposure system are exceeded.

C The photo shooting menu: Shooting options276
2 If [On] is selected for [ISO sensitivity settings] > [Auto ISO sensitivitycontrol] in the photo shooting menu, the camera will first use auto ISOsensitivity control to bring exposure as close as possible to the optimumand then bracket this exposure by varying shutter speed.
3 Use Custom Setting e5 [Auto bracketing (mode M)] to choose whetherthe camera varies shutter speed, aperture, or both shutter speed andaperture.
White balance bracketing
1 Select [WB bracketing] for [Auto bracketing set].[Number of shots] and [Increment] options will be displayed.
2 Choose the number of shots.・Highlight [Number of shots] and press 4 or 2 to choose the
number of shots in the bracketing sequence.
・At settings other than [0F], a bracketing icon will appear in thedisplay.

C The photo shooting menu: Shooting options277
3 Select a white balance increment.・Highlight [Increment] and press 4 or 2 to choose the bracketing
increment.・The size of the increment can be chosen from 1 (1 step), 2 (2 steps),
or 3 (3 steps).・Each step is equivalent to 5 mired. Higher “A” values correspond to
increased amounts of amber. Higher “B” values correspond toincreased amounts of blue.
・The bracketing programs with an increment of 1 are listed below.
[Numberof shots]
White balancebracketing indicator
No. ofshots
Whitebalance
increment
Bracketingorder
0F 0 1 0
B3F 3 1B 0/B1/B2
A3F 3 1A 0/A2/A1
B2F 2 1B 0/B1
A2F 2 1A 0/A1
3F 3 1A, 1B 0/A1/B1
5F 5 1A, 1B 0/A2/A1/B1/B2
7F 7 1A, 1B0/A3/A2/A1/B1
/B2/B3

C The photo shooting menu: Shooting options278
[Numberof shots]
White balancebracketing indicator
No. ofshots
Whitebalance
increment
Bracketingorder
9F 9 1A, 1B0/A4/A3/A2/A1/B1/B2/B3/B4
4 Take pictures.・Each shot will be processed to create the number of copies
specified in the bracketing program, and each copy will have adifferent white balance.
・Modifications to white balance are added to the white balanceadjustment made with white balance fine-tuning.
・ If the number of shots in the bracketing program is greater thanthe number of exposures remaining, the shutter release will bedisabled. Shooting can begin when a new memory card is inserted.
Cancelling bracketing❚❚To cancel bracketing, select [0F] for [Number of shots].
D White balance bracketing restrictionsWhite balance bracketing is not available at image quality settings of RAW orRAW + JPEG.
D White balance bracketing・ White balance bracketing affects only color temperature (the amber–blue
axis in the white balance fine-tuning display). No adjustments are madeon the green–magenta axis.
・ If the camera is turned off while shooting, the camera will power off onlyafter all photographs have been taken.
・ In self-timer mode, the number of copies specified in Step 2 of “White
balance bracketing” (0276) will be created each time the shutter isreleased, regardless of the option selected for Custom Setting c2 [Self-timer] > [Number of shots].

C The photo shooting menu: Shooting options279
ADL bracketing
1 Select [ADL bracketing] for [Auto bracketing set].[Number of shots] and [Amount] options will be displayed.
2 Choose the number of shots.・Highlight [Number of shots] and press 4 or 2 to choose the
number of shots in the bracketing sequence.
・At settings other than [0F], a bracketing icon will appear in thedisplay.
・The number of shots determines the bracketing sequence:
No. of shots Bracketing sequence
2 [Off]→Value selected in Step 3
3 [Off]→[Low]→[Normal]
4 [Off]→[Low]→[Normal]→[High]
5 [Off]→[Low]→[Normal]→[High]→[Extra high]
・ If you chose more than two shots, proceed to Step 4.
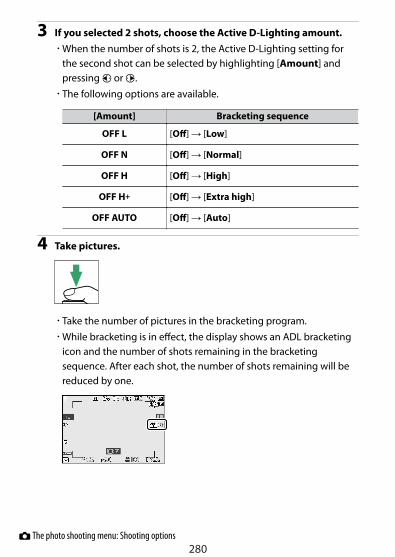
C The photo shooting menu: Shooting options280
3 If you selected 2 shots, choose the Active D-Lighting amount.・When the number of shots is 2, the Active D-Lighting setting for
the second shot can be selected by highlighting [Amount] andpressing 4 or 2.
・The following options are available.
[Amount] Bracketing sequence
OFF L [Off] → [Low]
OFF N [Off] → [Normal]
OFF H [Off] → [High]
OFF H+ [Off] → [Extra high]
OFF AUTO [Off] → [Auto]
4 Take pictures.
・Take the number of pictures in the bracketing program.・While bracketing is in effect, the display shows an ADL bracketing
icon and the number of shots remaining in the bracketingsequence. After each shot, the number of shots remaining will bereduced by one.

C The photo shooting menu: Shooting options281
Cancelling ADL bracketing❚❚To cancel bracketing, select [0F] for [Number of shots].
D ADL bracketing・ In continuous release modes, shooting will pause after the number of
shots specified in the bracketing program have been taken. Shooting willresume the next time the shutter-release button is pressed.
・ If the camera is turned off before all shots in the sequence have beentaken, bracketing will resume from the first shot in the sequence whenthe camera is turned on.
・ If the memory card fills before all shots in the sequence have been taken,shooting can be resumed from the next shot in the sequence after thememory card has been replaced.
Multiple exposure
G button U C photo shooting menu
Record two to ten RAW exposures as a single photograph.
Option Description
[Multipleexposuremode]
・ [On (series)]: Take a series of multiple exposures. To endmultiple exposure photography, select [Multipleexposure mode] again and choose [Off].
・ [On (single photo)]: Create one multiple exposure.・ [Off]: End multiple exposure photography.
[Number ofshots]
Choose the number of exposures that will be combined toform a single photograph.

C The photo shooting menu: Shooting options282
Option Description
[Overlaymode]
・ [Add]: The exposures are overlaid without modification;gain is not adjusted.
・ [Average]: Gain is adjusted before the exposures areoverlaid. The gain for each exposure is equal to 1 dividedby the total number of exposures taken. For example, ina photo made by combining two exposures, the gain foreach exposure will be set to 1/2, while in a photocombining three exposures, gain will be set to 1/3.
・ [Lighten]: The camera compares the pixels in eachpicture and uses only the brightest.
・ [Darken]: The camera compares the pixels in eachpicture and uses only the darkest.
[Saveindividualpictures(RAW)]
・ [On]: Save both the multiple exposure and the shots thatmake it up; the pictures are saved in RAW format.
・ [Off]: Discard the individual shots and save only themultiple exposure.
[Overlayshooting]
・ [On]: Earlier exposures are superimposed on the viewthrough the lens. The earlier exposures aid compositionof the next shot.
・ [Off]: Earlier exposures are not displayed while shootingis in progress.

C The photo shooting menu: Shooting options283
Option Description
[Select firstexposure(RAW)]
Choose the first exposure from the RAW images on thememory card.
Creating a multiple exposure
1 Highlight [Multiple exposure] in the photo shooting menu andpress 2.
2 Choose an option for [Multiple exposure mode].
・Highlight [Multiple exposure mode] and press 2.・Highlight a multiple exposure mode using 1 or 3 and press J.・ If [On (series)] or [On (single photo)] is selected, an icon will
appear in the display.

C The photo shooting menu: Shooting options284
3 Choose a value for [Number of shots] (number of exposures).
・Highlight [Number of shots] and press 2.・Choose the number of exposures using 1 or 3 and press J.
4 Choose an option for [Overlay mode].
・Highlight [Overlay mode] and press 2.・Highlight an option using 1 or 3 and press J.
5 Choose a setting for [Save individual pictures (RAW)].
・Highlight [Save individual pictures (RAW)] and press 2.・Highlight an option using 1 or 3 and press J.・To save both the multiple exposure and the shots that make it up,
select [On]; the individual shots are saved in RAW format. To saveonly the multiple exposure, select [Off].

C The photo shooting menu: Shooting options285
6 Choose an option for [Overlay shooting].
・Highlight [Overlay shooting] and press 2.・Highlight an option using 1 or 3 and press J.・Select [On] to superimpose earlier exposures on the view through
the lens. You can use the earlier exposures as a guide whencomposing subsequent shots.
7 Choose an option for [Select first exposure (RAW)].
・To choose the first exposure from existing RAW pictures, highlight[Select first exposure (RAW)] and press 2.
・Use the multi selector to highlight the desired picture.・To view the highlighted picture zoomed in, press and hold the X
button.・After highlighting the desired picture, press J.

C The photo shooting menu: Shooting options286
8 Start shooting.
・Take the selected number of shots. If you used [Select firstexposure (RAW)] to select an existing RAW image as the firstexposure in Step 7, shooting will start from the second exposure.
・Once you have taken the selected number of shots, the pictureswill be overlaid to create a multiple exposure.
・ If [On (series)] is selected for [Multiple exposure mode], you cancontinue to take additional multiple exposures until [Off] isselected.
・ If [On (single photo)] is selected, the camera will exit multipleexposure mode once the number of shots selected in Step 3 hasbeen taken.
D Saved overlaysIf you took pictures with the image quality set to RAW, JPEG images in the[JPEG fine] image quality will be saved.
The i menu❚❚Pictures can be viewed by pressing the K button while a multipleexposure is in progress. The most recent shot in the current multiple

C The photo shooting menu: Shooting options287
exposure is indicated by a $ icon; pressing the i button when this iconis present displays the multiple exposure i menu.
・ Highlight items and press J to select.・ You can also have the option of using touch controls after pressing
the i button.
Option Description
[View progress]View a preview created from the exposures recordedto the current point.
[Retake lastexposure]
Retake the most recent exposure.
[Save and exit]Create a multiple exposure from the exposures takento current point.
[Discard and exit]
Exit without recording a multiple exposure.・ If [On] is selected for [Save individual pictures
(RAW)], the individual exposures will be savedseparately.
C The photo shooting menu: Shooting options288
D Multiple exposure・ If you use the menus or view pictures in the display while shooting a
multiple exposure, remember that shooting will end and the multipleexposure will be recorded if no operations are performed for about 40seconds (or in the case of menus, about 90 seconds). The time available torecord the next exposure can be extended by choosing longer times forCustom Setting c3 [Power off delay] > [Playback] or [Menus].
・ Multiple exposures may be affected by “noise” in the form of randomly-spaced bright pixels, fog, or lines.
・ In continuous shooting modes, the camera records all exposures in asingle burst. If [On (single photo)] is selected, multiple exposure shootingwill end after the first multiple exposure is recorded. If [On (series)] isselected, an additional multiple exposure will be recorded each time theshutter-release button is pressed.
・ In self-timer mode, the interval between each shot in the exposure isselected using Custom Setting c2 [Self-timer] > [Interval betweenshots]. Regardless of the value selected for the c2 [Number of shots]option, shooting will however end after the number of shots selected forthe multiple exposure.
・ Multiple exposures may end if settings are changed while shooting is inprogress.
・ Shooting settings and photo info for multiple exposure photographs arethose for the first exposure.
・ Do not remove or replace the memory card while a multiple exposure is inprogress.
・ Memory cards cannot be formatted while a multiple exposure is inprogress. Some menu items will be grayed out and unavailable.
D Multiple exposure: RestrictionsMultiple exposure cannot be combined with some camera features,including:・ modes other than P, S, A, and M,・ video recording,・ bracketing,

C The photo shooting menu: Shooting options289
・ HDR (high dynamic range),・ interval-timer photography,・ time-lapse video recording, and・ focus shift
Ending multiple exposures❚❚To end a multiple exposure before the specified number of exposureshave been taken, select [Off] for multiple exposure mode. A multipleexposure will be created from the exposures that have been recorded tothat point (if [Average] is selected for [Overlay mode], gain will beadjusted to reflect the number of exposures actually recorded).
The multiple exposure will also end if:・ the standby timer expires after the first exposure has been taken, or・ you press the K button followed by the i button and select either
[Save and exit] or [Discard and exit]
HDR (high dynamic range)
G button U C photo shooting menu
Used with high contrast subjects, High Dynamic Range (HDR) preservesdetails in highlights and shadows by combining two shots taken at

C The photo shooting menu: Shooting options290
different exposures. Use with high-contrast scenes and other subjects topreserve a wide range of details, from highlights to shadows.
Option Description
[HDR mode]
・ [On (series)]: Take a series of HDR photographs. Toend HDR photography, select [HDR mode] again andchoose [Off].
・ [On (single photo)]: Take a single HDR photograph.・ [Off]: End HDR photography.
[Exposuredifferential]
Choose the difference in exposure between the twoshots. The higher the value, the greater the dynamicrange. If [Auto] is selected, the camera will automaticallyadjust the exposure differential to suit the scene.
[Smoothing]Choose how much the boundaries between the twoimages are smoothed.
[Save individualpictures (RAW)]
Choose [On] to save each of the individual shots used tocreate the HDR image; the shots are saved in RAWformat.
Taking HDR photographsWe recommend that you use the matrix metering option when shootingwith HDR.

C The photo shooting menu: Shooting options291
1 Highlight [HDR (high dynamic range)] in the photo shootingmenu and press 2.

C The photo shooting menu: Shooting options292
2 Select an [HDR mode].
・Highlight [HDR mode] and press 2.・Highlight one of the following options using 1 or 3 and press J.
Option Description
0 [On (series)]Take a series of HDR photographs. HDR shootingwill continue until you select [Off] for [HDRmode].
[On (single photo)]Normal shooting will resume after you havetaken a single HDR photograph.
[Off]Proceed without taking additional HDRphotographs.
・ If [On (series)] or [On (single photo)] is selected, an icon willappear in the display.

C The photo shooting menu: Shooting options293
3 Choose a value for [Exposure differential].
・Highlight [Exposure differential] and press 2.・Highlight an option using 1 or 3 and press J.
・Choose higher values for high-contrast subjects.・Note, however, that choosing a higher value than required may
not produce the desired results. Match your choice to the level ofcontrast in the scene.
・ If [Auto] is selected, the camera will automatically adjust theexposure differential to suit the scene.

C The photo shooting menu: Shooting options294
4 Adjust [Smoothing].
・Highlight [Smoothing] and press 2.・Highlight an option using 1 or 3 and press J; the selected option
represents the amount the boundaries between the two imagesare smoothed.
・Higher values produce a smoother composite image.
5 Choose a setting for [Save individual pictures (RAW)].
・Highlight [Save individual pictures (RAW)] and press 2.・Highlight an option using 1 or 3 and press J.・Choose [On] to save each of the individual shots used to create the
HDR image; the shots are saved in RAW format.

C The photo shooting menu: Shooting options295
6 Frame the photograph, focus, and shoot.・The camera takes two exposures when the shutter-release button
is pressed all the way down.・ If [On (series)] is selected for [HDR mode], you can continue to
take HDR photographs until [Off] is selected.・ If [On (single photo)] is selected, HDR will turn off automatically
after a single shot.・HDR photographs are recorded in JPEG format regardless of the
option selected for image quality.

C The photo shooting menu: Shooting options296
D HDR photography・ The edges of the image will be cropped out.・ The desired results may not be achieved if the camera or subject moves
during shooting. Use of a tripod is recommended.・ Depending on the scene, you may notice shadows around bright objects
or halos around dark objects. This can be mitigated using [Smoothing].・ Uneven shading may be visible with some subjects.・ With spot or center-weighted metering, an [Exposure differential] of
[Auto] is equivalent to [2 EV].・ Optional flash units will not fire.・ In continuous release modes, only one photograph will be taken each
time the shutter-release button is pressed all the way down.・ Long exposure (“Bulb” or “Time”) photography is not available. If you set
the shutter-speed dial to Bulb or Time, the Bulb or Time indicator flashesin the display.
D HDR restrictionsHDR cannot be combined with some camera features, including:・ modes other than P, S, A, and M,・ flicker reduction,・ bracketing,・ multiple exposures,・ interval-timer photography,・ time-lapse video recording, and・ focus shift
Interval timer shooting
G button U C photo shooting menu
Take photographs at the selected interval until the specified number ofshots has been recorded. When using the interval timer, select a releasemode other than E.

C The photo shooting menu: Shooting options297
Option Description
[Start]
Start interval timer shooting. Shooting will begineither after 3 s ([Now] selected for [Choose start day/time]) or at a selected date and time ([Choose day/time]). Shooting will continue at the selected intervaluntil all shots have been taken.
[Choose start day/time]
Choose a start option. Select [Now] to start shootingimmediately, [Choose day/time] to start shooting at achosen date and time.
[Interval]Specify the interval between shots in hours, minutes,and seconds.
[Intervals×shots/interval]
Choose the number of intervals and the number ofshots per interval.
[Exposuresmoothing]
Selecting [On] allows the camera to adjust exposureto match the previous shot.・ Large changes in subject brightness during
shooting may result in apparent variations inexposure. This can be addressed by shortening theinterval between shots.
・ Exposure smoothing will not take effect in mode Mif [Off] is selected for [ISO sensitivity settings] >[Auto ISO sensitivity control] in the photoshooting menu.
[Silentphotography]
Select [On] to silence the shutter and eliminate thevibrations it produces during shooting.・ Selecting [On] does not completely silence the
camera. Camera sounds may still be audible, forexample during autofocus or aperture adjustment,in the latter case most noticeably at aperturessmaller (i.e., at f-numbers higher) than f/5.6.

C The photo shooting menu: Shooting options298
Option Description
[Interval priority]
・ [On]: Enable interval priority to ensure that framesshot in modes P and A are taken at the choseninterval.- Select [Release] for Custom Setting a2 [AF-S
priority selection] when AF-S is selected forfocus mode and for Custom Setting a1 [AF-Cpriority selection] when AF-C is selected.
- If [ISO sensitivity settings] > [Auto ISOsensitivity control] in the photo shooting menuis set to [On], set [Minimum shutter speed] sothat it is shorter than the shooting interval.
・ [Off]: Disable interval priority to ensure that photosare correctly exposed.
[Focus before eachshot]
If [On] is selected, the camera will focus betweenshots.
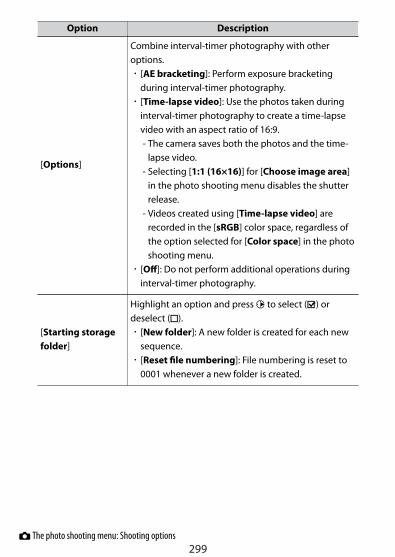
C The photo shooting menu: Shooting options299
Option Description
[Options]
Combine interval-timer photography with otheroptions.・ [AE bracketing]: Perform exposure bracketing
during interval-timer photography.・ [Time-lapse video]: Use the photos taken during
interval-timer photography to create a time-lapsevideo with an aspect ratio of 16:9.- The camera saves both the photos and the time-
lapse video.- Selecting [1:1 (16×16)] for [Choose image area]
in the photo shooting menu disables the shutterrelease.
- Videos created using [Time-lapse video] arerecorded in the [sRGB] color space, regardless ofthe option selected for [Color space] in the photoshooting menu.
・ [Off]: Do not perform additional operations duringinterval-timer photography.
[Starting storagefolder]
Highlight an option and press 2 to select (M) ordeselect (U).・ [New folder]: A new folder is created for each new
sequence.・ [Reset file numbering]: File numbering is reset to
0001 whenever a new folder is created.

C The photo shooting menu: Shooting options300
Interval-timer photography
D Before shooting・ Take a test shot at current settings.・ Before proceeding, select [Time zone and date] in the setup menu and
make sure that the camera clock is set to the correct time and date.・ To ensure that shooting is not interrupted, use a fully-charged battery or
an optional charging AC adapter.
1 Highlight [Interval timer shooting] in the photo shooting menu.
Press 2 to select the highlighted item and view interval timershooting options.

C The photo shooting menu: Shooting options301
2 Adjust interval timer settings.・Choose the start day and time.
Highlight [Choose startday/time] and press 2.
Highlight an option andpress J.
- To start shooting immediately, select [Now].- To start shooting at a chosen date and time, select [Choose day/
time]. Choose the date and time and press J.・Choose the interval between shots.
Highlight [Interval] andpress 2.
Choose an interval (inhours, minutes, and
seconds) and press J.

C The photo shooting menu: Shooting options302
・Choose the number of shots per interval.
Highlight[Intervals×shots/
interval] and press 2.
Choose the number ofintervals and the numberof shots per interval and
press J.
- In single frame release mode, if the number of shots per intervalis set to two or more, the photographs for each interval will betaken at the rate for continuous high-speed release mode.
- When [Off] is selected for [Silent photography], the maximumnumber of intervals will vary with the number of shots perinterval.
・Enable or disable exposure smoothing.
Highlight [Exposuresmoothing] and press 2.
Highlight an option andpress J.
- Selecting [On] allows the camera to adjust exposure to matchthe previous shot.
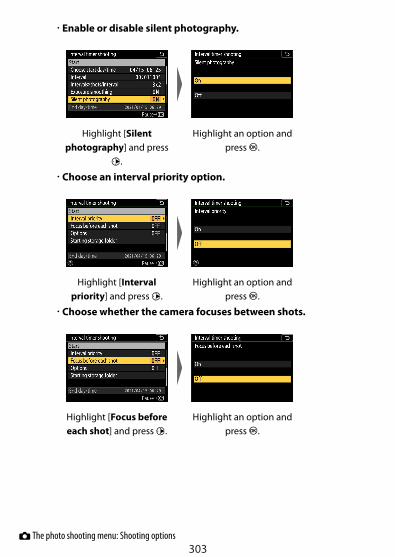
C The photo shooting menu: Shooting options303
・Enable or disable silent photography.
Highlight [Silentphotography] and press
2.
Highlight an option andpress J.
・Choose an interval priority option.
Highlight [Intervalpriority] and press 2.
Highlight an option andpress J.
・Choose whether the camera focuses between shots.
Highlight [Focus beforeeach shot] and press 2.
Highlight an option andpress J.

C The photo shooting menu: Shooting options304
・Choose additional options.
Highlight [Options] andpress 2.
Highlight [AE bracketing]or [Time-lapse video]
and press J.
- If you selected [AE bracketing], choose values for [Number ofshots] and [Increment]; if you selected [Time-lapse video],choose a setting for [Frame size/frame rate].
・Choose starting folder options.
Highlight [Startingstorage folder] and press
2.
Select the desired optionsand press J to proceed.

C The photo shooting menu: Shooting options305
3 Highlight [Start] and press J.
・ If [Now] was selected for [Choose start day/time] in Step 2,shooting will start after three seconds.
・Otherwise shooting will start at the time selected for [Choosestart day/time] > [Choose day/time].
・The display turns off during shooting.・Shooting will continue at the selected interval until all shots have
been taken.
D During shooting・ During interval timer photography, the memory card access lamp will
flash.
・ If the display is turned on by pressing the shutter-release button halfway,the message [Interval timer shooting] will be displayed and the Q iconwill flash.

C The photo shooting menu: Shooting options306
Pausing interval-timer photography❚❚Interval-timer photography can be paused between intervals bypressing J or by selecting [Interval timer shooting] in the photoshooting menu, highlighting [Pause], and pressing J. Note that themenus may not be displayed when the G button is pressed if the timeselected for [Interval] is very short.・ If [Time-lapse video] is selected for [Options], pressing J between
intervals will end interval-timer photography.
Resuming interval timer shooting❚❚Interval timer shooting can be resumed as described below.・ To resume shooting immediately:
Highlight [Restart] andpress J.
・ To resume shooting at a specified time:
Select [Restartoption], highlight
[Choose day/time]and press 2.
Choose a startingdate and time and
press J.
Highlight [Restart]and press J.

C The photo shooting menu: Shooting options307
Ending interval timer shooting❚❚To end interval-timer photography before all the photos are taken,select [Interval timer shooting] in the photo shooting menu, highlight[Off], and press J. Note that the menus may not be displayed when theG button is pressed if the time selected for [Interval] is very short. Inthis case you will need to press J to pause interval-timer photographyand then select [Interval timer shooting] in the photo shooting menu,highlight [Off], and press J.

C The photo shooting menu: Shooting options308
D Interval-timer photography・ Choose an interval longer than the time needed to take the selected
number of shots at the predicted shutter speed. Note that during actualinterval-timer photography, the camera must not only take shots at theselected interval but must also have sufficient time to complete theexposures and perform such tasks as processing the photographs. If theinterval is too short to take the selected number of photos, the cameramay skip to the next interval without shooting.
・ If the interval is too short, the total number of shots taken may be lessthan that selected for [Intervals×shots/interval].
・ If you are using a flash, choose an interval longer than the time needed forthe flash to charge. If the interval is too short, the flash may fire at lessthan the power needed for full exposure.
・ If shooting cannot proceed at current settings—for example, if shutterspeed is set to “Bulb” or “Time”, the [Interval] is [00:00'00"], or the starttime is in less than a minute—a warning will be displayed in the monitor.
・ Interval-timer photography will not start if [On] is selected for both[Silent photography] and [Interval priority] and [00:00'0.5"] is selectedfor [Interval].
・ If [On] is selected for [Silent photography] or [Time-lapse video] isselected for [Options], the standby timer will not expire during interval-timer photography, regardless of the option selected for Custom Settingc3 [Power off delay] > [Standby timer].
・ If the memory card is full, the interval timer will remain active but nopictures will be taken. Insert another memory card and resume shooting
(0306).・ Interval timer shooting will pause if:
- The camera is turned off and then on again (when the camera is off,batteries and memory cards can be replaced without ending interval-timer photography)
-E is selected for release mode・ Changing camera settings while the interval timer is active may cause
shooting to end.

C The photo shooting menu: Shooting options309
D Release modeRegardless of the release mode selected, the camera will take the specifiednumber of shots at each interval.
D Adjusting settings between shotsPictures can be viewed and shooting and menu settings adjusted betweenshots. Note, however, that the monitor will turn off and shooting will resumea few seconds before the next shot is taken.
D Interval-timer photography: RestrictionsInterval-timer photography cannot be combined with some camera features,including:・ video recording,・ long time-exposures (“Bulb” or “Time”),・ the self-timer,・ bracketing,・ HDR (high dynamic range),・ multiple exposures, and・ focus shift
D When [On] is selected for [Silent photography]Selecting [On] for [Silent photography] disables some camera features,including:・ ISO sensitivities of Hi 1 and Hi 2,・ flash photography,・ long-exposure noise reduction, and・ flicker reduction.
D Interval timer settingsTurning the camera off or selecting a new release mode does not affectinterval-timer photography settings.

C The photo shooting menu: Shooting options310
Time-lapse video
G button U C photo shooting menu
The camera automatically takes photos at selected intervals to create atime-lapse video.
Option Description
[Start]Start time-lapse recording. Shooting starts after about 3s and continues at the interval selected for [Interval] forthe time selected for [Shooting time].
[Interval]Choose the interval between shots, in minutes andseconds.
[Shooting time]Choose how long the camera will continue to takepictures, in hours and minutes.
[Exposuresmoothing]
Selecting [On] smooths abrupt changes in exposure.・ Large changes in subject brightness during shooting
may result in apparent variations in exposure. This canbe addressed by shortening the interval betweenshots.
・ Exposure smoothing will not take effect in mode M if[Off] is selected for [ISO sensitivity settings] > [AutoISO sensitivity control] in the photo shooting menu.
[Silentphotography]
Select [On] to silence the shutter and eliminate thevibrations it produces during shooting.・ Selecting [On] does not completely silence the
camera. Camera sounds may still be audible, forexample during autofocus or aperture adjustment, inthe latter case most noticeably at apertures smaller(i.e., at f-numbers higher) than f/5.6.
[Frame size/frame rate]
Choose the frame size and rate for the final video.

C The photo shooting menu: Shooting options311
Option Description
[Intervalpriority]
・ [On]: Enable interval priority to ensure that framesshot in modes P and A are taken at the choseninterval.- Select [Release] for Custom Setting a2 [AF-S
priority selection] when AF-S is selected for focusmode and for Custom Setting a1 [AF-C priorityselection] when AF-C is selected.
- If [On] is selected for [ISO sensitivity settings] >[Auto ISO sensitivity control] and the time chosenfor [Minimum shutter speed] is longer than theinterval, the time selected for the interval will takepriority over the selected shutter speed.
・ [Off]: Disable interval priority to ensure that photosare correctly exposed.
[Focus beforeeach shot]
If [On] is selected, the camera will focus between shots.
Recording time-lapse videos
D Before shooting・ Time-lapse videos are shot using the video crop.・ Take test shots and check the results in the monitor.・ Before proceeding, select [Time zone and date] in the setup menu and
make sure that the camera clock is set to the correct time and date.・ To ensure that shooting is not interrupted, use a fully-charged battery or
an optional charging AC adapter.

C The photo shooting menu: Shooting options312
1 Highlight [Time-lapse video] in the photo shooting menu.
Press 2 to select the highlighted item and view the [Time-lapsevideo] menu.

C The photo shooting menu: Shooting options313
2 Adjust time-lapse video settings.・Choose the interval between shots.
Highlight [Interval] andpress 2.
Choose an interval (inminutes and seconds) and
press J.
- Choose an interval longer than the slowest anticipated shutterspeed.
・Choose the total shooting time.
Highlight [Shootingtime] and press 2.
Choose a shooting time(in hours and minutes)
and press J.
- The maximum shooting time is 7 hours and 59 minutes.

C The photo shooting menu: Shooting options314
・Enable or disable exposure smoothing.
Highlight [Exposuresmoothing] and press 2.
Highlight an option andpress J.
- Selecting [On] smooths abrupt changes in exposure.・Enable or disable silent photography.
Highlight [Silentphotography] and press
2.
Highlight an option andpress J.
・Choose the frame size and rate.
Highlight [Frame size/frame rate] and press 2.
Highlight an option andpress J.

C The photo shooting menu: Shooting options315
・Choose an interval priority option.
Highlight [Intervalpriority] and press 2.
Highlight an option andpress J.
・Choose whether the camera focuses between shots.
Highlight [Focus beforeeach shot] and press 2.
Highlight an option andpress J.
- If [On] is selected for [Focus before each shot], the camera willfocus before each shot according to the option currently selectedfor focus mode.

C The photo shooting menu: Shooting options316
3 Highlight [Start] and press J.
・Shooting starts after about 3 s.・The display turns off during shooting.・The camera takes pictures at interval selected for [Interval] for the
time selected for [Shooting time] in Step 2.
Ending shooting❚❚To end shooting before all the photos are taken, press J or select [Time-lapse video] in the photo shooting menu, highlight [Off], and press J.Note that the menus may not be displayed when the G button ispressed if the time selected for [Interval] is very short.・ A video will be created from the frames shot to the point where
shooting ended and normal photography will resume.

C The photo shooting menu: Shooting options317
D Calculating the length of the final video・ The total number of frames in the final video can be calculated by
dividing the shooting time selected in Step 2 by the interval, rounding up,and adding 1.
・ The length of the final video can then be calculated by dividing thenumber of shots by the frame rate selected for [Frame size/frame rate](for example, a 48-frame video recorded with [1920×1080; 24p] selectedfor [Frame size/frame rate] will be about two seconds long).
・ The maximum length for time-lapse videos is 20 minutes.
1 Frame size/frame rate
2 Length recorded/maximumlength
3 Memory card indicator
D Picture reviewThe K button cannot be used to view pictures while shooting is in progress.The current frame will however be displayed for a few seconds after eachshot if [On] or [On (monitor only)] is selected for [Picture review] in theplayback menu. Note that other playback operations cannot be performedwhile the frame is displayed. The current frame may not be displayed if theinterval is very short.
D Time-lapse videos・ Sound is not recorded with time-lapse videos.・ The shutter speed and the time needed to record the image to the
memory card may vary from shot to shot. As a result, the interval betweena shot being recorded and the start of the next shot may vary.
・ Shooting will not begin if a time-lapse video cannot be recorded atcurrent settings, for example if:

C The photo shooting menu: Shooting options318
- The value selected for [Interval] is longer than that selected for[Shooting time]
- [00:00'00"] is selected for [Interval] or [Shooting time]- [On] is selected for both [Silent photography] and [Interval priority]
and [00:00'0.5"] is selected for [Interval]- The memory card is full
・ If time-lapse video recording cannot start at current settings, for examplebecause shutter speed is set to “Bulb” or “Time”, a warning will bedisplayed.
・ The K button cannot be used to view pictures while time-lapse recordingis in progress.
・ For consistent coloration, choose a white balance setting other than 4[Auto] or D [Natural light auto] when recording time-lapse videos.
・ Regardless of the option selected for Custom Setting c3 [Power off delay]> [Standby timer], the standby timer will not expire while recording is inprogress.
・ Shooting may end if camera controls are used, settings are changed, or anHDMI cable is connected. A video will be created from the frames shot tothe point where shooting ended.
・ The following end shooting without a beep sounding or a video beingrecorded:- Removing the battery- Ejecting the memory card
D During shootingThe memory card access lamp lights while shooting is in progress.
D Settings between recordingsShooting and menu settings can be adjusted between time-lapse videorecordings. Note, however, that the monitor will turn off and shooting willresume in about 2 seconds before the next shot is taken.
D Time-lapse videos: RestrictionsTime-lapse video recording cannot be combined with some camera features,including:

C The photo shooting menu: Shooting options319
・ video recording,・ long time-exposures (“Bulb” or “Time”),・ the self-timer,・ bracketing,・ HDR (high dynamic range),・ multiple exposures,・ interval-timer photography, and・ focus shift.
D When [On] is selected for [Silent photography]Selecting [On] for [Silent photography] disables some camera features,including:・ ISO sensitivities of Hi 1 and Hi 2,・ flash photography,・ exposure delay mode,・ long-exposure noise reduction, and・ flicker reduction.
Focus shift shooting
G button U C photo shooting menu
Focus shift automatically varies focus over a series of shots. Use it to takephotos that will later be combined using focus stacking to create asingle image with increased depth of field. Before using focus shift,choose a focus mode of AF-A, AF-S, or AF-C and a release mode otherthan E.
Option Description
[Start]Start shooting. The camera will take the selectednumber of shots, changing the focus distance by theselected amount with each shot.
[No. of shots] Choose the number of shots (maximum 300).

C The photo shooting menu: Shooting options320
Option Description
[Focus stepwidth]
Focus shift varies the focus distance over a series ofphotographs. Choose the amount the focus distancechanges with each shot.
[Interval untilnext shot]
Choose the interval between shots, in seconds.・ Select [00] to take photos at up to about 3 fps.・ To ensure correct exposure when using a flash,
choose an interval long enough for the flash tocharge.
[First-frameexposure lock]
・ [On]: The camera locks exposure for all shots at thesetting for the first frame.
・ [Off]: The camera adjusts exposure before each shot.
[Silentphotography]
Select [On] to eliminate shutter sounds duringshooting.・ Selecting [On] does not completely silence the
camera. Camera sounds may still be audible, forexample during autofocus or aperture adjustment, inthe latter case most noticeably at apertures smaller(i.e., at f-numbers higher) than f/5.6.
[Starting storagefolder]
Highlight an option and press 2 to select (M) ordeselect (U).・ [New folder]: A new folder is created for each new
sequence.・ [Reset file numbering]: File numbering is reset to
0001 whenever a new folder is created.
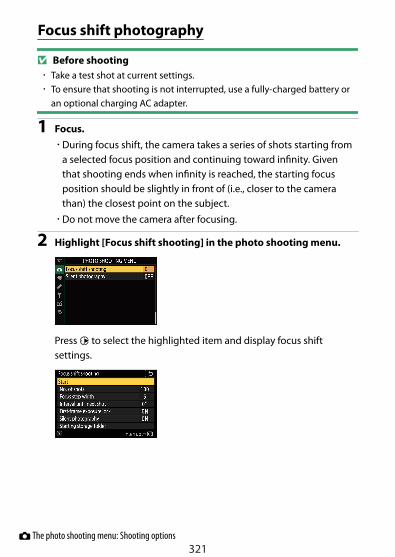
C The photo shooting menu: Shooting options321
Focus shift photography
D Before shooting・ Take a test shot at current settings.・ To ensure that shooting is not interrupted, use a fully-charged battery or
an optional charging AC adapter.
1 Focus.・During focus shift, the camera takes a series of shots starting from
a selected focus position and continuing toward infinity. Giventhat shooting ends when infinity is reached, the starting focusposition should be slightly in front of (i.e., closer to the camerathan) the closest point on the subject.
・Do not move the camera after focusing.
2 Highlight [Focus shift shooting] in the photo shooting menu.
Press 2 to select the highlighted item and display focus shiftsettings.
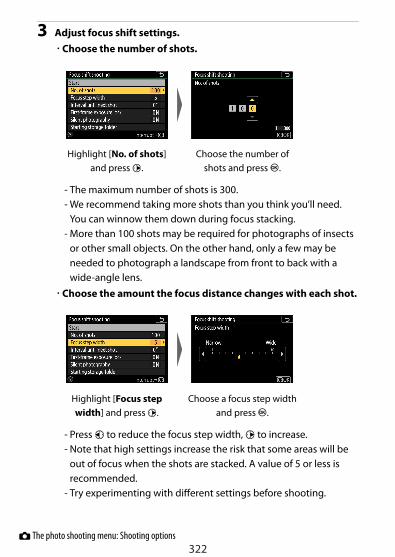
C The photo shooting menu: Shooting options322
3 Adjust focus shift settings.・Choose the number of shots.
Highlight [No. of shots]and press 2.
Choose the number ofshots and press J.
- The maximum number of shots is 300.- We recommend taking more shots than you think you’ll need.
You can winnow them down during focus stacking.- More than 100 shots may be required for photographs of insects
or other small objects. On the other hand, only a few may beneeded to photograph a landscape from front to back with awide-angle lens.
・Choose the amount the focus distance changes with each shot.
Highlight [Focus stepwidth] and press 2.
Choose a focus step widthand press J.
- Press 4 to reduce the focus step width, 2 to increase.- Note that high settings increase the risk that some areas will be
out of focus when the shots are stacked. A value of 5 or less isrecommended.
- Try experimenting with different settings before shooting.

C The photo shooting menu: Shooting options323
・Choose the interval until next shot.
Highlight [Interval untilnext shot] and press 2.
Choose the intervalbetween shots and press
J.
- Choose the interval between shots, in seconds.- Select [00] to take photos at up to about 3 fps.- To ensure correct exposure when using a flash, choose an
interval long enough for the flash to charge. A setting of [00] isrecommended when shooting without a flash.
・Enable or disable first-frame exposure lock.
Highlight [First-frameexposure lock] and press
2.
Highlight an option andpress J.
- [Off] is recommended if lighting and other conditions will notchange during shooting, [On] when photographing landscapesand the like under variable lighting.
- Selecting [On] locks exposure at the value for the first shot,ensuring that all photos have the same exposure. Large changesin subject brightness during shooting may however result in

C The photo shooting menu: Shooting options324
apparent variations in exposure. This can be addressed byselecting [Off].
・Enable or disable silent photography.
Highlight [Silentphotography] and press
2.
Highlight an option andpress J.
・Choose starting folder options.
Highlight [Startingstorage folder] and press
2.
Select the desired optionsand press J to proceed.
- Highlight an option and press 2 to select; selected items aremarked with a check (M). To deselect (remove the check from: U)a selected option, highlight it and press 2 again.
- Place a check (M) next to [New folder] to create a new folder foreach new sequence.
- Place a check (M) next to [Reset file numbering] to reset filenumbering to 0001 whenever a new folder is created.

C The photo shooting menu: Shooting options325
4 Highlight [Start] and press J.
・Shooting starts after about 3 s.・The display turns off during shooting.・The camera takes photographs at the selected interval, starting at
the focus distance selected at the start of shooting andprogressing out toward infinity by the selected focus step distancewith each shot.
・Shooting ends when the selected number of shots has been takenor focus reaches infinity.
Ending focus shift photography❚❚To end shooting before all shots have been taken, either:・ select [Focus shift shooting] in the photo shooting menu, highlight
[Off], and press J, or・ press the shutter-release button halfway or press the J button
between shots.

C The photo shooting menu: Shooting options326
D ApertureGiven that pictures shot at very small apertures (high f-numbers) may lackdefinition, we recommend that you choose apertures wider (f-numberslower) than f/8–f/11.
D During shootingThe memory card access lamp flashes while shooting is in progress.
D Focus shift photography・ The shutter speed and the time needed to record the image may vary
from shot to shot. As a result, the interval between a shot being recordedand the start of the next shot may vary.
・ Shooting ends when focus reaches infinity, and consequently dependingon the focus position at the start of shooting, shooting may end beforethe selected number of shots has been taken.
・ Regardless of the option selected for Custom Setting c3 [Power off delay]> [Standby timer], the standby timer will not expire while shooting is inprogress.
・ If you are using a flash, choose an interval longer than the time needed forthe flash to charge. If the interval is too short, the flash may fire at lessthan the power needed for full exposure.
・ If shooting cannot proceed at current settings, for example becauseshutter speed is set to “Bulb” or “Time”, a warning will be displayed.
・ Changing camera settings while focus shift photography is in progressmay cause shooting to end.
D Focus shift photography: RestrictionsFocus-shift photography cannot be combined with some camera features,including:・ video recording,・ long time-exposures (“Bulb” or “Time”),・ the self-timer,・ bracketing,・ HDR (high dynamic range),・ multiple exposures,

C The photo shooting menu: Shooting options327
・ interval-timer photography, and・ time-lapse video recording.
D When [On] is selected for [Silent photography]Selecting [On] for [Silent photography] disables some camera features,including:・ ISO sensitivities of Hi 1 and Hi 2,・ flash photography,・ exposure delay mode,・ long-exposure noise reduction, and・ flicker reduction.
A Close-upsBecause focus depth is reduced at short focus distances, we recommendchoosing smaller focus steps and increasing the number of shots whenphotographing subjects close to the camera.
Silent photography
G button U C photo shooting menu
Eliminate shutter sounds during shooting (0121).
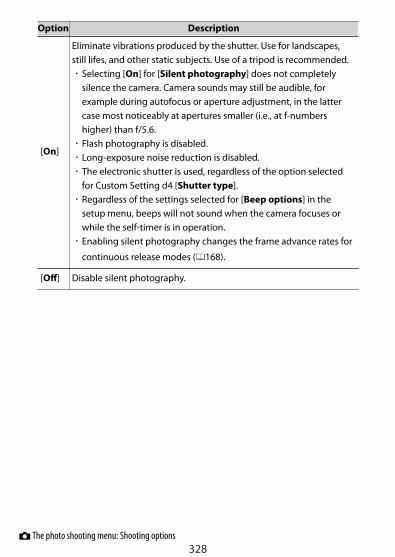
C The photo shooting menu: Shooting options328
Option Description
[On]
Eliminate vibrations produced by the shutter. Use for landscapes,still lifes, and other static subjects. Use of a tripod is recommended.・ Selecting [On] for [Silent photography] does not completely
silence the camera. Camera sounds may still be audible, forexample during autofocus or aperture adjustment, in the lattercase most noticeably at apertures smaller (i.e., at f-numbershigher) than f/5.6.
・ Flash photography is disabled.・ Long-exposure noise reduction is disabled.・ The electronic shutter is used, regardless of the option selected
for Custom Setting d4 [Shutter type].・ Regardless of the settings selected for [Beep options] in the
setup menu, beeps will not sound when the camera focuses orwhile the self-timer is in operation.
・ Enabling silent photography changes the frame advance rates for
continuous release modes (0168).
[Off] Disable silent photography.

1 The video recording menu: Video recording options329
1 The video recording menu: Videorecording options
To view the video recording menu, select the 1 tab in the cameramenus.
The video recording menu contains the following items:Item 0
[Reset video recording menu] 330
[File naming] 330
[Frame size/frame rate] 330
[Video quality] 330
[Video file type] 331
[ISO sensitivity settings] 331
[White balance] 332
[Set Picture Control] 333
[Manage Picture Control] 333
[Active D-Lighting] 333
[High ISO NR] 334
[Vignette control] 334
Item 0
[Diffraction compensation] 334
[Auto distortion control] 334
[Flicker reduction] 334
[Metering] 335
[Release mode (save frame)] 335
[Focus mode] 336
[AF-area mode] 336
[Vibration reduction] 336
[Electronic VR] 337
[Microphone sensitivity] 337
[Attenuator] 338
[Frequency response] 338

1 The video recording menu: Video recording options330
Item 0
[Wind noise reduction] 339
Item 0
[Timecode] 339
D See also“Video recording menu defaults” (0220)
Reset video recording menu
G button U 1 video recording menu
Highlight [Yes] and press J to restore video recording menu options to
their default values (0220).
File naming
G button U 1 video recording menu
Choose the three-letter prefix used in naming the image files in which
videos are stored; the default prefix is “DSC” (0242).
Frame size/frame rate
G button U 1 video recording menu
Choose the video frame size (in pixels) and frame rate. For moreinformation, see “Frame size and rate/Video quality” in “The i menu”
(0175).
Video quality
G button U 1 video recording menu
Choose from [High quality] and [Normal]. For more information, see
“Frame size and rate/Video quality” in “The i menu” (0175).

1 The video recording menu: Video recording options331
Video file type
G button U 1 video recording menu
Record videos in MOV or MP4 format.・ The audio recording format varies with video file format. Linear PCM
is used for MOV files and AAC for MP4 files.
ISO sensitivity settings
G button U 1 video recording menu
Adjust the ISO sensitivity settings for video mode.
Option Description
[Maximumsensitivity]
Choose the upper limit for auto ISO sensitivity controlto prevent it being raised too high.・ The selected value serves as the upper limit for ISO
sensitivity in modes P, S, and A and when [On] isselected for [Auto ISO control (mode M)] in mode M.
[Auto ISOcontrol (mode
M)]
If you select [On] and press the J button, the camera willautomatically adjust the ISO sensitivity for video mode inmode M. If [Off] is selected, the ISO sensitivity will remainfixed at the value selected with the ISO sensitivity dial.・ Regardless of the option selected, auto ISO sensitivity
control is used in modes other than M.

1 The video recording menu: Video recording options332
Option Description
[ISO sensitivity(mode M)]
The ISO sensitivity selected with the ISO sensitivity dial isdisplayed.
・ When auto ISO sensitivity control is enabled, the shooting display willshow ISO AUTO. When sensitivity is altered from the value selectedby the user, the ISO sensitivity will be shown in the displays.
D Auto ISO sensitivity control・ At high ISO sensitivities, “noise” (randomly-spaced bright pixels, fog, or
lines) may increase.・ At high ISO sensitivities, the camera may have difficulty focusing.・ The foregoing can be prevented by choosing a lower value for [ISO
sensitivity settings] > [Maximum sensitivity].
White balance
G button U 1 video recording menu
Choose the white balance for videos. Select [Same as photo settings]
to use the option currently selected for photos (0248).

1 The video recording menu: Video recording options333
Set Picture Control
G button U 1 video recording menu
Choose a Picture Control for videos. Select [Same as photo settings] to
use the option currently selected for photos (0255).
Manage Picture Control
G button U 1 video recording menu
Save modified Picture Controls as custom Picture Controls (0257).
Active D-Lighting
G button U 1 video recording menu
Preserve details in highlights and shadows, creating videos with naturalcontrast. Select [Same as photo settings] to use the option currently
selected for photos (0164, 0181).

1 The video recording menu: Video recording options334
High ISO NR
G button U 1 video recording menu
Reduce “noise” (randomly-spaced bright pixels) in videos recorded at
high ISO sensitivities (0263).
Vignette control
G button U 1 video recording menu
Reduce vignetting in videos. Select [Same as photo settings] to use the
option currently selected for photos (0264).
Diffraction compensation
G button U 1 video recording menu
Reduce diffraction in videos (0264).
Auto distortion control
G button U 1 video recording menu
Reduce barrel and pin-cushion distortion in videos (0265).
Flicker reduction
G button U 1 video recording menu
Reduce flicker and banding when shooting under fluorescent ormercury-vapor lighting during video recording. Choose [Auto] to allowthe camera to automatically choose the correct frequency. If [Auto] failsto produce the desired results, select [50 Hz] or [60 Hz] according to thefrequency of the local power supply. Choose [50 Hz] for areas with a 50Hz power supply, [60 Hz] for areas with a 60 Hz power supply.

1 The video recording menu: Video recording options335
D Flicker reduction in the video recording menu・ If [Auto] fails to produce the desired results and you are unsure as to the
frequency of the local power supply, test both the 50 and 60 Hz optionsand choose the one that produces the best results.
・ Flicker reduction may not produce the desired results if the subject is verybright. If this is the case, try choosing a smaller aperture (higher f-number).
・ Flicker reduction may not produce the desired results in modes otherthan M. If this is the case, select mode M and choose a shutter speedadapted to the frequency of the local power supply:- 50Hz: 1/100 s, 1/50 s, 1/25 s- 60Hz: 1/125 s, 1/60 s, 1/30 s
Metering
G button U 1 video recording menu
Choose how the camera meters exposure in video mode. [Spotmetering] is not available in the video recording menu (0162).
Release mode (save frame)
G button U 1 video recording menu
In video mode, you can choose the operation performed when the
shutter-release button is pressed (092).
Option Description
U [Single frame]The camera takes one photograph each time theshutter-release button is pressed. Up to 40 photographscan be taken with each video.

1 The video recording menu: Video recording options336
Option Description
c [Continuous]
・ The camera takes photos while the shutter-releasebutton is pressed.
・ The frame advance rate varies with the frame rateselected for [Frame size/frame rate] in the videorecording menu.
・ The length of time available for the burst is shown inthe shooting display.
・ While video recording is in progress, only one photowill be taken each time the shutter-release button ispressed.
Focus mode
G button U 1 video recording menu
Choose a focus mode for video recording (0100).
AF-area mode
G button U 1 video recording menu
Choose how the camera focuses in video mode (0102).
Vibration reduction
G button U 1 video recording menu
Adjust vibration reduction settings for video mode. Select [Same asphoto settings] to use the option currently selected for photos (0171).
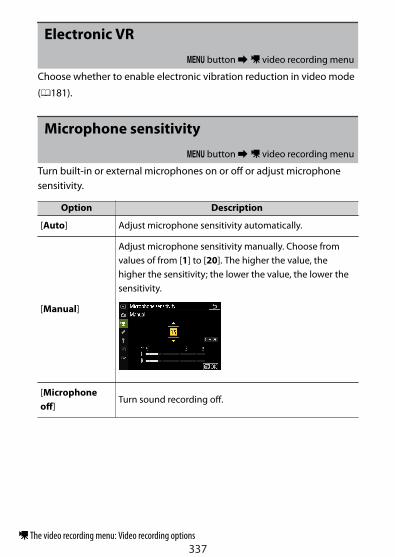
1 The video recording menu: Video recording options337
Electronic VR
G button U 1 video recording menu
Choose whether to enable electronic vibration reduction in video mode
(0181).
Microphone sensitivity
G button U 1 video recording menu
Turn built-in or external microphones on or off or adjust microphonesensitivity.
Option Description
[Auto] Adjust microphone sensitivity automatically.
[Manual]
Adjust microphone sensitivity manually. Choose fromvalues of from [1] to [20]. The higher the value, thehigher the sensitivity; the lower the value, the lower thesensitivity.
[Microphoneoff]
Turn sound recording off.

1 The video recording menu: Video recording options338
D Videos without soundVideos recorded with [Microphone off] selected for [Microphonesensitivity] are indicated by a 2 icon.
Attenuator
G button U 1 video recording menu
Select [Enable] to reduce microphone gain and prevent audio distortionwhen recording videos in loud environments.
Frequency response
G button U 1 video recording menu
Choose the range of frequencies to which built-in and externalmicrophones respond.
Option Description
S [Wide range]Record a wide range of frequencies. Choose foreverything from music to the bustling hum of a citystreet.
T [Vocal range] Choose for human voices.

1 The video recording menu: Video recording options339
Wind noise reduction
G button U 1 video recording menu
Choose whether to use wind noise reduction when recording videos. Formore information about wind noise reduction, see “Wind noise
reduction” in “The i menu” (0179).
Timecode
G button U 1 video recording menu
Choose whether to record time codes giving the hour, minute, second,and frame number for each frame when recording videos. Time codesare available only with videos recorded in MOV format.
Option Description
[Recordtimecodes]
・ [On]: Record time codes. The time code appears in theshooting display.
・ [On (with HDMI output)]: Time codes will be includedwith footage saved to external recorders connected tothe camera via an HDMI cable. The camera supportsAtomos SHOGUN, NINJA, and SUMO-series Monitorrecorders.
・ [Off]: Time codes are not recorded.
[Count-upmethod]
・ [Record run]: Time codes are incremented only whilerecording is in progress.
・ [Free run]: Time codes are incremented continuously.Time codes continue to be incremented while the camerais off.

1 The video recording menu: Video recording options340
Option Description
[Timecodeorigin]
・ [Reset]: Reset the time code to 00:00:00.00.・ [Enter manually]: Enter the hour, minute, second, and
frame number manually.・ [Current time]: Set the time code to the current time as
reported by the camera clock. Before proceeding, select[Time zone and date] in the setup menu and make surethat the camera clock is set to the correct time and date.
[Drop frame]Select [On] to compensate for discrepancies between theframe count and the actual recording time at frame rates of30 and 60 fps.
D HDMI devicesSelecting [On (with HDMI output)] for [Record timecodes] may disruptfootage output to HDMI devices.

A Custom Settings: Fine-tuning camera settings341
A Custom Settings: Fine-tuning camerasettings
To view Custom Settings, select the A tab in the camera menus.
Custom Settings are used to customize camera settings to suit individualpreferences. The Custom Settings menu is divided into two levels.

A Custom Settings: Fine-tuning camera settings342
The following Custom Settings are available: 1Item 0
[Reset custom settings] 343
a [Autofocus]
a1 [AF-C priority selection] 344
a2 [AF-S priority selection] 344
a3[Focus tracking withlock-on]
345
a4 [Focus points used] 345
a5[Store points byorientation]
346
a6 [AF activation] 348
a7[Limit AF-area modeselection]
349
a8[Focus point wrap-around]
349
a9 [Focus point options] 350
a10 [Low-light AF] 350
a11[Built-in AF-assistilluminator]
351
a12[Manual focus ring in AFmode] 2
352
b [Metering/exposure]
b1[Easy exposurecompensation]
352
Item 0
b2 [Center-weighted area] 353
b3[Fine-tune optimalexposure]
353
b4[b mode exposurecomp.] 354
c [Timers/AE lock]
c1[Shutter-release buttonAE-L]
354
c2 [Self-timer] 355
c3 [Power off delay] 355
d [Shooting/display]
d1[CL mode shootingspeed]
356
d2[Maximum shots perburst]
356
d3 [Exposure delay mode] 356
d4 [Shutter type] 357
d5[Extended shutterspeeds (M)] 357
d6 [File number sequence] 358
d7[Apply settings to liveview]
359
d8 [Framing grid display] 360

A Custom Settings: Fine-tuning camera settings343
Item 0
d9 [Focus peaking] 360
d10[View all in continuousmode]
361
e [Bracketing/flash]
e1 [Flash sync speed] 361
e2 [Flash shutter speed] 362
e3[Exposure comp. forflash]
363
e4[Auto c ISO sensitivitycontrol] 363
e5[Auto bracketing (modeM)] 364
e6 [Bracketing order] 365
f [Controls]
f1 [Customize i menu] 365
Item 0
f2[Custom controls(shooting)] 367
f3[Custom controls(playback)] 375
f4[Customize commanddials]
377
f5[Release button to usedial] 380
f6 [Reverse indicators] 381
g [Video]
g1 [Customize i menu] 381
g2 [Custom controls] 382
g3 [AF speed] 388
g4 [AF tracking sensitivity] 389
g5 [Highlight display] 389
1 Items modified from default values are indicated by asterisks (“U“).2 Available with compatible lenses only.
D See also“Custom Settings menu defaults” (0222)
Reset custom settings
G button U A Custom Settings menu
Restore Custom Settings to their default values.

A Custom Settings: Fine-tuning camera settings344
a: Autofocus
a1: AF-C priority selection
G button U A Custom Settings menu
Choose whether photos can be taken before the camera focuses whenAF-C is selected.
Option Description
G [Release]Photos can be taken whenever the shutter-release button ispressed (release priority).
F [Focus]Photos can be taken only when the camera is in focus (focuspriority).
a2: AF-S priority selection
G button U A Custom Settings menu
Choose whether photos can be taken before the camera focuses whenAF-S is selected.
Option Description
G [Release]Photos can be taken whenever the shutter-release button ispressed (release priority).
F [Focus]Photos can be taken only when the camera is in focus (focuspriority).

A Custom Settings: Fine-tuning camera settings345
a3: Focus tracking with lock-on
G button U A Custom Settings menu
Choose how quickly focus responds if something passes between thesubject and the camera when AF-C is selected for focus mode or whenAF-A is selected and you are shooting in AF-C.
・ Choose [5 (Delayed)] to help maintain focus on your original subject.・ Choose [1 (Quick)] to make it easier to shift focus to objects crossing
your field of view.・ If [Auto-area AF], [Auto-area AF (people)], or [Auto-area AF
(animals)] is selected for AF-area mode, blocked shot AF responsewill function in mode [3] when [2] or [1 (Quick)] is selected.
a4: Focus points used
G button U A Custom Settings menu
Choose the number of focus points available for manual focus-pointselection when an option other than [Auto-area AF], [Auto-area AF(people)], or [Auto-area AF (animals)] is selected for AF-area mode.
Option Description
6 [All points]Every focus point available in the current AF-area modecan be selected. The number of points available varieswith the AF-area mode.

A Custom Settings: Fine-tuning camera settings346
Option Description
7[Alternatingpoints]
The number of available focus points is reduced to onequarter of the number available when [All points] isselected. Use for quick focus-point selection. Thenumber of focus points available in [Pinpoint AF],[Wide-area AF (L)], [Wide-area AF (L-people)], or[Wide-area AF (L-animals)] mode does not change.
a5: Store points by orientation
G button U A Custom Settings menu
Choose whether separate focus points can be selected for “wide”(landscape) orientation, for “tall” (portrait) orientation with the camerarotated 90° clockwise, and for “tall” orientation with the camera rotated90° counterclockwise.

A Custom Settings: Fine-tuning camera settings347
・ Select [No] to use the same focus point regardless of cameraorientation.
Camera rotated 90°counter-clockwise
Landscape (wide)orientation
Camera rotated 90°clockwise

A Custom Settings: Fine-tuning camera settings348
・ Select [Yes] to enable separate focus-point selection.
Camera rotated 90°counter-clockwise
Landscape (wide)orientation
Camera rotated 90°clockwise
a6: AF activation
G button U A Custom Settings menu
Choose whether the shutter-release button can be used to focus. If [AF-ON only] is selected, the camera will not focus when the shutter-releasebutton is pressed halfway. Focus can only be adjusted using othercontrols to which AF-ON has been assigned using Custom Setting f2[Custom controls (shooting)].
Out-of-focus releaseTo choose whether the shutter can be released even in circumstances inwhich it would normally be disabled, select Custom Setting a6 [AFactivation], highlight [AF-ON only], and press 2. Selecting [Enable]allows the shutter to be released at any time.

A Custom Settings: Fine-tuning camera settings349
Option Description
[Enable] Shutter-release enabled.
[Disable] Shutter-release disabled.
a7: Limit AF-area mode selection
G button U A Custom Settings menu
Choose the AF-area modes that can be selected using the i menu orcustom controls.・ Highlight an option and press 2 to select (M) or deselect (U). Modes
marked with a check (M) are available for selection via the sub-command dial.
・ To complete the operation, press J.
a8: Focus point wrap-around
G button U A Custom Settings menu
Choose whether focus-point selection “wraps around” from one edge ofthe display to another. If [Wrap] is selected, focus-point selection will“wrap around” from top to bottom, bottom to top, right to left, and leftto right, so that, for example, pressing multi selector 2 when a focuspoint at the right edge of the viewfinder display is highlighted selectsthe corresponding focus point at the left edge of the display.

A Custom Settings: Fine-tuning camera settings350
a9: Focus point options
G button U A Custom Settings menu
Choose from the focus point display options below.
Manual focus modeOption Description
[On] The focus point is displayed at all times in manual focus mode.
[Off] The focus point is displayed only during focus point selection.
Dynamic-area AF assistChoose whether both the selected focus point and the surroundingfocus points are displayed in dynamic-area AF mode.
Option Description
[On] Display both the selected focus point and surrounding focus points.
[Off] Display only the selected focus point.
a10: Low-light AF
G button U A Custom Settings menu
Choose [On] for more accurate focus under low-light conditions whenAF-S is selected for focus mode or when AF-A is selected and you areshooting in AF-S.・ This option only takes effect in photo mode.・ In b mode, [Low-light AF] is fixed at [On].・ Low-light AF is disabled during interval-timer photography and time-
lapse video recording.・ The camera may require more time to focus when [On] is selected.

A Custom Settings: Fine-tuning camera settings351
・ While low-light AF is in effect, “Low-light” will appear in the display.The display refresh rate may drop.
a11: Built-in AF-assist illuminator
G button U A Custom Settings menu
Choose whether the built-in AF-assist illuminator lights to assist thefocus operation in photo mode when lighting is poor.
Option Description
[On]In photo mode, the illuminator will light as required when AF-S isselected for focus mode or when AF-A is selected and you areshooting in AF-S.
[Off]The illuminator does not light to assist the focus operation. Thecamera may not be able to focus when lighting is poor.
D The AF-assist illuminator・ The AF-assist illuminator has a range of about 1–3 m (3 ft 4 in.–9 ft 10 in.).・ Remove lens hoods when using the illuminator.・ Do not obstruct the AF-assist illuminator while it is lit.

A Custom Settings: Fine-tuning camera settings352
a12: Manual focus ring in AF mode
G button U A Custom Settings menu
Choose whether the lens focus ring can be used for manual focus inautofocus mode.
Option Description
[Enable]
Autofocus can be over-ridden by rotating the lens focus ring(autofocus with manual override). The focus ring can be used formanual focus while the shutter-release button is pressed halfway.To refocus using autofocus, lift your finger from the shutter-release button and then press it halfway again.
[Disable]The lens focus ring cannot be used for manual focus whileautofocus mode is selected.
b: Metering/exposure
b1: Easy exposure compensation
G button U A Custom Settings menu
Choose whether exposure compensation can be performed with thecommand dial when the exposure compensation dial is set to [C].
Option Description
[On (Autoreset)]
Exposure compensation can be adjusted using a commanddial. The setting selected with the command dial is reset whenthe camera turns off or the standby timer expires.
[On]Exposure compensation can be adjusted using a commanddial. Exposure compensation is not reset when the cameraturns off or the standby timer expires.

A Custom Settings: Fine-tuning camera settings353
Option Description
[Off]Set the exposure compensation with the exposurecompensation dial.
・ Enabled in modes P, S, A, and b. In mode b, set Custom Setting b4[b mode exposure comp.] to [Enable]. Easy exposurecompensation is not available in other modes.
・ The command dial used varies with the shooting mode.
b2: Center-weighted area
G button U A Custom Settings menu
When [Center-weighted metering] is selected, the camera assigns thegreatest weight to an area in the center of the shooting display whensetting exposure. Custom Setting b2 [Center-weighted area] is used tochoose the size of the area given the greatest weight when [Center-weighted metering] is selected.
b3: Fine-tune optimal exposure
G button U A Custom Settings menu
Use this option to fine-tune the exposure value selected by the camera;exposure can be fine-tuned separately for each metering method.Exposure can be adjusted up for brighter exposures or down for darkerexposures in the range +1 to −1 EV in steps of 1/6 EV. The default is 0.

A Custom Settings: Fine-tuning camera settings354
D Fine-tuning exposureRegardless of the option selected for Custom Setting b3 [Fine-tune optimalexposure], the exposure compensation icon (E) will not be displayed. Theonly way to determine how much exposure has been altered is to view theamount in the fine-tuning menu for Custom Setting b3.
b4: b mode exposure comp.
G button U A Custom Settings menu
When set to [Disable], the exposure compensation cannot be adjustedin mode b.
c: Timers/AE lock
c1: Shutter-release button AE-L
G button U A Custom Settings menu
Choose whether exposure locks when the shutter-release button ispressed.
Option Description
O [On (half press)]Pressing the shutter-release button halfway locksexposure.
P[On (burstmode)]
Exposure only locks while the shutter-releasebutton is pressed all the way down.
[Off]Pressing the shutter-release button does not lockexposure.

A Custom Settings: Fine-tuning camera settings355
c2: Self-timer
G button U A Custom Settings menu
Choose the length of the shutter release delay, the number of shotstaken, and the interval between shots in self-timer mode.
Option Description
[Self-timer delay] Choose the length of the shutter-release delay.
[Number ofshots]
Press 1 and 3 to choose the number of shots takeneach time the shutter-release button is pressed; choosefrom values of from 1 to 9.
[Intervalbetween shots]
Choose the interval between shots when [Number ofshots] is more than 1.
c3: Power off delay
G button U A Custom Settings menu
Choose how long the monitor or viewfinder remains on when nooperations are performed.・ Different settings can be chosen for [Playback], [Menus], [Picture
review], and [Standby timer].・ [Standby timer] determines how long the monitor, viewfinder, or
control panel remains on after the shutter-release button is pressedhalfway. The monitor and viewfinder dim a few seconds before thestandby timer expires. If [10 s] is selected, the timer will be extendedto 20 seconds while the i menu is displayed.
・ With the exception of [Picture review], each of the power-off delaysis extended by one minute in self-timer mode.
・ Longer power-off delays reduce battery endurance.

A Custom Settings: Fine-tuning camera settings356
d: Shooting/display
d1: CL mode shooting speed
G button U A Custom Settings menu
Choose the frame advance rate for low-speed continuous release mode;options range from [4 fps] to [1 fps].
d2: Maximum shots per burst
G button U A Custom Settings menu
The maximum number of shots that can be taken in a single burst incontinuous release modes can be set to any value between 1 and 100.・ Note that regardless of the option selected, there is no limit to the
number of photos that can be taken in a single burst when a shutterspeed of 1 s or slower is selected in mode S or M.
D The memory bufferCustom Setting d2 [Maximum shots per burst] is used to select the numberof shots that can be taken in a single burst. The number of shots that can betaken before the memory buffer fills and shooting slows varies with imagequality and other settings. When the buffer is full, the camera will display“r00” and the frame advance rate will drop.
d3: Exposure delay mode
G button U A Custom Settings menu
In situations where the slightest camera movement can blur pictures,shutter release can be delayed by from about 0.2 to 3 seconds after theshutter-release button is pressed.

A Custom Settings: Fine-tuning camera settings357
d4: Shutter type
G button U A Custom Settings menu
Choose the type of shutter used for photographs.
Option Description
O [Auto]
The camera chooses the shutter type automaticallyaccording to shutter speed. The electronic front-curtain shutter is used to reduce blur caused bycamera shake at slow shutter speeds.
P[Mechanicalshutter]
The camera uses the mechanical shutter for allphotos.
x[Electronic front-curtain shutter]
The camera uses the electronic front-curtain shutterfor all photos.
D “Mechanical shutter”[Mechanical shutter] is not available with some lenses.
D The electronic front-curtain shutterThe fastest shutter speed available when [Electronic front-curtain shutter]is selected is 1/2000 s.
d5: Extended shutter speeds (M)
G button U A Custom Settings menu
If you select [On], you can extend the shutter speed when shooting inmode M up to 900 seconds (15 minutes). This is useful when you want toshoot with the shutter open for extended periods, such as forastronomical photography.・ To use extended shutter speeds, choose [On] and select a shutter
speed of 60 s or slower. When shooting starts, the control panelswitches to indicate that the shutter is open.

A Custom Settings: Fine-tuning camera settings358
d6: File number sequence
G button U A Custom Settings menu
Choose a file numbering option.
Option Description
[On]
When a new folder is created or a new memory card is inserted inthe camera, file numbering will continue from the last numberused. This simplifies file management by minimizing theoccurrence of duplicate file names when multiple cards are used.
[Off]
When a new folder is created or a new memory card is inserted, filenumbering restarts from 0001. If the current folder already containsimages, file numbering will instead continue from the highest filenumber in the current folder.If you select [Off] after selecting [On], the camera will store thecurrent file number. File numbering will resume from thepreviously-stored value the next time [On] is selected.
[Reset]
Reset the file numbering for [On]. If the current folder is empty, filenumbering will restart from 0001 with the next picture taken. If thecurrent folder contains images, the next picture taken will beassigned a file number by adding one to the highest file number inthe current folder.

A Custom Settings: Fine-tuning camera settings359
D File number sequence・ If a picture is taken when the current folder contains a picture numbered
9999, a new folder will be created and file numbering will restart from0001.
・ When the current folder number reaches 999, the camera will no longerbe able to create new folders and the shutter release will be disabled if:- the current folder contains 5000 pictures (in addition, video recording
will be disabled if the camera calculates that the number of files neededto record a video of the maximum length would result in the foldercontaining over 5000 files), or
- the current folder contains a picture numbered 9999 (in addition,video recording will be disabled if the camera calculates that thenumber of files needed to record a video of the maximum length wouldresult in a file numbered over 9999).
To resume shooting, choose [Reset] for Custom Setting d6 [File numbersequence] and then either format the memory card or insert a newmemory card.
D Folder numbering・ If a picture is taken when the current folder contains 5000 pictures or a
picture numbered 9999, a new folder will be created and selected as thecurrent folder.
・ The new folder is assigned a number one higher than current foldernumber. If a folder with that number already exists, the new folder will beassigned the lowest available folder number.
d7: Apply settings to live view
G button U A Custom Settings menu
Choose whether the camera adjusts the preview in the viewfinder ormonitor to reflect how shooting settings will affect the hue andbrightness of the final picture. Regardless of the option selected, theeffects of camera settings are always visible in video mode.

A Custom Settings: Fine-tuning camera settings360
Option Description
[On]The effects of changes to settings such as white balance, PictureControls, and exposure compensation are visible in the shootingdisplay.
[Off]
・ The effects of changes to settings such as white balance, PictureControls, and exposure compensation are not visible in theshooting display. The hue and brightness of the display can beadjusted for ease of viewing during extended photo shoots.
・ A g icon appears in the shooting display.
d8: Framing grid display
G button U A Custom Settings menu
Display 3×3 (9 divisions) or 4×4 (16 divisions) grid lines, which are usefulfor checking composition on the display.
d9: Focus peaking
G button U A Custom Settings menu
When focus peaking is enabled in manual focus mode, objects that arein focus are indicated by colored outlines in the display. You can choosethe color.
Peaking levelChoose from [3 (high sensitivity)], [2 (standard)], [1 (low sensitivity)],and [Off]. The higher the value, the greater the depth that will be shownas being in focus.
Peaking highlight colorChoose the highlight color.

A Custom Settings: Fine-tuning camera settings361
d10: View all in continuous mode
G button U A Custom Settings menu
If [Off] is selected, the display will go blank during burst photography.
e: Bracketing/flash
e1: Flash sync speed
G button U A Custom Settings menu
Choose the flash sync speed.
Option Description
[1/200 s(AutoFP)]
Auto FP high-speed sync is enabled with compatible flash unitsand the maximum sync speed for other flash units is set to 1/200s.・ When the camera shows a shutter speed of 1/200 s in mode P
or A, auto FP high-speed sync will be activated if the actualshutter speed is faster than 1/200 s. If the flash supports autoFP high-speed sync, the camera can select shutter speeds asfast as 1/4000 s.
・ In mode S or M, the user can select shutter speeds as fast as1/4000 s when using flash units that support auto FP high-speed sync.
・ In mode S or M, if the shutter-speed dial is set to X, the shutterspeed will be set to 1/200 s.
[1/200s]
Flash sync speed set to selected value, which can be from 1/200to 1/60 s.・ In mode S or M, if the shutter-speed dial is set to X, the shutter
speed will be the same as the sync speed.・ In mode S or M, if the shutter-speed dial is set to a speed faster
than the sync speed, the shutter speed will be the same as thesync speed.
[1/160s]
[1/125s]

A Custom Settings: Fine-tuning camera settings362
Option Description
[1/100s]
Flash sync speed set to selected value, which can be from 1/200to 1/60 s.・ In mode S or M, if the shutter-speed dial is set to X, the shutter
speed will be the same as the sync speed.・ In mode S or M, if the shutter-speed dial is set to a speed faster
than the sync speed, the shutter speed will be the same as thesync speed.
[1/80 s]
[1/60 s]
D Fixing shutter speed at the flash sync speed limitIn modes S and M, shutter speed can be fixed at the value selected forCustom Setting e1 [Flash sync speed] by setting the shutter-speed dial to X.An X (flash sync indicator) will appear in the shooting display together withthe flash sync speed.
D Auto FP high-speed sync・ Auto FP high-speed sync allows the flash to be used at the highest shutter
speed supported by the camera. When [1/200 s (Auto FP)] is selected, thecamera automatically enables auto FP high-speed sync at shutter speedsfaster than the flash sync speed. This makes it possible to choose themaximum aperture for reduced depth of field even when the subject isbacklit in bright sunlight.
e2: Flash shutter speed
G button U A Custom Settings menu
Choose the slowest shutter speed available with a flash in mode P or A.

A Custom Settings: Fine-tuning camera settings363
Regardless of the setting chosen for Custom Setting e2 [Flash shutterspeed], shutter speeds can be as slow as 30 s in modes S and M or atflash settings of slow sync, slow rear-curtain sync, or red-eye reductionwith slow sync.
e3: Exposure comp. for flash
G button U A Custom Settings menu
Choose how the camera adjusts flash level when exposurecompensation is used.
Option Description
YE [Entire frame]The camera adjusts both the flash level andexposure. This changes the exposure for theentire frame.
E [Background only]Exposure compensation is adjusted for thebackground only.
e4: Auto c ISO sensitivity control
G button U A Custom Settings menu
Choose what the camera targets for exposure adjustment when autoISO sensitivity control is enabled during flash photography.
Option Description
e[Subject andbackground]
The camera takes both the main subject andbackground lighting into account when adjustingISO sensitivity.
f [Subject only]ISO sensitivity is adjusted only to ensure that themain subject is correctly exposed.

A Custom Settings: Fine-tuning camera settings364
e5: Auto bracketing (mode M)
G button U A Custom Settings menu
The settings affected when bracketing is enabled in mode M aredetermined by the options selected for [Auto bracketing] > [Autobracketing set] in the photo shooting menu and the option chosen forCustom Setting e5 [Auto bracketing (mode M)].
Custom Setting e5 [Autobracketing (mode M)]
Photo shooting menu [Auto bracketingset]
AE & flash bracketing* AE bracketing*
F [Flash/speed]Shutter speed and
flash levelShutter speed
G[Flash/speed/aperture]
Shutter speed,aperture, and flash
level
Shutter speedand aperture
H [Flash/aperture]Aperture and flash
levelAperture
I [Flash only] Flash level —
* If a flash is not used when [On] is selected for [Auto ISO sensitivitycontrol] and [Flash/speed], [Flash/speed/aperture], or [Flash/aperture] is selected for e5 [Auto bracketing (mode M)], ISO sensitivitywill be fixed at the value for the first shot in each bracketing sequence.
D Flash bracketingFlash bracketing is performed only with i-TTL or qA (auto aperture) flashcontrol.

A Custom Settings: Fine-tuning camera settings365
e6: Bracketing order
G button U A Custom Settings menu
Choose the order in which the shots in the bracketing program aretaken.
Option Description
H[MTR > under >over]
The unmodified shot is taken first, followed bythe shot with the lowest value, followed by theshot with the highest value.
I[Under > MTR >over]
Shooting proceeds in order from the lowest tothe highest value.
・ Custom Setting e6 [Bracketing order] has no effect on the order ofthe shots taken when [ADL bracketing] is selected for [Autobracketing] > [Auto bracketing set] in the photo shooting menu.
f: Controls
f1: Customize i menu
G button U A Custom Settings menu
Choose the items listed in the i menu displayed when the i button ispressed in photo mode.・ Highlight a position in the i menu, press J, and select the desired
item.・ The following items can be assigned to the i menu.
Item 0
J [Choose image area] 243
8 [Image quality] 160
o [Image size] 161
Item 0
E[Exposurecompensation]
139
m [White balance] 116

A Custom Settings: Fine-tuning camera settings366
Item 0
h [Set Picture Control] 147
p [Color space] 262
y [Active D-Lighting] 164
q [Long exposure NR] 262
r [High ISO NR] 263
w [Metering] 162
c [Flash mode] 502
Y[Flashcompensation]
504
s [Focus mode] 100
t [AF-area mode] 102
u[Vibrationreduction]
171
t [Auto bracketing] 270
$ [Multiple exposure] 281
2[HDR (high dynamicrange)] 289
7[Interval timershooting]
296
8 [Time-lapse video] 310
Item 0
9[Focus shiftshooting]
319
L[Silentphotography]
327
v [Release mode] 166
w[Custom controls(shooting)] 367
z[Exposure delaymode]
356
O [Shutter type] 357
y[Apply settings tolive view]
359
W [Focus peaking] 360
3[Monitor/viewfinderbrightness]
394, 396
Z[Bluetoothconnection]
366
U [Wi-Fi connection] 164
L[Wireless remoteconnection]
413
Bluetooth connectionEnable or disable Bluetooth.

A Custom Settings: Fine-tuning camera settings367
f2: Custom controls (shooting)
G button U A Custom Settings menu
Choose the operations performed in photo mode using the cameracontrols or lens control ring.・ Choose the roles played by the controls below. Highlight the desired
control and press J.
Option
2 [Fn button]
j [AE-L/AF-L button]
k [OK button]
z [Video record button]
S [Lens Fn button]
3 [Lens Fn2 button]
l [Lens control ring]
・ The roles that can be assigned to these controls are as follows:
Option 2 j k1 z S 3 l
K [Select center focus point] — 4 4 — — — —
A [AF-ON] 4 4 — — 4 4 —
F [AF lock only] 4 4 — — 4 4 —
E [AE lock (Hold)] 4 4 — 4 4 4 —

A Custom Settings: Fine-tuning camera settings368
Option 2 j k1 z S 3 l
D [AE lock (Reset on release)] 4 4 — 4 4 4 —
C [AE lock only] 4 4 — — 4 4 —
B [AE/AF lock] 4 4 — — 4 4 —
r [FV lock] 4 — — — 4 4 —
h [cDisable/enable] 4 — — — 4 4 —
q [Preview] 4 — — 4 4 4 —
L [Matrix metering] 4 — — — 4 4 —
M [Center-weighted metering] 4 — — — 4 4 —
N [Spot metering] 4 — — — 4 4 —
t [Highlight-weighted metering] 4 — — — 4 4 —
1 [Bracketing burst] 4 — — — 4 4 —
4 [+ RAW] 4 — — 4 4 4 —
n [Subject tracking] 4 — — — 4 4 —
L [Silent photography] 4 — — — 4 4 —
b [Live view info display off] 4 4 — 4 4 4 —
b [Framing grid display] 4 — — 4 4 4 —
p [Zoom on/off] 4 4 4 4 4 4 —
O [MY MENU] 4 — — 4 4 4 —
3 [Access top item in MY MENU] 4 — — 4 4 4 —
K [Playback] 4 — — — 4 4 —
J [Choose image area] 4 — — 4 — — —
8 [Image quality/size] 4 — — 4 — — —

A Custom Settings: Fine-tuning camera settings369
Option 2 j k1 z S 3 l
m [White balance] 4 — — 4 — — —
h [Set Picture Control] 4 — — 4 — — —
y [Active D-Lighting] 4 — — 4 — — —
w [Metering] 4 — — 4 — — —
I/Y [Flash mode/compensation] 4 — — 4 — — —
v [Release mode] 4 — — — — — —
z [Focus mode/AF-area mode] 4 — — 4 — — —
t [Auto bracketing] 4 — — 4 — — —
$ [Multiple exposure] 4 — — 4 — — —
2 [HDR (high dynamic range)] 4 — — 4 — — —
z [Exposure delay mode] 4 — — 4 — — —
W [Focus peaking] 4 — — — — — —
w [Choose non-CPU lens number] 4 — — 4 — — —
X [Focus (M/A)] — — — — — — 42, 3
q [Aperture] — — — — — — 43
E [Exposure compensation] — — — — — — 43
[None] 4 4 4 4 4 4 43
1 Regardless of the option selected, when [Auto-area AF], [Auto-areaAF (people)], or [Auto-area AF (animals)] is chosen for AF-areamode, the button functions only to initiate subject-tracking AF
(0102).2 Available with compatible lenses only.3 Regardless of the option selected, in manual focus mode the control
ring can only be used to adjust focus.

A Custom Settings: Fine-tuning camera settings370
・ The following options are available:
Role Description
K[Select centerfocus point]
Pressing the control selects the center focuspoint.
A [AF-ON] Pressing the control initiates autofocus.
F [AF lock only] Focus locks while the control is pressed.
E [AE lock (Hold)]
Exposure locks when the control is pressed.Exposure lock does not end when the shutteris released. Exposure remains locked until thecontrol is pressed a second time or thestandby timer expires.
D[AE lock (Reset onrelease)]
Exposure locks when the control is pressed.Exposure remains locked until the control ispressed a second time, the shutter isreleased, or the standby timer expires.
C [AE lock only] Exposure locks while the control is pressed.
B [AE/AF lock]Focus and exposure lock while the control ispressed.
r [FV lock]Press the control to lock flash value foroptional flash units; press again to cancel FVlock.
h [cDisable/enable]
If the flash is currently enabled, it will bedisabled while the control is pressed. If theflash is currently off, front-curtain sync will beselected while the control is pressed.
q [Preview]Keep the control pressed to preview photocolor, exposure, and depth of field.

A Custom Settings: Fine-tuning camera settings371
Role Description
L [Matrix metering][Matrix metering] is activated while thecontrol is pressed.
M[Center-weightedmetering]
[Center-weighted metering] is activatedwhile the control is pressed.
N [Spot metering][Spot metering] is activated while thecontrol is pressed.
t
[Highlight-weightedmetering]
[Highlight-weighted metering] is activatedwhile the control is pressed.
1 [Bracketing burst]
- If the control is pressed when an optionother than [WB bracketing] is selected for[Auto bracketing] > [Auto bracketing set]in the photo shooting menu in continuousrelease mode, the camera will take all theshots in the current bracketing programand repeat the bracketing burst while theshutter-release button is pressed. In single-frame release mode, shooting will end afterthe first bracketing burst.
- If [WB bracketing] is selected for [Autobracketing set], the camera will takepictures while the shutter-release button ispressed and apply white balancebracketing to each shot.

A Custom Settings: Fine-tuning camera settings372
Role Description
4 [+ RAW]
- If a JPEG option is currently selected forimage quality, “RAW” will be displayed anda RAW copy will be recorded with the nextpicture taken after the control is pressed.The original image quality setting will berestored when you remove your fingerfrom the shutter-release button or pressthe control again, canceling [+ RAW].
- RAW copies are recorded at the settingscurrently selected for [RAW recording] inthe photo shooting menu.
n [Subject tracking]
Pressing the control when [Auto-area AF],[Auto-area AF (people)], or [Auto-area AF(animals)] is selected for AF-area modeenables subject tracking; the focus point willchange to a targeting reticle and the monitorand viewfinder to subject-tracking displays.- To end subject-tracking AF, press the
control again or press the W (Q) button.
L[Silentphotography]
Press the control to perform silentphotography. Press again to cancel silentphotography.
b[Live view infodisplay off]
Press the control to hide the icons andshooting information on the display. Iconsand shooting information can be displayedby pressing the button again.
b[Framing griddisplay]
Each time you press the button, thecomposition framing grid on the displaychanges between [Off], [On (3×3)], and [On(4×4)].

A Custom Settings: Fine-tuning camera settings373
Role Description
O [MY MENU] Press the control to display “MY MENU”.
3[Access top itemin MY MENU]
Press the control to jump to the top item in“MY MENU”. Select this option for quickaccess to a frequently-used menu item.
K [Playback] Press the control to start playback.
J[Choose imagearea]
Press the control and rotate a command dialto choose the image area.
8[Image quality/size]
Press the control and rotate the maincommand dial to choose an image qualityoption and the sub-command dial to selectimage size.
m [White balance]
To choose a white balance option, hold thebutton and rotate the main command dial.Some options offer sub-options that can beselected by rotating the sub-command dial.
h[Set PictureControl]
Press the control and rotate a command dialto choose a Picture Control.
y[Active D-Lighting]
Press the control and rotate a command dialto adjust Active D-Lighting.
w [Metering]Press the control and rotate a command dialto choose a metering option.
I/Y[Flash mode/compensation]
Press the control and rotate the maincommand dial to choose a flash mode andthe sub-command dial to adjust flash output.

A Custom Settings: Fine-tuning camera settings374
Role Description
v [Release mode]
Press the control and rotate the maincommand dial to choose a release mode.When the release mode is [Continuous L],you can change the frame advance ratesetting by rotating the sub-command dial,and when the release mode is [Self-timer],you can change the setting of the time untilthe shutter is released by rotating the sub-command dial.
z[Focus mode/AF-area mode]
Hold the control and rotate the maincommand dial to choose the focus mode, thesub-command dial to choose the AF-areamode.
t [Auto bracketing]
Press the control and rotate the maincommand dial to choose the number ofshots and the sub-command dial to selectthe bracketing increment or Active D-Lighting amount.
$[Multipleexposure]
Press the control and rotate the maincommand dial to choose the mode and thesub-command dial to choose the number ofshots.
2[HDR (highdynamic range)]
Press the control and rotate the maincommand dial to choose the mode and thesub-command dial to choose the exposuredifferential.
z[Exposure delaymode]
Press the control and rotate a command dialto choose the shutter-release delay.

A Custom Settings: Fine-tuning camera settings375
Role Description
W [Focus peaking]
Press the control and rotate the maincommand dial to choose a peaking level andthe sub-command dial to select the peakingcolor.
w[Choose non-CPUlens number]
Press the control and rotate a command dialto choose a lens number saved using the[Non-CPU lens data] item in the setupmenu.
X [Focus (M/A)]
Autofocus can be over-ridden by rotating thelens control ring (autofocus with manualoverride). The control ring can be used formanual focus while the shutter-releasebutton is pressed halfway. To refocus usingautofocus, lift your finger from the shutter-release button and then press it halfwayagain.
q [Aperture]Rotate the lens control ring to adjustaperture.
E[Exposurecompensation]
Rotate the lens control ring when theexposure compensation dial is set to [C] toadjust exposure compensation.
[None] The control has no effect.
f3: Custom controls (playback)
G button U A Custom Settings menu
Choose the role assigned to the camera buttons during playback.

A Custom Settings: Fine-tuning camera settings376
Option Role Description
j[AE-L/AF-Lbutton]
g [Protect]Press the control to protect thecurrent picture.
c [Rating]
When you press the control, you canpress 4 or 2 or rotate the maincommand dial to change the ratingsetting for the displayed image.
p [Zoom on/off]
Press the control to zoom the displayin on the area around the currentfocus point (the zoom ratio isselected in advance). Press again tocancel zoom.・ To choose the zoom ratio,
highlight [Zoom on/off] and press2.
・ Zoom is available in both full-frame and thumbnail playback.
[None] The control has no effect.
k[OKbutton]*
n[Thumbnailon/off]
Press the control to toggle betweenfull-frame playback, 4-, 9-, and 72-frame thumbnail playback, andcalendar playback.
o[Viewhistograms]
A histogram is displayed while thecontrol is pressed. The histogramdisplay is available in both full-frameand thumbnail playback.

A Custom Settings: Fine-tuning camera settings377
Option Role Description
k[OKbutton]*
p [Zoom on/off]
Press the control to zoom the displayin on the area around the currentfocus point (the zoom ratio isselected in advance). Press again tocancel zoom.・ To choose the zoom ratio,
highlight [Zoom on/off] and press2.
・ Zoom is available in both full-frame and thumbnail playback.
u[Choosefolder]
Press the control to display the[Choose folder] dialog, where youcan then choose a folder forplayback.
* Regardless of the option selected, pressing J when a video is displayedfull frame starts video playback.
f4: Customize command dials
G button U A Custom Settings menu
Customize the operation of the main and sub-command dials.
Reverse rotationReverse the direction of rotation of the command dials for selectedoperations.・ Highlight [Exposure compensation] or [Shutter speed/aperture]
and press 2 to select (M) or deselect (U).・ Press J to save changes and exit.

A Custom Settings: Fine-tuning camera settings378
Change main/subReverse the roles of the main- and sub-command dials.
Option Description
[Exposuresetting]
If [On] is selected, the main command dial will controlaperture and the sub-command dial shutter speed. If [On(Mode A)] is selected, the main command dial will be usedto set aperture in mode A only.
[Autofocussetting]
If [On] is selected and [Focus mode/AF-area mode] hasbeen assigned to a control using Custom Setting f2 [Customcontrols (shooting)], you can choose the AF-area mode byholding the control and rotating the main command dialand focus mode by holding the control and rotating thesub-command dial.
Menus and playbackChoose the roles played by the multi selector and command dialsduring playback and menu navigation.

A Custom Settings: Fine-tuning camera settings379
Option Description
[On]
Playback:・ The main command dial can be used to choose the
picture displayed during full-frame playback. Thesub-command dial can be used to skip forward orback according to the option selected for [Sub-dialframe advance].
・ During thumbnail playback, the main command dialcan be used to highlight thumbnails and the sub-command dial to page up or down.
Menus*:Use the main command dial to highlight menu items.Rotating the sub-command dial right displays the sub-menu for the highlighted option. Rotating it leftdisplays the previous menu.
2
[On (picturereviewexcluded)]
As for [On] except that the command dials cannot beused for playback during picture review.
[Off]Use the multi selector to choose the picture displayedduring full-frame playback or to highlight pictures ormenu items.
* The sub-command dial cannot be used to select highlighted items. Toselect highlighted items, press J or 2.
Sub-dial frame advanceChoose the operation performed when rotating the sub-command dialduring full-frame playback. This option only takes effect when [On] or[On (picture review excluded)] is selected for [Menus and playback].
Option Description
[10 frames] Skip forward or back 10 frames at a time.

A Custom Settings: Fine-tuning camera settings380
Option Description
[50 frames] Skip forward or back 50 frames at a time.
c [Rating]Skip to the next or previous pictures with the selectedrating. To choose the rating, highlight [Rating] andpress 2.
P [Protect] Skip to the next or previous protected picture.
C [Photos only] Skip to the next or previous photo.
1 [Videos only] Skip to the next or previous video.
u [Folder] Rotate the sub-command dial to select a folder.
f5: Release button to use dial
G button U A Custom Settings menu
Selecting [Yes] allows adjustments that are normally made by holding abutton and rotating a command dial to be made by rotating thecommand dial after the button is released. This ends when the button ispressed again, the shutter-release button is pressed halfway, or thestandby timer expires.・ [Release button to use dial] applies to controls to which the
following roles have been assigned using Custom Settings f2[Custom controls (shooting)] or g2 [Custom controls]: [Chooseimage area], [Image quality/size], [White balance], [Set PictureControl], [Active D-Lighting], [Metering], [Flash mode/compensation], [Release mode], [Release mode (save frame)],[Focus mode/AF-area mode], [Auto bracketing], [Multipleexposure], [HDR (high dynamic range)], [Exposure delay mode],[Focus peaking], [Choose non-CPU lens number], and[Microphone sensitivity].

A Custom Settings: Fine-tuning camera settings381
f6: Reverse indicators
G button U A Custom Settings menu
Choose whether the exposure indicator is displayed with negativevalues on the left and positive values on the right, or with positivevalues on the left and negative values on the right.
Option Description
VThe indicator is displayed with positive valueson the left and negative values on the right.
W
The indicator is displayed with negativevalues on the left and positive values on theright.
g: Video
g1: Customize i menu
G button U A Custom Settings menu
Choose the items listed in the i menu displayed when the i button ispressed in video mode.・ Highlight a position in the i menu, press J, and select the desired
item.・ The following items can be assigned to the i menu.
Item 0
G[Frame size andrate/Video quality]
175
E[Exposurecompensation]
139
m [White balance] 175
Item 0
h [Set Picture Control] 175
y [Active D-Lighting] 181
w [Metering] 180
s [Focus mode] 182

A Custom Settings: Fine-tuning camera settings382
Item 0
t [AF-area mode] 182
u[Vibrationreduction]
182
4 [Electronic VR] 181
H[Microphonesensitivity]
178
5 [Attenuator] 338
6[Frequencyresponse]
338
7[Wind noisereduction]
179
v[Release mode (saveframe)] 335
Item 0
W [Focus peaking] 360
9 [Highlight display] 389
3[Monitor/viewfinderbrightness]
394,396
Z[Bluetoothconnection]
382
U [Wi-Fi connection]164,180
L[Wireless remoteconnection]
413
Bluetooth connectionEnable or disable Bluetooth.
g2: Custom controls
G button U A Custom Settings menu
Choose the operations performed in video mode using the cameracontrols or lens control ring.

A Custom Settings: Fine-tuning camera settings383
・ Choose the roles played by the controls below. Highlight the desiredcontrol and press J.
Option
2 [Fn button]
j [AE-L/AF-L button]
k [OK button]
G [Shutter-release button]
S [Lens Fn button]
3 [Lens Fn2 button]
l [Lens control ring]
・ The roles that can be assigned to these controls are as follows:
Option 2 j k1 G S 3 l
K [Select center focus point] — 4 4 — — — —
A [AF-ON] — 4 — — 4 4 —
F [AF lock only] — 4 — — 4 4 —
E [AE lock (Hold)] — 4 — — 4 4 —
C [AE lock only] — 4 — — 4 4 —
B [AE/AF lock] — 4 — — 4 4 —
n [Subject tracking] 4 — — — 4 4 —

A Custom Settings: Fine-tuning camera settings384
Option 2 j k1 G S 3 l
b [Live view info display off] 4 4 — — 4 4 —
b [Framing grid display] 4 — — — 4 4 —
p [Zoom on/off] 4 4 4 — 4 4 —
O [MY MENU] 4 — — — 4 4 —
3 [Access top item in MY MENU] 4 — — — 4 4 —
K [Playback] 4 — — — 4 4 —
C [Take photos] — — — 4 — — —
1 [Record videos] — 4 4 4 — — —
m [White balance] 4 — — — — — —
h [Set Picture Control] 4 — — — — — —
y [Active D-Lighting] 4 — — — — — —
w [Metering] 4 — — — — — —
c [Release mode (save frame)] 4 — — — — — —
z [Focus mode/AF-area mode] 4 — — — — — —
H [Microphone sensitivity] 4 — — — — — —
W [Focus peaking] 4 — — — — — —
X [Focus (M/A)] — — — — — — 42, 3
q [Power aperture] — — — — — — 43
E [Exposure compensation] — — — — — — 43
[None] 4 4 4 — 4 4 43
1 Regardless of the option selected, when [Auto-area AF], [Auto-areaAF (people)], or [Auto-area AF (animals)] is chosen for AF-area

A Custom Settings: Fine-tuning camera settings385
mode, the button functions only to initiate subject-tracking AF
(0102).2 Available with compatible lenses only.3 Regardless of the option selected, in manual focus mode the control
ring can only be used to adjust focus.・ The following options are available:
Role Description
K[Select centerfocus point]
Pressing the control selects the center focuspoint.
A [AF-ON] Pressing the control initiates autofocus.
F [AF lock only] Focus locks while the control is pressed.
E [AE lock (Hold)]
Exposure locks when the control is pressed.Exposure lock does not end when theshutter is released. Exposure remains lockeduntil the control is pressed a second time orthe standby timer expires.
C [AE lock only] Exposure locks while the control is pressed.
B [AE/AF lock]Focus and exposure lock while the control ispressed.
n [Subject tracking]
Pressing the control when [Auto-area AF],[Auto-area AF (people)], or [Auto-area AF(animals)] is selected for AF-area modeenables subject tracking; the focus point willchange to a targeting reticle and themonitor and viewfinder to subject-trackingdisplays.・To end subject-tracking AF, press the
control again or press the W (Q) button.

A Custom Settings: Fine-tuning camera settings386
Role Description
b[Live view infodisplay off]
Press the control to hide the icons andshooting information on the display. Iconsand shooting information can be displayedby pressing the button again.
b[Framing griddisplay]
Each time you press the button, thecomposition framing grid on the displaychanges between [Off], [On (3×3)], and [On(4×4)].
p [Zoom on/off]
Press the control to zoom the display in onthe area around the current focus point (thezoom ratio is selected in advance). Pressagain to cancel zoom.
O [MY MENU] Press the control to display “MY MENU”.
3[Access top item inMY MENU]
Press the control to jump to the top item in“MY MENU”. Select this option for quickaccess to a frequently-used menu item.
K [Playback] Press the control to start playback.
C [Take photos]Press the shutter-release button all the waydown to take a photograph with an aspectratio of 16:9.
1 [Record videos]Press the control to start recording. Pressagain to end recording.
m [White balance]
Hold the control and rotate the maincommand dial to adjust white balance forvideos. Some options offer sub-options thatcan be selected by rotating the sub-command dial.
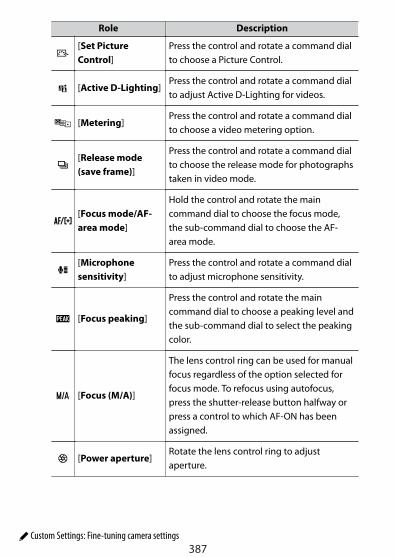
A Custom Settings: Fine-tuning camera settings387
Role Description
h[Set PictureControl]
Press the control and rotate a command dialto choose a Picture Control.
y [Active D-Lighting]Press the control and rotate a command dialto adjust Active D-Lighting for videos.
w [Metering]Press the control and rotate a command dialto choose a video metering option.
c[Release mode(save frame)]
Press the control and rotate a command dialto choose the release mode for photographstaken in video mode.
z[Focus mode/AF-area mode]
Hold the control and rotate the maincommand dial to choose the focus mode,the sub-command dial to choose the AF-area mode.
H[Microphonesensitivity]
Press the control and rotate a command dialto adjust microphone sensitivity.
W [Focus peaking]
Press the control and rotate the maincommand dial to choose a peaking level andthe sub-command dial to select the peakingcolor.
X [Focus (M/A)]
The lens control ring can be used for manualfocus regardless of the option selected forfocus mode. To refocus using autofocus,press the shutter-release button halfway orpress a control to which AF-ON has beenassigned.
q [Power aperture]Rotate the lens control ring to adjustaperture.

A Custom Settings: Fine-tuning camera settings388
Role Description
E[Exposurecompensation]
Rotate the lens control ring when theexposure compensation dial is set to [C] toadjust exposure compensation.
[None] The control has no effect.
D Power aperture・ Power aperture is available only in modes A and M.・ A 6 icon in the shooting display indicates that power aperture cannot be
used.・ The display may flicker while aperture is adjusted.
g3: AF speed
G button U A Custom Settings menu
Choose the focus speed in video mode when the focus mode is set toAF-C or AF-F.
Use [When to apply] to choose when the selected option applies.
Option Description
D [Always]The camera focuses at the selected speed at all timesin video mode.
E[Only whilerecording]
Focus is adjusted at the selected speed only duringvideo recording. At other times, the focus speed is“+5”, or in other words as fast possible.

A Custom Settings: Fine-tuning camera settings389
g4: AF tracking sensitivity
G button U A Custom Settings menu
Set the AF tracking sensitivity from values 1 to 7 in video mode whenthe focus mode is set to AF-C or AF-F.
・ Choose [7 (Low)] to help maintain focus on your original subject.・ If the subject leaves the selected focus area when [1 (High)] is
selected, the camera will respond by quickly shifting focus to a newsubject in the same area.
g5: Highlight display
G button U A Custom Settings menu
Choose whether shading is used to indicate highlights (bright areas ofthe frame) during video recording.
Display patternTo enable the highlight display, select [Pattern 1] or [Pattern 2].
Pattern 1 Pattern 2
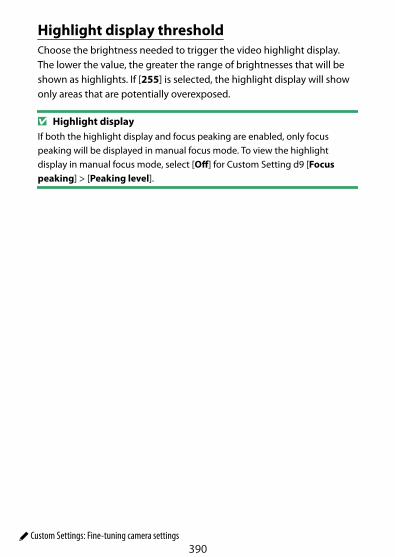
A Custom Settings: Fine-tuning camera settings390
Highlight display thresholdChoose the brightness needed to trigger the video highlight display.The lower the value, the greater the range of brightnesses that will beshown as highlights. If [255] is selected, the highlight display will showonly areas that are potentially overexposed.
D Highlight displayIf both the highlight display and focus peaking are enabled, only focuspeaking will be displayed in manual focus mode. To view the highlightdisplay in manual focus mode, select [Off] for Custom Setting d9 [Focuspeaking] > [Peaking level].

B The setup menu: Camera setup391
B The setup menu: Camera setupTo view the setup menu, select the B tab in the camera menus.
The setup menu contains the following items:Item 0
[Format memory card] 392
[Language] 393
[Time zone and date] 393
[Monitor brightness] 394
[Monitor color balance] 394
[Viewfinder brightness] 396
[Viewfinder color balance] 396
[Limit monitor modeselection]
397
[Information display] 397
[AF fine-tuning options] 397
[Non-CPU lens data] 400
[Save focus position] 401
[Image Dust Off ref photo] 401
Item 0
[Pixel mapping] 403
[Image comment] 404
[Copyright information] 405
[Beep options] 406
[Touch controls] 407
[Self-portrait mode] 408
[HDMI] 408
[Airplane mode] 408
[Connect to smart device] 408
[Connect to computer] 411
[Wireless remote (ML-L7)options]
413
[Conformity marking] 415
[USB power delivery] 415

B The setup menu: Camera setup392
Item 0
[Energy saving (photomode)] 417
[Slot empty release lock] 418
[Save/load menu settings] 419
Item 0
[Reset all settings] 423
[Firmware version] 423
D See also“Setup menu defaults” (0227)
Format memory card
G button U B setup menu
Format memory cards. Note that formatting permanently deletes allpictures and other data on the card. Before formatting, be sure tomake backup copies as required.
D During formattingDo not turn the camera off or remove memory cards until the message[Format memory card] clears from the display.
B The setup menu: Camera setup393
Language
G button U B setup menu
Choose a language for camera menus and messages. The languagesavailable vary with the country or region in which the camera wasoriginally purchased.
Time zone and date
G button U B setup menu
Change time zones and set the camera clock. We recommend that thecamera clock be adjusted regularly.
Option Description
[Time zone]Choose a time zone. [Date and time] is automatically setto the time in the new time zone.
[Date and time]Set the camera clock to the time in the selected [Timezone].
[Date format]Choose the order in which the day, month, and year aredisplayed.
[Daylightsaving time]
Select [On] to turn daylight saving time on, [Off] to turn itoff. Selecting [On] automatically advances the clock onehour. The default setting is [Off].
If the camera clock has been initialized, the 1 icon is displayed in theshooting display as a warning.

B The setup menu: Camera setup394
Monitor brightness
G button U B setup menu
Press 1 or 3 to adjust monitor brightness. Choose higher values forincreased brightness, lower values for reduced brightness.・ [Monitor brightness] can only be adjusted when the monitor is the
active display. It cannot be adjusted when [Viewfinder only] isselected for monitor mode or when your eye is to the viewfinder.
・ Higher values increase the drain on the battery.
Monitor color balance
G button U B setup menu
Adjust monitor color balance to your taste.・ [Monitor color balance] can only be adjusted when the monitor is
the active display. It cannot be adjusted when [Viewfinder only] isselected for monitor mode or when your eye is to the viewfinder.

B The setup menu: Camera setup395
・ Color balance is adjusted using the multi selector. Press 1, 3, 4, or2 to adjust color balance as shown below. Press J to save changes.
1 Increase green
2 Increase amber
3 Increase magenta
4 Increase blue
・ Monitor color balance applies only to menus, playback, and theshooting display; photos and videos taken with the camera are notaffected.
・ The reference image is either the last picture taken or, in playbackmode, the picture last displayed. If the memory card contains nopictures, an empty frame will be displayed instead.
・ To choose a different picture, press the W (Q) button. Highlight thedesired picture and press J to select it as the reference image.

B The setup menu: Camera setup396
・ To view the highlighted picture zoomed in, press and hold the Xbutton.
Viewfinder brightness
G button U B setup menu
・ Adjust viewfinder brightness. [Viewfinder brightness] can only beadjusted when the viewfinder is the active display. It cannot beadjusted in the monitor or when [Monitor only] is selected formonitor mode.
・ Higher values increase the drain on the battery.
Option Description
[Auto]Viewfinder brightness is adjusted automatically in response tolighting conditions.
[Manual]Press 1 or 3 to adjust brightness manually. Choose highervalues for increased brightness, lower values for reducedbrightness.
Viewfinder color balance
G button U B setup menu
Adjust viewfinder color balance to your taste. [Viewfinder colorbalance] can only be adjusted when the viewfinder is the active display.It cannot be adjusted in the monitor or when [Monitor only] is selectedfor monitor mode. Otherwise the procedure is the same as for [Monitorcolor balance] (0394).

B The setup menu: Camera setup397
Limit monitor mode selection
G button U B setup menu
Choose the monitor modes that can be selected using the M button.・ Highlight an option and press 2 to select (M) or deselect (U).
Options marked with a check (M) are available for selection.・ To complete the operation, press J.
Information display
G button U B setup menu
Adjust the appearance of the information display according to lightingconditions.
Dark on light Light on dark
Option Description
w[Dark onlight]
To make the display easier to read in bright locations, themonitor lights and the lettering is displayed in black.
x[Light ondark]
To make the display easier to read in dark locations, themonitor dims and the lettering is displayed in white.
AF fine-tuning options
G button U B setup menu
Fine-tune focus for the current lens.

B The setup menu: Camera setup398
・ Use only as required.・ We recommend that you perform fine-tuning at a focus distance you
use frequently. If you perform focus-tuning at a short focus distance,for example, you may find it less effective at longer distances.
Option Description
[AF fine-tune]
・ [On]: Turn AF fine-tuning on.・ [Off]: Turn AF fine-tuning off.
[Fine-tuneand savelens]
Fine-tune focus for the current lens. Press 1 or 3 to highlightitems and press 4 or 2 to choose from values between +20and -20.・ The larger the fine-tuning value, the farther the focal point
is from the lens; the smaller the value, the closer the focalpoint.
・ The display shows the current and previous values.・ The camera can store values for up to 40 lens types.・ If a lens for which values have already been saved is used,
the fine-tuning values will be overwritten.
[Default]Choose the fine-tuning values for lenses for which no valueshave previously been saved using [Fine-tune and save lens].Press 4 or 2 to choose from values between +20 and -20.

B The setup menu: Camera setup399
Option Description
[List savedvalues]
List values saved using [Fine-tune and save lens].Highlighting a lens in the list and pressing 2 displays a[Choose lens number] dialog.
・ The [Choose lens number] dialog is used to enter the lensidentifier.
・ The serial number is automatically entered for Z mountlenses and some F mount lenses.
D Deleting saved valuesTo delete values saved using [Fine-tune and save lens], highlight thedesired lens in the [List saved values] list and press O.
Creating and saving fine-tuning values
1 Attach the lens to the camera.
2 Select [AF fine-tuning options] in the setup menu, thenhighlight [Fine-tune and save lens] and press 2.An AF fine-tuning dialog will be displayed.

B The setup menu: Camera setup400
3 Press 4 or 2 to fine-tune autofocus.・Choose from values between +20 and −20.・The current value is shown by g, the previously-selected value byj.
・ If a zoom lens is attached, you can choose separate fine-tuningvalues for maximum angle (WIDE) and maximum zoom (TELE). Use1 and 3 to choose between the two.
・The larger the fine-tuning value, the farther the focal point is fromthe lens; the smaller the value, the closer the focal point.
4 Press J to save the new value.
Choosing a default fine-tuning value
1 Select [AF fine-tuning options] in the setup menu, thenhighlight [Default] and press 2.
2 Press 4 or 2 to fine-tune autofocus.・Choose from values between +20 and −20.・The current value is shown by g, the previously-selected value byj.
・The larger the fine-tuning value, the farther the focal point is fromthe lens; the smaller the value, the closer the focal point.
3 Press J to save the new value.
Non-CPU lens data
G button U B setup menu
Record data for non-CPU lenses attached using an optional mountadapter. By registering the focal length and maximum aperture of a non-CPU lens in the camera, you can display this data as shooting data.

B The setup menu: Camera setup401
Option Description
[Lens number] Choose a lens identifier.
[Focal length (mm)] Enter the focal length.
[Maximum aperture] Enter the maximum aperture.
Save focus position
G button U B setup menu
If set to [On], the focus position is saved at the same position as beforethe camera was turned off when you turn it off and then on again.・ The focus position may change depending on the zoom operation
and temperature changes.・ This function is enabled only when a Z mount lens with an autofocus
function is attached.・ If set to [On], it may take some time before you can operate the
camera after turning it on.
Image Dust Off ref photo
G button U B setup menu
Acquire reference data for the Image Dust Off option in NX Studio.Image Dust Off processes RAW images to mitigate effects caused bydust adhering in front of the camera image sensor. For moreinformation, refer to NX Studio online help.
B The setup menu: Camera setup402
Acquiring Image Dust Off reference data
1 Select [Start] on the Image Dust Off ref photo dialog.・Highlight [Start] and press J to display the shooting screen.
2 With the lens about ten centimeters (four inches) from a well-lit,featureless white object, frame the object so that it fills thedisplay and then press the shutter-release button halfway.・ In autofocus mode, focus will automatically be set to infinity.・ In manual focus mode, set focus to infinity manually.
3 Press the shutter-release button the rest of the way down toacquire Image Dust Off reference data.・The monitor turns off when the shutter-release button is pressed.・ If the reference object is too bright or too dark, the camera may be
unable to acquire Image Dust Off reference data and a messagewill be displayed and the camera will return to the display shownin Step 1. Choose another reference object and press the shutter-release button again.

B The setup menu: Camera setup403
D Acquiring Image Dust Off reference data・ A lens with a focal length of at least 50 mm is recommended.・ When using a zoom lens, zoom all the way in.・ The same reference data can be used for photographs taken with different
lenses or at different apertures.・ Reference images cannot be viewed using computer imaging software.・ A grid pattern is displayed when reference images are viewed on the
camera.
Pixel mapping
G button U B setup menu
Pixel mapping checks and optimizes the camera image sensor. If younotice unexpected bright spots appearing in pictures taken with thecamera, perform pixel mapping as described below.・ Pixel mapping is available only when a Z mount lens or an optional
FTZ mount adapter is attached.・ To prevent unexpected loss of power, use a fully-charged battery or
an optional charging AC adapter.
1 Select [Pixel mapping] in the setup menu.Turn the camera on, press the G button, and select [Pixelmapping] in the setup menu.
2 Select [Start].Pixel mapping will start. A message is displayed while the operationis in progress.

B The setup menu: Camera setup404
3 Turn the camera off when pixel mapping is complete.
D Pixel mapping・ Do not attempt to operate the camera while pixel mapping is in progress.
Do not turn the camera off or remove the battery.・ Pixel mapping may not be available if the camera’s internal temperature is
elevated.
Image comment
G button U B setup menu
Add a comment to new photographs as they are taken. Comments canbe viewed in NX Studio’s [Info] tab.
Input commentInput a comment of up to 36 characters. Highlight [Input comment]and press 2 to display a text-entry dialog. For information on text entry,
see “Text entry” (0239).
Attach commentTo attach the comment to subsequent photographs, highlight [Attachcomment], press 2, and confirm that a check (M) appears in theadjacent check box. Press J to save changes and exit; the comment willbe attached to all subsequent photographs.

B The setup menu: Camera setup405
D Photo infoComments can be viewed on the shooting data page in the photoinformation display.
Copyright information
G button U B setup menu
Add copyright information to new photographs as they are taken.Copyright information can be viewed in NX Studio’s [Info] tab.
Artist/CopyrightEnter the names of the photographer (maximum 36 characters) andcopyright holder (maximum 54 characters). Highlight [Artist] or[Copyright] and press 2 to display a text-entry dialog. For information
on text entry, see “Text entry” (0239).
Attach copyright informationTo attach copyright information to subsequent photographs, highlight[Attach copyright information], press 2, and confirm that a check (M)appears in the adjacent check box. Press J to save changes and exit;copyright information will be attached to all subsequent photographs.
B The setup menu: Camera setup406
D Copyright information・ To prevent unauthorized use of the artist or copyright holder names,
make sure that [Attach copyright information] is not selected beforelending or transferring the camera to another person. You will also needto make sure that the artist and copyright fields are blank.
・ Nikon does not accept liability for any damages or disputes arising fromthe use of the [Copyright information] option.
D Photo infoCopyright information is included in the shooting data shown in the photoinformation display.
Beep options
G button U B setup menu
Beep on/offTurn the beep speaker on or off.・ If [On] is selected for [Beep on/off], beeps sound when:
- the self-timer counts down,- interval-timer photography, time-lapse video recording, or focus
shift ends,- the camera focuses in photo mode (note that this does not apply if
AF-C is selected for focus mode or when AF-A is selected and youare shooting in AF-C, and [Release] is selected for Custom Settinga2 [AF-S priority selection]),
- touch controls are used, or- the shutter-release button is pressed with a write-protected
memory card inserted in the camera.・ Select [Off (touch controls only)] to disable the beep for touch
controls while enabling it for other purposes.

B The setup menu: Camera setup407
・ When [On] is selected for [Silent photography] in the photoshooting menu, a beep will not sound when the camera focuses orwhile the self-timer is in operation, regardless of the settings selectedfor [Beep options].
VolumeAdjust beep volume.
PitchChoose the pitch of the beep from [High] and [Low].
Touch controls
G button U B setup menu
Adjust settings for monitor touch controls.
Enable/disable touch controlsEnable or disable touch controls. Select [Playback only] to enable touchcontrols in playback mode only.
Full-frame playback flicksChoose whether the next image in full-frame playback is displayed byflicking left or by flicking right.
Option Description
S [LeftURight] Flick left to display the next picture.
T [LeftVRight] Flick right to view the next picture.

B The setup menu: Camera setup408
Self-portrait mode
G button U B setup menu
When set to [Disable], the monitor will not switch to self-portrait modeeven if it is set to the self-portrait mode position.
HDMI
G button U B setup menu
Adjust settings for connection to HDMI devices (0494).
Airplane mode
G button U B setup menu
Select [Enable] to disable the camera’s built-in Bluetooth and Wi-Fifunctions.
Connect to smart device
G button U B setup menu
Connect to smartphones or tablets (smart devices) via Bluetooth or Wi-Fi.
Pairing (Bluetooth)Pair with or connect to smart devices using Bluetooth.

B The setup menu: Camera setup409
Option Description
[Start pairing] Pair the camera with a smart device (0480).
[Paired devices]List paired smart devices. To connect, select adevice from the list.
[Bluetoothconnection]
Select [Enable] to enable Bluetooth.
Select for upload (Bluetooth)Select pictures for upload to a smart device. You can also opt to uploadpictures as they are taken.
Option Description
[Auto select forupload]
Select [On] to mark pictures for upload as they aretaken. Photos are uploaded in JPEG format at a size of 2megapixels, even if other upload size and formatoptions are selected with the camera. Photos taken invideo mode will not be uploaded. They must beuploaded manually.
[Manually selectfor upload]
Upload selected pictures. Transfer marking appears onthe selected pictures.
[Deselect all] Remove transfer marking from all pictures.
Wi-Fi connectionConnect to smart devices via Wi-Fi.
Establish Wi-Fi connection❚❚Initiate a Wi-Fi connection to a smart device.・ The camera SSID and password will be displayed. To connect, select
the camera SSID on the smart device and enter the password (0483).
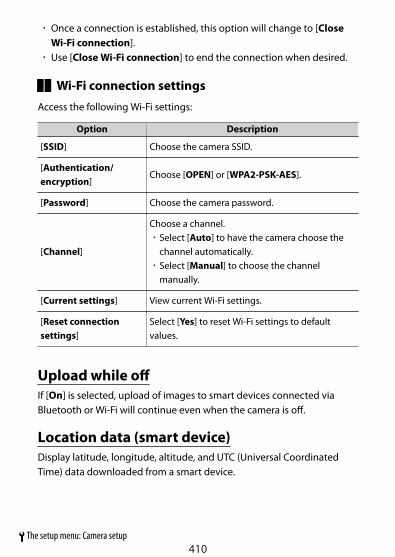
B The setup menu: Camera setup410
・ Once a connection is established, this option will change to [CloseWi-Fi connection].
・ Use [Close Wi-Fi connection] to end the connection when desired.
Wi-Fi connection settings❚❚Access the following Wi-Fi settings:
Option Description
[SSID] Choose the camera SSID.
[Authentication/encryption]
Choose [OPEN] or [WPA2-PSK-AES].
[Password] Choose the camera password.
[Channel]
Choose a channel.・ Select [Auto] to have the camera choose the
channel automatically.・ Select [Manual] to choose the channel
manually.
[Current settings] View current Wi-Fi settings.
[Reset connectionsettings]
Select [Yes] to reset Wi-Fi settings to defaultvalues.
Upload while offIf [On] is selected, upload of images to smart devices connected viaBluetooth or Wi-Fi will continue even when the camera is off.
Location data (smart device)Display latitude, longitude, altitude, and UTC (Universal CoordinatedTime) data downloaded from a smart device.

B The setup menu: Camera setup411
Connect to computer
G button U B setup menu
Connect to computers via Wi-Fi.
Wi-Fi connectionSelect [Enable] to connect using the settings currently selected for[Network settings].
Network settingsSelect [Create profile] to create a new network profile (0459, 0465).・ If more than one profile already exists, you can press J to select a
profile from a list.・ To edit an existing profile, highlight it and press 2.
Option Description
[General]
・ [Profile name]: Rename the profile. The default profile nameis the same as the network SSID.
・ [Password protection]: Select [On] to require that apassword be entered before the profile can be changed. Tochange the password, highlight [On] and press 2.

B The setup menu: Camera setup412
Option Description
[Wireless]
・ Infrastructure mode: Adjust settings for connection to anetwork via a router.- [SSID]: Enter the network SSID.- [Channel]: Selected automatically.- [Authentication/encryption]: Choose [OPEN] or [WPA2-
PSK-AES].- [Password]: Enter the network password.
・ Access-point mode: Adjust settings for direct wirelessconnection to the camera.- [SSID]: Choose the camera SSID.- [Channel]: Choose [Auto] or [Manual].- [Authentication/encryption]: Choose [OPEN] or [WPA2-
PSK-AES].- [Password]: If [WPA2-PSK-AES] is selected for
[Authentication/encryption], you can choose the camerapassword.
[TCP/IP]
Adjust TCP/IP settings for infrastructure connections. An IPaddress is required.・ If [Enable] is selected for [Obtain automatically], the IP
address and sub-net mask for infrastructure modeconnections will be acquired via a DHCP server or automaticIP addressing.
・ Select [Disable] to enter the IP address ([Address]) and sub-net mask ([Mask]) manually.
OptionsAdjust upload settings.
Auto upload❚❚Select [On] to upload new photos as they are taken.
B The setup menu: Camera setup413
・ Upload begins only after the photo has been recorded to thememory card. Be sure a memory card is inserted in the camera.
・ Videos and photos taken during video mode are not uploadedautomatically when recording is complete. They must instead be
uploaded from the playback display (0473).
Delete after upload❚❚Select [Yes] to delete photographs from the camera memory cardautomatically once upload is complete.・ Files marked for transfer before you selected [Yes] are not deleted.・ Deletion may be suspended during some camera operations.
Upload file as❚❚When uploading RAW + JPEG images, choose whether to upload boththe RAW and JPEG files or only the JPEG copy.・ The option chosen for [Upload file as] takes effect when [On] is
selected for [Auto upload].
Deselect all?❚❚Select [Yes] to remove transfer marking from all images. Upload ofimages with an “uploading” icon will immediately be terminated.
MAC addressView the MAC address.
Wireless remote (ML-L7) options
G button U B setup menu
Connect an optional ML-L7 Remote Control through Bluetooth. You canalso assign roles to the Fn1/Fn2 buttons on the ML-L7.

B The setup menu: Camera setup414
・ For the functions that can be used with the remote control andconnecting this camera and the remote control, see “ML-L7 Remote
Control” in “Other compatible accessories” (0567).
Wireless remote connectionOption Description
[Enable]Start connecting a paired ML-L7. If the camera is connected to asmartphone or computer, connection to those devices will beterminated.
[Disable] Disconnect the ML-L7.
Save wireless remote controllerPair the camera with an ML-L7. When the camera is in pairing standby,press and hold the power button on the remote control for about 3seconds or longer. When pairing is complete, the remote control statuslamp flashes green at about 3 second intervals.Only one remote control can be paired per camera. Only the last pairedremote control is enabled.
Delete wireless remote controllerDelete a paired ML-L7.
Assign Fn1 button/Assign Fn2 buttonChoose the role assigned to the Fn1 or Fn2 button on the ML-L7.

B The setup menu: Camera setup415
Option Description
[Same as camera Kbutton]
Set the same role as the camera’s K button.
[Same as camera Gbutton]
Set the same role as the camera’s G button.
[Same as camera i button] Set the same role as the camera’s i button.
[None] Pressing the button has no effect.
Conformity marking
G button U B setup menu
View some of the information related to standards with which thecamera complies.
USB power delivery
G button U B setup menu
Choose whether optional charging AC adapters or computersconnected via USB can be used to power the camera (USB powerdelivery). USB power delivery allows the camera to be used whilelimiting the drain on the battery.
Option Description
[Enable]
The camera draws power from connected devices while on.Connected devices will also supply power when the camera is offif Bluetooth upload is in progress or the memory card accesslamp is lit.
[Disable]The camera does not draw power from connected devices at anytime.

B The setup menu: Camera setup416
・ Power will only be supplied to the camera when the battery isinserted.
・ A USB power delivery icon appears in the shooting display when thecamera is powered by an external source.
・ For more information, see “Charging the camera with the charging
AC adapter” (0565).

B The setup menu: Camera setup417
D Computer USB power delivery・ Before using a computer to supply power to the camera, check that the
computer is equipped with a Type C USB connector. Use a UC-E25 USBcable (available separately) to connect the camera to the computer.
・ Depending on the model and product specifications, some computerswill not supply current to power the camera.
D “Power delivery” versus “charging”The supply of power for camera operations is referred to as “power delivery”,while the term “charging” is used when power is supplied only to charge thecamera battery. The conditions under which the power supplied by externaldevices is used to power the camera or charge the battery are shown below.
Option selected for [USB powerdelivery]
CameraExternal power source used for
[Enable]On* Power delivery
Off Charging
[Disable]On* —
Off Charging
* Includes instances in which the power switch is in the “OFF” position butBluetooth upload is in progress or the memory card access lamp is lit.
Energy saving (photo mode)
G button U B setup menu
In photo mode, the shooting display will turn off to save powerapproximately 15 seconds before the standby timer expires.
Option Description
[Enable] Enable energy saving. The display refresh rate may drop.

B The setup menu: Camera setup418
Option Description
[Disable]Disable energy saving. Note selecting [Disable] does not stopthe shooting display dimming a few seconds before the standbyexpires.
D Energy saving・ Note that even when [Enable] is selected, energy saving will not function:
- if [No limit] is selected for Custom Setting c3 [Power off delay] >[Standby timer] or if the delay selected is less than 30 seconds,
- in self-portrait mode,- during zoom,- while the camera is connected to another device via HDMI, or- while the camera is connected to and exchanging data with a computer
via USB.・ Selecting [Disable] increases the drain on the battery.
Slot empty release lock
G button U B setup menu
Choose whether the shutter can be released when no memory card isinserted in the camera.
Option Description
a[Releaselocked]
The shutter cannot be released when no memorycard is inserted.
b[Enablerelease]
The shutter can be released with no memory cardinserted. No pictures will be recorded; duringplayback, the camera displays [Demo].

B The setup menu: Camera setup419
Save/load menu settings
G button U B setup menu
Save current camera menu settings to a memory card. You can also loadsaved settings, allowing menu settings to be shared among cameras ofthe same model.・ The following settings are saved:
Settings that can be saved and loaded
PLAYBACK MENU
[Playback display options]
[Picture review]
[Rotate tall]
PHOTO SHOOTING MENU
[File naming]
[Choose image area]
[Image quality]
[Image size]
[RAW recording]
[ISO sensitivity settings]
[White balance]
[Set Picture Control] (Custom Picture Controlsare saved as [Auto])
[Color space]
[Active D-Lighting]
[Long exposure NR]
[High ISO NR]
[Vignette control]

B The setup menu: Camera setup420
Settings that can be saved and loaded
PHOTO SHOOTING MENU
[Diffraction compensation]
[Auto distortion control]
[Flicker reduction shooting]
[Metering]
[Flash control]
[Flash mode]
[Flash compensation]
[Focus mode]
[AF-area mode]
[Vibration reduction] (the options availablevary with the lens)
[Auto bracketing]
VIDEO RECORDING MENU
[File naming]
[Frame size/frame rate]
[Video quality]
[Video file type]
[ISO sensitivity settings]
[White balance]
[Set Picture Control] (Custom Picture Controlsare saved as [Auto])
[Active D-Lighting]
[High ISO NR]
[Vignette control]

B The setup menu: Camera setup421
Settings that can be saved and loaded
VIDEO RECORDING MENU
[Diffraction compensation]
[Auto distortion control]
[Flicker reduction]
[Metering]
[Focus mode]
[AF-area mode]
[Vibration reduction] (the options availablevary with the lens)
[Electronic VR]
[Microphone sensitivity]
[Attenuator]
[Frequency response]
[Wind noise reduction]
[Timecode] (excepting [Timecode origin])
CUSTOM SETTINGS MENU All items
SETUP MENU
[Language]
[Time zone and date] (except [Date and time])
[Limit monitor mode selection]
[Information display]
[Non-CPU lens data]
[Save focus position]
[Image comment]

B The setup menu: Camera setup422
Settings that can be saved and loaded
SETUP MENU
[Copyright information]
[Beep options]
[Touch controls]
[Self-portrait mode]
[HDMI]
[USB power delivery]
[Energy saving (photo mode)]
[Slot empty release lock]
Save menu settingsSave settings to a memory card. If the card is full, an error will bedisplayed and settings will not be saved. Saved settings can only beused with other cameras of the same model.
Load menu settingsLoad saved settings from a memory card. Note that [Load menusettings] is available only when a memory card containing savedsettings is inserted.
D Saved settingsSettings are saved to files named “NCSET***”. “***” is an identifier that variesfrom camera to camera. The camera will not be able to load settings if the filename is changed.

B The setup menu: Camera setup423
Reset all settings
G button U B setup menu
Reset all settings except [Language] and [Time zone and date] to theirdefault values. Copyright information and other user-generated entriesare also reset. Once reset, settings cannot be restored.We recommend that you save settings using the [Save/load menusettings] item in the setup menu before performing a reset.
Firmware version
G button U B setup menu
View the current camera firmware version. If new firmware for thecamera is on a memory card, you can update the firmware.
A Updating the firmwareTo update the camera firmware, you can use either a computer or smartdevice.・ When using a computer: You can confirm if there is a new firmware
version at the Nikon Download Center. For the update procedure, see thefirmware download website.
・ When using a smart device: If the camera and your smart device arealready paired using the SnapBridge app, the app will notify you whenthere is new firmware for your camera. You can then transfer the firmwareto the memory card in the camera by using your smart device. For theupdate procedure, see the SnapBridge app online help. The timing of thenotification may differ from the timing at which the update is released onthe Nikon Download Center.

N The retouch menu: Creating retouched copies424
N The retouch menu: Creatingretouched copies
To view the retouch menu, select the N tab in the camera menus.
The items in the retouch menu are used to trim or retouch existingpictures.・ The retouch menu is grayed out if a memory card is not inserted in
the camera or if a memory card does not contain pictures.・ Retouched copies are saved to new files, separate from the original
pictures.・ The retouch menu contains the following items:
Item 0
7 [RAW processing] 428
k [Trim] 431
8 [Resize] 432
i [D-Lighting] 436
j [Red-eye correction] 437
Z [Straighten] 438
Item 0
a [Distortion control] 438
e [Perspective control] 439
l [Monochrome] 440
o [Overlay pictures]* 441
9 [Trim video] 448
* Not displayed when [Retouch] is selected in the playback i menu.

N The retouch menu: Creating retouched copies425
Creating retouched copies
1 Select an item in the retouch menu.
Press 1 or 3 to highlight an item, 2 to select.
2 Select a picture.
・Highlight a picture using the multi selector.・To view the highlighted picture zoomed in, press and hold the X
button.・Press J to select the highlighted picture.
3 Select retouch options.・For more information, see the section for the selected item.・To exit without creating a retouched copy, press G. The retouch
menu will be displayed.

N The retouch menu: Creating retouched copies426
4 Create a retouched copy.
・Press J to create a retouched copy.・Retouched copies are indicated by a p icon.

N The retouch menu: Creating retouched copies427
D Retouching the current pictureTo create a retouched copy of the current image, press i and select[Retouch].
D Retouch・ The camera may not be able to display or retouch images that were taken
or retouched using other cameras or that have been retouched on acomputer.
・ If no actions are performed for a brief period, the display will turn off andany unsaved changes will be lost. To increase the time the display remainson, choose a longer menu display time using Custom Setting c3 [Poweroff delay] > [Menus].
D Retouching copies・ Most items can be applied to copies created using other retouch options,
although multiple edits may result in reduced image quality or fadedcolors.
・ With the exception of [Trim video], each item can be applied only once.・ Some items may be unavailable depending on the items used to create
the copy.・ Items that cannot be applied to the current image are grayed out and
unavailable.
D Image quality・ Copies created from RAW pictures are saved at an [Image quality] of
[JPEG fine].・ Copies created from JPEG pictures are the same quality as the original.・ In the case of dual-format pictures recorded to the same memory card at
image-quality settings of RAW + JPEG, only the RAW copy will beretouched.
D Image sizeExcept in the case of copies created with [RAW processing], [Trim], and[Resize], copies are the same size as the original.

N The retouch menu: Creating retouched copies428
RAW processing: Converting RAW to JPEG
G button U N retouch menu
The process of converting RAW images to other formats such as JPEG isreferred to as “RAW processing”. JPEG copies of RAW pictures can becreated on the camera as described below.
1 Select [RAW processing] in the retouch menu.
Highlight [RAW processing] and press 2.
2 Choose how pictures are selected.
Option Description
[Select picture(s)]Create JPEG copies of selected RAW images.Multiple RAW images can be selected.
[Select date]Create JPEG copies of all RAW pictures taken onselected dates.
[Select folder]Create JPEG copies of all RAW pictures in a selectedfolder.

N The retouch menu: Creating retouched copies429
3 Select photographs.If you chose [Select picture(s)]:
・Highlight pictures using the multi selector.・To view the highlighted picture zoomed in, press and hold the X
button.・To select the highlighted picture, press the W (Q) button. Selected
pictures are marked by a $ icon. To deselect the current picture,press the W (Q) button again; the $ icon will no longer bedisplayed. All images will be processed using the same settings.
・Press J to proceed once selection is complete.If you chose [Select date]:
・Highlight dates using the multi selector and press 2 to select (M)or deselect (U).
・All images taken on dates marked with a check (M) will beprocessed using the same settings.
・Press J to proceed once selection is complete.If you chose [Select folder]:Highlight a folder and press J to select; all images in the selectedfolder will be processed using the same settings.

N The retouch menu: Creating retouched copies430
4 Choose settings for the JPEG copies.・The settings in effect when the photograph was taken appear
below a preview.・To use the setting in effect when the photograph was taken, if
applicable, select [Original].
1 Image quality (0244)
2 Image size (0244)
3 White balance (0248)
4 Exposure compensation
(0139)
5 Set Picture Control (0255)
6 High ISO NR (0263)
7 Color space (0262)
8 Vignette control (0264)
9 Active D-Lighting (0164)
10 Diffraction compensation
(0264)
・To exit without copying the photographs, press the K button.

N The retouch menu: Creating retouched copies431
5 Copy the photographs.
・Highlight [EXE] and press J to create JPEG copies of the selectedphotographs.
・ If multiple photos are selected, a confirmation dialog will bedisplayed after you highlight [EXE] and press J; highlight [Yes]and press J to create JPEG copies of the selected photos.
・To cancel the operation before all copies have been created, pressthe G button; when a confirmation dialog is displayed, highlight[Yes] and press J.
D RAW processing・ RAW processing is available only with RAW images created with this
camera. RAW images created with other cameras or images in formatsother than RAW cannot be selected.
・ [Exposure compensation] can only be set to values between −2 and +2EV.
Trim
G button U N retouch menu
Create a cropped copy of the selected photograph. The photograph isdisplayed with the selected crop shown in yellow; create a cropped copyas described below.
To Description
Size the crop Press X or W (Q) to choose the crop size.

N The retouch menu: Creating retouched copies432
To Description
Change the cropaspect ratio
Rotate the main command dial to choose theaspect ratio.
Position the crop Use the multi selector to position the crop.
Save the crop Press J to save the current crop as a separate file.
D Cropped pictures・ Depending on the size of the cropped copy, playback zoom may not be
available when cropped copies are displayed.・ The crop size appears at upper left in the crop display. The size of the copy
varies with crop size and aspect ratio.
Resize
G button U N retouch menu
Create small copies of selected photographs.
Resizing multiple imagesIf you accessed the retouch menu via the G button, you can resizemultiple selected images.

N The retouch menu: Creating retouched copies433
1 Select [Resize] in the retouch menu.
Highlight [Resize] and press 2.
2 Choose a size.
・Highlight [Choose size] and press 2.・Highlight the desired size (length in pixels) using 1 and 3 and
press J.

N The retouch menu: Creating retouched copies434
3 Choose how pictures are selected.
Option Description
[Select picture(s)]Resize selected pictures. Multiple pictures can beselected.
[Select date] Resize all pictures taken on selected dates.
[Select folder] Resize all pictures in a selected folder.

N The retouch menu: Creating retouched copies435
4 Choose pictures.If you chose [Select picture(s)]:
・Highlight pictures using the multi selector.・To view the highlighted picture zoomed in, press and hold the X
button.・To select the highlighted picture, press the W (Q) button. Selected
pictures are indicated by a 8 icon. To deselect the current picture,press the W (Q) button again; the 8 will no longer be displayed.The selected pictures will all be copied at the size selected in Step3.
・Press J to proceed once selection is complete.If you chose [Select date]:
・Highlight dates using the multi selector and press 2 to select (M)or deselect (U).
・All pictures taken on dates marked with a check (M) will be copiedat the size selected in Step 3.
・Press J to proceed once selection is complete.If you chose [Select folder]:Highlight a folder and press J to select; all pictures in the selectedfolder will be copied at the size selected in Step 3.

N The retouch menu: Creating retouched copies436
5 Save the resized copies.
・A confirmation dialog will be displayed; highlight [Yes] and pressJ to save the resized copies.
・To cancel the operation before all copies have been created, pressthe G button; when a confirmation dialog is displayed, highlight[Yes] and press J.
D ResizeDepending on the copy size, playback zoom may not be available whenresized copies are displayed.
D-Lighting
G button U N retouch menu
D-Lighting brightens shadows. It is ideal for dark or backlit photographs.
Before After
The edit display shows before and after images.

N The retouch menu: Creating retouched copies437
・ Press 4 or 2 to choose the amount of correction performed. Theeffect can be previewed in the edit display.
・ Press J to save the retouched copy.
Red-eye correction
G button U N retouch menu
Correct “red-eye” caused by light from the flash reflecting from theretinas of portrait subjects.・ Red-eye correction is available only with photographs taken using a
flash.・ Red-eye that cannot be detected by the camera will not be corrected.・ Press J to save the retouched copy.
D Red-eye correction・ Note the following:
- Red-eye correction may not always produce the expected results.- In very rare circumstances, red-eye correction may be applied to
portions of the image that are not affected by red-eye.・ Check the preview thoroughly before proceeding.

N The retouch menu: Creating retouched copies438
Straighten
G button U N retouch menu
Rotate pictures by up to ±5° in increments of approximately 0.25°.
・ The effect can be previewed in the edit display.・ The greater the rotation, the more will be trimmed from the edges.・ Press 4 or 2 to choose the amount of straightening performed.・ Press J to save the retouched copy.
Distortion control
G button U N retouch menu
Create copies with reduced peripheral distortion; this can reduce barreldistortion in pictures taken with wide-angle lenses or pin-cushiondistortion in pictures taken with telephoto lenses. Select [Auto] to letthe camera correct distortion automatically and then make fineadjustments using the multi selector. Select [Manual] to reducedistortion manually.
・ The effect can be previewed in the edit display.・ Note that [Manual] must be used with copies created using the
[Auto] option and with photos taken using the [Auto distortion

N The retouch menu: Creating retouched copies439
control] option in the photo shooting menu. Manual distortioncontrol cannot be further applied to copies created using [Manual].
・ Press 4 to reduce pincushion distortion, 2 to reduce barreldistortion.
・ Press J to save the retouched copy.
D Distortion controlNote that greater amounts of distortion control result in more of the edgesbeing cropped out.
Perspective control
G button U N retouch menu
Create copies that reduce the effects of perspective in photos takenlooking up from the base of a tall object.
・ The effect can be previewed in the edit display.・ Note that greater amounts of perspective control result in more of
the edges being cropped out.・ Use the multi selector (1, 3, 4, or 2) to adjust perspective.

N The retouch menu: Creating retouched copies440
・ Press J to save the retouched copy.
Before After
Monochrome
G button U N retouch menu
Copy photographs in monochrome. [Monochrome] gives you a choiceof the following monochrome tints:
Option Description
[Black-and-white] Copy photographs in black-and-white.
[Sepia] Copy photographs in sepia.
[Cyanotype] Copy photographs in blue-and-white monochrome.
・ The effect can be previewed in the edit display.
・ In the case of [Sepia] or [Cyanotype], color saturation can beadjusted using the multi selector. Press 1 to increase, 3 to decrease.The changes are reflected in the preview.

N The retouch menu: Creating retouched copies441
・ Press J to save the retouched copy.
Overlay pictures
G button U N retouch menu
Picture overlay combines existing photographs to create a single picturethat is saved separately from the originals. One RAW image can beoverlaid on another using additive blending ([Add]), or multiple imagescan be combined using [Lighten] or [Darken].
AddOverlay two RAW images to create a single new JPEG copy.
1 Select [Overlay pictures] in the retouch menu.
Highlight [Overlay pictures] and press 2.

N The retouch menu: Creating retouched copies442
2 Select [Add].
Highlight [Add] and press 2 to display picture overlay options with[Picture 1] highlighted.
3 Highlight the first image.
・Press J to display a picture-selection dialog listing only RAWimages, where you can use the multi selector to highlight the firstphotograph in the overlay.
・To view the highlighted picture zoomed in, press and hold the Xbutton.

N The retouch menu: Creating retouched copies443
4 Select the first image.
Press J to select the highlighted photograph and return to thepreview display; the selected image will appear as [Picture 1].
5 Select the second image.
Press 2 and select [Picture 2], then select the second photo asdescribed in Steps 3 and 4.
6 Adjust gain.
・The overlay of [Picture 1] and [Picture 2] can be previewed in the“Preview” column. Highlight [Picture 1] or [Picture 2] andoptimize exposure for the overlay by pressing 1 or 3 to adjustgain.
・Choose from values between 0.1 and 2.0 in increments of 0.1.・The effects are relative to the default value of 1.0 (no gain). For
example, selecting 0.5 halves gain.

N The retouch menu: Creating retouched copies444
7 Select the “Preview” column.
・Press 4 or 2 to place the cursor in the “Preview” column.・To proceed without previewing the overlay, highlight [Save] and
press J.
8 Preview the overlay.
・To preview the overlay, highlight [Overlay] and press J.・To select new photos or adjust gain, press W (Q). You will be
returned to Step 6.
9 Save the overlay.
Press J while the preview is displayed to save the overlay anddisplay the resulting image.

N The retouch menu: Creating retouched copies445
D [Add]・ Colors and brightness in the preview may differ from the final image.・ Picture overlay is available only with RAW images created with this
camera. Images created with other cameras or in other formats cannot beselected.
・ The overlay is saved at an [Image quality] of [JPEG fine].・ RAW pictures can be combined only if they were created with the same
options selected for:- [Choose image area]- [RAW recording]
・ The overlay has the same photo info (including date of recording,metering, shutter speed, aperture, shooting mode, exposurecompensation, focal length, and image orientation) and values for whitebalance and Picture Control as the photograph selected for [Picture 1].Copyright information, however, is not copied to the new image. Thecomment is similarly not copied; instead, the comment currently active onthe camera, if any, is appended.
Lighten and darkenThe camera compares multiple selected pictures and selects only thebrightest or darkest pixels at each point in the image to create a singlenew JPEG copy.

N The retouch menu: Creating retouched copies446
1 Select [Lighten] or [Darken].After selecting [Overlay pictures] in the retouch menu, highlighteither [Lighten] or [Darken] and press 2.・ [Lighten]: The camera compares the pixels in each picture and
uses only the brightest.
・ [Darken]: The camera compares the pixels in each picture and usesonly the darkest.
2 Choose how pictures are selected.
Option Description
[Select individualpictures]
Select pictures for the overlay one-by-one.
[Select consecutivepictures]
Select two pictures; the overlay will include thetwo pictures and all images between them.
[Select folder]The overlay will include all pictures in theselected folder.

N The retouch menu: Creating retouched copies447
3 Select pictures.If you chose [Select individual pictures]:・Highlight pictures using the multi selector.・To view the highlighted picture zoomed in, press and hold the X
button.・To select the highlighted picture, press the W (Q) button. Selected
pictures are marked by a $ icon. To deselect the current picture,press the W (Q) button again; the $ icon will no longer bedisplayed. The selected pictures will be combined using the optionselected in Step 1.
・Press J to proceed once selection is complete.If you chose [Select consecutive pictures]:・All pictures in a range chosen using the multi selector will be
combined using the option selected in Step 1.- Use W (Q) to select the first and last pictures in the desired
range.- The first and last pictures are indicated by % icons and the
pictures between them by $ icons.- You can alter your selection by using the multi selector to
highlight different pictures to serve as the first or last frame. Pressthe A (g) button to move the start or end point in a range.
・To view the highlighted picture zoomed in, press and hold the Xbutton.
・Press J to proceed once selection is complete.If you chose [Select folder]:Highlight the desired folder and press J to overlay all pictures in thefolder using the option selected in Step 1.

N The retouch menu: Creating retouched copies448
4 Save the overlay.・A confirmation dialog will be displayed; highlight [Yes] and pressJ to save the overlay and display the resulting picture.
・To interrupt the process and display a confirmation dialog beforethe operation is complete, press the G button; to save thecurrent overlay “as is” without adding the remaining pictures,highlight [Save and exit] and press J. To exit without creating anoverlay, highlight [Discard and exit] and press J.
D [Lighten]/[Darken]・ The overlay will include only pictures created with this camera. Pictures
created with other cameras cannot be selected.・ The overlay will include only pictures created with the same options
selected for:- [Choose image area]- [Image size]
・ The image quality setting for the completed overlay is that of the highestquality picture it contains.
・ Overlays that include RAW pictures will be saved at an image quality of[JPEG fine].
・ The size of overlays that include both RAW and JPEG images isdetermined by the JPEG picture.
Trim video
G button U N retouch menu
Create a copy from which unwanted footage has been removed (0204).

O My Menu/m Recent settings449
O My Menu/m Recent settingsTo view [MY MENU], select the O tab in the camera menus.
O My Menu: Creating a custom menuMy Menu can be used to create and edit a customized list of up to 20items from the playback, photo shooting, video recording, CustomSettings, setup, and retouch menus. Options can be added, deleted, andreordered as described below.
Adding items to My Menu❚❚
1 Select [Add items] in [O MY MENU].
Highlight [Add items] and press 2.

O My Menu/m Recent settings450
2 Select a menu.
Highlight the name of the menu containing the item you wish toadd and press 2.
3 Select an item.
Highlight the desired menu item and press J.
4 Position the new item.
Press 1 or 3 to position the new item and press J to add it to MyMenu.

O My Menu/m Recent settings451
5 Add more items.
・The items currently displayed in My Menu are indicated by a checkmark (L).
・ Items indicated by a V icon cannot be selected.・Repeat Steps 1–4 to select additional items.
Removing items from My Menu❚❚
1 Select [Remove items] in [O MY MENU].Highlight [Remove items] and press 2.
2 Select items.
・Highlight items and press 2 to select (M) or deselect.・Continue until all the items you wish to remove are selected (L).

O My Menu/m Recent settings452
3 Remove the selected items.
Press J; a confirmation dialog will be displayed. Press J again toremove the selected items.
D Removing items while in My MenuItems can also be removed by highlighting them in [O MY MENU] andpressing the O button; a confirmation dialog will be displayed. Press the Obutton again to remove the selected item.
Reordering items in My Menu❚❚
1 Select [Rank items] in [O MY MENU].Highlight [Rank items] and press 2.
2 Select an item.
Highlight the item you wish to move and press J.

O My Menu/m Recent settings453
3 Position the item.
・Press 1 or 3 to move the item up or down in My Menu and pressJ.
・Repeat Steps 2–3 to reposition additional items.
4 Exit to [O MY MENU].Press the G button to return to [O MY MENU].

O My Menu/m Recent settings454
Displaying [RECENT SETTINGS]❚❚
1 Select [Choose tab] in [O MY MENU].
Highlight [Choose tab] and press 2.
2 Select [m RECENT SETTINGS].
・Highlight [m RECENT SETTINGS] in the [Choose tab] menu andpress J.
・The name of the menu will change from [MY MENU] to [RECENTSETTINGS].

O My Menu/m Recent settings455
m Recent settings: Accessing recently-usedsettings
How items are added to [RECENT SETTINGS]❚❚Menu items are added to the top of the [RECENT SETTINGS] menu asthey are used. The twenty most recently-used settings are listed.
D Removing items from the recent settings menuTo remove an item from the [RECENT SETTINGS] menu, highlight it andpress the O button; a confirmation dialog will be displayed. Press O buttonagain to remove the selected item.
D Displaying My MenuSelecting [Choose tab] in the [RECENT SETTINGS] menu displays the items
shown in Step 2 of “Displaying [RECENT SETTINGS]” (0454). Highlight [OMYMENU] and press J to view My Menu.

Network options456
Establishing wirelessconnections to computers orsmart devices
Network optionsThe camera can:・ connect to computers via Wi-Fi (0457) or
・ establish wireless connections to smartphones or tablets (smartdevices; 0479)

Connecting to computers via Wi-Fi457
Connecting to computers via Wi-Fi
What Wi-Fi can do for youConnect using the camera’s built-in Wi-Fi to upload selected pictures toa computer.
The Wireless Transmitter UtilityBefore you will be able to upload images via Wi-Fi, you will need to pairthe camera with the computer using Nikon’s Wireless Transmitter Utilitysoftware.・ Once the devices are paired, you will be able to connect to the
computer from the camera.・ The Wireless Transmitter Utility is available for download from the
Nikon Download Center. Be sure to download the latest version afterreading the release notes and system requirements.https://downloadcenter.nikonimglib.com/
Infrastructure and access-point modesEither of the following two methods can be used to establish wirelessconnections between the camera and a computer.
Direct wireless connection (access-point mode)❚❚The camera and computer connect via direct wireless link. The cameraacts as a wireless LAN access point, letting you connect when working

Connecting to computers via Wi-Fi458
outdoors and in other situations in which the computer is not alreadyconnected to a wireless network and eliminating the need forcomplicated adjustments to settings. The computer cannot connect tothe Internet while connected to the camera.
・ To create a new host profile, select [Direct connection to computer]in the connection wizard.
Infrastructure mode❚❚The camera connects to a computer on an existing network (includinghome networks) via a wireless router. The computer can still connect tothe Internet while connected to the camera.
・ To create a new network profile, select [Search for Wi-Fi network] inthe connection wizard.

Connecting to computers via Wi-Fi459
D Infrastructure mode・ This guide assumes you are connecting via an existing wireless network.・ Connection to computers beyond the local area network is not supported.
You can connect only to computers on the same network.
Connecting in access-point mode
1 Select [Connect to computer] in the camera setup menu, thenhighlight [Network settings] and press 2.
2 Highlight [Create profile] and press J.

Connecting to computers via Wi-Fi460
3 Highlight [Direct connection to computer] and press J.
The camera SSID and encryption key will be displayed.

Connecting to computers via Wi-Fi461
4 Establish a connection to the camera.Windows:
・Click the wireless LAN icon in the taskbar.・Select the SSID displayed by the camera in Step 3.・When prompted to enter the network security key, enter the
encryption key displayed by the camera in Step 3. The computerwill initiate a connection to the camera.
macOS:
・Click the wireless LAN icon in the menu bar.・Select the SSID displayed by the camera in Step 3.

Connecting to computers via Wi-Fi462
・When prompted to enter the network security key, enter theencryption key displayed by the camera in Step 3. The computerwill initiate a connection to the camera.
5 Start pairing.
When prompted, launch the Wireless Transmitter Utility on thecomputer.
6 Select the camera in the Wireless Transmitter Utility.
Select the name displayed by the camera in Step 5 and click [Next].

Connecting to computers via Wi-Fi463
7 In the Wireless Transmitter Utility, enter the authentication codedisplayed by the camera.
・The camera will display an authentication code.・Enter the authentication code in the dialog displayed by the
Wireless Transmitter Utility and click [Next].

Connecting to computers via Wi-Fi464
8 Complete the pairing process.
・When the camera displays a message stating that pairing iscomplete, press J.
・ In the Wireless Transmitter Utility, click [Next]; you will beprompted to choose a destination folder. For more information,see online help for the Wireless Transmitter Utility.
・A wireless connection will be established between the camera andcomputer when pairing is complete.

Connecting to computers via Wi-Fi465
9 Check the connection.
When a connection is established, the network SSID will bedisplayed in green in the camera [Connect to computer] menu.・ If the camera SSID is not displayed in green, connect to the camera
via the wireless network list on your computer.A wireless connection has now been established between thecamera and the computer.Pictures taken with the camera can be uploaded to the computer asdescribed in “Uploading pictures” (0473).
Connecting in infrastructure mode
1 Select [Connect to computer] in the camera setup menu, thenhighlight [Network settings] and press 2.
2 Highlight [Create profile] and press J.

Connecting to computers via Wi-Fi466
3 Highlight [Search for Wi-Fi network] and press J.
The camera will search for networks currently active in the vicinityand list them by name (SSID).
D [Easy Connect]
・To connect without entering an SSID or encryption key, press X in Step3. Next, press J and choose from the following options:
Option Description
[Push-buttonWPS]
For routers that support push-button WPS. Press theWPS button on the router and then press the camera Jbutton to connect.
[PIN-entryWPS]
The camera will display a PIN. Using a computer, enterthe PIN on the router. For more information, see thedocumentation provided with the router.
・After connecting, proceed to Step 6.

Connecting to computers via Wi-Fi467
4 Choose a network.
・Highlight a network SSID and press J.・Encrypted networks are indicated by a h icon. If the selected
network is encrypted (h), you will be prompted to enter theencryption key. If the network is not encrypted, proceed to Step 6.
・ If the desired network is not displayed, press X to search again.
D Hidden SSIDsNetworks with hidden SSIDs are indicated by blank entries in thenetwork list.
・To connect to a network with a hidden SSID, highlight a blank entryand press J. Next, press J; the camera will prompt you to provide anSSID.
・Enter the network name and press X. Press X again; the camera willnow prompt you to enter the encryption key.

Connecting to computers via Wi-Fi468
5 Enter the encryption key.
・Press J and enter the encryption key for the wireless router.・For more information, see the documentation for the wireless
router.
・Press X when entry is complete.・Press X again to initiate the connection. A message will be
displayed for a few seconds when the connection is established.

Connecting to computers via Wi-Fi469
6 Obtain or select an IP address.
・Highlight one of the following options and press J.
Option Description
[Obtainautomatically]
Select this option if the network is configured tosupply the IP address automatically. A“configuration complete” message will bedisplayed once an IP address has been assigned.
[Entermanually]
Enter the IP address and sub-net mask manually.・Rotate the main command dial to highlight
segments.・Press 4 or 2 to change the highlighted segment
and press J to save changes.・Next, press X; a “configuration complete”
message will be displayed. Press X again todisplay the sub-net mask.
・Press 1 or 3 to edit the sub-net mask and pressJ; a “configuration complete” message will bedisplayed.
・Press J to proceed when the “configuration complete” message isdisplayed.

Connecting to computers via Wi-Fi470
7 Start pairing.
When prompted, launch the Wireless Transmitter Utility on thecomputer.
8 Select the camera in the Wireless Transmitter Utility.
Select the name displayed by the camera in Step 7 and click [Next].

Connecting to computers via Wi-Fi471
9 In the Wireless Transmitter Utility, enter the authentication codedisplayed by the camera.
・The camera will display an authentication code.・Enter the authentication code in the dialog displayed by the
Wireless Transmitter Utility and click [Next].

Connecting to computers via Wi-Fi472
10 Complete the pairing process.
・When the camera displays a message stating that pairing iscomplete, press J.
・ In the Wireless Transmitter Utility, click [Next]; you will beprompted to choose a destination folder. For more information,see online help for the Wireless Transmitter Utility.
・A wireless connection will be established between the camera andcomputer when pairing is complete.

Connecting to computers via Wi-Fi473
11 Check the connection.
When a connection is established, the network SSID will bedisplayed in green in the camera [Connect to computer] menu.・ If the camera SSID is not displayed in green, connect to the camera
via the wireless network list on your computer.A wireless connection has now been established between thecamera and the computer.Pictures taken with the camera can be uploaded to the computer asdescribed in “Uploading pictures” (0473).
Uploading picturesPictures can be selected for upload during playback. They can also beuploaded automatically as they are taken.
D Destination foldersBy default, images are uploaded to the following folders:・ Windows: \Users\(user name)\Pictures\Wireless Transmitter Utility・ macOS: /Users/(user name)/Pictures/Wireless Transmitter Utility
The destination folder can be selected using the Wireless Transmitter Utility.For more information, see online help for the Wireless Transmitter Utility.
D Access point modeComputers cannot access the Internet while connected to the camera inaccess point mode. To access the Internet, terminate the connection to thecamera and then reconnect to a network with Internet access.

Connecting to computers via Wi-Fi474
Selecting pictures for upload❚❚
1 Press the K button on the camera and select full-frame orthumbnail playback.
2 Select a picture and press the i button.
3 Highlight [Select for upload to computer] and press J.
・A white “upload” icon will appear on the picture. If the camera iscurrently connected to a network, upload will begin immediatelyand the icon will turn green.
・Otherwise, upload will begin when a connection is established.・Repeat Steps 2–3 to upload additional pictures.
D Removing upload marking・ Repeat Steps 2–3 to remove transfer marking from selected images.・ To remove transfer marking from all pictures, select [Connect to
computer] > [Options] > [Deselect all?] in the setup menu.

Connecting to computers via Wi-Fi475
Uploading photos as they are taken❚❚To upload new photos as they are taken, select [On] for [Connect tocomputer] > [Options] > [Auto upload] in the setup menu.
・ Upload begins only after the photo has been recorded to thememory card. Be sure a memory card is inserted in the camera.
・ Videos and photos taken during video mode are not uploadedautomatically when recording is complete. They must instead beuploaded from the playback display.
The transfer icon❚❚Upload status is indicated by the transfer icon.
W (white): SendThe picture has been selected for automatic upload but upload has notyet begun.
X (green): SendingUpload in progress.
Y (blue): SentUpload complete.

Connecting to computers via Wi-Fi476
The status display❚❚The [Connect to computer] display shows the following:
1 Status: The status of theconnection to the host. Thehost name is displayed in greenwhen a connection isestablished.While files are beingtransferred, the status displayshows “Now sending” precededby the name of the file beingsent. Errors are also displayedhere.
2 Signal strength: Wirelesssignal strength.
3 Pictures/time remaining: Thenumber of pictures remainingand the time needed to sendthem. The time remaining is anestimate only.
D Loss of signalWireless transmission may be interrupted if the signal is lost. Upload ofpictures with “send” marking can be resumed by turning the camera off andthen on again once the signal has been re-established.

Connecting to computers via Wi-Fi477
Disconnecting and reconnecting
Disconnecting❚❚You can end the connection by:・ turning the camera off,・ selecting [Disable] for [Connect to computer] > [Wi-Fi connection]
in the setup menu,・ selecting [Enable] for [Airplane mode] in the setup menu,・ selecting [Wi-Fi connection] > [Close Wi-Fi connection] in the
photo-mode i menu, or・ connecting to a smart device via Wi-Fi or Bluetooth.
D Access-point modeAn error will occur if the computer’s wireless connection is disabled beforethe camera’s. Disable camera Wi-Fi first.
Reconnecting❚❚To reconnect to an existing network:・ select [Enable] for [Connect to computer] > [Wi-Fi connection] in
the setup menu, or・ select [Wi-Fi connection] > [Establish Wi-Fi connection with
computer] in the photo-mode i menu.

Connecting to computers via Wi-Fi478
D Access-point modeEnable camera Wi-Fi before connecting.
D Multiple network profilesIf the camera has profiles for more than one network, it will reconnect to thelast network used. Other networks can be selected using the [Connect tocomputer] > [Network settings] option in the setup menu.

Connecting to smart devices479
Connecting to smart devices
The SnapBridge appUse the SnapBridge app for wireless connections between the cameraand your smartphone or tablet (“smart device”).
・ SnapBridge apps can be downloaded from the Apple App Store® oron Google Play™.
・ Visit the Nikon website for the latest SnapBridge news.・ Carefully read any license agreements or the like displayed when
SnapBridge is launched and only proceed if you are willing to acceptthem.
What SnapBridge can do for youThe tasks that can be performed using the SnapBridge app are outlinedbelow. For details, see the SnapBridge app online help:https://nikonimglib.com/snbr/onlinehelp/en/index.html
Downloading pictures from the camera❚❚Download existing pictures to your smart device. Pictures can beuploaded as they are taken.

Connecting to smart devices480
Remote photography❚❚Control the camera and take pictures from the smart device.
Wireless connectionsUse the SnapBridge app for wireless connections between the camera
and your smart device. You can connect via either Bluetooth (0480) or
Wi-Fi (0483). Connecting using Bluetooth allows pictures to beuploaded automatically as they are taken.
Connecting via Bluetooth (pairing)Before connecting via Bluetooth for the first time, you will need to pairthe camera and smart device.
D Before pairing・ Enable Bluetooth on the smart device. For details, see the documentation
provided with the device.・ Ensure that the batteries in the camera and smart device are fully charged
to prevent the devices turning off unexpectedly.・ Check that there is space available on the camera memory card.
Pairing❚❚Pair the camera and smart device as described below.・ Some operations are performed using the camera, others on the
smart device.
・ Additional instructions are available via SnapBridge online help.

Connecting to smart devices481
1 Camera: Select [Connect to smart device] > [Pairing (Bluetooth)]in the setup menu, then highlight [Start pairing] and press J.
The camera name will be displayed in the monitor.
2 Smart device: Launch the SnapBridge app and tap [Connect tocamera] in the tab.
・ If this is the first time you have launched the app, you shouldinstead tap [Connect to camera] in the welcome display.
3 Smart device: Follow the on-screen instructions.・When prompted, tap the category for your camera and then tap
the “pairing” option when prompted to choose the connectiontype.
・Tap the camera name when prompted.

Connecting to smart devices482
4 Camera/smart device: After confirming that the camera andsmart device display the same authentication code, follow theon-screen instructions on both devices to complete pairing.・Tap the pairing button on the smart device and press the J button
on the camera.・The camera and smart device will each display a message when
pairing is complete. The camera will then automatically exit to themenus.
The camera and smart device are now paired.For information on using the SnapBridge app, see online help.

Connecting to smart devices483
D Pairing errorIf you wait too long between pressing the button on the camera and tappingthe button on the smart device in Step 4, the device will display an errormessage and pairing will fail.・ If you are using an Android device, tap [OK] and return to Step 1.・ If you are using an iOS device, dismiss the SnapBridge app and check that
it is not running in the background, then request iOS to “forget” thecamera before returning to Step 1. The request to “forget” the camera ismade via the iOS “Settings” app.
D Disabling BluetoothTo disable Bluetooth, select [Disable] for [Connect to smart device] >[Pairing (Bluetooth)] > [Bluetooth connection] in the camera setup menu.
Connecting to a previously-paired smart device❚❚Once the smart device has been paired with the camera, you will be ableto connect simply by enabling Bluetooth on both the smart device andcamera and launching the SnapBridge app.
Connecting via Wi-Fi (Wi-Fi mode)In Wi-Fi mode, the camera connects directly to the smart device via Wi-Fi, no Bluetooth pairing required.

Connecting to smart devices484
D Before connecting (Wi-Fi mode)・ Enable Wi-Fi on the smart device. For details, see the documentation
provided with the device.・ Ensure that the batteries in the camera and smart device are fully charged
to prevent the devices turning off unexpectedly.・ Check that there is space available on the camera memory card.
Connecting❚❚Follow the steps below to establish a connection between the cameraand smart device in Wi-Fi mode.・ Some operations are performed using the camera, others on the
smart device.
・ Additional instructions are available via SnapBridge online help.
1 Smart device: Launch the SnapBridge app, open the tab, tap
, and select [Wi-Fi mode].
・ If this is the first time you have launched the app, you shouldinstead tap [Connect to camera] in the welcome display. Whenprompted, tap the category for your camera and then tap the “Wi-Fi” option when prompted to choose the connection type.
2 Camera/smart device: Turn the camera on when prompted.Do not use any of the controls in the app at this point.

Connecting to smart devices485
3 Camera: Select [Connect to smart device] > [Wi-Fi connection] inthe setup menu, then highlight [Establish Wi-Fi connection] andpress J.
The camera SSID and password will be displayed.
D Enabling Wi-FiYou can also enable Wi-Fi by selecting [Wi-Fi connection] > [EstablishWi-Fi conn. with smart device] in the i menu for shooting mode.

Connecting to smart devices486
4 Smart device: Follow the on-screen instructions to establish aWi-Fi connection.・On iOS devices, the “Settings” app will launch. Tap [< Settings] to
open [Settings], then scroll up and tap [Wi-Fi] (which you’ll findnear the top of the settings list) to display Wi-Fi settings.
・ In the Wi-Fi settings display, select the camera SSID and enter thepassword displayed by the camera in Step 3.
5 Smart device: After adjusting device settings as described inStep 4, return to the SnapBridge app.・After establishing a Wi-Fi connection to the camera, the smart
device will display Wi-Fi mode options.・The camera will display a message stating that the connection is
complete.
The camera and smart device are now connected via Wi-Fi.For information on using the SnapBridge app, see online help.

Connecting to smart devices487
D Terminating Wi-Fi modeTo end the Wi-Fi connection, tap in the SnapBridge tab. When the icon
changes to , tap and select [Exit Wi-Fi mode.].

Troubleshooting488
TroubleshootingSolutions to some common issues are listed below.・ Troubleshooting information for the SnapBridge app can be found in
the app’s online help, which can be viewed at:https://nikonimglib.com/snbr/onlinehelp/en/index.html
・ For information on the Wireless Transmitter Utility, see the utility’sonline help.
Problem Solution
The camera displays aTCP/IP error.
Connection settings require adjustment. Checksettings for the host computer or wireless router
and adjust camera settings appropriately (0411).
The camera displays a“no memory card”error.
The memory card is inserted incorrectly or not at all.Confirm that the memory card is correctly inserted
(075).
Upload is interruptedand fails to resume.
Upload will resume if the camera is turned off and
then on again (0473).
The connection isunreliable.
If [Auto] is selected for [Channel] when you areconnecting to a smart device, choose [Manual] and
select the channel manually (0410).
If the camera is connected to a computer ininfrastructure mode, check that the router is set to a
channel between 1 and 8 (0411).

Connecting to computers via USB489
Cabled connections tocomputers and HDMI devices
Connecting to computers via USBThe camera can be connected to computers featuring USB connectors.
To connect, the optional USB cable (0563) is required. This item must bepurchased separately. You can then use Nikon NX Studio software tocopy pictures to the computer for viewing and editing. For informationon establishing wireless connections to computers, see “Connecting tocomputers via Wi-Fi” in “Establishing wireless connections to computers
or smart devices” (0457).
1 USB Type-C connector forconnection to camera
2 USB connector* for connectionto computer
* Choose a cable with a connector that matches the connector on thecomputer.
Installing NX StudioYou will need an Internet connection when installing NX Studio. Visit theNikon website for system requirements and other information.

Connecting to computers via USB490
・ Download the latest NX Studio installer from the website below andfollow the on-screen instructions to complete installation.https://downloadcenter.nikonimglib.com/
・ Note that you may be unable to download pictures from the camerausing earlier versions of NX Studio.
Copying pictures to a computer using NXStudioSee online help for detailed instructions.
1 Connect the camera to the computer.After turning the camera off and ensuring that a memory card isinserted, connect the USB cable as shown. You also have the optionof inserting the camera memory card into the computer’s card slot(if available) or a third-party card reader. Before doing so, check thatthe card is compatible with the reader or card slot.
2 Turn the camera on.・The Nikon Transfer 2 component of NX Studio will start. Nikon
Transfer 2 is image transfer software that is installed when youinstall NX Studio.
・ If a message is displayed prompting you to choose a program,select Nikon Transfer 2.
・ If Nikon Transfer 2 does not start automatically, launch NX Studioand click the “Import” icon.

Connecting to computers via USB491
3 Click [Start Transfer].
Pictures on the memory card will be copied to the computer.
4 Turn the camera off.Disconnect the USB cable when transfer is complete.

Connecting to computers via USB492
D Windows 10 and Windows 8.1Windows 10 and Windows 8.1 may display an AutoPlay prompt when thecamera is connected.
Click the dialog and then click [Nikon Transfer 2] to select Nikon Transfer 2.
D macOSIf Nikon Transfer 2 does not start automatically, confirm that the camera isconnected and then launch Image Capture (an application that comes withmacOS) and select Nikon Transfer 2 as the application that opens when thecamera is detected.
D Transferring videosDo not attempt to transfer videos from the memory card while it is insertedin a camera of a different make or model. Doing so could result in the videosbeing deleted without being transferred.
D Connecting to computers・ Do not turn the camera off or disconnect the USB cable while transfer is in
progress.・ Do not use force or attempt to insert the connectors at an angle. Be sure
also to keep the connectors straight when disconnecting the cable.・ Always turn the camera off before connecting or disconnecting a cable.
Connecting to computers via USB493
・ To ensure that data transfer is not interrupted, be sure the camera batteryis fully charged.
D USB hubsConnect the camera directly to the computer; do not connect the cable via aUSB hub or keyboard.

Connecting to HDMI devices494
Connecting to HDMI devicesThe camera can be connected to TVs, recorders, and other devicesfeaturing HDMI connectors. Use a third-party HDMI cable (Type D).These items must be purchased separately. Always turn the camera offbefore connecting or disconnecting an HDMI cable.
1 HDMI connector for connectionto camera
2 HDMI connector for connectionto external device*
* Choose a cable with a connector that matches the connector on theHDMI device.
TVs・ After tuning the TV to the HDMI input channel, turn the camera on
and press the K button to view pictures on the television screen.・ Audio playback volume can be adjusted using the controls on the TV.
Camera controls cannot be used.・ If the camera is paired with a smart device running the SnapBridge
app, the device can be used to control playback remotely while thecamera is connected to a TV. See the SnapBridge app online help fordetails.
RecordersThe camera can record video directly to connected HDMI recorders. Usethe [HDMI] item in the setup menu to adjust settings for HDMI output.

Connecting to HDMI devices495
Some recorders will start and stop recording in response to cameracontrols.
Output resolution❚❚Choose the format for images output to the HDMI device. If [Auto] isselected, the camera will automatically choose the appropriate format.
Advanced❚❚Adjust settings for connection to the HDMI device.
Option Description
[Outputrange]
The RGB video signal input range varies with the HDMI device.[Auto], which matches the output range to the HDMI device, isrecommended in most situations. If the camera is unable todetermine the correct RGB video signal output range for theHDMI device, you can choose from the following options:・ [Limited range]: For devices with an RGB video signal input
range of 16 to 235. Choose this option if you notice a loss ofdetail in shadows.
・ [Full range]: For devices with an RGB video signal inputrange of 0 to 255. Choose this option if you notice thatshadows are “washed out” or too bright.
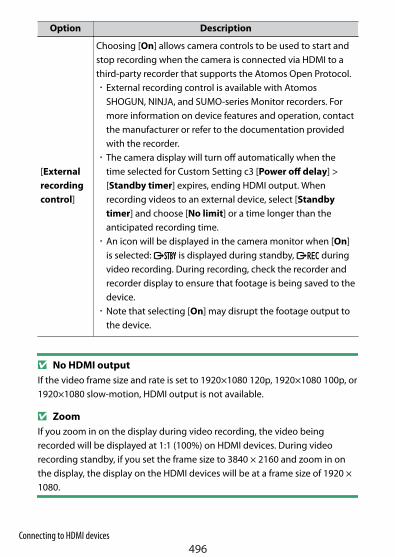
Connecting to HDMI devices496
Option Description
[Externalrecordingcontrol]
Choosing [On] allows camera controls to be used to start andstop recording when the camera is connected via HDMI to athird-party recorder that supports the Atomos Open Protocol.・ External recording control is available with Atomos
SHOGUN, NINJA, and SUMO-series Monitor recorders. Formore information on device features and operation, contactthe manufacturer or refer to the documentation providedwith the recorder.
・ The camera display will turn off automatically when thetime selected for Custom Setting c3 [Power off delay] >[Standby timer] expires, ending HDMI output. Whenrecording videos to an external device, select [Standbytimer] and choose [No limit] or a time longer than theanticipated recording time.
・ An icon will be displayed in the camera monitor when [On]is selected: A is displayed during standby, B duringvideo recording. During recording, check the recorder andrecorder display to ensure that footage is being saved to thedevice.
・ Note that selecting [On] may disrupt the footage output tothe device.
D No HDMI outputIf the video frame size and rate is set to 1920×1080 120p, 1920×1080 100p, or1920×1080 slow-motion, HDMI output is not available.
D ZoomIf you zoom in on the display during video recording, the video beingrecorded will be displayed at 1:1 (100%) on HDMI devices. During videorecording standby, if you set the frame size to 3840 × 2160 and zoom in onthe display, the display on the HDMI devices will be at a frame size of 1920 ×1080.

“On-camera” versus “remote”497
On-Camera flashphotography
“On-camera” versus “remote”You can take pictures using an optional flash unit mounted on thecamera accessory shoe or one or more remote flash units.・ When using a flash, select [Off] for [Silent photography] in the
photo shooting menu.
Camera-mounted flash unitsTake pictures using a flash unit mounted on the camera. See thefollowing pages for more information.
Remote flash photographyTake pictures with one or more remote flash units using wireless flashcontrol (Advanced Wireless Lighting, or AWL). For more information, see
“Remote flash photography” (0508).

Using an on-camera flash498
Using an on-camera flash
1 Mount a flash unit on the camera accessory shoe.
See the documentation provided with the unit for details.
2 Turn on the camera and flash unit.The flash will begin charging; the flash-ready indicator (c) willappear in the shooting display when charging is complete.
3 Choose the flash control mode (0501) and flash mode (0502).
4 Adjust shutter speed and aperture.
5 Take pictures.

Using an on-camera flash499
D Shutter speedShutter speed can be set as follows when an optional flash unit is used:
Mode Shutter speed
b Set automatically by camera (1/200 s–1/60 s)
P, A Set automatically by camera (1/200 s–1/60 s)*
S 1/200 s–30 s
M 1/200 s–30 s, Bulb, Time
* Shutter speed may be set as slow as 30 s if slow sync, rear-curtain sync, orslow sync with red-eye reduction is selected for flash mode.
D Third-party flash unitsThe camera cannot be used with flash units that would apply voltages over250 V to the camera’s X contacts or short-circuit contacts on the accessoryshoe. Use of such flash units could not only interfere with normal operationof the camera but also damage the flash sync circuits of the camera and/orflash.
D i-TTL flash controlWhen an optional flash unit that supports the Nikon Creative LightingSystem is attached and set to TTL, the camera uses monitor pre-flashes forbalanced or standard “i-TTL fill-flash” flash control. i-TTL flash control is notavailable with flash units that do not support the Nikon Creative LightingSystem. The camera supports the following types of i-TTL flash control:
Flash control Description
i-TTLbalanced fill-flash
The camera uses “i-TTL balanced fill-flash” flash control for anatural balance between the main subject and ambientbackground lighting. After the shutter-release button ispressed and immediately before the main flash, the flashunit emits a series of monitor pre-flashes which the camera

Using an on-camera flash500
Flash control Descriptioni-TTLbalanced fill-flash
uses to optimize flash output for a balance between themain subject and ambient background lighting.
Standard i-TTL fill-flash
Flash output is adjusted to bring lighting in the frame to astandard level; the brightness of the background is nottaken into account. Recommended for shots in which themain subject is emphasized at the expense of backgrounddetails, or when exposure compensation is used.
・ Standard i-TTL fill-flash is activated automatically when [Spot metering]is selected.

Flash control mode501
Flash control modeWhen a flash unit (an SB-500, SB-400, or SB-300) is mounted on thecamera, the flash control mode, flash level, and other flash settings canbe adjusted using the [Flash control] > [Flash control mode] item inthe photo shooting menu.
・ Settings for flash units other than the SB-500, SB-400, and SB-300 canonly be adjusted using flash unit controls.
Option Description
[TTL]
・ Flash output is adjusted automatically in response to shootingconditions.
・ Flash compensation can be adjusted using [Flashcompensation] in the photo shooting menu.
[Manual]・ Choose the flash level manually.・ Flash output is selected using [Manual output amount].
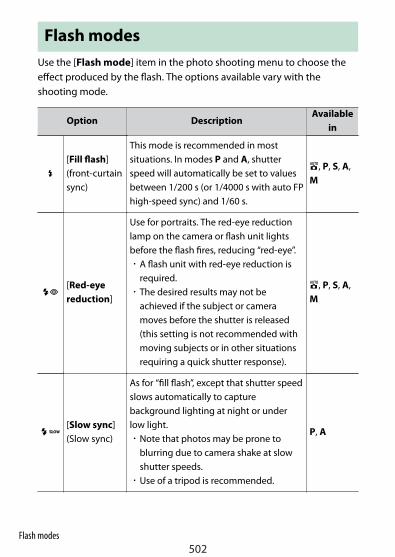
Flash modes502
Flash modesUse the [Flash mode] item in the photo shooting menu to choose theeffect produced by the flash. The options available vary with theshooting mode.
Option DescriptionAvailable
in
I
[Fill flash](front-curtainsync)
This mode is recommended in mostsituations. In modes P and A, shutterspeed will automatically be set to valuesbetween 1/200 s (or 1/4000 s with auto FPhigh-speed sync) and 1/60 s.
b, P, S, A,M
J[Red-eyereduction]
Use for portraits. The red-eye reductionlamp on the camera or flash unit lightsbefore the flash fires, reducing “red-eye”.・ A flash unit with red-eye reduction is
required.・ The desired results may not be
achieved if the subject or cameramoves before the shutter is released(this setting is not recommended withmoving subjects or in other situationsrequiring a quick shutter response).
b, P, S, A,M
L[Slow sync](Slow sync)
As for “fill flash”, except that shutter speedslows automatically to capturebackground lighting at night or underlow light.・ Note that photos may be prone to
blurring due to camera shake at slowshutter speeds.
・ Use of a tripod is recommended.
P, A

Flash modes503
Option DescriptionAvailable
in
K
[Slow sync +red-eye](red-eyereductionwith slowsync)
Use to include background lighting inportraits. Red-eye reduction is combinedwith slow shutter speeds to capturebackground lighting at night or underlow light.・ Note that photos may be prone to
blurring due to camera shake at slowshutter speeds.
・ Use of a tripod is recommended.
P, A
M[Rear-curtain sync]
The flash fires just before the shuttercloses, creating the effect of a stream oflight behind moving light sources.・ Selecting P or A after choosing this
option sets the flash mode to slowsync.
・ Note that photos may be prone toblurring due to camera shake at slowshutter speeds.
・ Use of a tripod is recommended.
P, S, A, M
s [Flash off] The flash does not fire.b, P, S, A,M
D Studio strobe lightingRear-curtain sync cannot be used with studio flash systems, as the correctsynchronization cannot be obtained.

Flash compensation504
Flash compensationFlash compensation is used to deliberately alter flash output, forexample in order to change the brightness of the subject relative to thebackground. Via the [Flash compensation] item in the photo shootingmenu, flash output can be increased to make the main subject appearbrighter, reduced to prevent glare, or otherwise fine-tuned to producethe desired result.
・ Choose from values of from −3 to +1 in steps of 1/3.・ Higher values make the subject brighter, lower values darker.・ At values other than ±0.0, a Y icon will appear in the shooting
display.・ Normal flash output can be restored by setting flash compensation to
±0.0. Flash compensation is not reset when the camera is turned off.

FV lock505
FV lockThis feature is used to lock flash output for CLS-compatible flash units,letting you take multiple photos or recompose shots without changingthe flash level. Your subject need not be in the center of the frame,giving you more freedom when composing shots.・ Flash output is adjusted automatically for any changes in ISO
sensitivity and aperture.・ FV lock is not available in b mode.
1 Assign [FV lock] to a control using Custom Setting f2 [Customcontrols (shooting)].
2 Mount a CLS-compatible flash unit on the camera accessoryshoe.
3 Turn the flash unit on and choose a flash control mode ofmonitor pre-flash qA or A.・ If you are using an SB-500, SB-400, or SB-300 mounted on the
camera accessory shoe, choose [TTL] for [Flash control] > [Flashcontrol mode] in the photo shooting menu.
・For information on other flash units, see the documentationprovided with the unit.

FV lock506
4 Focus.Position the subject in the center of the frame and press the shutter-release button halfway to focus.
5 Lock flash level.・After confirming that the flash-ready indicator (c) appears in the
shooting display, press the [FV lock] control; the flash unit willemit a monitor pre-flash to determine the appropriate flash level.
・Flash output will lock and an FV lock icon (r) will appear in theshooting display.
6 Recompose the shot.

FV lock507
7 Press the shutter-release button the rest of the way down toshoot.If desired, additional pictures can be taken without releasing FV lock.Repeat Steps 6 to 7 to take additional shots.
8 Release FV lock.Press the [FV lock] control to release FV lock and confirm that the FVlock icon (r) is no longer displayed in the shooting display.

What is remote flash photography?508
Remote flash photography
What is remote flash photography?Take pictures with one or more remote flash units using wireless flashcontrol (Advanced Wireless Lighting, or AWL). For information on using aflash unit mounted on the camera accessory shoe, see “On-Camera flash
photography” (0497).
Throughout this chapter, operations involving the camera and accessoriesconnected to the camera are indicated by C, operations involving remoteflash units by f. For more information on using remote flash units (f), seethe documentation provided with the flash unit.

Controlling remote flash units509
Controlling remote flash unitsRemote flash units can be controlled via optical signals from an optionalflash unit mounted on the camera accessory shoe and functioning as amaster flash (optical AWL). For information on compatible flash units,
see “Features available with CLS-compatible flash units” (0543).
・ If the flash unit in question is an SB-500, settings can be adjustedfrom the camera. For more information, see “Using optical AWL with
the SB-500” (0509). See the documentation provided with the flashunits for more information.
・ Settings for other flash units must be adjusted using flash unitcontrols. For more information, see the documentation provided withthe flash unit in question.
Using optical AWL with the SB-500When an optional flash unit SB-500 is mounted on the accessory shoe ofthe camera, [Wireless flash options] is displayed in [Flash control] inthe photo shooting menu. Group flash can be performed by selecting[Optical AWL] in [Wireless flash options].

Controlling remote flash units510
1 C: Highlight [Group flash options] in the [Flash control] displayand press 2.

Controlling remote flash units511
2 C: Adjust flash output and choose the channel and flash controlmode.
・Choose the flash control mode and flash level for the master flashand the remote flash units in each group.
・The following options are available:
Option Description
TTL i-TTL flash control.
qA Auto aperture. Available only with compatible flash units.
M Choose the flash level manually.
––(off)
The remote units do not fire. [Comp.] cannot be adjusted.
・Select [3] for [Channel].
3 f: Set the channel of the remote flash units to [3].

Controlling remote flash units512
4 f: Group the remote flash units.・Choose a group (A or B).・There is no limit on the number of remote flash units that may be
used. The practical maximum, however, is three per group, as thelight emitted by the remote flash units will interfere withperformance if more flash units are used.
5 C/f: Compose the shot and arrange the flash units.・See the documentation provided with the flash units for more
information.・Test-fire the units and confirm that they are functioning normally.
To test-fire the units, press the test button on the master flash.
6 C/f: Take the photograph after confirming that the flash-readylights for all flash units are lit.
D Remote flash photography・ Position the sensor windows on the remote flash units to pick up the light
from the master flash. Particular care is required if the master flash ismounted on a hand-held camera.
・ Be sure that direct light or strong reflections from the remote flash unitsdo not enter the camera lens (in [TTL] mode) or the photocells on theremote flash units ([qA] mode). Otherwise light from the flash units mayinterfere with exposure.
・ Even if [––] is selected for [Master flash] > [Mode], the master flash mayemit low-intensity timing flashes. These flashes may appear inphotographs taken at short range. This can be prevented by choosing lowISO sensitivities or small apertures (high f-numbers).
・ After positioning the remote flash units, take a test shot and view theresults in the camera display.

Before contacting customer support513
Troubleshooting
Before contacting customer supportYou may be able to resolve any issues with the camera by following thesteps below. Check this list before consulting your retailer or Nikon-authorized service representative.
STEP 1Check the list of common problems.Common problems and solutions are listed in the followingsections:・ “Problems and solutions” (0515)・ “Alerts and error messages” (0524)
STEP 2Turn the camera off and remove the battery, then wait abouta minute, re-insert the battery and turn the camera on.
The camera may continue to write data to the memory cardafter shooting. Wait at least a minute before removing thebattery.
STEP 3Search Nikon websites.・ For support information and answers to frequently asked
questions, visit the website for your country or region (035).・ To download the latest firmware for your camera, visit:
https://downloadcenter.nikonimglib.com/

Before contacting customer support514
STEP 4 Consult a Nikon-authorized service representative.
D Restoring default settings・ Depending on current settings, some menu items and other features may
be unavailable. To access menu items that are grayed out or features thatare otherwise unavailable, try restoring default settings using the [Resetall settings] item in the setup menu.
・ Note, however, that wireless network profiles, copyright information, andother user-generated entries will also be reset. Once reset, settings cannotbe restored.

Problems and solutions515
Problems and solutionsSolutions to some common issues are listed below.
Battery/displayThe camera is on but does not respond:●・Wait for recording and other operations to end.・ If the problem persists, turn the camera off.・ If the camera does not turn off, remove and reinsert the battery.
- Any data currently being recorded will be lost.- Data that have already been recorded are not affected by removing
the battery.
The viewfinder or monitor does not turn on:●・Have you changed the monitor mode? Choose a different monitor mode
using the M button.・Have you limited the choice of monitor modes available using the [Limit
monitor mode selection] item in the setup menu? Adjust settings asrequired.
・Dust, lint, or other foreign matter on the eye sensor may prevent itfunctioning normally. Clean the eye sensor with a blower.
The viewfinder is out of focus:●・Rotate the diopter adjustment control to adjust viewfinder focus.・ If adjusting viewfinder focus does not correct the problem, set the focus
mode to AF-S and the AF-area mode to single-point AF. Next, select thecenter focus point, choose a high-contrast subject, and focus usingautofocus. With the camera in focus, use the diopter adjustment controlto bring the subject into clear focus in the viewfinder.
The display in the viewfinder, monitor, or control panel turns offwithout warning:
●
Choose longer delays for Custom Setting c3 [Power off delay].

Problems and solutions516
ShootingThe camera takes time to turn on:●More time will be needed to find files if the memory card contains largenumbers of files or folders.
The shutter cannot be released:●・ Is a memory card inserted, and if so, does it have space available?・ Is the memory card write-protected?・ If you selected mode S after selecting a shutter speed of “Bulb” or
“Time” in mode M, choose a different shutter speed.・ Is [Release locked] selected for [Slot empty release lock] in the setup
menu?
The camera is slow to respond to the shutter-release button:●Select [Off] for Custom Setting d3 [Exposure delay mode].
Burst shooting is unavailable:●Burst shooting cannot be used in conjunction with HDR.
Photos are out of focus:●・ Is the camera in manual focus mode? To enable autofocus, select AF-A,
AF-S, AF-C, or AF-F for focus mode.・Autofocus does not perform well under the following conditions. In
these cases, use manual focus or focus lock. Autofocus does not performwell if: there is little or no contrast between the subject and thebackground, the focus point contains objects at different distances fromthe camera, the subject is dominated by regular geometric patterns, thefocus point contains areas of sharply contrasting brightness, backgroundobjects appear larger than the subject, or the subject contains many finedetails.
The beep does not sound:●・ Is [On] selected for [Silent photography] in the photo shooting menu?・ If AF-C is selected for focus mode or if AF-A is selected and you are
shooting in AF-C, a beep will not sound when the camera focuses.

Problems and solutions517
・Select an option other than [Off] for [Beep options] > [Beep on/off] inthe setup menu.
・The beep does not sound in video mode.
The full range of shutter speeds is not available:●Using a flash restricts the range of shutter speeds available. Flash syncspeed can be set to values of 1/200–1/60 s using Custom Setting e1 [Flashsync speed]. When using flash units that support auto FP high-speedsync, choose [1/200 s (Auto FP)] for a full range of shutter speeds.
Focus does not lock when the shutter-release button is pressedhalfway:
●
If AF-C is selected for focus mode or if AF-A is selected and you areshooting in AF-C, press the A (g) button to lock the focus.
Focus-point selection is not available:●Not available when [Auto-area AF], [Auto-area AF (people)], or [Auto-area AF (animals)] is selected for AF-area mode.
The camera is slow to record photos:●Is [On] selected for [Long exposure NR] in the photo shooting menu?
Photographs and videos do not appear to have the sameexposure as the preview shown in the display:
●
・The effects of changes to settings that affect exposure and color are notvisible in the display when [Off] is selected for Custom Setting d7 [Applysettings to live view].
・Note that changes to [Monitor brightness] and [Viewfinderbrightness] have no effect on images recorded with the camera.
Flicker or banding appears in video mode:●Select [Flicker reduction] in the video recording menu and choose anoption that matches the frequency of the local AC power supply.
Bright regions or bands appear:●Bright regions or bands may occur if the subject is lit by a flashing sign,flash, or other light source with brief duration.

Problems and solutions518
Smudges appear in photographs:●・Are there smudges on the front or rear (mount-side) lens elements?・ Is there foreign matter on the image sensor? See “Manual cleaning”
(0575), or consult a Nikon-authorized service representative.
Bokeh is irregular:●With fast shutter speeds and/or fast lenses, you may notice irregularities inhow Bokeh is shaped. The effect can be mitigated by choosing slowershutter speeds and/or higher f-numbers.
Pictures are affected by noticeable ghosting or flare:●You may notice ghosting or flare in shots that include the sun or otherbright light sources. These effects can be mitigated by attaching a lenshood or by composing shots with bright light sources well out of theframe. You can also try such techniques as removing lens filters, choosinga different shutter speed, or using silent photography.
Shooting ends unexpectedly or does not start:●・Shooting may end automatically to prevent the camera overheating, for
example if:- The ambient temperature is high- The camera has been used for extended periods to record videos- The camera has been used in continuous release modes for extended
periods・ If photographs cannot be taken because the camera is running hot, turn
the camera off and wait for it to cool before trying to take photographsagain. Note that the camera may feel warm to the touch, but this doesnot indicate a malfunction.
Image artifacts appear in the display during shooting:●・To reduce noise, adjust settings such as ISO sensitivity, shutter speed, or
Active D-Lighting.・At high ISO sensitivities, noise may become more noticeable in long
exposures or in pictures recorded when the camera temperature iselevated.

Problems and solutions519
・Randomly-spaced bright pixels, fog, or bright spots may arise as a resultof increases in the temperature of the camera’s internal circuits. Turn thecamera off when it is not in use.
・Randomly-spaced bright pixels, fog, lines or unexpected colors mayappear if you press the X button to zoom in on the view through thelens during shooting.
・Note that the distribution of noise in the display may differ from that inthe final picture.
The camera cannot measure a value for preset manual whitebalance:
●
The subject is too dark or too bright.
Certain pictures cannot be selected as sources for preset manualwhite balance:
●
Pictures created with cameras of other types cannot serve as sources forpreset manual white balance.
White balance (WB) bracketing is unavailable:●・White balance bracketing is not available when a RAW or RAW + JPEG
option is selected for image quality.・White balance bracketing cannot be used in multiple exposure and HDR
modes.
The effects of [Set Picture Control] differ from image to image:●[Auto] is selected for [Set Picture Control] or as the basis for a customPicture Control created using [Manage Picture Control], or [A] (auto) isselected for [Quick sharp], [Contrast], or [Saturation]. For consistentresults over a series of photographs, choose a setting other than [A] (auto).
The option selected for metering cannot be changed:●The option selected for metering cannot be changed during exposurelock.
Exposure compensation is not available:●Changes to exposure compensation in mode M apply only to theexposure indicator and have no effect on shutter speed or aperture.

Problems and solutions520
Uneven shading may appear in long exposures:●Uneven shading may appear in long exposures shot at shutter speeds of“Bulb” or “Time”. The effect can be mitigated by selecting [On] for [Longexposure NR] in the photo shooting menu.
The AF-assist illuminator does not light:●・ Is [Off] selected for Custom Setting a11 [Built-in AF-assist illuminator]?・The illuminator does not light in video mode.・ If AF-C is selected for focus mode, if AF-A is selected and you are
shooting in AF-C, or if MF is selected, the illuminator does not light.
Sound is not recorded with videos:●・ Is [Microphone off] selected for [Microphone sensitivity] in the video
recording menu?・Was the video recorded with [Manual] chosen for [Microphone
sensitivity] in the video recording menu and a low sensitivity selected?
PlaybackRAW pictures are not visible during playback:●The camera displays only the JPEG copies of pictures taken with [RAW +JPEG fine], [RAW + JPEG normal], or [RAW + JPEG basic] selected for[Image quality].
Pictures taken with other cameras are not displayed:●Pictures recorded with other types of camera may not display correctly.
Not all photos are visible during playback:●Select [All] for [Playback folder] in the playback menu.
“Tall” (portrait) orientation photos are displayed in “wide”(landscape) orientation:
●
・ Is [Off] selected for [Rotate tall] in the playback menu?・Auto image rotation is not available during picture review.・Camera orientation may not be correctly recorded in photos taken with
the camera pointing up or down.

Problems and solutions521
Pictures cannot be deleted:●・ Is the memory card write-protected?・Are the pictures protected?
Pictures cannot be retouched:●・The pictures cannot be further edited with this camera.・There is insufficient space on the memory card to record the retouched
copy.
The camera displays the message, [Folder contains no pictures.]:●Select [All] for [Playback folder] in the playback menu.
RAW pictures cannot be printed:●・Print JPEG copies of the pictures created using a tool such as the [RAW
processing] item in the retouch menu.・Copy the pictures to a computer and print them using NX Studio or
other software that supports the RAW format.
Pictures are not displayed on HDMI devices:●Confirm that an HDMI cable is correctly connected.
Output to HDMI devices does not function as expected:●・Confirm that an HDMI cable is correctly connected.・ Is [On] selected for [HDMI] > [Advanced] > [External recording
control] in the setup menu?・Pictures may display correctly if default settings are restored using the
[Reset all settings] item in the setup menu.
The effects of [Set Picture Control], [Active D-Lighting], or[Vignette control] are not visible:
●
In the case of RAW images, the effects can only be viewed using Nikonsoftware. View RAW images using NX Studio.
Pictures cannot be copied to a computer:●Depending on the operating system, you may be unable to uploadpictures when the camera is connected to a computer. Copy pictures fromthe memory card to a computer using a card reader or other device.

Problems and solutions522
Bluetooth and Wi-Fi (wireless networks)Smart devices do not display the camera SSID (network name):●・Navigate to the setup menu and confirm both that [Disable] is selected
for [Airplane mode] and that [Enable] is selected for [Connect to smartdevice] > [Pairing (Bluetooth)] > [Bluetooth connection].
・Confirm that [Connect to smart device] > [Wi-Fi connection] isenabled in the setup menu.
・Try disabling and re-enabling wireless network features on the smartdevice.
The camera cannot connect to printers and other wirelessdevices:
●
The camera cannot establish wireless connections with devices other thansmartphones, tablets, computers, and the ML-L7 Remote Control.
Pictures cannot be uploaded to smart devices via auto upload:●・ If [Foreground] is selected for [Auto link] > [Link mode] in the
SnapBridge tab, pictures will not be uploaded to the smart device
automatically while the SnapBridge app is running in the background.Pictures will only be uploaded when the SnapBridge app is displayed(running in the foreground) on the smart device.
・Check that the camera is paired with the smart device.・Check that the camera and smart device are configured for connection
via Bluetooth.
The camera cannot download location data from the smartdevice:
●
・The camera may be unable to download or display location data fromsmart devices depending on the version of the operating system and/orSnapBridge app used.
・ If [Foreground] is selected for [Auto link] > [Link mode] in the
SnapBridge tab, location data will not be downloaded to the camera.
Instead, they will be embedded in photographs after they are uploadedto the smart device.

Problems and solutions523
MiscellaneousThe date of recording is not correct:●Is the camera clock set correctly? The clock is less accurate than mostwatches and household clocks; check it regularly against more accuratetimepieces and reset as necessary.
Menu items cannot be selected:●Some items are not available at certain combinations of settings.
[Wireless remote (ML-L7) options] cannot be selected, or thecamera cannot be paired with the ML-L7 Remote Control using[Save wireless remote controller] in [Wireless remote (ML-L7)options]:
●
・Use a fully-charged battery.・Confirm that [Airplane mode] in the setup menu is set to [Disable].・The remote control cannot be used when the camera and computer are
connected via USB and are communicating. End the USB connection.
The camera does not respond even when the ML-L7 RemoteControl is used:
●
・The camera and ML-L7 Remote Control (optional) are not connected.Press the power button on the remote control to connect them. If L is
not displayed on the shooting screen, pair again and connect (0570).・Confirm that [Wireless remote (ML-L7) options] > [Wireless remote
connection] in the setup menu is set to [Enable].・Confirm that [Airplane mode] in the setup menu is set to [Disable].・The remote control cannot be used when the camera and computer are
connected via USB and are communicating. End the USB connection.

Alerts and error messages524
Alerts and error messagesThis section lists the alerts and error messages that appear in the cameradisplay.
AlertsThe following alerts appear in the camera display:
Alert Problem Solution
H Low battery. Ready spare battery.
l
([--] is alsodisplayed
flashing in thecontrol panel)
Lens is not correctlyattached.
・ Ensure that the lens is correctlyattached.
・ Ensure that retractable lenses areextended.
・ This indicator is also displayedwhen a non-CPU lens is attachedvia a mount adapter, but in thiscase no action need be taken.
Bulb (flashes)“Bulb” selected inmode S.
・ Change shutter speed.・ Select mode M.
Time (flashes)“Time” selected inmode S.
・ Change shutter speed.・ Select mode M.

Alerts and error messages525
Alert Problem Solution
(Exposureindicators andshutter speed
or aperturedisplay flash)
Subject too bright;limits of cameraexposure meteringsystem exceeded.
・ Lower ISO sensitivity.・ Shooting mode P: Use third-party
ND (neutral density) filter (filtercan also be used if alert is stilldisplayed after following settingsare adjusted in mode S or A).
・ Shooting mode S: Choose fastershutter speed.
・ Shooting mode A: Choose smalleraperture (higher f-number).
Subject too dark;limits of cameraexposure meteringsystem exceeded.
・ Increase ISO sensitivity.・ Shooting mode P: Use optional
flash unit (flash can also be used ifalert is still displayed afterfollowing settings are adjusted inmode S or A).
・ Shooting mode S: Choose slowershutter speed.
・ Shooting mode A: Choose wideraperture (lower f-number).
c (flashes)
Flash has fired at fullpower.
Photo may be underexposed. Checkdistance to subject and settings suchas aperture, flash range, and ISOsensitivity.
Subjects appear darkand underexposed.
Use optional flash unit.

Alerts and error messages526
Alert Problem Solution
Full (flashes)
・ Memoryinsufficient torecord furtherphotos.
・ Camera has runout of filenumbers.
・ Delete pictures from memory carduntil there is room for additionalpictures to be recorded. Copypictures you wish to keep tocomputer or other device beforeproceeding.
・ Insert new memory card.
Err (flashes) Camera malfunction.
Press shutter-release button again. Iferror persists or appears frequently,consult Nikon-authorized servicerepresentative.
Card (flashes)The memory card iswrite-protected(“locked”).
Slide the lock switch to the “write”
position (0598).
Error messagesThe following error messages may appear in the camera display:
Shutter release disabled. Recharge battery.●Battery exhausted.・Replace with spare battery.・Charge battery.
This battery cannot be used. It does not communicate properlywith this camera. To use the camera safely, choose a batterydesignated for use in this camera.
●
・Battery info not available.- Battery cannot be used. Contact Nikon-authorized service
representative.- Battery level is extremely low; charge battery.
・Battery cannot supply data to camera.- Replace third-party batteries with genuine Nikon batteries.

Alerts and error messages527
No memory card.●Memory card not inserted or inserted incorrectly.・Check that card is inserted correctly.
Cannot access this memory card. Insert another card.●Error accessing memory card.・Check that camera supports memory card.・ If error persists after card has been repeatedly ejected and reinserted,
card may be damaged. Contact retailer or Nikon-authorized servicerepresentative.
Memory card is locked. Slide lock to "write" position.●The memory card is write-protected (“locked”).・Slide the lock switch to the “write” position (0598).
This card is not formatted. Format the card.●Memory card is not correctly formatted.・Format memory card.・Replace with correctly-formatted memory card.
FTZ mount adapter firmware version not supported. Upgrade FTZfirmware.
●
The firmware of the mount adapter is not the latest version.・Update the firmware of the mount adapter to the latest version. For
information on firmware updates, see the Nikon website for your area.
Recording interrupted. Please wait.●Memory card does not support required video write speed.・Use card that supports required write speed or change option selected
for [Frame size/frame rate] in video recording menu.
The camera is too hot. It cannot be used until it cools. Please wait.Camera will turn itself off.
●
・Camera’s internal temperature is elevated.- Suspend shooting until camera has cooled.
・High battery temperature.- Remove battery and wait for it to cool.

Alerts and error messages528
Folder contains no pictures.●・Folder contains no images.
- Insert memory card that contains pictures.・No pictures in folder selected for playback.
- Use [Playback folder] item in playback menu to select folder thatcontains pictures.
Cannot display this file.●・File has been modified using computer application or does not conform
to DCF file standard.・File is corrupt.
- Do not overwrite images using computer applications.
Cannot select this file.●Selected picture cannot be retouched.・Retouch options are available only with pictures taken with or previously
retouched on camera.
This video cannot be edited.●Selected video cannot be edited.・Videos created with other devices cannot be edited.・Videos under two seconds long cannot be edited.

Compatible lenses and accessories529
Technical notes
Compatible lenses and accessoriesThe camera can be used with all Z mount lenses.
Confirm that the lens name includes “NIKKOR Z”.
A Compatible F mount lensesF mount lenses can be mounted on Z mount cameras using an FTZ mountadapter.・ Some features may not be available depending on the lens used.
Information on the F mount lenses that can be used with Z mount camerasand on any restrictions that may apply can be found in Compatible F MountLenses, available from the Nikon Download Center:https://downloadcenter.nikonimglib.com/en/products/491/FTZ.html

Camera displays530
Camera displaysFor illustrative purposes, the displays are shown with all indicators lit.
Monitor
Photo mode❚❚
1 Shooting mode (0127)
2 Flexible program indicator
(0128)
3 AF-area brackets (0102)
4 Flash mode (0502)
5 Interval timer indicator (0296)1 icon (084)“No memory card” indicator
(075, 0533)
6 Release mode (0166)
7 Focus point (085, 0102)
8 Focus mode (0100)
9 AF-area mode (0102)
10 Active D-Lighting (0164)
11 Picture Control (0147)
12 Bluetooth connection indicator
(0408)
Airplane mode (0408)

Camera displays531
13 White balance (0116, 0153,
0248)
14 Image area (0243)
15 Image size (0161)
16 Image quality (0160)
17 i icon (0145)
18 Exposure and flash bracketing
indicator (0271)WB bracketing indicator
(0276)ADL bracketing indicator
(0279)
HDR indicator (0290)Multiple exposure indicator
(0283)
19 Number of shots in exposureand flash bracketing sequence
(0271)Number of shots in WB
bracketing sequence (0276)Number of shots in ADL
bracketing sequence (0279)HDR exposure differential
(0290)Number of multiple exposure
(0283)
20 Exposure indicator
Exposure (0133)Exposure compensation
(0139)
Auto bracketing (0270)

Camera displays532
21 Flash-ready indicator (0498)
22 “k” (appears when memoryremains for over 1000
exposures; 077)
23 Number of exposures
remaining (077, 0600)
24 Wi-Fi connection indicator
(0164)Remote-control connection
indicator (0570)
25 ISO sensitivity (0137)
26 ISO sensitivity indicator (0137)Auto ISO sensitivity indicator
(0245)
27 Exposure compensation
indicator (0139)
28 Flash compensation indicator
(0504)
29 Subject-tracking AF (0109)
30 Aperture (0130, 0131)
31 Shutter speed (0128, 0131)
32 Flash sync indicator (0361)
33 FV lock indicator (0505)
34 Metering (0162)
35 Autoexposure (AE) lock (0142)

Camera displays533
36 Battery indicator (076)
37 USB power delivery (0415)
38 Flicker detection (0265)
39 Shutter type (0357)
Silent photography (0121)
40 Exposure delay mode (0356)
41 Focus indicator (0112)
42 Vibration reduction (0171)
43 Touch shooting (054, 0110)
44 Live view preview indicator
(0359)
45 Temperature warning
D Temperature warnings・ If the camera temperature becomes elevated, a temperature warning and
count-down timer will be displayed. When the timer reaches zero, theshooting display will turn off.
・ The timer turns red when the thirty second mark is reached. In somecases, the timer may be displayed immediately after the camera is turnedon.
D No memory card insertedIf no memory card is inserted, a “no memory card” indicator and [–E–] willappear in the shooting display.

Camera displays534
The information display●
1 Shooting mode (0127)
2 Flexible program indicator
(0128)
3 Shutter speed (0128, 0131)
4 Aperture (0130, 0131)
5 Exposure indicator
Exposure (0133)Exposure compensation
(0139)Exposure and flash
bracketing (0271)
WB bracketing (0276)
ADL bracketing (0279)
6 Flash sync indicator (0361)

Camera displays535
7 Flash compensation indicator
(0504)
8 Exposure compensation
indicator (0139)Exposure compensation value
(0139)
9 Exposure and flash bracketing
indicator (0271)WB bracketing indicator
(0276)ADL bracketing indicator
(0279)
HDR indicator (0290)Multiple exposure indicator
(0283)
10 “k” (appears when memoryremains for over 1000
exposures; 077)
11 Number of exposures
remaining (077, 0600)
12 i icon (0145)
13 ISO sensitivity (0137)
14 ISO sensitivity indicator (0137)Auto ISO sensitivity indicator
(0245)
15 FV lock indicator (0505)
16 Autoexposure (AE) lock (0142)

Camera displays536
17 Bluetooth connection indicator
(0408)
Airplane mode (0408)
18 Wi-Fi connection indicator
(0164)Remote-control connection
indicator (0570)
19 Long exposure noise reduction
indicator (0262)
20 Shutter type (0357)
Silent photography (0121)
21 Exposure delay mode (0356)
22 Interval timer indicator (0296)1 icon (084)
23 Flash control mode (0501)
24 “Beep” indicator (0406)
25 Battery indicator (076)
26 USB power delivery (0415)
27 Wi-Fi connection (0164)
28 Release mode (0166)
29 AF-area mode (0102)
30 Focus mode (0100)
31 Vibration reduction (0171)
32 Active D-Lighting (0164)
33 Metering (0162)
34 Image size (0161)
35 White balance (0116, 0153,
0248)
36 Set Picture Control (0147)
37 Image quality (0160)
38 Flash mode (0502)
39 Temperature warning

Camera displays537
Video mode❚❚
1 Recording indicator (090)
“No video” indicator (092)
2 External recording control
(0494)
3 Frame size and rate/Video
quality (0175)
4 Time remaining (090)
5 Timecode (0339)
6 File name (0242)
7 Wind noise reduction (0179)
8 Release mode (still
photography; 0335)
9 Sound level (0178)
10 Microphone sensitivity (0178)
11 Frequency response (0338)
12 Electronic VR indicator (0181)
13 Highlight display (0389)

Camera displays538
Viewfinder
Photo mode❚❚
1 Battery indicator (076)
2 Vibration reduction (0171)
3 Flash mode (0502)
4 Release mode (0166)
5 Focus mode (0100)
6 AF-area mode (0102)
7 Active D-Lighting (0164)
8 Picture Control (0147)
9 White balance (0116, 0153,
0248)
10 Image quality (0160)
11 Image size (0161)
12 Image area (0243)

Camera displays539
13 Bluetooth connection indicator
(0408)
Airplane mode (0408)
14 Wi-Fi connection indicator
(0164)Remote-control connection
indicator (0570)
15 Focus point (085, 0102)
16 Exposure and flash bracketing
indicator (0271)WB bracketing indicator
(0276)ADL bracketing indicator
(0279)
HDR indicator (0290)Multiple exposure indicator
(0283)
17 Subject-tracking AF (0109)
18 Number of shots in exposureand flash bracketing sequence
(0271)Number of shots in WB
bracketing sequence (0276)Number of shots in ADL
bracketing sequence (0279)HDR exposure differential
(0290)Number of multiple exposure
(0283)

Camera displays540
19 Flash-ready indicator (0498)
20 “k” (appears when memoryremains for over 1000
exposures; 077)
21 Number of exposures
remaining (077, 0600)
22 ISO sensitivity (0137)
23 ISO sensitivity indicator (0137)Auto ISO sensitivity indicator
(0245)
24 Exposure compensation
indicator (0139)
25 Flash compensation indicator
(0504)
26 Exposure indicator
Exposure (0133)Exposure compensation
(0139)
Auto bracketing (0270)
27 Aperture (0130, 0131)
28 Shutter speed (0128, 0131)
29 Flash sync indicator (0361)
30 Autoexposure (AE) lock (0142)
31 Flexible program indicator
(0128)
32 Shooting mode (0127)
33 Metering (0162)
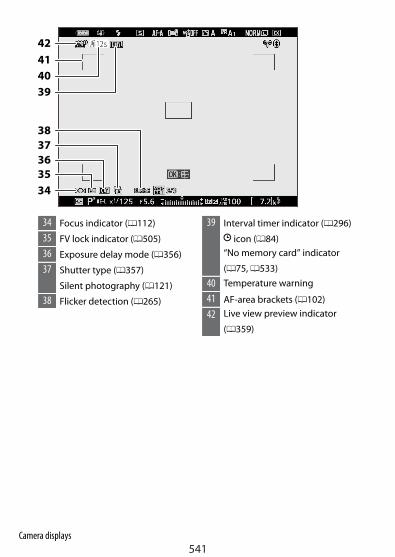
Camera displays541
34 Focus indicator (0112)
35 FV lock indicator (0505)
36 Exposure delay mode (0356)
37 Shutter type (0357)
Silent photography (0121)
38 Flicker detection (0265)
39 Interval timer indicator (0296)1 icon (084)“No memory card” indicator
(075, 0533)
40 Temperature warning
41 AF-area brackets (0102)
42 Live view preview indicator
(0359)
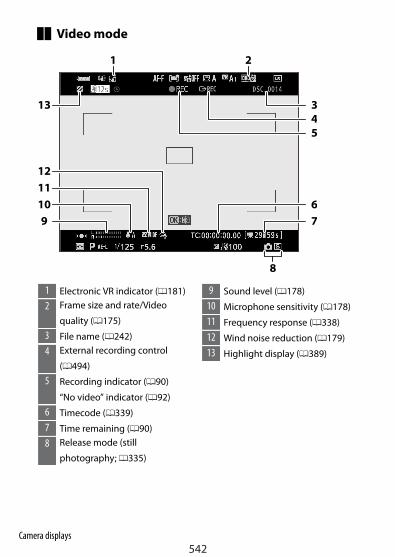
Camera displays542
Video mode❚❚
1 Electronic VR indicator (0181)
2 Frame size and rate/Video
quality (0175)
3 File name (0242)
4 External recording control
(0494)
5 Recording indicator (090)
“No video” indicator (092)
6 Timecode (0339)
7 Time remaining (090)
8 Release mode (still
photography; 0335)
9 Sound level (0178)
10 Microphone sensitivity (0178)
11 Frequency response (0338)
12 Wind noise reduction (0179)
13 Highlight display (0389)

Compatible flash units543
Compatible flash units
The Nikon Creative Lighting System (CLS)Nikon’s advanced Creative Lighting System (CLS) supports a variety offeatures thanks to improved communication between the camera andcompatible flash units.
Features available with CLS-compatible flashunits
Flash unit 0
SB-5000 543
SB-910/SB-900/SB-800 545
SB-700 547
SB-600 549
SB-500 550
Flash unit 0
SB-R200 552
SB-400 554
SB-300 555
SU-800 557
SB-5000❚❚Supported features
Single flash
i-TTLi-TTL balanced fill-flash 41
Standard i-TTL fill-flash 42
qA Auto aperture 4
A Non-TTL auto -
GN Distance-priority manual 4

Compatible flash units544
Supported features
M Manual 4
RPT Repeating flash 4
Optical Advanced Wireless Lighting
Master
Remote flash control 4
i-TTL i-TTL 4
[A : B] Quick wireless flash control 4
qA Auto aperture 4
A Non-TTL auto -
M Manual 4
RPT Repeating flash 4
Remote
i-TTL i-TTL 4
[A : B] Quick wireless flash control 4
qA/A Auto aperture/non-TTL auto 43
M Manual 4
RPT Repeating flash 4
Radio-controlled Advanced Wireless Lighting -
Color Information Communication (flash) 4
Color Information Communication (LED light) -
Auto FP high-speed sync 44
FV lock 45

Compatible flash units545
Supported features
Red-eye reduction 4
Camera modeling illumination -
Unified flash control -
Camera flash unit firmware update 4
1 Not available with spot metering.2 Can also be selected via the flash unit.3 Choice of qA and A depends on the option selected with the master
flash.4 Available only in i-TTL, qA, A, GN and M flash control modes.5 Available only in i-TTL flash control mode or when the flash is configured
to emit monitor pre-flashes in qA or A flash control mode.
SB-910/SB-900/SB-800❚❚Supported features
Single flash
i-TTLi-TTL balanced fill-flash 41
Standard i-TTL fill-flash 42
qA Auto aperture 43
A Non-TTL auto 43
GN Distance-priority manual 4
M Manual 4
RPT Repeating flash 4
Optical Advanced Wireless Lighting
Master
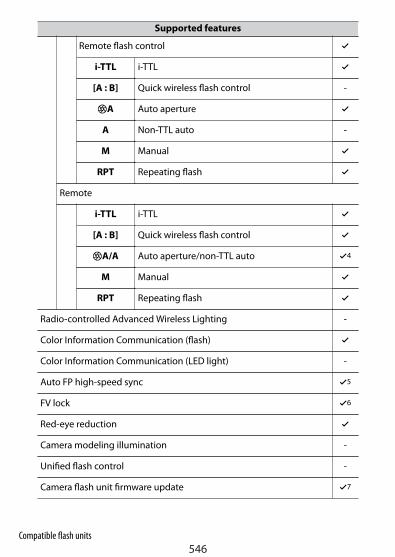
Compatible flash units546
Supported features
Remote flash control 4
i-TTL i-TTL 4
[A : B] Quick wireless flash control -
qA Auto aperture 4
A Non-TTL auto -
M Manual 4
RPT Repeating flash 4
Remote
i-TTL i-TTL 4
[A : B] Quick wireless flash control 4
qA/A Auto aperture/non-TTL auto 44
M Manual 4
RPT Repeating flash 4
Radio-controlled Advanced Wireless Lighting -
Color Information Communication (flash) 4
Color Information Communication (LED light) -
Auto FP high-speed sync 45
FV lock 46
Red-eye reduction 4
Camera modeling illumination -
Unified flash control -
Camera flash unit firmware update 47

Compatible flash units547
1 Not available with spot metering.2 Can also be selected via the flash unit.3 qA/A mode selection is performed on the flash unit using custom
settings.4 Choice of qA and A depends on the option selected with the master
flash.5 Available only in i-TTL, qA, A, GN, and M flash control modes.6 Available only in i-TTL flash control mode or when the flash is configured
to emit monitor pre-flashes in qA or A flash control mode.7 Firmware updates for the SB-910 and SB-900 can be performed from the
camera.
SB-700❚❚Supported features
Single flash
i-TTLi-TTL balanced fill-flash 41
Standard i-TTL fill-flash 4
qA Auto aperture -
A Non-TTL auto -
GN Distance-priority manual 4
M Manual 4
RPT Repeating flash -
Optical Advanced Wireless Lighting
Master
Remote flash control 4
i-TTL i-TTL 4
[A : B] Quick wireless flash control 4

Compatible flash units548
Supported features
qA Auto aperture -
A Non-TTL auto -
M Manual 4
RPT Repeating flash -
Remote
i-TTL i-TTL 4
[A : B] Quick wireless flash control 4
qA/A Auto aperture/non-TTL auto -
M Manual 4
RPT Repeating flash 4
Radio-controlled Advanced Wireless Lighting -
Color Information Communication (flash) 4
Color Information Communication (LED light) -
Auto FP high-speed sync 42
FV lock 43
Red-eye reduction 4
Camera modeling illumination -
Unified flash control -
Camera flash unit firmware update 4
1 Not available with spot metering.2 Available only in i-TTL, GN, and M flash control modes.3 Available only in i-TTL flash control mode.

Compatible flash units549
SB-600❚❚Supported features
Single flash
i-TTLi-TTL balanced fill-flash 41
Standard i-TTL fill-flash 42
qA Auto aperture -
A Non-TTL auto -
GN Distance-priority manual -
M Manual 4
RPT Repeating flash -
Optical Advanced Wireless Lighting
Master
Remote flash control -
i-TTL i-TTL -
[A : B] Quick wireless flash control -
qA Auto aperture -
A Non-TTL auto -
M Manual -
RPT Repeating flash -
Remote
i-TTL i-TTL 4
[A : B] Quick wireless flash control 4

Compatible flash units550
Supported features
qA/A Auto aperture/non-TTL auto -
M Manual 4
RPT Repeating flash 4
Radio-controlled Advanced Wireless Lighting -
Color Information Communication (flash) 4
Color Information Communication (LED light) -
Auto FP high-speed sync 43
FV lock 44
Red-eye reduction 4
Camera modeling illumination -
Unified flash control -
Camera flash unit firmware update -
1 Not available with spot metering.2 Can also be selected via the flash unit.3 Available only in i-TTL and M flash control modes.4 Available only in i-TTL flash control mode.
SB-500❚❚Supported features
Single flash
i-TTLi-TTL balanced fill-flash 41
Standard i-TTL fill-flash 4
qA Auto aperture -

Compatible flash units551
Supported features
A Non-TTL auto -
GN Distance-priority manual -
M Manual 42
RPT Repeating flash -
Optical Advanced Wireless Lighting
Master
Remote flash control 42
i-TTL i-TTL 42
[A : B] Quick wireless flash control -
qA Auto aperture -
A Non-TTL auto -
M Manual 42
RPT Repeating flash -
Remote
i-TTL i-TTL 4
[A : B] Quick wireless flash control 4
qA/A Auto aperture/non-TTL auto -
M Manual 4
RPT Repeating flash 4
Radio-controlled Advanced Wireless Lighting -
Color Information Communication (flash) 4
Color Information Communication (LED light) 4

Compatible flash units552
Supported features
Auto FP high-speed sync 43
FV lock 44
Red-eye reduction 4
Camera modeling illumination -
Unified flash control -
Camera flash unit firmware update 4
1 Not available with spot metering.2 Can be selected using the [Flash control] item in the camera menus.3 Available only in i-TTL and M flash control modes.4 Available only in i-TTL flash control mode.
SB-R200❚❚Supported features
Single flash
i-TTLi-TTL balanced fill-flash -
Standard i-TTL fill-flash -
qA Auto aperture -
A Non-TTL auto -
GN Distance-priority manual -
M Manual -
RPT Repeating flash -
Optical Advanced Wireless Lighting
Master

Compatible flash units553
Supported features
Remote flash control -
i-TTL i-TTL -
[A : B] Quick wireless flash control -
qA Auto aperture -
A Non-TTL auto -
M Manual -
RPT Repeating flash -
Remote
i-TTL i-TTL 4
[A : B] Quick wireless flash control 4
qA/A Auto aperture/non-TTL auto -
M Manual 4
RPT Repeating flash -
Radio-controlled Advanced Wireless Lighting -
Color Information Communication (flash) -
Color Information Communication (LED light) -
Auto FP high-speed sync 41
FV lock 42
Red-eye reduction -
Camera modeling illumination -
Unified flash control -
Camera flash unit firmware update -

Compatible flash units554
1 Available only in i-TTL and M flash control modes.2 Available only in i-TTL flash control mode.
SB-400❚❚Supported features
Single flash
i-TTLi-TTL balanced fill-flash 41
Standard i-TTL fill-flash 4
qA Auto aperture -
A Non-TTL auto -
GN Distance-priority manual -
M Manual 42
RPT Repeating flash -
Optical Advanced Wireless Lighting
Master
Remote flash control -
i-TTL i-TTL -
[A : B] Quick wireless flash control -
qA Auto aperture -
A Non-TTL auto -
M Manual -
RPT Repeating flash -
Remote
i-TTL i-TTL -

Compatible flash units555
Supported features
[A : B] Quick wireless flash control -
qA/A Auto aperture/non-TTL auto -
M Manual -
RPT Repeating flash -
Radio-controlled Advanced Wireless Lighting -
Color Information Communication (flash) 4
Color Information Communication (LED light) -
Auto FP high-speed sync -
FV lock 43
Red-eye reduction 4
Camera modeling illumination -
Unified flash control -
Camera flash unit firmware update -
1 Not available with spot metering.2 Can be selected using the [Flash control] item in the camera menus.3 Available only in i-TTL flash control mode.
SB-300❚❚Supported features
Single flash
i-TTLi-TTL balanced fill-flash 41
Standard i-TTL fill-flash 4
qA Auto aperture -

Compatible flash units556
Supported features
A Non-TTL auto -
GN Distance-priority manual -
M Manual 42
RPT Repeating flash -
Optical Advanced Wireless Lighting
Master
Remote flash control -
i-TTL i-TTL -
[A : B] Quick wireless flash control -
qA Auto aperture -
A Non-TTL auto -
M Manual -
RPT Repeating flash -
Remote
i-TTL i-TTL -
[A : B] Quick wireless flash control -
qA/A Auto aperture/non-TTL auto -
M Manual -
RPT Repeating flash -
Radio-controlled Advanced Wireless Lighting -
Color Information Communication (flash) 4
Color Information Communication (LED light) -

Compatible flash units557
Supported features
Auto FP high-speed sync -
FV lock 43
Red-eye reduction -
Camera modeling illumination -
Unified flash control -
Camera flash unit firmware update 4
1 Not available with spot metering.2 Can be selected using the [Flash control] item in the camera menus.3 Available only in i-TTL flash control mode.
The SU-800 Wireless Speedlight Commander❚❚When mounted on a CLS-compatible camera, the SU-800 can be used asa commander for SB-5000, SB-910, SB-900, SB-800, SB-700, SB-600,SB-500, or SB-R200 flash units. Group flash control is supported for up tothree groups. The SU-800 itself is not equipped with a flash.
Supported features
Single flash
i-TTLi-TTL balanced fill-flash -
Standard i-TTL fill-flash -
qA Auto aperture -
A Non-TTL auto -
GN Distance-priority manual -
M Manual -
RPT Repeating flash -

Compatible flash units558
Supported features
Optical Advanced Wireless Lighting
Master
Remote flash control 4
i-TTL i-TTL -
[A : B] Quick wireless flash control 41
qA Auto aperture -
A Non-TTL auto -
M Manual -
RPT Repeating flash -
Remote
i-TTL i-TTL -
[A : B] Quick wireless flash control -
qA/A Auto aperture/non-TTL auto -
M Manual -
RPT Repeating flash -
Radio-controlled Advanced Wireless Lighting -
Color Information Communication (flash) -
Color Information Communication (LED light) -
Auto FP high-speed sync 42
FV lock 43
Red-eye reduction -
Camera modeling illumination -

Compatible flash units559
Supported features
Unified flash control -
Camera flash unit firmware update -
1 Available during close-up photography only.2 Disabled when RPT is selected for flash control mode.3 Available only in i-TTL flash control mode or when the flash is configured
to emit monitor pre-flashes in qA flash control mode.
Notes and tips for optional flash unitsWhen using an optional flash unit, be sure also to read thedocumentation supplied with the unit.・ If the unit supports CLS, refer to the section on CLS-compatible
digital SLR cameras. This camera is not included in the “digital SLR”category in the documentation for the SB-80DX, SB-28DX, andSB-50DX.
・ If the flash-ready indicator (c) flashes for about three seconds after aphotograph is taken in i-TTL or non-TTL auto mode, the flash has firedat full power and the photograph may be underexposed (CLS-compatible flash units only).
・ i-TTL flash control can be used at ISO sensitivities between 100 and12800.
・ At ISO sensitivities over 12800, the desired results may not beachieved at some ranges or aperture settings.
・ In mode P, the maximum aperture (minimum f-number) is limitedaccording to ISO sensitivity, as shown below:
Maximum aperture (f-number) at ISO equivalent of:
100 200 400 800 1600 3200 6400 12800
4 5 5.6 7.1 8 10 11 13

Compatible flash units560
* If the maximum aperture of the lens is smaller than given above, themaximum value for aperture will be the maximum aperture of thelens.
・ The SB-5000, SB-910, SB-900, SB-800, SB-700, SB-600, SB-500, andSB-400 provide red-eye reduction in red-eye reduction and slow-syncwith red-eye reduction flash modes.
・ “Noise” in the form of lines may appear in flash photographs takenwith an SD-9 or SD-8A high-performance battery pack attacheddirectly to the camera. Reduce ISO sensitivity or increase the distancebetween the camera and the battery pack.
・ The camera provides AF-assist illumination as required. AF-assistilluminators on optional flash units will not light.
・ When an SC-series 17, 28, or 29 sync cable is used for off-camera flashphotography, correct exposure may not be achieved in i-TTL mode.We recommend that you select standard i-TTL fill-flash. Take a testshot and view the results in the camera display.
・ In i-TTL, do not use any form of flash panel (diffusion panel) otherthan the flash unit’s built-in flash panel or supplied bounce adapter.Using other panels may produce incorrect exposure.

Compatible flash units561
D Flash photographyFlash photography cannot be combined with some camera features,including:・ silent photography,・ video recording, and・ HDR (high dynamic range)
D Using FV lock with optional flash units・ FV lock is available with optional flash units in TTL and (where supported)
monitor pre-flash qA and monitor pre-flash A flash control modes (seethe documentation provided with the flash unit for more information).
・ Note that when Advanced Wireless Lighting is used to control remoteflash units, you will need to set the flash control mode for the master or atleast one remote group to TTL, qA, or A.
D Other flash unitsThe following flash units can be used in non-TTL auto (A) and manual modes.The options available do not vary with the lens used.
Flash unit Supported features
SB-80DX, SB-28DX, SB-28, SB-26,SB-25, SB-24
Non-TTL auto, Manual, Repeating flash,Rear-curtain sync1
SB-50DX, SB-23, SB-29, SB-21B,SB-29S
Manual, Rear-curtain sync1
SB-30, SB-272, SB-22S, SB-22, SB-20,SB-16B, SB-15
Non-TTL auto, Manual, Rear-curtainsync1
1 Available when the camera is used to select the flash mode.2 Mounting an SB-27 on the camera automatically sets the flash mode to
TTL, but setting the flash mode to TTL disables the shutter release. Setthe SB-27 to A.

Compatible flash units562
D Metering areas for FV lockThe areas metered when FV lock is used with optional flash units are asfollows:・ Stand-alone flash unit
Flash control mode Metered area
i-TTL 6-mm circle in center of frame
Auto aperture (qA) Area metered by flash exposure meter
・ Remote flash units
Flash control mode Metered area
i-TTL Entire frame
Auto aperture (qA)Area metered by flash exposure meter
Non-TTL auto (A)
D Flash compensation for optional flash unitsIn i-TTL and auto aperture (qA) flash control modes, the flash compensationselected with the optional flash unit or the camera [Flash control] item isadded to the flash compensation selected with the [Flash compensation]item in the photo shooting menu.
A Studio strobe lightingTo adjust the color and brightness of the view through the lens so that shotsare easier to frame, select [Off] for Custom Setting d7 [Apply settings to liveview].

Other compatible accessories563
Other compatible accessoriesA variety of accessories are available for your Nikon camera.
D Compatible accessories・ Availability may vary with country or region.・ See our website or brochures for the latest information.
Power sources●・EN-EL25 Rechargeable Li-ion Battery: Can be used with Nikon Z fc digital
cameras.・MH-32 Battery Charger: Can be used to recharge EN-EL25 batteries.・EH-7P Charging AC Adapter: The EH-7P can be used to charge batteries
inserted in the camera.- The battery will not charge while the camera is on.- The charging AC adapter can be used to power the camera; to do so,
select [Enable] for [USB power delivery] in the setup menu. For more
information, see “USB power delivery” (0415).
Filters●・Neutral Color (NC) filters can be used to protect the lens.・Filters may cause ghosting when the subject is framed against a bright
light, or when a bright light source is in the frame. Filters can be removed ifghosting occurs.
・Matrix metering may not produce the desired results with filters withexposure factors (filter factors) over 1× (Y44, Y48, Y52, O56, R60, X0, X1, C-PL, ND2S, ND4, ND4S, ND8, ND8S, ND400, A2, A12, B2, B8, B12). We suggestthat [Center-weighted metering] be selected instead. See the filterdocumentation for details.
・Filters intended for special-effects photography may interfere withautofocus or the in-focus indicator (I).
USB cables●・UC-E24 USB Cable: A USB cable with a type C connector for connection to
the camera and a type A connector for connection to the USB device.

Other compatible accessories564
・UC-E25 USB Cable: A USB cable with two type C connectors.
Hot shoe adapters●AS-15 Sync Terminal Adapter: Mount the AS-15 on the camera hot shoe toconnect studio strobe lights or other flash equipment via a sync terminal.
Accessory shoe covers●BS-1 Accessory Shoe Cover: A cover protecting the accessory shoe when noflash unit is attached.
Body caps●BF-N1 Body Cap: The body cap prevents dust entering the camera when nolens is in place.
Viewfinder eyepiece accessories●DK-32 Rubber Eyecup: A rubber eyecup that can be fitted to the cameraviewfinder. The DK-29 makes the image in the viewfinder easier to see,preventing eye fatigue.
Remove Replace
Mount adapters●FTZ Mount Adapter: An adapter that allows NIKKOR F mount lenses to beused with digital cameras that support interchangeable Z mount lenses.・For information on attaching, removing, maintaining, and using FTZ mount
adapters, refer to the documentation supplied with the device.* If a warning message prompting you to update is displayed on the
camera when a mount adapter is mounted on the camera, update to thelatest version. For information on firmware updates, see the Nikonwebsite for your area.

Other compatible accessories565
Microphones●・ME-1 Stereo Microphone: Connect the ME-1 to the camera microphone
jack to record stereo sound. Using an external microphone also reduces thechance of picking up equipment noise, such as the sounds producedduring video recording when focus is achieved using autofocus.
・ME-W1 Wireless Microphone: A wireless Bluetooth microphone. Use theME-W1 for off-camera recording.
Remote controls●ML-L7 Remote Control: Pair it with the camera and shoot videos and photosremotely.
D Attaching and removing the accessory shoe coverThe cover slides into the shoe as shown. To remove the cover, hold thecamera firmly, press the cover down with a thumb and slide it in the directionshown.
Charging the camera with the charging ACadapterWhen a battery is inserted in the camera, the optional EH-7P ChargingAC Adapter can be used to charge the battery.

Other compatible accessories566
・ After confirming that the camera is off, connect the charging ACadapter (q) and plug the adapter in. The battery charges while thecamera is off. Keep the plug straight during insertion and removal.
- The camera charge lamp (w) lights amber while charging is inprogress. The lamp turns off when charging is complete.
- An exhausted battery will fully charge in about 1 hour and 40minutes.
- Unplug the charging AC adapter and remove the cable from thecamera when charging is complete.
D The charging AC adapterIf the battery cannot be charged using the charging AC adapter, for examplebecause the battery is not compatible or the temperature of the camera iselevated, the charge lamp will flash rapidly for about 30 seconds and thenturn off. If the charge lamp is off and you did not observe the batterycharging, turn the camera on and check the battery level.

Other compatible accessories567
A Powering the camera with the charging AC adapter・ If [Enable] is selected for [USB power delivery] in the setup menu, the
charging AC adapter will power the camera when the camera is turned
on. For more information, see ““Power delivery” versus “charging”” (0417).・ The battery will not charge while the camera is powered by an outside
source.
A Computer USB power delivery and battery charging・ Computers will supply current to power the camera or charge the battery
only when connected via a UC-E25 USB cable (available separately). Theoptional UC-E24 USB cable cannot be used for this purpose.
・ Depending on the model and product specifications, some computerswill not supply current to power the camera or charge the battery.
ML-L7 Remote ControlYou can operate the camera from the remote control by pairing*
(0570) the optional ML-L7 Remote Control with the camera. With thiscamera, you can perform the operation in “Remote control part names
and functions (for Z fc)” (0568).* Connecting the camera and remote control via Bluetooth is called
“pairing” here.・ Only one remote control can be paired per camera. When pairing
another remote control, only the last paired remote control isenabled.
・ Also see the documentation supplied with the ML-L7 RemoteControl.
D Notes when using the remote controlThe remote control cannot be used in the following cases.・ When [Airplane mode] in the camera setup menu is set to [Enable]・ While the camera is connected to and exchanging data with a computer
via USB

Other compatible accessories568
Remote control part names and functions (for Z fc)❚❚
Part Function
1 - button Same operation as the W (Q) button on the camera.
2 + button Same operation as the X button on the camera.
3Video-recordbutton
Press to start recording, and press again to end recording.
4Powerbutton
When pressed, the remote control turns on and startssearching for a paired camera. If you press and hold it for 3seconds or longer, the remote control will start searchingfor unpaired cameras. Pressing the power button while theremote control is on will turn it off.
5 Status lampThe remote control status and shooting operation statusare indicated by the color and behavior of the lamp
(0570).

Other compatible accessories569
Part Function
6Shutter-release button
Corresponds to the shutter-release button on thecamera.・ There is no halfway press or press and hold function.
You cannot use the continuous shooting function,which requires press and hold.
・ Bulb shooting works the same way as Time shooting.
7 Multi selector Same operation as the multi selector on the camera.
8J (select)button
Same operation as the J button on the camera.
9
Fn1 (function1)/Fn2(function 2)button
Use functions registered beforehand (0414).・ By default, pressing the Fn1 button on the remote
control is the same operation as the K button onthe camera, while the Fn2 button is the sameoperation as the G button.

Other compatible accessories570
A Standby timer when using the remote controlWhen the standby timer of the camera expires and the monitor andviewfinder are off, turn on the remote control and then press and hold theshutter-release button or video-record button on the remote control toreturn to the original state.
A Remote control status lamp (for Z fc)
Color Status Description
Green Flashing about every second Detecting paired camera
GreenFlashing quickly (about every 0.5seconds)
Pairing
Green Flashing about every 3 seconds Connected to the camera
Orange Flashes once Start shooting photo
Orange Flashes twice End shooting photo
Red Flashes once Start recording video
Red Flashes twice End recording video
Connecting for the first time: Pairing❚❚When using the remote control for the first time, you must pair it withthe camera.

Other compatible accessories571
1 Select [Wireless remote (ML-L7) options] > [Save wirelessremote controller] in the camera setup menu and press J.
・The camera will standby for pairing.・ If the camera is connected to a smartphone or computer,
connection to those devices will be terminated.
2 Press and hold the power button on the remote control (3seconds or longer).・The camera and remote control will start pairing. In the meantime,
the remote control status lamp flashes at about 0.5 secondintervals.
・When pairing is complete, the camera and remote control will beconnected. L is displayed in the shooting display.
・ If a message indicating that pairing failed is displayed, start overfrom Step 1.

Other compatible accessories572
To connect with a paired remote control❚❚
1 Select [Wireless remote (ML-L7) options] > [Wireless remoteconnection] > [Enable] in the camera setup menu and press J.
2 Press the power button on the remote control.・The camera and remote control are automatically connected.

Software573
SoftwareThe following Nikon software can be used with the camera:
Computer software●Nikon computer software is available from the Nikon Download Center.Check the version and system requirements and be sure to download thelatest version.https://downloadcenter.nikonimglib.com/・NX Studio*: View and edit photos and videos shot with Nikon digital
cameras. Use NX Studio software to fine-tune photos shot in Nikon’s uniqueNEF/NRW (RAW) formats or convert them to JPEG or TIFF (RAW processing).NX Studio can be used not only with RAW pictures but also with JPEG andTIFF photos shot with Nikon digital cameras for such tasks as editing tonecurves and enhancing brightness and contrast.* Existing users should be sure to download the latest version, as earlier
versions may be unable to download pictures from the camera.・Wireless Transmitter Utility: The Wireless Transmitter Utility is required if
the camera is to be connected to a network. Pair the camera with thecomputer and download pictures via Wi-Fi.
・Webcam Utility: A module that allows you to connect the camera to acomputer with a USB cable and use the camera as a webcam. When youselect an external camera in web conferencing software, “Webcam Utility”is displayed. Select it to use it as a webcam. Check the Webcam Utility pageon the Nikon Download Center for compatible cameras, usage, operatingenvironment, and precautions during use.
Smartphone (tablet) apps●SnapBridge: Download photos and videos from the camera to your smartdevice via a wireless connection.・SnapBridge apps can be downloaded from the Apple App Store® or on
Google Play™.・Visit the Nikon website for the latest SnapBridge apps information.

Caring for the camera574
Caring for the camera
StorageWhen the camera will not be used for an extended period, remove thebattery. Before removing the battery, confirm that the camera is off. Donot store the camera in locations that:・ are poorly ventilated or subject to humidities of over 60%・ are next to equipment that produces strong electromagnetic fields,
such as televisions or radios・ are exposed to temperatures above 50 °C (122 °F) or below −10 °C (14
°F)
CleaningThe procedure varies with the part that requires cleaning. Theprocedures are detailed below.・ Do not use alcohol, thinner, or other volatile chemicals.
Camera body❚❚Use a blower to remove dust and lint, then wipe gently with a soft, drycloth. After using the camera at the beach or seaside, wipe off sand orsalt with a cloth lightly dampened in distilled water and dry the camerathoroughly.Important: The following are not covered under warranty:・ damage caused by the entry of dust, sand, or other foreign matter
into the camera, and・ damage caused by using an aerosol blower too close to the camera.
Lens and viewfinder❚❚These glass elements are easily damaged: remove dust and lint with ablower. If using an aerosol blower, keep the can vertical to prevent the

Caring for the camera575
discharge of liquid that could damage glass elements. To removefingerprints and other stains, apply a small amount of lens cleaner to asoft cloth and clean with care.
Monitor❚❚Remove dust and lint with a blower. When removing fingerprints andother stains, wipe the surface lightly with a soft cloth or chamois leather.Do not apply pressure, as this could result in damage or malfunction.
Manual cleaningDirt or dust entering the camera when lenses are exchanged or the bodycap is removed may adhere to the surface of the image sensor andaffect your photographs. The sensor can be cleaned manually asdescribed below. Note, however, that the sensor is extremely delicateand easily damaged; we recommend that manual cleaning beperformed only by a Nikon-authorized service representative.
1 Turn the camera off and remove the lens.
2 Holding the camera so that light can enter the camera, examinethe image sensor for dust or lint.
If no foreign objects are present, proceed to Step 4.

Caring for the camera576
3 Remove any dust and lint from the sensor with a blower.
・Do not use a blower-brush. The bristles could damage the sensor.・Dirt that cannot be removed with a blower can only be removed
by Nikon-authorized service personnel. Under no circumstancesshould you touch or wipe the sensor.
4 Replace the lens or supplied body cap.
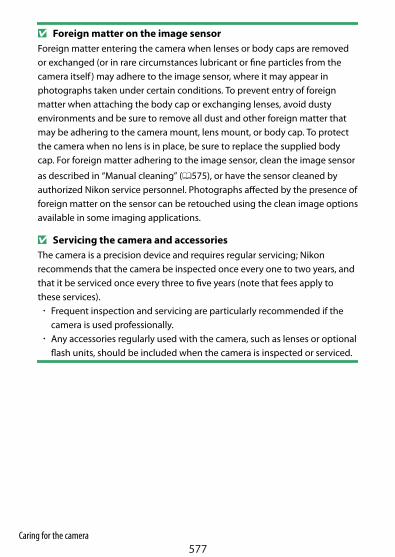
Caring for the camera577
D Foreign matter on the image sensorForeign matter entering the camera when lenses or body caps are removedor exchanged (or in rare circumstances lubricant or fine particles from thecamera itself ) may adhere to the image sensor, where it may appear inphotographs taken under certain conditions. To prevent entry of foreignmatter when attaching the body cap or exchanging lenses, avoid dustyenvironments and be sure to remove all dust and other foreign matter thatmay be adhering to the camera mount, lens mount, or body cap. To protectthe camera when no lens is in place, be sure to replace the supplied bodycap. For foreign matter adhering to the image sensor, clean the image sensor
as described in “Manual cleaning” (0575), or have the sensor cleaned byauthorized Nikon service personnel. Photographs affected by the presence offoreign matter on the sensor can be retouched using the clean image optionsavailable in some imaging applications.
D Servicing the camera and accessoriesThe camera is a precision device and requires regular servicing; Nikonrecommends that the camera be inspected once every one to two years, andthat it be serviced once every three to five years (note that fees apply tothese services).・ Frequent inspection and servicing are particularly recommended if the
camera is used professionally.・ Any accessories regularly used with the camera, such as lenses or optional
flash units, should be included when the camera is inspected or serviced.

Caring for the camera and battery: Cautions578
Caring for the camera and battery:Cautions
Camera careDo not drop●
Do not drop the camera or lens or subject them to blows. The product maymalfunction if subjected to strong shocks or vibration.
Keep dry●Keep the camera dry. Rusting of the internal mechanism caused by waterinside the camera can not only be expensive to repair but can in fact causeirreparable damage.
Avoid sudden changes in temperature●If you bring the camera from a cold place to a warm place, or from a warmplace to a cold place, water droplets may form inside and outside the cameraand cause damage. When you bring the camera to a place with atemperature difference, place the camera in a carrying case or plastic bagand seal it beforehand. When the camera has adapted to the ambienttemperature, take it out from the bag and use it.
Keep away from strong magnetic fields●Static charges or the magnetic fields produced by equipment such as radiotransmitters could interfere with the monitor, corrupt data stored on thememory card, or affect the product’s internal circuitry.
Do not leave the lens pointed at the sun●Do not leave the lens pointed at the sun or other strong light source forextended periods. Intense light may damage the image sensor or causefading or “burn in”. Photographs taken with the camera may exhibit a whiteblur effect.

Caring for the camera and battery: Cautions579
Lasers and other bright light sources●Do not direct lasers or other extremely bright light sources toward the lens,as this could damage the camera’s image sensor.
Cleaning●When cleaning the camera body, use a blower to gently remove dust and lint,then wipe gently with a soft, dry cloth. After using the camera at the beach orseaside, wipe off any sand or salt using a cloth lightly dampened in freshwater and then dry the camera thoroughly.
Cleaning the lens and viewfinder●These glass elements are easily damaged: remove dust and lint with a blower.If using an aerosol blower, keep the can vertical to prevent the discharge ofliquid that could damage glass elements. To remove fingerprints and otherstains from the lens, apply a small amount of lens cleaner to a soft cloth andwipe the lens carefully.
Do not touch the image sensor●Under no circumstances should you exert pressure on the image sensor, pokeit with cleaning tools, or subject it to powerful air currents from a blower.These actions could scratch or otherwise damage the sensor.
Cleaning the image sensor●For information on cleaning the image sensor, see “Manual cleaning” (0575).
The lens contacts●Keep the lens contacts clean. Avoid touching them with your fingers.

Caring for the camera and battery: Cautions580
Store in a well-ventilated area●To prevent mold or mildew, store the camera in a dry, well-ventilated area. Donot store the camera with naphtha or camphor moth balls, next toequipment that produces strong electromagnetic, or where it will beexposed to extremely high temperatures, for example near a heater or in anenclosed vehicle on a hot day. Failure to observe these precautions couldresult in product malfunction.
Long-term storage●To prevent damage caused by, for example, leaking battery fluid, remove thebattery if the product will not be used for an extended period. Store thecamera in a plastic bag containing a desiccant. Do not, however, store theleather camera case in a plastic bag, as this may cause the material todeteriorate. Store the battery in a cool, dry place. Note that desiccantgradually loses its capacity to absorb moisture and should be replaced atregular intervals. To prevent mold or mildew, take the camera out of storageat least once a month, insert the battery, and release the shutter a few times.
Turn the product off before removing the battery.●Removing the battery while the camera is on could damage the product.Particular care should be taken not to remove or disconnect the powersource while images are being recorded or deleted.
Monitor/viewfinder●・The monitors (including viewfinder) are constructed with extremely high
precision; at least 99.99% of pixels are effective, with no more than 0.01%being missing or defective. Hence while these displays may contain pixelsthat are always lit (white, red, blue, or green) or always off (black), this is nota malfunction. Images recorded with the device are unaffected. Yourunderstanding is requested.
・ Images in the monitor may be difficult to see in a bright light.・Do not apply pressure to the monitor. The monitor could malfunction or
suffer damage. Dust or lint on the monitor can be removed with a blower.Stains can be removed by wiping the monitor lightly with a soft cloth orchamois leather. Should the monitor break, care should be taken to avoid

Caring for the camera and battery: Cautions581
injury from broken glass. Be careful that liquid crystal from the monitordoes not touch the skin or enter the eyes or mouth.
・Should you experience any of the following symptoms while framing shotsin the viewfinder, discontinue use until your condition improves:- nausea, eye pain, eye fatigue,- dizziness, headache, stiffness in your neck or shoulders,- queasiness or loss of hand-eye coordination, or- motion sickness.
・The display may rapidly flicker on and off during burst photography.Watching the flickering display could cause you to feel unwell. Discontinueuse until your condition improves.
Bright lights and back-lit subjects●Noise in the form of lines may in rare cases appear in pictures that includebright lights or back-lit subjects.
Battery carePrecautions for use●
・ If improperly handled, batteries may rupture or leak, causing the product tocorrode. Observe the following precautions when handling batteries:- Turn the product off before replacing the battery.- Batteries may be hot after extended use.- Keep the battery terminals clean.- Use only batteries approved for use in this equipment.- Do not short or disassemble batteries or expose them to flame or
excessive heat.- When the battery is not inserted in the camera or charger, keep it in a
plastic bag or other non-conductive container so that the terminals areinsulated.
・ If the battery is hot, for example immediately after use, wait for it to coolbefore charging. Attempting to charge the battery while its internaltemperature is elevated will impair battery performance, and the batterymay not charge or charge only partially.

Caring for the camera and battery: Cautions582
・ If the battery will not be used for some time, insert it in the camera and runit flat before removing it from the camera for storage. The battery shouldbe stored in a cool, dry location with an ambient temperature of 15 °C to 25°C (59 °F to 77 °F). Avoid hot or extremely cold locations.
・Batteries should be charged within six months of use. During long periodsof disuse, charge the battery and use the camera to run it flat once every sixmonths before returning it to a cool location for storage.
・Remove the battery from the camera or charger when not in use. Thecamera and charger draw minute amounts of charge even when off andcould draw the battery down to the point that it will no longer function.
・Do not use the battery at ambient temperatures below 0 °C (32 °F) or above40 °C (104 °F). Failure to observe this precaution could damage the batteryor impair its performance. Charge the battery indoors at ambienttemperatures of 5 °C–35 °C (41 °F–95 °F). The battery will not charge if itstemperature is below 0 °C (32 °F) or above 60 °C (140 °F).
・Capacity may be reduced and charging times increase at batterytemperatures from 0 °C (32 °F) to 15 °C (59 °F) and from 45 °C (113 °F) to 60°C (140 °F).
・Batteries in general exhibit a drop in charging capacity at low ambienttemperatures.
・Batteries in general exhibit a drop in available capacity at low ambienttemperatures. The change in capacity with temperature is reflected in thecamera battery-level display. As a result, the battery display may show adrop in capacity as the temperature drops, even if the battery is fullycharged.
・Batteries may be hot after use. Observe due caution when removingbatteries from the camera.
Charge batteries before use●Charge the battery before use. The supplied battery is not fully charged atshipment.

Caring for the camera and battery: Cautions583
Ready spare batteries●Before taking photographs, ready a spare battery and keep it fully charged.Depending on your location, it may be difficult to purchase replacementbatteries on short notice.
Have fully-charged spare batteries ready on cold days●Partially-charged batteries may not function on cold days. In cold weather,charge one battery before use and keep another in a warm place, ready to beexchanged as necessary. Once warmed, a cold battery may recover some ofits charge.
Battery level●・Turning the camera on or off repeatedly when the battery is fully
discharged will shorten battery life. Batteries that have been fullydischarged must be charged before use.
・A marked drop in the time a fully charged battery retains its charge whenused at room temperature indicates that it requires replacement. Purchasea new rechargeable battery.
Do not attempt to charge fully-charged batteries●Continuing to charge the battery after it is fully charged can impair batteryperformance.
Recycling used batteries●Recycle rechargeable batteries in accord with local regulations, being sure tofirst insulate the terminals with tape.
Using the charger・Do not move the charger or touch the battery during charging; failure to
observe this precaution could in very rare instances result in the chargershowing that charging is complete when the battery is only partiallycharged. Remove and reinsert the battery to begin charging again.
・Do not short the charger terminals. Failure to observe this precaution couldresult in overheating and damage to the charger.
・Unplug the charger when it is not in use.

Caring for the camera and battery: Cautions584
・Use the MH-32 Battery Charger with compatible batteries only.・Do not use chargers with damage that leaves the interior exposed or that
produce unusual sounds when used.・ The symbols on this product represent the following:m AC, p DC, q Class II equipment (the construction of the productis double-insulated)
Using the charging AC adapter・Do not move the camera or touch the battery during charging. Failure to
observe this precaution could in very rare instances result in the camerashowing that charging is complete when the battery is only partiallycharged. Disconnect and reconnect the adapter to begin charging again.
・Do not short the adapter terminals. Failure to observe this precaution couldresult in overheating and damage to the charger.
・Unplug the adapter when it is not in use.・Do not use adapters with damage that leaves the interior exposed or that
produce unusual sounds when used.・ The symbols on this product represent the following:m AC, p DC, q Class II equipment (the construction of the productis double-insulated)

Specifications585
Specifications
Nikon Z fc digital cameraType
Type Digital camera with support for interchangeable lenses
Lens mount Nikon Z mount
Lens
Compatiblelenses
・ Z mount NIKKOR lenses・ F mount NIKKOR lenses (mount adapter required;
restrictions may apply)
Effective pixels
Effectivepixels
20.9 million
Image sensor
Type 23.5 × 15.7 mm CMOS sensor (Nikon DX format)
Total pixels 21.51 million
Dust-reductionsystem
Image Dust Off reference data (NX Studio softwarerequired)

Specifications586
Storage
Image size(pixels)
・ [DX (24×16)] selected for image area:- 5568 × 3712 (Large: 20.7 M)- 4176 × 2784 (Medium: 11.6 M)- 2784 × 1856 (Small: 5.2 M)
・ [1:1 (16×16)] selected for image area:- 3712 × 3712 (Large: 13.8 M)- 2784 × 2784 (Medium: 7.8 M)- 1856 × 1856 (Small: 3.4 M)
・ [16:9 (24×14)] selected for image area:- 5568 × 3128 (Large: 17.4 M)- 4176 × 2344 (Medium: 9.8 M)- 2784 × 1560 (Small: 4.3 M)
・ Photographs taken while recording videos at aframe size of 3840 × 2160: 3840 × 2160
・ Photographs taken while recording videos at otherframe sizes: 1920 × 1080
File format(imagequality)
・ NEF (RAW): 12 or 14 bit・ JPEG: JPEG-Baseline compliant with fine (approx. 1:4),
normal (approx. 1:8), or basic (approx. 1:16)compression
・ NEF (RAW)+JPEG: Single photograph recorded in bothNEF (RAW) and JPEG formats
PictureControlSystem
Auto, Standard, Neutral, Vivid, Monochrome, Portrait,Landscape, Flat, Creative Picture Controls (Dream,Morning, Pop, Sunday, Somber, Dramatic, Silence,Bleached, Melancholic, Pure, Denim, Toy, Sepia, Blue, Red,Pink, Charcoal, Graphite, Binary, Carbon); selected PictureControl can be modified; storage for custom PictureControls
MediaSD (Secure Digital) and UHS-I compliant SDHC and SDXCmemory cards

Specifications587
Storage
File system DCF 2.0, Exif 2.31
Viewfinder
Viewfinder1.0-cm/0.39-in. approx. 2360k-dot (XGA) OLED electronicviewfinder with color balance and auto and 7-level manualbrightness controls
Framecoverage
Approx. 100% horizontal and 100% vertical
Magnification Approx. 1.02× (50 mm lens at infinity, −1.0 m−1)
Eyepoint19.5 mm (−1.0 m−1; from back end of viewfinder eyepiecelens)
Diopteradjustment
−3 – +3 m−1
Eye sensorAutomatically switches between monitor and viewfinderdisplays
Monitor
Monitor
7.5-cm/3.0-in., approx. 1040k-dot vari-angle TFT touch-sensitive LCD with 170° viewing angle, approximately100% frame coverage, and color balance and 11-levelmanual brightness controls
Shutter
TypeElectronically-controlled vertical-travel focal-planemechanical shutter; electronic front-curtain shutter;electronic shutter

Specifications588
Shutter
Speed
・ Using the shutter-speed dial: 1/4000 – 4 s (1 step),Bulb, Time, X (Flash sync)
・ Using the main command dial: 1/4000 – 30 s (1/3 step,can be extended up to 900 s in mode M), Bulb, Time, X(Flash sync)
Flash syncspeed
X=1/200 s; synchronizes with shutter at 1/200 s or slower;auto FP high-speed sync supported
Release
Release modeSingle frame, Continuous L, Continuous H, Continuous H(extended), Self-timer
Approximateframe advancerate
・ Continuous L: Approx. 1 – 4 fps・ Continuous H: Approx. 5 fps・ Continuous H (extended): Approx. 11 fps
* Maximum frame advance rate as measured by in-house tests.
Self-timer2 s, 5 s, 10 s, 20 s; 1–9 exposures at intervals of 0.5, 1, 2, or 3s
Exposure
Meteringsystem
TTL metering using camera image sensor
Meteringmode
・ Matrix metering・ Center-weighted metering: Weight of 75% given to 8
mm circle in center of frame; weighting can instead bebased on average of entire frame
・ Spot metering: Meters 3.5 mm circle (about 2.5% offrame) centered on selected focus point
・ Highlight-weighted metering

Specifications589
Exposure
Range–4 – +17 EV* Figures are for ISO 100 and f/2.0 lens at 20 °C/68 °F
Modeb: Auto, P: programmed auto with flexible program, S:shutter-priority auto, A: aperture-priority auto, M: manual
Exposurecompensation
Range: –3 – +3 EV (–5 – +5 EV when the exposurecompensation dial is set to [C]), Increment: 1/3 step
Exposure lock Luminosity locked at detected value
ISO sensitivity(Recommended ExposureIndex)
ISO 100–51200 (step sizes of 1/3 EV); can also be set toapprox. 1 EV above ISO 51200 (ISO 102400 equivalent) orto approx. 2 EV above ISO 51200 (ISO 204800 equivalent);auto ISO sensitivity control available
Active D-Lighting
Auto, Extra high, High, Normal, Low, and Off
Multipleexposure
Add, average, lighten, darken
Other options HDR (high dynamic range), photo mode flicker reduction
Autofocus
Type Hybrid phase-detection/contrast AF with AF assist
Detectionrange
−4.5 – +19 EV* Without low-light AF: −3 – +19 EV* Measured in photo mode at ISO 100 and a temperatureof 20 °C/68 °F using single-servo AF (AF-S) and a lens witha maximum aperture of f/1.8

Specifications590
Autofocus
Lens servo
・ Autofocus: Single-servo AF (AF-S), continuous-servo AF(AF-C), AF mode auto-switch (AF-A, photo mode only),full-time AF (AF-F, video mode only), predictive focustracking
・ Manual focus (M): Electronic rangefinder can be used
Focus points209 focus points * Number of focus points available inphoto mode with single-point AF selected for AF-areamode and DX selected for image area
AF-area mode
Pinpoint AF (photo mode only), single-point AF, dynamic-area AF (photo mode only), wide-area AF (S), wide-area AF(L), wide-area AF (L-people), wide-area AF (L-animals),auto-area AF, auto-area AF (people), auto-area AF(animals)
Focus lockPress the A (g) button or press shutter-release buttonhalfway (single-servo AF/AF-S)
Flash
Flash controlTTL: i-TTL flash control; i-TTL balanced fill-flash is usedwith matrix, center-weighted, and highlight-weightedmetering, standard i-TTL fill-flash with spot metering
Flash modeFront-curtain sync, slow sync, rear-curtain sync, red-eyereduction, red-eye reduction with slow sync, off
Flashcompensation
–3 – +1 EV (step size of 1/3 EV) available in modes P, S, A,and M
Flash-readyindicator
Lights when optional flash unit is fully charged; flashes asunderexposure warning after flash is fired at full output
Accessoryshoe
ISO 518 hot-shoe with sync and data contacts and safetylock

Specifications591
Flash
Nikon CreativeLightingSystem (CLS)
i-TTL flash control, optical Advanced Wireless Lighting, FVlock, Color Information Communication, auto FP high-speed sync
White balance
White balance
Auto (3 types), natural light auto, direct sunlight, cloudy,shade, incandescent, fluorescent (3 types), flash, choosecolor temperature (2500 K–10,000 K), preset manual (up to6 values can be stored), all with fine-tuning except choosecolor temperature
Bracketing
Bracketing Exposure and/or flash, white balance, and ADL
Video
Meteringsystem
TTL metering using camera image sensor
Meteringmode
Matrix, center-weighted, or highlight-weighted
Frame size(pixels) andframe rate
・ 3840 × 2160 (4K UHD): 30p (progressive)/25p/24p・ 1920 × 1080: 120p/100p/60p/50p/30p/25p/24p・ 1920 × 1080 slow-motion: 30p (×4)/25p (×4)/24p (×5)
* Actual frame rates for 120p, 100p, 60p, 50p, 30p, 25p, and24p are 119.88, 100, 59.94, 50, 29.97, 25, and 23.976 fpsrespectively* Quality selection (normal/m) available at all sizes except3840 × 2160, 1920 × 1080 120p/100p, and 1920 × 1080slow-motion, when quality is fixed at m
File format MOV, MP4

Specifications592
Video
Videocompression
H.264/MPEG-4 Advanced Video Coding
Audiorecordingformat
Linear PCM (for videos recorded in MOV format) or AAC(for videos recorded in MP4 format)
Audiorecordingdevice
Built-in stereo or external microphone with attenuatoroption; sensitivity adjustable
Exposurecompensation
Range: –3 – +3 EV, Increment: 1/3 step
ISO sensitivity(Recommended ExposureIndex)
・ M: Manual selection (ISO 100–25600; step size of 1/3EV); auto ISO sensitivity control (ISO 100–25600)available with selectable upper limit
・ P, S, A: Auto ISO sensitivity control (ISO 100–25600) withselectable upper limit
・b: Auto ISO sensitivity control (ISO 100–25600)
Active D-Lighting
Same as photo settings, Extra high, High, Normal, Low, andOff
Other optionsTime-lapse video recording, electronic vibration reduction,time codes
Playback
Playback
Full-frame and thumbnail (4, 9, or 72 images or calendar)playback with playback zoom, playback zoom cropping,video playback, photo and/or video slide shows,histogram display, highlights, photo information, locationdata display, auto image rotation, and picture rating

Specifications593
Interface
USBType C USB connector (SuperSpeed USB); connection tobuilt-in USB port is recommended
HDMI output Type D HDMI connector
Audio inputStereo mini-pin jack (3.5 mm diameter; plug-in powersupported)
Wi-Fi/Bluetooth
Wi-Fi
・ Standards:- IEEE 802.11b/g/n (Africa, Asia, Bolivia, Europe, and
Oceania)- IEEE 802.11b/g/n/a/ac (U.S.A., Canada, Mexico)- IEEE 802.11b/g/n/a (other countries in the Americas)
・ Operating frequency:- 2412–2462 MHz (channel 11; Africa, Asia, Bolivia,
Europe, and Oceania)- 2412–2462 MHz (channel 11), 5180–5825 MHz (5180–
5580 MHz, 5660–5700 MHz, and 5745–5825 MHz)(U.S.A., Canada, Mexico)
- 2412–2462 MHz (channel 11), 5180–5805 MHz (5180–5320 MHz and 5745–5805 MHz) (other countries in theAmericas)
・ Maximum output power (EIRP):- 2.4 GHz band: 8.1 dBm- 5 GHz band: 7.9 dBm (countries in the Americas)
・ Authentication: Open system, WPA2-PSK

Specifications594
Wi-Fi/Bluetooth
Bluetooth
・ Communication protocols: Bluetooth SpecificationVersion 4.2
・ Operating frequency:- Bluetooth: 2402–2480 MHz- Bluetooth Low Energy: 2402–2480 MHz
・ Maximum output power (EIRP):- Bluetooth: 2.6 dBm- Bluetooth Low Energy: 1.1 dBm
Power source
Battery One EN-EL25 rechargeable Li-ion battery
Charging ACadapter
EH-7P charging AC adapter (available separately)
Tripod socket
Tripod socket 0.635 cm (1/4 in., ISO 1222)
Dimensions/weight
DimensionsApprox. 134.5 × 93.5 × 43.5 mm/5.3 × 3.7 × 1.8 in. (width ×height × depth)
WeightApprox. 445 g (15.7 oz.) with battery and memory card butwithout body cap; approx. 390 g/13.8 oz. (camera bodyonly)
Operating environment
Temperature 0 °C–40 °C (+32 °F–104 °F)
Humidity 85% or less (no condensation)

Specifications595
・Unless otherwise stated, all measurements are performed in conformitywith Camera and Imaging Products Association (CIPA) standards orguidelines.
・All figures are for a camera with a fully-charged battery.・The sample images displayed on the camera and the images and
illustrations in this document are for expository purposes only.・Nikon reserves the right to change the appearance and specifications of
the hardware and software described in this document at any time andwithout prior notice. Nikon will not be held liable for damages that mayresult from any mistakes that this document may contain.
MH-32 Battery Charger❚❚
Rated input AC 100 to 240 V, 50/60 Hz, 0.21 A
Rated output DC 8.4 V, 1.12 A (MAX)
Supportedbatteries
EN-EL25 Rechargeable Li-ion Battery
Charging time Approx. 2 hours 30 minutes* Time required to charge battery at an ambienttemperature of 25 °C (77 °F) when no charge remains
Operatingtemperature
0 °C–40 °C (+32 °F–104 °F)
Dimensions Approx. 67 × 94 × 28 mm/2.7 × 3.8 × 1.2 in., excludingplug adapter
Weight Approx. 99 g (3.5 oz), excluding plug adapter
The symbols on this product represent the following:m AC, p DC, q Class II equipment (the construction of the product isdouble-insulated)

Specifications596
EN-EL25 Rechargeable Li-ion Battery❚❚
Type Rechargeable lithium-ion battery
Rated capacity 7.6 V/1120 mAh
Operating temperature 0 °C–40 °C (+32 °F–104 °F)
Dimensions Approx. 34 × 50.5 × 18 mm/1.4 × 2.0 × 0.8 in.
Weight Approx. 53 g (1.9 oz)

Specifications597
D Disposing of data storage devicesPlease note that deleting images or formatting memory cards or other datastorage devices does not completely erase the original image data. Deletedfiles can sometimes be recovered from discarded storage devices usingcommercially available software, potentially resulting in the malicious use ofpersonal image data. Ensuring the privacy of such data is the user’sresponsibility.Before discarding a data storage device or transferring ownership to anotherperson, erase all data using commercial deletion software, or format thedevice and then completely refill it with images containing no privateinformation (for example, pictures of empty sky). Care should be taken toavoid injury when physically destroying data storage devices. Beforediscarding the camera or transferring ownership to another person, youshould also use the [Reset all settings] item in the camera setup menu todelete network settings and other personal information.
D Supported standards・ DCF Version 2.0: The Design Rule for Camera File System (DCF) is a
standard widely used in the digital camera industry to ensurecompatibility among different makes of camera.
・ Exif version 2.31: The camera supports Exif (Exchangeable Image FileFormat for Digital Still Cameras) version 2.31, a standard introduced withthe goal of improving the interoperability of printers and digital cameras,making it easier to produce high-quality prints. Information stored withphotographs is used for optimal color reproduction when the images areoutput on Exif-compliant printers. See the printer manual for details.
・ HDMI: High-Definition Multimedia Interface is a standard for multimediainterfaces used in consumer electronics and AV devices. This standardensures that audiovisual data and control signals can be transmitted toHDMI-compliant devices via a single cable connection.

Approved memory cards598
Approved memory cards・ The camera can be used with SD, SDHC, and SDXC memory cards.・ UHS-I is supported.
・ Cards rated UHS Speed Class 3 or better are recommended for videorecording and playback. Slower speeds may result in recording orplayback being interrupted.
・ When choosing cards for use in card readers, be sure they arecompatible with the device.
・ Contact the manufacturer for information on features, operation, andlimitations on use.
A The write protect switch・ SD memory cards are equipped with a write-protect switch. Sliding the
switch to the “lock” position write-protects the card, protecting the data itcontains.
・ A “–––” indicator and a [Card] warning appear in the shooting displaywhen a write-protected card is inserted.
・ If you attempt to release the shutter while a write-protected card isinserted, a warning will be displayed and no picture will be recorded.Unlock the memory card before attempting to take or delete pictures.

Portable chargers (power banks)599
Portable chargers (power banks)Portable chargers can be used to power the camera or charge thecamera battery. The following table lists the portable chargers that havebeen tested and approved for use, together with the approximatenumber of shots that can be taken with, and the approximate number oftimes the camera battery can be charged using, each device.
Manufacturer Model numberNumber of
shots1
Number ofcharges2
AnkerPowerCore III Elite 25600
87W2790 8
1 Camera and Imaging Products Association (CIPA) standard. [Viewfinderonly] selected for monitor mode. Measured at 23 °C/73.4 °F (±2 °C/3.6 °F)with a NIKKOR Z DX 16–50mm f/3.5–6.3 VR lens under the following testconditions: one photograph taken at default settings once every 30 s. The“number of shots” is the number of shots that can be taken using a fully-charged portable charger to supply power to a camera with a fully-charged battery (EN-EL25).
2 The number of times the camera battery (EN-EL25) can be fully chargedusing a portable charger at full charge.
・ See the documentation provided with the portable charger forinformation on use.
・ Use a USB cable with two Type-C connectors supplied with theportable charger when employing the device to power the camera orcharge the camera battery.
・ Up-to-date information on portable chargers is available on thewebsite of the manufacturers. Availability may vary with country orregion.

Memory card capacity600
Memory card capacityThe following table shows buffer capacity and the approximate numberof pictures that can be stored on a 32 GB1 card at different imagequalities and sizes when [DX (24×16)] is selected for [Choose imagearea]. Actual capacity varies with shooting conditions and the type ofcard.
Imagequality
Image size File sizeNumber ofexposures
remaining2
Buffercapacity2, 3
RAW (12-bit) LargeApprox. 19.4
MB873 frames 44 frames
RAW (14-bit) LargeApprox. 24.4
MB764 frames 36 frames
JPEG fine
Large Approx. 9.5 MB 2100 frames 83 frames
Medium Approx. 6.6 MB 3400 frames 100 frames
Small Approx. 3.7 MB 6400 frames 100 frames
JPEGnormal
Large Approx. 5.7 MB 4100 frames 100 frames
Medium Approx. 3.5 MB 6800 frames 100 frames
Small Approx. 2.0 MB 12300 frames 100 frames
JPEG basic
Large Approx. 2.4 MB 8000 frames 100 frames
Medium Approx. 1.7 MB 12800 frames 100 frames
Small Approx. 1.1 MB 22100 frames 100 frames
1 Figures are for a SanDisk SD memory card (SDSDXVE-032G-JNJIP,measured in April 2021).
2 Number of pictures that can be saved to memory card or stored inmemory buffer varies with scene recorded.

Memory card capacity601
3 Maximum number of exposures that can be stored in memory buffer atISO 100. If [Auto distortion control] is set to [On], the number ofexposures may drop.

Battery endurance602
Battery enduranceThe video footage or number of shots that can be recorded with a fully-charged EN-EL25 rechargeable Li-ion battery is given below. Actualendurance varies with such factors as the condition of the battery, theinterval between shots, and the options selected in the camera menus.Photo mode: Number of shots1
・ [Viewfinder only] selected for monitor mode: Approx. 310 shots・ [Monitor only] selected for monitor mode: Approx. 360 shots
Video mode: Length of footage2
・ [Viewfinder only] selected for monitor mode: Approx. 80 minutes・ [Monitor only] selected for monitor mode: Approx. 80 minutes
Actions such as the following can reduce battery endurance:・ Keeping the shutter-release button pressed halfway・ Repeated autofocus operations・ Taking RAW photographs・ Slow shutter speeds・ Using camera Wi-Fi (wireless LAN) and Bluetooth features・ Using the camera with optional accessories connected・ Repeatedly zooming in and out・ Taking pictures at low ambient temperatures
To ensure that you get the most from rechargeable Nikon EN-EL25batteries:・ Keep the battery contacts clean. Soiled contacts can reduce battery
performance.・ Use batteries immediately after charging. Batteries will lose their
charge if left unused.1 Camera and Imaging Products Association (CIPA) standard. Measured at
23 °C/73.4 °F (±2 °C/3.6 °F) with a NIKKOR Z DX 16–50mm f/3.5–6.3 VRlens and a SanDisk SDSDXVE-032G-JNJIP memory card under thefollowing test conditions: one photograph taken at default settings onceevery 30 s.

Battery endurance603
2 Actual battery endurance as measured under conditions specified byCIPA. Measured at 23 °C/73.4 °F (±2 °C/3.6 °F) with a NIKKOR Z DX 16–50mm f/3.5–6.3 VR lens and a SanDisk SDSDXVE-032G-JNJIP memorycard. Measurement performed at default settings.・Each shot can be up to 29 minutes 59 seconds in length.・ If camera temperature rises, recording may end before maximum
length or size is reached.
AF-assist illumination604
AF-assist illuminationThe AF-assist illuminator has a range of about 1–3 m (3 ft 4 in.–9 ft 10in.). Some lenses or lens hoods may block the illuminator at certain focusdistances. Remove the lens hood before shooting.・ For information on restrictions when shooting with the camera's
illuminator, see the Nikon Download Center.https://downloadcenter.nikonimglib.com/

Trademarks and licenses605
Trademarks and licenses・ The SD, SDHC, and SDXC logos are trademarks of SD-3C, LLC.・ Windows is either a registered trademark or a trademark of Microsoft
Corporation in the United States and/or other countries.・ Apple®, App Store®, the Apple logos, iPhone®, iPad®, Mac, and macOS
are trademarks of Apple Inc. registered in the U.S. and/or othercountries.
・ Android, Google Play and the Google Play logo are trademarks ofGoogle LLC. The Android robot is reproduced or modified from workcreated and shared by Google and used according to termsdescribed in the Creative Commons 3.0 Attribution License.
・ IOS is a trademark or registered trademark of Cisco Systems, Inc., inthe United States and/or other countries and is used under license.
・ HDMI, the HDMI logo and High-Definition Multimedia Interface aretrademarks or registered trademarks of HDMI Licensing, LLC.
・ The Bluetooth® word mark and logo are registered trademarks ownedby Bluetooth SIG, Inc., and any use of such marks by Nikon is underlicense.
・ Wi-Fi and the Wi-Fi logo are trademarks or registered trademarks ofthe Wi-Fi Alliance.
・ All other trade names mentioned in this document or the otherdocumentation provided with your Nikon product are trademarks orregistered trademarks of their respective holders.
・ Use of the Made for Apple badge means that an accessory has beendesigned to connect specifically to the Apple products identified inthe badge, and has been certified by the developer to meet Appleperformance standards. Apple is not responsible for the operation ofthis device or its compliance with safety and regulatory standards.Please note that the use of this accessory with an Apple product mayaffect wireless performance.

Trademarks and licenses606
D FreeType License (FreeType2)Portions of this software are copyright © 2012 The FreeType Project (https://www.freetype.org). All rights reserved.
D MIT License (HarfBuzz)Portions of this software are copyright © 2018 The HarfBuzz Project (https://www.freedesktop.org/wiki/Software/HarfBuzz). All rights reserved.
D Unicode® Character Database License (Unicode® CharacterDatabase)
The software for this product uses the Unicode® Character Database Licenseopen-source software. The terms of the software license are as follows:COPYRIGHT AND PERMISSION NOTICECopyright © 1991-2019 Unicode, Inc. All rights reserved.Distributed under the Terms of Use inhttps://www.unicode.org/copyright.html.Permission is hereby granted, free of charge, to any person obtaining a copyof the Unicode data files and any associated documentation (the “Data Files”)or Unicode software and any associated documentation (the “Software”) todeal in the Data Files or Software without restriction, including withoutlimitation the rights to use, copy, modify, merge, publish, distribute, and/orsell copies of the Data Files or Software, and to permit persons to whom theData Files or Software are furnished to do so, provided that either(i) this copyright and permission notice appear with all copies of the DataFiles or Software, or(ii) this copyright and permission notice appear in associatedDocumentation.THE DATA FILES AND SOFTWARE ARE PROVIDED “AS IS”, WITHOUTWARRANTY OF ANY KIND, EXPRESS OR IMPLIED, INCLUDING BUT NOTLIMITED TO THE WARRANTIES OF MERCHANTABILITY, FITNESS FOR APARTICULAR PURPOSE AND NONINFRINGEMENT OF THIRD PARTY RIGHTS. INNO EVENT SHALL THE COPYRIGHT HOLDER OR HOLDERS INCLUDED IN THISNOTICE BE LIABLE FOR ANY CLAIM, OR ANY SPECIAL INDIRECT ORCONSEQUENTIAL DAMAGES, OR ANY DAMAGES WHATSOEVER RESULTING

Trademarks and licenses607
FROM LOSS OF USE, DATA OR PROFITS, WHETHER IN AN ACTION OFCONTRACT, NEGLIGENCE OR OTHER TORTIOUS ACTION, ARISING OUT OF ORIN CONNECTION WITH THE USE OR PERFORMANCE OF THE DATA FILES ORSOFTWARE.Except as contained in this notice, the name of a copyright holder shall notbe used in advertising or otherwise to promote the sale, use or otherdealings in these Data Files or Software without prior written authorization ofthe copyright holder.
D AVC Patent Portfolio LicenseTHIS PRODUCT IS LICENSED UNDER THE AVC PATENT PORTFOLIO LICENSEFOR THE PERSONAL AND NON-COMMERCIAL USE OF A CONSUMER TO(i) ENCODE VIDEO IN COMPLIANCE WITH THE AVC STANDARD (“AVC VIDEO”)AND/OR(ii) DECODE AVC VIDEO THAT WAS ENCODED BY A CONSUMER ENGAGED IN APERSONAL AND NON-COMMERCIAL ACTIVITY AND/OR WAS OBTAINED FROMA VIDEO PROVIDER LICENSED TO PROVIDE AVC VIDEO.NO LICENSE IS GRANTED OR SHALL BE IMPLIED FOR ANY OTHER USE.ADDITIONAL INFORMATION MAY BE OBTAINED FROM MPEG LA, L.L.C.SEE https://www.mpegla.com

Notices608
Notices
Notices for customers in the U.S.A.●
The battery chargerIMPORTANT SAFETY INSTRUCTIONS—SAVE THESE INSTRUCTIONSDANGER—TO REDUCE THE RISK OF FIRE OR ELECTRIC SHOCK,CAREFULLY FOLLOW THESE INSTRUCTIONSFor connection to a supply not in the U.S.A., use an attachment plugadapter of the proper configuration for the power outlet if needed. Thispower unit is intended to be correctly oriented in a vertical or floor mountposition.
Federal Communications Commission (FCC) Radio FrequencyInterference Statement
Z fc
This equipment has been tested and found to comply with the limits fora Class B digital device, pursuant to Part 15 of the FCC rules. These limitsare designed to provide reasonable protection against harmfulinterference in a residential installation. This equipment generates, uses,and can radiate radio frequency energy and, if not installed and used inaccordance with the instructions, may cause harmful interference toradio communications. However, there is no guarantee that interferencewill not occur in a particular installation. If this equipment does causeharmful interference to radio or television reception, which can bedetermined by turning the equipment off and on, the user isencouraged to try to correct the interference by one or more of thefollowing measures:・ Reorient or relocate the receiving antenna.・ Increase the separation between the equipment and receiver.

Notices609
・ Connect the equipment into an outlet on a circuit different from thatto which the receiver is connected.
・ Consult the dealer or an experienced radio/television technician forhelp.
CAUTIONSModificationsThe FCC requires the user to be notified that any changes ormodifications made to this device that are not expressly approved byNikon Corporation may void the user’s authority to operate theequipment.Interface cablesUse the interface cables sold or provided by Nikon for your equipment.Using other interface cables may exceed the limits of Class B Part 15 ofthe FCC rules.Nikon Inc., 1300 Walt Whitman Road, Melville, New York 11747-3064,U.S.A.Tel.: 631-547-4200
Power cable●At voltages over AC 125 V (U.S.A. only): The power cable must berated for the voltage in use, be at least AWG no. 18 gauge, and have SVGinsulation or better with a NEMA 6P-15 plug rated for AC 250 V 15 A.
Notice for customers in Canada●CAN ICES-3 B / NMB-3 B
Notices for customers in Europe●
CAUTION: RISK OF EXPLOSION IF BATTERY IS REPLACED BY AN INCORRECTTYPE. DISPOSE OF USED BATTERIES ACCORDING TO THE INSTRUCTIONS.

Notices610
This symbol indicates that electrical and electronic equipment is to becollected separately.
The following apply only to users in European countries:・ This product is designated for separate collection at an appropriate
collection point. Do not dispose of as household waste.・ Separate collection and recycling helps conserve natural resources
and prevent negative consequences for human health and theenvironment that might result from incorrect disposal.
・ For more information, contact the retailer or the local authorities incharge of waste management.
This symbol on the battery indicates that the battery is to be collectedseparately.
The following apply only to users in European countries:・ All batteries, whether marked with this symbol or not, are designated
for separate collection at an appropriate collection point. Do notdispose of as household waste.
・ For more information, contact the retailer or the local authorities incharge of waste management.

Bluetooth and Wi-Fi (wireless LAN)611
Bluetooth and Wi-Fi (wireless LAN)This product is controlled by the United States Export AdministrationRegulations (EAR). The permission of the United States government isnot required for export to countries other than the following, which asof this writing are subject to embargo or special controls: Cuba, Iran,North Korea, Sudan, and Syria (list subject to change).The use of wireless devices may be prohibited in some countries orregions. Contact a Nikon-authorized service representative before usingthe wireless features of this product outside the country of purchase.The Bluetooth transmitter in this device operates in the 2.4 GHz band.
Notice for customers in the U.S.A. and Canada●This device complies with part 15 of FCC Rules and Innovation, Scienceand Economic Development Canada’s licence-exempt RSSs. Operation issubject to the following two conditions: (1) this device may not causeharmful interference, and (2) this device must accept any interferencereceived, including interference that may cause undesired operation.FCC WARNINGThe FCC requires the user to be notified that any changes ormodifications made to this device that are not expressly approved byNikon Corporation may void the user’s authority to operate theequipment.Compliance with FCC requirement 15.407(c)Data transmission is always initiated by software, which is the passeddown through the MAC, through the digital and analog baseband, andfinally to the RF chip. Several special packets are initiated by the MAC.These are the only ways the digital baseband portion will turn on the RFtransmitter, which it then turns off at the end of the packet. Therefore,the transmitter will be on only while one of the aforementioned packetsis being transmitted. In other words, this device automatically

Bluetooth and Wi-Fi (wireless LAN)612
discontinue transmission in case of either absence of information totransmit or operational failure.Frequency Tolerance: ±20 ppmThere are models that support only 2.4GHz or models that support2.4GHz / 5GHz. The Guam sales model is only compatible with 2.4GHz.FCC Radio Frequency Interference StatementNote: This equipment has been tested and found to comply with thelimits for a Class B digital device, pursuant to part 15 of the FCC Rules.These limits are designed to provide reasonable protection againstharmful interference in a residential installation. This equipmentgenerates, uses and can radiate radio frequency energy and, if notinstalled and used in accordance with the instructions, may causeharmful interference to radio communications. However, there is noguarantee that interference will not occur in a particular installation. Ifthis equipment does cause harmful interference to radio or televisionreception, which can be determined by turning the equipment off andon, the user is encouraged to try to correct the interference by one ormore of the following measures:・ Reorient or relocate the receiving antenna.・ Increase the separation between the equipment and receiver.・ Connect the equipment into an outlet on a circuit different from that
to which the receiver is connected.・ Consult the dealer or an experienced radio/TV technician for help.
Co-locationThis transmitter must not be co-located or operated in conjunction withany other antenna or transmitter.Nikon Inc., 1300 Walt Whitman Road, Melville, New York 11747-3064,U.S.A.Tel.: 631-547-4200FCC/ISED RF Exposure StatementThe available scientific evidence does not show that any healthproblems are associated with using low power wireless devices. There is

Bluetooth and Wi-Fi (wireless LAN)613
no proof, however, that these low power wireless devices are absolutelysafe. Low power Wireless devices emit low levels of radio frequencyenergy (RF) in the microwave range while being used. Whereas highlevels of RF can produce health effects (by heating tissue), exposure oflow-level RF that does not produce heating effects causes no knownadverse health effects. Many studies of low-level RF exposures have notfound any biological effects. Some studies have suggested that somebiological effects might occur, but such findings have not beenconfirmed by additional research. This product has been tested andfound to comply with FCC/ISED radiation exposure limits set forth for anuncontrolled environment and meets the FCC radio frequency (RF)Exposure Guidelines and RSS-102 of the ISED radio frequency (RF)Exposure rules. Please refer to the SAR test report that was uploaded toFCC website.Compliance with RSS-247 Issue 2 §6.4Data transmission is always initiated by software, which is the passeddown through the MAC, through the digital and analog baseband, andfinally to the RF chip. Several special packets are initiated by the MAC.These are the only ways the digital baseband portion will turn on the RFtransmitter, which it then turns off at the end of the packet. Therefore,the transmitter will be on only while one of the aforementioned packetsis being transmitted. In other words, this device automaticallydiscontinue transmission in case of either absence of information totransmit or operational failure.
Notice for customers in Canada●For indoor use only (5150-5350MHz).

Bluetooth and Wi-Fi (wireless LAN)614
Notice for customers in Europe and in countries complying withthe Radio Equipment Directive
●
Hereby, Nikon Corporation declares that the radio equipment type Z fcis in compliance with Directive 2014/53/EU.
The full texts of the EU declarations of conformity are available at thefollowing internet addresses:https://imaging.nikon.com/support/pdf/DoC_N2016.pdfWi-Fi・ Operating frequency:
- 2412–2462 MHz (channel 11; Africa, Asia, Bolivia, Europe, andOceania)
- 2412–2462 MHz (channel 11), 5180–5825 MHz (5180–5580 MHz,5660–5700 MHz, and 5745–5825 MHz) (U.S.A., Canada, Mexico)
- 2412–2462 MHz (channel 11), 5180–5805 MHz (5180–5320 MHzand 5745–5805 MHz) (other countries in the Americas)
・ Maximum output power (EIRP):- 2.4 GHz band: 8.1 dBm- 5 GHz band: 7.9 dBm (countries in the Americas)
Bluetooth・ Operating frequency:
- Bluetooth: 2402–2480 MHz- Bluetooth Low Energy: 2402–2480 MHz
・ Maximum output power (EIRP):- Bluetooth: 2.6 dBm- Bluetooth Low Energy: 1.1 dBm
Notice for customers in Singapore●

Bluetooth and Wi-Fi (wireless LAN)615
This device complies with radio-frequency regulations. The content ofcertification labels not affixed to the device is given below.
Notice for customers in Nigeria●
Notice for customers in Thailand●
Security●Although one of the benefits of this product is that it allows others tofreely connect for the wireless exchange of data anywhere within itsrange, the following may occur if security is not enabled:・ Data theft: Malicious third-parties may intercept wireless
transmissions to steal user IDs, passwords, and other personalinformation.
・ Unauthorized access: Unauthorized users may gain access to thenetwork and alter data or perform other malicious actions. Note thatdue to the design of wireless networks, specialized attacks may allowunauthorized access even when security is enabled.
・ Unsecured networks: Connecting to open networks may result inunauthorized access. Use secure networks only.

Bluetooth and Wi-Fi (wireless LAN)616
A Conformity markingSome of the information related to standards with which the cameracomplies can be viewed using the [Conformity marking] option in the setupmenu.
A Certificates

617
IndexSymbols
b (Auto) .......................................................... 85, 90
P (Programmed auto) ...................................128
S (Shutter-priority auto) .............................. 128
A (Aperture-priority auto) ..........................130
M (Manual) .......................................................... 131U (Single frame) ....................................166, 335V (Continuous L) .........................................166W (Continuous H) ........................................166X (Continuous H (extended)) ............166E (Self-timer) .....................................................166c (Continuous) ...............................................336L (Silent photography) .............................. 121x (Electronic front-curtain shutter) .....357P (Mechanical shutter) ............................... 357
3 (Pinpoint AF) ............................................... 103
d (Single-point AF) ..................................... 103
e (Dynamic-area AF) ................................. 103
f (Wide-area AF (S)) ..................................104
g (Wide-area AF (L)) .................................. 104
1 (Wide-area AF (L-people)) ..................104
2 (Wide-area AF (L-animals)) .................104
h (Auto-area AF) ...........................................105
5 (Auto-area AF (people)) .......................105
6 (Auto-area AF (animals)) ......................105
L (Matrix metering) ......................................163
M (Center-weighted metering) ............. 163
N (Spot metering) ..........................................163
t (Highlight-weighted metering) ..... 163M (Monitor mode) button ......................... 45
G button ........................................................... 64i button ........................................................68, 145K button ................................................................96O button ..................................................................99A (g) button .......................................... 63, 142W button .............................................................. 63X button ..................................................................63
d Help ......................................................................68i menu ..........................................................68, 145b mode exposure comp. ..........................354
A
Access-point mode .............................457, 459
Active D-Lighting ............................................164
ADL bracketing .................................................279
AE & flash bracketing ....................................271
AE bracketing .................................................... 271
AE lock ....................................................................142
AF activation ...................................................... 348
AF fine-tuning options ................................ 397
AF speed ...............................................................388
AF tracking sensitivity .................................. 389
AF-A (AF mode auto-switch) ................... 100
AF-area mode ....................................................102
AF-C (Continuous AF) ...................................101
AF-C priority selection ................................. 344
AF-F (Full-time AF) ..........................................101
AF-S (Single AF) ................................................101
AF-S priority selection ..................................344
Airplane mode ..................................................408

618
All pictures ...........................................................212
Animal-detection AF .....................................108
Aperture .....................................................130, 132
Aperture-priority auto ..................................130
Apply settings to live view ........................ 359
Attaching a lens ..................................................78
Attenuator ........................................................... 338
Auto (Set Picture Control) ..........................148
Auto (White balance) ................................... 117
Auto bracketing ............................................... 270
Auto bracketing (mode M) ....................... 364
Auto c ISO sensitivity control ..................363
Auto distortion control ..................... 265, 334
Auto ISO sensitivity control .......................245
Auto upload ....................................................... 475
Auto-area AF ...................................................... 105
Auto-area AF (animals) ................................ 105
Auto-area AF (people) ..................................105
B
Battery ...............................................................74, 75
Battery charger ....................................................74
Beep options ......................................................406
Bluetooth ............................................................. 480
Bracketing order .............................................. 365
Brightness (Set Picture Control) ............. 152
Built-in AF-assist illuminator .....................351
Built-in microphone ......................................... 91
Bulb ..........................................................................134
C
Calendar playback .......................................... 184
Camera-mounted flash units ...................497
Center-weighted area .................................. 353
Center-weighted metering .......................163
Charger .....................................................................74
Charging AC adapter .................................... 565
Choose color temperature (White
balance) ........................................................... 118
Choose image area ........................................ 243
Choose start/end point ...............................204
CL mode shooting speed .......................... 356
Clarity (Set Picture Control) .......................151
Cloudy (White balance) .............................. 118
Color space ......................................................... 262
Color temperature .................... 120, 155, 251
Command dial .....................................................48
Compensation .................................................. 504
Conformity marking ......................................415
Connect to computer .................................. 411
Connect to smart device ...... 408, 479, 481
Continuous ......................................................... 336
Continuous AF ..................................................101
Continuous H .................................................... 166
Continuous H (extended) .......................... 166
Continuous L ......................................................166
Contrast (Set Picture Control) ..................152
Control panel ........................................................40
Control ring .........................................................113
Copyright information .................................405
Creative Picture Control ..............................149
Custom controls .............................................. 382
Custom controls (playback) ......................375
Custom controls (shooting) ......................367
Custom Settings menu ............................... 341

619
Customize command dials ....................... 377
Customize i menu ....................69, 365, 381
D
D-Lighting ........................................................... 436
Delete .................................................. 98, 211, 232
Detaching lenses ............................................... 79
Diffraction compensation ...............264, 334
Diopter adjustment control ........................ 44
Direct connection to computer .............460
Direct sunlight (White balance) .............118
DISP button ........................................................... 61
Distortion control ............................................438
Dynamic-area AF .............................................103
E
Easy Connect ..................................................... 466
Easy exposure compensation ................. 352
Effect level (Set Picture Control) ............ 151
Electronic VR ............................................181, 337
Encryption key ....................................... 460, 468
Energy saving (photo mode) ...................417
Error (wireless connection) ....................... 488
Exposure comp. for flash ............................ 363
Exposure compensation .............................139
Exposure compensation dial ........... 50, 139
Exposure delay mode ...................................356
Exposure indicators ....................................... 133
Extended shutter speeds (M) .................. 357
Eye-detection AF .............................................106
F
Face-detection AF .......................................... 106
File information ................................................ 187
File naming ...............................................242, 330
File number sequence .................................358
Fill flash ....................................................... 162, 502
Filter effects (Set Picture Control) ......... 152
Fine-tune optimal exposure .....................353
Firmware version .............................................423
Flange-back distance ....................................114
Flash (White balance) ...................................118
Flash bracketing ...............................................271
Flash compensation ........................... 269, 504
Flash control .......................................................267
Flash control mode ........................................501
Flash mode ...............................................162, 502
Flash off ...................................................... 162, 503
Flash shutter speed ........................................362
Flash sync speed ..............................................361
Flat (Set Picture Control) .............................148
Flexible program ............................................. 128
Flicker reduction ..............................................334
Flicker reduction shooting ........................ 265
Fluorescent (White balance) ....................118
Fn button ......................................................71, 116
Focal plane mark ............................................. 114
Focus indicator ................................................. 113
Focus lock ............................................................ 142
Focus mode ...................................100, 173, 182
Focus peaking ........................................ 115, 360
Focus point options .......................................350
Focus point wrap-around ..........................349

620
Focus points used ................................ 105, 345
Focus ring ............................................................ 113
Focus shift shooting ......................................319
Focus tracking with lock-on .....................345
Format memory card ....................................392
Frame size/frame rate ........................175, 330
Framing grid display ......................................360
Frequency response ......................................338
Full-frame playback ........................................183
Full-time AF .........................................................101
FV lock ....................................................................505
H
HDMI ............................................................ 408, 494
HDR (high dynamic range) ....................... 289
Hi (ISO) ................................................................... 138
High ISO NR ............................................. 263, 334
High sensitivity (Hi) ........................................138
Highlight display ...................................188, 389
Highlight-weighted metering .................163
Histogram ....................................................... 61, 62
Hue (Set Picture Control) ............................152
I
Image comment ..............................................404
Image Dust Off ref photo ...........................401
Image quality ..........................................160, 244
Image size ................................................. 161, 244
Incandescent (White balance) ................118
Information display ........................................397
Infrastructure mode ............................458, 465
Interval timer shooting ................................296
IP address ............................................................. 469
ISO sensitivity .....................................................137
ISO sensitivity dial ................................... 49, 137
ISO sensitivity dial lock release ........49, 137
ISO sensitivity settings .......................245, 331
L
Landscape (Set Picture Control) ............ 148
Language ............................................................. 393
Limit AF-area mode selection ................. 349
Limit monitor mode selection ................397
Location data .....................................................196
Long exposure NR .......................................... 262
Long time-exposures ................................... 134
Low-light AF .......................................................350
M
MAC address ...................................................... 413
Main command dial .........................................48
Manage Picture Control ................... 257, 333
Manual (Shooting mode) ...........................131
Manual focus ...........................................101, 112
Manual focus ring in AF mode ............... 352
Matrix metering ............................................... 163
Maximum shots per burst ......................... 356
Memory buffer ..................................................169
Memory card ..................................................... 598
Memory card capacity ................................. 600
Metering ............................................................... 162
MF (Manual focus) .......................................... 101
Microphone sensitivity ..................... 178, 337

621
Mid-range sharpening (Set Picture
Control) ............................................................ 151
Mode selector ........................................... 47, 127
Monitor .....................................................................50
Monitor brightness ........................................ 394
Monitor color balance ..................................394
Monochrome .....................................................440
Monochrome (Set Picture Control) ......148
Multiple exposure ...........................................281
My Menu .............................................................. 449
N
Natural light auto (White balance) .......117
Network settings ........................411, 459, 465
Neutral (Set Picture Control) .................... 148
Non-CPU lens data .........................................400
O
Overlay pictures ...............................................441
Overview .............................................................. 197
P
Pairing (Bluetooth) ......................................... 408
Perspective control ........................................ 439
Photo information .......................................... 186
Photo shooting menu ..................................237
Photo/video selector ............................... 85, 90
Picture review ....................................................234
Pictures shot on selected dates ............. 213
PIN-entry WPS ...................................................466
Pinpoint AF ......................................................... 103
Pixel mapping ................................................... 403
Playback display options ............................ 233
Playback folder ..................................................233
Playback menu ................................................. 232
Portrait (Set Picture Control) .................... 148
Power off delay .........................................77, 355
Preset manual (White balance)
...........................................................119, 156, 252
Press the shutter-release button all the
way down ..........................................................88
Press the shutter-release button halfway
...................................................................................87
Programmed auto .......................................... 128
Protect ....................................................................125
Push-button WPS ............................................466
Q
Quick crop ........................................................... 199
Quick sharp (Set Picture Control) ..........151
R
Rating ...........................................................123, 236
RAW processing ............................................... 428
RAW recording ..................................................245
Rear-curtain sync ..................................162, 503
Recent settings .................................................455
Rechargeable Li-ion battery ........................74
Red-eye correction .........................................437
Red-eye reduction ...............................162, 502
Release button to use dial .........................380
Release mode ......................................... 166, 269
Release mode (save frame) .......................335
Remote flash photography .......................508

622
Remote photography ...................................480
Reset all settings ..............................................423
Reset custom settings ..................................343
Reset photo shooting menu ....................238
Reset video recording menu ................... 330
Resize ......................................................................432
Retouch menu ..................................................424
Reverse indicators ...........................................381
RGB histogram ..................................................189
Rotate tall ............................................................. 234
S
Saturation (Set Picture Control) ..............152
Save current frame .........................................207
Save focus position ........................................401
Save/load menu settings ........................... 419
Search for Wi-Fi network ............................ 466
Select for upload ............................................. 202
Select for upload (Bluetooth) .................. 409
Select for upload to computer ............... 474
Selected pictures .............................................212
Self-portrait mode .................................. 52, 408
Self-timer .........................................166, 169, 355
Set Picture Control ...............................147, 255
Set the clock ..........................................................81
Setup menu ........................................................391
Shade (White balance) ................................ 118
Sharpening (Set Picture Control) ...........151
Shooting data ....................................................192
Shutter speed ......................................... 128, 131
Shutter type ........................................................357
Shutter-priority auto ..................................... 128
Shutter-release button AE-L .....................354
Shutter-speed dial ........................47, 128, 131
Shutter-speed dial lock release
............................................................. 47, 128, 131
Silent photography ............................. 121, 327
Single AF ...............................................................101
Single frame .............................................166, 335
Single-point AF .................................................103
Slide show ........................................................... 234
Slot empty release lock ............................... 418
Slow sync ...................................................162, 502
Slow-motion video ........................................ 177
SnapBridge ..........................................................479
Spot metering ...................................................163
SSID ............................................................... 460, 467
Standard (Set Picture Control) ................ 148
Standby timer .......................................................77
Storage folder ....................................................238
Store points by orientation .......................346
Straighten ............................................................ 438
Sub-command dial ...........................................48
Subject-tracking AF ....................................... 109
T
Thumbnail ........................................................... 184
Time .........................................................................135
Time zone and date .......................................393
Time-lapse video .............................................310
Timecode ............................................................. 339
Toning (Set Picture Control) ..................... 152
Touch controls .......................................... 54, 407
Touch shutter .....................................................110

623
Trim ..........................................................................431
Trim video ............................................................448
U
Upload while off .............................................. 410
USB power delivery ........................................415
V
Vibration reduction ........................................171
Video file type ................................................... 331
Video quality ............................................175, 330
Video recording menu .................................329
Video-record button ........................................ 91
View all in continuous mode ...................361
Viewfinder .............................................................. 44
Viewfinder brightness ..................................396
Viewfinder color balance ........................... 396
Vignette control .................................... 264, 334
Virtual horizon ..............................................61, 62
Vivid (Set Picture Control) .......................... 148
W
WB bracketing ...................................................276
White balance ..............................116, 153, 248
Wi-Fi connection ............. 164, 180, 409, 411
Wi-Fi mode ..........................................................483
Wide-area AF (L) ...............................................104
Wide-area AF (L-animals) ............................104
Wide-area AF (L-people) ............................. 104
Wide-area AF (S) ...............................................104
Wind noise reduction ...................................339
Wireless remote (ML-L7) options ...........413
Wireless Transmitter Utility ........................457
Z
Zoom ...................................................................... 209

CT1H02(11)6MO00211-02