Precisely MapInfo Pro v2021 Install Guide
80
Precisely MapInfo Pro Install Guide Version 2021
-
Upload
khangminh22 -
Category
Documents
-
view
0 -
download
0
Transcript of Precisely MapInfo Pro v2021 Install Guide

Precisely MapInfo Pro
Install Guide
Version 2021

1 - Before you Install
Introduction............................................................4Requirements........................................................4MapInfo Pro Database Connectivity and
Support.............................................................7Microsoft Office Support........................................8MapInfo Pro Data File Support..............................8MapInfo Pro Web Server Support.......................13Before You Install MapInfo Pro............................13Citrix Installations................................................17
2 - Installing MapInfo Pro
MapInfo Pro Installer...........................................21Installing Data......................................................25Installing Related Resources...............................27Modifying or Removing MapInfo Pro...................28
3 - Starting and ActivatingMapInfo Pro
Determine the Type of License you have............31License Activation For MapInfo Pro 32-bit and 64-bit
Editions on the Same Computer....................32Advanced Licenses.............................................33Mapping Services................................................34Node-Locked Licenses........................................35Concurrent Licenses...........................................43Distributable Licenses.........................................47Appendix A:Workgroup Installations for System
Administrators
Understanding the Workgroup InstallationProcess..........................................................51
Beginning a Workgroup Installation (SystemAdministrators)...............................................52
Completing a Workgroup Installation (MapInfo ProUsers).............................................................54
Appendix B: Silent Installation Procedures
Silent Installation Procedures for SystemAdministrators................................................58
Installing Silently..................................................61Activating and Returning Licenses Silently.........63Uninstalling Silently.............................................66MapBasic Silent Install........................................66Appendix C: Advanced Configuration Options
for System Administrators
Controlling Advanced System Settings ..............68Controlling the Location of Application Data
Files................................................................69Configure MapInfo Pro on Initial Startup.............71Appendix D: Troubleshooting Your Installation
Installation Issues................................................73Error Messages...................................................74
Table of Contents

1 - Before you InstallMapInfo Pro is a comprehensive computer mapping tool that lets you performcomplex geographic analysis such as redistricting, accessing your remotedata, dragging and dropping map objects into your applications, creatingthematic maps that emphasize patterns in your data, and much more
This document describes how to install MapInfo Pro to your desktop. It alsoprovides more advanced topics that an IT Specialist or System Administratorwould follow for installing MapInfo Pro within an organization.
For information about how to work with MapInfo Pro, see the MapInfo ProUser Guide after installing MapInfo Pro.
In this section
Introduction.................................................................................................4Requirements.............................................................................................4MapInfo Pro Database Connectivity and Support......................................7Microsoft Office Support.............................................................................8MapInfo Pro Data File Support...................................................................8MapInfo Pro Web Server Support............................................................13Before You Install MapInfo Pro.................................................................13Citrix Installations.....................................................................................17

Introduction
This document is organized in two parts. The first provides information and instructions necessaryfor installing MapInfo Pro to a user’s desktop. The second are the appendices that provides informationand instructions necessary to IT Specialists or system administrators who must install MapInfo Proin an organization.
MapInfo Pro Users
Before you install MapInfo Pro on your desktop, refer to these sections:
1. System Requirements2. MapInfo Pro Database Connectivity and Support3. Before You Install MapInfo Pro
You are then ready to follow the instructions in Chapter 2: Installing MapInfo Pro.
To remove MapInfo Pro from your desktop, see Modifying or Removing MapInfo Pro.
IT Specialists or System Administrators
System administrators installing MapInfo Pro should refer to the appendices in this document, whichcontain information for:
• Workgroup Installations for System Administrators• Silent Installation Procedures• Advanced Configuration Options for System Administrators
Requirements
Below are the guidelines for minimum and recommended system requirements. Note that hardwarerequirements do vary based on your use of the product and your system. In general, a higher processorspeed, larger memory (RAM) and industry leading graphics cards provide a better user experienceand result in better responses from MapInfo Pro.
4MapInfo Pro 2021 Install Guide
Before you Install

If the systemmemory (RAM) is less than 4GB, then some of the MapInfo Pro Raster user preferencesare not available, such as:
• You cannot modify the cache size settings (only the Normal setting is available).• The display cache option is not available.
System Requirements
This product is tested on the following Microsoft Windows Desktop Operating Systems:
• Windows 10 64-bit
• Windows 11 64-bit
• Windows 2019 Server
• Windows 2019 Server 64-bit with XenApp 7.9
• Windows 2019 Server 64-bit with Citrix Virtual Apps 1912
• Windows 2022 Server 64-bit
Windows 10 Hardware Requirements
• Windows 10 64-bit
Table 1: Minimum
MonitorGraphicsDisk SpaceMemory
1024x768resolution or better
Microsoft DirectX 9 graphics device withWDDM driver
20GB (64-bit),Data 2.3GB orbetter
2GB RAM (64-bit) required, 4GB RAMrecommended,
1 GHz with support for PAE, NX, andSSE2
5MapInfo Pro 2021 Install Guide
Before you Install

Table 2: Recommended
MonitorGraphicsDisk SpaceMemory
1024x768resolution or betterDedicatedGPU: AMDRadeonHD 2000
series, NVIDIA GeForce 8 series orbetter
Integrated GPU: AMD Radeon HD3200, NVIDIA GeForce 9400, Intel HDGraphics or better
25GB (64-bit),Data 2.3GB.16+GB RAM (64-bit)
Intel Core 2 Duo, AMD Athlon X2 orbetter
Dependencies and Prerequisites
We recommend ensuring that your machine has the latest updates before installing Pro.
The install wizard checks for the following and prompts you if not already on your system; you canchoose to have the install wizard install these requirements, or cancel the installation if you do notwant to proceed.
• Microsoft Visual C++ 2015 Update3 Redistributable (x64)
• Microsoft Visual C++ 2017 Redistributable (x64)
• Microsoft Visual C++ 2019 Redistributable (x64)
Microsoft Edge WebView2 Runtime Installer (x64)
• Microsoft office Access database Engine 2010 (x64) - for 32-bit Microsoft Office
• Microsoft office Access database Engine 2010 (x64) - For 64-bit Microsoft Office
• Microsoft .NET Framework 4.7.2
• Windows fixes and updates:
Required UpdateOperating System
Cumulative Update KB3156387Windows 10 *
* On Windows 10, the install wizard does not install the Cumulative Update. Ensure this update isinstalled before installing this release.
MapInfo Pro installs a file from the Microsoft Windows Presentation Foundation (WPF) toolkit,WPFToolkit.dll file version 3.5, which is necessary for the Meta-Data Catalog Browser feature.
6MapInfo Pro 2021 Install Guide
Before you Install

MapInfo Pro Database Connectivity andSupport
MapInfo Pro supports the following spatial database servers:
• Microsoft SQL Server 2019• Microsoft SQL Server 2017• Microsoft SQL Server 2016 SP1 (also called SQL Server Spatial)• PostGIS 3.1 using PostgresSQL 13.2• PostGIS 2.5 using PostGreSQL 10.1• PostGIS client is 13.01 x64• SQLite v3.8 / FDO 3.8• Oracle 19c msp19c• Oracle 18c msp18c• Oracle Spatial 12C r2 msp12cr2• Oracle11gr2
In order for MapInfo Pro to access a remote database, you must install a client or driver. The followingare ODBC drivers that MapInfo Pro supports:
• Microsoft Access ODBC (64-bit)• Microsoft SQL Server 2019• Microsoft SQL Server 2017• Microsoft SQL Server 2016• Microsoft SQL Server 2012 QFE Native Client v11 (64-bit)• PostgreSQL Unicode and ANSI ODBC driver 13.01 (64 bit)• FDO toolkit 3.8 (used by SQLite and installed with MapInfo Pro)• Oracle Instant Client 19.11 (64-bit)
You can also open tables of data from the following and make them mappable, but only for pointdata:
• Microsoft Access 2013, 2016, and 2019 (64-bit)
For more about working with remote database information, see Accessing Remote Data and Settingyour Database Connection Preferences in the Help System.
PostgreSQL ODBC Driver Requires the Use Declare/Fetch Option
To avoid an error when using the PostgreSQL Unicode ODBC driver, you must enable the UseDeclare/Fetch option. When enabled, the driver automatically uses declare cursor/fetch to handleSELECT statements and keeps 100 rows in a cache. When disabled, which is the default setting,
7MapInfo Pro 2021 Install Guide
Before you Install

the driver buffers the entire result set. For large tables this could use all the Windows memoryresources. For details, see Message: ODBC Error.
Microsoft Office Support
MapInfo Pro supports Microsoft Excel ( *.xls , *.xlsx) and Microsoft Access (*.mdb, *.accdb) formatsfor versions 2010, 2013 and 2016.
MapInfo Pro Data File Support
You can open the following file types in MapInfo Pro on the HOME tab by pointing to Open:
• ACCDB – Microsoft Access 2007 or later files• CSV – Comma Delimited files• DBF – dBASE DBF files• MDB – Microsoft Access files• TAB – MapInfo .TAB files (includes MapInfo Extended – Type NATIVEX)• Raster image files – (*.adf, *.asc, *.bil, *.bip, *.bsq, *.dat, *.dem, *.dt0, *.dt1, *.dt2, *.ecw, *.ers,*.flt, *.grc, *.grd, *. gxf, *.img, *.j2c, *.j2k, *.jp2, *.jpc, *.jpx, *.kap, *.mrr, *.mvr, *.jpx, *.sid, *.tif, *.tiff,*.vrt, *.xml, *.xyz, *.zip)
• SHP – ESRI Shapefiles• TXT – Delimited ASCII files• WKS – Lotus 1-2-3 files (*.wk1, *.wks, *.wk3, *.wk4)• WOR – MapInfo workspace files• MWS – MapInfo workspace files• XLS – Microsoft Excel files• XLSX – Microsoft Excel 2007 or later files• Grid images – (*.adf, *.flt, *.txt, *.asc, *.img, *.dem, *.dt0, *.dt1, *.dt2, *.mig, *.grd). This releasedoes not support .XLSM and .XLSB Excel files.
• GPKG – GeoPackage files• OGR – Uses the GDAL OGR Vector File library to read and write many file types.
Note: Grid Format Direct Support: The following grid handlers support direct read ofDEM-USGS Text (.dem); GTOPO30 (.dem) and DTED levels 1, 2, 3 (.dt0, .dt1, .dt2). Thesegrid handlers are read-only; they cannot be used to create grid files during the Create GridThematic interpolation process.
8MapInfo Pro 2021 Install Guide
Before you Install

Importing File Formats
You can import the following file formats into MapInfo Pro using the Universal Translator (on theHOME tab, point to Open and click Universal Data. From the Specify Data Source dialog, clickBrowse the gallery to open the FME Reader Gallery dialog.):
• Autodesk AutoCAD DWG/DXF (.dxf, .dwg) — up to AutoCAD rel 2013• Bentley MicroStation Design 7 (.dgn)• Bentley MicroStation Design 8 (.pos, .fc1, .dgn)• ESRI ArcInfo Export (.e00)• ESRI ArcSDE• ESRI Geodatabase (File GeoDB API) (.gdb)• ESRI Geodatabase (Personal Geodatabase) (.mdb)• GML (Geography Markup Language) (.gml, .xml, .gz)• Google Earth KML (.kmz, kml)• OS MasterMap Database – Supports Cadcorp OS MasterMap Database data.• OS VectorMap District – Reader supports GML data in OS VectorMap District format.• OS VectorMap Local – Reader supports GML data in OS VectorMap Local format.• Spatial Data Transfer Standard, such as TR01CATD.DDF (*CATD.DFF)• Vector Product Format (VPF) Coverage, such as POAREA.AFT, POLINE.LFT, POPOINT.PFT(.*ft)
You can import the following file formats into MapInfo Pro on the HOME tab by selecting Open andthen pointing to Import:
• DXF – The graphic/data interchange format (DXF) for AutoCAD and other CAD packages• GML – OS MasterMap format• GML, XML – Geographic Markup Language (GML) 2.1• IMG – A file format for MapInfo Pro for DOS image files• MBI – MapInfo Pro Boundary Interchange format (MBI) An ASCII file for MapInfo DOS boundaryfiles.
• MIF – MapInfo Pro Interchange Format (MIF) MapInfo Pro’s data interchange format (ASCII fileformat).
• MMI – MapInfo DOS MMI
Note: You can download raster handlers for NIMA formats such as ADRG, CADRG, ASRP,CIB, USRP, and NITF formats from the Precisely website or get them from the InstallationDVD.
MapInfo Pro imports graphics and textual information from MapInfo Pro Interchange Format, DXF,MBI, and MMI files. MapInfo Pro imports only graphics from IMG.
Supported Raster Image File Formats
The following are the Raster image file formats that MapInfo Pro supports:
• ADF – ArcInfo coverage Data File (ADF)
9MapInfo Pro 2021 Install Guide
Before you Install

• ASC – ASCII text file• BIL – Satellite Pour l'Observation de la Terre (SPOT) satellite images Spot Image Formats 1.5and 4.0: 8 Bit Gray, Format 1.5, 8 Bit Gray, Format 4.0, 24 Bit Color, Format 1.5, 24 Bit Color,Format 4.0
• BIP – Band Interleaved by Pixel• BSQ – Band Sequential• BMP – Windows bitmap (BMP) Monochrome: 8 Bit Color, 24 Bit Color• DAT – Datum, contain data in text or binary format• DEM – Digital Elevation Model• DT0, DT1, DT2 – Digital Terrain Elevation Data (DTED) Level 0, 1, and 2• filename.* – Compressed ARC Digitized Raster Graphic (CADRG) format• filename.* – Controlled Image Base (CIB) format• ECW – Enhanced Compression Wavlet (ECW) format handler by ER Mapper• EMF – Enhanced Metafile Format• ERS – European Remote Sensing• FLT – Image Filter (FLT)• GEN – ARC Digitized Raster Graphic (ADRG) format• GEN – ARC Standard Raster Product to 1.2 (ASRP) 1.2 format• GIF – Graphics Interchange Format (GIF)• GIF – Graphics Interchange Format (GIF89a) non-interlaced only Monochrome: 8 Bit Color• GRC – Grid, or MapInfo Vertical Mapper• GRD – Classified Grid, or MapInfo Vertical Mapper
MapInfo Pro treats GRD files as either a grid or raster image. If the associated .TAB file containsa RasterStyle 6 entry, then MapInfo Pro treats the file as a grid.
• IMG – ERDAS IMAGINE File Format• JFIF – JPEG File Interchange Format (JFIF)
8 Bit Gray, 24 Bit Color, No Subsampling, 24 Bit Color, YUV422 Subsampling, 24 Bit Color, YUV411Subsampling
• JP2 – Joint Photographic Experts Group (JPEG) 2000 format
MapInfo Pro supports creating JPEG 2000 files using Save Window As and viewing JPEG 2000files using the LeadTools raster handler.
• JPG – Joint Photographic Experts Group (JPG)• JPEG – Joint Photographic Experts Group (JPEG)
8 Bit Gray, 24 Bit Color, No Subsampling, 24 Bit Color, YUV422 Subsampling, 24 Bit Color, YUV411Subsampling
• MRR – Multi-Resolution Raster• NTF – National Imagery Transmission Format (NITF) version 2.x format• PCX – ZSoft Paintbrush• PCX – Format Version 5 (Paintbrush Version 3.0)
10MapInfo Pro 2021 Install Guide
Before you Install

Monochrome, 8 Bit Gray, 8 Bit Color, 24 Bit Color
• PNG – Portable Network Graphics (PNG) format• PSD – Photoshop 3.0• SID – MrSID format
The MrSID raster handler allows you to open and display raster images compressed in the MrSIDformat
• TGA – Targa
TGA Truevision File Format Specification 2.0. 8 Bit Gray, 8 Bit Color, 24 Bit Color
• TIF – Geographic Tagged Image File Format (GeoTIFF)• TIF – Tagged Image File Format (TIFF)
TIFF Revision 5.0, Monochrome (Class B), Uncompressed, Monochrome (Class B), PackBitsCompression, 8 Bit Gray (Class G), Uncompressed, 8 Bit Color (Class P), Uncompressed, 24 BitColor (Class R), Uncompressed
• TIF – Tagged Image File Format (TIFF) CMYK• TIF – Tagged Information File Format (TIFF) CCITT Group 4• TIF – Tagged Information File Format (TIFF) LZW• TXT – Text• URL – Uniform Resource Locator• VRT – Virtual Format• WMF – Windows Metafile Format(WMF)
The raster handler will load a rasterized version of the WMF file.
• ZIP – a compressed file containing raster format files
File Limitations for MapInfo Pro Supported Formats
Keep the following notes in mind when working with these MapInfo formats:
• MapInfo Pro only supports the DXF file import to release 13: on the HOME tab, point to Open, andclick Import. This has been superseded by the Universal Translator and Open Universal Datafeature.
• The Open Universal Data feature supports all DWG and DXF formats up to the AutoCAD release2013. While it is our company’s intention to keep pace with the new releases of FME, if you extendthe application to import AutoCAD DWG and DXF files using a newer version of FME before wehave upgraded our product, errors may occur.
• You can have maximum 500 files open at a time in MapInfo Pro if you remove theHKEY_LOCAL_MACHINE\SOFTWARE\MapInfo\MapInfo\Common Max Files registry key.
• You can have up to 125 files open at a time for editing in MapInfo Pro.
11MapInfo Pro 2021 Install Guide
Before you Install

Feature Manipulation Engine (FME) Format Support
MapInfo Pro installs with the Feature Manipulation Engine (FME) 2021.1, which lets you open datadirectly to avoid having to translate it separately and work with copies of the data in .tab format. ThisFME opens following Universal Data formats:
• Autodesk AutoCAD DWG/DXF – Supports AutoCAD file versions up to and including 2013• Bentley MicroStation Design (V7) – Supports Intergraph Standard File Format (ISFF) Version 7• Bentley MicroStation Design (V8) – Supports Intergraph Standard File Format (ISFF) Version 8• ESRI ArcInfo Export (.e00) – Supports ArcGIS 10.x• ESRI ArcSDE – Supports ArcSDE 10.x• ESRI Geodatabase (File Geodatabase API) - Supports 10.0 File Geodatabases or higher• ESRI Geodatabase (Personal Geodatabase) – Supports ArcGIS 10.x• ESRI Shapefile (*.SHZ, *.SHP)• Geography Markup Language (GML) - Reader supports GML versions 2.1.2, 3.1.1, and 3.2.1 andWriter supports GML versions 3.1.1 and 3.2.1
• Google KML – Supports KML 2.2• OS MasterMap Database – Supports Cadcorp OS MasterMap Database data.• OS VectorMap District – Reader supports GML data in OS VectorMap District format.• OS VectorMap Local – Reader supports GML data in OS VectorMap Local format.• Spatial Data Transfer Standard (SDTS) - Supports USGS DLG datasets that adheres to the SDTSTopological Vector Profile (TVP) and USGS Digital Elevation Model (DEM) datasets that adhereto the SDTS Raster Profile
• Vector Product Format (VPF) Coverage - Supports VPF data that is stored in a structure describedin the Military Standard, Vector Product Format, MIL-STD-2407
Note: MapInfo Pro installs with a subset of FME that supports a limited number of formats.You can install the complete FME Suite from Safe Software for additional formats, and use itwith mapInfo Pro. SeeWorkingwith the FMESuite for details. For the list of formats supportedby the FME suit, see: http://docs.safe.com/fme/html/FME_Desktop_Documentation/FME_ReadersWriters/Format-List-All.htm.
To open these data formats in MapInfo Pro, on the HOME tab, point to Open and select UniversalData.
To translate TAB files using FME in MapInfo Pro, on the HOME tab, in the Tools group, click ToolExtensions, and select Universal Translator.
To see what is new in FME 2019, see http://www.safe.com/fme/new.
12MapInfo Pro 2021 Install Guide
Before you Install
MapInfo Pro Web Server Support
MapInfo Pro supports the following web servers:
• GML (Geospatial data in XML format) 2.1.2• FME Quick Translator) supports versions up to 3.2.1• Web Feature Service (WFS) 1.0, 1.1, and 2.0• Web Feature Service with transactions (WFS-T) using WFS 1.0• Web Map Service (WMS) 1.3• Web Map Tile Service (WMTS) 1.0
MapInfo Pro also supports the mapping tile servers:
• Microsoft Bing tile server
• MapXtreme.NET v9.3 tile server
• OpenStreetMap tile server
• Spatial Server v18.2
• WMTS including Spatial Server
• GeoMap
Before You Install MapInfo Pro
Before installing MapInfo Pro, record your serial number and access code in an easy-to-rememberplace. You need a valid serial number and access code to complete an installation or an upgrade.Also, complete the postage-paid registration card and return it to Precisely or register online byaccessing the Contact Info option on the DVD Browser.
If installing MapInfo Pro from a DVD on a shared network drive, ensure that the network drive ismapped to a specific drive letter (such as G). For details, see MapInfo Pro Installer Requires aDrive Letter.
It is possible that the MapInfo PDF Printer driver may not install when:
• Your IT department has a policy to disallow printer installations. Contact your IT department tocheck if there is such a policy in place. If there is, then have them temporarily allow printer installationon your machine while you install MapInfo Pro.
13MapInfo Pro 2021 Install Guide
Before you Install

• Your anti-malware or anti-spyware is turned on during the installation. Contact your IT departmentto temporarily stop the anti-malware or anti-spyware on your machine while you install MapInfoPro.
Note: If there are concerns about stopping anti-malware or anti-spyware, then try installingMapInfo Pro first and if the MapInfo PDF Printer driver does not install, uninstall MapInfo Pro,stop your anti-malware or anti-spyware, and then reinstall.
Upgrading
The MapInfoPro.WOR, STARTUP.WOR, and MapInfoPro.pref files are stored in the directoryC:\Users\<username<\AppData\Roaming\MapInfo\MapInfo. When an upgrade is performed theseconfiguration, preferences, settings, etc. will be automatically picked up by the newly installed version.
Application data (appdata) files are the non-executable data files that MapInfo Pro uses duringoperation.
Installing 32-bit and 64-bit Microsoft Office Drivers
MapInfo Pro is a 64-bit application that can access spreadsheets and tables from 64-bit editions ofMicrosoft Excel and Access. To use data from Excel and Access in MapInfo Pro, you must use theMicrosoft Office 64-bit edition.
As part of the MapInfo Pro installation process, the 64-bit Microsoft Access Database Engine 2010Redistributable for Office is installed.
If you require the 32-bit edition of Microsoft Office on the same system with MapInfo Pro, the followingprocedure shows you how to install both versions of Office drivers.
Note: Microsoft does not support both drivers installed on the same computer citingincompatibility between the product editions or their components, seehttp://support.microsoft.com/kb/2269468.
To install Microsoft Office 32- and 64-bit drivers on the same system:1. Download the Microsoft Office drivers from
http://www.microsoft.com/en-ca/download/details.aspx?id=13255.The 32-bit version is AccessDatabaseEngine.exe. The 64-bit version isAccessDatabaseEngine_x64.exe.
2. Uninstall the 64-bit Office driver, if installed, and reboot the system. You will already have itinstalled if you have installed MapInfo Pro 64-bit.
3. Install the 32-bit Office 2010 driver.
14MapInfo Pro 2021 Install Guide
Before you Install

4. In the System folder (for example C:\Windows\System32), right-click on cmd.exe and selectRun as administrator.
5. At the command prompt navigate to the folder where the 64-bit Office 2010 driver is located.6. Type the command and press enter: AccessDatabaseEngine_x64.exe /passive
7. If you have a 32-bit version of Microsoft Office 2007, 2010, 2013, or 2016 installed, then deleteor rename its mso.dll registry key.a) Open the Registry Editor window. On the Microsoft Start menu, type regedit in the
Search field, and then click regedit.exe.b) In the Registry Editor window, navigate to
HKEY_LOCAL_MACHINE\SOFTWARE\Microsoft\Office\14.0\Common\FilesPaths.c) If there is a mso.dll value, either delete it or rename it.
If you do not delete or rename the file, then may see a reconfigure message when you opena Microsoft Office application.
Both drivers are now installed on your system.
Opening Office 2013 32-bit Excel and Access FilesThere is a potential issue when both 32-bit and 64-bit versions of MapInfo Pro are installed on thesame machine along with the 32-bit version of Microsoft Office 2013. The 32-bit version of MapInfoPro can close unexpectedly when opening tables generated in the 32-bit version of Excel 2013 orAccess 2013.
The section Installing 32-bit and 64-bit Microsoft Office Drivers describes how to install theMicrosoft Office 32- and 64-bit drivers on the same system. If after following these steps your 32-bitversion of MapInfo Pro closes unexpectedly when opening Excel 2013 and Access 2013 tables, thenfollow the steps outlined below.
1. Uninstall both of the Microsoft Access database engine 2010 drivers.a) From the Start menu, select Control Panel.b) On the Control Panel, select Programs and Features.c) Scroll through the list to locate and selectMicrosoft Access database engine 2010. There
will be two instances of this application in the list.d) Select Uninstall and follow the instructions that the uninstall procedure provides.e) Select the second Microsoft Access database engine 2010 and uninstall it.
2. Download and install the 32-bit version of Microsoft Access Runtime 2013 (calledAccessRuntime_x86_en-us.exe) fromhttps://www.microsoft.com/en-us/download/details.aspx?id=39358.
3. Download the 64-bit version of Microsoft Access Database Engine 2010 (calledAccessDatabaseEngine_x64.exe) fromhttps://www.microsoft.com/en-us/download/details.aspx?id=13255. Make note of thedownload location, such as C:\Users\myname\Downloads.
CAUTION: Do not run (install) from your internet browser window, download it first.
15MapInfo Pro 2021 Install Guide
Before you Install

4. Install the 64-bit version of Microsoft Access Database Engine 2010 (calledAccessDatabaseEngine_x64.exe).a) Open a command prompt window with Administrator privileges. In the system folder
C:\Windows\System32, right-click on cmd.exe and select Run as Administrator.b) At the command prompt, change directories to the AccessDatabaseEngine_x64.exe
file (type cd C:\Users\myname\Downloads and press Enter).c) At the command prompt, type AccessDatabaseEngine_x64.exe /passive and press
Enter.
5. If you have a 32-bit version of Microsoft Office 2007, 2010, 2013, or 2016 installed, then deleteor rename its mso.dll registry key.a) Open the Registry Editor window. On the Microsoft Start menu, type regedit in the
Search field, and then click regedit.exe.b) In the Registry Editor window, navigate to
HKEY_LOCAL_MACHINE\SOFTWARE\Microsoft\Office\14.0\Common\FilesPaths.c) If there is a mso.dll value, either delete it or rename it.
If you do not delete or rename the file, then may see a reconfigure message when you opena Microsoft Office application.
Both 32-bit and 64-bit drivers are now installed on your system, and you can open Access 2013 andExcel 2013 files in both 32-bit and 64-bit versions of MapInfo Pro.
Navigating the MapInfo Pro DVD Browser
The initial dialog box of the MapInfo Pro DVD Browser includes these options:
• Install Products – From this option you can install MapInfo Pro (including DBMS support andtranslators) and free data.
• What’s New – Displays a list and description of new and enhanced features.• Online Reference –MapInfo Pro provides links to online reference documents, such as theMapInfoPro Install Guide (this document) and MapInfo Pro User Guide, as well as the Adobe AcrobatReader. These documents are copied into the Documentation subfolder of your installation directoryduring the installation process.
• MapInfo Tutorial – From this option you can access the MapInfo Pro Tutorial from the Preciselyweb site to learn more about the basic features of the product. To view these tutorials, visit us athttp://www.precisely.com/product/precisely-mapinfo/mapinfo-pro.
• Other Products – Displays information about MapInfo MapBasic, Spectrum Spatial, and otherproducts from our website.
• Contact Information – Wherever you are, Precisely is there to help you. Contact us at any ofthese locations or visit us at http://support.precisely.com
• Browse DVD – From this option you can review the contents of the DVD. There are additionalutilities that may be useful to you that are only available when you browse.
16MapInfo Pro 2021 Install Guide
Before you Install

Citrix Installations
Typically, a Citrix installation is performed by an IT Specialist or a system administrator, but this isnot always the case.
There are no special installation instructions for installing MapInfo Pro in a Citrix environment. Inaddition to the product serial number and access code (supplied on the Product Activation InformationCard in the product box), you will also need the MapInfo License Server machine name and portnumber to activate MapInfo Pro. Citrix installations use a concurrent license. Your system administratorwill supply this information.
Information for IT Specialist or System Administrators
In addition to MapInfo Pro, you will also have purchased a MapInfo License Server Utility to activateMapInfo Pro with. Citrix installations require a MapInfo License Server Utility to activate MapInfo Pro.For instructions on how to install and set up a MapInfo License Server for your organization, see theUser Guide that is provided with the Precisely License Server.
Number of MapInfo Pro Instances a Citrix Server can Support
The Citrix server should comply with the basic requirement provided by Citrix.
To determine the amount of RAM required for your Citrix server to serve MapInfo Pro, multiply thebase footprint by the number of concurrent MapInfo Pro users. If the footprint is 100M and there arefive (5) concurrent MapInfo Pro users, then multiply 5 x 100MB = 500MB RAM required.
The previous calculation is an estimate, because MapInfo Pro has many dependencies, such as thetype of data in use and type and frequency of operations performed. Different operations may havedifferent memory requirements; the following are the most memory intensive operations:
• Running object processing operations, with Clean and Check Regions being most intensive• Running complex SQL statements• Editing and drawing objects• Extensive use of the cosmetic layer• Extensive labeling
17MapInfo Pro 2021 Install Guide
Before you Install

2 - Installing MapInfo ProThis chapter provides instructions for installing MapInfo Pro on your desktop.In addition, there are instructions for fixing problems that come up as partof the installation process and for removing MapInfo Pro from your desktop.
We recommend you to make sure of the following before starting the processto install:
• You must have Administrator rights to run the Installer.• The Installer requires that your TEMP variable be set to a valid directory.• You must exit from all Windows programs before beginning the installationprocess.
The installer for MapInfo Pro will install all the files necessary to run Pro inmultiple languages. During the installation process the first question will bewhat language would you like to run Pro in. This will be the default languageof the Pro Application. The list of available languages to choose from willdepend on what is available in the installer. Eventually all languages will beavailable as the localization process finishes up.
MapInfo Pro users who register with a Precisely online account are able torun MapInfo Pro in a connected Viewer Only (subscription) mode. TheMapInfo Pro installer adds a shortcut (Icon) to the Windows Start Menu tostart MapInfo Pro in Viewer (subscription) mode. This icon is located nextto the regular MapInfo Pro Start Menu shortcut.
Advanced users may wish to run Pro in a different language than was chosenat installation time. This will now be possible by copying theMapInfoPro.exe.config from a language sub-folder (such as fr, de, ja, zh-CN)under the MapInfo Pro installation location on top of theMapInfoPro.exe.config in the MapInfo Pro installation location. Most userswill never need to do this, but if you do try it, be sure to make a copy of thefile first! Be aware that many Pro settings such as ribbon customization arelocale-specific.
These are the language versions of MapInfo Pro and the sub folders used(Changing AppLocale or System Charset via .config file is for advancedusers only).

SystemCharset NameCodePageLanguageCountry/Region
AppLocalecode
AppLocaleName
UI Locale and SubFolder Name
WindowsSimpChinese936Chinese (Simplified)2052zh-cNzh-CN
WindowsLatin21250Czech - Czech Republic1029cs-CZcs
WindowsLatin11252Danish - Denmark1030da-DKda
WindowsLatin11252Dutch - The Netherlands1043nl-NLnl
WindowsLatin11252English - United States1033en-USen
WindowsLatin11252Finnish - Finland1035fi-FIfi
WindowsLatin11252French - France1036fr-FRfr
WindowsLatin11252German - Germany1031de-DEde
WindowsHebrew1252Hebrew - Israel1037he-ILhe
WindowsLatin11252Italian - Italy1040it-ITit
WindowsJapanese932Japanese - Japan1041ja-JPja
WindowsLatin21250Polish - Poland1045pl-PLpl
WindowsLatin11252Portuguese - Brazil1046pt-BRpt
WindowsCyrillic1251Russian - Russia1049ru-RUru
WindowsLatin11252Spanish - Spain1034es-ESes
WindowsLatin11252Swedish - Sweden1053sv-SEsv
WindowsTurkish1254Turkish - Turkey1055tr-TRtr
In this section
19MapInfo Pro 2021 Install Guide
Installing MapInfo Pro

MapInfo Pro Installer................................................................................................................................21Installing Data..........................................................................................................................................25Installing Related Resources...................................................................................................................27Modifying or Removing MapInfo Pro.......................................................................................................28
20MapInfo Pro 2021 Install Guide
Installing MapInfo Pro
MapInfo Pro Installer
You must have Administrator rights to run the Installer, and the Installer requires that your TEMPvariable be set to a valid directory.
CAUTION: We strongly recommend that you exit from all Windows programs before beginningthe installation process. If you are upgrading from an earlier version of MapInfo Pro, werecommend that you uninstall before upgrading.
MapInfo Pro provides its application data files to each user. Called a Per-User install, this functionalityruns the first time you run MapInfo Pro or MapInfo Pro client on a machine, and each time the MapInfoPro Installer is run thereafter. The application data files include, among others, the Pen Styles file,Custom Symbols files, and Thematic Legend templates. These files allow different users to havecustom settings.
Note: You may install MapInfo Pro (64-bit) on a machine that already has an installation ofMapInfo Pro (32-bit). See License Activation For MapInfo Pro 32-bit and 64-bit Editionson the Same Computer on page 32.
To install MapInfo Pro:1. If installing from a DVD, the Installer automatically launches. If the Installer does not automatically
launch, then go to the DVD drive and click on autostart.exe. If installing from a download,go to the directory into which you downloaded MapInfo Pro and right-click the setup.exe file,select Run as Administrator from the pop-up menu to install using elevated privileges.
If you see a prompt for permission to continue. Click Allow or Yes to proceed.
The wizard begins to lead you through the installation process.
2. On the Launcher menu, choose Install Products.3. Choose MapInfo Pro and then choose MapInfo Pro Installer.
You may see a prompt for permission to continue. Click Allow or Yes to proceed (if you do notrespond and the message times-out, the install is unsuccessful).
4. Select the language in which you want to install MapInfo Pro.5. If any of the prerequisites listed underDependencies and Prerequisites are not already installed
on your system, then a prompt displays to install them. Click Install.Installing the prerequisites takes several minutes—the status of each prerequisite updates as itinstalls.
6. If you see a message that MapInfo Pro requires a reboot, click Yes. You must reboot to continuewith the installation.
7. Click Next to continue the process.
21MapInfo Pro 2021 Install Guide
Installing MapInfo Pro

8. On the License Information dialog box, review the license. If accepting the terms, click Nextto continue.
9. On the License Information dialog box, review the license. Click Next to continue.10. On the Customer Information dialog box, do one of the following:
• Select the MapInfo Pro - Licensed or Trial version check-box, type your user name,organization, serial number, and access code in the corresponding fields and click Next tocontinue.
The user name and organization fields are mandatory. If you also enter the serial number andaccess code, MapInfo Pro Licensed version is installed. If no credentials are entered, the trialversion of MapInfo Pro is installed.
This installs MapInfo Pro Licensed or Trial version based on the information provided andcreates a shortcut to MapInfo Pro in the Start menu.
• Select the MapInfo Viewer Subscription check-box, type your user name and organizationand click Next to continue.
This installs MapInfo Pro in the subscription mode and creates a shortcut to MapInfo Viewerin the Start menu.
• Select both the check-boxes and click Next to continue. Shortcuts to both MapInfo Pro andMapInfo Viewer are created in the Start menu.
Note: If you choose to select bothMapInfo Pro - Licensed or Trial version andMapInfoViewer Subscription check boxes, MapInfo Pro would be the default application associatedwith MapInfo Pro registered file types such as workspace (*.wor) or table (*.tab).
The serial number and access code are listed on the Product Activation Information Card oremailed with your license details, and are used to activate your product.
11. Click Next to continue.12. Do one of the following:
• If your organization purchased node-locked licenses, the third character of your serial numberis "N". Skip this step and go to step 13.
• If your organization purchased concurrent licenses, the third character of your serial numberis "S" or a distributeable license, the third character of your serial number is "D". In this case,the License Server Name and License Server Port Number fields display on the dialog box.
Note: For more information about node-locked, concurrent and distributable licenses,see Chapter 3: Starting and Activating MapInfo Pro.
22MapInfo Pro 2021 Install Guide
Installing MapInfo Pro

If you know the license server name and port number, type them here. If you do not, you cancontinue with the installation without filling in the license server name and port number. Youwill have another opportunity to supply this information when you start MapInfo Pro.
13. Click Next to continue.14. Select one of the following options:
• Typical – Choose this option if you will be using MapInfo Pro as a desktop application includingremote database access and connectivity. Continue to Typical Workstation Installation.
• Custom – Choose this option to restrict the components that are installed by the installationprogram. For example, you can prevent the installer from adding the documentation and tools.Continue to Custom Workstation Installation.
15. Click Next to continue.There are no special installation instructions for installing MapInfo Pro in a Citrix environment. Citrixusers follow the instructions in Typical Workstation Installation to install MapInfo Pro.
Typical Workstation Installation
You must have Administrator rights to run the Installer, and the Installer requires that your TEMPvariable be set to a valid directory. Make sure you have completed the directions under InstallingMapInfo Pro before beginning these instructions.
Choose the Typical option to install all MapInfo Pro program files including the documentation, tools,and Universal Translator.
To continue installing MapInfo Pro:1. On the Setup Type dialog box, choose Typical.2. On the Destination Folder dialog box, do one of the following:
23MapInfo Pro 2021 Install Guide
Installing MapInfo Pro

• Click Next to accept the destination folder indicated.• Click Change to create a new path on the Change Current Destination Folder dialog box.Type the new path in the Folder name field and click OK to continue. Choose to create a newdirectory name when you have an earlier version of MapInfo Pro installed and you do not wantto overwrite that version.
3. Click Next to continue.4. On the Ready to Install the Program dialog box, review your selections to ensure that the path
is correct and then click Install. To make changes, click Back.A progress bar indicates the status of the process.
Note: If you are using ODBC or Oracle Spatial for database connectivity, we install ODBCConnectivity and Oracle Spatial support by default to simplify the connectivity process.
5. At the end of the installation, the prompt: “Would you like to check our web site for any currentupdates to our product?” displays. If you have an Internet connection, click Yes to access thePrecisely web site containing information about product updates.
6. On the Complete dialog box, click Finish.Continue to Installing Data or to Chapter 3: Starting and Activating MapInfo Pro.
Custom Workstation Installation
Make sure you have completed the directions under Installing MapInfo Pro before beginningthese instructions.Choose Custom to select components and drivers within the MapInfo Pro installation program. Thisis useful when you want to save disk space by not installing the MapInfo Pro documentation or tools.
To continue installing MapInfo Pro:1. On the Setup Type dialog box, choose Custom.2. On the Custom Setup dialog box, you can click on a component to display information about it
and the space it requires:
• MapInfo Program Files – you must install these files to run MapInfo Pro.• Documentation – installs user guide documents in PDF format.• Tools - installs MapInfo Utilities.
Select the components that you do not want to install (all are selected by default) by clicking theDown Arrow beside it. From the following menu of options, select This feature will not beavailable.
• This feature will be installed on local hard drive.• This feature, and all sub features, will be installed on local hard drive.• This feature will not be available.
24MapInfo Pro 2021 Install Guide
Installing MapInfo Pro

3. To specify a non-default location for the installation, click Change.In the Change Current Destination Folder dialog box, type the new path in the Folder namefield and click OK to continue.
4. To see if you have enough space on your hard drive or other mapped resources, click the Spacebutton.The Disk Space Requirement dialog box displays the disk size, the amount of available space,and the amount of space the selected install would take.
5. After making your custom selections on the Custom Setup dialog box, click Next.6. If you are installing an English language version of MapInfo Pro, the Language Setting dialog
box displays. Select an English language preference and then click Next.7. On the Ready to Install the Program dialog box, click the Install button to begin the installation
of MapInfo Pro with the features you selected.The Installing MapInfo Pro dialog box displays with a progress bar indicating the status.
8. At the end of the installation, the prompt: “Would you like to check our web site for any currentupdates to our product?” displays. If you have an Internet connection, click Yes to access thePrecisely web site containing information about product updates.
9. On the Complete dialog box, click Finish.Continue to Installing Data or to Starting and Activating MapInfo Pro.
Installing Data
To help you get started, Precisely provides you with some United States-based and world-wide mapsyou can use as a background to your data.
To work with the sample data after installation, you must install to a folder that has permission toedit (read and write permission). Some folders, such as the Program Files or Program Files(x86) folder, do not have write permission by default when the User Account Control (UAC) is turnedon. Consult with your system administrator prior to installing.
To install the free data provided with MapInfo Pro:1. On the Launcher menu, choose Install Products.2. Click Introductory Data and Industry Samples.3. Click Install Introductory Data and Industry Samples.
You may see a prompt for permission to continue. Click Allow or Yes to proceed (if you do notrespond and the message times-out, the install is unsuccessful).
4. On theWelcome dialog box, click Next to continue.5. On the License Information dialog box, review the license. If accepting the terms, click Next
to continue.6. On the Setup Type dialog box, choose one of the following options:
25MapInfo Pro 2021 Install Guide
Installing MapInfo Pro

• Complete – This option installs all datasets. Click Next and continue to Complete DataInstallation.
• Custom – This option lets you choose which datasets to install. Click Next and continue toCustom Data Installation.
There are no special installation instructions for installing MapInfo Pro data in a Citrix environment.Citrix users follow the Complete Data Installation instructions to install MapInfo Pro data.
Complete Data Installation
Make sure you have completed the directions in Installing Data before beginning theseinstructions.Choose this option to install all of the MapInfo Pro sample data.
To continue installing data using the Complete Data instructions:1. On the Destination Folder dialog box, either keep the default location or click Change to select
a different location to install the data to. The default installation path is C:\Program Files(x86)\MapInfo\Data. Click Next to continue.
2. On the Related Products dialog box, choose one of the following options and then click Next.
• MapInfo Pro.• MapInfo Runtime
If you will be using the data with both MapInfo Pro and MapInfo Runtime, select MapInfo Pro.
3. If you selected MapInfo Pro in the previous step, a Question dialog box opens. Click Yes tocreate workspace icons for the data.
4. On the Ready to Install the Program dialog box, click Install.
You are now ready to work with the sample data.
Custom Data Installation
Make sure you have completed the directions in Installing Data before beginning theseinstructions.Choose this option to install some of the MapInfo Pro sample data. The data only installs to onefolder location.
To continue installing data using the Custom Data instructions:1. On the Custom Setup dialog box, clicking on a dataset displays information about it and the
space it requires. Select the datasets that you do not want to install (all are selected by default)by clicking the Down Arrow beside it. Choose an option from the following:
26MapInfo Pro 2021 Install Guide
Installing MapInfo Pro

• This feature will be installed on local hard drive• This feature, and all subfeatures, will be installed on local hard drive• This feature will not be available
2. To change the install location, clickChange. The default installation path is C:\Program Files(x86)\MapInfo\Data.
3. To see if you have enough space on your hard drive or other mapped resources, click Space.The Disk Space Requirement dialog box displays the disk size, the amount of available space,and the amount of space the selected install would take.
4. Click Next after making your custom selections.5. Depending on what data you selected to install in step 1, the Related Products dialog box may
opens. If it opens, choose one of the following options and then click Next.
• MapInfo Pro.• MapInfo Runtime
If you will be using the data with both MapInfo Pro and MapInfo Runtime, select MapInfo Pro
6. If you selected MapInfo Pro in the previous step, a Question dialog box opens. Click Yes tocreate workspace icons for the data.
7. On the Ready to Install the Program dialog box, click Install.
Continue to Installing Related Programs and Resources or toChapter 3: Starting and ActivatingMapInfo Pro
Getting More Data
To learn more about our products, choose Install Products, Introductory Data and IndustrySamples and Obtain More Data from the MapInfo Pro product launcher. You can do this afterinstalling MapInfo Pro on the PRO tab, by clicking Products, and then Download Data ProductsCatalog. If you have a browser installed, you are automatically connected to the Precisely web site,where we provide detailed information about our World Wide Data Products. We have over 350 dataproducts to choose from—products that provide both reliable and current information.
Installing Related Resources
This section contains the instructions for installing the the documentation associated with MapInfoPro.
The first time you start MapInfo Pro you must activate your product license. After installing relatedprograms and resources, continue to Starting and Activating MapInfo Pro.
27MapInfo Pro 2021 Install Guide
Installing MapInfo Pro

Installing Online References
MapInfo Pro installs documentation to the Documentation subfolder of your installation directory:
• MapInfo Pro Licensing and Activation• MapInfo Pro Install Guide• MapInfo Pro User Guide
To view PDF format documentation files, you will need to install a PDF reader; the Adobe AcrobatReader is a free download from www.adobe.com.
Modifying or Removing MapInfo Pro
Modifying, Removing, or Repairing from the MapInfo Pro DVD
Use the Program Maintenance feature of the MapInfo Pro DVD Browser to modify, repair, or removeMapInfo Pro software.
Note: To set MapInfo Pro preferences, see Setting MapInfo Pro Preferences in the HelpSystem.
To access Program Maintenance:1. Click Install Products from the MapInfo Pro DVD Browser.2. Click MapInfo Pro.
3. Click MapInfo Pro Installer.
You may see a prompt for permission to continue. Click Allow or Yes to proceed (if you do notrespond and the message times-out, the install is unsuccessful).
4. On theWelcome dialog box, click Next.5. On the Program Maintenance dialog box, choose one of the following options:
• Modify to display the Custom Setup dialog box.• Repair to repair installation errors in the program.• Remove to remove an existing copy of MapInfo Pro from your system. The installer opens theRemove the Program dialog box. ClickRemove to uninstall the product’s programs from yoursystem.
28MapInfo Pro 2021 Install Guide
Installing MapInfo Pro

For information on node-locked license transfer options at uninstall, see Chapter 3: Starting andActivating MapInfo Pro.
Removing MapInfo Pro from your System using Control Panel
To remove MapInfo Pro using the Control Panel:1. Launch the Control Panel and choose the Programs and Features option.
OnWindows 8, from theDesktopmenu, on theControl Panel, point to Programs and Features.
2. Right-click on MapInfo Pro 2021 (64-bit) and select Uninstall from the pop-up menu.
Removing MapInfo Pro from your System using the ProductLauncher
To uninstall MapInfo Pro:1. If you installed from a DVD, the Installer automatically launches. If the Installer does not
automatically launch, then go to the DVD drive and click on autostart.exe. If installed froma download, go to the directory into which you downloaded MapInfo Pro and right-click thesetup.exe file, select Run as Administrator from the pop-up menu to uninstall using elevatedprivileges.
2. On the Launcher menu, choose Install Products.3. Choose MapInfo Pro.4. Choose MapInfo Pro Installer.
You may see a prompt for permission to continue. Click Allow or Yes to proceed.
5. On theWelcome dialog box, click Next.6. On the Program Maintenance dialog box, select Remove and then click Next.7. On the Remove the Program dialog, click Remove.
29MapInfo Pro 2021 Install Guide
Installing MapInfo Pro

3 - Starting andActivating MapInfo ProThe first time you start MapInfo Pro you are asked to activate your productusing the serial number and access code you supplied during the installation.This section describes the activation process for the type of license yourorganization purchased.
To start MapInfo Pro, do one of the following:
• Double-click the MapInfo Pro icon on your desktop.• From the Startmenu, selectMapInfo Pro 2021 (64-bit) from the SelectedProgram folder.
In this section
Determine the Type of License you have.................................................31License Activation For MapInfo Pro 32-bit and 64-bit Editions on the Same
Computer.............................................................................................32Advanced Licenses..................................................................................33Mapping Services.....................................................................................34Node-Locked Licenses.............................................................................35Concurrent Licenses.................................................................................43Distributable Licenses..............................................................................47

Determine the Type of License you have
The serial number and access code that you enter during the installation indicates to MapInfo Prowhat type of license you have. Depending on the license type, MapInfo Pro will guide you throughactivating the product (if your organization purchased node-locked licenses) or connecting to a licenseserver (if your organization purchased concurrent or distributable licenses).
MapInfo Pro licenses can be categorized as:
• Feature Based Licenses
• Advanced Licenses - If the second character of your serial number is "A", your organizationpurchased MapInfo Pro Advanced licenses. For details, see Advanced Licenses.
• Premium Licenses - If the fourth character of your serial number is "P", your organizationpurchased Premium licenses. For details on Premium services, see Premium Services.
• Basic Licenses - If the second character of your serial number is "I" and the fourth characterof your serial number is "W", your organization purchased MapInfo Pro Basic licenses.
• Single-User and Sharable Licenses
• Node-Locked Licenses - If the third character of your serial number is "N", your organizationpurchased node-locked licenses. For activation instructions, see Node-Locked Licenses.
• Concurrent and Borrowable Licenses - If the third character of your serial number is "S", yourorganization purchased concurrent licenses. This is the case if MapInfo Pro is installed in a Citrixenvironment. For activation instructions, see Concurrent Licenses.
• Distributable Licenses - If the third character of your serial number is "D" or if you have limitedaccess to email, then your organization purchased distributable licenses. Your system administratorwill provide you with a license server machine name and port number. For activation instructions,see Distributable Licenses.
MapInfo Pro license serial number is a combination of different licenses described above. For example,if you purchased the Advanced and Premium services of MapInfo Pro to work on a single workstationyour serial number would be something like,
MANPEW1111111111
Here in the highlighted part of the serial number, "A" stands for Advanced License, "N" for aNode-Locked version and "P" for Premium Services.
31MapInfo Pro 2021 Install Guide
Starting and Activating MapInfo Pro

License Activation For MapInfo Pro 32-bit and64-bit Editions on the Same Computer
You can have a 32-bit version of MapInfo Pro (version 15.x or 12.5) on the same computer as this64-bit version regardless of the licensing model you are under. The actions when activating andreturning, and whether you can borrow a license, are different depending on which license you have.
Node-Locked Licenses
Licenses come from the Precisely FNO Server. When you install MapInfo Pro, you can activate thelicensing immediately or do it later during the 30 day courtesy period. Activating it gets you a licensefrom the Precisely FNO Server that is node-locked to your computer. When you install the 32-bitedition of MapInfo Pro, you will not need to activate a license. The same license is used for bothinstallations.
Take precautions when returning licenses if you have a 15.x or 12.5 license checked out and both32- and 64-bit versions of MapInfo Pro installed on the same machine. The 32- and 64-bit versionsuse the same license. If, for example you return the license for 64-bit MapInfo Pro 15.2 then your32-bit MapInfo Pro 15.0 will no longer work.
For more information, see Node-Locked Licenses on page 35.
Concurrent License
Concurrent, or floating licenses, come from a license server that your organization has purchasedand maintains. You will need to know the name and port of the license server to activate a concurrentlicense. You can activate the license during the installation process or when you start a MapInfo Prosession. Each session of MapInfo Pro on a computer requires the checkout of a concurrent license.However, the same user using both instances of MapInfo Pro on samemachine will not cause anotherlicense to be checked out. When you end your session, the license is returned to the server.
Borrowing a Concurrent License
Borrowable licenses are concurrent licenses that are borrowed for use on another computer for aperiod of time. This allows you to run an installation of MapInfo Pro that is not connected to thelicense server, for example on a laptop while traveling.
If you have both 32- and 64-bit editions of MapInfo Pro on the laptop, the borrowed license will beshared with both editions. When you return a shared license, you will have to reconnect the laptopto the license server network to get another concurrent (floating) license to continue to use eitheredition.
For more information, see Concurrent Licenses on page 43.
32MapInfo Pro 2021 Install Guide
Starting and Activating MapInfo Pro

Distributable Licenses
The distributable licensing model allows companies to "distribute" permanent licenses using yourMapInfo License Server, which is available on the MapInfo Pro DVD and for download. This modelis for customers who have limited access to email or to the Precisely FNO server. Distributed licensesfollow a similar activation procedure to other models that are handled using your License Server.For instructions on installing the License Server, please see the License Server User Guide.
For more information, see Distributable Licenses on page 47.
Universal Licenses
Organizations who purchase universal licenses are provided with a special license that they makeavailable to their MapInfo Pro users. There are no special requirements or handling when both 32-and 64-bit editions are installed on the same machine.
Advanced Licenses
MapInfo Pro Advanced licenses enable high quality raster visualization and lets you analyze grid-basedspatial information. The advanced license extends the capabilities of MapInfo Pro by providing acore raster engine that can be reused across desktop and server products. MapInfo Pro Advanced:
• Enables high performance with very large grid files.• Efficiently displays data at all zoom levels.• Supports both numeric and classified data in the same file.• Supports grid and/or imagery formats.• Provides high performance analysis, processing and complex workflows using huge raster fileswhich are too large to fit in main memory.
If you have not purchased an Advanced license of MapInfo Pro, only following basic features of theraster engine are available:
• Open any supported raster (MRR, ERS, ASC, GRD, GRC, etc…)• Raster Info• Statistics• Cell Value• Color Pseudo• Color RGB• Color Stretch• Hill shade• Convert• Copy
33MapInfo Pro 2021 Install Guide
Starting and Activating MapInfo Pro

• Delete• Rename
If you purchased node-locked licenses, your installation of MapInfo Pro must be activated beforeyou can use it. Activation is the process of acquiring a license from Precisely.
Note: For Citrix installations, you must use a concurrent license to be in compliance withyour licensing agreement.
Mapping Services
Microsoft Bing Maps Licensing
Purchasing a new MapInfo Pro license or upgrading an existing license provides access to MicrosoftBing Maps, a web mapping service, for Bing Aerial and Bing Hybrid maps. These maps are used bythe Add Bing Roads to Map and the Move Map to features in MapInfo Pro. Access to these mapsis for a limited time, see Bing Maps Expiration Date on page 34. To continue access after theexpiration date, you must keep your MapInfo Pro license on maintenance. This ensures that you canupgrade to the latest version of MapInfo Pro and continue to use the Add Bing Roads to Map andthe Move Map to features.
Bing Maps Expiration Date
Bing Maps has a limited license period, which is specific to each version of MapInfo Pro. Bing Mapsand the Add Bing Roads to Map and the Move Map to features cease working after this date:
• MapInfo Pro 17.0 on January 1st 2020• MapInfo Pro 16.0 on January 1st 2018• MapInfo Pro 15.0 and 15.2 on January 1st 2017
For those using the Premium Services option, which provides the Bing Roads layer and the MoveMap to feature, the same dates apply.
To continue accessing Bing Maps, you should upgrade to the latest version of MapInfo Pro. By doingso, you also benefit from the latest improvements to MapInfo Pro. We recognize that sometimes ITdepartments may be slow to upgrade software. If you have licenses on a valid maintenance contractand cannot upgrade your MapInfo Pro licenses before the above deadlines, we can extend the Binglicense for you. To extend your Bing Maps license for versions 11.0.x, 11.5.x, 12.0.x, 12.5.x, 15.0.x,15.2.x, 16.0.x or 17.0.x contact your Precisely representative or reseller.
34MapInfo Pro 2021 Install Guide
Starting and Activating MapInfo Pro
Using Your Own License
If you already have a license for Bing Maps that you purchased from Microsoft, then you can useyour license with MapInfo Pro.
To enter your license information in MapInfo Pro:
1. On the PRO tab point to Licensing and clickBing License Key to open theBing Key Credentialdialog box.
2. Type your license value in the Enter valid key field and click OK.
Bing Maps Terms of Use
There are restrictions on how Bing Maps capabilities may be used. To view the terms of use, on thePro tab, click About, and then click Bing Terms to open an internet browser window to the termsof use webpage.
Premium Services
The following (optional) premium services are available with a MapInfo Pro Premium license:
• Add Bing Roads to Map – MapInfo Pro supports Microsoft® Bing™ Roads. With a single click, youcan easily add a Microsoft Bing layer to a map.
• Move Map To – The Move Map To feature re-centers the map view to a new location by addressor place name.
These are also available during an evaluation period for trial. Installing an evaluation gives youunlimited use of MapInfo Pro for a thirty (30) day courtesy period. There is an extra cost to purchasethe Premium Services.
Node-Locked Licenses
Node-locked licenses enable you to run MapInfo Pro on a specific computer. If you purchasednode-locked licenses, your installation of MapInfo Pro must be activated before you can use it.Activation is the process of acquiring a license from Precisely
Note: For Citrix installations, you must use a concurrent license to be in compliance withyour licensing agreement.
35MapInfo Pro 2021 Install Guide
Starting and Activating MapInfo Pro

Product Activation
Precisely uses the serial number and access code you supplied during the installation to activatethe product. If you need to refer to these numbers again, the serial number and access code are onthe Product Activation Information Card or provided to you in an email.
To activate MapInfo Pro:1. Install MapInfo Pro, if you haven’t already, and start the product.
When you start MapInfo Pro for the first time after installation, the Activation Wizard launches.The MapInfo Pro Activation dialog box opens.
2. Select when you want to activate MapInfo Pro. Select one of the following:
• Activate Now–Select this option to start activation now. For further instructions, continue toActivate Now.
• Activate Later–Select this option to start a 30-day courtesy period in which you can use theproduct without activating. For further instructions, continue to Activate Later.
Activate LaterIf you selected Activate Later, the Activation Wizard closes and the courtesy period begins. Thecourtesy period enables you to use MapInfo Pro immediately and activate the product at a time thatis convenient for you. Each subsequent time you start MapInfo Pro, a dialog box opens informingyou of the time remaining in the courtesy period and giving you the opportunity to activate the product.You must activate MapInfo Pro sometime during the courtesy period to avoid interrupting your work.When the courtesy period ends, you will not be able to use MapInfo Pro until you activate it.
36MapInfo Pro 2021 Install Guide
Starting and Activating MapInfo Pro

Activate NowIn the Select Transfer Method dialog box, select one of the following activation methods and thenclick Next.
Automatic ActivationSelect the Automatic Activation option if you have an Internet connection. The Activation Wizard willmake a one-time connection with the Precisely FNO Server. Using the serial number and accesscode you provided during the installation, the Activation Wizard will retrieve one of the licenses yourorganization purchased and associate it with your computer.
You are finished with the activation process and you can begin working with your software.
Email ActivationSelect the Email Activation option when you do not have an Internet connection. The ActivationWizard will guide you through the creation of an Activation Request file that you must then email toPrecisely
To start email activation:1. In the Verify Activation Credentials dialog box, double-check that your serial number and
access code are correct and then click Next. Click Edit if you need to make any corrections.
37MapInfo Pro 2021 Install Guide
Starting and Activating MapInfo Pro

2. In the Specify location to save Activation Request file dialog box, click Browse to select afolder in which to save the Activation Request file and then click Next.The Activation Request contains your serial number and access code, plus information thatidentifies the computer you are activating on.
3. The Save this important information dialog box contains information about your ActivationRequest file. TheActivation Request File box shows the full path and filename of the ActivationRequest file. The Email address box shows the email address to send the file to.
Take a few moments to write down the location of the Activation Request file and email addressto send the Activation Request file to.
CAUTION: Please do not edit the Activation Request file in any way. If you do, Preciselymay not be able to process it and your activation will be delayed.
38MapInfo Pro 2021 Install Guide
Starting and Activating MapInfo Pro

4. Click OK.The Activation Wizard closes and the courtesy period automatically starts.
5. Email your Activation Request to Precisely at this address: [email protected]
Finishing Email Activation
When you receive the Activation Response file from Precisely, you are ready to finish activating yourproduct.
To finish email activation:1. Copy the Activation Response file you received from Precisely to an accessible folder on your
computer and make note of the location.2. Open MapInfo Pro. If MapInfo Pro is already open, exit and restart the program.
A dialog box opens asking you if you want to finish activating MapInfo Pro.3. Click Yes.4. In the Process Email Activation Response dialog box, clickBrowse to navigate to the location
of your Activation Response file.5. In the Locate Response file dialog box, click Open when you have located the file.
You will see the path and filename of your Activation Response file.
6. In the Process Email Activation Response dialog box, click Next.An activation message opens telling you that the activation was successful.
7. Click OK.The Activation Wizard closes, your product is activated and ready to use.
The email activation is complete. If you wish, you can delete the Activation Response file (you donot need to keep the file on your computer).
39MapInfo Pro 2021 Install Guide
Starting and Activating MapInfo Pro

Note: To check the status of your activation, on the PRO tab point to Licensing and reviewthe information.
Using MapInfo Pro While You Wait
While you are waiting for Precisely to send you the Activation Response file, you can continue touse MapInfo Pro under the courtesy period. To ensure uninterrupted use, we encourage you toactivate before the courtesy period expires.
Each time you open MapInfo Pro subsequent to initiating email activation, a dialog box opens askingif you are ready to finish activating MapInfo Pro. When you receive the Activation Response file fromPrecisely you are ready to finish activation.
To continue using MapInfo Pro under the courtesy period:1. In the Are you ready to finish activating MapInfo Pro dialog box, click No.2. In the dialog box that opens and provides information about the courtesy period, select one of
the following:
• Use MapInfo Pro – Select this option if you have not received an Activation Response file yetand you want to use MapInfo Pro under the courtesy period.
• Start Activation Over – Select this option if previous activation attempts have failed.
3. Click either Finish or Next.
• If you selected Use MapInfo Pro, click Finish. The Activation Wizard closes and MapInfo Prois ready to use under the courtesy period. You can finish the activation at a later time.
• If an earlier attempt to activate MapInfo Pro failed, and you selected Start Activation Over,clickNext. The ActivationWizard restarts, giving you the opportunity to try the activation again.
40MapInfo Pro 2021 Install Guide
Starting and Activating MapInfo Pro

Transferring a Node-Locked License
Node-locked licenses (the third character of the serial number is "N") are associated with a particularcomputer. To use your product on a computer other than the one on which you have it activated,and without consuming another license, you can transfer your license from one computer to another.For example, you received a new computer at work and you want to run your product on the newcomputer instead of on the old one. The number of transfers available per year is dependent on theoptions your organization chose when purchasing the licenses.
Transferring Your License to another ComputerTo transfer a node-locked license:1. Open MapInfo Pro.2. On the PRO tab, point to Licensing, and Transfer a License.3. In the MapInfo Pro License Transfer dialog box, click Yes.4. In the Select Transfer Method dialog box, select an activation method, either Automatic
Transfer or Email Transfer, and then click Next.For further instruction, continue to the Automatic Transfer section or to the Email Transfer section.
Automatic TransferSelect the Automatic Transfer option if you have an Internet connection. Your license will beautomatically transferred to Precisely You can retrieve the license by activating your product onanother computer.
To start Automatic transfer of license:1. In the Select Transfer Method dialog box, select Automatic Transfer and then click Next.
The License Transfer Wizard takes a few moments to transfer the license to Precisely Whenthis process is finished, a message opens informing you that the transfer was successful.
2. Click OK.
MapInfo Pro closes and can no longer be run from this computer. The license is now available foryou to activate MapInfo Pro on another computer.
Email TransferSelect Email Transfer if you do not have an Internet connection. You will be guided through thecreation of a Transfer Request file, which you must then email to Precisely
To transfer license through Email:1. In the Select Transfer Method dialog box, select Email Transfer and then click Next.2. In the Save Transfer Request File dialog box, enter, or click Browse to select the location of
the license file to transfer. Click Next to continue.
41MapInfo Pro 2021 Install Guide
Starting and Activating MapInfo Pro

3. In the Save this important information dialog box, is information about your Activation Requestfile. TheActivation Request File box shows the full path and filename of the Activation Requestfile. The Email address box shows the email address to send the file to.
Take a few moments to write down the location of the Transfer Request file and email addressto send the Transfer Request file.
CAUTION: Please do not edit the Transfer Request file in any way. If you do, Precisely maynot be able to process it and your activation will be delayed.
4. Click OK.MapInfo Pro closes and can no longer be run on this computer unless you activate it again.
5. Email your Activation Request to Precisely at this address: [email protected]
The license is now available for you to activate MapInfo Pro on another computer.
Uninstall Transfer OptionsIf you have a node-locked license and you uninstall MapInfo Pro, you have the option of transferringthe license to Precisely
If you intend to install MapInfo Pro on another computer, transfer the license to Precisely so that thelicense is available. When you install MapInfo Pro on the desired computer, you will be prompted toactivate the product.
If you intend to reinstall MapInfo Pro on the same computer, do not transfer the license. When youreinstall, you can reuse the same license without activating.
When you begin uninstalling MapInfo Pro, the Transfer License Now ? dialog box opens.
Do one of the following:• Click Yes to transfer the license to Precisely.
42MapInfo Pro 2021 Install Guide
Starting and Activating MapInfo Pro

The License Transfer Wizard will start and guide you through the transfer process. For moreinformation, see Transferring Your License to another Computer.
• Click No to keep the license on this computer.The uninstall operation continues. When you reinstall MapInfo Pro, you can reuse the licensewithout activating.
Concurrent Licenses
Concurrent licenses enable you to install MapInfo Pro on any number of computers. A license server,installed and maintained by your organization, limits the number of computers that can run MapInfoPro at any given time to the number of concurrent licenses purchased by your organization.
Note: Citrix installations require concurrent licenses.
In the concurrent licensing scheme, you must connect to a license server on your network to checkout a license before you can run MapInfo Pro. Checking out a license is the process of obtaining alicense from the license server. You will need to supply the license server machine name and portnumber to connect to the license server. You can do this either during installation or the first timeyou run MapInfo Pro. After you have established a license server connection, the check out occursautomatically.
A license server administrator from your organization installs and maintains the license server. Thelicense server administrator must also perform the following tasks:
• Activate the license server to make licenses available for check out.• Inform users of the license server machine name and port number.
Connecting to a License Server
If your organization purchased concurrent licenses for MapInfo Pro, you will need to connect to alicense server to run the product.
To connect to the license server, MapInfo Pro must have the license server name and port number.Your license server administrator will provide you with this information.
Connecting During InstallationThe installation program will ask you for the license server name and port number. If you know themat install time, enter them. When you start MapInfo Pro, you will be connected to the license serverand a license will be checked out automatically.
43MapInfo Pro 2021 Install Guide
Starting and Activating MapInfo Pro

If you do not have this information at the time you install MapInfo Pro, the installation program willenable you to continue with the installation without filling in the license server name and port number.You will have another opportunity to connect to the server when you start MapInfo Pro.
Connecting after InstallationIf you did not specify the license server name and port number during product installation, you willbe prompted for that information when you start MapInfo Pro. You will also be prompted if MapInfoPro cannot connect to a running license server using the server name and port number you providedat install.
To connect to the license server after you install MapInfo Pro:1. Start MapInfo Pro.
The Connect to License Server dialog box opens.
If you have the license server name and port number, proceed with these instructions. If you donot, see Starting the Courtesy Period for more information.
Note: The server name is in the format \\yourlicenseserver, and is the name or IP addressfor the machine that the license server is installed to. The port number defaults to 27000but it can be set by your License Server system administrator. Check with your administratorif the port number is not working.
2. Type the name of the license server in the Server name field.3. Type the port number in the Port number field.4. Click Connect.
MapInfo Pro takes a few moments to connect to the license server and check out a license.
When the license is checked out, the Connect to License Server dialog box closes. MapInfo Prois licensed and ready to use. After you successfully connect to your license server once, a licensewill be checked out automatically when you start MapInfo Pro.
44MapInfo Pro 2021 Install Guide
Starting and Activating MapInfo Pro

Starting the Courtesy PeriodIf you do not have the license server name and port number, but you want to start using MapInfoPro, you can start a 30-day courtesy period during which you can use MapInfo Pro without connectingto the license server.
To use the courtesy period to run MapInfo Pro:1. Open MapInfo Pro.2. In the Connect to License Server dialog box, click Courtesy Period.
An activation message opens telling you that the courtesy period started successfully.3. Click OK.MapInfo Pro is ready to use under the courtesy period.
Connection FailuresFailure to connect to the license server can occur for several reasons.
First, although you may know the license server name and port number, the license serveradministrator may not have had an opportunity to install it yet. In this case, MapInfo Pro cannot findthe license server you specified. To use MapInfo Pro, you can start the courtesy period, and thenconnect when you know that the license server has been installed and is running.
Failures can also occur if the license server has been moved to a different computer. In this case,you were previously able to connect to the license server, but the license server was moved sincethe last time you used MapInfo Pro. MapInfo Pro is looking for the license server in its previouslocation. If MapInfo Pro cannot connect to the license server at startup, the Connect to License Serverdialog opens. For more information, see Connecting after Installation. See your license serveradministrator for the correct license server name.
Finally, if all licenses have been checked out, you will not be able to run MapInfo Pro. You are ableto connect to the license server, but you cannot check out a license because they are all in use. Youwill need to wait until a license becomes available before you can check out a license.
Borrowing a Concurrent License
Some concurrent licenses can be borrowed. Borrowed licenses enable you to use MapInfo Pro whenyour computer is not able to connect to your license server. For example, if you have MapInfo Proinstalled on a laptop and you are going to be away from the office, you can borrow a license to useMapInfo Pro while you are away. Check with your license server administrator to find out if yourconcurrent license includes borrowing.
When you borrow a license, be sure to specify a borrow period that gives you sufficient time to useMapInfo Pro before the license expires. If the license expires before you have an opportunity to return
45MapInfo Pro 2021 Install Guide
Starting and Activating MapInfo Pro

it, the license is automatically returned to the license server. MapInfo Pro is unusable until you canconnect to your network again and check out a license.
To borrow a license, the computer that you want to put the borrowed license on must have MapInfoPro installed and be connected to the license server.
To borrow a license:1. Open MapInfo Pro.2. On the PRO menu, point to Licensing. Click Borrow a License to open the Borrow MapInfo
Pro License dialog box.3. Specify the number of days that you want to borrow the license. You can specify from the
maximum borrow period that an administrator has set.4. Click Borrow License.
After a few moments, an activation message opens to tell you that the license was borrowedfrom the server successfully.
5. Click OK.
You can use MapInfo Pro on this computer while not connected to your network for the borrowperiod that you specified.
Note: A License Server administrator can set the license borrow period from 1 to 365days, with the default being 365 days. Once a limit is set in the License Server Utility, aMapInfo Pro installation may borrow the license for a maximum of that many days.
Returning a Borrowed License
To return a borrowed license, you must reconnect the computer that is using the borrowed licenseto your network. If it is not connected, theReturn a Borrowed License command will not be available.
To return a borrowed license:1. Reconnect the computer to your network.2. Open MapInfo Pro.
A dialog box opens to tell you on what date the borrowed license is going to expire.3. Click OK.4. On the PRO tab, point to Licensing and Return a Borrowed License.
The Return borrowed license to license server dialog box opens. This dialog box explainshow a license is returned.
5. Click OK.An activation message opens to tell you that the license has returned to the license server.
6. Click OK.
46MapInfo Pro 2021 Install Guide
Starting and Activating MapInfo Pro

Distributable Licenses
The distributable licensing model allows companies to "distribute" permanent licenses using yourMapInfo License Server, which is available on the MapInfo Pro DVD and for download. This modelis for customers who have limited access to email or to the Precisely FNO server. Distributed licensesfollow a similar activation procedure to other models that are handled using your License Server.For instructions on installing the License Server, please see the License Server User Guide.
You can also return a distributed license to your License Server if you need to transfer it to anothercomputer. For these instructions, see Transferring a Distributed License.
Before you start the distributed activation process, make sure you have the following pieces ofinformation from your License Server administrator:
• The correct serial number and activation code• The License Server machine name• The port number for the server
Then you can begin your distributed license installation and activation.
Activating a Distributable License
Make sure your MapInfo License Server is running. Check to see that the server is set up properlyand contains the appropriate activated licenses.
To activate a distributed license:1. Begin the MapInfo Pro installation process as you would with any other license model.2. When you are prompted for your serial number and access code, enter the distributed license
serial number and activation code.Distributed license serial numbers begin with "MID" or "MAD".
3. Click Next.The License Server Name and Port dialog box opens.
47MapInfo Pro 2021 Install Guide
Starting and Activating MapInfo Pro

Note: The server name is in the format \\yourlicenseserver, and is the name or IP addressfor the machine that the license server is installed to. The port number defaults to 27000but it can be set by your License Server system administrator. Check with your administratorif the port number is not working.
4. Type in your License Server’s (machine) name in the License Server Name field and the portnumber in the License Server Port Number field or leave the default entry in place.
5. Click Next to continue.Follow the prompts in the dialog boxes until you finish the installation.
When you open MapInfo Pro for the first time, one of the following occurs:
• If the application finds the license server, and the serial number, activation code, and port numbersare correct, the application opens and the product is activated.
• If the application did not access the license server, did not recognize the serial number or activationcode, or did not recognize the port number, an error message opens. We recommend that youreview these components to ensure that they are correct and/or work with your system administratorto review these four pieces of information. Correct the erroneous information and begin the activationprocess again.
After you activate your license, you can review the licensing details in MapInfo Pro on the PRO tabby pointing to Licensing.
The serial number, access code, and licensing details are displayed in this panel for future reference.
Troubleshooting a Distributed or Borrowable License
You will see the following issues after upgrading MapInfo Pro with a distributed or borrowable licenseif the License Server has not been upgraded to a compatible version:
• MapInfo Pro is unable to borrow a license.
48MapInfo Pro 2021 Install Guide
Starting and Activating MapInfo Pro

• MapInfo Pro is unable to activate a distributed license from the License Server.
If this occurs, contact your License Server administrator and have them upgrade the License Serverto a compatible version to your MapInfo Pro. A compatible License Server version is one that isreleased with or after the version of MapInfo Pro that you are upgrading to.
Transferring a Distributed License
You can transfer a distributed license to your License Server, when you want to move the license toanother computer.
Note: Before making any hardware changes to your PC (such as disk re-formatting) pleaseremember to return your activated license back to Precisely or to your License Server. Afteryour hardware has been changed you may then re-activate your license.
To transfer a distributed license to your License Server:1. On the PRO tab, point to Licensing, and Transfer a License.
The Return distributed license to license server dialog box opens.
2. Click the OK button to transfer the distributed license to the server.If you have unsaved or open MapInfo table data, the Save Modified Table Data dialog boxopens. This dialog box helps you save or discard data before you transfer your license to yourLicense Server. Click the appropriate option to save or discard this data:
• Click Save to save the open table data• Click Save All to save the open data in the appropriate data tables• Click Discard to close the open table without saving the modified data• Click Discard All to close the open tables without saving the modified data
After you make your selection in this dialog box, the transfer continues.
Note: After you return the license, the application closes. Since MapInfo Pro is still installedon your computer, if you open the application again, the product will attempt to activate anotherdistributed license. If the license is not available, you can use the courtesy license for thebalance of your 30 day trial.
49MapInfo Pro 2021 Install Guide
Starting and Activating MapInfo Pro

A - WorkgroupInstallations for SystemAdministratorsMapInfo Pro is a desktop application that places user data on a map tosimplify business analysis for data with a spatial component. This sectionwill assist you in setting up a MapInfo Pro network share workgroup thatallows users to share application data resources (such as coordinate systeminformation and templates). Sharing these resources can unify the look ofuser maps and provide consistency in their data.
There are two steps to this Workgroup installation process:
• System administrators create a shared location for the application datafiles and create a method for users to install MapInfo Pro on their owncomputers. Before you begin, see Understanding the WorkgroupInstallation Process. To get started, see Beginning a WorkgroupInstallation (System Administrators).
• Users install the application on their computers, pointing to the sharedlocation for their Application Data Files. To complete a workgroupinstallation, go to Completing a Workgroup Installation (MapInfo ProUsers).
In this section
Understanding the Workgroup Installation Process.................................51Beginning a Workgroup Installation (System Administrators)..................52Completing a Workgroup Installation (MapInfo Pro Users)......................54

Understanding the Workgroup InstallationProcess
This workgroup installation allows users to retrieve the Application Data Files (such as theMAPINFOW.PRJ file and custom symbols) from a shared, network location but install the programlocally. Using this model, all users can share coordinate system settings, templates, and customsymbols.
The workgroup install process is organized in to two steps, so that you can choose to have users:
• install MapInfo Pro from a network location, or• install MapInfo Pro from a DVD you create for their use.
If copying the contents of the MapInfo Pro DVD to another location, copy both the MI_PRO andPro_WG folders together to the same place. The workgroup install has a dependency to the MI_Profolder, so both folders must be located together under the same parent directory. If they are notlocated together, then the Workgroup Installer installs only Application Data Files.
If you have any questions or difficulty with this process, please refer to the MapInfo Pro User Guideto determine the appropriate Precisely resource to call.
Note: The workgroup installation process lets a system administrator store commonly usedfiles in a shared, central location to accommodate Vista requirements.
What are the Application Data Files?
Application Data Files are user files that affect the look and basic settings of your MapInfo maps.Specifically:
• Custom Symbols• Layout Templates• Configuration files:
• MAPINFOW.ABB (The abbreviations file)• MAPINFOW.CLR (The colors file)• MAPINFOW.FNT (The fonts file)• MAPINFOPRO.MNU (The menu file)• MAPINFOW.PEN (The pen file)• MAPINFOW.PRJ (The projections file)
• Thematic Templates
51MapInfo Pro 2021 Install Guide
Workgroup Installations for System Administrators

• Web Feature Server (WFS), Web Map Server (WMS), Web Map Tile Service (WMTS), CatalogServer for the Web (CSW) lists, and the Precisely Global Geocoder service.
Beginning a Workgroup Installation (SystemAdministrators)
To prepare for a Workgroup installation:1. Insert the installation DVD, and on the Install Products tab, point toMapInfo Pro,MapInfo Pro
Workgroup, and Install MapInfo Workgroup.
You may see a prompt for permission to continue. Click Allow or Yes to proceed (if you do notrespond and the message times-out, the install is unsuccessful).
2. On theWorkgroup Installer Welcome dialog box, click Next.3. On the License Agreement dialog box, click I Accept and click Next.4. On the Custom Setup dialog box, you have the option of selecting how a feature is installed (if
it will install and where it installs to). Customize how features install by choosing one of thefollowing options, or leave the default settings. Click Next to continue.
• Select the option Application Data Files to prevent file sharing of one or more of these filetypes or to change the current destination folder for application data. For details, seeApplicationData Files Option.
• Select the option MapInfo Pro v2021 (64-bit) Installer to change the destination folder. Fordetails, see MapInfo Pro v2021 (64-bit) Installer Option.
5. On the Ready to Install the Program dialog box, click Install.6. On the Completed dialog box, click Finish.
52MapInfo Pro 2021 Install Guide
Workgroup Installations for System Administrators

7. Do one of the following:
• If you saved the installation files locally, create one MapInfo Pro installation DVD for each userfrom the contents of the local folder. Make sure you copy the mode.xml file along with theother installation files in that directory.
• If you saved the installation files on the network, notify each user of that network location sothey can install MapInfo Pro locally.
During this process, a mode.xml file was created that contains the shared location you set for theApplication Data Files. When the user opens MapInfo Pro for the first time, the path to the sharedlocation is copied from the mode.xml file to the user’s computer registry. If you need to change thenetwork location of these files, follow the instructions in Changing the Shared Location afterInstallation.
Note: If your users ask you about the product serial numbers, you can find them on the outsideof the MapInfo Pro box. Serial numbers are also in a letter inside the box, if you need to storethem.
The Application Data Files are also stored locally for use when the shared folder is unavailable. Thenext section describes this in more detail.
Application Data Files Option
During a workgroup installation, all Application Data Files are selected by default. However, on theCustom Setup dialog box, you have the option to install specific application data files:
• To prevent file sharing of one or more of these file types, click the drop-down arrow beside the filetype and select This feature will not be available from the list. (When you choose not to installfile(s) to the shared location, MapInfo Pro uses the local copy of these file(s) instead.)
• To change the current destination folder for application data, highlight the Application Data Filesentry and click Change.
After making your selections, the Change Current Destination Folder dialog box opens. Navigateto the shared location for storing these files and click OK. Make sure that this shared location isaccessible by all users who need these files. Users will need read/write access to add new templatesand other custom symbols to share.
Note: When users install MapInfo Pro, these same Application Data Files are also storedlocally. This allows them to access these files when the shared folder is unavailable. For moreinformation, see Completing a Workgroup Installation (MapInfo Pro Users).
53MapInfo Pro 2021 Install Guide
Workgroup Installations for System Administrators

MapInfo Pro v2021 (64-bit) Installer Option
To change the destination folder:1. Highlight the MapInfo Pro v2021 (64-bit) Installer option and click the Change button.2. In the Change Current Destination Folder dialog box, choose from the following options:
• If you want your users to install MapInfo Pro from a DVD, select a local destination folder andclick OK.
This installer then copies the MapInfo Pro installation files to the local destination folder youselected. At the end of this process, you can create installation DVDs for each user from theinstallation files copied to this local folder. You can then distribute these DVDs to each userso they can begin their MapInfo Pro installation.
• If you want your users to install MapInfo Pro from a central network location, select a networklocation folder and click OK.
This installer then copies the MapInfo Pro installation files to the network location folder youselected. At the end of this process, notify each user of this network destination folder so theycan begin their MapInfo Pro installation.
Completing a Workgroup Installation (MapInfoPro Users)
To complete the workgroup installation, do one of the following:
• If your system administrator has given you a DVD for installation, place this media in the appropriatecomputer drive and follow the instructions under Installing MapInfo Pro.
• If your system administrator has placed the MapInfo Pro installer in a network location, navigateto that location and follow the instructions under Installing MapInfo Pro.
Understanding your Workgroup Installation
When you install MapInfo Pro as part of a workgroup, you share commonly used files with the otherusers in your organization. Workgroups use the same configuration, template, and custom symbolfiles without having to copy themmanually. This method supports each workgroup member in creatingmore consistent maps.
54MapInfo Pro 2021 Install Guide
Workgroup Installations for System Administrators

As part of your application’s installation process, the MapInfo Pro installer creates a local copy ofthese Application Data Files for your use when the shared location is not available. This is veryimportant.
• If the shared location of your Application Data Files is available, MapInfo Pro saves your template,symbol, and configuration work to the shared location.
• If the shared location of your Application Data Files is not available, MapInfo Pro saves yourtemplate, symbol, and configuration work to your local copy of these files.
Note: If the shared location is not available when you open MapInfo Pro for the first time, anerror displays explaining that the application will use the local Application Data Files. You canuse the instructions in Changing the Shared Location after Installation to select a newshared location, if necessary.
Since typically you will access the shared location, this will not be an issue. But if you change anyof the Application Data Files locally and the shared location becomes available, we recommend youcopy your work to the shared location. This will ensure that your files are available when you andyour co-workers need them.
A Note about Theme Template Files
The search for theme template files is dependent upon the folder setting in theDirectory Preferencesdialog box. If these preferences do not exist in the network location, the application searches for fileslocally.
Changing the Shared Location after Installation
To change the shared location for these files after installation, use the Directory Preferences dialogbox. Each user in the workgroup needs to follow this procedure to maintain these shared files.
To change the application data file location for a Workgroup user:1. Start MapInfo Pro.2. On the PRO tab, point to Options, and Directories.
The Directory Preferences dialog box opens.
55MapInfo Pro 2021 Install Guide
Workgroup Installations for System Administrators

Note: The shared location displays in theWorkgroup Directory field.
3. Select one of the following options to reset the Workgroup folder:
• To set a new shared location, check the box Use when searching for application data files
and type a new path in the field provided or click to select a new shared path. You canalso use named drives or UNC paths in the Workgroup Directory section.
• To use local files only, clear the Use when searching for application data files check box.
4. Click OK to confirm your change.The application saves this new path to your registry. Each time you open MapInfo Pro after this,the application uses this new path to access the Application Data Files.
56MapInfo Pro 2021 Install Guide
Workgroup Installations for System Administrators

B - Silent InstallationProceduresThis chapter helps a system administrator install MapInfo Pro using acommandline.
Note: All of the Microsoft supported parameters for working with theMSIEXEC command are documented on the Microsoft web site.Search the term "MSIEXEC command line parameters" to find thisdetailed information.
In this section
Silent Installation Procedures for System Administrators.........................58Installing Silently.......................................................................................61Activating and Returning Licenses Silently..............................................63Uninstalling Silently..................................................................................66MapBasic Silent Install.............................................................................66

Silent Installation Procedures for SystemAdministrators
Silent installations allow you to repackage MapInfo Pro for deployment within your company so yourusers do not have to enter user- or company-specific information, path information, a serial number,or an access code.
Note: You may also be interested in reviewingWorkgroup Installations for SystemAdministrators for file sharing to use this installation model for deploying MapInfo Pro.
The MapInfo Pro installation setup.exe indicated in the steps below can be found on the installationDVD (D:\) in this directory:
\Install\MI_PRO\DISK1
The silent installation process involves:1. Place the installation DVD in the target computer’s disk drive.2. From the command line on the target computer, type:
"[Drive and Path]\setup.exe" /s /v"[Parameters for MSI]"
where [Parameters for MSI] are the parameters you set to populate the MSIEXEC.
For example:
"d:\Install\MI_PRO\DISK1\setup.exe /L#### /s /v"/qb USERNAME=\"MyUser\"COMPANYNAME=\"MyCompanyName\" PIDKEY=M############### ACCD=######MPRO=#### MVWR=####"
Note: To install only the MapInfo Viewer on your machine, omit the MPRO=#### parameterfrom the silent installation command above. Likewise, if you want to only install MapInfo Prowith out the Viewer, omit the MVWR=#### parameter from the installation command.
Where:
On a 64-bit operating system the default installaton directory is INSTALLDIR=\"C:\ProgramFiles\MapInfo\Professional\"
The parameter /qb tells the msiexec command to launch the install with a basic interface. Thatdoes not require any user action and allows the user to respond to the operating system's UserAccount Control (UAC).
There should be no space in between Variable=Content. A space is used as a separator inbetween parameters.
58MapInfo Pro 2021 Install Guide
Silent Installation Procedures

Parameters for user information:
• USERNAME = User Name• COMPANYNAME = Company Name
Parameters for installation information:
• INSTALLDIR = Install Directory• /L#### = 4-digit language code identifier. For example, for English type setup.exe /L1033,for French type setup.exe /L1036, for German type setup.exe /L1031. and for Japanesetype setup.exe /L1041. DO NOT leave a space between the /L and the 4 digit language code.
• MPRO=True creates the MapInfo Pro shortcut in the Startmenu and sets the default file associationof registered MapInfo Pro file types such as workspace (*.wor) or table (*.tab) with MapInfo Pro.
• MVWR=True creates the MapInfo Viewer shortcut in the Start menu. It also sets the default fileassociation of registered MapInfo Pro file types such as workspace (*.wor) or table (*.tab) with thenew MapInfo Viewer (subscription) if the MPRO parameter above is not set to True.
Note: If both the MPRO and MVWR parameters above are set to True, MPRO takes precedenceand MapInfo Pro would be the default application associated with MapInfo Pro registeredfile types such as workspace (*.wor) or table (*.tab).
Parameters for licensing information:
• PIDKEY = Serial Number• ACCD = Access Code• LSNAME = License Server Name• LSPN = License Server Port Number
Parameters for activating node lock and distributed licenses silently:
• ACTLIC = True. For silent automatic NODE LOCK and DISTRIBUTED activate licenses.• RETLIC = True. For silent return licenses.• LICLOG = Filename for log files.• BORROW = #days or True. If no specific number of days are entered, True is a valid input and resultsin a # of days.
• SDRLYN = False. Use the Show Dialog Return License Yes No (SDRLYN) parameter to preventduplicating the license transfer dialog when the user uninstalls. The license stays on the system ifnot RETLIC = True.
Note: Parameters ACTLIC and RETLIC are False by default.
Parameter for English language setting:
• LANGCS = ENUS or ENUK. The default is based on the computer’s region options format setting.If this is set to anything other than US English, ENUS, then UK English, ENUK, is set.
59MapInfo Pro 2021 Install Guide
Silent Installation Procedures

Parameters for Concurrent Licenses
For silent installations using concurrent licenses, you must include the parameters for the licenseserver name and license server port number.
1. Place the installation DVD in the target computer’s disk drive.2. From the command prompt, go to the MapInfo Pro setup directory.3. Type the following command:
"[Drive and Path]\setup.exe" /s /v"[Parameters for MSI]"
where [Parameters for MSI] are the parameters you set to populate the msiexec.
For example:
"d:\Install\MI_PRO\DISK1\setup.exe /s /v"/qb INSTALLDIR=\"C:\ProgramFiles\MapInfo\Professional\"LSNAME=\"mylicenseserver\" LSPN=mylsportnumber PIDKEY=MySerialNumberACCD=MyAccessCode"
Where:
On a 64-bit operating system the default installation directory is INSTALLDIR=\"C:\ProgramFiles\MapInfo\Professional\"
The parameter /qb tells the msiexec command to launch the install with a basic interface. Thatdoes not require any user action and allows the user to respond to the operating system's UserAccount Control (UAC).
There should be no space in between Variable=Content. A space is used as a separator inbetween parameters.
Parameters for licensing information:
• PIDKEY = Serial Number• ACCD = Access Code• LSNAME = License Server Name• LSPN = License Server Port Number
Substitute the appropriate serial number and access code when you perform the silent install.
60MapInfo Pro 2021 Install Guide
Silent Installation Procedures

Installing Silently
You can only perform a completely silent install of MapInfo Pro when your install process has elevatedadministrative privileges.
The command-line options /q and /qn do not work when the User Access Control (UAC) is turnedon and your install process does not run with elevated administrative privileges. These options turnoff the user interface during the installation, which suppresses theWindows UAC. Users must interactwith the UAC to provide the necessary credentials to run the installation as an administrator. If theuser interface is turned off, the installation is terminated without warning because the UAC cannotgather the appropriate credentials.
To work around the problem, use the /qb option in the command line when you run the silent install.This option gives the installation a basic user interface and allows the UAC to display on the dialogbox.
To perform a silent install using the /qb option:1. Place the installation DVD in the target computer’s disk drive.2. From the command prompt, go to the MapInfo Pro setup directory.3. Type the following command:
setup.exe /s /v"/qb USERNAME=\"MyUser\" COMPANYNAME=\"MyCompanyName\"PIDKEY=M############### ACCD=######"
where:
PIDKEY=M############### is the product serial numberACCD=###### is the access code
4. When User Access Control displays on the dialog box, click Allow or Yes.
For concurrent licenses, the license server name and port number parameters must be included:
SNAME="LicenseServerName"
LSPN="LicenseServerPortNumber"
Substitute the appropriate license server name and port number when you perform the silentinstall.
Note: FDODriver andCatalogBrowser are not anymore installed as default components.Use the ADDLOCAL parameters to enable the MapInfo Pro silent installer to install thesecomponents. Please note that the ProgramFiles, Documentation and Toolsparameters are required for a proper MapInfo Pro installation. You can omit othercomponents like Python37, FME, FDODriver and CatalogBrowser if you do not wantto install them.
61MapInfo Pro 2021 Install Guide
Silent Installation Procedures

Installing RSS Registry Keys
You can perform a silent installation with RSS registry keys to define the product notifications windowthat opens when MapInfo Pro first starts. For information about product notifications, refer to theMapInfo Pro Help. There are five registry keys: FeedTimeOut, ProductUpdate,ProductUpdateFrequency, NewsFeed, and NewsFeedFrequency.
The installer uses default values for the RSS registry keys unless they are overridden though acommand line. There are five commandline parameters: FEEDTIMEOUT, PRODUCTUPDATE,PRODUCTUPDATEFREQUENCY, NEWSFEED, AND NEWSFEEDFREQUENCY.
To perform a silent install with RSS registry keys:1. From the command prompt, go to the MapInfo Pro setup directory.2. Type the following command:
setup.exe /s /v"/qb FEEDTIMEOUT=xx PRODUCTUPDATE=xxPRODUCTUPDATEFREQUENCY=xx NEWSFEED=xx NEWSFEEDFREQUENCY=xxPIDKEY=M############### ACCD=######"
where:
PIDKEY=M############### is the product serial numberACCD=###### is the access code
xx are parameter values where:
• FEEDTIMEOUT=1 to 60• PRODUCTUPDATE=0 or 1. If PRODUCTUPDATE=1, the check for maintenance patches isenabled.
• PRODUCTUPDATEFREQUENCY=1 to 90• NEWSFEED=0 or 1. If NEWSFEED=1, the check for Precisely-related news is enabled.• NEWSFEEDFREQUENCY=1 to 15
Ensure that you have the required parameters, PIDKEY and ACCD, in the command or an errormessage will display. If you type an invalid value for any of the parameters, then an error messagedisplays and the setup aborts.
Customer Experience Improvement Program
We have created a Customer Experience Improvement Program (the “EIP”) in order to collectinformation about how our users and customers use our products, problems they may encounterwhile using the products, and features and functions most often used by our customers. This allows
62MapInfo Pro 2021 Install Guide
Silent Installation Procedures

us to provide thoughtful, continuous improvement to ensure that we offer our customers the bestuser experience available.
Participation in the EIP is voluntary. During the installation process you will be prompted to participatein EIP. You may or may not elect to participate upon installation of the product, and at any timethereafter. Go to the options, settings, or help menu for your product and change your settings toend your participation.
You can update your EIP participation by adding a DWORD entry to the following registry key:
\HKEY_LOCAL_MACHINE\SOFTWARE\MapInfo\MapInfo\Professional\1700\
Add a new DWORD entry Optin with the following values depending on your selection:
• 0 = EIP Turned off• 1 = EIP Turned on
You can also manage your EIP participation using the following switch when installing MapInfo Prousing the command-line:
• CUSTEXPPRG=\"True\" will tell the installer to add the Optin registry entry with the value 1• CustExpProg=\"False\" will tell the installer to add the Optin registry entry with the value 0
Activating and Returning Licenses Silently
Information Technology engineers may want to activate or return MapInfo Pro node-locked ordistributed licenses silently, using a log file for reports. The return process described in this sectioncan also return a borrowed license to the server. This section describes these processes.
Activating a Node-Locked or Distributed License from theCommand Line
Before making any hardware changes to your PC (such as disk re-formatting) please remember totransfer your activated license back to Precisely or to your License Server. After your hardware hasbeen changed you may then re-activate your license.
A node-locked license is a permanent license that originates from the Precisely FNO server. Adistributed license is a permanent license that originates from a License Server owned by yourcompany. This same process works for both types of license activations.
To activate a node-locked or distributed license silently:
63MapInfo Pro 2021 Install Guide
Silent Installation Procedures
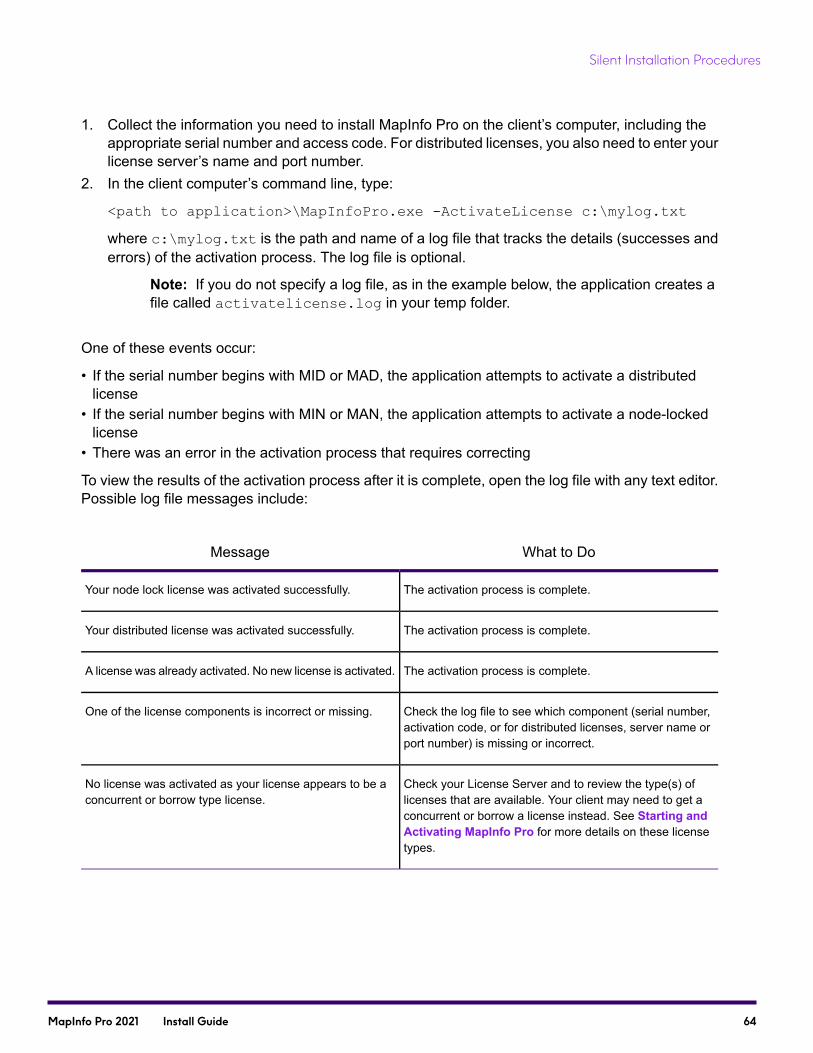
1. Collect the information you need to install MapInfo Pro on the client’s computer, including theappropriate serial number and access code. For distributed licenses, you also need to enter yourlicense server’s name and port number.
2. In the client computer’s command line, type:
<path to application>\MapInfoPro.exe -ActivateLicense c:\mylog.txt
where c:\mylog.txt is the path and name of a log file that tracks the details (successes anderrors) of the activation process. The log file is optional.
Note: If you do not specify a log file, as in the example below, the application creates afile called activatelicense.log in your temp folder.
One of these events occur:
• If the serial number begins with MID or MAD, the application attempts to activate a distributedlicense
• If the serial number begins with MIN or MAN, the application attempts to activate a node-lockedlicense
• There was an error in the activation process that requires correcting
To view the results of the activation process after it is complete, open the log file with any text editor.Possible log file messages include:
What to DoMessage
The activation process is complete.Your node lock license was activated successfully.
The activation process is complete.Your distributed license was activated successfully.
The activation process is complete.A license was already activated. No new license is activated.
Check the log file to see which component (serial number,activation code, or for distributed licenses, server name orport number) is missing or incorrect.
One of the license components is incorrect or missing.
Check your License Server and to review the type(s) oflicenses that are available. Your client may need to get aconcurrent or borrow a license instead. See Starting andActivating MapInfo Pro for more details on these licensetypes.
No license was activated as your license appears to be aconcurrent or borrow type license.
64MapInfo Pro 2021 Install Guide
Silent Installation Procedures

Returning a License
Before making any hardware changes to your PC (such as disk re-formatting) please remember toreturn your activated license back to Precisely or to your License Server. After your hardware hasbeen changed you may then re-activate your license.
<path to application>\MapInfoPro.exe -ReturnLicense c:\mylog.txt
where c:\mylog.txt is the path and name of a log file that tracks the details (successes anderrors) of the return process. The log file is optional.
One of these occur:
• The license is returned to the Precisely FNO Server or your License Server• An error occurs preventing the return of the license
To view the results of the return process after it is complete, open the log file with any text editor.Possible log file messages include:
What to DoMessage
The return process for the distributed license is complete.Your distributed license was returned successfully to thelicense server ServerName.
The return process for the borrowed license is complete.Your borrowed license was returned successfully to thelicense server ServerName.
The return process for the node-locked license is complete.Your node license was returned successfully to Precisely
Check the log file for the details of the error and correct theproblem either on the client’s machine or in your LicenseServer, as needed.
If returnable license was found but the system could notreturn it, the system posts an error message describing theerror.
Check the PRO tab under the Licensing group to ensurethat the license is distributed and try the return processagain.
No license was returned as no distributed license was found.
Check your License Server to make sure the license isavailable and the server is up. Then try the return processagain.
No license was returned as no server license was found.
Check the PRO tab under the Licensing group to ensurethat the license is node locked and try the return processagain.
No license was returned as no node- lock license was found.
65MapInfo Pro 2021 Install Guide
Silent Installation Procedures

Uninstalling Silently
From the command line on the target computer type:
msiexec.exe /x {6CF21AEE-78F0-465A-B48A-039409366564} /q
Running this command only uninstalls MapInfo Pro 2021. It does not uninstall a previous version ofMapInfo Pro. It does not uninstall MapInfo ProViewer, MapInfo Runtime, or MapBasic.
Note: The uninstall key is unique to each version of MapInfo Pro. To silently uninstall an olderversion of MapInfo Pro, you would need to use its product code (uninstall key). These keys are inthe registry atHKEY_LOCAL_MACHINE\SOFTWARE\Microsoft\Windows\CurrentVersion\Uninstall\
MapBasic Silent Install
You can now install MapBasic silently in the background, just like MapInfo Pro. To install MapBasicsilently, use the following commands:
For English
Setup.exe /L1033 /S /v"INSTALLDIR="C:\Test" /qb"
For Russian
Setup.exe /L1049 /S /v"INSTALLDIR="C:\Test" /qb"
For Japanese
Setup.exe /L1041 /S /v"INSTALLDIR="C:\Test" /qb"
Remove the INSTALLDIR parameter to install at the default location: .C:\ProgramFiles\MapInfo\MapBasic.
To make it an entirely silent install without any progress bar, use the "/qn" switch instead of "/qb"
66MapInfo Pro 2021 Install Guide
Silent Installation Procedures

C - AdvancedConfiguration Options forSystem AdministratorsThis section helps a system administrator configure MapInfo Pro.
In this section
Controlling Advanced System Settings ...................................................68Controlling the Location of Application Data Files....................................69Configure MapInfo Pro on Initial Startup..................................................71

Controlling Advanced System Settings
MapInfo Pro has some advanced system settings that cannot be configured through a dialog box.These settings allow you to control several low-level, technical aspects of how MapInfo Pro runs.Most users do not need to worry about these advanced settings.
For example, MapInfo Pro has a Dynamic Data Exchange (DDE) time-out setting, which controlshow long MapInfo Pro tries to communicate with other applications during DDE communications. Ifyou run a MapBasic application, and that application encounters time-out errors during DDE, youmay want to increase the DDE time-out setting. To modify one of MapInfo Pro’s advanced systemsettings (such as the DDE time-out setting), use this procedure.
Modifying the Windows Registry
MapInfo Pro stores system settings in the Windows registry. To edit the Windows registry, use theREGEDT program.
CAUTION: Be very careful when editing the registry; damaging the registry can cause seriousproblems in your operating system.
For example, to set MapInfo Pro’s Dynamic Data Exchange (DDE) time-out setting, locate the followingkey in the registry:
HKEY_LOCAL_MACHINE\SOFTWARE\MapInfo\MapInfo\Common
Within that key, edit the DDeTimeout value. If there is no value by that name, create a new value oftype string, and assign the name DDeTimeout to the value. Set the value’s data to be a number,representing the number of milliseconds (for example, type 30000 to specify a time-out of 30 seconds).For more on editing the registry, see the online help for REGEDIT or REGEDT32.
Descriptions of Advanced Registry Settings
This section describes advanced settings that are stored in the registry.
Note: Set Polygon Mode or Subdivide Printing in MapInfo Pro on the PRO menu by pointingto Options and Output Settings.
DDeTimeout=number
This setting controls MapInfo Pro’s time-out setting in DDE conversations where MapInfo Pro is theclient (the application that initiates a conversation). The number represents milliseconds. The defaultvalue is 10,000 milliseconds (ten seconds). If you run a MapBasic application that attempts to initiate
68MapInfo Pro 2021 Install Guide
Advanced Configuration Options for System Administrators

a DDE conversation, but the conversation fails because the server application does not respondwithin the time-out period, you may need to increase the DDeTimeout number.
MaxORACLETILES=number
The number is 0 (zero) or 1 (one). This setting applies when working with Quad-Tree indexed Oracletables from versions of Oracle that are older than version 10. A value of 0 (zero) causes MapInfoPro to disable spatial query and return all records using client-side clipping. A value of 1 (one) ormore specifies the maximum number of tiles to use per geometry to refine a spatial query. Whencreating a spatial index using the old Quad-Tree method, you specify the number of tiles to use. Thisvalue lets you further refine the search by specifying the max number of tiles to use.
MaxFiles=number
This setting must be an integer from 10 to 507, indicating how many files MapInfo Pro can opensimultaneously. This setting does not limit the number of tables you can open, but it does limit thenumber of tables you can edit at one time (the number of tables that have unsaved edits). The defaultvalue is 29. If you need to work with more files simultaneously, set number to 507.
Improving Performance for MapInfo Pro
To improve MapInfo Pro’s performance, you can increase the speed of the processor in the machine.A video accelerator card will increase the speed of the redraw. It will not speed up the initial draw ofthe map, but all subsequent redraws will be faster. A faster disk cache will also improve performance,as will adding memory.
Controlling the Location of Application DataFiles
By default, the setup program for MapInfo Pro installs application data files to locations that makesense for the typical user. After installing the product, the user is free to move one or more of theapplication data files to another predefined location and MapInfo Pro will find that file. For example,the administrator of a machine might move MAPINFOW.PEN from the per user area (its defaultlocation) into the install directory so all users on that machine will share the same set of pens. ForIT personnel responsible for a large number of MapInfo Pro installs, it is not practical to manuallymove application data files to realize the desired configuration.
To solve this problem, create a setting file, MODE.INI, to specify the location of application data filesprior to installing MapInfo Pro.
1. Copy the installation files to a read-write location.
69MapInfo Pro 2021 Install Guide
Advanced Configuration Options for System Administrators

2. Create a MODE.INI file in the root directory of the installer.3. Open MODE.INI into any text editor.4. Edit MODE.INI, modifying the code associated with the application data file/folder whose location
you wish to change.5. Install MapInfo Pro.
The following is a list of predefined locations for application data files supported by MapInfo Pro, andthe corresponding numeric code to be used in MODE.INI.
LocationDescriptionCode
Current User\Application Dataper user, roaming1
Current User\Local Settings\Application Dataper user, not roaming2
All Users\Application Dataper machine3
Install Dirprogram directory4
The following is a list of application data files/groups and their default locations:
Default LocationFilename
per user, roamingCustSymb
program directoryMapInfow.abb
per user, roamingMapInfow.clr
per user, roamingMapInfow.fnt
program directoryMapInfow.mnu
per user, roamingMapInfow.pen
program directoryMapInfow.prj
per user, roamingThmTmplt
per user, roamingWFSWMS.xml*
70MapInfo Pro 2021 Install Guide
Advanced Configuration Options for System Administrators

* The file called WFSWMS.XML is a representation of these separate files:
• MICSWServers.xml – this file is related to the MetaData Catalog Browser tool.• MIGeocodeServers.xml – this file is for geocoding using the Precisely Global Geocoder, whichis a Software as a Service (SaaS) offering through the Precisely Location Intelligence (LI) API.
• MIWFSServers.xml – this file is related to the list of WFS servers on the HOME tab, click Open,andWFS.
• MIWMSServers.xml – this file is related to the list of WMS servers on the HOME tab, click Open,andWFS.
• MIWMTSServers.xml – this file is related to the list of WMTS servers on the HOME tab, clickOpen, andWMTS.
MODE.INI File Example
Create a text file with the following syntax:
CustSymb = 1ThmTmplt = 3MapInfow.clr = 1MapInfow.fnt = 1MapInfow.pen = 1MapInfow.abb = 4MapInfow.prj = 4MapInfow.mnu = 4WFSWMS.xml = 1
Note: The parameter to relocate MapInfow.mnu is the same for both 32- and 64-biteditions: MapInfow.mnu
Configure MapInfo Pro on Initial Startup
You can create a workspace file, named AddUser.wor, that contains initial setup commands forMapInfo Pro. This is useful when you create or obtain custom tools that you want to load and registerwith MapInfo Pro. MapInfo Pro runs the AddUser.wor the first time a user launches MapInfo Pro.If multiple users are working with MapInfo Pro, then this file is run for each user.
You can use any valid WOR command within the AddUser.wor file. Save the file to the MapInfoPro application directory (for example, to C:\Program Files\MapInfo\Professional).
71MapInfo Pro 2021 Install Guide
Advanced Configuration Options for System Administrators

D - Troubleshooting YourInstallationThis section provides troubleshooting notes for installing MapInfo Pro.
In this section
Installation Issues.....................................................................................73Error Messages........................................................................................74

Installation Issues
MapInfo Pro Installer Requires a Drive Letter
The Installer must be run from a drive with a letter such as G: and not from an explicit uniform namingconvention (UNC) path. For example, you might have the MapInfo Pro DVD in your computer asUSERSPC. Other users may share this device as USERSPC; however, it would not contain a driveletter. The MapInfo Pro Installation program requires a drive letter.
To remedy this situation, map your network drive to a specific drive letter:1. In Windows Explorer, right-click the shared directory or DVD drive that contains the MapInfo Pro
SETUP.EXE and select Map Network Drive.2. Choose a drive letter to map.3. Run the Installation Program again from the newly mapped drive letter.
You may see a prompt for permission to continue. Click Allow or Yes to proceed (if you do notrespond and the message times-out, the install is unsuccessful).
The MapInfo PDF Printer Driver did not Install
It is possible that the MapInfo PDF Printer driver may not install when:
• Your IT department has a policy to restrict which users may install printers. Contact your ITdepartment to check if there is such a policy in place. If there is, then uninstall MapInfo Pro andhave them temporarily allow printer installation on your machine while you reinstall MapInfo Pro.
• Your anti-malware or anti-spyware is turned on during the installation. Uninstall MapInfo Pro.Contact your IT department to temporarily stop the anti-malware or anti-spyware on your machinewhile you reinstall MapInfo Pro.
Debug Startup Issues by Turning Off AutoLoad at Startup
To help you debug MapInfo Pro startup issues, launch MapInfo Pro with a NoAutoLoad argument.WhenMapInfo Pro opens, it automatically loads a startup.wor, a MapInfoPro.WOR, aMapInfoPro.woxandmapbasic tools marked for auto loading. System administratorsmanagingMapInfo Pro installations
73MapInfo Pro 2021 Install Guide
Troubleshooting Your Installation

can prevent these from loading by running MapInfo Pro from the commandline with the NoAutoLoadargument.
In the client computer’s command line, type:
<path to application>\MapInfoPro.exe -NoAutoLoad
Launching the software in this way helps to determine what is causing a startup issue.
Using .MSI file on the Installation DVD does not create aWarning Message
If performing a silent installation of MapInfo Pro, use the setup.exe file (if installing from a DVD, itis in the Install\MI_PROD\DISK1 folder) and not the MapInfo Pro .msi file. The .msi file doesnot install necessary prerequisites and will cause MapInfo Pro to behave unexpectedly.
Error Messages
Message: Unable to launch MapInfo Pro
If the .NET install is canceled or interrupted when installing MapInfo Pro, then the .NET may not beinstalled properly. If MapInfo Pro it does not launch after the second attempt to install it, an "Unableto launch MapInfo Pro" message opens.
MapInfo Pro requires .NET, so the MapInfo Pro install wizard installs .NET before it installs MapInfoPro software. If the .NET install is interrupted or canceled, then the MapInfo Pro install wizard cancels.If you then run the MapInfo Pro install wizard a second time, it assumes that .NET was installed onthe machine (even though its installation was interrupted or cancelled) and the MapInfo Pro softwareis unable to launch and run.
The first attempt to install .NET leaves a registry key set on the machine, so any subsequent attemptsto install .NET assume that .NET is already on the machine—the MapInfo Pro install wizard thinksthat .NET is already installed.
To correct this issue, and install .NET to themachine, youmust downloadMicrosoft .NET Framework4.6.1 from Microsoft's website and install it.
74MapInfo Pro 2021 Install Guide
Troubleshooting Your Installation

Message: The feature you are trying to use is on a networkresource that is unavailable.
If you see the following message, then the install was run on Windows 7 without elevated privileges.
The feature you are trying to use is on a network resource that isunavailable.
Re-run the install using elevated privileges, either:
• Right-click the executable file and select Run as Administrator from the pop-up menu to installusing elevated privileges. A prompt for permission to continue opens. ClickAllow or Yes to proceed(if you do not respond and the message times-out, then the install is unsuccessful).
• Have your System Administrator re-run the install, because your account does not have thenecessary privileges.
Message: ODBC Error
The following error may occur when using the PostgreSQL Unicode ODBC driver with the UseDeclare/Fetch option disabled.
ODBC Error: ODBC RC=-1, ODBC SQLState=HY001, DBMS RC=4, DBMS Msg=Out ofmemory while reading tuples.
The Use Declare/Fetch option is disabled by default, so that the driver buffers the entire result set.For large tables this could use all the Windows memory resources. To correct this issue, enable UseDeclare/Fetch option, so that the driver automatically uses declare cursor/fetch to handle SELECTstatements and keeps 100 rows in a cache.
To enable the Use Declare/Fetch option:
1. Launch the ODBC Administrator.
The ODBC Administrator is a utility freely distributed by Microsoft for managing your ODBCdrivers and data sources. You can run this utility from your Windows windows\system32directory ODBCADM32.EXE or from Administrator Tools on the Windows Control Panel.
2. Select the datasource and click Configure to open the PostresSQL ODBC Driver (psqlODBC)Setup dialog.
3. Click Datasource to open the Advanced Options dialog.4. Select the Use Declare/Fetch check box and click Apply.5. Click Save and then close the ODBC Administrator window.
75MapInfo Pro 2021 Install Guide
Troubleshooting Your Installation

If you require additional setup for your data source and driver, contact your Database Administrator(DBA) for assistance. They will understand the setup requirements for the data source you wish toaccess.
For details about the Use Declare/Fetch option, go to the PostgreSQL website and read about theUse Declare/Fetch under psqlODBC Configuration Options.
76MapInfo Pro 2021 Install Guide
Troubleshooting Your Installation

Notices

Information in this document is subject to change without notice and does not represent a commitmenton the part of the vendor or its representatives. No part of this document may be reproduced ortransmitted in any form or by any means, electronic or mechanical, including photocopying, withoutthe written permission of Precisely, 2 Blue Hill Plaza, #1563, Pearl River, NY 10965.© 1985, 2021 Precisely. All rights reserved.
Contact and support information is located at: http://support.precisely.com.© 2021OpenStreetMap contributors, CC-BY-SA; seeOpenStreetMaphttp://www.openstreetmap.org(license available at http://www.opendatacommons.org/licenses/odbl/index.html) and CC-BY-SAhttp://creativecommons.org/licenses/by-sa/2.0
libtiff © 1988-2021 Sam Leffler, © 2021 Silicon Graphics International, formerly Silicon Graphics Inc.All Rights Reserved.
libgeotiff © 2021 Niles D. Ritter.
Amigo, Portions © 2021 Three D Graphics, Inc. All Rights Reserved.
Halo Image Library © 2021 Media Cybernetics Inc. All Rights Reserved.
Portions thereof LEAD Technologies, Inc. © 1991-2021. All Rights Reserved.
Portions © 1993-2021 Ken Martin, Will Schroeder, Bill Lorensen. All Rights Reserved.
ECW by ERDAS © 1993-2021 Intergraph Corporation, part of Hexagon Geospatial AB and/or itssuppliers. All rights reserved.
Portions © 2021 Intergraph Corporation, part of Hexagon Geospatial AB. All Rights Reserved.
MrSID, MrSID Decompressor and theMrSID logo are trademarks of LizardTech, a Celartem company,used under license. Portions of this computer program are copyright © 1995-2021 LizardTech, ACelartem Company, and/or the University of California or are protected by US patent no. 5,710,835and are used under license. All rights reserved. MrSID is protected under US and international patentand copyright treaties and foreign patent applications are pending. Unauthorized use or duplicationprohibited.
Contains FME® Objects © 2005-2021 Safe Software Inc. All Rights Reserved.
Amyuni PDF Converter © 2000-2021, AMYUNI Consultants – AMYUNI Technologies Inc. All rightsreserved.
Civic England - Public Sector Symbols Copyright © 2021 West London Alliance. The symbols maybe used free of charge. For more information on these symbols, including how to obtain them foruse in other applications, please visit the West London Alliance Web site at http://www.wla.london/© 2006-2021 TomTom International BV. All Rights Reserved. This material is proprietary and thesubject of copyright protection and other intellectual property rights owned or licensed to TomTom.The use of this material is subject to the terms of a license agreement. You will be held liable for anyunauthorized copying or disclosure of this material.
Microsoft Bing: All contents of the Bing service are Copyright © 2021 Microsoft Corporation and/orits suppliers, One Microsoft Way, Redmond, WA 98052, USA. All rights reserved. Microsoft or its
78MapInfo Pro 2021 Install Guide
Copyright

suppliers own the title, copyright, and other intellectual property rights in the Bing service and content.Microsoft, Windows, Windows Live, Windows logo, MSN, MSN logo (butterfly), Bing, and otherMicrosoft products and services may also be either trademarks or registered trademarks of Microsoftin the United States and/or other countries.
This product contains 7-Zip, which is licensed under GNU Lesser General Public License, Version3, 29 June 2007 with the unRAR restriction. The license can be downloaded fromhttp://www.7-zip.org/license.txt. The GNU License may be downloaded fromhttp://www.gnu.org/licenses/lgpl.html. The source code is available from http://www.7-zip.org.
Products named herein may be trademarks of their respective manufacturers and are herebyrecognized. Trademarked names are used editorially, to the benefit of the trademark owner, with nointent to infringe on the trademark.
79MapInfo Pro 2021 Install Guide
Copyright

2 Blue Hill Plaza, #1563Pearl River, NY 10965USA
www.precisely.com
© 1985, 2021 Precisely. All rights reserved.