MEGA4: Molecular Evolutionary Genetics Analysis (MEGA) Software Version 4.0
Upload
khangminh22Category
view
3download
0
© 2012 Halliburton. All Rights Reserved.
DecisionSpace® WITSML Software
Version 5000.9.2
Install Guide
Confidential
DecisionSpace® WITSML 5000.9.2 Install Guide
i Release 5000.9.2
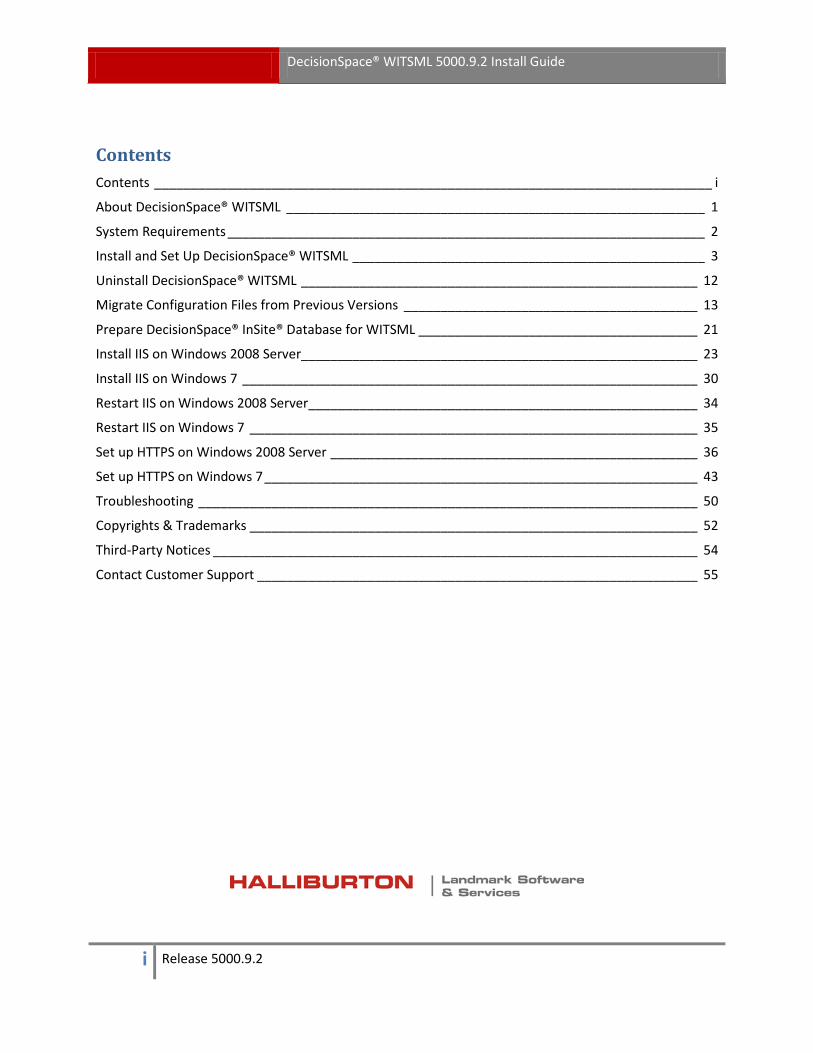
Contents Contents ____________________________________________________________________________ i
About DecisionSpace® WITSML _________________________________________________________ 1
System Requirements _________________________________________________________________ 2
Install and Set Up DecisionSpace® WITSML ________________________________________________ 3
Uninstall DecisionSpace® WITSML ______________________________________________________ 12
Migrate Configuration Files from Previous Versions ________________________________________ 13
Prepare DecisionSpace® InSite® Database for WITSML ______________________________________ 21
Install IIS on Windows 2008 Server______________________________________________________ 23
Install IIS on Windows 7 ______________________________________________________________ 30
Restart IIS on Windows 2008 Server _____________________________________________________ 34
Restart IIS on Windows 7 _____________________________________________________________ 35
Set up HTTPS on Windows 2008 Server __________________________________________________ 36
Set up HTTPS on Windows 7 ___________________________________________________________ 43
Troubleshooting ____________________________________________________________________ 50
Copyrights & Trademarks _____________________________________________________________ 52
Third-Party Notices __________________________________________________________________ 54
Contact Customer Support ____________________________________________________________ 55
DecisionSpace® WITSML 5000.9.2 Install Guide
1 5000.9.2 Install Guide
About DecisionSpace® WITSML DecisionSpace® WITSML software is a Web-based application that supports both WITSML standard versions 1.3.1 and 1.2.0. The user interface for DecisionSpace® WITSML is accessed through a Web browser.
DecisionSpace® WITSML software provides the following capabilities:
• Receive data streams from one or more WITSML sources.
• Produce one or more WITSML data streams.
• Store received data in an InSite® database.
• Import from a WITSML data file.
• Export to a WITSML data file.
Users can view WITSML objects organized according to the WITSML standard. Object data values are shown as formatted text or raw XML.
Users can create and save data maps that map selected variables in WITSML data format to the corresponding InSite ADI database format. A WITSML Administrator can set up and manage user access.
WITSML Objects Supported DecisionSpace® WITSML 5000.9.2 supports the following objects in the specified WITSML version:
WITSML 1.2.0 WITSML 1.3.1 1. log 2. mudLog
3. realtime
4. trajectory
5. trajectoryStation
6. well
7. wellbore
1. bhaRun
2. fluidsReport
3. formationMarker
4. log
5. mudLog
6. realtime
7. trajectory
8. trajectoryStation
9. tubular
10. wbGeometry
11. well
12. wellbore
13. welllog
WITSML Standard The WITSML standard is maintained by Energistics and defined by the WITSML Special Interest Group. WITSML documentation is available from the Energistics website at http://energistics.org/drilling-completions-interventions/witsml-standards.
DecisionSpace® WITSML 5000.9.2 Install Guide
2 5000.9.2 Install Guide
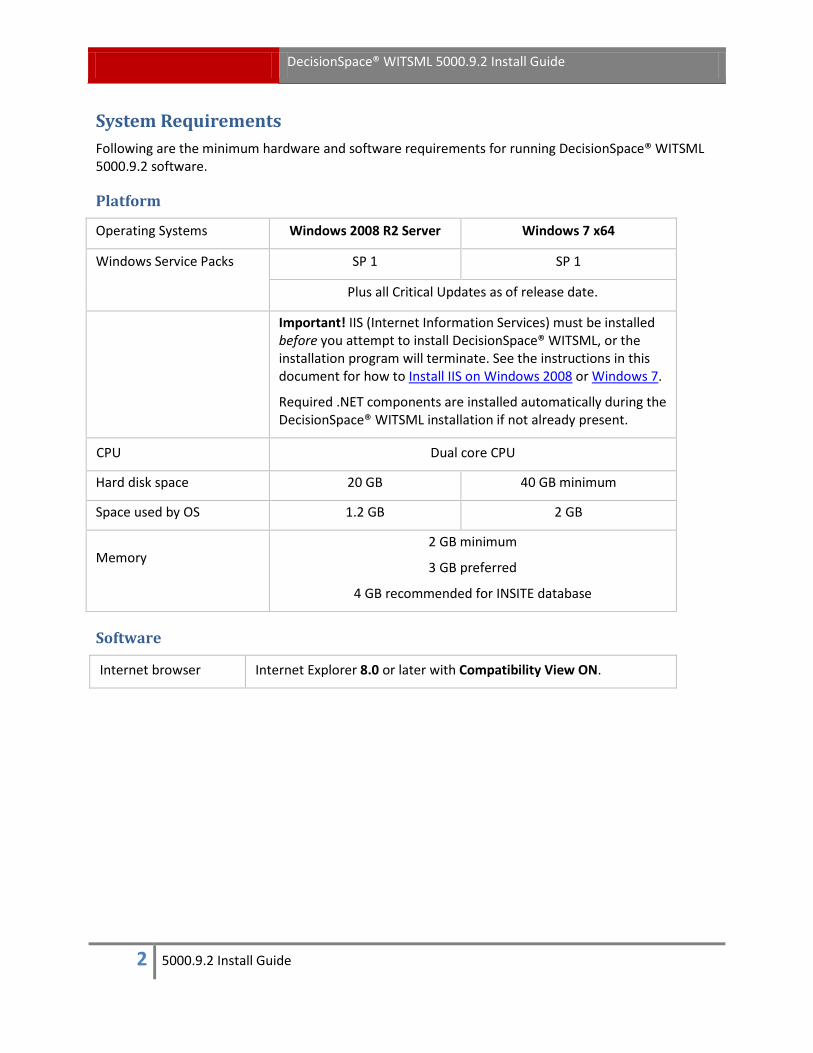
System Requirements Following are the minimum hardware and software requirements for running DecisionSpace® WITSML 5000.9.2 software.
Platform
Operating Systems Windows 2008 R2 Server Windows 7 x64
Windows Service Packs SP 1 SP 1
Plus all Critical Updates as of release date.
Important! IIS (Internet Information Services) must be installed before you attempt to install DecisionSpace® WITSML, or the installation program will terminate. See the instructions in this document for how to Install IIS on Windows 2008 or Windows 7.
Required .NET components are installed automatically during the DecisionSpace® WITSML installation if not already present.
CPU Dual core CPU
Hard disk space 20 GB 40 GB minimum
Space used by OS 1.2 GB 2 GB
Memory 2 GB minimum
3 GB preferred
4 GB recommended for INSITE database
Software
Internet browser Internet Explorer 8.0 or later with Compatibility View ON.
DecisionSpace® WITSML 5000.9.2 Install Guide
3 5000.9.2 Install Guide
Install and Set Up DecisionSpace® WITSML
Install DecisionSpace® WITSML These instructions describe how to install DecisionSpace® WITSML software on the server.
Before you start • Install IIS if not already present on your computer. The install program will terminate if IIS is not
detected. • Important! If you are upgrading from one of the these versions, InSite® WITSML v3.1.3,
DecisionSpace® WITSML 5000.9.1.2 or 5000.9.1.3, see the section Migrate Configuration Files from Previous Versions for important information before you uninstall a previous version.
• Uninstall any previous version of DecisionSpace® WITSML before installing a new version.
Download the software Start the install Select drive and location Complete the install
Download the software 1. Download the DecisionSpace® WITSML 5000.9.2 software using Landmark Software Manager
(LSM). The software is downloaded in a self-extracting zip file (*.zip). For information about LSM, access the Landmark Support Portal and click the LSM Information link on the top menu bar. In the Support Services pane on the left, click Landmark Software Manager to access the web application.
2. Extract the files to the local drive in the location of your choice.
Start the install 3. Open the folder in which you extracted the files. Locate setup.exe and double-click it.
The InstallShield Wizard opens and displays the message “Preparing to Install.”
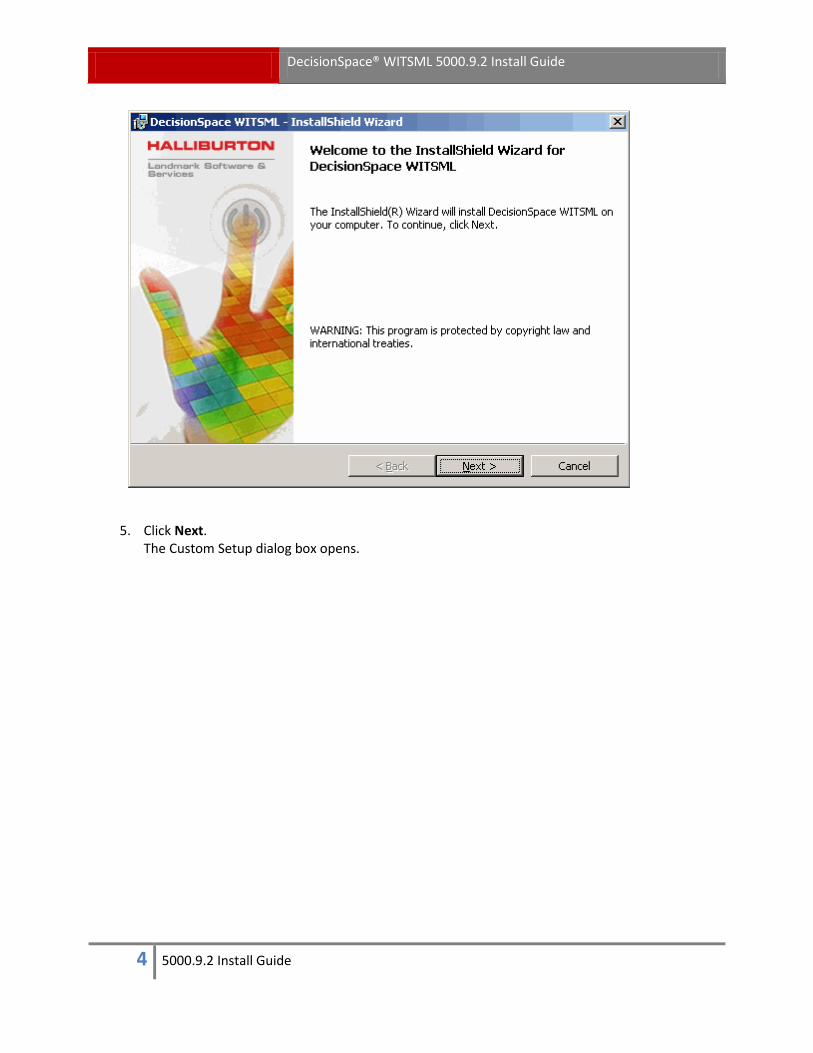
4. Wait a few moments for the Windows Installer to prepare. The Welcome to the InstallShield Wizard for DecisionSpace WITSML dialog box opens.
DecisionSpace® WITSML 5000.9.2 Install Guide
4 5000.9.2 Install Guide
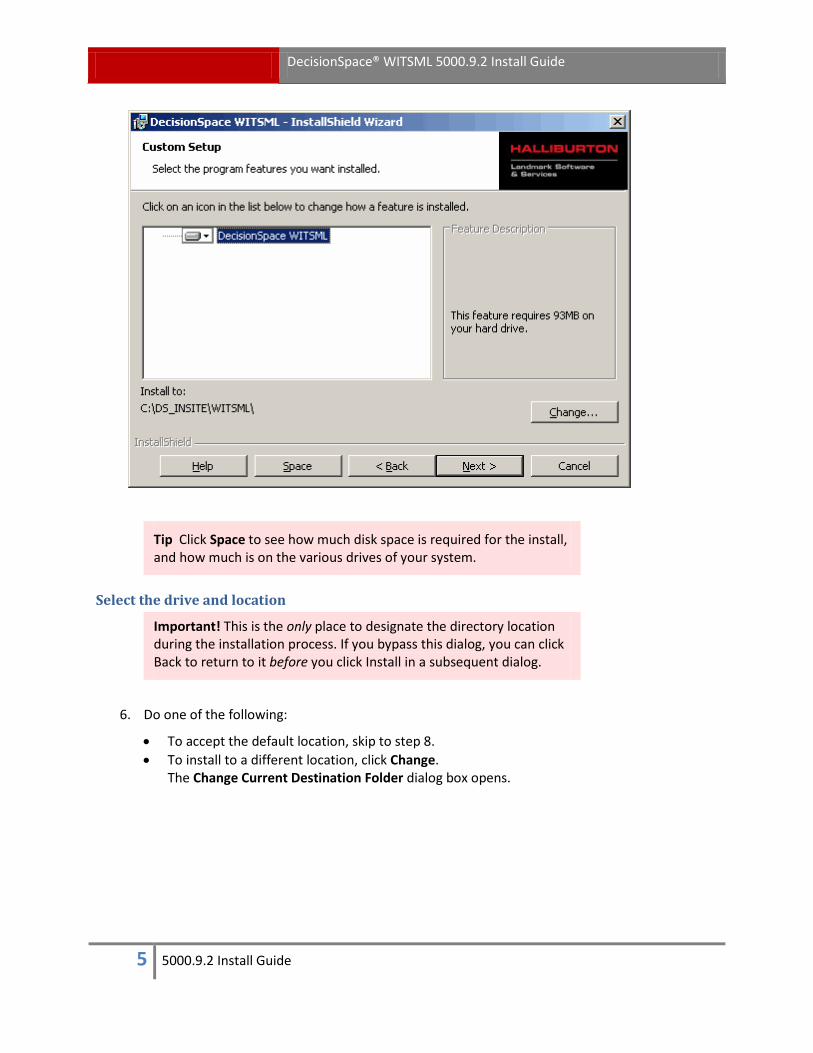
5. Click Next. The Custom Setup dialog box opens.
DecisionSpace® WITSML 5000.9.2 Install Guide
5 5000.9.2 Install Guide
Tip Click Space to see how much disk space is required for the install, and how much is on the various drives of your system.
Select the drive and location
Important! This is the only place to designate the directory location during the installation process. If you bypass this dialog, you can click Back to return to it before you click Install in a subsequent dialog.
6. Do one of the following:
• To accept the default location, skip to step 8. • To install to a different location, click Change.
The Change Current Destination Folder dialog box opens.
DecisionSpace® WITSML 5000.9.2 Install Guide
6 5000.9.2 Install Guide
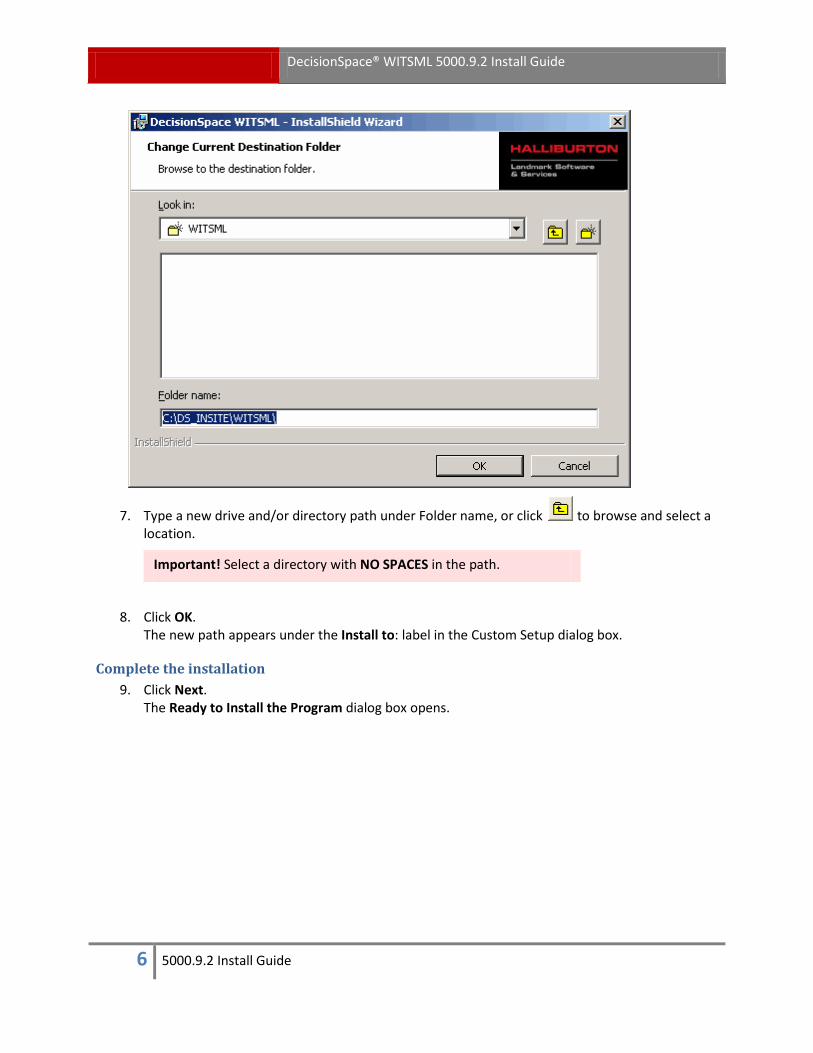
7. Type a new drive and/or directory path under Folder name, or click to browse and select a location.
Important! Select a directory with NO SPACES in the path.
8. Click OK. The new path appears under the Install to: label in the Custom Setup dialog box.
Complete the installation 9. Click Next.
The Ready to Install the Program dialog box opens.
DecisionSpace® WITSML 5000.9.2 Install Guide
7 5000.9.2 Install Guide
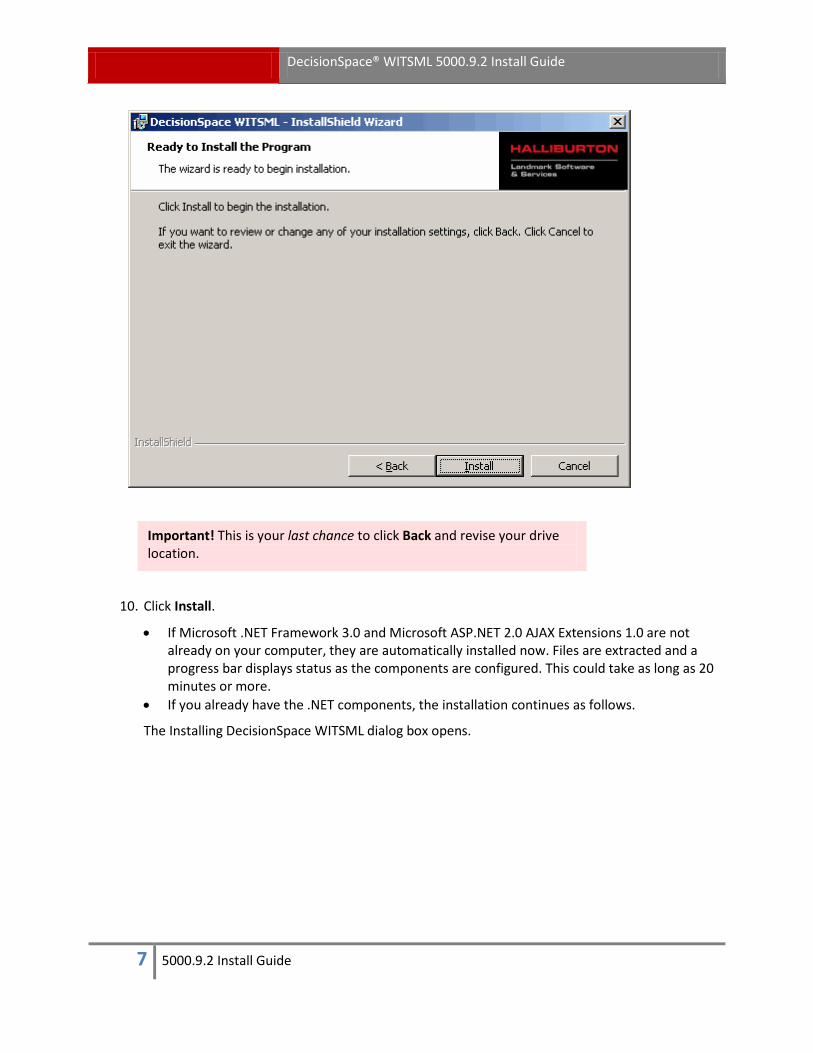
Important! This is your last chance to click Back and revise your drive location.
10. Click Install.
• If Microsoft .NET Framework 3.0 and Microsoft ASP.NET 2.0 AJAX Extensions 1.0 are not already on your computer, they are automatically installed now. Files are extracted and a progress bar displays status as the components are configured. This could take as long as 20 minutes or more.
• If you already have the .NET components, the installation continues as follows.
The Installing DecisionSpace WITSML dialog box opens.

DecisionSpace® WITSML 5000.9.2 Install Guide
8 5000.9.2 Install Guide
After all files have been installed, the InstallShield Wizard Completed dialog box opens.

DecisionSpace® WITSML 5000.9.2 Install Guide
9 5000.9.2 Install Guide
11. Click Finish.
A popup dialog states "You must restart your system...."
12. Do one of the following:
• Click Yes to restart now. • Click No to restart later.
13. Obtain a software license.
14. (highly recommended) Set up HTTPS for the WITSML server.
Important! If you plan to connect to DecisionSpace® InSite® version 5000.9.1 or later, you must add WITSML record definitions to the InSite® database.
DecisionSpace® WITSML 5000.9.2 Install Guide
10 5000.9.2 Install Guide
Obtain a license Before running DecisionSpace® WITSML software, you must obtain a license file. The license file enables you to access the applications and features you are authorized to use.
You can request a license from the Landmark Software Manager when you download the software, or from the Halliburton website Customer Support Portal. The License Application Manager (LAM) 5000.0.3.0 program is required for verifying product licenses. It can be downloaded from the Landmark Software Manager (LSM) > Technical Business Line > Tools > LAM.
Landmark Graphics Corporation derives the greatest portion of its revenues from the sale and/or maintenance of software licenses. We license our clients to use our software, but we retain ownership of the software and most, if not all, of its underlying technologies. A license is both a business agreement and an electronic method for enforcing that agreement.
Each DecisionSpace® Desktop software requires that one or more product-specific license keys be listed in the Landmark license file. If you do not have this information, please contact your client representative.
DecisionSpace® WITSML 5000.9.2 Install Guide
11 5000.9.2 Install Guide
Launch DecisionSpace® WITSML The DecisionSpace® WITSML interfaces for both the Administrator/Client and the Server are accessed using a Web browser.
The URL address for each is listed below, where "<server>" represents the location where DecisionSpace® WITSML software is installed.
WITSML Administrator/ Client Website
http://<server>/WitsmlAdmin/default.aspx
A desktop shortcut to the DecisionSpace® WITSML Login page is installed on the local machine.
WITSML Server Website http://<server>/wmls/wmls.asmx
Default Admin user
DecisionSpace® WITSML software is installed with the following default Administrator user name and password. The password is case sensitive.
Administrator User Name Admin
Initial Password Witsml1
All users in the system should have their own unique user name and password. The password should follow the Halliburton password standard.
Important! We recommend that you delete the default Admin user from the system as soon as Administrators have created their own user names and passwords. Not deleting the default user leaves the system open to abuse. It is the Server Administrator's responsibility to ensure the default user is deleted and reasonable security practices are followed.
Follow this link if you have trouble accessing the webpage or logging in.

DecisionSpace® WITSML 5000.9.2 Install Guide
12 5000.9.2 Install Guide
Uninstall DecisionSpace® WITSML Remove the DecisionSpace® WITSML software from your computer.
Important! You must uninstall any previous version of DecisionSpace® WITSML before installing a new version. The users and mappings are retained (in most cases), but WITSML Server Configurations must be redone.
If you are upgrading from one of the these versions, InSite® WITSML v3.1.3, DecisionSpace® WITSML 5000.9.1.2 or 5000.9.1.3, see the section Migrate Configuration Files from Previous Versions for important information before you uninstall a previous version.
1. Open the Windows Control Panel > Programs and Features. The Uninstall or change a program window opens.
2. Locate and select DecisionSpace WITSML.
3. Right-click and select Uninstall. A message prompts you to confirm the action.
4. Click Yes. A dialog box displays progress while removing the software. At various points in the process, a DOS command window opens and displays progress. The entire uninstall process takes several minutes. When finished, a popup dialog states "You must restart your system...."
5. Do one of the following:
• Click Yes to restart now. • Click No to restart later.

DecisionSpace® WITSML 5000.9.2 Install Guide
13 5000.9.2 Install Guide
Migrate Configuration Files from Previous Versions DecisionSpace® WITSML 5000.9.2 is a major release with changes to the application structure. Unlike with other releases, the users and mappings are NOT retained when you uninstall a previous release and install 5000.9.2. However, using this procedure you can migrate the configuration files from certain previous versions to DecisionSpace® WITSML 5000.9.2.
What versions can be migrated? The following table lists the only previous versions of DecisionSpace® WITSML for which the configuration files can be migrated to DecisionSpace® WITSML 5000.9.2. It also indicates whether you can install version 5000.9.2 on the same server as the previous version.
Previous Version Can you use the same server for 5000.9.2?
v3.1.3 b119 (build 119 only!)
No! Install on a NEW server. Version v3.1.3 leaves incompatible registry settings behind.
5000.9.1.2 Yes
5000.9.1.3 Yes
Copy (back up) configuration files from previous version 1. Locate the configuration files/folders on the WITSML server.
The default installation path for previous versions is shown in the table below. If your installation uses a custom path, replace “C:\” with your custom path.
Previous Version Path v3.1.3 b119 C:\WITSML\data 5000.9.1.2 C:\DS_INSITE\WITSML 5000.9.1.3 C:\DS_INSITE\WITSML
2. Copy the following files and folder (with all contents) to an external storage device, such as a USB pen drive.
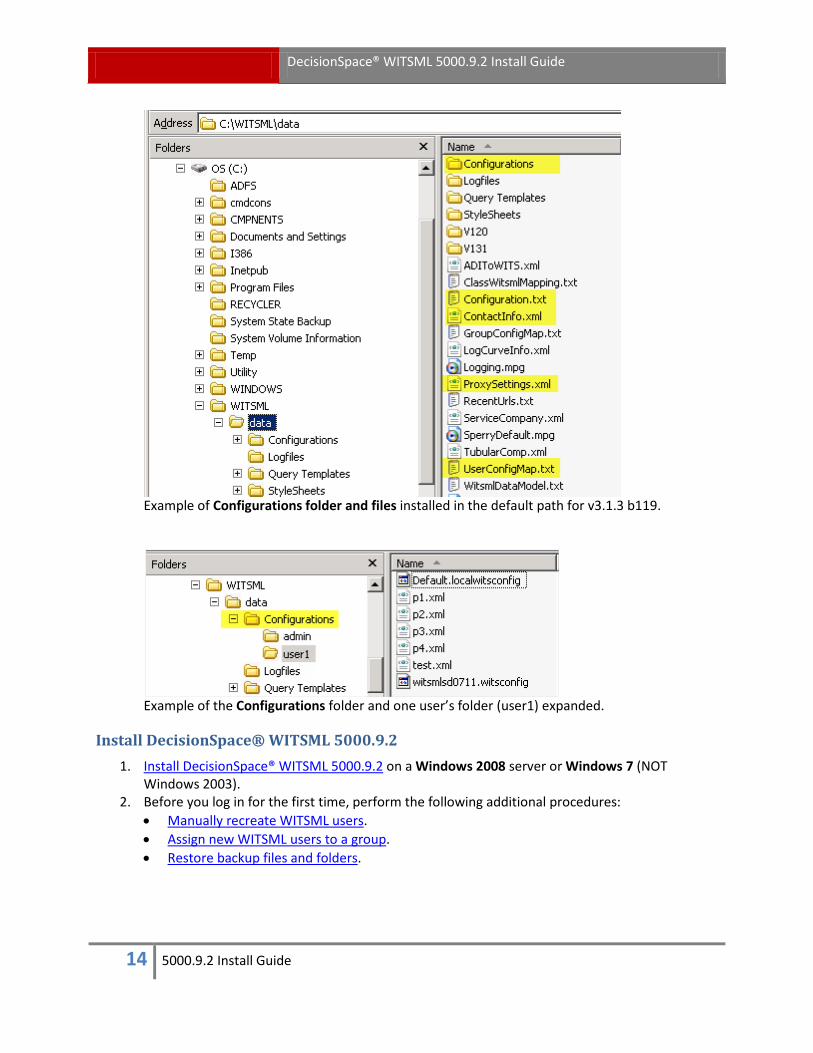
File or Folder Name Contents of file/folder Configurations (entire folder)
Folder with WITSML users and their pipeline configurations – each user has a separate folder
Configuration.txt Current list of WITSML Configurations ContactInfo.xml Localized support information ProxySettings.xml Proxy settings for the current server UserConfigMap.txt List of User IDs and their WITSML configuration associations
DecisionSpace® WITSML 5000.9.2 Install Guide
14 5000.9.2 Install Guide
Example of Configurations folder and files installed in the default path for v3.1.3 b119.
Example of the Configurations folder and one user’s folder (user1) expanded.
Install DecisionSpace® WITSML 5000.9.2 1. Install DecisionSpace® WITSML 5000.9.2 on a Windows 2008 server or Windows 7 (NOT
Windows 2003). 2. Before you log in for the first time, perform the following additional procedures:
• Manually recreate WITSML users. • Assign new WITSML users to a group. • Restore backup files and folders.
DecisionSpace® WITSML 5000.9.2 Install Guide
15 5000.9.2 Install Guide
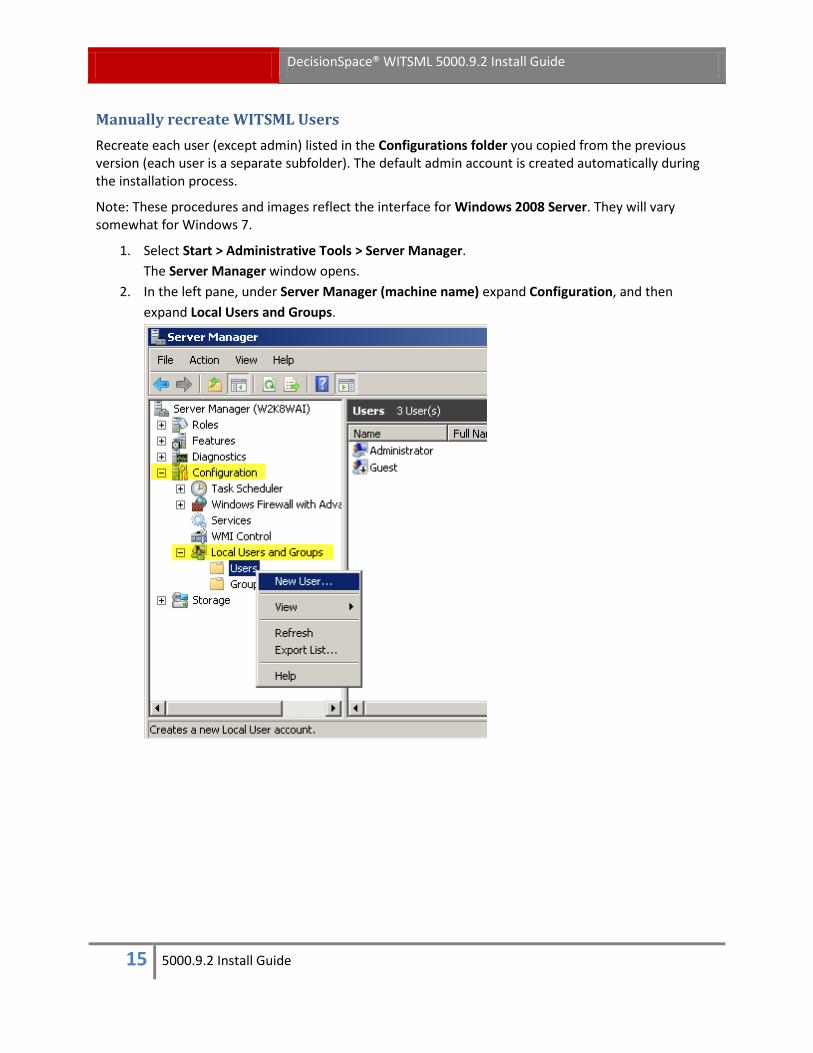
Manually recreate WITSML Users Recreate each user (except admin) listed in the Configurations folder you copied from the previous version (each user is a separate subfolder). The default admin account is created automatically during the installation process.
Note: These procedures and images reflect the interface for Windows 2008 Server. They will vary somewhat for Windows 7.
1. Select Start > Administrative Tools > Server Manager. The Server Manager window opens.
2. In the left pane, under Server Manager (machine name) expand Configuration, and then expand Local Users and Groups.
DecisionSpace® WITSML 5000.9.2 Install Guide
16 5000.9.2 Install Guide
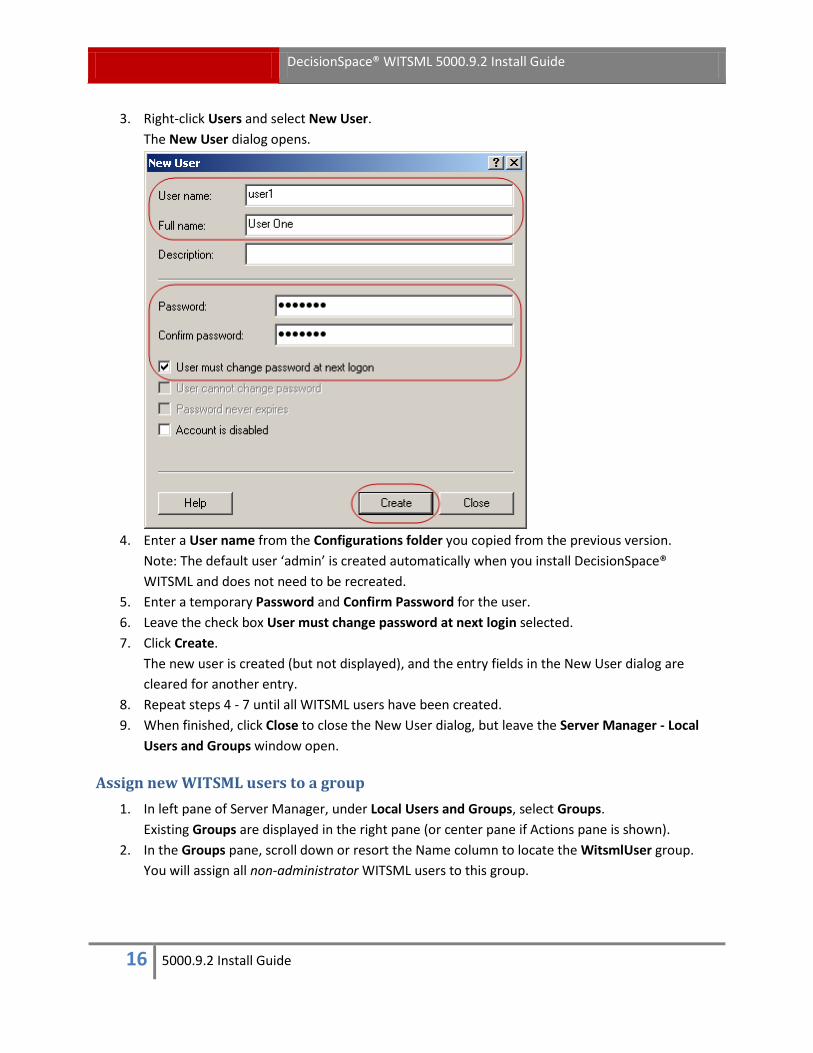
3. Right-click Users and select New User. The New User dialog opens.
4. Enter a User name from the Configurations folder you copied from the previous version.
Note: The default user ‘admin’ is created automatically when you install DecisionSpace® WITSML and does not need to be recreated.
5. Enter a temporary Password and Confirm Password for the user. 6. Leave the check box User must change password at next login selected. 7. Click Create.
The new user is created (but not displayed), and the entry fields in the New User dialog are cleared for another entry.
8. Repeat steps 4 - 7 until all WITSML users have been created. 9. When finished, click Close to close the New User dialog, but leave the Server Manager - Local
Users and Groups window open.
Assign new WITSML users to a group 1. In left pane of Server Manager, under Local Users and Groups, select Groups.
Existing Groups are displayed in the right pane (or center pane if Actions pane is shown). 2. In the Groups pane, scroll down or resort the Name column to locate the WitsmlUser group.
You will assign all non-administrator WITSML users to this group.
DecisionSpace® WITSML 5000.9.2 Install Guide
17 5000.9.2 Install Guide
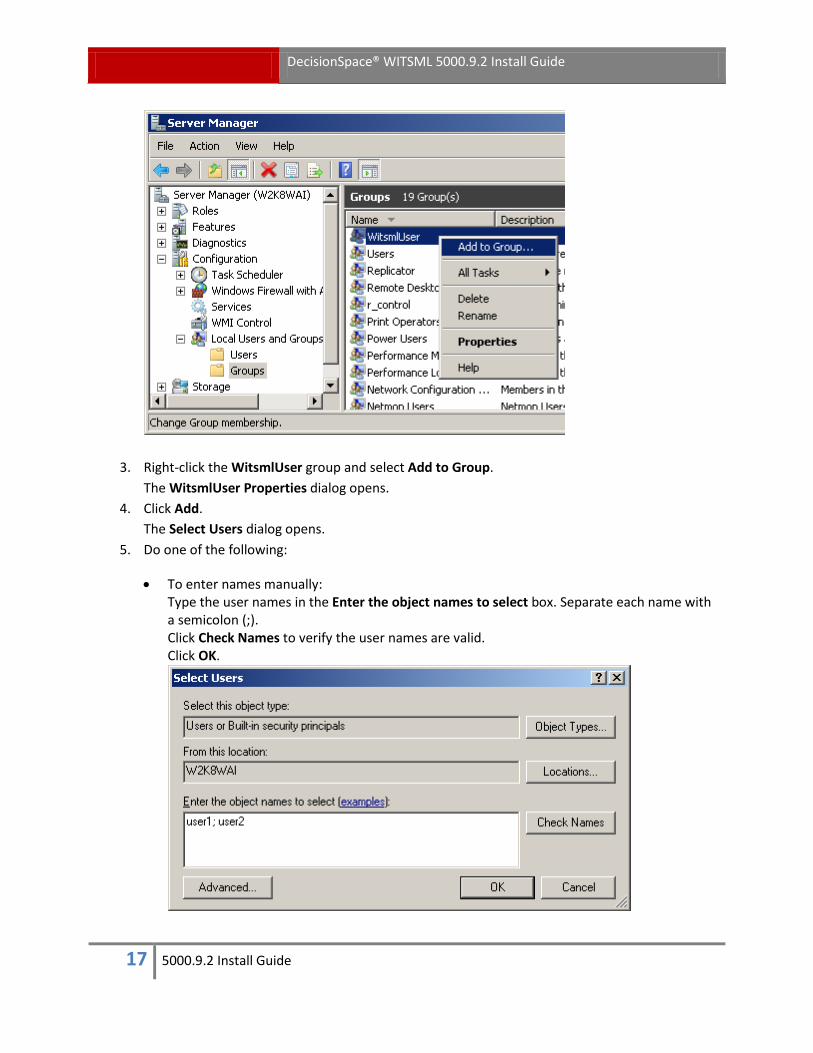
3. Right-click the WitsmlUser group and select Add to Group. The WitsmlUser Properties dialog opens.
4. Click Add. The Select Users dialog opens.
5. Do one of the following:
• To enter names manually: Type the user names in the Enter the object names to select box. Separate each name with a semicolon (;). Click Check Names to verify the user names are valid. Click OK.
DecisionSpace® WITSML 5000.9.2 Install Guide
18 5000.9.2 Install Guide
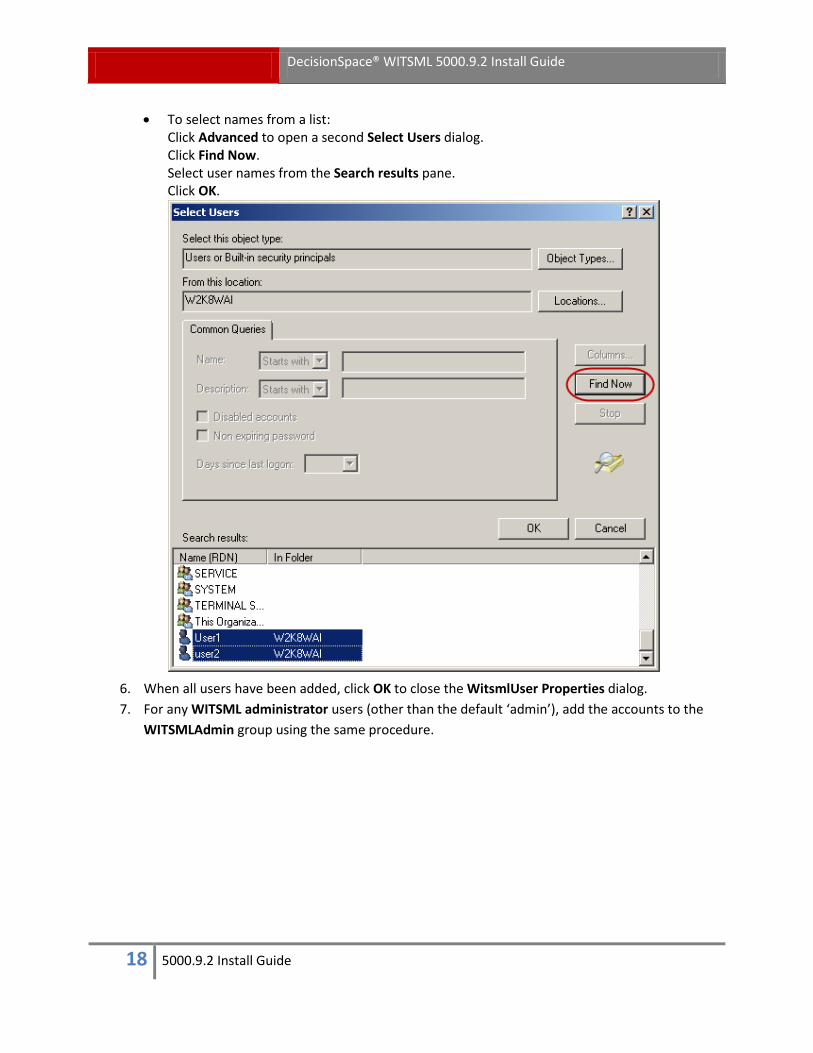
• To select names from a list: Click Advanced to open a second Select Users dialog. Click Find Now. Select user names from the Search results pane. Click OK.
6. When all users have been added, click OK to close the WitsmlUser Properties dialog. 7. For any WITSML administrator users (other than the default ‘admin’), add the accounts to the
WITSMLAdmin group using the same procedure.

DecisionSpace® WITSML 5000.9.2 Install Guide
19 5000.9.2 Install Guide
Restore backup files and folders Recommended: Before you restore the backed up files and folders, we recommend you save a copy in case you want to revert to a previous installation.
1. Restore the files and folders you copied from the old version to the new installation path. The default installation path for version 5000.9.2 is shown below. If your installation uses a custom path, replace “C:\” with your custom path.
New Default Path File or Folder Name C:\DS_INSITE\WITSML Configurations (entire folder) Configuration.txt ContactInfo.xml ProxySettings.xml UserConfigMap.txt
2. After successfully copying all back-up files, close all applications and windows. 3. Restart IIS. 4. Log in to the server as the default admin user to verify the server functionality. 5. If upgrading from version 5000.9.1.2, manually select the well access list for each configuration.
For 5000.9.1.2, select well access list for each configuration When upgrading from DecisionSpace® WITSML 5000.9.1.2 only, the Well Access List in the Configurations page of the interface does not get populated from the Configuration.txt file you copy and restore to 5000.9.2. Therefore, you must manually select the wells for each configuration.
1. Login to the WITSML server as an Administrator. 2. Select WITSML Server > Configurations. The Configurations page opens. 3. Do the following for each configuration:
a. Click Edit beside the configuration Name. The row expands for editing.
DecisionSpace® WITSML 5000.9.2 Install Guide
20 5000.9.2 Install Guide
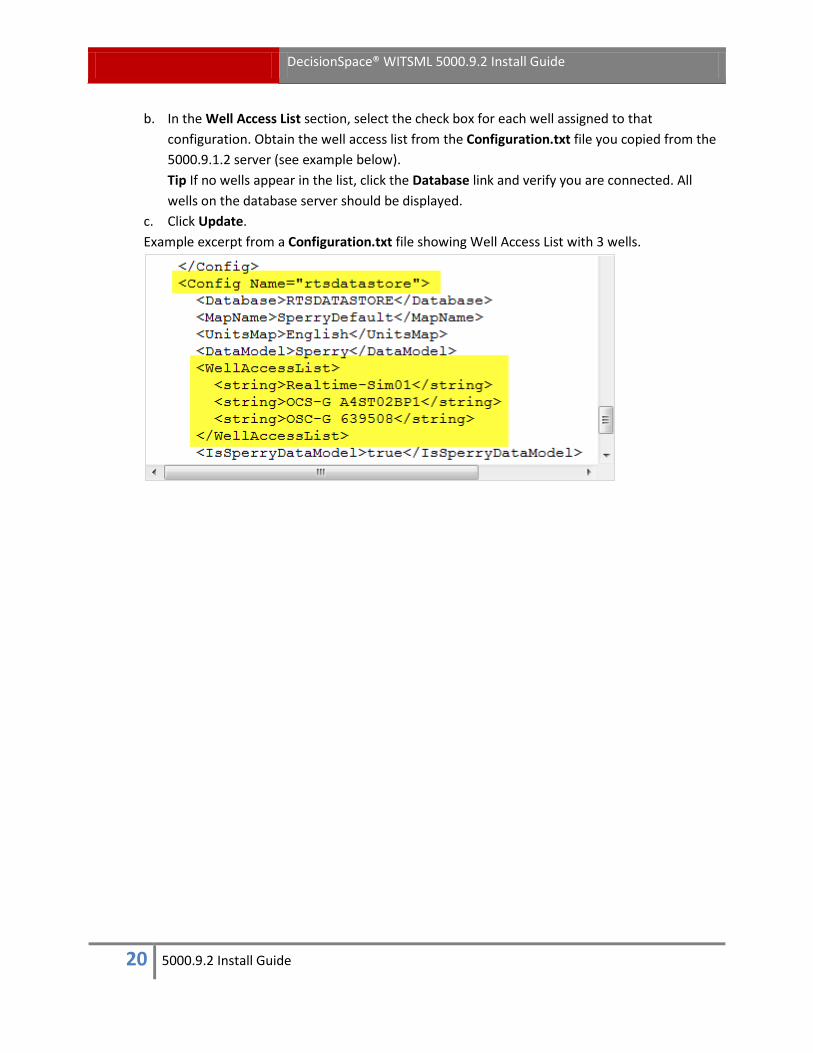
b. In the Well Access List section, select the check box for each well assigned to that configuration. Obtain the well access list from the Configuration.txt file you copied from the 5000.9.1.2 server (see example below). Tip If no wells appear in the list, click the Database link and verify you are connected. All wells on the database server should be displayed.
c. Click Update. Example excerpt from a Configuration.txt file showing Well Access List with 3 wells.
DecisionSpace® WITSML 5000.9.2 Install Guide
21 5000.9.2 Install Guide
Prepare DecisionSpace® InSite® Database for WITSML If you plan to connect to DecisionSpace® InSite® versions 5000.9.1 and later, you must manually add WITSML record definitions to the InSite® database. DecisionSpace® InSite® versions 5000.9.1 and later do not contain WITSML record definitions. Without these definitions, certain types of data will not be written to the database.
Add WITSML record definitions to InSite 1. On the WITSML server, navigate to the location, C:\DS_INSITE\WITSML\Data. 2. Copy the file WitsmlDataModel.txt to a portable drive, such as a USB flash drive. 3. On the DecisionSpace® InSite® server, shut down (close) System Manager. 4. If DecisionSpace® InSite® was installed with the option, Run InSite as background services, do
the following: a. Open system Services:
Windows 7 – right-click My Computer >Manage >Services and Applications > Services. Windows 2008 – right-click My Computer > Manage > Configuration > Services.
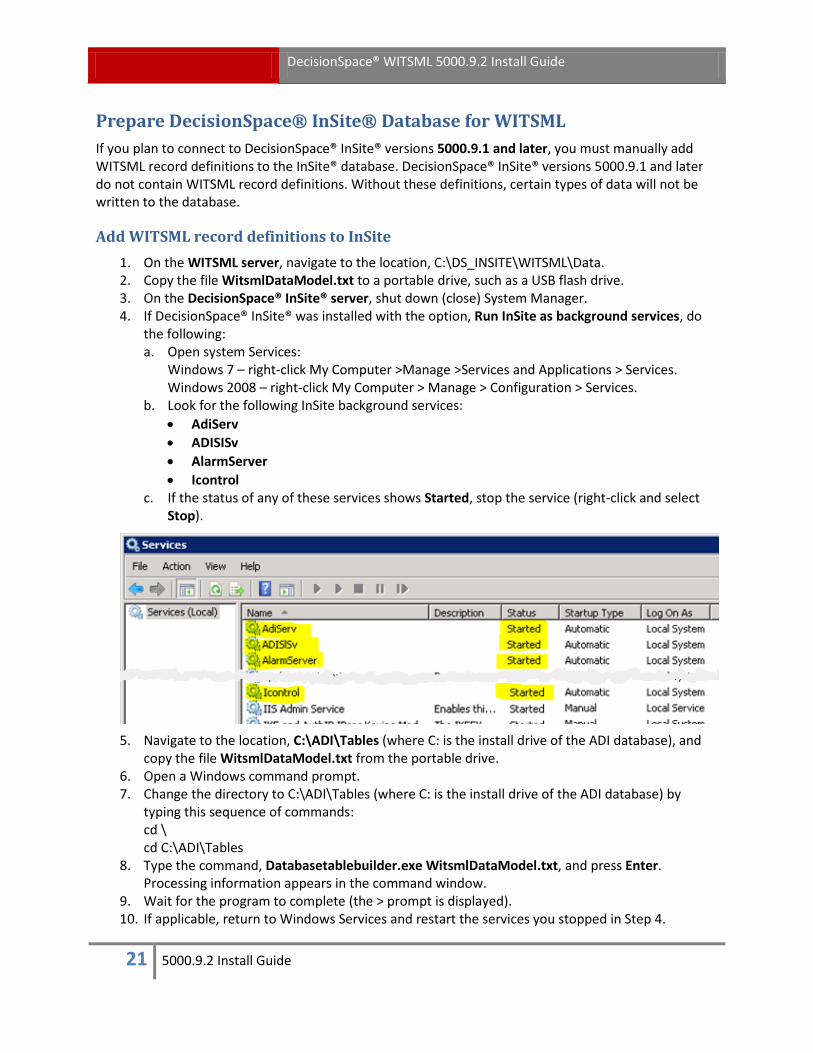
b. Look for the following InSite background services: • AdiServ • ADISISv • AlarmServer • Icontrol
c. If the status of any of these services shows Started, stop the service (right-click and select Stop).
5. Navigate to the location, C:\ADI\Tables (where C: is the install drive of the ADI database), and
copy the file WitsmlDataModel.txt from the portable drive. 6. Open a Windows command prompt. 7. Change the directory to C:\ADI\Tables (where C: is the install drive of the ADI database) by
typing this sequence of commands: cd \ cd C:\ADI\Tables
8. Type the command, Databasetablebuilder.exe WitsmlDataModel.txt, and press Enter. Processing information appears in the command window.
9. Wait for the program to complete (the > prompt is displayed). 10. If applicable, return to Windows Services and restart the services you stopped in Step 4.
DecisionSpace® WITSML 5000.9.2 Install Guide
22 5000.9.2 Install Guide
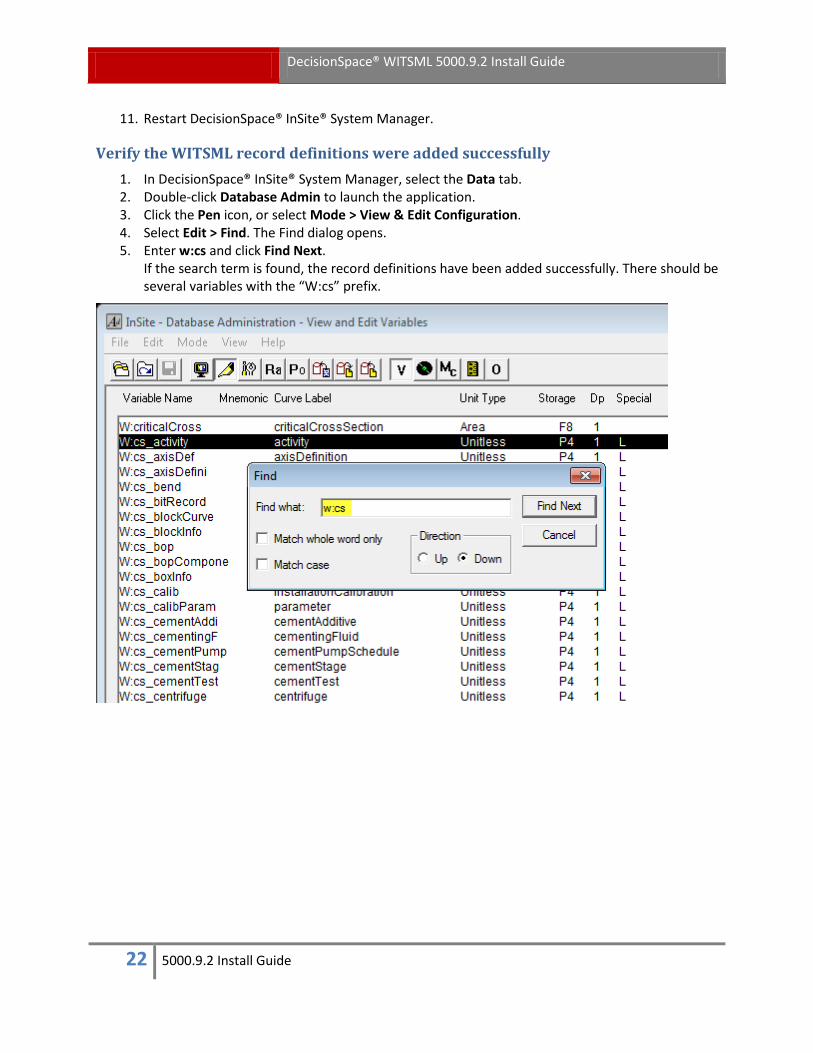
11. Restart DecisionSpace® InSite® System Manager.
Verify the WITSML record definitions were added successfully 1. In DecisionSpace® InSite® System Manager, select the Data tab. 2. Double-click Database Admin to launch the application. 3. Click the Pen icon, or select Mode > View & Edit Configuration. 4. Select Edit > Find. The Find dialog opens. 5. Enter w:cs and click Find Next.
If the search term is found, the record definitions have been added successfully. There should be several variables with the “W:cs” prefix.
DecisionSpace® WITSML 5000.9.2 Install Guide
23 5000.9.2 Install Guide
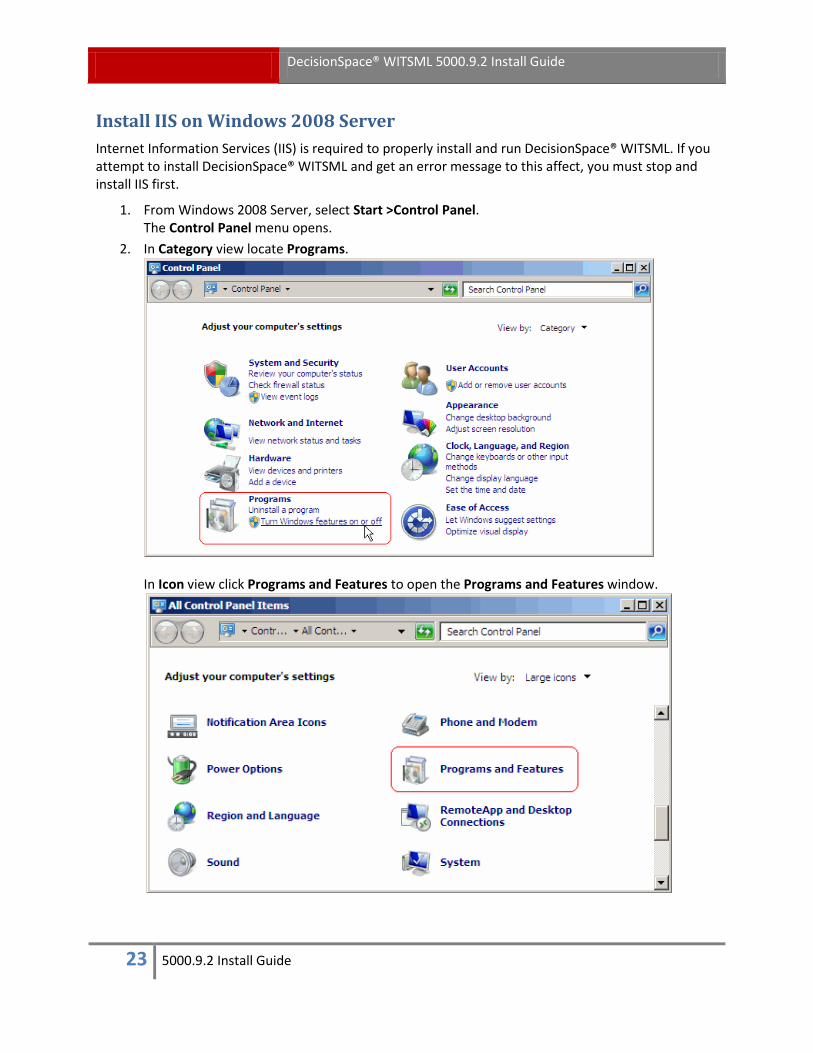
Install IIS on Windows 2008 Server Internet Information Services (IIS) is required to properly install and run DecisionSpace® WITSML. If you attempt to install DecisionSpace® WITSML and get an error message to this affect, you must stop and install IIS first.
1. From Windows 2008 Server, select Start >Control Panel. The Control Panel menu opens.
2. In Category view locate Programs.
In Icon view click Programs and Features to open the Programs and Features window.
DecisionSpace® WITSML 5000.9.2 Install Guide
24 5000.9.2 Install Guide
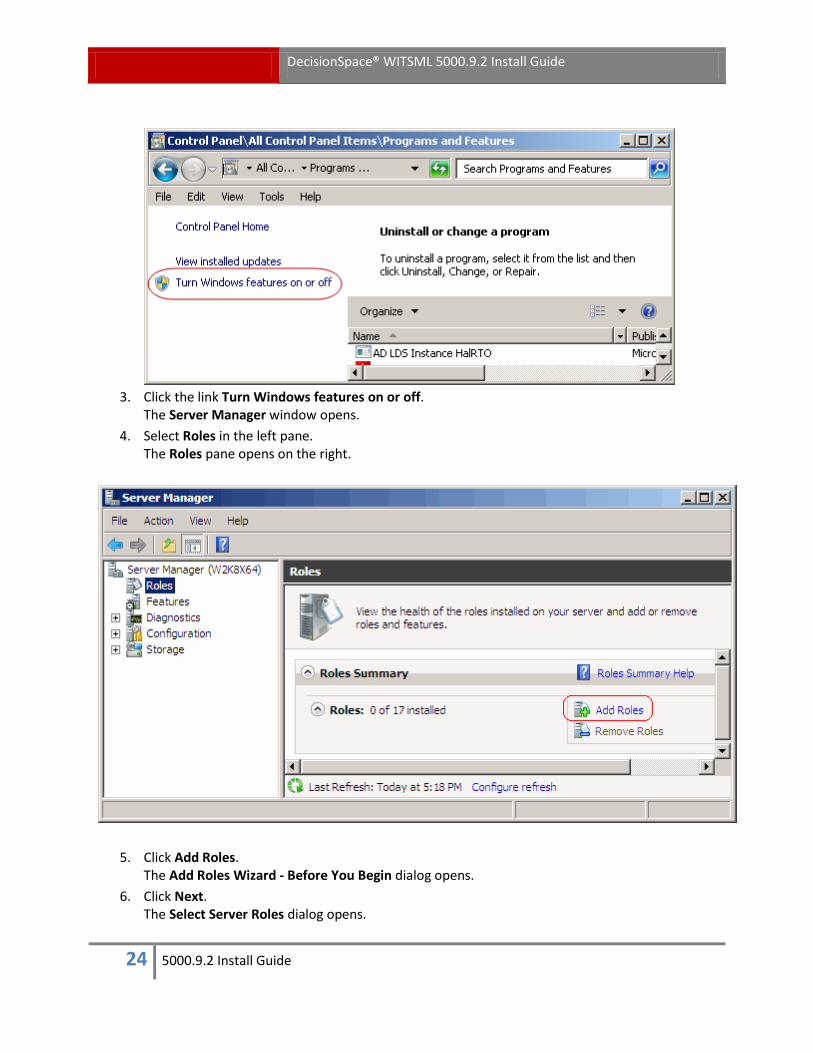
3. Click the link Turn Windows features on or off.
The Server Manager window opens. 4. Select Roles in the left pane.
The Roles pane opens on the right.
5. Click Add Roles. The Add Roles Wizard - Before You Begin dialog opens.
6. Click Next. The Select Server Roles dialog opens.
DecisionSpace® WITSML 5000.9.2 Install Guide
25 5000.9.2 Install Guide
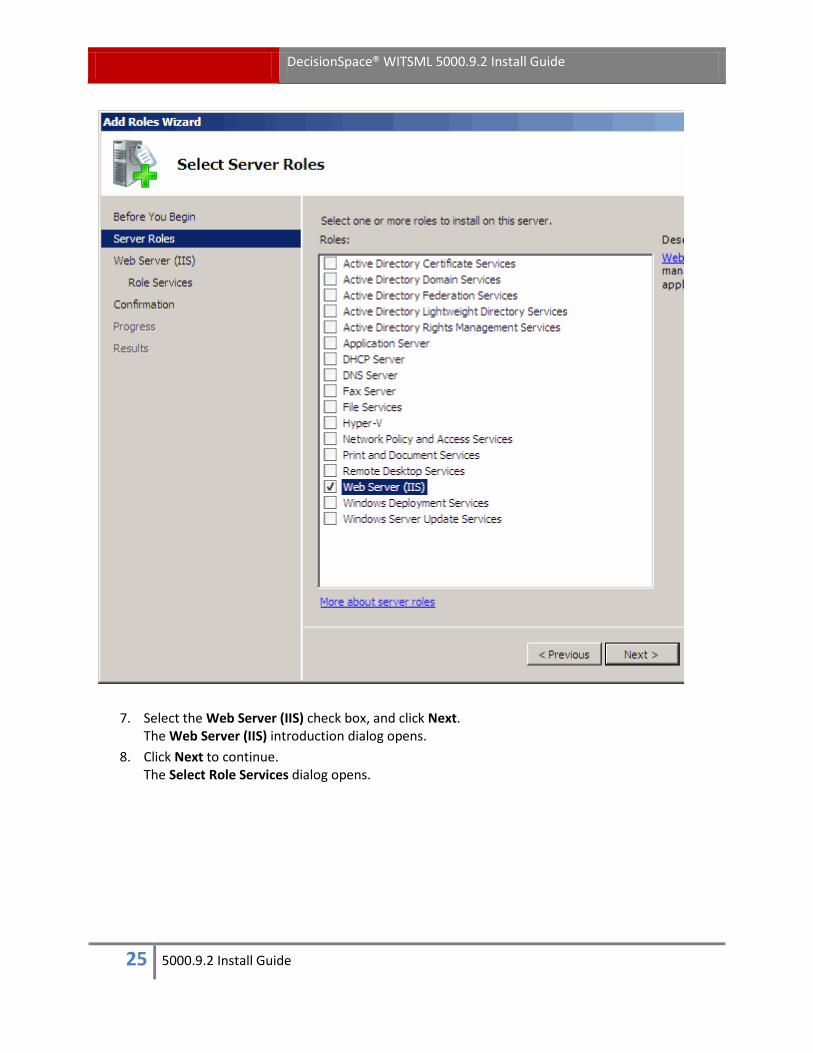
7. Select the Web Server (IIS) check box, and click Next. The Web Server (IIS) introduction dialog opens.
8. Click Next to continue. The Select Role Services dialog opens.

DecisionSpace® WITSML 5000.9.2 Install Guide
26 5000.9.2 Install Guide
It is OK if other features are selected in addition to those indicated in these instructions.
9. Under Web Server > Common HTTP Features, select the following check boxes. • Static Content • Default Document • HTTP Redirection
10. Under Web Server > Application Development, select the ASP.NET check box. A popup message asks, "Add role services required for ASP.NET?
DecisionSpace® WITSML 5000.9.2 Install Guide
27 5000.9.2 Install Guide
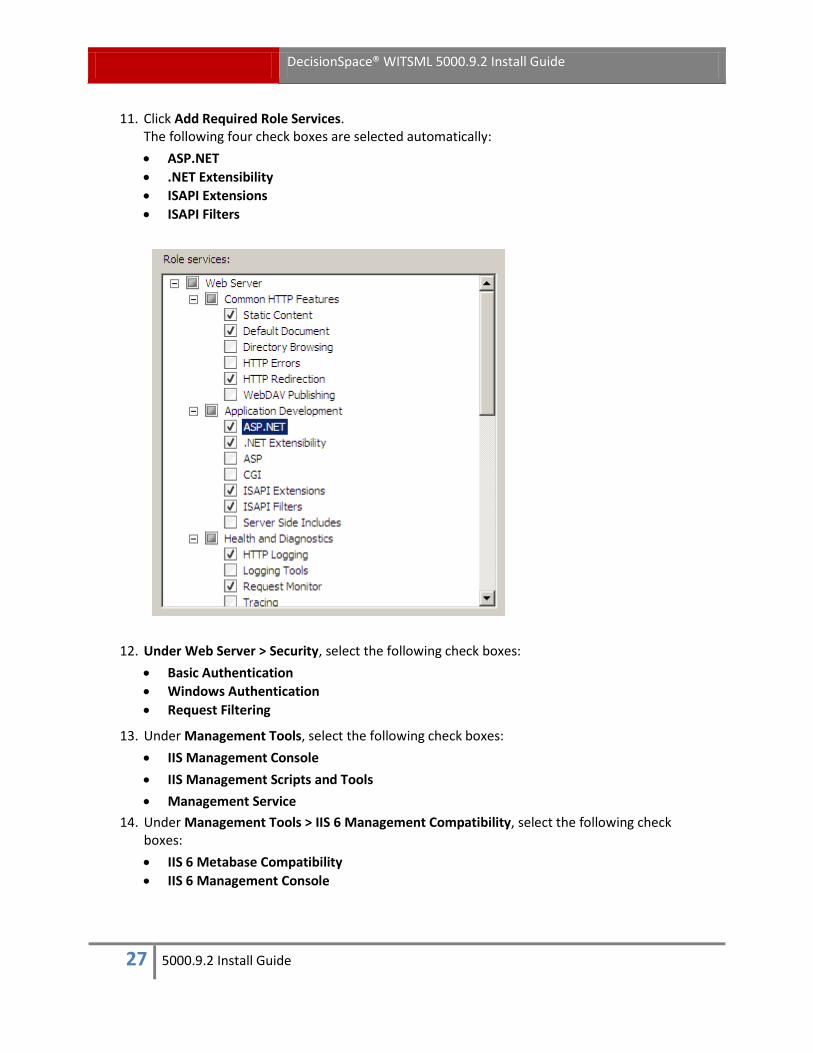
11. Click Add Required Role Services. The following four check boxes are selected automatically: • ASP.NET • .NET Extensibility • ISAPI Extensions • ISAPI Filters
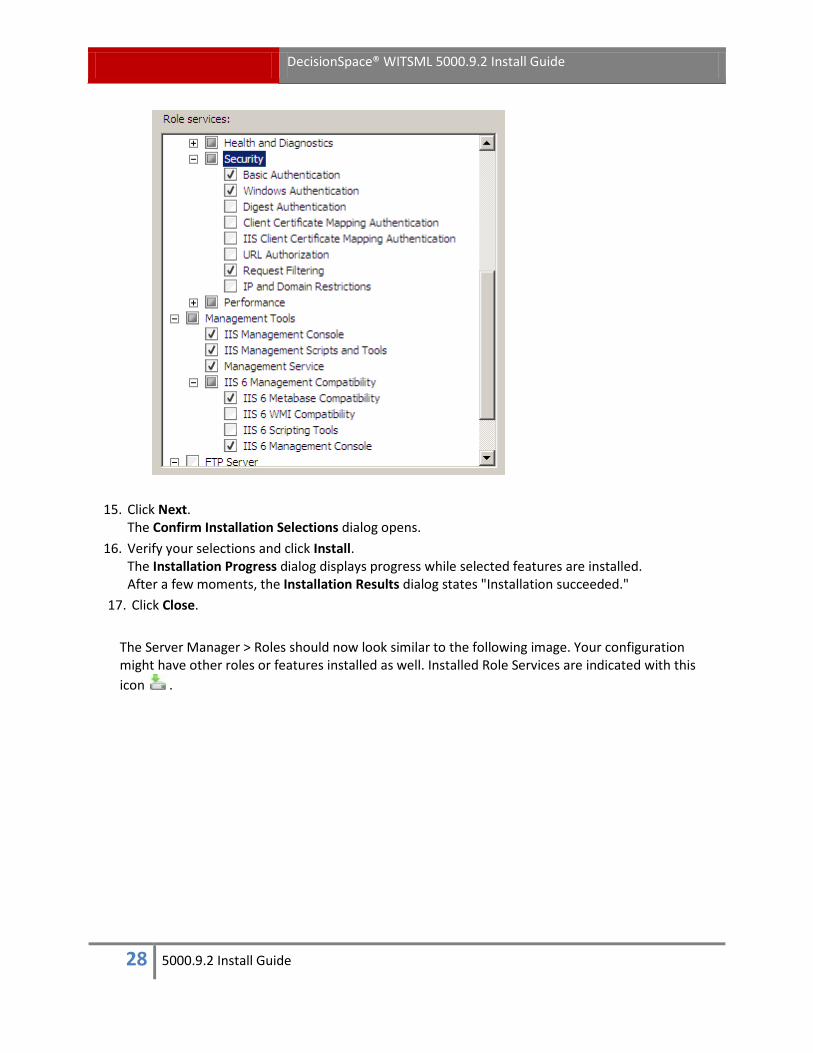
12. Under Web Server > Security, select the following check boxes: • Basic Authentication • Windows Authentication • Request Filtering
13. Under Management Tools, select the following check boxes: • IIS Management Console • IIS Management Scripts and Tools • Management Service
14. Under Management Tools > IIS 6 Management Compatibility, select the following check boxes: • IIS 6 Metabase Compatibility • IIS 6 Management Console
DecisionSpace® WITSML 5000.9.2 Install Guide
28 5000.9.2 Install Guide
15. Click Next. The Confirm Installation Selections dialog opens.
16. Verify your selections and click Install. The Installation Progress dialog displays progress while selected features are installed. After a few moments, the Installation Results dialog states "Installation succeeded."
17. Click Close. The Server Manager > Roles should now look similar to the following image. Your configuration might have other roles or features installed as well. Installed Role Services are indicated with this icon .

DecisionSpace® WITSML 5000.9.2 Install Guide
29 5000.9.2 Install Guide
DecisionSpace® WITSML 5000.9.2 Install Guide
30 5000.9.2 Install Guide
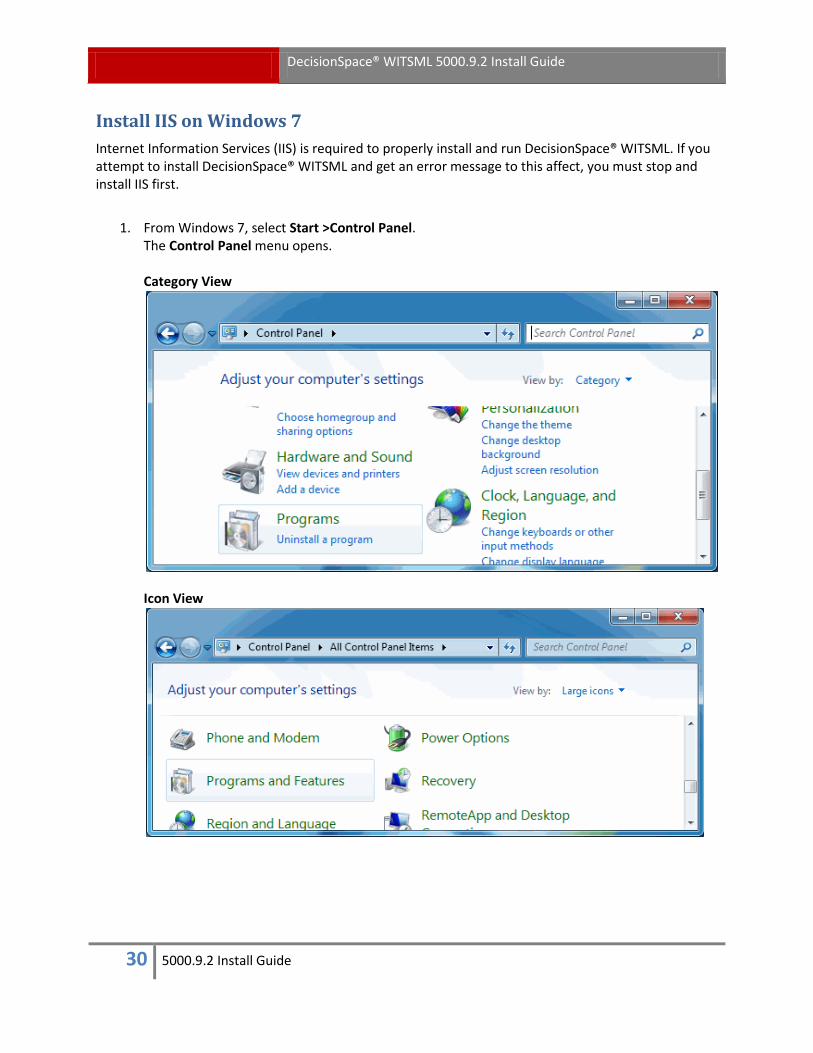
Install IIS on Windows 7 Internet Information Services (IIS) is required to properly install and run DecisionSpace® WITSML. If you attempt to install DecisionSpace® WITSML and get an error message to this affect, you must stop and install IIS first.
1. From Windows 7, select Start >Control Panel. The Control Panel menu opens. Category View
Icon View

DecisionSpace® WITSML 5000.9.2 Install Guide
31 5000.9.2 Install Guide
2. Select Programs (in Category view) or Programs and Features (in Icon view). The Programs and Features window opens.
3. In the left pane, click the link Turn Windows features on or off. The Windows Features dialog opens.
4. Expand the Internet Information Services feature. Select the check boxes as indicated in the image below and the next few steps. Some check boxes are automatically selected when related features are selected. Note: It is OK if other features are selected in addition to those indicated in these instructions.

DecisionSpace® WITSML 5000.9.2 Install Guide
32 5000.9.2 Install Guide
DecisionSpace® WITSML 5000.9.2 Install Guide
33 5000.9.2 Install Guide
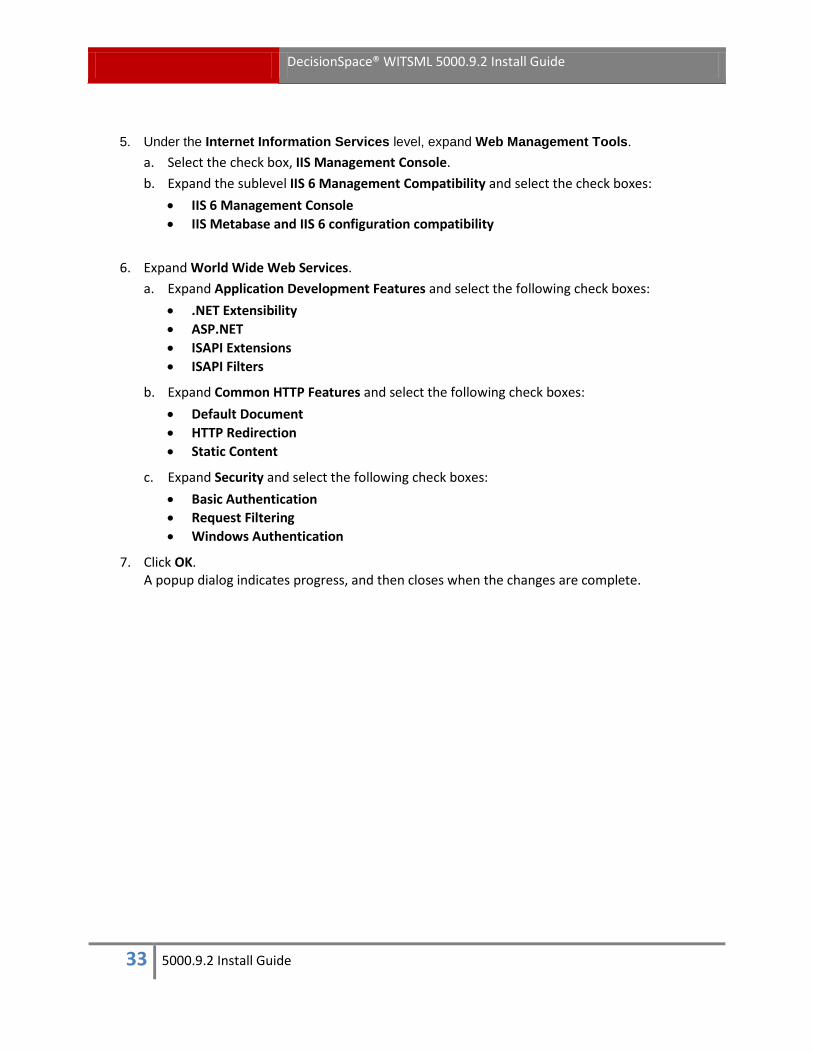
5. Under the Internet Information Services level, expand Web Management Tools.
a. Select the check box, IIS Management Console. b. Expand the sublevel IIS 6 Management Compatibility and select the check boxes:
• IIS 6 Management Console • IIS Metabase and IIS 6 configuration compatibility
6. Expand World Wide Web Services. a. Expand Application Development Features and select the following check boxes:
• .NET Extensibility • ASP.NET • ISAPI Extensions • ISAPI Filters
b. Expand Common HTTP Features and select the following check boxes: • Default Document • HTTP Redirection • Static Content
c. Expand Security and select the following check boxes: • Basic Authentication • Request Filtering • Windows Authentication
7. Click OK. A popup dialog indicates progress, and then closes when the changes are complete.
DecisionSpace® WITSML 5000.9.2 Install Guide
34 5000.9.2 Install Guide
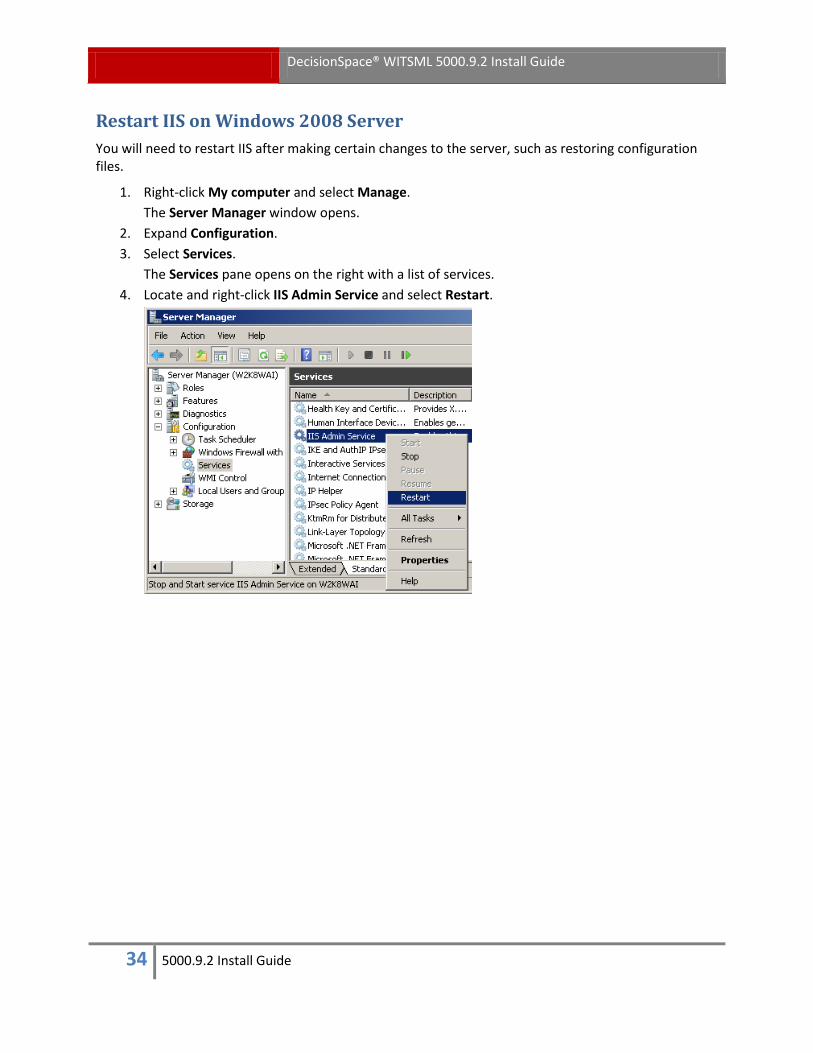
Restart IIS on Windows 2008 Server You will need to restart IIS after making certain changes to the server, such as restoring configuration files.
1. Right-click My computer and select Manage. The Server Manager window opens.
2. Expand Configuration. 3. Select Services.
The Services pane opens on the right with a list of services. 4. Locate and right-click IIS Admin Service and select Restart.

DecisionSpace® WITSML 5000.9.2 Install Guide
35 5000.9.2 Install Guide
Restart IIS on Windows 7 You will need to restart IIS after making certain changes to the server, such as restoring configuration files.
1. Right-click My computer and select Manage. The Computer Manager window opens.
2. Expand Services and Applications. 3. Select Services.
The Services pane opens on the right with a list of services. 4. Locate and select IIS Admin Service. 5. Do one of the following:
• Click the Restart link in the left pane. or
• Right-click and select Restart.
DecisionSpace® WITSML 5000.9.2 Install Guide
36 5000.9.2 Install Guide
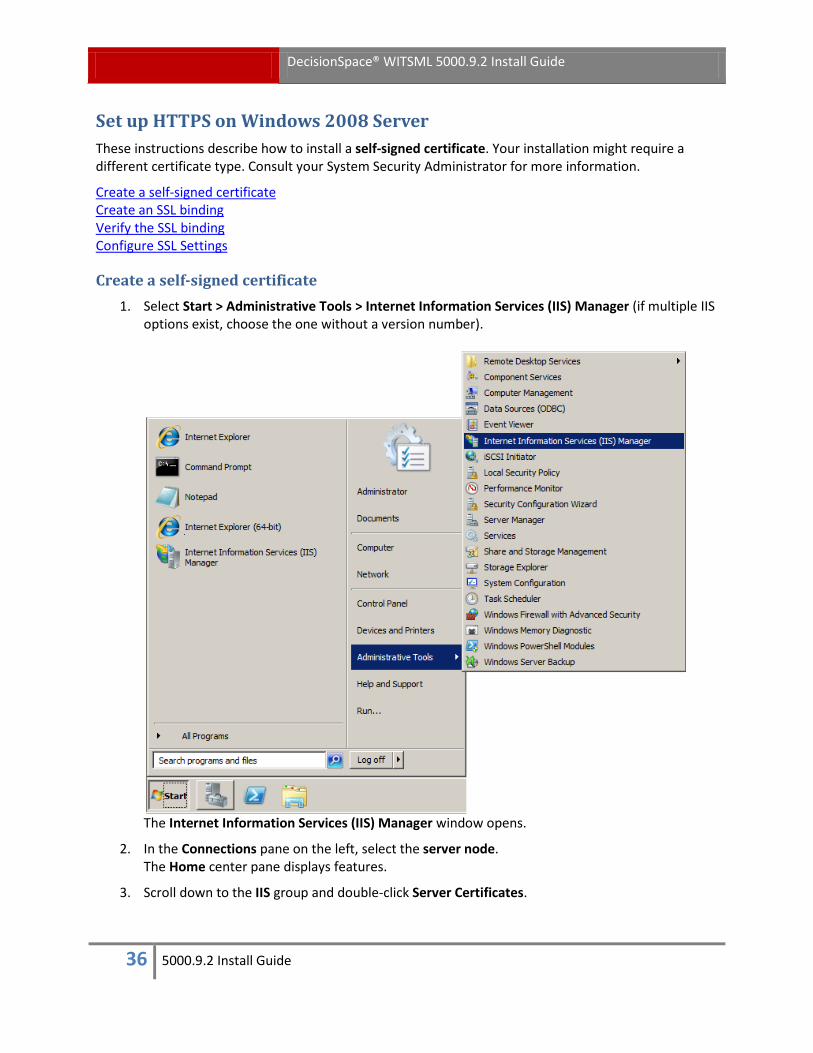
Set up HTTPS on Windows 2008 Server These instructions describe how to install a self-signed certificate. Your installation might require a different certificate type. Consult your System Security Administrator for more information.
Create a self-signed certificate Create an SSL binding Verify the SSL binding Configure SSL Settings
Create a self-signed certificate 1. Select Start > Administrative Tools > Internet Information Services (IIS) Manager (if multiple IIS
options exist, choose the one without a version number).
The Internet Information Services (IIS) Manager window opens.
2. In the Connections pane on the left, select the server node. The Home center pane displays features.
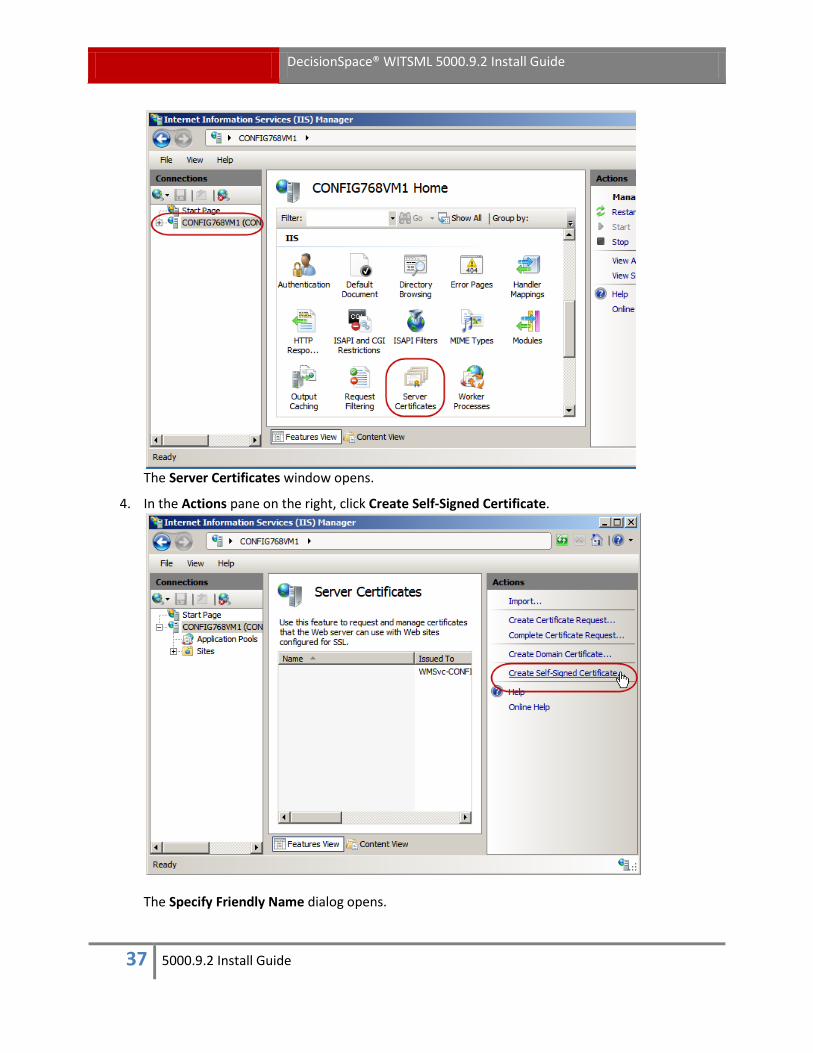
3. Scroll down to the IIS group and double-click Server Certificates.
DecisionSpace® WITSML 5000.9.2 Install Guide
37 5000.9.2 Install Guide
The Server Certificates window opens.
4. In the Actions pane on the right, click Create Self-Signed Certificate.
The Specify Friendly Name dialog opens.
DecisionSpace® WITSML 5000.9.2 Install Guide
38 5000.9.2 Install Guide
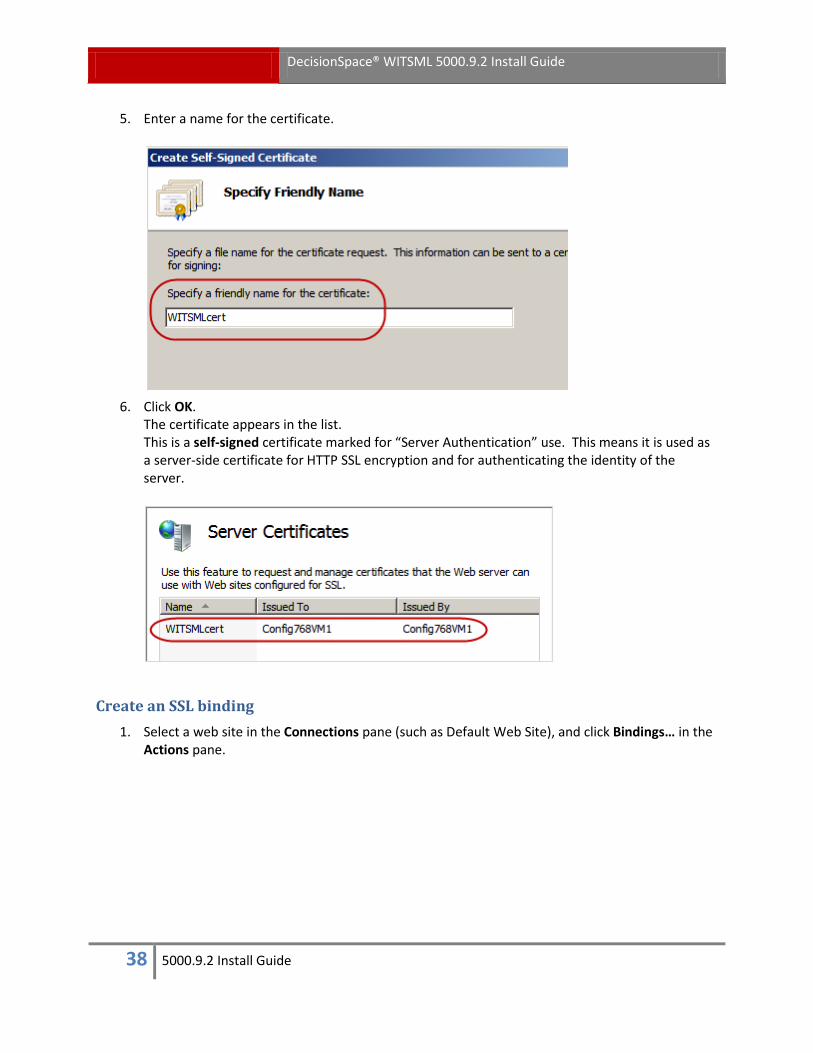
5. Enter a name for the certificate.
6. Click OK.
The certificate appears in the list. This is a self-signed certificate marked for “Server Authentication” use. This means it is used as a server-side certificate for HTTP SSL encryption and for authenticating the identity of the server.
Create an SSL binding 1. Select a web site in the Connections pane (such as Default Web Site), and click Bindings… in the
Actions pane.

DecisionSpace® WITSML 5000.9.2 Install Guide
39 5000.9.2 Install Guide
The Site Bindings dialog opens.
1. Click Add.
The Add Site Binding dialog opens.
2. Select https from the Type drop-down list. The SSL certificate field appears.
3. Enter the Port number (defaults to 443).
4. Select the SSL Certificate you created in the previous subsection.
5. Click OK. The SSL binding for https appears in the list.

DecisionSpace® WITSML 5000.9.2 Install Guide
40 5000.9.2 Install Guide
6. Click Close.
Verify the SSL binding 1. Locate the IIS Manager, Default Web Site Home window, which is still open.
1. In the Actions pane under Browse Web Site, click the link associated with the binding you just
created, such as Browse *.443 (https). Internet Explorer displays a Certificate Error page because the self-signed certificate was issued by your computer, not by a trusted Certificate Authority (CA).

DecisionSpace® WITSML 5000.9.2 Install Guide
41 5000.9.2 Install Guide
Tip Internet Explorer will trust the certificate if you add it to the list of Trusted Root Certification Authorities in the certificate store on the local computer, or in a Group Policy for the domain.
2. Click the link, Continue to this website (not recommended).
The IIS Welcome page opens.
3. Close the browser.
Configure SSL Settings 1. Back in the IIS Manager window, click the web site node in the Connections pane to go back to
the site’s Home page.

DecisionSpace® WITSML 5000.9.2 Install Guide
42 5000.9.2 Install Guide
2. In the IIS group, double-click SSL Settings in the middle pane.
The SSL Settings window opens in the middle pane.
3. Select the Require SSL check box.
4. Click Apply in the Actions pane. A message states “The changes have been successfully saved.”
DecisionSpace® WITSML 5000.9.2 Install Guide
43 5000.9.2 Install Guide
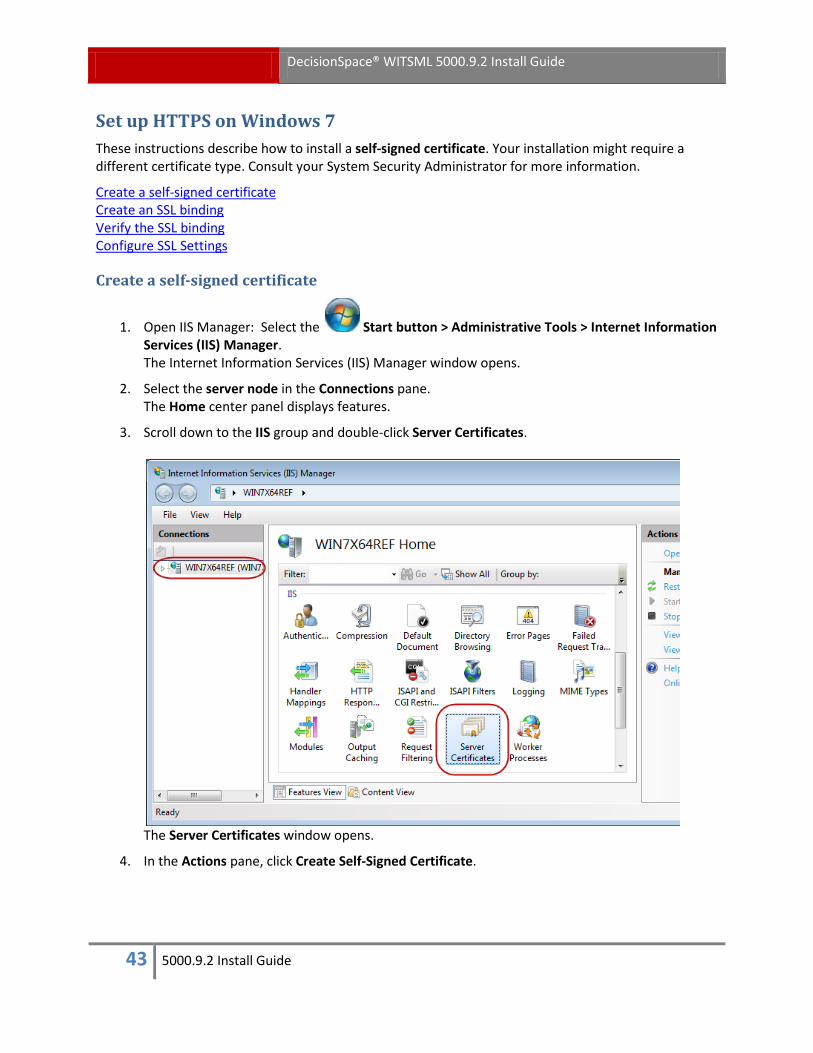
Set up HTTPS on Windows 7 These instructions describe how to install a self-signed certificate. Your installation might require a different certificate type. Consult your System Security Administrator for more information.
Create a self-signed certificate Create an SSL binding Verify the SSL binding Configure SSL Settings
Create a self-signed certificate
1. Open IIS Manager: Select the Start button > Administrative Tools > Internet Information Services (IIS) Manager. The Internet Information Services (IIS) Manager window opens.
2. Select the server node in the Connections pane. The Home center panel displays features.
3. Scroll down to the IIS group and double-click Server Certificates.
The Server Certificates window opens.
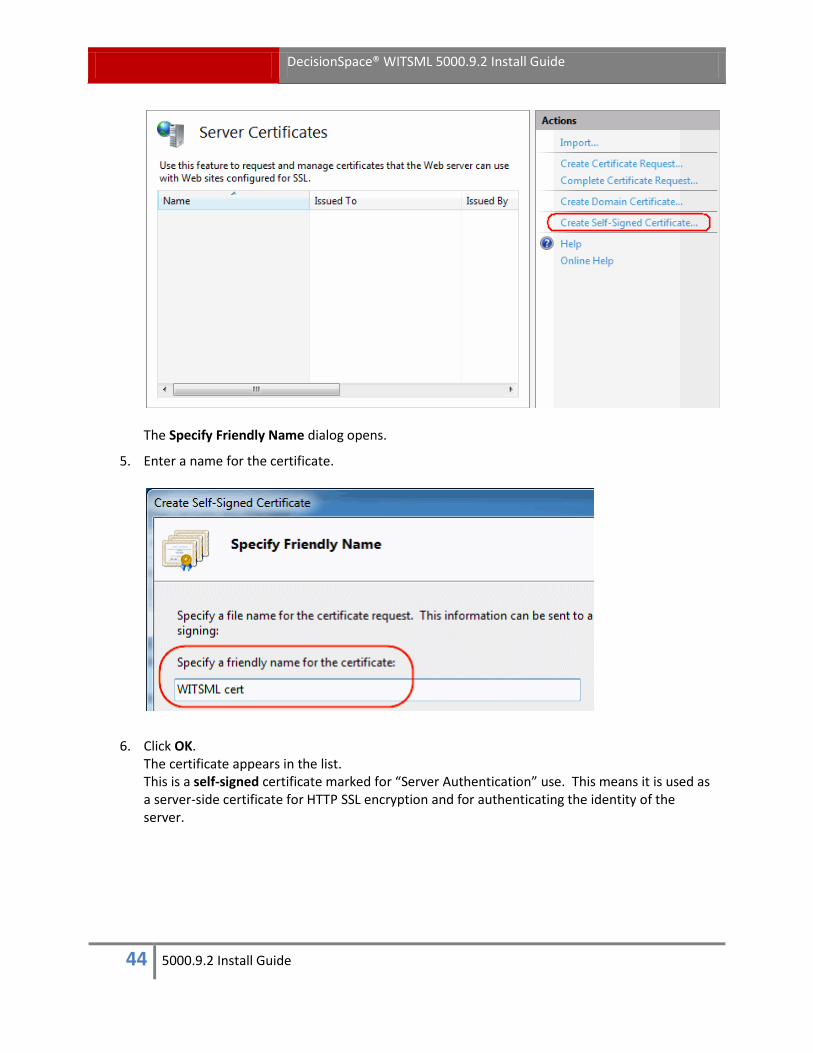
4. In the Actions pane, click Create Self-Signed Certificate.
DecisionSpace® WITSML 5000.9.2 Install Guide
44 5000.9.2 Install Guide
The Specify Friendly Name dialog opens.
5. Enter a name for the certificate.
6. Click OK. The certificate appears in the list. This is a self-signed certificate marked for “Server Authentication” use. This means it is used as a server-side certificate for HTTP SSL encryption and for authenticating the identity of the server.
DecisionSpace® WITSML 5000.9.2 Install Guide
45 5000.9.2 Install Guide
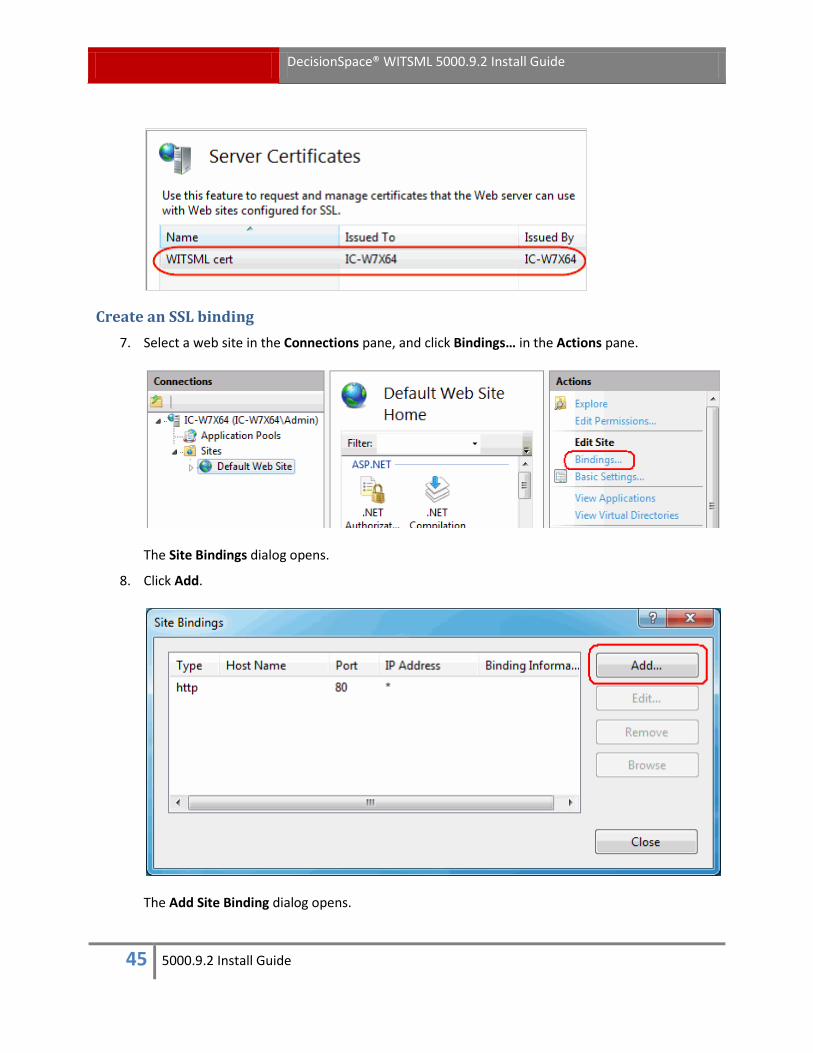
Create an SSL binding 7. Select a web site in the Connections pane, and click Bindings… in the Actions pane.
The Site Bindings dialog opens.
8. Click Add.
The Add Site Binding dialog opens.

DecisionSpace® WITSML 5000.9.2 Install Guide
46 5000.9.2 Install Guide
9. Select https from the Type drop-down list.
10. Enter the Port number.
11. Select the SSL Certificate you created earlier.
12. Click OK.
The SSL binding for https appears in the list.
13. Click Close.
Verify the SSL binding 14. Locate the IIS Manger, Default Web Site Home window, which is still open.

DecisionSpace® WITSML 5000.9.2 Install Guide
47 5000.9.2 Install Guide
15. In the Actions pane under Browse Web Site, click the link associated with the binding you just created, such as Browse *.443 (https). Internet Explorer displays a Certificate Error page because the self-signed certificate was issued by your computer, not by a trusted Certificate Authority (CA). Tip Internet Explorer will trust the certificate if you add it to the list of Trusted Root Certification Authorities in the certificate store on the local computer, or in a Group Policy for the domain.

DecisionSpace® WITSML 5000.9.2 Install Guide
48 5000.9.2 Install Guide
16. Click Continue to this website (not recommended).
The IIS Welcome page opens.
17. Close the browser.
Configure SSL Settings 18. Back in the IIS Manager window, click the website node in the Connections pane to go back to
the site’s Home page.

DecisionSpace® WITSML 5000.9.2 Install Guide
49 5000.9.2 Install Guide
19. Double-click SSL Settings in the middle pane.
The SSL Settings window opens in the middle pane.
20. Select the Require SSL check box.
21. Click Apply in the Actions pane. A message states “The changes have been successfully saved.”
DecisionSpace® WITSML 5000.9.2 Install Guide
50 5000.9.2 Install Guide
Troubleshooting
Cannot access with default login and password, or Webpage not found error If you have trouble accessing DecisionSpace® WITSML with the default login ID and password, or if you get a "webpage not found" error, verify that the correct ASP.NET version is selected. Under normal circumstances, the required version is installed automatically with the DecisionSpace® WITSML install.
To verify/change the ASP.NET version: 1. Select Start > Administrative Tools > Internet Information Services (IIS) Manager to open
the IIS Manager dialog.
2. Navigate in the directory tree to [WITSML server name] > Web Sites > Default Web Site > WITSMLAdmin.
3. Right-click and select Properties. The WITSMLAdmin Properties dialog opens.
4. Select the ASP.NET tab.
5. Verify the ASP.NET Version is set to 2.0.50727 or higher.
WITSML Transfer Service stopped and cannot be restarted Possible cause:
WITSML event log is full.
Solution: 1. Clear the WITSML event log and adjust properties as needed.
a. Select Start > Administrative Tools > Event Viewer.
b. Select the Witsml log to view events in the right pane.
c. If log is full, right-click Witsml and select Properties.
d. On the General tab, do one or both of the following:
• Increase the Maximum log size.
• Select the Overwrite entries as needed option.
e. Click Clear Log. Save the log if you wish when prompted.
f. Click OK to save the settings and close the dialog.
2. Restart Witsml Transfer Service.
a. Select Start > Administrative Tools > Services.
b. In Services (Local), locate Witsml Transfer Service.
c. Right-click and select Restart.
DecisionSpace® WITSML 5000.9.2 Install Guide
51 5000.9.2 Install Guide
RadTreeView: Server error in the NodeExpand event handler, press ok to view the result The following is one possible exception error you might see when you click OK to the above error message (not exact wording):
Timeout error when reading extremely large datasets
Solution: Reset the timeout limit on the server.
To reset the timeout limit
1. On the WITSML server machine, select Start > Administrative Tools > Internet Information Services (IIS) Manager. The Internet Information Services (IIS) Manager window opens.
2. In the left pane, navigate to [Server Name] (local computer) > Web Sites > Default Web Site > WITSMLAdmin.
3. In the right-pane, right-click web.config and select Properties. The web.config Properties dialog box opens.
4. Select the ASP.NET tab.
5. Click Edit Configuration. The ASP.NET Configuration Settings dialog box opens.
6. Select the Application tab.
7. In the top section, set the Request execution timeout (seconds) field to at least 300 seconds (5 minutes).
8. Click OK to save settings and close successive dialogs.
To enable the new timeout limit
1. Restart IIS services.
a. Select Start > Administrative Tools > Services. The Services window opens.
b. In Services (Local), locate IIS Admin Service. c. Right-click and select Restart.
2. Log off DecisionSpace® WITSML, and log in again.
If you encounter an error message or problem not listed here, please Contact Customer Support.
DecisionSpace® WITSML 5000.9.2 Install Guide
52 5000.9.2 Install Guide
Copyrights & Trademarks © 2012 Halliburton.
All rights reserved.
Information in this document is subject to change without notice. No part of this document may be reproduced or transmitted in any form or by any means, electronic or mechanical, for any purpose, without the express written permission of Halliburton. Unauthorized reproduction or distribution of this documentation, or any portion of it, may result in severe civil and criminal penalties, and will be prosecuted to the maximum extent possible under law.
Halliburton may have patents, patent applications, trademarks, copyrights, or other intellectual property rights covering subject matter in this document. The furnishing of this document does not give you any license to these patents, trademarks, copyrights, or other intellectual property.
Halliburton | Landmark Software & Services
2107 CityWest Blvd., Building 2, Houston, Texas 77042-3051, USA
P.O. Box 42806, Houston, Texas 77242, USA
Phone: 713.839.2000, Fax: 713.839.2015
Internet: www.halliburton.com/landmark
Trademarks
(l) limits, (or.ka), 3D Drill View, 3D Drill View KM, 3D Surveillance, 3DFS, 3DView, Active Field Surveillance, Active Reservoir Surveillance, Adaptive Mesh Refining, ADC, Advanced Data Transfer, Analysis Model Layering, ARIES, ARIES DecisionSuite, Asset Data Mining, Asset Decision Solutions, Asset Development Center, Asset Development Centre, Asset Journal, Asset Performance, AssetConnect, AssetConnect Enterprise, AssetConnect Enterprise Express, AssetConnect Expert, AssetDirector, AssetJournal, AssetLink, AssetLink Advisor, AssetLink Director, AssetLink Observer, AssetObserver, AssetObserver Advisor, AssetOptimizer, AssetPlanner, AssetPredictor, AssetSolver, AssetSolver Online, AssetView, AssetView 2D, AssetView 3D, Barrier Assurance Monitoring, BLITZPAK, CartoSnap, CasingLife, CasingSeat, CDS Connect, CGMage Builder, Channel Trim, COMPASS, Contract Generation, Corporate Data Archiver, Corporate Data Store, Data Analyzer, DataManager, DataServer, DataStar, DataVera, DBPlot, Decision Management System, DecisionSpace, DecisionSpace 3D Drill View, DecisionSpace 3D Drill View KM, DecisionSpace AssetLink, DecisionSpace AssetPlanner, DecisionSpace AssetSolver, DecisionSpace Atomic Meshing, DecisionSpace Base Module, DecisionSpace Desktop, DecisionSpace GIS Module, DecisionSpace InSite, DecisionSpace Nexus, DecisionSpace Reservoir, DecisionSuite, Deeper Knowledge. Broader Understanding., Depth Team, Depth Team Explorer, Depth Team Express, Depth Team Extreme, Depth Team Interpreter, DepthTeam, DepthTeam Explorer, DepthTeam Express, DepthTeam Extreme, DepthTeam Interpreter, Desktop Navigator, DESKTOP-PVT, DESKTOP-VIP, DEX, DIMS, Discovery, Discovery 3D, Discovery Asset, Discovery Framebuilder, Discovery PowerStation, Discovery Suite, DMS, DRC, Drillability Suite, Drilling Desktop, DrillModel, DrillNET, Drill-to-the-Earth-Model, Drillworks, Drillworks ConnectML, Drillworks Predict, DSS, Dynamic Frameworks to Fill, Dynamic Reservoir Management, Dynamic Surveillance System, EDM, EDM AutoSync, EDT, eLandmark, Engineer’s Data Model, Engineer’s Desktop, Engineer’s Link, eNotes, ESP, Event Similarity Prediction, ezFault, ezModel, ezSurface, ezTracker, ezTracker2D, FastTrack, Field Scenario Planner, FieldPlan, For Production, FrameBuilder, Frameworks to Fill, FZAP!, GeoAtlas, GeoDataLoad, GeoGraphix, GeoGraphix

DecisionSpace® WITSML 5000.9.2 Install Guide
53 5000.9.2 Install Guide
Exploration System, Geologic Interpretation Component, Geometric Kernel, GeoProbe, GeoProbe GF DataServer, GeoSmith, GES, GES97, GesFull, GESXplorer, GMAplus, GMI Imager, Grid3D, GRIDGENR, H. Clean, Handheld Field Operator, HHFO, High Science Simplified, Horizon Generation, I2 Enterprise, iDIMS, Infrastructure, iNotes, InSite, Iso Core, IsoMap, iWellFile, KnowledgeSource, Landmark (as a service), Landmark (as software), Landmark Decision Center, LandNetX, Landscape, Large Model, Lattix, LeaseMap, Limits, LithoTect, LogEdit, LogM, LogPrep, MagicDesk, Make Great Decisions, MathPack, MDS Connect, MicroTopology, MIMIC, MIMIC+, Model Builder, NETool, Nexus (as a service), Nexus (as software), Nexus View, Object MP, Object Reservoir, OneCall, OpenBooks, OpenJournal, OpenLink, OpenSGM, OpenVision, OpenWells, OpenWire, OpenWire Client, OpenWire Server, OpenWorks, OpenWorks Development Kit, OpenWorks Production, OpenWorks Well File, Operational Management Suite, ORKA, PAL, Parallel-VIP, Parametric Modeling, Permedia, Petris WINDS Enterprise, PetrisWINDS, PetroBank, PetroBank Explorer, PetroBank Master Data Store, PetroWorks, PetroWorks Asset, PetroWorks Pro, PetroWorks ULTRA, PlotView, Point Gridding Plus, Pointing Dispatcher, PostStack, PostStack ESP, PostStack Family, Power Interpretation, PowerCalculator, PowerExplorer, PowerExplorer Connect, PowerGrid, PowerHub, PowerModel, PowerView, PrecisionTarget, Presgraf, PressWorks, PRIZM, Production, Production Asset Manager, PROFILE, Project Administrator, ProMAGIC, ProMAGIC Connect, ProMAGIC Server, ProMAX, ProMAX 2D, ProMax 3D, ProMAX 3DPSDM, ProMAX 4D, ProMAX Family, ProMAX MVA, ProMAX VSP, pSTAx, Query Builder, Quick, Quick+, QUICKDIF, Quickwell, Quickwell+, Quiklog, QUIKRAY, QUIKSHOT, QUIKVSP, RAVE, RAYMAP, RAYMAP+, Real Freedom, Real Time Asset Management Center, Real Time Decision Center, Real Time Operations Center, Real Time Production Surveillance, Real Time Surveillance, Real-time View, Recall, Reference Data Manager, Reservoir, Reservoir Framework Builder, RESev, ResMap, Resolve, RTOC, SCAN, SeisCube, SEISINFO, SeisMap, SeisMapX, Seismic Data Check, SeisModel, SeisSpace, SeisVision, SeisWell, SeisWorks, SeisWorks 2D, SeisWorks 3D, SeisWorks PowerCalculator, SeisWorks PowerJournal, SeisWorks PowerSection, SeisWorks PowerView, SeisXchange, Semblance Computation and Analysis, Sierra Family, SigmaView, SimConnect, SimConvert, SimDataStudio, SimResults, SimResults+, SimResults+3D, SIVA+, SLAM, Smart Change, Smart Deploy, Smart Flow, Smart Skills, Smart Start, SmartFlow, smartSECTION, smartSTRAT, Spatializer, SpecDecomp, StrataMap, StrataModel, StratAmp, StrataSim, StratWorks, StratWorks 3D, StreamCalc, StressCheck, STRUCT, Structure Cube, Surf & Connect, SurfNet, SynTool, System Start for Servers, SystemStart, SystemStart for Clients, SystemStart for Servers, SystemStart for Storage, Tanks & Tubes, TDQ, Team Workspace, TERAS, T-Grid, The Engineer’s DeskTop, Total Drilling Performance, TOW/cs, TOW/cs Revenue Interface, TracPlanner, TracPlanner Xpress, Trend Form Gridding, Trimmed Grid, Turbo Synthetics, Unconventional Essentials, VESPA, VESPA+, VIP, VIP-COMP, VIP-CORE, VIPDataStudio, VIP-DUAL, VIP-ENCORE, VIP-EXECUTIVE, VIP-Local Grid Refinement, VIP-THERM, vSpace, vSpace Blueprint, vSpace Onsite, WavX, Web Editor, Well H. Clean, Well Seismic Fusion, Wellbase, Wellbore Planner, Wellbore Planner Connect, WELLCAT, WellDirect, WELLPLAN, WellSolver, WellXchange, WOW, Xsection, You’re in Control. Experience the difference., ZAP!, Zeh, ZetaAnalytics, Z-MAP, and Z-MAP Plus are trademarks, registered trademarks, or service marks of Halliburton.
All other trademarks, service marks, and product or service names are the trademarks or names of their respective owners.
Note
The information contained in this document is subject to change without notice and should not be construed as a commitment by Halliburton. Halliburton assumes no responsibility for any error that may
DecisionSpace® WITSML 5000.9.2 Install Guide
54 5000.9.2 Install Guide
appear in this manual. Some states or jurisdictions do not allow disclaimer of expressed or implied warranties in certain transactions; therefore, this statement may not apply to you.
Disclaimer
The programs and documentation may provide links to external web sites and access to content, products, and services from third parties. Halliburton is not responsible for the availability of, or any content provided on, third party web sites. You bear all risks associated with the use of such content. If you choose to purchase any products or services from a third party, the relationship is directly between you and the third party. Halliburton is not responsible for: (a) the quality of third party products or services; or (b) fulfilling any of the terms of the agreement with the third party, including delivery of products or services and warranty obligations related to purchased products or services. Halliburton is not responsible for any loss or damage of any sort that you may incur from dealing with any third party.
Third-Party Notices Halliburton uses various third-party software applications in the development of its software.
Halliburton acknowledges that certain third-party code has been bundled with, or embedded in, its software. The licensors of this third-party code, and the terms and conditions of their respective licenses, may be found at the following location:
<Install directory>\DS_INSITE\WITSML\Doc\DS_INSITE_Third_Party.pdf
Refer to the DecisionSpace® WITSML Software Release Notes for any third-party licenses and attributions that may have been added since the document was last updated.
DecisionSpace® WITSML 5000.9.2 Install Guide
55 5000.9.2 Install Guide
Contact Customer Support
DecisionSpace® WITSML Support The following contact information applies specifically to DecisionSpace® WITSML and DecisionSpace® InSite® software products.
Phone +1 713 839 2300
Email [email protected]
Landmark Support Landmark operates Technical Assistance Centers (TACs) in Australia, the United Kingdom, and the United States. Additional support is also provided through regional support offices around the world.
• Support Via Web Portal
• Technical Assistance Centers
• Regional Offices
• Helpful Links
Support via Web Portal Support information is always available on the Landmark Customer Support internet page. You can also submit a support request directly to Landmark Customer Support though the Landmark Customer Support Portal:
http://css.lgc.com/InfoCenter/index?page=home
To request support in the Landmark Customer Support Portal:
1. In the PIN and Password text boxes in the Please Sign In area, enter your registered personal identification number and password.
2. Click the Sign In button.
3. In the Case & Defect Information area, click the Create A New Case link.
4. In the Create Case area, fill in the necessary information. Provide details about your technical concern, including any error messages, the workflow steps where the problem occurred, and attachments of screen shots that display the problem. To help understand the concern, you can also attach other files too, such as example data files.
5. Click the Submit button. A support analyst in the nearest Technical Assistance Center will respond to your request.

DecisionSpace® WITSML 5000.9.2 Install Guide
56 5000.9.2 Install Guide
Technical Assistance Centers Asia, Pacific 8:00 am - 5:00 pm Local Time Monday-Friday, excluding holidays
61-8-9481-4488 (Perth, Australia) Toll Free 1-800-448-488 Fax: 61-8-9481-1580 Email: [email protected]
Europe, Africa, Middle East 9:00 am - 5:30 pm Local Time Monday - Friday, excluding holidays
44-1372-868686 (Leatherhead, UK) Fax: 44-1224-723260 (Aberdeen, UK) Fax: 44-1372-868601 (Leatherhead, UK) Email: [email protected]
Latin America (Spanish, Portuguese, English) 7:00 am - 5:00 pm Local Time
713-839-3405 (Houston, TX, USA) Fax: 713-839-3646 Email: [email protected]
North America 7:30 am - 5:30 pm Central Standard Time Monday - Friday, excluding holidays
713-839-2200 (Houston, TX, USA) Toll Free 1-877-435-7542 (1-877-HELP-LGC) Fax: 713-839-2168 Email: [email protected]
Regional Offices For contact information for regional offices, see the Contact Support page located at:
http://css.lgc.com/InfoCenter/index?page=contact§ion=contact
If problems cannot be resolved at the regional level, an escalation team is called to resolve your incidents quickly.
Helpful Links Name Website Address Landmark Software & Services home page http://www.halliburton.com/landmark Landmark Support Portal http://css.lgc.com/InfoCenter/index?page=home Oracle home page http://www.oracle.com FLEXNet Publisher (Flexera Software, Inc.) http://www.flexerasoftware.com Microsoft SQL Server home page http://www.microsoft.com/sqlserver Adobe Acrobat Reader http://www.adobe.com Microsoft SQL Server Express home page http://www.microsoft.com/express/sql
Copyright © 2022 FDOKUMEN