POWERSHELL COMMANDS - ShareGate
25
TOP 10 Every SharePoint Administrator Using Sharegate Should Know POWERSHELL COMMANDS
-
Upload
khangminh22 -
Category
Documents
-
view
6 -
download
0
Transcript of POWERSHELL COMMANDS - ShareGate
TOP 10Every SharePoint Administrator Using Sharegate Should Know
POWERSHELL COMMANDS

TABLE OF CONTENTS
The History of PowerShell
Connecting to One or More Subsites
Configure One or More Copy Settings
Select One or More Objects
Copy Site Objects
Copy SharePoint Content
Create a Property Template
Import Documents From a Local Computer into SharePoint
Import Property Mappings Previously Exported
Create Property Mappings
Export Migration Reports to a Local Computer
3
4
6
8
10
12
16
17
19
21
23
PowerShell was first introduced in the fall of
2006, just a few months before the release of
SharePoint 2007. Although the command line
tool was available, STSADM was the tool all
administrators used and that Microsoft
considered the “standard command line tool” of
choice. The release of SharePoint 2010 raised
some eyebrows, as PowerShell introduced over
400 commands that interacted directly with
any .NET object in a SharePoint environment,
something STSADM wasn’t able to do.
Fast forward to SharePoint 2013 and beyond,
PowerShell is Microsoft’s “standard command
line tool” with more than 700 commands
available on-premise and more being released
frequently through the Office 365 platform. It’s
critical for administrators to understand how to
utilize this powerful tool as it’s the backbone to
all things in your SharePoint environment.
The History of PowerShell
In its simplest form, PowerShell is a language
that allows individuals to run scripts or single
commands using what is called a cmdlet. A
cmdlet is an executable or command that consist
of two parts. The first is the call to action such as
“Get”, “Set”, “Add” and “Remove”. The second part
is the object you want to take action on. For
example, if I wanted a list of all my SharePoint
site collections I could use the cmdlet “Get-
SPSite”.
While manually running single cmdlets can be
extremely useful, PowerShell also has the ability
to run scripts! Scripting through PowerShell is
one of the most powerful ways to place
automation around many of your day to day
processes. An example of this may, be if your
application pools are recycled each night to run a
SharePoint warm-up script on your environment.
This will ensure your SharePoint pages are ready
to go each morning with maximum response
times.
What is PowerShell?
Although out of the box SharePoint provides a
total of 700+ cmdlets, there are a number of
commands that Sharegate offers which are just
damn simple to use. Whether you’re looking to
export migration reports for a recent deployment
or simply want a list of subsites, in this White
Paper we will cover the top 10 Sharegate
PowerShell cmdlets that will make your life
simpler.
Don’t worry if you don’t consider yourself an
expert PowerShell user. Each of these cmdlets
use a simple naming convention that will make it
easy for you to identify and even remember as
you begin to use them. Rest assured, you don’t
need to be a super geek, or even a geek for that
matter, to benefit from these commands. With
that said put your nerd glasses on and let’s dive
into these excellent commands.
The Simple PowerShell Solution
CMDLET #1
You’re the SharePoint administrator for a
company and you need a quick and simple way
to get a list of all the subsites for a particular site
in your environment. Sharegate has created a
simple cmdlet that is easy to remember and use
to resolve your issue!
EXAMPLE 1
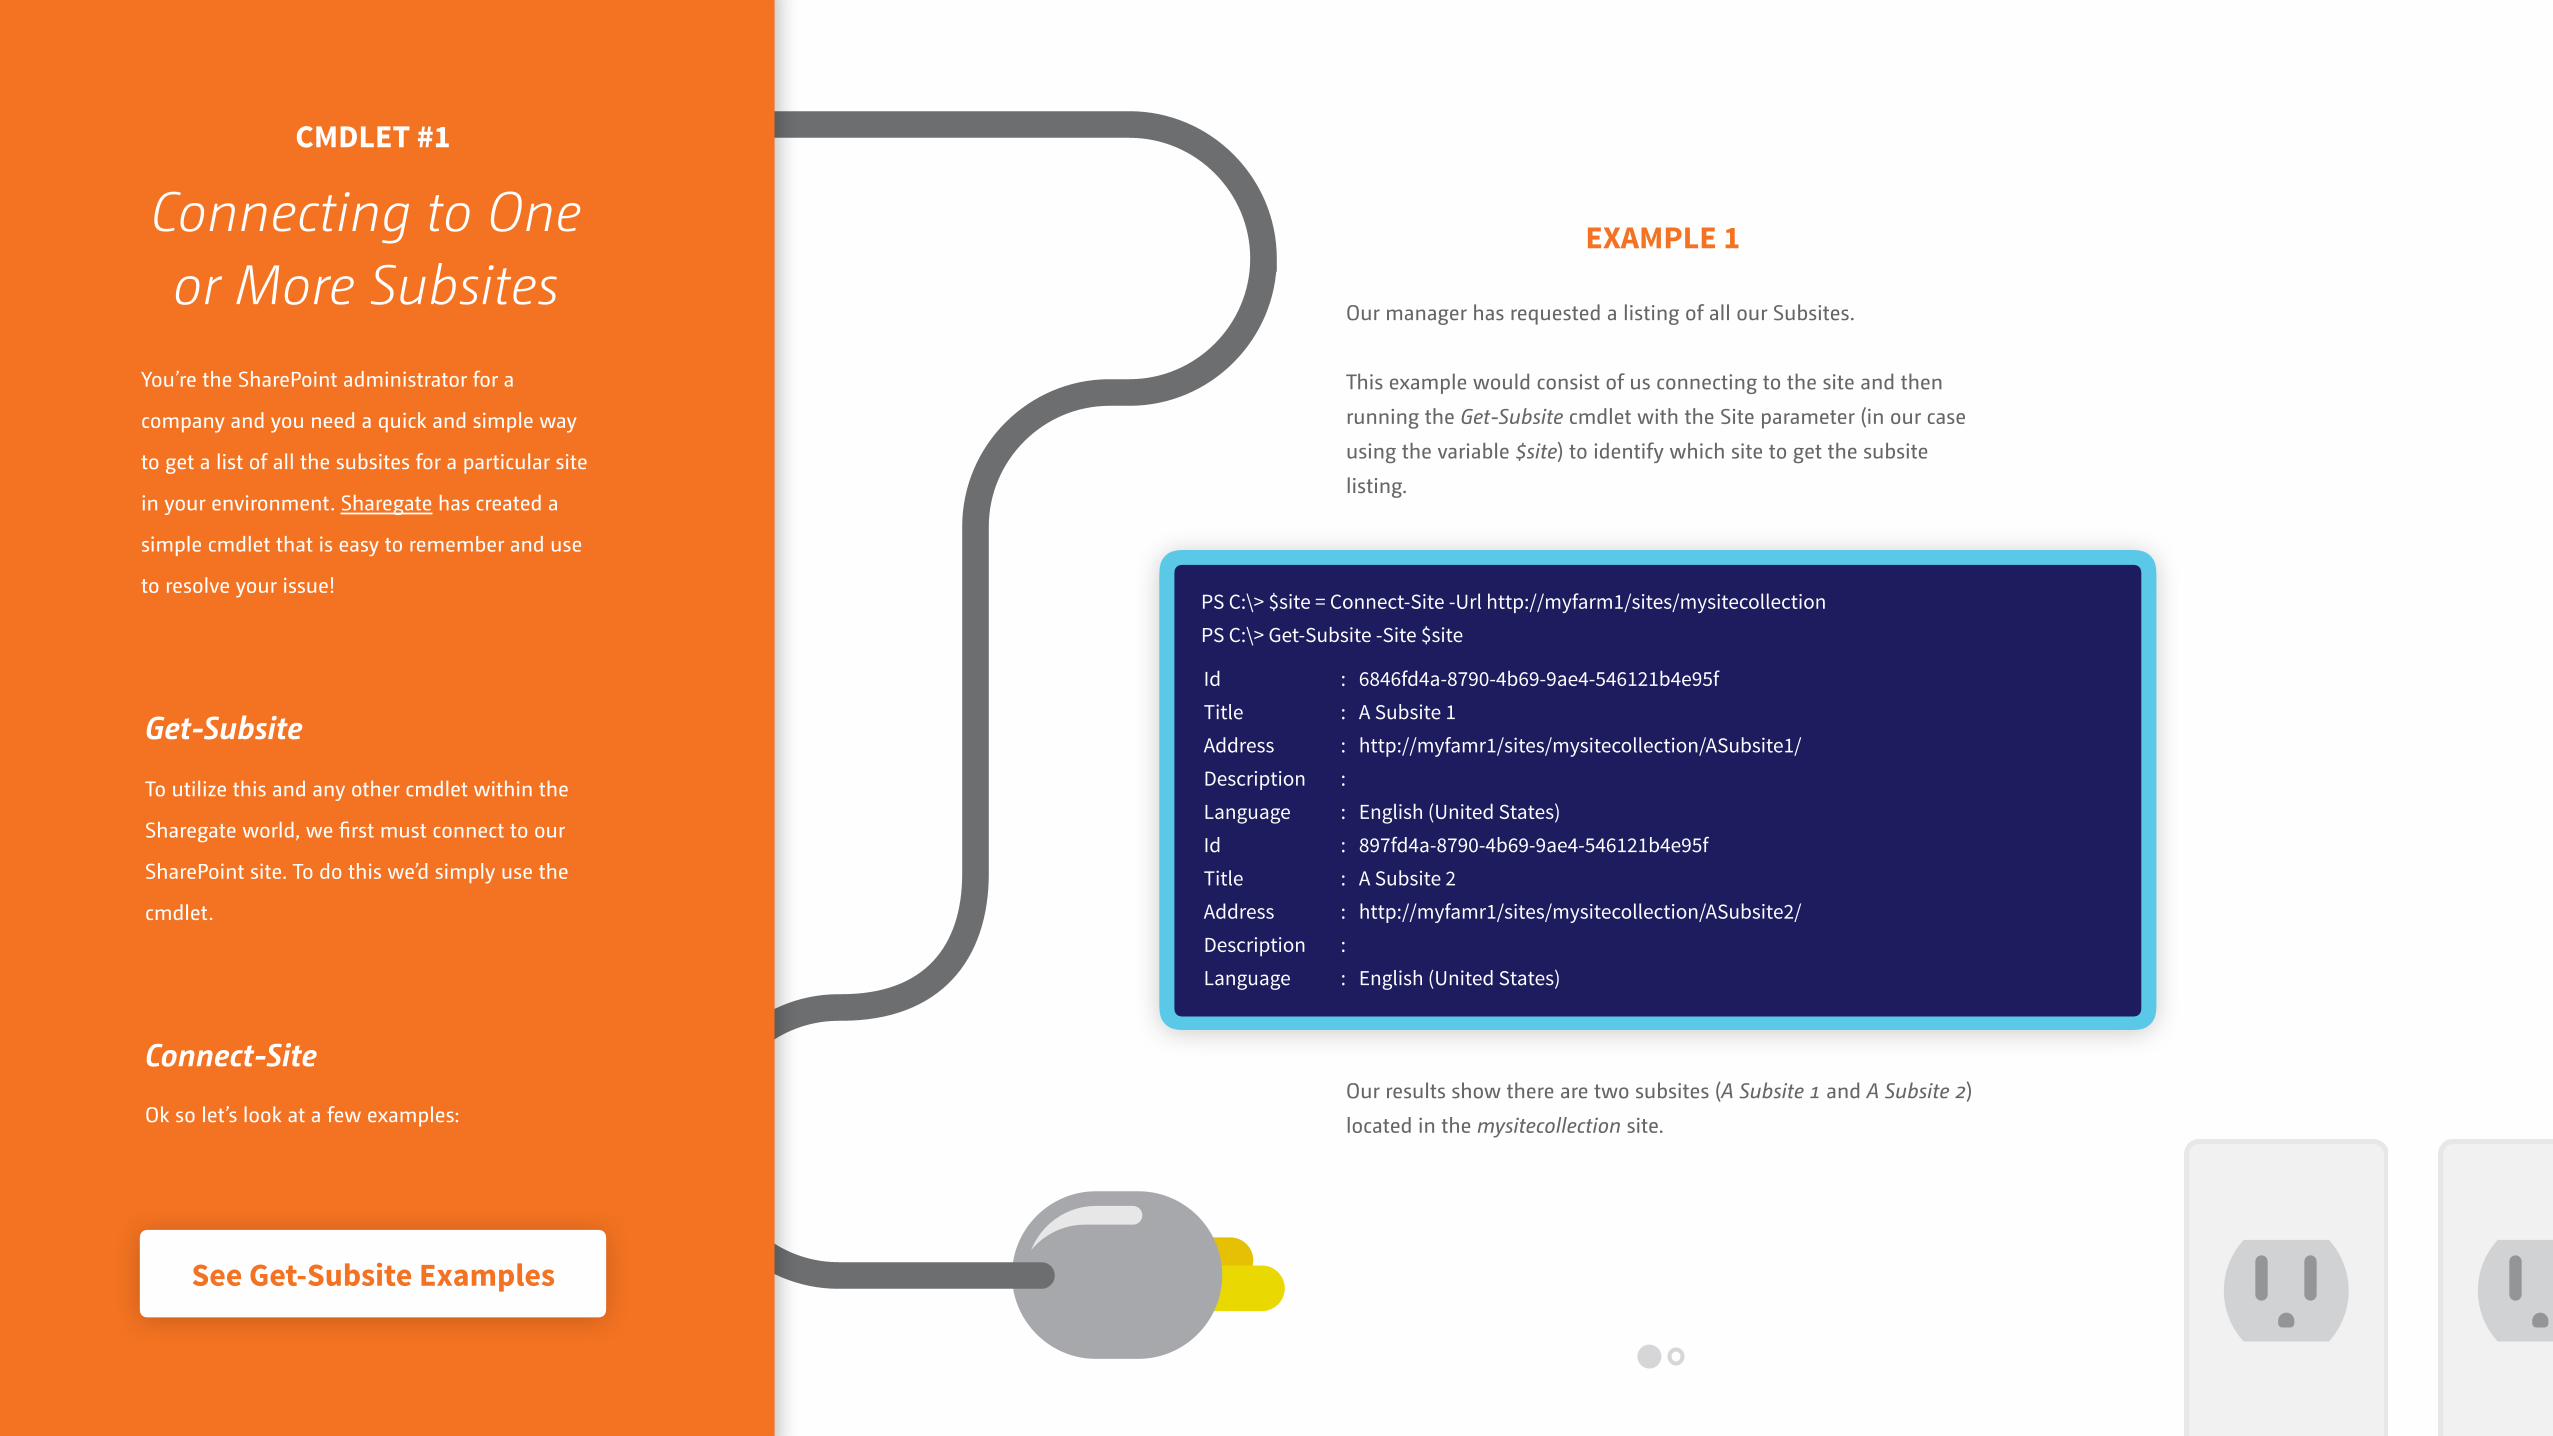
Our manager has requested a listing of all our Subsites.
This example would consist of us connecting to the site and then
running the Get-Subsite cmdlet with the Site parameter (in our case
using the variable $site) to identify which site to get the subsite
listing.
Connect-Site
Ok so let’s look at a few examples:Our results show there are two subsites (A Subsite 1 and A Subsite 2)
located in the mysitecollection site.
Connecting to One or More Subsites
Get-Subsite
To utilize this and any other cmdlet within the
Sharegate world, we first must connect to our
SharePoint site. To do this we’d simply use the
cmdlet.
: 6846fd4a-8790-4b69-9ae4-546121b4e95f : A Subsite 1 : http://myfamr1/sites/mysitecollection/ASubsite1/ : : English (United States) : 897fd4a-8790-4b69-9ae4-546121b4e95f : A Subsite 2 : http://myfamr1/sites/mysitecollection/ASubsite2/ : : English (United States)
Id Title Address Description Language Id Title Address Description Language
PS C:\> $site = Connect-Site -Url http://myfarm1/sites/mysitecollection PS C:\> Get-Subsite -Site $site
See Get-Subsite Examples
EXAMPLE 2
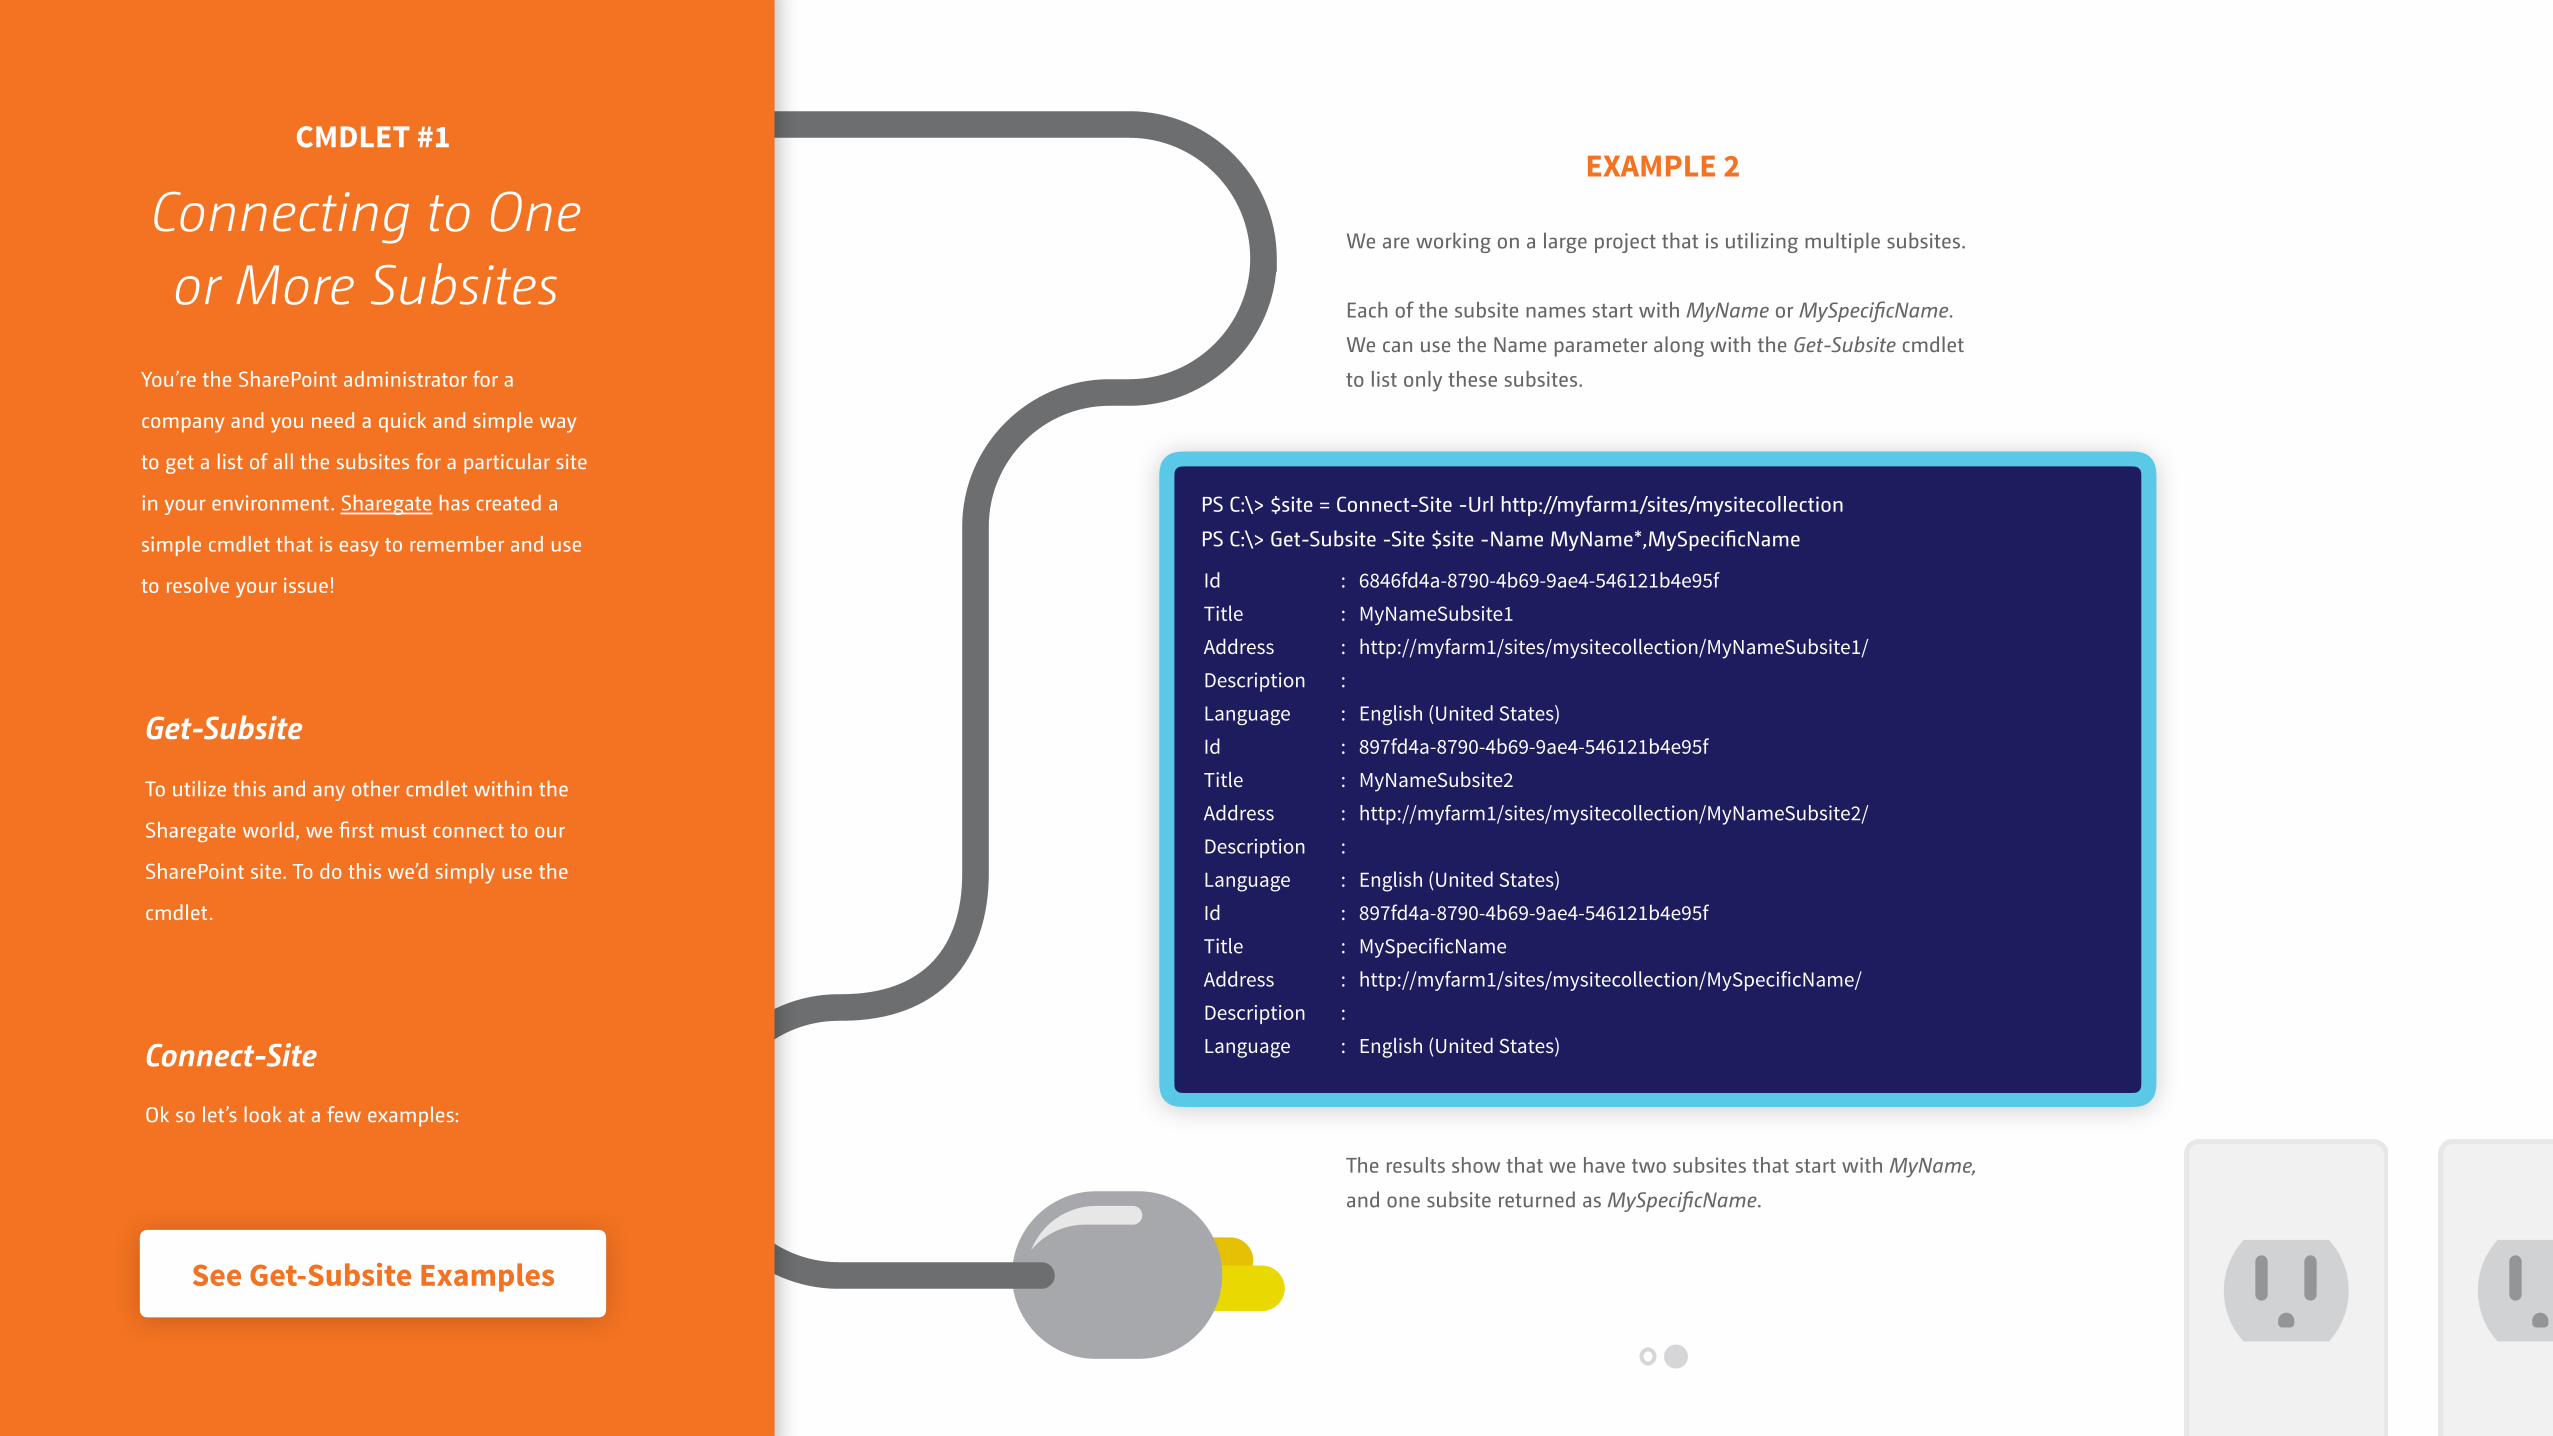
We are working on a large project that is utilizing multiple subsites.
Each of the subsite names start with MyName or MySpecificName.
We can use the Name parameter along with the Get-Subsite cmdlet
to list only these subsites.
The results show that we have two subsites that start with MyName,
and one subsite returned as MySpecificName.
: 6846fd4a-8790-4b69-9ae4-546121b4e95f : MyNameSubsite1 : http://myfarm1/sites/mysitecollection/MyNameSubsite1/ : : English (United States) : 897fd4a-8790-4b69-9ae4-546121b4e95f : MyNameSubsite2 : http://myfarm1/sites/mysitecollection/MyNameSubsite2/ : : English (United States) : 897fd4a-8790-4b69-9ae4-546121b4e95f : MySpecificName : http://myfarm1/sites/mysitecollection/MySpecificName/ : : English (United States)
Id Title Address Description Language Id Title Address Description Language Id Title Address Description Language
PS C:\> $site = Connect-Site -Url http://myfarm1/sites/mysitecollection
PS C:\> Get-Subsite -Site $site -Name MyName*,MySpecificName
CMDLET #1
You’re the SharePoint administrator for a
company and you need a quick and simple way
to get a list of all the subsites for a particular site
in your environment. Sharegate has created a
simple cmdlet that is easy to remember and use
to resolve your issue!
Connect-Site
Ok so let’s look at a few examples:
Connecting to One or More Subsites
Get-Subsite
To utilize this and any other cmdlet within the
Sharegate world, we first must connect to our
SharePoint site. To do this we’d simply use the
cmdlet.
See Get-Subsite Examples

EXAMPLE 1
You have a library named mysrclist within the mysourcesite site. We
need to copy the documents to another library named mydstlist in
the mydestinationsite site. Most of the documents in the mysrclist
are unique, but there are a few documents we can identify that are
the same in the mysrclist and the mydstlist libraries. For these
documents that are identical, we only want the most recent
document.
To perform this task, we can create a variable $copysettings, set it
equal to the New-CopySettings cmdlet and add the parameter
OnContentItemExists set to IncrementalUpdate. If a source document
already exists at the destination, Sharegate will look at the modified
date and only overwrite if the modified date is greater at the source
than at the destination.
: Operation completed successfully.Result
PS C:\> $copysettings = New-CopySettings -OnContentItemExists IncrementalUpdate PS C:\> $srcSite = Connect-Site -Url http://myfarm1/sites/mysourcesite PS C:\> $dstSite = Connect-Site -Url http://myfarm1/sites/mydestinationsite PS C:\> $srcList = Get-List -Name mysrclist -Site $srcSite PS C:\> $dstList = Get-List -Name mydstlist -Site $dstSite PS C:\> Copy-Content -SourceList $srcList -DestinationList $dstList -CopySettings $copysettings
CMDLET #2
There may be instances in your daily tasks that
will require you to work with two identical lists.
Maybe two departments share the same files or
you have a list that needs to be copied to another
location. Digging deeper into the file structure,
you may even notice identical documents in both
departments. You can easily copy only the
newest or updated versions of a file by using the
cmdlet New-CopySettings.
Configure One or More Copy Settings
New-CopySettings
Let’s take a look at a few examples of how this
works.
See New Copy Settings Examples
EXAMPLE 2
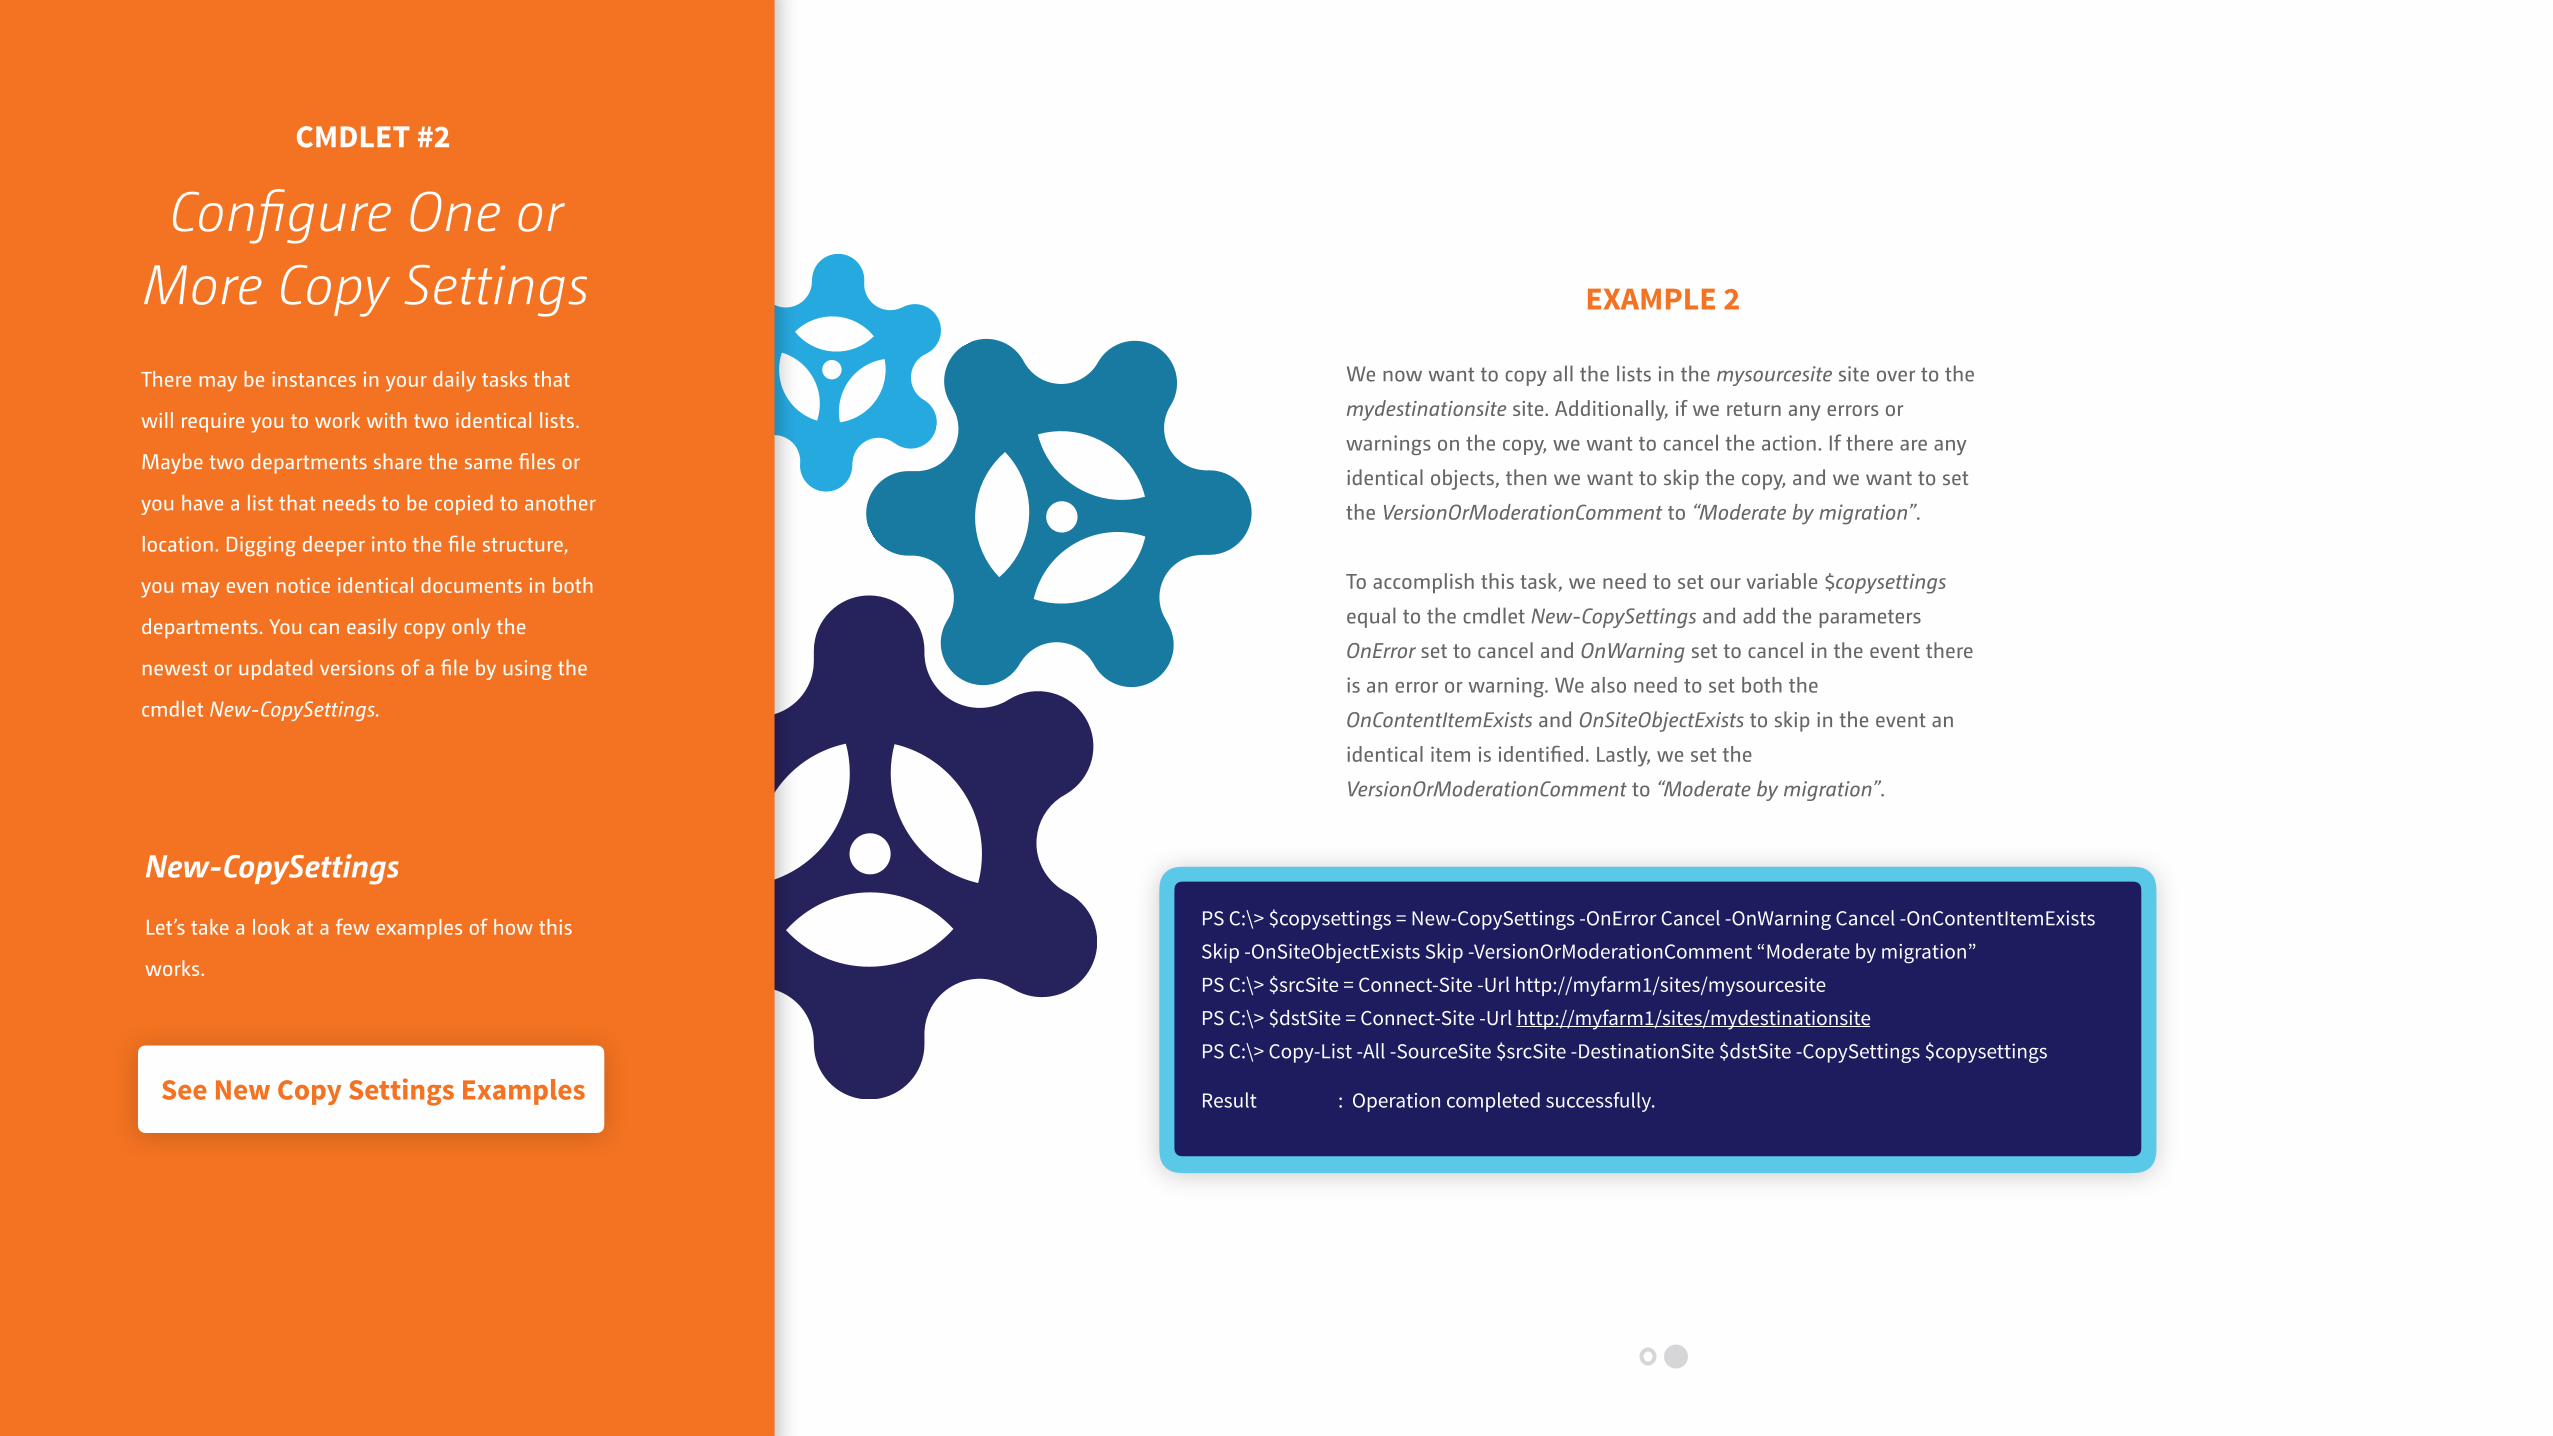
We now want to copy all the lists in the mysourcesite site over to the
mydestinationsite site. Additionally, if we return any errors or
warnings on the copy, we want to cancel the action. If there are any
identical objects, then we want to skip the copy, and we want to set
the VersionOrModerationComment to “Moderate by migration”.
To accomplish this task, we need to set our variable $copysettings
equal to the cmdlet New-CopySettings and add the parameters
OnError set to cancel and OnWarning set to cancel in the event there
is an error or warning. We also need to set both the
OnContentItemExists and OnSiteObjectExists to skip in the event an
identical item is identified. Lastly, we set the
VersionOrModerationComment to “Moderate by migration”.
: Operation completed successfully.Result
PS C:\> $copysettings = New-CopySettings -OnError Cancel -OnWarning Cancel -OnContentItemExists Skip -OnSiteObjectExists Skip -VersionOrModerationComment “Moderate by migration” PS C:\> $srcSite = Connect-Site -Url http://myfarm1/sites/mysourcesite PS C:\> $dstSite = Connect-Site -Url http://myfarm1/sites/mydestinationsite PS C:\> Copy-List -All -SourceSite $srcSite -DestinationSite $dstSite -CopySettings $copysettings
CMDLET #2
There may be instances in your daily tasks that
will require you to work with two identical lists.
Maybe two departments share the same files or
you have a list that needs to be copied to another
location. Digging deeper into the file structure,
you may even notice identical documents in both
departments. You can easily copy only the
newest or updated versions of a file by using the
cmdlet New-CopySettings.
Configure One or More Copy Settings
New-CopySettings
Let’s take a look at a few examples of how this
works.
See New Copy Settings Examples

You’re the admin of a site and were
asked to get a list of all the lists within
a particular SharePoint site. The
SharePoint farm has a large number of
sites, but we only need a list of all the
SharePoint lists for the site
mysitecollection.
We’d start by creating a variable ($site)
which would connect to our site named
mysitecollection. We would then run
the Get-List cmdlet along with the Site
parameter to get a full listing of all the
lists in that site.
: 6846fd4a-8790-4b69-9ae4-546121b4e95f : Announcements : List : /sites/mysitecollection/ : False : /sites/mysitecollection/Lists/Announcements/ : True : False : False : False : Sharegate.Automation.Entities.Site : 4686fd4a-8790-4b69-9ae4-546121b4e95f : Calendar : List : /sites/mysitecollection/ : False : /sites/mysitecollection/Lists/Calendar : True : False : False : False : Sharegate.Automation.Entities.Site : 5146fd4a-8790-4b69-9ae4-546121b4e95f : Customized Reports : Document Library
Id Title BaseType Source ContentApproval RootFolder EnableAttachments EnableVersioning EnableMinorVersions ForceCheckout Site Id Title BaseType Source ContentApproval RootFolder EnableAttachments EnableVersioning EnableMinorVersions ForceCheckout Site Id Title BaseType
PS C:\> $site = Connect-Site -Url http://myfarm1/sites/mysitecollection PS C:\> Get-List -Site $site
CMDLET #3
A common action when working with objects,
whether it’s a list, library, site column or term set
is to get an object. One of the more popular
items to “get” is a list or a library. This can easily
be accomplished with Sharegate PowerShell
cmdlets by simple using Get-List.
Select One or More Objects
Get-List
Using the Get-List cmdlet along with its
parameters Name and Site, you’ll have the
flexibility to identify a SharePoint site and name
of a list or library that you are looking to get.
Let’s take a look at a few scenarios.
View Get-List Examples After we run the command, we’ll notice
we’ve pulled a full listing of the two
lists named Announcements and
Calendar, as well as one library named
Customized Reports from our site.
EXAMPLE 1

EXAMPLE 2
Now that we’ve pulled a listing of all the lists and libraries within
the site, we’d like to pull a list by a particular id next. Using the Get-
List cmdlet, we can utilize the ID parameter to get the needed list!
: 1ca5588e-1283-41fa-b3df-511b39f28756 : MySpecificName : Document Library : /sites/mysitecollection/
Id Title BaseType Source
PS C:\> $site = Connect-Site -Url http://myfarm1/sites/mysitecollection PS C:\> Get-List -Site $site -Id 1ca5588e-1283-41fa-b3df-511b39f28756
CMDLET #3
A common action when working with objects,
whether it’s a list, library, site column or term set
is to get an object. One of the more popular
items to “get” is a list or a library. This can easily
be accomplished with Sharegate PowerShell
cmdlets by simple using Get-List.
Select One or More Objects
Get-List
Using the Get-List cmdlet along with its
parameters Name and Site, you’ll have the
flexibility to identify a SharePoint site and name
of a list or library that you are looking to get.
Let’s take a look at a few scenarios.Exactly as expected, we’ve pulled the list for the needed ID and we
can see that the list name is MySpecificName.
HINT: Did you know that you can also do the same to map users,
roles. site columns, and site templates ?!
View Get-List Examples
EXAMPLE 1
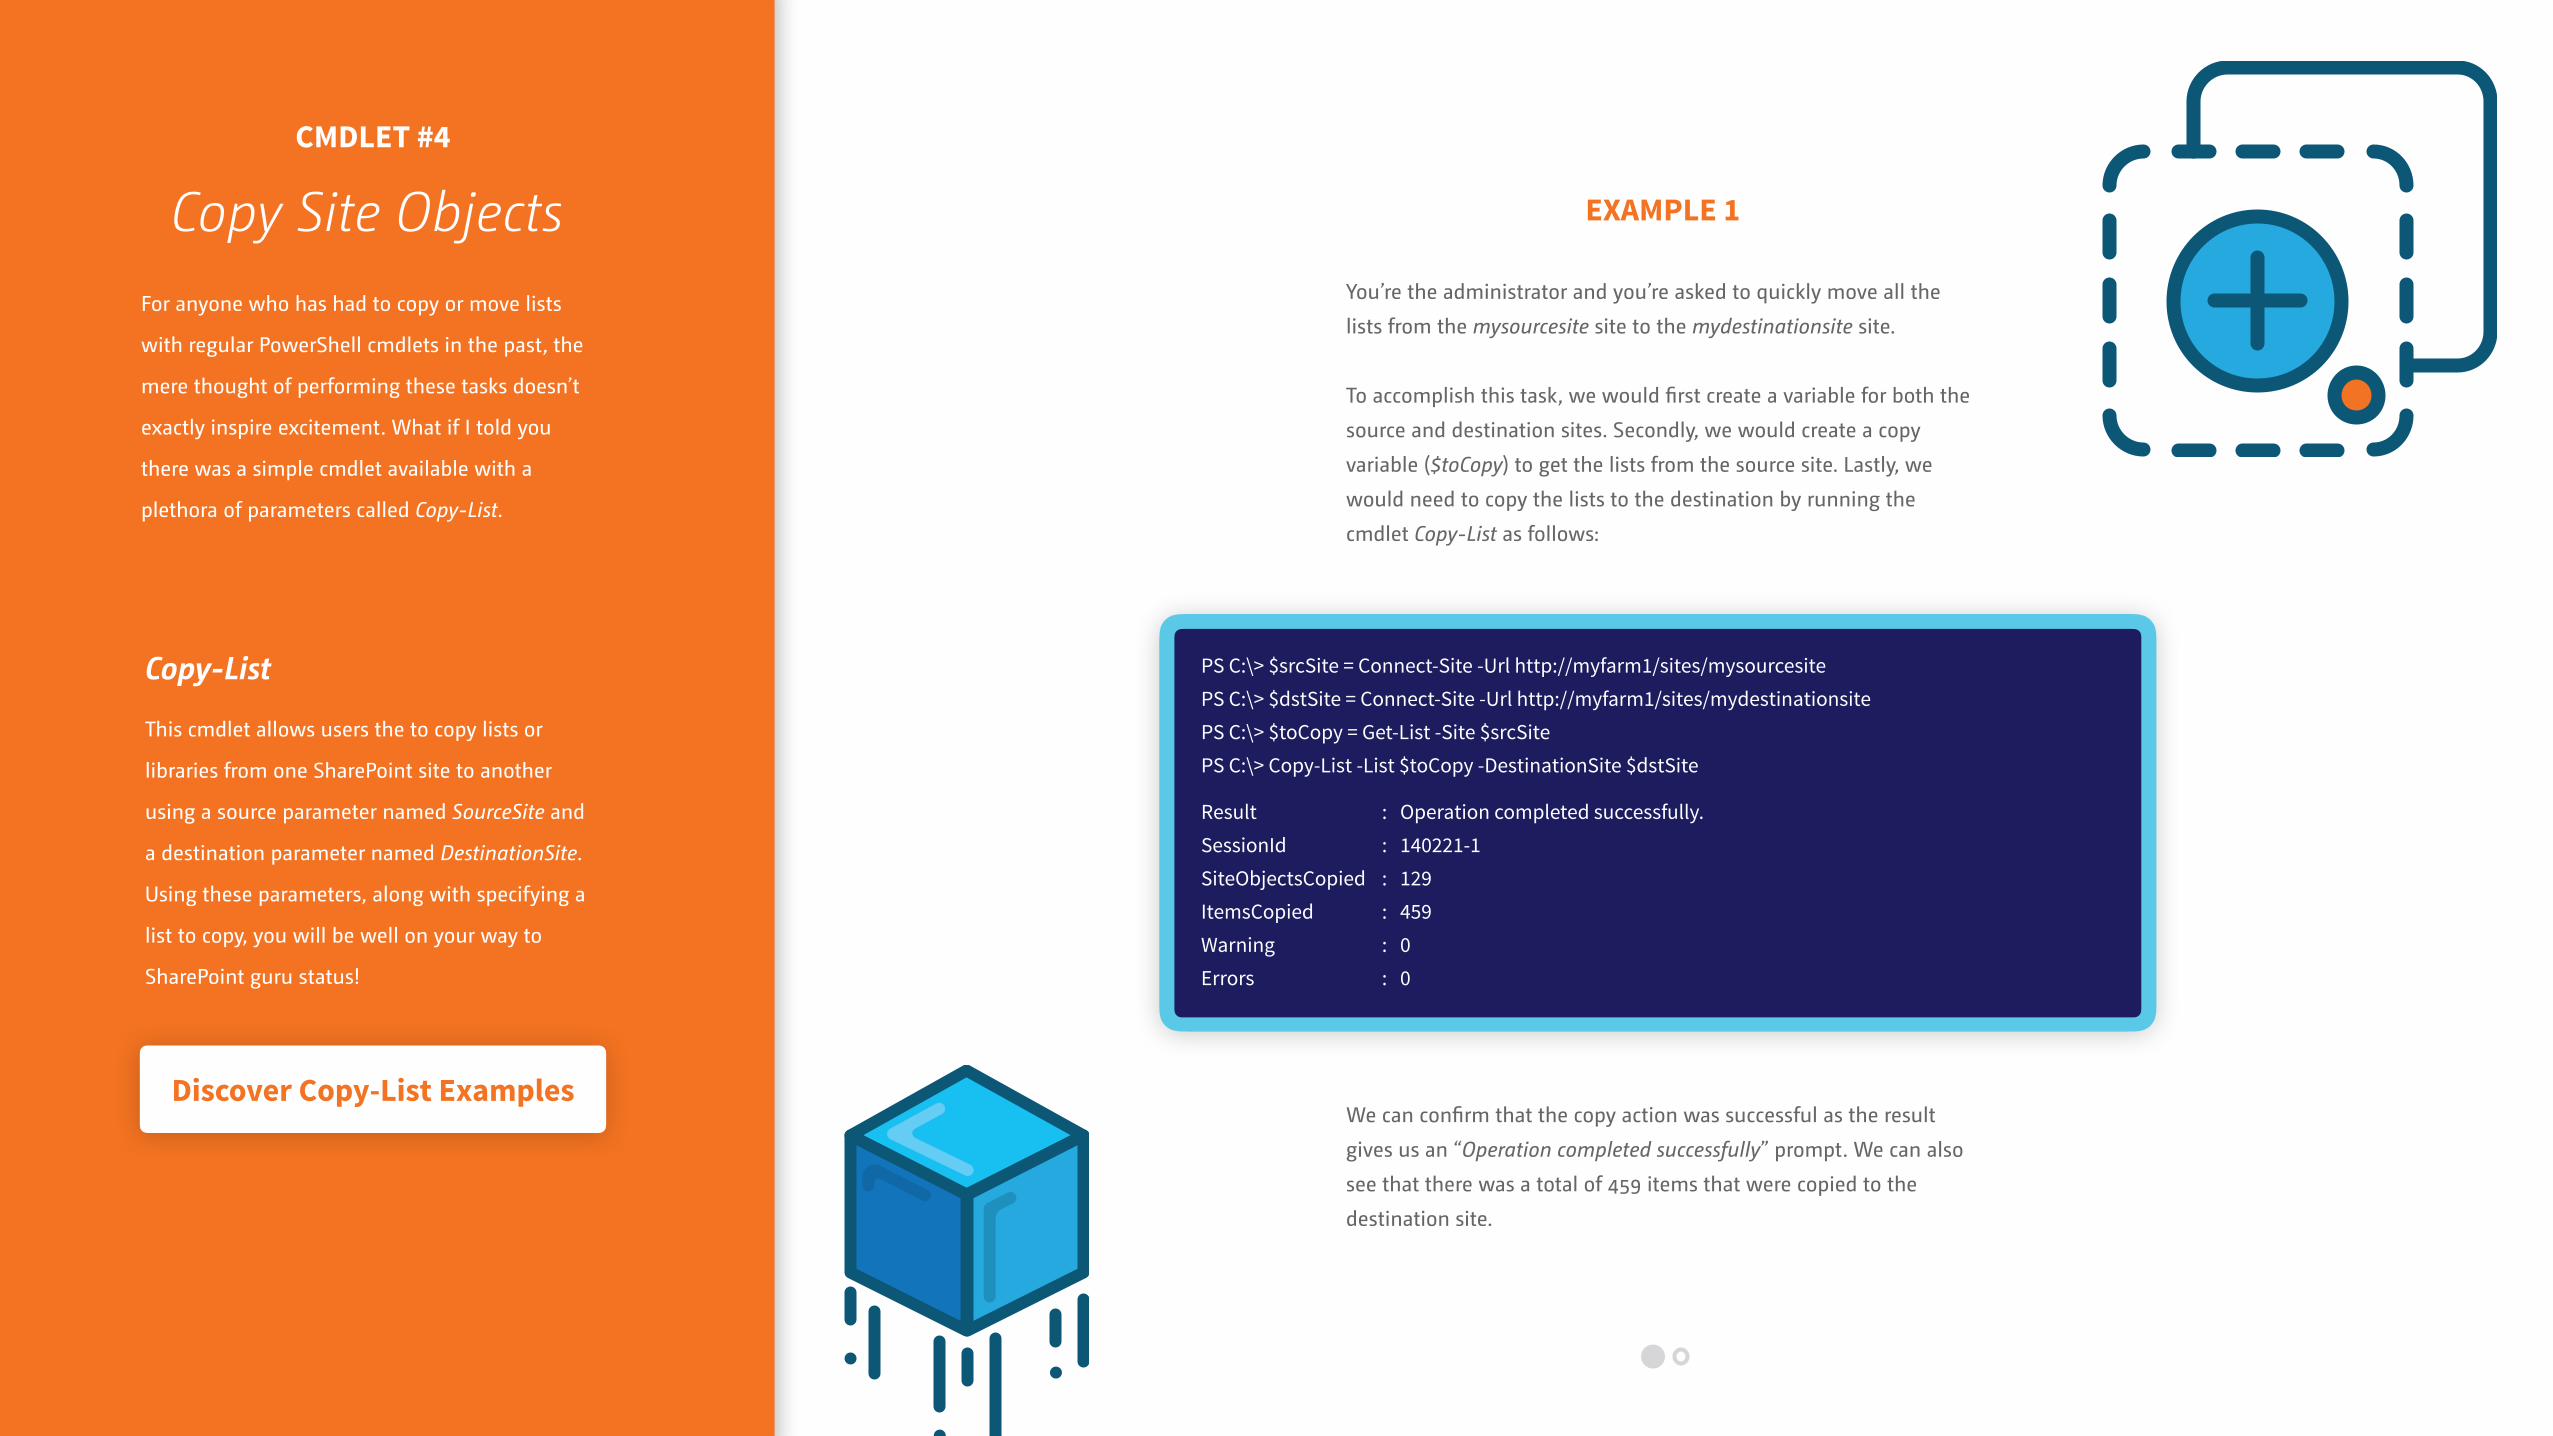
You’re the administrator and you’re asked to quickly move all the
lists from the mysourcesite site to the mydestinationsite site.
To accomplish this task, we would first create a variable for both the
source and destination sites. Secondly, we would create a copy
variable ($toCopy) to get the lists from the source site. Lastly, we
would need to copy the lists to the destination by running the
cmdlet Copy-List as follows:
: Operation completed successfully. : 140221-1 : 129 : 459 : 0 : 0
Result SessionId SiteObjectsCopied ItemsCopied Warning Errors
PS C:\> $srcSite = Connect-Site -Url http://myfarm1/sites/mysourcesite PS C:\> $dstSite = Connect-Site -Url http://myfarm1/sites/mydestinationsite PS C:\> $toCopy = Get-List -Site $srcSite PS C:\> Copy-List -List $toCopy -DestinationSite $dstSite
CMDLET #4
For anyone who has had to copy or move lists
with regular PowerShell cmdlets in the past, the
mere thought of performing these tasks doesn’t
exactly inspire excitement. What if I told you
there was a simple cmdlet available with a
plethora of parameters called Copy-List.
Copy Site Objects
Copy-List
This cmdlet allows users the to copy lists or
libraries from one SharePoint site to another
using a source parameter named SourceSite and
a destination parameter named DestinationSite.
Using these parameters, along with specifying a
list to copy, you will be well on your way to
SharePoint guru status!
Discover Copy-List ExamplesWe can confirm that the copy action was successful as the result
gives us an “Operation completed successfully” prompt. We can also
see that there was a total of 459 items that were copied to the
destination site.

EXAMPLE 2
You’re looking to quickly move source site content to the destination
site. But this time, instead of all the lists and libraries, we only want
to copy over the MySpecificTitle list, as well as any list that begins
with MyTitle.
To accomplish the above task, we’d create a variable for the
destination, connect to the source and use a pipeline to copy the list
to the specified lists. Lastly, we need to add the DestinationSite
parameter that would use the destination variable ($dstSite) created
to tell the copy action where to go which, in our example, is to
http://myfarm1/sites/mydestinationsite.
: Operation completed successfully. : 140221-4 : 9 : 52 : 0 : 0
Result SessionId SiteObjectsCopied ItemsCopied Warning Errors
PS C:\> $srcSite = Connect-Site -Url http://farm1/sites/mysourcesite PS C:\> $dstSite = Connect-Site -Url http://myfarm1/sites/mydestinationsite PS C:\> Copy-List -Name MyTitle*,MySpecificTitle -SourceSite $srcSite -DestinationSite $dstSite
CMDLET #4
For anyone who has had to copy or move lists
with regular PowerShell cmdlets in the past, the
mere thought of performing these tasks doesn’t
exactly inspire excitement. What if I told you
there was a simple cmdlet available with a
plethora of parameters called Copy-List.
Copy Site Objects
Copy-List
This cmdlet allows users the to copy lists or
libraries from one SharePoint site to another
using a source parameter named SourceSite and
a destination parameter named DestinationSite.
Using these parameters, along with specifying a
list to copy, you will be well on your way to
SharePoint guru status!
The results of our command show that the “Operation completed
successfully” with 52 items copied!
Discover Copy-List Examples
EXAMPLE 1
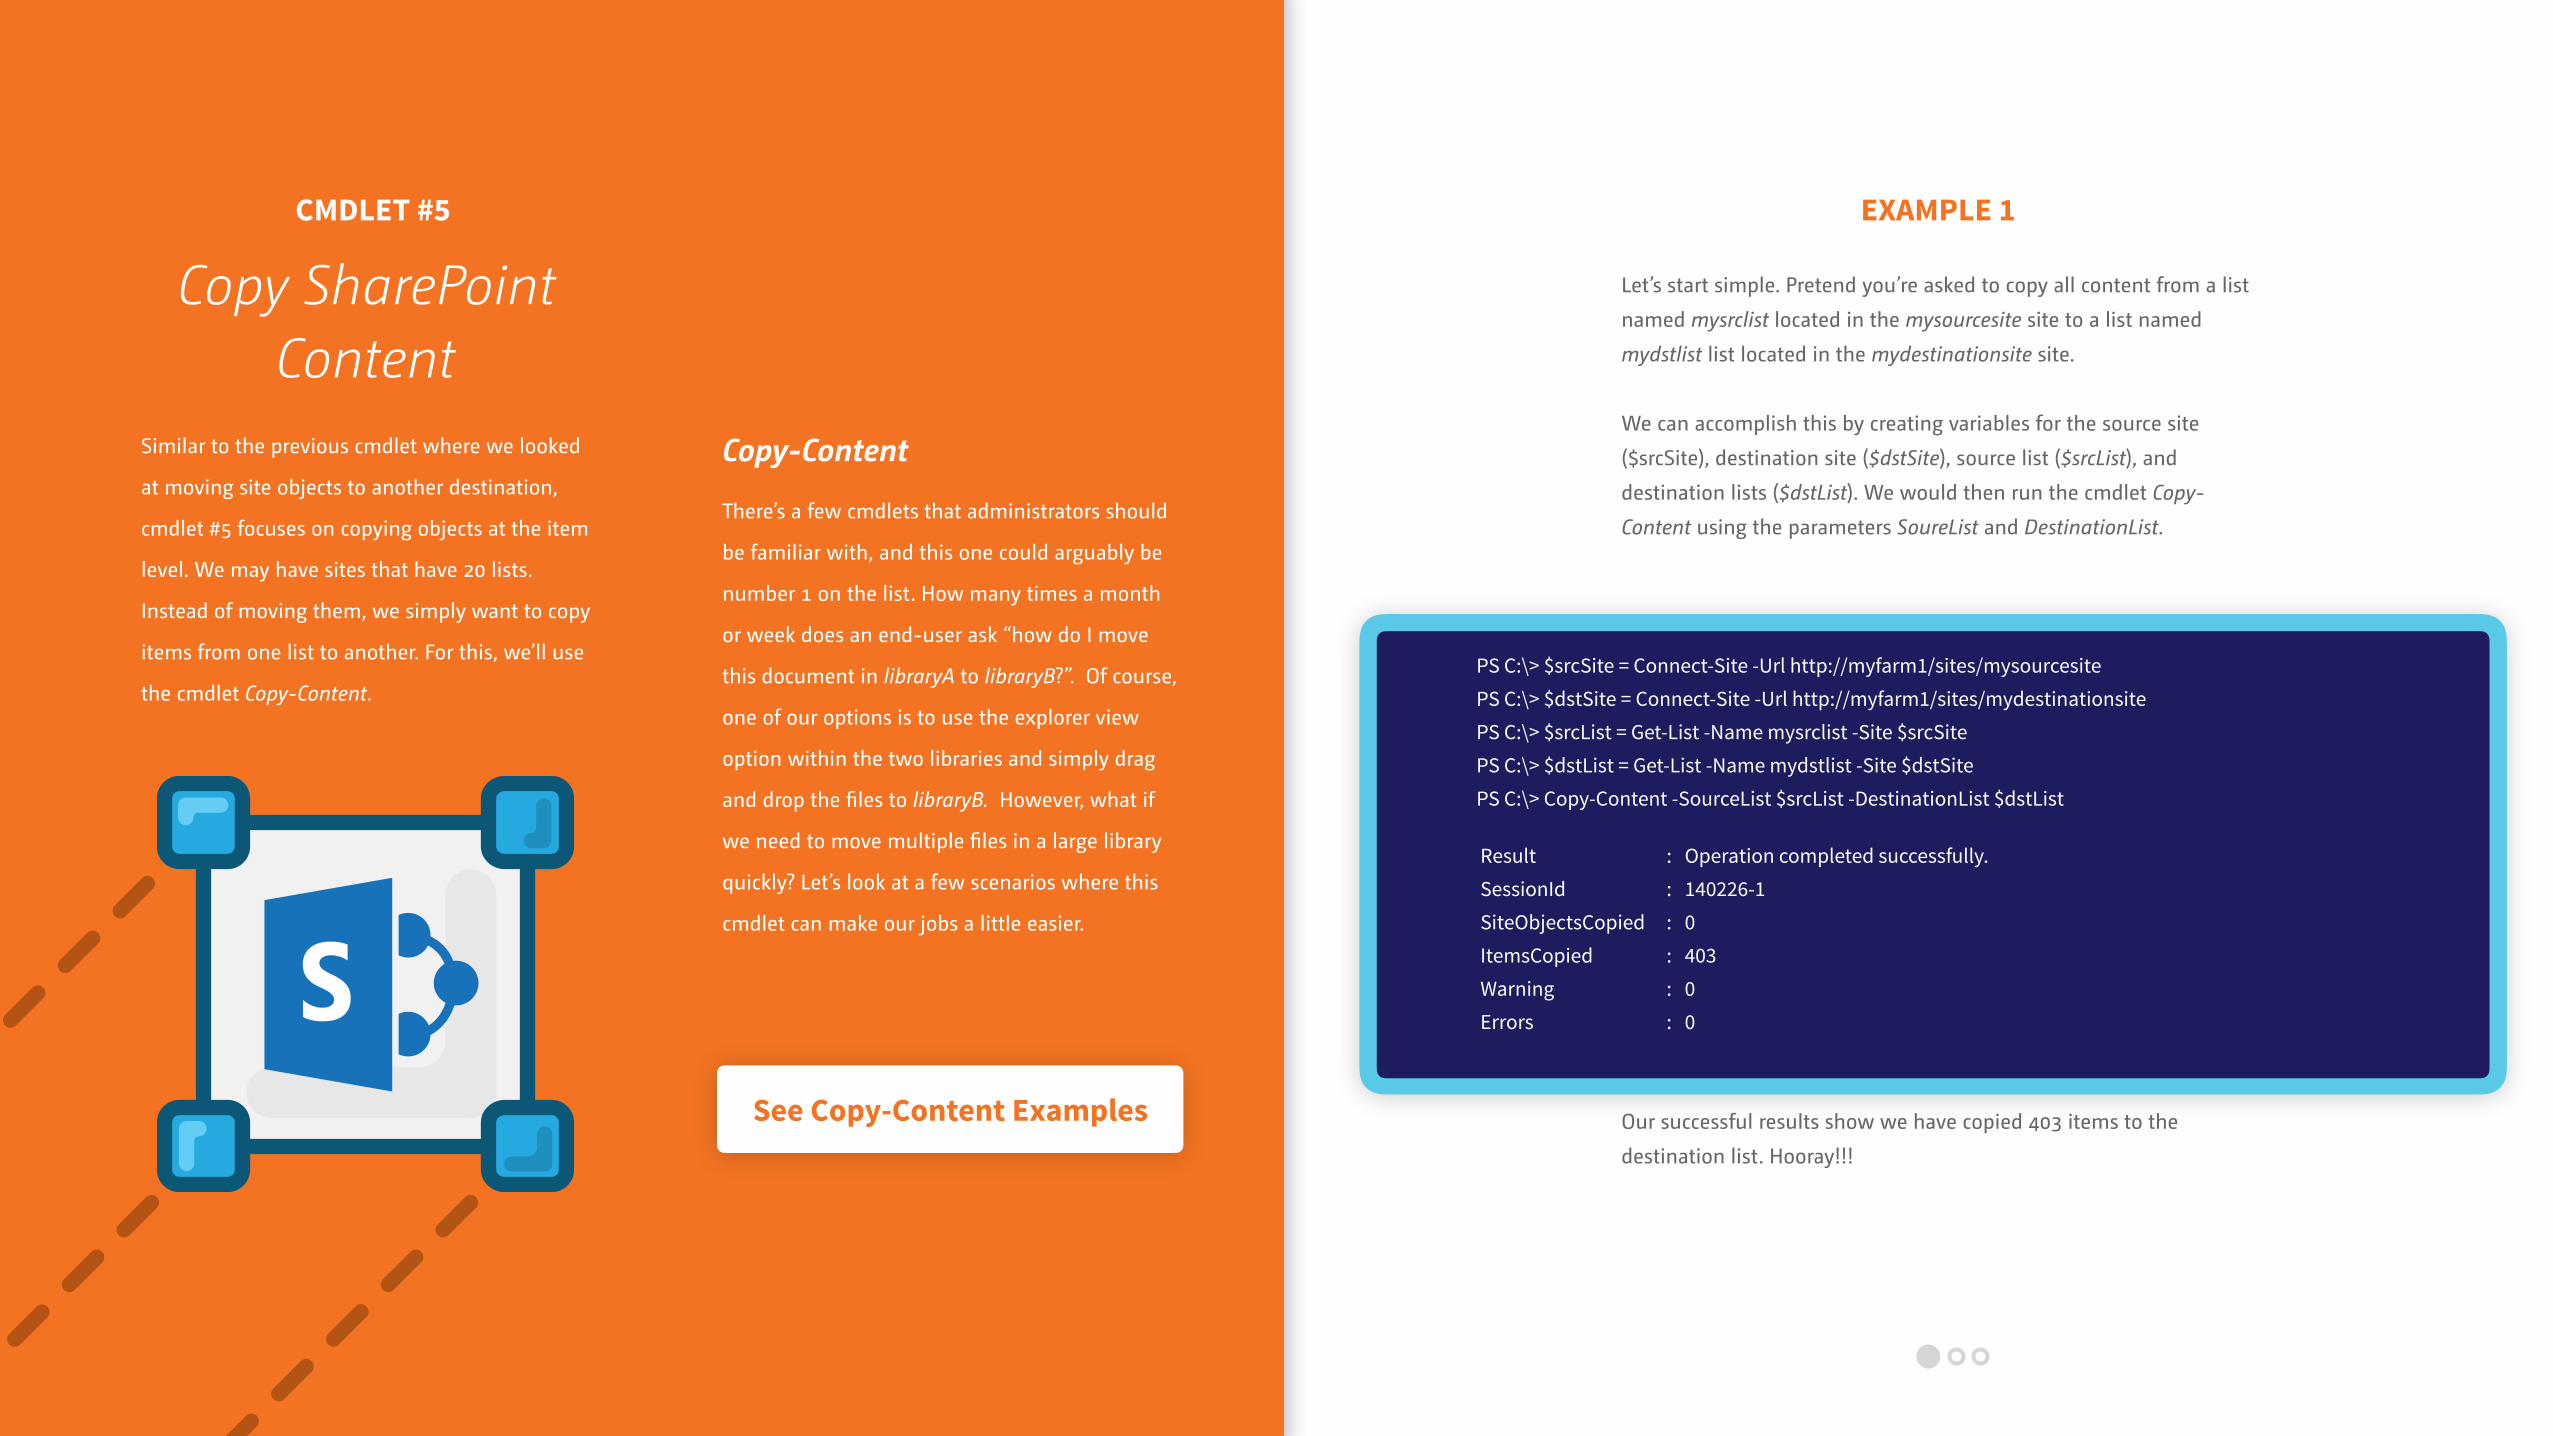
Let’s start simple. Pretend you’re asked to copy all content from a list
named mysrclist located in the mysourcesite site to a list named
mydstlist list located in the mydestinationsite site.
We can accomplish this by creating variables for the source site
($srcSite), destination site ($dstSite), source list ($srcList), and
destination lists ($dstList). We would then run the cmdlet Copy-
Content using the parameters SoureList and DestinationList.
: Operation completed successfully. : 140226-1 : 0 : 403 : 0 : 0
Result SessionId SiteObjectsCopied ItemsCopied Warning Errors
PS C:\> $srcSite = Connect-Site -Url http://myfarm1/sites/mysourcesite PS C:\> $dstSite = Connect-Site -Url http://myfarm1/sites/mydestinationsite PS C:\> $srcList = Get-List -Name mysrclist -Site $srcSite PS C:\> $dstList = Get-List -Name mydstlist -Site $dstSite PS C:\> Copy-Content -SourceList $srcList -DestinationList $dstList
CMDLET #5
Similar to the previous cmdlet where we looked
at moving site objects to another destination,
cmdlet #5 focuses on copying objects at the item
level. We may have sites that have 20 lists.
Instead of moving them, we simply want to copy
items from one list to another. For this, we’ll use
the cmdlet Copy-Content.
Copy SharePoint Content
Copy-Content
There’s a few cmdlets that administrators should
be familiar with, and this one could arguably be
number 1 on the list. How many times a month
or week does an end-user ask “how do I move
this document in libraryA to libraryB?”. Of course,
one of our options is to use the explorer view
option within the two libraries and simply drag
and drop the files to libraryB. However, what if
we need to move multiple files in a large library
quickly? Let’s look at a few scenarios where this
cmdlet can make our jobs a little easier.
See Copy-Content Examples Our successful results show we have copied 403 items to the
destination list. Hooray!!!
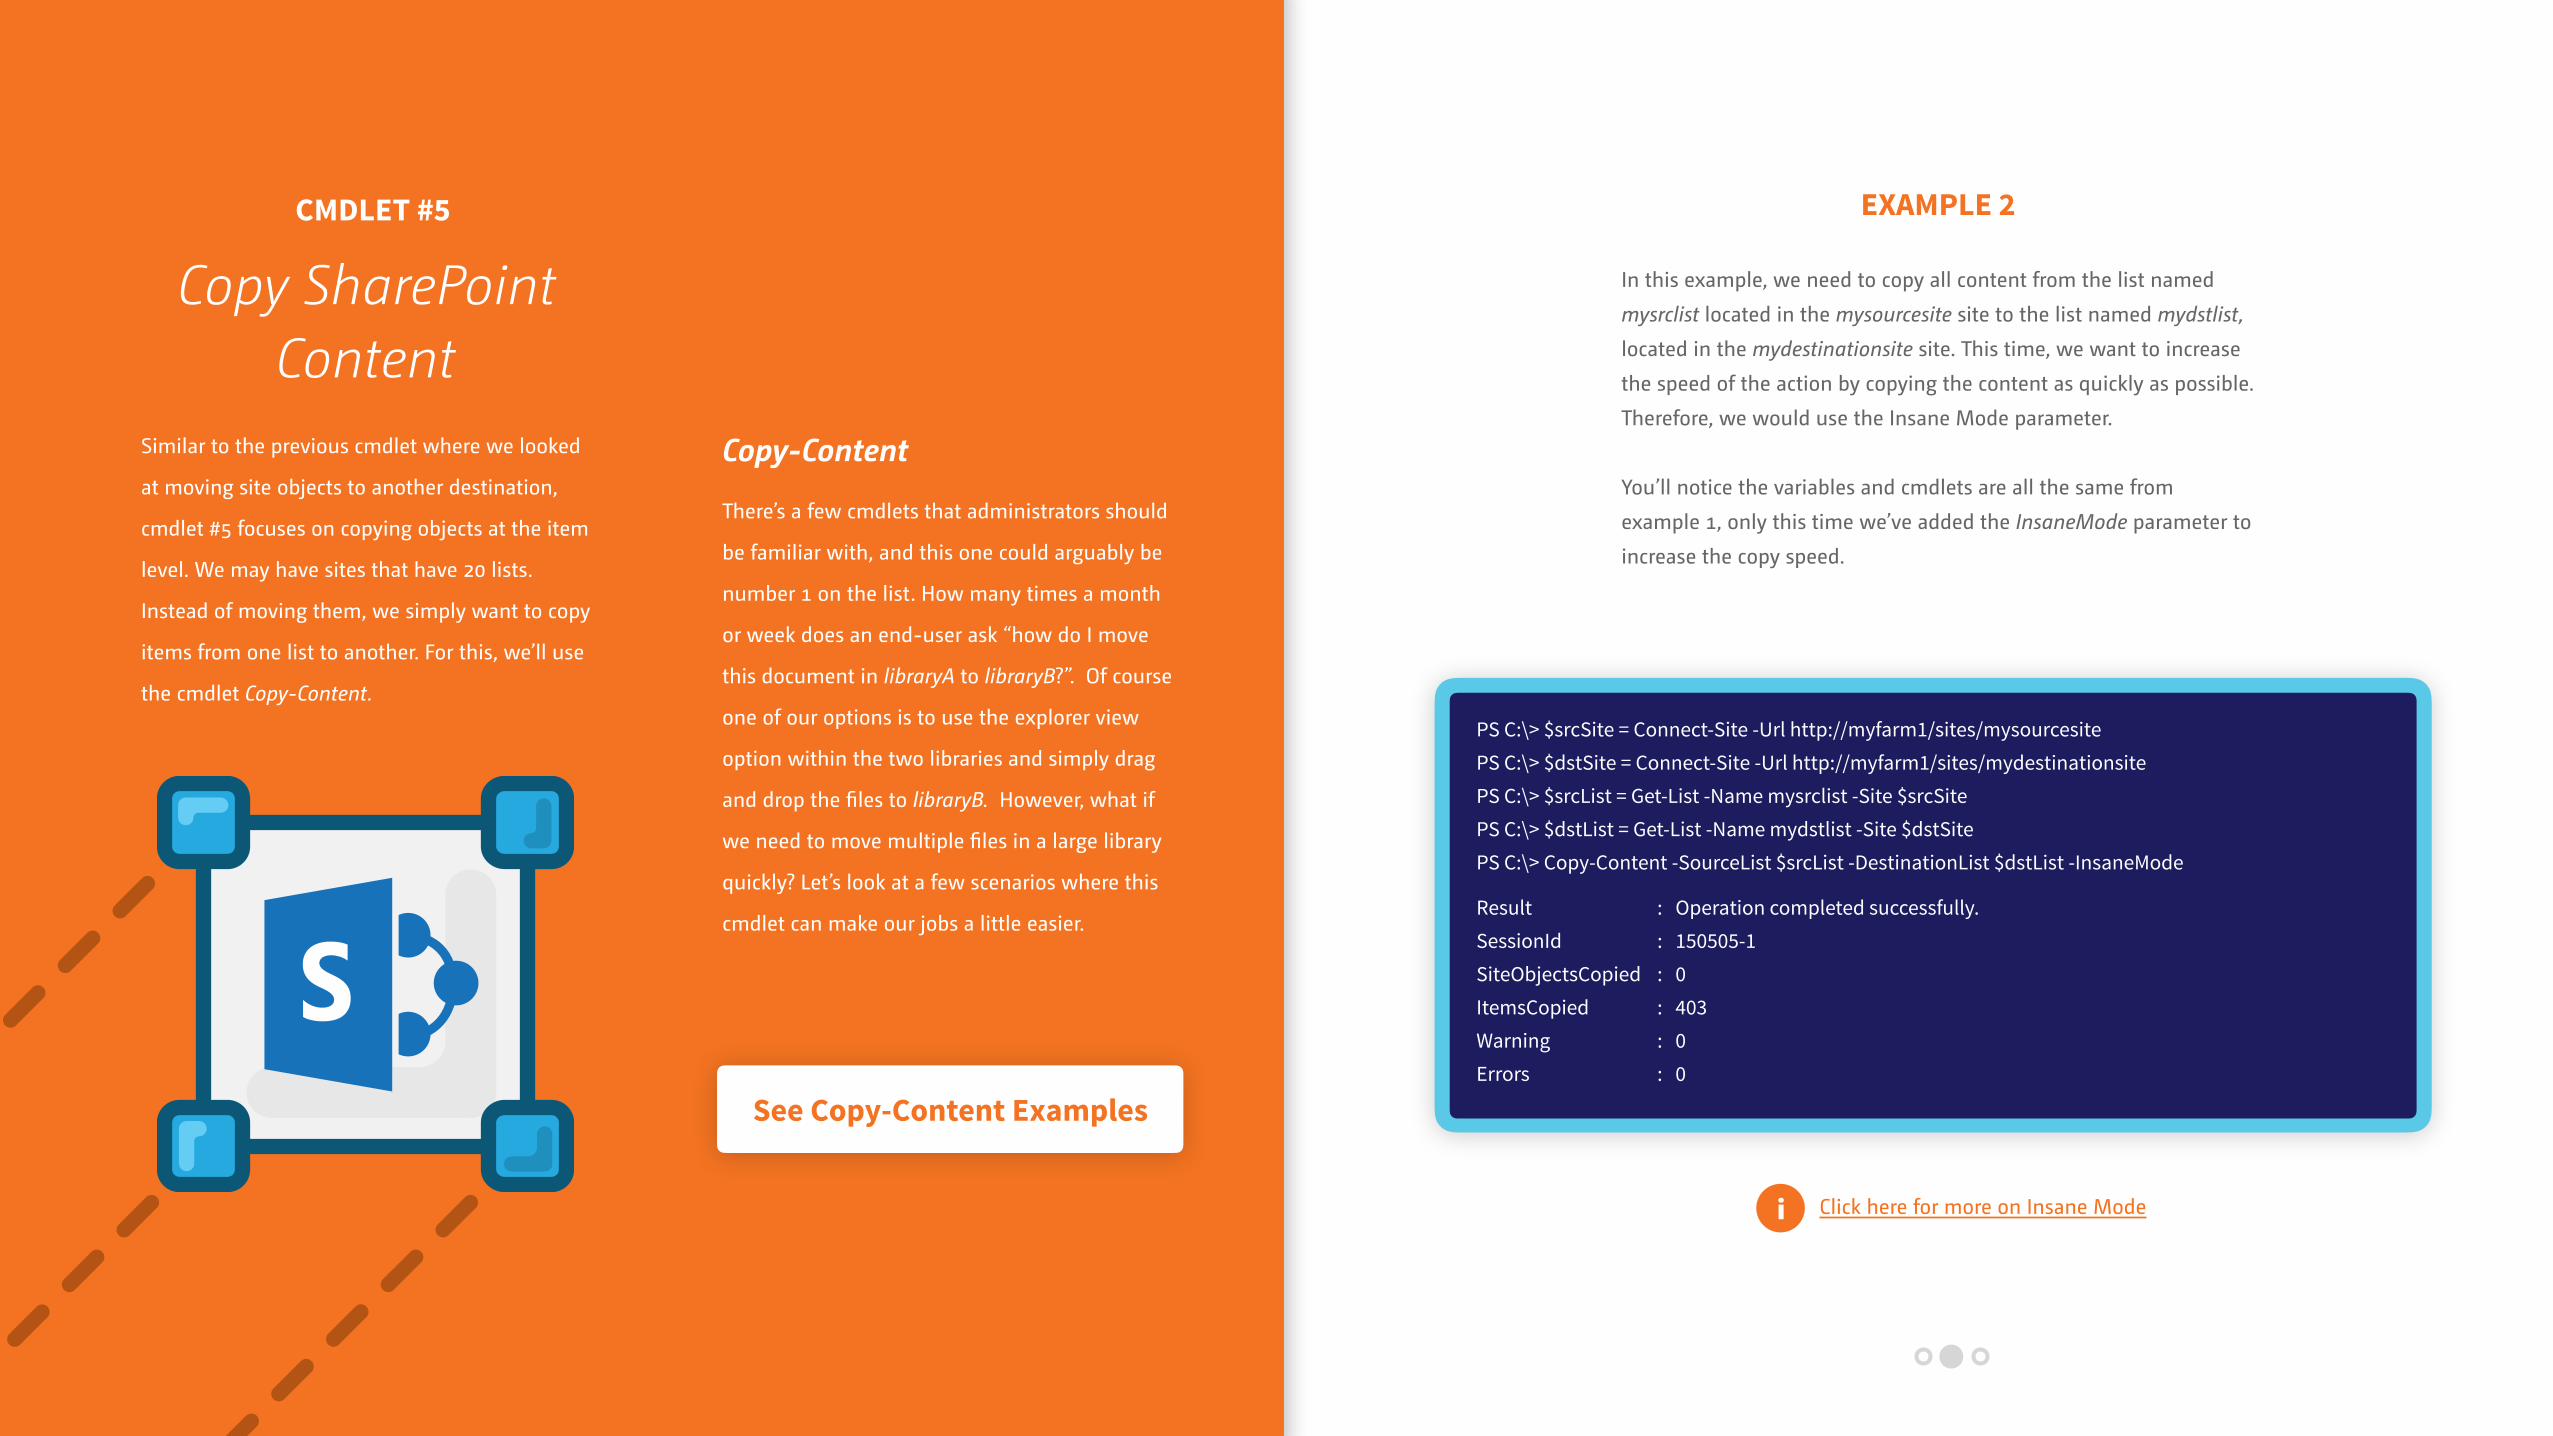
EXAMPLE 2
In this example, we need to copy all content from the list named
mysrclist located in the mysourcesite site to the list named mydstlist,
located in the mydestinationsite site. This time, we want to increase
the speed of the action by copying the content as quickly as possible.
Therefore, we would use the Insane Mode parameter.
You’ll notice the variables and cmdlets are all the same from
example 1, only this time we’ve added the InsaneMode parameter to
increase the copy speed.
: Operation completed successfully. : 150505-1 : 0 : 403 : 0 : 0
Result SessionId SiteObjectsCopied ItemsCopied Warning Errors
PS C:\> $srcSite = Connect-Site -Url http://myfarm1/sites/mysourcesite PS C:\> $dstSite = Connect-Site -Url http://myfarm1/sites/mydestinationsite PS C:\> $srcList = Get-List -Name mysrclist -Site $srcSite PS C:\> $dstList = Get-List -Name mydstlist -Site $dstSite PS C:\> Copy-Content -SourceList $srcList -DestinationList $dstList -InsaneMode
CMDLET #5
Similar to the previous cmdlet where we looked
at moving site objects to another destination,
cmdlet #5 focuses on copying objects at the item
level. We may have sites that have 20 lists.
Instead of moving them, we simply want to copy
items from one list to another. For this, we’ll use
the cmdlet Copy-Content.
Copy SharePoint Content
Copy-Content
There’s a few cmdlets that administrators should
be familiar with, and this one could arguably be
number 1 on the list. How many times a month
or week does an end-user ask “how do I move
this document in libraryA to libraryB?”. Of course
one of our options is to use the explorer view
option within the two libraries and simply drag
and drop the files to libraryB. However, what if
we need to move multiple files in a large library
quickly? Let’s look at a few scenarios where this
cmdlet can make our jobs a little easier.
Click here for more on Insane Modei
See Copy-Content Examples

EXAMPLE 3
In our last example, we dealt with files that only needed to be
moved. This time, however, we need to move them to a folder
where we can maintain the documents. Like example 1 and 2 we
will need to specify the source site and library as well as the
destination site and library. We will then run our Copy-Content
cmdlet using the parameter SourceFilePath to identify the specific
files to copy, and also the DestinationFolder parameter to specify
which folder to copy the files to.
: Operation completed successfully. : 140226-1 : 0 : 2
Result SessionId SiteObjectsCopied ItemsCopied
PS C:\> $srcSite = Connect-Site -Url http://myfarm1/sites/mysourcesite PS C:\> $dstSite = Connect-Site -Url http://myfarm1/sites/mydestinationsite PS C:\> $srcList = Get-List -Name mysrclist -Site $srcSite PS C:\> $dstList = Get-List -Name mydstlist -Site $dstSite PS C:\> Copy-Content -SourceList $srcList -DestinationList $dstList -SourceFilePath “Document1.txt”, “Folder/Document2.txt” -DestinationFolder “MyDestinationFolder”
CMDLET #5
Similar to the previous cmdlet where we looked
at moving site objects to another destination,
cmdlet #5 focuses on copying objects at the item
level. We may have sites that have 20 lists.
Instead of moving them, we simply want to copy
items from one list to another. For this, we’ll use
the cmdlet Copy-Content.
Copy SharePoint Content
Copy-Content
There’s a few cmdlets that administrators should
be familiar with, and this one could arguably be
number 1 on the list. How many times a month
or week does an end-user ask “how do I move
this document in libraryA to libraryB?”. Of course
one of our options is to use the explorer view
option within the two libraries and simply drag
and drop the files to libraryB. However, what if
we need to move multiple files in a large library
quickly? Let’s look at a few scenarios where this
cmdlet can make our jobs a little easier.
See Copy-Content Examples
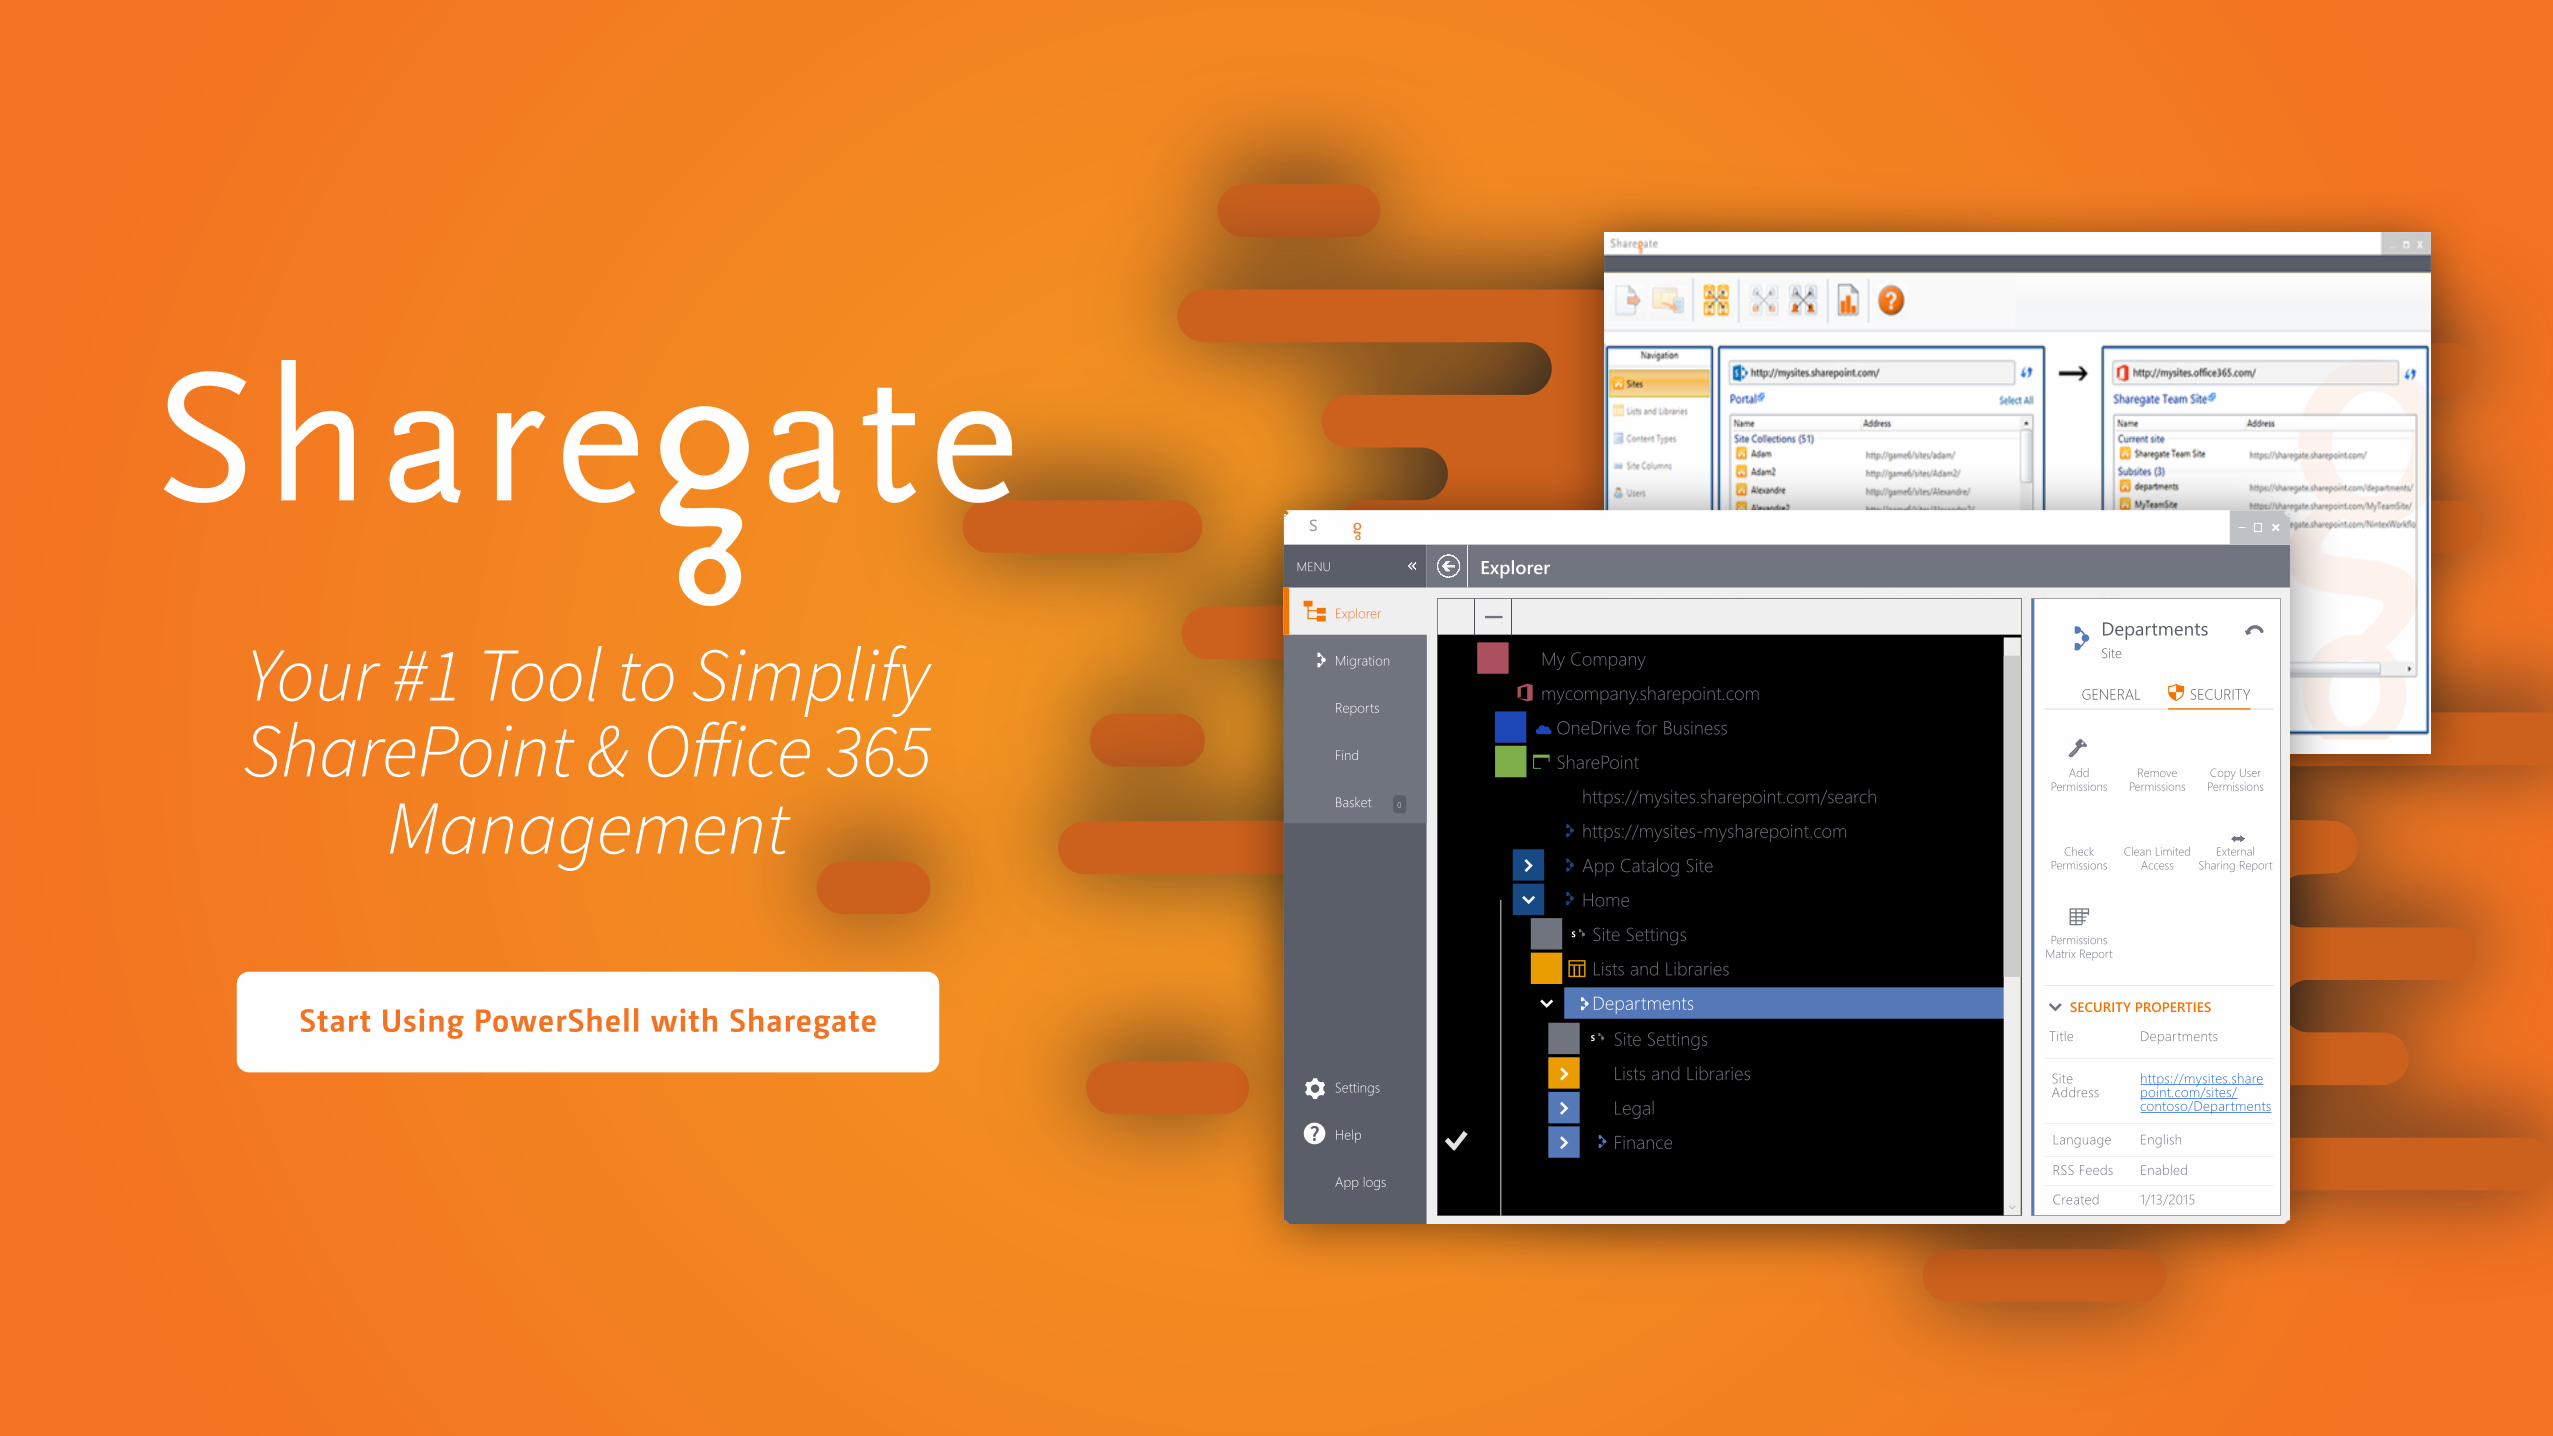
Start Using PowerShell with Sharegate
Your #1 Tool to Simplify SharePoint & Office 365
Management
Settings
Help
App logs
Explorer
Migration
Reports
Find
Basket 0
MENU Explorer
My Company
mycompany.sharepoint.com
OneDrive for Business
SharePoint
https://mysites.sharepoint.com/search
https://mysites-mysharepoint.com
App Catalog Site
Home
Site Settings
Lists and Libraries
Departments
Site Settings
Lists and Libraries
Legal
Finance
DepartmentsSite
SECURITYGENERAL
ExternalSharing Report
PermissionsMatrix Report
SiteAddress
1/13/2015Created
EnabledRSS Feeds
EnglishLanguage
DepartmentsTitle
SECURITY PROPERTIES
Clean LimitedAccess
CheckPermissions
Copy UserPermissions
RemovePermissions
AddPermissions
https://mysites.sharepoint.com/sites/contoso/Departments
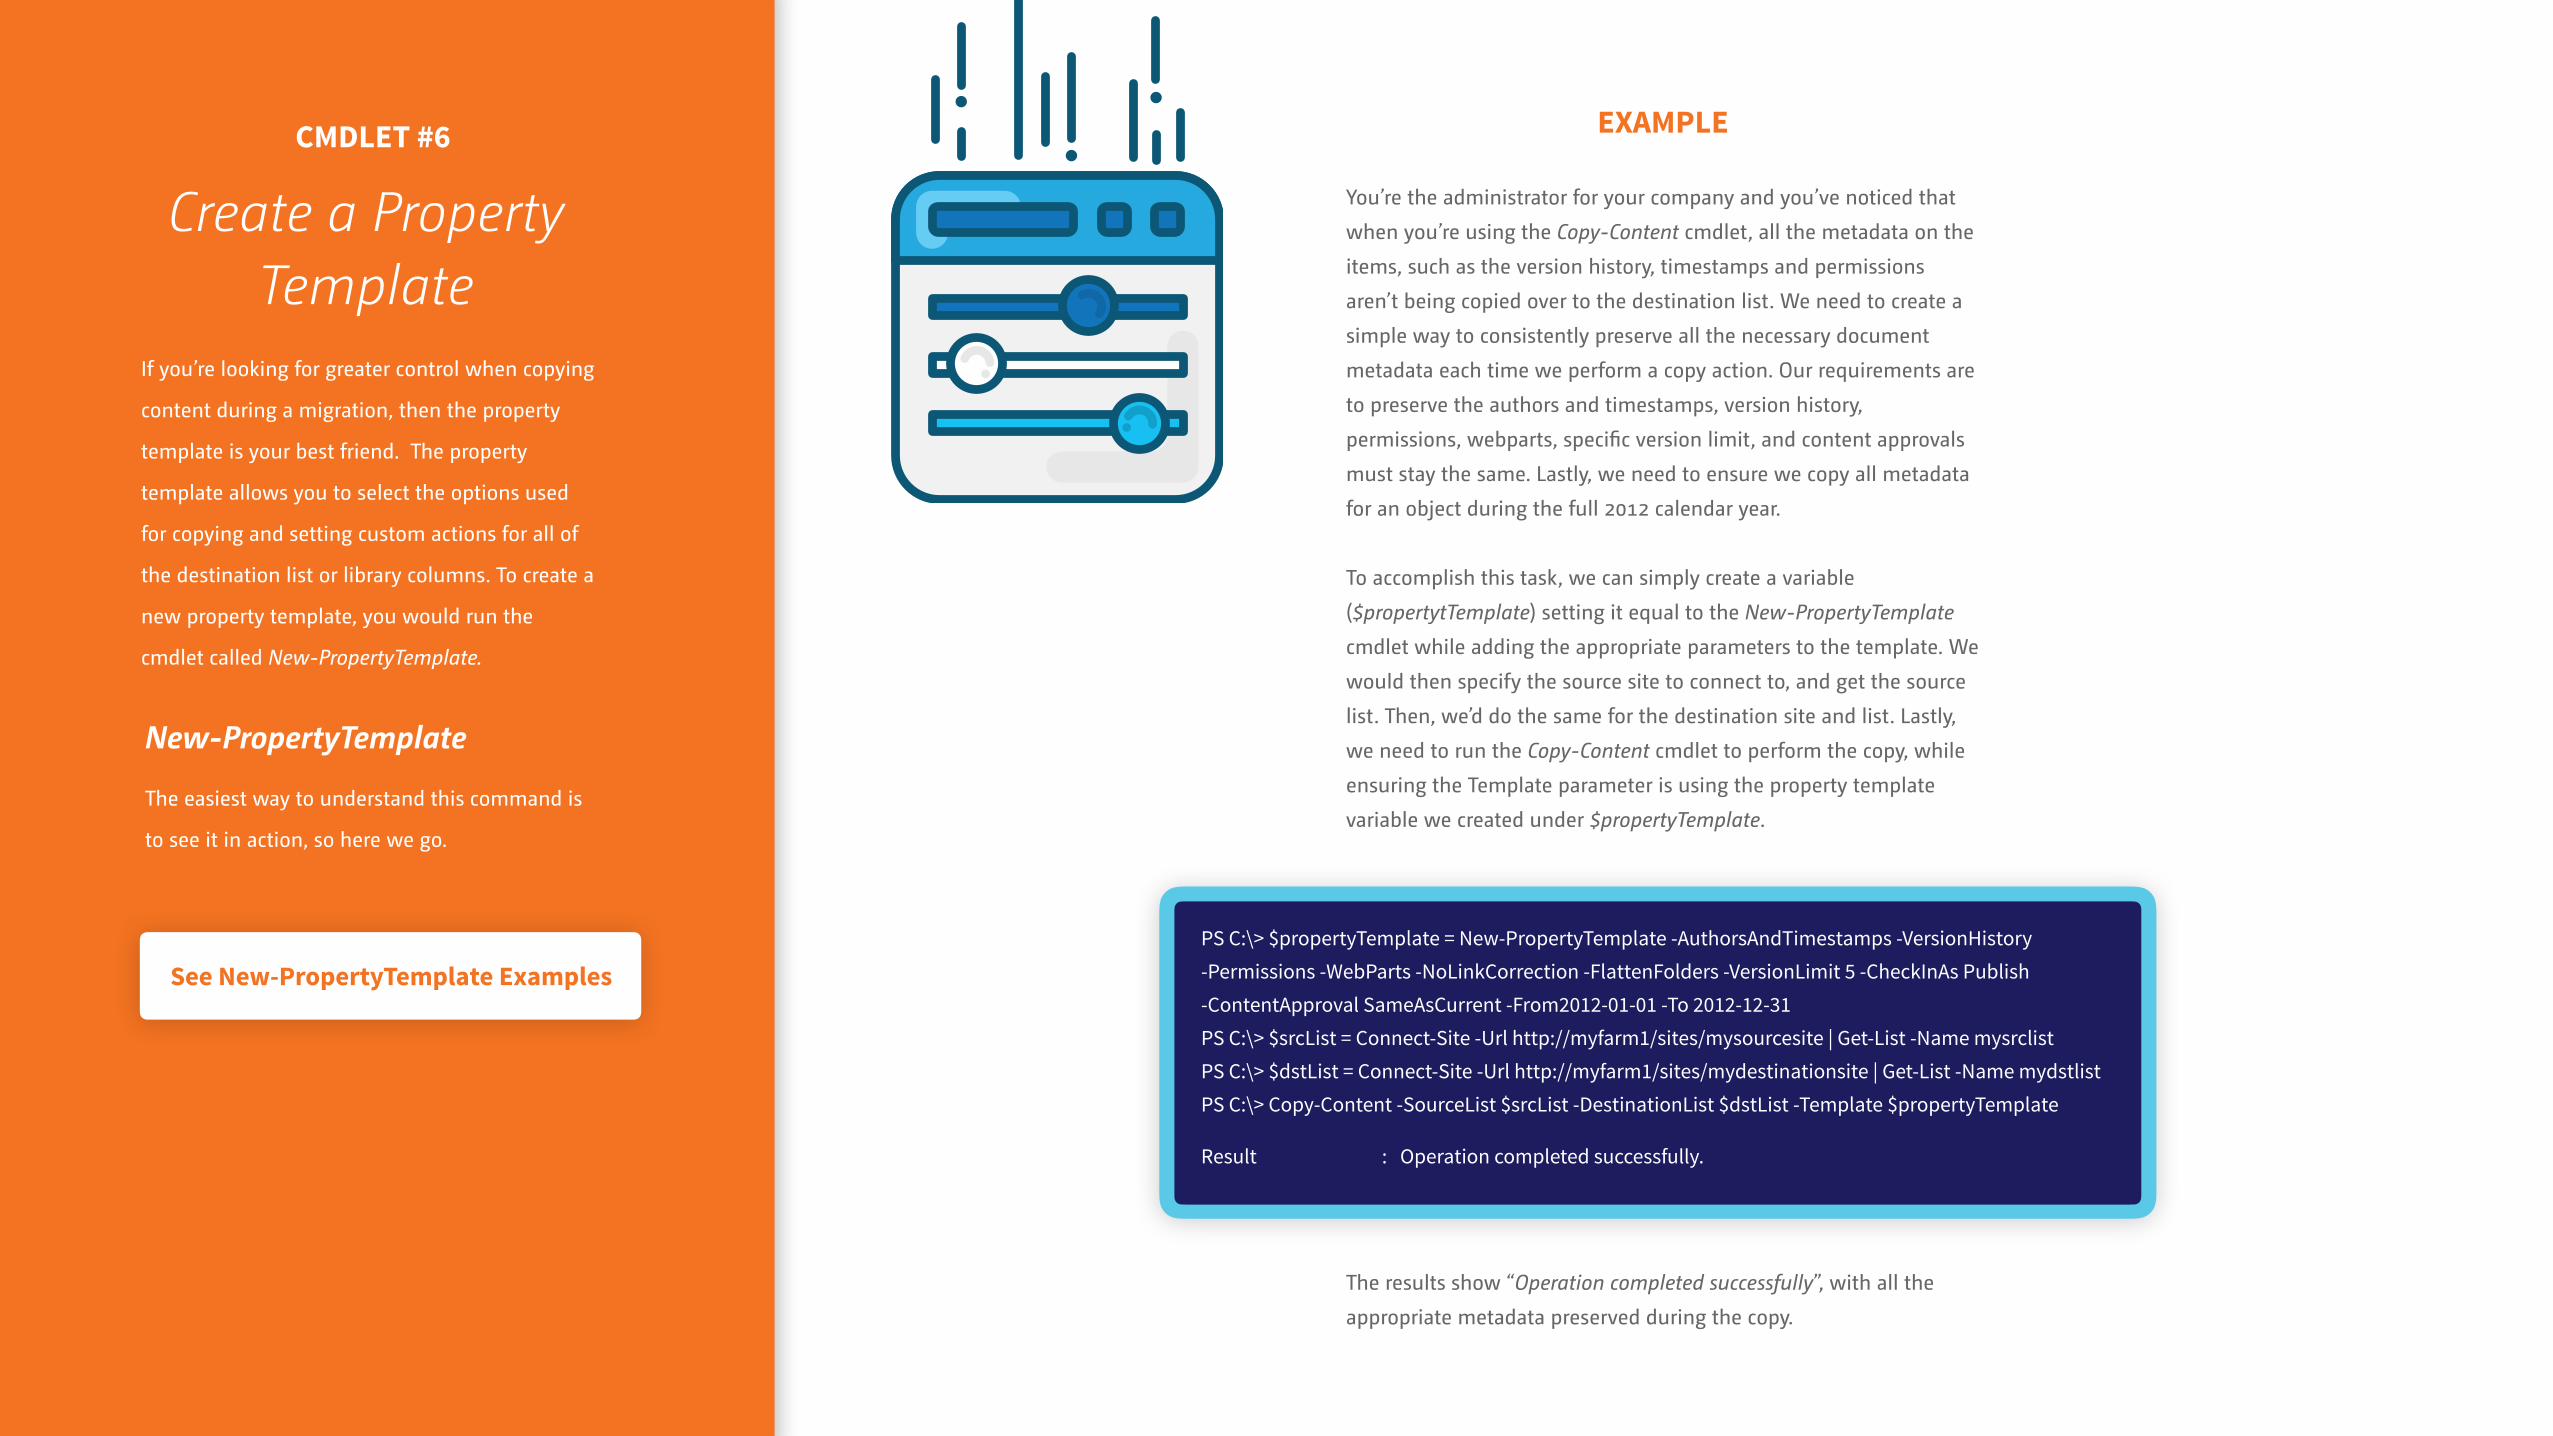
EXAMPLE
You’re the administrator for your company and you’ve noticed that
when you’re using the Copy-Content cmdlet, all the metadata on the
items, such as the version history, timestamps and permissions
aren’t being copied over to the destination list. We need to create a
simple way to consistently preserve all the necessary document
metadata each time we perform a copy action. Our requirements are
to preserve the authors and timestamps, version history,
permissions, webparts, specific version limit, and content approvals
must stay the same. Lastly, we need to ensure we copy all metadata
for an object during the full 2012 calendar year.
To accomplish this task, we can simply create a variable
($propertytTemplate) setting it equal to the New-PropertyTemplate
cmdlet while adding the appropriate parameters to the template. We
would then specify the source site to connect to, and get the source
list. Then, we’d do the same for the destination site and list. Lastly,
we need to run the Copy-Content cmdlet to perform the copy, while
ensuring the Template parameter is using the property template
variable we created under $propertyTemplate.
: Operation completed successfully.Result
PS C:\> $propertyTemplate = New-PropertyTemplate -AuthorsAndTimestamps -VersionHistory -Permissions -WebParts -NoLinkCorrection -FlattenFolders -VersionLimit 5 -CheckInAs Publish -ContentApproval SameAsCurrent -From2012-01-01 -To 2012-12-31 PS C:\> $srcList = Connect-Site -Url http://myfarm1/sites/mysourcesite | Get-List -Name mysrclist PS C:\> $dstList = Connect-Site -Url http://myfarm1/sites/mydestinationsite | Get-List -Name mydstlist PS C:\> Copy-Content -SourceList $srcList -DestinationList $dstList -Template $propertyTemplate
CMDLET #6
If you’re looking for greater control when copying
content during a migration, then the property
template is your best friend. The property
template allows you to select the options used
for copying and setting custom actions for all of
the destination list or library columns. To create a
new property template, you would run the
cmdlet called New-PropertyTemplate.
Create a Property Template
New-PropertyTemplate
The easiest way to understand this command is
to see it in action, so here we go.
See New-PropertyTemplate Examples
The results show “Operation completed successfully”, with all the
appropriate metadata preserved during the copy.

EXAMPLE 1
We currently have a folder on our local computer that has a few
documents we need to move to a SharePoint library named
mydstlib.
To import all the documents located in the folder named
documentsToImport, we first need to create a variable that will
connect to the destination site ($dstSite) and also a variable to the
destination library ($dstList). Lastly, we need to run the cmdlet
Import-Document with the parameters SourceFolder and
DestinationList.
: Operation completed successfully. : 140226-1 : 0 : 26 : 0 : 0
Result SessionId SiteObjectsCopied ItemsCopied Warning Errors
PS C:\> $dstSite = Connect-Site -Url http://myfarm1/sites/mydestinationsite PS C:\> $dstList = Get-List -Name mydstlib -Site $dstSite PS C:\> Import-Document -SourceFolder \\mysharedrive\documentsToImport\ -DestinationList $dstL
CMDLET #7
Let’s face it, although SharePoint is a highly
available platform that’s backed up daily, we
sometimes aren’t too smart, and save files to our
local computer anyway. The outcome of losing an
important file we think may be “safe” can result
in a disaster if the computer dies. No worries,
we can easily add these files to SharePoint by
running the Import-Document cmdlet.
Import Documents From a Local
Computer into SharePoint
Import-Document
The Import-Document provides numerous
parameters in which we can easily use to import
a document to a SharePoint library. When using
the cmdlet, you must have some sort of source
such as a SourceFolder, SourceFilePath or
ExcelFilePath. It also must have a specified
destination path, such as the parameter
DestinationList or DestinationFolder to copy the
file(s) to. Additionally, you have a number of
other parameters such as InsaneMode, mapping
to another location with the MappingSettings,
copy the same settings with CopySettings, as well
as the PropertyTemplate we discussed earlier.
View Import Document ExamplesWe can see that the “Operation completed successfully”, with all 26
documents in the source folder imported to the SharePoint library.
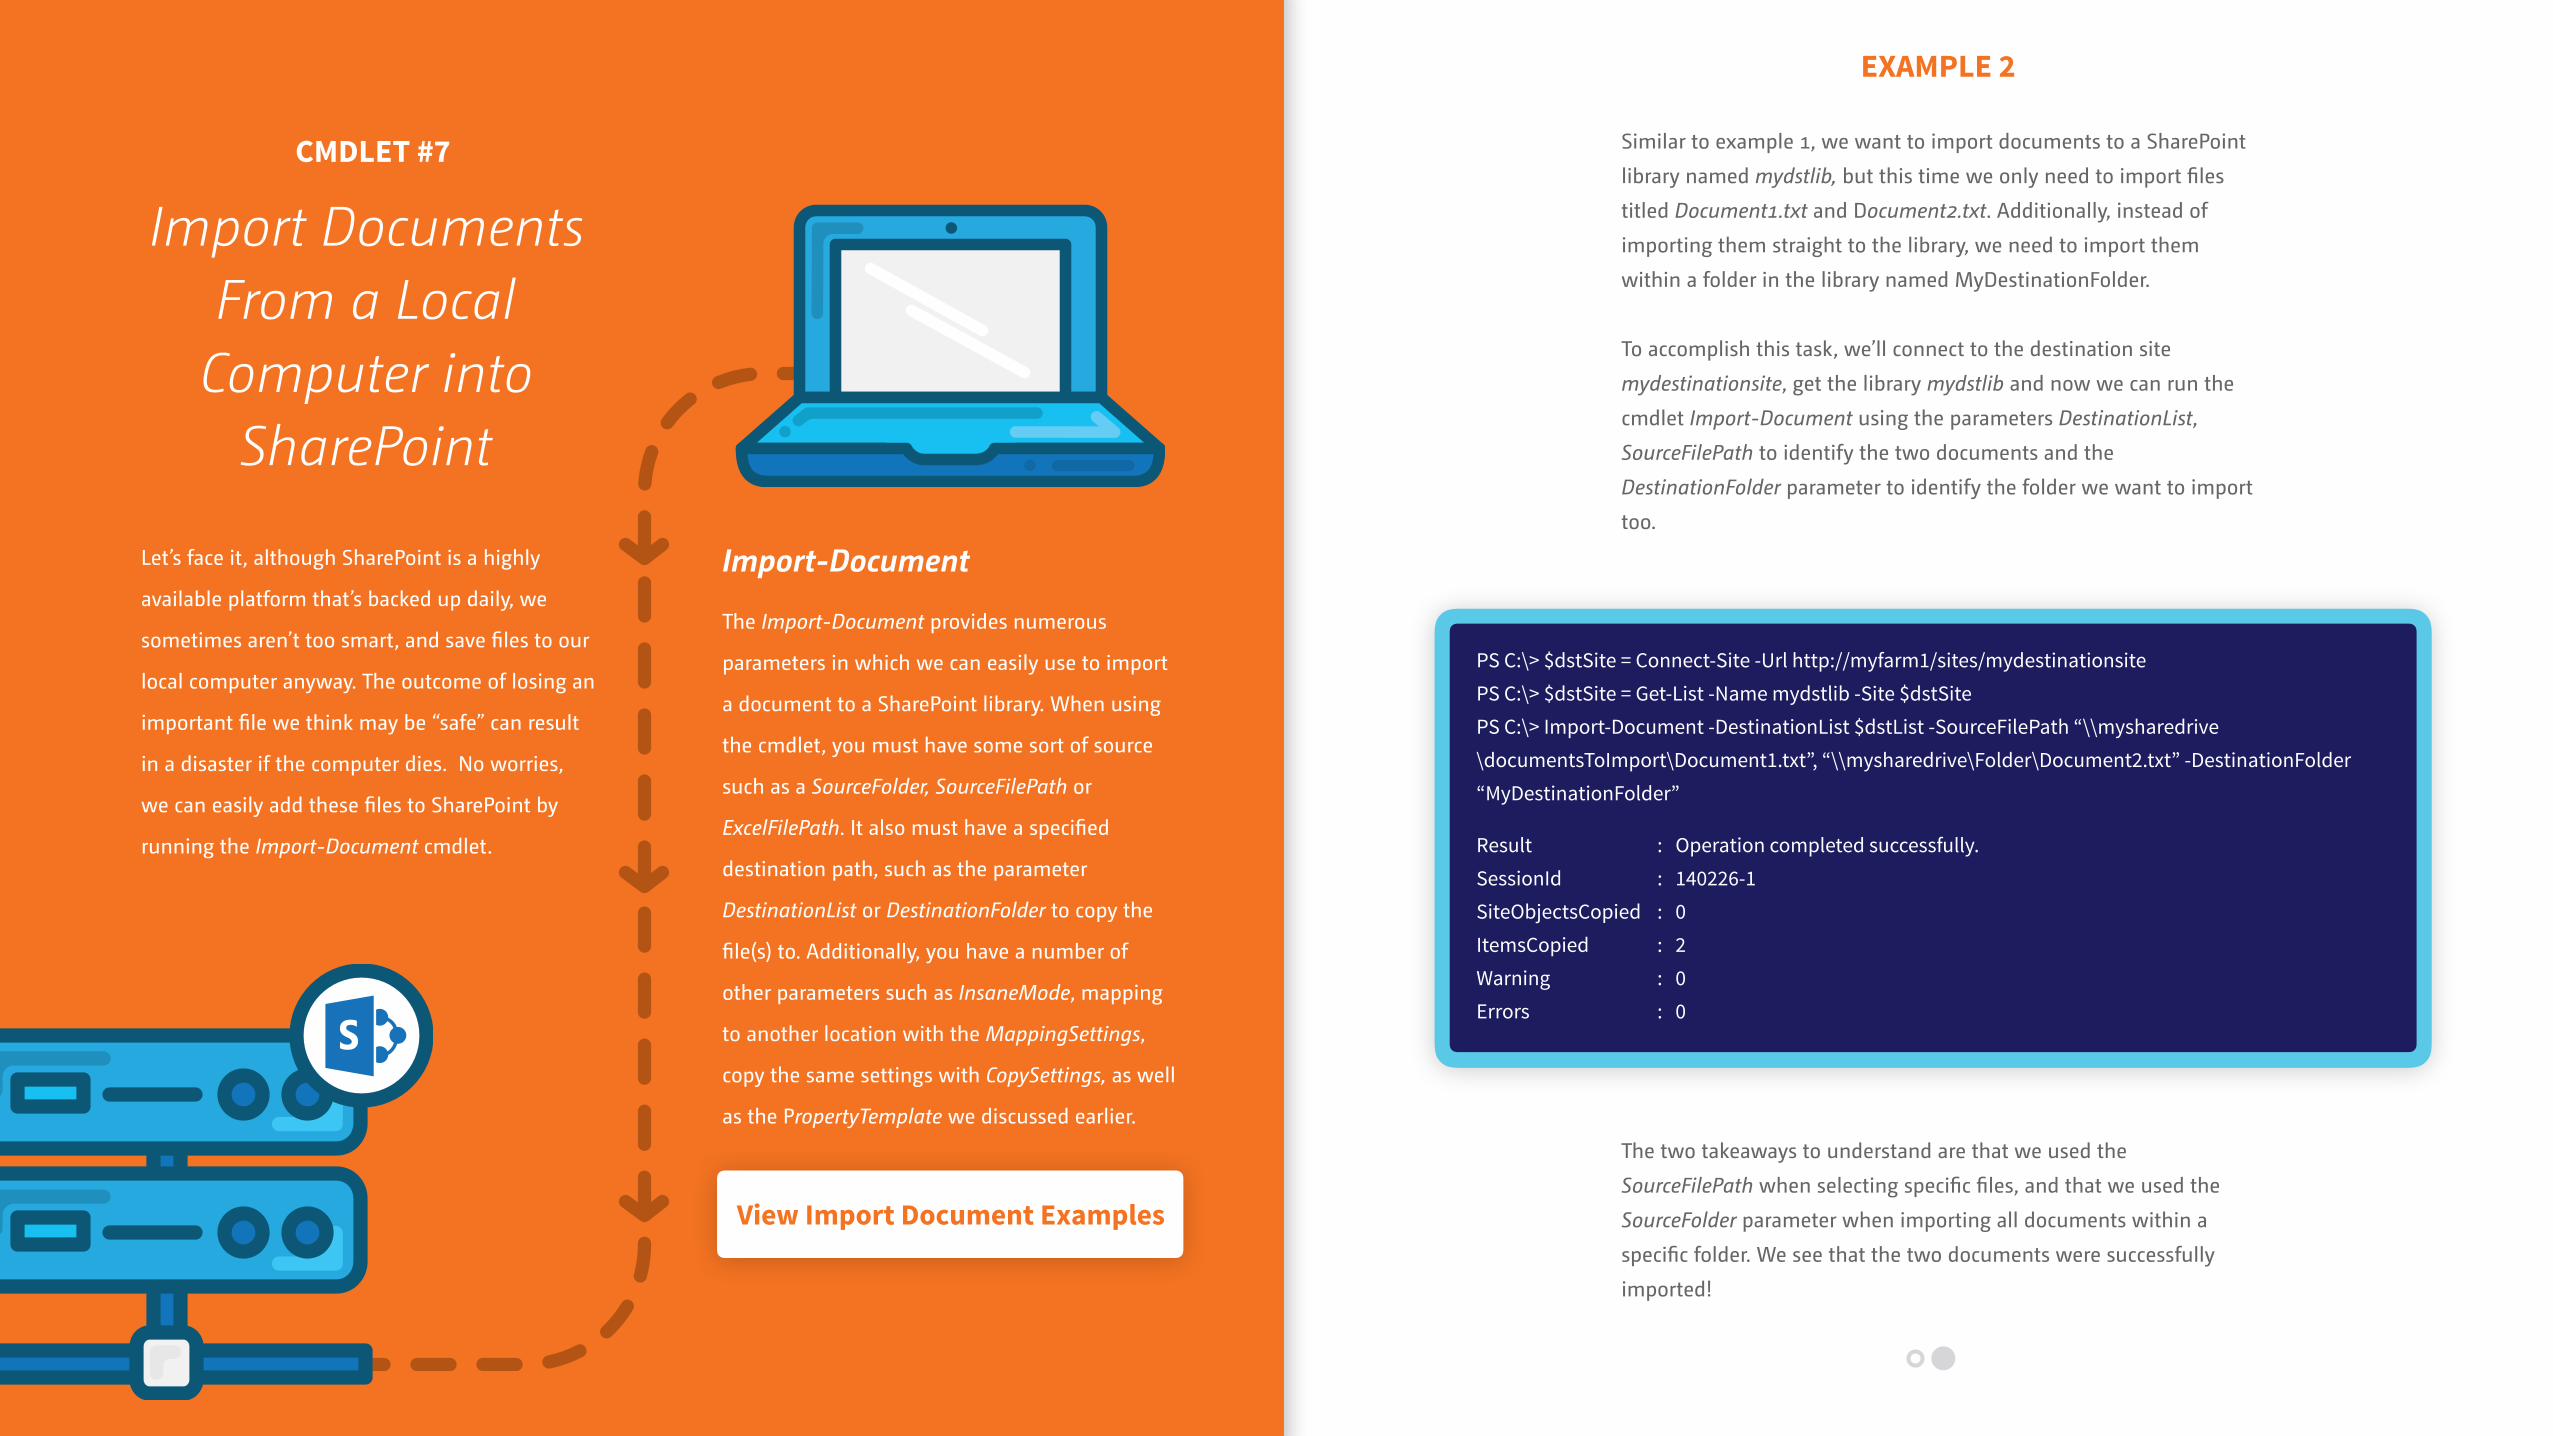
EXAMPLE 2
Similar to example 1, we want to import documents to a SharePoint
library named mydstlib, but this time we only need to import files
titled Document1.txt and Document2.txt. Additionally, instead of
importing them straight to the library, we need to import them
within a folder in the library named MyDestinationFolder.
To accomplish this task, we’ll connect to the destination site
mydestinationsite, get the library mydstlib and now we can run the
cmdlet Import-Document using the parameters DestinationList,
SourceFilePath to identify the two documents and the
DestinationFolder parameter to identify the folder we want to import
too.
: Operation completed successfully. : 140226-1 : 0 : 2 : 0 : 0
Result SessionId SiteObjectsCopied ItemsCopied Warning Errors
PS C:\> $dstSite = Connect-Site -Url http://myfarm1/sites/mydestinationsite PS C:\> $dstSite = Get-List -Name mydstlib -Site $dstSite PS C:\> Import-Document -DestinationList $dstList -SourceFilePath “\\mysharedrive\documentsToImport\Document1.txt”, “\\mysharedrive\Folder\Document2.txt” -DestinationFolder “MyDestinationFolder”
CMDLET #7
Let’s face it, although SharePoint is a highly
available platform that’s backed up daily, we
sometimes aren’t too smart, and save files to our
local computer anyway. The outcome of losing an
important file we think may be “safe” can result
in a disaster if the computer dies. No worries,
we can easily add these files to SharePoint by
running the Import-Document cmdlet.
Import Documents From a Local
Computer into SharePoint
Import-Document
The Import-Document provides numerous
parameters in which we can easily use to import
a document to a SharePoint library. When using
the cmdlet, you must have some sort of source
such as a SourceFolder, SourceFilePath or
ExcelFilePath. It also must have a specified
destination path, such as the parameter
DestinationList or DestinationFolder to copy the
file(s) to. Additionally, you have a number of
other parameters such as InsaneMode, mapping
to another location with the MappingSettings,
copy the same settings with CopySettings, as well
as the PropertyTemplate we discussed earlier.
The two takeaways to understand are that we used the
SourceFilePath when selecting specific files, and that we used the
SourceFolder parameter when importing all documents within a
specific folder. We see that the two documents were successfully
imported!
View Import Document Examples

EXAMPLE 1
You exported a property mapping file to C:\MyMappings\MyPropertyMappingFileName.sgpm and you need
to import it. Simply run the cmdlet Import-PropertyMapping with
the path of the file.
Author KEY Created
Editor Modified <NO SOURCE> MyCustomField
KEY Title
PropertyMappings :
PS C:\> $mappingSettings = Import-PropertyMapping -Path C:\MyMappings\MyPropertyMappingsFileName.sgpm PS C:\>$mappingSettings
CMDLET #8
In a case where we’ve exported a set of property
mappings, user and group mappings, content
type mappings, site template mappings or
permission level mappings, we can use the
unique mapping cmdlet to import the files back
to our environment. While each of these
mappings use a different cmdlet name, they all
share similar parameters which we’ll dive into
shortly. First, let’s look at the Import-
PropertyMapping cmdlet.
Import Property Mappings
Previously Exported
Import-PropertyMapping
The purpose of this command is to import the
property mappings from a previously exported
file. The parameters that each of these cmdlets
use consist of the MappingSettings parameter
and the Path parameter which points to the
location of the previously exported mapping file.
View Import Property Mapping Examples
We see that all the mappings that we previously exported are now
mapped back to our existing setup.
-> Author -> Created -> Editor -> Modified -> Multiple Column -> MyCustomField -> Title

CMDLET #8
In a case where we’ve exported a set of property
mappings, user and group mappings, content
type mappings, site template mappings or
permission level mappings, we can use the
unique mapping cmdlet to import the files back
to our environment. While each of these
mappings use a different cmdlet name, they all
share similar parameters which we’ll dive into
shortly. First, let’s look at the Import-
PropertyMapping cmdlet.
Import Property Mappings
Previously Exported
Import-PropertyMapping
The purpose of this command is to import the
property mappings from a previously exported
file. The parameters that each of these cmdlets
use consist of the MappingSettings parameter
and the Path parameter which points to the
location of the previously exported mapping file.
EXAMPLE 2
We can take this a step further and say we want to set column1 to
Multiple Column while additionally adding a column2 and column3
from example 1. Our results will show the three new columns while
column1 is mapped to MultipleColumn.
Author KEY Created
Editor Modified Col1 Col2 Col3 MyCustomField
KEY Title
PropertyMappings :
PS C:\> $mappingSettings = Set-PropertyMapping -Source Col1, Col2, Col3 -Destination “Multiple Column” PS C:\>$mappingSettings = Import-PropertyMapping -MappingSettings $mappingSettings -Path C:\MyMappings\MyPropertyMappingsFileName.sgpm PS C:\> $mappingSettings
-> Author -> Created -> Editor -> Modified -> Multiple Column -> _________I -> _________I -> MyCustomField -> Title
View Import Property Mapping Examples
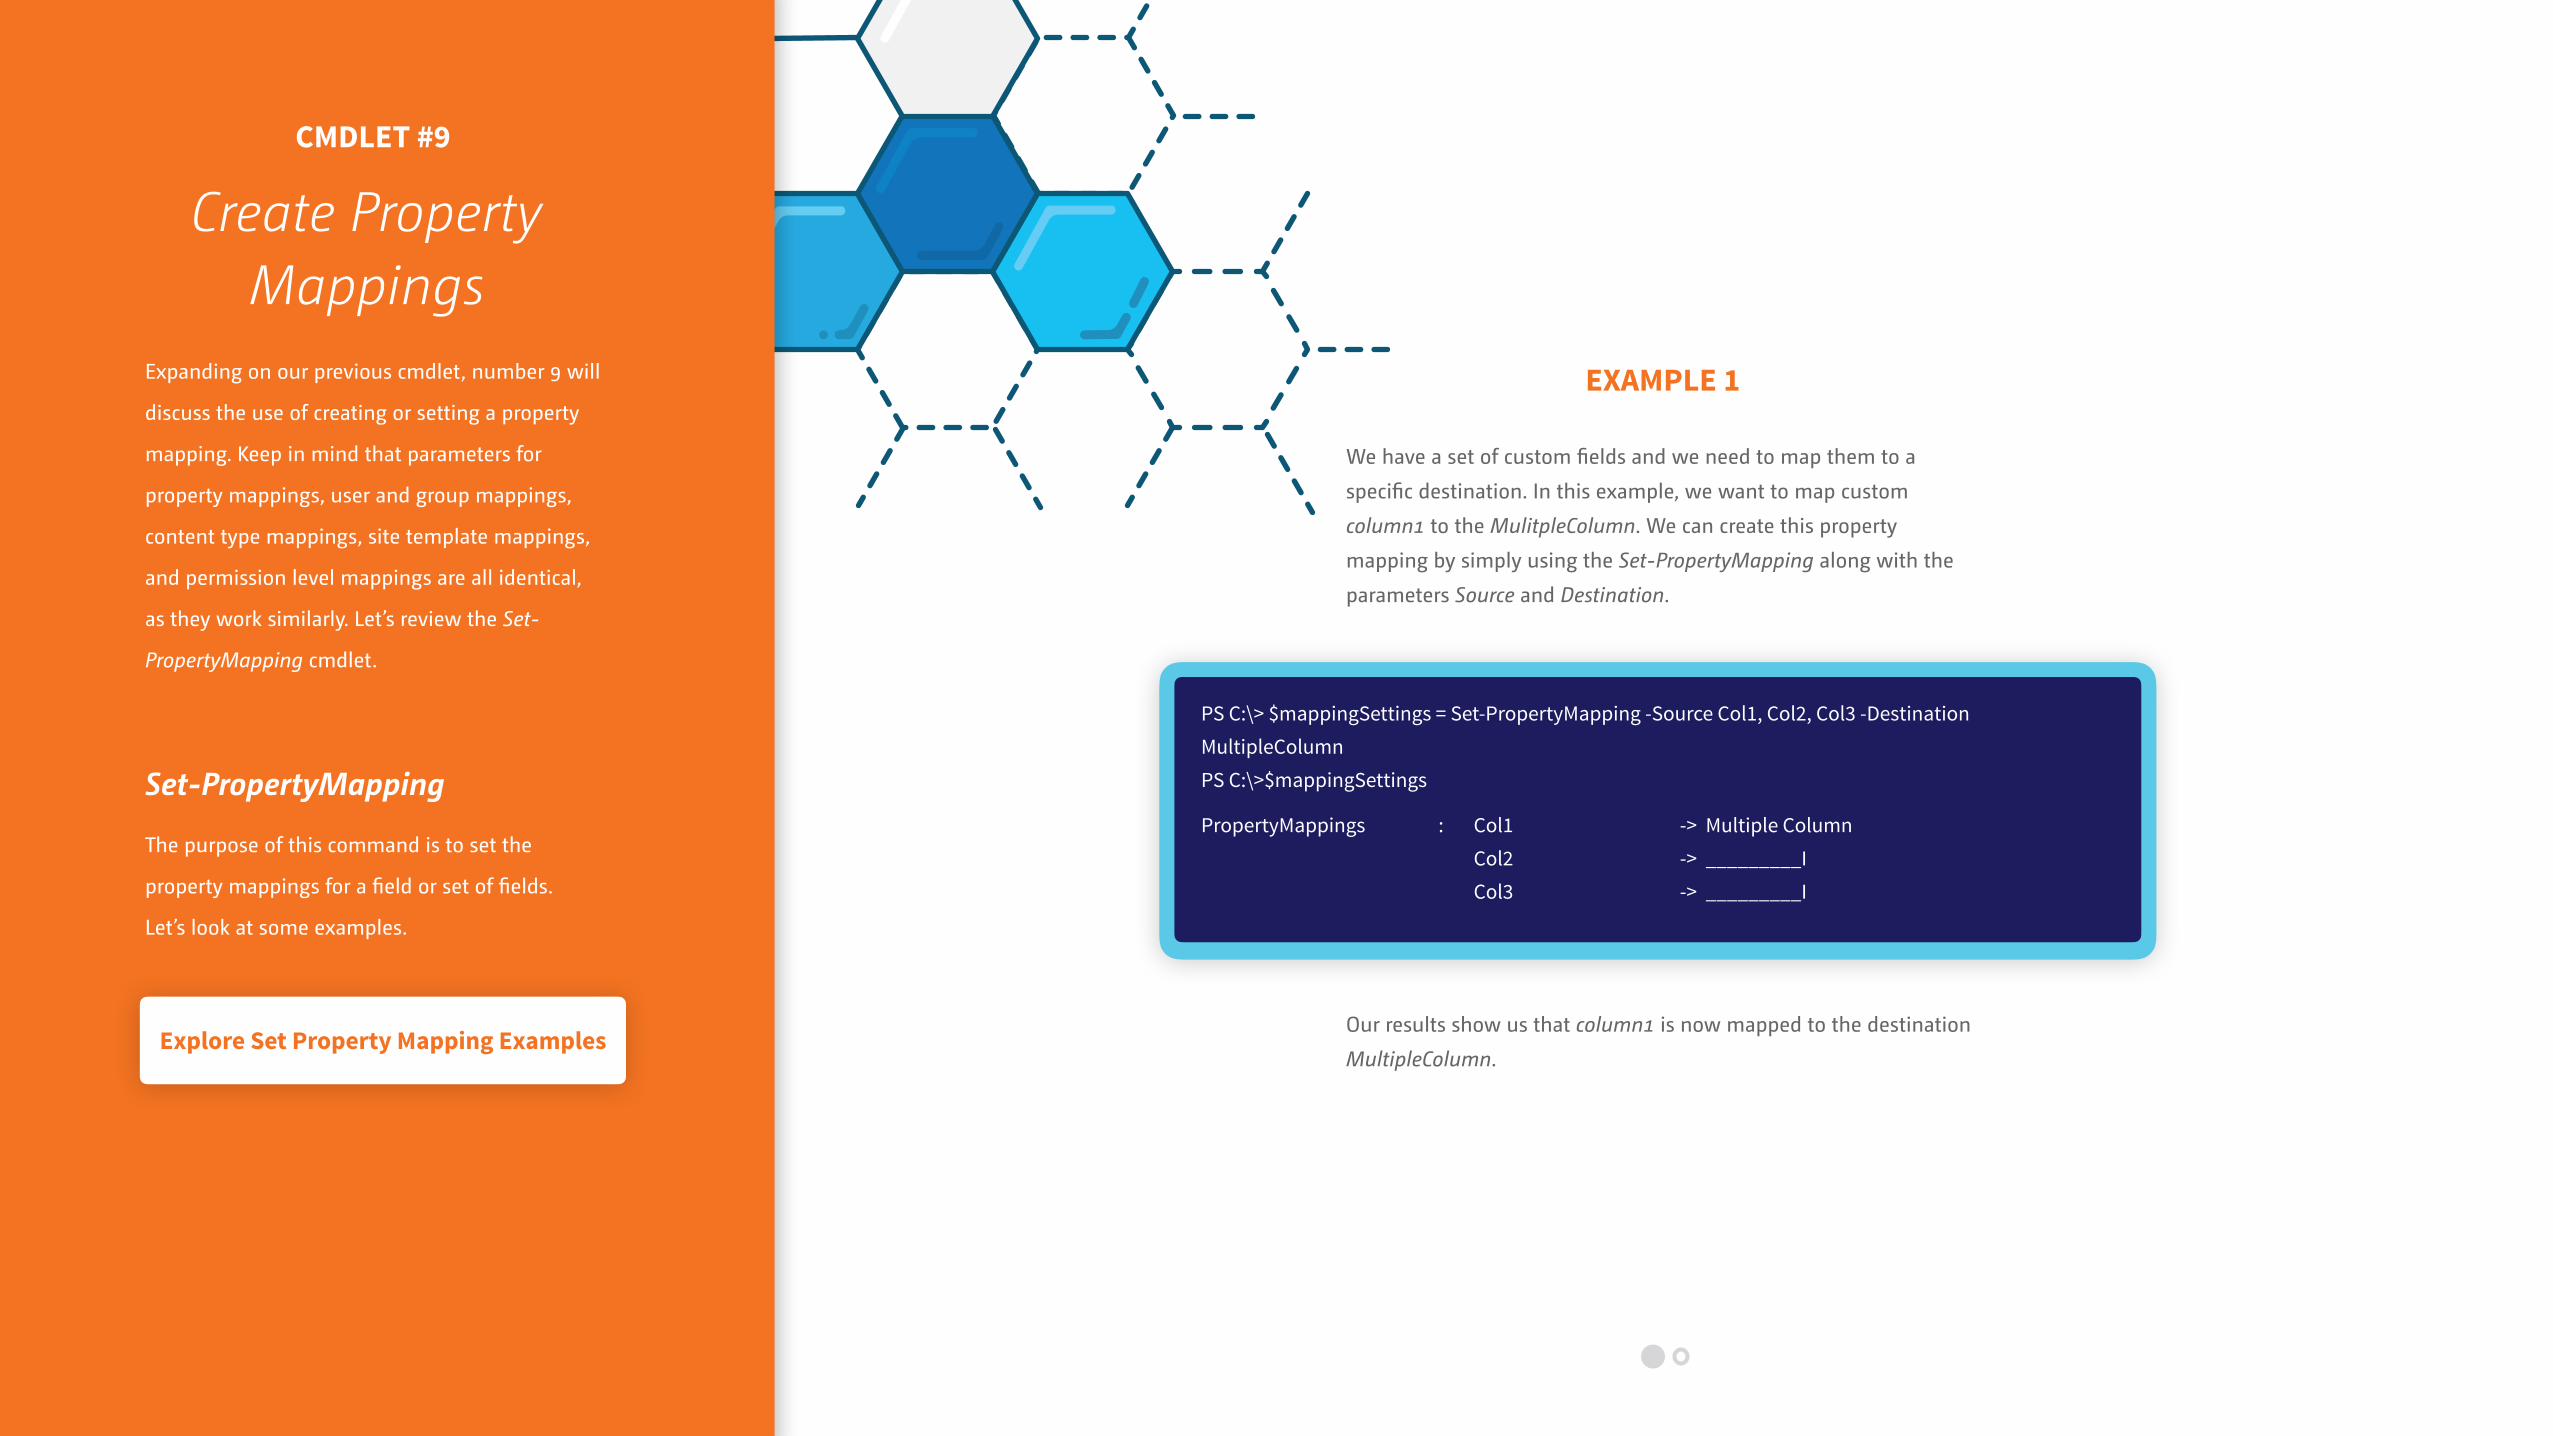
EXAMPLE 1
We have a set of custom fields and we need to map them to a
specific destination. In this example, we want to map custom
column1 to the MulitpleColumn. We can create this property
mapping by simply using the Set-PropertyMapping along with the
parameters Source and Destination.
Col1 Col2 Col3
PropertyMappings :
PS C:\> $mappingSettings = Set-PropertyMapping -Source Col1, Col2, Col3 -Destination MultipleColumn PS C:\>$mappingSettings
Our results show us that column1 is now mapped to the destination
MultipleColumn.
-> Multiple Column -> _________I -> _________I
CMDLET #9
Expanding on our previous cmdlet, number 9 will
discuss the use of creating or setting a property
mapping. Keep in mind that parameters for
property mappings, user and group mappings,
content type mappings, site template mappings,
and permission level mappings are all identical,
as they work similarly. Let’s review the Set-
PropertyMapping cmdlet.
Create Property Mappings
Set-PropertyMapping
The purpose of this command is to set the
property mappings for a field or set of fields.
Let’s look at some examples.
Explore Set Property Mapping Examples

CMDLET #9
Expanding on our previous cmdlet, number 9 will
discuss the use of creating or setting a property
mapping. Keep in mind that parameters for
property mappings, user and group mappings,
content type mappings, site template mappings,
and permission level mappings are all identical,
as they work similarly. Let’s review the Set-
PropertyMapping cmdlet.
Create Property Mappings
Set-PropertyMapping
The purpose of this command is to set the
property mappings for a field or set of fields.
Let’s look at some examples.
EXAMPLE 2
In this example we need to set a custom mapping on an existing
mapping from a source list and a destination list.
To accomplish this, we would first connect to both the source and
destination sites, get both source and destination lists, pulling the
existing mappings for the source list by running the cmdlet Get-
PropertyMapping. And then, finally, setting the mappings to the
identified source columns which in our case is Col1 and set the
destination parameter to the existing destination MultipleColumn.
PS C:\> $srcSite = Connect-Site -Url http://myfarm1/sites/mysourcesite PS C:\> $dstSite = Connect-Site -Url http://myfarm1/sites/mydestinationsite PS C:\> $srcList = Get-List -Name mysrclist -Site $srcSite PS C:\> $dstList = Get-List -Name mydstlist -Site $dstSite PS C:\> $mappingSettings = Get-PropertyMapping -SourceList $srcList -DestinationList $dstList PS C:\> $mappingSettings = Set-PropertyMapping -MappingSettings $mappingSettings -Source Col1, Col2, Col3 -Destination MultipleColumn PS C:\> $mappingSettings
Author Key Created
Editor Modified Col1 Col2 Col3 MyCustomField
PropertyMappings : -> Author -> Created -> Editor -> Modified -> MultipleColumn -> _________I -> _________I -> MyCustomField
Explore Set Property Mapping Examples
CMDLET #10
Being asked to create reports for completed
projects is a pretty regular occurrence. The
Sharegate PowerShell cmdlets provide users with
a simple way to export a report of all the details
of a migration by using the Export-Report cmdlet.
Export Migration Reports to a Local
Computer
Export-Report
The Export-Report cmdlet allows administrators
to save a migration report with one simple
action. Let’s dive into an example.
View Export Report Examples
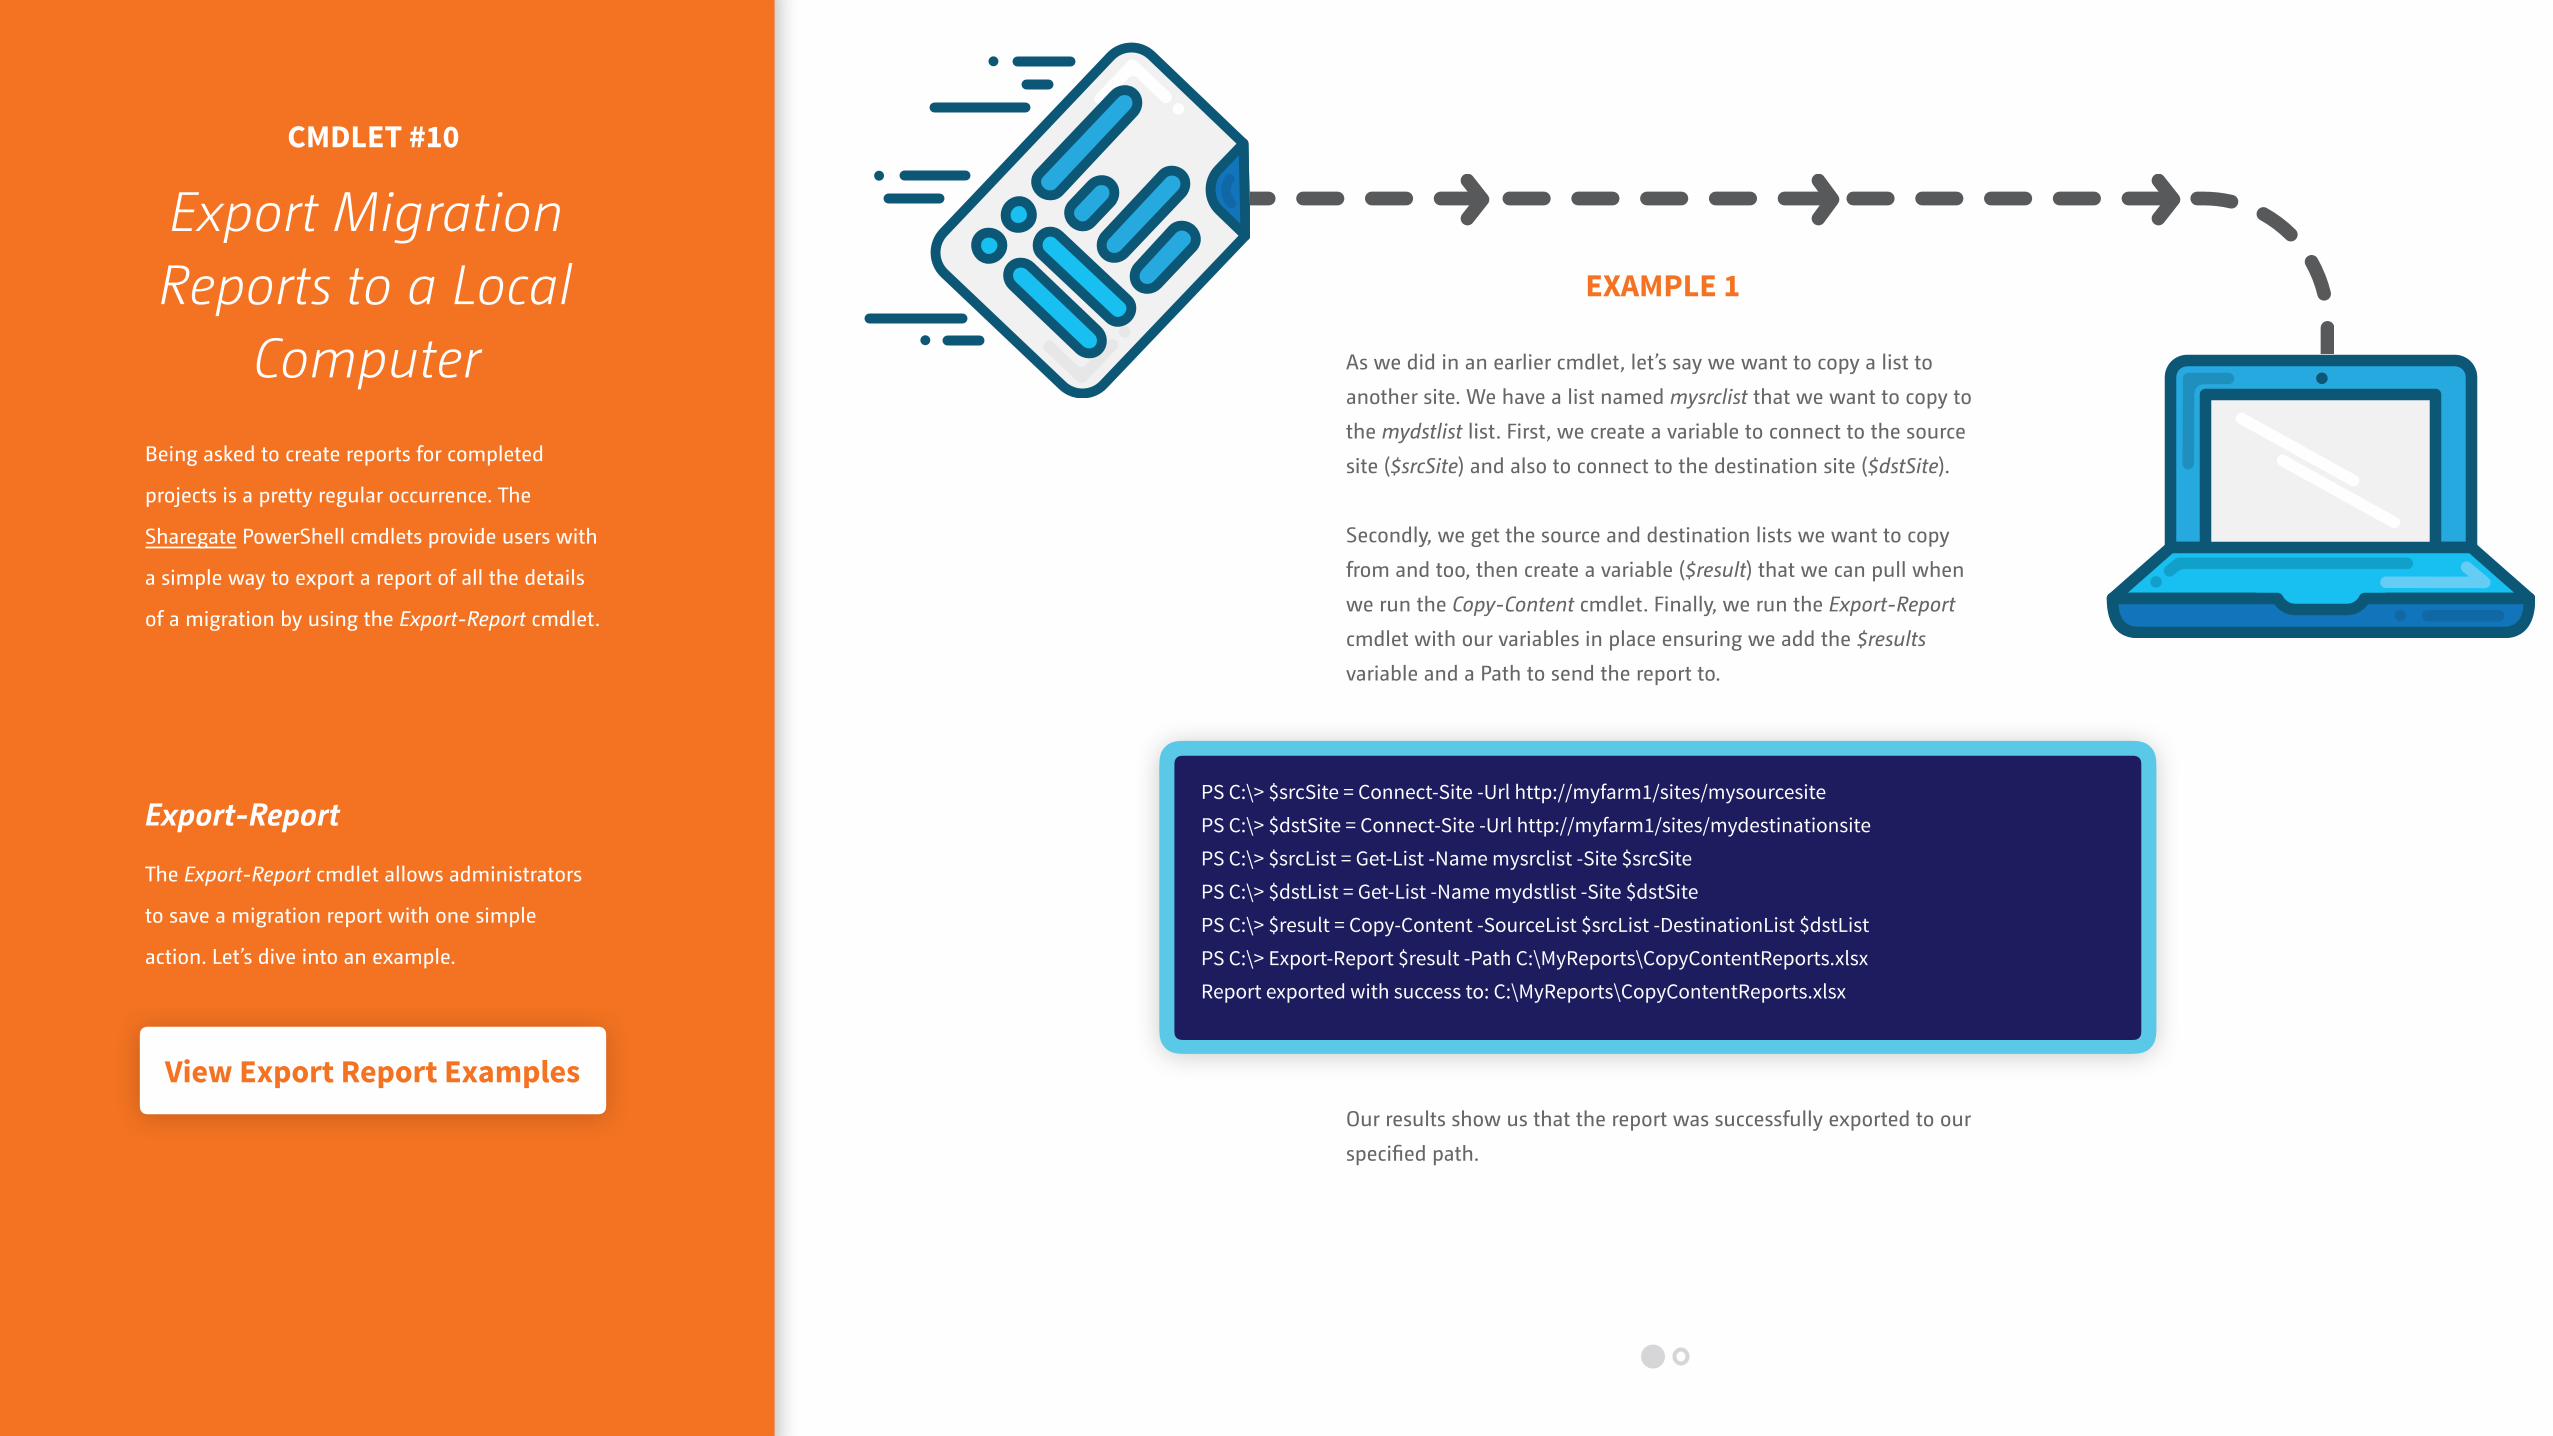
EXAMPLE 1
As we did in an earlier cmdlet, let’s say we want to copy a list to
another site. We have a list named mysrclist that we want to copy to
the mydstlist list. First, we create a variable to connect to the source
site ($srcSite) and also to connect to the destination site ($dstSite).
Secondly, we get the source and destination lists we want to copy
from and too, then create a variable ($result) that we can pull when
we run the Copy-Content cmdlet. Finally, we run the Export-Report
cmdlet with our variables in place ensuring we add the $results
variable and a Path to send the report to.
PS C:\> $srcSite = Connect-Site -Url http://myfarm1/sites/mysourcesite PS C:\> $dstSite = Connect-Site -Url http://myfarm1/sites/mydestinationsite PS C:\> $srcList = Get-List -Name mysrclist -Site $srcSite PS C:\> $dstList = Get-List -Name mydstlist -Site $dstSite PS C:\> $result = Copy-Content -SourceList $srcList -DestinationList $dstList PS C:\> Export-Report $result -Path C:\MyReports\CopyContentReports.xlsx Report exported with success to: C:\MyReports\CopyContentReports.xlsx
Our results show us that the report was successfully exported to our
specified path.
CMDLET #10
Being asked to create reports for completed
projects is a pretty regular occurrence. The
Sharegate PowerShell cmdlets provide users with
a simple way to export a report of all the details
of a migration by using the Export-Report cmdlet.
Export Migration Reports to a Local
Computer
Export-Report
The Export-Report cmdlet allows administrators
to save a migration report with one simple
action. Let’s dive into an example.
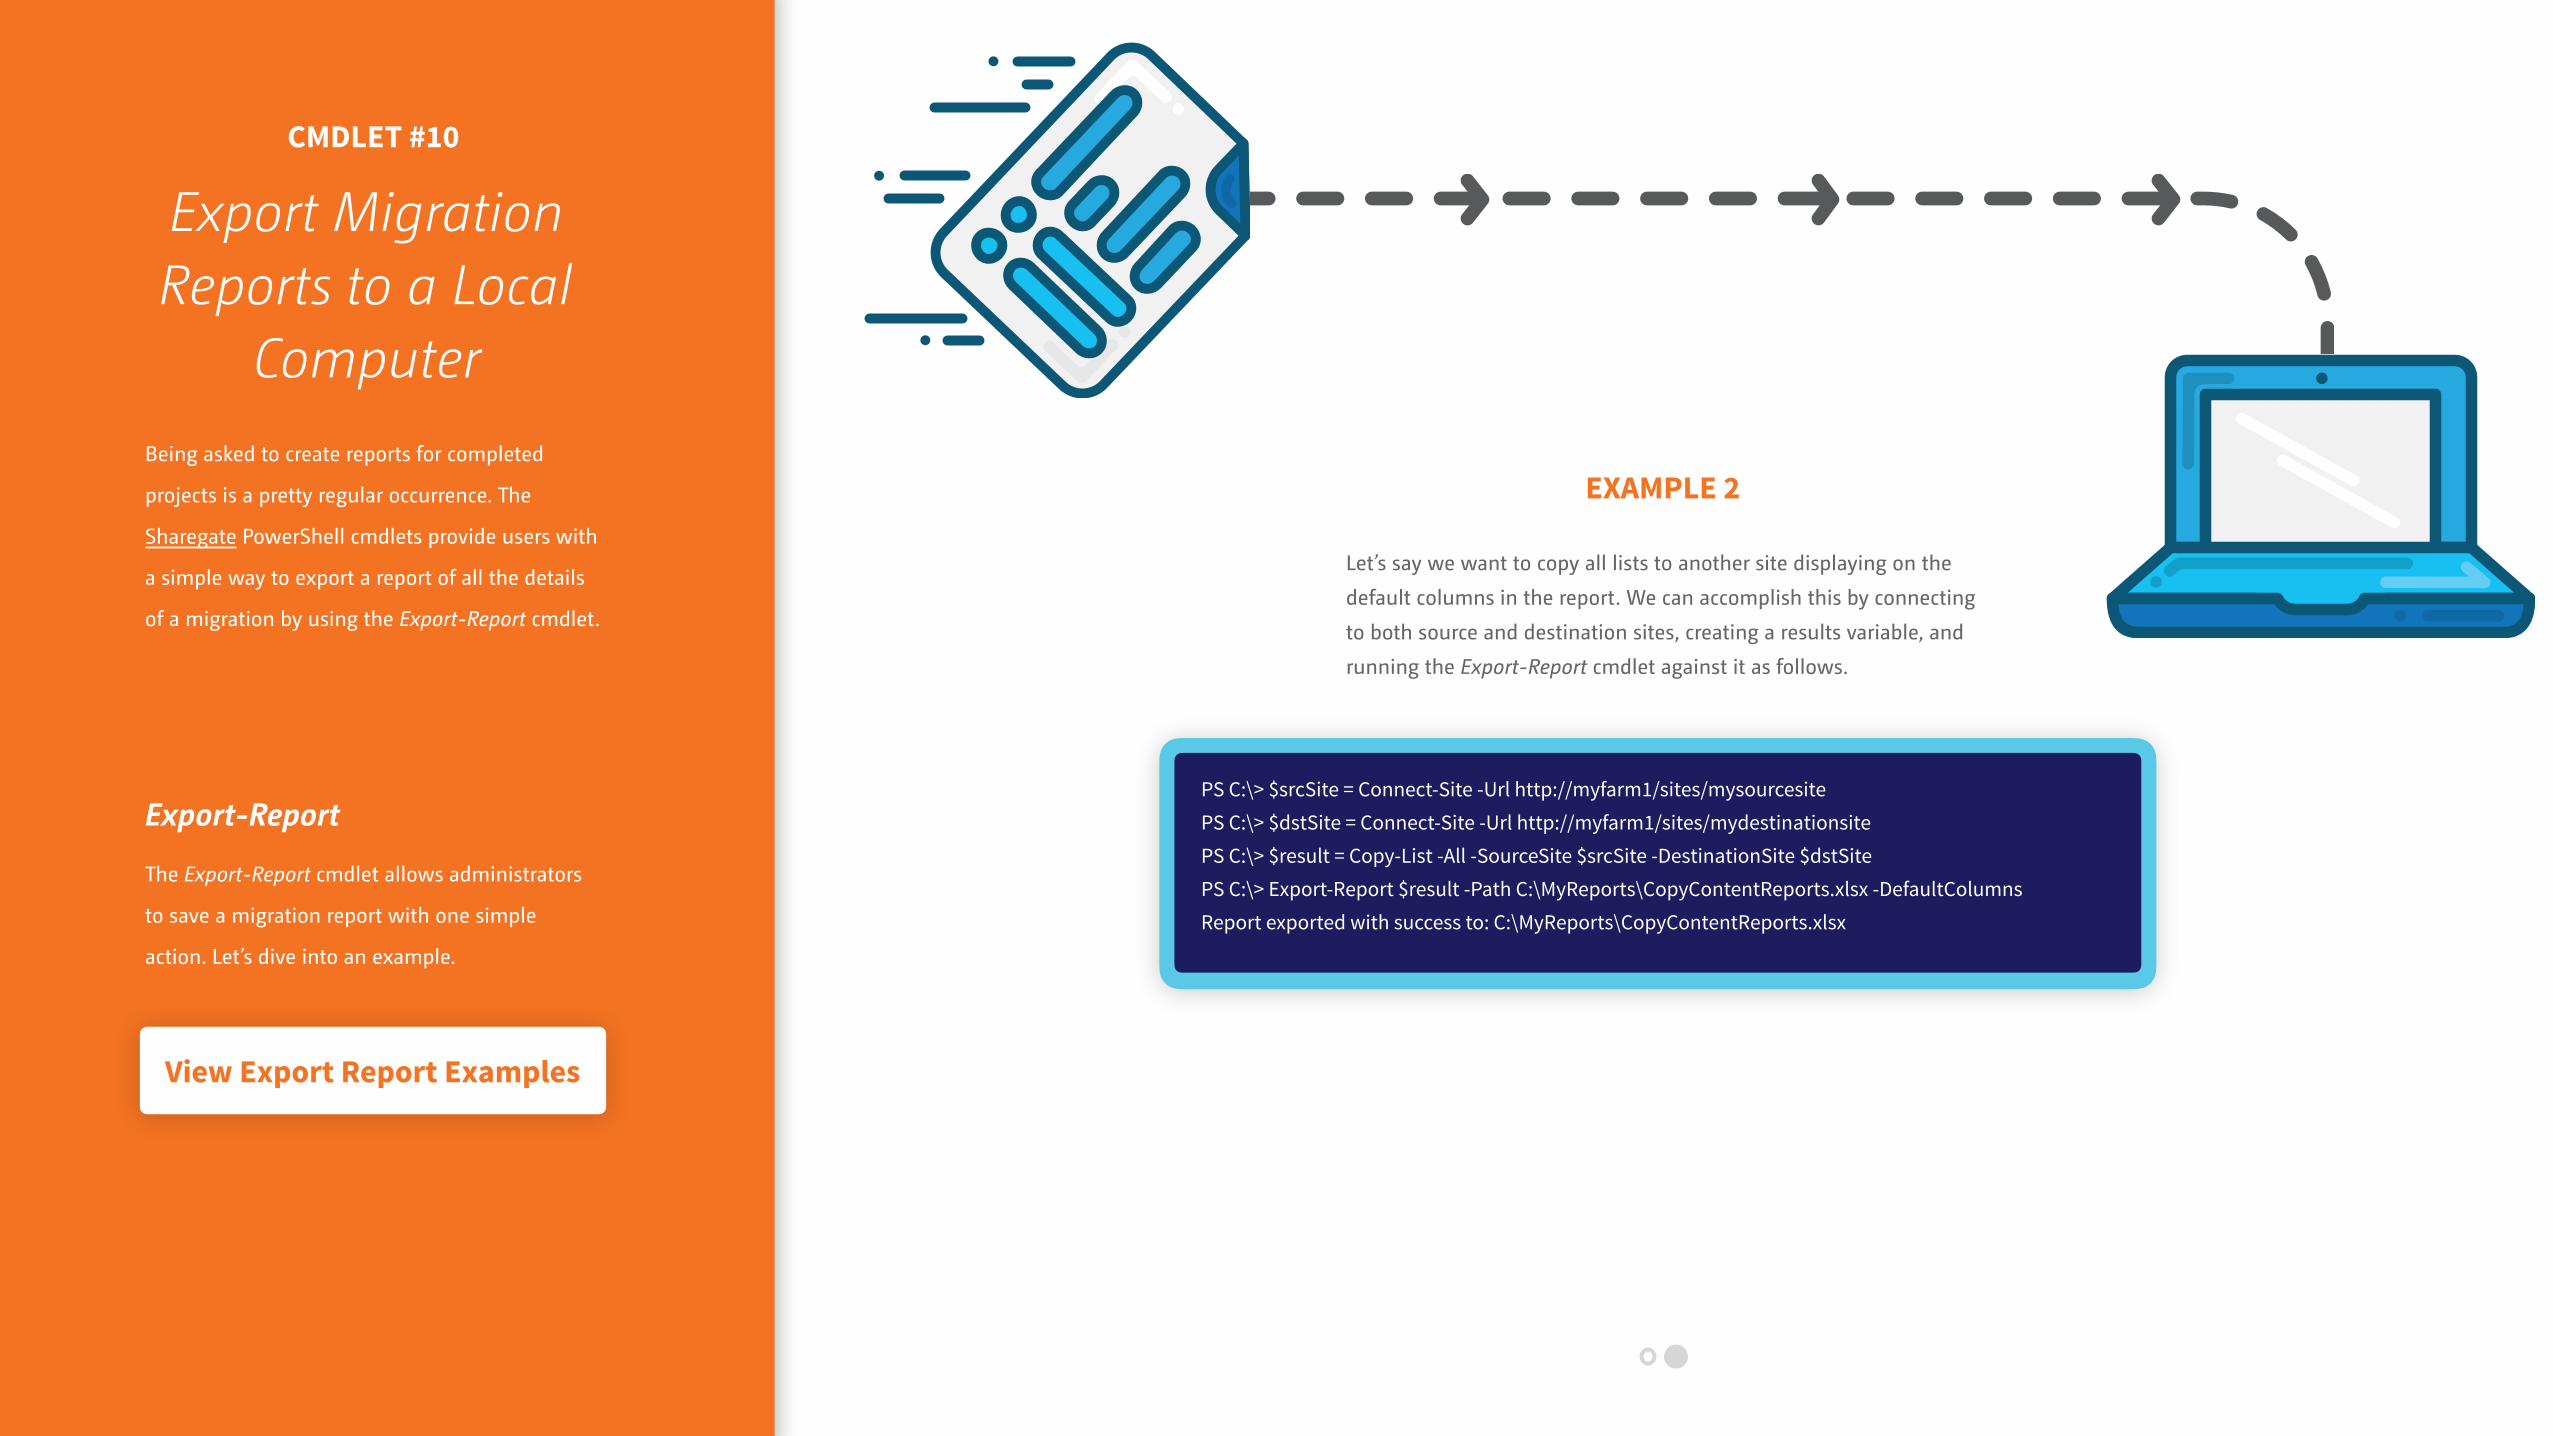
EXAMPLE 2
Let’s say we want to copy all lists to another site displaying on the
default columns in the report. We can accomplish this by connecting
to both source and destination sites, creating a results variable, and
running the Export-Report cmdlet against it as follows.
PS C:\> $srcSite = Connect-Site -Url http://myfarm1/sites/mysourcesite PS C:\> $dstSite = Connect-Site -Url http://myfarm1/sites/mydestinationsite PS C:\> $result = Copy-List -All -SourceSite $srcSite -DestinationSite $dstSite PS C:\> Export-Report $result -Path C:\MyReports\CopyContentReports.xlsx -DefaultColumns Report exported with success to: C:\MyReports\CopyContentReports.xlsx
View Export Report Examples

Your #1 Tool to Simplify SharePoint & Office 365
Management
Settings
Help
App logs
Explorer
Migration
Reports
Find
Basket 0
MENU Explorer
My Company
mycompany.sharepoint.com
OneDrive for Business
SharePoint
https://mysites.sharepoint.com/search
https://mysites-mysharepoint.com
App Catalog Site
Home
Site Settings
Lists and Libraries
Departments
Site Settings
Lists and Libraries
Legal
Finance
DepartmentsSite
SECURITYGENERAL
ExternalSharing Report
PermissionsMatrix Report
SiteAddress
1/13/2015Created
EnabledRSS Feeds
EnglishLanguage
DepartmentsTitle
SECURITY PROPERTIES
Clean LimitedAccess
CheckPermissions
Copy UserPermissions
RemovePermissions
AddPermissions
https://mysites.sharepoint.com/sites/contoso/Departments
Start Using PowerShell with Sharegate