Popular Woodworking Magazine November 2010 #186
68
74470 01355 0 6 11 US $5.99 Display until November 29, 2010 Free Video Visit with the Builder of this Project: Visit popularwoodworking.com/nov 10 popularwoodworking.com NOVEMBER 2010 ■ #186 1 Easy Trick Stops Sags in Your Finish Forever Country Corner Cabinet Easier Ways to Do Tombstone Doors & Fancy Curves Miter Box Saws: Cheap, Accurate, A Cinch to Find Ticking Sticks: A Carpentry Trick To Fit Any Door How to Age Your Projects So They Don’t Look Fake
-
Upload
khangminh22 -
Category
Documents
-
view
1 -
download
0
Transcript of Popular Woodworking Magazine November 2010 #186

FnL1 0
4 0120
01 JUYr
VyBQdW
JsaWN
hdGlvbn
MsIElu
YyAo
02 SW9
sYSBka
XZpc2lv
bikPR3J
lZ29yeS
BL 03 c
nVlZ2V
yAEu7A
L4EMT
AuNAI4
MAExB
VVQ
04 Qy1B
DDA3N
DQ3MD
AxMzU1
NgA=
74470 013550 6
11
US $5.99
Display until November 29, 2010
Free Video Visit with the Builder of this Project: Visit popularwoodworking.com/nov 10
popularwoodworking.com
NOVEMBER 2010 ■ #186
1 Easy Trick Stops Sags in Your Finish Forever
Country Corner CabinetEasier Ways to Do Tombstone Doors & Fancy Curves
Miter Box Saws: Cheap, Accurate, A Cinch to Find
Ticking Sticks: A Carpentry Trick To Fit Any Door
How to Age Your Projects So They Don’t Look Fake
~c1_1011_PWM_Cover_US.indd C1~c1_1011_PWM_Cover_US.indd C1 9/10/10 12:13:41 PM9/10/10 12:13:41 PM

Meet a new companywith a 64 year heritage.
General® International USA Inc., 760 Jessica St., Murfreesboro, TN 37130
www.general.ca
We’re new to the neighborhood. But not the industry. For more than 60 years,Canadian-based General Mfg. has been designing, producing and selling highquality, reliable woodworking machinery. Now we’ve opened our first Americandistribution center in Murfreesboro, TN. This new venture will allow us to betterserve our American distributors and their customers. So you’ll enjoy faster,easier access to our extensive line of woodworking products. And know thatwhatever you build, your tools were built on a long, proud heritage of trust.For more information visit general.ca.
For more information, go to PWFREEINFO.COM.
~c2-03_1011_PWM_TOC.indd c2~c2-03_1011_PWM_TOC.indd c2 9/8/10 3:37:58 PM9/8/10 3:37:58 PM

popularwoodworking.com ■ 1
FE ATURES
C O N T E N T S NOVEMBER 2010
30 Hanging Corner Cupboard
Graceful curves and a clever tombstone-panel
door add a stylish challenge to this 18th-
century-style piece (and it’s easier to build
than it looks).
BY MARK ARNOLD
ONLINE u American Corner Cabinet
If a full-size corner cabinet better fi ts your needs,
check out this classic example from Senior Editor
Glen D. Huey.
popularwoodworking.com/nov10
36 The Forgotten Miter Box
Once common, the miter box has been
relegated to garage sales. Here’s why you
should fi nd one for your workshop.
BY RON HERMAN
ONLINE u Saws GaloreRead the saw section on our web site for tons of
sawing information.
popularwoodworking.com/nov10
40 Cut, Glue & Sand Veneer
Simple and inexpensive tools are the core of a
successful veneering job. (Part 2 of a series.)
BY MARC ADAMS
ONLINE u SlideshowThis free slideshow will show you the steps to
make a basic veneered panel.
popularwoodworking.com/nov10
48 Fit Doors with Ticking Sticks
This traditional trick used by carpenters can
help you fi t doors into almost any irregular
opening – and it’s adaptable to many other fi tting
situations.
BY CARL BILDERBACK
ONLINE u Video InstructionWatch our free companion video to see ticking
sticks in action.
popularwoodworking.com/nov10
50 Aging Your Projects Gracefully
Adding artful (and believable) wear and tear to a
piece is like writing a convincing tale of fi ction.
(Part 1 of a series.)
BY MICHAEL DUNBAR
ONLINE u Stress ReliefFor a story on a less-graceful approach to adding
age to your work, read about Managing Editor
Megan Fitzpatrick’s assault on a toy chest.
popularwoodworking.com/nov10
MITER BOX & VENEER PHOTOS BY AL PARRISH; TICKING STICKS & AGING FURNITURE PHOTOS BY CHRISTOPHER SCHWARZ
36 4840
50
~c2-03_1011_PWM_TOC.indd 1~c2-03_1011_PWM_TOC.indd 1 9/8/10 3:38:39 PM9/8/10 3:38:39 PM

2 ■ POPULAR WOODWORKING MAGAZINE November 2010
REGUL ARS
28
6 New Workbench Book Teaches You How to Fish
ON THE LEVEL
BY CHRISTOPHER SCHWAR Z
8 Filling Benchtop Cracks
LETTERS
FROM OUR READERS
12 Template-routing Small Parts
TRICKS OF THE TRADE
FROM OUR READERS
VIDEO u Tricks-in-ActionWatch a video of one of our tricks at work.
popularwoodworking.com/tricks
16 Delta’s New 18" Drill Press
TOOL TEST
BY THE EDITORS
ONLINE u Tool Test ArchivesWe have lots of tool reviews on our web site, free.
popularwoodworking.com/tools
22 Add Spice To Your Work
DESIGN MATTERS
BY GEORGE R . WALKER
24 Bookstand: A William & Mary Rarity
ARTS & MYSTERIES
BY CHARLES BENDER
28 Contemporary Shelves
I CAN DO THAT
BY ROBERT W. LANG
54 Wiping Varnish FLEXNER ON FINISHING
BY BOB FLEXNER
62 Glossary TERMS OF THE TRADE
Woodworking’s terminology can be over-
whelming. Learn the terms used in this issue.
64 Repurposed, Reimagined
END GRAIN
BY BRENDAN ISA AC JONES
NOVEMBER 2010C O N T E N T S
22 24
DESIGN MATTERS INLAY PHOTO COURTESY LIE-NIELSEN TOOLWORKS; BOOKSTAND PHOTO BY CHARLES BENDER; DRILL PRESS & BOOKSHELVES PHOTO BY AL PARRISH
Number 186, November 2010. Popular Woodworking Magazine (ISSN 0884-8823,USPS 752-250) is
published 7 times a year, February, April, June, August, October, November and December,
which may include an occasional special, combined or expanded issue that may count as two
issues, by F+W Media, Inc. Editorial and advertising offices are located at 4700 E. Galbraith Road,
Cincinnati, Ohio 45236. Unsolicited manuscripts, photographs and artwork should include ample
postage on a self-addressed, stamped envelope (SASE); otherwise they will not be returned.
Subscription rates: A year’s subscription (7 issues) is $24.95; outside of the U.S. add $7/year ■
Canada Publications Mail Agreement No. 40025316. Canadian return address: 2835 Kew Drive,
Windsor, ON N8T 3B7 ■ Copyright 2010 by Popular Woodworking Magazine. Periodicals postage
paid at Cincinnati, Ohio, and additional mailing offices. Postmaster: Send all address changes to
Popular Woodworking Magazine, P.O. Box 420235, Palm Coast, FL 32142-0235 Canada GST
Reg. # R122594716 ■ Produced and printed in the U.S.A.
16
~c2-03_1011_PWM_TOC.indd 2~c2-03_1011_PWM_TOC.indd 2 9/8/10 3:39:13 PM9/8/10 3:39:13 PM

For more information, go to PWFREEINFO.COM.
~c2-03_1011_PWM_TOC.indd 3~c2-03_1011_PWM_TOC.indd 3 9/9/10 1:22:40 PM9/9/10 1:22:40 PM

u
u
u
4 ■ POPULAR WOODWORKING MAGAZINE November 2010
Mark Arnold“Hanging Corner Cupboard,” page 30.
Ron Herman“The Forgotten Miter Box,” page 36.
NOVEMBER 2010, VOL. 30, NO. 6
popularwoodworking.com
EDITORIAL OFFICES 513-531-2690
PUBLISHER & GROUP EDITORIAL DIRECTOR ■ Steve Shanesy
x11238, [email protected]
EDITOR ■ Christopher Schwarzx11407, [email protected]
SENIOR ART DIRECTOR ■ Linda Wattsx11396, [email protected]
EXECUTIVE EDITOR ■ Robert W. Langx11327, [email protected]
SENIOR EDITOR ■ Glen D. Hueyx11293, [email protected]
MANAGING EDITOR ■ Megan Fitzpatrickx11348, megan.fi [email protected]
ASSOCIATE EDITOR FOR THE WEB ■ Drew DePenningx11008, [email protected]
PHOTOGRAPHER ■ Al Parrish
F+W MEDIA, INC.
CHAIRMAN & CEO ■ David Nussbaum
CFO ■ James Ogle
PRESIDENT ■ Sara E. Domville
EXECUTIVE VICE PRESIDENT, eMEDIA ■ Chad Phelps
SENIOR VICE PRESIDENT, OPERATIONS ■ Phil Graham
IT DIRECTOR ■ Jim Kuster
EVENTS DIRECTOR ■ Cory Smith
NEWSSTAND DIRECTOR ■ Susan Rose
PRODUCTION COORDINATOR ■ Vicki Whitford
ADVERTISINGSENIOR VICE PRESIDENT, ADVERTISING ■ David Shiba
TEL. [email protected]
ADVERTISING DIRECTOR ■ Don Schroder331 N. Arch St., Allentown, PA 18104TEL. 610-821-4425; FAX. 610-821-7884
ADVERTISING SALES COORDINATOR ■ Connie KostrzewaTEL. 715-445-4612 x13883
SUBSCRIPTION SERVICES: Subscription inquiries, orders and address changes can be made at popularwoodworking.com (click on “Customer Service”). Or by mail: Popular Woodworking Magazine, P.O. Box 420235, Palm Coast, FL 32142-0235. Or call 386-246-3369. Include your address with all inquiries. Allow 6 to 8 weeks for delivery.
NEWSSTAND DISTRIBUTION: Curtis Circulation Co., 730 River Road, New Milford, NJ 07646.
ATTENTION RETAILERS: To carry Popular Woodworking Magazine in your store, call 800-894-4656 or write Magazine Retail Sales, P.O. Box 5014, Iola, WI 54945-5014.
BACK ISSUES are available. Call 800-258-0929 for pricing or visit popularwoodworking.com. Send check or money order to: Popular Woodworking Magazine Back Issues, F+W Media Products, 700 E. State St., Iola, WI 54990. Please specify publication, month and year.
Copyright ©2010 by F+W Media, Inc. All rights reserved. Popular Woodworking Magazine is a registered trademark of F+W Media.
Mark Arnold is a 1996 graduate of North Bennet Street School’s program in Cabinet and Furniture Making. After completing his coursework, he returned to his hometown of Sunbury, Ohio, where he founded Boston Woodworking.
Mark enjoys making furniture that shows off the motifs of the Federal period. He also teaches classes for woodworkers of all levels of experience and offers individualized instruction.
Mark is a member of the Society of American Period Furniture Makers (SAPFM) and, with the help of his wife, Margaret, has edited the organization’s annual publication, American Period Furniture, for the past fi ve years.
To read more about Mark and view a gallery of some of his work,
visit bostonwoodworking.com.
Since taking over a nearly century-old extended family business in 1996, Ron continues the tradition as master house wright and carpenter for Antiquity Builders of Ohio. From his mill in Columbus, with its extensive hand-tool inventory, the trades still are practiced at the highest levels. Whether felling trees or doing fi ne cabinetry, hand tools play a vital role both in the mill and on the job site. Ron’s customer base continues to expand with those who want accurate, historical res-toration – and a home to brag about.
For the last decade he has worked with numerous historical societies and woodworking clubs to educate them in the identifi cation, care and proper use of 19th- and 20th-century woodworking hand tools.
To read more about Ron, visit popularwoodworking.com/nov10.
C O N T R I B U T O R S
For more than 30 years, Carl Bilderback worked as a professional carpenter and foreman, in charge of crews of upward of 40 men. During his time in the fi eld, he often made use of ticking sticks, and in this issue he shares how this carpentry trick is easily adapted to the shop for fi tting doors.
Carl claims to be retired, but don’t believe it. He’s an avid collector of old tools, particularly saws and planes, and is an active member of the Mid-West Tool Collec-tors Association. He’s also one of the best copy editors we’ve ever met, as he takes the time to slowly and care-fully read every book we publish – and he calls us with any corrections (which is why our second printings often are far cleaner than the fi rst editions). His shop is in LaPorte, Ind.
To read more about Carl, visit popularwoodworking.com/nov10.
Carl Bilderback“Fit Doors with Ticking Sticks,” page 48.
04-05_1011_PWM_Cont-Mast.indd 404-05_1011_PWM_Cont-Mast.indd 4 9/8/10 3:41:34 PM9/8/10 3:41:34 PM

For more information, go to PWFREEINFO.COM. For more information, go to PWFREEINFO.COM.
For more information, go to PWFREEINFO.COM.
Forrest sets the standard for excellence with these new top-quality blades:
• Woodworker II 48-Tooth Blade for general-purpose applications. Features a 20º face hook, a 25º bevel, and sharp points for clean cross-grain slicing and quiet, smooth cutting.
• “Signature Line” Chop Master for quiet, precise cutting and less splintering. Features 90 teeth, a -5º hook to control the feed rate, and re-designed angles with 10” or 12” diameters and 5/8” or 1” center holes.
• 2-Piece & 4-Piece Finger Joint Sets with reversible, interlocking 8” blades. Ideal for rabbets and grooves. Blades have 24 teeth and standard 5/8” bore. Reversible for 3/16” and 5/16” cuts or 1/4” and 3/8” cuts.
• Thin Kerf Dados for clean cutting of 3/16” to 1/4” grooves in thin plywood and man-made materials. Available in two-piece and three-piece sets for table or radial arm saws.
Our blades are U.S.A-manufactured and have a 30-day, money-back guarantee.Custom sizes available. Order from Forrest dealers or retailers, by going online, or by calling us directly.
www.ForrestBlades.com 1-800-733-7111 (In NJ, call 973-473-5236) © 2010 Forrest Manufacturing Code PW
Do Your Tools Cut It?Your Long-Term Solution for Carving, Shaping, Cutting & Sanding.
• Custom Woodworking
• Furniture & Railings
• DIY Projects
• Carvings Large or Small
Reduce Your Work by 80% or More!Easy to control, remarkable durability,
Let the tools do the work while you take the credit.....in far less time.
Shop Kutzall Directwww.KutzallDirect.com
[email protected]: (810) 765-1000
1-800-683-8170 www.leevalley.com
Veritas® Quick-ReleaseSliding Tail Vise
To order this tail vise, call or visit us online. Request a copy of
our free 284-page woodworking tools catalog or browse it online.
This tail vise can be quickly incorporated into a new bench construction or easily retrofitted to an existing bench without major surgery. The vise mechanism is mounted onto the under-side of a workbench top and a user-made jaw is attached to the mechanism. The T-handle and quick-release lever can be
installed in a right- or left-handed orientation, allowing the vise to be mounted at either end of the bench. The
quick-release lever engages or disengages the Acme-threaded screw, which can apply up to 300
lb of force in both clamping and spreading applications – something not possible with any other quick-release tail vise. Maximum travel is 73/4". The body is ductile iron with zinc-alloy end plates, steel shafts and guide rods, and a maple handle. Made in Canada. Patent pending. 05G30.01 $269.00 Shipping and N.Y. sales tax extra.
04-05_1011_PWM_Cont-Mast.indd 504-05_1011_PWM_Cont-Mast.indd 5 9/8/10 3:41:51 PM9/8/10 3:41:51 PM

6 ■ POPULAR WOODWORKING MAGAZINE November 2010
Some people say I have a “workbench problem” because I’ve built so many of
them. It’s more accurate to say instead that I have a “problem with workbenches.”
After teaching in schools all over the country, I found the benches to be almost universally bad. The students and I would struggle to perform even basic tasks on these tables with some metal bits – they didn’t deserve the title of “workbench.”
So after years of research and building benches, we published my first book: “Work-benches: From Design & Theory to Construction & Use” (Popular Wood-working Books). That book sought to cure the world’s problems, with plans for two ancient benches (one French, one English), plus some rules on materials, bench dimensions and vises.
That book was a success (it’s in its third printing), but I wasn’t ready to call it quits on the topic. Why? Well that book is only half the story.
When you build something you can choose to make a reproduction of an estab-lished form or you can design something new. Your new design might encompass old details, but the way you combine those elements creates something unique.
Of course, designing something from scratch is harder than building a reproduc-tion. To do it right, you must understand the form (such as a dining table, sideboard or stick chair), and how your materials and details will help or hurt the form.
When building a workbench you have the same quandry: You can build a
New Workbench Book Teaches You How to Fish
Customer ServiceHow can I contact customer service with questions regarding my subscription, including a lost or damaged issue?Visit popularwoodworking.com/customerservice. Or write to Popular Woodworking Magazine, P.O. Box 420235, Palm Coast, FL 32142-0235. Or, if you prefer the telephone, call 386-246-3369 and a customer service representative will be happy to help you.
When does my subscription expire?The date of your subscription expiration appears on your magazine mailing label, above your name. The date indicates the last issue in your subscription.
Can I get back issues of Popular Woodworking and Woodworking Magazine?Back issues are available while supplies last. Visit popularwoodworking.com/backissues. Or if you know the exact month and year of the issue you want, call our customer service department toll-free at 800-258-0929 to order.
What if I want more information about the projects and tools I read about in Popular Woodworking Magazine? For all editorial questions, please write to Popular Woodworking Magazine, 4700 E. Galbraith Rd., Cincinnati, OH 45236. Or e-mail [email protected].
Does Popular Woodworking Magazine offer group discounts?Group discounts are available by special arrangement with the publisher. For more details, send an e-mail to Debbie Paolello at [email protected] or call 513-531-2690 x11296.
Our Privacy Promise to YouWe make portions of our customer list available to carefully screened companies that offer products and services we believe you may enjoy. If you do not want to receive offers and/or information, please let us know by contacting us at:
List Manager, F+W Media, Inc.4700 E. Galbraith Rd.Cincinnati, OH 45236
Safety NoteSafety is your responsibility. Manufacturers place safety devices on their equipment for a reason. In many photos you see in Popular Woodworking Magazine, these have been removed to provide clarity. In some cases we’ll use an awkward body position so you can better see what’s being demonstrated. Don’t copy us. Think about each procedure you’re going to perform beforehand.
reproduction or build an original. “Work-benches” focused on building a reproduc-tion (with slight custom touches).
This year, I’ve been working on a new book that has just been released: “The Workbench Design Book: The Art & Philosophy of Building Better Benches” (Popular Woodworking Books).
My goal with this new book is to plunge deeper into the world of bench design by
examining (and trying to stretch) the rules of bench building. Also, I wanted to examine other styles of benches besides the two designs from my fi rst book, so we added plans for nine additional benches from me plus the other editors here.
To learn to design, you need to learn to take and give criticism. So another key part of the book is an exami-nation of 18 common
workbench designs, plus details on how they should be changed.
And there’s additional information on workholding, plus plans for the jigs that soup up any bench (including a bench slave and portable double-screw vise).
After reading this book, you should have the skills necessary to design a bench with your name on it.
“The Workbench Design Book: The Art & Philosophy of Building Better Benches” is now available for sale in our store at woodworkersbookshop.com. PWM
O N T H E L E V E LB Y C H R I S T O P H E R S C H W A R Z , E D I T O R
Highly RecommendedAs far as fi t and fi nish go, it’s almost impossible to compete with Blue Spruce Toolworks. And this company’s new butt chisels are no exception.
But what I like the most about these chisels is that they can take an unholy beating. The handles are wood but have been impregnated with resin, making them nigh on indestructible.
The tools are balanced and have virtually no fl ats on their long edges. This makes them ideal for chopping out dovetail waste. Price: $70 to $100, depending on the width. Visit bluesprucetoolworks.com.
— Christopher Schwarz
PHOTO BY CHRISTOPHER SCHWARZ
06-07_1011_PWM_OTL.indd 606-07_1011_PWM_OTL.indd 6 9/8/10 3:43:11 PM9/8/10 3:43:11 PM

BY TOOL GUYS. FOR TOOL GUYS.
For more information, go to PWFREEINFO.COM.
06-07_1011_PWM_OTL.indd 706-07_1011_PWM_OTL.indd 7 9/8/10 3:43:33 PM9/8/10 3:43:33 PM

8 ■ POPULAR WOODWORKING MAGAZINE November 2010 ILLUSTRATIONS BY MARY JANE FAVORITE
F R O M O U R R E A D E R S
I have some 7" x 6" Douglas fi r to use for my benchtop, and this timber
has noticeable shakes. I can’t see them being a real problem and they might add character to my bench. Even so, they could be dust traps, so I want to fi ll them. I could use stained sawdust and resin glue. Do you think it would last? I could always get a jeweler friend to melt down all my old silver bling and use that! Before I get even more ridiculous though, may I ask what you used to fi ll the shakes in the cherry you used for the top of the 18th-century Bench from the August 2010 issue (#184)?
John WalkerBirmingham, England
John,When filling cracks, it’s always a crap-shoot. I did it for aesthetic reasons – I don’t
expect the epoxy I added to add strength. My next step on the top is to inlay a couple butterfl y keys across the two good-sized splits. Though the splits haven’t moved since February, a butterfl y key is the traditional way to contain a split and restore structural strength across it.
You can fi ll shakes with a wide variety of products, though plastic resin glue has limitations. It is so hard and infl exible that I would worry that it would crack when placed in a situation where it was being pulled apart. Other more fl exible glues (such as the construction epoxy I used) tend to move or “creep” with the wood.
Silver would add some weight, but it probably wouldn’t stay put – however, it sure would look wild (as it tore up your plane blades).
Christopher Schwarz, editor
Cleaning Grease from WoodI recently acquired a partially completed clock that had been sitting around for quite a while. While being stored, the bare oak ended up with several spots or stains from an unknown substance. It looks like oil or grease. When I go to stain the wood and fi nish it, these will likely give me problems. I was wondering if there
First wipe them several times with a very fast-evaporating solvent. Acetone would be good. You won’t hurt anything.
Then get some “fuller’s earth.” In case you’re not familiar with it, fuller’s earth is an absor-bent clay or clay-like earthy substance, which is used in kitty litter and is the material car mechanics use to spread on the fl oor to soak up oil and grease. It’s available from many online suppliers.
Now grind it to a powder (if it isn’t already powder). Then make a paste with the acetone and fuller’s earth, wet the affected area of the wood well with the acetone and apply the paste over it. Let it dry back to powder and clean it off. You may have to do this several times, but if it is oil or grease, you’ll notice a clear improve-ment each time.
If you can get the discoloration almost entirely out and the area doesn’t feel oily, a stain should adequately disguise what remains and the finish shouldn’t have any problem bonding.
Bob Flexner, contributing editor
Dovetail Saw Confi gurations: What’s the Best Choice?I’ve been cutting dovetails by hand with an inexpensive saw but want to buy a Lie-Nielsen. The company offers three ver-sions: the standard saw, the progressive pitch and the “thin plate” version. I can’t really tell if one is better than another, and I would appreciate any advice.
Darren StevensDothan, Alabama
Darren,With backsaws, you want to keep about 10 teeth in the cut. That means that a coarse saw such as the progressive pitch saw is ideal for carcase dovetails, in wood that is 3⁄4" or thicker.
The “regular” Lie-Nielsen dovetail saw is a good compromise for carcase dovetails (in 3⁄4"-thick wood) and drawer dovetails (in 1⁄2"-thick wood).
And the thin-kerf dovetail saw requires less work to push, but it can be more easily bent (I don’t recommend it for fi rst-time dovetailers).
One other consideration: The thin-kerf dovetail saw works better with the thin blade of a jeweler’s saw (if you use a frame saw to
is a good way to remove them. I was think-ing alcohol, acetone or some other solvent but I don’t want to make things worse. Any suggestions?
Tom VesselyArvada, Colorado
Tom,Assuming that the stains are oil or grease, here’s the best way to get them out.
CONTINUED ON PAGE 10
L E T T E R S
Filling Benchtop Cracks
08-11_1011_PWM_Letters.indd 808-11_1011_PWM_Letters.indd 8 9/8/10 3:44:37 PM9/8/10 3:44:37 PM

The Right CNC for Any ShopWhether you’re a weekend woodworker looking to expand the scope of your projects or a serious craftsperson ready to turn your passion into a business, ShopBot has an affordable, American-made CNC fabrication system to meet your woodworking needs.
Our PRSstandard CNC gives you theperformance necessary to take your designsto the next level, while our PRSalpha offers professional-grade speed, power and accuracy at a fraction of the cost of a big- iron machine, and both are available in a variety of sizes to fit your shop.
To get you up and running as quickly as possible, we offer training at our headquarters or in your shop. And, with some of the best customer service in the industry and a worldwide peer support network, help is never more than a phone call or a mouse click away.
Give us a call, visit us online today or stop by IWF Booth #5452, and let ShopBot build you a CNC system ready to meet your needs at a cost that won’t break your budget.
888-680-4466shopbottools.com
twitter.com/shopbotWhat will you make today?
PRSalpha120-60
Blade & Chipbreaker Matched SetIBC/Cosman Chipbreaker:
"
“ ”
Industrial Blade Company
“ and a
I
”
—
PROFESSIONAL QUALITY TOOLS™
Available Exclusively At Woodcraft!
For more information, go to PWFREEINFO.COM. For more information, go to PWFREEINFO.COM.
For more information, go to PWFREEINFO.COM.
08-11_1011_PWM_Letters.indd 908-11_1011_PWM_Letters.indd 9 9/8/10 3:44:53 PM9/8/10 3:44:53 PM

10 ■ POPULAR WOODWORKING MAGAZINE November 2010
CONTINUED FROM PAGE 8
L E T T E R S
“You can tell whether a man is clever by his answers. You can tell whether a man is wise by his questions.”
— Naguib Mahfouz (1911 - 2006)Egyptian novelist
Go Online FOR MORE …
Letters and CommentsAt popularwoodworking.com/letters you’ll fi nd reader questions and comments, as well as our editors’ responses.
We want to hear from you.Popular Woodworking Magazine welcomes comments from readers. Published corre-spondence may be edited for length or style. All correspondence becomes the property of Popular Woodworking Magazine.
Send your questions and comments via e-mail to [email protected], or by mail to: Letters, Popular Woodworking Magazine 4700 E. Galbraith Rd. Cincinnati, OH 45236
u
remove the waste). The thicker saws work well with a coping saw.
There’s no one defi nitive answer here. If you are a beginner who anticipates general work, get the regular dovetail saw. If you are going to work in thick stock, get the progressive pitch. And if you have some experience, you’ll really like the thin-plate saw.
Christopher Schwarz, editor
I have lots of planes with small hairline cracks that I treat like pieces of wood with splits. I watch them. I use them. Chances are that noth-ing will ever become of the cracks. If they get worse, then you fall back on plan B. In wood, that would be a butterfl y inlay. In cast iron, that can be welding or brazing by an accomplished machinist/metalworker.
Keep in mind that all this can cost some serious coin and should be considered to be like diffi cult surgery on a gerbil. You should do it for sentimental reasons. The act can cost you way more than the tool will ever be worth.
So plan C is to retire the plane to a shelf if it is not performing and put your money toward another tool.
Christopher Schwarz, editor
Matt, The infi lls do come loose with time and beat-ing. I inserted an oak wedge below each face and the thing has held up through incredible whuppings – and you can similarly wedge the handle if needed.
Christopher Schwarz, editor
Leg Vise Pressure: Does Guide Height Matter?I’ve a question about the leg vise on your 18th-century Roubo (August 2010, #184). In your original Roubo (Woodworking Mag-azine, Autum 2005), the parallel guide/pin setup is near the fl oor. In the new version, it rides above the stretchers. I assume that having the parallel guide higher makes it easier to change the pivot pin. Does having the parallel guide higher make a difference in function? I was specifi cally thinking in terms of clamping pressure, but I’ve forgotten all of my physics.
Wilbur PanEast Brunswick, New Jersey
Wilbur,Moving the parallel guide up will reduce the pressure the vise can exert. But we did a bunch of side-by-side comparisons in the shop and can fi nd no practical difference. Both can still crush your hand bones, should you be so reckless …. PWM
Christopher Schwarz, editor
Tighten a Stuffed MalletIn the August 2010 issue (#184), you point out your stuffed mallet in a photo.
I have a similar mallet on which the handle and fi ll are in good condition, but have shrunk just enough to be loose, but not come apart. I don’t want to wreck the nice old handle and infi ll, so I’m tempted to just drive a few wedges in around the edges of the handle hole. Bottom line, I can’t quite fi gure out how the thing was assembled in the fi rst place to feel confi -dent that I could disassemble and salvage the guts. Did you have to restore yours at all? I can’t really fi nd any information on how they’re constructed. Any leads?
Matt Winterowd, via e-mail
A Sad Day in the ShopIt’s a sad day here in my shop. I discovered a crack in the casting of my Stanley 41⁄2plane. It starts at the corner of the mouth on the passenger’s side and runs toward the tote. The crack is 3⁄16" long and, more or less, parallel to the edge of the sole. Also, one side of the crack is about .0025" higher than the other.
My question: Is there a practical method for repairing my plane?
I was thinking of cutting a “V” slot in the crack then fi lling it with epoxy-steel or similar product, fi ling it smooth, then lapping the sole. I am a tad sentimental about this 19th-century tool and I was wondering: Is my plan a viable option? Or, is it a better alternative to order a new plane?
Finally, I am wondering, what error did I likely commit to cause this dire hap-pening to occur?
Bill WieseMelbourne, Florida
Bill,If you didn’t drop the plane or hit it with a ham-mer, then the crack most likely had nothing to do with you.
Cast iron moves, and it can move in a bad way if the casting is thin.
So the real question is: What should you do?
Wedges
08-11_1011_PWM_Letters.indd 1008-11_1011_PWM_Letters.indd 10 9/8/10 3:45:14 PM9/8/10 3:45:14 PM

PROFESSIONAL QUALITY TOOLS™
Available Exclusively At Woodcraft!For A Free Catalog Or To Find Your Local Woodcraft Store,
Visit woodcraft.com Or Call 800-225-1153.
" " "
""
""
"
Pinnacle is defined by Webster’s as
the highest point of development or
achievement. The latest workbench
offering that bears the Pinnacle® name
has certainly lived up to this definition.
Every detail of these new Pinnacle
benches is engineered with one thing in
mind: to provide woodworkers with tools
that empower them. Pinnacle tools are
available exclusively at Woodcraft.
Pinnacle® Small Traditional Cabinetmaker’s Workbench
Pinnacle® Large Traditional Cabinetmaker’s Workbench 151074
150811
Made In The USA
For more information, go to PWFREEINFO.COM.
08-11_1011_PWM_Letters.indd 1108-11_1011_PWM_Letters.indd 11 9/8/10 3:45:31 PM9/8/10 3:45:31 PM
12 ■ POPULAR WOODWORKING MAGAZINE November 2010
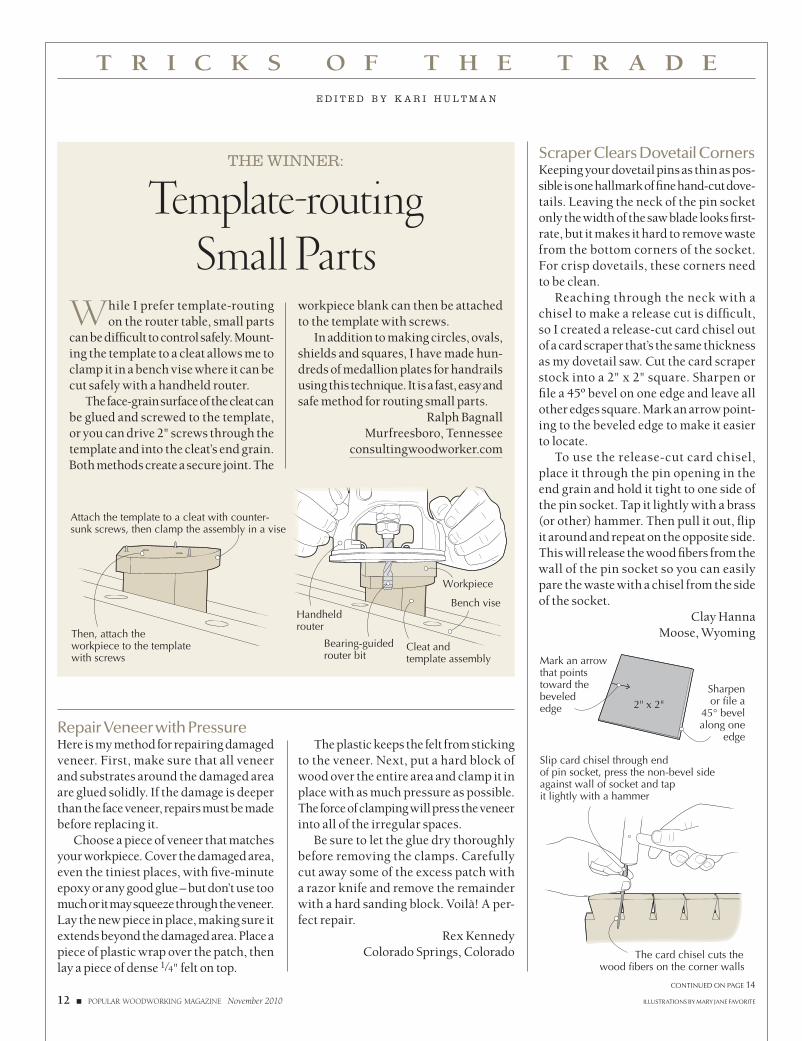
THE WINNER:
Attach the template to a cleat with counter-sunk screws, then clamp the assembly in a vise
Then, attach the workpiece to the template with screws
Bench vise
Workpiece
Cleat and template assembly
Handheldrouter
Bearing-guidedrouter bit
The card chisel cuts the wood fibers on the corner walls
Slip card chisel through end of pin socket, press the non-bevel side against wall of socket and tap it lightly with a hammer
Mark an arrow that pointstoward the bevelededge 2" x 2"
Sharpenor file a
45° bevelalong one
edge
Template-routing Small Parts
While I prefer template-routing on the router table, small parts
can be diffi cult to control safely. Mount-ing the template to a cleat allows me to clamp it in a bench vise where it can be cut safely with a handheld router.
The face-grain surface of the cleat can be glued and screwed to the template, or you can drive 2" screws through the template and into the cleat’s end grain. Both methods create a secure joint. The
ILLUSTRATIONS BY MARY JANE FAVORITE
E D I T E D B Y K A R I H U L T M A N
workpiece blank can then be attached to the template with screws.
In addition to making circles, ovals, shields and squares, I have made hun-dreds of medallion plates for handrails using this technique. It is a fast, easy and safe method for routing small parts.
Ralph BagnallMurfreesboro, Tennessee
consultingwoodworker.com
T R I C K S O F T H E T R A D E
Repair Veneer with PressureHere is my method for repairing damaged veneer. First, make sure that all veneer and substrates around the damaged area are glued solidly. If the damage is deeper than the face veneer, repairs must be made before replacing it.
Choose a piece of veneer that matches your workpiece. Cover the damaged area, even the tiniest places, with fi ve-minute epoxy or any good glue – but don’t use too much or it may squeeze through the veneer. Lay the new piece in place, making sure it extends beyond the damaged area. Place a piece of plastic wrap over the patch, then lay a piece of dense 1⁄4" felt on top.
Scraper Clears Dovetail CornersKeeping your dovetail pins as thin as pos-sible is one hallmark of fi ne hand-cut dove-tails. Leaving the neck of the pin socket only the width of the saw blade looks fi rst-rate, but it makes it hard to remove waste from the bottom corners of the socket. For crisp dovetails, these corners need to be clean.
Reaching through the neck with a chisel to make a release cut is diffi cult, so I created a release-cut card chisel out of a card scraper that’s the same thickness as my dovetail saw. Cut the card scraper stock into a 2" x 2" square. Sharpen or fi le a 45º bevel on one edge and leave all other edges square. Mark an arrow point-ing to the beveled edge to make it easier to locate.
To use the release-cut card chisel, place it through the pin opening in the end grain and hold it tight to one side of the pin socket. Tap it lightly with a brass (or other) hammer. Then pull it out, fl ip it around and repeat on the opposite side. This will release the wood fi bers from the wall of the pin socket so you can easily pare the waste with a chisel from the side of the socket.
Clay HannaMoose, Wyoming
The plastic keeps the felt from sticking to the veneer. Next, put a hard block of wood over the entire area and clamp it in place with as much pressure as possible. The force of clamping will press the veneer into all of the irregular spaces.
Be sure to let the glue dry thoroughly before removing the clamps. Carefully cut away some of the excess patch with a razor knife and remove the remainder with a hard sanding block. Voilà! A per-fect repair.
Rex KennedyColorado Springs, Colorado
CONTINUED ON PAGE 14
12-15_1011_PWM_Tricks.indd 1212-15_1011_PWM_Tricks.indd 12 9/8/10 4:08:17 PM9/8/10 4:08:17 PM

For more information, go to PWFREEINFO.COM.
12-15_1011_PWM_Tricks.indd 1312-15_1011_PWM_Tricks.indd 13 9/8/10 4:08:37 PM9/8/10 4:08:37 PM

14 ■ POPULAR WOODWORKING MAGAZINE November 2010
Steel weights apply clamping pressure where conventional clamps can’t reach
Scrap wood placed beneath the weights disperses pressure
Remove one outer dowel, pivot door 180° and replace dowel
Pivot dowelHeavy door
Trestle sawhorse
CONTINUED FROM PAGE 12
T R I C K S O F T H E T R A D E
Go Online FOR MORE …
You’ll fi nd links to all these online extras at:u popularwoodworking.com/nov10
VIDEO: Tricks-in-Action shows you a free video of one of this issue’s tricks in use in our shop. Watch “Repair Veneer with Pressure” – as well as a few of our other favorites.
WEB SITE: Visit the new Tricks of the Trade page online.
BLOG: Tricks Editor Kari Hultman writes about woodworking on her blog, The Village Carpenter.
IN OUR STORE: Get “601 Woodshop Tips & Tricks,” by Graham McCulloch.
All of our products are available online at:u WoodworkersBookShop.com
Cash and prizesfor your tricks and tips!Each issue we publish useful woodworking tips from our readers. Next issue’s winner receives a $250 gift certifi cate from Lee Val-ley Tools, good for any item in the catalog or on the web site (leevalley.com). (The tools pictured below are for illustration only, and are not part of the prize.)
Runners-up each receive a check for $50 to $100. When submitting a trick, include your mailing address and phone number. If your trick is selected, an editor will need to contact you. All entries become the property of Popular Woodworking Magazine. Send your trick by e-mail to [email protected], or mail it to Tricks of the Trade, Popular Wood-working Magazine, 4700 E. Galbraith Rd., Cincinnati, OH 45236.
u
Fast Finishing of Heavy DoorsWhen faced with the task of refi nishing a large, heavy oak door, I wanted to complete the job as quickly as possible by being able to work on both faces of the door without having to wait for one side to dry.
To solve the problem, I began by drill-ing a 1⁄2"-diameter hole in the exact center of each end of the door. Then, on one end, I drilled two additional holes, centering each carefully across the thickness of the door, but nearer the door’s edges. I cut four 1⁄2"-diameter hardwood dowels about 7" long, and planed each to size for a snug but easy-sliding fi t in the mating holes.
With the dowels inserted in their holes, I suspended the door across a couple trestle-style sawhorses, with the dowels lying on the horse beams. (Alternatively,
Steel Weight ‘Clamps’I have several different sizes and shapes of steel, and a pile of big steel washers that I use as “clamps” when I get in a jam for a clamping device. If I need to apply clamping pressure to a large, fl at piece and conventional clamps won’t work, I use my steel weights. Adding wood blocks under the steel disperses their pressure.
When time is tight or laziness sets in, I have used these weights to clamp edge banding. Just clamp the workpiece in a vise, set a caul on top of the edge banding, rest the weights on top of the caul and let gravity do the work.
I’ve used the steel washers to apply weight to very small pieces of wood when I’m doing marquetry and jigsaw puzzle-type work. I found the steel at a heavy
Super Sanding BlockI turn a 25-pound, granite surface plate into a super sanding block by attaching strips of fi ne-grit adhesive-backed sand-paper to the reference side. By angling the sanding block 45º and pushing it by the two outside corners, it works quickly to make surfaces super-fl at. It does a great job of fl attening glued-up boards such as table-tops, and of removing machine marks.
Every few minutes, clean the sand-paper with a fi le brush to avoid clogging
you could rest the dowels on 4x4s lying on two tables or benches.) After fi nishing one side of the door, I removed one out-ermost dowel, carefully pivoted the door 180°, and reinserted the dowel. I was then able to fi nish the opposite side of the door immediately.
When I was done with the fi nish work, I glued the dowels into their holes and sawed them fl ush. They’re never seen because of their placement on the large door.
Dan UrbanGlen Ellyn, Illinois
the abrasive. Hold a shop-vacuum nozzle near the brush while doing this to keep your workpiece and work surface clean. My granite surface plate is from Lee Val-ley (item #88N85.01), and is ground to an accuracy of ± .0001" overall. You can fi nd similar blocks at machinery supply stores. PWM
Don HendersonOrleans, Ontario
equipment repair/maintenance facility, but steel pieces are also available at steel or industrial supply businesses.
Jim WhetstoneNew Cumberland, Pennsylvania
12-15_1011_PWM_Tricks.indd 1412-15_1011_PWM_Tricks.indd 14 9/8/10 4:09:12 PM9/8/10 4:09:12 PM

High strength with a shorter clamp time along with no dyes for
a natural fi nish makes Gorilla Wood Glue ideal for your woodworking
and building projects.
© 2010 Gorilla Glue Company
FOR THE TOUGHEST JOBS ON PLANET EARTH®
1-800-966-3458 Made in U.S.A.
BUILD ITTOUGH.
For more information, go to PWFREEINFO.COM.
For more information, go to PWFREEINFO.COM. For more information, go to PWFREEINFO.COM.
For more information, go to PWFREEINFO.COM.
For more information, go to PWFREEINFO.COM.
12-15_1011_PWM_Tricks.indd 1512-15_1011_PWM_Tricks.indd 15 9/8/10 4:26:09 PM9/8/10 4:26:09 PM
16 ■ POPULAR WOODWORKING MAGAZINE November 2010
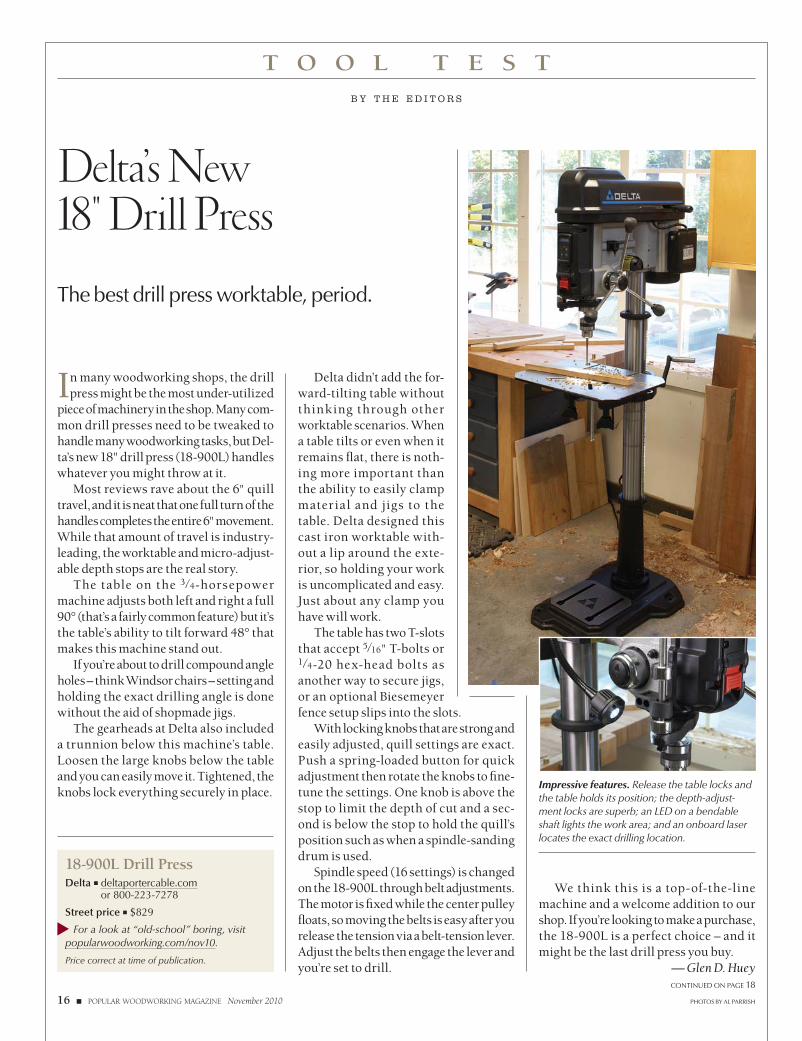
In many woodworking shops, the drill press might be the most under-utilized
piece of machinery in the shop. Many com-mon drill presses need to be tweaked to handle many woodworking tasks, but Del-ta’s new 18" drill press (18-900L) handles whatever you might throw at it.
Most reviews rave about the 6" quill travel, and it is neat that one full turn of the handles completes the entire 6" movement. While that amount of travel is industry-leading, the worktable and micro-adjust-able depth stops are the real story.
The table on the 3 ⁄4-horsepower machine adjusts both left and right a full 90° (that’s a fairly common feature) but it’s the table’s ability to tilt forward 48° that makes this machine stand out.
If you’re about to drill compound angle holes – think Windsor chairs – setting and holding the exact drilling angle is done without the aid of shopmade jigs.
The gearheads at Delta also included a trunnion below this machine’s table. Loosen the large knobs below the table and you can easily move it. Tightened, the knobs lock everything securely in place.
PHOTOS BY AL PARRISH
Delta’s New 18" Drill Press
The best drill press worktable, period.
CONTINUED ON PAGE 18
B Y T H E E D I T O R S
T O O L T E S T
Impressive features. Release the table locks and the table holds its position; the depth-adjust-ment locks are superb; an LED on a bendable shaft lights the work area; and an onboard laser locates the exact drilling location.
Delta didn’t add the for-ward-tilting table without thinking through other worktable scenarios. When a table tilts or even when it remains fl at, there is noth-ing more important than the ability to easily clamp material and jigs to the table. Delta designed this cast iron worktable with-out a lip around the exte-rior, so holding your work is uncomplicated and easy. Just about any clamp you have will work.
The table has two T-slots that accept 5⁄16" T-bolts or 1 ⁄4-20 hex-head bolts as another way to secure jigs, or an optional Biesemeyer fence setup slips into the slots.
With locking knobs that are strong and easily adjusted, quill settings are exact. Push a spring-loaded button for quick adjustment then rotate the knobs to fi ne-tune the settings. One knob is above the stop to limit the depth of cut and a sec-ond is below the stop to hold the quill’s position such as when a spindle-sanding drum is used.
Spindle speed (16 settings) is changed on the 18-900L through belt adjustments. The motor is fi xed while the center pulley fl oats, so moving the belts is easy after you release the tension via a belt-tension lever. Adjust the belts then engage the lever and you’re set to drill.
We think this is a top-of-the-line machine and a welcome addition to our shop. If you’re looking to make a purchase, the 18-900L is a perfect choice – and it might be the last drill press you buy.
— Glen D. Huey
18-900L Drill PressDelta ■ deltaportercable.com
or 800-223-7278
Street price ■ $829
For a look at “old-school” boring, visit popularwoodworking.com/nov10.
Price correct at time of publication.
u
16-21_1011_PWM_ToolTest.indd 1616-21_1011_PWM_ToolTest.indd 16 9/8/10 4:10:06 PM9/8/10 4:10:06 PM

Side WinderRouter Lift.
New
WoodpeckersPRECISION WOODWORKING TOOLS
®
www.woodpeck.com1-800-752-0725 See your local dealer for availability.
The new Woodpeckers®
Side Winder RouterLift makes using
your routertable even
easier.
Quick Liftfrom the top.Micro adjustfrom the side.
Made in U.S.A.
Protected by one or more of the following U.S. Patents; 6,505,659; 7,559,347; 7,481,253; 7,108,463 and other patents pending.
1 ⁄32
Per
Rotation.
Walking the talk.
Hand tools for the serious woodworker800.426.4613 32 33rd St. Brooklyn, NY 11232 www.toolsforworkingwood.com
visit us atpro.woodworker.com/pw10
If you are in a woodworkingbusiness…this could be the mostvaluable tool in yourofficesm.Please call1-800-321-9841for your 800 page catalog.
Mention code pw10
FREEto woodworking businesses.
For more information, go to PWFREEINFO.COM. For more information, go to PWFREEINFO.COM.
For more information, go to PWFREEINFO.COM. For more information, go to PWFREEINFO.COM.
For more information, go to PWFREEINFO.COM. For more information, go to PWFREEINFO.COM.
16-21_1011_PWM_ToolTest.indd 1716-21_1011_PWM_ToolTest.indd 17 9/10/10 12:08:48 PM9/10/10 12:08:48 PM
Glen-Drake Dovetail SawGlen-Drake Toolworks ■ glen-drake.com
or 800-961-1569
Street price ■ $129; blade, $29
Read more about this new saw at popularwoodworking.com/nov10.
Prices correct at time of publication.
u
CONTINUED FROM PAGE 16
T O O L T E S T
Glen-Drake Dovetail SawMost boutique toolmakers offer nicely made renditions of traditional forms. Kevin Drake builds tools of excellent quality, but he takes tool design one step further, going back to basic principles to make tools that fi t the hand and are easier to use. The result might look unusual, but he always has a good reason.
Despite the resemblance to a Japanese Dozuki, this new dovetail saw is Western style – it’s pushed, not pulled. The turned handle allows the user to adopt the same
grip whether cutting vertically or at an angle. The position of the saw changes; the position of the user’s hand stays the same. If you’re just learning how to saw by hand or have wrist problems, you’ll appreciate this feature.
The second unusual feature is the blade configuration, most notably the lack of teeth at the ends of the saw blade. This fl at area makes it easy to get the saw started in the right direction and orien-tation, especially if used in conjunction with the company’s Kerf-Starter, a small knife used for layout that cuts a track the same width as the saw cut.
The teeth are also progressively fi led – closely spaced at the front for a soft start, with fewer teeth in the middle to remove material quickly. The teeth are closer together at the back of the saw to help reverse the direction without snagging on an aggressive tooth.
The ease of starting and the comfortable grip make this saw a great choice as a fi rst joinery saw for those developing skills, or for those frustrated by conventional saw confi gurations. It’s a high-quality tool with a short learning curve, and is avail-able fi led rip or crosscut, with a choice of handle woods. — Robert W. Lang
16-21_1011_PWM_ToolTest.indd 1816-21_1011_PWM_ToolTest.indd 18 9/8/10 4:10:53 PM9/8/10 4:10:53 PM

Wainscot & Panelling SetInfi nity Cutting Tools ■ infi nitytools.com
or 887-872-2487
Street price ■ $90
Watch a video on fl ush-trim bits at popularwoodworking.com/nov10.
Price correct at time of publication.
u
visit dewalt.com/compactrouter
For more information, go to PWFREEINFO.COM.
Beadboards by RouterRouter bit profi les are used in many differ-ent applications. While the profi les might be identical, where the design is used changes depending on your work at hand.
Case in point is the new set of router bits from Infinity Cutting Tools – the Wainscot and Panel Routing Set (#005-10). This three-piece set produces a profi le to make wainscot, but the bead produced by these bits adds visual interest to the backboards of chests and cupboards.
The set includes two router bits to pro-
duce a 1⁄4" tongue and 1⁄4" groove on the edges of your stock, and one additional router bit to complete the design. Each bit has carbide cutting edges.
If you’re comfortable producing the tongue and groove with other tools, the wainscot router bit (item #02-510) is sold separately for $29.90.
The wainscot bit does two jobs when used for either wainscot or bead work. The fi rst is to cut a bevel into the face of the groove edge of the board. That’s accom-plished while positioning the board fl at to the top of a router table – these bits are not intended for handheld use.
On the tongue edge of the board, a bead completes the design. The router bit pro-duces a bead with a 5⁄32" radius held just below the face of the board, so you won’t sand the profile when cleaning up your boards
To cut the bead into the stock, the router bit is raised above the tongue portion of the
board and is shaped with the board running on its tongue edge, face flat to the fence.
Stock thickness determines the appro-priate setup of the bit. In 3⁄4" material, use the included 1⁄2" bearing. If you drop down in thickness to 5⁄8", use the 5⁄8" bearing that also is included.
This is a nice-looking profile that’s easy to set up and use. And the bits are good quality – as you’d expect from Infinity. PWM
— GH
T O O L T E S T
16-21_1011_PWM_ToolTest.indd 1916-21_1011_PWM_ToolTest.indd 19 9/8/10 4:11:15 PM9/8/10 4:11:15 PM

CT 26 / CT 36 Dust Extractors
Order Festool’s new CT 26 and CT 36 HEPA equipped Dust extractors today!
BOB MARINO
CALL 1.866.FESTOOLwww.BobMarinosBestTools.com
3 3 7 8 6 6 5
SERVICE AS IT SHOULD BE
FREE SHIPPING ON ALL FESTOOL ORDERS!No sales tax collected outside of NJ and OH.
The most complete dust removal system just got better!
• HEPA Filtration is standard• Self-cleaning filter bags• Next generation high-
performance motor• Integrated hose garage• Increased capacity
For more information, go to PWFREEINFO.COM.
For more information, go to PWFREEINFO.COM. For more information, go to PWFREEINFO.COM.
16-21_1011_PWM_ToolTest.indd 2016-21_1011_PWM_ToolTest.indd 20 9/8/10 4:11:39 PM9/8/10 4:11:39 PM

Make precise no-rattle dadoes with a router instead of a cumbersome dado blade with the new improved DadoMax™. Complete details and instructions are available for you at our website, www.woodline.com.
DadoMax™
1-800-472-6950
Wood GearClock Kit
Patent Pending
Inlay KitIncludes bushing & 1/8” solid carbide down spiral. Fits 13/16”standard size hole. WL-INLAY
ONLYWL-DMAX Reg. $109
$99Create this working work of art with Woodline’s Wooden Gear Clock Kit. The kit includes full size gear templates, hardware kit, spiral bit, and full in-structions on CD and DVD. The provided wood kit includes 6 pieces of specialty plywood for gears in your choice of walnut or cherry. You supply the oth-er wood needed from your scrap box. Grandfather style design with pendulum & weights.
ONLY $249Woodline Pin Router Accessory included
WL-WCK-DPC Cherry KitWL-WCK-DPW Walnut Kit
6pc Cabinet Set
3¼” Ogee Panel Raiser2 pc Ogee Rail & StileReversible Glue JointDrawer LockDoor Lip $169
WL-2020-3
3 Wings for smooth cuts
5 Straight, 6 Roundover,3 Dovetail, 3 Core Box,
3 Cove, 2 Flush Trim, 1 Panel Bit,2 Roman Ogee, 2 Slot Cutters,
1 V Groove, 1 Chamfer, 1 Bevel Trim
$109WL-2010
Arch Panel System
The Panel Master System makes routing raised panels safe and easy. A Blue Max 360 clamp holds the templates in place with handles giving precise control. Choice of Cathedral or Roman templates.
WL-ARCHCCathedral
WL-ARCHRRoman
$109
$99Either Set
Molding SetsFREE MOLDING
BOOK ON CD WITH EITHER SET. Shows you how to
layer bits for unique pro les.
5Pc Molding SetWL-2011
8Pc Classical SetWL-2016 ½” Shank only
Ogee Pro leWL-1505 ¾” Bore
$199$20• Fine Quality Carbide Bits• Wooden Hand Planes• Turning Tools & Accessories• Unsurpassed Customer Service
• Affordable Custom Bits• Complete Selection of Individual Bits and Shaper Cutters• Visit www.woodline.com for our full line
30pc Professional Set
5pc Cabinet Shaper Set
For more information, go to PWFREEINFO.COM.
16-21_1011_PWM_ToolTest.indd 2116-21_1011_PWM_ToolTest.indd 21 9/9/10 1:29:34 PM9/9/10 1:29:34 PM

22 ■ POPULAR WOODWORKING MAGAZINE November 2010
Thanksgiving at our house means shoe-horning 14 guests into a dining room
meant for eight, football on the television and the aroma of Barb’s sage dressing fi ll-ing the house. Every year she makes a big-ger batch (last year it was 56 cups) and every year it seems there is only a smidgen left over. She knows just the amount of sea-sonings to bring out that signature fl avor that makes the whole meal sparkle.
I like to think of ornament in furniture design similar to the spices we add to food. It serves to bring out the underlying fl a-vors or in the case of furniture, enhance the underlying bones of a form.
Ornament adds subtle spice. Inlay and banding add spice to this table by Steve Latta. The ornament gently highlights the form.
LEAD PHOTO, GEOMETRIC ORNAMENT & SUBTLE HIGHLIGHTS PHOTOS COURTESY OF LIE-NIELSEN TOOLWORKS; SHELL CARVING PHOTO COURTESY OF DAN REAHARD
B Y G E O R G E R. W A L K E R
Add Spice to Your Work
A dash of ornament
highlights a form.
D E S I G N M A T T E R S
What is Ornament? To understand ornament and the role it plays in design, it’s helpful to go back to architecture. In fact, many forms of ornament seen on furniture are bor-rowed directly from historic buildings. The hanging bellfl ower motif inlaid into the tapered legs of Federal card tables is inspired by stone carvings on classical buildings. Many links from architecture could be cited, but what’s more important is to understand some design principles that can guide our choices.
It’s helpful up front to distinguish between two similar terms – decoration and ornament. Decoration is some type of artwork, usually a painting, sculpture, carving or other artistic medium that is meant to create a focal point within a design. In the case of architecture, a statue or a large painted mural would be consid-ered decoration. Frequently the building
Architectural ornament. The hanging bellfl ower ornament seen on buildings in antiquity provided inspiration for cabinetmakers.
itself intentionally directs your gaze to the work of art. Decoration in this sense is rare in furniture design. One reason is scale. Murals and even large sculptures are quite small in comparison to the overall size of buildings. Furniture by its nature is usu-ally scaled to the human frame. Because it’s so small, it’s challenging to create a composition where decoration doesn’t overpower the form.
Ornament is the application of carv-ing, inlay, marquetry, painting or gilding meant to enhance the underlying form. Think of it as the curtains and props that together frame the stage in a play. Just the opposite of a focal point, instead it helps our eye enjoy the actors. For our purposes the actor may be a dresser, table or mir-ror frame, but the ornament never takes center stage. It can take on a variety of forms – some quite dramatic – but it’s most effective in a supporting role.
Bellfl ower
22-23_1011_PWM_DesignMatters.ind22 2222-23_1011_PWM_DesignMatters.ind22 22 9/8/10 3:46:23 PM9/8/10 3:46:23 PM

Go Online FOR MORE …
You’ll fi nd links to all these online extras at:u popularwoodworking.com/nov10
BLOG: For more Design Matters, read George R. Walker’s blog.
BLOG: Read about Editor Christopher Schwarz’s visit to George R. Walker’s shop.
IN OUR STORE: George R. Walker’s DVDs.
All of our products are available online at:u WoodworkersBookShop.com
About This ColumnIf you have a thirst to hone your creative skills, Design Matters dives into the basics of proportions, forms, contrast and composition
to give you the skill to tackle furniture design challenges with confi -dence.
u
popularwoodworking.com ■ 23
Categories of OrnamentOrnament traditionally falls into several categories. It may be based on animal life such as carved shells. (Another example of animal life is the egg-and-dart carving used on an ovolo moulding.) It also fre-quently fi nds expression in plant life such as carved acanthus leaves, fl ower blossoms or inlaid vines. Finally, ornament can be expressed in simple geometric patterns using inlay, bandings or marquetry.
Application of Ornament in a DesignIn most cases ornament emphasizes the form either by highlighting an existing element or creating a visual border. Vines and carved leaves are a perfect foil to emphasize curvature in table or chair legs. From a distance, carving comes across visually as a change in surface texture, beckoning your eye to pause and take in the overall form. Carving provides a delightful surprise when viewed close, but gently highlights the form from across the room.
Another application is to use ornament to create borders around the simple shapes that make up a design. Furniture designs are often built around combinations of simple rectangles, circles or ovals. Using ornament to border these simple shapes
helps the eye to take in the underlying form.
Adding simple stringing around the perimeter of a drawer front or table leg will subtly emphasize the bones of a design. When sizing borders it’s helpful to think of them as punctuating the shape or defi n-ing a clear beginning or ending. A good starting point is to use a fi fth or sixth of the height on a wide element such as a drawer front. On a tall element such as a door, use a fi fth or sixth of the width. That’s a decent rule of thumb when you are working through your initial rough sketches.
Avoid Some PitfallsIn learning how to cook, it’s easy to go overboard on the habañero peppers. Spices and ornament pack a lot of fl avor in a very small package. Many furniture builders eschew ornament precisely because it’s been overdone so much in the past. But just because it’s possible to go too heavy on the salt is no reason to abandon it. Obvi-ously, discretion is called for. One thing to keep in the back of your mind: A spice is at its best when it brings out the fl avor in the dish. Not the other way around.
I like to think you can get a feel for a design as you approach it from a dis-tance. The form or overall shape should be pronounced from across a room, but the ornament should be barely visible – if at all. It comes into focus as you cross the room then provides a delightful surprise when seen up close.
As always, take a closer look at master-ful work and take mental notes of those vines or inlaid ribbons that quietly empha-size a form. Observe carefully how the ornament is proportioned in relation to the elements they highlight. Hopefully this will inspire you to begin adding some ornament to your designs. Now, will some-one please pass the sage dressing before it’s all gone? PWM
George is the author of the DVDs “Unlocking the Secrets of Traditional Design” and “Unlocking the Secrets of Design: Moldings“ both from Lie-Nielsen Toolworks
(lie-nielsen.com).
Nature’s ornament. Shell carving is an example of ornament mimicking an animal form.
Geometric ornament. Inlay and banding can be used to create ornament in geometric patterns.
Subtle highlights. This shallow carving of honey-suckle blossoms highlights the curvature of this cabriole leg by Al Breed.
Pleasing proportion. Use a sixth of the height of a drawer as the starting point for proportioning a border around a drawer front.
22-23_1011_PWM_DesignMatters.ind23 2322-23_1011_PWM_DesignMatters.ind23 23 9/8/10 3:46:44 PM9/8/10 3:46:44 PM

24 ■ POPULAR WOODWORKING MAGAZINE November 2010 PHOTOS BY THE AUTHOR; ILLUSTRATIONS BY GLEN D. HUEY
The fi nest craftsmanship. Only the wealthy owned important books in the mid-to-late 17th century. Therefore, bookstands used to display those books would have been built by top-of-the-line craftsmen using the latest joinery techniques, including large dovetails and a variety of mortise-and-tenon joints.
Important books have long been a sym-bol of education and wealth in Western
culture since before Gutenberg rolled out his fi rst Bible. Up until the mid-17th cen-tury, the fact that someone could read was usually a signifi cant status symbol – and even today, important books often denote elite status. Naturally, if you owned an important book, you wanted a way to dis-play it so everyone could see it. Enter the ever-enterprising cabinetmaker.
After you’ve studied furniture as long as I have, you begin to look for pieces to build that are unique and rare. This bookstand is defi nitely one rarity worth a second look by any scholar and/or woodworker.
Bookstands are scarce in any period, but William & Mary bookstands are particularly rare. It’s very possible this is because fi ne book ownership was rare during the period.
The thing that struck me most when I fi rst saw this bookstand was the maker’s sense of style. Whoever made it not only was aware of the latest construction tech-niques (note that the body of the piece is essentially a dovetailed box instead of a mortise-and-tenon frame), but also had an understanding of William & Mary design. The ball feet and cyma curves of the apron put this piece squarely in the realm of a professional cabinetmaker working in the most fashionable taste.
B Y C H A R L E S B E N D E R
Bookstand: A William & Mary Rarity
A maximum skills test
using minimal materials.
A R T S & M Y S T E R I E S
Stock SelectionThe original piece is clearly made from straight grained, almost quartersawn, walnut. Using quartersawn or rift-sawn material for this piece makes sense given its size and construction.
First, there are no large surfaces that would highlight highly fi gured fl at-sawn material. Second, the lack of fi gure helps accentuate the real purpose of the stand: showing off the book. (The original owner would have had the stand prominently displayed in his or her home, but the focus was the book, not the stand.) Lastly, the dimensional stability of either of quarter-sawn rift-sawn material ensures the piece will remain fl at and functional throughout the life of its owner.
I’ve chosen to use some rather straight-grained Eastern black walnut for this stand but it is not, per se, true quartersawn material. Nearly any species works well in making this stand. Once the material is milled fl at and at the proper thickness, it needs to be dimensioned.
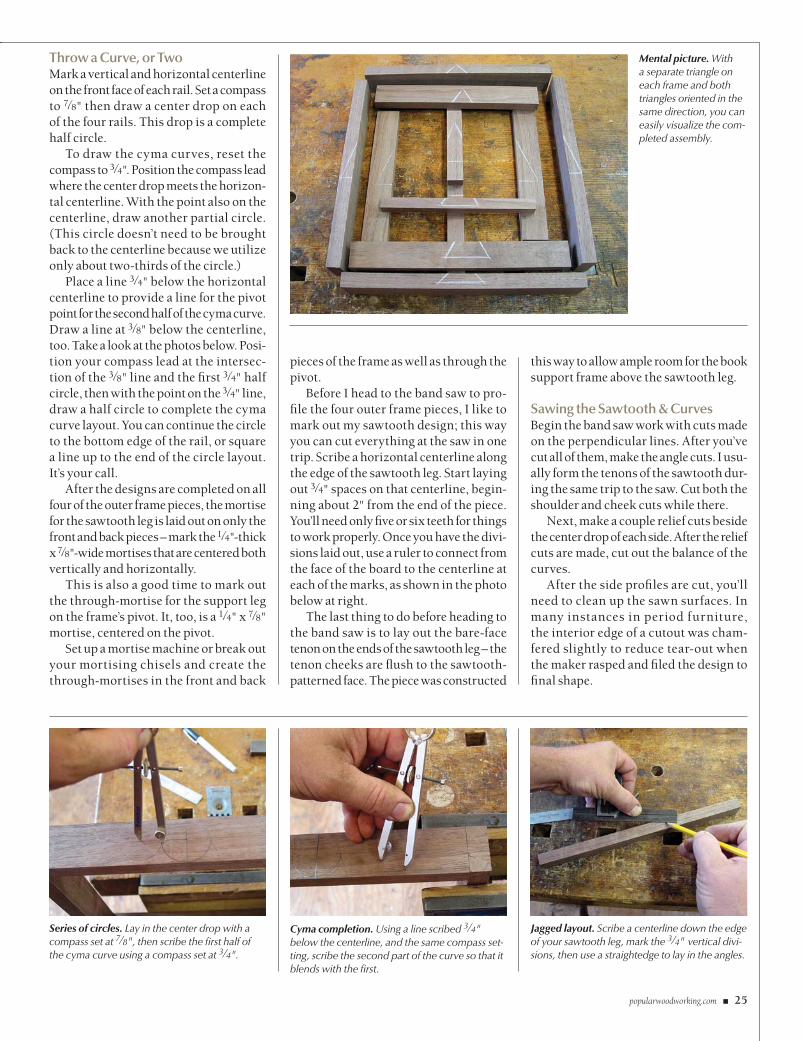
Triangles Keep Things StraightThere are many who use a triangular marking system but few who use it to its fullest potential. This project lends itself well to the full use of the system. As you can see in the photo of the book support frame (on the next page), by exploding a triangle across all the parts of the frame it’s easy to tell how all the parts relate to one another in the fi nished piece.
The great part of this project is that it is essentially a mortise-and-tenon frame within a dovetailed frame. Each frame can, to some extent, be approached sepa-rately until they are brought together in the fi nal glue-up.
Once the parts are properly oriented, the joinery begins. In typical William & Mary style, the outer frame has one big chunky dovetail at each corner. (After the frame is assembled, you’re able to make any necessary corrections to the sizes of the book support frame.) With the frame dovetailed, it’s time to lay out the cyma curves of the cutouts.
24-27_1011_PWM_A&M.indd 2424-27_1011_PWM_A&M.indd 24 9/8/10 3:47:37 PM9/8/10 3:47:37 PM
popularwoodworking.com ■ 25
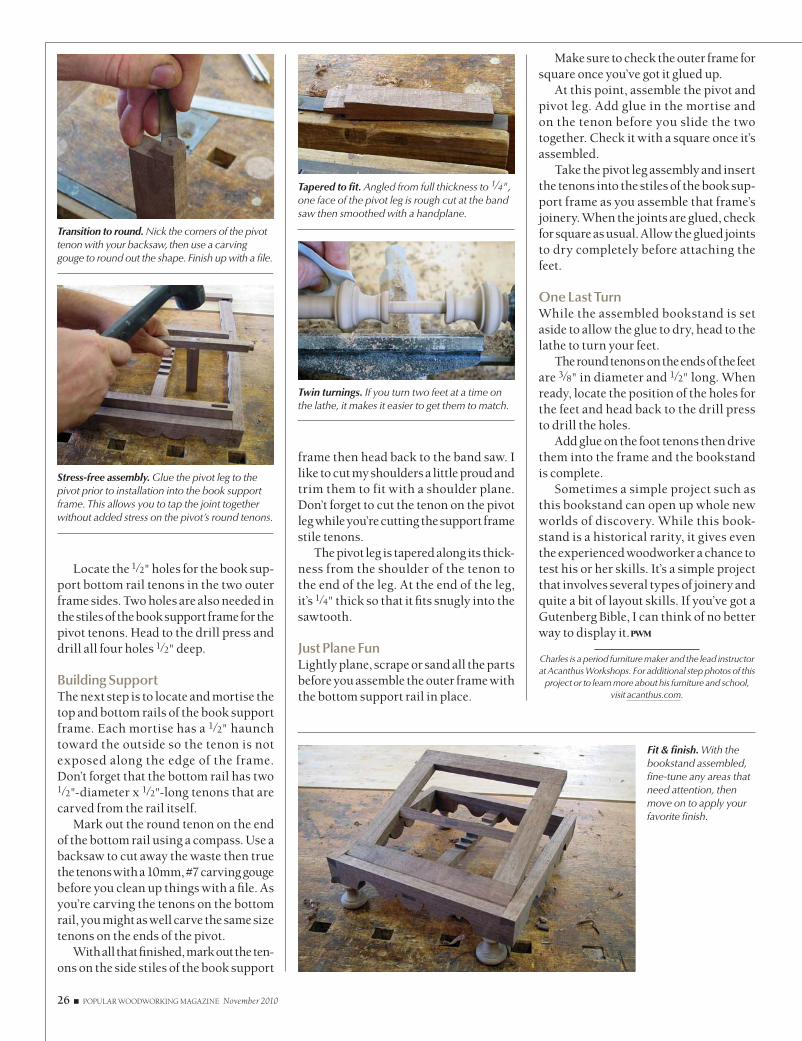
Throw a Curve, or TwoMark a vertical and horizontal centerline on the front face of each rail. Set a compass to 7⁄8" then draw a center drop on each of the four rails. This drop is a complete half circle.
To draw the cyma curves, reset the compass to 3⁄4". Position the compass lead where the center drop meets the horizon-tal centerline. With the point also on the centerline, draw another partial circle. (This circle doesn’t need to be brought back to the centerline because we utilize only about two-thirds of the circle.)
Place a line 3⁄4" below the horizontal centerline to provide a line for the pivot point for the second half of the cyma curve. Draw a line at 3⁄8" below the centerline, too. Take a look at the photos below. Posi-tion your compass lead at the intersec-tion of the 3⁄8" line and the fi rst 3⁄4" half circle, then with the point on the 3⁄4" line, draw a half circle to complete the cyma curve layout. You can continue the circle to the bottom edge of the rail, or square a line up to the end of the circle layout. It’s your call.
After the designs are completed on all four of the outer frame pieces, the mortise for the sawtooth leg is laid out on only the front and back pieces – mark the 1⁄4"-thick x 7⁄8"-wide mortises that are centered both vertically and horizontally.
This is also a good time to mark out the through-mortise for the support leg on the frame’s pivot. It, too, is a 1⁄4" x 7⁄8" mortise, centered on the pivot.
Set up a mortise machine or break out your mortising chisels and create the through-mortises in the front and back
pieces of the frame as well as through the pivot.
Before I head to the band saw to pro-fi le the four outer frame pieces, I like to mark out my sawtooth design; this way you can cut everything at the saw in one trip. Scribe a horizontal centerline along the edge of the sawtooth leg. Start laying out 3⁄4" spaces on that centerline, begin-ning about 2" from the end of the piece. You’ll need only fi ve or six teeth for things to work properly. Once you have the divi-sions laid out, use a ruler to connect from the face of the board to the centerline at each of the marks, as shown in the photo below at right.
The last thing to do before heading to the band saw is to lay out the bare-face tenon on the ends of the sawtooth leg – the tenon cheeks are fl ush to the sawtooth-patterned face. The piece was constructed
this way to allow ample room for the book support frame above the sawtooth leg.
Sawing the Sawtooth & CurvesBegin the band saw work with cuts made on the perpendicular lines. After you’ve cut all of them, make the angle cuts. I usu-ally form the tenons of the sawtooth dur-ing the same trip to the saw. Cut both the shoulder and cheek cuts while there.
Next, make a couple relief cuts beside the center drop of each side. After the relief cuts are made, cut out the balance of the curves.
After the side profi les are cut, you’ll need to clean up the sawn surfaces. In many instances in period furniture, the interior edge of a cutout was cham-fered slightly to reduce tear-out when the maker rasped and fi led the design to fi nal shape.
Mental picture. With a separate triangle on each frame and both triangles oriented in the same direction, you can easily visualize the com-pleted assembly.
Series of circles. Lay in the center drop with a compass set at 7⁄8", then scribe the fi rst half of the cyma curve using a compass set at 3⁄4".
Cyma completion. Using a line scribed 3⁄4" below the centerline, and the same compass set-ting, scribe the second part of the curve so that it blends with the fi rst.
Jagged layout. Scribe a centerline down the edge of your sawtooth leg, mark the 3⁄4" vertical divi-sions, then use a straightedge to lay in the angles.
24-27_1011_PWM_A&M.indd 2524-27_1011_PWM_A&M.indd 25 9/8/10 3:47:56 PM9/8/10 3:47:56 PM
26 ■ POPULAR WOODWORKING MAGAZINE November 2010
frame then head back to the band saw. I like to cut my shoulders a little proud and trim them to fit with a shoulder plane. Don’t forget to cut the tenon on the pivot leg while you’re cutting the support frame stile tenons.
The pivot leg is tapered along its thick-ness from the shoulder of the tenon to the end of the leg. At the end of the leg, it’s 1⁄4" thick so that it fi ts snugly into the sawtooth.
Just Plane FunLightly plane, scrape or sand all the parts before you assemble the outer frame with the bottom support rail in place.
Locate the 1⁄2" holes for the book sup-port bottom rail tenons in the two outer frame sides. Two holes are also needed in the stiles of the book support frame for the pivot tenons. Head to the drill press and drill all four holes 1⁄2" deep.
Building SupportThe next step is to locate and mortise the top and bottom rails of the book support frame. Each mortise has a 1⁄2" haunch toward the outside so the tenon is not exposed along the edge of the frame. Don’t forget that the bottom rail has two 1⁄2"-diameter x 1⁄2"-long tenons that are carved from the rail itself.
Mark out the round tenon on the end of the bottom rail using a compass. Use a backsaw to cut away the waste then true the tenons with a 10mm, #7 carving gouge before you clean up things with a fi le. As you’re carving the tenons on the bottom rail, you might as well carve the same size tenons on the ends of the pivot.
With all that fi nished, mark out the ten-ons on the side stiles of the book support
Fit & fi nish. With the bookstand assembled, fi ne-tune any areas that need attention, then move on to apply your favorite fi nish.
Make sure to check the outer frame for square once you’ve got it glued up.
At this point, assemble the pivot and pivot leg. Add glue in the mortise and on the tenon before you slide the two together. Check it with a square once it’s assembled.
Take the pivot leg assembly and insert the tenons into the stiles of the book sup-port frame as you assemble that frame’s joinery. When the joints are glued, check for square as usual. Allow the glued joints to dry completely before attaching the feet.
One Last TurnWhile the assembled bookstand is set aside to allow the glue to dry, head to the lathe to turn your feet.
The round tenons on the ends of the feet are 3⁄8" in diameter and 1⁄2" long. When ready, locate the position of the holes for the feet and head back to the drill press to drill the holes.
Add glue on the foot tenons then drive them into the frame and the bookstand is complete.
Sometimes a simple project such as this bookstand can open up whole new worlds of discovery. While this book-stand is a historical rarity, it gives even the experienced woodworker a chance to test his or her skills. It’s a simple project that involves several types of joinery and quite a bit of layout skills. If you’ve got a Gutenberg Bible, I can think of no better way to display it. PWM
Charles is a period furniture maker and the lead instructor at Acanthus Workshops. For additional step photos of this
project or to learn more about his furniture and school, visit acanthus.com.
Transition to round. Nick the corners of the pivot tenon with your backsaw, then use a carving gouge to round out the shape. Finish up with a fi le.
Tapered to fi t. Angled from full thickness to 1⁄4", one face of the pivot leg is rough cut at the band saw then smoothed with a handplane.
Stress-free assembly. Glue the pivot leg to the pivot prior to installation into the book support frame. This allows you to tap the joint together without added stress on the pivot’s round tenons.
Twin turnings. If you turn two feet at a time on the lathe, it makes it easier to get them to match.
24-27_1011_PWM_A&M.indd 2624-27_1011_PWM_A&M.indd 26 9/8/10 3:49:11 PM9/8/10 3:49:11 PM

1/4"5/8"45/8"
1/4"
5/8"
73/4"1/2"
1/2" dia.
101/2"
3/4"
71/2"
13/8"
3/4"
7/8"
1/2" dia.
101/2"1/2"
12"
101/2"3/4"
13/4"
1"7/8"
12"23/4"3/4"43/4"
1/4"
3/4"
3/4"
12"
1 grid square = 1/2"
1 grid square = 1/2"
popularwoodworking.com ■ 27
Go Online FOR MORE …
You’ll fi nd links to all these online extras at:u popularwoodworking.com/nov10
VIDEO: Think you have dovetails fi gured out? Watch Frank Klausz work his magic.
ARTICLE: Continue with Frank Klausz to learn to master the mortise and tenon.
WEB SITE: Take a detailed and in-depth look at Thomas Jefferson’s bookstand.
TO BUY: Learn more about William & Mary furniture in our April 2010 issue (#182).
IN OUR STORE: Pick up a DVD on turning basics to get started in the right direction.
All of our products are available online at:u WoodworkersBookShop.com
u
William & Mary Bookstand NO. ITEM DIMENSIONS (INCHES) MATERIAL COMMENTS T W L
❏ 4 Outer frame 3⁄4 13⁄4 12 Walnut
❏ 1 Support top rail 5⁄8 13⁄8 101⁄2 Walnut
❏ 1 Support bottom rail 5⁄8 13⁄8 111⁄2 Walnut 1⁄2"-long, 1⁄2"-round tenon
❏ 2 Support stiles 5⁄8 13⁄8 9 Walnut 3⁄4" TBE*
❏ 1 Sawtooth leg 5⁄8 7⁄8 12 Walnut
❏ 1 Support leg 5⁄8 7⁄8 45⁄8 Walnut 5⁄8" TOE**, TOF†
❏ 1 Frame pivot 5⁄8 5⁄8 83⁄4 Walnut 1⁄2"-long, 1⁄2"-round tenon
❏ 4 Feet 15⁄8 15⁄8 21⁄8 Walnut
* tenon both ends; ** tenon one end; †taper one face
OUTER FRAME - FRONT/BACK RAIL
OUTER FRAME - SIDE RAIL
SAWTOOTH LEG
FOOT
3-D VIEW
SUPPORT FRAME
SUPPORT LEG
FRAME PIVOT
3⁄8" dia.
1" dia.
7⁄8" dia.
3⁄4" dia.
13⁄8" dia.
15⁄8" dia.
13⁄8" dia.
1⁄2"
3⁄16"1⁄16"
25⁄32"15⁄8"
1⁄16"
7⁄16"3⁄32"
24-27_1011_PWM_A&M.indd 2724-27_1011_PWM_A&M.indd 27 10/4/10 1:51:09 PM10/4/10 1:51:09 PM

28 ■ POPULAR WOODWORKING MAGAZINE November 2010
B Y R O B E R T W. L A N G
Contemporary Shelves
LEAD PHOTO BY AL PARRISH; STEP PHOTOS AND ILLUSTRATION BY THE AUTHOR
For sturdy, attractive and affordable material to build these shelves, bypass
the fancy stuff at the front of your local home center and head for the back where they keep the lumber intended for use as rafters and fl oor joists.
In my neighborhood the available wood is Southern yellow pine. In other parts of the country you might fi nd Douglas fi r, spruce or another species. When logs are milled for construction lumber, this is where the good stuff goes.
Three 12'-long 2x12s will provide enough material to build the shelves as shown. You may have to cut them (or have them cut) to get them home, but longer lengths will be straighter and of better quality than short stuff. Pick through the stack and select the straightest, nicest-looking pieces.
Look at the ends of the boards, and avoid any with a tight circle in the rings in the middle of the board, which tells you that the board came from the middle, or heart, of the tree. As the wood dries and shrinks, this is the most likely part to cup and split. These boards will likely be rela-tively damp, and you should expect some movement as they dry.
You can hasten the drying process by cutting the boards to rough lengths. Let them sit for a while to acclimate to your environment. The parts don’t need to be perfect for this project to be a success, but the straighter they are, the easier it will be to put your shelves together.
Everything but the SidesCut the top, bottom, shelves and uprights to length, but leave the ends long for now. It is important that all of the uprights be square and the same length. Double-check the length of these short pieces, and the thickness of the horizontal parts. Lay out the locations of the shelves on the sides based on the actual size of the parts.
You only need to make the layout on one of the side pieces. Rather than measure and mark a second time, transfer the shelf locations by placing both sides next to each other. Use a square to mark the shelf locations from one side to the other.
The uprights are centered in the width of the top and bottom. Measure from both ends, and again transfer the layout marks from one piece to the other. Stack the four shelves on the bottom piece, with the ends fl ush. Use your square to mark the upright locations on each of the shelves.
You Know the DrillAll the parts of this shelf unit are held together with screws. If you’re going to paint the shelves, the screws can run from the outside in. Countersink the screw heads and plug the holes before priming and painting. If you want to use a clear fi nish as shown in this article, some of the screws should be discretely placed.
The fi rst and last short uprights con-nect to the top and bottom with 3" deck screws from the outside in. Drill three clearance holes on the centerline of the top and bottom. You can also attach one end of each upright to a shelf with the same method. Use pocket screws at the opposite end of the uprights, and at the ends of the top, bottom and shelves.
When you assemble the shelves, put the pocket screw holes facing down so they won’t be visible. Drill the pocket screw holes in all the parts before doing any
Humble origins. The thick, wide planks used to construct this set of shelves are framing lumber – 2x12s nor-mally used for fl oor joists. Select the best of the lot and let them be seen.
Construction lumber dressed up
for display.
I C A N D O T H A T
28-29_1011_PWM_ICDT.indd 2828-29_1011_PWM_ICDT.indd 28 9/8/10 3:50:41 PM9/8/10 3:50:41 PM

popularwoodworking .com ■ 29
48"
69"
12"
251⁄2"
213⁄4"
30"
15"
63⁄4"
45"
assembly. After all the holes are drilled, sand the pieces with #100-grit paper on a random-orbit sander.
The edges of the material will be rounded from the machining process. This is a problem where the ends of pieces meet the faces of other pieces. You can use a router equipped with a chamfer bit to turn this drawback into a design feature.
Set the depth of the router bit so that it cuts about 3⁄16" deep on the edge of a piece of scrap. The exact distance isn’t impor-tant; what’s important is that all the edges are chamfered the same. Think about how the parts will go together, and use a crayon or chalk to mark the edges you don’t want to rout.
All the long edges of all the parts should be chamfered. The edges on the ends of the top, bottom, shelves and uprights are also chamfered, but only on the short ends at the front and back. The ends of the long sides that go against the faces of other parts should remain square.
After routing, sand all the parts again, this time with #150-grit paper on your sander. If there are any areas where the grain broke out during routing, you can blend them in to the surrounding area with some judicious sanding.
Give Me Some RoomScrews will hold the shelves together, but the assembly will be stronger if you also glue each joint. Use yellow or white wood glue, and smear some glue on the end-grain surfaces of each piece. Let this soak in for a few minutes, then apply additional glue to both surfaces when you assemble.
Screw one upright to each of the four shelves, using the through-holes in the middle of each shelf. Set these aside and fi nd a large, fl at area to assemble the rest of the shelf unit. You’ll probably need to work on the fl oor to have enough room. Screw the top and bottom to the sides using 21⁄2"-
long pocket screws. Take the last upright and screw it to the bottom, coming in from the outside of the case.
Work up from there. Attach a shelf assembly to the cabinet side, and the upright to the bottom of the shelf with the long pocket screws. Remember that every other shelf attaches to the opposite side. If you need to, use clamps to help position the pieces to the appropriate layout lines.
You can buy special plugs to fi ll the vis-ible pocket screw holes in the uprights, or you can use short lengths of 3⁄8"-diameter dowel. Glue them in place. When the glue is dry, cut off the protruding part of the dowels then sand them flush to the surface.
Make it a feature. Chamfering the edges add a design highlight – and helps to cover up any slight mis-alignment.
Square to start. Square subassemblies will make the overall structure easier to put together.
Cut the three feet from your leftover material, chamfer the edges with the router and attach the feet to the bottom. Go over the assembly, clean off any excess glue and sand any spots that may have been missed or dinged during assembly. Now you’re ready to finish; I used two coats of clear shellac. PWM
Bob is the executive editor of Popular Woodworking Magazine. Contact him at 513-531-2690 x11327
Contemporary Shelves NO. ITEM DIMENSIONS (INCHES) T W L
❏ 2 Sides 11⁄2 111⁄4 69
❏ 2 Top & bottom 11⁄2 111⁄4 45
❏ 4 Shelves 11⁄2 111⁄4 30
❏ 5 Uprights 11⁄2 111⁄4 12
❏ 3 Feet 11⁄2 111⁄4 43-D VIEW
About This ColumnOur “I Can Do That” column features proj-ects that can be completed by any wood-worker with a modest (but decent) kit of tools in less than two days of shop time, and using raw materials that are available at any home center. We offer a free online manual in PDF format that explains all the tools and
shows you how to per-form the basic operations in a step-by-step format. Visit ICanDoThatExtras.com to download the free manual.
Go Online FOR MORE …
You’ll fi nd links to all these online extras at:u popularwoodworking.com/nov10
PLAN: Download the free SketchUp plan for the Contemporary Shelves.
ARTICLES: All the "I Can Do That" articles are free online.
IN OUR STORE: Read about fl ush-cut saws in the Autumn 2007 issue of Wood-working Magazine.
Download the complete “I Can Do That” manual:u popularwoodworking.com/icandothat
All of our products are available online at:u WoodworkersBookShop.com
u
28-29_1011_PWM_ICDT.indd 2928-29_1011_PWM_ICDT.indd 29 9/8/10 3:50:55 PM9/8/10 3:50:55 PM
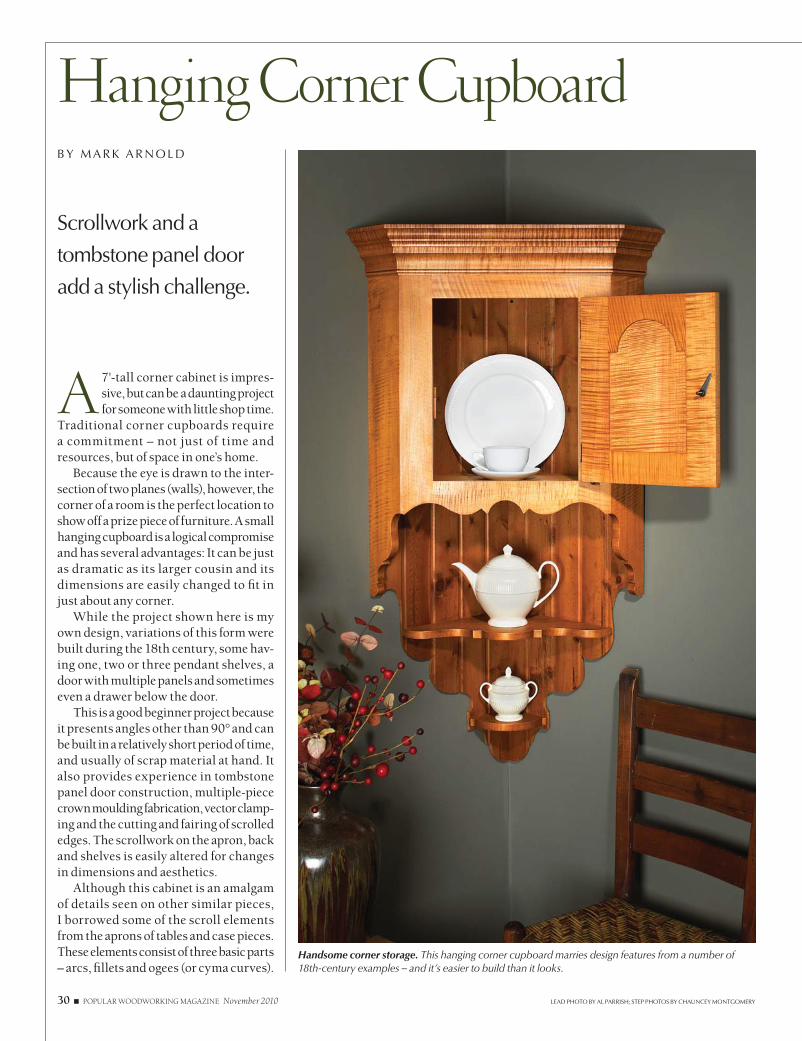
Hanging Corner CupboardB Y M A R K A R N O L D
Scrollwork and a
tombstone panel door
add a stylish challenge.
Handsome corner storage. This hanging corner cupboard marries design features from a number of 18th-century examples – and it’s easier to build than it looks.
LEAD PHOTO BY AL PARRISH; STEP PHOTOS BY CHAUNCEY MONTGOMERY
A 7'-tall corner cabinet is impres-sive, but can be a daunting project for someone with little shop time.
Traditional corner cupboards require a commitment – not just of time and resources, but of space in one’s home.
Because the eye is drawn to the inter-section of two planes (walls), however, the corner of a room is the perfect location to show off a prize piece of furniture. A small hanging cupboard is a logical compromise and has several advantages: It can be just as dramatic as its larger cousin and its dimensions are easily changed to fi t in just about any corner.
While the project shown here is my own design, variations of this form were built during the 18th century, some hav-ing one, two or three pendant shelves, a door with multiple panels and sometimes even a drawer below the door.
This is a good beginner project because it presents angles other than 90° and can be built in a relatively short period of time, and usually of scrap material at hand. It also provides experience in tombstone panel door construction, multiple-piece crown moulding fabrication, vector clamp-ing and the cutting and fairing of scrolled edges. The scrollwork on the apron, back and shelves is easily altered for changes in dimensions and aesthetics.
Although this cabinet is an amalgam of details seen on other similar pieces, I borrowed some of the scroll elements from the aprons of tables and case pieces. These elements consist of three basic parts – arcs, fi llets and ogees (or cyma curves).
30 ■ POPULAR WOODWORKING MAGAZINE November 2010
30-35_1011_PWM_HangingCupboard.i30 3030-35_1011_PWM_HangingCupboard.i30 30 9/8/10 3:51:48 PM9/8/10 3:51:48 PM
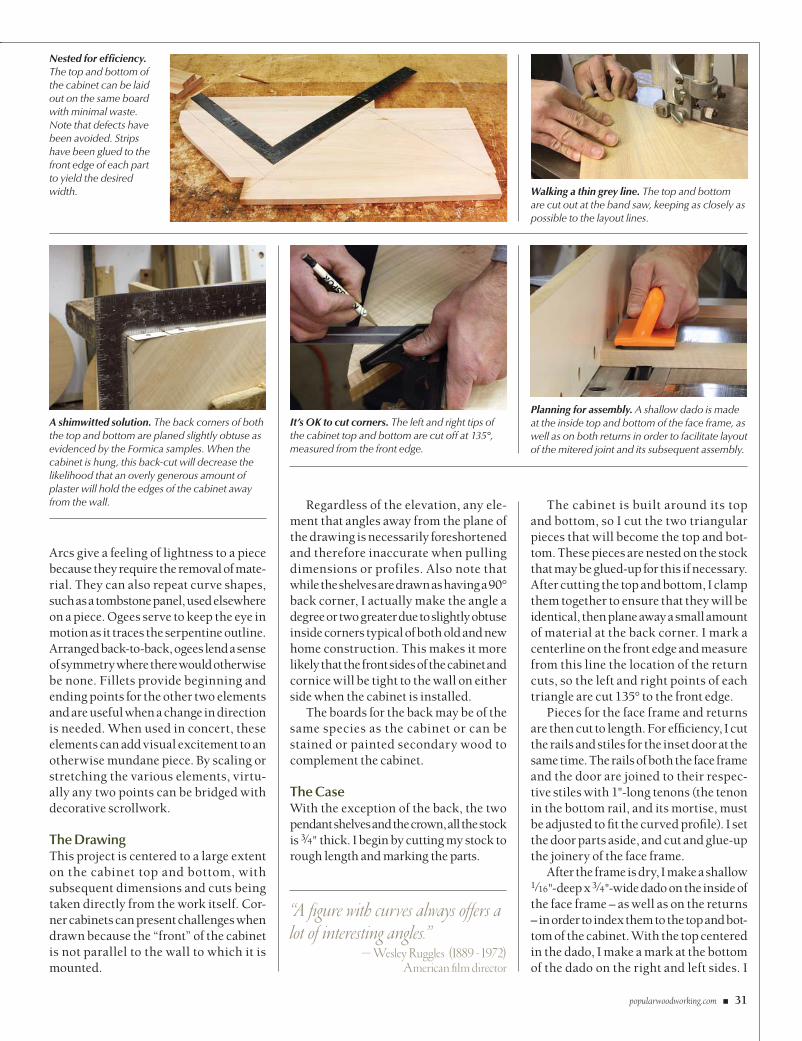
Regardless of the elevation, any ele-ment that angles away from the plane of the drawing is necessarily foreshortened and therefore inaccurate when pulling dimensions or profiles. Also note that while the shelves are drawn as having a 90° back corner, I actually make the angle a degree or two greater due to slightly obtuse inside corners typical of both old and new home construction. This makes it more likely that the front sides of the cabinet and cornice will be tight to the wall on either side when the cabinet is installed.
The boards for the back may be of the same species as the cabinet or can be stained or painted secondary wood to complement the cabinet.
The CaseWith the exception of the back, the two pendant shelves and the crown, all the stock is 3⁄4" thick. I begin by cutting my stock to rough length and marking the parts.
The cabinet is built around its top and bottom, so I cut the two triangular pieces that will become the top and bot-tom. These pieces are nested on the stock that may be glued-up for this if necessary. After cutting the top and bottom, I clamp them together to ensure that they will be identical, then plane away a small amount of material at the back corner. I mark a centerline on the front edge and measure from this line the location of the return cuts, so the left and right points of each triangle are cut 135° to the front edge.
Pieces for the face frame and returns are then cut to length. For effi ciency, I cut the rails and stiles for the inset door at the same time. The rails of both the face frame and the door are joined to their respec-tive stiles with 1"-long tenons (the tenon in the bottom rail, and its mortise, must be adjusted to fi t the curved profi le). I set the door parts aside, and cut and glue-up the joinery of the face frame.
After the frame is dry, I make a shallow 1⁄16"-deep x 3⁄4"-wide dado on the inside of the face frame – as well as on the returns – in order to index them to the top and bot-tom of the cabinet. With the top centered in the dado, I make a mark at the bottom of the dado on the right and left sides. I
Arcs give a feeling of lightness to a piece because they require the removal of mate-rial. They can also repeat curve shapes, such as a tombstone panel, used elsewhere on a piece. Ogees serve to keep the eye in motion as it traces the serpentine outline. Arranged back-to-back, ogees lend a sense of symmetry where there would otherwise be none. Fillets provide beginning and ending points for the other two elements and are useful when a change in direction is needed. When used in concert, these elements can add visual excitement to an otherwise mundane piece. By scaling or stretching the various elements, virtu-ally any two points can be bridged with decorative scrollwork.
The DrawingThis project is centered to a large extent on the cabinet top and bottom, with subsequent dimensions and cuts being taken directly from the work itself. Cor-ner cabinets can present challenges when drawn because the “front” of the cabinet is not parallel to the wall to which it is mounted.
Nested for effi ciency. The top and bottom of the cabinet can be laid out on the same board with minimal waste. Note that defects have been avoided. Strips have been glued to the front edge of each part to yield the desired width. Walking a thin grey line. The top and bottom
are cut out at the band saw, keeping as closely as possible to the layout lines.
A shimwitted solution. The back corners of both the top and bottom are planed slightly obtuse as evidenced by the Formica samples. When the cabinet is hung, this back-cut will decrease the likelihood that an overly generous amount of plaster will hold the edges of the cabinet away from the wall.
It’s OK to cut corners. The left and right tips of the cabinet top and bottom are cut off at 135°, measured from the front edge.
Planning for assembly. A shallow dado is made at the inside top and bottom of the face frame, as well as on both returns in order to facilitate layout of the mitered joint and its subsequent assembly.
“A figure with curves always offers a lot of interesting angles.”
— Wesley Ruggles (1889 - 1972)American fi lm director
popularwoodworking.com ■ 31
30-35_1011_PWM_HangingCupboard.i31 3130-35_1011_PWM_HangingCupboard.i31 31 9/8/10 3:52:18 PM9/8/10 3:52:18 PM

then set the table saw to make a 22.5° cut and carefully rip to the lines that I made. Because these lines are face down on the table saw, it is best to either sneak up on the fi nal width or transfer the cutlines to the end of the face frame.
The decorative scrolled apron of the face frame is laid out, cut at the band saw and cleaned up with fi les and sandpaper. When cutting this profi le, the areas where the scroll meets the miters are left uncut and are faired to the returns later. I then glue the cabinet top and bottom to the face frame. The returns can now be ripped at 22.5° to match the angle of the face frame, rabbeted for the back, and the scrollwork cut on the lower front edge. The returns are glued with the help of cauls that fi t over the front frame stiles and the returns, allowing
for vector clamping of the mitered joint. I then glue a door stop to the inside of the face frame. The stop should overhang the door opening by no more than 1⁄4".
The DoorWith the shell of the case assembled, I can now make the door. The tombstone panel is based on one from a Pennsylva-nia piece. It differs from a standard raised panel in that it overlays the front face of the door frame. The back edge of the panel is housed in a dado, like its raised cousin.
I begin by cutting a 1⁄4"-wide x 5⁄16"-deep groove for the panel, located 1⁄4" from the front of the rails and stiles. For the joinery, I use haunched mortise-and-tenon joints. The mortise is cut with a 1⁄4" hollow chisel mortiser centered in the stile groove then cleaned up with a chisel. I cut the corresponding tenon with a dado set. After cutting the joinery, I dry-assemble the door.
I then prepare a door panel blank on which the width is 1⁄8" less than the dis-tance between the groove bottoms of the
left and right stiles. I lay out and cut the tombstone shape, rout a 1⁄4"-radius bead on the front with a 1⁄16" fillet, and carve the inside corner of the bead where the arch meets the fl at at the top of the panel.
The radius of the arch of the top door rail is 5⁄16" smaller than the panel arch. Both the concave and convex arches are band sawn and faired with fi les and sand-paper. I then groove the three straight sides of the panel at the table saw so that the beaded edge of the panel fi ts tightly to the face of the door. Care is taken to achieve a proper fit – the bead should appear to terminate at the door frame, but should not be too snug.
The grooves in the arched top rail and in the tombstone portion of the panel are cut at the router table with a 1⁄4"-wide slot cutter. Because the slot cutter leaves mate-rial, the inside corner at the bottom of the panel dado must be chopped out with a 1⁄4" chisel. The door and panel are dry-assembled to check the fi t. Both the panel and frame are sanded prior to glue-up.
When the glue has dried, the door is
A careful layout. The cabinet top and bottom are centered left to right in the dados then each corner is marked at the bottom of the dado. The sides of the face frame are then mitered away from these layout lines. The top and bottom can now be glued in place.
Caul me. A V-notch cut into a scrap makes a perfect caul for clamping the odd-shaped top and bottom.
Angled clamping made easy. These cauls hook over the edges of the face frame and return, applying pressure right where it is needed.
A proud panel. This mockup of the door panel construction shows how the panel is held in the door frame groove yet overlays the face of the door.
Joinery preparation. The mortises for the 1" door tenons are located at the bottom of the groove and completed with a mortiser.
32 ■ POPULAR WOODWORKING MAGAZINE November 2010
30-35_1011_PWM_HangingCupboard.i32 3230-35_1011_PWM_HangingCupboard.i32 32 9/8/10 3:52:42 PM9/8/10 3:52:42 PM

fi t to the opening in preparation for hard-ware. Rattail hinges help to give the piece a period feel, although butterfl y or butt hinges may also be used. I chose a knob that, when rotated, locks the door with an interior metal fi nger. The hinges and knob are installed but removed prior to fi nishing.
The CorniceThe cornice of the cabinet is made of two pieces: a crown and a congé, or elongated cove. The crown profi le, a standard ogee with cove, is cut using a stock router bit.
Go on, bead it. A 1⁄4" roundover bit is used to rout the bead and fi llet on the tombstone panel.
The congé is cut on the table saw using an angled feed to take advantage of the arc of a 71⁄4"-diameter blade. Most of the waste is cut away before setting up the saw for the cove cut. The resultant surface is scraped
Many happy returns. When running mouldings around a cabinet, it is easier to begin at the front. Install the center piece fi rst, then fi t the returns to it.
Easy hardware. This was my fi rst experience with this style hinge. I was pleasantly surprised that there is rela-tively little play though my door reveals are about 1⁄16".
A tight curve. The groove for the inside edge of the upper door stile is cut with the same slot cut-ter used on the tombstone panel.
Don’t sweat the glue-up. Because everything has been dry-assembled more than once, glue-up should go smoothly. Just remember to avoid too much adhesive squeeze-out on the face. It is diffi cult to clean up around the panel, which should not be glued to the door frame.
A fi tting cut. The inside corner of the panel is shaped to fi t around the arched upper door stile.
Arch madness. The radius of the arc of the top door stile is 5⁄16" less than the radius of the panel arc. Note that the tenons have not yet been haunched.
It’s an inside job. Because neither the roundover bit nor the slot cutter used to rout the groove around the panel arch is capable of cutting an inside corner, both of these areas must be fi nished by hand.
popularwoodworking.com ■ 33
30-35_1011_PWM_HangingCupboard.i33 3330-35_1011_PWM_HangingCupboard.i33 33 9/8/10 3:53:00 PM9/8/10 3:53:00 PM

34 ■ POPULAR WOODWORKING MAGAZINE November 2010
Hanging Corner Cupboard NO. ITEM DIMENSIONS (INCHES) MATERIAL COMMENTS T W L
❏ 1 Top 3⁄4 121⁄4 203⁄16 Maple
❏ 1 Bottom 3⁄4 121⁄4 203⁄16 Maple
❏ 1 Face frame top rail 3⁄4 5 135⁄16 Maple
❏ 2 Face frame bottom rail 3⁄4 25⁄8 135⁄16 Maple
❏ 2 Face frame stiles 3⁄4 211⁄16 22 Maple
❏ 2 Returns 3⁄4 39⁄16 293⁄8 Maple
❏ 1 Upper door frame rail 3⁄4 43⁄8 85⁄16 Maple
❏ 1 Lower door frame rail 3⁄4 21⁄2 85⁄16 Maple
❏ 2 Door frame stiles 3⁄4 21⁄2 141⁄4 Maple
❏ 1 Tombstone panel 3⁄4 63⁄4 101⁄2 Maple
❏ 1 Upper shelf 5⁄8 9 151⁄4 Maple
❏ 1 Lower shelf 5⁄8 311⁄16 45⁄8 Maple
❏ Backboards 5⁄16 1413⁄16 44 White pine Shiplapped
❏ 1 Cornice crown 5⁄8 13⁄8 36 Maple Cut to fi t
❏ 1 Cornice congé 5⁄8 2 36 Maple With carrier strip
and sanded smooth. A small bead (1⁄4" diameter) with a 1⁄8" fi llet below is routed at the bottom of the cove. Once all of the mouldings have been prepared, they are mitered and installed with glue and nails. I fi nd it easier to install the front moulding fi rst, then fi t the returns to it.
The Back & Pendant ShelvesThe 44"-long x 5⁄16"-thick shiplapped back boards can be of primary or secondary wood. For this project, I am using white pine wainscoting that I had on hand, but I’ve also used random-width primary wood on a similar cabinet made of walnut. The backboards have a 3⁄32"-deep dado to house the 5⁄8"-thick pendant shelves. The
front edge of each shelf has a decorative profi le that echoes the scrollwork on the apron of the cabinet above.
The back itself also has a scrolled out-line. This profi le should be laid out so any cuts do not completely sever a piece of the back that is needed to complete the pro-fi le below it. By locating vertical scrolled elements below the back of each shelf, the front edges of the shelves will avoid unnecessary shaping.
All of the scroll cuts are done on the band saw then fi led to remove sawmarks. A few passes with #120-grit sandpaper are then needed to remove the fi le marks. Before the back is nailed to the cabinet, I fi nish all the parts. It is much easier to
fi nish the inside of the cabinet now than after everything is assembled.
The FinishThe fi gure of curly maple is really empha-sized when it has been stained with ani-line dye, but I fi nd most maple dyes result in an unrealistic yellow hue. I create my own shade of “antique maple” by mix-ing J.E. Moser’s powders. I use three tea-spoons of Honey Amber Maple and one teaspoon of American Walnut per quart of water. Although I often spray dye on larger pieces, for a small project like this, I simply rag it on. After the dye has dried, I apply three coats of Waterlox original formula, lightly sanding between coats with a fi ne sanding sponge to achieve a satin fi nish. I then apply dark paste wax to highlight the mouldings and tombstone panel, further giving the piece a worn appearance.
Completing the CabinetThe pieces for the back are glued and nailed to the pendant shelves beginning at the inside corner. With the back and pendant shelves assembled, this entire assembly is nailed to the back of the cabi-net. To protect the fi nish, I do this with the cabinet face down on a thick pad or moving blanket and allow the cornice to hang over the edge of the bench. The door hardware is then re-installed and the cabinet is ready to be hung.
The fi nished hanging cupboard with pendant shelves is a real eye-catcher in any room and the form is ideal for the beginner and seasoned woodworker alike. While the project shown here has many
A covert operation? After removing most of the waste, a cove is cut on the table saw. Care must be taken to ensure that the fence is properly secured and that the workpiece is held tight to the fence during the feed.
Strength in numbers. The backboards support the pendant shelves, keep the cabinet from racking, and carry its weight when attached to the wall. Here 5⁄8"-wide dados are cut for the pendant shelves.
The build-up. When installing a stepped or built-up moulding, run each layer entirely before beginning the next. Note that the pine carrier strip of the congé is capped by the crown. Expen-sive primary wood can thus be conserved.
Pine carrier strip
Pine carrier strip
30-35_1011_PWM_HangingCupboard.i34 3430-35_1011_PWM_HangingCupboard.i34 34 9/8/10 3:53:24 PM9/8/10 3:53:24 PM
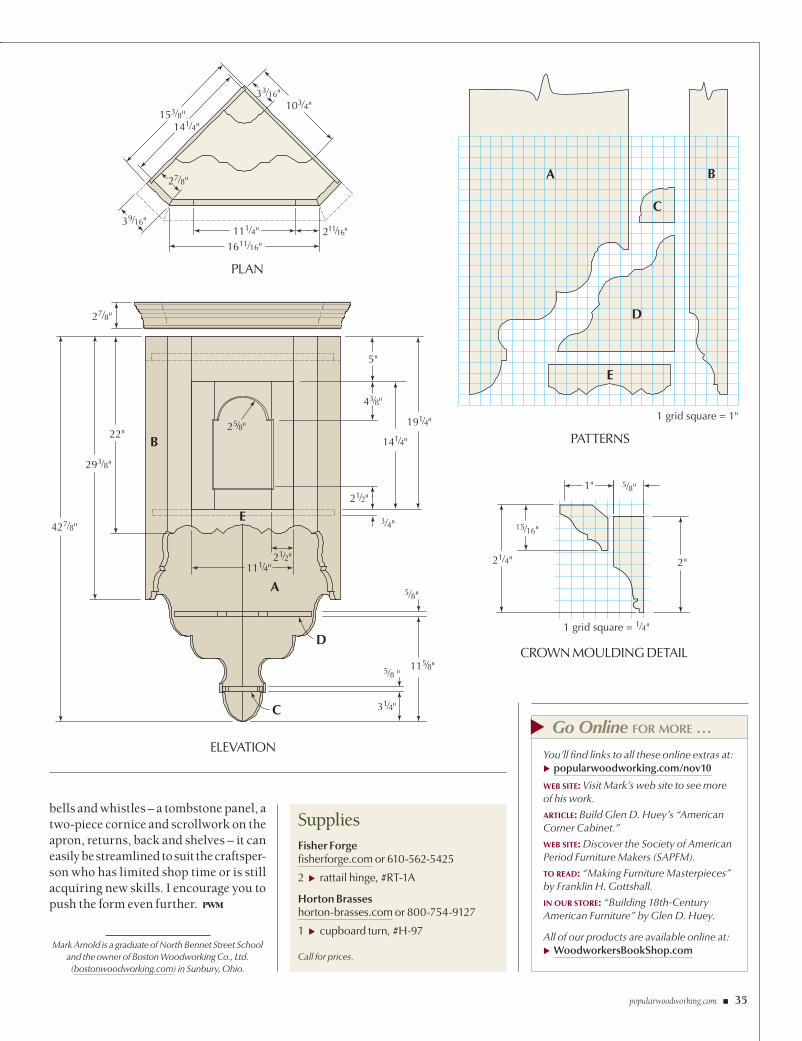
popularwoodworking.com ■ 35
Go Online FOR MORE …
You’ll fi nd links to all these online extras at:u popularwoodworking.com/nov10
WEB SITE: Visit Mark’s web site to see more of his work.
ARTICLE: Build Glen D. Huey’s “American Corner Cabinet.”
WEB SITE: Discover the Society of American Period Furniture Makers (SAPFM).
TO READ: “Making Furniture Masterpieces” by Franklin H. Gottshall.
IN OUR STORE: “Building 18th-Century American Furniture” by Glen D. Huey.
All of our products are available online at:u WoodworkersBookShop.com
u
1" 5⁄8"
15⁄16"
2"
1 grid square = 1⁄4"
21⁄4"
1 grid square = 1"
C
D
E
BA
293⁄8"
3⁄4"
5⁄8"
5⁄8 "
22"
427⁄8"
191⁄4"
31⁄4"
111⁄4"
115⁄8"
141⁄4"
21⁄2"
21⁄2"
5"
25⁄8"
43⁄8"
27⁄8"
E
D
C
B
A
103⁄4"33⁄16"
153⁄8"141⁄4"
27⁄8"
39⁄16"211⁄16"111⁄4"
1611⁄16"
SuppliesFisher Forgefi sherforge.com or 610-562-5425
2 u rattail hinge, #RT-1A
Horton Brasseshorton-brasses.com or 800-754-9127
1 u cupboard turn, #H-97
Call for prices.
bells and whistles – a tombstone panel, a two-piece cornice and scrollwork on the apron, returns, back and shelves – it can easily be streamlined to suit the craftsper-son who has limited shop time or is still acquiring new skills. I encourage you to push the form even further. PWM
Mark Arnold is a graduate of North Bennet Street School and the owner of Boston Woodworking Co., Ltd. (bostonwoodworking.com) in Sunbury, Ohio.
ELEVATION
PLAN
PATTERNS
CROWN MOULDING DETAIL
30-35_1011_PWM_HangingCupboard.i35 3530-35_1011_PWM_HangingCupboard.i35 35 9/8/10 3:53:46 PM9/8/10 3:53:46 PM

I build houses for a living, and I have a full array of power equipment at my disposal. Yet, when I trim out a house
or construct built-ins, I almost always turn to one of my manual miter boxes.
These nearly forgotten tools are more accurate than power saws. They can han-dle stock and mouldings that many power saws struggle with. And they are cheap, rugged and are hiding under every rock (if you know where to look).
In fact, miter boxes have always been a staple of my family’s construction busi-ness, and I think they should be in your workshop as well. So here’s an introduc-tion to one of my favorite tools.
Types of Miter BoxesThere are several types of miter boxes that you’ll fi nd in the wild. The simplest type is an open wooden trough with metal or wooden guides. These are usually crafts-man made, sometimes with commercially made metal parts. Though you can do good work with these boxes, you can easily fi nd more advanced models.
A second type of box is a metal table with a fence at the back. There is a single pivoting post at the fence that guides a saw back and forth. These miter boxes are usually designed for panel saws or hand saws, though they can also accom-modate a backsaw. Many people call this form an “open-front” miter box, and a
The Forgotten Miter BoxB Y R O N H E R M A N
Once common, the miter
box has been relegated
to garage sales. Here’s
why you should fi nd one
for your workshop.
Still on the job. Miter boxes work just as well today as they did when they built this country. With a little patience you can fi nd one (or seven) that will serve you for the rest of your life.
LEAD PHOTO BY AL PARRISH; STEP PHOTOS BY CHRISTOPHER SCHWARZ
good example is the Stanley No. 150. The advantage of these boxes is that you can saw really wide stuff if need be – just get a bigger saw.
The third type of box is a “fully framed” miter box. It also has a metal L-shaped frame. But instead of one guide, it has two: one guide at the fence and one up by the user. These miter boxes are almost always designed for a backsaw. And when set up correctly, the saw slides back and forth as smooth as silk, and it makes perfect straight or mitered cuts.
This type of miter box also can have a lot of gizmos for making repetitive cuts of all the same length or even cutting tenon shoulders to a preset depth. The fully framed box is probably the one that most furniture makers should keep an eye out for.
“The better class of workmen would rather part with the clothes off their backs and the beds from under them, than make away with their tools … .”
— Henry Mayhew (1812 - 1887)The Morning Chronicle, July 11, 1850
36 ■ POPULAR WOODWORKING MAGAZINE November 2010
36-39_1011_PWM_MiterBoxes.indd 3636-39_1011_PWM_MiterBoxes.indd 36 9/8/10 3:54:49 PM9/8/10 3:54:49 PM

But Which Box?Though there were a number of companies that made miter boxes, you’re mostly going to fi nd ones made by Stanley or Millers Falls (which will sometimes be branded as “Acme” or “Langdon”). I use both brands in my work; both can be fi ne tools.
If pressed, I usually recommend wood-workers get the Millers Falls boxes if they
Open wide. Miter boxes can have an enormous capacity. And their cuts are unmatched for accu-racy and safety.
A simple box. A miter box can be as rudimentary as a U-shaped trough. This one has some com-mercial metal guides added to it to improve its accuracy.
Open-front box. Here’s a Stanley No. 150 equipped with a panel saw. These are superior to simple miter boxes and have a huge crosscutting capacity.
The full enchilada. This fully framed Millers Falls miter box has all the bells and whistles, including a system to hold the blade locked above your work when you’re not using it. This is the most accurate style of box.
have a choice. Millers Falls didn’t change its components much over the years. So if you ever need parts for them, they will be easier to come by on “donor” boxes and will most likely fi t like a glove. One weakness of the Millers Falls boxes is the spring that locks the angle of the saw. It tends to rust.
The Stanley boxes can also be great (as long as they aren’t plastic). However, Stanley made so many different models and types with different parts that it can be hard to fi nd replacement parts.
No matter what the brand, miter box saws come in many sizes, from the tiny Langdon No. 161⁄2 with a 16"-long saw with a 2" depth of cut, all the way up to
the monster Langdon Acme No. 75 with a 30"-long saw with a full 5" depth of cut (heck Stanley even made saws with a 6" depth of cut). My work falls typically in the middle range. I prefer a 26"-long saw that has a 4" depth of cut for most trimming chores. If you deal with small mouldings or rails and stiles, you might look for a smaller box.
And What Type of Saw?First off, I recommend you learn to sharpen your own saws. Many woodworkers I see with these boxes have a saw that’s so dull it couldn’t cut butter if it fell on it. When you sharpen a saw for a miter box, joint the snot out of the teeth. Every tooth has to
popularwoodworking.com ■ 37
36-39_1011_PWM_MiterBoxes.indd 3736-39_1011_PWM_MiterBoxes.indd 37 9/8/10 3:55:04 PM9/8/10 3:55:04 PM

be at the same height because every tooth has to do its job in a miter box. Second tip: I don’t usually fi le a sloping gullet with my handsaws or backsaw, but I’ll fi le sloping gullets on my miter saws. The deeper gul-lets seem to hold more sawdust.
Most miter saws will be sharpened crosscut with about 11 points per inch (ppi). This is a good general fi ling, though I like to use a fi ner pitch (such as 13 ppi) with harder woods such as oak, and a
A Stanley feature. Some Stanley miter boxes allowed you to move one of the posts forward toward the operator in order to increase the maximum cutting width of the miter box.
Great for tenons. The secondary depth stops on many good miter boxes allow you to temporarily set the cutting depth. These are great for cutting tenon shoulders.
That’s not a hang hole. Some miter saws have a hole in the back at the end of the toe. If you insert a nail or a cotter pin it will prevent you from pull-ing the saw out of the box on the return stroke.
Other gizmos. You’ll see these bars on some miter boxes. They are designed to help hold your crown against the fence while you make a cut.
coarser pitch if I’m working with a lot of soft pine. I even keep some miter saws fi led for ripping with 9 ppi. I use these for trimming rosettes when I have to cut them with the grain. And sometimes you’ll set a miter box to 60° and the cut is a lot more like a rip. But I have a lot of saws.
Where to Find ThemMiter saws were in the truck of every car-penter and in the garage of many hom-
eowners – until the powered miter saws took over. There are millions of manual miter boxes out there. However, because they are heavy and diffi cult to ship, you don’t see them show up for sale much on eBay or other Internet sites.
As a result, you have to hit the streets. Attend a few auctions and you’ll see them come up. I fi nd lots of them at garage sales and fl ea markets. They even show up at tool swaps that are sponsored by tool col-
No degrees. Some early boxes didn’t mark the angles in degrees. Instead, they marked the quadrant with the number of sides that would be created with that angle setting. Set the box to “4” and you will get a four-sided frame (it’s 45°). Set it to “6” and you’d create a six-sided frame (it’s 30°).
A little grabby. One fea-ture on Millers Falls boxes is a stitched table. These tiny stitches grab your work and hold it fast.
38 ■ POPULAR WOODWORKING MAGAZINE November 2010
36-39_1011_PWM_MiterBoxes.indd 3836-39_1011_PWM_MiterBoxes.indd 38 9/8/10 3:55:25 PM9/8/10 3:55:25 PM

u Go Online FOR MORE …
You’ll fi nd links to all these online extras at:u popularwoodworking.com/nov10
WEB SITE: Read about backsaws and other saws on our site.
WEB SITE: Visit the web site of the Mid-West Tool Collectors Association. Join and attend a tool meet.
TO BUY: Lie-Nielsen Toolworks makes replacement miter box saws in custom sizes.
IN OUR STORE: “Handtool Essentials” con-tains lots of great articles on saws and get-ting started in hand work.
All of our products are available online at:u WoodworkersBookShop.com
lecting associations (such as the Mid-West Tool Collectors Association). However, few tool collectors are interested in com-mon user-grade miter boxes.
Put the word out in your neighborhood and with your friends that you are looking for one. Lots of people have them deep in their basement or garage.
How to Use ThemWe always mount our miter saws to a piece of plywood or scrap that has a cleat on its front edge. This allows us to hook them onto a flat surface (like a bench hook) when we’re in the fi eld. If your miter box is going to stay in the shop you can set up your box so that it drops into dog holes on your bench. Or you can pinch the wooden plate between dogs with a vise. No mat-ter which way you go, you’ll fi nd sawing easier if the box is secure.
If you are a good sawyer, then the actual cut is fairly straightforward. The first thing to do is to make sure all the box’s depth settings are correct. You want the saw to stop cutting right as the teeth slice through the work that’s against the table. This reduces the tearing you’ll get on the backside of your work. You also
don’t want the teeth to drag against the metal parts of the frame.
I typically start by dropping the blade on the work to confi rm it’s right where I want it. Then I begin the cut on the cor-ner of the work against the fence using no
downward pressure on the saw. Watch the kerf and ensure you are cutting square. If you are aggressive you will move the saw off line.
Once I have the kerf established then I can switch to sawing with my arm like a locomotive linkage – back and forth in a straight line. Use as much of the saw as you can. When I fi nish the cut, I want to have to press down just a little bit to slice through the last of the fi bers. Try it, and I think you’ll agree.
And once you’ve used a miter box with a sharp saw and correct technique, I think you’ll be sold. In fact I think I’ll start see-ing you at the garage sales and auctions that I haunt. Watch yourself. I’m an early riser. PWM
Ron Herman is the owner of Antiquity Builders of Ohio in Columbus, which specializes in restoring or rebuilding
historic properties and fi ne new home construction.
Not too deep. The depth stops on a miter saw are a critical setting. Set them too shallow and you won’t cut through your work. Set them too deep and you could destroy your saw.
The correct setting. Here are the teeth on a Mill-ers Falls miter box. They should fl oat right above the metal guide below when the saw is at full depth.
Just like sawing. Allow your arm to swing free when you saw with a miter box. And use as much of the length of the saw-plate as you can.
popularwoodworking.com ■ 39
36-39_1011_PWM_MiterBoxes.indd 3936-39_1011_PWM_MiterBoxes.indd 39 9/8/10 3:55:45 PM9/8/10 3:55:45 PM

For nearly 30 years I have worked with veneer as one of my principal materials in all my furniture pieces.
What I enjoy the most about working with veneer is that it’s a form of “silent” wood-working. It can be done without the run-ning of loud machinery. It offers more design opportunities, is forgiving and offers a great way to embellish any type of project. I love the challenge of cutting, arranging and pressing veneer. Even today there is a thrill of taking a fi nished panel out of the press to see the results.
The darker side of veneer is taking that fi nished panel out of the press and fi nding that it has some kind of failure, especially after all that effort.
Working with veneer involves skill – not talent. Anyone can do it. The pro-cess involves cutting veneer, arranging it, taping, choosing the proper glue and core, pressing, removing the tape, sanding and preparing it for fi nish. Each step is a process of its own that will make the next step easier and more successful.
Cutting VeneerIf you were to ask a handful of veneer experts how they cut veneer you would get a handful of answers. There is no right or wrong way to cut veneer. And it can be done by hand, with power tools or with a paper punch. When cutting by hand you will notice a big difference between cut-ting with the grain and across the grain. Be aware that lengthy edge cuts are not very
Cut, Glue & Sand VeneerB Y M A R C A DA M S
Part 2: Simple and
inexpensive tools are
the core of a successful
veneering job.
Express yourself. Veneer (plus marquetry and parquetry) allow you to do things that are not possible in solid wood. This type of work, as shown here in this wardrobe I built, is within your reach. The fi rst step is to learn the basics of cutting, taping and gluing veneers.
OPENING PHOTOS BY GARY CHILLUFFO; STEP PHOTOS BY AL PARRISH
practical by hand. A good rule for hand cutting is that you should limit your cut to less than the length of your straightedge. By the same token, cutting short lengths might not be safe with certain power tools. Some veneers are brittle or have unique textures, which could cause cutting prob-lems for both hand and machine cuts.
Hand Cutting VeneerThere are two items that will be necessary to have before you attempt to cut veneer
40 ■ POPULAR WOODWORKING MAGAZINE November 2010
40-47_1011_PWM_VeneerPart2.indd 4040-47_1011_PWM_VeneerPart2.indd 40 9/8/10 3:57:05 PM9/8/10 3:57:05 PM

by hand: a cutting mat and a straightedge. Self-healing cutting mats are readily avail-able and make for the best cutting sur-face. Harder materials, such as hardboard, melamine or Formica, can dull or break the tip from the knife and each pass will leave a cut in the surface that could affect the next series of cuts. A good straightedge is also necessary and can be made from a cut-off piece of a solid-surface material, such as Corian. A metal straightedge would be perfect as well. Stay away from wood or composite board as a straightedge because these are too easy for the knife to cut into. I recommend using spray adhe-sive to stick a piece of #120-grit sandpaper to the back/bottom of the straightedge to help it grip while you’re cutting.
Veneer can be cut by hand with a good pair of scissors, an X-Acto knife (with a No. 11 blade), utility knife, layout knife, chisel or veneer saw. Some veneer experts prefer knives with a single bevel such as a layout tool, chisel or veneer saw with the reasoning that the fl at side goes against the straightedge giving a truer vertical cut. I choose to use an X-Acto knife because as a kid I learned to hold a pencil to do fi ne cursive writing. This development of fi ne motor skills has helped me to have better control with the X-Acto knife for both straight and detail cuts. One prob-lem with an X-Acto knife is that it cuts right at the tip, which easily fl exes under force so it’s not the best choice for cut-ting stacked veneer. When knife-cutting veneer it’s best to make a light pass fi rst to establish a small score on the surface
followed by progressively deeper cuts. If you try to force the cut in one pass, the knife might follow the grain and stray from the straightedge. Do not hold the knife at a bevel; try to keep it as vertical as pos-sible. Crosscutting veneer will take a few extra passes.
Occasionally hand cutting brittle or grainy veneer, with any knife or saw, can tear, split or chip the fragile edges of the veneer fi bers. When this happens I stack the damaged veneer between two pieces of MDF (at least 1⁄2" thick) allowing the veneer to stick out just beyond the dam-aged fi ber.
With a sanding block held at 90° to the veneer, I’ll sand back and forth until the damaged fi ber is removed. This sanding block has #120-grit paper on one side and #220 on the other side.
Power ToolsIt’s possible to cut veneer on the table saw, band saw, jointer, chop saw, scroll saw, drill press or even with a router. In order to use stationary power equipment to cut
veneer you must “packetize” it – or sand-wich the veneer between two protective surfaces making a rigid block of wood. I make this block by clamping my veneers between two pieces of MDF then staple, nail or screw the pieces of MDF together, trying to avoid hitting the veneer or the area you intend to cut with the machines (wonder how I know that). Once the block is complete, it can be machined like a regu-lar piece of wood. After making the desired cuts you can then disassemble the packet and you’ll have several pieces of veneer all cut exactly the same.
Punching VeneerAnother way to cut veneer is to “punch” it. They make veneer punches that have irregular shapes for repairs. You first punch out the irregularity. Then, using the same punch on a piece of similar color and fi gure, you punch out a matching piece of veneer. The newly punched piece of veneer
“Is it possible there are hills that nature or God demands we climb alone or become forever the less for having been carried over them?”
— John Taylor Gatto, (1937 - )educator and author
from “The Underground History of American Education”
Essential tools. A self-healing cutting mat, an X-Acto knife and a shop-made straightedge can perform many cutting chores.
Feeling punchy? You will be surprised what you can do with veneer and a paper punch. It makes both the hole and the piece to inlay.
Edge repairs. You can fi x or true the edge of veneer by sandwiching it between pieces of MDF and using a sanding block to remove damaged fi bers.
popularwoodworking.com ■ 41
40-47_1011_PWM_VeneerPart2.indd 4140-47_1011_PWM_VeneerPart2.indd 41 9/8/10 3:57:21 PM9/8/10 3:57:21 PM

should fi t perfectly into the punched hole in the piece to be fi xed. You can also make your own punch from a piece of metal conduit or pipe.
However, another type of punch can be found in any hobby store that sells scrapbooking goodies. Today you can buy paper punches in a variety of shapes, letters and fi gures. These punches, when struck with a hammer, can also punch through veneers.
Arranging VeneersA veneer panel consists of two or more pieces of veneer that have been seamed or joined together. Because veneer is a material that is sequentially cut, arranging individual leaves in order gives consider-able artistry that solid wood can’t. This is a process called “matching.” The idea in matching is to take sequentially cut leaves and position them edge to edge in perfect fashion so that color, grain, fi gure and specifi c characteristics align. One significant event that takes place with matching veneer is that as adjoining pieces are fl ipped, shifted or rotated, it causes light to refl ect differently from piece to piece. This effect is similar to the stripes of a newly mown lawn. Although there are numerous ways to match veneers the most common are: slip, book, radial and four-way matches. The last two matches will be demonstrated and explained in detail in the third article of this series.
Slip MatchA slip match is where veneer leaves are joined side by side in sequential order to
give the panel an appearance of solid wood with all the grain, fi gure and light refrac-tion identical. The best way to explain how to create a slip match would be to imagine the way a deck of cards would lay if they have been fanned out on top of one another on a table.
BookmatchBookmatching is the most common way to match veneers. This is where every other sheet is turned over just as the pages of a book. What happens is the back of one leaf of veneer joins next to the front of the adjacent piece of veneer. In bookmatching, by aligning any unique fi gure from one leaf to the next it will create an identical mirror image. The effect of the light as it refl ects off the panel will result in one leaf of the veneer appearing lighter than the other one. This is sometimes referred to as the “barber pole effect.”
Radial MatchRadial matches are often referred to as “sunburst” matches and involve veneer leaves being cut and arranged like pieces of a pie. Radial matches can have the leaves arranged in either slip or bookmatch. If the veneer leaves are arranged in slip match it will create a pinwheel or revolving effect. If they are arranged in a bookmatch it will create a mirror image that has an effect
similar to that of a kaleidoscope. Radial matches are created by cutting veneer sim-ilar to slices in a pie. Each piece of the pie or “way” is cut to a specifi c angle that is based on the total number of pieces equal-ing 360°. In other words, a 12-way match would consist of 12 pieces of sequenced veneer being cut at 30° angles.
There are issues in the cutting and arranging of a radial match because cut-ting each piece to exactly a given angle only exists in theory – but there are ways to make it work. There are also specifi c ways each “way” fi ts into the arrangement. These tips will be explained later in this series.
Four-way MatchesFour-way matches can be cut to create both diamond and butt matches. A four- way match consists of four right angles being joined together. Depending on the grain direction and which way each piece is fl ipped it can create a variety of differ-ent matches, all in the diamond or butt family.
The Mirror TrickSometimes it is diffi cult to visualize what certain veneers might look like when matched together and it’s impossible to visualize a radial match. By using a mirror that is hinged to another piece of mirror
Four-way match. This is four right angles joined together; it can give the appearance of diamonds or reverse diamonds.
The mirror trick. Two pieces of mirror that have been hinged with some tape will help you visualize how a radial match will look. Here’s a four-way match.
42 ■ POPULAR WOODWORKING MAGAZINE November 2010
40-47_1011_PWM_VeneerPart2.indd 4240-47_1011_PWM_VeneerPart2.indd 42 9/8/10 3:57:36 PM9/8/10 3:57:36 PM

with tape, you can position it on a piece of veneer to see what the fi nished match might look like. The angle of the mirror will determine the pattern available. In other words, to see what a 12-way match might look like you will need to hold the mirrors together at a 30° angle as they sit on the veneer. A mirror will always refl ect the design in a bookmatch arrange-ment.
TapesThere are two types of tapes commonly used in veneering: masking tape and veneer tape. Both tapes are important and are used in different ways. However, both types are temporary and need to be removed from the surface. It is important with the taping of veneer that you estab-lish which face will be the “show” face. There is a glue face and a show face. It is OK to have tape on the show face but any
tape that is on the glue face will need to be removed before gluing.
Masking TapeMasking tape is available in varying strengths. I defi nitely recommend using the less tacky “blue” tape because it is
Blue has less goo. The blue “painter’s tape” is one of the ideal tapes for veneer work. Here I am using it to reinforce the fragile edges of this walnut veneer.
Hold it. Here I’m applying blue tape to the side of the veneer that will get glued. This holds the pieces in place as I check the results and get ready to apply the veneer tape on the show face of my panel.
Licked and sealed. Veneer tape is activated by moisture and is used on the show face. First tape across the joint.
The dismount. After the veneer tape is stuck down I remove the blue tape from the seam on the glue face.
Now seam it. Then tape along the seam.
easier to remove and leaves less gummy residue on the veneer. Masking tapes are typically used to hold two pieces together during knife cutting to keep them from shifting. I also use masking tape to tape the ends of each leaf of veneer to keep it from splitting during handling. Because
popularwoodworking.com ■ 43
40-47_1011_PWM_VeneerPart2.indd 4340-47_1011_PWM_VeneerPart2.indd 43 9/8/10 3:58:49 PM9/8/10 3:58:49 PM

masking tape does not use water to acti-vate it, it is a great tape for arranging small irregular shapes together, such as with marquetry and parquetry. The water from veneer tape can cause these small pieces to expand and warp, which makes han-dling very diffi cult. Typically I use blue masking tape as my initial tape. Once I’m happy with all the cuts, seams and fi ts, I then tape the other side (which is usu-ally the show face) with veneer tape and remove the masking tape from the back face (which is usually the glue face).
Veneer TapeVeneer tape, sometimes referred to as gum tape or fi sh tape, is thin paper mate-rial that has glue on one side. There are a variety of tapes, which vary in strength, paper type, size, perforation and glue. The glue on veneer tape is activated with water (usually from a moist sponge) and sticks as quickly as sealing an envelope. Once wetted, the tape is placed on the veneer and then rubbed or rolled to make contact and to push out excess moisture. As the tape dries it shrinks and pulls on the joint. Veneer tapes go only on the show face.
Veneer tapes are removed after the pressing of the veneer to the core, and can
be removed by scraping or light sanding. Veneer tapes can also be removed with a wet sponge, but you must be careful not to apply too much moisture – especially if you used a veneer-to-core glue that is not waterproof. When completely removed, veneer tape will not leave a residue that affects the fi nish.
Glues for VeneeringThere are all kinds of glues that can be used for veneering, and each has a specifi c requirement for how it’s applied and has different qualities when cured. A custom architectural veneer shop might use heat-activated resin, while a high-end furni-ture conservationist might use hide glue. There are many factors to consider when choosing a glue: creep, strength, water resistance, pressing requirements, repair-ability, hardness, color and on and on. So to make this section as simple as possible, I would recommend two choices: white glue and plastic resin glue – not because they are the best, but because they are the most practical for someone learning how to work veneer.
With either type of glue it’s important to spread the glue on the substrate only; if you put the glue on the veneer, the mois-
ture in the glue will cause it to curl. Make sure that the glue covers the entire core surface, thinly and evenly. When plac-ing the veneer on the core, make sure the veneer-taped face or show face is facing away from the glue side. In the third article in this series we will discuss each step of the gluing process.
White GlueI prefer to use white instead of yellow glue because it is a little thinner and has a slightly longer working time. This extra time might be handy if something goes wrong during the spreading process. White glue dries clear and offers a fair degree of repairability once it has cured. Although the learning curve on white glue is pretty short, there are a few concerns that need to be considered when using it with veneer. First, white glue creates a semi-rigid glue bond so there is a possi-bility that the veneer can creep at joints. Second, it will require clamping pressure to make a proper bond. Third, it is not waterproof so removing the veneer tape with water could be a problem. Fourth, white glue would not be a good glue choice for gluing exotic veneers that are high in resins. Last, white glue should not be used
Good glues. White glue and plastic resin glue are ideal for people just get-ting started in veneer. Each has its downsides and strengths, however.
44 ■ POPULAR WOODWORKING MAGAZINE November 2010
40-47_1011_PWM_VeneerPart2.indd 4440-47_1011_PWM_VeneerPart2.indd 44 9/8/10 3:59:32 PM9/8/10 3:59:32 PM

for applications that will be exposed to a lot of heat or moisture.
Plastic Resin or Urea-formaldehydeResin glues come in powder form and must be mixed with water or a special hard-ener before being applied. They create a rigid bond between the veneer and core so veneer creep is rare. Resin glues have superior strength, can handle heat and are almost waterproof so it is possible to use a moist sponge to remove the veneer tape. One of their best features is that they have a long open time. Like white glues, resin glues require clamping pressure to make a proper bond but unlike white glues, once cured they cannot be repaired. Resin glues cure better in warmer temperatures. They cost about twice as much as white glue and have a much shorter shelf life.
‘No’ to Contact AdhesivesAlthough contact adhesive eliminates the issues of pressing, overall they are my least favorite choice for veneering. Contact adhesives are applied to both surfaces, which will create a thick glue line. They allow for tremendous creep between the veneer and the core, and can be de-acti-vated by the solvents in certain fi nishes.
Bad glue. I do not recommend contact cement for veneer work. It creates a weak bond, is sensi-tive to heat and is messy (among its other faults).
Overall they create a weak bond, are heat sensitive and messy. More than likely, if you use contact adhesive, you will experi-ence some type of failure in the future.
CoreboardsVeneer is not strong enough to stand on its own. It must be applied to some type of coreboard or substrate to give it strength. Today the best choices for veneer core-boards include particleboard, MDF and plywood. These composite materials are much better than solid wooden cores because they are more dimensionally stable, have smoother surfaces and are lighter weight. It is important to watch for voids, bumps, ridges, grease or wax spots on any core material because these
defects can cause gluing problems or tele-graph through the surface of the veneer. Also, the darker the coreboard the more chance there is that the dark color could shadow through a lighter-colored veneer on the top. If this is the case it might be necessary to use a crossbanding veneer fi rst. This means that the surface will have two layers of veneer.
Particleboard & MDFIndustrial-grade particleboard and MDF aren’t your grandma’s corn flakes any-more. These materials are made to strict standards and are ideal for veneer core material. They are fl at, smooth, uniform in thickness, free of knots and grain patterns and are very stable. Although they don’t have the strength of plywood, they are a little cheaper. Drawbacks to these materi-als include their inability for structural as well as mechanical joinery. The edges will need to be covered or hidden if they are intended to be exposed. My preference for core material is defi nitely MDF.
Hardwood PlywoodHardwood plywood is probably the best choice as a core if strength is a priority. If you choose to veneer on plywood, I rec-
Calling all clamps. Then add clamps around the edges. The particleboard distributes the clamping pressure through the entire stack.
Start at the center. When clamping up veneer using a particleboard sand-wich (as shown), begin by applying one clamp to the middle of the stack.
popularwoodworking.com ■ 45
40-47_1011_PWM_VeneerPart2.indd 4540-47_1011_PWM_VeneerPart2.indd 45 9/8/10 3:59:48 PM9/8/10 3:59:48 PM
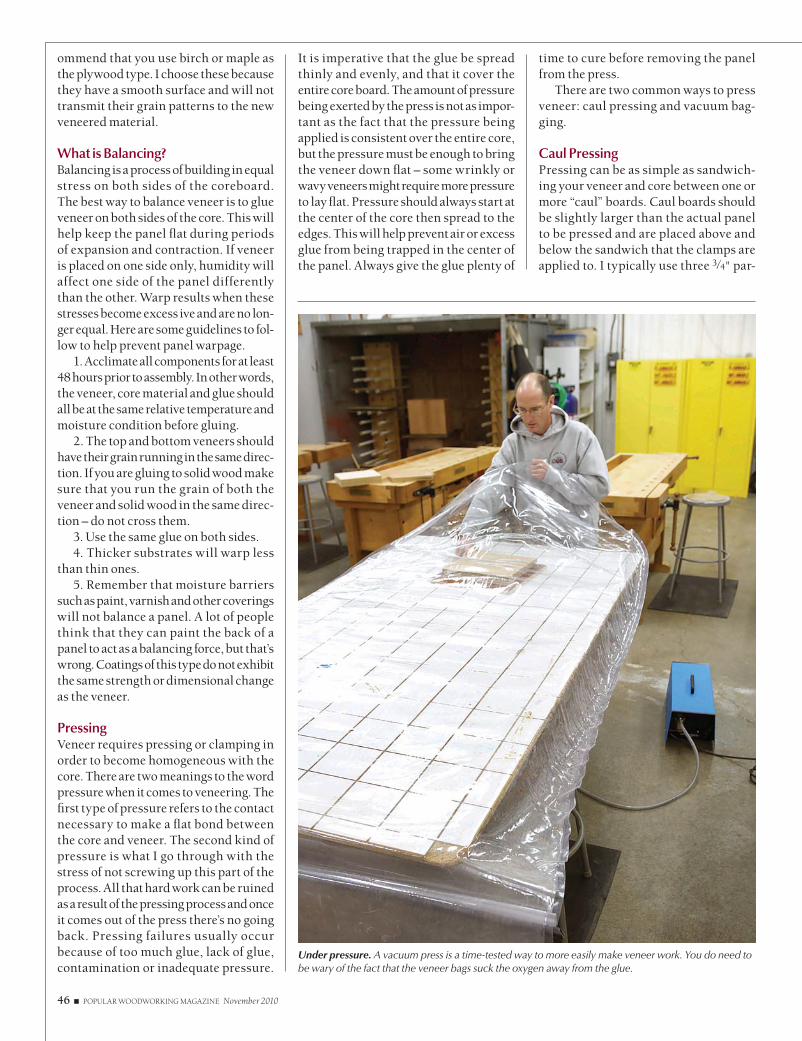
ommend that you use birch or maple as the plywood type. I choose these because they have a smooth surface and will not transmit their grain patterns to the new veneered material.
What is Balancing?Balancing is a process of building in equal stress on both sides of the coreboard. The best way to balance veneer is to glue veneer on both sides of the core. This will help keep the panel fl at during periods of expansion and contraction. If veneer is placed on one side only, humidity will affect one side of the panel differently than the other. Warp results when these stresses become excess ive and are no lon-ger equal. Here are some guidelines to fol-low to help prevent panel warpage.
1. Acclimate all components for at least 48 hours prior to assembly. In other words, the veneer, core material and glue should all be at the same relative temperature and moisture condition before gluing.
2. The top and bottom veneers should have their grain running in the same direc-tion. If you are gluing to solid wood make sure that you run the grain of both the veneer and solid wood in the same direc-tion – do not cross them.
3. Use the same glue on both sides.4. Thicker substrates will warp less
than thin ones.5. Remember that moisture barriers
such as paint, varnish and other coverings will not balance a panel. A lot of people think that they can paint the back of a panel to act as a balancing force, but that’s wrong. Coatings of this type do not exhibit the same strength or dimensional change as the veneer.
PressingVeneer requires pressing or clamping in order to become homogeneous with the core. There are two meanings to the word pressure when it comes to veneering. The fi rst type of pressure refers to the contact necessary to make a fl at bond between the core and veneer. The second kind of pressure is what I go through with the stress of not screwing up this part of the process. All that hard work can be ruined as a result of the pressing process and once it comes out of the press there’s no going back. Pressing failures usually occur because of too much glue, lack of glue, contamination or inadequate pressure.
It is imperative that the glue be spread thinly and evenly, and that it cover the entire core board. The amount of pressure being exerted by the press is not as impor-tant as the fact that the pressure being applied is consistent over the entire core, but the pressure must be enough to bring the veneer down fl at – some wrinkly or wavy veneers might require more pressure to lay fl at. Pressure should always start at the center of the core then spread to the edges. This will help prevent air or excess glue from being trapped in the center of the panel. Always give the glue plenty of
time to cure before removing the panel from the press.
There are two common ways to press veneer: caul pressing and vacuum bag-ging.
Caul PressingPressing can be as simple as sandwich-ing your veneer and core between one or more “caul” boards. Caul boards should be slightly larger than the actual panel to be pressed and are placed above and below the sandwich that the clamps are applied to. I typically use three 3⁄4" par-
Under pressure. A vacuum press is a time-tested way to more easily make veneer work. You do need to be wary of the fact that the veneer bags suck the oxygen away from the glue.
46 ■ POPULAR WOODWORKING MAGAZINE November 2010
40-47_1011_PWM_VeneerPart2.indd 4640-47_1011_PWM_VeneerPart2.indd 46 9/8/10 4:00:12 PM9/8/10 4:00:12 PM

First scrape. Remove most of the veneer tape using a scraper, then sand the remainder using a random-orbit sander.
Go Online FOR MORE …
You’ll fi nd links to all these online extras at:u popularwoodworking.com/nov10
VIDEO: See a slideshow of the steps to make a basic veneered panel.
BLOG: Read Robert W. Lang’s blog entries about his visit to a veneer mill.
WEB SITE: Visit the web site for the Marc Adams School of Woodworking.
TO BUY: Get veneer from Certainly Wood.
IN OUR STORE: “The Woodworker’s Guide to Veneering & Inlay.”
All of our products are available online at:u WoodworkersBookShop.com
u
ticleboard boards on each side of the sand-wich to help distribute the pressure from the clamps.
On smaller projects I use as many clamps as possible and I start at the center and work my way out, always offsetting the placement of each clamp. If your project is wider than your clamps can reach, then cross bars will be required to get pres-sure to the center of the core. I cut a slight (1⁄16") bow or curve in these bars so that the center of each bar is wider than the ends. When clamped from edge to edge, these bars pinch the caul boards in the center fi rst. As more pressure is applied, the bars will straighten out, causing the pressure to fl ow from the center fi rst to the edge last.
Vacuum PressingVacuum pressing is not new. Wurlitzer used the process in manufacturing their curved veneer plywood panels on their jukeboxes in the 1920s. The concept of using a vacuum in the hobbyist shop really took off in the 1980s. Thanks to vacuum press technology, veneering has become a lot less of a hassle. These systems are affordable, reliable, labor-saving and easy to use. A vacuum press will distribute pressure evenly over the entire area being pressed. They work on fl at panels as well as on curved, uneven or serpentine surfaces. The amount of pressure that a vacuum press can provide depends on your alti-tude. For the most part woodworkers usu-ally consider the bag pressure to be around 12 lbs. of pressure per square inch, which
is enough pressure to do an excellent job securing the veneer to the core. Be aware that white glue has to have air as a part of the process of curing and the vacuum will deplete most all the air inside when being used. To compensate for this issue I just leave my panels that have any PVA glue on them in the press for a few extra hours. Better safe than sorry.
A vacuum system is nothing more than a plastic bag with a hose that connects to a pump that draws air from inside the bag. Inside the bag is a sheet of composite board that has grooves cut in it that allows the bag to be pulled fl at to its surface. This board is called a platen. Pressing is as sim-ple as sticking the board to be pressed into the bag, sealing it up, fl ipping the switch, and then walking away.
Sanding & Preparing for FinishOnce the veneer panel is removed from the clamp system it can be treated as a regular board that can be drilled, jointed, cut, shaped and sanded. If there are no problems that need repair, the fi rst step is to remove the veneer tape on the surface. If you used white glue, I don’t recommend water to loosen the water-soluble veneer tape. This could cause the glue below to let go and the veneer might expand, blister or delaminate.
Instead I use a scraper to remove as much veneer tape as possible. Even though the scraper is sharp it will seem dull as it cuts through the tough veneer tape. Once about 80 to 90 percent of the veneer tape is off, I’ll begin sanding. The reason that I
don’t sand from the beginning is because the veneer tape and wood have different densities. The veneer tape is harder to sand than the veneer itself, so sanding from the start might cause unevenness on the surface.
I use a random-orbit sander with #120-grit sandpaper to start with. It is important to sand the entire surface – don’t concen-trate on just the remaining veneer tape. I work from one side to the other through-out the entire panel. After all the veneer tape has been removed, I move on to #150 grit and again cover the entire surface in the same fashion. I fi nish with #220-grit paper, then vacuum or lightly blow off the surface. At this time the panel is ready to be fi nished. PWM
Marc is the founder of the Marc Adams School of Wood-working (marcadams.com), the largest woodworking
school in North America.
popularwoodworking.com ■ 47
40-47_1011_PWM_VeneerPart2.indd 4740-47_1011_PWM_VeneerPart2.indd 47 9/8/10 4:00:26 PM9/8/10 4:00:26 PM

Fitting inset doors into a face frame cabinet is a task that even veteran cabinetmakers would rather avoid.
Unless the corners of the face frame are perfectly square, and the door’s rails and stiles are straight, the usual procedure is often time consuming and frustrating.
You know the drill: Check all the cor-ners of the face frame with your square, put a straightedge on the door’s rails and stiles to check for any humps or hollows. Typically you discover that the frame has some problems. So you make the door with enough extra length and width to allow for fitting the door to the frame. At this point there are different ways to advance the process, but the bottom line is that with enough trying and fi tting with a handplane you end up with a door that fi ts the frame with a nice equal margin on all four sides – maybe.
Some 25 or 30 years ago I read about a procedure usually used by carpenters called “The Ticking Stick Method” for fi t-ting countertops and the like into spaces with irregular shapes and angles. This
Fit Doors with Ticking SticksB Y CA R L B I L D E R BAC K
A traditional trick used by
carpenters can help you
fi t doors into almost any
irregular opening.
This is a ticking stick. In the past, many carpenters used ticking sticks to fi t built-ins into irregular spaces in a house. You can apply the same principles to fi t doors to face frames.
PHOTOS BY CHRISTOPHER SCHWARZ
method is simplicity itself because it allows for a near-perfect fi t using only a stick that has a long taper and a sharp point on one end, a piece of cardboard and a pencil. That’s right – no square, no sliding bevel and no tape measure is required.
Although this article deals with fi tting fl ush cabinet doors to the face frame, this system is adaptable to solve many other problems that you may encounter.
How it WorksWhen you boil down this method to its bones, it’s a bit like a secret decoder ring from childhood. You use a pointed stick with a mark on it and a sheet of paper or posterboard to make a pattern of the open-ing for your door.
You use the pointed end of the stick to touch several places of the opening for the door. At every point, you record the stick’s position on the posterboard – this creates the “code,” as it were. Note that the
more places you touch with the pointed end of your stick, the more accurate your pattern will be in the end.
Then you remove this posterboard from your door opening and lay it on your door. Take the same pointed stick and place it in each of the positions that you recorded on the poster board. Then mark the posi-tion of the point of the stick directly on the door. After you transfer all the positions onto the door, then you just connect all the dots you made on the door and that is the exact shape the door needs to be.
In this way you are “decoding” the pat-tern on the posterboard and transferring it full-size onto the door. Then you can plane the reveal you want around the door.
Editor’s note: To help you grasp the method, we’ve posted a free video on our web site so you can see it in action. PWM
Carl is a carpenter, woodworker and tool collector in LaPorte, Ind., and a member of the Mid-West Tool Collectors Association (mwtca.org).
“The world is like a board with holes in it, and the square men have got into the round holes, and the round into the square.”
— Bishop George Berkeley (1685 - 1753)infl uential 18th-century Irish philosopher
48 ■ POPULAR WOODWORKING MAGAZINE November 2010
48-49_1011_PWM_Ticking_Sticks.in48 4848-49_1011_PWM_Ticking_Sticks.in48 48 9/8/10 4:01:08 PM9/8/10 4:01:08 PM

Go Online FOR MORE …
You’ll fi nd links to all these online extras at:u popularwoodworking.com/nov10
ARTICLE: Read Carl Bilderback’s article on how to install a Dutchman.
WEB SITE: Visit the web site of the Mid-West Tool Collectors Association.
VIDEO: Want more explanation of how tick-ing sticks work? Watch this free video from the editors.
IN OUR STORE: Our “Cabinetmaking Essen-tials” DVD will get you started building cabinets.
All of our products are available online at:u WoodworkersBookShop.com
u
9 Connect the ticks. Use a straightedge
to connect the points of all the arrows you have drawn on your door. Then trim the door down to those lines.
8 The results. After tracing your ticking stick in every position, your door will be ringed
by a series of small arrows.
7 Trace the stick. Line up your ticking stick with one of the lines and its corresponding
tick. Use a sharp pencil to trace the pointed end of the stick onto your door.
6 Transfer your marks. Remove the ticking board from the face frame and attach it to
your door. Line up the knife marks with the edge of the door.
5 Here’s the tick. Make a mark on the stick and a cor-
responding mark on the ticking board. Use this mark on the stick for all your future readings on this face frame.4 Trace the tick. Hold the stick in position and mark along
one long edge of your ticking stick.3 A nick to remember. Make a small cut into
the ticking board where the ticking board and the inside of the face frame intersect.
2 Secure the ticking board. Find the straightest edge of your face frame and secure your ticking
board fl ush to that edge. I’m using pushpins. Spring clamps or tape also work.
1 Support from below. To help support my ticking board, I like to fi ll in the face frame with some fl exible strips that are slightly narrower than the thickness of my face frame (these strips
are 5⁄8" wide; my face frame is 3⁄4" thick).
popularwoodworking.com ■ 49
48-49_1011_PWM_Ticking_Sticks.in49 4948-49_1011_PWM_Ticking_Sticks.in49 49 9/8/10 4:01:26 PM9/8/10 4:01:26 PM

It’s your day off. So, you go into your shop to make a new piece of furniture. How do you want it to look when you’re
done? Well, it’s a new piece. So, that’s how it should look – new. You gently sand out every blemish from the raw wood. You carefully apply the fi nish. You rub it down until it is so perfect it gleams. There it is. Not a fl aw.
A growing number of woodworkers have a different impulse. When they com-plete a piece of furniture, they want it to look like it has been kicked around for a couple hundred years. They want their furniture to look worn and used. How did this trend get started? Follow the money. These furniture makers discovered that well-heeled customers are willing to pay for this look.
When Did This Happen?This fascination with worn and aged furniture dates back to the 1970s when a scholar named John T. Kirk wrote a book titled “The Impecunious Collector’s Guide to American Antiques.” In the book Kirk included the seminal chapter titled “Buy It Ratty and Leave It Alone.” The chapter’s title says it all. Before Kirk, the trend was to take antique furniture to a refi nisher and have it scraped and sanded so it looked new. Paint and dark fi nishes were removed to show “the natural beauty of the wood.” Kirk realized this process destroyed antique furniture. He advocated loving it and enjoying it just as found,
Aging Your Projects GracefullyB Y M I C H A E L D U N BA R
Part 1: Adding wear and
tear to a piece is like
writing a convincing
tale of fi ction.
A tale of two sitters. These two chairs were built at the same time and reside in the same house. Yet one is worn more than the other – why this happened is key to know when adding age to your project.
PHOTOS BY CHRISTOPHER SCHWARZ
with all its wear, use and even damage.At the same time, Early American
scholars at major museums were begin-ning to understand that furniture is more than just quaint objects from the past, handy for furnishing period rooms. Like written documents, early furniture is full of information. When studied in a dis-ciplined way, lots of new things can be
learned from it. For example, by studying old fi nishes, scholars learned that stripped and skinned antiques did not look any-thing like they did when new. By strip-ping the furniture they claimed to love, antique collectors had been creating a false impression.
Antique collectors picked up on this trend begun by Kirk and began to pay big
50 ■ POPULAR WOODWORKING MAGAZINE November 2010
50-53_1011_PWM_AgingFurniturePar50 5050-53_1011_PWM_AgingFurniturePar50 50 9/8/10 4:02:32 PM9/8/10 4:02:32 PM
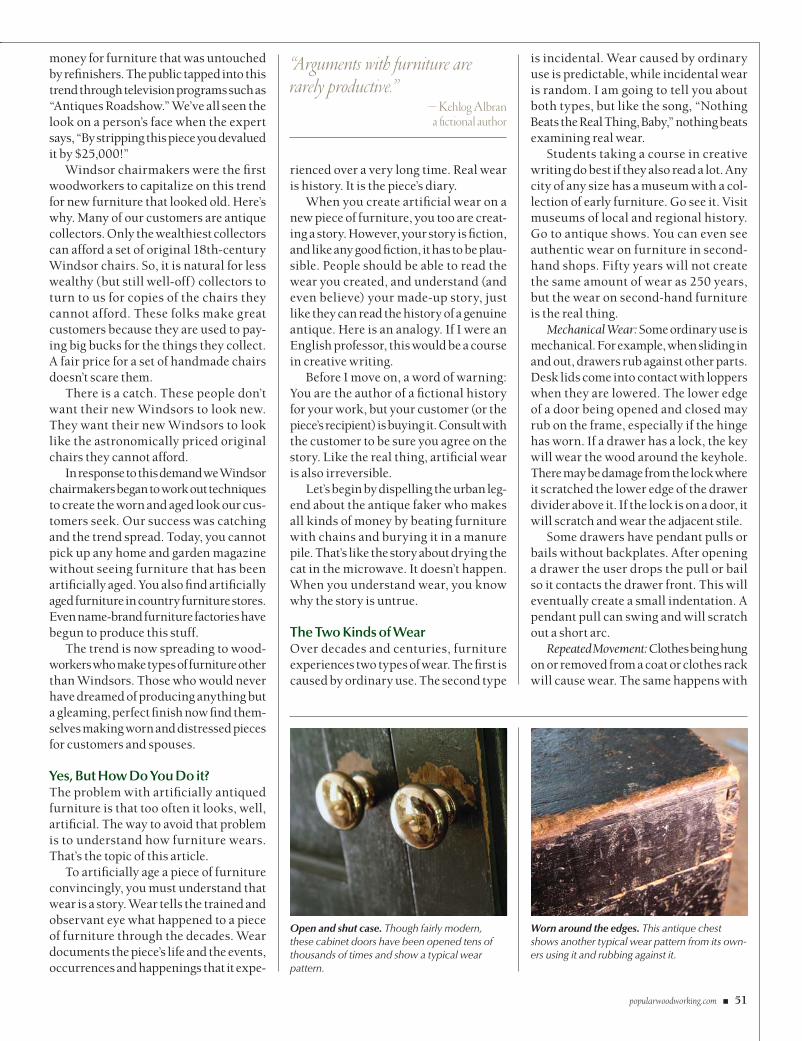
money for furniture that was untouched by refi nishers. The public tapped into this trend through television programs such as “Antiques Roadshow.” We’ve all seen the look on a person’s face when the expert says, “By stripping this piece you devalued it by $25,000!”
Windsor chairmakers were the fi rst woodworkers to capitalize on this trend for new furniture that looked old. Here’s why. Many of our customers are antique collectors. Only the wealthiest collectors can afford a set of original 18th-century Windsor chairs. So, it is natural for less wealthy (but still well-off) collectors to turn to us for copies of the chairs they cannot afford. These folks make great customers because they are used to pay-ing big bucks for the things they collect. A fair price for a set of handmade chairs doesn’t scare them.
There is a catch. These people don’t want their new Windsors to look new. They want their new Windsors to look like the astronomically priced original chairs they cannot afford.
In response to this demand we Windsor chairmakers began to work out techniques to create the worn and aged look our cus-tomers seek. Our success was catching and the trend spread. Today, you cannot pick up any home and garden magazine without seeing furniture that has been artifi cially aged. You also fi nd artifi cially aged furniture in country furniture stores. Even name-brand furniture factories have begun to produce this stuff.
The trend is now spreading to wood-workers who make types of furniture other than Windsors. Those who would never have dreamed of producing anything but a gleaming, perfect fi nish now fi nd them-selves making worn and distressed pieces for customers and spouses.
Yes, But How Do You Do it?The problem with artifi cially antiqued furniture is that too often it looks, well, artifi cial. The way to avoid that problem is to understand how furniture wears. That’s the topic of this article.
To artifi cially age a piece of furniture convincingly, you must understand that wear is a story. Wear tells the trained and observant eye what happened to a piece of furniture through the decades. Wear documents the piece’s life and the events, occurrences and happenings that it expe-
rienced over a very long time. Real wear is history. It is the piece’s diary.
When you create artifi cial wear on a new piece of furniture, you too are creat-ing a story. However, your story is fi ction, and like any good fi ction, it has to be plau-sible. People should be able to read the wear you created, and understand (and even believe) your made-up story, just like they can read the history of a genuine antique. Here is an analogy. If I were an English professor, this would be a course in creative writing.
Before I move on, a word of warning: You are the author of a fi ctional history for your work, but your customer (or the piece’s recipient) is buying it. Consult with the customer to be sure you agree on the story. Like the real thing, artifi cial wear is also irreversible.
Let’s begin by dispelling the urban leg-end about the antique faker who makes all kinds of money by beating furniture with chains and burying it in a manure pile. That’s like the story about drying the cat in the microwave. It doesn’t happen. When you understand wear, you know why the story is untrue.
The Two Kinds of WearOver decades and centuries, furniture experiences two types of wear. The fi rst is caused by ordinary use. The second type
is incidental. Wear caused by ordinary use is predictable, while incidental wear is random. I am going to tell you about both types, but like the song, “Nothing Beats the Real Thing, Baby,” nothing beats examining real wear.
Students taking a course in creative writing do best if they also read a lot. Any city of any size has a museum with a col-lection of early furniture. Go see it. Visit museums of local and regional history. Go to antique shows. You can even see authentic wear on furniture in second-hand shops. Fifty years will not create the same amount of wear as 250 years, but the wear on second-hand furniture is the real thing.
Mechanical Wear: Some ordinary use is mechanical. For example, when sliding in and out, drawers rub against other parts. Desk lids come into contact with loppers when they are lowered. The lower edge of a door being opened and closed may rub on the frame, especially if the hinge has worn. If a drawer has a lock, the key will wear the wood around the keyhole. There may be damage from the lock where it scratched the lower edge of the drawer divider above it. If the lock is on a door, it will scratch and wear the adjacent stile.
Some drawers have pendant pulls or bails without backplates. After opening a drawer the user drops the pull or bail so it contacts the drawer front. This will eventually create a small indentation. A pendant pull can swing and will scratch out a short arc.
Repeated Movement: Clothes being hung on or removed from a coat or clothes rack will cause wear. The same happens with
“Arguments with furniture are rarely productive.”
— Kehlog Albrana fi ctional author
Worn around the edges. This antique chest shows another typical wear pattern from its own-ers using it and rubbing against it.
Open and shut case. Though fairly modern, these cabinet doors have been opened tens of thousands of times and show a typical wear pattern.
popularwoodworking.com ■ 51
50-53_1011_PWM_AgingFurniturePar51 5150-53_1011_PWM_AgingFurniturePar51 51 9/8/10 4:02:55 PM9/8/10 4:02:55 PM

a blanket or quilt rack. Shoes will scratch and wear a footstool or a stepstool. Bottles, cans, shoes and other objects placed on shelves will scratch those surfaces. Fur-niture that holds everyday objects – for example a pipe or candle box – will show wear from the regular removal and return of those objects.
Far and away, the most ordinary wear on furniture is the result of contact with the human body. Wear occurs in circles around drawer pulls as fi ngers pulling on the knob also touch the wood. Wear will occur in the place on a chest lid where hands repeatedly grasp the lid to lift it and hold it open. Gate legs and butter-fl y supports have to be handled to swing them into place. They will evidence hand wear. These parts are also mechanical and will make scratches on the underside of table leaves.
People sit so their legs rub against adjacent table legs. Thus, it is predictable you will fi nd wear on the inside edges of table legs as well as on the tabletop. Sitters’ elbows and hands wear the edges of the top. If the table has a stretcher, people will put their feet on the stretcher and wear it. The shoe foot of a trestle table is another natural place for diners to rest their feet.
The Special Case of ChildrenFamilies have always bought child-sized furniture for their kids. These small pieces are great favorites with antique collectors and command high prices. I’ve probably made and sold more children’s chairs than any single type of adult chair. Children create their own particular patterns of
wear. For example, in the past children learned to walk by resting a child’s chair (usually a small ladderback) on its back and pushing it ahead of them. The rubbing and scratching of wooden stiles against wooden fl oors (with dirt and grit mixed in) would wear a round stile fl at.
When telling a story of wear caused by children, remember that kids are antsy. Children sit in highchairs until they are old enough for their chins to reach above the tabletop, generally fi ve to seven years. During all that time their busy feet wear the foot rest. They kick their feet as they sit in a chair. They bang their feet against the chair legs. They hit the table leg up
higher than an adult. They squirm a lot more than adults. So, the wear on a high-chair will be more extreme than on a chair used by grown-ups.
The Hard Life of ChairsSpeaking of chairs, no piece of furniture has a greater amount of its surface in con-tact with a greater amount of the user’s body than does a chair. So, the wear on a well-used chair is substantial. The sitter’s butt shifts back and forth on the seat. The sitter’s back rubs against the chair back. The sitter’s hands rub and wear the chair’s hands (notice how chairs are anthropo-morphic). Sitters rest their shoes against
Almost erosion. This seat has seen so many backsides that the fi nish has disappeared and even some of the soft earlywood is wearing down.
Foot traffi c. The moulding close to the fl oor of this chest bore the brunt of the piece’s contact with the feet (and likely the walls) of its previous owners.
Real rear and water wear. This authentic Windsor shows signifi cant wear in places that the owners’ bodies rubbed the chair, and from puddled water, as the piece was left outdoors for a period of time.
52 ■ POPULAR WOODWORKING MAGAZINE November 2010
50-53_1011_PWM_AgingFurniturePar52 5250-53_1011_PWM_AgingFurniturePar52 52 9/8/10 4:03:15 PM9/8/10 4:03:15 PM

the chair’s medial stretcher, wearing it. Sitters hook their feet over side stretchers, wearing the front ends of those parts.
At the other extreme, some pieces of furniture get very little wear from ordi-nary use. A bed is a good example. When using a bed, you don’t generally touch the wooden parts. The mattress and bedding are all you come in contact with.
To help you better understand how fur-niture wears, become conscious of your own interaction with the furniture in your house. Notice how you sit in a chair. Notice how you hold knobs when you open a drawer. Observe how you scratch or bump shelves and boxes as you take things out or put them back.
You will notice that while ordinary wear from repeated movement is predict-able, it is far from uniform. Use is often specifi c. This is the problem most wood-workers have when aging furniture. They repeat exactly the same wear on every surface. They do the same thing to every piece in a set, creating a result that looks artifi cial.
Think Specifi c, Not GeneralThat’s not how ordinary wear happens. For example, if you sit at the same corner of the table for every meal, you will wear one leg more than the others. If an area of a piece of furniture is protected, it will get no wear at all. So, if a table is against a wall, the rear surfaces of the far legs will seldom get touched. In a bureau we keep the items we use most in the most conve-nient drawers. So the top drawer will show more wear than the bottom drawer.
A lamp table near the door will get more use than its mate that is tucked in a cor-ner. Most people are right-handed. They are more likely to hold up a chest lid with the left hand while rummaging with the right. You get the idea.
When you use your dining room, notice that some chairs get most of the use. Eight years ago I made a set of six sackback Windsors for our dining room. The one on the end of the table has experienced considerably more wear than the others. Why? It is the one we are most inclined to sit in when at the table. Eating alone, that is the chair each of us uses. Eating together, there is always someone in that chair.
We don’t just eat there. We work and read at the table. If we need to use a chair somewhere else, the one on the end is the one that gets taken, as it is most handy. It even gets more coats and clothes thrown over it than the others. The result is a greater amount of wear.
On any piece, the more prominent surfaces will come into the most contact with the human body during ordinary use. Examples are: corners of drawers and upper edges, the raised surfaces of carv-ing, and corners and edges of fl at surfaces, such as shelves and tabletops.
Placement in the HouseA piece’s original cost will affect the amount of wear it receives over the decades and centuries. High-style parlor furniture was more highly regarded by later genera-tions and was often better cared for than more simple pieces, even after it was out of fashion. High-style furniture was kept
Go Online FOR MORE …
You’ll fi nd links to all these online extras at:u popularwoodworking.com/nov10
ARTICLE: Read Michael Dunbar’s blog.
WEB SITE: Visit the web site of The Windsor Institute.
TO BUY: “Windsor-Chair Making in America: From Craft Shop to Consumer,” by Nancy Goyne Evans.
IN OUR STORE: Our new “Flexner on Finish-ing” book will help you try different fi nishes to age your pieces.
All of our products are available online at:u WoodworkersBookShop.com
u
in rooms such as the parlor that were less frequented than were utilitarian rooms, such as the kitchen. So, you will usually fi nd less wear on a mahogany dining table than on a pine kitchen table.
The above is a general statement. Some-times high-style furniture was demoted when it went out of style and was replaced by more up-to-date furniture. It was some-times moved to areas of the house where there was more activity. Plain furniture experienced the same demotion. However, it often went out to the workshop, the barn or some other service building. Keep these events in mind when creating artifi cial ordinary wear for a customer. PWM
Coming next issue: Learn about the accidents that make furniture (and life) interesting.
Michael is the founder of The Windsor Institute (thewindsorinstitute.com), the country’s premier school
for teaching the craft of making Windsor chairs.
Sometimes you see it. This heavy mirror was occasionally dragged across the fl oor when it was moved, hence the wear pattern on the bottom edge of its frame.
Your hand was here. Applying this wear over the entire piece would be wrong. This burnished sort of rub-through occurs where your hands rest.
popularwoodworking.com ■ 53
50-53_1011_PWM_AgingFurniturePar53 5350-53_1011_PWM_AgingFurniturePar53 53 9/8/10 4:03:44 PM9/8/10 4:03:44 PM

54 ■ POPULAR WOODWORKING MAGAZINE November 2010 PHOTOS BY THE AUTHOR
Wiping varnish might be the most popular hand-applied fi nish used
by woodworkers. It’s popular because it’s just as easy to apply as oil finishes but much more moisture, scratch, heat and solvent resistant.
You can make wiping varnish yourself by thinning any oil-based alkyd or poly-urethane varnish about half with mineral spirits (paint thinner), or you can buy it from a large number of manufacturers.
Unfortunately, these manufacturers create confusion with their labeling. Most use uninformative names with the inten-tion of making you think you’re buying
Wiping Varnish
A method of brushing
onto a complex surface.
something unique. The variety of names used also puts up barriers to the treatment of this fi nish as a category, similar to lac-quer or water-based fi nish, with application instructions that apply to all brands.
I’ve written about wiping varnish a number of times because I believe it’s the best fi nish for most of those woodwork-ers who just want a fi nish that’s easy and foolproof, it and produces great results.
Traditional Application MethodsThe easiest way to apply wiping varnish is to wipe or brush the fi nish onto the wood and wipe off the excess before it dries. After overnight drying, sand lightly with #320- or #400-grit sandpaper (with just your hand backing the sandpaper) to remove dust nibs. Then remove the dust and apply another coat just as you did the fi rst.
Apply as many coats as you want to get the appearance and protection (thickness) you want. You will end up with a near-perfect fi nish.
The downside of applying wiping var-nish in this manner is that each coat is very thin, so you usually have to apply four, fi ve or six coats (maybe more) to achieve an acceptable result.
You can get the fi nish to build faster by brushing and leaving, just as you would
brush full-strength varnish. But wiping varnish is so thin that it will run on verti-cal and complex surfaces, so this applica-tion method works only on fl at, horizontal surfaces such as tabletops.
A Better MethodIn this article I’m going to show you a method of brushing wiping varnish that will produce almost the same perfect results as wiping off the excess but will build faster, and it can be used effectively on all surfaces.
Apply Wiping VarnishThe fi rst step is simply to get the wiping varnish onto the bare wood or over a pre-vious coat of fi nish. You can pour the wip-ing varnish onto horizontal surfaces and spread it around; you can soak a rag and apply the fi nish to vertical or complex sur-faces; or you can brush on the fi nish just as you would brush paint (but you don’t need to brush with the grain because it doesn’t matter).
Just get the wiping varnish onto the wood and don’t worry about runs or bub-bles because the next steps will take care of them. You may want to use a cloth to remove drips running off edges, how-ever.
B Y B O B F L E X N E R
F L E X N E R O N F I N I S H I N G
Commercial wiping varnishes. There are many brands of commercial wip-ing varnish. The brands on the left are typically available in home centers and paint stores. The brands on the right are typically available in wood-working stores and catalogs. Unfortunately, only a couple manufacturers
label their wiping varnishes in an informative manner so you know what you’re buying. This user-unfriendly labeling has held back the treatment of these fi nishes as a single category, with application procedures that apply to all brands.
CONTINUED ON PAGE 56
54-59_1011_PWM_Flexner.indd 5454-59_1011_PWM_Flexner.indd 54 9/8/10 4:13:28 PM9/8/10 4:13:28 PM

Your Source For Table Slides
New
www.osbornewood.com
OLIVER MACHINERY DEALERHARDWOOD PLYWOOD
CUSTOM RAISED PANEL DOORSCUSTOM PLANK HRDWD FLOORING
THIN CRAFTWOODEXOTIC LUMBER
UPSSpecials
Above prices are for 100' quantities of kilndried roughlumber sold by the Bd. Ft. FOB Mayodan, NC. Call forquantity discounts. Other sizes and grades available.
Above prices are 20 bd. ft. bundles of clearkilndriedlumber 3"-10" wide • 3'-5' long (Randomwidths & lengths) Surfaced 2 sides or rough.Delivered UPS prepaid in the Continental U.S.
STEVE WALL LUMBER CO.Quality Hardwoods and Woodworking machinery For The Craftsman
and Educational Institutions
Send $1.00 For Lumber CatalogPrices Subject to Change Without Notice
STEVE H. WALLLUMBER CO.
BOX 287MAYODAN, N.C. 27027
336-427-06371-800-633-4062
FAX 336-427-7588Email: [email protected]: www.walllumber.com
Ash .............................. 4/4 Select $ 2.60 ........................................ $ 94.00Basswood ................... 4/4 Select $ 1.95 ........................................ $ 80.00Birch ............................ 4/4 Select $ 3.55 ........................................ $ 108.00Butternut ..................... 4/4 1C $ 2.95 ........................................ $ 88.00Cherry ......................... 4/4 Select $ 4.90 ........................................ $ 117.00Hickory - Pecan .......... 4/4 Select $ 3.00 ........................................ $ 100.00Mahogany (Genuine) .. 4/4 Select $ 4.70 ........................................ $ 112.00Maple (Hard) ............... 4/4 Select $ 3.45 ........................................ $ 108.00Maple (Soft) ................ 4/4 Select $ 2.50 ........................................ $ 88.00Poplar ......................... 4/4 Select $ 1.80 ........................................ $ 78.00Red Oak ...................... 4/4 Select $ 2.70 ........................................ $ 96.00Walnut ......................... 4/4 Select $ 4.90 ........................................ $ 115.00White Oak ................... 4/4 Select $ 2.70 ........................................ $ 96.00Cedar (Aromatic Red) . 4/4 1C+Btr. $ 1.80 ........................................ $ 78.00Cypress ....................... 4/4 Select $ 2.60 ........................................ $ 90.00White Pine ................... 4/4 F.G. $ 1.25 ........................................ $ 70.00Yellow Pine ................. 4/4 Clear $ 2.30 ........................................ $ 82.00
SEE OUR
CATALOG ON
THE WEB!
Incredibly accurateIncredibly accurate
Find all the woodworking resources you need!
WoodworkersBookShop.comis your instant connection to the best wood-
working books, magazines and CD/DVDs available – all from the publishers of PopularWoodworking Magazine. Plus, you can even
download entire back issues and project plans in fully searchable PDF format.
Place your order today!WoodworkersBookShop.com
For more information, go to PWFREEINFO.COM.
For more information, go to PWFREEINFO.COM.
For more information, go to PWFREEINFO.COM.
For more information, go to PWFREEINFO.COM.
For more information, go to PWFREEINFO.COM.
For more information, go to PWFREEINFO.COM.
For more information, go to PWFREEINFO.COM. For more information, go to PWFREEINFO.COM.
54-59_1011_PWM_Flexner.indd 5554-59_1011_PWM_Flexner.indd 55 9/8/10 4:22:39 PM9/8/10 4:22:39 PM

56 ■ POPULAR WOODWORKING MAGAZINE November 2010
Remove SomeThe next step is to remove most of the excess wiping varnish and make the thickness even. You do this using a dry brush.
You can use the brush you used for application as long as you shake out the excess fi nish and wipe the bristles fairly dry with a clean cloth. You can use any type of brush, but natural bristles work a little better than synthetic (plastic) bris-tles. Inexpensive “chip” brushes shed bristles that you then have to find and pick out. Foam brushes soak up too much fi nish and are diffi cult to wipe dry.
It’s best to use an approximately $6- $8 2" natural-bristle brush.
Use the brush to make single strokes to remove some of the excess fi nish. After each stroke, wipe off the fi nish you have picked up on a clean lint-free cloth. Then make another stroke and wipe the brush dry again.
On small or narrow surfaces, you can make several strokes before wiping. The objective is to remove the excess wip-ing varnish so it doesn’t puddle or run anymore; no more brushing than this is necessary.
You can work from the bottom up or the top down, and you don’t have to brush with the grain for this step. You’ll get the feel very quickly.
Finish UpThe next step is the same as the last, except you make light brush strokes with the grain this time. You may not have to dry your brush after every single brush stroke.
This step should remove any remain-ing bubbles and leave a totally brush-mark-free and run-free surface. Just to be sure, look over the entire surface in light refl ected from a window or overhead fi xture. If you see any runs or other prob-lems, brush them out.
Let the fi nish dry overnight. Then sand lightly and apply another coat in the same manner as the fi rst. Continue applying coats, sanding between each, until you’re
happy with the way the fi nish looks.You can use a satin fi nish (instead of
gloss) for all coats or just the last one if you want a satin sheen, but it’s often diffi cult to get the satin entirely streak-free. To improve the result, rub the last coat with #0000 steel wool, then apply more coats of satin wiping varnish or gel varnish and wipe off all the excess.
To remove fi ne dust nibs from the last coat, rub lightly with a folded brown paper bag after the fi nish has cured for several days. PWM
Bob is author of the new book “Flexner on Finishing,” available from Popular Woodworking Books.
CONTINUED FROM PAGE 54
F L E X N E R O N F I N I S H I N G
Go Online FOR MORE …
You’ll fi nd links to all these online extras at:u popularwoodworking.com/nov10
ARTICLE: Read more about Bob’s method for cleaning and storing your brushes.
TO BUY: Bob new book, “Flexner on Finishing,” is available at WoodworkersBookShop.com.
WEB SITE: Read more fi nishing articles.
ARTICLE: Read Bob’s story on applying gel varnish.
All of our products are available online at:u WoodworkersBookShop.com
Brush storage. There’s no need to clean your brush between coats unless you expect a lot of time to elapse. Store your brush by wrapping it in plastic wrap or hang it in a jar of mineral spirits.
Brushing on. The fi rst step is to get the wiping varnish onto the surface. You can brush it on in any direction or you can wipe on with a cloth. Here, I’m using a brush to apply the wiping var-nish to a vertical surface that already has several coats built up.
Brushing off excess. With the surface you want to cover wet with wiping varnish, begin removing the excess with single strokes using an almost-dry brush. Wipe the brush on a clean cloth after each stroke to remove the fi nish you just picked up with the brush.
Refl ected light. When working on a vertical surface, check often in refl ected light to see prob-lems, especially runs and sags like the ones here.
u
54-59_1011_PWM_Flexner.indd 5654-59_1011_PWM_Flexner.indd 56 9/8/10 4:14:06 PM9/8/10 4:14:06 PM

CRAFTSMANSHIP IN HARMONYEXPLORE GREENE & GREENE FURNITURE: POEMS OF WOOD AND LIGHT
Greene and Greene looked beyond one design philosophy, incorporating the Arts & Crafts movement, Japanese architecture, Chinese furniture, and the environment and topography of California to create a unique design style. Discover details in the work of Greene & Greene as well as their gestalt design philosophy (designing house, furniture, decorative arts) and the important infl uences on their work. This book is the perfect addition to your design inspiration library, or a gift for someone special.
GET GREENE & GREENE FURNITURE AND MORE AT WOODWORKER’S BOOK SHOP www.woodworkersbookshop.com.
$35.00 • Hardcover with dust jacketISBN 978-1-4403-0299-2 • #Z6651
54-59_1011_PWM_Flexner.indd 5754-59_1011_PWM_Flexner.indd 57 9/8/10 4:14:22 PM9/8/10 4:14:22 PM
Go to School Without Ever Leaving HomeOur “ShopClass” series offers video woodworking
instruction through instant downloads
(ShopClass On Demand) to your computer –
or get it on CD/DVD.
Go to ShopClass now by visiting WoodworkersBookShop.comand click on “SHOPCLASS SERIES”
in the left-hand navigation bar.withRobert W. Lang
SketchUp FORWoodworkersPart 2: Advanced Techniques
S THE TEN
CO
MM
AN
DM
ENTS O
F FINISH
ING
STEVE SH
AN
ESY
nish TheCommandmentsof Finishing
1010TheCommandmentsof Finishingwith Steve Shanesy
Check back often – we’re adding new classes!
Everything You Need toFinish Your Projects
Like a ProNo more mystery. No more marketing hype. Just the straight dope.
Take control of finishing by learning how to use the many finishes available – and what those products actually are. Inside “Flexner on Finishing,” you’ll discover the truth about:
Order ‘Flexner on Finishing’ Now atWoodworkersBookShop.com
(or call 1-800-258-0929)or look for it and other Popular Woodworking books at your local retailer.
$24.99 • HardcoverISBN 978-1-4403-0887-1 • #Y0006
} Wood Preparation}Choosing a Finish}Coloring Wood}Brushing & Spraying
}Overcoming Finish Problems}Finishing Myths}Repairing Finishes}And So Much More!
54-59_1011_PWM_Flexner.indd 5854-59_1011_PWM_Flexner.indd 58 9/8/10 4:14:45 PM9/8/10 4:14:45 PM

$109.95 RETAIL Check Online for Limited-timeSPECIAL PRICE
A Decade’s Worth of Pure Woodworking Information
10 YEARS ofPopular Woodworking
in One Small Package
You’ll find a huge range of project plans – from contemporary to period classics – expert technique instruction, tool reviews, shop tips and tricks and more.
• 35+ designs for bookcases and storage• 400+ pages of plans, step-by-step instructions and drawings• Essential technique instruction• And much more – 5,500+ pages in all!
With 69 issues of Popular Wood-working, this CD is packed with thousands of pages of pure wood-working information – but it’s easy to zero in on what you need with the simple-to-use search function – or browse through individual issues.
Order ‘Popular Woodworking 2000-2009’ now –visit WoodworkersBookShop.com
and search ‘2000-2009’ or call 800-258-0929.
ISBN: 978-1-4403-0220-0 • #Z6070
STATEMENT OF OWNERSHIP, MANAGEMENT AND CIR-CULATION (required by Act of August 12, 1970: Section 3685, Title 39, United States Code). POPULAR WOODWORKING MAGAZINE is published seven times a year at 4700 East Galbraith Road, Cincinnati, Ohio 45236. The annual subscription price is $24.95. The full name and complete address of the publisher and the editor are: Publisher & Group Editorial Director: Steve Shanesy, 4700 East Galbraith Rd., Cincinnati OH 45236; Editor: Christopher Schwarz, 4700 East Galbraith Road, Cincinnati, Ohio 45236. The owner is F+W Media, Inc.: David Nussbaum, Chairman & CEO. Address: 38 E. 29th Street, 4th Floor, New York, NY 10016. The extent and nature of circulation is: A. Total number of copies printed (Net press run). Average number of copies each issue during preceding 12 months 198,700. Actual number of copies of single issue published nearest to fi ling date 193,341. B. Paid circulation. 1. Sales through dealers and carriers, street vendors and counter sales. Average number of copies each issue during the preceding 12 months 11,800. Actual number of copies of single issue published nearest to fi ling date 11,255. 2. Mail subscriptions. Average number of copies each issue dur-ing preceding 12 months 144,016. Actual number of copies of single issue published nearest to fi ling date 138,000. C. Total paid circulation. Average number of copies each issue during preceding 12 months 155,816. Actual number of copies of single issue published nearest to fi ling date 149,255. D. Free distribution by mail, carrier or other means. Samples, complimentaries and other free copies. Average number of copies each issue during preceding 12 months 996. Actual number of copies of single issue published nearest to fi ling date 2,592. E. Total distribution (Sum of C and D). Average number of copies each issue during preced-ing 12 months 156,812. Actual number of copies of single issue published nearest to fi ling date 151,847. F. 1. Offi ce use, leftover, unaccounted, spoiled after printing. Average number of copies each issue during preceding 12 months 366. Actual number of copies of single issue published nearest to fi ling date 357. 2. Returns from news agents. Average number of copies each issue during preceding 12 months 41,522. Actual number of copies of single issue published nearest to fi ling date 41,137. G. Total (Sum of E and F should equal net press run shown in A). Aver-age number of copies of each issue during preceding 12 months 198,700. Actual number of copies of single issue published near-est to fi ling date 193,341. I certify that the statements made by me above are correct and complete. Filed October 1, 2010. Steve Shanesy, Publisher & Group Editorial Director.
$17.99 • Hardcover
ISBN 978-1-4403-0926-7 • #Y0639PRINTED AND BOUND IN THE UNITED STATES
Order ‘Exercises in Wood-Working’ nowat WoodworkersBookShop.com
or call 1-800-258-0929.
‘SHOP CLASS’ – WATCH & LEARN!
Put the Past to Work in Your ShopFirst printed in 1889, this book was written to educate college students in the craft and business of woodworking. The original text is reprinted in its entirety, not only to help you discover late 19th-century practices in woodworking, but to help you make the most of traditional hand tools in the modern shop. As you work through a series of 39 exercises, you’ll discover how to:
� Set up your shop and identify the tools every well-stocked hand-tool shop needs
� Effectively wield the most-used woodworking hand tools
� Use the various marking gauges like a professional cabinetmaker
� Sharpen your tools – from plane blades to saw teeth
� Mark and cut the most-used joints in furniture making
� Use a frame saw (the quiet answer to the modern band saw)
� Make a door and drawer
� Install cabinet hardware including hinges and locks
� And more
Editor Christopher Schwarz has recorded eight
companion videos for the exercises as part of our “Shop
Class” series– they’re available as single-lesson digital
downloads, or as a compilation DVD.
For more information, visit WoodworkersBookShop.com
and click on “Shopclass Series” in the left-hand navigation bar.
54-59_1011_PWM_Flexner.indd 5954-59_1011_PWM_Flexner.indd 59 9/8/10 5:32:03 PM9/8/10 5:32:03 PM

WOODWORKER’S MARKETPLACE
For more information, go to PWFREEINFO.COM.
CraftsmanStudio.comFine Tools - Fair Prices - Fast Shipping
2737 Via Orange Way • Ste 110 • Spring Valley, CA 888-500-9093Authorized Lie-Nielsen Dealer
Free Shippingon ordersover $75
(Lower 48 States)
For more information, go to PWFREEINFO.COM.
Old English Academyof Fine Woodworking
Michael J. Gray MasterHands on Instruction for Groups & Individuals
Weekend Classes Year RoundP.O. Box 772 Selmer, TN 38375
www.oefce.comLearn the Fundamentals of Woodworking
from an Old World Master
For more information, go to PWFREEINFO.COM.
For more information, go to PWFREEINFO.COM.
For more information, go to PWFREEINFO.COM.
8 models to
choose from
Turn logs into lumber.
1.800.553.0182 www.woodmizer.com
Live life to the MAX.
© Copyright 2010, Wood-Mizer Products, Inc.
For more information, go to PWFREEINFO.COM.
HARDWOODLUMBER
MORE THAN
100SPECIES!
250 Ferris Avenue, White Plains, NY 10603Phone: (914) 946-4111 • Fax: (914) 946-3779
Call for a FAST, FREE QUOTEASK FORFREE
CATALOG!
BurlsBlocks
VeneersDeckingFlooringPlywoodMillwork
Mouldings
www.condonlumber.net
For more information, go to PWFREEINFO.COM.
• Kiln Dried• Exotic Species• Resawing
1.800.522.5760www.woodmizerblades.com
Stellite® tip technology for sawing tough wood
For more information, go to PWFREEINFO.COM.
Popular Woodworking Magazine’sWoodworkersBookShop.com
EVERYDAY EVERYDAY LOW PRICESLOW PRICES
on woodworking books, DVDs, plans, videos and more!
Visit
Hands on Instruction for All Skill Levels
Mario Rodriguez - Alan Turner
For more info on Courses:215.849.5174
PhiladelphiaFurnitureWorkshop.com
PhiladelphiaFurnitureWorkshop
For more information, go to PWFREEINFO.COM.
60 ■ POPULAR WOODWORKING MAGAZINE November 2010
For more information, go to PWFREEINFO.COM.
For more information, go to PWFREEINFO.COM.
60-61_1011_PWM_Classifieds.indd 6060-61_1011_PWM_Classifieds.indd 60 9/9/10 2:53:27 PM9/9/10 2:53:27 PM

popularwoodworking.com ■ 61
ADVERTISER’S INDEX PAGE # WEB ADDRESS
WOODWORKER’S MARKETPLACE
PAGE # WEB ADDRESS
CLASSIFIEDBooks
WE HAVE A WIDE VARIETY of woodworking books – from small projects, to home improvement, to enhancing your woodworking skills, and more! To see our full line of books, please visit our web site at WoodworkersBookShop.com!
Finishing Supplies & Equipment
WOODFINISHSUPPLY.COM -- SHELLAC.NETLarge Shellac Flake Selection - Brushes - Dyes BEHLEN Finishing Supplies - Stains - Aerosols RENAISSANCE Wax.
SPRAY-ON SUEDE Line boxes easily. Free brochure with sample. DonJer, 13142 Murphy Road, Winnebago, IL 61088; 800-336-6537; www.donjer.com.
BLOXYGEN SAVES LEFTOVER FINISHES - Just Spray, Seal and Store. www.bloxygen.com or (805) 542-9219.
Hand Tools
DI LEGNO WOODSHOP SUPPLY Quality woodworking hand tools at an affordable price. www.dlws.com or 1-877-208-4298.
WWW.JIMBODETOOLS.COM The Largest Antique Tool Website on Earth! Fine Antique Woodworking Tools of every kind.
Power Tools
FEIN TOOLS YOU’RE JUST ONE CLICK AWAY from the Fein Tools that you can’t do without - MultiMasterTools - Sanders - Grinder - Vacuums and more, plus all Accessories and Parts. http://www.waltertool.com or 800-356-6926.
Schools/Instruction
JOHN C. CAMPBELL FOLK SCHOOL, Brasstown, NC. Courses for all skill levels. Weeklong and week-end classes year-round, taught by nationally known instructors. Friendly, supportive environment. Com-fortable, on-campus housing. Delicious meals served three times a day. www.folkschool.org. 800/365-5724.
THE ACANTHUS WORKSHOP, LLC Traditional woodworking education with lead instructor, Charles Bender, using conventional hand tools and modern machinery. Call 610-970-5862 or visit www.acanthus.com.
PRIVATE CLASSES with woodworking author in the Great Smokey Mountains- All skill levels- www.GregoryPaolini.com (828) 627- 3948
The School at Annapolis Woodworks, Davidsonville, MD.Turning, Carving, Furniture Making, etc. Weeklong and Weekend classes for all skill levels. www.annapoliswoodworks.com 301-922-0649
Seat Weaving Supplies
CHAIR CANE & SPLINT, Shaker tape, fi ber & natural rush. Complete line of basketweaving supplies. Royalwood Ltd., 517-WW Woodville Rd, Mansfi eld, OH 44907. 800-526-1630. www.royalwoodltd.com.
Wood & Veneers
WWW.WALNUTWOODS.NET Black Walnut Burl Veneer, lumber, turning stock, gunstocks. Buckeye Burl slabs. Call 559-277-8456, Newton Woods, Fresno, CA
Classifi ed rate is $6.00 per word, 15-word minimum. Order must be accompanied by payment; ads are non-commissionable. Send to: Popular Woodworking Magazine, 4700 E. Galbraith Rd., Cincinnati, OH 45236 or Don Schroder, [email protected]. Phone: 610-821-4425, Fax: 610-821-7884.
Acanthus Workshop 61 acanthus.comApollo Sprayers Int’l. 9 hvlp.comBeall Tool Company 60 bealltool.comBloxygen 61 bloxygen.comBob Marino’s Festool Store 20 bobmarinosbesttools.comCraftsman Plans 60 craftsmanplans.comCraftsman Studio 60 craftsmanstudio.comDeWalt Industrial Tool 18, 19 dewalt.comDi Legno Woodshop Supply 61 dlws.comDMT 15 dmtsharp.comDonJer Products 61 donjer.comEagle America 55 eagleamerica.comEBAC Industrial Products 55 ebacusa.comForrest Mfg. 5 forrestblades.comFranklin International 13 titebond.comFreud America 3 freudtools.comGeneral International USA C2 general.caGorilla Glue 15 gorillaglue.comGranberg International 15 granberg.comGregory Paolini Design LLC 61 gregorypaolini.comHartville Tool 20 hartvilletool.comHighland Woodworking 15 highlandwoodworking.comJet Tools C3 jettools.comJim Bode Tools 61 jimbodetools.comJohn Campbell Folk School 61 folkschool.orgKeller & Company 60 kellerdovetail.comKutzall Tools 5 kutzalltools.comLee Valley 5 leevalley.comLie-Nielsen Toolworks 17 lie-nielsen.comM.L. Condon 60 condonlumber.net
Marc Adams School 17 marcadams.comMortise Pal 60 mortisepal.comNewton Woods 61 walnutwoods.netOld English Academy 61 oefce.comOneida Air Systems 20 oneida-air.comOsborne Wood Products 15, 55 osbornewood.comPhiladelphia Furniture Workshop 60 philadelphiafurnitureworkshop.comPopular Woodworking Books 57-59, 63 popularwoodworkers.comRadarCarve 55 radarcarve.netRouterbits.com 55 routerbits.comRoyalwood Ltd. 61 royalwoodltd.comSchool at Annapolis Woodworks 61 annapoliswoodworks.comShellac.net 61 shellac.netShopbot 9 shopbottools.comStanley Tools C4 stanleytools.comSteebar Corp. 55 steebar.comSteel City Tool Works 7 steelcitytoolworks.netSuper Bright LEDs 60 superbrightleds.comTools for Working Wood 17 toolsforworkingwood.comWall Lumber 55 walllumber.comWalter Tool 61 waltertool.comWhitechapel Ltd. 55 whitechapel-ltd.comWoodcraft 9, 11 woodcraft.comWoodfi nder 60 woodfi nder.comWoodline USA 21 woodline.comWood-Mizer 60 woodmizer.comWoodpeckers 17 woodpeck.comWoodworker’s Hardware 17 wwhardware.comWoodworker’s Source 60 woodworkerssource.comWoodworker’s Supply 17 woodworker.com
60-61_1011_PWM_Classifieds.indd 6160-61_1011_PWM_Classifieds.indd 61 9/9/10 2:53:43 PM9/9/10 2:53:43 PM
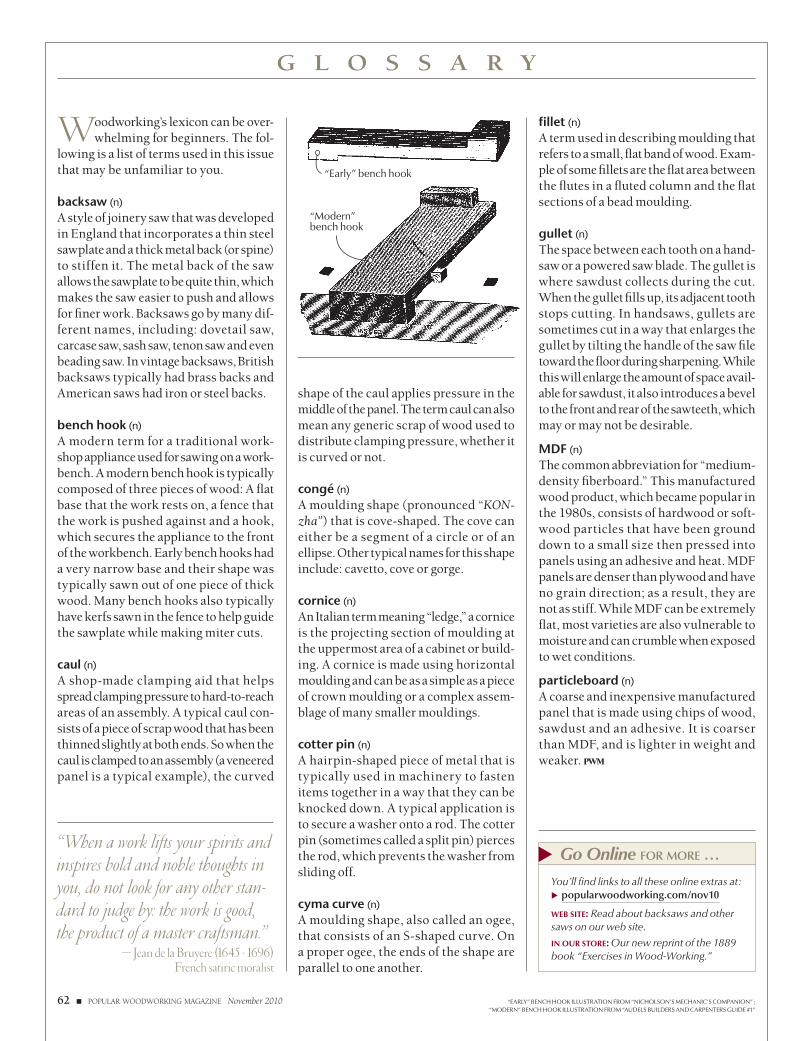
62 ■ POPULAR WOODWORKING MAGAZINE November 2010
Woodworking’s lexicon can be over-whelming for beginners. The fol-
lowing is a list of terms used in this issue that may be unfamiliar to you.
backsaw (n)
A style of joinery saw that was developed in England that incorporates a thin steel sawplate and a thick metal back (or spine) to stiffen it. The metal back of the saw allows the sawplate to be quite thin, which makes the saw easier to push and allows for fi ner work. Backsaws go by many dif-ferent names, including: dovetail saw, carcase saw, sash saw, tenon saw and even beading saw. In vintage backsaws, British backsaws typically had brass backs and American saws had iron or steel backs.
bench hook (n)
A modern term for a traditional work-shop appliance used for sawing on a work-bench. A modern bench hook is typically composed of three pieces of wood: A fl at base that the work rests on, a fence that the work is pushed against and a hook, which secures the appliance to the front of the workbench. Early bench hooks had a very narrow base and their shape was typically sawn out of one piece of thick wood. Many bench hooks also typically have kerfs sawn in the fence to help guide the sawplate while making miter cuts.
caul (n)
A shop-made clamping aid that helps spread clamping pressure to hard-to-reach areas of an assembly. A typical caul con-sists of a piece of scrap wood that has been thinned slightly at both ends. So when the caul is clamped to an assembly (a veneered panel is a typical example), the curved
G L O S S A R Y
“EARLY” BENCH HOOK ILLUSTRATION FROM “NICHOLSON’S MECHANIC’S COMPANION” ; “MODERN” BENCH HOOK ILLUSTRATION FROM “AUDELS BUILDERS AND CARPENTERS GUIDE #1”
fi llet (n)
A term used in describing moulding that refers to a small, fl at band of wood. Exam-ple of some fi llets are the fl at area between the fl utes in a fl uted column and the fl at sections of a bead moulding.
gullet (n)
The space between each tooth on a hand-saw or a powered saw blade. The gullet is where sawdust collects during the cut. When the gullet fi lls up, its adjacent tooth stops cutting. In handsaws, gullets are sometimes cut in a way that enlarges the gullet by tilting the handle of the saw fi le toward the fl oor during sharpening. While this will enlarge the amount of space avail-able for sawdust, it also introduces a bevel to the front and rear of the sawteeth, which may or may not be desirable.
MDF (n)
The common abbreviation for “medium-density fi berboard.” This manufactured wood product, which became popular in the 1980s, consists of hardwood or soft-wood particles that have been ground down to a small size then pressed into panels using an adhesive and heat. MDF panels are denser than plywood and have no grain direction; as a result, they are not as stiff. While MDF can be extremely fl at, most varieties are also vulnerable to moisture and can crumble when exposed to wet conditions.
particleboard (n)
A coarse and inexpensive manufactured panel that is made using chips of wood, sawdust and an adhesive. It is coarser than MDF, and is lighter in weight and weaker. PWM
“When a work lifts your spirits and inspires bold and noble thoughts in you, do not look for any other stan-dard to judge by: the work is good, the product of a master craftsman.”
— Jean de la Bruyere (1645 - 1696)French satiric moralist
shape of the caul applies pressure in the middle of the panel. The term caul can also mean any generic scrap of wood used to distribute clamping pressure, whether it is curved or not.
congé (n)
A moulding shape (pronounced “KON-zha”) that is cove-shaped. The cove can either be a segment of a circle or of an ellipse. Other typical names for this shape include: cavetto, cove or gorge.
cornice (n)
An Italian term meaning “ledge,” a cornice is the projecting section of moulding at the uppermost area of a cabinet or build-ing. A cornice is made using horizontal moulding and can be as a simple as a piece of crown moulding or a complex assem-blage of many smaller mouldings.
cotter pin (n)
A hairpin-shaped piece of metal that is typically used in machinery to fasten items together in a way that they can be knocked down. A typical application is to secure a washer onto a rod. The cotter pin (sometimes called a split pin) pierces the rod, which prevents the washer from sliding off.
cyma curve (n)
A moulding shape, also called an ogee, that consists of an S-shaped curve. On a proper ogee, the ends of the shape are parallel to one another.
“Early” bench hook
“Modern” bench hook
Go Online FOR MORE …
You’ll fi nd links to all these online extras at:u popularwoodworking.com/nov10
WEB SITE: Read about backsaws and other saws on our web site.
IN OUR STORE: Our new reprint of the 1889 book “Exercises in Wood-Working.”
u
62-63_1011_PWM_Glossary.indd 6262-63_1011_PWM_Glossary.indd 62 9/8/10 4:04:34 PM9/8/10 4:04:34 PM

What Can You Accomplish in a Weekend?
40 Projects You Can Build in Days!Do you only have a few days to work on your woodworking? Then this is the book for you! With projects like a game box, jewelry box, several bookcases and shelves, frames and more, in a variety of styles, there’s something for every woodworker.
Pick a project and get started — time’s a wastin’!
Get The Weekend Woodworker’s Project Collection and other quality products at Woodworker’s Book Shopwww.woodworkersbookshop.com.
$22.99 • PaperbackISBN 978-1-4403-0888-8#Y0007
NEWfrom
Christopher Schwarz & the Popular Woodworking
staff .99 • Hardcover
N 978-1-4403-1040-9 • #Y1532
PRINTED AND BOUND IN THE UNITED STATES
Build Your Ideal Workbenche Workbench Design Book” is the companion book to Christopher Schwarz’srkbenches: From Design & Theory to Construction & Use.” Its 256 pageshock-full of information on designing the ideal workbench for the way you
k. You’ll get complete step-by-step drawings and instructions for building e styles of workbenches, from ancient to thoroughly modern, with an in-depth ique of each:
• Authentic 18th-century Roubo• Holtzapffel Cabinetmaker’s Bench• LVL Workbench• 21st-century Workbench• Shaker Workbench• The 24-hour Workbench• Power Tool Workbench• $230 Workbench• German Patternmaker’s Workbench
Plus, you’ll find information on modifying an existing workbench, workhold-ng, tool storage and more. And, Chris critiques a wide range of common work-bench designs with “before and after” illustrations to show what works – andwhat he’d change.
You’ll head to the shop armed with all the knowledge and plans you need tomake the perfect bench for your shop, no matter what kind of work you do.
ORDER ‘The Workbench Design Book’ NOWat WoodworkersBookShop.com, or call 1-800-258-0929.
(Shipping is free in the United States!)
62-63_1011_PWM_Glossary.indd 6362-63_1011_PWM_Glossary.indd 63 9/8/10 4:05:14 PM9/8/10 4:05:14 PM
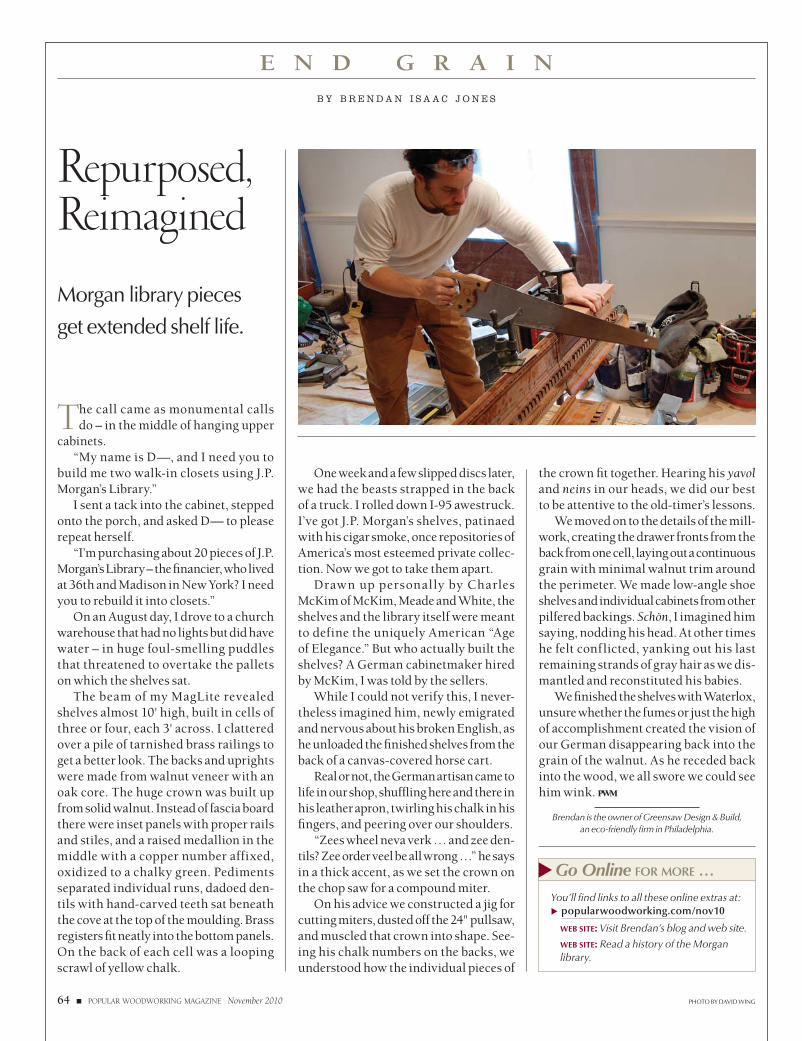
64 ■ POPULAR WOODWORKING MAGAZINE November 2010
u Go Online FOR MORE …
You’ll fi nd links to all these online extras at:u popularwoodworking.com/nov10
WEB SITE: Visit Brendan’s blog and web site.
WEB SITE: Read a history of the Morgan library.
The call came as monumental calls do – in the middle of hanging upper
cabinets. “My name is D—, and I need you to
build me two walk-in closets using J.P. Morgan’s Library.”
I sent a tack into the cabinet, stepped onto the porch, and asked D— to please repeat herself.
“I’m purchasing about 20 pieces of J.P. Morgan’s Library – the fi nancier, who lived at 36th and Madison in New York? I need you to rebuild it into closets.”
On an August day, I drove to a church warehouse that had no lights but did have water – in huge foul-smelling puddles that threatened to overtake the pallets on which the shelves sat.
The beam of my MagLite revealed shelves almost 10' high, built in cells of three or four, each 3' across. I clattered over a pile of tarnished brass railings to get a better look. The backs and uprights were made from walnut veneer with an oak core. The huge crown was built up from solid walnut. Instead of fascia board there were inset panels with proper rails and stiles, and a raised medallion in the middle with a copper number affixed, oxidized to a chalky green. Pediments separated individual runs, dadoed den-tils with hand-carved teeth sat beneath the cove at the top of the moulding. Brass registers fi t neatly into the bottom panels. On the back of each cell was a looping scrawl of yellow chalk.
PHOTO BY DAVID WING
B Y B R E N D A N I S A A C J O N E S
Repurposed,Reimagined
Morgan library pieces
get extended shelf life.
One week and a few slipped discs later, we had the beasts strapped in the back of a truck. I rolled down I-95 awestruck. I’ve got J.P. Morgan’s shelves, patinaed with his cigar smoke, once repositories of America’s most esteemed private collec-tion. Now we got to take them apart.
Drawn up personally by Charles McKim of McKim, Meade and White, the shelves and the library itself were meant to define the uniquely American “Age of Elegance.” But who actually built the shelves? A German cabinetmaker hired by McKim, I was told by the sellers.
While I could not verify this, I never-theless imagined him, newly emigrated and nervous about his broken English, as he unloaded the fi nished shelves from the back of a canvas-covered horse cart.
Real or not, the German artisan came to life in our shop, shuffl ing here and there in his leather apron, twirling his chalk in his fi ngers, and peering over our shoulders.
“Zees wheel neva verk … and zee den-tils? Zee order veel be all wrong …” he says in a thick accent, as we set the crown on the chop saw for a compound miter.
On his advice we constructed a jig for cutting miters, dusted off the 24" pullsaw, and muscled that crown into shape. See-ing his chalk numbers on the backs, we understood how the individual pieces of
the crown fi t together. Hearing his yavol and neins in our heads, we did our best to be attentive to the old-timer’s lessons.
We moved on to the details of the mill-work, creating the drawer fronts from the back from one cell, laying out a continuous grain with minimal walnut trim around the perimeter. We made low-angle shoe shelves and individual cabinets from other pilfered backings. Schön, I imagined him saying, nodding his head. At other times he felt conflicted, yanking out his last remaining strands of gray hair as we dis-mantled and reconstituted his babies.
We fi nished the shelves with Waterlox, unsure whether the fumes or just the high of accomplishment created the vision of our German disappearing back into the grain of the walnut. As he receded back into the wood, we all swore we could see him wink. PWM
Brendan is the owner of Greensaw Design & Build, an eco-friendly fi rm in Philadelphia.
E N D G R A I N
64-c4_1011_PWM_EndGrain.indd 6464-c4_1011_PWM_EndGrain.indd 64 9/8/10 4:15:52 PM9/8/10 4:15:52 PM

For more information, go to PWFREEINFO.COM.
64-c4_1011_PWM_EndGrain.indd c364-c4_1011_PWM_EndGrain.indd c3 9/8/10 4:16:14 PM9/8/10 4:16:14 PM

THEY’RE BACKNO. 4
SMOOTHING PLANE
NO. 62LOW ANGLE JACK PLANE
NO. 9 -1/2BLOCK PLANE
NO. 60 -1/2LOW ANGLE BLOCK PLANE
NO. 92SHOULDER / CHISEL PLANE
stanleytools.com
© 2010 Stanley Black & Decker, Inc
Stanley® Revisits A Cherished Era of Qualityand Craftsmanship.
Introducing the new line of Stanley® premium hand planes. Their mechanical precision, simple adjustment features, and top-quality materials are once again worthy of the famous Sweetheart™ logo ... a distinction that professionals and serious woodworkers recognize asa coveted symbol of quality. Not only do these hand planes maintaina tradition of quality and craftsmanship, they also offer a Sweetheart™
price as well.
Visit a participating Stanley ® dealer near you to own yours today.
For more information, go to PWFREEINFO.COM.
64-c4_1011_PWM_EndGrain.indd c464-c4_1011_PWM_EndGrain.indd c4 9/15/10 9:43:11 AM9/15/10 9:43:11 AM