December 2006 Popular Woodworking - Woodtools
73
BEST NEW TOOLS of 2006 16 PLUS ■ Build a Solar Kiln ■ Turn Perfect Platters ■ A Better Shooting Boa WIN THE WORKSHOP OF YOUR DREAMS Traditional Lingerie Dresser popularwoodworking.com A Smarter Shop Place Your Tools To Work Faster The Classic SLIDING DOVETAIL Made Simple 74470 01355 0 6 12 US $5.99 CAN $7.99
-
Upload
khangminh22 -
Category
Documents
-
view
1 -
download
0
Transcript of December 2006 Popular Woodworking - Woodtools

Learn How ■ Discover Why ■ Build Better
BEST NEW TOOLSof 2006
16
DECEMBER 2006DECEMBER 2006ISSUE #159
PLUS■ Build a Solar Kiln■ Turn Perfect Platters■ A Better Shooting BoardA Better Shooting Board
WINTHE WORKSHOP OF YOUR DREAMSWIN
TraditionalLingerie Dresser
popularwoodworking.com
A Smarter ShopPlace Your ToolsTo Work FasterThe ClassicSLIDING DOVETAILMade Simple
74470 013550 6
12
US $5.99CAN $7.99

contentscontentsLearn How ■ Discover Why ■ Build Better
contents
popularwoodworking.com 3
IN EVERY ISSUE
18 Foosballs to the RescueTRICKS OF THE TRADE
This ingenious rack for storing modern handsaws borrows a ball from the game room. Plus, improve dust collection on your band saw, and make a clever bit-depth gauge for your router with scraps of wood and a $16 dial indicator.
32 FeatherBow FeatherboardTOOL TEST
Find out if this manufactured featherboard is worth the price. Plus, a new bowsaw that glides through cuts, fl oats that make mortises and chamfers a breeze and more.
36 Mystery of the Marking GaugeARTS & MYSTERIES
Guest columnist Dean Jansa shares his plans for making an old-fashioned marking gauge – its clever features make it surpass most modern commercial models.by Dean Jansa
40 Whale Tail ShelvesI CAN DO THAT
Pocket-hole joints help to make this impressive-looking project deceptively simple to build.by Megan Fitzpatrick
80 In the Greene & Greene Style GREAT WOODSHOPS
An unfl agging drive to get the details exactly right has attracted worldwide attention to James Ipekjian, an expert maker and restorer of Greene and Greene furniture. by Robert W. Lang
90 Platter Up AT THE LATHE
Whether you’re a novice or experienced turner, you can create a platter worthy of serving the fanciest feast.by Judy Ditmer
98 Thick & Thin of FinishingFLEXNER ON FINISHING
Discover how to balance thickness with ease of application to achieve the most effective, effi cient and aesthetically pleasing fi nish for your work. by Bob Flexner
Number 159, December 2006. Popular Woodworking (ISSN 0884-8823,USPS 752-250) is published 7 times a year in Febru-ary, April, June, August, October, November and December by F+W Publications Inc. Editorial and advertising offices are located at 4700 E. Galbraith Road, Cincinnati, Ohio 45236; tel.: 513-531-2222. Unsolicited manuscripts, photographs and artwork should include ample postage on a self-addressed, stamped envelope (SASE); otherwise they will not be returned. Subscription rates: A year’s subscription (7 issues) is $19.96; outside of U.S. add $7/year ■ Canada Publications Mail Agreement No. 40025316. Canadian return address: 2835 Kew Drive, Windsor, ON N8T 3B7 ■ Copyright 2006 by Popular Woodworking. Periodicals postage paid at Cincinnati, Ohio, and additional mailing offices. Postmaster: Send all address changes to Popular Woodworking, P.O. Box 420235, Palm Coast, FL 32142-0235 Canada GST Reg. # R122594716 ■Produced and printed in the U.S.A.
36
80
32
40
90
1818

POPULAR WOODWORKING December 20066
ON THE COVER
The shop-made mould-ings and other special details help make Glen Huey’s lingerie chest an heirloom piece.
Cover photo by Al Parrish
DEPARTMENTS
10 Out on a LimbNormites v. Luddites: What gets lost in the haze of battle
12 LettersMail from readers and answers to your woodworking questions
30 Endurance TestDeWalt two-base router kit
26 Power-tool Joinery
Attaching Tabletopsby Bill Hylton
104 Out of the WoodworkName-brand Toolsby Philip Leon
42 Lingerie ChestThis traditional tall dresser has a lot of 18th-century fl air – and a lot of drawers for all your wife’s bits and pieces.by Glen D. Huey
49 Setting Up Shop: Machine Placement
WOODWORKING ESSENTIALS
The right machines in the right positions will help make your precious woodshop time more effi cient and enjoyable.by Scott Gibson
57 Housed DovetailsThis super-strong joint is easier to make – with this super-slick trick and a simple jig.by Geoffrey Ames
60 Best New ToolsThe outstanding class of 2006 produced a record 16 tools for our annual roundup of those that impress – from an entire new line of machines from Steel City Tools to the tiny-but-powerful Bosch lithium-ion driver.
66 Shooting BoardsThese ingenious, effi cient and easy-to-build foundations of any hand-tool shop help you achieve planed perfection, one shaving at a time. by Paul Sellers
72 Tiny but Useful No. 1 Plane
This cute-as-a-button bench plane sparks a lot of affection, but it also had a number of practical applications.by Clarence Blanchard
74 Solar Drying KilnHarness the power of the sun for a cost-effective and effi cient way to take green boards to usable lumber – and avoid the inherent problems of kiln-dried lumber. by John Wilson
PROJECTS, TOOLS AND TECHNIQUES
74
66
7272
6060
49
®
SAFETY NOTESafety is your responsibility. Manufacturers place safety devices on their equipment for a reason. In many pho-tos you see in Popular Woodworking, these have been removed to provide clarity. In some cases we’ll use an awkward body position so you can better see what’s being demonstrated. Don’t copy us. Think about each procedure you’re going to perform beforehand.
December 2006, Vol. 26, No. 7popularwoodworking.com
Editorial Offi ces 513-531-2690
Publisher & Group Editorial Director Publisher & Group Editorial Director Publisher & Group Editorial DirectorSteve Shanesy
Editor Editor Editor Christopher Schwarzext. 1407 • [email protected]
Art Director Art Director Art Director Linda Wattsext. 1396 • [email protected]
Senior Editor Senior Editor Senior Editor Robert W. Langext. 1327 • [email protected] Editor Managing Editor Managing Editor Megan Fitzpatrick
ext. 1348 • megan.fi [email protected] Designer Associate Designer Associate Designer Susan L. Smith
ext. 1058 • [email protected] Illustrator Project Illustrator Project Illustrator John Hutchinson
Photographer Photographer Photographer Al Parrish
Contributing EditorsAdam Cherubini, Nick Engler, Bob Flexner,
Glen Huey, Don McConnell, Troy Sexton
F+W PUBLICATIONS INC.David H. Steward, Chairman & CEOBarbara Schmitz, VP, Manufacturing
Eric Svenson, Group Publisher, Interactive Media
F+W PUBLICATIONS INC.MAGAZINE GROUP
Joel Toner, VP & Publishing DirectorSara DeCarlo, VP, Consumer Marketing
Susan Du Bois, VP, Circulation OperationsTom Wiandt, Business Planning
Sara Dumford, Conference DirectorDeb Westmaas, Group Circulation DirectorCristy Malcolm, Newsstand Sales Supervisor
PRODUCTIONVicki Whitford, Production Manager
Katherine Seal, Production Coordinator
ADVERTISINGDon Schroder, Advertising Director
331 N. Arch St., Allentown, PA 18104Tel. 610-821-4425; Fax 610-821-7884
[email protected] Production Coordinator
Nancy Miller, Tel. 513-531-2690 ext. [email protected]
SUBSCRIPTION SERVICES: Subscription inquiries, orders and address changes can be made at popularwoodworking.com
(click on “Customer Service FAQs”). Or by mail: Popular Woodworking,Popular Woodworking,Popular WoodworkingP.O. Box 420235, Palm Coast, FL 32142-0235. Or call toll-free
877-860-9140 or 386-246-3369. Include your address with all inquiries. Allow 6 to 8 weeks for delivery.
NEWSSTAND DISTRIBUTION: Curtis Circulation Co.,730 River Road, New Milford, NJ 07646
ATTENTION RETAILERS: To carry Popular Woodworking in your store, call 800-894-4656 or write Magazine Retail Sales, P.O. Box 5014, Iola, WI 54945-5014.
Back issues are available. Call 800-258-0929 for pricing or visit popularwoodworking.com. Send check or money order to: Popular Woodworking Back Issues, F+W Publications Products, 700 E. State St., Iola, WI 54990. Please specify publication, month and year.
Contact Customer ServiceHave a question about your subscription, a change of address or need to renew? Contact customer service quickly and easily using the online form.
Free Project PlansEvery month, we simply give away some of our most popular project plans.
Article IndexLooking for a specifi c technique or proj-ect, or all the articles from your favorite author? Look no further than the mag-azine’s online article index! And when you fi nd what you need, it’s a simple click to order a back issue.
Magazine Extras & Editor BlogsHere, you’ll find article corrections (yes, it’s true – once in a while we make a mistake), expanded project plans, 18th-century shop inventories and other curious items. You also can read about what our editors are doing in the shop right now on our blogs.
Online Toolspopularwoodworking.com
At Popular Woodworking, we want to know what you think about the magazine – that’s why we publish our e-mail addresses and direct phone numbers in every issue (see the masthead at right). If you’ve ever called us, you know that we always try to help.
Now, we’re stepping up to embrace a new level of reader input, and we invite you to participate. It’s called the “Popular Wood-working Reader Panel” and it’s basically an easy online survey that lets us know what you like (and dislike) about the magazine, and exactly what sort of woodworker you are. This information will help us make sure that Popular Woodworking continues to be a Popular Woodworking continues to be a Popular Woodworkingvital and exciting magazine. And in return for the help, Reader Panel members will
Tool ReviewsFrom miter saws to metal-bodied spoke-shaves, you’ll find a selection of tool reviews you need to outfi t your shop with the machines and hand tools that best fi t your needs and price range.
Writer’s GuidelinesGot a great idea for an article? Here’s how to submit your proposal.
Contact the StaffIf you have a question about Popular Woodworking, about woodworking in general … or even a complaint about the magazine, we want to hear it. You can contact us directly through our web site – and we even give you our direct phone numbers.
Visit popularwoodworking.com today – and explore.
occasionally get special offers and exclusive discounts.
We hope you’ll take a few minutes to visit the web site and participate in this new and important customer service. It won’t take much of your time – the initial survey is quick and gathers information about you and your woodworking. We’ll be following up with you for more information only every month or so. It will help make Popular Woodworkinga better magazine. It can help tool manufac-turers create better tools for woodworking. And, it can help you get the woodworking information you want and need. Visit our home page to get started. PW
Inside Online
Join Our New Reader Panel

Christopher SchwarzEditor
P.S. Not sick of me yet? I’m teaching a class in hand-tool fundamentals May 21-25 at the Marc Adams School of Woodworking. For information, drop me a line or contact the school at 317-535-4013 or marcadams.com.
Luddites! Normites! It’s Time to Unite
POPULAR WOODWORKING December 200610
Many woodworkers talk about the craft as if there are rifts between two camps of
builders – the hand-tool people v. the power-tool people. The quick-and-easy joinery cabal v. the dovetail-everything-or-else crowd.
I don’t see things that way. Those per-spectives are just different ways of doing the same thing: Making two pieces of wood stick together into something useful, beautiful or (if you’re lucky) both.
Instead, the biggest battle in woodwork-ing today is much harder to see, though it touches each of us every time we turn on the fl uorescents in our shops.
Here it is: Every moment is a struggle to discover new and better ways to do things in the shop, and it is also a struggle to retain the immense body of woodworking knowledge that has preceded us.
Let me give you an example. I just returned from the Inter-national Woodworking Fair in Atlanta, the most gluttonous overdose of tools you can get. While there, an offi cial from Hitachi Power Tools handed me a new pneu-matic 15-gauge nailer that had an odd brightly colored button by its exhaust port.
When you pressed that button, the nailer redirected the air from the compressor to shoot out of the top of the nail gun. In other words, you could use the nailer to blow sawdust off your work so you could see your layout lines.
Maybe some other company somewhere has done this before, but it was new to me. I was in awe at the cleverness of the thing. Why isn’t this feature on every pneumatic nailer?
Fast-forward to this morning in the shop. I’m testing a set of fl oats that are being manu-factured by Lie-Nielsen Toolworks. What are fl oats? They’re an old-fashioned tool that is a bit like a cross between a fi le and a handsaw.
CONTRIBUTORS
GEOFFREY AMESGeoff Ames holds several patents for Plastic Shipping Drums, was a scratch golfer for 25 years and started his woodworking business more than three decades ago.
His early work was produced exclusively with hand tools, but he was forced to start using machinery for stock preparation. However, he still uses hand tools for most details.
Geoff is a Period Furniture Master spe-cializing in 18th-century New England-style furniture. He teaches at The Homestead Woodworking School in Newmarket, N.H. Four of his pieces were featured in “Fine Furniture: A Resource for Handcrafted and Custom Furniture,” by Kerry Pierce.
In this issue, he shares a slick trick for making housed dovetails (page 57).
CLARENCE BLANCHARDIf you collect old tools, you probably have run into Clarence Blanchard, either at one of his auctions or at a tool show some-where in the country. Clarence runs Brown
Auction Services and the Fine Tool Journal (fi netoolj.com), a quar-terly about old tools. Though he studied to become a chemical engineer, Clarence entered the construc-
tion trade instead, where a natural interest in tools followed. One day he decided to collect all the Stanley tools from the No. 1 (which he writes about on page 72) to the No. 100; his collection blossomed and he later acquired the auction company and the Fine Tool Journal. He runs both (with the help of his staff) in Pownal, Maine.
Our Privacy Promise to YouWe make portions of our customer list available to carefully screened companies that offer products and services we believe you may enjoy. If you do not want to receive offers and/or information, please let us know by contacting us at:
List Manager, F+W Publications4700 E. Galbraith Road, Cincinnati, OH 45236
The tool’s teeth act like little scrapers. The tools cut fast, are easy to navigate and leave a beautiful surface. I refi ned the shape of a cabriole leg with one fl oat. I straightened out a through-mortise with another.
I was again in awe. Why have these tools been forgotten? People who make wooden handplanes and gunstocks haven’t forgotten about fl oats, but most cabinetmakers have.
To me, it seems we are forever racing for-ward to discover new things and discarding old things that are useful.
So what is to be done? It’s simple. Don’t keep your knowledge to your-self. In old Europe, much of the woodworking intelli-gence was tightly controlled by the guilds, and when they began to fade away, so did many of their secrets. There are precious few (and mostly confusing) early books on woodworking that recorded their ways and workings.
So if you have an “a-ha” moment in the shop with your plunge router, or if you fi nally
unlock the secrets of a vintage tool, send it to us and we’ll fi nd a way to use it. It could be a Trick of the Trade, a letter or even an article. Whatever happens, don’t ever be the last per-son on earth who knows a trick. PW
OUT ON A LIMB

UsingQualityHardwareGood hardware means different things to different people. No matter the style, there are three elements to consider:
Material: You chose your wood carefully. Choose the hardware just as carefully. We use solid brass. It lasts forever.
Construction: Good con-struction is a must. Hardware reects the countless hours spent building your master-piece. Details make the differ-ence.
Finish: You’ve strived to get your wood to glow. The brasses need to accentuate that effort. A beautiful nish is the nal step.
We have been making brass hardware for 70 years. We think we’ve learned a few things about making and deliv-ering hardware.
• We have no minimum order size
• Hardware is always in stock
• Shipping charge is just $5.00
Please call or visit us online.
www.horton-brasses.com800-754-912749 Nooks Hill Road
Cromwell, CT 06416
Difference
TheHorton Brasses
Machinist’s Scraper Good for Wood
LETTERS
POPULAR WOODWORKING December 2006 12
Sometimes, the Best Tools are CheapI read your review of the Blue Spruce marking knife (issue #154), then of the new birdcage-style awl in this last issue (#157). It seems like you appreciate sharp precision tools. I’m a machinist by training and an engineer in practice. We have a cool tool you might want to investigate. It’s called a three-corner scraper or a machinist’s scraper. As machin-ists we were trained to use them for all things “deburring.”
It’s also a training exercise to grind one, by hand, from a three-corner fi le. It isn’t diffi cult. You stay with the profi le of the three-corner fi le and taper off to a point on one end. Grind symmetrically using the grinding wheel to hollow grind the three fl ats. Flat hone the edges on an Arkansas stone until you start to hit the center of the grind. This freshens it up many, many times. Not overheating the tip (annealing) and not cutting yourself while you grind are the challenges. When fi nished, you have a small and handy tool for cutting steel burrs or anything else you throw at it.
Or, you can purchase a machinist’s scraper from McMaster Carr (mcmaster.com) and/ or MSC (mscdirect.com). I don’t remember pay-ing more than $15 for a standard-sized one.
The small ones are the most useful and deadly. Keep them pushed into a wine bottle cork until ready for use – it reduces the number of puncture wounds!
continued on page 14
I’m betting you’ll be recommending three-corner scrapers to your readers in no time – cheap and useful is good!
Gordon N. Meacham IISan Mateo, California
Router or Shaper – Which Should I Buy?I am debating on a router and router table, or a shaper. What, in your opinion, is the better choice and why? Will router bits work in both a router and shaper? Will shaper bits work in both? What’s the difference?
Larry L.HerodVersailles, Missouri
I think it all depends on the type of work you are doing. The shaper is an industrial-quality machine, capable of running all day long, day in and day out. If you do production work, its solid mass, quiet operation and durability over time make it an obvious choice. The downside is the cost of the machine and of tooling. A $100 router bit can easily be a $300 shaper cutter.
If you’re a hobbyist, or doing one-of-a-kind work, I think a router table makes more sense. The advantages of the shaper don’t come into play unless you are doing enough work, or the type of work, that would make it cost-effective. You don’t need a lot of bells and whistles on a router table. A good router, a fl at table and a straight fence can be had for much less than the cost of even an entry-level shaper.
Illustration by Hayes Shanesy
Edges can scrape small or curved surfaces
Pointed end can be useful for reaming holes
CIRCLE NO. 127 ON FREE INFORMATION CARD.

LETTERS
continued from page 12continued from page 12
POPULAR WOODWORKING December 200614
Shapers and routers are designed to run at different speeds, with routers running much faster. The cutting geometry is designed with these speeds in mind, so to get a decent quality cut with a router bit in a shaper, you need to slow your feed rate down to match the slower spinning machine. Running a shaper cutter designed to spin no faster than 12,000 rpm in a router capable of turning 20,000 rpm or more is crazy in my book, and I can’t think of a responsible manufacturer that would market an adapter to let you do this.
— Robert W. Lang, senior editor
Is Big-box Wood Good for Furniture?I want to start building furniture. I loved working in my grandfather’s shop and now that I have my own home, I have decided to take on some basic projects to see if my desire can match my skill. My question: Is the wood purchased from a home center good for furni-ture? I read about the moisture content and I wonder if their wood will warp.
Brady SmithLewisville, Texas
Wood from home centers can be used to make furniture, but hardwoods (such as oak and poplar) are far more expensive at home centers than hardwood from a lumberyard or wood-working specialty store. Softwood (pine and fi r) is generally well-priced at a home center.
If you do buy lumber from a home center, here are a few tips: It’s always a good idea to buy wood that has been stored indoors. Pick the straightest stuff possible even if you have to go through the entire rack. If you don’t own a moisture meter to check each board, a good rule of thumb is that the boards that are lightest in weight are the driest (water is heavy).
And one fi nal tip: Once you purchase the wood, it’s always a good idea to let it acclimate in your shop for a couple weeks. Then you should be good to go.
— Christopher Schwarz, editor
Can Leftover Decking Wood Be Used to Build a Durable Workbench?Due to a crazy brother-in-law who ordered way too much wood for a deck, I fi nd myself with a healthy supply of 2" x 6", 20'-long cedar boards. Is this wood good for a workbench? I’m just starting out in woodworking; I just bought a contractor saw and wonder if this
would be a good fi rst project. I appreciate any tips you can give me.
Kevin Klauber Sonoma, California
Traditional European benches were made from beech. Maple is a common choice in this coun-try. But I think that what is more important than the species you choose is the physical prop-erties that the wood possesses. I recommend people use materials that are inexpensive, plentiful, heavy and tough for a workbench.
Unfortunately, cedar doesn’t pass this test. It’s cheap and easy to get, but it is a lightweight and soft wood. And, in my opinion, it’s too lightweight and soft for a traditional bench. I’ve made a lot of benches out of Southern yellow pine, hemlock and fi r, but those are about as soft a wood as I would consider.
I’d check out the lumberyard and see what wood is available for framing joists and other high-stress applications, which requires clear, strong material. That material – whatever it is – is almost always good stuff for a workbench. It might need to dry for a while in your shop, but it won’t break the bank.
— Christopher Schwarz, editor
Swiss Made Tools Produce Premium Quality Carving BladesAlthough your recent article in the October 2006 issue by David Calvo contained a lot of information which would be benefi cial to any beginning carver, his statement that “Swiss brands” are the poorest quality carving tools on the market today is unfounded and very misleading.
Pfeil, our supplier of Swiss carving tools, is a very well-respected manufacturer that has been producing premium quality carv-ing tools since 1942. Pfeil utilizes a unique manufacturing process that begins with a special alloy chrome vanadium steel, made to Pfeil’s specifi cations, which combines out-standing elasticity with unsurpassed edge-holding properties. This steel is then forged in house to ensure consistent tool shaping and quality. The entire blade is then fi nely ground and polished inside and out. All Swiss Made blades are electronically hardened to Rc 58-60, sharpened and honed ready to use. The blades feature square tangs that prevent twisting in the handle, and full bolsters to distribute pressure to the handles. The easy-
to-grip octagonal ash handles provide extra control and feature an internal steel ferrule under the bolster to prevent the handle from splitting. All tools are quality inspected at every stage of the manufacturing process to ensure only the fi nest tools receive the Swiss Made trade mark.
With more than 300 sizes and styles there is a Swiss Made tool for virtually every carv-ing application. Thousands of carvers world wide, including the prestigious Brienz Carv-ing School, make Pfeil Swiss Made their tool of choice.
Andrew Bondidirector of product development, Woodcraft
Editor’s note: David Calvo responded that he stands by the statements he made in his origi-nal article.
High-end Machines Review RequestI have been shopping around for a cabinet saw and I can get reviews from different sources for Delta, Jet, Powermatic etc. However, I have a hard time finding reviews for the higher priced, higher quality saws.
I think it would be great if Popular Wood-working could do an article about or review working could do an article about or review workingseveral of these costlier saws and give the pros and cons of each. Not everyone can afford one of these machines, but I am sure that some of your readers can and would fi nd such an article very informative.
Richard KellyGallatin, Tennessee
I don’t know if we’ll be able to review all the expensive saws in the coming year, but we do have an article coming up that compares Euro-pean table saws with American table saws. It will be evaluating the features on European saws and try to assess their value. (We suspect that once accessories are added to an Ameri-can saw to make it equivalent to a European saw, the price difference will be much less.)
— Megan Fitzpatrick, managing editor
Pierce Oversimplifi es Shaker Cabinet May I make the following observations relat-ing to issue #155 regarding the Shaker cabinet? Firstly, the Shakers were not wood poor; they were very careful in the choice of stock and had access to old-growth timber. No compe-tent craftsman would of choice use rift-sawn
continued on page 16

LETTERS
continued from page 14continued from page 14
POPULAR WOODWORKING December 200616
stock for rails and stiles and then hope to cut excellent narrow mortises. Use quartersawn for the important areas.
Secondly, through mortises were often bored from either side, according to the writ-ings of Bro. Freegift Wells, and then pared to the required dimensions. This is common sense of course.
Finally, until recently it was affi rmed prac-tice to leave cleaning up until after assembly, sometimes removing quite a few shavings in order to achieve the required standard. That was how my cabinetmaker grandfather worked in retirement in the 1940s.
I make these points simply because the advice given in the article regarding purchase of timber and chopping of through mortises oversimplifi es the project and misleads. Home-center stock may be defect-free, but not likely to remain fl at for long.
As to the reason for wide face-frame rails and stiles, I believe this to be practical. Have you ever opened the door of a high cabinet to remove an item and ended up trying to catch half a dozen? PW
David HowdenCambridge, England
QUESTION? COMPLAINT?WRITE TO USPopular Woodworking welcomes comments Popular Woodworking welcomes comments Popular Woodworkingfrom readers about the magazine or wood-working in general, as well as questions on all areas of woodworking. We are more than happy to share our woodworking ex-perience with you by answering your ques-tions or adding some clarity to whatever aspect of the craft you are unsure about, and if you have a complaint, we want to address it whenever possible.
Though we receive a good deal of mail, we try to respond to all correspondence in a prompt manner. Published correspondence may be edited for length or style. All corre-spondence becomes the property of Popular Woodworking. Woodworking. WoodworkingSend your questions and comments via e-mail to [email protected], via fax to 513-891-7196, or by mail to: Letters
Popular Woodworking 4700 E. Galbraith Road Cincinnati, OH 45236
CIRCLE NO. 166 ON FREE INFORMATION CARD.

CASH AND PRIZES FOR YOUR TRICKS AND TIPS!Each issue we publish useful woodworking tips from our read-ers. Next issue’s winner receives a set of Veritas joinery planes from Lee Valley, valued at over $400. The set includes a medium shoulder plane, a router plane and a bullnose plane.
Runners-up each receive a check for $25 to $100. When submitting a trick (either by mail or e-mail) you must include your complete mailing address and a daytime phone number. If your trick is selected for publication, an editor will need to contact you. All entries become the property of Popular Woodworking. You can send your trick by e-mail to [email protected], or mail it to Tricks of the Trade, Popular Woodworking, 4700 Popular Woodworking, 4700 Popular WoodworkingE. Galbraith Road, Cincinnati, OH 45236.
21⁄2⁄2⁄ "
13⁄8⁄8⁄ "
3⁄16⁄16⁄ "
20º
Blade slotBlade slot
FoosballFoosball
Saw blade
1⁄16⁄16⁄ " Masonite
31⁄2⁄2⁄ "
31⁄2⁄2⁄ "
Slots are 21⁄2⁄2⁄ " deep
34mmFoosball
QUALITY WOODWORKING TOOLS • SUPPLIES • ADVICE™
For A Free Catalog Or To Find Your Local Woodcraft Store, Visit www.woodcraft.com Or Call 800-542-9115.
Dept: 06PW12PA
Professional Drawer SlidesWoodcraft features heavy duty, name brand drawer slides from ACCURIDE to BLUM in a variety of styles and finishes.
BRUSSO Solid Brass HingesPrecision box hinges feature rectangular knuckles which stop the lid in a vertical position so it won’t drop back. Hinge pins are precision ground tool steel, with pin boxes that are first drilled, then reamed, for smooth fit and operation.
Blum European HingesThe best just got better. Removable hinge technology combined with single screw plate and hinge adjustment make these the most advanced hinges on the market today. Now with the turn of a fixed screw you can move the Cam Action Hinge Plate up and down for precise door adjustment.
Table Alignment ClipsSecurely hold table top halves together while providing flush alignment of top leaves.
Align-N-LockThis new innovation in table top hardware provides two functions in one. It accurately aligns the two sections of table top and provides a secure locking mechanism.
From form to function or expressing your personal
style, explore a multitude of design options of knobs,
pulls and hinges for your next piece of furniture, and
complement your wood perfectly.
A Storage Rack for Modern Handsaws
POPULAR WOODWORKING December 200618
THE WINNER:My saw collection includes the same rip, crosscut and dovetail saws my dad had, as well as various pullsaws. Some of these saws have handles that would protrude too far from the wall with the type of saw rack my dad used.
After trying different types of racks, I arrived at this design, made from a section of 4 x 4 post. The slots intersect angled holes that contain textured foosballs, which lock the blade against the side of the slot. Inserting the saw from the bot-tom of the slot moves the foosball upwards, while gravity and friction hold the saw in place. To remove a saw, simply lift it up and out.
Cut a length of 4 x 4, spacing the saw slots 21⁄1 ⁄1 2⁄2⁄ " apart. Carry the layout lines across the top and face of the block, marking the 3⁄3⁄3 16⁄16⁄ " slots and the 13⁄3⁄3 8⁄8⁄ " holes so they intersect with the holes angled at about 20°. Cut the slots on the table saw and drill the holes using a drill press.
In each hole put a 34mm, textured foosball (available from foosballstore.com or 800-707-1901). Slot and attach a piece of Masonite on top to keep sawdust out of the holes. The completed rack can now be screwed to the wall.
Jeff IslerSouth Salem, New York
Super Glue TipsCyanoacrylate is handy stuff for instantly bonding surfaces together. Unfortunately, the nozzles on the little bottles clog up quickly. I have tried to unclog them using a pin, but usually managed to just tear up the tip in the process. You can clean a tip by soaking it in acetone, but that takes a little while, and I’m usually in a hurry. I discovered that the solu-tion is to stick with one type of bottle, and to save the nozzles when a bottle runs out or goes bad from age. I soak the spare nozzles long enough to remove the glue, then set them aside so I always have a supply of clean nozzles on hand when I need one.
Clark LangLos Angeles, California
TRICKS OF THE TRADECompiled by Paul Anthony
Illustrations by Matt Bantly
continued on page 20

POPULAR WOODWORKING December 200620
TRICKS OF THE TRADE
Router Bit Depth GaugeSetting the projection of a router bit using a ruler can be problematic, and not terrifi -cally accurate, especially if your eyes aren’t what they used to be. To solve the problem, I made this simple but very accurate router bit depth gauge from a scrap of wood and an inexpensive dial indicator ($15.50 from Lee Valley, 800-871-8158). It measures bit pro-jection in thousandths of an inch up to 7⁄7⁄7 8⁄8⁄ ", which is enough for most of my grooving and slotting tasks.
The dial indicator shaft fi ts snugly into a hole drilled in the top of the inverted U-shaped gauge block. A slot extending out from the hole is pinched together with a machine screw to lock the indicator in place. After unscrewing the stock tip, a small hardwood block is friction fi t onto the end of the plunge rod to serve as a plunger pad.
Glue and Putty PaletteWe’ve all grabbed a scrap of wood to tempo-rarily hold glue, putty and such, but drilling a large thumbhole through a piece of Masonite turns it into a tool that you might not want to throw away. Whether you’re working on a
ladder or mixing thick epoxy, the painter’s-palette style thumbhole guarantees a solid grip. To get several days’ use from one palette, coat the surface with polyurethane and wax. Most materials will pop off.
Joe WajszczukPlatteville, WisconsinPlatteville, Wisconsin
Smoother Scribe SawingI use a jigsaw a lot for on-site cabinet and trim installation. It’s really a great tool for cutting scribed face frames, mouldings and other trim when fi tting pieces against bowed walls and ceilings and other irregular surfaces. When cutting to scribe lines, I usually back-bevel the edge so the exposed surface of the trim easily meets the adjacent piece. My jigsaw base tilts to allow for this but, like many woodwork-ers, I prefer to simply teeter the saw on the edge being cut rather than readjust the tilt of the saw from left to right as circumstances demand. This also avoids the aggravation of having to accurately set the base back to 90° if the jigsaw’s detent is imprecise.
The problem with tilt-cutting is that the bases on many jigsaws often include recessed channels that serve to stiffen the metal and create egress for chips and sawdust. Unfor-tunately, a channel can cause a tilted base to hang up on an edge, especially when turning the saw. The fi x for this is easy. I simply use double-faced tape to attach an auxiliary base that I made from a scrap of plastic laminate. The auxiliary base can also serve to cover any fl ared opening in front of the blade, which can also cause the saw to hang up. It sure makes for smoother cutting.
Dave ShaffranSeattle, Washington
To use the gauge, fi rst zero it out with the plunge-rod block pressed against the router plunge-rod block pressed against the router base or router tabletop. Then center the block base or router tabletop. Then center the block over the bit, and raise the bit until the desired over the bit, and raise the bit until the desired projection is reached.
Rick WilsonRick WilsonHouston, TexasHouston, Texas
continued from page 18continued from page 18
Plunger pad 3⁄8⁄8⁄ " thick x 3⁄4⁄4⁄ " square
Gauge blockGauge block1" x 2" x 3"
NutNut
Machine screwMachine screw
Dial indicator
Band saw slot to center of block
13⁄8⁄8⁄ "
Router bit
1"
Drill thumb hole in Masonite board for a better grip
Coat the surface with polyurethane and wax
continued on page 22

Use shelf for accessories
Make box from 33⁄⁄4⁄4⁄ " plywood" plywood
Wire light and tool to switchtool to switch
Fluorescent Fluorescent “undercabinet” “undercabinet” fi xturefi xture
Buffer or Buffer or grindergrinder
Adhere sandpaper to kitchen knives
#180-grit back-to-back with #220-grit sandpaper makes for stiffer fold
18" DELUXE BANDSAWPOWER
INTRODUCING THE NEW LINE OF JET® BANDSAWS
POPULAR WOODWORKING December 200622
TRICKS OF THE TRADE
Sanding Small PartsA lot of my shop time is spent sawing small parts on the scrollsaw. I thought I’d pass along some tricks I’ve fi gured out for sanding little pieces and getting into tight areas. First of all, if you lack a bench vise as I do, try clamping or screwing a handscrew clamp to the benchtop to create a sort of mini-vise. For larger parts, you can cantilever one jaw off the edge of the bench, as shown, so the lower part of the workpiece can hang below, against the edge of the bench.
When using narrow folded strips of sand-paper to get into tight crevices, #220-grit paper proves to be a bit weak. I’ve found that gluing a sheet of #220-grit and a sheet of #180-grit back-to-back with spray adhesive before fold-ing makes for much stiffer strips. To sand larger edges, I use spray adhesive to glue sandpaper to ordinary kitchen knives, which are readily available at thrift stores if the wife objects to you raiding the kitchen fl atware drawer.
John HigginsSan Diego, California
Buffi ng Station in a BoxMy sharpening procedures involve a lot of buffi ng with compound. On one side of my buffer I’ve mounted a hard felt wheel, and on the other a paper wheel shaped to buff con-cave bevels. To prevent the buffi ng compound from fl ying all over the shop, I mounted my buffer in a simple plywood box that’s open at the front. (You could do the same with a bench grinder.)
I attached a small fl uorescent undercabinet fi xture (available at home supply stores) to the ceiling of the box, which makes it easy to see what I’m doing. The buffer and the light are both connected to a switch mounted on the box, so I can activate both at once when I’m ready to work. The top of the box serves as a platform to hold additional buffi ng wheels, honing compound, etc. while I work. Perhaps best of all, the box is portable. It clamps to my bench, but can easily be stowed away elsewhere when not in use. The setup works great and only took about an hour to build.
Tod HerrliMarion, Indiana
continued from page 20continued from page 20
continued on page 24

Metal duct
1⁄2⁄2⁄ " rare-earth " rare-earth magnets attached to attached to lower band saw lower band saw cover
Dust collection Dust collection tube
1-800-966-3458 • www.gorillaglue.com
TM
Bondshundreds ofmaterials includingwood, stone, metal,ceramic & more!Incredibly strong& 100% waterproof!
1-800-966-3458 • www.gorillatape.com
Extra Thick. Extra Stick.New Gorilla Tape sticks to things
ordinary tapes simply can’t.
TM
POPULAR WOODWORKING December 200624
TRICKS OF THE TRADE
CIRCLE NO. 123 ON FREE INFORMATION CARD.
Band Saw Dust CollectionBand saws are notorious for poor dust col-lection, particularly older models that don’t include any sort of dust port. I’ve found that placing a 4"-diameter dust-collection hose directly underneath the table does a pretty good job of collecting the majority of dust at its source. But how do I connect the port to the saw, you ask? Well, those magic li’l rare earth magnets come to the rescue once again. I just attach a length of metal duct to the end of my dust collection hose, and it clings to a row of 1⁄1⁄1 2⁄2⁄ "-diameter magnets stuck in a vertical row to the front edge of my lower band saw cover. In fact, the metal duct serves as a quick-connect fi tting to all of my machines because it allows me to simply slip it onto a 4"-diameter dust port without having to mess around with hose clamps or other unwieldy connections.
Paul AnthonyPW contributor
Screw Keeper CardI’ve found that there are good reasons to keep track of hardware attachment screws that I remove during repairs or refurbishing of antiques. Before the days of modern screw manufacturing, screw threads could vary quite a bit, so it’s important to return each antique screw back to its orig-inal hole. Otherwise, a mismatch between a screw’s threads and the thread channels in a dissimilar hole will chew away wood on the hole’s wall, compromising the screw’s grab.
Before I remove hinges or other hardware, I sketch a rough outline of the hardware on a piece of cardboard. With hinges, I note the top, bottom, and center hinge (if any). Then I poke the appropriate number of screw holes in each drawing using an awl. As I remove each screw from the antique, I immediately thread it into its place on the screw keeper card. That way, I know exactly which hole to return it to when reinstalling the hinge later.
A side note along these lines: It is often recommended that when installing a brass screw into a pilot hole for the fi rst time, it’s wise to fi rst insert and remove a steel screw
of the same size into the hole to precut the threads and reduce the chance of snapping off the head of the brass screw. That’s a good idea, but I recommend fi rst scrutinizing both screws carefully to ensure a good thread match. I’ve found that sometimes brass and steel screws of the same size and type have a different screw pitch or spacing. PW
Craig BentzleyChalfont, Pennsylvania
continued from page 22continued from page 22
Use awl to Use awl to punch holes punch holes in cardboardin cardboard
Thread screw into Thread screw into corresponding holecorresponding hole
Mark hinge locations on scrap piece of cardboard

About a decade ago, I made a drop-leaf table for a book of projects. When it
came time to mount the top, I just drilled pilot holes and drove cut nails through the top into the aprons. Are you horrifi ed? Actually, the approach worked great. In the years since I put it together, the top has remained sound and fi rmly affi xed to the aprons. And while I don’t hesitate to use this approach when the circumstances are right, such as on an infor-mal kitchen table, there are many better ways to mount a tabletop to its stand.
You could attach a tabletop to its stand with blocks glued securely to both the aprons and the tabletop. This doesn’t allow the table-top to expand and contract, of course, and the resulting stresses eventually will split or buckle the top.
And herein is the challenge: How to pre-vent wood’s ongoing expansion and contrac-tion from destroying the assembly or itself. The tabletop must be held tight to the leg assembly, but in such a way as to allow the top to expand and contract.
Most woodworkers know this, of course, and I think that’s why so many of them cringe at the thought of face-nailing a tabletop to its stand. Well OK – it may also be an affront to their aesthetic sensibilities.
To make it a bit easier, let’s assume here that the tabletop’s grain is square to a recti-linear leg-and-apron stand. That is, two of the aprons are parallel with the tabletop’s grain and two are perpendicular to it. The shape of the top – square, rectangular, round, oval, free-form – has no bearing on this. The grain direction, and thus the direction of expansion and contraction, is what’s important.
If you’re building a table with curved aprons, or no aprons at all, you’ll have to extrapolate from my examples to fit your specifi c design.
before you do, bore pilots for the screws – you want to use screws, not nails – to secure them to the tabletop.
At the center of the block that runs cross-grain is a “fi xed pilot,” a hole matched to the diameter of the screw. This screw anchors the tabletop to the leg assembly; all the movement occurs on either side of this point. Flanking the fi xed pilot should be pilot slots that paral-lel the block’s grain.
The blocks that run parallel to the tabletop grain should have only slotted pilot holes, and they must be oriented across the grain.
Making the fi xed pilot is, of course, simple. Drill a hole. But making the slots is more of a challenge. Typically, I use a 3⁄3⁄3 16⁄16⁄ " twist drill bit in the drill press. I position the block with a thin (low) fence clamped to the table.
Glue & Screw BlocksAn improved version of the glue-block method is to secure blocks or ledger strips to the aprons, then drive screws through them into the table-top. This is an excellent approach, so long as elongated pilot holes, properly oriented, are used to allow for seasonal expansion and contraction of the wood.
First of all, the grain of the blocks should parallel the apron’s grain. Wood movement doesn’t have an impact here, so you can glue, nail, or screw the blocks to the aprons. But
Attaching Solid Wood TabletopsMethods that allow wood to move with the seasons.
POPULAR WOODWORKING December 200626
by Bill Hylton
Bill is the author of several books about furniture construction and router operations.
When he isn’t writing about woodworking, he’s doing it in his home shop in Kempton, Pennsylvania.
Phot
os b
y the
aut
hor
Buttons are but one method for attaching tabletops. Here’s how they work: Slip the button’s tongue into its groove and screw it to the tabletop. Avoid jamming the button’s shoulder tight to the apron. A gap ensures the tabletop’s natural movement can be accommodated. Buttons are screwed to the tabletop, not the aprons. But each has a tongue that projects into a groove in the apron, pinching the apron tight to the tabletop.
POWER-TOOL JOINERY

Drill holes to delineate the ends of the slot, then nibble away the waste between them. A twist bit, of course, skitters off the wood into one or the other of the holes, but it doesn’t take long to form a trench. Lock the quill and slide the work back and forth along the fence to tidy the slot.
With the right sort of screw, one with a washer-like head, you can use 1⁄1⁄1 4⁄4⁄ "-wide slots, which you can produce easily with a Forstner bit. This is a little less trying than using a twist bit, because a Forstner doesn’t wander.Although I’m a dedicated router user, I don’t view this as a router job. The diameter and length of bit necessary – 3⁄3⁄3 16⁄16⁄ " to 1⁄1⁄1 4⁄4⁄ " – makes routing an iffy proposition, in my opinion. You also need two setups, one for the cross-grain slots, another for the long-grain ones.
Were I to tackle this as a router job, I’d rout the slots in a wide board, then rip the strips from it. Then I’d lay out the slots and use an edge guide to position the long-grain cuts and guide the router. Next, use a T-square to guide the cross-grain cuts. Just eyeball the beginning and end of each slot, and make each slot with a series of cuts, each plunged progressively deeper.
Screw Pockets It’s quite common these days to skip the blocks and just drill oversized pilot holes directly in the aprons. You can run long screws straight up through an apron’s edge and into the tabletop, or through angled pockets cut in an apron’s inside face. The latter approach works better for me, because it lets me use shorter screws.
Creating the pockets and pilots is easiest if you have a pocket jig and related accessories, but it’s not the only way.
With a drill press and Forstner bit, you can make very tidy, uniform pockets. Lay out the pocket locations on the apron. Chuck a Forstner bit in the drill press – I usually use a 1⁄1⁄1 2⁄2⁄ " size. Hold the apron at an angle and bore the pocket. The design of the bit enables it to slice cleanly into the wood to form a fl at-bottomed pocket.
The real trick here is setting and holding the apron at the right angle. You typically see the apron cradled in a nifty custom-made jig. Is such a jig worthwhile for the occasional proj-ect? I don’t think so. I use two fences: One is upright to lean the apron against, the second is a fl at trap fence set against the apron’s bottom
popularwoodworking.com 27
How do I make those narrow slots, you ask? I bore a hole at each end of the layout, then nibble away the waste between them with the same drill bit. It’s not particularly elegant, but it works.
The key to drilling pockets is attitude – that is, the angle of the apron in relation to the bit. Lean the apron against an upright fence, align the pilot layout on the end with a bit in the drill chuck, and trap it at the right angle with a fl at fence.
The completed pocket is fl at-bottomed and large enough for a screw with an integral washer.
edge to hold at it the correct angle.I establish the angle by laying it out on the
end of a scrap of the apron stock. I’ll usually put a small rule on the scrap’s end and draw an eyeballed angle from the center of the edge to a spot 11⁄1⁄1 2⁄2⁄ " to 2" up the inside face. If you prefer to use a sliding bevel, set it to about 15°.
Chuck a twist bit in the drill press, lower the bit almost to the table, and lock the quill. Line up the layout line with the bit, setting the upright fence so the apron is tilted just right. Then slide the trap fence against the apron to keep the bottom edge from skidding forward and changing the angle. Change to the Forstner bit, set an apron in place, then bore the pockets.
After boring all the pockets, switch back to a twist bit and bore the pilots. Most of these pilots must be elongated, of course, but with pockets, this is usually accomplished by rock-ing the drill to expand the exit hole. You can’t do this on the drill press so switch to a hand drill. Rock the drill parallel to the aprons that will be across the tabletop’s grain, and across the aprons that will parallel the grain.
Buttons are BetterAnd there’s yet another solution, and it’s one I often use when constructing a table. It uses “buttons” spaced around the tabletop inside the aprons. A button, often called a cabinet-maker’s button, is a small block, roughly 11⁄1⁄1 4⁄4⁄ " square and 3⁄3⁄3 4⁄4⁄ " or less thick. It has a tongue, which you stick into a groove cut in the apron. You then drive a screw through the button body into the tabletop. Over time, as the table-top expands and contracts, the button moves with it. As it does, the tongue moves along, or in and out of, its groove in the apron.
The apron grooves can be through or stopped. Some use through grooves in the aprons that cross the tabletop grain, because the button’s tongue will move along the groove. But they use stopped grooves in the long-grain aprons, figuring that here the tongue is moving in and out. I tend to use stopped grooves all around. I’ll divvy up a long apron’s length for three or four buttons, but use only a single one in the center of a short apron.
Through grooves can be cut on the table saw or routed with a straight bit or slot cutter. Stopped grooves are a router proposition, or you could use a biscuit joiner.
Trap fence
Upright fence

TWO CHERRIESQuality German Carving Tools Since 1858
Two Cherries woodcarving tools are produced using the highest quality materials. Each tool is hand forged, heat treated to 61 Rockwell,and finely polished. Over 1000 carving tools in the line, with 600stocked for immediate delivery in the United States.
For a brochure or information on becoming a Two Cherries dealer, please contact:Robert Larson Company
800-356-2195 · WWW.RLARSON.COM · [email protected]
To ensure the tabletop is held tightly to the stand, design the button so its shoulder is slightly shorter than the space between the apron’s top edge and the groove. When screwed to the tabletop, the button should be slightly pitched. The tongue should be slightly thinner than the width of the groove. To accommodate the pitch, you may need to
Cut a rabbet across the end of a wide board, then cut off a strip as long as you want the buttons to be. Clip the strip into uniformly sized buttons.
A through groove is less venturesome to rout than the stopped groove, and requires no layout. A button works in either.
chamfer the tip of the tongue.First, fi gure out the thickness of button
needed, mill a scrap board, and cut a rab-bet across each end. Crosscut a strip about 11⁄1 ⁄1 4⁄4⁄ " long from each end, then rip the strips into buttons about 1" wide. Drill a pilot hole through the body of each button.
With any of the attachment methods I’ve
described – glue-and-screw blocks, screws in pockets, buttons – fi nal assembly involves setting the tabletop, show face down, on the bench. You upend the leg-and-apron assembly and align it on the top. Then you drive the mounting screws. PW
Coming next issue, Bill Hylton investigates beaded frames.
CIRCLE NO. 157 ON FREE INFORMATION CARD.
CIRCLE NO. 152 ON FREE INFORMATION CARD.
POWER-TOOL JOINERY

When routers with a single motor that fi t into either a plunge or fi xed base fi rst
hit the tool market, they made significant waves. Suddenly, it was possible to have the benefi ts of both a plunge-base and a fi xed-base router at an affordable price. Of course there are some compromises in performance and features, but it was and still is a good deal.
DeWalt introduced its two-base kit after many of its competitors had already entered the fray, so DeWalt had the advantage of knowing what they had to compete against. The DW618PK had more features than any of the other kits and we were duly impressed. In fact the tool’s designers even added a third D-handle base to the mix as an option that many woodworkers prefer.
Among the quality features that we iden-tifi ed initially (and that we still appreciate) are the tool’s quick-release motor latches that make it very simple to switch between bases with a minimum of fuss. No thumbscrews or (even worse) a latch that requires a screwdriver to release the motor!
For those of us who seem to have trouble keeping the cord out of the way of the spin-ning bits, DeWalt made the clever choice of
adding a detachable cord. This is nice for more than just safety. When you’re changing bases or setting up the router, the cord can often be a nuisance. This is a nice feature (and less expensive when you replace the cord).
The DW618 kit also gives you the option of using a spindle lock or two wrenches to tighten or remove bits. Some woodworkers think a spindle lock puts unnecessary stress on the motor armature, so for those of that opinion, the option is nice. I think the spindle lock is the more user-friendly choice.
The router performed well in our tests and continues to provide good power for edge and joinery work. About the only thing we’d hesi-tate to ask the router to do is run raised-panel bits all day long.
The DW618 generally has good ergonom-ics, with the tool’s switches and handles well located for convenient use. One of the more important (but often overlooked) features on a router is the ability to see where the bit meets the wood. The visibility on the DW618 is very good with clear base plates that don’t obscure the cut area.
One of our favorite features (transplanted from the DW621 plunge router) is the tool’s through-the-column dust collection that reduces the need for hoses and accessories that always seem to be in the way. You still need a hose, but it’s mounted above the router body and away from the work.
We did have a couple of things that we took issue with. When the motor is in the plunge base, the variable-speed control knob is posi-tioned too close to the dust-collection column to get your fi ngers in there easily. While most woodworkers don’t change the speed of the bit constantly, it is annoying.
There have been some reported incidences of a motor magnet breaking apart in the motor housing and causing damage to the motor, which happened to us. But DeWalt reports that these have been isolated incidents.
Lastly (and a little picky), the noise and vibration in the DW618 are acceptable, but they’re not the best in the category.
As we’ve continued to use the DeWalt kit we’re still very pleased with the ease of use and the performance of the router. PW
— David Thiel
DeWalt Two-base Router KitAfter a couple years in the shop, it’s still the router we’d choose.
Phot
o by
Al P
arris
h
ENDURANCE TEST
POPULAR WOODWORKING December 200630
ABOUT OUR ENDURANCE TESTS Every tool featured in our Endurance Test column has survived at least two years of heavy use in our shop here at Popular Woodworking. Popular Woodworking. Popular Woodworking
SPECIFICATIONSDeWalt DW618PK Router SystemStreet price: $230 or lessMotor: 12 amp, 8K to 24K rpmThings we like:
• Good ergonomics• Through-the-column dust collection• Good bit visibility• Plenty of power• Easy base change
Things we’d change: • Easier access to speed control• Dampen noise and vibration
For more information: Contact DeWalt at800-433-9258 or dewalt.com

����������
�����������������
�����
���������
�����
�����
�����
�����
�����
POPULAR WOODWORKING December 200632
Traditionally, a shop-made featherboard is used to hold a small or narrow workpiece
fi rmly against a fence or machine table. The common form has been around since the inception of the table saw, and when I fi rst saw the FeatherBow, I thought, “Why would I spend $30 for something I could make in fi ve minutes?” But after testing these featherboards on our table saw and router table, I believe it’s $30 well spent.
In addition to the traditional form of featherboard on one end, the other end is bow shaped and can also be used for control-ling stock. The bow-shaped end has a plastic piece on the inside of the bow that is used to gauge the amount of pressure the bow exerts on the work. While the bow shape effectively holds the work down to the table fi rmly, it won’t prevent stock from moving backward as the traditional shape will.
The company also makes a FeatherBow Junior, which has the bow shape on one end and a single feather on the other. It’s intended
to be used as an addition to the larger version, providing downward pressure from the fence, while the large hold-in, mounted in the miter-gauge slot, applies lateral pressure. The large size has an expanding bolt that locks the device in the miter-gauge slot, and the small one is designed to attach to a T-track or to a piece of wood attached to the table saw fence.
The big advantage to these is the ease and adjustability of mounting. This is the major drawback to shop-made featherboards; you need to use two clamps on each one, and it can be diffi cult to locate them where you want them, and to fi nd a suitable place to clamp to.
While the product is nicely made and func-tions as it should, the printed instructions leave a lot to be desired. The company is in the process of updating its written manual.
— Robert LangFor more information, circle # 115 on Free Information Card.
Better Featherboards for Many Tools
Gramercy Tools Bowsaw Gets All the Details RightAs a devoted band saw user, I’ve always resisted the bowsaw, which was used by early Ameri-can and English woodworkers to cut curves. My problem with the modern manufactured bowsaws was that they were diffi cult to steer, they cut slowly and were unbalanced.
The new 12" bowsaw from Gramercy Tools, however, is another animal entirely. The fi rst time I used it was like the fi rst time I used a premium handplane – it was an almost reli-gious experience. Thanks to the saw’s sharp and narrow blade, its featherweight frame and its remarkable balance, the saw absolutely fl ies through your work, tracks a line and is so bal-anced that you use it one-handed.
Like all my favorite tools, this bowsaw seems almost psychic and anticipates where I want to go and what I want to do.
So what’s the secret? It’s the details. Unlike other manufactured bowsaws, this one is light-weight at only 12.4 ounces (other saws that I’ve weighed tip the scales at 22.2 ounces). With this type of saw, every ounce counts.
The hickory frame is nicely sculpted in all the right places and even has a recess up by the handle for your index fi nger, which
is one of the reasons the saw is easy to steer with just one hand. The toggle that tightens the fi shing line at top is easy to tension and release.
T he blade s t hem-selves are also special. While some bowsaws use scrap band saw blades, the Gramercy uses thin blades (1⁄1 ⁄1 8⁄8⁄ " wide at most) that are made like a cop-ing saw blade with integral pins. Other bowsaws have separate pins that get lost or are tricky to remove. The Gramercy bowsaw comes with three blades: 24, 18 and 10 tpi.
The saw is worth every bit of its $140 price tag, but you can cut that price by purchasing a kit that includes the blades and brass fittings for $26 and then download the free plans for the saw from the company’s web site (it’s an easy one-day project to build).
— Christopher SchwarzFor more information, circle # 176 on Free Information Card.
SPECIFICATIONSFeatherBowStreet price: $7.45 to $29.95Construction: Molded Celcon plasticHold-down pressure: 10 to 35 poundsGuarantee: LifetimePerformance:●●●●❍
Price range: $$$Company: 860-896-0683
featherbow.com
SPECIFICATIONSGramercy Tools BowsawStreet price: $140 (saw kit, $26)Frame material: HickoryWeight: 12.4 ouncesHandle length: 4"Performance:●●●●●
Price range: $$$$$Tools for Working Wood: 800-426-4613 or toolsforworkingwood.com
TOOL TEST
continued on page 34

GRAMERCY TOOLS FINISHING BRUSHESFirst of all, these are very good brushes. I used the 2" version ($34.95) to apply three coats of shellac to the Whale Tail Shelves in this issue (page 40). The brush held an ample load of shellac which meant I didn’t waste time with constant dipping (important when working with fast-dry-ing fi nishes), shedding was minimal and brush marks were non-existent.
But what’s really great about these brushes is the story behind them. Joel Moskowitz and his team at Tools for Work-ing Wood simply couldn’t fi nd a fi nish-ing brush they liked, so they decided to make one. First, the team delved into all extant texts on traditional brushes and brushmaking techniques … that took about fi ve minutes. So, they bought and used all the brushes on the market to see what worked, what didn’t, and how they could improve on what’s available.
What they developed are 100-percent European Ox Hair brushes, which are handmade in New York by one of the few remaining brushmakers in the country. And they’ve captured the arcane craft on video; download it and fi nd out more about the process at toolsforworkingwood.com.
— Megan Fitzpatrick
Making dados for casework starts with the choice of using the table saw or the router. If you prefer the router, you’ve probably cobbled together a lot of jigs to keep the router square and put the dado in the right spot.
The Router-Ease Guide aims to replace those jigs with one multipurpose guide system. It consists of several aluminum extrusions and molded plastic connectors. The connectors allow you to adjust the aluminum guides to make through and stopped dados, or square cutouts. Because of the height of the extru-sions, you need to replace the baseplate of your router with the thicker version that comes with the guide.
We tested the 36" model and found it square and accurate. The kit includes a siz-ing block that makes it simple to set the jig for dados that fi t undersized plywood. While setting the width is easy, locating it on the work and clamping the work to the jig is awkward.
Router-Ease Guide
Lie-Nielsen FloatsPlanemakers have long used fl oats to shape and true the critical sur-faces of wooden handplanes. But cabinetmakers also used fl oats, and after several months of using fl oats made by Lie-Nielsen Toolworks, I understand why.
These tools are a cross between a rasp, a saw and a scraper. The teeth shape curved and fl at surfaces quickly, but the tools leave a polished surface behind. And the stiff steel bodies and wide cutting area of the tools allow you to accurately trim mor-tises and tenons. The tools make beautiful chamfers, as well.
I tried a set of fl oats made for planemak-ers (these tools were developed with Clark & Williams planemakers) and was impressed by the long, rectangular bed fl oat, which can smooth a cabriole leg and true a through-mortise. One of the small cheek fl oats works on the pull stroke and cleans up blind mortises with ease. And the edge fl oats worked well
for squaring up routed corners of through-mortises. These are excellent, well-made tools and highly recommended. — CSFor more information, circle # 177 on Free Information Card.
You also need to keep the same edge of the base against the fence for consistent results. PW
— RLFor more information, circle # 175 on Free Information Card.
POPULAR WOODWORKING December 200634
SPECIFICATIONSRouter-Ease GuideStreet price: $175-$215Router guide: Adjustable extrusionsSet-up blocks: Reference to set cutsX and Y adjustablity: Allows four-sided cutsPerformance:●●●❍❍
Price range: $$$$$Company: 508-763-4136 or
RouterEaseGuide.com
TOOL RATINGSPerformance is rated on a one-to-fi ve scale. You won’t see a low rating (“one or two”) because we don’t publicize inferior tools. “Five” indicates the leader in the category. Five dollar signs indicates highest price in the category. Three indicates an average price. If you have tool questions, call me at 513-531-2690 ext. 1407, or e-mail me at [email protected]. Or visit our web site at popularwoodworking.com to sign up for our free e-mail newsletter.
— Christopher Schwarz, editor
SPECIFICATIONSLie-Nielsen Planemaker’s FloatsStreet price: $40 to $50 eachSteel: S-7 tool steel, Rc 51-52Handles: MaplePerformance:●●●●●
Price range: $$Lie-Nielsen Toolworks: 800-327-2520 or
lie-nielsen.com
TOOL TEST

Mystery of the Marking Gauge
POPULAR WOODWORKING December 200636
The simple marking gauge, often over-looked, even taken for granted, is criti-
cal in the hand-tool shop. It allows you to create uniform surfaces quickly with planes, to accurately transfer measurements from one board to another and to help duplicate measurements across similar parts.
Inventories of 18th-century toolmakers show that they made gauges for sale, but the inventories also show quantities of marking-gauge pins that woodworkers would use to build their own gauges. Despite the fact that these pins are no longer commonly found for sale, you can build a gauge – a gauge superior to mass-produced gauges – with common shop sundries and wood from your offcut pile.
Building a GaugeI chose to copy a marking gauge found in the tool chest of Benjamin Seaton, an 18th-century English chest that has survived with most of the original tools intact. This simple gauge, sometimes referred to as a “French gauge,” offers features often absent on mod-ern gauges: You can adjust and lock the gauge with one hand thanks to a captive wedge, and the head has a comfortable shape, which helps you direct pressure and control the depth of cut.
The basic dimensions of the gauge as shown are not set in stone. Feel free to modify the dimensions to fi t your needs. For example, I made my gauge arms a bit shorter than the original Seaton gauges so they would fi t in my tool chest’s trays. I recommend you make the arm’s width and thickness match a chisel width available in your kit. The head of the gauge can be scaled to fi t your hand.
by Dean Jansa
Dean is a guest columnist interested in 18th-century woodworking. He strives to understand and preserve
the techniques of those who preceded us. You can contact him at [email protected].
my hand over the top of the head. My free fi ngers fall naturally around the arm. Holding the gauge like this allows me to lock, unlock and adjust the gauge with one hand. The rea-son for the bevel on the bottom of the head – indeed, the reason for the overall shape of the gauge – became clear to me the moment I held a completed gauge. It was an “a-ha” moment in my shop.
With your hand in this position you can scoot the head forward or backward with your thumb. If the head slides too freely on the arm, lightly engage the wedge to create friction. Once the desired setting is achieved, press the wedge with your thumb. A fi nal light tap on your workbench fi rmly locks the gauge. A quick tap on the opposite side of the wedge unlocks the gauge.
In use, the gauge’s pin is rarely perfectly perpendicular to the work, rather it trails behind the arm. The closer to vertical the pin, the deeper the gauge cuts. You control this angle by rolling your wrist about the gauge arm.
Gauges made of beech and birch were com-mon, however hard and soft maple, cherry and mahogany work as well. Use 6/4 stock for the head of the gauge and straight-grained 4/4 stock for the arm. Pins made from 4d fi nishing d fi nishing dnails or cut brads are soft and easy to shape; however, they do not hold an edge as long as a harder material. Twist drill bits (I use 5⁄5⁄5 64⁄64⁄ ") are easy to shape on a grinder and take and hold an edge well.
Use the photos and illustrations on pages 38-39 to build the gauge.
Using the GaugeThe head shape and captive wedge of the Seaton gauge offer benefits compared to a modern mass-produced gauge. I hold the gauge with my thumb and index fi nger, wrapping
Phot
os b
y the
aut
hor
This early style marking gauge has important features that are absent from modern commercial mark-ing gauges. You can easily make your own gauge in an afternoon in the shop.
ARTS & MYSTERIES
Many commercial gauges are missing excellent features found on traditional versions.

popularwoodworking.com 37
When making long-grain marks I make my fi rst pass with the pin barely engaged with the wood. If a deeper mark is required – in coarse-grained wood for example – I make a second pass with a more aggressive angle of attack. Cross-grain marking requires a lighter touch to avoid tear-out. Despite shaping my pins like small knives, I still use a very low angle of attack for cross-grain marking.
You can use this wrist-rolling technique to speed up marking mortises. Mark the start and end points of the mortise with a marking knife. Next set the gauge to the appropriate offset from the face. With the gauge’s pin very lightly touching the wood, drag the gauge until you feel the pin drop into the mortise
start point. Roll your wrist to deepen the cut and mark until you feel the pin intersect with the mortise endpoint.
Gauging, Not MeasuringGauging is the use of a tool to transfer a mea-surement from one board or surface to another. For example, in casework you set a marking gauge with the mating board when marking dovetail baselines. Using a gauge to lay out dovetail baselines eliminates errors by avoid-ing transferring measurements from a ruler.
Creating Uniform SurfacesUniformly thick boards can be quickly made by hand using this gauge as a guide. Begin by
TYPES OF GAUGESThere are dozens of types of gauges, though only a few are still made today. Here are some of the more useful ones you might encounter at fl ea markets or in tool catalogs.
‘Tenon’ GaugesIn handwork the width of a mortise is defi ned by the chisel used to cut it.
For layout you need to mark only one side of the mortise and to delimit the starting and ending points of the opening. Here a single-pin gauge suffi ces. What is needed is a method to lay out the corresponding tenon to fi t this mortise. I often wonder why we don’t call this type of gauge a tenon gauge. Seaton’s mortise gauge had an arm with four sets of fi xed pins, each spaced to match a mortise chisel in his kit. Modern mortise gauges have an adjustable pair of pins. An alternative approach to a multi-pin mortise gauge was offered by Charles Holtzapffel in “Turning and Mechanical Manipulation” (1846): “The appropriate chisel having been
selected, the gage-lines corresponding with its width are gaged on each side of the styles and rails. Frequently the mortise chisel is slightly stuck into the work to imprint its own width, by which to adjust the gages; and every piece is gaged from the face side, so that when the whole are put together they may be fl ush with one another.”
Panel GaugesA panel gauge looks like a marking gauge on steroids. The head is wider to provide a solid bearing surface and the arms are 24" or longer. Panel gauges are used to mark larger panels; marking gauges with their short arms and small heads are not able to span these larger distances. In the modern power-tool shop the table saw fence serves the function of a panel gauge.
Cutting GaugesReplacing the marking gauge pin with a lancet-shaped blade creates a cutting gauge.
fl attening one face of the board. Then use the gauge much like a dial caliper and fi nd the thinnest spot in the board. Set your gauge at that point, mark the thickness around the board’s four edges, and plane down to the mark. Working this way saves any extra effort needed to create a uniform board. You are removing only the minimum amount of material necessary for uniformity. Not all 4/4 lumber need be 3⁄3⁄3 4⁄4⁄ " thick.
Repeatable MeasurementsCreating a number of boards of the same thick-ness or width follows a similar set of steps. Set the gauge to a board of the desired thickness or width and mark each remaining board with
A traditional English gauge with two pins. Is it a mortise gauge or tenon gauge?
This antique panel gauge is still useful for mark-ing out long rip cuts.
The contemporary Tite-Mark is technically a cutting gauge. Some cutting gauges have an even larger circular blade.
The cutting gauge cleanly cuts both cross-grain and long-grain. This function allows you to quickly delimit shoulders for raised panels. Small rabbets can be cut entirely with a cutting gauge.
The cutting gauge is also useful in veneer work. I use a cutting gauge to create a crisp and even shoulder for cross-banding veneer. After laying the fi eld veneer, set the gauge for the desired cross-banding width.
Cut the fi eld veneer with this gauge set-ting, creating a clean shoulder. Reheat the hide glue, remove the excess fi eld veneer, and lay in the cross-banding.
Other GaugesThere are many more gauges to be found in old texts, each specialized for a specifi c task. Holtzapffel mentions router gauges for inlay work, the cooper’s croze, as well as an interesting bisecting gauge used to mark the centerline of workpieces.
The humble gauge comes in many shapes and serves many purposes. — DJ

ARTS & MYSTERIES
POPULAR WOODWORKING December 200638
Begin by working on the gauge’s head. Mark the mortise for the arm’s vertical sides. Press the chisel you will use to chop the arm mortise into the center of the stock. Set a gauge to each side of the chisel impression and mark both ver-tical sides of the mortise. Mark the entire length of the stock on both the face and opposite side.
Mark the sloped and straight lines of the mor-tise for the wedge. Transfer those lines to the non-face side and both edges. Those guide lines assist you while chopping the wedge mortise. Continue the wedge mortise layout on the two edges of the head. The top and the bottom of the mortise are defi ned by the layout lines you just made. The width is defi ned by the chisel you will use to chop the mortise. Eyeball the center of the stock and press the chisel into the head on one of the existing layout lines. Set a gauge to each side of the chisel mark and mark both vertical sides of the mortise on both edges of the head stock.
Lay out the size of the gauge’s arm by using a marking gauge that is set to the width of the chisel you used to chop the arm mortise. Mark the width and the thickness of the arm with that gauge setting and work the arm to those lines.
BUILDING A MARKING GAUGE
Pin shapes fall into two profi les: conical and knife-like. Conical-shaped pins are simple to make; however, they tend to follow grain and cause fuzzy torn lines while marking cross-grain. Also, you must be consistent as to exactly where on the conical pin you reference while setting the gauge. Should you set the gauge referring to the very top, or very base of the pin? While easy to make, this shape of pin leaves room for improve-ment in use.
A knife-like pin is shaped in half-football cross section, with the fl at side facing the head of the gauge. This pin shape provides two fl at references to set your gauge. These fl at references allow you to quickly and accurately set your gauge from a board or a fi xed reference such as a chisel. With the leading and trailing edges sharpened like a knife, tear-out on cross-grain marking is minimized. There is no need to shape a pin with this profi le to a point as the pin cuts along its length, not on the very bottom, as it is dragged behind the arm. — DJ
Chisel mark
the gauge. The gauge will be correct. Each mark will be exactly the same as the last. Your results are repeatable.
Combining gauging, uniformity and repeatability speeds your work. If you need a number of uniformly thick boards, begin by fl attening one face of each board. Then find the thinnest spot on the entire group of boards.
Mark the remaining boards with this set-ting and plane each board to the mark.
Large panel glue-ups can also use this tech-nique. Face joint the individual boards. Match plane the edge joints and glue up the panel.
After glue-up, make any necessary adjust-ments to the face side of the panel. Again, fi nd the thinnest spot remaining in the panel with your gauge, mark the panel thickness, and plane to the mark. This eliminates planing the non-face side of the boards twice.
ConclusionThe simple marking gauge is a critical tool in the hand-tool shop. From stock preparation to cutting dovetails, the gauge plays its role. It improves your speed and minimizes your effort with planes. It offers lessons about build-ing accurately by defi ning what you need to produce accuracy: parts that fi t other parts (gauging), parts that are all the same (repeat-ability), or parts that have uniform surfaces (uniformity).
Despite its many tasks, the marking gauge is simple to build, yet has features that should not be overlooked: Pin shape, head shape and single-handed use.
With these features in mind, building your own gauge is easy. I’ll bet you can’t stop with just one. Make some out of your favorite exotic wood to avoid losing them in the pile of shav-ings you’re sure to make. PW
MARKING GAUGE PINS – WHERE’S THE FLAT?
A knife-like pin slices the wood and is easier to set accurately.
A cone-shaped pin tends to follow the grain of the wood.
1
3
5

�����
����
����
���������
�����
����
�����
�����
�����
����
�����
����
�����
����
���� ����
����
����������
popularwoodworking.com 39
From a squared end of the head stock, mark out the horizontal sides of the arm mortise. The bot-tom of the mortise is about 3⁄4⁄4⁄ " from the squared end of the stock. Mark and transfer this line around the stock to the rear using a try square and marking knife. Determine the mortise’s height with the chisel you will use to chop the arm mortise. Mark this line and transfer to the rear.
Chop the wedge’s mortise fi rst, using the lines to help guide your chisel’s angle. Work this sloped mortise from both sides of the head. If the slope you end up with is not perfect you can adjust the wedge to match. Next, cut the mortise for the arm. Again, work from both sides.
Lay out the curved top and bottom bevel on the gauge head. Remove the bulk of the waste with a backsaw; clean up with rasps and fi les.
If necessary, fi ne-tune the arm fi t with a scraper for a snug, but not tight, fi t. The wedge will accommodate slight errors in arm thickness; however, the arm width should be as precise as possible.
Lay out the wedge as shown in the plan. Cut the wedge to shape, and shape the ends with rasps and fi les. Adjust the fi t by taking fi ne shavings from the bottom and sides of the wedge. Fit the width fi rst, then adjust the height to allow the arm to slide snugly in its arm mortise with the wedge in the unlocked position. Shape and hone the pin material to the chosen profi le. Drill a pilot hole centered about 3⁄8⁄8⁄ " from the end of the arm end and insert the pin. — DJ
Front view
Wedge Pin(not to scale)
Gauge arm
Side view
Illus
trat
ion
by M
att B
antly
2
4
6 7
8

Whale Tail ShelvesPocket holes make a seemingly complicated project simple.
POPULAR WOODWORKING December 200640
These classic shelves are easy to build thanks to the pocket-hole joints that
attach the shelves to the sides. While pocket holes aren’t a traditional joint, they allow you to build pieces that might otherwise be too complex. (If so inclined you could even build a kitchen using pocket-hole joinery, but the screws would add up in cost).
To build these shelves, based on a design from Contributing Editor Troy Sexton, buy two 8'-long 1 x 6s (which actually measure approximately 3⁄3⁄3 4⁄4⁄ " x 51⁄1 ⁄1 2⁄2⁄ "). Sight down the boards to check for cupping or twisting. And while you’re at the home center, pick up a cou-ple hangers so you don’t have to make a second trip (at least it got me out of the offi ce).
Before you start cutting, make a pattern for the sides. Cut a piece of cardboard to 5" x 26" (just a wee bit bigger than the shelf side) and draw a 1" grid on it. Using the grid as your guide, copy the curve from the pattern on the next page onto your full-size grid. Use a utility knife to cut out the pattern, employing a fl uid hand motion. It’s best to make a few light cuts than to try to cut through the several paper layers in the cardboard all at once.
Now use your miter saw to gang crosscut three 27" pieces of wood for the shelf sides (it’s always good to have a spare), clamp them together and trim the ends fl ush. Be careful not to take off too much, as 27" gives you a
by Megan Fitzpatrick
Questions or comments? Contact Megan at (513) 531-2690 x1348 or e-mail megan.fi [email protected].
in relation to the curve of the sides, as shown above right.
Set your jigsaw’s blade to the angle that matches the line, and rip each shelf to width. Clean up each cut as necessary with a block plane or a rasp and sandpaper.
Next, mark the placement of the pocket holes on the bottom of each shelf, 3⁄3⁄3 4⁄4⁄ " in from each long edge. Set the jig for 3⁄3⁄3 4⁄4⁄ "-thick mate-rial, and make a few practice holes in scrap material. When you feel confi dent, line up the mark on the shelf with the mark on the jig as shown at right, secure the shelf in the jig, and
small margin for error, and you’ll want a bit of that remaining for the next step.
Put double-sided tape on two of the boards (this will help keep them from slipping) then clamp them together and trace the pattern on top. Use your jigsaw to make a few relief cuts at the top and bottom of the curves, as shown below right, then cut along the edge of the pattern. When fi nished, clean up the edges with your rasp, fi le and sandpaper.
Next, gang cut the four shelves to final length on the miter saw. Test-fi t the shelves between the two sides, and mark the width
Phot
o by
Al P
arris
h
Use double-sided tape and clamps to keep your side pieces fi rmly together as you make your relief cuts and curve cuts.
Clamp up your three side pieces (one is an extra) being sure to align the long edges as much as possible. Then, trim the ends fl ush.
I CAN DO THAT

�������� �
������ ���� �
������ ���� �
������ ���� �
����� ���� �
����� ���� �
����� ���� �
����� ���� �
�������� �
������� ����
������������������
ABOUT THIS COLUMNOur “I Can Do That” column features proj-ects that can be completed by any wood-worker with a modest (but decent) kit of tools in less than two days of shop time, and using raw materials that are available at any home center. We offer a free online manual in PDF format that explains all the tools and shows you how to perform the basic operations in a step-by-step format. You’ll learn to rip with a jigsaw, crosscut with a miter saw and drill straight with the help of our manual.
To download the free manual, visit ICanDoThatExtras.com.
popularwoodworking.com 41
WHALE TAIL SHELF NO. ITEM DIMENSIONS (INCHES) MATERIAL COMMENTS
T W L
❏ 2 Sides 3⁄4⁄4⁄ 47⁄7⁄7 8⁄8⁄ 251⁄4⁄4⁄ Pine ❏ 4 Shelves 3⁄4⁄4⁄ 51⁄4⁄4⁄ 23 Pine Trim to fi t
drill your pocket holes using the bit provided in the kit. For the best result, keep the angle of your drill in line with the angle of the hole, and squeeze the trigger while the bit is at the top of the hole to allow it to get up to speed before making contact with the wood. Now drill the remaining 15 pocket holes.
Before assembly, sand all the parts to #180 grit (stop at #120 if you plan to paint it).
Using a scrap piece of material as a clamp-ing block to help secure the shelf to the side as shown at far right, clamp the top shelf to the top of one side and drive pocket screws through the two pocket holes and into the side, using the driver provided in the kit. For the best result, set your drill on a low speed and clutch setting, to avoid stripping the screws.
Now, attach the three remaining shelves to that side. Then attach the other side to the unit.
As shown, the whale tail shelf has three coats of brushed-on amber shellac. Sand between your coats with #320-grit stearated paper. Wipe off the dust with a tack cloth, and add a couple coats of aerosol lacquer before attaching hangers to the back. PW
Fit the shelves against the
two side pieces, and
carefully mark the width in
relation to the curve of the side. Then,
cut with your jigsaw.
After securing the board fi rmly in the jig, squeeze your drill’s trigger and allow it to get up to speed before drilling into the wood.
An offcut makes a handy clamping block to help you keep the shelves in place as you drive the pocket screws.
Section
Elevation
Offcut
Illus
trat
ion
by Jo
hn H
utch
inso
n &
Mar
y Jan
e Fa
vorit
e

Lingerie Chest
by Glen D. Huey
Glen builds custom furniture, is a contributing editor to Popular Woodworking,
the author of several books on period furniture and the host of three DVDs.
For more information on his work, visit woodworkersedge.com.
POPULAR WOODWORKING December 200642
If you have woodworking tools and a talent to build, there is a certain time each year that you are called
upon to use both. Suddenly, Aunt Susan needs a cookbook holder or Grandma needs new picture frames as the holidays come into sight on the calendar. As a result, the plans you made to build your signifi cant other that special gift get put on hold.
So this year I decided to get an early start and build this traditional-style dresser for my wife.
Joinery in the SidesThe case begins with the dovetails that connect the sides to the bot-tom. These dovetails will be hid-den by moulding when the project is complete, so have some fun here. You could cut these joints by hand.
Lay out the pins in the sides and the matching tails in the bottom. This arrangement will prevent the case from ever loosening up across
Showcase your skills with this traditionally styled tall dresser.
Phot
o by
Al P
arris
h

Lingerie Chest
popularwoodworking.com 43
its width. After the pins are cut, transfer the layout to the bottom piece to create the tails.
Now lay out the location of the drawer dividers on the case sides. Begin from the bottom of the case. The joinery between the drawer dividers and the sides is a sliding dovetail (except with the bottom divider, which is butt-jointed against the case sides). I like to cut the dovetail socket into the case sides using a router with a 3⁄3⁄3 4⁄4⁄ ", 14° dovetail bit and a 3⁄3⁄3 4⁄4⁄ "outside-diameter bushing. The bushing rides along a straightedge fence that you clamp directly on the layout lines, while the bit cuts the bottom of the slot in line with that fence.
The drawer dividers for the drawers located behind the doors are set into dados that are routed into the case sides. Use a straightedge fence in combination with a 1⁄1⁄1 2⁄2⁄ " straight bit with a 1⁄1⁄1 2⁄2⁄ "top-mount bearing set to cut 3⁄3⁄3 16⁄16⁄ "deep. Run these dados to a point 11⁄1⁄1 4⁄4⁄ " from the front edge. Square the ends with your chisel.
The front top rail is attached to the case sides with a half-dovetail joint. Lay out the 1⁄1⁄1 2⁄2⁄ "-long socket, make a cut with your dovetail saw that defi nes the socket and clean out the waste. Then cut the rail to shape and check the fi t.
The dovetail joint that con-nects the back top rail to the case sides is arranged a bit differently. I chose to use a single wide pin on the end of the rail with two small half tail areas in the case side. Shape the rail then use that as a template for the sides.
To complete the work to the case sides you will need to create the 7⁄7⁄7 16⁄16⁄ "-deep x 3⁄3⁄3 4⁄4⁄ "-wide rabbet along the back edge of the side pieces for the back boards.
Dividers and RailsThe dovetailed drawer dividers are cut to fi t the sockets in your sides
using the same bit used to create those sockets. At your router table, set the bit to the appropriate height and then set the fence to leave the desired dovetail thickness. Make the cuts from both faces to ensure that the tail is centered on the divider. If you can push the pieces
together tightly by hand you have the correct fi t.
The dovetailed dividers also need 1⁄1⁄1 4⁄4⁄ "-wide x 1"-long x 1⁄1⁄1 2⁄2⁄ "-deep mortises to accept a tenon on the drawer runners. For all the rails except the bottom one, the mor-tise begins at the shoulder of the
sliding dovetail. The mortise for the bottom rail is cut completely to the end of the rail.
Cut and fi t the front top rail to the half-dovetail socket that you made earlier. Glue the dovetails at the case bottom and slide the joint together. Add glue to the two
Speed up the dovetailing process by setting the angle on your jigsaw to match the layout lines and defi ne the pins at the bottom of the case. You’ll only be able to cut one side without changing the angle to complete the cuts.
After the fi rst cut for the sliding dovetail slots, and with the router off, slide the bit to the back of the cut and draw a line where the base sits. This will be the stopping point of each cut in this operation.
This is one of my favorite methods for cutting dados for drawer runners (or dividers in this case). Use a double thickness of plywood to make a straightedge fence. The bit’s bearing will ride against the fence creating a straight dado.
This dovetail on the back top rail accepts a great deal of tension if the case is ever lifted using the top.
For the dovetail dividers mill an extra piece of scrap for setup. A snug fi t will get tighter when you add glue. Note the backup block behind the work. This keeps the divider stable as it is cut.
The “step” method involves plunging one cut, skipping the second 1⁄4⁄4⁄ ", and making the next plunge allowing equal pressure on all sides of the chisel. Work the entire length of the mortise then remove the remaining waste.

������
���
�����
������
�����
������
����
����
������
���� ����
�������
�������
�����
�����
����
������
������
�����
�����
�����
��
�����
�����
��
����
����
�����
�����
�����
��
��
�����
�����
��������������
�����
������
POPULAR WOODWORKING December 200644
dovetail sockets at the top of the case and position the rails to their respective mates. A few clamps will hold the case. Check the mea-surements from corner to corner to make sure that it is square.
Begin the installation of the drawer dividers with the bottom divider. Make sure it fi ts snugly, add a thin bead of glue to the bot-tom of this divider and attach it to the case through the bottom with 11⁄1⁄1 4⁄4⁄ " wood screws.
The dovetailed dividers are installed into the case after adding a small amount of glue into each socket as well as on the leading edge of the sliding dovetail.
Once those dividers are in place it is time to install the 1⁄1⁄1 2⁄2⁄ "-thick dividers for the drawers
behind the doors. Be sure to mill the drawer runners for the inte-rior drawers before you install the dividers. To install all these pieces you simply slide the divider into position. Then add the drawer run-ners directly behind the dividers to hold them tightly to the front. There is no mortise-and-tenon joint used with these dividers. Add a bead of glue to the edge of the runner that meets the case sides and install it into position. A brad at the front and rear will secure the runner to the case side. Above the topmost drawer, install the drawer kicks by gluing and nailing them to the side pieces.
Because you need clearance to properly operate the interior draw-ers while avoiding the hinges of
the doors, you need to build out the interior case sides. To do this you need to add the interior side spac-ers. These spacers have a moulded edge and fit tightly from top to bottom. Hold them tight to the front edge of the installed dividers. Attach them with a small bead of
glue and brads. To fi nish the inte-rior area you need to cut and fi t the interior drawer guides.
Now install the drawer runners behind the dovetailed dividers. Cut a tenon on the runners that fit the mortises in the dividers. For aesthetic reasons I opt to clip
Profi le section Elevation Elevation section
Illus
trat
ions
by R
ober
t W. L
ang
& M
ary J
ane
Favo
rite
Interior drawer detail

����
����
���������������
����
����
�����
����
����
����
�����������
������
��
����
����
�����
�����
�����
��������
popularwoodworking.com 45
LINGERIE CHESTNO. ITEM DIMENSIONS (INCHES) MATERIAL COMMENTS
T W L
❏ 2 Case sides 3⁄3⁄3 4⁄4⁄ 16 511⁄2⁄2⁄ P ❏ 1 Case bottom 5⁄5⁄5 8⁄8⁄ 16 25 S ❏ 1 Back top rail 3⁄3⁄3 4⁄4⁄ 21⁄2 ⁄2 ⁄ 25 S❏ 1 Front top rail 3⁄3⁄3 4⁄4⁄ 2 241⁄2⁄2⁄ P ❏ 5 Dovetail drawer dividers 3⁄3⁄3 4⁄4⁄ 21⁄2⁄2⁄ 241⁄2⁄2⁄ P ❏ 1 Bottom divider 3⁄3⁄3 4⁄4⁄ 21⁄2⁄2⁄ 231⁄2⁄2⁄ P❏ 12 Drawer runners 3⁄3⁄3 4⁄4⁄ 1 13 S 1⁄2⁄2⁄ " tenon, one end❏ 2 Interior drawer dividers 1⁄2⁄2⁄ 21⁄2⁄2⁄ 237⁄7⁄7 8⁄8⁄ P❏ 4 Interior drawer runners 1⁄2⁄2⁄ 1 11 S ❏ 2 Top drawer kicks 1⁄2⁄2⁄ 1 51⁄2⁄2⁄ P Glued, nailed to case sides❏ 2 Interior side spacer 3⁄8⁄8⁄ 3⁄3⁄3 4⁄4⁄ 155⁄5⁄5 8⁄8⁄ P Glued to case sides❏ 6 Interior drawer guides 3⁄8⁄8⁄ 5⁄5⁄5 8⁄8⁄ 12 S❏ 1 Base frame front 3⁄3⁄3 4⁄4⁄ 23⁄3⁄3 4⁄4⁄ 271⁄8⁄8⁄ P Miter both ends❏ 2 Base frame sides 3⁄3⁄3 4⁄4⁄ 23⁄3⁄3 4⁄4⁄ 171⁄16⁄16⁄ P Miter one end❏ 1 Base frame back 3⁄3⁄3 4⁄4⁄ 23⁄3⁄3 4⁄4⁄ 241⁄8⁄8⁄ S 11⁄4⁄4⁄ " tenon, both ends❏ 2 Feet blanks 15⁄5⁄5 8⁄8⁄ 51⁄8⁄8⁄ 26 P For front & sides❏ 2 Rear feet blanks 3⁄3⁄3 4⁄4⁄ 51⁄8⁄8⁄ 8 S For rear of case❏ 1 Case top 13⁄16⁄16⁄ 171⁄8⁄8⁄ 271⁄2⁄2⁄ P Attached with buttons❏ 2 Front moulding 9⁄9⁄9 16⁄16⁄ 3⁄3⁄3 4⁄4⁄ 281⁄2⁄2⁄ P ❏ 4 Side moulding 9⁄9⁄9 16⁄16⁄ 3⁄3⁄3 4⁄4⁄ 181⁄2⁄2⁄ P ❏ 3 Door stiles 3⁄3⁄3 4⁄4⁄ 17⁄7⁄7 8⁄8⁄ 157⁄7⁄7 8⁄8⁄ P ❏ 1 Door stile 3⁄3⁄3 4⁄4⁄ 21⁄4⁄4⁄ 157⁄7⁄7 8⁄8⁄ P Wider for lip❏ 4 Door rails 3⁄3⁄3 4⁄4⁄ 17⁄7⁄7 8⁄8⁄ 101⁄8⁄8⁄ P 1" tenon, both ends❏ 2 Raised panels 5⁄5⁄5 8⁄8⁄ 83⁄4⁄4⁄ 123⁄4⁄4⁄ P 5⁄5⁄5 16⁄16⁄ " tongue, all sides❏ 3 Interior drawers 43⁄4⁄4⁄ 223⁄4⁄4⁄ 121⁄4⁄4⁄ P & S Overall drawer dimensions❏ 1 Moulded drawer #4 41⁄2⁄2⁄ 241⁄8⁄8⁄ 143⁄8⁄8⁄ P & S Overall drawer dimensions❏ 1 Moulded drawer #5 51⁄4⁄4⁄ 241⁄8⁄8⁄ 143⁄8⁄8⁄ P & S Overall drawer dimensions❏ 1 Moulded drawer #6 61⁄4⁄4⁄ 241⁄8⁄8⁄ 143⁄8 ⁄8 ⁄ P & S Overall drawer dimensions❏ 1 Moulded drawer #7 7 241⁄8⁄8⁄ 143⁄8 ⁄8 ⁄ P & S Overall drawer dimensions❏ 1 Moulded drawer #8 73⁄8⁄8⁄ 241⁄8⁄8⁄ 143⁄8⁄8⁄ P & S Overall drawer dimensions❏ 6 Interior drawer stops 5⁄5⁄5 8⁄8⁄ 3⁄4⁄4⁄ 3 S ❏ 28 Foot blocks stacked 3⁄4⁄4⁄ 11⁄8⁄8⁄ 11⁄8⁄8⁄ S Makes 4 pieces❏ 2 Foot blocks 3⁄4⁄4⁄ 3⁄4⁄4⁄ 14 S Makes 4 pieces❏ Back boards 5⁄5⁄5 8⁄8⁄ 243⁄8⁄8⁄ 511⁄2⁄2⁄ S Many pieces❏ 5 Wooden clips 3⁄4⁄4⁄ 7⁄7⁄7 8⁄8⁄ 21⁄4⁄4⁄ S ❏ 1 Door catch 5⁄5⁄5 8⁄8⁄ 5⁄5⁄5 8⁄8⁄ 23⁄4⁄4⁄ P
P= primary wood; S=secondary wood
Door detail
Moulded drawer detail
Exploded viewExploded view
Bottom moulding detailBottom moulding detail Top moulding detailTop moulding detail
�������������������������
�������
������
������
������
���
���

���������������
POPULAR WOODWORKING December 200646
the non-mortised end with a 45° cut. Add glue to the mortise and tenon as well as the fi rst few inches on the runner and slide the joint together. The runner is nailed to the case sides at the rear.
Wooden clips attach the top to the case. The slots for the clips should be 1⁄1⁄1 4⁄4⁄ " wide and are placed from 1⁄1⁄1 2⁄2⁄ " to 3⁄3⁄3 4⁄4⁄ " down from the top edge of the sides. I use my biscuit joiner to make the slots.
Make the Base FrameMill the stock for the base frame pieces to size and cut both ends of the front piece at a 45° angle. While the miter gauge is set for 45° you can cut one end of each of the base frame sides.
The other end of the side pieces receives a mortise that is 1⁄1⁄1 4⁄4⁄ " wide x 21⁄1⁄1 4⁄4⁄ " long x 11⁄1⁄1 4⁄4⁄ " deep. The angled cuts are to be joined with a #20 biscuit. Then cut
matching tenons on both ends of the base frame’s back.
To assemble the base frame, add clamps to square the frame as shown in the photo above and set it aside for the glue to dry.
Once the glue in the frame is dry, level the mitered corners and the mortised areas then mould the edges on the two sides and the front with a router.
Ogee Bracket FeetShape the ogee feet using a cove-cutting technique on your table saw. Trace the ogee foot profile on both ends of your stock. Set the table saw’s blade height to the top edge of the cove of the foot while laying the stock face down on the saw’s surface. Set an auxil-iary fence so that the blade starts in at the cove of the foot and exits at the opposite end of the cove, then clamp the fence in place. Lower the blade, then gradually cut the cove in small steps until the shape is complete.
Then, at the table saw with your fence aligned with the blade and the blade tilted to an appropri-ate angle, remove as much of the waste as possible by running the stock through the blade with the top edge against the tabletop.
Next, use the pattern below to lay out the foot profi le. Trace the scrolled profi le onto the stock and mark the center point of the area to be drilled to create the spur.
Remove the area that will cre-ate the spur using a 13⁄3⁄3 8⁄8⁄ " Forstner bit and then cut each foot to shape using the band saw.
Set one of each profi le of the feet aside to use as the rear foot on the case side. The remaining feet will be paired to make the front foot assemblies. Cut a 45° miter on each of these feet. The fi rst two will be cut with the miter gauge and auxiliary fence set in the stan-dard position. Place a stop block to keep the blank from moving away from the blade as it is cut, and with the top edge of the foot against the fence make a cut to form the angle.
The second two pieces will be cut with the miter gauge set up reversed in the same slot of the table saw. Adjust your stop block and make the cuts while you are keeping the top edge of the foot tight to the fence with a push stick. Now you have a matched set for the front foot assembly.
Before changing the blade
The drawer guides are glued and nailed at the front with a nail only at the back.
Make a 1⁄4⁄4⁄ "tenon on one end of a wide piece of second-ary wood. Once the tongue is fi t to the mortise in the dividers, rip the board into the 1" strips that will be the drawer runners.
Front leg profi leFront leg profi le Back leg profi leBack leg profi le
Clamping the base frame in this manner is the most effective method. You will need to work all four clamps in unison to simultaneously close the joint and square the frame.
SpurSpurSpur SpurSpurSpur
Runner
Guide
Interior side spacer

popularwoodworking.com 47
angle, set the fence to make a 1⁄1 ⁄1 4⁄4⁄ "-wide x 3⁄3⁄3 8⁄8⁄ "-deep groove for a plywood spline in each foot.
Now assemble the front feet for the chest. Add glue, insert the spline and use duct tape or clear packing tape to immobilize the feet as the glue sets.
The two remaining moulded feet pieces are for the rear feet assemblies. They are dovetailed to the rear foot blanks, which are fl at and made from a secondary species, such as poplar.
Before attaching the foot assemblies to the base frame, sand the edge profi le and fi nish shaping the face of the feet. Attach the feet to the frame using glue blocks. Place the blocks in the corner of the foot vertically, as well as along the return of each foot. For the vertical blocks I stack squares of stock so the grain is alternating.
Now attach the completed base to the case with #8 x 11 ⁄1 ⁄1 4⁄4⁄ "screws along the front edge and nails at the back. The screws hold the relationship of the two con-stant with movement forced to the rear, which the nails will allow.
Create the transition mould-ing on your router table and attach it to the case covering the joint of the two assemblies. Use glue along the front piece and about 4" back along the side pieces, then fi nish the installation with brads.
I selected a classic ogee bit for the top edge and a 1⁄1⁄1 4⁄4⁄ " roundover to soften the bottom edge of the top. Sand the top to #180 grit and attach it to the case. Use nails into the rear top case rail and screws through the wooden clips, which are rabbeted, leaving a 1⁄1⁄1 4⁄4⁄ " tongue that slips into the slots cut in the case sides and front rail. Add the moulding below the top.
Building the DoorsFor the lipped doors, I chose the right stile of the left-hand (or fixed) door to be the wide stile.
This is the stile into which the opposite door will lip. Each stile receives mortises that are 1 ⁄1 ⁄1 4⁄4⁄ " x 11⁄1⁄1 2⁄2⁄ " x 1" in depth. They begin at 1 ⁄1 ⁄1 2⁄2⁄ " in from the end of the stile. Then cut matching tenons on the rails, being sure to leave material
Set an auxiliary fence onto the saw with one piece of stock on each side of the blade and angle the fence until the point of the blade matches both end points of the cove of the foot just as it passes above and below the table top.
Mark the location for the center point of the drill area that will form the spur of the foot with a small drill bit. You will need three profi les facing in both directions.
It may take a couple of passes to accomplish removing the waste from the top edge of the feet. Be sure not to cut the profi le lines.
Transfer the layout of the dovetails to the secondary blanks. Do not change or straighten the lines. If you adjust the lines you will not have a tight fi t of the dove-tails joint when complete.
Carefully hold the stock both down to the table and tight to the fence as you complete the cut. It is important to use a push stick to complete this cut!
for a 3⁄3⁄3 8⁄8⁄ " haunch that will fit into the door’s groove.
Cut a 1⁄1⁄1 4⁄4⁄ " groove for the panel in the center of each rail and stile. That groove needs to be 3⁄3⁄3 8⁄8⁄ " deep. To raise the panel, tilt the table saw’s blade to 12° and set the fence
at exactly 3⁄3⁄3 16⁄16⁄ " away from the blade from where it tips below the table surface. This will create the appro-priate fit of the panel into the groove of the door frame parts. To create a classic raised panel you need to set the saw blade so
Auxiliary fence
Align to infeed side of blade
Cove marked on this piece. Align on outfeed side with blade

SUPPLIESHorton Brasses800-754-9127 or horton-brasses.com
2 pr. • door hinges#HDH-4, semi-bright
1 • door cupboard turn#H-40, semi-bright
1 • door pull#H-40, semi-bright
10 • drawer pulls#H-17, 21⁄2⁄2⁄ " bore, semi-bright
6 • int. drawer knobs#H-42, 3⁄4⁄4⁄ " semi-bright
• nails#N-7, clout or shingle
POPULAR WOODWORKING December 200648
that the outer edge of the blade is fl ush with the outside surface of the panel.
The setup for the second cut can be the most diffi cult (if you need more pictures and direction, visit woodworkersedge.com). You will need to raise the blade to just the height of the previously cut area and set the fence so that you are just nipping the 12° cut. This creates the square arris between the panel’s fl at fi eld and the raised edges. Once set you can make the cuts on all four locations on each panel. Then glue up the doors.
Rout the profi le on the perim-eter of both doors. Then set up a rabbeting bit and create a 3⁄3⁄3 8⁄8⁄ " rab-bet on the top and bottom edge of both doors and the middle stile of the operable door. On the two outer or hinge edges of the doors create an 1⁄1⁄1 8⁄8⁄ " rabbet.
Next you need to create a matching edge profile and lip
against which the second door will close. An ovolo bit will handle this task. Run this door with the raised panel fl at on the table.
Drawers Come NextBegin the drawers by measuring the openings. For the fi ve lower drawers, add an additional 5⁄5⁄5 8⁄8⁄ " to the length of the opening and a 1⁄1 ⁄1 4⁄4⁄ " to the height to arrive at the needed sizes for the drawer fronts. Next use a 3⁄3⁄3 16⁄16⁄ " beading bit to pro-fi le the drawer edge. The interior drawer fronts are cut to fit the openings, less an 1⁄1⁄1 8⁄8⁄ " from side to side and a 1⁄1⁄1 16⁄16⁄ " from top to bottom with no edge profi le.
Create the lip on the drawer fronts by cutting a 3⁄3⁄3 8⁄8⁄ " x 1⁄1 ⁄1 2⁄2⁄ " rab-bet on all but the bottom edge of the lower drawers. Then use the fi nished drawer fronts to get the measurements for the balance of the drawer parts. The width of the drawer backs is 3⁄3⁄3 4⁄4⁄ " less than the width of the drawer sides to make room for the bottom to slide in.
Everyone makes drawers differ-ently, depending on their prefer-ences. Here’s how I make mine: I use through dovetails to join the sides to the back. The dovetails at the front are half-blind. The bottom fi ts into a groove in the sides and drawer front.
The drawer bottom is made the same way as the raised panel for the doors. The difference is that this time you allow the blade to extend completely through the panel – not stop as the blade is fl ush to the panel. Once complete, sand the bottom and slide it into the drawer box then just inside the back, draw a small line. That line will be the height of the cut for the addition of a nail that will hold the bottom to the drawer back.
Slide the drawers into the case. On the exterior drawers you don’t need stops, but the interior draw-ers need stop blocks attached to the case sides.
Hardware and FinishTo install the hinges, fi rst position the hinge at the door. You need to cut the lip of the door only to the width of the hinge – not the pin tips – with a saw and remove the material until it is fl ush with the door edge. I use a router to clean most of the waste from the hinge area then fi nish with a chisel. The short leaf of the hinge should be fl ush with the door edge after it is installed.
To mark the hinge locations into the case, position the doors and transfer them onto the case. You have access to the hinges with the drawers removed from the interior through the back of the piece. Next, scribe the hinge profile to the case with a sharp knife. Complete the work with your chisel. The balance of the hardware is installed after the piece has had the fi nish applied.
The fi xed door is held in place with a small catch. To use the catch it will be spun to a vertical position to catch the top rail of the case. Attach the catch in place with a #8 x 1" wood screw.
To fi nish this piece I elected to use Moser’s water-based aniline dye in dark antique Sheraton. It works well with the mahogany. After staining I knocked down any raised grain with #400-grit paper and applied a coat of clear shellac with my HVLP system.
Because I wanted a smooth fi n-ish and mahogany has an open grain, I added a coat of oil-based fi ller to the areas that would show
on the final project. Apply the fi ller, allow it to fl ash off or turn white and wipe away the excess by wiping across the grain.
That was followed by two more coats of shellac to seal in the fi ller and after sanding it once, I applied one coat of dull rubbed effect Sherwin-Williams lacquer.
Complete the piece by add-ing the back boards, which are shiplapped and run horizontal to the case. They are attached with reproduction nails. No fi nish is applied to either the back boards or the secondary drawer parts.
My holiday is safe because I have my gift fi nished. But, even if you cannot get your cabinet built in time, I bet a picture folded in an small envelope will work wonders. Remember that good things come in small packages. PW
I fi nd it most helpful to add a block to the back of the door to stabilize the router as it is used to cut the area for the hinge.
Adjust the height of your cut fi rst, then set the ovolo cutter to leave a 3⁄8⁄8⁄ " fl at area on the wide stile of your fi xed door.
Here are the completed rails and stiles. You can see how the haunched tenon fi lls the groove area of the stiles.
Haunch
Support block
Hinge mortise

CHAPTER
3In a much earlier era, cabinetmakers
didn’t spend much time worrying about where to put machines in their
shops. They didn’t have much to work with. A small shop might have had a communal lathe turned by an appren-tice, but artisans worked mostly at their benches with hand tools. Period draw-ings of these old shops make it clear just how far we’ve come.
Anyone setting up shop these days can choose from a tremendous vari-ety of stationary and portable power tools. Manufacturers from Pacifi c Rim countries, from the United States and from Europe, all competing in a world market, have helped to keep tool prices stable. New designs are safer and more innovative. It’s good news for someone just getting interested in the craft.
Finding the right spot to set up shop, covered in Chapter 1 of this series (issue #156), has a way of helping us decide which tools are most impor-tant. Small spaces dictate a very care-ful selection of essential tools. A larger space invites more freedom. But either way, fi guring out exactly where to put those tools is an essential next step.
No two woodworkers are likely to agree on how a shop should be organized. The “best” arrangement depends on a variety of factors – what’s being produced, for example, as well as individual work habits. That said, no matter what the shop, machinery should be arranged to eliminate extra
steps and extra work while leaving enough elbow room for both safety and comfort.
Machinery EssentialsFor a Small ShopWoodworking can cover anything from turning wooden pen bodies to building an armoire or a Windsor chair. What we make will help shape the list of machine tools we invest in
and how we organize them in the shop.At one end of the spectrum are
woodworkers such as Alan Bradstreet, a Maine professional who turns out a single product – bookmarks made from thin strips of cherry. Every machine in his shop is part of a well-organized pro-gression that transforms blocks of scrap cherry into fi nished bookmarks. Every tool is devoted to this end, and all of them are precisely placed for effi ciency.
Setting Up Shop:Placing MachineryPlacing Machinery
One of the luxuries of a large shop is having plenty of room to set up woodworking equip-ment without feeling crowded. Smaller shops require more discipline in choosing and placing equipment. This is the nearly 3,000-square-foot shop of Scott Phillips of the PBS television show ”American Woodshop.”
WOODWORKINGESSENTIALS
BY SCOTT GIBSON

POPULAR WOODWORKING
Kentucky chairmaker Brian Boggs represents another type of woodworker with specialized needs – no table saw, for one thing.
Most of us, however, are woodwork-ing generalists who might make a din-ing table one month and a wall cabinet or chair the next.
The basic stationary tools for this kind of woodworking are a table saw, a jointer and a planer. These three tools allow you to turn rough lumber into fi nished goods, and you really need all three of them. A typical setup for a small shop would include a 10" table saw, a jointer with a minimum capacity of 6" and a 12" thickness planer.
There are woodworkers who would swap a band saw for a table saw (for one thing, band saws are safer). But even in these shops the basic steps remain the same: Rough lumber must be fl attened (face jointed) and straightened on a jointer, then run through a planer to a uniform thickness and fi nally cut to length and width on a saw. Only then can you make something out of it.
Many woodworkers start with these basics and build on them in time by adding a drill press, stationary belt sander or disc sander, mortising machine, shaper and spindle sander.
Dedicated Tools or Combination Machines?If the table saw/jointer/planer combina-tion is to be the tool foundation of most new shops, there’s still the question of whether to buy three separate machines or a combination machine that will handle two or more basic functions. There are good arguments for and against each solution.
Dedicated machines are always ready to go – they don’t have to be converted from one thing to another – and that saves both time and effort. Separate machines obviously take up more room, but they also can be less expensive and there are more brands from which to choose. There’s a brisk market in used tools, so it should be possible to get started on even a fairly modest budget.
The type of work produced in a shop dictates the size and variety of woodworking machinery. Kentucky chairmaker Brian Boggs doesn’t need a table saw, which is a mainstay in most cabinet shops. For him, a band saw and specialized joint-cutting equipment are more useful.
The assembly room in Boggs’ chairmaking shop is nearly devoid of woodworking equipment. Creating a quiet zone away from machinery is worth considering if space allows.
Norm Abram’s New Yankee Workshop houses a number of dedicated woodworking machines. The ample fl oor plan allows this approach, but smaller shops may consider combination machines to save space.

popularwoodworking.com
Combination machines have some advantages, too. Primarily, of course, they save space. In a very small work-shop, a combination planer/jointer eliminates one bulky piece of equip-ment. And because these tools use a common set of knives for jointing and thickness planing, you’ll be able to fl at-ten wide pieces of lumber. That’s a very big advantage. The Robland X31, for example, which combines a total of fi ve machines in one, comes with 12" knives for jointing and planing.
The downside to combination machines is that it takes time to switch from one function to another. Key set-tings – such as the position of the fence – might have to be changed in switch-ing from one job to another. Combi-nation machines also tend to be more expensive than separate machines that do the same jobs. Even with these draw-backs, they’re worth considering for very small shops.
Finding a Layout that Works in Your SpaceIf you’ve never set up a shop before, it’s going to be hard to visualize the many possible layouts in the space you have
to work with. Machines are not only heavy, but they frequently require spe-cial connections – a 240-volt receptacle, for example, or a connection to the dust collection system. With that in mind, it makes sense to do as much as you can on paper before pushing machines around the shop.
Start by drawing a fl oor plan of the shop exactly to scale. Mark on it the locations of windows, doors, electri-cal outlets and any other features that might affect the operation of a sta-tionary tool. Now make cutouts, also to scale, of each machine you need to fi nd a home for. It’s easy to move the machines around on paper.
Each machine requires a certain amount of clearance between it and nearby objects. Think of it as the tool’s aura. For example, a table saw must be positioned so that long pieces of lumber can be run over the blade and ripped. Eight feet is a minimum benchmark for solid lumber (that’s also the length of a full-size piece of plywood), so you’ll need a space that’s longer than 16' in which to place the table saw. It’s better to allow a few extra feet on each end. You’ll also need space on the left side
of the saw so you can maneuver a full sheet of plywood up on the table.
A jointer and planer also need gener-ous allowances of room on both the infeed and outfeed sides. But because you are more likely to cut stock roughly to length before jointing and planing, you may not need quite as much room as you would with the table saw. And you won’t need nearly as much width.
In a large shop it won’t be a problem locating the saw to provide these kinds of clearances. In a small shop, you may need to take advantage of a window or a door. You might, for example, give your-self 12' of space on the infeed side of the table saw and only 6' on the outfeed side. By positioning the saw near a door, you can always accommodate those extra-length boards when you need to.
Another key element is the relative heights of adjacent tools and fi xtures. You might, for example, have plenty of room on infeed and outfeed sides of a table saw to handle long pieces of stock. That part of it works out just fi ne. But what about potential interference on the side? Maybe you were planning on
This shop allows plenty of infeed and outfeed room for the table saw. Tom Willenborg incorpo-rated a second table saw in the extension table of his cabinet saw for a dado stack that’s always ready to go.
Michigan-based craftsman John Wilson uses a band saw to cut out a canoe paddle in his shop. To cut a piece of stock this long he needs adequate infeed and outfeed room, but the saw could be backed up against a wall and still be effective.

POPULAR WOODWORKING
putting a workbench several feet to the left of the table saw. If it’s just an inch or two higher than the saw, the distance between the two becomes the maxi-mum length of stock you can crosscut.
If you weigh these relationships in advance they often can be solved without much trouble. In the case of a nearby bench, raising the saw slightly
on blocks or cutting down the legs of the bench a bit may fi x the problem.
Taking this idea one step further, consider building simple models of your shop and tools out of cardboard or foam board. Make them to scale and move things around until you’re satisfi ed you’ve got a plan. It takes more time than working on paper, but you’ll get
This is the assembly area in Maloof’s shop. Here, woodworkers use smaller tools and escape the din of the larger machine area.
a three-dimensional look at what your shop will look and feel like.
Think About Work Flow You’ll probably end up buying rough lumber in lengths much longer than what you’ll eventually need. You may be building a wall cabinet that’s only 3' high, but the rough lumber could easily be 12' or more in length when you get it home. So one of the fi rst steps is to place tools so that you can break the raw material into manageable pieces.
Close to the entry along one side of the shop is a good place to put a long bench, as well as a centrally located chop saw and nearby storage racks for both lumber and plywood. A long board can be cut to rough length before it travels around the shop.
Locating the storage bin for sheet goods close to the table saw makes it easier to cut pieces of plywood or particleboard to size. Sheet goods tend to be quite heavy – a 4' x 8' sheet of Medium-density Fiberboard (MDF) 3⁄3⁄3 4⁄4⁄ "thick can weigh close to 100 pounds – so it doesn’t make sense carrying them any farther than necessary.
What comes next? Usually, the lumber will need to be fl attened and straightened on the jointer and then sent through the thickness planer. Locating these two machines (or com-bination machine) nearby and close to the table saw will save some steps.
These machines can be located very close to one another as long as the stock doesn’t bump into anything else while it’s being processed. For example, you might group the table saw, jointer and planer in line in the middle of a small shop so that stock runs from side to side, the full width of the space.
A Working Triangle For the WoodshopThis idea of grouping machines for effi -ciency and comfort is the same as creat-ing a work triangle in the kitchen. In a kitchen, this is the relationship between the sink, stove and refrigerator. In a shop
The workshop of Sam Maloof includes a machine room with enough fl oor area to house a large thickness planer with a jointer parked right next door. These tools are often used in tandem.

popularwoodworking.com
it might be the relationship between machines that are used most frequently.
Suppose, for example, you expect to resaw stock for bookmatched panels on a fairly regular basis. The process involves a band saw (to slice the full width of a board) as well as frequent trips to a jointer so the cut side of the board can be trued up. In a shop like this, the work triangle might include band saw, jointer and possibly a cutoff saw or table saw.
The work triangle in kitchen design is a relatively rigid planning guide. Some designers go so far as to prescribe minimum and maximum distances when you add up all three legs of the triangle. English kitchen designer Johnny Grey favors a much more fl ex-ible approach that can be applied to a workshop as well as a kitchen.
Grey starts by accounting for all the important work stations in a kitchen. That includes the sink, food preparation areas, stove, refrigerator and so forth – roughly a dozen in all. Then he thinks of the paths people will travel to get from one function to another. These are not necessarily straight lines that can’t be bent. Instead, he thinks of them as rubber bands that have some fl exibility but can’t be completely severed.
In a workshop, as in a kitchen, no fl oor plan will perfectly accommo-date everything we do. The idea is to think about operations we commonly undertake and design around them. As long as movement around the shop and between machines is unobstructed and logical, the machine layout will prob-ably work most of the time.
Some Machines Don’t Need Much SpaceIt’s easy to think of machine placement only in terms of the bigger pieces of equipment. That makes sense because they are the hardest to place and tend to dominate the work environment. But there are many smaller machines that can be worked in around the edges of a shop. They may not need as much room
around them because the workpieces we usually bring to them are much smaller.
A bench grinder doesn’t take up very much space and can easily be tucked in a corner because the workpieces are short – you sure don’t need much clearance for a chisel or plane iron. The same is true of a drill press and a hori-zontal boring machine. They seldom require the kind of clearances that a table saw, jointer or planer must have.
Smaller tools can sometimes share space. A hollow-chisel mortising machine doesn’t have a very large foot-print but you occasionally may want to cut mortises in fairly long pieces of stock. Housing the tool on the same long bench as a chop saw is one way of dealing with it.
In fi nding homes for small pieces of equipment, a key consideration is how often they are used. That grinder, for example, may be only an occasional tool for many woodworkers, something we use once a month to regrind edge chisels or plane blades. In that case, it can be housed in a distant corner of the shop, preferably near good natural light, or even mounted to a board that can be put in a storage cabinet when it’s not needed.
If, on the other hand, you’re going to do a lot of turning, you may need to make frequent trips to the grinder to touch up your tools. You’d probably want the grinder right next to the lathe or at most just a few steps away.
Don’t overlook out-of-the-way nooks and crannies when trying to shoehorn in all your tools in a shop. There’s no reason a compressor has to take up fl oor space in a small shop when it could just as easily be stored beneath a bench. You may not need a separate router table if you use part of your table saw’s exten-sion table for that purpose. In a small shop, consolidate where you can and
A power miter saw centered on a bench against a wall can cut be used to cut long pieces of stock into more manageable pieces. By locating the saw near the entry door and storage racks, you won’t have to maneuver long pieces of wood through the shop.
Making the most of a small basement workshop, Popular Woodworking Pub-Woodworking Pub-Woodworkinglisher Steve Shanesy pushes his lathe right up against the wall. Some tools don’t require much space around them, making them good candi-dates for overlooked corners and nooks.

POPULAR WOODWORKING
give up dedicated fl oor space only to those tools that are used all the time.
Mobile Tools Can Make Small Spaces Serve Many NeedsWhen the woodshop takes over the garage, the family sedan often winds up outside. But by making some machines mobile, even a single-car garage can accommodate both needs.
Scott Landis, in his book “The Workshop Book” (Taunton Press), visits one woodworker who has made this arrangement work and no doubt there are countless others. Maurice Gordon, who had only 420 square feet to work with, used a computer-design program to plan his shop. It houses a full comple-ment of tools – everything from a table saw to a scroll saw, and lumber storage to boot. But when it’s time to put the car away, the planer, table saw, band saw, jointer and sander can be rolled out of the way.
Gordon’s shop is a marvel of good planning and it revolves around good-
The cabinets in this organized shop have sliding storage shelves for easy access to tools that aren’t used every day.
Space beneath the long extension table on this full-sized cabi-net saw is too valu-able to waste. This storage cabinet holds saw blades, a dado set and other table saw accessories.
When space is at a premium, tuck infrequently used tools in cabinets, under workbenches or otherwise out of the way until they’re needed. They can be mounted temporarily in just a few minutes.
quality mobile bases for large stationary power tools. Even a full-sized cabinet saw with an extended table can be mounted on a mobile base. When the wheels are retracted, the saw is rock-solid. When it needs to be moved, one person can push it across the fl oor.
Even if you don’t need to make room for a Buick, mounting some tools on wheels is a great way of creating more elbow room in a small shop. Consider a wheeled base for a planer, for instance, which you’ll probably use less often than a table saw, a real shop workhorse.
You might want to invest in a bases for heavy stationary tools, but a variety of other shop fi xtures and tools can be put on bases of your own making. When looking for casters, invest in models where both wheels and spindles can be locked. Casters with wheel-only locking mechanisms are cheaper but you may fi nd the tool has an annoying habit of moving around while you try to use it.
Be Ready to Try New IdeasEven with careful planning, it’s tough to get everything in exactly the right spot

popularwoodworking.com
your fi rst time out. Many woodworkers will continue to tinker with shop layout and machinery locations for as long as they inhabit the space.
The kind of shop you have cer-tainly affects how much fl exibility you have to alter machine placements. If you’re building a new shop from scratch
Even in a very large shop, there’s no reason to give up fl oor space to tools that can work just as effectively under a bench or in an outdoor storage area. Air compressors and dust collectors are two candidates for this treatment.
and plan to start with a concrete slab, you can cast electrical conduit in the fl oor to get power to exactly where it’s needed. That’s a big plus, but it also calls for very careful planning and won’t allow much tinkering later.
But for those at work in shops with more forgiving fl oors, experimentation
with shop layout is going to be a plus. Adding a new tool to an existing
inventory may require some juggling of equipment. You might borrow an idea from another workshop. Whatever the reason for changes, tool placement is one of those things that’s never really cast in stone.
Dropping a router table into the top of this large, centrally located assembly table is a good way to save space and increase shop effi ciency.
Making a tool mobile is an excel-
lent way of making your shop more
fl exible. Putting a chop saw or a drill press on a custom
stand that includes its own storage
allows these tools to be pushed out of the way when they
are not needed.

SHOP SHOTS: A Shop Made for Many
����������������������������������������������������������������������������������������������������������������������������������������������
������������������������������������������������������������������������������
�������
�� ��������������������������
�����������������������������������������������������������
����������������������������������������
����������������������������������������
����������������������������������������
������������������������������������������������������������������������������
����������������������������������������������������������������������������
�������������������������������������������������������������������������������������������������������������������������������������������������������������������������������������������
�����������������������������������
���������������������������������������������������������������������������������������������������������������������������������������������������������������������������������������������������������������������������������������������������������������������������������������������������
��������������������������������������������������������������
�����������������������������������
����������������������������������������������������������������������������������������������������������������������������������������������
������������������������������������������������������������������������������
������������������������������������������
����������������������������������������������
����������������������������������������������
��������������������������������������������
��������������������������������������������
�������
�� ��������������������������
�����������������������������������������������������������
����������������������������������������
����������������������������������������
����������������������������������������
�����������������������������������������������������������������������������������������������������������������������
�����������������������������������
�������������������������������������������������������������������������������������������������������������������������������������������������������������������������������������������
�������������������������������������������������������������������
����������������������������������������������������������������������������������������������������������������������������������������������������������������������������������������������������������������������������������������������������������������������������������������������������������������������������������������������������������������������������������������
�����������������������������������������������������������������������������������������������������������������������������������������������������������������������������������������������������������������������������������������������������������������
��������������������������������������������������������������������������������
���������������������
���������������������������������������������������������
������������������������������������������������
�����������������������������������
Everything you need Everything you need to know about setting up your shop!From getting the most out of your space, to choosing machinery loca-tion, lighting, power and material storage, this seven-chapter series offers all the answers.
Chapter 4Small ToolOrganizationBalancing maximum storage with accessiblity will save time and energy.
Chapter 5
Material StorageProper lumber and sheet-good Proper lumber and sheet-good storage keeps the materials straight and handy.
Chapter 6
Dust CollectionKeep your shop (and your lungs) dust free by planning ahead for any task.
Chapter 7
Workstations& BenchesBeyond machines, worksta-tions and benches are where everything gets done in a woodshop. Choose well.
Chapter 1 (ISSUE #157)
The Right LocationLearn the pros and cons of basement, garage and out-building shops – and how to make the most of any shop.
Chapter 2 (ISSUE #158)
Lighting & PowerTask versus ambient light-ing? 110v or 220v power? Learn the best options for your shop.
IN FUTURE ISSUES
IN PAST ISSUES
������������������������������������������
����������������������������������������������
����������������������������������������������
��������������������������������������������
��������������������������������������������
���������������������������������������
������������������������������������������
����������������������������������������������
����������������������������������������������
��������������������������������������������
��������������������������������������������
�������
�� ��������������������������
�����������������������������������������������������������
����������������������������������������
����������������������������������������
����������������������������������������
�����������������������������������������������������������������������������������������������������������������������
������������������������������������������������������������������������������������������������������������������������������������������������������������������������������������������������������������������������������
�������������������������������������������������������������������
����������������������������������������������������������������������������������������������������������������������������������������������������������������������������������������������������������������������������������������������������������������������������������������������������������������������������������������������������������������������������������������
��������������������������������������������������������������������������������������������������������������������������������������������
����������������������������������������������
�����������������������������������
IN PAST ISSUES
������������������������������������������
����������������������������������������������
����������������������������������������������
��������������������������������������������
��������������������������������������������
������������������������������������������
����������������������������������������������
����������������������������������������������
��������������������������������������������
��������������������������������������������
�������
�� ��������������������������
�����������������������������������������������������������
����������������������������������������
����������������������������������������
����������������������������������������
������������������������������������������������������������������������������
����������������������������������������������������������������������������
�������������������������������������������������������������������������������������������������������������������������������������������������������������������������������������������
�����������������������������������
������������������������������������������������������������������������������������������������������������������������������������������������������������������������������������������������������������������������������������������������������������������������������������������������������������������������������������������������������������������������������������������������������������������������
�����������������������������������������������������������������������������������������������������������������������������������������������������������������������������������������������������������������������������������������������������������������
��������������������������������������������������������������������������������
���������������������
��������������������������������������������������������������������������������������������������������������������������������������������������������������������������������������������������������������������������������������������������������
���������������������������������������
�����������������������
�����������������������������������
The Right Location
�����������������������������������������������������������������������������������������������������������������������������������������������������������������������������������������������������������������������������
�������
�� ��������������������������
�����������������������������������������������������������
����������������������������������������
����������������������������������������
����������������������������������������
�����������������������������������������������������������������������������������������������������������������������
���������������������������������������������������������������������������������������������������������������������������������������������������������������������������������������
���������������������������������������
�������������������������������������������������������������������
����������������������������������������������������������������������������������������������������������������������������������������������������������������������������������������������������������������������������������������������������������������������������������������������������������������������������������������������������������������������������������������
�������������������������������
����������������������������������������������������������������������������������������������������������������������������������������������������������������������������������������������������������������������������������
��������������������������������������������������������������������������������
���������������������
��������������������������������������������������������������������������������������������������������������������������������������
����������������������������������������������������
�����������������������������������
Order back issues online at popularwoodworking.com or call 800-258-0929.
�����������������������������������������������������������������������������������������������������������������������������������������������������������������������������������������������������������������������������
Order back issues online at popularwoodworking.com or
POPULAR WOODWORKING
Planning a shop for a single woodworker can
be challenge enough, but what if the shop
has to serve dozens of people? That was the
job facing Peter Korn, executive director of the
Center for Furniture Craftsmanship in Rockland,
Maine.
Between the school’s 12-week courses,
its nine-month comprehensive program and
a variety of one- and two-week courses, the
workshops have to accommodate 300 or so
students a year. No, they’re not all lined up to
use the table saw at once, but shop space still
had to be planned carefully so people weren’t in
each other’s way.
Like many shops, this one keeps benches
separated from the machine room. That’s not
possible in a one-car garage shop, but it is a
strategy worth considering for slightly larger
spaces. It keeps hand tools grouped with a
workbench and assembly area – what some
view as the essential woodshop “work triangle”
– and noisy woodworking equipment for rough
milling and dimensioning in another.
Working at the bench can be quiet and con-
templative; milling a stack of lumber is grunt
work. Separating the two makes perfect sense.
The Center’s machine room has roughly 20
woodworking machines of roughly the same size
and type that you’d fi nd in a home shop. Only
there are more of them, including two planers,
two table saws, two jointers, two band saws and
a pair of drill presses.
How they are arranged holds lessons for
much smaller shops. Tools that require long
infeed and outfeed areas – table saws, jointers
and planers – get a central location with plenty
of room on each end of the tool. Jointers and
planers don’t need much side-to-side clear-
ance. The school has paired an 8" jointer and a
13" planer side by side in one area, and a 15"
planer and a 12" jointer in another. Because
woodworkers go from one machine to the other,
there’s a minimum of wasted motion.
The two table saws are not far from a shared
workbench – a handy place to park workpieces
as they await ripping or crosscutting.
While those machines need plenty of room,
a variety of other machines are placed close to
walls around the perimeter of the room. In one
corner is the lathe, which handles relatively
short workpieces. Band saws, a slot mortiser,
drill presses and a spindle sander all can be
backed up to the wall without affecting their use.
It all fi lls a lot more space than most home
woodworking shops. But shrink that to home-
shop dimensions and the same layout principles
still apply.
You can fi nd out more about the Center online
at woodschool.org, or call 207-594-5611. PW— SG
A large machine room at the Center for Furniture Craftsmanship in Rockland, Maine, houses a dozen and a half woodworking machines organized so they minimize potential confl icts. Home shops planned along the same lines will enjoy the same benefi ts.
Chapter 3Placing MachineryThe right machines in the right locations will make your woodworking smooth.
offers all the answers.
IN FUTURE ISSUES

popularwoodworking.com 57
The housed dovetail joint is mechanically sound, historically correct for 18th-century casework and a hallmark of fi ne craftsmanship. It provides an
accurate means of locating drawer dividers and runners, and is quite useful when making shelves. If you can mill stock straight and square, control stock thickness, make dados and operate a router, you can make this joint. When assembling case pieces or shelves, you will have little need for glue, screws or nails.
Dados alone have little mechanical strength, but with the addition of a dovetail socket and dovetail tenon, the joint is properly aligned and quite strong. This joint allows cases to be made without face frames.
When the housed dovetail joint is used for shelving, the shelves are prevented from cupping because the shelves are held fl at in the straight, shallow dados.
Much of my work replicates 18th-century case pieces such as chests and highboys. For years, I made furniture by laying out the housed dovetail joinery, carefully hand-sawing, then chiseling the dovetail sockets. This slow and ineffi cient process tested my patience enough that I began my search for a quicker, more accurate method.
I like to make the housed dovetail joint with a dado roughly 1⁄1⁄1 8⁄8⁄ " deep. The dado is used to align and strengthen drawer runners or shelves. By housing the shoulders of run-ners or shelves, the joint doesn’t invite gaps like a half-blind dovetail joint, as seen in the drawing on the next page.
Housed
by Geoffrey Ames
Geoffrey builds 18th-century period furniture and teaches at the Homestead Woodworking School in New Market, N.H.
DovetailsA super-slick trick to make
a super-strong joint.
Photo by Al Parrish

���������������������������������������������������������������������������������
������������������������������������������������������������������
�������������������������������������������
���������������������������������������������������������������������������������������������������������
��������������������������������������������������������������������������������������������������
POPULAR WOODWORKING December 200658
The 3⁄4⁄4⁄ " outside-diameter guide bushing must be reduced to protrude less than 1⁄8⁄8⁄ ". This allows the base of the router to lay fl at on the workpiece.
The fi rst step is to mill all of the dados to a depth of 1⁄8⁄8⁄ " with a 3⁄4⁄4⁄ "-diameter straight router bit.
Use the modifi ed guide bushing and a 3⁄8⁄8⁄ " straight bit to prepare the socket for cutting the dovetail.
Use the same guide bushing and a 3⁄4⁄4⁄ " dovetail bit to fi nish the dovetailed part of the joint.
Combining a dado joint with a half-blind dovetail yields a superior joint for casework. The weaknesses of both joints are eliminated.
As you slide the router along the edge, the guide bushing and dovetail bit will enter the dado together.
Searching for a SolutionAs I tried out different meth-ods, I built numerous sleds and edge guides, but my only success required the use of a sled and two matching routers – one fi tted with a 3⁄3⁄3 4⁄4⁄ " O.D. straight bit, the other with a 3⁄3⁄3 4⁄4⁄ "-14˚ dovetail bit.
My search for a simple solution led me to milling all the dados prior to routing the dovetail sock-ets. But aligning the dovetail bit with the dado was not possible because a standard 3 ⁄3 ⁄3 4⁄4⁄ " guide bushing was too deep for the 1⁄1⁄1 8⁄8⁄ "-deep dado, and the 3⁄3⁄3 4⁄4⁄ " dovetail bit interfered with or would shear the guide bushing. Then it occurred to me that what I really needed was a shorter guide bushing.
Get a standard 3⁄3⁄3 4⁄4⁄ " O.D. Porter-Cable router-guide bushing and reduce the protruding guide to
slightly less than 1 ⁄8⁄8⁄ ". You can cut the excess off with a hacksaw, and then fi le or grind the cut edge smooth.
Now you can set up your router with the modifi ed guide bushing and a 3⁄3⁄3 4⁄4⁄ "-14˚ dovetail bit as seen in the photo at right. The bottom edge of the dovetail bit should pro-trude a bit less than 1⁄1⁄1 2⁄2⁄ " below the guide bushing, for a total depth of about 5⁄5⁄5 8⁄8⁄ ". Be sure your stock is thick enough to prevent routing through your workpiece. I recom-mend using 13⁄13⁄13 16⁄16⁄ " or 7⁄7⁄7 8⁄8⁄ " stock for case sides. The drawing at the top of this page shows the proportions and appearance of the finished housed dovetail.
A Simple FormulaTo successfully make the housed dovetail joint there are a few mill-
ing, tooling and setup require-ments. The dado must be a minimum width of 3⁄3⁄3 4⁄4⁄ " to allow a 3⁄3⁄3 4⁄4⁄ " guide bushing to ride into the dado to create the dovetail socket. The dados should be slightly more
than the depth of your modifi ed guide bushing. The stock thick-ness for the drawer dividers or shelves should be the same as the width of your dados.
After milling all the dados with

��
����� ���� �
��
��
����� ���� �
����� ���� �
�����������
��������������������������������������������������������������
��������������������������
����� ����������
������������������������������������������������������
��� ������� ���� �������������������
��������������
���������
����� ���� �
popularwoodworking.com 59
The secret to this jig is the 1⁄8⁄8⁄ "-thick Masonite guide piece. This matches the depth of the dado, so the only adjustment needed is to move the guide piece in or out to establish the finished width of the dovetail tenon.
This clamping jig lets me quickly make the tenons without adjusting the router setup. The work is clamped vertically below the Masonite guide piece.
Dovetail tenon clamping jigclamping jig
a 3⁄3⁄3 4⁄4⁄ "-diameter straight router bit,set up the router with the modi-fi ed 3⁄3⁄3 4⁄4⁄ " guide bushing and a 3⁄3⁄3 8⁄8⁄ "-diameter straight bit. Clearing out the socket with this bit will reduce the amount of material the dove-tail bit will have to remove.
When you have pre-cut all the sockets, switch your router setup to the dovetail bit. Securely clamp your workpiece to your bench, lock your router bit depth, and turn on your router. The photos in the middle of the facing page show the sequence of the cuts you need to make.
The router is slid along the face of the case side, from left to right. The dovetail bit and the guide bushing locate the dado and enter the dado at the same moment. Keep the router base fi rmly down on the case side and carefully guide the router into and out of the socket without lifting the tool from the work.
Slide the router up to your stop line then retract. If you turn off the
router while it is in the socket the dovetail bit may be pulled down and ruin your work. Cleaning out the socket with a 3⁄3⁄3 8⁄8⁄ " bit prior to routing the dovetail socket helps prevent this. You’ll likely expe-rience some tear-out where the router exits the socket. Make your workpiece about 1⁄1 ⁄1 8⁄8⁄ " wider than the fi nished dimension to allow for edge cleanup. Any tear-out is easily removed by a few passes over the jointer.
On to the Matching TenonOf course the dovetail socket requires a matching dovetail tenon. With an easy solution to making the female part of the joint, I looked for an equally sim-ple method to cut the dovetailed tenons on the end of the drawer divider or shelf. I came up with this jig that uses the same 3⁄3⁄3 4⁄4⁄ "-14˚ dovetail bit and router setup.
The common method used to create dovetail tenons is to mount the same dovetail bit used to rout
the sockets in a router table and run the long narrow dividers ver-tically, twice at each end. This method is precarious and shaky at best. An alternative is a hori-zontally mounted router, but my method uses a simple and easy-to-make jig as seen above.
When setting up the vertical dovetailing jig, make some trial passes on scrap the same thickness as your workpiece so that the top of the bit barely touches the top edge of the board. Move the jig top in or out to adjust the tenon thickness to match the 3⁄3⁄3 4⁄4⁄ " width of the socket.
The 1⁄1⁄1 8⁄8⁄ "-thick Masonite on the
top of the jig is equal to the depth of the dado cut in the side of the case. With the base of the router on top of the Masonite, and the edge of the bushing against the edge of the Masonite, the tenons can be made without changing the router setup.
The stock used for the drawer dividers and runners should be milled to precisely the same thick-ness as the dados. This housed-dovetail system is based on 3⁄3⁄3 4⁄4⁄ "tooling. Consequently, the dados, dividers, runners or shelves should be uniform, fl at and straight. Good stock preparation is absolutely essential for good results. PW
Masonite

THE WINNERS
★ Bosch
★ Delta
★ Freud
★ General
★ Gramercy
★ Grizzly
★ Laguna
★ Lie-Nielsen
★ MicroFence
★ Panasonic
★ Powermatic
★ Rikon
★ Steel City
★ Veritas
I’ve been attending tool shows to see new woodworking machinery and hand tools for 10 years now, but the 2006 vintage
will be remembered as a very good one for years to come. In fact, we typically honor 12 tools every year, but this year we expanded it to 16 tools and we still had to fi ght to keep it from ballooning to 20 tools (or more).
Tool manufacturers have been a busy bunch. For proof of that, you need look no further than Steel City Tool Works. I could be wrong, but I doubt if I’ll ever get to see another woodworking show where a new company launches an entire line of truly new machines all at once.
And while the machines are new, the people behind the company are not. Steel City was started by men and women who have worked in the woodworking machinery industry for decades. They have the contacts in the Far East to build the kind of machines they always wanted to sell. And it looks like they’ve succeeded.
The other pleasant surprise was the appearance of two table saws on the mar-ket that have riving knives (one from Powermatic and one from Grizzly). Saw-Stop’s table saw already has a riving knife, and other manufacturers are testing the waters right now. As a woodworker who has worked on table saws with and without this safety feature, I can tell you this without hesitation: You want one. If you can get a saw with one, do it. You’ll be glad you have it the fi rst time that some case-hardened stock tries to pinch your saw blade.
And on the hand-tool side, things con-tinue to blossom into a full-blown renais-sance. There are so many good new hand tools out there now, I could almost write an entire separate story on the Best New Hand Tools of 2006. But let me call your attention to one in particular. It’s not obvious. The new Veritas plane irons are a big deal. They are so simple to set up and sharpen it could be the tool that launches many an adventure into the world of handplanes.
— Christopher Schwarz,editor
THE WINNERS
Best New Tools
of 2006
POPULAR WOODWORKING December 200660
Laguna

popularwoodworking.com 61
You don’t hunt squirrels with an elephant gun, and you don’t always need a large plunge router. This router base is the tool I reach for when precision and visibility are more important than brute power. With the Bosch Colt router motor and the Microfence edge guide you can make extremely precise adjustments in any direction. It is a joy to use, and extremely well made. I had so much fun testing this tool that I found myself look-ing for any good excuse to use it. I’ve even made inch-deep mortises for face frames, as well as shallow mortises for hinges.
In addition to the precise adjustments and smooth operation, the ability to see what is happening is another feature I’ve come to appreciate. Used without the edge guide, I can see the bit well enough to waste the background in a carving or between the pins of half-blind dovetails. The small LED light is quite effective, as is the dust collection shroud.
Swiss-watch precision and smooth opera-tion are combined in a package that is easier to compare to fi ne German sports cars than to other woodworking tools.
800-480-6427 or microfence.com
Bosch I-Driver I-DriverThe I-driver from Bosch proves t h a t g o o d things come in small things come in small packages. In testing this packages. In testing this 10.4-volt lithium-ion bat-10.4-volt lithium-ion bat-tery-powered driver, I put it tery-powered driver, I put it through the same daily tasks through the same daily tasks that I would use a 12v cord-that I would use a 12v cord-less drill for.
It did everything I asked It did everything I asked of it with as much power and of it with as much power and battery life as the larger drill battery life as the larger drill I’m used to. In addition, the I’m used to. In addition, the drill head pivots from a right drill head pivots from a right angle to an inline driver with angle to an inline driver with three stops in between, allowing it to reach places a larger drill can’t. Its ergonomic design, reliable power and light weight make it one of the best small drills ever.
877-267-2499 or boschtools.com
Powermatic PM2000 Cabinet SawWhen we fi rst caught wind of the Powermatic PM2000 cabinet saw, we thought there was no way that the company would be able to improve on the design of the venerable Powermatic 66. After all, dozens of table saws have passed through our shop, but the 66 has remained at the center of the Popular Woodworking shop for more than 11 years.
Right now, when I walk into our shop I Right now, when I walk into our shop I can see two table saws: our beat-up 66 and can see two table saws: our beat-up 66 and the still-shiny PM2000. They’re facing each the still-shiny PM2000. They’re facing each other in the shop, and things are likely to stay that way for many years to come.
The PM2000 isn’t a replacement for the The PM2000 isn’t a replacement for the 66, it’s a different saw for a different kind of 66, it’s a different saw for a different kind of woodworker. First, it has a riving knife (a woodworker. First, it has a riving knife (a splitter that moves with the arbor) which splitter that moves with the arbor) which makes it ideal for the furniture maker who makes it ideal for the furniture maker who has to change the confi guration of the saw has to change the confi guration of the saw many times during a project. The riving many times during a project. The riving knife keeps you safe. While the PM2000 knife keeps you safe. While the PM2000 is fl exible, the 66 excels at ripping all day is fl exible, the 66 excels at ripping all day without a hiccup.
The PM2000 also has an integrated The PM2000 also has an integrated caster system that allows you to move the caster system that allows you to move the
saw at a moment’s notice – a good feature for those who might have to move machines around a lot. The casters are moved by the wheel that also controls the blade tilt.
The PM2000 also has a nice oversized table, a smooth-sliding T-square-style rip fence and a decent guard.
We’ve had the saw in our shop for more than six months and it has really earned its keep. It has yet to show any signs of bogging down in the heaviest rip cuts. And the saw has remained in adjustment, just like its older brother. We think they’re an excellent pair.
800-274-6848 or powermatic.com
MicroFence Three-Axis Mill
★
★★

POPULAR WOODWORKING December 200662
We’ve never given a “Best New Tool” We’ve never given a “Best New Tool” award to a company’s entire award to a company’s entire line of machinery, but this is line of machinery, but this is an exceptional year, and these an exceptional year, and these are exceptional tools.
To be fair with you, we haven’t gotten To be fair with you, we haven’t gotten to build any furniture with these tools to build any furniture with these tools yet, but after four editors inspected the yet, but after four editors inspected the tools at the company’s headquarters and tools at the company’s headquarters and at an August woodworking show, we were at an August woodworking show, we were impressed.
These tools are serious, as evidenced by These tools are serious, as evidenced by the close look we gave the company’s table the close look we gave the company’s table saws. The trunnions on the company’s three saws. The trunnions on the company’s three styles of cabinet saws look like the trunnions styles of cabinet saws look like the trunnions on older beefy machines we’re familiar with. on older beefy machines we’re familiar with. The T-square-style fences on the saws glide The T-square-style fences on the saws glide smoothly across the table – thanks to some smoothly across the table – thanks to some clever engineering. And what is also nice is what the saws don’t have: a lot of bells and whistles. Instead, the company’s engineers upgraded what was important, such as the optional titanium nitrite coating for the top, which reduces galling and rust.
This was the same level of attention to detail throughout the line. The 15" planer comes standard with a clever Wixey-brand digital depth gauge – the only upgrade a machine like this needs.
The Steel City steel-frame band saws (a 14" cast-iron saw is in the works) are thoughtfully designed with a tensioning
system that uses two springs. Plus, on the band saw as well as all the other machines, many of the handles are metal instead of the plastic we’ve come to expect.
And the prices? You’ll be pleased. The machines aren’t a low-price leader, but they do seem a lot of machine for the money.
Of course, the proof will be in how these machines perform, and we’re making plans to test several of the tools in the line. But after inspecting the machines like a customer would in a store, I can honestly say I was ready to get out my checkbook and plunk some seri-ous money down on these tools. And after 10 years of seeing more new tools than I can count, that is saying something.
615-225-9001 or steelcitytoolworks.com
Steel City Tools Machinery Line Machinery Line
Veritas PullshaveScooping out a chair’s seat can require sev-eral hard-to-fi nd or expensive tools. And even with the right tools, it’s a task that requires some strength and dexterity.
Now Veritas, the manufacturing line of Lee Valley Tools, has developed a new tool for saddling seats that is ergonomic, easy to adjust and a good value. Veritas calls it a Pullshave, and it looks like a paint scraper that was wedded to a curved-sole spokeshave. The shape of the tool and its handles allow you to pull the tool toward your body, which increases your strength and control. The traditional travisher, on the other hand, requires more wrist and thumb action and it isn’t always easy to press
the tool down against the work as much as you’d like.
The Pullshave uses the same robust blade-adjustment mechanism found on the
company’s spokeshaves, which is a welcome feature. Vintage travishers can be tricky to adjust properly. And fi nally, one of the great-est things about the tool is that it’s available. Chairmakers have long had to search (or save) for a good tool. Now a phone call and $130 is all you need to get scooping.
800-871-8158 or leevalley.com
★
★

★
★
popularwoodworking.com 63
Rikon’s Newest 14" Steel-frame Band SawWhen the Rikon 10-325 arrived in our shop, we thought we had a winner on our hands. When we started putting it to work, we knew we were right. This saw won an Editor’s Choice award in our November test of steel-frame band saws (issue #158), and our enthusiasm for this 14" machine has yet to peter out.
Rikon redesigned this saw for 2006 and added many important upgrades. We’re quite fond of the saw’s guide system, especially the way the thrust bearings are mounted. Changing the saw’s blade is easy with the slot in the table up front instead of on the side. And we really liked this saw’s tension-release lever. But we were really impressed with the machine once we started resawing with it. This thing has some real guts and was able to handle 11"-wide oak with ease.
Priced at $750, the Rikon 10-325 is an excellent value for a tool with this sort of resaw capacity and fi t and fi nish.
781-933-8400 or rikontools.com
Grizzly’s 12" Cabinet Saw with Riving Knife 12" Cabinet Saw with Riving KnifeMost home woodworkers think a 12" cabi-net saw is out of their reach. I thought that too until I encountered this saw at the Inter-national Woodworking Fair in Atlanta.
Less than $2,000 will get you a ton (actu-ally .375 ton) of cast iron, welded steel and (wait for it …) a quick-release riving knife – our favorite safety accessory.
A riving knife is a splitter that travels up and down with the arbor. The bottom line is that you almost never have to remove the saw’s safety equipment for non-through cuts, such as rabbeting. It’s standard equipment on European saws, and it should be here.
The G0605X offers a 5-horsepower motor that runs on 220-volt household current (the G0606X, shown above, is the
71⁄1⁄1 2 ⁄2 ⁄ hp three-phase version). Both saws come standard with an outfeed and extension table, and there are specially designed toolboxes that can be purchased as an accessory that fi t neatly below the tables.
The saw also includes a nice T-square rip fence and a digital gauge that indicates blade tilt. Grizzly offi cials had to redesign the inte-rior of the saw’s cabinet to accommodate the riving knife and indicated that the feature could start trickling down to the company’s 10" table saws in time. Until that happens, we recommend you look closely at this big-boy saw, which costs just a few hundred dol-lars more than a comparably equipped 10" Delta Unisaw.
800-523-4777 or grizzly.com
Laguna Drift Master Band Saw FenceWith so many premium band saw fences With so many premium band saw fences to choose from, it takes something pretty to choose from, it takes something pretty special to catch our eye. Laguna Tool’s new Drift Master fence was obviously designed by someone who demands a lot of their band saw.who demands a lot of their band saw.
There are three standout features that There are three standout features that make this fence a winner. First, you can make repeatable resawing cuts with great ease (and without having to face-joint your stock after every cut). The fence’s micro-adjustment lets you move the fence in exact increments toward the blade after each pass. Second, the way you adjust the fence for blade drift is the easiest I’ve ever seen. You
simply turn a knob below the fence and it pivots left or right to compensate quickly for any blade or tension setup – no tools required. And the third feature is the aluminum fence itself, which can be locked in two positions, high or low, much like a Delta Unifence.
The fence costs $295. Contact Laguna for details as to which band saws it fi ts on.
800-234-1976 or lagunatools.com
★

★
★
★
Panasonic Lithium-ion 14.4-volt Drill/DriverWe test a lot of drills. But there are two brands we really like: Festool and Panasonic. So when Panasonic showed us a new 14.4v cobalt lithium-ion drill (the EY7440LN2S), we were eager to try it. The drill is light at 3.5 lbs. and compact at 71⁄1⁄1 2⁄2⁄ " long. And with Panasonic’s battery technology (the cobalt lithium-ion batteries run cool with high output), we know it will be a winner.
800-405-0652 or panasonic.com/cordlesstools
POPULAR WOODWORKING December 200664
Veritas Plane IronsWith many toolmakers switching to long-wearing A2 steels, why would we honor an old-fashioned high-carbon blade? Simple.These aren’t your ancestor’s O1 blades.
Veritas has developed a way to lap the unbeveled side of the blade dead fl at – it took me about 60 seconds to polish each of the four blades I tested. That’s a big deal because that process is the worst part of setting up a new blade and is the place where an error can ruin a blade. Some woodworkers prefer this old-fashioned steel, saying it’s easier to sharpen and takes a keener edge (though it’s less durable than A2). These blades are available for the Veritas planes and other bench planes and block planes.
800-871-8158 or leevalley.com
General’s HoverpadWhen I fi rst saw this mobile base in action, I went into denial. With the turn of a switch, Arra David made the shaper, shown at right, fl oat on a cushion of air. And then he pushed the machine around with one fi nger.
The Hoverpad is probably the highest tech mobile base ever. You need only a pan-cake compressor to run it, and you can cut either size of Hoverpad down to fi t most machines. While it won’t work on all fl oors (shag carpet, for example), the Hoverpad can fl oat an 800-pound cabinet saw with ease. Priced between $169 and $249, it’s not cheap, but it is amazing.
514-326-1161 or general.ca
Freud Premier Fusion BladeIn the world of table saw blades, the Forrest Woodworker II has long been the blade to beat. Many tooling manufacturers have tried to capture that carbide-tipped crown, but we don’t think they’ve succeeded.
However, this year could be the year. This summer Freud demonstrated its new Premier Fusion blade, a 40-tooth blade with a novel combination of high-quality car-bide, a high alternate-top-bevel grind and a secondary bevel on the sides of the teeth. Company offi cials demonstrated the blade with rips, crosscuts and work in veneered material. The resulting cuts were as clean as any I’d seen. The $99 blade is headed for our shop now for an extensive round of tests. If the blade cuts as well as the dem-
onstration blade, I think we can guarantee onstration blade, I think we can guarantee that our arbor wrench will see a lot less use when it comes to changing blades.
800-472-7307 or freudtools.com
★

★ ★
★★
popularwoodworking.com 65
Delta’s New Drill Presses New Drill Presses For WoodworkersDelta unveiled three new drill presses this summer that were designed for woodworkers instead designed for woodworkers instead of machinists. All three models (a 17", of machinists. All three models (a 17", the 17-959L; and two 20", the 20-950 and the 17-959L; and two 20", the 20-950 and 20-959LX) share features that will be 20-959LX) share features that will be welcome in the woodshop.
First: the table. It tilts in two First: the table. It tilts in two directions instead of one. (If you directions instead of one. (If you make chairs, you can start drooling make chairs, you can start drooling now). Plus there are T-slots, a replaceable now). Plus there are T-slots, a replaceable wooden insert in the center and the edge wooden insert in the center and the edge of the table is easy to clamp stuff to. The second nice of the table is easy to clamp stuff to. The second nice upgrade is the stroke of the quill. Instead of a typical upgrade is the stroke of the quill. Instead of a typical 4" to 5" stroke, these go to 6".
You can buy either size machine with lasers. The You can buy either size machine with lasers. The 20" machines let you change speeds without 20" machines let you change speeds without belts or pulleys. We’re testing one in the belts or pulleys. We’re testing one in the shop right now.
800-223-7278 or deltamachinery.com800-223-7278 or deltamachinery.com
Most woodworkers want the features of a full-size router table, but they don’t have the space or money for one.
Bosch has just introduced a new $170 benchtop router table that seems to be the best of both worlds. The RA1171 has a convenient switch up front for controlling the router. The aluminum insert plate appeared very well-made and fl at on the model we inspected, and it’s drilled at the factory to accept many popular routers. The
fence has all the nice fea-fence has all the nice fea-tures you expect on a tures you expect on a full-size table (including full-size table (including
adjustable fence faces), adjustable fence faces), and the cabinet and the cabinet even has a port for dust collec-
tion. Bosch got tion. Bosch got everything right with everything right with this design. this design.
877-267-2499 or boschtools.com
Bosch RA1171 Benchtop Router Table
I’ve gotten to work on a lot of shave horses at chairmaking classes and at other woodworkers’ shops. This one is the most comfortable, easy-to-use and versatile one I’ve ever straddled.
Designed by Kentucky Chair-maker Brian Boggs, this shave horse lets you quickly move the head up and down for different stock thicknesses. And the leather on the head grips the stock with remarkable tenacity – it is almost impossible to pull your spindle stock out of the jaws, even in a heavy cut with a drawknife. The sculpted seat, which is nice for long spindle-shaping sessions, adjusts back and forth with ease so you can apply just the right amount of pressure to your work without straining your legs.
There are many plans for making your own shave horse out there, but if you’d rather just giddyap and get on with chairmaking, this shave horse belongs in the winner’s circle.
800-327-2520 or lie-nielsen.com
The problem with most contemporary bow-saws is they are bulky and the blades are poorly made and difficult to change. So when I picked up the new Gramercy Tools bowsaw, I was immediately delighted.
The sparrow-like saw weighs but 12.4 ounces and its hickory frame is thin and refi ned. The saw’s three blades are precisely made, sharp and properly set. And they attach to the saw’s frame with pins built into the blades, like on a coping saw. These and a hundred other details conspire to make a saw that seems to anticipate your next move. It is worth every single penny of its $140 price tag. PW
800-426-4613 or toolsforworkingwood.com
Gramercy Tools BowsawLie-Nielsen’s Brian Boggs Shave Horse
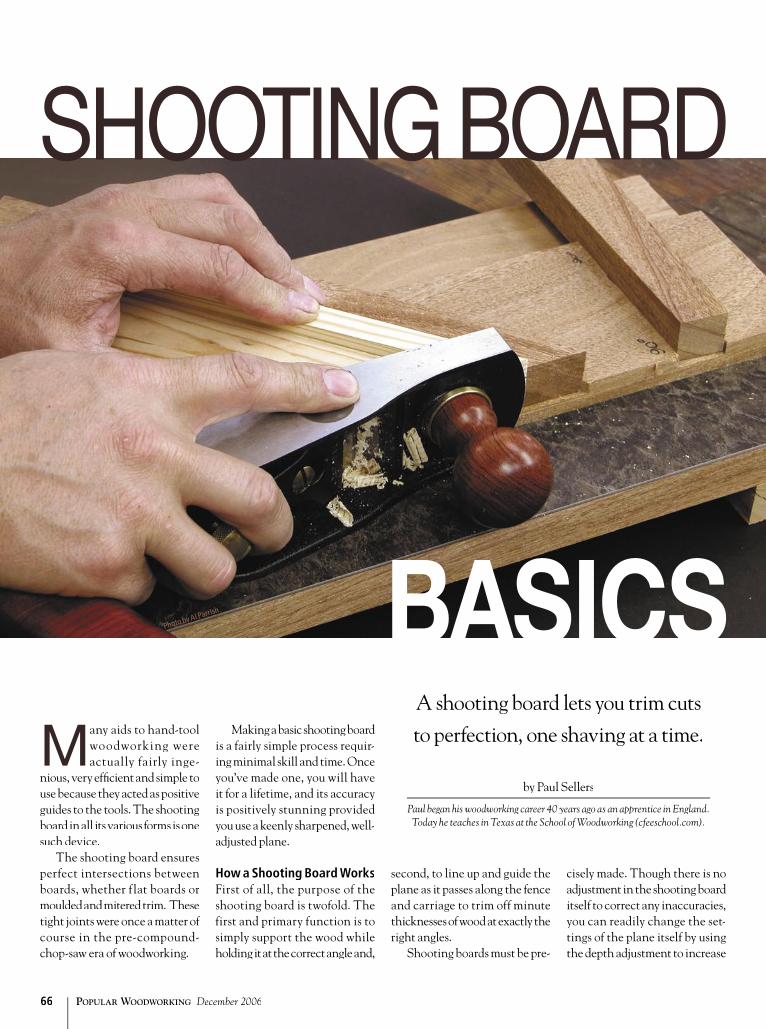
POPULAR WOODWORKING December 200666
Many aids to hand-tool woodworking were actually fairly inge-
nious, very effi cient and simple to use because they acted as positive guides to the tools. The shooting board in all its various forms is one such device.
The shooting board ensures perfect intersections between boards, whether flat boards or moulded and mitered trim. These tight joints were once a matter of course in the pre-compound-chop-saw era of woodworking.
SHOOTING BOARD
by Paul Sellers
Paul began his woodworking career 40 years ago as an apprentice in England. Today he teaches in Texas at the School of Woodworking (cfeeschool.com).
Making a basic shooting board is a fairly simple process requir-ing minimal skill and time. Once you’ve made one, you will have it for a lifetime, and its accuracy is positively stunning provided you use a keenly sharpened, well-adjusted plane.
How a Shooting Board WorksFirst of all, the purpose of the shooting board is twofold. The first and primary function is to simply support the wood while holding it at the correct angle and,
second, to line up and guide the plane as it passes along the fence and carriage to trim off minute thicknesses of wood at exactly the right angles.
Shooting boards must be pre-
cisely made. Though there is no adjustment in the shooting board itself to correct any inaccuracies, you can readily change the set-tings of the plane itself by using the depth adjustment to increase
A shooting board lets you trim cuts to perfection, one shaving at a time.
BASICSPhoto by Al Parrish

Square stop
Angled stop
Fence platform
Main baseboard
Underside stop
Underside stop
Exploded viewExploded view
popularwoodworking.com 67
BASIC SHOOTING BOARDNO. ITEM DIMENSIONS (INCHES)
T W L
❏ 1 Main baseboard 1 83⁄4⁄4⁄ 23❏ 1 Fence platform 1⁄2⁄2⁄ 4 23❏ 2 Fence stops* 1 11⁄2⁄2⁄ 12❏ 2 Underside stops 1 11⁄2⁄2⁄ 83⁄4⁄4⁄
*Stops taper in width from 11⁄2⁄2⁄ " at one end to 11⁄4⁄4⁄ " at the other.
or decrease the amount of stock you remove, and also by moving the lateral adjustment lever to set your iron at 90° to the platform so that the angles are perfectly perpendicular to the stock being trimmed. Using a low-angle plane with an adjustable mouth enables you to open and close the throat of the plane to suit your needs.
When you build your shoot-ing board, I recommend that your stops, which hold the work, be removable. Stops are by necessity disposable. Inevitably the stops wear, shrink, bruise and in other ways distort through continued use. They take a lot of beating, so removable stops are the answer.
I also recommend you make the stops taper and wedge into tapered recesses (no glue) so the stops can be tapped tight against the angled shoulders during sea-sonal shrinkage.
To make a basic shooting board you will need either a suit-able hardwood, or you can com-bine hardwood with some type of hardwood plywood, such as Finn-ish birch, for the main baseboard. I used mahogany to make mine. Other woods such as cherry, wal-nut or oak would also work well, but whichever wood you use you must make sure that the wood is well seasoned to minimize the possibility of any distortion that might affect the stability or accu-racy of the board.
This shooting board will trim stock at both 90° and 45°. Follow the photos on these pages to build your own.
Layout for building a conventional shooting board for 45º & 90º cutsLayout for building a conventional shooting board for 45º & 90º cuts
������
����� ����� ����
��
��
�����
�����
����� ����� ����������
�����
��� ���
���
����������������������������������������
���������������������������
��������������
�����������
�����������������������������������������������������������������������������������������������������������������������������������
����
�����
��
��������������������������������������������������������
Plan – fence platformPlan – fence platform
Plan
Illus
trat
ion
by Jo
hn H
utch
inso
n
Illustration by the author

POPULAR WOODWORKING December 200668
Mark the 90° and 45° lines only onto the fl at face of the 4"-wide fence platform using a combination square and pencil according to the drawing.
Transfer those layout lines onto the long edges of the fence platform using a square.
Use a marking gauge to indicate the 1⁄4⁄4⁄ " depth of the recesses on the long edges of the fence platform.
With the recesses marked, use the knife and com-bination square to cut the 90° and the 45° lines only. (Don’t mark the tapered lines. They will be marked directly from the tapered stops to ensure an accurate fi t).
On the 90° and 45° knife cut, fi rst chisel a slight angled recess in preparation for guiding the hand saw cuts.
Use a small backsaw to cut down the walls of your recesses to the gauge lines.
Make deeper cuts in toward the wall of your recesses, down to just shy of the 1⁄4⁄4⁄ "-depth lines.
Place each tapered stop in against the wall of your recess and use a knife to score the angled line of each stop on the fence platform.
1
MAKING THE SHOOTING BOARD
2 3
4 5 6
7 8
Illus
trat
ion
by Jo
hn H
utch
inso
nIll
ustr
atio
n by
John
Hut
chin
son

popularwoodworking.com 69
Use a marking gauge set to to 23⁄8⁄8⁄ " to mark a parallel line along the length of the main baseboard. Apply glue to the underside of the fence platform and position it against the gauge line. Clamp the fence platform to the main base-board using protective cauls to prevent damage to the shooting board.
With a 1"-wide chisel, defi ne the second, opposite knife walls. Then use the saw to cut down to just above the depth line.
Remove the waste wood with a chisel but stay slightly above the fi nal depth.
Use a hand router to fl atten the bottom of the recesses.
For added wear resistance and to reduce friction, glue a piece of plastic lami-nate to the main baseboard. Finally, screw the underside stops to the main baseboard.
If the stop overhangs, remove the excess with a small saw. If it falls short of the outside edge, shave off some of the width of the stop with a plane, and tap it further into the recess.
10 11
12
13
14
9

POPULAR WOODWORKING December 200670
A GOOD PLANE FOR SHOOTINGThough a regular bench plane will work well with your shooting board, it is my fi rm belief that using a low-angle plane (sometimes called a “bevel-up” plane) of any type will really refi ne the cut sur-face of the wood exponentially, producing both a perfectly planed surface and an accurate cut.
I use two low-angle planes by Veritas, both of which work extremely well, but the weight and heft of the low-angle jack plane, combined with its 3⁄16⁄16⁄ "-thick iron and the accurate machin-ing throughout the plane itself make this tool my fi rst choice for shooting wood of all types. I should reiterate at this point that a dull plane is extremely counterproductive to accuracy. Even though you may make a perfect shooting board, with all the angles and stops accurately cut, you will not be able to produce the crisp, clean, precise cuts you desire without a well-sharpened plane iron. When a cutting iron dulls through use it actually becomes rounded at the very cutting edge. Instead of slicing cleanly through the wood in a continuous single plane, the cutting iron itself causes the plane to incrementally rise as it continues through the cut and so produces a round or hollow instead of a truly fl at surface. — PS
To use the shooting board, lay a plane on its side in the rabbet as shown and slice off a few shavings at both 45° and 90°.
If you fi nd your miter or square cuts are less than perfect, adjust the wall of the stop’s recess with a sharp knife against a square or miter square.
��������������
��������������
���������������
������
When you use the shooting board for the fi rst time, the protruding plane iron will cut a small rabbet on the fence and so automatically line up the rabbet with the stop. The edge corner of the plane sole will then be guided by the fence platform.
Compare the surface of a handplaned miter with a machined miter: machined on the left, handplaned on the right.
USING THE SHOOTING BOARD
1
2
34
Illus
trat
ion
by Jo
hn H
utch
inso
n

popularwoodworking.com 71
OTHER TYPES OF SHOOTING BOARDSThe fl at shooting board in this article will readily miter both fl at and moulded stock along the broad width but will not miter vertical cuts. Three other types of miter trimming devices facilitate fi ne trimming of vertical and large stock miters – the donkey’s-ear shooting board, the miter shooting box and the screw miter shooting clamp.
■ Donkey’s-ear Shooting BoardDonkey’s-ear Shooting BoardAnother type of shooting board used for shooting Another type of shooting board used for shooting both cross-grain and long-grain miters is the both cross-grain and long-grain miters is the donkey’s-ear shooting board. Both square and donkey’s-ear shooting board. Both square and moulded stock can be trimmed on these types of shooting boards. Craftsmen gen-types of shooting boards. Craftsmen gen-erally made them to suit their individual needs and so they come in a variety of different confi gurations and sizes.
■ Miter Shooting BoxA miter shooting box accommodates large, wide moulding by holding the stock within the box and using the outside, angled walls to guide the sole of the plane. The moulding can be held in place by using a dowel as a retaining bar and wedging the stock in place with a wedge. You may also need a packing (scrap) to support the unsupported side of the moulding. Often unsupported side of the moulding. Often you can reverse another piece of the same mould to you can reverse another piece of the same mould to counterpoise the stock being worked.
■ Screw Miter Shooting ClampScrew Miter Shooting ClampScrew Miter Shooting ClampScrew Miter Shooting ClampAs with the miter shooting box, the screw miter As with the miter shooting box, the screw miter As with the miter shooting box, the screw miter shooting clamp accommodates large, wide mould-shooting clamp accommodates large, wide mould-shooting clamp accommodates large, wide mould-ings, but this has a clamping mechanism that holds ings, but this has a clamping mechanism that holds the wood so it can be planed at the correct angle. the wood so it can be planed at the correct angle. The outside, angled walls guide the sole of the The outside, angled walls guide the sole of the plane. PW — PS
Want to Read More About Shooting Boards? Paul Sellers has written an expanded version of this article that is available for a free download at our web site. Go to popularwoodworking.com and click on Magazine Extras.
Illustr
ation
s by t
he au
thor

Few tools spark the affection of so many as the Stanley No. 1 size bench plane.
Regardless of one’s interest, the small plane has a way of catch-ing everyone’s eye. Set one on a table at a tool show and nearly everyone who walks by will stop to look it over and check the price. When conversation starts, two comments are always heard. First, “What a cute little plane.” And second, “How did they ever use such a small thing?” I am intrigued by this question and have been collecting uses for this tiny bench plane for years. My list of docu-mented uses now numbers eight and continues to grow slowly. I’ll share some of these uses with you, but fi rst some background.
The fi rst metal No. 1 was most likely made by Leonard Bailey in Boston by 1865 (or slightly earlier). From looking at existing examples and catalogs, it seems clear that the No. 1 followed roughly the
No. 1 Plane
by Clarence Blanchard
Clarence is the president of Antique & Collectible Tools Inc., and publisher of the Fine Tool Journal. He can be reached via e-mail at ceb@fi netoolj.com.
POPULAR WOODWORKING December 200672
same development as the larger Stanley bench planes. As major changes took place in the larger planes, similar changes, when applicable, can be found in the No. 1. Exceptions to this rule are the plane’s lateral adjustment lever, some frog redesigns and the 1910 frog-adjuster screw, as these parts were never incorporated into the No. 1.
No less than fi ve different com-panies offered a similar miniature plane: L. Bailey, Stanley Rule & Level Co., Ohio Tool Co., Union Manufacturing Co. and Chaplin.
The little planes were all more or less 51⁄1⁄1 2⁄2⁄ " long with 11⁄1⁄1 4⁄4⁄ "-wide cut-ters. The Ohio Tool Co. was the only company to offer a version with a corrugated sole. In addition to Stanley’s regular production, Stanley also made a “Liberty Bell” model in the 1870s and the “Defi -ance” model in the 1927 to 1929 period. Stanley was the last com-pany to manufacture the plane and stopped catalog offerings in 1943. So all told, the little No. 1 plane was a hit on hardware store shelves for more than 78 years.
But the tale of the smallest
bench plane doesn’t end there; Lie-Nielsen Toolworks reintro-duced production of the No. 1 in the late 1980s. The Lie-Nielsen No. 1 is produced with a bronze body but is otherwise very simi-lar to the traditional iron-bodied Stanley version.
So why did the No. 1 plane exist? Stanley was a successful company and the reason it man-ufactured the No. 1 plane was because it sold. Sales may have not been in the millions but were clearly adequate enough to keep this jewel in the pages of the cata-logs for years. Only the cultural transformation of World War II was able to halt production.
So why was the plane so popu-lar long before modern-day collec-tors decided it was cute?
A Number of No. 1 UsesMy fi rst documented use was by beekeepers. Beekeepers work far from a workbench and the small plane was easy to tote about. The plane was easy to tote about. The honey that the keepers take from honey that the keepers take from the bees is stored in a separate sec-the bees is stored in a separate sec-tion of the hive called a super. The tion of the hive called a super. The super sits on top of the main hive super sits on top of the main hive and must fi t tight to the hive or the and must fi t tight to the hive or the
It sure is cute – but is it useful?
The

No. 1 Plane
popularwoodworking.com 73
bees waste time fi lling the joints with wax. The No. 1 was used for adjusting the edges when fi xing a super to a hive in the fi eld.
Another user of the plane was the bamboo fl y-rod maker. Cane rods are constructed in six sec-tions, carefully planed to form a hexagon. The No. 1 worked like a charm for this delicate work with the soft, stringy bamboo.
For much the same reasons as the beekeeper, the wood shingle installer and trim carpenter also used the No. 1. The small size and narrow width fi t easily into the bib or overalls pocket, whereas a block plane with its 15⁄5⁄5 8⁄8⁄ "-wide cutter was often too wide.
The boatbuilder found the No. 1 useful for fi tting and shaping the laps and gunnels of small wooden boats. The small size allowed access into tight spots up to the very ends of the boat, while the higher cutting angle of the tool (45°) made working softwoods such as cedar and pine a breeze.
Linenfold panels are another example of where the plane is just the right size and shape. The fl ow-ing curves run the length of the panels and require considerable hand shaping. The plane’s narrow width and upright profi le make it ideal for this type of work.
The work of the house carpen-ter was often outside in the cold and always demanded a strong grip. The constant use and cold took their toll on the hands and arthritis was a common ailment. The No. 1 plane was the solution. The higher profile of the plane (compared to a low-slung block plane) offered more meat to grip and did not require that the hand close as tightly. Therefore, as a carpenter aged, the No. 1 often became a necessary replacement for his block plane.
The only group found to date to actually hold the No. 1 bench plane in a traditional manner is young trade school students. Smaller hands allowed them to hold the plane by the handles and push it along much as an adult would use a No. 5 jack plane. Over the years, many No. 1 planes have turned up at trade school auctions. One auction in the 1960s sold caf-eteria trays full of No. 1 and No. 2 planes for mere peanuts; boy, have times changed! Now, they’re highly sought after at auction where good examples can fetch thousands of dollars.
One popular theory is that the small plane was a salesman’s sample. I doubt this use was wide-spread and was certainly not the reason for manufacturing the plane. However, the quality con-struction and small size would certainly make the small plane a convenient sales tool. One story is of a Stanley salesperson who did a number of trade shows carry-ing a Stanley No. 1 in his pocket. The plane was attached to a chain
hooked to his belt. When the tim-ing was right, he would pull the chain, whip out the No. 1 and hope to hammer home a sale.
More uses certainly exist but three things seem clear: the smaller size, the tool’s high profi le and its 45° cutter pitch were keys to its longevity. Today, many of us like to look at the shelf and think we know a new reason, but just maybe there was a carpenter or two in the 1890s who salted a No. 1 away in the corner of his box just because it was cute.
Dating Your PlaneMuch confusion exists in deter-mining the exact age of a Stan-ley No. 1 plane. In general, it is accurate to say the plane follows the types as defined in Roger Smith’s type study in “Patented Transitional & Metallic Planes in America 1827-1927.” However, production differences and miss-ing types do exist and need to be allowed for.
The No. 1 was not equipped with all the features offered on larger planes. The most notable missing items are the lateral adjustment lever, the recessed adjuster knob and the frog adjust-ment screw. Therefore, as these features were added to the bench plane line, the No. 1 would have remained unchanged making for fewer, longer-produced types. It is recommended that Smith’s Type Study be followed and types such as Type 5 be simply noted as not produced in the No. 1 size.
Author’s Note: Stanley often used parts with earlier trademarks or stamps long after redesigns had been introduced. Dating by mark is an indication of a “not earlier than” date – not a production date. Many tools sold in the 1930s had the Rule & Level trademark. Always remember, Stanley did not have the type studies when they assembled the tools. PW
DATING ANO. 1 PLANE Note: When a company made major changes to a tool (such as the casting or a brand mark), collectors say that they created a new “type” of tool. A “Type 1” would be the earliest version of the tool. Basically, it’s like the model year of an automobile.
■ Type 1: Earliest style with higher sides, thicker tote and a banjo-shaped spring on the tool’s lever cap.
■ Type 2: 1867-1873. Main features are an “I-shaped” frog receiver and higher body sides.
■ Type 3: Probably not pro-duced in the No. 1 size.
■ Type 4 & 6: 1874-1892. Similar productions. All cutter marks have been observed. Slight vari-ations in handle shape noted.
■ Type 5: Not applicable.
■ Type 7 to 11: 1893-1918. The planes produced in this period are similar. Dating can be done by casting marks; both “S” and “B” marks on the castings have been noted.
■ Type 12: First Sweethart Production, 1919-1924. Body castings remain the same but cutters are marked with the Sweethart logo.
■ Type 13: Sweethart Produc-tion, 1925-1932. Planes of this period have the “notched” Stanley logo cast into the lever cap. Several planes of this type observed, including an example with red lever cap logo.
■ Type 14 to 16: Last produc-tion, 1933-1943. Body castings remain much the same. Changes are the orange paint on the notched cap logo and a plated lever cap. Dating can be done by markings on the cutter and logos on the lever cap. Examples have been noted with orange frogs, with and without kidney-shaped lever-cap holes, and with plated and unplated lever caps. — CB
Photo by Al Parrish

Phot
os b
y A
l Par
rish
Solar Drying KilnA cost-effective and effi cient way to take green boards to usable lumber.
by John Wilson
John is the founder of The Home Shop (ShakerOvalBox.com), in Charlotte, Michigan, which produces and sells
supplies for making Shaker oval boxes.

approx. 16' – depending on glass size
64"
4 x 4 outdoor wood 2 x 4 outdoor wood Cap blocksCap blocks
The solar drying kiln is the most cost-effective way for the craftsman to get
quality boards for woodworking from green lumber. Today there are many band saw operators cut-ting boards from trees that grow in abundance in much of America. The solar kiln is the link between this resource and the shop.
A wood kiln is any space used for controlling heat and humidity where lumber is dried. The solar drying kiln harnesses the free energy of the sun. It operates on the regular cycle of day and night to prevent wood stress that can ruin lumber in other systems. The scale of the unit at 1,000 board-feet (bf) capacity, plus the simple structure and affordable cost of running a fan, makes this solar kiln practical for the home crafts-man or small professional shop.
The Basics of DryingEvaporation from the surface of lumber occurs when surround-ing air picks up the water. The capacity of air to hold water is dependent on temperature. This is expressed in the term “relative humidity,” where humidity is the degree of saturation in a volume of air, and the amount is rela-tive to the temperature. When temperatures fall, moisture from saturated air precipitates. When temperatures rise, the air can hold increased amounts of water, mak-ing it effectively dry air. Hold on to this last statement because it is how a kiln works.
To give an example of relative humidity at work, take our homes
popularwoodworking.com 75
in winter. Air passes in and out of the normal home every one-half to three hours for a complete air exchange. Outside air at 30° Fahrenheit (F) at a comfortable 60 percent relative humidity comes inside where it is heated to 70° F and is 20 percent relative humid-ity, because of the capacity of warmer air to hold more moisture. This phenomenon is even more at work at higher temperature ranges. The interval from 70° F to 120° F sees a 10-fold increase in moisture-holding capacity, which is the range in which the solar dry-ing kiln works. The ambient air on a hot sticky day in summer at 100 percent relative humidity with little capacity for drying becomes desert-dry air of 10 percent relative humidity when the sun heats it to 120° F inside the kiln.
Another operating principle is the daily cycle of the sun’s energy shutting off at night. This is key to the trouble-free operation of the kiln. The danger inherent in standard hot-air dryers is the stress in wood due to surface shrinkage before core areas can dry. Such stress not only warps lumber, it is the cause of “case hardening,” which we encounter when saw-ing a board that will bind the saw blade. In the extreme, it can tear the core apart in a condition known as “honeycombing.”
In the solar kiln, the boards have a chance to “normalize” every day – what I like to think of as smoothing out the differences in moisture levels throughout the wood. Because of this daily cycle, you do not have to monitor the progress of drying to be sure to have good results. Nature does it for you. A word of caution: If you incorporate ways of shortening the drying time by having drying go on 24 hours a day, attention must be given to the impact it will have on boards because that then erases the normalization period.
Building the Solar Kiln The kilns used in our business of providing wood to craftsmen who make Shaker oval boxes have a capacity of 1,000 bf to 1,500 bf of lumber. To give scale to this amount, 500 bf of dry hardwood
boards weighs about a ton, or a good sized pickup truck load. Each kiln is a building wide enough to hold a 4'-wide stack, and long enough to fit the longest logs you are likely to have sawed. Our boards are 12' long and the kiln is 16', which allows for the fan at the end. You can adapt the size you build to suit your cutting needs.
The construction uses stan-dard 2 x 4s, 1 ⁄1 ⁄1 2⁄2⁄ " plywood sides, a 3⁄3⁄3 4⁄4⁄ " plywood fl oor and 4 x 4s and cap blocks or short posts for a foundation. The south wall and roof are made from recycled tem-pered glass of the kind used in sliding patio doors. These ther-mopane units have a nasty habit of developing air leaks in the seals, which fogs the glass. Replacement is common, and used glass is read-ily available from those in the window business. The condition
(Left) Solar kilns used at The Home Shop in Charlotte, Mich. Two 16' kilns are joined at the middle by a 4'-section for sticker storage. The end wall is opened with the door to the left and the main panel is temporar-ily leaning against the outside. Foundation planFoundation plan
Illus
trat
ions
by L
en C
hurc
hill
The window wall and roof make use of readily available salvaged slid-ing door glass panels, which are 76" long. Each piece of glass lands on a rafter or stud and is held is place by a batten. The end of the rafter bat-ten has a strap to prevent the glass from sliding.
Solar Drying Kiln

76"
5⁄4 x 11⁄2⁄2⁄batten
strips anddeck screws
Offset studfor 1⁄4⁄4⁄ "
ledge forglass
4" solid blocksor similar base support
4 x 4 outdoor wood
3⁄3⁄3 4⁄4⁄ " outdoor wood plywood
1⁄2⁄2⁄ "ply
siding
2 x 4 outdoor wood platestop, bottom and foundation
headers
Flashingbehind
glass ledge
2 x 4studs
Flashing strap
All-glass roof and south wall34" x 76" or 46" x 76"
Leave space for glassin bird’s mouth of rafter
2 x 4 outdoor wood rafter
Thermostat switch
Power to receptaclenear floor
Fan frame of 2 x 4slifts out for loading
Open soffitvents whenwood is wet
Open soffit
Flashing strap
96"
2 x 4studs
64"
POPULAR WOODWORKING December 200676
of the seal does not affect our use, because single-layer glass is used. To separate old thermopanes, run a utility knife around the edge to lift the glass off the seal. Do not clean off the remaining rubber seal on the glass as it will make for a better installation. We do not use double-pane glass because the night-time insulating qualities are not necessary as the kiln shuts down anyway, and in the day there would be a 10-percent sun loss due to the second layer of glass.
The plans show construction details for the building. Before building, however, you must obtain the recycled tempered glass panes. Their size will determine the spacing of studs and rafters, as well as the exact overall size of the building. The standard ther-mopane in 8'-patio doors is 46" x 76", and in 6'-patio doors, 34" x 76". Either size will work as it is the 76" length that will span the roof. The edges of the glass need to be supported on 2 x 4 framing, which will be adjusted according to glass size.
I have learned from disman-tling older kilns that the use of outdoor wood will add years to the building. Rafters, wall plates at top and bottom, fl oor plywood, and foundation framing need to withstand water. The simple wood-batten and deck-screw fas-tening of glass on the roof gives adequate service, but as it does not prevent some water leakage, the framing beneath needs to be rot resistant.
A word about air infi ltration is in order. Do not be concerned with stopping up all the cracks and sealing the doors. This build-ing works well with the level of construction used for a hen house. Some air fl ow from different places in the building is normal.
Two areas of structural con-cern for glass attachment are the foot ledge on which the south wall
glass rests, and the straps over the eave end of roof glass. The plans show the use of fl ashing to cover the shelf that supports the glass sheets for the wall. Follow direc-tions (shown in the photos and drawings at right) to achieve the 1⁄1⁄1 4⁄4⁄ " step in the fl ashing. The roof
glass offers an interesting example of glass dynamics. Glass expands and contracts with temperature changes. Every time it does, glass tries to creep down the roof slope. To counter this, a strap made from a double fold of fl ashing 11⁄1⁄1 2⁄2⁄ " x 14" is screwed into the rafter around
the eave end. If these screws enter the eave board only and not the rafter, the entire board can be pushed out.
The kiln works when air is warmed, circulated through the stack of boards, and a portion vented from the building laden
Solar kiln cross section

1"1⁄4⁄4⁄ "
Fold down11/4" of the7"-wideflashing
Fold up 1"creating1⁄4⁄4⁄ " step
3/4" outdoor wood ply floor
2 x 4 stud
Tempered glassTempered glassT
4" solidcapblock
4 x 4 outdoor wood
5/4 x 11⁄2⁄2⁄ " batten
11⁄2⁄2⁄ " x 14"strap
Use eave strapat each batten
Leave a 1⁄4⁄4⁄ " space forglass in rafter cutout
Stud
BattenTempered Tempered Tglass
Rafter2 x 4
outdoor wood
popularwoodworking.com 77
with moisture. The glass south wall and roof provide solar energy for warmth. The adjustable soffi ts along the eaves provide escape for moisture. Air circulation within the kiln is provided by the fan. There is a great deal of resistance to air f low within a stickered pile of boards. To overcome this resistance, a high-volume fan is needed. A 30"-attic fan that oper-ates in the 5,000 cubic feet per minute (cfm) range can do the job. Units are available from discount builders’ supply for $220.
The fan mounts on a remov-able 2 x 4 frame at the opening end of the kiln. The frame fits into holding slots so it can be lifted out for loading or servicing. The power is switched through a thermo switch of the sort used in farm silos (Dayton #2E728, cost $37.55). This will be set for seasonal nighttime temperature, which in Michigan is 70° F in the summer and 50° F in the spring and fall.
With this temperature switch in place, the fan operates during the day only. It switches off at night when there is little tempera-
BendingBendingglass shelf fl ashingglass shelf fl ashingGlass wall support shelf & fl ashingGlass wall support shelf & fl ashingRoof glass eave strap &Roof glass eave strap &
rafter cutout for wall glassrafter cutout for wall glass
Bending the aluminum flashing used in the 1⁄4⁄4⁄ " ledge on which the window wall glass will rest. Step one was to make a right angle in the flashing. Here, the final bend is facilitated by a board with a 1⁄4⁄4⁄ " rabbet sawn in it and clamped to the bench.
The bottom of the wall windows rests on a 1⁄4⁄4⁄ " ledge in the framing. Aluminum flashing keeps water out while the glass is held in place by a block, in this case scrap Corian left over from a countertop installation.
Block holds glass
Flashing
ture advantage which allows the boards to equalize their internal moisture levels.
Operating the KilnStacking lumber in this kiln is a hand operation because we are too small a business for the use of a forklift. Were mechanical load-ing desired, then a beam of two 2 x 12s across the top of the back wall would allow for removal of all the back plywood panels and
supports when loading from the rear. As it is, we use a cordless drill to unscrew the plywood section in the back where a man stands to add sticks to the layers of boards during loading (see photo on page 78). It also makes it bearable to work in there on a sunny day. The large end panel is secured and opened the same way. (The 16"-wide end panel is hinged to afford access to check as drying progresses.) Deck screws placed
18" to 24" apart has not been a problem for access the three or four times a year it’s needed. It should be noted that the end panel is structurally necessary to keep the building from sagging, so keep it screwed in place except when loading.
When stacking lumber, use dry sticks 1" square by 4' long. Scraps cut while milling can be a source of sticks, but wet wood sticks can cause mold growth.

48"
30" fan –Lift out for loadingStud
Plate
Wood supportbetween studs
16"
6"Here, we replace the fan, which will be plugged into a receptacle whose power is controlled by a thermostat. The end wall is closed by using drywall screws to secure the door and the main end panel.
POPULAR WOODWORKING December 200678
Before loading, the end of the kiln is opened by a hinged door panel and unscrewing a 4'-wide main panel. The 30" fan is being removed to give access.
Removable fan
The space at the top of the window wall is opened by removing the soffi t panels. It is when green wood is fi rst introduced that this venting of moisture-laden air is necessary. Later in the drying cycle, the soffi t is screwed shut to increase temperatures in the kiln, while moisture is dissipated through small cracks in the structure’s simple construction.
Better to invest the time to make ones that are kept protected from rain when not in use. Ours are 3⁄3⁄3 4⁄4⁄ " thick by 1" wide rather than the full 1" squares of commercial operators. When loading, keep the sticks in line, one above the other, to avoid bending unsup-ported boards with all the dead
weight of the load above. Spacing is three feet apart. You will need about 200 when fi lling the kiln.
Space the boards a few inches apart for air fl ow. We have exper-imented with different ways of moving air, and simply having a large-volume fan at one end blow-ing through the stack spaced with

popularwoodworking.com 79
the edges of the boards 1" to 2" apart works. However, we often leave an additional chimney 6" wide up the middle in the fi rst half of the load. When drying is com-plete, unsticker the pile, as wood can easily reabsorb moisture dur-ing poor drying months.
Everyone asks how long it takes to dry lumber in a solar kiln. There are many answers, ranging from four weeks to six months. Weather, species of wood and thickness of boards are the major factors. Comparing solar drying with other systems, the night shutdown period means extended drying times for any size or kind of stack. The season of the year will predictably come as a major factor. Here in Michigan, the kilns work effectively March through October. During winter months, drying down to 12-15 per-cent moisture content (MC) will occur, but it takes warmer condi-tions to achieve full drying. When we need boards dry in winter, we unload a small number, like one-fourth of a total kiln, into the shop (which is heated every day). These are stickered using two ordinary 24" box fans to fi nish the drying.
The two other factors affecting drying times are the species and thickness of the lumber. Softer woods dry in half the time of oak and maple. As the thickness increases, so does the length of time, and at least proportionately: twice the thickness, twice the dry-ing time, or more.
All of this means you need to have a moisture meter in order to operate a drying kiln. Also, check periodically while unloading, as the top layers dry sooner than lower ones do. The Lignomat Co. (lignomat.com or 800-227-2105) makes a line of meters, and the smallest unit, the miniLigno, sells for about $70 and is what we use. The regional standards vary a bit depending on local conditions.
Some types of wood are prone to warping. Elm is one of them, especially when knots are pres-ent. Here, elm boards were set on top of the kiln load to dry. With-out the weight of stacked boards on top, this is what happened a month later. It was so bad, one had to laugh! I never saw anything like it in 20 years. You can read all the reports, but at the end of the day, experience will be your teacher.
Here in Michigan, boards used in furniture making are 7 percent MC. Air drying will achieve 14 percent MC after a year. The reason for using a kiln is to fin-ish the drying, shorten the time, and avoid defects from weather exposure, mold and bugs.
The benefits of these kilns remain outstanding for the small operator. They provide the means for converting readily available green lumber into fi nished stock. The low investment and small operating costs make it possible to easily begin with one kiln, and add another if needed. This can overcome the slower drying times inherent to such a system. Couple these economics with the self-regulating drying cycle, and you have a user-friendly system for the craftsman with a small shop. PW
Who needs a kiln? What are the other options for drying small lots of boards?
A woodworker called for advice on drying box alder lumber cut into 4/4 x 6' boards. Before giving him the rundown on solar kilns, I checked out whether he needed one at all. The quantity he had was about 200 bf, and of that it was the wood with distinctive reddish markings that he was most interested in drying.
First of all he was hoping that I would have room to dry it for him. The answer to that question is almost always “no.” It is very diffi cult to combine outsiders’ small lots into existing drying schedules. You will be fortunate if you ever fi nd this to be a possibility.
Accordingly, with the small quantity involved, and no immediate time constraints, he could dry them at home. Knowing what it takes to dry lumber will open up on-site possibilities. This is what you need to do:
• Find a site with a temperature rise of 10° to 20° F or more above ambient air for a part of the day.
• Separate the boards to allow for equal drying on all sides.
• Provide for air circulation.• Wait. It takes from a month to a year depend-
ing on thickness, species and optimal conditions.
DO YOU NEED A KILN?Think about a space where it gets hot, like the
space above your garage, the attic, a barn loft, etc. Your home during the winter will serve the need, since this is, after all, the environment in which furniture exists. There is a fair amount of moisture given off in the short initial loss of free water that might best be done outside before home drying. Your shop can serve your drying needs if you have the space. In winter, my shop serves to fi nish off wood that cannot dry in the solar kilns, as we heat the shop most days with a wood stove.
Boards are best stickered using dry 1" square sticks that optimize air fl ow between layers. But sticks ¾" thick will work almost as well. The key thing is to keep the stack narrow and the boards spaced wide apart when depending on natural air fl ow. By tying into the building for support (C-clamp a strut to a stud for instance), it is possible to make a stack one board wide. If you can rig up a common box fan for air fl ow that would be best.
The ultimate in natural air fl ow is to stand individual boards on end. The next best is standing them on edge. The disadvantage here is the pos-sibility of warpage in drying, as well as running out of space to store them.
Keep the basics in mind and you will fi nd places already available. The most important act of all is to do it promptly. Keep it simple, but do it. — JW

Recreating Greene & Greene James Ipekjian has built a career on reproducing furniture designed by Charles and Henry Greene.
POPULAR WOODWORKING December 200680
James Ipekjian didn’t set out to become an expert on reproducing the early 20th-
century furniture designed by architects Jcentury furniture designed by architects JCharles and Henry Greene, and he can’t really explain how he got to be where he is today.
“If there were a contest for the luckiest woodworker on the planet” he says, “I don’t know if I’d win – but I think I’d be one of the fi nalists.”
Today, he works alone in a comfortably cluttered but remarkably well-equipped shop located near the ultimate bungalows built by the Greenes in Pasadena, Calif. In the 1970s, Ipekjian was working as a model maker in the aerospace industry, and building projects from Popular Mechanics out of plywood in his garage. Bitten by the woodworking bug, he wondered if he could possibly make a living working with wood. A commission for an 18th-century highboy, as well as dissatisfac-tion with his job, led him to give it a try.
Working fi rst in his garage, and later in a rented storefront, Ipekjian did all the work that came his way: kitchen cabinets, remod-eling jobs and the occasional antique repair. His story isn’t that different from a lot of wood-workers – except that some of the remodeling and repair work was on original Greene and Greene houses and furniture. Ipekjian had the drive to get the details exactly right, and the quality and range of his work since then has attracted attention worldwide.
In the early 1980s, Ipekjian purchased property to build a 3,000-square-foot shop. Infl ation and rising interest rates kept him from building for a few years, but eventually he built the shop he works in today. He moved out for a few years to a larger shop full of old
by Robert W. Lang
Comments or questions? Contact Bob at 513-531-2690 ext. 1327 or [email protected].
Visit his web site at craftsmanplans.com.
equipped machine shop. This remnant from Ipekjian’s days as a model maker allows him to fabricate metal parts and hardware when he needs to.
Just inside the front door sit reproduc-tions of two different Greene and Greene chairs, and the Gamble house’s entry table. “That’s my showroom,” says the soft-spoken craftsman. “Nothing fancy; I think the work speaks for itself.” I spent two days looking at original pieces by Greene and Greene before visiting Ipekjian’s shop; to say I was impressed would be a serious understatement. Except for a lack of aged patina, his reproductions were the equal of the originals down to the smallest detail.
As Ipekjian explains the details of how a
machinery, but came back to his original loca-tion three years ago when the city needed his property. For the last 13 years, Ipekjian has worked almost exclusively on reproducing the work that Peter and John Hall originally made for Greene and Greene.
Some of the vintage, industrial-size machinery made the return trip to his cur-rent shop, including an Oliver sliding table saw, one of the widest jointers I’ve ever seen, and an ancient yet efficient mortiser. In a small room at the back of the shop is a fully
Old industrial machinery, like this massive bandsaw, shares space with impeccable reproductions of Greene and Greene furniture in Jim Ipekjian’s workshop in Pasadena, Calif.
GREAT WOODSHOPS

popularwoodworking.com 81
drawer was made, his enthusiasm and knowl-edge of his work become apparent. He actually has more years of experience working on this furniture than the original makers did. The pieces he has reconstructed range from tiny jewel-like inlays and intricate light fi xtures to the timber-framed pergola of the Blacker house in Pasadena, Calif.
Ipekjian is self-taught. His earlier career gave him the ability to work precisely, and helped him to develop excellent problem-solving skills. “I enjoy the challenge of fi gur-ing it out,” he says, “and I’m not afraid to try things I haven’t done before.”
Ipekjian has spent so much time working with original pieces and drawings that he has become adept at interpreting the original drawings of Charles Greene. Pointing to one drawing he remarks, “That’s his representation of a cloud; you can see it in other pieces.”
On the day of my visit, Ipekjian was work-ing on a custom table that had been drawn by Greene, but never constructed. Working from
a copy of an original sketch, he was carving details in the legs. “I’m not very good at pre-dicting how long it will take to do something. For this table, I fi gured the four legs would take a day, but it’s taking me a day to do each one. This isn’t production work; each piece is a little different,” he explains.
When the Blacker house was built, there was a music cabinet in the living room that the current owners wanted reproduced. Original drawings existed, but didn’t show the details
of the exteriors of the upper doors – and the whereabouts of the original was unknown. Ipekjian made his best guess, and constructed the piece. “Unfortunately,” he says matter-of-factly, “a photo of the original surfaced shortly after I had this completed, and my guess was wrong. So I get to make a new pair of doors.”
Getting the details exactly right has been a key element to his success, and the original pieces contained an incredible amount of intricate details that aren’t readily apparent.
An ancient, but accurate Oliver sliding table saw and fl oor-to-ceiling stacks of lumber occupy the back half of the shop.
Not many one-man shops have a 20" jointer like this vintage machine, but then again, not many one-man shops produce work at the level of quality and detail that Jim Ipekjian does.
Much of Ipekjian’s work requires detailing by hand, as in these carved table legs.
GREAT WOODSHOPS

THE BLACKER HOUSEMany of the homes designed and built by Charles Sumner Greene and Henry Mather Greene have suffered cruel fates. Some were torn down; others were thoughtlessly remodeled or left to rot. Before the revival of interest in the work of Greene and Greene that began in the 1970s, no one seemed to know or care what treasures these houses and their furnishings were. After the revival it was often too late to undo the damage and dispersal that had been done.
The Blacker house, in Pasadena, Calif., one of the fi nest examples of the Greene’s worked once seemed doomed, but it is now in the middle of a happy ending to its sad story. As long as the original owner and his widow lived in the house, Henry Greene saw to it that the property was maintained, and wrote to his brother Charles in the 1930s of how good the interiors looked after being “gone over.”
Shortly after Mrs. Blacker’s death in the late 1940s, the fi ve-acre site was subdivided and new houses were erected in what had been a majestic backyard garden. Much of the furniture was sold off in a yard sale, and years later reappeared in museum and private collections.
By the mid 1980s, the Blacker house looked more like an eyesore than the center-piece of a posh neighborhood. New shingles had been placed directly over old ones, and the roof had deteriorated. Exposed rafter ends had begun to rot, and the once-colorful structure had turned a moldy looking black.
The worst blow to the house’s dignity came in 1985 when the property changed hands. A new owner had purchased the house after learning that the light fi xtures
able craftsman needed to be in charge, and Ipekjian oversaw the project for two years before beginning work on the lights.
With more than 50 lighting fi xtures completed, Ipekjian began reproducing the original furniture. In the dining room, breakfast room and living room, most of the furniture has now been reproduced, and the remaining pieces originally made by Peter and John Hall will likely be completed in the next few years.
The Blacker house is not open to the public, except for occasional private tours. The restored interiors have been featured in several recent books. The only discernable difference between Ipekjian’s reproductions and the original pieces is the patina that comes with 100 years of age. — RL
and art glass windows were worth more than the property itself. Immediately after closing, trucks appeared, and more than 50 exqui-site wood and art-glass light fi xtures were removed and sold off. The city of Pasadena passed legislation preventing the future removal of fi xtures and furnishings from historic structures, and negotiated with the owner to replace art glass windows he wanted to sell with exact reproductions.
The property was sold again to an owner who wanted to restore it, but who wasn’t up to the task. In 1995, the current owners began their restoration. James Ipekjian was fi rst asked to reproduce the light fi xtures that had been removed. As the restoration of the entire house proceeded, it became evident to the owners that an experienced, knowledge-
GREAT WOODSHOPS
POPULAR WOODWORKING December 200682
The renovation of the Blacker house is complete. Many of the original furniture pieces have also been reproduced, and more are planned.
These planes, including a very rare Stanley No. 164 smoothing plane, originally belonged to Charles Sumner Greene.
“There’s a subtlety to this furniture that you really can’t get unless you’ve seen a lot of it up close,” Ipekjian says.
His curiosity goes well beyond solving tech-nical problems. Discussing the mechanism of a drop-front desk, Ipekjian questions where the details came from: “Did the customer ask for this, or even notice it? It could have come from the guy who made it, or Henry (Greene) may have had it all drawn out.”
Ipekjian can’t keep from talking about the details – how something is put together, what lies behind the detail, and what that detail
continued on page 84

Accurate reproductions in a corner of the shop near the entrance serve as Ipekjian’s showroom.
The Blacker house furniture reproductions, and several other Greene and Greene pieces, fea-
ture inlays of precious metals, mother of pearl, semi-precious stones and carved wood. James
Ipekjian’s work includes highly detailed repro-ductions of these incredible jewelry-like inlays.ductions of these incredible jewelry-like inlays.
does for the entire piece. He likely knows more about the details and construction of this furniture than anyone. Describing the tech-niques of Peter and John Hall, the craftsmen who built the originals, Ipekjian says, “The Halls didn’t do anything the quick and easy way, but I think they were having fun, seeing what they could do.”
Ipekjian’s skill and attention to detail have brought him to a place that most woodwork-ers only dream about. He works in a pleasant space, at a comfortable pace, recreating some of the fi nest furniture ever made. His repu-tation keeps him busy. “If everything I have talked with people about comes through, I’ll be busy for the next three or four years. I’m comfortable, but still I can’t keep from worry-ing about what I’ll do after that,” he says.
Unfortunately for the rest of us, Ipekjian doesn’t have any plans at this point to teach or write about his work, “I’m too busy really doing the work. I work a lot of hours because it’s fun, and I love what I do.” Pointing to a stack of lumber leaning on the wall next to some shelves he says, “You might be interested in that wood and those tools; they belonged to Charles Greene.” The tools were worn from use but well cared for, and the lumber was marked with Greene’s name and address from many years ago.
The tools and lumber were freely given to Ipekjian. He also has a sense of gratitude for where he is today. “I can’t explain it, or pos-
sibly tell someone else how to get here, I’m fortunate to be where I am.”
When studying old furniture and its mak-ers, I often wonder what it was like at the time. Why did they do things a certain way? What were the reasons for doing this, and how was it done? James Ipekjian has spent nearly 30
years asking those questions – and discovering many of the answers – about the furniture of Greene and Greene. He remains curious and eager to fi nd the answers to the questions he still has, and in the meantime, he has another table leg to carve. PW
GREAT WOODSHOPS
continued from page 82continued from page 82
POPULAR WOODWORKING December 200684

Serving up Turning onA PlatterThis wide, shallow ‘bowl’ is an elegant project with interesting challenges.
AT THE LATHE
POPULAR WOODWORKING December 200690
A platter is a great project for beginners and advanced turners alike. It can be
as plain or as fancy as you want to make it. A beginner will want to start with fairly simple shapes and close, even-grained woods. Most of the domestic hardwoods are fi ne. You can use readily obtainable 8/4, kiln-dried wood. Common domestic species such as maple, ash, oak, cherry and so on can be found in widths suitable for platters. Some burls and exotics are also available in wide pieces. But even plain wood can make a beautiful platter; adding a bit more detail will show off these woods to good effect. For fancier woods, keep the shapes simple. Whatever wood you choose, it should be properly dried, or the platter will warp too much.
A more experienced turner might want to do more elaborate or intricate detailing or use more challenging woods, such as burls or very hard, brittle exotics. And platters are always a wonderful canvas for more decorative techniques such as burning, carving, painting, inlay and other types of work.
A platter is really just a very wide, very shallow bowl. It’s not all that different to make, either. For the methods shown here, cut the blank round on a band saw, and screw a face-plate to what is going to be the inside of the platter. Turn the entire outside of the platter (except the inside curve of the foot ring) on this fi rst mount. Prepare a recess in the foot
by Judy Ditmer
Judy, author of two turning books and many articles, has been turning since 1985. She teaches and
demonstrates her skills throughout the United States and Canada.
for a chuck. Then re-mount the piece on the chuck and turn the inside.
To finish the foot, mount a third time between centers, as described in photo 19, and cut the inside of the foot ring. This third
Whether you’re new to turning or have scads of experience, you can make a platter. Beginners can impress with a fancy wood but simple shapes, while advanced turners may opt for decorative details.
Phot
os b
y Al P
arris
h
step is skipped by some, who leave a straight-shouldered hole in the bottom of the platter where it was held by the chuck. “Bad form,” as Captain Hook would say. There is only a bottom because of gravity, not because it doesn’t matter what happens down there. Take the extra few minutes to fi nish off the foot cleanly. It will make the difference between a piece that’s just OK and one that is elegant enough to really show off the wood – and your turning skills.

popularwoodworking.com 91
The blank mounted and ready to go. Begin turning the bottom of the platter
by cutting with a bowl gouge from the approxi-
mate edge of the foot toward the rim. You’ll need
to take more material off toward the rim than at the
foot, so make more cuts and/or take deeper cuts as you near the edge. Be
sure the foot area is deep enough to cut an adequate
recess for the chuck.
1
When you’ve removed most of the excess wood, make smaller, cleaner cuts as you rough in the shape of the platter. Begin planning what the rim will look like; you’ll need to shape the bottom accordingly now.
2Use lighter cuts with a freshly sharpened tool to leave a clean surface as you refi ne the shape. As you make the workpiece thinner, you may begin to have problems with some chattering. Make sure to apply the tool pressure into the cut (i.e., parallel to the surface), not into the surface of the piece itself; this will help reduce the chatter.
Turn the chuck key until the jaws are nearly closed, but not quite; if you cut the recess a bit too small, you can just close the jaws the rest of the way to make the chuck fi t into the foot. Also a recess of the smallest diameter that will accom-modate the chuck reduces the chance of the foot ring breaking from the outward pressure. With a compass, divider or caliper, measure from the center of the chuck to the outside of the jaws.
Transfer the measurement to the foot: With the lathe on, put one point at center (but not touch-ing the wood), and mark with the other point (or pencil) by allowing it to touch the wood. This establishes the size of the recess you will cut for the chuck jaws.
The recess should be deep enough that the bot-tom surface is at the same level as that of the platter. It’s most pleasing if it appears as though the foot ring was applied to a perfectly curved, continuous surface. The bottom surface (of the foot) should be completed and sanded at this point, because it won’t be accessible when the piece is re-mounted to complete the foot ring.
The shoulder inside the foot must be slightly dovetailed so the chuck jaws can grip it securely. I use a long fi nger-nail-ground spindle gouge for this cut; it’s hard to get a good, clean under-cut shoulder with even the smallest bowl gouge.
3
4
5
6
7

AT THE LATHE
POPULAR WOODWORKING December 200692
When you have the shape you want and the cleanest surface you can get with the tools, sand the outside of the platter. If you are power sand-ing with a drill and sanding discs, pay attention to the direction of rotation. The part of the disc actually making contact with the wood should be going in the opposite direction from the wood itself. (See arrows.)
Alternating between power and hand-sanding will usually give you the best results. When hand-sanding, hold the sandpaper so that the wood is moving away from your fi ngertips, not toward them, or you could end up with stoved fi ngers. If your lathe reverses, defi nitely change the rotation two or three times while sanding.
Apply your favorite bowl fi nish to the outside of the platter. I’m using an oil-and-wax mixture which, alas, isn’t being made anymore. Many supply catalogs have a fi nish you apply and then buff out with the lathe running. This generates heat, which allows the fi nish to penetrate deeper into the wood, and which brings up a little sheen. Now you are ready to re-mount the platter on a chuck to turn the inside.
Make sure you have the jaws inserted all the way into the recess; they should be making contact with the bottom of the platter. Expand the jaws into the recess. They should be quite snug, so they will hold during the turning of the interior. You need a deep enough recess, and as wide a foot ring as practical at this stage to withstand this outward pressure.
Begin by shaping the rim. Platters almost always benefi t from a fairly wide, defi ned rim; it shows off the wood, and frames the food you put on it. Particularly when you are using 8/4 wood, a wide rim will allow you to make a large-diameter piece that doesn’t look like it was made out of a too-thin piece of wood.
Finish turning and sanding the rim before you excavate the center. As you remove wood from the interior of the piece, the wood will begin to move because internal stresses can manifest themselves in a thinner piece. This will happen no matter how stable and well-dried the wood is. Simply put, the rim will start to wobble. Once you have removed even part of the wood from the interior, it will be impossible to work on the rim again as it will be signifi cantly out-of-round.
With the bowl gouge, begin excavating the interior. Work from the rim toward the center. Try to cut only with the right (low) side of the gouge; you can cut with the left (or higher) side, but that cut is much more likely to catch, and dramatically so. Remember that a plat-ter isn’t fl at inside (that would make it a tray; a different project entirely). Rather, it has a very shallow curve that gets fl atter and fl at-ter toward the center. Be careful not to leave a dip or a bump in the center, and make sure the curve is smooth all the way. A platter with a washboard surface isn’t pleasing to the eye or hand.
Area of contact
8 9 10
11
12
13
14
continued on page 94

When you have fi nished turning, sand the interior. Power sanding can help remove minor ripples in the curve; you just spend more time sanding where there is a bit of a high spot, being careful to feather out to each side of the high area so you don’t just turn one bump into two dips and three bumps. It takes some practice to get it right, so be patient. Sanding is a skill, just as turning is, so you will have to practice, practice, practice. As noted above, the part of the disc touching the wood must be moving in the opposite direc-tion from the wood itself. (See arrows.)
When you have fi nished sanding, apply fi nish to the entire surface, and …
… buff with a clean cotton cloth as the piece spins. The platter is ready to re-mount to complete the foot.
… the tailstock. The cone center shown here has had the point removed, and is cush-ioned with a piece of foam so it doesn’t mar the bottom of the plat-ter. If your live center point can’t be removed, you’ll need to make a small wood piece to protect the platter. Be sure to put enough pressure on the piece to hold it in place; lock the tailstock and wind the quill feed in fi rmly.
15
16
17
18 19
Complete the platter by turning away the excess wood between the outer edge of the foot ring and the spot where it meets the bottom of the platter. This could be a slight inside curve, or a slight outside curve; avoid making it straight. You are a turner; don’t make straight lines. Curves are good. PW
A closer view of the live center arrangement. This piece of packing foam, while it was handy, was a poor choice on my part to cushion the center. A piece of leather would have worked better – and is what I would have used, had I not been rushing a little.
Area of contact
20 21
AT THE LATHE
POPULAR WOODWORKING December 200694
The foot is turned with the piece mounted between centers. Attach a piece of waste wood that’s a third to half the diameter of the platter to a faceplate. Mount the faceplate/waste-block assembly on the lathe, and turn it round. Make a slight concavity in the surface so the plat-ter can’t rock on it, then round over the edges so they don’t bite into and mar the platter. If your platter is quite thin, you’ll need to turn the waste piece to match the curve of the platter very closely, so it can’t rock but also will not be cracked by tailstock pressure. Cushioned by a piece of foam, the platter is pinched between the headstock and …
continued from page 92continued from page 92

Thick & Thin of Wood Finishing A penetrating look at protection.
POPULAR WOODWORKING December 200698
This article makes use of a clever title to combine two unrelated facts about wood
fi nishing.The fi rst is: The thicker the fi nish fi lm
after all coats have dried, the better the pro-tection for the wood against water penetration and moisture-vapor exchange.
The second is: The more you thin a fi nish, the better it lays out fl at. That is, the thinner the fi nish you are applying (which is not the same as the thinner you apply it to the wood) the more reduced the brush marks, orange peel and rag tracks.
Protecting Against MoistureA fi nish has two functions. The obvious one is to improve the appearance of the wood. The more important one is to protect the wood from water absorption and moisture-vapor exchange.
Water absorption causes black staining and delamination of veneer. It can also cause warping and splitting if the wetting and dry-ing out continues long enough. Look at what happens to deck boards after a few years of wet/dry cycles.
Excessive moisture-vapor exchange leads to joints breaking down sooner because of increased shrinkage and swelling in the cross-grain construction.
No fi nish totally stops the passage of mois-ture in vapor form (humidity). Finishes merely slow the passage. Consider wood windows and doors with many coats of paint and how they still swell so tight in the summer they stick, and they become loose and leak air in the winter when the air is drier.
Reactive fi nishes (varnish and “catalyzed” fi nishes) are better at slowing water pene-tration and moisture-vapor exchange than evaporative finishes (shellac and lacquer) and coalescing fi nishes (water-based fi nish).
by Bob Flexner
Bob is the author of “Understanding Wood Finishing” (Reader’s Digest Books) and a contributing editor
to Popular Woodworking.
The same is the case for oil and oil/varnish blend fi nishes. Even though these fi nishes cure by molecular crosslinking and are therefore of the reactive type, all the excess fi nish has to be wiped off after each coat to prevent it drying gummy on the wood. These fi nishes are therefore too thin to be very effective. Water penetrates through within seconds or minutes. (The claim of some suppliers that their oil/varnish blend fi nish protects from inside the wood is nonsense.)
In contrast to wax and oil fi nishes, con-sider epoxy-resin fi nishes often applied to bar tops and restaurant tables. These fi nishes are poured on, sometimes as thick as 1⁄1 ⁄1 4⁄4⁄ ". They are so effective at reducing moisture-vapor exchange that boards can be assembled in butt and miter confi gurations without fear of the boards breaking apart due to cross-grain swelling and shrinking.
One important caveat when it comes to
Far more important than the fi nish, however, is the thickness of the fi lm that is applied. The thicker the fi nish fi lm, no matter which fi nish used, the better it is at keeping liquids and vapors from penetrating.
Take wax as an example. Wax is used to seal the ends of lumber. The wax is brushed on these ends and left thick. Wax is also used as a fi nish on small objects and as a polish over another fi nish.
In the fi rst case, the wax is very effective at reducing moisture penetration because it is thick. In the latter two cases, wax is almost totally ineffective because it is so thin that moisture can fi nd a way though with little problem.
The thicker a fi nish fi lm the better it protects the wood against moisture penetration and moisture-vapor exchange. This photo is of the end of a Gabon ebony board with a thick coat of wax applied to reduce the chances of splitting caused by damp/dry cycles in humidity.
Phot
os b
y the
aut
hor
FLEXNER ON FINISHING

popularwoodworking.com 99
thickness is that catalyzed fi nishes tend to crack if applied too thick. Three or four coats is the upper limit with these fi nishes.
Creating a Level FinishAchieving a level fi nish should always be your goal because the more level the fi nish is, the better it looks and feels. Of course, you can always make a fi nish level by sanding it after all the coats have been applied (see “Rub To Create a Great Finish,” issue #156), but the work required can be reduced and even elimi-nated if you apply the fi nish level to begin with. In every case, except when wiping off the excess, you will improve the leveling of your fi nish by thinning it.
Let’s take each application method – wip-ing, brushing, spraying and French polishing – in turn.
In most cases the reason you apply a fi n-ish by wiping is because you intend to wipe off the excess. If you do this, you will always achieve perfect levelness as long as you have prepared the wood well and you get the fi nish wiped off before it sets up too hard. There’s no need to thin the fi nish except to increase the amount of time you have to wipe off.
The common wiping fi nishes are oil, oil/varnish blend, wiping varnish, gel varnish and wax. (Wiping varnish is any oil-based varnish that has been thinned enough so it levels well.)
When you intend to build a thicker fi nish fi lm, you usually brush or spray the fi nish. Brushing can leave brush marks and spraying can leave orange peel. With any hard-curing finish, including regular or polyurethane varnish, water-based fi nish, shellac, lacquer and catalyzed lacquer, you can reduce these fl aws by thinning the fi nish with the appro-priate thinner.
Use mineral spirits (paint thinner) with any type of varnish, denatured alcohol with shellac, and lacquer thinner with lacquer and catalyzed lacquer.
Thinning water-based fi nish is more com-plicated. You can add a little water, but this seldom corrects the problem because water has a high surface tension. It’s better to use the manufacturer’s “fl ow out” additive. Unfortu-nately, only a few manufacturers commercially supply one.
It’s easy to picture how thinning can be used to achieve total fl atness. Imagine brush-
ing or spraying just one of the thinners onto wood. The thinner will level out perfectly of course. It’s only logical, therefore, that a fi n-ish can be made to level perfectly somewhere between full strength and no strength – that is, just the thinner.
The downside of thinning is that you reduce the build of each coat. To get a good build quickly and still achieve a level end result, apply several full-strength coats, sand the surface level, then apply one or two thinned coats.
French polishing is a method of applying shellac with a cloth to achieve a perfectly fl at, high-gloss fi nish. The cloth is made into a pad and the shellac wiped on, often in circles or fi gure eights and usually with the aid of min-eral oil to lubricate the rubbing.
Similar to the brush marks left by brush-ing, the pad will leave rag tracks if the shellac is too thick. The way to achieve a perfectly fl at French-polished surface, therefore, is to begin thinning the shellac as you proceed through the fi nal applications.
The most effi cient way to do the thinning is right on the pad. After you have built the thickness you want, begin adding alcohol to the pad along with the shellac. Use two dis-pensers and add more alcohol and less shellac each time you refi ll the pad until you are add-ing only alcohol. (See “Fixing Finish With French Polish,” issue #144.)
In summary, thicker fi nish fi lms are most effective for protecting wood from water penetration and moisture-vapor exchange. Thinned fi nishes fl ow out and level better than unthinned fi nishes. PW
Oil fi nishes are always thin on the wood because the excess has to be wiped off after each appli-cation to keep the oil from drying gummy. As a result, watermarks like this one are common.
One of the thickest and most protective of all fi nishes is an epoxy-resin fi nish, which is applied very thick and commonly used on bar tops and restaurant tabletops such as this one.
The thicker a fi nish during application the less it fl attens out and the more brush marks and orange peel show. On the left side of each of these panels, I applied the fi nish right out of the can – brushing varnish on the top panel and spraying lacquer on the bottom panel. On the right side of the panels I brushed and sprayed the same fi nishes thinned signifi cantly with the appropriate thinner.

Name Brand Tools Name Brand Tools Whether you know it or not, Whether you know it or not, you often reach for eponyms in the woodshop.
POPULAR WOODWORKING December 2006104
Distinctive furniture styles such as Hep-plewhite, Sheraton, Phyfe and Chip-
pendale are named for their creators. The fancy word for a person whose name becomes synonymous with an object is eponym. We use eponyms when we build furniture or other projects using Phillips screws, Forstner bits and Allen wrenches. But who were these eponymous inventors?
The Phillips screw or screwdriver (you can’t have one without the other) was actu-ally the invention of J. P. Thompson, who couldn’t fi nd anyone willing to manufacture the screws. Henry F. Phillips (1890–1958) of Portland, Ore., purchased the rights for the recessed crosshead design and obtained pat-ent protection. He entered into a business arrangement with the American Screw Co. in Providence, R.I., which was bet-ter equipped to manufacture the product. Phillips and the American Screw Co. pros-pered when automobile makers universally switched to Phillips screws.
Another eponymous product, the Forst-ner bit, was named for Benjamin Forstner (1834–1897). This popular bit forms fl at-bottomed holes in wood, especially use-ful to woodworkers. Forstner was born in Pennsylvania but migrated to Salem, Ore., in 1865 where he was a gunsmith until 1889. His knowledge of metallurgy, boring and rifl ing helped him develop the bit that was originally called the “Forstner Flange Bit” or the “Webfoot Auger.” He patented his bit design in 1874.
Like Phillips, Forstner turned to the great factories in New England to take his invention into full production. The Colt Patent Fire Arms Co. of Hartford, Conn., best-known for the revolver pistol, manu-
by Philip Leon
Philip is a woodworker and English professor at The Citadel in Charleston, S.C.
If you have made basic repairs on power tools in your shop, you probably used an Allen wrench to turn setscrews or lock-screws in both metal and metal affi xed to wood.
A more interesting story behind the Allen wrench is who did not invent it. An erroneous account got started that the inventor of the Allen wrench was Gil-bert F. Heublein (1850–1937), a German immigrant who became a liquor importer in Hartford, Conn. Heublein created and bottled America’s fi rst premixed cocktails with great commercial success, but Prohibi-tion crippled the liquor industry. Following Prohibition, Heublein’s grandson infused fi nancial energy into the company on the strength of producing and distributing a famous brand of vodka, the basic ingre-dient, along with orange juice, for a pre-mixed cocktail known as a “screwdriver.” Somehow the story became distorted that Heublein – the person, not the company – invented a new kind of screwdriver. Noth-ing in Gilbert F. Heublein’s obituary in the New York Times mentions the Allen wrench (he died six years before the Allen wrench was patented). PW
factured the bits with a short center point and sharp cylindrical rim. Having perfected strong bits that could provide accurate boring of gun barrels and cylinders, Colt adapted Forstner’s bit for drilling wood.
The Forstner bit won a prize at the Cen-tennial Exposition of 1876 and another at the World’s Fair of 1883. His business arrangement with Colt was lucrative; Colt paid Forstner a royalty for the rest of his life, and he died a wealthy landowner. Today you will see these bits spelled Forstner or forst-ner and sometimes foerstner.
A third eponym, the Allen screw and wrench (also called the Allen key, hex key or hex head wrench), was trademarked in 1943 in the United States by the Allen Manufac-turing Co. in Hartford, Conn., however it had existed in Europe about three decades earlier. Although H. M. Allen, owner of the Allen Manufacturing Co., did not invent this screw and wrench, his name became the eponym for the adapted American version.
Illus
trat
ion
by P
at L
ewis
Illus
trat
ion
by P
at L
ewis
OUT OF THE WOODWORK