P90 BASIC AND PRO VERSIONS - 3B Scientific
16
OPERATING MANUAL P90 BASIC AND PRO VERSIONS
-
Upload
khangminh22 -
Category
Documents
-
view
2 -
download
0
Transcript of P90 BASIC AND PRO VERSIONS - 3B Scientific

OPERATING MANUAL
P90 BASIC AND PRO VERSIONS

3B Scientific Birth Simulator
2 Do you have any questions? +49 (0)40 - 739 66 0P90 | Table of contents
TABLE OF CONTENTS
BASIC AND PRO VERSIONS ...............................................................................................................3 FEATURES ...............................................................................................................................................4 DELIVERY CONTENTS .........................................................................................................................5 DELIVERY CONTENTS .........................................................................................................................6
Assembly and upgrade of the birth simulator ...............................................................................7 CLIP CONNECTIONS ...........................................................................................................................7 Opening and closing the clip connections ..................................................................................7 ABDOMINAL WALL ...............................................................................................................................7 Removing and inserting the abdominal wall ...............................................................................8 ABDOMINAL WALL INSERT ...............................................................................................................8 CERVIX AND VULVA ............................................................................................................................8 Replacing the vulva (Basic and Pro versions) .............................................................................8 Replacing the cervix (Basic and Pro versions) ............................................................................9 Installing the vulva-cervix unit (Pro version) ................................................................................9 UTERUS ...................................................................................................................................................9 UMBILICAL CORD .............................................................................................................................. 10
BIRTH SIMULATION .............................................................................................................................. 11 INTRODUCTION ................................................................................................................................. 11 PREPARING FOR A BIRTH ............................................................................................................... 11 SECURING THE BIRTH SIMULATOR .......................................................................................... 11 BIRTH PROCESSES ........................................................................................................................... 11 CONTRACTIONS AND BABY LUBRICANT ............................................................................... 11 CUTTING THE UMBILICAL CORD .............................................................................................. 11 DETERMINING THE POSITION OF THE BABY ........................................................................ 12 ANTERIOR OCCIPUT PRESENTATION (NORMAL BIRTH) .................................................... 12 POSTERIOR OCCIPUT PRESENTATION ................................................................................... 12 BREECH PRESENTATION ............................................................................................................. 12 C-section ........................................................................................................................................... 13 FREQUENT COMPLICATIONS ........................................................................................................ 13 Shoulder dystocia ........................................................................................................................... 13 Placenta previa ................................................................................................................................ 14 Umbilical cord complications ....................................................................................................... 14 Unruptured amniotic sac ............................................................................................................... 15 Adherent placenta .......................................................................................................................... 15 CLEANING AND CARE ...................................................................................................................... 16
ORDER LIST ........................................................................................................................................... 16LEGAL NOTICE ...................................................................................................................................... 16

3B Scientific Birth Simulator
3 Do you have any questions? +49 (0)40 - 739 66 0
You have acquired a birth simulator with basic features (Basic) or advanced features (Pro). It can be used to simulate the birth mechanics of normal positions, position anomalies and frequent complications, and C-sections. The simulated baby has a fontanel, shaped shoulder blades and an open mouth. The baby’s umbilical cord can be cut and reused up to five times. The placenta includes placenta residues that can be broken off and that leave adherent placenta in the birth simulator during the afterbirth.
The anatomy of the 3B Scientific birth simulator makes allowance for the S-curve of the maternal spinal column and a large movement range through its fully movable joints on the limbs of the baby. The materials used are soft PVC and silicone.
The Basic version of the birth simulator can be easily reconfigured into the Pro version. The Basic version has connecting elements with which the birth simulator can be easily supplemented with additional elements such as the uterus insert and the attachment for safety straps on the base of the birth simulator. The planar vulva and cervix elements in the Basic version can also be replaced by the anatomically shaped vulva and cervix from the Pro version. This allows a rapid increase in the range of representation and intervention options.
P90
BASIC AND PRO VERSIONS
BASIC
Article no.: 1020332 / P90B
PRO
Article no.: 1020333 / P90P

3B Scientific Birth Simulator
4 Do you have any questions? +49 (0)40 - 739 66 0P90 | BASIC and PRO VERSIONS
FEATURES
The Basic version allows a simplified, generalized representation and demonstration of the anatomy of the female pelvis and the various po-sitions of the baby before and during birth. The realistic simulation of the Pro version, with its supplementary elements, also makes it suitable for realistic, practical exercises. These include for example a more realistic measurement of position in the Pro version through feeling the is-chial spine, made possible by the realistic soft tissue simulation, or palpation of the birth position through the abdominal wall (e.g. Leopold’s maneuvers) covering the inflatable uterus insert.
Simulator BASIC PRO
Area of application Simplified representation and demonstration of birth mechanics
Representation, demonstration and realistic birth mechanics exercises
Mot
her
Safeguards during the simulation 1. Anti-slip feet2. Handhold for assistants
1. Anti-slip feet2. Handhold for assistants3. Fastening straps for table or bed
Vulva Planar, dilatable, large intervention Shaped, dilatable, in a realistic size, together with vagina constitutes a unit
Cervix Planar, dilatable with opening Anatomically shaped, together with vagina constitutes the birth canal
Pelvic bones(symphysis)
Anatomical shaping
Uterus 1. For determining the position of the baby
2. Removable, upper uterine wall for double C-section
Abdominal wall insert (C-section) Soft PVC with specified bikini cut Two-layer with simulated muscle layer, very elastic silicone that can be opened manually with the scalpel using common incision types
Bab
y
Baby body Fully movable limbs and head
Important anatomical structures 1. Fontanel2. Scapula3. Open mouth
Umbilical cord Can be cut up to five times and then replaced by an umbilical cord in the original length.
Adherent placenta Simplified representation with separable connection to the umbilical cord, hook-and-loop fastener for attachment in the womb. Two detachable adherent placenta parts with hook-and-loop fastener for retention in the womb

3B Scientific Birth Simulator
5 Do you have any questions? +49 (0)40 - 739 66 0P90 | Delivery contents
DELIVERY CONTENTS
BASIC
Base bodyRemovable parts • Abdominal wall • Abdominal wall insert made of soft PVC • Planar cervix • Planar vulva with large openingLubricantAccessory set (5 mm Allen key, 3 spare clips 15 clip holders)Baby
PRO
Base bodyRemovable parts • Abdominal wall • Two-layer abdominal wall insert made of cuttable silicone • Inflatable uterus insert with cuttable and exchangeable upper
uterine wall • Anatomically shaped cervix • Modeled vulva with vagina (birth canal) • Amnion inserts (100 sheets) • Safety strap (belt holder on base body)LubricantAmniotic fluid additiveAccessory set (5 mm Allen key, 3 spare clips 9 clip holders)Baby
BABY (FOR PRO AND BASIC)
BabyRemovable parts • Umbilical cord with 2 clamps • Placenta • Adherent placenta parts
Umbilical cord
Placenta
Safety strap
Inflatable uterus insert
Amniotic fluid additiveLubricant
Accessory set
Amnion insert
Base body Abdominal wall Vulva
Cervix
Abdominal wall insert
Modeled vulva with vagina (birth canal)
Abdominal wall insertCervix
Base body
Abdominal wall

3B Scientific Birth Simulator
6 Do you have any questions? +49 (0)40 - 739 66 0P90 | Delivery contents
DELIVERY CONTENTS
UPGRADE (FROM BASIC TO PRO)
Removable parts • Abdominal wall • Two-layer abdominal wall insert made of cuttable silicone • Inflatable uterus insert with cuttable and exchangeable upper
uterine wall • Anatomically shaped cervix • Modeled vulva with vagina (birth canal) • Safety strap • Amnion inserts2 x lubricant3 x amniotic fluid additive2 x strap holder with screws
Safety strap
Abdominal wall insert
Inflatable uterus insert Abdominal wall
Amniotic fluid additive
Lubricant
Amnion insert
CervixModeled vulva with vagina (birth canal)
Strap holders

3B Scientific Birth Simulator
7
è
è
Do you have any questions? +49 (0)40 - 739 66 0
Clip connectionsThe vulva in the basic version and the abdominal wall insert (in both versions) are fastened to the abdominal wall using clip connections.
Opening and closing the clip connections
NOTE: To open the snap-on connection, you will need to loosen
the washer from the clip. If it is pushed more than one notch onto the clip, it may be difficult to raise the washer again with your fingernail.
• To avoid damage to the surrounding material, always loosen using a flat, dull-edged tool such as a rounded spatula.
• Slide the tool carefully between the abdominal wall and the washer to loosen the connection.
• To open the clip connection, lift the washer with your fingernail.• Otherwise, use a flat, dull-edged object, as rounded as possible, to
leverage the washer from the clip (caution: sharp or pointed ob-jects may damage the material).
• To close the clip connection, slide the washer only onto the first notch on the clip.
NOTE: The abdominal wall is fixed to the birth simulator using 14*
phantom locks. A phantom lock consists of a sealing sleeve made of soft PVC on the abdominal wall and a plastic locking pin fixed to the birth simulator. The soft PVC is elastic. When the abdominal wall is mounted, the connection is not visible.
• Loosen the abdominal wall by pulling it up firmly and evenly. • Always pull close to the connection to ensure that the
tension can act directly on the connection and no material is fatigued or damaged.
• Avoid sudden pulling or tearing.
* In the PRO version, there are only 13 phantom locks
• Place the birth simulator on a non-slip surface such as a table.• Start loosening the abdominal wall at the top of the
abdominal cavity.• To expose the interior of the birth simulator, it is sufficient to
loosen all connections except the lowest in the interior of the birth simulator.
ASSEMBLY AND UPGRADE OF THE BIRTH SIMULATOR
Abdominal wallTo enable free access to the inner soft tissue simulations, the birth simulator’s abdominal wall can be removed. This is a good idea if you want to give trainees a better insight into the birth mechanics at the beginning of demonstrations and exercises. To replace the vulva and cervix simulations in the Basic version with the Pro ver-sion, you will need to remove the entire abdominal wall from the birth simulator.
P90 | Assembly and upgrade of the birth simulator

3B Scientific Birth Simulator
8
è
è
Do you have any questions? +49 (0)40 - 739 66 0P90 | Assembly and upgrade of the birth simulator
Removing and inserting the abdominal wall
NOTE: Always start the installation of the abdominal wall with the
lowest connection in the interior of the birth simulator (coccyx). As you proceed, this connecting pin becomes difficult to reach.
• Place the birth simulator on a non-slip surface such as a table.• First connect the abdominal wall with the locking pin in the interior
of the birth simulator (coccyx).• Then connect the remaining connections upward towards the
abdominal cavity.• To connect the sleeves on the abdominal wall with the connecting
pins at the top of the torso, apply tension with some force to the abdominal wall.
Abdominal wall insert
TIP: It is usually sufficient if the abdominal wall insert with the
plastic clip for the clip connection is loosely connected to the birth simulator without using the washer.
Only close the clip connection completely if you want to demonstrate a C-section on the birth simulator.
• Place the abdominal wall insert into the designated recess in the abdominal wall.
• Slide the clips between the abdominal wall insert and abdominal wall.
Cervix and vulvaIn the Basic version, cervix and vulva are two separate elements of the birth simulator. In the Pro version, the vulva insert includes a birth canal that extends to the iliac crest, where it is also fixed. To upgrade to the Pro version, the following steps are required:
• Remove the Basic version abdominal wall• Remove the planar cervix from the iliac crest• Install the vulva-cervix unit• Replace the Pro version abdominal wall
Replacing the vulva (Basic version)The vulva is connected to the abdominal wall using six clip connections.
• Loosen the abdominal wall as described under “Removing and inserting the abdominal wall”.
• On the back of the abdominal wall, remove the six washers as described under “Opening and closing the clip connections”.
• To upgrade to the Pro version, replace the abdominal wall with the Pro version.
• To exchange parts in the Basic version, you can now replace the vulva.
• To fix it back into place, run the clips from the outside through the opening in the abdominal wall and in through the vulva.
• From the inside of the abdominal wall, press the washers onto the clip.
• Let the clip lock into place near the abdominal wall without squeez-ing the abdominal wall material.
• Continue with the replacement of the cervix, or fix the abdominal wall.
To better illustrate the intrauterine situation, it may be a good idea to remove the abdominal wall completely. In this case, please see the note below.

3B Scientific Birth Simulator
9
è
Do you have any questions? +49 (0)40 - 739 66 0
Replacing the cervix (Basic and Pro versions)The cervix is fixed to the pelvic bone in the interior of the birth simu-lator with 10 knurled screws. The flexible silicone inserts can be pulled over the screw heads and removed without loosening the screws.
• Pull the planar cervix down from the knurled screws.
• For the Basic version, you can now replace the planar cervix.• To upgrade to the Pro version, continue with the installation of the
vulva-cervix unit.
Installing the vulva-cervix unit (Pro version)• Pull the opening of the vulva-cervix unit over the
10 knurled screws.
Uterus
NOTE: The uterus is introduced into the abdominal cavity from above.
It can be pumped up to enable realistic palpation maneuvers.
The uterus can be inserted into the abdominal cavity from the torso side of the birth simulator, where it can be secured using a locking pin on the underside. Its counter piece, the locking cylinder in the abdominal cavity, is closed where necessary with a blind plug.
Remove the blind plug before introducing the uterus into the abdominal cavity.
• Insert the uterus into the abdominal cavity from above.• Let the uterus “snap into place” with the designated locking
cylinder in the recess in the abdominal cavity.
P90 | Assembly and upgrade of the birth simulator

3B Scientific Birth Simulator
10
è
Do you have any questions? +49 (0)40 - 739 66 0P90 | Assembly and upgrade of the birth simulator
Umbilical cord
NOTE: The umbilical cord is connected to the baby’s body with a
screw connection. It can be cut and reconnected to the baby’s body up to five times, after which the umbilical cord is too short for the simulation of birth.
• To remove the umbilical cord from the baby’s body, turn the screw (anticlockwise).
• Then turn the cap on the detached umbilical cord to expose the transparent silicone sleeve.
• To use the severed umbilical cord again, pull off the transparent silicone case from the short end of the cut umbilical cord.
Squeeze the blue and red strings into the screw connection using an Allen screw.• Unscrew the Allen screw with the size 5 Allen key, which is
included in delivery.
• Before re-using the cut umbilical cord for further exercises, pull the strings about 2-3 cm out of the longer section of the umbilical cord.
• Twist the strings together. • Slide the twisted strings into the screw connection.
• Fix the strings with the Allen key.• Slide the silicone sleeve onto the navel plug.
• Turn the umbilical cord and the strings slightly. • Screw the cap onto the navel plug. • Screw the umbilical cord (clockwise) onto the baby’s body.
3B Scientific Birth Simulator
11
è
Do you have any questions? +49 (0)40 - 739 66 0
BIRTH SIMULATION
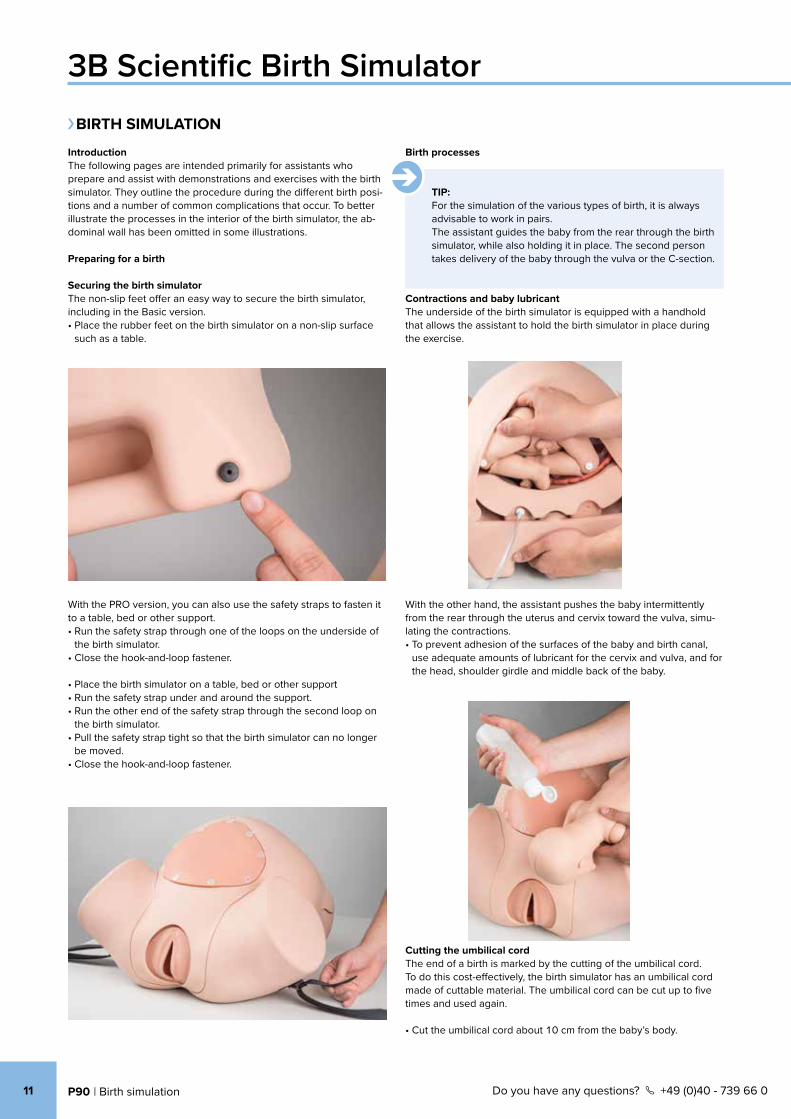
IntroductionThe following pages are intended primarily for assistants who prepare and assist with demonstrations and exercises with the birth simulator. They outline the procedure during the different birth posi-tions and a number of common complications that occur. To better illustrate the processes in the interior of the birth simulator, the ab-dominal wall has been omitted in some illustrations.
Preparing for a birth
Securing the birth simulatorThe non-slip feet offer an easy way to secure the birth simulator, including in the Basic version.• Place the rubber feet on the birth simulator on a non-slip surface
such as a table.
With the PRO version, you can also use the safety straps to fasten it to a table, bed or other support.• Run the safety strap through one of the loops on the underside of
the birth simulator.• Close the hook-and-loop fastener.
• Place the birth simulator on a table, bed or other support• Run the safety strap under and around the support. • Run the other end of the safety strap through the second loop on
the birth simulator.• Pull the safety strap tight so that the birth simulator can no longer
be moved.• Close the hook-and-loop fastener.
Birth processes
TIP: For the simulation of the various types of birth, it is always
advisable to work in pairs. The assistant guides the baby from the rear through the birth simulator, while also holding it in place. The second person takes delivery of the baby through the vulva or the C-section.
Contractions and baby lubricantThe underside of the birth simulator is equipped with a handhold that allows the assistant to hold the birth simulator in place during the exercise.
With the other hand, the assistant pushes the baby intermittently from the rear through the uterus and cervix toward the vulva, simu-lating the contractions.• To prevent adhesion of the surfaces of the baby and birth canal,
use adequate amounts of lubricant for the cervix and vulva, and for the head, shoulder girdle and middle back of the baby.
Cutting the umbilical cordThe end of a birth is marked by the cutting of the umbilical cord. To do this cost-effectively, the birth simulator has an umbilical cord made of cuttable material. The umbilical cord can be cut up to five times and used again.
• Cut the umbilical cord about 10 cm from the baby’s body.
P90 | Birth simulation

3B Scientific Birth Simulator
12
è
Do you have any questions? +49 (0)40 - 739 66 0P90 | Birth simulation
Determining the position of the babyThe birth simulator’s inflatable uterus allows a manual diagnosis to determine the position of the baby through the abdominal wall, for example using Leopold’s maneuvers.
• Insert the uterus into the abdominal cavity from above.• Make sure that the locking pin on the uterus engages with the
locking cylinder on the birth simulator.• Place the baby on the uterus in the required position.• Use the pump to start inflating the uterus until you can feel the
baby’s body through the abdominal wall.
You can use the release valve to deflate the uterus.
• To remove the uterus and baby or to change the position of the baby, let air out through the release valve.
• Hold the button on the release valve until enough air has escaped and the baby can be moved.
Anterior occiput presentation (normal birth)In most cases, the baby is head down in the uterus before birth. There are two fetal positions: the baby’s back is facing the mother’s left side (first position) or the mother’s right side (second position).
Turning the baby’s head down in the cervix produces an anterior occiput presentation. Turning the baby’s head up in the cervix pro-duces a posterior occiput presentation.
• Apply adequate amounts of lubricant to the baby’s head and upper body up to the shoulder blades.
• Introduce the baby from the rear into the birth simulator in the first position (see illustration) or toward the other side in the sec-ond position.
• Push the baby into the cervix while simulating contractions.
Posterior occiput presentationA posterior occiput presentation is when the baby is in the cervix with the head facing the belly of the mother.• Apply adequate amounts of lubricant to the baby’s head and
upper body up to the shoulder blades.• Introduce the baby from the rear into the birth simulator in the first
or second position.• Push the baby into the cervix while simulating contractions.• Turn the baby with the face toward the abdominal wall.
Breech presentationA breech presentation is when the baby is in the uterus with the head up. Three different forms of breech presentation are distin-guished (frank breech, footling breech and kneeling breech).
TIP: In all variations of the breech presentation, it is important to ensure that adequate amounts of lubricant are applied to the body of the baby to prevent the baby’s body from adhering to the cervix material during simulation.
• Apply the lubricant primarily to the lower body of the baby, in particular the legs, buttocks and lower back.
• Because of the more difficult passage through the birth canal in the breech position, you may need to apply additional pressure through the opening in the abdominal wall insert.
Breech position• Turn the baby’s legs up.
Notiz
Incorrect. Not separable.

3B Scientific Birth Simulator
13
è
Do you have any questions? +49 (0)40 - 739 66 0
TIP: Both the footling breech and kneeling breech positions can
be complete or incomplete. In the complete position, both legs are involved. In the incomplete position, only one of the legs has the relevant orientation.
Footling breech• Bend the baby’s legs.
Kneeling breech• Bend the baby’s legs so that it is “kneeling” or “standing” in
the uterus.
Stabilizing and guiding the baby’s headThe baby has an open mouth. You can place your finger in the baby’s mouth to stabilize and guide the head during the breech delivery, for example when carrying out the Smellie-Veit maneuver.
C-sectionIn the Basic version, the birth simulator has an abdominal wall insert with a pre-assembled C-section opening. In the Pro version, the ab-dominal wall insert is suitable for demonstrating and practicing the C-section with its common vertical and horizontal incisions on the birth simulator. In addition, the uterus has a schematically represent-ed uterine wall, which can also be cut and torn. The uterine wall in-sert (foam) is symmetrically shaped, allowing a second intervention on the uterine wall insert after it has been rotated by 180°.
• Start the cut for the bikini cut horizontally in the lower third of the abdominal insert.
• Cut through both layers of the abdominal wall insert, which repre-sent the skin layers (upper layer) and connective tissue (lower layer).
• Make another cut on the uterus wall insert and open it out manually as appropriate.
• The opening can be dilated in a realistic manner through the use of extremely flexible materials.
• Turn the uterine wall insert 180° to start a new intervention.
FREQUENT COMPLICATIONS
Shoulder dystociaAfter delivery of the head, incorrect positioning of the child’s shoul-ders in the mother’s pelvis can cause the delivery of the body to be obstructed or delayed. The shoulders can be obstructed by the pu-bic bone or by the maternal pelvis.
• Apply adequate amounts of lubricant to the baby’s head and upper body up to the shoulder blades.
• Introduce the baby from the rear into the birth simulator in the first position (see illustration) or toward the other side in the second position.
• Push the baby into the cervix while simulating contractions.
P90 | Birth simulation
Notiz
Incorrect. Change to "represen- ted"
Notiz
Incorrect. Change to: "repres- ent"
Notiz
Incorrect. Not separable.

3B Scientific Birth Simulator
14
è
Do you have any questions? +49 (0)40 - 739 66 0
Placenta previaNormally, the placenta as the supply organ for the unborn child is found in the upper to middle areas of the uterus (see illustration). When placenta previa occurs, the placenta is too low in the uterus, sometimes as low as the cervix. When you demonstrate the occurrence of placenta previa, the main concern is usually to show the positions of the placenta and baby.
• To better illustrate the positions of the placenta and baby, remove the abdominal wall.
• First place the placenta in the uterus near the cervix or in the cervix.
• Then place the baby in the required birth position. • If you are planning a subsequent C-section to deal with the placen-
ta previa, fix the abdominal wall back onto the birth simulator with the phantom locks
• Close the clip connections with which the abdominal wall insert is held in the abdominal wall.
Umbilical cord complications
TIP: To present complications that may occur with the umbilical
cord during birth, it is important to ensure that the umbilical cord is of sufficient length. Some complications cannot be presented with an umbilical cord that has already been cut.
• For such cases, keep a second umbilical cord that has not been cut during an earlier exercise.
Obstruction by the pubic boneThe shoulder girdle remains in the first or second position, as in the initial lateral position of the baby. The anterior shoulder gets caught on the pubic bone. The body cannot be delivered.• Push the baby into the lateral position toward the vagina.• Partially deliver the head. The anterior shoulder gets caught on the
pubic bone. • Explain (in outlines) the McRoberts maneuver for clearing the
block.
Obstruction by the pelvic floorDuring the delivery, the baby’s shoulders fail to rotate in the mater-nal pelvis, causing the baby’s shoulders to be transverse to the pel-vic floor.• Push the baby into the lateral position toward the vagina. • Fully deliver the head. • Turn the child on its longitudinal axis.• The shoulders remain in a transverse position in the pelvis.
Presentation of the umbilical cordFor a presentation of the umbilical cord, the cord is already in front of the birth opening during the pregnancy, i.e. when the amniotic sac is intact (if required, this presentation can be combined with an un-ruptured amniotic sac. See also the section headed “Unruptured amniotic sac”).• Place the baby in the normal position in the uterus.
• Place part of the umbilical cord in the cervix.• If the abdominal wall is still open, fix it fully into place with all
phantom locks.• Loosen any straps fixing the birth simulator to the table or bed to
allow the Trendelenburg position and to correct the position of the umbilical cord.
• If the position of the umbilical cord remains unchanged, prepare for a C-section.
• Close the clip connections with which the abdominal wall insert is held in the abdominal wall.
Umbilical cord prolapseAn umbilical cord prolapse is when the umbilical cord is between child and cervix and the waters have already broken.
• Prepare the delivery as described under “Presentation of the um-bilical cord”.
• Loosen any straps fixing the birth simulator to the table or bed. • Raise the pelvis to relieve the umbilical cord up to the C-section.• Close the clip connections with which the abdominal wall insert is
held in the abdominal wall.
Looping of the umbilical cordThe movements of the fetus during pregnancy may cause the umbil-ical cord to loop around parts of the body.
• Prepare various loops, for example around the arms, legs or neck.• Place the baby from above into the abdominal cavity in the uterus.
P90 | Birth simulation
Übersetzer
Notiz
Incorrect. Chage to "pla- centa"

3B Scientific Birth Simulator
15 Do you have any questions? +49 (0)40 - 739 66 0
Unruptured amniotic sacThe Pro version of the birth simulator includes 100 amnion inserts made of polyethylene. The amnion inserts can be used to simulate an unruptured amniotic sac.
• Fix the six holes on the amnion insert to the 6 knurled screws on the cervix.
• Press the bag into the cervix toward the vagina.
• Now fill the cervix with an adequate amount of water (max 150 ml) and a few drops of amniotic fluid additive (2 splashes from the spray bottle).
• You can now open the “unruptured amniotic sac” through the vagi-na with an appropriate instrument.
• Have a container ready to collect the water that drains. We recom-mend placing the entire structure in a shallow pan or on very absorbent padding.
Adherent placenta partsThe placenta has two small inserts with a hook-and-loop strip. You can fix these to the designated positions in the uterus or womb to illustrate adherent placenta. • Fix the placenta with the inserts (1) on hook-and-loop fasteners in
the uterus or womb (2).
When you deliver the afterbirth, parts of the placenta remain in the uterus or womb.
• Remove any adherent placenta through the vagina.
P90 | Birth simulation
Übersetzer
Notiz
Change "with an appropriate instrument" to "with an amniotic finger cot or hook."

3B Scientific Birth Simulator
16
© Copyright 2016 for instruction manual and design of product:
3B Scientific GmbH, Germany
3B Scientific GmbH Rudorffweg 8 • 21031 Hamburg • GermanyTel.: + 49-40-73966-0 • Fax: + 49-40-73966-100www.3bscientific.com • [email protected]
A w o r l d w i d e g r o u p o f c o m p a n i e s3B Scientific
è è
Do you have any questions? +49 (0)40 - 739 66 0P90
Cleaning and careThe surfaces of the simulator can be cleaned with a damp cloth. The removable parts of the birth canal (vulva, cervix) and the fetus can also be rinsed under running water. Foam parts are used in the abdominal wall and the abdominal wall insert in the Pro version, and in the uterus insert. Please keep these away from water and moisture. Please ensure that all parts are completely dry before storing.
NOTE: Do not use any cleaning products containing solvents,
as they may cause damage to the surface. Please avoid labeling and marking the surface, as this can cause permanent discoloration.
Technical data Dimensions: Simulator (H x W x D) 34 x 52 x 44 cm Weight: Basic 5.85 kg, Pro 7.35 kgOperating temperature: -10°C to 40°CStorage temperature: -20 °C to +60 °C
Order list
TIP: Residues of applied lubricant may remain on some parts
of the birth simulator if it is used again in quick succession. Always ensure that sufficient lubricant is applied before starting any birth cycle. If not used for an extended period, ensure that all parts are free of lubricant and follow the instructions for cleaning.
Article number Description Birth simulator Basic P90B
Birth Simulator Pro P90P
Main product
1020332 [P90B] Basic birth simulator
1020333 [P90P] Pro birth simulator
Replacement parts
1020336 [XP90-001] Complete baby set X X
1020342 [XP90-007] Birth canal and cervix (2x birth canal / 1x cervix) X
1020343 [XP90-008] Birth canal and cervix (1x birth canal / 1x cervix) X
1020344 [XP90-009] Abdominal wall X
1020345 [XP90-010] Cervix / vulva X
1020346 [XP90-011] C-section insert X
1020348 [XP90-013] Pin set (30 pieces) X X
1020349 [XP90-014] Plastic screw set (10 pieces) X X
Consumables
1020338 [XP90-003] Uterine wall X
1020339 [XP90-004] C-section insert X
1020340 [XP90-005] Complete abdominal wall set X
1020341 [XP90-006] Amniotic fluid insert X
1020347 [XP90-012] Umbilical cord set X X
1020608 [XP90-015] Lubricating gel (2 x 250 ml) X X
Option
1020337 [XP90-002] Upgrade kit Basic -> Pro X
1020367 [XP90-016] Leopold insert X X