OS-TSC - For TSC control panel - OPERATOR'S MANUAL
78
OPERATOR’S MANUAL OPERATOR’S MANUAL OS-TSC For TSC control panel www.northern-lights.com
-
Upload
khangminh22 -
Category
Documents
-
view
2 -
download
0
Transcript of OS-TSC - For TSC control panel - OPERATOR'S MANUAL

OPERATOR’S MANUALOPERATOR’S MANUAL
OS-TSCFor TSC control panel
www.northern-lights.com

Breathing Diesel engine exhaust and some of its constituents are known to the State of California to cause cancer, birth defects, and other reproductive harm.* Always start and operate the engine in a well-ventilated area.* If in an enclosed area, vent the exhaust to the outside.* Do not modify or tamper with the exhaust system.* Do not idle the engine except as necessary.For more information, go to www.P65warnings.ca.gov/diesel.
— CALIFORNIA —Proposition 65 Warning:
Northern Lights4420 14th Avenue NWSeattle, WA 98107Tel: (206) 789-3880Fax: (206) 782-5455
Copyright ©2018 Northern Lights, Inc.All rights reserved. Northern Lights™, andthe Northern Lights logo are trademarks ofNorthern Lights, Inc.
Printed in U.S.A.PART NO.: OS-TSC 07/18

OS-TSC 1/181
Read this operator's manual thoroughly before starting to operate your equipment.This manual contains information you will need to run and service your new unit.
OPERATOR'S MANUALOS-TSC User Manual
1 SPECIFICATIONS .................................................... 2 1.1 INTRODUCTION .......................................... 3 1.2 THIS MANUAL ............................................. 3 1.3 RECEIVING, HANDLING & STORAGE .......... 4 1.4 SAFETY RULES............................................... 52 INSTALLATION ................................................... 6 - 7 2.1 TYPICAL WIRING DIAGRAM ....................... 8 2.2 ELECTRICAL INSTALLATION ........................ 9 3 USING THE CONTROLLER ............................. 10 - 11 3.1 MODES, STARTING & STOPPING .............. 12APPENDIX A: SPECIAL PROGRAMMING .............. 13 A.1 CUSTOM INPUTS & PROGRAMS .............. 13 A.2 TERMINAL DESCRIPTIONS ................. 13 - 14 A.3 UNIVERSAL SENSOR ................................. 15 A.4 SETTINGS ................................................... 16 A.4.1 OPERATOR SETUP ............................ 16 A.4.2 SWITCHED INPUTS ..................... 17 - 18 A.4.3 CONFIGURABLE INPUTS .................. 19 A.5 SWITCHED OUTPUTS .......................... 20 - 21 A.5.1 GROUP OUTPUTS ............................. 21 A.6 SENSORS ................................................... 22 A.6.1 ENGINE TEMPERATURE .................... 22 A.6.2 OIL PRESSURE ................................... 22 A.6.3 FUEL LEVEL ....................................... 23 A.6.4 ENGINE SPEED ................................. 23 A.6.5 BATTERY LEVEL ................................. 24 A.6.6 AUXILIARY ........................................ 25 A.6.6.1 FAULT MONITOR EXAMPLE ............26 A.6.6.3 OUTPUT ON LOW / HIGH EXAMPLE .................................. 27 A.6.7 CUSTOM SENDER TABLES ................ 28 A.7 TIMERS ....................................................... 29 A.7.1 ENGINE LOGIC ................................ 29 A.7.1.1 PREHEAT MODE ...................... 30 A.8 MAINTENANCE ......................................... 31 A.9 AC MONITOR ........................................... 32 A.9.1 GENERATOR VOLTAGE ................... 32 A.9.2 GENERATOR FREQUENCY .............. 33 A.9.3 GENERATOR CURRENT ................... 33APPENDIX B: J1939 COMMUNICATIONS. .............. 34 B.1 CANBUS WIRING ....................................... 34 B.2 REFERENCE ................................................ 34 B.3 STANDARD ......................................... 35 - 36 B.4 PROPRIETY .......................................... 37 - 39 B.5 AUXILIARY SENSORS ................................. 39 B.6 DMI ............................................................ 40 B.7 WARNINGS ................................................ 40 B.8 FAILURES .................................................... 41APPENDIX C: RS485 COMMUNICATIONS .............. 42 C.1 MODBUS SETTING & WIRING ................... 42 C.2 MODBUS VERSION 2 ................................ 43 C.2.2 QUICK REGISTER REFERENCE ......... 43
Proprietary InformationThis publication is the property of Northern Lights, Inc.
It may not be reproduced in whole or in part without the written permission of Northern Lights, Inc.© Northern Lights, Inc. All rights reserved. Litho U.S.A. Publication number OS-TSC 1/18
Table of Contents C.2.2.1 REMOTE CONTROL REGISTERS .... 43 C.2.2.2 SYSTEM STATUS REGISTERS ........... 43 C.2.2.3 AC SENSING REGISTERS ............... 43 C.2.2.4 SERVER REGISTERS ....................... 44 C.2.2.5 TIMER REGISTERS .......................... 44 C.2.2.6 SWITCHED I/O REGISTERS ............ 44 C.2.2.7 CONTROLLER INFORMATION ...... 44 C.2.2.8 EVENTS HISTORY REGISTERS ......... 45 C.3 DETAILED REGISTER INFORMATION ........ 46 C.3.1.1 SYSTEM STATE ............................... 46 C.3.1.2 RUNNING STATE ........................... 46 C.3.1.3 EVENT BIT MAP 1 .......................... 47 C.3.1.4 EVENT BIT MAP 2 .......................... 48 C.3.1.5 FAULT BIT MAP .............................. 49 C.3.1.6 WARNING BIT MAP ...................... 50 C.4 AC SENSING ............................................. 51 C.4.1 AC VOLTAGE CONFIGURATION ... 51 C.4.2 GENERATOR FREQUENCY .............. 51 C.4.3 GENERATOR VOLTAGE ................... 51 C.4.4 GENERATOR CURRENT ................... 51 C.5 SENSORS ................................................... 52 C.5.1 ENGINE TEMPERATURE .................... 52 C.5.2 OIL PRESSURE ................................... 52 C.5.3 FUEL LEVEL ....................................... 52 C.5.4 ENGINE SPEED ................................. 52 C.5.5 BATTERY VOLTAGE .......................... 52 C.5.6 AUXILIARY SENSOR 1 ....................... 53 C.5.7 AUXILIARY SENSOR 2 ....................... 53 C.5.8 AUXILIARY SENSOR 3 ....................... 53 C.5.9 AUXILIARY SENSOR 4 ....................... 53 C.5.10 AUXILIARY SENSOR UNITS ............. 54 C.5.11 INTERNAL TEMPERATURE ............... 54 C.6 TIMER ......................................................... 55 C.6.1 ENGINE RUN HOURS ....................... 55 C.6.2 TOTAL ENGINE HOURS .................... 55 C.6.3 MAINTENANCE COUNTER .............. 55 C.7 SWITCHED I/O .......................................... 56 C.7.1 SWITCHED INPUTS ............................ 56 C.7.2 SWITCHED OUTPUTS ........................ 56 C.8 CONTROLLER INFORMATION .................. 57 C.8.1 SERIAL NUMBER ............................... 57 C.8.2 HARDWARE VERSION ..................... 57 C.8.3 FIRMWARE VERSION ....................... 57 C.9 EVENTS HISTORY ....................................... 58 C.9.1 LOG CONTROL................................ 58 C.9.2 LOG TYPE .................................. 59 - 61 C.9.3 LOG TIME ......................................... 61 C.9.4 LOG DTC CODE .............................. 62 C.9.5 LOG NUMBER .................................. 62 C.9.6 TOTAL LOGS .................................... 62D APPENDIX D: INSTALLATION DRAWINGS PER APPLICATION .................................... 53 - 74

OS-TSC 1/18
1 Specifications
2
Testing SpecificationsSpecification Rating
Electrical Transients SAE1113-11
Thermal Shock and Cycling SAE1455
Vibration Profiles SAE1455
Electric Static Discharge SAE1113-13
Physical SpecificationsSpecification Rating
Operating Temperature -40 to +158°F (-40 to +70°C)
LCD Viewing Temperature -4 to +158°F (-20 to +70°C )
Weight
0,83lb (0.38kg)
Dimensions 4.17" x 6.50" x 1.38" (10.59cm x 16.51cm x 3.51cm)
Electrical SpecificationsSpecification Rating
Operating Voltage 5.5 ~ 36VDC
Standby Current 60mA @ 12V38mA @ 24V
Switched Inputs +Battery, Ground, Open
Switched Outputs +Battery @ 1A Max
Communications SAE J1939 (Tier II, III, IV)

OS-TSC 1/18
1.1 Introduction
3
The TOUGH series controllers are designed to provide complete control, protection, AC metering, and engine instrumentation for both standard and electronic engines. Your S-TSCI Panel has been configured by Northern Lights to work with your genset. However, if you require custom configutarions, the programming can be modified using either the front panel buttons or PC configuration software. See Appendix for information. TOUGH series controllers are ideally suited for severe duty applications where reliability is critical.
This manual is divided into three sections: 1. Hardware Installation 2. Operation / Configuration 3. Advanced Configuration
Features and Functions:• SAE J1939 CAN Bus Protocol• RPM via J1939, Magnetic Pickup, or Generator• Autostart on low battery and other sensors• Trim feature for AC monitoring and sensors• Maintenance counter• Exerciser Clock• 150 Event Log
Available Displays:• Engine Temperature• Oil Pressure• Fuel Level• Engine Speed• AC Metering• Battery Voltage
• Conformally coated for protection against moisture
• Gasket for water ingress protection IP65• Passcode protected• Automatic shutdowns and warnings• Manual and Remote start• Pre-heat and many other configurable timers• Accepts common senders (VDO, Datcon)
• Real Time Clock• Engine Hours• Time to Maintenance• Text• Custom Senders• Warnings and Failures
1.2 This Manual
OS-TSC 1/18
1.3 Receiving, Handling & Storage
Receiving:Every effort is made to ensure that your S-TSC gen-set controller arrives at its destination undamaged and ready for installation. The packaging is designed to protect the S-TSC internal components as well as the enclosure. Care should be taken to protect the equipment from impact at all times. Do not remove the protective packaging until the equipment is at the installation site and ready to be installed.
When the S-TSC reaches its destination, the customer should inspect the shipping box and controller for any signs of damage that may have occurred during transportation. Any damage should be reported to a Northern Lights representative after a thorough inspection has been completed.
A shipping label affixed to the shipping box includes a variety of product and shipping information, such as items and Customer numbers. Make certain that this information matches your order information.
Handling: As previously mentioned, each S-TSC gen-set controller is packaged in its own individual box. Do not discard the packing material until the controller is ready for installation. Protect the equipment from impact at all times and do not carelessly stack. Once the controller is at the installation site and ready to be installed, the packaging material may be removed.
Storage: Although well packaged, this equipment is not suitable for outdoor storage. S-TSC is to be stored indoors for any period of time, it should be stored with its protective packaging in place. Protect the controller at all times from excessive moisture, dirty conditions, corrosive conditions, and other contaminants. It is strongly recommended that the package-protected equipment be stored in a climate-controlled environment of -20 to 65°C (-4 to 149°F), with a relative humidity of 80% or less. Do not stack other equipment on top of the stored controllers.
4

OS-TSC 1/18
1.4 Safety Rules
5
Your Northern Lights Generator Set is provided with a S-TSC control panel that allows for automatic operation (starting and stopping) of the generator, and allows for installed protective devices to stop the engine if a fault is encountered.
The S-TSC control panel is not intended to provide all the necessary protections to ensure intrinsically safe operation of the generator set under all conditions, therefore proper precautions must be taken by the operator of the generator to ensure safe operation:
• The generators’ onboard protective devices are not intended to provide adequate protection for unmanned operation, a responsible operator is required to attend the generator set while operating.• No service or inspections of a running generator are to be performed under any circumstances.• Always ensure the generator is stopped prior to beginning any service or inspections, ensure the “STOP” button on the S-TSC controller is depressed, and the “EMERGENCY STOP” button is depressed.• Do not knowingly operate the engine with a mechanical or electrical defect.
Failure to adhere to these safety precautions could result in serious injury or death.

OS-TSC 1/18
Generator systems contain high voltage circuitry and precautions to protect against it should be taken. Failing to power down and lock out equipment can cause damage, injury or death.
Wiring of this controller should be performed by qualified electricians only.
The following general electrical safety precaution should be followed: • Do a thorough inspection of the area before performing any maintenance.• Keep fluids away from electrical equipment.• Unplug connectors by pulling on the plug and not the cord.• Use fuses where appropriate.• Ensure all equipment is properly grounded.• Provide support to wires to prevent stress on terminals.
To ensure proper and safe operation, caution must be taken at the installation site to make sure it is free from excessive moisture, fluctuating temperature, dust and corrosive materials. Choose a mounting surface with the least amount of vibration, within reach of the cables connecting the unit to the generator set. There are two ways to mount the local (or remote) control panel.
Surface Mounting
The rear wall of the S-TSC enclosure has four, 3/16” diameter holes for mounting to a flat surface.1. Choose a suitable location based on the criteria above, with adequate space for the S-TSC
enclosure.2. Using the dimensions below, drill pilot or through holes for the enclosure, depending on your
mounting method.3. Remove the four screws holding the S-TSC faceplate to the enclosure.4. If desired, the connectors to the back of the S-TSC controller can be (carefully!) removed for
enclosure installation. They will only plug in to the correct receptacles.5. Secure the enclosure to the mounting surface.6. Plug in the panel connectors if necessary, and secure the faceplate to the enclosure with the
original screws.
2 Installation
6

OS-TSC 1/18
7
2 Installation (Continued)
Flush Mounting
1. Choose a suitable location based on the dimensions below, with adequate area for the S-TSC faceplate and adequate depth behind the panel for the enclosure body.
2. Drill four mounting holes as shown in "hole pattern dimensions". When creating "panel cutout dimensions" as shown below, ensure hat you begin by carefully locating cutout with respect to holes as shown in dimensions marked "A" and "B".
3. Remove the four screws holding the S-TSC faceplate to the enclosure.4. If desired, the connectors to the back of the S-TSC controller can be (carefully!) removed for
enclosure installation. They will only plug in to the correct receptacles.5. Place the controller and faceplate on the front surface of your panel. Insert one of the faceplate
screws in a mounting hole to maintain location if necessary.6. If control panel wire harnesses are disconnected, then bring the enclosure close to the rear side of
the panel, and plug the connectors into the back of the S-TSC.7. Secure the enclosure to the rear of your panel by inserting the faceplate screws through the
faceplate, through the holes in your panel, and threading into the enclosure.
PANEL (INSTALLATION SURFACE)
5.13
130.
213
7.50 190.50
PANEL HOLES CLEARANCE FOR 6-32(11/64" RECOMMENDED)
FACEPLATE OUTLINE
HOLE PATTERN DIMENSIONS(FRONT VIEW)
7.96 202.26
5.25
133.
35
0.83 21.12
7.03 178.60
1.02
25.9
4
0.91
23.1
6
4.34
110.
19
4.23
107.
410.18 4.61
0.06
1.57
FACEPLATE OUTLINE
PANEL CUTOUT DIMENSIONS(FRONT VIEW)
A *SEE NOTE 2
B * SEE NOTE 2
FLUSH MOUNTING
CHOOSE A SUITABLE LOCATION BASED ON THE DIMENSIONS ABOVE, WITH ADEQUATE AREA FOR 1.THE S-TSC FACEPLATE AND ADEQUATE DEPTH BEHIND THE PANEL FOR THE ENCLOSURE BODY.DRILL FOUR MOUNTING HOLES AS SHOWN IN "HOLE PATTERN DIMENSIONS". WHEN CREATING2."PANEL CUTOUT DIMENSIONS" SHOWN ABOVE,ENSURE THAT YOU BEGIN BY CAREFULLY LOCATING CUTOUT WITH RESPECT TO HOLES AS SHOWN IN DIMENSIONS MARKED A AND B .REMOVE THE FOUR SCREWS HOLDING THE S-TSC FACEPLATE TO THE ENCLOSURE.3.IF DESIRED, THE CONNECTORS TO THE BACK OF THE S-TSC CONTROLLER CAN BE (CAREFULLY!) REMOVED 4.FOR ENCLOSURE INSTALLATION. THEY WILL ONLY PLUG IN TO THE CORRECT RECEPTACLES.PLACE THE CONTROLLER AND FACEPLATE ON THE FRONT SURFACE OF YOUR PANEL. INSERT ONE OF THE 5.FACEPLATE SCREWSIN A MOUNTING HOLE TO MAINTAIN LOCATION IF NECESSARY.IF CONTROL PANEL WIRE HARNESSES ARE DISCONNECTED, THEN BRING THE ENCLOSURE CLOSE TO THE 6.REAR SIDE OF THE PANEL, AND PLUG THE CONNECTORS INTO THE BACK OF THE S-TSC.SECURE THE ENCLOSURE TO THE REAR OF YOUR PANEL BY INSERTING THE FACEPLATE SCREWS THROUGH 7.THE FACEPLATE,THROUGH THE HOLES IN YOUR PANEL, AND THREADING INTO THE ENCLOSURE.

OS-TSC 1/18
8
2.1 Typical Wiring Diagram
B-10
775A

OS-TSC 1/18
9
Wiring required for S-TSC controllers is installed by Northern Lights, and your controller has been configured for and tested with your generator set at the factory. Minimal installation, if any, is required.
Control Connections1. Plug the smaller rectangular connectors together between the S-TSC panel and the generator set. These
connectors provide AC sensing signals. UNDER NO CIRCUMSTANCES is the generator set to be run with these connectors disconnected. Dangerous voltages could result.
2. Plug the larger rectangular connectors together between the S-TSC panel and the generator set. These connectors interface the S-TSC controller to the generator set’s DC logic relays.
3. A single set of AC and DC extension harnesses may be used to locate the S-TSC further from the genera-tor set. ONLY ONE SET OF EXTENSIONS MAY BE USED. Use of additional extensions will cause errors in the AC sensing circuits. If a longer run is required, a remote S-TSC must be used in conjunction with the local panel.
4. Whenever possible, the factory will install the current transformers on the fixed output leads of the gen-erator. If the current transformers are installed, the load lines may be connected to the generator output terminals, and no further installation is necessary. If the current transformers are NOT already installed and are loose in the junction box, the installation leads will need to be run through them when the electri-cal installation of the generator is completed. All of the CTs must face the same direction, and the side marked “H1” must face the generator as shown in the diagram below. Do not make more than one pass through the CT, or disturb any other generator winding wires.
5. When making AC output connections in the junction box, you may have noticed that one of the relay bases is empty. DO NOT insert a relay in this base. If your generator set came with a loose relay, it is a spare and can be set aside.
Data ConnectionsThe circular connector on the bottom of the S-TSC enclosure provides power and data to an S-TSC remote panel, or RS485 interface device. If one of these accessories was ordered, connect the associated extension cable to this connector, and the other end to the remote panel or network interface.
Refer also to the electrical drawings that were supplied with your unit for further information.
2.2 Electrical Installation

OS-TSC 1/18
10
Note! Before starting the generator set, make sure that the AVR circuit breakers are in the closed (up) position.
Running the GeneratorWith the generator set fully installed, connected to the starting battery and ready to run, the S-TSC will power on and the LCD display will show the status of the generator.
Manual Run: Press the Run button. The controller will enter preheat mode for ten seconds, and then engage the starter. The starter will crank for a maximum of ten seconds. If the generator fails to start in that time, the controller will repeat the preheat/crank cycle for a total of five times. If the generator still fails to start after the fifth attempt, the S-TSC will display a failure message and return to stopped mode.
Press the Stop button to stop the generator.Auto or Remote Start: From Off mode, press the Auto button to place the S-TSC into autostart mode. The generator set can then be run by pressing the Run button on the local or remote panel.Likewise, the generator can be stopped by pressing the Stop button on the local or remote panel.Pressing the Stop button at the local panel will also revert the S-TSC from Auto to Off mode.
Warning! Placing the S-TSC in Off mode is not an adequate method of disabling the generator for service. The starting battery cables MUST be disconnected before attempting to adjust or service the generator set.
When the generator is running, the S-TSC display will scroll through AC electrical and engine information. Refer to the tables below for further information about display and control functions.
Warnings and FailuresThe S-TSC is programmed with a number of warnings and shutdowns (failures). These include high engine temperature, low oil pressure, overspeed, underspeed, and other parameters specific to your generator. When a warning threshold is reached, a warning message will show on the display and be added to the event log. The generator will continue to run, and if the problem is remedied, the warning will turn off. If a failure threshold is exceeded, the generator will shut down. The failure will be displayed on the screen and recorded in the event log.
As a backup to the oil pressure and coolant temperature shutdowns based on engine sensor readings, Northern Lights generators include fixed-value shutdown switches. If the low oil pressure or high coolant temperature switch is tripped (or high exhaust elbow temperature on models so equipped), the failure message will display “NLI Shutdown.”
3 Using the Controller

OS-TSC 1/18
11
3 Using the Controller (Continued)

OS-TSC 1/18
12
The following table describes the different operating modes of the controller:ModesMode / State Description
OFF When in the OFF mode, the engine cannot be remotely started.
Auto When in the Auto mode, the engine waits to receive a start command.
Running When engine is Running, the controller monitors engine parameters and waits to receive astop command.
Failure When a failure occurs, the controller shuts down the engine and displays reason for failure.The unit must be reset using the front panel OFF button with the exception of Modbus.
Menu When in the menu you can change settings and view the events history.
The following table describes the different methods in which a controller can start. The controller must be in the AUTO mode inorder to start for all methods with the exception of Manual Run.
Starting MethodsMethods Description
Manual Run Pressing the Run button will start the engine. You must press the OFF button to shutdownthe engine.
Start / Stop Switched Input When this input is active the engine will start. When the input becomes inactive the enginewill shutdown.
Engine cranks, controller shows “Locked Rotor” failure and stops cranking.
Controller is not receiving AC output to measure speed. 1. Confirm that AVR circuit breakers are ON 2. Field may need to be flashed.
3.1 Troubleshooting
If you are having issues with your controller, please refer to the table below for a solution before contacting technical support.
3.2 Modes, Starting and Stopping

OS-TSC 1/18
13
Main Connector (J4)Terminal Name Description
J4-1 +Battery Provides power to the controller from the battery
J4-2 +Battery Provides power to the controller from the battery
J4-3 Ground Provides ground return for the controller
J4-4 Ground Provides ground return for the controller
J4-5 Switched Input A Configurable to detect +Battery, Ground, or Open
J4-6 Switched Input B Configurable to detect +Battery, Ground, or Open
J4-7 Switched Input C Configurable to detect +Battery, Ground, or Open
J4-8 Switched Output A Outputs +Battery voltage when active (Max Current: 1A)
J4-9 Switched Output C Outputs +Battery voltage when active (Max Current: 1A)
J4-10 Switched Output B Outputs +Battery voltage when active (Max Current: 1A)
J4-11 Sensor Ground Provides ground return for 2-wire sensors.
J4-12 Sensor Input A High impedance sensor input (0 - 7,500Ω)
J4-13 Sensor Input B Low impedance sensor input (0 - 750Ω)
J4-14 Sensor Input C Universal sensor input (0 - 750Ω, 0 - 7,500Ω, 0 - 5VDC, 4 - 20mA) See UniversalSensor section for more information.
Expansion Connector (J3)Terminal Name Description
J3-1 Switched Input D Configurable to detect +Battery, Ground, or Open
J3-2 Switched Input E Configurable to detect +Battery, Ground, or Open
J3-3 Switched Output D Outputs +Battery voltage when active (Max Current: 1A)
J3-4 Switched Output E Outputs +Battery voltage when active (Max Current: 1A)
J3-5 Switched Output F Outputs +Battery voltage when active (Max Current: 1A)
J3-6 Sensor 5V Provides 5V for electronics sensors.
J3-7 Sensor Ground Provides ground return for 2-wire sensors.
J3-8 Sensor Input D Universal sensor input (0 - 750Ω, 0 - 7,500Ω, 0 - 5VDC, 4 - 20mA) See UniversalSensor section for more information.
Appendix A: Special Programming
A.2 Terminal Descriptions
A.1 Custom Inputs and Programming
Your Northern Lights Tough Series controller has been programmed by the factory and tested with your generator set to provide optimum performance and protection. Altering the programming is not rec-ommended. However, some applications may require additional controls. This section provides infor-mation on programming auxiliary inputs and outputs on the S-TSC.
To connect to the auxiliary inputs and outputs on connector J3, you will need a Molex 39-01-2080 8-position connector body, and 39-00-0039 female crimp terminals. These are available from many electronic component suppliers. J3 terminal assignments are as follows:
J3-1 Switched Input D J3-5 Switched Output F
J3-2 Switched Input E J3-6 N/C
J3-3 Switched Output D J3-7 Sensor Ground
J3-4 Switched Output E J3-8 Sensor Input D

OS-TSC 1/18
Main Connector (J4)Terminal Name Description
J4-1 +Battery Provides power to the controller from the battery
J4-2 +Battery Provides power to the controller from the battery
J4-3 Ground Provides ground return for the controller
J4-4 Ground Provides ground return for the controller
J4-5 Switched Input A Configurable to detect +Battery, Ground, or Open
J4-6 Switched Input B Configurable to detect +Battery, Ground, or Open
J4-7 Switched Input C Configurable to detect +Battery, Ground, or Open
J4-8 Switched Output A Outputs +Battery voltage when active (Max Current: 1A)
J4-9 Switched Output C Outputs +Battery voltage when active (Max Current: 1A)
J4-10 Switched Output B Outputs +Battery voltage when active (Max Current: 1A)
J4-11 Sensor Ground Provides ground return for 2-wire sensors.
J4-12 Sensor Input A High impedance sensor input (0 - 7,500Ω)
J4-13 Sensor Input B Low impedance sensor input (0 - 750Ω)
J4-14 Sensor Input C Universal sensor input (0 - 750Ω, 0 - 7,500Ω, 0 - 5VDC, 4 - 20mA) See UniversalSensor section for more information.
Expansion Connector (J3)Terminal Name Description
J3-1 Switched Input D Configurable to detect +Battery, Ground, or Open
J3-2 Switched Input E Configurable to detect +Battery, Ground, or Open
J3-3 Switched Output D Outputs +Battery voltage when active (Max Current: 1A)
J3-4 Switched Output E Outputs +Battery voltage when active (Max Current: 1A)
J3-5 Switched Output F Outputs +Battery voltage when active (Max Current: 1A)
J3-6 Sensor 5V Provides 5V for electronics sensors.
J3-7 Sensor Ground Provides ground return for 2-wire sensors.
J3-8 Sensor Input D Universal sensor input (0 - 750Ω, 0 - 7,500Ω, 0 - 5VDC, 4 - 20mA) See UniversalSensor section for more information.
14
A.2 Terminal Descriptions (Continued)
Communications Connector (J6)Terminal Name Description
J6-1 RS485-A Communications line for Modbus (RS485)
J6-2 RS485-B Communications line for Modbus (RS485)
J6-3 No Connection No Connection
J6-4 CAN-L Communications line for CAN Bus (J1939)
J6-5 CAN-H Communications line for CAN Bus (J1939)
J6-6 CAN-Shield Connect the shield of the twisted pair cable to this terminal.
J6-7 Speed Sensing A Connect to a magnetic pickup, tachometer, or a flywheel alternator. Not polaritysensitive and not required if using AC voltage terminals for speed sensing.
J6-8 Speed Sensing B Connect to a magnetic pickup, tachometer, or a flywheel alternator. Not polaritysensitive and not required if using AC voltage terminals for speed sensing.
J6-9 No Connection No Connection
J6-10 RS485-Common Common line for Modbus (RS485)
Generator AC Voltage (J7)Terminal Name Description
J7-1 Phase A Connect to Phase A of the generator.
J7-2 Phase B Connect to Phase B of the generator.
J7-3 Phase C Connect to Phase C of the generator.
J7-4 Neutral Connect to neutral.
Generator AC Current (J5)Terminal Name Description
J5-1 Phase A Connect to current transformer for Phase A of the generator.
J5-2 Phase B Connect to current transformer for Phase B of the generator.
J5-3 Phase C Connect to current transformer for Phase C of the generator.
J5-4 CT Common Connect to the commons of the current transformers.

OS-TSC 1/1815
A.3 Universal Sensor
Universal Sensors have the ability to be configured to detect different sender types (0 - 750Ω, 0 - 7,500Ω, 0 - 5VDC, 4 - 20mA).The examples shown below are advanced applications of the universal sensor.
NOTE: Custom Sender tables are required for the universal sender to work with these examples. See the Custom Sender Table section for more information.
Example #1: The following example shows the correct way for wiring a 4-20mA sensor. The 240Ω resistor is required to change the 4-20mA current into a 0-5V voltage level that the con-troller can understand.
Example #2: Sometimes it is required to measure voltages outside the 0-5V range allowed by the controller. To do this you must use a voltage divider with appropriate scaling resistors. The equation to calculate the resistor values is as follows:
The following diagram shows the typical wiring of a voltage divider. The resistors values have been selected to allow the controller to read up to 36V from an external battery bank.
4-20mA Wiring Example
0-36V Wiring Example

OS-TSC 1/18
A.4 Settings
16
The following section relates to settings that can be changed to alter the way the controller performs its functions. Read and review these sections carefully to ensure your settings are set correctly for your engine.
The following settings are used to change the way the user interacts with the controller. They are not password protected and can be changed by anyone from the front panel.
A.4.1 Operator Setup

OS-TSC 1/18
17
A.4.2 Switched Inputs
The controller has switched inputs which when activated, cause the controller to perform a function.

OS-TSC 1/18
A.4.2 Switched Inputs
18
NOTE: More than one Active Mode can be selected.
NOTE: When running wires over long distances (100+), it is recommended to use +BATTERY as the trigger method.

OS-TSC 1/18
19
A.4.3 Configurable Inputs
These inputs are used to create custom warnings and failures. Using the Software Configurator you can change the text that is displayed when the warning or failure occurs. If you select one of these inputs without changing the text it will default to 'Config Warn X' and 'Config Fail X.'
There are also timers associated with which can be found in the menu under Timers -> Trigger Delays. These timers change the amount of time the input has to be active before the controller registers the warning or failure.
Example: The user wants a pump to turn on 30 seconds after a high water level switch is tripped and remain on until the level switch turns off.
The level switch is connected to Switched Input C and closes to ground when the water level is too high. The words 'Water Pumping' are also required to be displayed on the controllers LCD screen. The pump is connected to a slave relay which is controlled by Switched Output D on the controller.
NOTE: If the switched input becomes inactive before the trigger delay time expires, the warning or failure will not occur.
OS-TSC 1/18
20
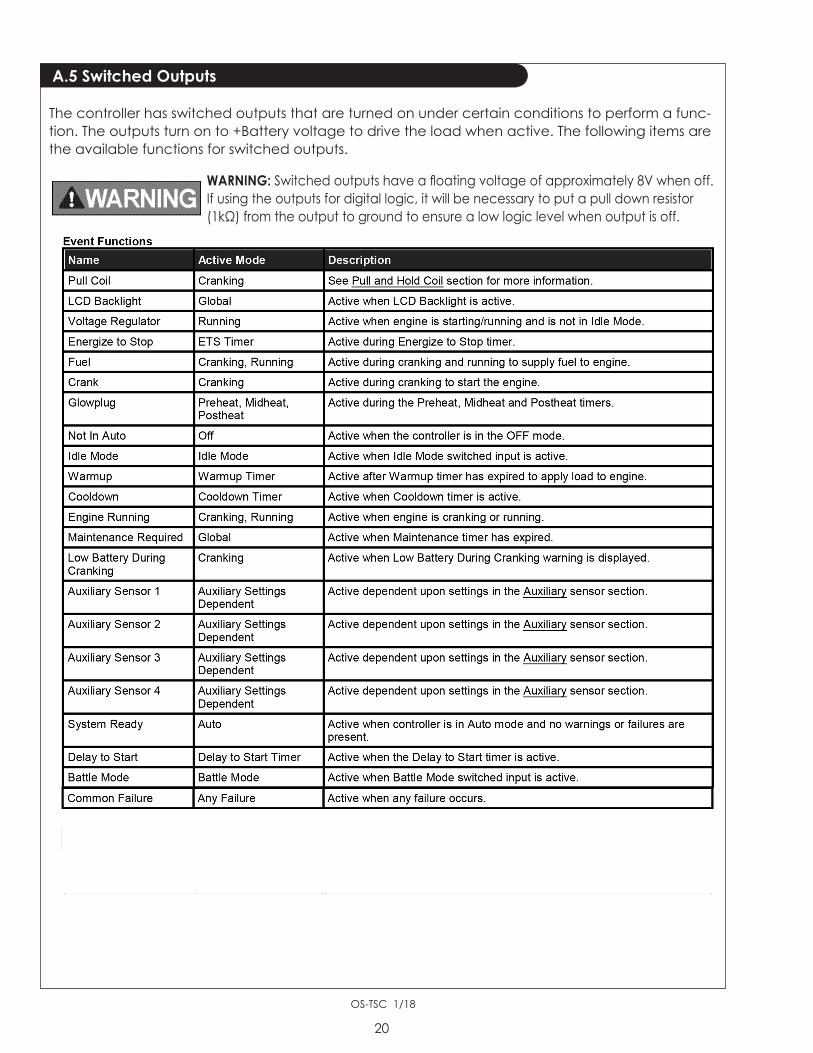
A.5 Switched Outputs
The controller has switched outputs that are turned on under certain conditions to perform a func-tion. The outputs turn on to +Battery voltage to drive the load when active. The following items are the available functions for switched outputs.
WARNING: Switched outputs have a floating voltage of approximately 8V when off. If using the outputs for digital logic, it will be necessary to put a pull down resistor (1kΩ) from the output to ground to ensure a low logic level when output is off.

OS-TSC 1/18
21
A.5 Switched Outputs (Continued)
Group functions are designed so that multiple output functions can be bundled together and assigned to a single switched output pin. The definition of a group output is as follows:
-When any of the functions in a group is active (OR logic), the assigned switched output will be active.
Example: Low AC Frequency, High AC Frequency are bundled in 'Group #1' and assigned to Switched Output D. This output is connected to an external indicator lamp labeled 'AC Frequency Warnings.' This allows one output to indicate there is a warning with the AC frequency. The following table shows the output state based on the warnings status.
A.5.1 Group Outputs

OS-TSC 1/18
22
A.6 SensorsThe controller has sensor ports which can be connected to a variety of different sensor types (Temperature, Pressure, Level, etc). See the Terminal Descriptions section for more information on which terminals your sensor is compatible with (Low Ω, High Ω, 0-5V or 4-20mA).Most sensors are used to monitor for warnings and failures but the Auxiliary sensors can be used to perform special functions(Example: Starting engine on low temperature).
The following settings are used to configure how the controller reads and interprets data from the engine temperature sender.
The following settings are used to configure how the controller reads and interprets data from the oil pressure sender.
A.6.1 Engine Temperature
A.6.2 Oil Pressure

OS-TSC 1/18
23
A.6.3 Fuel LevelThe following settings are used to configure how the controller reads and interprets data from the fuel level sender.
The following settings are used to configure how the controller reads and interprets speed sensing data.
NOTE: When using J1939 or Genset Signal as a signal source, connections to the speed sensing terminals are not required.
WARNING: Switched outputs have a floating voltage of approximately 8V when off. If using the outputs for digital logic, it will be necessary to put a pull down resistor (1kΩ) from the output to ground to ensure a low logic level when output is off.
A.6.4 Engine Speed

OS-TSC 1/18
24
A.6.5 Battery LevelThe following settings are used to configure how the controller reads and interprets the battery voltage level.
NOTE: When the engine is running, the battery voltage will equal the alternator charging voltage. The actual open circuit battery voltage may be lower than displayed.

OS-TSC 1/18
A.6.6 Auxiliary
25
The Auxiliary sensors on the controller are used for performing functions based on sensor readings. There are 2 different ways in which the auxiliary sensors can be utilized:
Scenario #1 - Custom SensorsUse the auxiliary sensors to create custom sensors (Current, Voltage, etc.) that are not supported by the controller by default (Engine Temperature, Oil Pressure, Fuel Level).
Scenario #2 - Add-On FunctionalityDouble up the auxiliary sensor onto the same Sensor Port that is currently being used by one of the other sensors (Engine temperature, Oil pressure, Fuel level). This allows you to use the special functions (Output on High, etc.) in conjunction with those sensors.
NOTE: You must set the auxiliary sensor port and sender table to the same values as the other sensor.

OS-TSC 1/1826
A.6.6.1 Fault Monitor ExampleIn this example, a sensor is monitoring the temperature of an engine block. If the temperature rises above 275°F a warning message is displayed. If the temperature rises above 350°F the engine shuts down and a failure message is displayed.
The chart above shows the connection between engine temperature and time. At approximately 13 minutes run time the temperature rises above the 275°F warning threshold so a warning is displayed. The engine continues to run because it does not reach the 350°F failure threshold. At 20 minutes run time the temperatures falls below the warning threshold and the warning disappears.

OS-TSC 1/18
A.6.6.2 Output on Low / High ExampleIn this example, a sensor is monitoring the temperature of an engine. If the temperature rises above 325°F a fan will turn on to cool the engine. Once the temperature drops to below 200°F the fan will turn off.
The chart above shows the connection between engine temperature and time. At approximately 10 minutes run time the temperature rises above the 325°F start threshold and the fan turns on. The fan continues to run as the temperature declines.When the temperature falls below the 200°F stop threshold the fan turns off.
27

OS-TSC 1/18
A.6.7 Custom Sender TablesCustom Sensor Tables are created using the Software Configurator when using a sensor that is not supported by Northern Lights. The configurator has the ability to create these custom tables so that the controller can properly read the sensor data.
28
NOTE: Custom sender tables can only be created when using the configurator.
The following steps are an example of how to create a custom sensor table: 1. Navigate to the sensor input that will be using your custom sensor table. 2. Select a Name, Input Type and Unit Type for the controller (Definitions in table above). 3. Click the check box next to 'Build Table' (Image Step 1). 4. From the 'Sender' drop down menu, select 'Custom' (Image Step 2). 5. Click the 'Edit' button next to the drop down menu (Image Step 3). 6. Enter the sensor values. Once entered, click Apply then OK.

OS-TSC 1/18
A.7 TimersThe controller has an internal clock which is used not only to keep time, but to make sure certain events happen at the correct times. The following sections are used to configure settings associated with timing functions.
29
NOTE: The controller has an on-board backup battery to keep time even when main power is not supplied to the unit. This battery has an un-powered (no main power) lifetime of approximately five years.
NOTE: Setting a timers value to 0 seconds will disable the timer. Example: If Delay to Start is set to 0 seconds, the controller will not perform a Delay to Start when starting the engine.
A.7.1 Engine LogicThe following settings determine how the controller starts and stops the engine. It gives the user the functionality to add delays and timers to the sequences. Most of the settings have a switched output associated with them that must be set in the Switched Outputs settings.

OS-TSC 1/18
The controller has the ability to control the length of the preheat time through 3 different methods. The table below describes each method:
30
NOTE: During preheat the Glowplug switched output is on.
A.7.1.1 Preheat Mode

OS-TSC 1/18
A.8 MaintenanceThe controller has the ability to count down the time between scheduled maintenance by a technician. Once maintenance is required, the controller will alert the operator via the LCD screen and a switched output (if enabled) wired to a lamp / horn / buzzer. The following settings are used to configure the maintenance timer.
To find out the amount of time until next maintenance, follow these menu steps: Main Menu -> Device Info. -> MaintenanceMaintenance counter is disabled if '----' is displayed. A negative number indicates the amount of time since maintenance timer expired.
31

OS-TSC 1/18
A.9 AC Monitor
The following sections are use to configure settings associated with AC monitoring.
The following settings are used to configure how the controller responds to voltage measurements.
Application Note: Scaling FactorThe scaling factor setting can be used to calibrate the AC voltage if there are discrepancies between the reading and the actual value. It can also be used if transformers are used to step up / down the voltage.The scaling factor applies to all phases in a system.
Example: The voltage source is a 3-Wire 3-Phase system with a nominal voltage of 208V. The con-troller is reading 206.3V but a calibrated multimeter gives 208.3V. Use the formula below to deter-mine the scaling factor.
1. Scaling Factor = Multimeter Reading / Controller Reading 2. Scaling Factor = 208.4V / 206.3V 3. Scaling Factor = 1.010
32
A.9.1 Generator Voltage

OS-TSC 1/18
A.9.2 Generator Frequency
The following settings are used to configure how the controller responds to frequency measurements.
33
The following settings are used to configure how the controller responds to current measurements.
A.9.3 Generator Current
OS-TSC 1/18
34
Appendix B: J1939 Communications
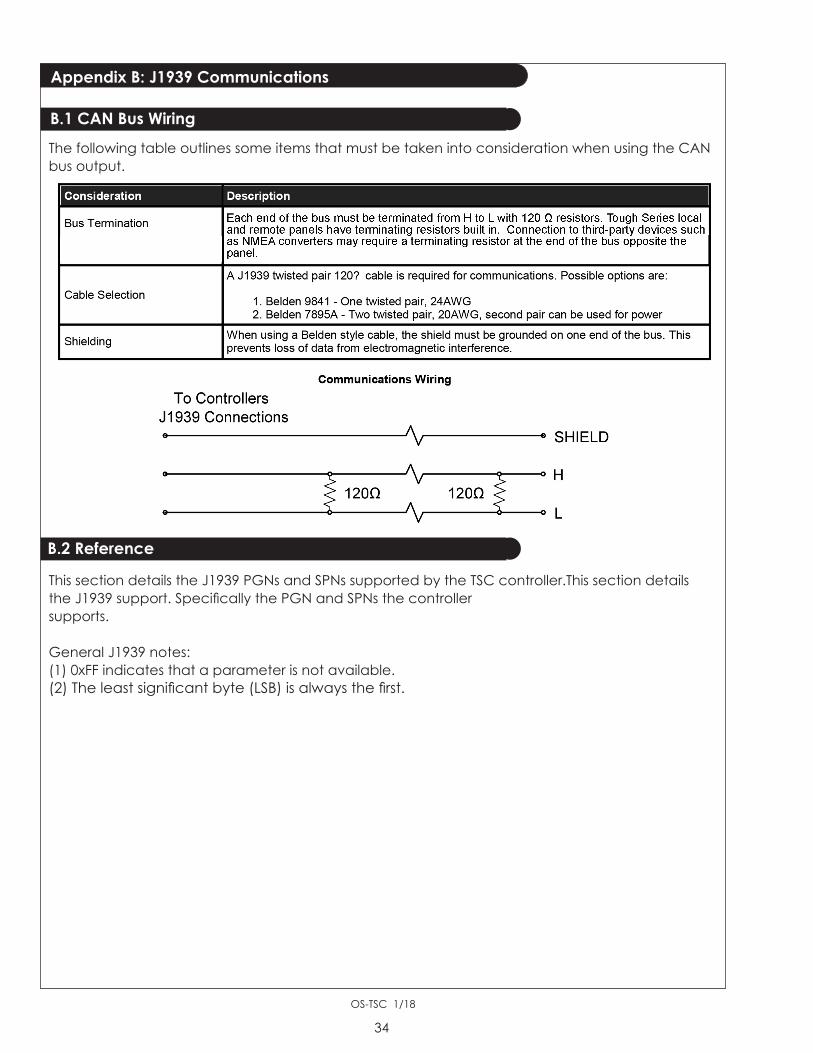
The following table outlines some items that must be taken into consideration when using the CAN bus output.
This section details the J1939 PGNs and SPNs supported by the TSC controller.This section details the J1939 support. Specifically the PGN and SPNs the controller supports.
General J1939 notes:(1) 0xFF indicates that a parameter is not available.(2) The least significant byte (LSB) is always the first.
B.1 CAN Bus Wiring
B.2 Reference

OS-TSC 1/18
35
B.3 Standard
List of PGN's PGN # Name Short Rate Priority Description Name (ms) 65021 Generator Phase C Basic GPCAC 100 3 Transmits AC Frequency, AC Voltage, and AC RMS (0xFDFC) AC Quantities Current for Phase A. 65024 Generator Phase B Basic GPBAC 100 3 Transmits AC Frequency, AC Voltage, ad AC RMS (0xFE00) AC Quantities Current for Phase B. Controller does not support phase B frequency. 65027 Generator Phase A Basic GPAAC 100 3 Transmits AC Frequency, AC Voltage, and AC RMS (0xFE03) AC Quantities Current for Phase C. Controller does not support phase C frequency. 65030 Generator Average Basic GAAC 100 3 Average of Phase A, B and C for Line-Line, (0xFE06) AC Quantities Line-Neutral, AC Frequency and AC RMS current. 59904 PGN Request RQST N/A 6 Request by controller for engine hours from ECM. (0xEA00) 61444 Electronic Engine EEC1 100 3 Used to broadcast or receive engine speed. (0xF004) Controller 1 For receiving ECM must be at address 0. Controller can also broadcast engine speed. 65253 Engine hours, Revolutions HOURS N/A 6 Used to receive or broadcast engine speed. (0xFEE5) Requested by controller every 1s. Broadcast (if enable) by controller every 5s. 65262 Engine Temperature 1 ET1 1000 6 Used to receive or broadcast engine temperature. (0xFEEE) Must be at address 0 to receive ECM. 65263 Engine Fluid Level/ EFL/P1 500 6 Used to receive or broadcast oil pressure from (0xFEEF) Pressure 1 ECM. Must be at address 0 to receive EM. 65271 Vehicle Electrical Power 1 VEP1 1000 6 Used to broadcast battery voltage. (0xFEF7) 65276 Dash Display DD 1000 6 Used to broadcast fuel level. (0xFEFC)
Engine SPNs Parameter SPN Range Conversion/ PGN PGN Byte/ Description Name Unit Bit Location Fuel Level 1 96 0 to 100% Gain = 0.4%/bit 65276 Byte 2 Used for broadcasting fuel level. Offset = 0 (0xFEFC) Engine Oil 100 0 to Gain = 4kPa/bit 65263 Byte 4 Used to broadcast or receive oil pressure. Pressure 1000kPa Offset = 0 (0xFEEF) Engine Coolant 110 -40 to 210 Gain = 1degC/ 65262 Byte 1 Used to broadcast or receive engine Temperature bit. Offset = -40 (FEEE) temperature. Controller is limited to 0oC for failure set-point purposes. Battery Potential 168 0 to Gain = 0.05V/bit 65271 Bytes 5 Used for broadcasting battery voltage Power Input 1 3212.75V Offset = 0 (0xFEF7) and 6 Engine Speed 190 0 to Gain = 61444 Bytes 4 Used to broadcast and receive engine 8,031.875 0.125rpm/bit (0xF004) and 5 speed. Controller is limited to 6000 rpm. rpm Offset = 0 Engine Total 247 0 to Gain = 0.05hr/ 65253 Bytes 1 to 4 Used to broadcast and received engine Hours of 210,554, bit (0xFEE5) hours. Operation 060.75 hr Offset = 0

OS-TSC 1/18
B.3 Standard
B.4 Proprietary
36
Engine SPNs Parameter SPN Range Conversion/ PGN PGN Byte/ Description Name Unit Bit Location Generator Average 2430 0 to 501.992 Gain = 1/129 65030 Bytes 5 Broadcast by controller AC Frequency 1875 Hz Hz/bit (0xFE06) and 6 Offset = 0 Generator Phase A 2437 0 to 501.992 Gain = 1/128 65027 Bytes 5 Broadcast by controller AC Frequency 1875 Hz Hz/bit (0xFE03) and 6 Offset = 0 Generator Average 2440 0 to 64 Gain = 1V/bit 65000 Bytes 1 Broadcast by controller Line-Line AC RMS 255 Volts Offset = 0 (0xFE06) and 2 Voltage Generator Phase 2441 0 to 64 Gain = 1V/bit 65027 Bytes 1 Broadcast by controller AB Line-Line AC 255 Volts Offset = 0 (0xFE03) and 2 RMS Voltage Generator Phase 2442 0 to 64 Gain = 1V/bit 65024 Bytes 1 Broadcast by controller BC Line-Line AC 255 Volts Offset = 0 (0xFE00) and 2 RMS Voltage Generator Phase 2443 0 to 64 Gain = 1V/bit 65021 Bytes 1 Broadcast by controller CA Line-Line AC 255 Volts Offset = 0 (0xFDFD) and 2 RMS Voltage Generator Average 2444 0 to 64 Gain = 1V/bit 65000 Bytes 3 Broadcast by controller Line-Neutral AC 255 Volts Offset = 0 (0xFE06) and 4 RMS Voltage Generator Phase A 2445 0 to 64 Gain = 1V/bit 65027 Bytes 3 Broadcast by controller Line-Neutral AC 255 Volts Offset = 0 (0xFE03) and 4 RMS Voltage Generator Phase B 2446 0 to 64 Gain = 1V/bit 65024 Bytes 3 Broadcast by controller Line-Neutral AC 255 Volts Offset = 0 (0xFE00) and 4 RMS Voltage Generator Phase C 2447 0 to 64 Gain = 1V/bit 65021 Bytes 3 Broadcast by controller Line-Neutral AC 255 Volts Offset = 0 (0xFDFD) and 4 RMS Voltage Generator Average 2448 0 to 64 Gain = 1A/bit 65030 Bytes 7 Broadcast by controller AC RMS Current 255 Amps Offset = 0 (0xFE06) and 8 Generator Phase A 2449 0 to 64 Gain = 1A/bit 65027 Bytes 7 Broadcast by controller AC RMS Current 255 Amps Offset = 0 (0xFE03) and 8 Generator Phase B 2450 0 to 64 Gain = 1A/bit 65024 Bytes 7 Broadcast by controller AC RMS Current 255 Amps Offset = 0 (0xFE00) and 8 Generator Phase C 2451 0 to 64 Gain = 1A/bit 65021 Bytes 7 Broadcast by controller AC RMS Current 255 Amps Offset = 0 (0xFDFD) and 8
Engine SPNs PGN# Name Short Name Rate Priority Description 65450 Dynagen 1 N/A 200 6 Broadcasting of internal controller parameters (0xFFAA) useful to a remote panel 65451 Dynagen 2 N/A 200 6 Broadcasting of the auxiliary sensors 1 to 4. (0xFFAB) Units or custom text are not broadcast.

OS-TSC 1/18
B.4 Proprietary
37
Dynagen 1 PGN Parameter SPN Range Gain/ PGN PGN Byte/ Description Name Offset Bit Location Controller State 52020 0= Others Gain = 1 65450 Bits 0 to 3 0 1= Failure Offset = 0 (0xFFAA) of Byte 1 2= OFF 3= AUTO 4= Cooldown 5= Running Pressure Unit 52020 0 = kPa 65450 Bit 7 of Byte 1 1 1 = PSI (0xFFAA) Temperature 52020 0 = Fahrenheit 65450 Bit 6 of Byte 1 Unit 2 1= Celsius (0xFFAA) Failure State 52020 0 = OK Gain = 1 65450 Bits 4 and 5 3 1= Warning Offset = 0 (0xFFAA) of Byte 1 2= Failure 3= Double Failure Warning/Failure 52020 0= Failed to Stop Gain = 1 65450 Byte 2 ID 4 2= Load Imbalance Offset = 0 (0xFFAA) 3= (reserved) 4= Over Current 6= High Engine Temp 7= Low Oil Pressure 8= Under Speed 9= Over Speed 11= Low Battery 13= Over Crank 14= Over Voltage 15= Under Voltage 16= (reserved) 20= High Battery 22= Under Frequency 23= Over Frequency 255= (none) First Line 52020 0= (empty) Gain = 1 65450 Byte 3 Display ID 5 1= Auto Start Offset = 0 (0xFFAA) 2= Not in Auto 3= Menu Setting 4= Start Engine 5= (reserved) 6= Preheating 7= J1939 Remote 8= Speed Valid 9= Dly To Stat 10= Preheating 11= Cranking 12= Warm-up 13= Crank Rest 14= Running 15= Cooldown 16= Shutdown 17= Idle Running 18= System Failed 19= Emergency 20= Speed Detect 21= Idle Cool 22= Remote Run 23= Manual Run 25= Charging 32= Switch Run 33= Cranking 34= Idle Speed

OS-TSC 1/18
B.4 Proprietary
38
Dynagen 1 PGN Parameter SPN Range Gain/ PGN PGN Byte/ Description Name Offset Bit Location Second Line 52020 0= (empty) Gain = 1 65450 Byte 4 Display ID 6 1= (scroll lock Offset = 0 (0xFFAA) symbol) 2= Waiting to Start 3= Enter To Reset 4= Warning 5= Crank Failed 6= No System Comm 7= Low Batt InCrank 11= Engine Started 12= Lock Screen 15= Under Voltage 18= Under Speed 19= Over Speed 20= Over Voltage 21= High Engine Temp 22= Low Oil Pressure 29= False Restart 35= (auxiliary sensor 1 text) 36= Not Registered 37= (auxiliary sensor 2 text) 38= Under Speed 39= Rotor Locked 41= Low Battery 42= High Battery 44= (reserved) 45= (reserved) 46= (reserved) 47= Emergency Stop 49= Under Frequency 50= Over Frequency 51= Emergency Stop 52= Manual Stop 57= (config warn 1 input text) 58= (config warn 2 input text) 59= Sensor Start 60= Sensor Shutdown 61= Switch Start 62= Switch Stop 65= Over Current 66= (start inhibit text) 67= (auxiliary sensor 3 text) 68= (auxiliary sensor 4 text) 77= Load Imbalance 78= Start Inhibit

OS-TSC 1/18
B.4 Proprietary
B.5 Aux Sensor
39
Dynagen 1 PGN Parameter SPN Range Gain/ PGN PGN Byte/ Description Name Offset Bit Location AC Group 52020 17 (0x11) = single Gain = 1 65450 Byte 6 Voltage and current Display 7 phase 2 wire w/ Offset = 0 (0xFFAA) configuration current 1 (0x01) = single phase 2 wire w/o current 18 (0x12) = 3 wire single phase A-B w/ current 2 (0x02) = 3 wire single phase A-B w/o current
146 (0x92) = 3 wire single phase A-C w/ current 130 (0x82) = 3 wire single phase A-C w/o current
19 (0x13) = 3 wire 3-phase w/ current
3 (0x03) = 3 wire 3-phase w/o current
20 (0x14) = 4 wire 3-phase with current 4 (0x04) = 4-wire 3-phase w/o current
21 (0x15) = 4-wire Delta 3-phase w/ current 5 (0x05) = 4-wire Delta 3-phase w/o current Current Run 52020 0 to 6500.0 hr. Units: hrs 65450 Bytes 7 and 8 Amount of time controller has Display limited to Gain = 0.1 (0xFFAA) been running since last start 999.9 hours Offset = 0
Parameter SPN Range Gain/ PGN PGN Byte/ Description Name Offset Bit Location Auxiliary 52022 0 to 6553.5 Gain = 0.1 65451 Bytes 1 and 2 0xFFFF= parameter disabled Sensor 1 0 Offset = 0 (0xFFAB) or not available. Units are not transmitted over J1939. Auxiliary 52022 0 to 6553.5 Gain = 0.1 65451 Bytes 3 and 4 0xFFFF= parameter disabled Sensor 2 1 Offset = 0 (0xFFAB) or not available. Units are not transmitted over J1939. Auxiliary 52022 0 to 6553.5 Gain = 0.1 65451 Bytes 5 and 6 0xFFFF= parameter disabled Sensor 3 2 Offset = 0 (0xFFAB) or not available. Units are not transmitted over J1939. Auxiliary 52022 0 to 6553.5 Gain = 0.1 65451 Bytes 7 and 8 0xFFFF= parameter disabled Sensor 4 3 Offset = 0 (0xFFAB) or not available. Units are not transmitted over J1939.

OS-TSC 1/18
FMI Description 1 High Engine Temperature 2 Low Oil Pressure 3 Under Speed 4 Over Speed 7 Low Battery Voltage 8 High Battery Voltage 9 Under AC Frequency 10 Over AC Frequency 11 AC Under Voltage 12 AC Over Voltage Battery 14 Over Current Warning 16 Switched Input Configurable Warning 1 17 Switched Input Configurable Warning 2 18 Auxiliary Sensor 1 19 Auxiliary Sensor 2 20 Auxiliary Sensor 3 21 Auxiliary Sensor 4 22 Load Imbalance 23 Remote Start Inhibit 24 - 31 (Reserved)
The controller can broadcast it's warnings and failures over J1939.
It deviates from the J1939 standard in the following ways: (1) It sends only one DTC at a time even when multiple trouble codes are active. It alternates between DTCs every 3s.(2) It always sends an SPN of 40179 for warnings and a SPN of 40181 for failures. (3) The FMI does not indicate the failure mode. The FMI indicates the specific active warning or failure.
B.6 DM1
B.7 Warnings
40
OS-TSC 1/18
B.8 Failures
41
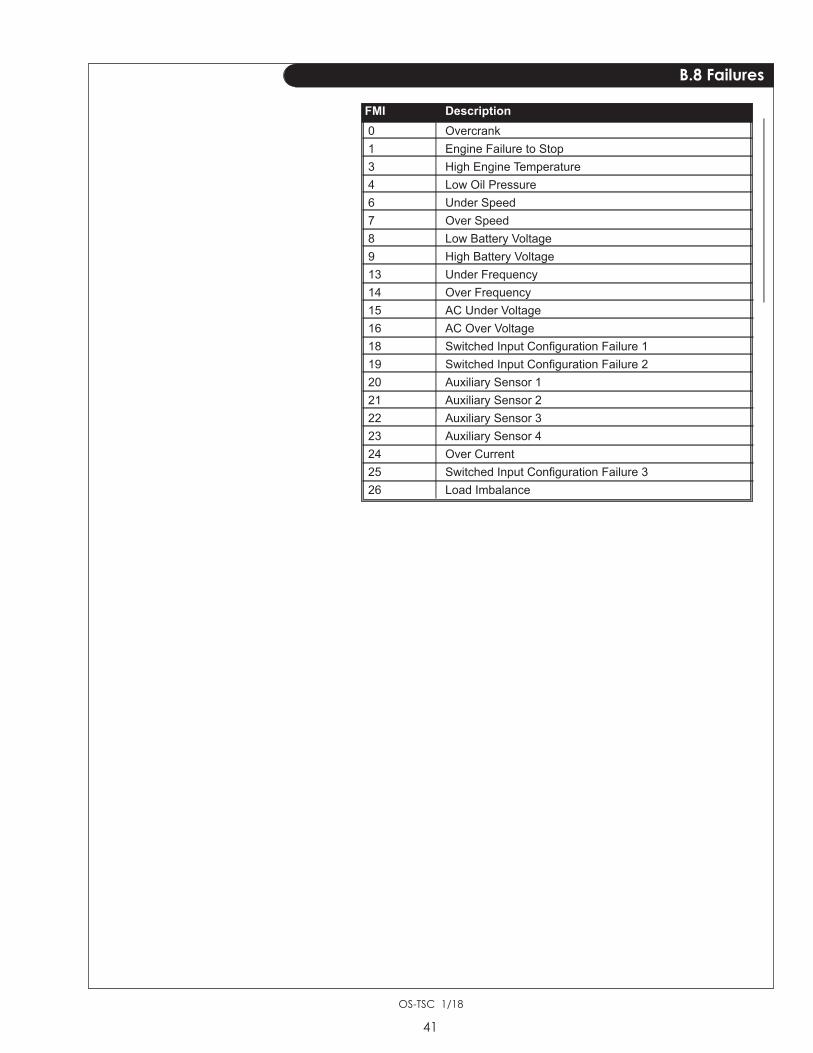
FMI Description 0 Overcrank 1 Engine Failure to Stop 3 High Engine Temperature 4 Low Oil Pressure 6 Under Speed 7 Over Speed 8 Low Battery Voltage 9 High Battery Voltage 13 Under Frequency 14 Over Frequency 15 AC Under Voltage 16 AC Over Voltage 18 Switched Input Configuration Failure 1 19 Switched Input Configuration Failure 2 20 Auxiliary Sensor 1 21 Auxiliary Sensor 2 22 Auxiliary Sensor 3 23 Auxiliary Sensor 4 24 Over Current 25 Switched Input Configuration Failure 3 26 Load Imbalance
OS-TSC 1/18
42
Appendix C: R5485 Communications
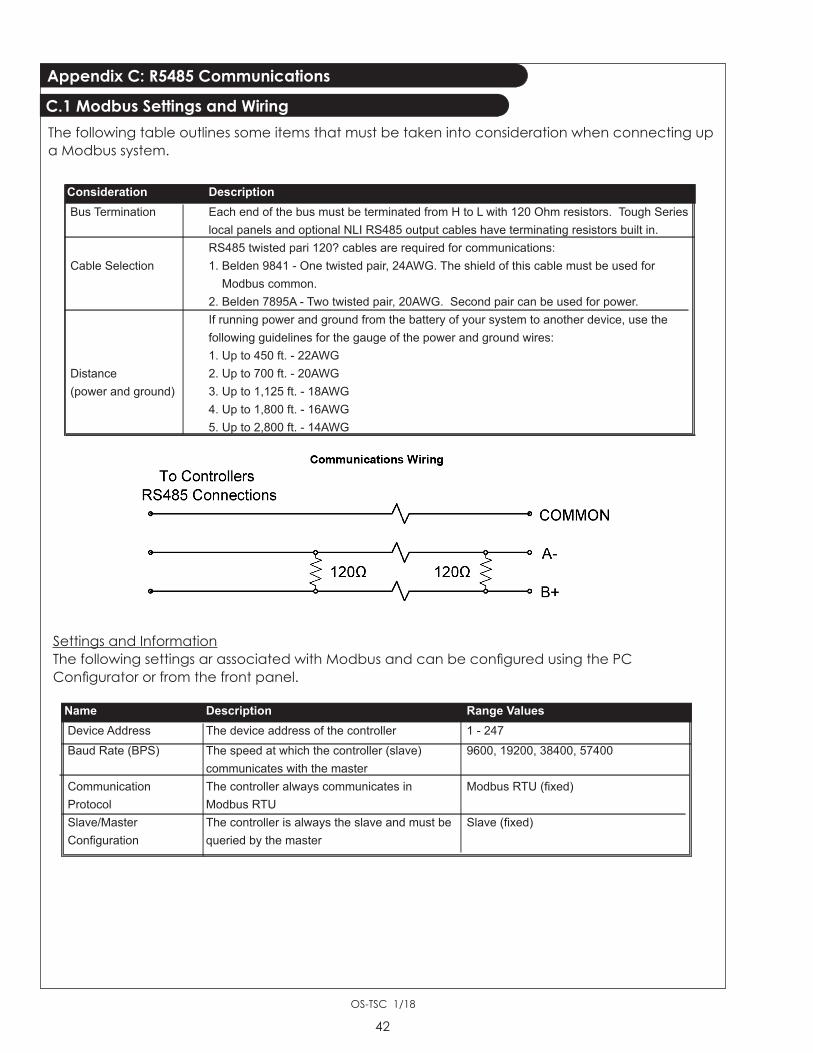
The following table outlines some items that must be taken into consideration when connecting up a Modbus system.
C.1 Modbus Settings and Wiring
Consideration Description Bus Termination Each end of the bus must be terminated from H to L with 120 Ohm resistors. Tough Series local panels and optional NLI RS485 output cables have terminating resistors built in. RS485 twisted pari 120? cables are required for communications: Cable Selection 1. Belden 9841 - One twisted pair, 24AWG. The shield of this cable must be used for Modbus common. 2. Belden 7895A - Two twisted pair, 20AWG. Second pair can be used for power. If running power and ground from the battery of your system to another device, use the following guidelines for the gauge of the power and ground wires: 1. Up to 450 ft. - 22AWG Distance 2. Up to 700 ft. - 20AWG (power and ground) 3. Up to 1,125 ft. - 18AWG 4. Up to 1,800 ft. - 16AWG 5. Up to 2,800 ft. - 14AWG
Settings and InformationThe following settings ar associated with Modbus and can be configured using the PC Configurator or from the front panel.
Name Description Range Values Device Address The device address of the controller 1 - 247 Baud Rate (BPS) The speed at which the controller (slave) 9600, 19200, 38400, 57400 communicates with the master Communication The controller always communicates in Modbus RTU (fixed) Protocol Modbus RTU Slave/Master The controller is always the slave and must be Slave (fixed) Configuration queried by the master

OS-TSC 1/18
The following section is used as a quick reference to find out information about a register. To find more information about that register and how to interpret it, click on the register name or go to the Detailed Register Information section of the manual.
C.2.2 Quick Register Reference
C.2 Modbus Version 2
C.2.2.2 System Status Registers
C.2.2.3 AC Sensing Registers
43
C.2.2.1 Remote Control Registers
Name Description Write Single Register Value Enable System Places the controller in AUTO mode 40098 0x5BA4 Disable System Places the controller in OFF mode 40098 0x5DA2 Start Engine Starts the engine 40098 0x9768 Stop Engine Stops the engine 40098 0x57A8
Name Register Units/Format Range Resolution Not Available Bit Format System State 40168 List N/A N/A N/A 16 bit unsigned Running State 40169 List N/A N/A N/A 16 bit unsigned Event Bit Map 1 40183-40184 List N/A N/A N/A 32 bit unsigned Event Bit Map 2 40185-40186 List N/A N/A N/A 32 bit unsigned Fault Bit Map 40181-40182 List N/A N/A N/A 32 bit unsigned Warning Bit Map 40178-40180 List N/A N/A N/A 32 bit unsigned Active Event 40170 List N/A N/A N/A 16 bit unsigned Active Fault 40171 List N/A N/A N/A 32 bit unsigned
Name Register Units/Format Range Resolution Not Available Bit Format AC Voltage Configuration 40152 List N/A N/A N/A 16 bit unsigned Generator Frequency 40154 Hz 0-1000 0.1 N/A 16 bit unsigned Generator Voltage 40156-40158 Vms 0-10000 0.1 N/A 16 bit unsigned Generator Current 40159-40161 Ams 0-10000 0.1 N/A 16 bit unsigned Main's Voltage * 40159-40161 Vms 0-10000 0.1 N/A 16 bit unsigned * Currently not supported. Reserved for future use.

OS-TSC 1/18
44
C.2.2.7 Controller Information Registers
C.2.2.5 Timer Registers
C.2.2.6 Switched I/O Registers
C.2.2.4 Sensor Registers
Name Register Units/Format Range Resolution Not Available Bit Format Engine Temperature 40151 oF 0 ~ 10000 0.1 0xFFFF 16 bit unsigned Oil Pressure 40152 PSI 0 ~ 10000 0.1 0xFFFF 16 bit unsigned Fuel Level 40153 % 0 ~ 1000 0.1 0xFFFF 16 bit unsigned Engine Speed 40150 RPM 0 - 50000 0.1 0xFFFF 16 bit unsigned Battery Voltage 40155 Vdc 0 - 400 0.1 N/A 16 bit unsigned Sender Table Sender Table Aux Sensor 1 40172 Dependent Dependent 0.1 0xFFFF 16 bit unsigned Sender Table Sender Table Aux Sensor 2 40173 Dependent Dependent 0.1 0xFFFF 16 bit unsigned Sender Table Sender Table Aux Sensor 3 40195 Dependent Dependent 0.1 0xFFFF 16 bit unsigned Sender Table Sender Table Aux Sensor 4 40196 Dependent Dependent 0.1 0xFFFF 16 bit unsigned Auxiliary Units 40189 List N/A N/A N/A 16 bit unsigned Internal Temperature 1 40165 0.1 -400 ~ 2000 0.1 0xFFFF 16 bit signed 1. Only available on controllers with heater option
Name Register Units/Format Range Resolution Not Available Bit Format Engine Run Hours 40163 Hours 0 - 60000 0.1 N/A 16 bit unsigned Total Engine Hours 40187-40189 Hours 0 - 1000000 0.1 N/A 32 bit unsigned Maintenance Counter 40164 Hours -30000 ~ 9990 1 -0x767D 16 bit signed
Name Register Units/Format Range Resolution Not Available Bit Format Serial Number 40193-40194 N/A 0 - 999999 N/A N/A 32 bit unsigned Hardware Version 40176 x xx 0 - 999 0.01 N/A 16 bit unsigned Firmware See detailed See detailed Version 40177 register register N/A N/A 16 bit unsigned
Name Register Units/Format Range Resolution Not Available Bit Format Switched Inputs 40166 List N/A N/A N/A 16 bit unsigned Switched Outputs 40167 List N/A N/A N/A 16 bit unsigned

OS-TSC 1/18
C.2.2.8 Events History Registers
45
Name Description Write Single Register Value Read Previous Event Read Previous Event 40130 0x6C9B Read Next Event Read Next Event 40130 0x639C
Name Register Units/Format Range Resolution Not Available Bit Format Log Type 40131 N/A N/A N/A N/A 16 bit unsigned Log Minute 40132 N/A 1 - 59 1 N/A 16 bit unsigned Log Hour 40135 N/A 1 ~ 23 1 N/A 16 bit unsigned Log Date 40134 N/A 1 ~ 31 1 N/A 16 bit unsigned Log Month 40135 N/A 1 ~ 12 1 N/A 16 bit unsigned DTC Code 40135 ~ 40137 N/A N/A N/A N/A 32 bit unsigned Log Number 40138 N/A 1 - 150 1 N/A 16 bit unsigned Total Logs 40139 N/A 1 - 150 1 N/A 16 bit unsigned
OS-TSC 1/18
High Byte Value Name Description 0x21 Manual Controller was started from the front panel buttonExample: A reading of 0x2106 indicates the controller was started from the front panel button and is currently in a normal running state
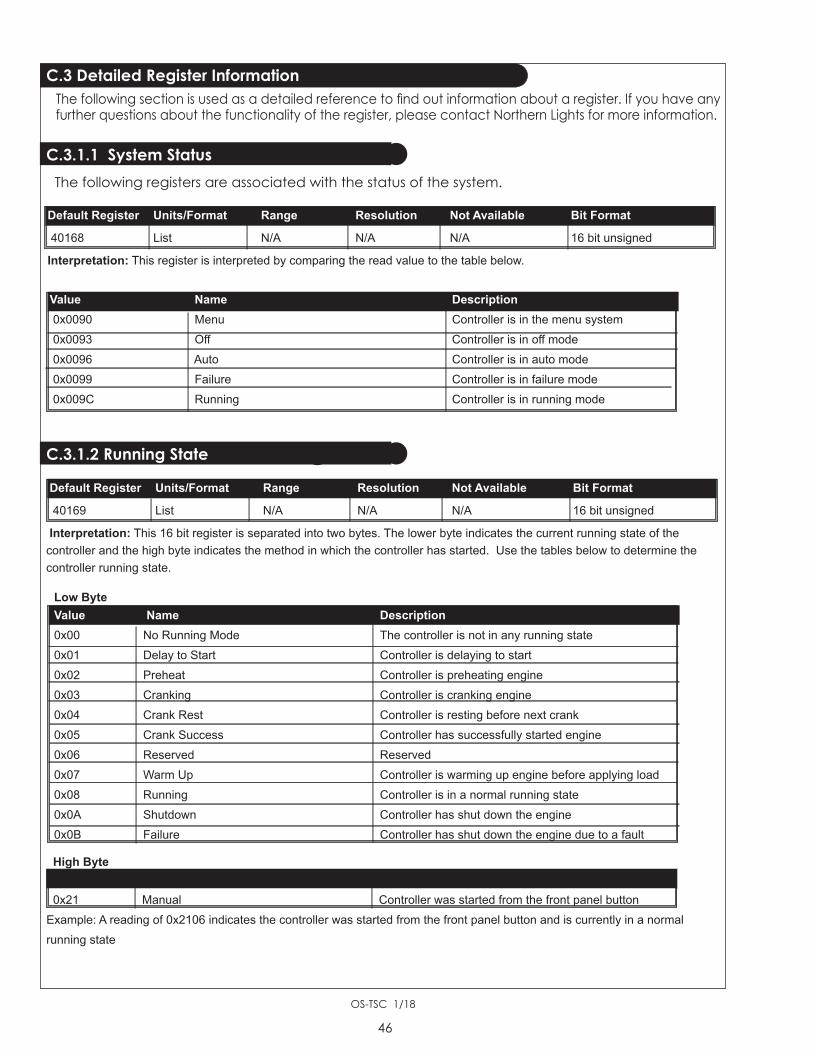
C.3 Detailed Register InformationThe following section is used as a detailed reference to find out information about a register. If you have any further questions about the functionality of the register, please contact Northern Lights for more information.
The following registers are associated with the status of the system.
46
C.3.1.2 Running State
C.3.1.1 System Status
Default Register Units/Format Range Resolution Not Available Bit Format
40168 List N/A N/A N/A 16 bit unsigned
Interpretation: This register is interpreted by comparing the read value to the table below.
Value Name Description 0x0090 Menu Controller is in the menu system 0x0093 Off Controller is in off mode 0x0096 Auto Controller is in auto mode 0x0099 Failure Controller is in failure mode 0x009C Running Controller is in running mode
Default Register Units/Format Range Resolution Not Available Bit Format
40169 List N/A N/A N/A 16 bit unsigned
Interpretation: This 16 bit register is separated into two bytes. The lower byte indicates the current running state of the controller and the high byte indicates the method in which the controller has started. Use the tables below to determine the controller running state.
Low Byte Value Name Description 0x00 No Running Mode The controller is not in any running state 0x01 Delay to Start Controller is delaying to start 0x02 Preheat Controller is preheating engine 0x03 Cranking Controller is cranking engine 0x04 Crank Rest Controller is resting before next crank 0x05 Crank Success Controller has successfully started engine 0x06 Reserved Reserved 0x07 Warm Up Controller is warming up engine before applying load 0x08 Running Controller is in a normal running state 0x0A Shutdown Controller has shut down the engine 0x0B Failure Controller has shut down the engine due to a fault

OS-TSC 1/18
47
C.3.1.3 Event Bit Map 1
Default Register Units/Format Range Resolution Not Available Bit Format
40183 ~ 84 List N/A N/A N/A 32 bit unsigned
Interpretation: This register is separated into individual bits to indicate an event. A bit can be either 0 (inactive) or 1 (active). The majority of the items listed below have a Switched Output that can be assigned to them. The bit will still become active even if there is no switched output associated with the event.
Value Name Description 0 Not in Auto Bit is on because controller is not in auto mode 1 Idle Mode Bit is on because controller is in idle mode 2 Battle Mode Bit is on because controller is in battle mode 3 System OK Bit is on because controller is free of warnings and failures 4 Glowplug Bit is on because of "Preheat" timer 5 Warm Up Bit is on because of "Warm Up" timer 6 Cool Down Bit is on because of "Cool Down" timer 7 Engine Running Bit is on because engine is running 8 Reserved Reserved 9 Reserved Reserved 10 Maintenance Required Bit is on because "Maintenance Counter" timer has expired 11 Low Battery During Crank Bit is on due to "Low Battery During Cranking" 12 Auxiliary Sensor 1 Bit is on because of Auxiliary Sensor 1 reading 13 Auxiliary Sensor 2 Bit is on because of Auxiliary Sensor 2 reading 14 Auxiliary Sensor 3 Bit is on because of Auxiliary Sensor 3 reading 15 Auxiliary Sensor 4 Bit is on because of Auxiliary Sensor 4 reading 16 Delay to Start Bit is on due to "Delay to Start" timer 17 Reserved Reserved 18 Reserved Reserved 19-23 Reserved Reserved 24 Fuel Bit is on because fuel output is enabled 25 Crank Bit is on because crank output is enabled 26 Genset Break 1 Bit on due transferring of generator position 27 Reserved Reserved 28 Pull Coil Bit is on because pull coil has been enabled 29 LCD Backlight Bit is on because LCD backlight is on 30 Voltage Regulator Bit is on when controller is not in idle mode 31 Energize to Stop Bit is on because of Energize to Stop timer
1- Currently not supported. Reserved for future use.
Example: A reading of 0010 0001 0000 0000 0000 0000 1000 1000 has the following bits active: 3, 7, 24, 29.Looking at the bits in the table reveals the following: 1. Controller is free from warnings and failures 2. Controller is currently running 3. Fuel output is currently on 4. Backlight is currently on
OS-TSC 1/18
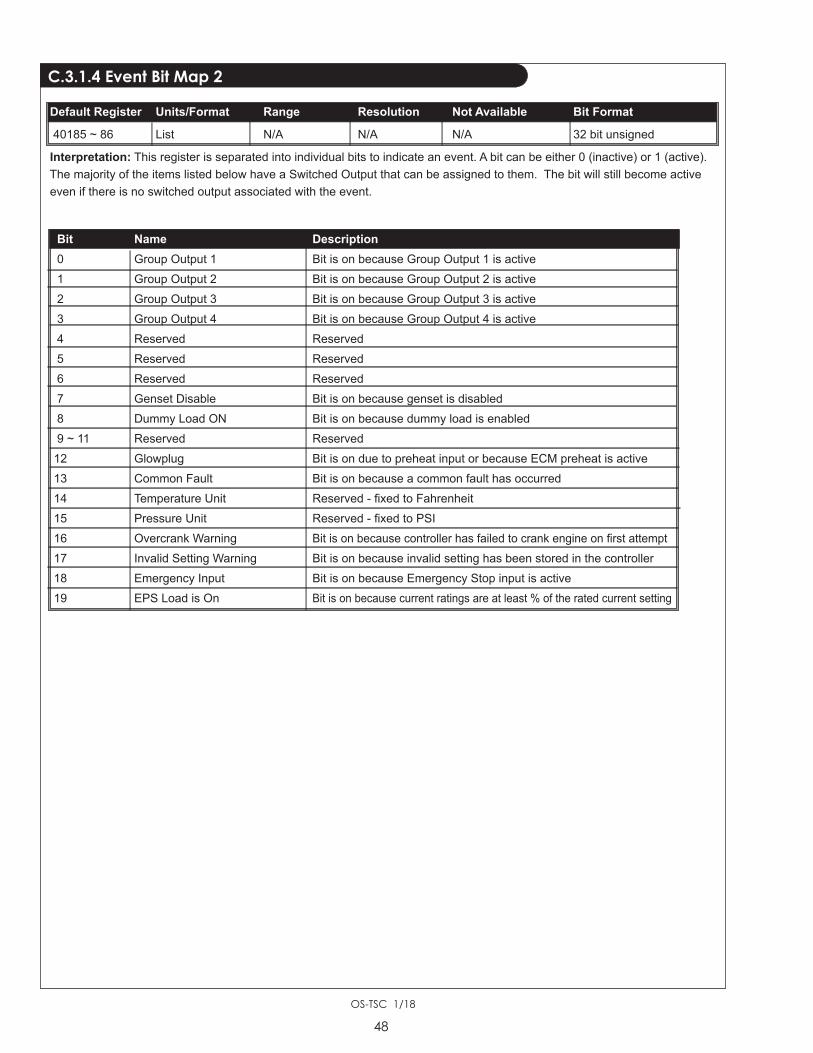
C.3.1.4 Event Bit Map 2
48
Default Register Units/Format Range Resolution Not Available Bit Format
40185 ~ 86 List N/A N/A N/A 32 bit unsigned
Interpretation: This register is separated into individual bits to indicate an event. A bit can be either 0 (inactive) or 1 (active). The majority of the items listed below have a Switched Output that can be assigned to them. The bit will still become active even if there is no switched output associated with the event.
Bit Name Description 0 Group Output 1 Bit is on because Group Output 1 is active 1 Group Output 2 Bit is on because Group Output 2 is active 2 Group Output 3 Bit is on because Group Output 3 is active 3 Group Output 4 Bit is on because Group Output 4 is active 4 Reserved Reserved 5 Reserved Reserved 6 Reserved Reserved 7 Genset Disable Bit is on because genset is disabled 8 Dummy Load ON Bit is on because dummy load is enabled 9 ~ 11 Reserved Reserved 12 Glowplug Bit is on due to preheat input or because ECM preheat is active 13 Common Fault Bit is on because a common fault has occurred 14 Temperature Unit Reserved - fixed to Fahrenheit 15 Pressure Unit Reserved - fixed to PSI 16 Overcrank Warning Bit is on because controller has failed to crank engine on first attempt 17 Invalid Setting Warning Bit is on because invalid setting has been stored in the controller 18 Emergency Input Bit is on because Emergency Stop input is active 19 EPS Load is On Bit is on because current ratings are at least % of the rated current setting

OS-TSC 1/18
C.3.1.5 Fault Bit Map
49
Default Register Units/Format Range Resolution Not Available Bit Format
40181 ~ 82 List N/A N/A N/A 32 bit unsigned
Interpretation: This register is separated into individual bits to indicate an event. A bit can be either 0 (inactive) or 1 (active). Use the table below to determine the fault.
Value Name Description 0 Overcrank Fault due to max attempt at cranking without starting 1 Engine Failed to Stop Fault due to engine speed not being 0 RPM at shutdown 3 High Engine Temperature Fault due to high engine temperature 4 Low Oil Pressure Fault due to low oil pressure 5 Low Fuel Level Fault due to low fuel level 6 Under Speed Fault due to low engine speed 7 Over Speed Fault due to high engine speed 8 Low Battery Voltage Fault due to low battery voltage 9 High Battery Voltage Fault due to high battery voltage 10 Low Coolant Level Fault due to low coolant level 13 Under Frequency Fault due to low AC frequency 14 Over Frequency Fault due to high AC frequency 15 AC Under Voltage Fault due to low AC voltage 16 AC Over Voltage Fault due to high AC voltage 17 ECM Communication Fault due to loss of communications with ECM Value Failure 1 Description 18 Configurable Failure 1 Fault due to Configurable Fail Input 1 being active 19 Configurable Failure 2 Fault due to Configurable Fail Input 2 being active 20 Auxiliary Sensor 1 Fault due to low/high reading on Auxiliary Sensor 1 21 Auxiliary Sensor 2 Fault due to low/high reading on Auxiliary Sensor 2 22 Auxiliary Sensor 3 Fault due to low/high reading on Auxiliary Sensor 3 23 Auxiliary Sensor 4 Fault due to low/high reading on Auxiliary Sensor 4 24 Over Current Fault due to high current reading 25 Configurable Failure 3 Fault due to Configurable Fail Input 3 being active 26 ~ 31 Reserved Reserved
1- These items are only applicable when using the CAN protocol to communicate with an ECM.
Example: A reading of 0000 0000 0000 0000 1000 0000 0000 0000 indicates that the controller shut down due to low AC voltage from the generator.
OS-TSC 1/18
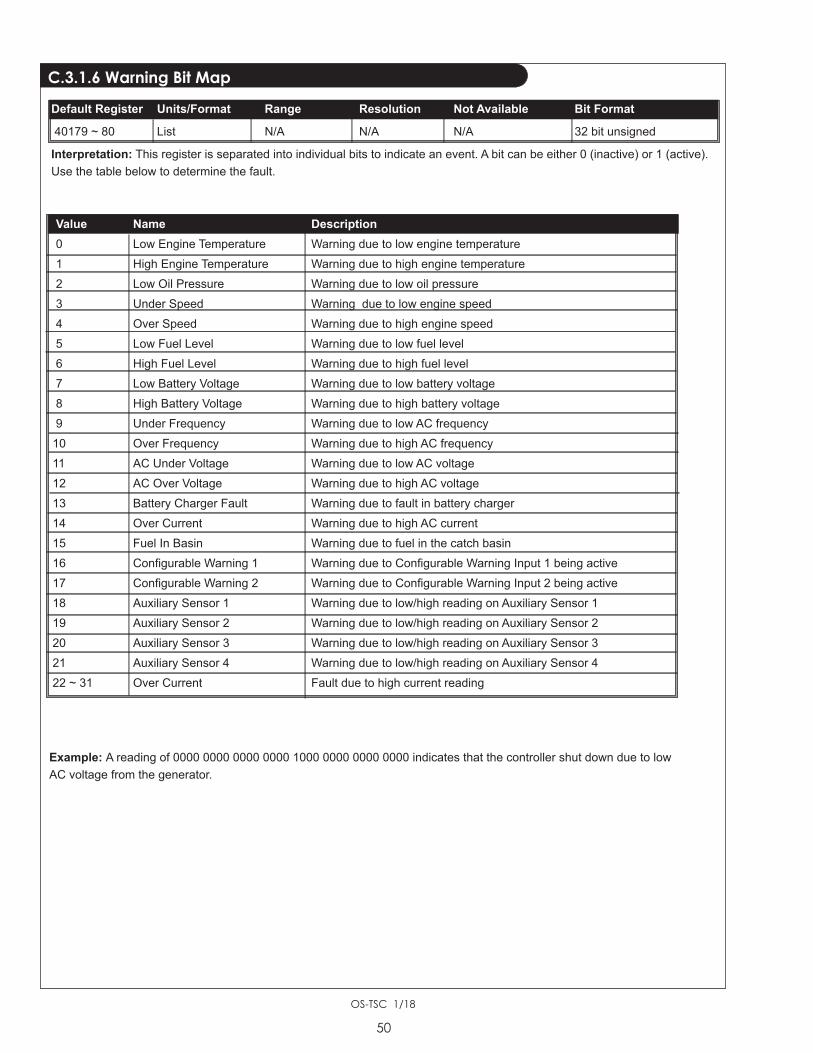
C.3.1.6 Warning Bit Map
50
Default Register Units/Format Range Resolution Not Available Bit Format
40179 ~ 80 List N/A N/A N/A 32 bit unsigned
Interpretation: This register is separated into individual bits to indicate an event. A bit can be either 0 (inactive) or 1 (active). Use the table below to determine the fault.
Value Name Description 0 Low Engine Temperature Warning due to low engine temperature 1 High Engine Temperature Warning due to high engine temperature 2 Low Oil Pressure Warning due to low oil pressure 3 Under Speed Warning due to low engine speed 4 Over Speed Warning due to high engine speed 5 Low Fuel Level Warning due to low fuel level 6 High Fuel Level Warning due to high fuel level 7 Low Battery Voltage Warning due to low battery voltage 8 High Battery Voltage Warning due to high battery voltage 9 Under Frequency Warning due to low AC frequency 10 Over Frequency Warning due to high AC frequency 11 AC Under Voltage Warning due to low AC voltage 12 AC Over Voltage Warning due to high AC voltage 13 Battery Charger Fault Warning due to fault in battery charger 14 Over Current Warning due to high AC current 15 Fuel In Basin Warning due to fuel in the catch basin 16 Configurable Warning 1 Warning due to Configurable Warning Input 1 being active 17 Configurable Warning 2 Warning due to Configurable Warning Input 2 being active 18 Auxiliary Sensor 1 Warning due to low/high reading on Auxiliary Sensor 1 19 Auxiliary Sensor 2 Warning due to low/high reading on Auxiliary Sensor 2 20 Auxiliary Sensor 3 Warning due to low/high reading on Auxiliary Sensor 3 21 Auxiliary Sensor 4 Warning due to low/high reading on Auxiliary Sensor 4 22 ~ 31 Over Current Fault due to high current reading
Example: A reading of 0000 0000 0000 0000 1000 0000 0000 0000 indicates that the controller shut down due to low AC voltage from the generator.

OS-TSC 1/18
C.4 AC Sensing
C.4.2 Generator Frequency
The following registers are associated with AC sensing and monitoring.
51
C.4.1 AC Voltage Configuration
C.4.3 Generator Voltage
C.4.4 Generator Current
Default Register Units/Format Range Resolution Not Available Bit Format
40162 List N/A N/A N/A 16 bit unsigned Interpretation: This 18 bit register is separated into two bytes. The low byte indicates the AC configuration of the gnenerator and the high byte indicates the AC configuration main's power. Both bytes can use the table below to determine their respective configuration.
Value Name Description 0x0000 Disabled Controller has AC sensing disabled 0x0001 2-Wire Single Phase Controller is sensing 2-Wire Single Phase voltage 0x0002 3-Wire Single Phase Controller is sensing 3-Wire Single Phase voltage 0x0003 3-Wire Three Phase Controller is sensing 3-Wire Three Phase voltage 0x0004 4-Wire Three Phase Controller is sensing 4-Wire Three Phase voltage 0x0005 4-Wire Delta Controller is sensing 4-Wire Delta voltage
Example: A reading of 0x0002 indicates that both the generator and main's voltages are 3-Wire Single Phase systems.
Default Register Units/Format Range Resolution Not Available Bit Format
40154 Hertz 0 - 1000 0.1 N/A 16 bit unsigned
Interpretation: This register is meant to be read as a decimal number. The right digit is the decimal point. The digits to the left of it are whole numbers. Example: A reading of 599 can be interpreted as 59.9 Hz.
Configuration Register A Register B Register C 2-Wire Single Phase Line A-N N/A N/A 3-Wire Single Phase Line A-N Line B-N Line A-B 3-Wire Three Phase Line A-B Line B-C Line C-A 4-Wire Three Phase Line A-B Line B-C Line C-A 4-Wire Delta Line A-B Line B-C Line C-A (High Leg) Example: A reading of 2073 can be read as 207.3 Vrms
Default Register Units/Format Range Resolution Not Available Bit Format
40156 - 40158 Vrms 0 - 1000 0.1 N/A 16 bit unsigned
Interpretation: This register is meant to be read as a decimal number. The right digit is the decimal point. The digits to the left of it are whole numbers.The readings will change based on which AC Voltage Communication is selected. The following table indicates what each register is reading based on the configuration.
Default Register Units/Format Range Resolution Not Available Bit Format
40159 - 40161 Arms 0 - 10000 0.1 N/A 16 bit unsigned
Interpretation: This register is meant to be read as a decimal number. The right digit is the decimal point. The digits to the left of it are whole numbers. Example: A reading of 894 can be interpreted as 89.4 Arms

OS-TSC 1/18
The following registers are associated with the readings of sensors.C.5 Sensors
C.5.3 Fuel Level
52
C.5.1 Engine Temperature
C.5.2 Oil Pressure
C.5.4 Engine Speed
C.5.5 Battery Voltage
Default Register Units/Format Range Resolution Not Available Bit Format
40151 oF 0 ~ 10000 0.1 0xFFFF 16 bit unsigned
Interpretation: This register is meant to be read as a decimal number. The right digit is the decimal point. The digits to the left of it are whole numbers. Example: A reading of 2154 can be interpreted as 2.154 Hz.
Default Register Units/Format Range Resolution Not Available Bit Format
40152 PSI 0 - 1000 0.1 0xFFFF 16 bit unsigned
Interpretation: This register is meant to be read as a decimal number. The right digit is the decimal point. The digits to the left of it are whole numbers. Example: A reading of 404 can be interpreted as 40.4 PSI.
Default Register Units/Format Range Resolution Not Available Bit Format
40153 % 0 - 1000 0.1 0xFFFF 16 bit unsigned
Interpretation: This register is meant to be read as a decimal number. The right digit is the decimal point. The digits to the left of it are whole numbers. Example: A reading of 895 can be interpreted as 89.5%.
Default Register Units/Format Range Resolution Not Available Bit Format
40150 RPM 0 - 62500 0.1 0xFFFF 16 bit unsigned
Interpretation: This register is meant to be read as a decimal number. The right digit is the decimal point. The digits to the left of it are whole numbers. Example: A reading of 17985 can be interpreted as 1798.5 RPM.
Default Register Units/Format Range Resolution Not Available Bit Format
4015 Vdc 0 ~ 400 0.1 N/A 16 bit unsigned
Interpretation: This register is meant to be read as a decimal number. The right digit is the decimal point. The digits to the left of it are whole numbers. Example: A reading of 135 can be interpreted as 13.5 Vdc.

OS-TSC 1/18
C.5.6 Auxiliary Sensor 1
53
C.5.9 Auxiliary Sensor 4
C.5.7 Auxiliary Sensor 2
C.5.8 Auxiliary Sensor 3
Default Register Units/Format Range Resolution Not Available Bit Format 40172 Auxiliary Units Auxiliary Units 0.1 0xFFFF 16 bit unsigned Dependent Dependent
Interpretation: This register is meant to be read as a decimal number. The right digit is the decimal point. The digits to the left of it are whole numbers. Note: This register's units, range and resolution are all dependent upon the sender table that has been programmed to the controller. To determine these values, refrer to the Auxiliary Sensor Units register.
Default Register Units/Format Range Resolution Not Available Bit Format 40173 Auxiliary Units Auxiliary Units 0.1 0xFFFF 16 bit unsigned Dependent Dependent
Interpretation: This register is meant to be read as a decimal number. The right digit is the decimal point. The digits to the left of it are whole numbers. Note: This register's units, range and resolution are all dependent upon the sender table that has been programmed to the controller. To determine these values, refrer to the Auxiliary Sensor Units register.
Default Register Units/Format Range Resolution Not Available Bit Format 40195 Auxiliary Units Auxiliary Units 0.1 0xFFFF 16 bit unsigned Dependent Dependent
Interpretation: This register is meant to be read as a decimal number. The right digit is the decimal point. The digits to the left of it are whole numbers. Note: This register's units, range and resolution are all dependent upon the sender table that has been programmed to the controller. To determine these values, refrer to the Auxiliary Sensor Units register.
Default Register Units/Format Range Resolution Not Available Bit Format 40196 Auxiliary Units Auxiliary Units 0.1 0xFFFF 16 bit unsigned Dependent Dependent
Interpretation: This register is meant to be read as a decimal number. The right digit is the decimal point. The digits to the left of it are whole numbers. Note: This register's units, range and resolution are all dependent upon the sender table that has been programmed to the controller. To determine these values, refrer to the Auxiliary Sensor Units register.

OS-TSC 1/18
C.5.11 Internal Temperature
C.5.10 Auxiliary Sensor Units
54
Default Register Units/Format Range Resolution Not Available Bit Format
40189 List N/A N/A N/A 16 bit unsigned
Interpretation: This 16 bit register is separated into 4 sections, one for each of the Auxiliary Sensors. Use the tables below to determine the units, range and resolution.
Bits Name 0 ~ 3 Auxiliary Sensor 1 3 ~ 7 Auxiliary Sensor 2 8 - 11 Auxiliary Sensor 3 12 ~ 15 Auxiliary Sensor 4
Value Name Units Range Resolution 0xF Disabled N/A N/A N/A 0x0 Temperature oF 320 ~ 9999 0.1 0x1 Level % 10 - 1250 0.1 0x2 Pressure PSI 10 - 60000 0.1 0x3 Voltage V 0 ~ 1000 0.1 0x4 Current A 1 ~ 199 0.1 Example: A hexadecimal reading of 0xF012 gives the following information: 1. Auxiliary Sensor 1 is configured for Pressure. 3. Auxiliary Sensor 3 is configured for Temperature. 2. Auxiliary Sensor 4 is configured for Level. 4. Auxiliary Sensor 4 is disabled.
Default Register Units/Format Range Resolution Not Available Bit Format
40165 oF -400 ~ 2000 0.1 0xFFFF 16 bit unsigned
Interpretation: This register is meant to be read as a decimal number. The right digit is the decimal point. The digits to the left of it are whole numbers. Example: A reading of 905 can be interpreted as 90.5 oF

OS-TSC 1/18
C.6 TimersThe following registers are associated with the timers of the system.
C.6.1 Engine Run Hours
55
C.6.2 Total Engine Hours
C.6.3 Maintenance Counter
Default Register Units/Format Range Resolution Not Available Bit Format
40163 Hours 0 ~ 60000 0.1 N/A 16 bit unsigned
Interpretation: This register is meant to be read as a decimal number. The right digit is the decimal point. The digits to the left of it are whole numbers. Note: This register only updates every 6 minutes as readings are in 1/10th of an hour. Example: A reading of 104 can be interpreted as 10.4 Hours.
Default Register Units/Format Range Resolution Not Available Bit Format
40167 ~ 88 Hours 0 ~ 10000000 0.1 N/A 32 bit unsigned
Interpretation: This register is meant to be read as a decimal number. The right digit is the decimal point. The digits to the left of it are whole numbers. Note: This register only updates every 6 minutes as readings are in 1/10th of an hour. Example: A reading of 1004 can be interpreted as 100.4 Hours.
Default Register Units/Format Range Resolution Not Available Bit Format
40164 Hours -30000- 9990 1 0x767D 32 bit unsigned
Interpretation: This register is meant to be read as a decimal number. The right digit is the decimal point. The digits to the left of it are whole numbers. A negative number indicates the number of hours since maintenance counter has expired. Note: This register only updates every 6 minutes as readings are in 1/10th of an hour.

OS-TSC 1/18
C.7 Switched I/O
The following registers are associated with the status of the inputs and outputs.
C.7.2 Switched Outputs
C.7.1 Switched Inputs
56
Default Register Units/Format Range Resolution Not Available Bit Format
40166 List N/A N/A N/A 16 bit unsigned
Interpretation: This 16 bit register is separated into two bytes. The low byte indicates whether the corresponding output is low (ground) or high (battery). The high byte indicates if corresponding output is active or inactive. Each type is broken down as follows.
Bit 7 6 5 4 3 2 1 0
Input N/A N/A N/A Input E Input D Input C Input B Input A Example: A binary reading of 0000 0111 0000 0101 provides the following information: 1. Input A is high and active 3. Input C is high and active 2. Input B is low and active 4. All other inputs are open
Default Register Units/Format Range Resolution Not Available Bit Format
40166 List N/A N/A N/A 16 bit unsigned
Interpretation: This 16 bit register only utilizes the low byte. Each bit corresponds to a switched output that indicates if it is active or inactive. The byte is broken down as follows.
Bit 7 6 5 4 3 2 1 0
Input N/A N/A Output F Input E Input D Input C Input B Input A Example: A binary reading of 0000 0000 0000 0101 provides the following information: 1. Switched output A is active 2. Switched output C active 3. All other inputs are off

OS-TSC 1/18
57
C.8 Controller Information
C.8.2 Hardware Version
C.8.3 Firmware Version
The following registers are associated with information related to the controller.
Default Register Units/Format Range Resolution Not Available Bit Format
40193 ~ 94 N/A N/A 1 N/A 32 bit unsigned
Interpretation: The register is meant to be read as a decimal number. Example: A decimal reading of 10256 can be interpreted as 10258.
Default Register Units/Format Range Resolution Not Available Bit Format
40178 N/A 0 ~ 999 0.01 N/A 16 bit unsigned
Interpretation: The register is meant to be read as a decimal number. The two right digits are the decimal point. All digits to the left are whole numbers. Example: A decimal reading of 122 can be interpreted as V1.22
Default Register Units/Format Range Resolution Not Available Bit Format
40177 N/A N/A 0.01 N/A 16 bit unsigned With the firmware version, the two right digits of the decimal number are the decimal points. All digits to the left are whole numbers. The beta
is a whole number.
Example: A hexadecimal reading of 0x1E61 can be interpreted as follows:
1. The beta bits can bread as decimal 1 which is 01.
2. The firmware version bits can be read as decimal 122 which is 1.22.
3. Combing both numbers give you a Firmware Version 1.22.01.

OS-TSC 1/18
C9.1 Log Control
C.9 Events History
Use the following commands to change the currently viewed event:
The following registers are associated with the Events History log.
58
Name Description Write Single Register Value Read Previous Event Read Previous Event 40130 0x6C93 Read Next Event Read Next Event 40130 0x639C

OS-TSC 1/18
C.9.2 Log Type
59
Default Register Units / Format Range Resolution Not Available Bit Format
40131 N/A N/A 1 N/A 16 bit unsigned
Interpretation:
Value Name Type
0x00DE Empty No Log Returned
0x00E9 DTC DTC Log Returned
0x00A0 Configurable Warning 1 User Defined Text
0x00A1 Configurable Warning 2 User Defined Text
0x00A4 Auxiliary Sensor 1 Warning User Defined Text
0x00A5 Auxiliary Sensor 2 Warning User Defined Text
0x00A6 Auxiliary Sensor 3 Warning User Defined Text
0x00A7 Auxiliary Sensor 4 Warning User Defined Text
0x00B4 Auxiliary Sensor 1 Event User Defined Text
0x00B5 Auxiliary Sensor 2 Event User Defined Text
0x00B6 Auxiliary Sensor 3 Event User Defined Text
0x00B7 Auxiliary Sensor 4 Event User Defined Text
0x00B8 Start Inhibit User Defined Text
0x00C2 Configurable Failure 1 User Defined Text
0x00C3 Configurable Failure 2 User Defined Text
0x00C4 Auxiliary Sensor 1 Failure User Defined Text
0x00C5 Auxiliary Sensor 2 Failure User Defined Text
0x00C6 Auxiliary Sensor 3 Failure User Defined Text
0x00C7 Auxiliary Sensor 4 Failure User Defined Text
0x00C8 Reserved User Defined Text
0x00C9 Configurable Failure 3 User Defined Text
0x8000 Power ON Event
0x8001 Auto Enabled Event
0x8002 Off Enabled Event
0x8003 Manual Start Event
0x8004 Start Cooldown Event
0x8005 Remote Start Event
0x8006 Remote Stop Event
0x8007 Emergency Stop Event
0x8008 Start Charging Event
0x8009 Stop Charging Event
0x800A Service Required Event
0x800B Reset Defaults Event
0x800C Service Complete Event
0x800D Exerciser Bypass Event
0x800E Start Exercise Event
0x800F Stop Exercise Event
0x8010 Log Cleared Event
0x8011 Event
0x8012 Event
0x8013 System Recovery Event
0x8014 Engine Started Event
0x8015 Reserved Event
0x8016 Idle Speed Event
0x8017 Normal Speed Event
0x8018 Auxiliary Sensor 1 Run Event
0x8019 Auxiliary Sensor 2 Run Event
0x801A Auxiliary Sensor 1 Stop Event
0x801B Auxiliary Sensor 2 Stop Event
0x801C Mains Failed Event
0x801D Mains Return Event
0x801E Switch Start Event
0x801F Switch Stop Event
0x8020 Regen Inhibited Event
0x8023 Auxiliary Sensor 3 Run Event
0x8024 Auxiliary Sensor 4 Run Event
0x8025 Auxiliary Sensor 3 Stop Event
0x8026 Auxiliary Sensor 4 Stop Event
0xC000 Crank Failed Warning
0xC001 Low Battery During Cranking Warning
0xC002 Warning
0xC003 High Fuel Level Warning
0xC004 Low AC Voltage Warning
0xC005 Under Speed Warning
0xC006 Over Speed Warning
0xC007 High Engine Temperature Warning
0xC008 Low Oil Pressure Warning
0xC009 Low Fuel Level Warning
0xC00A False Restart Warning
0xC00B Reserved Warning
0xC00C High Current Warning
0xC00D Fuel In Basin Warning
0xC00E Low Battery Voltage Warning
0xC00F High Battery Voltage Warning
0xC010 Low Engine Temperature Warning
0xC011 Battle Mode Warning
0xC012 Low Frequency Warning
0xC013 High Frequency Warning
0xC014 Invalid Setting Warning
0xC015 High AC Voltage Warning
0xF000 Failed to Stop Failure
0xF001 Reserved Failure
0xF002 Reserved Failure
0xF003 Reserved Failure
0xF004 High Current Failure
0xF005 ECM Shutdown Failure
0xF006 High Engine Temperature Failure
0xF007 Low Oil Pressure Failure
0xF008 Under Speed Failure
0xF009 Over Speed Failure
0xF00A Low Fuel Level Failure
0xF00B Low Battery Voltage Failure
0xF00C Low Coolant Level Failure
0xF00D Cranking Failed Failure
0xF00E High AC Voltage Failure
0xF00F Low AC Voltage Failure
0xF011 Reserved Failure
0xF014 High Battery Voltage Failure
0xF015 ECM Communication Failure Failure
0xF016 Low AC Frequency Failure
0xF017 High AC Frequency Failure
Example: A reading of 0xF00A indicates that the current log item was due to 'Low Fuel Level.'
Reserved
Reserved
Reserved

OS-TSC 1/18
C.9.2 Log Type (Continued)
60
Default Register Units / Format Range Resolution Not Available Bit Format
40131 N/A N/A 1 N/A 16 bit unsigned
Interpretation:
Value Name Type
0x00DE Empty No Log Returned
0x00E9 DTC DTC Log Returned
0x00A0 Configurable Warning 1 User Defined Text
0x00A1 Configurable Warning 2 User Defined Text
0x00A4 Auxiliary Sensor 1 Warning User Defined Text
0x00A5 Auxiliary Sensor 2 Warning User Defined Text
0x00A6 Auxiliary Sensor 3 Warning User Defined Text
0x00A7 Auxiliary Sensor 4 Warning User Defined Text
0x00B4 Auxiliary Sensor 1 Event User Defined Text
0x00B5 Auxiliary Sensor 2 Event User Defined Text
0x00B6 Auxiliary Sensor 3 Event User Defined Text
0x00B7 Auxiliary Sensor 4 Event User Defined Text
0x00B8 Start Inhibit User Defined Text
0x00C2 Configurable Failure 1 User Defined Text
0x00C3 Configurable Failure 2 User Defined Text
0x00C4 Auxiliary Sensor 1 Failure User Defined Text
0x00C5 Auxiliary Sensor 2 Failure User Defined Text
0x00C6 Auxiliary Sensor 3 Failure User Defined Text
0x00C7 Auxiliary Sensor 4 Failure User Defined Text
0x00C8 Reserved User Defined Text
0x00C9 Configurable Failure 3 User Defined Text
0x8000 Power ON Event
0x8001 Auto Enabled Event
0x8002 Off Enabled Event
0x8003 Manual Start Event
0x8004 Start Cooldown Event
0x8005 Remote Start Event
0x8006 Remote Stop Event
0x8007 Emergency Stop Event
0x8008 Start Charging Event
0x8009 Stop Charging Event
0x800A Service Required Event
0x800B Reset Defaults Event
0x800C Service Complete Event
0x800D Exerciser Bypass Event
0x800E Start Exercise Event
0x800F Stop Exercise Event
0x8010 Log Cleared Event
0x8011 Event
0x8012 Event
0x8013 System Recovery Event
0x8014 Engine Started Event
0x8015 Reserved Event
0x8016 Idle Speed Event
0x8017 Normal Speed Event
0x8018 Auxiliary Sensor 1 Run Event
0x8019 Auxiliary Sensor 2 Run Event
0x801A Auxiliary Sensor 1 Stop Event
0x801B Auxiliary Sensor 2 Stop Event
0x801C Mains Failed Event
0x801D Mains Return Event
0x801E Switch Start Event
0x801F Switch Stop Event
0x8020 Regen Inhibited Event
0x8023 Auxiliary Sensor 3 Run Event
0x8024 Auxiliary Sensor 4 Run Event
0x8025 Auxiliary Sensor 3 Stop Event
0x8026 Auxiliary Sensor 4 Stop Event
0xC000 Crank Failed Warning
0xC001 Low Battery During Cranking Warning
0xC002 Warning
0xC003 High Fuel Level Warning
0xC004 Low AC Voltage Warning
0xC005 Under Speed Warning
0xC006 Over Speed Warning
0xC007 High Engine Temperature Warning
0xC008 Low Oil Pressure Warning
0xC009 Low Fuel Level Warning
0xC00A False Restart Warning
0xC00B Reserved Warning
0xC00C High Current Warning
0xC00D Fuel In Basin Warning
0xC00E Low Battery Voltage Warning
0xC00F High Battery Voltage Warning
0xC010 Low Engine Temperature Warning
0xC011 Battle Mode Warning
0xC012 Low Frequency Warning
0xC013 High Frequency Warning
0xC014 Invalid Setting Warning
0xC015 High AC Voltage Warning
0xF000 Failed to Stop Failure
0xF001 Reserved Failure
0xF002 Reserved Failure
0xF003 Reserved Failure
0xF004 High Current Failure
0xF005 ECM Shutdown Failure
0xF006 High Engine Temperature Failure
0xF007 Low Oil Pressure Failure
0xF008 Under Speed Failure
0xF009 Over Speed Failure
0xF00A Low Fuel Level Failure
0xF00B Low Battery Voltage Failure
0xF00C Low Coolant Level Failure
0xF00D Cranking Failed Failure
0xF00E High AC Voltage Failure
0xF00F Low AC Voltage Failure
0xF011 Reserved Failure
0xF014 High Battery Voltage Failure
0xF015 ECM Communication Failure Failure
0xF016 Low AC Frequency Failure
0xF017 High AC Frequency Failure
Example: A reading of 0xF00A indicates that the current log item was due to 'Low Fuel Level.'
Reserved
Reserved
Reserved

OS-TSC 1/18
C.9.2 Log Type (Continued)
C.9.3 Log Time
61
Default Register Units / Format Range Resolution Not Available Bit Format
40131 N/A N/A 1 N/A 16 bit unsigned
Interpretation:
Value Name Type
0x00DE Empty No Log Returned
0x00E9 DTC DTC Log Returned
0x00A0 Configurable Warning 1 User Defined Text
0x00A1 Configurable Warning 2 User Defined Text
0x00A4 Auxiliary Sensor 1 Warning User Defined Text
0x00A5 Auxiliary Sensor 2 Warning User Defined Text
0x00A6 Auxiliary Sensor 3 Warning User Defined Text
0x00A7 Auxiliary Sensor 4 Warning User Defined Text
0x00B4 Auxiliary Sensor 1 Event User Defined Text
0x00B5 Auxiliary Sensor 2 Event User Defined Text
0x00B6 Auxiliary Sensor 3 Event User Defined Text
0x00B7 Auxiliary Sensor 4 Event User Defined Text
0x00B8 Start Inhibit User Defined Text
0x00C2 Configurable Failure 1 User Defined Text
0x00C3 Configurable Failure 2 User Defined Text
0x00C4 Auxiliary Sensor 1 Failure User Defined Text
0x00C5 Auxiliary Sensor 2 Failure User Defined Text
0x00C6 Auxiliary Sensor 3 Failure User Defined Text
0x00C7 Auxiliary Sensor 4 Failure User Defined Text
0x00C8 Reserved User Defined Text
0x00C9 Configurable Failure 3 User Defined Text
0x8000 Power ON Event
0x8001 Auto Enabled Event
0x8002 Off Enabled Event
0x8003 Manual Start Event
0x8004 Start Cooldown Event
0x8005 Remote Start Event
0x8006 Remote Stop Event
0x8007 Emergency Stop Event
0x8008 Start Charging Event
0x8009 Stop Charging Event
0x800A Service Required Event
0x800B Reset Defaults Event
0x800C Service Complete Event
0x800D Exerciser Bypass Event
0x800E Start Exercise Event
0x800F Stop Exercise Event
0x8010 Log Cleared Event
0x8011 Event
0x8012 Event
0x8013 System Recovery Event
0x8014 Engine Started Event
0x8015 Reserved Event
0x8016 Idle Speed Event
0x8017 Normal Speed Event
0x8018 Auxiliary Sensor 1 Run Event
0x8019 Auxiliary Sensor 2 Run Event
0x801A Auxiliary Sensor 1 Stop Event
0x801B Auxiliary Sensor 2 Stop Event
0x801C Mains Failed Event
0x801D Mains Return Event
0x801E Switch Start Event
0x801F Switch Stop Event
0x8020 Regen Inhibited Event
0x8023 Auxiliary Sensor 3 Run Event
0x8024 Auxiliary Sensor 4 Run Event
0x8025 Auxiliary Sensor 3 Stop Event
0x8026 Auxiliary Sensor 4 Stop Event
0xC000 Crank Failed Warning
0xC001 Low Battery During Cranking Warning
0xC002 Warning
0xC003 High Fuel Level Warning
0xC004 Low AC Voltage Warning
0xC005 Under Speed Warning
0xC006 Over Speed Warning
0xC007 High Engine Temperature Warning
0xC008 Low Oil Pressure Warning
0xC009 Low Fuel Level Warning
0xC00A False Restart Warning
0xC00B Reserved Warning
0xC00C High Current Warning
0xC00D Fuel In Basin Warning
0xC00E Low Battery Voltage Warning
0xC00F High Battery Voltage Warning
0xC010 Low Engine Temperature Warning
0xC011 Battle Mode Warning
0xC012 Low Frequency Warning
0xC013 High Frequency Warning
0xC014 Invalid Setting Warning
0xC015 High AC Voltage Warning
0xF000 Failed to Stop Failure
0xF001 Reserved Failure
0xF002 Reserved Failure
0xF003 Reserved Failure
0xF004 High Current Failure
0xF005 ECM Shutdown Failure
0xF006 High Engine Temperature Failure
0xF007 Low Oil Pressure Failure
0xF008 Under Speed Failure
0xF009 Over Speed Failure
0xF00A Low Fuel Level Failure
0xF00B Low Battery Voltage Failure
0xF00C Low Coolant Level Failure
0xF00D Cranking Failed Failure
0xF00E High AC Voltage Failure
0xF00F Low AC Voltage Failure
0xF011 Reserved Failure
0xF014 High Battery Voltage Failure
0xF015 ECM Communication Failure Failure
0xF016 Low AC Frequency Failure
0xF017 High AC Frequency Failure
Example: A reading of 0xF00A indicates that the current log item was due to 'Low Fuel Level.'
Reserved
Reserved
Reserved
Default Register Units/Format Range Resolution Not Available Bit Format
40132 N/A 0 ~ 59 1 N/A 16 bit unsigned
Default Register Units/Format Range Resolution Not Available Bit Format
40133 N/A 0 ~ 23 1 N/A 16 bit unsigned
Default Register Units/Format Range Resolution Not Available Bit Format
40134 N/A 0 ~ 31 1 N/A 16 bit unsigned
Default Register Units/Format Range Resolution Not Available Bit Format
40135 N/A 0 - 12 1 N/A 16 bit unsigned Interpretation: All these registers are meant to be read in a decimal format.
Example: A log reading with the following register values can be interprested as July 4th, 12:01 am 1. 40132 = 0x0001 3. 40134 = 0x0004 2. 40133 = 0x0000 4. 40135 = 0x0007

OS-TSC 1/18
C.9.4 Log DTC Code
C.9.5 Log Number
C.9.6 Total Logs
62
Default Register Units/Format Range Resolution Not Available Bit Format 40138 N/A 1 ~ 150 1 N/A 16 bit unsigned
Interpretation: The register is meant to be read as a decimal number. It indicates what the number of the currently viewed log is. Example: A decimal reading of 7 can be interpreted as the 7th log out of the Total Logs.
Default Register Units/Format Range Resolution Not Available Bit Format 40136 - 401371 List N/A N/A N/A 32 bit unsigned 1 - Register only valid if the Log Type register is DTC (0x00EB). Interpretation: This 32 bit register is separated into 4 sections. Use the tables below to determine the SPN, OC, FMI and CM of the DTC code for the current log.
Bits Name 0 ~ 18 Suspect Parameter Number (SPN) 19 - 25 Occurrence (OC) 26 - 30 Failure Mode Identifier (FMI) 31 Connection Management (CM)
1. The SPN bits can be read as 110 which is Engine Coolant Temperature 2. The OC bits can be read as decimal 2 occurrences 3. The FMI bits can be read as decimal 3 which is Above Normal. 4. The CM bit can be read a decimal 0 which is Version 4. Note: You must have access to J1939 specifications to interpret all the data appropriately.
Default Register Units/Format Range Resolution Not Available Bit Format 40139 N/A 1 ~ 150 1 N/A 16 bit unsigned
Interpretation: The register is meant to be read as a decimal number. It indicates how many logs there are in the Events History. Example: A decimal reading of 96 can be interpreted as a total of 96 logs.

OS-TSC 1/18
Appendix D Additional Drawings
63
PAN
EL W
IRIN
G D
IAG
RAM
M77
3-M
944T
AN
D N
L773
-NL8
43C
-722
0

OS-TSC 1/18
Appendix D Additional Drawings
64
PAN
EL W
IRIN
G D
IAG
RAM
M67
3L A
ND
NL6
73C
-722
3

OS-TSC 1/18
65
Appendix D Additional Drawings
PAN
EL W
IRIN
G D
IAG
RAM
NL8
44T4
EC
-731
8

OS-TSC 1/18
66
PAN
EL W
IRIN
G D
IAG
RAM
C12
/C13
C-7
257
Appendix D Additional Drawings

OS-TSC 1/18
Appendix D Additional Drawings
PAN
EL W
IRIN
G D
IAG
RAM
M67
3-94
4T; M
50/5
5/65
/99C
13A-
1280
8
67

OS-TSC 1/18
Appendix D Additional Drawings
PAN
EL W
IRIN
G D
IAG
RAM
M67
3-94
4T; M
50/5
5/65
/99C
13A-
1284
5
68

OS-TSC 1/18
Appendix D Additional Drawings
69
39M
MA
X T
OT
AL L
EN
GT
H
INFO
RM
ATIO
NAL
DIA
GR
AM M
673-
M94
4TB-
1081
4C

OS-TSC 1/18
70
39M
MA
X T
OT
AL L
EN
GT
H
INFO
RM
ATIO
NAL
DIA
GR
AM M
50/5
5/65
/99C
13B-
1081
5
Appendix D Additional Drawings

OS-TSC 1/18
71
LOC
AL P
ANEL
ASS
EMBL
Y M
673-
M94
4TB-
1094
4
6
3
2
9
1
8
4
5
7
11
10
1412
13
NO
TE: C
ABL
ES R
EPRE
SEN
TATIV
E O
NLY
. REF
ER T
O W
IRIN
G D
IAG
RAM
FO
R FU
RTHE
R D
ETA
IL.
P/N
: 22-
9048
0 A
SSEM
BLY
LIST
KEY
P/N
DES
CRI
PTIO
NQ
TY1
39-4
0050
ENC
LOSU
RE1
228
-900
43FA
CEP
LATE
13
22-9
0353
S-TS
C M
OD
ULE
14
22-4
0685
D.C
. WIR
E HA
RNES
S1
522
-406
20A
.C. W
IRE
HARN
ESS
- PA
NEL
SID
E1
622
-000
94FU
SE H
OLD
ER1
722
-406
30S-
TSC
DA
TA W
IRE
HARN
ESS
18
22-4
5608
CO
NN
ECTO
R C
AP
19
22-4
0748
FUSE
110
22-4
0655
A.C
. WIR
E HA
RNES
S - G
ENER
ATO
R SI
DE
111
12-0
0090
ENC
LOSU
RE/F
AC
EPLA
TE S
CRE
WS
412
23-9
0022
SWITC
H G
UARD
1
1322
-903
71EM
ERG
ENC
Y ST
OP
PUSH
BUTT
ON
SW
ITCH
ASS
EMBL
Y1
1414
-000
17SW
ITCH
GUA
RD N
UTS
2
Appendix D Additional Drawings

OS-TSC 1/18
72
REM
OTE
PAN
EL A
SSEM
BLY
M67
3-M
944T
B-10
945
1
2
3
4
5
6
*8
*9
*7
NO
TE: C
ABL
ES R
EPRE
SEN
TATIV
E O
NLY
. REF
ER T
O W
IRIN
G D
IAG
RAM
FO
R FU
RTHE
R D
ETA
IL.
P/N
: 22-
9561
0 A
SSEM
BLY
LIST
KEY
P/N
DES
CRI
PTIO
NQ
TY1
39-4
0058
ENC
LOSU
RE1
228
-900
42FA
CEP
LATE
13
22-9
0364
S-TS
C M
OD
ULE
14
22-4
0635
S-TS
C D
ATA
/PO
WER
WIR
E HA
RNES
S1
500
-406
25PL
UG1
612
-000
90EN
CLO
SURE
/FA
CEP
LATE
SC
REW
S4
P/N
: 22-
9563
5 *A
LTER
NA
TIVE
MO
UNTIN
G (I
F A
PPLI
CA
BLE)
*723
-900
23C
ON
NEC
TOR
MO
UNTIN
G B
RAC
KET
2*8
12-0
0004
BRA
CKE
T SC
REW
(#8-
32 X
3/8
" S/S
)1
*914
-000
00BR
AC
KET
NUT
(#8-
32 S
/S)
1
Appendix D Additional Drawings

OS-TSC 1/18
73
INTE
RM
EDIA
TE R
EMO
TE P
ANEL
ASS
EMBL
Y M
673-
M94
4TB-
1094
6
1
2
3
4
5
*6*8
*7
NO
TE: C
ABL
ES R
EPRE
SEN
TATIV
E O
NLY
. REF
ER T
O W
IRIN
G D
IAG
RAM
FO
R FU
RTHE
R D
ETA
IL.
P/N
: 22-
9562
5 A
SSEM
BLY
LIST
KEY
P/N
DES
CRI
PTIO
NQ
TY1
39-4
0058
ENC
LOSU
RE1
228
-900
42FA
CEP
LATE
13
22-9
0364
S-TS
C M
OD
ULE
1
422
-406
70S-
TSC
DA
TA/P
OW
ER W
IRE
HARN
ESS
(INTE
RMD
IATE
'Y')
1
512
-000
90EN
CLO
SURE
/FA
CEP
LATE
SC
REW
S4
P/N
: 22-
9563
0 *A
LTER
NA
TIVE
MO
UNTIN
G (I
F A
PPLI
CA
BLE)
*623
-900
23C
ON
NEC
TOR
MO
UNTIN
G B
RAC
KET
2*7
12-0
0004
BRA
CKE
T SC
REW
(#8-
32 X
3/8
" S/S
)1
*814
-000
00BR
AC
KET
NUT
(#8-
32 S
/S)
1
Appendix D Additional Drawings

OS-TSC 1/18
74
TSC
INST
ALLA
TIO
N T
O S
OU
ND
SH
IELD
- M
673L
3 &
M67
3LD
3B-
1092
1
Appendix D Additional Drawings

OS-TSC 1/18

OS-TSC 1/18
4420 14th Ave. NW., Seattle WA 98107 Tel: (206) 789-3880 • 1-800-762-0165 • www.northern-lights.comNorthern Lights and Lugger are registered trademarks of Northern Lights, Inc. © 2018 All rights reserved. Litho USA.