Operation Manual Software FanTestic (ATTMA)
63
rev-2017-10-02 www.retrotec.com Operation Manual Software FanTestic (ATTMA)
-
Upload
khangminh22 -
Category
Documents
-
view
1 -
download
0
Transcript of Operation Manual Software FanTestic (ATTMA)

rev-2017-10-02
www.retrotec.com
Operation Manual
Software
FanTestic
(ATTMA)

rev-2017-10-02
Page 2 of 63 ©2017 Retrotec
Table of Contents
1 Getting Started ............................................................................................. 5
1.1 Video training ................................................................................................................................ 5 1.2 Minimum system requirements ................................................................................................... 6 1.3 Download and install FanTestic .................................................................................................... 6 1.4 DM-2 users install a USB Driver manually..................................................................................... 8 1.5 Start FanTestic............................................................................................................................... 8 1.6 Select a test standard to use for new tests ................................................................................. 10 1.7 Enter license key when you receive one ..................................................................................... 10 1.8 Change language to use for user interface and reports ............................................................. 12 1.9 Change parameters used for running the program – (advanced operation) ............................. 13
Basics tab for items applying to all tests ................................................................................. 13 Settings tab for items specific to each test Standard ............................................................. 15 Application tab for items specific to FanTestic behind the scenes ......................................... 15 ATTMA gauge calibration pressure pre-sets ........................................................................... 16
1.10 Automatic Save ........................................................................................................................... 16 1.11 Create a new Test file ................................................................................................................. 17
2 Enter Equipment (fans and gauges) used for the Test .................................. 17
2.1 Gauge Info ................................................................................................................................... 18 2.2 Gauge calibration factors ............................................................................................................ 18 2.3 Device connected to Gauge Info ................................................................................................. 18
Calibrated Fan Model .............................................................................................................. 18
FanTestic Retrotec’s Building Air Leakage Test software
✓ Fully compliant with ASTM, USACE Protocol, CGSB, ATTMA, EN13829 variants, ISO9972 variants
✓ Manual data entry or fully automatic data capture
✓ Generate reports in MS Word from captured readings or output directly to MS Excel
✓ ATTMA version includes an upload tool for the ATTMA Lodgment web service
✓ Automatic updating over the Internet (requires an internet connection)
Computer requirements:
✓ Computer running MS Windows (XP or later)
✓ For report generation - Microsoft Word (2007 or later)
✓ For Data Export – Microsoft Excel (2007 or later)
Automatic data collection requires:
✓ A Retrotec gauge and door fan (or other manufacturer fan with Retrotec fan speed control adapter)
✓ Using DM-2 gauge requires USB2.0 port and installation of DM2 Driver software
✓ Using DM32 gauge requires Ethernet port (or USB2.0 port with DM32 Driver software)

rev-2017-10-02
Page 3 of 63 ©2017 Retrotec
Use Gauge Only – with no calibrated fan attached ................................................................ 19 Fan Serial Number (S/N): ........................................................................................................ 19 Device Location ....................................................................................................................... 19
2.4 Change fan flow coefficients after re-calibration ....................................................................... 20 2.5 Find gauges attached to computer, automatically ..................................................................... 22 2.6 Changing Range in the test, manual entry .................................................................................. 22 2.7 Adding multiple fan/gauge pairs ................................................................................................. 22 2.8 Retrieve Gauge serial number and fan model automatically ..................................................... 23 2.9 Delete a Fan/Gauge pair ............................................................................................................. 23 2.10 Test Technician and report identifier.......................................................................................... 23
3 Enter Building description and Dimensions ................................................. 23
3.1 Building Address.......................................................................................................................... 24 3.2 Customer details ......................................................................................................................... 24 3.3 Height of building above ground ................................................................................................ 24 3.4 Accuracy of building measurements ........................................................................................... 24 3.5 Volume ........................................................................................................................................ 24 3.6 Total envelope area .................................................................................................................... 24 3.7 Floor area .................................................................................................................................... 24
4 Manage Pressurization/Depressurization (Data) Sets .................................. 25
4.1 Adding a Set to the Test .............................................................................................................. 27 4.2 Removing a Set from the Test ..................................................................................................... 28 4.3 Clearing Data in the Set .............................................................................................................. 28 4.4 View Graph of data in the Data set ............................................................................................. 28
5 Enter Test Data ........................................................................................... 29
5.1 Start date .................................................................................................................................... 30 5.2 Start Time .................................................................................................................................... 30 5.3 Barometric pressure ................................................................................................................... 30 5.4 ATTMA testing method ............................................................................................................... 30 5.5 Wind speed and direction ........................................................................................................... 31 5.6 Operator location ........................................................................................................................ 31 5.7 Temperature, initial .................................................................................................................... 31 5.8 Baseline/bias pressure, initial [Pa] .............................................................................................. 31 5.9 Time per Induced Pressure ......................................................................................................... 32 5.10 Induced Pressure data lines [Pa] ................................................................................................. 32 5.11 Test Fan Data lines ...................................................................................................................... 33
Select Range installed on fan during test ................................................................................ 33 Enter Fan Pressure or direct flow values: ............................................................................... 34 Manual range change – how to add another fan pressure line .............................................. 35 When to change range during a test ...................................................................................... 35
5.12 Baseline/bias pressure, final [Pa] ................................................................................................ 36 5.13 Temperature, final ...................................................................................................................... 36 5.14 Results for the Set ....................................................................................................................... 36
Air leakage results for the Set ................................................................................................. 37 Calculated results .................................................................................................................... 38
5.15 Data set notes ............................................................................................................................. 39 5.16 Finish time ................................................................................................................................... 39

rev-2017-10-02
Page 4 of 63 ©2017 Retrotec
6 Capture Data with an Automatic Test ......................................................... 39
6.1 Before performing the automatic test ........................................................................................ 39 6.2 Connect your Gauge to the Computer ........................................................................................ 40
DM-2 (use USB connection) .................................................................................................... 40 DM32 with WiFi connection ................................................................................................... 41 DM32 with Wired Ethernet connection .................................................................................. 41
6.3 Find connected gauges to use for the test ................................................................................. 42 6.4 Start the Auto-Test ...................................................................................................................... 42 6.5 Changing the Range during an Automatic Test........................................................................... 42 6.6 View the Gauge Display during an automatic Test ..................................................................... 45
7 Capture data with a Semi-Automatic Test ................................................... 46
7.1 Understanding the Semi-Automatic Test Mode ......................................................................... 46 7.2 How to use the Semi-Automatic Test feature ............................................................................ 46
8 Summary Test Results ................................................................................. 48
8.1 Test notes and deviations from test method ............................................................................. 49 8.2 Summary Results – combined average of test data sets ............................................................ 49 8.3 View Graph of Summary Results................................................................................................. 49
9 Use the Test results ..................................................................................... 50
9.1 Open an existing Test file ............................................................................................................ 50 9.2 Save results to a test file (.exml) ................................................................................................. 50 9.3 Save As to save results to a different file .................................................................................... 51 9.4 Print the Test as a Print-Screen ................................................................................................... 51
10 Create a report from the Test results in MS Word .................................... 51
10.1 Generate Report ......................................................................................................................... 51 10.2 View listing of reports ................................................................................................................. 52 10.3 Customize the way your Report looks ........................................................................................ 52
11 Export Data to MS Excel ........................................................................... 53
12 Upload the Test data to the ATTMA Lodgment Web Service .................... 54
12.1 Open the Web Service Tool ........................................................................................................ 54 12.2 How to get your ATTMA web service credentials ....................................................................... 56 12.3 Fill out data in the Tool ............................................................................................................... 58
13 Troubleshooting ....................................................................................... 58
14 Contact Tech Support ............................................................................... 61
14.1 The log file ................................................................................................................................... 62 14.2 The .exml test file ........................................................................................................................ 62 14.3 Settings file .................................................................................................................................. 62 14.4 A screenshot ............................................................................................................................... 62

rev-2017-10-02
Page 5 of 63 ©2017 Retrotec
Copyright ©2017 Retrotec
All rights reserved.
This document contains materials protected under International and Federal Copyright Laws. No part of this book may be reproduced or transmitted in any form or by any means, electronic or mechanical, including photocopying, recording, or by any information storage and retrieval system without express written permission from Retrotec.
Retrotec makes no warranties with respect to this documentation and disclaims any implied warranties of merchantability, quality, or fitness for any particular purpose. The information in this document is subject to change without notice. Retrotec reserves the right to make revisions to this publication without obligation to notify any person or entity of any such changes.
FanTestic is a Trademark of Retrotec. Other trademarks or brand names mentioned herein are trademarks or registered trademarks of their respective owners.
1 Getting Started
FanTestic is software designed to capture data and calculate results required for the analysis of building energy leakage based on one of a number of published Test Standards.
You can carry out the building leakage tests using a gauge, fan and door panel and capture the readings on paper to later enter into FanTestic so the software can calculate compliance for you and generate a report in MS Word or put your test readings into MS Excel. This is called a Manual Test in this document.
Alternatively, you can use FanTestic to automatically control your gauge and fan to carry out the test by stepping through the required induced pressure target points and capturing data according to the Test Standard, again with the ability to generate a report or Excel data. This is called an Automatic Test in this document.
A Semi-Automatic mode is also included if you need more control of your test at each induced pressure target point.
Be sure you are familiar with carrying out a building air leakage test before attempting to use the software – for reference you can look at the following Retrotec guides:
Air Leakage Testing Procedures Manual
Door Fan Operation Manual: for 200, 300, 1000-3000 systems for 300, 5000-6000 systems
Multiple Fan Testing (Large Buildings): for 1000-3000 systems for 5000-6000 systems
1.1 Video training The following videos explain the steps to be taken:
• Webinar showing FanTestic Operation
The following videos are for older versions of the software but you may find them valuable in general, since many of the steps required to use the software have remained the same.

rev-2017-10-02
Page 6 of 63 ©2017 Retrotec
• Webinar for FanTestic Operation including demo of Virtual Gauge software for DM32
• How to enter data from a Manual Test (ASTM)
• How to use FanTestic to capture data automatically (ASTM)
• Graphing and Saving Test Data
For more Retrotec videos and webinars on other topics, visit
http://www.youtube.com/user/RetrotecEnergy
1.2 Minimum system requirements • Microsoft Windows O/S: XP (SP2 or greater) or newer (Vista/7/8) –current with all updates
• Processor: 1 GHz
• RAM: 1 GB
• Disk space: 600MB (32-bit) or 1.5 GB (64-bit)
• Microsoft Word: 2007/2010+ (or Word 2003 with 2007 support add-in)
• Internet connection (for automatic software updates)
• .NET 4.0 framework (will update automatically with the FanTestic installation)
1.3 Download and install FanTestic a) Go to: http://retrotec.com/support/software-downloads
b) When the webpage opens, click on the “Download” button beside “FanTestic (Lite/Pro/6/24)”

rev-2017-10-02
Page 7 of 63 ©2017 Retrotec
c) Click the “Install” button on the window that opens.
d) When prompted with “Do you want to run or save setup.exe?” click on the “Run” button.
e) If not prompted, go to the Downloads menu option on your web browser and double-click on
the file you have just downloaded (which is called “setup.exe”).
f) The “Application Install – Security Warning” window will open:
g) Click on the “Install” button.
h) If the User Account Control (UAC) asks for permission, you must give administrator permission
for the software to install the DM32 USB driver automatically.
i)
j) The program will install, and try to start FanTestic for you.
k) If you have been running a previous version of FanTestic and have been using “Run As
Administrator” mode, you will receive the following non-fatal message indicating that the
installer cannot launch the software because FanTestic must run in Administrator mode:
l) Just click ok and launch FanTestic as described in section 1.5.

rev-2017-10-02
Page 8 of 63 ©2017 Retrotec
1.4 DM-2 users install a USB Driver manually If you want to run automatic tests with a DM-2 gauge, you must download and manually install a driver for the USB port.
DM32 users will have the driver automatically installed when they install FanTestic or the DM32 Software Suite, and should only use USB connection to update the firmware through the DM32 Configurator, not for automatic control of the gauge.
DM32 users should use Ethernet to connect to the gauges for auto-testing, since that will provide the longest cable option and most reliability. WiFi can also be used depending on the distance between the gauge and the computer and the type of building construction.
a) Go to: http://retrotec.com/support/software-downloads
b) Download by clicking on the “Download button and when prompted to Run or Save, choose
“Save”
c) To install the Retrotec DM2 driver (DM2deviceinstaller32.exe or DM2DeviceInstaller64.exe), do
not double click the file when the download has completed. Instead, right click the downloaded
“DM2deviceinstaller” file, and select Run as administrator to start the installation. This will give
permission to install the required system files.
1.5 Start FanTestic After installation, click the Start Menu All Programs Retrotec FanTestic.
rev-2017-10-02
Page 9 of 63 ©2017 Retrotec
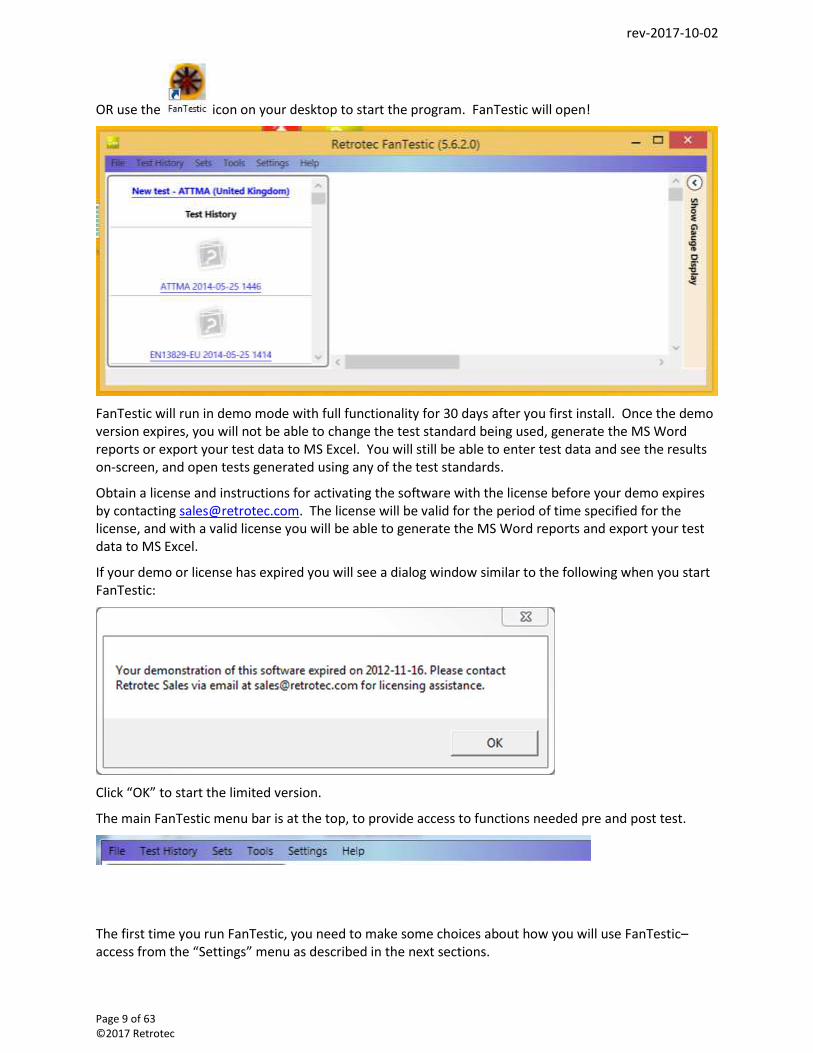
OR use the icon on your desktop to start the program. FanTestic will open!
FanTestic will run in demo mode with full functionality for 30 days after you first install. Once the demo version expires, you will not be able to change the test standard being used, generate the MS Word reports or export your test data to MS Excel. You will still be able to enter test data and see the results on-screen, and open tests generated using any of the test standards.
Obtain a license and instructions for activating the software with the license before your demo expires by contacting [email protected]. The license will be valid for the period of time specified for the license, and with a valid license you will be able to generate the MS Word reports and export your test data to MS Excel.
If your demo or license has expired you will see a dialog window similar to the following when you start FanTestic:
Click “OK” to start the limited version.
The main FanTestic menu bar is at the top, to provide access to functions needed pre and post test.
The first time you run FanTestic, you need to make some choices about how you will use FanTestic– access from the “Settings” menu as described in the next sections.

rev-2017-10-02
Page 10 of 63 ©2017 Retrotec
1.6 Select a test standard to use for new tests FanTestic is based on national and international standards which specify how the Air Leakage Tests are to be performed to be valid. Choices of test standard are available “Settings” “Change Standard used for new tests”. The number of Test standards available to be chosen in the list depends on the license purchased.
The dialog opens for you to choose the standard by clicking on the button beside the name of the standard:
1.7 Enter license key when you receive one • Start FanTestic, if not already running.
• Once in the program click “Settings” “Enter license details”.

rev-2017-10-02
Page 11 of 63 ©2017 Retrotec
• Click on the “Install License Key” button in the dialog window that opens, and a text entry area
opens:
• Copy the license key from the email you received and paste it into the text entry area that
appeared, being sure to include the “===START_KEY===” and “===END_KEY===” portion of the
key. If selecting from an email, be sure that the email has not inserted any odd items into the
string, such as an “emailto” link. The email containing the key that is sent out from Retrotec will
be a “Text only” email, not HTML based, in order to try to minimize license corruption.
• Click on the “Install License” button below the text box.

rev-2017-10-02
Page 12 of 63 ©2017 Retrotec
• Test Standard may be automatically selected based on the license- if not, choose one from the
list.
• Next, fill in the user’s name and email address (corresponds to the technician doing tests with
the software). “Software user’s company” will be filled in automatically from the license that
was entered:
• Then click “OK”.
1.8 Change language to use for user interface and reports Start FanTestic if it is not already running.
Click on “Settings” “Advanced - view or change default program parameters”
The Settings dialog will open, and the “Language to use” drop-down is at the bottom:

rev-2017-10-02
Page 13 of 63 ©2017 Retrotec
Choose the language from the language drop-down:
1.9 Change parameters used for running the program – (advanced operation)
Changes can be made any time, but a new test file must be opened for any changes to take effect. If changes are made to settings, FanTestic will save and close any open test file (user can skip this) and create and open a new Test file.
Start FanTestic if it is not already running.
Click on “Settings” “Advanced - view or change default program parameters”
Basics tab for items applying to all tests Start FanTestic if it is not already running.
Click on “Settings” “Advanced - view or change default program parameters”
Click on “Basics” tab

rev-2017-10-02
Page 14 of 63 ©2017 Retrotec
1.9.1.1 Cover fans before taking bias readings? Selecting "Yes" will cause the software to stop after the initial bias pressure readings have been taken in order for the user to uncover the fan(s). Select “No” for a nonstop test in which test pressure will be taken immediately following initial bias pressure readings.
1.9.1.2 Show calculation warning?
Warnings will appear when the “Calculate” button is clicked if insufficient building information is provided (i.e. no building volume was entered, therefore ACH50 cannot be calculated). Choose Yes to view the calculation warnings.
1.9.1.3 Data to show On Graphs
This selection allows you to choose whether the graphs will show all readings, or only show the single point that is the average of all readings at any particular Test Fan pressure.
1.9.1.4 Individual Control
The Gauge Control function allows a user choose the method that the FanTestic will use to seek a target pressure when multiple fans are being used. The Gauge Control function sets whether a number of fans are controlled with the same signal (from one primary gauge) so all fans run at the same speed or whether each fan is controlled individually and will run at different speeds.
With Gauge Control set to “Common”, all fans will be controlled by the induced pressure reading on the primary gauge, and the non-primary gauges will be set to the speed of the primary fan.
With Gauge Control set to “Individual”, each fan is controlled by the induced pressure on its own gauge. Controlling this way may result in “dueling” fans, where one takes over and runs up to a speed of 100%, while the other fans decrease to 0% speed. If this happens during your test, change to Common Control.
Each gauge must be connected to FanTestic for automatic control, and each gauge must be connected using the yellow speed control cable to its own fan. For details about setting up multiple fan tests, see the manuals for Multiple Fan Testing (Large Buildings): for 1000-3000 systems for 5000-6000 systems.
Gauge Control: “Common”
To control the speed of multiple fans based on the speed of the primary gauge, choose “Common”. When attempting to create a pressure, FanTestic will set the target pressure on a single (primary) gauge.

rev-2017-10-02
Page 15 of 63 ©2017 Retrotec
FanTestic tells the primary gauge to seek that target pressure, and then reads the %speed from the primary gauge, and tells all other gauges to go to that speed. This effectively turns all fans into one big fan that is controlled by the induced pressure on channel A of the primary gauge.
The first gauge in the list in the Equipment tab is the “primary gauge”. The primary gauge can be switched by the user.
Gauge Control: “Individual”
For each fan to be controlled only by their own gauge, choose “Individual”. When attempting to create a pressure, FanTestic will set the target pressure or speed on each of the gauges. FanTestic tells each gauge to seek that pressure target simultaneously. This would be the same as a human operator using the Set Pressure function on each gauge individually.
Settings tab for items specific to each test Standard Start FanTestic if it is not already running.
Click on “Settings” “Advanced - view or change default program parameters”
Click on “Settings” tab.
Many of the settings can be changed to accommodate user-defined testing procedures.
However, you usually want to run a test according to the default protocol rules. If so, click the
button to run a test according to the default protocol rules.
Application tab for items specific to FanTestic behind the scenes Start FanTestic if it is not already running.
Click on “Settings” “Advanced - view or change default program parameters”
Click on “Application” tab.

rev-2017-10-02
Page 16 of 63 ©2017 Retrotec
ATTMA gauge calibration pressure pre-sets The Gauge Calibration will be based on the number of points and on the range of pressures you specify in this pre-set option (either 7 points or 11 points as indicated). This affects what shows up in the “Gauge Calibration” window which opens when you enter a gauge calibration for a particular gauge serial number (see section Error! Reference source not found.).
Start FanTestic if it is not already running.
Click on “Settings” “Advanced - view or change default program parameters”
Click on “Application” tab.
1.10 Automatic Save Test data can be automatically saved at periodic intervals by turning the Auto Save function on (“File” “Auto save?”).
Test files are normally saved on your local C: drive under [MyDocuments]\Retrotec\Tests.

rev-2017-10-02
Page 17 of 63 ©2017 Retrotec
If you change the location of the test file to a remote drive, and then remove the remote drive with FanTestic running and AutoSave on, the software will not be able to save the file to the remote drive anymore, and may report an error.
Turn AutoSave Off if you wish to double click to launch test files attached to emails. If you double click on a file with extension .exml attached to an email in MS Outlook with AutoSave on, FanTestic will start up and open the test file, but when AutoSave tries to save to the inaccessible MS Outlook temporary location, FanTestic may report an error.
1.11 Create a new Test file To create a new test, click on “New test” at the top of the history list, or go to “File” “New”.
Make sure “New Test” on the history list is followed by ATTMA. If not, go to “Settings” “Change Standard used for new tests” and change the test standard to ATTMA. You may need to restart the program if this change is not active immediately.
Old tests are listed as a history, below the “New test” option if you have the history list open. You can click on any test name or picture to open that previously saved Test. Older tests are at the bottom of the list.
2 Enter Equipment (fans and gauges) used for the Test
Each gauge/fan pair is managed by the software. Choose a Gauge model and enter the serial number. Then choose a fan model from the drop-down. You can also enter a serial number for the fan. These values are all output to the generated report.
When you enter the serial numbers, ensure that the correct gauge is paired with the fan in use. The software calculates flows from the fan pressures reported by a gauge based on the specific parameters of each fan model.
ATTMA requires that the fan(s) used in any test be calibrated by a third party calibration laboratory, and that the corrections for the calibrations be made in the software program. This can be done in FanTestic with minimal effort. See section Error! Reference source not found..
Information entered for the test technician, fan model, gauge model, and serial number will be saved and entered automatically for you when you create a new test.

rev-2017-10-02
Page 18 of 63 ©2017 Retrotec
2.1 Gauge Info
You must select the gauge model.
The serial number of Retrotec gauges can be found on a label on the device. The serial number can be entered manually.
You can use the “Find Gauges” button to have FanTestic find any and all gauges attached to the computer via USB (for DM-2) or via USB, Wired Network, or WiFi for the DM32. FanTestic cannot automatically detect gauges from other manufacturers.
Note that the “Find Gauges” button will read the type of fan in use from the device that is currently set on the associated gauge, and will find the gauge serial number and type. It cannot find the serial number of the fan.
2.2 Gauge calibration factors Digital Gauges are either in calibration or not. The old tool for adjusting analog gauges is no longer provided in FanTestic.
2.3 Device connected to Gauge Info
Calibrated Fan Model Select the model of the series of fan used in your system using the pictures in the fan drop-down as a guide. If you are performing a duct test, be sure to choose a Duct Testing fan, conveniently grouped together and shown in the picture with attached flex duct. Building test fans do not show the attached flex duct.

rev-2017-10-02
Page 19 of 63 ©2017 Retrotec
When you enter fan pressure values into the Test data set, you must have selected the device being used in order for FanTestic to correctly compute flow results. FanTestic uses the latest values of the Fan Flow Coefficients for each fan model to give you the most accurate value for flow.
You can, if you are entering a Test manually, directly enter flow values from the gauge but this is not recommended, as your gauge may have fan flow coefficients that are not up to date.
Note that Automatic testing will read the type of fan in use from the device that is currently set on the associated gauge.
If there is data in a data set, you will not be able to change the type of the fan in the equipment panel.
Use Gauge Only – with no calibrated fan attached In some cases, users may wish to monitor pressures during a test using gauges with “No fan” connected to the gauge.
In this case, users choose the Device called “Gauge Only” in the Device models dropdown. The Range in the Fan Pressure Line for this gauge/fan pair automatically shows up as “No fan”.
The pressure values on Channel A from the “Gauge Only” device are included in the room pressure. The pressure values read on Channel B and shown in the “No fan” line are not included in the flow calculations.
Note that Automatic testing will ignore the device that is currently set on the associated gauge if you have chosen “Gauge Only” for this gauge in FanTestic.
Fan Serial Number (S/N): The serial number of Retrotec door fans can be found on a gray label at the top or side of the fan.
The serial number of the fan must be entered manually, and will be read in from a previously open test automatically when you have entered it for a previous test. Fan serial numbers and locations are included in generated reports.
Device Location The Location data entry box allows you to enter details about the device, such as the location:

rev-2017-10-02
Page 20 of 63 ©2017 Retrotec
Fan serial numbers and locations are included in generated reports.
2.4 Change fan flow coefficients after re-calibration ATTMA requires that the fan(s) used in any test be re-calibrated by a third party calibration laboratory, and that the corrections for the fan coefficients be made in the software program. The changed flow coefficients will be used to calculate flow when the fan with the specific serial number is used in tests.
Click the small wrench icon beside the fan serial number:
If you have entered a Fan Serial Number, the following screen will appear:
The equation displayed in the Fan Calibration window is the important thing to understand.
𝐹𝑙𝑜𝑤 = (𝑃𝑟𝐵 − 𝑃𝑟𝐴 ∙ 𝐾1)𝑛 ∙ (𝐾 + 𝐾3 ∙ 𝑃𝑟𝐵) ∙ 𝐾4
This equation defines the relationship between fan pressure, building pressure, and flow. This equation is used to convert readings of fan pressure (usually on channel B, called FP or PrB in the equation). Note that Fan pressure should always be a positive value.
There are 2 different ways to enter calibration constants, depending on how the calibration lab supplies the values to you.
If you are only provided a new K4 value from the lab, you just change the K4 value for each range. K4 is just a simple multiplier and the units do not matter.

rev-2017-10-02
Page 21 of 63 ©2017 Retrotec
• Choose the “Range” from the drop-down,
• enter the provided K4 value for that range
• Choose the next “Range” from the drop-down, and enter the provided K4 value for that range
• Repeat until K4 for all “Ranges” have been entered
When you have been provided with an exponent (N), a K coefficient, and perhaps a minimum flow value for each range from the calibration lab, you must enter the information differently. If this is the case, follow these steps:
• Click the “Ranges” drop down and select a “Range”
• Change the units by choosing from the drop-down whatever flow units were used by the
calibration lab
• Set K1 and K3 to 0 for the range
• Set K4 to 1 for the range
• Enter the exponent N, coefficient K, and the “Minimum flow” value provided for the selected
range
•
• Repeat by clicking the “Ranges” drop-down and choosing another “Range” and following the
steps until Every Range has been updated
Once you have changed the constants for all Ranges of the fan using one or another of the data entry
methods explained above, click .
Click “Cancel” to exit without making any changes.

rev-2017-10-02
Page 22 of 63 ©2017 Retrotec
If “OK” is clicked, FanTestic will save the range calibration factors and save them to your computer’s local hard drive, and apply them to future fan flow rate calculations on FanTestic using the fan with that particular fan serial number.
The button will reset all the K1 through K4 to the original factory flow coefficient settings for the selected Fan type on all the Ranges.
2.5 Find gauges attached to computer, automatically If you have gauges connected to the computer via USB (or Ethernet if you are using a DM32), you can read the gauge serial number and the fan model that is set on the gauge, as well as the range that is set on the gauge.
To retrieve the gauge serial number and fan model automatically, click the button. If the “Find Gauges” button is not visible in the Equipment tab, that means there is data already collected in this test, and you cannot change the devices or fan numbers that were used before.
FanTestic will set the Fan model in the Equipment Tab to whatever device is set on the gauge. Thus you need to ensure that the fan/gauge pair is what you expect after a Find Gauges scan.
FanTestic will add a fan pressure line in the data sets with an Open Range for each fan. See section 5.11 for details about Fan Pressure Lines.
2.6 Changing Range in the test, manual entry The Range setting for each fan is entered in each Data Set, rather than here in the Equipment tab, because the fan can use any of its ranges at any time during the test. See section 5.11 for details.
2.7 Adding multiple fan/gauge pairs If you have a non-expired demo or Pro license, you will be able to add more than one fan/gauge pair, and enter or collect data for both.
If you are using more than one fan, click the button as many times as the number of fans you would like to add (total number limited by the license in use).
Once new fans are added, you are given the option to note the Location - where the fan is set up in the building- for your own information and to see on the Data set graph.
The first gauge in the list is used as the “Primary gauge” when running a multiple fan test (see section 1.9.1.4 for an explanation).
Click the button to make the gauge on that line the primary gauge (placing it as #1 Fan).

rev-2017-10-02
Page 23 of 63 ©2017 Retrotec
2.8 Retrieve Gauge serial number and fan model automatically If you have gauges connected to the computer via USB (or Ethernet if you are using a DM32), you can read the gauge serial number and the fan model that is set on the gauge.
To retrieve the gauge serial number and fan model automatically, click the button.
Note that you need to ensure that the fan/gauge pair is still correct after a Find Gauges scan – FanTestic will set the Fan model in the Equipment Tab to whatever model is set on the gauge.
2.9 Delete a Fan/Gauge pair You can delete the line corresponding to a fan/gauge pair if it is not being used in the Test, but it is not necessary. If a fan/gauge pair line exists, a corresponding line will appear in the Data Set.
Click the button to delete the line corresponding to a fan/gauge pair.
You must always have at least one fan/gauge pair.
2.10 Test Technician and report identifier
Enter the name of the person doing the test. More than one name can be entered in this text entry area.
If you have a unique reference number for the report on this property, enter it here. This value is used in the ATTMA Lodgment Web Service found in the Tools Menu, see section 12.
3 Enter Building description and Dimensions Fill out building’s description and the building dimensions.

rev-2017-10-02
Page 24 of 63 ©2017 Retrotec
3.1 Building Address Enter the street address where the building is located. Ignore any entry boxes that are not applicable to your situation. Unique property ID is used in the ATTMA Lodgment Web Service found in the Tools Menu, see section 12.
3.2 Customer details Enter the name of the customer. If the customer is located at a different address than the building being tested, that can be entered here as well.
3.3 Height of building above ground Enter the building’s height, measured from the ground to the top. How to make this measurement will be spelled out in the Test Standard you are using.
3.4 Accuracy of building measurements Enter a value indicating how accurately the building measurements were made. This should be a value between 1 and 10% (each measurement is within this percentage of the actual measurement). The percentage entered will be used in the calculation of Uncertainty.
3.5 Volume Enter the building volume in cubic metres.
This value is used to calculate any result that requires volume, such as air changes per hour.
If you include the basement, perform the test with the door between the basement and the building open.
3.6 Total envelope area Enter the “total envelope area” as the above grade surface area of the exterior envelope of the building, in square metres.
This value is used to calculate any result that requires exposed surface area such as flow per unit of area. The surface area will generally include all surfaces separating the conditioned space of the building from unconditioned spaces (e.g. exterior walls, floors over unheated and vented crawlspaces, surfaces separating the building and the attic, etc.), but how to make this measurement will be spelled out in the Test Standard you are using.
3.7 Floor area Enter the floor area of the building in square metres.
This value will be used to calculate all results that requires floor area, such as L/s per square metre of floor area.
Generally the floor area includes the area of all floors that are intentionally heated. If you have included the basement in your volume calculation, also include the basement in the floor area calculation. How to measure floor area will be spelled out in the Test Standard you are using.

rev-2017-10-02
Page 25 of 63 ©2017 Retrotec
4 Manage Pressurization/Depressurization (Data) Sets The actual data read during an automatic test or entered for a manual test is stored in Data Sets based on the direction – direction being whether the test was performed to induce pressurization in the building or depressurization.
If there is data in a data set that has been captured using an automatic method, only the Semi-Automatic test button will be available. If there is data in a data set, you will also not be able to change the type of the fan in the equipment panel.
Data readings from each fan are specific to the range configuration installed on the fan when the pressure is read from the gauge. A Fan Pressure Line must be included in the set for each fan/range combination used during the test. New fan pressure lines must be added if ranges have to be changed during a test to reach the required induced pressure.
If fan pressure (or directly entered flow values) are too low to be in the valid calibrated region of the fan for the induced pressure point being measured, the digits will turn red at the row/column of the fan pressure line affected.

rev-2017-10-02
Page 26 of 63 ©2017 Retrotec
Test standards also require recording the state of the building pressure as it is without any fan running. This is variously called baseline, or bias pressure. Space is provided in the data set for readings taken when the fan is not running before the test commences. If the Standard requires measuring the baseline after the test is complete, there is space for that too.
Pressurization/depressurization depends on the location of the blue pressure pickup on the gauge with respect to the building, since building induced pressure is measured between the red and blue connections, and the red tube always goes through the panel.
The location of the operator (blue pickup on the gauge) as well as the sign (plus or minus) of the induced pressures are thus used to choose the label on the data set – “Pressurization Set” or “Depressurization Set”.
Data results can be added to the Set either manually or automatically.
Choosing “Capture data automatically” enables the Auto Test buttons, and greys out all the data entry boxes in the Set (and will not let you type in them).

rev-2017-10-02
Page 27 of 63 ©2017 Retrotec
It also clears any data that was previously entered manually. If you do not want to clear the entered data, create a new Set to collect your automatic data.
To enter data manually that you have recorded on paper during a test, choose “Enter data manually”. This removes the Auto Test buttons, and changes the user interface to allow you to type into all the data entry boxes.
Each time you run another test after stopping for any reason, it is recommended that you add a new Set and delete the bad one, rather than resuming the test.
4.1 Adding a Set to the Test You can add as many new sets as your needs require. To add a new set of data to an existing project,
simply click the button.
All previously entered environmental data will be duplicated for this new set, but not the test results. This speeds the data entry required when starting a new Set, and helps if you have to run before and after tests, or pressurization and depressurization tests (tests in both directions).

rev-2017-10-02
Page 28 of 63 ©2017 Retrotec
Add a set to include a test in the opposite direction, or to complete a second set in the same direction after sealing leaks.
4.2 Removing a Set from the Test Delete any Set that should not be included in the average in the Summary Results (the section following all the Data sets).
You can add as many new sets as your needs require; if you decide that some of these sets are no longer
necessary, click the button within that particular data set, and follow the prompt. This will be a permanent deletion, so be sure to save the Test file beforehand.
4.3 Clearing Data in the Set
Clicking the “Clear data set” will clear all result data that had been entered into that particular set, but leave the environmental data.
Clicking “Clear point…” will ask the user to specify which point to clear, giving a list of possible points. Once chosen, all readings taken for that particular column, from all fan/range combinations listed will be deleted.
To re-take data for a single point in a data set that was captured automatically, you must use the “Begin Semi-Automatic Test” button as described in section 7.2.
4.4 View Graph of data in the Data set
Data in the set can be viewed on graphs – click on “Show Graphs”. The graph will open in its own window, and allow users the resize as necessary.

rev-2017-10-02
Page 29 of 63 ©2017 Retrotec
The number and location of the fan from which the readings are taken is shown on the graph legend, and moving the cursor over the points on the graph shows detail about each reading (pressure and flow at that point). The individual fan flow readings are shown, as is the sum of all flows in the case of the use of multiple fans.
If the “Show Graphs” button is clicked after an automatic test starts, the graph will be updated in real time as the readings are taken.
5 Enter Test Data The following is an explanation of inputs required for each Data Set.
Data may be changed in any one of the green or yellow boxes but you must click the button when any input changes are made, to re-calculate the new results.
If the data entry lines for pressures are greyed out and you wish to enter data using the keyboard instead of capturing it automatically from the gauge during a test, click on the “Enter data manually” choice. The software will ask if you want to lose any data entered.
If you have data entered in this data set that you wish to keep, start a new Data Set in which to capture your automatic data, and then in the NEW data set click on the “Enter data manually” choice.

rev-2017-10-02
Page 30 of 63 ©2017 Retrotec
Manually enter your data into all of the green or yellow boxes. Yellow boxes will turn green after entry.
Click the button once all the data is entered, and the gray boxes will show the calculated results.
5.1 Start date
The date is entered automatically by the computer in the format yyyy-mm-dd when the test is created, but you can update at any time.
5.2 Start Time 24 hour time is automatically entered by the computer when you start a new test. If this time does not
match the time you start your test, you can click to update the time that will be recorded in your report.
5.3 Barometric pressure
This value is used for the density correction.
5.4 ATTMA testing method
Use the dropdown box to select the appropriate testing method used for this test (A, B or C).

rev-2017-10-02
Page 31 of 63 ©2017 Retrotec
Any deviations from the testing method selected must be explained – use the window in the Results Summary section to enter details.
5.5 Wind speed and direction
Enter the approximate wind speed at the time of the test. Make a note of the approximate wind direction and enter this information as well.
5.6 Operator location
Select whether the operator is located inside or outside during the test (inside is typical). This is used in conjunction with the sign (positive or negative) from the Induced Pressure read from the gauge, to determine the test direction (Pressurization or Depressurization). The test direction will be displayed beside the Start time:
5.7 Temperature, initial Enter the indoor and outdoor temperature at the start of the test. The initial temperature is to be entered before both the pressurization and depressurization sets.
5.8 Baseline/bias pressure, initial [Pa]
This is the baseline pressure before a pressurization or depressurization test. Baseline values are averaged to correct the building gauge pressure readings. Once the building is prepared for the test but before turning on the fan, determine the baseline pressures.

rev-2017-10-02
Page 32 of 63 ©2017 Retrotec
According to the ATTMA standard, at least 10 bias pressure readings (taken with measurements averaged over 10 seconds) are required before the test starts. Values can be measured and entered manually by using the [Baseline] function on the Retrotec gauge, or let the automatic test capture them.
When manually entering data into FanTestic, set the time averaging on the gauge to at least 60 seconds for baseline readings. This must be done in order to compensate for the effects of wind and to ensure that you get an average reading. On windy days you will have to take readings for a longer period of time. To determine if it is windy, set your gauge 25 second averaging and if the pressure fluctuation is above 2 Pa. If so, double the time averaging for the baseline to 120 seconds.
On the DM32, tap Channel A to activate the Hold feature so the readings don’t change while you’re writing them down.
FanTestic calculates the average initial baseline and reports it in the Data set. Initial and final baseline values are averaged and used to correct the building gauge pressure readings.
P01 = average of all pre-test Baseline pressures
P01- = average of negative pre-test Baseline pressures
P01+ = average of positive pre-test Baseline pressures
Note that P01- can be zero if there are no negative Baseline pressures in your data.
5.9 Time per Induced Pressure The Time per Induced Pressure must be greater than 20 seconds to comply with ATTMA.
You can adjust the [Time Avg] function of your gauge to ensure that proper averaging occurs during the manual readings.
5.10 Induced Pressure data lines [Pa]
Enter the induced pressure, as read from the gauge (PrA on the gauge). This is the test pressure created in the building as a result of the door fan running.
The ATTMA states that there must be a minimum of 10 Induced Pressures while pressurizing, and 10 Induced Pressures while depressurizing, between 15 and 60 Pa. Each induced pressure must be measured over at least 20 seconds.
You can adjust the [Time Avg] function of your gauge to ensure that proper averaging occurs during the manual readings.
When manually entering data into FanTestic, set the time averaging on the gauge to at least 20 seconds for induced pressure and flow readings. This must be done in order to compensate for the effects of wind and to ensure that you get an average reading. On windy days you will have to take readings for a longer period of time. To determine if it is windy, set your gauge 25 second averaging and check if the pressure fluctuation is above 2 Pa. If so, double the time averaging for the induced pressure and flow readings to 40 seconds.
On the DM32, tap Channel A to activate the Hold feature so the readings don’t change while you’re writing them down.
If more than one fan is used for the test, automatic mode must be used, since the average building pressure is to be used for ATTMA, and must be entered and calculated for each fan.

rev-2017-10-02
Page 33 of 63 ©2017 Retrotec
If the variation of induced pressure at any of the fans is out of compliance, those cells are highlighted in red background:
5.11 Test Fan Data lines
Data readings from each fan are specific to the range configuration installed on the fan when the pressure or flow is read from the gauge. A Fan Pressure Line must be added in the set for each fan/range combination used during the test. New lines must be added if ranges have to be changed during a test to reach the required induced pressure.
The fan number in the drop down next to “Test Fan” corresponds to the fan number in the list of fans you entered in the Equipment tab, see section 2.
If you are running a multiple fan test, Test Fan [1] is the fan attached to the primary gauge.
If you are running an automatic test, there will be no “New” button available, since fan pressure lines will be added automatically if a range change happens during the test.
Select Range installed on fan during test The chosen range must match the range on the door fan being used for the test. The range must be selected correctly for FanTestic to calculate the correct flow.
It sometimes becomes necessary to change ranges during a test due to fan pressure too low. Fan pressure too low happens when there is not enough flow through the fan, so not enough fan pressure being generated across the fan pressure pickups inside the fan.
Range change is also require if FanTestic is unable to reach a pressure target so the fan speed gets up to 100% before the target pressure is reached.
These conditions can happen during a manual test, an automatic test, or a semi-automatic test.
Setting the Range in use during an Automatic or Semi-Automatic test:
FanTestic will read the Device and Range automatically from the connected gauge(s) during automatic/semi-automatic testing. This means you need to set the correct device and range on the gauge(s) when you set up the physical ranges on the fans. For details about range changing during automatic testing see section 6.5.

rev-2017-10-02
Page 34 of 63 ©2017 Retrotec
To change the Range of the Fan Pressure line if you are entering data manually:
Click the drop down labeled “Select Range” (or labeled with the name of the range currently selected) to open a selection dialog with pictures of all the possible ranges for this fan:
At the bottom of the Select Range chooser, you may also choose units for flow rates if you would like to manually enter flow rates by reading them directly off the gauge. If you only recorded flow values during a manual test, you will not have fan pressures to enter, so you must use this method.
Enter Fan Pressure or direct flow values: The units for the input values depends on the choice made in the Select Range chooser.

rev-2017-10-02
Page 35 of 63 ©2017 Retrotec
If you’ve selected a range plate, enter the fan pressure signal in Pa (PrB on the gauge).
If you have selected a unit of flow, enter the flow readings as read from Channel B of the gauge.
If fan pressure (and thus flow value) is too low to be in the valid calibrated region of the fan, the digits will turn red. This would indicate the need for a range change to increase the fan pressure being used. A rule of thumb to use is that fan pressure readings should be at least twice the required induced pressure.
To delete a line of fan pressure input readings, click the button
Manual range change – how to add another fan pressure line
Add a new fan pressure line for the new range change by clicking the (“New”) button on the left of any of the existing fan pressure lines.
Enter the appropriate fan pressure data into the correct door fan pressure line, depending on the flow range used during the test. In the example below, the first three target pressures were achieved with the C8 range plate; the following three required a smaller range plate (C6), and are therefore on a different line.
When to change range during a test It is recommended that the tester induce pressures over the full range of pressures desired to be tested (i.e., 10 and 60 Pa) prior to performing the test, to ensure that one flow range can satisfy all pressures, to avoid changing ranges, and to need only one fan pressure line in which to enter data.
If fan pressure (and thus flow values) are too low to be in the valid calibrated region of the fan for the induced pressure point being measured, the digits will turn red at the row/column of the fan pressure line affected. This indicates the need for a range change to increase the fan pressure being used. A rule of thumb to use for house testing fans is that fan pressure readings should be at least twice the required induced pressure.
a) If TOO LOW appears on the gauge:
• Increase fan pressure (restrict the flow) by installing a smaller flow range (for example, starting
at C8, put in two more plugs for C6).
• Make sure this flow range change is recorded in your notes/test form.
b) If the fan is close to 100% fan speed without achieving the target pressure:
• Decrease fan pressure (increase the flow) by installing a larger flow range (for example, starting
at C8, remove C range plate to end up with B ring).

rev-2017-10-02
Page 36 of 63 ©2017 Retrotec
• Make sure this flow range change is recorded in your notes/test form, and entered in the
software.
5.12 Baseline/bias pressure, final [Pa]
This is the bias pressure after a pressurization or depressurization test.
According to the ATTMA standard, at least 10 bias pressure readings (taken with measurements averaged over 10 seconds) are required after the induced pressures are measured, with the fan turned off.
Values can be measured and entered manually by using the [Baseline] function on the Retrotec gauge, or let the automatic test capture them.
FanTestic calculates the average final baseline and reports it in the Data set. Initial and final baseline values are averaged and used to correct the building gauge pressure readings.
P02 = average of all post-test Baseline pressures
P02- = average of negative post-test Baseline pressures
P02+ = average of positive post-test Baseline pressures
Note that P02- can be zero if there are no negative Baseline pressures in your data.
5.13 Temperature, final
Enter the indoor and outdoor temperature after a test. The final temperature is to be entered after both the pressurization and depressurization sets. The indoor and outdoor temperature defaults to the initial temperature values entered previously, but they can be overwritten.
5.14 Results for the Set Each Test standard has specific requirements for calculating the results from the measured flow through the fan required to reach the induced pressure points. The results of these calculations are shown for each data set, and then all sets are combined into a separate summary.
There are common elements for every data set, discussed in this section. The flows (corrected as required by the standard in use) are analyzed by FanTestic to create an ideal line on an Induced Pressure versus Flow graph using all the measurements. The “Error” for each flow shows how far away that point is from the ideal.
The flow coefficient, the flow coefficient, and the correlation all relate to the line created by FanTestic based on the measurements in this Set.

rev-2017-10-02
Page 37 of 63 ©2017 Retrotec
Air leakage results for the Set
Click “Calculate” to force FanTestic to go through all the readings in the set and calculate the results. Always click calculate before creating a report, to be sure that the latest information has been included.
“Average bias pressure, initial” and “…, final” are used to correct building gauge pressure readings and are required in the report.
5.14.1.1 Total flow This is the volumetric flow rate corrected for each building gauge pressure test point to correspond to standard temperatures and pressures of 101.325 kPa, 20°C and 0% relative humidity.
5.14.1.2 Corrected flow This is the volumetric flow rate that occurred through the envelope at the environmental conditions present during the test.
5.14.1.3 Error This is the 95% confidence limit for the results. It essentially means that 19 times out of 20 the results will statistically fall within this error limit.
5.14.1.4 Correlation, r This is a measure of how well the data fits the ideal line created from the data readings. This is a measure of how well the data fits the curve and must be between 98 and 100.
5.14.1.5 Confidence Limit 95% This shows the 95% confidence limit (lower and upper limits) for each of the results. It means that 19 times out of 20 the results will statistically fall between the lower and upper limit.
5.14.1.6 Intercept (C) and Slope (n) A Building Leakage Curve (the ideal line) will be created after at least two points have been entered, which is used to estimate the leakage rate of the building at any pressure.
This curve will be more accurate (line of best fit) after at least three points have been entered. The Building Leakage Curve is defined by the following equation:
Q = C x Pn where:

rev-2017-10-02
Page 38 of 63 ©2017 Retrotec
Q is airflow (in CFM)
C is the Air Leakage Coefficient
P is the pressure difference between the inside and outside of the building
n is the slope of the building leakage curve
Example: calculate the airflow needed to create a 5 Pa pressure if:
C = 110.2 n = 0.702
Q, the airflow (at 5 Pa) = 110.2 x 50.702 = 341 CFM.
It would take 341 CFM to cause a 5 Pa pressure change in this building.
5.14.1.7 Intercept, Cenv Data is curve fit to the formula Qenv = Cenv * Pn
5.14.1.8 Intercept, CL Used to calculate the Q50 using the formula: Q50 = CL * Pn
Calculated results There are a number of results that are available based on the flows recorded in the data set.
5.14.2.1 Air flow at 50 Pa This value shows the airflow calculated from the curve fit at 50 Pa using the intercept CL. This air flow is used to calculate the other results for this data Set.
This value is sometimes referred to as Q50.
5.14.2.2 Uncertainty This shows the % uncertainty for each of the results.
5.14.2.3 Air permeability at 50 Pa This is the measured flow result for this data set divided by the above grade building envelope surface area.
It is a useful method of adjusting (or normalizing) the leakage rate by the amount of envelope surface through which air leakage can occur. This is the average air flow that would occur through one square meter of envelope at a 50 Pascal pressure.
Experience has shown that for buildings with a flow/surface area result of 1.0 or higher, very large cost-effective reductions in infiltration can often be achieved using door fan guided infiltration sealing and insulation techniques. In the 0.5 to 1.0 range, it is often more difficult to achieve economical improvements in airtightness.

rev-2017-10-02
Page 39 of 63 ©2017 Retrotec
If you did not enter an Envelope Area value in the building dimensions section, permeability will not be calculated.
5.14.2.4 Equivalent leakage area at 50 This is the area of “holes” left in the building.
It is an aerodynamic equivalent area based on a sharp edged orifice, so it should be taken as an approximate value.
5.14.2.5 Air changes at 50 Pa The air change rate, also known as Air Changes per Hour (often ACH50 or n50) is another commonly used measure of building air tightness. ACH50 is the number of complete air changes that will occur in one hour when a 50 Pascal pressure is applied across the building envelope.
ACH at 50 Pa is a useful method of adjusting (or normalizing) the leakage rate by the size (volume) of the building. If the building volume is not entered in the building dimensions section, “Air change rate” will not be calculated.
ACH at 50 Pa = (m3/h) / building volume in cubic metres
5.15 Data set notes
You can type notes with details about anything that may have happened during this specific data set capture in the data entry box labeled “(add notes here)”.
5.16 Finish time When you’ve finished a pressurization or depressurization test, enter the finish time of the test manually
or click .
6 Capture Data with an Automatic Test
6.1 Before performing the automatic test The following videos demonstrate how to run an Automatic Test (using a DM-2 gauge and an early version of the software, but the concepts and explanations still apply).
Prepare for an Auto-Test
Auto-Test Settings
Auto-Test Part 1
Auto-Test Part 2
Before performing an automatic test, ensure:
• The panels, fans and gauges are set up properly. Set the Device and Range on the gauge,
because FanTestic will read this when the test starts.
• Prior to the test, it is recommended to manually attempt to achieve the minimum and maximum
pressures required for your automatic test, to ensure that your fan is on a range chosen so that
you will not have to change range (if possible).

rev-2017-10-02
Page 40 of 63 ©2017 Retrotec
• Ensure that your gauge is displaying the correct device and correct range configuration. Adjust
gauge settings to display flow. If TOO LOW appears, you must change to a lower range and try
again since this will cause the test to pause (review quick guide for your system and see section
5.11.4).
• Make sure both the building pressures and flows can be achieved for the range of pressures
required for your test before starting Auto-Test.
For the automatic test with DM-2 gauge you'll need:
• A computer with a High Speed USB2.0 port or better
• A cable to connect the USB on your computer to the mini USB on your DM-2A
• A speed control Ethernet style cable to connect your DM-2 to a Retrotec fan
• The Retrotec DM2DeviceDriver for USB2.0 High Speed and FanTestic installed
For the automatic test with DM32 gauge you'll need:
• A computer with an Ethernet port or WiFi capability
• A cable to connect the Ethernet port on your computer with the “Network” port on your DM32
• A speed control Ethernet style cable to connect your DM32 “Control” port to a Retrotec fan
• DM32 with Network Status set to Wired, WiFi Create or WiFi Join
• If WiFi Create mode is used, PC must successfully join the DM32 WiFi before starting the auto
test
• FanTestic installed
Start FanTestic, create a new test, and ensure the test standard is being used is ATTMA (see section 1.6).
The Settings should be reviewed because this will dictate how the automatic test is to be performed, see section 1.9. The default settings can be changed before any test.
Retrotec recommends starting at the highest possible target pressure and going down from there, as this will give the fastest test and will be the scenario most likely to have the entire test performed on the same Range.
6.2 Connect your Gauge to the Computer
DM-2 (use USB connection) Check that the selected device matches the fan you are going to use for the test, and the correct range is chosen on the gauge to match what is installed on your fan.
Connect your DM-2 to the computer with the supplied USB to mini USB cable.
Note: The mini USB on the DM-2 is the control connection for automatic testing and is connected to the USB on the laptop or hub. The yellow Ethernet style connector is the Fan Speed Control Cable and is NOT used to connect the gauge with a computer or network, it simply goes between the DM-2 and the fan so the gauge can control the fan speed.
Note: If you have more gauges than the number of USB ports on your computer, you can purchase an actively powered USB HUB from an electronics store, which allows multiple USB inputs.
Also, any DM-2 gauge that is older than Firmware Version 3.0 requires an Active Powered USB2.0 High Speed HUB. In other words, DM-2 gauges with Firmware versions 3.0 and later may not require actively powered USB HUBs – The firmware version is displayed when you turn on the DM-2 gauge, and on the

rev-2017-10-02
Page 41 of 63 ©2017 Retrotec
DM32 with WiFi connection Turn your DM32 gauge on.
Check that the selected device matches the fan you are going to use for the test, and the correct range is chosen on the gauge to match what is installed on your fan.
From the home screen, tap “Settings”, then tap the “…” key. Check that the setting key labeled “Network” reads “WiFi Create” in white text. If not, tap it and then tap “Status” until it reads “WiFi Create” then go back to the home screen. The DM32 gauge will create a WiFi hotspot that your computer can connect to.
Connect your computer to the WiFi hotspot created by the DM32 gauge (when it is set with “Network” = “WiFi Create”) using your normal Wireless connection panel - same procedure you would use to connect to the wireless hotspot at the coffee shop.
Depending on your version of Windows, it will look something like:
See the connect computer section of the DM32 WiFi QuickGuide for more information.
DM32 with Wired Ethernet connection Turn your DM32 gauge on.
Check that the selected device matches the fan you are going to use for the test, and the correct range is chosen on the gauge to match what is installed on your fan.
From the home screen, tap “Settings”, then tap the “…” key. Check that the setting key labeled “Network” reads “Wired” in white text. If not, tap it and then tap “Status” until it reads “Wired”, then tap “Mode” until it reads “Static”, then go back to the home screen.
Connect the blue Ethernet cable from the DM32 “Network” connection on the bottom of the gauge to the Ethernet connector on your computer.
The yellow Ethernet style connector is the Fan Speed Control Cable and is NOT used to connect the gauge with a computer or network, it simply goes between the DM32 port marked “Control” and the fan so the gauge can control the fan speed.
See the DM32 QuickGuide for more information.

rev-2017-10-02
Page 42 of 63 ©2017 Retrotec
6.3 Find connected gauges to use for the test Look at your gauge(s) and be sure that the selected device matches the fan you are going to use for the test, and that the correct range is chosen on the gauge to match what is installed on your fan, since these values are what will be read in by the software.
If the Find Gauges and the Add Test Fan buttons are not present, that means there is already data in your test and you cannot change the devices connected to the test. In this case, start a new test.
Click the button. The FanTestic software will find the gauges and fill in serial number automatically. The model of the fan will also be changed to whatever device is set on the gauge, but the serial number of the fan must be entered manually.
Fan Pressure Lines in the DataSet will be created for the Open range of the connected device.
If the range configuration is incorrect it can be changed in the software at any time after the test is complete.
6.4 Start the Auto-Test
If the “Begin-Auto Test” button is not visible, click on the “Capture data automatically” choice. The software will ask if you want to lose any data entered.
If you have data entered in this data set that you wish to keep, start a new Data Set in which to capture your automatic data, and then in the NEW data set click on the “Capture data automatically” choice.
Click the “Begin AutoTest” button. FanTestic checks for the connected gauges, adds any needed Fan Pressure Lines based on the Range set in the gauge, then captures data automatically. New data will be displayed in the data set, and on the gauge display on a regular basis until the test is completed.
Extra Fan Pressure Lines that FanTestic does not add data into can be deleted at the end of the test.
The final temperature must be added manually in order to complete the test.
Data may be changed in any one of the green boxes such as building area or volume but you must click
the button when any input changes are made, to re-calculate the new results.
The Finish time will be filled in automatically at the end of the test on auto test mode, unlike manual mode where it must be entered manually.
6.5 Changing the Range during an Automatic Test The same conditions may arise during an automatic test as in a manual test, for which the fan Range must be changed, see section 5.11.4.

rev-2017-10-02
Page 43 of 63 ©2017 Retrotec
If these conditions occur during the test, FanTestic will automatically pause the test and request the tester to change ranges.
If the induced pressure target cannot be reached but the fan is at 100%, the following window will open asking you how to proceed:
If fan pressures become too low, %, the following window will open asking you how to proceed:
If you determine that you need to change the Range to complete the target point, click on “Pause test and change range”, then physically change the range on the fan, and change the Range showing on the gauge. You will see the following in the Test Dashboard.

rev-2017-10-02
Page 44 of 63 ©2017 Retrotec
Use the dropdown box, highlighted in the image above, to select the new range.
If you are close to your gauge, you will see the new range is set on the gauge, and the new range shows up in the Test Dashboard.
A new Fan Pressure line will be added to match the new range:
If there was data already in the fan pressure line for the first range, then you will see two fan pressure lines for the same fan:

rev-2017-10-02
Page 45 of 63 ©2017 Retrotec
Click to continue the test on the new range.
If fan pressure (or flow value) is too low to be in the valid calibrated region of the fan for the induced pressure point being measured, the digits will turn red at the row/column of the fan pressure line affected.
This is an indication that the point will have to be re-taken (use semi-automatic mode or start a new data set and start the whole test over).
6.6 View the Gauge Display during an automatic Test FanTestic provides a Gauge Display while you run a test , which allow you to see your test in action. You can show or hide the gauge display by clicking on the arrow labeled either “Hide Gauge Display” or “Show Gauge Display” in the upper right hand corner of the FanTestic window.
For the duration of your test, virtual meters and gauges visually display the progression of the building’s pressure, the building’s pressure change rate, the fan’s air flow rate, and the fan’s speed

rev-2017-10-02
Page 46 of 63 ©2017 Retrotec
7 Capture data with a Semi-Automatic Test NOTE: The Semi-Automatic Test mode is still in its developmental “beta” phase and has not been thoroughly tested by Retrotec. Use at your own risk.
7.1 Understanding the Semi-Automatic Test Mode The Semi-Automatic Test feature allows you to capture data into the data set on the computer, with automatic control of the gauge.
This feature provides a way to take test points under user-defined conditions, and at intervals of time that are also user-defined. It is as if a manual test was being completed, but instead of physically writing down the results from the gauge screen, the software program will record values more accurately and calculate results, like it does during an automatic test.
This feature will also allow a tester to repeat a test point that may have gone awry for whatever reason during an automatic test, by selecting the appropriate input cell point and re-taking that data point.
7.2 How to use the Semi-Automatic Test feature If the “Begin Semi-Automatic Test” button is not visible, click on the “Capture data automatically” choice. The software will ask if you want to lose any data entered.
If you have data entered in this data set that you wish to keep, start a new Data Set in which to capture your automatic data, and then in the NEW data set click on the “Capture data automatically” choice.
Click . Click [OK] to accept the warning message “The Semi-Automatic Test mode is still in its developmental “beta” phase and has not been thoroughly tested by Retrotec. Use at your own risk.”
FanTestic will search for attached gauges and make sure they are sending and receiving data. The Test Dashboard that you use in Automatic Testing is used in Semi-Auto as well to provide you information about the state of the test and gauges. Once gauges are found, the information will display in the Test Dashboard:
A small window called “Semi-Automatic Testing” will then pop up that will act as the control window for the semi-automatic data collection option.
You will control either “All gauges” or a single gauge by serial number, by choosing the appropriate item in the first dropdown.

rev-2017-10-02
Page 47 of 63 ©2017 Retrotec
Fans can be controlled to reach a target pressure either by setting the speed, or by setting the target building pressure. Enter the target fan speed or building pressure into the appropriate green box, or use
the slider to increase/decrease the speed and/or pressure. Click to start the fans at the speed/pressure selected, or to update them if the speed or pressure value has been changed.
Determine what type of point is to be taken (bias pressure initial or final, or building pressure). This point can be put into the next empty or incomplete cell in FanTestic. You can choose also which of the 12 cells to put it in by selecting the appropriate choice in the drop-down box:
.
If taking bias pressures:

rev-2017-10-02
Page 48 of 63 ©2017 Retrotec
choose Initial baseline or Final bias pressure, set the fan speed to zero or set the pressure target to 0
and click , and then click .
If you are going to collect data, do not click Stop Fan(s) to set the fan speed to zero, because that tells the Test Dashboard in FanTestic that the Semi-Auto window is not doing any more data collecting.
Once the Test Dashboard says that the building pressure has been achieved, or you are satisfied with the
fan speed you can collect induced pressures. Click the button to have the target data point captured in the software program. If pressure has not been attained in the Test Dashboard, you will get a message telling you to wait.
Back in the Data Set, data may be changed in any one of the grey or green boxes but you must click the
button when any input changes are made including by the capture of a new target point, to re-calculate the new results.
The Finish time will be filled in automatically when you close the semi-automatic window.
8 Summary Test Results The “Results Summary” section includes the summarized results from all the data sets in the Test file, and notes for the deviations from the test method.
Click in any data set if any data has been changed in order to calculate and view the current results.
Any calculation warnings that are generated are shown at the bottom right of the Summary under “Warnings and Errors”.

rev-2017-10-02
Page 49 of 63 ©2017 Retrotec
8.1 Test notes and deviations from test method
The tester can note any complaints, temporary air sealing, any deviations from standard methods, building set up, and HVAC systems present.
8.2 Summary Results – combined average of test data sets If both depressurization and pressurization test sets are completed, the results will be provided as an average of all the data set results. The average of the results from each test set are used to create the entries in the summary table.
The reason behind performing an air leakage test in both directions is to average out any potential pressure problems there might be in one direction over the other (like blowing open a damper in one direction, but sucking it closed it in the other).
8.3 View Graph of Summary Results
FanTestic provides a graphical display of the test data collected, opened by clicking the button in the Summary Results section below the combined Mean or Reduction calculated test results.

rev-2017-10-02
Page 50 of 63 ©2017 Retrotec
The graphs will open in a new window that can be opened and closed at any time. Two graphs will be displayed.
The graph on the left shows the pressure readings (Pa) from the gauges. The graph on the right shows the total fan flow rate (CFM or other flow units) plotted against building pressure on a logarithmic scale. The right hand graph also shows the ideal (regression) line based on the data points, and the individual flow rates from all the fans that are included in the total.
9 Use the Test results
9.1 Open an existing Test file To open a test file that has already been completed and saved, there are several options:
• The main opening screen for FanTestic displays can display previously completed tests in the
“Test History” pane on the left hand side (with a photo of the building, if it was included when
the test file was created). If you have this option turned on (“Test History” “AutoHide“ not
enabled), the list will remain open on the left at all times. Click the name of the test file you
would like to open.
• Click on “File” “Open” and a pop-up Windows Explorer window will display all tests all tests
in the [MyDocuments]\Retrotec\Tests directory which have the file extension “.exml”.
• Click on “Test History” “Show” – the left hand list of all saved tests will appear, the same as
the one displayed on the opening screen for FanTestic.
If you open an existing test with AutoSave turned on, and make changes, your original file will be changed and saved in the changed state and will not be recoverable. It is always best to work on a copy of an older test so that the original data is always available.
9.2 Save results to a test file (.exml) When a new test file is created, it is automatically named based on the Standard used (ATTMA) and the date (yyyy-MM-dd) and time (HHmm) that the file was created, and it has a file extension of .exml.
For example, “ATTMA 2014-02-28 1642.exml” would be the name of the file created at 16:42 (4:42pm) on the 28th day of February in the year 2014.
When you click “File” “Save”, FanTestic stores test data into that file.

rev-2017-10-02
Page 51 of 63 ©2017 Retrotec
Test files are normally saved on your local C: drive under [MyDocuments]\Retrotec\Tests.
Test data can be automatically saved at periodic intervals by turning the Auto Save function on (“File” “Auto save?”).
Turn AutoSave Off if you wish to double click to launch test files attached to emails.
9.3 Save As to save results to a different file FanTestic can store test data (“File” “Save As”), which creates a new test file with the same name as the current test file but with the current date (yyyy-mm-dd) and time (HHMM) added at the end. The new file is normally saved in your MyDocuments\Retrotec\Tests folder.
For example, using the original test file “ATTMA 2014-02-28 1642.fxml”, if we do a “File” “Save As” at 10:42am on the 3rd of March 2014, the new file will have the suggested file name: “ATTMA 2014-02-28 1642 [2014-03-03 1042].fxml”.
The “SaveAs” function makes it convenient to save the original test and keep it intact, but have a second “Save As” copy in which to manipulate parameters without affecting the original test.
The “SaveAs” copy of the file may be changed without affecting the original test data, but the two files are visually linked via the filename.
9.4 Print the Test as a Print-Screen FanTestic will print the data as-is, i.e. only what is on the interface screen.
Click on “File” “Print”, and you can either generate a PDF document or print a paper copy using the printer functions in Windows.
The “Print” function essentially prints a screen shot of the FanTestic interface with each of the expander sections open, even if you cannot see all of the expander information on the screen at once.
Alternatively, and more effectively, you can generate a report from the data and print the report, see section 10.
10 Create a report from the Test results in MS Word FanTestic includes a built-in template to generate reports for test results, each template specific to a test standard (such as ATTMA). Users can customize the templates, and can have several different templates for each standard if they wish. Before generating a report, FanTestic will ask the user to choose the template from which to generate the report.
The report generation function is only available if you have a valid, non-expired license for FanTestic. If you do not have such a license, you will be limited to seeing results on the screen.
10.1 Generate Report To generate a report, click on “File” “Generate Report (docx file – MS Word)”.
FanTestic will ask you to choose the template to use for the report, and then generate and automatically open a Word document containing the data and results from your test. The generated report will be saved in your [MyDocuments]\Retrotec\Reports folder with the name you choose.
Once the Word document is open, you can edit and print it directly, or create a PDF using the functions of MS Word.

rev-2017-10-02
Page 52 of 63 ©2017 Retrotec
10.2 View listing of reports Click on “File” “View Reports in directory”.
Windows File Explorer will open on your [MyDocuments]\Retrotec\Reports directory. You can then open any of the report (.docx) files that appear.
10.3 Customize the way your Report looks Because the report is created by copying a template document and replacing tags with the actual test data, reports are customizable in Microsoft Word with FanTestic.
ATTMA test reports in English are generated using the template called “ATTMA-en.docx” which will be located in the [MyDocuments]\Retrotec\Templates directory after you have created at least one report. To generate a report, FanTestic creates a copy of the template with the report name chosen and goes

rev-2017-10-02
Page 53 of 63 ©2017 Retrotec
through the template, replacing any of the words surrounded by {} with specific test results or words. Those words surrounded by {} are known as “tags”.
Users customize the report output by changing the text in the template file that is used to create the Word document, and as long as the tags remain somewhere in the template, test data will be output to the generated document, replacing those tags.
If you want to create a language specific report, to match the language you use in the user interface, you can translate the template and call it “ATTMA-xx.docx” where xx is replaced with the country identifier. Some templates are already provided in translation, and if so, they will automatically be chosen for you if you have changed the language to use in FanTestic.
To start customizing a template, click on “File” “Customize Report Template”.
Windows Explorer will open on the [MyDocuments]\Retrotec\Templates directory so you can choose a template to edit. FanTestic will then copy the chosen template to a new document called “xxxxxx_To_Customize [yyyy-MM-dd hhmm].docx” and open that for you to edit.
The report generation and template editing functions are only available if you have a valid, non-expired license for FanTestic Integrity. If you do not have such a license, you will be limited to seeing results on the screen.
For full details on customizing your report, and a reference of all the available tags, see the separate manual:
Manual-FanTestic-How to Customize Generated Reports.pdf
11 Export Data to MS Excel FanTestic includes a template for raw data to be exported to Microsoft Excel, in order to view all readings that went into each averaged test point.
To export data, click “File” “Export Data (Excel)”. This process takes a few minutes, especially for large files, so allow it to process even if it appears to be frozen.

rev-2017-10-02
Page 54 of 63 ©2017 Retrotec
Once completed, an Excel spreadsheet document will open containing all data readings taken during the test. These will be stored in the same location as the reports ([MyDocuments]\Retrotec\Reports), but will have the file extension .xlsx.
For details on customizing your output to Excel, and a reference of all the available tags, see the separate manual:
Manual-FanTestic-How to Customize Generated Reports.pdf
12 Upload the Test data to the ATTMA Lodgment Web Service Once you have completed an ATTMA Air Leakage Test, you can automatically have the test uploaded to the web service at ATTMA without re-typing your results. The results will be pulled from the test file you have open when you launch the ATTMA Web Service Tool from the tools menu.
12.1 Open the Web Service Tool
The following window opens.

rev-2017-10-02
Page 55 of 63 ©2017 Retrotec
The first time you use the tool, you have to enter your Web Service Credentials, so you have to click the small grey arrow to the left:
Enter the credentials you received from ATTMA. If you do not have any, see the next section on how to get some.

rev-2017-10-02
Page 56 of 63 ©2017 Retrotec
12.2 How to get your ATTMA web service credentials
Clicking on the help button will show you a page with information about how to access the web service. The help information is reproduced as follows:
To get the web service username and password to use in FanTestic, go to the link
https://www.attmalodgement.org/Login.aspx and log in with your ATTMA lodgement username and
password:
This should open a page like the following, and if not, click on the “My Tester Details” tab:

rev-2017-10-02
Page 57 of 63 ©2017 Retrotec
To find your web service credentials needed to lodge a test remotely using FanTestic, there are several steps:
Click on the “My Tester Details” Tab to see your account details. At the bottom of the list you will see
the option to “Edit”.
Click on the link to edit your profile so you see the following:
Click on the “Credentials” button on the bottom so you get the popup window:
Copy and paste the username and password into the boxes in FanTestic (do not include the “username:
” or “password: “ portions):
You also need to know your User Id, Company Id, and the Equipment Id from this website to enter into the lodgement window in FanTestic.

rev-2017-10-02
Page 58 of 63 ©2017 Retrotec
12.3 Fill out data in the Tool Enter information specific to this upload in the tool, and then click OK to upload to the website.
FanTestic will give you a message with your confirmation number.
13 Troubleshooting
Problem Solution
Cannot generate reports in FanTestic • Make sure you are using the most recent
version of Microsoft Word (2007 or
greater)
• If you are using an earlier version (2003 or
earlier), please download a free
compatibility pack here that will allow you
to open/edit/save Word 2007 documents.
• If this does not fix the problem, contact
us.
Cannot find gauges with DM-2 connected –
DM-2-to-computer connection is not functional
• You must download the DM-2 USB driver
from Retrotec’s website in order to get
the computer to recognize the DM2
gauge. You can access this driver here.
• Make sure to first right click
“DM2deviceinstaller” exe and select Run
as administrator to install it, instead of
double-clicking the file.
• If the driver is downloaded and
functional, unplug the DM-2 from the
computer, power it off, turn it back on
after 10 seconds, and re-plug it back in.

rev-2017-10-02
Page 59 of 63 ©2017 Retrotec
Try the button once
more.
• Try plugging the DM-2 into an active
powered USB hub (with hub plugged into
mains power)
Cannot find gauges using DM-2 with firmware
older than version 3.0 (The version is displayed
when you turn on the DM-2 gauge, and on the
top line when you push [Setup].)
Any DM-2 gauge that is older than Firmware
Version 3.0 requires an Active Powered
USB HUB, with hub plugged into mains
power.
Intermittent DM-2 connection over USB • Try plugging the DM-2 into an active
powered USB hub (with hub plugged into
mains power)
• Try running both the laptop and the DM-2
from batteries, not plugged into any
external power source
Unable to find gauges with DM32 connected to USB port of laptop
• Try plugging the DM32 into an active
powered USB hub (with hub plugged into
mains power). Some new laptops do not
provide enough power on the USB port.
• Use the Ethernet port on the DM32 for
automatic control instead of the USB
Problem Solution
Cannot generate reports in FanTestic • Make sure you are using the most recent
version of Microsoft Word (2007 or
greater)
• If you are using an earlier version (2003 or
earlier), please download a free
compatibility pack here that will allow you
to open/edit/save Word 2007 documents.
• If this does not fix the problem, contact
us.
Cannot find gauges with DM-2 connected –
DM-2-to-computer connection is not functional
• You must download the DM2 USB driver
from Retrotec’s website in order to get
the computer to recognize the DM2
gauge. You can access this driver here.
• Make sure to first right click
“DM2deviceinstaller” exe and select Run
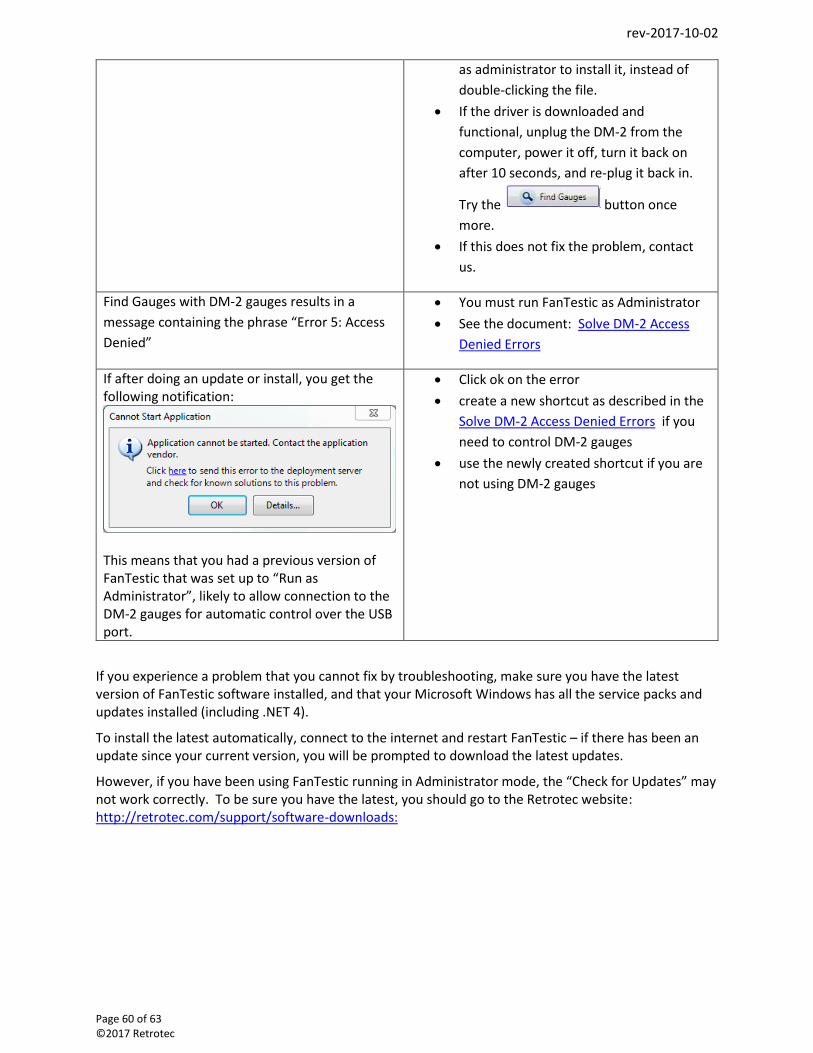
rev-2017-10-02
Page 60 of 63 ©2017 Retrotec
as administrator to install it, instead of
double-clicking the file.
• If the driver is downloaded and
functional, unplug the DM-2 from the
computer, power it off, turn it back on
after 10 seconds, and re-plug it back in.
Try the button once
more.
• If this does not fix the problem, contact
us.
Find Gauges with DM-2 gauges results in a
message containing the phrase “Error 5: Access
Denied”
• You must run FanTestic as Administrator
• See the document: Solve DM-2 Access
Denied Errors
If after doing an update or install, you get the following notification:
This means that you had a previous version of FanTestic that was set up to “Run as Administrator”, likely to allow connection to the DM-2 gauges for automatic control over the USB port.
• Click ok on the error
• create a new shortcut as described in the
Solve DM-2 Access Denied Errors if you
need to control DM-2 gauges
• use the newly created shortcut if you are
not using DM-2 gauges
If you experience a problem that you cannot fix by troubleshooting, make sure you have the latest version of FanTestic software installed, and that your Microsoft Windows has all the service packs and updates installed (including .NET 4).
To install the latest automatically, connect to the internet and restart FanTestic – if there has been an update since your current version, you will be prompted to download the latest updates.
However, if you have been using FanTestic running in Administrator mode, the “Check for Updates” may not work correctly. To be sure you have the latest, you should go to the Retrotec website: http://retrotec.com/support/software-downloads:

rev-2017-10-02
Page 61 of 63 ©2017 Retrotec
Then click on the Download button beside FanTestic. That will open a webpage which will show that latest version. If this version is different than what you have installed, you should use Control Panel to uninstall FanTestic from your computer and proceed to install the new version as described in section 1.3.
14 Contact Tech Support If you are still having problems even after updating to the latest software version and updating your Windows with all patches, follow these steps:
For Technical Support or to send suggestions, create an email to [email protected]
If you have encountered a bug which makes FanTestic crash, create an email to: [email protected]
In your email, describe the problem and when it occurs, and attach the following:
• The standard are you using ( click “Settings” “Change Standard” to check)
• Log file from [My Documents]\Retrotec\Logs
• Test file you are using, file extension .exml
• Settings.xml file [My Documents]\Retrotec\AppData
• A screenshot of the software running or having the error
• the version of Microsoft Office you are using
• The version of Microsoft Windows you are using

rev-2017-10-02
Page 62 of 63 ©2017 Retrotec
14.1 The log file Each test has an associated log file that is saved on your C: drive, in the Retrotec folder. These logs will help Retrotec to determine where the problem occurred. You can access the log files in your local drive, in [My Documents]\Retrotec\Logs.
A new log file is created for each day, named Log_yyyy-MM-dd.txt. If you leave FanTestic running over the course of multiple days, the log file will have the date of the day when FanTestic was initially started. The correct log file to send will be named with the date you began the test (even if changes were made over several days).
14.2 The .exml test file Test files with extension .exml can be found in the My Documents\Retrotec\Tests folder, and are saved in the same fashion as log files. The name of the .exml file is the date you began the test. Send the .exml file with the same name/date as the log file.
14.3 Settings file The Settings.xml file is found in your [My Documents]\Retrotec\AppData folder, and contains information troubleshooting personnel can use to diagnose the problem.
14.4 A screenshot Screenshots are a way to show our tech support staff what your error looks like on your screen. This will help us, along with the background information (log and .exml files), to determine the best approach to fix the problem.
Current versions of Microsoft Windows include the “Snipping Tool” which can be used to make a screen snip of the window or of an area of a window on the screen. The image will be on the Windows clipboard as if it has been “copied” so you can just “paste” it into an email.
In older versions you may need to create a document and then capture an image of the screen you are currently looking at, by pressing the [Print Scrn] button on your keyboard. In order to attach this image as a file for us to view, you must paste it into a document.

rev-2017-10-02
Page 63 of 63 ©2017 Retrotec
To do this, in the open Microsoft Word or Paint document, right click on your mouse and select Paste (or Edit Paste). The captured image of your screen should appear in the document. You can now save this document and include it as an attachment when you submit your information to us.