Operating instructions Dishwasher - Miele
96
Operating instructions Dishwasher To avoid the risk of accidents or damage to the appliance, it is essential to read these instructions as well as the installation sheet before it is installed and used for the first time. en-SG M.-Nr. 11 836 720 HG07
-
Upload
khangminh22 -
Category
Documents
-
view
0 -
download
0
Transcript of Operating instructions Dishwasher - Miele

Operating instructionsDishwasher
To avoid the risk of accidents or damage to the appliance, it isessential to read these instructions as well as the installation sheetbefore it is installed and used for the first time.
en-SG M.-Nr. 11 836 720HG07

Contents
2
Warning and safety instructions ...................................................................... 5
Guide to the appliance ...................................................................................... 15Appliance overview ............................................................................................. 15Control panel ....................................................................................................... 16Display functions................................................................................................. 17
Caring for the environment .............................................................................. 18
Before using for the first time .......................................................................... 19Opening the door ................................................................................................ 19Closing the door.................................................................................................. 20Activating the safety lock .................................................................................... 20Basic settings...................................................................................................... 21
Setting the language ...................................................................................... 21Setting the water hardness level .................................................................... 21
Dishwasher salt ................................................................................................... 23Filling the salt reservoir................................................................................... 24Refilling the salt .............................................................................................. 25
Rinse aid.............................................................................................................. 26Adding rinse aid ............................................................................................. 27Filling the rinse aid reservoir........................................................................... 27
Settings .............................................................................................................. 28Opening the settings menu ................................................................................. 28Changing settings ............................................................................................... 28Closing the settings menu................................................................................... 28Language ......................................................................................................... 29Water hardness ................................................................................................... 29Rinse aid.............................................................................................................. 30Consumption (EcoFeedback) .............................................................................. 30Display brightness............................................................................................... 31Refill reminders.................................................................................................... 31AutoOpen ............................................................................................................ 31Extra clean........................................................................................................... 32Extra dry .............................................................................................................. 322nd interim rinse.................................................................................................. 32Hygiene cycle ...................................................................................................... 32Software version.................................................................................................. 33Showroom ........................................................................................................... 33Factory default..................................................................................................... 33
Caring for the environment .............................................................................. 34Economical dishwashing..................................................................................... 34

Contents
3
EcoFeedback consumption indicator.................................................................. 35
Loading the dishwasher.................................................................................... 36General information ............................................................................................. 36Upper basket....................................................................................................... 38Adjusting the upper basket ................................................................................. 41Lower basket....................................................................................................... 42Cutlery tray .......................................................................................................... 44
Loading the 3D MultiFlex tray......................................................................... 44
Detergent ........................................................................................................... 46Active ingredients ............................................................................................... 46Detergent dispensing .......................................................................................... 47Adding detergent................................................................................................. 48
Operation............................................................................................................ 49Switching on the dishwasher .............................................................................. 49Selecting a programme ....................................................................................... 49Display programme duration ............................................................................... 50Starting the programme ...................................................................................... 50End of programme............................................................................................... 51Energy management ........................................................................................... 51Switching off the dishwasher .............................................................................. 52Unloading the dishwasher................................................................................... 52Interrupting a programme.................................................................................... 53Cancelling or changing a programme ................................................................. 53
Options ............................................................................................................... 54Timer .............................................................................................................. 54
Guide for selecting a programme .................................................................... 56
Programme overview ........................................................................................ 58 Further programmes ...................................................................................... 60
Programme options........................................................................................... 61Selecting programme options ............................................................................. 61
Express ...................................................................................................... 61IntenseZone .............................................................................................. 61
Cleaning and care ............................................................................................. 62Cleaning the wash cabinet .................................................................................. 62Cleaning the door and the door seal................................................................... 63Cleaning the control panel .................................................................................. 64Cleaning the appliance front ............................................................................... 64
Contents
4
Cleaning the spray arms...................................................................................... 65Checking the filters in the wash cabinet ............................................................. 68Cleaning the filters............................................................................................... 68Cleaning the water inlet filter ............................................................................... 70Cleaning the drain pump ..................................................................................... 71
Problem solving guide ...................................................................................... 73Technical problems ............................................................................................. 73Fault messages ................................................................................................... 74Door release ........................................................................................................ 75Water inlet fault ................................................................................................... 76Water drainage fault ............................................................................................ 77General problems with the dishwasher ............................................................... 78Noises.................................................................................................................. 79Unsatisfactory washing result ............................................................................. 80
Service................................................................................................................ 84Contact in the event of a fault ............................................................................. 84EPREL database ................................................................................................. 84Guarantee............................................................................................................ 84
Optional accessories ........................................................................................ 85
Installation.......................................................................................................... 87The Miele Waterproof system.............................................................................. 87Water inlet ........................................................................................................... 87Regulation in Germany........................................................................................ 88Water drainage .................................................................................................... 89Electrical connection .......................................................................................... 91
Technical data.................................................................................................... 92

Warning and safety instructions
5
This dishwasher conforms to current safety requirements.Inappropriate use can, however, lead to personal injury andmaterial damage.
Please observe the installation sheet and read the operatinginstructions carefully before setting up the dishwasher and using itfor the first time. They both contain important information on itsinstallation, safety, use and maintenance. This is to protectyourself from injury and prevent damage to the dishwasher.
In accordance with standard IEC 60335-1, Miele expressly andstrongly advises that you read and follow the instructions in thechapter on installing the dishwasher as well as the safetyinstructions and warnings.Miele cannot be held liable for damage caused by non-compliancewith these instructions.
Keep the installation sheet and the operating instructions in a safeplace and pass them on to any future owner.
Warning and safety instructions
6
Appropriate use
This dishwasher is intended for use in domestic households andsimilar working and residential environments.
This dishwasher is not intended for outdoor use.
This dishwasher is intended for use at altitudes of up to 4000 mabove sea level.
This dishwasher must only be used for cleaning domesticcrockery and cutlery. All other types of use are not permitted.
The appliance can only be used by people with reduced physical,sensory or mental capabilities, or lack of experience and knowledge,if they are supervised whilst using it, or have been shown how to useit in a safe way and recognise and understand the consequences ofincorrect operation.

Warning and safety instructions
7
Safety with children
Children under 8 years of age must be kept away from thedishwasher unless they are constantly supervised.
Children aged 8 and older may only use the dishwasher withoutsupervision if they have been shown how to use it in a safe manner.Children must be able to understand and recognise the possibledangers caused by incorrect operation.
Children must not be allowed to clean or maintain the dishwasherunsupervised.
Children should be supervised in the vicinity of the dishwasher.Never allow children to play with the dishwasher. There is a dangerthat children might shut themselves in the dishwasher.
If the automatic door opening mechanism is active (depending onthe model), keep young children away from the area in which thedoor opens. There is a danger of injury in the unlikely event of a faultwith the opening mechanism.
Danger of suffocation! Whilst playing, children may becomeentangled in packaging material (such as plastic wrapping) or pull itover their head and risk suffocation. Keep packaging material awayfrom children.
Keep children away from detergents. Detergents cause severeskin burns and severe eye damage. They can cause burning in themouth and throat, or inhibit breathing. It is therefore important tokeep children away from the dishwasher when the door is open.Detergent residues could still be present in the dishwasher. Seekmedical advice immediately if a child has swallowed or inhaled anydetergents.

Warning and safety instructions
8
Technical safety
Unauthorised installation, maintenance and repairs can causeconsiderable danger for the user. Installation, maintenance andrepairs must only be carried out by a qualified technician.
Damage to the dishwasher can compromise your safety. Beforeusing the dishwasher and in particular following transport, check itfor any visible damage. Never use a damaged dishwasher.
The electrical safety of this dishwasher can only be guaranteedwhen correctly earthed. It is most important that this basic safetyrequirement is present. If in doubt, the electrical installation shouldbe checked by a qualified electrician. Miele cannot be held liable for the consequences of an inadequateor lack of earthing system (e.g. electric shock).
Temporary or permanent operation on an autonomous powersupply system or a power supply system that is not synchronisedwith the mains power supply (e.g. island networks, back-up systems)is possible. A prerequisite for operation is that the power supplysystem complies with the specifications of EN 50160 or anequivalent standard.The function and operation of the protective measures provided inthe domestic electrical installation and in this Miele product mustalso be maintained in isolated operation or in operation that is notsynchronised with the mains power supply, or these measures mustbe replaced by equivalent measures in the installation. As described,for example, in the current version of BS OHSAS 18001–2 ISO45001.
The dishwasher must only be plugged into the electricity supplyvia a suitable switched socket using a fused 3-pin plug (it must notbe hard-wired). The electrical socket must be easily accessible afterthe dishwasher is installed so that it can be disconnected from theelectricity supply at any time.

Warning and safety instructions
9
There must be no electrical sockets behind the dishwasherbecause the building-in niche may be too small. Danger ofoverheating and fire risk if the dishwasher were to be pushed upagainst a plug.
The dishwasher must not be installed underneath a hob. The hightemperatures radiated by hobs could damage the dishwasher below.For the same reason, the appliance must not be installed next toopen fires or other appliances that give off heat, such as heatersetc., not normally found in a kitchen.
Ensure that the connection data on the dishwasher’s data plate(fuse rating, frequency and voltage) match the mains electricitysupply. This data must correspond in order to avoid the risk ofdamage to the dishwasher. Compare these before connecting theappliance to the mains. If in any doubt, consult a qualifiedelectrician.
Do not connect the dishwasher to the mains supply until it hasbeen fully installed and any adjustment has been made to the doorsprings.
The dishwasher may only be operated if the door openingmechanism is working correctly. Otherwise there could be a risk ofdanger whilst the automatic door opening mechanism (depending onthe model) is active.To check that the door opening mechanism is working correctly:
- The door springs must be evenly adjusted on both sides. They arecorrectly adjusted when the door remains stationary when left halfopen (approx. 45° opening angle). It is also important that thedoor cannot fall open.
- The door locking pins automatically retract when the door opensat the end of the drying phase.

Warning and safety instructions
10
Multi-socket adapters and extension leads do not guarantee therequired safety of the appliance (fire hazard). Do not connect thedishwasher to the mains electricity supply using a multi-socketadapter or an extension lead.
The dishwasher must not be used in a non-stationary location(e.g. on a ship).
Do not install the dishwasher in a room where there is a risk offrost occurring. Frozen hoses are at risk of tearing or bursting. Thereliability of the electronic control unit may be impaired attemperatures below freezing point.
To avoid any damage to the dishwasher, it must only be operatedwhen it is connected to a fully vented plumbing system.
The plastic housing of the water connection contains a solenoidvalve. The housing must not be dipped in water.
There are live wires in the water inlet hose. Do not cut the hose,even if it is too long.
The integrated Waterproof system offers protection from waterdamage, provided that the following conditions are met:
- Installation has been carried out correctly
- The dishwasher is properly maintained and parts are replacedwhere this is noticeably required
- The stopcock is turned off during longer absences from the home(e.g. whilst on holiday).
The Waterproof system will work even when the dishwasher isswitched off. However, the dishwasher must remain connected tothe electricity supply.
The water-connection pressure needs to be between 50 and1,000 kPa.

Warning and safety instructions
11
A damaged dishwasher could be dangerous. If the dishwashergets damaged, switch it off at the mains immediately and call yourMiele dealer or Miele Service.
While the appliance is under warranty, repairs should only beundertaken by a Miele authorised service technician. Otherwise thewarranty is invalidated.
We recommend replacing defective components with originalspare parts. If original Miele spare parts are installed correctly, Mieleensures full compliance with safety requirements and the warrantyremains valid.
During installation, maintenance and repair work, the dishwashermust be disconnected from the mains electricity supply (switch it offand withdraw the plug from the socket).
If the mains connection cable is damaged, it must only bereplaced with a specific mains connection cable of the same type(available from the Miele Customer Service Department). For safetyreasons this must only be done by the Miele Customer ServiceDepartment or a Miele authorised technician.
Correct installation
The dishwasher must be installed and connected in compliancewith the supplied installation sheet.
Be careful before and while installing the dishwasher.Some metal parts pose a risk of injury/being cut. Wearprotective gloves.
The dishwasher must be correctly aligned horizontally to ensureproblem-free operation.
In order to ensure stability, built-under and integrated dishwashersmust only be installed under a continuous worktop that is secured toadjacent cabinetry.
Warning and safety instructions
12
The dishwasher must only be built into a tall unit if additionalsafety precautions are taken. In order to safely install the appliancein a tall unit, please use the Tall unit installation set and observe theinstallation sheet provided. Otherwise there is the danger of the unittipping over.
The door springs must be evenly adjusted on both sides. They arecorrectly adjusted when the door remains stationary when left halfopen (approx. 45° opening angle). It is also important that the doorcannot fall open. The appliance must only be operated with properly adjusted doorsprings. If the door cannot be adjusted properly, contact the Miele CustomerService Department.
The maximum weight of the front panel that can be aligned with thefactory fitted door springs is 10–12 kg (depending on model).
Correct use
Do not use solvents in the dishwasher. Risk of explosion.
Dishwasher detergents can cause burning on the skin and in theeyes, nose, mouth and throat. Avoid contact with detergents. Do notinhale powder detergents. Do not swallow dishwasher detergents.Seek medical attention immediately if detergent has been swallowedor inhaled.
Avoid leaving the dishwasher door open unnecessarily. You couldinjure yourself on the open door or trip over it.
Do not sit or lean on the open door. The dishwasher could tipover. This could injure you or damage the dishwasher.
Crockery may be very hot at the end of the programme. Allow thedishes to cool until they are comfortable enough to handle beforeunloading them.
Only use detergent and rinse aid formulated for domesticdishwashers. Do not use washing-up liquid.

Warning and safety instructions
13
Do not use any commercial or industrial detergents. These maycause material damage, and there is a risk of a severe explosivechemical reaction (such as an explosive oxyhydrogen gas reaction).
Do not fill the rinse aid reservoir with powder or liquid detergent.This will cause damage to the reservoir.
Do not fill the AutoDos (depending on model) with powder orliquid detergent. Loose detergent will damage the AutoDos.
Do not fill the salt reservoir with powder or liquid detergent.Detergent will damage the water softener.
Only use special coarse-grained dishwasher salt or other purekitchen salt for reactivation. Other salts may contain insolubleadditives that can impair the functioning of the water softener.
In dishwashers with a cutlery basket (depending on model), knivesand forks should be placed with the handles upwards in the basketfor safety reasons. Knives and forks placed with the handlesdownwards pose a danger of injury. However, cutlery placed handledown in the basket will come out cleaner and drier.
Plastic items that cannot withstand being washed in hot water,such as disposable plastic containers or plastic cutlery, should notbe cleaned in the dishwasher. The high temperatures in thedishwasher may cause them to melt or lose shape.
If you use the timer option (depending on model), the detergentcompartment must be dry. If it is not, wipe it until dry. The detergentwill clump together if the detergent compartment is not dry, and thismay mean that it is not fully rinsed out.
Please observe the information given in the “Technical data”chapter regarding the capacity of the dishwasher.
Warning and safety instructions
14
Accessories and spare parts
Only use original Miele accessories. If other parts are used,warranty, performance and, if applicable, product liability claims willbe invalidated.
Miele will guarantee to supply functional spare parts for aminimum of 10 years and up to 15 years following thediscontinuation of your dishwasher.
Transport
Damage to the dishwasher can compromise your safety. Beforeusing the dishwasher, check it for any visible transport damage.Never use a damaged dishwasher.
Only transport the dishwasher in an upright position so that nowater flows into the electrical controls, as this would cause faults.
If you wish to transport the dishwasher, empty it and securelyfasten all loose parts such as baskets, hoses and mains connectioncables.
Guide to the appliance
15
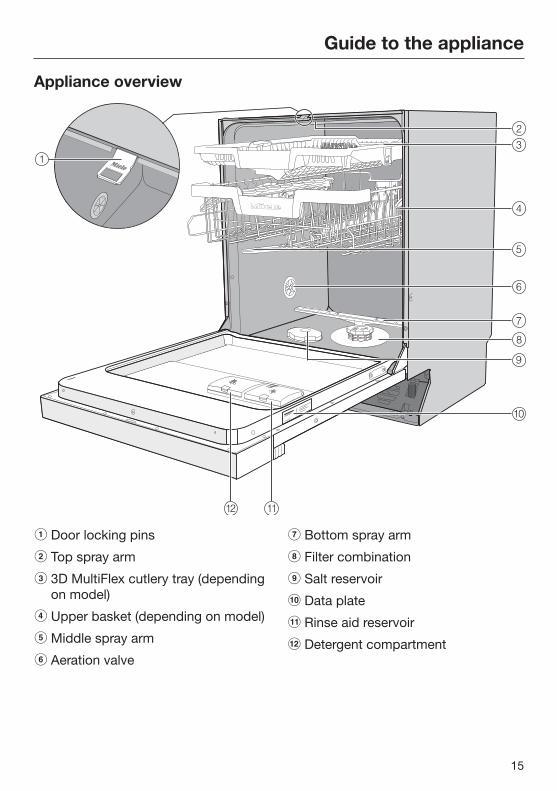
Appliance overview
a Door locking pins
b Top spray arm
c 3D MultiFlex cutlery tray (dependingon model)
d Upper basket (depending on model)
e Middle spray arm
f Aeration valve
g Bottom spray arm
h Filter combination
i Salt reservoir
j Data plate
k Rinse aid reservoir
l Detergent compartment

Guide to the appliance
16
Control panel
a Programme selection
ECO = ECO Auto = Auto 45–65 °C 45 °C = Gentle 45 °C 65 °C = QuickPowerWash 65 °C 75 °C = Intensive 75 °C = Further programmes/
settings
b DisplayFor further information, see “Guideto the appliance” in the “Displayfunctions” section.
c Start button with indicator lightFor starting the selected programme.
d IntenseZone buttonIncreases cleaning performance inthe lower basket.
e Express buttonFor reducing the programmeduration.
f Timer buttonFor selecting a later programmestart.
g OK buttonTo select menu options and valuesdisplayed. To confirm messages.
h buttonsFor programme selection. For changing the values displayed. For scrolling to other menu pages.
i Back buttonFor navigating back to the previousmenu or deleting values that havebeen set previously.
j Programme selection button For programme selection.
k Optical interfaceFor service technicians.
l ON/OFF buttonFor switching the dishwasher on andoff.
Guide to the appliance
17
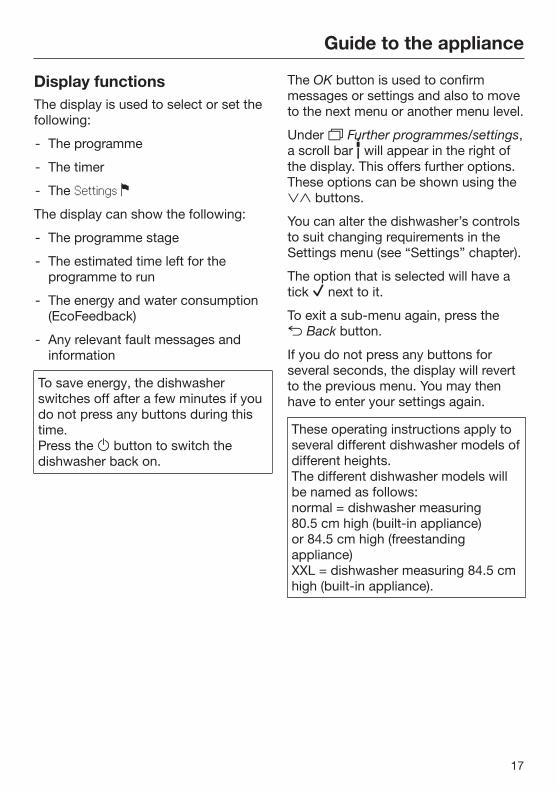
Display functionsThe display is used to select or set thefollowing:
- The programme
- The timer
- The Settings
The display can show the following:
- The programme stage
- The estimated time left for theprogramme to run
- The energy and water consumption(EcoFeedback)
- Any relevant fault messages andinformation
To save energy, the dishwasherswitches off after a few minutes if youdo not press any buttons during thistime. Press the button to switch thedishwasher back on.
The OK button is used to confirmmessages or settings and also to moveto the next menu or another menu level.
Under Further programmes/settings,a scroll bar will appear in the right ofthe display. This offers further options.These options can be shown using the buttons.
You can alter the dishwasher’s controlsto suit changing requirements in theSettings menu (see “Settings” chapter).
The option that is selected will have atick next to it.
To exit a sub-menu again, press the Back button.
If you do not press any buttons forseveral seconds, the display will revertto the previous menu. You may thenhave to enter your settings again.
These operating instructions apply toseveral different dishwasher models ofdifferent heights. The different dishwasher models willbe named as follows: normal = dishwasher measuring80.5 cm high (built-in appliance) or 84.5 cm high (freestandingappliance) XXL = dishwasher measuring 84.5 cmhigh (built-in appliance).

Caring for the environment
18
Disposal of the packingmaterialThe packaging is designed to protectthe appliance from damage duringtransportation. The packaging materialsused are selected from materials whichare environmentally friendly for disposaland should be recycled.
Recycling the packaging reduces theuse of raw materials in themanufacturing process and alsoreduces the amount of waste in landfillsites.
Disposing of your oldapplianceElectrical and electronic appliancesoften contain valuable materials. Theyalso contain specific materials,compounds and components, whichwere essential for their correct functionand safety. These could be hazardousto human health and to the environmentif disposed of with your domestic wasteor if handled incorrectly. Please do not,therefore, dispose of your old appliancewith your household waste.
Please dispose of it at your localcommunity waste collection / recyclingcentre for electrical and electronicappliances, or contact your dealer orMiele for advice. You are alsoresponsible (by law, depending onterritory) for deleting any personal datathat may be stored on the appliancebeing disposed of. Please ensure thatyour old appliance poses no risk tochildren while being stored prior todisposal.

Before using for the first time
19
Every dishwasher is tested at thefactory. There will be residual water inthe appliance from this test. It is notan indication that the dishwasher hasbeen used previously.
Opening the doorIn some programmes the doorautomatically opens slightly to assistthe drying process. This function can be deactivated, ifpreferred (see “Settings” chapter,“AutoOpen”).
To open the door, reach under thedoor grip and pull.
Open the door fully to disengage thelocking mechanism.
At the end of the programme, if theAutoOpen function is on, the doorlocking pins automatically retract.
To prevent a technical fault, do nothold the door locking pins firmlywhen they are retracting.
If the door is opened during operationall wash functions are automaticallyinterrupted.
Risk of scalding due to hotwater.During operation, water in thedishwasher may be very hot.During operation, only open the doorwith extreme caution.
Risk of injury due to dooropening automatically.The door may open automatically atthe end of a programme.Keep the area around the door freeof obstructions.

Before using for the first time
20
Closing the door Push the baskets right in.
Raise the door upwards until thecatch engages.
Risk of crushing due to the doorclosing.When closing the door, you are atrisk of shutting your fingers in it.Do not put your hand inside the dooras it is closing.
Activating the safety lockUse the safety lock to prevent childrenopening the dishwasher door. The doorcan then only be opened by using a lotof force.
To lock the door, push the slideunderneath the door grip to the right.
To unlock the door, push the slide tothe left.

Before using for the first time
21
Basic settings
Switching on the dishwasher
Switch the dishwasher on with the button.
The welcome screen will appear whenthe dishwasher is switched on.
For further information about thedisplay functionality, see the “Displayfunctions” section in the “Guide to theappliance” chapter.
Setting the language
The display will then changeautomatically to the screen for settingthe language.
Select the language you want as wellas the country, if applicable, usingthe buttons and confirm with OK.
For further information on setting thelanguage, see the “Language” sectionin the “Settings” chapter.
A tick will appear next to thelanguage that has been set.
Setting the water hardness level
The display will change to the screenfor setting the water hardness.
- You should programme thedishwasher to the correct waterhardness for your area.
- Your local water authority will be ableto advise you of the water hardnesslevel in your area.
- Where the water hardness fluctuatese.g. between 1.8 and 2.7 mmol/l (10 -15 °dH - German scale) alwaysprogramme the dishwasher to thehigher value (2.7 mmol/l or 15 °dH inthis example).
In the event of a fault, it will help theservice technician if you know thehardness of your local water supply.
Therefore, please enter the waterhardness:
____________°dH or mmol/l
The dishwasher is programmed at thefactory for a water hardness level of2.5 mmol/l (14 °dH – German scale).
Set the water hardness level in yourarea and confirm using OK.
See the “Settings” chapter, “Waterhardness” section for moreinformation.
Before using for the first time
22
Finally, prompts will appear in thedisplay.
After confirming these prompts withOK, the messages Refill salt and Refill rinse aid may appear.
Add salt and rinse aid if necessary(see “Before using for the first time“ –”Dishwasher salt” and “Rinse aid”).
Select OK to confirm the messages.
The programme selected will brieflyappear in the display and the indicatorlight for the programme selected willcome on. Next, the estimated energy and waterconsumption may be shown for thechosen programme for severalseconds.Then the display will show theestimated running time for theprogramme selected.

Before using for the first time
23
Dishwasher saltIn order to achieve good cleaningresults, the dishwasher needs tooperate with soft water. Hard waterresults in the build-up of calciumdeposits on crockery and on the washcabinet walls. Mains water with a water hardness levelhigher than 0.9 mmol/l (5 °dH – Germanscale) must be softened. This occursautomatically in the integrated watersoftener. The water softener is suitablefor a water hardness level of up to12.6 mmol/l (70 °dH – German scale).
In order to maintain the functions ofthe water softener, it must bereactivated regularly. Reactivationoccurs automatically every ninthprogramme sequence. At the start ofthe next programme, an additional4.4 l of water is required for thisprocess. Energy consumptionincreases by 0.015 kWh and theprogramme is extended by approx.3 minutes. The above only applies to the ECOprogramme at a water hardness of2.5 mmol/l (14 °dH – German scale).For other programmes and waterhardness levels, the frequency ofreactivation will differ.
In order to be reactivated, the watersoftener requires dishwasher salt. Depending on the water hardness level(< 3.8 mmol/l, or < 21 °dH – Germanscale), dishwasher salt is not required ifcombination detergents are being used(see “Detergent – Powder detergent anddetergent tabs”).
If the water in your area is very softand constantly lower than 0.9 mmol/l(5 °dH – German scale), you do notneed to add dishwasher salt. The saltrefill indicator will automatically switchoff after the water hardness has beenset accordingly (see “Settings – Waterhardness”).
Damage to the water softenerfrom detergent.Detergent will damage the watersoftener.Do not fill the salt reservoir withpowder or liquid detergent.
Damage caused by usingunsuitable salts.Some types of salt may containinsoluble components which cancause the water softener tomalfunction.Only use special coarse-graineddishwasher salt or other pure kitchensalt for reactivation.
If you only ever use combinationdetergent products in yourdishwasher, you can turn off both refillreminders if you wish (see “Settings –Refill reminders”).
Please make sure that if you stopusing combination detergentproducts, you refill the dishwashersalt and rinse aid. Switch the refillreminders back on if required.

Before using for the first time
24
Filling the salt reservoir
Before filling the salt reservoir for thefirst time, you must fill it with approx.2 l of water to enable the salt todissolve.
Once the dishwasher has been usedonce, there is always sufficient waterin the salt reservoir.
Remove the lower basket from thewash cabinet and unscrew the saltreservoir cap.
Danger of corrosion due to salinesolution.Water or saline solution will run outof the reservoir when the cap isopened. Saline solution that runs outcan cause corrosion in the washcabinet and to the dishwasher load.The salt reservoir should thereforeonly be opened in order to replenishthe salt.
Fill the salt reservoir with approx. 2 lof water (first use only).
Place the funnel provided over thesalt reservoir and carefully fill withdishwasher salt until the reservoir isfull. The salt reservoir holds up to2 kg of salt, depending on the type ofsalt used.
Clean off salt residues from aroundthe salt reservoir opening. Next,screw the salt reservoir cap on againfirmly.
Immediately after filling the saltreservoir and each time you removethe salt container cap, run the 65 °C QuickPowerWashprogramme with the Expressprogramme option selected without aload in the dishwasher to dissolveand remove any traces of salt fromthe wash cabinet.
Before using for the first time
25
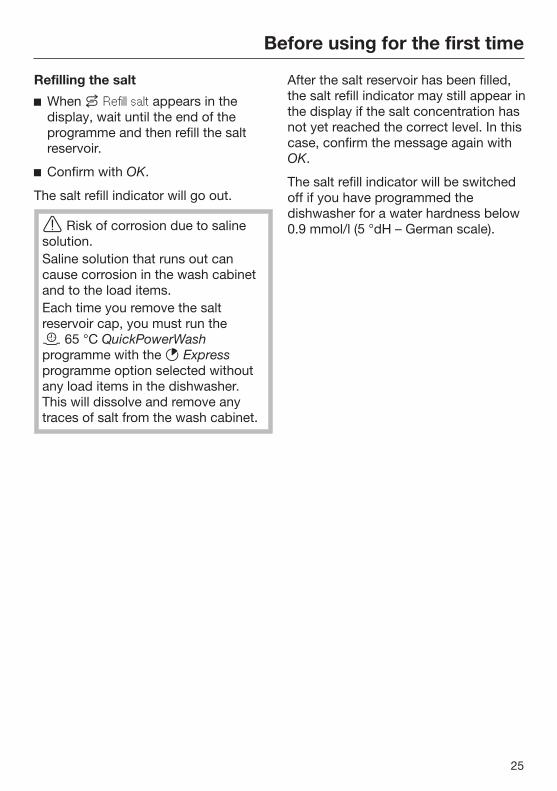
Refilling the salt
When Refill salt appears in thedisplay, wait until the end of theprogramme and then refill the saltreservoir.
Confirm with OK.
The salt refill indicator will go out.
Risk of corrosion due to salinesolution.Saline solution that runs out cancause corrosion in the wash cabinetand to the load items.Each time you remove the saltreservoir cap, you must run the 65 °C QuickPowerWashprogramme with the Expressprogramme option selected withoutany load items in the dishwasher.This will dissolve and remove anytraces of salt from the wash cabinet.
After the salt reservoir has been filled,the salt refill indicator may still appear inthe display if the salt concentration hasnot yet reached the correct level. In thiscase, confirm the message again withOK.
The salt refill indicator will be switchedoff if you have programmed thedishwasher for a water hardness below0.9 mmol/l (5 °dH – German scale).

Before using for the first time
26
Rinse aidRinse aid is necessary to ensure thatwater does not cling and leave markson crockery during the drying phase,and helps crockery dry faster after ithas been washed. Rinse aid is poured into the containerand the amount set is dispensedautomatically.
Washing-up liquid or detergentcan cause damage.Washing-up liquid and detergent candamage the rinse aid container.Only fill it with rinse aid formulatedfor domestic dishwashers.
Alternatively, you could use liquid citricacid at a concentration of up to 10 %.The resulting rinsing and drying qualityon the crockery will not, however, be asgood as when rinse aid is used.
Risk of acid damage.The dishwasher can be damaged byhigh concentrations of acid.Under no circumstances should youuse citric acid with a higher acidcontent.
If you only ever wish to usecombination products in yourdishwasher, you do not need to addrinse aid. However, for optimum rinsing anddrying results, use dishwasherdetergent and add dishwasher saltand rinse aid separately.
If you only ever use combinationdetergent products containing salt andrinse aid in your dishwasher, you canswitch off both refill reminders if youwish (see “Settings – Refillreminders”).
Please make sure that if you stopusing combination detergents, yourefill the dishwasher salt and rinseaid. Switch the refill reminders backon if required.

Before using for the first time
27
Adding rinse aid
Press the yellow button on the lidof the rinse aid reservoir.
The lid will spring open.
Fill with rinse aid until the filling levelindicator (arrow) changes to a darkcolour while the door is horizontallyopen.
The rinse aid reservoir holdsapproximately 110 ml.
Close the lid firmly until you hear itclick into place. Otherwise, water canenter the rinse aid reservoir during aprogramme.
Wipe up any spilled rinse aid. Thisprevents excess foam developingduring the next programme.
You can adjust the rinse aid dosagefor the best wash result (see“Settings” chapter, “Rinse aid”section).
Filling the rinse aid reservoir
When the refill reminder Refill rinse aidappears in the display, the reservoircontains sufficient rinse aid for 2 to 3programmes only.
Refill with rinse aid in plenty of time.
Confirm with OK.
The rinse aid refill reminder willdisappear.

Settings
28
You can alter the dishwasher’scontrols to suit changing requirementsby adjusting the settings.
The settings can be altered at anytime.
Opening the settings menu Switch the dishwasher on with the button if it is switched off.
Use the programme selectionbutton to select the Furtherprogrammes/settings option .
The first of the further programmes willappear in the display.
Select the Settings menu optionusing the buttons and confirmwith OK.
The first option in the Settings menu willappear in the display.
For further information about thedisplay functionality, see the “Displayfunctions” section in the “Guide to theappliance” chapter.
Changing settings Use the buttons to select the
menu option you want to change andconfirm your selection with OK.
Sub-menu options that have alreadybeen selected will have a tick beside them.
Use the buttons to select thesetting you want and confirm withOK.
To exit a sub-menu again, use the Back button.
The display will revert to the menuabove.
Closing the settings menu Press the button.
The display will change to the menu.
Settings
29
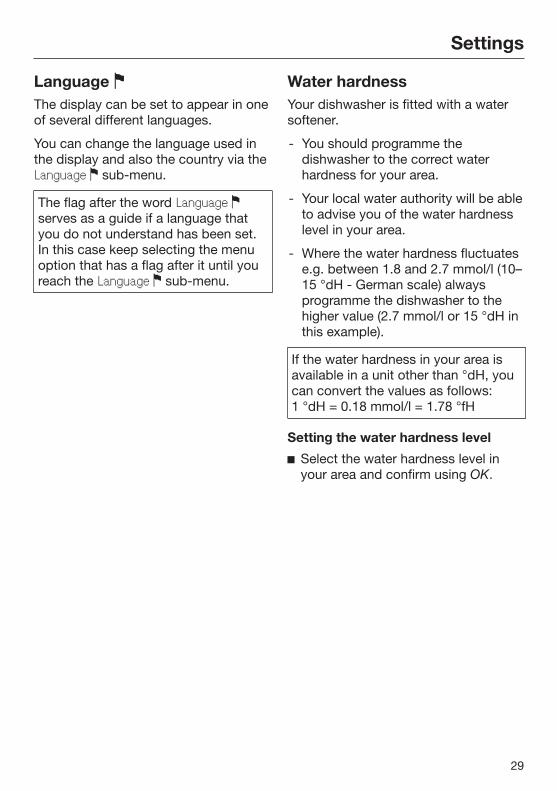
Language The display can be set to appear in oneof several different languages.
You can change the language used inthe display and also the country via theLanguage sub-menu.
The flag after the word Language serves as a guide if a language thatyou do not understand has been set.In this case keep selecting the menuoption that has a flag after it until youreach the Language sub-menu.
Water hardnessYour dishwasher is fitted with a watersoftener.
- You should programme thedishwasher to the correct waterhardness for your area.
- Your local water authority will be ableto advise you of the water hardnesslevel in your area.
- Where the water hardness fluctuatese.g. between 1.8 and 2.7 mmol/l (10–15 °dH - German scale) alwaysprogramme the dishwasher to thehigher value (2.7 mmol/l or 15 °dH inthis example).
If the water hardness in your area isavailable in a unit other than °dH, youcan convert the values as follows: 1 °dH = 0.18 mmol/l = 1.78 °fH
Setting the water hardness level
Select the water hardness level inyour area and confirm using OK.

Settings
30
Rinse aidYou can adjust the rinse aid dosage forbest results. The rinse aid dosage can be set from 0to 6 ml. 3 ml is the factory default setting.
The rinse aid dosage can turn out to behigher than the set value due to theautomatic adjustment of theprogramme.
If spots appear on crockery andglassware:
- Increase the rinse aid dosage.
If clouding or smearing appears oncrockery and glassware:
- Decrease the rinse aid dosage.
Consumption (EcoFeedback)You can set whether the energy andwater consumption is displayed for theselected programme. This functionshows the estimated consumptionbefore a programme, and the actualconsumption after the end of theprogramme. In this menu you can also call up thetotal consumption of energy and waterfor all the wash programmes you havepreviously run on your dishwasher (see“Caring for the environment” chapter,“EcoFeedback consumption ”displaysection).
Display Consumption
Select the Consumption display menuoption and confirm with OK.
Select the setting you want andconfirm with OK.
Display Total consumption
Select the Total consumption menuoption and confirm with OK.
You can display the values for Energyand Water using the buttons.
You can also reset the values for thetotal consumption to 0.
Select the Reset menu option andconfirm with OK.
Select the Yes menu option andconfirm with OK.
Confirm the message with OK.
The values are now reset to 0.

Settings
31
Display brightnessYou can set the display brightness toone of seven different levels.
Refill remindersIf you only ever use combinationdetergent products or automaticdispensing using Miele PowerDisks (ifavailable), you can switch off the refillreminders for dishwasher salt and rinseaid if you wish.
Please make sure that if you stopusing combination detergents, yourefill the dishwasher salt and rinseaid. Switch the refill reminders backon.
AutoOpenIn some programmes the doorautomatically opens slightly to assistthe drying process.
This function can be deactivated if youwish.
Risk of damage due to steam.Steam from the dishwasher coulddamage the edges of delicateworktops when you open the door atthe end of the programme if the fanis no longer running.If you have deactivated theautomatic door opening function butwould still like to open the door atthe end of the programme, thenmake sure that you open the doorfully.

Settings
32
Extra cleanYou can choose this function toincrease the cleaning performance ofthe programmes.
If you activate this function, theprogramme durations and the mainwash temperatures will increase. Thewater and energy consumption mayincrease.
If this function is switched on, it will beapplied to all programmes until it isswitched off again.
Extra dryYou can select this function in order toincrease the programme dryingperformance.
If you activate this function, theprogramme durations and final rinsetemperatures will increase. The energyconsumption may increase.
If this function is switched on, it will beapplied to all programmes until it isswitched off again.
2nd interim rinseYou can choose this function toincrease the cleaning performance ofthe programmes with a second interimrinse.
When this function is activated, waterconsumption may increase.
If this function is switched on, it will beapplied to all programmes until it isswitched off again (except for the ECOprogramme).
Hygiene cycleIf you mainly use low temperatureprogrammes (< 50 °C), there is a risk ofbacteria and unpleasant odoursbuilding up in the wash cabinet (see“Cleaning and care – Hygiene cycle”).
If this function is switched on, amessage will be displayedrecommending the use of a hightemperature programme after severallow temperature programmes havebeen run.

Settings
33
Software versionYou can call up the electronic softwareversion of your dishwasher for technicalsupport purposes.
Showroom
For demonstration purposes only.
The dishwasher is equipped with ademo mode for showroom use.
Factory defaultYou can reset all dishwasher settings tothe factory default settings.
Select Reset and confirm with OK.

Caring for the environment
34
Economical dishwashingThis dishwasher is exceptionallyeconomical in its use of water andelectricity. You can make the most of yourappliance by following these tips:
- Washing in a dishwasher generallyuses less water and energy thanwashing by hand.
- There is no need to pre-wash itemsunder running water, and thisunnecessarily increases water andenergy consumption.
- For the most economicaldishwashing, make full use of thebasket capacity without overloadingthe dishwasher. This results in themost economical dishwashing interms of energy and waterconsumption.
- Choose the programme to suit thetype of crockery being washed andthe degree of soiling (see“Programme overview”).
- Select the ECO programme forenergy-saving dishwashing. Thisprogramme is the most efficient interms of its combined energy andwater consumption for cleaningcrockery with a normal level ofsoiling.
- Follow the detergent manufacturer’srecommendations on detergentdosage.
- When using powder or liquiddetergent, you can use 1/3 lessdetergent if the baskets are only halffull.
- You can connect the dishwasher to ahot water supply. A hot waterconnection is particularly suitablewith energy-saving water heatingsources, such as solar energy with acirculation system.If the water is heated by electricity,we would recommend connection tocold water.
Caring for the environment
35
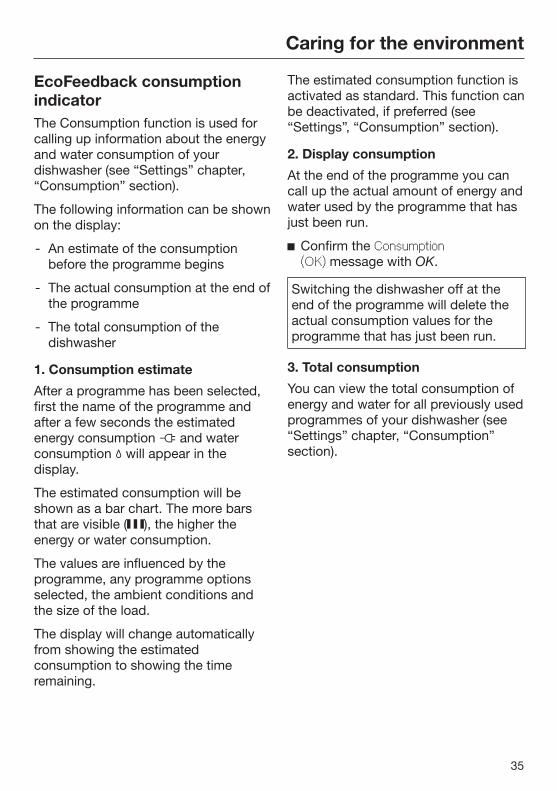
EcoFeedback consumptionindicatorThe Consumption function is used forcalling up information about the energyand water consumption of yourdishwasher (see “Settings” chapter,“Consumption” section).
The following information can be shownon the display:
- An estimate of the consumptionbefore the programme begins
- The actual consumption at the end ofthe programme
- The total consumption of thedishwasher
1. Consumption estimate
After a programme has been selected,first the name of the programme andafter a few seconds the estimatedenergy consumption and waterconsumption will appear in thedisplay.
The estimated consumption will beshown as a bar chart. The more barsthat are visible ( ), the higher theenergy or water consumption.
The values are influenced by theprogramme, any programme optionsselected, the ambient conditions andthe size of the load.
The display will change automaticallyfrom showing the estimatedconsumption to showing the timeremaining.
The estimated consumption function isactivated as standard. This function canbe deactivated, if preferred (see“Settings”, “Consumption” section).
2. Display consumption
At the end of the programme you cancall up the actual amount of energy andwater used by the programme that hasjust been run.
Confirm the Consumption(OK) message with OK.
Switching the dishwasher off at theend of the programme will delete theactual consumption values for theprogramme that has just been run.
3. Total consumption
You can view the total consumption ofenergy and water for all previously usedprogrammes of your dishwasher (see“Settings” chapter, “Consumption”section).

Loading the dishwasher
36
General informationRemove coarse food residues fromcrockery.
There is no need to pre-rinse itemsunder running water.
Damage can be caused by ash,sand, wax, lubricating grease orpaint.These substances will contaminatethe dishwasher and can then nolonger be removed.Do not wash items soiled with thesesubstances in the dishwasher.
Crockery can be loaded anywhere inthe baskets, but the following notesshould be observed:
- Do not place crockery and cutleryinside other items where they willcover one another.
- Load the crockery so that water canaccess all surfaces. This ensures thatthey get properly cleaned.
- Make sure that all items are securelypositioned.
- Hollow items such as cups, glasses,pots etc. must be placed upsidedown in the baskets.
- Tall and narrow hollow items, such aschampagne glasses, should beplaced in the middle of the basketrather than in the corners. Thisensures the hollow items are moreeasily accessed by the water jets.
- Wide-based items should be placedat an angle so that water can run offthem freely.
- The spray arms must not be blockedby items that are too tall or hangthrough the baskets. Test for freemovement by manually rotating thespray arms.
- Make sure that small items cannotfall through the holders in thebaskets. Small items such as lids shouldtherefore be placed in the 3DMultiFlex tray or cutlery basket(depending on model).
Some foods may contain natural dyes,e.g. carrots, tomatoes or ketchup.These dyes can discolour plastic itemsin the dishwasher if large quantities ofthese foods are in contact with thecrockery inside the appliance. Thestability of plastic items is not affectedby this discolouration.Washing silverware can also causeplastic items to discolour.

Loading the dishwasher
37
Items not suitable for dishwashers:
- Wooden cutlery and crockery oritems with wooden parts: these maydiscolour and fade. The glue used inthese items is not dishwasher-proofand wooden handles may comeloose after being washed in adishwasher.
- Craft items, antiques, valuable vasesand decorative glassware: such itemsare not suitable for dishwashers.
- Plastic items that are not heatresistant: the high temperatures inthe dishwasher may cause them tomelt or lose shape.
- Copper, brass, tin and aluminiumitems: these may discolour orbecome dull.
- Colours painted over a glaze: thesemay fade after a number of washes.
- Delicate glassware and glasswarecontaining lead crystal: clouding mayoccur over time.
Silver
Silver that has been in contact withfoods containing sulphur can discolour.These include egg yolk, onions,mayonnaise, mustard, pulses, fish, fishbrine and marinades. Silverware previously cleaned with asilver polish may still be damp orspotted at the end of a programme,where water has not run off smoothly.
Tip: Rub the silver dry with a cloth.
Damage due to caustic alkalinedetergents.Aluminium parts (e.g. the greasefilters of cooker hoods) can bedamaged by caustic alkalinedetergents. In extreme cases, thereis a risk of an explosive chemicalreaction (such as an explosiveoxyhydrogen gas reaction).Aluminium components must not becleaned in the dishwasher withcaustic alkaline commercial orindustrial detergents.
Tip: When purchasing new crockeryand cutlery, make sure they aredishwasher-proof if you want to washthem in the dishwasher.
Glass care
- Clouding may occur on glasses afterfrequent washing in the dishwasher.When washing delicate glassware inthe dishwasher, ensure that only aspecial glass care programme withvery low temperatures is selected(see “Programme overview”). This willreduce the risk of clouding.
- Purchase glassware that isdishwasher-safe (e.g. Riedelglassware).
- Use detergents with glass protectiveadditives.

Loading the dishwasher
38
Upper basket
Loading the upper basket
Damage due to leaking water.If you run the dishwasher without theupper basket, water can leak out ofthe dishwasher.Only run the dishwasher with theupper basket in place (except duringthe programme Tall items, if available).
Use the upper basket for small,lightweight and delicate items suchas bowls, cups and glasses. Shallow pans or casserole dishes canalso be placed in the upper basket.
Long items such as soup ladles andmixing spoons should be placed lyingdown across the front of the upperbasket.
Loading the FlexCare cup rack
You can put cups, small bowls and flatcrockery on the FlexCare cup rack.Glasses can be arranged along the cuprack so they sit securely during theprogramme.
Lower the cup rack to do so.
Raise the cup rack upwards to makeroom for tall items.

Loading the dishwasher
39
Adjusting the FlexCare cup rack
You can set the height and depth of thecup rack at 2 different levels so that itcan accommodate larger cups and sothat taller crockery can be placedunderneath it.
Pull the cup rack upwards and click itinto the desired position (see arrow).
Loading the silicone elements of theFlexCare cup rack
The silicone elements in the cup rackare specially designed to hold tallglasses with long stems securely.
Lower the cup rack and lean theglasses in the openings.
If you wish you can adjust the leftinsert of the 3D MultiFlex tray tomake space for taller glasses (see“Cutlery – 3D MultiFlex tray”).

Loading the dishwasher
40
Loading the hinged bowl rack
The hinged bowl rack on the left in theupper basket is used to load smallerbowls.
Lean the bowls at an angle across thehinged bowl rack to enable water torun off more easily.
Lowering the hinged bowl rack
You can lower the hinged bowl rack onthe left in the upper basket to make iteasier to arrange larger crockery, likecereal bowls.
Press the yellow lever downwards ,and then lower the hinged bowl rack.
Loading the dishwasher
41
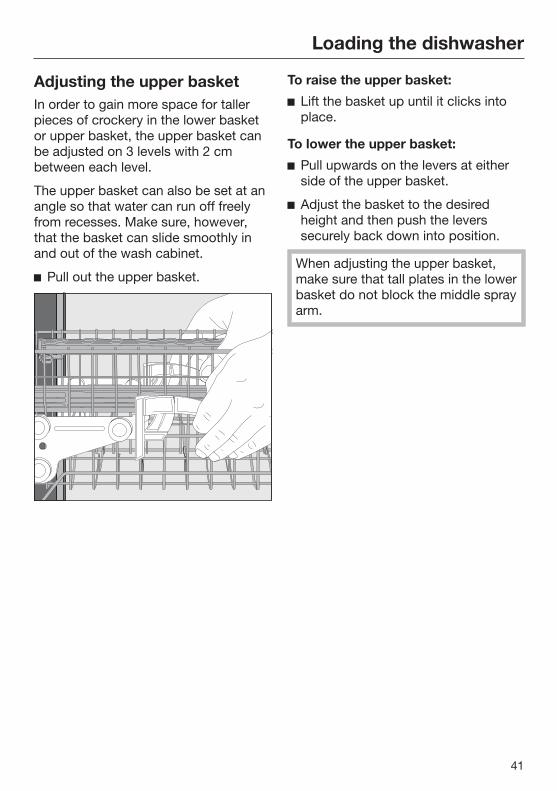
Adjusting the upper basketIn order to gain more space for tallerpieces of crockery in the lower basketor upper basket, the upper basket canbe adjusted on 3 levels with 2 cmbetween each level.
The upper basket can also be set at anangle so that water can run off freelyfrom recesses. Make sure, however,that the basket can slide smoothly inand out of the wash cabinet.
Pull out the upper basket.
To raise the upper basket:
Lift the basket up until it clicks intoplace.
To lower the upper basket:
Pull upwards on the levers at eitherside of the upper basket.
Adjust the basket to the desiredheight and then push the leverssecurely back down into position.
When adjusting the upper basket,make sure that tall plates in the lowerbasket do not block the middle sprayarm.
Loading the dishwasher
42
Lower basket
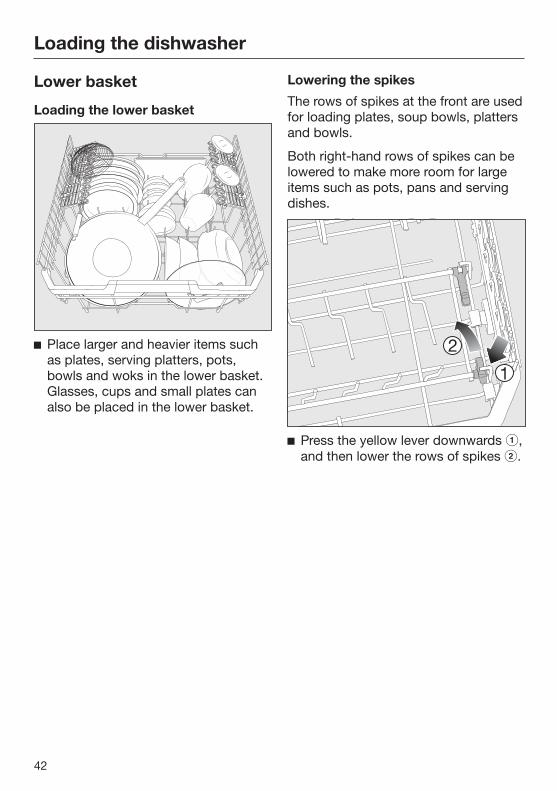
Loading the lower basket
Place larger and heavier items suchas plates, serving platters, pots,bowls and woks in the lower basket. Glasses, cups and small plates canalso be placed in the lower basket.
Lowering the spikes
The rows of spikes at the front are usedfor loading plates, soup bowls, plattersand bowls.
Both right-hand rows of spikes can belowered to make more room for largeitems such as pots, pans and servingdishes.
Press the yellow lever downwards ,and then lower the rows of spikes .

Loading the dishwasher
43
Loading the FlexCare glass holder
The silicone elements in the glassholder provide a stable and secure holdfor delicate stemware.
Stemware such as wine glasses,champagne flutes and beer glassescan be leaned against the glassholder or suspended from it.
The glass holder can be raised tomake more room for tall items.
You can set the glass holder to twodifferent heights.
Slide the glass holder to the desiredheight until the catches click intoplace at the top or the bottom.

Loading the dishwasher
44
Cutlery tray Load the cutlery into the 3D MultiFlex
tray.
Loading the 3D MultiFlex tray
To make unloading easier, cutleryshould be grouped in zones, one forknives, one for forks, one for spoons,etc.
Spoon heads should be placed incontact with at least one of the serratedretainers on the base of the tray toensure that water runs off them freely.
You can push the left insert to themiddle in order to accommodate tallitems of crockery and long stemmedglasses in the upper basket (see “Upperbasket – Loading the silicone elementsof the FlexCare cup rack”).
You can put large and long cutlery inthe recessed centre part of the tray.
Arrange tall items (such as cakeservers) so that they do not block theupper spray arm.
You can adjust the height of the right-hand insert to create more space in theright-hand part of the tray for largercutlery items or smaller pieces ofcrockery.
Pull the insert inwards by the yellowhandle and click it into place in one ofthe two positions.
Loading the dishwasher
45
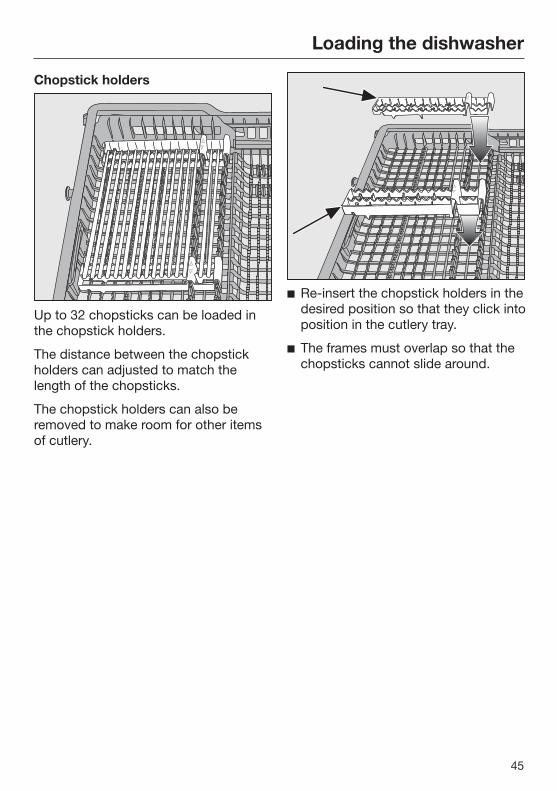
Chopstick holders
Up to 32 chopsticks can be loaded inthe chopstick holders.
The distance between the chopstickholders can adjusted to match thelength of the chopsticks.
The chopstick holders can also beremoved to make room for other itemsof cutlery.
Re-insert the chopstick holders in thedesired position so that they click intoposition in the cutlery tray.
The frames must overlap so that thechopsticks cannot slide around.

Detergent
46
Active ingredients
Damage caused by usingunsuitable detergents.Detergents that are not suitable fordomestic dishwashers can causedamage to the dishwasher or to theload.Only use detergents formulated fordomestic dishwashers.
Modern detergents contain variousactive ingredients, the most importantof which are:
- Water softening complexing agentsto prevent calcification.
- Alkalis to aid removal of dried-onsoiling.
- Enzymes to break down starch andloosen protein.
- Oxygen-based bleaching agents toremove coloured stains (e.g. tea,coffee, tomato sauce).
Most dishwasher detergents are mildlyalkaline and contain enzymes andoxygen-based bleaching agents.
There are different types of detergent:
- Powder and liquid gel detergents.These detergents allow you to adjustthe amount dispensed according tothe size of the load and level ofsoiling.
- Tab detergents. These are suitable formost levels of soiling.
As well as the usual detergents,combination products are alsoavailable. These contain rinse aid and watersoftener (dishwasher salt).Only use these combination detergentsfor the water hardness levelsrecommended by the manufacturer onthe packaging. The cleaning and drying performance ofthese combination detergents can varygreatly.
For optimum cleaning and dryingresults, use dishwasher detergent andadd salt and rinse aid separately.

Detergent
47
Risk of chemical burns fromdetergent.Dishwasher detergents can causeburning on the skin and in the eyes,nose, mouth and throat.Avoid contact with detergents. Do not inhale powder detergents. Donot swallow dishwasher detergents.Seek medical attention immediately ifdetergent has been swallowed orinhaled.Keep children away from detergents.Detergent residues could still bepresent in the dishwasher. Keepchildren away from the dishwasherwhen the door is open. Do not fill thedetergent dispenser until just beforestarting the programme and activatethe door safety lock (depending onmodel).
Detergent dispensingThe detergent compartment holds amaximum of 50 ml.
There are marks in the detergentcompartment to aid with dispensing:20, 30, max. When the door is openedto a horizontal position, they show theapproximate fill level in ml and themaximum fill height.
Follow the detergent dosagerecommended by the manufactureron the packaging.
Unless directed otherwise, use onedetergent tab or add 20 to 30 ml ofdetergent to the detergentcompartment, depending on thedegree of soiling of the crockery.
Failure to dispense the recommendedamount of detergent may impaircleaning results.
Some tabs may not dissolve completelywhen the programme QuickPowerWashis used.

Detergent
48
Adding detergent
Press the yellow button on the lidof the detergent compartment.
The lid will spring open. The lid will also open at the end of aprogramme sequence.
Add the detergent to the detergentcompartment.
Push the lid shut until you hear it clickinto place.
The detergent must not cause thedetergent compartment lid to getstuck. This can prevent the lid fromopening during the programmesequence.Do not overfill the detergentcompartment.
Ensure that the detergent packagingis properly closed after use. Thisprevents the detergent from gettingdamp and clumping together.
You can also apply a small amount ofdetergent to the inner panel of thedoor in programmes that have a pre-wash stage (see “Programmeoverview”).

Operation
49
Switching on the dishwasher Make sure the spray arms can rotate
freely.
Close the door.
Open the stopcock, if it is closed.
Press the button.
The programme selected will brieflyappear in the display and the indicatorlight for the programme selected willcome on. Next, the estimated energy and waterconsumption may be shown for thechosen programme for severalseconds. Then the display will show theestimated duration for the selectedprogramme.
The Start indicator light will flash.
Selecting a programmeChoose your programme according tothe type of crockery and the degree ofsoiling.
The different programmes and theiruses are described under “Programmeoverview”.
Use the programme selectionbutton to select the programmeyou want.
The indicator light for the programmeselected will come on.
Further programmes can be selectedunder .
Use the programme selectionbutton to select the option.
The first of the further programmes willappear in the display.
Use the buttons to select theprogramme you want from thedisplay.
You can now select programme options(see “Programme options”).
If any programme options are selected,the appropriate indicator lights will alsolight up.
Operation
50
Display programme durationThe estimated duration of the selectedprogramme appears on the displaybefore the programme begins. Duringthe programme, the time left until theend of the programme is displayed.
Symbols appear to indicate which stagethe programme is at:
Pre-wash/Soak
Main wash
Interim rinse
Final rinse
Drying
End
The displayed duration may vary withthe same programme. It is influencedby, for example, the water temperatureat each inlet, the reactivation process ofthe water softener, the detergent type,and the amount of dishes and howsoiled they are.
When a programme is selected for thefirst time, the display will show theaverage programme duration for a coldwater inlet.
The programme durations shown in the“Programme overview” chapter refer tostandard test loads and temperatures.
Each time a programme is run, thecontrol-display module calculates theprogramme duration required accordingto the temperature of the water takeninto the dishwasher and the size of theload.
Starting the programme Press the Start button.
If necessary, confirm the previouslydisplayed message with OK.
The programme starts.
The Start indicator light will come on.
During the programme sequence, youcan use OK to display the name of theprogramme that is currently running.
Risk of scalding due to hotwater.During operation, water in thedishwasher may be very hot.During operation, only open the doorwith extreme caution.

Operation
51
End of programmeThe programme has ended when thedisplay shows the message Finished.
In some programmes, if the AutoOpenfunction is activated, the door willautomatically open slightly (see“Settings” chapter, “AutoOpen”section). This improves the dryingprocess.
If the Consumption programmablefunction is switched on, you can nowcall up the actual energy and waterconsumption of the programme thathas just finished (see “Caring for theenvironment” chapter, “EcoFeedbackconsumption indicator” section).
The drying fan may continue to run fora few minutes at the end of theprogramme.
Risk of damage due to steam.Steam from the dishwasher coulddamage the edges of delicateworktops when you open the door atthe end of the programme if the fanis no longer running.If you have deactivated theautomatic door opening function (see“Settings” chapter, “AutoOpen”section), but would still like to openthe door at the end of theprogramme, then make sure that youopen the door fully.
Energy managementTo save energy, the dishwasher willswitch off automatically 10 minutesafter the last time a button is pressed orafter the end of a programme.
You can switch the dishwasher back onagain with the button.
The dishwasher will not switch itselfoff whilst a programme is running or ifthere is a fault.

Operation
52
Switching off the dishwasher The dishwasher can be switched off
at any time using the button.
Confirm the query Switch off with OK.
Switching the dishwasher off during aprogramme stops the programme.
You can also do this to stop an ongoingtimer.
Risk of damage from leakingwater.Water leakage can cause damage.If the dishwasher is not going to beused for a longer period of time, e.g.whilst on holiday, the stopcockshould be closed as a precaution.
Unloading the dishwasherDishes tend to break and chip moreeasily when they are hot. Allow thedishes to cool until they are comfortableenough to handle before unloadingthem.
If you open the door fully after switchingoff, the dishes will cool much faster.
First unload the lower basket, thenthe upper basket and finally the 3DMultiFlex tray (if present). This will prevent water drops from theupper basket and 3D MultiFlex trayfrom falling onto the dishes in thelower basket.

Operation
53
Interrupting a programmeA programme will be interrupted assoon as the door is opened. If the door is closed again, theprogramme will continue from the pointit was at before the door was opened.
Risk of scalding due to hotwater.During operation, water in thedishwasher may be very hot.During operation, only open the doorwith extreme caution.
Cancelling or changing aprogramme
If a programme is cancelled,important programme stages may bemissed.A programme should only becancelled in the first few minutes ofthe programme sequence.
If a programme has already started andyou wish to cancel it, proceed asfollows:
Switch the dishwasher off with the button.
Confirm the query Switch off with OK.
If you would like to select anotherprogramme:
Switch the dishwasher on again withthe button.
If you have dispensed detergentmanually, check whether thedetergent compartment is still closed. If the lid is already open, fill it withdetergent again and close the lid.
Select the programme you want, andthen start it.

Options
54
Timer You can set the start time of aprogramme. The programme start timecan be delayed for between 30 minutesand 24 hours. With start time delays between30 minutes and 3 hours, the delay canbe set in 30 minute stages. It is set inhours for periods longer than this.
With manual detergent dispensing,the detergent will clump together ifthe detergent compartment is not dryand this may mean it is not fullyrinsed out.When using the timer function, makesure that the detergent compartmentis dry before adding detergent. Wipedry with a cloth first, if necessary. Do not use any liquid cleaningagents. These can leak out.
Danger to health due todetergent.To prevent children coming intocontact with dishwasher detergent:Do not fill the detergent dispenseruntil just before starting theprogramme, i.e. before you activatethe timer. Use the safety lock tosecure the dishwasher door.
Activating the timer
Switch the dishwasher on with the button.
The Start indicator light will flash.
Select the programme you want touse.
Press the Timer button.
The most recently set “Start in” time willbe shown on the display. The Timerindicator light will light up.
Set the required time after which theprogramme should start automaticallyusing the buttons.
Pressing and holding button or willautomatically adjust the time.
Confirm with OK.
The Start indicator light will come on.

Options
55
After you have activated the timer, allthe displays will switch off after a fewminutes to save energy.
Press the button to switch thedisplay back on again for a fewminutes.
The time up until the programme startswill show counting down in the displayin hours for durations above 10 hours,and in minutes for durations below this.
At the end of the delay period, theprogramme selected beginsautomatically. The time left will appearin the display and the Timer indicatorlight will go out.
Starting a programme before thetime for the timer has elapsed:
A programme can be started before thetime for the timer has elapsed. Proceed as follows:
Switch the dishwasher off with the button.
Switch the dishwasher on again withthe button.
Select the programme you want.
Press the Start button.
The programme starts. TheStart indicator light will come on.
Guide for selecting a programme
56
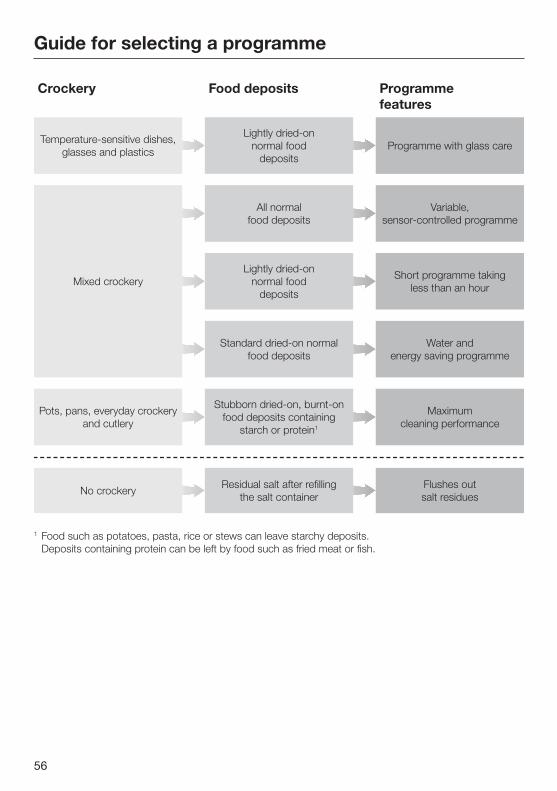
Pots, pans, everyday crockery and cutlery
Standard dried-on normal food deposits
Stubborn dried-on, burnt-on food deposits containing
starch or protein1
Water and energy saving programme
Maximum cleaning performance
Crockery Food deposits Programme features
Temperature-sensitive dishes, glasses and plastics
Mixed crockery
Lightly dried-on normal food
deposits
All normal food deposits
Lightly dried-on normal food
deposits
Programme with glass care
Variable, sensor-controlled programme
Short programme taking less than an hour
No crockery Residual salt after refilling the salt container
Flushes out salt residues
1 Food such as potatoes, pasta, rice or stews can leave starchy deposits. Deposits containing protein can be left by food such as fried meat or fish.

Guide for selecting a programme
57
Gentle 45 °C
Auto 45–65 °C
QuickPowerWash 65 °C
ECO
Intensive 75 °C
Programme2 Consumption estimate3
QuickPowerWash 65 °C + Express
2 The programmes can be combined with the “Express” or “IntenseZone” programme options (see “Programme options”). You can also select the “Extra clean”, “Extra dry” and “Second interim rinse” function (if available) (see “Settings”).3 The estimated values may change due to the selected settings or programme options, or the conditions in which the appliance is being used.
Programme duration 13 minutes, no heating up,
solely for flushing out salt.
Energy consumption
Water consumption
Programme duration
Energy consumption
Water consumption
Programme duration
Energy consumption
Water consumption
Programme duration
Energy consumption
Water consumption
Programme duration
Energy consumption
Water consumption
Programme duration
Programme overview
58
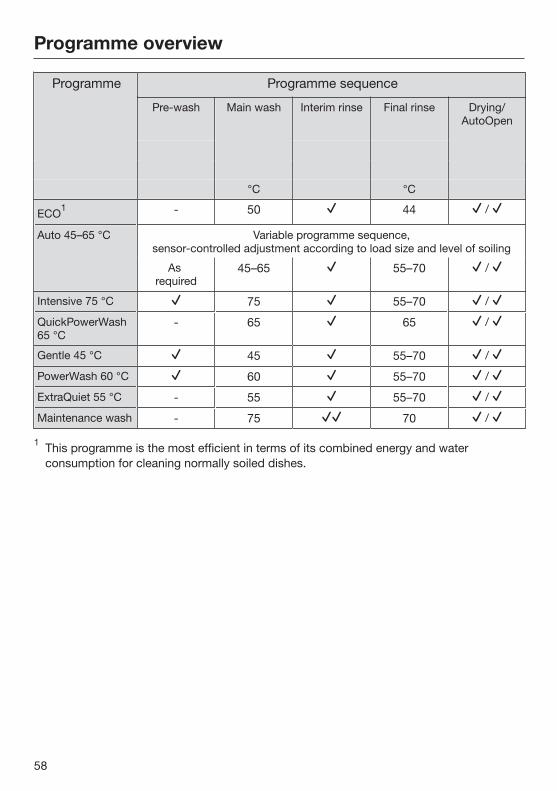
Programme Programme sequence
Pre-wash Main wash Interim rinse Final rinse Drying/AutoOpen
°C °C
ECO1 - 50 44 /
Auto 45–65 °C Variable programme sequence,sensor-controlled adjustment according to load size and level of soiling
As required
45–65 55–70 /
Intensive 75 °C 75 55–70 /
QuickPowerWash65 °C
- 65 65 /
Gentle 45 °C 45 55–70 /
PowerWash 60 °C 60 55–70 /
ExtraQuiet 55 °C - 55 55–70 /
Maintenance wash - 75 70 /
1 This programme is the most efficient in terms of its combined energy and waterconsumption for cleaning normally soiled dishes.
Programme overview
59
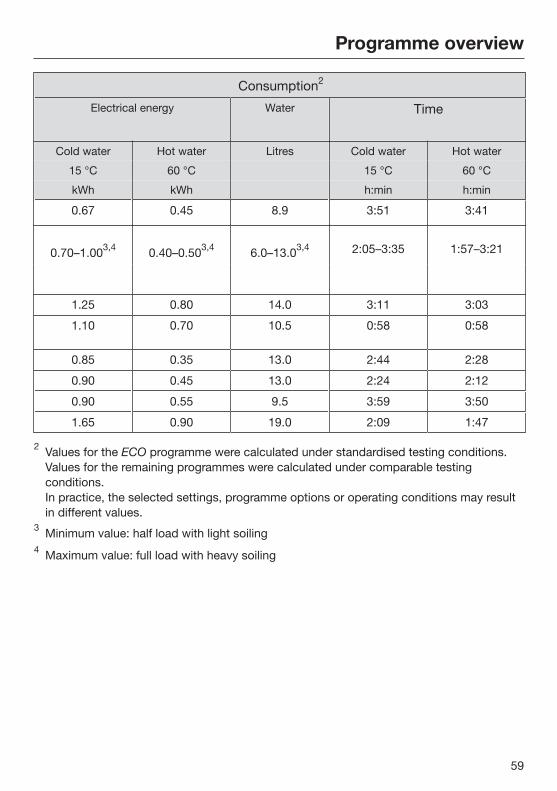
Consumption2
Electrical energy Water Time
Cold water Hot water Litres Cold water Hot water
15 °C 60 °C 15 °C 60 °C
kWh kWh h:min h:min
0.67 0.45 8.9 3:51 3:41
0.70–1.003,4 0.40–0.503,4 6.0–13.03,4 2:05–3:35 1:57–3:21
1.25 0.80 14.0 3:11 3:03
1.10 0.70 10.5 0:58 0:58
0.85 0.35 13.0 2:44 2:28
0.90 0.45 13.0 2:24 2:12
0.90 0.55 9.5 3:59 3:50
1.65 0.90 19.0 2:09 1:47
2 Values for the ECO programme were calculated under standardised testing conditions.Values for the remaining programmes were calculated under comparable testingconditions. In practice, the selected settings, programme options or operating conditions may resultin different values.
3 Minimum value: half load with light soiling4 Maximum value: full load with heavy soiling

Programme overview
60
Further programmes
PowerWash 60 °C
Programme for cleaning a mixed loadwith normal household food residues.
ExtraQuiet 55 °C
Very quiet programme with longerduration. This programme is suitable fora mixed load with normal householdfood residues that have dried onslightly.
Maintenance programme
The dishwasher wash cabinet isgenerally self-cleaning. However, ifresidues or deposits occur, use theMaintenance programme to clean it. Thedishwasher must not be loaded for thisprogramme. This programme isdesigned for cleaning the wash cabinetusing care products (dishwashercleaner/dishwasher conditioner) (see“Optional accessories” chapter,“Appliance care” section). Follow theinstructions on the packaging. Whenusing dishwasher care products,detergent should not be dispensed. Forthis reason, automatic dispensing (ifavailable) will be deactivated for thisprogramme.

Programme options
61
Selecting programme optionsYou can use programme options toadjust the programmes.
To do this, you can select or deselectthe programme options before runningthe programme.
Switch the dishwasher on with the button.
The Start indicator light will flash.
Select a different programme asrequired.
Press the button for the programmeoption you want.
The indicator light will come on for therelevant button if the programme optionis available for the programme selected.
If the programme option is notcompatible with the selectedprogramme, a message to this effectwill appear in the display.
In this instance, confirm the messagewith OK.
Press the Start button to start theprogramme.
The selected programme option willremain active for that particularprogramme until the setting is changed(except for the ECO programme).
Express
The Express programme optionreduces the programme duration.
In order to achieve optimum cleaningresults, the temperature, and thereforethe energy consumption, will increasewith this option.
The time by which the programmeduration is shortened varies accordingto the selected programme.
Selecting the Express programmeoption may take precedence over otherselected options.
When used in combination with theQuickPowerWash programme, the Express programme option resultsin a rinse designed solely for thepurpose of flushing out the chamberto remove salt solution that leaked outafter refilling the salt reservoir.
IntenseZone
The IntenseZone programme optionincreases cleaning performance in thelower basket.
Energy consumption increases due tothe extended wash duration in the lowerbasket and increased temperature.
Cleaning and care
62
Check the condition of yourdishwasher regularly (approx. every4–6 months). In this way, faults andproblems can be avoided.
Damage due to unsuitablecleaning agents.All surfaces are susceptible toscratching. Contact with unsuitablecleaning agents can alter ordiscolour the external surfaces.Only use cleaning agents formulatedfor use on the relevant surfaces.
Cleaning the wash cabinetThe wash cabinet is largely self-cleaning, provided that the correctamount of detergent is always used.
The frequent use of low-temperaturewash programmes (< 50 °C) increasesthe risk of contamination and odoursinside the wash cabinet. Run theIntensive 75 °C programme once permonth to clean the wash cabinet andprevent odours from developing.
However, if residues such as limescaleor grease have been deposited, use theMaintenance programme to clean thedishwasher (see “Programme overview– Additional programmes ”) withdishwasher cleaner (see “Optionalaccessories – Appliance care”). Followthe instructions on the productpackaging.
Miele cleaning and care products areavailable to order from the MieleCustomer Service Department or fromthe Miele online shop.
Clean the filters in the wash cabinetregularly.

Cleaning and care
63
Hygiene cycleIf you mainly use low temperatureprogrammes, there is a risk of bacteriaand unpleasant odours building up inthe wash cabinet. If you repeatedly uselow temperature programmes, youshould regularly run a high temperatureprogramme. This is to prevent the build-up of residues and odours.
You can activate or deactivate aHygiene info message (see “Settings –Hygiene cycle”). If you deactivate this message, run theIntensive 75 °C programme once permonth to clean the wash cabinet andprevent odours from developing.
Cleaning the door and the doorsealThe door seal and the sides of thedishwasher door cannot be reachedand cleaned by the spray arm jets. As aresult, mould can develop here.
Wipe the door seals regularly with adamp cloth to remove food deposits.
Wipe off any food or drink residuesthat may have dripped onto the sidesof dishwasher door.

Cleaning and care
64
Cleaning the control panel The control panel should only be
wiped with a damp cloth.
Cleaning the appliance front
Damage due to soiling.Soiling that is left too long mightbecome impossible to remove andcould cause the external surfaces toalter or discolour.It is therefore best to remove anysoiling immediately.
Clean the appliance front with a cleansoft sponge and a solution of warmwater and washing-up liquid. Aftercleaning, wipe the surfaces dry usinga soft cloth. A clean, damp microfibre clothwithout detergent can also be used.
To avoid damaging the externalsurfaces, do not use the following:
- Detergents containing soda,ammonia, acids or chlorides
- Detergents containing descalingagents
- Abrasive detergents, e.g. scouringpowder, scouring liquid, or pumicestones
- Detergents containing solvents
- Stainless steel cleaning agents
- Dishwasher cleaner
- Oven cleaner
- Glass cleaning agents
- Hard, abrasive brushes or sponges,e.g. pot scourers, brushes orsponges that have been previouslyused with abrasive cleaning agents
- Eraser stain remover blocks
- Sharp metal scrapers
- Wire wool
- Steam cleaners
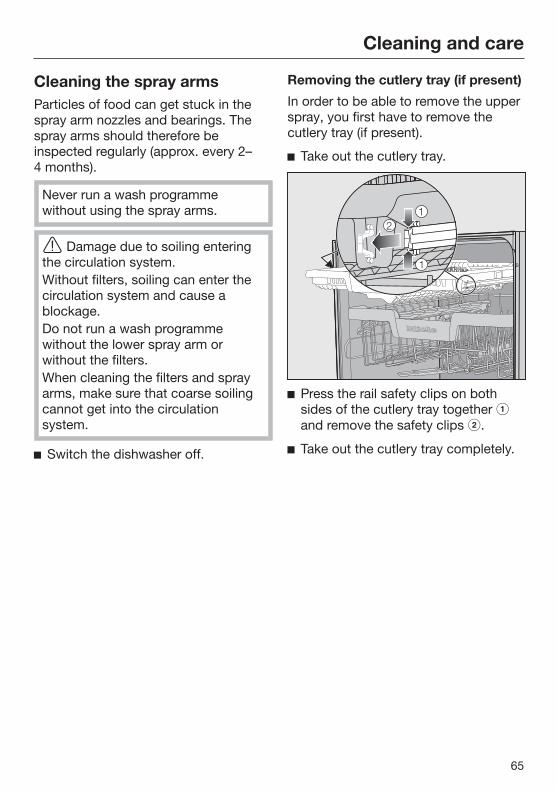
Cleaning and care
65
Cleaning the spray armsParticles of food can get stuck in thespray arm nozzles and bearings. Thespray arms should therefore beinspected regularly (approx. every 2–4 months).
Never run a wash programmewithout using the spray arms.
Damage due to soiling enteringthe circulation system.Without filters, soiling can enter thecirculation system and cause ablockage.Do not run a wash programmewithout the lower spray arm orwithout the filters.When cleaning the filters and sprayarms, make sure that coarse soilingcannot get into the circulationsystem.
Switch the dishwasher off.
Removing the cutlery tray (if present)
In order to be able to remove the upperspray, you first have to remove thecutlery tray (if present).
Take out the cutlery tray.
Press the rail safety clips on bothsides of the cutlery tray together and remove the safety clips .
Take out the cutlery tray completely.

Cleaning and care
66
Removing the top spray arm
Push the upper spray arm upwards to engage the inner ratchet. Thenunscrew the spray arm by rotating thescrew connection anti-clockwise .
Removing the middle spray arm
Rotate the screw connection of themiddle spray arm clockwise andremove the spray arm .
Removing the lower spray arm
Remove the lower basket.
Rotate the screw connection of thelower spray arm anti-clockwise and pull the spray arm upwards toremove .
Cleaning the spray arms
Use a pointed object to push foodparticles into the spray arm nozzles.
Rinse the spray arm thoroughly underrunning water.

Cleaning and care
67
Refitting the spray arms
Refit the upper spray arm and tightenit by hand.
Refit the middle spray arm.
Refit the lower spray arm and ensurethat the filter combination lies flat inthe base of the wash cabinet.
Rotate the screw connection of thelower spray arm clockwise until thearrow in the viewing window points tothe lock symbol .
Make sure the spray arms can rotatefreely.
Damage due to soiling enteringthe circulation system.The lower spray arm is used tosecure the filter combination.Without filters, coarse soiling canenter the circulation system andcause a blockage.Do not run a wash programmewithout the lower spray arm orwithout the filters.
Inserting the cutlery tray (if present)
Slide the cutlery tray back onto therails from the front.
Replace the safety clips in the rails onboth sides of the cutlery tray.

Cleaning and care
68
Checking the filters in thewash cabinetThe filter combination in the base of thewash cabinet retains coarse soilingfrom the suds solution. This preventssoiling getting into the circulationsystem and re-entering the washcabinet through the spray arms.
Damage due to soiling enteringthe circulation system.Without filters, soiling can enter thecirculation system and cause ablockage.Do not run a wash programmewithout the lower spray arm orwithout the filters.When cleaning the filters and sprayarms, make sure that coarse soilingcannot get into the circulationsystem.
The filters can become blocked bysoiling that collects over time. The levelof soiling and the time it takes beforethe filters need cleaning will varydepending on use.
The message Check filters will appear inthe display after every 50 programmecycles.
Check the filter combination.
Clean it, if necessary.
Then confirm the message with OK.
Cleaning the filters Switch the dishwasher off.
Remove the lower spray arm (see“Cleaning and care” chapter,“Cleaning the spray arms” section).
Before removing the filtercombination, remove any coarsesoiling to prevent it from entering thecirculation system.
Remove the filter combination.
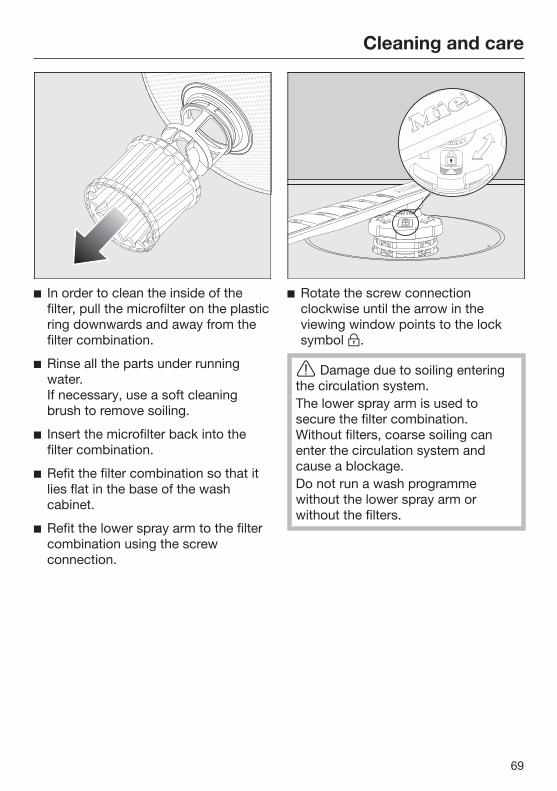
Cleaning and care
69
In order to clean the inside of thefilter, pull the microfilter on the plasticring downwards and away from thefilter combination.
Rinse all the parts under runningwater. If necessary, use a soft cleaningbrush to remove soiling.
Insert the microfilter back into thefilter combination.
Refit the filter combination so that itlies flat in the base of the washcabinet.
Refit the lower spray arm to the filtercombination using the screwconnection.
Rotate the screw connectionclockwise until the arrow in theviewing window points to the locksymbol .
Damage due to soiling enteringthe circulation system.The lower spray arm is used tosecure the filter combination.Without filters, coarse soiling canenter the circulation system andcause a blockage.Do not run a wash programmewithout the lower spray arm orwithout the filters.
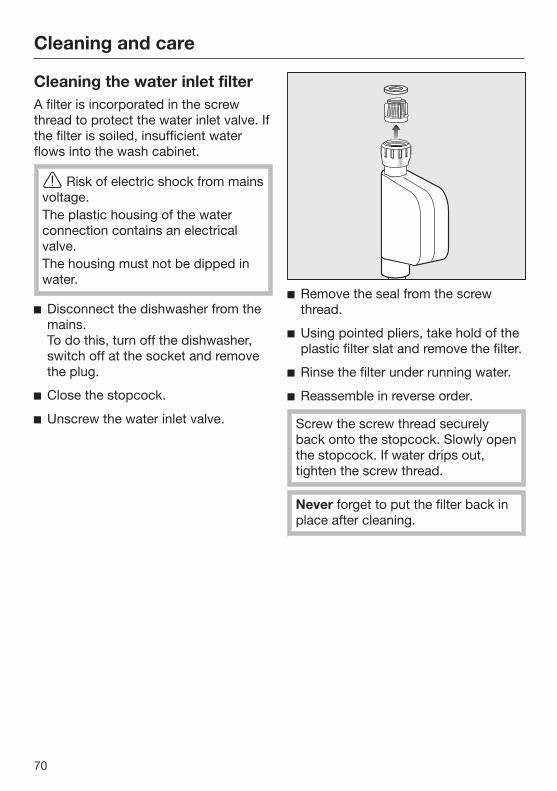
Cleaning and care
70
Cleaning the water inlet filterA filter is incorporated in the screwthread to protect the water inlet valve. Ifthe filter is soiled, insufficient waterflows into the wash cabinet.
Risk of electric shock from mainsvoltage.The plastic housing of the waterconnection contains an electricalvalve.The housing must not be dipped inwater.
Disconnect the dishwasher from themains. To do this, turn off the dishwasher,switch off at the socket and removethe plug.
Close the stopcock.
Unscrew the water inlet valve.
Remove the seal from the screwthread.
Using pointed pliers, take hold of theplastic filter slat and remove the filter.
Rinse the filter under running water.
Reassemble in reverse order.
Screw the screw thread securelyback onto the stopcock. Slowly openthe stopcock. If water drips out,tighten the screw thread.
Never forget to put the filter back inplace after cleaning.

Cleaning and care
71
Cleaning the drain pumpIf water remains in the wash cabinetafter the end of a programme, the waterhas not been pumped away. The drainpump may be blocked by foreignobjects. These are easy to remove.
Disconnect the dishwasher from themains. To do this, turn off the dishwasher,switch off at the socket and withdrawthe plug.
Take the filter combination out of thewash cabinet (see “Cleaning andcare” chapter, “Cleaning the filters”).
Scoop the water out of the cabinetusing a suitable small container orutensil.
Press the catch of the drain pumpcover inwards .
Tip the cover inwards until it isreleased .
Rinse the cover thoroughly underrunning water and remove all foreignobjects.

Cleaning and care
72
The drain pump (see arrow) isunderneath the cover.
Risk of injury from glasssplinters.It is especially difficult to see glasssplinters in the drain pump.Take care when cleaning the drainpump.
Carefully remove all foreign objectsfrom the drain pump. Check the drainpump impeller by manually turning it.You will feel a little resistance whenyou turn the impeller.
Refit the cover by placing it downvertically from above.
Ensure that the catch engagescorrectly.
Damage due to incorrectcleaning.The components are delicate andcan be damaged during cleaning.Take care when cleaning the drainpump.

Problem solving guide
73
Many malfunctions and faults that can occur in daily operation can be easilyremedied. Time and money will be saved because a service call will not beneeded.
The following guide may help you to find the reason for a malfunction or a fault,and to correct it.
This section only lists faults that you can remedy yourself. All other faults areshown in Fault FXX.
Technical problems
Problem Cause and remedy
The display remainsdark and the Startindicator light is notflashing after thedishwasher has beenswitched on with the button.
The dishwasher is not plugged in. Insert the plug and switch on at the socket.
The mains fuse has tripped. Reset the trip switch in the fuse box or replace the
fuse in the plug (see data plate for minimum fuserating).
If the mains fuse trips again, contact the MieleCustomer Service Department.
The button does notrespond immediately oronly responds once ithas been pressedseveral times.
Energy management: the door was opened or closedshortly before the button was pressed. As a result,the dishwasher was already switched on. Theelectronic module requires a few seconds to beready for operation. Wait a few seconds after opening or closing the
door. Then press the button.
The dishwasher stopsduring a programme.
The mains fuse has tripped. Reset the trip switch in the fuse box or replace the
fuse in the plug (see data plate for minimum fuserating).
If the mains fuse trips again, contact MieleService.

Problem solving guide
74
Fault messages
Problem Cause and remedy
One of the followingfaults appears in thedisplay:
Before rectifying the problem: Switch the dishwasher off.
Fault FXX There may be a technical fault. Switch the dishwasher back on after a few
seconds. Restart the desired programme.
If the fault message appears again, there is atechnical fault. Switch the dishwasher off. Close the stopcock. Call Miele Service.
Waterproof The Waterproof system has reacted. Switch the dishwasher off. Close the stopcock. Call Miele Service.
Fault F78 Circulation pump fault. Switch the dishwasher off. Switch the dishwasher back on. Restart the desired programme.
If the fault message appears again, there is atechnical fault. Switch the dishwasher off. Close the stopcock. Call Miele Service.
Problem solving guide
75
Door release
Problem Cause and remedy
The following fault isindicated via thedisplay:
Before rectifying the problem: Switch the dishwasher off.
Door fault The door does not open automatically. There may be a technical fault. Open the door manually (see “Before using for the
first time – Opening the door”) and switch thedishwasher back on again.
If the same fault message appears again, call theMiele Customer Service Department.
The door locking pins do not retract after the door isopened. There may be a technical fault. Switch the dishwasher back on. If the same fault message appears again, call the
Miele Customer Service Department.
Problem solving guide
76
Water inlet fault
Problem Cause and remedy
One of the followingmessages appears inthe display:
Open stopcock The stopcock is closed. Open the stopcock fully.
Water intake Before rectifying the problem: Switch the dishwasher off.
The water inlet is restricted. Open the stopcock fully and start the programme
again. Clean the filter in the water inlet (see “Cleaning
and care” – Cleaning the filter in the water inlet”). The water-connection pressure is lower than
50 kPa. Seek professional advice.
The on-site connection for the water drainage maybe too low and you will need to vent the waterdrainage (see “Installation – Water drainage”).
Fault F18 A technical fault has occurred. Switch the dishwasher off. Close the stopcock. Call the Miele Customer Service Department.

Problem solving guide
77
Water drainage fault
Problem Cause and remedy
The message Drain appears in thedisplay.
Before rectifying the problem: Switch the dishwasher off.
Water drainage fault.There might be water in the wash cabinet. Clean the filter combination (see “Cleaning and
care” chapter, “Cleaning the filters” section). Clean the drain pump (see “Cleaning and care”
chapter, “Cleaning the drain pump” section). Remove any kinks or loops in the drain hose.

Problem solving guide
78
General problems with the dishwasher
Problem Cause and remedy
The indicator lights andthe display are dark.
The dishwasher has switched off automatically tosave energy. Switch the dishwasher on again with the button.
Detergent residue is leftin the detergentcompartment at the endof a programme.
The detergent compartment was still damp whendetergent was added. Only add the detergent when the detergent
compartment is dry.
The detergentcompartment lid cannotbe closed.
Residual detergent is blocking the catch. Remove the residual detergent.
At the end of aprogramme there is afilm of moisture on theinside of the door andpossibly on the interiorcabinet walls.
This is part of the normal function of the dryingsystem. The moisture will dissipate after a shortwhile.
Water remains in thewash cabinet at the endof a programme.
Before rectifying the problem: Switch the dishwasher off.
The filter combination in the wash cabinet is clogged. Clean the filter combination (see “Cleaning and
care” chapter, “Cleaning the filters” section).
The drain pump is blocked. Clean the drain pump (see “Cleaning and care”
chapter, “Cleaning the drain pump” section).
The drain hose is kinked. Remove any kinks from the drain hose.
Build-up of odours inthe wash cabinet
The frequent use of low-temperature washprogrammes (< 50 °C) increases the risk ofcontamination and odours inside the wash cabinet. Regularly run a high-temperature programme. This
is to prevent the build-up of residues and odours.

Problem solving guide
79
Noises
Problem Cause and remedy
Knocking noise in thewash cabinet
A spray arm is knocking against a wash item. Carefully open the door and rearrange the wash
items that are obstructing the spray arm.
Rattling noise in thewash cabinet
Wash items are insecure in the wash cabinet. Carefully open the door and rearrange the wash
items so that they sit securely.
There is a foreign object (e.g. glass shard) in the drainpump. Remove the foreign object from the drain pump
(see “Cleaning and care” chapter, “Cleaning thedrain pump” section).
Knocking noise in thewater pipes
This may be caused by the on-site installation or thecross-section of the piping. However, this will not affect the functioning of the
dishwasher in any way. If in doubt, contact asuitably qualified plumber.

Problem solving guide
80
Unsatisfactory washing result
Problem Cause and remedy
The crockery is notclean.
The crockery was not loaded correctly. See notes under “Loading the dishwasher” for
examples on how to load crockery and cutlery.
The programme was not powerful enough. Select a more powerful programme (see
“Programme overview”). Activate the Extra clean function (see “Settings –
Extra clean”). Activate the “Second interim rinse” function (see
“Settings – Second interim rinse”).
Not enough detergent was dispensed. Use more detergent during manual dispensing or
change the detergent you are using. Increase the dispensing quantity during automatic
dispensing (if available) (see “Settings – AutoDos”).
Items are blocking the path of the spray arms. Carry out a rotation check and if needed rearrange
the items so that the spray arms can rotate freely.
The filter combination in the wash cabinet is notclean or was incorrectly fitted. This may have caused the spray arm jets to becomeblocked. Clean and/or fit the filter combination correctly. Clean the spray arm jets if necessary (see
“Cleaning and care – Cleaning the spray arms”).
There are smears onglassware and cutlery.There is a bluish sheenon the surface ofglassware. The film canbe wiped off.
The rinse aid dosage is set too high. Reduce the dosage (see “Settings” chapter, “Rinse
aid” section).
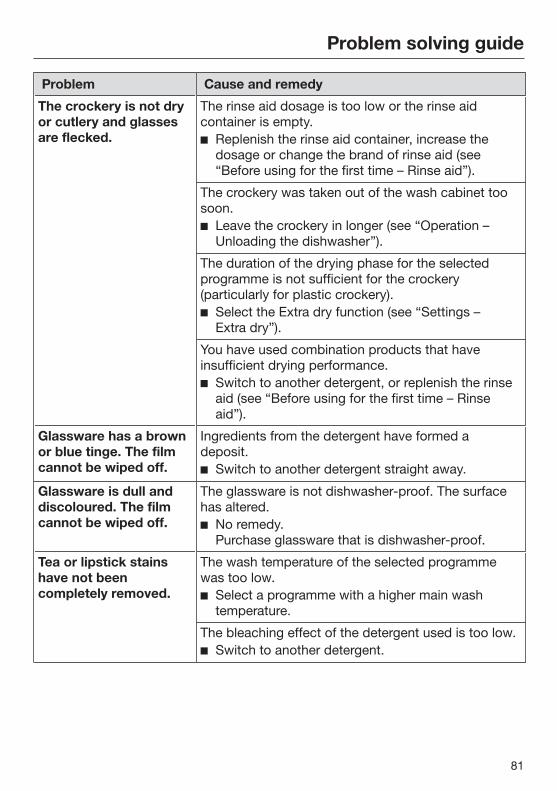
Problem solving guide
81
Problem Cause and remedy
The crockery is not dryor cutlery and glassesare flecked.
The rinse aid dosage is too low or the rinse aidcontainer is empty. Replenish the rinse aid container, increase the
dosage or change the brand of rinse aid (see“Before using for the first time – Rinse aid”).
The crockery was taken out of the wash cabinet toosoon. Leave the crockery in longer (see “Operation –
Unloading the dishwasher”).
The duration of the drying phase for the selectedprogramme is not sufficient for the crockery(particularly for plastic crockery). Select the Extra dry function (see “Settings –
Extra dry”).
You have used combination products that haveinsufficient drying performance. Switch to another detergent, or replenish the rinse
aid (see “Before using for the first time – Rinseaid”).
Glassware has a brownor blue tinge. The filmcannot be wiped off.
Ingredients from the detergent have formed adeposit. Switch to another detergent straight away.
Glassware is dull anddiscoloured. The filmcannot be wiped off.
The glassware is not dishwasher-proof. The surfacehas altered. No remedy.
Purchase glassware that is dishwasher-proof.
Tea or lipstick stainshave not beencompletely removed.
The wash temperature of the selected programmewas too low. Select a programme with a higher main wash
temperature.
The bleaching effect of the detergent used is too low. Switch to another detergent.
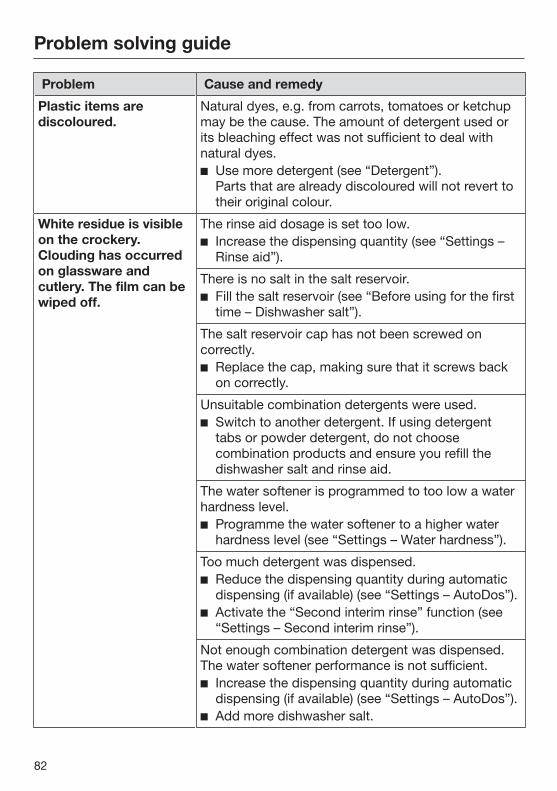
Problem solving guide
82
Problem Cause and remedy
Plastic items arediscoloured.
Natural dyes, e.g. from carrots, tomatoes or ketchupmay be the cause. The amount of detergent used orits bleaching effect was not sufficient to deal withnatural dyes. Use more detergent (see “Detergent”).
Parts that are already discoloured will not revert totheir original colour.
White residue is visibleon the crockery.Clouding has occurredon glassware andcutlery. The film can bewiped off.
The rinse aid dosage is set too low. Increase the dispensing quantity (see “Settings –
Rinse aid”).
There is no salt in the salt reservoir. Fill the salt reservoir (see “Before using for the first
time – Dishwasher salt”).
The salt reservoir cap has not been screwed oncorrectly. Replace the cap, making sure that it screws back
on correctly.
Unsuitable combination detergents were used. Switch to another detergent. If using detergent
tabs or powder detergent, do not choosecombination products and ensure you refill thedishwasher salt and rinse aid.
The water softener is programmed to too low a waterhardness level. Programme the water softener to a higher water
hardness level (see “Settings – Water hardness”).
Too much detergent was dispensed. Reduce the dispensing quantity during automatic
dispensing (if available) (see “Settings – AutoDos”). Activate the “Second interim rinse” function (see
“Settings – Second interim rinse”).
Not enough combination detergent was dispensed.The water softener performance is not sufficient. Increase the dispensing quantity during automatic
dispensing (if available) (see “Settings – AutoDos”). Add more dishwasher salt.
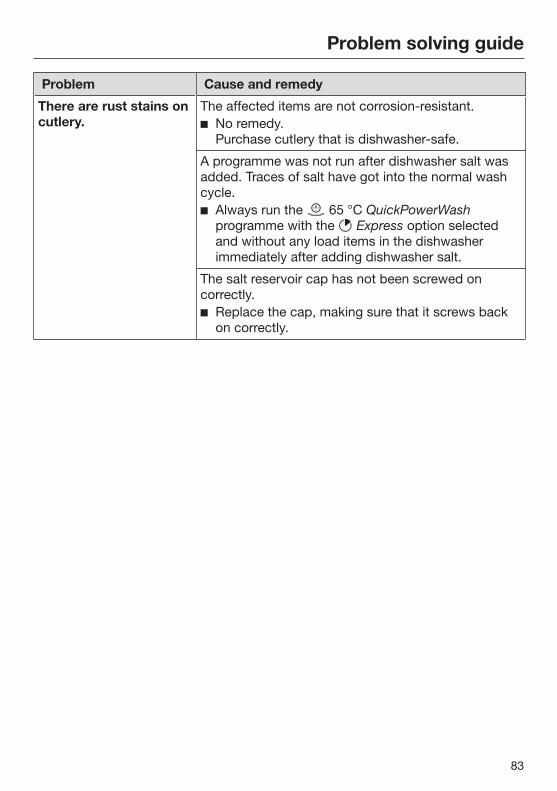
Problem solving guide
83
Problem Cause and remedy
There are rust stains oncutlery.
The affected items are not corrosion-resistant. No remedy.
Purchase cutlery that is dishwasher-safe.
A programme was not run after dishwasher salt wasadded. Traces of salt have got into the normal washcycle. Always run the 65 °C QuickPowerWash
programme with the Express option selectedand without any load items in the dishwasherimmediately after adding dishwasher salt.
The salt reservoir cap has not been screwed oncorrectly. Replace the cap, making sure that it screws back
on correctly.

Service
84
Contact in the event of a faultIn the event of any faults which youcannot remedy yourself, please contactyour Miele dealer or the Miele CustomerService Department.
You can book a Miele CustomerService Department call-out online atwww.miele.com/service.
Contact information for the MieleCustomer Service Department can befound at the end of this document.
Please quote the model identifier andserial number of your appliance (Fabr./SN/Nr.) when contacting the MieleCustomer Service Department. Thisinformation can be found on the dataplate.
Please note that telephone calls may bemonitored and recorded for trainingpurposes and that a call-out charge willbe applied to service visits where theproblem could have been resolved asdescribed in this booklet.
The data plate is located on the rightside of the door.
EPREL databaseFrom 1 March 2021, information onenergy labelling and ecodesignrequirements will be available in theEuropean Product Database (EPREL).You can find the product database atthe following link https://eprel.ec.europa.eu/. You will be askedto enter the model identifier.
The model identifier can be found onthe data plate.
AC xxxV xxHzx,x kWxx A
Made in xxx
X xxxx
Mat
.: xx
xxxx
xx
GuaranteeFor information on the applianceguarantee specific to your countryplease contact Miele. See end of thisbooklet for contact details.
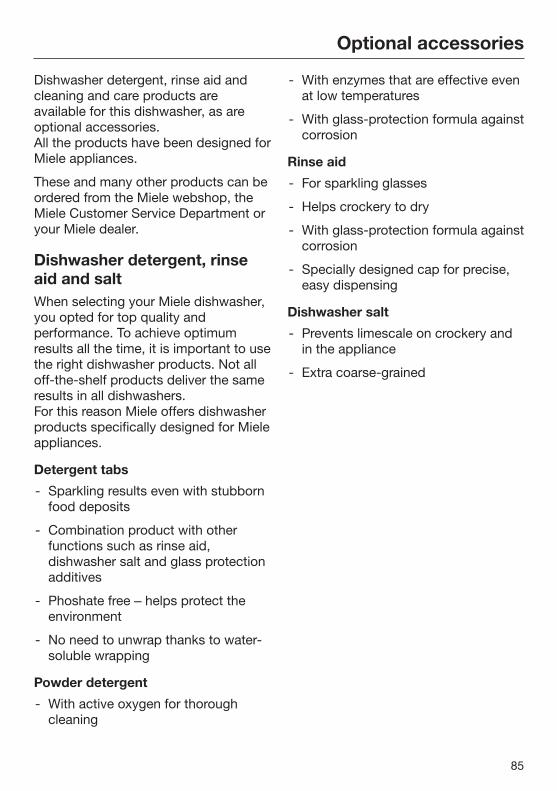
Optional accessories
85
Dishwasher detergent, rinse aid andcleaning and care products areavailable for this dishwasher, as areoptional accessories. All the products have been designed forMiele appliances.
These and many other products can beordered from the Miele webshop, theMiele Customer Service Department oryour Miele dealer.
Dishwasher detergent, rinseaid and saltWhen selecting your Miele dishwasher,you opted for top quality andperformance. To achieve optimumresults all the time, it is important to usethe right dishwasher products. Not alloff-the-shelf products deliver the sameresults in all dishwashers. For this reason Miele offers dishwasherproducts specifically designed for Mieleappliances.
Detergent tabs
- Sparkling results even with stubbornfood deposits
- Combination product with otherfunctions such as rinse aid,dishwasher salt and glass protectionadditives
- Phoshate free ‒ helps protect theenvironment
- No need to unwrap thanks to water-soluble wrapping
Powder detergent
- With active oxygen for thoroughcleaning
- With enzymes that are effective evenat low temperatures
- With glass-protection formula againstcorrosion
Rinse aid
- For sparkling glasses
- Helps crockery to dry
- With glass-protection formula againstcorrosion
- Specially designed cap for precise,easy dispensing
Dishwasher salt
- Prevents limescale on crockery andin the appliance
- Extra coarse-grained

Optional accessories
86
Appliance careMiele cleaning and care productsprovide optimum care for your Mieledishwasher.
Dishwasher cleaner
- For use with theMaintenance programme withoutdetergent dispensing
- Cleans the dishwasher effectivelyand thoroughly
- Removes grease, bacteria, andassociated unpleasant odours
- Ensures excellent dishwashingresults
Descaling agent
- Removes heavy limescale deposits
- Mild and gentle with natural citricacid
Conditioner
- Removes odours, limescale and lightdeposits
- Maintains the elasticity and leaktightness of the seals
Freshener
- Neutralises unpleasant odours
- Fresh, pleasant fragrance of lime andgreen tea
- Easy and convenient to attach to thedishwasher basket
- Very economical; lasts for 60 washcycles

Installation
*INSTALLATION*
87
The Miele Waterproof systemProvided that your dishwasher hasbeen installed correctly, the MieleWaterproof system will protect you fromwater damage throughout its lifetime.
Water inlet
Health risk due to wash water.Water in the dishwasher is notdrinking water.Do not drink any water from thedishwasher.
Health risk and risk of damagedue to contaminated incoming water.The quality of the incoming watermust correspond to the drinkingwater specification of the country inwhich the dishwasher is beingoperated.Connect the dishwasher to a drinkingwater supply.
The dishwasher may be connected tocold or hot water (up to max. 60 °C)supplies. If energy-saving water heating sourcessuch as solar energy circulationsystems are used, we recommendconnecting to the hot water supply. Thissaves both time and electrical energycosts. Hot water is used in allprogrammes.
The SolarSave programme (if available)requires a hot water connection ofbetween a minimum of 45 °C and amaximum of 60 °C (inlet temperature). The higher the water intaketemperature, the better the cleaning anddrying results.
The water inlet hose is approx. 1.5 mlong. A 1.5 m long, flexible metalextension hose (tested to14,000 kPa/140 bar) is available as anoptional accessory from Miele specialistdealers or the Miele Customer ServiceDepartment.
A stopcock with a ¾" threaded union isrequired for the connection. If astopcock is not available, only aqualified installer may connect thedishwasher to the drinking watersupply.
The water connection pressure must bebetween 50 and 1000 kPa. If the waterconnection pressure is too high, apressure reducing valve must be fitted.

Installation
*INSTALLATION*
88
Risk of damage from leakingwater.The connection point is subject tomains water pressure. Water leakingfrom it can cause damage.You should therefore open thestopcock slowly and check for leaks.Correct the position of the seal andscrew thread if appropriate.
Regulation in GermanyFor the protection of drinking water, thenon-return valve supplied with thedishwasher must be installed betweenthe stopcock and the water inlet hose.
Screw the non-return valve onto thestopcock.
Screw the water inlet hose onto thethread of the non-return valve.
Risk of damage due to excessivepressure.A brief increase in the water pressurecan damage components of thedishwasher.This dishwasher must only beoperated when it is connected to afully vented plumbing system.
Risk of electric shock from mainsvoltage.There are electrical components inthe water inlet hose.The inlet hose must not be shortenedor damaged in any way (seeillustration).

Installation
*INSTALLATION*
89
Water drainageThe dishwasher’s drainage system isfitted with a non-return valve, whichprevents dirty water from flowing backinto the appliance via the drain hose.
The dishwasher is supplied withapprox. 1.5 m of flexible drain hose withan internal diameter of 22 mm.
The drain hose can be extended using aconnection piece to attach a furtherlength of hose. The drainage lengthmust not be longer than 4 m and thedelivery head no higher than 1 m.
If the hose is to be directly fitted to thedrainage outlet on site, use the hoseclip supplied (see installation plan).
The hose can be directed to the left orthe right of the appliance.
The on-site connector for the drain hosecan be adapted to different hosediameters. If the connector extends toofar into the drain hose, it must beshortened. Otherwise, the drain hosecan become blocked.
The drain hose must not be shortened.
Lay the drain hose so that it does notkink and is not being subjected topressure or tension.
Risk of damage from leakingwater.Leaking water can cause damage.After commissioning, make sure thatthe water is not leaking.

Installation
*INSTALLATION*
90
Venting the water drain
If the on-site drainage connection issituated lower than the guide path forthe lower basket rollers in the opendoor, the drainage system must bevented. Otherwise, a siphoning effectduring a programme can cause theappliance to empty itself of water.
Open the dishwasher door fully.
Remove the lower basket.
Insert a screwdriver into the middleopening of the vent valve in the leftwash cabinet wall .
Press the screwdriver further into theopening and push it through themembrane behind.
The vent opening for the water drain isnow open.

Installation
*INSTALLATION*
91
Electrical connectionThe dishwasher is “connector-ready” asstandard for connection to an earthedsocket.
The socket must be easily accessibleafter the dishwasher has been installed.If that is not possible, ensure that asuitable means of disconnection isprovided on the installation side foreach pole.
Risk of fire from overheating.Connecting the dishwasher to amulti-socket adapter or to anextension lead can overload themains connection cable.For safety reasons, do not use anextension lead or multi-socketadapter.
The electrical installation must complywith VDE 0100 requirements.
For safety reasons, we recommendusing a type residual current device(RCD) in the assigned electricalinstallation for connecting thedishwasher.
If the mains connection cable isdamaged, it must only be replaced witha specific mains connection cable ofthe same type (available from the MieleCustomer Service Department). Forsafety reasons, such replacement mayonly be carried out by a qualifiedspecialist or the Miele CustomerService Department.
These operating instructions and thedata plate indicate the nominal powerconsumption and the appropriate fuserating. Compare this information withthe data of the on-site electricalconnection.If in any doubt, consult a qualifiedelectrician.
Temporary or permanent operation onan autonomous power supply system ora power supply system that is notsynchronised with the mains powersupply (e.g. island networks, back-upsystems) is possible. A prerequisite foroperation is that the power supplysystem complies with the specificationsof EN˽50160 or an equivalent standard.The function and operation of theprotective measures provided in thedomestic electrical installation and inthis Miele product must also bemaintained in isolated operation or inoperation that is not synchronised withthe mains power supply, or thesemeasures must be replaced byequivalent measures in the installation.As described, for example, in thecurrent version of BS OHSAS 18001–2ISO 45001.

Technical data
92
Technical data
Dishwasher model Normal XXL
Height of freestandingappliance
84.5 cm(adjustable by+3.5 cm)
-
Height of built-in appliance 80.5 cm(adjustable by+6.5 cm)
84.5 cm(adjustable by+6.5 cm)
Height of building-in niche Min. 80.5 cm (+6.5 cm) Min. 84.5 cm (+6.5 cm)
Width 59.8 cm 59.8 cm
Width of building-in niche 60 cm 60 cm
Depth of freestandingappliance
60 cm -
Depth of built-in appliance 57 cm 57 cm
Weight Max. 58 kg Max. 49 kg
Voltage See data plate
Rated load See data plate
Fuse rating See data plate
Test certifications awarded See data plate
Water pressure 50–1000 kPa(0.5–10 bar)
50–1000 kPa(0.5–10 bar)
Hot water connection Up to max. 60 °C Up to max. 60 °C
Delivery head Max. 1 m Max. 1 m
Drainage length Max. 4 m Max. 4 m
Mains connection cable Approx. 1.7 m Approx. 1.7 m
Capacity 13/14 place settings* 13/14 place settings*
*Depending on model


Germany
Miele Pte. Ltd.29 Media Circle#11-04 ALICE@MediapolisSingapore 138565sTel:Fax:E-Mail: [email protected]: www.miele.sg
Miele & Cie. KGCarl-Miele-Straße 2933332 Gütersloh
+65-67351191+65-67351161
Singapore
ThailandMiele Appliances Ltd.BHIRAJ TOWER at EmQuartier43rd Floor Unit 4301-4303 689 Sukhumvit RoadNorth Klongton Sub-DistrictVadhana DistrictBangkok 10110, Thailand
MalaysiaMiele Sdn BhdSuite 12-2, Level 12Menara Sapura Kencana PetroleumSolaris Dutamas No. 1Jalan Dutamas 150480 Kuala Lumpur, MalaysiaPhone: +603-6209-0288Fax: +603-6205-3768
Miele (Hong Kong) Limited41/F - 4101, Manhattan Place23 Wang Tai Road, Kowloon BayHong KongTel: (852) 2610 1025Fax: (852) 3579 1404Email: [email protected]: www.miele.hk
Hong Kong, China

M.-Nr. 11 836 720 / 01en-SG
G 7100 C SC, G 7100 C SCi