NICE Perform eXpress Troubleshooting Guide Release 3.0
261
-
Upload
khangminh22 -
Category
Documents
-
view
1 -
download
0
Transcript of NICE Perform eXpress Troubleshooting Guide Release 3.0


Information in this document is subject to change without notice and does not represent a commitment on the part of NICE Systems Ltd. The systems described in this document are furnished under a license agreement or nondisclosure agreement.
All information included in this document, such as text, graphics, photos, logos and images, is the exclusive property of NICE Systems Ltd. and protected by United States and international copyright laws.Permission is granted to view and photocopy (or print) materials from this document for personal, non-commercial use only. Any other copying, distribution, retransmission or modification of the information in this document, whether in electronic or hard copy form, without the express prior written permission of NICE Systems Ltd., is strictly prohibited. In the event of any permitted copying, redistribution or publication of copyrighted material, no changes in, or deletion of, author attribution, trademark legend or copyright notice shall be made.
All contents of this document are: Copyright © 2011 NICE Systems Ltd. All rights reserved.This product is covered by one or more of the following US patents:
ACTIMIZE, Actimize logo, Alpha, Customer Feedback, eGlue Interact, FAST, FAST alpha Silver, Fortent, Fortent Logo, IEX, Insight from Interactions, Intent. Insight. Impact., Interaction Capture Unit, Know More, Risk Less, Last Message Replay, Mass Detection, Center, Mirra, My Universe, NICE, NICE Analyzer, NICE Inform, NICE Logo, NICE Perform, NICE Situator, NICE SmartCenter, NICE Storage Center, NICE Systems, NiceCall, NiceCall Focus, NiceLog, NiceTrack, NiceTrack IP Probe, NiceTrack Location Tracking, NiceTrack Mass Detection Center, NiceTrack Monitoring Center, NiceTrack Pattern Analyzer, NiceTrack Traffic Analysis, NiceVision, NiceVision Alto, NiceVision Analytics, NiceVision ControlCenter, NiceVision Digital, NiceVision Net, NiceVision NVSAT, NiceVision Pro, Open Situation Management, Playback Organizer, Scenario Replay, Searchspace, Syfact, Syfact Investigator, TotalView are trademarks and/or registered trademarks of NICE Systems Ltd. All other trademarks are the property of their respective owners.
Applications to register certain of these marks have been filed in certain countries, including Australia, Brazil, the European Union, Israel, Japan, Mexico, Argentina and the United States. Some of such registrations have matured to registrations.
385A0828-03 Rev. A2
RE41,292
5,911,134
6,249,570
6,694,374
6,871,229
7,010,109
7,333,445
7,532,744
7,599,475
7,714,878
7,761,544
7,953,219
5,274,738
5,937,029
6,252,946
6,728,345
6,880,004
7,058,589
7,346,186
7,545,803
7,631,046
7,716,048
7,770,221
5,325,292
6,044,355
6,252,947
6,775,372
6,937,706
7,085,728
7,383,199
7,546,173
7,660,297
7,720,706
7,788,095
5,339,203
6,115,746
6,311,194
6,785,369
6,959,079
7,152,018
7,386,105
7,573,421
7,664,794
7,725,318
7,801,288
5,396,371
6,122,665
6,330,025
6,785,370
6,965,886
7,203,655
7,392,160
7,577,246
7,665,114
7,728,870
7,822,605
5,446,603
6,192,346
6,542,602
6,856,343
6,970,829
7,240,328
7,436,887
7,581,001
7,683,929
7,738,459
7,848,947
5,457,782
6,246,752
6,615,193
6,865,604
7,010,106
7,305,082
7,474,633
7,587,454
7,705,880
7,751,590
7,933,407

For assistance, contact your local supplier or nearest NICE Systems Customer Service Center:
EMEA Region: (Europe, Middle East, Africa)Tel: +972-9-775-3800Fax: +972-9-775-3000email: [email protected]
APAC Region: (Asia/Pacific)Tel: +852-8338-9818Fax: +852-2802-1800email: [email protected]
The Americas Region: (North, Central, South America)Tel: 1-800-6423-611Fax: +720-264-4012email: [email protected]
Israel:Tel: 09-775-3333Fax: 09-775-3000email: [email protected]
All queries, comments, and suggestions are welcome! Please email: [email protected] more information about NICE, visit www.nice.com
International Headquarters-IsraelTel: +972-9-775-3100Fax: +972-9-775-3070email: [email protected]
North AmericaTel: 1-800-663-5601Fax: +201-356-2197email: [email protected]
United KingdomTel: +44-8707-22-4000Fax: +44-8707-22-4500
GermanyTel: +49-(0)-69-97177-0Fax: +49-(0)-69-97177-200
FranceTel: +33-(0)1-41-38-5000Fax: +33-(0)1-41-38-5001
Hong-KongTel: +852-2598-3838Fax: +852-2802-1800
NICE invites you to join the NICE User Group (NUG).
Visit the NUG Website at www.niceusergroup.org, and follow the online instructions.

Revision History
Revision Modification Date Description
A1 December 2010 • Updated FAQs. See:
• Board Name Different in Microsoft Device Manager on page 29.
• (FTF Environments after Upgrade) Interaction Details Not Displayed on page 42.
• Updated application error messages. See Responding to Application Messages on page 168.
• Added copying the MIB file from NICE Perform eXpress system to the appropriate location on the external SNMP manager. See Defining the SNMP Settings for an External SNMP Manager on page 180.
A2 July 2011 • Added the following FAQs:
• Caller ID is not Numeric on page 33
• TDM System Not Recording on page 63
• Expanded Solution for SQL Server 2008 Component Fails to Install on page 62
• Added Suggested Action for Playback error code 3993. See Table 10-1 on page 143
• Added instructions for licensing after reinstalling NICE Perform eXpress. See Reactivating a NICE Perform eXpress License on page 56

Blank page for double-sided printing.

Contents
1Overview 15
NICE Perform eXpress System Architecture . . . . . . . . . . . . . . . . . . . . . . . . . . . .16Drill Down of System Architecture . . . . . . . . . . . . . . . . . . . . . . . . . . . . . . . . . . .16
Application Layer Components . . . . . . . . . . . . . . . . . . . . . . . . . . . . . . . . . .17Storage Layer Components . . . . . . . . . . . . . . . . . . . . . . . . . . . . . . . . . . . . .18Recording Layer Components . . . . . . . . . . . . . . . . . . . . . . . . . . . . . . . . . . .18
Backing Up Data Before Maintenance . . . . . . . . . . . . . . . . . . . . . . . . . . . . . . . . .20Guidelines for Installing Anti-virus Software. . . . . . . . . . . . . . . . . . . . . . . . . . . .21Which NICE Perform eXpress Guide Do I Need? . . . . . . . . . . . . . . . . . . . . . . . . .22
Locating Documentation for Tools . . . . . . . . . . . . . . . . . . . . . . . . . . . . . . . . . . .24
2Frequently Asked Questions 27
Archiving Error Appears for 24 Hours After Installation. . . . . . . . . . . . . . . . . . .29Board Name Different in Microsoft Device Manager . . . . . . . . . . . . . . . . . . . . . .29Buttons on Message Boxes Do Not Function . . . . . . . . . . . . . . . . . . . . . . . . . . .29Cannot Set Up Channels (Mixed Environment) . . . . . . . . . . . . . . . . . . . . . . . . . .31Channels Not Listed in Channel Monitor Application . . . . . . . . . . . . . . . . . . . . .32Caller ID is not Numeric . . . . . . . . . . . . . . . . . . . . . . . . . . . . . . . . . . . . . . . . . . . .33Data Execution Prevention (DEP) Prevents TDM Gateway from Starting . . . . .34Dates of Interactions in Incorrect Format . . . . . . . . . . . . . . . . . . . . . . . . . . . . . .35Decreased Functionality in the User Interface . . . . . . . . . . . . . . . . . . . . . . . . . .37Electric Power Cut Off During Software Installation . . . . . . . . . . . . . . . . . . . . . .38Error 2002 Appears Constantly in System Alerts Area . . . . . . . . . . . . . . . . . . . .38Error 3505 After Renaming Machine . . . . . . . . . . . . . . . . . . . . . . . . . . . . . . . . . .39Installation Process Stalls with High CPU . . . . . . . . . . . . . . . . . . . . . . . . . . . . . .41
Contents
NICE Perform eXpress Release 3.0: Troubleshooting Guide (Rev. A2)
7

(FTF Environments after Upgrade) Interaction Details Not Displayed . . . . . . . .42Interactions Not Displayed . . . . . . . . . . . . . . . . . . . . . . . . . . . . . . . . . . . . . . . . . .42License State Displayed Incorrectly. . . . . . . . . . . . . . . . . . . . . . . . . . . . . . . . . . .45Logger Service does not Start after Upgrade . . . . . . . . . . . . . . . . . . . . . . . . . . .46Machine Not in Sync with Local Time . . . . . . . . . . . . . . . . . . . . . . . . . . . . . . . . .49Message: Windows Media Player Not Installed . . . . . . . . . . . . . . . . . . . . . . . . . .51Nice Differential Backup Job Failed during the ITP . . . . . . . . . . . . . . . . . . . . . .52Player Stops During Playback . . . . . . . . . . . . . . . . . . . . . . . . . . . . . . . . . . . . . . .54Reactivating a NICE Perform eXpress License . . . . . . . . . . . . . . . . . . . . . . . . . .56
Automatic License Activation . . . . . . . . . . . . . . . . . . . . . . . . . . . . . . . . . . . . . .56Manual License Activation . . . . . . . . . . . . . . . . . . . . . . . . . . . . . . . . . . . . . . . .58
SQL Server 2008 Component Fails to Install . . . . . . . . . . . . . . . . . . . . . . . . . . .62TDM System Not Recording . . . . . . . . . . . . . . . . . . . . . . . . . . . . . . . . . . . . . . . . .63Windows Media Server Failed Message . . . . . . . . . . . . . . . . . . . . . . . . . . . . . . . .64
3Using eXpress Assistant to Start Troubleshooting 65
eXpress Assistant Workflow. . . . . . . . . . . . . . . . . . . . . . . . . . . . . . . . . . . . . . . . .66Using the eXpress Assistant . . . . . . . . . . . . . . . . . . . . . . . . . . . . . . . . . . . . . . . .67
Step 1: Starting the eXpress Assistant . . . . . . . . . . . . . . . . . . . . . . . . . . . . . . .67Possible Pitfalls for Step 1 . . . . . . . . . . . . . . . . . . . . . . . . . . . . . . . . . . . . . .68
Step 2: (Mixed Environments only) Choosing an Environment . . . . . . . . . . . . .69Step 3: Verifying Connected Devices and Channels . . . . . . . . . . . . . . . . . . . . .70
Possible Pitfalls for Step 3 . . . . . . . . . . . . . . . . . . . . . . . . . . . . . . . . . . . . . .71Step 4: Verifying User Mapping . . . . . . . . . . . . . . . . . . . . . . . . . . . . . . . . . . . .72
Possible Pitfalls for Step 4 . . . . . . . . . . . . . . . . . . . . . . . . . . . . . . . . . . . . . .72Step 5: Recording a Test Interaction . . . . . . . . . . . . . . . . . . . . . . . . . . . . . . . . .73
Possible Pitfalls for Step 5 . . . . . . . . . . . . . . . . . . . . . . . . . . . . . . . . . . . . . .73Step 6: Playing Back or Saving the Test Interaction . . . . . . . . . . . . . . . . . . . . .75
Navigating Troubleshooting Windows . . . . . . . . . . . . . . . . . . . . . . . . . . . . . . . . .76Resolving Issues Found in eXpress Assistant . . . . . . . . . . . . . . . . . . . . . . . . . .78
8 Contents
NICE Perform eXpress Release 3.0: Troubleshooting Guide (Rev. A2)

4Managing Interface Boards 83
Overview . . . . . . . . . . . . . . . . . . . . . . . . . . . . . . . . . . . . . . . . . . . . . . . . . . . . . . . .84Defining the Board ID . . . . . . . . . . . . . . . . . . . . . . . . . . . . . . . . . . . . . . . . . . . . . .85Determining the Board ID . . . . . . . . . . . . . . . . . . . . . . . . . . . . . . . . . . . . . . . . . . .87Identifying the Physical Location of a Board. . . . . . . . . . . . . . . . . . . . . . . . . . . .88
5Testing PCIe Interface Boards 91
System Specifications and Requirements . . . . . . . . . . . . . . . . . . . . . . . . . . . . . .92Service Request Requirements . . . . . . . . . . . . . . . . . . . . . . . . . . . . . . . . . . . . .92
Using the Board Diagnostic Tool . . . . . . . . . . . . . . . . . . . . . . . . . . . . . . . . . . . . .93Common Scenarios . . . . . . . . . . . . . . . . . . . . . . . . . . . . . . . . . . . . . . . . . . . . . . . .97
Do You Suspect a False PASSED Test Result? . . . . . . . . . . . . . . . . . . . . . . . .97System Cannot Boot . . . . . . . . . . . . . . . . . . . . . . . . . . . . . . . . . . . . . . . . . . . . .98
6Troubleshooting Licenses 99
Licensing Overview. . . . . . . . . . . . . . . . . . . . . . . . . . . . . . . . . . . . . . . . . . . . . . .100Resolving Licensing Issues . . . . . . . . . . . . . . . . . . . . . . . . . . . . . . . . . . . . . . . .101
License Expired . . . . . . . . . . . . . . . . . . . . . . . . . . . . . . . . . . . . . . . . . . . . . . .101Channels Allocated Incorrectly . . . . . . . . . . . . . . . . . . . . . . . . . . . . . . . . . . . .102Partitions Reformatted on NICE Perform eXpress Machine . . . . . . . . . . . . . . .102
Contacting Support for Licensing Issues . . . . . . . . . . . . . . . . . . . . . . . . . . . . .103
7Troubleshooting Business Data 105
Generating Reports with Transferred Business Data . . . . . . . . . . . . . . . . . . . .106Troubleshooting Business Data in the Interactions Center . . . . . . . . . . . . . . .109
Overview . . . . . . . . . . . . . . . . . . . . . . . . . . . . . . . . . . . . . . . . . . . . . . . . . . . .109Defining Business Data . . . . . . . . . . . . . . . . . . . . . . . . . . . . . . . . . . . . . . . . . .110Deleting Business Data . . . . . . . . . . . . . . . . . . . . . . . . . . . . . . . . . . . . . . . . . .113
9 Contents
NICE Perform eXpress Release 3.0: Troubleshooting Guide (Rev. A2)

8Verifying Recording 115
Understanding the Recording Data Flow . . . . . . . . . . . . . . . . . . . . . . . . . . . . . .116Recording Data Flow with a CTI . . . . . . . . . . . . . . . . . . . . . . . . . . . . . . . . . . .116Recording Data Flow without a CTI (Line Signaling) . . . . . . . . . . . . . . . . . . . .117
Verifying PABX Issues . . . . . . . . . . . . . . . . . . . . . . . . . . . . . . . . . . . . . . . . . . . .118Verifying the PABX Configuration and Physical Line Connectivity . . . . . . . . . .118
Analog Extensions - Verifying the Configuration and Connectivity . . . . . . .118Digital Extensions - Verifying the Configuration and Connectivity . . . . . . .118Trunks - Verifying the Configuration and Connectivity . . . . . . . . . . . . . . . .118
Verifying the Distance from the Recording Unit . . . . . . . . . . . . . . . . . . . . . . . .118
Channel Not Recording. . . . . . . . . . . . . . . . . . . . . . . . . . . . . . . . . . . . . . . . . . . .119VoIP Channel Status . . . . . . . . . . . . . . . . . . . . . . . . . . . . . . . . . . . . . . . . . . . .119TDM Channel Status . . . . . . . . . . . . . . . . . . . . . . . . . . . . . . . . . . . . . . . . . . . .120
Checking Exceptions . . . . . . . . . . . . . . . . . . . . . . . . . . . . . . . . . . . . . . . . . . . . .121
9Verifying Archiving 133
Understanding the Archiving Data Flow . . . . . . . . . . . . . . . . . . . . . . . . . . . . . .134Archiving and Backup Troubleshooting Issues . . . . . . . . . . . . . . . . . . . . . . . .135
Archiving Troubleshooting . . . . . . . . . . . . . . . . . . . . . . . . . . . . . . . . . . . . . . .135Understanding Displayed System Information . . . . . . . . . . . . . . . . . . . . . .135
Backup Troubleshooting . . . . . . . . . . . . . . . . . . . . . . . . . . . . . . . . . . . . . . . . .139USB Tapes Not Detected . . . . . . . . . . . . . . . . . . . . . . . . . . . . . . . . . . . . .139SCSI Tapes Not Detected . . . . . . . . . . . . . . . . . . . . . . . . . . . . . . . . . . . . .139Other Backup Issues . . . . . . . . . . . . . . . . . . . . . . . . . . . . . . . . . . . . . . . . .140
10Verifying Playback 141
Understanding the Query and Playback Data Flow . . . . . . . . . . . . . . . . . . . . . .142Understanding Playback Error Messages . . . . . . . . . . . . . . . . . . . . . . . . . . . . .143
Key to Internal Playback Error Messages . . . . . . . . . . . . . . . . . . . . . . . . . . . .143Windows Media Player Not Installed Message . . . . . . . . . . . . . . . . . . . . . . . .146
10 Contents
NICE Perform eXpress Release 3.0: Troubleshooting Guide (Rev. A2)

11Managing Nice Services 147
Introducing the Services Configuration Manager . . . . . . . . . . . . . . . . . . . . . . .148Starting the Services Configuration Manager . . . . . . . . . . . . . . . . . . . . . . . . .148Getting Around the Services Configuration Manager . . . . . . . . . . . . . . . . . . . .148Available Nice Services . . . . . . . . . . . . . . . . . . . . . . . . . . . . . . . . . . . . . . . . .149
Starting and Stopping Nice Services . . . . . . . . . . . . . . . . . . . . . . . . . . . . . . . . .151Viewing the Service Logs . . . . . . . . . . . . . . . . . . . . . . . . . . . . . . . . . . . . . . . . . .152Changing the Reporting Level of Service Logs . . . . . . . . . . . . . . . . . . . . . . . . .153Creating a Memory Dump File . . . . . . . . . . . . . . . . . . . . . . . . . . . . . . . . . . . . . .155
Installing Debugging Tools for Windows . . . . . . . . . . . . . . . . . . . . . . . . . . . . .156
12Collecting Information 157
Collecting Logs . . . . . . . . . . . . . . . . . . . . . . . . . . . . . . . . . . . . . . . . . . . . . . . . . .158Viewing Logs with Log Viewer . . . . . . . . . . . . . . . . . . . . . . . . . . . . . . . . . . . . . .159
Opening Logs . . . . . . . . . . . . . . . . . . . . . . . . . . . . . . . . . . . . . . . . . . . . . . . . .159Filtering Logs . . . . . . . . . . . . . . . . . . . . . . . . . . . . . . . . . . . . . . . . . . . . . . . . .161Finding Text Strings in Open Logs . . . . . . . . . . . . . . . . . . . . . . . . . . . . . . . . .162
Collecting Information from SQL Processes . . . . . . . . . . . . . . . . . . . . . . . . . . .163
13System Messages 167
Responding to Application Messages . . . . . . . . . . . . . . . . . . . . . . . . . . . . . . . .168SNMP Messages . . . . . . . . . . . . . . . . . . . . . . . . . . . . . . . . . . . . . . . . . . . . . . . . .179
Understanding SNMP Messages and Settings . . . . . . . . . . . . . . . . . . . . . . . .179Managing SNMP Messages . . . . . . . . . . . . . . . . . . . . . . . . . . . . . . . . . . .179Defining the SNMP Settings for an External SNMP Manager . . . . . . . . . . .180
Responding to SNMP Messages . . . . . . . . . . . . . . . . . . . . . . . . . . . . . . . . . . .182
14NICE Perform eXpress Integration Testing Tools 185
Connection Manager Monitor . . . . . . . . . . . . . . . . . . . . . . . . . . . . . . . . . . . . . . .186
11 Contents
NICE Perform eXpress Release 3.0: Troubleshooting Guide (Rev. A2)
Setting Up the Connection Manager Monitor . . . . . . . . . . . . . . . . . . . . . . . . . .186Managing the Connection Manager Monitor . . . . . . . . . . . . . . . . . . . . . . . . . .191
Stopping the Connection Manager Monitor . . . . . . . . . . . . . . . . . . . . . . . .191Disconnecting the Connection Manager Monitor Client . . . . . . . . . . . . . . .191
Log Manager System . . . . . . . . . . . . . . . . . . . . . . . . . . . . . . . . . . . . . . . . . . . . .192Using the Log Manager . . . . . . . . . . . . . . . . . . . . . . . . . . . . . . . . . . . . . . . . . .192Using the CTI Console Viewer . . . . . . . . . . . . . . . . . . . . . . . . . . . . . . . . . . . .192
15Troubleshooting Cisco Integrations 197
Cisco Skinny and SIP Troubleshooting . . . . . . . . . . . . . . . . . . . . . . . . . . . . . . .198Cisco Passive Troubleshooting . . . . . . . . . . . . . . . . . . . . . . . . . . . . . . . . . . . . .199
Using TAPIMonitor . . . . . . . . . . . . . . . . . . . . . . . . . . . . . . . . . . . . . . . . . . . . .199Setting Up TAPIMonitor as a Debug Tool . . . . . . . . . . . . . . . . . . . . . . . . .199Collecting the TAPIMonitor Log Files . . . . . . . . . . . . . . . . . . . . . . . . . . . . .204Resetting TAPI . . . . . . . . . . . . . . . . . . . . . . . . . . . . . . . . . . . . . . . . . . . . .204
Using TSP as a Debug Tool . . . . . . . . . . . . . . . . . . . . . . . . . . . . . . . . . . . . . .204Collecting and Saving TSP Log Files . . . . . . . . . . . . . . . . . . . . . . . . . . . . .204Resetting the TSP . . . . . . . . . . . . . . . . . . . . . . . . . . . . . . . . . . . . . . . . . . .206
TAPI Troubleshooting . . . . . . . . . . . . . . . . . . . . . . . . . . . . . . . . . . . . . . . . . . .207A Complete List of Lines Does Not Appear . . . . . . . . . . . . . . . . . . . . . . . .208No Lines Appear in TAPIMonitor . . . . . . . . . . . . . . . . . . . . . . . . . . . . . . . .209TSP’s STATUS Certificate Not Available . . . . . . . . . . . . . . . . . . . . . . . . . .212Call Park Scenarios are not Reported Correctly . . . . . . . . . . . . . . . . . . . .212Receiving No Events for a Specific Device . . . . . . . . . . . . . . . . . . . . . . . .213Events Are Not Received . . . . . . . . . . . . . . . . . . . . . . . . . . . . . . . . . . . . .216Extension Mobility Log In/Log Out Problems . . . . . . . . . . . . . . . . . . . . . . .216
16Troubleshooting Avaya Integrations 217
Troubleshooting Avaya SIP . . . . . . . . . . . . . . . . . . . . . . . . . . . . . . . . . . . . . . . .218No CTI Events Received by CTI Driver from Interface . . . . . . . . . . . . . . . . . .218
Verifying the Network Configuration . . . . . . . . . . . . . . . . . . . . . . . . . . . . .218
12 Contents
NICE Perform eXpress Release 3.0: Troubleshooting Guide (Rev. A2)

Troubleshooting Avaya IP Mappers . . . . . . . . . . . . . . . . . . . . . . . . . . . . . . . . . .219SNMP/Push/RAS Troubleshooting . . . . . . . . . . . . . . . . . . . . . . . . . . . . . . . . .219SMS Troubleshooting . . . . . . . . . . . . . . . . . . . . . . . . . . . . . . . . . . . . . . . . . .219
Avaya SMS Web Interface Test Application Page . . . . . . . . . . . . . . . . . . .219Avaya Sms Monitor Test . . . . . . . . . . . . . . . . . . . . . . . . . . . . . . . . . . . . .221
Troubleshooting Avaya CVLAN . . . . . . . . . . . . . . . . . . . . . . . . . . . . . . . . . . . . .223Checking the Connection Manager Log . . . . . . . . . . . . . . . . . . . . . . . . . . . . .223Checking for Unsuccessful Device Monitoring . . . . . . . . . . . . . . . . . . . . . . . . .223Checking a Connection Problem . . . . . . . . . . . . . . . . . . . . . . . . . . . . . . . . . . .224Checking Monitor End is Received . . . . . . . . . . . . . . . . . . . . . . . . . . . . . . . . .227Checking ISDN Trunk Alerting Event . . . . . . . . . . . . . . . . . . . . . . . . . . . . . . .227Checking the Connection Manager and Driver Connection to the AES . . . . . .227General AES Environment Troubleshooting Tips . . . . . . . . . . . . . . . . . . . . . .228Client Cannot Connect to CVLAN Server . . . . . . . . . . . . . . . . . . . . . . . . . . . .230CVLAN Dump Utility . . . . . . . . . . . . . . . . . . . . . . . . . . . . . . . . . . . . . . . . . . . .231
Troubleshooting Avaya TSAPI . . . . . . . . . . . . . . . . . . . . . . . . . . . . . . . . . . . . . .232Missing Login/Logout Error . . . . . . . . . . . . . . . . . . . . . . . . . . . . . . . . . . . . . . .232Missing VDN Information in Database . . . . . . . . . . . . . . . . . . . . . . . . . . . . . . .233Failed to Monitor Device . . . . . . . . . . . . . . . . . . . . . . . . . . . . . . . . . . . . . . . . .233Failed to Establish Connection to the Avaya AES Server . . . . . . . . . . . . . . . .234Monitor End Event is Received . . . . . . . . . . . . . . . . . . . . . . . . . . . . . . . . . . . .235Calls are Reported with Wrong Direction, or Phone Number is Missing . . . . . .235Verifying Communication Between AES Server and Avaya Switch . . . . . . . . .236Viewing Avaya Error Messages Documentation . . . . . . . . . . . . . . . . . . . . . . .237Avaya Exerciser . . . . . . . . . . . . . . . . . . . . . . . . . . . . . . . . . . . . . . . . . . . . . . .237
Installing the Avaya AES TSAPI Exerciser . . . . . . . . . . . . . . . . . . . . . . . .237Verifying User Groups and Configured Devices . . . . . . . . . . . . . . . . . . . . .239
17Troubleshooting Nortel Integrations 247
Using the RTD SDK Connection Tester . . . . . . . . . . . . . . . . . . . . . . . . . . . . . . .248Using the Nortel Tester Tool. . . . . . . . . . . . . . . . . . . . . . . . . . . . . . . . . . . . . . . .249
Connecting to Symposium . . . . . . . . . . . . . . . . . . . . . . . . . . . . . . . . . . . . . . .249Monitor Request . . . . . . . . . . . . . . . . . . . . . . . . . . . . . . . . . . . . . . . . . . . . . . .251Stop Monitor Request . . . . . . . . . . . . . . . . . . . . . . . . . . . . . . . . . . . . . . . . . . .252
13 Contents
NICE Perform eXpress Release 3.0: Troubleshooting Guide (Rev. A2)

Nortel Troubleshooting Issues . . . . . . . . . . . . . . . . . . . . . . . . . . . . . . . . . . . . . .253Exception Raised from CNortelCTILink . . . . . . . . . . . . . . . . . . . . . . . . . . . . . .253Events Not Inserted into the Database . . . . . . . . . . . . . . . . . . . . . . . . . . . . . .253
ALog Collector Files 255
14 Contents
NICE Perform eXpress Release 3.0: Troubleshooting Guide (Rev. A2)

1
Overview
This chapter describes the high level system architecture of the NICE Perform eXpress system and a drill down of its components as well as an overview of the system documentation.
Contents
NICE Perform eXpress System Architecture ...............................................................16Drill Down of System Architecture..............................................................................16
Backing Up Data Before Maintenance ..........................................................................20
Guidelines for Installing Anti-virus Software...............................................................21
Which NICE Perform eXpress Guide Do I Need?.........................................................22Locating Documentation for Tools..............................................................................24
Chapter 1: Overview
NICE Perform eXpress Release 3.0: Troubleshooting Guide (Rev. A2)
15

NICE Perform eXpress System Architecture
NICE Perform eXpress System ArchitectureThe architecture of the NICE Perform eXpress system consists of three layers, as follows:
• Recording Layer: Responsible for recording the audio in phone conversations within an organization. The Recording Layer processes the audio and its accompanying metadata by means of telephony equipment.
• Storage Layer: Responsible for managing the archiving of the recorded interactions in remote storage and backup devices. The Storage Layer also provides business logic processing that serves the Application Layer.
• Application Layer: Responsible for the interface between the NICE Perform eXpress system and the user. The Applications Layer employs an HTML-based user interface and is accessed from the desktops of the NICE Perform eXpress users.
Figure 1-1 NICE Perform eXpress System Architecture
For a drill down of the components in each layer, see Drill Down of System Architecture in the next section. The data flows within each layer are described in the following sections:
• Understanding the Recording Data Flow on page 54
• Understanding the Query and Playback Data Flow on page 80
• Understanding the Archiving Data Flow on page 72
Drill Down of System Architecture
Each of the Application, Storage, and Recording layers are made up of components.
• Application Layer Components on page 17
• Storage Layer Components on page 18
• Recording Layer Components on page 18
Legend
16 Chapter 1: Overview
NICE Perform eXpress Release 3.0: Troubleshooting Guide (Rev. A2)

NICE Perform eXpress System Architecture
Figure 1-2 illustrates a drill down of the components in each layer. Figure 1-2 Drill Down of Components in NICE Perform eXpress System Architecture
Application Layer Components
Channel Monitoring
Channel Monitoring monitors channels in real time.
Interactions
Interactions queries the Database component for interactions.
Playback
The Playback component searches the Storage Center and the Recording Unit for the audio associated with the interaction and plays it back.
17 Chapter 1: Overview
NICE Perform eXpress Release 3.0: Troubleshooting Guide (Rev. A2)

NICE Perform eXpress System Architecture
Database
The Database component holds interaction information and administrative information.
Configuration
The Configuration component integrates the NICE Perform eXpress system with the telephony environment of the site and sets up channel mapping and storage.
System Management
The System Management component enables displaying a summary of system information including the recording environment, mapped channels, and available storage space. System alerts (SNMP messages) are also displayed through this component. In addition, the System Management component is responsible for managing license keys and software versions.
Audit Trail
Audit Trail enables querying system messages.
Storage Layer Components
Rule Engine
The Rule Engine collects interactions that need to be archived and creates a task in the Database to archive these interactions.
Backup
When a backup device is installed, the Backup component continuously archives audio as well as retrieves and deletes audio from archived media.
Storage Center
The Storage Center archives the audio data to the storage device for long term storage.
Recording Layer Components
Interactions Center
The Interactions Center is responsible for coordinating all events between the switch and the NICE Perform eXpress system and captures the information about the customer-agent interactions.
Recording Unit
The Recording Unit records the audio of the interaction.
Telephony Integration
The Telephony Integration receives CTI information from the telephony and then reports this information to the Interactions Center.
18 Chapter 1: Overview
NICE Perform eXpress Release 3.0: Troubleshooting Guide (Rev. A2)

NICE Perform eXpress System Architecture
Line Signaling Decoder
The Line Signaling Decoder creates an interaction by mapping line activity to the caller ID, dialed number, and direction of the call. It then sends this interaction information to the Interaction Center.
TRS
In case of a CTI failure, the Total Recording Solution (TRS) component ensures that all recorded Logger sessions are reported to the Database component.
19 Chapter 1: Overview
NICE Perform eXpress Release 3.0: Troubleshooting Guide (Rev. A2)

Backing Up Data Before Maintenance
Backing Up Data Before MaintenanceBack up NICE databases and copy configuration files and registry keys before starting any maintenance procedure.
• Back up NICE databases. See Backing Up NICE Perform eXpress Databases on page 107.
• From the NICE Perform eXpress installation folder, copy the following configuration files, and save them to an alternative location:
• ...\NICE Stream Server\Bin\NiceApplications.Playback.Administration.Startup.exe.config
• ...\NICE Stream Server\Bin\NiceApplications.Playback.Streaming.Encoder.exe.config
• ...\NICE Stream Server\Bin\NiceApplications.Playback.Streaming.Startup.exe.config
• ...\NICE Stream Server\WMRM\web.config
• ...\Applications\ServerBin\NiceApplications.AuditTrail.Host.exe.config
• ...\Applications\ServerBin\NiceApplications.RuleEngine.Service.exe.config
• ...\Applications\ServerBin\NiceApplications.SystemAdministrator.Host.exe.config
• ...\Applications\ServerBin\Playback\Web.Config
• ...\SystemMonitoring\Bin\NICE.Perform.Express.SystemMonitoring.Service.exe.config
• Back up the following registry keys:
Registry Key Value
SOFTWARE\NICECTI\SYSTEM SysAdminHostURL
SOFTWARE\NICECTI\Integrations SystemAdministratorLocation
SOFTWARE\Nice systems\Setup\NICE Storage Center\Administration\CLS1
SysAdminIpAddress
20 Chapter 1: Overview
NICE Perform eXpress Release 3.0: Troubleshooting Guide (Rev. A2)

Guidelines for Installing Anti-virus Software
Guidelines for Installing Anti-virus SoftwareA list of general instructions follows:
• Before installation of the antivirus software, you must review the Third Party Security and Backup Application Guidelines document on ExtraNICE.
• During the installation of the antivirus software, all applications and screens must be closed.
• When upgrading the antivirus software, all applications and screens must be closed.
• Scan and Live Updates should be scheduled to run in system idle time.
• Do not run Scan or Live Update during NICE software installation.
• Always set Scan Priority to Low.
21 Chapter 1: Overview
NICE Perform eXpress Release 3.0: Troubleshooting Guide (Rev. A2)

Which NICE Perform eXpress Guide Do I Need?
Which NICE Perform eXpress Guide Do I Need?The documentation for NICE Perform eXpress is divided into a number of guides. The following table explains the audience and main tasks for each of these guide types:
NICE Perform eXpress Guide Audience Provides Instruction To...
Administrator’s Guide IT Professional • Understand system alerts and backup device status.
• Update licenses.
• Verify channel activity.
• Monitor channels in real time.
• Define users and groups.
• Query audit messages.
• Define extended retention for storage.
Central Administration Guide
IT Professional • Define CTI and storage parameters at one central location for use at all locations (Branches).
• Deploy CTI and storage definitions to the Branches.
• Create IT administrators who can access and manage all the Branches.
• Update existing CTI and Storage configurations at all NICE Perform eXpress Branches.
Installation Guides NICE Installer • Install the NICE Perform eXpress hardware and software.
• Configure NICE Perform eXpress for the telephony environment.
• Prepare the CTI for NICE Perform eXpress. (Guidelines are provided: The CTI setup is the responsibility of its manufacturer.)
Interactions Guide: Query and Playback
Manager or Agent/Trader
• Run a built-in query to find interactions and play them back.
• Create a customized query to find specific interactions.
• Save an interaction from NICE Perform eXpress to a standard format in order to play it back on any media player.
22 Chapter 1: Overview
NICE Perform eXpress Release 3.0: Troubleshooting Guide (Rev. A2)

Which NICE Perform eXpress Guide Do I Need?
Maintenance Guide IT Professional, NICE Installer
• Verify the NICE Perform eXpress system is functioning correctly by means of a Support Calendar.
• Maintain the NICE databases.
• Expand an existing NICE Perform eXpress system on the same server and to a replacement machine.
• Replace faulty boards.
• Recover a system.
• Manage NICE Services and logs.
• Respond to SNMP traps.
• Manage NICE Perform eXpress versions and updates.
• Change the server name. (Business Partners only)
Migrating from NiceCall Focus III and NiceUniverse 8.9
Business Partner
• Migrates NiceCall Focus III and NiceUniverse 8.9 systems to NICE Perform eXpress.
Pre-Installation Guide NICE Installer • Select the correct server/PC for the NICE Perform eXpress system.
• Harden the machine in order to prepare a secure environment for the NICE Perform eXpress system.
• Install the required software before installing the NICE Perform eXpress system.
• Verify the necessary anti-virus requirements.
Quality Management Guide Manager, Agent/Trader or IT Professional
• Configure quality management, which includes setting up screen recording, defining QM rules, monitoring client machines, and defining QM users.
• Create forms for quality management.
• Query for interactions marked for QM.
• Evaluate agents/traders.
• Generate reports.
NICE Perform eXpress Guide (Continued) Audience Provides Instruction To...
23 Chapter 1: Overview
NICE Perform eXpress Release 3.0: Troubleshooting Guide (Rev. A2)

Which NICE Perform eXpress Guide Do I Need?
Locating Documentation for Tools
The following is an alphabetical list of tools available on your NICE Perform eXpress server. Consult the relevant guide as needed.
Troubleshooting Guide IT Professional, NICE Installer, Business Partner
• Manage NICE Services and logs.
• Respond to SNMP traps.
• Troubleshoot:
• Licensing
• Archiving
• Playback
• Recording
• PCIe Interface Boards
• Integrations (Vendor-side)
Upgrade Guide NICE Installer • Upgrade NICE Perform eXpress from Releases 1.0 and 2.1 to Release 3.0.
NICE Perform eXpress Guide (Continued) Audience Provides Instruction To...
NICE Perform eXpress Tools
Tool What it does When to use NICE Perform eXpress Guide
Archive Tool Retrieves media from a NiceCall Focus III or NiceUniverse 8.9 system that was backed up to a DVD.
As part of the process for upgrading from NiceCall Focus III or NiceUniverse 8.9 to NICE Perform eXpress.
Migrating NiceCall Focus III and NiceUniverse 8.9
Board Diagnostic Tool
Enables testing the functionality for PCIe Interface boards.
• To test a suspected faulty board.
• To create a log file to accompany a Service Request for a faulty board.
Troubleshooting Guide
24 Chapter 1: Overview
NICE Perform eXpress Release 3.0: Troubleshooting Guide (Rev. A2)
Which NICE Perform eXpress Guide Do I Need?
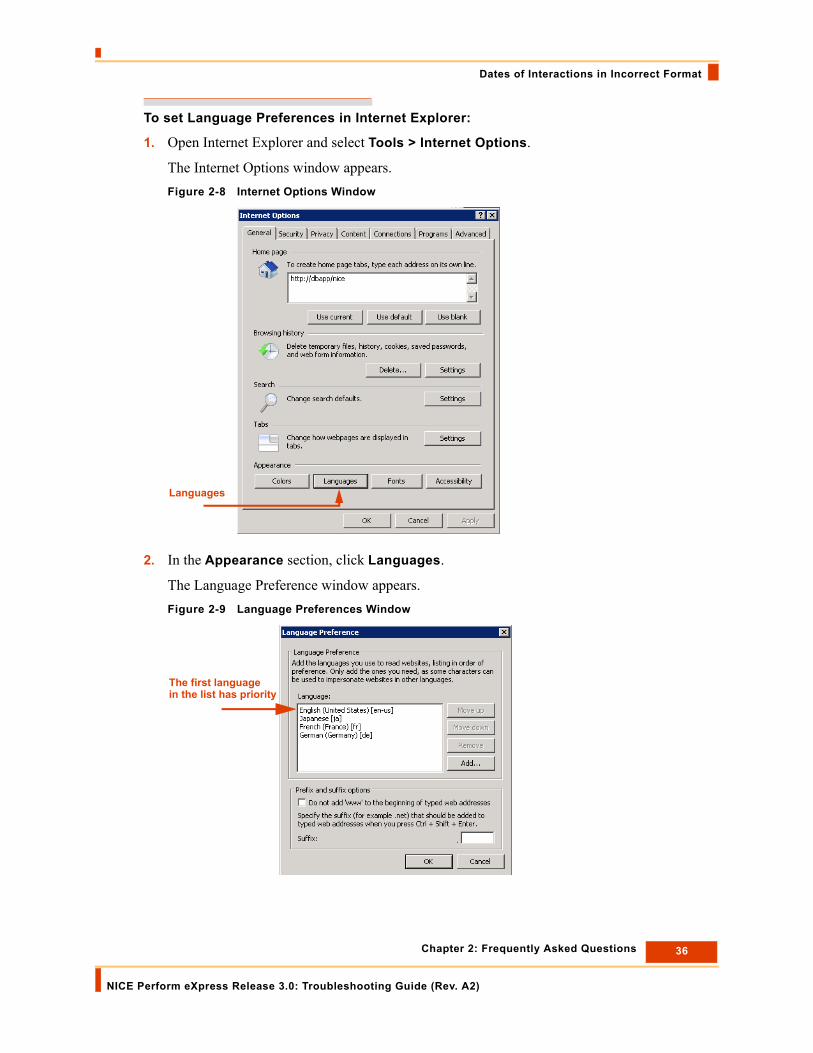
Board Numbering ToolNot applicable for boards from NICE Perform eXpress 1.0
• Defines Board IDs.
• Enables you to locate and view details for all NICE Perform eXpress 3.0 PCIe interface boards.
• When installing one of the following boards:DP6409-ehPCM6409-ehDT6409-eh
• To determine the Board ID on any PCIe interface board.
Installation Guides-and-
Troubleshooting Guide
eXpress Assistant
Tests your system and recommends steps for repair if errors are found with any of the following:
• Connected Devices
• Connected Channels
• User Mapping
• Records and plays back an interaction
• After initial configuration is complete and users are defined.
• Whenever a configuration change is made, such as adding or remapping channels to ensure that the entire system is working.
• To begin troubleshooting.
Installation Guides-and-
Troubleshooting Guide
Log Collector Gathers information from the NICE Perform eXpress server and application into a compressed zip file to be sent to NICE Customer Support.
As instructed by NICE Customer Support.
Maintenance Guide-and-
Troubleshooting Guide
Log Viewer Enables you to view the Log files.
As instructed by NICE Customer Support.
Maintenance Guide-and-
Troubleshooting Guide
NICE Migration Application
Migrates the NICE databases from NiceCall Focus III and NiceUniverse 8.9 to NICE Perform eXpress.
As part of the process for upgrading from NiceCall Focus III or NiceUniverse 8.9 to NICE Perform eXpress.
Migrating NiceCall Focus III and NiceUniverse 8.9
Performance Collector
• Creates a trace file and log file to send to NICE Customer Support.
• Collects information for the SQL Profiler to aid in debugging the SQL.
SQL Performance problems such as:
• Queries do not run
• Archiving Error
Troubleshooting Guide
NICE Perform eXpress Tools (Continued)
Tool What it does When to use NICE Perform eXpress Guide
25 Chapter 1: Overview
NICE Perform eXpress Release 3.0: Troubleshooting Guide (Rev. A2)

Which NICE Perform eXpress Guide Do I Need?
Rename Host Replaces default host server names in the NICE Perform eXpress machine with the actual server names at your site.
• During expansion to a new machine.
• During system recovery on a new machine.
• During initial setup to complete host name resolution (only NICE Business Partners are authorized to make this change).
Maintenance Guide
Security Configuration Tool
In an Active Directory environment, switches between NICE Authentication mode (default) and Windows Authentication mode.
• To define Single Sign-On (SSO). This is part of the initial installation procedures.
• If your organization’s user authentication mode changes.
Installation Guides-and-
Maintenance Guide
Services Configuration Manager
Enables the following:
• Start/stop NICE Services.
• View Service Logs and change Reporting levels.
• Create a Memory Dump file for troubleshooting (requires Windows Debugging Tools)
As instructed by NICE Customer Support.
Maintenance Guide-and-
Troubleshooting Guide
Site Readiness Tool
Automatically verifies the prerequisites required for successfully installing NICE Perform eXpress.
After completing all pre-installation procedures, before installing boards and NICE Perform eXpress software.
Pre-Installation Guide
NICE Perform eXpress Tools (Continued)
Tool What it does When to use NICE Perform eXpress Guide
26 Chapter 1: Overview
NICE Perform eXpress Release 3.0: Troubleshooting Guide (Rev. A2)

2
Frequently Asked Questions
Contents
Archiving Error Appears for 24 Hours After Installation.............................................29
Board Name Different in Microsoft Device Manager ...................................................29
Buttons on Message Boxes Do Not Function..............................................................29
Cannot Set Up Channels (Mixed Environment) ...........................................................31
Caller ID is not Numeric .................................................................................................33
Data Execution Prevention (DEP) Prevents TDM Gateway from Starting .................34
Dates of Interactions in Incorrect Format ....................................................................35
Decreased Functionality in the User Interface.............................................................37
Electric Power Cut Off During Software Installation ...................................................38
Error 2002 Appears Constantly in System Alerts Area...............................................38
Error 3505 After Renaming Machine.............................................................................39
Installation Process Stalls with High CPU....................................................................41
(FTF Environments after Upgrade) Interaction Details Not Displayed ......................42
Interactions Not Displayed ............................................................................................42
License State Displayed Incorrectly .............................................................................45
Logger Service does not Start after Upgrade ..............................................................46
Machine Not in Sync with Local Time...........................................................................49
Message: Windows Media Player Not Installed ...........................................................51
Nice Differential Backup Job Failed during the ITP ....................................................52
Player Stops During Playback.......................................................................................54
Reactivating a NICE Perform eXpress License............................................................56
Chapter 2: Frequently Asked Questions
NICE Perform eXpress Release 3.0: Troubleshooting Guide (Rev. A2)
27

SQL Server 2008 Component Fails to Install ...............................................................62
TDM System Not Recording ..........................................................................................63
Windows Media Server Failed Message.......................................................................64
28 Chapter 2: Frequently Asked Questions
NICE Perform eXpress Release 3.0: Troubleshooting Guide (Rev. A2)

Archiving Error Appears for 24 Hours After Installation
Archiving Error Appears for 24 Hours After InstallationThe following error might appear in the System Alerts area within 24 hours after installing the NICE Perform eXpress system:
Error in archiving recorded data. The system detected failure to archive some of the calls.
You can safely ignore this error for the first 24 hours after installing the system.
Board Name Different in Microsoft Device ManagerSymptom
The NICE Perform eXpress board name in the Microsoft Device Manager is not the same as the name in the NICE Board Numbering Tool or the Board Diagnostic Tool.
Cause
The Microsoft Device Manager shows the board details as defined by the PnP device ID. This ID shows the wrong board name.
The NICE Board Numbering Tool and the Board Diagnostic Tool both show the board details as defined by Audio Codes API, which shows the correct board name.
Solution
Use the Board Numbering Tool or the Board Diagnostic Tool for the correct NICE Perform eXpress board name.
Buttons on Message Boxes Do Not FunctionSymptom
The buttons in the message boxes, such as OK or Cancel, do not work.
Cause
In the Internet Explorer, the Enhanced Security Configuration does not allow the buttons to function.
Solution
In the Internet Explorer, the Enhanced Security Configuration needs to be changed to include the about:blank page as a Trusted Site. Note: By default, the Enhanced Security Configuration does include the about:blank page as a Trusted Site. This issue occurs when the default security settings are changed.
To troubleshoot:
1. In the Internet Explorer, go to Tools > Internet Options, and click the Security tab.
29 Chapter 2: Frequently Asked Questions
NICE Perform eXpress Release 3.0: Troubleshooting Guide (Rev. A2)

Buttons on Message Boxes Do Not Function
2. Select Trusted Sites.Figure 2-1 Internet Options Window
3. Click Sites.
The Trusted Sites window appears.Figure 2-2 Trusted Sites Window
4. Clear the Require secure verification (https:) for all sites in this zone checkbox.
5. In the Add this Web site to the zone field, enter about:blank.
30 Chapter 2: Frequently Asked Questions
NICE Perform eXpress Release 3.0: Troubleshooting Guide (Rev. A2)

Cannot Set Up Channels (Mixed Environment)
Figure 2-3 Trusted Sites Window
6. Click Add.
The about:blank site appears in the Web sites area.Figure 2-4 about:blank Added to Trusted Sites
7. Click OK.
Cannot Set Up Channels (Mixed Environment)Symptom
In the Channel Monitor application, no channel activity is evident, and there is an error message: Setup is not possible for the selected channel type.
Cause
The DIP switches of the boards are not set up correctly.
Solution
• When the NPX machine has two boards of different types (Example: ALI and NATI) both boards must be set with the DIP switches set to off.
31 Chapter 2: Frequently Asked Questions
NICE Perform eXpress Release 3.0: Troubleshooting Guide (Rev. A2)

Channels Not Listed in Channel Monitor Application
• When the NPX machine has two boards of the same type (Example: Two ALI boards), the first board must be set with the DIP switches set to off, and the second board must be set according to the DIP switch requirements of the board. See the relevant NICE Perform eXpress Installation Guide.
Channels Not Listed in Channel Monitor ApplicationSymptom
(TDM Environments Only) In the Channel List area of the Channel Monitor application, physically connected channels do not appear.
Cause
The channels are not mapped.
Solution
In the Configuration application, map the channels. See the relevant NICE Perform eXpress Installation Guide.
32 Chapter 2: Frequently Asked Questions
NICE Perform eXpress Release 3.0: Troubleshooting Guide (Rev. A2)

Caller ID is not Numeric
Caller ID is not Numeric Symptom
When E1 ISDN is selected, the Caller ID is not numeric.
Cause
In a Line Signaling Based (VOX) TDM environment recording of Control and Signaling information does not work (no Control and Signaling information is received for interactions).
Troubleshooting
1. In the Recording Settings section, make sure that the Trunk Type parameter is defined as E1 ISDN (The dialed number and caller ID can only be received at ISDN). See the relevant Installation Guide for further information.
2. Contact the Switch technician and make sure that the appropriate frame format is selected. If the frame format is wrong it may affect the Control and Signaling information.
3. Make sure the RJ45 cable is crossed, as displayed in Figure 2-5, and as described in the Hardware Installation chapter of the NICE Perform eXpress Installation Guide. If the cable is not crossed it can record, but Control and Signaling information is lost.Figure 2-5 Crossover Cable
4. Confirm that the system is now configured correctly, by checking the Dialed Number and Caller ID in the Query Results area of the Interactions window.
5. If the problem persists, contact your local support representative or NICE Customer Support.
33 Chapter 2: Frequently Asked Questions
NICE Perform eXpress Release 3.0: Troubleshooting Guide (Rev. A2)

Data Execution Prevention (DEP) Prevents TDM Gateway from Starting
Data Execution Prevention (DEP) Prevents TDM Gateway from Starting
Cause
After installing NICE Perform eXpress, the system is restarted, and an MS Windows message appears stating that the Data Execution Prevention (DEP) prevented the TDMGateway service from starting.
Solution
1. Right-click My Computer, and select Properties.
2. Click the Advanced tab.
3. In the Performance area, click Settings.
The Performance Options window appears.
4. Click the Data Execution Prevention tab.
The Data Execution Prevention tab appears.Figure 2-6 Performance Options Window
5. Select Turn on DEP for all programs and services except those I select.
6. Click Add, and browse to: D:\Program Files\NICE Systems\NICE Perform eXpress\VoiceCapture\Bin.
34 Chapter 2: Frequently Asked Questions
NICE Perform eXpress Release 3.0: Troubleshooting Guide (Rev. A2)

Dates of Interactions in Incorrect Format
7. Select TDMGateway.exe, and click Open.
The TDM Gateway service appears in the list of services the DEP will ignore.Figure 2-7 Performance Options Window - DEP Ignore List
8. Restart the NICE Perform eXpress machine.
Dates of Interactions in Incorrect FormatSymptom:
Dates of the interactions appear in the wrong format.
Cause:
The local language is not correctly defined in the Internet Options.
Solution:
To use NICE Perform eXpress in your local language, the language must have the highest priority in your Internet Options. Use the following procedure to select a language and set priority.
This procedure must be completed on the NICE Perform eXpress machine and on each workstation that accesses the NICE Perform eXpress.
The language that has priority determines the language and format of your calendar and how dates appear on your screen. If dates do not appear correctly, verify that the correct language has priority in the Language Preference window using the following procedure.
35 Chapter 2: Frequently Asked Questions
NICE Perform eXpress Release 3.0: Troubleshooting Guide (Rev. A2)
Dates of Interactions in Incorrect Format
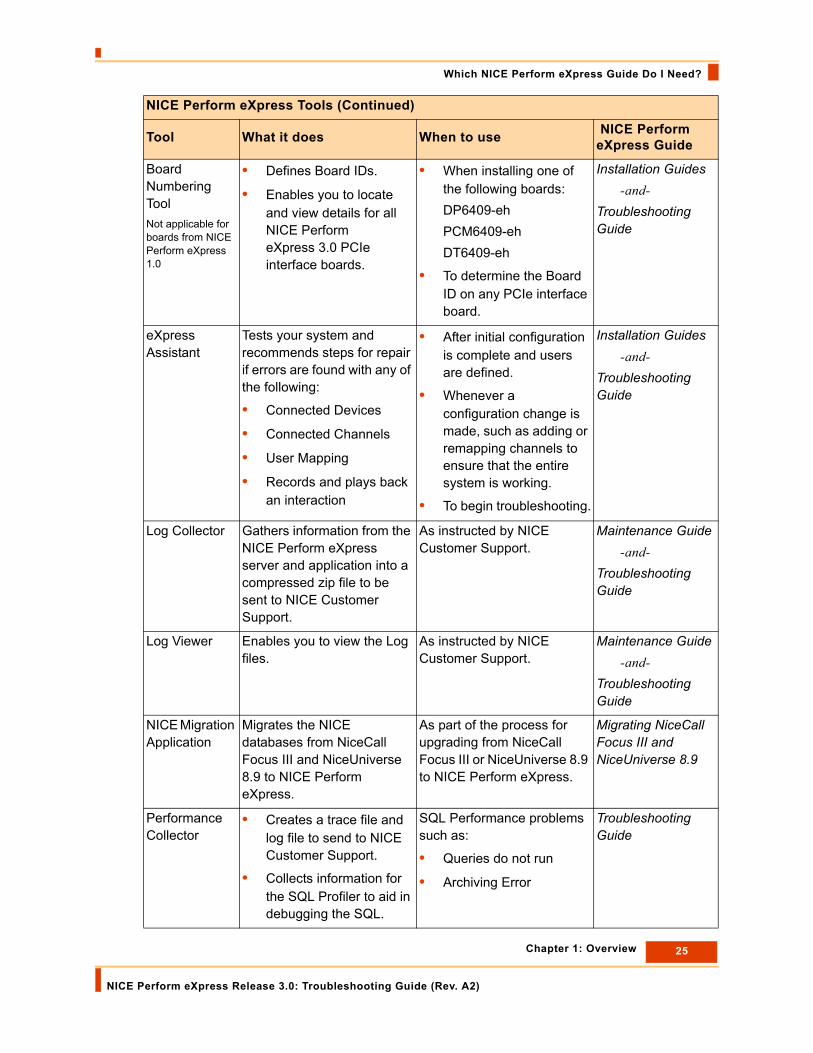
To set Language Preferences in Internet Explorer:
1. Open Internet Explorer and select Tools > Internet Options.
The Internet Options window appears.Figure 2-8 Internet Options Window
2. In the Appearance section, click Languages.
The Language Preference window appears.Figure 2-9 Language Preferences Window
Languages
The first languagein the list has priority
36 Chapter 2: Frequently Asked Questions
NICE Perform eXpress Release 3.0: Troubleshooting Guide (Rev. A2)

Decreased Functionality in the User Interface
3. If your local language does not appear in the list, do the following:
a. Click Add.
The Add Language window appears.Figure 2-10 Add Language Window
b. Select a language. Then click OK.
If more than one dialect appears for your language, select any of them.
The language is added to the list in the Language Preferences window.
4. The Local language must be the first one in the list. To move a language to the top of the list, select the language. Then click Move Up.
5. Click OK to close the Language Preferences window.
6. Click OK to close the Internet Options window.
7. This procedure must be repeated on each workstation that accesses the NICE Perform eXpress.
Decreased Functionality in the User InterfaceCause
When Internet Explorer 8 is installed on a client workstation, some options do not function in NICE Perform eXpress applications.
Solution
NICE Perform eXpress needs to be displayed in Internet Explorer in Compatibility View. From the Command Bar, select Tools, and then select Compatibility View Settings to add the URL of the NICE Perform eXpress site to the list.
37 Chapter 2: Frequently Asked Questions
NICE Perform eXpress Release 3.0: Troubleshooting Guide (Rev. A2)

Electric Power Cut Off During Software Installation
Electric Power Cut Off During Software InstallationCause
The electric power is cut off during the software installation, such as an accidently unplugged power cable, and the software installation fails.
Solution
All software required for the NICE Perform eXpress system needs to be reinstalled.
1. Install all required software as listed in the NICE Perform eXpress Pre-installation Guide.
2. Install the NICE Perform eXpress software. See the relevant NICE Perform eXpress Installation Guide.
Error 2002 Appears Constantly in System Alerts AreaSymptom
The 2002 error appears constantly in the System Alerts area. The error message states that there is a telephony connectivity error and to check the cable connections.
Cause
• The value in the Configured Channels field is greater than the number of mapped channels.
and/or
• There is a problem with the channel’s cable connection to the PABX.
Solution
Decrease the number of configured channels so that it is the same value as the number of mapped channels. Note: Sometimes site constraints do not support this solution. If the 2002 error continues to appear, check the status of the channels in the Channel Monitor application.
To troubleshoot:
1. In the Configuration application, click the CTI and Recording tab, and note the value in the Configured Channels field in the Recording Settings area.
2. Click the Channel Mapping tab, and note the number of mapped channels.
3. Click the CTI and Recording tab, and change the value in the Configured Channels field to match the number of mapped channels.
4. If the 2002 error continues to appear in the System Alerts area, go to the Channel Monitor application and verify that the status of all channels is OK.
38 Chapter 2: Frequently Asked Questions
NICE Perform eXpress Release 3.0: Troubleshooting Guide (Rev. A2)

Error 3505 After Renaming Machine
Error 3505 After Renaming MachineSymptom:
3505 error appears stating that channel monitoring failed.
Cause:
NICE Perform eXpress uses the NICE Playback Streaming service, by means of the Windows Media Services component, to monitor channels in real time. When the Windows Media Services component is installed a user is created. This user includes the machine name. For example, a user might be WMUS_HOSTNAME where HOSTNAME is the name of the machine where Windows Media Services is installed.
When the machine name is changed, the name of the user includes the previous machine name. Therefore, the Windows Media Services fails to handle the NICE Playback Streaming service request to monitor the channel.
Solution:
You must uninstall Microsoft Windows Media Services and then reinstall it again so that the machine name will be correct for the Windows Media Services user. After reinstalling the component, you run the AddPublishingPoint.vbs script to create an on-demand Publishing Point, which adds the NICE Stream Server as a content source.
To troubleshoot:
1. From the Control Panel, select Add or Remove Programs. The Add or Remove Programs window appears.
2. In the Add and Remove Programs window, select Add/Remove Window Components. The Windows Components Wizard appears.
39 Chapter 2: Frequently Asked Questions
NICE Perform eXpress Release 3.0: Troubleshooting Guide (Rev. A2)

Error 3505 After Renaming Machine
Figure 2-11 Windows Components Wizard
3. In the Components list, clear the Windows Media Services option, and click Next.
4. Click Next. The Completing the Windows Components Wizard window appears.
5. Click Finish, and restart the machine.
6. After the computer restarts, from the Control Panel, select Add or Remove Programs. The Add or Remove Programs window appears.
7. In the Add and Remove Programs window, select Add/Remove Window Components. The Windows Components Wizard appears.
8. In the Components list, select the Windows Media Services option, and click Next. The Completing the Windows Components Wizard window appears.
9. Click Finish.
10. Navigate to <Installation Folder>\NICE Perform eXpress\Tools\Rename Host Tool, and run the AddPublishingPoint.vbs script.
If the script does not run after double-clicking it, run it from the command line as follows:
a. From the command line, navigate to the location of the AddPublishingPoint.vbs file.
b. Run the following command: cscript AddPublishingPoint.vbs.
Clear this option
40 Chapter 2: Frequently Asked Questions
NICE Perform eXpress Release 3.0: Troubleshooting Guide (Rev. A2)

Installation Process Stalls with High CPU
11. From the Control Panel, select Administrative Tools > Windows Media Services, and verify that Publishing Point NPE_Publish_Point appears. Figure 2-12 Windows Media Services Window
12. Select the Source tab. Verify that the location path is local to the computer and is inside the NICE Stream Server installation folder.Figure 2-13 Windows Media Services Window
13. Restart the NICE Playback Streaming service.
Installation Process Stalls with High CPUCause
The HP StorageWorks DAT72 USB backup device is installed, but its driver is not installed, or the device was disabled. The NICE Perform eXpress installation stalls with a high CPU.
41 Chapter 2: Frequently Asked Questions
NICE Perform eXpress Release 3.0: Troubleshooting Guide (Rev. A2)

(FTF Environments after Upgrade) Interaction Details Not Displayed
Solution
1. Stop the NICE Perform eXpress installation.
2. Verify that the HP StorageWorks DAT72 USB driver is installed. If it is not, install it.
3. In the Device Manager, verify that the device is enabled.
4. Install NICE Perform eXpress.
(FTF Environments after Upgrade) Interaction Details Not Displayed
Symptom
(Financial Trading Floor environments - BT, Etrali, and IPC - after upgrading from a previous version of NICE Perform eXpress) The recorded interactions appear in the Interactions application, but the interaction cannot be expanded to view the interaction details.
Cause
When upgrading from a previous version of NICE Perform eXpress, business data is not automatically saved in NICE Perform eXpress 3.0.
Resolution
On the CTI and Recording tab in the Configuration application, click Save to save the business data. When the business data is saved, the interaction details are available for viewing.
Here’s how:
1. In the Configuration applications, click the CTI and Recording tab.
2. Click .
3. In the Interactions application, expand an interaction to view its details.
The interaction details appear.
Interactions Not DisplayedSymptom
Recorded interactions do not appear in the Interactions application.
Cause
The SQL job that is responsible for a specific population is not running. For example, if the OS administrative user who installed NICE Perform eXpress was changed, the SQL job cannot run.
42 Chapter 2: Frequently Asked Questions
NICE Perform eXpress Release 3.0: Troubleshooting Guide (Rev. A2)

Interactions Not Displayed
Resolution
The OS administrative user is necessary to run NICE services and SQL jobs. If you need to change this user, you must also do the following:
1. Create a new OS administrative user.
2. Change the name of the user who runs services that require a log-on.
3. Run the ReplaceJobsOwner.sql script that changes the name of the user in SQL jobs.
Here’s how:
1. Create the OS administrative user with which you want to replace the user who installed the NICE Perform eXpress software. This new user must have the following privileges:
• Log on as service
• Log on as a batch job
• Act as part of the operating system
• Create a token object
• Replace a process-level token
• Manage auditing and security log
2. Write down the username and password of this new user.
3. Change the user who runs NICE Perform eXpress services to the new OS administrative user:
a. From the Start menu, select All Programs > NICE Perform eXpress > Tools > Services Configuration Manager.
The Services Configuration Manager opens.Figure 2-14 Services Configuration Manager
b. Stop all services.
• Press the Ctrl and A keys.
• Click the Stop button. In the State column, the state changes from Running to Stopped.
c. Verify the user name in the the Log On column. You need to update the user name for all the services except the ones that use the Local System user.
43 Chapter 2: Frequently Asked Questions
NICE Perform eXpress Release 3.0: Troubleshooting Guide (Rev. A2)

Interactions Not Displayed
d. For each service whose user name needs to be changed, right-click the service and select Properties.
• In the Log on as area, in the This Account field, type .\ and then enter the user name of the new OS administrator. For example: .\Administrator1.
• In the Password and Confirm fields, enter the password and confirm it, respectively.
• Click OK.Figure 2-15 Service Properties Window
The Log On user name is updated to the new OS administrator for all the services.
e. Start all services.
• Press the Ctrl and A keys.
• Click the Start button. In the State column, the state changes from Stopped to Running.
4. Change the user who runs the Microsoft SQL services to the new OS administrative user.
a. From the Control Panel, select Administrative Tools > Services.
b. Find the SQL Server service in the list of services.
c. Click the Log On tab.
• In the Log on as area, in the This Account field, type .\ and then enter the user name of the new OS administrator. For example: .\Administrator1.
• In the Password and Confirm fields, enter the password and confirm it, respectively.
• Click OK.
44 Chapter 2: Frequently Asked Questions
NICE Perform eXpress Release 3.0: Troubleshooting Guide (Rev. A2)

License State Displayed Incorrectly
d. Repeat Step b and Step c for the SQL Server Agent and SQL Server Reporting services.
5. Edit the ReplaceJobsOwner.sql script to include the former and current name of the OS administrator by completing the following.
a. Navigate to D:\Program Files\NICE Systems\NICE Perform eXpress\Tools\Rename Host Tool, and open the ReplaceJobsOwner.sql script.Figure 2-16 SQL Script
b. Edit the ReplaceJobsOwner.sql script as follows:
• In the set @oldName = ‘[previous name of the OS Administrator]’ command, between the single quotation marks, enter the previous name of the OS administrator, including the domain name.
For example, set @oldName = ‘NICE_Systems\Administrator’.
• In the set @newName = ‘[new name of the OS Administrator]’ command, between the single quotation marks, enter the new name of the OS administrator, including the domain name.
For example, set @newName = ‘NICE_Systems\Administrator1’.
c. Save the changes to the script.
d. On the NICE Perform eXpress machine, run the ReplaceJobsOwner.sql script.
License State Displayed IncorrectlyCause
The updated license state does not display.
Resolution
You reset the IIS server and refresh the NICE Perform eXpress URL.
Here’s how:
1. From the Run menu, in the Open field, enter iisreset.
Change thesevalues
45 Chapter 2: Frequently Asked Questions
NICE Perform eXpress Release 3.0: Troubleshooting Guide (Rev. A2)

Logger Service does not Start after Upgrade
The Command Prompt window opens, and the IIS server is reset.
2. From the NICE Perform eXpress window, click Refresh .
3. In the System Management application, go to the System Settings tab > Licensing area.
In the License Information field, the license state is updated.
Logger Service does not Start after UpgradeSymptom
After upgrading to NICE Perform eXpress 2.1.10, the Logger Service, NTLoggerSvc, does not start.
Cause
The Bin folder for the Logger was not created or is missing files.
NTLoggerSvc is Stopped
46 Chapter 2: Frequently Asked Questions
NICE Perform eXpress Release 3.0: Troubleshooting Guide (Rev. A2)

Logger Service does not Start after Upgrade
To determine if there is an error with the Bin folder:
1. Navigate to the Logger directory: ...\NTLogger\Logger
2. If the Bin folder does not exist then see the Solution below.
3. Open the Bin folder.
4. If the file Ntlogger.exe does not exist in the Bin folder, see the Solution below.
5. If there are less than 50 files in the Bin folder, see the Solution below.
Solution
The Logger service must be reinstalled using the following procedure. At the end of this procedure you must restart your machine.
To reinstall the Logger service:
1. Stop all NICE services.
2. In the NICE Services Configuration Manager, from the Action menu select Exit. This closes the NICE Services Configuration Manager which must be closed, not minimized.
47 Chapter 2: Frequently Asked Questions
NICE Perform eXpress Release 3.0: Troubleshooting Guide (Rev. A2)

Logger Service does not Start after Upgrade
3. Navigate to the NICE Perform eXpress installation folder: ...\2.1.10\NPX\Logger.
4. Run LoggerSetup.exe.
5. If the Corrupted Logger message appears, do the following:
a. Click Yes.
The Logger Setup creates a backup of the Logger files. The Choose Destination window appears.
b. Choose a location for this backup. Then click Next.
c. Continue with Step 7.
-or-
6. If the Corrupted Logger message does not appear, continue with Step 7.
7. When the Setup Complete window appears, select Yes, I want to restart my computer now. Then click Finish.
8. Open the NICE Services Configuration Manager and verify that all NICE services are running.
9. Verify that your system is recording and playing back recordings correctly.
Run LoggerSetup.exe
48 Chapter 2: Frequently Asked Questions
NICE Perform eXpress Release 3.0: Troubleshooting Guide (Rev. A2)

Machine Not in Sync with Local Time
Machine Not in Sync with Local TimeCause
The time settings on the NICE Perform eXpress machine were not set to change when Daylight Savings time went into effect.
Solution
Preparing your NICE Perform eXpress for time synchronization when Daylight Saving Time begins or ends involves setting the correct properties in the Date and Time Properties window on your NICE Perform eXpress Machine.
• If your site does not use an NTP server for time synchronization, you define Daylight Saving Time on the Time Zone tab as described in Preparing for Daylight Saving Time without an NTP Server on page 49.
-or-
• If your site uses an NTP server for time synchronization, you define the server on the Internet Time tab as described in Preparing for Daylight Saving Time with an NTP Server on page 50.
Do this procedure now and you will be prepared in advance when Daylight Saving Time changes.
Preparing for Daylight Saving Time without an NTP Server
If your environment does not use an NTP server for time synchronization, use the following procedure to prepare for Daylight Saving Time.
To prepare for Daylight Saving Time:
1. From the Start menu, select Settings > Control Panel > Date and Time.
-or-
Double-click the clock in the Notification area.
The Date and Time Properties window appears.
WARNING If you make any changes to the Date, Time or Time Zone after your system is installed, your license will become invalidated. In this event, contact NICE Support and see the Troubleshooting Guide for further information.
REMEMBER!After you have completed the procedure below, you do not have to reset any clocks or restart your machine when Daylight Savings Time begins or ends.
49 Chapter 2: Frequently Asked Questions
NICE Perform eXpress Release 3.0: Troubleshooting Guide (Rev. A2)

Machine Not in Sync with Local Time
Figure 2-17 Date and Time Properties Window
2. Select the Time Zone tab.
3. Select Automatically adjust clock for daylight saving changes.
4. Click OK.
Automatic adjustments will be made for Daylight Saving Time. You do not need to restart your machine. When daylight saving time begins or ends, your NICE Perform eXpress will be automatically adjusted.
Preparing for Daylight Saving Time with an NTP Server
If your environment uses an NTP server for time synchronization, use the following procedure to prepare for Daylight Saving Time.
For sites that use a NTP server:
1. From the Start menu, select Settings > Control Panel > Date and Time.
-or-
Double-click the clock in the Notification area.
The Date and Time Properties window appears.
Select this option
50 Chapter 2: Frequently Asked Questions
NICE Perform eXpress Release 3.0: Troubleshooting Guide (Rev. A2)

Message: Windows Media Player Not Installed
Figure 2-18 Date and Time Properties Window
2. Select the Internet Time tab.
3. Select Automatically synchronize with an Internet time server.
4. In the Server field, select your NTP server. Then click Update Now.
5. Click OK.
Automatic adjustments will be made for Daylight Saving Time. You do not need to restart your machine. When daylight saving time begins or ends, your NICE Perform eXpress will be automatically adjusted.
Message: Windows Media Player Not Installed Cause
When the memory use of the Internet Explorer browser is too high, the following error message appears stating that the Windows Media Player 9.0 must be installed on the machine, even though the Media Player is already installed.Figure 2-19 Windows Media Player Error Message
Select this option
Select yourNTP Server
51 Chapter 2: Frequently Asked Questions
NICE Perform eXpress Release 3.0: Troubleshooting Guide (Rev. A2)

Nice Differential Backup Job Failed during the ITP
Solution
Open a new instance of the Internet Explorer browser, and try again to play back the interaction or monitor the channel.
Nice Differential Backup Job Failed during the ITPSymptom
After installing the NICE Perform eXpress system, installers perform an Installation Test Procedure (ITP). One part of the ITP is verifying that the SQL jobs are running without errors. At this point in the ITP, the following error appears:
Cannot perform a differential backup for database "nice_express", because a current database backup does not exist.
Cause
NICE Perform eXpress automatically runs a full backup on all NICE databases every Saturday. On the other days of the week, it automatically runs a differential backup to back up the changes to the database since the full backup.
When the NICE Perform eXpress system is installed on any day except Saturday, the automatic differential backup fails, since no full backup is available. This failure means that no NICE Perform eXpress databases are backed up until the first full backup, which will take place on the first Saturday after the installation.
Solution
You need to run the Nice Full Backup job.
To troubleshoot:
1. From the Start menu, navigate to Programs > Microsoft SQL Server 2008 > SQL Server Management Studio.
The SQL Server Management Studio opens.
52 Chapter 2: Frequently Asked Questions
NICE Perform eXpress Release 3.0: Troubleshooting Guide (Rev. A2)

Nice Differential Backup Job Failed during the ITP
2. Expand SQL Server Agent > Jobs, and right-click Nice Full Backup.Figure 2-20 Nice Full Backup Job
3. Select Start Job at Step.
The Start Job window appears.Figure 2-21 Start Job Window
4. Click Start to back up all the databases in the NICE Perform eXpress system.
Select Start Job at Step
53 Chapter 2: Frequently Asked Questions
NICE Perform eXpress Release 3.0: Troubleshooting Guide (Rev. A2)

Player Stops During Playback
The Start Jobs progress window appears to display the status of each backup job as it progresses.Figure 2-22 Start Jobs Window
5. In the Status column, verify that the status of the backup jobs is Success, and click Close.
The NICE Perform eXpress databases are backed up.
Player Stops During PlaybackSymptom
When the anti-virus application is scanning the system, interactions that are over six minutes cannot be played back.
Cause
The WAV encoding causes the anti-virus scan to stop, which makes Player stop as well.
Solution
When the anti-virus application is Microsoft ForeFront Antivirus, a workaround comprises adding a parameter to Stream Server configuration files.
Note: A drawback of this workaround is that playback will be slower for all interactions.
Job status is success
54 Chapter 2: Frequently Asked Questions
NICE Perform eXpress Release 3.0: Troubleshooting Guide (Rev. A2)

Player Stops During Playback
To troubleshoot:
1. On the NICE Perform eXpress machine, navigate to: ...\Program Files\NICE Systems\NICE Perform eXpress\NICE Stream Server\Bin.
2. Locate the following files:
• NiceApplications.Playback.Streaming.Startup.exe.config
• NiceApplications.Playback.Streaming.Encoder.exe.config
• NiceApplications.Playback.Administration.Startup.exe.config
3. In each file, search for the string CustomConfiguration. An example of the parameters in this configuration is below:
<CustomConfiguration>
<ApplicationName name="Default">
<Settings>
<add key="MaxReconnectTimes" value="2" />
<add key="UseCTIAnalysis" value="true" />
<add key="LocateServiceDebugMode" value="false" />
</Settings>
</ApplicationName>
</CustomConfiguration>
4. Under the <Settings> section, add this key: <add key="ASFProfile" value="Default" />.
5. Save the configuration file.
6. Repeat Step 3 to Step 5 for the configuration files listed in Step 2.
7. Restart the following services:
• Playback Streaming
• Playback Administration
55 Chapter 2: Frequently Asked Questions
NICE Perform eXpress Release 3.0: Troubleshooting Guide (Rev. A2)

Reactivating a NICE Perform eXpress License
Reactivating a NICE Perform eXpress LicenseIn the following scenarios you can reactivate your original NICE Perform eXpress license:
• When initial license activation is on a temporary server. If you remove NICE Perform eXpress and reinstall it on a more permanent server, you can reactivate your original NICE Perform eXpress license.
• If the physical server where NICE Perform eXpress is installed fails, causing you to replace the physical server, you can reactivate your original NICE Perform eXpress license.
• If you change the time on your NICE Perform eXpress server, the license becomes invalidated. You can reactivate the original license.
Limitations when reactivating a NICE Perform eXpress license
• The original NICE Perform eXpress license can only be activated one extra time, for a total of two times.
• The license key includes only the original system resources. If you upgraded your system at any point, contact NICE Support for a new license file.
How to Proceed
Your NICE Perform eXpress is installed with a default license that is valid for recording five channels for a three month period. The status of this license is Provisional. You must activate a new license before the temporary one reaches its expiration date. There are two ways to activate a license.
• If you have direct internet access from the NICE Perform eXpress machine, use Automatic Activation. This option is only available while your license status is Provisional. For instructions, see Automatic License Activation on page 56.
-or-
• If you do not have direct internet access from the NICE Perform eXpress machine, use Manual Activation/Update. For instructions, see Manual License Activation on page 58.
Automatic License Activation
You will require a valid Product Key to complete this process.
NOTE: After activating a license for a second time, in future upgrades, you might receive two *.v2c files. Only one of them will be valid on your current NICE Perform eXpress machine.
56 Chapter 2: Frequently Asked Questions
NICE Perform eXpress Release 3.0: Troubleshooting Guide (Rev. A2)

Reactivating a NICE Perform eXpress License
To activate a First-Time License:
1. In System Management, click the System Settings tab.
The License Information shows the status as Provisional, with an expiration date. You will need to update the license to a permanent one before this expiration date is reached.
2. In the Automatic Activation area, enter a valid Product Key. Then click Activate.
The license is updated to Activated. You have completed this procedure.
3. To begin configuring your NICE Perform eXpress, click Sign out. Then log in again and all your tabs will appear.
Automatic Activations appears onlywhen the License status is Provisional
ProvisionalLicense
Activated License
57 Chapter 2: Frequently Asked Questions
NICE Perform eXpress Release 3.0: Troubleshooting Guide (Rev. A2)

Reactivating a NICE Perform eXpress License
Manual License Activation
In this procedure you will be instructed on how to generate a License Information File from your NICE Perform eXpress. Then you will be instructed how to use this License Information File (*.c2v) to obtain a valid License Activation File (*.v2c). You will require the following:
• Access to a machine with internet access to NICE’s ExtraNICE site. This does not have to be the same machine as the NICE Perform eXpress machine.
• A valid ExtraNICE Username and Password.
• A valid Product Key to obtain your License Activation File from the ExtraNICE.
To manually activate or update a License:
1. In System Management, click the System Settings tab.
2. In the Manual Activation / Update area, click Generate.
Generate
Automatic Activations appears onlywhen the License status is Provisional
58 Chapter 2: Frequently Asked Questions
NICE Perform eXpress Release 3.0: Troubleshooting Guide (Rev. A2)

Reactivating a NICE Perform eXpress License
The File Download window appears with the License Information File.
3. Click Save to save the License Information File.
The Save As window appears.
4. Select a location for the License Information File (license.c2v). Then click Save. You will need this file to receive your License Activation File.
The Download Complete window appears.
5. Click Close.
59 Chapter 2: Frequently Asked Questions
NICE Perform eXpress Release 3.0: Troubleshooting Guide (Rev. A2)

Reactivating a NICE Perform eXpress License
6. Transfer the license.c2v file to a machine with Internet access to NICE’s ExtraNICE site.
7. On the machine with Internet access to the ExtraNICE do the following:
a. Open an Internet Explorer window and enter the following URL:
http://www.extranice.com/EIS/OnlineServices/LicenseActivation/Pages/default.aspx
If you have not previously logged in to ExtraNICE, the following window appears.
b. Enter a valid ExtraNICE Username and Password. Then click Log On to ExtraNICE.
The NICE Perform eXpress License Activation window appears.
c. Click Browse and select the License Information File (license.c2v) from Step 6.
d. Enter a valid Product Key. Then click Activate.
e. Download the corresponding License Activation File (license.v2c).
f. Transfer the License Activation File (license.v2c) to the NICE Perform eXpress machine.
60 Chapter 2: Frequently Asked Questions
NICE Perform eXpress Release 3.0: Troubleshooting Guide (Rev. A2)

Reactivating a NICE Perform eXpress License
8. On the NICE Perform eXpress machine, click Browse and select the License Activation File (license.v2c).
9. Click Activate.
The license is updated.
10. Click Sign out. Then log in again and all the tabs will appear.
61 Chapter 2: Frequently Asked Questions
NICE Perform eXpress Release 3.0: Troubleshooting Guide (Rev. A2)

SQL Server 2008 Component Fails to Install
SQL Server 2008 Component Fails to Install Symptom
• During NICE Perform eXpress installation, a Setup Error appears during the process for Installing Microsoft SQL Server.
• In the SQL installation log, located at ...\Program Files\Microsoft SQL Server\100\Setup Bootstrap\Log, the following message appears:
SQL Server installation media on a network share or in a custom folder can cause installation failure if the total length of the path exceeds 260 characters. To correct this issue, utilize Net Use functionality or shorten the path name to the SQL Server setup.exe file.
Cause
The reason that the SQL Server 2008 component fails to install can be one or both of the following:
• The path to the SQL Server installation folder exceeds the 260 character limit, which will prevent installation files from being copied. As a result, files are missing, and the SQL Server installation will fail. This occurs with nested folders and/or long file names.
Example: D:\809A1197-11 - NICE Perform eXpress version 3.0.10 - installation\809A1197-11 - NICE Perform eXpress version 3.0.10 - installation\installation
• The server needs to be restarted.
Solution
To resolve:
1. Copy the installation folder to the root of a drive, such as D: so that there are no nested folders.Figure 2-23 Sample Installation Folder Path
62 Chapter 2: Frequently Asked Questions
NICE Perform eXpress Release 3.0: Troubleshooting Guide (Rev. A2)

TDM System Not Recording
TIP: After completing the installation, the installation folder just copied, not the installation itself, can be deleted from this location to free up space.
2. If the installation folder has a long name, rename the folder to short name, such as Installation.
3. Restart the server.
4. Start the installation again.
TDM System Not Recording Symptom
NICE Perform eXpress is using a TDM environment, and the system is not recording.
Cause
When a LAN is connected to the NICE Perform eXpress, the Network Interface Card (NIC) may not be properly configured.
Solution
Verify that the NIC is properly configured.
NOTE: Errors will appear in the log, but the system will record.
63 Chapter 2: Frequently Asked Questions
NICE Perform eXpress Release 3.0: Troubleshooting Guide (Rev. A2)

Windows Media Server Failed Message
Windows Media Server Failed MessageSymptom
In the Server Manager > Streaming Media Services, the following error appears:
The Windows Media server failed.Error code: 0xc00d1583Error text: The plug-in 'WMS Advanced FF/RW Format Media Parser' cannot be loaded on this version of Windows.
Cause
The NICE Perform eXpress machine does not have a sound card, or the sound card is disabled.
Solution
This error has no impact and can be ignored.
64 Chapter 2: Frequently Asked Questions
NICE Perform eXpress Release 3.0: Troubleshooting Guide (Rev. A2)

Chapter 3: Using eXpress Assistant to Start Troubleshooting
NICE Perform eXpress Release 3.0: Troubleshooting Guide (Rev. A2)
65
3
Using eXpress Assistant to Start Troubleshooting
The eXpress Assistant tests the NICE Perform eXpress to ensure that the entire system is working. Run the eXpress Assistant to start troubleshooting. At the end of the process, the eXpress Assistant gives suggestions to solve issues discovered with the system. These issues are covered in this Troubleshooting Guide. See Resolving Issues Found in eXpress Assistant on page 78.
Contents
eXpress Assistant Workflow .........................................................................................66
Using the eXpress Assistant .........................................................................................67Step 1: Starting the eXpress Assistant .......................................................................67Step 2: (Mixed Environments only) Choosing an Environment ..................................69Step 3: Verifying Connected Devices and Channels..................................................70Step 4: Verifying User Mapping..................................................................................72Step 5: Recording a Test Interaction ..........................................................................73Step 6: Playing Back or Saving the Test Interaction...................................................75
Navigating Troubleshooting Windows .........................................................................76
Resolving Issues Found in eXpress Assistant ............................................................78

66 Chapter 3: Using eXpress Assistant to Start Troubleshooting
NICE Perform eXpress Release 3.0: Troubleshooting Guide (Rev. A2)
eXpress Assistant Workflow
eXpress Assistant WorkflowBelow is a flowchart for the eXpress Assistant. For a detailed procedure, see Using the eXpress Assistant on page 67.Figure 3-1 eXpress Assistant Flowchart

67 Chapter 3: Using eXpress Assistant to Start Troubleshooting
NICE Perform eXpress Release 3.0: Troubleshooting Guide (Rev. A2)
Using the eXpress Assistant
Using the eXpress Assistant The following procedure describes how to use the eXpress Assistant. Each step is immediately followed with Possible Pitfalls for that step. For a graphic flow, see eXpress Assistant Workflow on page 66.
The eXpress Assistant should be run after configuration is complete and users are defined. If users are not defined, the eXpress Assistant can still test recording on a channel.
Step 1: Starting the eXpress Assistant
What is verified in this step:
• If a Telephony Environment has been defined
• That the latest configuration changes have been applied
To start the eXpress Assistant:
1. On the NICE Perform eXpress server, select Start > Programs > NICE Perform eXpress > Tools > eXpress Assistant.
The eXpress Assistant Tool opens.Figure 3-2 Welcome Window
2. In the Welcome window, click Next.
In a Mixed Environment, the Choosing Environment window appears. Continue with Step 2: (Mixed Environments only) Choosing an Environment on page 69.
In a Single Environment, the Choosing Device window appears. Continue with Step 3: Verifying Connected Devices and Channels on page 70.

68 Chapter 3: Using eXpress Assistant to Start Troubleshooting
NICE Perform eXpress Release 3.0: Troubleshooting Guide (Rev. A2)
Using the eXpress Assistant
Possible Pitfalls for Step 1
The following scenarios can occur as an outcome of Step 1.
• Telephony Environment not defined
An error message appears.
What to do:
a. Close the message box.
b. Close the eXpress Assistant.
c. Open NICE Perform eXpress and click the Configuration tab.
d. Define your system (Telephony Environment, channels, users, etc.).
e. Restart the eXpress Assistant.
• Changes were saved, but not Applied
Changes made in Configuration were saved, but not applied.Figure 3-3 Configuration Changes Window
What to do:
a. Open NICE Perform eXpress and click the Configuration tab.
b. Click Apply.
c. In this window, click Next.
In a Mixed Environment, the Choosing Environment window appears. Continue with Step 2: (Mixed Environments only) Choosing an Environment on page 69.
In a Single Environment, the Choosing Device window appears. Continue with Step 3: Verifying Connected Devices and Channels on page 70.

69 Chapter 3: Using eXpress Assistant to Start Troubleshooting
NICE Perform eXpress Release 3.0: Troubleshooting Guide (Rev. A2)
Using the eXpress Assistant
Step 2: (Mixed Environments only) Choosing an Environment
This step must be preceded by Step 1: Starting the eXpress Assistant on page 67.
There is no verification in this step; In a Mixed Environment, select the Telephony Environment being tested.
Figure 3-4 Choosing Environment Window
How to choose a Telephony Environment:
1. Select a Telephony Environment.
2. Click Next.
The Choosing Device window appears.
3. Continue with Step 3: Verifying Connected Devices and Channels on page 70.

70 Chapter 3: Using eXpress Assistant to Start Troubleshooting
NICE Perform eXpress Release 3.0: Troubleshooting Guide (Rev. A2)
Using the eXpress Assistant
Step 3: Verifying Connected Devices and Channels
This step must be preceded by one or both of the following:
Step 1: Starting the eXpress Assistant on page 67
Step 2: (Mixed Environments only) Choosing an Environment on page 69
What is verified in this step:
• That all devices are recognized for recording (visual verification by the tester)
• That the channel selected for this test is functioning properly
• It is possible to repeat this step as needed to test several channelsFigure 3-5 Choosing Device Window
How to verify connected devices and channels:
1. Verify that all devices being recorded appear.
In Extension and VoIP environments, only devices mapped to channels appear in the eXpress Assistant. In trunk environments, devices do not have to be mapped; therefore all monitored devices appear.
2. Select a device to use for the rest of this test.
3. Click Next.
The User Mapping window appears.
4. Continue with Step 4: Verifying User Mapping on page 72.

71 Chapter 3: Using eXpress Assistant to Start Troubleshooting
NICE Perform eXpress Release 3.0: Troubleshooting Guide (Rev. A2)
Using the eXpress Assistant
Possible Pitfalls for Step 3
The following scenarios can occur as an outcome of Step 3.
• Not all devices appear in the list
Note that in Extension and VoIP environments, only devices mapped to channels appear in the eXpress Assistant. In trunk environments, devices do not have to be mapped; therefore all monitored devices appear.
What to do:
a. Open NICE Perform eXpress and click the Configuration tab.
b. In the Channel Mapping tab, add the devices to the list of Monitored Devices.
c. If necessary, map the devices to Channels.
• The selected device is mapped to a channel which is not functioning properly
The Channel Problem window appears.Figure 3-6 Channel Problem Window
Do one of the following:
• Correct the problem with the channel. Then click Repeat.
• Select a different device: Click Back.
• Troubleshoot: Click Troubleshooting . For a troubleshooting overview, see Navigating Troubleshooting Windows on page 76.
• Ignore the problem: Select Ignore this Problem. Then click Next. Continue with Step 4: Verifying User Mapping on page 72.

72 Chapter 3: Using eXpress Assistant to Start Troubleshooting
NICE Perform eXpress Release 3.0: Troubleshooting Guide (Rev. A2)
Using the eXpress Assistant
Step 4: Verifying User Mapping
This step must be preceded by Step 3: Verifying Connected Devices and Channels on page 70.
What is verified in this step:
• That the correct user is mapped to the selected deviceFigure 3-7 User Mapping Window
How to verify user mapping:
1. The User Name and User ID of the User mapped to the selected device are displayed. Verify that the expected user appears. Use the following guidelines:
• Fixed seating indicates that each agent is directly associated with an extension, in a one-to-one relationship.
• Free seating indicates that seating is dynamic. The user in this window is the agent currently logged in to the extension.
• N/A indicates that no agent is currently connected to (fixed seating), or logged in to (free seating) the extension. You can still test the channel for recording.
2. Click Next.
The Call Recording window appears.
3. Continue with Step 5: Recording a Test Interaction on page 73
Possible Pitfalls for Step 4
The following scenario can occur as an outcome of Step 4.
• No User or the User is incorrect
What to do:
a. Open NICE Perform eXpress and verify/correct one of the following:
• In the User Administration, correct the User definition.
• In the Configuration, change the extension mapped to the channel.

73 Chapter 3: Using eXpress Assistant to Start Troubleshooting
NICE Perform eXpress Release 3.0: Troubleshooting Guide (Rev. A2)
Using the eXpress Assistant
b. Troubleshoot: Click Troubleshooting . For a troubleshooting overview, see Navigating Troubleshooting Windows on page 76.
Step 5: Recording a Test Interaction
This step must be preceded by Step 4: Verifying User Mapping on page 72.
What is verified in this step:
• Incoming and outgoing interactions can be recorded on the selected deviceFigure 3-8 Interaction Recording Window
How to record a test interaction:
1. To test incoming interactions: From a different phone, dial the indicated extension.
-or-
To test outgoing interactions: From the indicated extension, dial to a different phone.
The progress of the interaction is shown.
2. Click Next.
The Searching Call window appears.
3. Continue with Step 6: Playing Back or Saving the Test Interaction on page 75
Possible Pitfalls for Step 5
The following scenario can occur as an outcome of Step 5.
• Progress does not advance
This indicates that the interaction was not automatically detected. You can search this or other devices for an interaction to test playback.
What to do:
a. Select Interaction was not detected.
b. Click Next.
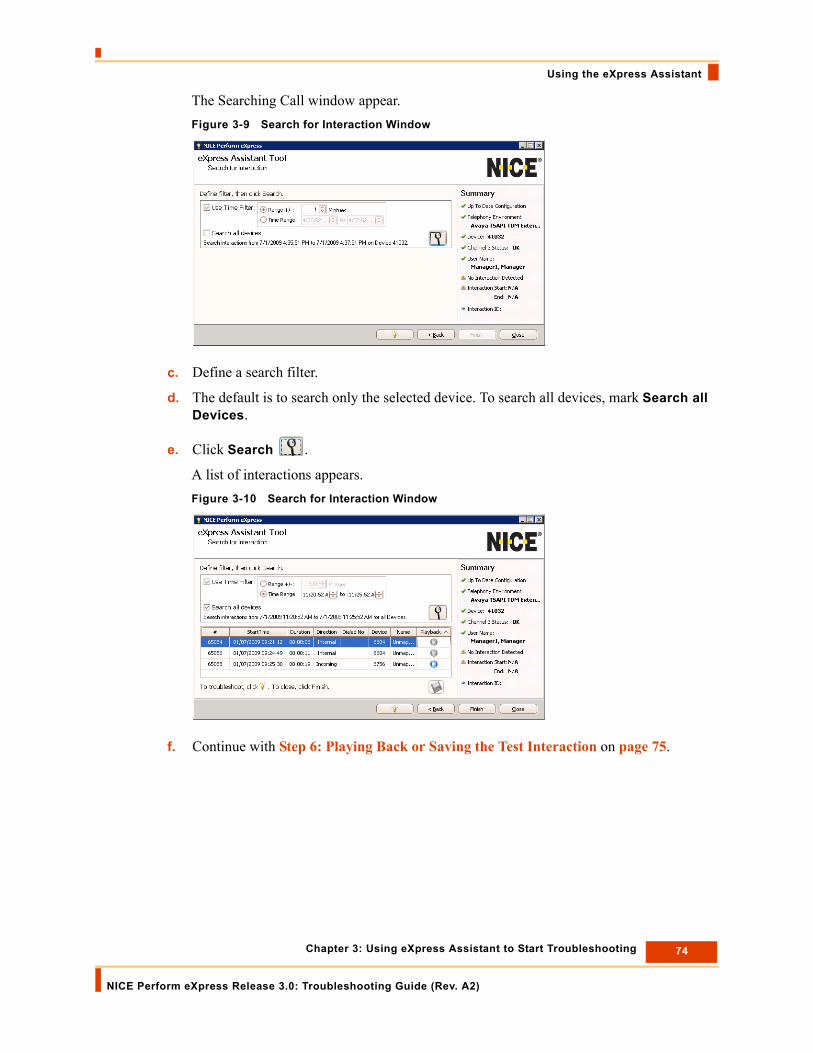
74 Chapter 3: Using eXpress Assistant to Start Troubleshooting
NICE Perform eXpress Release 3.0: Troubleshooting Guide (Rev. A2)
Using the eXpress Assistant
The Searching Call window appear.Figure 3-9 Search for Interaction Window
c. Define a search filter.
d. The default is to search only the selected device. To search all devices, mark Search all Devices.
e. Click Search .
A list of interactions appears.Figure 3-10 Search for Interaction Window
f. Continue with Step 6: Playing Back or Saving the Test Interaction on page 75.

75 Chapter 3: Using eXpress Assistant to Start Troubleshooting
NICE Perform eXpress Release 3.0: Troubleshooting Guide (Rev. A2)
Using the eXpress Assistant
Step 6: Playing Back or Saving the Test Interaction
This step must be preceded by Step 5: Recording a Test Interaction on page 73.
What is verified in this step:
• Listen to the interaction from the previous step, or save it to another location. You need a sound card to hear the interaction
Figure 3-11 Search for Interaction Window
How to play back or save an interaction:
1. To hear the interaction, select the interaction and click Play . A sound card must be installed on your machine. A playback window does not open.
2. To save the interaction, click Save .
3. To search for and play back or save other interactions, see Possible Pitfalls for Step 5 on page 73.
4. Click Finish.
Your NICE Perform eXpress has tested successfully.

76 Chapter 3: Using eXpress Assistant to Start Troubleshooting
NICE Perform eXpress Release 3.0: Troubleshooting Guide (Rev. A2)
Navigating Troubleshooting Windows
Navigating Troubleshooting WindowsTroubleshooting is initiated from within the eXpress Assistant. There are two basic troubleshooting windows. The contents of each window is dynamic and changes according to the current state and the choices you make in the Troubleshooting process. A sample of each window is shown below.Figure 3-12 Troubleshooting Window
The following options are available from all steps:
Restart Tool - return to the beginning of the eXpress Assistant.
Back to Tool - return to window from where you initiated troubleshooting.
Keyboard Shortcuts:
Backspace = Back to previous window
Enter = Next
Up arrow = Select the previous option
Down arrow = Select the next option
Troubleshooting Workflow
The Troubleshooting window presents a question to help the eXpress Assistant pinpoint the problem. Select one of the possible answers. Then click Next to advance to the next window.
Parametersfrom the eXpress Assistantthat are now being tested
Informativemessage
Question orInstructions
PossibleAnswersor Results

77 Chapter 3: Using eXpress Assistant to Start Troubleshooting
NICE Perform eXpress Release 3.0: Troubleshooting Guide (Rev. A2)
Navigating Troubleshooting Windows
Figure 3-13 Troubleshooting Window
Troubleshooting Solutions
The Troubleshooting window presents a list of recommended actions to correct the problem determined by the Troubleshooting Workflow. Use this list as a guideline in resolving open issues.Figure 3-14 Troubleshooting Window

78 Chapter 3: Using eXpress Assistant to Start Troubleshooting
NICE Perform eXpress Release 3.0: Troubleshooting Guide (Rev. A2)
Resolving Issues Found in eXpress Assistant
Resolving Issues Found in eXpress AssistantTable 3-1 provides an index of the suggestions that the eXpress Assistant offers at the end of the troubleshooting process. These suggestions are listed alphabetically and include a reference to more complete documentation for solving the issue.
Table 3-1: Resolving Issues in eXpress Assistant
Suggestion in eXpress Assistant How to...
Channel Status was not fully identified by the system. See the Troubleshooting Guide.
See Channel Not Recording on page 119 for a list of channel statuses.
Check for errors in NICE TDM Gateway service logs.
From the Start menu, select All Programs > NICE Perform eXpress > Tools > Services Configuration Manager. Right-click the NICE TDM Gateway log, and select Show Log.See Viewing the Service Logs on page 152.
Check for errors in the NICE Interaction Center logs (RCM).
From the Start menu, select All Programs > NICE Perform eXpress > Tools > Services Configuration Manager. Right-click the RCM log, and select Show Log.See Viewing the Service Logs on page 152.
Check for exceptions regarding the specific interaction.
See Checking Exceptions on page 121.
Check for monitor failures in the integration logs.
From the Log Viewer, open the CTI log, and search for the string “monitor failure”. See Finding Text Strings in Open Logs on page 162.
Check for network errors or high packet loss. Use a third-party application, such as Wireshark (http://www.wireshark.org/).
Check that the line is connected properly. Verify that the lines that connect the NICE Perform eXpress machine to the PABX are connected properly. See Verifying the PABX Configuration and Physical Line Connectivity on page 118.
Check the channel settings in the Channel Monitor application.
Adjust the Energy Threshold, Automatic Gain Control, and Manual Gain Control settings in the Channel Monitoring application. See the Administrator’s Guide for more information.
Check the integration logs for errors.
Check the limitations for the telephony environment at your site in the Installation Guide.
See the Installation Guide for your telephony environment.

79 Chapter 3: Using eXpress Assistant to Start Troubleshooting
NICE Perform eXpress Release 3.0: Troubleshooting Guide (Rev. A2)
Resolving Issues Found in eXpress Assistant
Check the NIC. If a NIC is not connected to the network, it must be disabled. Verify that all installed NICs are configured to Auto Negotiation. Auto Negotiation ensures that the maximum speed will be used.
Check the PABX configuration, physical line connectivity, regularity, and the distance from the Recording Unit.
• PABX configuration and physical line Connectivity: See the documentation from your PABX vendor and Verifying the PABX Configuration and Physical Line Connectivity on page 118.
• Regularity: See Verifying the Distance from the Recording Unit on page 118.
• Distance from Recording Unit: Each PABX has different requirements for the distance between the Recording Unit and the PABX. Verify the requirements for your site in the Installation Guides.
Check the wiring of the device. Contact the IT administrator, and ensure that the wiring is correct for the PABX.
Collect all log files and contact NICE support. From the Start menu, select All Programs > NICE Perform eXpress > Tools > Log Collector. After the Log Collector runs, you are prompted to save the ZIP file. Send this ZIP file to NICE support.See Collecting Logs on page 158.
Device wiring or mapping might be incorrect. Verify the configuration and wiring.
• Contact the IT administrator, and ensure that the wiring is correct for the PABX.
• In the Configuration application, on the Channel Mapping tab, verify that the channel mapping is correct for your site.
Go to the Channel Monitor application, and look for activity on other channels. Verify that the interaction you need was not recorded on a different channel. This can happen due to a channel mapping problem.
See the Administrator’s Guide for more information regarding monitoring channels.
Go to the Channel Monitor application, and play the last 5 minutes on channel <Channel ID>, and search for the interaction you need. Try to make another interaction and check if there's activity on the channel (Channel monitoring has a delay of 10-20 seconds).
See the Administrator’s Guide for more information regarding monitoring channels.
Table 3-1: Resolving Issues in eXpress Assistant (Continued)
Suggestion in eXpress Assistant How to...

80 Chapter 3: Using eXpress Assistant to Start Troubleshooting
NICE Perform eXpress Release 3.0: Troubleshooting Guide (Rev. A2)
Resolving Issues Found in eXpress Assistant
If this is a static IP environment, verify that the IP address is defined correctly in the Configuration application, on the Channel Mapping tab.
You need the IP address for your site.
If you recently changed the user mapping, it might take up to 10 minutes for NICE Perform eXpress to be updated with the new definitions. Try again later.
N/A
In the Channel Monitor application, check activity (on channel [Channel Name]) by playing the last 5 minutes and looking for the interaction.
See the Administrator’s Guide.
In the Channel Monitor application, check the channel settings.
See the Administrator’s Guide.
In the Configuration application, go to the CTI and Recording tab and verify that Source-Side Summation is configured correctly.
You need the Source-Side Summation setting for your site.
In the Configuration application, go to the CTI and Recording tab, and verify that the Recording Settings match those in the installation guide for your telephony environment.
You need the Recording Settings that are correct for your site.
In the Configuration application, go to the CTI and Recording tab, and verify the frame format configuration.
You need the Frame Format that is correct for your site.
In the Configuration application, go to the CTI and Recording tab, and verify the trunk configuration.
You need the trunk configuration that is correct for your site. See the Installation Guide for your telephony environment.
In the System Management application, go to the System Alerts area, and click Scan for errors and warnings. Verify that no new alerts are received.
See Understanding SNMP Messages and Settings on page 179.
No user is mapped to the device <Device ID>, or the agent is not logged on.
Go to the User Administration application, and edit the user definition to include the correct extension.
Table 3-1: Resolving Issues in eXpress Assistant (Continued)
Suggestion in eXpress Assistant How to...

81 Chapter 3: Using eXpress Assistant to Start Troubleshooting
NICE Perform eXpress Release 3.0: Troubleshooting Guide (Rev. A2)
Resolving Issues Found in eXpress Assistant
Restart the NICE Interactions Center service and try again.
From the Start menu, select All Programs > NICE Perform eXpress > Tools > Services Configuration Manager. Select the NICE Interactions Center service, and click the Start
button. See Starting and Stopping Nice Services on page 151.
Restart the NICE Perform eXpress system to refresh the channel.
Restart the NICE Perform eXpress machine. Verify that NICE services are up and running.
The interaction was mapped to the incorrect user.
Go to the User Administration application, and edit the user definition to include the correct extension or Agent ID.
The interaction was not mapped to a user. Go to the User Administration application, and edit the user definition to include the correct extension or Agent ID.
Trunk information is not mapped to a channel, and therefore it is not recorded.
See the Installation Guide for your telephony environment.
Try to play the interaction from the Interaction application. If the Player displays a white line, which indicates silence, there might be a line problem. Check channel status.
See the User’s Guide for more information regarding playback.
Verify that channels are mapped correctly. You need the correct channel mapping for your site. In the Configuration application, go to the Channel Mapping tab and verify the channel mapping.
Verify that device <Device ID> is configured for monitoring at your CTI provider.
Contact the IT administrator and ask him/her whether the CTI is configured for monitoring devices.
Verify the trunk configuration. See the Installation Guide for your telephony environment.
Table 3-1: Resolving Issues in eXpress Assistant (Continued)
Suggestion in eXpress Assistant How to...

Blank page for double-sided printing.

Chapter 4: Managing Interface Boards
NICE Perform eXpress Release 3.0: Troubleshooting Guide (Rev. A2)
83
4
Managing Interface Boards
The Board Numbering Tool is used for defining the Board ID of the DP6409-eh, PCM6409-eh, or DT6409-eh PCIe interface board.
The tool can also be used for locating and viewing details for all NICE Perform eXpress 3.0 PCIe interface boards, whether for extension-side, trunk-side, or dedicated trunk environments. This tool cannot be used for boards from NICE Perform eXpress 1.0.
Contents
Overview..........................................................................................................................84
Defining the Board ID.....................................................................................................85
Determining the Board ID ..............................................................................................87
Identifying the Physical Location of a Board...............................................................88

84 Chapter 4: Managing Interface Boards
NICE Perform eXpress Release 3.0: Troubleshooting Guide (Rev. A2)
Overview
OverviewWhen you access the Board Numbering Tool, all boards installed in the NICE Perform eXpress machine are displayed in the main window. The board details include:
• Board Type - Indicates the type of board (view only)
• Serial Number - Displays the serial number of the board (view only)
• Bus and Device - Displays the bus and device number (view only)
• Ports - Displays the number of channels that the board can support (view only)
• Board ID - The ID number of the board. See Defining the Board ID on page 85 and Determining the Board ID on page 87 for further information.
The Board Numbering Tool is used for:
• Defining the logical position (Board ID) of DP6409-eh, PCM6409-eh, and DT6409-eh PCIe interface boards. See Defining the Board ID on page 85.
• Identifying the logical position (Board ID) of all NICE Perform eXpress 2.1 PCIe interface boards. See Determining the Board ID on page 87.
• Identifying the physical positions (bus and device) of the boards (for all board types). See Identifying the Physical Location of a Board on page 88.
• Providing details for each board. For example, board type, number of ports, serial number.
IMPORTANT The PCM6409-eh, DP6409-eh and DT6409-eh boards may be received with or without a thumb wheel switch. If they are received with the thumb wheel switch, the logical position (Board ID) of the boards should still be defined using the Board Numbering Tool.

85 Chapter 4: Managing Interface Boards
NICE Perform eXpress Release 3.0: Troubleshooting Guide (Rev. A2)
Defining the Board ID
Defining the Board IDYou must run the Board Numbering Tool and define the Board ID position for each board:
• The first time you start up the NICE Perform eXpress machine, if your site is using a DP6409-eh, PCM6409-eh, or DT6409-eh PCIe interface board.
• If you are adding or removing a DP6409-eh, PCM6409-eh, or DT6409-eh PCIe interface board to an existing NICE Perform eXpress 2.1 machine.
To define the Board ID position:
1. From the Start menu, select NICE Perform eXpress > Tools > Board Numbering.
The Board Numbering Tool window appears.Figure 4-1 Board Numbering Tool Window
2. Select the board that you want to define. Then from the Board ID drop-down list, select a position for the board.Figure 4-2 Board ID Drop-Down List
NOTE: Although the PCIe interface boards that use the Thumb Wheel Switch are displayed, they are marked as disabled, and their Board ID cannot be changed. If there is an error in the Board ID of one or more of these boards, you must change the position by using the Thumb Wheel Switch located on the board itself.

86 Chapter 4: Managing Interface Boards
NICE Perform eXpress Release 3.0: Troubleshooting Guide (Rev. A2)
Defining the Board ID
3. Repeat step 2 for each board that you want to define.
4. Click Apply.
The Restart Service window appears.Figure 4-3 Restart Window
5. Click Yes, to restart the TDM Gateway service.
6. Click Close.
The Exit Confirmation window appears.Figure 4-4 Exit Confirmation Window
7. Click Yes.
IMPORTANT The board numbering must be continuous (starting from zero) and without duplication.In a mixed environment the Board IDs for both environments are numbered consecutively across both environments and without duplication.Example: If you have 2 boards, their Board IDs must be 0 and 1. They cannot be numbered 0 and 4, or 1 and 2.If you have two environments with one board each, the Board ID for one environment is 0 and for the other environment it is 1.
IMPORTANT • When installing NICE Perform eXpress 2.1 for the first time, you must restart the TDM
Gateway service before you can proceed to configure NICE Perform eXpress.
• For systems with existing NICE Perform eXpress 2.1 boards, if you do not restart the TDM Gateway service, the system configures according to the existing Board ID definitions.

87 Chapter 4: Managing Interface Boards
NICE Perform eXpress Release 3.0: Troubleshooting Guide (Rev. A2)
Determining the Board ID
Determining the Board IDWhen you access the Board Numbering Tool, all boards installed in the NICE Perform eXpress machine are displayed in the main window.
To determine the logical board position (Board ID):
• From the Start menu, select NICE Perform eXpress > Tools > Board Numbering.
The Board Numbering Tool window appears.Figure 4-5 Board Numbering Tool Window
The Board ID is the value that appears in the Board ID column.
If the Board does not have a value for Board ID, see Defining the Board ID on page 85.
Board ID

88 Chapter 4: Managing Interface Boards
NICE Perform eXpress Release 3.0: Troubleshooting Guide (Rev. A2)
Identifying the Physical Location of a Board
Identifying the Physical Location of a Board You can use the Board Numbering Tool to assist in identifying the physical location of boards in the NICE Perform eXpress machine. Each board is inserted into a PCIe slot. Use this procedure if you need to identify the bus and device location, or to easily identify the board(s).
To identify NICE Perform eXpress PCIe interface boards:
1. From the Start menu, select NICE Perform eXpress > Tools > Board Numbering.
The Board Numbering Tool window appears.Figure 4-6 Board Numbering Tool Window
2. Select the board that you want to physically identify, and click .
The board LED on the selected board starts to blink. In the Board Numbering Tool window, under the Board LEDs (On/Off) column, the light bulb is displayed in yellow. See Figure 4-7.
WARNING In order to view the PCIe slot locations, the cover of the NICE Perform eXpress machine must be removed.This procedure must only be performed by authorized personnel, following safety precautions.

89 Chapter 4: Managing Interface Boards
NICE Perform eXpress Release 3.0: Troubleshooting Guide (Rev. A2)
Identifying the Physical Location of a Board
Figure 4-7 Board LEDs (On/Off)
-or-
3. Click All LEDs ON.
The LEDs on all the boards start to blink, and on the Board Numbering Tool window, under the Board LEDs (On/Off) column, all the lightbulbs are displayed in yellow.
Displayed in Yellow when the Board LEDs are flashing.
Click here to cause all the board LEDs for all boards to start flashing.

Blank page for double-sided printing.

5
Testing PCIe Interface Boards
Contents
System Specifications and Requirements ...................................................................92Service Request Requirements .................................................................................92
Using the Board Diagnostic Tool ..................................................................................93
Common Scenarios........................................................................................................97Do You Suspect a False PASSED Test Result?.........................................................97System Cannot Boot ..................................................................................................98
Chapter 5: Testing PCIe Interface Boards
NICE Perform eXpress Release 3.0: Troubleshooting Guide (Rev. A2)
91

System Specifications and Requirements
System Specifications and RequirementsThis section describes the systems specifications and requirements.
• The following boards, in both PCI and PCI-e formats, are supported:
• NGX: 2400, 1600, 800
• LD: 2409, 1609, 809
• DT: 6409, 3209
• DP: 6409, 3209
• PCM: 6409, 3209
• By default, SmartWORKS 5.3 is installed during the NICE Perform eXpress installation. Verify that it is installed on the NICE Perform eXpress machine. SmartWORKS 5.3 is backwards compatible with SmartWORKS 5.2.
Service Request Requirements
When you send a Service Request to NICE, you must include the following information:
• NICE part number: NICE catalog number for the board.
• Manufacturer part number: AudioCodes catalog number for the board.
• Serial number: Identifying number for the board.
• Diagnostic report: Log file that is generated by the Board Diagnostic Tool. Note: If the system cannot boot, you cannot generate a report.
• Problem/failure details: Specific problem or failure of the boards. Example: Channels not functioning.
NOTE: DP, DT, and PCM boards with rotary switches are not supported.
92 Chapter 5: Testing PCIe Interface Boards
NICE Perform eXpress Release 3.0: Troubleshooting Guide (Rev. A2)

Using the Board Diagnostic Tool
Using the Board Diagnostic ToolThe Board Diagnostic Tool enables testing the functionality for PCIe Interface boards. By means of the tool, you can:
• Test one or more PCIe Interface boards in a chassis.
• Detect PCIe Interface boards.
• Generate a log file.
You use these functions to find out information regarding faulty boards. When a board is faulty, you open a Service Request with your local support representative. See Service Request Requirements on page 92.
When you suspect that a board is faulty, even though it has passed the tests in the Board Diagnostic Tool, you need to further investigate the problem before sending the board back to NICE. See Do You Suspect a False PASSED Test Result? on page 97.
Example Workflow
An example workflow for using the Board Diagnostic Tool is below:
You test several boards, and the Test Status of one board is Failed. You generate a log file and then remove the cover of the NICE Perform eXpress machine. You use the detect functionality of the tool to pinpoint the board whose LED is not blinking. You shut down the system, and then remove the board whose LED was not blinking. You verify that the serial number on the board matches the serial number of the failed board in the log file.
To use the Board Diagnostic Tool:
1. Close all applications.
2. Stop the Nice TDM Gateway service. For more information, see Starting and Stopping Nice Services on page 117.
3. From the Start menu, select All Programs > NICE Perform eXpress > Tools > Board Diagnostic Tool.
The Board Diagnostic Tool appears.
93 Chapter 5: Testing PCIe Interface Boards
NICE Perform eXpress Release 3.0: Troubleshooting Guide (Rev. A2)

Using the Board Diagnostic Tool
Figure 5-1 Board Diagnostic Tool
4. To test the boards, complete the following:
a. Select the boards to test.
To select a single board, select the checkbox next to the board name.
To select all the boards, click Select All.
To deselect all the boards, click Select None.
b. Click Start Test.
Note: The test may take several minutes. To stop the test manually, click Stop Test.
Test results appear, indicating whether or not the board Passed or Failed.
94 Chapter 5: Testing PCIe Interface Boards
NICE Perform eXpress Release 3.0: Troubleshooting Guide (Rev. A2)

Using the Board Diagnostic Tool
Figure 5-2 Board Diagnostic Tool Test Results
5. To detect the boards, complete the following:
a. Select the boards to detect.
To select a single board, select the checkbox next to the board name.
To select all the boards, click Select All.
To deselect all the boards, click Select None.
b. Click Start Detect.
The CR17 LED for each of the selected boards blinks.
Note: The CR17 LED is visible only after opening the chassis.
6. To generate a log file, click Save Log File.
The Save Log As window appears.
95 Chapter 5: Testing PCIe Interface Boards
NICE Perform eXpress Release 3.0: Troubleshooting Guide (Rev. A2)

Using the Board Diagnostic Tool
Figure 5-3 Save Log As Window
7. In the File name field, enter a name for the log file, and click Save.
A text file of the data in the Status Report area is saved.Figure 5-4 Log File
8. Click Exit to stop the Board Diagnostic Tool.
9. Start the Nice TDM Gateway service. For more information, see Starting and Stopping Nice Services on page 117.
10. If the board is faulty, open a Service Request with your local support representative. See Service Request Requirements on page 92.
96 Chapter 5: Testing PCIe Interface Boards
NICE Perform eXpress Release 3.0: Troubleshooting Guide (Rev. A2)

Common Scenarios
Common ScenariosDo You Suspect a False PASSED Test Result?
This section describes how to diagnose a faulty board that has passed the Board Diagnostic Tool. Before sending a PASSED board back to NICE, you must complete this diagnostic workflow.
Diagnostic Workflow
The diagnostic workflow for testing a board you suspect to be faulty is below:
1. Stop the TDM Gateway Service. See Starting and Stopping Nice Services on page 117.
2. Test the suspected board with the Board Diagnostic Tool.
3. (Spare board available) If the Test Status of the board is PASSED, replace this board with a spare board, if you have one.
4. If the system is now recording, re-install the original board. This step is necessary to confirm that the PASSED board is indeed faulty.
If the system stops recording, the board is faulty. Send the board back to NICE with a Service Request. See Service Request Requirements on page 92.
5. Start the TDM Gateway Service. See Starting and Stopping Nice Services on page 117.
Figure 5-5 summarizes this workflow:Figure 5-5 Diagnostic Workflow
97 Chapter 5: Testing PCIe Interface Boards
NICE Perform eXpress Release 3.0: Troubleshooting Guide (Rev. A2)

Common Scenarios
System Cannot Boot
Sometimes, when a board is faulty, the system cannot boot. In this case, before sending the board back to NICE, complete the troubleshooting procedure in this section. You need a spare board to complete this procedure.
To troubleshoot:
1. Install a spare board.
One of the following occurs:
• The system starts as expected. Proceed to Step 2.
• The system still does not boot. The problem is not the board. Keep investigating.
2. Install the suspected board a second time.
3. If the system still does not boot, send the board back to NICE with a Service Request. See Service Request Requirements on page 92.
98 Chapter 5: Testing PCIe Interface Boards
NICE Perform eXpress Release 3.0: Troubleshooting Guide (Rev. A2)

6
Troubleshooting Licenses
Licensing issues have three main sources:
• License Expired
• Channels Allocated Incorrectly
• Partitions Reformatted on NICE Perform eXpress Machine
To resolve these issues, it is necessary to contact your local support representative.
Contents
Licensing Overview......................................................................................................100
Resolving Licensing Issues ........................................................................................101
Contacting Support for Licensing Issues ..................................................................103
Chapter 6: Troubleshooting Licenses
NICE Perform eXpress Release 3.0: Troubleshooting Guide (Rev. A2)
99

Licensing Overview
Licensing OverviewIn the System Management application, the Licensing area in the System Settings tab displays the state of the license, the serial number of the NICE Perform eXpress, and the number of licensed channels. When the NICE Perform eXpress machine has connectivity to ExtraNICE, the Automatic Activation area enables activating a new license by means of the Product Key. The Manual Activation/Update area enables activating a license offline and updating the license status.Figure 6-1 Licensing Information
License information
License Information
License activation (new license)
File generation
100 Chapter 6: Troubleshooting Licenses
NICE Perform eXpress Release 3.0: Troubleshooting Guide (Rev. A2)

Resolving Licensing Issues
Resolving Licensing IssuesLicensing issues have three main sources:
• License Expired
• Channels Allocated Incorrectly
• Partitions Reformatted on NICE Perform eXpress Machine
To resolve these issues, contact your local support representative and send him/her the information listed in Contacting Support for Licensing Issues on page 103.
License Expired
When the license is expired, recording continues. However, you can only access the System Management and Configuration applications.
The license can be expired for a number of reasons. The reason for the expiration is noted in the License Information field. Figure 6-2 Licensing Information with Expired License
101 Chapter 6: Troubleshooting Licenses
NICE Perform eXpress Release 3.0: Troubleshooting Guide (Rev. A2)

Resolving Licensing Issues
Figure 6-3 Main Toolbar With No Access to Applications
Contact your local support representative and send him/her the information listed in Contacting Support for Licensing Issues on page 103.
Channels Allocated Incorrectly
This scenario occurs when there is more than one NICE Perform eXpress machine and the licenses need to be divided between them. Some or all of the licensed channels from one NICE Perform eXpress machine need to be transferred to a second machine. Contact your local support representative and send him/her the information listed in Contacting Support for Licensing Issues on page 103.
Partitions Reformatted on NICE Perform eXpress Machine
Reformatting partitions on a NICE Perform eXpress system sometimes requires re-licensing, as follows:
• Physical machine: When all the partitions on the NICE Perform eXpress machine are reformatted, it is necessary to re-license the system.
• Virtual machine: When one the partitions on the NICE Perform eXpress virtual machine is reformatted, it is necessary to re-license the system.
In the above cases, contact your local support representative and send him/her the information listed in Contacting Support for Licensing Issues on page 103.
Table 6-1: Reasons for License Expiration
Reason for Expiration Description
VM NICE Perform eXpress is running on a Virtual Machine and needs to be activated in order to play back interactions.
TS NICE Perform eXpress is accessed from a Terminal Server and needs to be activated in order to play back interactions.
Passed Expiration Date Trial period of 90 days is over.
System Time Changed Time was changed on the machine.
Clone Detected/Hardware Change NICE Perform eXpress software was copied to another machine, or the hardware, such as the motherboard, was changed.
102 Chapter 6: Troubleshooting Licenses
NICE Perform eXpress Release 3.0: Troubleshooting Guide (Rev. A2)

Contacting Support for Licensing Issues
Contacting Support for Licensing IssuesWhen contacting your local support representative for licensing issues, send him/her the following information:
• NICE Perform eXpress serial number
• Contact details of the person troubleshooting the license
• Log files. See Collecting Logs on page 124 to run the Log Collector.
• License Information File. To create a License Information File, in the System Settings tab, in the Manual Activation/Update area, click Generate.Figure 6-4 Generate License Information File
103 Chapter 6: Troubleshooting Licenses
NICE Perform eXpress Release 3.0: Troubleshooting Guide (Rev. A2)

Blank page for double-sided printing.

7
Troubleshooting Business Data
The Event Spy and CAPI Spy tools enable viewing the business data transferred from the Connection Manager to the driver and then from the driver to the Interactions Center, respectively. Troubleshooting business data in the Interactions Center comprises verifying that the business data is correctly defined.
Contents
Generating Reports with Transferred Business Data................................................106
Troubleshooting Business Data in the Interactions Center .....................................109
Chapter 7: Troubleshooting Business Data
NICE Perform eXpress Release 3.0: Troubleshooting Guide (Rev. A2)
105

Generating Reports with Transferred Business Data
Generating Reports with Transferred Business DataThe Integrations Dispatch service includes the Event Spy and CAPI Spy tools, which generate reports regarding business data transferred from the Connection Manager to the driver (Event Spy) and then from the driver to the Interactions Center (CAPI Spy).
To generate reports with transferred business data:
1. From the Start menu, select All Programs > NICE Perform eXpress > Tools > Services Configuration Manager.
The Services Configuration Manager opens.
2. Select the IntegrationsDispatch service, and click Advanced.
The Advanced Settings window appears.Figure 7-1 Advanced Settings Window
3. Select Event Spy and CAPI Spy, and then click OK.
4. Restart the IntegrationsDispatch service.
5. To verify that the business data was transferred from the Connection Manager to the driver, navigate to Programs > NICE Perform eXpress > CTI Tools, and select Event Spy.
106 Chapter 7: Troubleshooting Business Data
NICE Perform eXpress Release 3.0: Troubleshooting Guide (Rev. A2)

Generating Reports with Transferred Business Data
The transferred business data appears in the Business Data section.Figure 7-2 Events Spy
6. To verify that the business data was transferred from the driver to the Interactions Center, navigate to Programs > NICE Perform eXpress > CTI Tools, and select CAPI Spy.
107 Chapter 7: Troubleshooting Business Data
NICE Perform eXpress Release 3.0: Troubleshooting Guide (Rev. A2)

Generating Reports with Transferred Business Data
The transferred business data appears in the Business Data section.Figure 7-3 CAPI Spy
108 Chapter 7: Troubleshooting Business Data
NICE Perform eXpress Release 3.0: Troubleshooting Guide (Rev. A2)

Troubleshooting Business Data in the Interactions Center
Troubleshooting Business Data in the Interactions CenterYou cannot directly troubleshoot the business data in the Interactions Center component. Instead, you verify that the business data was correctly configured.
This section explains how to configure business data and covers the following topics:
• Overview
• Defining Business Data on page 110
• Deleting Business Data on page 113
Overview
Business Data fields can be added according to the following guidelines:
• The Name field is case-sensitive! It must exactly match the CTI field name. Take care to enter it correctly!
• The number of fields of each type and size is as follows:
• If you are defining a Text field, then select a Text Field Size according to the following guidelines:
• 1 character = 1 byte in the NICE Perform eXpress database.
• In Unicode systems, 1 character requires 2 bytes in the NICE Perform eXpress database.
Example: In a Unicode system, if you are receiving a field is that is 20 characters long, you will require a business data field that is 40 bytes.
• You must select a size that is equal to or greater than the actual or maximum size of the CTI field.
• The amount of fields of each size is limited. Once you define the maximum amount of fields for a size, you will no longer be able to select that field size.
• If you select a size that is smaller than the CTI field, information will be truncated.
Examples:
Field Type Text Field Size in bytes Number of Available fields
Number n/a 6
Text 20 6
Text 30 2
Text 40 8
Text 80 8
Text 120 2
109 Chapter 7: Troubleshooting Business Data
NICE Perform eXpress Release 3.0: Troubleshooting Guide (Rev. A2)

Troubleshooting Business Data in the Interactions Center
• You have 2 data fields that are 100 bytes each, select Text Field Type = 120 for each.
• You have 3 data fields that are 100 bytes each, select Text Field Type = 120 for 2 of the data fields. For the third data field, select Text Field Type = 80; the last 20 bytes of information will get truncated.
• IMPORTANT: In a Mixed Environment, only one set of Business Data fields is available. If you have two different CTIs, make sure to plan accordingly. Business Data fields used for one CTI will not be available for the other CTI.
Example: If you define 2 text fields of size 30 for the first CTI, there will not be a text field of size 30 available for the second CTI.
• Once you define a field, you can edit only its Alias and Assign to Role values. You cannot edit its Name, Field Type, or Text Field Size.
• If you delete a Business Data definition, you can later add the same CTI field as a new Business Data field with different parameters. However, all information from the first definition will be lost.
Example: You define a Business Data field for ibirthday with alias Birthday and field Number. You then delete this field and redefine ibirthday with alias Birth and field Text 20. All data received from the ibirthday field while ibirthday was defined as Number will be lost.
Where will you see Business Data?
The next time a user, whose Role has access to a Business Data field logs in:
• There will be an additional column in the Interactions application labeled with the field’s Alias name.
• When defining a query, there will be an additional field for the Business Data, according to the Alias name.
Defining Business Data
Use the following procedure to define Business Data fields.
To define Business Data:
1. On the CTI and Recording tab, scroll down to the Business Data Settings section.
2. Click Add .
110 Chapter 7: Troubleshooting Business Data
NICE Perform eXpress Release 3.0: Troubleshooting Guide (Rev. A2)

Troubleshooting Business Data in the Interactions Center
A new row appears.
3. In the Name field, enter the Name of the field exactly as it appears in the CTI. This field is case-sensitive!
4. In the Alias Name field, enter a user-friendly name. This is the name that will appear in queries and as a column heading in the Interactions window. The Alias Name can contain special characters and spaces.
5. To define a numeric field, select Number. The Text Field Size field becomes disabled. Continue with Step 6.
-or-
To define a text field, select Text. Then use these guidelines to select a Text Field Size.
• The amount of fields of each type and size is as follows:
• Select a Text Field Size that is equal to or greater than the size of the CTI field. If you select a size that is smaller than the CTI field, information will be truncated.
Example: The CTI field size is 30. You can select 40. Do not select 20; data will be truncated.
• Remember: The amount of fields of each size is limited. Once you define the maximum amount of fields for a size, you will no longer be able to select that size.
Example: Only two fields are available at size 120. Once you define two different fields as size 120, 120 will no longer appear in the drop-down list.
Type Size Available fields
Number n/a 6
Text 20 6
Text 30 2
Text 40 8
Text 80 8
Text 120 2
The Name field is case-sensitive!
1. Click Add to start a new row
2. Click Add aftercompleting theinformation
111 Chapter 7: Troubleshooting Business Data
NICE Perform eXpress Release 3.0: Troubleshooting Guide (Rev. A2)

Troubleshooting Business Data in the Interactions Center
• In a Mixed Environment, only one set of Business Data fields is available. If you have two different CTIs, make sure to plan accordingly. Business Data fields used for one CTI will not be available for the other CTI.
6. In the Assign to Role field, select the Roles who will have access to this field.
7. In the new row, click Add.
8. Repeat this entire procedure for each Business Data field.
9. Click Save to save your changes.
10. Click Apply to active your changes in the system. Recording is not interrupted.
112 Chapter 7: Troubleshooting Business Data
NICE Perform eXpress Release 3.0: Troubleshooting Guide (Rev. A2)

Troubleshooting Business Data in the Interactions Center
Deleting Business Data
If a Business Data field is deleted, then the following occurs:
• All filters in Quality Management rules based on the Business Data field are removed. The Quality Management rule that contained the Business Data field will remain.
• Data saved in the Business Data field will be lost. If the same field is later added again, the previous data will not be found.
To delete a Business Data field:
1. On the CTI and Recording tab, scroll down to the Business Data Settings section.
2. Select a row. Then click Delete .
A Confirmation message appears.
3. Click OK.
4. Click Save to save your changes.
5. Click Apply to active your changes in the system. Recording is not interrupted.
The Business Data field is deleted.
113 Chapter 7: Troubleshooting Business Data
NICE Perform eXpress Release 3.0: Troubleshooting Guide (Rev. A2)

Blank page for double-sided printing.

8
Verifying Recording
Contents
Understanding the Recording Data Flow ................................................................... 116
Verifying PABX Issues.................................................................................................. 118Verifying the PABX Configuration and Physical Line Connectivity ........................... 118Verifying the Distance from the Recording Unit ....................................................... 118Verifying the Distance from the Recording Unit ....................................................... 118
Channel Not Recording................................................................................................ 119
Checking Exceptions ...................................................................................................121
Chapter 8: Verifying Recording
NICE Perform eXpress Release 3.0: Troubleshooting Guide (Rev. A2)
115

Understanding the Recording Data Flow
Understanding the Recording Data FlowThis section describes the data flows for recording with and without a CTI.
Recording Data Flow with a CTI
The data flow for recording with a CTI is as follows:
1. The Telephony Integration receives CTI information from the telephony, such as Call Start Time, Caller ID, Dialed Number, and Direction (incoming, outgoing, internal).
2. The Telephony Integration reports to the Interactions Center, which maps the CTI information with the agent and channel associated with the interaction.
3. In parallel to Step 2, the Recording Unit records the audio of the interaction.
4. The Interactions Center enters the CTI, agent, and channel information for the interaction into the Database.
Figure 8-1 Recording Data Flow with a CTI
116 Chapter 8: Verifying Recording
NICE Perform eXpress Release 3.0: Troubleshooting Guide (Rev. A2)

Understanding the Recording Data Flow
Recording Data Flow without a CTI (Line Signaling)
The data flow for recording without a CTI is as follows:
1. The Recording Unit captures events, such as On/Off Hook and DMTF, and identifies activity on the line.
2. The Recording Unit reports this information to the Line Signaling Decoder, which creates an interaction and maps this information to the Caller ID, Dialed Number, and Direction (incoming, outgoing, and internal).
3. The Line Signaling Decoder sends the interaction information to the Interactions Center, which maps it to an agent and channel information.
4. The Interactions Center enters the agent, interaction, and channel information into the Database.
Figure 8-2 Recording Data Flow without a CTI (Line Signaling)
117 Chapter 8: Verifying Recording
NICE Perform eXpress Release 3.0: Troubleshooting Guide (Rev. A2)

Verifying PABX Issues
Verifying PABX IssuesThis section comprises the following topics:
• Verifying the PABX Configuration and Physical Line Connectivity on page 118
• Verifying the Distance from the Recording Unit on page 118
Verifying the PABX Configuration and Physical Line Connectivity
You verify the PABX configuration and the physical line connectivity together. This section describes the ways to verify the configuration and connectivity for analog extensions, digital extensions, and trunks.
Analog Extensions - Verifying the Configuration and Connectivity
With analog extensions, there are phone lines and non-phone lines. Sometimes, the PABX is configured for phone lines, and the extensions are configured for non-phone lines and vise versa. From the System Management application, on the System Status tab, verify that no system alerts appear in the System Alerts area. See SNMP Messages on page 179 for more information.
(NICE Perform eXpress 1.0 Boards) On the board, verify that the jumper settings are correct for your recording type. The NICE Perform eXpress 1.0 Installation Guides include the jumper settings for non-phone lines.
Digital Extensions - Verifying the Configuration and Connectivity
• From the Configuration application, verify that the following settings match those documented in the Installation Guides:
• On the Telephony Environment tab, verify that the correct telephony environment is selected.
• On the CTI and Recording tab, verify that the board is connected to the correct PABX.
• On each board, verify that the DIP switch settings are correct. See the Installation Guides for the correct DIP switch settings.
Trunks - Verifying the Configuration and Connectivity
• Contact the IT administrator, and from the Configuration application, on the CTI and Recording tab, verify that each recording setting is correct for the PABX.
• (More than one trunk) Check the board ID and trunk settings to verify that each trunk is connected to the correct board.
• On each board, verify that the DIP switch settings are correct. See the Installation Guides for the correct DIP switch settings.
Verifying the Distance from the Recording Unit
The Recording Unit must be connected a certain distance from the PABX. See the Installation Guides for your site for the correct distance.
118 Chapter 8: Verifying Recording
NICE Perform eXpress Release 3.0: Troubleshooting Guide (Rev. A2)

Channel Not Recording
Channel Not RecordingThis section lists the possible channel status for VoIP and TDM channels. The channel status appears in the Channel Monitor application in the Status column.Figure 8-3 Channel Status in the Channel Monitor Application
VoIP Channel Status
The following channel statuses related to VoIP channels might appear.
Channel Status
Channel Status Description Suggested Action
Channel Critical Error
Critical error occurred on the channel. Collect all log files and contact your Customer Support. See Collecting Logs on page 124.Restart the system to refresh the channel.
Export Error Some or all of the channels failed to export buffers to the NICE Perform eXpress.
General Error IP Capture General error.
OK No channel error.
Reception Error IP Capture data reception error. Check the NIC.
119 Chapter 8: Verifying Recording
NICE Perform eXpress Release 3.0: Troubleshooting Guide (Rev. A2)

Channel Not Recording
TDM Channel Status
The following possible channel statuses related to TDM channels might appear. If one does appear, verify the PABX configuration, physical line connectivity, and the distance from the NICE Perform eXpress system.
Channel Status Description
AIS Alarm Indication Signal. Signal with the digit “one” only, indicating an alarm on the far end (PABX).
Channel Indicators timeout
No phone indicators (LED, display…) where received for the last 30 minutes. The line most probably cannot function properly.
Frame error Frame found with errors.
Frame loss Frame was not found.
Line Error Indicates a problem with the line (Synchronization, loss problem, etc.)
Multiframe alignment was lost
Loss of multiframe alignment signal.
No Multiframe Synchronization
No synchronization on Multiframe level due to multiframe error or loss.
No Signal No input signal. Check line connectivity. See Verifying the PABX Configuration and Physical Line Connectivity on page 118.
No Signaling Capabilities are Available
OK No channel error.
RAI Remote Alarm Indication. Sent by the far end (PABX), indicating a problem with the signal it is receiving from the local end (ETAI-III board).
RS Receiver SLIP (time discrepancy)
Signal is Unbalanced Positive and negative signal peaks are not equal.
Signal was lost No input signal. Check line connectivity. Verifying the PABX Configuration and Physical Line Connectivity on page 118.
Unknown Status
XS Transmitter SLIP (time discrepancy) - ISDN only.
120 Chapter 8: Verifying Recording
NICE Perform eXpress Release 3.0: Troubleshooting Guide (Rev. A2)

121 hapter 8: Verifying Recording
Checking Exceptions
s and not directly to the interaction IDs. In tails and the related recording (which
Recommended Action
Check the driver or PABX.Collect the driver and CLS log files.
C
NICE Perform eXpress Release 3.0: Troubleshooting Guide (Rev. A2)
Checking ExceptionsQuery the database to see the exceptions. Most of the time exceptions are connected to recordingorder to see the connection between an exception and interaction ID, query both the exception deincludes the interaction ID).
To check the CLS Exceptions in the Database:
1. Query the tblInteractionCatalog table to check for which period the calls occur.
2. Get all the exceptions related to interactions:
SELECT * FROM tblExceptionXX, tblInteractionXXWHEREtblExceptionXX.iInteractionID = tblInteractionXX.iInteractionID
3. Get all exceptions related to recordings:
SELECT * FROM tblExceptionXX, tblRecordingXXWHEREtblExceptionXX.iRecordingID = tblRecordingXX.iRecordingID
4. Check the vcExceptionDetail field in tblException.
5. See Table 8-1 for a list of exceptions, their possible cause, and the recommended action.
Table 8-1: List of Exceptions
ID Exception Short Description Meaning Possible Cause
1 Duplicate call start. Duplicate start of call – another call with the same call key has started while this call was open.
Problem with the driver or PABX reports.

122 hapter 8: Verifying Recording
Checking Exceptions
Check if the value of the Call Server parameter op_MaxOpenCallDuration matches the length of calls in the site.
Check that the driver is up.Review the driver log files, look for errors. If there is no error no action is needed.
N/A
Check the driver or PABX.Review the driver log files, look for errors. If there are errors, collect the driver and CLS log files.
N/A
Recommended Action
C
NICE Perform eXpress Release 3.0: Troubleshooting Guide (Rev. A2)
2 Maximum duration exceeded.
Call too long – the call was open for more seconds than the value of the registry parameter MaxOpenCallDuration and was therefore forcibly closed.
Either the call was longer than the parameters value, or there is a problem with the driver or PABX reports.
3 Call flushed while open.
Call flushed – a flush command was executed while the call was open.
The driver may have gone down and come up.
4 N/A N/A N/A
5 Call start not reported.
End call without start (Default Start Time).
Problem with the driver or PABX reports.Could be followed by reports with exp02 because the start and end call reports have different information.
6 N/A N/A N/A
Table 8-1: List of Exceptions (Continued)
ID Exception Short Description Meaning Possible Cause

123 hapter 8: Verifying Recording
Checking Exceptions
Could be caused by unclosed recorded calls. Check for exp02 calls. If there is a substantial amount of calls with these exceptions, check the RCM logs for Logger disconnections (Logger down) and if channels were allocated after connection reestablished with Logger. Relevant for voice and screen resources.
Check the Logger. Check the network connectivity between the Logger and the CLS.Check the RCM logs.
Collect the Integration and CLS log files.
Check if it is physically possible to logout during a call.Collect the Integration and CLS log files.
Check if the parameter value meets the requirements of the site. Look for calls with exp02 to see if there is a problem with the call reports.
Recommended Action
C
NICE Perform eXpress Release 3.0: Troubleshooting Guide (Rev. A2)
7 No available recording resource.
No available recording resource.
There are not enough recording channels to handle the number of recording requests in the site.
8 Logger not responding.
Logger not responding. Problem with Logger or connection to Logger.
9 Unspecified recording failure.
Unspecified recording failure.
Unknown failure cause. Received from the RCM.
10 Agent logout during call.
Agent logout during the call. Problem with the driver or PABX call or logout reports.
11 Too many calls for agent/extension.
MaxExtentionOpenCall - too many open calls for the same agent/extension when compared to the op_MaxCallPerExt registry parameter.
The agent had more simultaneous open segments than the parameter value.Could be a problem with the driver or PABX call reports.
Table 8-1: List of Exceptions (Continued)
ID Exception Short Description Meaning Possible Cause

124 hapter 8: Verifying Recording
Checking Exceptions
• Collect the Integration and CLS log files.
• Sub-exception 12 310 indicates the Logger is down.
• Sub-exception 12 1702 indicates no VoIP audio due to a configuration problem. This is dependant on the VoIP integration. Check the configuration, the forwarding data passed to the Capture (RCM logs), the Capture logs, as well as the forwarding device configuration. For example, no audio is received if no or wrong forwarding information is passed to Capture, or if the audio is not forwarded by the telephony switch/forwarding device.
Check the NiceScreen Logger and ScreenAgent. Check the RCM logs for errors when calling screen capture to start record.
Recommended Action
C
NICE Perform eXpress Release 3.0: Troubleshooting Guide (Rev. A2)
12 Voice recording failed.
Voice recording failed. Error code received from the telephony server or if RCM was down on start of Call. If this appears as e12 check the sub-exception ID for more information.
13 Screen Logger not responding.
Screen logger not responding.
Logger is down or network issue.
Table 8-1: List of Exceptions (Continued)
ID Exception Short Description Meaning Possible Cause

125 hapter 8: Verifying Recording
Checking Exceptions
• Check the NiceScreen Logger.
• Check the RCM logs.
• Sub-exception 14 1002 indicates an error was received during screen recording. Either ScreenAgent was disconnected from the Interactions Center or ScreenAgent recording failed. Partial recording (up until the time of the error) may be available.
• Sub-exception 14 4 indicates there was an unspecified failure.
Switch the logs to DEBUG.Check channels configuration. See if there is a mapping configured for this call. Check the RCM logs.Check what the RCM received in the Start request.
If the allocation mode is by IP address then check if the agent logged in. Check ports. Verify in RCM logs that the start request for recording the agent's screen contained the screen agent's IP.
Recommended Action
C
NICE Perform eXpress Release 3.0: Troubleshooting Guide (Rev. A2)
14 Screen recording failed.
Screen recording failed. An Error code that might indicate RCM was down on start of Call.If this appears as e14, check the sub-exception ID for more information.
15 Unmapped voice recording.
Unmapped voice recording. Problem in the voice channel configuration.
16 Unmapped screen recording.
Unmapped screen recording. The recording request was received with empty Station or IP address (depends on the screen allocation mode).
Table 8-1: List of Exceptions (Continued)
ID Exception Short Description Meaning Possible Cause

126 hapter 8: Verifying Recording
Checking Exceptions
Check Logger for possible reasons for temporary failures.
Check reason for Call Server failure. Collect CLS logs, event viewer and CPU Performance Monitor.
N/A
No action is needed if there was indeed a short call; otherwise collect CLS and driver log files.If the request was for 2 medias, try to understand the recording problem with the first media. Check the RCM logs.Check the Call Server logs.
N/A
N/A
Recommended Action
C
NICE Perform eXpress Release 3.0: Troubleshooting Guide (Rev. A2)
17 Voice recording retry. Recording voice succeeded only after retry (partial retry).
May be a temporary failure on the Logger.
18 Call Server service shutdown.
Call Server was down during the call.
Call Server was down.
19 N/A N/A N/A
20 Logger not responding.
The Logger did not respond to the start record command.
Stop record command arrived before a response for the start record request arrived. This may occur for one of the following reasons:
• The call was very short (1 or 2 seconds).
• The request was for 2 medias.
• Success in both was required (usually QA).
• One media failed immediately.
• Stop record is sent for both medias.
21 N/A N/A N/A
22 N/A N/A N/A
Table 8-1: List of Exceptions (Continued)
ID Exception Short Description Meaning Possible Cause

127 hapter 8: Verifying Recording
Checking Exceptions
No action is needed if there was indeed a short call; otherwise collect CLS and driver log files.If the request was for 2 medias, try to understand the recording problem with the first media.Check the RCM logs.Check the Call Server logs.
No action is needed if there was indeed a short call; otherwise collect CLS and driver log files.If the request was for 2 medias, try to understand the recording problem with the first media.Check the RCM logs.Check the Call Server logs.
Collect CLS and driver log files.Check the Call Server logs.
Recommended Action
C
NICE Perform eXpress Release 3.0: Troubleshooting Guide (Rev. A2)
23 Call start not reported.
Stop record without start (screen or voice).
Usually happens with very short calls.The request was for 2 medias. Success in both was required (usually QA). One media failed immediately. Stop record was sent for both medias.Or may be an internal problem.
24 Error in stop record request.
Stop record with wrong ID.No start call request was found with this CLS Call ID.
Usually happens with very short calls.The request was for 2 medias. Success in both was required (usually QA). One media failed immediately. Stop record was sent for both medias.Or may be an internal problem.
25 Too many requests for channel.
Too many recording requests for the same Logger and channel (more than 30).
May occur due to a problem with the driver or PABX call reports – calls are not closed.
Table 8-1: List of Exceptions (Continued)
ID Exception Short Description Meaning Possible Cause

128 hapter 8: Verifying Recording
Checking Exceptions
Collect CLS logs, event viewer and CPU Performance Monitor.Check the RCM logs.Check the reason that the RCM went down.
Check the driver or PABX. Collect CLS and driver log files.Check the RCM logs for a long period in DEBUG mode.
See if the configuration meets the site needs. If not change it. Collect CLS and driver log files.Restart RCM.Check the RCM logs. Could be a problem with the driver or PABX reports.
Check the driver or PABX. Collect CLS and driver log files.
Collect CLS log files.Check why Call Server was closed.
Recommended Action
C
NICE Perform eXpress Release 3.0: Troubleshooting Guide (Rev. A2)
26 RCM service down during call.
RCM was down during the call.
RCM was down.
27 Error on complete interaction start.
The contact started after its segment.
Problem in the driver or PABX call or logout reports.
28 No available recording resource.
No available recording resource. The RCM (Resource Call Manager) cannot allocate more resources for this initiator.
Not enough Logger recording channels.Bad resource management configuration.There maybe a problem with calls that are not closed and therefore resources are not being freed up.
29 Error on complete interaction close.
Segment was open when the contact closed.
Could be a problem with the drivers or PABX call reports.
30 Time Interval recording aborted.
Block dummy call was closed due to a Call Server restart.
Call Server restarted.
Table 8-1: List of Exceptions (Continued)
ID Exception Short Description Meaning Possible Cause

129 hapter 8: Verifying Recording
Checking Exceptions
Collect CLS log files.Check why the client was disconnected. Check the Call Server logs.
N/A
No action required.
Collect CLS log files.Check the Call Server logs.
Collect CLS logs, event viewer and CPU Performance Monitor.Check the RCM logs.
Collect CLS and driver log files.Check the maximum business data length, change it in the DB and restart the CLS.
Recommended Action
C
NICE Perform eXpress Release 3.0: Troubleshooting Guide (Rev. A2)
31 Client disconnect. Client was disconnected during the open block.
Client was disconnected.
32 N/A N/A N/A
33 Stop on demand not by initiator.
Stop on demand was performed on the interaction recording by a client who was not the recording initiator.
Stop on demand was performed on the interaction recording by a client who was not the recording initiator.
34 Invalid call time report.
Time field was changed by the DB Server. Interaction was inserted with time value lower then 1970. Stop time was lower than start time.
Call Server error. Illegal time parameters were reported.
35 RCM service not responding.
The Call Server received a timeout error on the request to the RCM.
RCM is too busy.Internal RCM error.Event caused the RCM not to respond, for example, detected many Loggers initializing.
36 Business data value too long.
String field was truncated by the DB Server. Call Server sent a string longer than allowed by the DB schema.
Business data length is incorrectly specified.
Table 8-1: List of Exceptions (Continued)
ID Exception Short Description Meaning Possible Cause

130 hapter 8: Verifying Recording
Checking Exceptions
• Run a sniffer to check if packets were coming in.
• Collect CLS and Logger log files.
• Check for channel mapping failures.
• Check the RCM logs for the allocated channel.
• Check the Capture logs.
Check that the device in the Update VoIP sent from driver is mapped.
No action required.
Check the Call Server logs.
Recommended Action
C
NICE Perform eXpress Release 3.0: Troubleshooting Guide (Rev. A2)
37 Failed to record VoIP. Failed to record. Audio not found in VoIP recording.
This usually results from a failure to sniff VoIP packets by the Logger.After the Start command to the Logger, the RCM waits 2.5 seconds and checks if the audio packets were received.
38 Failed to update VoIP data.
Update VoIP (which updates the IP for an open request and its participant) sent by the Driver failed.
Occurs, for example, when the update is for an unmapped device or a closed request, or because the update was not received by the RCM.
39 Complete interaction handled on multiple servers.
Split Contact - Segments for contact handled on more than one Interactions Center.
Interaction Router could not find mapped segment on the Interactions Center that was selected for the other open segment under the same contact.
40 Recording time mismatch.
Recording Time Mismatch – recording time was out of call time range.
Problem with integration. Calls may be reported late to the CLS when the system is under stress.
Table 8-1: List of Exceptions (Continued)
ID Exception Short Description Meaning Possible Cause

131 hapter 8: Verifying Recording
Checking Exceptions
Ensure the user exists and is defined in the DB.
Recommended Action
C
NICE Perform eXpress Release 3.0: Troubleshooting Guide (Rev. A2)
41 Unknown Initiator. At the start of the call, the initiator participant has no User ID, that is, the User ID was not found in the UserAdmin Database.
User is not defined under UserAdmin.
Table 8-1: List of Exceptions (Continued)
ID Exception Short Description Meaning Possible Cause

Blank page for double-sided printing.

9
Verifying Archiving
.
Contents
Understanding the Archiving Data Flow.....................................................................134
Archiving and Backup Troubleshooting Issues ........................................................135Archiving Troubleshooting........................................................................................135Backup Troubleshooting...........................................................................................139
Chapter 9: Verifying Archiving
NICE Perform eXpress Release 3.0: Troubleshooting Guide (Rev. A2)
133

Understanding the Archiving Data Flow
Understanding the Archiving Data FlowIn the NICE Perform eXpress system, all interactions are archived. The data flow for archiving interactions with NICE Perform eXpress is as follows:
1. The Rule Engine collects interactions that need to be archived and creates a task in the Database to archive these interactions.
2. The Storage Center reads the task from the Database.
3. The Storage Center gets the audio stored on the Recording Unit.
4. The Storage Center saves the audio to a remote storage path or to an ESM.
5. If there is a backup device, the audio is continuously backed up to this device.Figure 9-1 Archiving Data Flow
134 Chapter 9: Verifying Archiving
NICE Perform eXpress Release 3.0: Troubleshooting Guide (Rev. A2)

Archiving and Backup Troubleshooting Issues
Archiving and Backup Troubleshooting IssuesMost archiving issues, such as an error in archiving recorded interactions, appear as an SNMP message in the System Management application. See SNMP Messages on page 179 for suggested actions if an SNMP message appears.
Other issues, however can be solved before contacting your local support representative. These issues are described in this section.
• Archiving Troubleshooting on page 135
• Backup Troubleshooting on page 139
Archiving Troubleshooting
In the System Management application, the System Status tab summarizes pertinent archiving and storage information. See Understanding Displayed System Information in the next section. If you see that there is not enough storage space available, create another Remote Storage Path on a partition with free space. See the Installation Guide of your telephony environment for more information.
Understanding Displayed System Information
The System View area summarizes the information relevant to the recording environment. When data in the System View area needs the attention of the system administrator, it is displayed in orange or red, depending on whether a warning or critical threshold was reached.Figure 9-2 System View Area
Table 9-1 describes the information in the System View area.
Table 9-1: Information in System View
Information Description
Environment Telephony environment and CTI name.
Recording Unit • Number of interactions recorded in the last 24 hours.
• Date and time of the last recorded interaction.
• Name of the board, if installed. If no board is installed, None appears.
135 Chapter 9: Verifying Archiving
NICE Perform eXpress Release 3.0: Troubleshooting Guide (Rev. A2)

Archiving and Backup Troubleshooting Issues
Channels • Number of mapped channels out of the total number of available channels. Example: 4/75 mapped channels means that4 channels are mapped out of 75 available channels.
• Channel Status: Describes the status of the channels. When an error occurs, the problmatic status appears in red. Go to the Channel Monitor application to verify the problem.
• Number of users assigned to an extension through the User Administration application. Example: 5 mapped users means that 5 users are assigned extensions.
Database Percentage of space used by each component in the database.
Device • Percentage of space used by each drive on the NICE Perform eXpress machine.
• Information regarding the backup device, if enabled.
Storage Storage area of the system. More than one NICE Perform eXpress system might be attached to the same partition. With an ESM storage type, the data stored on this partition is later moved to the ESM. With remote storage, the data remains on this partition:Important: The Free and Archived values refer to the size of the interactions data and do not include other files on the partition.Parameters included in this area are:
• Total: Size of entire space available on the partition.
• Free: Size of remaining free storage space on the partition after archiving by all NICE Perform eXpress systems that are attached to this storage space.
• Archived: Size of the storage space used by the current NICE Perform eXpress system. Note: 100 MB is the smallest size displayed.
• Last archived call: Date and time when the interaction listed in the Archive time column actually occurred.
• Archive time: Date and time when the interaction listed in the Last archived call column was saved to the configured storage path.
• Archive Statistics: Link to a report that summarizes information regarding Retention Rules.
Important: Make sure that the time difference between the Last archived call and the Archive time stays relatively constant. If the time changes drastically, there could be an archiving backlog.
Table 9-1: Information in System View (Continued)
Information Description
136 Chapter 9: Verifying Archiving
NICE Perform eXpress Release 3.0: Troubleshooting Guide (Rev. A2)

Archiving and Backup Troubleshooting Issues
Differences in Data Retention according to Storage Type
Depending on whether you are using an ESM or remote storage, NICE Perform eXpress responds differently when the partition reaches its capacity.
For ESMs: When the partition reaches its capacity, oldest interactions are automatically deleted.
For remote storage: When the partition reaches its capacity, one of the following occurs:
• Oldest interactions are automatically deleted.
• If the retention period is still in effect, new interactions are not stored.
In the System Status tab, in the Storage column, the Free value displays exactly the size of storage space left for all the systems together in the configured storage path.
Alerts in the System View Area
When the data displayed in the System View area needs the attention of a system administrator, the data is displayed in orange or red, depending on whether a warning or critical threshold was reached. In Table 9-2, the warning and critical thresholds for displayed information are listed.
Table 9-2: Warning and Critical Thresholds
Area Information Title Warning Alert Threshold (Orange)
Critical Alert Threshold (Red)
Recording Unit Last 24 hours When 0 calls are recorded.
Last recorded call When N/A or if the last recorded call was more than 24 hours ago.
Database Interactions When the value is: > or = 95.
Administration When the value is:> or = 80 but < 95.
When the value is:> or = 95.
Audit Trail When the value is:> or = 80 but < 95.
When the value is:> or = 95.
Rules When the value is:> or = 80 but < 95.
When the value is:> or = 95.
Storage When the value is:> or = 80 but < 95.
When the value is:> or = 95.
Device Status Error
When the value is:> or = 90 but < 95.
When the value is:> or = 95.
137 Chapter 9: Verifying Archiving
NICE Perform eXpress Release 3.0: Troubleshooting Guide (Rev. A2)

Archiving and Backup Troubleshooting Issues
Backup Device Tasks and Statuses
When a backup device is enabled, its current task and status appear in the System View area in the Device column.Figure 9-3 Device Column
Backup Device Task
The task of the backup device is its currently assigned function. A backup device can perform one of the following tasks:
• Archiving: Device is saving interactions from the Recording Unit to its recording media.
• Retrieval: Device is accessing interactions from its recording media and transferring them to the Recording Unit for playback.
• None: No archiving or retrieval is taking place, or the backup device is disabled.
Backup Device Statuses
The different backup device statuses are described in the table below:
Storage Total/Free/Archived Less than 2% of total free space.
Last archived call Older than 1 day.
Archived time Older than 1 day.
Table 9-3: Backup Device Statuses
Status Description
Archiving Device is archiving data from the Recording Unit to the recording media.
Table 9-2: Warning and Critical Thresholds
Area Information Title Warning Alert Threshold (Orange)
Critical Alert Threshold (Red)
Current task of the backup device
Status of backup device
138 Chapter 9: Verifying Archiving
NICE Perform eXpress Release 3.0: Troubleshooting Guide (Rev. A2)

Archiving and Backup Troubleshooting Issues
Backup Troubleshooting
USB Tapes Not Detected
When NICE Perform eXpress does not detect USB tapes, check that the certified drivers are installed for the tapes and that no other backup devices are installed.
To troubleshoot USB tapes not detected by the system:
1. Check that certified drivers are installed for the USB tapes.
2. Additional installed backup devices prevent the detection of USB tapes. Check that no DVD-RAM devices or SCSI/IDE tapes are connected to the NICE Perform eXpress machine.
SCSI Tapes Not Detected
When NICE Perform eXpress does not detect SCSI tapes, make sure that no DVD-RAM devices are connected to the machine.
Cannot Append Old Media Media with data from a previous version of the Recording Unit is in the device, and it cannot be appended.
Cleaning Cleaning media is inserted in the device.
Closing Device is ejecting the media.
Empty No media is in the backup device.
Error Error in the device or in the recording media.
Loading for Reading Device is loading the media before retrieving data from it.
Loading for Write Device is loading the media before archiving to it.
None No archiving or retrieval is taking place.
Ready for Reading Device is ready for retrieval requests.
Ready for Write Device is ready to archive, but there is no data on the Recording Unit.
Recovering The media did not eject properly, and the device is attempting to recover data from the media.
Retrieving Device is retrieving data from the media and transferring it to the Recording Unit for playback.
Waiting for User Eject DVD media is full, and the administrator needs to eject it. (Shown only for DVD media)
Table 9-3: Backup Device Statuses (Continued)
Status Description
139 Chapter 9: Verifying Archiving
NICE Perform eXpress Release 3.0: Troubleshooting Guide (Rev. A2)

Archiving and Backup Troubleshooting Issues
To troubleshoot SCSI tapes not detected by the system:
• Installed DVD-RAM devices prevent the detection of SCSI tapes. Check that no DVD-RAM devices are connected to the Backup Server.
Other Backup Issues
When browsing in the My Computer folder, do not browse in the removable disk drives or CD drives as this might interrupt archiving.
140 Chapter 9: Verifying Archiving
NICE Perform eXpress Release 3.0: Troubleshooting Guide (Rev. A2)

10
Verifying Playback
Contents
Understanding the Query and Playback Data Flow...................................................142
Understanding Playback Error Messages..................................................................143Key to Internal Playback Error Messages ................................................................143Windows Media Player Not Installed Message ........................................................146
Chapter 10: Verifying Playback
NICE Perform eXpress Release 3.0: Troubleshooting Guide (Rev. A2)
141

Understanding the Query and Playback Data Flow
Understanding the Query and Playback Data FlowThe data flow for querying and playing back interactions with NICE Perform eXpress is as follows:
1. In the Interactions application, the user searches interactions by querying the database.
2. From the query results, the user selects an interaction and clicks the Play button, which transfers the interaction information to the Playback component.
3. The Playback component locates the interaction in the Storage Center or in the Recording Unit.
4. The Playback component streams the audio to the user and plays it back in Player.
5. The Playback component sends Audit Trail a message with details of the user who played back the interaction as well as details of the interaction itself.
Figure 10-1 Query and Playback Data Flow
142 Chapter 10: Verifying Playback
NICE Perform eXpress Release 3.0: Troubleshooting Guide (Rev. A2)

Understanding Playback Error Messages
Understanding Playback Error MessagesThis section describes playback error messages.
• Key to Internal Playback Error Messages on page 143
• Windows Media Player Not Installed Message on page 146
Key to Internal Playback Error Messages
Internal playback error messages appear with only a number. Table 10-1 displays the error message number, a description of the error, and suggested actions to fix the problem.
Resolving Playback Error Messages
The descriptions of the error messages and the suggested actions cover a wide range of possible issues. When there is no suggested action, or the suggested action does not solve the problem, complete the following steps:
1. Run the Log Collector tool. See Collecting Logs on page 158. A ZIP file of the logs is created.
2. Send support the ZIP file of the logs, the site configuration, and any changes on the PBX.
Table 10-1: Playback Error Messages
ID Source Description Suggested Actions
3500 Server Operation successful. None
3501 Server No recordings found. Go to the System Management application, and then in the Backup Management tab, verify that the audio is stored on backup media.
3502 Server User is not authorized to play the selected interaction.
None
3503 Server Failed to play back the interaction.
3504 Server Failed to save the interaction.
3505 Server Failed to monitor the channel. See Error 3505 After Renaming Machine on page 39.
143 Chapter 10: Verifying Playback
NICE Perform eXpress Release 3.0: Troubleshooting Guide (Rev. A2)

Understanding Playback Error Messages
3506 Server Error occurred while trying to report to the Audit Trail application when saving an interaction.
None
3507 Server Get user confirmation to retrieve the audio from an offline storage device.
3508 Server Tag or Comment handling generated an error.
3509 Server Failed to retrieve the audio from offline storage. Recordings are inaccessible.
3991 Client Sound card problem. Verify that a sound device is installed on your computer.Verify that the sound device is functioning properly.
3992 Client Windows Media Player failed to play the URL that was received from the Web service.
None
Table 10-1: Playback Error Messages (Continued)
ID Source Description Suggested Actions
144 Chapter 10: Verifying Playback
NICE Perform eXpress Release 3.0: Troubleshooting Guide (Rev. A2)

Understanding Playback Error Messages
3993 Client When playing back in the Interactions application, WMS is not active.When monitoring channels in the Channel Monitor application, broadcast is not active.The WMS Anonymous User Authentication plug-in is using a password that is out of sync with the Windows user account.
1. Uninstall WMS and then reinstall.
2. From the Start menu, select Run. Enter compmgmt.msc and click OK.
3. In the Computer Management (local) tree, select Local Users and Groups, and select Users
4. Locate the Windows Media anonymous account. This is WMUS_<machine name>.
5. Right-click this user account and select Set Password.
6. Proceed with setting the password and give the account a new password, then click OK.
7. In Windows Media Services, select the server name. In the Properties tab, select Authentication.
8. Double-click the WMS Anonymous User Authentication plug-in.
9. Verify that the user account name is the same as that in Computer Management.
10. Set the password to be the same as what you set in Computer Management.
11. Click OK and enable the WMS Anonymous User Authentication plug-in.
3994 Client Stop monitoring when monitor session reaches 1 hour.
Go to the Channel Monitor application, and start a new monitor session.
3995 Client Windows Media Player is not installed – ActiveX object allocation failure.
See Windows Media Player Not Installed Message below.
Table 10-1: Playback Error Messages (Continued)
ID Source Description Suggested Actions
145 Chapter 10: Verifying Playback
NICE Perform eXpress Release 3.0: Troubleshooting Guide (Rev. A2)

Understanding Playback Error Messages
Windows Media Player Not Installed Message
Cause
When the memory use of the Internet Explorer browser is too high, the following error message appears stating that the Windows Media Player 9.0 must be installed on the machine, even though it is already installed.Figure 10-2 Information Window
Solution
Open a new instance of the Internet Explorer browser, and try again to play back the interaction or monitor the channel.
3996 Client Windows Media Player version is lower than 9.0.
None
3997 Client Web service proxy call returned with failure.
3998 Client The file path returned by the Web service is empty or null.
3999 Client Error occurred while connecting to the Web service. The Web service was not reached.
Table 10-1: Playback Error Messages (Continued)
ID Source Description Suggested Actions
146 Chapter 10: Verifying Playback
NICE Perform eXpress Release 3.0: Troubleshooting Guide (Rev. A2)

11
Managing Nice Services
You manage Nice services through the Services Configuration Manager.
Contents
Introducing the Services Configuration Manager .....................................................148Starting the Services Configuration Manager...........................................................148Getting Around the Services Configuration Manager...............................................148Available Nice Services............................................................................................149
Starting and Stopping Nice Services..........................................................................151
Viewing the Service Logs ............................................................................................152
Changing the Reporting Level of Service Logs.........................................................153
Creating a Memory Dump File .....................................................................................155
Chapter 11: Managing Nice Services
NICE Perform eXpress Release 3.0: Troubleshooting Guide (Rev. A2)
147

Introducing the Services Configuration Manager
Introducing the Services Configuration ManagerThis section describes how to start the Services Configuration Manager, introduces the user interface, and lists available services.
• Starting the Services Configuration Manager on page 148
• Getting Around the Services Configuration Manager on page 148
• Available Nice Services on page 149
Starting the Services Configuration Manager
The Services Configuration Manager is installed along with NICE Perform eXpress. You start it from the Start menu on the NICE Perform eXpress machine.
To start the Services Configuration Manager:
• From the Start menu, select All Programs > NICE Perform eXpress > Tools > Services Configuration Manager.
The Services Configuration Manager opens.Figure 11-1 Services Configuration Manager
Getting Around the Services Configuration Manager
The Services Configuration Manager (Figure 11-1 on page 148) lists all available NICE services and enables performing a number of actions on them, which can be executed both from the Action menu and from the tool bar.
Each service listed in the Services Configuration Manager includes the following information:
Action
Toolbar
Menu
AvailableNICEServices
Table 11-1: Service Information Listed in the Services Configuration Manager
Column Name Description
Name Name of the EXE file
Display Name Name displayed in the Microsoft Services window
148 Chapter 11: Managing Nice Services
NICE Perform eXpress Release 3.0: Troubleshooting Guide (Rev. A2)

Introducing the Services Configuration Manager
Available Nice Services
Nice services that run with NICE Perform eXpress are listed below:
Description Explanation of the actions the service performs
State • Running
• Stopped
• Paused
Start Mode • Manual
• Disabled
Log On User who has permission to run the service
Exe Path Path of the EXE file for the service
Table 11-1: Service Information Listed in the Services Configuration Manager
Column Name Description
Table 11-2: NICE Services
Service Name Description
Nice Audit Trail Service Enables adding messages and events issued by NICE CEM applications to the Audit Trail database.
Nice Central NPX Responsible for synchronizing the Central Administration and NICE Perform eXpress servers data.Note: This service only appears on machines where the Central Administration is installed.
Nice Interactions Center Monitor Reports failover/OK messages to the session controller.
Nice Integration Dispatch Service Launches and maintains NICE integration processes such as the CTI driver, Connection Manager, Key Manager, and others.
Nice Interaction Center Determines which interactions to record and how to record them, based on the configuration and recording rules of the system.
NPX SystemMonitoring Monitors and reports the status of the NPX system.
Nice Integrations Log Retention Provides retention of the NICE integration log files.
149 Chapter 11: Managing Nice Services
NICE Perform eXpress Release 3.0: Troubleshooting Guide (Rev. A2)

Introducing the Services Configuration Manager
Nice VoIP Logger NICE recording service for VoIP.
Nice Playback Administration Manages administrative tasks for the Player.
Nice Storage Streaming Service Plays back the Storage Center files to NICE Perform eXpress.
Nice Playback Streaming Manages media streaming for Player.
Nice Rule Engine Performs rules, according to rules defined in the Rules Manager.
Nice Storage Center Service Performs long term archiving for all NICE interactions.
SNMP Service Enables Simple Network Management Protocol (SNMP) requests to be processed by this computer. If this service is stopped, the computer will be unable to process SNMP requests. If this service is disabled, any services that explicitly depend on it will fail to start.
Nice SystemAdministrator Performs administrative tasks for NICE applications.
Nice TDM Gateway TDM to VoIP service.
Nice Interactions Center TRS Inserts missing calls into the CLS database.
Table 11-2: NICE Services (Continued)
Service Name Description
150 Chapter 11: Managing Nice Services
NICE Perform eXpress Release 3.0: Troubleshooting Guide (Rev. A2)

Starting and Stopping Nice Services
Starting and Stopping Nice Services
You start and stop Nice services from the Services Configuration Manager.
To start and stop Nice services:
1. Start the Services Configuration Manager. See Starting the Services Configuration Manager on page 148.
2. Select the service you want to start or stop. To select all services, press the Ctrl and A keys.Figure 11-2 Service Selected in the Services Configuration Manager
3. Do one of the following:
• To start a service, click the Start button. In the State column, the state changes from Stopped to Running.
• To stop a service, click the Stop button. In the State column, the state changes from Running to Stopped.
4. (Recommended) To verify that the services have started or stopped, complete the following:
a. From the Control Panel, select Administrative Tools > Services. The Services window appears.
b. In the Status column, verify that the service has started or stopped.
BEST PRACTICE: Starting and stopping Nice services momentarily shuts down the NICE Perform eXpress machine, which results in data loss. Wait until off-hours before performing these maintenance tasks.
151 Chapter 11: Managing Nice Services
NICE Perform eXpress Release 3.0: Troubleshooting Guide (Rev. A2)

Viewing the Service Logs
Viewing the Service LogsYou can view the NICE service logs from the Services Configuration Manager. Logs that are supported by the Log Viewer application, open in Log Viewer. Logs that are not supported by the Log Viewer application, open as TXT files in Notepad.
To view service logs:
1. Start the Services Configuration Manager. See Starting the Services Configuration Manager on page 148.
2. Select the service whose log you want to view.Figure 11-3 Service Selected in the Services Configuration Manager
3. Do one of the following:
• Click Show Log .
-or-
• Right click the service, and select Show Log.
The Logs List window appears.Figure 11-4 Logs List Window
4. Select the log you want to view, and click Open.
152 Chapter 11: Managing Nice Services
NICE Perform eXpress Release 3.0: Troubleshooting Guide (Rev. A2)

Changing the Reporting Level of Service Logs
Changing the Reporting Level of Service LogsYou can change the reporting level of service logs to include more or less information. For example, if the reporting level is set to Warning, and you want more information, you might change the reporting level to Info. The possible reporting levels change according to each specific service.
To change the reporting levels of service logs:
1. Start the Services Configuration Manager. See Starting the Services Configuration Manager on page 148.
2. Select the service for whose log you want to change the reporting level.Figure 11-5 Service Selected in the Services Configuration Manager
3. Do one of the following:
• Click Change Debug Level .
-or-
• Right-click the service, and select Change Debug Level.
The Change Log Debug Level window appears.Figure 11-6 Change Log Debug Level Window
4. (Optional) Click Details to view the logs that will be affected by the new debug level.
5. In the New Level drop-down list, select the new reporting level.
6. Click OK.
153 Chapter 11: Managing Nice Services
NICE Perform eXpress Release 3.0: Troubleshooting Guide (Rev. A2)

Changing the Reporting Level of Service Logs
The reporting level is changed.
NOTE: • You might be prompted to restart the service in order to change the Reporting Level.
Click OK.
• Some services take up to 10 minutes to change the Reporting Level.
154 Chapter 11: Managing Nice Services
NICE Perform eXpress Release 3.0: Troubleshooting Guide (Rev. A2)

Creating a Memory Dump File
Creating a Memory Dump FileFor troubleshooting purposes, you can create a memory dump file for any service. You need to install Debugging Tools for Windows before creating the memory dump file. See Installing Debugging Tools for Windows on page 156.
To create a memory dump file:
1. Download and install Debugging Tools for Windows. See Installing Debugging Tools for Windows on page 156.
2. Start the Services Configuration Manager. See Starting the Services Configuration Manager on page 148.
3. Select the service for which you want to create a memory dump file.Figure 11-7 Service Selected in the Services Configuration Manager
4. Do one of the following:
• Click Memory Dump File .
-or-
• Right-click the service, and select Memory Dump File.
The following message appears in the Dump File window.Figure 11-8 Dump File Window
5. Click Yes.
The first time you create a memory dump file, you are prompted to locate the Debugging Tools for Windows. Browse to the location where you installed it on the NICE Perform eXpress machine.
You are prompted to indicate a location to save the memory dump file.
155 Chapter 11: Managing Nice Services
NICE Perform eXpress Release 3.0: Troubleshooting Guide (Rev. A2)

Creating a Memory Dump File
6. Click OK.
The memory dump file is created at the location you indicated in Step 5.
Installing Debugging Tools for Windows
Microsoft has a free download of debugging tools at the following link:
http://www.microsoft.com/whdc/devtools/debugging/default.mspx
Download the application and install it according to the documentation at the link.
156 Chapter 11: Managing Nice Services
NICE Perform eXpress Release 3.0: Troubleshooting Guide (Rev. A2)

12
Collecting Information
NICE Perform eXpress includes tools for collecting and viewing logs as well as collecting SQL performance information.
Contents
Collecting Logs.............................................................................................................158
Viewing Logs with Log Viewer ....................................................................................159Opening Logs...........................................................................................................159Filtering Logs............................................................................................................161Finding Text Strings in Open Logs ...........................................................................162
Collecting Information from SQL Processes .............................................................163
Chapter 12: Collecting Information
NICE Perform eXpress Release 3.0: Troubleshooting Guide (Rev. A2)
157

Collecting Logs
Collecting LogsThe Log Collector gathers information from the NICE Perform eXpress server and application and then automatically compresses this information into a ZIP file. At the same time, it also gathers site information and creates a second ZIP file.
The ZIP file with the server and application information is named: LCReports[<Date><Time>].zip
The ZIP file with the site information is named: LCSICReports[<Date><Time>].zip
You send these files to your local support representative for further analysis.
To collect logs:
1. From the Start menu, select All Programs > NICE Perform eXpress > Tools > Log Collector.
The Log Collector begins collecting information from the NICE Perform eXpress server and application, and a progress bar appears.Figure 12-1 Progress Bar of the Log Collector
After the information is collected, the Browse For Folder window appears.Figure 12-2 Browse for Folder Window
2. In the Browse For Folder window, navigate to the folder where the information will be saved, and click OK.
Two ZIP files are created.
The ZIP file with the server and application information is named: LCReports[<Date><Time>].zip
158 Chapter 12: Collecting Information
NICE Perform eXpress Release 3.0: Troubleshooting Guide (Rev. A2)

Viewing Logs with Log Viewer
The ZIP file with the site information is named: LCSICReports[<Date><Time>].zip
3. Send both of these ZIP files to your local support representative for further analysis.
Viewing Logs with Log ViewerThis section describes the following topics:
• Opening Logs on page 159
• Filtering Logs on page 161
• Finding Text Strings in Open Logs on page 162
Opening Logs
You can open multiple logs in Log Viewer and toggle between them by clicking their tabs.
To open logs:
1. From the Start menu, select All Programs > NICE Perform eXpress > Tools > Log Viewer.
The Log Viewer opens.Figure 12-3 Log Viewer
2. From the File menu, select Open, and browse to the log you want to view.
The log opens in Log Viewer as a tab.
159 Chapter 12: Collecting Information
NICE Perform eXpress Release 3.0: Troubleshooting Guide (Rev. A2)

Viewing Logs with Log Viewer
Figure 12-4 Log Open in Log Viewer
3. If you want to open an additional log, repeat Step 2.
The log opens as a new tab in the Log Viewer. Figure 12-5 Log Open in Log Viewer
160 Chapter 12: Collecting Information
NICE Perform eXpress Release 3.0: Troubleshooting Guide (Rev. A2)

Viewing Logs with Log Viewer
Filtering Logs
You can filter the active log to only display the required information in the log.
To filter logs:
1. Open at least one log in Log Viewer. See Opening Logs on page 159.
2. If more than one log is open, click the tab of the log you want to filter.
3. In the Filter area, define the filter as follows:
• Reporting Level: By default, all Reporting Levels are selected. Clear the Reporting Levels you do not need.
• Date - Time Range: In the From and To fields, enter the date and time of the information to view.
• Module Name: By default, all modules are selected. Clear the modules you do not need.
• Thread ID: By default, all thread IDs are selected. Clear the thread IDs you do not need.
• Message: Enter the Message text that you want to find.
4. Click the Filter button.
The Log Viewer filters the information in the log according to the filter definition you set.Figure 12-6 Log Filtered to Include Warnings
5. To filter according to the default settings, click the Reset Filter button.
161 Chapter 12: Collecting Information
NICE Perform eXpress Release 3.0: Troubleshooting Guide (Rev. A2)

Viewing Logs with Log Viewer
6. To refresh the results of a filter, click the Refresh button.
Finding Text Strings in Open Logs
You can search across all open logs for specific text strings.
To find text strings in open logs:
1. From the File menu, select Find.
The Find window appears.Figure 12-7 Find Window
2. From the Find in Files drop-down list, select a single log file or all the open log files.
3. From the Find what drop-down list, enter the text you want to find.
4. From the In column drop-down list, select the columns in which you want to find the text.
5. Click Find.
6. The results appear in a split pane under the log. If more than one log is open, click the tab of the each log to view the results.
7. To return to the full-screen view of the log, from the Advanced menu, select Collapse Find.
8. To review the find results again, from the Advanced menu, select Expand Find.
162 Chapter 12: Collecting Information
NICE Perform eXpress Release 3.0: Troubleshooting Guide (Rev. A2)

Collecting Information from SQL Processes
Collecting Information from SQL ProcessesWhen there is a problem with SQL performance, such as query that does not run, you use the SQL Performance Collector tool to collect information from SQL processes. This tool creates a trace file and log file, which you send to NICE support. You can also use this tool to collect information for the SQL Profiler.
To collect information from SQL processes:
1. From the Start menu, select All Programs > NICE Perform eXpress > Tools > Performance Collector. Figure 12-8 Shortcut to the Performance Collector
The Performance Collector opens.
163 Chapter 12: Collecting Information
NICE Perform eXpress Release 3.0: Troubleshooting Guide (Rev. A2)

Collecting Information from SQL Processes
Figure 12-9 Performance Collector
2. Click Get Data/Log Drive.
The location of the data and log drives appear.
3. In the Destination Folder field, enter the destination folder for the trace files that the Performance Collector creates.
4. If you need the SQL profiler, do this:
a. In the Filter Duration greater than field, enter 0.
b. Click Start.
c. Continue to Step 7.
5. If you want to schedule the Performance Collector to run at times when performance issues often occur, you set a schedule:
a. In the Schedule area, select Enable trace start at, and then enter the start time for the Performance Collector to run.
b. Select Enable trace stop at, and then enter the stop time for the Performance Collector to stop.
c. Click Start.
d. Continue to Step 7.
6. If you want to check a problematic query, do this:
a. Click Start.
164 Chapter 12: Collecting Information
NICE Perform eXpress Release 3.0: Troubleshooting Guide (Rev. A2)

Collecting Information from SQL Processes
b. Run the problematic query.
c. Click Stop.
d. Continue to Step 7.
7. Go to the destination folder you set in Step 3, and send the following files to NICE Support:
• Sql_<date>_<start time>_Trace.trc
• counters.log
165 Chapter 12: Collecting Information
NICE Perform eXpress Release 3.0: Troubleshooting Guide (Rev. A2)

Blank page for double-sided printing.

13
System Messages
Contents
Responding to Application Messages........................................................................168
SNMP Messages ...........................................................................................................179Understanding SNMP Messages and Settings ........................................................179Responding to SNMP Messages .............................................................................182
Chapter 13: System Messages
NICE Perform eXpress Release 3.0: Troubleshooting Guide (Rev. A2)
167

168 Chapter 13: System Messages
Responding to Application Messages
plications. If there is no suggested action, rors that are not listed here, see Key to
Suggested Action
Enter a different User Name or Password.
Contact your System Administrator.
Contact your System Administrator.
Contact your System Administrator.
N/A
Try again later.
Contact your System Administrator.
Try again.
Try again.
Reduce the number of channels.
Change the ID of the board with the maxi-mum number of channels to 0.
Change one Board ID.
Change the second board port ID to 2.
Change the second board port ID to 3.
NICE Perform eXpress Release 3.0: Troubleshooting Guide (Rev. A2)
Responding to Application MessagesTable 13-1 lists application messages that might appear when running NICE Perform eXpress apor the suggested action does not solve the issue, open an SR with NICE support. For playback erInternal Playback Error Messages on page 143.
Table 13-1: Application Messages and Corrective Actions
Code Type Message
1000 Information Failed to log in.
1001 Information Your user account is locked.
1002 Information Your user account is inactive.
1003 System Error Unknown error.
1004 Confirmation Are you sure you want to perform this action?
1005 Connection Error Failed to connect to server.
1006 Information Unauthorized login attempted.
1501 System Error Failed to delete telephony environment.
1502 System Error Failed to define new telephony environment.
1601 Invalid Data T1 ISDN capture type cannot have more than 23 channels.
1602 Invalid Data The ID of the first board must be 0.
1603 Invalid Data Boards with the same Board Type cannot have the same Board ID.
1604 Invalid Data In summed mode, the second board port must be 2.
1605 Invalid Data In unsummed mode, the second board port must be 3.

169 Chapter 13: System Messages
Responding to Application Messages
Change one Board ID to 0.
Reduce the number of trunks for boards with more than 2 trunks.
Change the configuration so that only the last trunk uses less channels than the maximum.
Verify that all trunks connected to the same board are of the same type.
Reduce the number of configured chan-nels on one of the boards.
Choose identical Companding Laws for all Telephony Environments.
Verify that all the required fields are filled.
Verify as detailed in the message.
Verify as detailed in the message.
Verify as detailed in the message.
Edit Recording Settings. Then select the correct Digital Board Type.
Try again later.
Try again later.
Try again later.
Change one of the board IDs.
Suggested Action
NICE Perform eXpress Release 3.0: Troubleshooting Guide (Rev. A2)
1606 Invalid Data For each Board Type, there must be at least one board with Board ID 0.
1607 Invalid Data Only 2 trunks can be assigned to each board.
1608 Invalid Data Only the last trunk may have less than the maximum number of channels.
1609 Invalid Data Cannot define 2 trunks with different Trunk Types on same Board.
1610 Invalid Data The number of configured channels cannot exceed the number of available channels.
1612 Incomplete Data Companding Law must be identical in all Telephony Environments.
1613 Incomplete Data Some required data is missing.
1614 Incomplete Data Each Board ID must have a Board Port numbered 1.
1615 Invalid Data The entire Board ID must have the same Source-Side Summation.
1616 Invalid Data All trunks on the same board must have the same Frame Format.
1617 Information Digital Board Type does not match the installed board.
1620 System Error Failed to initialize capture settings.
1621 System Error Failed to update Recording Settings.
1622 System Error Failed to save Recording Settings.
1623 Invalid Data Duplicate board IDs are not supported.
Table 13-1: Application Messages and Corrective Actions
Code Type Message
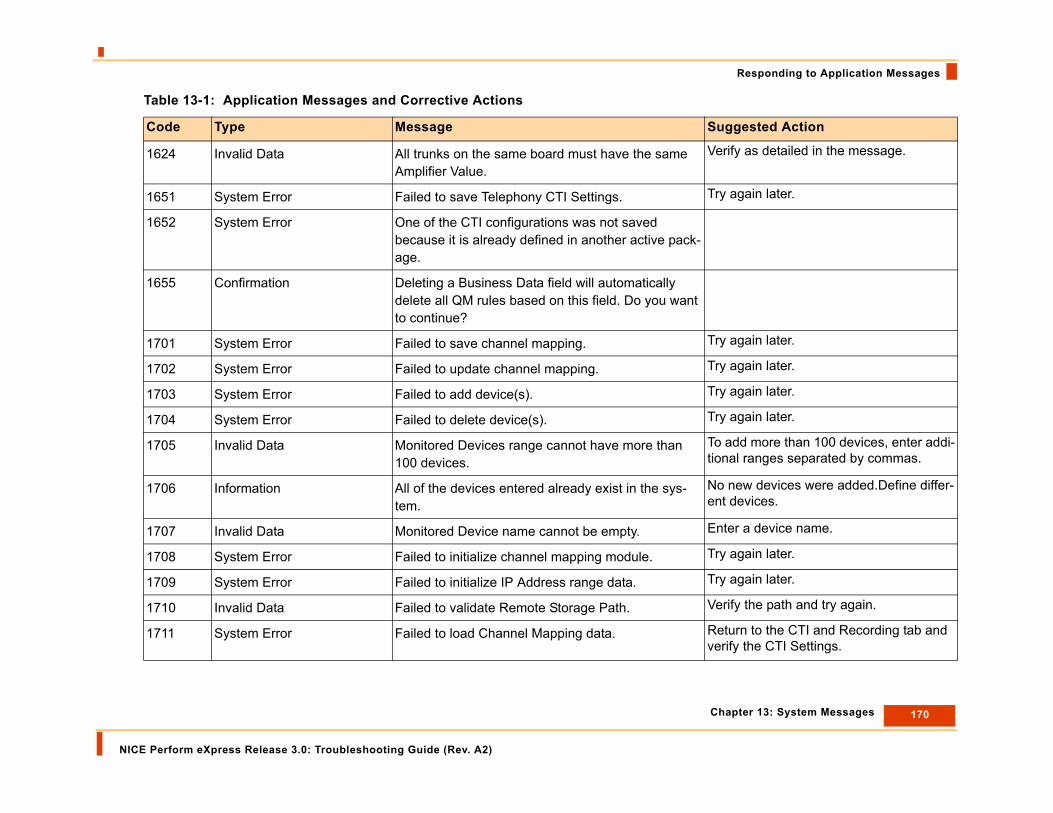
170 Chapter 13: System Messages
Responding to Application Messages
Verify as detailed in the message.
Try again later.
Try again later.
Try again later.
Try again later.
Try again later.
To add more than 100 devices, enter addi-tional ranges separated by commas.
No new devices were added.Define differ-ent devices.
Enter a device name.
Try again later.
Try again later.
Verify the path and try again.
Return to the CTI and Recording tab and verify the CTI Settings.
Suggested Action
NICE Perform eXpress Release 3.0: Troubleshooting Guide (Rev. A2)
1624 Invalid Data All trunks on the same board must have the same Amplifier Value.
1651 System Error Failed to save Telephony CTI Settings.
1652 System Error One of the CTI configurations was not saved because it is already defined in another active pack-age.
1655 Confirmation Deleting a Business Data field will automatically delete all QM rules based on this field. Do you want to continue?
1701 System Error Failed to save channel mapping.
1702 System Error Failed to update channel mapping.
1703 System Error Failed to add device(s).
1704 System Error Failed to delete device(s).
1705 Invalid Data Monitored Devices range cannot have more than 100 devices.
1706 Information All of the devices entered already exist in the sys-tem.
1707 Invalid Data Monitored Device name cannot be empty.
1708 System Error Failed to initialize channel mapping module.
1709 System Error Failed to initialize IP Address range data.
1710 Invalid Data Failed to validate Remote Storage Path.
1711 System Error Failed to load Channel Mapping data.
Table 13-1: Application Messages and Corrective Actions
Code Type Message

171 Chapter 13: System Messages
Responding to Application Messages
A range cannot contain more than 100 devices.
Ensure that values are selected for both an Extension and Position.
Select a Trunk Group from the list.
Try again later.
Enter a different Remote Storage Path.
Enter a valid IP address.
Enter a valid Storage Name.
Enter at least one valid Remote Storage Path.
Enter at least one valid Remote Storage Path.
Enter at least one valid IP address for EMC Centera.
Enter a different IP address.
Suggested Action
NICE Perform eXpress Release 3.0: Troubleshooting Guide (Rev. A2)
1712 Invalid Data The range entered for Monitored Devices is invalid.Enter a range or single values separated by commas.
1713 Insufficient Data Either Extension or Position is missing.
1714 Invalid Data Invalid range.
1719 Invalid Data At least one NEQT is required.
1720 Insufficient Data Select a Trunk Group for NEQT mapping.
1721 Invalid Data Invalid NEQT range.
1722 Invalid Data A device cannot be mapped to itself.
1801 System Error Failed to save storage data.
1802 Invalid Data This Remote Storage Path already exists.
1803 Invalid Data Illegal IP address.
1804 Insufficient Data Storage Name field cannot be empty.
1805 Insufficient Data Remote Storage Path field cannot be empty.
1806 Insufficient Data At least one Remote Storage Path is required.
1807 Invalid Data At least one IP address must be entered for EMC Centera storage type.
1808 Invalid Data This IP address already exists in the system.
1809 System Error Failed to add the Retention Rule.
1810 System Error Failed to update the Retention Rule.
Table 13-1: Application Messages and Corrective Actions
Code Type Message

172 Chapter 13: System Messages
Responding to Application Messages
Enter Screen Recording Path again.
Try again later.
Try again.
Refresh the page.
Proceed with this action when system is not recording.
See system log for details.
Verify that all installed boards are manu-factured by the same vendor.
Use the Board Numbering Tool to make changes. Click Save to save the data.
Validate board numbering using the Board Numbering Tool on the NICE Perform eXpress server.
Verify as detailed in the message.
Use a different user name.
Suggested Action
NICE Perform eXpress Release 3.0: Troubleshooting Guide (Rev. A2)
1811 System Error Failed to delete the Retention Rule.
1812 Information Select a Retention Rule.
1817 Invalid Data Screen Recording Path could not be validated.
1818 System Error Failed to save Screen Recording configuration.
1901 System Error Failed to Apply changes.
1902 System Error Failed to navigate between tabs.
1903 System Error A failure occurred while loading the page. As a result, Apply Changes might not work properly.
1904 Confirmation This action might temporarily interrupt recording, resulting in lost data. Are you sure you want to pro-ceed?
1905 System Error Error while loading Configuration tab.
1906 Invalid Data The system has detected boards manufactured by different vendors. All installed boards must be man-ufactured by the same vendor.
1907 System Error Board is not configured.
1908 Information Invalid board configuration.The system was updated, however recording might not work.
1909 Information TDM board firmware is currently being updated. Temporarily, changes cannot be applied.
2000 Insufficient Data User must be either an agent or system user.
2001 Invalid Data The user name already exists.
Table 13-1: Application Messages and Corrective Actions
Code Type Message

173 Chapter 13: System Messages
Responding to Application Messages
Use a different OS login.
Use a different Agent ID.
The password must be at least 4 charac-ters. See the Administrator's Guide for more password requirements.
Enter the Recording settings.
Enter a different Group Name.
Define an Agent ID or Extension for the agent.
Define the Telephony Environment in the Configuration application.
Verify that file format is correct.
Try again later.
Delete all users from the group before deleting the group.
Select channels of the same type.
Try again later.
Select one or more channels of the same type.
Suggested Action
NICE Perform eXpress Release 3.0: Troubleshooting Guide (Rev. A2)
2002 Invalid Data The OS login already exists.
2003 Invalid Data The Agent ID already exists.
2004 Invalid Data The password does not meet the password strength requirements.
2005 Insufficient Data Recording settings not supplied.
2006 Invalid Data The Group Name already exists.
2007 Insufficient Data Agent must have at least one Agent ID or Extension.
2008 Invalid Data The Telephony Environment is not defined.
2009 Information All Users group cannot be deleted.
2010 Information A group that contains users cannot be deleted.
2011 Invalid Data Failed to upload file.
2012 System Error Import failed.
2013 System Error Failed to add new user
2014 System Error Failed to update selected user
2016 Invalid Data This Domain name already exists.
2500 Information Setup is enabled only for channels of the same type.
2501 Information Setup is not possible for the selected channel type.
2502 System Error Channel Setup is currently not available.
2503 Insufficient Data No channels selected for setup.
Table 13-1: Application Messages and Corrective Actions
Code Type Message

174 Chapter 13: System Messages
Responding to Application Messages
Select one channel only.
Select one channel only.
Select one channel only.
Select one channel only.
Check the following: 1. The Recording Unit is properly con-nected.2. The NICE TDM Gateway and the NICE VoIP Logger services are up and running.
Check the following:1. The Recording Unit is properly con-nected.2. The NICE TDM Gateway and the NICE VoIP Logger services are up and running.
Select the Configuration application to continue.
Enter a different name.
Narrow the search criteria.
Correct the invalid parameters.
Contact your System Administrator.
Enter a valid name.
Suggested Action
NICE Perform eXpress Release 3.0: Troubleshooting Guide (Rev. A2)
2504 Invalid Data Only one channel can be selected for monitoring.
2505 Invalid Data No channels were selected for monitoring.
2506 Invalid Data Only one channel can be selected for playback
2507 Invalid Data No channels selected for playback
2508 System Error Failed to save channel setup.
2509 System Error Failed to load channel information.
2510 Information No channels are currently mapped. Configuration is incomplete.
3000 Invalid Data Query/Folder with same name already exists.
3001 System Error Query execution timed out.
3002 Insufficient Privileges You are not authorized to modify/delete public que-ries.
3003 Insufficient Privileges You are not authorized to modify/delete public fold-ers.
3004 Invalid Data Query is not defined properly.
3005 System Error Failed to access the database.
3006 Invalid Data Query/Folder name cannot be empty.
Table 13-1: Application Messages and Corrective Actions
Code Type Message

175 Chapter 13: System Messages
Responding to Application Messages
Enter a valid name that does not include the following characters: <;:%%:?;%>
Enter a numerical value.
Check the validity of the defined time range.
Try again later.
Verify SNMP service is installed.
Verify SNMP service is installed.
Verify that a valid file is selected.
If the problem persists contact your Sys-tem Administrator.
If the problem persists contact your Sys-tem Administrator.
If the problem persists contact your Sys-tem Administrator.
No new messages found.
Suggested Action
NICE Perform eXpress Release 3.0: Troubleshooting Guide (Rev. A2)
3007 Invalid Data Query/Folder name contains an illegal string.
3008 Invalid Data Invalid time range.
3009 Invalid Data Query time range is invalid.
3010 Confirmation Are you sure you want to delete the selected folder?
3011 Confirmation Are you sure you want to delete the selected query?
3012 Connection Error Failed to connect to server.
3013 System Error Failed to execute query.Contact your System Administrator.
3014 Confirmation Do you want to save changes?
4500 System Error Failed to save SNMP Settings.
4501 System Error Failed to read SNMP Settings.
4502 System Error Failed to update license.
4503 System Error Failed to load System Alerts.Try again later.
4504 System Error Failed to upload license file.
4505 System Error Unable to connect to Recording Unit, or the Backup device is not running.
4506 System Error Unable to connect to Recording Unit or the Backup Assignment is mismatched.
4507 Connection Error Unable to connect to Recording Unit.
4508 Information The scan for errors and warnings is complete.
Table 13-1: Application Messages and Corrective Actions
Code Type Message

176 Chapter 13: System Messages
Responding to Application Messages
Contact your System Administrator.
Contact your System Administrator.
Perform Manual Activation.
Verify Internet connectivity.
Verify Internet connectivity.
Perform Manual Activation.
Verify that Product Key is entered cor-rectly.
Verify that Product Key is correct
Activate all previous Product Keys first.
Verify that the correct License Activation File (*.v2c) is being used.
Activate all previous License Activation Files (*.v2c) first.
Suggested Action
NICE Perform eXpress Release 3.0: Troubleshooting Guide (Rev. A2)
4509 System Error Failed to save screen agent configuration due to an internal server error.
4510 System Error Failed to save screen agent configuration due to invalid configuration data.
4511 System Error One or more clients could not be deleted.Contact your System Administrator
4512 System Error One or more clients are active and therefore cannot be deleted.
4600 System Error General licensing error
4601 System Error Automatic Activation failed.
4611 Connection Error Automatic Activation failed due to communication failure
4612 Connection Error Automatic Activation failed due to communication timeout
4613 System Error Automatic Activation failed due to invalid activation server URLPerform Manual Activation.
4621 Invalid Data Invalid Product Key.
4622 Invalid Data Product Key has already been activated.
4623 Invalid Data Product Key is based on a previous Product Key which must be activated first ({0})
4642 Invalid Data License Activation File (*.v2c) is older than the cur-rent activated license ({0})
4643 Invalid Data An older License Activation File (*.v2c) exists and must be activated first ({0})
Table 13-1: Application Messages and Corrective Actions
Code Type Message

177 Chapter 13: System Messages
Responding to Application Messages
Verify that you are uploading the correct *.v2c file for this NICE Perform eXpress machine
Licenses cannot be updated before they are activated. First activate the license. Then update the license with this License Activation File (*.v2c)
Verify that the correct License Activation File (*.v2c) is being used.
Try again later.
Try again later.
Contact your System Administrator.
Contact your System Administrator.
Contact your System Administrator.
Contact your System Administrator.
Verify as detailed in the message.
Suggested Action
NICE Perform eXpress Release 3.0: Troubleshooting Guide (Rev. A2)
4644 Invalid Data License Activation File (*.v2c) is corrupt or does not belong to this machine ({0})
4645 Invalid Data The License Activation File (*.v2c) contains an update for an activated license.
4655 Invalid Data License Activation File (*.v2c) is incompatible with existing license
5000 System Error Failed to apply changes for this branch.Try again later.
5001 System Error Failed to recover this branch.
5500 Invalid Data Unknown error
5501 8;Functionality Disabled Extend retention functionality is disabled.
5502 Insufficient Privileges You do not have privileges to use Extend Retention
5503 9;Insufficient License Insufficient License
5504 Invalid Data Extend retention period cannot exceed 10 years.
6500 System Error Unknown error
6501 Connection Error Error connecting to the Reporter Server.
6502 Confirmation Are you sure you want to delete the selected Report?
6503 Invalid Data High score threshold must be greater than or equal to low score threshold.
Table 13-1: Application Messages and Corrective Actions
Code Type Message

178 Chapter 13: System Messages
Responding to Application Messages
Enter a different name.
Enter a valid name.
Suggested Action
NICE Perform eXpress Release 3.0: Troubleshooting Guide (Rev. A2)
6504 Invalid Data Report/folder with this name already exists.
6505 Invalid Data Report/folder name cannot be empty.Enter a valid name.
Table 13-1: Application Messages and Corrective Actions
Code Type Message
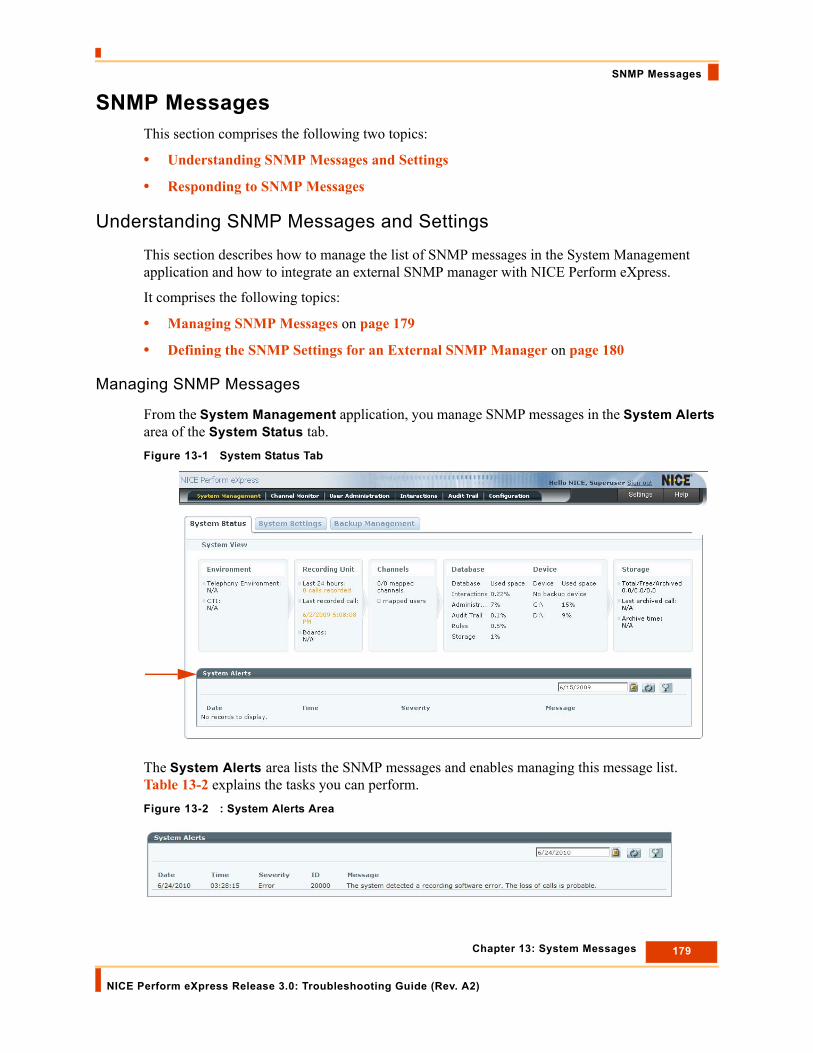
SNMP Messages
SNMP MessagesThis section comprises the following two topics:
• Understanding SNMP Messages and Settings
• Responding to SNMP Messages
Understanding SNMP Messages and Settings
This section describes how to manage the list of SNMP messages in the System Management application and how to integrate an external SNMP manager with NICE Perform eXpress.
It comprises the following topics:
• Managing SNMP Messages on page 179
• Defining the SNMP Settings for an External SNMP Manager on page 180
Managing SNMP Messages
From the System Management application, you manage SNMP messages in the System Alerts area of the System Status tab.Figure 13-1 System Status Tab
The System Alerts area lists the SNMP messages and enables managing this message list. Table 13-2 explains the tasks you can perform.Figure 13-2 : System Alerts Area
179 Chapter 13: System Messages
NICE Perform eXpress Release 3.0: Troubleshooting Guide (Rev. A2)

SNMP Messages
Defining the SNMP Settings for an External SNMP Manager
When NICE Perform eXpress uses an external SNMP manager, you define the SNMP settings from the System Settings tab of the System Management application. Figure 13-3 System Settings Tab
Table 13-2: Message List Functionality
If you want to... Do this...
Sort SNMP messages by the column title.
Click the column title. For example, click Date to sort the messages by date. After sorting, a small arrow appears next to the column title.
Filter SNMP messages by a specific date.
Enter a date in the Date field.
- Or -
Click Calendar , and select a date.
Refresh the message list. Click Refresh .
Scan the NICE Perform eXpress system for warnings and errors. Click Scan for warnings and errors . SNMP
messages appear in the System Alerts area. (The scan can take several minutes.)
Sorted
180 Chapter 13: System Messages
NICE Perform eXpress Release 3.0: Troubleshooting Guide (Rev. A2)

SNMP Messages
The SNMP Settings area in the System Settings tab enables integrating an external SNMP manager with NICE Perform eXpress.
You need to:
• Copy the MIB file from NICE Perform eXpress system to the appropriate location on the external SNMP manager.
• Define the SNMP trap destination and the Community Name of the SNMP messages originating from the NICE Perform eXpress machine.
To define the SNMP settings:
1. Navigate to: ...\NICE Systems\NICE Perform eXpress\SystemMonitoring\ExternalProducts. The NPX-MIB.mib file is saved here.
2. Copy the NPX-MIB.mib file to the appropriate location on the external SNMP manager. See the documentation of the SNMP manager for more details.
3. In the SNMP Settings area of the System Settings tab, enter the following information:
4. Click Save .
IMPORTANT • It is best practice to integrate an external SNMP Manager with the NICE Perform eXpress
system.
• Only define the SNMP settings if the NICE Perform eXpress system has an external SNMP manager.
• Before you begin, you need the:
• IP or host name of the server that receives the SNMP traps
• Community Name for the SNMP messages originating from the NICE Perform eXpress machine
• Location on the external SNMP manager for the NPX-MIB.mib file
Table 13-3: SNMP Settings Fields
Field Name Description Example
SNMP Trap Destination
IP or host name of the server that functions as an external SNMP manager.
snmp-server
Community Name Name of the group by which SNMP communities are identified.
public
181 Chapter 13: System Messages
NICE Perform eXpress Release 3.0: Troubleshooting Guide (Rev. A2)
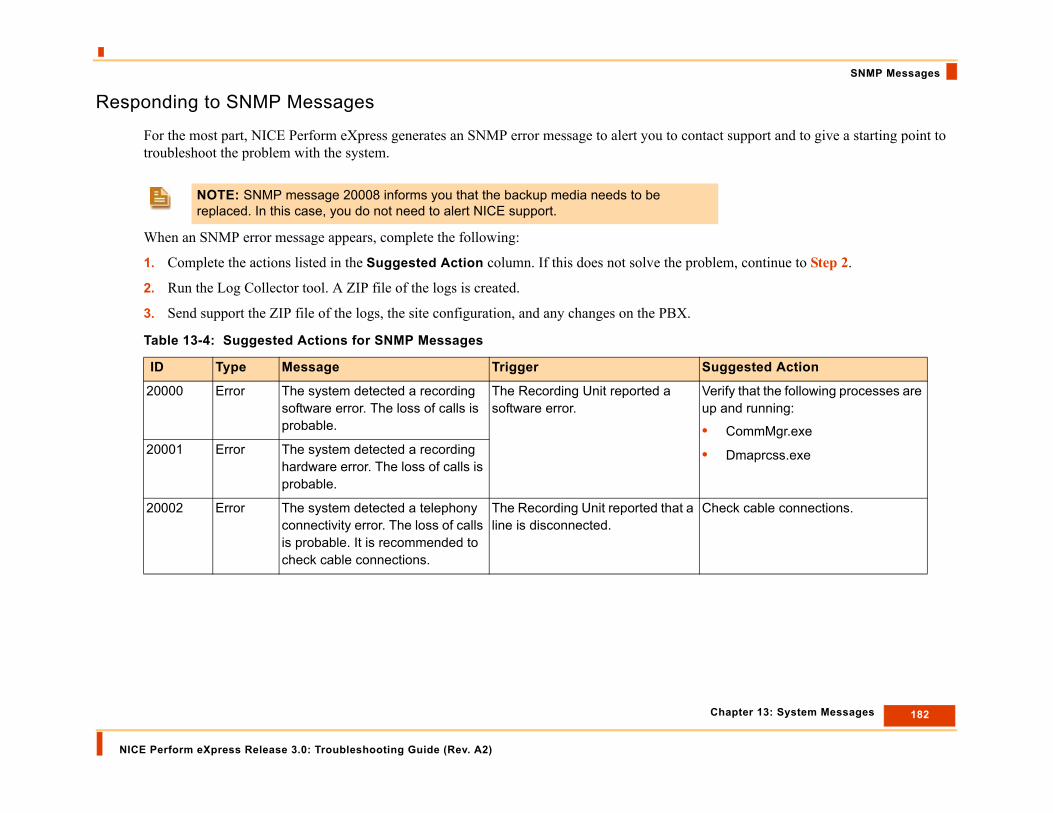
182 Chapter 13: System Messages
SNMP Messages
act support and to give a starting point to
lem, continue to Step 2.
uggested Action
erify that the following processes are p and running:
CommMgr.exe
Dmaprcss.exe
heck cable connections.
NICE Perform eXpress Release 3.0: Troubleshooting Guide (Rev. A2)
Responding to SNMP Messages
For the most part, NICE Perform eXpress generates an SNMP error message to alert you to conttroubleshoot the problem with the system.
When an SNMP error message appears, complete the following:
1. Complete the actions listed in the Suggested Action column. If this does not solve the prob
2. Run the Log Collector tool. A ZIP file of the logs is created.
3. Send support the ZIP file of the logs, the site configuration, and any changes on the PBX.
NOTE: SNMP message 20008 informs you that the backup media needs to be replaced. In this case, you do not need to alert NICE support.
Table 13-4: Suggested Actions for SNMP Messages
ID Type Message Trigger S
20000 Error The system detected a recording software error. The loss of calls is probable.
The Recording Unit reported a software error.
Vu
••20001 Error The system detected a recording
hardware error. The loss of calls is probable.
20002 Error The system detected a telephony connectivity error. The loss of calls is probable. It is recommended to check cable connections.
The Recording Unit reported that a line is disconnected.
C

183 Chapter 13: System Messages
SNMP Messages
heck that the NICE Rule Engine ervice is up and running. (From the tart menu, select All Programs > ools > Services Configuration anager. heck database parameters by
unning the Performance Collector ol, and send the trace file to
upport. (From the Start menu, select ll Programs > Tools > erformance Collector. Save the ace file.)
the System Management pplication, check the capacity of the torage area.ing the network connection to the emote Storage Path.
heck the network connectivity of the torage area by pinging it.ing the network connection to the SM.
heck whether the following occurred n the PBX:
The PBX had been disconnected.
Recent maintenance activities.
Parameter changes.
uggested Action
NICE Perform eXpress Release 3.0: Troubleshooting Guide (Rev. A2)
20003 Error Error in archiving recorded data. The system detected that not all recorded calls are being archived.
Recorded interactions are not archived, which creates an archiving backlog.
CsSTMCrtosAPtr
20003 Error Error in archiving recorded data. The system detected failure to archive some of the calls.
NICE Perform eXpress failed to archive interactions.
InasPR
20003 Error Error in archiving recorded data. The system detected that the archiving backlog is greater than expected.
Interactions have been stored in the database for more than 24 hours without being archived by NICE Perform eXpress.
CsPE
20004 Error Error in collecting the call metadata. The system detected recorded calls that are missing CTI information.
Too many interactions completed by the Total Recording Solution (TRS).
Co
•••
Table 13-4: Suggested Actions for SNMP Messages (Continued)
ID Type Message Trigger S

184 Chapter 13: System Messages
SNMP Messages
heck the space available for atabase backup. the system was installed less than a eek ago, run the Nice Full Backup b.
heck that the SQL server is up and unning.onnect to the SQL server.un the Performance Collector tool.
eplace the backup device.
the backup device, replace or insert ecording media.
uggested Action
NICE Perform eXpress Release 3.0: Troubleshooting Guide (Rev. A2)
20005 Error Database error. The system detected that a database backup operation failed.
Database backup process failed. CdIfwjo
20005 Error Database error. The system detected a general database error.
General database failure. CrCR
20006 Error The system detected a backup device hardware error.
Backup device failure. R
20007 Error The system detected a backup device software error.
Backup device failure.
20008 Info The system detected that a manual maintenance action is required on the backup device.
Backup device requires replacing or inserting recording media.
Inr
Table 13-4: Suggested Actions for SNMP Messages (Continued)
ID Type Message Trigger S

14
NICE Perform eXpress Integration Testing Tools
Contents
Connection Manager Monitor ......................................................................................186
Log Manager System ...................................................................................................192
Chapter 14: NICE Perform eXpress Integration Testing Tools
NICE Perform eXpress Release 3.0: Troubleshooting Guide (Rev. A2)
185

Connection Manager Monitor
Connection Manager MonitorThe NICE Connection Manager Monitor tool enables you to view the contents of the Connection Manager’s tables. It also enables you to verify if:
• Devices are monitored
• Monitored devices are filtered
and
• Displays the loaded CTI links
• Displays connected clients.
Your next step is to connect the Connection Manager Monitor tool to the Connection Manager as a client. It then receives events in addition to monitoring devices, enabling you to conduct simple tests without running a driver.
This section includes:
• Setting Up the Connection Manager Monitor
• Managing the Connection Manager Monitor
Setting Up the Connection Manager Monitor
To set up the Connection Manager Monitor, follow the procedures below.
To set up Connection Manager Monitor:
1. In the NICE Interactions Center, navigate to the Integrations folder (the default location is D:\Program Files\NICE Systems\NICE Perform eXpress\CTI. Double-click ConnectionManagerMonitor.exe. The Connection Manager Monitor window appears.
186 Chapter 14: NICE Perform eXpress Integration Testing Tools
NICE Perform eXpress Release 3.0: Troubleshooting Guide (Rev. A2)

Connection Manager Monitor
Figure 14-1 Connection Manager Monitor Window
2. From the Monitor menu, select Connect. The Select Connection Manager window appears.Figure 14-2 Select Connection Manager Window
3. Enter the Connection Manager ID of the NICE Interactions Center to which you want to connect. Click OK. The Connection Manager Monitor displays the contents of the Connection Manager tables.
Enter the Connection Manager ID of the NICE Interactions Center to which you want to connect
187 Chapter 14: NICE Perform eXpress Integration Testing Tools
NICE Perform eXpress Release 3.0: Troubleshooting Guide (Rev. A2)
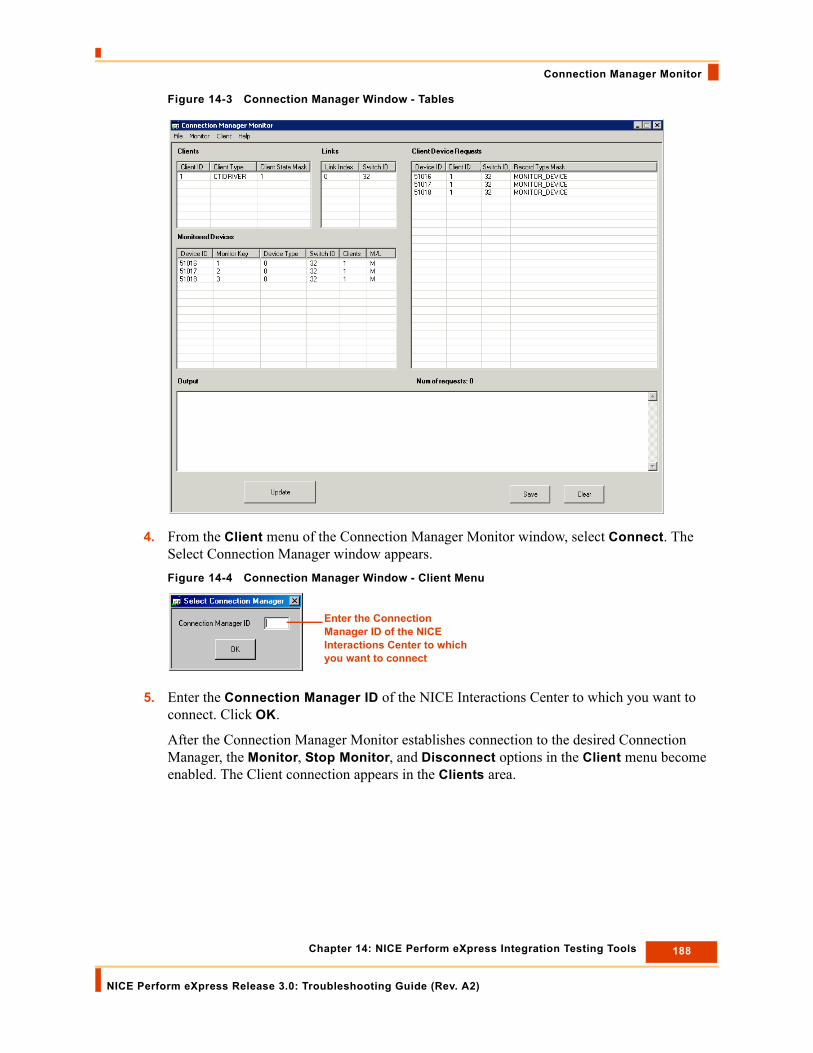
Connection Manager Monitor
Figure 14-3 Connection Manager Window - Tables
4. From the Client menu of the Connection Manager Monitor window, select Connect. The Select Connection Manager window appears.Figure 14-4 Connection Manager Window - Client Menu
5. Enter the Connection Manager ID of the NICE Interactions Center to which you want to connect. Click OK.
After the Connection Manager Monitor establishes connection to the desired Connection Manager, the Monitor, Stop Monitor, and Disconnect options in the Client menu become enabled. The Client connection appears in the Clients area.
Enter the Connection Manager ID of the NICE Interactions Center to which you want to connect
188 Chapter 14: NICE Perform eXpress Integration Testing Tools
NICE Perform eXpress Release 3.0: Troubleshooting Guide (Rev. A2)

Connection Manager Monitor
Figure 14-5 Connection Manager Monitor - Client Connection in Clients Area
6. From the Client menu, select Monitor. The Monitor Device window appears.Figure 14-6 Monitor Device Window
a. In the Device ID field, enter the Device ID number of the Connection Manager to which you want to connect.
b. In the Switch ID field, enter the Switch ID number.
c. From the Device Type drop-down list, select the appropriate device type.
d. Click Monitor. The response appears in the Output area.
Client connection
189 Chapter 14: NICE Perform eXpress Integration Testing Tools
NICE Perform eXpress Release 3.0: Troubleshooting Guide (Rev. A2)

Connection Manager Monitor
Figure 14-7 Output Area
7. Click Update. The new Client appears in the Client Device Requests area.Figure 14-8 Connection Manager Monitor - Client Device Requests Area
IMPORTANTThe Connection Manager Monitor window does not continuously refresh the data displayed in the window; it only displays the data current at the time you establish the connection. To update the data displayed in the window, click Update.
New Client
190 Chapter 14: NICE Perform eXpress Integration Testing Tools
NICE Perform eXpress Release 3.0: Troubleshooting Guide (Rev. A2)

Connection Manager Monitor
Managing the Connection Manager Monitor
This section includes the following topics:
• Stopping the Connection Manager Monitor
• Disconnecting the Connection Manager Monitor Client
Stopping the Connection Manager Monitor
This procedure describes how to stop the Connection Manager Monitor when it is functioning as a client.
To stop the Connection Manager Monitor:
1. From the Client menu of the Connection Manager Monitor window, select Stop Monitor. The Stop Monitor Device window appears.Figure 14-9 Stop Monitor Device Window
2. Enter the Device ID number and the Switch ID of the device you want to stop monitoring.
3. Click Stop Monitor. The response appears in the Output area.
Disconnecting the Connection Manager Monitor Client
This procedure describes how to disconnect the Connection Manager Monitor when it is functioning as a client.
To disconnect the Connection Manager Monitor Client:
• From the Client menu of the Connection Manager Monitor window, select Disconnect.
The Client connection of the Connection Manager no longer appears in the Clients area and in the Client Device Requests area.
191 Chapter 14: NICE Perform eXpress Integration Testing Tools
NICE Perform eXpress Release 3.0: Troubleshooting Guide (Rev. A2)

Log Manager System
Log Manager System The Log Manager system logs all significant system activity and maintains a log of all data, enabling you to view the history of all relevant system activity.
The Log Manager system has the following main components:
• Log Manager
• CTI Console Viewer
• Log Manager Services
• Log Viewer
Using the Log Manager
The Log Manager creates log message files and/or sends information to the CTI Console Viewer, the log file, and the Event Log according to the predefined Reporting Level filter.
Using the CTI Console Viewer
The CTI Console Viewer enables real-time log tracking of the screens of all integration components installed on the local machine. This application replaces the Console windows in the Reporting Level of the integration process, and provides the user with filtering capability.
CTI Console Viewer has a separate window for each integration process. You can view and filter an event, as well as change the Reporting Level. You cannot do this in the System Administrator. Files are saved automatically in the Log Manager and can be viewed afterwards in the Log Viewer. Figure 14-10 CTI Console Viewer
192 Chapter 14: NICE Perform eXpress Integration Testing Tools
NICE Perform eXpress Release 3.0: Troubleshooting Guide (Rev. A2)

Log Manager System
Opening the CTI Console Viewer
Follow the procedure below.
To open the CTI Console viewer:
• Double-click the icon in the system tray. Figure 14-11 System Tray
-or-
• Right-click the icon, and select Open NICE CTI Console Viewer.
To open a specific integration process window:
• From the NICE CTI Console Viewer window, select the relevant integration process.Figure 14-12 NICE CTI Console Viewer
A log window opens and the integration modules installed on the local machine are listed. (This list is updated when you add/remove any integration modules in the NICE System Administrator.)
Select CTI icon
Connection Manager Dispatch CTI Driver Media Provider Controller
193 Chapter 14: NICE Perform eXpress Integration Testing Tools
NICE Perform eXpress Release 3.0: Troubleshooting Guide (Rev. A2)

Log Manager System
Figure 14-13 CTI Log Window
Filtering Messages
You can filter messages in any of the following manners:
Resetting the Filter
To reset the filter:
• Click the Reset Filter button.
The filter in Module Name and Thread ID is reset, and all the messages are printed. (The Reset filter option does not affect the reporting level).Figure 14-14 Reset Filter
NOTE: These Reporting Levels are only relevant for the CTI Console.
WARNINGReporting Levels may be helpful for troubleshooting. However, making changes to the Reporting Levels can greatly add to the load on your system. Changing Reporting Levels should therefore be done only by authorized personnel and in conjunction with NICE Customer Support.
• Reporting Level: Clear the checkboxes of the Reporting Levels that are irrelevant (message importance).
• Module name: Clear the checkboxes of any modules that are irrelevant.
• Thread ID: Clear the checkboxes of any Thread IDs that are irrelevant.
NOTE: The filter is applied to new messages. It does not affect old messages.
194 Chapter 14: NICE Perform eXpress Integration Testing Tools
NICE Perform eXpress Release 3.0: Troubleshooting Guide (Rev. A2)

Log Manager System
Managing the CTI Console Viewer
To clear the screen of messages:
• Click the Clear Screen button.
All the messages are cleared from the screen.
To open the last log file:
• Click the Open last log file button.
The current log file with Log Viewer opens (see Log Viewer section). You can see log messages from the specific modules in real-time as they are displayed.
To change console size and color:
1. From the Options menu, select Console size.Figure 14-15 Options Menu
When the log window is filled with the maximum number of messages, the top rows are automatically deleted.
2. From the Options menu, select Change color.
a. Select a background color.
b. Select a color for each reporting level.
195 Chapter 14: NICE Perform eXpress Integration Testing Tools
NICE Perform eXpress Release 3.0: Troubleshooting Guide (Rev. A2)

Blank page for double-sided printing.

15
Troubleshooting Cisco Integrations
Contents
Cisco Skinny and SIP Troubleshooting......................................................................198
Cisco Passive Troubleshooting ..................................................................................199
Chapter 15: Troubleshooting Cisco Integrations
NICE Perform eXpress Release 3.0: Troubleshooting Guide (Rev. A2)
197

Cisco Skinny and SIP Troubleshooting
Cisco Skinny and SIP TroubleshootingIf the CTI Driver does not receive any CTI events from the SIP Decoder/Cisco Skinny Interface, verify the network configuration is correctly configured to capture the signaling packet between the CUCM/CUCMX and the endpoints.
To verify the Network configuration:
1. For the network configuration to capture the signalling packets between the CUCM/CUCMX and the endpoints, it should be configured in one of the following ways:
• Both the driver and the IP phones should be connected on the same Hub (less common).
• The switch should be configured to mirror the traffic. Verify this with your Site Engineer.
2. Verify with your Site Engineer that the network adapter configuration conforms to your site.
198 Chapter 15: Troubleshooting Cisco Integrations
NICE Perform eXpress Release 3.0: Troubleshooting Guide (Rev. A2)

Cisco Passive Troubleshooting
Cisco Passive TroubleshootingUsing TAPIMonitor
Follow the relevant procedure:
• Setting Up TAPIMonitor as a Debug Tool
• Collecting the TAPIMonitor Log Files on page 204
• Resetting TAPI on page 204
Setting Up TAPIMonitor as a Debug Tool
The TAPIMonitor enables you to see the events occurring from the Cisco TSP. You can view the lines that are open and see the events on those lines.
Before opening an Open Service Request Procedure, set up the TAPIMonitor to run as a debug tool. You should perform open line for a specific Directory Number (DN) and recreate the problematic call scenario.
You can also use the TAPIMonitor to verify that the Directory Numbers (DNs) are being monitored. In this case too, you should perform open line.
Remember to send the TapiMonitor.exe log file when you open the Service Request.
To run the TAPIMonitor as a debug tool:
1. From the NICE Perform eXpress machine, navigate to ..\Program Files\NICE Systems\NICE Perform eXpress\CTI.
2. Double-click TAPIMonitor.exe.
3. Run the TAPI monitor application. A window appears with the connection details. A successful connection should look similar to Figure 15-1 on page 200.
NOTE: This tool should only be used for debugging purposes when you are instructed to do so by the NICE Customer Support.
IMPORTANTWhen running TAPIMonitor as a debug tool, it is highly recommended that you stop the NICE Integration Dispatch Service. If you cannot stop it for operational reasons, contact NICE Customer Support.
199 Chapter 15: Troubleshooting Cisco Integrations
NICE Perform eXpress Release 3.0: Troubleshooting Guide (Rev. A2)
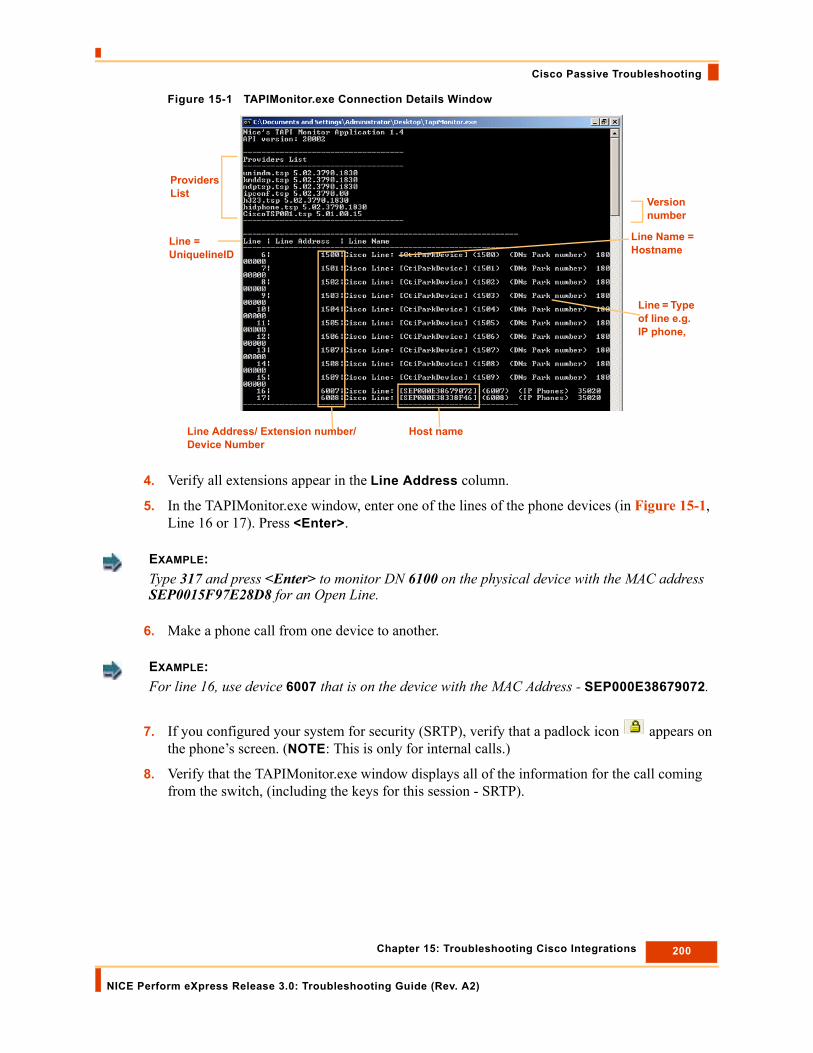
Cisco Passive Troubleshooting
Figure 15-1 TAPIMonitor.exe Connection Details Window
4. Verify all extensions appear in the Line Address column.
5. In the TAPIMonitor.exe window, enter one of the lines of the phone devices (in Figure 15-1, Line 16 or 17). Press <Enter>.
6. Make a phone call from one device to another.
7. If you configured your system for security (SRTP), verify that a padlock icon appears on the phone’s screen. (NOTE: This is only for internal calls.)
8. Verify that the TAPIMonitor.exe window displays all of the information for the call coming from the switch, (including the keys for this session - SRTP).
Providers List
Line = UniquelineID
Line Name = Hostname
Line = Type of line e.g. IP phone,
Version number
Line Address/ Extension number/Device Number
Host name
EXAMPLE:Type 317 and press <Enter> to monitor DN 6100 on the physical device with the MAC address SEP0015F97E28D8 for an Open Line.
EXAMPLE:For line 16, use device 6007 that is on the device with the MAC Address - SEP000E38679072.
200 Chapter 15: Troubleshooting Cisco Integrations
NICE Perform eXpress Release 3.0: Troubleshooting Guide (Rev. A2)

Cisco Passive Troubleshooting
Figure 15-2 TAPIMonitor.exe - Successful Connection Example
9. Perform the scenario and verify that events are received.
NOTE: You can also see the host name (SEP + MAC address) for each device. This can be useful for future troubleshooting.
Providers ListLine = UniquelineID Line Name = Host name
Line = Type of line e.g. IP phone
Version number
Recording modes of each device
MAC Address
Line Address/Extension number/Device Number
Type Open line # (line
201 Chapter 15: Troubleshooting Cisco Integrations
NICE Perform eXpress Release 3.0: Troubleshooting Guide (Rev. A2)

Cisco Passive Troubleshooting
Figure 15-3 Example - Verify the Events are Received
After you have verified the connection, the TSP Client is able to monitor the devices configured in the CUCM and receive the relevant information required to decrypt the call packets and to allow proper recordings.
10. To monitor all lines in this list, type -OAL and press <Enter>.
NOTE: You can view all information regarding the TAPIMonitor results in the TAPIMonitor.txt file - NICE Perform eXpress\CTI\TAPICTILink.
Line accepted - monitoring device
202 Chapter 15: Troubleshooting Cisco Integrations
NICE Perform eXpress Release 3.0: Troubleshooting Guide (Rev. A2)

Cisco Passive Troubleshooting
Figure 15-4 Monitor All Lines
11. Exit the program after the scenario is completed.
12. Navigate to D:\Program Files\NICE Perform eXpress\CTI\TAPICTILink.
Figure 15-5 TAPIMonitor Folder
13. Zip the files and send the TAPIMonitor.txt file to NICE Customer Support.
Type -OAL
203 Chapter 15: Troubleshooting Cisco Integrations
NICE Perform eXpress Release 3.0: Troubleshooting Guide (Rev. A2)

Cisco Passive Troubleshooting
Collecting the TAPIMonitor Log Files
You should send the TAPIMonitor files to NICE Customer Support.
To collect the TAPIMonitor files:
1. In the NICE Interactions Center, navigate to the TAPICTILink folder. (The default location is D:\Program Files\Nice Systems\NICE Perform eXpress\CTI\TAPICTILink).
2. Zip the files and send them to NICE Customer Support.
Resetting TAPI
No reset is required for the TAPIMonitor.
Remember to close the application when you have finished debugging the system.
Using TSP as a Debug Tool
Follow the relevant procedure:
• Collecting and Saving TSP Log Files on page 204
• Resetting the TSP on page 206
Collecting and Saving TSP Log Files
The TSP Log files are very useful for troubleshooting purposes. You should send these files together with the other log files.
Before you repeat the scenario for troubleshooting purposes, you should delete existing log files. You then need to set up the TSP for troubleshooting, repeat the problematic scenario, zip the log files for sending to NICE Customer Support, and then return the TSP to its original settings.
To collect and save TSP log files:
1. Navigate to C:\Temp and delete all existing TSP log directories.
2. Navigate to Start > Settings > Control Panel and point to Phone and Modem Options.
3. Click the Advanced tab.
204 Chapter 15: Troubleshooting Cisco Integrations
NICE Perform eXpress Release 3.0: Troubleshooting Guide (Rev. A2)

Cisco Passive Troubleshooting
Figure 15-6 Phone and Modem Options Window - Advanced Tab
4. In the Providers list, select CiscoTSP001.tsp and click Configure. The Cisco Unified Communications Manager TSP window appears.
a. Click the Trace tab.Figure 15-7 CUCM TSP Window - Trace Tab
IMPORTANTConsider the available free disk space on the relevant drive BEFORE setting your File Size and No. of files fields.
205 Chapter 15: Troubleshooting Cisco Integrations
NICE Perform eXpress Release 3.0: Troubleshooting Guide (Rev. A2)

Cisco Passive Troubleshooting
b. In the File Size field, enter 500. (This value is in MB.)
c. In the No. of files field, enter 20.
d. Select Detailed.
e. Select the CTI Trace and TSPI Trace checkboxes.
f. Leave the default directory setting as C:\Temp.
g. Click OK.
5. Repeat the problematic scenario.
6. Navigate to C:\Temp and zip the relevant log file directories and send them to NICE Customer Support together with all other relevant log files and the completed Open Service Request Procedure checklist.
7. After sending the Open Service Request Procedure’s log files, reset the TSP to its original settings, see Resetting the TSP on page 206.
Resetting the TSP
After sending the TSP log files to NICE Customer Support, return the system to its original configuration.
To access and save TSP log files:
1. Navigate to Start > Settings > Control Panel. From the Control Panel, select Phone and Modem Options. Click the Advanced tab. In the Providers list, select CiscoTSP001.tsp and click Configure.
2. Click the Trace tab.
EXAMPLE:In the example above, the available disk space required will be:500 x 20 = 10 GB.
206 Chapter 15: Troubleshooting Cisco Integrations
NICE Perform eXpress Release 3.0: Troubleshooting Guide (Rev. A2)
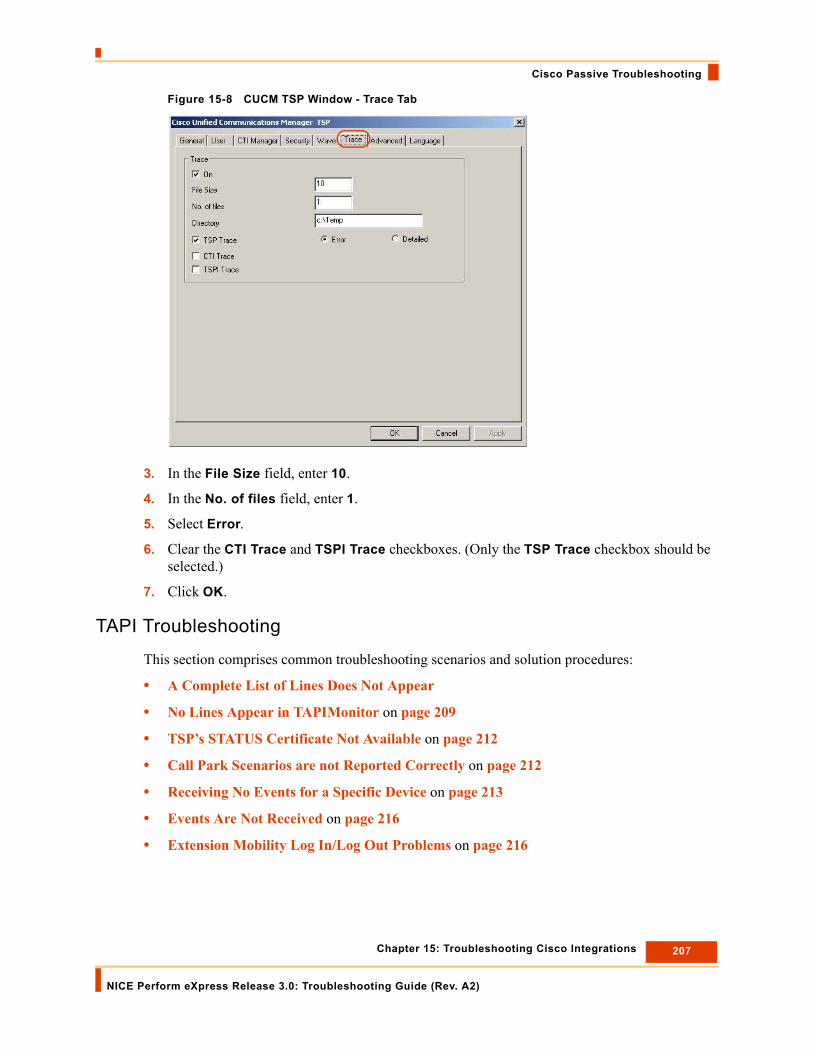
Cisco Passive Troubleshooting
Figure 15-8 CUCM TSP Window - Trace Tab
3. In the File Size field, enter 10.
4. In the No. of files field, enter 1.
5. Select Error.
6. Clear the CTI Trace and TSPI Trace checkboxes. (Only the TSP Trace checkbox should be selected.)
7. Click OK.
TAPI Troubleshooting
This section comprises common troubleshooting scenarios and solution procedures:
• A Complete List of Lines Does Not Appear
• No Lines Appear in TAPIMonitor on page 209
• TSP’s STATUS Certificate Not Available on page 212
• Call Park Scenarios are not Reported Correctly on page 212
• Receiving No Events for a Specific Device on page 213
• Events Are Not Received on page 216
• Extension Mobility Log In/Log Out Problems on page 216
207 Chapter 15: Troubleshooting Cisco Integrations
NICE Perform eXpress Release 3.0: Troubleshooting Guide (Rev. A2)

Cisco Passive Troubleshooting
A Complete List of Lines Does Not Appear
Scenario: After installing and configuring the Cisco TSP, you run TapiMonitor.exe. However, a complete list of lines does not appear.
Solution: Reboot the computer. The Telephony Service must be synchronized with the CUCM. For this to happen, the computer must be rebooted. See the following section, Resetting the CTI service on the CUCM cluster.
Resetting the CTI service on the CUCM cluster
Follow this procedure to reset the CTI service on the CUCM cluster.
To reset the CTI service on the CUCM cluster:
1. From the Navigation drop-down list, select Cisco Unified Serviceability and click Go.Figure 15-9 Navigation Drop-down List
2. Login to Cisco Unified Serviceability.
3. From the Tools menu, select Control Center - Feature Services. Figure 15-10 Navigation Drop-down List
4. In the Select Server area, from the Server drop-down list, select the server where the CTI service is installed.
208 Chapter 15: Troubleshooting Cisco Integrations
NICE Perform eXpress Release 3.0: Troubleshooting Guide (Rev. A2)

Cisco Passive Troubleshooting
Figure 15-11 Select Server Area
5. Click Go.
6. In the CM Services area, select Cisco CTIManager and click Restart.
No Lines Appear in TAPIMonitor
Figure 15-12 TAPIMonitor - No Lines Appear
If no lines appear in the TAPIMonitor, troubleshoot this problem using the scenarios below:
Click Restart
209 Chapter 15: Troubleshooting Cisco Integrations
NICE Perform eXpress Release 3.0: Troubleshooting Guide (Rev. A2)

Cisco Passive Troubleshooting
Scenario 1: While you are configuring the TSP client (see Figure 15-13 on page 210), you try to run the TAPIMonitor. No lines appear in the TAPIMonitor.
Solution: Finish configuring the TSP client and then run TAPIMonitor. Figure 15-13 Scenario 1
Scenario 2: If one of the parameters in the TSP client are not configured properly, then no lines appear in the TAPIMonitor.
Solution: Verify the following parameters:
• user name
• password
• IP address
Scenario 3: If there is a problem of connectivity from the NICE Perform eXpress system to the CUCM, then no lines appear in the TAPIMonitor.
Solution: Perform all normal connectivity tests e.g. ping the CUCM, firewall, etc.
Scenario 4: If no devices were configured on the CUCM, then no lines appear in the TAPIMonitor.
Solution: Verify that all relevant devices are configured on the CUCM in the nicecti user:
Scenario 5: If the TSP client does not appear under the Phones and Modems Options window, then no lines appear in the TAPIMonitor.
210 Chapter 15: Troubleshooting Cisco Integrations
NICE Perform eXpress Release 3.0: Troubleshooting Guide (Rev. A2)

Cisco Passive Troubleshooting
Solution: You need to add the TSP client.
To add the TSP client:
1. Navigate to Start > Settings > Control Panel > Phone and Modem Options. The Phone and Modem Options window appears.
2. Click Advanced.Figure 15-14 Phone and Modem Options Window - Advanced Tab
3. Click Add.Figure 15-15 Phone and Modem Options Window - Advanced Tab
4. Select the relevant Cisco TSP client.
5. Click Add. The selected TSP client appears in the Phone and Modem Options window.
6. Click Configure and verify that it is configured properly.
211 Chapter 15: Troubleshooting Cisco Integrations
NICE Perform eXpress Release 3.0: Troubleshooting Guide (Rev. A2)

Cisco Passive Troubleshooting
TSP’s STATUS Certificate Not Available
Scenario: (Secured Connections Only) In the Security tab, the TSP’s STATUS certificate is not available.
Solution: Ask the Cisco Site Engineer for a new authorization string. Select Fetch Certificate and try to fetch the certificate again. Then, reboot. If this doesn’t work, reboot the CTI server.
Call Park Scenarios are not Reported Correctly
Scenario: Call Park scenarios are not reported correctly.
Solution: Ensure that the Call Park numbers are attached to your nicecti user.
To ensure that all Call Park numbers are attached to the nicecti user:
• If using an Application User, ensure that all Call Park numbers are attached to your nicecti user appear in the Permissions Information area.Figure 15-16 Permissions Information Area
-or-
• If using an End User, ensure that all Call Park numbers are attached to your nicecti user appear in the Permissions Information area.Figure 15-17 Permissions Information Area
Call Park Monitoring must appear here
Call Park Monitoring must appear here
212 Chapter 15: Troubleshooting Cisco Integrations
NICE Perform eXpress Release 3.0: Troubleshooting Guide (Rev. A2)

Cisco Passive Troubleshooting
Receiving No Events for a Specific Device
If you have performed all the required configuration for the Application User and you still receive no events for a specific device, follow the procedure below.
To enable control of device from CTI:
1. From the Device menu, select Phone. Figure 15-18 Device Menu
The Find and List Phones window appears.Figure 15-19 Find and List Phones Window
2. In the Find Phone where area, enter the information for the phone/s that you want to record.
3. Click Find. The Find and List Phones window appears.
The Phone Configuration window appears.
213 Chapter 15: Troubleshooting Cisco Integrations
NICE Perform eXpress Release 3.0: Troubleshooting Guide (Rev. A2)

Cisco Passive Troubleshooting
Figure 15-20 Phone Configuration Window
4. In the Device Information area, select Allow Control of Device from CTI.Figure 15-21 Phone Configuration Window - Allow Control of Device from CTI
5. Click Save.
6. If you still receive no events from this specific device, see Receiving No Events for a Specific Device #2.
214 Chapter 15: Troubleshooting Cisco Integrations
NICE Perform eXpress Release 3.0: Troubleshooting Guide (Rev. A2)

Cisco Passive Troubleshooting
Receiving No Events for a Specific Device #2
Receiving No Events for a Specific Device #3
If you have verified that Allow Control of Device from CTI is selected and that the device is associated with the Application User/End User and you are still receiving no events for a specific device, you should reset the Cisco CTIManager Service.
To reset the CTIManager Service:
1. Navigate to the Cisco Unified Serviceability window.
2. From the Tools menu, select Control Center - Feature Services. Figure 15-22 Control Center - Feature Services
3. For the relevant server, reset the relevant Cisco CTIManager.
IMPORTANTIf there is still a problem after you have performed the configuration above, verify that this device is associated with the Application User and NOT an End User as recommended by CiscoIf the problem continues, see Receiving No Events for a Specific Device #3.
215 Chapter 15: Troubleshooting Cisco Integrations
NICE Perform eXpress Release 3.0: Troubleshooting Guide (Rev. A2)

Cisco Passive Troubleshooting
Events Are Not Received
If your site is experiencing problems when receiving events, verify that the nicecti user is configured as an Application User and not as an End User.
Extension Mobility Log In/Log Out Problems
If your site is experiencing extension mobility login/logout problems, verify that the nicecti user is configured as an Application User and not as an End User.
216 Chapter 15: Troubleshooting Cisco Integrations
NICE Perform eXpress Release 3.0: Troubleshooting Guide (Rev. A2)

16
Troubleshooting Avaya Integrations
Contents
Troubleshooting Avaya SIP .........................................................................................218
Troubleshooting Avaya IP Mappers............................................................................219
Troubleshooting Avaya CVLAN...................................................................................223
Troubleshooting Avaya TSAPI ....................................................................................232
Chapter 16: Troubleshooting Avaya Integrations
NICE Perform eXpress Release 3.0: Troubleshooting Guide (Rev. A2)
217

Troubleshooting Avaya SIP
Troubleshooting Avaya SIPNo CTI Events Received by CTI Driver from Interface
Problem
If the CTI Driver does not receive any CTI events from the SIP Decoder Interface, verify the network configuration as described in the next section.
Verifying the Network Configuration
In order for the SIP Decoder Driver to capture the signaling packet between the SES and the endpoints, verify the network configuration is correctly configured.
To verify the Network configuration:
1. For the network configuration to capture the signalling packets between the SES and the endpoints, it should be configured in one of the following ways:
• Both the driver and the IP Phones should be connected on the same Hub.
• The switch should be configured to mirror the traffic. Verify this with your Site Engineer.
2. Verify that the network adapter configuration conforms to the requirements of your site. See the Installation Guide for more information.
218 Chapter 16: Troubleshooting Avaya Integrations
NICE Perform eXpress Release 3.0: Troubleshooting Guide (Rev. A2)

Troubleshooting Avaya IP Mappers
Troubleshooting Avaya IP MappersSNMP/Push/RAS Troubleshooting
For the Push Monitor Tester, contact NICE Customer Support.
SMS Troubleshooting
If Avaya SMS CTI link does not function correctly, check the following:
• The local host is connected to the network and that you can reach the SMS host.
• Avaya SMS is installed and configured correctly.
To confirm Avaya SMS is installed and configured correctly, use the following tests:
• Avaya SMS Web Interface Test Application Page
• Avaya Sms Monitor Test
Avaya SMS Web Interface Test Application Page
In order to test interactions with the System Management Service, use Avaya SMS web interface test page.
To access the Avaya SMS web interface test page:
1. Go to http://<smshost>/sms/sms_test.php. The .php web page opens.
NOTE: If the web page does not display, this may be a problem with the SMS configuration.If you get an error message, follow the instructions.
219 Chapter 16: Troubleshooting Avaya Integrations
NICE Perform eXpress Release 3.0: Troubleshooting Guide (Rev. A2)

Troubleshooting Avaya IP Mappers
Figure 16-1 Avaya SMS Web Interface Test Page
2. Complete the relevant information using the following guidelines:
• OSSI Login ID: Enter the username for the Communication Manager.
• Password: Enter the password for the Communication Manager.
• Model: Enter Station.
• Operation: Enter List.
• Objectname: Leave this field blank.
• Qualifier: Enter count 5.
• Fields: Enter *.
3. Click .
4. The test result appears in the Response area.
• Below is an example where the test connection succeeded.
220 Chapter 16: Troubleshooting Avaya Integrations
NICE Perform eXpress Release 3.0: Troubleshooting Guide (Rev. A2)

Troubleshooting Avaya IP Mappers
• Below is an example where the test connection failed.
Avaya Sms Monitor Test
Another tool that can be used to test interactions with the System Management Service is the Avaya Sms Monitor.
The main difference between the Avaya Sms Monitor testing tool and the Avaya SMS Web Interface Test Application Page, is the Avaya SMS web interface only tests Avaya SMS functionality but the Avaya Sms Monitor also tests the smsHandler.
The smsHandler is the connector between the System Management Service and the Avaya SMS CTI link.
The Avaya Sms Monitor is located under Program Files\NICE Systems\NICE Perform eXpress\CTI\AvayaSmsCTILink.
Before running the Avaya Sms Monitor application:
Ensure that the InitApplication.xml file and the Commands.xml file are located in the Config folder in the application folder.
The InitApplication.xml file should include:
• SMS Connection parameters which consist of the following:
• Timeout: The timeout for SMS web service requests.
• Url: http://<smsHostIpAddress>/sms/SystemManagementService.php
• Mode: BASIC_AUTHORIZATION
• Username - Username for the Communication Manager (Example: mylogin@cmserveraddr).
• Password - Password for the Communication Manager.
• Load and results parameters which consist of the following:
• SMS Commands file name (optional).
• Log fie name and whether to write to this file (optional).
• Results file name and whether to write to this file (optional).
The Commands.xml file should include the commands you want to load into the system.
221 Chapter 16: Troubleshooting Avaya Integrations
NICE Perform eXpress Release 3.0: Troubleshooting Guide (Rev. A2)

Troubleshooting Avaya IP Mappers
Figure 16-2 Commands.xml File Window
After running the Avaya Sms Monitor application you can:
• Load new configured commands .
• Run the configured command either one by one or in a series .
• Run the currently displayed command .
• Enter a command manually.
• Choose to write to the Log file or to the Results file .Figure 16-3 Sms Monitor - Commands Window
222 Chapter 16: Troubleshooting Avaya Integrations
NICE Perform eXpress Release 3.0: Troubleshooting Guide (Rev. A2)

Troubleshooting Avaya CVLAN
Troubleshooting Avaya CVLANThis section comprises the following topics:
• No CTI Events Received by CTI Driver from Interface on page 218
• SNMP/Push/RAS Troubleshooting on page 219
• SMS Troubleshooting on page 219
• Checking the Connection Manager Log on page 223
• Checking for Unsuccessful Device Monitoring on page 223
• Checking a Connection Problem on page 224
• Checking Monitor End is Received on page 227
• Checking ISDN Trunk Alerting Event on page 227
• Checking the Connection Manager and Driver Connection to the AES on page 227
• General AES Environment Troubleshooting Tips on page 228
• Client Cannot Connect to CVLAN Server on page 230
• CVLAN Dump Utility on page 231
Checking the Connection Manager Log
Locate the error on the Connection Manager Log. This should provide you with an understanding of the error that occurred. The error is either reported with an associated cause, or as an error number.
See Connection Manager Monitor on page 186.
To locate the error on the Connection Manager log, see Finding Text Strings in Open Logs on page 162.
Checking for Unsuccessful Device Monitoring
A device was not monitored successfully.
1. Check the switch connectivity (see Verifying the PABX Configuration and Physical Line Connectivity on page 118).
2. Locate the error on the Connection Manager Log (see Checking the Connection Manager Log on page 223).
3. Check that there are no other processes (other CTI Servers or applications) monitoring the device, by asking the customer if they are running other applications.
4. Check that the device status on the switch is in-service.
223 Chapter 16: Troubleshooting Avaya Integrations
NICE Perform eXpress Release 3.0: Troubleshooting Guide (Rev. A2)

Troubleshooting Avaya CVLAN
Figure 16-4 Device Monitoring - General Status
Checking a Connection Problem
If Avaya CVLAN has a connection problem it may be due to a change on the switch. You will need to check for an Avaya CVLAN client software version problem (see the Integration Description Document (IDD).
To check a connection problem:
1. Restart the AES twice. If the driver log shows a CVLAN client version mismatch, install the correct Avaya CVLAN client software version (see the Installation Guide).
2. Restart the NICE Perform eXpress machine.
3. Check the physical and network connections.
4. Check if the CVLAN interfaces and CVLAN clients that are configured on the AES server exist. To do this:
a. In the OAM, go to CTI Admin on AES Server > Administration > CTI Link Admin > CVLAN Links.
224 Chapter 16: Troubleshooting Avaya Integrations
NICE Perform eXpress Release 3.0: Troubleshooting Guide (Rev. A2)

Troubleshooting Avaya CVLAN
Figure 16-5 Avaya CVLAN Links
b. Select the required CTI link and click Edit Client.
Figure 16-6 Avaya CVLAN - Edit Clients
225 Chapter 16: Troubleshooting Avaya Integrations
NICE Perform eXpress Release 3.0: Troubleshooting Guide (Rev. A2)

Troubleshooting Avaya CVLAN
c. Verify that the clients exist.
5. Check the ASAI-IP link. To do this, go to the ACM and run the command status aesvcs cti.
Figure 16-7 Avaya AES Status - CTI Link
6. Verify that the AES is communicating with the switch. To do this:
a. In the OAM, navigate to Status and Control > Switch Conn Summary.
b. Verify that the Conn Status is Talking.
7. Verify that the CVLAN link is communicating. To do this:
a. Click Per Service Connection Details.
b. Check that the Connection State for the link is Talking.
8. Verify that the IP address of the AES for client connectivity is defined (the IP address of one network card).
The client connectivity cannot be defined as Any (meaning any network card). CVLAN does not support the option Any.
To do this:
a. In the OAM, navigate to Administration > Local IP.
b. Check Client Connectivity.
9. Verify host connectivity. To do this:
a. In the OAM, navigate to Utilities > Ping Host.
NOTE: When a site is configured with two separate NIC, the two IP addresses could appear here. One IP is configured to reside on the NIC designated for the Switch connection and the other IP is configured to reside on the NIC designated for the Client connection. Ensure that you select the correct IP address.
226 Chapter 16: Troubleshooting Avaya Integrations
NICE Perform eXpress Release 3.0: Troubleshooting Guide (Rev. A2)

Troubleshooting Avaya CVLAN
b. In the Host/IP field, enter the IP address of the C-LAN board, and click Ping.
If the ping is successful, the system displays a message indicating a packet size and packet count.
10. Locate the error on the Connection Manager Log (see Checking the Connection Manager Log on page 223).
This should provide you with an understanding of the error that occurred. The error is either reported with an associated cause or as an error number.
Checking Monitor End is Received
Problem:
The Monitor End event is received in the NMS when the CVLAN Interface configured on the AES server cannot receive events for a specific device (Event Monitor End Received). This usually indicates that a device was deleted in the switch or a CVLAN Interface configured on the AES server failure occurred.
Solution:
1. Check the device configuration in the switch.
2. Check that the CVLAN Interface configured on the AES server is running. To do this:
a. In the OAM, navigate to Status and Control > Switch Conn Summary.
b. Click Per Service Connection Details.
c. Check that the Connection State for the link is Talking.
Checking ISDN Trunk Alerting Event
Problem:
A trunk with PRI facility (ISDN Trunk), the Alerting Event will contain (#####).
Solution:
Once the call is connected, the value can be updated if the trunk or facility is properly administered.
Checking the Connection Manager and Driver Connection to the AES
Problem:
NICE Connection Manager failed to open a connection to the Avaya CVLAN server.
Solution:
The CVLAN Client IP is configured on the CVLAN server. Therefore, if trying to connect via the DHCP IP, the server will not accept the client.
1. To resolve this, the client must use the static IP address to connect to the server.
227 Chapter 16: Troubleshooting Avaya Integrations
NICE Perform eXpress Release 3.0: Troubleshooting Guide (Rev. A2)

Troubleshooting Avaya CVLAN
2. In the event that the Connection Manager has more than one NIC card, the static IP network card must be set as the default network card.
General AES Environment Troubleshooting Tips
In an AES environment, verify the following details when troubleshooting communication problems.
1. Verify the AES version in the site. See the Integration Description Document (IDD).
2. Verify that the AES is communicating with the switch.
a. In the OAM, navigate to Status and Control > Switch Conn Summary.
b. In the Conn State column, verify that the switch status shows Talking.Figure 16-8 OAM: Switch Connections Summary
3. Verify that the CVLAN link is communicating.
a. Click . The Per Service Connection Details appear.
b. Check that the Connection State for the link is Talking.
228 Chapter 16: Troubleshooting Avaya Integrations
NICE Perform eXpress Release 3.0: Troubleshooting Guide (Rev. A2)

Troubleshooting Avaya CVLAN
Figure 16-9 OAM: Per Service Connections Details
4. Verify that the IP address of the AES for client connectivity is defined (the IP address of one network card). The client connectivity cannot be defined as Any (meaning any network card). CVLAN does not support the option Any.
Figure 16-10 OAM: Local IP
5. Verify host connectivity as follows:
a. From the menu bar, click Ping host. The Ping Host/IP page appears.
NOTE: When a site is configured with two separate NIC, the two IP addresses could appear here. One IP address is configured to reside on the NIC designated for the Switch connection and the other IP address is configured to reside on the NIC designated for the Client connection. Ensure that you select the correct IP address.
229 Chapter 16: Troubleshooting Avaya Integrations
NICE Perform eXpress Release 3.0: Troubleshooting Guide (Rev. A2)

Troubleshooting Avaya CVLAN
Figure 16-11 Avaya OAM - Ping Host/IP Page
b. In the Host/IP field, type the IP address of the CLAN board and click Ping. If the ping is successful, the system displays a message indicating a packet size and packet count.
Client Cannot Connect to CVLAN Server
• Verify that the IP address of the CVLAN for client connectivity is defined (the IP address of one network card). The client connectivity cannot be defined as Any (meaning any network card). CVLAN does not support Any.
Figure 16-12 OAM: Local IP
NOTE: When a site is configured with two separate NIC, the two IP addresses could appear here. One IP address is configured to reside on the NIC designated for the Switch connection and the other IP address is configured to reside on the NIC designated for the Client connection. Ensure that you select the correct IP address.
client connectivity
230 Chapter 16: Troubleshooting Avaya Integrations
NICE Perform eXpress Release 3.0: Troubleshooting Guide (Rev. A2)

Troubleshooting Avaya CVLAN
CVLAN Dump Utility
The CVLAN Dump Utility saves the output from the CVLAN Interface and is used to check the server connection as well as specific information flows. The utility should only be used for a few devices.
Prerequisites
Before running the CVLAN Dump Utility, verify:
• CVLAN Client version 4.2.2 is installed.
• The IP address of the machine where the CVLAN Dump Utility is running, is registered on the AES server.
To use the CVLAN Dump Utility:
1. In the command line, enter the following commands:
CVLanDumpUtility.exe -i <CVLAN Server IP address> -p <CVLAN Server port number> -s <CVLAN signal> -f <device file name>
(<device file name> where the file contains the devices that should be monitored by the utility)
2. Press Enter.
The CVLAN Dump Utility connects to a non-secure connection for port number 9999, and a secure connection for any other port number, that is defined in the Avaya switch.
The CVLAN Dump Utility creates 3 files in the local directory:
• CtiText.log: Text file containing the CVLAN outputs.
• CtiBinary.log: Binary file containing the CVLAN outputs.
• ApplicationLog.log: CVLAN Dump Utility outputs.
EXAMPLE: CVLanDumpUtility.exe –i 100.99.99.1 -p 9999 –s signal01 –f devices.txt
Where:CVLanDumpUtility.exe –i 100.99.99.1 -p 9999 –s signal01 –f devices.txt
CVLAN Server IP address
CVLAN signal
device file name
CVLAN Server port number
231 Chapter 16: Troubleshooting Avaya Integrations
NICE Perform eXpress Release 3.0: Troubleshooting Guide (Rev. A2)

Troubleshooting Avaya TSAPI
Troubleshooting Avaya TSAPIThis section covers the following topics:
• Missing Login/Logout Error on page 232
• Missing VDN Information in Database on page 233
• Failed to Monitor Device on page 233
• Failed to Establish Connection to the Avaya AES Server on page 234
• Monitor End Event is Received on page 235
• Calls are Reported with Wrong Direction, or Phone Number is Missing on page 235
• Verifying Communication Between AES Server and Avaya Switch on page 236
• Viewing Avaya Error Messages Documentation on page 237
• Avaya Exerciser on page 237
Missing Login/Logout Error
Problem:
The NICE Perform eXpress system did not receive login or logout events from the agent in real-time.
Solution:
Monitor the ACD number (hunt group extension number). Add the ACD number to the nicecti group of monitored devices.
In an AES environment, configure as follows:
1. Log in to OAM.
2. In the Devices window, add the ACD number to the list of devices.
IMPORTANTDuring startup, when the driver initializes, the driver queries the Avaya CT/AES TSAPI Server monitored devices. For each device that is currently logged in to the switch, the driver creates a Login event. The driver sends these Login events to the Call Server. There are no corresponding Logout events for these Login events. This is the normal behavior of the driver.
IMPORTANTAn Avaya System Administrator is responsible for all procedures in the Avaya environment.All procedures in the Avaya environment are by recommendation only!
232 Chapter 16: Troubleshooting Avaya Integrations
NICE Perform eXpress Release 3.0: Troubleshooting Guide (Rev. A2)

Troubleshooting Avaya TSAPI
Missing VDN Information in Database
Problem:
In the nice interactions database, the VDN column remains empty.
Solution:
1. Add the VDN number to the monitored devices list.
2. In a CT server environment, check if the VDN information is reported in the Called Device field in the Delivered or Established events.
3. In an AES server environment, check if the VDN information is reported in the distributingVDN field in the private data.
4. Using the Avaya Exerciser, verify if the device type is VDN (for details, see Avaya Exerciser on page 237).
In an AES environment, configure as follows:
1. Log in to OAM.
2. In the Devices window, add the VDN number to the list of devices.
Failed to Monitor Device
Problem:
A device was not monitored successfully.
Solution:
First, run the Avaya Exerciser tool to isolate if the problem is a switch installation problem or a driver configuration problem. See Avaya Exerciser on page 237.
• If the Exerciser does not succeed in monitoring the device, contact the appropriate Avaya personnel.
• If the Exerciser succeeds in monitoring the device, then troubleshoot the driver configuration.
Now, analyze the information. Here’s How:
1. Check that the monitored devices group is created and includes all monitored devices.
See the Installation Guide.
2. Check that the number of associated monitored devices does not exceed the maximum monitored devices defined for the specific device.
IMPORTANTAn Avaya System Administrator is responsible for all procedures in the Avaya environment.All procedures in the Avaya environment are by recommendation only!
233 Chapter 16: Troubleshooting Avaya Integrations
NICE Perform eXpress Release 3.0: Troubleshooting Guide (Rev. A2)
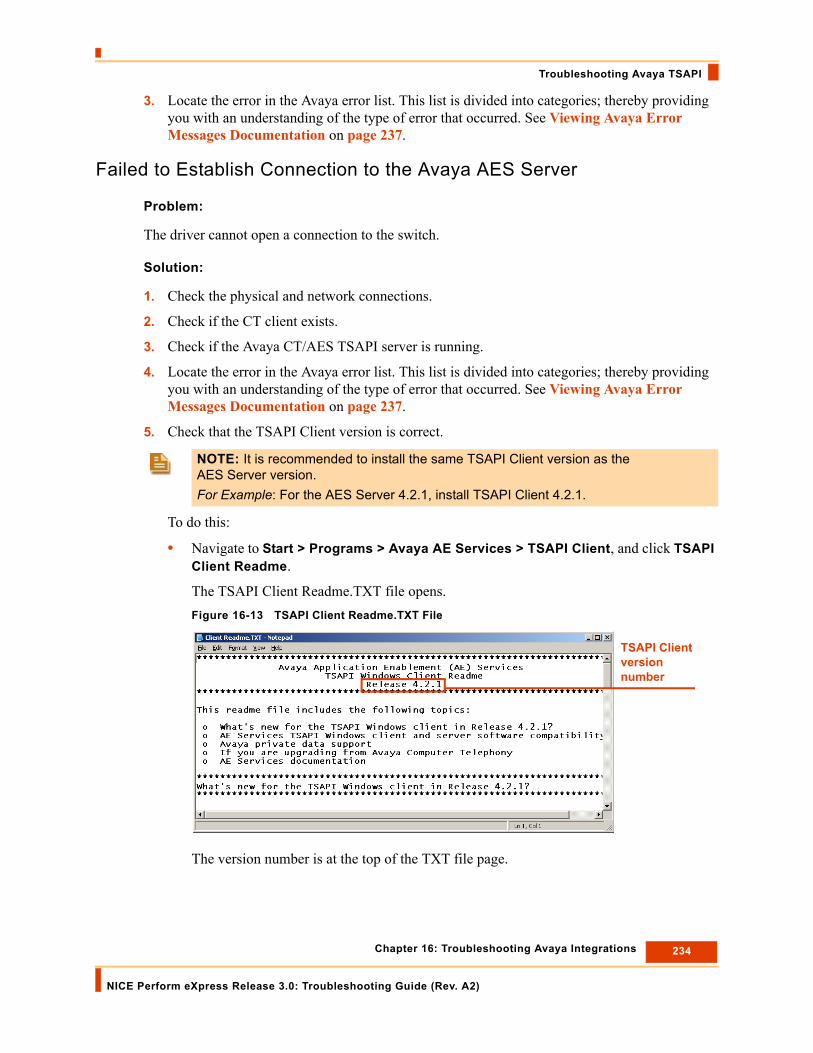
Troubleshooting Avaya TSAPI
3. Locate the error in the Avaya error list. This list is divided into categories; thereby providing you with an understanding of the type of error that occurred. See Viewing Avaya Error Messages Documentation on page 237.
Failed to Establish Connection to the Avaya AES Server
Problem:
The driver cannot open a connection to the switch.
Solution:
1. Check the physical and network connections.
2. Check if the CT client exists.
3. Check if the Avaya CT/AES TSAPI server is running.
4. Locate the error in the Avaya error list. This list is divided into categories; thereby providing you with an understanding of the type of error that occurred. See Viewing Avaya Error Messages Documentation on page 237.
5. Check that the TSAPI Client version is correct.
To do this:
• Navigate to Start > Programs > Avaya AE Services > TSAPI Client, and click TSAPI Client Readme.
The TSAPI Client Readme.TXT file opens.Figure 16-13 TSAPI Client Readme.TXT File
The version number is at the top of the TXT file page.
NOTE: It is recommended to install the same TSAPI Client version as the AES Server version. For Example: For the AES Server 4.2.1, install TSAPI Client 4.2.1.
TSAPI Client version number
234 Chapter 16: Troubleshooting Avaya Integrations
NICE Perform eXpress Release 3.0: Troubleshooting Guide (Rev. A2)

Troubleshooting Avaya TSAPI
Monitor End Event is Received
Problem:
The Monitor End event is received when the Avaya AES Server cannot receive events for a specific device. This usually indicates that a device was deleted in the switch or a Avaya AES Server failure occurred.
Solution:
1. Check the device configuration in the switch.
2. Check that the Avaya AES Server is running.
Calls are Reported with Wrong Direction, or Phone Number is Missing
Problem:
• Calls are reported as Tandem or outgoing in the CallServer, although the calls are normal incoming calls from a customer to an agent.
-or-
• The phone number is missing from the call.
Solution:
1. The parameter MaxLenOfInternalDevice from the Avaya TSAPI CTI Interface plug-in may not contain the correct value.
This parameter should contain the maximum length of the agent’s extensions, the default value is 6. In case the site agent’s extension value is higher than 6, you should update this parameter respectively, otherwise the agent’s extensions will be reported as type trunk instead of station and the direction of the call will be wrong.
2. In the system administrator, check the parameters TreatType20As and TreatType40As from the Avaya TSAPI CTI Interface plug-in.
The device type 20 is considered as Trunk by default, and device type 40 is considered as Station by default.
If in the customer site the agent’s extensions are reported with device type 20, they will be recognized as trunk and not station and the direction will be wrong. In this case you should update this parameter from trunk to station in the system administrator. The same procedure should be repeated for the TreatType40 parameter.
NOTE: See the Avaya Exerciser on page 237 to determine as what types the agent’s extensions are being reported. In Avaya terminology, type 20 is IMPLICIT_PUBLIC and type 40 is IMPLICIT_PRIVATE.
235 Chapter 16: Troubleshooting Avaya Integrations
NICE Perform eXpress Release 3.0: Troubleshooting Guide (Rev. A2)

Troubleshooting Avaya TSAPI
Verifying Communication Between AES Server and Avaya Switch
In an AES environment, verify the following details when troubleshooting communication problems.
1. Verify the AES version in the site. See the Integration Description Document (IDD).
2. Verify that the AES is communicating with the switch.
a. In the OAM, navigate to Status and Control > Switch Conn Summary.
b. In the Conn State column, verify that the switch status shows Talking.Figure 16-14 OAM: Switch Connections Summary
3. Verify that the link is communicating.
a. Click . The Per Service Connection Details appear.
b. Check that the Connection State for the link is Talking.Figure 16-15 OAM: Per Service Connections Details
236 Chapter 16: Troubleshooting Avaya Integrations
NICE Perform eXpress Release 3.0: Troubleshooting Guide (Rev. A2)

Troubleshooting Avaya TSAPI
Viewing Avaya Error Messages Documentation
You can view Avaya’s online documentation to view a comprehensive list of operation error messages in the TSAPI Programmer’s Reference. These messages can help you troubleshoot problems.
To view a PDF file of the Avaya error messages documentation:
1. Open a PDF file of the Avaya Programmer’s Reference manual, by clicking on the link
http://support.avaya.com/elmodocs2/AES/4.2/02-300544_i4.pdf2. In the Avaya Programmer’s Reference PDF, search for ACSUniversalFailureConfEvent to
view the list of error values.
Avaya Exerciser
The Avaya Exerciser simulates every action performed by the Avaya AES stream. Use this tool to analyze the source of a problem.
When analyzing and troubleshooting a site, it is essential to isolate the stage where data was not transferred successfully, using a process of elimination. The TS Spy tool displays all the events that were reported by the Avaya CT or TSAPI on the AES server. By reviewing this data, you can analyze if data was transferred successfully at each stage.
Installing the Avaya AES TSAPI Exerciser
To install the Avaya TSAPI Exerciser:
1. Insert the Avaya Application Enablement Services TSAPI SDK Client installation CD in the CD-ROM drive of the NICE Perform eXpress machine.
The Avaya Application Enablement Services (AES) TSAPI SDK installation wizard starts.
NOTE: The Avaya Exerciser can also be used to simulate actions performed by the Avaya CT stream.
237 Chapter 16: Troubleshooting Avaya Integrations
NICE Perform eXpress Release 3.0: Troubleshooting Guide (Rev. A2)

Troubleshooting Avaya TSAPI
Figure 16-16 Avaya AES TSAPI SDK Installation Wizard
After a few moments, the Avaya AES TSAPI SDK Welcome window appears.Figure 16-17 Avaya AES TSAPI SDK Welcome Window
2. Click Next.
The TSAPI SDK Setup window appears.
238 Chapter 16: Troubleshooting Avaya Integrations
NICE Perform eXpress Release 3.0: Troubleshooting Guide (Rev. A2)

Troubleshooting Avaya TSAPI
Figure 16-18 TSAPI SDK Setup Window
3. Click Select All to select all the components to install.
4. Click Next.
The Wizard Complete window appears.Figure 16-19 Wizard Complete Window
5. Click Finish.
The Avaya Exerciser is installed.
Verifying User Groups and Configured Devices
To verify user groups and configured devices using the TSAPI Exerciser:
1. From the Start menu on the NICE Perform eXpress machine, select Programs > Avaya AE Services > SDKs > TSAPI > TSAPI Exerciser.
The Exerciser window appears.
NOTE: If you are able to run an Exerciser session, it indicates that connection exists between the Avaya AES Switch and NICE Perform.
239 Chapter 16: Troubleshooting Avaya Integrations
NICE Perform eXpress Release 3.0: Troubleshooting Guide (Rev. A2)

Troubleshooting Avaya TSAPI
Figure 16-20 Exerciser Window - Blank
2. Select Run > Start Exerciser Session. The Start Exerciser Session window appears.Figure 16-21 Start Exerciser Session Window
3. From the SERVER NAME drop-down menu, select your Avaya TSAPI TLink name.
4. Enter the LOGIN, PASSWORD, and keep the default API VERSION.
IMPORTANT• Verify the AES Server IP address. To do this:
• Click Start > Programs > AvayaAE Services > TSAPI Client, and click to open Edit TSLIB.INI file.
• The TLink that appears in the SERVER NAME field must be the same as the TLink that appeared in the TSAPI TLink window.
240 Chapter 16: Troubleshooting Avaya Integrations
NICE Perform eXpress Release 3.0: Troubleshooting Guide (Rev. A2)

Troubleshooting Avaya TSAPI
5. Click OK.
The Exerciser window appears displaying the actions performed by the Avaya TSAPI driver.Figure 16-22 Exerciser Window with Information
You can now perform one or more of the following procedures:
• Get Device List (see page 241)
• Monitoring Device/ACD (see page 243)
• Monitoring VDN (see page 244)
• Query Device Info (see page 244)
Get Device List
To run Get Device List:
1. From the Exerciser window, select Query > cstaGetDeviceList(). The Get Device List window appears.
241 Chapter 16: Troubleshooting Avaya Integrations
NICE Perform eXpress Release 3.0: Troubleshooting Guide (Rev. A2)

Troubleshooting Avaya TSAPI
Figure 16-23 Get Device List Window
2. Select Call/Device Monitor? and click Send Message.
The Exerciser window displays a list of devices that can be monitored.
Figure 16-24 Exerciser Window
3. To close the Exerciser window, select Run > End Session.
NOTE: When you click the Send Message button, the query returns the first 20 devices. Each time you click Send Message, the query returns the next 20 messages. Continue to do so until -1 appears in the Index field.
242 Chapter 16: Troubleshooting Avaya Integrations
NICE Perform eXpress Release 3.0: Troubleshooting Guide (Rev. A2)

Troubleshooting Avaya TSAPI
Monitoring Device/ACD
To Monitor Device/ACD:
1. From the Exerciser window, select Status > cstaMonitorDevice.
The cstaMonitorDevice test checks one device at a time. The Monitor Device window appears.Figure 16-25 Monitor Device Window
2. Enter a Device ID and click Send Message.
3. Make a call to the Device ID you defined in the Monitor Device window.
The Exerciser window displays events generated by the monitored device.Figure 16-26 Exerciser Window
243 Chapter 16: Troubleshooting Avaya Integrations
NICE Perform eXpress Release 3.0: Troubleshooting Guide (Rev. A2)

Troubleshooting Avaya TSAPI
4. To close the Exerciser window, select Run > End Session.
Monitoring VDN
To run Monitor VDN:
1. From the Exerciser window, select Status > cstaMonitorCallsViaDevice.
The cstaMonitorCallsViaDevice test checks one device at a time. The Monitor Calls Via Device window appears.Figure 16-27 Monitor Calls Via Device Window
2. Enter a Device ID and click Send Message.
3. Make a call to the Device ID you defined in the Monitor Device window.
The Exerciser window displays events generated by the monitored device.Figure 16-28 Exerciser Window
4. To close the Exerciser window, select Run > End Session.
Query Device Info
To run Query Device Info:
1. From the Exerciser window, select Query >cstaQueryDeviceInfo.
The Query Device Info window appears.
244 Chapter 16: Troubleshooting Avaya Integrations
NICE Perform eXpress Release 3.0: Troubleshooting Guide (Rev. A2)

Troubleshooting Avaya TSAPI
Figure 16-29 Query Device Info Window
2. Enter a Device ID and click Send Message.
The Exerciser window displays the results as follows:
• If the device is ACD, see Figure 16-30 (on page 245).
• If the device is VDN, see Figure 16-31 (on page 246).
• If the device is Device Type, see Figure 16-32 (on page 246).Figure 16-30 Exerciser Window - ACD
ACD
245 Chapter 16: Troubleshooting Avaya Integrations
NICE Perform eXpress Release 3.0: Troubleshooting Guide (Rev. A2)

Troubleshooting Avaya TSAPI
Figure 16-31 Exerciser Window - VDN
Figure 16-32 Exerciser Window - Device Type
3. To close the Exerciser window, select Run > End Session.
VDN
Device Type
246 Chapter 16: Troubleshooting Avaya Integrations
NICE Perform eXpress Release 3.0: Troubleshooting Guide (Rev. A2)

17
Troubleshooting Nortel Integrations
Contents
Using the RTD SDK Connection Tester ......................................................................248
Using the Nortel Tester Tool ........................................................................................249
Nortel Troubleshooting Issues....................................................................................253
Chapter 17: Troubleshooting Nortel Integrations
NICE Perform eXpress Release 3.0: Troubleshooting Guide (Rev. A2)
247

Using the RTD SDK Connection Tester
Using the RTD SDK Connection TesterThe RTD SDK Connection Tester checks the connection with CCMS/SCCS.
To use the RTD SDK Connection Tester:
1. Run the RTD SDK Connection Tester. The LLSymposiumTest window appears.Figure 17-1 LLSymposium Test Window
2. In the LLSymposiumTest window:
a. In the Server IP field, enter the CCMS/SCCS server IP.
b. In the User ID field, enter the RTD user name.
c. In the Password field, enter the password.
d. Click Connect. The result appears in the Return Value area.
248 Chapter 17: Troubleshooting Nortel Integrations
NICE Perform eXpress Release 3.0: Troubleshooting Guide (Rev. A2)

Using the Nortel Tester Tool
Using the Nortel Tester ToolThe purpose of this tool is to simulate interaction between the Nortel Symposium interface and the Nortel integration.
The tool allows you to send different types of requests and to receive responses and unsolicited events. All received events and responses are translated and printed and saved in the log file if chosen as an option. In addition, the Nortel Tester allows checking the RTP session activity by listening to given IP addresses and ports.
If required, the tool saves the log to a file.
When the application has registered successfully, you can send the following:
1. Monitor Request
2. Stop Monitor Request
Connecting to Symposium
In order to send requests the Nortel Tester connects to Symposium.
To connect to Symposium:Figure 17-2 Log Window Flow
NOTE: For the purpose of debugging, it is possible to save a log that appears in the log window to file. The log lines are saved only after choosing this option, and cannot be performed retroactively.
NOTE: The above order is recommended (and correct), but you can also send the requests in a different order.
249 Chapter 17: Troubleshooting Nortel Integrations
NICE Perform eXpress Release 3.0: Troubleshooting Guide (Rev. A2)

Using the Nortel Tester Tool
1. In the Nortel Tester window, from the Connection menu, select Connect. The Connect window appears.Figure 17-3 Connect Window
2. Enter the Symposium IP number in the Symposium IP field.
3. Enter the port number in the Nortel switch port field.
4. Click Connect.
The Nortel Tester opens the TCP connection with Symposium and attempts to register the application, by sending application registration requests and checking the responses. It continues to do this, until it succeeds.
You can see this flow in the log window.Figure 17-4 Log Window Flow
5. From the File menu, select Save to log file in order to be able to collect log files.
NOTE: : The Nortel Tester prints to the log window, the sent/received message following its translation.
250 Chapter 17: Troubleshooting Nortel Integrations
NICE Perform eXpress Release 3.0: Troubleshooting Guide (Rev. A2)

Using the Nortel Tester Tool
Monitor Request
This message lets the Nortel Tester register specified Directory Numbers (DNs) in order to receive its CTI events. Perform this procedure from the Monitor window.
To send a Monitor Request:
1. Select Monitor > Start Monitor. The Monitor window appears.Figure 17-5 Monitor Window
2. Enter the device number in the Device Number field.
3. Select the device type from the Device Type drop-down list.
4. If you want to receive TNs in monitor response that are required for Start Record request, select DMS support.
5. If you are interested in multiple appearances of the same device number, select Multiple Appearance. If selected, the tester now receives Monitor responses and unsolicited events for all the appearances of the device type (partly supported).
6. Click OK.
If the monitor request succeeded, the device is added to the Device Tracking table (in the log window).Figure 17-6 Device Tracking Table
251 Chapter 17: Troubleshooting Nortel Integrations
NICE Perform eXpress Release 3.0: Troubleshooting Guide (Rev. A2)

Using the Nortel Tester Tool
Stop Monitor Request
This stops the device from receiving events.
To perform a Stop Monitor request:
1. Select Monitor > Stop Monitor. The Stop Monitor window appears.Figure 17-7 Stop Monitor Window
2. Enter the device number, or select it, from the Choose device drop-down list.
The Device Type drop-down list is filled automatically.
3. Click OK.
252 Chapter 17: Troubleshooting Nortel Integrations
NICE Perform eXpress Release 3.0: Troubleshooting Guide (Rev. A2)

Nortel Troubleshooting Issues
Nortel Troubleshooting IssuesException Raised from CNortelCTILink
Problem
In the Nortel driver screen, the following message appears in red:
CTILink #x: An Exception has been raised from CNortelCTILink::Connect
Cause
1. Incorrect IP address: if you fail to ping the correct Symposium IP address, this error occurs.
2. Incorrect Port ID - the Port ID should be 3000.
3. Problems with the network.
Solution
Test the connection using the Nortel Tester tool application, see Using the Nortel Tester Tool on page 249.
Events Not Inserted into the Database
Problem
On a specific extension, events are not inserted into the Database.
Cause
1. This device is not in the Monitored Devices list.
2. This device is in the Rejected Devices list.
3. Switch configuration.
Solution
Check the configurations.
253 Chapter 17: Troubleshooting Nortel Integrations
NICE Perform eXpress Release 3.0: Troubleshooting Guide (Rev. A2)

Blank page for double-sided printing.

A
Log Collector Files
The Log Collector gathers the following files from the NICE Perform eXpress system. For more information regarding the NICE Perform eXpress components, see NICE Perform eXpress System Architecture on page 16.
Site Information Collector
1. Site Information Report
Collect site's component information NPX10 NPX30
General
2. .Net Versions Registry
Collects .Net registry versions from HKLM\SOFTWARE\NDP NPX10 NPX30
3. Application Events Collects Application events NPX10 NPX30
4. Computer Configuration
Collects system information data report NPX10 NPX30
5. NICE Registry Collects the registry under HKLM\SOFTWARE\NICE SYSTEMS NPX10 NPX30
6. Security Events Collects Security events NPX10 NPX30
7. System Events Collects System events NPX10 NPX30
8. Time Settings General NPX10 NPX30
9. Windows Services Collects Windows Services details on the machine NPX10 NPX30
10. Windows Updates Collects all Windows updates on the machine NPX10 NPX30
Appendix A: Log Collector Files
NICE Perform eXpress Release 3.0: Troubleshooting Guide (Rev. A2)
255

Log Collector Files
Applications Suite
11. ActiveDirectory Tool Logs
ActiveDirectory Tool log files from the NICE Perform eXpress\Tools\ActiveDirectoryTool
NPX30 NPX30
12. Administrative Database Data
Collects administrative data nice_admin database NPX10 NPX30
13. Administrative Parameters
Collects the Administrative Parameters data NPX10 NPX30
14. Applications Configuration
Collects Applications configuration files NPX10 NPX30
15. Applications Logs Collects Applications log files NPX10 NPX30
16. Central Application Configuration
Collects Central Application configuration file NPX10 NPX30
17. Central Application Logs
Collects Central Application log files NPX10 NPX30
18. Configuration Database Data
Collects NPX configuration data from nice_express database NPX10 NPX30
19. Configured Channels View
Collects the current configured channels which are used by the Channel Monitoring
NPX10 NPX30
20. IIS Configuration Collects IIS configuration NPX10 NPX30
21. IIS Logs Collects Internet Information Services (IIS) log files NPX10 NPX30
22. License Info Collects information about the license state NPX21 NPX30
23. Locate Database Settings
Collects Locate setting from the nice_admin.dbo.tblApplicationsSystemSettings table
NPX10 NPX30
24. LogService SelfLogging Logs for NPX2.1 and above
Collects LogService SelfLogging log files (%ALLUSERSPROFILE%\Application Data\NICE Systems\LogServiceSelfLogging)
NPX21 NPX30
25. Migration Tool Logs Migration Tool log files from the NICE Perform eXpress\Tools\NICE Migration Tool\Logs
NPX30 NPX30
256 Appendix A: Log Collector Files
NICE Perform eXpress Release 3.0: Troubleshooting Guide (Rev. A2)

Log Collector Files
26. Migration Tool SQL Scripts' Logs
Migration Tool SQL scripts' log files from the NICE Perform eXpress\Tools\NICE Migration Tool\SqlScripts
NPX30 NPX30
27. Playback Administrator Logs
Collects Playback Administrator log files NPX10 NPX30
28. Playback Gateway Configuration
Collects Playback Gateway configuration file NPX10 NPX30
29. Playback Gateway Files
Collects Playback Gateway files versions directory NPX10 NPX30
30. Report Server Events
Collects Report Server events NPX10 NPX30
31. Screen Agent Client Configuration
Collects Screen Agent client configuration file NPX30 NPX30
32. Screen Agent Client Status View
Collects the Screen Agent Client Status NPX30 NPX30
33. Server Bin Files Collects versions of files in Applications\ServerBin directory NPX10 NPX30
34. Setup Framework Logs
Setup Framework log files from the %APPS_DATA%\NICE Perform eXpress
NPX10 NPX30
35. SQL Server Reporting Service Performance Counters
Collects SQL Server Reporting Service performance counters values NPX30 NPX30
36. SQL Server Reporting Services Logs
Collects SQL Server Reporting Services log files NPX30 NPX30
37. Storage Streaming Events
Collects Storage Streaming events NPX10 NPX30
38. System Monitoring Events
Collects System Monitoring events NPX10 NPX30
Telephony Services Server
39. Files Versions Collects Playback Administration files versions NPX10 NPX30
257 Appendix A: Log Collector Files
NICE Perform eXpress Release 3.0: Troubleshooting Guide (Rev. A2)

Log Collector Files
40. Logs Collects Playback Administration log files NPX10 NPX30
41. Playback Administration Configuration
Collects Playback Administration configuration file NPX10 NPX30
Logger
42. Backup Server Logs Collects Backup Server log files NPX10 NPX30
43. Backup Server Registry
Collects Backup Server registry branch under HKLM\SOFTWARE\NICE Systems\Backup
NPX10 NPX30
44. Backup Server Version Registry
Collects Backup Server version registry branch under HKLM\SOFTWARE\NICE Systems\Setup\NICE Storage\BSRV
NPX10 NPX30
45. CIMService Registry Collects CIMService registry branch under HKLM\SOFTWARE\NICE Systems\CIMService
NPX10 NPX21
46. Logger Configuration Files
Collects Logger configuration files NPX10 NPX30
47. Logger Files Versions
Collects Loggers file versions from D:\NTLogger\Logger\Bin NPX10 NPX30
48. Logger Logs Collects Logger log files (D:\NTLogger\Logger\Log\*.*) NPX10 NPX10
49. Logger Logs (Logger) (from NPX2.1 and above)
Collects Logger log files (Logger) (from NPX2.1 and above) NPX21 NPX30
50. Logger Version Registry
Collects Logger registry branch under HKLM\SOFTWARE\NICE Systems\Setup\NICE NiceLog
NPX10 NPX30
51. SmartWorks Registry
Collects SmartWorks registry branch under HKLM\SYSTEM\CurrentControlSet\Services\Ntidrv
NPX10 NPX30
52. Voice Capture Configuration
Collects Resource Manager configuration file NPX10 NPX30
53. Voice Capture Driver Registry
Collects Voice Logger Driver registry branch under HKLM\SOFTWARE\Nice systems\VoiceCaptureDriver
NPX10 NPX30
258 Appendix A: Log Collector Files
NICE Perform eXpress Release 3.0: Troubleshooting Guide (Rev. A2)

Log Collector Files
54. Voice Capture Files Versions
Collects Voice Capture file versions NPX10 NPX30
55. Voice Capture Logs (VoiceCapture) (from NPX2.1 and above)
Collects Voice Capture log files (VoiceCapture) (from NPX2.1 and above)
NPX21 NPX30
56. Voice Capture Registry
Collects Voice Logger registry branch under HKLM\SOFTWARE\Nice systems\VoiceCapture
NPX10 NPX30
57. VoiceCapture Driver registry (OS settings)
Collects VoiceCapture driver registry branch under HKLM\SYSTEM\CurrentControlSet\Services\NiceLogVC
NPX10 NPX30
58. VoiceCapture Log files
Collects VoiceCapture log files NPX10 NPX10
59. VoIP Configuration Files
Collects VoIP configuration files NPX10 NPX30
60. VoIP Files Versions Collects VoIP file versions from D:\NTLogger\VoIPCapture\Bin NPX10 NPX30
61. VoIP Log files Collects VoIP log files NPX10 NPX10
62. VoIP Log files (IPCapture) for NPX2.1 and above
Collects VoIP log files NPX21 NPX30
63. VoIP Versions Registry
Collects VoIP registry branch from HKLM\SOFTWARE\NICE Systems\Setup\IPCapture
NPX10 NPX30
SQL Server
64. Database Info Collects Database disk size information data report NPX10 NPX30
65. DM Database Info Collects DM Database disk size information data report NPX10 NPX30
66. Logs Collects SQL error and log files NPX10 NPX30
Interactions Center
67. .Net Memory Performance Counters
Collects .NET Memory performance counters values NPX10 NPX30
259 Appendix A: Log Collector Files
NICE Perform eXpress Release 3.0: Troubleshooting Guide (Rev. A2)
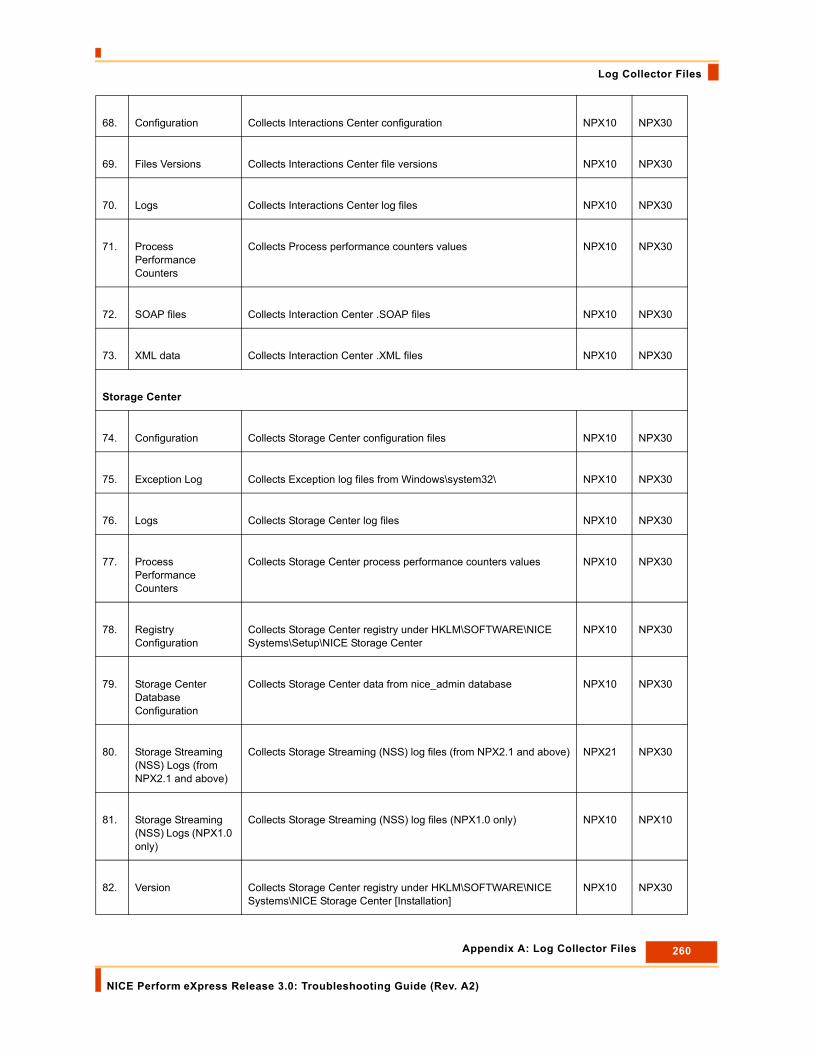
Log Collector Files
68. Configuration Collects Interactions Center configuration NPX10 NPX30
69. Files Versions Collects Interactions Center file versions NPX10 NPX30
70. Logs Collects Interactions Center log files NPX10 NPX30
71. Process Performance Counters
Collects Process performance counters values NPX10 NPX30
72. SOAP files Collects Interaction Center .SOAP files NPX10 NPX30
73. XML data Collects Interaction Center .XML files NPX10 NPX30
Storage Center
74. Configuration Collects Storage Center configuration files NPX10 NPX30
75. Exception Log Collects Exception log files from Windows\system32\ NPX10 NPX30
76. Logs Collects Storage Center log files NPX10 NPX30
77. Process Performance Counters
Collects Storage Center process performance counters values NPX10 NPX30
78. Registry Configuration
Collects Storage Center registry under HKLM\SOFTWARE\NICE Systems\Setup\NICE Storage Center
NPX10 NPX30
79. Storage Center Database Configuration
Collects Storage Center data from nice_admin database NPX10 NPX30
80. Storage Streaming (NSS) Logs (from NPX2.1 and above)
Collects Storage Streaming (NSS) log files (from NPX2.1 and above) NPX21 NPX30
81. Storage Streaming (NSS) Logs (NPX1.0 only)
Collects Storage Streaming (NSS) log files (NPX1.0 only) NPX10 NPX10
82. Version Collects Storage Center registry under HKLM\SOFTWARE\NICE Systems\NICE Storage Center [Installation]
NPX10 NPX30
260 Appendix A: Log Collector Files
NICE Perform eXpress Release 3.0: Troubleshooting Guide (Rev. A2)

Log Collector Files
NiceScreen Logger
83. Configuration Collects NiceScreen Logger configuration file NPX30 NPX30
84. Files Versions Collects NiceScreen Logger file versions NPX30 NPX30
85. Logs Collects NiceScreen Logger log files NPX30 NPX30
86. Registry Collects NiceScreen Logger registry under HKLM\SOFTWARE\Nice Systems Ltd.\Nice Multimedia Logger
NPX30 NPX30
CTI Integrations
87. ConfigCache.xml and VOX channel mapping files (when applicable)
Collects configuration cache and VOX channel mapping files (when applicable).
NPX10 NPX30
88. Files Versions Collects CTI file versions NPX10 NPX30
89. Logs Collects NICE Perform CTI module logs NPX10 NPX30
90. NiceCTI Registry Collects registry related to NICE Perform CTI installation. NPX10 NPX30
System Monitor
91. Config Collects System Monitor configuration file. NPX10 NPX30
92. Logs Collects System Monitor log files. NPX10 NPX30
Stream Server
93. Stream Server Logs Collects Stream Server log files NPX10 NPX30
261 Appendix A: Log Collector Files
NICE Perform eXpress Release 3.0: Troubleshooting Guide (Rev. A2)