NetApp Filer Auditing Guide - ManageEngine
20
NetApp Filer Auditing Guide www.adauditplus.com
-
Upload
khangminh22 -
Category
Documents
-
view
6 -
download
0
Transcript of NetApp Filer Auditing Guide - ManageEngine
NetApp FilerAuditing Guide
www.adauditplus.com
Table of Contents
1. Overview
2. Adding NetApp 7Mode/vFiler CIFS server
3. Configure audit policies
Automatic configuration
Manual configuration
4. Configure object-level auditing
Automatic configuration
Manual configuration
5. Exclude configuration
6. Troubleshooting
1
1
7
7
8
9
9
11
13
15
1. Overview of NetApp filer auditing
2. Adding NetApp 7Mode/vFilers in ADAudit Plus
NetApp filer network-attached storage (NAS) devices, also known as NetApp fabric-attached storage
(FAS), are storage systems that use NetApp's proprietary operating system, ONTAP. A vFiler unit is a
partition of a storage system and the associated network resources. Each vFiler partition appears to the
user as a separate storage system on the network, and functions as a storage system.
ManageEngine ADAudit Plus, a user behavior analytics (UBA)-driven change auditor, provides real-time
visibility into your NetApp 7Mode/vFiler CIFS servers. It delivers detailed reports on user activity in
NetApp files and shares, analyzes permission changes, and automates instant responses to security
incidents. It also streamlines compliance with numerous regulations such as HIPAA, FISMA, GDPR, SOX,
CCPA, and more.
Supported versions
ADAudit Plus can monitor these ONTAP versions:
NetApp ONTAP 7.2 and above
Audited events
ADAudit Plus audits every attempt to perform these file activities in NetApp filers:
Create
Read
Modify
Write
Delete
Change file permissions
Rename
Move
This guide provides steps to configure change auditing in your NetApp 7Mode/vFiler CIFS
servers using ADAudit Plus.
To add your target NetApp filers to your ADAudit Plus console, follow these steps:
Log in to the ADAudit Plus web console.
Navigate to the File Audit tab > Configured Server(s) > NetApp Server. From the Domain
drop-down, select the domain with the target server.
Click +Add Server in the top right corner. This will open the Add File Servers pop-up, listing
all the servers available in the selected domain.
1.
2.
3.
1
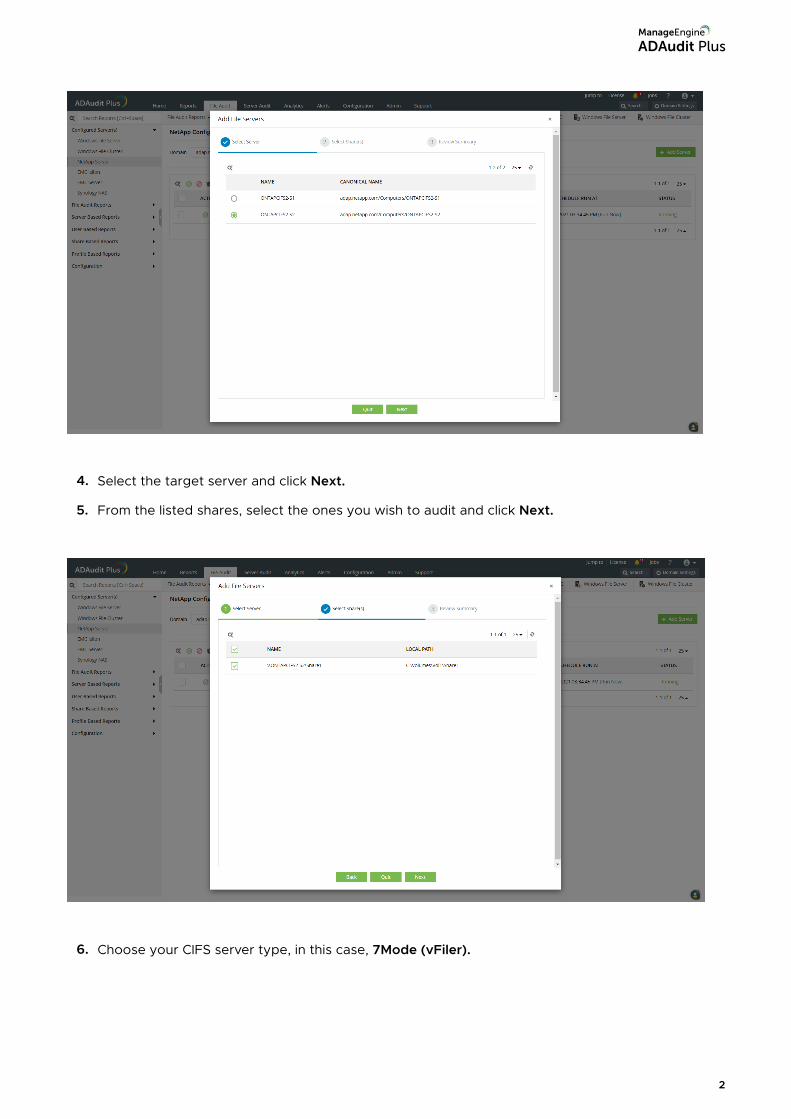
Select the target server and click Next.
From the listed shares, select the ones you wish to audit and click Next.
4.
Choose your CIFS server type, in this case, 7Mode (vFiler).6.
5.
2
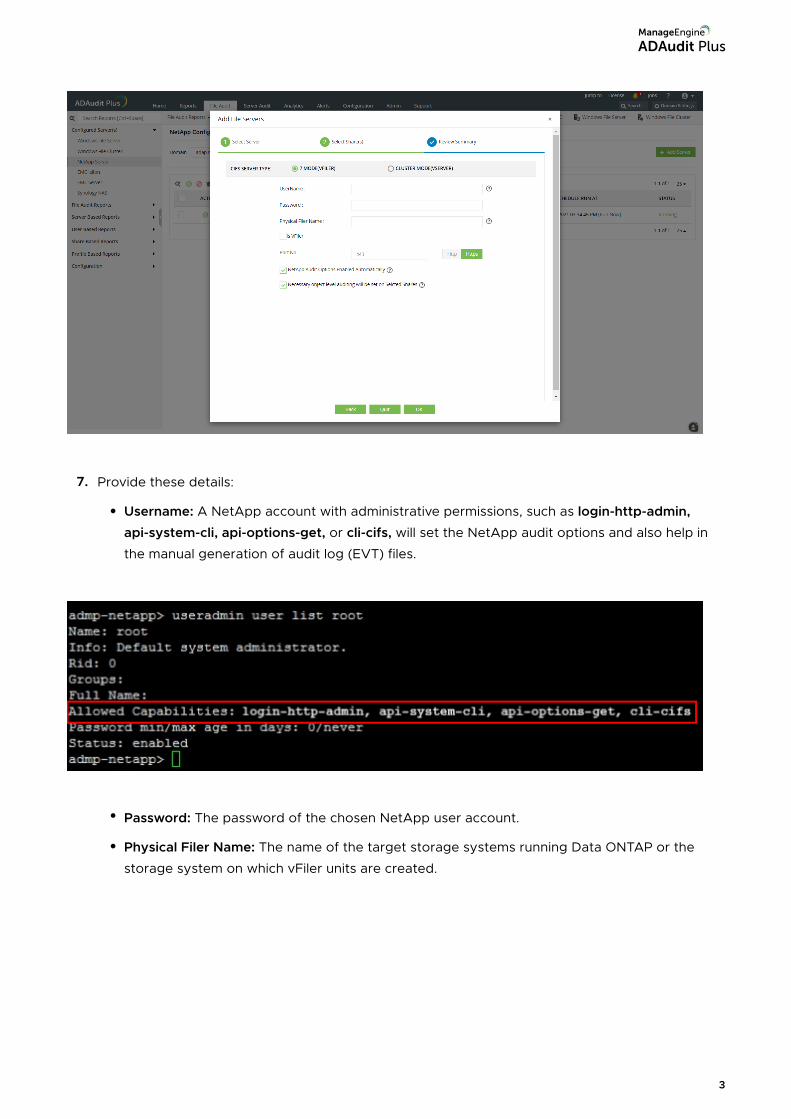
Provide these details:
Username: A NetApp account with administrative permissions, such as login-http-admin,
api-system-cli, api-options-get, or cli-cifs, will set the NetApp audit options and also help in
the manual generation of audit log (EVT) files.
Password: The password of the chosen NetApp user account.
Physical Filer Name: The name of the target storage systems running Data ONTAP or the
storage system on which vFiler units are created.
7.
3
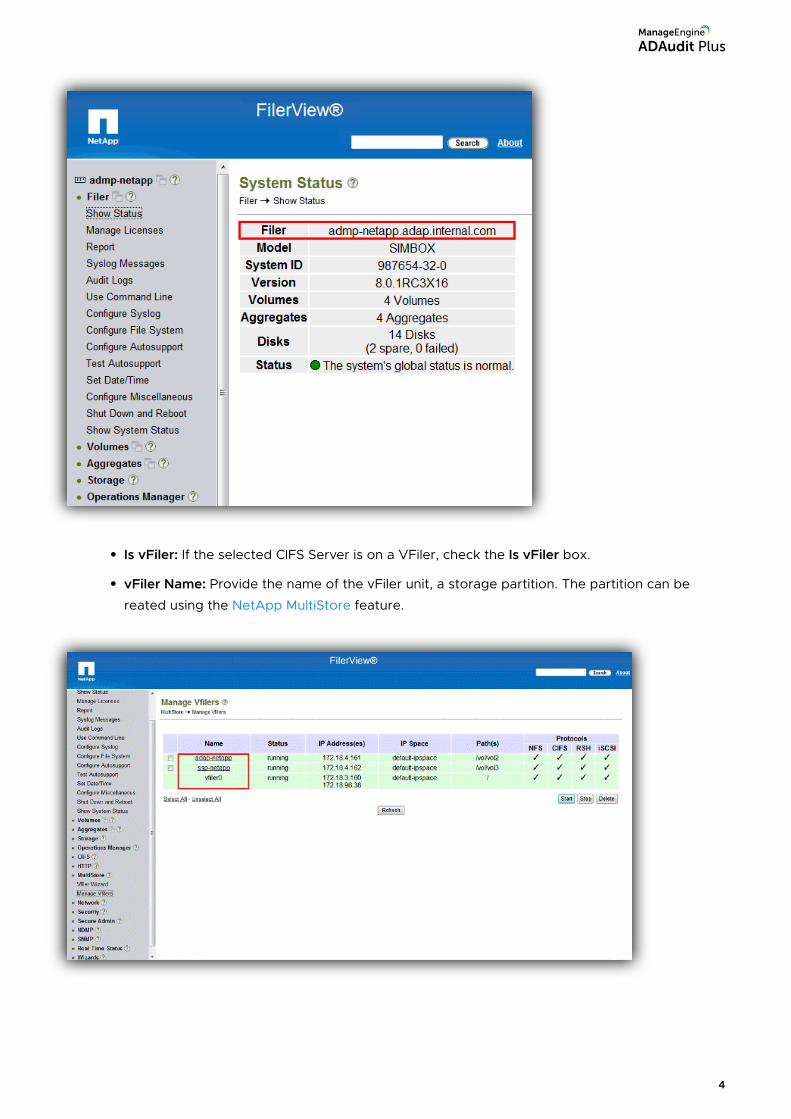
Is vFiler: If the selected CIFS Server is on a VFiler, check the Is vFiler box.
vFiler Name: Provide the name of the vFiler unit, a storage partition. The partition can be
reated using the NetApp MultiStore feature.
4
Note: If you want ADAudit Plus to auto-configure the required audit policies and object-level auditing
(SACL) in the target shares, ensure that the NetApp Audit Options Enabled Automatically and
Necessary object level auditing will be set on Selected Shares checkboxes are selected.
Otherwise, deselect the checkboxes and proceed with the next step. You will need to manually
configure the audit policies and SACLs on the target shares to ensure that the system generates
audit events when files are accessed.
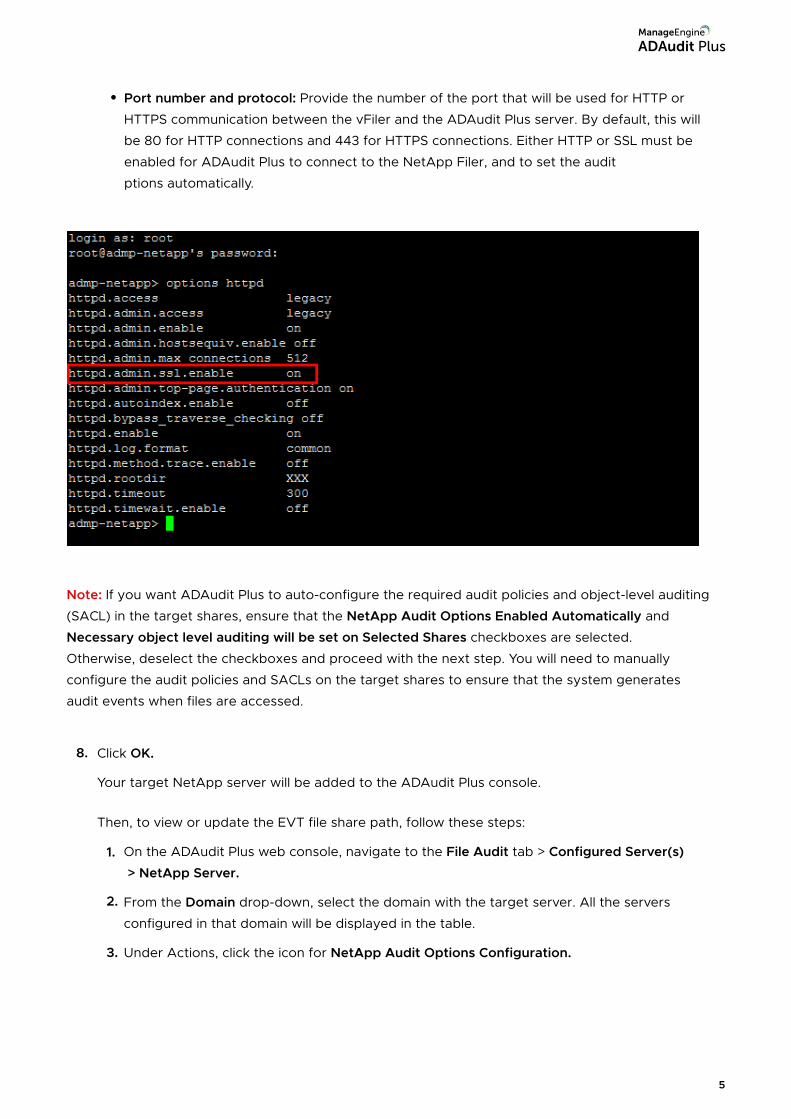
Port number and protocol: Provide the number of the port that will be used for HTTP or
HTTPS communication between the vFiler and the ADAudit Plus server. By default, this will
be 80 for HTTP connections and 443 for HTTPS connections. Either HTTP or SSL must be
enabled for ADAudit Plus to connect to the NetApp Filer, and to set the audit
ptions automatically.
Click OK.
Your target NetApp server will be added to the ADAudit Plus console.
Then, to view or update the EVT file share path, follow these steps:
On the ADAudit Plus web console, navigate to the File Audit tab > Configured Server(s)
> NetApp Server.
From the Domain drop-down, select the domain with the target server. All the servers
configured in that domain will be displayed in the table.
Under Actions, click the icon for NetApp Audit Options Configuration.
8.
1.
3.
2.
5
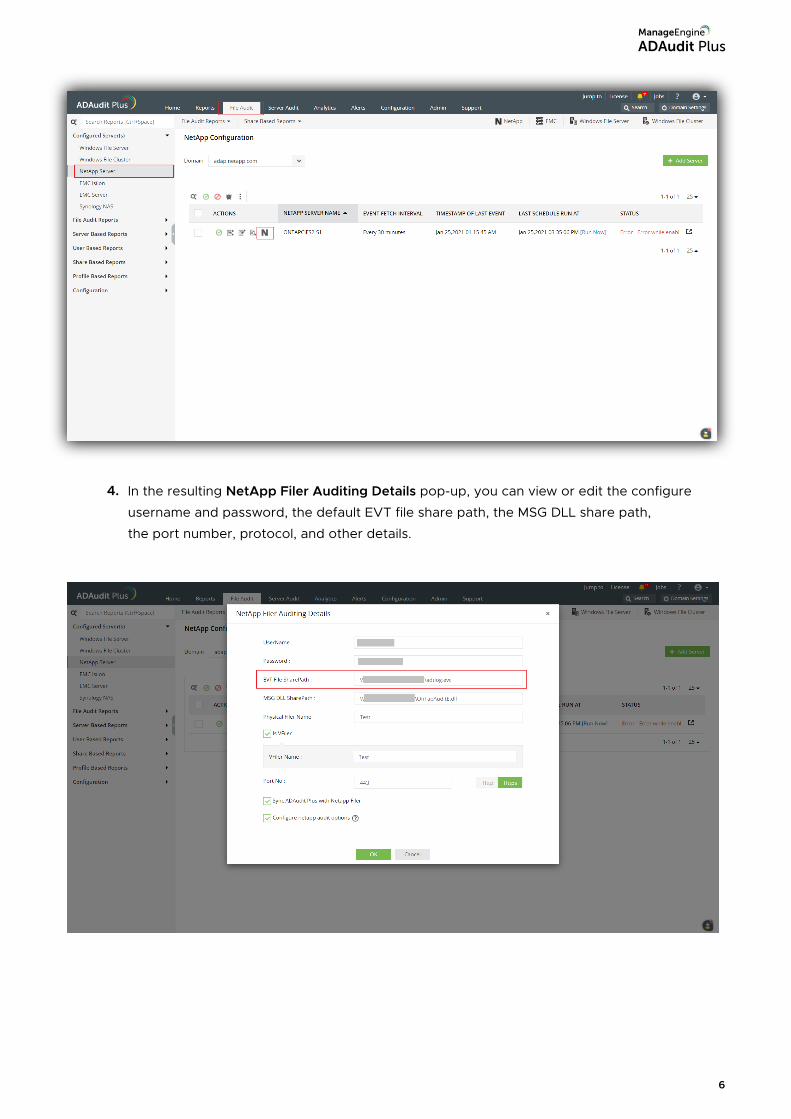
In the resulting NetApp Filer Auditing Details pop-up, you can view or edit the configure
username and password, the default EVT file share path, the MSG DLL share path,
the port number, protocol, and other details.
4.
6
3. Configuring Audit Policies in NetApp 7-Mode
CIFS server/vFilers
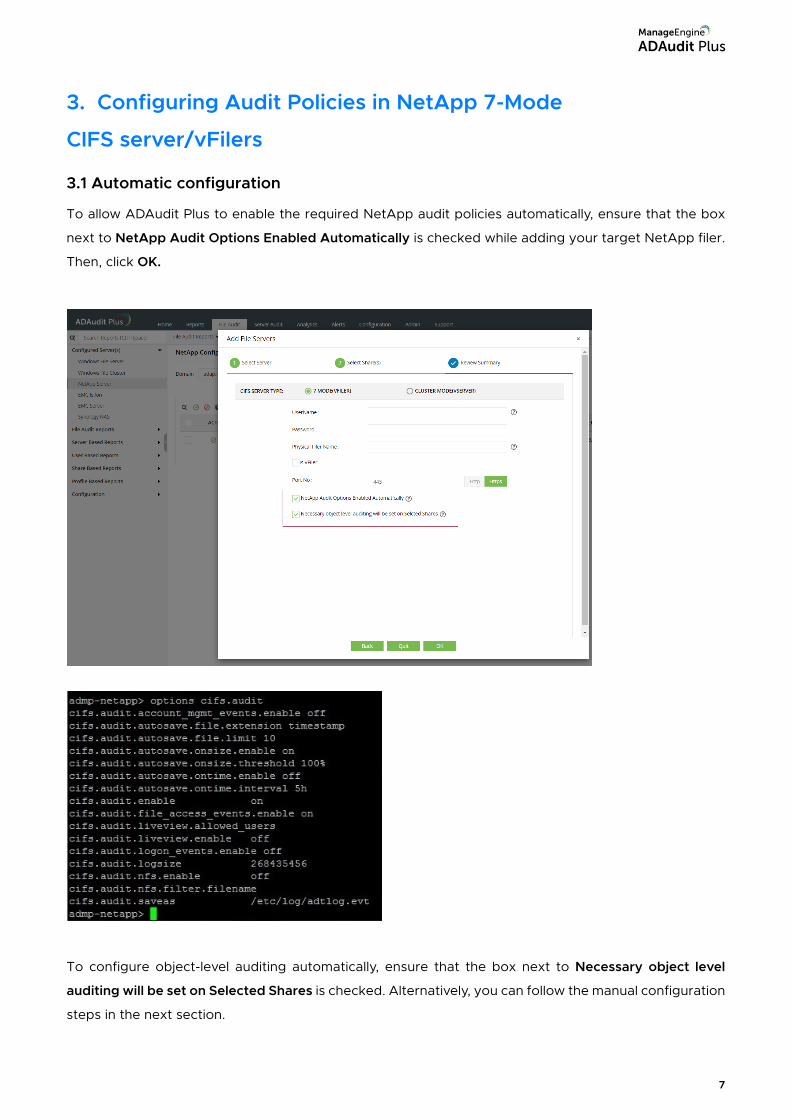
To allow ADAudit Plus to enable the required NetApp audit policies automatically, ensure that the box
next to NetApp Audit Options Enabled Automatically is checked while adding your target NetApp filer.
Then, click OK.
To configure object-level auditing automatically, ensure that the box next to Necessary object level
auditing will be set on Selected Shares is checked. Alternatively, you can follow the manual configuration
steps in the next section.
3.1 Automatic configuration
7
This section details the procedure to configure the required NetApp audit policies manually in your
target vFilers.
Audit policies must be configured to ensure that events are logged whenever any activity occurs in your
NetApp filers. They are set via the NetApp Filer command prompt, which is accessible through an
SSH/Telnet connection.
To configure the audit policies, connect to the filer via SSH and execute these basic commands:
To get an option value:
options < option_name >
To set the option value:
options < option_name > < option_value >
For example, to enable the cifs.audit.enable option, execute the following command:
options cifs.audit.enable on
Note: For a full list of commands along with their descriptions, refer to this NetApp document.
Execute the commands below to specify when automatic saves occur, the maximum number of
automatically-saved files, and other prerequisites. These audit options have to be enabled in the NetApp
filer via SSH to generate the required file audit events and automatically capture them as EVT files.
options cifs.audit.account_mgmt_events.enable off
options cifs.audit.logon_events.enable off
options cifs.audit.liveview.enable off
options cifs.audit.enable on
options cifs.audit.file_access_events.enable on
options cifs.audit.autosave.file.extension timestamp
options cifs.audit.autosave.file.limit 10
options cifs.audit.autosave.onsize.enable on
options cifs.audit.autosave.onsize.threshold 100%
options cifs.audit.autosave.ontime.enable off
options cifs.audit.logsize 268435456
Further, you must disable the cifs.audit.liveview.enable option since it interferes with ADAudit Plus's
processing of the collected audit data.
3.2 Manual configuration
8
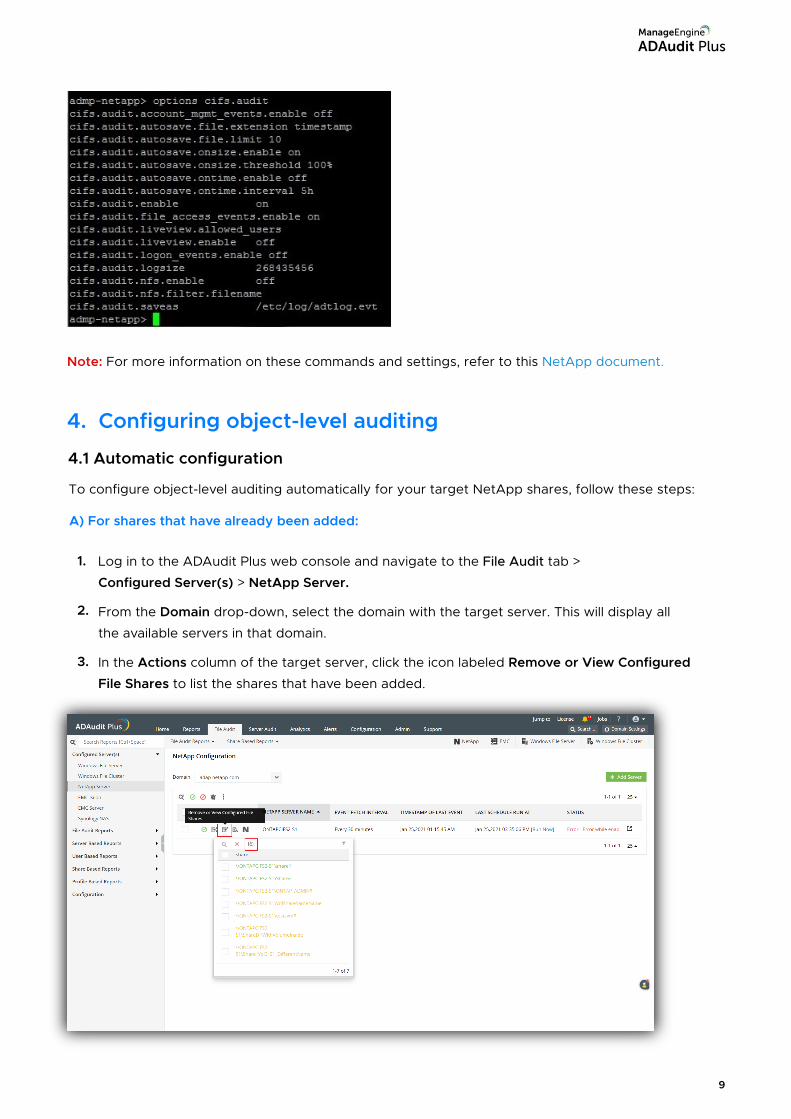
Note: For more information on these commands and settings, refer to this NetApp document.
4. Configuring object-level auditing
4.1 Automatic configuration
To configure object-level auditing automatically for your target NetApp shares, follow these steps:
A) For shares that have already been added:
Log in to the ADAudit Plus web console and navigate to the File Audit tab >
Configured Server(s) > NetApp Server.
From the Domain drop-down, select the domain with the target server. This will display all
the available servers in that domain.
In the Actions column of the target server, click the icon labeled Remove or View Configured
File Shares to list the shares that have been added.
1.
2.
3.
9
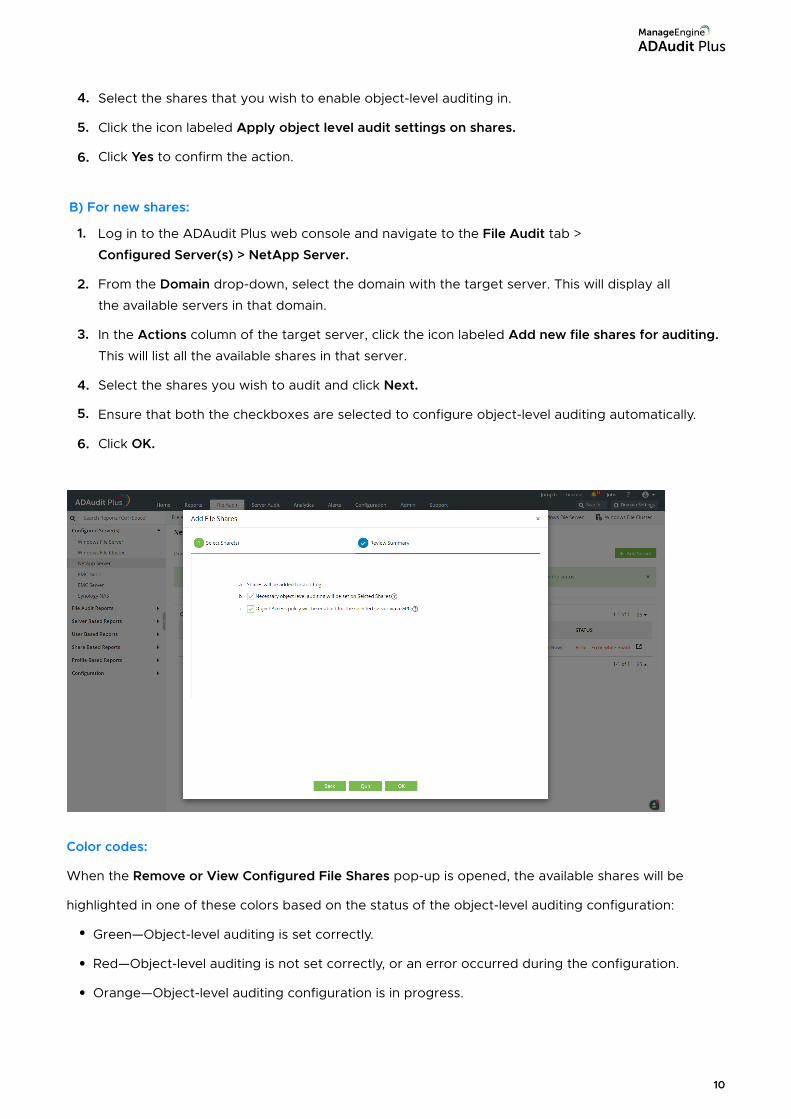
B) For new shares:
Select the shares that you wish to enable object-level auditing in.
Click the icon labeled Apply object level audit settings on shares.
Click Yes to confirm the action.
4.
5.
6.
Log in to the ADAudit Plus web console and navigate to the File Audit tab >
Configured Server(s) > NetApp Server.
From the Domain drop-down, select the domain with the target server. This will display all
the available servers in that domain.
In the Actions column of the target server, click the icon labeled Add new file shares for auditing.
This will list all the available shares in that server.
Select the shares you wish to audit and click Next.
Ensure that both the checkboxes are selected to configure object-level auditing automatically.
Click OK.
1.
2.
3.
4.
5.
6.
Color codes:
When the Remove or View Configured File Shares pop-up is opened, the available shares will be
highlighted in one of these colors based on the status of the object-level auditing configuration:
Green—Object-level auditing is set correctly.
Red—Object-level auditing is not set correctly, or an error occurred during the configuration.
Orange—Object-level auditing configuration is in progress.
10
4.2 Manual configuration
Using PowerShell cmdlets
Go to the <installation directory>\bin folder within the PowerShell command prompt Type in
ADAP-Set-SACL.ps1 Follow the steps to apply object-level auditing to shares on the file server.
Create a CSV file containing the Universal Naming Convention (UNC) path or local path and the
type of auditing (file server auditing [FA] or file integrity monitoring [FIM]) of all the folders that you
need to enable auditing for.
The CSV file should contain the list of folders in the following format: <folder>,<type>
Example:
\\SERVERNAME\folder,FA
C:\test folder,FA
E:\test folder,FIM
\\SERVERNAME\c$\folder,FIM
Once you have the CSV file that lists all the servers and the type of auditing required, go to the
<Installation Directory>\bin folder within the PowerShell command prompt.
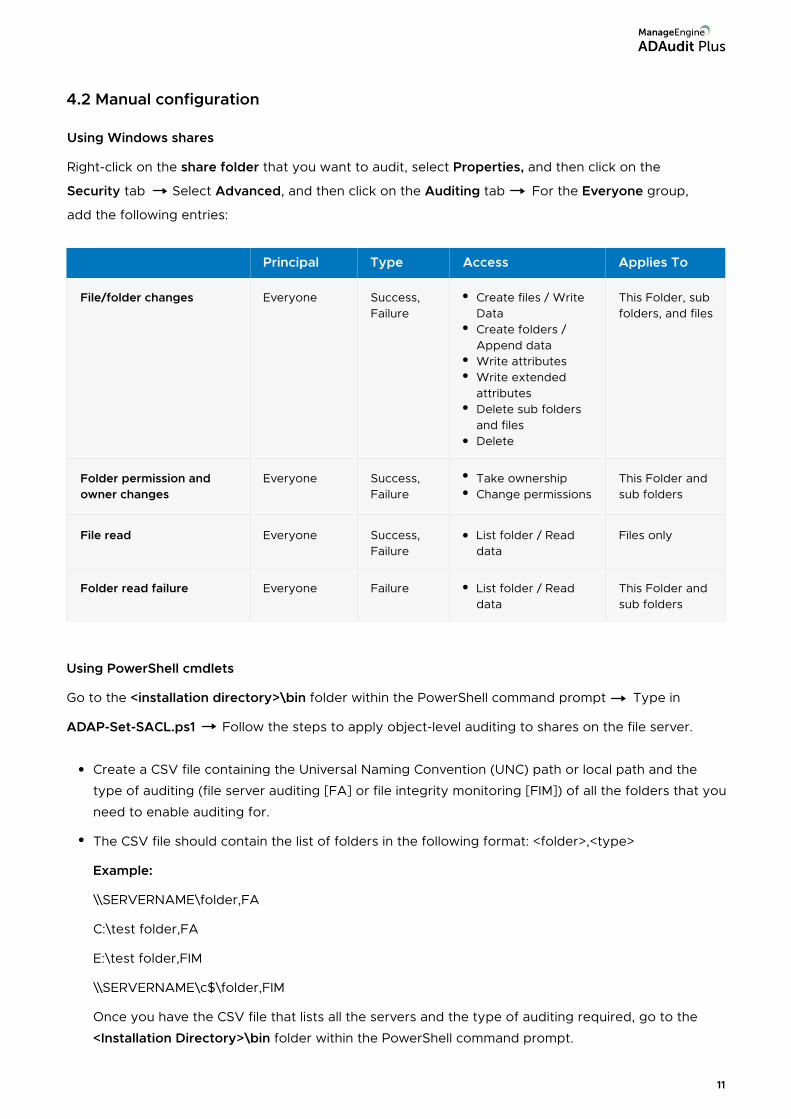
Using Windows shares
Right-click on the share folder that you want to audit, select Properties, and then click on the
Security tab Select Advanced, and then click on the Auditing tab For the Everyone group,
add the following entries:
Principal Access Applies ToType
File/folder changes Everyone Success,Failure
Create files / WriteDataCreate folders /Append dataWrite attributesWrite extendedattributesDelete sub foldersand filesDelete
This Folder, subfolders, and files
Folder permission andowner changes
Everyone Success,Failure
Take ownershipChange permissions
This Folder andsub folders
File read Everyone Success,Failure
List folder / Readdata
Files only
Folder read failure Everyone Failure List folder / Readdata
This Folder andsub folders
11
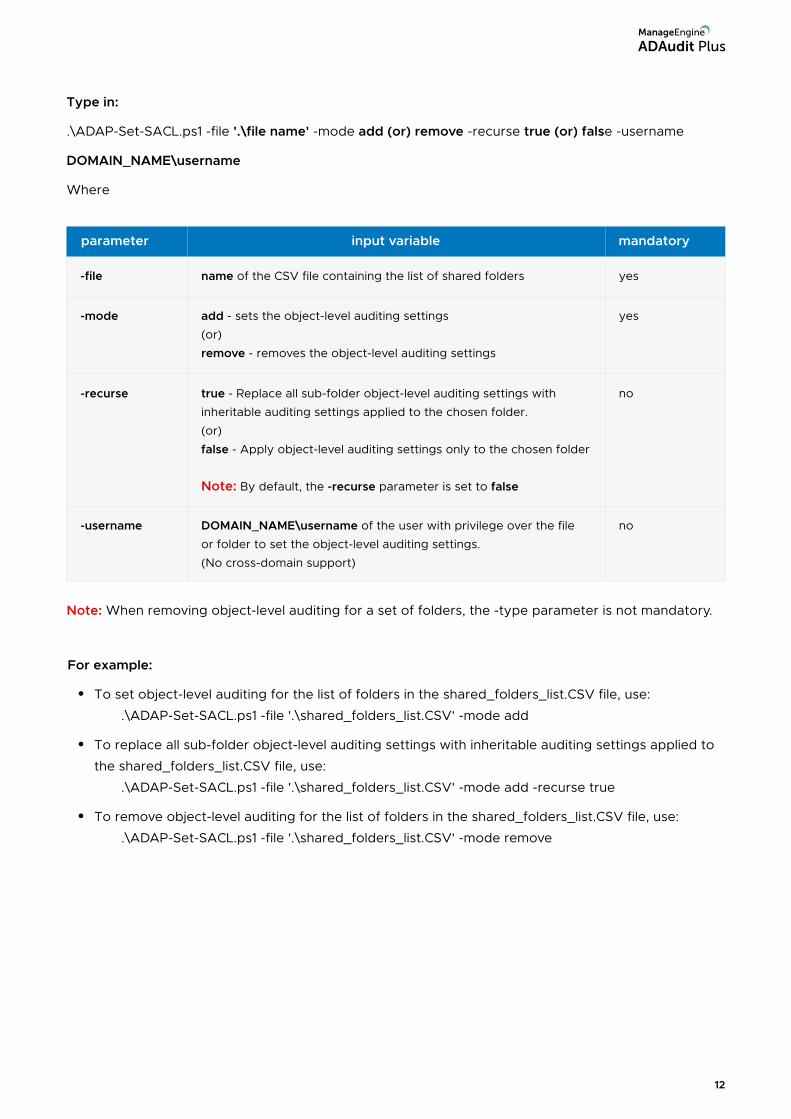
Type in:
.\ADAP-Set-SACL.ps1 -file '.\file name' -mode add (or) remove -recurse true (or) false -username
DOMAIN_NAME\username
Where
parameter mandatoryinput variable
-file name of the CSV file containing the list of shared folders yes
-mode add - sets the object-level auditing settings
(or)
remove - removes the object-level auditing settings
yes
-recurse true - Replace all sub-folder object-level auditing settings with
inheritable auditing settings applied to the chosen folder.
(or)
false - Apply object-level auditing settings only to the chosen folder
Note: By default, the -recurse parameter is set to false
no
-username DOMAIN_NAME\username of the user with privilege over the file
or folder to set the object-level auditing settings.
(No cross-domain support)
no
Note: When removing object-level auditing for a set of folders, the -type parameter is not mandatory.
For example:
To set object-level auditing for the list of folders in the shared_folders_list.CSV file, use:
.\ADAP-Set-SACL.ps1 -file '.\shared_folders_list.CSV' -mode add
To replace all sub-folder object-level auditing settings with inheritable auditing settings applied to
the shared_folders_list.CSV file, use:
.\ADAP-Set-SACL.ps1 -file '.\shared_folders_list.CSV' -mode add -recurse true
To remove object-level auditing for the list of folders in the shared_folders_list.CSV file, use:
.\ADAP-Set-SACL.ps1 -file '.\shared_folders_list.CSV' -mode remove
12
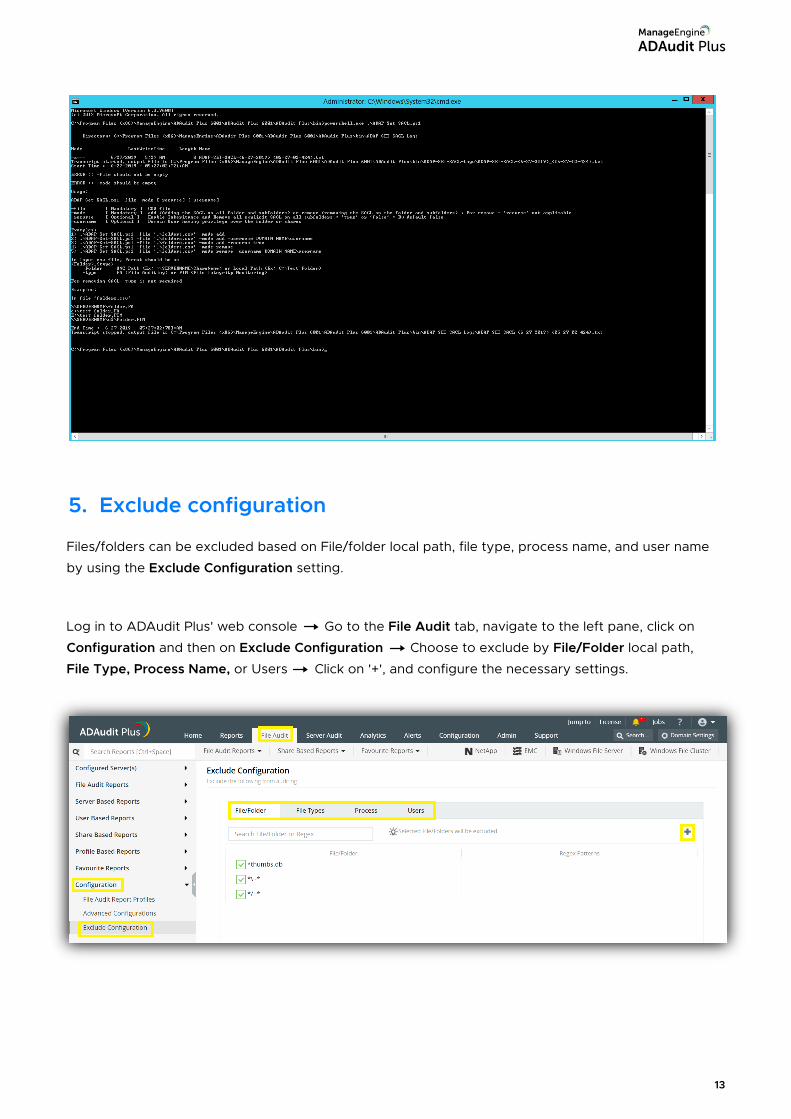
Files/folders can be excluded based on File/folder local path, file type, process name, and user name
by using the Exclude Configuration setting.
Log in to ADAudit Plus' web console Go to the File Audit tab, navigate to the left pane, click on
Configuration and then on Exclude Configuration Choose to exclude by File/Folder local path,
File Type, Process Name, or Users Click on '+', and configure the necessary settings.
5. Exclude configuration
13
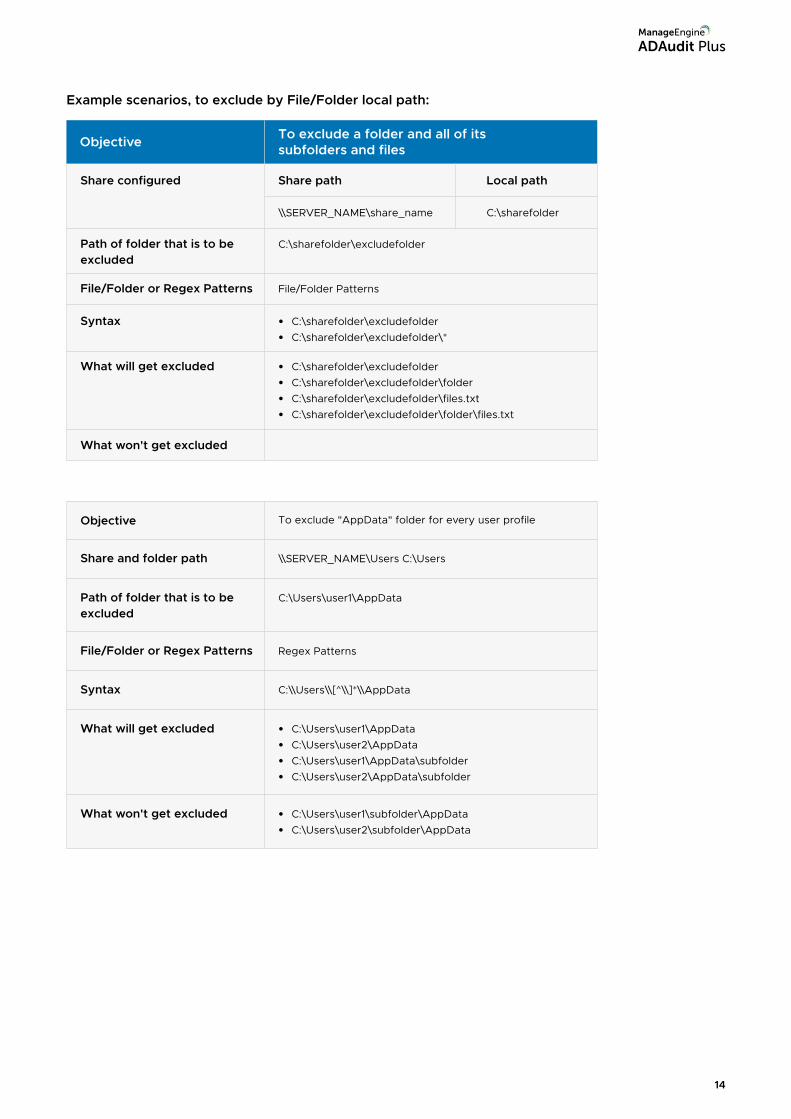
Example scenarios, to exclude by File/Folder local path:
Objective To exclude a folder and all of itssubfolders and files
Share pathShare configured Local path
C:\sharefolder\excludefolderPath of folder that is to beexcluded
\\SERVER_NAME\share_name C:\sharefolder
File/Folder PatternsFile/Folder or Regex Patterns
C:\sharefolder\excludefolder C:\sharefolder\excludefolder\*
Syntax
C:\sharefolder\excludefolderC:\sharefolder\excludefolder\folderC:\sharefolder\excludefolder\files.txtC:\sharefolder\excludefolder\folder\files.txt
What will get excluded
What won't get excluded
\\SERVER_NAME\Users C:\UsersShare and folder path
To exclude "AppData" folder for every user profileObjective
C:\Users\user1\AppDataPath of folder that is to beexcluded
Regex PatternsFile/Folder or Regex Patterns
C:\\Users\\[^\\]*\\AppDataSyntax
C:\Users\user1\AppDataC:\Users\user2\AppDataC:\Users\user1\AppData\subfolderC:\Users\user2\AppData\subfolder
What will get excluded
C:\Users\user1\subfolder\AppDataC:\Users\user2\subfolder\AppData
What won't get excluded
14
Objective To exclude files from a specific folder butaudit all subfolders and its contents
Regex PatternsFile/Folder or Regex Patterns
\\SERVER_NAME\share_name C:\sharefolderShare and folder path
C:\sharefolder\excludefolderPath of folder that is to beexcluded
^C:\\sharefolder\\excludefolder\\[^\\]*\.[^\\]*$Syntax
C:\sharefolder\excludefolder\file.txtC:\sharefolder\excludefolder\folder.withDot
What will get excluded
C:\sharefolder\excludefolderC:\sharefolder\excludefolder\folderWithoutDotC:\sharefolder\excludefolder\folderWithoutDot\subfolderC:\sharefolder\excludefolder\folderWithoutDot\testfile.txtC:\sharefolder\excludefolder\folder.withDot\subfolderC:\sharefolder\excludefolder\folder.withDot\testfile.txt
What won't get excluded
6. Troubleshooting
Understand and resolve the most common issues faced while auditing your
NetApp filers using ADAudit Plus.
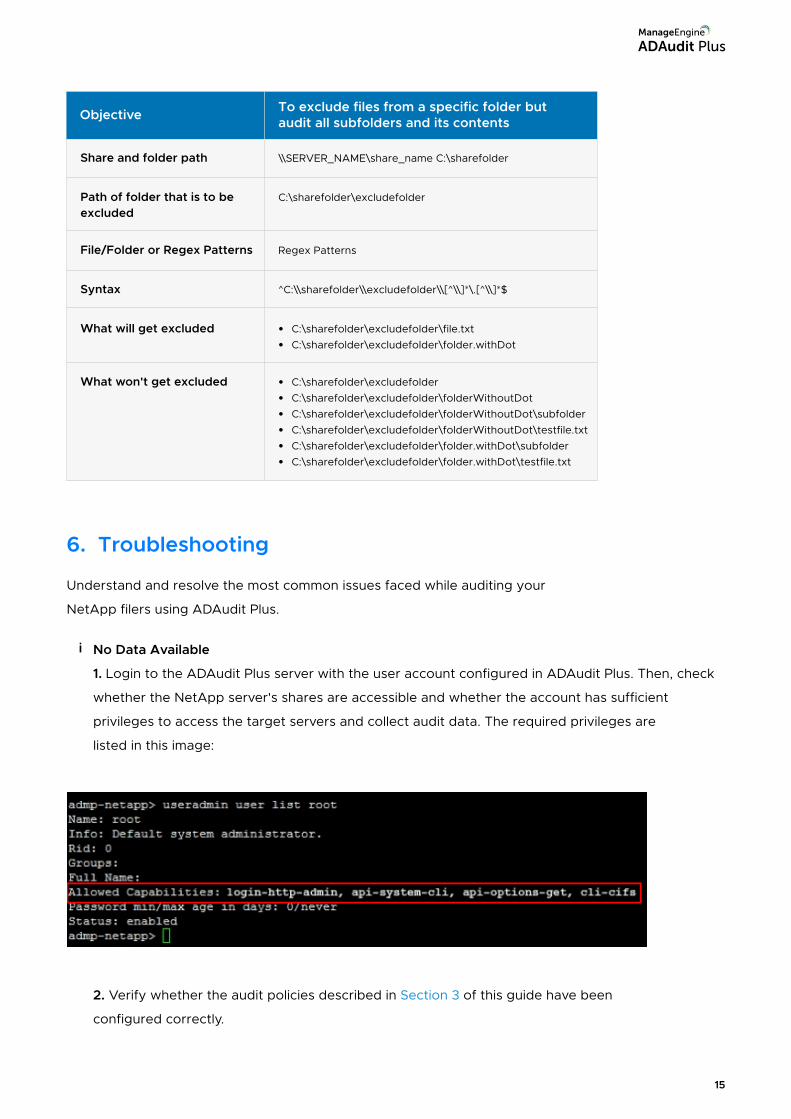
No Data Available
1. Login to the ADAudit Plus server with the user account configured in ADAudit Plus. Then, check
whether the NetApp server's shares are accessible and whether the account has sufficient
privileges to access the target servers and collect audit data. The required privileges are
listed in this image:
2. Verify whether the audit policies described in Section 3 of this guide have been
configured correctly.
i
15
The network path was not found
This error occurs when the target computer cannot be contacted, or when the ADAudit Plus
service account does not have sufficient privileges to access the share on the target computer.
To troubleshoot:
1. Connect to the audit files (EVT file shares) on the target computer.
2. Open File Explorer from the taskbar and select Network from the left tree.
3. Double-click on the NetApp server which contains the target shared folder.
4. Open the shared folder and double-click on the share you want to access.
5. If you can access the share, try pinging the NetApp server by following these steps:
a. Login to your ADAudit Plus web console.
b. Navigate to File Audit > Configured Servers > NetApp Server and identify the NetApp
server showing the error.
c. Note the name of the NetApp server as found in ADAudit Plus console.
d. Open Command Prompt and ping the NetApp server with its name as noted from the
ADAudit Plus console. For example, if the server's name is servername1, type the
command ping servername1.
e. If the ping to the NetApp server fails, append the DNS suffix in the Advanced TCP/IP
settings, or add a host record in the DNS server, mapping this name to the NetApp
server's IP address.
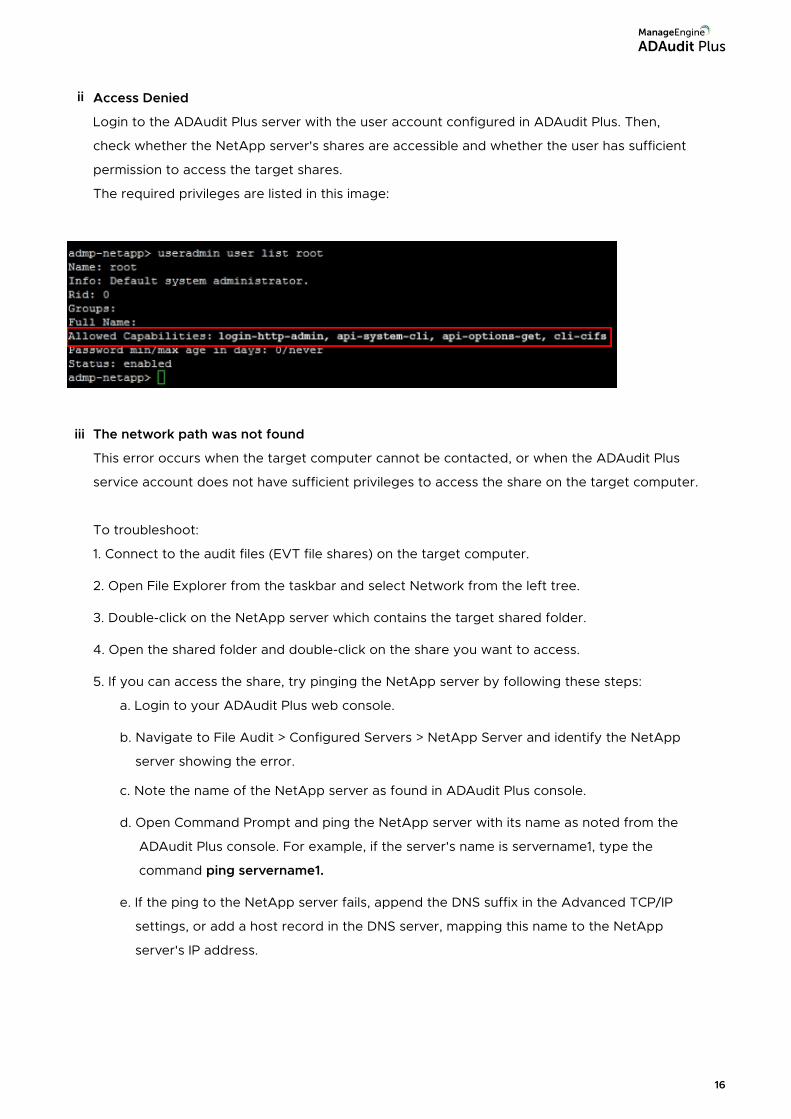
Access Denied
Login to the ADAudit Plus server with the user account configured in ADAudit Plus. Then,
check whether the NetApp server's shares are accessible and whether the user has sufficient
permission to access the target shares.
The required privileges are listed in this image:
ii
iii
16
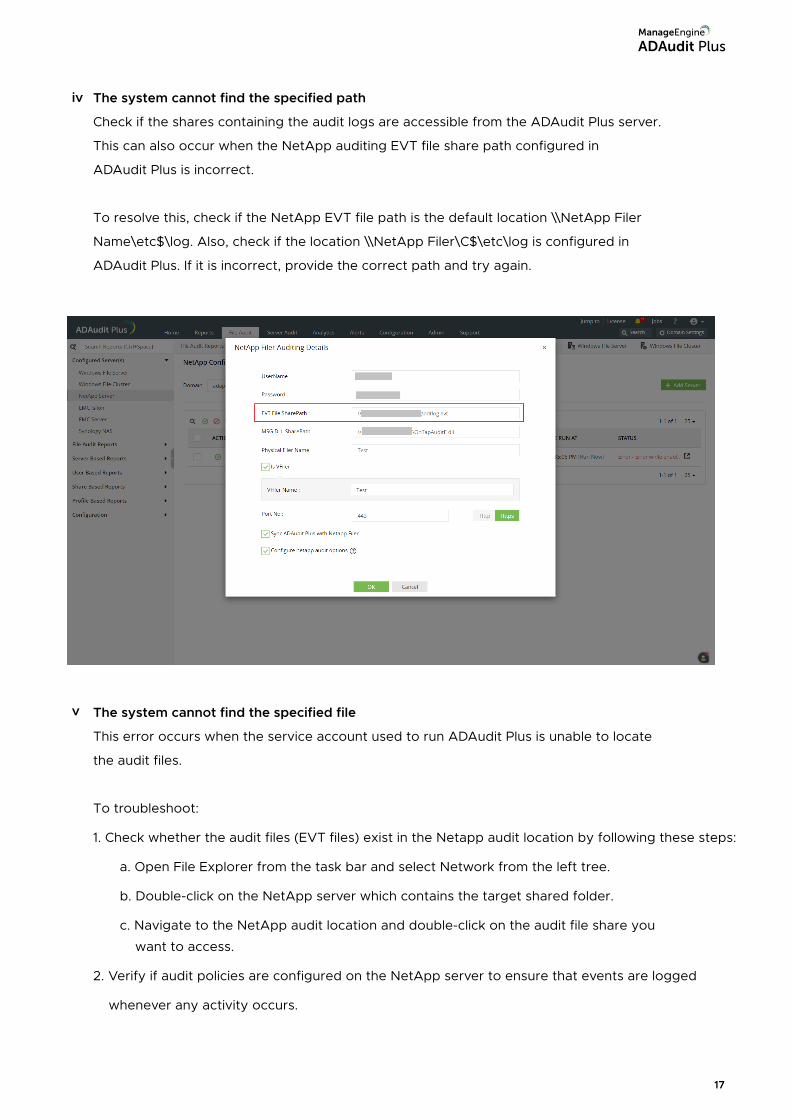
The system cannot find the specified path
Check if the shares containing the audit logs are accessible from the ADAudit Plus server.
This can also occur when the NetApp auditing EVT file share path configured in
ADAudit Plus is incorrect.
To resolve this, check if the NetApp EVT file path is the default location \\NetApp Filer
Name\etc$\log. Also, check if the location \\NetApp Filer\C$\etc\log is configured in
ADAudit Plus. If it is incorrect, provide the correct path and try again.
The system cannot find the specified file
This error occurs when the service account used to run ADAudit Plus is unable to locate
the audit files.
To troubleshoot:
1. Check whether the audit files (EVT files) exist in the Netapp audit location by following these steps:
a. Open File Explorer from the task bar and select Network from the left tree.
b. Double-click on the NetApp server which contains the target shared folder.
c. Navigate to the NetApp audit location and double-click on the audit file share you
want to access.
2. Verify if audit policies are configured on the NetApp server to ensure that events are logged
whenever any activity occurs.
iv
v
17
ManageEngine ADAudit Plus is an IT security and compliance solution. With over 200 event-specific reports and
real-time email alerts, it provides in-depth knowledge about changes effected to both the content and
configuration of Active Directory, Azure AD and Windows servers. Additionally it also provides thorough access
intelligence for workstations and file servers (including NetApp and EMC).
To learn more about how ADAudit Plus can help you with all your Active Directory auditing needs, please visit:
https://www.manageengine.com/products/active-directory-audit/
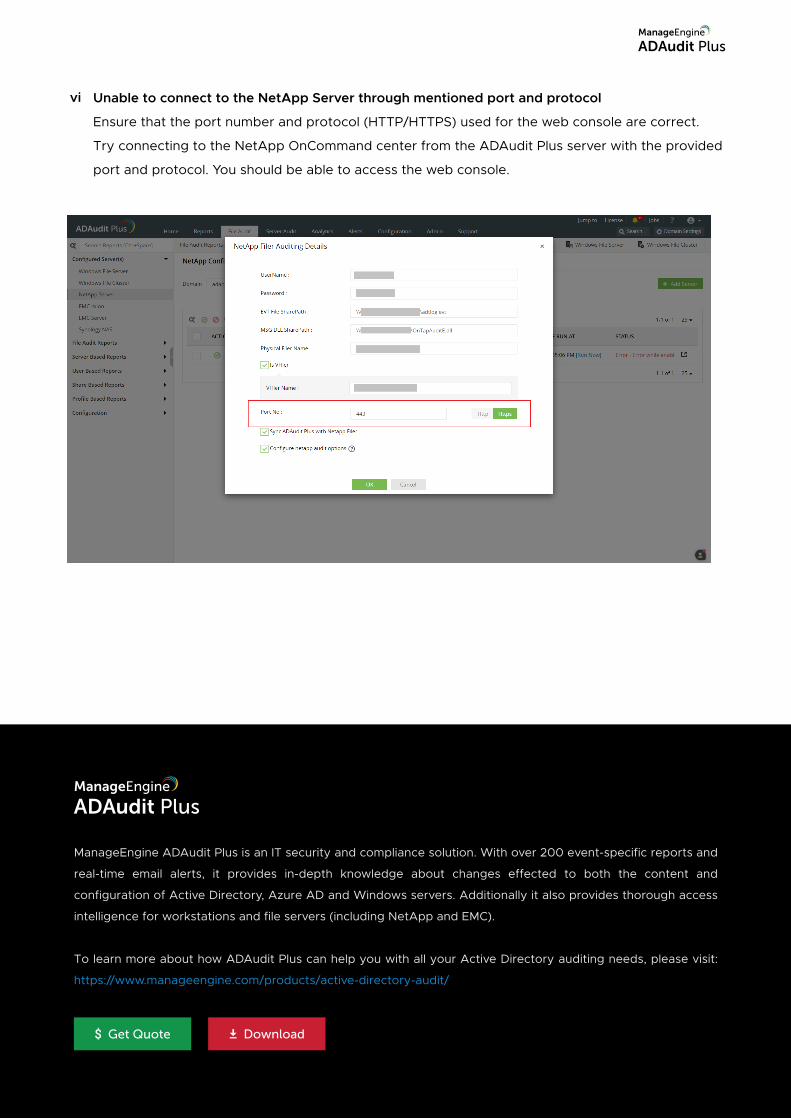
Unable to connect to the NetApp Server through mentioned port and protocol
Ensure that the port number and protocol (HTTP/HTTPS) used for the web console are correct.
Try connecting to the NetApp OnCommand center from the ADAudit Plus server with the provided
port and protocol. You should be able to access the web console.
vi