Net-Top-Box User Guide - MobilePRO
181
ONELAN Digital Signage Net-Top-Box User Guide V10.1.0 (50066) Copyright © 2010-2015 ONELAN Ltd. All rights reserved.
-
Upload
khangminh22 -
Category
Documents
-
view
1 -
download
0
Transcript of Net-Top-Box User Guide - MobilePRO

ONELAN Digital SignageNet-Top-Box User Guide
V10.1.0 (50066)
Copyright © 2010-2015ONELAN Ltd. All rights reserved.
ONELAN Digital SignageNet-Top-Box User Guide
Version: 10.1.0
The ONELAN Net-Top-Box digital signage appliance is amultimedia, multizoned solution capable of displayingstored media and live media, for example, RSS feeds,web pages, and broadcast or locally streamed TV. With abrowser-based user interface, the system is fullymultilingual, including all main European languages.
Copyright © 2010-2015 ONELAN Ltd. All rights reserved.
All rights reserved. No parts of this work may be reproduced in any form or by any means - graphic, electronic, ormechanical, including photocopying, recording, taping, or information storage and retrieval systems - without the writtenpermission of the publisher.
Products that are referred to in this document may be either trademarks and/or registered trademarks of the respectiveowners. The publisher and the author make no claim to these trademarks.
While every precaution has been taken in the preparation of this document, the publisher and the author assume noresponsibility for errors or omissions, or for damages resulting from the use of information contained in this document orfrom the use of programs and source code that may accompany it. In no event shall the publisher and the author be liablefor any loss of profit or any other commercial damage caused or alleged to have been caused directly or indirectly by thisdocument.
Printed: 25 March 2015
Net-Top-Box User Guide
3
Table of Contents
Part 1: Welcome to ONELAN Digital Signage 111.1 Terms You Need to Know 11
1.2 Logging On 13
1.3 Using theWeb Interface 14
Part 2: Creating Digital Signage 212.1 Using Schedules 21
2.1.1 Creating a Schedule 22
2.1.2 Schedule Entries 23
2.1.3 Overriding the Schedule 25
2.2 Using Layouts 26
2.2.1 Manage Layout Page 26
2.2.2 Adding a New Layout 27
2.2.3 Editing a Layout 27
2.2.4 Layout Properties 27
2.2.5 Interaction Properties 28
2.3 Using Zones 28
2.3.1 The Layout Editor 29
2.3.2 Editing a Zone 30
2.3.3 Editing a Zone'sProperties 31
2.4 Using Playlists 32
2.4.1 Viewing and Editing ConditionalPlay 33
2.4.2 Viewing and Editing Time Validity 35
2.4.3 AddingMedia Item Files to a Playlist 36
2.4.4 Adding Special Items to a Playlist 37
2.4.5 Adding Folders to a Playlist 37
2.4.6 Playing Content Items to Test Them 38
Part 3: Understanding Media Types 433.1 Media Directly Managed by the NTB 43
3.1.1 Text 43
3.1.2 Newsfeeds 44
3.1.3 Clocks 45
3.1.4 Tables 45
3.1.5 RS-232 Items 47
3.1.6 QR Codes 47
4
3.2 Media Run from the NTB Disk 48
3.2.1 Uploading Content Files 49
3.2.2 Video 51
3.2.3 Text Files 51
3.2.4 Imagesand Photos 52
3.2.5 Audio 52
3.2.6 Presentations 53
3.2.7 HTMLWeb Pages 54
3.2.8 Adobe Flash 54
3.2.9 PDF Files 55
3.2.10 Folder Play 55
3.3 Media from External Sources 55
3.3.1 TV 56
3.3.2 Radio 56
3.3.3 Live Video 56
3.3.4 Multicast Video 57
3.3.5 ExternalWeb Pages 57
3.4 Media Item Properties 59
3.4.1 Movie Properties 60
3.4.2 HTMLProperties 61
3.4.3 Image Properties 62
3.4.4 Text Properties 63
3.4.5 SoundtrackProperties 64
3.4.6 Newsfeed Properties 64
3.4.7 ClockProperties 66
3.4.8 PDF File Properties 66
3.4.9 Folder PlayProperties 67
3.4.10 PlayCriteria Properties 69
3.4.11 Advanced Properties 70
3.4.12 AdHocProperties 70
3.5 Playlist Commands 71
3.5.1 RendezvousPoints and the Advance To Command 71
3.5.2 Change Layout Command 72
3.6 Colours 73
3.7 Fonts 74
Part 4: Enhancing Your Displays 774.1 Synchronising Playlist Displays Between Zones 77
4.1.1 AutomaticCaptioning 77
Net-Top-Box User Guide
5
4.1.2 Displaying Video-On-DemandUsing a Sub-Playlist 78
4.2 Using Interactivity 79
4.2.1 Designing Interactive Layouts 82
4.2.2 GeneralPurpose Input/Output 82
4.2.3 Touch Screens 83
4.2.4 ClickOn Touch 83
4.3 Using the RS-232 Interface Port 84
4.4 Displaying Part of aMovie orWeb Page 84
4.5 Changing the Screen Background 84
Part 5: Ad Hoc Content 875.1 Enhanced AdHoc Access Control 88
5.2 Remote Keypad Control 90
5.3 Additional Ad Hoc 91
5.4 Ad Hoc from Centre 93
5.5 Managing Ad Hoc Items 93
5.6 Creating Ad Hoc User Accounts 94
5.7 Ad Hoc Pages 95
5.7.1 Managing AdHocPages 95
5.7.2 Editing Ad HocPages 95
5.8 Ad Hoc Folder Play 96
5.9 Ad Hoc Folder Mirror 97
5.10 AdHoc Media Folder 98
5.11 Changing Ad Hoc Content 99
5.12 AdHoc Theming 100
Part 6: Sharing Content Using Layout Packages 1056.1 Layout Packages 105
6.2 Creating a Layout Package 106
6.3 Uploading and Installing a Layout Package 106
6.4 Layout Package Conflicts 106
6.5 Layout Package Information 107
Part 7: Channels and Signage Networks 1117.1 Channel Roles 112
7.2 Channel Content Servers 113
6
7.3 Publishing 114
7.3.1 Configuring the Publisher 114
7.3.2 Publishing a Channel 116
7.3.3 MultichannelPublishing 118
7.3.4 Managing Channels 118
7.4 Subscribing 120
7.4.1 Configuring a Subscriber 120
7.4.2 Updating Subscription 121
7.5 Channel Ad Hoc 122
Part 8: Player and System Status 1258.1 Player Status 125
8.2 System Status 125
8.3 Conditional Play Status 126
8.4 TV & Radio Status 127
8.5 Screen Snap Shot 127
Part 9: Setup 1319.1 Help and User Interface Options 131
9.2 System Setup 132
9.2.1 Users 133
9.2.2 Date &Time 134
9.2.3 Network 135
9.2.4 TV&Radio 137
9.2.5 HTTPProxy 139
9.2.6 Security – GeneralSettings 140
9.2.7 Security – Advanced LDAPSettings 143
9.2.8 Player Local Information 147
9.2.9 Reporting and Remote Setup 148
9.2.10 Licensing 149
9.3 Player Setup 149
9.3.1 Audio Settings 149
9.3.2 Screen 150
9.3.3 Players 151
9.3.4 RS-232Outputs 152
9.3.5 Interactivity 154
9.3.6 InternationalSettings 155
9.4 Backing Up Your NTB 155
Net-Top-Box User Guide
7
9.5 Software Update 156
9.6 Reboot System 158
Part 10: Troubleshooting 16110.1 Support Snap Shot 161
10.2 Connection Troubleshooter 161
Part 11: Technical Reference 16711.1 Energy Saving 167
11.2 Optimising Playback Performance 168
11.3 RS-232 Technical Reference 168
11.4 Backup Contents 170
Part 12: Glossary 173
Index 177

Part IWelcome to ONELANDigital Signage

Net-Top-Box User Guide
11
Part 1: Welcome to ONELAN Digital SignageWelcome to the Net-Top-Box (NTB) user guide. Here you will find comprehensive information about how to createdigital signage with the NTB and how tomanage the NTB unit.
Find the subject you are looking for in the table of contents or in the PDF bookmarks. Track down the location ofspecific topics with the index at the end of the guide or by using the Adobe®Reader® search facility.
If you are new to the NTB, how it operates, and what it can offer, you will find helpful orientation by reading throughTerms You Need to Know.
Following that, check through the steps for Logging On to the NTB and Using theWeb Interface.
However, themore experiencedmay wish to go straight to the information about creating and controlling digitaldisplays:
l Creating a Schedule – Getting started with designing and implementing your display.
l UnderstandingMedia Types – Understanding the different types of content you can display and how the NTBmanages them.
You can also find background Information on setting up andmanaging the NTB:
l Player and System Status – Keeping your NTB running smoothly.
l Setup – Performing configuration andmaintenance tasks.
Important: This user guide provides comprehensive information about all the features the NTB offers. However,some features are only enabled if you purchase the appropriate license. Please contact your reseller or supplier formore information.
1.1 Terms You Need to KnowThe NTB provides powerful facilities to help you to design, structure, and control sophisticated and effective contentdisplay. Before you canmake full use of those facilities, you need to be familiar with some core concepts.
The NTB is a digital signage player that displays content on a screen. The screen is physically attached to the NTBand is usually an LCD panel or LCD TV. To design what appears on the screen, and tomanage the NTB itself, youconnect to it over your network using a web browser running on your PC.
To understand how you use the NTB tomanage display of content, it is important to understand how certain keyfeatures relate to each other.

Part 1: Welcome to ONELAN Digital Signage
12
The following diagram illustrates the critical relationships betweenSchedules, Layouts, Zones, andPlaylists:
To flesh out how those relationships work, consider each of those key features in turn.
Schedule
The NTB is designed to run continuously. You control which Layouts are displayed on what days and at which timesby creating aSchedule. The schedulemay be something like this:
l Layout A runs from 4.00 pm to 6.00 pm, Mondays to Fridays.
l Layout B runs from 2.00 pm to 8.00 pm, Saturdays and Sundays.
l Layout C runs at all other times, throughout the week.
Layout
A Layout is the arrangement of individual display areas, known as Zones, that you use to compose your on-screendisplay. Your layout might display video in one zone, scrolling text in another, a sequence of still images in a thirdzone, with a full-screen zone behind the others showing a background colour or image.
Zones
Zones are rectangular areas, each of which can display various forms of content (known asmedia items). You candesign layouts with any number of zones, of any size, in any location, either separate or overlapping. You specifywhich zones display whichmedia types (for example, one for a promotional video, one for scrolling text, another foryour organisation's name or logo, and so on). You can also have zones display amix of media types. You arrange themedia items for each zone in aPlaylist.
Playlist
A Playlist contains one or several media items that you choose to display in a zone. Media items include fixed andscrolling text, movies, images, Adobe® Flash® animations, web pages, and newsfeeds. To display amedia item, youadd it to the playlist. Each zone has its own favourite playlist, which runs continuously. You can also synchronise the
Net-Top-Box User Guide
13
display between two playlists (for example, to run a scrolling text message at the same time as a related promotionalvideo or image.
That examination of the key features gives a flavour of how you put together your signage display on a single NTB.However, if your license permits it, you can also easily create a network of inter-related NTB players. You do this bydesignating and configuring one NTB as aPublisher, whichmeans it shares the design and content of its scheduleand layout with other NTB players. In turn, you designate those other NTB players as Subscribers. This sharedcontent is referred to as aChannel.
You can also allow people local to the subscriber players to have a degree of control over the content the NTBdisplays. Thematerial and features that you allow local users tomodify is calledAd Hoc content and they are calledAd Hoc Users.
That brief survey of the key terms provides the foundation to start using the NTB. Other sections introduce anddescribe additional terms and concepts as needed. An extensive Glossary provides definitions of the core NTBterminology.
But now, to consider further how to use schedules, layouts, zones, and playlists to create your digital signage, referto Creating Digital Signage.
1.2 Logging OnDuring the log on process, you will need to provide the IP address of your NTB. Make a note of this before you begin.If you do not know the IP address, restart the NTB: it displays its IP address above the progress bar towards the endof the boot sequence.
Follow these steps to log in to your NTB:
1. Ensure that the NTB is connected to the network.
2. Open a web browser (such as Mozilla® Firefox® or Microsoft® Internet Explorer®) on a computer on the samenetwork as the NTB.
3. In your browser's address bar, type in the IP address of your NTB and click the 'go to' arrow or press theEnterkey.
4. When prompted, enter the username and password. The factory-set defaults for these are remote and 9999respectively. Your NTB displays its Home page
Security: It is strongly recommended that you change the remote account password from the factory default assoon as possible. Also change the NTB master password and check that the security services configurationmatches your requirements (see Security – General Settings for details).
For the future, youmight want to bookmark theHome page or add it to your favourites for easier access. If yournetwork is set up to provide DHCP and DNS support, you can also access the NTB using its name rather than its IPaddress: the name is automatically generated in the format NTBserial, where serial is the serial number of your NTB(for example, NTB123456).
The NTB comes ready-installed with a number of sample displays and youmight find those useful to illustrate thekinds of features you can implement.
If you need assistance at any time, click Help on themenu bar to access page-specific help or to navigate to anyother help page.
You can now begin to become familiar with the NTB user interface.
Part 1: Welcome to ONELAN Digital Signage
14
1.3 Using the Web InterfaceYou control andmanage the NTB through your browser using the web-style pages of the NTB user interface.
You should familiarise yourself with the essential features of the user interface before beginning to use the NTB.Most important is themainHome page but you should also be aware of the generic navigation and commandfeatures employed on other pages. What follows is a tour of theHome page followed by descriptions of those genericfeatures.
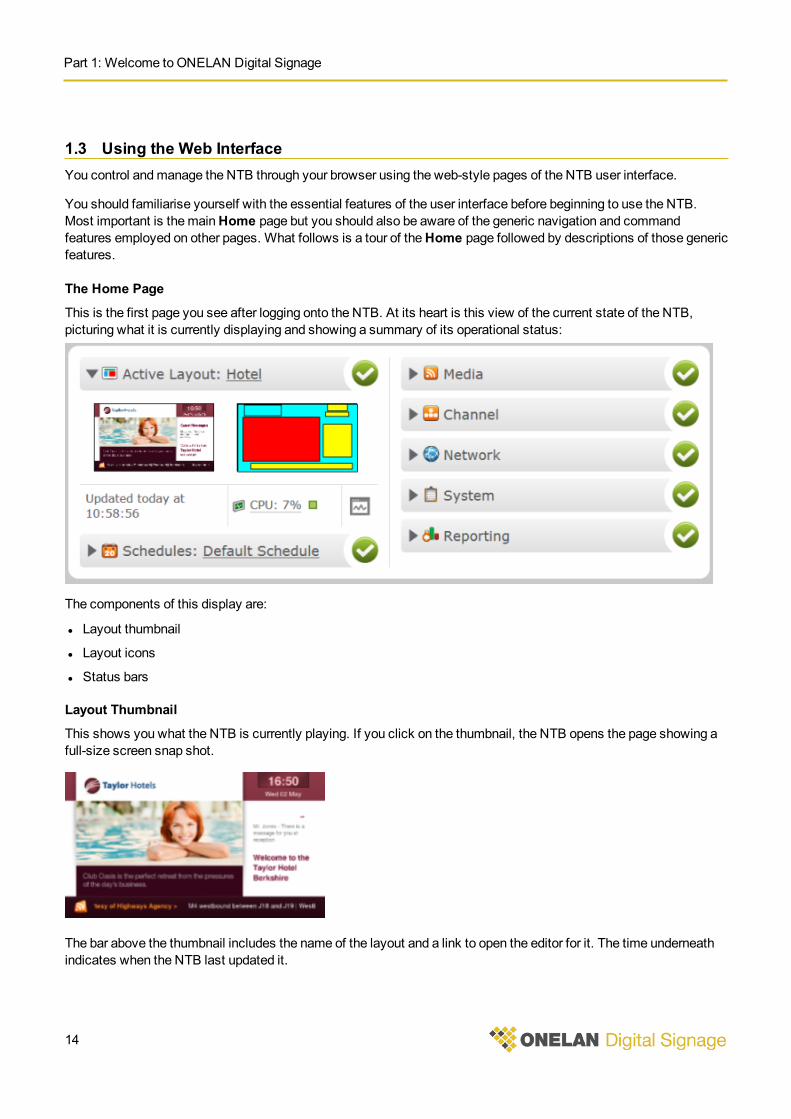
The Home Page
This is the first page you see after logging onto the NTB. At its heart is this view of the current state of the NTB,picturing what it is currently displaying and showing a summary of its operational status:
The components of this display are:
l Layout thumbnail
l Layout icons
l Status bars
Layout Thumbnail
This shows you what the NTB is currently playing. If you click on the thumbnail, the NTB opens the page showing afull-size screen snap shot.
The bar above the thumbnail includes the name of the layout and a link to open the editor for it. The time underneathindicates when the NTB last updated it.

Net-Top-Box User Guide
15
Layout Icons
This shows you the arrangement of zones in the layout. Each zone is represented by a rectangle and the coloursindicate the kind of content that zone can display. If you click on a zone, the NTB opens its playlist for you to edit.
The panels underneath the layout show:
l How much CPU the NTB is currently using to display the layout.
l The icon: click this to open the system status page.
Status Bars
These indicate the status of key NTB operational components. Each status bar has this general appearance:
The features to note are:
l Open/close arrow –Click the arrow to reveal more details. Click the arrow to reduce the detail.
l Name – The subject of the status report (in the above case the subject is theNetwork).
l Status summary – The colour of the status bar icon indicates the current status (in the above case, the networkstatus is good).
Here are status bars that respectively indicate attention needed and problem detected:
If you click the open arrow on an attention or problem status bar, the NTB provides a description of the problem in theinformation revealed. To take corrective action, click on the appropriate button to open the relevant page in theinterface.
Part 1: Welcome to ONELAN Digital Signage
16
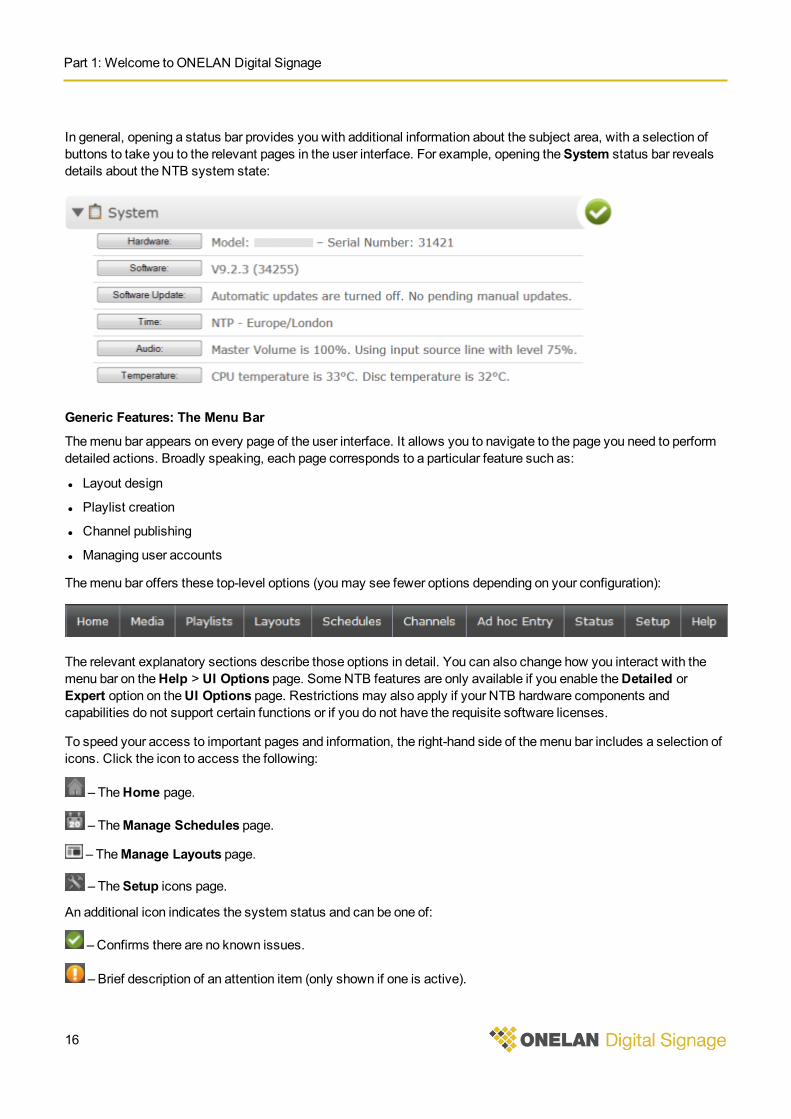
In general, opening a status bar provides you with additional information about the subject area, with a selection ofbuttons to take you to the relevant pages in the user interface. For example, opening theSystem status bar revealsdetails about the NTB system state:
Generic Features: The Menu Bar
Themenu bar appears on every page of the user interface. It allows you to navigate to the page you need to performdetailed actions. Broadly speaking, each page corresponds to a particular feature such as:
l Layout design
l Playlist creation
l Channel publishing
l Managing user accounts
Themenu bar offers these top-level options (youmay see fewer options depending on your configuration):
The relevant explanatory sections describe those options in detail. You can also change how you interact with themenu bar on theHelp > UI Options page. SomeNTB features are only available if you enable theDetailed orExpert option on theUI Options page. Restrictions may also apply if your NTB hardware components andcapabilities do not support certain functions or if you do not have the requisite software licenses.
To speed your access to important pages and information, the right-hand side of themenu bar includes a selection oficons. Click the icon to access the following:
– TheHome page.
– TheManage Schedules page.
– TheManage Layouts page.
– TheSetup icons page.
An additional icon indicates the system status and can be one of:
– Confirms there are no known issues.
– Brief description of an attention item (only shown if one is active).
Net-Top-Box User Guide
17
– Brief description of a problem item (only shown if one is active).
Note: The NTB does not display the quick access icons if your computer screen is too small or you haverestricted the size of the browser window.
To allow you to usemore of the screen to display page content, the left-hand side of themenu bar includes a controlto collapse and expand the screen banner:
– Collapse the banner.
– Expand the banner.
Generic Features: Tabbed Pages
Many options in the NTB user interface are split across tabbed pages:
To access the options on the tabbed page, click the tab label (for example, Add Schedule Entry).
Generic Features: Action Buttons
Numerous actions are common across different NTB pages. The user interface indicates these with icon actionbuttons. Click the button to perform the indicated action:
– Audition
– Delete
– Rename
–Copy
– Edit
– Drag to reorder
Generic Features: Command Buttons
Some commands are common across different NTB pages. The user interface provides command buttons for these.
To execute the command, click the button. The label on the button describes the command, such as
or .

Part IICreating DigitalSignage

Net-Top-Box User Guide
21
Part 2: Creating Digital SignageThis section describes how to create your digital signs. If you are new to the NTB see Terms You Need to Knowbefore you begin.
The details in this section apply equally to creating content for a standalone NTB and for creating content for achannel publisher.
Click on the links below for more information on:
Using Schedules – Controlling what is displayed and when.
Using Layouts – Organising the screen into different display areas.
Using Zones – Configuring the type of content displayed in each layout.
Using Playlists – Specifying themedia items that play in each zone.
UnderstandingMedia Types – Setting up andmanaging the different types of media.
Enhancing Your Displays – Using synchronisation, interactivity, and the RS-232 interface.
2.1 Using SchedulesThe NTB units are designed to run continuously. You control which layouts are displayed on what days and at whattimes by creating aSchedule. A schedule always contains at least oneSchedule Entry, which defines at least oneNTB action (often, which layout to display). A schedule entry does not necessarily specify a layout change, it couldspecify some other action (for example, switching the audio tomute).
Note: If your NTB is a publisher, you specify schedules per channel not for the whole NTB.
The schedule entries define periods of time during which actions occur. The programme of schedule entries is basedon a one-week cycle. TheDefault Schedule Entry defines the layout that appears, or the actions that occur, whenno other schedule entry is active.
The NTB always displays the schedule with themost recent start time. Once a schedule starts running it continuesuntil another schedule is set to begin. If there is only one schedule it runs indefinitely.
An example schedulemight contain schedule entries taking these actions:
l Playing layout X from 4:00 pm to 6:00 pm, Mondays to Fridays.
l Playing layout Y from 2:00 pm to 8:00 pm on Saturdays and Sundays.
l The default schedule entry, playing layout Z at all other times.
Whenever youmake a change to a schedule or layout, youmust click the button toimplement the change.
You can temporarily interrupt a schedule by using aSchedule Override.
To access the schedules configured on the NTB:
1. On themenu bar, click Schedules.
2. If your NTB is a publisher, select the channel from the drop-down list.
3. Click Manage Schedules.
Part 2: Creating Digital Signage
22
The NTB provides these action buttons:
– Delete the schedule.
– Copy the schedule.
– Edit the schedule.
Note: Deleting a schedule does not delete its associated layouts. If only one schedule remains, you cannotdelete it.
To create a new schedule, click theAdd Schedule tab.
2.1.1 Creating a Schedule
To display content on your NTB, you need to create at least one schedule. Create additional schedules as required.You add schedule entries to a schedule to fine tune how the NTB runs it.
To create a new schedule:
1. On themenu bar, click Schedules.
2. Click Manage Schedules.
3. Click theAdd Schedule tab.
To create the new schedule, complete the following details and click the button:
Schedule Name Enter a unique name for the schedule.
Valid From Select the date and time when the NTB starts running the schedule (the default is in 24 hours time).
Valid Until Select the option that matches your requirement:
l Superseded – The NTB keeps playing this schedule until a more eligible schedule becomesavailable.
l Date – The NTB keeps playing this schedule until the date and time you choose. It then plays thenext eligible schedule. If the NTB cannot find an eligible schedule, it continues to play this one.
Show Layout Select the layout to display.
Conditional Play This is only enabled when you have added Player Local Information (PLI) to the NTB (see PlayerLocal Information for details).
If it is enabled, you have two options:
l Play Always – Default. The NTB always plays the schedule.
l Play if Player Local Information Item – The NTB only plays the schedule if certain conditions aremet.
If you select Play if Player Local Information Item, complete these steps:
1. Select the name of the relevant player local information from the first drop-down list.
2. Select the test to apply from the second drop-down list.
3. Enter the value to test for in the final field (add further values by clicking the button or delete
values by clicking the button).
Net-Top-Box User Guide
23
2.1.2 Schedule Entries
A schedule entry is a set of one or more actions for the NTB to perform at specified times. Schedule entries repeatover a weekly cycle and a programme of schedule entries make up a schedule.
Use schedule entries to specify these actions:
l Displaying a layout.
l Switching a screen on or off.
l Switching audio on or off.
l PerformingAdvance To commands.
Whenever you create a new schedule, the NTB automatically includes aDefault Schedule Entry. The defaultschedule entry has no start and end time and defines the default states when no other entry is active.
Schedule entries allow you to direct your NTB to perform simple or highly sophisticated sequences of actions. Youcan have the NTB display different layouts at different times of the day and different days of the week, switch thedisplay on and off, or repeat actions at specified intervals.
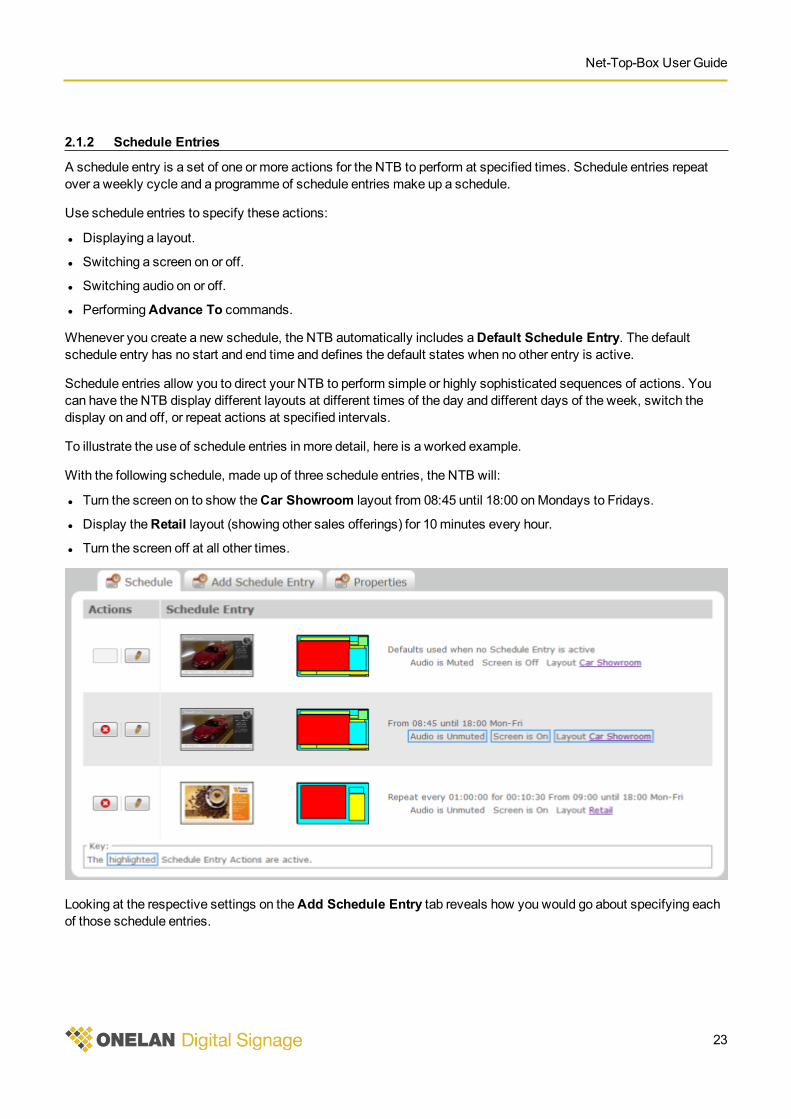
To illustrate the use of schedule entries in more detail, here is a worked example.
With the following schedule, made up of three schedule entries, the NTB will:
l Turn the screen on to show theCar Showroom layout from 08:45 until 18:00 onMondays to Fridays.
l Display theRetail layout (showing other sales offerings) for 10minutes every hour.
l Turn the screen off at all other times.
Looking at the respective settings on theAdd Schedule Entry tab reveals how you would go about specifying eachof those schedule entries.
Part 2: Creating Digital Signage
24
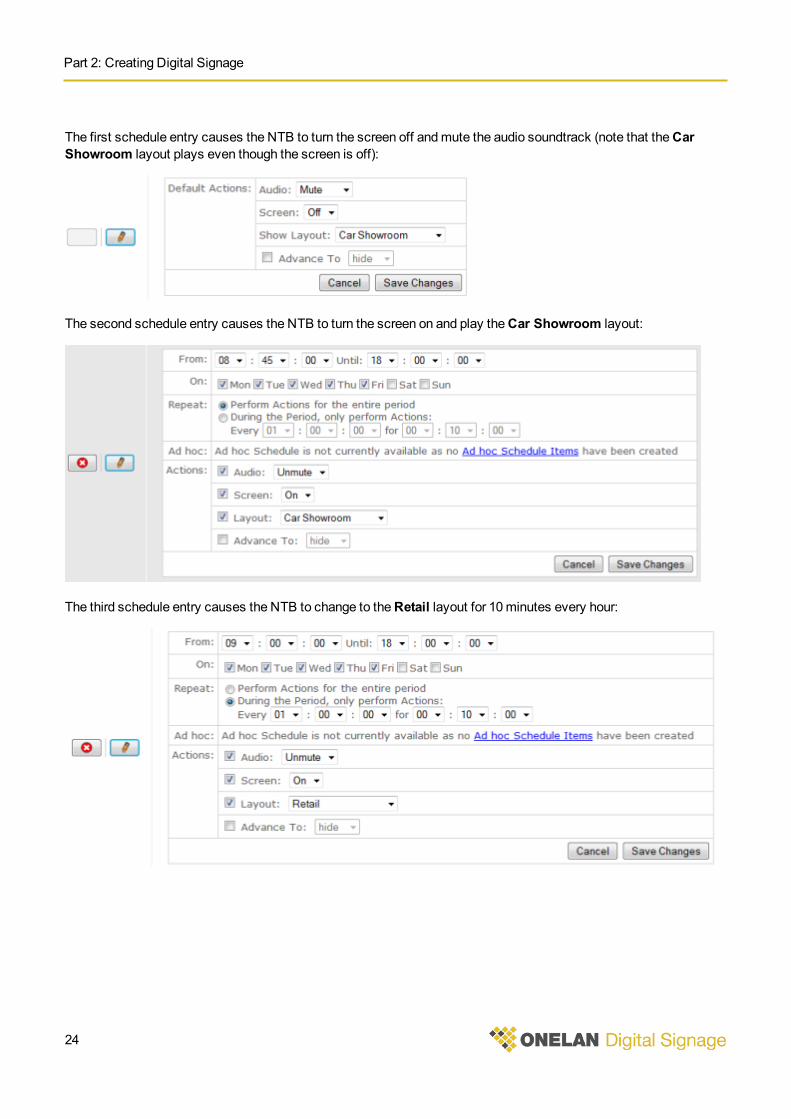
The first schedule entry causes the NTB to turn the screen off andmute the audio soundtrack (note that theCarShowroom layout plays even though the screen is off):
The second schedule entry causes the NTB to turn the screen on and play theCar Showroom layout:
The third schedule entry causes the NTB to change to theRetail layout for 10minutes every hour:
Net-Top-Box User Guide
25
To create a new schedule entry, click theAdd Schedule Entry tab, complete the following details, and click thebutton:
From Select the time range during which you want the NTB to apply the schedule entry.
00:00:00 means midnight. Set both From and Until to midnight for the NTB to run the schedule entry allday. For a period that runs through midnight, add separate schedule entries: one ending at midnight, onecommencing from midnight.
On Check the boxes for the days you want the NTB to play the schedule entry.
Repeat Choose the option that matches your requirement:
l Perform actions for the entire period – The NTB performs the actions all of the time.
l During the period, only perform actions – The NTB performs the actions only when and for as long asyou specify. Specify the regularity with the Every options and the duration with the for options. TheEvery setting must be at least 30 seconds longer than the for setting. The minimum for setting is 30seconds.
Ad hoc This is only enabled when you have added ad hoc schedule items to the NTB (see Managing Ad HocPages for details).
Check the User can override From, On and Repeat settings using Ad hoc Schedule Item box to allowad hoc users to alter those time settings.
Actions Check the boxes and select the required action you want the NTB to perform:
l Audio – Unmute or mute the display's sound.
l Screen – Turn the screen on or off.
l Layout – Display the selected layout.
l Advance To – Play the next item in the zones containing the selected rendezvous point.
Modify a schedule entry by clicking the button next to it on theSchedule tab.
2.1.3 Overriding the Schedule
Youmay need to override the current schedule at certain times (for example, to show a special event from a TVbroadcast feed). You can create aSchedule Overridewhich temporarily replaces the current schedule. The NTBstops playing the current schedule and displays a different layout. You restore the normal schedule by clicking the
button.
Note: Although channel subscriptions take place, they are not activated until you click thebutton to return to the normal schedule.
To create a schedule override, follow these steps.
1. On themenu bar, click Schedules.
2. Click Manage Overrides.
3. Click theAdd Override tab.
4. Enter a name for the override. Use a descriptive name (for example, 'Emergency Instructions').
5. Select what you want the NTB to do with audio and the screen.
Part 2: Creating Digital Signage
26
6. Choose a layout for the NTB to display.
7. Click the button.
To activate an override, follow these steps:
1. On themenu bar, select Schedules thenManage Schedules.
2. Click theOverrides tab.
3. Click the button next to the override you want to use.
The NTB displays the override layout immediately and continues to do so until you click thebutton.
2.2 Using LayoutsA layout is an arrangement of various display areas, called zones. Your layout may include video in one zone,scrolling text in another zone, and a sequence of still images in a third zone. Youmay also have a zone that is thesame size as the layout and contains a background image on which all the other zones are superimposed. Youraudience sees everything in your layout, so you need to take care to design layouts that are appealing and effective.
By default, the NTB names the zones for each layout on the screen in the order in which they were created – zone A,B, C and so on. To helpmanage the zones, you can change the names tomake themmore descriptive (for example,'Background' or 'Main Video'). You can change the relative display positions of the zones in a layout.
Each zone can display media items of different types, according to themedia player or players you enable for thezone.
The NTB screen background is visible in any part of the layout that is not covered by a zone. You can define thecolour or image for the screen background independently of any layout.
2.2.1 Manage Layout Page
The Layouts >Manage Layouts page shows all the layouts available on this NTB. A number of layouts are providedby default and you can create new ones by clicking theAdd Layout tab and following the steps in Adding a NewLayout.
For each layout, the NTB displays:
l A thumbnail image (blank if the NTB has not used the layout yet).
l A diagram of the layout's zones.
l The name and description of the layout.
l If applicable, the names of the schedules and channels that use the layout.
l The canvas size required for the layout.
l The names of any rendezvous points orChange Layout commands.
l A link to the layout's Ad hoc Page.
Additionally, the NTB displays an audio icon if you enable a soundtrack and a touch-screen icon if you enableinteractivity. Click on the icon to edit those properties.
Click the layout name (or the thumbnail) to open the graphical layout editor or to access the layout's properties. Clicka zone in the layout diagram to open the zone's playlist.
Net-Top-Box User Guide
27
The NTB provides the following action buttons for each layout:
– Audition the layout (on the screen or in your browser, depending on your UI Options setting).
– Delete the layout (you cannot delete a layout referenced by a schedule, even if inactive).
– Rename the layout.
– Copy the layout.
– Edit the playlists for the layout's zones or edit the layout itself.
To reduce the number of layouts displayed, follow these steps:
1. Click the button.
2. Enter all or part of the layout's name.
3. Click the button.
To clear a filter, click the button.
2.2.2 Adding a New Layout
To add a new layout, follow these steps:
1. On themenu bar, select Layouts thenManage Layouts.
2. Click theAdd Layout tab.
3. Enter a name for the new layout and its overall width and height.
4. Click the button
5. Click the button next to your new layout in the layouts list to open the graphical layout editor.
6. Add and set the properties for the zones you require.
7. When done, click and .
You can return to and edit your layout whenever you wish.
2.2.3 Editing a Layout
To edit a layout, click its name on the Layoutsmenu or on the Layouts >Manage Layouts page.
The edit layout page has these tabs:
l Zones – Displays the graphical layout editor for you to add or modify zones and their properties.
l Layout Properties – Displays options for you to set up the layout's canvas size, ad hoc page, and soundtrack.You can also specify which users are allowed to edit the layout.
l Interaction – Displays the interactivity options for you to configure.
2.2.4 Layout Properties
The Layout Properties tab allows you to configure the following details (when complete, click thebutton):
Part 2: Creating Digital Signage
28
Description Optional. Enter a description of the layout. The NTB displays this on the Layout pagesunderneath the layout's name.
Layout Ad hoc Page Check this box and the NTB will automatically create an ad hoc page if you add ad hoc items tothis layout.
If you add or remove ad hoc items, the NTB will add or remove them from that ad hoc page. If youdelete all ad hoc items, the NTB deletes the ad hoc page.
Soundtrack Check the Include Soundtrack box to enable a soundtrack for this layout.
By default, the NTB checks the Add default media to Soundtrack's Playlist box. This means thatthe NTB will play the default soundtrack media. If you uncheck that box, you will need to add amedia file by opening the Soundtrack item in the layout's Playlist menu.
Check the Enable media auditing by default for all items in the soundtrack box to include dataon the soundtrack items in the media audit reports.
Users allowed to edit All users with the Layout Manager permission can edit layouts. To permit others to edit thislayout, check the box next to the user's name.
2.2.5 Interaction Properties
The Interaction tab allows you to define how the layout responds to touch screen, remote control, and RS-232 inputevents.
Note: The NTB may require a license to use these options.
For each type of interaction, the NTB offers three basic actions in response:
l No default action – The layout does not respond to the interaction.
l Advance to a rendezvous point – Specify the rendezvous point and the zone from the drop-downmenus. For atouch screen event, you can also choose whether this is on press or release and can configure an on-click sound.
l Change to layout – Specify the layout to change to from the drop-downmenu.
In each case, the NTB also offers timeout options for you to further refine the response. You can specify the numberof seconds that the NTB waits:
l After the last event – Delays the response to an interaction.
l For the first event – Provides a response if there is no interaction during the timeout period.
See Using Interactivity for details on designing and implementing interactive responses.
2.3 Using ZonesYou compose layouts from defined rectangular areas called zones. Each zone can display various types of mediacontent. The number of zones in your layout, their size, and location is up to you.
It is common to use different zones to display different types of content (for example, one for scrolling text, one for apromotional video, and so on). However, any zone can display any media type: you just have to enable the zone withthe appropriate media player. You can have a zone display a single item or a sequence of items. You define the itemsthat a zone displays in a playlist.
Net-Top-Box User Guide
29
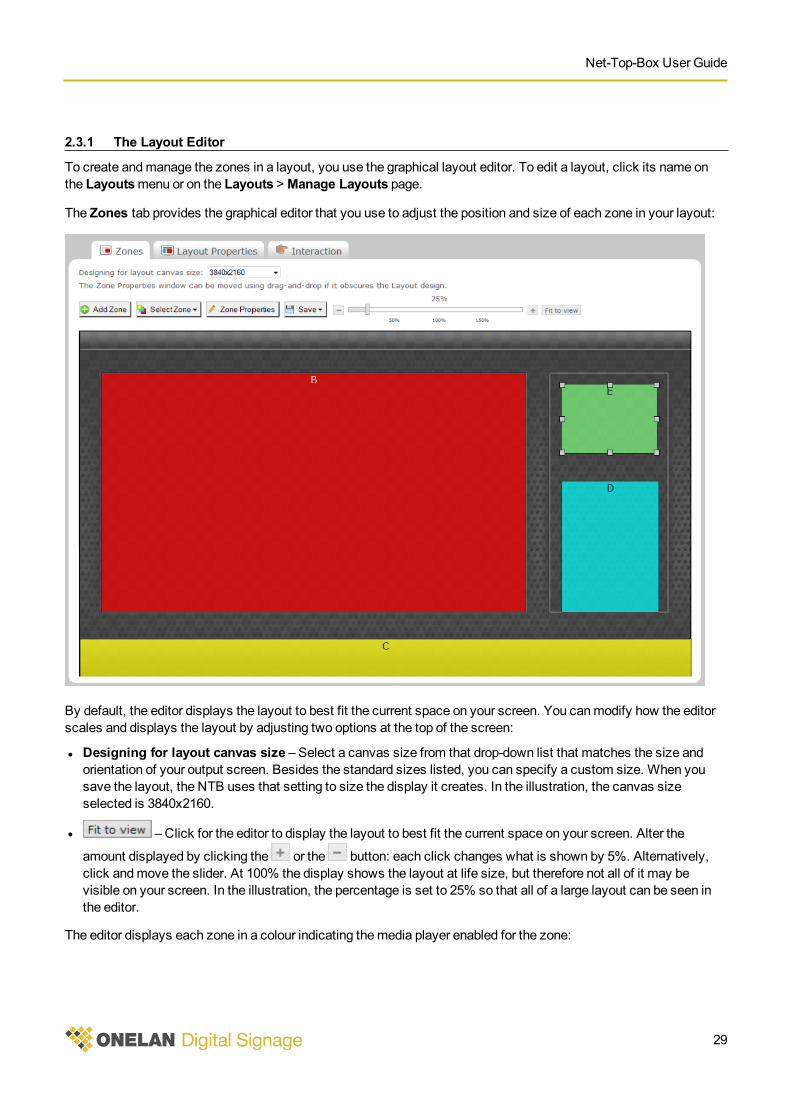
2.3.1 The Layout Editor
To create andmanage the zones in a layout, you use the graphical layout editor. To edit a layout, click its name onthe Layoutsmenu or on the Layouts >Manage Layouts page.
The Zones tab provides the graphical editor that you use to adjust the position and size of each zone in your layout:
By default, the editor displays the layout to best fit the current space on your screen. You canmodify how the editorscales and displays the layout by adjusting two options at the top of the screen:
l Designing for layout canvas size – Select a canvas size from that drop-down list that matches the size andorientation of your output screen. Besides the standard sizes listed, you can specify a custom size. When yousave the layout, the NTB uses that setting to size the display it creates. In the illustration, the canvas sizeselected is 3840x2160.
l – Click for the editor to display the layout to best fit the current space on your screen. Alter the
amount displayed by clicking the or the button: each click changes what is shown by 5%. Alternatively,click andmove the slider. At 100% the display shows the layout at life size, but therefore not all of it may bevisible on your screen. In the illustration, the percentage is set to 25% so that all of a large layout can be seen inthe editor.
The editor displays each zone in a colour indicating themedia player enabled for the zone:
Part 2: Creating Digital Signage
30
l Red –Movie player (zone B)
l Light green – HTML player (zone E).
l Light blue – Image player (zone D).
l Yellow – Text player (zone C).
Note: The display shows the zones with a slight transparency (for example, to aid in aligning with backgroundimages). This does not indicate how the zone appears when displayed on screen.
To select a zone, click it. The editor shows the selected zone with handles (as seen for zone E). Tomove the zone,drag-and-drop it. To resize the zone, drag one of the handles.
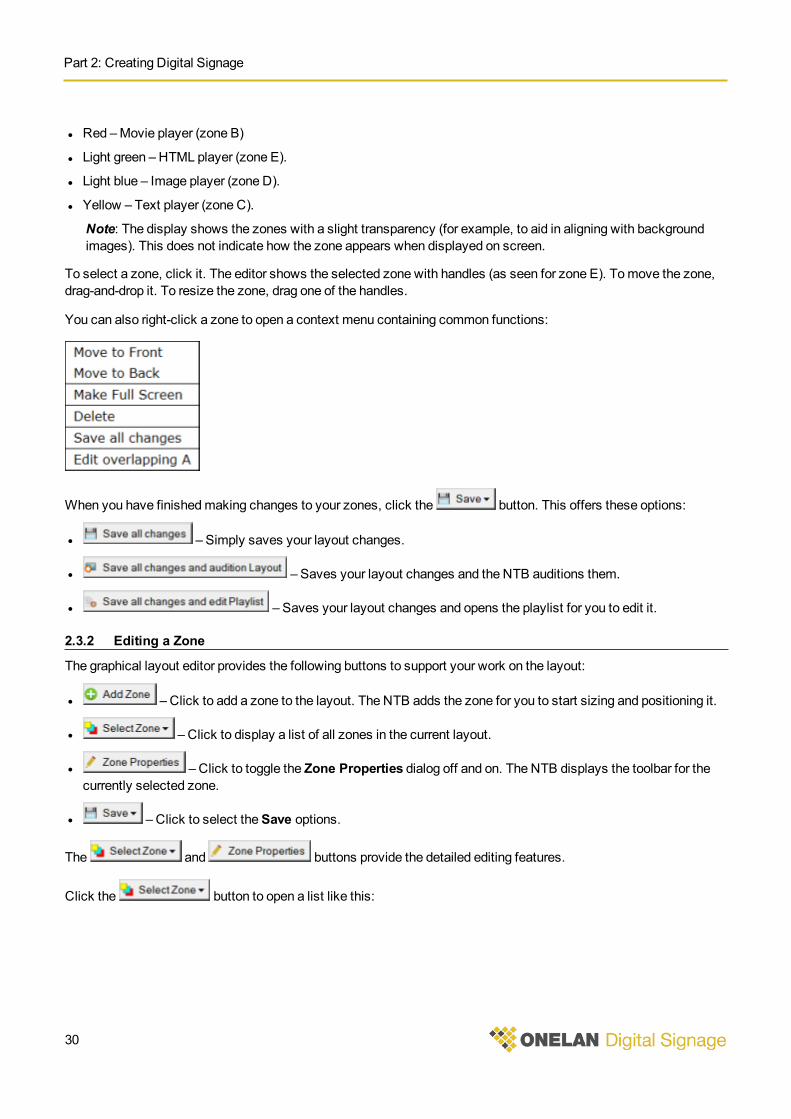
You can also right-click a zone to open a context menu containing common functions:
When you have finishedmaking changes to your zones, click the button. This offers these options:
l – Simply saves your layout changes.
l – Saves your layout changes and the NTB auditions them.
l – Saves your layout changes and opens the playlist for you to edit it.
2.3.2 Editing a Zone
The graphical layout editor provides the following buttons to support your work on the layout:
l – Click to add a zone to the layout. The NTB adds the zone for you to start sizing and positioning it.
l – Click to display a list of all zones in the current layout.
l – Click to toggle the Zone Properties dialog off and on. The NTB displays the toolbar for thecurrently selected zone.
l – Click to select theSave options.
The and buttons provide the detailed editing features.
Click the button to open a list like this:
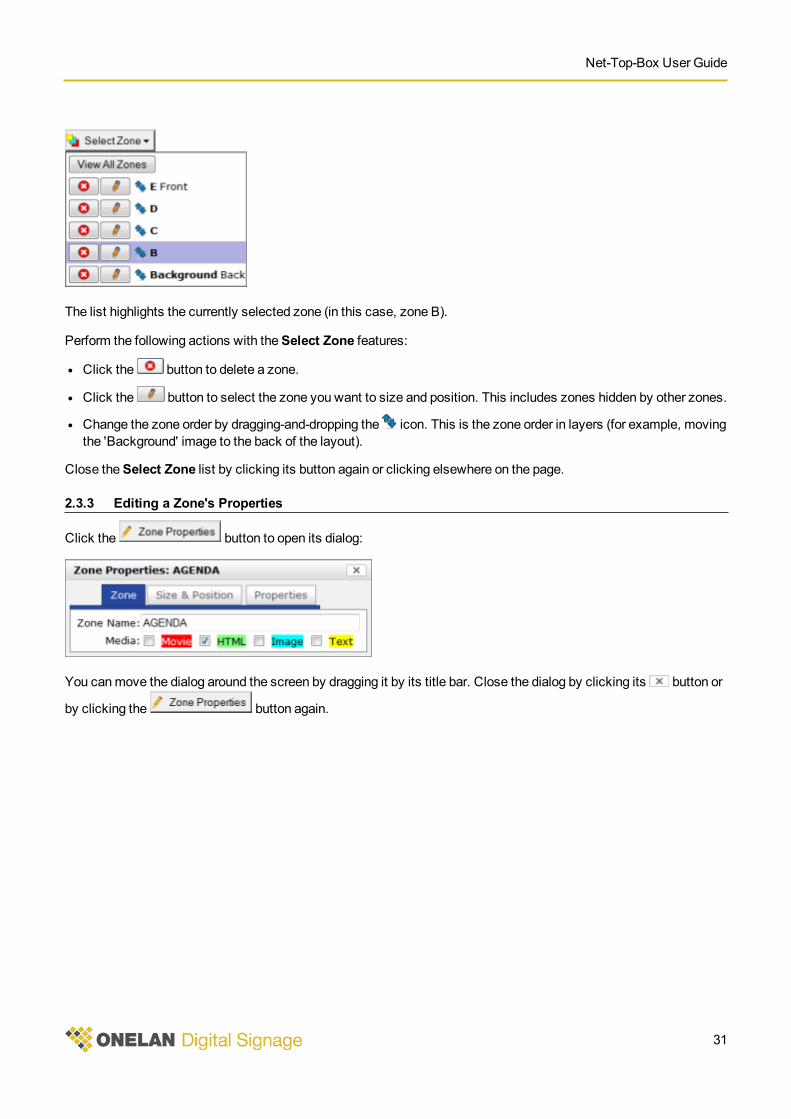
Net-Top-Box User Guide
31
The list highlights the currently selected zone (in this case, zone B).
Perform the following actions with theSelect Zone features:
l Click the button to delete a zone.
l Click the button to select the zone you want to size and position. This includes zones hidden by other zones.
l Change the zone order by dragging-and-dropping the icon. This is the zone order in layers (for example, movingthe 'Background' image to the back of the layout).
Close theSelect Zone list by clicking its button again or clicking elsewhere on the page.
2.3.3 Editing a Zone's Properties
Click the button to open its dialog:
You canmove the dialog around the screen by dragging it by its title bar. Close the dialog by clicking its button or
by clicking the button again.

Part 2: Creating Digital Signage
32
You can access and configure the properties by selecting the appropriate tab and entering the values required:
Zone Choose from the following options:
l Zone Name – Optional. Enter a descriptive name for the zone. The NTB shows this name when youare on a zone-specific page (such as in its playlist).
l Media – Check the relevant box or boxes to enable the zone to play that media type.
Size & Position Size and position the zone by entering specific values.
Note: If you use pixel values, the result may vary according to the resolution of the screen.
l Top, Bottom, Left, and Right Edge Offsets – The NTB offsets the position of the zone relative tothe edge of the screen.
l Width – Exact width for the zone.
l Height – Exact height for the zone.
l Aspect Ratio – Use to automatically size the zone depending on the aspect ratio of its content.Only available if you use pixels forWidth and Height and do not select the Specify custom widthand height option. First, select the type of aspect ratio needed from the drop-down list. Second,select whether the NTB calculates the required zone size keyed to the height or to the width.
Properties Check the box or boxes to enable the options required:
l Image – If you have enabled the zone to show images, check this box to see the first item in theplaylist in the layout editor (instead of the standard coloured area). This helps preview the imageand align other zones to it.
l Design Visibility – Uncheck this box so that the zone is not shown in thumbnail views. This helps toedit other zones that are overlapped by this zone.
l Media Audit – Check this box to enable media audit reporting for the zone. You can override thison an item-by-item basis in the playlist. See Reporting and Remote Setup for more details onreporting.
2.4 Using PlaylistsA playlist is a sequence of media items that you choose for display in a zone. Each zone has its own playlist and runsindependently of other playlists. A soundtrack also has its own playlist.
Playlists play their content in a continuous loop. After the NTB plays the last item, it starts again with the first.
You can include the following in a playlist:
l Individual content files (such as images, movies, or text).
l Special items (such as newsfeeds, TV stations, and tables).
l Folders containingmultiple items.
l Ad hoc Items (controlled by your local users).
To add or modify items in a playlist, you need to access its specific page. Use one of thesemethods to access aplaylist's page:
l On themenu bar, click Playlists and select the zone from the relevant layout.
l On themenu bar, click Layouts >Manage Layouts and click on the zone in the relevant layout diagram.
Net-Top-Box User Guide
33
The playlist page has these tabs:
Playlist Lists the items in the playlist (displays their type, media details, play duration, and any time validity orconditional play settings you have configured). To see how to add, copy, or change a file-based mediaitem, see Adding Media Item Files to a Playlist.
The NTB may display icons to indicate the status of those items (as described in the Key panel at thebottom of the playlist)
That default view of the playlist is called the Manage View. To open one of the additional play criteriaviews, click the relevant button at the top right of the list:
l – Conditional Play View. Use this to view and edit the conditional play configuration of playlistitems. See Viewing and Editing Conditional Play for more information.
l – Time Validity View. Use this to view and edit the time validity configuration of playlist items.See Viewing and Editing Time Validity for more information.
To return to the Manage View, click the button.
Files & Folders Lists the folders containing media items you can add to the playlist (also use to navigate betweenfolders and move files between folders). You can also add a whole folder to a playlist. See Media Runfrom the NTB Disk for more information.
Upload Files Use to copy files onto the NTB and to create new folders. See Uploading Content Files for moreinformation.
Specials Use to add special items to the playlist (items other than files and folders). See Adding Special Items toa Playlist for more information.
Defaults Use to set the default properties for media items when you first add them to the playlist. Changing adefault value does not affect items already in the playlist.
The NTB provides the following action buttons for each item in a playlist:
– Move the item (by drag-and-drop).
– Audition the item (preview on the screen or in your browser).
– Delete the item.
– Add a copy of the item to the playlist.
– Edit the item's properties.
2.4.1 Viewing and Editing Conditional Play
On the playlist page, click the button to open theConditional Play View. You control whether a playlist runsconditionally by creating and applying player local information (see Player Local Information for more information).
Use theConditional Play View to examine and edit the conditional play properties for all the items in the playlist. If
youmake changes, click the button. You can also access the conditional play for an individual item by editingit and opening its Play Criteria tab.
Part 2: Creating Digital Signage
34
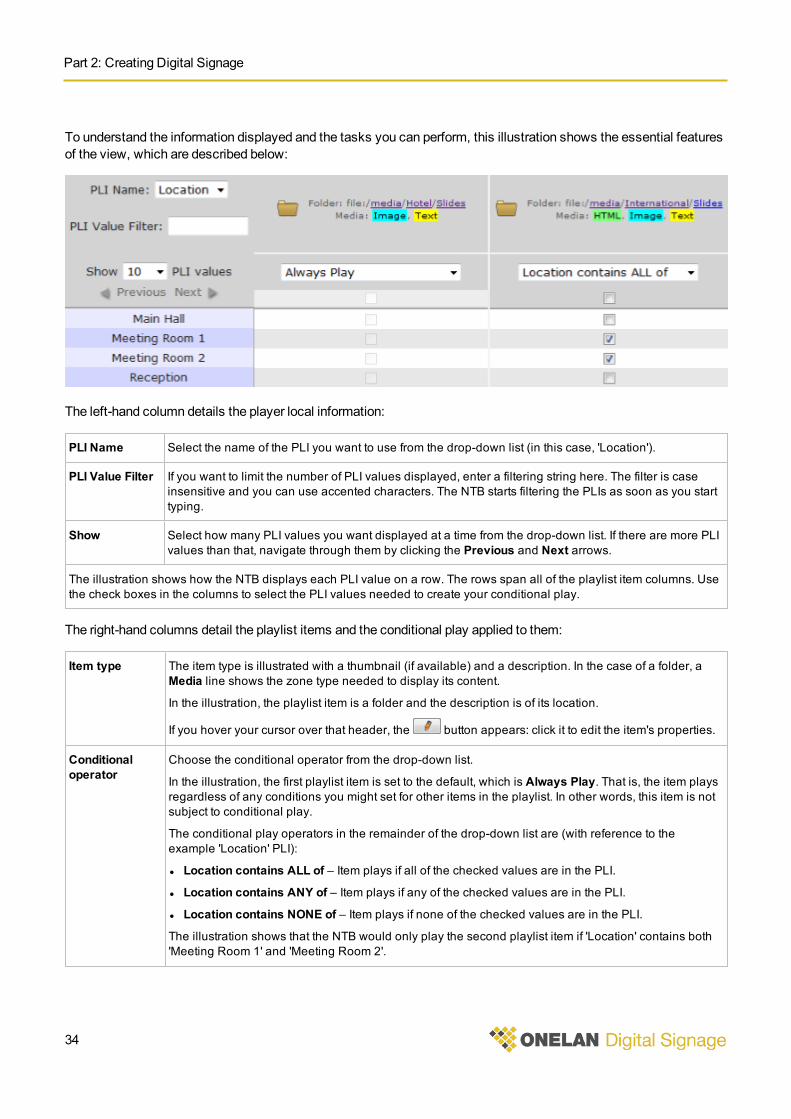
To understand the information displayed and the tasks you can perform, this illustration shows the essential featuresof the view, which are described below:
The left-hand column details the player local information:
PLI Name Select the name of the PLI you want to use from the drop-down list (in this case, 'Location').
PLI Value Filter If you want to limit the number of PLI values displayed, enter a filtering string here. The filter is caseinsensitive and you can use accented characters. The NTB starts filtering the PLIs as soon as you starttyping.
Show Select how many PLI values you want displayed at a time from the drop-down list. If there are more PLIvalues than that, navigate through them by clicking the Previous and Next arrows.
The illustration shows how the NTB displays each PLI value on a row. The rows span all of the playlist item columns. Usethe check boxes in the columns to select the PLI values needed to create your conditional play.
The right-hand columns detail the playlist items and the conditional play applied to them:
Item type The item type is illustrated with a thumbnail (if available) and a description. In the case of a folder, aMedia line shows the zone type needed to display its content.
In the illustration, the playlist item is a folder and the description is of its location.
If you hover your cursor over that header, the button appears: click it to edit the item's properties.
Conditionaloperator
Choose the conditional operator from the drop-down list.
In the illustration, the first playlist item is set to the default, which is Always Play. That is, the item playsregardless of any conditions you might set for other items in the playlist. In other words, this item is notsubject to conditional play.
The conditional play operators in the remainder of the drop-down list are (with reference to theexample 'Location' PLI):
l Location contains ALL of – Item plays if all of the checked values are in the PLI.
l Location contains ANY of – Item plays if any of the checked values are in the PLI.
l Location contains NONE of – Item plays if none of the checked values are in the PLI.
The illustration shows that the NTB would only play the second playlist item if 'Location' contains both'Meeting Room 1' and 'Meeting Room 2'.
Net-Top-Box User Guide
35
Check the boxes associated with the PLI values you want to apply. To apply all of the PLI values, checkthe box below the conditional operator drop-down list.
The illustration shows that the PLI values 'Meeting Room 1' and 'Meeting Room 2' will be applied to thesecond playlist item.
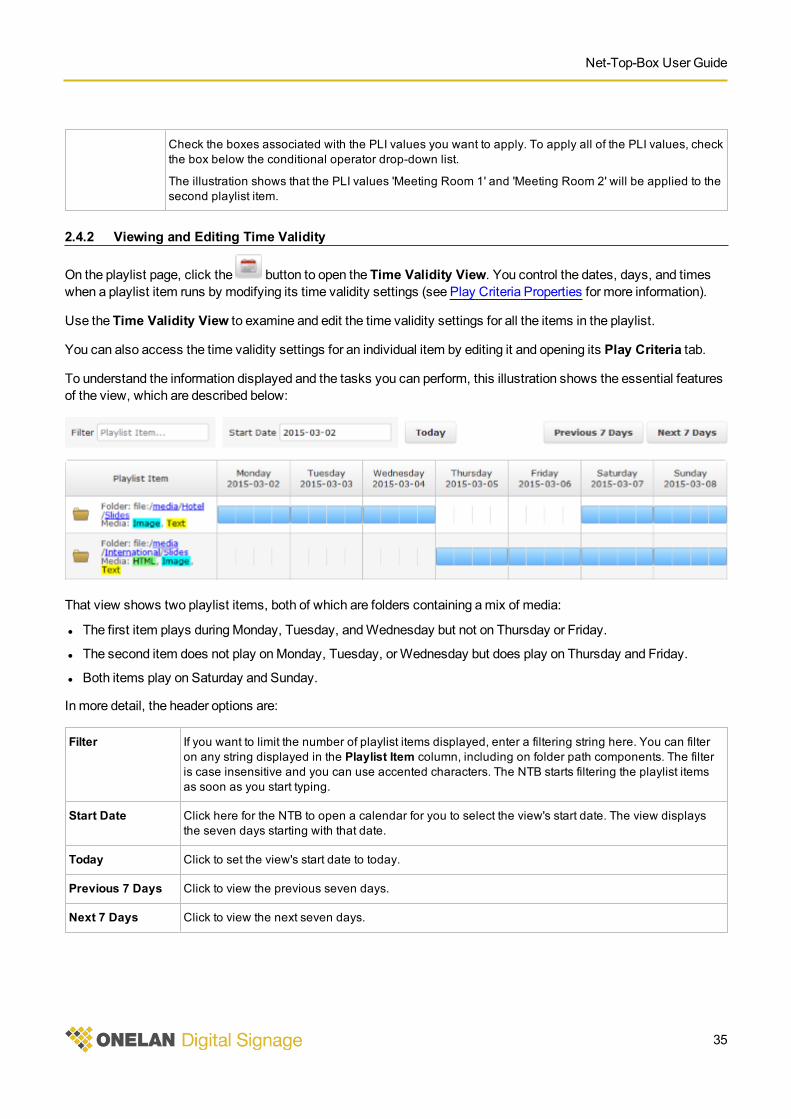
2.4.2 Viewing and Editing Time Validity
On the playlist page, click the button to open the Time Validity View. You control the dates, days, and timeswhen a playlist item runs by modifying its time validity settings (see Play Criteria Properties for more information).
Use the Time Validity View to examine and edit the time validity settings for all the items in the playlist.
You can also access the time validity settings for an individual item by editing it and opening its Play Criteria tab.
To understand the information displayed and the tasks you can perform, this illustration shows the essential featuresof the view, which are described below:
That view shows two playlist items, both of which are folders containing amix of media:
l The first item plays duringMonday, Tuesday, andWednesday but not on Thursday or Friday.
l The second item does not play onMonday, Tuesday, orWednesday but does play on Thursday and Friday.
l Both items play on Saturday and Sunday.
In more detail, the header options are:
Filter If you want to limit the number of playlist items displayed, enter a filtering string here. You can filteron any string displayed in the Playlist Item column, including on folder path components. The filteris case insensitive and you can use accented characters. The NTB starts filtering the playlist itemsas soon as you start typing.
Start Date Click here for the NTB to open a calendar for you to select the view's start date. The view displaysthe seven days starting with that date.
Today Click to set the view's start date to today.
Previous 7 Days Click to view the previous seven days.
Next 7 Days Click to view the next seven days.
Part 2: Creating Digital Signage
36
The view displays each item on a row containing:
l A thumbnail of the item (if available) and a description. In the case of a folder, the description shows the zone typeneeded to display its content. If you hover your cursor over the thumbnail, the button appears: click it to editthe item's properties.
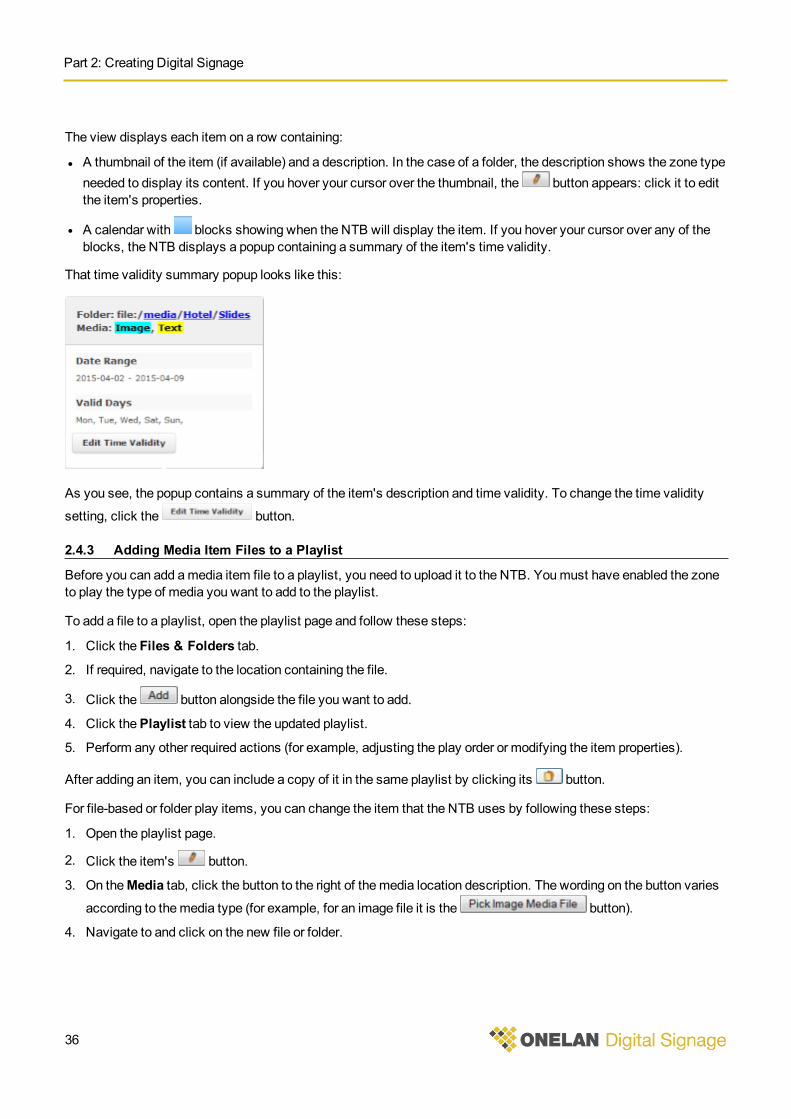
l A calendar with blocks showing when the NTB will display the item. If you hover your cursor over any of theblocks, the NTB displays a popup containing a summary of the item's time validity.
That time validity summary popup looks like this:
As you see, the popup contains a summary of the item's description and time validity. To change the time validity
setting, click the button.
2.4.3 Adding Media Item Files to a Playlist
Before you can add amedia item file to a playlist, you need to upload it to the NTB. Youmust have enabled the zoneto play the type of media you want to add to the playlist.
To add a file to a playlist, open the playlist page and follow these steps:
1. Click the Files & Folders tab.
2. If required, navigate to the location containing the file.
3. Click the button alongside the file you want to add.
4. Click thePlaylist tab to view the updated playlist.
5. Perform any other required actions (for example, adjusting the play order or modifying the item properties).
After adding an item, you can include a copy of it in the same playlist by clicking its button.
For file-based or folder play items, you can change the item that the NTB uses by following these steps:
1. Open the playlist page.
2. Click the item's button.
3. On theMedia tab, click the button to the right of themedia location description. The wording on the button variesaccording to themedia type (for example, for an image file it is the button).
4. Navigate to and click on the new file or folder.
Net-Top-Box User Guide
37
5. Click the or button.
6. Click the button. The NTB displays the updated playlist.
2.4.4 Adding Special Items to a Playlist
You can add special items to a playlist if supported by your NTB and themedia you have enabled the zone to play.
There are two groups of special items:
l Those you need to set up in advance.
l Those you do not need to set up in advance.
The special items you need to set up in advance are:
l Video (including TV stations).
l Newsfeeds.
l Tables.
The special items you do not need to set up in advance are:
l Clocks.
l Direct text.
l External web pages.
l QR Codes.
l Interactivity actions.
l TheWait, Rendezvous Point, Advance To, andChange Layout commands.
To add a special item to a playlist, open the playlist page and follow these steps:
1. Click theSpecials tab.
2. Click the button alongside the item you want to add. (Depending on the item, youmay need to enter text orselect properties first.)
3. Click thePlaylist tab to view the updated playlist.
4. Perform any other required actions (for example, adjusting the play order or modifying the item properties).
2.4.5 Adding Folders to a Playlist
You can add a whole folder to a playlist. The NTB treats the folder as a single playlist item but plays the files within itindividually.
Before you add it, ensure that the folder contains themedia items you want to use.
To add a folder to a playlist, open the playlist page and follow these steps:
1. Click the Files & Folders tab.
2. Click the button alongside the folder you want to add.
3. Click thePlaylist tab to view the updated playlist.
4. Perform any other required actions (see Folder Play Properties for information on customising how the NTB playsthe folder items).
Part 2: Creating Digital Signage
38
2.4.6 Playing Content Items to Test Them
There are various ways of playing content items to test them:
l Activate a layout and view it on the screen. This is useful if you want to see the complete run of all items and youcan easily view the screen.
l Audition a layout, playlist, or individual items on the screen. This is useful if you want to see individual items andyou can easily view the screen.
l Display a single image of the current screen or view a live screen display of the current layout in your webbrowser. This is useful if you want to see the content of the current display but cannot easily view the screen.
l Preview an item in your web browser. This is useful if you want to see one particular item but cannot easily viewthe screen.
Activate a Layout and View it on the Screen
To activate a layout and view it on the screen, take these steps:
1. On themenu bar, click Layouts andManage Layouts.
2. Click the layout's button.
To return to what was previous being played, click the button.
Audition a Layout, Playlist, or Individual Item on the Screen
To audition a layout on the screen, take these steps:
1. On themenu bar, click Layouts and thenManage Layouts.
2. Click the layout's button.
3. The NTB shows the layout on the screen until you click the button.
Alternatively, to view an item, click on a zone in the layout preview and then the item's button.
Display a Single Image of the Current Screen or View a Live-Screen Display in Your Web Browser
To preview a single pixel-perfect screen snap shot or a 60 second-long live-screen display, take these steps:
1. On themenu bar, click Status andPlayer.
2. Click the Screen Snap Shot tab. The NTB displays an exact image of the current screen content.
3. To run the live-screen display, choose the view size you want and how many frames per second to update it.
4. Click the button. The NTB displays the live-screen display in your web browser. By default, it
runs for 60 seconds but you can stop it at any time by clicking the button.
Note: Viewing the live-screen display may impact the quality of the actual screen's output.
Preview an Item in Your Web Browser
To preview an item in your web browser, take these steps:
1. On themenu bar, click Help andUI Options.
2. On theMy Options tab, set theAudition method toWeb Preview.
Net-Top-Box User Guide
39
3. Click the button.
4. On themenu bar, click Layouts andManage Layouts.
5. Click the layout's button.
Note: The screen will go black for amoment while the NTB takes the snap shot then reverts to the current layout.The NTB displays the snap shot in a new browser window (or browser tab).


Part IIIUnderstanding MediaTypes

Net-Top-Box User Guide
43
Part 3: Understanding Media TypesYour NTB units can display a great many types of digital content (also referred to as media).
When creating a layout, youmust specify the type of media each zone will display. This enables the zone to 'play' themedia concerned. You can configure zones to support one or more of these players:
l Movie player – For media such as video and TV.
l HTML player – For media such as web pages and tables.
l Image player – For media such as graphics and photographs.
l Text player – For media such as text and newsfeeds.
In addition to thosemedia types, you can add audio to a layout using theSoundtrack feature (see Audio and Radiofor more details).
The NTB provides many features for setting up andmanaging themedia items you want to use. It is important tounderstand how the NTB handles groups of media differently depending on their types and characteristics:
l Media Directly Managed by the NTB (includes text, newsfeeds, clocks, tables, RS-232 outputs, andQR Codes).
l Media Run from the NTB Disk (includes video, text files, images and photos, audio, presentations, HTMLwebpages, Adobe Flash files, PDF files, and folder play).
l Media from External Sources (includes TV, radio, live video, multicast video, and external web pages).
3.1 Media Directly Managed by the NTBSome types of media aremanaged directly by the NTB. These include:
Text
Newsfeeds
Clocks
Tables
RS-232 Items
QR Codes
You can include a wide variety of media items as ad hoc content and they are also directly managed by the NTB.Using ad hoc content is described separately (see AdHoc Content for details).
3.1.1 Text
You can display text you directly enter on the NTB. (You can also display text files: see Text Files for more details.)
Zone player type to enable: Text.
Playlist tab containing the item: Special.
Part 3: UnderstandingMedia Types
44
Additional notes:
Supported Format Notes
NTB text editorial formats The text editor offers formatting features (for example, use of bold,italic, font size, and colour).
3.1.2 Newsfeeds
You can display newsfeeds from external sources on the NTB.
Broadcasters or news agencies (for example, the BBC or Reuters) provide newsfeeds containing headline news orsports reports. Providers often do not charge and usually do not require usernames or passwords. However, someproviders do define terms restricting display of their newsfeeds in digital signage networks and youmust check onthis before using newsfeed content.
Zone player type to enable: Text.
Playlist tab containing the item: Special.
Additional notes:
Supported Format Notes
RSS 0.91 and 2.0 (must say'RSS' or 'XML' ). Compatible newsfeeds are normally indicated by the symbol.
To subscribe to a newsfeed, follow these steps:
1. Find the newsfeed using your browser.
2. Click the link to the newsfeed or click the RSS button .
3. Copy the newsfeed's web address from the browser's address bar.
4. On the NTB, on themenu bar, click Media andNewsfeeds.
5. Click theAdd Newsfeed tab, complete the newsfeed properties, and click the button.
The newsfeed properties are:
Name Enter a unique name for the newsfeed.
RSS Newsfeed URL Enter or paste in the newsfeed web address. You must include the protocol (for example,http://www.bbc.co.uk/travelnews/tpeg/en/pti/pti_rss.xml).
Refresh Interval Specify how often the NTB checks for updates.
Maximum Age Specify how long the NTB will continue to display existing items if there is no connection to thenewsfeed to obtain new ones.
Net-Top-Box User Guide
45
Authentication Select the required authentication style:
l No authentication required – The newsfeed does not require a username and password.
l Login with – The newsfeed requires a username and password. Enter them in the fieldsprovided.
Proxy Select the required proxy configuration:
l No proxy required – The NTB connects directly to the internet.
l Use proxy if configured – The NTB accesses the internet through the configured proxy. Youmust first configure the proxy (on the Setup > System > HTTP Proxy page).
3.1.3 Clocks
You can display a digital clock on the NTB showing the date and time in any one of a variety of formats.
Zone player type to enable: Text.
Note: Earlier versions of the NTB supported clocks in zones enabled with theHTML player. If you already haveHTML clocks in your layout you can continue to use them.
Playlist tab containing the item: Special.
3.1.4 Tables
You can create and format tables for display on the NTB. Before you can add a table to a playlist, you have to createit.
Tables are a convenient way of displaying static data. You can also use tables to hold ad hoc entries that local userscontrol (for example, a table showing conference centre room allocations). The NTB creates tables using HTML.
Zone player type to enable: HTML.
Playlist tab containing the item: Special.
Adding and Editing an Ordinary Table:
To add a table, follow these steps:
1. On themenu bar, click Media and Tables.
2. Click theAdd Table tab.
3. Enter a descriptive name for the table.
4. Enter the number of rows and columns. Themaximum size is 19 rows by 39 columns. You cannot change thesize of a table after you create it.
5. Click the button.

Part 3: UnderstandingMedia Types
46
The NTB displays the Tables tab with your table added to the list. Click the button next to a table to take theseactions:
Delete the table. You cannot delete a table that is in use. Checkthe right-hand column to see the items using the table.
Rename the table. Enter the new name in the field and click the
button. If you decide not to rename the table,
click the button.
Copy the table. Enter the name for the copy in the field and click
the button. If you decide not to copy the table, click
the button.
Edit the table. To edit a table after creating it, follow the samesteps as described next for setting up a new table.
You need to set up your new table by following these steps:
1. Click the table's button.
2. Click theStyle tab.
3. Take whichever of these formatting steps are needed to get the effect you want:
o Click the button to change the width and colour of the border.
o Click the button for each column you want to sizemanually.
o Click the button for each cell whose text font and size you want to adjust. Text Properties describes theformatting options. You can edit one cell and specify that the NTB also applies those changes to other cells
4. Click theValues tab.
5. Edit the default text in each cell as required.
6. Click the button.
Adding and Editing Ad Hoc Tables:
To create an ad hoc table, follow these steps:
1. Create a table as described above.
2. On themenu bar, click Media andManage Ad hoc Items.
3. Click theAdd Item tab.
4. Add a new Ad hoc Table Item that references the table.
Note: If you copy an ad hoc table, the copied table is not an ad hoc table.
To edit an ad hoc table, open the Tables page and click the table's . Make changes on theStyle andDefaultValues tabs as described for theStyle andValues tabs above. Click theAd Hoc tab to specify the ad hoc features.Click the button for the cell you want to change and select the option required:
Net-Top-Box User Guide
47
l Default Value – The ad hoc user cannot change the cell value.
l Override with any value – The ad hoc user can enter any value in the cell.
If you set theUser Interface Policy toDetailed, the NTB also offers these options:
l Override with Integer between – The ad hoc user can only enter values between the lower limit and upper limityou specify (both inclusive).
l Override with text of maximum length – The ad hoc user can only enter text up to the number of characters youspecify.
l Override value with text matching – The ad hoc user can only enter text that matches the regular expressionyou specify. In the Feedback Message field, enter themessage you want the NTB to display to the ad hoc user ifwhat they enter does not match the regular expression. Information about using regular expressions is readilyavailable (for example, at http://www.regular-expressions.info/).
3.1.5 RS-232 Items
You can add an RS-232 output item to a playlist. When the item is reached in a playlist, the NTB sends a characterstring to an external device through its RS-232 port (for example, to switch on a light at the start of the day). SeeRS-232Outputs for how to set up RS-232 items.
Zone player type to enable: any player type.
Playlist tab containing the item: Special.
To add an RS-232 output item to a playlist, follow these steps:
1. On themenu bar, click Playlists and select the layout and zone where you want to add the RS-232 item.
2. Click theSpecials tab.
3. Check the Send RS-232 Item.
4. Click the button.
5. In the playlist, drag the icon to adjust the position of the RS-232 item in the playlist, as necessary.
6. If required, click the button to change the RS-232 item on theMedia tab or to set conditional play on thePlay Criteria tab.
3.1.6 QR Codes
You can create and display QR Codes using the NTB.
QR Codes (Quick Response Codes) are two-dimensional barcodes carrying content that can be read by a suitabledevice. For example, a QR Code can contain a web site URL or an email address: a user scans the QR Code with asmartphone to open that web site or to compose an email to that address.
Zone player type to enable: Image.
Playlist tab containing the item: Special.
Part 3: UnderstandingMedia Types
48
Additional notes:
Supported Format Notes
QR Code The NTB creates QR Codes with Level H error correction (30%)and uses byte encoding.
3.2 Media Run from the NTB DiskUse theMedia > Files & Folders option tomanagemedia content files on the NTB disk.
Note: You cannot create or edit files on the NTB. Create or edit files elsewhere and upload the result to the NTB.
Click the tab for the options you require:
l Files & Folders –Manage the files and folders on the NTB disk (see below for details).
l Upload Files – Copy files from your computer onto the NTB (as described in Uploading Content Files).
The File & Folders tab provides these file management features:
l List – Displays all the files and folders in the current location.
l Navigate –Move between folders (click on a folder name or on a link in the Folder field to open it).
l Act – Delete, move, and rename files and folders and also copy files.
Click the button next to a folder to take these actions:
– Delete the folder
–Move or rename the folder.
Click the button next to a file to take these actions:
– Delete the file.
– Move or rename the file.
– Copy the file.
Note: You cannot take any folder or file actions in the NTB system folders.
Refer to themedia-specific information to see which zone player type to enable and for additional notes on theformats supported by the NTB:
Video
Text Files
Images and Photos
Audio
Presentations
HTMLWeb Pages
Adobe Flash
PDF Files
Net-Top-Box User Guide
49
Folder Play
3.2.1 Uploading Content Files
You can upload content files to the NTB in several ways:
l Using the Upload Files Tab – The NTB offers anUpload Files tab on theMedia > Files & Folders page or whenyou open a specific playlist.
l Using FTP
l Using Drag and Drop – If supported by your browser.
Note: Always add your content files to theMedia folder or to sub-folders of theMedia folder.
Using the Upload Files Tab:
You use both the Files & Folders and playlist Upload Files tabs in the sameway:
1. Navigate to the folder where you want to add the file.
2. Click theUpload Files tab.
3. If required, create a subfolder:
a. Type a name for the subfolder in the Folder name field.
b. Click the button.
c. Click the subfolder name to enter it.
d. Click theUpload Files tab.
4. Click the button and navigate to the file you want to upload.
5. Click the button.
6. Repeat those steps for each file.
Using FTP:
Before using FTP, make a note of the IP address of your NTB. If you do not know the IP address, consult the personwho administers your network or reboot the NTB: it displays its IP address during the process.
Note: You need to have the FTP Read/Write permission on the NTB to upload using FTP. FTP may also bedisabled on your network for security reasons. If you have difficulty using FTP, check with the person whoadministers your NTB or network.
You can upload using a dedicated FTP program. A quick alternative is to useWindows Explorer (or similar file-management program):
1. Open two copies of Windows Explorer.
2. In the first copy, navigate to the folder with the content you want to upload.
3. In the second copy, type ftp:// and the IP address of your NTB in the address bar (for example,ftp://192.168.0.254) and press theEnter key.
4. When prompted, enter your NTB username and password. Windows Explorer now displays your default NTBfolder location.
5. Navigate to theMedia folder. Do not add or modify files in any other folder as this may render the NTB unusable.
Part 3: UnderstandingMedia Types
50
6. As required, create further folders under theMedia folder. It is good practice to create separate folders for eachlayout and sub-folders for each zone (for example, media/Layout_reception/Zone_A).
7. To upload content to the NTB, drag-and-drop or copy-and-paste folders and files from the first copy of WindowsExplorer to the second copy of Windows Explorer.
Note: If the FTP page does not refresh, press the F5 key or click Refresh to update it.
When you have connectedWindows Explorer to your NTB with FTP, you can also:
l Rename and delete files on the NTB.
l Download files from the NTB to your computer using drag-and-drop or copy-and-paste.
You cannot move files from one folder to another using FTP. Instead, download the file to your computer and thenupload it to the other NTB folder. Alternatively, move files using theMedia > Files & Folders page.
Using Drag and Drop:
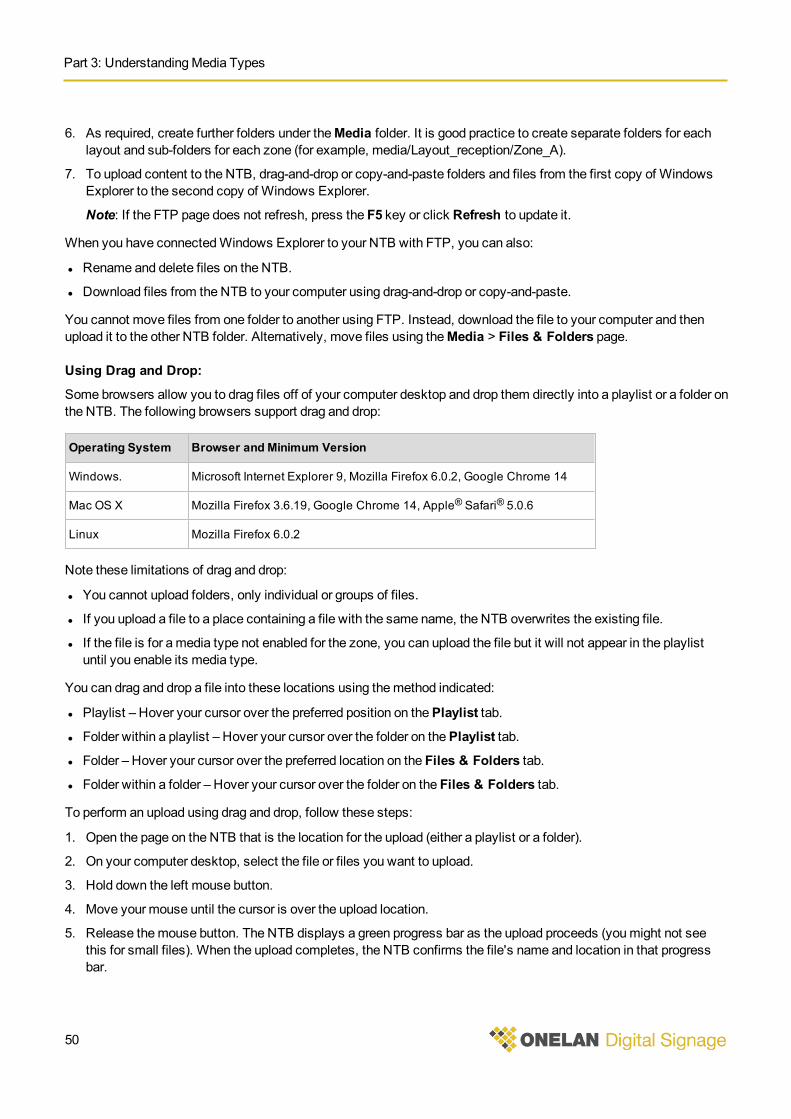
Some browsers allow you to drag files off of your computer desktop and drop them directly into a playlist or a folder onthe NTB. The following browsers support drag and drop:
Operating System Browser and Minimum Version
Windows. Microsoft Internet Explorer 9, Mozilla Firefox 6.0.2, Google Chrome 14
Mac OS X Mozilla Firefox 3.6.19, Google Chrome 14, Apple® Safari® 5.0.6
Linux Mozilla Firefox 6.0.2
Note these limitations of drag and drop:
l You cannot upload folders, only individual or groups of files.
l If you upload a file to a place containing a file with the same name, the NTB overwrites the existing file.
l If the file is for amedia type not enabled for the zone, you can upload the file but it will not appear in the playlistuntil you enable its media type.
You can drag and drop a file into these locations using themethod indicated:
l Playlist – Hover your cursor over the preferred position on thePlaylist tab.
l Folder within a playlist – Hover your cursor over the folder on thePlaylist tab.
l Folder – Hover your cursor over the preferred location on the Files & Folders tab.
l Folder within a folder – Hover your cursor over the folder on the Files & Folders tab.
To perform an upload using drag and drop, follow these steps:
1. Open the page on the NTB that is the location for the upload (either a playlist or a folder).
2. On your computer desktop, select the file or files you want to upload.
3. Hold down the left mouse button.
4. Move your mouse until the cursor is over the upload location.
5. Release themouse button. The NTB displays a green progress bar as the upload proceeds (youmight not seethis for small files). When the upload completes, the NTB confirms the file's name and location in that progressbar.

Net-Top-Box User Guide
51
3.2.2 Video
You can play various video formats with the NTB.
Zone player type to enable:Movie.
Note: By default, you can enable up to twomovie zones. To enablemore requires an additional license and themaximum number is dependent on the NTB model. For best performance, only enable onemovie zone per layouton less powerful NTB models.
Playlist tab containing the item: Files & Folders.
To help you identify a particular video, the NTB displays a thumbnail image from it. That appears in the Filenamecolumn of the Files & Folders display (and in theMedia columnwhen you add the video to the playlist). The NTB
displays the icon if it cannot render a thumbnail.
Additional notes:
Supported Codecs Notes
H.264 Recommended. Small file size but higher CPU load. However,supports high definition.
MPEG-1 Poor resolution.
MPEG-2 Good combination of CPU load and resolution but large file size.
MPEG-4 (ASP and AVC) Small file size but higher CPU load. However, supports highdefinition.
VOB Same as MPEG-2.
WMV 9 Windows Media Video.
Supported Containers Notes
AVI Microsoft® format. Can contain a wide-range of codecs. CPU loadand resolution depends on the codecs within (see table above forguidance).
MOV Apple®QuickTime® format. Can contain a wide-range of codecs.CPU load and resolution depends on the codecs within (see tableabove for guidance).
MPG MPEG transport stream.
MP4 ISOMPEG-4 container (subset of MOV).
3.2.3 Text Files
You can display text files on the NTB. (You can also display text you enter directly: see Text for more details.)
Zone player type to enable: Text.
Part 3: UnderstandingMedia Types
52
Playlist tab containing the item: Files & Folders.
Additional notes:
Supported Format Notes
TXT Plain text only. The NTB does not support the display of filesformatted by word-processor (for example, DOC or DOCX filesfrom Microsoft®Word or PDF files from Adobe® Acrobat®).
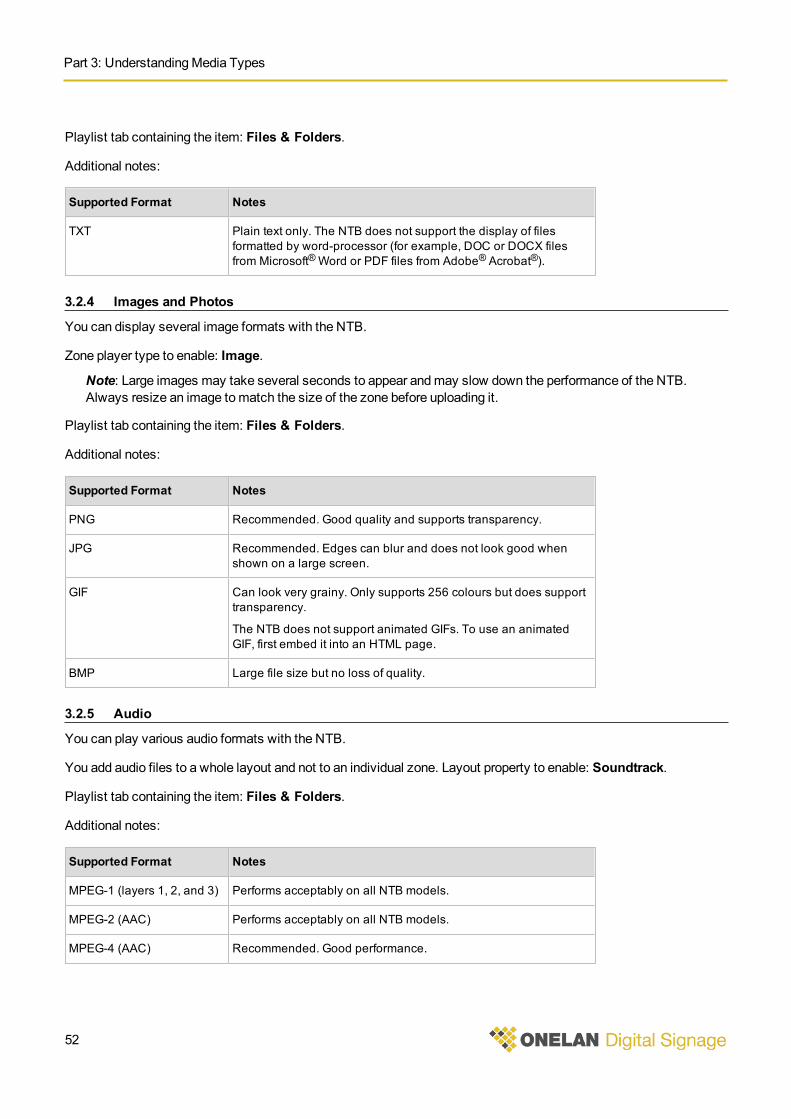
3.2.4 Images and Photos
You can display several image formats with the NTB.
Zone player type to enable: Image.
Note: Large images may take several seconds to appear andmay slow down the performance of the NTB.Always resize an image tomatch the size of the zone before uploading it.
Playlist tab containing the item: Files & Folders.
Additional notes:
Supported Format Notes
PNG Recommended. Good quality and supports transparency.
JPG Recommended. Edges can blur and does not look good whenshown on a large screen.
GIF Can look very grainy. Only supports 256 colours but does supporttransparency.
The NTB does not support animated GIFs. To use an animatedGIF, first embed it into an HTML page.
BMP Large file size but no loss of quality.
3.2.5 Audio
You can play various audio formats with the NTB.
You add audio files to a whole layout and not to an individual zone. Layout property to enable: Soundtrack.
Playlist tab containing the item: Files & Folders.
Additional notes:
Supported Format Notes
MPEG-1 (layers 1, 2, and 3) Performs acceptably on all NTB models.
MPEG-2 (AAC) Performs acceptably on all NTB models.
MPEG-4 (AAC) Recommended. Good performance.
Net-Top-Box User Guide
53
Supported Format Notes
MP3 Recommended. Good performance.
Uncompressed PCM (WAV) Container. High quality but much larger file size than MP3.
WMA V1-3 Performs acceptably on all NTB models.
AC3 Performs acceptably on all NTB models.
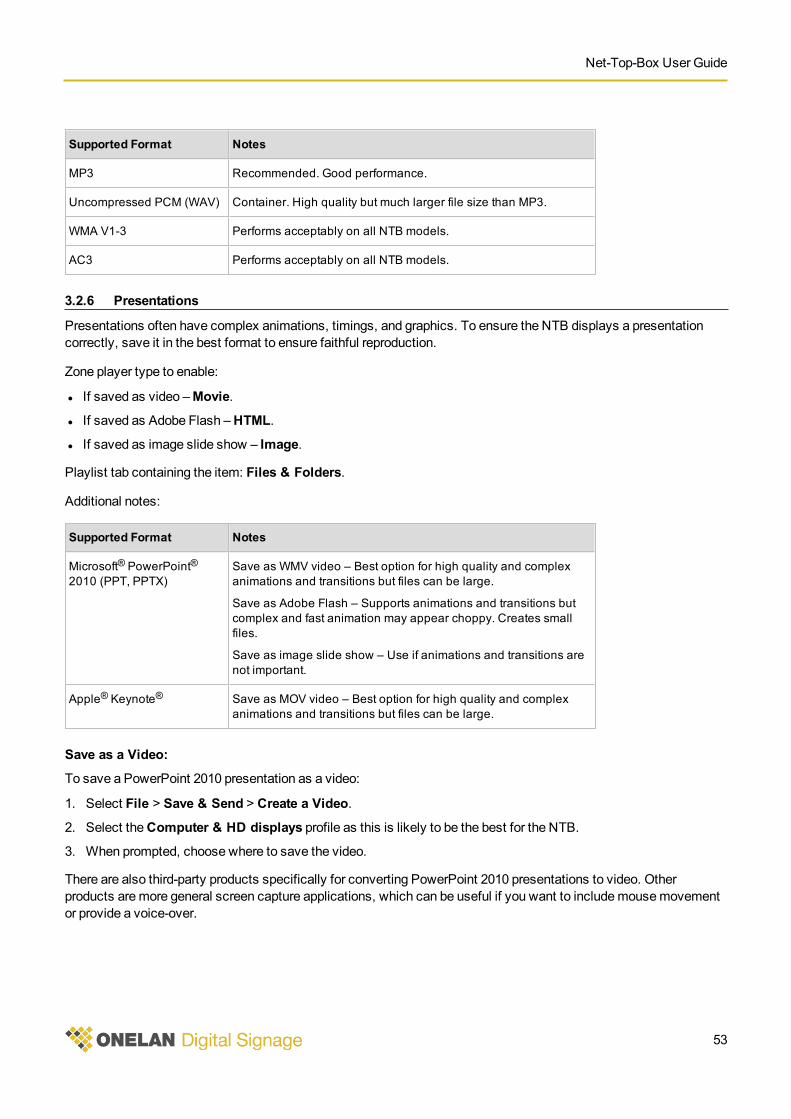
3.2.6 Presentations
Presentations often have complex animations, timings, and graphics. To ensure the NTB displays a presentationcorrectly, save it in the best format to ensure faithful reproduction.
Zone player type to enable:
l If saved as video –Movie.
l If saved as Adobe Flash –HTML.
l If saved as image slide show – Image.
Playlist tab containing the item: Files & Folders.
Additional notes:
Supported Format Notes
Microsoft® PowerPoint®2010 (PPT, PPTX)
Save as WMV video – Best option for high quality and complexanimations and transitions but files can be large.
Save as Adobe Flash – Supports animations and transitions butcomplex and fast animation may appear choppy. Creates smallfiles.
Save as image slide show – Use if animations and transitions arenot important.
Apple® Keynote® Save as MOV video – Best option for high quality and complexanimations and transitions but files can be large.
Save as a Video:
To save a PowerPoint 2010 presentation as a video:
1. Select File > Save & Send > Create a Video.
2. Select theComputer & HD displays profile as this is likely to be the best for the NTB.
3. When prompted, choose where to save the video.
There are also third-party products specifically for converting PowerPoint 2010 presentations to video. Otherproducts aremore general screen capture applications, which can be useful if you want to includemousemovementor provide a voice-over.
Part 3: UnderstandingMedia Types
54
Save as Adobe Flash:
There are third-party products for converting PowerPoint 2010 presentations to an Adobe Flash animation withvarying degrees of complexity. For example, you can use the free OpenOffice suite to open a PowerPoint 2010presentation and export it to an Adobe Flash file but without slide transitions or animations.
Save as Image Slide Show:
To save a PowerPoint 2010 presentation as an image slide show:
1. Select File > Save & Send > Change file type.
2. Choose a supported image file type (PNG is recommended, but the NTB also supports JPG, TIF, and BMP).
3. When prompted, choose where to save the files and select Every Slide.
3.2.7 HTML Web Pages
You can display local HTML files on the NTB. (You can also display whole or part pages from a remote web site: seeExternal Web Pages for details.)
Zone player type to enable: HTML.
Playlist tab containing the item: Files & Folders.
Additional notes:
Supported Format Notes
HTML The NTB displays HTML using the WebKit browser engine forLinux. (The Apple Safari and Google Chrome browsers also usethe WebKit engine.)
WebKit supports web pages including JavaScript® and AdobeFlash but not ActiveX®.
3.2.8 Adobe Flash
You can display Adobe Flash files with the NTB.
Note: Complex Adobe Flash files may not run smoothly on less powerful NTB models.
Zone player type to enable: HTML.
Playlist tab containing the item: Files & Folders.
Additional notes:
Supported Format Notes
SWF The NTB supports Adobe Flash Player version 11.
Flash files give no indication to the NTB that they are finished. Youneed to set a maximum duration when you add the file to a playlistto force the NTB to move on to the next item.
Net-Top-Box User Guide
55
3.2.9 PDF Files
You can display pages from PDF files with the NTB.
Zone player type to enable: Image.
Playlist tab containing the item: Files & Folders.
Additional notes:
Supported Format Notes
PDF Supported version: ISO 32000-1:2008 (also known as PDF 1.7).Earlier versions may display correctly but are not supported.
The NTB cannot display:
l Dynamic PDF content (such as forms).
l PDF files secured by password.
3.2.10 Folder Play
Rather than adding a number of files individually to a playlist, you can add and play an entire folder from the NTB disk.This is known as Folder Play. You can add or delete files even while the NTB is playing the folder.
Zone player type to enable: as required by themedia types in the files.
Playlist tab containing the item: Files & Folders.
You can configure folder play properties to control how the NTB plays the files:
l In sequence – Files play in file name order. Numbers come before letters and uppercase characters beforelowercase (for example, '1' comes before 'A' which comes before 'a').
l In random order – Files play in a random order (shuffle play).
Coupled with the order of play, you can also configure these properties:
l How many of the files to play.
l The number of files to jump before playing the next file.
See Folder Play Properties for more details about how to configure folder play.
3.3 Media from External SourcesYou can display media running directly from external sources with the NTB.
Refer to themedia-specific Information to see which zone player type to enable and for additional notes on theformats supported:
TV
Radio
Live Video
Multicast Video
External Web Pages
Part 3: UnderstandingMedia Types
56
3.3.1 TV
You can play output from external digital and analogue TV stations with the NTB.
Zone player type to enable:Movie.
Playlist tab containing the item: Specials.
Additional notes:
Supported Format Notes
Digital TV Broadcast DVB-T digital TV, where available.
Analogue TV Broadcast TV, where available.
The NTB must be set up with:
l TV antenna connected to its TV socket.
l TV tuner card tuned to the digital transmitter.
l Analogue TV station name and number pairs.
See TV & Radio for more details of tuning and setting up digital and analogue TV.
3.3.2 Radio
You can play output from external digital radio stations with the NTB.
You add audio to a whole layout and not to an individual zone. Layout property to enable: Soundtrack.
Playlist tab containing the item: Specials.
Additional notes:
Supported Format Notes
Digital radio Digital radio stations, where available.
The NTB must be set up with:
l A TV antenna connected to its TV socket.
l A tuner card for tuning in to the stations (see TV & Radio for more details).
See TV & Radio for more details of tuning and setting up digital radio.
3.3.3 Live Video
You can output live video from various devices with the NTB.
Zone player type to enable:Movie.
Playlist tab containing the item: Specials.
Net-Top-Box User Guide
57
Additional notes:
Supported Formats Notes
S-Video
Composite video
Includes output from video cameras, DVD players, set-topboxes, and so on.
Your NTB must be set up with:
l The correct license.
l A TV tuner or video capture card.
l The appropriate video cable connecting the video device tothe TV tuner card.
Before you can add live video in to a playlist you need to configure your TV Tuner to recognise the video source as aTV input.
3.3.4 Multicast Video
As an alternative to receiving TV broadcasts directly, the NTB can receivemulticast video (also known as InternetProtocol Television (IPTV)) over the local network.
Note: Usingmulticast video requires an additional license.
Zone player type to enable:Movie.
Playlist tab containing the item: Specials.
Additional notes:
Supported Format Notes
MPEG-2 Transport Stream inUDP
Your NTB setup needs to include:
l An Internet Group Management Protocol (IGMP) networkinfrastructure to support multicast streaming.
l A device to stream video onto the network.
Before you can add live video in to a playlist, you need to configure your TV tuner to recognise the video source as aTV input. See TV & Radio for more details.
3.3.5 External Web Pages
You can display whole or parts of pages from an external web site with the NTB. See Displaying Part of aMovie orWeb Page for details of how to display only a part of a web page. See HTMLWeb Pages for how to display HTMLfiles held locally on the NTB.
Zone player type to enable: HTML.
Playlist tab containing the item: Specials.
Part 3: UnderstandingMedia Types
58
Additional notes:
Supported Format Notes
HTML The NTB displays HTML using the WebKit browser engine forLinux. (The Apple Safari and Google Chrome browsers also usethe WebKit engine.) WebKit supports web pages includingJavaScript and Adobe Flash but not ActiveX.
To display a web page, the NTB must have live access to it at thetime. If the web page requires a username and password to log in,include those in the URL in the format:protocol://username:password@site.
Adding External Web Pages to a Playlist:
To add an external web page to a playlist, follow these steps:
1. Open the web page you want to link to and copy its whole URL address. (You can also sometimes use the URLto link to a specific frame or image to display.)
2. On the NTB menu bar, click Playlists and select the zone in the layout you want to add the page to.
3. Select theSpecials tab.
4. Paste the web site URL into theExternal Web Page field.
5. Click the button.
6. In the playlist, you can drag the icon to adjust the item's position or click its button tomodify itsproperties.
Notes:o HTML pages always have a white, non-transparent background.
o Auto-refresh web pages direct the NTB browser to reload the page at regular intervals. Add auto-refresh pagesto a playlist with an indefinite duration to be sure that they always show the latest information. Determinewhether a page auto-refreshes by searching for the <meta http-equiv=refresh> tag in its HTML code:
o To keep non-auto-refresh pages current, you need to reload them periodically. To do so, add the pages to aplaylist with a fixed duration, as this forces the NTB to reload the page.
Saving Web Pages to Disk and Adding to a Playlist:
As an alternative to displaying a web page directly from an external source, you can save it on the NTB. Thisremoves the connection to the source and your files will not be updated if the source changes.
To save the HTML files, use your browser's Save function. For example, with Internet Explorer, follow these steps:
1. From the File menu select Save as.
2. Navigate to the location where you want to save the files.
3. From theSave as type drop-down list, selectWeb page, complete. This saves the page as well as all itsassociated files (such as images). Internet Explorer saves the associated files in a folder called pagename_files, where pagename is the name of the HTML page.
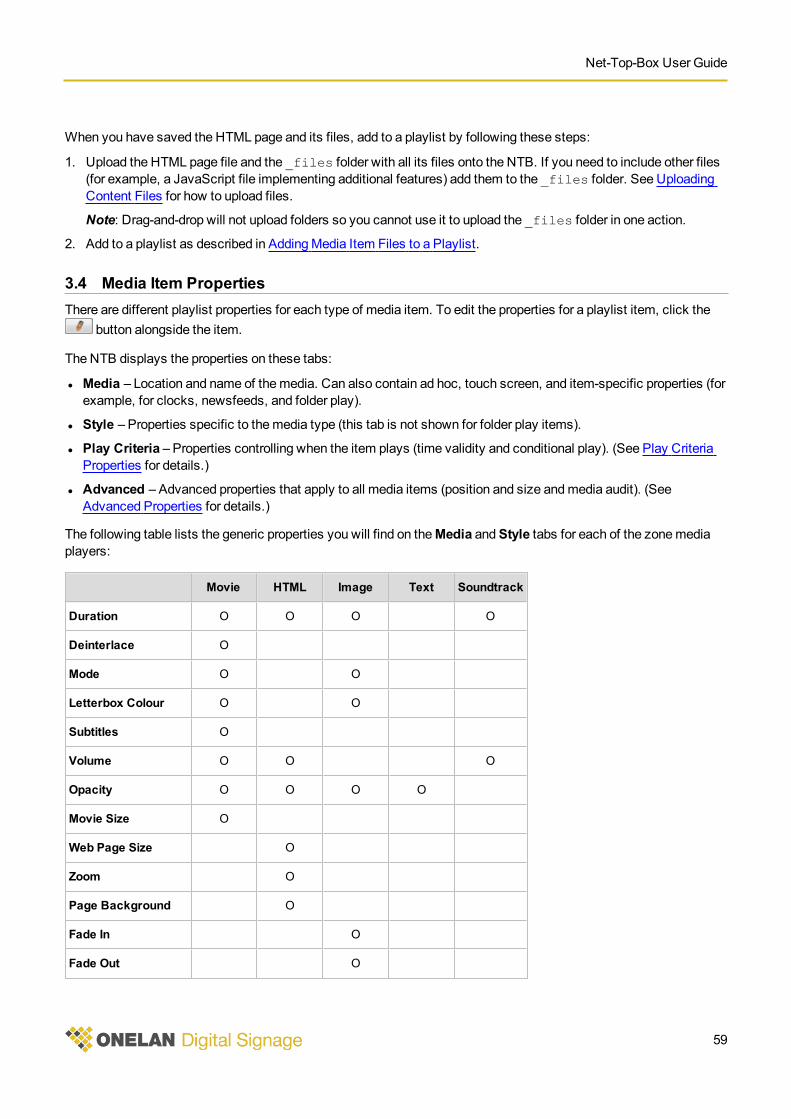
Net-Top-Box User Guide
59
When you have saved the HTML page and its files, add to a playlist by following these steps:
1. Upload the HTML page file and the _files folder with all its files onto the NTB. If you need to include other files(for example, a JavaScript file implementing additional features) add them to the _files folder. See UploadingContent Files for how to upload files.
Note: Drag-and-drop will not upload folders so you cannot use it to upload the _files folder in one action.
2. Add to a playlist as described in AddingMedia Item Files to a Playlist.
3.4 Media Item PropertiesThere are different playlist properties for each type of media item. To edit the properties for a playlist item, click the
button alongside the item.
The NTB displays the properties on these tabs:
l Media – Location and name of themedia. Can also contain ad hoc, touch screen, and item-specific properties (forexample, for clocks, newsfeeds, and folder play).
l Style – Properties specific to themedia type (this tab is not shown for folder play items).
l Play Criteria – Properties controlling when the item plays (time validity and conditional play). (See Play CriteriaProperties for details.)
l Advanced – Advanced properties that apply to all media items (position and size andmedia audit). (SeeAdvanced Properties for details.)
The following table lists the generic properties you will find on theMedia andStyle tabs for each of the zonemediaplayers:
Movie HTML Image Text Soundtrack
Duration O O O O
Deinterlace O
Mode O O
Letterbox Colour O O
Subtitles O
Volume O O O
Opacity O O O O
Movie Size O
Web Page Size O
Zoom O
Page Background O
Fade In O
Fade Out O
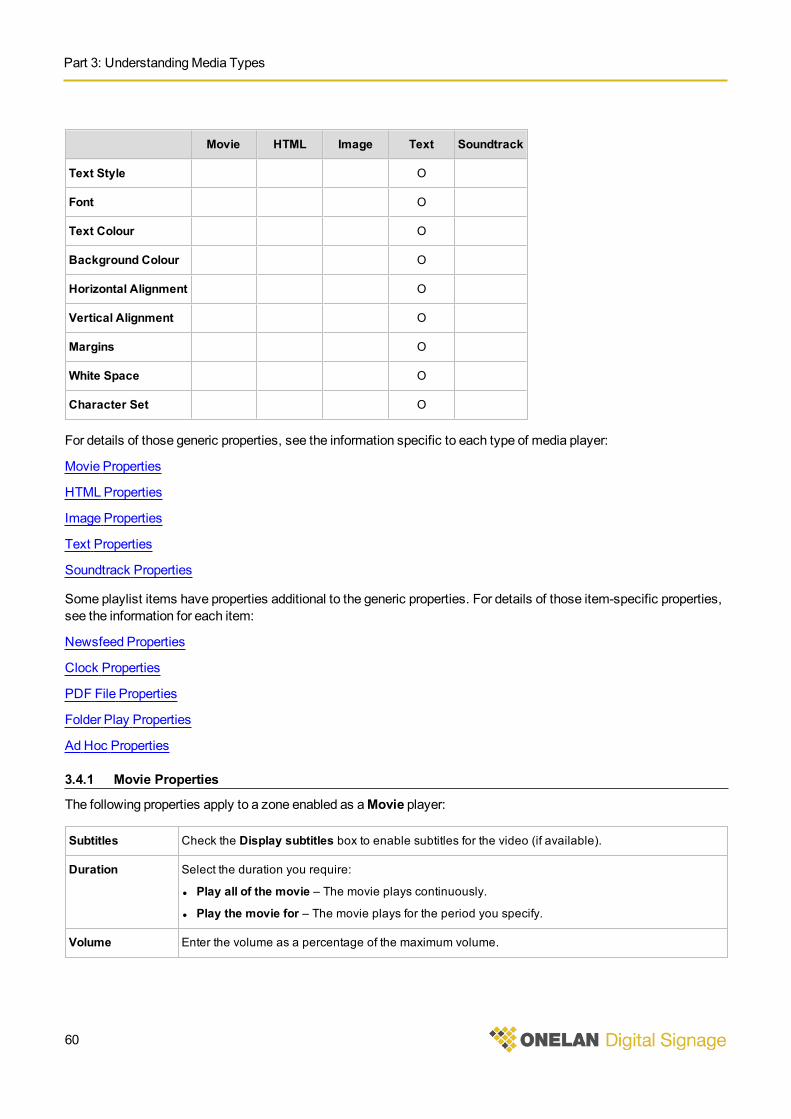
Part 3: UnderstandingMedia Types
60
Movie HTML Image Text Soundtrack
Text Style O
Font O
Text Colour O
Background Colour O
Horizontal Alignment O
Vertical Alignment O
Margins O
White Space O
Character Set O
For details of those generic properties, see the information specific to each type of media player:
Movie Properties
HTMLProperties
Image Properties
Text Properties
Soundtrack Properties
Some playlist items have properties additional to the generic properties. For details of those item-specific properties,see the information for each item:
Newsfeed Properties
Clock Properties
PDF File Properties
Folder Play Properties
Ad Hoc Properties
3.4.1 Movie Properties
The following properties apply to a zone enabled as aMovie player:
Subtitles Check the Display subtitles box to enable subtitles for the video (if available).
Duration Select the duration you require:
l Play all of the movie – The movie plays continuously.
l Play the movie for – The movie plays for the period you specify.
Volume Enter the volume as a percentage of the maximum volume.
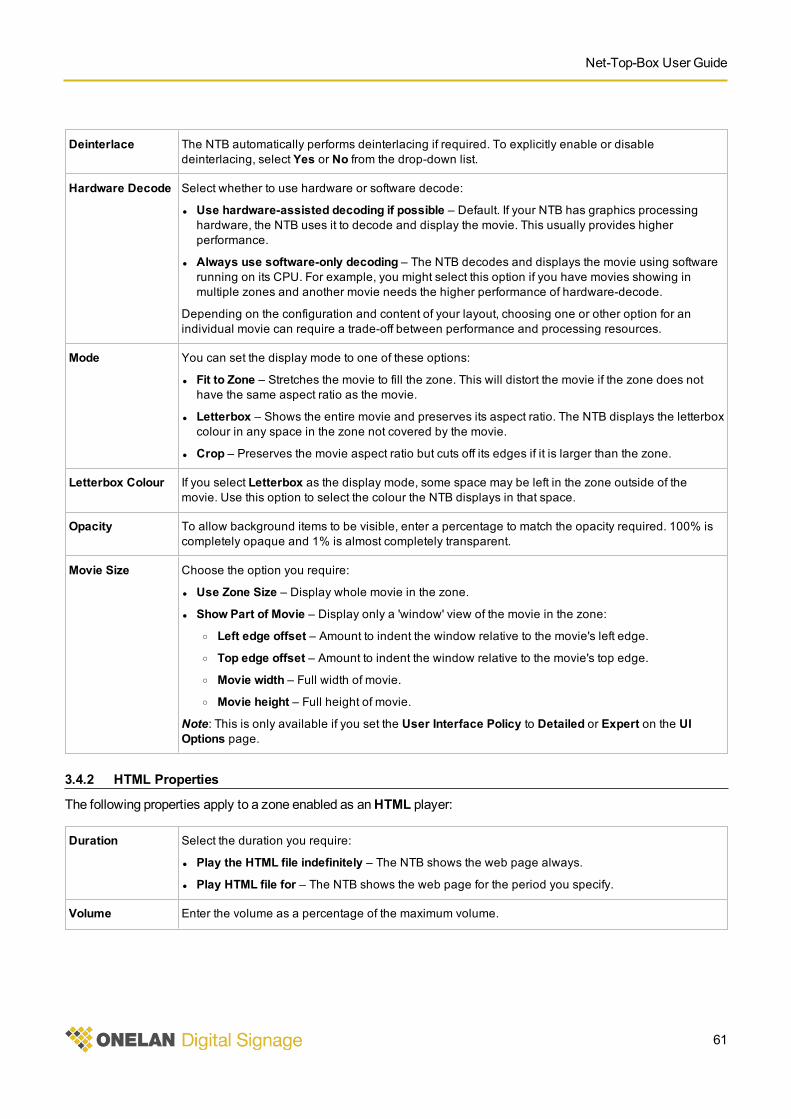
Net-Top-Box User Guide
61
Deinterlace The NTB automatically performs deinterlacing if required. To explicitly enable or disabledeinterlacing, select Yes or No from the drop-down list.
Hardware Decode Select whether to use hardware or software decode:
l Use hardware-assisted decoding if possible – Default. If your NTB has graphics processinghardware, the NTB uses it to decode and display the movie. This usually provides higherperformance.
l Always use software-only decoding – The NTB decodes and displays the movie using softwarerunning on its CPU. For example, you might select this option if you have movies showing inmultiple zones and another movie needs the higher performance of hardware-decode.
Depending on the configuration and content of your layout, choosing one or other option for anindividual movie can require a trade-off between performance and processing resources.
Mode You can set the display mode to one of these options:
l Fit to Zone – Stretches the movie to fill the zone. This will distort the movie if the zone does nothave the same aspect ratio as the movie.
l Letterbox – Shows the entire movie and preserves its aspect ratio. The NTB displays the letterboxcolour in any space in the zone not covered by the movie.
l Crop – Preserves the movie aspect ratio but cuts off its edges if it is larger than the zone.
Letterbox Colour If you select Letterbox as the display mode, some space may be left in the zone outside of themovie. Use this option to select the colour the NTB displays in that space.
Opacity To allow background items to be visible, enter a percentage to match the opacity required. 100% iscompletely opaque and 1% is almost completely transparent.
Movie Size Choose the option you require:
l Use Zone Size – Display whole movie in the zone.
l Show Part of Movie – Display only a 'window' view of the movie in the zone:
o Left edge offset – Amount to indent the window relative to the movie's left edge.
o Top edge offset – Amount to indent the window relative to the movie's top edge.
o Movie width – Full width of movie.o Movie height – Full height of movie.
Note: This is only available if you set the User Interface Policy to Detailed or Expert on the UIOptions page.
3.4.2 HTML Properties
The following properties apply to a zone enabled as anHTML player:
Duration Select the duration you require:
l Play the HTML file indefinitely – The NTB shows the web page always.
l Play HTML file for – The NTB shows the web page for the period you specify.
Volume Enter the volume as a percentage of the maximum volume.
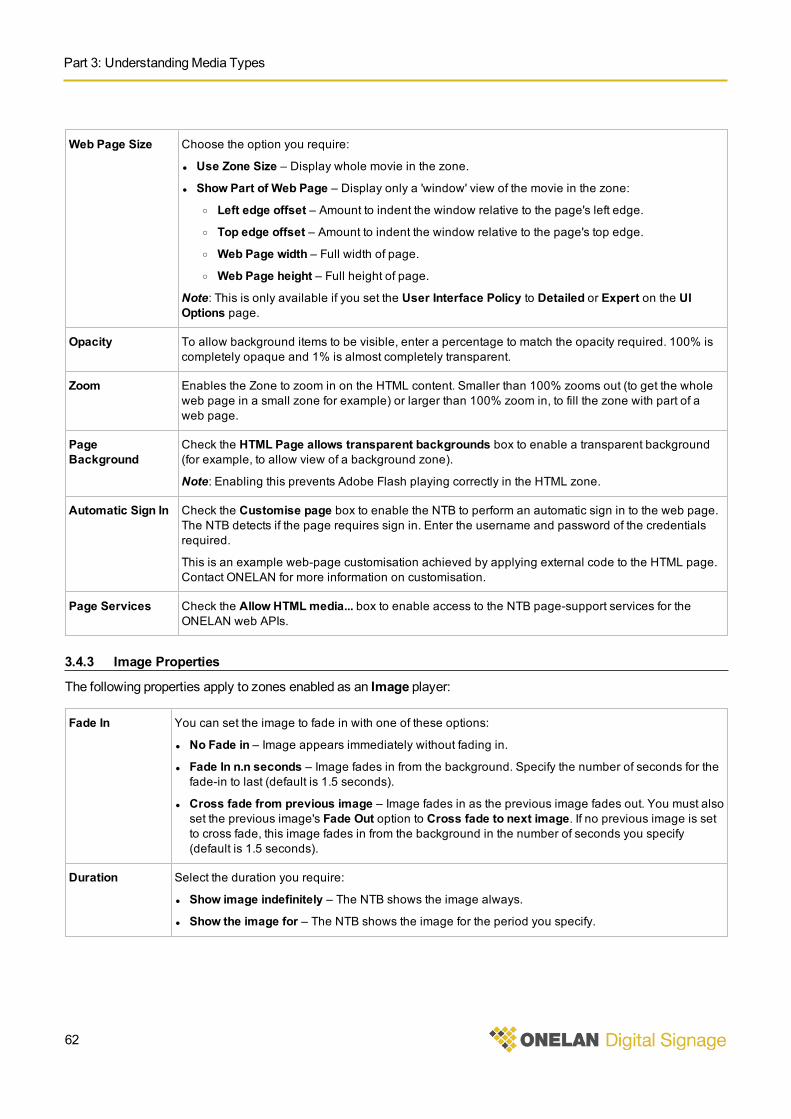
Part 3: UnderstandingMedia Types
62
Web Page Size Choose the option you require:
l Use Zone Size – Display whole movie in the zone.
l Show Part of Web Page – Display only a 'window' view of the movie in the zone:
o Left edge offset – Amount to indent the window relative to the page's left edge.
o Top edge offset – Amount to indent the window relative to the page's top edge.
o Web Page width – Full width of page.o Web Page height – Full height of page.
Note: This is only available if you set the User Interface Policy to Detailed or Expert on the UIOptions page.
Opacity To allow background items to be visible, enter a percentage to match the opacity required. 100% iscompletely opaque and 1% is almost completely transparent.
Zoom Enables the Zone to zoom in on the HTML content. Smaller than 100% zooms out (to get the wholeweb page in a small zone for example) or larger than 100% zoom in, to fill the zone with part of aweb page.
PageBackground
Check the HTML Page allows transparent backgrounds box to enable a transparent background(for example, to allow view of a background zone).
Note: Enabling this prevents Adobe Flash playing correctly in the HTML zone.
Automatic Sign In Check the Customise page box to enable the NTB to perform an automatic sign in to the web page.The NTB detects if the page requires sign in. Enter the username and password of the credentialsrequired.
This is an example web-page customisation achieved by applying external code to the HTML page.Contact ONELAN for more information on customisation.
Page Services Check the Allow HTMLmedia... box to enable access to the NTB page-support services for theONELAN web APIs.
3.4.3 Image Properties
The following properties apply to zones enabled as an Image player:
Fade In You can set the image to fade in with one of these options:
l No Fade in – Image appears immediately without fading in.
l Fade In n.n seconds – Image fades in from the background. Specify the number of seconds for thefade-in to last (default is 1.5 seconds).
l Cross fade from previous image – Image fades in as the previous image fades out. You must alsoset the previous image's Fade Out option to Cross fade to next image. If no previous image is setto cross fade, this image fades in from the background in the number of seconds you specify(default is 1.5 seconds).
Duration Select the duration you require:
l Show image indefinitely – The NTB shows the image always.
l Show the image for – The NTB shows the image for the period you specify.
Net-Top-Box User Guide
63
Fade Out You can set the image to fade out with one of these options:
l No Fade out – Image disappears immediately without fading out.
l Fade out in n.n seconds – Image fades out to the background. Specify the number of seconds forthe fade-out to last (default is 1.5 seconds).
l Cross fade to next image in n.n seconds – Image fades out as the next image fades in. You mustalso set the next image's Fade In option to Cross fade from previous image. If no next image isset to cross fade, this image fades out to the background in the number of seconds you specify(default is 1.5 seconds).
Mode You can set the display mode to one of these options:
l Fit to Zone – Stretches the image to fill the zone. This will distort the image if the zone does nothave the same aspect ratio as the image.
l Letterbox – Shows the entire image and preserves its aspect ratio. The NTB displays the letterboxcolour in any space in the zone not covered by the image.
l Crop – Preserves the image aspect ratio but cuts off its edges if it is larger than the zone.
Letterbox Colour If you select Letterbox as the display mode, some space may be left in the zone outside of the image.Use this option to select the colour the NTB displays in that space.
Opacity To allow background items to be visible, enter a percentage to match the opacity required. 100% iscompletely opaque and 1% is almost completely transparent.
3.4.4 Text Properties
The following properties apply to a zone enabled as a Text player:
Text Style Choose the option for how you want the text displayed:
l Show text indefinitely – Displays always.
l Show text for – Displays for the period you specify.
l Text moving from right to left at speed – Scrolls right-to-left at the speed you specify.
l Text moving from left to right at speed – Scrolls left-to-right at the speed you specify.
l Text moving from bottom to top at speed – Scrolls bottom-to-top at the speed you specify.
l Text moving from top to bottom at speed – Scrolls top-to-bottom at the speed you specify.
For best results, set the scrolling speed in multiples of 60 (for example, 60 or 120).
Font Select the font family you want and the size and style to apply.
Text Colour If you want text in a different colour than the default, click the button to select analternative.
Background Colour If you want the background in a different colour than the default, click the button toselect an alternative.
Horizontal Alignment Select the text horizontal position (only enabled for stationary and vertically-scrolling text).
Vertical Alignment Select the text vertical position (only enabled for stationary and horizontally-scrolling text).
Margins Set values to add blank space at each margin (in pixels).
Part 3: UnderstandingMedia Types
64
White Space Choose the option for how you want extra spaces, tabs, and new lines handled (collectivelytermed 'whitespace'):
l Display spaces and new lines as entered – Display all whitespace as entered (default).
l Display multiple spaces as single space and multiple new lines as a single new line –Ignore extra whitespace.
Note: This property is for text files only.
Character Set If necessary, select an alternative text-encoding standard.
Note: This property is for text files only.
Opacity To allow background items to be visible, enter a percentage to match the opacity required. 100%is completely opaque and 1% is almost completely transparent..
3.4.5 Soundtrack Properties
The following properties apply to the audio playlist for layouts enabled with theSoundtrack option:
Duration Select the duration you require:
l Play all of the audio file – The soundtrack plays continuously.
l Play audio file for – The soundtrack plays for the period you specify.
Volume Enter the volume as a percentage of the maximum volume.
3.4.6 Newsfeed Properties
The NTB holds a newsfeed's properties in a number of locations. Access each group of properties by:
l Clicking the button for the newsfeed on theMedia > Newsfeeds page (see Newsfeeds for a description ofthose properties).
l Clicking the button for the newsfeed in the playlist. The NTB displays some properties on theMedia tab andsome on theStyle tab.
The newsfeed properties on the playlistMedia tab are:
Item Type Indicates who can make changes to the setup on this page (click the Save Changes andchange Item Type button to alter this).
Ad Hoc Entry Label Enter a reference label for the NTB to use in the playlistMedia column.
Allowed Choices Select which newsfeeds the ad hoc user can choose:
l All Available Newsfeeds – User can choose from any of the newsfeeds you have added.
l Only Selected Newsfeeds – User can choose only from the newsfeeds you check.
Default Newsfeed Select the default newsfeed from the drop-down list.
Fields Select whether to display components of the newsfeed other than the content:
l Title – Newsfeed title.
l Description – Newsfeed summary description.
Customisation Status Indicates the newsfeed selection status.
Net-Top-Box User Guide
65
The newsfeed properties on the playlist Style tab are:
Item Selection Choose the properties that specify how you want the NTB to choose from and sequence thenewsfeed articles:
l Play all Items – Play all of the articles.
l Play only the first n items – Play just this number of articles.
l Play all Items in groups of n items – Jump this number of articles before playing the nextarticle.
l Select items sequentially – Play articles in title order. Numbers come before letters anduppercase characters before lowercase (for example, '1' comes before 'A' which comesbefore 'a').
l Select items at random – Play articles at random (shuffle play).
ItemSynchronisation
If you need to synchronise between zones, select the appropriate option for yoursynchronisation strategy:
l Slave - track changes to Master – The media shown in this zone is controlled from amaster zone.
l Master – This zone controls the media shown in a slave zone.
You may want to show the headline in one zone and the details in another zone: seeSynchronising Playlist Displays Between Zones for how to keep the displays aligned.
Text Style Choose the option for how you want the text displayed:
l Show first Newsfeed item indefinitely – Displays always.
l Show each Newsfeed Item for – Displays for the period you specify.
l Text moving from right to left at speed – Scrolls right-to-left at the speed you specify.
l Text moving from left to right at speed – Scrolls left-to-right at the speed you specify.
l Text moving from bottom to top at speed – Scrolls bottom-to-top at the speed you specify.
l Text moving from top to bottom at speed – Scrolls top-to-bottom at the speed you specify.
For best results, set the scrolling speed in multiples of 60 (for example, 60 or 120).
Font Select the font family you want and the size and style to apply.
Text Colour If you want text in a different colour than the default, click the button to select analternative.
Background Colour If you want the background in a different colour than the default, click the button toselect an alternative.
Horizontal Alignment Select the text horizontal position (only enabled for stationary and vertically-scrolling text).
Vertical Alignment Select the text vertical position (only enabled for stationary and horizontally-scrolling text).
Margins Set values to add blank space at each margin (in pixels).
Opacity To allow background items to be visible, enter a percentage to match the opacity required.100% is completely opaque and 1% is almost completely transparent..
Part 3: UnderstandingMedia Types
66
3.4.7 Clock Properties
The NTB holds a clock's properties in the playlist's Media andStyle tabs.
The clock properties on theMedia tab are:
Display Content Select the overall date and time format.
Day of Week Format Select the positioning and format of the day.
Date Format Select the sequence of date components.
Year Format Select a 2 or 4 digit year display.
Month Format Select a month name or number display.
Time Format Select whether to use the time format for the locale (defined on the NTB Setup > Player >International page) or the one you specify here.
Hour Format Select whether to use 12 hour or 24 hour clock.
Time Zone Select the required time zone from the drop-down list.
The clock properties on theStyle tab are:
Duration Select the duration you require:
l Show Clock indefinitely – The NTB displays the clock all the time.
l Show Clock for – The NTB displays the clock for the period you specify
Font Select the font family you want and the size and style to apply.
Text Colour If you want text in a different colour than the default, click the button to select analternative.
Background Colour If you want the background in a different colour than the default, click the button toselect an alternative.
Horizontal Alignment Select the clock's horizontal position.
Vertical Alignment Select the clock's vertical position.
Margins Set values to add blank space at each margin (in pixels).
Opacity To allow background items to be visible, enter a percentage to match the opacity required.100% is completely opaque and 1% is almost completely transparent.
3.4.8 PDF File Properties
With one addition, PDF files have the same properties as images (see Image Properties for details).
Net-Top-Box User Guide
67
The addition is an option to select the pages you want the NTB to display. To select the pages you want displayed,take these steps:
1. Add the PDF file to the playlist.
2. Click the PDF file's button.
3. Open theMedia tab.
4. Enter the required setting in thePDF Pages to be shown field.
Depending on the setting, the NTB will display pages in sequence, repeatedly, in groups, and in a different order thanthey appear in the file. If you havemore than one PDF file in a folder play, the settings apply to all those PDF files.This table contains example settings to illustrate the flexibility available to you (note the use of commas and hyphensto delineate page selections):
Example Setting Pages Displayed
1- All pages from page 1 to the end. This is the default setting.
10- All pages from page 10 to the end.
15 Page 15.
1,5,7 Pages 1, 5, and 7.
1-3,6-9 Pages 1, 2, 3 and 6, 7, 8, 9.
3-5,3-5 Pages 3, 4, 5 and 3, 4, 5.
1-5,7-3 Pages 1, 2, 3, 4, 5 and 7, 6, 5, 4, 3.
7-2 Pages 7, 6, 5, 4, 3, 2.
-1 All pages in reverse order (page 1 last).
3.4.9 Folder Play Properties
The NTB displays folder play properties on theMedia tab. Besides the folder play properties, this contains propertiesfor all of the player types enabled for the zone.
You can customise how long the NTB plays movie, HTML, and SWF (Adobe Flash) files. Specify the length of playby adding the string -duration-x just before the file extension (where x is the duration in seconds). For example,the NTB would play the file logo-intro-duration-17.swf for 17 seconds. This customisation has no effect ifyou add the file into a playlist individually.
Part 3: UnderstandingMedia Types
68
The following specific properties apply to folders in a playlist:
Media Check the box to enable the relevant media player for the zone.
Management Check the Management box to enable ad hoc management of this folder.
If the ad hoc user places files in the indicated ad hoc media folder, the NTB plays them insteadof those in the current folder. If there are no suitable files in the ad hoc media folder, the NTBplays the files in the current folder.
If this NTB is a subscriber, a channel update does not remove the ad hoc files. This means thateven a subscriber NTB can use local content.
Item Selection Choose the properties that specify how you want the NTB to choose from and sequence thefiles:
l Play all Items – Play all of the files.
l Play only the first n items – Play just this number of files.
l Play all Items in groups of n items – Jump this number of files before playing the next file.
l Select items sequentially – Play files in file name order. Numbers come before letters anduppercase characters before lowercase (for example, '1' comes before 'A' which comesbefore 'a').
l Select items at random – Play files at random (shuffle play).
If you choose a property other than Play all items, the NTB plays files in the sequence you havechosen. To do that, it records which files it played and when (in other words, retains the currentstate of play). Folders in different playlists run through their sequence independently.
However, you may went to ensure that the NTB synchronises the order of folder play betweendifferent playlists. That is, have the NTB restart each folder play sequence from the beginning.To do so, add a Folder Play Reset item to the playlist at the point where you want that tohappen. Select Folder Play Reset from the options on the Specials tab. Combine folder playreset with the rendezvous point and advance to features to create the synchronised play yourequire.
Item Synchronisation If you need to synchronise between zones, select the appropriate option for yoursynchronisation strategy:
l Slave - track changes to Master – The media shown in this zone is controlled from a masterzone.
l Master – This zone controls the media shown in a slave zone.
See Synchronising Playlist Displays Between Zones for more details.
You can combine folder play properties to create complex sequences tomeet specific requirements. For example,youmay wish to set up a playlist that showed a sequence of music videos in a fixed order, and between each videoshow two randomly selected advertisements followed by a corporate logo for a fixed time.
To create this sequence of folders, follow these steps:
1. Create three folders on the NTB as follows:
o Music
o Advertisements
o Logo
2. Upload videos into theMusic folder. Rename the video files as necessary to create the play order you want (forexample, 'A Summer in the city.mpg, B Bemy girl.mpg', and so on).
Net-Top-Box User Guide
69
3. Upload the advertisements into theAdvertisements folder.
4. Upload the logo into the Logo folder.
5. Create a playlist as follows:
o Add theMusic folder to the playlist (set to play all items sequentially).o Add theAdvertisements folder to the playlist (set to play only the first two items randomly).o Add the logo image as an individual file (set duration 10 seconds).
3.4.10 Play Criteria Properties
All media items have the properties present on thePlay Criteria tab.
The following properties apply to any zone:
Time Validity To control when the NTB shows an item in a playlist, check the relevant boxes and set the times yourequire:
l Date Range – Select the dates during which you want these settings to apply (for a single day,set both dates the same).
l Days – Select the days you want the item to appear.
l Time Period – Select the period during which you want the item to appear.
Examples when you might choose to use this property:
l To play adverts only on certain days of the week.
l To show a traffic report only after 5.00 pm.
Points to note:
l Outside the times you specify, the NTB skips the item when its turn comes in the playlist.
l The NTB continues to play the item even if the valid time expires before the item ends.
l These settings do not prevent you auditioning a single media item or zone.
l These settings will apply if you audition the whole layout.
Conditional Play This is only enabled when you have added player local information to the NTB (see Player LocalInformation for details).
If it is enabled, you have two options:
l Play Always – Default. The NTB always plays the item.
l Play if Player Local Information Item – The NTB only plays the item if certain conditions are met.
If you select Play if Player Local Information Item, complete these steps:
1. Select the name of the relevant player local information from the first drop-down list.
2. Select the test to apply from the second drop-down list.
3. Enter the value to test for in the final field (add further values by clicking the button or
delete values by clicking the button).
4. Click the button.
5. Click the .button to apply the setting.
Part 3: UnderstandingMedia Types
70
3.4.11 Advanced Properties
All media items have the properties present on theAdvanced tab.
Other than theMedia Audit property, the NTB only displays theAdvanced properties if:
l You have set theUser Interface Policy toDetailed orExpert on theUI Options page.
l You have previously enabled the property.
The following properties apply to any zone:
Position and Size To override the position and size of a zone, select the Use custom position and size radio buttonand set the values you require:
l Top edge offset – Amount to move the zone relative to the screen's top edge.
l Left edge offset – Amount to move the zone relative to the screen's left edge
l Width – Width for the zone.
l Height – Height for the zone.
This property is not applicable to soundtrack items.
Media Audit To change whether the NTB collects media audit data to send in its reports, check the relevant radiobutton:
l Inherit the zone's media audit setting – The NTB collects or does not collect the data dependingon the setting in the zone's properties.
l Disable media auditing – Disables data collection even if it is enabled in the zone's properties.
l Enable media auditing – Enables data collection even if it is not enabled in the zone's properties.
3.4.12 Ad Hoc Properties
The NTB displays ad hoc properties on theMedia tab.
You can apply the following properties to directly entered text, newsfeeds, radio, TV, and tables that you have set tobe customisable or ad hoc:
Item Type Click the button to save any existing changes to the itemand to open the page to select the item's type:
l Content of this item is controlled by the Layout Designer
l Content of this item can be customised using this Layout's Ad hoc Entry Page
l There are no existing Shared Ad hoc Items of this type
l Create and use a new Ad hoc Item
Ad Hoc Entry Label The label used to refer to this item on the layout's Ad hoc Page.
Ad Hoc Item Name Unique identifier for the ad hoc Item on the NTB. (Only for ad hoc items that you cannotcustomise.)
Net-Top-Box User Guide
71
Properties dependenton media type
The NTB displays some properties that are dependent on the type of ad hoc item:
l Directly entered text:
o Ad Hoc Input – Options to format the text and specify allowable ad hoc user input.o Default Text – Enter default text to display.o Customisation Scope – Either Local (customised text displays only on the ad hoc user's
local NTB) or Remote (customised text displays on players that are subscribers to the adhoc user's publisher NTB).
l Newsfeed:
o Allowed Choices – Whether you allow the ad hoc user to select all or a subset of theavailable newsfeeds on the NTB.
o Default Newsfeed – Select the default newsfeed to display.o Fields – Whether to display newsfeed with or without title or description.
l TV and radio:
o Allowed Choices – Whether you allow the ad hoc user to select all or a subset of theavailable stations on the NTB.
o Default Station – Select the default station to play.o Subtitles – Whether or not to display subtitles (if available).
l Tables:
o Table – Name link to the Ad Hoc tab of the Media > Tables page for configuring thetable.
Customisation Status Indicates if this item is currently displaying its default value or if it has been overridden by an adhoc user.
Used By Layouts Lists the layouts that use this ad hoc Item. (Only for ad hoc items that you cannot customise.)
3.5 Playlist CommandsYou can use the following playlist features to alter the display sequence and appearance:
l Rendezvous Points and the Advance To Command
l Change Layout Command
3.5.1 Rendezvous Points and the Advance To Command
Each playlist displays a sequence of items that operate independently. Even if two playlists contain items of exactlyequal lengths, you cannot rely on their display being completely synchronized. Instead, if you want to achievesynchronization between playlists, you need to use a combination of Advance To commands andRendezvousPoints.
AnAdvance To command in a playlist causes the NTB to start displaying an item in another playlist. You specify theitem to display by placing amatching rendezvous point at an appropriate place in the other playlist. If the receivingzone's playlist contains the rendezvous point, the NTB immediately starts playing the playlist item after therendezvous point.
To link the two together, theAdvance To command refers to the rendezvous point by name. You can select whetherthe NTB passes theAdvance To command to a single zone or to all zones in the current layout. Therefore, by
Part 3: UnderstandingMedia Types
72
placing the same rendezvous point in several zones, you can trigger actions in all of them with a singleAdvance Tocommand.
You can also use theAdvance Tomechanism to initiate NTB actions as a result of user interactions, such as motionsensor, pressuremat, or touch screen events (see Using Interactivity for more details).
To add a rendezvous point to a playlist, follow these steps:
1. Click theSpecials tab.
2. In theRendezvous Point field, enter a name. You can enter any text for the name (but not starting with the stringauto_) and names are not case-sensitive.
3. Click the button.
4. Make sure the rendezvous point appears immediately before the item you want the NTB to synchronize with theother playlist.
5. If required, repeat to create additional rendezvous points in other playlists.
6. Add theAdvance To command.
To add anAdvance To command to a playlist, follow these steps:
1. Click theSpecials tab.
2. From theAdvance To Rendezvous Point drop-down list, select the relevant rendezvous point name.
3. Click the button.
4. Make sure theAdvance To command appears immediately before the item you want the NTB to synchronizewith the other playlist.
5. If you want theAdvance To command to target only a specific zone:
a. Click the button.
b. Select the zone from the drop-down list.
c. Click the button.
Note: If you want to change theAdvance To command to point to a different rendezvous point or to differentzones, click the button and alter your selection.
3.5.2 Change Layout Command
Unlike theAdvance To command, theChange Layout command launches a different screen layout with its ownarrangement of zones.
If you want to implement a simple change of the layout, then theAdvance To command brings a quick result.However, it is difficult to implement a complex change using theAdvance To command. TheChange Layoutcommand displays a different layout entirely, but it does take longer to refresh the screen.
To add aChange Layout command to a playlist, follow these steps:
1. Click theSpecials tab.
2. From theChange Layout drop-down list, select the new layout you want to use.
3. Click the button.
4. Make sure theChange Layout command appears in the right place in the playlist.
Net-Top-Box User Guide
73
Note: If you want to change theChange Layout command to point to a different layout, click the button andalter your selection.
3.6 ColoursUse theMedia > Colours page to set the colours the NTB applies to fonts, backgrounds, and other items.
When you create a new layout or a new table, the NTB automatically creates new colour items:
l For layouts, the colour items are for the text foreground, the text background, and the letterbox background.
l For tables, the colour items are for the text foreground and text background.
The NTB names colour items in the format Layout name: Colour item. For example, if you create a new layout named'Holidays', the NTB creates the following colour items for it:
l Text foreground – Holidays: Text
l Text background – Holidays: Background
l Letterbox – Holidays: Letterbox
You canmodify the properties for these colour items as needed.
You define aColour Item by a unique name, a colour value, and an opacity setting. If you change the colour value or
opacity setting, the NTB updates all the items that use the colour. Click the button toapply your changes. You can definemore than one colour item with the same colour values.
Click the tab for the option you require:
l Colours – Listing the colour items and their characteristics. Click the button to delete a colour (you cannotdelete it if it is in use). Click the button to:
o Modify a colour – The settings are as described for theAdd Colour tab. Click the button toenable your modifications.
o Access theUsed By tab – Lists which layouts are using the colour.
l Add Colour – Adding a new colour manually.
To add a new colour, complete the following details and click the button:
Name Enter a unique and meaningful name for the colour. This does not have to be in Layout name: Colouritem format followed by the NTB.
Colour Value Specify the colour using either separate RGB values or a single hexadecimal value. On a Windows PC,you can find the RGB values for a colour you want to use by following these steps:
1. Click Start and select All Programs > Accessories > Paint.
2. Open a file containing an image that uses the target colour.
3. Use the Colour Picker tool to select a pixel of the target colour.
4. Click the Edit Colours tool .
5. Read off the RGB values at the bottom right of the Edit Colours display.
Part 3: UnderstandingMedia Types
74
Opacity To allow background items to be visible, enter a percentage to match the opacity required. 100% iscompletely opaque and 1% is almost completely transparent..
3.7 FontsThe NTB offers a collection of standard fonts that are suitable for most purposes.
To view the installed fonts:
1. On themenu bar, click Media and Fonts.
2. Click the Font Families tab.
The Font Families tab shows details of all the fonts available on the NTB (including those you install). The FontFiles tab lists the files for any fonts you install.
If you want to use a font that is not available on the NTB, youmust add your own font files. The NTB supportsTrueType® (TTF or TTC) andOpenType® (OTF) format font files. If your NTB is a publisher, youmust also install thatadditional font on every subscriber NTB.
To add a font file, follow these steps:
1. On themenu bar, selectMedia and Fonts.
2. Click theAdd Font File tab.
3. Click the button and navigate to the font file you wish to add.
4. Click the button.
5. Click the button.
6. After you add a font file, youmust restart the NTB.
To preview a font, click its button. The NTB interrupts the current display and auditions the font in a selection offormats cycling through several sizes:
l Formats: plain, bold, italic, and bold italic.
l Sizes: 12, 20, 32, 48, 60, and 72 point.
Stop the audition by clicking the button to resume the scheduled display.
To change the text used in the font audition, follow these steps:
1. On themenu bar, selectMedia and Fonts.
2. Click the Font Options tab.
3. Modify or add to the text in theAudition text box.
4. Click the button.
Part IVEnhancing YourDisplays

Net-Top-Box User Guide
77
Part 4: Enhancing Your DisplaysYou can enhance your digital sign display in various ways:
Synchronising Playlist Displays Between Zones
Using Interactivity
Using the RS-232 Interface Port
Displaying Part of aMovie orWeb Page
Changing the Screen Background
4.1 Synchronising Playlist Displays Between ZonesYou can synchronise the display between playlists in useful and sophisticated ways using rendezvous points andAdvance To commands.
Examples include:
l Displaying video or images in one zone and related text captions in another zone (for amethod to achieve this, seeAutomatic Captioning).
l Displaying a selection of videos or images in response to ad hoc user input (for amethod to achieve this, seeDisplaying Video-On-Demand Using a Sub-Playlist).
You can achieve further complex and powerful results with other of the rendezvous point andAdvance To commandmechanisms:
l AnAdvance To command executed in any currently playing playlist (including in the same playlist).
l AnAdvance To command delivered over the player's Ethernet port in the form of an XMLmessage posted to theHTML TCP port.
l AnAdvance To command in a schedule entry or in an ad hoc page.
l A change in binary input lines on the RS-232 port initiating anAdvance To command.
l An event on an attached touch-sensitive screen initiating anAdvance To command.
4.1.1 Automatic Captioning
To implement synchronisation between zones, you need to designate one playlist as theMaster Playlist and one ormore other playlists as Slave Playlists. You add rendezvous points to each slave playlist and the identically namedAdvance To command in themaster playlist. When themaster playlist reaches theAdvance To command, theNTB forces the slave playlists to start playing the first item after the rendezvous point.
To have the NTB perform automatic captioning, you have to use files with corresponding file names. For example, todisplay captioning for a video file called Marketing_Highlights_01.mpg, you would need to create a file calledMarketing_Highlights_01.txt containing the text captions.
To set up automatic captioning between the zone playing the video and the zone playing the captions, first set up thevideo zone:
1. Upload all the videos into one folder on the NTB.
2. Open the video zone's playlist page.
3. Click the Files & Folders tab and navigate to the video folder location.
Part 4: Enhancing Your Displays
78
4. Click the folder's button.
5. Click thePlaylist tab.
6. Click the folder's button.
7. From the Item Synchronisation drop-down list, selectMaster.
8. InMovie properties, select theDuration optionPlay the Movie File Indefinitely.
9. Click the button.
Second, set up the captioning zone:
1. Upload all of the text files into one folder on the NTB. (This can be the same folder that contains the videos.)
2. Open the captioning zone's playlist page.
3. Click the Files & Folders tab and navigate to the text folder location.
4. Click the folder's button.
5. Click thePlaylist tab.
6. Click the folder's button.
7. From the Item Synchronisation drop-down list, select Slave - Track Changes to Master.
8. In Text properties, select the Text Style option toShow Text File Indefinitely.
9. Click the button.
4.1.2 Displaying Video-On-Demand Using a Sub-Playlist
You can use the Ad hoc mechanism to configure the NTB to show videos on-demand (in response to a button-click)by using a series of Advance To commands. The samemechanism can also be used to set up images or any othermedia type to be displayed on-demand. You do this using sub-playlists.
You can create a loop, or sub-playlist, by inserting both a rendezvous point at the beginning of a sequence of itemsand anAdvance To command at the end of the sequence in the same playlist. This means that the NTB displays theitems in the sequence in a continuous loop until anotherAdvance To command breaks out of the loop.
To illustrate that mechanism, here is a sequence of items in a playlist:
Rendezvous Point: Start
o Default Movie item
o Advance To: Start
Rendezvous Point: Option1
o Option1Movie Item
o Advance To: Start
Rendezvous Point: Option2
o Option2Movie item
o Advance To: Start
Net-Top-Box User Guide
79
That playlist sequencemight run like this:
1. The NTB plays Default Movie item in a continuous loop created by theAdvance To command and rendezvouspoint Start.
2. AnAdvance To commandOption1 arrives from an ad hoc page.
3. The NTB starts playing the item after rendezvous point Option1 and this is Option1 Movie Item.
4. At the end of Option1 Movie item, the NTB processes theAdvance To commandStart.
5. The NTB therefore returns to rendezvous point Start and plays theDefault Movie Item again in a continuousloop.
To create a sub-playlist loop, follow these steps:
1. Click on a zone to edit its playlist.
2. Click on theSpecials tab.
3. Type the name of the loop into theRendezvous Point text box (use as descriptive a name as possible).
4. Click the button to add the rendezvous point to the playlist.
5. Add the items that must appear in the sub-playlist in the usual manner. If you want a sub-playlist to play just once,insert an image at the end with an indefinite duration.
6. In theSpecials tab, select the rendezvous point by name from theAdvance To Rendezvous Point list andclick the button.
7. Make the layout live by adding to a schedule and clicking the button.
You are now able to switch between playlists by addingAdvance To commands to an ad hoc page:
1. SelectMedia >Manage Ad hoc items, and click theAdd Item tab.
2. Select theAdvance To type, enter a name, and click the button. Repeat to add anAdvance To commandfor each rendezvous point.
3. SelectMedia > Design Pages >Manage Ad hoc pages, and click theAdd Pages tab.
4. Create a new page with a name such as 'Movie control'.
5. Click the button and add the ad hoc items for each rendezvous point to the ad hoc page.
6. In theProperties tab, select the users who are allowed to call the commands.
7. Click the button.
4.2 Using InteractivityYou can configure the NTB to respond to inputs from an external source. External inputs are known as Events andthey may be caused by:
l Someone pressing or releasing a defined area on a USB touch screen.
l Someone passing a detector or stepping on a pressuremat that generates a general purpose input/output (GPIO)signal (received through the NTB unit's RS-232 port or adapter).
l Someone pressing a button on a remote keypad (infrared controller).
Part 4: Enhancing Your Displays
80
The way you configure the NTB to respondmay include:
l Executing aChange Layout command.
l Executing anAdvance To command.
Those responses are known as Actions and you can configure the NTB to take them immediately or after a timeout.Together, the combination of an event and an action is known as an Interaction.
For all events (or timeouts), you can have the NTB take one of these actions:
l Change to a specified layout.
l Advance to a rendezvous point.
l Ignore the event for this zone or layout and pass it to another zone or layout.
Additionally, for touch andGPIO events, you can have the NTB take one of these actions:
l Touch andGPIO events – Take no action.
l Touch event – Pass to a web page. If the zone supports HTML, the NTB can pass a touch event to the currentlyshowing web page. If there is no web page, the NTB takes no action.
Playlist and Layout Interaction:
To provide detailed control, you can specify behaviour that differs at the playlist and at the layout level:
l Playlist:
o Process the interaction if someone touches the currently playing item.
o Keep the interaction process active awaiting other events. You can implement complex behaviour by definingmultiple interaction actions in the same playlist.
l Layout:
o Process the interaction if there is no playlist action (that is, the layout action is a default).
o Process the interaction if someone touches anywhere on the screen.
You will find it easier to review layout interaction behaviour because the NTB displays all layout components at once.
To configure touch actions for a playlist, youmust either:
l Include anOn Touch Advance To command in the playlist.
l Include anOn Touch Change Layout command in the playlist.
l Play an HTML page in the zone.
To add items, click on the playlist's Specials tab and select those required. You can includemore than oneOnTouch Advance To orOn Touch Change Layout commands in the playlist. EachOn Touch command overridesthe previous one. This allows you to have the NTB change its response to touch events throughout the playlist.
If you enable touch for a zone that is displaying an HTML page, the NTB passes touch events to the HTML player forhandling. You can use this to allow a user to navigate through web pages using links embedded in the displayedHTML page.
Note: To use HTML navigation, either omit On Touch playlist items or useOn Touch Screen Event PerformNo Action (found on the playlist's Specials tab) to deactivate existingOn Touch items. Otherwise, On Touchitems will take precedence over the HTML player. Then, the NTB only passes Left Mouse Button Up andDownevents to the HTML player.
Net-Top-Box User Guide
81
To configure touch actions for a layout, on themenu bar click Layouts and select the layout you want to configure.Click the Interaction tab and select the touch screen actions in response to a touch screen event. The settingsinclude:
l Whether a touch response is required for this layout at the layout level or not.
l Whether the touch response is aChange Layout orAdvance To command.
l Whether it is the touch or release operation that causes the action.
l The period after which the layout will revert to another layout in the absence of a touch event.
Interaction Processing:
The way the NTB processes an event depends upon:
l The source (touch screen, GPIO, or remote keypad).
l The currently active interactions.
The NTB processes interactions for touch screen events as follows:
1. Creates a list of zones showing items directly underneath the touched screen location.
2. Processes that list in depth order, starting with the top zone.
3. If a zone has an active touch action, and that is not to pass the event to another zone, the NTB performs thespecified action and stops processing.
4. If no zone has an active touch action, the NTB performs the touch action defined for the layout.
The NTB processes interactions for RS-232 input events as follows:
1. Creates a list of all zones showing items coincident to the RS-232 input.
2. Processes that list in depth order, starting with the top zone.
3. If a zone has an active RS-232 input action, and that is not to pass the event to another zone, the NTB performsthe specified action and stops processing.
4. If no zone has an active RS-232 input action, the NTB performs the RS-232 action defined for the layout.
The NTB processes a remote keypad button event as follows:
1. Creates a list of all zones showing items coincident to the remote keypad button event.
2. Processes that list in depth order, starting with the top zone.
3. If a zone has an active remote keypad button action, and that is not to pass the event to another zone, the NTBperforms the specified action and stops processing.
4. If no zone has an active remote keypad button action, the NTB performs the remote keypad action defined for thelayout.
Passing Touch Events to HTML Pages:
If the current zone supports HTML, the NTB can pass touch events directly to the currently showing HTML page.Using this technique, you can build rich interactive applications using stored HTML content. However, you cannotcreate interactions with external web sites.

Part 4: Enhancing Your Displays
82
When developing such HTML applications, you will likely require a large number of files. In order for the NTB to keeptrack of these files during channel publishing and layout package creation, follow these rules:
l Initiate the application from a single HTML file (you can redirect from here to other files as required). Add that file tothe playlist.
l Place all additional files in a single subdirectory named [pagename]_files, where [pagename] is the name ofthe initiating HTML file (without its extension). Locate that subdirectory in the directory containing the initiatingHTML file.
4.2.1 Designing Interactive Layouts
You can design layouts that respond to user input in various ways:
l Send anAdvance To command to play a specific item or start a playlist.
l Change the current layout.
l Change the size and position of a zone.
l Display hidden zones.
l Send a signal to another device through the RS-232 port or adapter.
Youmight find the following general guidance helpful when developing interactive layouts.
Develop a Storyboard:
Advance planning is particularly important when designing a layout that smoothly offers choices and options to users.A storyboard is a plan based on a series of sketches of individual scenes. Storyboarding is very effective techniquewhen designing interaction sequences. You can create a storyboard with sketches of screen layouts or simply with aflowchart. The important point is to detail all possible outcomes at each stage of interaction.
Provide Material for Optional Actions:
Youmust make sure that you have collected and uploaded all themedia files you require for any possible scenarioscontrolled by interaction events. Before you start implementing your interaction events, create playlists for zones thatinclude all the necessary Advance To commands and rendezvous points.
Trade-Offs Between Display Change Methods:
You can change the display in response to an interaction either by changing the size and show/hide properties of azone or by using aChange Layout command. Eachmethod has advantages and disadvantages:
Method Advantages Disadvantages
Change zone size and show/hideproperties
Very fast transition Continues using existing mediaplayers
Use Change Layout command Resets all media players Slower, visible transition
4.2.2 General Purpose Input/Output
The NTB can respond to changes in voltages generated by aGPIO device such as amotion sensor or a pressuremat. The NTB receives those inputs through its RS-232 port or adapter. It can also send output signals. For moredetails see the RS-232 Technical Reference.

Net-Top-Box User Guide
83
Control-Line Inputs:
The NTB RS-232 interface has four input lines that can receive binary events such as contact closure or signals fromother devices. The available lines are:
l Clear To Send (CTS).
l Data Carrier Detect (DCD).
l Data Set Ready (DSR).
l Ring Indicator (RI).
The lines do not affect the operation of the RS-232Send andReceive strings.
Include an RS-232 input item in a playlist and configure it to issue anAdvance To orChange Layout command.Use those commands to change themedia played by the NTB. This is triggered when the NTB detects a linetransition generated by a user action.
Control Line Outputs:
The NTB can control the output state of the RS-232 DTR and RTS lines. Create RS-232 output items to change oneor both RS-232 outputs and optionally transmit a string of characters. Give the RS-232 output items unique names toclarify their purpose.
4.2.3 Touch Screens
The NTB includes support for touch screen input from users. These features allow you to configure the NTB torespond to those user inputs (for example, by executingAdvance To orChange Layout commands). Connect anoverlay touch-screen panel to the NTB through its USB port and perform the calibration process before using it.
You can configure the response at one or both of these levels:
l Touch screen physical interface – The NTB supports USB touch-screen overlays that report absolute X/Ycoordinates and key up and key down events. There is no support for amouse-like device that sends relativemovements since this requires an on-screen cursor.
l Touch screen calibration –On the NTB menu bar, click Setup and select Player > Interactivity. Click the Touchtab and click the button.
See Interactivity for more details.
4.2.4 Click On Touch
You can configure the NTB to play an audio file when someone touches an interactive screen.
To play an audio file, click the layout's Interaction tab and enableClick on Touch. The NTB does not play a soundwhen the setting is No Click on Touch.
Specify these items:
l Volume – Express volume as a percentage of theMaster Volume level. (You can specify theMaster Volumelevel on theAudio page in theSetup menu.) If this entry is blank, the NTB uses 75% of theMaster Volumelevel.
l Actions – Check the audio file's Use sound button. If necessary, navigate to the location of the file using thefolder display.
Part 4: Enhancing Your Displays
84
4.3 Using the RS-232 Interface PortIf you require the NTB to control equipment through an RS-232 interface, use its built-in RS-232 port or the USB toRS-232 adapter, whichever is appropriate for the NTB model.
Considerations for sending RS-232 strings at specific events or playlist positions:
l Define the strings by expressing their byte values as separated hexadecimal pairs (for example, 3A 3B 3C 0D0A).
l Create the strings in accordance with the needs of the attached device.
l The state of the RS-232 control lines does not affect transmission of RS-232 strings.
Considerations for receiving RS-232 strings:
l The NTB reports themost recently received string in the Items tab on its Setup > Player > RS-232 Outputspage.
l The state of the RS-232 control lines does not affect reception of RS-232 strings.
4.4 Displaying Part of a Movie or Web PageYou can configure amovie or HTML item in a playlist to display only a part of its output.
This is useful if you want to:
l Show a specific area of amovie or web page without resizing it.
l Crop amovie designed for a 16:9 (widescreen) format to a 4:3 (standard) format. This avoids resizing the zone,which would alter the aspect ratio and distort the image.
To display only part of a movie item, modify the values for its Movie Size property (seeMovie Properties for details).To display only part of an HTML item, modify the values for itsWeb Page Size property (see HTMLProperties fordetails).
4.5 Changing the Screen BackgroundWhen switching between layouts, you can have the NTB display a coloured background or image. It can also displaythis background in any areas of a layout that are not covered by zones.
Note: Setting the colour to black is not recommended because it makes fault-findingmore difficult.
To change the screen background, follow these steps:
1. On themenu bar, click Media andScreen Background.
2. Select eitherSolid colour or Image:
o If you select Solid Colour, then click the button to select a colour.
o If you select Image, then browse the file system for an image. If you want a splash screen effect, set theLayout Activation option toActivate new Layout after and select the delay from the drop-down list.
3. Click the button.

Part VAd Hoc Content

Net-Top-Box User Guide
87
Part 5: Ad Hoc ContentTheAd hoc feature allows you to delegate limited control of content to staff local to the display. This is particularlyuseful where several players share the same channel but also need some customised content. The people at eachlocation canmake those changes with a quick and easy, browser-based operation.
Local control of content is important in a wide range of application areas:
l In an office, a secretary or office administrator can display welcomemessages for visitors or display staffinformation.
l On a university campus with multiple displays, different informationmay need to be delivered to different facultiesabout upcoming events, room allocations, and so on.
l In the retail sector, store information and special offer details will vary from branch to branch.
l In health care, patient information and other details will vary in different hospitals or GP practices in the samehealth authority area.
As the content designer, you delimit how much access is allowed at each site. You retain control of the key displayelements tomaintain a consistent appearance and uniform identity for your organisation.
The ad hoc environment consists of these components:
l Ad hoc user – The person, usually at the display location, who has limited access and can update or change onlythe content items you specify.
l Ad hoc entry – Is where ad hoc users log in through their browser, access pages that are available to them, andmake their changes.
l Ad hoc media folders – Contain all themedia files that the ad hoc user can use when updating or changingcontent.
You can delegate local responsibility for several different types of content:
l Text
l Tables
l Newsfeeds
l TV channels, radio stations, and streaming TV
l Folders
You can allow ad hoc users to update customisable content you have added to a playlist or update content theycreate in the layouts you have allowed them to access.
As well as giving such access to content, you can also allow ad hoc users to:
l Change complete layouts.
l Change display schedules.
l Perform schedule overrides.
l Synchronise content.
You can also delegate control of a channel to an ad hoc user. In this case, you designate certain items as Ad hocfrom Centre. This allows the ad hoc user to update those items on the publisher NTB and in turn that updates eachsubscribing NTB.
Part 5: Ad Hoc Content
88
The ad hoc system is secure: no ad hoc user canmake changes unless you specify the customisable item and givethe user permission to access it.
5.1 Enhanced Ad Hoc Access ControlGenerating ad hoc content is quick and easy. As the content designer, you can build-in ad hoc content duringimplementation of your design. Alternatively, you can work with an existing design and allocate ad hoc content asrequired. Whichever route you choose, the overall time taken for generating display content is minimised. Ad hocusers can be working with the system productively with minimum delay.
Automatic Ad Hoc:
By default, the NTB enables automatic ad hoc for all newly-created layouts. You can control whether it is disabled orenabled with the Layout Ad hoc Page setting on the layout's Layout Properties tab.
Automatic ad hoc makes creating content easier, as it eliminates many of the configuration and setup tasks. Thelayout automatically creates a single ad hoc page, which contains all ad hoc playlist Items in the layout. As you addor remove ad hoc items, the NTB automatically adds or removes them from the layout ad hoc page.
You have full control over ad hoc pages, including specifying which users are or are not authorised tomake changes.However, you cannot add or remove existing ad hoc Items or reference ad hoc items in other layouts. Therefore,automatic ad hoc is unsuitable if you want multiple layouts to use the same ad hoc item.
Manual Ad Hoc:
Manual ad hoc gives you complete responsibility for creating andmanaging all ad hoc pages and the items withinthem. You need to add ad hoc items to one or more playlists and one or more ad hoc pages, as required.
Youmust create an ad hoc item before you can add it to a playlist. Similarly, youmust create an ad hoc page and addone or more ad hoc items to it before it can be used by ad hoc users.
In manual ad hoc mode, you can create ad hoc pages that contain ad hoc items added tomultiple layout playlists. Forexample, this is useful if you want to show the same ad hoc welcomemessage onmultiple layouts.
Creating Ad Hoc Content as You Build Your Design:
Create your layout in the normal way:
1. On themenu bar, click Layouts andManage Layouts.
2. Click theAdd Layout tab.
3. Enter a name for the layout and click the button.
4. Locate your new layout on the Layouts page and click its button.
5. Create the zones you require and enable them to play the ad hoc media items you want to add.
6. Click the button and select Save all changes and edit Playlist from the drop-down list.
Net-Top-Box User Guide
89
You can now add ad hoc items. The way in which you do this depends on the type of ad hoc item you want to add:
Text 1. On the playlist's page, click the Specials tab and enter the text you wish to be displayed.
2. Check the Content of this item can be customised using this Layout's Ad hoc Entry Page box.
3. Click the button.
4. Click the button and set the item's Customisation Scope:
o Local – Only for this NTB.o Remote – For all the subscribers to this channel.
Tables You should have already created and formatted the ad hoc table you require.
1. On the playlist's page, click the Specials tab.
2. From the Table Item drop-down list, select the table you want.
3. Click the button.
4. Click the table's button.
5. Click the button.
6. Check the Use an existing Ad Hoc Item button and select the table from the drop-down list.
7. Click the button.
Newsfeeds You should have already configured the newsfeed you require.
1. On the playlist's page, click the Specials tab.
2. From the Newsfeed drop-down list, select the newsfeed you want.
3. Check the Content of this item can be customised using this Layout's Ad hoc Entry Page box.
4. Click the button.
5. If you want to further configure the item's ad hoc options, click the button.
TV and RadioStations
You should have already tuned the TV and radio stations. For radio, you must enable the layout'ssoundtrack.
1. On the playlist's page, click the Specials tab.
2. Take the action appropriate to the type of station you want::
o TV – From the Live Video drop-down list, select the station you want.o Radio – From the Live Radio drop-down list, select the station you want.
3. Check the Content of this item can be customised using this Layout's Ad hoc Entry Page box.
4. Click the button.
5. If you want to further configure the item's ad hoc options, click the button.
Converting an Existing Design to Ad hoc Content:
You can create ad hoc content after you have completed a design. To create ad hoc content in an existing design, theprocess is the same as in each case above. You need to disableAutomatic Ad Hoc in the Layout Properties tab.
Part 5: Ad Hoc Content
90
Creating Ad Hoc Pages:
When ad hoc users log on, theirHome page displays theAd Hoc Pages you create. Ad hoc users cannot accessany other NTB user interface pages. You design the ad hoc pages to display only the text fields ad hoc users canchange or the commands they are allowed to issue.
To create an ad hoc page:
1. On themenu bar, click Media and select Design Pages >Manage Ad hoc Pages.
2. Click theAdd Page tab
3. Enter a name for the page. Use a name that will be easily recognizable by your ad hoc users.
4. Click the button.
5. Click the page's button.
6. Select the item you require from the drop-down list and click the button.
7. To addmore ad hoc items, click theAdd Item tab again. Rearrange the order of items using the andbuttons.
8. Click theProperties tab. Add any instructive text in theUser Guidance Message field and select the users youwant to be able to see this ad hoc page.
9. Click the button.
5.2 Remote Keypad ControlFor convenience and ease of use, ad hoc users can control their local NTB using an infrared remote keypad. Thisenables them to change content at the touch of a button instead of having to access the NTB by their browser.
Note: theRemote Keypad tab indicates the status of the NTB infrared receiver. The remote keypad feature onlyworks if the NTB infra-red receiver is connected.
The remote keypad has the following controls:
l Volume (up and down) – Adjusts themaster volume level in 10% divisions.
l Station (up and down) – Controls the ad hoc TV and radio stations played. The user can scroll up and down thestation list.
l Programmable buttons (A, B, C, and D) – Each can be programmed to correspond to a specific rendezvouspoint or layout.
When the user presses a button, the NTB displays a status message at the top right of the screen.
To allow ad hoc users to control the display with the remote keypad, take these steps:
1. On themenu bar, click Layouts and select the one the remote keypad will control.
2. Click the Interaction tab.
3. For each button, check the action required:
o No default Button Action – Check for the NTB to take no action when the user presses this button.
o When button is pressed Advance to Rendezvous Point – Check to assign a rendezvous point to thisbutton. Choose the zones you allow the ad hoc user to control.
Net-Top-Box User Guide
91
o When button is pressed change to Layout – Check to assign a layout to this button. Ad hoc users pressthis button to switch the display to that layout.
To allow ad hoc users to choose TV or radio stations, take these steps:
1. On themenu bar, click Media andManage Ad hoc items.
2. Click the Add Item tab.
3. From theAdd Ad hoc Item of Type drop-down list, select TV orRadio.
4. Enter a name for the item and click the button.
5. In theAd hoc Item property Allowed Choices, select one of:o All Available TV or Radio Stations – Allows ad hoc users to select from any TV or radio station configured
on the NTB.
o Only Selected TV or Radio Stations – Allows ad hoc users to select from the TV or radio stations youchoose.
5. Select the default TV or radio station from theDefault TV or Radio Station drop-down list.
5.3 Additional Ad HocAdditional Ad Hoc features allow for greater customisation of layout content. This is particularly useful in achannel, where a network of players all play the same content.
Using additional ad hoc, multiple players in a channel can each show different content, controlled by ad hoc userslocally. This allows an organisation tomaintain a consistent appearance or brand image across a number of sites,while allowing local users to upload their own content and change the layouts and playlists to which they have beengiven access.
The content types that can be used with additional ad hoc include:
l Folder play
l Layout
l Schedule
l Schedule override
l Advance To
Folder play allows you to add a folder to a playlist and give ad hoc users permission to upload their own content intothe folder. For example, different GP practices with players in the same channel could carry different local informationabout late night dispensing chemists.
Layouts allow the ad hoc user to select a layout for a specific time slot in the schedule. Typically, if an organisationpublished a channel with a layout for each department, an ad hoc user in each department could select the rightlayout for that location.
Schedule allows the ad hoc user to set the time when a layout should appear on the display. For example, if a lunchhour layout has been scheduled, but times vary at different locations, local ad hoc users can set their timesaccordingly.
Schedule override allows the ad hoc user to display one of a selection of predefined layouts and not have thisinterrupted by any other layout changes in the schedule. For example, this can be used to show a special TV event ordisplay an emergency message without interruption.
Part 5: Ad Hoc Content
92
Advance To allows the ad hoc user on-demand control in several areas, including content selection. For example,this might be useful in a foyer where the NTB is showing a corporate video in a continuous loop. TheAd hocAdvance To command allows a local user to switch to live TV if required.
The following two procedures describe:
l Setting up an ad hoc schedule override.
l Setting up an ad hoc Advance To command .
Ad Hoc Schedule Override:
To set up an ad hoc schedule override andmake it available to ad hoc users:
1. On themenu bar, click Schedules.
2. Select Manage Schedules.
3. Click theAdd Override tab.
4. Enter a descriptive name for the override.
5. Select the audio, screen, and layout options from the drop-down lists.
6. Click the button.
7. On themenu bar, click Media andManage Ad hoc items.
8. Click theAdd Item tab.
9. Enter a name for the override in theAdd Ad Hoc Schedule Override field and click the button.
10. In theAllowed Choices panel, select one of the following:o All Available Schedule Overrides – Allows ad hoc users to select from any schedule overrides configured
on the NTB.
o Only Selected Schedule Overrides – Allows ad hoc users to select only from the schedule overrides youselect.
11. Select the appropriateCustomisation Scope option:o Local – Customisation applies on the individual NTB.o Remote – Customisation applies on each NTB in the channel.
12. Click the button.
Ad Hoc Advance To Command:
To set up an ad hoc Advance To command:
1. On themenu bar, click Help andUI Options.
2. Select theUser Interface Policy as Detailed orExpert.
3. Click Playlists and select the layout and zone to locate theAdvance To command.
4. Click theSpecials tab.
5. Add a rendezvous point to the playlist and give it a name.
6. Add one or moremedia items to the playlist.
7. Click theSpecials tab
Net-Top-Box User Guide
93
8. Select theAdvance To item that has the same name as the rendezvous point you created and add it to theplaylist. This causes the playlist to loop back to the start again, regardless of what may follow.
9. Add a second rendezvous point to the playlist.
10. Add one or more ad hoc media items to the playlist.
11. Add theAdvance To command that has the same name as the second rendezvous point to the playlist. Thiscauses the playlist to loop continuously through the ad hoc media items. If you want to revert back to the originalmedia items, omit this step.
12. On theManage Ad hoc Items page, create an ad hoc Advance To item and select the names of the tworendezvous points you have created.
13. Add those ad hoc Advance To items to an ad hoc page.
14. Log in as an ad hoc user and browse to the ad hoc page you have created.
15. Select theAdvance To command that you wish to test and click the button. If the NTB is playing theplaylist, it will jump to the point in the playlist under the selected rendezvous point.
5.4 Ad Hoc from CentreTheUpdate from Centre feature allows ad hoc users tomake changes on a publisher NTB that will be updated tothe channel's subscribers. The ad hoc users on the publisher NTB can only change the content on the ad hoc pageyou create.
You can use theUpdate from Centre feature with ad hoc text and schedule override items. When you create an adhoc from centre item, you set its scope as one of:
l Local – Default. Ad hoc text items behave as normal. Ad hoc users can log in and change the contents for eachNTB.
l Remote – Ad hoc items will only be visible to ad hoc users on the publisher NTB. Changing the ad hoc item on thepublisher NTB causes updates to all subscribers too. To restore the original schedule, select Default Schedulefrom theAd hoc page.
Subscriber players may not normally check for updates often enough if the ad hoc from centre changes are frequent.Therefore, you can configure the subscriber players to check for update from centre items more frequently. On thesubscriber, theChannels >Manage Subscription page offers theUpdate From Centre Poll Interval option. Thisdetermines how often the subscriber polls for update from centre items and changes accordingly. The subscriberplayer checks for normal updates and for updates from centre independently.
5.5 Managing Ad Hoc ItemsThe ad hoc items page allows you to create, delete, and set properties for ad hoc items. Reach that page from themenu bar by clickingMedia andManage Ad hoc Items.
To create an ad hoc item, click theAdd Item tab. Select the item type from the drop-down list or select one of theother types displayed and enter a unique name for it.
To delete an ad hoc item, click the . button. If the NTB does not display the item's button, it is in use andcannot be deleted. To see which items are in use, click the button and look at theUsed By Layouts andUsedby Ad hoc Pages information.
Part 5: Ad Hoc Content
94
When you add an ad hoc item, you can also set a range of properties, depending on the item. The NTB supportsthese item types:
l Advance To
l Layout
l Newsfeed
l Schedule
l Schedule override
l Text
l TV
l Radio
When you add an item, you have to select one of theseAllowed Choices options:
l All Available – Permits the ad hoc user to choose any of the defined items.
l Only Selected – Permits the ad hoc user to choose only those items you select.
In addition, for schedule override and text items, the NTB offers you theCustomisation Scope option. Use this toselect where those ad hoc items can be customised and displayed:
l Local – Customisation applies on the individual NTB.
l Remote – Customisation applies on each NTB in the channel.
Text also has its own set of ad hoc options. Use these to control what an ad hoc user can enter in theDefault TextandAd hoc User pages:
l Rich text – No validation is performed.
l Plain text – An ad hoc user cannot customise the text colour or styling.
l Integer between – Enter the lower and upper integer limits (both inclusive) for ad hoc content. This option is onlyshown if you have set theUser Interface Policy toDetailed.
l Plain text of maximum length – Limits themaximum length of plain text. This option is only shown if you haveset theUser Interface Policy toDetailed.
l Plain text matching – This option is only shown if you have set theUser Interface Policy toDetailed.
l Regular Expression – The ad hoc content must match the regular expression that you provide. There aremanyweb sites and books that provide information about using regular expressions. For example: http://www.regular-expressions.info/javascript.html.
l Feedback Message – Enter amessage to display if the ad hoc user text does not match the regular expressionyou provided.
l Default Text – Enter the default text to use until an ad hoc user makes a change on theAd hoc Data Entry page.Your default text must be compatible with the ad hoc input mode you have selected.
l Customisation Status – Indicates if the ad hoc user has overridden the default value or not.
5.6 Creating Ad Hoc User AccountsIf you want a user on a subscriber NTB to update ad hoc channel content, youmust create an account for them on thesubscriber with the ad hoc and any other required permissions. If you want a user on a publisher NTB to be
Net-Top-Box User Guide
95
responsible for ad hoc from centre content, youmust create an account for them on the publisher NTB with theAdhoc and any other required permissions.
5.7 Ad Hoc PagesWhen ad hoc users access the NTB using their browser, they only see the pages you have created for them. TheNTB does not allow ad hoc users access to any other pages in the NTB user interface. The NTB displays ad hocpages with the text fields you have allowed ad hoc users to change or the commands you have allowed them toissue. You can give ad hoc users access to the ad hoc media folder, which contains all the items that they canchoose from when updating or changing content.
By default, the NTB enables ad hoc pages for all layouts when you create them. This means that when you addcustomisable or ad hoc items to a layout, the NTB generates an ad hoc page for that layout containing all thecustomisable and ad hoc items within it.
You can also create ad hoc pages that are not directly associated with a specific layout.
5.7.1 Managing Ad Hoc Pages
Tomanage ad hoc pages, youmust have your user interface policy set toDetailed orExpert. To do so, follow thesesteps:
1. On themenu bar, click Help andUI Options.
2. In theUser Interface Policy section, select Detailed orExpert.
3. Click the button.
To open themanage ad hoc pages screen, click Media on themenu bar and select Design Pages >Manage Adhoc Pages. The NTB displays theAd hoc Pages andAdd Page tabs.
Ad hoc Pages:
The NTB provides the following action buttons for each ad hoc page:
– Delete the ad hoc page.
– Edit the ad hoc page tomanage its items and properties.
If the NTB does not display the page's button, it is in use and cannot be deleted. Also, you cannot delete layoutad hoc pages, only disable them on the Layout Properties tab.
Add Page:
To create an ad hoc page that is not associated with a specific layout, follow these steps:
1. In theAdd Ad hoc Page Name field, enter a unique name for the page.
2. Click the button. The NTB displays theAd hoc Pages tab with the new page listed.
3. Click the button next to the page to configure its items and properties.
5.7.2 Editing Ad Hoc Pages
The edit ad hoc page lists all the items you have added to the page that an ad hoc user can change.
Note: Click theAd hoc Entry Page link at the top of the page to navigate to theData Entry page.
Part 5: Ad Hoc Content
96
The NTB displays these tabs:
l Items – Shows the items on the page and allows you tomodify them.
l Add Items – Allows you to add new items to the page (not shown for layouts automatically managing adhoc pages).
l Properties – Allows you to change the page name, the user message, and the users allowed to changeitems on it.
Items:
To remove an ad hoc item, click its button.
Note: This is not available on layouts that automatically manage ad hoc pages.
On pages with multiple items, you can adjust their order using these buttons:
–Move the item to the top.
–Move the item up one place.
–Move the item down one place.
–Move the item to the bottom.
Add Item:
To add an ad hoc item to the page, click theAdd Items tab and follow these steps:
1. Select the item from theAdd Ad hoc Item drop-down list.
Note: You can have only one ad hoc Schedule Override item on an ad hoc page.
2. Click the button.
3. Perform other actions on the Items tab. Move the item or click its button to add a label to show next to it ontheData Entry page.
Properties:
The options on theProperties tab are:
l Page Name – Unique identifier for the ad hoc page. The NTB displays it on theData Entry page.
l User Guidance Message –Optional. Enter amessage for the NTB to display on theData Entry page to helpusers when entering values.
l Users allowed to Enter Data – Select the users who have permission to view andmake changes to theDataEntry page (users with Layout Manager permission can view andmodify all ad hoc Data Entry pages).
5.8 Ad Hoc Folder PlayYou can add a folder to a playlist and then give ad hoc users permission to upload their own content into that folder.For example, youmight develop a layout for an education authority with a zone dedicated to showing student artworkthat is published to subscriber NTB units in each school: each school uploads its local artwork to the ad hoc folder sothe content of the zone is unique to that school.
Net-Top-Box User Guide
97
Your NTB does not need to be a publisher to use an ad hoc folder play. The same principles apply to a standaloneNTB.
Your ad hoc folder must contain at least one default item that is shown until ad hoc users upload content. Even if yourepublish the channel, local content remains in place (unless you have removed the folder from the playlist).
To add an ad hoc folder to a playlist follow these steps:
1. On themenu bar, click Playlists and select the layout and zone where you want to add the folder.
2. Click the Files & Folders tab.
3. Click the button for the folder you want to add to the playlist.
4. Click thePlaylist tab and, If necessary, adjust the item order.
5. Click the folder's button.
6. Check theManagement box.
7. Click the button.
The NTB creates a subfolder in the ad_hoc_media folder with the same name as the folder you added in step 3. Putany default ad hoc content into that subfolder. The NTB will display the content in that subfolder rather than thecontent in the original folder. Your ad hoc users can add to or delete content from that subfolder as required. However,if you or your ad hoc users leave the ad hoc subfolder empty, the NTB will display the content in the original folder youadded to the playlist.
You can also have the NTB automatically update the files in the ad hoc folder with changes made to the files on aremote computer (see AdHoc Folder Mirror for details).
5.9 Ad Hoc Folder MirrorUse theAd Hoc Folder Mirror option to have the NTB keep the files in an ad hoc folder up-to-date with those in afolder on your computer. Your computer must support the SMB/CIFS protocol (typically, Windows computers).
The NTB periodically checks for changes in the folder on your computer and updates the ad hoc folder accordingly.
Note: The NTB canmirror files in a folder but not subfolders within it. The exception is if you aremirroring HTMLfiles as they often require supporting subfolders (such as those containing images). Youmust name the subfolderin the format name_files, where name is the base name of the HTML file (for example, .for website.htmlyoumust name its subfolder website_files).
If you delete all the files in themirrored folder, the NTB will also delete all the files in the ad hoc folder. However, theNTB does not delete the files if you simply change the settings to point to a different ad hoc folder. The NTB keepsthe files on disk and, if you want to delete them, youmust do somanually.
Before you can configure ad hoc folder mirror:
1. On your computer: add the folder containing the files you want mirrored and configure it as a share.
2. On your NTB: add an ad hoc folder to the playlist (see AdHoc Folder Play for details).
Click the tab for themirroring option you require:
l Settings – Configuring the local folder to mirror the remote folder.
l Status – Checking the current state of mirroring and the files involved.
Part 5: Ad Hoc Content
98
Settings:
To configuremirroring, complete the following options then click the button:
Folder Mirror Check the option you require:
l No folder will be mirrored – Do not use mirroring.
l Mirror contents of specified folder – Use mirroring.
Network Location Complete these details to identify the remote folder's location:
l Server – The name of the computer hosting the remote folder.
l Share – The name of the remote folder.
Windows Credentials Provide the credentials allowing access to the remote folder:
l Domain – If required (not for the same domain), the name of the domain where thehost computer resides.
l Username – If required (not for anonymous login), the username of an account thatcan access the folder.
l Password – If required (not for anonymous login), the password for that account.
For enhanced stability and security, you should consider accessing the folder using adedicated account suitably configured for the purpose. An ordinary user account may notbe appropriate (for example, you would have to reconfigure folder mirror every time thatuser's password changed).
Ad Hoc Folder Select the local ad hoc folder from the drop-down list.
Check for Changes Interval Select how often the NTB checks the remote folder for changes. To allow for processing,the minimum interval is 5 seconds.
Minimum Free Space on NTB Default 16 MiB (this is the minimum free space you can select). Modify this value if yourequire more free space to be left on the NTB. The NTB will stop copying if the free spacedrops below this minimum.
Status:
Shows the latest characteristics of themirroring operation.
5.10 Ad Hoc Media FolderYou designate ad hoc media folders to delimit themedia folders that ad hoc users can access. Go to theMedia >Files & Folders page to create folders and to browse the file system.
To allow an ad hoc user to access amedia folder, youmust add it to the playlist and then enable it for the ad hoc user.If suitable material is available in the folder, the NTB plays it in preference to any other. If no suitable media isavailable, the NTB plays the content of the default folder for that playlist instead.
Youmust create an ad hoc folder for the user to upload content to. If you see themessage 'NoMedia Folder has beenconfigured for this user', you need to designate amedia folder for the user's account. Do so by following these stepson the NTB:
1. On themenu bar, click Setup and select System > Users.
2. Click the user's button.
Net-Top-Box User Guide
99
3. Select the folder from theMedia Folder drop-down list.
4. Click the button.
5.11 Changing Ad Hoc ContentIf you want to change the ad hoc content currently playing on the NTB, the general steps to follow are:
1. Connect to the NTB with your browser
2. On themenu bar, click Ad hoc Entry.
3. Select the ad hoc page for the content you want to change.
4. Make the necessary changes (see table below for details).
5. If the NTB is playing the item, click the button. Your change takes effectimmediately.
6. If the NTB is not playing the item, click the button. Your change takes effect when the NTB nextplays the item.
7. Exit your browser to leave the NTB.
In more detail, how youmake your change depends on the ad hoc item concerned. Follow the steps for the ad hocitem you want to change:
Text and Tables Change the text scrolling across the screen or in a table:
1. On the menu bar, click Ad hoc Entry.
2. Select the ad hoc page for the content you want to change.
3. Edit the text or table entry. Tips:
o To remove text from the screen, delete everything in the box.
o To create a line break in vertically scrolling text, press the Enter key at the location required.
4. Click the or button.
TV Stations Change the TV station showing on the screen:
1. On the menu bar, click Ad hoc Entry.
2. Select the ad hoc page for the content you want to change.
3. Select the new TV channel from the drop-down list
4. Click the or button.
Radio Stations Change the radio station:
1. On the menu bar, click Ad hoc Entry.
2. Select the ad hoc page for the content you want to change.
3. Select the new radio station from the drop-down list
4. Click the or button.

Part 5: Ad Hoc Content
100
Newsfeeds Change the source for a newsfeed showing on the screen:
1. On the menu bar, click Ad hoc Entry.
2. Select the ad hoc page for the content you want to change.
3. Select the new newsfeed from the drop-down list.
4. Click the or button.
Media Folders Manage media items (typically, still images held in a folder) showing on the screen:
1. On the menu bar, click Ad hoc Entry.
2. SelectMedia Folder. The NTB shows the contents of your media folder.
3. To view a file, click its name.
4. To upload a new file or manage the existing files, see Uploading Content Files.
5. To change the order in which files play, see Folder Play Properties.
Screen Layouts Change the whole layout (this assumes you have already added an ad hoc layout to the ad hoc page):
1. On the menu bar, click Ad hoc Entry.
2. Select the ad hoc page relevant to the layout you want to change.
3. Select the new layout from the drop-down list.
4. Click the or button.
Scheduling Change the schedule for when the NTB makes changes to the display (for example, to coincide withmeal or break times or for an after-hours event):
1. On the menu bar, click Ad hoc Entry.
2. Select the ad hoc page relevant to the schedule you want to change.
3. Modify the schedule using the drop-down lists and check boxes.
4. Click the or button.
If the current time is within your new schedule, the NTB triggers the change immediately (unless it hasalready begun another schedule).
If the schedule has related audio or you require silence, reprogram the audio on or off time to match.
Advance To (ondemand)
Activate events on demand (for example, to show a video selected from a list):
1. On the menu bar, click Ad hoc Entry.
2. Select the ad hoc page relevant to the Advance To command you want to invoke.
3. Select the relevant name from the drop-down list.
4. Click the or button.
5.12 Ad Hoc ThemingYou can change how the user interface appears to your ad hoc users by usingAd hoc Theming. Ad hoc theminglets you customise page headers and the text that appears on the page.
Youmight use ad hoc theming to:
Net-Top-Box User Guide
101
l Include a company logo in a page tomake it consistent with a brand identity.
l Provide a translation of pages in a language not already supported on the NTB.
The ad hoc theme applies to ad hoc users on the NTB or on a NTB subscribing through a channel. You cannot includead hoc themes in layout packages.
To access theAd hoc theme page, click onMedia and selectManage Ad hoc Theme. Create your themingfeatures using the following tabs:
Properties Select the options you require:
l Ad Hoc Theme – Choose the Disabled button to retain the default appearance. Choose theEnabled button to use the theme you are customising.
l Header text colour – Click the button to select a different header text colour.
l Header background colour – Click the button to select a different header backgroundcolour.
l Page logo – Select the Alignment option for the position you want the logo to have on the page.
Select the logo image from the files displayed. If your logo file is not there, navigate through the foldersto where it is located or click the Files & Folder link to upload it.
When complete, click the button.
Strings Allows you to provide either translations or alternative text for all the headers, boxes, instructions, andwarnings that appear in three ad hoc areas:
l Homepage
l Ad hoc Item Edit Pages
l Media Folder
The NTB displays the default text on the left. Enter your new text in the field on the right.
When complete, click the button.

Part VISharing Content UsingLayout Packages

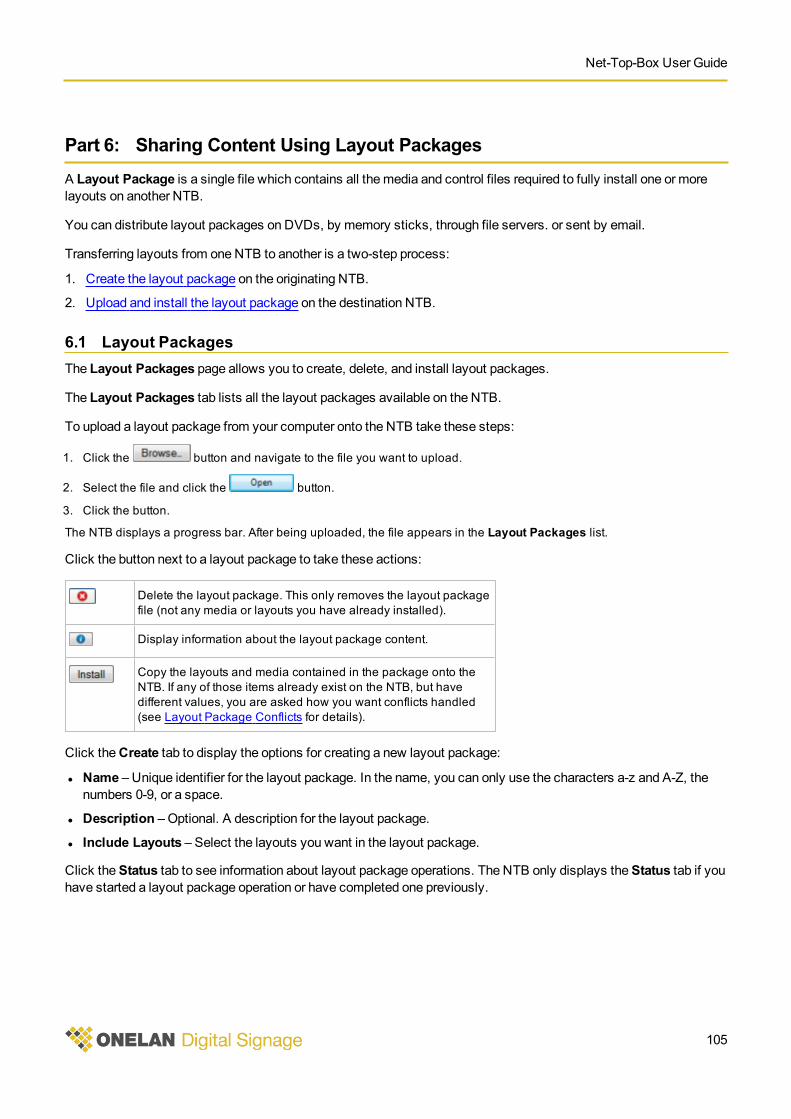
Net-Top-Box User Guide
105
Part 6: Sharing Content Using Layout PackagesA Layout Package is a single file which contains all themedia and control files required to fully install one or morelayouts on another NTB.
You can distribute layout packages on DVDs, by memory sticks, through file servers. or sent by email.
Transferring layouts from one NTB to another is a two-step process:
1. Create the layout package on the originating NTB.
2. Upload and install the layout package on the destination NTB.
6.1 Layout PackagesThe Layout Packages page allows you to create, delete, and install layout packages.
The Layout Packages tab lists all the layout packages available on the NTB.
To upload a layout package from your computer onto the NTB take these steps:
1. Click the button and navigate to the file you want to upload.
2. Select the file and click the button.
3. Click the button.
The NTB displays a progress bar. After being uploaded, the file appears in the Layout Packages list.
Click the button next to a layout package to take these actions:
Delete the layout package. This only removes the layout packagefile (not any media or layouts you have already installed).
Display information about the layout package content.
Copy the layouts and media contained in the package onto theNTB. If any of those items already exist on the NTB, but havedifferent values, you are asked how you want conflicts handled(see Layout Package Conflicts for details).
Click theCreate tab to display the options for creating a new layout package:
l Name – Unique identifier for the layout package. In the name, you can only use the characters a-z and A-Z, thenumbers 0-9, or a space.
l Description –Optional. A description for the layout package.
l Include Layouts – Select the layouts you want in the layout package.
Click theStatus tab to see information about layout package operations. The NTB only displays theStatus tab if youhave started a layout package operation or have completed one previously.

Part 6: Sharing Content Using Layout Packages
106
6.2 Creating a Layout PackageTo create a layout package, follow these steps:
1. Finalise the layout or layouts that you will include in the layout package.
2. On themenu bar, click Layouts and Layout Packages.
3. Click theCreate tab.
4. Enter a suitable name and optionally a description for the new layout package.
5. Check the box next to each layout to include in the package.
Note: The NTB also includes layouts referenced by Change Layout commands even if you do not select thoselayouts explicitly here.
6. Click the button. The NTB displays theStatus tab.
7. When the layout package creation completes, click thePackage Filename link and follow the prompts on thepop-up screen to save the package file on your computer.
8. Send copies of the layout package ZIP file to those who need them.
6.3 Uploading and Installing a Layout PackageTo upload and install a layout package on your NTB, follow these steps:
1. On themenu bar, click Layouts and Layout Packages.
2. Click the button and navigate to the layout package file on your computer.
3. Click the button to copy the file onto the NTB. The NTB displays a progress bar during upload.
4. After uploading, the NTB displays the layout package in the list.
5. Click the layout package's button. If items in the package have the same name as items already on theNTB, the NTB prompts you to resolve the conflict (see Layout Package Conflicts for more details).
Note: Layout packages are compressed ZIP files. The NTB does not list other types of file on the layout packagepage.
You can also copy layout packages to and from the NTB by using an FTP client (for example, Internet Explorer) onyour computer. Browse to the /HOME/package folder on the NTB.
6.4 Layout Package ConflictsWhen you install a layout package, the NTB merges items in the package with existing items. This includes:
l Layouts
l Special items
l Ad hoc items
l Ad hoc pages
l Media files
Net-Top-Box User Guide
107
The NTB flags a conflict when an item in the package is identical to an existing item, but has different propertyvalues. You are prompted to resolve the conflict with one of these options:
l Do Not Copy – The NTB will not change the existing items. This is equivalent to not copying any conflictingitems or files from the layout package. The NTB installs all non-conflicting items.
l Copy and Replace – The NTB will replace existing items with items from the layout package. This is equivalentto the NTB overwriting the local items.
l Copy but Keep Both Items – The NTB renames the items in the layout package to avoid conflicts with existingitems. The NTB displays the new names on theStatus tab.
The NTB may offer different conflict actions for media files and layout and special items.
In some cases, selectingCopy but Keep Both Itemsmay cause additional items to be in conflict. For example, ifan ad hoc text item is in conflict and is contained in a layout that exists locally, but is identical, and you choose theCopy but Keep Both Items option, the NTB renames the ad hoc text item. This causes the layout in the layoutpackage to bemodified to reference the newly renamed ad hoc text item. This in turn causes a layout conflict, sincethe local layout and themodified layout are now different. The NTB shows additional, secondary conflicts on aseparate line in theConflict Details section.
Click the button to proceed with the Installation or the button to stop theinstallation process.
6.5 Layout Package InformationTo see information about a layout package, follow these steps:
1. On themenu bar, click Layouts and Layout Packages.
2. Click the layout package's button.
The NTB displays this information:
l The originating NTB.
l Layouts included in the package.
l Special Items included in the package.
l Other additional settings (such as colour items and special fonts).
l Media item files in the package.
This informationmay help you resolve any conflicts between items in the package and those already on your NTB.


Part VIIChannels and SignageNetworks

Net-Top-Box User Guide
111
Part 7: Channels and Signage NetworksChannels provide an easy way to display the same content at multiple locations by setting up a digital signagenetwork of players. A collection of players that all play the same content on their screens is known as a channel.
A channel has these basic parts:
l The publisher NTB.
l The content that the NTB publishes.
l Optionally, a separateChannel Content Server (CCS). You can use a CCS to handle delivery of content to theplayers, thus reducing processing overhead on the publisher NTB.
l One ormore subscriber players.
The publisher NTB publishes content to the CCS. (On small networks, the publisher NTB can also act as the CCS.)Each subscriber NTB regularly polls the CCS for themost up-to-date content.
Note: SomeNTB players are sold as 'Subscriber only' and cannot act as publishers.
When you publish to a channel, it includes all the related schedules, layouts, andmedia content. You should considerthese factors when calculating the storage space required for a channel:
l With the exception of video files, content does not require large amounts of storage. If your layouts do not includevideo files, you should find 1GB to 2GB of space sufficient.
l If your layouts include video files, increase storage by at least 2 GB per hour of standard quality video. Allow formore if the video is high quality.
l The NTB displays the size of the channel on its Channels > Detailed Status page. Allow at least twice that onthe subscriber NTB as it stores the channel twice: once to subscribe and again to display.
However, the channel does not include:
l Any custom fonts you have installed.
l User records, including ad hoc users.
If your content relies on either of the above, you will need to ensure they are already present on each of thesubscribers.
Also consider the capabilities of the subscriber units in your network:
l Are they powerful enough to show the content? Some content may not show optimally on less powerful playermodels (for example, high-resolutionmovies or Adobe Flash items that require a fast CPU).
l What resolution are their attached screens? Ideally, to display the same content you should have screens set tothe same resolution. If some screens display at lower resolution, take into account that content will be cropped.
l Do they have any additional hardware or licenses required? Subscribers can only display certain content if theyare configured to do so (for example, TV channels)?
To set up and begin using a channel, first configure your NTB as a publisher and then follow these general steps:
1. Create the content on the publisher NTB.
2. When your content is ready, click theManage Channels Page link that appears at the top of each screen onyour publisher NTB. The NTB displays theManage Channels page. Specify your channel configuration here(see Configuring the Publisher for more details).
Part 7: Channels and Signage Networks
112
3. Click the appropriate publish button on theManage Channels page. The NTB will not distribute changes to achannel until you publish them. See Publishing a Channel for details of the publishing options.
You will now need to configure each NTB in your network in theSubscriber role, pointing them to the correct locationto find the channel content to display.
Important: The NTB user account you specify in the subscriber configurationmust have theSubscribeChannel permission.
After a period, the subscriber players will poll for channel content, download it, and begin displaying it on the screensthey control.
Some other features may be of interest to you:
l Add ad hoc content to your channel. This provides content that varies on a per NTB basis. For example, if youhave players on different sites, youmay wish to allow local users to display messages specific to their location.You will need to provide the users on the subscriber players with the appropriate ad hoc permissions. See AdHocContent for more details.
l Publishmore than one channel from your publisher. SeeMultichannel Publishing for more details.
l Distribute channel content using a separate Channel Content Server (CCS). Youmight consider adding one ormore CCSs to your digital signage network depending on the configuration scenarios you need to support. SeeChannel Content Servers for more details.
Note: It is recommended that the publisher NTB and each subscriber NTB run the same software version.Although later-version subscribers can sometimes display content created on an earlier-version publisher NTB,they will fail to display features no longer supported.
7.1 Channel RolesIn a channel, you configure each NTB to operate according to the role it performs. The NTB can have one of theseroles:
l Publisher – The NTB publishes content to a channel. Subscribers download and display the content. Youmusthave thePublish Channel permission to publish to a channel.
l Subscriber – The NTB downloads and displays content from a channel. Publishers create and publish content tothe channel. Youmust have theSubscribe Channel permission to subscribe to a channel.
l Standalone – The NTB is neither a publisher or subscriber. It does not take its content from a channel (that is, it isnot part of a digital signage network).
To change the channel role. follow these steps:
1. On themenu bar, click Setup, select System, and click Channel Role.
2. Select the required role.
3. Click the button:
o If the role is Standalone, you have now completed the change of role.
o If the role is Publisher, click the link to go to theManage Channels page.o If the role is Subscriber, click the link to go to theChannels Settings page.
4. On the relevant page, complete the publisher or subscriber configuration (see either Configuring the Publisher orConfiguring a Subscriber for more details).
Net-Top-Box User Guide
113
Notes:o SomeNTB models are 'subscriber-only' and cannot be configured as publishers.
o You cannot change the role of a publisher NTB if it publishes more than one channel. Youmust delete all butone channel to proceed.
7.2 Channel Content ServersSubscriber players can download channel content directly from your publisher NTB. However, this is not alwayspossible or the best solution for your signage network.
An alternative is to use an external Channel Content Server (CCS) to offload channel distribution processing fromyour publisher NTB. Each subscriber NTB polls the CCS for the latest channel content in the sameway it would pollthe publisher NTB directly.
How you publish your channel depends on the number of NTB players in the channel and the network they areconnected to:
How to Publish Description WhenWould You Use This Method?
On the publisher NTB You store channel files on the publisher NTB andsubscribers download them using HTTP, HTTPS(recommended), or FTP.
You only have a small number ofsubscribers (typically, less than five)that will not slow the publisher down.
This method requires no extrahardware.
Using a USB memory stick You publish channel files onto USB memory sticks.You distribute the sticks to each subscriber, whichautomatically reads the channel from it.
You have to perform this process every time youupdate the channel.
Your subscribers are not connected toa network or you do not want topublish the channel through anetwork.
Using an external CCS You use FTP to upload the channel content to aCCS. The CCS makes the files available to thesubscribers, either through HTTP, HTTPS(recommended), or FTP.
You have a large number ofsubscribers or there are larger mediafiles in the channel.
This method:
l Takes the processing load off ofyour publisher NTB.
l Does not require any special FTP orweb server.
l Easily ties this into your existingserver hardware or web host.
When planning how to publish, you should bear in mind these network and bandwidth considerations:
l Using a CCS requires both the publisher NTB and the subscriber to be able to connect to it through a local networkor the internet.
l Using network-based publication will not work if there is a problem with connectivity or if the credentials providedby the subscriber for either the publisher NTB or the CCS are incorrect.
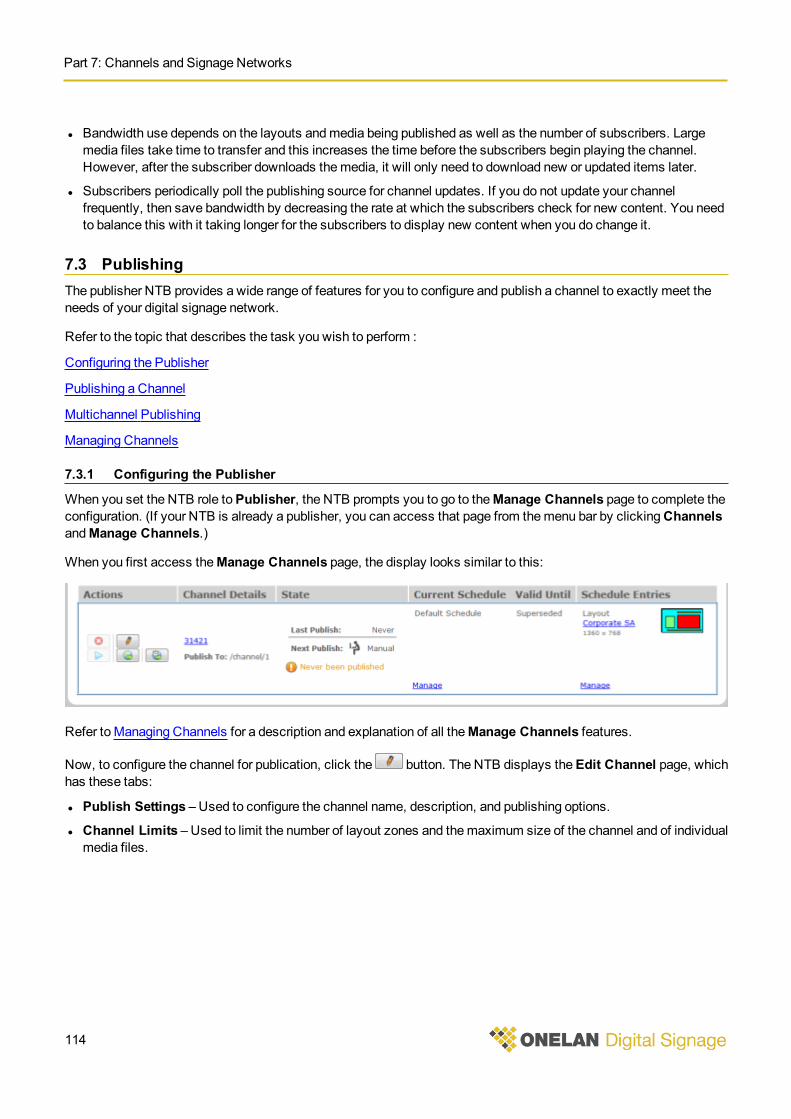
Part 7: Channels and Signage Networks
114
l Bandwidth use depends on the layouts andmedia being published as well as the number of subscribers. Largemedia files take time to transfer and this increases the time before the subscribers begin playing the channel.However, after the subscriber downloads themedia, it will only need to download new or updated items later.
l Subscribers periodically poll the publishing source for channel updates. If you do not update your channelfrequently, then save bandwidth by decreasing the rate at which the subscribers check for new content. You needto balance this with it taking longer for the subscribers to display new content when you do change it.
7.3 PublishingThe publisher NTB provides a wide range of features for you to configure and publish a channel to exactly meet theneeds of your digital signage network.
Refer to the topic that describes the task you wish to perform :
Configuring the Publisher
Publishing a Channel
Multichannel Publishing
Managing Channels
7.3.1 Configuring the Publisher
When you set the NTB role toPublisher, the NTB prompts you to go to theManage Channels page to complete theconfiguration. (If your NTB is already a publisher, you can access that page from themenu bar by clickingChannelsandManage Channels.)
When you first access theManage Channels page, the display looks similar to this:
Refer to Managing Channels for a description and explanation of all theManage Channels features.
Now, to configure the channel for publication, click the button. The NTB displays theEdit Channel page, whichhas these tabs:
l Publish Settings – Used to configure the channel name, description, and publishing options.
l Channel Limits – Used to limit the number of layout zones and themaximum size of the channel and of individualmedia files.
Net-Top-Box User Guide
115
To get started, go through the items on thePublish Settings tab and configure the options you require. It is notnecessary to configureChannel Limits but if you need to, click the tab to configure those options too. Click the
button when you have completed all of your configuration.
Configure thePublish Settings options you require as follows:
Channel Name Enter a unique name for the channel. When the channel is active, this appears at the top of the page onthe subscriber and publisher.
Description Optional. A meaningful description to further identify the channel and its content.
Publish Mode Select the mode of publication you want:
l Manual – You publish by clicking a button on the Manage Channels page.
l Automatic – The NTB publishes at the time you specify. Selecting this mode enables the Publishoptions.
Publish Only enabled if you set Publish Mode to Automatic.
Select the time you want the NTB to publish the channel:
l at – Publish each day at the time you choose (00:00 is midnight).
l every – Publish regularly at the interval you choose (in hours and minutes).
Important: Before choosing the timing, take into account when the NTB is publishing other channels inyour configuration. Consider staggering the timings to balance the load on the NTB and on yournetwork.
Channel Server Select how you want to publish the channel:
l The NTB /channel/1 folder – The NTB publishes the channel to one of its own channel folders. TheNTB displays the folder details on the Manage Channels page. Subscribers access the contentthrough FTP, HTTP, or HTTPS. Selecting this option enables the Channel URI option.
l The USB Flash Memory's / channel folder – The NTB publishes the channel to the channel folderon an attached USB stick.
l FTP Site – The NTB uploads the channel to an FTP site. Selecting this option enables the other FTPconfiguration items you must also complete (Publishing Root URL, Authentication, and Error RetryInterval).
Channel URI Only enabled if you set Channel Server to The NTB /channel/1 folder.
If you want to publish to a location other than the /channel/1 folder, enter its URI here.
Part 7: Channels and Signage Networks
116
Publishing RootURL
This and the next two options are only enabled if you set Channel Server to FTP Site.
Enter the URL required.
A valid FTP URL begins with ftp:// followed by the host name or address and the full path to thepublication location. Examples of valid FTP URLs are:
l ftp://example.com/mychannel/
l ftp://192.168.0.23/channel/
l ftp://somehost/a/b/c/
Note these points:
l If the folders do not exist on the FTP server, the NTB attempts to create them. This will fail if you donot provide a login name and password with appropriate write access.
l To test the setup, the NTB attempts to log into the FTP server you have defined. It notifies you if thisis successful or not.
Authentication Select the login method required:
l Login using anonymous FTP access – The FTP site does not require specific login credentials.
l Login with – The FTP site requires login credentials. Enter the username and password in the boxesprovided.
Error RetryInterval
If the NTB fails to connect to the FTP site, specify the period before it tries again.
Configure any Channel Limits options you require as follows:
Layout ZoneLimit
Specify the number of zones allowed in published layouts:
l Unlimited number of zones – Default. Do not limit the number of zones.
l Limit to – Do not allow more zones than the value you specify. For example, if publishing to lesspowerful models, choose a value to ensure you will not overload them.
Channel SizeLimit
Specify the size limit for the channel:
l Unlimited size – Default. Do not limit the size of the channel.
l Limit to (MiB) – Do not allow the channel size to exceed the value you specify. For example, if youset a limit of 100 then all of the combined elements in that channel cannot exceed a total of 100 MiB.
Individual MediaFile Size Limit
Specify the size limit for each individual media file:
l Unlimited size – Default. Do not limit the size of each individual media file.
l Limit to (MiB) – Do not allow each media file size to exceed the value you specify. For example, ifyou set a limit of 50 then each media file uploaded cannot exceed the limit of 50 MiB.
7.3.2 Publishing a Channel
After configuring the channel for publication, you are ready to publish and activate it. You can add and publishadditional channels later.
Note: If you are publishing to a USB stick, insert that into the NTB before beginning. Ensure it has the capacity tohold the channel content.
Before continuing, it is important to understand the distinction between publish and activate:
Net-Top-Box User Guide
117
l Publish –When the NTB copies the channel content to the publication location you specified.
l Activate –When the subscribers start displaying the channel.
You can specify that activation takes place later than publication. In other words, the NTB will publish the channel butsubscribers will not display it until after the date and time you specify. This is useful to ensure all subscribers startshowing the channel content at the same time (rather than as soon as they can download it). For example, you canuse this to allow for the difference in time it takes several subscribers to download largemedia files over a slownetwork.
To publish and activate the channel, follow these steps:
1. On themenu bar, click Channels.
2. Click Manage Channels.
3. In the channel's Actions column, click the button for the publishing option you require:
o – Publish and activate as soon as possible.
o – Publish and activate later. The NTB prompts you for the date and time after which to activate.
The NTB begins the copying process and displays progress in the channel's State column. If there is a problem, theNTB displays an error message. After copying is complete, how the subscriber receives the new content depends onwhere you chose to publish the channel:
l NTB channel folder or external server– The subscribers will download the new content the next time theycheck the channel.
l USB stick – Remove the USB stick and use it to load the channel content onto each subscriber.
Repeat the same process even if you have only changed the schedule. In all cases, the publisher NTB displays thefollowing banner if you have changed the channel contents but have not yet published it:
If you are not on theManage Channels page, clicking theManage Channels Page link takes you there. To publishthe new content, follow the same steps as described above.
TheManage Channels page provides you with all of the features you need to add, edit, and delete channels. It alsodisplays status information on each channel. You can also access detailed information on each channel by followingthese steps:
1. On themenu bar, click Channels.
2. Select Detailed Status. The NTB displays the list of channel names.
3. Click the name of the channel whose status you want to check.
TheDetailed Status page contains this information:
l Publisher State – The current publication state of the channel.
l Channel – Channel identifier and activation details.
l Required Version – If relevant, indicates theminimum software version the players must be running to displaythe channel.
l Size – The size of the channel content sent so far, its total size, and the status of delivery progress.
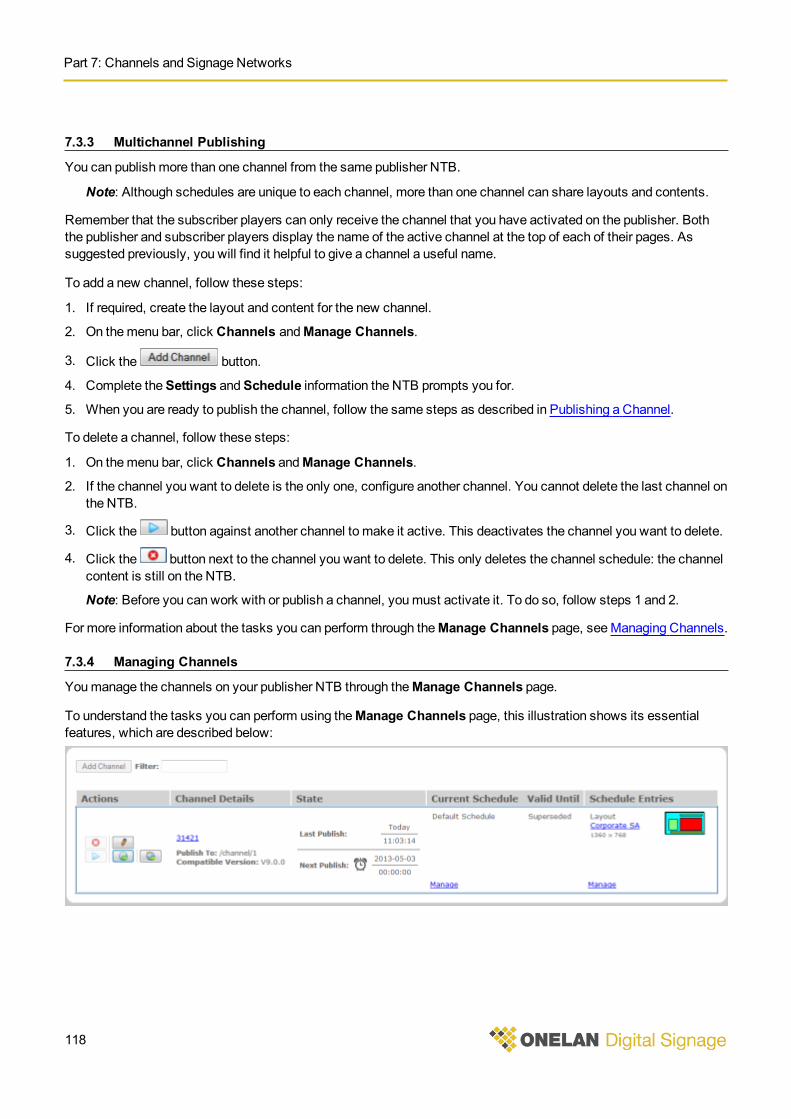
Part 7: Channels and Signage Networks
118
7.3.3 Multichannel Publishing
You can publishmore than one channel from the same publisher NTB.
Note: Although schedules are unique to each channel, more than one channel can share layouts and contents.
Remember that the subscriber players can only receive the channel that you have activated on the publisher. Boththe publisher and subscriber players display the name of the active channel at the top of each of their pages. Assuggested previously, you will find it helpful to give a channel a useful name.
To add a new channel, follow these steps:
1. If required, create the layout and content for the new channel.
2. On themenu bar, click Channels andManage Channels.
3. Click the button.
4. Complete theSettings andSchedule information the NTB prompts you for.
5. When you are ready to publish the channel, follow the same steps as described in Publishing a Channel.
To delete a channel, follow these steps:
1. On themenu bar, click Channels andManage Channels.
2. If the channel you want to delete is the only one, configure another channel. You cannot delete the last channel onthe NTB.
3. Click the button against another channel to make it active. This deactivates the channel you want to delete.
4. Click the button next to the channel you want to delete. This only deletes the channel schedule: the channelcontent is still on the NTB.
Note: Before you can work with or publish a channel, youmust activate it. To do so, follow steps 1 and 2.
For more information about the tasks you can perform through theManage Channels page, seeManaging Channels.
7.3.4 Managing Channels
Youmanage the channels on your publisher NTB through theManage Channels page.
To understand the tasks you can perform using theManage Channels page, this illustration shows its essentialfeatures, which are described below:
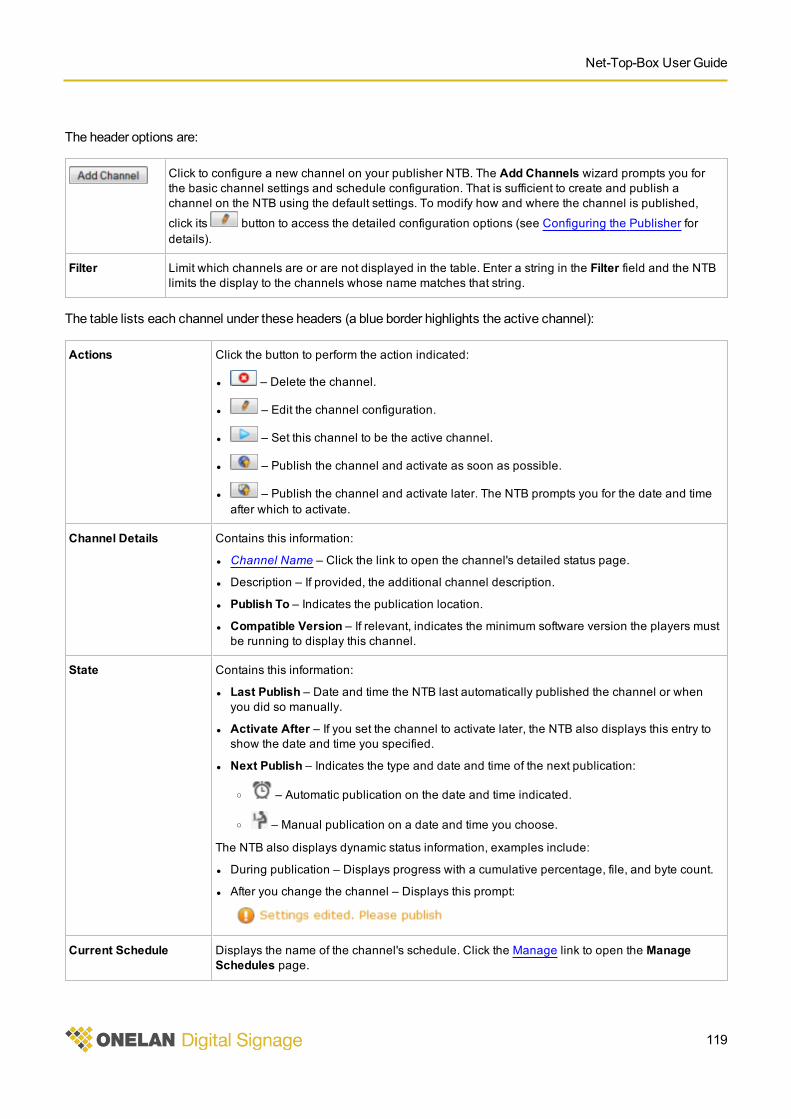
Net-Top-Box User Guide
119
The header options are:
Click to configure a new channel on your publisher NTB. The Add Channels wizard prompts you forthe basic channel settings and schedule configuration. That is sufficient to create and publish achannel on the NTB using the default settings. To modify how and where the channel is published,
click its button to access the detailed configuration options (see Configuring the Publisher fordetails).
Filter Limit which channels are or are not displayed in the table. Enter a string in the Filter field and the NTBlimits the display to the channels whose name matches that string.
The table lists each channel under these headers (a blue border highlights the active channel):
Actions Click the button to perform the action indicated:
l – Delete the channel.
l – Edit the channel configuration.
l – Set this channel to be the active channel.
l – Publish the channel and activate as soon as possible.
l – Publish the channel and activate later. The NTB prompts you for the date and timeafter which to activate.
Channel Details Contains this information:
l Channel Name – Click the link to open the channel's detailed status page.
l Description – If provided, the additional channel description.
l Publish To – Indicates the publication location.
l Compatible Version – If relevant, indicates the minimum software version the players mustbe running to display this channel.
State Contains this information:
l Last Publish – Date and time the NTB last automatically published the channel or whenyou did so manually.
l Activate After – If you set the channel to activate later, the NTB also displays this entry toshow the date and time you specified.
l Next Publish – Indicates the type and date and time of the next publication:
o – Automatic publication on the date and time indicated.
o – Manual publication on a date and time you choose.
The NTB also displays dynamic status information, examples include:
l During publication – Displays progress with a cumulative percentage, file, and byte count.
l After you change the channel – Displays this prompt:
Current Schedule Displays the name of the channel's schedule. Click the Manage link to open the ManageSchedules page.
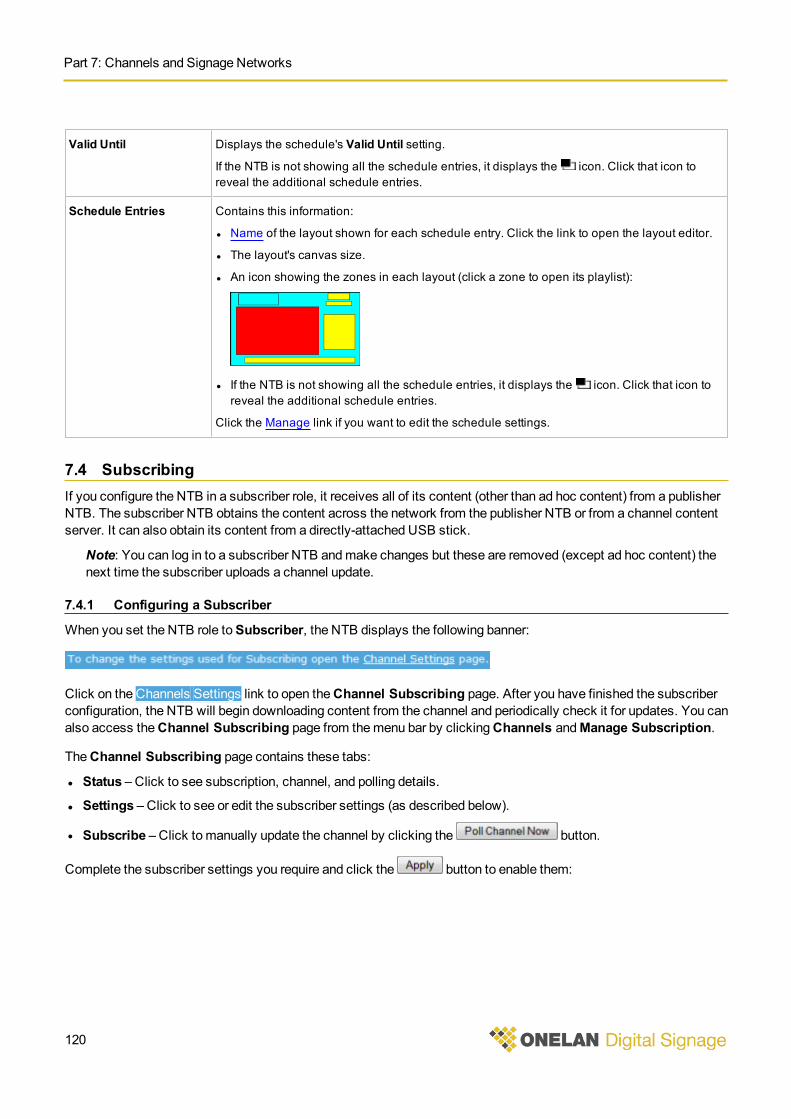
Part 7: Channels and Signage Networks
120
Valid Until Displays the schedule's Valid Until setting.
If the NTB is not showing all the schedule entries, it displays the icon. Click that icon toreveal the additional schedule entries.
Schedule Entries Contains this information:
l Name of the layout shown for each schedule entry. Click the link to open the layout editor.
l The layout's canvas size.
l An icon showing the zones in each layout (click a zone to open its playlist):
l If the NTB is not showing all the schedule entries, it displays the icon. Click that icon toreveal the additional schedule entries.
Click the Manage link if you want to edit the schedule settings.
7.4 SubscribingIf you configure the NTB in a subscriber role, it receives all of its content (other than ad hoc content) from a publisherNTB. The subscriber NTB obtains the content across the network from the publisher NTB or from a channel contentserver. It can also obtain its content from a directly-attached USB stick.
Note: You can log in to a subscriber NTB andmake changes but these are removed (except ad hoc content) thenext time the subscriber uploads a channel update.
7.4.1 Configuring a Subscriber
When you set the NTB role toSubscriber, the NTB displays the following banner:
Click on the Channels Settings link to open theChannel Subscribing page. After you have finished the subscriberconfiguration, the NTB will begin downloading content from the channel and periodically check it for updates. You canalso access theChannel Subscribing page from themenu bar by clickingChannels andManage Subscription.
TheChannel Subscribing page contains these tabs:
l Status – Click to see subscription, channel, and polling details.
l Settings – Click to see or edit the subscriber settings (as described below).
l Subscribe – Click to manually update the channel by clicking the button.
Complete the subscriber settings you require and click the button to enable them:
Net-Top-Box User Guide
121
Subscription Poll Interval Specify how often the subscriber polls for new channel content. Set this often enough to pickup changes but not so often as to overwhelm the network or channel content server withrequests.
Update From Centre PollInterval
Specify how often the subscriber polls for changes to ad hoc from centre items. As above,take care with how often you poll. However, these changes require less bandwidth and youcould set the poll interval accordingly.
Channel Server Select where the channel content comes from:
l The USB Memory stick's /channel folder – Channel content is on a USB stick
l Remote Web site or FTP server – Upload channel content from a publisher NTB orchannel content server.
Channel Subscription URL If the subscriber downloads channel content from a publisher NTB or channel contentserver, enter the URL required. The format of the URL depends on whether you uploadcontent by HTTP/HTTPS or FTP.
For HTTP/HTTPS, the required URL is of the form:
http://<publisher>/channel/<channel_number>
Specify the protocol at the start of the URL (HTTP or HTTPS). In the rest of the URL,<publisher> is the host name or IP address of the publisher or server and <channel_number> is the channel number. You can find out the channel number on the publisher'sManage Channels page.
For FTP, the required URL is slightly different:
ftp://<publisher>/channel/<channel_number>
Example subscription URLs:
l https://192.168.1.54/channel/1
l http://NTB9038/channel/2
l ftp://NTB9038/channel/2
l ftp://192.168.1.54/channel/5
Check the Append NTB Serial to Channel Subscription URL box to have the NTB add itsserial number to the URL.
Authentication Select whether the target publisher or server requires authentication or not. If it does, selectLogin with and enter the required username and password.
Proxy If access to the internet is by a proxy, select Use Proxy if configured. You must havealready configured the proxy.
Error Retry Interval If the subscriber fails to connect, or an update is incomplete, specify the period before tryingagain.
File Transfer Allowed If required, specify From and To times to control when the subscriber uploads files. Youmight do this if updates typically involve large files and you want to choose times whenother network activity is low.
7.4.2 Updating Subscription
After you configure the NTB as a subscriber to a channel, it continues to automatically poll the channel for updateswithout any further intervention.
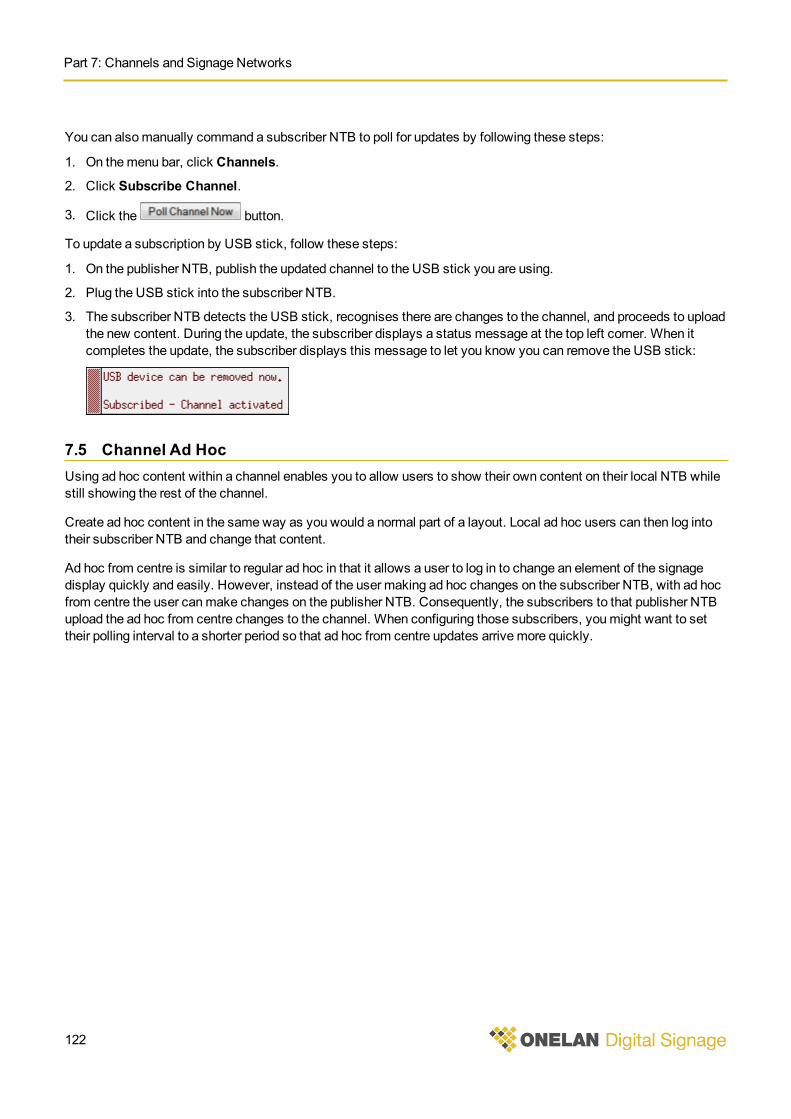
Part 7: Channels and Signage Networks
122
You can alsomanually command a subscriber NTB to poll for updates by following these steps:
1. On themenu bar, click Channels.
2. Click Subscribe Channel.
3. Click the button.
To update a subscription by USB stick, follow these steps:
1. On the publisher NTB, publish the updated channel to the USB stick you are using.
2. Plug the USB stick into the subscriber NTB.
3. The subscriber NTB detects the USB stick, recognises there are changes to the channel, and proceeds to uploadthe new content. During the update, the subscriber displays a status message at the top left corner. When itcompletes the update, the subscriber displays this message to let you know you can remove the USB stick:
7.5 Channel Ad HocUsing ad hoc content within a channel enables you to allow users to show their own content on their local NTB whilestill showing the rest of the channel.
Create ad hoc content in the sameway as you would a normal part of a layout. Local ad hoc users can then log intotheir subscriber NTB and change that content.
Ad hoc from centre is similar to regular ad hoc in that it allows a user to log in to change an element of the signagedisplay quickly and easily. However, instead of the user making ad hoc changes on the subscriber NTB, with ad hocfrom centre the user canmake changes on the publisher NTB. Consequently, the subscribers to that publisher NTBupload the ad hoc from centre changes to the channel. When configuring those subscribers, youmight want to settheir polling interval to a shorter period so that ad hoc from centre updates arrivemore quickly.
Part VIIIPlayer and SystemStatus

Net-Top-Box User Guide
125
Part 8: Player and System StatusUse theStatus options to access information about the player and the system.
Select themenu item for the status information you want to access:
l Player – Viewing the current and recently displayed layouts and the CPU load.
l System – Viewing the disk and CPU temperatures over time, general system status, and hardware specification.
l Conditional Play – Checking the items that are subject to conditional play.
l TV & Radio – Examining the state and use of the TV card.
Note: The NTB only displays the TV & Radio item if it has a TV card installed.
8.1 Player StatusThePlayer status page provides details about what the NTB is currently playing and what it played recently. TheNTB refreshes this display automatically as it plays new content.
Select the tab for the option you require:
l Playing Now – Displays a CPU usage graph for each zone. Compare this with the information on the CPU Loadtab to determine whichmedia, or combination of media, imposes a high load on the NTB CPU.
l Played Recently – Displays a list of recently displayed layouts and recently-implementedAdvance Tocommands.
l Screen Snap Shot – Displays a pixel-perfect image of the current screen display. You can also view a live-screen display of what is running on the screen. See Screen Snap Shot for more details).
8.2 System StatusTheSystem status page provides details of the environmental performance of your NTB.
Select the tab for the option you require:
l °C 24 Hours – Viewing disk and CPU temperatures from the last 24 hours.
l °C 30 Days – Viewing disk and CPU temperatures from the last 30 days.
l Status – Viewing uptime, temperature, Ethernet, andmemory metrics.
l Hardware – Viewing NTB processor specification andmemory capacity.
l CPU Load – Viewing a graph of the processor loading.
°C 24 Hours:
Illustrates disk and CPU temperatures from the previous 24 hours on separate graphs. Green lines indicate the safetemperature range and red where the temperature is too high.
Beneath each graph, notes indicate themaximum temperature during the period and the shut down temperature. TheNTB shuts itself down if the disk temperature exceeds 50 °C for more than 5minutes.
°C 30 Days:
As above except covering the previous 30 days.
Part 8: Player and System Status
126
Status:
The display contains the following information (some systems do not report all items):
NTB Uptime How long the NTB has been running since its last restart.
Disk Temperature Current disk temperature
CPU Temperature Current CPU temperature.
System Temperature Current system temperature.
CPU Fan Speed Speed of CPU cooling fan (in RPM).
System Fan Speed Speed of system cooling fan (in RPM).
Ethernet Receive Total inbound network traffic (in bytes and packets) and number of errors.
Ethernet Transmit Total outbound network traffic (in bytes and packets) and number of errors.
System Disk How much system disk space used of how much available.
Data Disk How much data disk space used of how much available
Hardware:
The display contains the following information:
CPU Make, model, and speed of NTB processor.
Available Memory Amount of NTB main memory.
CMOS Signature Support may request this value.
TV Card The model of TV card installed or if none is fitted.
TV Card Features TV card features (if fitted).
CPU Load:
The display contains the following information:
l The average percentage CPU load over the previous 10 seconds.
l A rolling graph of processor load sampled every second.
Values of 90% and above indicate processor overload (for example, videomay not play smoothly as a result). Toavoid CPU overload, you can change themedia type or change the order of items in the zones.
8.3 Conditional Play StatusTheConditional Play status page summarises the playlists or schedules with theConditional Play property set.
The page displays details of the items that you have configured to play conditionally along with the result. If you havenot added the required player local information for those conditions, the NTB displays an actionmessage containing alink you can follow to add themissing name.
Net-Top-Box User Guide
127
The rest of the page is split into two tabs, one each forPlaylist Items andSchedule. Each tab displays:
l Details of the PLI name on which the item depends.
l The operation that the NTB executes to decide if the item plays.
l The values that the item contains and the current values in the PLI.
The NTB displays links to the required items: click the link to go to the page you need to access.
8.4 TV & Radio StatusThe NTB only displays the TV & Radio status page if it has a TV card installed. This page provides informationabout how the NTB uses the TV card.
The first line of TV Hardware State contains one of these values:
Not in Use No NTB feature is using the TV card.
Rebroadcasting The NTB is using the TV card to rebroadcast a TV or radio station. The display includes:
l Signal Status – One of:o Goodo Acceptableo Bado Usable - Signal is too strong, try attenuationo Unusable - Signal is too strong, try attenuation
l Station – The station now playing.
l Advertised As – The name displayed for the station
l Multicast Bandwidth – Bandwidth if the rebroadcast is by multicast.
l Unicast Bandwidth – Bandwidth if the rebroadcast is by unicast.
In use by a Zone The NTB is using the TV card, either to preview or audition TV and radio media or to play alayout. The display includes:
l Signal Status - One of:o Goodo Acceptableo Bado Usable - Signal is too strong, try attenuationo Unusable - Signal is too strong, try attenuation
l Now Playing –The station now playing.
l Station Type – One of TV or Radio.
8.5 Screen Snap ShotTheScreen Snap Shot status page offers you two views of the current screen display:
l When you first open the page, NTB displays a pixel-perfect image of what is currently on screen.
l NTB can also provide a live-screen display of what is currently running.
Part 8: Player and System Status
128
To view the live-screen display, follow these steps:
1. Select the relative percentage size for the display.
2. Select the frames-per-second refresh rate for the display.
3. Click the button.
By default, the display runs for 60 seconds but you can stop it at any time by clicking the button.
Note: Viewing the live-screen display may impact the quality of the actual screen's output.
Part IXSetup

Net-Top-Box User Guide
131
Part 9: SetupUse theSetup options to configure and check the operational features of your NTB.
Select themenu item for the option you require:
l System Setup – Configuring the administrative and infrastructure aspects of the NTB system.
l Player Setup – Configuring the display output characteristics you want the NTB to support.
l Maintenance & Troubleshooting – Performing backup, update, and support activities.
9.1 Help and User Interface OptionsUse theHelpmenu to access the NTB user interface options, page-specific help, and the user guide.
Use theHelp > UI Options page to set the NTB user interface options. Those options are on these tabs:
l My Options – Changing user interface behaviour (these changes only apply to the user interface you see).
l Shared Options – Adding a title on every page of the user interface (this change applies to the user interface forall users).
When you have completedmaking your changes, click the button to enable them.
To change the general options, select from the following:
User Interface Policy Select the display mode you want:
l Productive – Displays only the most commonly used features.
l Detailed – Displays both commonly used and advanced features.
l Expert – Displays commonly used, advanced, and expert features. Take care if you use thismode.
Audition Method Select the audition method you require:
l On Screen – The NTB shows the content on the screen. (The relevant pages will display theaudition button.)
l Web Preview – The NTB shows the content on your browser. This is useful if you cannot easilyview the screen. (The relevant pages will display the preview button.)
To create the web preview, the NTB has to momentarily turn off the screen and mute the audio. Itthen restarts the screen and audio again with the existing layout. This is useful when new contentshould not be seen before you add it to the active schedule.
Media Thumbnail Disable or resize the thumbnail by selecting from the drop-down list.
To change the Time & Date Display options, select from the following:
Time Style Select the time format you prefer. Locale Specific means the format matches the language optionyou have set on your browser.
Time Separator A character to separate the time-display values. A colon is the default. Enter another character touse as an alternative. The NTB ignores this setting if you have selected the Locale Specificoption from the Time Style menu.

Part 9: Setup
132
Date Style Select the date format you prefer. Locale Specific means the format matches the language optionyou have set on your browser.
Uncheck the Show last 5 days as day name instead of date box if you want the NTB to displayrecent days by numeric date rather than by name (for example, 'Monday').
Date Separator A character to separate the date-display values. A hyphen is the default. Enter another characterto use as an alternative. The NTB ignores this setting if you have selected the Locale Specificoption from the Date Style menu.
Month Style Select how you prefer to see the month expressed.
To change theAdvanced options, select from the following:
Update CurrentlyPlaying Status
Select when you want the NTB to update the current status information:
l Screen thumbnail and currently playing Layout information is updated each time the webpage is shown – Updates when you open the Home page.
l Screen thumbnail and currently playing Layout information is updated every few seconds– Updates every few seconds (this may prevent smooth on-screen text scrolling).
Layout Editing Select how you want to edit layouts:
l Graphical Layout Editing – Direct editing including use of drag-and-drop.
l Non-Graphical Layout Editing – Indirect editing by entering values. May be needed if yourbrowser does not support direct editing.
Home Page Select the Home page style you prefer:
l Use operational status summary Home page – Displays current layout as thumbnails andplayer status as colour-themed bars.
l Use graphical Home page – Displays current and recently used layouts as thumbnails.
l Classic NTB Home and Setup pages – Displays current layout as thumbnails and setupoptions as icons.
Playlist Add Item Select where you want the NTB to add new items to a playlist:
l At Top – Items are added to the top of a playlist.
l At Bottom – Items are added to the bottom of a playlist.
After the items are added, you can move them into whichever position you wish.
Drop DownMenuDisplay Mode
Select the menu behaviour you want:
l Menu is shown when hovered over – Menu expands when you hover your cursor over it.
l Menu will show when clicked – Menu expands when you click it.
9.2 System SetupUse theSetup > System options to configure and check the operational features of your NTB.
Select themenu item for the option you require:
l Users – Adding andmanaging user accounts.
l Date & Time – Specifying time source and time zone.
Net-Top-Box User Guide
133
l Network – Setting up and testing the network connection.
l TV & Radio – Tuning and using TV and radio stations (only displayed if the NTB has a TV card installed).
l HTTP Proxy – Setting up proxy server access.
l Security – Configuring firewall and secure access services.
l Player Local Information – Adding customised data items to the player.
l Reporting and Remote Setup – Configuring the NTB to report to the network's Digital Signage Manager (DSM).
l Licensing –Managing your software licenses.
9.2.1 Users
Use theUsers options to add andmanage NTB user accounts.
Click the tab for the option you require:
l Users – Listing the users and their permissions. Click the button to delete a user (you cannot delete thecurrent user). Click the button to change the user settings.
l Add Users – Adding a new user.
The NTB displays the same settings whether you are adding a new user or editing an existing one.
To add or change a user account, complete the following settings and click the or button:
Username The name the user logs in with (for example, 'remote', or 'chef'). This must be unique on this NTB.Follow the on-screen guidance on how to compose the username.
Permissions Check the boxes next to the permissions you wish to grant the user:
l System Settings – Access to the Setup and Fonts pages.
l Layout Editor – Ability to access layouts you have permitted the user to edit. Grant edit permissionon the layout Properties tab.
l Subscribe Channel – Read-only access to a channel using HTTPS or HTTP.
l FTP Read/Write – Read, write, and delete files in the Media folder and all its subfolders using FTP.
l Status Monitor – Access to the Player, System, and TV & Radio status pages only.
l Activate Channel – Permits the user to activate channels.
l Ad hoc – Access to the Ad Hoc Entry page (not the ad hoc content design pages). The user canread, write, and modify files in the folder you select from the Media Folder drop-down list. You mustselect a specific folder and not All Folders.
l FTP Read Only – Read-only access to the Media folder and all its subfolders using FTP.
l Layout Manager – Access to the Manage Layouts, Schedules, Ad hoc Entry, Newsfeeds, Tables,Colours, and Files & Folders pages.
l Publish Channel – Allows the user to publish to a channel.
l XML Control – Access to the XML message interface allowing non-browser based control of theNTB. (Does not allow access to pages.)
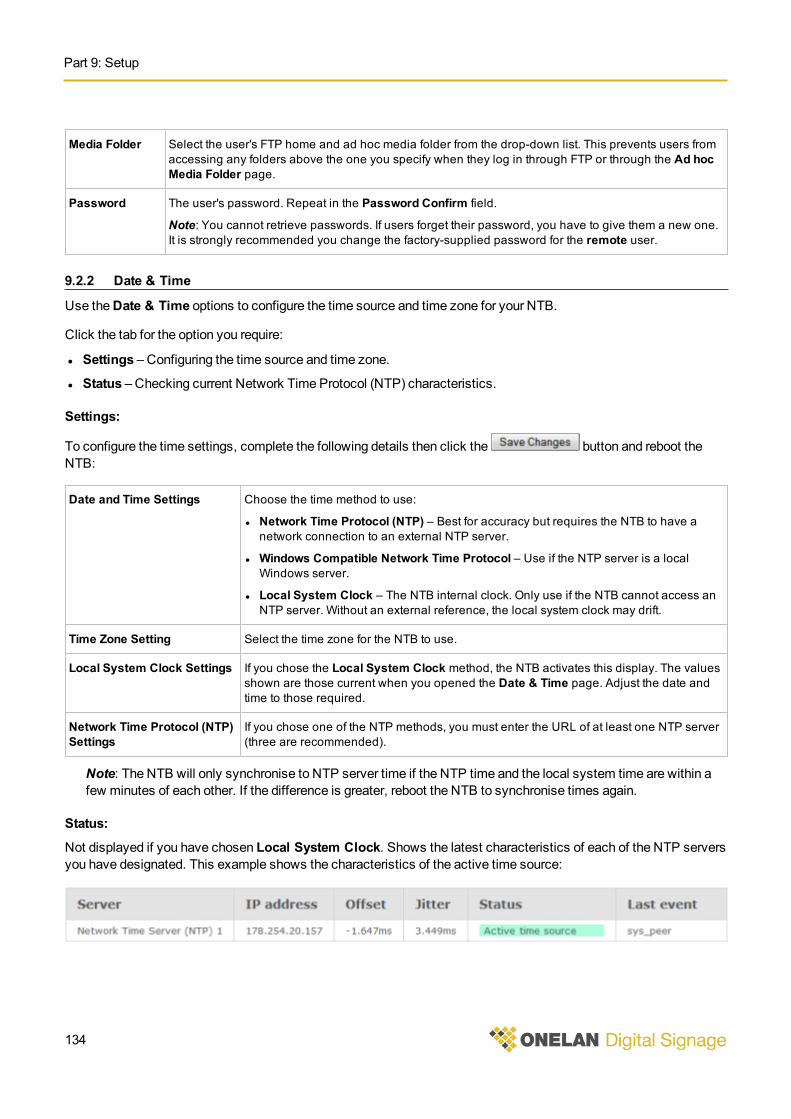
Part 9: Setup
134
Media Folder Select the user's FTP home and ad hoc media folder from the drop-down list. This prevents users fromaccessing any folders above the one you specify when they log in through FTP or through the Ad hocMedia Folder page.
Password The user's password. Repeat in the Password Confirm field.
Note: You cannot retrieve passwords. If users forget their password, you have to give them a new one.It is strongly recommended you change the factory-supplied password for the remote user.
9.2.2 Date & Time
Use theDate & Time options to configure the time source and time zone for your NTB.
Click the tab for the option you require:
l Settings – Configuring the time source and time zone.
l Status – Checking current Network Time Protocol (NTP) characteristics.
Settings:
To configure the time settings, complete the following details then click the button and reboot theNTB:
Date and Time Settings Choose the time method to use:
l Network Time Protocol (NTP) – Best for accuracy but requires the NTB to have anetwork connection to an external NTP server.
l Windows Compatible Network Time Protocol – Use if the NTP server is a localWindows server.
l Local System Clock – The NTB internal clock. Only use if the NTB cannot access anNTP server. Without an external reference, the local system clock may drift.
Time Zone Setting Select the time zone for the NTB to use.
Local System Clock Settings If you chose the Local System Clock method, the NTB activates this display. The valuesshown are those current when you opened the Date & Time page. Adjust the date andtime to those required.
Network Time Protocol (NTP)Settings
If you chose one of the NTP methods, you must enter the URL of at least one NTP server(three are recommended).
Note: The NTB will only synchronise to NTP server time if the NTP time and the local system time are within afew minutes of each other. If the difference is greater, reboot the NTB to synchronise times again.
Status:
Not displayed if you have chosen Local System Clock. Shows the latest characteristics of each of the NTP serversyou have designated. This example shows the characteristics of the active time source:
Net-Top-Box User Guide
135
9.2.3 Network
Use theNetwork options to configure, check, and test the NTB network connection.
Note: The NTB displays its active IP address in large text on the splash screen during the boot up process.
Click the tab for the options you require:
l Ethernet – Configuring IP address and DNS settings.
l 3GModem –Configuring a 3G network connection.
l Wireless – Configuring a wireless connection.
l Network Status – Checking current IP address and DNS values.
l Order – Designating the preference order for using network connections.
l Tests – Running ping, trace, DNS lookup, and TCP dump tests.
Ethernet:
To configure IP addressing, complete the following details then click the button and reboot the NTB:
Ethernet Settings Select how the NTB obtains its IP address:
l DHCP – Select if the NTB will obtain its IP address from a DHCP server on your network. If theNTB cannot find a DHCP server, it defaults to an IP address of 169.254.1.1.
l Static – Select if you are specifying an IP address for the NTB. Enter it in the IP Address field. Ifyou select this option, the NTB enables the Static Address Settings and Static DNS Settingsfields.
Caution: If you are using a static address in combination with an LDAP securityconfiguration, youmust specify a valid DNS Nameserver. Failure to do so will make yourNTB inaccessible.
DHCP Setting Optional. For ease of reference, enter a name for the NTB. Only available if your DHCP serversupports this feature.
Static AddressSettings
If you selected the Static Ethernet setting, enter the addresses required:
l IP Address – Enter the IP address for the NTB.
l Netmask – Specify the address range for the NTB subnet.
l Default Gateway – Enter the gateway IP address if the NTB uses one.
Static DNS Settings If you selected the Static Ethernet setting, enter the addresses required:
l DNS Search Path – Enter the path needed to reach the Domain Name Server (DNS).
l DNS Nameserver – Enter the IP addresses of up to three DNS nameservers.
Part 9: Setup
136
3G Modem:
If your NTB can connect to a 3G network, complete the following details then click the button andreboot the NTB:
Enable Select whether you want to connect by 3G or not:
l Disable 3G network – The NTB will not use the 3G network.
l Enable 3G network – The NTB will use the 3G network.
PPP Authentication If the 3G network requires authentication, enter the username and password.
PIN If the 3G network requires a PIN, enter the PIN.
Access Point Name If the 3G network requires an Access Point Name (APN), enter the APN.
Wireless:
Use these options tomanage the NTB connections to wireless networks.
The NTB will only connect to a wireless network if:
1. You have enabled the wireless interface.
2. You have defined the wireless network settings. If you definemultiple networks, you cannot specify which onethe NTB will prefer.
3. The wireless network is in range.
Wireless has its own set of tabs and you use them as follows:
Enable/Disable Select the Disabled or Enabled option depending on whether you want to use wireless or not. Click
the button to switch:
Defined Networks Lists the networks you have already defined. Manage the networks using the buttons displayednext to each network:
l – Click to delete this network from your list. If the NTB is currently connected to the network,clicking this button disconnects it.
l – Click to change the network configuration. When complete, click thebutton to update the details.
l or – Displays according to the current setting for the network. Click todisable or enable whether you want the NTB to try connecting to this network.
l – Click to connect to this network. The NTB will attempt to make the connection (if youhave enabled wireless). This breaks any existing wireless connection. If you restart the NTB, itmay not reconnect to the same network.
Net-Top-Box User Guide
137
Add New Network Chose the network you want to use, complete the required information, and click the
button:
l Visible – Lists reachable wireless networks. Select the button next to the network you want toconnect to. If the network requires a network password or key, enter it in the Key field.
l Other – Select if the network you want is not listed above. Enter the network SSID and select thecorrect Key Type option. If the network requires a network password or key, enter it in the Keyfield.
l IP Settings, DHCP Setting, Static Address Settings, and Static DNS Settings – You can useeither DHCP or static IP settings. For guidance on completing these fields, refer to thedescription of the Ethernet tab.
Network Status:
Displays the current network connection status and values.
Order:
You can specify the order in which the NTB tries tomake a network connection. If a particular network is unavailable,the NTB tries the next preference. Change the order using the and buttons.
Tests:
In each case, start the test by entering the host's name or IP address and clicking the button:
Ping Host Ping the host.
Trace Route Trace the route to the host. This can take a few minutes to complete.
DNS Lookup See the host's details held on the DNS.
TCP Dump Collect IP packets for the number of seconds you specify.
9.2.4 TV & Radio
Use the TV & Radio options to configure the NTB to tune and use TV and radio stations.
Note: Some features may depend on installed licenses or hardware. Consequently, your NTB may not display allof the tabs and options described here.
Click the tab for the option you require:
l Rebroadcaster Settings – Configuring TV rebroadcasting.
l Digital Tuning – Tuning and auditioning digital TV and radio stations.
l Analogue Settings – Adding, naming, andmanaging analogue TV stations.
l Capture Tests – Testing the Composite and S-Video capture inputs.
l Streaming TV & Radio – Specifying and checkingmulticast addresses.
l TV System – Specifying and checking the TV system for your locale.
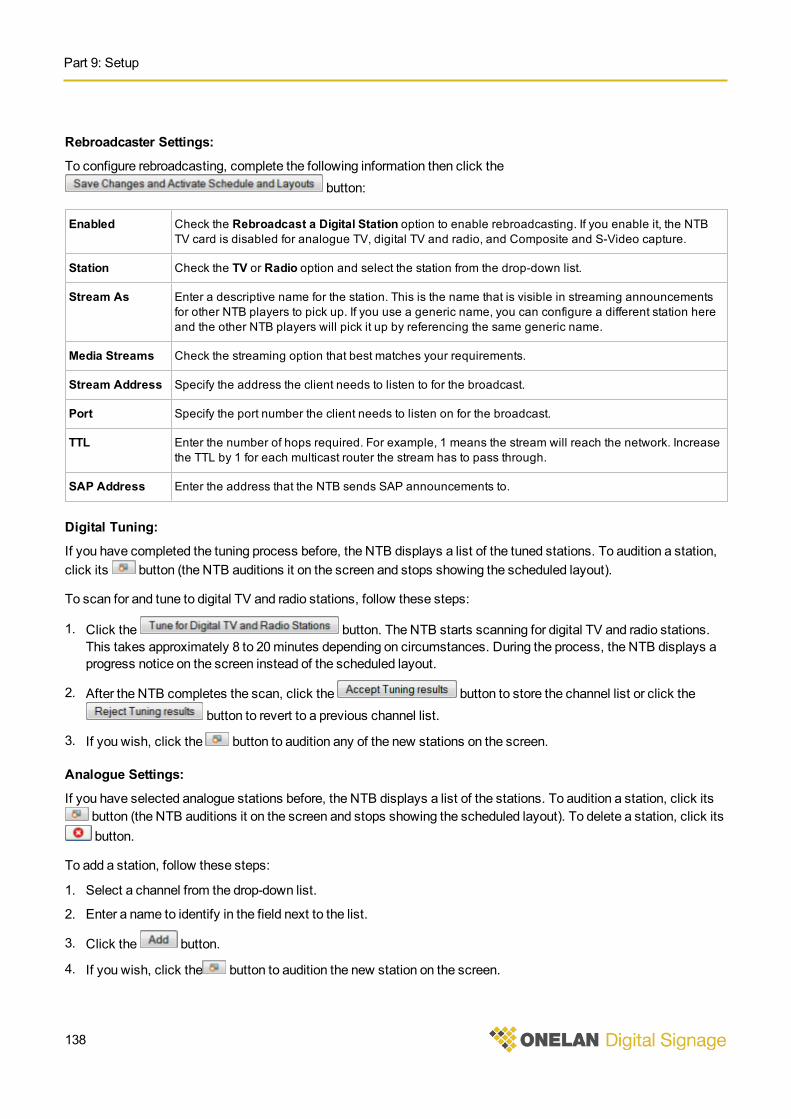
Part 9: Setup
138
Rebroadcaster Settings:
To configure rebroadcasting, complete the following information then click thebutton:
Enabled Check the Rebroadcast a Digital Station option to enable rebroadcasting. If you enable it, the NTBTV card is disabled for analogue TV, digital TV and radio, and Composite and S-Video capture.
Station Check the TV or Radio option and select the station from the drop-down list.
Stream As Enter a descriptive name for the station. This is the name that is visible in streaming announcementsfor other NTB players to pick up. If you use a generic name, you can configure a different station hereand the other NTB players will pick it up by referencing the same generic name.
Media Streams Check the streaming option that best matches your requirements.
Stream Address Specify the address the client needs to listen to for the broadcast.
Port Specify the port number the client needs to listen on for the broadcast.
TTL Enter the number of hops required. For example, 1 means the stream will reach the network. Increasethe TTL by 1 for each multicast router the stream has to pass through.
SAP Address Enter the address that the NTB sends SAP announcements to.
Digital Tuning:
If you have completed the tuning process before, the NTB displays a list of the tuned stations. To audition a station,click its button (the NTB auditions it on the screen and stops showing the scheduled layout).
To scan for and tune to digital TV and radio stations, follow these steps:
1. Click the button. The NTB starts scanning for digital TV and radio stations.This takes approximately 8 to 20minutes depending on circumstances. During the process, the NTB displays aprogress notice on the screen instead of the scheduled layout.
2. After the NTB completes the scan, click the button to store the channel list or click thebutton to revert to a previous channel list.
3. If you wish, click the button to audition any of the new stations on the screen.
Analogue Settings:
If you have selected analogue stations before, the NTB displays a list of the stations. To audition a station, click itsbutton (the NTB auditions it on the screen and stops showing the scheduled layout). To delete a station, click itsbutton.
To add a station, follow these steps:
1. Select a channel from the drop-down list.
2. Enter a name to identify in the field next to the list.
3. Click the button.
4. If you wish, click the button to audition the new station on the screen.
Net-Top-Box User Guide
139
Capture Tests:
Click the button to audition the capture feature indicated.
Streaming TV and Radio:
If the NTB cannot receive a TV signal directly, it might be able to receive it by multicast streams using the localnetwork. The NTB decodes themulticast stream and displays the TV image in a zone in the normal way.
If you want to usemulticast streams to provide TV to the NTB there are these requirements:
l The NTB has the appropriate license.
l There is a streaming transmit server to convert the TV signals into multicast packets.
l If your publisher NTB and the subscriber NTB are on different networks, the streaming addresses must be thesame.
l All routers and switches on the local network between the streaming transmit server and each NTB are enabledfor multicast streaming.
l There is sufficient network capacity to efficiently support multicast streaming.
Note: Theremay be copyright issues involved in rebroadcastingmaterial onto a local network.
Click theStatus tab to display a list of stations available through streaming. Click the button to audition a stationon the screen.
Click theSettings tab to specify themulticast address by following these steps:
1. In a blank field, enter the IP address on which to receive the Service Advertising Protocol (SAP) packets. Validaddresses are between 224.0.0.0 and 239.255.255.255.
2. If required, enter additional addresses in the remaining fields. You can specify up to six addresses.
3. Click the button.
TV System:
Different countries use differently configured TV systems. You need to specify your country so that the NTB canconfigure itself correctly.
Select your country from the drop-down list and click the button. The NTB now restarts tocomplete the configuration.
9.2.5 HTTP Proxy
Use theHTTP Proxy page to set up proxy server access if the NTB needs to use one to access Internet resources.Check with your network administrator to see if a proxy is needed.
To use a proxy for accessing an Internet resource, youmust perform both of the following actions:
l Set up the HTTP proxy by completing the information on theAdd HTTP Proxy tab.
l Specify that the NTB must use a HTTP proxy when you set up individual Internet resources (for example, anewsfeed).

Part 9: Setup
140
After you have configured the HTTP proxy, specify that the NTB uses it on the relevant setup page:
l HTML player – Set up on theSetup > Player > Players page.
l Channel subscription – Set up on theChannels >Manage Subscription page.
l Newsfeed – Set up the individual newsfeed on theMedia > Newsfeeds page.
l Reporting – Set up on theSetup > System > Reporting & Remote Setup page.
l Software update – Set up on theSetup >Maintenance & Troubleshooting > Software Update page (Settingstab).
The NTB does not transfer a proxy configuration in a channel.
Note: Newsfeeds and channel subscription do not support use of Microsoft®NTLM authentication. Werecommend changing theWindows proxy to allow Digest authentication. Youmust restart the NTB when youmake any changes to the HTTP proxies.
To configure the HTTP proxy, complete the following details then click the button:
Server Address Enter the IP address of the proxy server.
Server Port Enter the port the NTB needs to connect to on the proxy server (default is 3128).
Username If the proxy server requires authentication, enter the username.
Password If the proxy server requires authentication, enter the password.
Use this proxy for Check the box for each resource the NTB needs to use the proxy for.
9.2.6 Security – General Settings
Use theSecurity options to configure the NTB firewall and other security services and tomonitor firewall activity.
Caution: The NTB comes ready-prepared with default firewall and other security service settings to protectagainst unauthorised access. Do not change the security settings unless you have a good working knowledge ofIP networking and network security. Incorrect configuration can block all access to the NTB.
The NTB firewall protects it against unwanted and potentially malicious traffic. However, the NTB also needs toaccept your login and allow necessary communications. To allow and protect such access, the NTB supports avariety of secure services:
l VPN – Virtual Private Network. Allows the NTB to communicate over an encrypted path through firewalls.
l HTTP/HTTPS –Hypertext Transfer Protocol and Hypertext Transfer Protocol Secure. By default, the NTB usesHTTP with Digest authentication, which encrypts passwords. HTTPS is more secure because it also encryptscontent.
l FTP – File Transfer Protocol. FTP access is controlled by password. Passwords are not encrypted. Use FTP forcopying over backups and software updates.
l SSH – Secure Shell. Only used to access the NTB operating system for occasional support andmaintenancepurposes. Access is by themaster password.
You can configure each of those tomatch the specific security needs of your network or to conform to corporatepolicy on port numbering.
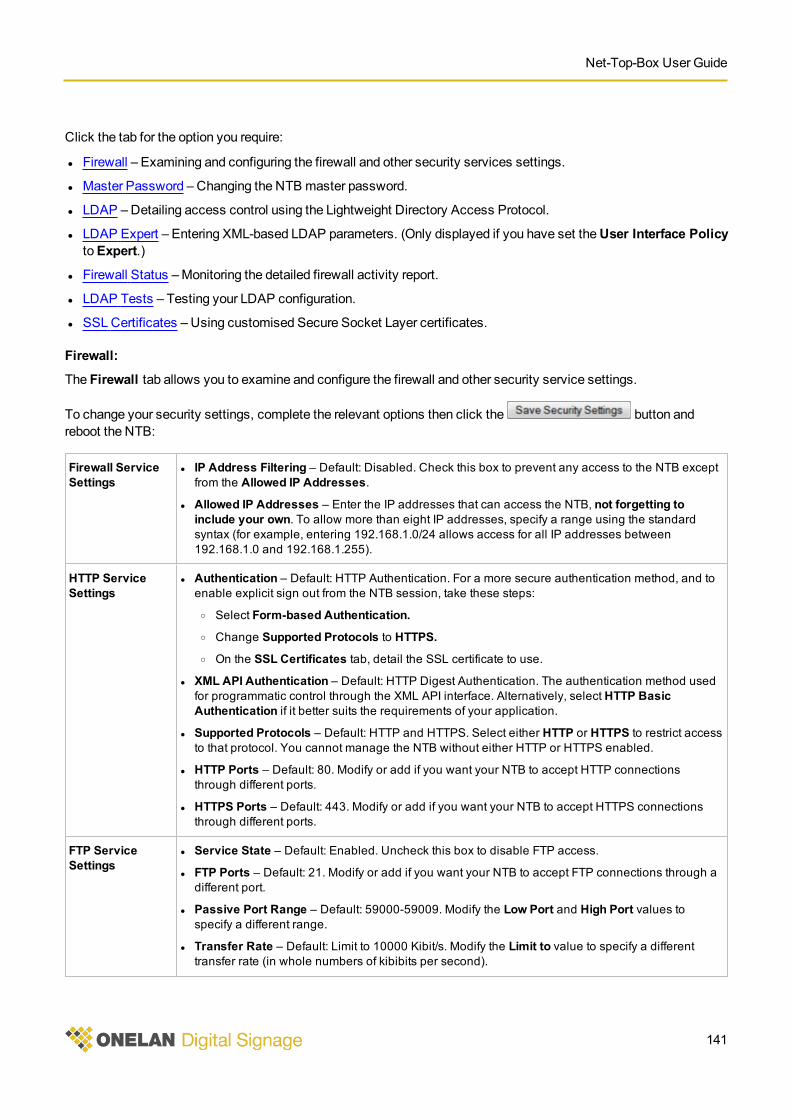
Net-Top-Box User Guide
141
Click the tab for the option you require:
l Firewall – Examining and configuring the firewall and other security services settings.
l Master Password – Changing the NTB master password.
l LDAP –Detailing access control using the Lightweight Directory Access Protocol.
l LDAP Expert – Entering XML-based LDAP parameters. (Only displayed if you have set theUser Interface PolicytoExpert.)
l Firewall Status –Monitoring the detailed firewall activity report.
l LDAP Tests – Testing your LDAP configuration.
l SSLCertificates – Using customised Secure Socket Layer certificates.
Firewall:
The Firewall tab allows you to examine and configure the firewall and other security service settings.
To change your security settings, complete the relevant options then click the button andreboot the NTB:
Firewall ServiceSettings
l IP Address Filtering – Default: Disabled. Check this box to prevent any access to the NTB exceptfrom the Allowed IP Addresses.
l Allowed IP Addresses – Enter the IP addresses that can access the NTB, not forgetting toinclude your own. To allow more than eight IP addresses, specify a range using the standardsyntax (for example, entering 192.168.1.0/24 allows access for all IP addresses between192.168.1.0 and 192.168.1.255).
HTTP ServiceSettings
l Authentication – Default: HTTP Authentication. For a more secure authentication method, and toenable explicit sign out from the NTB session, take these steps:
o Select Form-based Authentication.o Change Supported Protocols to HTTPS.o On the SSL Certificates tab, detail the SSL certificate to use.
l XML API Authentication – Default: HTTP Digest Authentication. The authentication method usedfor programmatic control through the XML API interface. Alternatively, select HTTP BasicAuthentication if it better suits the requirements of your application.
l Supported Protocols – Default: HTTP and HTTPS. Select either HTTP or HTTPS to restrict accessto that protocol. You cannot manage the NTB without either HTTP or HTTPS enabled.
l HTTP Ports – Default: 80. Modify or add if you want your NTB to accept HTTP connectionsthrough different ports.
l HTTPS Ports – Default: 443. Modify or add if you want your NTB to accept HTTPS connectionsthrough different ports.
FTP ServiceSettings
l Service State – Default: Enabled. Uncheck this box to disable FTP access.
l FTP Ports – Default: 21. Modify or add if you want your NTB to accept FTP connections through adifferent port.
l Passive Port Range – Default: 59000-59009. Modify the Low Port and High Port values tospecify a different range.
l Transfer Rate – Default: Limit to 10000 Kibit/s. Modify the Limit to value to specify a differenttransfer rate (in whole numbers of kibibits per second).
Part 9: Setup
142
SSH ServiceSettings
l SSH Ports – Default: 22. Modify or add if you want your NTB to accept FTP connections through adifferent port.
Movie PlayerUnicast ListenerService Settings
l Service State – Default: Disabled. Check this box to enable the unicast listener service.
l Listening Ports – Specify the ports the NTB listens on.
Master Password:
TheMaster Password tab allows you to change themaster password. You need themaster password to access theNTB operating system through SSH.
Note: This is not the same password you use to login to the NTB through a browser.
It may be desirable to change themaster password, but youmust know the existing one to do so. Please contactyour reseller or supplier for themaster password.
To enable the new password, youmust click the button and reboot the NTB.
LDAP:
See Security – Advanced LDAP Settings for details.
LDAP Expert:
See Security – Advanced LDAP Settings for details.
Firewall Status:
The Firewall Status tab displays the detailed NTB firewall activity report.
Understanding the information in that report requires a good working knowledge of IP networking and networksecurity. In particular, note these points:
l TheChain PLAYER-INPUT section details the rules governing connections made to the NTB on variousprotocols.
l The NTB checks the IP address of incoming connections against theChain PLAYER-INPUT-ADDRESSESrule set. The NTB drops connections from IP addresses disallowed by the security settings.
l The NTB checks allowed connections against theChain PLAYER-INPUT-PORTS rule set. The NTB dropsconnections to a port disallowed by the security settings.
l ThePkts (packets) andBytes columns show the volume of traffic accepted or rejected by each rule. An unusuallyhigh number of packets on aDROP linemight indicate an attack on the NTB.
LDAP Tests:
Run the LDAP test to check your current LDAP settings and to receive feedback on any problems.
Recommendation: Always test any change to the LDAP settings before rebooting the NTB.
To run a test:
1. Enter the name of the target NTB user in the Test Username field.
2. Click the button.
Net-Top-Box User Guide
143
The test results are displayed in two parts:
l A table showing the status of each step.
l A detailed log.
When you have a correct setup, and the NTB username is valid, the LDAP test returns thePassed status. To correctany indicated problems, check the user permissions and change the associated LDAP settings.
The NTB performs the following tests and indicates any failures as well as displaying detailed logmessages:
Tests Checks
Bind to LDAP server Configuration and Bind sections
Search for FTP user FTP User section
FTP Read/Write Access FTP User section User Filter
Search for HTTP user HTTP User section
Find HTTP user HTTP User section
Search for group membership HTTP Permissions section
Ad hoc Permissions Ad hoc Users section
SSL Certificates:
If you want to use customised SSL certificates, rather than the default certificates, follow these steps:
1. Select theUse Custom SSL certificates for the Web Server option.
2. Enter yourCertificate, Key, andCA Chain values in the relevant fields.
3. Click the button and reboot the NTB.
9.2.7 Security – Advanced LDAP Settings
The NTB Security page includes tabs to allow you to configure and test LDAP:
l LDAP – Detailing access control using the Lightweight Directory Access Protocol.
l LDAP Expert – Entering XML-based LDAP parameters. (Only displayed if you have set theUser InterfacePolicy toExpert.)
l LDAP Tests – Testing your LDAP configuration.
Caution: Do not use LDAP to control security for the NTB unless you have expertise with LDAPimplementations. LDAP is a powerful technology and enabling amisconceived configuration canmake the NTBunusable.
Before beginning to configure security for the NTB using the options on the LDAP and LDAP Expert tabs, readthrough the guidance that follows. When you have completed your configuration, click on the LDAP Tests tab to testit before rebooting the NTB (see LDAP Tests for details).
To begin with, it is important to understand the difference between the NTB and the LDAP security models:
l The basic NTB security model prevents access to system features unless a user is authenticated and has explicitpermissions.
Part 9: Setup
144
l In the LDAP security model, a user is considered to have permission if an LDAP filter matches entries in thedirectory. Typically, an LDAP filter establishes that a user is amember of a group.
Recommendation: Use secure HTTP (HTTPS) for LDAP authentication otherwise passwords are sent in theclear and are not encrypted.
What follows is guidance for completing each of the fields on the LDAP tab:
l Configuration
l Fallback User
l Bind
l FTP User
l HTTP User
l HTTP Permissions
l AdHoc Users
Configuration:
Youmust check theEnable LDAP box to allow the NTB to use LDAP.
Youmust enter thePrimary LDAP Server hostname and port and choose theServer Encryption.
TheServer Encryption types are:
l None – No encryption (passwords are sent in clear text) (standard LDAP port is 389). Not recommended.
l SSL – The NTB encrypts all communications with the LDAP server using SSL (standard LDAP port is 636).
l TLS – The NTB encrypts all communications with the LDAP server using TLS (standard LDAP port is 389).
The Certification Authority (CA) Certificate is required when you use SSL or TLS encryption. For SSL, the certificatemust conform to the following (if your certificate is in a different format youmust convert it to conform to thesupported format):
l Is a PEM-encoded certificate (X.509).
l Is not a PEM-encoded version of an archive certificate format.
l Is an RSA-based certificate.
l Has a PEM-encoded RSA key and is not pass-phrase protected.
l Has a CA chain that is PEM encoded.
l Does not have a CA chain that is a PEM-encoded version of an archive format.
For TLS, the certificate must conform to the following:
l Is a PEM-encoded certificate (X.509).
l Is not a PEM-encoded version of an archive certificate format.
Note: Microsoft® Active Directory® does not support LDAP over TLS and by default LDAP requires additionalconfiguration of the Active Directory server.
Fallback User:
The fallback user can always login to the NTB and perform management tasks, even when LDAP authentication isnot working.
Net-Top-Box User Guide
145
Enter the username and password that you wish to use tomanage the NTB in the event of problems with the LDAPsetup.
Recommendation: Give the fallback userSystemAdministrator access. Use a very strong password for thefallback user password.
Bind:
Select Allow Anonymous Bind to use anonymous binding to the LDAP server. Otherwise select Bind using DNand complete theBind Username andBind Password.
For example, the bind username is a distinguished name (DN) like: cn=Manager,dc=yourdomain,dc=com.
FTP User:
The information in this section is used to authenticate users and give them permission to gain FTP read/write accessto the NTB. You will need to know how to find the user object in the directory that corresponds to the username givento FTP.
ForScope, select Subtree orOne level depending on how you want to limit the search for the user object startingfrom the Base DN.
Enter theBase DN in the appropriate format for your implementation.
Set the Login Username Attribute to an attribute that will contain the username given to FTP. This is typically asdescribed for the relevant context:
l Active Directory – Typically, the sAMAccountName attribute.
l Posix SchemeDirectory – Typically, the uid attribute.
In theUser Filter field, enter the LDAP filter that will match a user object in the directory (use %s where you wish thefilter to contain the username of the user that is logging in).
Recommendation: If possible, add checks for groupmembership to control which users can access FTP on theNTB.
Example user filters for the relevant contexts are:
l Active Directory – (&(sAMAccountName=%s)(objectclass=user)(memberOf=CN=NTB ftpaccess,OU=Security Groups,DC=yourdomain,DC=com))
l Posix SchemeDirectory – (&(uid=%s)(objectclass=posixAccount))
HTTP User:
The information in this section is used to authenticate users to use the web interface of the NTB. Permissions are setin the next section. You will need to know how to find the user object in the directory that corresponds to theusername given to HTTP.
ForScope, select Subtree orOne level depending on how you want to limit the search for the user object startingfrom the Base DN.
Enter theBase DN in the appropriate format for your implementation.
Set the Login Username Attribute to an attribute that will contain the username given to HTTP. This is typically asdescribed for the relevant context:
Part 9: Setup
146
l Active Directory – Typically, the sAMAccountName attribute (note: in this case, do not include this attribute intheUser Filter field).
l Posix SchemeDirectory – Typically, the uid attribute.
In theUser Filter field, enter the LDAP filter that will match a user object in the directory (use %s where you wish thefilter to contain the username of the user that is logging in). Example user filters for the relevant contexts are:
l Active Directory – (objectclass=user)
l Posix SchemeDirectory – (objectclass=posixAccount)
In theDisplay Name Attribute field, enter an informal name for the user for the NTB to use in the banner. This istypically as described for the relevant context:
l Active Directory – Typically, the displayName or sAMAccountName attribute.
l Posix SchemeDirectory – Typically, the cn or uid attribute.
HTTP Permissions:
After a user has been authenticated to access the NTB web interface through HTTP, the NTB will check the user'spermissions.
ForScope, select Subtree orOne level depending on how you want to limit the search for the user object startingfrom the Base DN.
Enter theBase DN in the appropriate format for your implementation.
Enter the Filter Attribute appropriate to your context. Example filter attributes for the relevant contexts are:
l Active Directory – dn
l Posix SchemeDirectory – uid
You can set up these permission filters:
Monitor Access Filter Access to player status and system information only.
System Settings Filter Access to the Setupmenu and Fonts page.
Layout Manager Filter Access to the Layouts, Schedules, Ad hoc Entry Page, Newsfeeds, Tables, Colours, andFiles & Folders menus
Layout Editor Filter Access to the graphical layout editor.
Publish Channel Filter Access to the Publish Channelmenu.
Activate Channel Filter Access to the Activate Channel option.
XML Control Filter Access to the XML message interface allowing non-browser based control of the NTB only.(Provides no access to menu options.)
Set those to LDAP filters that match the user's permissions. Use %s where you wish the users username to bewritten into the filter.
Typically, the filter checks that the user is amember of a group. Example permission filters for the relevant contextsare:
Net-Top-Box User Guide
147
l Active Directory – (&(objectClass=group)(member=%s)(distinguishedName=CN=playermonitor,OU=Security Groups,DC=yourdomain,DC=uk))
l Posix SchemeDirectory – (&(objectClass=posixGroup)(memberUid=%s)(cn=monitor))
Ad Hoc Users:
Click the button to add an ad hoc user and to set the filters for them as required.
9.2.8 Player Local Information
Use thePlayer Local Information page to add, delete, or modify data items for customising NTB behaviour.
Click the tab for the option you require:
l Player Local Information – View, delete, or edit player local information. To delete a set of PLI, click itsbutton. To edit a set of PLI, click its button and take the relevant action (click the buttonwhen done):
o Modify – Edit any of theName orValue fields.
o Delete a value – Click its button.
o Add a value – Click the button. The NTB opens a new field for you to enter the value. A value can beanything you choose (for example, '3', 'Conference Room', 'London').
l Add Player Local Information Item – Add a new set of player local information. To do so, follow these steps:
a. Enter a name for the PLI. The NTB will use this name to reference the PLI on other screens.
b. Enter at least one value. To add another value, click the button. To delete a value, click its button.
c. Click the button.
Example uses of PLI include the following:
l Conditional play – Add data that the NTB checks to determine which playlist items or schedules to play.
l Localise HTML pages – Add data that the NTB uses to localise output from web pages.
l Configure a weather widget – Specify the current location to customise a weather widget display.
Any change youmake to the player location information can have an immediate effect on the currently playing item.
These examples further expand and illustrate how youmight use player local information:
l Design general channel content that also allows each NTB to play specific content. For example, if your companyhas branches in different countries, you could use player local information to specify each location in ISO format.A weather widget you install checks that value and provides a localised weather forecast.
l Design general channel content but that uses conditional play to control themedia and schedule for individualNTB units. For example, you could create the same channel content for all branches of a chain store but useplayer local information to control conditional play items in that content. You could play content in each storebased on the profile of customers visiting that store (using conditional play for playlist items). Youmight alsodisplay specific opening hours for a store (using conditional play for one or more schedules).
l When you enable reporting, the NTB includes player local information in its reports to the DSM and you can usethis for whatever purpose you wish. For example, you could use player local information for asset trackingpurposes by storing the player's address and asset tracking identifier. If there is a problem, it is easy to determinethe location of the player based on DSM reports.
Part 9: Setup
148
9.2.9 Reporting and Remote Setup
Use theReporting & Remote Setup options to configure how your NTB reports status information to the DSM.
Note: Some features may depend on installed licenses.
You can configure your NTB to send reports to the DSM using any of HTTP, HTTPS, or VPN. However, if you wantto use some or all of the remote setup features youmust configure your NTB according to these settings:
l Report using VPN – Allows the DSM to remotely control your NTB (and optionally connect to it over SSH).
l Report using VPN and enable theRemote Setup option – The above plus your NTB can accept setups from anddonate its setup to the DSM.
l Report using HTTPS and enable theRemote Setup option – Your NTB can accept setups from but cannot donateits setup to the DSM.
Click the tab for the option you require:
l Reporting Settings – Enabling and configuring reports.
l Status – Checking reporting states and events.
l Remote Setup Settings – Enabling and configuring remote setup.
Reporting Settings:
To configure reporting, complete the following details then click the button (youmust also reboot theNTB if you change theReporting orSSH settings):
Reporting Check the button for the reporting option you want:
l Status reporting is disabled – The NTB does not send reports.
l Report status to a DSM via HTTP – The NTB sends report using HTTP or HTTPS.
l Report status to a DSM via VPN – The NTB sends report using VPN.
Screen Thumbnails Check the box for the NTB to include a thumbnail of its current display in the report. Thisincreases the bandwidth required for each report.
Media Auditing Check the button for the media audit reporting option you want:
l Do not send media audit logs to the DSM – The NTB does not send media audit reports.
l Sendmedia audit logs every – Specify how often you want the NTB to send media auditreports.
l Sendmedia audit logs every day at – Specify the time when you want the NTB to send mediaaudit reports only once a day.
Reporting Interval Specify how often you want the NTB to send a report. The minimum interval is 5 seconds.
Report to DSM viaHTTP
Select whether the NTB sends reports using HTTP or HTTPS. Enter the name or network addressof the DSM in the field (optionally with the required port number appended after a colon).
Report to DSM viaVPN
Enter the name or network address of the DSM in the field (optionally with the required portnumber appended after a colon).
Check the Allow SSH access via VPN box to allow the DSM to connect to the NTB over SSH.
Net-Top-Box User Guide
149
Authentication Enter the username and password for the reporter account on the DSM.
Proxy Check the Use proxy if configured box if the NTB has to send reports through a proxy. You musthave already configured the proxy (see HTTP Proxy for details).
Remote Setup Settings:
To configure remote setup, complete the following information then click the button and reboot theNTB:
Remote Setup Check the Enable remote setup for this player box to allow the NTB to report its setup to andreceive setup updates from the DSM.
Categories Check the boxes for the categories of setup you want the NTB to report or donate and forwhich it will accept updates.
Note: You cannot select the Channel category when the NTB is a publisher.
9.2.10 Licensing
Certain features beyond the normal capabilities of the NTB are licensed. This page allows you to view currentlyinstalled licenses and features and to add new licenses.
The Licensing tab shows a summary of all installed licenses, while theStatus tab shows all currently licensedfeatures.
TheAdd License tab allows you to add new licenses.
Note: The NTB must be rebooted for newly installed license features to become available.
9.3 Player SetupUse theSetup > Player options to configure, check, and test the NTB player settings.
Select themenu item for the option you require:
l Audio – Setting the volume and source of sound.
l Screen – Configuring characteristics of the display screen.
l Players – Enabling HTTP proxy, Adobe Flash, and XMLweb service options.
l RS-232Outputs – Configuring and adding RS-232 items.
l Interactivity – Configuring touch screen, RS-232, and remote keypad interaction.
l International – Designating country and language preferences for screen output.
9.3.1 Audio Settings
Use theAudio page to set the sound volume and output type.
Click the tab for the option you require:
l Settings – Enter the settings you require and click the button to enable them:
o Audio Output – Select the output type from the drop-downmenu.
Part 9: Setup
150
o Analogue Master Volume – Set themaster output volume as a percentage of maximum (100%) output level.You specify individual item volumes as a percentage of this master volume. (Only applies to the analogueoutput.)
o Analogue Input Level – Set the input level as a percentage of maximum (100%) input level. (Only applies tothe analogue input.)
l Status – Indicates if audio is muted or not.
l Tests – Click the button and the NTB sends audio test signals so you can hear how the setup sounds.Running the test stops the currently playingmedia. To stop the test and restart themedia, click the
button.
9.3.2 Screen
Use theScreen options to set the screen resolution and orientation and to test its performance.
Click the tab for the options you require:
l Settings – Changing the screen settings.
l Status – Displaying a summary of the screen's Extended Display Identification Data (EDID), including screenresolution.
l Tests – Testing different aspects of screen performance.
Before setting up your screen, you need to understand the Layout Canvas Size setting and understand itsapplication when designing your content.
You use the layout canvas size setting to:
l Define the size of the display space on which the NTB will render your layouts.
l Specify the screen resolution if the NTB cannot read it automatically.
Follow these best practice principles when designing your content:
l Decide on your desired output resolution (typically, 1360 x 768 or 1920 x 1080).
l Set the layout canvas size tomatch that output resolution.
l Choose or design layouts to fit that layout canvas size.
l If your content will be distributed in a channel, set all the screens involved to the same layout canvas size.
The NTB configures the screen by plug-and-play, using values obtained from the screen's EDID information. If thescreen does not include a preset display modematching your layout canvas size, the NTB automatically scales thelayout to fit the screen as best it can. In that case, so long as your layout fills the layout canvas size, the NTB willdisplay all of your layout though some of the screenmay remain unused.
If the NTB is unable to obtain EDID values, it outputs at the same resolution as the layout canvas size and uses thefallback timings you provide on the Settings tab. This can occur because your screen is connected through a VGAextender or distribution amplifier that does not support EDID or DDC. Otherwise, fallback timings should only beneeded for VGA screens as all digital interface specifications mandate plug and play support.
Note: Only connect one screen to the NTB at a time.
Settings:
To configure your screen, complete the following information then click the button:
Net-Top-Box User Guide
151
Layout Canvas Size Specify the dimensions you want for your layout canvas size in pixels:
l Width – Whole numbers in the range 640 to 2560 (2048 on players with Intel Atom CPUs).
l Height – Whole numbers in the range 480 to 2000.
Orientation Specify the orientation of the display relative to the screen by selecting from the drop-down list:
l Landscape - Top edge at top – Default. Corresponds to 0 degrees of rotation.
l Portrait - Left edge at top – Corresponds to 90 degrees of rotation.
l Portrait - Right edge at top – Corresponds to 270 degrees of rotation.
l Landscape - Bottom edge at top – Corresponds to 180 degrees of rotation.
Fallback Timings Select and complete the fallback timings appropriate to your screen:
l VESA CVT Timings – The width and height are taken from your layout canvas size. The NTBcalculates timing information using the standard VESA CVT formula. Always use NormalBlanking for CRT screens. Try Reduced Blanking for flat-screen displays.
l Custom Timings – For advanced users only. The width and height are taken from your layoutcanvas size. Enter your required values for the indicated timing characteristics.
Status:
The NTB lists its available screen connection ports and details of the connected screen.
Tests:
Click the button for the test you want to run on your screen:
l Alignment
l Checker board
l Colour bars
l Grey scale bars
l Horizontal lines
l Vertical lines
Be aware of these characteristics:
l Tests run immediately and interrupt the currently scheduled display.
l Tests run indefinitely until you stop them. Stop a test by running another test or by clicking thebutton to resume the scheduled display.
9.3.3 Players
Use thePlayers page to adjust the settings for the NTB HTML player type.
To configure the HTML player settings, complete the following information then click thebutton:
Part 9: Setup
152
HTTP Proxy Specify whether the NTB uses a proxy for the HTML player to access the Internet:
l No Proxy required – The NTB connects directly to the Internet and does not use a proxy to doso. However, you can configure the NTB so that the HTML player still has to use a proxy (seeHTTP Proxy for details). The Use proxy line indicates if the NTB uses a proxy for the HTMLplayer or if one is not configured.
l No proxy for – Specify internet resources the HTML player can access directly without usinga proxy. Specify each resource individually using its web address or URL separated bycommas (for example, '.bbc.co.uk, 192.168.1.0/24').
Trust Local Flash Select the trust level for running Adobe Flash content on the NTB:
l Restrict disk based flash from communicating with Internet sites – Default and safestoption. Select if the Adobe Flash content does not require access to network connections.
l Allow disk based flash to communicate with internet sites – Select if the Adobe Flashcontent requires access to network connections.
Adobe Flash can access local data on your NTB and, if allowed, pass it on through a networkconnection (for example, to the internet). This is not an issue if you trust the content's source.However, for a more secure configuration, select the Restrict option unless your Adobe Flashcontent requires access to a network. For more details on Adobe Flash security, refer to theAdobe web site.
XMLWeb ServicesExternal URL Access
Select whether the HTML player XML API can access external web sites:
l Do not allow XML web services to access external sites – Default and safest option.Prevents access to external sites .
l Allow XML web services to access external sites – Allows access to external sites. Noteand consider the additional on-screen prompt: Allow only if you understand securityimplications of this choice.
9.3.4 RS-232 Outputs
Use theRS-232 Outputs options to add andmanage RS-232 items.
You can use the NTB RS-232 port, or the RS-232 adapter attached to one of its USB ports, to send RS-232 strings orRS-232 outputs to control an external, RS-232 enabled device. You do this by creating RS-232 items on the NTB.
The RS-232 item consists of one or more of these properties:
l The voltage level for either or both of the RS-232 output lines.
l AnRS-232 hexadecimal control string.
l The event causing the NTB to execute the item.
Click the tab for the option you require:
l Items – Listing the RS-232 items already defined on the NTB.
l Add Item – Adding a new RS-232 item.
l Configuration – Accessing the RS-232 configuration options, including baud rate, data bits, stop bits, and parity.
The NTB can execute an RS-232 item in a playlist or automatically at one of the following events:
l Screen is muted or unmuted.
l Audio is muted or unmuted.
l A specified layout starts or completes.
Net-Top-Box User Guide
153
You have to specify the condition when you create the item: you cannot change it later.
Note: You can only create one RS-232 item for each of the conditions.
If your NTB is a publisher, the RS-232 items are published as part of the channel and are downloaded to subscriberplayers. However, the NTB provides an override so you can designate an RS-232 string or configuration to uselocally that is different from that defined in the channel's RS-232 item.
Items:
For each item, you can take these actions:
l Click the button to delete an item.
l Click the button to review ormodify an item's properties. Click the button to enable anymodifications.
Note: If you have enabledSend RS-232 String Action for the item, a subscriber or publisher NTB also displaysthe Local Override section. This allows you to enable and define a local RS-232 string for the item separate fromthe one defined in the channel.
The Last Response section details the response received the last time the NTB executed this item. Click theExecute RS-232 String button to have the NTB execute the RS-232 item immediately and display any responsestring.
Add Item:
To create the RS-232 item, complete the following details and click the button:
Name Enter a name to uniquely identify this RS-232 item.
Perform Enabled Actions when Specify when the NTB executes the RS-232 item (in a playlist or automatically at theevent you specify).
Send RS-232 String Action Check the Send RS-232 String Action box to enable the NTB to send the RS-232string you specify. Clearing the box disables it.
RS-232 String (as Hexadecimal) Enter the RS-232 string you want the NTB to send (in hexadecimal).
DTR (Data Terminal Read) Action Check the Set DTR level box to enable the NTB to set the DTR line voltage to theoption you select. Clearing the box disables it.
RTS (Ready To Send) Action Check the Set RTS level box to enable the NTB to set the RTS line voltage to theoption you select. Clearing the box disables it..
Configuration:
Configure the NTB RS-232 transmission tomatch the settings of the connected RS-232 equipment. To configure
RS-232, complete the following details and click the button:
l Bits per Second – Select the baud rate from 110 to 460800.
l Data Bits – Select either 7 or 8 data bits.
l Stop Bits – Select either 1 or 2 stop bits.
l Parity – Select the parity as none, odd, or even.
Part 9: Setup
154
Note: If your NTB is either a subscriber or publisher, it also displays the Local Override section. This allows youto enable and define a local RS-232 configuration separate from the one defined in the channel.
9.3.5 Interactivity
Use the Interactivity page to program the NTB to respond to input from user-interaction devices.
Click the tab for the option you require:
l Touch – Setting up and calibrating touch-sensitive screens.
l RS-232 Inputs – Configuring and enabling responses to inputs through the RS-232 port.
l Remote Keypad – Programming the actions associated with the buttons on the remote control.
Note: Some features may depend on installed licenses.
Touch:
TheStatus field indicates the current state of the touch system:
l No touch screen is connected.
l Touch screen is connected but is not calibrated.
l Touch screen is available. (The touch screen is only usable when the NTB displays this status.)
After you have connected a touch screen, youmust calibrate it by following these steps:
1. Click the button.
2. On the touch screen, carefully press your finger on the centre of each of the three crosshairs as they appear.
3. Touch thePress to finishmessage in the centre of the screen.
4. On your browser, if necessary adjust theDrag Threshold value (see below).
5. Click the button.
You can cancel the calibration by clicking theCancel Touch Calibration button on theCalibrating Touch Screenpage. The NTB will also cancel calibration automatically if:
l You do nothing for 60 seconds.
l You or the NTB activates a layout.
l You audition an item.
If the calibration process does not complete successfully, the NTB uses a previously successful calibration or leavesthe screen in an uncalibrated state.
When you perform the calibration, the NTB estimates aDrag Threshold using the difference between your pressand release on the three calibration crosshairs. The drag threshold is theminimum number of screen pixels distancebetween the press and the release to interpret your action as a press-drag-release, rather than a press-release. Thisis particularly important when the NTB passes touch events to a displayed web page, as typically a press-release isrequired.
Youmay need to adjust the drag threshold to take account of themedia the NTB will display and the intended users.To do so, enter the required value in theDrag Threshold field.
Net-Top-Box User Guide
155
RS-232 Inputs:
The NTB can respond to voltage changes on the following RS-232 inputs:
l Clear To Send (CTS).
l Data Carrier Detect (DCD).
l Data Set Ready (DSR).
l Ring Indicator (RI).
Click the button to view and edit the properties for each input required:
l Enabled – Indicates the availability of the input for use on the NTB.
l Name – The name to use for this input when referencing it elsewhere.
l Current Level – Indicates the current state of the input (positive or negative voltage).
l Used By – Indicates the zones and layouts that use the input.
Remote Keypad:
The NTB can respond to button presses on a infra-red controller or remote keypad. The buttons are:
l Volume up and down – Adjusts themaster volume level up and down in 10% divisions. The NTB indicates thenew volume at the top right of the screen.
l Station up and down – Selects the next station up or down in the list of available ad hoc TV or radio stations. TheNTB indicates the new station, or that none are available, at the top right of the screen.
l Four programmable buttons: A, B, C, D – Provides interaction with layout and playlists. If you have notprogrammed the button with an action, the NTB reports that in amessage at the top right of the screen.
The status message on theRemote Keypad tab indicates if the NTB has the infra-red receiver connected or not. TheNTB requires the infra-red receiver to enable it to received remote keypad inputs.
9.3.6 International Settings
Use the International page to choose language and country preferences for the screen output. You should choosethe setting that best matches the expectations of those viewing the screen.
Note: These are different from the language and localisation settings of the user interface, which are determinedby the browser settings.
The settings on the International page are used by:
l The HTML player – To provide a preferred language and locale to web sites that support localisation.
l The text clock – To determine locale-specific date and time formats if you have not specified explicit formats.
9.4 Backing Up Your NTBIn case of problems, you shouldmaintain regular backups of themedia content files and settings that your NTB uses.See Backup Contents for details of what is backed up.
Use theSetup >Maintenance & Troubleshooting > Backup & Restore page to create, save, and restore backupfiles. You save the files on a USB device attached to the NTB (for example, a USB stick or external disk drive,depending on how much space your backup needs). If needed later, you can restore those files and settings onto thisor another NTB.
Part 9: Setup
156
To create a backup:
1. On themenu bar, click Setup and selectMaintenance & Troubleshooting > Backup & Restore.
2. Attach a USB device to the NTB.
3. Click theCreate Backup tab.
4. If you want to create a new folder to hold the backup:
a. Enter the folder name in theNamed field.
b. Click the button.
c. Click the new folder's link to specify it as the backup location.
5. Click the button. It can take several minutes for the NTB to create the backup.
6. If you want to save the backup to a location on your computer, click the USB Memory Stick link and the backupfilename then follow the prompts on the pop-up screen.
7. When you have completed the backup process, remove the USB device.
To restore a backup:
1. On themenu bar, click Setup and selectMaintenance & Troubleshooting > Backup & Restore.
2. Attach the USB device containing the backup to the NTB.
3. Click the button next to the backup you want to restore.
4. Wait for the NTB to reboot after the restore process finishes.
5. Remove the USB stick.
If you wish to restoremedia content onto a different NTB that does not have theBackup & Restore page, then thereare twomethods available:
l Using the options on theManage Channels page – Use for a player that is part of your signage network or totransfer media content between networked systems. See Configuring the Publisher for more details.
l Using the options on the Layout Packages page – Use to create files that you can store on or transfer to adifferent NTB. See Creating a Layout Package for more details.
9.5 Software UpdateYou can access theSoftware Updates page from theSetup >Maintenance Troubleshootingmenu.
Use theSoftware Update options to check the latest update status and to configure whether the NTB performsupdates automatically or not. Please contact your reseller or supplier for more information on available updates.
Note: It is not possible to install an earlier software version than the one currently installed. The currently installedversion is shown highlighted.
Click the tab for the option you require:
l Update Status – Checking details of the last update, how the NTB checks for updates, and if any new updatesare available.
l Settings – Configuring or disabling automatic updating.
l Manual Update – Performing amanual update from a downloaded file.
Net-Top-Box User Guide
157
Caution: Never turn off the power to the NTB while it is installing an update. It can take 30minutes to install alarge update.
Update Status:
The display contains the following information:
Last Update Messages Describes the most recent update.
Status Indicates whether or not the NTB is allowed to check for updates.
If it reads 'Not allowed to Check for updates' this is because you have selected one of thefollowing options on the Settings tab:
l Turn off automatic update.
l Download Allowed – specifying a period that does not include the current time.
Last Checked for updates Indicates when the NTB last checked for updates.
If you have either selected Turn off automatic update or have set a Download Allowedperiod that does not include the current time, this reads 'Not known'.
Update File Indicates if an update is available or not.
If an update is available, and has not yet been installed, the display details its location anddescription. To install that update:
1. Click the Settings tab.
2. Select the Automatically download and install updates option.
3. Click the button.
Update Description A description of what the update listed above provides.
Not displayed if there is no update available.
Progress Contains a progress bar during a download. After a download completes, indicates that anupdate is ready for installation at the next reboot.
Not displayed if there is no update available.
Settings:
To configure software updating, complete the following details and click the button:
Update Mode By default, automatic update is turned off. To turn it on, select the mode of operation youwant to use:
l Automatically download and install updates
l Check for new updates but do not download or install them
l Turn off automatic update
Reboot Allowed Specify the day and time when the NTB can reboot to install an update.
Only activated if you have chosen Automatically download and install updates.
Part 9: Setup
158
Download Allowed Specify the day and a time slot when the NTB can check for updates.
If you have selected Automatically download and install updates, the NTB will check forupdates and, if it finds one, will download and install it automatically. The NTB installs theupdate at the day and time specified in the Reboot Allowed option.
If you have selected Check for new updates but do not download or install them, the NTBwill check for but not download updates. Instead, it displays the details of any new update onthe Update Status tab.
Not activated if you have chosen Turn off automatic update.
Update Server URL If different from the default, specify the URL where the NTB checks for updates.
Not activated if you have chosen Turn off automatic update.
Check Interval Specify how often the NTB checks for updates (in hours and minutes).
Not activated if you have chosen Turn off automatic update.
Authentication If the update server requires authentication, enter the details here.
Not activated if you have chosen Turn off automatic update.
Proxy Select the required proxy configuration:
l No proxy required – The NTB connects directly to the internet.
l Use proxy if configured – The NTB accesses the internet through the configured proxy.You must first configure the proxy (on the Setup > System > HTTP Proxy page).
Manual Update:
The first part of this screen confirms the version of the software currently installed on the NTB.
If you havemanually downloaded an update and wish to install it, follow these steps:
1. Click the button and navigate to the update file location.
2. Select the file and click the button
3. Click the button.
4. Follow the on-screen instructions.
9.6 Reboot SystemYou can access theReboot page from theSetup >Maintenance & Troubleshootingmenu.
Use theReboot page to perform a controlled reboot of the NTB.
Caution: You can stop and restart the NTB simply by switching the power off and on. However, following asoftware update, youmust reboot the NTB using this controlled process to ensure the update completessuccessfully.
Select Yes from the drop-down list and click the button.
Part XTroubleshooting

Net-Top-Box User Guide
161
Part 10: TroubleshootingYour NTB requires little maintenance.
From time to time, ONELAN Limitedmay release software updates for your NTB. Tomake sure you keep your NTBup to date, you can set it to receive and install those updates automatically (see Software Update for more details).
The following topics providemore information about NTB maintenance and problem solving procedures:
l Backing Up Your NTB –Creating and restoring a backup of your media files and NTB settings.
l Reboot System –Manually rebooting the NTB.
l Support Snap Shot– Creating a collection of log and device data for support purposes.
l Connection Troubleshooter – Following a sequence of tasks to track down and correct connection problems.
10.1 Support Snap ShotIf you have a problem with your NTB, your support representativemay ask you to create aSupport Snap Shot. Asupport snap shot consists of a detailed collection of NTB logs and device setting data.
You can access theSupport Snap Shot page from theSetup >Maintenance & Troubleshooting menu
Click the button and follow the on-screen instructions to create the support snap shot, if youare asked to do so.
TheExtras tab includes further diagnostic tools that youmay be asked to use by the support representative to helpdiagnose and resolve problems with your NTB.
10.2 Connection TroubleshooterIf you are having difficulties connecting to your NTB, work through the tasks in the following table:
Task Comment
There must be network cables connecting the NTB toyour PC.
Use either a network cable connecting your computer to your LANand one connecting the NTB to the LAN, or a crossover cableconnecting your computer directly to the NTB. Make absolutelysure that you are using a crossover cable.
If you are using a laptop. connect it to mains power. If your laptop is running on battery power, and the battery is low,the networking circuits may have been shut down. You may needto reboot your laptop and the NTB.
If you are using a crossover cable, turn off anywireless networking.
Your laptop may have a switch to turn wireless networking on andoff. Otherwise, look for an icon on your desktop or in your ControlPanel (for Windows PCs).
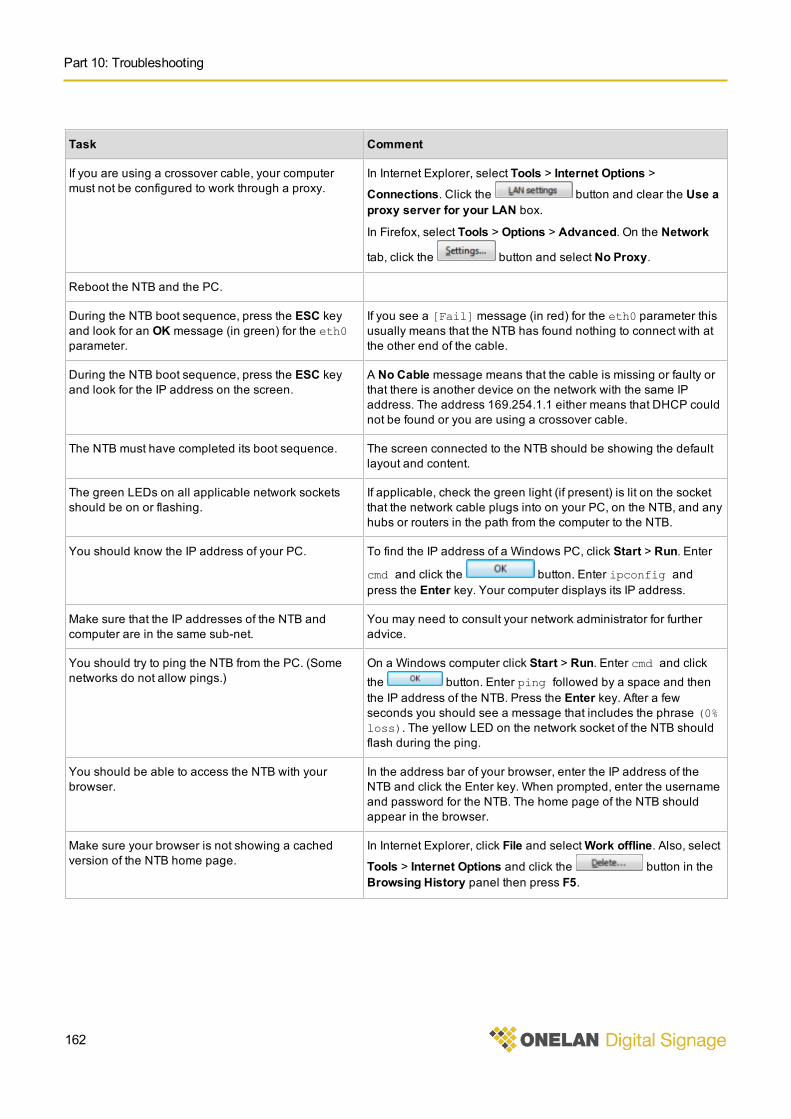
Part 10: Troubleshooting
162
Task Comment
If you are using a crossover cable, your computermust not be configured to work through a proxy.
In Internet Explorer, select Tools > Internet Options >
Connections. Click the button and clear the Use aproxy server for your LAN box.
In Firefox, select Tools > Options > Advanced. On the Network
tab, click the button and select No Proxy.
Reboot the NTB and the PC.
During the NTB boot sequence, press the ESC keyand look for an OK message (in green) for the eth0parameter.
If you see a [Fail]message (in red) for the eth0 parameter thisusually means that the NTB has found nothing to connect with atthe other end of the cable.
During the NTB boot sequence, press the ESC keyand look for the IP address on the screen.
A No Cable message means that the cable is missing or faulty orthat there is another device on the network with the same IPaddress. The address 169.254.1.1 either means that DHCP couldnot be found or you are using a crossover cable.
The NTB must have completed its boot sequence. The screen connected to the NTB should be showing the defaultlayout and content.
The green LEDs on all applicable network socketsshould be on or flashing.
If applicable, check the green light (if present) is lit on the socketthat the network cable plugs into on your PC, on the NTB, and anyhubs or routers in the path from the computer to the NTB.
You should know the IP address of your PC. To find the IP address of a Windows PC, click Start > Run. Enter
cmd and click the button. Enter ipconfig andpress the Enter key. Your computer displays its IP address.
Make sure that the IP addresses of the NTB andcomputer are in the same sub-net.
You may need to consult your network administrator for furtheradvice.
You should try to ping the NTB from the PC. (Somenetworks do not allow pings.)
On a Windows computer click Start > Run. Enter cmd and clickthe button. Enter ping followed by a space and thenthe IP address of the NTB. Press the Enter key. After a fewseconds you should see a message that includes the phrase (0%loss). The yellow LED on the network socket of the NTB shouldflash during the ping.
You should be able to access the NTB with yourbrowser.
In the address bar of your browser, enter the IP address of theNTB and click the Enter key. When prompted, enter the usernameand password for the NTB. The home page of the NTB shouldappear in the browser.
Make sure your browser is not showing a cachedversion of the NTB home page.
In Internet Explorer, click File and selectWork offline. Also, select
Tools > Internet Options and click the button in theBrowsing History panel then press F5.
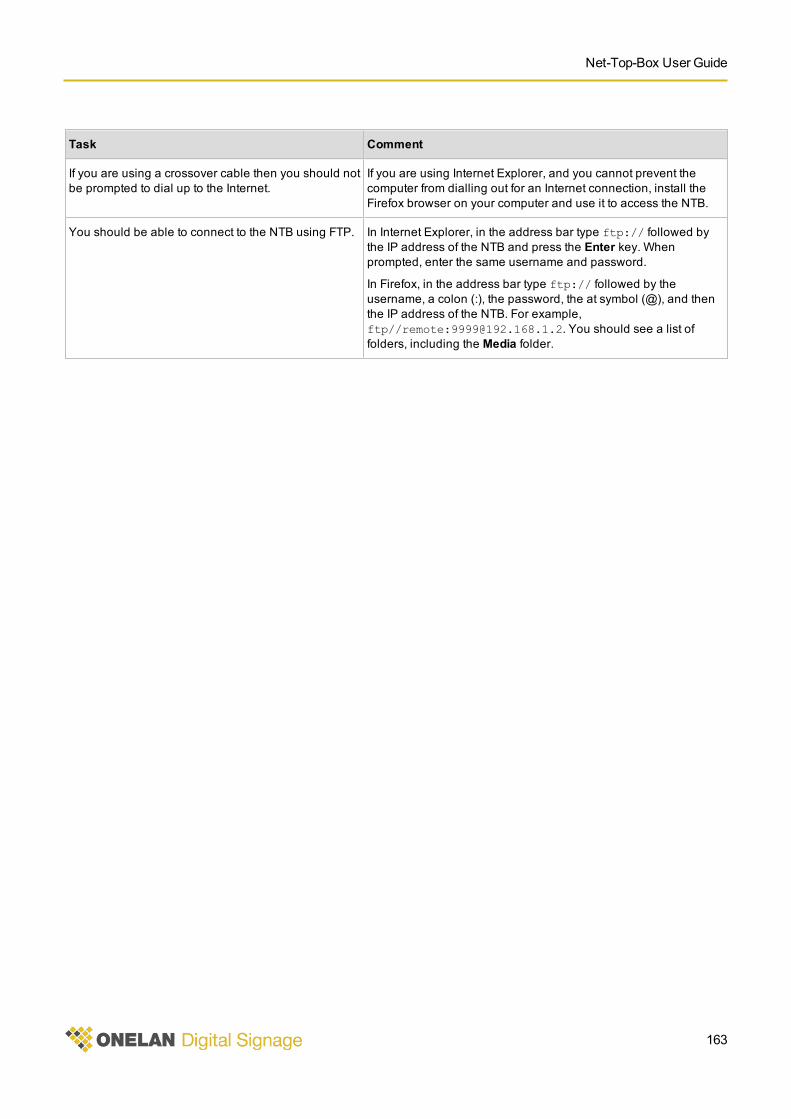
Net-Top-Box User Guide
163
Task Comment
If you are using a crossover cable then you should notbe prompted to dial up to the Internet.
If you are using Internet Explorer, and you cannot prevent thecomputer from dialling out for an Internet connection, install theFirefox browser on your computer and use it to access the NTB.
You should be able to connect to the NTB using FTP. In Internet Explorer, in the address bar type ftp:// followed bythe IP address of the NTB and press the Enter key. Whenprompted, enter the same username and password.
In Firefox, in the address bar type ftp:// followed by theusername, a colon (:), the password, the at symbol (@), and thenthe IP address of the NTB. For example,ftp//remote:[email protected]. You should see a list offolders, including the Media folder.

Part XITechnical Reference

Net-Top-Box User Guide
167
Part 11: Technical ReferenceThis section contains technical reference topics not covered elsewhere:
l Energy Saving – Reducing the amount of power your system consumes.
l Optimising Playback Performance – Enhancing the playback performance of specific media types.
l RS-232 Technical Reference – Understanding RS-232 pin assignments and electrical interfaces.
l Backup Contents – Understanding which files and folders the NTB saves in a backup.
11.1 Energy SavingDigital signage players like the NTB are designed to run continuously. To reduce the energy consumed, youmaywish to shut down part or all of your system during appropriate times of the day or night.
Here are some techniques youmight consider using:
Technique Steps to Follow Effects
Switch Screen to Standby Mode To put the screen into standby mode immediately,follow these steps:
1. On the menu bar, click Schedule and selectManage Schedules.
2. Click the button for the currently runningschedule.
3. Click the button for the current schedule entry.
4. Set Screen to Off.
5. Click the button.
To put the screen into standby mode at other times,create schedule entries to turn the screen off when it isnot needed.
Screen in standby mode.
NTB continues to run.
Switch Screen off with RS-232 Cable 1. Refer to the screen manufacturer's information forthe RS-232 codes needed to switch the screen onand off.
2. Connect the NTB to the screen using a RS-232cable.
3. On the menu bar, click Setup and select Player >RS-232 outputs.
4. Click the Add Item tab and create separate RS-232items containing the screen on and off codes. Click
the button to save each item.
5. Add those RS-232 output items to a playlist from theSpecial tab.
Screen switched off.
NTB continues to run.
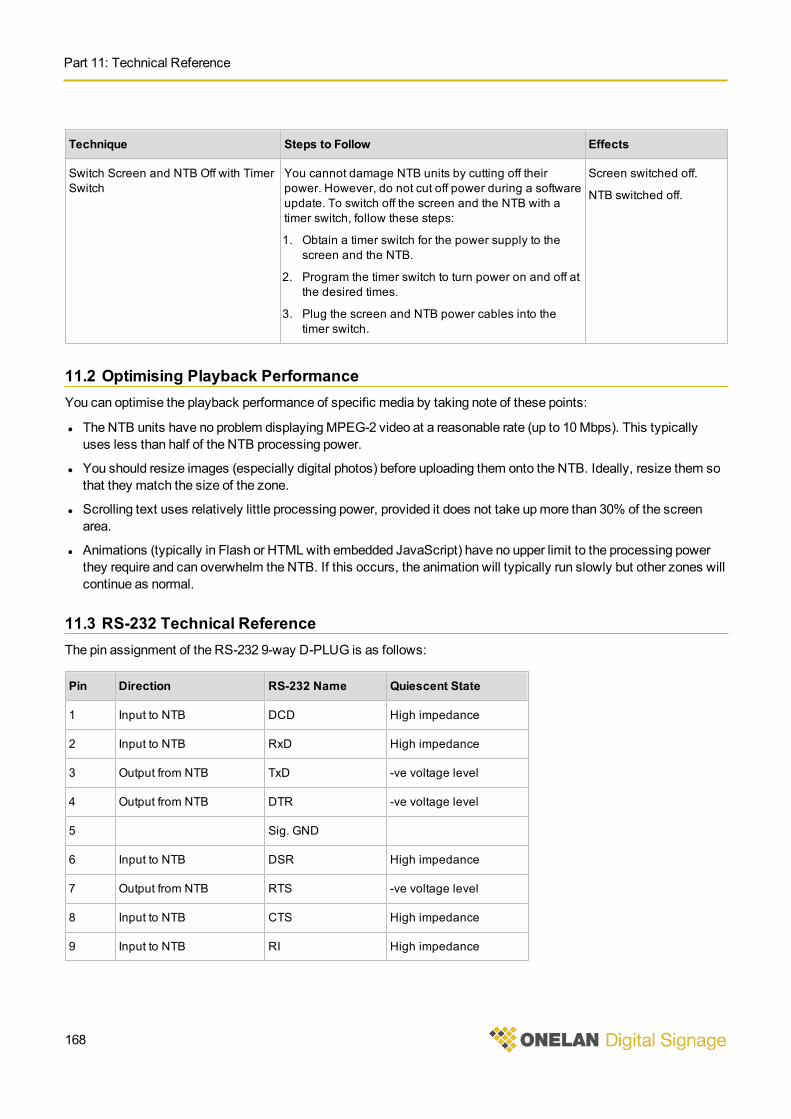
Part 11: Technical Reference
168
Technique Steps to Follow Effects
Switch Screen and NTB Off with TimerSwitch
You cannot damage NTB units by cutting off theirpower. However, do not cut off power during a softwareupdate. To switch off the screen and the NTB with atimer switch, follow these steps:
1. Obtain a timer switch for the power supply to thescreen and the NTB.
2. Program the timer switch to turn power on and off atthe desired times.
3. Plug the screen and NTB power cables into thetimer switch.
Screen switched off.
NTB switched off.
11.2 Optimising Playback PerformanceYou can optimise the playback performance of specific media by taking note of these points:
l The NTB units have no problem displayingMPEG-2 video at a reasonable rate (up to 10Mbps). This typicallyuses less than half of the NTB processing power.
l You should resize images (especially digital photos) before uploading them onto the NTB. Ideally, resize them sothat they match the size of the zone.
l Scrolling text uses relatively little processing power, provided it does not take upmore than 30% of the screenarea.
l Animations (typically in Flash or HTMLwith embedded JavaScript) have no upper limit to the processing powerthey require and can overwhelm the NTB. If this occurs, the animation will typically run slowly but other zones willcontinue as normal.
11.3 RS-232 Technical ReferenceThe pin assignment of the RS-232 9-way D-PLUG is as follows:
Pin Direction RS-232 Name Quiescent State
1 Input to NTB DCD High impedance
2 Input to NTB RxD High impedance
3 Output from NTB TxD -ve voltage level
4 Output from NTB DTR -ve voltage level
5 Sig. GND
6 Input to NTB DSR High impedance
7 Output from NTB RTS -ve voltage level
8 Input to NTB CTS High impedance
9 Input to NTB RI High impedance
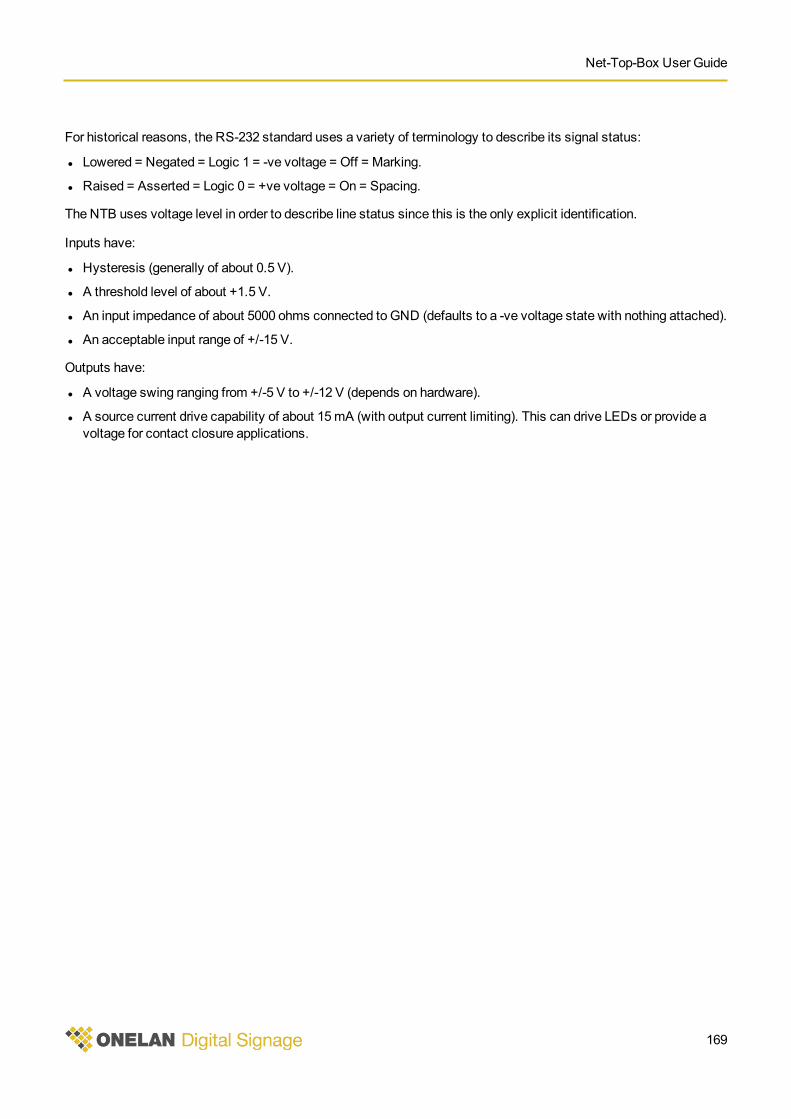
Net-Top-Box User Guide
169
For historical reasons, the RS-232 standard uses a variety of terminology to describe its signal status:
l Lowered = Negated = Logic 1 = -ve voltage = Off = Marking.
l Raised = Asserted = Logic 0 = +ve voltage = On = Spacing.
The NTB uses voltage level in order to describe line status since this is the only explicit identification.
Inputs have:
l Hysteresis (generally of about 0.5 V).
l A threshold level of about +1.5 V.
l An input impedance of about 5000 ohms connected to GND (defaults to a -ve voltage state with nothing attached).
l An acceptable input range of +/-15 V.
Outputs have:
l A voltage swing ranging from +/-5 V to +/-12 V (depends on hardware).
l A source current drive capability of about 15mA (with output current limiting). This can drive LEDs or provide avoltage for contact closure applications.
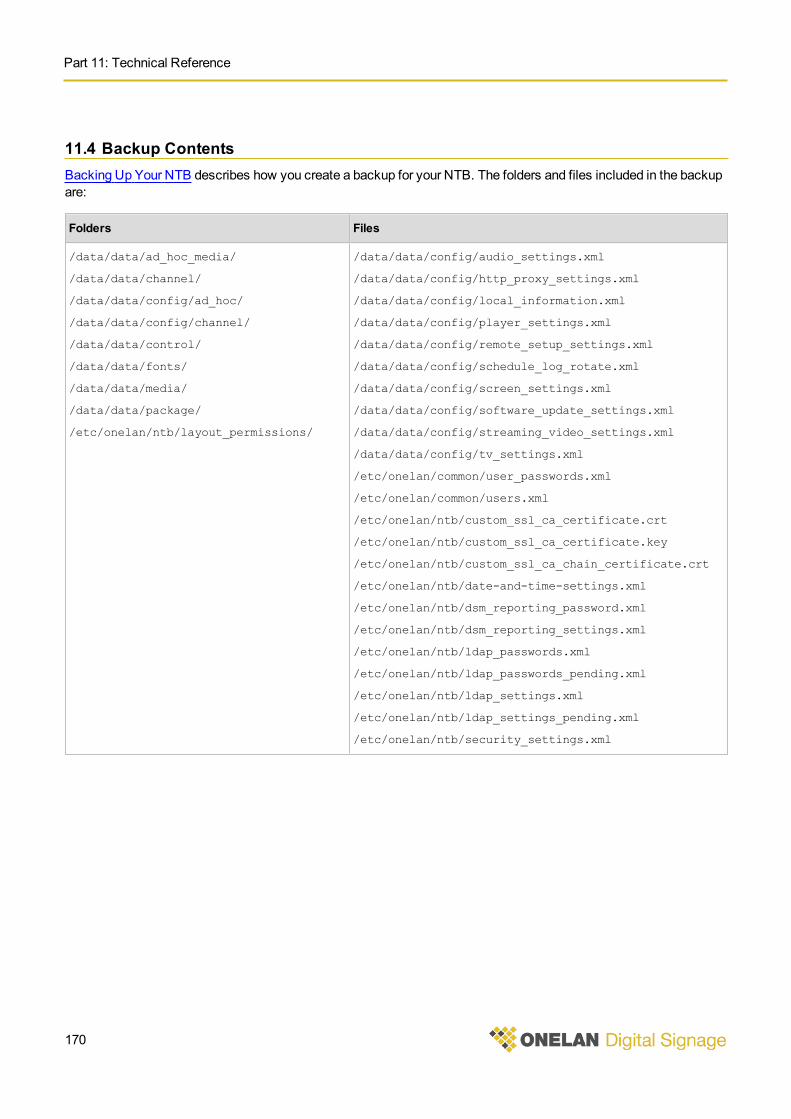
Part 11: Technical Reference
170
11.4 Backup ContentsBacking Up Your NTB describes how you create a backup for your NTB. The folders and files included in the backupare:
Folders Files
/data/data/ad_hoc_media/
/data/data/channel/
/data/data/config/ad_hoc/
/data/data/config/channel/
/data/data/control/
/data/data/fonts/
/data/data/media/
/data/data/package/
/etc/onelan/ntb/layout_permissions/
/data/data/config/audio_settings.xml
/data/data/config/http_proxy_settings.xml
/data/data/config/local_information.xml
/data/data/config/player_settings.xml
/data/data/config/remote_setup_settings.xml
/data/data/config/schedule_log_rotate.xml
/data/data/config/screen_settings.xml
/data/data/config/software_update_settings.xml
/data/data/config/streaming_video_settings.xml
/data/data/config/tv_settings.xml
/etc/onelan/common/user_passwords.xml
/etc/onelan/common/users.xml
/etc/onelan/ntb/custom_ssl_ca_certificate.crt
/etc/onelan/ntb/custom_ssl_ca_certificate.key
/etc/onelan/ntb/custom_ssl_ca_chain_certificate.crt
/etc/onelan/ntb/date-and-time-settings.xml
/etc/onelan/ntb/dsm_reporting_password.xml
/etc/onelan/ntb/dsm_reporting_settings.xml
/etc/onelan/ntb/ldap_passwords.xml
/etc/onelan/ntb/ldap_passwords_pending.xml
/etc/onelan/ntb/ldap_settings.xml
/etc/onelan/ntb/ldap_settings_pending.xml
/etc/onelan/ntb/security_settings.xml

Part XIIGlossary

Net-Top-Box User Guide
173
Part 12: Glossary
Term Meaning
Ad Hoc An override to a display schedule, often managed locally by ad hoc users, which is restrictedto a specific zone and/or content type. Ad hoc users control ad hoc content or ad hoc items,which are kept in ad hoc media folders, and displayed on ad hoc pages.
Ad hoc from centre An ad hoc schedule override which is managed and sent by a remote publisher NTB to oneor more specific subscriber players.
Advance To A command in a playlist that causes the NTB to start displaying from a specific place in this oranother playlist. A matching rendezvous point indicates the place in the other playlist
Audition Manually launching new content to observe how it performs.
Canvas The display space in which the NTB renders layouts.
Channel A source of display content used by subscribers. Also refers to the content it contains.
Channel Content Server A server storing and publishing channel content to offload processing overhead from thepublisher.
Channel name Identifies the channel.
Conditional play A means of controlling whether content is played or not depending on the values set in theplayer local information.
Content An item of digital media or text that is displayed in a zone as part of a playlist.
Digital signage Electronic display that may show a combination of any or all of text, graphics, and still andmoving images.
Digital Signage Network A set of systems connected together to provide integrated management of numerous displayscreens.
Display The overall content being shown on the screen, rather than its layout or zone configuration.
Donate The process of applying a player's configuration to a folder that the Digital Signage Managerthen uses to configure other players.
Event An interactive input that causes a change in the display.
Folder play The ability to add an entire folder of items to a playlist and have them play in sequence.
Graphical layout editor The interactive editor for creating and modifying layouts using zones.
Interactivity The NTB can run predetermined fixed schedules in the different zones within a layout.However content can also be dictated by external stimuli such as floor pressure pads, theincorporation of a touch screen display, or changing content using a remote keypad.
IPTV (Internet ProtocolTelevision)
The delivery of television services over the Internet (as opposed to traditional broadcasttechnology, satellite, or cable reception).
Layout The combination of a background image and one or more display areas (zones) and that canbe shown simultaneously on a screen.
Part 12: Glossary
174
Term Meaning
Layout icons view Abstract display of a layout showing only the distribution and size of its zones. The colour ofeach zone indicates the media it is enabled to play.
Layout package The media and settings for a layout bundled in a ZIP file for distribution to other players.
Manager A component of the ONELAN Digital Signage Platform. Manager is the generic term for theappliance that manages the digital signage network. Specifically, the manager is theONELAN Digital Signage Manager.
Media General term for the content the NTB displays (such as text, images, video, and newsfeeds).
Media audit Reports indicating which media items played on the NTB, when, and for how long.
Media folder Designated area on the NTB disk holding media items for adding to playlists.
Media player A feature that provides a zone with the ability to 'play' different types of media. You canenable a zone with players for movie, HTML, text, and image media, either singly or incombination.
Menu bar Appearing on all of the user interface pages, the menu bar provides access to the variousNTB configuration and design options (such as Media or Playlists).
Multichannel publishing A publisher NTB configured with more than one channel. Only one channel at a time can beactive.
Override Users can override or interrupt a schedule when necessary, for example to display specialinstructions in the event of an emergency, or to show a special event from a TV broadcastfeed.
Page The NTB interface is made up of different pages, accessed through the menu bar. Ad hocusers have their own dedicated pages for their limited-level access.
Player A component of the ONELAN Digital Signage Platform. Player is the generic term for theappliance that runs the screen. Specifically, the player is the ONELAN Net-Top-Box.
Player local information Data entered on an NTB used to alter what is displayed according to conditions often tied to alocality.
Playlist A series of digital media content items displayed in a zone.
Properties, item Refers to the specific characteristics of a display item such as the font and type size of text,the format of images, or the duration of an item in a playlist.
Publish To distribute channel schedules to multiple subscriber players for display on their associatedscreens.
Publisher A device that provides content to players through channels.
Remote keypad A programmable hand-held device for local control of displays, this can be used to switchbetween layouts, choose TV or radio stations, and adjust volume level.
Remote setup A feature allowing a player's configuration to be applied to other players by the DigitalSignage Manager through a folder.
Net-Top-Box User Guide
175
Term Meaning
Rendezvous Point This may be added to a playlist as part of an Advance To command or may be used inmultiple playlists to ensure synchronisation between them.
Role Describes the function of a player: one of standalone, subscriber, or publisher.
Schedule A plan or timetable for displaying layouts at specific times.
Schedule entry An individual action added to the NTB schedule.
Screen snap shot A picture of what the NTB is currently displaying.
Standalone A player that is neither a subscriber or publisher.
Streaming video Video which is delivered to the end user 'live' (that is, direct from the video provider).
Subscribe Players that show a schedule from a publisher subscribe to that device.
Subscriber A player that accepts a channel from a publisher.
Support snap shot A collection of detailed logging information used for support and problem solving purposes.
User Interface policy The level of features exhibited in the menu bar and in other options (can be productive,detailed, or expert).
Zone A single display area in a layout.


Net-Top-Box User Guide
Index33Gmodem 135
AAction buttons 17Ad hoc 87
adding layout items automatically 28Advance To 92, 100and LDAP 147and remote control 90and security 88and showing video-on-demand 78automatic 88channel content 112content 13controlling display 90controlling TV or radio 91creating as you design 88creating pages 95creating users upload folder 98customisation 91customisation scope 94default text 94deleting page 95disabling layout page 95environment 87folder play 91how to set up Advance To 92how to set up schedule override 92item types 94layout 91local control 87manual 88media 70media folder 100newsfeeds 100on publisher 93publisher account 94radio stations 99schedule 91, 100scope of update from centre 93screen layouts 100subscriber account 94text and tables 99TV stations 99user feedback message 94users 88
Advance To 71and ad hoc 100and playlists 71and RS-232 83and synchronisiong playlists 77comparison with Change Layout command 72
Animations and optimising display 168Audio 52
click on touch 83icon 26master volume 150playing on touch 83test 150
Authentication 141form-based 141HTTP 141
BBackground image 84Backup 155
creating 156on USB device 155restoring 156what is included 170
CCanvas size 29Change Layout 82
adding 72and RS-232 83comparison with Advance To command 72
Channeladd 119basic steps to use 111content server 111managing 118parts of 111publish 111publishingmethods 113setting up proxy server 140storage space required 111
Channel Content Server 111Clock and international settings 155Colour 73
adding 73background 84defining 73deleting 73modifying 73naming format 73opacity 74
177
Index
Command buttons 17Conditional play 22
and player local information 147status 126view 33
Conflicts during layout package installation 106Crop 84
HTML 84movie 84
Customisation scope and ad hoc 94
DDate and time 134Display changemethod tradeoffs 82
EEthernet 135
FFile & Folders tab 48File management 48Firewall 141
settings 141status 142
Folder play 37creating complex sequences 68defined 55
Font adding 74Form-based authentication 141FTP 49
uploading files 49using to copy a layout package 106
GGPIO and RS-232 82Graphical layout editor 29
HHelp 13Home page features 14HTML page 54
and interactivity 80passing touch events to 81
HTML playerand international settings 155setting up proxy 140settings 151
HTTP 148and reporting 148
HTTPS and reporting 148
IImages and optimising display 168Interactivity 28, 82
actions 80and storyboards 82and zone displaying HTML 80click on touch 83configuring layout 81configuring playlist 80events 79how the player processes 81options 154playing audio 83remote keypad 81, 155RS-232 81, 155touch screen 81, 83, 154touch screen icon 26
IPTV 57
LLayout 26
action buttons 27activate 38adding a soundtrack 28adding ad hoc items automatically 28audition 38audition in browser 38canvas size 150colour naming 73configuring interactivity 81creating package 105defined 12delete package 105display 26, 29filtering those displayed 27icons 15installing package 105interaction with playlist 80managing packages 105saving changes 30thumbnail 14zones 29
Layout package 105copying using FTP 106distributionmethods 105
LDAP 141adding ad hoc user 147binding 145configuring FTP user 145
178
Net-Top-Box User Guide
configuring HTTP permissions 146configuring HTTP user 145fallback user 144security model 143setting up 143testing setup 142
Localisation 155Localising HTML pages and PLI 147Logon and form-based authentication 141
MMaster password 141Master volume 150Media 43
ad hoc 70Adobe Flash 54audio 43, 52backup and restore 155clocks 45common properties 70entering text 43external web pages 57fonts 74HTMLweb pages 54images 52live video 56multicast video 57newsfeeds 44on player disk 48overview 43PDF files 55play criteria properties 69players 43players described 29presentations 53properties listed andmapped 59QR Codes 47radio 56setting up user's folder 134soundtrack 43tab 59tables 45test 38text 43, 51uploading file with drag and drop 50uploading files 49uploading files with FTP 49video 51
Media folder and ad hoc 98Movie 51
crop 84formats 84
size 84MPEG and optimising display 168Multicast TV 139Multichannel publishing 112
NNetwork 135
setting connection order 137status 137tests 137
Newsfeed 44and ad hoc 100setting up proxy server 140subscribing to 44
OOpenType font 74
PPlay Criteria
properties 69tab contents 59
Playerstatus 125
Player accessing by name 13Player local information 147
and conditional play 147and localising HTML pages 147and weather widget 147examples 147
Playlist 32action buttons 33adding Advance To command 72adding Change Layout commnand 72adding external web pages 58adding rendezvous point 72adding RS-232 47and Advance To 71and rendezvous point 71and RS-232 152configuring touch actions 80creating a sub-playlist loop 79defined 12examples of synchronising 77interaction with layout 80master 77slave 77synchronising 77
PowerPoint and save as formats 53
179
Index
Properties 59advanced 59generic 59listed andmapped 59
Proxy server 139Publish 111
multichannel 112to a channel 111
Publisher 114and ad hoc account 94network and bandwidth considerations 113publishingmethods 113role described 112
RRadio 56
and soundtrack 56configuring 137status 127tuning digital stations 138
Remote keypad 79and interactivity 81controls 90
Remote setup 148Rendezvous point 71
and playlists 71and synchronising playlists 77
Reporting 148setting up 148setting up proxy server 140
Restoremediausing Layout Packages page 156usingManage Channels page 156
Rolesand changing them 112
RS-232 84adding to playlist 47and Advance To 83and Change Layout 83and hexadecimal code 84and interactivity 81control line inputs and outputs 83creating item 152GPIO 82in playlist 152sending and receiving 84uses of 152
SSchedule 21
action buttons 22
and ad hoc 100creating 22default entry 21defined 12entry 21example 21, 23listing all 21override 21
Screenand layout canvas size 150setting resolution and orientation 150testing 151viewing current display 127
Screen colour 84Screen layouts and ad hoc 100Security 140
and ad hoc users 87, 147and configuration 13and passwords 13configuring LDAP 144configuring LDAP FTP user 145configuring LDAP HTTP permissions 146configuring LDAP HTTP user 145defaults 140firewall 141firewall status 142LDAP 143LDAP binding 145LDAP fallback user 144LDAP model 143master password 142SSL certificates 143testing LDAP setup 142VPN, HTTP, HTTPS, FTP, and SSH
described 140Software 156
updating automatically 157updatingmanually 158
Software update and proxy server 140Soundtrack 64
adding to a layout 28with radio 56
SSHconnecting over 148enabling 148
SSL certificates 143Standalone role described 112Status 125
conditional play 126firewall 142network 137on Home page 15overview 125
180
Net-Top-Box User Guide
player 125system 125TV and radio 127
Streaming TV 139Style tab contents 59Subscriber
and ad hoc account 94obtaining content 120role described 112updating by USB stick 122updatingmanually 122
Systemdate and time 134
System status 125
TTabbed pages 17Tables 45
and ad hoc 99and colour items 73
Terminology 11Test 137
audio 150layout 38layout in browser 38LDAP 142media 38network 137screen 151video capture 139viewing current screen 38
Text and ad hoc 99Time and date formats 131Time validity
view 35Time zone 134Touch screen 83
and interactivity 81calibrating 154icon 26
TrueType font 74TV 137
and ad hoc 99configuring 137configuring rebroadcast 138multicast 139setting up streaming 139specifying system 139status 127tuning digital stations 138
UUploading files 33
and drag and drop 50and FTP 49and the Uploading Files tab 49
User interface 14action buttons 17changing appearance 131changing display modes 131command buttons 17features 14tabbed pages 17time and date 131
Users 133setting up andmodifying accounts 133setting upmedia folder 134
VVideo 51
on demand using ad hoc 78storage space required 111testing video capture 139
View current screen 38VPN and reporting 148
WWeather widget and PLI 147Web page size 84Wireless 135
ZZones 28
action buttons 31buttons on tab 30captioning 77defined 12in layout 29listing 30master playlist 77media players 29moving properties dialog 31players for 43saving changes 30slave playlist 77synchronising 77
181