NAUTILUS Operation Guide - Strumenti Musicali
269
Operation Guide E 1
-
Upload
khangminh22 -
Category
Documents
-
view
0 -
download
0
Transcript of NAUTILUS Operation Guide - Strumenti Musicali
i
Operation Guide
E 1
ii
About this manual
The owner’s manuals and how to use themThese manuals apply to all NAUTILUS models. The front panel and rear panel illustrations show the NAUTILUS-61, but they apply identically to the other models.The NAUTILUS comes with the following manuals.• Quick Start Guide (printed and PDF)• Operation Guide (PDF)• Parameter Guide (PDF)• Voice Name List (PDF)A printed copy is included only for the Quick Start Guide.You can download these PDF manuals from the Korg website (www.korg.com).
Quick Start GuidePlease read this first. It introduces all of the basic features of the NAUTILUS, and is designed to get you up and running quickly.
Operation Guide (this document)Put simply, the Operation Guide is designed to answer the question, “How do I do this?”It explains the names and functions of each part of the NAUTILUS, basic operation, an overview of each mode, how to edit sounds, record on the sequencer, sample, and so on. This guide also explains the basics of effects, arpeggiator, Wave Sequences, and Drum Kits.Finally, it also contains a troubleshooting guide and supplemental information such as specifications.
Parameter GuideThe Parameter Guide is designed to answer the question, “What does this do?”Organized by mode and page, the Parameter Guide includes information on each and every parameter in the NAUTILUS.
Voice Name ListThe Voice Name List lists all of the sounds and setups that are in the NAUTILUS when it is shipped from the factory, including Programs, Combinations, Multisamples, Drumsamples, Drum Kits, Arpeggio Pattern, Wave Sequences, Drum Track Patterns, Template Songs, and Effect Presets.
PDF versionsThe NAUTILUS PDF manuals are designed for easy navigation and searching. They include extensive PDF contents information, which generally appears on the side of the window in your PDF reader and lets you jump quickly to a specific section. All cross-references are hyper-links, so that clicking on them automatically takes you to the source of the reference.
Conventions in this manual
Abbreviations for the manuals: QSG, OG, PG, VNLIn the documentation, references to the manuals are abbreviated as follows.QSG: Quick Start GuideOG: Operation GuidePG: Parameter GuideVNL: Voice Name List
Symbols , , Note, TipsThese symbols respectively indicate a caution, a MIDI-related explanation, a supplementary note, or a tip.
Example screen displaysThe parameter values shown in the example screens of this manual are only for explanatory purposes, and may not neccessarily match the values that appear in the LCD screen of your instrument.
MIDI-related explanationsCC# is an abbreviation for Control Change Number.In explanations of MIDI messages, numbers in square brackets [ ] always indicate hexadecimal numbers.
* Linux is a trademark or registered trademark of Linus Torvalds in the United States and in other countries.
* All product names and company names are the trademarks or registered trademarks of their respective owners.
Thank you for purchasing the Korg NAUTILUS. To help you get the most out of your new instrument, please read this manual carefully.

iii
Contents
About this manual . . . . . . . . . . . . . . . . . . . . . . . . . . . ii
Introduction to NAUTILUS. . . . . . . . . . . . . 1Front and rear panels. . . . . . . . . . . . . . . . . . . . . . . . . 1
Front panel . . . . . . . . . . . . . . . . . . . . . . . . . . . . . . . . . . 1Rear panel . . . . . . . . . . . . . . . . . . . . . . . . . . . . . . . . . . . 5TouchView user interface . . . . . . . . . . . . . . . . . . . . . . . 7
Basic information . . . . . . . . . . . . . . . . . . . . . . . . . . . 10About the NAUTILUS’ modes . . . . . . . . . . . . . . . . . . 10About the NAUTILUS’ PCM memory. . . . . . . . . . . . 13About polyphony. . . . . . . . . . . . . . . . . . . . . . . . . . . . . 13Basic operations . . . . . . . . . . . . . . . . . . . . . . . . . . . . . 14
Setup . . . . . . . . . . . . . . . . . . . . . . . . . . . . . . . . . . . . . . 18Turning the power on/off . . . . . . . . . . . . . . . . . . . . . . 18Connections. . . . . . . . . . . . . . . . . . . . . . . . . . . . . . . . . 20
Playing and editing Programs . . . . . . . .25Playing Programs . . . . . . . . . . . . . . . . . . . . . . . . . . . 25
Selecting Programs . . . . . . . . . . . . . . . . . . . . . . . . . . . 25Using Controllers . . . . . . . . . . . . . . . . . . . . . . . . . . . . 29
Easy Program Editing. . . . . . . . . . . . . . . . . . . . . . . . 32Quick edits using the RT control knobs . . . . . . . . . . . 32
Quick Layer/Split. . . . . . . . . . . . . . . . . . . . . . . . . . . . 35Quick Layer example: adding strings to a piano sound. . . . . . . . . . . . . . . . . . 36Quick Split example: adding left-hand bass to a piano . . . . . . . . . . . . . . . . . 38
Detailed Program Editing. . . . . . . . . . . . . . . . . . . . 40Editing HD-1 Programs . . . . . . . . . . . . . . . . . . . . . . . 40Using LFOs and Envelopes (EGs) . . . . . . . . . . . . . . . 43Using Alternate Modulation (AMS) and the AMS Mixers . . . . . . . . . . . . . . . . . . . . . . . . . . 44Controlling Pitch . . . . . . . . . . . . . . . . . . . . . . . . . . . . . 45Using Filters . . . . . . . . . . . . . . . . . . . . . . . . . . . . . . . . 46Using the Amp section . . . . . . . . . . . . . . . . . . . . . . . . 48Using EXi . . . . . . . . . . . . . . . . . . . . . . . . . . . . . . . . . . 50Using Vector Synthesis. . . . . . . . . . . . . . . . . . . . . . . . 52Effects . . . . . . . . . . . . . . . . . . . . . . . . . . . . . . . . . . . . . 53
Playing and editing Combinations . . . .55Playing Combinations . . . . . . . . . . . . . . . . . . . . . . . 55
Selecting Combinations . . . . . . . . . . . . . . . . . . . . . . . 55
Easy Combination editing . . . . . . . . . . . . . . . . . . . 58Changing the Programs within a Combi . . . . . . . . . . . 58Adjusting the mix . . . . . . . . . . . . . . . . . . . . . . . . . . . . 58
Quick Layer/Split . . . . . . . . . . . . . . . . . . . . . . . . . . . . 59Quick Layer example: adding strings to a piano Combination . . . . . . . . . . . . .59Quick Split example: adding a lead synth to a Combination . . . . . . . . . . . . .61
Detailed Combination editing . . . . . . . . . . . . . . . . 63Combination overview . . . . . . . . . . . . . . . . . . . . . . . . .64Layers, Splits, and Velocity Switches . . . . . . . . . . . . .65MIDI Settings . . . . . . . . . . . . . . . . . . . . . . . . . . . . . . . .66Altering Programs to fit within a Combination . . . . . .67Editing Programs from within a Combination or Song . . . . . . . . . . . . . . . . . . . . . . . . . . . . . . . . . . . . . . .68Effects. . . . . . . . . . . . . . . . . . . . . . . . . . . . . . . . . . . . . .69Saving your edits . . . . . . . . . . . . . . . . . . . . . . . . . . . . .70
Creating songs (SEQUENCER mode) . . .71Playing Songs . . . . . . . . . . . . . . . . . . . . . . . . . . . . . . . 73
Playback . . . . . . . . . . . . . . . . . . . . . . . . . . . . . . . . . . . .73
MIDI recording . . . . . . . . . . . . . . . . . . . . . . . . . . . . . . 76Preparations for recording . . . . . . . . . . . . . . . . . . . . . .76Recording MIDI in real-time . . . . . . . . . . . . . . . . . . . .79MIDI step recording . . . . . . . . . . . . . . . . . . . . . . . . . . .83Recording the sound of a Combination or Program. . .85Recording multiple MIDI tracks from an external sequencer . . . . . . . . . . . . . . . . . . . . . . . . . .86Recording System Exclusive events. . . . . . . . . . . . . . .87Recording patterns . . . . . . . . . . . . . . . . . . . . . . . . . . . .89Other ways to record . . . . . . . . . . . . . . . . . . . . . . . . . .90
Audio recording. . . . . . . . . . . . . . . . . . . . . . . . . . . . . 91Audio recording overview . . . . . . . . . . . . . . . . . . . . . .91Audio input settings and recording source selection . .93Recording procedure . . . . . . . . . . . . . . . . . . . . . . . . . .95Other variations of audio track recording. . . . . . . . . .101Placing a WAVE file in an audio track . . . . . . . . . . .102
Song editing . . . . . . . . . . . . . . . . . . . . . . . . . . . . . . . 104
Using RPPR (Realtime Pattern Play/Record) . . 106Creating RPPR data . . . . . . . . . . . . . . . . . . . . . . . . . .106RPPR playback. . . . . . . . . . . . . . . . . . . . . . . . . . . . . .107Recording an RPPR performance. . . . . . . . . . . . . . . .108
Sampling in SEQUENCER mode . . . . . . . . . . . . . . 109
Saving your Song . . . . . . . . . . . . . . . . . . . . . . . . . . 109
Other notes about SEQUENCER mode. . . . . . . . 110NAUTILUS sequencer file formats . . . . . . . . . . . . . .110The Compare function . . . . . . . . . . . . . . . . . . . . . . . .111Memory Protect . . . . . . . . . . . . . . . . . . . . . . . . . . . . .111About MIDI . . . . . . . . . . . . . . . . . . . . . . . . . . . . . . . .112
iv
Set Lists . . . . . . . . . . . . . . . . . . . . . . . . . . . 113Set List Overview . . . . . . . . . . . . . . . . . . . . . . . . . . 113
Selecting and playing sounds . . . . . . . . . . . . . . . 114Selecting Set Lists. . . . . . . . . . . . . . . . . . . . . . . . . . . 114Selecting Slots. . . . . . . . . . . . . . . . . . . . . . . . . . . . . . 115Using the Comment Pad . . . . . . . . . . . . . . . . . . . . . . 116
Editing Set Lists. . . . . . . . . . . . . . . . . . . . . . . . . . . . 117Selecting and re-arranging sounds . . . . . . . . . . . . . . 117Detailed Set List editing . . . . . . . . . . . . . . . . . . . . . . 119
Smooth Sound Transitions . . . . . . . . . . . . . . . . . 121Overview. . . . . . . . . . . . . . . . . . . . . . . . . . . . . . . . . . 121Using Smooth Sound Transitions . . . . . . . . . . . . . . . 121
Sampling (Open Sampling System) . . 123Sampling overview . . . . . . . . . . . . . . . . . . . . . . . . 123
About sampling on the NAUTILUS. . . . . . . . . . . . . 123
Preparations for sampling . . . . . . . . . . . . . . . . . . 126Audio Settings. . . . . . . . . . . . . . . . . . . . . . . . . . . . . . 126
Sampling and editing in SAMPLING mode . . . 132Creating multisample indexes and sampling–Recording . . . . . . . . . . . . . . . . . . . . . . . . . 132Basic examples of sampling . . . . . . . . . . . . . . . . . . . 134Editing loops . . . . . . . . . . . . . . . . . . . . . . . . . . . . . . . 138Using Time Slice . . . . . . . . . . . . . . . . . . . . . . . . . . . 140Sample waveform editing . . . . . . . . . . . . . . . . . . . . . 142Multisample editing . . . . . . . . . . . . . . . . . . . . . . . . . 143Saving, converting to Programs, and Comparing . . . 144
Sampling in PROGRAM and COMBINATION modes. . . . . . . . . . . . . . . . . . . . . . . . . . . . . . . . . . . . . 145
Overview. . . . . . . . . . . . . . . . . . . . . . . . . . . . . . . . . . 145Resampling a Arpeggiator phrase in PROGRAM mode. . . . . . . . . . . . . . . . . . . . . . . . . . . 145Mixing a Scene drum phrase with a live guitar input, and sampling the result . . . . . . . . . . . . . . . . . . . . . . . 146Sampling a guitar from the audio inputs, while listening to a Scene drum phrase . . . . . . . . . . 147
Sampling in SEQUENCER mode . . . . . . . . . . . . . 148In-Track Sampling . . . . . . . . . . . . . . . . . . . . . . . . . . 148Resampling a song to create a Wave file . . . . . . . . . 149
User Sample Banks. . . . . . . . . . . . . . . . . . . . . . . . . 151Overview. . . . . . . . . . . . . . . . . . . . . . . . . . . . . . . . . . 151Saving User Sample Banks. . . . . . . . . . . . . . . . . . . . 152Loading User Sample Banks. . . . . . . . . . . . . . . . . . . 154Editing User Sample Banks . . . . . . . . . . . . . . . . . . . 155User Sample Bank IDs and limitations. . . . . . . . . . . 156
Arpeggiator function . . . . . . . . . . . . . . . 157Arpeggiator functions and scene settings. . . . 157
Selecting a scene, playing with the arpeggiator and drum track or step sequencer . . . . . . . . . . . . . . . . . . .158Setting the scenes . . . . . . . . . . . . . . . . . . . . . . . . . . . .160Arpeggiator settings in COMBINATION and SEQUENCER modes . . . . . . . . . . . . . . . . . . . . . . . . .164Regarding arpeggiator synchronization . . . . . . . . . . .167
Creating Drum Track patterns. . . . . . . . . . . . . . . 169
Global Settings, Wave Seq., Drum Kits . . . . . . . . . . . . . . . . . . . . . . . . . . . . . . . . . . . 171GLOBAL mode overview . . . . . . . . . . . . . . . . . . . . 171
Global Settings . . . . . . . . . . . . . . . . . . . . . . . . . . . . 172Basic Setup . . . . . . . . . . . . . . . . . . . . . . . . . . . . . . . . .172Global audio settings . . . . . . . . . . . . . . . . . . . . . . . . .174MIDI settings . . . . . . . . . . . . . . . . . . . . . . . . . . . . . . .174Pedal and other controller settings . . . . . . . . . . . . . . .175Configuring the QUICK ACCESS buttons . . . . . . . .176Creating user scales . . . . . . . . . . . . . . . . . . . . . . . . . .178Setting Category Names for Programs, and Combinations . . . . . . . . . . . . . . . . . . . . . . . . . . . . . . .178
Automatically loading sample data. . . . . . . . . . 179Using the KSC Auto-Load list to select which samples to load . . . . . . . . . . . . . . . . . . . . . . . .179Creating and saving .KSC files . . . . . . . . . . . . . . . . .180
Connecting to computers via USB Ethernet and FTP . . . . . . . . . . . . . . . . . . . 182
Using Wave Sequences . . . . . . . . . . . . . . . . . . . . . 183Wave Sequence Overview . . . . . . . . . . . . . . . . . . . . .183Programming Basics . . . . . . . . . . . . . . . . . . . . . . . . .184Adjusting the sound of an individual step . . . . . . . . .186Using rhythmic Wave Sequences. . . . . . . . . . . . . . . .188Creating smooth, evolving timbres . . . . . . . . . . . . . .190Modulating Wave Sequences . . . . . . . . . . . . . . . . . . .190Saving Wave Sequences. . . . . . . . . . . . . . . . . . . . . . .192
Using Drum Kits. . . . . . . . . . . . . . . . . . . . . . . . . . . . 193Drum Kit Overview . . . . . . . . . . . . . . . . . . . . . . . . . .193Before you start editing… . . . . . . . . . . . . . . . . . . . . .194Editing Drum Kits . . . . . . . . . . . . . . . . . . . . . . . . . . .194Saving Drum Kits. . . . . . . . . . . . . . . . . . . . . . . . . . . .196
Editing arpeggio patterns . . . . . . . . . . . . . . . . . . 197Creating a user arpeggio pattern. . . . . . . . . . . . . . . . .197Saving the arpeggio pattern . . . . . . . . . . . . . . . . . . . .201

v
Loading & saving data . . . . . . . . . . . . . .203Saving data . . . . . . . . . . . . . . . . . . . . . . . . . . . . . . . . 203
Overview. . . . . . . . . . . . . . . . . . . . . . . . . . . . . . . . . . 203Writing to internal memory. . . . . . . . . . . . . . . . . . . . 205Saving to internal drive, CDs, and USB media. . . . . 209
Loading data from disk . . . . . . . . . . . . . . . . . . . . . 213Loading Songs, sounds, and samples together . . . . . 213Loading individual banks from a .PCG file . . . . . . . 215Loading data by individual item or bank . . . . . . . . . 216Loading the samples required by Programs or Combinations . . . . . . . . . . . . . . . . . . . . . . . . . . . . . . 217
Using Effects . . . . . . . . . . . . . . . . . . . . . . .219Effects overview . . . . . . . . . . . . . . . . . . . . . . . . . . . 219
Effects basics. . . . . . . . . . . . . . . . . . . . . . . . . . . . . . . 219Effect I/O. . . . . . . . . . . . . . . . . . . . . . . . . . . . . . . . . . 220Effects in each mode . . . . . . . . . . . . . . . . . . . . . . . . . 221
Effects selection and routing. . . . . . . . . . . . . . . . 223Using effects in Programs . . . . . . . . . . . . . . . . . . . . . 223Using effects in Combinations and Songs . . . . . . . . 225Using effects in SAMPLING mode . . . . . . . . . . . . . 227Using effects with the audio inputs. . . . . . . . . . . . . . 229
Detailed effects editing. . . . . . . . . . . . . . . . . . . . . 230Dynamic modulation (Dmod) . . . . . . . . . . . . . . . . . . 230MIDI/Tempo Sync . . . . . . . . . . . . . . . . . . . . . . . . . . 231Common FX LFO . . . . . . . . . . . . . . . . . . . . . . . . . . . 231Effect Presets. . . . . . . . . . . . . . . . . . . . . . . . . . . . . . . 232
Appendices . . . . . . . . . . . . . . . . . . . . . . . .233Troubleshooting . . . . . . . . . . . . . . . . . . . . . . . . . . . 233
Power supply. . . . . . . . . . . . . . . . . . . . . . . . . . . . . . . 233LCD screen . . . . . . . . . . . . . . . . . . . . . . . . . . . . . . . . 233Audio input and output . . . . . . . . . . . . . . . . . . . . . . . 234Programs and Combinations . . . . . . . . . . . . . . . . . . . 235Knobs . . . . . . . . . . . . . . . . . . . . . . . . . . . . . . . . . . . . 236Songs. . . . . . . . . . . . . . . . . . . . . . . . . . . . . . . . . . . . . 236Set Lists. . . . . . . . . . . . . . . . . . . . . . . . . . . . . . . . . . . 237Sampling . . . . . . . . . . . . . . . . . . . . . . . . . . . . . . . . . . 238Arpeggiator function . . . . . . . . . . . . . . . . . . . . . . . . . 239Drum Track/Step Sequence . . . . . . . . . . . . . . . . . . . 239X-Y control . . . . . . . . . . . . . . . . . . . . . . . . . . . . . . . . 239Drum Kits . . . . . . . . . . . . . . . . . . . . . . . . . . . . . . . . . 239Wave Sequences . . . . . . . . . . . . . . . . . . . . . . . . . . . . 239Effects . . . . . . . . . . . . . . . . . . . . . . . . . . . . . . . . . . . . 240MIDI . . . . . . . . . . . . . . . . . . . . . . . . . . . . . . . . . . . . . 240Internal drive, CDs, and USB Media . . . . . . . . . . . . 240Other problems . . . . . . . . . . . . . . . . . . . . . . . . . . . . . 241
Error and confirmation messages. . . . . . . . . . . . 242A (ADC–Are You Sure) . . . . . . . . . . . . . . . . . . . . . . .242B (Buffer) . . . . . . . . . . . . . . . . . . . . . . . . . . . . . . . . . .242C (Can’t calibrate–Completed). . . . . . . . . . . . . . . . . .242D (Destination–Disk) . . . . . . . . . . . . . . . . . . . . . . . . .243E (Error–Exceeded) . . . . . . . . . . . . . . . . . . . . . . . . . .244F (File–Front) . . . . . . . . . . . . . . . . . . . . . . . . . . . . . . .245H . . . . . . . . . . . . . . . . . . . . . . . . . . . . . . . . . . . . . . . . .246I (Illegal–Index) . . . . . . . . . . . . . . . . . . . . . . . . . . . . .246K . . . . . . . . . . . . . . . . . . . . . . . . . . . . . . . . . . . . . . . . .247M (Master–Multisample) . . . . . . . . . . . . . . . . . . . . . .247N (No data–Not enough song memory) . . . . . . . . . . .248O (Obey copyright rules–Oscillator) . . . . . . . . . . . . .250P (Pattern–Program) . . . . . . . . . . . . . . . . . . . . . . . . . .250Q (Quick Layer/Split function) . . . . . . . . . . . . . . . . .250R (Rear sample–Root) . . . . . . . . . . . . . . . . . . . . . . . .251S (Sample–Source) . . . . . . . . . . . . . . . . . . . . . . . . . . .251T (The clock–/TEMP folder detected) . . . . . . . . . . . .252U (Unable to create directory–USB Hub) . . . . . . . . .252W (Wave) . . . . . . . . . . . . . . . . . . . . . . . . . . . . . . . . . .253Y (You). . . . . . . . . . . . . . . . . . . . . . . . . . . . . . . . . . . .253
Internal drive and Media information. . . . . . . . 254Types of media supported by the NAUTILUS. . . . . .254Operations that the NAUTILUS can perform on media . . . . . . . . . . . . . . . . . . . . . . . . . . . . . . . . . . . . .254Restoring the factory settings . . . . . . . . . . . . . . . . . . .255
Specifications . . . . . . . . . . . . . . . . . . . . . . . . . . . . . . 256
MIDI Implementation Chart . . . . . . . . . . . . . . . . . 262

vi

1
Introduction to NAUTILUS
Front and rear panels
Front panel
1. MASTER VOLUME sliderThis adjusts the volume of the main L/R audio outputs, as well as the volume of the headphone jack.
2. VALUE controllersWhen you’ve selected a parameter on the TouchView display, you can edit it using the dial or buttons of the front-panel:
VALUE dialUse this dial to edit the selected parameter’s value. This control is convenient when you want to scroll through a very long list of selections.
− and + buttonsThese are used to increase or decrease the parameter value by individual steps. They’re convenient for making fine parameter adjustments.
ENTER buttonPress the ENTER button to accept the values you input or to execute a variety of shortcut commands.
Special functions of the ENTER buttonPress the ENTER button to execute a variety of shortcut commands. For instance, on parameters for inputting note numbers and velocity values, you can input data in the usual way or input data directly using the ENTER button and the keyboard of the NAUTILUS, by following the steps below.
1. Select the parameter for which you will enter a note number or velocity value.
2. Play a key on the keyboard while holding down the ENTER button to directly input the note number or velocity value.
You can use the ENTER button to jump into the editing pages of a Program from within a COMBINATION or SEQUENCER—while still hearing all of the other Timbres or Tracks. To do so, go to the Mixer page, hold down the ENTER button, and touch the Program select field in the display. For more information, see “Editing Programs from within a Combination or Song” on page 68.
EXIT buttonReturns to the main page of the current mode. Each time you press the button, you’ll move between pages in the following way.Returns to the Home page of the current mode. Each time you press the button, you’ll move between pages in the following way.
Last selected (tab) page of the Home page group → first (tab) page of the Home page group → specified parameter (such as “Program Select”) in each mode
When a dialog box is open, pressing this button cancels the dialog box settings and closes the dialog box, just like pressing the Cancel button. If a pop-up menu for the Page menu is open, pressing EXIT closes the menu.
13. SW 1&2
14. Joystick
1. MASTER VOLUME
3. MODE
4. PAGE
11. OCTAVE
2. VALUE controllers
15. TouchViewdisplay
7. RT control knobs, SELECT
12. AUDIO IN 6. SHIFT
9. Arpeggiator, Drum track, Step sequencer
10. Effectors
8. DYNAMICS
5. QUICK ACCESS
Introduction to NAUTILUS
2
3. MODE buttonThe NAUTILUS uses seven modes. To select each mode, press the MODE button and choose using the Mode Select page that is displayed.To close the menu, press the Close button or the EXIT button.
4. PAGE buttonWhen you press this button, a list of the pages within the selected mode will appear in the display. Press the button of the desired page. (see page 14)
5. QUICK ACCESS: A–F buttonsSelect a combination of button functions that corresponds to how you will operate the NAUTILUS. These buttons can be used to jump to the pages you set, and to select the modes. They can also be used as playback, stop, record and other buttons in SEQUENCER mode.The button function settings can be accessed from the Quick Access page in GLOBAL mode. (see “Configuring the QUICK ACCESS buttons” on page 176)
6. SHIFT buttonBy using the SHIFT button together with another button or control, you can access alternate functions assigned to that button or control. The main functions that can be set are shown below.• SHIFT + OCTAVE −/+ button:
The range of pitches assigned to the keys can be changed in semitone steps, up or down.
• SHIFT + AUDIO IN button:Displays the Analog Input Setup dialog box, where you can configure the input level and so on.
• SHIFT + MFX or TFX button:Shows the MFX1 or TFX1 page for the current mode.
• SHIFT + ARP button:Shows the ARP DRUM page for the current mode.
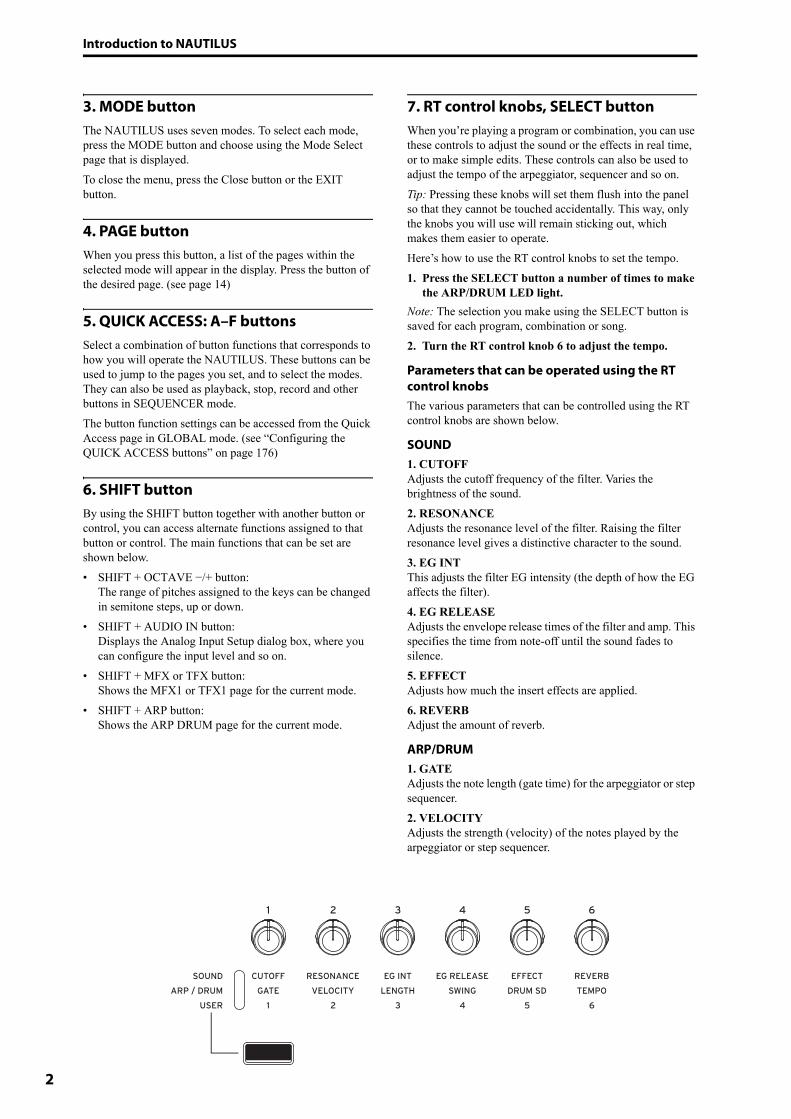
7. RT control knobs, SELECT buttonWhen you’re playing a program or combination, you can use these controls to adjust the sound or the effects in real time, or to make simple edits. These controls can also be used to adjust the tempo of the arpeggiator, sequencer and so on.Tip: Pressing these knobs will set them flush into the panel so that they cannot be touched accidentally. This way, only the knobs you will use will remain sticking out, which makes them easier to operate.Here’s how to use the RT control knobs to set the tempo.1. Press the SELECT button a number of times to make
the ARP/DRUM LED light.Note: The selection you make using the SELECT button is saved for each program, combination or song.2. Turn the RT control knob 6 to adjust the tempo.
Parameters that can be operated using the RT control knobsThe various parameters that can be controlled using the RT control knobs are shown below.
SOUND1. CUTOFFAdjusts the cutoff frequency of the filter. Varies the brightness of the sound.2. RESONANCEAdjusts the resonance level of the filter. Raising the filter resonance level gives a distinctive character to the sound.3. EG INTThis adjusts the filter EG intensity (the depth of how the EG affects the filter).4. EG RELEASEAdjusts the envelope release times of the filter and amp. This specifies the time from note-off until the sound fades to silence.5. EFFECTAdjusts how much the insert effects are applied.6. REVERBAdjust the amount of reverb.
ARP/DRUM1. GATEAdjusts the note length (gate time) for the arpeggiator or step sequencer.2. VELOCITYAdjusts the strength (velocity) of the notes played by the arpeggiator or step sequencer.

Front and rear panels Front panel
3
3. LENGTHAdjusts the length of the arpeggiator pattern and the step sequencer’s sequence.4. SWINGAdjusts the pattern of the arpeggiator or drum track, or the shuffle feel of the sequence played by the step sequencer.5. DRUM SDChanges the pattern of the drum track, or the snare drum sound used in the sequence played by the step sequencer.6. TEMPOAdjusts the overall tempo. The tempo setting will control the following.• Arpeggiator• Drum Track• Step sequencer• Songs in SEQUENCER mode• Tempo sync LFO• Tempo sync (BPM) delay effects
USERThis lets you control the functions set for each program and combination. (see “Assigning functions to RT control knobs 1–6” on page 33)
8. DYNAMICS
DYNAMICS button and knob Pressing the button to turn DYNAMICS ON (the button will light) will activate the knob.This adjusts how the volume and tone will be changed in response to how hard the keys are played (velocity) on this keyboard. Turning the knob to the left will cause the sound to play softer in response to the strength of the keys played.This is good for playing highly inflected passages from pianissimo (very soft) to fortissimo (very loud), such as solo piano or in band ensembles.Turning the knob to the right will cause the sound to play louder in response to the strength of the keys played.This is good for generally making your sound stand out when playing backing parts in a band ensemble, or when playing a solo.The sound will not change when the knob is in center position.For layered and split sounds, the dynamics effect will be applied to both sounds.Note: The effect controlled may differ, depending on the program. The dynamics will have no effect on programs that do not change in volume or tone with velocity, such as organ sounds or some synth sounds.Note: The dynamics settings can only be saved in a set list. When in SET LIST mode, the values saved in each slot will be used. When in a mode other than Set List, the front panel settings (these are off when the power is turned on) will be used.Note: The effect will be applied to the velocity curve (→p.172) that is selected.
9. Arpeggiator (ARP)
LATCH buttonWhen latch is turned on, the arpeggiator will keep generating patterns and phrases, even after you stop playing the keyboard and take your hands off, or after a MIDI note on/off message is received.
ARP buttonSwitches the arpeggiator function on/off. The button’s LED will light when this is on.
DRUM buttonSwitches the drum function on/off. The drums operate as either a drum track or as a step sequencer, depending on the current scene selected. When this is on, the button will light and the drum track pattern will start playing. If the button is blinking when the drum function is on, the drum track pattern will enter standby mode. The drum track pattern will start when you play the keyboard or a MIDI note-on is received. (see page 158)
TAP buttonThis button lets you enter tempos simply by tapping your finger on the button. Two taps are enough to change the tempo; for greater accuracy, you can continue tapping, and the tempo will be averaged over the most recent 16 taps.You can use the tap feature to change the ARP and other tempo settings in PROGRAM, COMBINATION and SEQUENCER modes. In SEQUENCER mode, you can use this to control the song’s tempo.Lightly tap the TAP button several times at the desired tempo during playback. The tempo will change in real time to follow your taps. This is a convenient way to adjust the playback tempo to a different speed in real time.Note: You can also tap tempos using a foot switch. For more information, see “Foot Switch Assignments” on page 917 of the PG.Note: If “MIDI Clock” (GLOBAL) is set to “External MIDI” or “External USB”, or if it is set to “Auto MIDI” or “Auto USB” and a MIDI clock is currently being received, the TAP button will not have any effect.Press the TAP button while holding down the SHIFT button to hear the click sound.Note: You cannot use this operation to turn the click on/off when you are in SEQUENCER mode.
Introduction to NAUTILUS
4
10. Effectors
MFX buttonTFX buttonThese buttons turn the master effects and total effects on/off. When the buttons are on (LED lit), the effect settings for the program, combination, or song will be enabled. When the buttons are off (LED unlit), the corresponding effects will be off.The on/off status of these buttons is remembered even when you switch programs, combinations, or songs.
11. OCTAVE buttons
OCTAVE −/+ buttonsThe range of pitches assigned to the keys can be changed in one-octave steps, up or down. Press the OCTAVE − and + buttons together to return to the standard pitch. Hold down the SHIFT button and press the OCTAVE −/+ buttons to change the range of pitches assigned to the keys in semitone steps, up or down.
12. AUDIO IN buttonEnables the input from the Audio Input 1, 2 jacks on the rear panel. Press the AUDIO IN button while holding down SHIFT to display the Analog Input Setup dialog box, where you can configure the input level and so on.For more on input settings, see “2. Analog audio input connections” on page 21.
13. SW1 and SW2These on/off buttons can perform a number of different functions, such as modulating sounds or locking the modulation values of the joystick.Also, each one may work either as a toggle, or as a momentary switch. In toggle mode, each press alternates between on and off; in momentary mode, the button only changes for as long as you hold it down.Each button has an LED, which lights up when the button is on.Each Program, Combination, and Song stores its own settings for what the buttons will do, and whether each button defaults to being on or off.
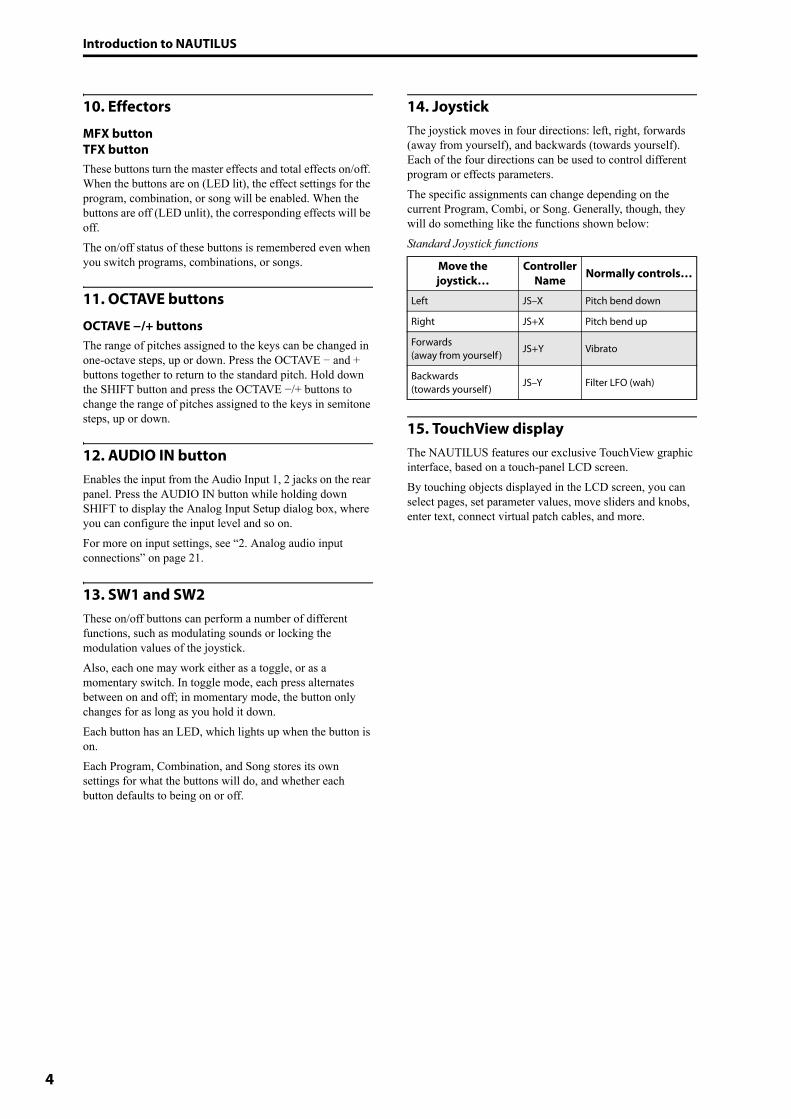
14. JoystickThe joystick moves in four directions: left, right, forwards (away from yourself), and backwards (towards yourself). Each of the four directions can be used to control different program or effects parameters. The specific assignments can change depending on the current Program, Combi, or Song. Generally, though, they will do something like the functions shown below:Standard Joystick functions
15. TouchView displayThe NAUTILUS features our exclusive TouchView graphic interface, based on a touch-panel LCD screen.By touching objects displayed in the LCD screen, you can select pages, set parameter values, move sliders and knobs, enter text, connect virtual patch cables, and more.
Move the joystick…
Controller Name Normally controls…
Left JS–X Pitch bend down
Right JS+X Pitch bend up
Forwards (away from yourself )
JS+Y Vibrato
Backwards (towards yourself )
JS–Y Filter LFO (wah)

Front and rear panels Rear panel
5
Rear panel
1. AC Power connectorConnect the included power cable here.We recommend that you first connect the power cable to the NAUTILUS, and then connect the other end of the cable to an AC outlet (see “1. Connecting the power cable” on page 18).
2. (power button)This button turns the power on and off. Before turning NAUTILUS off, make sure that you’ve saved any edits to your Programs, Combis, Songs, or other user data.
After turning the power off, please wait for at least ten seconds before you turn the power on again.
Auto power-offThe NAUTILUS has an auto power-off function that automatically turns off the power when the keyboard or front panel buttons are not used for a certain length of time*.
* This does not include the MASTER VOLUME slider.
Note: Auto power-off will not operate when the display or front panel controls are used, when you play the NAUTILUS, when MIDI is transmitted or received, or when the drive is accessed (including communication via FTP).When the power turns off, the settings you had been editing will be lost. If you want to keep the edited settings, you must save them first.You can change the time it takes for the NAUTILUS to turn off automatically, or disable the auto power-off feature entirely.To do so:1. Select “Auto Power-Off Setting…” in the page menu
commands on the GLOBAL > Basic Setup - Basic page.
2. Set how long it will take for the power to turn off. Set this to “Disabled” if you do not want to use this function.
3. Press “Done” to finish making the settings.Note: The factory default setting is four hours.
3. USB
USB A portThere is an external, high-speed USB 2.0 port. You can use it to connect storage media such as hard disks, flash media, etc, as well as class-compliant USB MIDI controllers. For more information, see “4. Connecting USB devices” on page 22.
USB B portThis high-speed USB 2.0 port lets you connect to a Mac or Windows PC, for sending and receiving MIDI and audio. For more information, see “6. Connecting to computers via USB” on page 23.
4. Analog Audio InputsYou can use the audio inputs for recording, sampling, and real-time mixing through the built-in effects.
INPUT 1 & 2Inputs 1 and 2 provide 1/4" TRS balanced connectors. You can use these for either microphone-level or line-level signals. You can toggle between mic and line level in the GLOBAL settings.To adjust the input gain (Gain) and other values, use the AUDIO IN page of each mode. (see page 21)For more information for how to make connections and settings, see “2. Analog audio input connections” on page 21.
5. Analog Audio Outputs4. Analog Audio Inputs
8. Pedals7. MIDI
3. USB
6. PHONES
2. (power button)
1. AC Power connector

Introduction to NAUTILUS
6
5. Analog Audio OutputsAll of the analog audio outputs use balanced TRS 1/4" phone jacks, referenced to a +4 dBu signal level.
Connect these outputs to the input jacks of your amp or mixer. In addition to the L/MONO and R main stereo audio outputs, the NAUTILUS provides four individual audio outputs. The sound from each oscillator, drum, timbre/track, or insert effect can be freely routed to any output. Additionally, you can route the metronome sound to an individual output, to separate it from the stereo mix. For more information, see “Effects selection and routing” on page 223.
(Main) L/MONO, RThese are the main stereo outputs; their volume is controlled by the MASTER VOLUME slider. All of the factory Programs and Combis are programmed to play through these outputs.When editing sounds, or when setting up a Song in SEQUENCER mode, you can access the main outputs by setting Bus Select to L/R.If no cable is connected to the R output, L/MONO will carry a mono summation of the stereo signal. So, if you are connecting to a device which does not have stereo inputs (such as a simple keyboard amp), use the L/MONO output.
(Individual) 1…4These 4 additional audio outputs let you isolate sounds, audio inputs, or audio tracks for recording or complex live sound setups. These can be used as stereo or mono outputs, in any combination. You can also use the Global Audio page LR Bus Indiv. Assign parameter to map the main stereo outputs to any of these output pairs, if you like.Note that the individual outputs are not affected by the MASTER VOLUME slider.
6. Headphone jackYou can connect headphones to this jack (stereo 1/4"). This jack outputs the same signal as the Audio (OUTPUT) L/MONO and R jacks. Use the MASTER VOLUME slider to control the headphone volume.
7. MIDI
MIDI lets you connect NAUTILUS to computers or other MIDI devices, for sending and receiving notes, controller gestures, sound settings, and so on. For more information on MIDI connections, see “MIDI applications” on page 929 of the PG.
MIDI THRU connectorMIDI data received at the MIDI IN connector is re-transmitted without change from the MIDI THRU connector.You can use this to chain multiple MIDI devices together.
MIDI OUT connectorThis connector transmits MIDI data. Use this to control external MIDI devices, or to record into an external sequencer.
MIDI IN connectorThis connector receives MIDI data. Use this to play the NAUTILUS from another MIDI device, or from an external sequencer.
8. Pedals
DAMPER jackFor the damper–also known as the sustain pedal– you can connect either a standard footswitch, or Korg’s special half-damper pedal, the optional DS-1H.The DS-1H half-damper pedal allows a finer degree of control compared to switch-type pedals. Set the pedal polarity so that the half-damper pedal will function correctly.1. Set the polarity in “Damper Polarity” (GLOBAL >
Controllers/Scales–Controller page) as appropriate.With the KORG DS-1H, use the (–) KORG Standard setting.
2. After setting the polarity, calibrate the pedal using the “Half Damper Calibration” page menu command (GLOBAL > Basic Setup page).
ASSIGNABLE SWITCH jackThis lets you connect a simple on/off footswitch, such as the optional Korg PS-1. The footswitch can perform a wide variety of functions, such as modulating sounds and effects, tap tempo, sequencer start/stop, etc.The switch’s function is set in GLOBAL > Controllers tab of the Controllers/Scales page, so that it always works the same regardless of the current Program, Combi, or Song. For more information, see “Setting up the Assignable Switch and Pedal” on page 175.
ASSIGNABLE PEDAL jackThis lets you connect a continuous controller pedal, such as the Korg EXP-2 foot controller or Korg XVP-20 EXP/VOL pedal, to use as an assignable modulation source.Like the ASSIGNABLE SWITCH, the pedal’s function is set in GLOBAL mode. For more information, see “Setting up the Assignable Switch and Pedal” on page 175.
Front and rear panels TouchView user interface
7
TouchView user interface
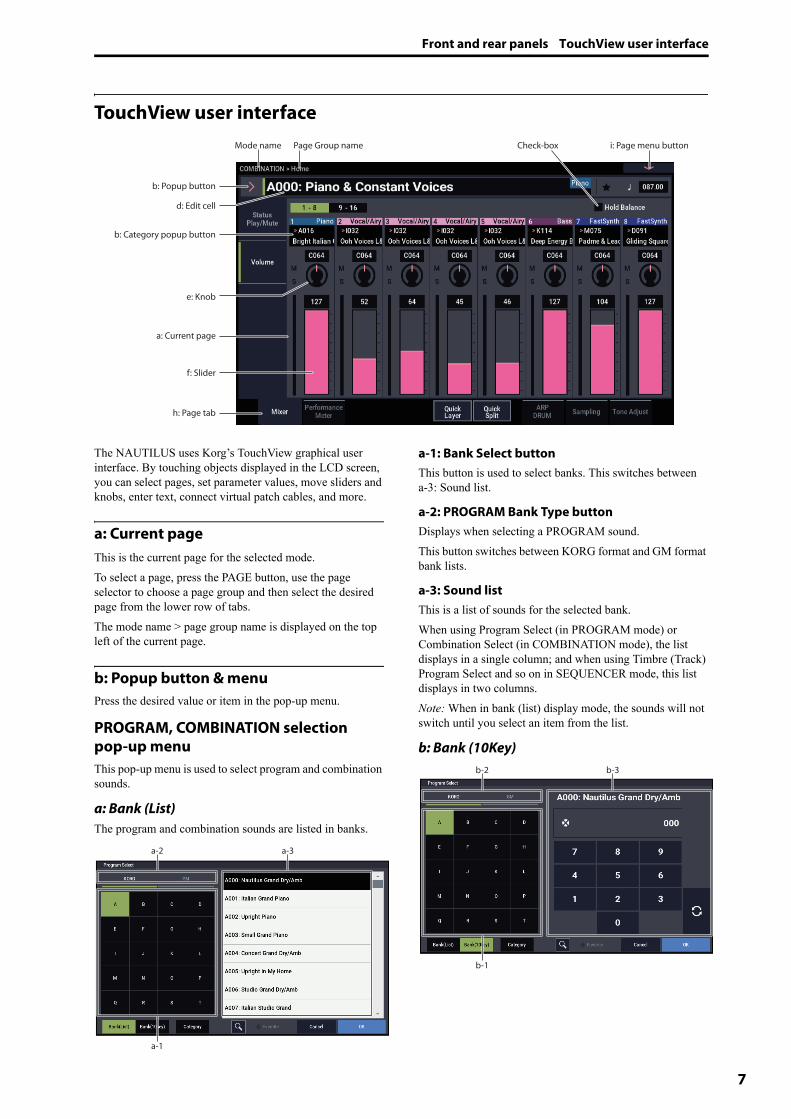
The NAUTILUS uses Korg’s TouchView graphical user interface. By touching objects displayed in the LCD screen, you can select pages, set parameter values, move sliders and knobs, enter text, connect virtual patch cables, and more.
a: Current pageThis is the current page for the selected mode.To select a page, press the PAGE button, use the page selector to choose a page group and then select the desired page from the lower row of tabs.The mode name > page group name is displayed on the top left of the current page.
b: Popup button & menuPress the desired value or item in the pop-up menu.
PROGRAM, COMBINATION selection pop-up menuThis pop-up menu is used to select program and combination sounds.
a: Bank (List)The program and combination sounds are listed in banks.
a-1: Bank Select buttonThis button is used to select banks. This switches between a-3: Sound list.
a-2: PROGRAM Bank Type buttonDisplays when selecting a PROGRAM sound.This button switches between KORG format and GM format bank lists.
a-3: Sound listThis is a list of sounds for the selected bank.When using Program Select (in PROGRAM mode) or Combination Select (in COMBINATION mode), the list displays in a single column; and when using Timbre (Track) Program Select and so on in SEQUENCER mode, this list displays in two columns.Note: When in bank (list) display mode, the sounds will not switch until you select an item from the list.
b: Bank (10Key)
h: Page tab
a: Current page
d: Edit cell
b: Category popup button
b: Popup button
e: Knob
f: Slider
i: Page menu buttonCheck-boxMode name Page Group name
a-2
a-1
a-3
b-2
b-1
b-3
Introduction to NAUTILUS
8
b-1: Bank Select button ( a-1)
b-2: PROGRAM Bank Type button ( a-2)
b-3: 10 KeyUse these keys to input a sound number for a sound in the selected bank. The sound will switch when you press the update ( ) button.The sound will be updated and the dialog box will close even if you press the OK button without pressing the update button.Note: In Bank (10Key) display mode, the sound will change right after you select a bank using Bank Select.
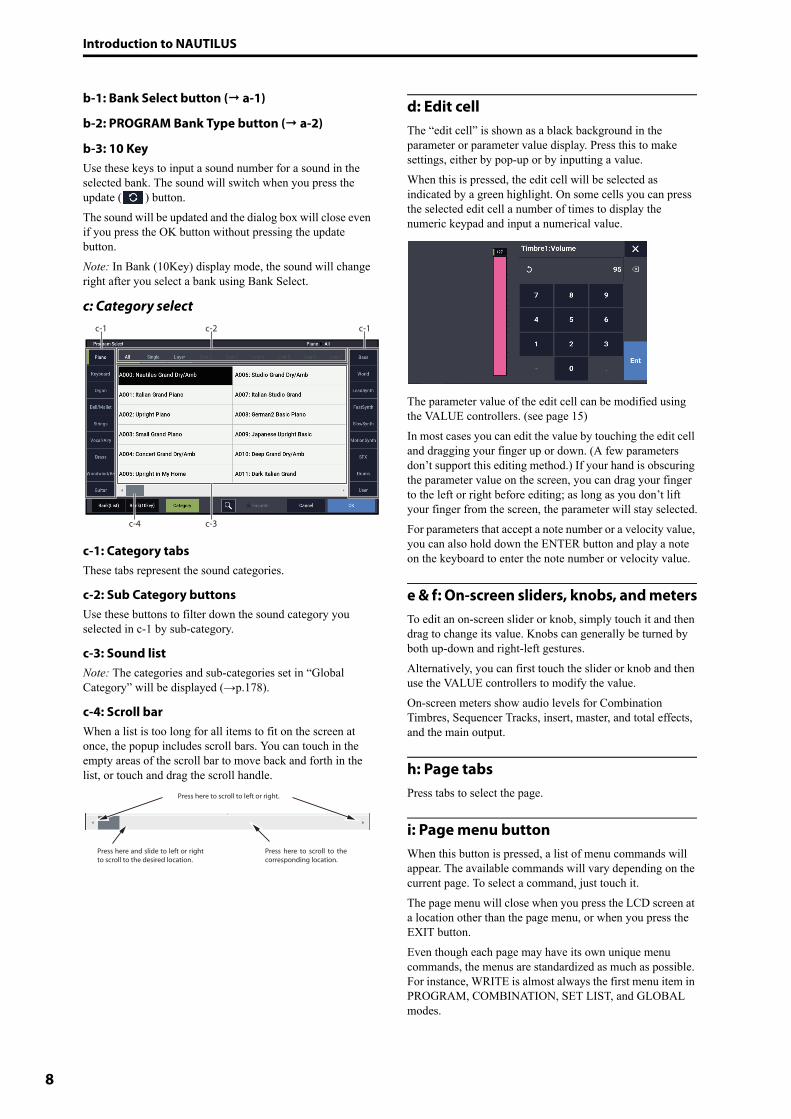
c: Category select
c-1: Category tabsThese tabs represent the sound categories.
c-2: Sub Category buttonsUse these buttons to filter down the sound category you selected in c-1 by sub-category.
c-3: Sound listNote: The categories and sub-categories set in “Global Category” will be displayed (→p.178).
c-4: Scroll barWhen a list is too long for all items to fit on the screen at once, the popup includes scroll bars. You can touch in the empty areas of the scroll bar to move back and forth in the list, or touch and drag the scroll handle.
d: Edit cellThe “edit cell” is shown as a black background in the parameter or parameter value display. Press this to make settings, either by pop-up or by inputting a value.When this is pressed, the edit cell will be selected as indicated by a green highlight. On some cells you can press the selected edit cell a number of times to display the numeric keypad and input a numerical value.
The parameter value of the edit cell can be modified using the VALUE controllers. (see page 15)In most cases you can edit the value by touching the edit cell and dragging your finger up or down. (A few parameters don’t support this editing method.) If your hand is obscuring the parameter value on the screen, you can drag your finger to the left or right before editing; as long as you don’t lift your finger from the screen, the parameter will stay selected.For parameters that accept a note number or a velocity value, you can also hold down the ENTER button and play a note on the keyboard to enter the note number or velocity value.
e & f: On-screen sliders, knobs, and metersTo edit an on-screen slider or knob, simply touch it and then drag to change its value. Knobs can generally be turned by both up-down and right-left gestures.Alternatively, you can first touch the slider or knob and then use the VALUE controllers to modify the value.On-screen meters show audio levels for Combination Timbres, Sequencer Tracks, insert, master, and total effects, and the main output.
h: Page tabsPress tabs to select the page.
i: Page menu buttonWhen this button is pressed, a list of menu commands will appear. The available commands will vary depending on the current page. To select a command, just touch it. The page menu will close when you press the LCD screen at a location other than the page menu, or when you press the EXIT button.Even though each page may have its own unique menu commands, the menus are standardized as much as possible. For instance, WRITE is almost always the first menu item in PROGRAM, COMBINATION, SET LIST, and GLOBAL modes.
c-1 c-1
c-4 c-3
c-2
Press here and slide to left or right to scroll to the desired location.
Press here to scroll to left or right.
Press here to scroll to the corresponding location.
Front and rear panels TouchView user interface
9
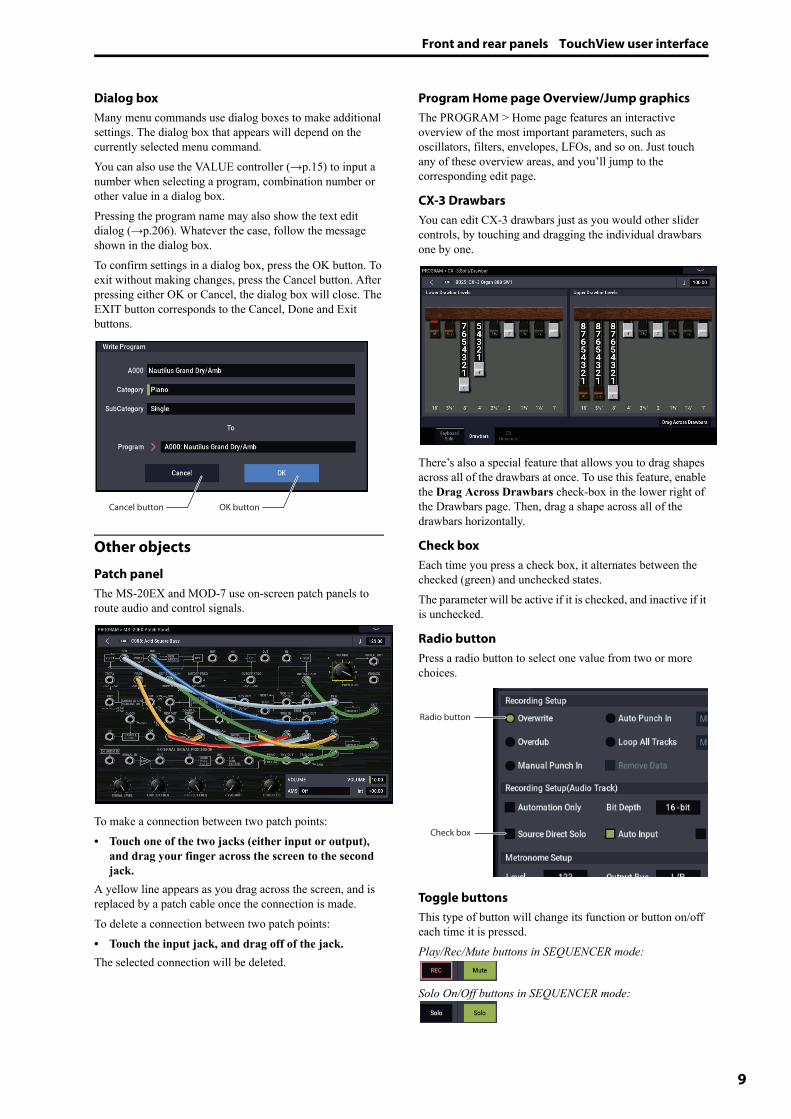
Dialog boxMany menu commands use dialog boxes to make additional settings. The dialog box that appears will depend on the currently selected menu command.You can also use the VALUE controller (→p.15) to input a number when selecting a program, combination number or other value in a dialog box.Pressing the program name may also show the text edit dialog (→p.206). Whatever the case, follow the message shown in the dialog box. To confirm settings in a dialog box, press the OK button. To exit without making changes, press the Cancel button. After pressing either OK or Cancel, the dialog box will close. The EXIT button corresponds to the Cancel, Done and Exit buttons.
Other objects
Patch panelThe MS-20EX and MOD-7 use on-screen patch panels to route audio and control signals.
To make a connection between two patch points:• Touch one of the two jacks (either input or output),
and drag your finger across the screen to the second jack.
A yellow line appears as you drag across the screen, and is replaced by a patch cable once the connection is made.To delete a connection between two patch points:• Touch the input jack, and drag off of the jack.The selected connection will be deleted.
Program Home page Overview/Jump graphicsThe PROGRAM > Home page features an interactive overview of the most important parameters, such as oscillators, filters, envelopes, LFOs, and so on. Just touch any of these overview areas, and you’ll jump to the corresponding edit page.
CX-3 DrawbarsYou can edit CX-3 drawbars just as you would other slider controls, by touching and dragging the individual drawbars one by one.
There’s also a special feature that allows you to drag shapes across all of the drawbars at once. To use this feature, enable the Drag Across Drawbars check-box in the lower right of the Drawbars page. Then, drag a shape across all of the drawbars horizontally.
Check boxEach time you press a check box, it alternates between the checked (green) and unchecked states.The parameter will be active if it is checked, and inactive if it is unchecked.
Radio buttonPress a radio button to select one value from two or more choices.
Toggle buttonsThis type of button will change its function or button on/off each time it is pressed.Play/Rec/Mute buttons in SEQUENCER mode:
Solo On/Off buttons in SEQUENCER mode:
Cancel button OK button
Radio button
Check box
Introduction to NAUTILUS
10
Basic information
About the NAUTILUS’ modesThe NAUTILUS has a large number of features that let you play and edit programs and combinations, record and play sequence data, record and play back samples, and manage data on drive. The largest unit used to organize these features is called a mode.The NAUTILUS has seven modes.
SET LIST modeSet Lists make it simple to play and organize any of the sounds loaded into the NAUTILUS, without regard for what bank they’re stored in or whether they’re Programs, Combinations, or even Songs.Large on-screen buttons make sound selection fast and foolproof, and the Program Up or Down footswitch assignments can be used for hands-free sound changes. Cut, copy, paste, and insert tools make re-ordering a snap.Smooth Sound Transitions (SST) let the previous sound and its effects ring out naturally, making it easy to change sounds during a live performance. SST is active in all of the NAUTILUS modes, but Set Lists give you greater control over the transitions. You can fine-tune the ring-out time for each sound, so that (for instance) one sound fades out very quickly, while another sound’s delays continue to repeat for ten or twenty seconds.Set Lists are great for live performance, but they’re also handy for organizing sounds in general. For example, you could create a Set List with all of your favorite String sounds, including both Programs and Combinations.
PROGRAM modePrograms are the basic sounds of NAUTILUS. In PROGRAM mode, you can:• Select and play Programs• Edit Programs
Make detailed settings for oscillators, filters, amps, EGs, LFOs, effects, arpeggiator function (including drum track, step sequence), vector synthesis, etc. The specific parameters will vary depending on the synthesis type: HD-1, AL-1, CX-3, STR-1, MS-20EX, PolysixEX, MOD-7, EP-1, or SGX-2
• Create drum programs using drum kits (as created in GLOBAL mode)
• Use one arpeggiator• You can play back drum track patterns while you
perform with a program. You can also use the step sequencer as an alternative to drum tracks to play back a phrase while you are performing
• The arpeggiator, drum track/step sequencer variations can be managed through four scenes
• Sample and resampleFor example, you can sample an external audio source, or you can play a Program and resample your performance.
COMBINATION modeCombinations are sets of up to 16 Programs that can be played simultaneously, letting you create sounds more complex than a single Program. In COMBINATION mode, you can:• Select and play Combinations• Use NAUTILUS as a 16-track multitimbral tone
generator• Edit Combinations
Assign Programs to each of the 16 Timbres, each with separate volume, pan, EQ, and keyboard and velocity zones; make settings for effects, vector synthesis, arpeggiator function (drum track, step sequence)
• Use two arpeggiators• The arpeggiator, drum track/step sequencer variations
can be managed through four scenes• Sample or resample
For example you can sample an external audio source, or resample a performance you play using a combination.
SEQUENCER modeSEQUENCER mode lets you record, play back, and edit MIDI tracks and audio tracks. You can:• Select and play Songs• Edit Songs
Assign Programs to each of the 16 MIDI Tracks, with separate volume, pan, EQ, and keyboard and velocity zones; make settings for effects, vector synthesis, arpeggiator function (drum track, step sequence)
• Record up to sixteen MIDI tracks simultaneously• Record up to four of the sixteen audio tracks
simultaneously, mix using automation, and import WAVE files
• Use two arpeggiators• The arpeggiator, drum track/step sequencer variations
can be managed through four scenes• Sample or resample
You can sample an external audio input source while playing a song, and use In-Track Sampling to automatically create a note event that triggers the sample at the same time as it was recorded
• Use NAUTILUS as a 16-track multitimbral tone generator
• Record patterns and assign them to individual keys, using RPPR (Realtime Pattern Play/Recording)
• Create your own Drum Track Patterns
Basic information About the NAUTILUS’ modes
11
SAMPLING modeSAMPLING mode lets you record and edit your own Samples and Multisamples. For example, you can:• Record samples from external audio sources, including
sampling through effects• Edit the recorded samples, or samples loaded from
MEDIA mode; set loop points, truncate, time-slice, etc.• Create and edit Multisamples, which consist of one or
more Samples spread out across the keyboard• Quickly convert Multisamples into Programs• Create massive sounds using the generous internal RAM:
if you like, a single Multisample can use about 6 hours of sampling time
• Load a number of these huge Multisamples at once, via User Sample Banks and Virtual Memory
GLOBAL modeGLOBAL mode lets you make overall settings for the entire NAUTILUS, and edit wave sequences and drum kits. For instance, you can:• Make settings that affect the entire NAUTILUS, such as
master tune and global MIDI channel• Set up sample auto-loading at startup• Manage currently loaded samples• Create user scales• Create user Drum Kits and Wave Sequences using
samples from ROM, EXs, User Sample Banks or SAMPLING mode
• Create Arpeggio Patterns• Rename Program, and Combination categories• Set the function of the assignable pedals and assignable
switches• Transmit MIDI System Exclusive data dumps
MEDIA modeMEDIA mode lets you save, load, and manage data using the internal disk and external USB 2.0 storage devices. You can:• Save and load Programs, Combinations, Songs, Samples,
and Global setup data• Format disks and storage media, copy and rename files,
etc. • Load AKAI, SoundFont 2.0, AIFF, and WAVE samples,
and export RAM samples in AIFF or WAVE formats• Export and import sequences to and from SMF (Standard
MIDI Files)• Use the Data Filer function to save or load MIDI System
Exclusive data
Introduction to NAUTILUS
12
MEDIA MODE
OSC 1
PITCH1 FILTER1AMP1/
DRIVER1
OSC 2
PITCH2 FILTER2AMP2/
DRIVER2
PROGRAM (HD-1)
TRACK 1
TRACK 8
TRACK 2
TRACK 3
TRACK 4
TRACK 5
TRACK 6
TRACK 7 PROGRAM
PROGRAM
PROGRAM
PROGRAM
PROGRAM
PROGRAM
PROGRAM
PROGRAM
SEQUENCER
TRACK 9
TRACK 16
TRACK 10
TRACK 11
TRACK 12
TRACK 13
TRACK 14
TRACK 15
COMBINATIONGLOBAL MODE
Key Assign
WAVE SEQUENCE
DRUM KIT
SAMPLING MODE
Multisample
Sample
Sample
Sample
SampleSampleSampleSample
Multisample
AUDIO INPUT1
AUDIO INPUT2
USB DRIVE
Resampling
INTERNAL DRIVE
PROGRAM
PROGRAM
PROGRAM
PROGRAM
PROGRAM
PROGRAM
PROGRAM
PROGRAM
TIMBRE1
TIMBRE8
TIMBRE2
TIMBRE3
TIMBRE4
TIMBRE5
TIMBRE6
TIMBRE7 PROGRAM
PROGRAM
PROGRAM
PROGRAM
PROGRAM
PROGRAM
PROGRAM
PROGRAM TIMBRE9
TIMBRE16
TIMBRE10
TIMBRE11
TIMBRE12
TIMBRE13
TIMBRE14
TIMBRE15 PROGRAM
PROGRAM
PROGRAM
PROGRAM
PROGRAM
PROGRAM
PROGRAM
PROGRAM
MIDI TRACK 1...16
TRACK 1
TRACK 8
TRACK 2
TRACK 3
TRACK 4
TRACK 5
TRACK 6
TRACK 7 REGION
REGION
REGION
REGION
REGION
REGION
REGION
REGION TRACK 9
TRACK 16
TRACK 10
TRACK 11
TRACK 12
TRACK 13
TRACK 14
TRACK 15 REGION
REGION
REGION
REGION
REGION
REGION
REGION
REGION
AUDIO TRACK 1...16
MS MS MS MS
IFX 1
IFX 12
MFX 1
MFX 2
TFX 1
TFX 2
Insert / Master / Final Effect
WAVE FILES
IFX 1
IFX 12
MFX 1
MFX 2
TFX 1
TFX 2
Insert / Master / Total EffectEXi 1
EXi 2
PROGRAM (EXi)
IFX 1
IFX 12
MFX 1
MFX 2
TFX 1
TFX 2
Insert / Master / Total Effect
IFX 1
IFX 12
MFX 1
MFX 2
TFX 1
TFX 2
Insert / Master / Total Effect
Audio Recording
Multisample
Drum Kit
Wave Seq.
PCG / SNGPCG
KSC
Preset Drum Track Pattern
User Drum Track Pattern
DRUM TRACK PATTERN
EP-1PolysixEXSTR-1AL-1
SGX-2MOD-7MS-20EXCX-3
EP-1PolysixEXSTR-1AL-1
SGX-2MOD-7MS-20EXCX-3
MS1 (MS/WS)Drum Kit MS5 (MS/WS)
MS2 (MS/WS) MS6 (MS/WS)
MS3 (MS/WS) MS7 (MS/WS)
MS4 (MS/WS) MS8 (MS/WS)
MS1 (MS/WS)Drum Kit MS5 (MS/WS)
MS2 (MS/WS) MS6 (MS/WS)
MS3 (MS/WS) MS7 (MS/WS)
MS4 (MS/WS) MS8 (MS/WS)
USB AUDIO IN1
USB AUDIO IN2
SET LIST
Multisample
Slot 127
Slot 001
Slot 000
Set List 000 ... 127
DS1 (DS/Sample) DS5 (DS/Sample)
DS2 (DS/Sample) DS6 (DS/Sample)
DS3 (DS/Sample) DS7 (DS/Sample)
DS4 (DS/Sample) DS8 (DS/Sample)
Arpeggiator A
Drum Track / Step Sequencer
Drums Program
Scene1...4
Arpeggiator A
Drum Track / Step Sequencer
Drums Program
Scene1...4
Arpeggiator A
Arpeggiator B
Drum Track / Step Sequencer
Scene1...4
IFX 1
IFX 12
MFX 1
MFX 2
TFX 1
TFX 2
Insert / Master / Total Effect
Arpeggiator A
Arpeggiator B
Drum Track / Step Sequencer
Scene1...4
Basic information About the NAUTILUS’ PCM memory
13
About the NAUTILUS’ PCM memory“PCM” is another way of saying “samples.” The NAUTILUS has several types of PCM banks, as described below: ROM, EXs, User Sample Banks, and Sampling Mode Data.For more information on the contents of the included ROM and EXs sample data, see the Voice Name List (VNL).
ROMThe NAUTILUS ROM contains the basic multisamples and samples, and is always loaded and available.
EXsEXs stands for EXpansion Samples. These can be loaded or not, as you wish. The NAUTILUS comes with a number of EXs libraries, including multiple gigabytes of samples.
User Sample BanksUser Sample Banks may be sounds that you create yourself, or load from imported Akai or SoundFont 2.0 libraries, or WAV or AIFF files.
Sampling Mode DataSAMPLING mode is used to create and edit samples. When you save Sampling Mode Data, it becomes available as a User Sample Bank.
Using samples in your own soundsYou can use any of these bank types, together or separately, when making your own sounds. Simply set the Bank as desired in the Program or Wave Sequence Step’s Multisample Select fields, or the Drum Kit Drumsample Select fields. For more information, see:• Program: “Bank (Multisample),” on page 51 of the PG• Wave Sequence: “Bank (Multisample),” on page 662 of
the PG• Drum Kit: “Bank,” on page 669 of the PG
Lossless compressionWhen EXs data is loaded into RAM, the NAUTILUS uses a lossless compression technique. This yields a modest reduction in size; for instance, EXs1 uses 284MB of RAM for 313MB of data. You’ll notice that this is much milder than the dramatic size reductions of mp3, or the PCM compression sometimes found in other synthesizers. There is a strong advantage over these other methods, however: the NAUTILUS compression is completely lossless, and causes absolutely no degradation in audio quality.
Loading samples at startupThe NAUTILUS can load your favorite samples automatically at startup. For more information, see “Automatically loading sample data” on page 179.
User sampling RAM capacityThe NAUTILUS is equipped with 3 GB of RAM. Approximately 1 GB of this RAM is used by the operating system and ROM sample data. The remainder is shared between the samples in EXs, User Sample Banks, and SAMPLING mode.This means that the size of the currently loaded EXs and User Sample Banks trades off against the memory available for SAMPLING mode. The more space used by EXs and User Sample Banks, the less is available for SAMPLING mode.Using Virtual Memory for EXs and User Sample Banks generally lets you load more samples at once, but may still use a substantial amount of RAM.Note: To check the amount of sample RAM available, see “0–1f: Free Sample Memory/Locations” on page 579 of the PG.For more information, see “Free RAM and approximate sampling times” on page 123.
About polyphonyMost hardware synthesizers offer a single, fixed method of synthesis, a predetermined number of voices, and a fixed amount of effects processing power for a specific number of effects. NAUTILUS is different; it has no fixed synthesis method, its polyphony varies depending on which synth engines are being used, some synth engines provide additional effects (augmenting the 16 normal effects slots), and there are sometimes trade-offs of processing power between voices and effects.This flexibility means that the system can deliver power where you need it the most. As you play different sounds from different synth engines, the NAUTILUS automatically divides its processing power appropriately.Unlike most computer-based systems, NAUTILUS also monitors the overall processing power, reducing the overall number of voices if necessary, to make sure that there are never problems with the audio.
Normally, you shouldn’t need to think about this at all; it will just happen automatically. Sometimes, however, it can be convenient to know how the system is allocating its resources. The Performance Meters page shows this information; you can find it on the Perf Meters tab of Home in PROGRAM, COMBINATION, and SEQUENCER modes. For more information, see “0–2: Performance Meter” on page 13 of the PG.

Introduction to NAUTILUS
14
Basic operationsAfter you’ve turned on the NAUTILUS, here’s how to perform basic operations such as selecting modes and pages.
1. Selecting modesTo enter each mode, press the MODE button and then the respective mode button in the Mode menu on the display. The NAUTILUS features seven operating modes.
SET LIST buttonThis selects SET LIST mode. Set Lists make it simple to play and organize any of the sounds loaded into the NAUTILUS, without regard for what bank they’re stored in or whether they’re Programs, Combinations, or even Songs.
PROGRAM buttonThis selects PROGRAM mode, for playing and editing basic sounds.
COMBINATION buttonThis selects COMBINATION mode, for playing and editing complex splits and layers of Programs.
SEQUENCER buttonThis selects SEQUENCER mode, for recording, playing, and editing audio and MIDI tracks.
SAMPLING buttonThis selects SAMPLING mode, for recording and editing audio samples and multisamples.
GLOBAL buttonThis selects GLOBAL mode, for making overall settings, editing Wave Sequences and Drum Kits, and more.
MEDIA buttonThis selects MEDIA mode, for saving and loading data to and from the internal disk or external USB storage devices.
2. Selecting pagesEach mode has a large number of parameters, which are grouped into pages. These are further subdivided by tabs into up to nine tab pages.1. Select the desired mode, as described above.We’ll use PROGRAM mode as an example for our explanation. Press the MODE button to select the PROGRAM mode.
2. Press the PAGE button to go to the Page Select.As an example here, select the Basic/X-Y/Controllers button.
3. The current page indication in the upper left of the LCD screen will indicate “PROGRAM > Basic/X-Y/Controllers,” and the page group will change.
When you press the EXIT button, you will return to Home from any page.
Page tab
Basic information Basic operations
15
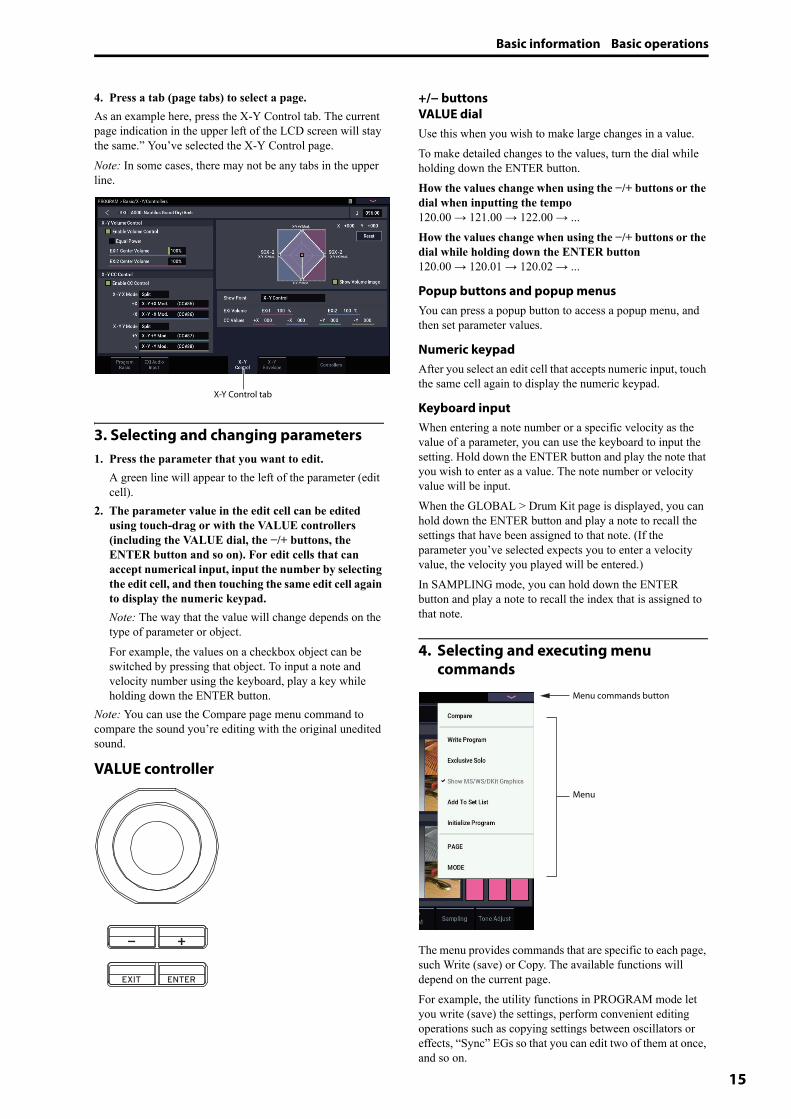
4. Press a tab (page tabs) to select a page.As an example here, press the X-Y Control tab. The current page indication in the upper left of the LCD screen will stay the same.” You’ve selected the X-Y Control page.Note: In some cases, there may not be any tabs in the upper line.
3. Selecting and changing parameters1. Press the parameter that you want to edit.
A green line will appear to the left of the parameter (edit cell).
2. The parameter value in the edit cell can be edited using touch-drag or with the VALUE controllers (including the VALUE dial, the −/+ buttons, the ENTER button and so on). For edit cells that can accept numerical input, input the number by selecting the edit cell, and then touching the same edit cell again to display the numeric keypad.Note: The way that the value will change depends on the type of parameter or object.For example, the values on a checkbox object can be switched by pressing that object. To input a note and velocity number using the keyboard, play a key while holding down the ENTER button.
Note: You can use the Compare page menu command to compare the sound you’re editing with the original unedited sound.
VALUE controller
+/− buttonsVALUE dialUse this when you wish to make large changes in a value.To make detailed changes to the values, turn the dial while holding down the ENTER button.How the values change when using the −/+ buttons or the dial when inputting the tempo120.00 → 121.00 → 122.00 → ...How the values change when using the −/+ buttons or the dial while holding down the ENTER button120.00 → 120.01 → 120.02 → ...
Popup buttons and popup menusYou can press a popup button to access a popup menu, and then set parameter values.
Numeric keypadAfter you select an edit cell that accepts numeric input, touch the same cell again to display the numeric keypad.
Keyboard inputWhen entering a note number or a specific velocity as the value of a parameter, you can use the keyboard to input the setting. Hold down the ENTER button and play the note that you wish to enter as a value. The note number or velocity value will be input.When the GLOBAL > Drum Kit page is displayed, you can hold down the ENTER button and play a note to recall the settings that have been assigned to that note. (If the parameter you’ve selected expects you to enter a velocity value, the velocity you played will be entered.)In SAMPLING mode, you can hold down the ENTER button and play a note to recall the index that is assigned to that note.
4. Selecting and executing menu commands
The menu provides commands that are specific to each page, such Write (save) or Copy. The available functions will depend on the current page.For example, the utility functions in PROGRAM mode let you write (save) the settings, perform convenient editing operations such as copying settings between oscillators or effects, “Sync” EGs so that you can edit two of them at once, and so on.
X-Y Control tab
Menu
Menu commands button

Introduction to NAUTILUS
16
1. In the upper right of the display, press the menu button. A list of menu commands will appear.
2. Select a menu command by pressing it with your finger.A dialog box for the selected menu command will appear. Check-type commands will not display a dialog box; their status will be switches, and the list will close.
• To close the list without selecting a command, press the display somewhere other than the list, or press the EXIT button.
3. For a parameter in a dialog box, select it by pressing it with your finger, and use the VALUE dial or +/− buttons to enter its value.
4. To execute the command, press the OK or ENTER button. If you decide not to execute the command, press the Cancel button or the EXIT button.
The dialog box will close.
Compare commandUse this when you wish to compare the edits you have made to a program or combination’s sound with the un-edited original (i.e., the sound that is written into memory).When editing a program or combination, execute the command, and the last-written settings for that program number or combination number will be recalled. When you execute the command once again, you will return to the settings that you were editing.If compare command will not appear on the page menu command, you cannot return to the settings that you were editing.In SEQUENCER mode, you can use the command to make “before and after” comparisons immediately after using realtime recording or step recording to record a song, or after performing a track edit operation.For example, this can be used effectively when realtime-recording a track for a song.1. Realtime-record a MIDI track. (Take 1)2. Once again, realtime-record on the same track.
(Take 2)3. Execute the command, and take 1 will be recalled.4. Execute the command once again, and take 2 will be
recalled.5. If at step 3 you once again realtime-record on the
same track (take 3), the object of the Compare function will now be take 1.
If at step 4 you once again realtime-record on the same track (take 3), the object of the Compare function will be take 2.In this way, the Compare function lets you recall the previous recording or the previous state of event editing.
5. Using the Quick Access buttonsSelect a combination of button functions that corresponds to how you will operate the NAUTILUS. These buttons can be used to jump to the pages you set, and to select the modes. They can also be used as playback, stop, record and other buttons in SEQUENCER mode.The button function settings can be accessed from the Quick Access page in GLOBAL mode. (See “Configuring the QUICK ACCESS buttons” on page 176.)When you press a QUICK ACCESS button along with a different button, the buttons serve as a shortcut to the page jump and page menu commands.
MODE button + A...F buttonsThis works as a shortcut to switch between modes.MODE button + A: SET LIST modeMODE button + B: PROGRAM modeMODE button + C: COMBINATION modeMODE button + D: SEQUENCER modeMODE button + E: SAMPLING modeMODE button + F: GLOBAL mode/MEDIA mode
(toggles between modes)
ENTER button + A...F buttonsSix functions (except for “Compare”) from the page menu command that is displayed from up to down are selected, each corresponding to the mode buttons.
PAGE button + A...F buttonsJumps to a pre-allocated page in the current mode.
EXIT button + A...F buttonsActivates the following functions, but only in SEQUENCER mode.EXIT button + A button: SEQUENCER PLAY/STOP buttonEXIT button + B button: SEQUENCER REC/WRITE buttonEXIT button + C button: SEQUENCER LOCATE buttonEXIT button + D button: SEQUENCER REW buttonEXIT button + E button: SEQUENCER FF buttonEXIT button + F button: SEQUENCER PAUSE button
Basic information Basic operations
17
6. Writing and savingAfter you edit, you should write or save your changes as necessary. For example if you’ve edited a program, your changed will be lost if you select another program or turn off the power. The same applies to a combination. Settings you edit in GLOBAL mode will be remembered as long as the power is on, but your changes will be lost when you turn off the power.For details on the Write operations, see the following pages. • Programs: see “Saving your edits” on page 34• Combinations: see “Saving your edits” on page 70• Effect presets: see “Saving Effect Presets” on page 232• Global settings: see “Writing Global settings” on
page 208• Arpeggio Pattern: see “Saving the arpeggio pattern” on
page 201• Wave Sequences: see “Saving Wave Sequences” on
page 192• Drum kits: see “Saving Drum Kits” on page 196• User Drum Track patterns: see “Creating Drum Track
patterns” on page 169Preset/user Drum Track patterns are saved in internal memory even when the power is turned off. Patterns you create in SEQUENCER mode can be converted into user Drum Track patterns and saved in internal memory. • User template songs: see “Saving your own Template
Songs” on page 78Preset/user template songs are saved in internal memory even when the power is turned off. Track settings and effect settings of a song you create can be saved in internal memory by the menu command Save Template Song. • Writing to internal memory →p.205
For more information about saving, refer to the following page.• Saving to internal drive, CDs, and USB media →p.209Note: On the NAUTILUS, the action of writing into internal memory is called “Writing,” and the action of saving to an external USB storage device is called “Saving.”
Introduction to NAUTILUS
18
Setup
Turning the power on/off
1. Connecting the power cable1. Connect the included power cable to the NAUTILUS’
rear panel AC power inlet.2. Connect the other end of the power cable to the AC
power outlet.If your power cable uses a separate ground wire, you must connect this ground wire before inserting the plug into the AC outlet. When disconnecting, you must first disconnect the plug before you disconnect the ground wire. If you are unsure of how to make connections, please contact your Korg Distributor.Make sure that your AC outlet is the correct voltage for your instrument.
2. Turning the power on1. Press the rear panel (power button) to turn on the
power.2. Turn on your powered monitors or stereo amp.3. Turn the NAUTILUS’s MASTER VOLUME slider all
the way down to an appropriate level, and adjust the volume of your powered monitors or stereo amp.After you’ve turned off the power, you must wait approximately ten seconds before turning the power on again.
Tip: You can set the Power On Mode (GLOBAL > Basic Setup– Basic page) so that the mode and page that had been selected when you turned the power off will appear when the power is turned on.For more information, see “Recalling the last-selected mode and page at power-on” on page 173.
3. Turning the power offWhen you turn off the power, the programs and combinations etc. will revert to their unedited state. If you want to keep your edits, you’ll need to Write them. For more information, see “Saving data” on page 203.Similarly, the user multisample and sample data will be erased when you turn off the power. If you want to use these again, save the data before turning off the power, and then reload the data when you restart the NAUTILUS.
Note: You can set the samples and multisamples to be reloaded automatically when the NAUTILUS is powered up. See “Automatically loading sample data” on page 179.1. Turn the NAUTILUS’s MASTER VOLUME slider all
the way down, minimizing the volume.2. Turn off the power of your powered monitor or stereo
amp.3. Press the NAUTILUS’s (power button) to turn off
the power.After you press the power button, you can let go once all of the LEDs on the panel buttons have gone dark.
Never turn off the power while data is being written into internal memory. The display will show the message “Now writing into internal memory” when this is in progress.Never turn off the power while media such as the internal drive is being accessed, such as while recording or playing audio tracks, or sampling to disk for an extended time. Turning off the power while disk access is occurring may render the media unusable. The DISK LED shows when the internal drive is being accessed.
If you’ve turned off the power and want to turn the power on again, wait for about 10 seconds after turning the NAUTILUS off.
Auto Power-OffThe NAUTILUS can be set to automatically turn off the power when the system has not been active for a certain length of time. Note: “Activity” includes using the TouchView display and most front panel controls, playing sounds, sending or receiving MIDI, local or ftp drive activity, etc. It does not include usage of the MASTER VOLUME slider, however.
When the power turns off, any un-saved edits or settings will be lost. Make sure that you save important settings before this occurs.
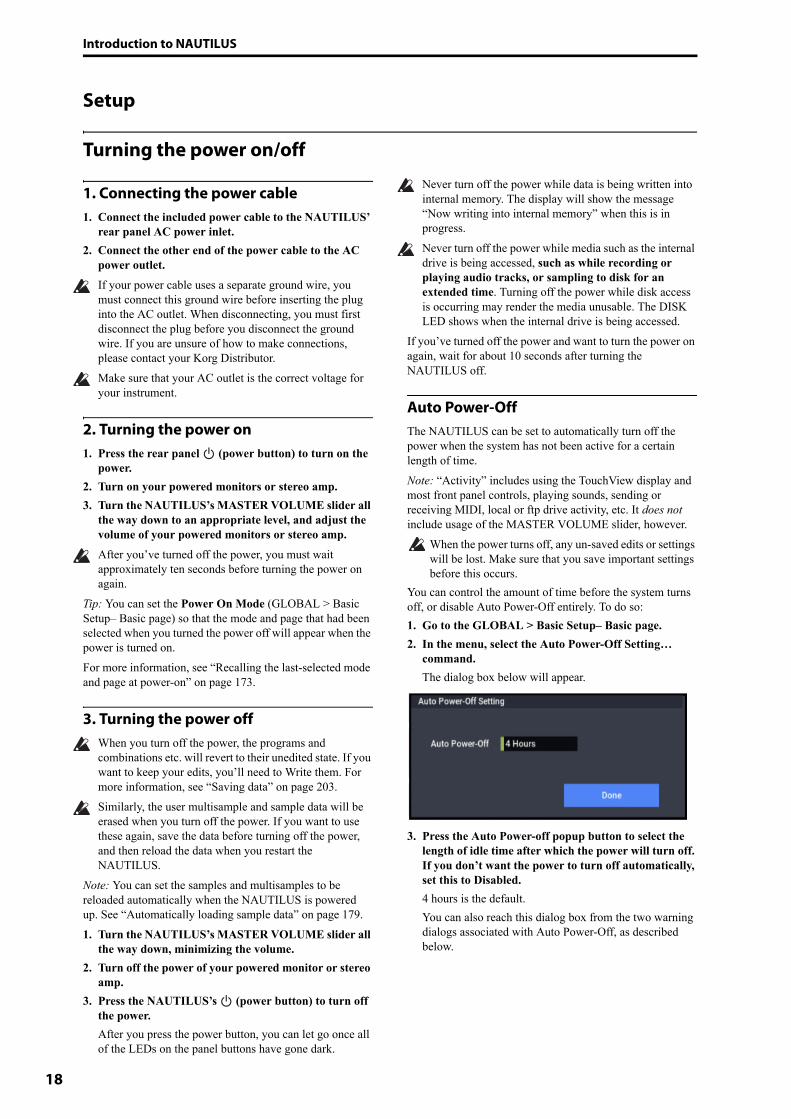
You can control the amount of time before the system turns off, or disable Auto Power-Off entirely. To do so:1. Go to the GLOBAL > Basic Setup– Basic page.2. In the menu, select the Auto Power-Off Setting…
command.The dialog box below will appear.
3. Press the Auto Power-off popup button to select the length of idle time after which the power will turn off. If you don’t want the power to turn off automatically, set this to Disabled.4 hours is the default.You can also reach this dialog box from the two warning dialogs associated with Auto Power-Off, as described below.
Setup Turning the power on/off
19
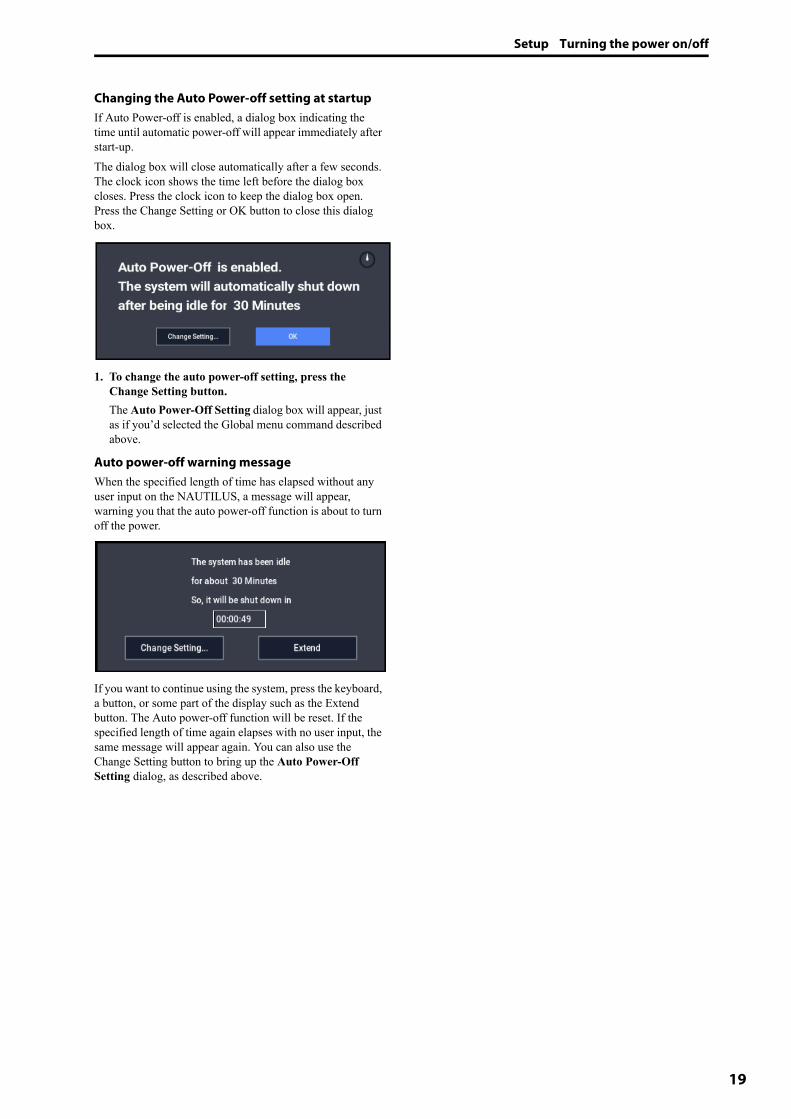
Changing the Auto Power-off setting at startupIf Auto Power-off is enabled, a dialog box indicating the time until automatic power-off will appear immediately after start-up.The dialog box will close automatically after a few seconds. The clock icon shows the time left before the dialog box closes. Press the clock icon to keep the dialog box open. Press the Change Setting or OK button to close this dialog box.
1. To change the auto power-off setting, press the Change Setting button. The Auto Power-Off Setting dialog box will appear, just as if you’d selected the Global menu command described above.
Auto power-off warning messageWhen the specified length of time has elapsed without any user input on the NAUTILUS, a message will appear, warning you that the auto power-off function is about to turn off the power.
If you want to continue using the system, press the keyboard, a button, or some part of the display such as the Extend button. The Auto power-off function will be reset. If the specified length of time again elapses with no user input, the same message will appear again. You can also use the Change Setting button to bring up the Auto Power-Off Setting dialog, as described above.
Introduction to NAUTILUS
20
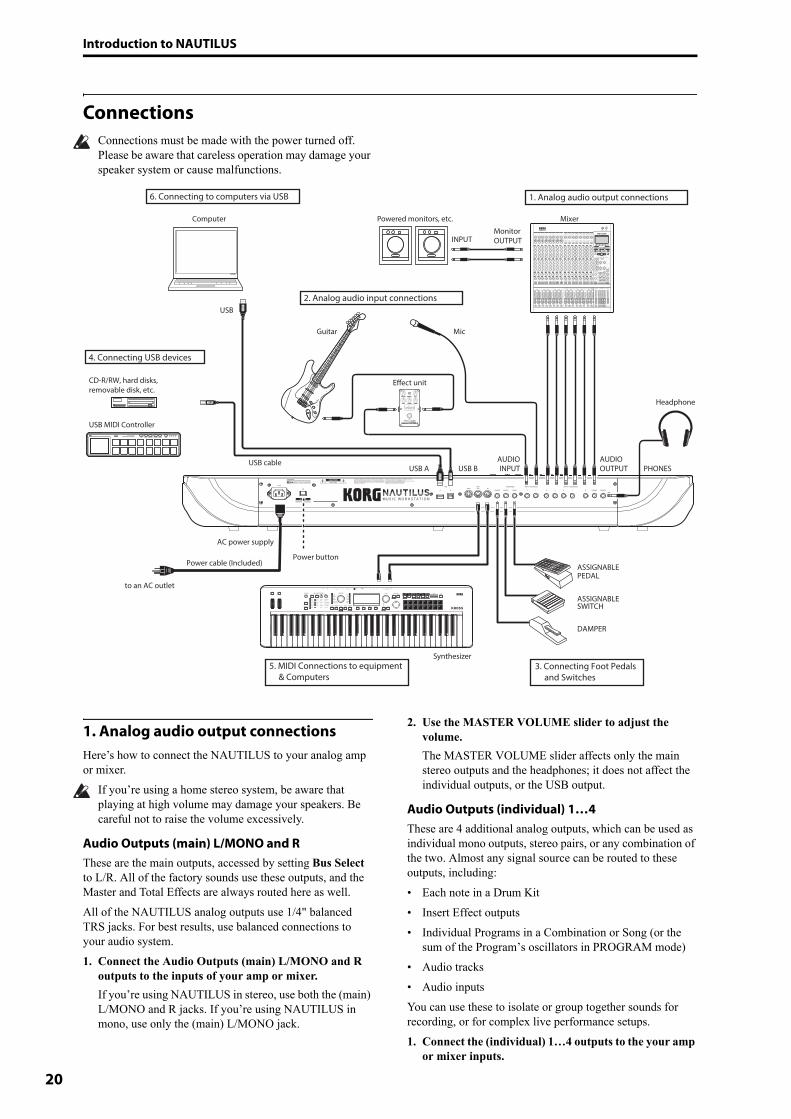
ConnectionsConnections must be made with the power turned off. Please be aware that careless operation may damage your speaker system or cause malfunctions.
1. Analog audio output connectionsHere’s how to connect the NAUTILUS to your analog amp or mixer.
If you’re using a home stereo system, be aware that playing at high volume may damage your speakers. Be careful not to raise the volume excessively.
Audio Outputs (main) L/MONO and RThese are the main outputs, accessed by setting Bus Select to L/R. All of the factory sounds use these outputs, and the Master and Total Effects are always routed here as well. All of the NAUTILUS analog outputs use 1/4" balanced TRS jacks. For best results, use balanced connections to your audio system.1. Connect the Audio Outputs (main) L/MONO and R
outputs to the inputs of your amp or mixer.If you’re using NAUTILUS in stereo, use both the (main) L/MONO and R jacks. If you’re using NAUTILUS in mono, use only the (main) L/MONO jack.
2. Use the MASTER VOLUME slider to adjust the volume.The MASTER VOLUME slider affects only the main stereo outputs and the headphones; it does not affect the individual outputs, or the USB output.
Audio Outputs (individual) 1…4These are 4 additional analog outputs, which can be used as individual mono outputs, stereo pairs, or any combination of the two. Almost any signal source can be routed to these outputs, including:• Each note in a Drum Kit• Insert Effect outputs• Individual Programs in a Combination or Song (or the
sum of the Program’s oscillators in PROGRAM mode)• Audio tracks• Audio inputsYou can use these to isolate or group together sounds for recording, or for complex live performance setups.1. Connect the (individual) 1…4 outputs to the your amp
or mixer inputs.
AC power supply
to an AC outlet
Power cable (Included)Power button
Headphone
PHONES
INPUTMonitorOUTPUT
AUDIOOUTPUT
1. Analog audio output connections
MixerPowered monitors, etc.
MicGuitar
Effect unit
2. Analog audio input connections
CD-R/RW, hard disks, removable disk, etc.
USB MIDI Controller
USB cableUSB A USB B
USB
Computer
6. Connecting to computers via USB
4. Connecting USB devices
AUDIOINPUT
DAMPER
PEDAL
SWITCH
ASSIGNABLE
ASSIGNABLE
3. Connecting Foot Pedals and Switches
Synthesizer5. MIDI Connections to equipment
& Computers

Setup Connections
21
2. Use the Bus Select parameters to send the desired sounds, audio tracks, inputs, or effects to the individual outputs, as either mono (1…4) or stereo (1/2 and 3/4) signals.
If the signal is going through one or more insert effects, the output is set at the last IFX in the chain, via the Bus Select parameter on the IFX– Insert FX page.If a Program, Timbre, or Track is not going through any insert effects, the output is set using the Bus Select parameters on the Routing page.To assign audio inputs directly to outputs, use Bus Select parameters in the Sampling page.In GLOBAL mode, the Basic Setup– Audio page L/R Bus Indiv. Assign setting lets you mirror the MAIN stereo L/R output on any pair of individual outputs. You can use this to create a private monitoring setup in live and studio environments. For more information, see “L/R Bus Indiv. Assign” on page 638 of the PG.Note: The MASTER VOLUME slider doesn’t affect the volume of the individual outputs.
Headphones1. If you’re using headphones, connect them to the
NAUTILUS’ headphone jack.2. Use the MASTER VOLUME slider to adjust the
volume of the headphones. The NAUTILUS’ headphone jack outputs the same signal as the (main) L/MONO and R jacks.
Tip: To monitor the signals from the individual outputs, use an external mixer.
2. Analog audio input connectionsYou can bring external analog audio sources into the NAUTILUS for sampling, recording, or processing through the internal effects.
Audio Inputs 1, 2These two inputs use 1/4" TRS balanced jacks, and include preamps with adjustable gain. To set up the audio inputs:1. Connect your mics or the output jacks of your
external audio sources to the Input 1 and 2 jacks.2. With the Audio Input parameter on the PROGRAM >
Home– Sampling page, set Bus Select of Input 1 and Input 2 to “L/R”.
3. Press the Audio In button while holding down the SHIFT button to display the Analog Input Setup dialog box. Switch “Input Select” to “Mic” or “Line” according to the device that is connected, and adjust the Analog Input Gain.
Choose the Mic setting only when connecting a mic. Note that some microphones, such as condensers, may require external phantom power, which is not supplied by the NAUTILUS.Choose the Line setting if you’ve connected a mixer, computer, audio system, signal processor, or another synthesizer. Note: Guitars with active pickups can be connected directly. Guitars with passive pickups (i.e., guitars that do not have an internal preamp) can be used, but the impedance mismatch will cause both a change in tone and a reduction in volume. For best results, route such guitars through a pre-amp or effects unit before connecting them.4. Adjust the output level on any connected external
equipment.5. After turning on the power, use the Audio Input page
to set up the volume, pan, bus routing, and send levels for the inputs, as desired.
For more information, see• “Audio Input settings” on page 93• “Audio Settings” on page 126• “0–8: Sampling” on page 22 of the PG• “0–2: Audio” on page 637 of the PG
3. Connecting Foot Pedals and Switches
Connecting a damper pedalThe damper pedal is also sometimes called the sustain pedal. It acts like the similarly-named pedal on an acoustic piano; when you hold down the pedal, notes will continue to sustain even when you lift your hands off of the keyboard.1. Connect an optional DS-1H damper pedal to the
DAMPER jack. If you’ve connected a DS-1H, you’ll be able to obtain half-damper effects.After turning the power on:
2. Go to the GLOBAL > Controllers/Scales– Controller page, and use the Damper Polarity parameter to set the damper polarity.
3. Go to the GLOBAL > Basic Setup– Basic page, and use the Half Damper Calibration menu command to adjust the sensitivity if desired.
For more information, see “Damper Pedal (Sustain)” on page 31, and “Damper Polarity” on page 675 of the PG.
Connecting a foot switchYou can use a connected foot switch to perform functions such as controlling sostenuto, soft pedal on/off, ARP on/off, selecting Programs, Combinations, or Set List Slots, starting/stopping the sequencer, and controlling tap tempo.1. Connect a foot switch such as the optional PS-1 to the
ASSIGNABLE SWITCH jack.2. After turning the power on, use GLOBAL >
Controllers/Scales– Controller “Foot Switch Assign” and “Foot Switch Polarity” to assign the function controlled by the foot switch and to specify the polarity.
For more information, see “5–1a: Foot Switch & Pedal/Damper” on page 675 of the PG.

Introduction to NAUTILUS
22
Connecting a foot pedalYou can use a connected foot pedal to control volume, modulation, or other functions.1. Connect an optional XVP-20 or EXP-2 etc. to the
ASSIGNABLE PEDAL jacks.2. After turning the power on, use GLOBAL >
Controllers/Scales– Controller “Foot Pedal Assign” to assign the function controlled by the foot pedal.
For more information, see “Foot Pedal Assign” on page 675 of the PG.
4. Connecting USB devicesThe NAUTILUS supports high-speed USB 2.0 for connecting to storage devices, such as hard drives, flash media, and CD-R/RW drives, as well as class-compliant USB MIDI controllers.
USB storage devicesYou can save and load samples, sounds, sequences, and other data to and from USB 2.0 storage devices for backup, transferring to computers, etc.Note that HDR tracks must be played from and recorded onto the internal disk. You can back them up to USB devices, however.The maximum supported capacity depends upon the format of the USB device. With FAT16 format, the maximum capacity is 4 GB; with FAT32, the maximum is 2 TB (2,000 GB).1. Use a USB cable to connect your USB storage device
to one of the NAUTILUS’s USB A ports.Standard USB cables have a different connector at each end. Plug the flat, rectangular connector into the NAUTILUS, and plug the square-ish connector into the external USB storage device.Note: If the device you are using does not support hot-plugging, make connections with the device powered-off, and then turn on the power of your device.
2. Wait a few seconds for the device to be recognized.3. Use the MEDIA mode Drive Select screen to check the
connection.For more information, see “Loading & saving data” on page 203.
USB MIDI controllersYou can connect class-compliant USB MIDI controllers directly to the NAUTILUS, and use them just as you would controllers connected to the 5-pin MIDI jacks. To do so:1. Use a USB cable to connect your USB MIDI controller
to one of the NAUTILUS’s USB A ports.If the controller is set to a different MIDI channel than the NAUTILUS’s Global MIDI Channel, you can use it to play a different sound than the local keyboard in Combinations or Songs, as controlled by the Timbre or Track MIDI settings.
USB alphanumeric keyboardsAnywhere that you can enter text, you can use a connected USB alphanumeric keyboard as an alternative to the touch-screen keyboard. The standard US “IBM PC” QWERTY keyboard layout is recommended.
Hot-pluggingThe NAUTILUS supports USB hot-plugging. This means that you can connect or disconnect the USB cable while the power is on. Note: In order to use hot-plugging, the USB device you are connecting must also support hot-plugging.
8 USB devices maximumNAUTILUS has USB 2.0 ports, and can support up to 8 USB devices simultaneously. Note that it doesn’t matter how the devices are connected; even if you use hubs or different ports, the maximum is always 8 devices.
USB PowerSome USB devices get their power from the USB connection. These are called “bus-powered” devices, and they are supported by the NAUTILUS.Other USB devices may require a separate power source, in addition to the USB connection; in this case, you’ll need to use an appropriate power adaptor for the device.There is a limitation to the total current supplied to all connected USB devices, as defined by the USB specification. If the total current consumption of the connected devices exceeds this limit, the NAUTILUS may not correctly recognize the connected USB devices. If this happens, the error message “USB Hub Power Exceeded!” will appear.To avoid this problem, if you connect more than one USB device, please use a self-powered USB hub in self-powered mode. For details on connections and settings for your hub, please refer to its documentation.For details on the electrical current used by a specific USB device, refer to its owner’s manual.
NAUTILUS
CD-R/RW,hard disk,removable disk, etc.
Type A
Type A
Type B
Type B
USB cable
USB hub
USB MIDI Controller
USB QWERTY Keyboard

Setup Connections
23
5. MIDI connections to equipment & computers
Connections to MIDI equipmentThe keyboard, controllers, and sequencer etc. of the NAUTILUS can be used to control an external MIDI tone generator. Conversely, another MIDI keyboard or sequencer can control the tone generator of NAUTILUS to produce sound.• Use MIDI cables to connect the MIDI connectors of
NAUTILUS with the MIDI connectors of your external device.
For more information, see “Connecting MIDI devices & computers” on page 929 of the PG.
Connections to a computer via MIDIIn conjunction with MIDI software on your computer, you can use the NAUTILUS as a MIDI controller, and transmit the NAUTILUS sequencer playback as MIDI data. You can also play the NAUTILUS sounds from the computer. To do so:• Use a MIDI interface to connect the MIDI connectors of
NAUTILUS to the MIDI connectors of your computer.For more information, see “Connecting MIDI devices & computers” on page 929 of the PG.Note: Some USB-MIDI interfaces may not be able to transmit or receive the NAUTILUS’s MIDI System Exclusive messages.
6. Connecting to computers via USBThe NAUTILUS’s USB B port lets you connect to a USB-equipped Mac or Windows PC, for sending and receiving MIDI and audio, and for connecting to the NAUTILUS Editor. For USB audio, the NAUTILUS uses the standard USB audio driver that comes with Windows or macOS, so you don’t need to install a separate audio driver.
Installing the KORG USB-MIDI driverThe NAUTILUS cannot be used by multiple applications simultaneously when you are using the standard USB-MIDI driver included with the Windows operating system. If you want to use the NAUTILUS with multiple applications simultaneously, you must install the Korg USB-MIDI driver.Even if the NAUTILUS will not be used with multiple applications, we recommend installing the KORG USB-MIDI driver, as it may offer improved operating stability.Download the “Korg USB-MIDI driver” from the Korg website, and install it as described in the accompanying documentation.Note: See the Korg website for the latest information on OS support.https://www.korg.com/support/os/Note: When you first connect the NAUTILUS to your computer, the USB-MIDI driver included with the operating system will be installed automatically.

Introduction to NAUTILUS
24
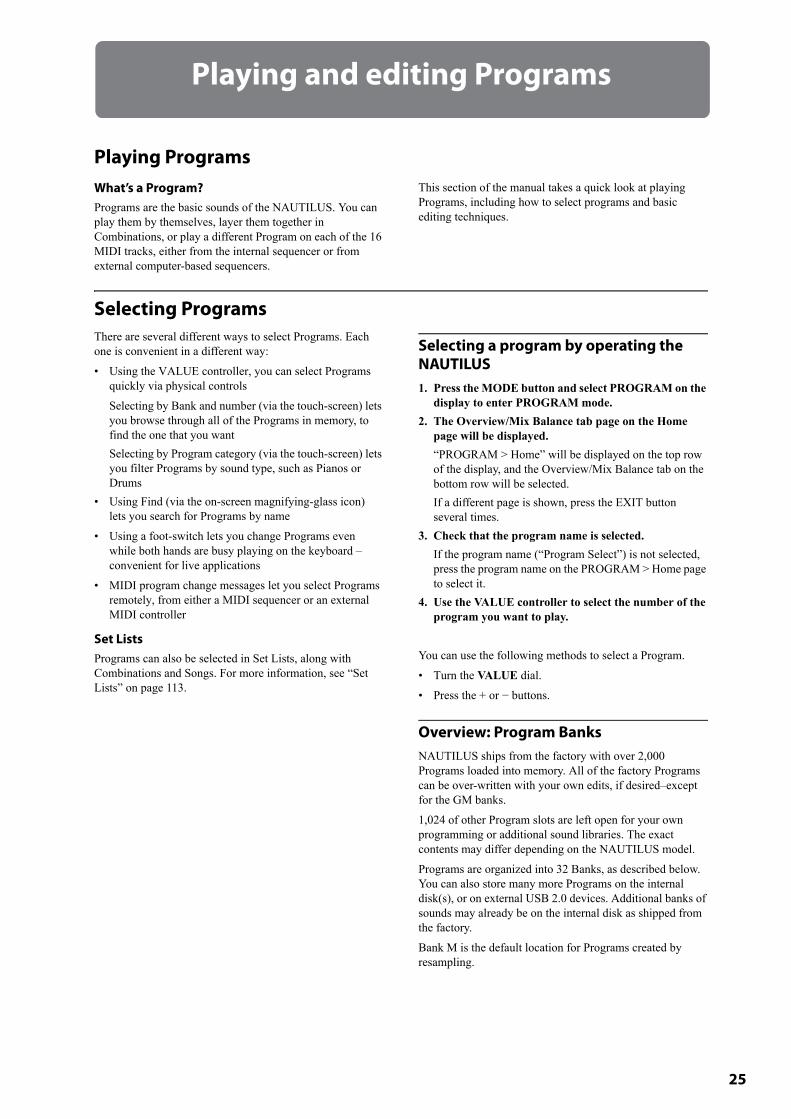
25
Playing and editing Programs
Playing ProgramsWhat’s a Program?Programs are the basic sounds of the NAUTILUS. You can play them by themselves, layer them together in Combinations, or play a different Program on each of the 16 MIDI tracks, either from the internal sequencer or from external computer-based sequencers.
This section of the manual takes a quick look at playing Programs, including how to select programs and basic editing techniques.
Selecting ProgramsThere are several different ways to select Programs. Each one is convenient in a different way:• Using the VALUE controller, you can select Programs
quickly via physical controlsSelecting by Bank and number (via the touch-screen) lets you browse through all of the Programs in memory, to find the one that you wantSelecting by Program category (via the touch-screen) lets you filter Programs by sound type, such as Pianos or Drums
• Using Find (via the on-screen magnifying-glass icon) lets you search for Programs by name
• Using a foot-switch lets you change Programs even while both hands are busy playing on the keyboard –convenient for live applications
• MIDI program change messages let you select Programs remotely, from either a MIDI sequencer or an external MIDI controller
Set ListsPrograms can also be selected in Set Lists, along with Combinations and Songs. For more information, see “Set Lists” on page 113.
Selecting a program by operating the NAUTILUS1. Press the MODE button and select PROGRAM on the
display to enter PROGRAM mode.2. The Overview/Mix Balance tab page on the Home
page will be displayed.“PROGRAM > Home” will be displayed on the top row of the display, and the Overview/Mix Balance tab on the bottom row will be selected.If a different page is shown, press the EXIT button several times.
3. Check that the program name is selected.If the program name (“Program Select”) is not selected, press the program name on the PROGRAM > Home page to select it.
4. Use the VALUE controller to select the number of the program you want to play.
You can use the following methods to select a Program.• Turn the VALUE dial.• Press the + or − buttons.
Overview: Program BanksNAUTILUS ships from the factory with over 2,000 Programs loaded into memory. All of the factory Programs can be over-written with your own edits, if desired–except for the GM banks.1,024 of other Program slots are left open for your own programming or additional sound libraries. The exact contents may differ depending on the NAUTILUS model.Programs are organized into 32 Banks, as described below. You can also store many more Programs on the internal disk(s), or on external USB 2.0 devices. Additional banks of sounds may already be on the internal disk as shipped from the factory.Bank M is the default location for Programs created by resampling.
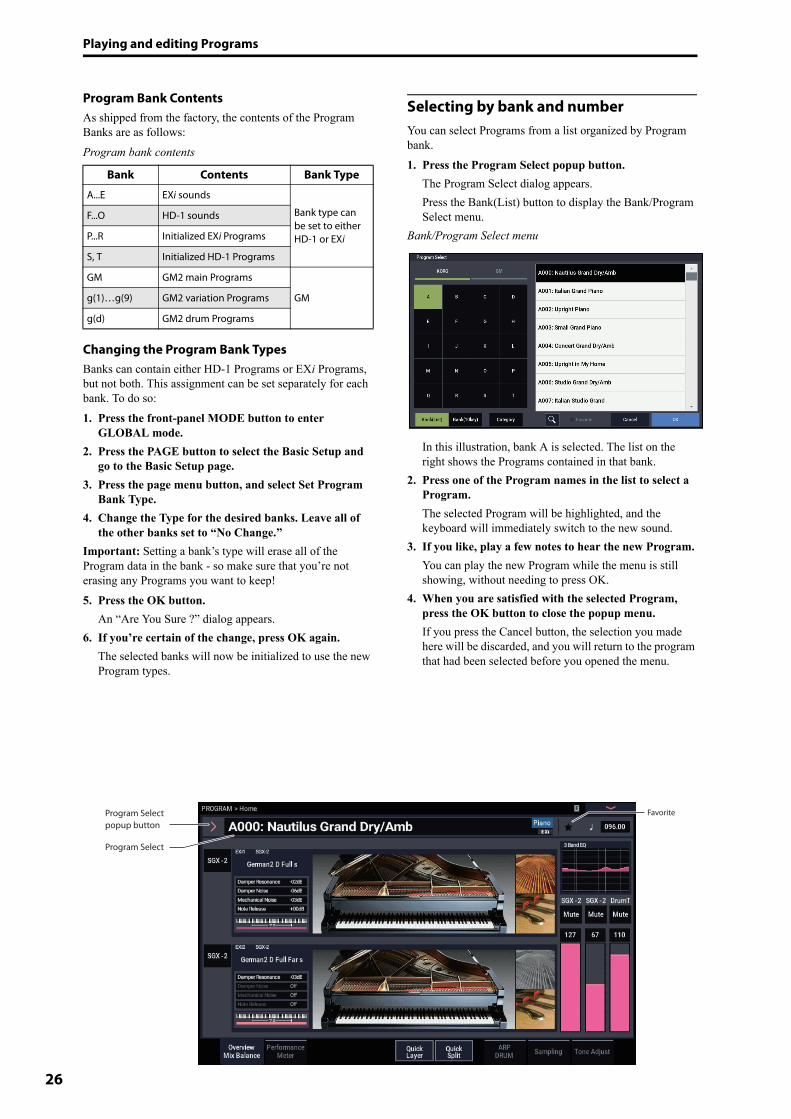
Playing and editing Programs
26
Program Bank ContentsAs shipped from the factory, the contents of the Program Banks are as follows:Program bank contents
Changing the Program Bank TypesBanks can contain either HD-1 Programs or EXi Programs, but not both. This assignment can be set separately for each bank. To do so:1. Press the front-panel MODE button to enter
GLOBAL mode.2. Press the PAGE button to select the Basic Setup and
go to the Basic Setup page.3. Press the page menu button, and select Set Program
Bank Type.4. Change the Type for the desired banks. Leave all of
the other banks set to “No Change.”Important: Setting a bank’s type will erase all of the Program data in the bank - so make sure that you’re not erasing any Programs you want to keep!5. Press the OK button.
An “Are You Sure ?” dialog appears.6. If you’re certain of the change, press OK again.
The selected banks will now be initialized to use the new Program types.
Selecting by bank and numberYou can select Programs from a list organized by Program bank.1. Press the Program Select popup button.
The Program Select dialog appears.Press the Bank(List) button to display the Bank/Program Select menu.
Bank/Program Select menu
In this illustration, bank A is selected. The list on the right shows the Programs contained in that bank.
2. Press one of the Program names in the list to select a Program.The selected Program will be highlighted, and the keyboard will immediately switch to the new sound.
3. If you like, play a few notes to hear the new Program.You can play the new Program while the menu is still showing, without needing to press OK.
4. When you are satisfied with the selected Program, press the OK button to close the popup menu.If you press the Cancel button, the selection you made here will be discarded, and you will return to the program that had been selected before you opened the menu.
Bank Contents Bank Type
A...E EXi sounds
Bank type can be set to either HD-1 or EXi
F...O HD-1 sounds
P...R Initialized EXi Programs
S, T Initialized HD-1 Programs
GM GM2 main Programs
GMg(1)…g(9) GM2 variation Programs
g(d) GM2 drum Programs
Program Select
Program Select popup button
Favorite

Playing Programs Selecting Programs
27
Selecting by CategoryYou can select Programs from within a category, such as keyboard, organ, bass, and drums. When shipped from the factory, the Programs are organized into 16 categories, each with several sub-categories. There are also 2 more categories, initially named User 16 and User 17, which you can use and rename as desired.1. Press the Program Select pop-up button.
The Program Select menu appears.Press the Category button to display the Category/Program Select menu.
Category/Program Select menu
In the illustration above, the Motion Synth category is selected. The list on the right shows the Programs which belong to that category.
2. Press the tabs on the left and right sides of the display to selecting a different category.The name of the selected category will be displayed in full in the upper right of the display.
3. Optionally, focus on a more specific group of sounds by selecting a sub-category from the upper row of tabs.The full name of the sub-category also appears in the upper right of the display.
4. Press one of the names in the center area to select a Program.The selected Program will be highlighted.
5. When you are satisfied with the selected program, press the OK button to close the popup menu.If you press the Cancel button, your selection will be discarded, and you will return to the Program that had been selected when you opened the popup menu.
Using the Find featureAt the bottom of the Program Select menu screen, you’ll see a button marked with a magnifying glass. Pressing this button brings up the Find dialog. You can use Find to search for Programs by name. To do so:1. Press the magnifying glass to open the Find dialog.
2. Enter the text to search for.For instance, you can enter “Pian” to search for Programs with “piano” in the name. Ignore Case is enabled by default; disable this if you want the find function to distinguish between upper and lower case.In addition to the on-screen keyboard, you can use a USB alphanumeric keyboard to enter text. For more information, see “Editing names and entering text” on page 206.
3. Press Find to find matches to the entered text.The names of Programs which match the provided text will appear, displayed one at a time.
4. Use the Next and Previous buttons to step through the Programs. Alternatively, use the front-panel +/− buttons.You can audition the Programs by playing on the keyboard.
5. To select a found Program, press the OK button. To exit without selecting a new Program, press the Cancel button.
Find is available throughout the systemFind is also available at the bottom right of the selection dialogs for Programs, Combinations, Songs, Set Lists, Samples, Multisamples, Wave Sequences, Drum Kits, Effects, and MOD-7 algorithms.
Using the Favorites check-boxThe Bank and Category select pop-ups both include a Favorite check-box at the bottom of the screen. This lets you trim the list to show only Programs you’ve marked as favorites. If the selected Bank or Category contains no Programs marked as Favorites, the check-box will be grayed out and unavailable. When shipped from the factory, no Programs will be marked (we leave that up to you, since they should be your favorites!).To mark a Program as a Favorite:1. Go to the Home page.

Playing and editing Programs
28
2. Press the (Favorite) to the left of the Tempo parameter. The turns green. (this shows that the box is “checked”)
3. Write the Program. This is an important step. If you don’t write the Program, the change to the Favorites check-box won’t be retained. For details on how to write Programs, see “Saving your edits” on page 34.
Using a footswitch to select ProgramsYou can assign a footswitch to step through Programs one by one, either going up (0, 1, 2, 3, etc.) or going down (3, 2, 1 etc.). This lets you change Programs without using your hands–great for quick Program changes in live performance situations.There are two ways of doing this: by assigning the footswitch to Program Up/Down, or to Value +/−. Program Up/Down is recommended for normal use, while Value +/− is a special-purpose setting, as described below.Note: These settings apply to Set Lists and Combinations, as well.
Assigning the footswitch to Program Up/DownAssigning the footswitch to Program Up or Program Down lets you directly control Program changes from the footswitch.To set this up:1. Connect a foot switch to the rear-panel
ASSIGNABLE SWITCH input.Use a simple on/off footswitch, such as the optional Korg PS-1.
2. Press the MODE button to select GLOBAL mode.3. Go to the GLOBAL > Controllers/Scales– Controllers
page.4. Set the Foot Switch Polarity parameter to match the
connected switch.5. At the top of the page, set the Foot Switch Assign
parameter to Program Up (or Program Down).For this setting to persist after power-down, you need to write the Global settings.
6. Open the menu, and select the Write Global Setting command.The Write Global Setting dialog will appear.
7. Press the MODE button to select PROGRAM mode.The Home page will be displayed, and you can step through the programs one at a time with the foot switch.Note: This setting applies to selecting Combinations, as well.
Assigning the footswitch to Value +/−This lets you use the Assignable Foot Switch to duplicate the functions of the front-panel + or − button.This is a special-case setting, but it may be convenient if you like to keep the Bank or Category select windows open as you play, so that you can see the list of available Programs or Combinations. While the window is open, the Program Up/Down assignments still change sounds as usual, but the window does not update to show the currently selected
sound. However, assigning the Foot Switch to the + or − button lets you step through the items in the list, one by one—just like pressing the front-panel buttons.To set this up:1. Follow steps 1-4 under “Assigning the footswitch to
Program Up/Down,” above.2. At the top of the page, set the Foot Switch Assign
parameter to Value + (or Value −).For this setting to persist after power-down, you need to write the Global settings.
3. Open the menu, and select the Write Global Setting command.The Write Global Setting dialog will appear.
4. Press OK, and then OK again to confirm.Now, the foot switch will act just like pressing the front-panel + or − button.Note: The footswitch will work like this for the entire NAUTILUS–not just when the Program or Combination Select window is open.
Assigning incoming MIDI CCs to Program Up/Down or Value +/−In addition to using the built-in footswitch input, you can also map incoming MIDI CCs to Program Up/Down or Value +/−. This allows you to assign multiple switches to the different functions—for instance, one for Program Up and a second for Program Down—using an external MIDI or USB MIDI foot controller. For more information, see “5–3: Function Assign” on page 678 of the PG.
Selecting Programs via MIDIYou can select any Program from any bank by using MIDI Program Change messages in conjunction with MIDI Bank Select messages. When you select Programs from the front panel, the appropriate MIDI messages are sent automatically (unless MIDI filters are active; see below).If you are entering the MIDI messages manually into a sequencer, note that the Bank Select message needs to come before the Program Select message.
In PROGRAM mode, use the Global MIDI ChannelWith the exception of the Drum Track, all transmission and reception of MIDI data in PROGRAM mode is performed on the Global MIDI Channel. You can set this on the GLOBAL > MIDI page.
Bank MapBank Select messages can work in one of two ways, as controlled by the Bank Map parameter on the GLOBAL > Basic Setup– Basic page. The factory default setting will work for most standard applications, and most people will never need to change it. If you use General MIDI sequences, the alternative GM(2) setting may be helpful. For more information, see “Bank Map” on page 633 of the PG.
MIDI filtersYou can use MIDI filters to control whether or not Program Change and Bank Select messages will be transmitted and/or received. The filters are set up on the GLOBAL > MIDI-MIDI page. For more information, see “1–1c: MIDI Filter” on page 655 of the PG.

Playing Programs Using Controllers
29
General MIDI ProgramsInternal bank G contains a full set of General MIDI 2 Programs, as well as sub-banks g(1)–g(9) (GM2 variation programs), and bank g(d) (drums).When you select Programs using the Bank/Program Select menu, press the GM button to select GM Bank.
Using ControllersThe NAUTILUS provides a lot of hands-on ways to control the sound–the mod and pitch-bend joystick, two buttons (SW1 and SW2), and the RT control knobs.These controls let you modify the tone, pitch, volume, effects, etc. in realtime while you play.
Joystick
The joystick moves in four directions: left, right, forwards (away from yourself), and backwards (towards yourself). Each of the four directions can be used to control a different function, such as modulating Program or effects parameters. These assignments can be different for every Program, but generally, they do the following:Standard Joystick functions
Joystick LockThe joystick is spring-loaded, so that it automatically returns to the center position when you let go.However, you can use either of the two front-panel buttons (SW1 or SW2), or a foot-switch, to “lock” the current position of the joystick. This leaves your hands free to play on the keyboard, or to use other controllers. For more information, please see “Using the Lock function” on page 30.
SW1 and SW2You can use SW1 and SW2 to control program parameters via AMS (Alternate Modulation Source), or effect parameters via DMod (Dynamic Modulation).
They can also transpose the keyboard by octaves, turn portamento on/off, or lock the modulation values of the joystick.Each button may work as either as a toggle or a momentary switch. In Toggle mode, each press alternates between on and off; in Momentary mode, the button only changes for as long as you hold it down.Each Program, Combination, and Song stores its own settings for what the buttons will do, and whether each button is on or off.In all modes, you can edit the assignments on the Controllers– Switch page.
Move the joystick…
Controller Name Normally controls…
Left JS–X Pitch bend down
Right JS+X Pitch bend up
Forwards (away from yourself )
JS+Y Vibrato
Backwards (towards yourself )
JS–Y Filter LFO (wah)Programs (HD-1 and EXi) Basic/X-Y/Controllers
Combinations and Songs EQ/X-Y/Controllers

Playing and editing Programs
30
An example of settings in a Program
EXi : Controllers Page(PAGE button → Common: Basic/X-Y/Controllers → Controllers tab)
When using SW1/2 for AMS or Dmod, the default settings are SW1 Mod.:CC#80 and SW2 Mod.:CC#81.For an example, see “Using Dmod to change the feedback level via SW1” on page 230. For a complete list of the possible assignments, see “SW1/2 Assignments” on page 915 of the PG.Note: If you wish to keep these settings after the power is turned off, you must save the Program, Combination, or Song. Settings for SAMPLING mode cannot be saved.
Using the Lock function
Locking the Joystick1. Using the factory sounds, select Program F073: Real
Suit E.Piano, and play the keyboard.2. Move the joystick away from yourself (the +Y
direction).The vibrato effect will deepen.
3. While holding the joystick away from yourself, press the SW2 button.When you press the button, its LED will light up, and the modulation effect at this point will be maintained.
4. Release the joystick, and play the keyboard.The modulation will stay the same as it was when SW2 was pressed. Moving the joystick away from yourself will not affect the sound.
5. Press the SW2 key once again to release the Lock function.
RT control knobsThe RT control has 6 knobs. You can use these for many different tasks:
• Easy Program Editing• Controlling Arpeggiator1. Select a function you want to control using SELECT
button.Select “SOUND” to adjust the parameters for the currently selected program, such as CUTOFF, RESONANCE and EG INT.Select ARP/DRUM to adjust the arpeggiator settings.Selecting “USER” with the SELECT button will let you operate the functions that are configured in the PROGRAM > Basic/X-Y/Controllers– Controllers page.
You can freely change back and forth between the different functions, without losing any of your edits.2. Control functions by using RT control knobs.
Keyboard
VelocityVelocity is a measure of how hard you play a note on the keyboard. This can be used to modulate many different aspects of the sound, such as volume, brightness, or the character of the attack.
Note NumberSounds can be programmed to change in character based on the note being played. As you play higher or lower on the keyboard, the note number can modulate the timbre–such as becoming brighter as you play higher. Envelopes may also become faster or slower; the volume may change; and so on.

Playing Programs Using Controllers
31
Foot Pedals and Switches
Damper Pedal (Sustain)The damper pedal is also sometimes called the sustain pedal. It acts like the similarly-named pedal on an acoustic piano; when you hold down the pedal, notes will continue to sustain even when you lift your hands off of the keyboard.
Footswitch vs. Half-Damper PedalYou can use either a standard footswitch (such as the Korg PS-1) or a special half-damper pedal (such as the Korg DS-1H) as the Damper.If you use a footswitch, it will work like a normal synthesizer sustain pedal: notes will sustain forever, as long as the pedal is held down.A half-damper pedal is a special type of continuous footswitch (normal footswitches won’t work properly for this application). It offers more subtle control of sustain, which can be especially useful for piano sounds. The off and full-on positions of the half-damper work just like the footswitch, but intermediate positions modulate the release time to increase sustain without making it infinite.The NAUTILUS will automatically sense when a half-damper is connected to the rear-panel DAMPER input. For proper operation, you will also need to calibrate the pedal, using the Calibrate Half-Damper command in the GLOBAL page menu.
Damper and MIDIThe Damper Pedal is sent and received as MIDI CC #64. In COMBINATION and SEQUENCER modes, you can “filter” CC# 64 so that it only affects some of the sounds in the Combi or Song.
Assignable Foot SwitchThis lets you use a simple footswitch, such as the Korg PS-1, as an assignable controller. The footswitch can perform a wide variety of functions, such as:• An assignable source for modulating sounds and effects• Portamento on/off• Una Corda on/off (convenient for the SGX-2)• Program select up or down• Sequencer start/stop or punch in/out• Tap Tempo• ARP on/off, or ARP Latch on/off• Drum on/off• Duplication of many front panel controls, including the
modulation joystick, RT control knobs, SW 1/2The switch’s function is set in GLOBAL mode (on the Controllers tab of the Controllers/Scales– Controllers page), so that it always works the same regardless of the current Program, Combi, or Song. For more information, please see “Setting up the Assignable Switch and Pedal” on page 175.
Assignable Foot PedalThis lets you use a continuous controller pedal, such as the Korg EXP-2 foot controller or Korg XVP-20 EXP/VOL pedal, as an assignable controller.Like the Assignable Foot Switch, described above, the Foot Pedal can be used for many different functions, including:• Master Volume• Channel Volume, Pan, or Expression• Assignable sound modulation, as several different AMS
or Dmod sources (convenient for CX-3 expression)• Effects Send level control• Duplication of many front panel controls, including the
modulation joystick, RT control knobs, SW 1/2The pedal’s function is set globally (on the Controllers tab of the GLOBAL > Controllers/Scales– Controllers page), so that it always works the same regardless of the current Program, Combi, or Song. For more information, please see “Setting up the Assignable Switch and Pedal” on page 175.

Playing and editing Programs
32
Easy Program Editing
Quick edits using the RT control knobsYou can edit any of the Programs shipped with NAUTILUS, or you can start with an initialized Program to create sounds from scratch.You can do many basic edits directly from the front panel RT control knobs without ever delving deeper into the LCD interface. For instance, you can use the knobs to change CUTOFF and RESONANCE, and so on.
The RT control knobs will do different things, depending of the SELECT setting. For editing Programs, select SOUND.
Editing sounds & effects with the RT control knobsThe RT control knobs are a traditional feature of Korg workstations, combining modulation, quick edits, and hands-on control.1. Press the SELECT button to select SOUND.2. Knobs 1-6 have dedicated functions, All of these
correspond to standard MIDI CCs.RT control knob functions
When you move a knob, it sends out the corresponding MIDI CC. Also, when the CC is received via MIDI, the knob value changes to match the CC value.Generally, the knobs “scale” the Program’s internal settings. When the knob is in the center, the settings are as programmed. To move the settings to their maximum value, turn the knob all the way to the right; to move them to their minimum value, turn the knob all the way to the left.
Knob scaling
For example:1. Select Program F092: Smooth Operators.
This is an electric piano sound; let’s see what we can do to make it sound a bit different.
2. Press the SELECT button to choose SOUND.3. While playing the sound, turn knob 1 (Filter CutOff
Frequency) to the right, slowly, to about 3 o’clock.Notice how the piano becomes a sort of synth sweep.
4. Next, turn knob 2 (Filter Resonance) to the right, also to about 3 o’clock.
5. With knob 2 in that position, try moving knob 1 back and forth as you play.With the resonance increased, it now sounds like you’re playing through a wah pedal.
Next, let’s say that you decide that’s not really what you wanted–so, we’ll set the knobs back to their default values. You could move them back to the straight-up, 12 o’clock position.
Knob edits can be savedThe RT control knobs are great for modulating sounds in performance, or for recording. If you like, you can also save the edited version of the sound, using the normal Write Program command (see “Saving your edits” on page 34).Internally, a single knob usually affects several different parameters. When you write a Program, the edits are saved into the individual parameters, and not to the knob itself. After writing the Program, you’ll notice that the knobs have returned to their center positions–since the old “edited” values are now the new “saved” values.
Knob MIDI CC Normally controls…
1 74 Filter Cutoff Frequency
2 71 Filter Resonance
3 79 Filter EG Intensity
4 72 EG Release Time
5 Often Effect Depth - but can vary per Program
6 Often Reverb Depth - but can vary per Program
99
00
CC Value
ParameterValue
As Programmed
640 127
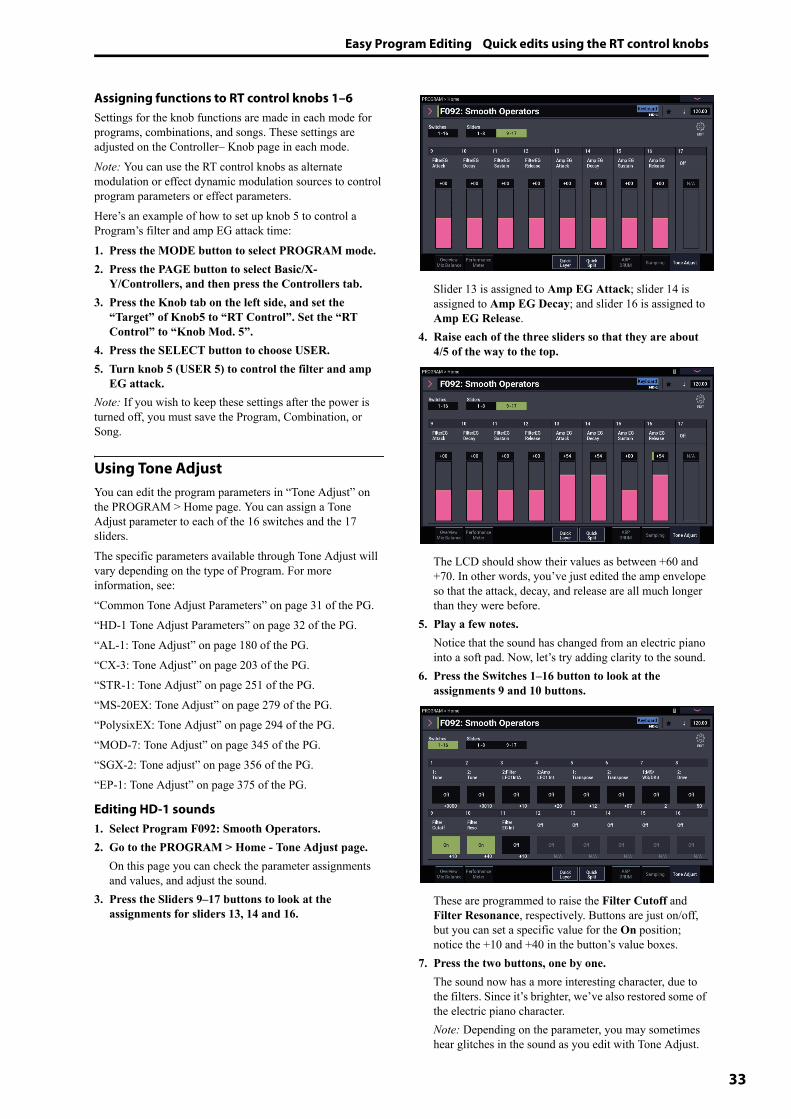
Easy Program Editing Quick edits using the RT control knobs
33
Assigning functions to RT control knobs 1–6Settings for the knob functions are made in each mode for programs, combinations, and songs. These settings are adjusted on the Controller– Knob page in each mode.Note: You can use the RT control knobs as alternate modulation or effect dynamic modulation sources to control program parameters or effect parameters.Here’s an example of how to set up knob 5 to control a Program’s filter and amp EG attack time:1. Press the MODE button to select PROGRAM mode.2. Press the PAGE button to select Basic/X-
Y/Controllers, and then press the Controllers tab.3. Press the Knob tab on the left side, and set the
“Target” of Knob5 to “RT Control”. Set the “RT Control” to “Knob Mod. 5”.
4. Press the SELECT button to choose USER.5. Turn knob 5 (USER 5) to control the filter and amp
EG attack.Note: If you wish to keep these settings after the power is turned off, you must save the Program, Combination, or Song.
Using Tone AdjustYou can edit the program parameters in “Tone Adjust” on the PROGRAM > Home page. You can assign a Tone Adjust parameter to each of the 16 switches and the 17 sliders.The specific parameters available through Tone Adjust will vary depending on the type of Program. For more information, see:“Common Tone Adjust Parameters” on page 31 of the PG.“HD-1 Tone Adjust Parameters” on page 32 of the PG.“AL-1: Tone Adjust” on page 180 of the PG.“CX-3: Tone Adjust” on page 203 of the PG.“STR-1: Tone Adjust” on page 251 of the PG.“MS-20EX: Tone Adjust” on page 279 of the PG.“PolysixEX: Tone Adjust” on page 294 of the PG.“MOD-7: Tone Adjust” on page 345 of the PG.“SGX-2: Tone adjust” on page 356 of the PG.“EP-1: Tone Adjust” on page 375 of the PG.
Editing HD-1 sounds1. Select Program F092: Smooth Operators.2. Go to the PROGRAM > Home - Tone Adjust page.
On this page you can check the parameter assignments and values, and adjust the sound.
3. Press the Sliders 9–17 buttons to look at the assignments for sliders 13, 14 and 16.
Slider 13 is assigned to Amp EG Attack; slider 14 is assigned to Amp EG Decay; and slider 16 is assigned to Amp EG Release.
4. Raise each of the three sliders so that they are about 4/5 of the way to the top.
The LCD should show their values as between +60 and +70. In other words, you’ve just edited the amp envelope so that the attack, decay, and release are all much longer than they were before.
5. Play a few notes.Notice that the sound has changed from an electric piano into a soft pad. Now, let’s try adding clarity to the sound.
6. Press the Switches 1–16 button to look at the assignments 9 and 10 buttons.
These are programmed to raise the Filter Cutoff and Filter Resonance, respectively. Buttons are just on/off, but you can set a specific value for the On position; notice the +10 and +40 in the button’s value boxes.
7. Press the two buttons, one by one.The sound now has a more interesting character, due to the filters. Since it’s brighter, we’ve also restored some of the electric piano character.Note: Depending on the parameter, you may sometimes hear glitches in the sound as you edit with Tone Adjust.

Playing and editing Programs
34
Using Compare commandWhen you’re in the process of editing a sound, executing the Compare command on Menu command will recall the saved version of the sound, as it was before you started editing. Executing the Compare command again returns you to the version you are editing.If you edit after having executed the Compare command, your previous edits will be lost.
Saving your editsOnce you’ve tweaked the sound to perfection, you’ll want to save your work. To save your edits:1. Select the Write Program command from the page
menu, at the upper right-hand corner of the screen.This brings up a dialog box which allows you to save the Program. Optionally, you can also select a new location, change the Program’s name, and assign it to a sound category (such as keyboard, guitar, etc.).
2. Press the Program’s name to bring up the text edit dialog.You can give the Program a descriptive name using the on-screen keyboard.
3. After entering the name, press OK.The text edit window will disappear, returning you to the main Write dialog.
4. To set the category and sub-category, press the “Category” and “Sub Category” pop-up buttons and select the categories/sub-categories from the list.
5. To select the bank and number to save, press the “Program” pop-up button, select the save destination in the list and press the OK button.You can write to any location in banks A-T. To avoid overwriting the factory sounds, it’s safer to use a slot in one of the Banks P-T.Important: HD-1 Programs can only be written to HD-1 Banks, and EXi Programs can only be written to EXi Banks. For more information on the default Bank types, and on how to change them, please see “Program Bank Contents” on page 26, and “Changing the Program Bank Types” on page 26.
6. After selecting the location, press OK.7. Press OK again to start the write process.8. If you’re sure you want to write to this location, press
OK again.After that, you’re done!For more information, see “Writing Programs and Combinations” on page 205.
Saving edits to GM ProgramsYou can edit GM Programs, but you must then save them to other banks; the GM Programs themselves cannot be over-written.
Saving to mediaYou can also save and manage Programs on the internal drive and USB storage devices. For more information, see “Saving to internal drive, CDs, and USB media” on page 209.
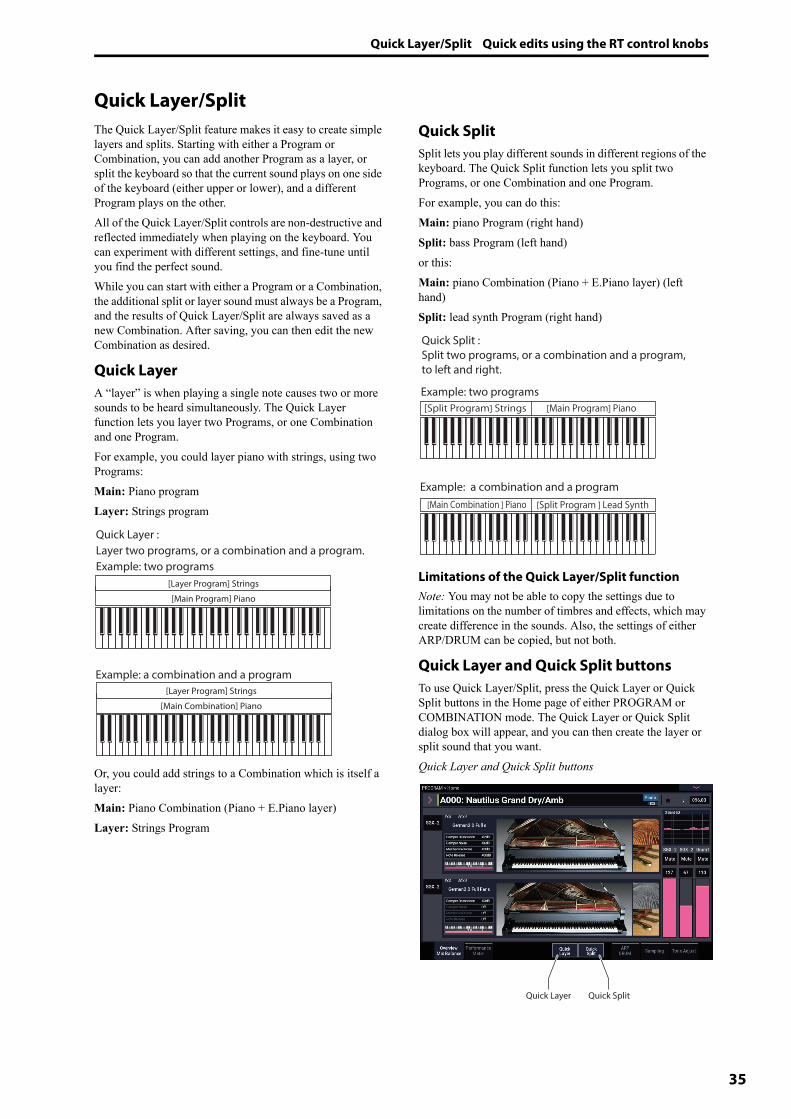
Quick Layer/Split Quick edits using the RT control knobs
35
Quick Layer/SplitThe Quick Layer/Split feature makes it easy to create simple layers and splits. Starting with either a Program or Combination, you can add another Program as a layer, or split the keyboard so that the current sound plays on one side of the keyboard (either upper or lower), and a different Program plays on the other.All of the Quick Layer/Split controls are non-destructive and reflected immediately when playing on the keyboard. You can experiment with different settings, and fine-tune until you find the perfect sound.While you can start with either a Program or a Combination, the additional split or layer sound must always be a Program, and the results of Quick Layer/Split are always saved as a new Combination. After saving, you can then edit the new Combination as desired.
Quick LayerA “layer” is when playing a single note causes two or more sounds to be heard simultaneously. The Quick Layer function lets you layer two Programs, or one Combination and one Program.For example, you could layer piano with strings, using two Programs:Main: Piano programLayer: Strings program
Or, you could add strings to a Combination which is itself a layer:Main: Piano Combination (Piano + E.Piano layer)Layer: Strings Program
Quick SplitSplit lets you play different sounds in different regions of the keyboard. The Quick Split function lets you split two Programs, or one Combination and one Program.For example, you can do this:Main: piano Program (right hand)Split: bass Program (left hand)or this:Main: piano Combination (Piano + E.Piano layer) (left hand)Split: lead synth Program (right hand)
Limitations of the Quick Layer/Split functionNote: You may not be able to copy the settings due to limitations on the number of timbres and effects, which may create difference in the sounds. Also, the settings of either ARP/DRUM can be copied, but not both.
Quick Layer and Quick Split buttonsTo use Quick Layer/Split, press the Quick Layer or Quick Split buttons in the Home page of either PROGRAM or COMBINATION mode. The Quick Layer or Quick Split dialog box will appear, and you can then create the layer or split sound that you want.Quick Layer and Quick Split buttons
[Main Program] Piano
[Layer Program] Strings
[Main Combination] Piano
[Layer Program] Strings
Quick Layer :Layer two programs, or a combination and a program.Example: two programs
Example: a combination and a program
[Main Program] Piano[Split Program] Strings
Quick Split :Split two programs, or a combination and a program, to left and right.
Example: two programs
[Main Combination ] Piano [Split Program ] Lead Synth
Example: a combination and a program
Quick Layer Quick Split
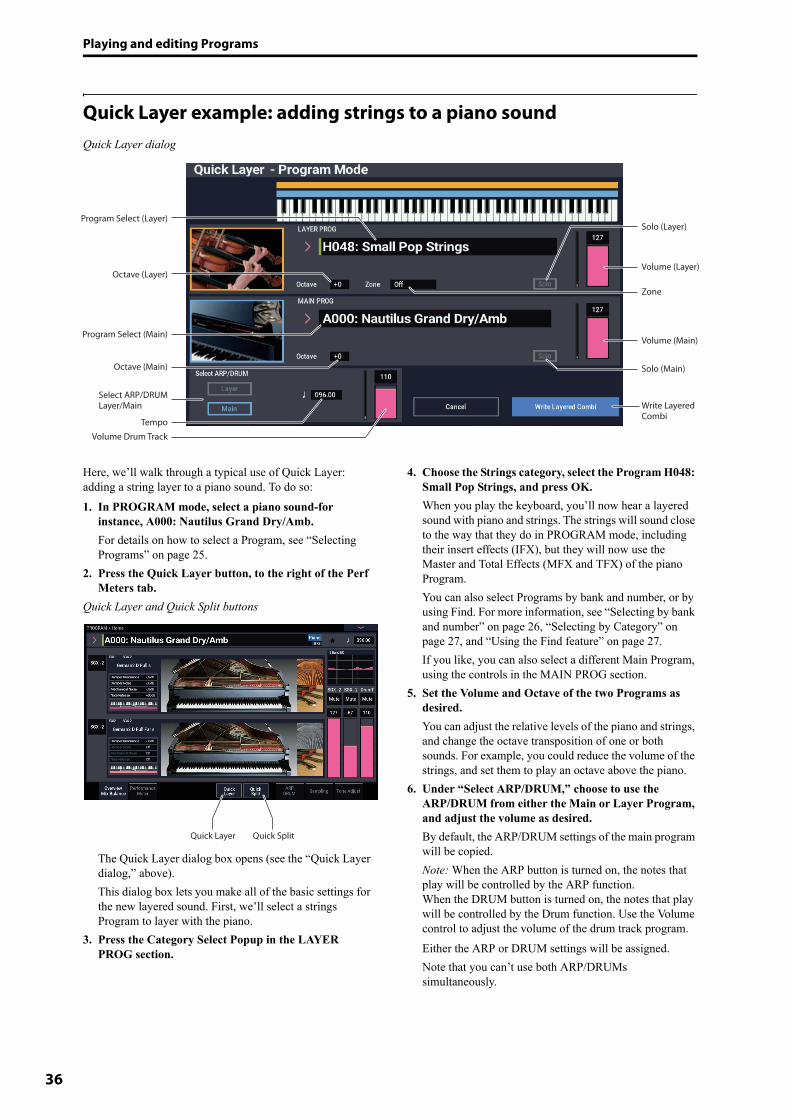
Playing and editing Programs
36
Quick Layer example: adding strings to a piano soundQuick Layer dialog
Here, we’ll walk through a typical use of Quick Layer: adding a string layer to a piano sound. To do so:1. In PROGRAM mode, select a piano sound-for
instance, A000: Nautilus Grand Dry/Amb.For details on how to select a Program, see “Selecting Programs” on page 25.
2. Press the Quick Layer button, to the right of the Perf Meters tab.
Quick Layer and Quick Split buttons
The Quick Layer dialog box opens (see the “Quick Layer dialog,” above).This dialog box lets you make all of the basic settings for the new layered sound. First, we’ll select a strings Program to layer with the piano.
3. Press the Category Select Popup in the LAYER PROG section.
4. Choose the Strings category, select the Program H048: Small Pop Strings, and press OK.When you play the keyboard, you’ll now hear a layered sound with piano and strings. The strings will sound close to the way that they do in PROGRAM mode, including their insert effects (IFX), but they will now use the Master and Total Effects (MFX and TFX) of the piano Program. You can also select Programs by bank and number, or by using Find. For more information, see “Selecting by bank and number” on page 26, “Selecting by Category” on page 27, and “Using the Find feature” on page 27.If you like, you can also select a different Main Program, using the controls in the MAIN PROG section.
5. Set the Volume and Octave of the two Programs as desired.You can adjust the relative levels of the piano and strings, and change the octave transposition of one or both sounds. For example, you could reduce the volume of the strings, and set them to play an octave above the piano.
6. Under “Select ARP/DRUM,” choose to use the ARP/DRUM from either the Main or Layer Program, and adjust the volume as desired. By default, the ARP/DRUM settings of the main program will be copied.Note: When the ARP button is turned on, the notes that play will be controlled by the ARP function.When the DRUM button is turned on, the notes that play will be controlled by the Drum function. Use the Volume control to adjust the volume of the drum track program.Either the ARP or DRUM settings will be assigned.Note that you can’t use both ARP/DRUMs simultaneously.
Program Select (Layer)
Program Select (Main)
Volume Drum Track
Octave (Main)
Tempo
Octave (Layer)
Write Layered Combi
Zone
Solo (Layer)
Solo (Main)
Select ARP/DRUMLayer/Main
Volume (Layer)
Volume (Main)
Quick Layer Quick Split
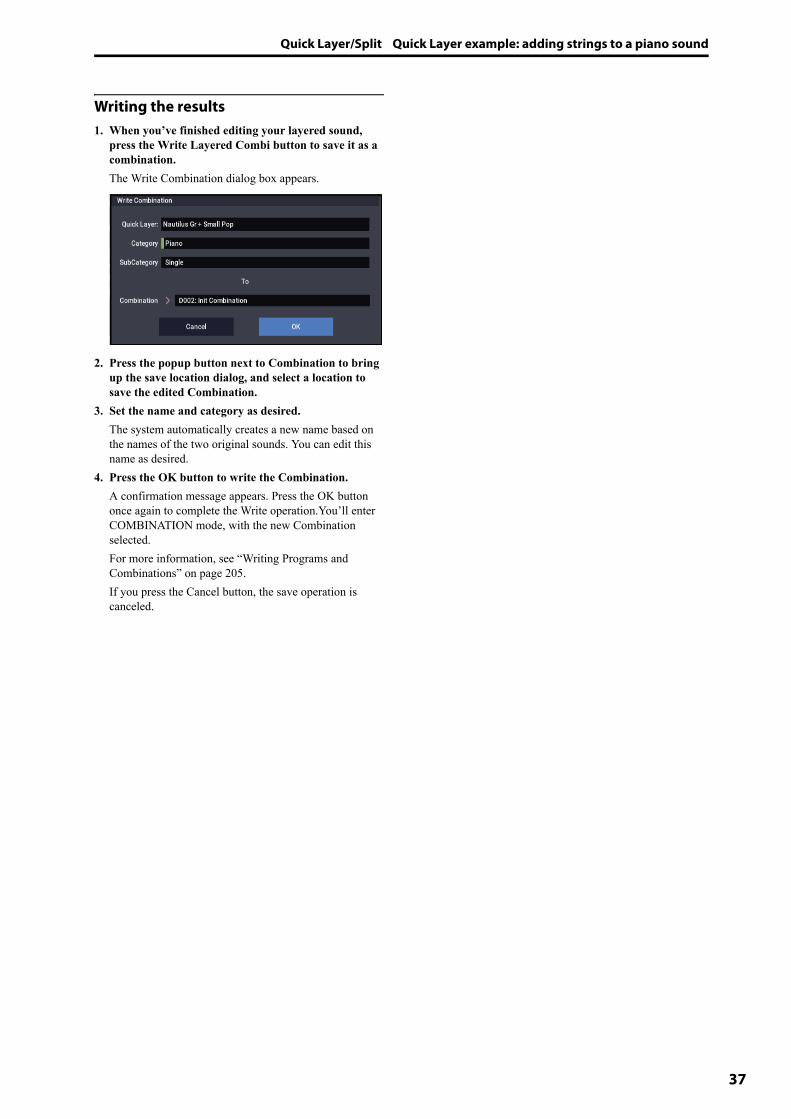
Quick Layer/Split Quick Layer example: adding strings to a piano sound
37
Writing the results1. When you’ve finished editing your layered sound,
press the Write Layered Combi button to save it as a combination.The Write Combination dialog box appears.
2. Press the popup button next to Combination to bring up the save location dialog, and select a location to save the edited Combination.
3. Set the name and category as desired.The system automatically creates a new name based on the names of the two original sounds. You can edit this name as desired.
4. Press the OK button to write the Combination.A confirmation message appears. Press the OK button once again to complete the Write operation.You’ll enter COMBINATION mode, with the new Combination selected.For more information, see “Writing Programs and Combinations” on page 205.If you press the Cancel button, the save operation is canceled.
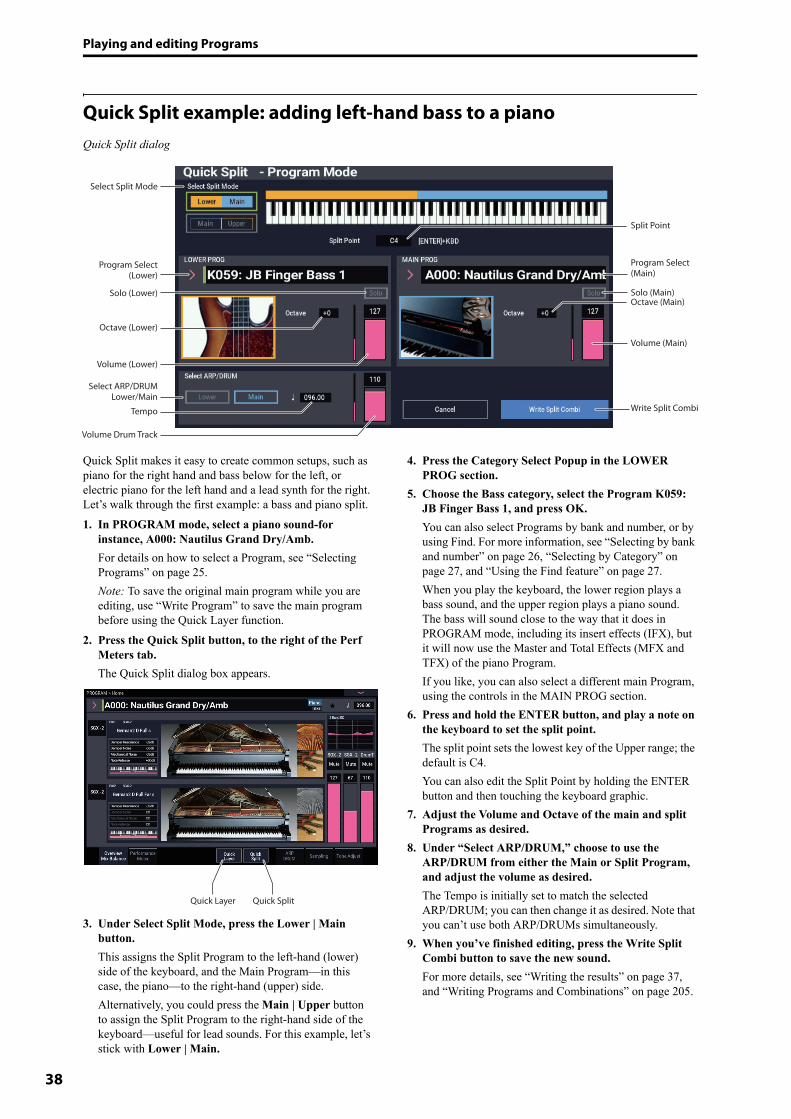
Playing and editing Programs
38
Quick Split example: adding left-hand bass to a pianoQuick Split dialog
Quick Split makes it easy to create common setups, such as piano for the right hand and bass below for the left, or electric piano for the left hand and a lead synth for the right. Let’s walk through the first example: a bass and piano split.1. In PROGRAM mode, select a piano sound-for
instance, A000: Nautilus Grand Dry/Amb.For details on how to select a Program, see “Selecting Programs” on page 25.Note: To save the original main program while you are editing, use “Write Program” to save the main program before using the Quick Layer function.
2. Press the Quick Split button, to the right of the Perf Meters tab.The Quick Split dialog box appears.
3. Under Select Split Mode, press the Lower | Main button.This assigns the Split Program to the left-hand (lower) side of the keyboard, and the Main Program—in this case, the piano—to the right-hand (upper) side.Alternatively, you could press the Main | Upper button to assign the Split Program to the right-hand side of the keyboard—useful for lead sounds. For this example, let’s stick with Lower | Main.
4. Press the Category Select Popup in the LOWER PROG section.
5. Choose the Bass category, select the Program K059: JB Finger Bass 1, and press OK.You can also select Programs by bank and number, or by using Find. For more information, see “Selecting by bank and number” on page 26, “Selecting by Category” on page 27, and “Using the Find feature” on page 27.When you play the keyboard, the lower region plays a bass sound, and the upper region plays a piano sound. The bass will sound close to the way that it does in PROGRAM mode, including its insert effects (IFX), but it will now use the Master and Total Effects (MFX and TFX) of the piano Program. If you like, you can also select a different main Program, using the controls in the MAIN PROG section.
6. Press and hold the ENTER button, and play a note on the keyboard to set the split point.The split point sets the lowest key of the Upper range; the default is C4.You can also edit the Split Point by holding the ENTER button and then touching the keyboard graphic.
7. Adjust the Volume and Octave of the main and split Programs as desired.
8. Under “Select ARP/DRUM,” choose to use the ARP/DRUM from either the Main or Split Program, and adjust the volume as desired. The Tempo is initially set to match the selected ARP/DRUM; you can then change it as desired. Note that you can’t use both ARP/DRUMs simultaneously.
9. When you’ve finished editing, press the Write Split Combi button to save the new sound.For more details, see “Writing the results” on page 37, and “Writing Programs and Combinations” on page 205.
Solo (Lower)
Volume Drum Track
Tempo
Select Split Mode
Octave (Lower)
Write Split Combi
Program Select (Lower)
Select ARP/DRUMLower/Main
Volume (Lower)
Split Point
Octave (Main)Solo (Main)
Program Select (Main)
Volume (Main)
Quick Layer Quick Split

Quick Layer/Split Quick Split example: adding left-hand bass to a piano
39
Writing the results1. When you’ve finished editing your splitted sound,
press the Write Split Combi button to save it as a combination.The Write Combination dialog box appears.
2. Press the popup button next to Combination to bring up the save location dialog, and select a location to save the edited Combination.
3. Set the name and category as desired.The system automatically creates a new name based on the names of the two original sounds. You can edit this name as desired.
4. Press the OK button to write the Combination.A confirmation message appears. Press the OK button once again to complete the Write operation.You’ll enter COMBINATION mode, with the new Combination selected.For more information, see “Writing Programs and Combinations” on page 205.If you press the Cancel button, the save operation is canceled.
Playing and editing Programs
40
Detailed Program Editing
Editing HD-1 ProgramsCreating your own ProgramsYou can create your own original HD-1 sounds by editing the factory Programs, or by initializing a Program and starting from scratch. You can save these Programs into any bank other than GM (which contains General MIDI Programs).You can also create Programs using your own Multisamples, either from SAMPLING mode or User Sample Banks. In addition, you can play a Program and resample your performance, or sample an external audio source while listening to the sound of a Program.
Overview of editing pagesPROGRAM > Home page is where you select and play programs, and adjust the ARP/DRUM settings. The other pages let you modify the sound in more detailed ways.
For details on how to select the different pages, see “Basic operations” on page 14.You can sample from within PROGRAM mode—including resampling the Program itself. For more information, see “Sampling in PROGRAM and COMBINATION modes” on page 145. You can also mix in live audio inputs, and process them through effects. For more information, see “Using effects with the audio inputs” on page 229.Note that the page and parameter structures of EXi Programs are different than those of HD-1 Programs.
Basic HD-1 Structure
Multisamples and Wave SequencesThe sound of the HD-1 starts with one or more Multisamples. These can be recordings of instruments like piano, bass, guitar, strings, organs, analog synths, and so on, or purely digitally-created timbres.You can play these Multisamples directly, or use them through Wave Sequences, which play a series of different Multisamples over time to create rhythms or complex, evolving timbres.
Oscillator ModeHD-1 Single Programs have one oscillator, and Double Programs have two oscillators. Each oscillator includes a complete synthesis voice, with velocity-switched Multisamples, dual filters, EGs, LFOs, and so on. Single and Double Drum modes are similar, but use Drum Kits (as created in GLOBAL mode) instead of Multisamples.Single and Single Drum Programs use one oscillator, for a maximum of 140-note polyphony.Double and Double Drum Programs use two oscillators, for a maximum of 70-note polyphony.
A note about polyphonyPolyphony means the number of notes that you can play at a time. This number will vary depending on the particular sound being played, and how that sound is produced. Generally speaking:• Double Programs use twice as many voices as Single
Programs.• Wave Sequences use twice as many voices as
Multisamples.• Stereo Multisamples use twice as many voices as Mono
Multisamples, and Stereo Wave Sequences use twice as many voices as Mono Wave Sequences.
• If the X-Y Envelope is enabled, the number of voices used increases slightly.
Page Main features
Home
• Select and play Programs• Perform easy edits using the RT control knobs,
and Tone Adjust• Adjust mix parameters including volume, pan,
EQ, and send levels• ARP/DRUM settings• Quick sampling and re-sampling
Basic/X-Y/Controllers
• Set the Program to Single, Double, Single Drum, or Double Drum
• Select Mono or Poly voice allocation• Select a scale (e.g., Equal Temperament)• Set up controllers• Set up Vector synthesis
Osc/Pitch
• Select Multisamples, Wave Sequences. or Drum Kits
• Settings related to the pitch, including the pitch EG
Filter• Settings related to the filter (tone), including
the filter EG
Amp/EQ• Settings related to the amplifier (volume),
including amp EG and pan• Settings for the 3-band EQ
LFO
• For each of the two LFOs provided for each oscillator, select the LFO type and speed, etc. (Settings in the pitch, filter, and amp pages determine how much the LFOs affect the sound.)
AMS Mixer/Common KeyTrack
• Mix and modify AMS sources using the two AMS mixers provided for each oscillator
• Set up how the Common Key Track output changes as you play up and down the keyboard
IFX• Select insert effects and make settings for
them. Specify send levels to the Master effects and routing to the outputs
MFX/TFX• Select Master send effects and Total effects,
and adjust their settings
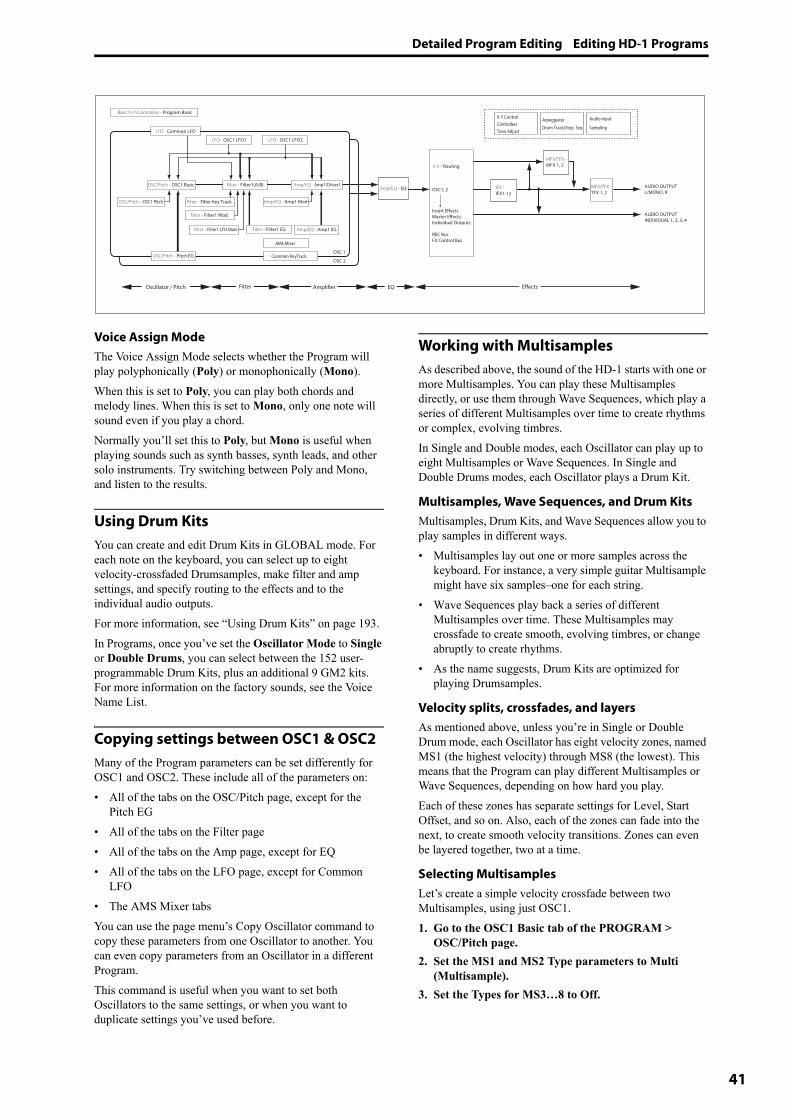
Detailed Program Editing Editing HD-1 Programs
41
Voice Assign ModeThe Voice Assign Mode selects whether the Program will play polyphonically (Poly) or monophonically (Mono). When this is set to Poly, you can play both chords and melody lines. When this is set to Mono, only one note will sound even if you play a chord.Normally you’ll set this to Poly, but Mono is useful when playing sounds such as synth basses, synth leads, and other solo instruments. Try switching between Poly and Mono, and listen to the results.
Using Drum KitsYou can create and edit Drum Kits in GLOBAL mode. For each note on the keyboard, you can select up to eight velocity-crossfaded Drumsamples, make filter and amp settings, and specify routing to the effects and to the individual audio outputs.For more information, see “Using Drum Kits” on page 193.In Programs, once you’ve set the Oscillator Mode to Single or Double Drums, you can select between the 152 user-programmable Drum Kits, plus an additional 9 GM2 kits. For more information on the factory sounds, see the Voice Name List.
Copying settings between OSC1 & OSC2Many of the Program parameters can be set differently for OSC1 and OSC2. These include all of the parameters on:• All of the tabs on the OSC/Pitch page, except for the
Pitch EG• All of the tabs on the Filter page• All of the tabs on the Amp page, except for EQ• All of the tabs on the LFO page, except for Common
LFO• The AMS Mixer tabsYou can use the page menu’s Copy Oscillator command to copy these parameters from one Oscillator to another. You can even copy parameters from an Oscillator in a different Program.This command is useful when you want to set both Oscillators to the same settings, or when you want to duplicate settings you’ve used before.
Working with MultisamplesAs described above, the sound of the HD-1 starts with one or more Multisamples. You can play these Multisamples directly, or use them through Wave Sequences, which play a series of different Multisamples over time to create rhythms or complex, evolving timbres.In Single and Double modes, each Oscillator can play up to eight Multisamples or Wave Sequences. In Single and Double Drums modes, each Oscillator plays a Drum Kit.
Multisamples, Wave Sequences, and Drum KitsMultisamples, Drum Kits, and Wave Sequences allow you to play samples in different ways.• Multisamples lay out one or more samples across the
keyboard. For instance, a very simple guitar Multisample might have six samples–one for each string.
• Wave Sequences play back a series of different Multisamples over time. These Multisamples may crossfade to create smooth, evolving timbres, or change abruptly to create rhythms.
• As the name suggests, Drum Kits are optimized for playing Drumsamples.
Velocity splits, crossfades, and layersAs mentioned above, unless you’re in Single or Double Drum mode, each Oscillator has eight velocity zones, named MS1 (the highest velocity) through MS8 (the lowest). This means that the Program can play different Multisamples or Wave Sequences, depending on how hard you play.Each of these zones has separate settings for Level, Start Offset, and so on. Also, each of the zones can fade into the next, to create smooth velocity transitions. Zones can even be layered together, two at a time.
Selecting MultisamplesLet’s create a simple velocity crossfade between two Multisamples, using just OSC1.1. Go to the OSC1 Basic tab of the PROGRAM >
OSC/Pitch page.2. Set the MS1 and MS2 Type parameters to Multi
(Multisample).3. Set the Types for MS3…8 to Off.
AUDIO OUTPUTINDIVIDUAL 1, 2, 3, 4
OSC/Pitch - OSC1 Basic Amp/EQ - Amp1/Driver1
OSC/Pitch - Pitch EG
Filter - Filter1 EG Amp/EQ - Amp1 EG
LFO - OSC1 LFO1
OSC 1
OSC 2
Filter - Filter Key Track
Filter - Filter1 Mod.
Filter - Filter1 LFO Mod.
OSC/Pitch - OSC1 Pitch
LFO - OSC1 LFO2
Amp/EQ - Amp1 Mod
Basic/X-Y/Controllers - Program Basic
AUDIO OUTPUTL/MONO, R
MFX/TFX - MFX 1, 2
MFX/TFX - TFX 1, 2
IFX - IFX1-12
Oscillator / Pitch Filter Amplifier Effects
Amp/EQ - EQ Filter - Filter1(A/B)
AMS Mixer
Common KeyTrack
OSC1, 2
Insert EffectsMaster EffectsIndividual Outputs
REC BusFX Control Bus
IFX - Routing
EQ
LFO - Common LFO
X-Y Control Arpeggiator
Drum Track/Step Seq
Audio Input
SamplingTone AdjustControllers
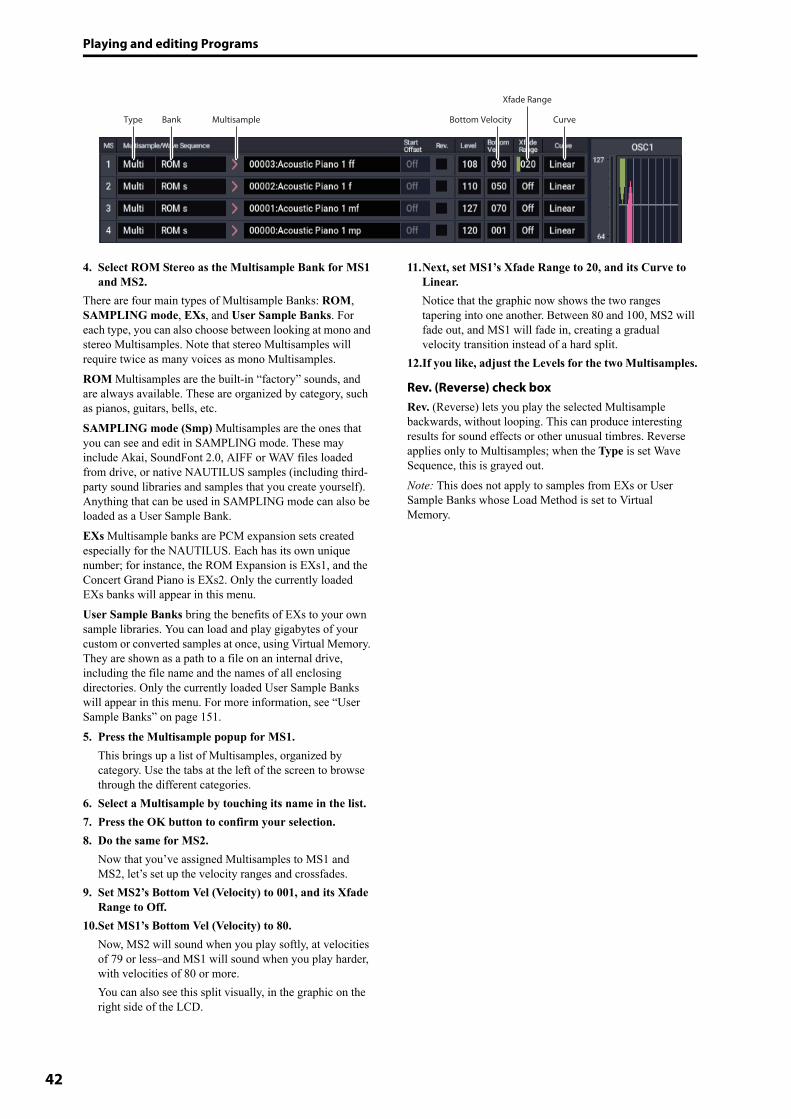
Playing and editing Programs
42
4. Select ROM Stereo as the Multisample Bank for MS1 and MS2.
There are four main types of Multisample Banks: ROM, SAMPLING mode, EXs, and User Sample Banks. For each type, you can also choose between looking at mono and stereo Multisamples. Note that stereo Multisamples will require twice as many voices as mono Multisamples.ROM Multisamples are the built-in “factory” sounds, and are always available. These are organized by category, such as pianos, guitars, bells, etc.SAMPLING mode (Smp) Multisamples are the ones that you can see and edit in SAMPLING mode. These may include Akai, SoundFont 2.0, AIFF or WAV files loaded from drive, or native NAUTILUS samples (including third-party sound libraries and samples that you create yourself). Anything that can be used in SAMPLING mode can also be loaded as a User Sample Bank.EXs Multisample banks are PCM expansion sets created especially for the NAUTILUS. Each has its own unique number; for instance, the ROM Expansion is EXs1, and the Concert Grand Piano is EXs2. Only the currently loaded EXs banks will appear in this menu.User Sample Banks bring the benefits of EXs to your own sample libraries. You can load and play gigabytes of your custom or converted samples at once, using Virtual Memory. They are shown as a path to a file on an internal drive, including the file name and the names of all enclosing directories. Only the currently loaded User Sample Banks will appear in this menu. For more information, see “User Sample Banks” on page 151.5. Press the Multisample popup for MS1.
This brings up a list of Multisamples, organized by category. Use the tabs at the left of the screen to browse through the different categories.
6. Select a Multisample by touching its name in the list.7. Press the OK button to confirm your selection.8. Do the same for MS2.
Now that you’ve assigned Multisamples to MS1 and MS2, let’s set up the velocity ranges and crossfades.
9. Set MS2’s Bottom Vel (Velocity) to 001, and its Xfade Range to Off.
10.Set MS1’s Bottom Vel (Velocity) to 80.Now, MS2 will sound when you play softly, at velocities of 79 or less–and MS1 will sound when you play harder, with velocities of 80 or more.You can also see this split visually, in the graphic on the right side of the LCD.
11.Next, set MS1’s Xfade Range to 20, and its Curve to Linear.Notice that the graphic now shows the two ranges tapering into one another. Between 80 and 100, MS2 will fade out, and MS1 will fade in, creating a gradual velocity transition instead of a hard split.
12.If you like, adjust the Levels for the two Multisamples.
Rev. (Reverse) check boxRev. (Reverse) lets you play the selected Multisample backwards, without looping. This can produce interesting results for sound effects or other unusual timbres. Reverse applies only to Multisamples; when the Type is set Wave Sequence, this is grayed out.Note: This does not apply to samples from EXs or User Sample Banks whose Load Method is set to Virtual Memory.
Type Bank CurveMultisample Bottom Velocity
Xfade Range
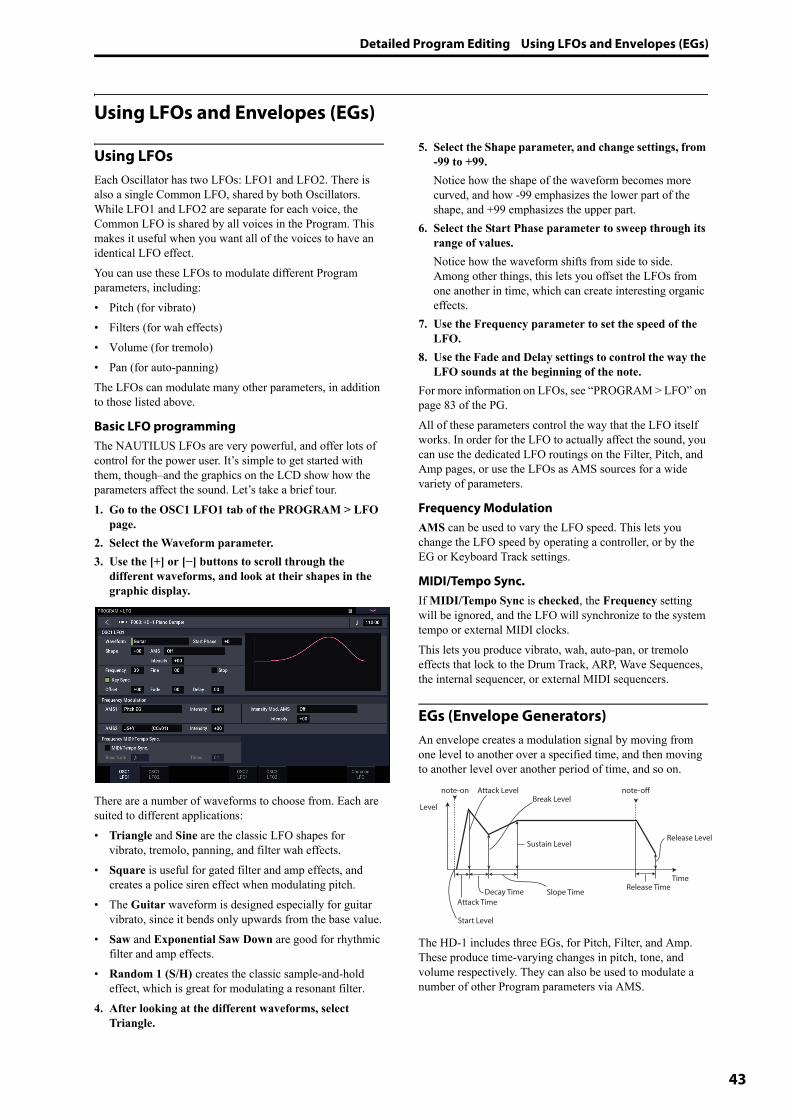
Detailed Program Editing Using LFOs and Envelopes (EGs)
43
Using LFOs and Envelopes (EGs)
Using LFOsEach Oscillator has two LFOs: LFO1 and LFO2. There is also a single Common LFO, shared by both Oscillators. While LFO1 and LFO2 are separate for each voice, the Common LFO is shared by all voices in the Program. This makes it useful when you want all of the voices to have an identical LFO effect.You can use these LFOs to modulate different Program parameters, including:• Pitch (for vibrato)• Filters (for wah effects)• Volume (for tremolo)• Pan (for auto-panning)The LFOs can modulate many other parameters, in addition to those listed above.
Basic LFO programmingThe NAUTILUS LFOs are very powerful, and offer lots of control for the power user. It’s simple to get started with them, though–and the graphics on the LCD show how the parameters affect the sound. Let’s take a brief tour.1. Go to the OSC1 LFO1 tab of the PROGRAM > LFO
page.2. Select the Waveform parameter.3. Use the [+] or [−] buttons to scroll through the
different waveforms, and look at their shapes in the graphic display.
There are a number of waveforms to choose from. Each are suited to different applications:• Triangle and Sine are the classic LFO shapes for
vibrato, tremolo, panning, and filter wah effects.• Square is useful for gated filter and amp effects, and
creates a police siren effect when modulating pitch.• The Guitar waveform is designed especially for guitar
vibrato, since it bends only upwards from the base value.• Saw and Exponential Saw Down are good for rhythmic
filter and amp effects.• Random 1 (S/H) creates the classic sample-and-hold
effect, which is great for modulating a resonant filter.4. After looking at the different waveforms, select
Triangle.
5. Select the Shape parameter, and change settings, from -99 to +99.Notice how the shape of the waveform becomes more curved, and how -99 emphasizes the lower part of the shape, and +99 emphasizes the upper part.
6. Select the Start Phase parameter to sweep through its range of values.Notice how the waveform shifts from side to side. Among other things, this lets you offset the LFOs from one another in time, which can create interesting organic effects.
7. Use the Frequency parameter to set the speed of the LFO.
8. Use the Fade and Delay settings to control the way the LFO sounds at the beginning of the note.
For more information on LFOs, see “PROGRAM > LFO” on page 83 of the PG.All of these parameters control the way that the LFO itself works. In order for the LFO to actually affect the sound, you can use the dedicated LFO routings on the Filter, Pitch, and Amp pages, or use the LFOs as AMS sources for a wide variety of parameters.
Frequency ModulationAMS can be used to vary the LFO speed. This lets you change the LFO speed by operating a controller, or by the EG or Keyboard Track settings.
MIDI/Tempo Sync.If MIDI/Tempo Sync is checked, the Frequency setting will be ignored, and the LFO will synchronize to the system tempo or external MIDI clocks. This lets you produce vibrato, wah, auto-pan, or tremolo effects that lock to the Drum Track, ARP, Wave Sequences, the internal sequencer, or external MIDI sequencers.
EGs (Envelope Generators)An envelope creates a modulation signal by moving from one level to another over a specified time, and then moving to another level over another period of time, and so on.
The HD-1 includes three EGs, for Pitch, Filter, and Amp. These produce time-varying changes in pitch, tone, and volume respectively. They can also be used to modulate a number of other Program parameters via AMS.
Level
Time
Attack TimeDecay Time Slope Time
Release Time
Attack Level
Start Level
Sustain Level
Break Levelnote-on note-off
Release Level
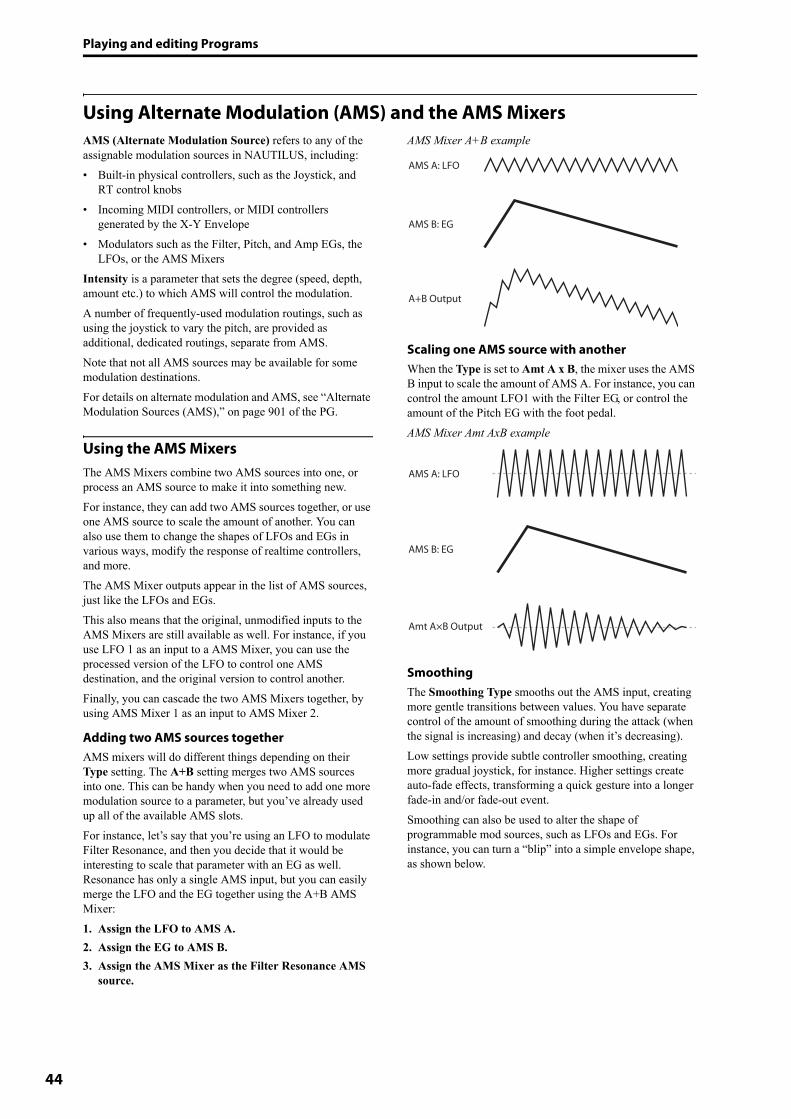
Playing and editing Programs
44
Using Alternate Modulation (AMS) and the AMS MixersAMS (Alternate Modulation Source) refers to any of the assignable modulation sources in NAUTILUS, including:• Built-in physical controllers, such as the Joystick, and
RT control knobs• Incoming MIDI controllers, or MIDI controllers
generated by the X-Y Envelope• Modulators such as the Filter, Pitch, and Amp EGs, the
LFOs, or the AMS MixersIntensity is a parameter that sets the degree (speed, depth, amount etc.) to which AMS will control the modulation.A number of frequently-used modulation routings, such as using the joystick to vary the pitch, are provided as additional, dedicated routings, separate from AMS.Note that not all AMS sources may be available for some modulation destinations. For details on alternate modulation and AMS, see “Alternate Modulation Sources (AMS),” on page 901 of the PG.
Using the AMS MixersThe AMS Mixers combine two AMS sources into one, or process an AMS source to make it into something new.For instance, they can add two AMS sources together, or use one AMS source to scale the amount of another. You can also use them to change the shapes of LFOs and EGs in various ways, modify the response of realtime controllers, and more.The AMS Mixer outputs appear in the list of AMS sources, just like the LFOs and EGs.This also means that the original, unmodified inputs to the AMS Mixers are still available as well. For instance, if you use LFO 1 as an input to a AMS Mixer, you can use the processed version of the LFO to control one AMS destination, and the original version to control another.Finally, you can cascade the two AMS Mixers together, by using AMS Mixer 1 as an input to AMS Mixer 2.
Adding two AMS sources togetherAMS mixers will do different things depending on their Type setting. The A+B setting merges two AMS sources into one. This can be handy when you need to add one more modulation source to a parameter, but you’ve already used up all of the available AMS slots.For instance, let’s say that you’re using an LFO to modulate Filter Resonance, and then you decide that it would be interesting to scale that parameter with an EG as well. Resonance has only a single AMS input, but you can easily merge the LFO and the EG together using the A+B AMS Mixer: 1. Assign the LFO to AMS A.2. Assign the EG to AMS B.3. Assign the AMS Mixer as the Filter Resonance AMS
source.
AMS Mixer A+B example
Scaling one AMS source with anotherWhen the Type is set to Amt A x B, the mixer uses the AMS B input to scale the amount of AMS A. For instance, you can control the amount LFO1 with the Filter EG, or control the amount of the Pitch EG with the foot pedal.AMS Mixer Amt AxB example
SmoothingThe Smoothing Type smooths out the AMS input, creating more gentle transitions between values. You have separate control of the amount of smoothing during the attack (when the signal is increasing) and decay (when it’s decreasing).Low settings provide subtle controller smoothing, creating more gradual joystick, for instance. Higher settings create auto-fade effects, transforming a quick gesture into a longer fade-in and/or fade-out event.Smoothing can also be used to alter the shape of programmable mod sources, such as LFOs and EGs. For instance, you can turn a “blip” into a simple envelope shape, as shown below.
AMS A: LFO
AMS B: EG
A+B Output
AMS A: LFO
AMS B: EG
Amt A×B Output
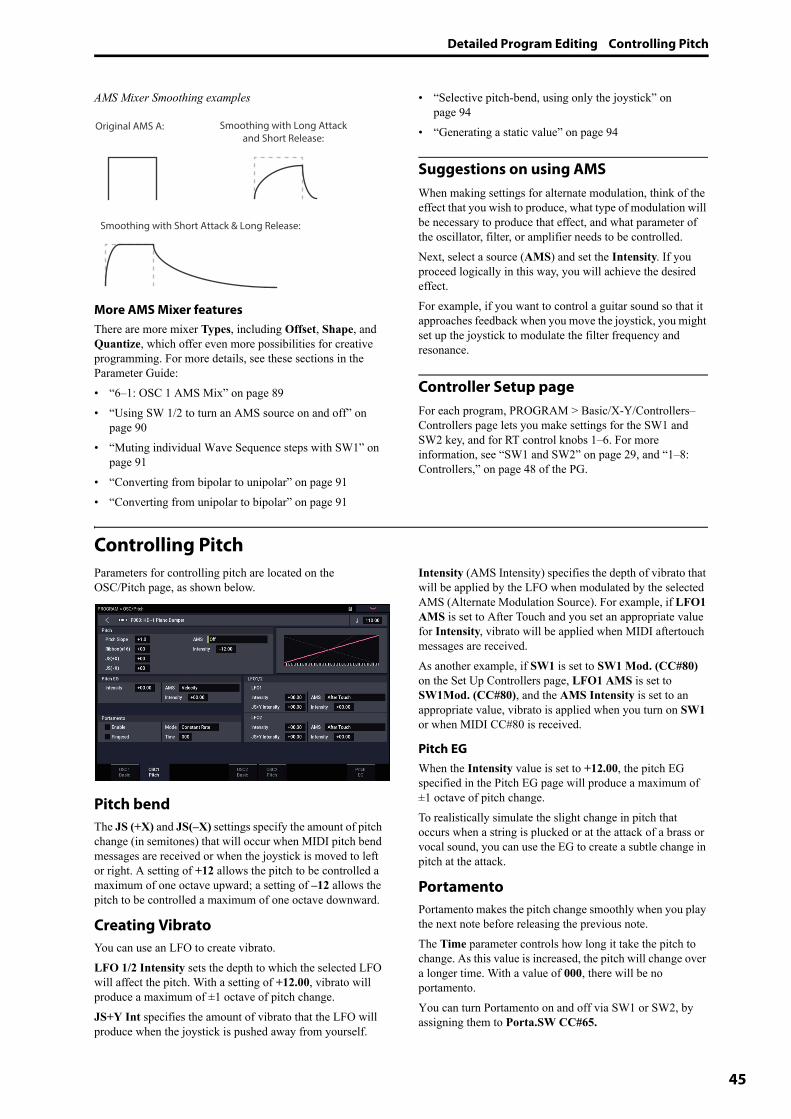
Detailed Program Editing Controlling Pitch
45
AMS Mixer Smoothing examples
More AMS Mixer featuresThere are more mixer Types, including Offset, Shape, and Quantize, which offer even more possibilities for creative programming. For more details, see these sections in the Parameter Guide:• “6–1: OSC 1 AMS Mix” on page 89• “Using SW 1/2 to turn an AMS source on and off” on
page 90• “Muting individual Wave Sequence steps with SW1” on
page 91• “Converting from bipolar to unipolar” on page 91• “Converting from unipolar to bipolar” on page 91
• “Selective pitch-bend, using only the joystick” on page 94
• “Generating a static value” on page 94
Suggestions on using AMSWhen making settings for alternate modulation, think of the effect that you wish to produce, what type of modulation will be necessary to produce that effect, and what parameter of the oscillator, filter, or amplifier needs to be controlled. Next, select a source (AMS) and set the Intensity. If you proceed logically in this way, you will achieve the desired effect.For example, if you want to control a guitar sound so that it approaches feedback when you move the joystick, you might set up the joystick to modulate the filter frequency and resonance.
Controller Setup pageFor each program, PROGRAM > Basic/X-Y/Controllers– Controllers page lets you make settings for the SW1 and SW2 key, and for RT control knobs 1–6. For more information, see “SW1 and SW2” on page 29, and “1–8: Controllers,” on page 48 of the PG.
Controlling PitchParameters for controlling pitch are located on the OSC/Pitch page, as shown below.
Pitch bendThe JS (+X) and JS(–X) settings specify the amount of pitch change (in semitones) that will occur when MIDI pitch bend messages are received or when the joystick is moved to left or right. A setting of +12 allows the pitch to be controlled a maximum of one octave upward; a setting of –12 allows the pitch to be controlled a maximum of one octave downward.
Creating VibratoYou can use an LFO to create vibrato.LFO 1/2 Intensity sets the depth to which the selected LFO will affect the pitch. With a setting of +12.00, vibrato will produce a maximum of ±1 octave of pitch change.JS+Y Int specifies the amount of vibrato that the LFO will produce when the joystick is pushed away from yourself.
Intensity (AMS Intensity) specifies the depth of vibrato that will be applied by the LFO when modulated by the selected AMS (Alternate Modulation Source). For example, if LFO1 AMS is set to After Touch and you set an appropriate value for Intensity, vibrato will be applied when MIDI aftertouch messages are received.As another example, if SW1 is set to SW1 Mod. (CC#80) on the Set Up Controllers page, LFO1 AMS is set to SW1Mod. (CC#80), and the AMS Intensity is set to an appropriate value, vibrato is applied when you turn on SW1 or when MIDI CC#80 is received.
Pitch EGWhen the Intensity value is set to +12.00, the pitch EG specified in the Pitch EG page will produce a maximum of ±1 octave of pitch change.To realistically simulate the slight change in pitch that occurs when a string is plucked or at the attack of a brass or vocal sound, you can use the EG to create a subtle change in pitch at the attack.
PortamentoPortamento makes the pitch change smoothly when you play the next note before releasing the previous note.The Time parameter controls how long it take the pitch to change. As this value is increased, the pitch will change over a longer time. With a value of 000, there will be no portamento.You can turn Portamento on and off via SW1 or SW2, by assigning them to Porta.SW CC#65.
Original AMS A: Smoothing with Long Attack and Short Release:
Smoothing with Short Attack & Long Release:

Playing and editing Programs
46
Using FiltersThe filters allows you to diminish or emphasize specified frequency areas of the sound.The tone of the sound will depend significantly on the filter settings.The basic filter settings, including the routing, type, cutoff frequency, and resonance, are set on the Filter page.
Filter RoutingEach oscillator has two filters, Filter A and Filter B. The Routing parameter controls whether one or both of the filters are used, and if both are used, it controls how they are connected to each other.The Single routing uses only Filter A as a single 2-pole, 12dB/octave filter (6dB for Band Pass and Band Reject).The Serial routing uses both Filter A and Filter B. The oscillator first goes through Filter A, and then the output of Filter A is processed through Filter B. Parallel also uses both Filter A and Filter B. The oscillator feeds both filters directly, and the outputs of the two filters are then summed together.The 24dB/4-pole routing merges both filters to create a single 4-pole, 24dB/octave filter (12dB for Band Pass and Band Reject). In comparison to Single, this option produces a sharper roll-off beyond the cutoff frequency, as well as a slightly more delicate resonance. Many classic analog synths used this general type of filter.Serial and Parallel Routing
Filter TypesThis selects the parts of the sound which will be affected by the filter, as described below. With the Serial and Parallel routings, you can independently set the types for Filter A and Filter B.The filters will produce very different results depending on the selected filter type. The selections will change slightly according to the selected Filter Routing, to show the correct cutoff slope in dB per octave.Low Pass. This cuts out the parts of the sound which are higher than the cutoff frequency. Low Pass is the most common type of filter, and is used to make bright timbres sound darker.High Pass. This cuts out the parts of the sound which are lower than the cutoff frequency. You can use this to make timbres sound thinner or more buzzy. Band Pass. This cuts out all parts of the sound, both highs and lows, except for the region around the cutoff frequency. Since this filter cuts out both high and low frequencies, its effect can change dramatically depending on the cutoff setting and the oscillator’s multisample.With low resonance settings, you can use the Band Pass filter to create telephone or vintage phonograph sounds. With higher resonance settings, it can create buzzy or nasal timbres.Band Reject. This filter type–also called a notch filter–cuts only the parts of the sound directly around the cutoff frequency. Try modulating the cutoff with an LFO to create phaser-like effects.Filter Types and Cutoff FrequencyFilter A (Low Pass)Oscillator Filter B (High Pass)
Oscillator
Filter A (Low Pass)
Filter B (High Pass)
Low Pass
High Pass
Band Pass
Band Reject
Cutoff Frequency
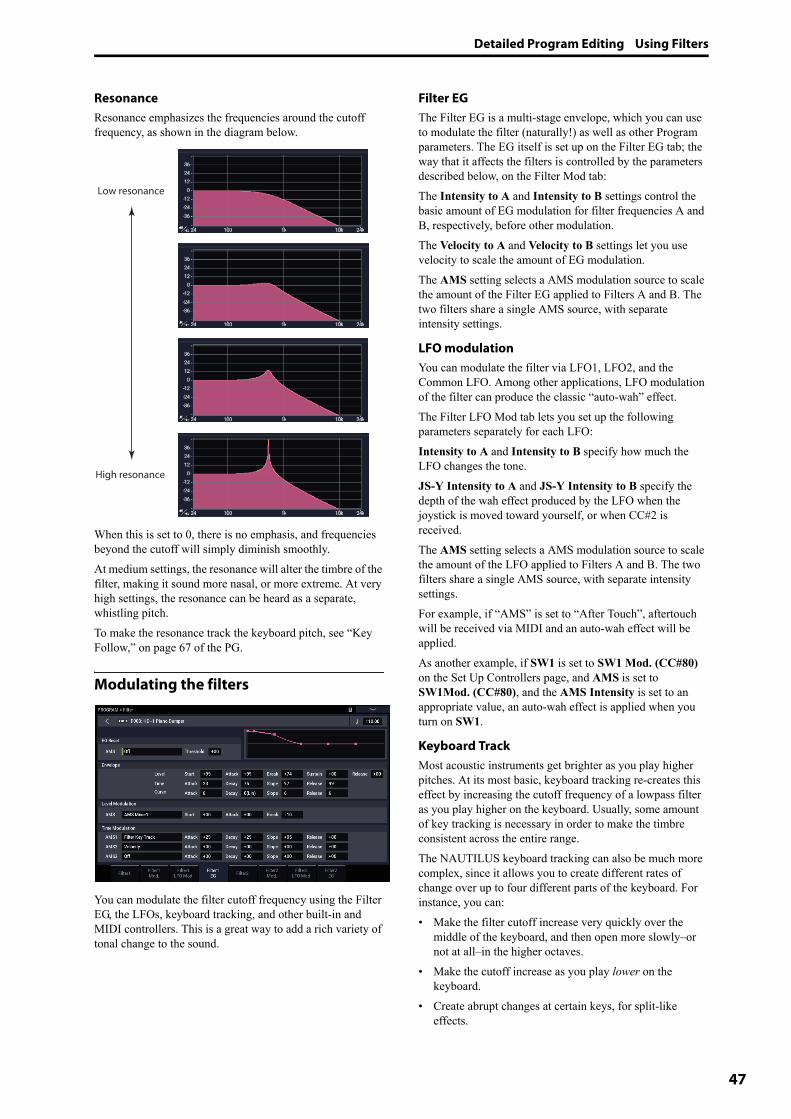
Detailed Program Editing Using Filters
47
ResonanceResonance emphasizes the frequencies around the cutoff frequency, as shown in the diagram below.
When this is set to 0, there is no emphasis, and frequencies beyond the cutoff will simply diminish smoothly.At medium settings, the resonance will alter the timbre of the filter, making it sound more nasal, or more extreme. At very high settings, the resonance can be heard as a separate, whistling pitch.To make the resonance track the keyboard pitch, see “Key Follow,” on page 67 of the PG.
Modulating the filters
You can modulate the filter cutoff frequency using the Filter EG, the LFOs, keyboard tracking, and other built-in and MIDI controllers. This is a great way to add a rich variety of tonal change to the sound.
Filter EGThe Filter EG is a multi-stage envelope, which you can use to modulate the filter (naturally!) as well as other Program parameters. The EG itself is set up on the Filter EG tab; the way that it affects the filters is controlled by the parameters described below, on the Filter Mod tab:The Intensity to A and Intensity to B settings control the basic amount of EG modulation for filter frequencies A and B, respectively, before other modulation.The Velocity to A and Velocity to B settings let you use velocity to scale the amount of EG modulation.The AMS setting selects a AMS modulation source to scale the amount of the Filter EG applied to Filters A and B. The two filters share a single AMS source, with separate intensity settings.
LFO modulationYou can modulate the filter via LFO1, LFO2, and the Common LFO. Among other applications, LFO modulation of the filter can produce the classic “auto-wah” effect.The Filter LFO Mod tab lets you set up the following parameters separately for each LFO:Intensity to A and Intensity to B specify how much the LFO changes the tone.JS-Y Intensity to A and JS-Y Intensity to B specify the depth of the wah effect produced by the LFO when the joystick is moved toward yourself, or when CC#2 is received.The AMS setting selects a AMS modulation source to scale the amount of the LFO applied to Filters A and B. The two filters share a single AMS source, with separate intensity settings.For example, if “AMS” is set to “After Touch”, aftertouch will be received via MIDI and an auto-wah effect will be applied.As another example, if SW1 is set to SW1 Mod. (CC#80) on the Set Up Controllers page, and AMS is set to SW1Mod. (CC#80), and the AMS Intensity is set to an appropriate value, an auto-wah effect is applied when you turn on SW1.
Keyboard TrackMost acoustic instruments get brighter as you play higher pitches. At its most basic, keyboard tracking re-creates this effect by increasing the cutoff frequency of a lowpass filter as you play higher on the keyboard. Usually, some amount of key tracking is necessary in order to make the timbre consistent across the entire range.The NAUTILUS keyboard tracking can also be much more complex, since it allows you to create different rates of change over up to four different parts of the keyboard. For instance, you can:• Make the filter cutoff increase very quickly over the
middle of the keyboard, and then open more slowly–or not at all–in the higher octaves.
• Make the cutoff increase as you play lower on the keyboard.
• Create abrupt changes at certain keys, for split-like effects.
Low resonance
High resonance
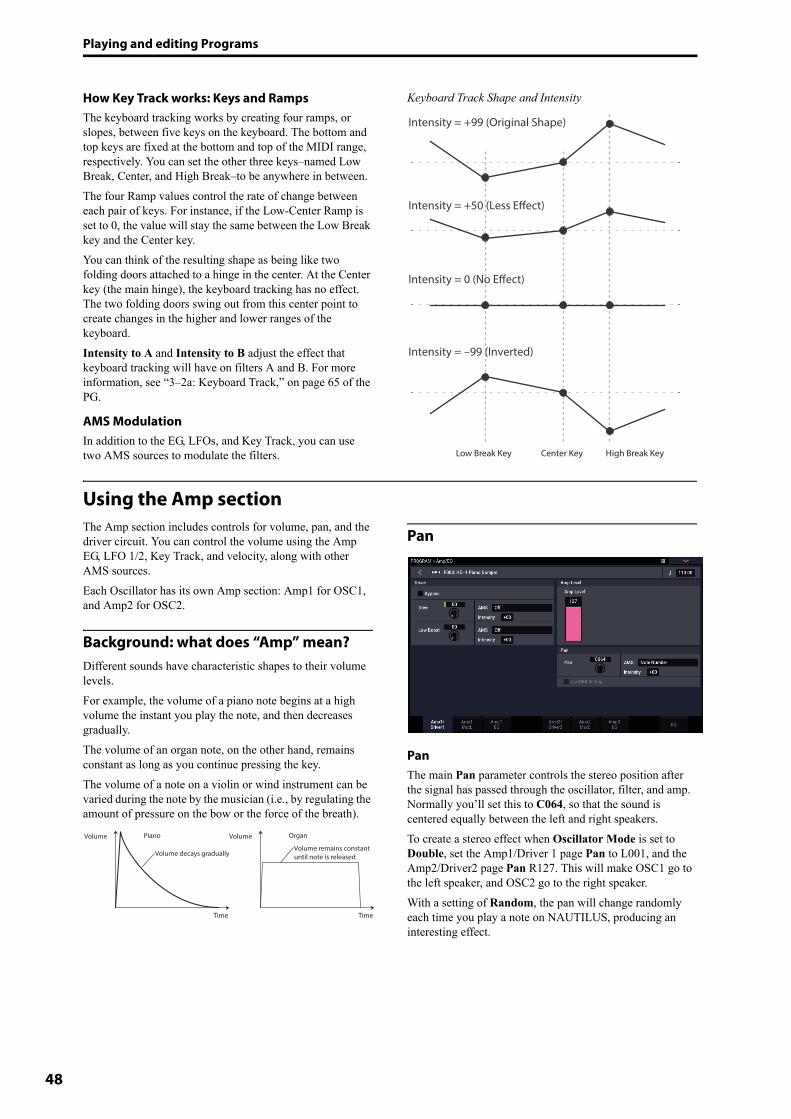
Playing and editing Programs
48
How Key Track works: Keys and RampsThe keyboard tracking works by creating four ramps, or slopes, between five keys on the keyboard. The bottom and top keys are fixed at the bottom and top of the MIDI range, respectively. You can set the other three keys–named Low Break, Center, and High Break–to be anywhere in between.The four Ramp values control the rate of change between each pair of keys. For instance, if the Low-Center Ramp is set to 0, the value will stay the same between the Low Break key and the Center key. You can think of the resulting shape as being like two folding doors attached to a hinge in the center. At the Center key (the main hinge), the keyboard tracking has no effect. The two folding doors swing out from this center point to create changes in the higher and lower ranges of the keyboard.Intensity to A and Intensity to B adjust the effect that keyboard tracking will have on filters A and B. For more information, see “3–2a: Keyboard Track,” on page 65 of the PG.
AMS Modulation In addition to the EG, LFOs, and Key Track, you can use two AMS sources to modulate the filters.
Keyboard Track Shape and Intensity
Using the Amp sectionThe Amp section includes controls for volume, pan, and the driver circuit. You can control the volume using the Amp EG, LFO 1/2, Key Track, and velocity, along with other AMS sources.Each Oscillator has its own Amp section: Amp1 for OSC1, and Amp2 for OSC2.
Background: what does “Amp” mean?Different sounds have characteristic shapes to their volume levels.For example, the volume of a piano note begins at a high volume the instant you play the note, and then decreases gradually. The volume of an organ note, on the other hand, remains constant as long as you continue pressing the key.The volume of a note on a violin or wind instrument can be varied during the note by the musician (i.e., by regulating the amount of pressure on the bow or the force of the breath).
Pan
PanThe main Pan parameter controls the stereo position after the signal has passed through the oscillator, filter, and amp. Normally you’ll set this to C064, so that the sound is centered equally between the left and right speakers. To create a stereo effect when Oscillator Mode is set to Double, set the Amp1/Driver 1 page Pan to L001, and the Amp2/Driver2 page Pan R127. This will make OSC1 go to the left speaker, and OSC2 go to the right speaker.With a setting of Random, the pan will change randomly each time you play a note on NAUTILUS, producing an interesting effect.
Low Break Key Center Key High Break Key
Intensity = +99 (Original Shape)
Intensity = –99 (Inverted)
Intensity = +50 (Less Effect)
Intensity = 0 (No Effect)
Volume
Time
Piano
Volume decays gradually
Volume
Time
Organ
Volume remains constant until note is released
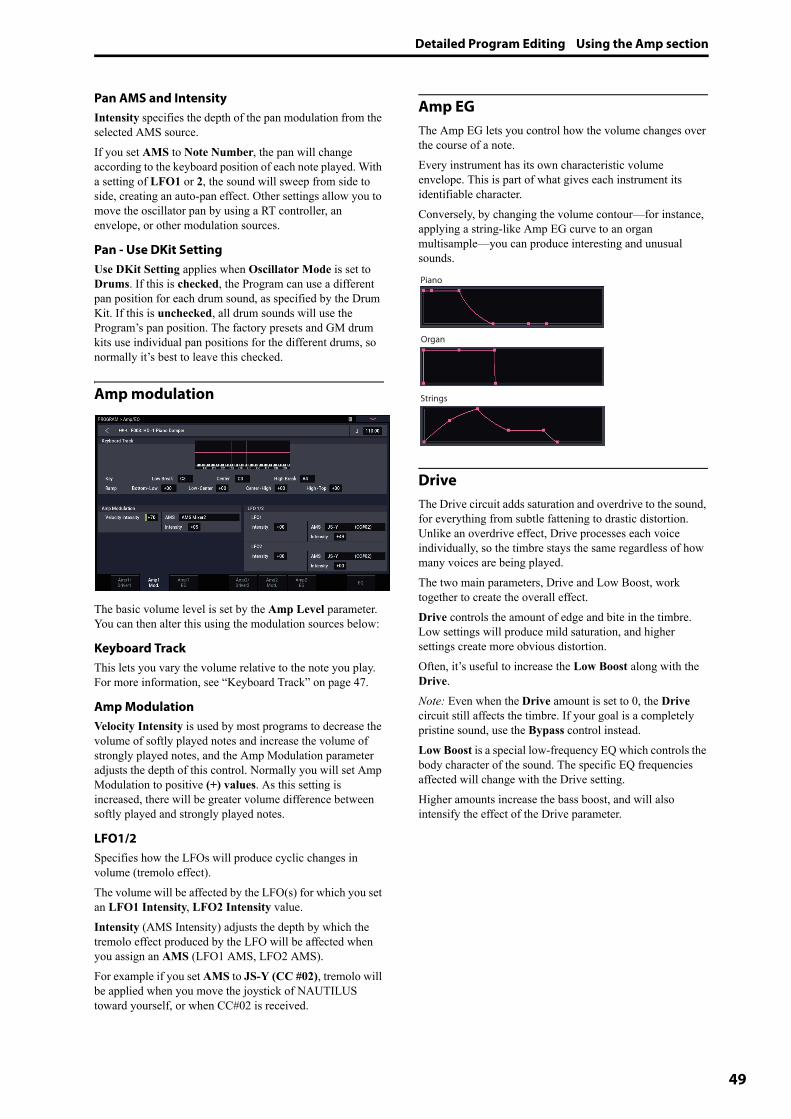
Detailed Program Editing Using the Amp section
49
Pan AMS and IntensityIntensity specifies the depth of the pan modulation from the selected AMS source.If you set AMS to Note Number, the pan will change according to the keyboard position of each note played. With a setting of LFO1 or 2, the sound will sweep from side to side, creating an auto-pan effect. Other settings allow you to move the oscillator pan by using a RT controller, an envelope, or other modulation sources.
Pan - Use DKit SettingUse DKit Setting applies when Oscillator Mode is set to Drums. If this is checked, the Program can use a different pan position for each drum sound, as specified by the Drum Kit. If this is unchecked, all drum sounds will use the Program’s pan position. The factory presets and GM drum kits use individual pan positions for the different drums, so normally it’s best to leave this checked.
Amp modulation
The basic volume level is set by the Amp Level parameter. You can then alter this using the modulation sources below:
Keyboard TrackThis lets you vary the volume relative to the note you play. For more information, see “Keyboard Track” on page 47.
Amp ModulationVelocity Intensity is used by most programs to decrease the volume of softly played notes and increase the volume of strongly played notes, and the Amp Modulation parameter adjusts the depth of this control. Normally you will set Amp Modulation to positive (+) values. As this setting is increased, there will be greater volume difference between softly played and strongly played notes.
LFO1/2Specifies how the LFOs will produce cyclic changes in volume (tremolo effect).The volume will be affected by the LFO(s) for which you set an LFO1 Intensity, LFO2 Intensity value.Intensity (AMS Intensity) adjusts the depth by which the tremolo effect produced by the LFO will be affected when you assign an AMS (LFO1 AMS, LFO2 AMS). For example if you set AMS to JS-Y (CC #02), tremolo will be applied when you move the joystick of NAUTILUS toward yourself, or when CC#02 is received.
Amp EGThe Amp EG lets you control how the volume changes over the course of a note.Every instrument has its own characteristic volume envelope. This is part of what gives each instrument its identifiable character. Conversely, by changing the volume contour—for instance, applying a string-like Amp EG curve to an organ multisample—you can produce interesting and unusual sounds.
DriveThe Drive circuit adds saturation and overdrive to the sound, for everything from subtle fattening to drastic distortion. Unlike an overdrive effect, Drive processes each voice individually, so the timbre stays the same regardless of how many voices are being played.The two main parameters, Drive and Low Boost, work together to create the overall effect. Drive controls the amount of edge and bite in the timbre. Low settings will produce mild saturation, and higher settings create more obvious distortion. Often, it’s useful to increase the Low Boost along with the Drive.Note: Even when the Drive amount is set to 0, the Drive circuit still affects the timbre. If your goal is a completely pristine sound, use the Bypass control instead.Low Boost is a special low-frequency EQ which controls the body character of the sound. The specific EQ frequencies affected will change with the Drive setting.Higher amounts increase the bass boost, and will also intensify the effect of the Drive parameter.
Piano
Organ
Strings
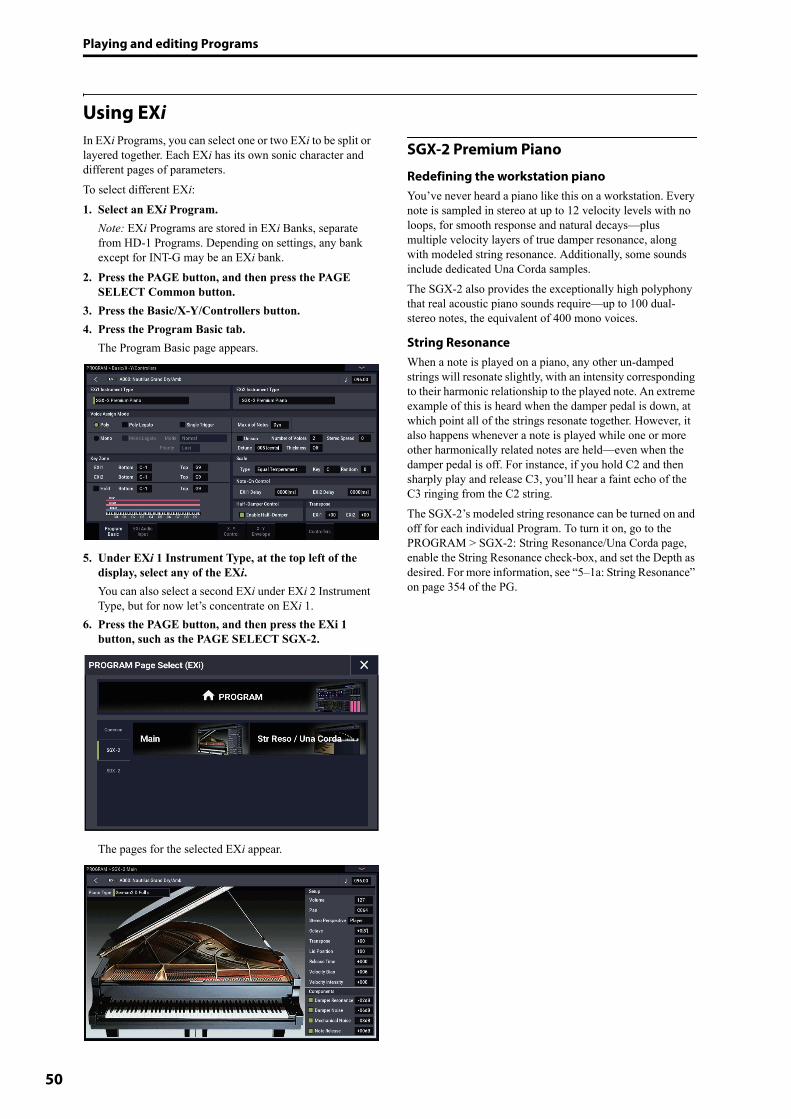
Playing and editing Programs
50
Using EXiIn EXi Programs, you can select one or two EXi to be split or layered together. Each EXi has its own sonic character and different pages of parameters.To select different EXi:1. Select an EXi Program.
Note: EXi Programs are stored in EXi Banks, separate from HD-1 Programs. Depending on settings, any bank except for INT-G may be an EXi bank.
2. Press the PAGE button, and then press the PAGE SELECT Common button.
3. Press the Basic/X-Y/Controllers button.4. Press the Program Basic tab.
The Program Basic page appears.
5. Under EXi 1 Instrument Type, at the top left of the display, select any of the EXi.You can also select a second EXi under EXi 2 Instrument Type, but for now let’s concentrate on EXi 1.
6. Press the PAGE button, and then press the EXi 1 button, such as the PAGE SELECT SGX-2.
The pages for the selected EXi appear.
SGX-2 Premium Piano
Redefining the workstation pianoYou’ve never heard a piano like this on a workstation. Every note is sampled in stereo at up to 12 velocity levels with no loops, for smooth response and natural decays—plus multiple velocity layers of true damper resonance, along with modeled string resonance. Additionally, some sounds include dedicated Una Corda samples.The SGX-2 also provides the exceptionally high polyphony that real acoustic piano sounds require—up to 100 dual-stereo notes, the equivalent of 400 mono voices.
String ResonanceWhen a note is played on a piano, any other un-damped strings will resonate slightly, with an intensity corresponding to their harmonic relationship to the played note. An extreme example of this is heard when the damper pedal is down, at which point all of the strings resonate together. However, it also happens whenever a note is played while one or more other harmonically related notes are held—even when the damper pedal is off. For instance, if you hold C2 and then sharply play and release C3, you’ll hear a faint echo of the C3 ringing from the C2 string.The SGX-2’s modeled string resonance can be turned on and off for each individual Program. To turn it on, go to the PROGRAM > SGX-2: String Resonance/Una Corda page, enable the String Resonance check-box, and set the Depth as desired. For more information, see “5–1a: String Resonance” on page 354 of the PG.
Detailed Program Editing Using EXi
51
EP-1 MDS Electric Piano
New technology, classic soundsThe EP-1 provides incredible recreations of six classic tine and reed electric pianos, along with modeled vintage effects. Based on Korg’s Multi-Dimensional Synthesis (MDS), the EP-1 delivers natural real-time expression without the limitations of ordinary sample playback. For instance, you’ll appreciate the natural decay and astonishingly smooth gradation of dynamics from pp to ff, without tell-tale split points - just like the real instruments. RT control over noise elements, including mechanical key-off noises controlled by release velocity, gives your performances even greater realism and detail.
CX-3 Tonewheel Organ
Modeled organ with drawbar controlBased on Korg’s ground-breaking CX-3 keyboard (with additional refinements), the CX-3 is a detailed tone-wheel organ model with live drawbar control, Perfect tone-wheel phase coherency means solid, powerful sounding chords just like the real thing. A choice of tone wheel types, adjustable overtones, leakage, noise, and key-click modeling provide unparalleled realism.Amp modeling, Vibrato/Chorus, and Rotary Speaker effects are built in. EX mode lets you introduce additional drawbar and percussion harmonics, for new timbres unavailable on traditional organs.
AL-1 Analog Modeling Synthesizer
Modern virtual analog synthThe AL-1 is our feature-packed, modern virtual analog synth. Its patented ultra-low-aliasing oscillators (using completely different technology than the HD-1) recreate all the power and glory of true analog synthesis—without the artifacts that can plague lesser instruments.Morphing waveforms allow you to change the oscillator shapes in real-time. Resonance modeling lets you choose between classic filter sounds, and the extraordinarily flexible MultiFilter lets you create your own hybrid filter shapes. Hard sync, analog-style FM, drive, low-boost, and ring modulation offer plenty of tone-twisting power.
MS-20EX
Patch-panel synth with unique, aggressive toneA dramatic expansion of Korg’s classic MS-20 analog synth, the MS-20EX puts modular patch cables under your fingertips. Modulate filters with audio-rate oscillators; turn audio inputs into control signals; control all of the original knobs with mod sources including additional envelopes, LFOs, and RT controllers. It’s a tweaker’s dream, but even without the patch panel, the MS-20EX would make waves with its unique, aggressive tone—due in large part to its unusual filters, which are completely different from those in either the AL-1 or the PolysixEX.
PolysixEX
Rich-sounding, versatile, and easy-to-use synthWith its self-oscillating four-pole filter, smooth analog oscillator and sub-oscillator, and rich, built-in chorus and ensemble effects, the PolysixEX proves you don’t have to be fancy in order to be great. Based on the classic Korg Polysix analog synth, its timbre is distinctly different from the AL-1 and the MS-20EX, but we didn’t stop there; we added modulation of every control on the front panel, for a world of sounds impossible on the original.It’s also very well-suited to hands-on control with Tone Adjust for almost all of the original Polysix controls. As a bonus, it’s also capable of extremely high polyphony—up to 180 voices!
STR-1 Plucked String
Physical modeling, from the real to the fantasticPhysics has brought us lasers, cell phones, electric cars—and now the STR-1. What would it sound like to play harmonics on a metal bar “plucked” by a piano, or to sing into a guitar string? Play with the STR-1 and discover.In addition to unique, experimental timbres, the STR-1 is great for traditional instruments from guitars, basses, harps, and world/ethnic sounds to clavinets, harpsichords, bells, and electric pianos.You can also process samples and live audio input through the physical model—including audio feedback from any of the NAUTILUS effects.
MOD-7 Waveshaping VPM Synthesizer
Patch-panel VPM/waveshaping/PCM processorCombine Variable Phase Modulation (VPM), waveshaping, ring modulation, samples, and subtractive synthesis with a modular patch-panel system, and you have the MOD-7. Exceptionally versatile, it offers everything from classic FM keyboards, bells and basses (including the ability to import sounds from vintage DX synths) to rhythmic soundscapes and sparkling, epic pads.Vast sample-mangling capabilities, with incredible flexibility and power, let you create incredibly rich processing environments: combine multiple stages of filtering, waveshaping, and ring modulation, even use samples as FM modulators, all patched together however you like.
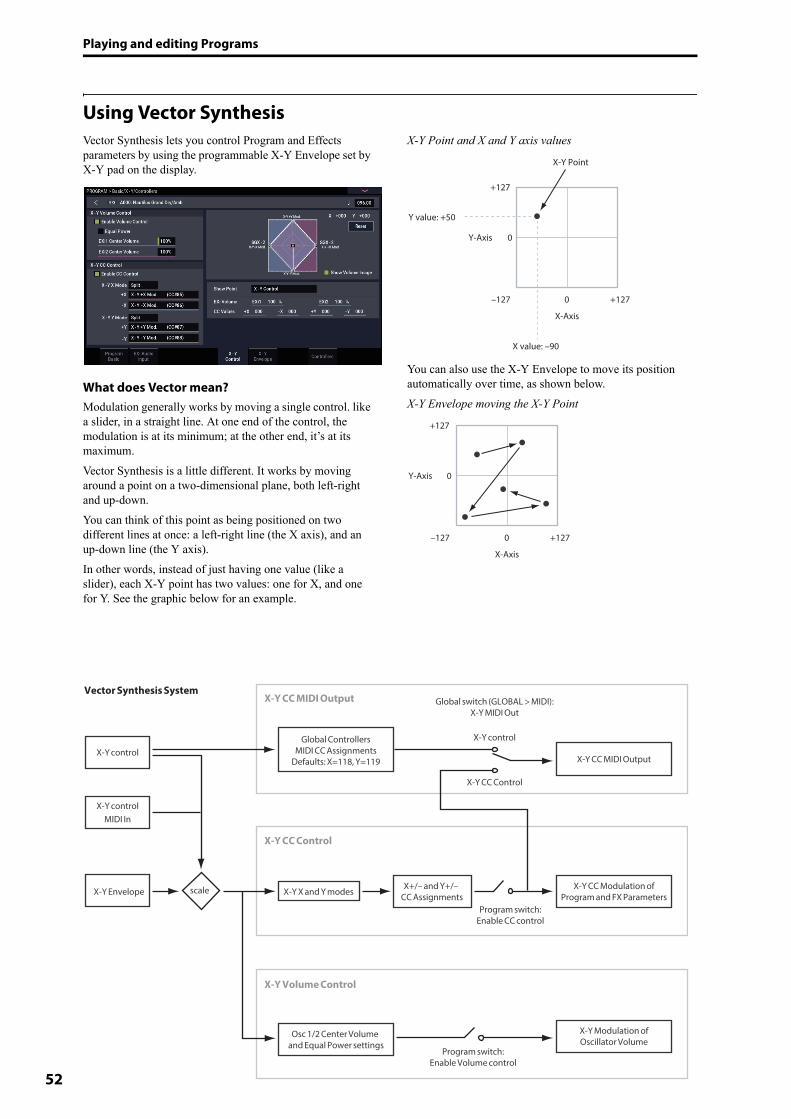
Playing and editing Programs
52
Using Vector SynthesisVector Synthesis lets you control Program and Effects parameters by using the programmable X-Y Envelope set by X-Y pad on the display.
What does Vector mean?Modulation generally works by moving a single control. like a slider, in a straight line. At one end of the control, the modulation is at its minimum; at the other end, it’s at its maximum.Vector Synthesis is a little different. It works by moving around a point on a two-dimensional plane, both left-right and up-down.You can think of this point as being positioned on two different lines at once: a left-right line (the X axis), and an up-down line (the Y axis). In other words, instead of just having one value (like a slider), each X-Y point has two values: one for X, and one for Y. See the graphic below for an example.
X-Y Point and X and Y axis values
You can also use the X-Y Envelope to move its position automatically over time, as shown below.X-Y Envelope moving the X-Y Point
X-Y CC Control
X-Y CC MIDI OutputVector Synthesis System
X-Y Volume Control
X-Y Envelope
X-Y control
X-Y controlMIDI In
X-Y X and Y modes
Program switch:Enable CC control
Program switch:Enable Volume control
Global switch (GLOBAL > MIDI):X-Y MIDI Out
X-Y control
X-Y CC Control
scale X+/– and Y+/– CC Assignments
X-Y CC Modulation ofProgram and FX Parameters
X-Y Modulation ofOscillator Volume
Osc 1/2 Center Volume and Equal Power settings
X-Y CC MIDI Output
Global ControllersMIDI CC Assignments
Defaults: X=118, Y=119
+127
+127–127
Y-Axis
X-Axis
X value: –90
X-Y Point
Y value: +50
0
0
+127
+127–127
Y-Axis
X-Axis
0
0
Detailed Program Editing Effects
53
X-Y control Volume Control and CC ControlThe X-Y control does two main things: it can control the relative volume of the two Oscillators in PROGRAM mode (or of up to 16 Programs at once in COMBINATION mode), and it can generate CCs for controlling Program and Effects parameters.
X-Y control and MIDIThe X-Y control features interact with MIDI through the X-Y CC Control.The X-Y CC Control is generated by the X-Y position. Normally, this will only affect internal sounds and effects. If you like, however, you can also enable a Global parameter to send these generated CCs to external MIDI devices.For more information on Vector Synthesis, see “1–5: X-Y Control” on page 41 of the PG.
EffectsEffects are covered in their own section of the manuals, so we won’t go into too much detail here. See the cross-references below for more information.
Insert EffectsInsert Effects let you send either individual Oscillators or the entire Program through up to 12 effects, in series. You can use any type of effects, from distortions and compressors to choruses and reverbs. The Insert Effects can be routed to the main outputs, or to any of the individual outputs.For more information, see “Insert effects” on page 223.
Master EffectsThere are two Master Effects, which are accessed through Sends 1 and 2. These are best-suited to effects such as reverbs and delays, but you can use them with any type of effect.For more information, see “Master effects” on page 224.
Total EffectsThe two Total Effects are dedicated to processing the main L/R outputs. They’re ideally suited to overall mix effects, such as compression, limiting, and EQ–but as with the other effects sections, you can use any type of effect that you like.For more information, see “PROGRAM > MFX/TFX” on page 107 of the PG.

Playing and editing Programs
54

55
Playing and editing Combinations
Playing CombinationsWhat’s a Combination?Combinations, or “Combis” for short, let you split and layer up to 16 Programs at once. A Combi is made up of 16 Timbres. Each Timbre has a Program, along with parameters for key and velocity zones, mixer settings, MIDI channel and controller filtering, and so on.
As with Programs, each Combi has 12 Insert Effects, 2 Master Effects, and 2 Total Effects, for shaping and transforming the sounds of the individual Timbres. Finally, combis can use two arpeggiators and drum tracks or step sequences.
Selecting Combinations
Overview: Combination BanksNAUTILUS ships from the factory with 256 of factory-programmed Combinations. You can create your own original combinations by editing these factory-set combinations, or by initializing a combination and starting “from scratch.”You can use 1792 combinations to store sounds that you’ve created, or to add optional sound libraries.These Combinations are organized into 14 Banks of 128 Combinations each, as described below. You can also store many more Combinations on the internal drive, or on external USB 2.0 devices.For more details on the factory Combinations, please refer to the Voice Name List.Combination bank contents
There are several different ways to select Combinations. Each one is convenient in a different way:• Using the VALUE controllers, you can select
Combinations quickly via physical controls• Selecting by Bank and number (via the touch-screen) lets
you browse through all of the Combinations in memory, to find the one that you want
• Selecting by Combination category (via the touch-screen) lets you filter Combinations by sound type, such as Pianos or Drums
• Using Find (via the on-screen magnifying-glass icon) lets you search for Combinations by name
• Using a foot-switch lets you change Combinations even while both hands are busy playing on the keyboard - convenient for live applications
• MIDI program change messages let you select Combinations remotely, from either -a MIDI sequencer or an external MIDI controller
Set ListsCombinations can also be selected in Set Lists, along with Programs and Songs. For more information, see “Set Lists” on page 113.
Selecting Combination with the front-panel and LCD1. Press the MODE button and select COMBINATION
on the display to enter COMBINATION mode.2. Go to the COMBINATION > Home– Mixer page.
“PROGRAM > Home” will be displayed on the top row of the display, and the Overview/Mix Balance tab on the bottom row will be selected.If a different page is shown, press the EXIT button several times.The Mixer page shows the selected Program, status, pan, and volume for timbres 1–16.
3. Make sure that the Combination name is selected.If it is not selected, touch the COMBINATION > Home page and touch the Combination’s name, so that it’s selected.
4. Use the VALUE controllers to select the Combination number that you wish to play.
You can use the following methods to select a Combination.• Turn the VALUE dial.• Press the + or − buttons.
Bank No. Description
A, B 000…127 Factory Combinations
C...N 000…127 User Combinations

Playing and editing Combinations
56
Selecting by Bank and numberYou can select Combinations from a list organized by Combination bank.1. Press the Combination Select popup button.
Press the Bank(List) button at the bottom of the screen.The Bank/Combination Select dialog appears.
Bank/Combination Select menu:
In this illustration, bank A is selected. The list on the right shows the Combinations contained in that bank.
2. Press the buttons on the left side of the display to select a bank.
3. Press one of the names in the list to select a Combination.The selected Combination will be highlighted, and the keyboard will immediately switch to the new sound.Press the “Bank (10key)” button to switch the list to a numeric keypad, where you can input the number to select.
4. If you like, play a few notes to hear the new Combination.You can play the new Combination while the menu is still showing, without needing to press OK.
5. When you are satisfied with the selected Combination, press the OK button to close the popup menu.If you press the Cancel button, the selection you made here will be discarded, and you will return to the Combination that had been selected before you opened the menu.
Combination Select popup button
Combination Select
Pan
Volume
Program Select
Timbre 01
Favorite

Playing Combinations Selecting Combinations
57
Selecting by CategoryYou can select Combinations from within a category, such as keyboard, organ, bass, and drums. When shipped from the factory, the Combinations are organized into 16 categories, each with several sub-categories. There are also 2 more categories, initially named User 16 and User 17, which you can use and rename as desired.1. Press the Combination Select popup button.
Press the Category button at the bottom of the screen.The Category/Combination Select dialog appears.
Category/Combination Select menu
In the illustration above, the Keyboard category is selected. The combinations included in that category will be shown.
2. Press the tabs located to the left and right sides of the display to select a different category.The name of the selected category will be displayed in full in the upper right of the display.
3. Optionally, focus on a more specific group of sounds by selecting a sub-category from the upper part of the display.The full name of the sub-category also appears in the upper right of the display.
4. Press one of the Combination names in the center area to select a Combination.The selected Combination will be highlighted.
5. Play the keyboard to hear the combination you selected.While the menu is displayed, you can switch combinations without pressing the OK button to check out different sounds.
6. Select the (Favorite) check box at the top of the menu to show all combinations for which the favorites function has been turned on.The check box will be disabled if there are no combinations in the selected category that have their favorite settings turned on.
7. When you are satisfied with the selected Combination, press the OK button to close the popup menu.If you press the Cancel button, your selection will be discarded, and you will return to the Combination that had been selected when you opened the popup menu.
Using the Find featureOn the Bank/Combination Select menu, and Category/Combination Select menu, you’ll see a button marked with a magnifying glass. Pressing this button brings up the Find dialog. You can use Find to search for Combinations by name.
Using the Favorites check-boxThe Bank and Category select pop-ups both include a Favorite check-box at the bottom of the screen. This lets you trim the list to show only Combinations you’ve marked as favorites. For more information, see “Using the Favorites check-box” on page 27.
Using a footswitch to select CombinationsYou can assign a footswitch to step through Combinations one by one, either going up (0, 1, 2, 3, etc.) or going down (3, 2, 1 etc.). This lets you change Combinations without using your hands–great for quick Program changes in live performance situations.For more information, see “Using a footswitch to select Programs” on page 28.
Selecting Combinations via MIDIYou can send MIDI Program Change messages to NAUTILUS from external MIDI devices, such as computer sequencers or other MIDI controllers. In conjunction with MIDI Bank Select, you can use these to select any Combination from all 14 Banks.For more information, see “Selecting combinations,” on page 932 of the PG.
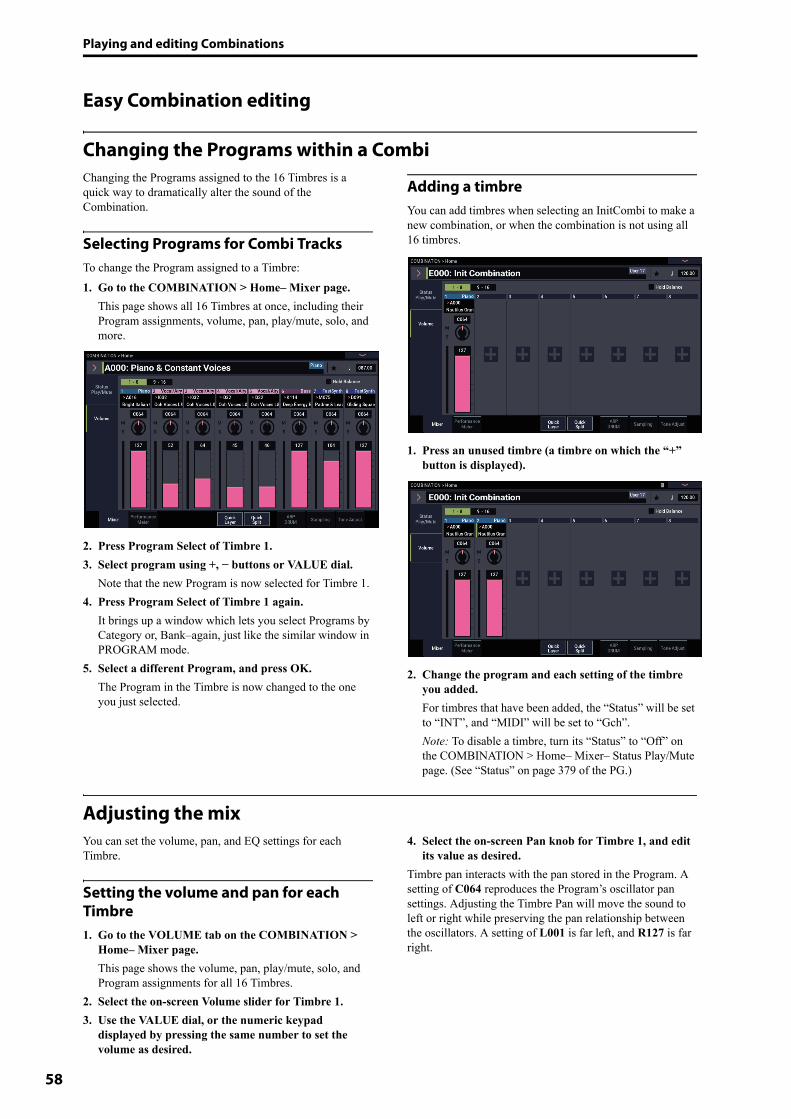
Playing and editing Combinations
58
Easy Combination editing
Changing the Programs within a CombiChanging the Programs assigned to the 16 Timbres is a quick way to dramatically alter the sound of the Combination.
Selecting Programs for Combi TracksTo change the Program assigned to a Timbre:1. Go to the COMBINATION > Home– Mixer page.
This page shows all 16 Timbres at once, including their Program assignments, volume, pan, play/mute, solo, and more.
2. Press Program Select of Timbre 1.3. Select program using +, − buttons or VALUE dial.
Note that the new Program is now selected for Timbre 1.4. Press Program Select of Timbre 1 again.
It brings up a window which lets you select Programs by Category or, Bank–again, just like the similar window in PROGRAM mode.
5. Select a different Program, and press OK.The Program in the Timbre is now changed to the one you just selected.
Adding a timbreYou can add timbres when selecting an InitCombi to make a new combination, or when the combination is not using all 16 timbres.
1. Press an unused timbre (a timbre on which the “+” button is displayed).
2. Change the program and each setting of the timbre you added.For timbres that have been added, the “Status” will be set to “INT”, and “MIDI” will be set to “Gch”.Note: To disable a timbre, turn its “Status” to “Off” on the COMBINATION > Home– Mixer– Status Play/Mute page. (See “Status” on page 379 of the PG.)
Adjusting the mixYou can set the volume, pan, and EQ settings for each Timbre.
Setting the volume and pan for each Timbre1. Go to the VOLUME tab on the COMBINATION >
Home– Mixer page.This page shows the volume, pan, play/mute, solo, and Program assignments for all 16 Timbres.
2. Select the on-screen Volume slider for Timbre 1.3. Use the VALUE dial, or the numeric keypad
displayed by pressing the same number to set the volume as desired.
4. Select the on-screen Pan knob for Timbre 1, and edit its value as desired.
Timbre pan interacts with the pan stored in the Program. A setting of C064 reproduces the Program’s oscillator pan settings. Adjusting the Timbre Pan will move the sound to left or right while preserving the pan relationship between the oscillators. A setting of L001 is far left, and R127 is far right.
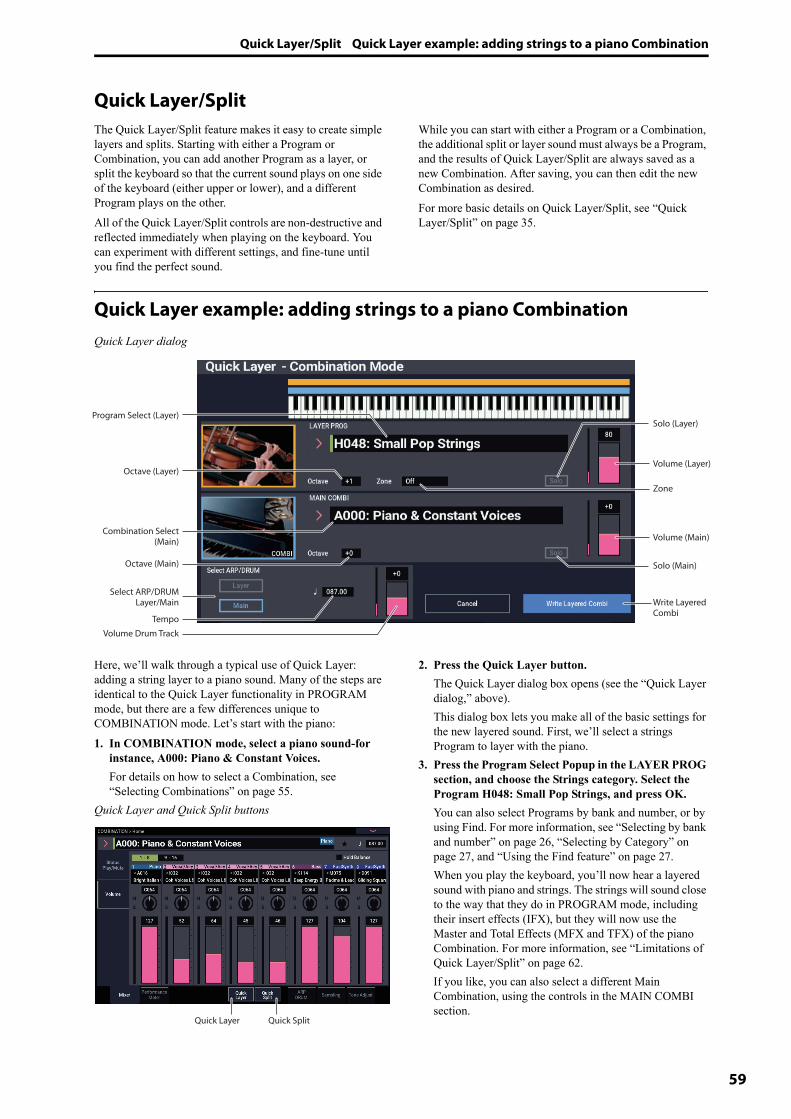
Quick Layer/Split Quick Layer example: adding strings to a piano Combination
59
Quick Layer/SplitThe Quick Layer/Split feature makes it easy to create simple layers and splits. Starting with either a Program or Combination, you can add another Program as a layer, or split the keyboard so that the current sound plays on one side of the keyboard (either upper or lower), and a different Program plays on the other.All of the Quick Layer/Split controls are non-destructive and reflected immediately when playing on the keyboard. You can experiment with different settings, and fine-tune until you find the perfect sound.
While you can start with either a Program or a Combination, the additional split or layer sound must always be a Program, and the results of Quick Layer/Split are always saved as a new Combination. After saving, you can then edit the new Combination as desired.For more basic details on Quick Layer/Split, see “Quick Layer/Split” on page 35.
Quick Layer example: adding strings to a piano CombinationQuick Layer dialog
Here, we’ll walk through a typical use of Quick Layer: adding a string layer to a piano sound. Many of the steps are identical to the Quick Layer functionality in PROGRAM mode, but there are a few differences unique to COMBINATION mode. Let’s start with the piano:1. In COMBINATION mode, select a piano sound-for
instance, A000: Piano & Constant Voices.For details on how to select a Combination, see “Selecting Combinations” on page 55.
Quick Layer and Quick Split buttons
2. Press the Quick Layer button.The Quick Layer dialog box opens (see the “Quick Layer dialog,” above).This dialog box lets you make all of the basic settings for the new layered sound. First, we’ll select a strings Program to layer with the piano.
3. Press the Program Select Popup in the LAYER PROG section, and choose the Strings category. Select the Program H048: Small Pop Strings, and press OK.You can also select Programs by bank and number, or by using Find. For more information, see “Selecting by bank and number” on page 26, “Selecting by Category” on page 27, and “Using the Find feature” on page 27.When you play the keyboard, you’ll now hear a layered sound with piano and strings. The strings will sound close to the way that they do in PROGRAM mode, including their insert effects (IFX), but they will now use the Master and Total Effects (MFX and TFX) of the piano Combination. For more information, see “Limitations of Quick Layer/Split” on page 62.If you like, you can also select a different Main Combination, using the controls in the MAIN COMBI section.
Program Select (Layer)
Combination Select (Main)
Volume Drum Track
Octave (Main)
Tempo
Octave (Layer)
Write Layered Combi
Zone
Solo (Layer)
Solo (Main)
Select ARP/DRUMLayer/Main
Volume (Layer)
Volume (Main)
Quick Layer Quick Split
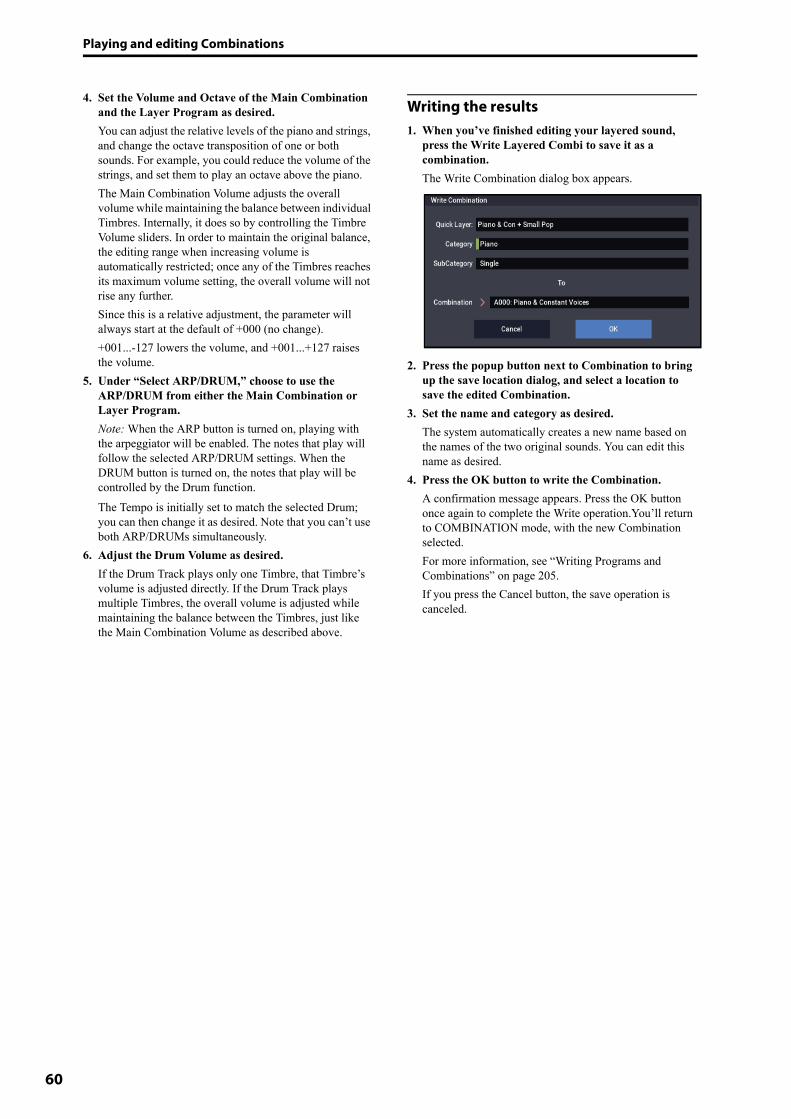
Playing and editing Combinations
60
4. Set the Volume and Octave of the Main Combination and the Layer Program as desired.You can adjust the relative levels of the piano and strings, and change the octave transposition of one or both sounds. For example, you could reduce the volume of the strings, and set them to play an octave above the piano.The Main Combination Volume adjusts the overall volume while maintaining the balance between individual Timbres. Internally, it does so by controlling the Timbre Volume sliders. In order to maintain the original balance, the editing range when increasing volume is automatically restricted; once any of the Timbres reaches its maximum volume setting, the overall volume will not rise any further.Since this is a relative adjustment, the parameter will always start at the default of +000 (no change).+001...-127 lowers the volume, and +001...+127 raises the volume.
5. Under “Select ARP/DRUM,” choose to use the ARP/DRUM from either the Main Combination or Layer Program.Note: When the ARP button is turned on, playing with the arpeggiator will be enabled. The notes that play will follow the selected ARP/DRUM settings. When the DRUM button is turned on, the notes that play will be controlled by the Drum function.The Tempo is initially set to match the selected Drum; you can then change it as desired. Note that you can’t use both ARP/DRUMs simultaneously.
6. Adjust the Drum Volume as desired.If the Drum Track plays only one Timbre, that Timbre’s volume is adjusted directly. If the Drum Track plays multiple Timbres, the overall volume is adjusted while maintaining the balance between the Timbres, just like the Main Combination Volume as described above.
Writing the results1. When you’ve finished editing your layered sound,
press the Write Layered Combi to save it as a combination.The Write Combination dialog box appears.
2. Press the popup button next to Combination to bring up the save location dialog, and select a location to save the edited Combination.
3. Set the name and category as desired.The system automatically creates a new name based on the names of the two original sounds. You can edit this name as desired.
4. Press the OK button to write the Combination.A confirmation message appears. Press the OK button once again to complete the Write operation.You’ll return to COMBINATION mode, with the new Combination selected.For more information, see “Writing Programs and Combinations” on page 205.If you press the Cancel button, the save operation is canceled.
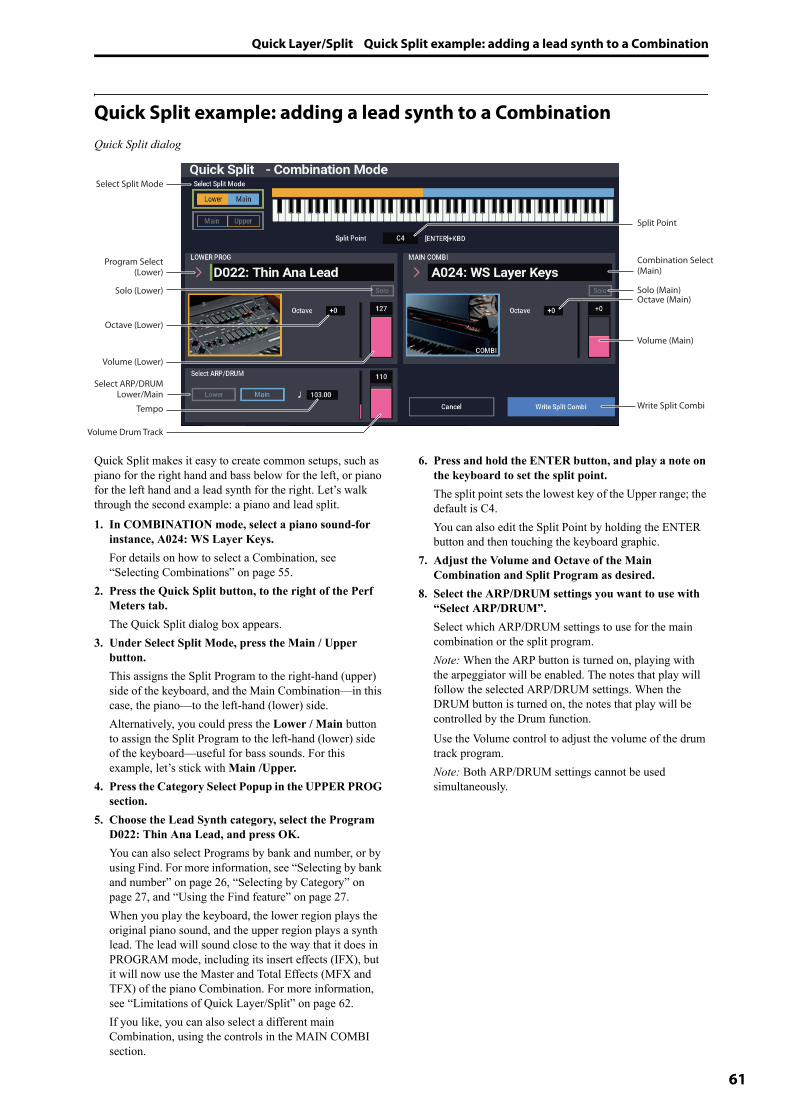
Quick Layer/Split Quick Split example: adding a lead synth to a Combination
61
Quick Split example: adding a lead synth to a CombinationQuick Split dialog
Quick Split makes it easy to create common setups, such as piano for the right hand and bass below for the left, or piano for the left hand and a lead synth for the right. Let’s walk through the second example: a piano and lead split.1. In COMBINATION mode, select a piano sound-for
instance, A024: WS Layer Keys.For details on how to select a Combination, see “Selecting Combinations” on page 55.
2. Press the Quick Split button, to the right of the Perf Meters tab.The Quick Split dialog box appears.
3. Under Select Split Mode, press the Main / Upper button.This assigns the Split Program to the right-hand (upper) side of the keyboard, and the Main Combination—in this case, the piano—to the left-hand (lower) side.Alternatively, you could press the Lower / Main button to assign the Split Program to the left-hand (lower) side of the keyboard—useful for bass sounds. For this example, let’s stick with Main /Upper.
4. Press the Category Select Popup in the UPPER PROG section.
5. Choose the Lead Synth category, select the Program D022: Thin Ana Lead, and press OK.You can also select Programs by bank and number, or by using Find. For more information, see “Selecting by bank and number” on page 26, “Selecting by Category” on page 27, and “Using the Find feature” on page 27.When you play the keyboard, the lower region plays the original piano sound, and the upper region plays a synth lead. The lead will sound close to the way that it does in PROGRAM mode, including its insert effects (IFX), but it will now use the Master and Total Effects (MFX and TFX) of the piano Combination. For more information, see “Limitations of Quick Layer/Split” on page 62.If you like, you can also select a different main Combination, using the controls in the MAIN COMBI section.
6. Press and hold the ENTER button, and play a note on the keyboard to set the split point.The split point sets the lowest key of the Upper range; the default is C4.You can also edit the Split Point by holding the ENTER button and then touching the keyboard graphic.
7. Adjust the Volume and Octave of the Main Combination and Split Program as desired.
8. Select the ARP/DRUM settings you want to use with “Select ARP/DRUM”.Select which ARP/DRUM settings to use for the main combination or the split program.Note: When the ARP button is turned on, playing with the arpeggiator will be enabled. The notes that play will follow the selected ARP/DRUM settings. When the DRUM button is turned on, the notes that play will be controlled by the Drum function.Use the Volume control to adjust the volume of the drum track program.Note: Both ARP/DRUM settings cannot be used simultaneously.
Solo (Lower)
Volume Drum Track
Tempo
Select Split Mode
Octave (Lower)
Write Split Combi
Program Select (Lower)
Select ARP/DRUMLower/Main
Volume (Lower)
Split Point
Octave (Main)Solo (Main)
Combination Select (Main)
Volume (Main)

Playing and editing Combinations
62
Writing the results1. When you’ve finished editing your splitted sound,
press the Write Split Combi button to save it as a combination.The Write Combination dialog box appears.
2. Press the popup button next to Combination to bring up the save location dialog, and select a location to save the edited Combination.
3. Set the name and category as desired.The system automatically creates a new name based on the names of the two original sounds. You can edit this name as desired.
4. Press the OK button to write the Combination.A confirmation message appears. Press the OK button once again to complete the Write operation.You’ll return to COMBINATION mode, with the new Combination selected.For more information, see “Writing Programs and Combinations” on page 205.If you press the Cancel button, the save operation is canceled.
Limitations of Quick Layer/SplitFor combinations that are created using the Quick Layer/Split function in PROGRAM mode, three timbres (Main, Layer/Split and DRUM) are always used. In this way, you will never run out of timbres.In contrast, when you are using the Quick Layer/Split function in COMBINATION mode, you may run into a situation where the main combination is already using all of the timbres and none are available.In this case, the layer/split program will automatically be overwritten by certain parts of the timbre in use. For this reason, the main combination will not sound exactly the same.When the split points of the main combination and split program fall within the range of the main combination’s keyboard zone slope, the “Top Slope” and “Bottom Slope” values will be automatically adjusted when possible to their optimum values. The main combination may not sound the same in this case.Also, the value of “Timbre Zone Bypass” for the arpeggiator will be automatically adjusted if possible; and again, the main combination might not sound the same.
Detailed Combination editing Quick Split example: adding a lead synth to a Combination
63
Detailed Combination editingYou can edit any of the Combinations shipped with NAUTILUS, or you can start with an initialized Combination to create sounds from scratch.Naturally, you can use the factory Programs to create new Combis, or use your own custom Programs. If you’re in the process of editing a Program in PROGRAM mode, and you use the Program in a Combi, you’ll hear the edited version in COMBINATION mode as well.As with Programs, you can do many basic edits directly from the RT control knobs, without ever delving deeper into the LCD interface. For instance, you can use the RT control knobs to change release time, make sounds brighter or darker, alter effects depths, add Arpeggiator phrase, and so on. For details on how these work in PROGRAM mode, see “Quick edits using the RT control knobs” on page 32.
A suggested approach for editingFirst, select a Program for each Timbre, on the Mixer tab of the Home page. (Note that you don’t have to use all 16 Timbres!)Next, create any desired keyboard or velocity splits, layers, or crossfades between the different Timbres. You can do this on the Keyboard Zones and Velocity Zones tabs of the MIDI Filter/Zones page.After this, adjust the volumes of the Timbres (back on the Prog Select/Mixer tab), and set up any other Timbre parameters as desired.To add finishing touches to the sound, set up the Insert, Master, and Total Effects as desired (on the IFX and MFX/TFX pages, respectively.) These effects can be different from those of the individual Programs in PROGRAM mode, if desired.In addition, you can make Scene settings (on the Home– ARP DRUM page) and controller settings (on the EQ/X-Y/Controllers– Controllers page) to create the finished Combination.
Using CompareWhen you’re in the process of editing a sound, executingCompare page menu command will recall the saved versionof the sound, as it was before you started editing.
While editing a combination, you can execute the Compare command (menu command) to recall the settings that were last saved. Use the “Compare” command once more to return the settings to how they were before.If you edit the settings that you recalled with the Compare command, (i.e., the settings that were saved), you will not be able to return to the settings used before the command was executed.
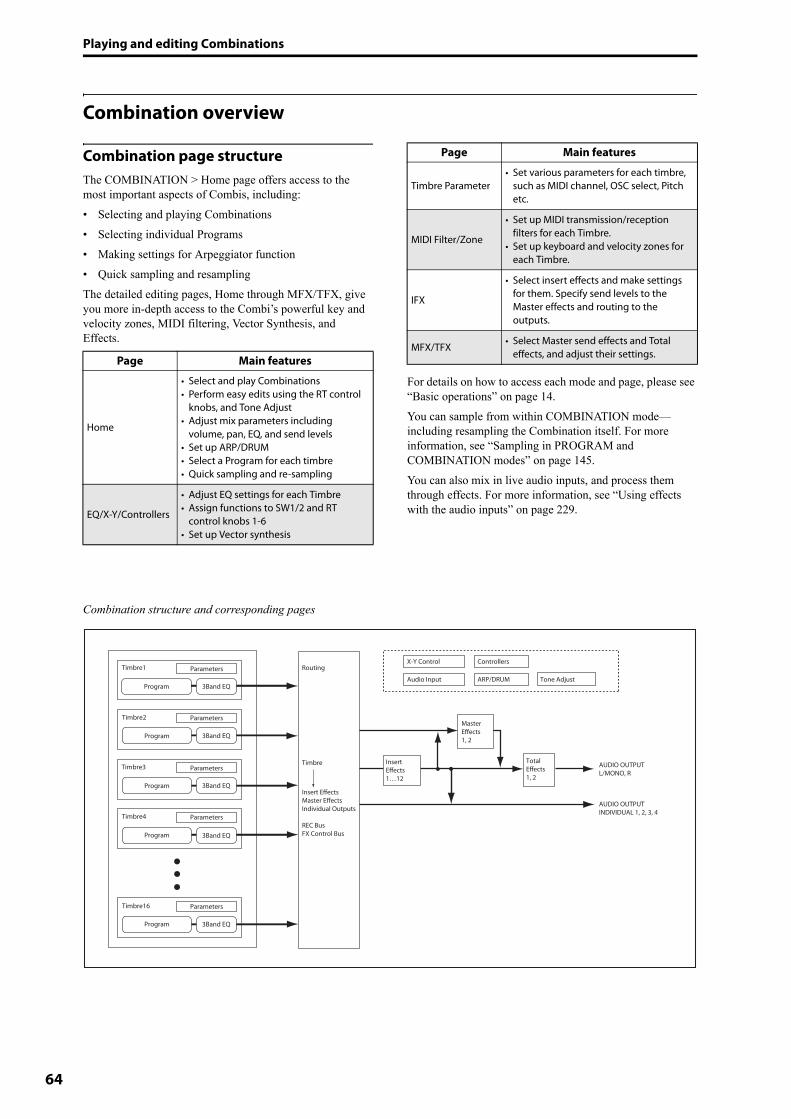
Playing and editing Combinations
64
Combination overview
Combination page structureThe COMBINATION > Home page offers access to the most important aspects of Combis, including:• Selecting and playing Combinations• Selecting individual Programs• Making settings for Arpeggiator function• Quick sampling and resamplingThe detailed editing pages, Home through MFX/TFX, give you more in-depth access to the Combi’s powerful key and velocity zones, MIDI filtering, Vector Synthesis, and Effects.
For details on how to access each mode and page, please see “Basic operations” on page 14.You can sample from within COMBINATION mode—including resampling the Combination itself. For more information, see “Sampling in PROGRAM and COMBINATION modes” on page 145. You can also mix in live audio inputs, and process them through effects. For more information, see “Using effects with the audio inputs” on page 229.
Combination structure and corresponding pages
Page Main features
Home
• Select and play Combinations• Perform easy edits using the RT control
knobs, and Tone Adjust• Adjust mix parameters including
volume, pan, EQ, and send levels• Set up ARP/DRUM• Select a Program for each timbre• Quick sampling and re-sampling
EQ/X-Y/Controllers
• Adjust EQ settings for each Timbre• Assign functions to SW1/2 and RT
control knobs 1-6• Set up Vector synthesis
Timbre Parameter• Set various parameters for each timbre,
such as MIDI channel, OSC select, Pitch etc.
MIDI Filter/Zone
• Set up MIDI transmission/reception filters for each Timbre.
• Set up keyboard and velocity zones for each Timbre.
IFX
• Select insert effects and make settings for them. Specify send levels to the Master effects and routing to the outputs.
MFX/TFX• Select Master send effects and Total
effects, and adjust their settings.
Page Main features
Parameters
Parameters
Parameters
ParametersTimbre2
Timbre3
Timbre16
Timbre4
Timbre1 Parameters
Program
Program
Program
Program
Program
AUDIO OUTPUTINDIVIDUAL 1, 2, 3, 4
AUDIO OUTPUTL/MONO, R
Master Effects1, 2
Total Effects1, 2
Insert Effects1…12
ControllersX-Y Control
Audio Input ARP/DRUM
Timbre
Insert EffectsMaster EffectsIndividual Outputs
REC BusFX Control Bus
Routing
Tone Adjust3Band EQ
3Band EQ
3Band EQ
3Band EQ
3Band EQ
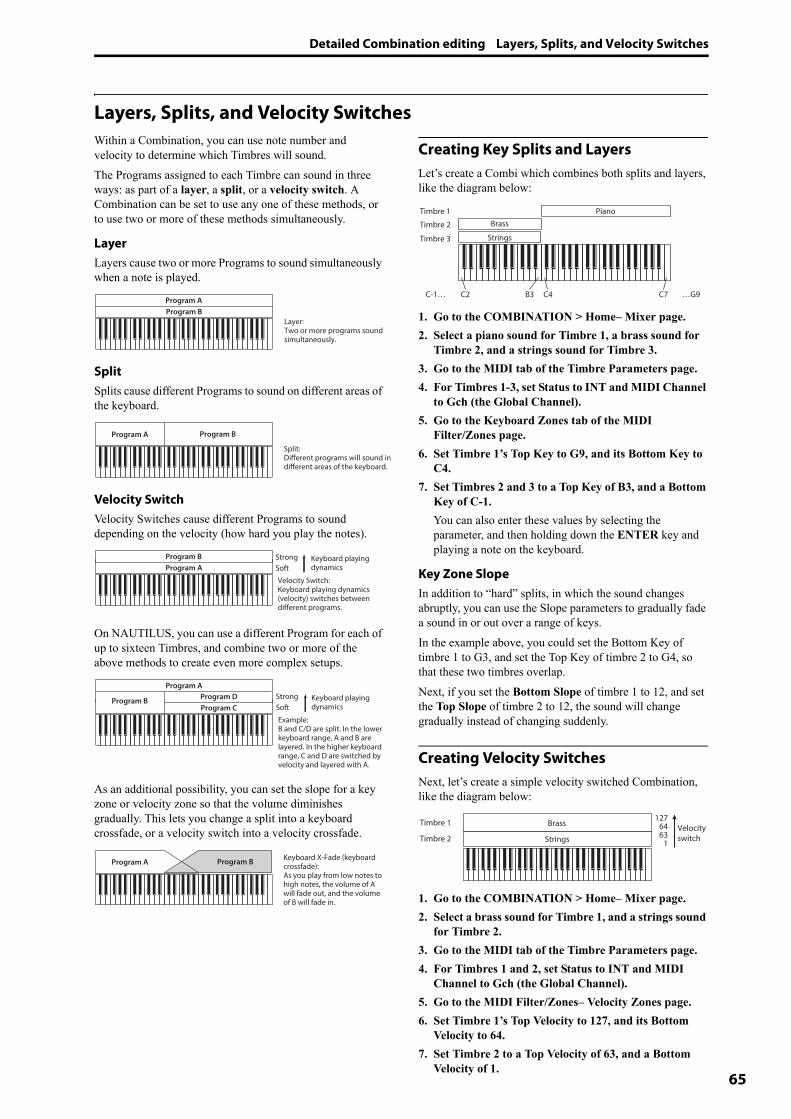
Detailed Combination editing Layers, Splits, and Velocity Switches
65
Layers, Splits, and Velocity SwitchesWithin a Combination, you can use note number and velocity to determine which Timbres will sound.The Programs assigned to each Timbre can sound in three ways: as part of a layer, a split, or a velocity switch. A Combination can be set to use any one of these methods, or to use two or more of these methods simultaneously.
LayerLayers cause two or more Programs to sound simultaneously when a note is played.
SplitSplits cause different Programs to sound on different areas of the keyboard.
Velocity SwitchVelocity Switches cause different Programs to sound depending on the velocity (how hard you play the notes).
On NAUTILUS, you can use a different Program for each of up to sixteen Timbres, and combine two or more of the above methods to create even more complex setups.
As an additional possibility, you can set the slope for a key zone or velocity zone so that the volume diminishes gradually. This lets you change a split into a keyboard crossfade, or a velocity switch into a velocity crossfade.
Creating Key Splits and LayersLet’s create a Combi which combines both splits and layers, like the diagram below:
1. Go to the COMBINATION > Home– Mixer page.2. Select a piano sound for Timbre 1, a brass sound for
Timbre 2, and a strings sound for Timbre 3.3. Go to the MIDI tab of the Timbre Parameters page.4. For Timbres 1-3, set Status to INT and MIDI Channel
to Gch (the Global Channel).5. Go to the Keyboard Zones tab of the MIDI
Filter/Zones page.6. Set Timbre 1’s Top Key to G9, and its Bottom Key to
C4.7. Set Timbres 2 and 3 to a Top Key of B3, and a Bottom
Key of C-1.You can also enter these values by selecting the parameter, and then holding down the ENTER key and playing a note on the keyboard.
Key Zone SlopeIn addition to “hard” splits, in which the sound changes abruptly, you can use the Slope parameters to gradually fade a sound in or out over a range of keys.In the example above, you could set the Bottom Key of timbre 1 to G3, and set the Top Key of timbre 2 to G4, so that these two timbres overlap. Next, if you set the Bottom Slope of timbre 1 to 12, and set the Top Slope of timbre 2 to 12, the sound will change gradually instead of changing suddenly.
Creating Velocity SwitchesNext, let’s create a simple velocity switched Combination, like the diagram below:
1. Go to the COMBINATION > Home– Mixer page.2. Select a brass sound for Timbre 1, and a strings sound
for Timbre 2.3. Go to the MIDI tab of the Timbre Parameters page.4. For Timbres 1 and 2, set Status to INT and MIDI
Channel to Gch (the Global Channel).5. Go to the MIDI Filter/Zones– Velocity Zones page.6. Set Timbre 1’s Top Velocity to 127, and its Bottom
Velocity to 64.7. Set Timbre 2 to a Top Velocity of 63, and a Bottom
Velocity of 1.
Program B
Program A
Layer: Two or more programs sound simultaneously.
Program BProgram A
Split: Different programs will sound in different areas of the keyboard.
Program A
Program B Keyboard playingdynamics
StrongSoft
Velocity Switch:Keyboard playing dynamics (velocity) switches between different programs.
Program C
Program DProgram B
Program A
Keyboard playingdynamics
StrongSoft
Example:B and C/D are split. In the lower keyboard range, A and B are layered. In the higher keyboard range, C and D are switched by velocity and layered with A.
Program A Program BKeyboard X-Fade (keyboard crossfade): As you play from low notes to high notes, the volume of A will fade out, and the volume of B will fade in.
C2C-1… C4 C7 …G9B3
PianoTimbre 1
BrassTimbre 2
StringsTimbre 3
1276463
1StringsVelocity switch
Timbre 1
Timbre 2
Brass
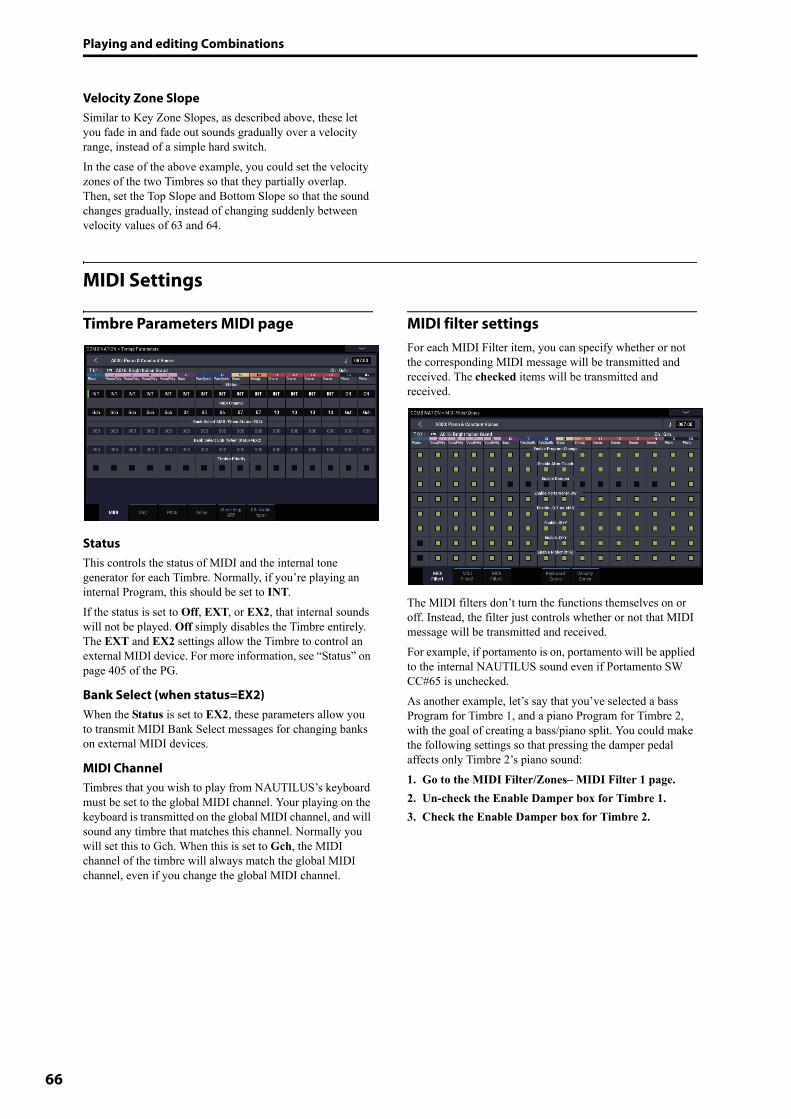
Playing and editing Combinations
66
Velocity Zone SlopeSimilar to Key Zone Slopes, as described above, these let you fade in and fade out sounds gradually over a velocity range, instead of a simple hard switch.In the case of the above example, you could set the velocity zones of the two Timbres so that they partially overlap. Then, set the Top Slope and Bottom Slope so that the sound changes gradually, instead of changing suddenly between velocity values of 63 and 64.
MIDI Settings
Timbre Parameters MIDI page
StatusThis controls the status of MIDI and the internal tone generator for each Timbre. Normally, if you’re playing an internal Program, this should be set to INT. If the status is set to Off, EXT, or EX2, that internal sounds will not be played. Off simply disables the Timbre entirely. The EXT and EX2 settings allow the Timbre to control an external MIDI device. For more information, see “Status” on page 405 of the PG.
Bank Select (when status=EX2)When the Status is set to EX2, these parameters allow you to transmit MIDI Bank Select messages for changing banks on external MIDI devices.
MIDI ChannelTimbres that you wish to play from NAUTILUS’s keyboard must be set to the global MIDI channel. Your playing on the keyboard is transmitted on the global MIDI channel, and will sound any timbre that matches this channel. Normally you will set this to Gch. When this is set to Gch, the MIDI channel of the timbre will always match the global MIDI channel, even if you change the global MIDI channel.
MIDI filter settingsFor each MIDI Filter item, you can specify whether or not the corresponding MIDI message will be transmitted and received. The checked items will be transmitted and received.
The MIDI filters don’t turn the functions themselves on or off. Instead, the filter just controls whether or not that MIDI message will be transmitted and received. For example, if portamento is on, portamento will be applied to the internal NAUTILUS sound even if Portamento SW CC#65 is unchecked.As another example, let’s say that you’ve selected a bass Program for Timbre 1, and a piano Program for Timbre 2, with the goal of creating a bass/piano split. You could make the following settings so that pressing the damper pedal affects only Timbre 2’s piano sound:1. Go to the MIDI Filter/Zones– MIDI Filter 1 page.2. Un-check the Enable Damper box for Timbre 1.3. Check the Enable Damper box for Timbre 2.

Detailed Combination editing Altering Programs to fit within a Combination
67
Altering Programs to fit within a CombinationYou can make various changes to Programs within the context of a particular Combination, to make them fit better with other Programs, or to create particular sonic effects. These changes do not affect the original Programs, or how those Programs sound in other Combinations.
Timbre Parameters: OSC
Force OSC ModeNormally this should be set to PRG, so that the sound will play as set by the original Program. If you wish to force a polyphonic program to sound monophonically, set this either to Mono or Legato. Conversely, set this to Poly if you wish to force a monophonic program to play polyphonically.For more information, see “Force OSC Mode,” on page 406 of the PG.
OSC SelectNormally, this should be set to Both.If the timbre is using a program whose Oscillator Mode is Double or Double Drums, and you want only OSC1 or OSC2 (not both) to sound, set this to OSC1 (only OSC1 will sound) or OSC2 (only OSC2 will sound).
PortamentoNormally, this should be set to PRG.If the Program uses portamento, but you’d like to disable this for the current Combination, set this parameter to Off. Conversely, if you want to force the portamento to be on, or just to change the portamento time, set this to a value of 001–127. The portamento will change to use the newly specified time.
Timbre Parameters: Pitch
Transpose, Detune (BPM Adjust)These parameters adjust the pitch of the timbre.• In a layer-type combination, you can set two or more
timbres to the same program, and create a richer sound by using Transpose to shift their pitch apart by an octave or by using Detune to create a slight difference in pitch between the two.
• In split-type combinations, you can use Transpose to shift the pitch (in semitone units) of the programs specified for each key zone.
• If you wish to change the playback pitch of a drum program, use Detune. If you change the Transpose setting, the relationship between notes and drum sounds will change.
Adjusting the BPM of multisamples or samples created in SAMPLING modeIf a timbre’s program uses multisamples or samples that you created in SAMPLING mode (or loaded in MEDIA mode) at a specific BPM value, you can use the page menu command Detune BPM Adjust to call up a new BPM value. This changes the BPM by adjusting the playback pitch. For more information, see “Detune BPM Adjust,” on page 437 of the PG.
Use Program’s Scale, ScaleThis specifies the scale for each timbre. If you check Use Program’s Scale, the scale specified by the program will be used. Timbres for which this is not checked will use the Scale setting.
DelayYou can set some Timbres so that they don’t sound immediately at note-on. This can create cool effects, and more dramatic layers. You can specify the delay for each Timbre either in milliseconds (ms), or in rhythmic values which sync to the system tempo.If you set the Delay to Key Off, the Timbre will sound when the note is released.
Playing and editing Combinations
68
Editing Programs from within a Combination or SongIf you want to dive in deeper than Tone Adjust allows, you can also go directly into the editing pages of a Program from within a Combination or Song—while still hearing all of the other Timbres or Tracks.
Tone Adjust lets you change the way the Program sounds in a specific Combination or Song without affecting the original Program. In contrast, the method described below changes the original Program, and will affect any Combinations or Songs which use that Program.
To edit a Program within a Combination or Song:1. Go to the Home– Mixer page.2. Select any parameter in the column of the Timbre or
Track which contains the Program you’d like to edit, and then select the Edit Program command from the Page Menu Command.The system will then display the Home page for the selected Program.
3. Edit as desired.Eventually, if you want to keep your changes, you’ll need to Write the Program. However, while you’re working, you can go back and forth between the edited Program and the Combination or Song.You’ll notice that some Program pages and tabs will be grayed out; for more information, see “Parameters unavailable while editing in context,” below.To return to the COMBINATION or SEQUENCER mode:
4. Press the MODE buttons. The normal rules of editing apply: if you select another Program, all edits to the previous Program will be lost. So, make sure to save your work:
5. While on the Program edit pages, use the Write menu command to save your edits.Note that you must be on the Program edit pages in order to Write the Program edits. Writing the Combination or Song will not affect the Program.If you Write the Program to different bank/number, the Combination Timbre or Song Track selected in step 2, above, will be updated to reference the new location. In this case, if other Timbres or Tracks use the Program, they will not be updated automatically (since you may want them to continue to play the original Program); you can change them manually if desired.
Parameters unavailable while editing in contextWhen editing a Program in context, you’ll hear the Combination or Song’s effects, EQ, and ARP/DRUM. Because of this, related pages, tabs, parameters, and functions within the Program will be grayed out and unavailable, including:• Home: EQ, or ARP/DRUM• Audio Input/Sampling• Controllers• Program EQ (HD-1: EQ or EXi: EQ)• EXi Program: Program Basic: EXi1 and 2 Instrument
Type• IFX• MFX/TFX• Tempo
Playing the Program during editing, from the keyboard and MIDIWhile editing a Program in context, input from the keyboard and MIDI continues to play the Combination or Song exactly as it did before. For instance, MIDI Channels, Key and Velocity Zones, Solo and Mute, etc. continue to apply. This is important, since it lets you hear the Program exactly as it will play in the finished Combination or Song. Note that this means that if the local keyboard does not play the selected Program in COMBINATION or SEQUENCER modes (for instance, if you’re in a Combi and the Timbre is not on the Global MIDI Channel), then the keyboard will still not play the Program during editing. If the sound is being played by other means—for example, from the NAUTILUS sequencer, ARP, or an external DAW or MIDI controller—then this may not matter. If necessary, you can use various means to route the keyboard to the Program, such as:• Use MIDI Thru on an external DAW• In SEQUENCER mode, set the Keyboard Track to play
the desired Track• In COMBINATION mode, temporarily change the
Timbre/Track’s MIDI channel, and/or adjust Key or Velocity zones
Of course, if you want to edit the Program by itself, unaffected by the context of the Combination or Song, simply go to PROGRAM mode and edit the sound there!
Detailed Combination editing Effects
69
EffectsEffects are covered in their own section of the manuals, so we won’t go into too much detail here.
Insert EffectsInsert Effects let you send either individual Oscillators or the entire Program through up to 12 effects, in series. You can use any type of effects, from distortions and compressors to choruses and reverbs. The Insert Effects can be routed to the main outputs, or to any of the individual outputs.For more information, see “Insert effects” on page 223.
Master EffectsThere are two Master Effects, which are accessed through Sends 1 and 2. These are best-suited to effects such as reverbs and delays, but you can use them with any type of effect.For more information, see “Master effects” on page 224.
Total EffectsThe two Total Effects are dedicated to processing the main L/R outputs. They’re ideally suited to overall mix effects, such as compression, limiting, and EQ–but as with the other effects sections, you can use any type of effect that you like.
Playing and editing Combinations
70
Saving your editsOnce you’ve tweaked the sound to perfection, you’ll want to save your work. To save your edits:1. Select the Write Combination command from the
page menu, at the upper right-hand corner of the screen.This brings up a dialog box which allows you to save the Combination. Optionally, you can also select a new location, or change the Combination’s name.
2. Press the Combination’s name to bring up the text edit dialog.You can give the Combination a descriptive name using the on-screen keyboard. After entering the name, press OK.The text edit window will disappear, returning you to the main Save dialog.
3. To set the category and sub-category, press the “Category” and “Sub Category” pop-up buttons and select the categories/sub-categories from the list.
4. Under “To” at the bottom of the dialog, press the popup button next to Combination to bring up the save location dialog.Select a location to save the edited Combination.You can write to any location in banks A–N. To avoid overwriting the factory sounds, it’s safer to use a slot in one of the empty User banks. After selecting the location, press OK.
5. Press OK again to start the write process.6. If you’re sure you want to write to this location, press
OK again.After that, you’re done!For more information, see “Writing Programs and Combinations” on page 205.
Saving to mediaYou can also save and manage Combinations on the internal drive and USB storage devices. For more information, see “Saving to internal drive, CDs, and USB media” on page 209.
71
Creating songs (SEQUENCER mode)
Sequencer overview
About the NAUTILUS’ sequencerThe NAUTILUS’ sequencer can hold up to 200 songs and 400,000 MIDI events or 300,000 audio events. It consists of a 16-track MIDI sequencer and a 16-track audio recorder, giving you a total of 32 tracks.Via MIDI, you can record from and play through external MIDI devices, as well as the NAUTILUS keyboard, physical controllers, and internal sounds. The 24-bit, 48kHz audio recorder supports 16 tracks of playback and four simultaneous channels of recording. Audio tracks can record external audio sources such as guitars and vocals as well as the NAUTILUS’ internal sounds. You can even record mix automation for volume and pan.With its broad range of capabilities such as In-track Sampling, Time Stretch/Slice, Arpeggiator, high-quality effects, and physical controllers, the NAUTILUS is the ideal environment for music production or live performance.
Sequencer edits must be saved to diskWhen you turn off the power, the SEQUENCER mode settings, the recorded songs and other data will automatically be saved. The data that was saved will automatically be reloaded next time you turn on the power, and the SEQUENCER mode settings will be restored.
SEQUENCER mode structure
SongsA song consists of MIDI tracks 1–16, a master track, audio tracks 1–16, song parameters such as the song name, Vector, Arpeggiator, Drum, effects, and RPPR settings, and 100 user patterns.A maximum of 200 songs can be loaded into the NAUTILUS memory at once. Thousands can be stored on the internal disk, or on USB storage media.MIDI tracks 1–16 and audio tracks 1–16 each consist of setup parameters located at the start location, and musical data within the track. The master track consists of tempo and time signature data. For more information, see “Setup parameters & Musical data” on page 441 of the PG.
Song recording and editingSong recording is performed on tracks. You can record MIDI tracks in either of two ways; real-time recording or step recording. For real-time recording you can choose one of six recording modes.Audio tracks can be recorded in real-time, or created by adding WAVE files.You can edit MIDI tracks by using Event Edit operations to modify the recorded data or insert new data, and by using Track Edit operations such as Create Control Data, which inserts pitch bend, aftertouch, or control change data.
You can also edit audio tracks in a variety of ways including Event Editing operations that let you insert or delete audio events, and Region Editing operations.Region Editing allows you to select WAVE files and to edit the start/end addresses of a WAVE file in single-sample units.
PatternsThere are two types of patterns: preset patterns and user patterns.• Preset patterns: Patterns suitable for drum tracks are
preset in internal memory, and can be selected for any song.
• User patterns: Each song can have up to 100 patterns. When using a pattern in a different song, use the Utility menu commands Copy Pattern or Copy From Song etc. to copy the pattern. You can set the pattern length to one or more measures, as desired.
Patterns always contain only a single track of musical data. If you want to use patterns on multiple tracks, you’ll need to use a separate pattern for each track.To use patterns in a Song, either place them in a MIDI track using the Put to MIDI Track menu command, or copy them using the Copy to MIDI Track menu command. You can also use patterns with the RPPR. For more information, see “Using RPPR (Realtime Pattern Play/Record)” on page 106.
Sequencer patterns and Drum Track patternsPreset patterns are directly available for use as Drum Track patterns.User patterns can also be used with the Drum Track, but they must first be converted into user Drum Track patterns (via the Convert to Drum Track Pattern menu command on Pattern/RPPR).When you convert a user pattern, it will be stored in internal memory, and will not disappear even when you turn off the power.
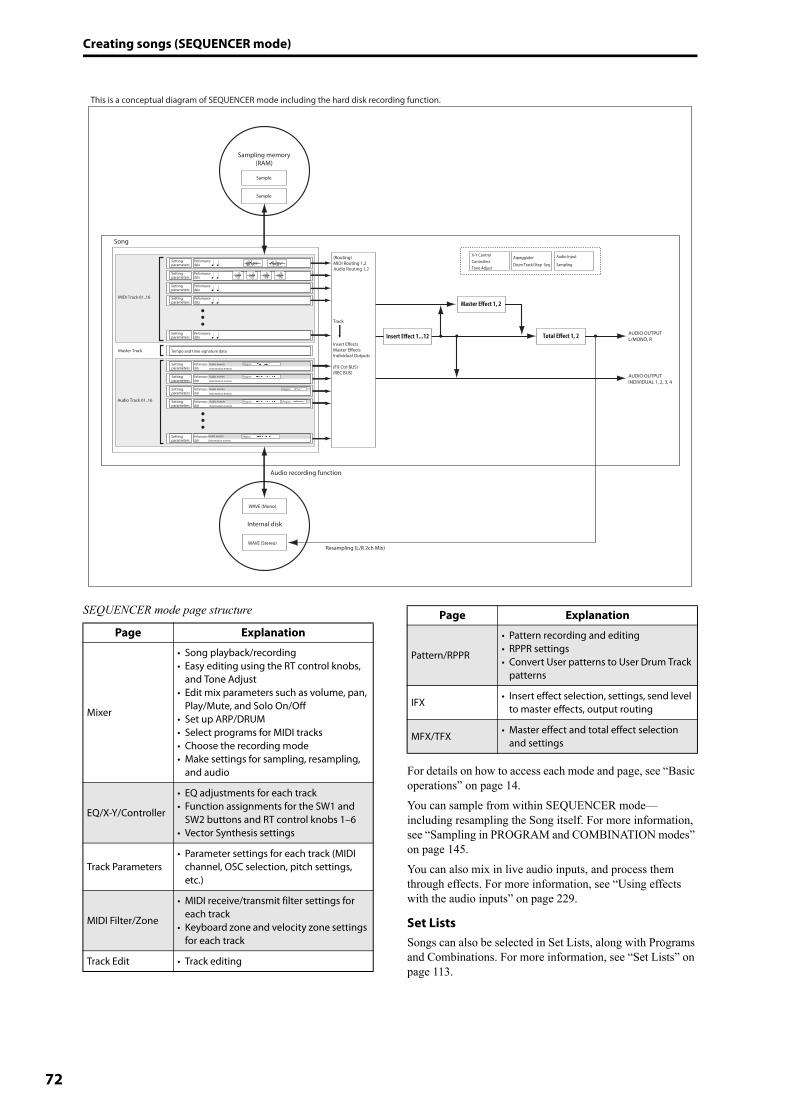
Creating songs (SEQUENCER mode)
72
SEQUENCER mode page structure
For details on how to access each mode and page, see “Basic operations” on page 14.You can sample from within SEQUENCER mode—including resampling the Song itself. For more information, see “Sampling in PROGRAM and COMBINATION modes” on page 145. You can also mix in live audio inputs, and process them through effects. For more information, see “Using effects with the audio inputs” on page 229.
Set ListsSongs can also be selected in Set Lists, along with Programs and Combinations. For more information, see “Set Lists” on page 113.
Page Explanation
Mixer
• Song playback/recording• Easy editing using the RT control knobs,
and Tone Adjust• Edit mix parameters such as volume, pan,
Play/Mute, and Solo On/Off• Set up ARP/DRUM• Select programs for MIDI tracks• Choose the recording mode• Make settings for sampling, resampling,
and audio
EQ/X-Y/Controller
• EQ adjustments for each track• Function assignments for the SW1 and
SW2 buttons and RT control knobs 1–6• Vector Synthesis settings
Track Parameters• Parameter settings for each track (MIDI
channel, OSC selection, pitch settings, etc.)
MIDI Filter/Zone
• MIDI receive/transmit filter settings for each track
• Keyboard zone and velocity zone settings for each track
Track Edit • Track editing
Pattern/RPPR
• Pattern recording and editing• RPPR settings• Convert User patterns to User Drum Track
patterns
IFX• Insert effect selection, settings, send level
to master effects, output routing
MFX/TFX• Master effect and total effect selection
and settings
Page Explanation
AUDIO OUTPUTL/MONO, R
AUDIO OUTPUTINDIVIDUAL 1, 2, 3, 4
Insert Effect 1...12
Master Effect 1, 2
Total Effect 1, 2
X-Y Control Arpeggiator
Drum Track/Step Seq
Audio Input
SamplingTone AdjustControllers
Master Track
Resampling (L/R 2ch Mix)
Tempo and time signature data
Song
Audio recording function
This is a conceptual diagram of SEQUENCER mode including the hard disk recording function.
(Routing)MIDI Routing 1,2Audio Routing 1,2
Track
Insert EffectsMaster EffectsIndividual Outputs
(FX Ctrl BUS)(REC BUS)
Audio Track 01..16
Setting parameters
Performance data
Setting parameters
Performance data
Setting parameters
Performance data
Setting parameters
Performance data
Setting parameters
Performance data
Automation events
Automation events
Automation events
Automation events
Automation events
Audio events Region
Audio events
Audio events
Audio events
Audio events Region
Region
Region Region
Region
MIDI Track 01..16
Setting parameters
Performance data
Setting parameters
Performance data
Setting parameters
Performance data
Setting parameters
Performance data
Setting parameters
Performance data
Internal disk
Sampling memory(RAM)
WAVE (Stereo)
WAVE (Mono)
Sample
Sample
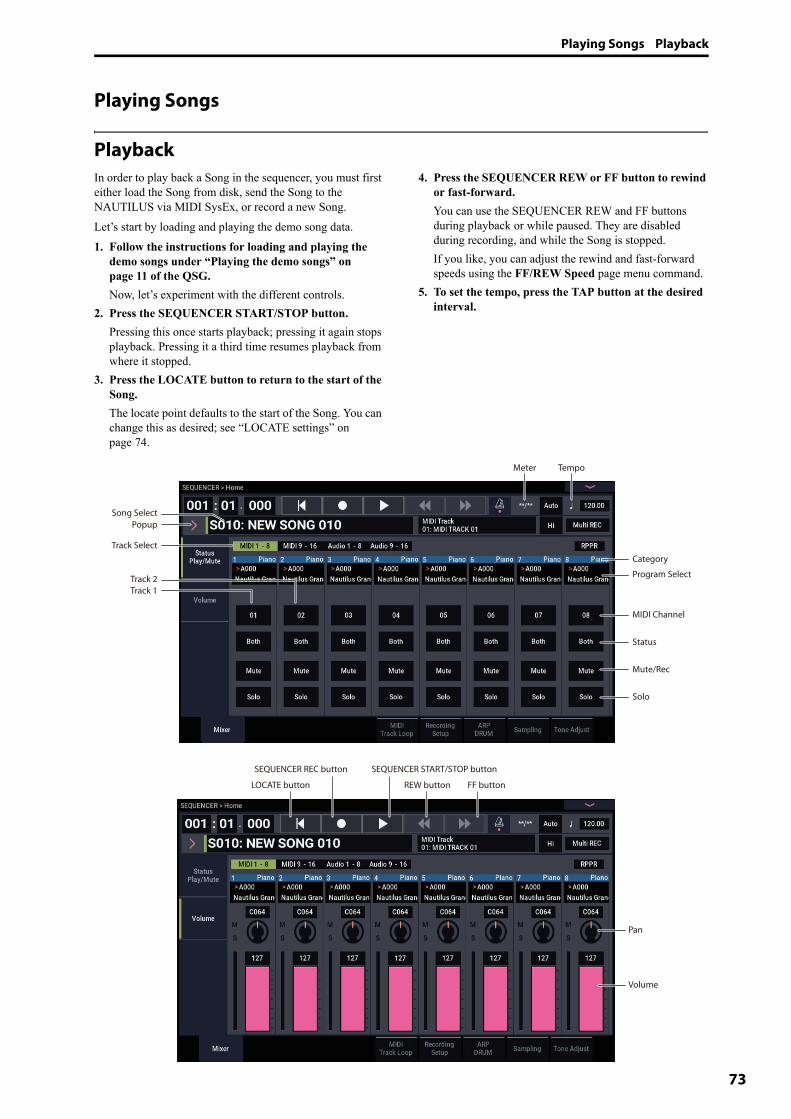
Playing Songs Playback
73
Playing Songs
PlaybackIn order to play back a Song in the sequencer, you must first either load the Song from disk, send the Song to the NAUTILUS via MIDI SysEx, or record a new Song.Let’s start by loading and playing the demo song data. 1. Follow the instructions for loading and playing the
demo songs under “Playing the demo songs” on page 11 of the QSG.Now, let’s experiment with the different controls.
2. Press the SEQUENCER START/STOP button.Pressing this once starts playback; pressing it again stops playback. Pressing it a third time resumes playback from where it stopped.
3. Press the LOCATE button to return to the start of the Song.The locate point defaults to the start of the Song. You can change this as desired; see “LOCATE settings” on page 74.
4. Press the SEQUENCER REW or FF button to rewind or fast-forward. You can use the SEQUENCER REW and FF buttons during playback or while paused. They are disabled during recording, and while the Song is stopped.If you like, you can adjust the rewind and fast-forward speeds using the FF/REW Speed page menu command.
5. To set the tempo, press the TAP button at the desired interval.
Solo
Mute/Rec
Status
MIDI Channel
Program Select
Category
Track 1Track 2
Popup
Track Select
Song Select
Meter Tempo
Pan
Volume
LOCATE button
SEQUENCER REC button SEQUENCER START/STOP button
REW button FF button
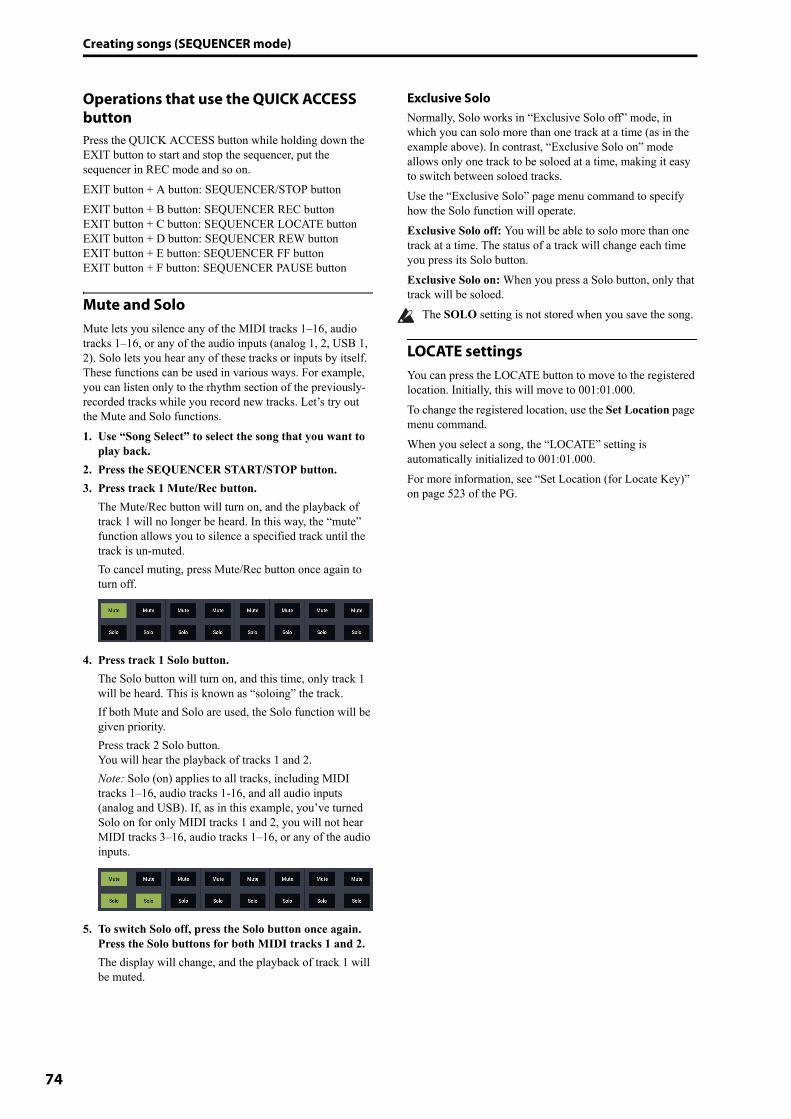
Creating songs (SEQUENCER mode)
74
Operations that use the QUICK ACCESS buttonPress the QUICK ACCESS button while holding down the EXIT button to start and stop the sequencer, put the sequencer in REC mode and so on.EXIT button + A button: SEQUENCER/STOP buttonEXIT button + B button: SEQUENCER REC buttonEXIT button + C button: SEQUENCER LOCATE buttonEXIT button + D button: SEQUENCER REW buttonEXIT button + E button: SEQUENCER FF buttonEXIT button + F button: SEQUENCER PAUSE button
Mute and SoloMute lets you silence any of the MIDI tracks 1–16, audio tracks 1–16, or any of the audio inputs (analog 1, 2, USB 1, 2). Solo lets you hear any of these tracks or inputs by itself. These functions can be used in various ways. For example, you can listen only to the rhythm section of the previously-recorded tracks while you record new tracks. Let’s try out the Mute and Solo functions.1. Use “Song Select” to select the song that you want to
play back.2. Press the SEQUENCER START/STOP button.3. Press track 1 Mute/Rec button.
The Mute/Rec button will turn on, and the playback of track 1 will no longer be heard. In this way, the “mute” function allows you to silence a specified track until the track is un-muted.To cancel muting, press Mute/Rec button once again to turn off.
4. Press track 1 Solo button.The Solo button will turn on, and this time, only track 1 will be heard. This is known as “soloing” the track.If both Mute and Solo are used, the Solo function will be given priority.Press track 2 Solo button.You will hear the playback of tracks 1 and 2.Note: Solo (on) applies to all tracks, including MIDI tracks 1–16, audio tracks 1-16, and all audio inputs (analog and USB). If, as in this example, you’ve turned Solo on for only MIDI tracks 1 and 2, you will not hear MIDI tracks 3–16, audio tracks 1–16, or any of the audio inputs.
5. To switch Solo off, press the Solo button once again. Press the Solo buttons for both MIDI tracks 1 and 2.The display will change, and the playback of track 1 will be muted.
Exclusive SoloNormally, Solo works in “Exclusive Solo off” mode, in which you can solo more than one track at a time (as in the example above). In contrast, “Exclusive Solo on” mode allows only one track to be soloed at a time, making it easy to switch between soloed tracks.Use the “Exclusive Solo” page menu command to specify how the Solo function will operate.Exclusive Solo off: You will be able to solo more than one track at a time. The status of a track will change each time you press its Solo button.Exclusive Solo on: When you press a Solo button, only that track will be soloed.
The SOLO setting is not stored when you save the song.
LOCATE settingsYou can press the LOCATE button to move to the registered location. Initially, this will move to 001:01.000.To change the registered location, use the Set Location page menu command. When you select a song, the “LOCATE” setting is automatically initialized to 001:01.000.For more information, see “Set Location (for Locate Key)” on page 523 of the PG.

Playing Songs Playback
75
Loop playbackWhen recording or playing back a song, you can individually loop the MIDI tracks that are playing.In the Home– MIDI Track Loop page, check Track Play Loop for the MIDI tracks you want to loop, and use Loop Start Measure and Loop End Measure to specify the starting and ending measure of the region that will play back as a loop.If Play Intro is checked (enabled), the measures preceding the loop will be played back as an introduction before the loop begins.If you play back from the first measure with the settings shown in the screenshot below, the specified region of measures will repeat as follows. Note that Play Intro is enabled for Track 1, but disabled for Track 2.
If Play Intro is disabled (un-checked) for Track 1, the specified region of measures will repeat as follows.
Measure 1 2 3 4 5 6 7 8 9 10 11 12 13
Track 1 1 2 3 4 5 6 7 8 5 6 7 8 5
Track 2 9 10 9 10 9 10 9 10 9 10 9 10 9
Measure 1 2 3 4 5 6 7 8 9 10 11 12 13
Track 1 5 6 7 8 5 6 7 8 5 6 7 8 5
Track 2 9 10 9 10 9 10 9 10 9 10 9 10 9
Loop StartMeasure
Track PlayLoop
Play Intro
Loop EndMeasure
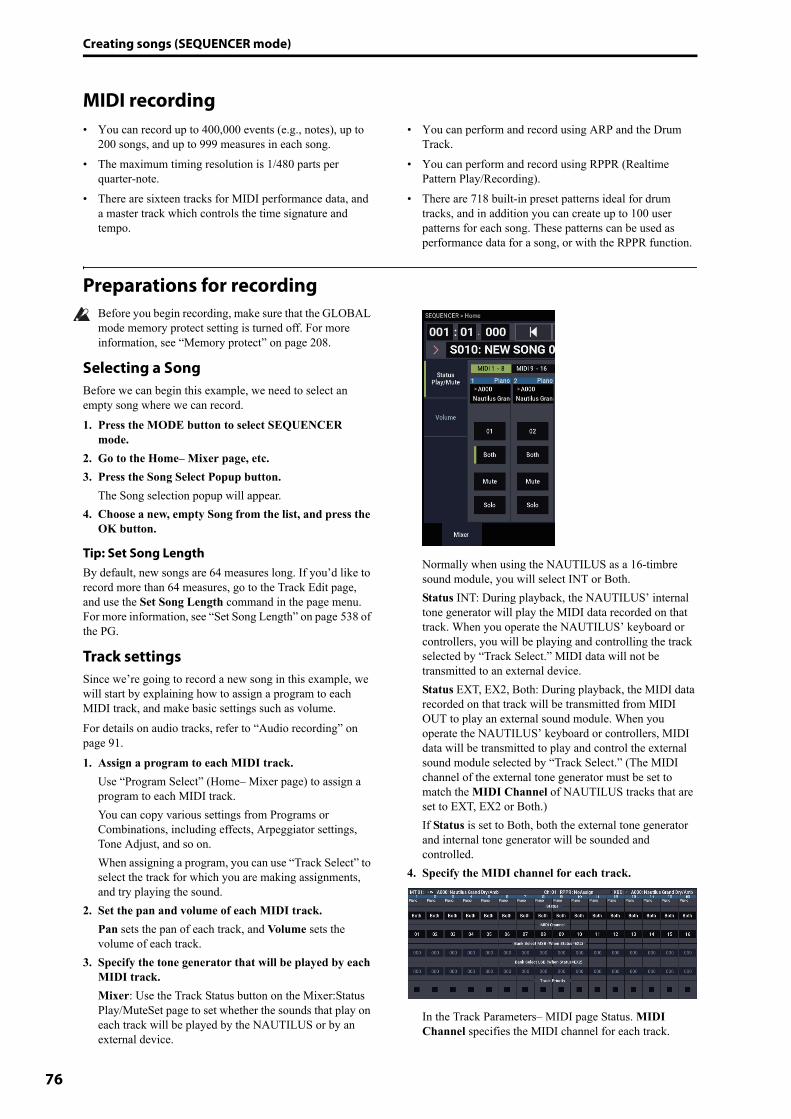
Creating songs (SEQUENCER mode)
76
MIDI recording• You can record up to 400,000 events (e.g., notes), up to
200 songs, and up to 999 measures in each song.• The maximum timing resolution is 1/480 parts per
quarter-note.• There are sixteen tracks for MIDI performance data, and
a master track which controls the time signature and tempo.
• You can perform and record using ARP and the Drum Track.
• You can perform and record using RPPR (Realtime Pattern Play/Recording).
• There are 718 built-in preset patterns ideal for drum tracks, and in addition you can create up to 100 user patterns for each song. These patterns can be used as performance data for a song, or with the RPPR function.
Preparations for recordingBefore you begin recording, make sure that the GLOBAL mode memory protect setting is turned off. For more information, see “Memory protect” on page 208.
Selecting a SongBefore we can begin this example, we need to select an empty song where we can record. 1. Press the MODE button to select SEQUENCER
mode. 2. Go to the Home– Mixer page, etc.3. Press the Song Select Popup button.
The Song selection popup will appear.4. Choose a new, empty Song from the list, and press the
OK button.
Tip: Set Song LengthBy default, new songs are 64 measures long. If you’d like to record more than 64 measures, go to the Track Edit page, and use the Set Song Length command in the page menu. For more information, see “Set Song Length” on page 538 of the PG.
Track settingsSince we’re going to record a new song in this example, we will start by explaining how to assign a program to each MIDI track, and make basic settings such as volume.For details on audio tracks, refer to “Audio recording” on page 91.1. Assign a program to each MIDI track.
Use “Program Select” (Home– Mixer page) to assign a program to each MIDI track.You can copy various settings from Programs or Combinations, including effects, Arpeggiator settings, Tone Adjust, and so on. When assigning a program, you can use “Track Select” to select the track for which you are making assignments, and try playing the sound.
2. Set the pan and volume of each MIDI track.Pan sets the pan of each track, and Volume sets the volume of each track.
3. Specify the tone generator that will be played by each MIDI track.Mixer: Use the Track Status button on the Mixer:Status Play/MuteSet page to set whether the sounds that play on each track will be played by the NAUTILUS or by an external device.
Normally when using the NAUTILUS as a 16-timbre sound module, you will select INT or Both.Status INT: During playback, the NAUTILUS’ internal tone generator will play the MIDI data recorded on that track. When you operate the NAUTILUS’ keyboard or controllers, you will be playing and controlling the track selected by “Track Select.” MIDI data will not be transmitted to an external device.Status EXT, EX2, Both: During playback, the MIDI data recorded on that track will be transmitted from MIDI OUT to play an external sound module. When you operate the NAUTILUS’ keyboard or controllers, MIDI data will be transmitted to play and control the external sound module selected by “Track Select.” (The MIDI channel of the external tone generator must be set to match the MIDI Channel of NAUTILUS tracks that are set to EXT, EX2 or Both.)If Status is set to Both, both the external tone generator and internal tone generator will be sounded and controlled.
4. Specify the MIDI channel for each track.
In the Track Parameters– MIDI page Status. MIDI Channel specifies the MIDI channel for each track.
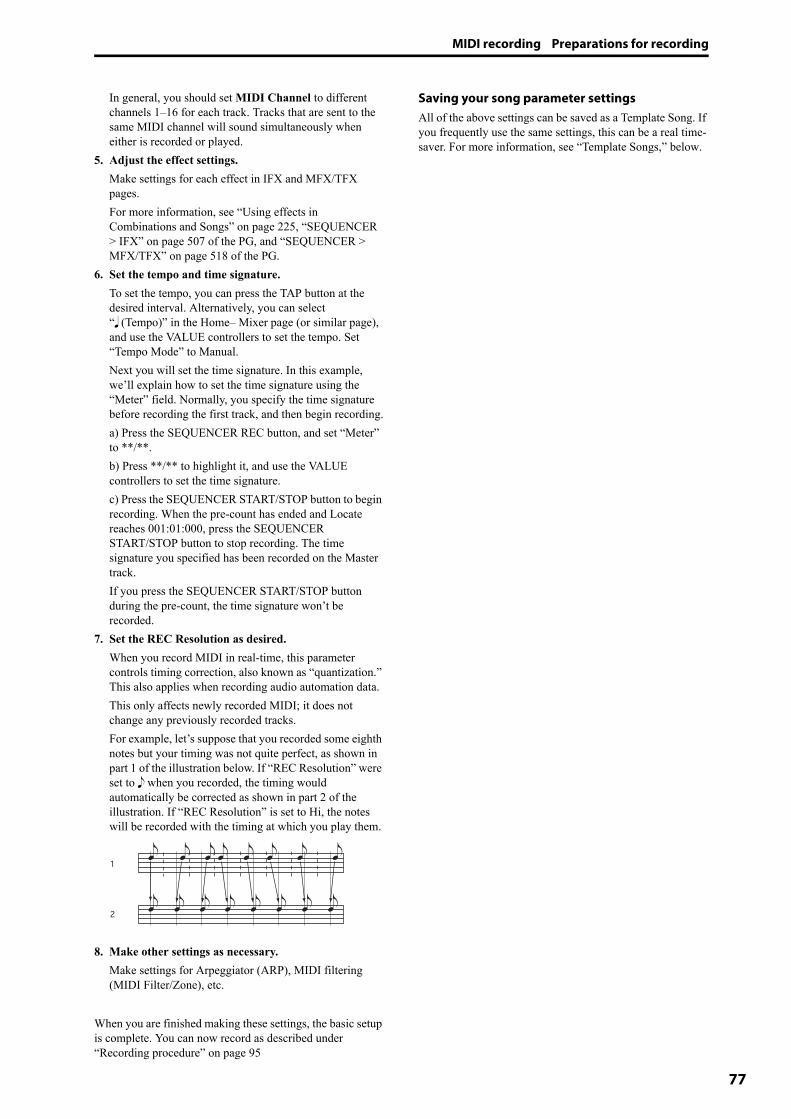
MIDI recording Preparations for recording
77
In general, you should set MIDI Channel to different channels 1–16 for each track. Tracks that are sent to the same MIDI channel will sound simultaneously when either is recorded or played.
5. Adjust the effect settings.Make settings for each effect in IFX and MFX/TFX pages.For more information, see “Using effects in Combinations and Songs” on page 225, “SEQUENCER > IFX” on page 507 of the PG, and “SEQUENCER > MFX/TFX” on page 518 of the PG.
6. Set the tempo and time signature.To set the tempo, you can press the TAP button at the desired interval. Alternatively, you can select “� (Tempo)” in the Home– Mixer page (or similar page), and use the VALUE controllers to set the tempo. Set “Tempo Mode” to Manual.Next you will set the time signature. In this example, we’ll explain how to set the time signature using the “Meter” field. Normally, you specify the time signature before recording the first track, and then begin recording.a) Press the SEQUENCER REC button, and set “Meter” to **/**.b) Press **/** to highlight it, and use the VALUE controllers to set the time signature.c) Press the SEQUENCER START/STOP button to begin recording. When the pre-count has ended and Locate reaches 001:01:000, press the SEQUENCER START/STOP button to stop recording. The time signature you specified has been recorded on the Master track.If you press the SEQUENCER START/STOP button during the pre-count, the time signature won’t be recorded.
7. Set the REC Resolution as desired. When you record MIDI in real-time, this parameter controls timing correction, also known as “quantization.” This also applies when recording audio automation data. This only affects newly recorded MIDI; it does not change any previously recorded tracks.For example, let’s suppose that you recorded some eighth notes but your timing was not quite perfect, as shown in part 1 of the illustration below. If “REC Resolution” were set to � when you recorded, the timing would automatically be corrected as shown in part 2 of the illustration. If “REC Resolution” is set to Hi, the notes will be recorded with the timing at which you play them.
8. Make other settings as necessary.Make settings for Arpeggiator (ARP), MIDI filtering (MIDI Filter/Zone), etc.
When you are finished making these settings, the basic setup is complete. You can now record as described under “Recording procedure” on page 95
Saving your song parameter settingsAll of the above settings can be saved as a Template Song. If you frequently use the same settings, this can be a real time-saver. For more information, see “Template Songs,” below.
�� � � � � � � �
� � � � � � �
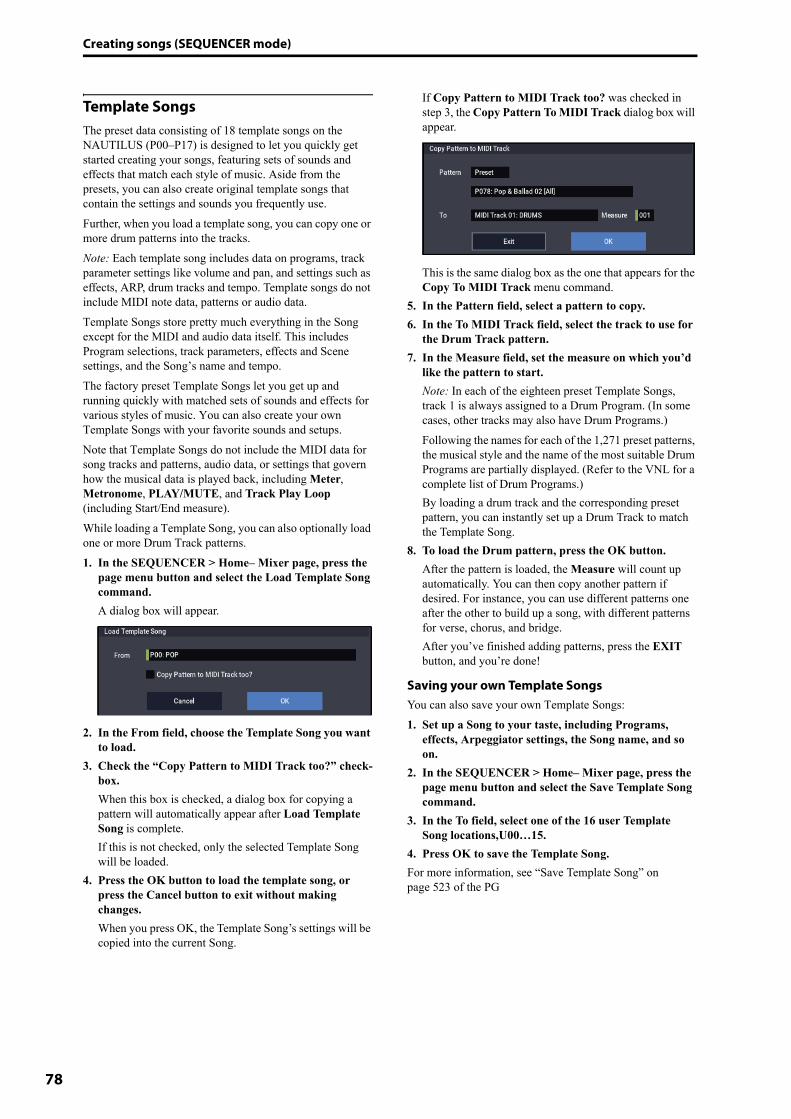
Creating songs (SEQUENCER mode)
78
Template SongsThe preset data consisting of 18 template songs on the NAUTILUS (P00–P17) is designed to let you quickly get started creating your songs, featuring sets of sounds and effects that match each style of music. Aside from the presets, you can also create original template songs that contain the settings and sounds you frequently use.Further, when you load a template song, you can copy one or more drum patterns into the tracks.Note: Each template song includes data on programs, track parameter settings like volume and pan, and settings such as effects, ARP, drum tracks and tempo. Template songs do not include MIDI note data, patterns or audio data.Template Songs store pretty much everything in the Song except for the MIDI and audio data itself. This includes Program selections, track parameters, effects and Scene settings, and the Song’s name and tempo. The factory preset Template Songs let you get up and running quickly with matched sets of sounds and effects for various styles of music. You can also create your own Template Songs with your favorite sounds and setups.Note that Template Songs do not include the MIDI data for song tracks and patterns, audio data, or settings that govern how the musical data is played back, including Meter, Metronome, PLAY/MUTE, and Track Play Loop (including Start/End measure). While loading a Template Song, you can also optionally load one or more Drum Track patterns.1. In the SEQUENCER > Home– Mixer page, press the
page menu button and select the Load Template Song command.A dialog box will appear.
2. In the From field, choose the Template Song you want to load.
3. Check the “Copy Pattern to MIDI Track too?” check-box.When this box is checked, a dialog box for copying a pattern will automatically appear after Load Template Song is complete.If this is not checked, only the selected Template Song will be loaded.
4. Press the OK button to load the template song, or press the Cancel button to exit without making changes.When you press OK, the Template Song’s settings will be copied into the current Song.
If Copy Pattern to MIDI Track too? was checked in step 3, the Copy Pattern To MIDI Track dialog box will appear.
This is the same dialog box as the one that appears for the Copy To MIDI Track menu command.
5. In the Pattern field, select a pattern to copy. 6. In the To MIDI Track field, select the track to use for
the Drum Track pattern.7. In the Measure field, set the measure on which you’d
like the pattern to start.Note: In each of the eighteen preset Template Songs, track 1 is always assigned to a Drum Program. (In some cases, other tracks may also have Drum Programs.)Following the names for each of the 1,271 preset patterns, the musical style and the name of the most suitable Drum Programs are partially displayed. (Refer to the VNL for a complete list of Drum Programs.)By loading a drum track and the corresponding preset pattern, you can instantly set up a Drum Track to match the Template Song.
8. To load the Drum pattern, press the OK button.After the pattern is loaded, the Measure will count up automatically. You can then copy another pattern if desired. For instance, you can use different patterns one after the other to build up a song, with different patterns for verse, chorus, and bridge. After you’ve finished adding patterns, press the EXIT button, and you’re done!
Saving your own Template SongsYou can also save your own Template Songs:1. Set up a Song to your taste, including Programs,
effects, Arpeggiator settings, the Song name, and so on.
2. In the SEQUENCER > Home– Mixer page, press the page menu button and select the Save Template Song command.
3. In the To field, select one of the 16 user Template Song locations,U00…15.
4. Press OK to save the Template Song.For more information, see “Save Template Song” on page 523 of the PG
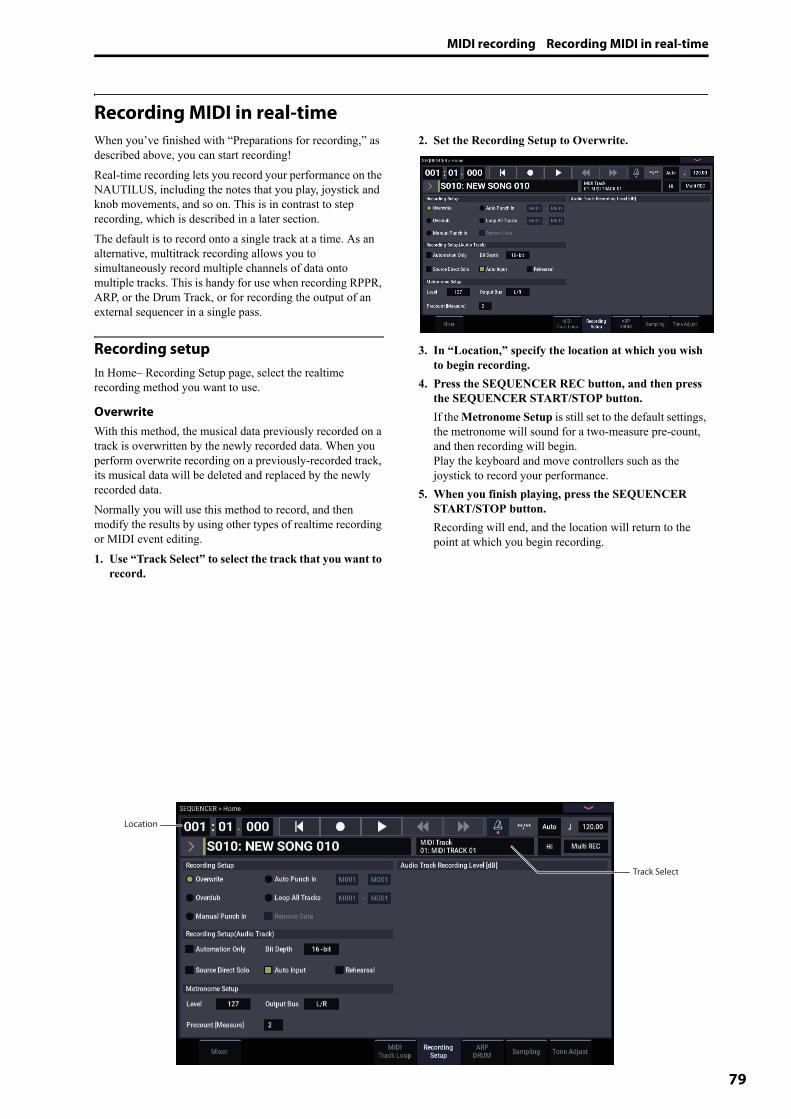
MIDI recording Recording MIDI in real-time
79
Recording MIDI in real-timeWhen you’ve finished with “Preparations for recording,” as described above, you can start recording!Real-time recording lets you record your performance on the NAUTILUS, including the notes that you play, joystick and knob movements, and so on. This is in contrast to step recording, which is described in a later section.The default is to record onto a single track at a time. As an alternative, multitrack recording allows you to simultaneously record multiple channels of data onto multiple tracks. This is handy for use when recording RPPR, ARP, or the Drum Track, or for recording the output of an external sequencer in a single pass.
Recording setupIn Home– Recording Setup page, select the realtime recording method you want to use.
OverwriteWith this method, the musical data previously recorded on a track is overwritten by the newly recorded data. When you perform overwrite recording on a previously-recorded track, its musical data will be deleted and replaced by the newly recorded data.Normally you will use this method to record, and then modify the results by using other types of realtime recording or MIDI event editing.1. Use “Track Select” to select the track that you want to
record.
2. Set the Recording Setup to Overwrite.
3. In “Location,” specify the location at which you wish to begin recording.
4. Press the SEQUENCER REC button, and then press the SEQUENCER START/STOP button.If the Metronome Setup is still set to the default settings, the metronome will sound for a two-measure pre-count, and then recording will begin. Play the keyboard and move controllers such as the joystick to record your performance.
5. When you finish playing, press the SEQUENCER START/STOP button.Recording will end, and the location will return to the point at which you begin recording.
Location
Track Select

Creating songs (SEQUENCER mode)
80
OverdubWith this method, the newly recorded musical data is added to the existing data.When you perform overdub recording on a previously-recorded track, the newly recorded data will be added to the previously-recorded data.It is best to select this mode if you will be recording additional control data, recording a drum pattern, or recording the tempo in the master track. With this mode, data can be added without erasing the existing performance data.1. Use “Track Select” to select the track that you want to
record.2. Set the Recording Setup to Overdub.
3. For the rest of the procedure, refer to steps 3–5 of “Overwrite.”
Manual punch-inWhile the song is playing, you can press the SEQUENCER REC button or a connected pedal switch at the desired location to start or stop recording. With this method, the musical data previously on the track is overwritten by the newly recorded data.1. Use “Track Select” to select the track that you want to
record.2. Set the Recording Setup to Manual Punch In.
3. In “Location,” specify a location several measures earlier than the point at which you wish to begin recording.
4. Press the SEQUENCER START/STOP button.Playback will begin.
5. At the point at which you wish to begin recording, press the SEQUENCER START/STOP button.Recording will begin. Play the keyboard and operate controllers such as the joystick to record your performance.
6. When you finish recording, press the SEQUENCER START/STOP button.Recording will end (playback will continue).Note: Instead of pressing the SEQUENCER REC button in steps 5 and 6, you can use a foot switch connected to the ASSIGNABLE SWITCH jack.Set the GLOBAL > Controllers/Scales page “Foot Switch Assign” to Song Punch In/Out. For more information, see “Setting up the Assignable Switch and Pedal” on page 175.
7. Press the SEQUENCER START/STOP button.Playback will stop, and you will return to the location that you specified in step 3.
Auto punch-inFirst you must specify the area that will be re-recorded. Then recording will occur automatically at the specified area. With this method, the musical data previously on the track is overwritten by the newly recorded data.1. Use “Track Select” to select the track that you want to
record.2. Set the Recording Setup to Auto Punch In.
3. In “M (Auto Punch In Start Measure), “M (Auto Punch In End Measure)” specify the area that you wish to record.For example if you specify M005–M008, recording will occur only from measure 5 to measure 8.
4. In “Location,” specify a location several measures earlier than the point at which you wish to begin recording.
5. Press the SEQUENCER REC button, and then press the SEQUENCER START/STOP button.Playback will begin.When you reach the starting location you specified in step 3, recording will begin. Play the keyboard and operate controllers such as the joystick to record your performance. When you reach the ending location you specified in step 3, recording will end. (Playback will continue.)
6. Press the SEQUENCER START/STOP button.Playback will stop, and you will return to the location you specified in step 4.
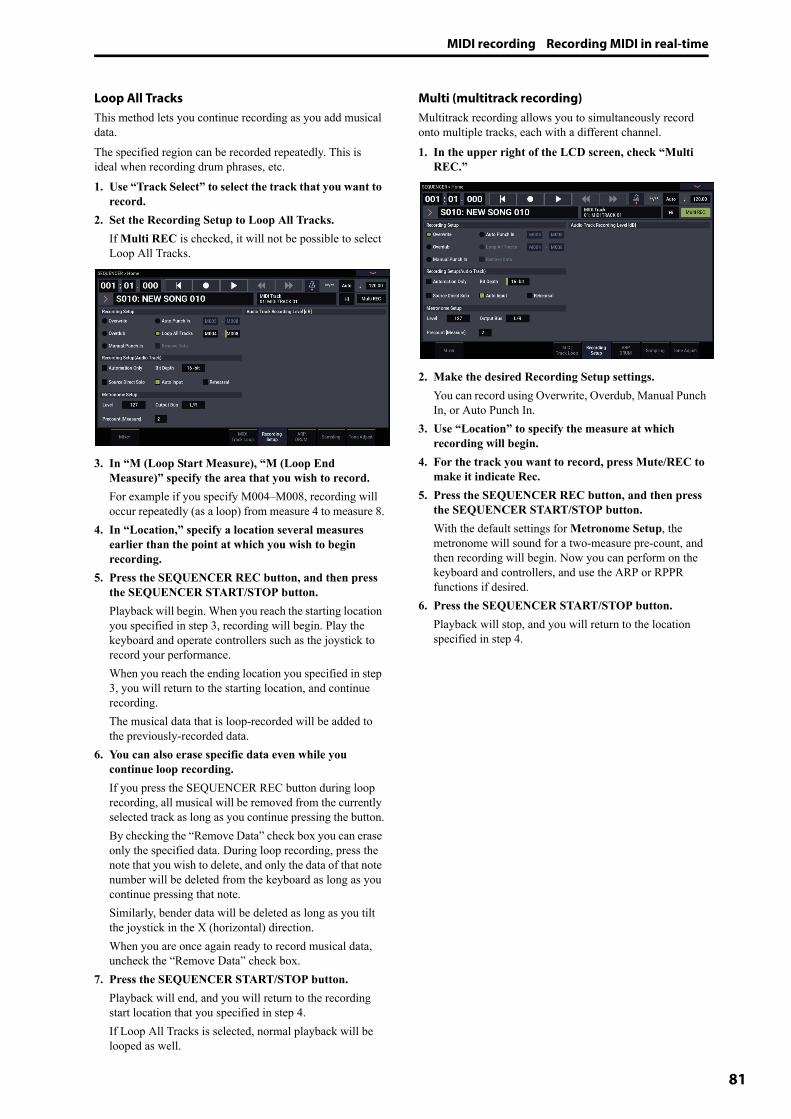
MIDI recording Recording MIDI in real-time
81
Loop All TracksThis method lets you continue recording as you add musical data.The specified region can be recorded repeatedly. This is ideal when recording drum phrases, etc.1. Use “Track Select” to select the track that you want to
record.2. Set the Recording Setup to Loop All Tracks.
If Multi REC is checked, it will not be possible to select Loop All Tracks.
3. In “M (Loop Start Measure), “M (Loop End Measure)” specify the area that you wish to record.For example if you specify M004–M008, recording will occur repeatedly (as a loop) from measure 4 to measure 8.
4. In “Location,” specify a location several measures earlier than the point at which you wish to begin recording.
5. Press the SEQUENCER REC button, and then press the SEQUENCER START/STOP button.Playback will begin. When you reach the starting location you specified in step 3, recording will begin. Play the keyboard and operate controllers such as the joystick to record your performance. When you reach the ending location you specified in step 3, you will return to the starting location, and continue recording.The musical data that is loop-recorded will be added to the previously-recorded data.
6. You can also erase specific data even while you continue loop recording.If you press the SEQUENCER REC button during loop recording, all musical will be removed from the currently selected track as long as you continue pressing the button.By checking the “Remove Data” check box you can erase only the specified data. During loop recording, press the note that you wish to delete, and only the data of that note number will be deleted from the keyboard as long as you continue pressing that note.Similarly, bender data will be deleted as long as you tilt the joystick in the X (horizontal) direction.When you are once again ready to record musical data, uncheck the “Remove Data” check box.
7. Press the SEQUENCER START/STOP button.Playback will end, and you will return to the recording start location that you specified in step 4.If Loop All Tracks is selected, normal playback will be looped as well.
Multi (multitrack recording)Multitrack recording allows you to simultaneously record onto multiple tracks, each with a different channel.1. In the upper right of the LCD screen, check “Multi
REC.”
2. Make the desired Recording Setup settings.You can record using Overwrite, Overdub, Manual Punch In, or Auto Punch In.
3. Use “Location” to specify the measure at which recording will begin.
4. For the track you want to record, press Mute/REC to make it indicate Rec.
5. Press the SEQUENCER REC button, and then press the SEQUENCER START/STOP button.With the default settings for Metronome Setup, the metronome will sound for a two-measure pre-count, and then recording will begin. Now you can perform on the keyboard and controllers, and use the ARP or RPPR functions if desired.
6. Press the SEQUENCER START/STOP button.Playback will stop, and you will return to the location specified in step 4.
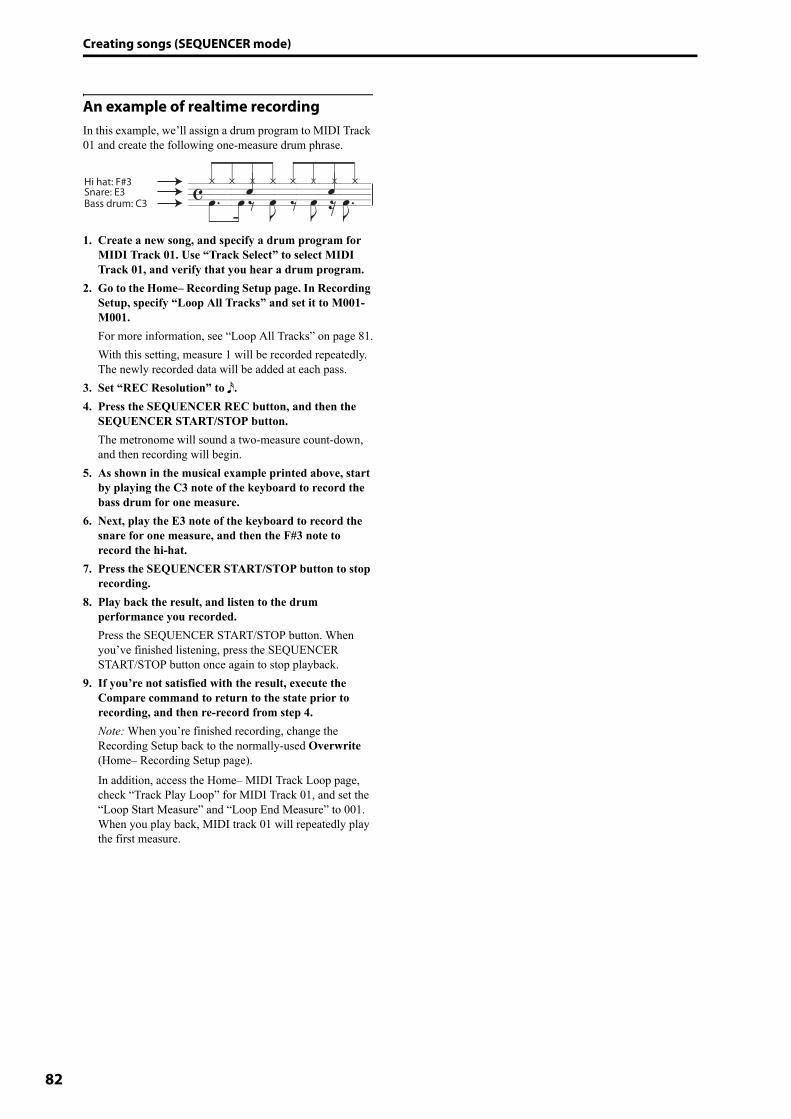
Creating songs (SEQUENCER mode)
82
An example of realtime recordingIn this example, we’ll assign a drum program to MIDI Track 01 and create the following one-measure drum phrase.
1. Create a new song, and specify a drum program for MIDI Track 01. Use “Track Select” to select MIDI Track 01, and verify that you hear a drum program.
2. Go to the Home– Recording Setup page. In Recording Setup, specify “Loop All Tracks” and set it to M001-M001.For more information, see “Loop All Tracks” on page 81.With this setting, measure 1 will be recorded repeatedly. The newly recorded data will be added at each pass.
3. Set “REC Resolution” to �.4. Press the SEQUENCER REC button, and then the
SEQUENCER START/STOP button.The metronome will sound a two-measure count-down, and then recording will begin.
5. As shown in the musical example printed above, start by playing the C3 note of the keyboard to record the bass drum for one measure.
6. Next, play the E3 note of the keyboard to record the snare for one measure, and then the F#3 note to record the hi-hat.
7. Press the SEQUENCER START/STOP button to stop recording.
8. Play back the result, and listen to the drum performance you recorded.Press the SEQUENCER START/STOP button. When you’ve finished listening, press the SEQUENCER START/STOP button once again to stop playback.
9. If you’re not satisfied with the result, execute the Compare command to return to the state prior to recording, and then re-record from step 4.Note: When you’re finished recording, change the Recording Setup back to the normally-used Overwrite (Home– Recording Setup page).In addition, access the Home– MIDI Track Loop page, check “Track Play Loop” for MIDI Track 01, and set the “Loop Start Measure” and “Loop End Measure” to 001. When you play back, MIDI track 01 will repeatedly play the first measure.
Bass drum: C3Snare: E3Hi hat: F#3
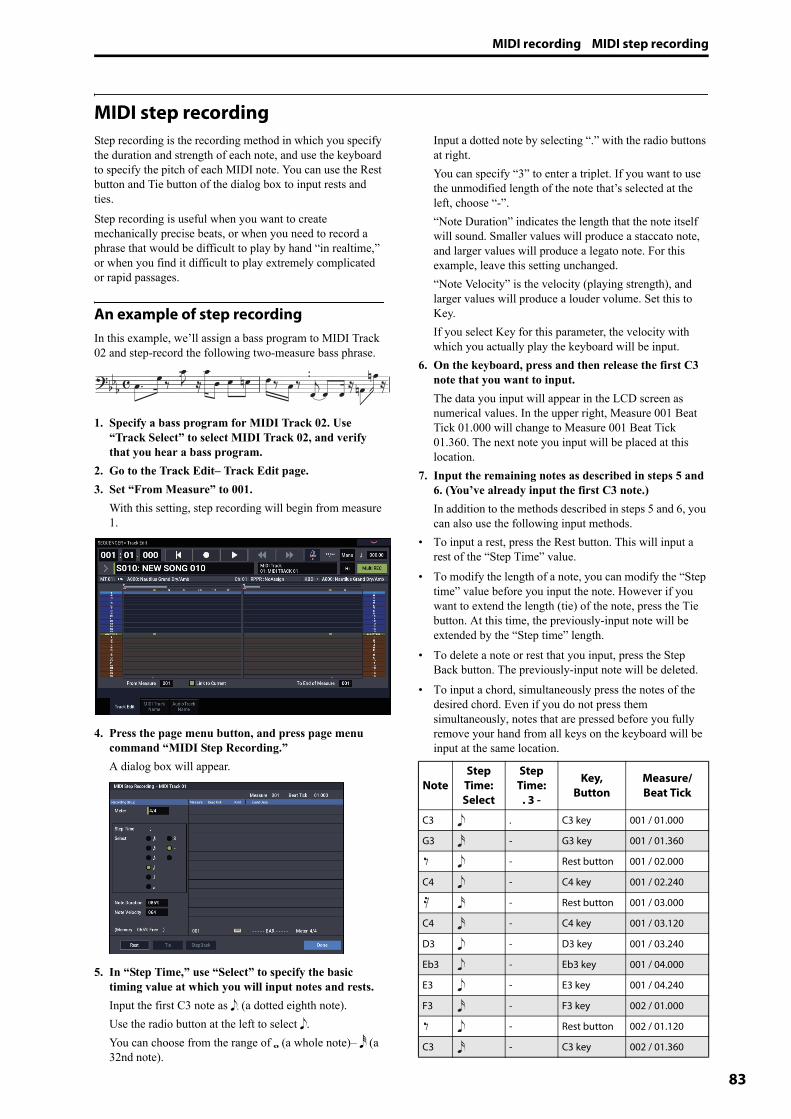
MIDI recording MIDI step recording
83
MIDI step recordingStep recording is the recording method in which you specify the duration and strength of each note, and use the keyboard to specify the pitch of each MIDI note. You can use the Rest button and Tie button of the dialog box to input rests and ties.Step recording is useful when you want to create mechanically precise beats, or when you need to record a phrase that would be difficult to play by hand “in realtime,” or when you find it difficult to play extremely complicated or rapid passages.
An example of step recordingIn this example, we’ll assign a bass program to MIDI Track 02 and step-record the following two-measure bass phrase.
1. Specify a bass program for MIDI Track 02. Use “Track Select” to select MIDI Track 02, and verify that you hear a bass program.
2. Go to the Track Edit– Track Edit page.3. Set “From Measure” to 001.
With this setting, step recording will begin from measure 1.
4. Press the page menu button, and press page menu command “MIDI Step Recording.”A dialog box will appear.
5. In “Step Time,” use “Select” to specify the basic timing value at which you will input notes and rests.Input the first C3 note as �� (a dotted eighth note).Use the radio button at the left to select �.You can choose from the range of � (a whole note)– � (a 32nd note).
Input a dotted note by selecting “.” with the radio buttons at right.You can specify “3” to enter a triplet. If you want to use the unmodified length of the note that’s selected at the left, choose “-”.“Note Duration” indicates the length that the note itself will sound. Smaller values will produce a staccato note, and larger values will produce a legato note. For this example, leave this setting unchanged.“Note Velocity” is the velocity (playing strength), and larger values will produce a louder volume. Set this to Key.If you select Key for this parameter, the velocity with which you actually play the keyboard will be input.
6. On the keyboard, press and then release the first C3 note that you want to input.The data you input will appear in the LCD screen as numerical values. In the upper right, Measure 001 Beat Tick 01.000 will change to Measure 001 Beat Tick 01.360. The next note you input will be placed at this location.
7. Input the remaining notes as described in steps 5 and 6. (You’ve already input the first C3 note.)In addition to the methods described in steps 5 and 6, you can also use the following input methods.
• To input a rest, press the Rest button. This will input a rest of the “Step Time” value.
• To modify the length of a note, you can modify the “Step time” value before you input the note. However if you want to extend the length (tie) of the note, press the Tie button. At this time, the previously-input note will be extended by the “Step time” length.
• To delete a note or rest that you input, press the Step Back button. The previously-input note will be deleted.
• To input a chord, simultaneously press the notes of the desired chord. Even if you do not press them simultaneously, notes that are pressed before you fully remove your hand from all keys on the keyboard will be input at the same location.
NoteStep
Time: Select
Step Time:
. 3 -
Key, Button
Measure/Beat Tick
C3 . C3 key 001 / 01.000
G3 - G3 key 001 / 01.360
- Rest button 001 / 02.000
C4 - C4 key 001 / 02.240
- Rest button 001 / 03.000
C4 - C4 key 001 / 03.120
D3 - D3 key 001 / 03.240
Eb3 - Eb3 key 001 / 04.000
E3 - E3 key 001 / 04.240
F3 - F3 key 002 / 01.000
- Rest button 002 / 01.120
C3 - C3 key 002 / 01.360

Creating songs (SEQUENCER mode)
84
8. When you are finished recording, press the Done button.Press the SEQUENCER START/STOP button to play back.Go to the Home– MIDI Track Loop page, check Track Play Loop for MIDI Track 02, set Loop Start Measure to 001, and Loop End Measure to 002. MIDI track 02 will play measures 1–2 repeatedly.
9. If you’re not satisfied with the result, use the Compare command in the page menu commands to return to the state prior to recording, and then re-record from step 4.When you begin step recording, all data in the MIDI track that follows the measure where you began recording will be erased. You need to be aware of this if you begin step recording from a measure mid-way through the song.If you want to copy data into a measure that already contains data, perform step recording in an empty MIDI track, and use the Move Measure or Copy Measure menu commands. For more information, see “Copy Measure” on page 543 of the PG, and “Move Measure” on page 544 of the PG.If you want to edit or add to the recorded data, you can use the MIDI Event Edit function. For more information, see “Event Edit” on page 551 of the PG.
- Rest button 002 / 02.000
F2 - F2 key 002 / 02.240
Tie - Tie button 002 / 03.000
F2 - F2 key 002 / 03.240
- Rest button 002 / 03.360
A2 - A2 key 002 / 04.000
A3 - A3 key 002 / 04.240
- Rest button 002 / 04.360
NoteStep
Time: Select
Step Time:
. 3 -
Key, Button
Measure/Beat Tick
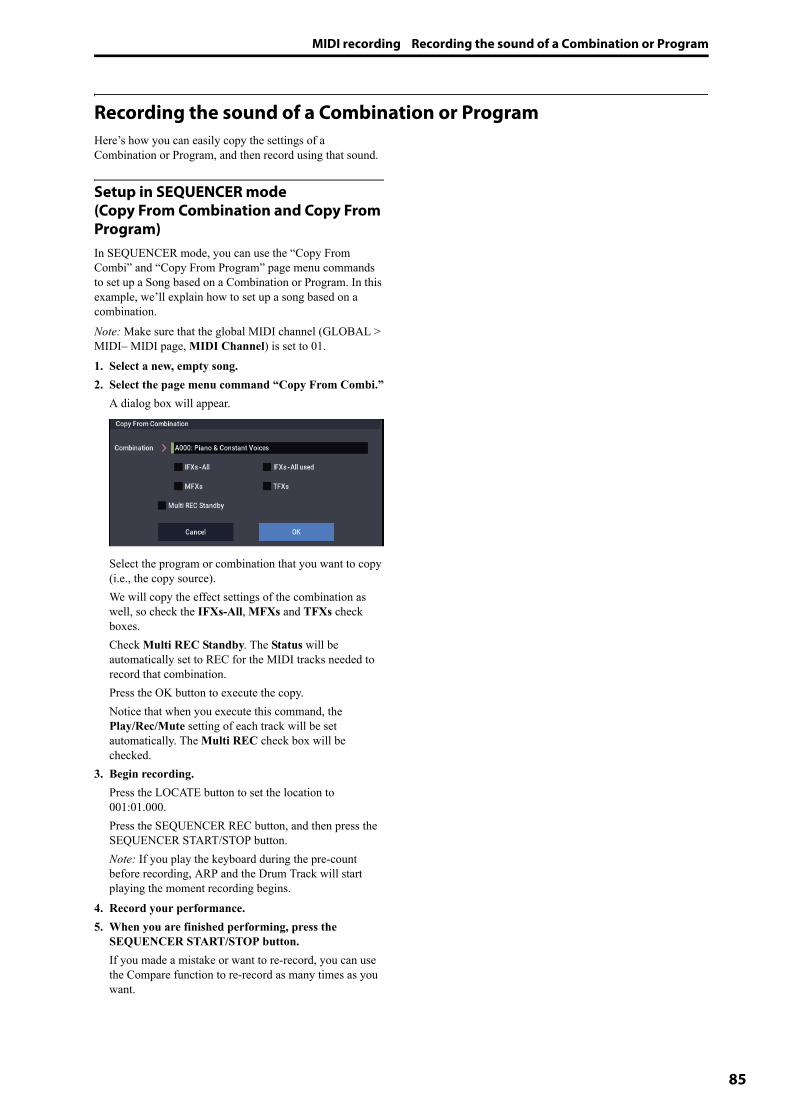
MIDI recording Recording the sound of a Combination or Program
85
Recording the sound of a Combination or ProgramHere’s how you can easily copy the settings of a Combination or Program, and then record using that sound.
Setup in SEQUENCER mode(Copy From Combination and Copy From Program)In SEQUENCER mode, you can use the “Copy From Combi” and “Copy From Program” page menu commands to set up a Song based on a Combination or Program. In this example, we’ll explain how to set up a song based on a combination.Note: Make sure that the global MIDI channel (GLOBAL > MIDI– MIDI page, MIDI Channel) is set to 01.1. Select a new, empty song. 2. Select the page menu command “Copy From Combi.”
A dialog box will appear.
Select the program or combination that you want to copy (i.e., the copy source).We will copy the effect settings of the combination as well, so check the IFXs-All, MFXs and TFXs check boxes.Check Multi REC Standby. The Status will be automatically set to REC for the MIDI tracks needed to record that combination.Press the OK button to execute the copy.Notice that when you execute this command, the Play/Rec/Mute setting of each track will be set automatically. The Multi REC check box will be checked.
3. Begin recording.Press the LOCATE button to set the location to 001:01.000.Press the SEQUENCER REC button, and then press the SEQUENCER START/STOP button.Note: If you play the keyboard during the pre-count before recording, ARP and the Drum Track will start playing the moment recording begins.
4. Record your performance.5. When you are finished performing, press the
SEQUENCER START/STOP button.If you made a mistake or want to re-record, you can use the Compare function to re-record as many times as you want.

Creating songs (SEQUENCER mode)
86
Recording multiple MIDI tracks from an external sequencer1. Make sure that the MIDI OUT of your external
sequencer is connected to the MIDI IN of the NAUTILUS.If it is not connected, turn off the power, make the connection, and then turn the power on. For more information, see “MIDI applications” on page 929 of the PG.
2. In the GLOBAL > MIDI– MIDI page, set MIDI Clock to External MIDI. With this setting, the NAUTILUS will synchronize to MIDI clock messages from your external sequencer.Make sure that Receive Ext. Realtime Commands is checked.
3. Create a new song in SEQUENCER mode, and in the SEQUENCER > Home– Recording Setup page, check the Multi REC check box. Set Recording Setup to Overwrite.
4. Press Mute/Rec button on the SEQUENCER > Home– Mixer page to select “REC” for the tracks you want to record.For the tracks you don’t want to record, turn Mute On or Off (Play mode).
5. In the SEQUENCER > Track Parameters– MIDI page, use MIDI Channel to specify the MIDI channel of each track.Set the MIDI channel of each NAUTILUS track to match the MIDI channel of each external sequencer track. Data of the matching channel will be recorded on each NAUTILUS track.Make sure that Status is set to INT or Both.
6. Press the LOCATE button to set the location to 001:01.000.
7. Press the SEQUENCER REC button to enter record-standby mode.
8. Start your external sequencer.The NAUTILUS’ sequencer will automatically begin recording when it receives the MIDI Start message transmitted by your external sequencer.
9. When playback has ended, stop your external sequencer.The NAUTILUS’ sequencer will automatically stop recording when it receives the MIDI Stop message transmitted by the external sequencer. You can also stop recording by pressing the SEQUENCER START/STOP button of the NAUTILUS.After this, you can play back the newly recorded sequence:
10.In the GLOBAL > MIDI page, set MIDI Clock to Internal.
11.Set “Tempo Mode” to Auto.12.Press the SEQUENCER START/STOP button to play
back.Note: If the correct sounds are not selected when you start playing back, you may be able to solve the problem by using the page menu command “MIDI Event Edit” (Track Edit) to re-specify the Program Change data.

MIDI recording Recording System Exclusive events
87
Recording System Exclusive eventsExclusive messages received from an external MIDI device or the parameter changes produced when you edit a MIDI track parameter, audio track parameter or effect parameter can be realtime-recorded on any MIDI track.During playback, the exclusive messages you recorded will control the track parameters and effect parameters of the song, and can be sent to external MIDI devices.Note: You can use the page menu command “Put Effect Set-ting to Track” to insert an exclusive event containing the parameter settings for an insert effect, master effect or total effect into the desired location of a track, so that these set-tings will automatically switch during playback.
GM, XG, and GS exclusive messages can be recorded on a track, but the NAUTILUS’s tone generator will not respond to these messages.
Recording internal parameter changesYou can use SysEx for automation of internal NAUTILUS effects and Program parameters.As an example, let’s record a short phrase on track 1, add an insert effect, and then record parameter changes for that effect on an unused track.Note: In order to record system exclusive messages, make sure that the GLOBAL > MIDI– MIDI setting “Enable Exclusive” is checked.
1. Select the desired program for MIDI track 1, and route it to IFX1. Then record a phrase of about sixteen measures.
• In the Home– Mixer page, use “Program Select” to select the desired program for MIDI Track 01.
• In the IFX– MIDI Routing1 page, route the MIDI Track 01 Bus Select (IFX/Indiv. Out Assign) to IFX1. Then in the IFX– Insert FX page, select the desired effect for IFX1.
• Select MIDI Track 01 in “Track Select.” Then press the SEQUENCER REC button and then the SEQUENCER START/STOP button, and record a phrase of about sixteen measures.
2. Select MIDI Track 09 in “Track Select,” and record parameter changes as desired.Note: For this example, select an empty track. If you want to record onto a MIDI track that already contains data, set the Home– Recording Setup page Recording Setup to “Overdub,” as described on page 80.
• Select MIDI Track 09 in “Track Select.” Then press the SEQUENCER REC button and then the SEQUENCER START/STOP button, and begin recording.
• At the appropriate time while recording, adjust the parameter(s) that you want to realtime-record.Select another effect for IFX1 in the IFX– Insert FX page, and edit the effect parameter values, or use the Home– Tone Adjust page Tone Adjust controls to edit the sound in realtime.Note: For details on the effects parameters that you can record in real-time, please see “System Exclusive events supported in Sequencer mode” on page 557 of the PG.
3. Stop recording.Note: Exclusive messages are always recorded on the current track selected by “Track Select.” In this example, they are recorded on MIDI track 9.Note: In the MIDI event edit screen you can view the recorded exclusive events and their location. Exclusive events are displayed as “EXCL”.To view these events, go to the Track Edit– Track Edit page, and select the page menu command “MIDI Event Edit.” Then in the Set Event Filters dialog box, check Exclusive and press the OK button.
Exclusive events cannot be changed to a different type of event. Nor can other events be changed into exclusive events.
4. If you go to the page (e.g., Insert Effect) that shows the parameters you adjusted in realtime, you can watch the recorded changes be reproduced while the song plays back.
Event displayLocation
Creating songs (SEQUENCER mode)
88
Exclusive messages that can be recorded in real-timeThe following exclusive messages can be recorded in real-time:• Exclusive messages received from an external MIDI
device• Parameter changes in SEQUENCER mode (see “System
Exclusive events supported in Sequencer mode” on page 557 of the PG)
• Master Volume universal exclusive messages assigned to the foot pedal or a knob
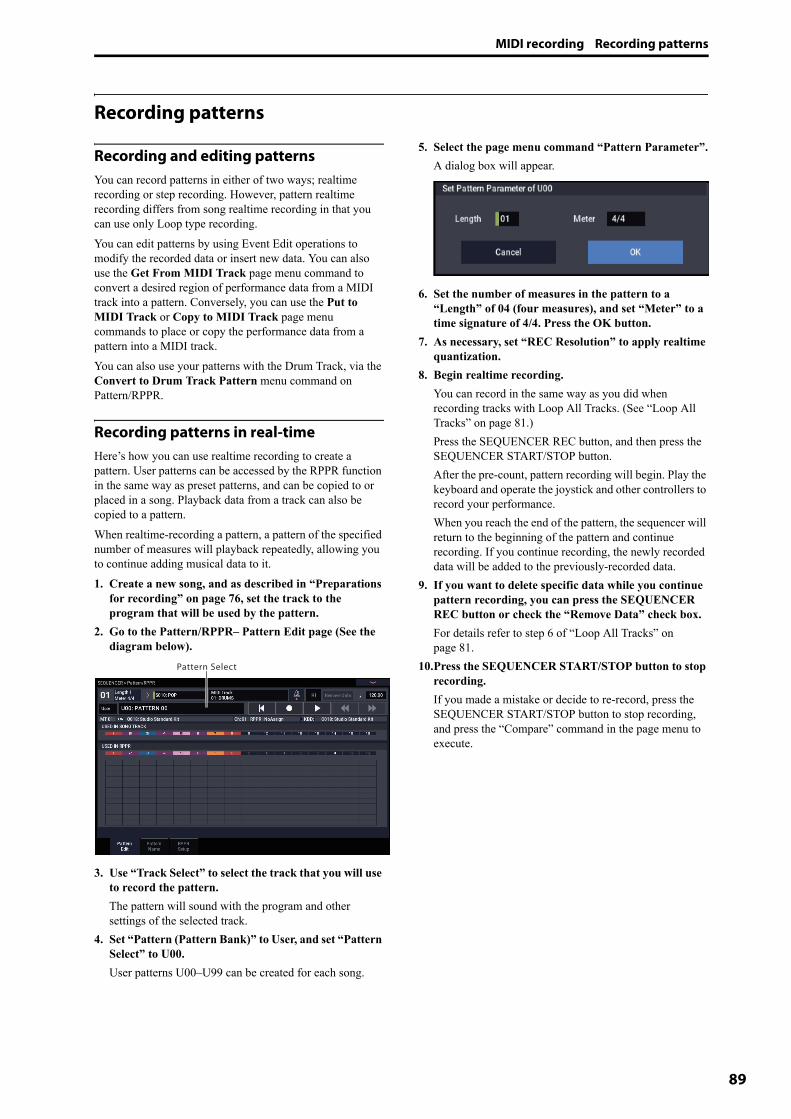
MIDI recording Recording patterns
89
Recording patterns
Recording and editing patternsYou can record patterns in either of two ways; realtime recording or step recording. However, pattern realtime recording differs from song realtime recording in that you can use only Loop type recording.You can edit patterns by using Event Edit operations to modify the recorded data or insert new data. You can also use the Get From MIDI Track page menu command to convert a desired region of performance data from a MIDI track into a pattern. Conversely, you can use the Put to MIDI Track or Copy to MIDI Track page menu commands to place or copy the performance data from a pattern into a MIDI track.You can also use your patterns with the Drum Track, via the Convert to Drum Track Pattern menu command on Pattern/RPPR.
Recording patterns in real-timeHere’s how you can use realtime recording to create a pattern. User patterns can be accessed by the RPPR function in the same way as preset patterns, and can be copied to or placed in a song. Playback data from a track can also be copied to a pattern.When realtime-recording a pattern, a pattern of the specified number of measures will playback repeatedly, allowing you to continue adding musical data to it.1. Create a new song, and as described in “Preparations
for recording” on page 76, set the track to the program that will be used by the pattern.
2. Go to the Pattern/RPPR– Pattern Edit page (See the diagram below).
3. Use “Track Select” to select the track that you will use to record the pattern.The pattern will sound with the program and other settings of the selected track.
4. Set “Pattern (Pattern Bank)” to User, and set “Pattern Select” to U00.User patterns U00–U99 can be created for each song.
5. Select the page menu command “Pattern Parameter”.A dialog box will appear.
6. Set the number of measures in the pattern to a “Length” of 04 (four measures), and set “Meter” to a time signature of 4/4. Press the OK button.
7. As necessary, set “REC Resolution” to apply realtime quantization.
8. Begin realtime recording.You can record in the same way as you did when recording tracks with Loop All Tracks. (See “Loop All Tracks” on page 81.)Press the SEQUENCER REC button, and then press the SEQUENCER START/STOP button.After the pre-count, pattern recording will begin. Play the keyboard and operate the joystick and other controllers to record your performance.When you reach the end of the pattern, the sequencer will return to the beginning of the pattern and continue recording. If you continue recording, the newly recorded data will be added to the previously-recorded data.
9. If you want to delete specific data while you continue pattern recording, you can press the SEQUENCER REC button or check the “Remove Data” check box.For details refer to step 6 of “Loop All Tracks” on page 81.
10.Press the SEQUENCER START/STOP button to stop recording.If you made a mistake or decide to re-record, press the SEQUENCER START/STOP button to stop recording, and press the “Compare” command in the page menu to execute.
Pattern Select

Creating songs (SEQUENCER mode)
90
Control data in pattern recordingTo record control data in a pattern, you should restore the control data to its normal value within the pattern. If you fail to restore the normal value, unnecessary control data may remain in a “stuck” position when you place the pattern in a song or use the RPPR function to play the pattern. However, the following control data will be automatically reset to the following values when the song or RPPR function finishes playing the pattern, or when playback is halted.
Using ARP for pattern recordingIf ARP is set to operate for the track that is selected for “Track Select,” and record the performance of ARP into the pattern.
Other ways to record
Multi-track recording with ARP and the Drum TrackYou can record multi-track performances generated by ARP and/or the Drum Track. For more information, see “Arpeggiator settings in SEQUENCER mode” on page 166
Multi-track recording with RPPRYou can record multi-track performances generated by RPPR. For more information, see “Using RPPR (Realtime Pattern Play/Record)” on page 106.
Controller Reset value
Modulation 1 (CC#01) 00 (zero)
Modulation 2 (CC#02) 00 (zero)
Expression (CC#11) 127 (max)
Damper switch (CC#64) 00 (zero)
Sostenuto switch (CC#66) 00 (zero)
Soft switch (CC#67) 00 (zero)
EG sustain level (CC#70) 64 (center)
Resonance level (CC#71) 64 (center)
EG release time (CC#72) 64 (center)
EG attack time (CC#73) 64 (center)
Low pass filter cutoff (CC#74) 64 (center)
EG decay time (CC#75) 64 (center)
LFO1 speed (CC#76) 64 (center)
LFO1 depth (pitch) (CC#77) 64 (center)
LFO1 delay (CC#78) 64 (center)
Filter EG intensity (CC#79) 64 (center)
SW1 modulation (CC#80) 00 (zero)
SW2 modulation (CC#81) 00 (zero)
Pitch bender 00 (zero)
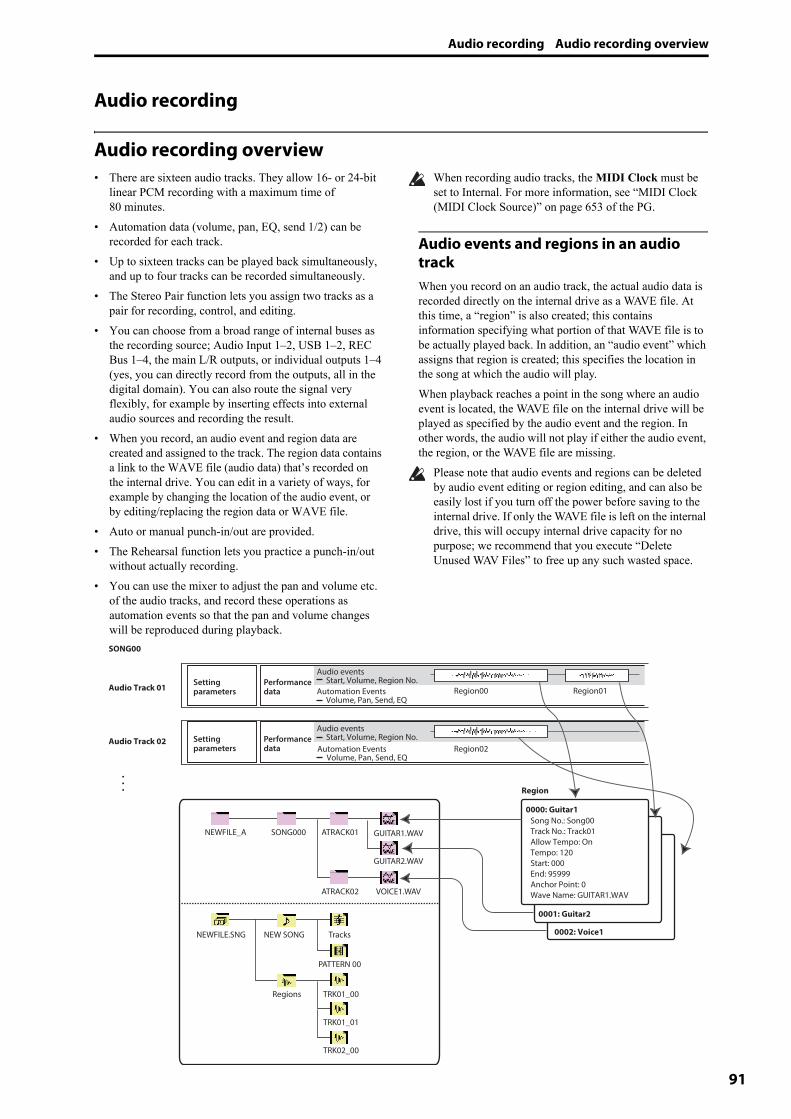
Audio recording Audio recording overview
91
Audio recording
Audio recording overview• There are sixteen audio tracks. They allow 16- or 24-bit
linear PCM recording with a maximum time of 80 minutes.
• Automation data (volume, pan, EQ, send 1/2) can be recorded for each track.
• Up to sixteen tracks can be played back simultaneously, and up to four tracks can be recorded simultaneously.
• The Stereo Pair function lets you assign two tracks as a pair for recording, control, and editing.
• You can choose from a broad range of internal buses as the recording source; Audio Input 1–2, USB 1–2, REC Bus 1–4, the main L/R outputs, or individual outputs 1–4 (yes, you can directly record from the outputs, all in the digital domain). You can also route the signal very flexibly, for example by inserting effects into external audio sources and recording the result.
• When you record, an audio event and region data are created and assigned to the track. The region data contains a link to the WAVE file (audio data) that’s recorded on the internal drive. You can edit in a variety of ways, for example by changing the location of the audio event, or by editing/replacing the region data or WAVE file.
• Auto or manual punch-in/out are provided.• The Rehearsal function lets you practice a punch-in/out
without actually recording.• You can use the mixer to adjust the pan and volume etc.
of the audio tracks, and record these operations as automation events so that the pan and volume changes will be reproduced during playback.
When recording audio tracks, the MIDI Clock must be set to Internal. For more information, see “MIDI Clock (MIDI Clock Source)” on page 653 of the PG.
Audio events and regions in an audio trackWhen you record on an audio track, the actual audio data is recorded directly on the internal drive as a WAVE file. At this time, a “region” is also created; this contains information specifying what portion of that WAVE file is to be actually played back. In addition, an “audio event” which assigns that region is created; this specifies the location in the song at which the audio will play.When playback reaches a point in the song where an audio event is located, the WAVE file on the internal drive will be played as specified by the audio event and the region. In other words, the audio will not play if either the audio event, the region, or the WAVE file are missing.
Please note that audio events and regions can be deleted by audio event editing or region editing, and can also be easily lost if you turn off the power before saving to the internal drive. If only the WAVE file is left on the internal drive, this will occupy internal drive capacity for no purpose; we recommend that you execute “Delete Unused WAV Files” to free up any such wasted space.
Audio Track 01
SONG00
Setting parameters
Region
Automation Events Volume, Pan, Send, EQ
Audio events Start, Volume, Region No.
Region00 Region01
0000: Guitar1
0001: Guitar2
0002: Voice1
Song No.: Song00Track No.: Track01 Allow Tempo: On Tempo: 120 Start: 000End: 95999 Anchor Point: 0Wave Name: GUITAR1.WAV
Setting parameters
Performance data
Performance data Automation Events
Volume, Pan, Send, EQ
Audio events Start, Volume, Region No.
NEWFILE.SNG NEW SONG Tracks
PATTERN 00
Regions TRK01_00
TRK01_01
TRK02_00
NEWFILE_A SONG000 ATRACK01 GUITAR1.WAV
VOICE1.WAV
GUITAR2.WAV
Region02Audio Track 02
ATRACK02
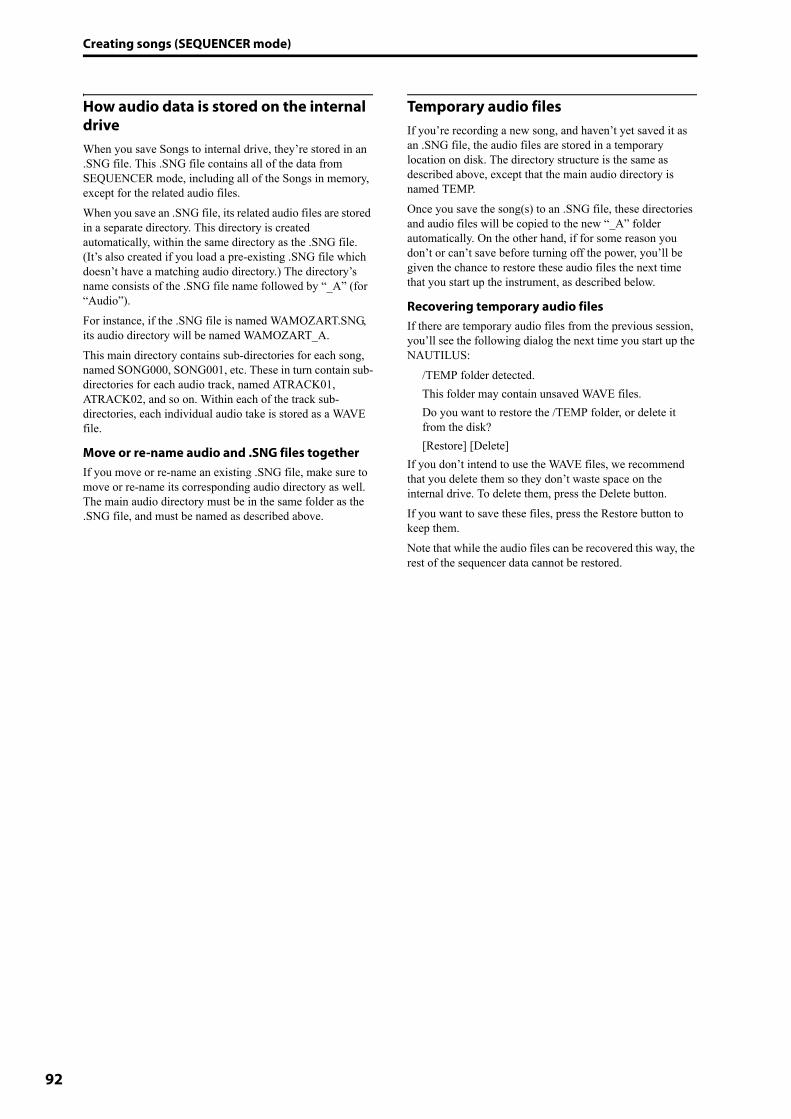
Creating songs (SEQUENCER mode)
92
How audio data is stored on the internal driveWhen you save Songs to internal drive, they’re stored in an .SNG file. This .SNG file contains all of the data from SEQUENCER mode, including all of the Songs in memory, except for the related audio files.When you save an .SNG file, its related audio files are stored in a separate directory. This directory is created automatically, within the same directory as the .SNG file. (It’s also created if you load a pre-existing .SNG file which doesn’t have a matching audio directory.) The directory’s name consists of the .SNG file name followed by “_A” (for “Audio”).For instance, if the .SNG file is named WAMOZART.SNG, its audio directory will be named WAMOZART_A.This main directory contains sub-directories for each song, named SONG000, SONG001, etc. These in turn contain sub-directories for each audio track, named ATRACK01, ATRACK02, and so on. Within each of the track sub-directories, each individual audio take is stored as a WAVE file.
Move or re-name audio and .SNG files togetherIf you move or re-name an existing .SNG file, make sure to move or re-name its corresponding audio directory as well. The main audio directory must be in the same folder as the .SNG file, and must be named as described above.
Temporary audio filesIf you’re recording a new song, and haven’t yet saved it as an .SNG file, the audio files are stored in a temporary location on disk. The directory structure is the same as described above, except that the main audio directory is named TEMP.Once you save the song(s) to an .SNG file, these directories and audio files will be copied to the new “_A” folder automatically. On the other hand, if for some reason you don’t or can’t save before turning off the power, you’ll be given the chance to restore these audio files the next time that you start up the instrument, as described below.
Recovering temporary audio filesIf there are temporary audio files from the previous session, you’ll see the following dialog the next time you start up the NAUTILUS:
/TEMP folder detected.This folder may contain unsaved WAVE files.Do you want to restore the /TEMP folder, or delete it from the disk?[Restore] [Delete]
If you don’t intend to use the WAVE files, we recommend that you delete them so they don’t waste space on the internal drive. To delete them, press the Delete button.If you want to save these files, press the Restore button to keep them.Note that while the audio files can be recovered this way, the rest of the sequencer data cannot be restored.
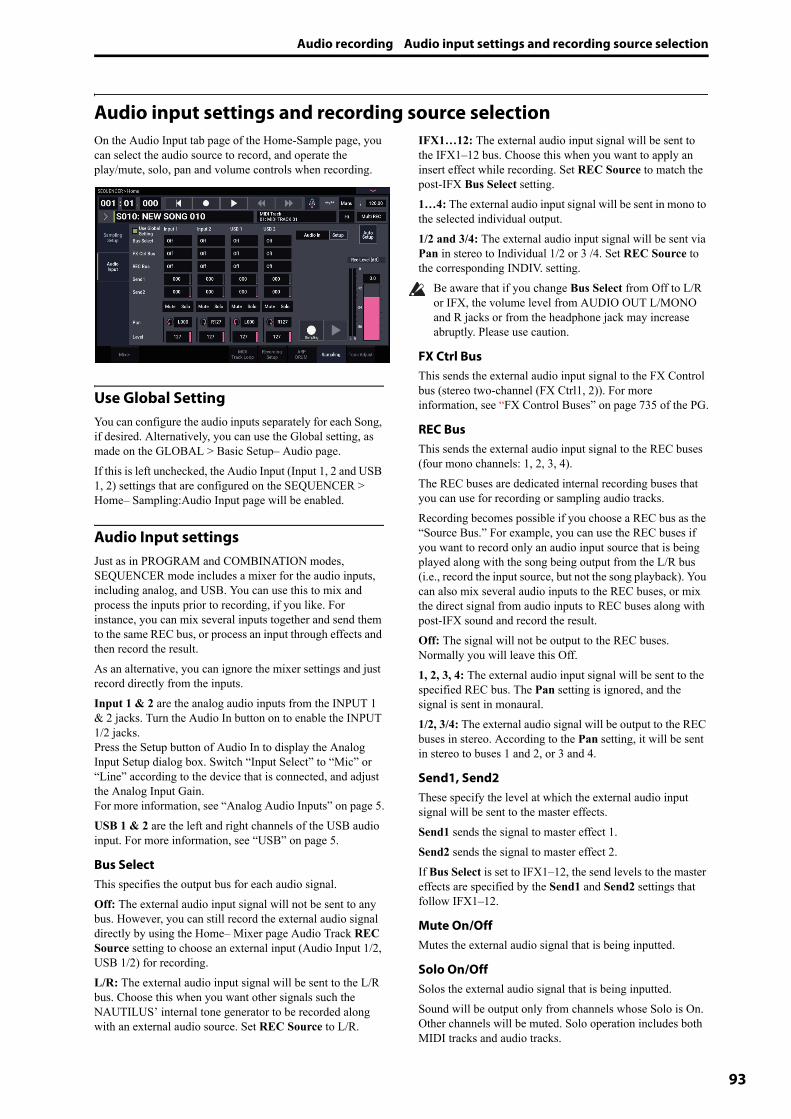
Audio recording Audio input settings and recording source selection
93
Audio input settings and recording source selectionOn the Audio Input tab page of the Home-Sample page, you can select the audio source to record, and operate the play/mute, solo, pan and volume controls when recording.
Use Global SettingYou can configure the audio inputs separately for each Song, if desired. Alternatively, you can use the Global setting, as made on the GLOBAL > Basic Setup– Audio page.If this is left unchecked, the Audio Input (Input 1, 2 and USB 1, 2) settings that are configured on the SEQUENCER > Home– Sampling:Audio Input page will be enabled.
Audio Input settingsJust as in PROGRAM and COMBINATION modes, SEQUENCER mode includes a mixer for the audio inputs, including analog, and USB. You can use this to mix and process the inputs prior to recording, if you like. For instance, you can mix several inputs together and send them to the same REC bus, or process an input through effects and then record the result.As an alternative, you can ignore the mixer settings and just record directly from the inputs.Input 1 & 2 are the analog audio inputs from the INPUT 1 & 2 jacks. Turn the Audio In button on to enable the INPUT 1/2 jacks.Press the Setup button of Audio In to display the Analog Input Setup dialog box. Switch “Input Select” to “Mic” or “Line” according to the device that is connected, and adjust the Analog Input Gain. For more information, see “Analog Audio Inputs” on page 5.USB 1 & 2 are the left and right channels of the USB audio input. For more information, see “USB” on page 5.
Bus SelectThis specifies the output bus for each audio signal.Off: The external audio input signal will not be sent to any bus. However, you can still record the external audio signal directly by using the Home– Mixer page Audio Track REC Source setting to choose an external input (Audio Input 1/2, USB 1/2) for recording.L/R: The external audio input signal will be sent to the L/R bus. Choose this when you want other signals such the NAUTILUS’ internal tone generator to be recorded along with an external audio source. Set REC Source to L/R.
IFX1…12: The external audio input signal will be sent to the IFX1–12 bus. Choose this when you want to apply an insert effect while recording. Set REC Source to match the post-IFX Bus Select setting.1…4: The external audio input signal will be sent in mono to the selected individual output.1/2 and 3/4: The external audio input signal will be sent via Pan in stereo to Individual 1/2 or 3 /4. Set REC Source to the corresponding INDIV. setting.
Be aware that if you change Bus Select from Off to L/R or IFX, the volume level from AUDIO OUT L/MONO and R jacks or from the headphone jack may increase abruptly. Please use caution.
FX Ctrl Bus This sends the external audio input signal to the FX Control bus (stereo two-channel (FX Ctrl1, 2)). For more information, see “FX Control Buses” on page 735 of the PG.
REC BusThis sends the external audio input signal to the REC buses (four mono channels: 1, 2, 3, 4).The REC buses are dedicated internal recording buses that you can use for recording or sampling audio tracks.Recording becomes possible if you choose a REC bus as the “Source Bus.” For example, you can use the REC buses if you want to record only an audio input source that is being played along with the song being output from the L/R bus (i.e., record the input source, but not the song playback). You can also mix several audio inputs to the REC buses, or mix the direct signal from audio inputs to REC buses along with post-IFX sound and record the result.Off: The signal will not be output to the REC buses. Normally you will leave this Off.1, 2, 3, 4: The external audio input signal will be sent to the specified REC bus. The Pan setting is ignored, and the signal is sent in monaural.1/2, 3/4: The external audio signal will be output to the REC buses in stereo. According to the Pan setting, it will be sent in stereo to buses 1 and 2, or 3 and 4.
Send1, Send2These specify the level at which the external audio input signal will be sent to the master effects.Send1 sends the signal to master effect 1.Send2 sends the signal to master effect 2.If Bus Select is set to IFX1–12, the send levels to the master effects are specified by the Send1 and Send2 settings that follow IFX1–12.
Mute On/OffMutes the external audio signal that is being inputted.
Solo On/OffSolos the external audio signal that is being inputted.Sound will be output only from channels whose Solo is On. Other channels will be muted. Solo operation includes both MIDI tracks and audio tracks.

Creating songs (SEQUENCER mode)
94
PanThis specifies the panning of each external audio input signal. If you are inputting a stereo audio source, you will normally pan the inputs to L000 and R127 respectively.
LevelThis controls the level of the external audio signal. The default is 127.Note: The analog audio signals from Audio Inputs 1 & 2 are converted into digital form by an A/D converter. The meter to the left of the Level fader shows the signal level immedi-ately after conversion, and before the Level control. Level sets the volume of the signal immediately after the meter.If the sound is distorted even though the Level setting is very low, see “Tips for eliminating distortion when using the analog inputs” on page 97.
Avoiding extraneous noiseIf cables are connected to any of the audio inputs (analog or USB), any noise carried by the cables will enter into the NAUTILUS mixer structure. This may include hiss, hum, and other audio noise.To avoid noise from unused audio inputs, either:
• Set the input’s Level to 0or
• Set all of the bus assignments to Off, including Bus Select (IFX/Indiv. Out Assign), REC Bus, and FX Control BusIf no audio cables are connected to the analog audio inputs, the input signals are forced to zero, preventing any additional noise.
Audio Track MixerYou can specify the audio source to record from, and change the Play/Mute status, Solo status, pan, and volume for playback.
REC SourceThis selects the source that will be recorded on the track. The signal of the bus line you specify here will be recorded. If you set the Track Select field to Audio Track, you will be able to monitor the REC Source of that track.The options will differ slightly depending on whether or not Stereo Pair is enabled.Audio Input 1, 2, 1/2, or USB 1, 2, 1/2: Choose these to directly record the audio input from the analog, or USB inputs. The inputs will be recorded directly without passing through the L/R bus, REC buses, or Individual buses. None of the Audio Input settings will affect the recorded signal; this includes Bus (IFX/Indiv), Pan, Level, Solo, and Play/Mute. See the diagram “REC Source = Audio Input 1, 2, 1/2.”If Stereo Pair is on and Audio Input 1/2 is selected, Audio Input 1 will be input to the odd-numbered track, and Audio Input 2 will be input to the even-numbered track. Similarly, USB 1/2 will be input to the odd-numbered and even-numbered tracks respectively.L, R, L/R: The L/R bus after passing through TFX 1 and 2 will be recorded. Choose this if you want to record an external audio signal being sent to the L/R bus, or the sound being produced by the NAUTILUS (and sent to the L/R bus) in response to sequencer playback, keyboard playing, or MIDI input.If Stereo Pair is on, L is sent to odd-numbered tracks, and R is sent to even-numbered tracks.
Track: REC (Mono)Track: REC (Mono) Stereo
Level Pan
Insert Effects
CLIP !
L/MONOR
AUDIO OUTPUTHEADPHONES
Insert Effects
L/RBUS
REC1/2
REC3/4
Indiv.1/2
Sequencer PlaybackKeyboard
Level Pan
Insert Effects
Audio Input 1
Audio Input 2
REC Source = Audio Input 1, 2, 1/2
[x] Source Direct Solo
TotalEffects
Master Effects
Recording
Monitor
BUS = L/R or IFX1-12
3/4
See the signal flowchart on the page 449 of the PG for other REC sources.

Audio recording Recording procedure
95
REC 1, 2, 1/2, REC 3, 4, 3/4: The REC 1/2 or REC 3/4 buses will be recorded. Choose this if you want to record only the audio input while hearing the sequencer playback and your keyboard playing from the L/R outputs. You can also mix several audio inputs to the REC buses, or use the REC buses to mix the direct sound from the audio inputs with the sound processed by insert effects, and record the result.If Stereo Pair is on, REC bus 1 (3) is sent to odd-numbered tracks, and REC bus 2 (4) is sent to even-numbered tracks.Indiv.1…4, Indiv.1/2 and 3/4: This allows you to record the signal at the individual outputs directly, without the need for an external cable. Similarly to using the REC buses, you can choose this when you want to monitor the L/R output while recording a different signal.If Stereo Pair is on and you’ve selected Indiv.1/2, the Indiv. bus 1 will be sent to odd-numbered tracks, and Indiv. bus 2 will be sent to even-numbered tracks.
Mute/RecUse this to mute an audio track, or to select the recording tracks for multi-track recording. During playback, or for single-track recording (normal recording), it is possible only to select Mute On or Off (Play mode) for tracks (playback tracks) other than the recording track. For multi-track recording, tracks can be set to Mute On or Off (Play mode), or Rec. The setting will alternate each time you press the Mute/Rec button.
Solo On/OffThis turns the Solo function on/off.
PanThis specifies the pan of audio track.
VolumeSets the volume of audio tracks 1–16.
Recording procedure
Recording SetupThese parameters specify how audio tracks will be recorded.For details on each recording method, refer to the examples for MIDI tracks. (See “Recording setup” on page 79)However, this differs from MIDI track recording as follows.
OverwriteWhen recording for the first time, you will normally select this method.To begin recording, press the SEQUENCER REC button and then the SEQUENCER START/ STOP button. To stop recording, press the SEQUENCER START/STOP button once again.Audio Track Audio Events: Only the measures you recorded will be overwritten; the data in subsequent measures will remain unchanged.Audio Track Automation Events: All data following the measure at which you begin recording will be erased.
OverdubSelect this method when you wish to add Audio Track Automation Event data to a previously-recorded track. To begin recording, press the SEQUENCER REC button and then the SEQUENCER START/STOP button. To stop recording, press the SEQUENCER START/STOP button once again.
Audio Track Audio Events: As with Overwrite, only the measures you recorded will be overwritten; the data in subsequent measures will remain unchanged.Audio Track Automation Events: The previously-recorded data will remain, and the newly-recorded data will be added to it.
Manual Punch InSelect this method when you wish to use the SEQUENCER REC button or a foot switch to re-record selected portions of a previously-recorded track.
Auto Punch InSelect this method when you wish to automatically re-record selected portions of a previously-recorded track.For both Manual Punch In and Auto Punch In, recording will occur as follows.Audio Track Audio Events, Audio Track Automation Events: Only the measures you recorded will be overwritten; the data in subsequent measures will remain unchanged.
Loop All TracksChoose this method if you want to repeatedly record track automation events over a specified region of measures, adding data at each pass. Only automation events can be recorded. You can use “Remove Data” to remove audio track automation events.Audio events cannot be recorded. This means that if you set “Track Select” to Audio Track, and turn “Automation Only” Off, you will be unable to start recording.
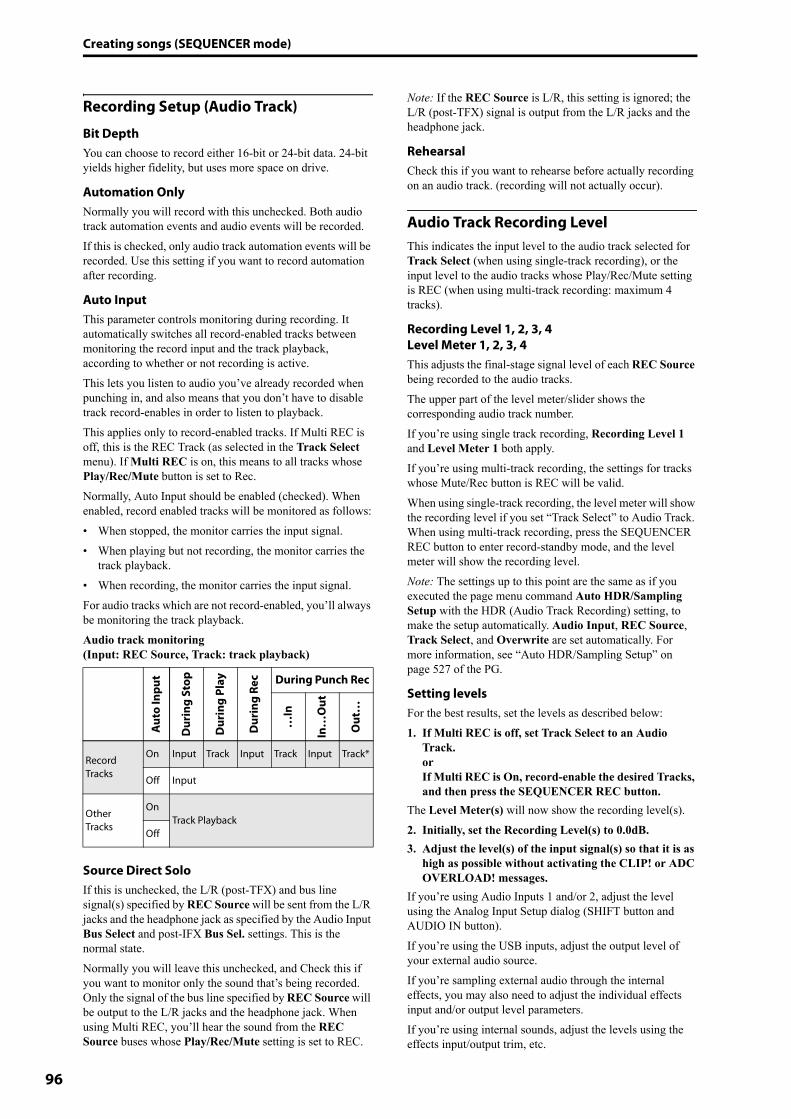
Creating songs (SEQUENCER mode)
96
Recording Setup (Audio Track)
Bit DepthYou can choose to record either 16-bit or 24-bit data. 24-bit yields higher fidelity, but uses more space on drive.
Automation OnlyNormally you will record with this unchecked. Both audio track automation events and audio events will be recorded.If this is checked, only audio track automation events will be recorded. Use this setting if you want to record automation after recording.
Auto InputThis parameter controls monitoring during recording. It automatically switches all record-enabled tracks between monitoring the record input and the track playback, according to whether or not recording is active. This lets you listen to audio you’ve already recorded when punching in, and also means that you don’t have to disable track record-enables in order to listen to playback.This applies only to record-enabled tracks. If Multi REC is off, this is the REC Track (as selected in the Track Select menu). If Multi REC is on, this means to all tracks whose Play/Rec/Mute button is set to Rec.Normally, Auto Input should be enabled (checked). When enabled, record enabled tracks will be monitored as follows:• When stopped, the monitor carries the input signal.• When playing but not recording, the monitor carries the
track playback.• When recording, the monitor carries the input signal.For audio tracks which are not record-enabled, you’ll always be monitoring the track playback.Audio track monitoring(Input: REC Source, Track: track playback)
Source Direct SoloIf this is unchecked, the L/R (post-TFX) and bus line signal(s) specified by REC Source will be sent from the L/R jacks and the headphone jack as specified by the Audio Input Bus Select and post-IFX Bus Sel. settings. This is the normal state.Normally you will leave this unchecked, and Check this if you want to monitor only the sound that’s being recorded. Only the signal of the bus line specified by REC Source will be output to the L/R jacks and the headphone jack. When using Multi REC, you’ll hear the sound from the REC Source buses whose Play/Rec/Mute setting is set to REC.
Note: If the REC Source is L/R, this setting is ignored; the L/R (post-TFX) signal is output from the L/R jacks and the headphone jack.
RehearsalCheck this if you want to rehearse before actually recording on an audio track. (recording will not actually occur).
Audio Track Recording LevelThis indicates the input level to the audio track selected for Track Select (when using single-track recording), or the input level to the audio tracks whose Play/Rec/Mute setting is REC (when using multi-track recording: maximum 4 tracks).
Recording Level 1, 2, 3, 4Level Meter 1, 2, 3, 4This adjusts the final-stage signal level of each REC Source being recorded to the audio tracks.The upper part of the level meter/slider shows the corresponding audio track number.If you’re using single track recording, Recording Level 1 and Level Meter 1 both apply.If you’re using multi-track recording, the settings for tracks whose Mute/Rec button is REC will be valid.When using single-track recording, the level meter will show the recording level if you set “Track Select” to Audio Track. When using multi-track recording, press the SEQUENCER REC button to enter record-standby mode, and the level meter will show the recording level.Note: The settings up to this point are the same as if you executed the page menu command Auto HDR/Sampling Setup with the HDR (Audio Track Recording) setting, to make the setup automatically. Audio Input, REC Source, Track Select, and Overwrite are set automatically. For more information, see “Auto HDR/Sampling Setup” on page 527 of the PG.
Setting levelsFor the best results, set the levels as described below:1. If Multi REC is off, set Track Select to an Audio
Track.orIf Multi REC is On, record-enable the desired Tracks, and then press the SEQUENCER REC button.
The Level Meter(s) will now show the recording level(s). 2. Initially, set the Recording Level(s) to 0.0dB.3. Adjust the level(s) of the input signal(s) so that it is as
high as possible without activating the CLIP! or ADC OVERLOAD! messages.
If you’re using Audio Inputs 1 and/or 2, adjust the level using the Analog Input Setup dialog (SHIFT button and AUDIO IN button).If you’re using the USB inputs, adjust the output level of your external audio source.If you’re sampling external audio through the internal effects, you may also need to adjust the individual effects input and/or output level parameters.If you’re using internal sounds, adjust the levels using the effects input/output trim, etc.
Aut
o In
put
Dur
ing
Stop
Dur
ing
Play
Dur
ing
Rec During Punch Rec
…In
In…
Out
Out
…
Record Tracks
On Input Track Input Track Input Track*
Off Input
Other Tracks
OnTrack Playback
Off

Audio recording Recording procedure
97
4. If the level is still not high enough, increase the Recording Level using the on-screen slider.
Again, the goal is to get the level as high as possible without activating the CLIP! or ADC OVERLOAD! messages.
Tips for eliminating distortion when using the analog inputsIf sound from the analog inputs is distorted, but the CLIP! message doesn’t appear, it’s possible that distortion is occurring at the analog input stage, or that distortion is being caused by the settings of the internal effects.If the “ADC OVERLOAD!” message appears above the Recording Level meters, the distortion is due to excessive levels at the input. In this case, lower the output level of the external audio source, or adjust using the Analog Input Setup dialog (SHIFT button and AUDIO IN button) so that this message does not appear.If there is distortion, but the “ADC OVERLOAD!” message does not appear, it’s possible that the distortion is being caused by the settings of the internal effects. To solve this problem, either lower the input Level, or adjust the effects settings (such as changing the individual effect Input Trim parameters).
Examples of audio track recording
Recording an external input on audio track 1In this example, we’ll explain how a guitar connected to the Audio Input 1 jack can be recorded on audio track 1.
Recording and playback on an audio track can occur until the end of the master track. You cannot record for longer than 80 minutes.
Connect your guitar1. Connect your guitar to the rear panel Audio Input 1
jack.Select the LINE position using the Analog Input Setup dialog (SHIFT button and AUDIO IN button), and set the Analog Input Gain at about the center.
If you connect a guitar with passive pickups (i.e., a guitar that does not contain a preamp), you will be unable to sample it at the correct level because of the impedance mismatch. Such guitars should be routed through a preamp or an effect unit first, and then connected to the NAUTILUS.
Setup2. In the Home– Audio Input Sampling page, set the
Audio Input parameters as described below.Use Global setting OffAudio In: On– INPUT 1 –Bus Select: OffPan: L000Level: 127REC Bus: OffNote: The meter to the left of the Level fader shows the signal level immediately after A/D conversion, before the Level control. Changing the Level will not affect the meter.
In the Home– Mixer page Audio Track, use REC Source to select Audio Input 1 (In 1), so that the signal from Audio Input 1 will be recorded directly on audio track 1.Audio Track 1 REC Source: Audio Input 1 (In 1)Audio Track 1 Mute/REC: REC
Go to the IFX– Audio Routing1 page.Set the output for Audio Track 1 as follows.Bus Select (IFX/Indiv. Out Assign): L/RSend1 (MFX1) and Send2 (MFX2): 000
Guitar
Effect unit
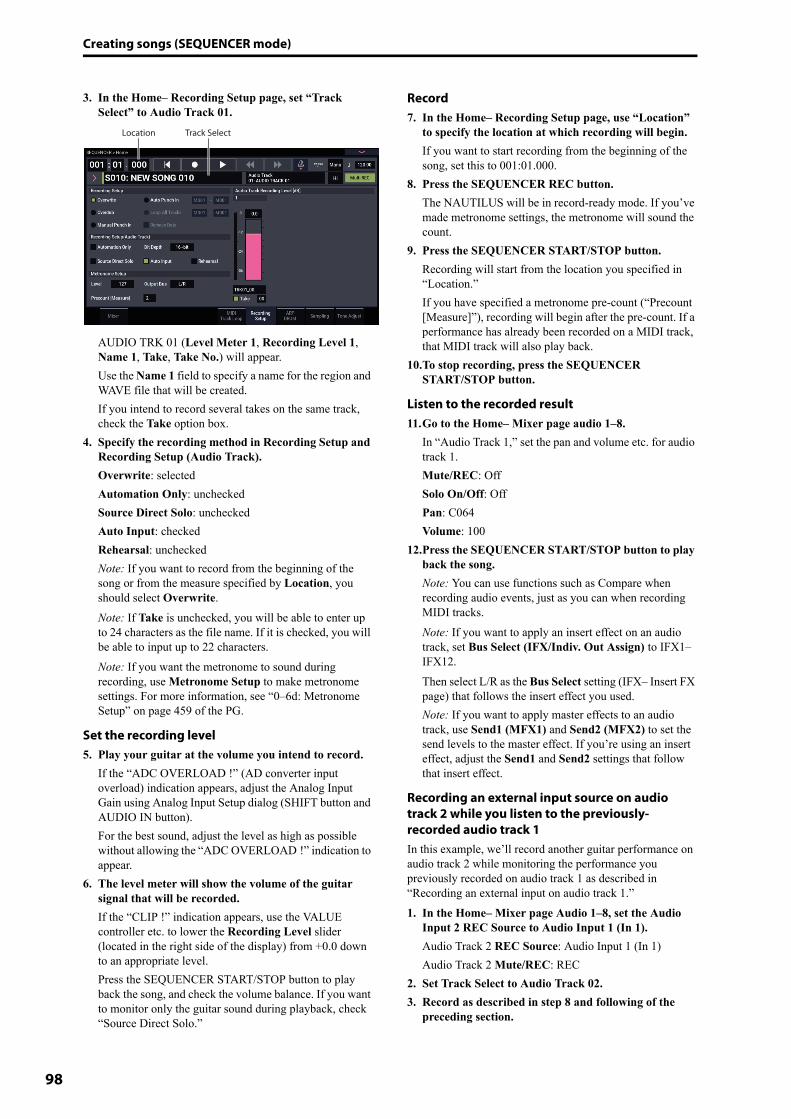
Creating songs (SEQUENCER mode)
98
3. In the Home– Recording Setup page, set “Track Select” to Audio Track 01.
AUDIO TRK 01 (Level Meter 1, Recording Level 1, Name 1, Take, Take No.) will appear.Use the Name 1 field to specify a name for the region and WAVE file that will be created.If you intend to record several takes on the same track, check the Take option box.
4. Specify the recording method in Recording Setup and Recording Setup (Audio Track).Overwrite: selectedAutomation Only: uncheckedSource Direct Solo: uncheckedAuto Input: checkedRehearsal: uncheckedNote: If you want to record from the beginning of the song or from the measure specified by Location, you should select Overwrite.Note: If Take is unchecked, you will be able to enter up to 24 characters as the file name. If it is checked, you will be able to input up to 22 characters.Note: If you want the metronome to sound during recording, use Metronome Setup to make metronome settings. For more information, see “0–6d: Metronome Setup” on page 459 of the PG.
Set the recording level5. Play your guitar at the volume you intend to record.
If the “ADC OVERLOAD !” (AD converter input overload) indication appears, adjust the Analog Input Gain using Analog Input Setup dialog (SHIFT button and AUDIO IN button).For the best sound, adjust the level as high as possible without allowing the “ADC OVERLOAD !” indication to appear.
6. The level meter will show the volume of the guitar signal that will be recorded.If the “CLIP !” indication appears, use the VALUE controller etc. to lower the Recording Level slider (located in the right side of the display) from +0.0 down to an appropriate level.Press the SEQUENCER START/STOP button to play back the song, and check the volume balance. If you want to monitor only the guitar sound during playback, check “Source Direct Solo.”
Record7. In the Home– Recording Setup page, use “Location”
to specify the location at which recording will begin.If you want to start recording from the beginning of the song, set this to 001:01.000.
8. Press the SEQUENCER REC button.The NAUTILUS will be in record-ready mode. If you’ve made metronome settings, the metronome will sound the count.
9. Press the SEQUENCER START/STOP button.Recording will start from the location you specified in “Location.”If you have specified a metronome pre-count (“Precount [Measure]”), recording will begin after the pre-count. If a performance has already been recorded on a MIDI track, that MIDI track will also play back.
10.To stop recording, press the SEQUENCER START/STOP button.
Listen to the recorded result11.Go to the Home– Mixer page audio 1–8.
In “Audio Track 1,” set the pan and volume etc. for audio track 1.Mute/REC: OffSolo On/Off: OffPan: C064Volume: 100
12.Press the SEQUENCER START/STOP button to play back the song.Note: You can use functions such as Compare when recording audio events, just as you can when recording MIDI tracks.Note: If you want to apply an insert effect on an audio track, set Bus Select (IFX/Indiv. Out Assign) to IFX1–IFX12.Then select L/R as the Bus Select setting (IFX– Insert FX page) that follows the insert effect you used.Note: If you want to apply master effects to an audio track, use Send1 (MFX1) and Send2 (MFX2) to set the send levels to the master effect. If you’re using an insert effect, adjust the Send1 and Send2 settings that follow that insert effect.
Recording an external input source on audio track 2 while you listen to the previously-recorded audio track 1In this example, we’ll record another guitar performance on audio track 2 while monitoring the performance you previously recorded on audio track 1 as described in “Recording an external input on audio track 1.”1. In the Home– Mixer page Audio 1–8, set the Audio
Input 2 REC Source to Audio Input 1 (In 1).Audio Track 2 REC Source: Audio Input 1 (In 1)Audio Track 2 Mute/REC: REC
2. Set Track Select to Audio Track 02.3. Record as described in step 8 and following of the
preceding section.
Location Track Select
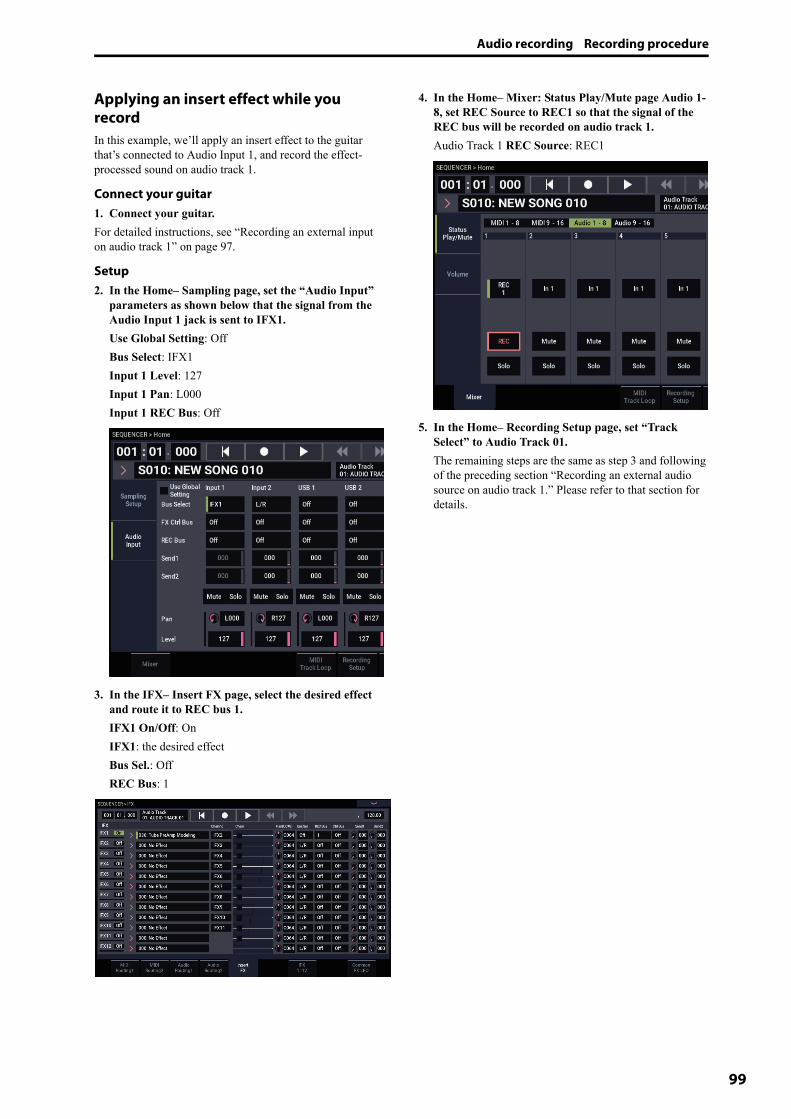
Audio recording Recording procedure
99
Applying an insert effect while you recordIn this example, we’ll apply an insert effect to the guitar that’s connected to Audio Input 1, and record the effect-processed sound on audio track 1.
Connect your guitar1. Connect your guitar.For detailed instructions, see “Recording an external input on audio track 1” on page 97.
Setup2. In the Home– Sampling page, set the “Audio Input”
parameters as shown below that the signal from the Audio Input 1 jack is sent to IFX1.Use Global Setting: OffBus Select: IFX1Input 1 Level: 127Input 1 Pan: L000Input 1 REC Bus: Off
3. In the IFX– Insert FX page, select the desired effect and route it to REC bus 1.IFX1 On/Off: OnIFX1: the desired effectBus Sel.: OffREC Bus: 1
4. In the Home– Mixer: Status Play/Mute page Audio 1-8, set REC Source to REC1 so that the signal of the REC bus will be recorded on audio track 1.Audio Track 1 REC Source: REC1
5. In the Home– Recording Setup page, set “Track Select” to Audio Track 01.The remaining steps are the same as step 3 and following of the preceding section “Recording an external audio source on audio track 1.” Please refer to that section for details.
Creating songs (SEQUENCER mode)
100
Punch-in recording an external input source on an audio trackIn this example, we’ll show how to punch-in record a portion of the track you recorded in “Recording an external input on audio track 1.”Do not change the settings below—use them as they are.• “Audio Input” (Home– Sampling page)• “Recording Setup(Audio Track)” (Home– Recording
Setup page)• “REC Source” (Home– Mixer page)
Setup1. In the Home– Recording Setup page, make sure that
Audio Track 01 is selected for the “Track Select” parameter.
2. Use Recording Setup to specify how recording will start.In this example, choose punch-in recording.Auto Punch In: onM***–M***: Specify the range of measures for which you want to record.AUDIO TRK 01 Name, Take, Take No.: Specify the region and wave file name that you want to record.Note: If you set Recording Setup to Auto Punch In and set “M***–M***” to the desired range of measures, playback will occur until that range of measures, and then only the specified range of measures will be recorded.If you set Recording Setup to Manual Punch In, the measures you specify by pressing the SEQUENCER REC button or foot switch will be recorded. In this case, press the SEQUENCER START/STOP button to play back the song. When you reach the measure at which you want to start recording, press the SEQUENCER REC button or the foot switch to begin recording. When you reach the measure at which you want to stop recording, press the REC button or foot switch once again; recording will end.
RehearseIf desired, you can simulate the action of recording without actually recording. This will function just as if you were recording, but no audio event, region, or WAVE file will be created.3. In “Recording Setup (Audio Track),” check the
“Rehearsal” option.4. Use “Location” to specify the location at which you
want to start recording. Set this several measures earlier than the region you specified for “M***–M***”.
5. Press the SEQUENCER REC button.You will enter record-ready mode.Once you press the SEQUENCER REC button, you will be unable to change the audio track selection in “Track Select.”
6. Press the SEQUENCER START/STOP button.Playback will begin from the measure specified by “Location,” and simulated recording will occur only in the range of measures specified by “M***-M***”. Then playback will resume, and will continue to the end of the song.Note: If the “Recording Setup (Audio Track)” parameter “Auto Input” is Off, you will always be able to hear the REC Source. For more information, see “Auto Input” on page 457 of the PG.
7. Press the SEQUENCER START/STOP button to stop recording.
8. In “Recording Setup (Audio Track),” uncheck the “Rehearsal” option.
Record9. Use “Location” to specify the location at which you
want to start recording. Set this several measures earlier than the region you specified for “M***–M***”.
10.Press the SEQUENCER REC button.You will enter record-ready mode.Once you press the SEQUENCER REC button, you will be unable to change the audio track selection in “Track Select.”
11.Press the SEQUENCER START/STOP button.Playback will begin from the measure specified by “Location,” and recording will occur only in the range of measures specified by “M***–M***”. Then playback will resume, and will continue to the end of the song.Note: If the “Recording Setup (Audio Track)” parameter “Auto Input” is Off, you will always be able to hear the REC Source.
12.Press the SEQUENCER START/STOP button to stop recording.
Listen to the recorded result13.Press the SEQUENCER START/STOP button to play
back the song.Make output settings for the audio track as described under “Listen to the recorded result” on page 98.
14.Press the SEQUENCER START/STOP button to stop playback.
Compare the recorded result• Select the “Compare” page menu command to play back.
The audio track prior to punch-in recording will play back.
• Execute the “Compare” page menu command once more to play back.The audio track following punch-in recording will play back.
Audio recording Other variations of audio track recording
101
Other variations of audio track recording
Bouncing audio tracksBouncing lets you combine two or more tracks into either a single mono track, or a stereo pair.In this example, we’ll show how audio tracks 1 and 2 can be bounced to audio track 3.Before you proceed, you’ll need to record onto audio tracks 1 and 2. To record on audio track 2, make settings as described under “Recording Setup” on page 95, but in the Home– Mixer page, set Audio Track 2 REC Source to REC1, and in the Home– Recording Setup page, set “Track Select” to Audio Track 02.
Setup1. In the Home– Mixer page, set up both audio tracks 1
and 2 as shown below:Mute/REC: OffSolo On/Off: OnPan: L000Volume: 127Note: By turning on Solo for both AUDIO 1 and AUDIO 2, you are specifying that only these audio tracks will be heard and recorded.
2. In the IFX– Audio Routing 1 page, set up both audio tracks 1 and 2 as shown below:Bus Select (IFX/Indiv. Out Assign): L/RSend 1 (MFX1) and Send 2 (MFX2): 000Note: If you want to apply insert effects to the audio tracks, set Bus Sel. (IFX/Indiv. Out Assign) to your choice of IFX1–IFX12. Then choose L/R for the Bus Select setting (IFX– Insert FX page) that follows the insert effect you’re using.Note: If you want to apply master effects to an audio track, use “Send 1 (MFX1)” and “Send 2 (MFX2)” to adjust the send levels to the master effects. If you are using an insert effect on the audio track, adjust the Send1 and Send2 that follow the insert effect you’re using.
3. Press the SEQUENCER START/STOP button to play back the song, and adjust the balance of the audio track 1 and 2 output levels.The output level of each audio track is adjusted in the Home– Mixer page by the audio track 1 and audio track 2 Volume setting.When you’ve finished making adjustments, stop playback.
4. In the Home– Recording Setup page, use “Track Select” to select Audio Track 03.
5. In Recording Setup, Recording Setup (Audio Track), specify the desired recording method.– Recording Setup –Overwrite: on– Recording Setup (Audio Track) –Automation Only: uncheckedSource Direct Solo: uncheckedAuto Input: checkedRehearsal: unchecked
– Audio TRK 03 –Name, Take, Take No.: Specify the desired region and WAVE filename to be recorded.Note: The settings up to this point are the same as if you used the page menu command Auto HDR/Sampling Setup to execute Bounce Audio Track with the following settings. For more information, see “Bounce Audio Track” on page 528 of the PG.Mode: MonoFrom: Audio Track 01: checkedAudio Track 02: checkedTo: Audio Track 03
6. In the Home– Mixer page, set REC Source so that L will be recorded on audio track 3.Audio track 3 REC Source: LWhen bounce-recording audio tracks, turn the metronome off (Metronome Setup “Sound”: Off).
Record7. Set “Location” to the beginning of the song (001:
01.000).8. Press the SEQUENCER REC button.
You will be in record-ready mode.9. Press the SEQUENCER START/STOP button.
Playback will begin, and bounce-recording will also begin simultaneously.When the audio tracks have finished playing back, recording will also end. Song playback will also end automatically.
Listen to the recorded result10.In the Home– Mixer page, mute the playback of both
audio tracks 1 and 2.Mute/REC: OnSolo On/Off: Off
11.Press the SEQUENCER START/STOP button to play back the song.Make output settings for audio track 3 as described in “Listen to the recorded result” on page 98.
12.Press the SEQUENCER START/STOP button to stop playback.If you want to create a WAVE file on the internal drive from a song that includes audio tracks, see “Resampling a song to create a Wave file” on page 149.
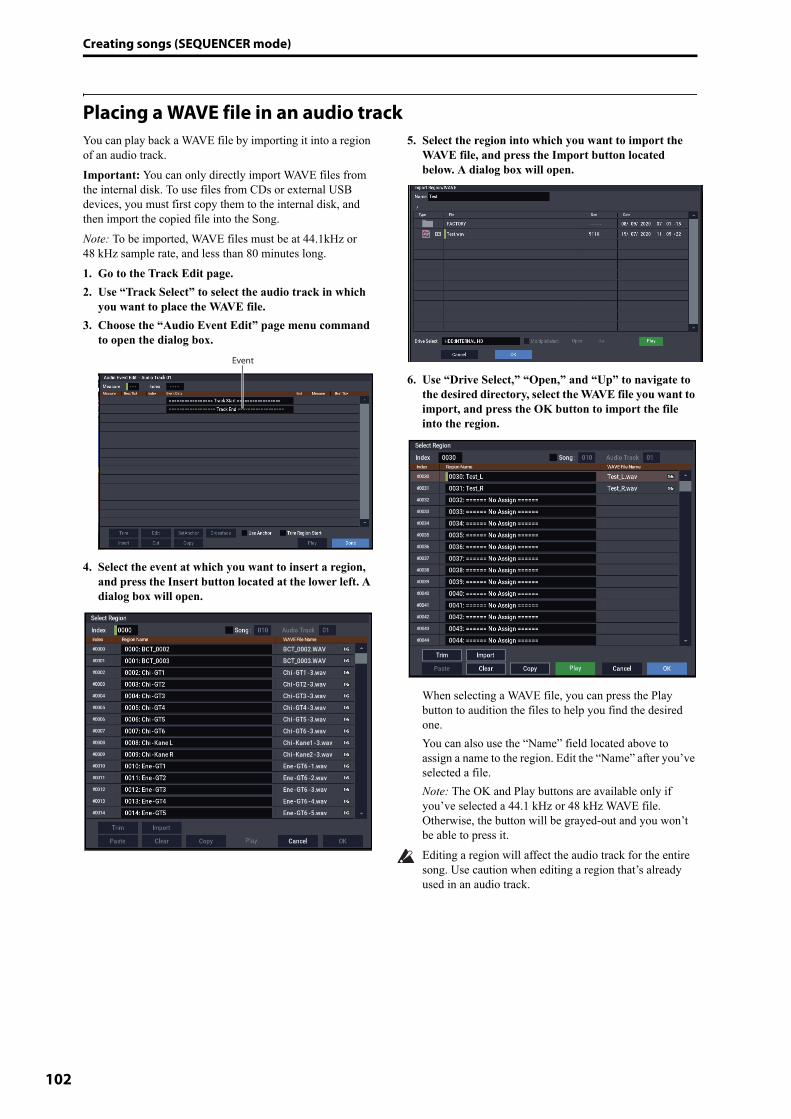
Creating songs (SEQUENCER mode)
102
Placing a WAVE file in an audio trackYou can play back a WAVE file by importing it into a region of an audio track.Important: You can only directly import WAVE files from the internal disk. To use files from CDs or external USB devices, you must first copy them to the internal disk, and then import the copied file into the Song.Note: To be imported, WAVE files must be at 44.1kHz or 48 kHz sample rate, and less than 80 minutes long.1. Go to the Track Edit page.2. Use “Track Select” to select the audio track in which
you want to place the WAVE file.3. Choose the “Audio Event Edit” page menu command
to open the dialog box.
4. Select the event at which you want to insert a region, and press the Insert button located at the lower left. A dialog box will open.
5. Select the region into which you want to import the WAVE file, and press the Import button located below. A dialog box will open.
6. Use “Drive Select,” “Open,” and “Up” to navigate to the desired directory, select the WAVE file you want to import, and press the OK button to import the file into the region.
When selecting a WAVE file, you can press the Play button to audition the files to help you find the desired one.You can also use the “Name” field located above to assign a name to the region. Edit the “Name” after you’ve selected a file.Note: The OK and Play buttons are available only if you’ve selected a 44.1 kHz or 48 kHz WAVE file. Otherwise, the button will be grayed-out and you won’t be able to press it.Editing a region will affect the audio track for the entire song. Use caution when editing a region that’s already used in an audio track.
Event
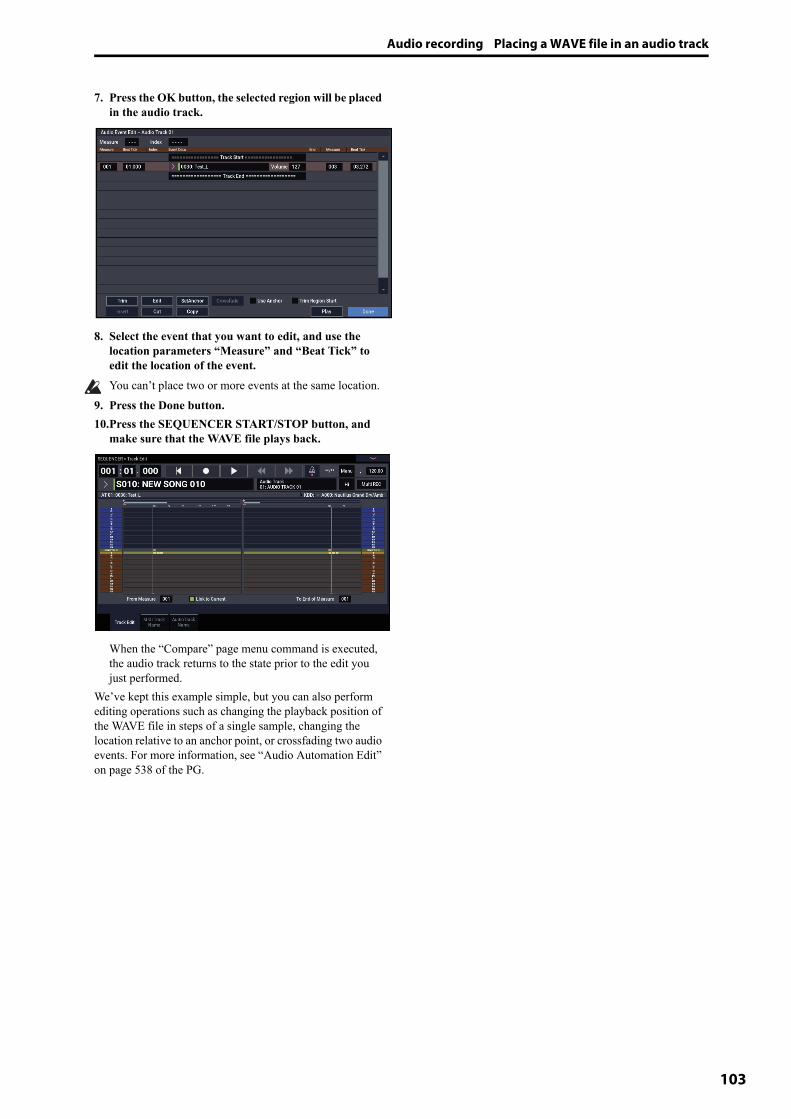
Audio recording Placing a WAVE file in an audio track
103
7. Press the OK button, the selected region will be placed in the audio track.
8. Select the event that you want to edit, and use the location parameters “Measure” and “Beat Tick” to edit the location of the event.You can’t place two or more events at the same location.
9. Press the Done button.10.Press the SEQUENCER START/STOP button, and
make sure that the WAVE file plays back.
When the “Compare” page menu command is executed, the audio track returns to the state prior to the edit you just performed.
We’ve kept this example simple, but you can also perform editing operations such as changing the playback position of the WAVE file in steps of a single sample, changing the location relative to an anchor point, or crossfading two audio events. For more information, see “Audio Automation Edit” on page 538 of the PG.

Creating songs (SEQUENCER mode)
104
Song editingYou can apply a variety of editing operations to Songs, MIDI Tracks, and Audio Tracks, as described below.
SongsInitialize Song: This command erases all data in the current song, and restores all parameters to their default states. For more information, see “Initialize Song,” as described on page 522 of the PG.Copy From Song: This command copies all of the setting data and musical data from the specified song to the currently selected song. For more information, see “Copy From Song” on page 522 of the PG.FF/REW Speed: This allows you to set the speed at which fast-forward or rewind will occur when you press the FF or REW buttons. For more information, see “FF/REW Speed” on page 523 of the PG.GM Initialize: This command transmits a GM System On message to the SEQUENCER mode, resetting all MIDI tracks to the GM settings. For more information, see “GM Initialize” on page 523 of the PG.Bounce All Tracks To Disk: This command records all tracks in the song to a single stereo WAVE file. For more information, see “Bounce All Tracks To Disk” on page 532 of the PG.Set Song Length: This command changes the length of the specified song. When it is executed, the length of the master track will change, and the number of measures played will change. For more information, see “Set Song Length” on page 538 of the PG.
Auto HDR/Sampling SetupThis command walks you through making the appropriate settings for various common operations, including disk recording, audio track bouncing, and sampling/resampling (in-track sampling, etc.). For more information, see “Auto HDR/Sampling Setup” on page 527 of the PG.Initialize: Sets audio recording and sampling parameters to their default values.HDR (Audio Track Recording): Makes the necessary settings for recording external audio, such as guitars or vocals.Bounce Audio Track: Makes the necessary settings for bounce-recording audio tracks.2ch Mix: Use this setting when you want to resample the completed song to create a two-channel stereo WAVE file.Resample SEQ Play: Makes settings for resampling.In-Track Sampling: Makes settings for sampling external audio using In-Track Sampling.
MIDI Tracks
Track editingMIDI Step Recording: It allows you to specify the length and velocity of each note numerically, and to input MIDI data, the pitches, from the keyboard. You can use the Rest button and Tie button to enter a rest or tie. For more information, see “MIDI Step Recording” on page 532 of the PG.
MIDI Event Edit: Here you can edit individual events of MIDI data. For more information, see “MIDI Event Edit” on page 534 of the PG.Bounce Track: This command combines the musical data of the bounce source and bounce destination tracks, and places the combined data in the bounce destination. All musical data in the bounce source will be erased. For more information, see “Bounce Track” on page 539 of the PG.Create Control Data: This command creates control change, aftertouch, pitch bend, or tempo data in the specified region of a MIDI track or the master track. For more information, see “Create Control Data” on page 544 of the PG.Erase Control Data: This command erases data such as control changes, aftertouch, pitch bend, or tempo in the specified range. For more information, see “Erase Control Data” on page 545 of the PG.Quantize: This command corrects the timing of MIDI data of the type you specify (note data, control change, aftertouch, pitch bend, program change, etc.) in the track. For more information, see “Quantize” on page 545 of the PG.Shift/Erase Note: This command shifts (moves) or erases the specified note numbers in a specified MIDI track and range of measures. For more information, see “Shift/Erase Note” on page 546 of the PG.Modify Velocity: This command modifies the velocity values of notes in the specified area so that they will change over time according to a selected curve. For more information, see “Modify Velocity” on page 547 of the PG.
Pattern editingStep Recording (Loop Type): Here you can perform step recording into a pattern. For more information, see “Step Recording (Loop Type)” on page 551 of the PG.Event Edit: Here you can edit individual events of the musical data in a pattern. For more information, see “Event Edit” on page 551 of the PG.Pattern Parameter: This command specifies the number of measures and the time signature of the selected pattern. For more information, see “Pattern Parameter” on page 551 of the PG.Erase Pattern: This command erases the data from the selected pattern. For more information, see “Erase Pattern” on page 551 of the PG.Copy Pattern: This command copies the settings and musical data of the selected pattern to another pattern. For more information, see “Copy Pattern” on page 551 of the PG.Bounce Pattern: This command combines the musical data of the bounce source pattern and bounce destination pattern, and places the combined musical data in the bounce destination. For more information, see “Bounce Pattern” on page 552 of the PG.Get From MIDI Track: This command takes musical data from a MIDI track and loads it into the specified pattern. For more information, see “Get From MIDI Track” on page 552 of the PG.

Song editing Placing a WAVE file in an audio track
105
Put To MIDI Track: This command places a pattern into a MIDI track. For more information, see “Put To MIDI Track” on page 552 of the PG.Copy To MIDI Track: This command copies the specified area of musical data from the specified pattern to a MIDI track as musical data. For more information, see “Copy To MIDI Track” on page 553 of the PG.Convert to Drum Track Pattern: This command converts a user pattern into a user drum track pattern, which can then be used with the Drum Track in any mode. For more information, see “Convert to Drum Track Pattern” on page 553 of the PG.Load Drum Track Pattern: This command loads a user Drum Track pattern into a user pattern. For more information, see “Load Drum Track Pattern” on page 553 of the PG.Erase Drum Track Pattern: This erases the specified Drum Track pattern. For more information, see “Erase Drum Track Pattern” on page 532 of the PG.
Common to MIDI tracks and audio tracksErase Track: This command erases the data from the specified track. It is not possible to erase the master track by itself. For more information, see “Erase Track” on page 539 of the PG.Copy Track: This command copies musical data from the copy source track to the specified track. For more information, see “Copy Track” on page 539 of the PG.Erase Measure: This command erases the specified type(s) of musical data from the specified range of measures. The Erase Measure command can also be used to remove only a specific type of data. Unlike the Delete Measure command, executing the Erase Measure command does not cause the subsequent measures of musical data to be moved forward. For more information, see “Erase Measure” on page 540 of the PG.Delete Measure: This command deletes the specified measures. When the Delete Measure command is executed, the musical data following the deleted measures will be moved towards the beginning of the sequence. For more information, see “Delete Measure” on page 541 of the PG.Insert Measure: This command inserts the specified number of measures into the specified track. When you execute the Insert Measure command, the musical data following the insert location will be moved backward. For more information, see “Insert Measure” on page 541 of the PG.Repeat Measure: This command repeatedly inserts the specified measures for the specified number of times. When you execute the Repeat Measure command, the measures will be inserted following the measure specified by “To End of Measure,” and musical data following the inserted data will be moved backward. For more information, see “Repeat Measure” on page 542 of the PG.Copy Measure: This command copies the measures of musical data specified as the “From” source to the beginning of the measure specified as the “To” location. When you execute the Copy Measure command, the existing track data at the copy destination will be rewritten. For more information, see “Copy Measure” on page 543 of the PG.
Move Measure: This command moves the specified measures of performance data to another measure. When you execute the Move Measure command, the performance data following the move-source measures will move forward by the corresponding number of measures, and the performance data following the move-destination will move backward (i.e., later in the song) by the same number of measures. For more information, see “Move Measure” on page 544 of the PG.
Audio TracksAudio Event Edit: This command lets you edit individual audio events that have been recorded, or trim (i.e., make adjustments in steps of a single sample to) the region used by audio events. For more information, see “Audio Event Edit” on page 535 of the PG.Audio Automation Edit: This lets you edit individual automation data events. For more information, see “Audio Automation Edit” on page 538 of the PG.Region Edit: Here’s how to edit the regions used in an audio track. In addition to Importing or Pasting a region, you can use the Trim dialog box to specify the range in which a WAVE file will play back. For more information, see “Region Edit” on page 547 of the PG.Volume Ramp: This command modifies the data values (volume) of the specified area. You can gradually increase (Fade In) or decrease (Fade Out) the volume between the start and end points. For more information, see “Volume Ramp” on page 549 of the PG.Copy Song’s Tempo to Region: This command changes the tempo used by the specified regions of audio events so that the audio event tempo will match the tempo of the location in which those regions play back. If the tempo of an audio track matches the tempo of the MIDI tracks, executing this command to match the region tempo will ensure that the “Adjust Region to Song’s Tempo (Time Stretch)” or “Adjust Song’s Tempo to Region” commands can be executed correctly. For more information, see “Copy Song’s Tempo to Region” on page 550 of the PG.Adjust Song’s Tempo to Region: This command creates tempo events in the master track to match the tempo of the regions used by the audio events in the specified range. This is useful if you create audio tracks in a previously-recorded region, and want all tracks (including MIDI tracks) to match that region. For more information, see “Adjust Song’s Tempo to Region” on page 550 of the PG.Adjust Region to Song’s Tempo (Time Stretch): If the tempo of regions used by audio events in the specified range differs from the tempo of the range in which those regions play back, you can execute Time Stretch (Sustaining) to create new WAVE files and regions. Audio events that use the newly created regions will also be created automatically.If you want to modify the tempo of an existing song, it is convenient to first specify the desired tempo in the master track, and then execute this command so that the audio track(s) will be created according to the new tempo. For more information, see “Adjust Region to Song’s Tempo” on page 550 of the PG.

Creating songs (SEQUENCER mode)
106
Using RPPR (Realtime Pattern Play/Record)This section explains how to assign a pattern to RPPR, and how to play and record using RPPR.
Creating RPPR data1. Create a new song, and choose a drum program for
MIDI track 1.2. Select the SEQUENCER > Pattern/RPPR-RPRR
Setup page. In this page, the RPPR function is automatically turned on.
3. Select the key to which the pattern will be assigned.Select C#2. Hold down the ENTER button and play a key, or use the scroll bar located at the right to find the key.Note: C2 and lower keys are used to stop playback, and cannot be assigned.
4. Check “Assign” for C#2.5. Set “Bank” to Preset, and set “Pattern Name” to
P001.
6. Set “Track Name” to T01.The selected pattern will be played according to the settings (program, etc.) of the track you select here.
7. With the C#2 parameter selected, press the Copy button.
8. Assign patterns to other keys.Select the D2 parameter, and press the Paste button.The “Assign,” “Bank,” “Pattern Name,” “Track Name,” “Mode,” “Shift,” and “Sync” settings you made in steps 5 and 6 will be copied automatically.
9. Modify only the “Pattern Name.” Select “Pattern Name,” and press the + button to select P002.
10.Select the D#2 parameter, and press the Paste button.The “Assign,” “Bank,” “Pattern Name,” “Track Name,” “Mode,” “Shift,” and “Sync” settings you made in steps 5 and 6 will be copied automatically.Similar to step 9, set “Pattern” to P003.Note: When making RPPR settings, you can use the Copy button and Paste button in this way to efficiently assign the “Bank,” “Pattern Name,” and “Track Name” etc. to each key.
11.As described above, assign several other patterns such as P004 and higher.
12.Press the C#2 key. The assigned pattern will play.Take your finger off the C#2 key, and press the D2 key. The pattern will change, and playback will begin. At this time, the pattern operation will depend on the “Sync” and “Mode” setting.Set “KEY” to C#2, and set “Sync” to Measure. Make the same setting for D2 (See the diagram below).Now press the notes consecutively. Notice that the patterns operate in a different way.With the “Measure” setting, patterns will be handled in one-measure units. The second and subsequent patterns will start in sync with the end of previously played pattern.If you change the “Mode” setting to Once, the entire pattern will playback to the end even if you release your finger from the keyboard immediately.
13.To stop playback, either press the same key once again, or press the C2 or lower key.
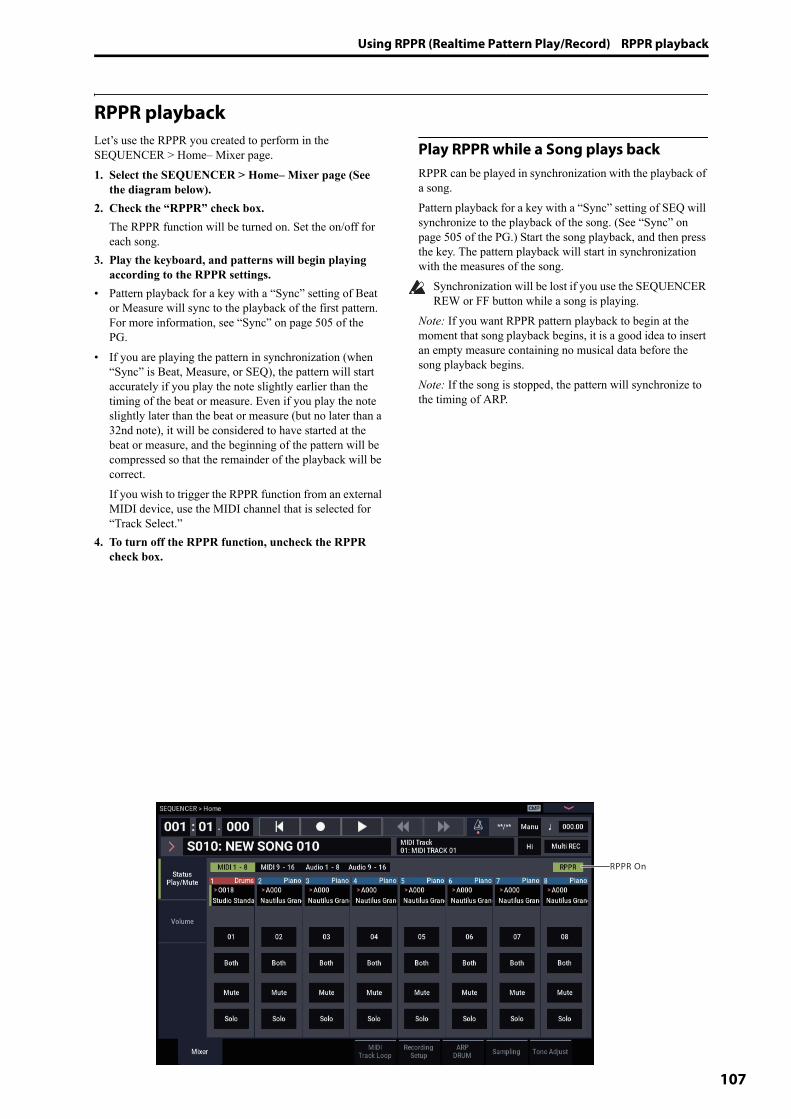
Using RPPR (Realtime Pattern Play/Record) RPPR playback
107
RPPR playbackLet’s use the RPPR you created to perform in the SEQUENCER > Home– Mixer page.1. Select the SEQUENCER > Home– Mixer page (See
the diagram below).2. Check the “RPPR” check box.
The RPPR function will be turned on. Set the on/off for each song.
3. Play the keyboard, and patterns will begin playing according to the RPPR settings.
• Pattern playback for a key with a “Sync” setting of Beat or Measure will sync to the playback of the first pattern. For more information, see “Sync” on page 505 of the PG.
• If you are playing the pattern in synchronization (when “Sync” is Beat, Measure, or SEQ), the pattern will start accurately if you play the note slightly earlier than the timing of the beat or measure. Even if you play the note slightly later than the beat or measure (but no later than a 32nd note), it will be considered to have started at the beat or measure, and the beginning of the pattern will be compressed so that the remainder of the playback will be correct.If you wish to trigger the RPPR function from an external MIDI device, use the MIDI channel that is selected for “Track Select.”
4. To turn off the RPPR function, uncheck the RPPR check box.
Play RPPR while a Song plays backRPPR can be played in synchronization with the playback of a song.Pattern playback for a key with a “Sync” setting of SEQ will synchronize to the playback of the song. (See “Sync” on page 505 of the PG.) Start the song playback, and then press the key. The pattern playback will start in synchronization with the measures of the song.
Synchronization will be lost if you use the SEQUENCER REW or FF button while a song is playing.
Note: If you want RPPR pattern playback to begin at the moment that song playback begins, it is a good idea to insert an empty measure containing no musical data before the song playback begins.Note: If the song is stopped, the pattern will synchronize to the timing of ARP.
RPPR On

Creating songs (SEQUENCER mode)
108
Recording an RPPR performance
You can record RPPR performances in real-time. If you are using only one track (such as MIDI Track 01), set “Track Select” to the desired track, and un-check Multi Rec.On the other hand, even if RPPR uses only one track, use multi-track recording if you will be selecting another track in “Track Select” and recording its performance at the same time.You should also select multi-track recording if you specified the RPPR data using multiple tracks rather than just a single track, and want to simultaneously record the performance of multiple tracks.Note: The RPPR pattern will be recorded as performance data on the tracks used by the pattern.In this example, we’ll explain how you can record an RPPR performance and a keyboard performance at the same time. Before you continue, use the Home– Mixer page to assign a drum program to MIDI track 1, and a bass program to MIDI track 2.1. Assign several keys starting with C#2 to preset
patterns.Check the C#2 “Assign” setting, and set “Bank” to Preset and “Pattern Name” to the desired preset pattern. For “Track Name,” select MIDI track 1 (T01) to which you assigned a drum program.
2. For each RPPR pattern, set “Sync” to SEQ (See the diagram above).With a setting of SEQ, patterns played by the RPPR function while the sequencer is playing or recording will start in synchronization with the measures of the sequencer.
3. Select the SEQUENCER > Home– Mixer page.4. Check the “RPPR” check box, and set “Track Select”
to MIDI Track 02.When the RPPR function is on, pressing a key to which a pattern is assigned will cause the assigned pattern to start playing, regardless of the track that’s selected in “Track Select.”Keys to which patterns are not assigned can be played in the usual way. You can play the program that’s assigned to the MIDI track you select here.
5. Since you want the tracks you play via RPPR and the track you play from the keyboard to be recorded at the same time, check the Multi REC check box.Note: If Recording Setup is set to “Loop All Tracks,” it will not be possible to select Multi REC. Set the Recording Setup to Overwrite.
6. Press the SEQUENCER REC button to enter record-ready mode.
7. For the tracks you will be recording (MIDI Track 1, 2), press Play/Rec/Mute to make them indicate REC.Make sure that the tracks you’re not recording are indicated as Play or Mute.
8. Press the SEQUENCER LOCATE button to set the location to 001:01.000.
9. Press the SEQUENCER START/STOP button, and then press a key that plays an RPPR pattern.If, during the pre-count before recording, you press a key that’s assigned to an RPPR pattern, the pattern will begin playing (and being recorded) the moment that recording begins.Record the RPPR pattern playback and keyboard performance.When recording the playback of patterns triggered by RPPR, the timing of the recorded events may be slightly skewed. If this occurs, try setting “REC Resolution” to a setting other than Hi.
10.When you are finished performing, press the SEQUENCER START/STOP button.Recording will end, and the sequencer will return to the location at which recording began.If you made a mistake during your performance or would like to re-record, you can use the Compare function to re-record as many times as you wish.
11.If you want to record other tracks, un-check the Multi REC (See step 5) or “RPPR” (See step 4) check boxes as necessary.
Sync: Off
Sync: Beat
Sync: Measure
Sync: SEQ
Key 1 on
Song
Key 2 on Key 1 off
Sync settings
Patterns 1 and 2 are set to Mode=Manual, and have identical Sync settings
Pattern 1
Pattern 2
Pattern 1
Pattern 2
Pattern 1
Pattern 2
Pattern 1
Pattern 2
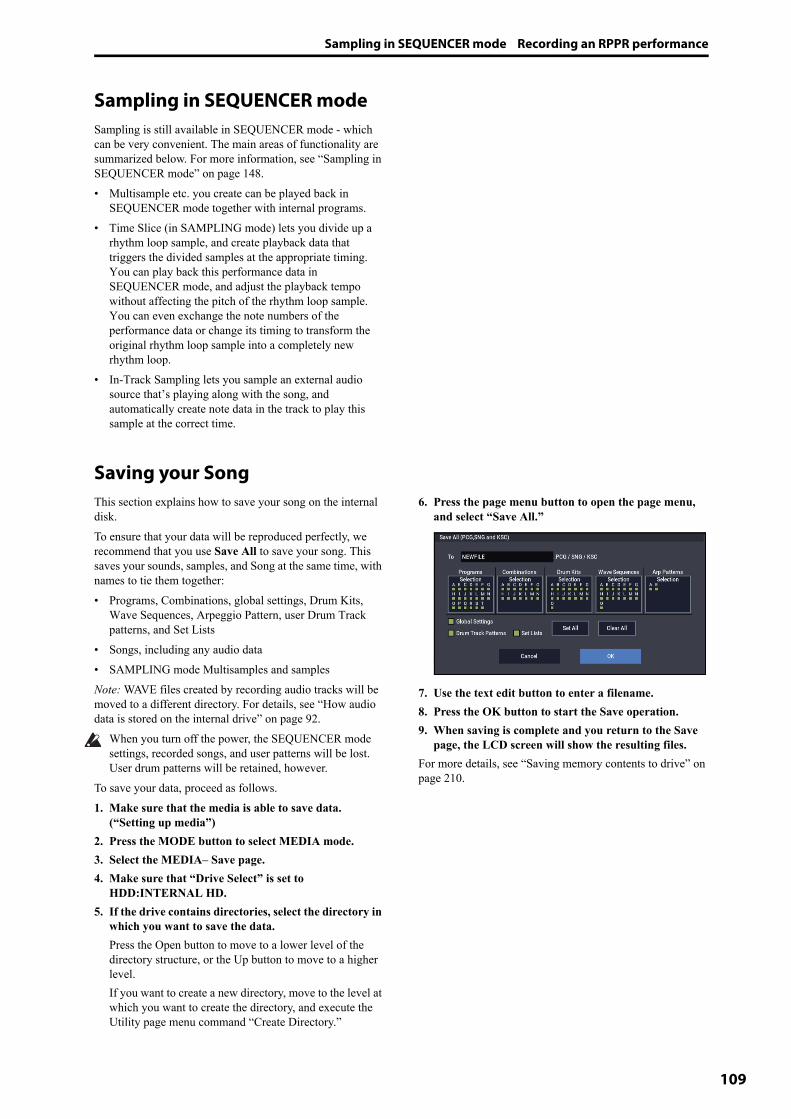
Sampling in SEQUENCER mode Recording an RPPR performance
109
Sampling in SEQUENCER modeSampling is still available in SEQUENCER mode - which can be very convenient. The main areas of functionality are summarized below. For more information, see “Sampling in SEQUENCER mode” on page 148.• Multisample etc. you create can be played back in
SEQUENCER mode together with internal programs. • Time Slice (in SAMPLING mode) lets you divide up a
rhythm loop sample, and create playback data that triggers the divided samples at the appropriate timing. You can play back this performance data in SEQUENCER mode, and adjust the playback tempo without affecting the pitch of the rhythm loop sample. You can even exchange the note numbers of the performance data or change its timing to transform the original rhythm loop sample into a completely new rhythm loop.
• In-Track Sampling lets you sample an external audio source that’s playing along with the song, and automatically create note data in the track to play this sample at the correct time.
Saving your SongThis section explains how to save your song on the internal disk.To ensure that your data will be reproduced perfectly, we recommend that you use Save All to save your song. This saves your sounds, samples, and Song at the same time, with names to tie them together:• Programs, Combinations, global settings, Drum Kits,
Wave Sequences, Arpeggio Pattern, user Drum Track patterns, and Set Lists
• Songs, including any audio data• SAMPLING mode Multisamples and samplesNote: WAVE files created by recording audio tracks will be moved to a different directory. For details, see “How audio data is stored on the internal drive” on page 92.
When you turn off the power, the SEQUENCER mode settings, recorded songs, and user patterns will be lost. User drum patterns will be retained, however.
To save your data, proceed as follows.1. Make sure that the media is able to save data.
(“Setting up media”)2. Press the MODE button to select MEDIA mode.3. Select the MEDIA– Save page.4. Make sure that “Drive Select” is set to
HDD:INTERNAL HD.5. If the drive contains directories, select the directory in
which you want to save the data.Press the Open button to move to a lower level of the directory structure, or the Up button to move to a higher level.If you want to create a new directory, move to the level at which you want to create the directory, and execute the Utility page menu command “Create Directory.”
6. Press the page menu button to open the page menu, and select “Save All.”
7. Use the text edit button to enter a filename.8. Press the OK button to start the Save operation.9. When saving is complete and you return to the Save
page, the LCD screen will show the resulting files.For more details, see “Saving memory contents to drive” on page 210.
Creating songs (SEQUENCER mode)
110
Other notes about SEQUENCER mode
NAUTILUS sequencer file formatsThe NAUTILUS sequencer supports both the internal NAUTILUS Song format, and Standard MIDI Files. If you like, you can convert data between the two formats, simply by loading the data in one format and then saving it in the other.For more information, see “Save to Standard MIDI File” on page 723 of the PG, and “Save SEQ” on page 721 of the PG.
NAUTILUS Song formatThis is the native NAUTILUS sequencer format, which is required to ensure that all NAUTILUS-specific data is saved correctly.
Standard MIDI FilesYou can also load and save Standard MIDI Files (SMF), for compatibility with other sequencers. Note that some NAUTILUS-specific data may not be maintained when in SMF files.
GM, XG, and GS System Exclusive DataThe NAUTILUS sequencer can record System Exclusive messages, including XG or GS data. For more information, see “System Exclusive events supported in Sequencer mode” on page 557 of the PG.
Note that GM, XG, and GS exclusive messages do not affect the NAUTILUS when they are played back.
Other notes about SEQUENCER mode The Compare function
111
The Compare functionWhen you perform realtime recording, step recording, or track editing, this function allows you to make before-and-after comparisons.Select and execute the “Compare” page menu command, to recall the performance data.
Operations for which Compare is availableIn general, MIDI track, audio track and pattern event data can not be returned to its original state.Comparing song parameters is possible only during song editing (when executing a page menu command).• Recording to a MIDI track• Recording to a audio track• Track Edit
All commands except for the page menu commands “Memory Status,” “FF/REW Speed” and “Set Location” of the Track Edit– Track Edit page.
• Recording to a pattern• Pattern Edit
All commands except for the page menu commands “Memory Status”, “Exclusive Solo”, “Drum Track Pattern”, “Erase Drum Track Pattern” and “FF/REW Speed” of the Pattern/RPPR– Pattern Edit page.
• Song EditHome page, etc: Page menu commands “Initialize Song” and “Copy From Song”
Comparing after samplingThe Convert to Program and Convert to Seq Event options in the Select Sample No. dialog affect the way that Compare works with sampling in SAMPLING mode. If both are enabled, Compare affects sequencer events and returns Multisamples and Samples to the state prior to sampling; unwanted samples will not remain. If neither are enabled, Compare has no effect on the sampling process. For more information, see “Select Sample No.” on page 526 of the PG.
The Program will not be affected by the Compare, and will not return to its prior state.WAVE files are not deleted when you compare edits to audio tracks. To delete a WAVE file you no longer need, use the menu command “Delete Unused WAV Files,” as described on page 726 of the PG.
Operations for which Compare is not available• Editing song parameters• Page menu commands other than those listed under
“Operations for which Compare is available,” above.
Memory ProtectBefore you record a track or pattern, or edit the musical data, you will need to turn off the memory protect setting in GLOBAL mode. For more information, see “Memory protect” on page 208.
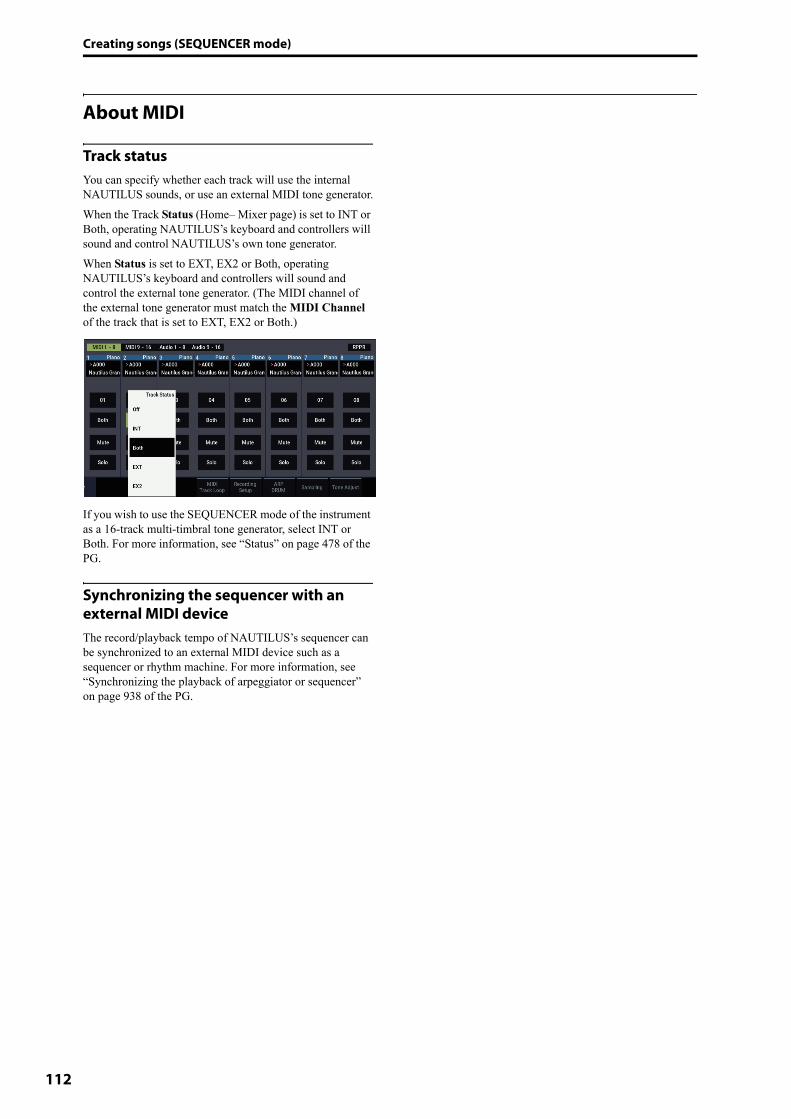
Creating songs (SEQUENCER mode)
112
About MIDI
Track statusYou can specify whether each track will use the internal NAUTILUS sounds, or use an external MIDI tone generator.When the Track Status (Home– Mixer page) is set to INT or Both, operating NAUTILUS’s keyboard and controllers will sound and control NAUTILUS’s own tone generator.When Status is set to EXT, EX2 or Both, operating NAUTILUS’s keyboard and controllers will sound and control the external tone generator. (The MIDI channel of the external tone generator must match the MIDI Channel of the track that is set to EXT, EX2 or Both.)
If you wish to use the SEQUENCER mode of the instrument as a 16-track multi-timbral tone generator, select INT or Both. For more information, see “Status” on page 478 of the PG.
Synchronizing the sequencer with an external MIDI deviceThe record/playback tempo of NAUTILUS’s sequencer can be synchronized to an external MIDI device such as a sequencer or rhythm machine. For more information, see “Synchronizing the playback of arpeggiator or sequencer” on page 938 of the PG.

113
Set Lists
Set List OverviewSet Lists make it simple to play and organize any of the sounds loaded into the NAUTILUS, without regard for what bank they’re stored in or whether they’re Programs, Combinations, or even Songs.Large on-screen buttons with selectable colors make sound selection fast and foolproof, and the Program Up or Down footswitch assignments can be used for hands-free sound changes. Cut, copy, paste, and insert tools make re-ordering a snap.Smooth Sound Transitions (SST) let the previous sound and its effects ring out naturally, making it easy to change sounds during a live performance. SST is active in all of the NAUTILUS modes, but Set Lists give you greater control over the transitions. You can fine-tune the ring-out time for each sound, so that (for instance) one sound fades out very quickly, while another sound’s delays continue to repeat for ten or twenty seconds.Long comments (up to 512 characters) let you store lyrics or performance notes with the sound.Set Lists are great for live performance, but they’re also handy for organizing sounds in general. For example, you can create a Set List with all of your favorite String sounds, including both Programs and Combinations.
Set Lists and SlotsA Set List has 128 Slots, each of which can be assigned to any Program, Combination, or Song. 4, 8, or 16 Slots are shown at once, as large on-screen buttons. You can have 128 Set Lists in memory at once. One way of thinking about this is that a Set List is a “bank” of Slots.
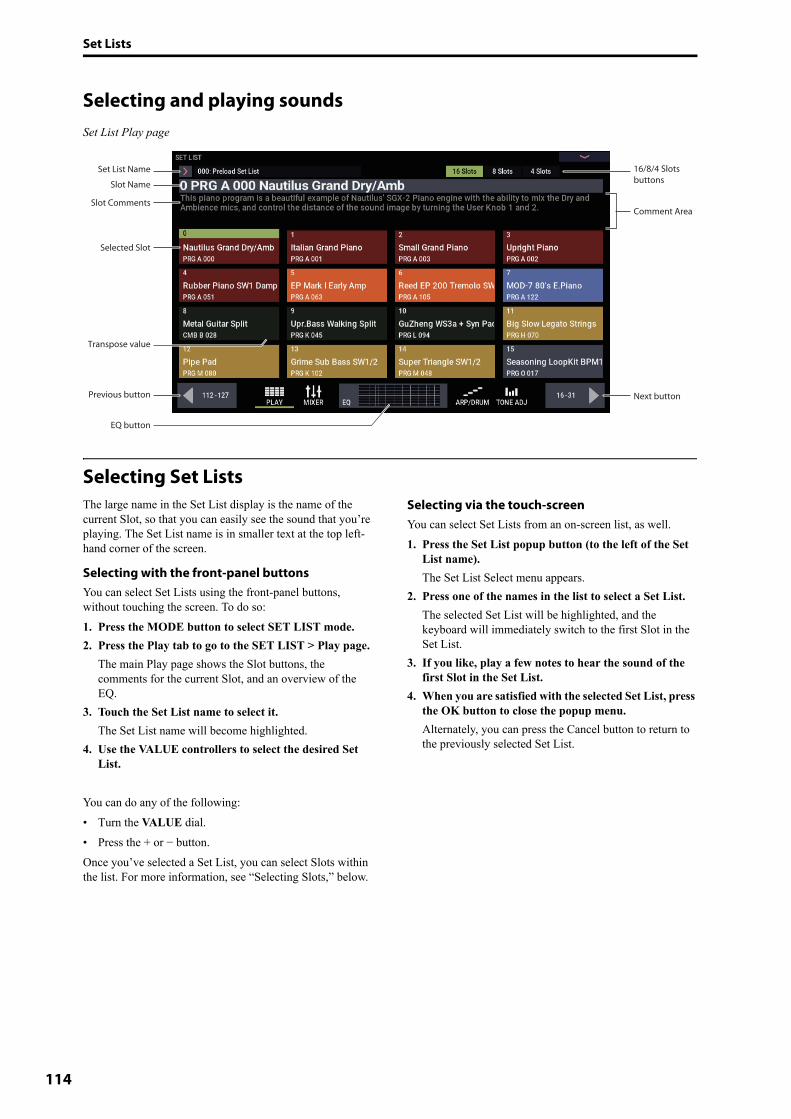
Set Lists
114
Selecting and playing soundsSet List Play page
Selecting Set ListsThe large name in the Set List display is the name of the current Slot, so that you can easily see the sound that you’re playing. The Set List name is in smaller text at the top left-hand corner of the screen.
Selecting with the front-panel buttonsYou can select Set Lists using the front-panel buttons, without touching the screen. To do so:1. Press the MODE button to select SET LIST mode.2. Press the Play tab to go to the SET LIST > Play page.
The main Play page shows the Slot buttons, the comments for the current Slot, and an overview of the EQ.
3. Touch the Set List name to select it.The Set List name will become highlighted.
4. Use the VALUE controllers to select the desired Set List.
You can do any of the following:• Turn the VALUE dial.• Press the + or − button.Once you’ve selected a Set List, you can select Slots within the list. For more information, see “Selecting Slots,” below.
Selecting via the touch-screenYou can select Set Lists from an on-screen list, as well.1. Press the Set List popup button (to the left of the Set
List name).The Set List Select menu appears.
2. Press one of the names in the list to select a Set List.The selected Set List will be highlighted, and the keyboard will immediately switch to the first Slot in the Set List.
3. If you like, play a few notes to hear the sound of the first Slot in the Set List.
4. When you are satisfied with the selected Set List, press the OK button to close the popup menu.Alternately, you can press the Cancel button to return to the previously selected Set List.
Set List Name
Selected Slot
Next buttonPrevious button
EQ button
16/8/4 Slots buttonsSlot Name
Slot Comments
Transpose value
Comment Area
Selecting and playing sounds Selecting Slots
115
Selecting Slots
16/8/4 Slots buttonsThese buttons, at the top of the display, select how many Slots are shown at once. Smaller numbers of Slots leave more room to show the Comments; larger numbers let you select between more Slots without switching screens. You can change between these settings at any time, as convenient, and the setting is stored with the Set List.
Selecting within the current group of SlotsTo select one of the Slots shown on the display:1. Press the desired button.
The button becomes highlighted, and the large Slot number/name at the top of the screen are updated accordingly.Also notice that the comments area, above the Slot buttons, updates to show the contents for the selected Slot. You can view the comments in this position above the Slots, or dedicate the entire screen to showing the comments; for more information, see “Using the Comment Pad” on page 116.
Selecting outside the current group of SlotsTo select a Slot which is not shown on the display:1. Use the next and previous arrow-buttons at the
bottom of the screen to browse through the groups of 16.The labels for next/previous will vary depending on the current group of Slots, and on the number of Slots being shown. For instance, if 16 Slots are being shown and the current group is 0-15, the buttons will show 112-127 and 16-31, respectively.As you browse, the current selection does not change until you actually press one of the Slot buttons.
2. When the desired group of Slots is displayed, press the button for the desired Slot.The button becomes highlighted, and the comments and large Slot number/name at the top of the screen are updated accordingly.
Selecting using VALUE controllerIn addition to using the touch-screen buttons, you can select Set List and Slots using the VALUE dial, and +/− buttons.
Returning to the current group of SlotsIf you have navigated away from the current group of Slots, you can return easily:• Touch the name of the current item, at the top of
the screen (e.g. “0 PRG A 000 Nautilus Grand Dry/Amb”).
The display changes to show the group of Slots containing the current selection.
Stepping through Slots in orderIn addition to selecting Slots via the on-screen buttons, you can use +/− or a footswitch assigned to Program Up or Program Down to step through the Slots in order, one by one.
Selecting with +/− buttons1. Touch one of the on-screen Slot buttons.
Once a Slot is selected, you can use the + and − buttons to step through the list of sounds.If you’re on the last Slot on the current page, pressing + will advance you to the first Slot of the next group.
Program Up/Down footswitchThe Program Up (or Program Down) footswitch always steps through the list, regardless of whether or not one of the buttons has the UI focus.The assignable footswitch can be assigned to Program Up or Program Down on the GLOBAL > Controllers/Scales– Controllers page.
Wrapping between Set Lists+/− and Program Up/Down wrap between Set Lists. For instance:1. Select Slot 127 in Set List 5.2. Press +, or the Program Up footswitch.Slot 0 of Set List 6 is selected. If you’ve edited any Slots in the Set List, a dialog will appear prompting you to save your changes before proceeding. Otherwise, your edits will be lost when the new Set List is selected. For more information, see “Save Changes before changing Set List: a confirmation dialog” on page 116.
Selecting Slots and Set Lists via MIDI
MIDI InProgram Change messages on the Global Channel select the Slot, and Bank Select messages on the Global Channel select the Set List.When a Slot is selected via MIDI, the display updates if necessary to show the appropriate group of Slots.
MIDI OutSelecting a Slot sends Program Change and Bank Select messages, as above.When selected, Combinations and Songs can transmit other Program Change and Bank Select messages on other channels, as they do in COMBINATION and SEQUENCER modes.

Set Lists
116
Bank MapThe GLOBAL > Basic Setup– Basic Bank Map (KORG, GM(2)) parameter does not affect the reception or transmission of Set List Program and Bank Select messages.
Save Changes before changing Set List: a confirmation dialogIf you have edited a Set List, and then do something that would select a different Set List (including directly changing the Set List, or wrapping between Set Lists by changing the Slot), a confirmation dialog will appear. The dialog offers the option of saving or discarding the edits.
Saving your editsIf you want to save your edits:1. Press the set list name shown above to give it a new
name if necessary.2. Select the location to save to using the To Set List
parameter. 3. Press the OK button to save the changes.The changes will be saved to the specified location, and the Set List change will proceed.
Discarding editsIf you do not want to save your edits, and just want to proceed to the new Set List:1. Press the Discard Edits button.
Canceling the Set List changeIf you want to review your edits, and not proceed to the new Set List:1. Press the Cancel button.
Using the Comment PadThe Comment Pad devotes the entire screen to the comment text—convenient for viewing lyrics or longer notes, especially with larger font sizes.To show the Comment Pad:1. Touch the comment area and drag down.When you touch the comment area, a downward arrow appears as a hint that this is available.
To close the Comment Pad:1. Press the large X in the upper right corner of the
window, or press the EXIT button.To adjust the brightness of the text:1. Use the three brightness icons in the upper left corner
of the window.To adjust the size of the font:1. Use the S/M/L/XL buttons at the bottom of the
Window. This setting mirrors the Slot’s Font parameter.
Graphic EQPress the EQ button on the bottom of the display to show a dialog box for graphic EQ settings that are effective only for the set list.
This is a nine-band graphic EQ applied to the sound after TFX2, which tailors the sound from the main stereo outputs (including the analog L/R outputs, and USB).You can use this EQ to compensate for the acoustic environment of a specific club or other performance venue.All bands are peaking, including the high and low bands.There is a single graphic EQ setting for each Set List, which applies to all Slots in the list.
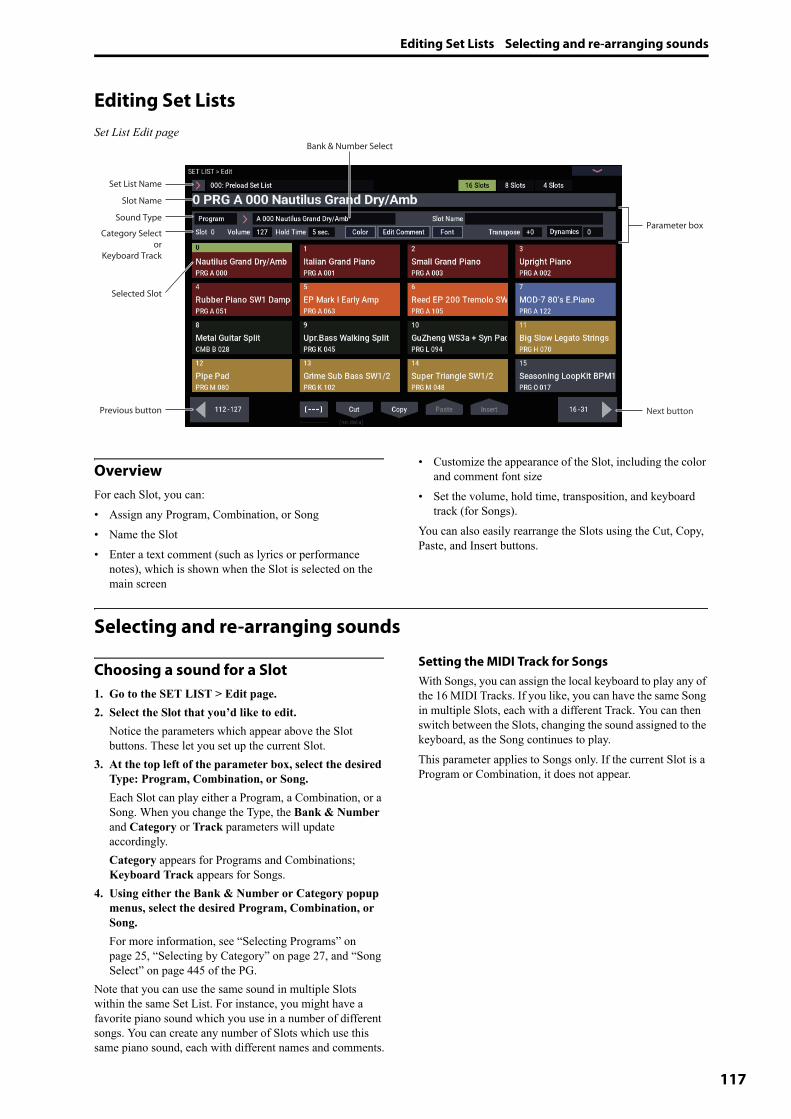
Editing Set Lists Selecting and re-arranging sounds
117
Editing Set ListsSet List Edit page
OverviewFor each Slot, you can:• Assign any Program, Combination, or Song• Name the Slot• Enter a text comment (such as lyrics or performance
notes), which is shown when the Slot is selected on the main screen
• Customize the appearance of the Slot, including the color and comment font size
• Set the volume, hold time, transposition, and keyboard track (for Songs).
You can also easily rearrange the Slots using the Cut, Copy, Paste, and Insert buttons.
Selecting and re-arranging sounds
Choosing a sound for a Slot1. Go to the SET LIST > Edit page.2. Select the Slot that you’d like to edit.
Notice the parameters which appear above the Slot buttons. These let you set up the current Slot.
3. At the top left of the parameter box, select the desired Type: Program, Combination, or Song.Each Slot can play either a Program, a Combination, or a Song. When you change the Type, the Bank & Number and Category or Track parameters will update accordingly.Category appears for Programs and Combinations; Keyboard Track appears for Songs.
4. Using either the Bank & Number or Category popup menus, select the desired Program, Combination, or Song.For more information, see “Selecting Programs” on page 25, “Selecting by Category” on page 27, and “Song Select” on page 445 of the PG.
Note that you can use the same sound in multiple Slots within the same Set List. For instance, you might have a favorite piano sound which you use in a number of different songs. You can create any number of Slots which use this same piano sound, each with different names and comments.
Setting the MIDI Track for SongsWith Songs, you can assign the local keyboard to play any of the 16 MIDI Tracks. If you like, you can have the same Song in multiple Slots, each with a different Track. You can then switch between the Slots, changing the sound assigned to the keyboard, as the Song continues to play.This parameter applies to Songs only. If the current Slot is a Program or Combination, it does not appear.
Next button
Set List Name
Selected Slot
Previous button
Slot Name
Sound TypeParameter box
Bank & Number Select
Category Selector
Keyboard Track
Set Lists
118
Adding items to the Set List from other modesPROGRAM, COMBINATION, and SEQUENCER modes each have a command in their top page menus: Add To Set List. This makes it easy to browse through sounds and place them in Set Lists as you go. To do so:1. Choose “Add To Set List” to open the dialog box.2. Use the “Set List” and “Insert Slot” parameters to
select the destination Set List and Slot.By default, these are set to the current Set List and Slot. If you select something other than the current Set List and Slot, the Revert To Current button will be enabled; press this button to return the parameters to the current Set List and Slot.
3. Use the text popup to set the Slot Name as desired.The name of the Program, Combination, or Song is copied into the slot name by default.
4. Press OK to add the Program, Combination, or Song to the Set List, or press Cancel to exit without making changes.When you press OK, the current Program, Combination, or Song is inserted at the selected Slot, using the same logic as the Set List Edit page’s Insert command.
When adding a Song, the current Keyboard Track is copied into the slot’s Keyboard Track parameter.
Re-arranging SlotsThe Cut, Copy, Paste, and Insert buttons make it simple to re-arrange the Slots, and the [---] button (the Multiple Slot Selection tool) lets you select two or more Slots at once.
Using the [---] button to select a range of SlotsTo select a range of slots with the [---] button:1. Select the Slot at one end of the desired range of slots
(either the first or the last).2. Press the [---] button.
Notice that the selected Slot now has a different highlight color.
3. Select the Slot at the other end of the desired range.Once the desired range is selected, use the Cut/Copy/Paste/Insert buttons, as described below, to operate on the Slots. The selected range is also used by the Color and Font dialog boxes, so that you can edit multiple Slots at once.
Copying a Slot to another locationTo copy one Slot to another (for instance, if you have a sound that you’d like to use in multiple Slots):1. Select the Slot you’d like to copy.2. Press the Copy button.3. Select the Slot you’d like to replace.4. Press the Paste button.The selected Slot will be replaced by the copied Slot.
Inserting Slots into the middle of a Set ListYou can also insert copied Slots into the middle of a Set List, while leaving the rest of the list intact. To do this:1. Select the Slots you’d like to copy.2. Press the Copy button.3. Select the Slot to specify the insert point.
The copied Slot(s) will be placed in front of the selected Slot, and the rest of the Set List will move to make room.
4. Press the Insert button.
Removing Slots from a Set ListYou can remove Slots from the middle of a Set List, while leaving the rest of the list intact. To do so:1. Select the Slots you’d like to remove.2. Press the Cut button.
This removes the Slots from the list, and moves the rest of the list to fill in the now-empty space.Note: If you like, you can Paste or Insert the Slots that were removed via Cut, similar to the Copy operations described above.

Editing Set Lists Detailed Set List editing
119
Detailed Set List editing
Naming a SlotYou can name a Slot separately from the name of the Program, Combination, or Song it contains. For instance, if you’re creating a Set List for a gig, you can name the Slots after the section of music in which they’re used, such as “Montana Intro.” To do so:1. Press the slot name to bring up the text edit dialog.2. Enter the name as desired, and then press OK.Slot names can have up to 24 characters.
Controlling Slot volumeYou can control the volume separately for each Slot. For instance, you might set the volume softer for a Slot playing an accompaniment part, and louder for a Slot with a lead sound. To do so:1. Adjust the Volume parameter.Note that the stored Master Volume setting of the Slot’s Program, Combination, or Song still applies as well. See the graphic below for details on how the Set List volume interacts with other volume controls.Set List Slot Volume
Transposing individual SlotsYou can adjust transposition separately for each Slot. For instance, you might decide to transpose a song down by a few half-steps to accommodate a singer. To do so:1. Adjust the Transpose parameter.When “Transpose” is set to any value besides “+0”, the transpose value is shown in the slot. For example, if “Transpose” is set to “-12”, the slot will display as shown below.
Drums not affected by Slot TransposeSlot Transpose is designed so that, in general, it doesn’t affect un-pitched drum sounds unless they’re being played directly from the keyboard.If the Slot contains a Program, its Drum Track Program is not affected by Transpose.Similarly, if the Slot contains a Combination or Song, drums played by the Drum Track are generally excluded from Transposition. To achieve this, Timbres or Tracks are not affected by Transpose if both of the following are true:
• When the timbre’s MIDI channel is set to something other than the global channel (COMBI).
• When the track’s MIDI channel is different than the channel of the Track Select track.
• The Program’s Category is “Drums,” except for the sub-category “Pitched” (used for timpani, for instance).
Entering commentsEach Slot can have a comment of up to 512 characters, for lyrics, performance notes, and so on. To edit the comments:1. Press the Edit Comment button to bring up the text
edit dialog box.
The comment edit dialog box has a few added features in comparison to the standard text editor:• Text is displayed using the Slot’s selected font.• Use touch-drag to select text.• Use the LF button to insert line feeds (aka “returns”).• Multiple cut/copy clipboards are supported; see below
for details.If a USB QWERTY keyboard is connected, you can use this to enter text instead of the on-screen keyboard. For more information, see “Editing names and entering text” on page 206.2. Enter the comment as desired, and then press OK.You can read the entire comment, even with multiple lines, on the Set List Play page.
Multiple clipboards in the Comment editorAfter copying or cutting text in the Comment editor, press the Clipboard button to show the current contents of the clipboards. Each clipboard is represented by a button with an abbreviation of the text it contains. 10 clipboards can be retained at once. If an eleventh section of text is copied, the oldest clipboard is discarded. Touch the buttons to paste the text into the comment. (The separate Paste button always pastes the most recent clipboard.) To remove a clipboard, enable its Remove checkbox and then press the Remove button.
TFX 2& EQ
Set List Slot Volume
Front PanelMain Volume
Universal ExclusiveMaster Volume
(From Knobs, Pedals,MIDI, or Sequencer)
Headphone & Main L/R
Outputs
Program, Combination,
or SongMaster Volume

Set Lists
120
Setting the Slot’s colorYou can assign each Slot to one of 16 different colors, to make it easier to distinguish between them quickly. You can also apply a color to a range of Slots at once. To do so:1. Press the Color button to bring up the color selection
dialog box. 2. Choose a color for the Slot.
If you like, you can also select a range of Slots, and apply a color to all of them at once.
3. When you’re done, press OK.
Saving your editsOnce you’ve made a Set List, you’ll want to save your work. To do so:1. Select the Write Set List command from the page
menu, at the upper right-hand corner of the screen.This brings up a dialog box which allows you to save the Set List. Optionally, you can also select a new location, or change the Set List’s name.
2. Press the Set List name to bring up the text edit dialog.You can give the Set List a descriptive name using the on-screen keyboard.
3. After entering the name, press OK.The text edit window will disappear, returning you to the main Write dialog.
4. Under “To” at the bottom of the dialog, press the popup button next to Set List to bring up the save location dialog.
5. Select a location to save the edited Set List.6. After selecting the location, press OK.7. Press OK again to start the write process.8. If you’re sure you want to write to this location, press
OK again.After that, you’re done!
Editing a Slot’s Program, Combination, or SongWhen you’re in a rehearsal or sound-check, you may need to make quick edits to a sound in the Set List.With this in mind, you can:• Jump to the editing pages for the selected Program,
Combination, or Song• Make the desired edits• Save the edits• Return easily to the original Set List pageTo do so:1. Select the desired item in the Set List.
Next, from any of the Set List pages:2a.In the menu, select the Edit [Type] command.
The actual name of the command will be either Edit Program, Edit Combination, or Edit Song, depending on the selected Slot.or:
2b.Hold the front-panel ENTER button, and touch the Slot’s button.The mode will change to PROGRAM, COMBINATION, or SEQUENCER as appropriate, and the system will display the Home page for the selected item.The Set List settings, including EQ and volume, continue to affect the sound.
3. Edit as desired.4. Write your edits.
For more information, see “Saving your edits” on page 34 (for Programs), “Saving your edits” on page 70 (for Combinations), or “Saving your Song” on page 109.
5. Press the MODE button to return to the Set List.SET LIST mode will be as you left it, with the same Set List and Slot selected.

Smooth Sound Transitions Overview
121
Smooth Sound Transitions
OverviewSmooth Sound Transitions (SST) help to avoid jarring discontinuities when changing between Programs, Combinations, and Songs, by allowing the previous sound and its effects to ring out naturally as you play the newly selected sound. You can even continue to hold notes on the old sound (on the keyboard or with the sustain pedal) as you play the new sound.SST applies to all modes—not just the Set List. For instance, notes and effects are sustained when changing from one Combination to another in COMBINATION mode, or from a Program (in PROGRAM mode) to a Combination (in COMBINATION mode).There are only two parameters that relate to SST: the Global Hold Time, and the Hold Time for each Slot in a Set List. Under the hood, though, there’s a lot going on. We’ll talk about some of this in detail below, but if you’re in a hurry, here are the main things that you need to know:
• SST works between two sounds at a time: the current sound and the previous sound. If you select a new sound while two older sounds are still overlapping, the oldest sound stops.
• SST requires that the effects for both the old and new sounds fit into the available processing power. For factory sounds, this should almost never be a problem. In the unlikely event that the effects don’t fit, the older sound will be silenced, including all of its notes and effects.
• The Hold Time parameters control how long the old sound rings out after all of its notes have been released.
• Arpeggiator and the Drum Track stop when you change sounds. Their notes will continue to ring out naturally.
Using Smooth Sound Transitions
Using Hold TimeThe NAUTILUS has two Hold Time parameters. As noted above, these control how long the old sound rings out after all of its notes have been released. One of these parameters is on the Global Basic page, and it controls the hold time for everything outside of the Set List, including PROGRAM, COMBINATION, and SEQUENCER modes. The other, in the Set List Slot parameters, controls the hold time for each individual Slot. Let’s look at how this one works.1. Go to the SET LIST > Edit page.2. Select Set List 127.
This has been left initialized for your own use.3. Select Slot 1, and set its Program to D048: Scary
Splites Lead.This sound has a long delay on the lead sound, which will help to demonstrate the effect of Hold Time.
4. Set Slot 1’s Hold Time to 10 seconds.5. With Slot 1 still selected, press the Copy button.6. Select Slot 3.
We’ll leave Slot 2 set to the default piano sound.7. Press the Paste button.
Slot 3 becomes a copy of Slot 1, with the same Program setting.
8. Set Slot 3’s Hold Time to 0 seconds.9. Play a brief phrase on the lead synth sound on the
right-hand side of the keyboard, and then pause to listen.Notice how the delay repeats for a long time, as the sound gradually fades away. Hold Time doesn’t affect the sound as long as you stay on the same Slot.
10.Play the phrase again, and this time immediately switch to Slot 2.This time, the sound disappears very quickly. The Hold Time comes into play when you change between different sounds. Note that it’s the old Slot’s Hold Time (Slot 3 in this case) that determines the speed of the fade. Also, notice that even though Hold Time is set to 0 seconds, it’s still a smooth fade; after the Hold Time has elapsed, there’s always a half-second or so fade to silence.
11.Select Slot 1.Remember, this Slot’s Hold Time is set to 10 seconds.
12.Play the phrase again, and immediately switch to Slot 2.Notice how the delay repeats for a long time.
13.Play something briefly on Slot 2’s piano sound, and then pause to listen.Notice how the delay from Slot 1 is still fading out, alongside the piano sound.
So, why would you want to change this in the first place? Even though the default of 5 seconds works well to smooth transitions in general, there may be times in live performance when you’d either like the effects and decaying notes to ring out for a long time, or fade away immediately. The per-Slot Hold Time gives you this control.

Set Lists
122
Hold Time starts after notes are releasedThe Hold Time starts only after you release any notes being played on the old sound. Continuing from the example above:1. Select Slot 3.2. Play and hold a note on the lead synth sound on the
right-hand side of the keyboard.3. While holding the note, switch to Slot 2.
Notice how the note continues to play.4. After holding the note for a while, release the note.After you release the note, the Hold Time starts, and the sound fades away quickly.
Global Hold TimeThe Global Hold Time parameter is on the Global Basic page. As mentioned above, it controls the hold time for everything outside of the Set List, including PROGRAM, COMBINATION, and SEQUENCER modes. The default setting is 5 seconds, which should work well in most cases, but you can change it if you like.
Stopping sustaining or held notesSometimes, you may want to stop sounding voices immediately—for instance, if a sound is set to hold indefinitely. To do so:1. Select a different sound, including any Program,
Combination, Song, or Set List Slot.2. Select a different sound again.
For instance, within a Set List with Slot 1 selected, select Slot 2 and then return to Slot 1.
3. Afterwards, select Slot 1 again.When using sounds apart from those in the set lists, press the MODE button on the front panel and select the COMBINATION mode (the combination will then be selected) while program A000 is selected (for example). After this, press the MODE button and then select the PROGRAM mode (the previous program will then be reselected). At the second change, all notes held from the original sound will be stolen.
Other details
ControllersMost controllers (Joystick Y, RT control knobs, etc.) affect only the new sound, and not the old.Sustain, Sostenuto, Joystick X (pitch bend), and Note Gate continue to affect the old sound, as well as the new. You can use the Combination and Song MIDI Filters for additional control over these MIDI messages, if desired.
EffectsInternally, the NAUTILUS has two separate sets of effects, like two racks of effects. One of these racks is used by the current sound; the other is used by the previous sound. This allows the two sets of effects to work simultaneously; for instance, the previous sound’s delays can continue to ring out while you’re playing the new sound.There are only two of these effects racks, however. Every time that you select a new sound, the older of the two effects racks is silenced and re-configured for the new sound.Also, it’s possible for the combined requirements of the two effects racks to exceed the available processing power. If this happens, the old effects rack is silenced immediately.Note: When the old effects rack is silenced, all of the notes which were playing through it are silenced as well.
LimitationsWhen you select a new sound, the previous sound’s ARP and Drum Track patterns stop. Any notes being played by the Drum Track or Arpeggiator (including those generated by ARP’s Thru In and Thru Out Zones) are released, and then decay normally. Similarly, the PolysixEX arpeggiator stops playing on sound change.When editing EXi Programs, changing the EXi model of the current Program will silence any voices from the previous sound. Note that this happens only when actually editing the Program, and not simply when changing from one Program to another.Resource limitations may prevent the previous sound from ringing out until silence. For instance:• Notes may be stolen.• If there is not enough processing power for the old and
new effects racks to coexist, both the old effects rack and all old voices will be silenced.

123
Sampling (Open Sampling System)
Sampling overview
About sampling on the NAUTILUS
OverviewThe NAUTILUS can sample external audio from the analog, or USB inputs, at 48 kHz 16-bit resolution (or 24-bit when sampling to disk), in mono or stereo. You can record samples into RAM, or sample directly to disk.You can also digitally resample the complete sound of a Program, Combi, or Song, played live or sequenced, including any effects and ARP-generated events.Finally, you can process the inputs through the IFX, MFX, and TFX, or through the synthesis functions of EXi such as the MS-20EX and MOD-7.You can combine any and all of these features at once. For instance, you can sample a live guitar riff from the audio inputs, processed through NAUTILUS effects, while listening to and either recording or not recording a Drum Track or Step Sequence phrase.You can use your samples directly in Drum Kits, or make them into Multisamples and use them anywhere that you use ROM Multisamples, such as in HD-1 Programs or Wave Sequences.
KSC Files and User Sample BanksKSC stands for Korg Sample Collection. KSC files group your Samples and Multisamples together, and let you load them as User Sample Banks. User Sample Banks may be loaded either into RAM, or may use Virtual Memory, just like EXs. They have other benefits as well. For more information, see “Creating and saving .KSC files” on page 180.
Sampling and RAMThe NAUTILUS comes with 3 GB of RAM pre-installed. Approximately 1 GB of this RAM is used by the operating system and ROM sample data. The remainder is shared between the samples in EXs, User Sample Banks, and SAMPLING mode.This means that the size of the currently loaded EXs and User Sample Banks trades off against the memory available for SAMPLING mode. The more space used by EXs and User Sample Banks, the less is available for SAMPLING mode.Using Virtual Memory for EXs and User Sample Banks generally lets you load more samples at once, but may still use a substantial amount of RAM.Note: To check the amount of sample RAM available, see “0–1f: Free Sample Memory/Locations” on page 579 of the PG.The amount of sampling time depends on the amount of free RAM, as shown below.
Free RAM and approximate sampling times
Sampling to driveYou can sample directly to drive (including the internal drive and USB storage devices), creating a WAVE file. This lets you record up to 80 minutes continuously, in either mono or stereo (mono: approximately 440 MB, stereo: approximately 879 MB). As long as they fit into the available RAM, these WAVE files can then be loaded into SAMPLING mode and used in Drum Kits, HD-1 Programs or Wave Sequences. (Note that after loading them into SAMPLING mode, you’ll need to save them again; the WAVE files can’t be used directly for Programs, etc.)WAVE files can also be used in audio tracks of the sequencer. For more information, see “Audio recording” on page 91.
24-bit sampling to driveWhen sampling to drive, you can choose either 16-bit or 24-bit resolution. Both 16- and 24-bit WAVE files can be used directly in SEQUENCER mode audio tracks. When loaded as RAM samples, 24-bit WAVE files are automatically converted to 16-bit resolution.
Sampling in SAMPLING modeIn SAMPLING mode, you can sample analog audio from connected microphones or line inputs, or digital audio from USB. If you like, you can also sample through the NAUTILUS effects.Samples can be processed through effects and internally sampled again (“resampled”). You can use either “Auto” mode which automatically applies the specified effect processing to the selected sample, or “Manual” mode which lets you play the sample manually with effects applied and resample your performance.
Free RAMApproximate Sampling Time (min:sec)
Mono Stereo
16 MB 2:54 1:27
64 MB 11:39 5:49
128 MB 23:18 11:39
256 MB 46:36 23:18
512 MB 93:12 46:36

Sampling (Open Sampling System)
124
PROGRAM, COMBINATION, SEQUENCER modesIn PROGRAM, COMBINATION, and SEQUENCER modes, you can resample a complete live performance including filters, effects, ARP, and even sequencer playback.You can also sample external audio sources, mix the NAUTILUS sounds with the external audio and sample the combined result, or even monitor the performance of the NAUTILUS while sampling only the external source.
In-Track Sampling in SEQUENCER modeIn SEQUENCER mode, you can sample while playing along with a Song, and automatically create note data to trigger the new samples at the appropriate moment in the Song. You can then manipulate these samples using the synthesis abilities of the HD-1, for creative alternatives to HDR. This is called “In-Track Sampling.”
Sampling frequency and bit resolutionAs shown in the diagram, sampling reads the level of the analog signal at fixed intervals along the time axis, and stores the levels in memory as digital data.The time between these intervals is called the “sampling frequency.” 48 kHz (kilohertz) means that sampling is performed 48,000 times each second, so that the intervals are 1/48,000 of a second apart— approximately 0.02083 ms (milliseconds).The higher the sampling frequency, the closer to the original analog signal the waveform in memory will be.Each level is read and converted into digital data. The accuracy of the level measurement is determined by the bit resolution. This process converts an analog signal with infinite resolution into a digital signal with finite resolution. With 16 bit resolution, each level is indicated in 65,536 steps (the sixteenth power of two).The greater the bit resolution, the closer to the original analog signal the waveform in memory will be.
Samples and Multisamples
SamplesThe data that is recorded (sampled) into internal memory or loaded from a file is referred to as a sample or sample file. Samples consist of the actual waveform data, and parameters that specify how the data will be played back, such as Start, Loop Start, and End Address. Samples can be used in multisamples and drum kits.SAMPLING mode supports a maximum of 16,000 Samples at once. Samples in EXs and User Banks do not count towards this maximum.The NAUTILUS can share a single waveform among multiple samples. This allows you to create multiple samples with different playback addresses from the same waveform without wasting internal memory. For example, suppose that you have waveform data that records a voice saying “One-Two-Three.” This single piece of waveform data could be shared by three samples, with the playback of sample A producing “One-Two-Three,” sample B producing “One-Two,” and sample C producing “Two-Three.” For more information, see “Copy” on page 615 of the PG.
Sampled digital waveform Time
Level
Level
TimeAnalog waveform
16 bit= 65,536 levels of data
48 kHz = 48,000 times every second= 0.0208 mS cycle
AUDIO INPUTS
ADC
Analog/digital convertor
Sample 0000 ... 15999
RAM
DAC
Digital/analog convertor
AUDIOOUTPUTS
Analog signal
Insert Effects(Master Effects)
Digital signal Analog signalDigital signal
Internal drive
RAM
Multisample 0000 ... 3999
ProgramUsed by Combinations and Songs
WAVE File
ResamplingPrograms, Combinations and Songs
USB B
Conceptual diagram of the Open Sampling System
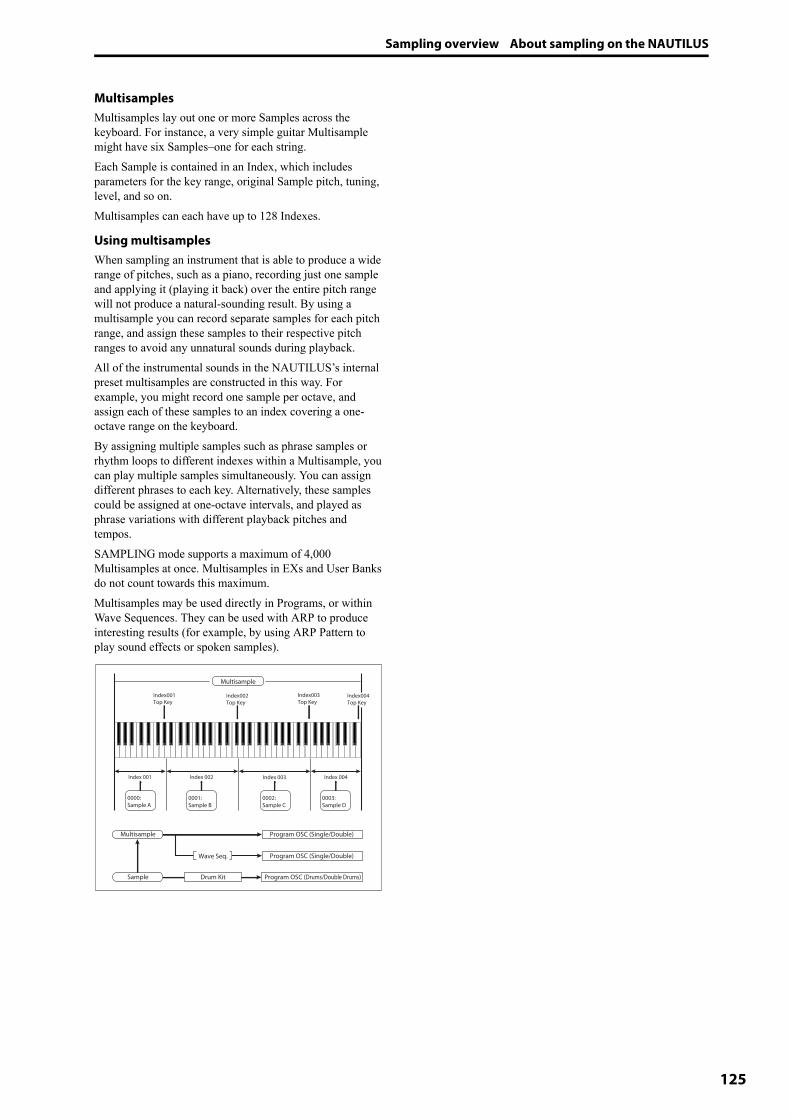
Sampling overview About sampling on the NAUTILUS
125
MultisamplesMultisamples lay out one or more Samples across the keyboard. For instance, a very simple guitar Multisample might have six Samples–one for each string.Each Sample is contained in an Index, which includes parameters for the key range, original Sample pitch, tuning, level, and so on.Multisamples can each have up to 128 Indexes.
Using multisamplesWhen sampling an instrument that is able to produce a wide range of pitches, such as a piano, recording just one sample and applying it (playing it back) over the entire pitch range will not produce a natural-sounding result. By using a multisample you can record separate samples for each pitch range, and assign these samples to their respective pitch ranges to avoid any unnatural sounds during playback.All of the instrumental sounds in the NAUTILUS’s internal preset multisamples are constructed in this way. For example, you might record one sample per octave, and assign each of these samples to an index covering a one-octave range on the keyboard. By assigning multiple samples such as phrase samples or rhythm loops to different indexes within a Multisample, you can play multiple samples simultaneously. You can assign different phrases to each key. Alternatively, these samples could be assigned at one-octave intervals, and played as phrase variations with different playback pitches and tempos.SAMPLING mode supports a maximum of 4,000 Multisamples at once. Multisamples in EXs and User Banks do not count towards this maximum.Multisamples may be used directly in Programs, or within Wave Sequences. They can be used with ARP to produce interesting results (for example, by using ARP Pattern to play sound effects or spoken samples).
Multisample
Index 001 Index 002 Index 003 Index 004
Index001Top Key
Index002Top Key
Index003Top Key
Index004Top Key
0000:Sample A
0001:Sample B
0002:Sample C
0003:Sample D
Program OSC (Single/Double)
Program OSC (Single/Double)
Multisample
Drum Kit
Wave Seq.
Sample Program OSC (Drums/Double Drums)

Sampling (Open Sampling System)
126
Preparations for sampling
Audio Settings
Audio input settings
The Audio Input pageThis page is available in PROGRAM, COMBINATION, SEQUENCER, and SAMPLING modes, and lets you adjust the volume, pan, effects sends, and bussing for the audio inputs, including analog inputs 1 & 2, and USB 1 & 2. Outside of SAMPLING mode, this is the main page for sampling-related settings.Pages with Audio input settings include:
Global audio input settingsEach Program, Combination, and Song can either use the single, Global audio input mixer setup, or have its own custom settings. SAMPLING mode, on the other hand, has its own, separate settings for the audio inputs.For Programs, Combinations, and Songs, the choice of whether or not to use the Global setup is controlled by the Use Global Setting parameter.When Use Global Setting is On, the Program, Combination, or Song uses the Global settings. This is the default, and lets you change freely between different sounds without affecting the audio inputs. Also, any edits made on Audio Input page will affect the Global setting, along with any other Programs, Combis, or Songs which use the Global setting.On the other hand, it may sometimes be convenient to save a particular mixer setup with an individual Program, Combi, or Song, to set up special sub-mixer settings or effects processing for particular inputs. For example, you can set up a Program to use a mic input with a vocoder, as described under “Vocoder (PROGRAM mode)” on page 736 of the PG.
In this case, set Use Global Setting to Off, and the audio inputs will use the Program’s custom settings.
Sampling can bypass the mixer entirelyWhen sampling, you’ll use the Source Bus parameter to select the source of the audio to sample. Depending on the selected Source Bus, you may or may not need to use the Audio Input mixer at all.For instance, if you’re sampling through the NAUTILUS effects, you’ll need to use the Audio Input mixer to send the desired audio input to the effects.However, if you simply want to sample the input directly, you can just set the Source Bus to the desired input, and you’re done—with no need to do any setup in the Audio Input mixer.
Audio Input mixer
Input 1 & 2, USB 1 & 2Input 1 & 2: These are the analog audio inputs, for either microphones or line-level signals. Turn the Audio In button on to enable the INPUT 1/2 jacks.Press the Setup button of Audio In to display the Analog Input Setup dialog box. Switch “Input Select” to “Mic” or “Line” according to the device that is connected, and adjust the Analog Input Gain.For more information, see “Analog Audio Inputs” on page 5.USB 1 & 2: These are the USB audio inputs, for sampling from a connected computer.
Bus SelectThis sets the output bus for the external audio input signal. You can send the audio directly to physical outputs, or to the insert effects.L/R: The external audio input signal will be sent to the L/R bus. Choose this if you want to sample the performance of the NAUTILUS itself along with the other signals of the L/R bus. Set Source Bus to L/R.IFX1…12: The external audio input signal will be sent to the IFX1–12 bus. Choose one of these settings if you want to apply an insert effect while recording. Set the Source Bus to match the Bus Select that follows the insert effect.
Mode Page
SAMPLING Recording– Audio Input
COMBINATION Home– Audio Input/Sampling
PROGRAM Home– Audio Input/Sampling
SEQUENCER Home– Sampling
GLOBAL Basic Setup– Audio
USB B
MicGuitar
Effect unit
Computer
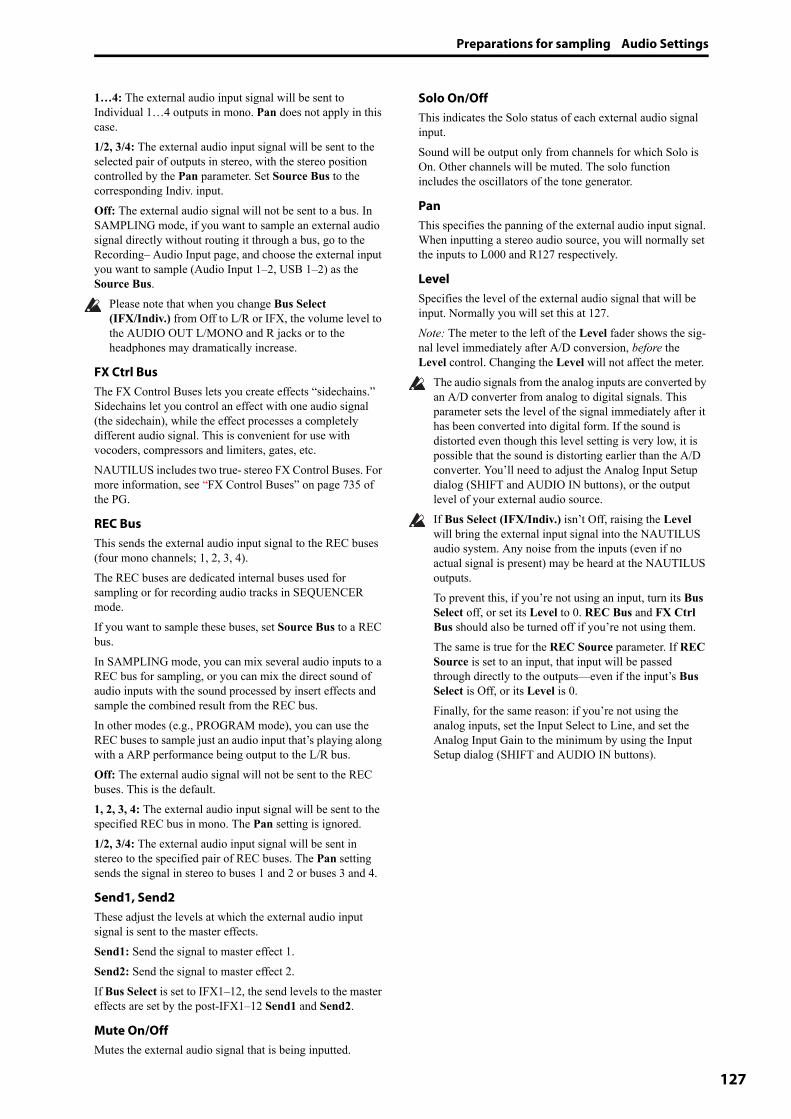
Preparations for sampling Audio Settings
127
1…4: The external audio input signal will be sent to Individual 1…4 outputs in mono. Pan does not apply in this case.1/2, 3/4: The external audio input signal will be sent to the selected pair of outputs in stereo, with the stereo position controlled by the Pan parameter. Set Source Bus to the corresponding Indiv. input.Off: The external audio signal will not be sent to a bus. In SAMPLING mode, if you want to sample an external audio signal directly without routing it through a bus, go to the Recording– Audio Input page, and choose the external input you want to sample (Audio Input 1–2, USB 1–2) as the Source Bus.
Please note that when you change Bus Select (IFX/Indiv.) from Off to L/R or IFX, the volume level to the AUDIO OUT L/MONO and R jacks or to the headphones may dramatically increase.
FX Ctrl BusThe FX Control Buses lets you create effects “sidechains.” Sidechains let you control an effect with one audio signal (the sidechain), while the effect processes a completely different audio signal. This is convenient for use with vocoders, compressors and limiters, gates, etc.NAUTILUS includes two true- stereo FX Control Buses. For more information, see “FX Control Buses” on page 735 of the PG.
REC BusThis sends the external audio input signal to the REC buses (four mono channels; 1, 2, 3, 4).The REC buses are dedicated internal buses used for sampling or for recording audio tracks in SEQUENCER mode.If you want to sample these buses, set Source Bus to a REC bus.In SAMPLING mode, you can mix several audio inputs to a REC bus for sampling, or you can mix the direct sound of audio inputs with the sound processed by insert effects and sample the combined result from the REC bus.In other modes (e.g., PROGRAM mode), you can use the REC buses to sample just an audio input that’s playing along with a ARP performance being output to the L/R bus.Off: The external audio signal will not be sent to the REC buses. This is the default.1, 2, 3, 4: The external audio input signal will be sent to the specified REC bus in mono. The Pan setting is ignored.1/2, 3/4: The external audio input signal will be sent in stereo to the specified pair of REC buses. The Pan setting sends the signal in stereo to buses 1 and 2 or buses 3 and 4.
Send1, Send2These adjust the levels at which the external audio input signal is sent to the master effects.Send1: Send the signal to master effect 1.Send2: Send the signal to master effect 2.If Bus Select is set to IFX1–12, the send levels to the master effects are set by the post-IFX1–12 Send1 and Send2.
Mute On/OffMutes the external audio signal that is being inputted.
Solo On/OffThis indicates the Solo status of each external audio signal input. Sound will be output only from channels for which Solo is On. Other channels will be muted. The solo function includes the oscillators of the tone generator.
PanThis specifies the panning of the external audio input signal. When inputting a stereo audio source, you will normally set the inputs to L000 and R127 respectively.
LevelSpecifies the level of the external audio signal that will be input. Normally you will set this at 127.Note: The meter to the left of the Level fader shows the sig-nal level immediately after A/D conversion, before the Level control. Changing the Level will not affect the meter.
The audio signals from the analog inputs are converted by an A/D converter from analog to digital signals. This parameter sets the level of the signal immediately after it has been converted into digital form. If the sound is distorted even though this level setting is very low, it is possible that the sound is distorting earlier than the A/D converter. You’ll need to adjust the Analog Input Setup dialog (SHIFT and AUDIO IN buttons), or the output level of your external audio source.If Bus Select (IFX/Indiv.) isn’t Off, raising the Level will bring the external input signal into the NAUTILUS audio system. Any noise from the inputs (even if no actual signal is present) may be heard at the NAUTILUS outputs.To prevent this, if you’re not using an input, turn its Bus Select off, or set its Level to 0. REC Bus and FX Ctrl Bus should also be turned off if you’re not using them.The same is true for the REC Source parameter. If REC Source is set to an input, that input will be passed through directly to the outputs—even if the input’s Bus Select is Off, or its Level is 0.Finally, for the same reason: if you’re not using the analog inputs, set the Input Select to Line, and set the Analog Input Gain to the minimum by using the Input Setup dialog (SHIFT and AUDIO IN buttons).
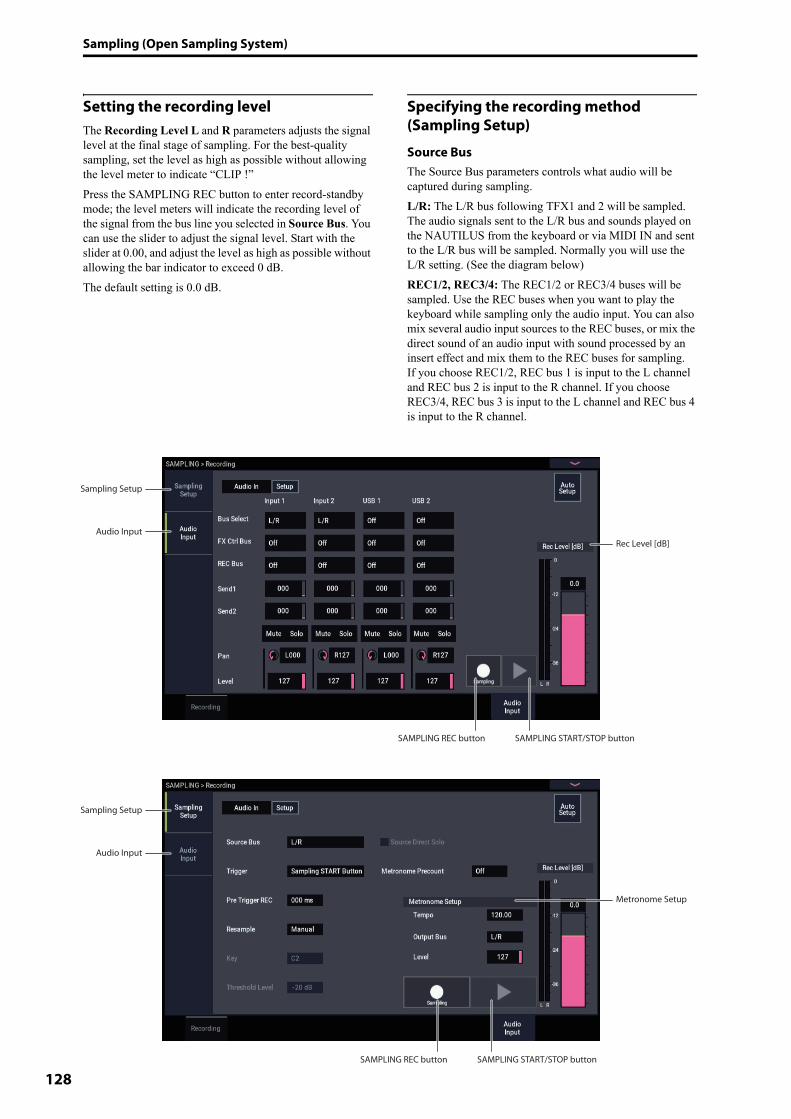
Sampling (Open Sampling System)
128
Setting the recording levelThe Recording Level L and R parameters adjusts the signal level at the final stage of sampling. For the best-quality sampling, set the level as high as possible without allowing the level meter to indicate “CLIP !”Press the SAMPLING REC button to enter record-standby mode; the level meters will indicate the recording level of the signal from the bus line you selected in Source Bus. You can use the slider to adjust the signal level. Start with the slider at 0.00, and adjust the level as high as possible without allowing the bar indicator to exceed 0 dB.The default setting is 0.0 dB.
Specifying the recording method (Sampling Setup)
Source BusThe Source Bus parameters controls what audio will be captured during sampling.L/R: The L/R bus following TFX1 and 2 will be sampled. The audio signals sent to the L/R bus and sounds played on the NAUTILUS from the keyboard or via MIDI IN and sent to the L/R bus will be sampled. Normally you will use the L/R setting. (See the diagram below)REC1/2, REC3/4: The REC1/2 or REC3/4 buses will be sampled. Use the REC buses when you want to play the keyboard while sampling only the audio input. You can also mix several audio input sources to the REC buses, or mix the direct sound of an audio input with sound processed by an insert effect and mix them to the REC buses for sampling.If you choose REC1/2, REC bus 1 is input to the L channel and REC bus 2 is input to the R channel. If you choose REC3/4, REC bus 3 is input to the L channel and REC bus 4 is input to the R channel.
Rec Level [dB]
SAMPLING START/STOP buttonSAMPLING REC button
Sampling Setup
Audio Input
SAMPLING START/STOP buttonSAMPLING REC button
Metronome Setup
Sampling Setup
Audio Input
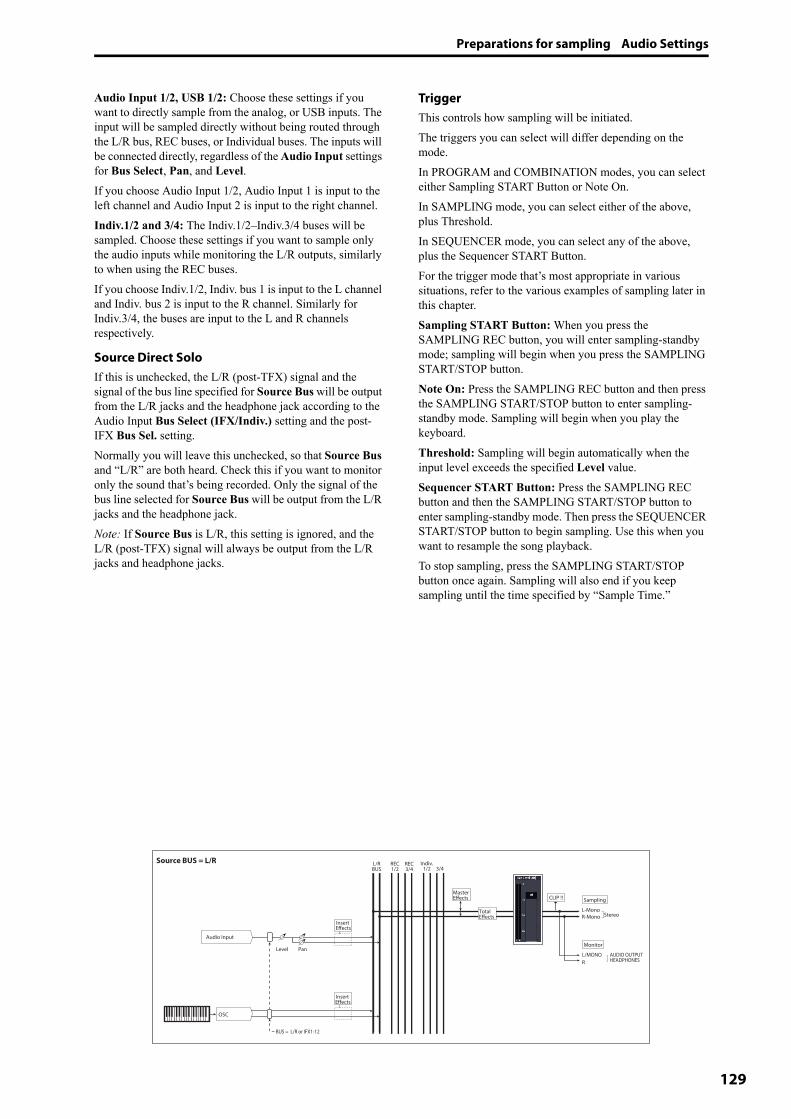
Preparations for sampling Audio Settings
129
Audio Input 1/2, USB 1/2: Choose these settings if you want to directly sample from the analog, or USB inputs. The input will be sampled directly without being routed through the L/R bus, REC buses, or Individual buses. The inputs will be connected directly, regardless of the Audio Input settings for Bus Select, Pan, and Level.If you choose Audio Input 1/2, Audio Input 1 is input to the left channel and Audio Input 2 is input to the right channel.Indiv.1/2 and 3/4: The Indiv.1/2–Indiv.3/4 buses will be sampled. Choose these settings if you want to sample only the audio inputs while monitoring the L/R outputs, similarly to when using the REC buses.If you choose Indiv.1/2, Indiv. bus 1 is input to the L channel and Indiv. bus 2 is input to the R channel. Similarly for Indiv.3/4, the buses are input to the L and R channels respectively.
Source Direct SoloIf this is unchecked, the L/R (post-TFX) signal and the signal of the bus line specified for Source Bus will be output from the L/R jacks and the headphone jack according to the Audio Input Bus Select (IFX/Indiv.) setting and the post-IFX Bus Sel. setting.Normally you will leave this unchecked, so that Source Bus and “L/R” are both heard. Check this if you want to monitor only the sound that’s being recorded. Only the signal of the bus line selected for Source Bus will be output from the L/R jacks and the headphone jack.Note: If Source Bus is L/R, this setting is ignored, and the L/R (post-TFX) signal will always be output from the L/R jacks and headphone jacks.
TriggerThis controls how sampling will be initiated.The triggers you can select will differ depending on the mode.In PROGRAM and COMBINATION modes, you can select either Sampling START Button or Note On.In SAMPLING mode, you can select either of the above, plus Threshold.In SEQUENCER mode, you can select any of the above, plus the Sequencer START Button.For the trigger mode that’s most appropriate in various situations, refer to the various examples of sampling later in this chapter.Sampling START Button: When you press the SAMPLING REC button, you will enter sampling-standby mode; sampling will begin when you press the SAMPLING START/STOP button.Note On: Press the SAMPLING REC button and then press the SAMPLING START/STOP button to enter sampling-standby mode. Sampling will begin when you play the keyboard.Threshold: Sampling will begin automatically when the input level exceeds the specified Level value.Sequencer START Button: Press the SAMPLING REC button and then the SAMPLING START/STOP button to enter sampling-standby mode. Then press the SEQUENCER START/STOP button to begin sampling. Use this when you want to resample the song playback.To stop sampling, press the SAMPLING START/STOP button once again. Sampling will also end if you keep sampling until the time specified by “Sample Time.”
L-MonoR-Mono Stereo
Level Pan
Insert Effects
CLIP !!
L/MONO
Source BUS = L/R
RAUDIO OUTPUTHEADPHONES
Insert Effects
L/RBUS
REC1/2
REC3/4
Indiv.1/2 3/4
BUS = L/R or IFX1-12
Audio Input
OSC
TotalEffects
Master Effects Sampling
Monitor
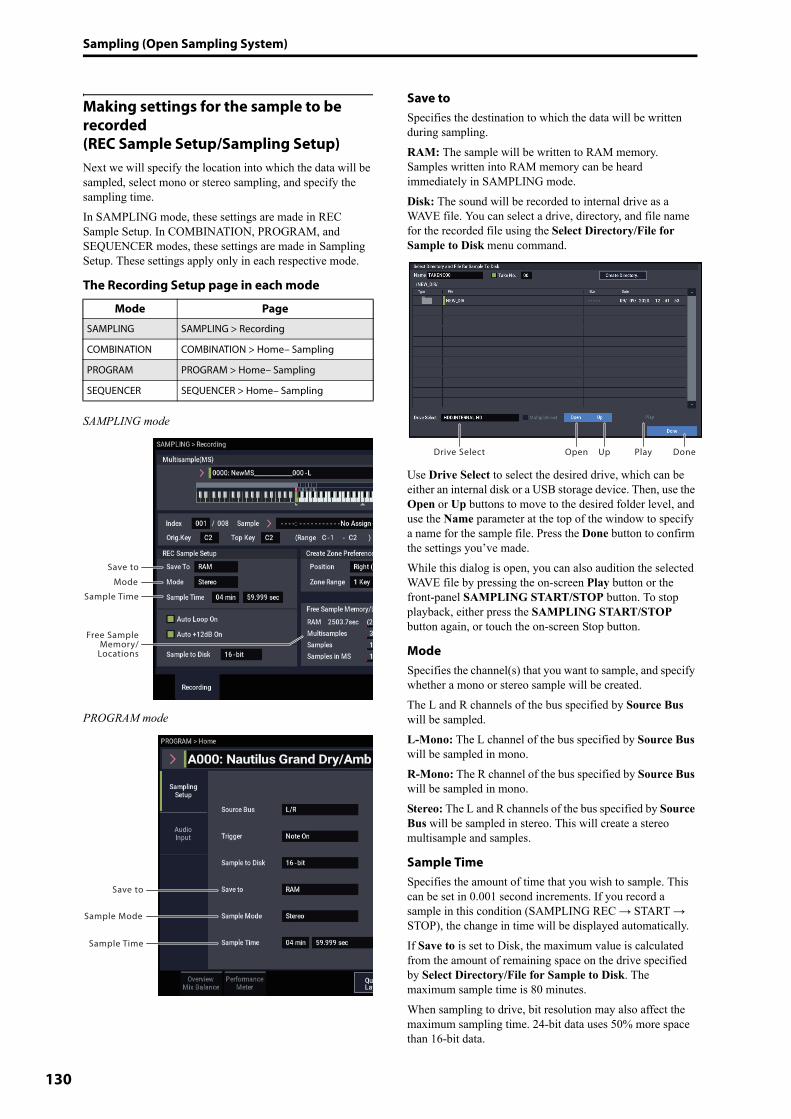
Sampling (Open Sampling System)
130
Making settings for the sample to be recorded(REC Sample Setup/Sampling Setup)Next we will specify the location into which the data will be sampled, select mono or stereo sampling, and specify the sampling time.In SAMPLING mode, these settings are made in REC Sample Setup. In COMBINATION, PROGRAM, and SEQUENCER modes, these settings are made in Sampling Setup. These settings apply only in each respective mode.
The Recording Setup page in each mode
SAMPLING mode
PROGRAM mode
Save toSpecifies the destination to which the data will be written during sampling.RAM: The sample will be written to RAM memory. Samples written into RAM memory can be heard immediately in SAMPLING mode.Disk: The sound will be recorded to internal drive as a WAVE file. You can select a drive, directory, and file name for the recorded file using the Select Directory/File for Sample to Disk menu command.
Use Drive Select to select the desired drive, which can be either an internal disk or a USB storage device. Then, use the Open or Up buttons to move to the desired folder level, and use the Name parameter at the top of the window to specify a name for the sample file. Press the Done button to confirm the settings you’ve made.While this dialog is open, you can also audition the selected WAVE file by pressing the on-screen Play button or the front-panel SAMPLING START/STOP button. To stop playback, either press the SAMPLING START/STOP button again, or touch the on-screen Stop button.
ModeSpecifies the channel(s) that you want to sample, and specify whether a mono or stereo sample will be created.The L and R channels of the bus specified by Source Bus will be sampled.L-Mono: The L channel of the bus specified by Source Bus will be sampled in mono.R-Mono: The R channel of the bus specified by Source Bus will be sampled in mono.Stereo: The L and R channels of the bus specified by Source Bus will be sampled in stereo. This will create a stereo multisample and samples.
Sample TimeSpecifies the amount of time that you wish to sample. This can be set in 0.001 second increments. If you record a sample in this condition (SAMPLING REC → START → STOP), the change in time will be displayed automatically.If Save to is set to Disk, the maximum value is calculated from the amount of remaining space on the drive specified by Select Directory/File for Sample to Disk. The maximum sample time is 80 minutes.When sampling to drive, bit resolution may also affect the maximum sampling time. 24-bit data uses 50% more space than 16-bit data.
Mode Page
SAMPLING SAMPLING > Recording
COMBINATION COMBINATION > Home– Sampling
PROGRAM PROGRAM > Home– Sampling
SEQUENCER SEQUENCER > Home– Sampling
Save to
Mode
Sample Time
Free SampleMemory/
Locations
Save to
Sample Mode
Sample Time
Drive Select DoneOpen Up Play
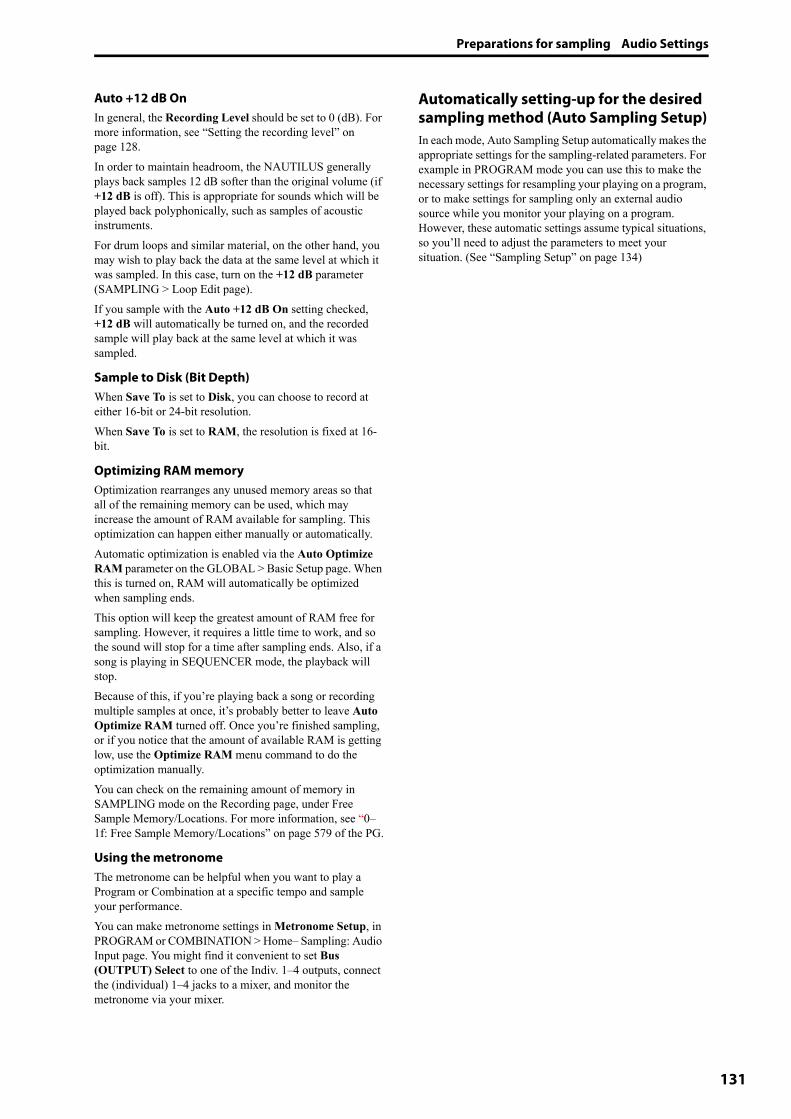
Preparations for sampling Audio Settings
131
Auto +12 dB OnIn general, the Recording Level should be set to 0 (dB). For more information, see “Setting the recording level” on page 128.In order to maintain headroom, the NAUTILUS generally plays back samples 12 dB softer than the original volume (if +12 dB is off). This is appropriate for sounds which will be played back polyphonically, such as samples of acoustic instruments. For drum loops and similar material, on the other hand, you may wish to play back the data at the same level at which it was sampled. In this case, turn on the +12 dB parameter (SAMPLING > Loop Edit page).If you sample with the Auto +12 dB On setting checked, +12 dB will automatically be turned on, and the recorded sample will play back at the same level at which it was sampled.
Sample to Disk (Bit Depth)When Save To is set to Disk, you can choose to record at either 16-bit or 24-bit resolution.When Save To is set to RAM, the resolution is fixed at 16-bit.
Optimizing RAM memoryOptimization rearranges any unused memory areas so that all of the remaining memory can be used, which may increase the amount of RAM available for sampling. This optimization can happen either manually or automatically.Automatic optimization is enabled via the Auto Optimize RAM parameter on the GLOBAL > Basic Setup page. When this is turned on, RAM will automatically be optimized when sampling ends.This option will keep the greatest amount of RAM free for sampling. However, it requires a little time to work, and so the sound will stop for a time after sampling ends. Also, if a song is playing in SEQUENCER mode, the playback will stop.Because of this, if you’re playing back a song or recording multiple samples at once, it’s probably better to leave Auto Optimize RAM turned off. Once you’re finished sampling, or if you notice that the amount of available RAM is getting low, use the Optimize RAM menu command to do the optimization manually. You can check on the remaining amount of memory in SAMPLING mode on the Recording page, under Free Sample Memory/Locations. For more information, see “0–1f: Free Sample Memory/Locations” on page 579 of the PG.
Using the metronomeThe metronome can be helpful when you want to play a Program or Combination at a specific tempo and sample your performance.You can make metronome settings in Metronome Setup, in PROGRAM or COMBINATION > Home– Sampling: Audio Input page. You might find it convenient to set Bus (OUTPUT) Select to one of the Indiv. 1–4 outputs, connect the (individual) 1–4 jacks to a mixer, and monitor the metronome via your mixer.
Automatically setting-up for the desired sampling method (Auto Sampling Setup)In each mode, Auto Sampling Setup automatically makes the appropriate settings for the sampling-related parameters. For example in PROGRAM mode you can use this to make the necessary settings for resampling your playing on a program, or to make settings for sampling only an external audio source while you monitor your playing on a program. However, these automatic settings assume typical situations, so you’ll need to adjust the parameters to meet your situation. (See “Sampling Setup” on page 134)
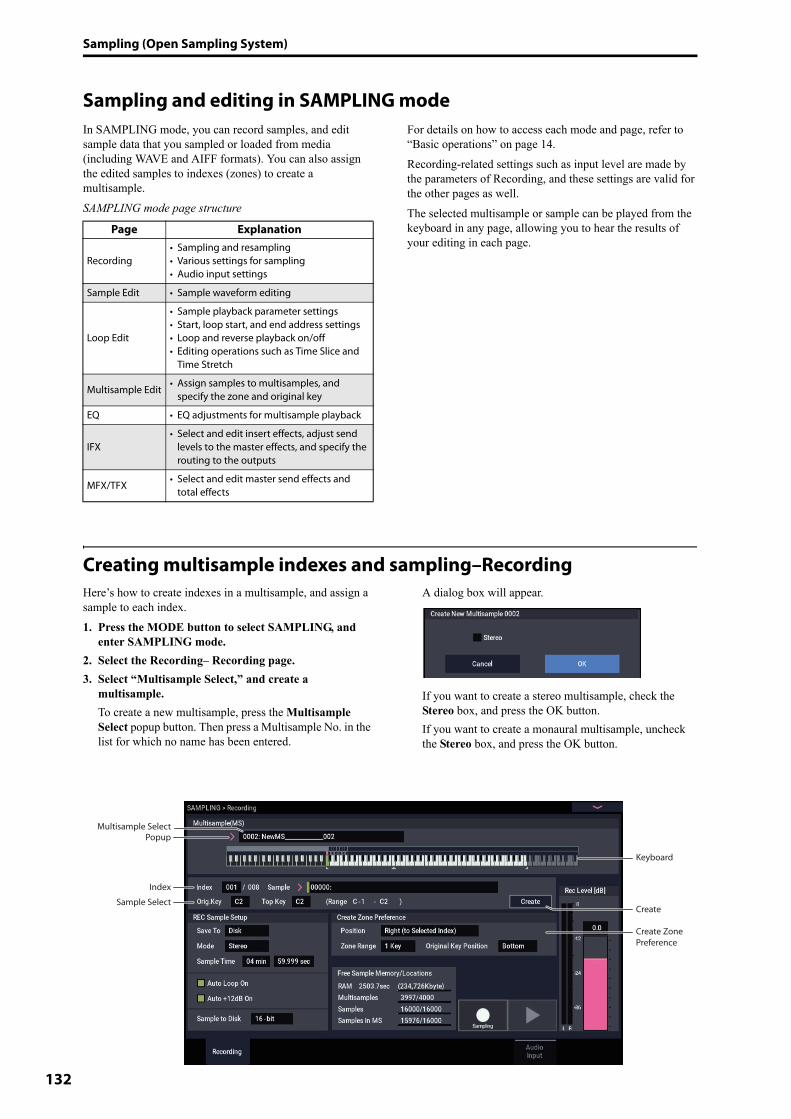
Sampling (Open Sampling System)
132
Sampling and editing in SAMPLING modeIn SAMPLING mode, you can record samples, and edit sample data that you sampled or loaded from media (including WAVE and AIFF formats). You can also assign the edited samples to indexes (zones) to create a multisample.SAMPLING mode page structure
For details on how to access each mode and page, refer to “Basic operations” on page 14.Recording-related settings such as input level are made by the parameters of Recording, and these settings are valid for the other pages as well.The selected multisample or sample can be played from the keyboard in any page, allowing you to hear the results of your editing in each page.
Creating multisample indexes and sampling–RecordingHere’s how to create indexes in a multisample, and assign a sample to each index.1. Press the MODE button to select SAMPLING, and
enter SAMPLING mode.2. Select the Recording– Recording page.3. Select “Multisample Select,” and create a
multisample. To create a new multisample, press the Multisample Select popup button. Then press a Multisample No. in the list for which no name has been entered.
A dialog box will appear.
If you want to create a stereo multisample, check the Stereo box, and press the OK button.If you want to create a monaural multisample, uncheck the Stereo box, and press the OK button.
Page Explanation
Recording• Sampling and resampling• Various settings for sampling• Audio input settings
Sample Edit • Sample waveform editing
Loop Edit
• Sample playback parameter settings• Start, loop start, and end address settings• Loop and reverse playback on/off• Editing operations such as Time Slice and
Time Stretch
Multisample Edit• Assign samples to multisamples, and
specify the zone and original key
EQ • EQ adjustments for multisample playback
IFX• Select and edit insert effects, adjust send
levels to the master effects, and specify the routing to the outputs
MFX/TFX• Select and edit master send effects and
total effects
PopupMultisample Select
Keyboard
Create
Index
Create ZonePreference
Sample Select
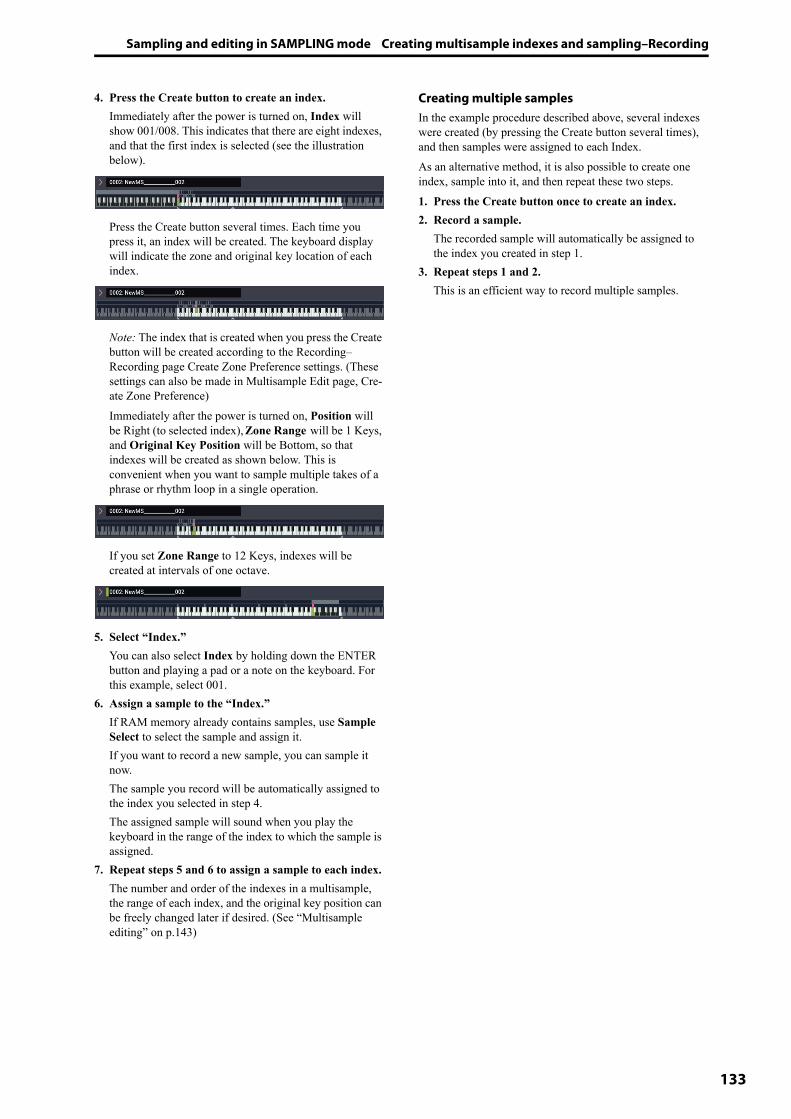
Sampling and editing in SAMPLING mode Creating multisample indexes and sampling–Recording
133
4. Press the Create button to create an index.Immediately after the power is turned on, Index will show 001/008. This indicates that there are eight indexes, and that the first index is selected (see the illustration below).
Press the Create button several times. Each time you press it, an index will be created. The keyboard display will indicate the zone and original key location of each index.
Note: The index that is created when you press the Create button will be created according to the Recording– Recording page Create Zone Preference settings. (These settings can also be made in Multisample Edit page, Cre-ate Zone Preference)Immediately after the power is turned on, Position will be Right (to selected index), Zone Range will be 1 Keys, and Original Key Position will be Bottom, so that indexes will be created as shown below. This is convenient when you want to sample multiple takes of a phrase or rhythm loop in a single operation.
If you set Zone Range to 12 Keys, indexes will be created at intervals of one octave.
5. Select “Index.”You can also select Index by holding down the ENTER button and playing a pad or a note on the keyboard. For this example, select 001.
6. Assign a sample to the “Index.”If RAM memory already contains samples, use Sample Select to select the sample and assign it.If you want to record a new sample, you can sample it now.The sample you record will be automatically assigned to the index you selected in step 4. The assigned sample will sound when you play the keyboard in the range of the index to which the sample is assigned.
7. Repeat steps 5 and 6 to assign a sample to each index.The number and order of the indexes in a multisample, the range of each index, and the original key position can be freely changed later if desired. (See “Multisample editing” on p.143)
Creating multiple samplesIn the example procedure described above, several indexes were created (by pressing the Create button several times), and then samples were assigned to each Index.As an alternative method, it is also possible to create one index, sample into it, and then repeat these two steps.1. Press the Create button once to create an index.2. Record a sample.
The recorded sample will automatically be assigned to the index you created in step 1.
3. Repeat steps 1 and 2.This is an efficient way to record multiple samples.
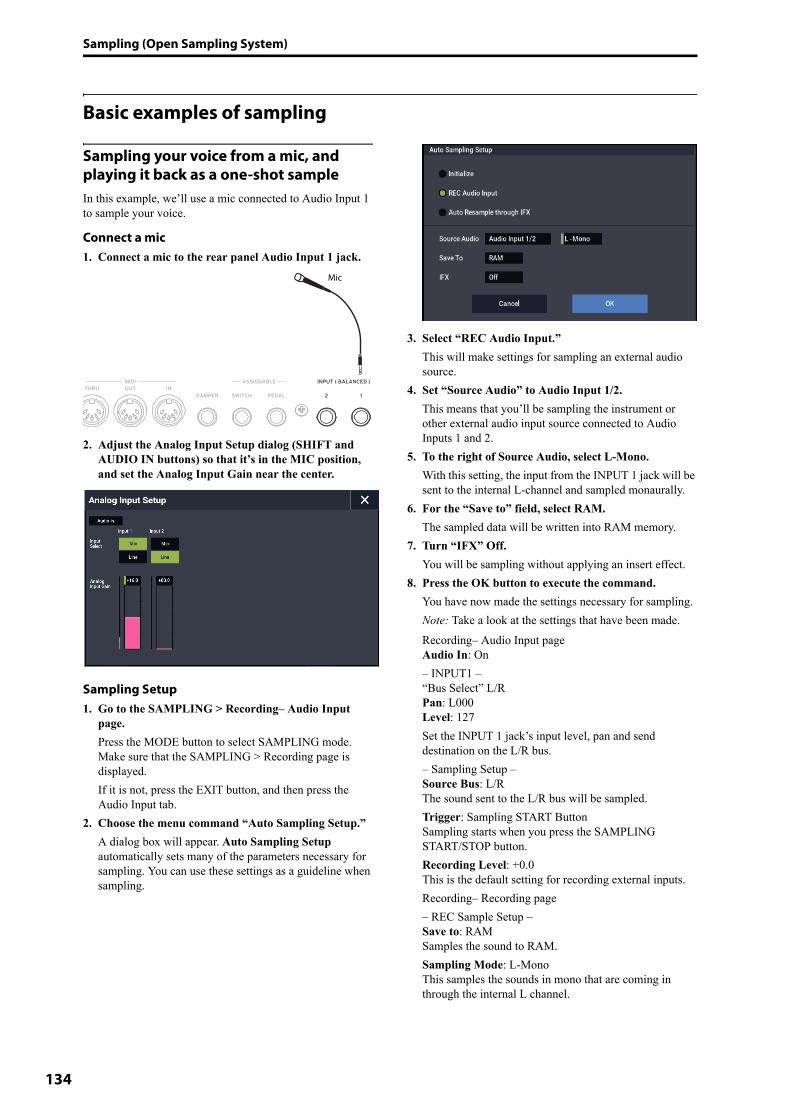
Sampling (Open Sampling System)
134
Basic examples of sampling
Sampling your voice from a mic, and playing it back as a one-shot sampleIn this example, we’ll use a mic connected to Audio Input 1 to sample your voice.
Connect a mic1. Connect a mic to the rear panel Audio Input 1 jack.
2. Adjust the Analog Input Setup dialog (SHIFT and AUDIO IN buttons) so that it’s in the MIC position, and set the Analog Input Gain near the center.
Sampling Setup1. Go to the SAMPLING > Recording– Audio Input
page.Press the MODE button to select SAMPLING mode. Make sure that the SAMPLING > Recording page is displayed.If it is not, press the EXIT button, and then press the Audio Input tab.
2. Choose the menu command “Auto Sampling Setup.” A dialog box will appear. Auto Sampling Setup automatically sets many of the parameters necessary for sampling. You can use these settings as a guideline when sampling.
3. Select “REC Audio Input.”This will make settings for sampling an external audio source.
4. Set “Source Audio” to Audio Input 1/2. This means that you’ll be sampling the instrument or other external audio input source connected to Audio Inputs 1 and 2.
5. To the right of Source Audio, select L-Mono. With this setting, the input from the INPUT 1 jack will be sent to the internal L-channel and sampled monaurally.
6. For the “Save to” field, select RAM. The sampled data will be written into RAM memory.
7. Turn “IFX” Off. You will be sampling without applying an insert effect.
8. Press the OK button to execute the command. You have now made the settings necessary for sampling. Note: Take a look at the settings that have been made. Recording– Audio Input pageAudio In: On– INPUT1 –“Bus Select” L/RPan: L000Level: 127Set the INPUT 1 jack’s input level, pan and send destination on the L/R bus.– Sampling Setup –Source Bus: L/RThe sound sent to the L/R bus will be sampled.Trigger: Sampling START ButtonSampling starts when you press the SAMPLING START/STOP button.Recording Level: +0.0This is the default setting for recording external inputs.Recording– Recording page– REC Sample Setup –Save to: RAMSamples the sound to RAM.Sampling Mode: L-MonoThis samples the sounds in mono that are coming in through the internal L channel.
Mic

Sampling and editing in SAMPLING mode Basic examples of sampling
135
9. On the Recording– Audio Input page, try changing the method used to start sampling to “Trigger”. This sets sampling to begin when the input sound exceeds a certain volume.Trigger: ThresholdThis sets sampling to begin when the input sound exceeds a certain volume.Threshold Level: –30 dBRecording will automatically begin when an audio input is received in record-ready mode at a level of –30dB or greater.Pre Trigger REC: 005msRecording will begin just before sampling starts (5 ms), to prevent the beginning of the sound from being clipped off.
Set the recording level10.Speak or sing at the volume you intend to record.
If the “ADC OVERLOAD !” (AD converter input overload) indication appears, adjust the Analog Input Gain level appropriately using the Analog Input Setup dialog (SHIFT and AUDIO IN buttons).For the best sound, adjust the level as high as possible without allowing the “ADC OVERLOAD !” indication to appear.
11.Press the SAMPLING REC button.Speak into the mic, and notice that the level meter indicates the volume of the sound that will be recorded.If the “CLIP!” indication appears, use the VALUE controller to lower the Recording Level slider (shown in the right of the display) from the 0.0 setting to an appropriate position.
12.When you’ve finished making adjustments, press the SAMPLING REC button.
Record13.Press the SAMPLING REC button.14.Press the SAMPLING START/STOP button.
The NAUTILUS will be in record-ready mode.15.Speak into the mic, saying the word(s) you want to
sample.(Example: “It’s”)Recording will start when the level exceeds the Level –30 dB setting.
16.When you’ve finished saying the word(s), press the SAMPLING START/STOP button.This completes the sampling operation. The new sample will be automatically assigned to “Sample (Sample Select).”
Hear the sampled result17.The sample you just recorded will (by default) be
assigned to Index 001. When you press the “OrigKey” key (C2) for Index 001, you will hear the sound you just sampled.Notice that the sample will loop (play repeatedly) if you hold down the key. We’re going to turn looping off.
Turn looping off18.Press the Loop Edit tab to go to the Loop Edit page.
Uncheck Loop. Now the sample will not loop even if you hold down the C2 key.
Next, we’ll specify that looping will be turned off for each newly recorded sample.
19.Press the lower Recording tab and then the upper Recording tab to go to the Recording– Recording page.
20.Uncheck Auto Loop On.If Auto Loop On is checked, the Loop setting will automatically be turned on when you sample, so that the sample will loop.
Record the next sample21.In the Recording– Recording page, select “Index” and
press the + button to select 002.22.Press the SAMPLING REC button and then the
SAMPLING START/STOP button.Speak into the mic, saying the word(s) you want to sample.(Example: “So”)When you’ve finished speaking, press the SAMPLING START/STOP button.

Sampling (Open Sampling System)
136
23.Repeat steps 14 and 15 several times more to record a few more samples.(Example: “Easy,” “To,” “Sample,” “With,” “NAUTILUS”)
Listen to the recorded result24.Play the keys one after another.
Play the keys starting at C2 in semitone steps. The samples you just recorded will play one after another.(For example if you sequentially play the keys from C2 through F#2, you will hear “It’s So Easy To Sample With NAUTILUS.”)The multisample you created can be used as a program or combination. (See “Converting a Multisample to a Program” on page 144)
Sampling external audio through insert effectsIn this example, we’ll apply an insert effect to the sound from a mic connected to the Audio Input 1 jack, and sample the processed sound in stereo.
Connecting a mic and adjusting the input level1. Connect your mic to the rear panel Audio Input 1
jack. (See “Sampling your voice from a mic, and playing it back as a one-shot sample” on page 134)
Sampling Setup2. Select the “Auto Sampling Setup” page menu
command on the SAMPLING > Recording– Audio Input page to display the command.
3. Select “REC Audio Input”.This configures the external audio for sampling.
4. Set “Source Audio” to “Audio Input 1/2”. Sample an instrument or other sound source, whose analog audio outputs are connected to the AUDIO INPUT 1/2 jacks of the NAUTILUS.
5. Set “L-Mono/R-Mono/Stereo” to “Stereo”. The input signals from the INPUT 1/2 jacks are sent to the internal L/R channels, and the signals are sampled in stereo.
6. Set “Save to” to RAM. The sampled data will be saved to RAM.
7. Set “IFX” to “IFX1”. Insert effect 1 will be used for sampling.
8. Press the OK button to execute the command.This completes the setup process for sampling.Note: You might want to recheck the settings you made.Recording– Audio Input pageAudio In: On– INPUT1 –“Bus Select” IFX1Set the INPUT 1 jack’s input level, pan and send destination to the IFX1 bus.Recording – Recording page– REC Sample Setup –Mode: StereoThis samples the sounds in stereo that are coming in through the internal L/R channels.The other settings are the same as “Sampling your voice from a mic, and playing it back as a one-shot sample” on page 134.
9. Let’s change the settings a bit.Set the “Pan” parameter of “Input1” on the Recording – Audio Input page to “C064”.This sets the input signal to the center of the stereo field.Also, set the “Trigger” to “Threshold”, the “Level” to “−30 dB”, and the “Pre Trigger” to “005ms”.
10.Go to the IFX– Insert FX page.Press the IFX tab, and then the Insert FX tab.
11.Select IFX1, and from Reverb/ER category on IFX Select page, select 101: Reverb Hall and press OK button.Press IFX1 On/Off to turn it on.
12.Speak into the mic, and verify that reverb is applied.You can use the IFX1 page (IFX1 tab) to edit the effect settings.
13.Make sure that the Bus Sel. that follows IFX1 is set to L/R.

Sampling and editing in SAMPLING mode Basic examples of sampling
137
14.Press the EXIT button, and then press the Recording tab to go to the Recording– Recording page.
15.Select Index.If you want to create a new index, press the Create button.
Set the recording level16.Refer to “Set the recording level” on page 135 to make
the settings.
RecordPress the SAMPLING REC button, and then the SAMPLING START/STOP button to enter record-ready mode.Speak the word you want to sample.Recording will start when the level exceeds the Level –30 dB setting.Press the SAMPLING START/STOP button to stop sampling.
Hear the sampled result17.Play the keyboard.
Press the “OrigKey” key to hear the sound you sampled.
Applying an insert effect to a sample and resampling the resultYou can process a sample through effects, and then sample the result. This is called “resampling.” During resampling, the NAUTILUS can even play a selected source sample automatically.
“Resample” Auto1. On the “Recording– Recording” page, assign the
samples to be resampled to “Sample Select”.When the power of the NAUTILUS is first turned on, the assigned sample will be set to “Orig. Key” (C2).
2. Select the “Auto Sampling Setup” page menu command.A dialog box will appear.
3. Select “Auto Resample through IFX”, and select an effect that uses “IFX”.
4. Press the OK button to execute the command.This completes the setup process for sampling.
5. Set the samples to be resampled in “Key” on the “Recording– Audio Input” page.Normally, this is set to the “Orig. Key” on the Recording page.
6. Confirm that the “Auto +12dB On” checkbox is selected on the Recording– Recording page.
7. On the IFX– Insert FX page, select “101: Reverb Hall” for “IFX1”, and set “IFX On/Off” to ON.
Press the key on the keyboard (C2) that is set in the “Key” parameter to make sure that reverb is applied to the resulting sound.Also, make sure that the “Bus Sel.” that comes after IFX1 in the output chain is set to “L/R”.
8. Press the SAMPLING REC button and then the SAMPLING START/STOP button.The sample automatically assigned to C2 will be played, and resampling will begin.The sample will play back to the end, and resampling will end.The sample that was resampled in “Sample Select” will automatically be assigned.Note: To avoid the insert effect from being applied twice when you monitor the result of a sound that was resam-pled with an insert effect applied, “Bus Select” on the IFX– Routing page will automatically be set to “L/R” when resampling ends.If you want to reapply the insert effect, change the setting back to “IFX1”.
Parameter settings using “Auto Resample through IFX”• Recording– Audio Input
– INPUT1 –Bus Select: OffTurn the input from the INPUT 1,2 and USB 1/2 jacks off.– Sampling Setup –Source Bus: L/RThe sound sent to the L/R bus will be sampled.Trigger: Sampling START ButtonAfter you press the SAMPLING REC button and the

Sampling (Open Sampling System)
138
NAUTILUS enters record-ready mode, resampling will begin when you press the SAMPLING START/STOP button.Resample: AutoSamples that are assigned to an index will automatically be resampled.Recording Level: 0.0This is the default setting for resampling.
• Recording– RecordingSave to: RAMSamples the sound to RAM.Sampling Mode: StereoSamples the sounds in stereo that are coming in through the internal L/R channels.Recording– PreferenceAuto +12dB On: OnThe “+12dB” setting will automatically be turned on for samples that were taken.
• IFX– RoutingBus Select: IFX1
Use caution when changing the “Bus” setting from “Off” to “L/R” or “IFX 1–12”, as the volume levels going from the AUDIO OUT L/MONO and R jacks as well as the headphone jack may rise excessively.
“Resample” ManualAside from the automatic method of resampling (“Resample” Auto, mentioned above), you can also resample sounds that you play using the keyboard of the NAUTILUS (“Resample” Manual).• Assign the sample you want to resample in “Sample
Select”, and set “Resample” to “Manual”. Set “Trigger” to “Note On”, and set “Sample Mode” to “Stereo” as necessary. Also, set “Source Bus”, IFX– Routing “Bus Select” and the effect(s).After you press the SAMPLING REC button and the SAMPLING START/STOP button, resampling begins when you press the key corresponding to the sample you wish to resample. Press the SAMPLING START/STOP button to finish resampling.
Editing loopsYou can edit the playback address at which the sample will be looped. The Loop Edit page lets you do the following things.• You can specify the looping addresses by editing Start,
End, and Loop Start while watching the waveform. Functions like Zoom In/Out, Use Zero, and Grid make editing easy.
• You can turn looping on/off, adjust the tuning of the loop playback, apply a +12 dB playback boost, or reverse the playback.
• You can use the Time Slice function to automatically detect the attacks of kick and snare notes etc. in a rhythm loop sample (a looped sample containing a drum pattern), and automatically slice the sample at the appropriate locations. This function can automatically create performance data (notes) to play the divided samples at the appropriate moments, letting you play this phrase in SEQUENCER mode at the desired tempo without affecting the pitch of the individual notes. You can also do things like changing the pitch of just the snare drum, replacing it with an entirely different sample, or changing the playback timing of the phrase in the sequencer to transform the original rhythm loop into an entirely different rhythm loop. (Stereo samples are supported.)
• You can use the Time Stretch function to modify the tempo without changing the sample’s pitch. When executing Time Stretch, you can choose either “Sustaining” (suitable for loops of sustained sounds such as strings or vocal) or “Slice” (suitable for loops of decay-type sounds such as drums). (Stereo samples are supported.)
• Sometimes when looping a sample of pitched instruments such as strings or winds, the looped portion may play back in an unnatural way. By executing the Crossfade Loop function you can eliminate this problem so that the loop sounds right.
Loop settings1. Select the sample for which you wish to make loop
settings.To select the sample, use the Sample Select or Index parameters of Loop Edit page or of the Recording– Recording page.If you use Sample Select to select the sample, be aware that the assignment to the index will also change.
2. In the Loop Edit page, use the “Loop” check box to turn loop playback on/off for the sample.Looping will be turned on if the box is checked.This will operate between the addresses you specify in step 3.Loop On: Start→End→Loop Start→End→ (Loop Start→End is repeated)Loop Off: Start→End
To play the sample, press the key to which the sample is assigned (the key range that is highlighted in Keyboard & Pad).A sample waveform that was sampled with Sample Mode set to Stereo will be displayed in two levels. The upper level is the L channel, and the lower level is the R channel.

Sampling and editing in SAMPLING mode Editing loops
139
3. Set the start address in “Start,” the loop start address in “Loop Start,” and the end address in “End.”Select Loop Start (highlighted), and use the [VALUE] dial or other VALUE controllers to modify the value. The corresponding vertical line will move. Set Start and End in the same way. In the example shown below, Start is set immediately before the first waveform, Loop Start is set immediately before the second waveform, and End is set as desired.
ZOOM4. By using the ZOOM button you can change the range
that is displayed. When “Start” is highlighted, zoom will be performed from the start address.
Area “a” shown in the illustration displays the entire sample. Area “b” indicates the region within the entire sample that is shown in area “c.” As you zoom-in on the time axis, this shows you where the zoomed region is located within the entire sample. Use the Zoom buttons to specify how area “c” will show a magnified (zoom-in) or reduced (zoom-out) view of the waveform.
Use ZeroIf the Use Zero check box is checked, only those addresses where the waveform data crosses the zero level will be found automatically when searching, and can be set. This lets you easily make address settings where noise is less likely to occur when looping.
Truncate5. If necessary, use the page menu command “Truncate”
to delete unwanted data that falls outside the start (or loop start) and end addresses.Select the Front & End radio button.In this example, we will not change the settings of the Save to No. and Overwrite check boxes, so press the OK button to execute.When you execute this operation, the truncated sample data will automatically be assigned to the index.
In the dialog boxes of some page menu items, there is a Save to No. setting that lets you specify the sample number to which the edited sample will be saved. At this time, a vacant sample number will be selected automatically, so you will change the setting only if you want to specify the save destination number. If you check Overwrite in the dialog box of the command, the data prior to editing will be deleted and overwritten by the edited data. Normally, you will execute the Write operation without checking this, so that the unedited data is preserved. When you are completely finished with your editing, you can use the page menu command Delete Sample to delete unneeded samples.
Using the grid to make loop settingsGrid overlays a grid on the waveform display to indicate the tempo BPM. This helps you make loop settings that match the tempo.You can also view the grid in the Sample Edit page, and use the grid to edit the waveform to match the tempo.1. Check “Grid.”
The grid will appear in the waveform display.Set Resolution as desired, and specify the tempo BPM value.The grid is displayed according to the playback pitch at the base key (the key shown in green for “Keyboard”). You can select the base key by holding down the ENTER button and playing a key.Press the base key to play the sample, and press the TAP button at quarter-note intervals along with the phrase. This will enable Tap Tempo and specify the tempo.
2. Set the end address “End” so that it coincides with a grid line.This will make the loop length match the BPM.If looping is on, the grid is displayed beginning at the Loop Start. If looping is off, the grid is displayed beginning at the Start.
3. If you want to hide the grid display, uncheck the “Grid” option.
Loop StartStart End
b a c

Sampling (Open Sampling System)
140
Using Time SliceTime Slice is a function that detects the attack of the kick or snare etc. in a rhythm loop sample (a sample consisting of a looped pattern of drums etc.), and automatically divides it into separate instrumental sounds. Each of the divided instrumental sounds is made into a sample of its own, and then automatically expanded into a multisample and program. Pattern playback data for the SEQUENCER mode using the divided samples is also created automatically.The time-sliced sample can be used in the following ways by the song of SEQUENCER mode.• Multiple rhythm loop samples of differing tempo can be
matched to the same tempo without changing their pitch.• You can change the tempo in realtime without affecting
the pitch.As an example, we will describe how a rhythm loop sample can be time-sliced in SAMPLING mode, and then how the rhythm loop sample can be played in SEQUENCER mode.You will need to provide rhythm loop samples of drums etc. You can either record these on the NAUTILUS, or load them in MEDIA mode. Initially, you should try this using a one-measure pattern in 4/4 time with a fairly simple beat, and record the pattern as a mono rhythm loop sample.1. Use “Sample Select” to select the sample data that you
want to time-slice.Play back the sample, and verify that the beats that you want to loop are played cleanly.If they are not played cleanly, make the appropriate settings for the start address Start and end address End, and execute the page menu command Truncate (See “Loop settings” on page 138).
2. Go to the Loop Edit page. Select the page menu command “Time Slice.”The Set Sample Tempo dialog box will appear.
3. Specify the number of quarter-note beats in the sample, and its tempo.If you know the tempo in BPM, set the Source BPM accordingly.If you do not know the BPM, use Beat to enter the total number of beats, and the BPM will be calculated automatically.
4. Press the OK button.The sample will automatically be sliced, and a dialog box will appear.
When you play the keyboard, C2 will play the original sample (Source), and D2 and subsequent keys will play the divided samples. While listening to each divided sample, adjust Sensitivity so that each drum strike or other rhythm instrument sound is divided into its own sample. In some cases, it may not be possible to slice the sample cleanly even if you adjust Sensitivity. If the attack of the next sound is included in the end of the preceding sample, or if one sample contains two notes, you will need to edit the samples.If you want to edit, hold down the ENTER button and select the Index that is assigned to the note that you want to edit. (This portion of the waveform display will be highlighted.) Then you can make adjustments by adjusting Start or End, and by using Divide to separate or Link to combine. For more information, see “Time Slice” on page 620 of the PG.
5. Press the Save button.The Save Samples & MS dialog box will appear.Here you can save the time-sliced samples and the multisample.At this time, set the items in the Save With area to specify the conversion destination for the program that will use the samples and multisample, and for the performance data (track or pattern) that will be used in SEQUENCER mode to “recreate” the rhythm loop sample.
• If you want to create the performance data in a track:Turn Program and Seq.Event On (checked)Program: as desired (P000)Track: OnSong: 010, Track: 01, Meter: 4/4Start Measure: 001, Time: 008
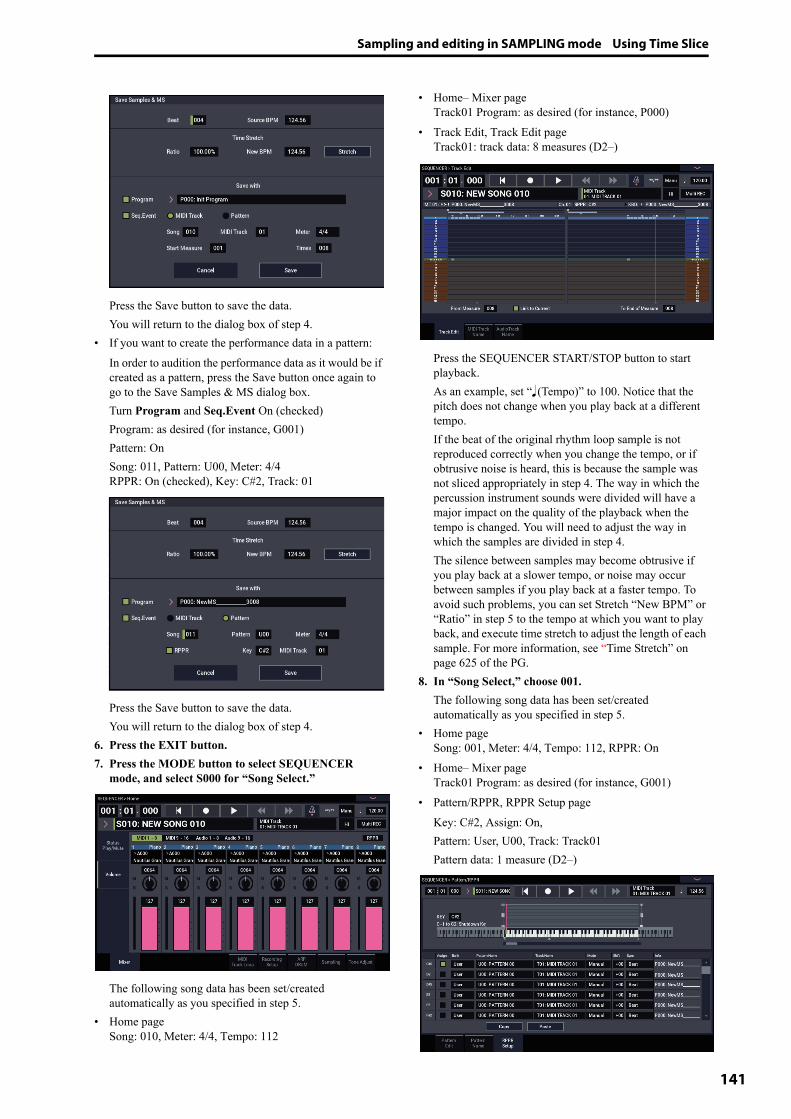
Sampling and editing in SAMPLING mode Using Time Slice
141
Press the Save button to save the data.You will return to the dialog box of step 4.
• If you want to create the performance data in a pattern:In order to audition the performance data as it would be if created as a pattern, press the Save button once again to go to the Save Samples & MS dialog box.Turn Program and Seq.Event On (checked)Program: as desired (for instance, G001)Pattern: OnSong: 011, Pattern: U00, Meter: 4/4RPPR: On (checked), Key: C#2, Track: 01
Press the Save button to save the data.You will return to the dialog box of step 4.
6. Press the EXIT button.7. Press the MODE button to select SEQUENCER
mode, and select S000 for “Song Select.”
The following song data has been set/created automatically as you specified in step 5.
• Home pageSong: 010, Meter: 4/4, Tempo: 112
• Home– Mixer pageTrack01 Program: as desired (for instance, P000)
• Track Edit, Track Edit pageTrack01: track data: 8 measures (D2–)
Press the SEQUENCER START/STOP button to start playback.As an example, set “� (Tempo)” to 100. Notice that the pitch does not change when you play back at a different tempo.If the beat of the original rhythm loop sample is not reproduced correctly when you change the tempo, or if obtrusive noise is heard, this is because the sample was not sliced appropriately in step 4. The way in which the percussion instrument sounds were divided will have a major impact on the quality of the playback when the tempo is changed. You will need to adjust the way in which the samples are divided in step 4.The silence between samples may become obtrusive if you play back at a slower tempo, or noise may occur between samples if you play back at a faster tempo. To avoid such problems, you can set Stretch “New BPM” or “Ratio” in step 5 to the tempo at which you want to play back, and execute time stretch to adjust the length of each sample. For more information, see “Time Stretch” on page 625 of the PG.
8. In “Song Select,” choose 001.The following song data has been set/created automatically as you specified in step 5.
• Home pageSong: 001, Meter: 4/4, Tempo: 112, RPPR: On
• Home– Mixer pageTrack01 Program: as desired (for instance, G001)
• Pattern/RPPR, RPPR Setup pageKey: C#2, Assign: On,Pattern: User, U00, Track: Track01Pattern data: 1 measure (D2–)
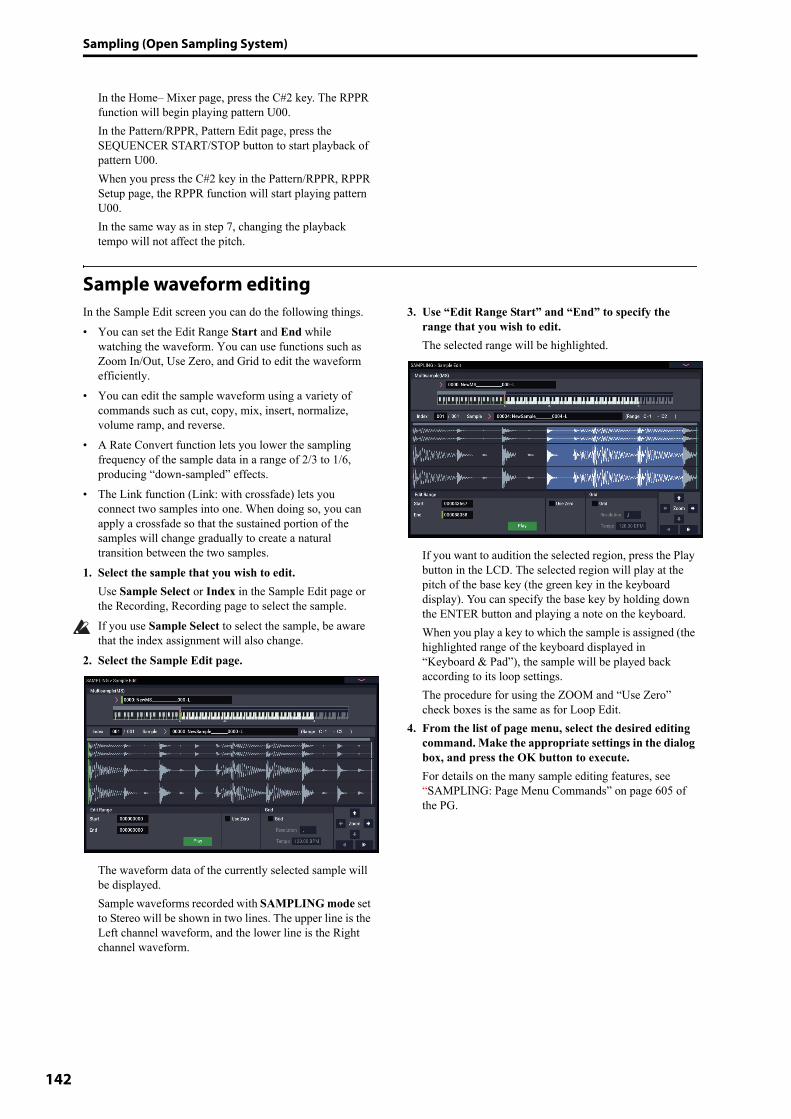
Sampling (Open Sampling System)
142
In the Home– Mixer page, press the C#2 key. The RPPR function will begin playing pattern U00.In the Pattern/RPPR, Pattern Edit page, press the SEQUENCER START/STOP button to start playback of pattern U00.When you press the C#2 key in the Pattern/RPPR, RPPR Setup page, the RPPR function will start playing pattern U00.In the same way as in step 7, changing the playback tempo will not affect the pitch.
Sample waveform editingIn the Sample Edit screen you can do the following things.• You can set the Edit Range Start and End while
watching the waveform. You can use functions such as Zoom In/Out, Use Zero, and Grid to edit the waveform efficiently.
• You can edit the sample waveform using a variety of commands such as cut, copy, mix, insert, normalize, volume ramp, and reverse.
• A Rate Convert function lets you lower the sampling frequency of the sample data in a range of 2/3 to 1/6, producing “down-sampled” effects.
• The Link function (Link: with crossfade) lets you connect two samples into one. When doing so, you can apply a crossfade so that the sustained portion of the samples will change gradually to create a natural transition between the two samples.
1. Select the sample that you wish to edit.Use Sample Select or Index in the Sample Edit page or the Recording, Recording page to select the sample.If you use Sample Select to select the sample, be aware that the index assignment will also change.
2. Select the Sample Edit page.
The waveform data of the currently selected sample will be displayed.Sample waveforms recorded with SAMPLING mode set to Stereo will be shown in two lines. The upper line is the Left channel waveform, and the lower line is the Right channel waveform.
3. Use “Edit Range Start” and “End” to specify the range that you wish to edit.The selected range will be highlighted.
If you want to audition the selected region, press the Play button in the LCD. The selected region will play at the pitch of the base key (the green key in the keyboard display). You can specify the base key by holding down the ENTER button and playing a note on the keyboard.When you play a key to which the sample is assigned (the highlighted range of the keyboard displayed in “Keyboard & Pad”), the sample will be played back according to its loop settings.The procedure for using the ZOOM and “Use Zero” check boxes is the same as for Loop Edit.
4. From the list of page menu, select the desired editing command. Make the appropriate settings in the dialog box, and press the OK button to execute.For details on the many sample editing features, see “SAMPLING: Page Menu Commands” on page 605 of the PG.
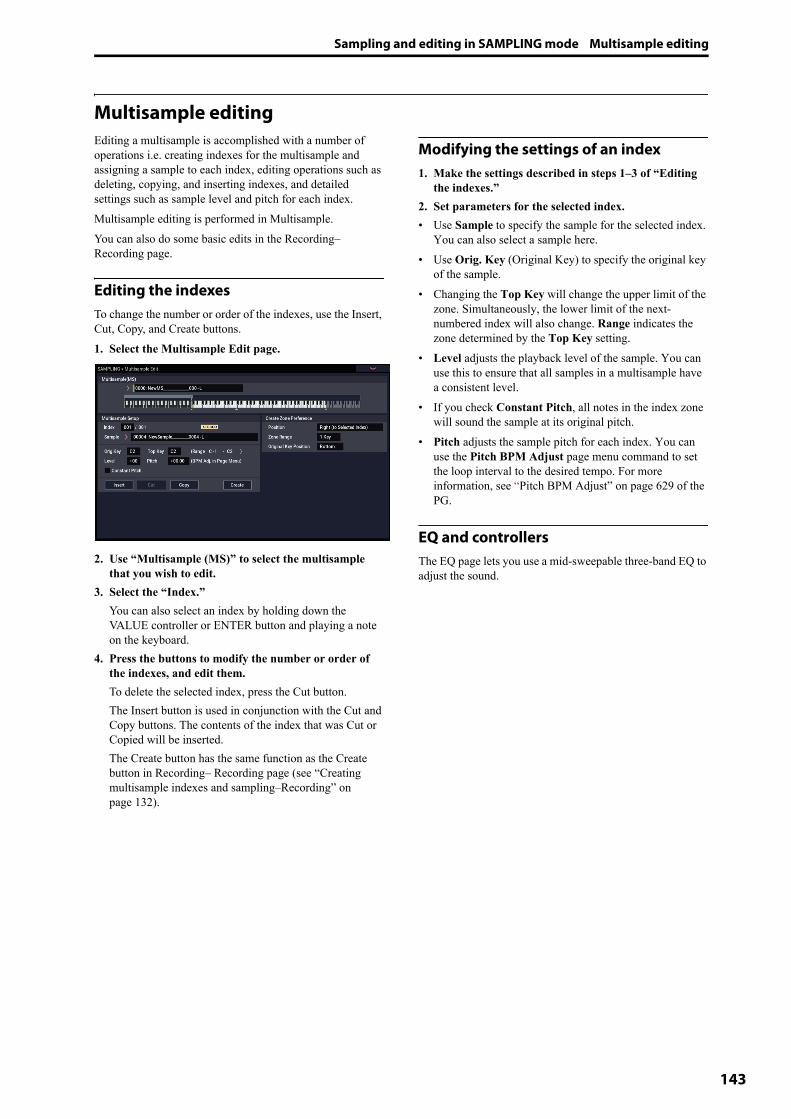
Sampling and editing in SAMPLING mode Multisample editing
143
Multisample editingEditing a multisample is accomplished with a number of operations i.e. creating indexes for the multisample and assigning a sample to each index, editing operations such as deleting, copying, and inserting indexes, and detailed settings such as sample level and pitch for each index.Multisample editing is performed in Multisample.You can also do some basic edits in the Recording– Recording page.
Editing the indexesTo change the number or order of the indexes, use the Insert, Cut, Copy, and Create buttons.1. Select the Multisample Edit page.
2. Use “Multisample (MS)” to select the multisample that you wish to edit.
3. Select the “Index.”You can also select an index by holding down the VALUE controller or ENTER button and playing a note on the keyboard.
4. Press the buttons to modify the number or order of the indexes, and edit them.To delete the selected index, press the Cut button. The Insert button is used in conjunction with the Cut and Copy buttons. The contents of the index that was Cut or Copied will be inserted.The Create button has the same function as the Create button in Recording– Recording page (see “Creating multisample indexes and sampling–Recording” on page 132).
Modifying the settings of an index1. Make the settings described in steps 1–3 of “Editing
the indexes.”2. Set parameters for the selected index.• Use Sample to specify the sample for the selected index.
You can also select a sample here.• Use Orig. Key (Original Key) to specify the original key
of the sample.• Changing the Top Key will change the upper limit of the
zone. Simultaneously, the lower limit of the next-numbered index will also change. Range indicates the zone determined by the Top Key setting.
• Level adjusts the playback level of the sample. You can use this to ensure that all samples in a multisample have a consistent level.
• If you check Constant Pitch, all notes in the index zone will sound the sample at its original pitch.
• Pitch adjusts the sample pitch for each index. You can use the Pitch BPM Adjust page menu command to set the loop interval to the desired tempo. For more information, see “Pitch BPM Adjust” on page 629 of the PG.
EQ and controllersThe EQ page lets you use a mid-sweepable three-band EQ to adjust the sound.

Sampling (Open Sampling System)
144
Saving, converting to Programs, and Comparing
Saving Samples and Multisamples Any Samples and Multisamples that you create or edit in SAMPLING mode must be saved in MEDIA mode, or they’ll go away when you turn off the power. This is different from Programs and Combinations, which can be written to memory. For more information, see “Some types of data must be saved to disk” on page 209.
To save only the Samples and Multisamples, use the Save Sample Data menu command on the Disk– Save page.If you want to create an archive of the current setup, including any Programs, Wave Sequences, or Drum Kits which use the sample data, we recommend that you use Save All in order to ensure that the sounds will be reproduced correctly the next time you load them.For more information, see “Saving to internal drive, CDs, and USB media” on page 209.
KSC Files and User Sample BanksKSC stands for Korg Sample Collection. KSC files are saved to and loaded from drive; they group your Samples and Multisamples together, and let you load them as User Sample Banks. User Sample Banks may be loaded either into RAM, or may use Virtual Memory, just like EXs. They have other benefits as well. For more information, see “Creating and saving .KSC files” on page 180.
Converting a Multisample to a ProgramIn pages Recording– EQ, you can use the Convert MS To Program page menu command. When you execute this command, the settings of the currently selected Multisample will be converted into a Program. In PROGRAM mode you can make filter, amp and effect settings etc., and play the sample as a program. The resulting Program can be used in a combination or song.If you want to use a Multisample created in SAMPLING mode as a Program, go to the PROGRAM > OSC Pitch page and select RAM Mono or RAM stereo as the Bank for OSC1 Multisample/Wave Sequence or OSC2 Multisample/Wave Sequence Bank (when Type is set to Multisample). In this case, the Multisample will sound according to the settings of the program parameters.1. Use “Multisample Select (MS)” to select the
Multisample that you want to convert to a Program.2. Choose “Convert MS To Program” to open the dialog
box.
3. Press the text edit button to open the text edit dialog box, and input a new program name (up to 24 characters). By default, this will be the name of the multisample.
4. Enable or disable “Use Destination Program Parameters” as desired.Use Destination Program Parameters unchecked:When you execute the command, the multisample of the destination Program will be replaced by the multisample you select here, and the other Program parameters will be initialized so that it reproduces the sound heard in SAMPLING mode.The program will be converted with an Oscillator Mode (Program 1–1a) of Single.Use Destination Program Parameters checked:When you execute the command, the multisample of the conversion-destination program will be replaced by the multisample you select here, but the other program parameters will not be initialized. Choose this if you want to use the parameter settings of an existing program.If you check Use Destination Program Parameters, please be aware of the following point.The destination program’s Oscillator Mode must be Single. If this is not the case, the message “Oscillator Mode conflicts” will appear when you attempt to execute the command. To solve this, change the Oscillator Mode setting of the destination Program.
5. Use the To “Program” field to specify the conversion-destination program.We recommend that you use Program banks P–T for saving Programs created in SAMPLING mode.
6. Press the OK button to execute.7. Press the MODE button to go to the PROGRAM
mode, select the converted program, and try it out.
CompareIn SAMPLING mode, there is no Compare function that lets you return to the state prior to editing.If you want to preserve the state prior to editing, use a function such as Copy Sample or Copy MS to copy the multisample or sample before you begin editing. For more information, see “Copy Sample” on page 606 of the PG, and “Copy MS (Copy Multisample)” on page 608 of the PG.In some of the page menu commands on the Sample Edit and Loop Edit pages, you can execute with the Overwrite option unchecked in the dialog box, so that the sample data prior to editing will be preserved.

Sampling in PROGRAM and COMBINATION modes Overview
145
Sampling in PROGRAM and COMBINATION modes
OverviewIn addition to using SAMPLING mode, you can also sample both external audio sources and internal sounds in PROGRAM, COMBINATION, and SEQUENCER modes.For instance, you can resample a performance that uses the NAUTILUS’s full range of features, including filters, effects, Drum Track, and ARP. You can even sample a full, multitimbral sequence, played either from the internal sequencer or an external MIDI sequencer.
You can also sample the NAUTILUS’s performance together with audio from an external input source, or monitor the performance of the NAUTILUS’s ARP function and sequencer etc. while you sample only the external audio from the input jacks.
Resampling a Arpeggiator phrase in PROGRAM modeYou can resample the sound of a program or combination being played by yourself or by Arpeggiator.In this example, we’ll explain how to sample a ARP-generated phrase in PROGRAM mode. You can sample in a similar way in COMBINATION or SEQUENCER modes as well.1. Press the MODE button to go to the PROGRAM
mode, and select the program that you want to resample.
2. Turn on ARP (ARP button lit), play the keyboard, and verify that a phrase is generated.
3. Press the PROGRAM > Home– Sampling tab to select Audio Input tab.
4. If the “Use Global Setting” checkbox is selected, execute the “Auto Sampling Setup” page menu command to edit the Input settings of GLOBAL mode. If the checkbox is not selected, the input settings for each program will be edited. The settings are easy to check here, so deselect the checkbox.
5. Select the “Auto Sampling Setup” page menu command to display the dialog box.The various sampling-related parameters will be automatically configured. You can use this as a guide when resampling programs, combinations or song performance, or when sampling external audio. This is also used for initializing the settings.
6. Make the settings as follows.Resample Program Play: OnThis configures the program performance to be resampled.Save to: RAMWrites the resampled data to RAM.
Convert to Program: OnProgram: OptionalAfter resampling, the data will be automatically converted and written as the program number you set in “Program”.
7. Press the OK button to execute the command.This completes the setup process for resampling.Note: You might want to recheck the settings you made.– Input –Each bus: OffThis sets the external input to “Off”.– RECORDING LEVEL –Recording Level: 0.0This is the default setting for resampling.– Sampling Setup –Source Bus: L/RThe sound sent to the L/R bus will be sampled.Trigger: Note OnSampling will start when you play the keyboard.Save to: RAMSamples the sound to RAM.Mode: StereoSamples the sounds in stereo that are coming in through the internal LR channels.
8. Adjust the recording level.Press the SAMPLING REC button, and adjust the level using the “Recording Level” slider.Turn on the arpeggiator function and play the keyboard. Set the recording level just before it reaches the level at which the “CLIP!” indicator lights up.
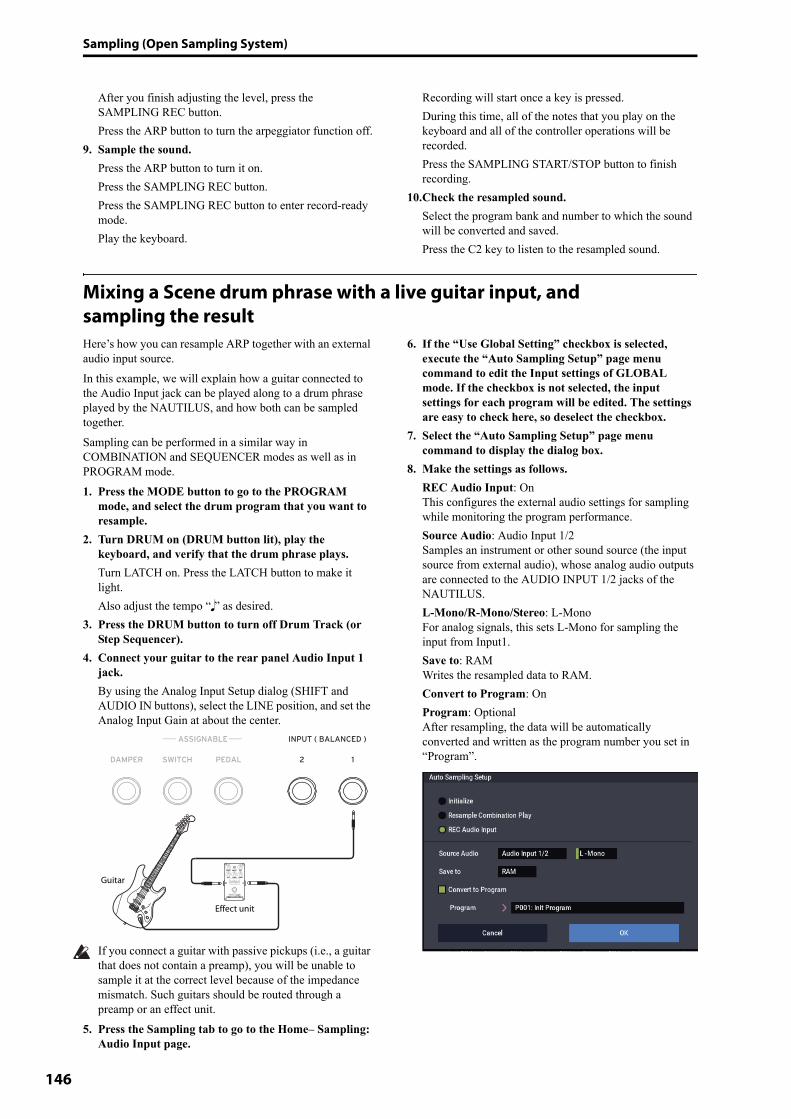
Sampling (Open Sampling System)
146
After you finish adjusting the level, press the SAMPLING REC button.Press the ARP button to turn the arpeggiator function off.
9. Sample the sound.Press the ARP button to turn it on.Press the SAMPLING REC button.Press the SAMPLING REC button to enter record-ready mode.Play the keyboard.
Recording will start once a key is pressed.During this time, all of the notes that you play on the keyboard and all of the controller operations will be recorded.Press the SAMPLING START/STOP button to finish recording.
10.Check the resampled sound.Select the program bank and number to which the sound will be converted and saved.Press the C2 key to listen to the resampled sound.
Mixing a Scene drum phrase with a live guitar input, and sampling the resultHere’s how you can resample ARP together with an external audio input source.In this example, we will explain how a guitar connected to the Audio Input jack can be played along to a drum phrase played by the NAUTILUS, and how both can be sampled together.Sampling can be performed in a similar way in COMBINATION and SEQUENCER modes as well as in PROGRAM mode.1. Press the MODE button to go to the PROGRAM
mode, and select the drum program that you want to resample.
2. Turn DRUM on (DRUM button lit), play the keyboard, and verify that the drum phrase plays.Turn LATCH on. Press the LATCH button to make it light.Also adjust the tempo “�” as desired.
3. Press the DRUM button to turn off Drum Track (or Step Sequencer).
4. Connect your guitar to the rear panel Audio Input 1 jack.By using the Analog Input Setup dialog (SHIFT and AUDIO IN buttons), select the LINE position, and set the Analog Input Gain at about the center.
If you connect a guitar with passive pickups (i.e., a guitar that does not contain a preamp), you will be unable to sample it at the correct level because of the impedance mismatch. Such guitars should be routed through a preamp or an effect unit.
5. Press the Sampling tab to go to the Home– Sampling: Audio Input page.
6. If the “Use Global Setting” checkbox is selected, execute the “Auto Sampling Setup” page menu command to edit the Input settings of GLOBAL mode. If the checkbox is not selected, the input settings for each program will be edited. The settings are easy to check here, so deselect the checkbox.
7. Select the “Auto Sampling Setup” page menu command to display the dialog box.
8. Make the settings as follows.REC Audio Input: OnThis configures the external audio settings for sampling while monitoring the program performance.Source Audio: Audio Input 1/2Samples an instrument or other sound source (the input source from external audio), whose analog audio outputs are connected to the AUDIO INPUT 1/2 jacks of the NAUTILUS.L-Mono/R-Mono/Stereo: L-MonoFor analog signals, this sets L-Mono for sampling the input from Input1.Save to: RAMWrites the resampled data to RAM.Convert to Program: OnProgram: OptionalAfter resampling, the data will be automatically converted and written as the program number you set in “Program”.
Guitar
Effect unit
Sampling in PROGRAM and COMBINATION modes Sampling a guitar from the audio inputs, while listen-
147
9. Press the OK button to execute the command.This completes the setup process for sampling.Note: You might want to recheck the settings you made.Audio In: On– Input 1, 2 –REC Bus: 1/2Sends the input from AUDIO INPUT 1 to AUX Bus 1/2.– RECORDING LEVEL –Recording Level: 0.0This is the default setting for resampling.– Sampling Setup –Source Bus: REC 1/2The sound sent to the REC Bus 1/2 will be sampled. Sounds made by the internal tone generator that are sent to the L/R bus will not be sampled.Trigger: Sampling START ButtonAfter you press the SAMPLING REC button and the NAUTILUS enters record-ready mode, sampling starts when you press the SAMPLING START/STOP button.Save to: RAMSamples the sound to RAM.Mode: L-MonoThis samples the sounds in mono that are coming in through the internal L channel.
10.Now, let’s try changing some of the settings.Metronome Precount: 4After you press the SAMPLING REC button and the NAUTILUS enters recording standby mode, press the SAMPLING START/STOP button for a four-beat count-in, after which recording will start. (The metronome will not sound during recording.)You might also like to change the pan position using Input “Pan”.
11.Press the SAMPLING REC button.
12.Play your guitar at the volume you want to use while recording.If “ADC OVERLOAD!” is displayed, adjust the Analog Input Gain level as appropriate in the Analog Input Setup dialog box (press the SHIFT + AUDIO IN buttons).You’ll get the best sound if you set the recording level just before “ADC OVERLOAD!” displays (the maximum level before overload).Play your guitar and check the level meter to see the volume of the guitar sound to be sampled.If the “CLIP!” indicator is shown, lower the level of the “Recording Level” slider on the right side of the display, changing the value from 0.0 to an appropriate level using the VALUE controller.
13.After you finish adjusting the level, press the SAMPLING REC button.
14.Press the DRUM button to turn it on.15.Press the SAMPLING REC button to enter record-
ready mode.The metronome will start counting down.
16.Play the keys in time with the metronome to begin playing the drum track (or step sequencer).
17.Press the SAMPLING START/STOP button to start recording, in time with the drum track (or step sequencer).Sampling will begin after a four-beat countdown. Start playing.
18.After you have finished recording, press the SAMPLING START/STOP button.
19.Press the DRUM button to turn it off.20.Check the sampled sound.
Select the program bank and number to which the sound will be converted and saved.Press the C2 key to listen to the sampled sound.
Sampling a guitar from the audio inputs, while listening to a Scene drum phraseHere we’ll explain how you can sample just the sound of an external input source while listening to a performance generated by Drum Track (or Step Sequencer).You can do this by modifying the settings in step 9 of the preceding “Mixing a Scene drum phrase with a live guitar input, and sampling the result” to change them as follows.
Audio In: On– INPUT1 –Bus Select: L/RREC Bus: Off– Sampling Setup –Source Bus: L/RThe sound sent to the L/R bus will be sampled.Mode: optional
For the level adjustment in step 11 as previously-mentioned, press the DRUM button to turn it on, play some keys and drum phrases and then play your guitar to check the final combined volume level.
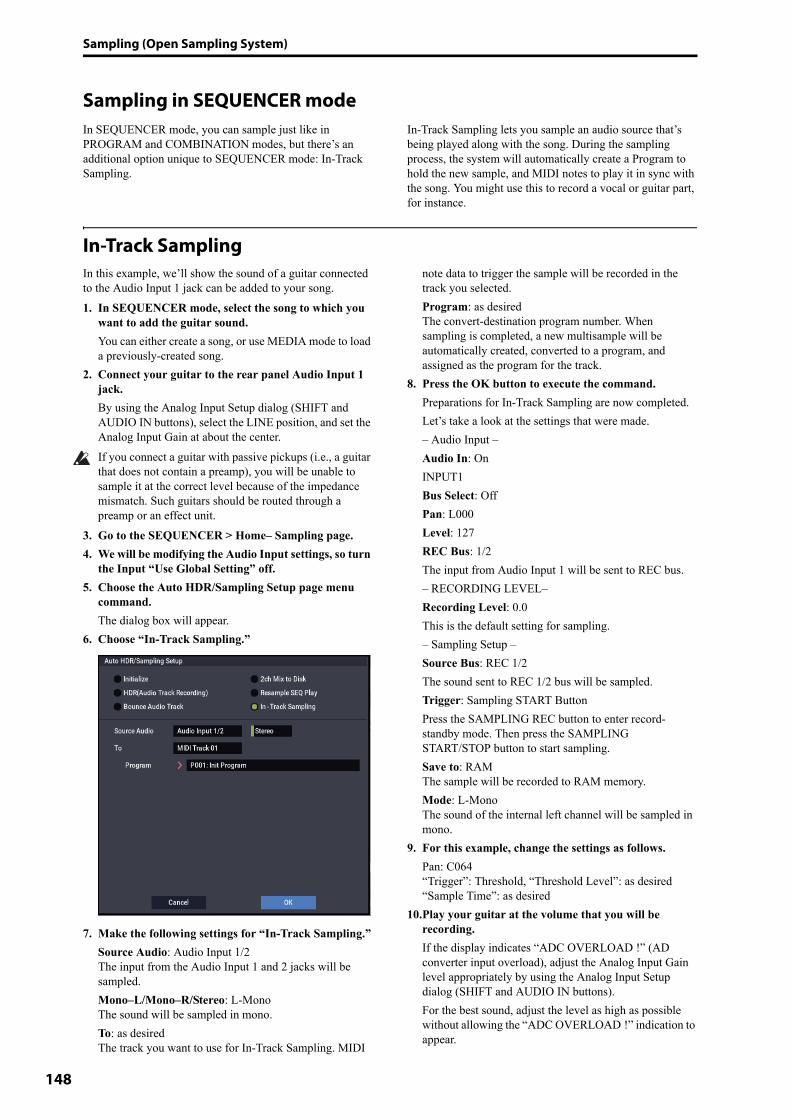
Sampling (Open Sampling System)
148
Sampling in SEQUENCER modeIn SEQUENCER mode, you can sample just like in PROGRAM and COMBINATION modes, but there’s an additional option unique to SEQUENCER mode: In-Track Sampling.
In-Track Sampling lets you sample an audio source that’s being played along with the song. During the sampling process, the system will automatically create a Program to hold the new sample, and MIDI notes to play it in sync with the song. You might use this to record a vocal or guitar part, for instance.
In-Track SamplingIn this example, we’ll show the sound of a guitar connected to the Audio Input 1 jack can be added to your song.1. In SEQUENCER mode, select the song to which you
want to add the guitar sound.You can either create a song, or use MEDIA mode to load a previously-created song.
2. Connect your guitar to the rear panel Audio Input 1 jack.By using the Analog Input Setup dialog (SHIFT and AUDIO IN buttons), select the LINE position, and set the Analog Input Gain at about the center.If you connect a guitar with passive pickups (i.e., a guitar that does not contain a preamp), you will be unable to sample it at the correct level because of the impedance mismatch. Such guitars should be routed through a preamp or an effect unit.
3. Go to the SEQUENCER > Home– Sampling page.4. We will be modifying the Audio Input settings, so turn
the Input “Use Global Setting” off.5. Choose the Auto HDR/Sampling Setup page menu
command.The dialog box will appear.
6. Choose “In-Track Sampling.”
7. Make the following settings for “In-Track Sampling.”Source Audio: Audio Input 1/2The input from the Audio Input 1 and 2 jacks will be sampled.Mono–L/Mono–R/Stereo: L-MonoThe sound will be sampled in mono.To: as desiredThe track you want to use for In-Track Sampling. MIDI
note data to trigger the sample will be recorded in the track you selected.Program: as desiredThe convert-destination program number. When sampling is completed, a new multisample will be automatically created, converted to a program, and assigned as the program for the track.
8. Press the OK button to execute the command.Preparations for In-Track Sampling are now completed.Let’s take a look at the settings that were made.– Audio Input –Audio In: OnINPUT1Bus Select: OffPan: L000Level: 127REC Bus: 1/2The input from Audio Input 1 will be sent to REC bus.– RECORDING LEVEL–Recording Level: 0.0This is the default setting for sampling.– Sampling Setup –Source Bus: REC 1/2The sound sent to REC 1/2 bus will be sampled.Trigger: Sampling START ButtonPress the SAMPLING REC button to enter record-standby mode. Then press the SAMPLING START/STOP button to start sampling.Save to: RAMThe sample will be recorded to RAM memory.Mode: L-MonoThe sound of the internal left channel will be sampled in mono.
9. For this example, change the settings as follows.Pan: C064“Trigger”: Threshold, “Threshold Level”: as desired“Sample Time”: as desired
10.Play your guitar at the volume that you will be recording.If the display indicates “ADC OVERLOAD !” (AD converter input overload), adjust the Analog Input Gain level appropriately by using the Analog Input Setup dialog (SHIFT and AUDIO IN buttons).For the best sound, adjust the level as high as possible without allowing the “ADC OVERLOAD !” indication to appear.
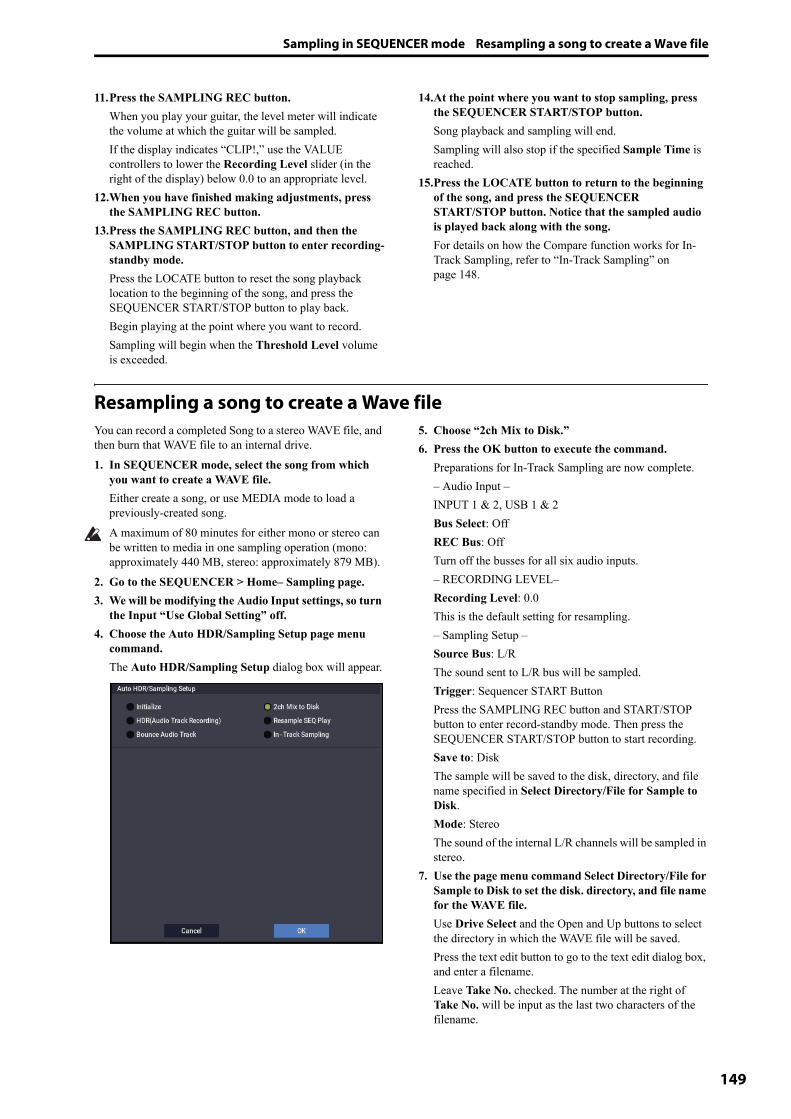
Sampling in SEQUENCER mode Resampling a song to create a Wave file
149
11.Press the SAMPLING REC button.When you play your guitar, the level meter will indicate the volume at which the guitar will be sampled.If the display indicates “CLIP!,” use the VALUE controllers to lower the Recording Level slider (in the right of the display) below 0.0 to an appropriate level.
12.When you have finished making adjustments, press the SAMPLING REC button.
13.Press the SAMPLING REC button, and then the SAMPLING START/STOP button to enter recording-standby mode.Press the LOCATE button to reset the song playback location to the beginning of the song, and press the SEQUENCER START/STOP button to play back.Begin playing at the point where you want to record.Sampling will begin when the Threshold Level volume is exceeded.
14.At the point where you want to stop sampling, press the SEQUENCER START/STOP button.Song playback and sampling will end.Sampling will also stop if the specified Sample Time is reached.
15.Press the LOCATE button to return to the beginning of the song, and press the SEQUENCER START/STOP button. Notice that the sampled audio is played back along with the song.For details on how the Compare function works for In-Track Sampling, refer to “In-Track Sampling” on page 148.
Resampling a song to create a Wave fileYou can record a completed Song to a stereo WAVE file, and then burn that WAVE file to an internal drive.1. In SEQUENCER mode, select the song from which
you want to create a WAVE file.Either create a song, or use MEDIA mode to load a previously-created song.A maximum of 80 minutes for either mono or stereo can be written to media in one sampling operation (mono: approximately 440 MB, stereo: approximately 879 MB).
2. Go to the SEQUENCER > Home– Sampling page.3. We will be modifying the Audio Input settings, so turn
the Input “Use Global Setting” off.4. Choose the Auto HDR/Sampling Setup page menu
command.The Auto HDR/Sampling Setup dialog box will appear.
5. Choose “2ch Mix to Disk.”6. Press the OK button to execute the command.
Preparations for In-Track Sampling are now complete.– Audio Input –INPUT 1 & 2, USB 1 & 2Bus Select: OffREC Bus: OffTurn off the busses for all six audio inputs.– RECORDING LEVEL–Recording Level: 0.0This is the default setting for resampling.– Sampling Setup –Source Bus: L/RThe sound sent to L/R bus will be sampled.Trigger: Sequencer START ButtonPress the SAMPLING REC button and START/STOP button to enter record-standby mode. Then press the SEQUENCER START/STOP button to start recording.Save to: DiskThe sample will be saved to the disk, directory, and file name specified in Select Directory/File for Sample to Disk.Mode: StereoThe sound of the internal L/R channels will be sampled in stereo.
7. Use the page menu command Select Directory/File for Sample to Disk to set the disk. directory, and file name for the WAVE file.Use Drive Select and the Open and Up buttons to select the directory in which the WAVE file will be saved.Press the text edit button to go to the text edit dialog box, and enter a filename.Leave Take No. checked. The number at the right of Take No. will be input as the last two characters of the filename.
Sampling (Open Sampling System)
150
This number will increment each time you sample, ensuring that the filename will not be the same even if you sample repeatedly.After you have made the settings, press the Done button to close the dialog box.
8. Set Sample Time to the length that you want to sample.Set this to a value slightly greater than the length of the song.
9. Set the Sample to Disk parameter to the desired bit depth.You can sample to drive at either 16-bit or 24-bit resolution.
10.Set the recording level.Press the SAMPLING REC button.Note: It will take between several seconds to nearly a minute from the moment you press the SAMPLING REC button until the NAUTILUS enters standby mode (i.e., until the SAMPLING REC button changes from blink-ing to lit). This time is required in order to allocate suffi-cient space on the disk.Press the SEQUENCER START/STOP button to play back the song, and adjust the sampling volume while you watch the level meters. The default setting is 0.0 dB. If the level is too low, use the VALUE controller to raise the level as high as possible without causing the “CLIP !” indicator to appear.When you finish making adjustments, press the SAMPLING REC button.Press the SEQUENCER START/STOP button to stop the song playback. Then press the LOCATE button.
11.Start sampling.Press the SAMPLING REC button and then the SAMPLING START/STOP button to enter recording-standby mode.Press the SEQUENCER START/STOP button to play back the song. Sampling will begin at the same time.When the song finishes playing back, press the SAMPLING START/STOP button to stop sampling.Use the page menu command Select Directory/File for Sample to Disk to verify that the WAVE file was created. Select the file and press the SAMPLING START/STOP button to listen to the sound that was sampled.
User Sample Banks Overview
151
User Sample Banks
OverviewUser Sample Banks bring the benefits of EXs to your own sample libraries. You can load and play gigabytes of your custom or converted samples at once, using Virtual Memory. Drive and memory management is easy: you can create subsets of User Sample Banks, and mix and match parts of different banks, without duplicating samples on disk. It’s also easy to share sounds with friends and collaborators, since Programs maintain links to User Sample Banks even when samples are moved on disk or loaded onto different systems.
SAMPLING mode and User Sample BanksSAMPLING mode and User Sample Banks are two different ways to work with your sample data, and you can switch back and forth between the two as necessary.SAMPLING mode lets you create and edit Samples and Multisamples. However, it doesn’t have access to Virtual Memory. When loaded as a User Sample Bank, the samples are more like EXs; they can access Virtual Memory, but they can’t be edited.• Use SAMPLING mode to create and edit your Samples
and Multisamples, or to import sounds from Akai and SoundFont 2.0 formats.
• When you’re done editing, load the data as a User Sample Bank in order to access Virtual Memory.
• At any time, you can load the sample data into SAMPLING mode again, to edit the existing data or add more Samples or Multisamples.
Programs, Wave Sequences, and Drum Kits will remember which Multisamples and Samples they use, regardless of whether the data is loaded into SAMPLING mode or as a User Sample Bank. (For more information, see “User Sample Bank IDs” on page 156.)
.KSC filesKSC stands for Korg Sample Collection. .KSC files contain links to SAMPLING mode, EXs, and/or User Sample Bank data, including Multisamples, Samples, and Drumsamples. Loading a .KSC file loads all of the linked data. If a .KSC includes links to Sampling Mode Data, other .KSC files can link to that .KSC as a User Sample Bank. For more information, see “Creating and saving .KSC files” on page 180.
Freeing up space in RAMTo create and edit data for User Sample Banks, you’ll use SAMPLING mode. If you’re working with a very large set of samples, you may wish to free up RAM by temporarily un-loading all other sample data. Important: this will clear all data from SAMPLING mode, as well as un-loading all EXs and User Sample Bank data. If you have any un-saved edits to data in SAMPLING mode, make sure that you save to drive before proceeding!To free all RAM for use by SAMPLING mode:1. Go the GLOBAL > Basic Setup– KSC Auto-Load
page.2. Un-check all selected KSC files.3. Press the Do Auto-Load Now button.
A confirmation dialog appears.4. Press OK to confirm.All sample data will be un-loaded, except for the ROM banks.

Sampling (Open Sampling System)
152
Saving User Sample BanksSaving a KSC file which includes Sampling Mode Data automatically creates a User Sample Bank. To do so:1. Create your own set of samples in SAMPLING mode,
load previously created samples, or load samples from Akai or SoundFont 2.0 formats.
2. In MEDIA mode, go to the Save page.3. Select the internal drive (if you have two internal
drives installed, select either one).You can also save to a USB storage device, but in order to work as a User Sample Bank, the files must be on an internal drive.
4. In the menu, select the Save Sampling Data command.5. Set the Include parameter to Sampling Mode Data.
This saves everything from SAMPLING mode, and keeps the KSC file clean by not saving links to EXs or other User Sample Banks.
6. Set Sampling Mode Data Options to All.7. Leave Force new User Sample Bank ID un-checked
(off).8. Give the KSC file a descriptive name.9. Press OK to save the file.
That’s it! You’ve now saved a User Sample Bank to the drive. To use it, you’ll need to load it as described below.
Saving creates two KSC filesWhen you save a KSC which includes Sampling Mode Data, two KSC files are created:• A KSC with the name you’ve specified, which includes
the actual Samples and Multisamples from SAMPLING mode.
• A second KSC which includes links to the first KSC’s Sampling Mode Data, with Load Method for EXs and User Sample Banks set to Virtual Memory. The name for this KSC is the name you’ve specified followed by the text “_UserBank.” For instance, if the first KSC is named BillGig.KSC, the second will be BillGig_UserBank.KSC. This is the file that you’ll load to access the sample data as a User Sample Bank.
Both files may contain references to other EXs or User Sample Banks, depending on the setting of the Include parameter in the Save dialog.
Saving User Sample Banks: Examples
Revising an existing User Sample BankLet's say that you have a set of samples in a User Sample Bank, and you want to make a few changes to improve or expand it. You load the data into SAMPLING mode and perform your edits, such as improving loop points, changing Multisample mapping, maybe even adding a few related samples. When you save your Sampling Data, make sure that the Force new User Sample Bank ID option is Off (un-checked). Leaving this un-checked means that the User Sample Bank retains its identity; any Programs or other .KSC files which refer to it will continue to function as expected. For more information, see “User Sample Bank IDs” on page 156.
Changing an existing User Sample Bank into something differentYou might sometimes load data into SAMPLING mode and then change a lot of the Samples and Multisamples, so that it’s essentially a new set of sounds. In this case, you’ll probably wish to save the result as a completely new User Sample Bank—rather than over-writing the original data. To do this, save your Sampling Data with a different name and turn On the Force new User Sample Bank ID option. This ensures that the original User Sample Bank, and any Programs or KSCs which refer to it, will continue to function as expected. If you have Programs, Wave Sequences, etc. that you want to switch from using the original User Sample Bank to the new one, use the Remap MS/Sample Banks menu command to do so (you can find this on the Global Sample Management page, as well as any page with a Sample/Multisample bank select parameter).Note that if you are a normal user (as opposed to a sound developer creating a file for distribution or sale) and you just want to add or remove Multisamples or Drumsamples—for instance, in order to save memory or create a “best of” KSC—you should NOT do this; instead, see “Creating combined or stripped-down KSCs,” below.

User Sample Banks Saving User Sample Banks
153
Creating combined or stripped-down KSCsThe great thing about User Sample Banks is that they let you use their data by reference, instead of by copying and editing the data itself. Let's say that you have three User Sample Banks: CoverBand_UserBank.KSC, SoloProject_UserBank.KSC, and Experimental_UserBank.KSC. You can then create additional KSCs to do any of the following:• Combine all three KSCs into a single master KSC, which
you can load in a single step• Create different stripped-down versions of
CoverBand.KSC, each containing the samples for a few of the songs.
• Create a “best of” KSC with only your favorite samples from the three KSCs.
All of these would take up very little additional space on the drive, don't require any editing in SAMPLING mode, and don't require you to edit the original data in any way.To combine all three KSCs:1. Save any data you’ve created in SAMPLING mode.
(The next step will erase all Sampling Mode Data.)2. Load CoverBand_UserBank.KSC, using the Clear All
option.This clears out all other sample data, so that the KSC you save later will include only the data you’ve just loaded.3. Load SoloProject_UserBank.KSC and
Experimental_UserBank.KSC, using the Append option.
4. Save a new KSC with a different name (such as Combined.KSC), with Include set to “Links to EXs and User Sample Banks.”
This new KSC now links to all of the sample data from the three individual KSCs. To create a stripped-down version of CoverBand.KSC:1. Save any data you’ve created in SAMPLING mode.
(The next step will erase all Sampling Mode Data.)2. Load CoverBand_UserBank.KSC, using the Clear All
option.3. On the Global Sample Management page, set the
Bank to CoverBand.KSC, and delete any unwanted Multisamples or Drumsamples.
4. Save a new KSC with a different name (such as CoverBandStripped.KSC), with Include set to “Links to EXs and User Sample Banks.”
To create a “best of” KSC with only your favorite samples from the three KSCs:1. Save any data you’ve created in SAMPLING mode.
(The next step will erase all Sampling Mode Data.)2. In MEDIA mode, browse into the
CoverBand_UserBank.KSC file.3. Select one or more Multisamples (Multiple Select lets
you choose two or more at once).4. Load the Multisamples using the Clear All option.5. Load additional Multisamples or Drumsamples from
other UserBank.KSC files, using the Append Option.
6. Save a new KSC with a different name (such as BestOfEverything.KSC), with Include set to “Links to EXs and User Sample Banks.”
For more detailed step-by-step information on this approach, see “Creating a new KSC by loading individual Multisamples” on page 181.

Sampling (Open Sampling System)
154
Loading User Sample BanksOnce saved to drive, User Sample Banks can be used much like EXs. To load a User Sample Bank:1. Go to the folder in which you’ve saved your KSC from
“Saving User Sample Banks,” above.2. Select the “[name] UserBank.KSC” file.3. Press the Load button.
The Load KSC dialog will appear.
4. If you’ve just saved the KSC that you want to load, set .KSC Allocation to Clear Sampling Mode Data.This will unload the data from SAMPLING mode. Data in User Sample Banks can be loaded either into SAMPLING mode (for editing), or as a User Sample Bank (for playback with Virtual Memory), but not both at the same time.
5. For now, leave the Load Method for EXs and User Sample Banks set to the default of .KSC Setting. The automatically-created [name]_UserBank.KSC file will be set to use Virtual Memory.
6. Press OK to load the User Sample Bank.That’s it! Any Programs, Wave Sequences, or Drum Kits which used the data from SAMPLING mode will automatically use the same data from the User Sample Bank.
Automatic loading at startupYou can use the KSC Auto-Load settings to load samples automatically at startup, as described under “Automatically loading sample data” on page 179.

User Sample Banks Editing User Sample Banks
155
Editing User Sample BanksAt any time, you can load a User Sample Bank’s data into SAMPLING mode and edit the Samples or Multisamples as desired, or add new Samples or Multisamples. To do so:1. If the data is already loaded as a User Sample Bank,
use the “Unload all in bank” command on the Global Sample Management page to unload the data before proceeding.
For more information, see “Unloading an entire bank of data” on page 644 of the PG.2. Go to the folder in which you’ve saved your KSC from
“Saving User Sample Banks,” above.3. Select the “[name].KSC” file—the one without
“UserBank” in the name.4. Press the Load button.The Load KSC dialog will appear.5. Set .KSC Allocation to Clear Sampling Mode Data.This is important, in order to preserve the User Sample Bank ID. For more information, see “User Sample Bank IDs,” below.6. Press OK to load the data.7. Edit as desired, but don’t change the numbering of
existing Multisamples (or Samples, if you’ve used them for Drum Kits). If you add new Multisamples or Samples, add them at the end of the list.
Programs, Wave Sequences, and Drum Kits refer to Multisamples and Samples by their number in the bank. To make sure that existing sounds continue to work properly, keep that numbering the same. 8. Save the KSC.For details, see “Saving User Sample Banks,” above.

Sampling (Open Sampling System)
156
User Sample Bank IDs and limitations
User Sample Bank IDsUnder the hood, the NAUTILUS keeps track of User Sample Banks by a special ID saved in the KSC file. This lets the system find and recognize the User Sample Bank if you change the name or location on the drive, and even if it’s used on another NAUTILUS altogether.An ID is initially assigned when the samples are created in SAMPLING mode. This ID stays with the data as long as you load and save using KSCs—even if you save to a different location, or with a different name. It also stays with the data regardless of whether it’s loaded as a User Sample Bank, or loaded into SAMPLING mode for editing.It will not be preserved, however, if you load or save individual Samples or Multisamples.If there are multiple files on internal disks with the same ID, the one with the most recent modification date one will be used. KSCs on USB storage devices are ignored for this purpose.When you look at the bank name in Programs, Drum Kits, and Wave Sequences, you’ll see the full file path of the associated KSC file.
What triggers a change to the User Sample Bank ID?SAMPLING mode is given a new ID under the following circumstances:• At system startup• If the Clear Sampling Mode Data option is used when
loading a KSC which does not include Sampling Mode Data
• When the Global Sample Management page’s Unload all in bank command is used for Sampling Mode Data
• When the GLOBAL > Basic Setup– KSC Auto Load page’s Do Auto-load Now command is used (unless one of the auto-loaded files includes Sampling Mode Data, as described below)
• On save, if Force new User Sample Bank ID is selected (see “Force new User Sample Bank ID,” below)
SAMPLING mode assumes the ID of an existing KSC under the following circumstances:• When a KSC with Sampling Mode Data is loaded using
the Clear Sampling Mode Data or Clear All options, or when SAMPLING mode has not been used since startup
• Similar to the above, but when loading the entire folder of Sampling Mode Data when browsing within a KSC
SAMPLING mode keeps its current ID under the following circumstances: • If SAMPLING mode has been used since startup, and a
KSC is loaded into SAMPLING mode with allocation set to Append
• When individual Samples and/or Multisamples are loaded
Force new User Sample Bank IDThis option is available in the Save Sampling Data dialog, but not in the Save All dialog. It should be used only in special cases.For instance, you might use Force new User Sample Bank ID if you have loaded a User Sample Bank, edited it substantially, and wish to save the result as a totally new User Sample Bank. After doing so, you’ll also need to use the Remap MS/Sample Banks menu command to assign Programs, Wave Sequences, or Drum Kits to use the new bank instead of the old one.
Limitations: Tone Adjust
Tone Adjust “MS Bank”In the same way, the User Sample Bank is not available as one of the banks that can be selected for MS bank editing (meta-parameters) using the Tone Adjust function. The selection is limited to ROM, Sampling Mode Data, and EXs. Tone Adjust MS/WS/DKit Select can still be used to select different Multisamples or Drumsamples from within the current bank, including EXs above 125 and User Sample Banks, as long as MS Bank is not used.
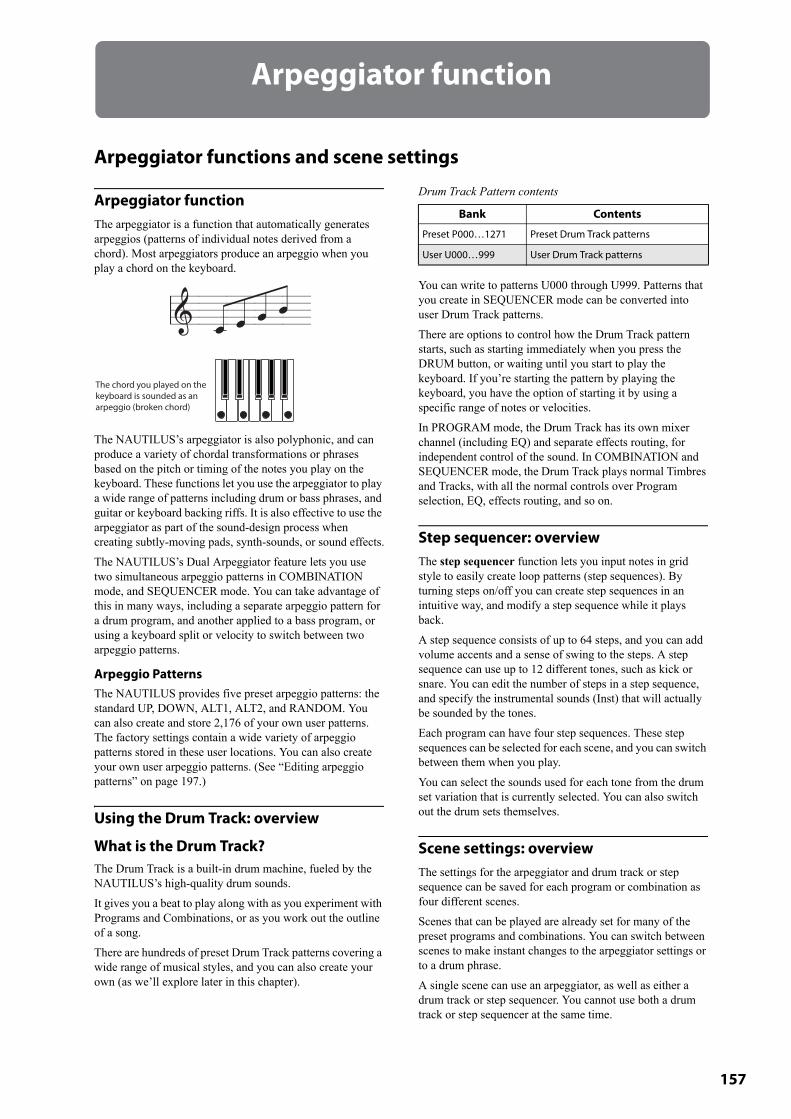
157
Arpeggiator function
Arpeggiator functions and scene settings
Arpeggiator functionThe arpeggiator is a function that automatically generates arpeggios (patterns of individual notes derived from a chord). Most arpeggiators produce an arpeggio when you play a chord on the keyboard.
The NAUTILUS’s arpeggiator is also polyphonic, and can produce a variety of chordal transformations or phrases based on the pitch or timing of the notes you play on the keyboard. These functions let you use the arpeggiator to play a wide range of patterns including drum or bass phrases, and guitar or keyboard backing riffs. It is also effective to use the arpeggiator as part of the sound-design process when creating subtly-moving pads, synth-sounds, or sound effects.The NAUTILUS’s Dual Arpeggiator feature lets you use two simultaneous arpeggio patterns in COMBINATION mode, and SEQUENCER mode. You can take advantage of this in many ways, including a separate arpeggio pattern for a drum program, and another applied to a bass program, or using a keyboard split or velocity to switch between two arpeggio patterns.
Arpeggio PatternsThe NAUTILUS provides five preset arpeggio patterns: the standard UP, DOWN, ALT1, ALT2, and RANDOM. You can also create and store 2,176 of your own user patterns. The factory settings contain a wide variety of arpeggio patterns stored in these user locations. You can also create your own user arpeggio patterns. (See “Editing arpeggio patterns” on page 197.)
Using the Drum Track: overview
What is the Drum Track?The Drum Track is a built-in drum machine, fueled by the NAUTILUS’s high-quality drum sounds.It gives you a beat to play along with as you experiment with Programs and Combinations, or as you work out the outline of a song. There are hundreds of preset Drum Track patterns covering a wide range of musical styles, and you can also create your own (as we’ll explore later in this chapter).
Drum Track Pattern contents
You can write to patterns U000 through U999. Patterns that you create in SEQUENCER mode can be converted into user Drum Track patterns.There are options to control how the Drum Track pattern starts, such as starting immediately when you press the DRUM button, or waiting until you start to play the keyboard. If you’re starting the pattern by playing the keyboard, you have the option of starting it by using a specific range of notes or velocities.In PROGRAM mode, the Drum Track has its own mixer channel (including EQ) and separate effects routing, for independent control of the sound. In COMBINATION and SEQUENCER mode, the Drum Track plays normal Timbres and Tracks, with all the normal controls over Program selection, EQ, effects routing, and so on.
Step sequencer: overviewThe step sequencer function lets you input notes in grid style to easily create loop patterns (step sequences). By turning steps on/off you can create step sequences in an intuitive way, and modify a step sequence while it plays back.A step sequence consists of up to 64 steps, and you can add volume accents and a sense of swing to the steps. A step sequence can use up to 12 different tones, such as kick or snare. You can edit the number of steps in a step sequence, and specify the instrumental sounds (Inst) that will actually be sounded by the tones.Each program can have four step sequences. These step sequences can be selected for each scene, and you can switch between them when you play.You can select the sounds used for each tone from the drum set variation that is currently selected. You can also switch out the drum sets themselves.
Scene settings: overviewThe settings for the arpeggiator and drum track or step sequence can be saved for each program or combination as four different scenes.Scenes that can be played are already set for many of the preset programs and combinations. You can switch between scenes to make instant changes to the arpeggiator settings or to a drum phrase.A single scene can use an arpeggiator, as well as either a drum track or step sequencer. You cannot use both a drum track or step sequencer at the same time.
The chord you played on the keyboard is sounded as an arpeggio (broken chord)
Bank Contents
Preset P000…1271 Preset Drum Track patterns
User U000…999 User Drum Track patterns

Arpeggiator function
158
Setting you can make for the scenes• Arpeggiator settings• Drum track or step sequence selection• Drum track patterns
Selecting a scene, playing with the arpeggiator and drum track or step sequencer
Selecting the scene1. In PROGRAM mode, COMBINATION mode. or
SEQUENCER mode, display the ARP/DRUM tab on the Home page.
2. Select the scene button on the display.
3. Turn the arpeggiator function on. The arpeggiator that you set in the scene you selected will start playing when you start playing the keys.
4. Press the DRUM button to play the drum track or step sequence that has been set, or to enter performance standby.
Arpeggiator on/off• Each time you press the ARP button, the arpeggiator will
be switched on/off.When the arpeggiator is turned on (the LED will light up) and the selected arpeggio pattern will begin when you play the keyboard.Refer to “Using RT control knobs 1–5 to control the arpeggiator” and “Making the Arpeggiator settings” (explained on the next page) to check that the arpeggio performance is changing.Note: The on/off status is saved when you write each program.
The arpeggios may not start when you press the ARP button - depending on the saved settings. You may need to play a keyboard.The ARP button, TAP button and RT Control knobs (when SELECT is set to “ARP/DRUM”) will work for both arpeggiators A and B. The status will be preserved when you write the combination.
Turning the Drum Track on and off1. Press the MODE button to select PROGRAM mode,
and select a program. (See “Selecting Programs” on page 25.)
2. Press the DRUM button.The button’s LED will either light solidly or blink on and off, depending on the Program’s Trigger Mode setting.
Tempo
EDIT button
Drum track patterns
RT control knob parametersLATCH/ARP/DRUM buttonArpeggio pattern
Scene 1–4 buttons
Scene button
Time signature
When step sequence Bis selected Arpeggiator B (when 1Shot is enabled)
When the drum track is selected
Arpeggiator A (when latch is enabled)
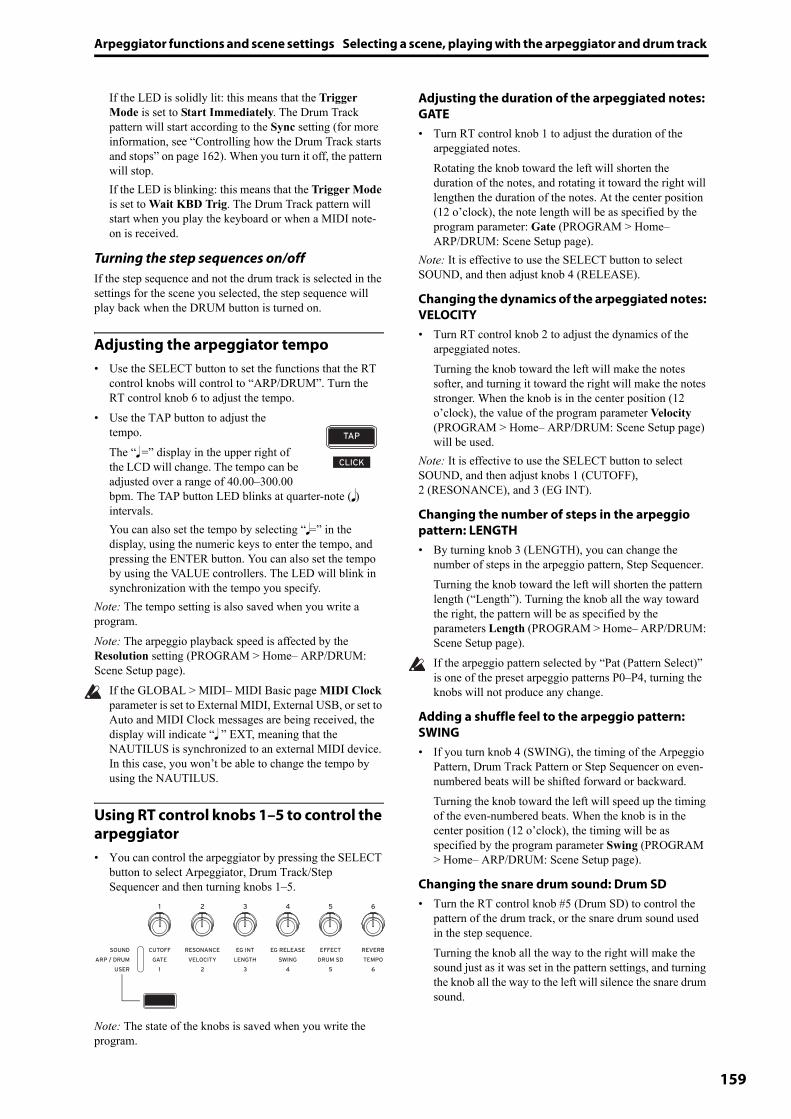
Arpeggiator functions and scene settings Selecting a scene, playing with the arpeggiator and drum track
159
If the LED is solidly lit: this means that the Trigger Mode is set to Start Immediately. The Drum Track pattern will start according to the Sync setting (for more information, see “Controlling how the Drum Track starts and stops” on page 162). When you turn it off, the pattern will stop.If the LED is blinking: this means that the Trigger Mode is set to Wait KBD Trig. The Drum Track pattern will start when you play the keyboard or when a MIDI note-on is received.
Turning the step sequences on/offIf the step sequence and not the drum track is selected in the settings for the scene you selected, the step sequence will play back when the DRUM button is turned on.
Adjusting the arpeggiator tempo• Use the SELECT button to set the functions that the RT
control knobs will control to “ARP/DRUM”. Turn the RT control knob 6 to adjust the tempo.
• Use the TAP button to adjust the tempo.The “� =” display in the upper right of the LCD will change. The tempo can be adjusted over a range of 40.00–300.00 bpm. The TAP button LED blinks at quarter-note (�) intervals.You can also set the tempo by selecting “�=” in the display, using the numeric keys to enter the tempo, and pressing the ENTER button. You can also set the tempo by using the VALUE controllers. The LED will blink in synchronization with the tempo you specify.
Note: The tempo setting is also saved when you write a program.Note: The arpeggio playback speed is affected by the Resolution setting (PROGRAM > Home– ARP/DRUM: Scene Setup page).
If the GLOBAL > MIDI– MIDI Basic page MIDI Clock parameter is set to External MIDI, External USB, or set to Auto and MIDI Clock messages are being received, the display will indicate “� ” EXT, meaning that the NAUTILUS is synchronized to an external MIDI device. In this case, you won’t be able to change the tempo by using the NAUTILUS.
Using RT control knobs 1–5 to control the arpeggiator• You can control the arpeggiator by pressing the SELECT
button to select Arpeggiator, Drum Track/Step Sequencer and then turning knobs 1–5.
Note: The state of the knobs is saved when you write the program.
Adjusting the duration of the arpeggiated notes: GATE• Turn RT control knob 1 to adjust the duration of the
arpeggiated notes.Rotating the knob toward the left will shorten the duration of the notes, and rotating it toward the right will lengthen the duration of the notes. At the center position (12 o’clock), the note length will be as specified by the program parameter: Gate (PROGRAM > Home– ARP/DRUM: Scene Setup page).
Note: It is effective to use the SELECT button to select SOUND, and then adjust knob 4 (RELEASE).
Changing the dynamics of the arpeggiated notes: VELOCITY• Turn RT control knob 2 to adjust the dynamics of the
arpeggiated notes.Turning the knob toward the left will make the notes softer, and turning it toward the right will make the notes stronger. When the knob is in the center position (12 o’clock), the value of the program parameter Velocity (PROGRAM > Home– ARP/DRUM: Scene Setup page) will be used.
Note: It is effective to use the SELECT button to select SOUND, and then adjust knobs 1 (CUTOFF), 2 (RESONANCE), and 3 (EG INT).
Changing the number of steps in the arpeggio pattern: LENGTH• By turning knob 3 (LENGTH), you can change the
number of steps in the arpeggio pattern, Step Sequencer.Turning the knob toward the left will shorten the pattern length (“Length”). Turning the knob all the way toward the right, the pattern will be as specified by the parameters Length (PROGRAM > Home– ARP/DRUM: Scene Setup page).If the arpeggio pattern selected by “Pat (Pattern Select)” is one of the preset arpeggio patterns P0–P4, turning the knobs will not produce any change.
Adding a shuffle feel to the arpeggio pattern: SWING• If you turn knob 4 (SWING), the timing of the Arpeggio
Pattern, Drum Track Pattern or Step Sequencer on even-numbered beats will be shifted forward or backward.Turning the knob toward the left will speed up the timing of the even-numbered beats. When the knob is in the center position (12 o’clock), the timing will be as specified by the program parameter Swing (PROGRAM > Home– ARP/DRUM: Scene Setup page).
Changing the snare drum sound: Drum SD• Turn the RT control knob #5 (Drum SD) to control the
pattern of the drum track, or the snare drum sound used in the step sequence.Turning the knob all the way to the right will make the sound just as it was set in the pattern settings, and turning the knob all the way to the left will silence the snare drum sound.
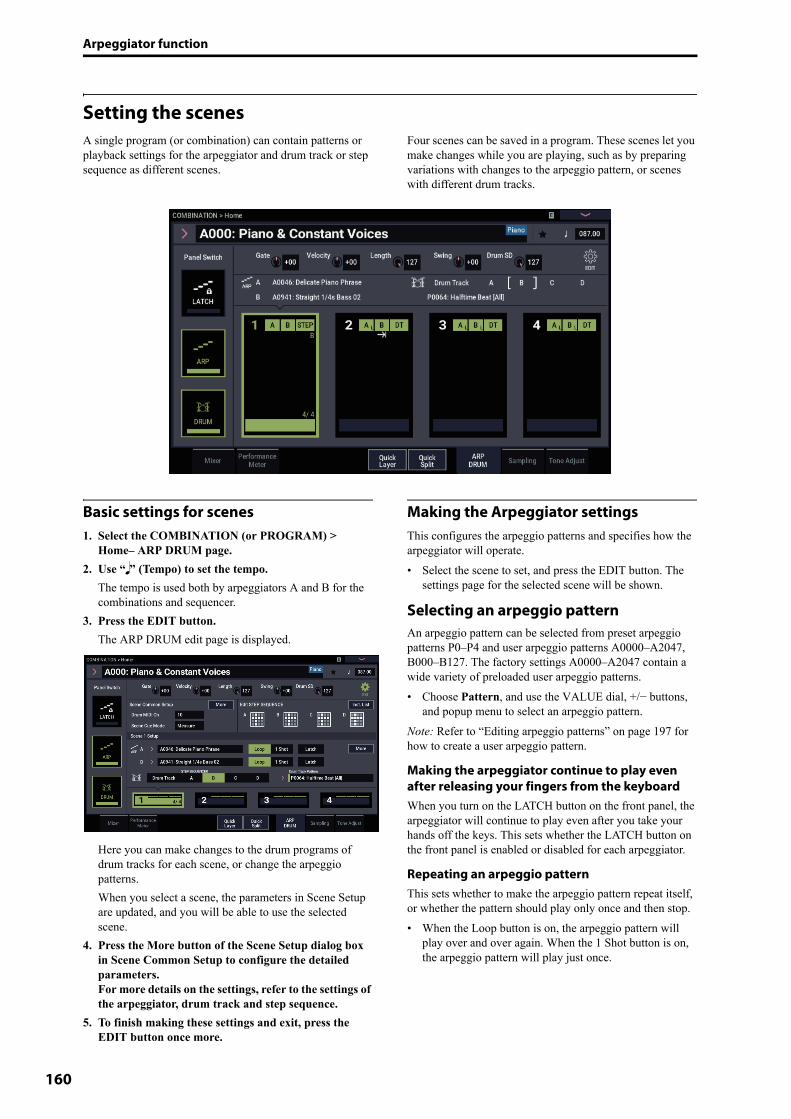
Arpeggiator function
160
Setting the scenesA single program (or combination) can contain patterns or playback settings for the arpeggiator and drum track or step sequence as different scenes.
Four scenes can be saved in a program. These scenes let you make changes while you are playing, such as by preparing variations with changes to the arpeggio pattern, or scenes with different drum tracks.
Basic settings for scenes1. Select the COMBINATION (or PROGRAM) >
Home– ARP DRUM page.2. Use “�” (Tempo) to set the tempo.
The tempo is used both by arpeggiators A and B for the combinations and sequencer.
3. Press the EDIT button.The ARP DRUM edit page is displayed.
Here you can make changes to the drum programs of drum tracks for each scene, or change the arpeggio patterns.When you select a scene, the parameters in Scene Setup are updated, and you will be able to use the selected scene.
4. Press the More button of the Scene Setup dialog box in Scene Common Setup to configure the detailed parameters.For more details on the settings, refer to the settings of the arpeggiator, drum track and step sequence.
5. To finish making these settings and exit, press the EDIT button once more.
Making the Arpeggiator settingsThis configures the arpeggio patterns and specifies how the arpeggiator will operate.• Select the scene to set, and press the EDIT button. The
settings page for the selected scene will be shown.
Selecting an arpeggio patternAn arpeggio pattern can be selected from preset arpeggio patterns P0–P4 and user arpeggio patterns A0000–A2047, B000–B127. The factory settings A0000–A2047 contain a wide variety of preloaded user arpeggio patterns.• Choose Pattern, and use the VALUE dial, +/− buttons,
and popup menu to select an arpeggio pattern.Note: Refer to “Editing arpeggio patterns” on page 197 for how to create a user arpeggio pattern.
Making the arpeggiator continue to play even after releasing your fingers from the keyboardWhen you turn on the LATCH button on the front panel, the arpeggiator will continue to play even after you take your hands off the keys. This sets whether the LATCH button on the front panel is enabled or disabled for each arpeggiator.
Repeating an arpeggio patternThis sets whether to make the arpeggio pattern repeat itself, or whether the pattern should play only once and then stop.• When the Loop button is on, the arpeggio pattern will
play over and over again. When the 1 Shot button is on, the arpeggio pattern will play just once.

Arpeggiator functions and scene settings Setting the scenes
161
Selecting the octave range where the arpeggio is soundedUse the “Octave” to specify the range of octaves where the arpeggio will play.• Press an “Octave” to make your selection.
Sounding an arpeggio in the order of the pitches in the chord you playedYou can select whether the notes of the arpeggio will be sounded in the order of the pitches in the chord you played (regardless of the order in which you actually played the notes), or in the order in which you played the notes.• Press the “Sort” check box in the display to make this
setting.Checked: the arpeggio will play each note in the order of its pitch, regardless of the order in which you actually played the notes.Unchecked: the arpeggio will trigger each note in the order in which you actually played the notes.
Synchronizing the arpeggiator to your keyboard timingYou can specify whether the arpeggio will begin at the moment you play the keyboard, or whether it will always play in synchronization to the MIDI clock tempo.• Press the “Key Sync.” check box to make this setting.
Checked: The arpeggio pattern will start from the beginning when you press a key. This setting is suitable when you want the arpeggio to start from the beginning of the measure as you are playing in realtime.Unchecked: The arpeggiator will synchronize to the MIDI clock timing.
Changing the note value of the arpeggiated notesThis button sets the resolution of the arpeggio. The speed of the arpeggio pattern is determined by the tempo and resolution settings.• Press the More button in Scene 1–4 Setup to display the
Scene Setup dialog box. Select “Resolution”, and set the note values of the arpeggio notes using the VALUE dial, the −/+ buttons and � � –� in the pop-up menu.
Changing the duration of the arpeggiated notesThe Gate parameter specifies the duration of the arpeggiated notes. With a setting of 000–100(%), the duration will always be the specified gate time. Step is available if you’ve selected A0000–A2048, B000–B127 as the Pattern; the gate value specified for each step will be used.
Specifying the arpeggio pattern’s velocity and other settingsThe Velocity parameter specifies the velocity of the arpeggiated notes. If you choose a value in the range of 001–127, that velocity value will always be used. If you choose Key, the velocity value of how you played the key will be used. Step is available if “Pattern” is set to A0000–A2048, B000–B127; this causes the velocity value specified for each step to be used.“Swing” is used to shift the timing of the even-numbered arpeggiated notes from the first note.
Sounding both the arpeggio notes and the notes you play• Press the “Keyboard” check box to adjust this setting.
Checked: The notes you play on the keyboard and the notes played by the arpeggiator will both be heard.Unchecked: Only the arpeggiated notes will sound.
Octave: 4UP
ON, UP
Sort
OFF, UP
Sort

Arpeggiator function
162
Setting the range in which the arpeggiator operatesPress the “More” button in Common Settings (on the ARP DRUM edit page) to show the Scene Common Setup dialog box, where you can set the notes (on the keyboard) that make the arpeggiator operate, as well as the velocity range.
Setting Drum Track to Scene
Selecting the Drum Track pattern1. Press the EDIT button on the ARP DRUM page.
In this example, we will change the drum track pattern in Scene 1 Setup.
2. Select “Scene 1 Setup”.3. Select the drum track.
If a step sequencer aside from the drum track is selected, press the Drum Track button.
4. Select the “Drum Track” pattern.Press the “Drum Track Pattern” pop-up button and select a drum track pattern in the Category/Drum Pattern Select dialog box.
Selecting a drum program1. Press the setting button on the ARP DRUM page.2. Select a drum program in “Program” on the Scene
Common Setup page.Select a program using the VALUE controllers, or press the pop-up button to display the “Drum Program Select” dialog box and select a program from there.
3. To set the drum track volume, press the More button on the Scene Common Setup page to display the Drum Program dialog box, and then make the setting.
Use the right-hand “Volume” slider to adjust the volume of the drum track.Use the “Detune” value to adjust the pitch of the entire program.Refer to the Parameter Guide for details on adjusting the EQ and configuring the bus settings.
ShiftThe patterns used in GM drum programs may not sound as intended, due to differences in mapping. If this is the case, set the “Shift” parameter value to “−12” and try again.Shift lets you transpose the Drum Track pattern in semitone steps, causing different instruments of the drum kit to play. This will generally cause unexpected results, which may often be interesting—experiment and see!
Controlling how the Drum Track starts and stopsYou have several options to control how and when the Drum Track starts and stops.1. Press the EDIT button on the ARP DRUM page.2. Press the More button in Scene Common Setup to
show the Scene Common Setup dialog box.3. In the Drum Trigger section, set the Mode to control
how the pattern will start and stop.Start Immediately: When you turn on the Drum by pressing the DRUM button, the LED will light and the Drum Track pattern will start according to the Sync setting. It will stop when you turn off the button.Wait KBD Trig: When you press the DRUM button to turn it on, the LED will blink and the Drum Track pattern will wait to start. When you play the keyboard or receive a MIDI note-on, the Drum Track pattern will start according to the Sync setting.
4. If Trigger Mode is set to Wait KBD Trig, specify the Latch setting. Latch controls whether the Drum Track pattern will continue playing even after you take your hands off of the keyboard.Off: If the DRUM button is on, the LED will blink, and the pattern will start when you play the keyboard. When you stop playing, the Drum will stop as well.On: If the DRUM button is on (the LED will blink), the pattern will start when you play the keyboard (note-on). The pattern will continue when you release the keyboard (note-off). The pattern will stop when you turn the DRUM button off (the LED will go dark).
Pattern Bank/No.Drum Track Program

Arpeggiator functions and scene settings Setting the scenes
163
Use LATCH Button: The LATCH button settings on the front panel will be used for the latch settings of the drums.
5. If Trigger Mode is set to Wait KBD Trig, specify the Keyboard Zone and Velocity Zone.These settings specify the range of keys and velocities that will trigger the Drum pattern when you play the keyboard (or receive a note-on).
6. Close the Scene Common Setup dialog box.7. Press the More button in Scene Setup to show the
Scene Setup dialog box.8. Specify the Sync setting.
Off: The Drum Track pattern will not synchronize to the currently-running ARP, but will start immediately.On: The beat of the drum track pattern will play back in sync with the ARP’s beat.
Storing the on/off settingIf the Trigger Mode is set to Wait KBD Trig, the on/off status of the DRUM button is also saved when you save the Program.If the Trigger Mode is set to Start Immediately, the switch status is always saved as Off, regardless of the whether the switch is on or off when you Write.
Setting the step sequencer
Entering a patternWith the scene settings, you can input and save four step sequences.1. Press the EDIT button on the ARP DRUM page.2. Press either step sequence in “Edit Step Seq”. The
step sequence edit dialog box will be displayed.
3. Input the pattern.4. Press a location on the grid to enter the steps for each
tone.5. To set an accent for a particular step, enter the step in
the “Accent” (lowest) row.
Drum Track MIDI in and outThe Drum Track, or Step Sequencer can interact with MIDI in several different ways. You can:• Trigger the Drum Track pattern via MIDI in• Play the Drum Track Program via MIDI in• Transmit the Drum Track pattern via MIDI out
Triggering the Drum Track pattern via MIDIIf you’re triggering the Drum Track pattern by playing the keyboard, input on the Global MIDI Channel will trigger the Drum Track as well.
Playing the Drum Track Program via MIDIYou can play the Drum Track Program via MIDI, separately from the main Program sound. In PROGRAM mode, the Drum Track’s MIDI channel is set by the Global MIDI page’s Prog MIDI Ch parameter. The default is channel 10.(In COMBINATION and SEQUENCER modes, this works a little differently; see “Drum Track settings in COMBINATION mode,” below.)Note that the Drum Track Program does not transmit or receive Program changes.
Transmitting the Drum Track pattern via MIDIWith the factory settings, the Drum Track pattern will not be sent via MIDI out. If you like, however, you can do so—for instance, you could use it to play an external MIDI device, or record it into an external sequencer. To do so:1. Go to the GLOBAL > MIDI– MIDI page.2. Under Drum MIDI Setup, enable Prog MIDI Out.3. Set the Prog MIDI Ch. as desired.
The Drum Track pattern will then transmit MIDI on the selected channel.

Arpeggiator function
164
Arpeggiator settings in COMBINATION and SEQUENCER modesIn COMBINATION and SEQUENCER modes, you can use use two arpeggio patterns simultaneously, thanks to the NAUTILUS’s dual arpeggiator functionality. The settings in each of these modes are adjusted in a similar way. The following example shows how to adjust settings in COMBINATION mode.The dual arpeggiator functionality lets you do the following things.• Select an arpeggio pattern and set parameters
independently for A and B. • Make Scan Zone page settings so that you can use
keyboard range or playing velocity to switch between normal playing and arpeggiated playing, or to switch between arpeggiators A and B.
• You can make the A and B arpeggiators use different tones by changing the MIDI channel settings.
Arpeggiator settings in COMBINATION mode1. Select COMBINATION > Home page.
Select programs for the timbres that you wish to use. For this example, select any desired program for timbres 1–4.
2. Select COMBINATION > Timbre Parameters– MIDI page.For the timbres that you will be using, set Status to INT, and set MIDI Channel to Gch or to the global MIDI channel (set in GLOBAL > MIDI page MIDI Setup-Basic MIDI Channel).For this example, set timbres 1–4 to a Status of INT, and timbres 5–8 to a Status of Off. Set the MIDI Channel of timbres 1–4 to Gch.
3. Select COMBINATION > Play– ARP DRUM page.
4. Set “� (Tempo)” to specify the tempo.This is the same as for a program. However, the tempo is shared by both arpeggiators A and B.
5. Select the scene to set, and press the EDIT button.The settings page for the selected scene will be shown.
6. Set the parameters for arpeggiators A and B.The parameters for A and B are the same as for a program (see page 160).
7. Set the arpeggio patterns of A or B to OFF if you do not want to hear them.
8. Press the More button in Scene Setup. Configure the MIDI channel of the timbre that will be used to play the “Output Channel” of each arpeggiator.
9. Press the More button in Common Setup to show the Scene Common Setup box, and set the range in which arpeggiator A and B operate.The parameters for A and B are the same as for a program.You can use keyboard ranges or velocity ranges to use one or both of the arpeggiators, or to switch between arpeggiators A and B. By using the COMBINATION > MIDI Filter/Zone– Keyboard Zone page, and Velocity Zone page to set keyboard and velocity ranges in conjunction with each other, you can create even more variations.The “Status” setting of the timbre whose MIDI channel matches the “Output Ch” determines whether the pattern data is transmitted via MIDI to an external device.
Triggering the arpeggiator using signals inputted via MIDIWhen triggering the arpeggiator by playing notes on the keyboard of the NAUTILUS, note that the arpeggiator can also be triggered by MIDI signals received by the global MIDI channel.

Arpeggiator functions and scene settings Arpeggiator settings in COMBINATION and SEQUENCER
165
Using the Drum Track in COMBINATION mode
Selecting a Drum Track pattern and soundIn PROGRAM mode, the Drum Track has a special reserved mixer slot, a dedicated Program select parameter, and so on—and the Drum Track pattern always plays that dedicated Program. In COMBINATION mode (and SEQUENCER mode), the Drum Track simply sends MIDI to play one or more of the 16 Timbres/Tracks.To set up the Drum Track in COMBINATION mode:1. Go to the COMBINATION > Home page.2. Choose a Timbre to use as the Drum Track Program.
You can use two or more Timbres at once, if you want to get really fancy—but in general, all you’ll need is one. In this case, let’s use Timbre 10.
3. Open the Timbre’s Category popup, and select a drum Program. O0188: Studio Standard Kit is a good first choice.
4. Go to the Timbre Parameters MIDI page.5. Set Timbre 10 (the drum Program) to MIDI channel
10.Note: if another timbre uses the same MIDI channel, the drum pattern will play that timbre as well.You can use any MIDI channel, but it’s best to use something other than the Global MIDI channel. Otherwise, the Drum Track pattern will play all of the sounds assigned to the keyboard, with unpredictable results.
6. Press the EDIT button on the ARP/DRUM tab.In the Drum MIDI Ch section, set the 10 (to match the Timbre’s channel, as set in step 5).
7. Select a Drum Pattern. 8. Press the DRUM button to verify that the pattern
sounds correctly.The method of triggering will depend on the Trigger settings. If Trigger Mode is Start Immediately, the Drum Track pattern will start when you press the DRUM button. For more information, please see “Synchronizing the Drum Track” on page 167.
Drum Track settings in COMBINATION modeUnlike PROGRAM mode, COMBINATION mode does not have a dedicated track for the Drum Track. Instead, you can assign any of the 16 Timbres to the Drum Track.To do so, select a drum Program for the desired Timbre. Then, set the Drum Pattern’s Output MIDI channel to match the timbre’s MIDI channel.
MIDI in and outIn COMBINATION mode, MIDI interacts with the Drum Track differently than in PROGRAM mode. You can still:• Trigger the Drum Track pattern via MIDI in• Play the Drum Track Program via MIDI in• Transmit the Drum Track pattern via MIDI out
Triggering the Drum Track pattern via MIDIIf you’re triggering the Drum Track pattern by playing the keyboard, input on the Global MIDI Channel will trigger the Drum Track as well.
Playing the Drum Track Program via MIDISince the Drum Program(s) use standard Combination Timbres, you can play the Drum Program just as you would any other Timbre.
Transmitting the Drum Track pattern via MIDIThe Drum Track will transmit on the MIDI channel specified by the Drum Pattern Output setting of each Combination.Set this to match the MIDI channel of the timbre you’ve specified for the drum Program.If the timbre’s Status is EXT or EX2, the Drum Track pattern will be transmitted via MIDI out.

Arpeggiator function
166
Arpeggiator settings in SEQUENCER modeThe Drum Track works much the same in SEQUENCER mode as it does in COMBINATION mode.However, while a combination triggers the arpeggio pattern or drum track pattern on the global MIDI channel, a song triggers the drum track pattern on the MIDI channel specified on the Drum Trigger “Input Ch” in Scene Common Setup. Normally you’ll set this to Tch. With the Tch setting, the MIDI channel of the track selected by Track Select will automatically be used as the trigger channel.For details, please see “Selecting the Drum Track pattern” on page 162.
In SEQUENCER mode you can use the Drum Track while real-time-recording a song track or pattern.The note-on/off data transmitted by the Drum Track pattern can be recorded as events in a track or pattern.
You can’t use note data from the internal sequencer as a trigger to start Drum Track patterns.
Drum Track MIDI in and outIn SEQUENCER mode, the Drum Track transmits and receives on the following MIDI channels.Receive: The drum track will receive on the MIDI channel that is set in “Input Ch” of Drum Trigger in ARP/DRUM Scene Common Setup, which is configured for each song. Normally you’ll set this to Tch and use the NAUTILUS’s keyboard to control the triggering.Transmit: The drum track will transmit on the MIDI channel that is set in “Drum MIDI Ch” of ARP/DRUM Scene Common Setup, which is configured for each song. Set this to match the MIDI channel of the MIDI track for which you’ve assigned the drum Program.If the track’s Status is Both, EXT, or EX2, note data etc. of the Drum Track pattern will be transmitted.

Arpeggiator functions and scene settings Regarding arpeggiator synchronization
167
Regarding arpeggiator synchronization
“Key Sync.” parameterThe timing of the arpeggiator notes depends on the state of the arpeggiator Key Sync. check box.If this box is checked, the arpeggiator will start running at the first note-on that occurs after you’ve taken your hands completely off the keyboard.If this box is unchecked, the arpeggiator will run in synchronization with the internal/external MIDI clock.Below, we will explain how synchronization occurs when the Key Sync. check box is not checked (Synchronization with Song Start and with MIDI realtime Start messages are excluded).
Synchronization between arpeggiators A and BIn COMBINATION and SEQUENCER modes, the two arpeggiators can run simultaneously. In this case, if one arpeggiator is already running, and you then run the other arpeggiator (with “Key Sync.” unchecked), the second arpeggiator will synchronize to the “� (Tempo)” based on the first arpeggiator.If Key Sync. is checked, arpeggiators A and B will run independently, each at their own tempo.
Synchronization with the drum trackIf you want the arpeggiator to synchronize to the drum track pattern that’s currently playing, uncheck the Key Sync. setting. In this case, the arpeggiator will synchronize to the beat of the drum track pattern that’s currently playing.Note: If you want the drum track pattern to synchronize to the arpeggiator that’s currently running, turn on the “Sync” setting (the Trigger parameter of the Drum Track page of each mode).
Synchronization between the arpeggiator and sequencer in SEQUENCER mode
If song playback is stopped• The arpeggiator will synchronize to the “� (Tempo)”
based on the internal MIDI clock timing.• If an RPPR pattern is playing in SEQUENCER mode,
the arpeggiator will synchronize to the beat based on that pattern.
If you want the RPPR pattern playback to synchronize to the arpeggiator that’s currently running, set “Sync” to SEQ (SEQUENCER > Pattern/RPPR– RPPR Setup page).Pattern playback will synchronize to the “� (Tempo)” timing of the arpeggiator.
While playing back or recording a song• The arpeggiator will synchronize to the beat based on the
timing of the song.
Synchronization with Song Start• If the arpeggiator is turned on (ARP button is on) and is
running, it will reset to the beginning of its arpeggio pattern when a Song Start is received. (This is unaffected by the Key Sync. setting.)
• In SEQUENCER mode when Key Sync. is unchecked and the ARP button is on, if you start the arpeggiator by pressing a key during the pre-count before recording begins, the arpeggiator will start its pattern as soon as recording begins, and will be recorded.
Synchronization with external sequencer playbackIf “� (Tempo)” is EXT (i.e., if GLOBAL > MIDI MIDI Clock is External MIDI or External USB) in PROGRAM, COMBINATION, or SEQUENCER modes, the arpeggiator will synchronize to the MIDI timing Clock and Start messages received from a connected MIDI device.Note: Synchronization will occur in the same way if MIDI timing Clock is Auto and MIDI realtime clock messages are being received from a connected MIDI device.
Synchronization with external MIDI timing clockThe arpeggiator will synchronize to the “� (Tempo)” timing of the external MIDI timing clock.
Synchronization with MIDI realtime Start messagesIf the arpeggiator is turned on and running, an incoming MIDI realtime Start message will reset the arpeggiator to the beginning of its pattern (This is unaffected by the Key Sync. setting).
Synchronizing the Drum Track
The Trigger “Sync” parameterThe trigger timing of a Drum Track will depend on the setting of its Drum Trigger parameter. On (checked): The trigger timing will be quantized to the nearest beat relative to the base tempo.Off (unchecked): If Trigger Mode is Start Immediately, triggering will occur at the moment you press the DRUM button. If this is set to Wait KBD Trig, triggering will occur at the moment you play the keyboard.
Synchronizing the Drum Track with ARP, the Sequencer, and RPPR performanceIf you want the Drum Track pattern to play in sync with the currently-operating ARP function, currently-playing song, or RPPR performance, turn Trigger Sync To ARP on.Trigger Sync To ARP Off: If the Trigger Mode setting is Start Immediately, the Drum Track pattern will be triggered the moment you press the DRUM button. If this is set to Wait KBD Trig, the Drum Track pattern will be triggered the moment you play the keyboard. It will not synchronize to the currently-operating ARP function or to the currently-playing song, pattern, or RPPR.Trigger Sync To ARP On: Triggering will synchronize to the currently-playing song, pattern or RPPR performance in units of a measure. Triggering will synchronize to the currently-operating ARP function (in SEQUENCER mode if the song or pattern is stopped) in units of a beat.Note: If you want to synchronize the RPPR pattern performance to the currently-running Drum Track, set the Sync parameter to Beat or Measure.

Arpeggiator function
168
Synchronization with Songs• When you press the SEQUENCER START/STOP
button, the Drum Track will stop along with the sequencer.
• If you want the Drum Track to start simultaneously with the beginning of recording, press the DRUM button during the pre-count before recording (if Trigger Mode is Start Immediately) or play the keyboard (if Trigger Mode is Wait KBD Trig). The Drum Tracks will not be triggered immediately, but will be triggered in synchronization with the sequencer the moment recording starts.
Slave operationConnect the NAUTILUS’s MIDI IN to your external MIDI device’s MIDI OUT, or connect the NAUTILUS’s USB B connector to your computer’s USB port. Then, set up the NAUTILUS as described under “MIDI Clock synchronization” on page 174.
Synchronization with MIDI real-time commandsIn SEQUENCER mode, Song Start, Continue, and Stop messages that the NAUTILUS receives will control song playback and recording just as when you operate the SEQUENCER START/STOP button. Arpeggiator also will be controlled in the same way as when you operate the ARP button. (See “Synchronization with Songs,” above.)
Master operationConnect the NAUTILUS’s MIDI IN to your external MIDI device’s MIDI OUT, or connect the NAUTILUS’s USB B connector to your computer’s USB port.Set the Global MIDI Clock to Internal. The connected external MIDI device will synchronize to the MIDI real-time clock and real-time commands it receives.Note: You can also use MIDI Clock=Auto MIDI or Auto USB, as long as clock messages are not being received. For details, please see “MIDI Clock synchronization” on page 174.
Synchronization via MIDI clockThe connected external MIDI device will synchronize to the MIDI clock of the NAUTILUS.
Synchronizing the step sequencerThe step sequencer will play in synchronization with the internal/external MIDI clock.
Synchronization with the arpeggiatorThe step sequencer will synchronize to the timing of the currently playing arpeggiator.Note: If you want to synchronize the arpeggiator playback to the step sequencer that’s currently running, turn Key Sync off.
Synchronization between the step sequencer and the sequencer in SEQUENCER mode
When playing or recording a song• The step sequencer will synchronize to the song in units
of one beat.
Synchronization with song start• If the step sequencer is on and running, it will reset to the
beginning of the pattern when it receives a song start message.
Synchronization with the playback of an external sequencerIf “� (Tempo)” is EXT in PROGRAM, COMBINATION, or SEQUENCER modes, the step sequencer will synchronize to MIDI timing clock and start messages from an external MIDI sequencer etc. connected via a MIDI cable.Note: The step sequencer will also synchronize in the same way if MIDI Clock is set to Auto and MIDI timing clock messages are being received from a connected MIDI device.
Synchronization with external MIDI timing clockThe step sequencer will synchronize to “� (Tempo)” based on the external MIDI timing clock.
Synchronization with the MIDI realtime command Start messageIf the step sequencer is on and running, it will be reset to the beginning of the pattern when it receives the Start command.
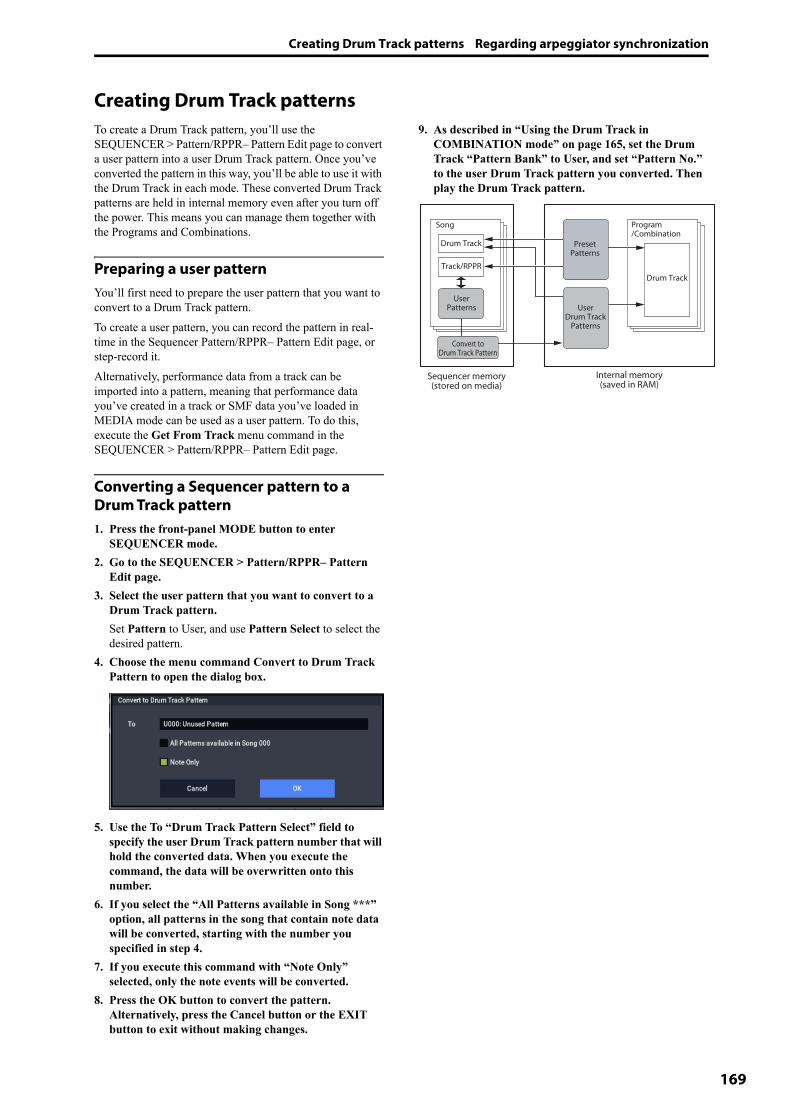
Creating Drum Track patterns Regarding arpeggiator synchronization
169
Creating Drum Track patternsTo create a Drum Track pattern, you’ll use the SEQUENCER > Pattern/RPPR– Pattern Edit page to convert a user pattern into a user Drum Track pattern. Once you’ve converted the pattern in this way, you’ll be able to use it with the Drum Track in each mode. These converted Drum Track patterns are held in internal memory even after you turn off the power. This means you can manage them together with the Programs and Combinations.
Preparing a user patternYou’ll first need to prepare the user pattern that you want to convert to a Drum Track pattern.To create a user pattern, you can record the pattern in real-time in the Sequencer Pattern/RPPR– Pattern Edit page, or step-record it.Alternatively, performance data from a track can be imported into a pattern, meaning that performance data you’ve created in a track or SMF data you’ve loaded in MEDIA mode can be used as a user pattern. To do this, execute the Get From Track menu command in the SEQUENCER > Pattern/RPPR– Pattern Edit page.
Converting a Sequencer pattern to a Drum Track pattern1. Press the front-panel MODE button to enter
SEQUENCER mode. 2. Go to the SEQUENCER > Pattern/RPPR– Pattern
Edit page.3. Select the user pattern that you want to convert to a
Drum Track pattern.Set Pattern to User, and use Pattern Select to select the desired pattern.
4. Choose the menu command Convert to Drum Track Pattern to open the dialog box.
5. Use the To “Drum Track Pattern Select” field to specify the user Drum Track pattern number that will hold the converted data. When you execute the command, the data will be overwritten onto this number.
6. If you select the “All Patterns available in Song ***” option, all patterns in the song that contain note data will be converted, starting with the number you specified in step 4.
7. If you execute this command with “Note Only” selected, only the note events will be converted.
8. Press the OK button to convert the pattern. Alternatively, press the Cancel button or the EXIT button to exit without making changes.
9. As described in “Using the Drum Track in COMBINATION mode” on page 165, set the Drum Track “Pattern Bank” to User, and set “Pattern No.” to the user Drum Track pattern you converted. Then play the Drum Track pattern.
Internal memory(saved in RAM)
Song
Drum Track
Track/RPPR
Program/Combination
Drum Track
Convert toDrum Track Pattern
UserPatterns
PresetPatterns
UserDrum Track
Patterns
Sequencer memory (stored on media)

Arpeggiator function
170

171
Global Settings, Wave Seq., Drum Kits
GLOBAL mode overviewIn GLOBAL mode you can make overall settings that apply to the entire NAUTILUS, such as master tune, key transpose, effect global button, global MIDI channel, and system clock.In addition, you can set the QUICK ACCESS button, create user Drum Kits, Wave Sequence, and Scales, make settings for the damper pedal and assignable foot switches/pedals, and specify category names for programs and combinations.GLOBAL mode page structure
Note: For details on how to access each mode and page, please see “Basic operations” on page 14.
To save changes, you must use the Write command
Edits to GLOBAL mode parameters will not be preserved after the power is turned off unless you first save your settings. Four types of data are handled in GLOBAL mode: Wave Sequences (GLOBAL > Wave Sequence), user Drum Kits (GLOBAL > Drum Kit), Arpeggio Pattern (GLOBAL > Arpeggio Pattern), and all other global settings (Global Basic–Category). Each type of data is stored separately, and can also be saved to internal or external drives in MEDIA mode. For more information, see “Writing Global settings” on page 208, “Saving to internal drive, CDs, and USB media” on page 209.Note: The following settings are not saved by the Write command: Memory Protect, System Clock, and Effect Global SW.Note: The following settings are saved automatically, regardless of the Write command: KSC Auto-Load, Auto Power-off, and the Network and Fan Control settings.Note that Compare can’t be used in GLOBAL mode, except when editing Wave Sequences and Drum Kits.
Page Features
Basic Setup
• Basic settings for the entire NAUTILUS• Audio input settings• Sample management• QUICK ACCESS button settings
MIDI • MIDI settings for the entire NAUTILUS
Controllers/Scales
• Footswitch and pedal setup• MIDI settings for the RT control knob,
Joystick and SW• User scales
Category Name• Edit category/sub category names for
Programs, Combinations and ARP
Wave Sequence • Edit Wave Sequences
Drum Kit • Edit Drum Kits
Arpeggio Pattern • Edit arpeggio pattern
Options Info• View system information• Authorize options

Global Settings, Wave Seq., Drum Kits
172
Global Settings
Basic Setup
Tuning and Transposing
Tuning to another instrumentTo adjust the tuning in fine increments, in order to match other instruments or recorded music:1. Press the MODE button to select GLOBAL mode.2. Press the PAGE button to choose the Basic page, and
then press the Basic tab to go to the Basic Setup page.3. Adjust the Master Tune to the desired pitch.
The Master Tune is adjustable over a range of ±50 cents (one semitone = 100 cents). When Master Tune is at 0, middle A is tuned to 440 Hz.
Transposing the keyboardYou can also transpose the keyboard in semitones, for quick key-changes (for instance, if the band decides to play a song in F rather than E). To do so:1. Go to GLOBAL > Basic Setup page.2. Adjust the Key Transpose as desired.
You can adjust the transposition over a range of ±1 octave.
3. If you’re using MIDI or the internal sequencer, press the PAGE button to go to the main MIDI page.
4. Set the Convert Position according to whether or not you’re using an external MIDI controller to play the NAUTILUS.PreMIDI is the normal setting. This applies the transposition (as well as the velocity curves, described below) to both MIDI output from the NAUTILUS keyboard, and the internal sounds. This is also required in order to record the output of the curves into the internal sequencer.PostMIDI applies the transposition, Velocity curves and Aftertouch curves to incoming MIDI, for adjusting the NAUTILUS response to an external MIDI controller.When simply playing the internal sounds from the NAUTILUS keyboard, both settings work the same.
Velocity curves: adjusting the keyboard responseVelocity curves let you adjust the way the NAUTILUS responds to how you play on the keyboard. The default settings should work for most players, but there are many other choices to let you customize the response to match your own style.To set the velocity curves:1. If you’re using MIDI or the internal sequencer, press
the MIDI tab to go to the main MIDI page.2. Set the Convert Position according to whether or not
you’re using an external MIDI controller to play the NAUTILUS.See “Transposing the keyboard,” above, for details on Convert Position.
3. Go to GLOBAL > Basic Setup page.4. Set the Velocity Curve to suit your playing style.
Velocity Curve 4 is the default, and should work for most players.Curve 9 is designed specifically for playing piano sounds from the weighted RH3 keyboards in the 73-note and 88-note models.For details on the other curves, see the graphic below, as well as “Velocity Curve” on page 632 of the PG.
Velocity curves
1
MAX
127
1
8
65
43
2
7
Soft
127
Strong1
12
38
65
4
7
Curve 4
Curve 1–9
Curve 1–9
Pre
Global Convert Position
Keyboard
MIDI
Curve 4
Sound
Post
9 9
Velocity (MIDI In to sound engines)Velocity (Keyboard to MIDI Out)Convert Position = PostMIDIConvert Position = PreMIDI
Velocity effect
Received TableTransmitted Table
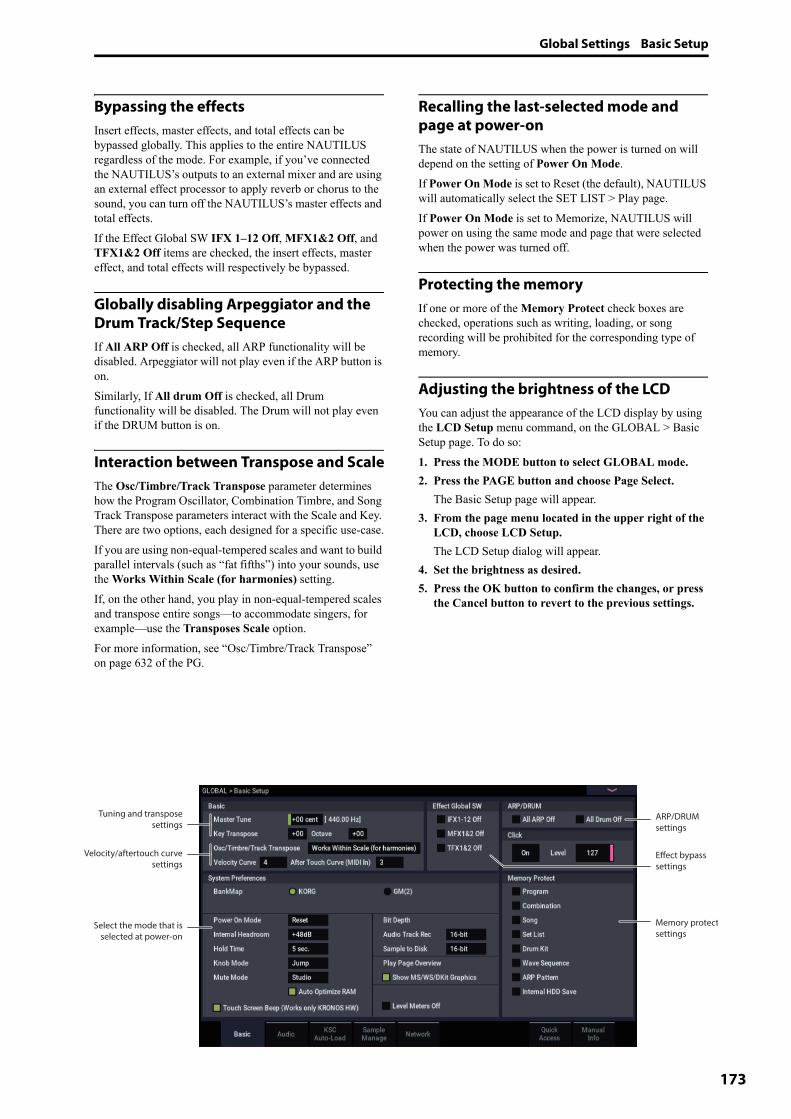
Global Settings Basic Setup
173
Bypassing the effectsInsert effects, master effects, and total effects can be bypassed globally. This applies to the entire NAUTILUS regardless of the mode. For example, if you’ve connected the NAUTILUS’s outputs to an external mixer and are using an external effect processor to apply reverb or chorus to the sound, you can turn off the NAUTILUS’s master effects and total effects.If the Effect Global SW IFX 1–12 Off, MFX1&2 Off, and TFX1&2 Off items are checked, the insert effects, master effect, and total effects will respectively be bypassed.
Globally disabling Arpeggiator and the Drum Track/Step SequenceIf All ARP Off is checked, all ARP functionality will be disabled. Arpeggiator will not play even if the ARP button is on.Similarly, If All drum Off is checked, all Drum functionality will be disabled. The Drum will not play even if the DRUM button is on.
Interaction between Transpose and ScaleThe Osc/Timbre/Track Transpose parameter determines how the Program Oscillator, Combination Timbre, and Song Track Transpose parameters interact with the Scale and Key. There are two options, each designed for a specific use-case.If you are using non-equal-tempered scales and want to build parallel intervals (such as “fat fifths”) into your sounds, use the Works Within Scale (for harmonies) setting.If, on the other hand, you play in non-equal-tempered scales and transpose entire songs—to accommodate singers, for example—use the Transposes Scale option.For more information, see “Osc/Timbre/Track Transpose” on page 632 of the PG.
Recalling the last-selected mode and page at power-onThe state of NAUTILUS when the power is turned on will depend on the setting of Power On Mode.If Power On Mode is set to Reset (the default), NAUTILUS will automatically select the SET LIST > Play page.If Power On Mode is set to Memorize, NAUTILUS will power on using the same mode and page that were selected when the power was turned off.
Protecting the memoryIf one or more of the Memory Protect check boxes are checked, operations such as writing, loading, or song recording will be prohibited for the corresponding type of memory.
Adjusting the brightness of the LCDYou can adjust the appearance of the LCD display by using the LCD Setup menu command, on the GLOBAL > Basic Setup page. To do so:1. Press the MODE button to select GLOBAL mode.2. Press the PAGE button and choose Page Select.
The Basic Setup page will appear.3. From the page menu located in the upper right of the
LCD, choose LCD Setup.The LCD Setup dialog will appear.
4. Set the brightness as desired.5. Press the OK button to confirm the changes, or press
the Cancel button to revert to the previous settings.
Tuning and transposesettings
Velocity/aftertouch curvesettings
ARP/DRUMsettings
Memory protectsettings
Effect bypass settings
Select the mode that isselected at power-on

Global Settings, Wave Seq., Drum Kits
174
Global audio settings
Making default audio input settingsThe Global Audio Input page controls the default mixer settings for the audio inputs, including level, pan, effects busing, and so on. It also lets you route the main L/R outputs to a pair of individual outputs, for specific applications in live performance and recording.Each Program, Combination, and Song can either use these Global audio input mixer settings, or have its own custom settings. This is controlled by the Use Global Setting parameter, on the Program, Combination, or Song’s Sampling– Audio Input page.The default for Use Global Setting is On (checked). This lets you change freely between different Programs, Combis, and Songs without affecting the audio inputs.Also, any edits made in the mode’s Audio Input page will affect the Global setting, and vice-versa.On the other hand, it may sometimes be convenient to save a particular mixer setup with an individual Program, Combi, or Song, to set up special sub-mixer settings or effects processing for particular inputs. For example, you can set up a Program to use a mic input with a vocoder, as described under “Vocoder (PROGRAM mode)” on page 736 of the PG.In this case, set the Program, Combi, or Song’s Use Global Setting to Off (un-checked), and the audio inputs will use the custom settings.
With this in mind, the Global settings apply in the following situations:• When this page (GLOBAL > Basic Setup– Audio Input)
is open.• In PROGRAM, COMBINATION, and SEQUENCER
modes, if the Sampling– Audio Input page’s Use Global Setting check-box is On (checked). This can be set independently for each Program, Combination, and Song.
• In other pages of GLOBAL mode, if you switch to GLOBAL mode from a Program, Combi, or Song with Use Global Setting set to On (checked).
• Similarly, in MEDIA mode, if you switch to MEDIA mode from a Program, Combi, or Song with Use Global Setting set to On (checked).
Configuring the audio input
GLOBAL > Basic Setup– Audio: Analog Setup pageSwitch “Input Select” to “Mic” or “Line” according to the device that is connected, and adjust the Analog Input Gain.This setting is the same as when you press the AUDIO IN button while holding down SHIFT to display the Analog Input Setup dialog box.
MIDI settings
Global MIDI ChannelThe Global MIDI Channel is the most important MIDI-related setting in the NAUTILUS. It determines the main MIDI channel used for both PROGRAM and COMBINATION modes, for instance. To set the Global MIDI Channel:1. Go to the GLOBAL > MIDI page.2. In the MIDI Setup section, set the MIDI Channel as
desired.
MIDI Clock synchronizationThe NAUTILUS can use its own internal tempo, or synchronize to external clocks from either MIDI or USB. The two best general-purpose settings are Auto MIDI and Auto USB. These combine the functionality of Internal and External MIDI/USB, so that you don’t have to manually switch between the two:• If external clocks are being received, they control the
NAUTILUS tempo.• If external clocks are not being received, the NAUTILUS
uses its internal tempo instead.
Synchronizing to a USB-connected computerIf you want to synchronize the NAUTILUS tempo to a computer connected via USB:1. Go to the GLOBAL > MIDI– MIDI page.2. In the MIDI Setup section, set the MIDI Clock to Auto
USB.3. Use the Write Global Setting menu command to save
the MIDI Clock setting.For more information, see “Writing Global settings” on page 208.
Synchronizing to a MIDI-connected computerIf you want to synchronize the NAUTILUS tempo to a computer connected via MIDI:1. Go to the GLOBAL > MIDI– MIDI page.2. In the MIDI Setup section, set the MIDI Clock to Auto
MIDI.3. Use the Write Global Setting menu command to save
the MIDI Clock setting.For more information, see “Writing Global settings” on page 208.
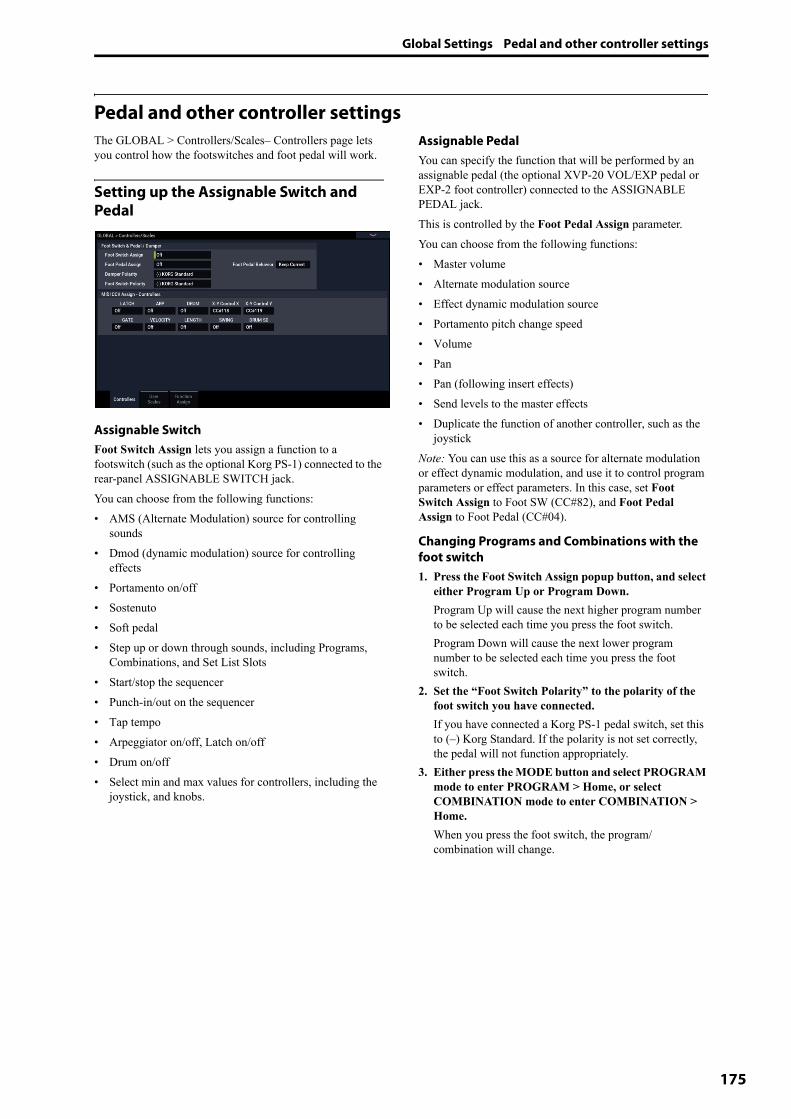
Global Settings Pedal and other controller settings
175
Pedal and other controller settingsThe GLOBAL > Controllers/Scales– Controllers page lets you control how the footswitches and foot pedal will work.
Setting up the Assignable Switch and Pedal
Assignable SwitchFoot Switch Assign lets you assign a function to a footswitch (such as the optional Korg PS-1) connected to the rear-panel ASSIGNABLE SWITCH jack.You can choose from the following functions:• AMS (Alternate Modulation) source for controlling
sounds• Dmod (dynamic modulation) source for controlling
effects• Portamento on/off• Sostenuto• Soft pedal• Step up or down through sounds, including Programs,
Combinations, and Set List Slots• Start/stop the sequencer• Punch-in/out on the sequencer• Tap tempo• Arpeggiator on/off, Latch on/off• Drum on/off• Select min and max values for controllers, including the
joystick, and knobs.
Assignable PedalYou can specify the function that will be performed by an assignable pedal (the optional XVP-20 VOL/EXP pedal or EXP-2 foot controller) connected to the ASSIGNABLE PEDAL jack.This is controlled by the Foot Pedal Assign parameter.You can choose from the following functions:• Master volume• Alternate modulation source• Effect dynamic modulation source• Portamento pitch change speed• Volume• Pan• Pan (following insert effects)• Send levels to the master effects• Duplicate the function of another controller, such as the
joystick Note: You can use this as a source for alternate modulation or effect dynamic modulation, and use it to control program parameters or effect parameters. In this case, set Foot Switch Assign to Foot SW (CC#82), and Foot Pedal Assign to Foot Pedal (CC#04).
Changing Programs and Combinations with the foot switch1. Press the Foot Switch Assign popup button, and select
either Program Up or Program Down.Program Up will cause the next higher program number to be selected each time you press the foot switch.Program Down will cause the next lower program number to be selected each time you press the foot switch.
2. Set the “Foot Switch Polarity” to the polarity of the foot switch you have connected.If you have connected a Korg PS-1 pedal switch, set this to (–) Korg Standard. If the polarity is not set correctly, the pedal will not function appropriately.
3. Either press the MODE button and select PROGRAM mode to enter PROGRAM > Home, or select COMBINATION mode to enter COMBINATION > Home.When you press the foot switch, the program/ combination will change.

Global Settings, Wave Seq., Drum Kits
176
Configuring the QUICK ACCESS buttonsYou can configure which functions will be assigned to the QUICK ACCESS buttons by going to the GLOBAL > Basic Setup– Quick Access page.
Selecting a templateSelect the type of template you want to use.
Type1A button: Set ListB button: Combination Select (Category)C button: Program Select (Category)D button: ARP DRUM page for the current modeE button: Tone Adjust page for the current modeF button: Controllers page for the current mode
Type2A button: COMBINATION > Home pageB button: PROGRAM > Home pageC button: SEQUENCER > Home pageD button: SET LISTE button: Controllers page for the current modeF button: Sound Select (Category) page for the current mode
Type3A button: SET LISTB button: PROGRAM > Home pageC button: SEQUENCER > Home pageD button: Sound Select (Category) page for the current modeE button: CompareF button: Write
Type4A button: Home page for the current modeB button: ARP DRUM page for the current modeC button: Sampling page for the current modeD button: Tone Adjust page for the current modeE button: IFX page for the current modeF button: MFX page for the current mode
Type U1–U4You can assign the functions you choose to the Type U1–U4 buttons.To assign a function, select Type U1–U4 and then press the EDIT button.
Setting dialog box1. The A–F buttons on the screen will be outlined in
pink. Press the function you want to set.
2. Select the function you want to set for the selected button.None: Nothing will be assigned.Page Jump: Page jump will be assigned to the QUICK ACCESS button.
Current Mode Page: Sets the QUICK ACCESS button to make the display jump to a common page within the mode.
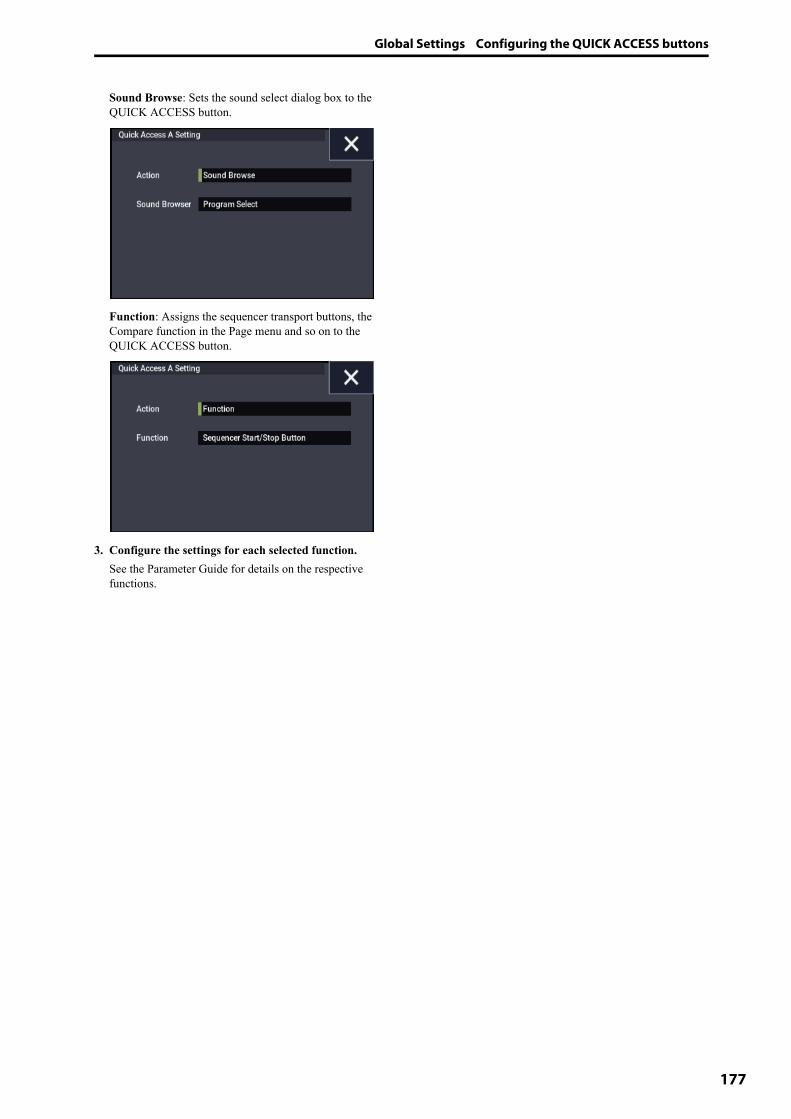
Global Settings Configuring the QUICK ACCESS buttons
177
Sound Browse: Sets the sound select dialog box to the QUICK ACCESS button.
Function: Assigns the sequencer transport buttons, the Compare function in the Page menu and so on to the QUICK ACCESS button.
3. Configure the settings for each selected function.See the Parameter Guide for details on the respective functions.
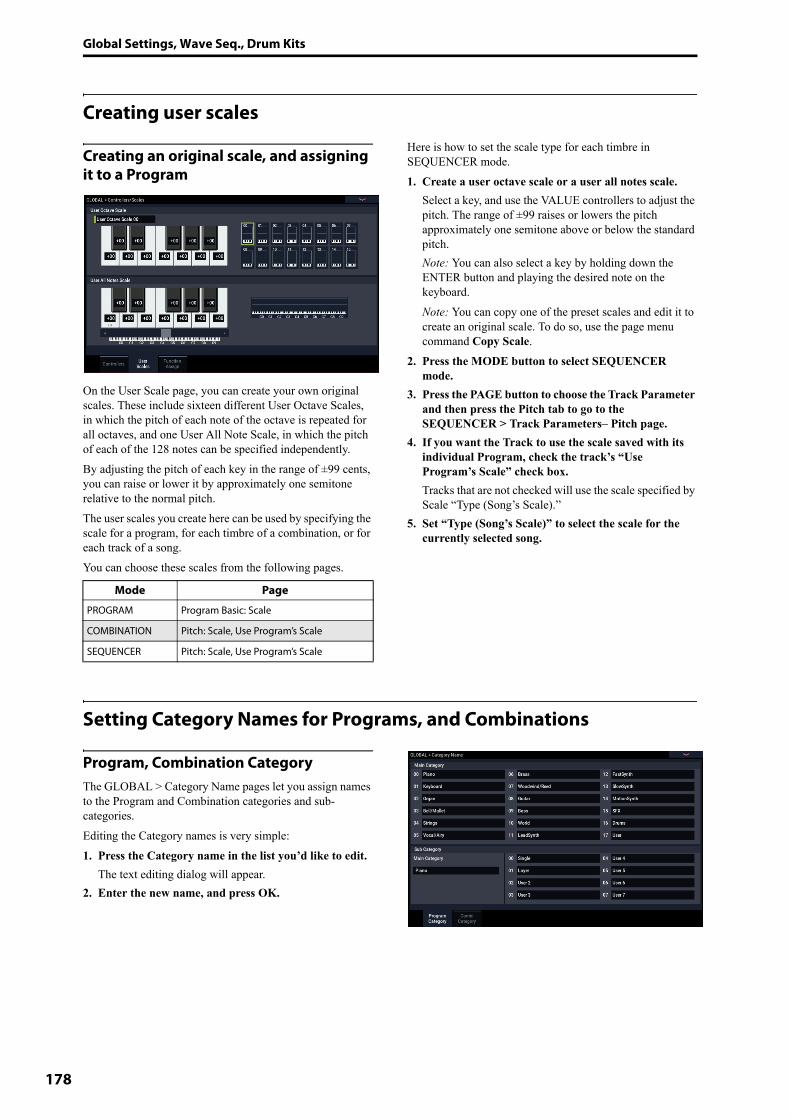
Global Settings, Wave Seq., Drum Kits
178
Creating user scales
Creating an original scale, and assigning it to a Program
On the User Scale page, you can create your own original scales. These include sixteen different User Octave Scales, in which the pitch of each note of the octave is repeated for all octaves, and one User All Note Scale, in which the pitch of each of the 128 notes can be specified independently.By adjusting the pitch of each key in the range of ±99 cents, you can raise or lower it by approximately one semitone relative to the normal pitch.The user scales you create here can be used by specifying the scale for a program, for each timbre of a combination, or for each track of a song.You can choose these scales from the following pages.
Here is how to set the scale type for each timbre in SEQUENCER mode.1. Create a user octave scale or a user all notes scale.
Select a key, and use the VALUE controllers to adjust the pitch. The range of ±99 raises or lowers the pitch approximately one semitone above or below the standard pitch.Note: You can also select a key by holding down the ENTER button and playing the desired note on the keyboard.Note: You can copy one of the preset scales and edit it to create an original scale. To do so, use the page menu command Copy Scale.
2. Press the MODE button to select SEQUENCER mode.
3. Press the PAGE button to choose the Track Parameter and then press the Pitch tab to go to the SEQUENCER > Track Parameters– Pitch page.
4. If you want the Track to use the scale saved with its individual Program, check the track’s “Use Program’s Scale” check box.Tracks that are not checked will use the scale specified by Scale “Type (Song’s Scale).”
5. Set “Type (Song’s Scale)” to select the scale for the currently selected song.
Setting Category Names for Programs, and Combinations
Program, Combination CategoryThe GLOBAL > Category Name pages let you assign names to the Program and Combination categories and sub-categories.Editing the Category names is very simple: 1. Press the Category name in the list you’d like to edit.
The text editing dialog will appear.2. Enter the new name, and press OK.
Mode Page
PROGRAM Program Basic: Scale
COMBINATION Pitch: Scale, Use Program’s Scale
SEQUENCER Pitch: Scale, Use Program’s Scale

Automatically loading sample data Using the KSC Auto-Load list to select which samples to load
179
Automatically loading sample data
Using the KSC Auto-Load list to select which samples to load
What’s a KSC?KSC stands for Korg Sample Collection. KSC files contain links to SAMPLING mode, EXs, and/or User Sample Bank data, including Multisamples, Samples, and Drumsamples. Loading a KSC file loads all of the linked data.You can load KSC files in MEDIA mode, and the NAUTILUS can also automatically load one or more KSC files at startup. The Global KSC Auto-Load page lets you keep a list of your favorite KSC files, and select which ones from the list are loaded automatically at startup. You can also load KSC files immediately, without re-starting, directly from this page.Note that you can keep files in the list without loading them. For instance, you might have one KSC file for a recording project, and a different KSC file for a live band. The list lets you keep them at hand for easy loading when desired, and may often be more convenient than using MEDIA mode.Note: The KSC Auto-Load settings are saved automatically, and are not part of the Global PCG file.
Adding a KSC to the listTo add a KSC to the list:1. Go to the GLOBAL > Basic Setup– KSC Auto-Load
page.2. Press the Add KSC button.
The Add KSC file dialog appears, allowing you to select KSC files from drive.
3. Select the desired KSC files.You can use Multiple select to choose more than one file, if desired.
4. Press Add.The selected KSC files will be added to the list.Note: When you load a KSC in MEDIA mode, it’s automatically added to the list on a temporary basis. If you then check the KSC’s Auto-load check-box, the KSC is added to the list just as if it had been added by using Add KSC. Otherwise, any automatically-added KSCs are cleared from the list at the next startup.
Removing a KSC from the listYou can also remove KSCs from the list. Note that this only affects the contents of the list; it does not affect the files themselves. To do so:1. Select the KSC file that you’d like to remove.2. Press the Remove KSC button.
A confirmation dialog appears.3. Press OK.
The KSC file will be removed from the list.
Selecting which KSC will be loadedTo select whether or not a KSC will be loaded:1. Check or un-check the Auto-load box next to the KSC
name in the list.That’s it! The next time that the system powers on, the checked KSC files will be loaded. You can also load them immediately, as described below.
Applying changes immediatelyNormally, changes the auto-load settings only take affect after the next restart. You can also load and un-load KSCs immediately. Important: this will clear all RAM and EXs data in memory. If you have any un-saved edits to RAM Sample or Multisample data, make sure that you save your edits before proceeding!1. Press the Do Auto-load Now button.
A confirmation dialog appears.2. Press OK.Any changes you’ve made by adding or removing KSC files will be applied, with sample data loaded and un-loaded as necessary. Note that this may take some time to complete.The Do auto-load now button is grayed out if the selected samples exceed the maximum available RAM, # of MS, # of Samples, or # of MS Indexes.
Loading into RAM or Virtual MemoryThe Load Method sets the preferred way to load the KSC’s samples: load them entirely into RAM, or use Virtual Memory. Note that if the data is extremely large, and would not fit into RAM regardless of which other samples were loaded, the data will use Virtual Memory regardless of this setting.These settings apply only to EXs and User Sample Bank data; Sampling Mode Data is always loaded into RAM.RAM: The samples will be loaded into RAM. This has the advantage of allowing reverse sample playback.

Global Settings, Wave Seq., Drum Kits
180
Virtual Memory: The samples will use Virtual Memory. This generally allows you to load more large samples at once. Note that the samples may still require a significant amount of RAM.KSC Settings: KSCs can store separate load method settings for each Multisample or Drumsample, based on the settings when the KSC was saved. Setting Load method to KSC Settings uses these individual settings.
Memory usage graphicThis shows the amount of memory used by the different types of samples, along with the slots used for SAMPLING mode Multisamples, Samples, and Multisample Indexes (key zones within Multisamples).
Show Current or Selected Auto-LoadThis selects whether the graphic shows the current state of memory, or the state of memory as it would be after doing an auto-load using the current settings.It’s possible for different KSC files to refer to the same sample data; for instance, two KSC files may point to the same set of Grand Piano multisamples. The system takes note of this, so that the redundant data is counted only once.EXS/USR BANK shows the amount of memory used for samples in EXs and User Sample Banks.SAMPLING shows the amount of memory used for samples in SAMPLING mode.Free shows the amount of memory still available.The next section shows the numbers of Multisamples, Samples, and Multisample Indexes currently used in SAMPLING mode, out of the available maximum. Data in EXs and User Banks does not count towards these maximums.
Multisamples shows the current number of Multisamples in SAMPLING mode, out of the maximum of 4,000.Samples shows the number of Samples in SAMPLING mode, out of the maximum of 16,000.MS Indexes shows the total number of Indexes in all Multisamples in SAMPLING mode, out of the maximum of 16,000.
Memory capacity exceededIf the size of the sample data in MB adds up to greater than the total available memory, then there are several indications in the graphic: • The Free box turns red, and shows the amount by which
the selected data exceeds the available memory, as a negative number
• The word OVER appears in red to the right of the Free box, with three exclamation points on a second line
Max numbers exceeded for SAMPLING mode Multisamples, Samples, or Multisample IndexesAs noted above, SAMPLING mode can have up to 4,000 Multisamples, 16,000 Samples, and 16,000 Multisample Indexes. If any of these limits would be exceeded by the selected auto-load, then there are two indications in the graphic:• The numbers for the affected data type (e.g., number of
Samples) are shown in red• The bar-graph for the data type turns red, instead of blue,
and extends to fill the entire length
Creating and saving .KSC files
Creating a subset of PRELOAD.KSCYou may decide that you want to remove some of the factory-loaded samples from memory, in order to make room for optional Korg or third-party EXs, or for your own samples. This is easy to do. You can unload an entire EXs, if you wish, or unload individual Multisamples or Drumsamples.Unloading does not affect the data stored on drive; it only changes what is currently loaded into memory.
Unloading an entire bank of dataTo un-load an entire bank of data at once:1. Go to the GLOBAL > Basic Setup– Sample
Management page.This page offers tools for managing the sample data currently loaded into the NAUTILUS.
2. In the menu, select the Unload all in bank command.The Unload all data from selected bank dialog will appear.
3. Select the desired bank (such as an EXs).4. Press the OK button to confirm, or Cancel to exit the
dialog without making changes.
5. Proceed to the instructions under “Saving a KSC file,” below.
Unloading individual itemsTo unload individual Multisamples, Drumsamples, or Samples:1. Go to the GLOBAL > Basic Setup– Sample
Management page.2. Above the list of sample data, select the desired Bank
and Type.For EXs and User Sample Banks, the possible Types are Multisample or Drumsample. For SAMPLING mode, the possible Types are Multisample or Sample.
3. Select the desired items (Multisamples or Samples) from the list.To select two or more items at once, enable the Multiple Select check-box.
4. Press the Unload button.A confirmation dialog will appear.
5. Press the OK button to confirm, or Cancel to exit the dialog without making changes.

Automatically loading sample data Creating and saving .KSC files
181
Sample data may be shared by two or more Multisamples or Drumsamples. If a Sample is used only by the Multisample or Drumsample being unloaded, the Sample will be unloaded as well. If the Sample is used elsewhere, it will stay loaded.
Creating a new KSC by loading individual MultisamplesYou can also load a few Multisamples from an existing KSC, and then save out the result as a new KSC.Important: this example will delete any Samples or Multisamples in SAMPLING mode! Make sure that you save any data that you want to keep.1. Go to the MEDIA– Load page.2. Select a .KSC file on drive.3. Press the Open button.
You’re now looking inside the .KSC file. Even though the .KSC file is just a list, pointing to other files, you can browse through it on the disk as if it contained directories. At the top level of the KSC file, you’ll see one or more folders, depending on the KSC: one for Sampling Mode Data, and one for each referenced User Sample Bank or EXs. If the .KSC file doesn’t have a type of data, there won’t be a folder for it.
4. Select the one of the folders, and press Open to look inside.User Sample Data will contain one or two folders, for Multisamples and Samples. Usually, there will be both.EXs and User Sample Bank folders will contain one or two folders, for Multisamples and Drumsamples.
5. Select a folder of Multisamples, and press Open to look inside.
6. Touch the Multiple Select check-box at the bottom of the screen, so that it’s checked.
7. Touch a few Multisamples to select them.8. Press the Load button.9. An Are You Sure ? message appears, to confirm that
you want to load multiple files; press OK.The Load dialog appears.
10.Set Sample & MS Allocation to Clear All.When we save the .KSC file, we’ll be including all of the loaded samples. This option lets us start with a clean slate.
11.If you’re loading EXs or User Sample Bank data, set the Load Method for EXs and User Sample Banks as desired.See “Loading into RAM or Virtual Memory” on page 179.
12.Press OK to load the Multisamples.Now, only the selected Multisamples are loaded.
13.Un-check the Multiple Select check-box.In order to navigate back out of the .KSC file, this must be disabled.
14.Press the Up button several times, until you’re back at the root level of the drive.
15.Proceed to the instructions under “Saving a KSC file,” below.
Saving a KSC file1. In MEDIA mode, go to the Save page.2. In the menu, select the Save Sampling Data command.
A dialog appears. There are many options here; you can save either Sampling Mode Data, Links to EXs and User Sample Banks, or both. There are also various options for saving only a single Multisample or Sample from the user data. In this case, we’re going to save everything.
3. Set Include to Both Sampling Mode & Links.4. Set User Save Data Options to All.5. Give the KSC file a descriptive name.6. Press OK to save the file.
That’s it! You’ve now created and saved your own .KSC file. You can now load this later, or set it to automatically load at startup.
If you’ve created this .KSC file as a subset of PRELOAD.KSC to make room for other samples, make sure to disable auto-load for PRELOAD.KSC as described under “Selecting which KSC will be loaded” on page 179.To reload your previous set of auto-loaded samples, follow the instructions under “Applying changes immediately” on page 179.

Global Settings, Wave Seq., Drum Kits
182
Connecting to computers via USB Ethernet and FTP
OverviewYou can use a USB Ethernet adapter to rapidly and easily transfer files to and from your computer, by means of the FTP server functionality built into the NAUTILUS. This feature makes it simple to back up and transfer sample data from the NAUTILUS, restructure your programs and other data, rename various files and directories and so on.The NAUTILUS is compatible with aftermarket USB Ethernet adapters, which are widely available.Check the Korg website for a list of compatible products.
What’s FTP?FTP stands for “File Transfer Protocol,” and is a standard way to access files over networks. You can use FTP to transfer files between the NAUTILUS internal drive(s) and any modern computer system.The NAUTILUS is an FTP “server,” and your computer will be the FTP “client.” Free FTP client software is available for all modern operating systems; some may include built-in FTP support. If you don’t already have FTP client software, try searching for “free ftp client” for your operating system (e.g., Windows or Mac).
Connecting to the NAUTILUS via FTPOn the NAUTILUS:1. Connect a compatible USB ethernet adapter.2. Connect an ethernet cable from the adapter to your
local network.For connection to a wireless network, you’ll need to use a wireless-to-ethernet bridge.
3. Go to the GLOBAL > Basic Setup– Network page.This page lets you set up the USB ethernet connection and configure the FTP server .
4. Set the User Name and Password as desired.The user name must be at least one character, and can be up to 32 characters, including letters, numbers, and dashes. The password may be left blank, if you are not concerned about security; like the user name, it can be up to 32 characters.
5. Leave the other parameters set to their defaults.6. Note the IP address shown in the TCP/IP section.
This will be something like 10.0.1.2, or 192.168.1.2.You’re now ready to connect to the NAUTILUS from your computer.On your computer:
7. If you haven’t already done so, install FTP client software.
8. In the FTP client software, connect to the IP address from step 6 above, with the name and password from step 4.
If you need more information about how to configure your FTP software, see its documentation.After connecting, you should be able to see the internal disk(s) of your NAUTILUS. You can then use your FTP client software to transfer files between the NAUTILUS and your computer.
Network TroubleshootingThe Status parameter shows the current state of the NAUTILUS network connection. Normal states are shown in black text, and errors are shown in red.If the Status shows an error, try the following:1. Press the Configure button to open the Configure
TCP/IP dialog.2. Press OK to close the dialog.
This will make NAUTILUS attempt to reconnect to the network; watch the Status parameter to see its progress.
3. Make sure that all ethernet cables are connected properly.If possible, it’s sometimes helpful to swap the cables themselves.Network troubleshooting is outside the scope of this manual, but here are a few other things to try:
4. If possible, use DHCP instead of manual addressing.5. Try restarting the DHCP server (usually, this will be
the network router).

Using Wave Sequences Wave Sequence Overview
183
Using Wave Sequences
Wave Sequence Overview
What’s a Wave Sequence?Wave Sequences play back a series of different Multisamples over time. You can use this to create a variety of unique timbral and rhythmic effects, as described below.Wave Sequences are similar to Drum Kits, in that you create and edit them in GLOBAL mode, and then use them in Programs. In HD-1 Programs, you can use Wave Sequences just as you would normal Multisamples, including velocity switches or crossfades, layering different Wave Sequences on the two Oscillators, and so on.Also like drum kits, when you play a Wave Sequence in GLOBAL mode, it will use the settings from the previously selected Program or Combi.You can create many different effects with wave sequences, from subtle to extreme. Here are descriptions of three common uses: rhythmic Wave Sequences, crossfading Wave Sequences, and velocity-switched Wave Sequences.
Rhythmic Wave SequencesRhythmic Wave Sequences use short or abrupt crossfades, so that transitions between the different Multisamples create a rhythmic phrase. Flexible swing amount, rests, and ties let you build complex patterns, which you can then sync to ARP and the system tempo.
Crossfading Wave SequencesBy using long durations and crossfade times, Wave Sequences can produce complex, evolving timbres. Modulating the Start Step, Position, and Duration makes the sound even more organic, so that every note can play the Wave Sequence a little differently.
Velocity-Switching Wave SequencesBy setting each step’s duration to GATE, and then modulating the Start Step by velocity, you can create a sound with up to 64 velocity switches. For instance, you can use this to switch between a large number of different attack transients.
Wave Sequence banksThere are built-in “factory” sounds in the banks A, B–I, as shown below. You can over-write them if you wish, but doing so may change the sounds of the factory HD-1 Programs, as well as the Combis which use them.Other banks are empty when shipped from the factory. You can use these for storing sounds that you create yourself, optional sound banks from Korg, or third-party sound libraries. Each bank contains 32 Wave Sequences.
Wave Sequence bank contents
Bank Contents
A000…148 Factory Wave Sequences
A149 Initialized Wave Sequence
B00…131 Factory Wave Sequences
C13...31, I21...31
Initialized Wave Sequences
J00…O31 Factory (Initialized) Wave Sequences
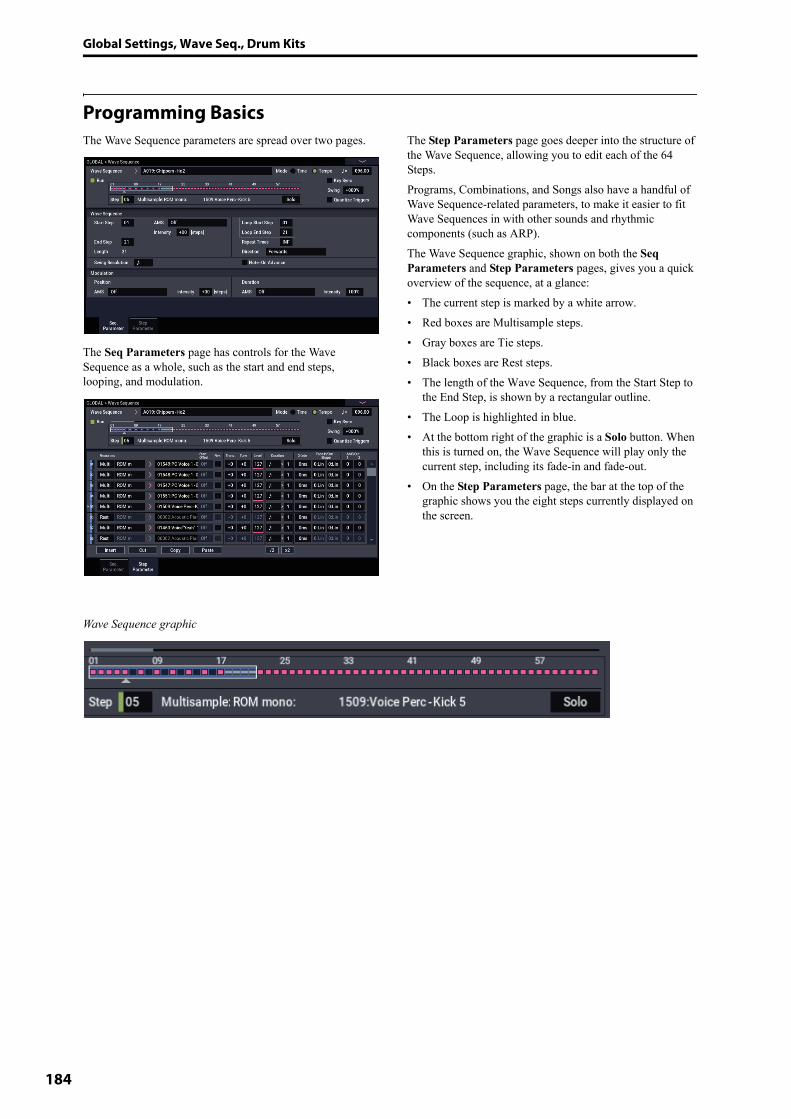
Global Settings, Wave Seq., Drum Kits
184
Programming BasicsThe Wave Sequence parameters are spread over two pages.
The Seq Parameters page has controls for the Wave Sequence as a whole, such as the start and end steps, looping, and modulation.
The Step Parameters page goes deeper into the structure of the Wave Sequence, allowing you to edit each of the 64 Steps.Programs, Combinations, and Songs also have a handful of Wave Sequence-related parameters, to make it easier to fit Wave Sequences in with other sounds and rhythmic components (such as ARP).The Wave Sequence graphic, shown on both the Seq Parameters and Step Parameters pages, gives you a quick overview of the sequence, at a glance:• The current step is marked by a white arrow. • Red boxes are Multisample steps.• Gray boxes are Tie steps.• Black boxes are Rest steps.• The length of the Wave Sequence, from the Start Step to
the End Step, is shown by a rectangular outline.• The Loop is highlighted in blue.• At the bottom right of the graphic is a Solo button. When
this is turned on, the Wave Sequence will play only the current step, including its fade-in and fade-out.
• On the Step Parameters page, the bar at the top of the graphic shows you the eight steps currently displayed on the screen.
Wave Sequence graphic
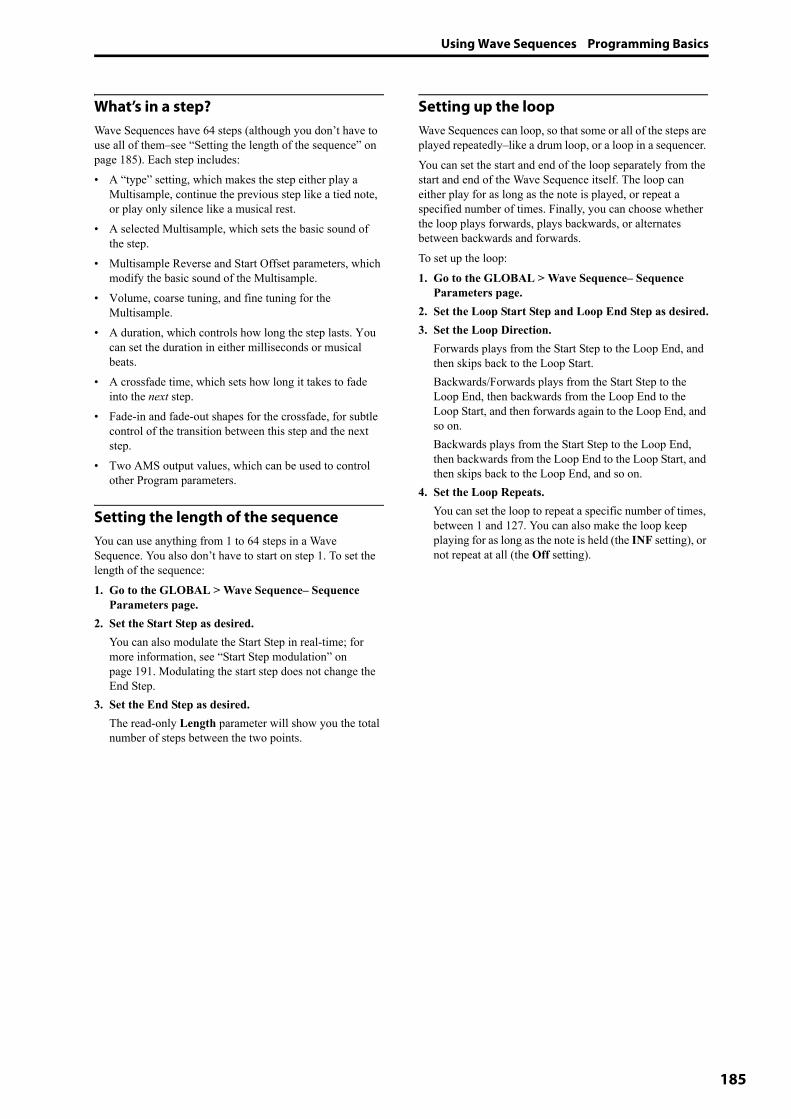
Using Wave Sequences Programming Basics
185
What’s in a step?Wave Sequences have 64 steps (although you don’t have to use all of them–see “Setting the length of the sequence” on page 185). Each step includes:• A “type” setting, which makes the step either play a
Multisample, continue the previous step like a tied note, or play only silence like a musical rest.
• A selected Multisample, which sets the basic sound of the step.
• Multisample Reverse and Start Offset parameters, which modify the basic sound of the Multisample.
• Volume, coarse tuning, and fine tuning for the Multisample.
• A duration, which controls how long the step lasts. You can set the duration in either milliseconds or musical beats.
• A crossfade time, which sets how long it takes to fade into the next step.
• Fade-in and fade-out shapes for the crossfade, for subtle control of the transition between this step and the next step.
• Two AMS output values, which can be used to control other Program parameters.
Setting the length of the sequenceYou can use anything from 1 to 64 steps in a Wave Sequence. You also don’t have to start on step 1. To set the length of the sequence:1. Go to the GLOBAL > Wave Sequence– Sequence
Parameters page.2. Set the Start Step as desired.
You can also modulate the Start Step in real-time; for more information, see “Start Step modulation” on page 191. Modulating the start step does not change the End Step.
3. Set the End Step as desired.The read-only Length parameter will show you the total number of steps between the two points.
Setting up the loopWave Sequences can loop, so that some or all of the steps are played repeatedly–like a drum loop, or a loop in a sequencer. You can set the start and end of the loop separately from the start and end of the Wave Sequence itself. The loop can either play for as long as the note is played, or repeat a specified number of times. Finally, you can choose whether the loop plays forwards, plays backwards, or alternates between backwards and forwards.To set up the loop:1. Go to the GLOBAL > Wave Sequence– Sequence
Parameters page.2. Set the Loop Start Step and Loop End Step as desired.3. Set the Loop Direction.
Forwards plays from the Start Step to the Loop End, and then skips back to the Loop Start. Backwards/Forwards plays from the Start Step to the Loop End, then backwards from the Loop End to the Loop Start, and then forwards again to the Loop End, and so on.Backwards plays from the Start Step to the Loop End, then backwards from the Loop End to the Loop Start, and then skips back to the Loop End, and so on.
4. Set the Loop Repeats.You can set the loop to repeat a specific number of times, between 1 and 127. You can also make the loop keep playing for as long as the note is held (the INF setting), or not repeat at all (the Off setting).
Global Settings, Wave Seq., Drum Kits
186
Adjusting the sound of an individual stepYou can make some basic adjustments to the sound of each step’s Multisample, including changing its volume and pitch, making it play in reverse, and changing the sample start points. You can also use the AMS Outputs to modulate other Program parameters outside of the Wave Sequence, such as Filter Frequency, Pan, and so on.To edit steps:1. Go to the GLOBAL > Wave Sequence– Step
Parameters page.This page shows the parameters for eight steps at a time. Use the scroll bar at the right of the screen to change which steps are in view.
2. In order for a step to make a sound, set its Type to Multi (Multisample).
3. Select a Multisample using the Bank and Multisample pop-up menus.Mono and stereo Multisamples are stored in different Banks. Each step can be either mono or stereo. Note that even if only one step uses a stereo Multisample, the entire Wave Sequence becomes “stereo,” and uses twice as many voices - it’s the price that you pay for power!
4. Set the Level (volume) as desired.This can be useful for evening out the perceived levels of different Multisamples, or for accenting steps in rhythmic sequences.
5. Set the Transpose and Tune as desired.Transpose sets the Multisample’s coarse tuning, in semitones. You can use this to change the octave for individual steps, to create melodies, or to create interesting variations on percussion sounds by extreme transposition.Tune controls the fine tuning, in cents (1/100 of a semitone). Small variations in tuning can create an interesting, organic feel.
6. Use Reverse and Start Offset to change the way that the Multisample plays.Reverse plays the selected Multisample backwards, without looping. (If individual samples within the Multisample are already set to Reverse, they will still play in reverse, regardless of this setting.)Start Offset lets you select from up to 8 pre-programmed sample start points (for ROM and EXs), or between the normal start point and the loop start (for SAMPLING mode and User Sample Banks).
Using Insert/Cut/Copy/PasteYou can use the Insert, Cut, Copy, and Paste buttons to copy all of the parameters from one step to another, or to move a step to a different position in the sequence.To insert a copy of a step into the sequence:1. Select the step you’d like to copy.
You can do this by touching any of the step’s parameters, or by directly editing the Step parameter under the Wave Sequence graphic. The selected step is shown by a red arrow on the left side of the screen, as well as a red arrow in the graphic.
2. Press the Copy button.You’re now ready to insert or paste the step.
3. Select the step which you’d like to follow the new step.4. Press the Insert button.
The copied step is inserted at the selected position. The previously selected step, and all steps following it, move down to make room for the inserted step.
To remove a step from the sequence:1. Select the step you’d like to remove.2. Press the Cut button.
The selected step will be removed from the sequence, and all following steps will shift up to fill in the space.
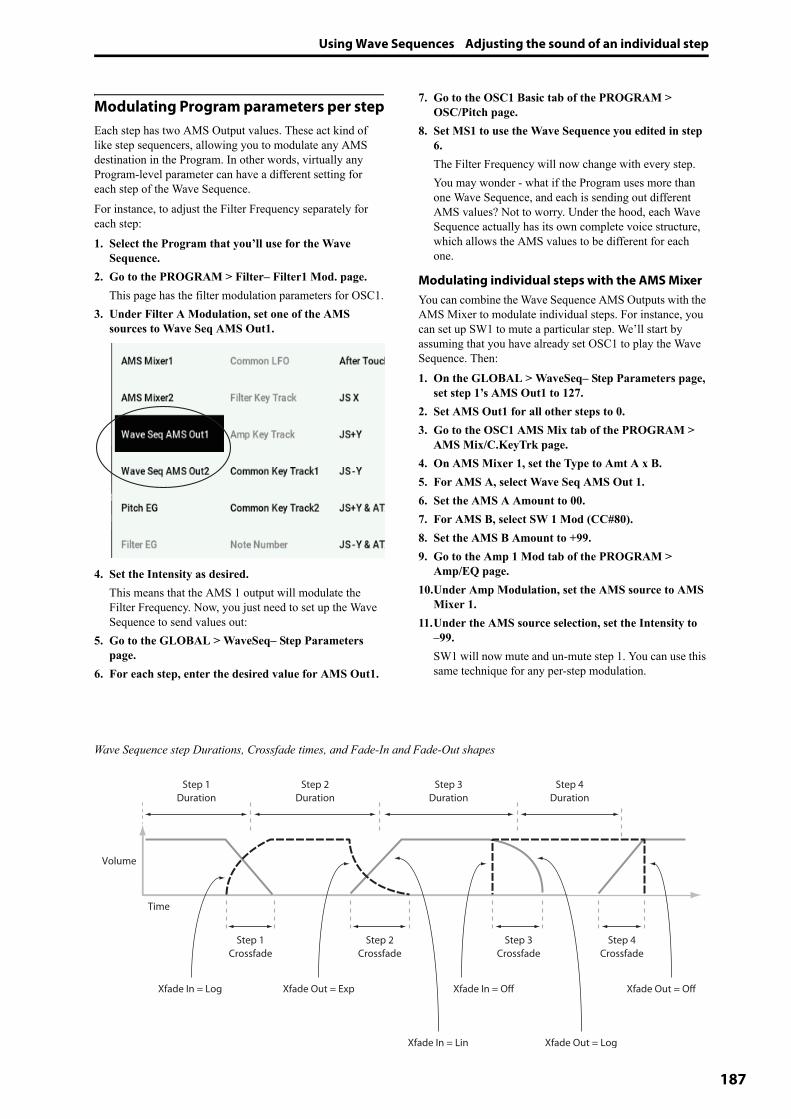
Using Wave Sequences Adjusting the sound of an individual step
187
Modulating Program parameters per stepEach step has two AMS Output values. These act kind of like step sequencers, allowing you to modulate any AMS destination in the Program. In other words, virtually any Program-level parameter can have a different setting for each step of the Wave Sequence. For instance, to adjust the Filter Frequency separately for each step:1. Select the Program that you’ll use for the Wave
Sequence.2. Go to the PROGRAM > Filter– Filter1 Mod. page.
This page has the filter modulation parameters for OSC1.3. Under Filter A Modulation, set one of the AMS
sources to Wave Seq AMS Out1.
4. Set the Intensity as desired.This means that the AMS 1 output will modulate the Filter Frequency. Now, you just need to set up the Wave Sequence to send values out:
5. Go to the GLOBAL > WaveSeq– Step Parameters page.
6. For each step, enter the desired value for AMS Out1.
7. Go to the OSC1 Basic tab of the PROGRAM > OSC/Pitch page.
8. Set MS1 to use the Wave Sequence you edited in step 6.The Filter Frequency will now change with every step. You may wonder - what if the Program uses more than one Wave Sequence, and each is sending out different AMS values? Not to worry. Under the hood, each Wave Sequence actually has its own complete voice structure, which allows the AMS values to be different for each one.
Modulating individual steps with the AMS MixerYou can combine the Wave Sequence AMS Outputs with the AMS Mixer to modulate individual steps. For instance, you can set up SW1 to mute a particular step. We’ll start by assuming that you have already set OSC1 to play the Wave Sequence. Then:1. On the GLOBAL > WaveSeq– Step Parameters page,
set step 1’s AMS Out1 to 127.2. Set AMS Out1 for all other steps to 0.3. Go to the OSC1 AMS Mix tab of the PROGRAM >
AMS Mix/C.KeyTrk page.4. On AMS Mixer 1, set the Type to Amt A x B.5. For AMS A, select Wave Seq AMS Out 1.6. Set the AMS A Amount to 00.7. For AMS B, select SW 1 Mod (CC#80).8. Set the AMS B Amount to +99.9. Go to the Amp 1 Mod tab of the PROGRAM >
Amp/EQ page.10.Under Amp Modulation, set the AMS source to AMS
Mixer 1.11.Under the AMS source selection, set the Intensity to
–99.SW1 will now mute and un-mute step 1. You can use this same technique for any per-step modulation.
Wave Sequence step Durations, Crossfade times, and Fade-In and Fade-Out shapes
Volume
Time
Step 1Duration
Step 1Crossfade
Step 2Crossfade
Step 2Duration
Step 3Duration
Step 4Duration
Step 3Crossfade
Step 4Crossfade
Xfade In = Log Xfade Out = Exp Xfade In = Off
Xfade In = Lin Xfade Out = Log
Xfade Out = Off
Global Settings, Wave Seq., Drum Kits
188
Using rhythmic Wave Sequences
Creating rhythmic Wave SequencesTo create a rhythmic Wave Sequence:1. On the Seq Parameters page, set the Mode to Tempo.
This makes the Wave Sequence synchronize to the system tempo, as set by either the Tempo knob or MIDI Clock.
2. Set Run to On.This is the default setting; the Wave Sequence will move from step to step automatically.
3. Select the Multisamples that you’d like to use, and set the Start, End, and Loop Start/End steps as desired.
4. Set the Loop Repeats to INF.This will make the sequence repeat as long as you hold the note.
5. On the Step Parameters page, use the Base Note and Multiply (“x”) parameters to set the rhythmic values for each step.For instance, to create a dotted eighth note, set the Base Note to 1/16, and Multiply (“x”) to 3.
6. Set the Step Xfade times to relatively short values, such as 0–5 ms.This preserves the initial transients of the samples.
7. To create pauses in the rhythm, set the Step Type to Rest.
Doubling or halving the rhythmic pulseYou may sometimes want to slow down a 16th-note rhythm so that it becomes 8th-notes instead, or vice versa. The /2 and x2 buttons make this easy.Press the /2 button to cut the Base Note and/or Multiply settings in half, so that 1/4 notes become 1/8 notes, 1/8 notes become 1/16 notes, and so on. Press the x2 button to multiply the Base Note and/or Multiply settings by two, so that 1/8 notes become 1/4 notes, 1/4 notes become 1/2 notes, and so on.Note: These buttons only appear when the Mode is set to Tempo.
Setting the tempoEach Program, Combi, and Song has its own tempo setting. You can change the tempo simply by adjusting the front-panel RT control knob 6 (when selecting ARP/DRUM), or by tapping in quarter-notes on the TAP button.There’s also a GLOBAL mode parameter which lets you switch between using the internal tempo or tempo from an external MIDI source (such as a computer-based sequencer). To sync to an external MIDI source:1. Press the MODE button to select GLOBAL mode.2. Select the MIDI tab.3. Under MIDI Setup, set the MIDI Clock parameter as
desired.Internal uses the tempo stored with the Program, Combi, or Song, and set by the TAP button.
External MIDI syncs to incoming MIDI clocks, and ignores the TAP button.Auto is a combination of the above. When clocks are received via MIDI, it syncs to the incoming clocks; when no clocks are being received, it defaults to the stored tempo settings.
Using SwingSwing adds a human feel to the rhythm, and provides an easy way to turn a “square” rhythm into a shuffle groove.This works by adjusting the position of the up-beats, relative to the Wave Sequence’s Swing Resolution setting. For instance, if the Swing Resolution is set to 1/8, Swing affects every other 8th note.While the Swing Resolution is stored in the Wave Sequence, the Swing amount is set in the Program, Combi Timbre, or Song Track. This lets you use a single Wave Sequence in different Programs, Combis, and Songs, each with different amounts of swing.For instance, to turn an 8th-note rhythm into a shuffle:1. Create or select a Wave Sequence with an 8th-note
rhythm.2. On the Seq Parameters page, make sure that Swing
Resolution is set to an 8th-note.3. Create or select the Program in which you’d like to
use the Wave Sequence.4. Go to the OSC1 Basic tab of the PROGRAM >
OSC/Pitch page.5. Set MS1 to use the Wave Sequence you selected in step
1.6. Go to the Program Basic tab of the PROGRAM >
Basic/X-Y/Controllers page.7. Under Wave Sequence, set the Swing parameter to
+100%.This makes the 8th-notes into a triplet, shuffle pattern.Positive values make the up-beats later, and negative values make them earlier. When Swing is set to +300%, up-beats will be moved all the way to the next down-beat. At this point, the notes on the up-beats will not be heard at all.If you are using the Wave Sequence in conjunction with Arpeggiator, you may wish to adjust Arpeggiator’s swing amount as well.
Swing with multiple Wave SequencesIf a Program contains multiple Wave Sequences with different Swing Resolution settings, the Program will use the finest value. For instance, if one Wave Sequence is set to 1/8 and the other is set to 1/16, the Program will use 1/16.
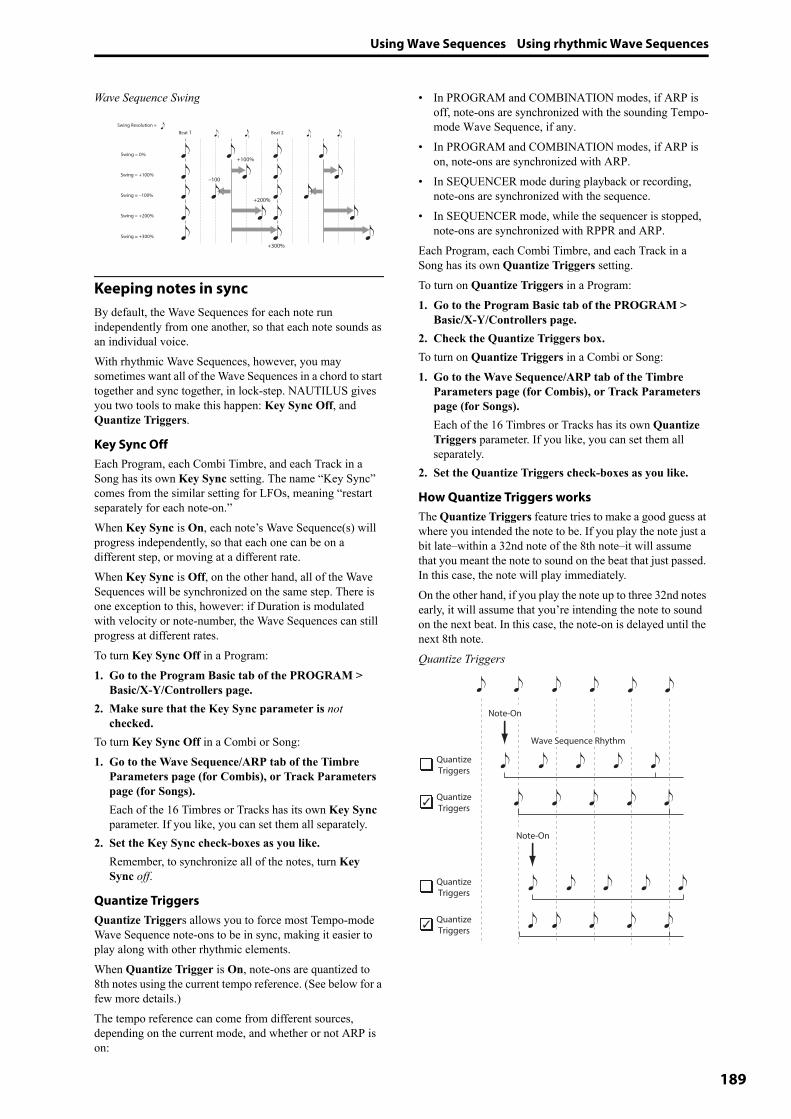
Using Wave Sequences Using rhythmic Wave Sequences
189
Wave Sequence Swing
Keeping notes in syncBy default, the Wave Sequences for each note run independently from one another, so that each note sounds as an individual voice. With rhythmic Wave Sequences, however, you may sometimes want all of the Wave Sequences in a chord to start together and sync together, in lock-step. NAUTILUS gives you two tools to make this happen: Key Sync Off, and Quantize Triggers.
Key Sync OffEach Program, each Combi Timbre, and each Track in a Song has its own Key Sync setting. The name “Key Sync” comes from the similar setting for LFOs, meaning “restart separately for each note-on.”When Key Sync is On, each note’s Wave Sequence(s) will progress independently, so that each one can be on a different step, or moving at a different rate.When Key Sync is Off, on the other hand, all of the Wave Sequences will be synchronized on the same step. There is one exception to this, however: if Duration is modulated with velocity or note-number, the Wave Sequences can still progress at different rates.To turn Key Sync Off in a Program:1. Go to the Program Basic tab of the PROGRAM >
Basic/X-Y/Controllers page.2. Make sure that the Key Sync parameter is not
checked.To turn Key Sync Off in a Combi or Song:1. Go to the Wave Sequence/ARP tab of the Timbre
Parameters page (for Combis), or Track Parameters page (for Songs).Each of the 16 Timbres or Tracks has its own Key Sync parameter. If you like, you can set them all separately.
2. Set the Key Sync check-boxes as you like.Remember, to synchronize all of the notes, turn Key Sync off.
Quantize TriggersQuantize Triggers allows you to force most Tempo-mode Wave Sequence note-ons to be in sync, making it easier to play along with other rhythmic elements. When Quantize Trigger is On, note-ons are quantized to 8th notes using the current tempo reference. (See below for a few more details.)The tempo reference can come from different sources, depending on the current mode, and whether or not ARP is on:
• In PROGRAM and COMBINATION modes, if ARP is off, note-ons are synchronized with the sounding Tempo-mode Wave Sequence, if any.
• In PROGRAM and COMBINATION modes, if ARP is on, note-ons are synchronized with ARP.
• In SEQUENCER mode during playback or recording, note-ons are synchronized with the sequence.
• In SEQUENCER mode, while the sequencer is stopped, note-ons are synchronized with RPPR and ARP.
Each Program, each Combi Timbre, and each Track in a Song has its own Quantize Triggers setting.To turn on Quantize Triggers in a Program:1. Go to the Program Basic tab of the PROGRAM >
Basic/X-Y/Controllers page.2. Check the Quantize Triggers box.To turn on Quantize Triggers in a Combi or Song:1. Go to the Wave Sequence/ARP tab of the Timbre
Parameters page (for Combis), or Track Parameters page (for Songs).Each of the 16 Timbres or Tracks has its own Quantize Triggers parameter. If you like, you can set them all separately.
2. Set the Quantize Triggers check-boxes as you like.
How Quantize Triggers worksThe Quantize Triggers feature tries to make a good guess at where you intended the note to be. If you play the note just a bit late–within a 32nd note of the 8th note–it will assume that you meant the note to sound on the beat that just passed. In this case, the note will play immediately.On the other hand, if you play the note up to three 32nd notes early, it will assume that you’re intending the note to sound on the next beat. In this case, the note-on is delayed until the next 8th note.Quantize Triggers
Swing Resolution =
Swing = 0%
Swing = +100%
Swing = –100%
Swing = +200%
Swing = +300%
+300%
Beat 1 Beat 23 3 3 3
+100%
–100
+200%
QuantizeTriggers
QuantizeTriggers
QuantizeTriggers
QuantizeTriggers
Note-On
Note-On
Wave Sequence Rhythm
Global Settings, Wave Seq., Drum Kits
190
Creating smooth, evolving timbres
Crossfaded Wave SequencesTo create a smooth, crossfading Wave Sequence:1. On the Seq Parameters page, set the Mode to Time.
This turns off tempo synchronization, so that you can set Wave Sequence durations in milliseconds.
2. Set Run to On.This is the default setting; the Wave Sequence will move from step to step automatically.
3. Select the Multisamples that you’d like to use, and set the Start, End, and loop steps as desired.
4. On the Step Parameters page, set the Durations to relatively long values, 500ms or more.
5. Set the Xfade parameters to long values as well.To crossfade continually, without pausing to hear a single step on its own, set the Xfade times the same as the Durations.Note: In Time mode, the actual crossfade time cannot exceed the total duration of the two steps being crossfaded. If the Xfade setting would exceed this limit, the crossfade time will be clipped internally.
6. Adjust the step Levels to smooth out perceived volume differences between different Multisamples.
7. Adjust the Fade-In and Fade-Out shapes to taste.The shapes can help you to fine-tune the transitions between the steps.
Stretching or compressing the sequenceIf you like the proportions of the step durations and crossfades, but want the whole sequence to go faster or slower. The Exp/Comp (Expand/Compress) button makes this easy:1. On the Step Parameters page, press the Exp/Comp
button.A dialog box will appear.
2. In the dialog box, set the Expand/Compress % parameter as desired.100% means the current duration and crossfade times. Values 99 and below make the times shorter, and values 101 and above make them longer.
3. Press the OK button.The step durations and crossfade times will be adjusted by the selected percentage.
Note: The Exp/Comp button appears only when the Mode is set to Time. You can also stretch and compress Wave Sequences in real-time, via AMS. For more information, see “Duration modulation” on page 190.
Modulating Wave Sequences
Position modulationPosition modulation lets you offset the Wave Sequence from the current step. If Run is turned On, The Wave Sequence will continue to progress through its steps during modulation, kind of like fast-forwarding while playing a tape or CD.To sweep through a sequence manually, creating the distinctive sound of a famous German synthesizer:1. Set Run to Off.
This means that the Wave Sequence will stay on the current step, until you modulate the position.
2. Under Modulation and Position, select an AMS source, such as an EG.
3. Set the Intensity to a positive value to move forward through the steps, or a negative value to move backwards.For instance, if Intensity is set to +14, the maximum amount of modulation will move 14 steps forward in the Wave Sequence.
Position modulation and loopsPosition AMS affects only the current step, and does not change the loop start or loop end. This means that Position AMS can make the Wave Sequence jump into the middle of the loop, or jump back out of the loop again.
Duration modulationDuration modulation lets you dynamically control the step duration and crossfade times. You can speed up or slow down the Wave Sequence so that it runs between 1% and 400% of the original rate. By using Velocity, key tracking, or note number as the AMS source, you can make the Wave Sequences on every note have slightly different timing (or dramatically different timing, for that matter!) This can be very useful for making a cross-faded Wave Sequence sound more organic. For instance, to make the Wave Sequence move faster when you play at higher velocities: 1. Go to the Sequence Parameters page.2. Under Modulation and Duration, select Velocity as the
AMS source.3. Set the Intensity to a value less than 100%, such as
90%.Values below 100% make the durations shorter, so the Wave Sequence moves more quickly. Values above 100% make the durations longer, so the sequence moves more slowly.
Using Wave Sequences Modulating Wave Sequences
191
Start Step modulationYou can use a MIDI controller, such as Velocity, to select a different start step for each note, to introduce more variety into the timbre. You can move the start step either forwards or backwards. For instance:1. Make sure that Note-On Advance is Off.
When Note-On Advance is On, Start Step modulation is disabled.
2. Set the Start Step to 10, and the End Step to 25.3. Set the Loop Start and Loop End to the same points –
10 and 25.The sequence will now loop through 16 steps, from 10 to 25.
4. Set the Start Step AMS (to the right of the Start Step parameter) to Velocity.
5. Set the Intensity to –9.Playing at the highest velocities will now start the sequence at step 1 (moving it forward by 9 steps); at the lowest velocities, the sequence will still start at step 10.In general, negative modulation moves the Start Step earlier in the sequence, to the limit of Step 1. Positive modulation moves the Start Step later in the sequence, to the limit of the End Step.
Note-On AdvanceThis feature lets you advance the start point of the Wave Sequence by one step with each new note-on. If Loop Repeats is not set to Off, Note-On Advance will step through the loop, paying attention to the loop direction and number of repeats.For instance, let’s say that the Wave Sequence Start Step is 2, and the End Step is 6. Also, the Loop Start is set to 3, the Loop End is set to 5, and the Loop Direction is set to Forward. If Repeat Times is Off, Note-On Advance will make the Wave Sequence play as follows:1st note: 2, 3, 4, 5, 62nd note: 3, 4, 5, 63rd note: 4, 5, 64th note: 5, 65th note: 66th note: 2, 3, 4, 5, 67th note: 3, 4, 5, 68th note: 4, 5, 69th note: 5, 610th note: 611th note: 2, 3, 4, 5, 6etc…
If Repeat Times is 1, Note-On Advance will make the Wave Sequence play as follows:1st note: 2, 3, 4, 5, 3, 4, 5, 62nd note: 3, 4, 5, 3, 4, 5, 63rd note: 4, 5, 3, 4, 5, 64th note: 5, 3, 4, 5, 65th note: 3, 4, 5, 66th note: 4, 5, 67th note: 5, 68th note: 69th note: 2, 3, 4, 5, 3, 4, 5, 610th note: 3, 4, 5, 3, 4, 5, 611th note: 4, 5, 3, 4, 5, 612th note: 5, 3, 4, 5, 613th note: 3, 4, 5, 614th note: 4, 5, 615th note: 5, 6etc…Finally, if Repeat Times is INF, Note-On Advance will make the Wave Sequence play as follows. Note that the Wave Sequence never returns to the start step, since it’s outside of the loop:1st note: 2, 3, 4, 5, 3, 4, 5, 3, 4, 5, 3, 4, 5…2nd note: 3, 4, 5, 3, 4, 5, 3, 4, 5, 3, 4, 5…3rd note: 4, 5, 3, 4, 5, 3, 4, 5, 3, 4, 5…4th note: 5, 3, 4, 5, 3, 4, 5, 3, 4, 5…5th note: 3, 4, 5, 3, 4, 5, 3, 4, 5…6th note: 4, 5, 3, 4, 5, 3, 4, 5…7th note: 5, 3, 4, 5, 3, 4, 5…8th note: 3, 4, 5, 3, 4, 5…9th note: 4, 5, 3, 4, 5, 3, 4, 5…10th note: 5, 3, 4, 5, 3, 4, 5…etc…
Note-On Advance and Key SyncNote-On Advance is also affected by the setting of the Key Sync parameter.If Key Sync is On, the start point will advance by one step for each note.If Key Sync is Off, the start point will advance by one step for each new phrase. For more information, see “Key Sync” on page 658 of the PG.
Global Settings, Wave Seq., Drum Kits
192
Saving Wave SequencesOnce you’ve spent all this time editing, you’ll want to save your work. To save your Wave Sequence edits:1. Select the Write Wave Sequence command from the
page menu.This brings up a dialog box which allows you to save the Wave Sequence. Optionally, you can also select a new location, or change the Wave Sequence’s name.
2. Press the Wave Sequence name to bring up the text edit dialog.You can give the Wave Sequence a descriptive name using the on-screen keyboard.
3. After entering the name, press OK.The text edit window will disappear, returning you to the main Save dialog.
4. Press the popup button next to WaveSeq to bring up the save location dialog.
5. Select a location to save the edited Wave Sequence.To avoid overwriting the factory sounds, it’s safer to use a slot in one of the User banks.
6. After selecting the location, press OK.7. Press OK again to start the write process.8. If you’re sure you want to write to this location, press
OK again.After that, you’re done!The Wave Sequence Tempo, Key Sync, Swing, and Quantize Trigger settings are stored with each Program, Combination, or Song. These parameters are provided on the Wave Sequence pages for use during editing, but are not actually saved with the Wave Sequence. If you’ve moved from PROGRAM or COMBINATION mode and edited these parameters, return to the previous mode and write your edits.

Using Drum Kits Drum Kit Overview
193
Using Drum Kits
Drum Kit Overview
What’s a Drum Kit?Drum Kits, as the name implies, are optimized for creating drum sounds. They offer a number of special features, such as:• Each note can play a different sound• Instead of selecting Multisamples (which span the entire
keyboard), you can select Drumsamples (which contain a single drum sound). These can be from the ROM, RAM, or EXs banks.
• On each note, you can use up to eight Drumsamples, with velocity crossfades
• Each note has separate settings for the most important sound parameters, including volume, filter cutoff and resonance, envelope attack and decay, pitch, drive and low boost, and gain for each band of the Program EQ. For instance, you could combine high drive and low cutoff frequency to create a lo-fi effect on only a few sounds, while the rest of the sounds remained clear and pristine.
• Each note can be routed to different Insert Effects, or have separate FX Send amounts. For instance, you can send a snare sound through a dedicated compressor.
You can use Drum Kits only in Programs whose Oscillator Mode is set to Single or Double Drums.
Drum Kit memory structureThe NAUTILUS has over 273 Drum Kits, divided into groups as shown below. You can edit or write into any of the locations except for the GM bank, which cannot be erased. For details on the factory-programmed Drum Kits, please see the Voice Name List.Drum Kit bank contents
The 9 Drum Kits in the GM bank are compatible with the GM2 sound map. The other Drum Kits may use different mappings, where appropriate.
Drum Kit Programs and Oscillator ModeThe Program’s Oscillator Mode setting, on the Program Basic tab of the PROGRAM > Basic/X-Y/Controllers page, sets whether the Program is used to play Drum Kits or to play normal Multisamples (such as pianos, strings, etc.).You’ll see the results of this setting on the OSC1/Basic tab of the PROGRAM > OSC/Pitch page. If the Oscillator Mode is set to Single or Double, you can select up to eight Multisamples for each Oscillator, with velocity switches or crossfades.If the Oscillator Mode is set to Single Drums or Double Drums, you’ll be able to select a one or two Drum Kits. There are still eight levels of velocity switches and layers - but these are within the Drum Kit itself, and not stored or edited in the Program.
Bank Contents
A 00…39 Factory Drum Kits
B...E 00...15 Factory Drum Kits
F...O 00...15 User (Initialized) Drum Kits
GM 0…8 GM2 Drum Kits

Global Settings, Wave Seq., Drum Kits
194
Before you start editing…
First, select a Drum ProgramDrum Kits are edited in GLOBAL mode. While you’re in GLOBAL mode, you’ll play the kit that you’re editing as if you were playing it from within the Program, Combi, or Song which was selected before you entered GLOBAL mode.So, before you enter GLOBAL mode, it’s best to select a Program which is already set up for drums, with the appropriate EG settings, effects, and so on. Just use the Program Category select popup, and choose a drum Program such as “Studio Standard Kit.”
Working with Double Drum ProgramsIf you select a Double Drums Program before entering GLOBAL mode, the Drum Kit from Oscillator 1 will be selected and ready for editing. When editing in GLOBAL mode, the selected Drum Kit will always play as if it were in the Program’s Oscillator 1. The Drum Kit in Oscillator 2 will continue to sound as well, although you can’t edit it directly.
OSC1/Basic Octave settingIn order for the note mappings to match the keyboard, the Oscillator’s Octave setting needs to be +0 [8']. All Drum Kit Programs should have this setting already. If you’re unsure, you can check this yourself: 1. Go to the OSC1/Basic tab of the PROGRAM >
OSC/Pitch page.2. Check that the Octave parameter (near the top of the
page) is set to +0 [8'].With a setting other than +0 [8'], the relationship between the keys and the Drum Kit sound map will be incorrect.
Make sure that Memory Protect is disabledBefore you start editing, go to the Global Basic page, and look in the Memory Protect section. Make sure that Drum Kit is not checked–if so, you won’t be able to make any edits.
Drum Kits may be used by more than one ProgramWhen you edit a Drum Kit, all Programs that use that Drum Kit will be affected. To avoid changing the factory voicing, you may wish to copy Drum Kits to empty locations in the USER banks before editing.
Editing Drum Kits
Basic Editing1. Select the Program that you wish to use while editing
the Drum Kit.For more information, see “First, select a Drum Program,” above.
2. Press the front-panel MODE button to enter GLOBAL mode.
3. Go to the Sample Setup tab of the GLOBAL > Drum Kit page.
4. Use the Drum Kit parameter, at the top of the screen, to select the Drum Kit that you wish to edit.You can save this to a different memory location after editing, if you like.
5. Use the Key parameter to select the note that you wish to edit.To select a key, you can use any of the standard VALUE controllers (the VALUE dial, numeric keypad etc.). As a shortcut, you can also hold down the ENTER key and play a note on the keyboard.This Key selection applies to all three Drum Kit editing tabs.
6. Use the Assign check box to specify whether the key will have its own settings, or use the same settings as the next higher note.If Assign is checked, the key will have its own settings. This is the default.If Assign is not checked, the key won’t have its own settings. Instead, it will use the same settings as the next higher note–except that the Drumsamples will be played at a lower pitch. The amount of pitch change depends on the Pitch Slope parameter, on the OSC1 Pitch tab of the PROGRAM > OSC/Pitch page.Use this setting when you want only to change the pitch, such as with tom or cymbal sounds.

Using Drum Kits Editing Drum Kits
195
Creating a velocity crossfadeFor this key, let’s create a simple velocity crossfade between two stereo Drumsamples.1. On the GLOBAL > Sample Setup page, make sure
that DS1 and DS2 are turned On.Just press the On/Off buttons to toggle them, if necessary.
2. Similarly, make sure that DS3…8 are turned Off.When they are turned off, most of their parameters will be grayed out.
3. Select ROM Stereo as the Bank for DS1 and DS2.There are three main types of Drumsample Banks: ROM, Smp, and EXs. For each type, you can also choose between looking at mono and stereo Drumsamples. Note that stereo Drumsamples will require twice as many voices as mono Drumsamples.ROM Drumsamples are the built-in “factory” sounds, and are always available. These are organized by category, such as bass drums, snares, hats, etc.Smp Drumsamples include Akai, SoundFont 2.0, AIFF or WAV files loaded from disk, and samples created in SAMPLING mode.EXs Drumsample banks are PCM expansion sets created especially for the NAUTILUS. Each has its own unique number; for instance, the ROM Expansion is EXs1, and the Concert Grand Piano expansion is EXs2. Only the currently loaded EXs banks will appear on this menu.
4. Press the Drumsample popup for DS1.This brings up a list of Drumsamples, organized by category. Use the tabs at the left of the screen to browse through the different categories.For a list of the Drumsample names, please see the Voice Name List.
5. Select a Drumsample by touching its name in the list.6. Press the OK button to confirm your selection.7. Do the same for DS2.
Now that you’ve assigned Drumsamples to DS1 and DS2, let’s set up the velocity ranges and crossfades.
8. Set DS2’s Bottom Velocity to 001, and its Xfade Range to Off.
9. Set DS1’s Bottom Velocity to 80.Now, DS2 will sound when you play softly, at velocities of 79 or less–and DS1 will sound when you play harder, with velocities of 80 or more.You can also see this split visually, in the graphic on the right side of the LCD.
10.Next, set DS1’s Xfade Range to 20, and its Curve to Linear.Notice that the graphic now shows the two ranges tapering into one another. Between 80 and 100, DS2 will fade out, and DS1 will fade in, creating a gradual velocity transition instead of a hard split.
Fine-tuning the sound of each sample1. If you like, adjust the Levels for the two Drumsamples.
This can be very useful in creating a smooth velocity split or crossfade.
2. Set the tuning and EG parameters as desired.For each Drumsample, you can control offsets to the Program’s settings for transposition, tuning, and EG attack and decay times.
3. Go to the Sample Parameter tab of the GLOBAL > Drum Kit page.This page lets you make even more adjustments to the sound. For each Drumsample, can control offsets to the Program’s settings for filter cutoff and resonance, drive, and low boost. Additionally, you can control the gain for each band of the EQ.For more information, please see “GLOBAL > Drum Kit” on page 667 of the PG.
4. Repeat steps 1–3 to set up each key of the Drum Kit.You can also copy settings from one key to another, using the Copy Key Setup menu command.
Using Exclusive Groups1. Select the Voice Assign/Mixer of the GLOBAL >
Drum Kit page.2. Use the Exclusive Groups to make one drum sound
cut off another drum sound - such as closed and open hi-hats.
For example, let’s say that you’ve assigned an open hi-hat and a closed hi-hat to the same exclusive group:• Play the open hi-hat sound.• While it’s still ringing, play the closed hi-hat.• The open hi-hat sound will be cut off–simulating the
action of a physical hi-hat.
Using HoldThe Program Hold parameter can be especially useful for drum programs, since it lets the samples ring out naturally regardless of how long you hold down the note. The way that this works depends on settings in both the Program and the Drum Kit, as described below.To enable Hold:1. In PROGRAM mode, go to the Program Basic tab of
the PROGRAM > Basic/X-Y/Controllers page.2. Under Key Zone, make sure that the Hold check-box
is checked.Once you’ve turned on Hold for the Program, the function is controlled on a note-by-note basis according to settings within the Drum Kit.
3. In GLOBAL mode, go to the Voice Assign/Mixer tab of the Drum Kit page.
4. For each key, set the Enable Note Off Receive parameter as desired.If this parameter is unchecked, the key will be held.If it is checked, the key will not be held.If you turn off Hold in the Program, no keys will be held - regardless of their Enable Note Off Receive setting.

Global Settings, Wave Seq., Drum Kits
196
Controlling effects for each keyDrum Kits have their own, built-in mixers. For each key, you can control the Insert Effects busing, Master Effects sends, and pan.To use separate bus settings for each key:1. In PROGRAM mode, go to the Routing tab of the IFX
page.2. Make sure that the Use DKit Setting check-box is
checked.When Use DKit Setting is on, the Program will use the Bus Select and Effects Send settings for each key of the Drum Kit.When Use DKit Setting is off, the Program will ignore the Drum Kit’s Bus Select and Effects Send settings.
3. In GLOBAL mode, go to the Voice Assign/Mixer tab of the Drum Kit page.
4. Use the Bus Select (IFX/Indiv. Out Assign) parameter to send drum sounds through their own Insert effects, or to the individual outputs.If you like, you can send each note to its own Insert effect, or to the individual audio outputs, in addition to the main L/R outputs.For example, you might send all snare sounds to IFX1, all kick sounds to IFX2, and the remaining sounds to L/R.
5. Use “Send1(MFX1)” and “Send2(MFX2)” to set the send levels to the master effects.
Controlling pan for each keyTo use separate pan settings for each key:1. In PROGRAM mode, go to the Amp1/Driver1 tab of
the Amp/EQ page.2. Under Pan, make sure that the Use DKit Setting
check-box is checked.When Use DKit Setting is on, the Program will use the pan settings for each key of the Drum Kit.
3. In GLOBAL mode, go to the Voice Assign/Mixer tab of the Drum Kit page.
4. Use the Pan parameter to specify the key’s stereo output position.
Double Drum ProgramsDouble Drum Programs let you layer two Drum Kits together. Most often, these will be close-mic’d and ambient versions of the same acoustic drums, so that you can control the balance between the two. You could also use this for creative layering and special effects, of course!Everything else about Double Drum Programs is the same as for Single Drum Programs.
Saving Drum KitsOnce you’ve spent all this time editing, you’ll want to save your work. To save your Drum Kit edits:1. Select the Write Drum Kit command from the page
menu.This brings up a dialog box which allows you to save the Drum Kit. Optionally, you can also select a new location, or change the Drum Kit’s name.
2. Press the Drum Kit name to bring up the text edit dialog.You can give the Drum Kit a descriptive name using the on-screen keyboard.
3. After entering the name, press OK.The text edit window will disappear, returning you to the main Save dialog.
4. Press the popup button next to Drum Kit to bring up the save location dialog.
5. Select a location to save the edited Drum Kit.To avoid overwriting the factory sounds, it’s safer to use a slot in one of the seven USER banks.Note that although you can edit General MIDI kits, you can only save these edits to locations in the INT or USER banks. The original GM kits cannot be over-written.
6. After selecting the location, press OK.7. Press OK again to start the write process.8. If you’re sure you want to write to this location, press
OK again.After that, you’re done!

Editing arpeggio patterns Creating a user arpeggio pattern
197
Editing arpeggio patterns
Creating a user arpeggio pattern
About user arpeggio patternsThe patterns that can be selected on the NAUTILUS’s arpeggiator are called “arpeggio patterns.” There are two types of arpeggio patterns: preset arpeggio patterns and user arpeggio patterns.Preset arpeggio patterns:There are five patterns; UP, DOWN, ALT1, ALT2, and RANDOM.The functionality of these patterns is fixed, and cannot be edited.User arpeggio patterns:There are 2176 patterns - A0000-A2047, B000-B127 - which can develop chords or phrases in a wide variety of ways, based on the pitches that you play on the keyboard or the timing with which you play them.In GLOBAL > ARP Pattern– Setup you can modify these user arpeggio patterns, or create a new user arpeggio pattern from an initialized condition. Edited user arpeggio patterns can be written to internal memory areas A0000-A2047, B000-B127.In MEDIA mode, you can also save user arpeggio patterns to media.
Editing a user arpeggio patternIf you want to edit a user arpeggio pattern, you must first make sure that memory protect is unchecked. (See page 635 of the PG)
If you enter this mode from the PROGRAM mode, your editing will apply to the arpeggio pattern specified for the selected program.Note: To edit a preloaded arpeggio pattern, you might want to copy it to an unused user arpeggio pattern first and then edit it.1. In PROGRAM mode, select a program which uses the
arpeggio pattern you wish to edit, or a program that you wish to use as a basis for editing the arpeggio pattern.
2. Press the ARP button to turn the arpeggiator on (the button will light up).Even if you entered GLOBAL mode from a program in which the arpeggiator was turned off, you can use the ARP button to turn it on.
3. Select the GLOBAL > Arpeggio Pattern page (see page 680 of the PG).
4. “Arpeggio Module” will automatically be set to A when you navigate to this page from PROGRAM mode.
5. In “Pattern,” select the arpeggio pattern that you wish to edit.For this example, select an empty user arpeggio pattern.If a blank pattern is selected, playing the keyboard will not start an arpeggio. Although preset arpeggio patterns P0–P4 can be selected, they cannot be edited.When you edit a user arpeggio pattern, the changes will have an effect anytime that this pattern is used in Program, Combination, or Song.
6. In “Length,” specify the length of the pattern.After the pattern has played for the length specified, it will return to the beginning. This setting can also be changed during or after editing. For this example, set it to 08.Turn the RT control knob 3 (“LENGTH” with ARP/DRUM selected) all the way to the right so that its value is that of “Length” (on the GLOBAL > Arpeggio Pattern– Setup page).Note: For the preload arpeggio patterns A0002–A1592, simply changing the “Length” can significantly change the character of the pattern. Try changing the length and listening to the result. (See “Changing the number of steps in the arpeggio pattern: LENGTH” on page 159.)
7. Using the other parameters, specify how the arpeggio will be developed.
8. Press the EDIT button to select ARP Pattern Edit dialog.
Overview
Touch Grid Parameter View

Global Settings, Wave Seq., Drum Kits
198
A pattern consists of Steps and Tones.• Step: Each user arpeggio pattern has up to 64 steps.
Starting with the first step, the arpeggiator will play notes at intervals of the note value specified by Resolution. The vertical lines of the grid indicate the steps.Use Step to select the step; then specify Pitch, Gate, Velocity and Flam for each step.You can also select the step by pressing the Step line in the parameter view at the bottom. You can also edit by dragging in the parameter view.
• Tone: Each step can sound a chord of up to 12 tones (Tone No. 1-12). By touching and dragging the overview on the upper part of the screen, select the location for entering tones in the zoom view below. Press the touch grid to enter tones.
Creating an example pattern
1. Press the EDIT button.2. Enter tones in the touch grid as shown in the
illustration below.
3. When you play the keyboard as shown in the illustration, the arpeggiator will begin playing.Tone 1 corresponds to the pitch of the lowest key of chord you play on the keyboard. (If the “Sort” checkbox in the Scene Setup dialog box on the ARP DRUM page in PROGRAM mode is not selected, it will correspond to the pitch of the first note you play.)
4. For steps 01–08, make settings for “Pitch,” “Gate,” “Velocity,” and “Flam.”Pitch: This offsets the pitch of the arpeggio note in semitones up or down. You can input the same tone for each step, and change the Pitch value for each to create a melody using a single tone. (See “Melody pattern”) Gate: Specifies the length of the arpeggio note for each step.
Velocity: This specifies the strength of the note. With a setting of Key, the note will sound at the strength of how it was actually played.The Gate and Velocity settings you select here will be valid if the Gate and Velocity parameters (Scene Setup dialog in PROGRAM mode) are set to Step. If these parameters have a setting other than Step, the Gate and Velocity that were specified for each individual step will be ignored, and all notes of the arpeggio will sound according to the settings in Scene Setup dialog. Be sure to verify the settings of the program.When editing Gate, Velocity, and Swing, use the SELECT button to select ARP/DRUM, and set knob 1 (GATE), knob 2 (VELOCITY) and knob 4 (SWING) to the center position (12 o’clock).
5. To change the user arpeggio pattern name, use the “Rename Arpeggio Pattern” menu command. (See page 693 of the PG)
6. If you wish to save the edited user arpeggio pattern to internal memory, be sure to Write the user arpeggio pattern. (See page 201)If you turn off the power without writing, the edited contents will be lost.
7. If you wish to save the state of the program at the same time, return to PROGRAM mode and write the program. (See page 34)
Other examples of creating a user arpeggio pattern
Melody pattern
1. Press the EDIT button.2. In the touch grid, set tone 1 for “Step” 01, 02, 03, 04,
05, 07, and 08 (i.e., all but 06).3. Specify the pitch. Set the “Step” 02 “Pitch” to +10,
“Step” 05 “Pitch” to +12, and the “Step” 08 “Pitch” to –2.
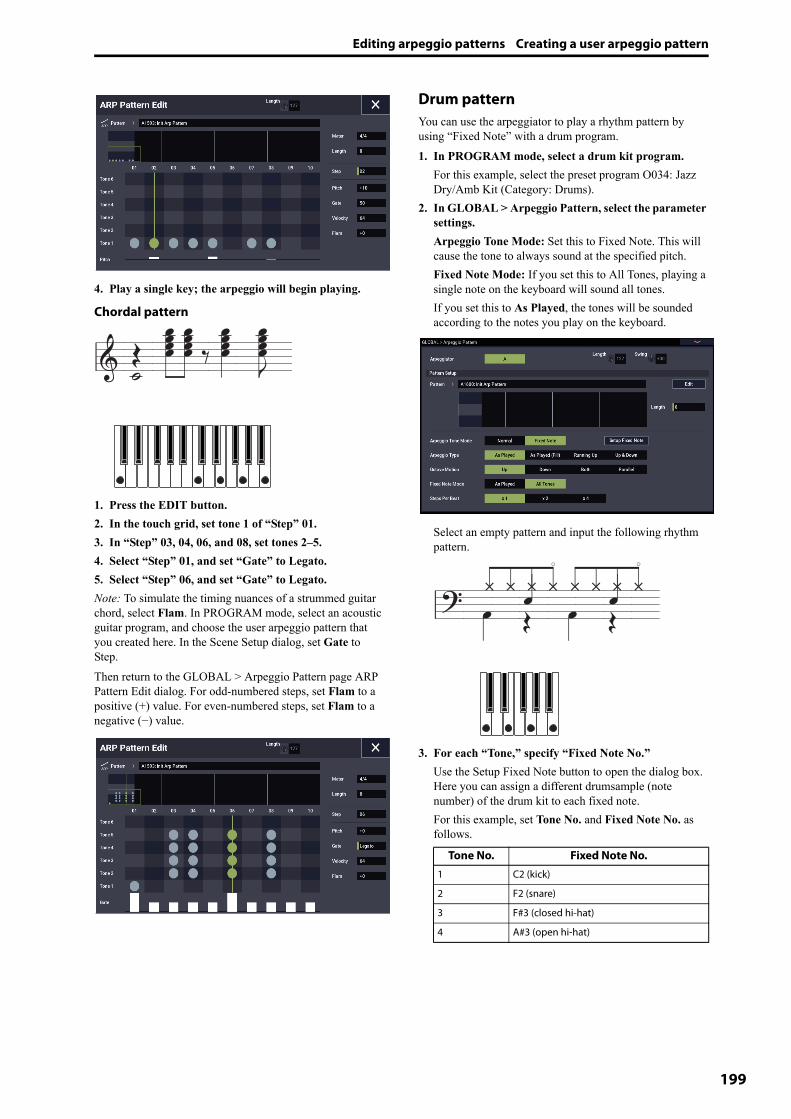
Editing arpeggio patterns Creating a user arpeggio pattern
199
4. Play a single key; the arpeggio will begin playing.
Chordal pattern
1. Press the EDIT button.2. In the touch grid, set tone 1 of “Step” 01.3. In “Step” 03, 04, 06, and 08, set tones 2–5.4. Select “Step” 01, and set “Gate” to Legato.5. Select “Step” 06, and set “Gate” to Legato.Note: To simulate the timing nuances of a strummed guitar chord, select Flam. In PROGRAM mode, select an acoustic guitar program, and choose the user arpeggio pattern that you created here. In the Scene Setup dialog, set Gate to Step.Then return to the GLOBAL > Arpeggio Pattern page ARP Pattern Edit dialog. For odd-numbered steps, set Flam to a positive (+) value. For even-numbered steps, set Flam to a negative (−) value.
Drum patternYou can use the arpeggiator to play a rhythm pattern by using “Fixed Note” with a drum program.1. In PROGRAM mode, select a drum kit program.
For this example, select the preset program O034: Jazz Dry/Amb Kit (Category: Drums).
2. In GLOBAL > Arpeggio Pattern, select the parameter settings.Arpeggio Tone Mode: Set this to Fixed Note. This will cause the tone to always sound at the specified pitch.Fixed Note Mode: If you set this to All Tones, playing a single note on the keyboard will sound all tones.If you set this to As Played, the tones will be sounded according to the notes you play on the keyboard.
Select an empty pattern and input the following rhythm pattern.
3. For each “Tone,” specify “Fixed Note No.”Use the Setup Fixed Note button to open the dialog box. Here you can assign a different drumsample (note number) of the drum kit to each fixed note.For this example, set Tone No. and Fixed Note No. as follows.
Tone No. Fixed Note No.1 C2 (kick)
2 F2 (snare)
3 F#3 (closed hi-hat)
4 A#3 (open hi-hat)
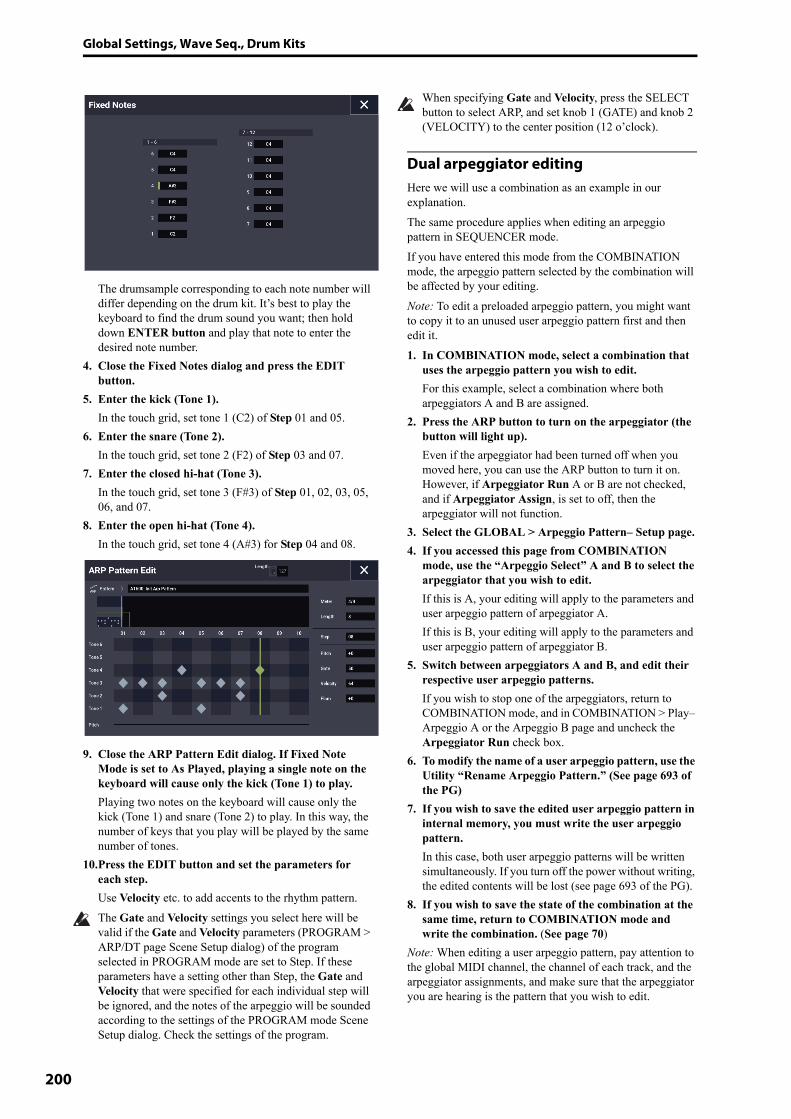
Global Settings, Wave Seq., Drum Kits
200
The drumsample corresponding to each note number will differ depending on the drum kit. It’s best to play the keyboard to find the drum sound you want; then hold down ENTER button and play that note to enter the desired note number.
4. Close the Fixed Notes dialog and press the EDIT button.
5. Enter the kick (Tone 1).In the touch grid, set tone 1 (C2) of Step 01 and 05.
6. Enter the snare (Tone 2).In the touch grid, set tone 2 (F2) of Step 03 and 07.
7. Enter the closed hi-hat (Tone 3).In the touch grid, set tone 3 (F#3) of Step 01, 02, 03, 05, 06, and 07.
8. Enter the open hi-hat (Tone 4).In the touch grid, set tone 4 (A#3) for Step 04 and 08.
9. Close the ARP Pattern Edit dialog. If Fixed Note Mode is set to As Played, playing a single note on the keyboard will cause only the kick (Tone 1) to play.Playing two notes on the keyboard will cause only the kick (Tone 1) and snare (Tone 2) to play. In this way, the number of keys that you play will be played by the same number of tones.
10.Press the EDIT button and set the parameters for each step.Use Velocity etc. to add accents to the rhythm pattern.The Gate and Velocity settings you select here will be valid if the Gate and Velocity parameters (PROGRAM > ARP/DT page Scene Setup dialog) of the program selected in PROGRAM mode are set to Step. If these parameters have a setting other than Step, the Gate and Velocity that were specified for each individual step will be ignored, and the notes of the arpeggio will be sounded according to the settings of the PROGRAM mode Scene Setup dialog. Check the settings of the program.
When specifying Gate and Velocity, press the SELECT button to select ARP, and set knob 1 (GATE) and knob 2 (VELOCITY) to the center position (12 o’clock).
Dual arpeggiator editingHere we will use a combination as an example in our explanation.The same procedure applies when editing an arpeggio pattern in SEQUENCER mode.If you have entered this mode from the COMBINATION mode, the arpeggio pattern selected by the combination will be affected by your editing.Note: To edit a preloaded arpeggio pattern, you might want to copy it to an unused user arpeggio pattern first and then edit it.1. In COMBINATION mode, select a combination that
uses the arpeggio pattern you wish to edit.For this example, select a combination where both arpeggiators A and B are assigned.
2. Press the ARP button to turn on the arpeggiator (the button will light up).Even if the arpeggiator had been turned off when you moved here, you can use the ARP button to turn it on. However, if Arpeggiator Run A or B are not checked, and if Arpeggiator Assign, is set to off, then the arpeggiator will not function.
3. Select the GLOBAL > Arpeggio Pattern– Setup page.4. If you accessed this page from COMBINATION
mode, use the “Arpeggio Select” A and B to select the arpeggiator that you wish to edit.If this is A, your editing will apply to the parameters and user arpeggio pattern of arpeggiator A.If this is B, your editing will apply to the parameters and user arpeggio pattern of arpeggiator B.
5. Switch between arpeggiators A and B, and edit their respective user arpeggio patterns.If you wish to stop one of the arpeggiators, return to COMBINATION mode, and in COMBINATION > Play– Arpeggio A or the Arpeggio B page and uncheck the Arpeggiator Run check box.
6. To modify the name of a user arpeggio pattern, use the Utility “Rename Arpeggio Pattern.” (See page 693 of the PG)
7. If you wish to save the edited user arpeggio pattern in internal memory, you must write the user arpeggio pattern.In this case, both user arpeggio patterns will be written simultaneously. If you turn off the power without writing, the edited contents will be lost (see page 693 of the PG).
8. If you wish to save the state of the combination at the same time, return to COMBINATION mode and write the combination. (See page 70)
Note: When editing a user arpeggio pattern, pay attention to the global MIDI channel, the channel of each track, and the arpeggiator assignments, and make sure that the arpeggiator you are hearing is the pattern that you wish to edit.
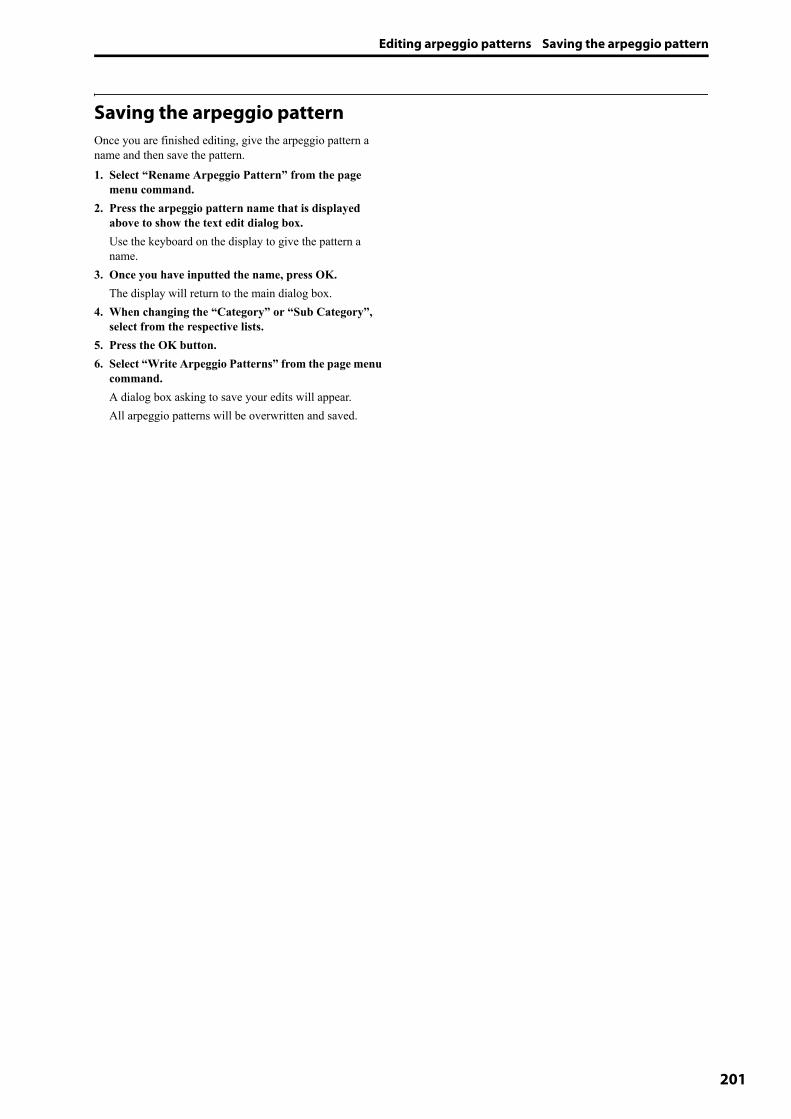
Editing arpeggio patterns Saving the arpeggio pattern
201
Saving the arpeggio patternOnce you are finished editing, give the arpeggio pattern a name and then save the pattern.1. Select “Rename Arpeggio Pattern” from the page
menu command.2. Press the arpeggio pattern name that is displayed
above to show the text edit dialog box.Use the keyboard on the display to give the pattern a name.
3. Once you have inputted the name, press OK.The display will return to the main dialog box.
4. When changing the “Category” or “Sub Category”, select from the respective lists.
5. Press the OK button.6. Select “Write Arpeggio Patterns” from the page menu
command.A dialog box asking to save your edits will appear.All arpeggio patterns will be overwritten and saved.

Global Settings, Wave Seq., Drum Kits
202
203
Loading & saving data
Saving data
OverviewThere are three ways to save data; you can write it into internal memory, save it to media (on the internal drive or external USB storage media, including CD-R/RW), or transmit it as a MIDI data dump.
Writing to internal memoryThe following types of data can be written into the internal memory.• Programs
Programs 000–127 in banks A...T• Combinations
Combinations 000–127 in banks A...N• Global settings
(GLOBAL > Basic– Category Name)• User Wave Sequences
Banks A: 000...149, Banks B...O: 00...31• User Drum Kits
Banks A: 00...39, Banks G...T: 00...15• User Drum Track Patterns
User 000…999• User Arpeggio Pattern
A0000-A2048, B000-B127• FX Presets
Preset 00…15 and User 00…15 for each effect• User Template Songs
User 0…15. These include the program selections, track parameters, effect settings, ARP settings, and the name and tempo of the current song as a re-usable template. For more information, see “Save Template Song” on page 523 of the PG.SAMPLING mode Multisamples and Samples must be saved to and loaded from drive; they cannot be written into internal memory. This means that if you turn the power off and then on once again, but do not re-load the necessary Multisamples or Samples into SAMPLING mode, any data that uses those Multisamples or Samples will not sound as intended. This can include Combinations, Programs, Drum Kits, Wave Sequences, and Multisamples.Once they’ve been saved to disk, you can set the NAUTILUS to automatically load them at startup. For details, see “Automatically loading sample data” on page 179.
Saving to internal drive and USB mediaThe following file types can be saved to disk:• .PCG files
Set Lists, Programs, Combinations, global settings, Drum Kits, User Drum Track Patterns, Wave Sequences and Arpeggio Pattern. (You can choose which data types are included, via options in the Save dialog.)
• .SNG filesSong and region data.
• .KMP filesThese are Korg format Multisamples.
• .KSF filesThese are Korg format Samples.
• .KSC filesThese store collections of EXs Multisamples and Drumsamples, and/or User Multisamples and Samples.
• .KFX filesEffect preset data.
• .MID filesSaves a SEQUENCER mode song in Standard MIDI File (SMF) format.
• .EXL filesSystem exclusive data from an external device that was saved on the NAUTILUS. (This allows the NAUTILUS to be used as a data filer.)
• .WAV and .AIF files:User samples can be exported as WAVE or AIFF files.
Loading & saving data
204
MIDI data dumpThe following types of data can be transmitted as a MIDI data dump and saved on an external data filer or other device.• Set Lists, Programs, Combinations, global settings,
Drum Kits, Drum Track Patterns, Wave Sequences and Arpeggio Pattern
• SongsFor more information, see “Dump Program” on page 690 of the PG.
About preload data and preset data“Preload data” refers to the sounds and other data loaded in the NAUTILUS when it is shipped from the factory. You are free to rewrite this data, and with the exception of the demo songs, the data will be written to the location listed in “Writing to internal memory.” All of this data is stored in the internal drive.• Programs A…O• Combinations A, B• Drum Kits A…H• Wave Sequences A…O• Demo songsPreset data is data that cannot be rewritten by the Write operation. This includes the following data:• Program banks GM, g(1)–g(9), and g(d): 001–128• Preset Drum Kits GM0–GM8• Preset Template Songs P00–P17• Preset patterns P0000–P1271

Saving data Writing to internal memory
205
Writing to internal memory
Writing Programs and CombinationsEdits to Programs and Combinations can be saved to the internal memory, which we’ll refer to as “Writing.” If you want edits to be preserved after the power is turned off, you must write them.
Do not turn off the power for at least 10 seconds after using any of the Write commands. This allows the system time to complete the process, which includes saving a backup of the data to the internal drive.Before you write data into memory, you must turn off the related memory protect setting(s) in GLOBAL mode. (See “Memory protect” on page 208.)Combinations rely on Programs to make sounds, but they don’t contain the actual Program parameters. Instead, they simply remember the Program banks and numbers. If you edit a Program that’s used by a Combination, or load a different Program into the same bank and number, the sound of the Combination will also change.
Using the Write commands1. Anywhere in PROGRAM or COMBINATION modes,
select the page menu command “Write Program” or “Write Combination.”The Write Program or Write Combination dialog box will appear.
The screen shown is for PROGRAM mode
2. Check the program/combination name displayed in the upper line (the writing source).
3. If you wish to change the name of the program/ combination, press the text edit button.The text dialog box will appear. Enter the name of the program/combination. See “Editing names and entering text” on page 206.After you have entered the name, press the OK button to return to the Write Program/Write Combination dialog box.
4. In “Category,” specify the category of the Program/ Combination.
5. Select a Sub Category as well.The categories/sub-categories set here can be selected using the Program/Combination Select menus shown below.
• PROGRAM > Program Select on the Home page• COMBINATION > Timbre Program Select on the Home
– Mixer page
• COMBINATION > Combination Select on the Home page
• SEQUENCER > Track Program Select on the Home – Mixer page
6. Use “To” to specify the bank and number of the writing destination program/combination.Use the VALUE controllers to make your selection.
7. To execute the Write operation, press the OK button. To cancel without executing press the Cancel button.When you press the OK button, the display will ask “Are You Sure ?” When you press the OK button once again, the data will be written.
Saving Tone Adjust editsTone Adjust edits are saved in different ways depending on whether the parameter is Relative or Absolute, and whether you’re saving a Program, Combination, or Song.• Relative parameters typically adjust two or more
Program parameters simultaneously. For instance, Filter/Amp EG Attack Time affects a total of six Program parameters. The value of the Relative parameter shows the amount of change to these underlying Program parameters.
• Absolute parameters usually control a single Program parameter, such as Oscillator 1 Transpose. The Program and Tone Adjust parameters mirror one another; when you change one, the other will change to match.
PROGRAM mode:• Edits to Relative parameters affect the sound
immediately, but don’t change the underlying Program parameter settings until the Program is saved. When the Program is saved, the NAUTILUS calculates the combined effects of Tone Adjust and dedicated CC modulation (from the RT control knobs, for instance), and saves the results into the Program parameters directly. At that point, all of the Relative parameters are reset to 0.
• Edits to Absolute parameters are immediately reflected in the corresponding on-screen parameters, and vice-versa.
COMBINATION and SEQUENCER modes:• Edits to both Relative and Absolute parameters are
written and preserved as the Tone Adjust settings for the Timbre or Track.
Writing Drum Kits, Wave Sequences and Arpeggio PatternFor details on how to write Wave Sequence edits to memory, see “Saving Wave Sequences” on page 192.For details on how to write Drum Kit and Arpeggio Pattern edits to memory, see “Saving Drum Kits” on page 196 and “Saving the arpeggio pattern” on page 201.
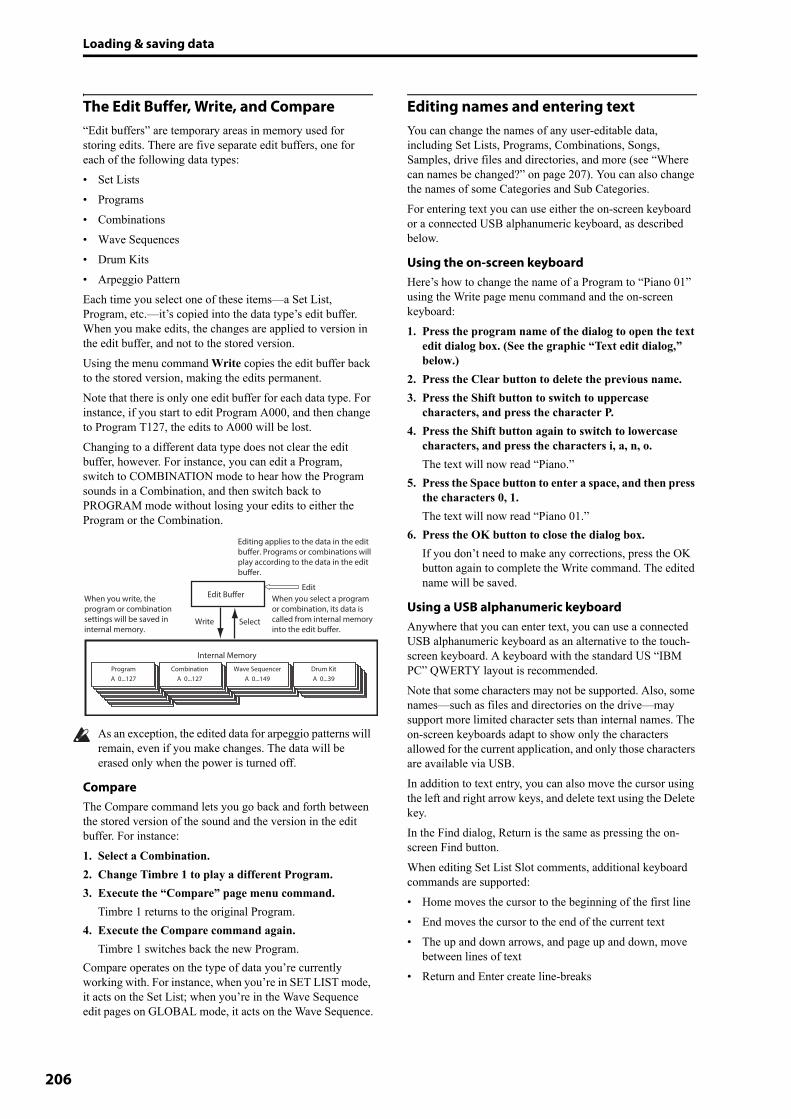
Loading & saving data
206
The Edit Buffer, Write, and Compare“Edit buffers” are temporary areas in memory used for storing edits. There are five separate edit buffers, one for each of the following data types:• Set Lists• Programs• Combinations• Wave Sequences• Drum Kits• Arpeggio PatternEach time you select one of these items—a Set List, Program, etc.—it’s copied into the data type’s edit buffer. When you make edits, the changes are applied to version in the edit buffer, and not to the stored version.Using the menu command Write copies the edit buffer back to the stored version, making the edits permanent.Note that there is only one edit buffer for each data type. For instance, if you start to edit Program A000, and then change to Program T127, the edits to A000 will be lost. Changing to a different data type does not clear the edit buffer, however. For instance, you can edit a Program, switch to COMBINATION mode to hear how the Program sounds in a Combination, and then switch back to PROGRAM mode without losing your edits to either the Program or the Combination.
As an exception, the edited data for arpeggio patterns will remain, even if you make changes. The data will be erased only when the power is turned off.
CompareThe Compare command lets you go back and forth between the stored version of the sound and the version in the edit buffer. For instance:1. Select a Combination.2. Change Timbre 1 to play a different Program.3. Execute the “Compare” page menu command.
Timbre 1 returns to the original Program.4. Execute the Compare command again.
Timbre 1 switches back the new Program.Compare operates on the type of data you’re currently working with. For instance, when you’re in SET LIST mode, it acts on the Set List; when you’re in the Wave Sequence edit pages on GLOBAL mode, it acts on the Wave Sequence.
Editing names and entering textYou can change the names of any user-editable data, including Set Lists, Programs, Combinations, Songs, Samples, drive files and directories, and more (see “Where can names be changed?” on page 207). You can also change the names of some Categories and Sub Categories.For entering text you can use either the on-screen keyboard or a connected USB alphanumeric keyboard, as described below.
Using the on-screen keyboardHere’s how to change the name of a Program to “Piano 01” using the Write page menu command and the on-screen keyboard:1. Press the program name of the dialog to open the text
edit dialog box. (See the graphic “Text edit dialog,” below.)
2. Press the Clear button to delete the previous name.3. Press the Shift button to switch to uppercase
characters, and press the character P.4. Press the Shift button again to switch to lowercase
characters, and press the characters i, a, n, o.The text will now read “Piano.”
5. Press the Space button to enter a space, and then press the characters 0, 1.The text will now read “Piano 01.”
6. Press the OK button to close the dialog box.If you don’t need to make any corrections, press the OK button again to complete the Write command. The edited name will be saved.
Using a USB alphanumeric keyboardAnywhere that you can enter text, you can use a connected USB alphanumeric keyboard as an alternative to the touch-screen keyboard. A keyboard with the standard US “IBM PC” QWERTY layout is recommended.Note that some characters may not be supported. Also, some names—such as files and directories on the drive—may support more limited character sets than internal names. The on-screen keyboards adapt to show only the characters allowed for the current application, and only those characters are available via USB.In addition to text entry, you can also move the cursor using the left and right arrow keys, and delete text using the Delete key.In the Find dialog, Return is the same as pressing the on-screen Find button.When editing Set List Slot comments, additional keyboard commands are supported:• Home moves the cursor to the beginning of the first line• End moves the cursor to the end of the current text• The up and down arrows, and page up and down, move
between lines of text• Return and Enter create line-breaks
Edit Buffer
Write Select
Internal Memory
Edit
ProgramA 0...127
CombinationA 0...127
Wave SequencerA 0...149
Drum KitA 0...39
When you write, the program or combination settings will be saved in internal memory.
When you select a program or combination, its data is called from internal memory into the edit buffer.
Editing applies to the data in the edit buffer. Programs or combinations will play according to the data in the edit buffer.
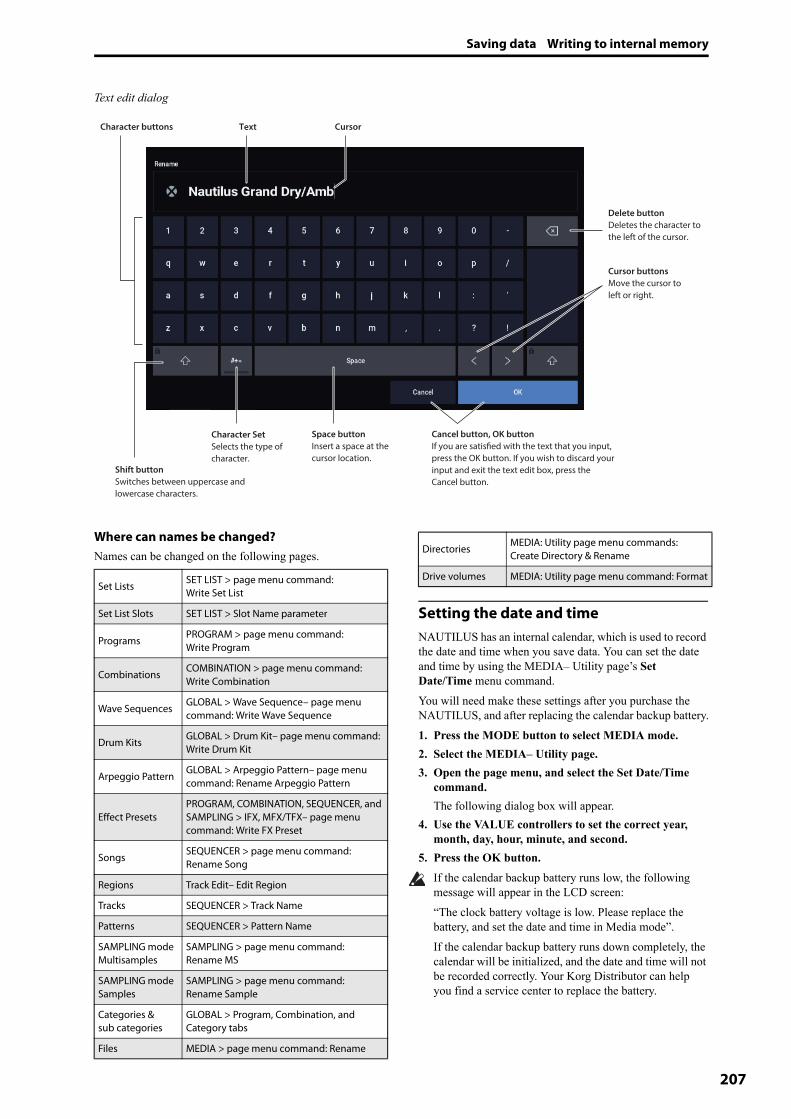
Saving data Writing to internal memory
207
Text edit dialog
Where can names be changed?Names can be changed on the following pages.
Setting the date and timeNAUTILUS has an internal calendar, which is used to record the date and time when you save data. You can set the date and time by using the MEDIA– Utility page’s Set Date/Time menu command.You will need make these settings after you purchase the NAUTILUS, and after replacing the calendar backup battery.1. Press the MODE button to select MEDIA mode.2. Select the MEDIA– Utility page. 3. Open the page menu, and select the Set Date/Time
command.The following dialog box will appear.
4. Use the VALUE controllers to set the correct year, month, day, hour, minute, and second.
5. Press the OK button.If the calendar backup battery runs low, the following message will appear in the LCD screen:“The clock battery voltage is low. Please replace the battery, and set the date and time in Media mode”.If the calendar backup battery runs down completely, the calendar will be initialized, and the date and time will not be recorded correctly. Your Korg Distributor can help you find a service center to replace the battery.
Cursor
Character Set
Selects the type ofcharacter.
Character buttons
Shift button
Switches between uppercase and lowercase characters.
Delete button
Deletes the character to the left of the cursor.
Cursor buttons
Move the cursor to left or right.
Space button
Insert a space at the cursor location.
Text
Cancel button, OK button
If you are satisfied with the text that you input, press the OK button. If you wish to discard your input and exit the text edit box, press the Cancel button.
Set ListsSET LIST > page menu command: Write Set List
Set List Slots SET LIST > Slot Name parameter
ProgramsPROGRAM > page menu command: Write Program
CombinationsCOMBINATION > page menu command: Write Combination
Wave SequencesGLOBAL > Wave Sequence– page menu command: Write Wave Sequence
Drum KitsGLOBAL > Drum Kit– page menu command: Write Drum Kit
Arpeggio PatternGLOBAL > Arpeggio Pattern– page menu command: Rename Arpeggio Pattern
Effect PresetsPROGRAM, COMBINATION, SEQUENCER, and SAMPLING > IFX, MFX/TFX– page menu command: Write FX Preset
SongsSEQUENCER > page menu command: Rename Song
Regions Track Edit– Edit Region
Tracks SEQUENCER > Track Name
Patterns SEQUENCER > Pattern Name
SAMPLING mode Multisamples
SAMPLING > page menu command: Rename MS
SAMPLING mode Samples
SAMPLING > page menu command: Rename Sample
Categories &sub categories
GLOBAL > Program, Combination, and Category tabs
Files MEDIA > page menu command: Rename
DirectoriesMEDIA: Utility page menu commands: Create Directory & Rename
Drive volumes MEDIA: Utility page menu command: Format

Loading & saving data
208
Memory protectMemory Protect lets you prevent certain types of data from being overwritten accidentally. There are individual check-boxes to enable Memory Protect for different parts of the system, as described below.For Programs, Combinations, Songs, Set Lists, Drum Kits, Wave Sequences, and Arpeggio Pattern, Memory Protect prevents:• Using the Write command to save edits• Loading the data type from drive• Receiving dumps of the data type via MIDI SysExWhen enabled for Songs, Memory Protect also prevents recording in SEQUENCER mode.When enabled for Internal HDD Save, Memory Protect prevents saving any data to the internal drive.Before saving edits, loading data, and so on, use the following procedure to turn the memory protect off.1. Press the MODE button to select GLOBAL mode.2. Go to the GLOBAL > Basic Setup and select the Basic
page.
3. Press the “Memory Protect” check box for each type of data you wish to write or save, so that the box is unchecked.
Writing Global settingsAny edits in GLOBAL > Basic Setup, MIDI, Controllers/Scales, Category Name are temporary until you use the Write command to store them in the internal memory. If you don’t use the Write command, your changes will be gone when you turn off the power.(Note that Wave Sequences, Drum Kits and Arpeggio Pattern are stored from the other Global parameters.)
Using the Write page menu command1. To write global settings (the various settings in
GLOBAL > Basic Setup, MIDI, Controllers/Scales, Category Name), press the page menu command Write Global Setting in GLOBAL > Basic Setup, MIDI, Controllers/Scales, Category Name.The Write Global Setting dialog box will appear.
2. To execute the Write operation, press the OK button. To cancel, press the Cancel button.When you press the OK button, the display will ask “Are You Sure ?” Press the OK button once again to write the data.
Memory Area
Write Power On
Internal Memory
Edit
Global SettingBasic Setup...Category
Editing will affect the data that has been called into the memory area.When you Write, the
various GLOBAL > Basic Setup, MIDI, Controllers/Scales, Category Name settings will be saved in internal memory.
When the power is turned on, the settings are called into the memory area.

Saving data Saving to internal drive, CDs, and USB media
209
Saving to internal drive, CDs, and USB media
Some types of data must be saved to diskEverything that you create or edit within the NAUTILUS—sounds, songs, samples, etc.—can be saved to disk, and backed up on external media.As described under “Writing to internal memory” on page 205, some types of data can be written into internal memory, without using the MEDIA mode Save commands. Other types of data must be saved to disk before the power is turned off, or any changes will be lost. This includes Song and region data from SEQUENCER mode, as well as SAMPLING mode Multisamples and Samples. In order to keep this data, you must write it to the internal drive or to an external USB storage device (hard disks, flash media, CD-R/RW drive, etc.). When you’ve come up with settings you like, it’s a good idea to save them, so that you’ll always be able to reload them if desired.
Do not turn off the power for at least 10 seconds after saving data. This allows the system time to complete the process, which may continue in the background even after the disk operation appears to be complete.
Types of media you can use
Internal drive SSDThe internal drive supports the Linux ext3 format.
USB storage media (hard drives, flash media, etc.)The NAUTILUS supports MS-DOS FAT16 and FAT32 formatted USB storage devices, including drive, removable disks, and flash media.
Capacity recognized:FAT32: up to 2 terabytes = 2,000 Gigabytes (GB)FAT16: up to 4 GB
USB CD-R/RW and DVD drivesNAUTILUS supports three CD-R/RW formats: UDF, CD-DA (audio CDs) and ISO9660 (level 3).Standard saving and loading from CD-R/RW drives uses the UDF format, which allows you to treat CDs much as you would a hard drive. For more information, see “CD-R/RW disks on the NAUTILUS: UDF and packet-writing” on page 948 of the PG.You can load data from ISO9660 (level 3) discs, but NAUTILUS does not write directly to ISO9660 format. You can, however, convert a UDF-formatted CD-R/RW to ISO9660 format, for easier loading on other systems. For more information, see “Convert to ISO9660 Format” on page 727 of the PG.You can also load data from UDF-formatted DVD-ROMs.
USB Floppy disksMS-DOS format 3.5 inch 2HD and 2DD floppy disks can be used. The formatted capacity of the floppy disks will be 1.44 MB (18 sectors/track) for 2HD, and 720 KB (9 sectors/track) for 2DD.
Media setupBefore saving or loading data, make sure that the desired drive or USB storage media is selected.
Setup for saving data on the internal drive1. Press the MODE button to select MEDIA mode.2. Use Drive Select to select HDD: INTERNAL HD.
Setup for using a USB device1. Use a USB cable to connect the USB 2.0 connector of
the NAUTILUS to the USB connector of your USB device (hard disk, removable disk, CD-R/RW).Note: The NAUTILUS’s USB 2.0 connectors support hot-plugging; you can connect or disconnect the USB cable while the power is on. However in order to do so, your USB device must also support hot-plugging.
2. Turn on the power.3. If you are using a USB hard disk, removable disk, or
CD-R/RW drive, turn on the power of your USB device and use a USB cable to connect it to the NAUTILUS’s USB 2.0 connector.Note: The above step assumes that your USB device sup-ports hot-plugging. If you are using a device that does not support hot-plugging, connect it with the power turned off. After plugging it in, turn on the power.While the NAUTILUS is accessing the USB device, do not connect another USB device or disconnect the connected device. Doing so may damage your data.
4. Press the MODE button to select MEDIA mode.Wait a few seconds to allow USB devices to be recognized.
5. Use Drive Select to select the desired device.If you are using a removable disk, insert the media. After you exchange media in your USB device, press the LCD screen to make the NAUTILUS detect the media. When the media has been detected, the LCD screen will display information about the media.
6. If the media needs to be formatted, execute the Format operation.Media requiring formatting is indicated as Unformatted in Drive Select. For more information, see “Formatting media” on page 211.
Drive Select

Loading & saving data
210
Saving memory contents to driveYou can save various types of data individually, as explained under “Saving to internal drive and USB media” on page 203. However, you can also save all of the most important contents of memory, including:• Set Lists, Programs, Combinations, Drum Kits, Wave
Sequences, Arpeggio Pattern, User Drum Track Patterns, and global settings
• Songs and recorded audio• SAMPLING mode Multisamples and Samples• Links to loaded EXs and User Sample Bank data
If you save this data to low-capacity media, you may need more than one media.
To save all of the above data at once:1. Prepare the media on which you want to save the data.
(See “Media setup” on page 209.)2. Press the front-panel MODE button to enter MEDIA
mode.3. Select the MEDIA– Save page. Press the File tab, and
then the Save tab.4. Press Drive Select to select the save-destination drive.5. If the media contains directories, select the directory
in which you want to save the data.Press the Open button to move to a lower level, or press the Up button to move to an upper level.Note: If you are saving data on high-capacity media, we recommend that you create directories to organize the media into sections.To create a new directory, move to the level at which you want to create the directory, and use the Utility page menu command Create Directory.
6. Select the Save All command from the page menu.Save All will save the sounds, songs, and sample data, and ARP at the same time. A dialog box will appear. The contents, settings, and operations for the dialog box will depend on the type of data that you are saving.
7. Press the file name cell and enter a name for the files. (See “Editing names and entering text” on page 206.)All of the files created by Save All will share this name, but with different file extensions. If you load one of these files later, you’ll be given the option to automatically load all of the other related files as well—a handy time-saver.
8. For now, leave all of the boxes checked in the Selection button dialogs.There are individual check-boxes for each bank of Programs and Combis, and for various other types of data. Leaving all of these checked ensures that you’re saving everything you’ll need.
9. Press the OK button to execute the Save operation.All of the data will be saved, creating a handful of different files. For details, see “File types included in Save All,” below.When the save is complete, the system returns to the Save page, and the display will show the resulting file(s). The amount of time required will depend on the amount of data being saved.If a file with the same name already exists on the media, you will be asked whether you want to overwrite. If you wish to overwrite, press the OK button. If you wish to save without overwriting, press the Cancel button, re-do the operation from step 6, and rename the data in step 7 before saving it.
Split filesIf the data does not fit onto the selected volume, the “No space available on medium” dialog box will appear. You can press the OK button to divide the file will be divided and save it to multiple volumes of media (such as multiple USB sticks). If you don’t want to divide the file, press the Cancel button, and save the file to larger-capacity media.For more information, see “Save All (PCG, SNG and KSC)” on page 720 of the PG.
File types included in Save AllThe various types of data are saved as the following files..PCG file: This contains all of the Programs, Combinations, Drum kits, Wave Sequences, Arpeggio Pattern, and global settings from the internal memory..SNG file: This contains all of the Songs from SEQUENCER mode.Note: If the audio tracks contain recorded data, region data will also be saved at this time. The WAVE files are stored in a directory named after the .SNG plus “_A” at the end, in the same directory as the .SNG file itself..KSC file: This lists all of the Multisamples and Samples in SAMPLING mode, along with all of the loaded EXs and User Sample Bank Multisamples and Drumsamples. Directory: A directory containing the User Multisamples (.KMP files) and Samples (.KSF files) that are listed in the .KSC file.
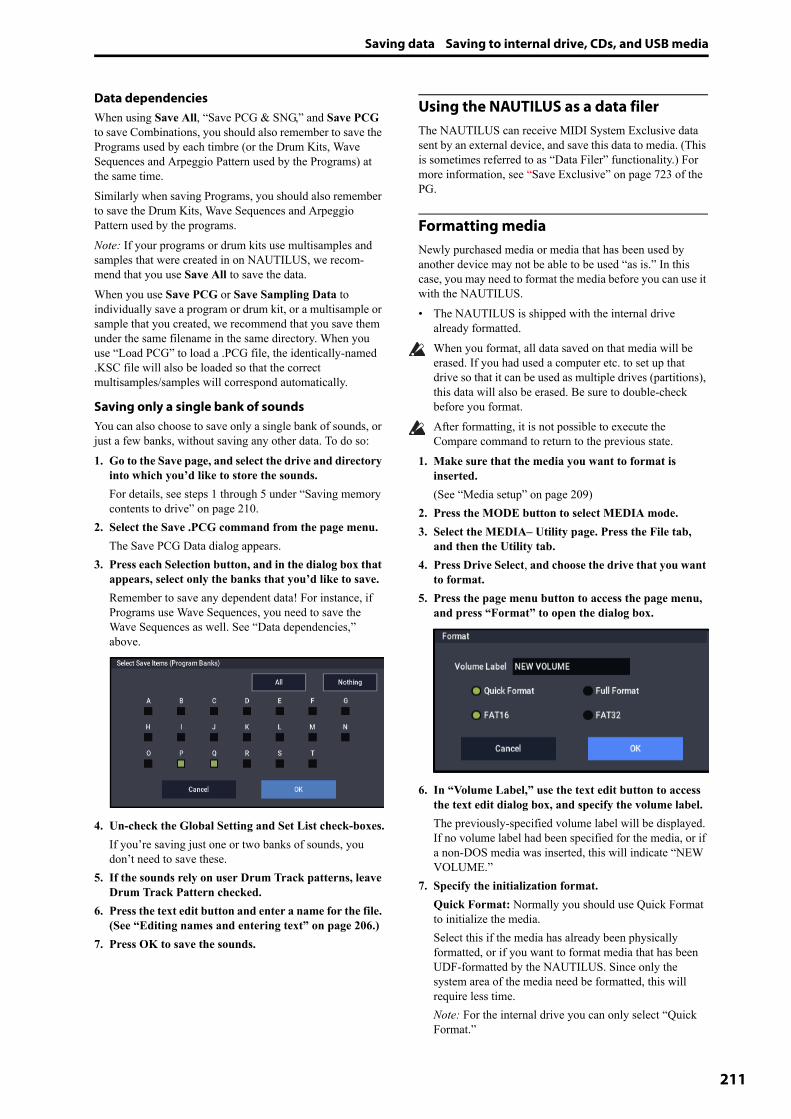
Saving data Saving to internal drive, CDs, and USB media
211
Data dependenciesWhen using Save All, “Save PCG & SNG,” and Save PCG to save Combinations, you should also remember to save the Programs used by each timbre (or the Drum Kits, Wave Sequences and Arpeggio Pattern used by the Programs) at the same time.Similarly when saving Programs, you should also remember to save the Drum Kits, Wave Sequences and Arpeggio Pattern used by the programs.Note: If your programs or drum kits use multisamples and samples that were created in on NAUTILUS, we recom-mend that you use Save All to save the data.When you use Save PCG or Save Sampling Data to individually save a program or drum kit, or a multisample or sample that you created, we recommend that you save them under the same filename in the same directory. When you use “Load PCG” to load a .PCG file, the identically-named .KSC file will also be loaded so that the correct multisamples/samples will correspond automatically.
Saving only a single bank of soundsYou can also choose to save only a single bank of sounds, or just a few banks, without saving any other data. To do so:1. Go to the Save page, and select the drive and directory
into which you’d like to store the sounds.For details, see steps 1 through 5 under “Saving memory contents to drive” on page 210.
2. Select the Save .PCG command from the page menu.The Save PCG Data dialog appears.
3. Press each Selection button, and in the dialog box that appears, select only the banks that you’d like to save.Remember to save any dependent data! For instance, if Programs use Wave Sequences, you need to save the Wave Sequences as well. See “Data dependencies,” above.
4. Un-check the Global Setting and Set List check-boxes.If you’re saving just one or two banks of sounds, you don’t need to save these.
5. If the sounds rely on user Drum Track patterns, leave Drum Track Pattern checked.
6. Press the text edit button and enter a name for the file. (See “Editing names and entering text” on page 206.)
7. Press OK to save the sounds.
Using the NAUTILUS as a data filerThe NAUTILUS can receive MIDI System Exclusive data sent by an external device, and save this data to media. (This is sometimes referred to as “Data Filer” functionality.) For more information, see “Save Exclusive” on page 723 of the PG.
Formatting mediaNewly purchased media or media that has been used by another device may not be able to be used “as is.” In this case, you may need to format the media before you can use it with the NAUTILUS.• The NAUTILUS is shipped with the internal drive
already formatted.When you format, all data saved on that media will be erased. If you had used a computer etc. to set up that drive so that it can be used as multiple drives (partitions), this data will also be erased. Be sure to double-check before you format.After formatting, it is not possible to execute the Compare command to return to the previous state.
1. Make sure that the media you want to format is inserted.(See “Media setup” on page 209)
2. Press the MODE button to select MEDIA mode.3. Select the MEDIA– Utility page. Press the File tab,
and then the Utility tab.4. Press Drive Select, and choose the drive that you want
to format.5. Press the page menu button to access the page menu,
and press “Format” to open the dialog box.
6. In “Volume Label,” use the text edit button to access the text edit dialog box, and specify the volume label.The previously-specified volume label will be displayed. If no volume label had been specified for the media, or if a non-DOS media was inserted, this will indicate “NEW VOLUME.”
7. Specify the initialization format.Quick Format: Normally you should use Quick Format to initialize the media.Select this if the media has already been physically formatted, or if you want to format media that has been UDF-formatted by the NAUTILUS. Since only the system area of the media need be formatted, this will require less time.Note: For the internal drive you can only select “Quick Format.”

Loading & saving data
212
Full Format: Select this when formatting media that has not been physically formatted, or media (CD-RW) that has not been UDF-formatted.Note: Normally, it is not necessary to perform a Full For-mat on media that has been physically formatted at 512 bytes/block. Execute the Quick Format for such media.Note: You will normally select Full Format for CD-RW media etc. that has not been UDF-formatted. If an error message of “Media not formatted” appears, execute Full Format.Depending on the capacity of the media, executing Full Format may require a substantial length of time.
8. Specify the file system.Use FAT16 to format media of 4 GB or less (such as flash media), and use FAT32 to format larger media (theoretically, up to 2 terabytes = 2,000 Gigabytes (GB)).
9. Press the OK button to format, or press the Cancel button if you decide to cancel.When you press the OK button, a message will ask you for confirmation. Press the OK button once again to execute the Format operation.You must format a CD-R/RW disc if you want to use it for packet writing, or if it has previously been used by another device.You must use the NAUTILUS to format the media. The NAUTILUS will not correctly recognize media that has been formatted by another device.
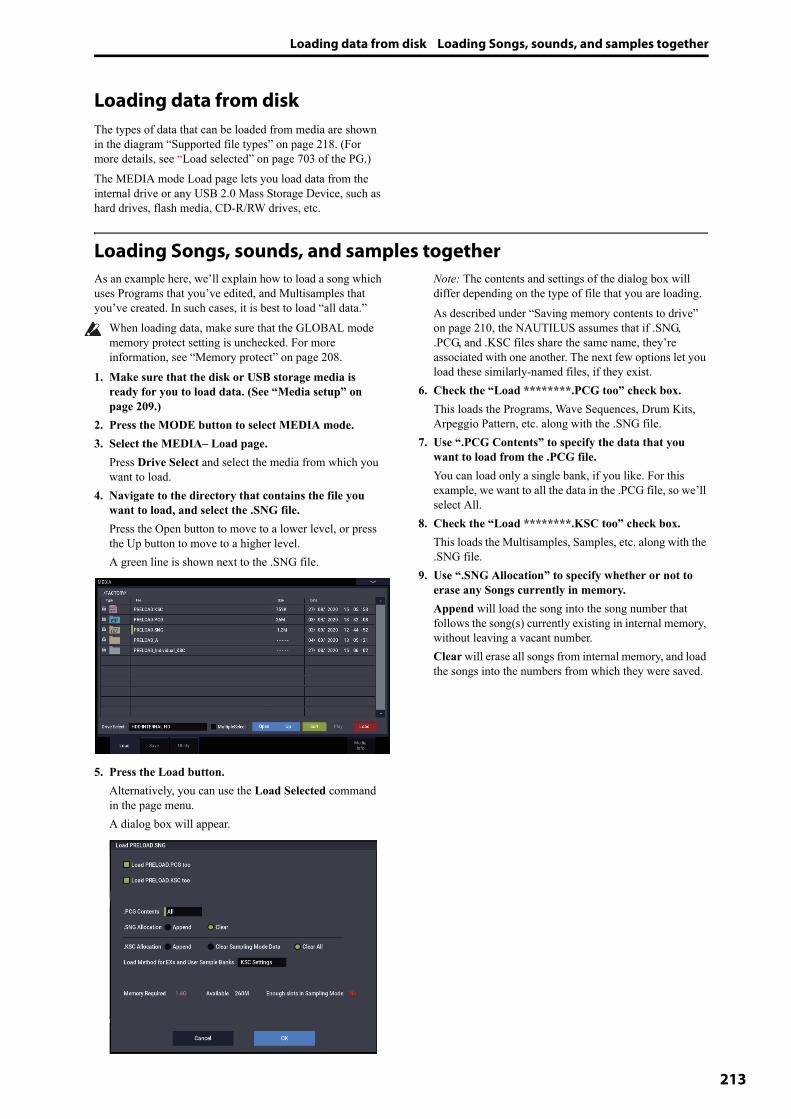
Loading data from disk Loading Songs, sounds, and samples together
213
Loading data from diskThe types of data that can be loaded from media are shown in the diagram “Supported file types” on page 218. (For more details, see “Load selected” on page 703 of the PG.)The MEDIA mode Load page lets you load data from the internal drive or any USB 2.0 Mass Storage Device, such as hard drives, flash media, CD-R/RW drives, etc.
Loading Songs, sounds, and samples togetherAs an example here, we’ll explain how to load a song which uses Programs that you’ve edited, and Multisamples that you’ve created. In such cases, it is best to load “all data.”
When loading data, make sure that the GLOBAL mode memory protect setting is unchecked. For more information, see “Memory protect” on page 208.
1. Make sure that the disk or USB storage media is ready for you to load data. (See “Media setup” on page 209.)
2. Press the MODE button to select MEDIA mode.3. Select the MEDIA– Load page.
Press Drive Select and select the media from which you want to load.
4. Navigate to the directory that contains the file you want to load, and select the .SNG file.Press the Open button to move to a lower level, or press the Up button to move to a higher level.A green line is shown next to the .SNG file.
5. Press the Load button.Alternatively, you can use the Load Selected command in the page menu.A dialog box will appear.
Note: The contents and settings of the dialog box will differ depending on the type of file that you are loading.As described under “Saving memory contents to drive” on page 210, the NAUTILUS assumes that if .SNG, .PCG, and .KSC files share the same name, they’re associated with one another. The next few options let you load these similarly-named files, if they exist.
6. Check the “Load ********.PCG too” check box.This loads the Programs, Wave Sequences, Drum Kits, Arpeggio Pattern, etc. along with the .SNG file.
7. Use “.PCG Contents” to specify the data that you want to load from the .PCG file.You can load only a single bank, if you like. For this example, we want to all the data in the .PCG file, so we’ll select All.
8. Check the “Load ********.KSC too” check box.This loads the Multisamples, Samples, etc. along with the .SNG file.
9. Use “.SNG Allocation” to specify whether or not to erase any Songs currently in memory.Append will load the song into the song number that follows the song(s) currently existing in internal memory, without leaving a vacant number.Clear will erase all songs from internal memory, and load the songs into the numbers from which they were saved.
Loading & saving data
214
10.Use “.KSC Allocation” to specify whether or not to erase any samples currently in memory.Append will leave all currently-loaded SAMPLING mode, EXs, and User Sample Bank data intact. SAMPLING mode Multisamples and Samples will be loaded into the next available vacant numbers following the existing data.Clear Sampling Mode Data will erase all Multisamples and Samples from SAMPLING mode, and load the data in the same configuration with which it was saved. Existing EXs and User Sample Bank data is left intact.Clear All is similar to Clear Sampling Mode Data, above, but also un-loads existing EXs and User Sample Bank data before loading the new .KSC file. This frees up the most memory for the new .KSC.You can use the information at the bottom of the dialog box, including Memory Required, (Memory) Available, and Enough slots for Samples & MS, to determine whether or not you need to free up room for the new .KSC.
11.Set the Load Method for EXs and User Sample Banks as desired.This sets the preferred way to load the EXs and User Sample Bank data in the KSC: load it into RAM, or use Virtual Memory. Note that if the data is extremely large, and would not fit into RAM regardless of which other samples were loaded, the data will use Virtual Memory regardless of this setting.These settings apply only to EXs and User Sample Banks; Sampling Mode Data is always loaded into RAM.RAM: The samples will be loaded into RAM. Virtual Memory: The samples will use Virtual Memory. KSC Settings: KSCs can store separate load method settings for each Multisample or Drumsample, based on the settings when the KSC was saved. Setting Load Method for EXs and User Sample Banks to KSC Settings uses these individual settings.
12.Press the OK button to load the data.Never remove or disconnect USB storage devices while data is being loaded.
Loading multiple files at onceYou can use “wildcards” to specify multiple .KMP, .KSF, .AIF, .WAV, SoundFont 2, Akai Program, and Akai Sample files, and load them simultaneously. For more information, see “Loading multiple files at once” on page 713 of the PG.

Loading data from disk Loading individual banks from a .PCG file
215
Loading individual banks from a .PCG file1. Select the .PCG file containing the data you want to
load.Refer to steps 1–4 of “Loading Songs, sounds, and samples together” on page 213.” Select the .PCG file in step 4.
2. Press the Load button.You can load individual banks by using “.PCG Contents” in the dialog box to select the load-source bank, and “To” to select the load-destination bank.
When you press OK, the source bank’s Programs, Combinations, Drum Kits, Wave Sequences and Arpeggio Pattern will be loaded into the destination bank. Global setting data will not be loaded.If you set “.PCG Contents” to Bank A, and “To” to Bank A, data will be loaded as follows.Programs• Bank A: loaded into Bank ACombinations• Bank A: loaded into Bank ADrum Kits• A: loaded into Bank AArpeggio Pattern• A: loaded into Bank AWave Sequences• A: loaded into Bank A
When data is loaded into a bank that is different than its original bank, the data (bank, program, pattern, and kit numbers, etc.) will automatically be reconfigured so that after loading, the various types of data will correspond correctly in each mode.The following data will also be reconfigured automatically if you have checked “Load .SNG too” (so that song data is loaded at the same time), the following data will also be reconfigured automatically in order to ensure that the song data plays back correctly. • The bank of each program used by combinations• The bank of each drum kit and Wave sequence used by
each program• The bank of the program used by each track of the song• If the song contains track/pattern events, the program
banks within these events
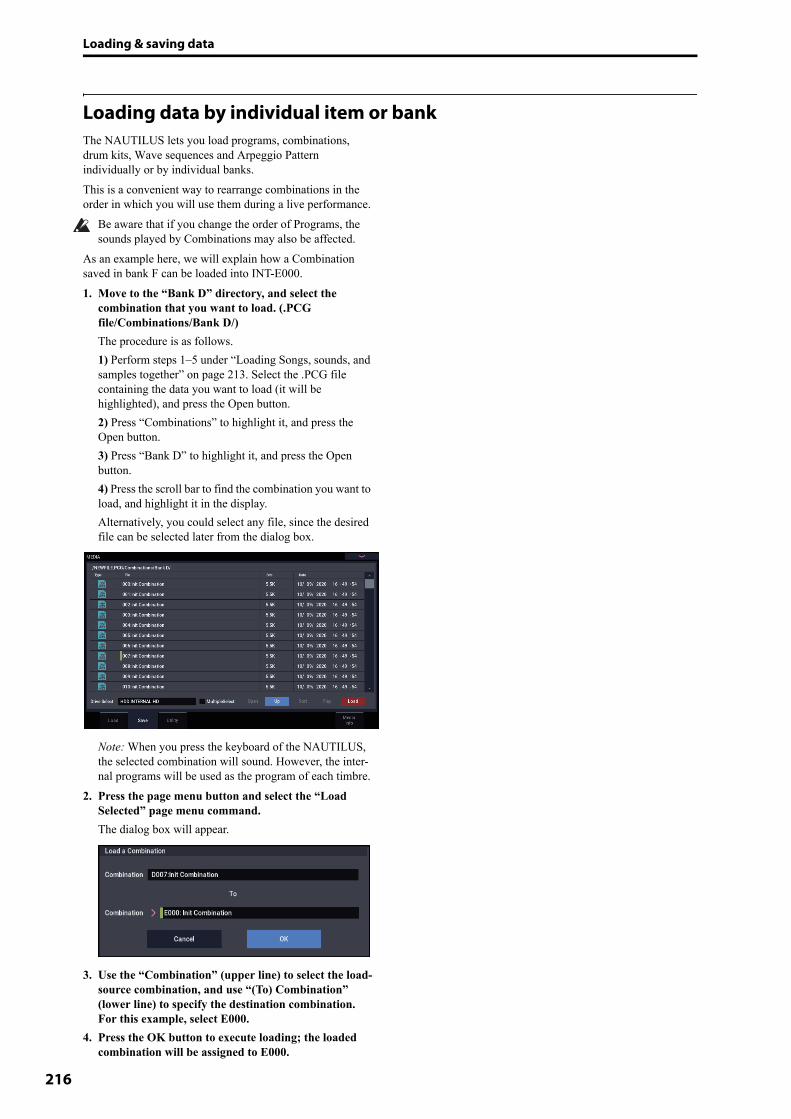
Loading & saving data
216
Loading data by individual item or bankThe NAUTILUS lets you load programs, combinations, drum kits, Wave sequences and Arpeggio Pattern individually or by individual banks. This is a convenient way to rearrange combinations in the order in which you will use them during a live performance.
Be aware that if you change the order of Programs, the sounds played by Combinations may also be affected.
As an example here, we will explain how a Combination saved in bank F can be loaded into INT-E000.1. Move to the “Bank D” directory, and select the
combination that you want to load. (.PCG file/Combinations/Bank D/)The procedure is as follows.1) Perform steps 1–5 under “Loading Songs, sounds, and samples together” on page 213. Select the .PCG file containing the data you want to load (it will be highlighted), and press the Open button.2) Press “Combinations” to highlight it, and press the Open button.3) Press “Bank D” to highlight it, and press the Open button.4) Press the scroll bar to find the combination you want to load, and highlight it in the display.Alternatively, you could select any file, since the desired file can be selected later from the dialog box.
Note: When you press the keyboard of the NAUTILUS, the selected combination will sound. However, the inter-nal programs will be used as the program of each timbre.
2. Press the page menu button and select the “Load Selected” page menu command.The dialog box will appear.
3. Use the “Combination” (upper line) to select the load-source combination, and use “(To) Combination” (lower line) to specify the destination combination. For this example, select E000.
4. Press the OK button to execute loading; the loaded combination will be assigned to E000.
Loading data from disk Loading the samples required by Programs or Combinations
217
Loading the samples required by Programs or Combinations
Loading samples required by a single Program or CombinationPrograms and Combinations may sometimes require sample data that’s not currently loaded. If this happens, the message Samples Not Loaded appears at the top of the display. You can easily load the required sample data, and save the results so that it can be loaded automatically in the future. To do so:1. Go to the Home page for the PROGRAM or
COMBINATION.2. Select the menu command Load required samples.
This command is only available when the Samples Not Loaded message appears at the top of the display.A dialog box will appear, with a list of all of the missing Multisamples, Samples, and/or Drum Samples required by the Program or Combination, including the bank(s) containing the data.
3. Select the “Load only required samples” radio button to load the listed data.The bottom of the dialog box shows the Memory Required and (Memory) Available. If there isn’t enough room to load the samples, you’ll need to un-load other samples before continuing.
4. Press Load to load the data, or Cancel to exit without loading.
5. Repeat as desired for other Programs or Combinations.If you’d like to automatically load the sample data in the future:
6. Save the result as a new KSC file.To do so, follow the instructions under “Saving a KSC file” on page 181.
7. Set up the new KSC file to load automatically at startup.Follow the instructions under “Adding a KSC to the list” on page 179.
Creating a custom sample setLoad required samples also lets you create custom sample sets based on your favorite Programs, even if they use different EXs or User Sample Banks. To do so:1. Save any data you’ve created in SAMPLING mode.
(The next steps will erase all Sampling Mode Data.)For more information, see “Saving a KSC file” on page 181.
2. Go to the KSC Auto-Load page in GLOBAL mode.3. Un-check all KSCs.4. Press the Do Auto-Load Now button.
This clears out all other sample data, so that the KSC you eventually save will include only the data loaded in step 5, below.
5. One by one, select the desired Programs. For each one, use the Load required samples command to load its sample data.
6. Select the “Save Sampling Data” page menu command on the Save page in SAMPLING mode.
7. Save a new KSC with a different name (such as Custom.KSC), with Include set to “Links to EXs and User Sample Banks.”For more information, see “Saving a KSC file” on page 181.This new KSC now links to all of the sample data required by the Programs.
8. Go to the KSC Auto-Load page in GLOBAL mode, and re-enable KSCs as desired. Remember to include your newly-created KSC!
Loading samples required by a bank of Programs or CombinationsIf a bank of Programs or Combinations all require a specific EXs or User Sample Bank, you can easily load the whole bank of samples at once. To do so:1. Go to the Home page for the PROGRAM or
COMBINATION.2. Select the menu command Load required samples.3. Select the Load complete banks radio button to load
the entire bank(s) containing the data.Check the Memory Required and (Memory) Available to see that there’s enough room to load the data.
4. Press Load to load the data, or Cancel to exit without loading.
If you’d like to automatically load the sample data in the future:5. Save the result as a new KSC file.
To do so, follow the instructions under “Saving a KSC file” on page 181.
6. Set up the new KSC file to load automatically at startup.Follow the instructions under “Adding a KSC to the list” on page 179.
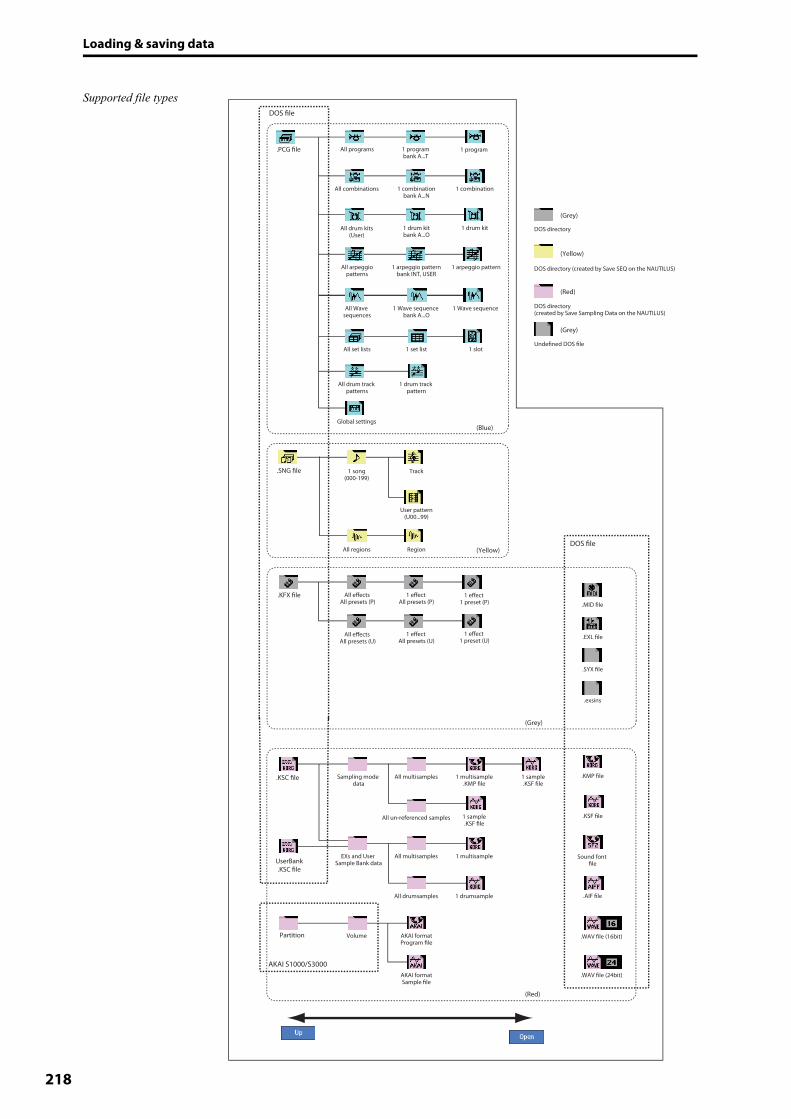
Loading & saving data
218
Supported file types
DOS directory
Undefined DOS file
DOS file
DOS file
.PCG file
.SNG file
.KFX file
All programs
All combinations
All drum kits(User)
All arpeggiopatterns
1 programbank A...T
1 program
1 combinationbank A...N
1 combination
1 drum kitbank A...O
1 drum kit
1 arpeggio patternbank INT, USER
1 arpeggio pattern
All drum track patterns
1 drum track pattern
Global settings
1 song(000-199)
Track
User pattern(U00...99)
All regions Region
All effects All presets (U)
All effects All presets (P)
1 effect All presets (P)
1 effect All presets (U)
1 effect 1 preset (P)
1 effect 1 preset (U)
Partition
AKAI S1000/S3000
Volume AKAI formatProgram file
AKAI formatSample file
.KMP file
.KSF file
.WAV file (16bit)
.AIF file
.MID file
.EXL file
.SYX file
.exsins
DOS directory (created by Save SEQ on the NAUTILUS)
DOS directory(created by Save Sampling Data on the NAUTILUS)
(Grey)
(Blue)
(Yellow)
(Grey)
(Red)
(Yellow)
(Red)
(Grey)
Sound font file
.WAV file (24bit)
.KSC file
UserBank.KSC file
All multisamples 1 multisample
All drumsamples 1 drumsample
EXs and User Sample Bank data
All multisamples
All un-referenced samples
1 multisample.KMP file
1 sample.KSF file
1 sample.KSF file
Sampling mode data
All Wave sequences
1 Wave sequence bank A...O
1 Wave sequence
All set lists 1 set list 1 slot
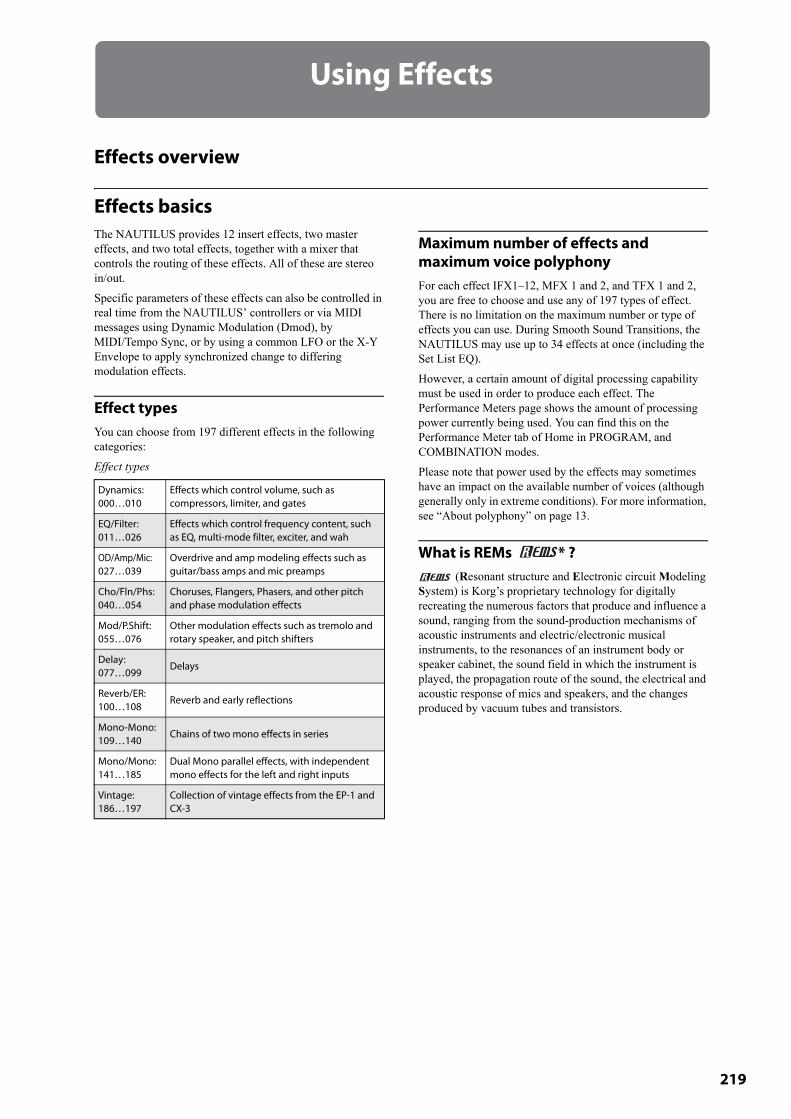
219
Using Effects
Effects overview
Effects basicsThe NAUTILUS provides 12 insert effects, two master effects, and two total effects, together with a mixer that controls the routing of these effects. All of these are stereo in/out.Specific parameters of these effects can also be controlled in real time from the NAUTILUS’ controllers or via MIDI messages using Dynamic Modulation (Dmod), by MIDI/Tempo Sync, or by using a common LFO or the X-Y Envelope to apply synchronized change to differing modulation effects.
Effect typesYou can choose from 197 different effects in the following categories:Effect types
Maximum number of effects and maximum voice polyphonyFor each effect IFX1–12, MFX 1 and 2, and TFX 1 and 2, you are free to choose and use any of 197 types of effect. There is no limitation on the maximum number or type of effects you can use. During Smooth Sound Transitions, the NAUTILUS may use up to 34 effects at once (including the Set List EQ). However, a certain amount of digital processing capability must be used in order to produce each effect. The Performance Meters page shows the amount of processing power currently being used. You can find this on the Performance Meter tab of Home in PROGRAM, and COMBINATION modes. Please note that power used by the effects may sometimes have an impact on the available number of voices (although generally only in extreme conditions). For more information, see “About polyphony” on page 13.
What is REMs * ? (Resonant structure and Electronic circuit Modeling
System) is Korg’s proprietary technology for digitally recreating the numerous factors that produce and influence a sound, ranging from the sound-production mechanisms of acoustic instruments and electric/electronic musical instruments, to the resonances of an instrument body or speaker cabinet, the sound field in which the instrument is played, the propagation route of the sound, the electrical and acoustic response of mics and speakers, and the changes produced by vacuum tubes and transistors.
Dynamics: 000…010
Effects which control volume, such as compressors, limiter, and gates
EQ/Filter: 011…026
Effects which control frequency content, such as EQ, multi-mode filter, exciter, and wah
OD/Amp/Mic: 027…039
Overdrive and amp modeling effects such as guitar/bass amps and mic preamps
Cho/Fln/Phs: 040…054
Choruses, Flangers, Phasers, and other pitch and phase modulation effects
Mod/P.Shift: 055…076
Other modulation effects such as tremolo and rotary speaker, and pitch shifters
Delay: 077…099
Delays
Reverb/ER:100…108
Reverb and early reflections
Mono-Mono: 109…140
Chains of two mono effects in series
Mono/Mono: 141…185
Dual Mono parallel effects, with independent mono effects for the left and right inputs
Vintage: 186…197
Collection of vintage effects from the EP-1 and CX-3
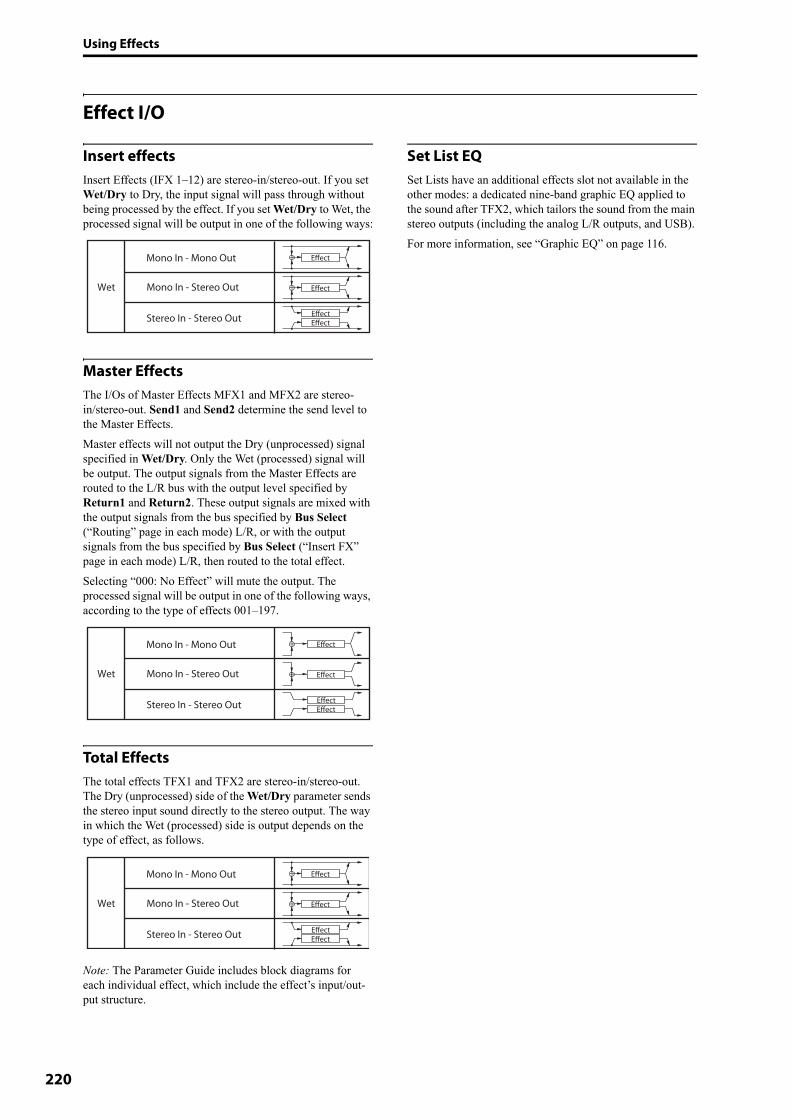
Using Effects
220
Effect I/O
Insert effectsInsert Effects (IFX 1–12) are stereo-in/stereo-out. If you set Wet/Dry to Dry, the input signal will pass through without being processed by the effect. If you set Wet/Dry to Wet, the processed signal will be output in one of the following ways:
Master EffectsThe I/Os of Master Effects MFX1 and MFX2 are stereo-in/stereo-out. Send1 and Send2 determine the send level to the Master Effects.Master effects will not output the Dry (unprocessed) signal specified in Wet/Dry. Only the Wet (processed) signal will be output. The output signals from the Master Effects are routed to the L/R bus with the output level specified by Return1 and Return2. These output signals are mixed with the output signals from the bus specified by Bus Select (“Routing” page in each mode) L/R, or with the output signals from the bus specified by Bus Select (“Insert FX” page in each mode) L/R, then routed to the total effect.Selecting “000: No Effect” will mute the output. The processed signal will be output in one of the following ways, according to the type of effects 001–197.
Total EffectsThe total effects TFX1 and TFX2 are stereo-in/stereo-out. The Dry (unprocessed) side of the Wet/Dry parameter sends the stereo input sound directly to the stereo output. The way in which the Wet (processed) side is output depends on the type of effect, as follows.
Note: The Parameter Guide includes block diagrams for each individual effect, which include the effect’s input/out-put structure.
Set List EQSet Lists have an additional effects slot not available in the other modes: a dedicated nine-band graphic EQ applied to the sound after TFX2, which tailors the sound from the main stereo outputs (including the analog L/R outputs, and USB).For more information, see “Graphic EQ” on page 116.
Stereo In - Stereo Out
Mono In - Mono Out
Mono In - Stereo Out
EffectEffect
Effect+
Effect+
Wet
Stereo In - Stereo Out
Mono In - Mono Out
Mono In - Stereo Out
EffectEffect
Effect+
Effect+
Wet
Stereo In - Stereo Out
Mono In - Mono Out
Mono In - Stereo Out
EffectEffect
Effect+
Effect+
Wet

Effects overview Effects in each mode
221
Effects in each mode
PROGRAM modeFor HD-1 Programs, you can use insert effects to process the final sound in the same way that you use the Filter, Driver, Amplifier, and EQ (equalizer) to process the sound from the oscillators (OSC 1 & 2). Then the master effects are used to create overall ambience such as reverb, and use the total effects to make final adjustments. All of these settings can be made independently for each Program.
EXi Programs may have a different filter and amp structure for each type, but you can also apply insert effects, master effects, and total effects to EXi 1 & 2, just as for OSC 1 & 2 an HD-1 Program.In both HD-1 and EXi Programs, the Drum Track also has its own independent routing to the effects.
PROGRAM mode
COMBINATION and SEQUENCER modesIn COMBINATION and SEQUENCER modes, you can use the track EQ and insert effects to process the program sound (and audio track sound) of each timbre/track. Then you can use the master effects to create overall ambience, and use the total effects to make final adjustments.
In COMBINATION mode you can make these settings for each combination, and in SEQUENCER mode you can make them for each song.In SEQUENCER mode, you can switch between effects or modify the effect parameters and record these changes, so that effects will switch automatically or effect parameters will be modified automatically as the song plays back.
COMBINATION and SEQUENCER modes
SAMPLING modeIn SAMPLING mode, the analog, and USB audio inputs, can be processed by insert effects, master effects, and total effects, and then sampled. Use the Recording– Audio Input page to make audio input settings for SAMPLING mode. These settings apply only to SAMPLING mode.
Samples that you’ve assigned as a multisample can also be processed by the insert effects, master effects, and total effects, and then resampled.
SAMPLING mode
Oscillator1 Filter1 Driver1 Amplifier1
Oscillator2 Filter2 Driver2 Amplifier2 EQ Insert Effect 1–12 Total Effect 1–12
Master Effect 1, 2Return
OUTPUTL/MONO, R
Send
EQDrum Track
Timbre 1 /MIDI Track 1 EQ
Timbre 16 /MIDI Track 16 EQ
Audio Track 1 EQ
Audio Track 16 EQ
Insert Effect 1–12 Total Effect 1–12
Master Effect 1, 2Return
OUTPUTL/MONO, R
Send
Insert Effect 1–12 Total Effect 1–12
Master Effect 1, 2Return
SampleRecording
Send
Sampling
AUDIO INPUT (1, 2)
USB B (1, 2)
EQ Insert Effect 1–12 Total Effect 1–12
Master Effect 1, 2Return
Resampling
Send
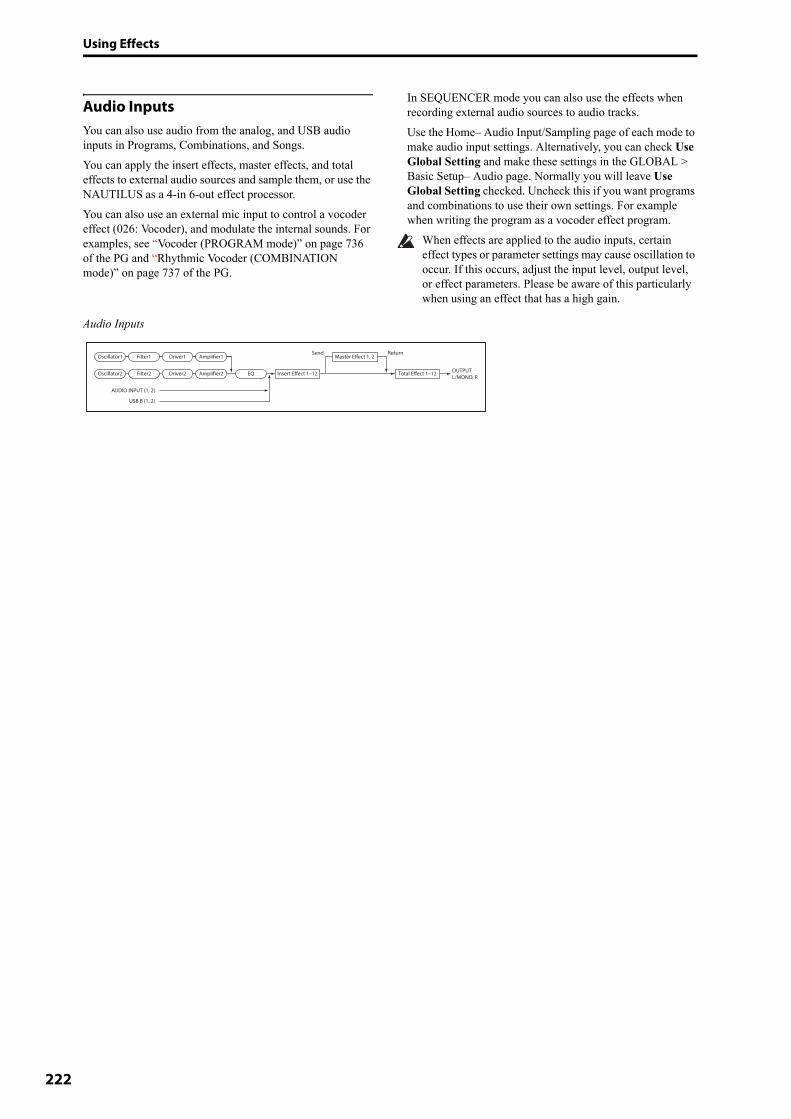
Using Effects
222
Audio InputsYou can also use audio from the analog, and USB audio inputs in Programs, Combinations, and Songs.You can apply the insert effects, master effects, and total effects to external audio sources and sample them, or use the NAUTILUS as a 4-in 6-out effect processor. You can also use an external mic input to control a vocoder effect (026: Vocoder), and modulate the internal sounds. For examples, see “Vocoder (PROGRAM mode)” on page 736 of the PG and “Rhythmic Vocoder (COMBINATION mode)” on page 737 of the PG.
In SEQUENCER mode you can also use the effects when recording external audio sources to audio tracks.Use the Home– Audio Input/Sampling page of each mode to make audio input settings. Alternatively, you can check Use Global Setting and make these settings in the GLOBAL > Basic Setup– Audio page. Normally you will leave Use Global Setting checked. Uncheck this if you want programs and combinations to use their own settings. For example when writing the program as a vocoder effect program.
When effects are applied to the audio inputs, certain effect types or parameter settings may cause oscillation to occur. If this occurs, adjust the input level, output level, or effect parameters. Please be aware of this particularly when using an effect that has a high gain.
Audio Inputs
Oscillator1 Filter1 Driver1 Amplifier1
Oscillator2 Filter2 Driver2 Amplifier2 EQ Insert Effect 1–12 Total Effect 1–12
Master Effect 1, 2Return
OUTPUTL/MONO, R
Send
AUDIO INPUT (1, 2)
USB B (1, 2)
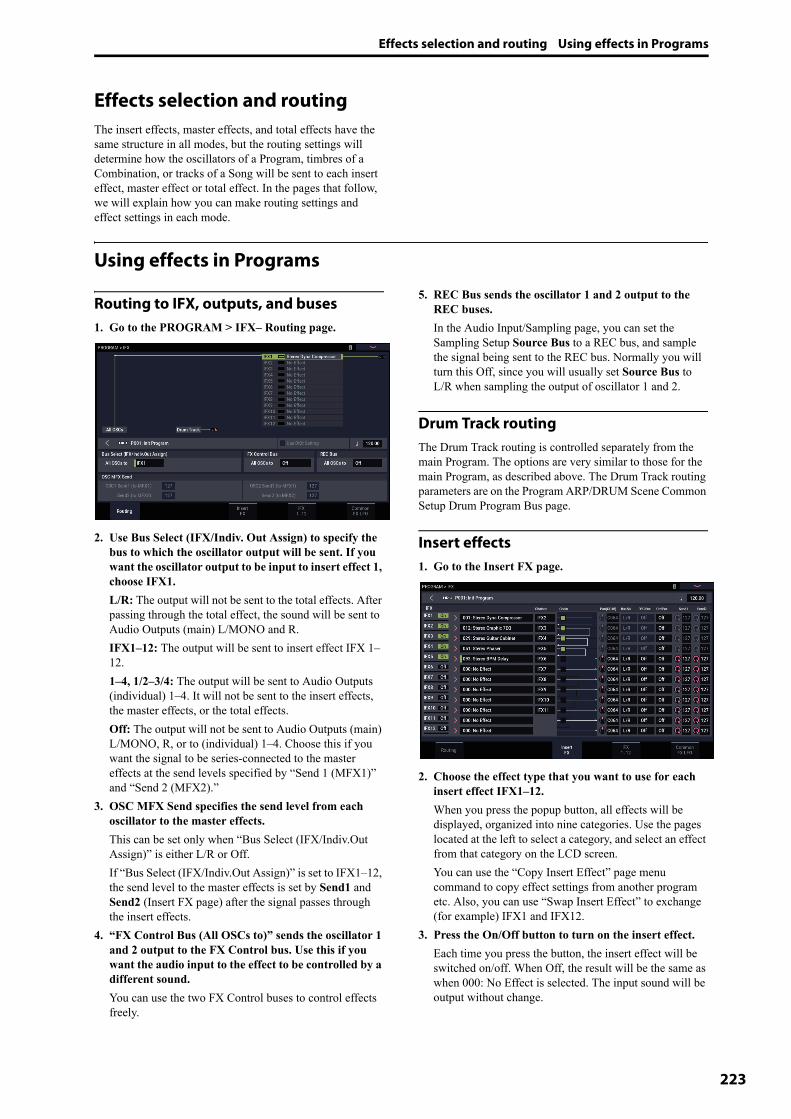
Effects selection and routing Using effects in Programs
223
Effects selection and routingThe insert effects, master effects, and total effects have the same structure in all modes, but the routing settings will determine how the oscillators of a Program, timbres of a Combination, or tracks of a Song will be sent to each insert effect, master effect or total effect. In the pages that follow, we will explain how you can make routing settings and effect settings in each mode.
Using effects in Programs
Routing to IFX, outputs, and buses1. Go to the PROGRAM > IFX– Routing page.
2. Use Bus Select (IFX/Indiv. Out Assign) to specify the bus to which the oscillator output will be sent. If you want the oscillator output to be input to insert effect 1, choose IFX1.L/R: The output will not be sent to the total effects. After passing through the total effect, the sound will be sent to Audio Outputs (main) L/MONO and R.IFX1–12: The output will be sent to insert effect IFX 1–12.1–4, 1/2–3/4: The output will be sent to Audio Outputs (individual) 1–4. It will not be sent to the insert effects, the master effects, or the total effects.Off: The output will not be sent to Audio Outputs (main) L/MONO, R, or to (individual) 1–4. Choose this if you want the signal to be series-connected to the master effects at the send levels specified by “Send 1 (MFX1)” and “Send 2 (MFX2).”
3. OSC MFX Send specifies the send level from each oscillator to the master effects.This can be set only when “Bus Select (IFX/Indiv.Out Assign)” is either L/R or Off.If “Bus Select (IFX/Indiv.Out Assign)” is set to IFX1–12, the send level to the master effects is set by Send1 and Send2 (Insert FX page) after the signal passes through the insert effects.
4. “FX Control Bus (All OSCs to)” sends the oscillator 1 and 2 output to the FX Control bus. Use this if you want the audio input to the effect to be controlled by a different sound.You can use the two FX Control buses to control effects freely.
5. REC Bus sends the oscillator 1 and 2 output to the REC buses.In the Audio Input/Sampling page, you can set the Sampling Setup Source Bus to a REC bus, and sample the signal being sent to the REC bus. Normally you will turn this Off, since you will usually set Source Bus to L/R when sampling the output of oscillator 1 and 2.
Drum Track routingThe Drum Track routing is controlled separately from the main Program. The options are very similar to those for the main Program, as described above. The Drum Track routing parameters are on the Program ARP/DRUM Scene Common Setup Drum Program Bus page.
Insert effects1. Go to the Insert FX page.
2. Choose the effect type that you want to use for each insert effect IFX1–12.When you press the popup button, all effects will be displayed, organized into nine categories. Use the pages located at the left to select a category, and select an effect from that category on the LCD screen.You can use the “Copy Insert Effect” page menu command to copy effect settings from another program etc. Also, you can use “Swap Insert Effect” to exchange (for example) IFX1 and IFX12.
3. Press the On/Off button to turn on the insert effect.Each time you press the button, the insert effect will be switched on/off. When Off, the result will be the same as when 000: No Effect is selected. The input sound will be output without change.
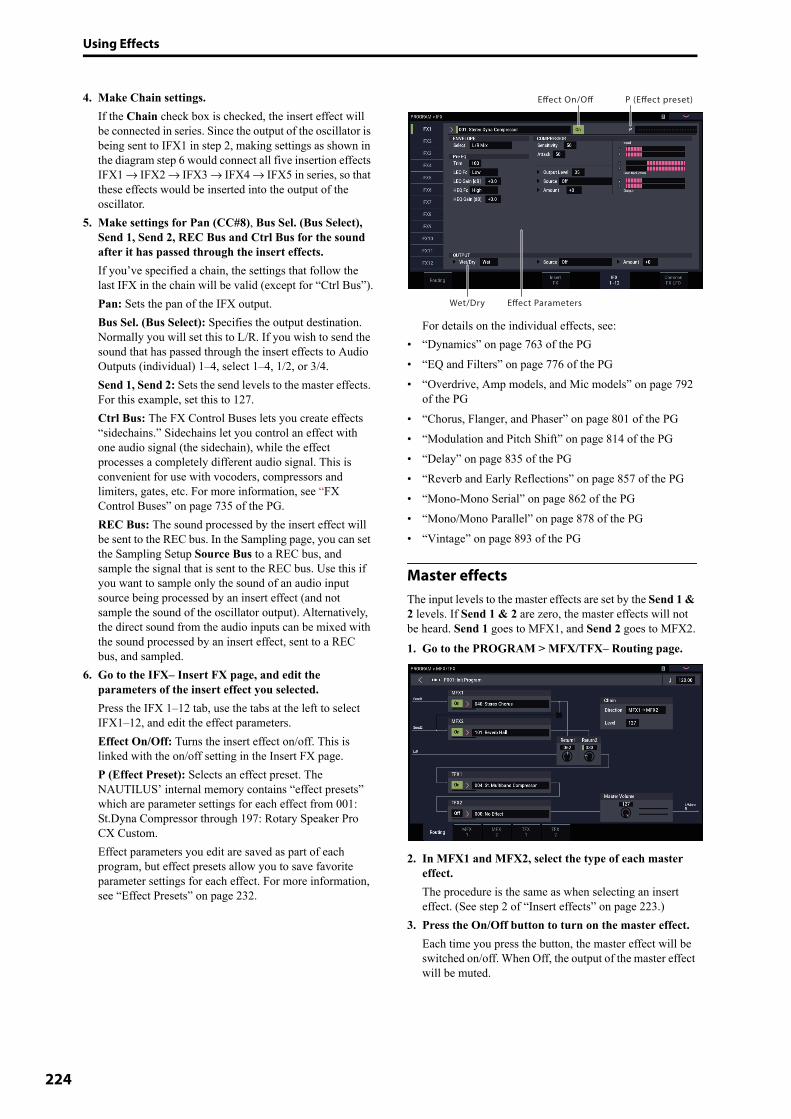
Using Effects
224
4. Make Chain settings.If the Chain check box is checked, the insert effect will be connected in series. Since the output of the oscillator is being sent to IFX1 in step 2, making settings as shown in the diagram step 6 would connect all five insertion effects IFX1 → IFX2 → IFX3 → IFX4 → IFX5 in series, so that these effects would be inserted into the output of the oscillator.
5. Make settings for Pan (CC#8), Bus Sel. (Bus Select), Send 1, Send 2, REC Bus and Ctrl Bus for the sound after it has passed through the insert effects.If you’ve specified a chain, the settings that follow the last IFX in the chain will be valid (except for “Ctrl Bus”).Pan: Sets the pan of the IFX output.Bus Sel. (Bus Select): Specifies the output destination. Normally you will set this to L/R. If you wish to send the sound that has passed through the insert effects to Audio Outputs (individual) 1–4, select 1–4, 1/2, or 3/4.Send 1, Send 2: Sets the send levels to the master effects. For this example, set this to 127.Ctrl Bus: The FX Control Buses lets you create effects “sidechains.” Sidechains let you control an effect with one audio signal (the sidechain), while the effect processes a completely different audio signal. This is convenient for use with vocoders, compressors and limiters, gates, etc. For more information, see “FX Control Buses” on page 735 of the PG.REC Bus: The sound processed by the insert effect will be sent to the REC bus. In the Sampling page, you can set the Sampling Setup Source Bus to a REC bus, and sample the signal that is sent to the REC bus. Use this if you want to sample only the sound of an audio input source being processed by an insert effect (and not sample the sound of the oscillator output). Alternatively, the direct sound from the audio inputs can be mixed with the sound processed by an insert effect, sent to a REC bus, and sampled.
6. Go to the IFX– Insert FX page, and edit the parameters of the insert effect you selected.Press the IFX 1–12 tab, use the tabs at the left to select IFX1–12, and edit the effect parameters.Effect On/Off: Turns the insert effect on/off. This is linked with the on/off setting in the Insert FX page.P (Effect Preset): Selects an effect preset. The NAUTILUS’ internal memory contains “effect presets” which are parameter settings for each effect from 001: St.Dyna Compressor through 197: Rotary Speaker Pro CX Custom.Effect parameters you edit are saved as part of each program, but effect presets allow you to save favorite parameter settings for each effect. For more information, see “Effect Presets” on page 232.
For details on the individual effects, see:• “Dynamics” on page 763 of the PG• “EQ and Filters” on page 776 of the PG• “Overdrive, Amp models, and Mic models” on page 792
of the PG• “Chorus, Flanger, and Phaser” on page 801 of the PG• “Modulation and Pitch Shift” on page 814 of the PG• “Delay” on page 835 of the PG• “Reverb and Early Reflections” on page 857 of the PG• “Mono-Mono Serial” on page 862 of the PG• “Mono/Mono Parallel” on page 878 of the PG• “Vintage” on page 893 of the PG
Master effectsThe input levels to the master effects are set by the Send 1 & 2 levels. If Send 1 & 2 are zero, the master effects will not be heard. Send 1 goes to MFX1, and Send 2 goes to MFX2.1. Go to the PROGRAM > MFX/TFX– Routing page.
2. In MFX1 and MFX2, select the type of each master effect.The procedure is the same as when selecting an insert effect. (See step 2 of “Insert effects” on page 223.)
3. Press the On/Off button to turn on the master effect.Each time you press the button, the master effect will be switched on/off. When Off, the output of the master effect will be muted.
P (Effect preset)Effect On/Off
Effect ParametersWet/Dry

Effects selection and routing Using effects in Combinations and Songs
225
4. Use “Return 1” and “Return 2” to adjust the output levels of the master effects.Note: For each effect, the Wet value of the Wet/Dry parameter is the output level at the effect. The return value is multiplied with this (“Return” = 127 will be x1.0) to determine the actual output level of the master effect.
5. Select the MFX1 and MFX2 pages, and set the parameters for each selected effect as desired.(See step 6 of “Insert effects” on page 224.)
Total EffectsIf you use Bus Select (IFX/Indiv.Out Assign) to choose L/R as the oscillator output, or if you set the post-IFX Bus Select to L/R, the signal will go through the total effect.The output from the master effects is sent to the total effects via the Return 1 and Return 2 settings on the PROGRAM > MFX/TFX– Routing page.After being processed through the total effects, the signal goes to the Audio Outputs (main) L/MONO and R outputs.1. Go to the PROGRAM > MFX/TFX– Routing page.2. Choose the desired total effect for TFX1 and TFX2.
The procedure is the same as when selecting an insert effect. (See step 2 of “Insert effects” on page 223.)
3. Press the On/Off button to turn the total effects on.The total effect will be switched on/off each time you press the button. If this is Off, the result will be the same as if 000: No Effect is selected. The input sound will be output without change.
4. Access the TFX1 or TFX2 pages, and edit the parameters of each effect to adjust the final sound as desired.(See step 6 of “Insert effects” on page 224.)
Using effects in Combinations and SongsIn COMBINATION, and SEQUENCER modes, you can specify the routing of each timbre/track to the insert effects, master effects and total effects. These settings are made in the same way in each of these modes. We will be using the example of COMBINATION mode in our explanation here.
Routing to IFX, outputs, and buses1. Go to the COMBINATION > IFX– Routing1 page.
2. Use “Bus Select (IFX/Indiv.Out Assign)” to specify the bus to which each timbre will be output. Choose IFX1 if you want to send the output of a timbre to insert effect 1.The routing, insert effects, and chain settings are shown graphically in the upper part of the display screen. In this example, T01 (timbre 1) uses IFX1 and 2. T02 uses IFX2, T03 uses IFX3 and 4, T04 and T05 use IFX4, and T06 and T07 use IFX5.
3. Use Send1 and Send2 to specify the send level of each timbre to the master effects.This can be set only if “Bus Select (IFX/Indiv.Out Assign)” is set to L/R or Off.Note: The actual send level is determined by multiplying this by the “Send 1” or “Send 2” settings for oscillators 1 and 2 within the program selected by the timbre. If the program parameter “Send 1” or “Send 2” is set to 0, the resulting level will still be 0 even if you raise this send level.If “Bus Select (IFX/Indiv.Out Assign)” is set to IFX1–12, the send levels to the master effects are set by Send1 and Send2 (Insert FX page) following the insert effects.
4. Go to the COMBINATION > IFX– Routing 2 page.Bus Select (IFX/Indiv. Out Assign) is the same as in the Routing 1 page. You can set it from either page.FX Control Bus sends the output of the timbre to an FX Control bus. Use this when you want the audio input to an effect to be controlled by another sound. There are two FX Control buses, which gives you a great deal of freedom for controlling effects freely.REC Bus sends the output of the timbre to a REC bus. In the Sampling page Sampling Setup, you can set the Sampling Setup Source Bus to a REC bus, and sample the signal that is sent to the REC bus. Use this if you want to sample only the sound of a specific timbre.Note: SEQUENCER mode has settings for MIDI Rout-ing 1/2 and Audio Routing 1/2. These specify the effect routing for MIDI tracks and audio tracks.In SEQUENCER mode, you can also choose a REC bus as the Source Bus for each audio track in the Mixer page, so that the signals sent to the REC bus(es) can be recorded to the disk.
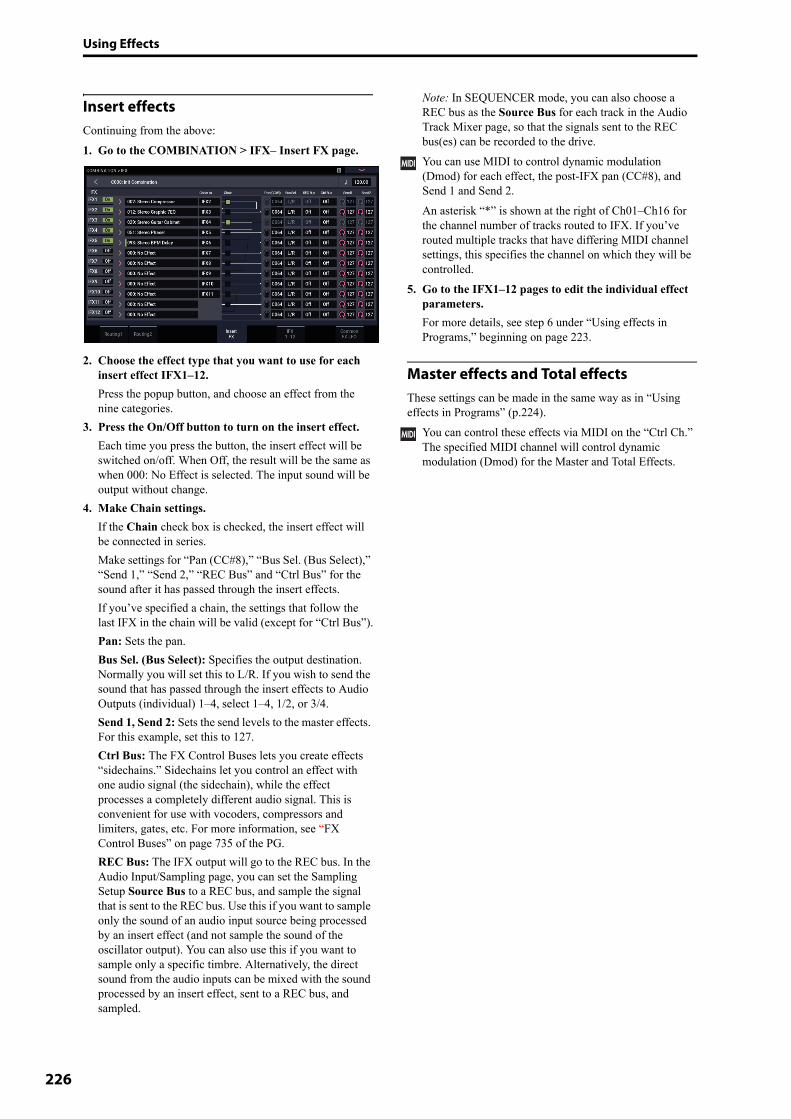
Using Effects
226
Insert effectsContinuing from the above:1. Go to the COMBINATION > IFX– Insert FX page.
2. Choose the effect type that you want to use for each insert effect IFX1–12.Press the popup button, and choose an effect from the nine categories.
3. Press the On/Off button to turn on the insert effect.Each time you press the button, the insert effect will be switched on/off. When Off, the result will be the same as when 000: No Effect is selected. The input sound will be output without change.
4. Make Chain settings.If the Chain check box is checked, the insert effect will be connected in series. Make settings for “Pan (CC#8),” “Bus Sel. (Bus Select),” “Send 1,” “Send 2,” “REC Bus” and “Ctrl Bus” for the sound after it has passed through the insert effects.If you’ve specified a chain, the settings that follow the last IFX in the chain will be valid (except for “Ctrl Bus”).Pan: Sets the pan.Bus Sel. (Bus Select): Specifies the output destination. Normally you will set this to L/R. If you wish to send the sound that has passed through the insert effects to Audio Outputs (individual) 1–4, select 1–4, 1/2, or 3/4.Send 1, Send 2: Sets the send levels to the master effects. For this example, set this to 127.Ctrl Bus: The FX Control Buses lets you create effects “sidechains.” Sidechains let you control an effect with one audio signal (the sidechain), while the effect processes a completely different audio signal. This is convenient for use with vocoders, compressors and limiters, gates, etc. For more information, see “FX Control Buses” on page 735 of the PG.REC Bus: The IFX output will go to the REC bus. In the Audio Input/Sampling page, you can set the Sampling Setup Source Bus to a REC bus, and sample the signal that is sent to the REC bus. Use this if you want to sample only the sound of an audio input source being processed by an insert effect (and not sample the sound of the oscillator output). You can also use this if you want to sample only a specific timbre. Alternatively, the direct sound from the audio inputs can be mixed with the sound processed by an insert effect, sent to a REC bus, and sampled.
Note: In SEQUENCER mode, you can also choose a REC bus as the Source Bus for each track in the Audio Track Mixer page, so that the signals sent to the REC bus(es) can be recorded to the drive.You can use MIDI to control dynamic modulation (Dmod) for each effect, the post-IFX pan (CC#8), and Send 1 and Send 2.An asterisk “*” is shown at the right of Ch01–Ch16 for the channel number of tracks routed to IFX. If you’ve routed multiple tracks that have differing MIDI channel settings, this specifies the channel on which they will be controlled.
5. Go to the IFX1–12 pages to edit the individual effect parameters.For more details, see step 6 under “Using effects in Programs,” beginning on page 223.
Master effects and Total effectsThese settings can be made in the same way as in “Using effects in Programs” (p.224).
You can control these effects via MIDI on the “Ctrl Ch.” The specified MIDI channel will control dynamic modulation (Dmod) for the Master and Total Effects.

Effects selection and routing Using effects in SAMPLING mode
227
Using effects in SAMPLING modeIn SAMPLING mode, you can apply effects to external audio sources from the Audio Input 1–2 jacks, and sample the result. It’s also possible to apply effects to a multisample and resample the result.
Routing an external input1. Go to the SAMPLING > Recording– Audio Input
page.
2. Use Bus Select to specify the bus to which each audio input will be sent.For example if you want the signal from a device connected to Audio Input 1 to be input to insert effect 1, set the INPUT 1 Bus Select to IFX1.
3. Use Send1 and Send2 to specify the send level of each timbre to the master effects.This can be set only if Bus Select is set to L/R or Off.If Bus Select is set to IFX1–12, the send levels to the master effects are set by Send1 and Send2 (Insert FX page) following the insert effects.
4. Use Pan to set the panning of the audio input.If you’re inputting a stereo audio source, you will normally set the inputs to L000 and R127 respectively.
5. Use Level to adjust the level of the audio input. Normally you will leave this at 127.
6. FX Control Bus sends the output of the timbre to an FX Control bus.The FX Control Buses lets you create effects “sidechains.” Sidechains let you control an effect with one audio signal (the sidechain), while the effect processes a completely different audio signal. This is convenient for use with vocoders, compressors and limiters, gates, etc. For more information, see “FX Control Buses” on page 735 of the PG.
7. REC Bus sends the audio input to a REC bus.By selecting a REC bus as the “Source Bus,” you can sample the signal that’s being sent to the REC bus.Normally when sampling in this mode, you will turn this Off, since the Source Bus will be set to L and R.
8. Turn the Audio In button on.
Insert effects1. Go to the Insert FX page.
2. Choose the insert effect that you want to use on the audio input.Press the popup button, and choose an effect from the nine categories.
3. Press the On/Off button to turn on the insert effect.Each time you press the button, the insert effect will be switched on/off. When Off, the result will be the same as when 000: No Effect is selected. The input sound will be output without change.
4. Make Chain settings.If the Chain check box is checked, the insert effect will be connected in series.
5. Make settings for Pan (CC#8), “Bus Sel. (Bus Select),” “Send 1,” “Send 2,” REC Bus and “Ctrl Bus” for the sound after it has passed through the insert effects.If effects are chained, the settings that follow the last IFX are valid (except for “Ctrl Bus”).Pan: Sets the pan.Bus Sel. (Bus Select): Specifies the output destination. Normally you will set this to L/R. If you wish to send the sound that has passed through the insert effects to Audio Outputs (individual) 1–4, select 1–4, 1/2, or 3/4.Send 1, Send 2: Sets the send levels to the master effects. For this example, set this to 127.Ctrl Bus: The signal processed by the insert effect will be sent to the FX Control bus. Use this if you want to use another sound to control the audio being input to an effect. You can use the two FX Control buses to control effects freely. For more information, see “FX Control Buses” on page 735 of the PG.REC Bus: The sound processed by the insert effect will be sent to the REC bus. In the Audio Input page, you can set the Sampling Setup Source Bus to a REC bus, and sample the signal that is sent to the REC bus. Normally you will sample with Source Bus set to L/R and REC Bus turned Off. However by using the REC bus, the direct sound of the audio input and the sound processed by the insert effect can be mixed to a REC bus and sampled.

Using Effects
228
6. Access the IFX1–12 pages and edit the parameters of each effect.For more details, see step 6 under “Using effects in Programs,” beginning on page 223.
For details on applying an effect to an external audio input and sampling the result, see “Sampling external audio through insert effects” on page 136.
Master effects and Total effectsMaster effects work the same as the do in PROGRAM mode, as described under “Master effects” on page 224.
Sending the output of a multisample to an effect bus1. If you want the samples assigned to a multisample to
be sent to an effect bus, go to the SAMPLING > IFX– Routing page, and make settings for “Bus Select (All OSCs to)”.
For details on resampling through effects, see “Applying an insert effect to a sample and resampling the result” on page 137.

Effects selection and routing Using effects with the audio inputs
229
Using effects with the audio inputsJust as you can in SAMPLING mode, the PROGRAM, COMBINATION, and SEQUENCER modes also let you apply the NAUTILUS’ effects to the signals from the analog, or USB inputs and sample the result, or to use the NAUTILUS as a 4-in (analog, and USB) 6-out effect processor. You can also use the NAUTILUS as a vocoder effect (026:Vocoder) that uses an external mic input to control the internal sounds.Input-related settings are made in the Sampling page of each mode. Normally, you will make settings in the GLOBAL > Basic Setup– Audio page and share these settings in all modes, but you can also make individual settings for a specific program (in PROGRAM mode) if, for example, you want to use that program as a vocoder.
Routing to IFX, outputs, and buses1. Go to the GLOBAL > Basic Setup– Audio page.
Note: You must move to GLOBAL mode from the mode (other than SAMPLING mode) in which you want to input the external audio signals. If you move from SAM-PLING mode to GLOBAL mode, the Audio Input set-tings of SAMPLING mode will be maintained, and you won’t be able to view the settings of this page.These settings are not used in SAMPLING mode. Audio input settings for SAMPLING mode are made in the SAMPLING > Recording– Audio Input page.When applying effects to the signals from the analog, or USB inputs, oscillation may occur depending on the effect type and parameter settings. If so, adjust the input level, output level, and effect parameters. In particular, use caution when using high-gain effects.
2. Use Bus Select to specify the bus to which each audio input will be sent.For example if you want the signal from a device connected to Audio Input 1 to be input to insert effect 1, set the INPUT 1 Bus Select to IFX1.
3. Use Send1 and Send2 to specify the send level of each timbre to the master effects.This can be set only if Bus Select is set to L/R or Off.If Bus Select is set to IFX1–12, the send levels to the master effects are set by Send1 and Send2 (Insert FX page) following the insert effects.
4. Set MUTE and Solo as desired. 5. Use Pan to set the panning of the audio input. If
you’re inputting a stereo audio source, you will normally set the inputs to L000 and R127 respectively.
6. Use Level to adjust the level of the audio input. Normally you will leave this at 127.
7. FX Ctrl Bus sends the output of the timbre to an FX Control bus.Use this when you want the audio input to an effect to be controlled by another sound. There are two FX Control buses, which gives you a great deal of freedom for controlling effects freely.
8. REC Bus sends the audio input to a REC bus.In the Sampling page, you can choose a REC bus as the Sampling Setup Source Bus so that the signal sent to the REC bus can be sampled or recorded (only in SEQUENCER mode).Noise can enter the NAUTILUS via these buses; see “Avoiding extraneous noise” on page 94.If you want to save the edited settings in the NAUTILUS, you must write them. Use the GLOBAL mode page menu command Write Global Setting to do this.
9. If you want to use the GLOBAL mode Input settings in the other modes, check the “Use Global Setting” option.If you want to make independent settings for programs, combinations, and songs, uncheck this setting.
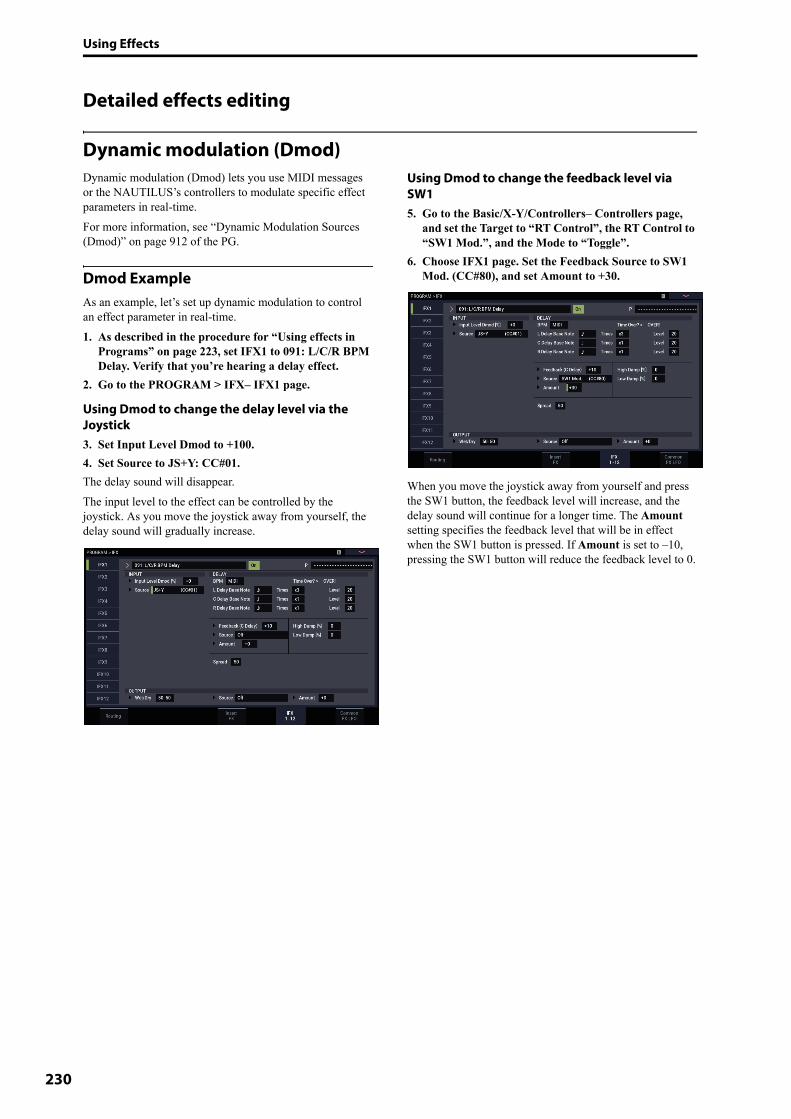
Using Effects
230
Detailed effects editing
Dynamic modulation (Dmod)Dynamic modulation (Dmod) lets you use MIDI messages or the NAUTILUS’s controllers to modulate specific effect parameters in real-time.For more information, see “Dynamic Modulation Sources (Dmod)” on page 912 of the PG.
Dmod ExampleAs an example, let’s set up dynamic modulation to control an effect parameter in real-time.1. As described in the procedure for “Using effects in
Programs” on page 223, set IFX1 to 091: L/C/R BPM Delay. Verify that you’re hearing a delay effect.
2. Go to the PROGRAM > IFX– IFX1 page.
Using Dmod to change the delay level via the Joystick3. Set Input Level Dmod to +100.4. Set Source to JS+Y: CC#01. The delay sound will disappear.The input level to the effect can be controlled by the joystick. As you move the joystick away from yourself, the delay sound will gradually increase.
Using Dmod to change the feedback level via SW15. Go to the Basic/X-Y/Controllers– Controllers page,
and set the Target to “RT Control”, the RT Control to “SW1 Mod.”, and the Mode to “Toggle”.
6. Choose IFX1 page. Set the Feedback Source to SW1 Mod. (CC#80), and set Amount to +30.
When you move the joystick away from yourself and press the SW1 button, the feedback level will increase, and the delay sound will continue for a longer time. The Amount setting specifies the feedback level that will be in effect when the SW1 button is pressed. If Amount is set to –10, pressing the SW1 button will reduce the feedback level to 0.
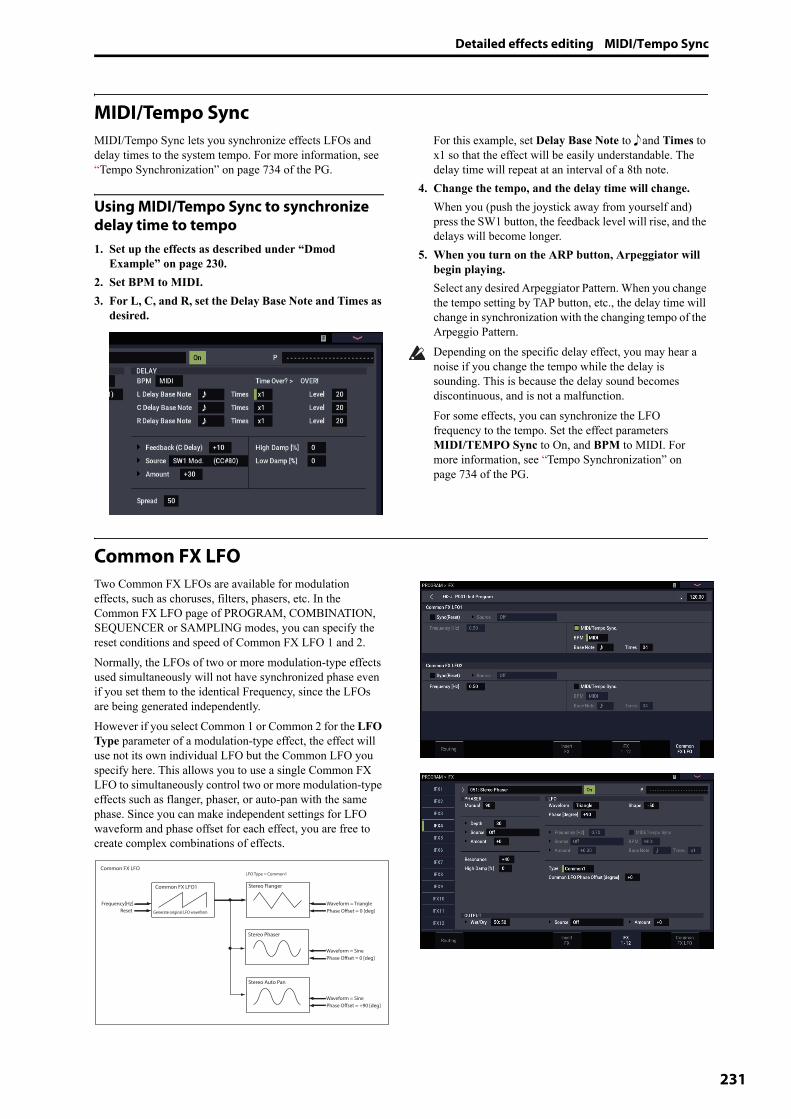
Detailed effects editing MIDI/Tempo Sync
231
MIDI/Tempo SyncMIDI/Tempo Sync lets you synchronize effects LFOs and delay times to the system tempo. For more information, see “Tempo Synchronization” on page 734 of the PG.
Using MIDI/Tempo Sync to synchronize delay time to tempo1. Set up the effects as described under “Dmod
Example” on page 230.2. Set BPM to MIDI.3. For L, C, and R, set the Delay Base Note and Times as
desired.
For this example, set Delay Base Note to � and Times to x1 so that the effect will be easily understandable. The delay time will repeat at an interval of a 8th note.
4. Change the tempo, and the delay time will change.When you (push the joystick away from yourself and) press the SW1 button, the feedback level will rise, and the delays will become longer.
5. When you turn on the ARP button, Arpeggiator will begin playing.Select any desired Arpeggiator Pattern. When you change the tempo setting by TAP button, etc., the delay time will change in synchronization with the changing tempo of the Arpeggio Pattern.Depending on the specific delay effect, you may hear a noise if you change the tempo while the delay is sounding. This is because the delay sound becomes discontinuous, and is not a malfunction.For some effects, you can synchronize the LFO frequency to the tempo. Set the effect parameters MIDI/TEMPO Sync to On, and BPM to MIDI. For more information, see “Tempo Synchronization” on page 734 of the PG.
Common FX LFOTwo Common FX LFOs are available for modulation effects, such as choruses, filters, phasers, etc. In the Common FX LFO page of PROGRAM, COMBINATION, SEQUENCER or SAMPLING modes, you can specify the reset conditions and speed of Common FX LFO 1 and 2.Normally, the LFOs of two or more modulation-type effects used simultaneously will not have synchronized phase even if you set them to the identical Frequency, since the LFOs are being generated independently. However if you select Common 1 or Common 2 for the LFO Type parameter of a modulation-type effect, the effect will use not its own individual LFO but the Common LFO you specify here. This allows you to use a single Common FX LFO to simultaneously control two or more modulation-type effects such as flanger, phaser, or auto-pan with the same phase. Since you can make independent settings for LFO waveform and phase offset for each effect, you are free to create complex combinations of effects.
Stereo FlangerCommon FX LFO1
Common FX LFO
Stereo Phaser
Stereo Auto Pan
Waveform = Triangle
Generate original LFO waveform
Frequency[Hz]Reset Phase Offset = 0 [deg]
Waveform = SinePhase Offset = 0 [deg]
Waveform = SinePhase Offset = +90 [deg]
LFO Type = Common1

Using Effects
232
Effect PresetsEffect Presets let you easily store and recall all of the settings for an individual effect. You can store up to 16 user presets for each effect type, in addition to 15 re-writable factory presets.
The same presets appear in all of the modes (PROGRAM, COMBINATION, SEQUENCER, and SAMPLING), and sets of presets can be saved to and loaded from drive.Note that edits to effects parameters are automatically stored with the Program, Combination, or Song–you don’t need to store them as an Effect Preset. Presets just make it easier to re-use your favorite settings. For instance, you can save an Effect Preset while working on a particular Program, and then later use the same Effect Preset in a different Program, Combi, or Song.Note: Programs, Combinations, and Songs save the effects parameter settings, but they don’t save the number of the selected Effect Preset. If you select an Effect Preset, and then save the Program, the Effect Preset setting will revert to “--------------.”
Selecting Effect Presets1. Select an effect in the Insert FX page.2. The P00: Initial Set settings will be recalled.
“P (Effect Preset)” will show --------.3. Use “P (Effect Preset)” to select an effect preset: P00–
P15 or U00–U15.The stored parameters will be recalled. Note that this will overwrite all parameters of the effect.P00: Initial Set: These are the default settings that are recalled when you select an effect type in the Insert FX page. You can’t save your own settings here.P01…P15: These contain Korg preset data. We recommend that you store your settings in U00–U15.U00…U15: These are areas in which you can store your own settings.---------------: This shows that no Effect Preset has been selected. You’ll see this if you’ve just selected an effect, written a Program, or selected a new Program. Selecting this setting from the menu will not have any effect.
4. Edit the recalled parameters as desired.
Saving Effect PresetsIf you’ve come up with settings you like and want to save them as a new preset, you can save them.1. On the IFX 1-12 page, touch the menu button to open
the page menu.2. In the menu, select the Write FX Preset command.
The Write FX Preset dialog will appear.3. Name the Preset as desired.4. Open the “To” popup, and select the Preset number to
save to.You can save into any of the slots, but we recommend that you store your settings in U00–U15.
5. Press OK to save the Preset, or Cancel to exit without saving.
P (Effect preset)Effect On/Off
Effect ParametersWet/Dry
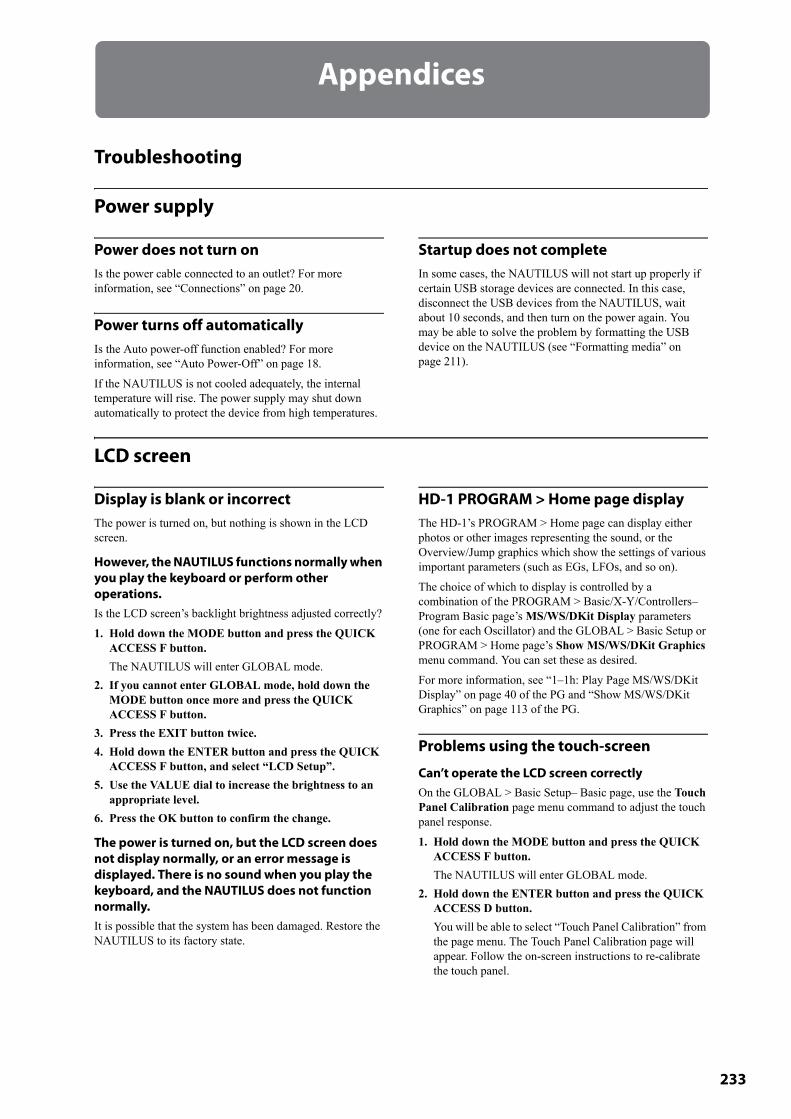
233
Appendices
Troubleshooting
Power supply
Power does not turn onIs the power cable connected to an outlet? For more information, see “Connections” on page 20.
Power turns off automaticallyIs the Auto power-off function enabled? For more information, see “Auto Power-Off” on page 18.If the NAUTILUS is not cooled adequately, the internal temperature will rise. The power supply may shut down automatically to protect the device from high temperatures.
Startup does not completeIn some cases, the NAUTILUS will not start up properly if certain USB storage devices are connected. In this case, disconnect the USB devices from the NAUTILUS, wait about 10 seconds, and then turn on the power again. You may be able to solve the problem by formatting the USB device on the NAUTILUS (see “Formatting media” on page 211).
LCD screen
Display is blank or incorrectThe power is turned on, but nothing is shown in the LCD screen.
However, the NAUTILUS functions normally when you play the keyboard or perform other operations.Is the LCD screen’s backlight brightness adjusted correctly?1. Hold down the MODE button and press the QUICK
ACCESS F button.The NAUTILUS will enter GLOBAL mode.
2. If you cannot enter GLOBAL mode, hold down the MODE button once more and press the QUICK ACCESS F button.
3. Press the EXIT button twice.4. Hold down the ENTER button and press the QUICK
ACCESS F button, and select “LCD Setup”.5. Use the VALUE dial to increase the brightness to an
appropriate level.6. Press the OK button to confirm the change.
The power is turned on, but the LCD screen does not display normally, or an error message is displayed. There is no sound when you play the keyboard, and the NAUTILUS does not function normally.It is possible that the system has been damaged. Restore the NAUTILUS to its factory state.
HD-1 PROGRAM > Home page displayThe HD-1’s PROGRAM > Home page can display either photos or other images representing the sound, or the Overview/Jump graphics which show the settings of various important parameters (such as EGs, LFOs, and so on). The choice of which to display is controlled by a combination of the PROGRAM > Basic/X-Y/Controllers– Program Basic page’s MS/WS/DKit Display parameters (one for each Oscillator) and the GLOBAL > Basic Setup or PROGRAM > Home page’s Show MS/WS/DKit Graphics menu command. You can set these as desired.For more information, see “1–1h: Play Page MS/WS/DKit Display” on page 40 of the PG and “Show MS/WS/DKit Graphics” on page 113 of the PG.
Problems using the touch-screen
Can’t operate the LCD screen correctlyOn the GLOBAL > Basic Setup– Basic page, use the Touch Panel Calibration page menu command to adjust the touch panel response.1. Hold down the MODE button and press the QUICK
ACCESS F button.The NAUTILUS will enter GLOBAL mode.
2. Hold down the ENTER button and press the QUICK ACCESS D button.You will be able to select “Touch Panel Calibration” from the page menu. The Touch Panel Calibration page will appear. Follow the on-screen instructions to re-calibrate the touch panel.
Appendices
234
Can’t switch modes or pagesIf the NAUTILUS is doing any of the following, you may not be able to change modes or switch to a different page:• Recording or playing back a song or pattern• Sampling • Playing a WAVE file• A menu dialog or select dialog is on the LCD display
In COMBINATION or SEQUENCER modes, can’t edit the value of Timbre/Track parameters such as MIDI Channel or StatusSome parameters can’t be edited while notes are playing, either locally or from MIDI. If the damper pedal is held down, or if its calibration is incorrect, notes may be sustaining even if they aren’t audible.• Are you using a damper pedal with a polarity that does
not match the Damper Polarity setting (GLOBAL > Controllers/Scales)? For more information, see “Damper Polarity,” on page 675 of the PG.
• In some cases, this problem can be solved be executing the page menu command Half Damper Calibration (GLOBAL > Basic Setup). For more information, see “Half Damper Calibration,” on page 687 of the PG.
Audio input and output
No soundAre connections made correctly to your amp, mixer, or headphones? For more information, see “Connections” on page 20.Is the connected amp or mixer powered-on, and is its volume raised?Is Local Control turned on?• In GLOBAL > MIDI, check the Local Control On
check box.Is the MASTER VOLUME slider raised? See “MASTER VOLUME slider” on page 1.Could MASTER VOLUME have been assigned to the ASSIGNABLE PEDAL, and the pedal set in the minimum position?If there is no sound from the Audio Outputs (individual) 1–4 jacks, make sure that Bus Select or Bus Sel. (Bus Select) following the insert effect is set to 1–4, or 1/2–3/4.Does the “Samples Not Loaded” message appear? If so, is the required sample data loaded?If a specific timbre doesn’t sound in COMBINATION mode, is its Play/Mute button set to Play? Alternatively, are all Solo settings turned off?If a certain timbre is not sounding in COMBINATION mode, or if a certain track is not playing in SEQUENCER mode, the output channel might have been set to the arpeggiator’s output channel.• To hear the notes you play on the keyboard when the
ARP button is off, switch “Thru By ARP Switch Off” in Scene Setup, MIDI Settings to “ON”.
• Is “Keyboard” set to ON when ARP is ON and you want to input notes using the keyboard?
If a specific track doesn’t sound in SEQUENCER mode, is its Play/Rec/Mute button set to Play? Alternatively, are all Solo settings turned off? Make sure that the Status is INT or Both. (See “Preparations for recording” on page 76.)Are the Key Zone and Velocity Zone set so that sound will be produced when you play?Has an empty pattern been selected? (See page 160)
Audio inputs don’t work properlyAre the appropriate sources connected to the analog, or USB inputs? If there is no sound in SAMPLING mode, check that Bus Select, and Level are set correctly in the SAMPLING > Recording– Audio Input page.Alternatively, is SAMPLING REC button turned on?If there is no sound in PROGRAM, COMBINATION, and SEQUENCER modes, check that Bus Select, and Level are set correctly in GLOBAL > Basic Setup– Audio page; or in the Home– Sampling pages of PROGRAM, COMBINATION, or SEQUENCER modes.Is the Use Global Setting parameter set correctly?
Analog audio inputsIs the Audio In button on the front panel turned on? (See page 4)If you are using Audio Input 1 and/or 2, make sure that the Analog Input Gain level of the Analog Input Setup dialog (SHIFT button and AUDIO IN button) is raised. If you are using Audio Input 1 and/or 2, is the Input Select of the Analog Input Setup dialog (SHIFT button and AUDIO IN button) set appropriately?
Noise or distortion on audio inputs or recorded soundIf you are recording from audio inputs 1 and/or 2, are the Analog Input Gain of the Analog Input Setup dialog (SHIFT button and AUDIO IN button) and Recording Level settings appropriate?• If Recording Level shows “ADC OVERLOAD !,”
adjust the Analog Input Gain. If “CLIP !” is displayed, adjust the Recording Level slider.
If you are recording from the USB inputs, are the level of the output device and the Recording Level set appropriately?• If “CLIP !” appears, adjust the Recording Level slider.Is the system clock set correctly?• If cyclic click noise is occurring, check that you have
selected the System Clock that is being input.
Troubleshooting Programs and Combinations
235
After sampling or sample editsAfter a sample edit has been executed, or after a stereo sample has been recorded, a small noise may be heard. This has no effect on the audio data that was edited or sampled.
Noise or oscillation with effectsWhen using an effect on external audio inputs, oscillation may occur depending on the type of effect or on the parameter settings. Please adjust the input level, output level, and effect parameters. You need to be particularly careful when using a high-gain effect.When using the MIDI/Tempo Sync function to control the delay time of an effect, noise may occur in the delay sound. This noise is due to discontinuities in the delay sound, and is not a malfunction.Some effects, such as 023: Stereo Analog Record, generate noise intentionally. It is also possible to create oscillation using a filter with resonance. These are not malfunctions.When raising the volume using the DYNAMICS knob, the levels may become excessive owing to digital signal processing, which may produce a distorted or noisy sound. This is not a malfunction.Adjust this by turning down the levels for each section.
Disk access noise is heard in the analog outputsCheck that the electrical grounding is correct for the NAUTILUS and all connected audio equipment, and remove any ground loops.
Notes do not stopIn PROGRAM > Basic/X-Y/Controllers, select the Program Basic page, make sure that the Hold check box is unchecked.Could you have used Tone Adjust to turn Hold on?In GLOBAL > Controllers/Scales, make sure that Damper Polarity or Foot Switch Polarity is set correctly.
Sound fades in and outIf an option is in demo mode, any sound which uses the option will fade in and out.
Programs and Combinations
Program or Combination does not play correctly
Preloaded programs don’t play correctly.Does the “Samples Not Loaded” message appear? If so, is the required sample data loaded?Is the “<!>” symbol displayed on Program Select of the Mixer page in COMBINATION or SEQUENCER mode, or is there a red line showing under the “Timbre\Track No.”? If so, have you loaded the necessary EXs sample data?• Use the Load required samples menu command on the
Home page. For more information, see “Load required samples” on page 114 of the PG.
• Alternatively, in GLOBAL mode, use the Auto-Load KSC feature to load the PRELOAD.KSC file. For more information, see “Automatically loading sample data” on page 179.
Settings for oscillator 2 are not displayedMake sure that the Oscillator Mode (PROGRAM > Basic/X-Y/Controllers– Program Basic) parameter is set to Double.
EXi2–related settings are not displayedOn the PROGRAM > X-Y/Controllers– Program Basic page, is there an instrument selected for EXi2 Instrument Type? For more information, see “EXi 2 Instrument Type” on page 130 of the PG.
Reverse can’t be enabledIf a Multisample or Drumsample is loaded using Virtual Memory, Reverse cannot be enabled.
• Use the GLOBAL > Basic Setup– Sample Management page to change the Multisample or Drumsample’s Load method to RAM.
EXi programs don’t play correctly in a CombinationDoes the Timbre Program have a gray background color?• The Programs in the Combination are asking for more
than the maximum available EXi fixed resources. Remove one or more of the EXi Programs which uses fixed resources. For more information, see “CX-3 & other EXi: Limitations on EXi fixed resources” on page 380 of the PG.
Is the “<!>” symbol displayed on Program Select of the Mixer page in COMBINATION or SEQUENCER mode, or is there a red line showing under the “Timbre\Track No.”? If so, have you loaded the necessary EXs sample data?
Combination does not play correctly after loading from driveIn the dialog box when you saved the data, did you check the items that you wanted to save?Are the bank/numbers of the programs used by the combination the same as when the combination was created?• If you have switched program banks, you can use the
Change all bank references menu command to change the program bank for each timbre of a combination. For more information, see “Change all bank references” on page 687 of the PG.
Appendices
236
Can’t write a ProgramYou can’t write HD-1 Programs into an EXi bank, or EXi Programs into an HD-1 bank. If desired, you can use the GLOBAL mode page menu command Set Program Bank Type to change the type of each bank, so that it will accommodate the desired type of Programs. For more information, see “Changing the Program Bank Types” on page 26.
Samples don’t play from the correct keysIs Portamento enabled? When Portamento glides between two notes which are mapped to different samples, the system always plays the higher sample and then glides to the target pitch. If a Multisample contains distinct samples mapped to different key ranges—for instance, loops or sound effects—this can produce unexpected results. • To prevent this from occurring, turn off Portamento.
Knobs
The knob effect set on the Controllers page does not workThe SELECT button should be set to “USER”.
Songs
Song does not play correctly after being loadedIn the dialog box when you saved the data, did you check all of the items that you wanted to save?Are the Programs used by the Song the same as when the song was created?• If you have switched Program banks, you can use the
page menu command Change all bank references to change the Program bank for each track of a Song. For more information, see “Change all bank references” on page 687 of the PG.
• When saving the song, it is best to use Save All or Save PCG & SEQ so that the programs are saved together with the song. Then when loading, load both the .PCG and the .SEQ data.
Have you loaded the multisamples and samples used by the program?
Audio tracks don’t playThe audio files for the Song must be stored within a directory at the same directory level as the .SNG file, and that directory must be have the same name as the .SNG file , followed by “_A” (for “Audio”). For instance, if the .SNG file is named WAMOZART.SNG, its audio folder must be named WAMOZART_A. If you move or rename the .SNG file, make sure to move or rename the main audio folder as well.If the folder containing the WAVE files for the song you loaded has the wrong name, the icon is shown in gray. Could you have moved or renamed the folder?
Loading OASYS-, KRONOS- format SongsThe NAUTILUS can play Songs created on the Korg OASYS. However, the name of the audio directory will need to be changed slightly.OASYS files were limited to 8 characters, and so the name of the audio file directory was typically abbreviated. For instance, if the .SNG file was named WAMOZART.SNG, the OASYS audio folder would be named WAMOZA_A.
Before you load an OASYS .SNG file, edit the name of the directory so that it matches the NAUTILUS standard: the same name as the .SNG file , followed by “_A” (for “Audio”). In the case above, you’d rename “WAMOZA_A” to “WAMOZART_A.”
Playback does not start when you press the SEQUENCER START/STOP buttonIs the MIDI Clock (GLOBAL > MIDI) set to Internal or Auto?
Can’t record in SEQUENCER modeDid you use Track Select to select the MIDI track or audio track that you want to record?Is the Memory Protect Song check box (GLOBAL > Basic Setup page) unchecked?Is the MIDI Clock (GLOBAL > MIDI) set to Internal, Auto MIDI, or Auto USB?
EXi programs don’t play correctly in a Song.Does the Track Program have a gray background color?• The Programs in the Song are asking for more than the
maximum available EXi fixed resources. Remove one or more of the EXi Programs which uses fixed resources. For more information, see “CX-3 & other EXi: Limitations on EXi fixed resources” on page 380 of the PG.
Is the “<!>” symbol displayed on Program Select of the Mixer page in COMBINATION or SEQUENCER mode, or is there a red line showing under the “Timbre\Track No.”? If so, have you loaded the necessary EXs sample data?

Troubleshooting Set Lists
237
ARP doesn’t record properly after using “Copy From Combi”Is Multi REC (SEQUENCER > Mixer) checked? Are the settings in the Copy From Combination dialog box correct?• In the Copy From Combination dialog box, check the
Multi REC standby option before you execute the copy. This will cause the settings to be adjusted automatically.
Can’t record your performance using Tone AdjustChanges you make using Tone Adjust are recorded as system exclusive data. Did you check the GLOBAL mode MIDI Filter Enable Exclusive check box?
RPPR does not startIs the SEQUENCER > Home– Mixer RPPR setting checked? (See “Using RPPR (Realtime Pattern Play/Record)” on page 106.)Are Assign, Pattern Select, and Track set correctly? See “Using RPPR (Realtime Pattern Play/Record)” on page 106.Is the MIDI Clock (GLOBAL > MIDI) parameter set to Internal, Auto MIDI, or Auto USB? See “MIDI Clock (MIDI Clock Source)” on page 653 of the PG.
Can’t record on an audio trackHave you unchecked the Memory Protect Internal HDD Save check box (GLOBAL > Basic Setup– Basic page)?Have you set Track Select to the audio track you want to record?If you want to perform multi-track recording (Multi REC checked), is Play/Rec/Mute set to REC?
Are the audio input settings correct?• Please see Audio input and output, and Audio inputs
don’t work properly.Is there space remaining on the drive?• Delete unwanted WAVE files.• Save a copy of important WAVE files on external media,
and then delete them from the disk.Are the REC Source settings correct?A “File already exists” message appears, and you can’t record.• In the Home– Recording Setup page, change the name of
the WAVE file that you’re going to record. • Delete the files in the TEMP folder.
Can’t import WAVE files into a region of an audio trackIn the Import Region/WAVE dialog box, you selected a WAVE file but can’t press the OK button.• Only 44.1 kHz and 48 kHz WAVE files can be imported. • You can only directly import WAVE files from the
internal drive. To use files from CDs or external USB devices, you must first copy them to the internal drive, and then import the copied file into the Song.
Noise in sampled audioIf you change the EXi Instrument type in an EXi Program while recording a sample, this can cause a glitch in the resulting sample.
Set Lists
COMPARE doesn’t affect RT control knobWhen you’re in SET LIST mode, the Compare command acts on edits to the Set List, such as the sounds selected for each Slot, hold times, comments, and so on.RT control knob edits in SET LIST mode apply to the Slot’s Program, Combination, or Song, and not to the Set List itself. This means that Compare command in SET LIST mode will not revert such edits.To revert RT control knob edits made in SET LIST mode:1. Go to the sound’s native mode. For instance, if the Slot contains a Program, go to PROGRAM mode.2. Execute Compare command.The RT control knob edits will be reverted. You can then return to SET LIST mode if desired.

Appendices
238
Sampling
Can’t sampleAre the audio input settings correct?• See “Audio inputs don’t work properly” on page 234Is there enough free RAM memory for sampling?Is there free space in memory? For more information, see “0–1f: Free Sample Memory/Locations” on page 579 of the PG, and “0–9: Media Info” on page 702 of the PG.• In order to sample to RAM, you must allocate sufficient
space for sampling.• If you are sampling to drive, select a different disk. For
more information, see “Select Directory/File for Sample To Disk” on page 115 of the PG.
• Delete unneeded samples. For more information, see “Delete Sample” on page 606 of the PG, and “0–4: Sample Manage” on page 643 of the PG.
• Save important samples to external media, and then delete them from memory.
If you’re sampling to the internal drive, did you uncheck the Memory Protect “Internal HDD Save” dialog box? (GLOBAL > Basic Setup– Basic)If you’re sampling to external USB storage media, did you select recordable media?Is the Trigger setting correct? For more information, see “Trigger” on page 24 of the PG. In SAMPLING mode, if Resample is set to Auto, has the sample to be resampled been assigned to the keyboard, and the Key parameter set correctly? See “Applying an insert effect to a sample and resampling the result” on page 137.Is the Source Bus setting correct?If a “buffer overrun error occurred” message is displayed frequently when you are sampling to disk, execute the page menu command Check Medium (MEDIA– Utility page) to find and correct any errors on the selected MS-DOS format media. For more information, see “Check Medium” on page 728 of the PG.
A stereo sample can’t be played in stereoIs the multisample actually stereo?• Execute the page menu command “MS Mono To Stereo”
to convert the multisample to stereo. For more information, see “MS Mono To Stereo/MS Stereo To Mono (Change Multisample Type)” on page 610 of the PG.
Is the sample name assigned correctly? (See “Stereo” on page 576 of the PG.)
Volume of a recorded sample is too low/too highSamples that you resampled at a Recording Level of approximately 0.0 (dB) have a lower volume than when you resampled them.• Did you turn on the Auto +12 dB On setting when you
resampled? See “Auto +12 dB On” on page 131.• If you resampled with Auto +12 dB On turned off, turn
on +12 dB (SAMPLING > Loop Edit page) for that sample.
Song playback stops temporarily when you sampleIs Auto Optimize RAM checked?• If this is checked, RAM will be optimized automatically
when sampling ends, causing the sound to stop at that point. If a song is being played in SEQUENCER mode, the playback will stop.
AIFF file can’t be loadedMake sure that the file suffix is three characters: .AIF. Some computer applications create files with a four character suffix, .AIFF, which is not recognized by the NAUTILUS.
Time lag between pressing the SAMPLING REC button and entering sampling-standby modeThe length of time until you enter sampling-standby mode will depend on the state of the free space on the drive (i.e., whether the free space is continuous or fragmented).• When sampling to the drive, pressing the SAMPLING
REC button will cause the amount of space specified by Sample Time to be allocated within the drive.
• Set Sample Time only slightly longer than the length that you will actually sample; avoid specifying an excessively long sample time.
Snap/click noise in recorded sampleSome things can cause the system to pause briefly in the middle of recording a sample, creating a snap or click noise. These include changing the EXi type parameters on the EXi PROGRAM > Program Basic page, or receiving a System Exclusive bulk dump. Avoid these while sampling.

Troubleshooting Arpeggiator function
239
Arpeggiator function
The arpeggiator will not startIs the ARP button turned on (lit)? (see page 158)Is “MIDI Clock” (GLOBAL > MIDI) set to Internal or Auto? See “MIDI Clock” on page 653 of the PG.Is “All ARP Off” selected on the GLOBAL > Basic Setup- Basic page? See “All ARP Off” on page 633 of the PG.
Has a user pattern been selected that does not contain note data?If the arpeggio pattern fails to start in COMBINATION mode, is the “Output Ch” set appropriately?If the arpeggio pattern fails to start in SEQUENCER mode, are the “Input Ch” and “Output Ch” set appropriately?
Drum Track/Step Sequence
Drum Track/Step Sequence does not startIs the DRUM button turned on (lit)?The pattern won't start even though I pressed the DRUM button.Is the DRUM button blinking? Trigger Mode is set to Wait KBD Trig. The pattern will start when you play the keyboard, or when a note-on is received via MIDI. See “Controlling how the Drum Track starts and stops” on page 162.The user pattern may be empty (no data), or “P000:Off” might be selected. Also, an empty step sequence might have been selected. If there’s no data in the pattern, the pattern won’t play.
If you’re in COMBINATION mode, is the Drum MIDI Channel setting appropriate? See “Scene Common Setup” on page 390 of the PG.If you’re in SEQUENCER mode, are the Drum Trigger “Input Ch”, “Drum MIDI Ch” settings appropriate? See “Scene Common Setup” on page 460 of the PG.Is the MIDI Clock parameter set correctly? See “MIDI Clock synchronization” on page 174.In the GLOBAL > Basic Setup– Basic page, is All Drum Off checked? See “Globally disabling Arpeggiator and the Drum Track/Step Sequence” on page 173.
X-Y control
Can’t control the volumeIs the Enable Volume Control check box checked? Is the COMBINATION or SEQUENCER mode X-Y Assign setting appropriate?Have you checked the Enable Program X-Y Volume check box so that the volume control of a program can be reproduced in COMBINATION or SEQUENCER mode?
CC control does not workIs the Enable CC Control check box checked? Are the X-Y X mode and X-Y Y mode settings appropriate?In COMBINATION or SEQUENCER mode, are the Enable Combi X-Y CC or Enable Song X-Y CC check boxes checked?Have you checked the Enable Program X-Y CC check box so that the CC control of a program can be reproduced in COMBINATION or SEQUENCER mode?
Drum Kits
The Drumsample’s pitch does not changeYou have left the Assign check box unchecked, and want to play the Drumsample at the adjacent right a semitone lower, but the pitch does not change.
• If you have selected a drum program in PROGRAM mode, and then want to edit the drum kit in GLOBAL mode, go to the PROGRAM > Edit-Pitch, OSC1 Pitch Mod. page and set Pitch Slope to +1.0 before you enter GLOBAL mode.
Wave Sequences
The wave sequence does not advanceIs the Run check box checked?
Swing does not work properlyIs the wave sequence’s Mode set to Tempo? Is the wave sequence’s Swing Resolution set appropriately?
Appendices
240
Effects
Effects are not appliedHave you selected effect program 000?• Select an effect other than 000: No Effect for IFX1–12,
MFX 1, 2 or TFX 1, 2.Are the Effect Global SW IFX 1–12 Off, MFX1&2 Off, or TFX1&2 Off (GLOBAL > Basic Setup– Basic page) settings checked?
If you are in COMBINATION or SEQUENCER mode and master effects are not applied when you raise the timbre/track Send1 or Send2 settings, does Return 1 or Return 2 from the master effect need to be raised? Alternatively, have Send 1 or Send 2 for each oscillator of the program used by the timbre/track been lowered? Note: The actual send level is determined by multiplying the send setting of each oscillator in the program with the send setting of the timbre/track.Have you routed the output to an insert effect?
MIDI
The NAUTILUS does not respond at all to incoming MIDI dataAre all MIDI cables connected correctly?Is the MIDI data being received on the channel on which it is being transmitted?
The NAUTILUS does not respond correctly to incoming MIDI dataAre the GLOBAL > MIDI settings MIDI Filter Enable Program Change, Enable Bank Change, Enable Control Change, Enable AfterTouch, and Enable Exclusive each checked? Does the NAUTILUS support the types of messages that are being sent to it?
Incorrect response to program change messagesIs the Bank Map setting correct?
The DYNAMICS knob does not respond to MIDI inputThe Dynamics function only works on notes that are played using the keyboard of the NAUTILUS.Dynamics has no effect on notes received via MIDI IN.
Internal drive, CDs, and USB Media
Internal drive and external USB devices
External USB devices are not recognizedHas the drive been formatted? Is the external device connected correctly? Have you waited a few seconds for newly-connected USB devices to be recognized?
“Error in writing to medium” occurs frequently when saving dataUse the page menu command Check Medium (MEDIA– Utility page) to detect and repair errors on the media. For more information, see “Check Medium” on page 728 of the PG.
Save or Load operations cannot be completedIf there is no more room on the internal drive (the MEDIA mode Media Info page’s Free Space parameter will show zero free space), then Write, Save, or Load operations may not be completed.
CD-R/RW (separately sold)
CD-R/RW drive is not recognized, or Can’t writeWas the drive subjected to physical shock or vibration while data is being written?If you are unable to save data such as PCG or SNG files, has the disc been formatted?Are you using the recommended media for your drive?Are you using blank media?• If using CD-R, please use new media. Are you trying to use DVD media? The NAUTILUS cannot write to DVD media.
A NAUTILUS CD-R/RW is not recognized by an external deviceA CD-R/RW saved or copied on the NAUTILUS using packet writing is not recognized on a computer.• If you install a UDF version 1.5 compatible UDF reader
or packet writing software on your computer, it will be possible to recognize the disc.
Troubleshooting Other problems
241
• In the case of a CD-R, it may be possible to make the disc be recognized by executing the page menu command Convert to ISO9660 Format (MEDIA– Utility page) to convert the disc to ISO9660 format. However depending on the state in which the disc was saved, it may be converted into ISO9660 level 3 format, and may still not be recognized. In this case if you install ISO9660 level 3 compatible reader software or packet writing software on your computer, it will be possible to recognize the disc.
A CD-R/RW that was saved or copied on the NAUTILUS using packet writing is not recognized by the TRITON/TRITON pro/TRITON proX/ TRITON-Rack/TRITON Le.• These models do not support UDF version 1.5, and
therefore will not recognize such a disc.• In the case of a CD-R, it may be possible to make the
disc be recognized by executing the page menu command Convert to ISO9660 Format (MEDIA– Utility page) to convert the disc to ISO9660 format. However depending on the state in which the disc was saved, it may be converted into ISO9660 level 3 format, and may still not be recognized.
WAVE files
Can’t loadIs the WAVE file in a format that the NAUTILUS can load?• Only 48 kHz or 44.1 kHz WAVE files can be inserted
into an audio track in a Song.
Can’t previewIs the WAVE file in a format that the NAUTILUS can load?• Only 48 kHz or 44.1 kHz WAVE files can be previewed
by pressing the Play button in the directory window.
Some Global settings are stored automatically, and not saved to PCG filesSome settings in GLOBAL mode are stored automatically, and are not saved in the Global section of PCG files. If you wish to duplicate or restore these settings, you will need to do so by editing the parameters manually.This includes:• The Auto Power-Off parameter • Fan Control settingAs well as all settings on the following pages:• 0–3: KSC Auto-Load• 0–5: Network
Other problems
Date and time are incorrectSaved files or sampled WAVE files have an incorrect date or time.• Use the page menu command Set Date/Time (MEDIA–
Utility page) to set the current date and time. For more information, see “Setting the date and time” on page 207.
Does the message “The clock battery voltage is low. Please replace the battery, and set the date and time in MEDIA mode” appear? If so, the calendar backup battery needs to be replaced. Your Korg Distributor can help you find a service center to replace the battery.
Appendices
242
Error and confirmation messages
A (ADC–Are You Sure)
ADC OverloadMeaning: If the ADC OVERLOAD! indication appears above the Recording Level bar, the signal is distorting because of an overload at the Audio Input stage. To solve this problem:• Adjust the Analog Input Setup dialog (SHIFT button and
AUDIO IN button), or the output level of your external audio source.
Are you sure?Meaning: This message asks you to confirm execution. To execute press the OK button. To cancel, press the Cancel button.
B (Buffer)
Buffer overrun error occurredMeaning: When sampling to external USB media, the processing could not keep up with the sampling. To solve this problem:• Execute the MEDIA– Utility page menu command
Check Medium. Then try the sampling operation again. If this does not resolve the problem, copy several files from that media to other media, delete those files, and then try the sampling operation again.
Note: Sampling may not be possible because of the media you’re using. Please use the recommended types of media.Note: If the “Buffer overrun error occurred” error message appears. the data up to the point the error occurred has been sampled, but the data at the point the error occurred may not play back correctly.
Buffer underrun error occurredMeaning: When playing back a WAVE file from external USB media, the data could not be read fast enough for playback processing.• Copy the file you want to play into another folder, and
then execute the operation again.Note: Playback may not be possible because of the media you’re using. Please use the recommended types of media (see “Types of media supported by the NAUTILUS” on page 254).
C (Can’t calibrate–Completed)
Can’t calibrateMeaning: Calibration could not be performed correctly.• Try again.
Can’t execute Audio Track recordingMeaning: You attempted to record audio tracks when Recording Setup is set to Loop All Tracks• You cannot perform audio track recording with Loop All
Tracks. Choose a different Recording Setup, and try recording again.
Meaning: You attempted to record audio tracks with the GLOBAL mode MIDI Clock set to External MIDI/USB or Auto MIDI/USB, and an external device (such as a computer or another MIDI device) is acting as the MIDI clock master• You cannot perform audio track recording when an
external device is the MIDI clock master. Set MIDI Clock to Internal so that the NAUTILUS is the MIDI clock master.
Meaning: If the GLOBAL mode Memory Protect parameter Internal HDD Save is checked, writing to the internal disk is prohibited. This error message will appear if you attempt to record on audio tracks in this state.• Uncheck the Internal HDD Save item, and try the
recording again.
Can’t insert event in stereo trackMeaning: In SEQUENCER mode, you were performing audio event editing on an audio track that is assigned as a stereo pair, and were unable to insert an audio event because the paired track contained an audio event.• Delete the unwanted audio event from the paired audio
track, and then insert the desired event.
Can’t load divided PCG fileMeaning: The page menu command Load PCG (RAM) and Samples cannot be performed on a divided PCG file.
Error and confirmation messages D (Destination–Disk)
243
Can’t open pattern Continue?Meaning: When you finished recording, it was not possible to allocate enough memory to open the pattern that was Put into the track. (When it must be opened automatically.) If you press the OK button, the pattern data will be deleted, and the recorded or edited content will be saved. If you press the Cancel button, the recorded content will be discarded.
CLIP!Meaning: The “CLIP!” indication will appear if the signal level exceeds 0 dB.
• The signal being sampled or recorded to an audio track has overloaded; use the Recording Level slider to adjust the level.
Note: When using the analog audio inputs, you will obtain the widest possible dynamic range if you adjust the Analog Input Setup dialog (SHIFT button and AUDIO IN button) as high as possible without allowing “ADC OVERLOAD!” to appear. In addition, you should set Level (0–2a) to 127, and adjust Recording Level as high as possible without allow-ing “CLIP!” to appear.
CompletedMeaning: Execution of the command ended normally.
D (Destination–Disk)
Destination and source are identicalMeaning: When copying or bouncing, the same song, track or pattern was selected for both the source and destination. To solve this problem:• Select a different song, track, or pattern for the source
and destination.
Destination from-measure within the limits of sourceMeaning: When executing the Move Measure command for all tracks or within the same track, the specified destination measure is within the source range. To solve this problem:• Set a destination measure that is outside of the source
range.
Destination is emptyMeaning: When editing, the track or pattern that was specified as the destination contains no musical data. To solve this problem:• Select a track or pattern that contains musical data.
Destination measure is emptyMeaning: The measure that was specified as the destination contains no data.• Specify a destination measure that contains data.
Destination multisample already existsMeaning: A multisample already exists at the destination (save location) multisample.• Either delete the multisample at the destination (save
location), or change the save destination multisample number.
Destination multisample and source multisample are identicalMeaning: The same multisample is selected for the source and destination.• Select different multisamples for the source and
destination.
Destination sample already existsMeaning: A sample already exists at the destination (save location).• Either delete the sample at the destination (save
location), or change the save destination sample number.
Destination sample data used in source sample
Can’t overwriteMeaning: Since the sample data at the destination (save location) is also used by the source sample, it cannot be overwritten.• Without using Overwrite, specify a different sample for
the destination (save location).
Destination sample is emptyMeaning: The sample for editing is empty.
Directory is not empty Cleanup directory
Are you sure?Meaning: When deleting a directory, files or directories exist within that directory.• Press the OK button to delete all files and/or directories
within that directory.
Disk not formattedMeaning: When you attempted to perform a high-level format (quick format) of media, the media had not been physically formatted yet. To solve this problem:• Use the MEDIA mode Utility page menu command
Format to physically format the media (full format).
Appendices
244
E (Error–Exceeded)
Error in formatting mediumMeaning: An error occurred while performing a physical format (full format) or high-level format (quick format) of the media. To solve this problem:• Use other media.Meaning: When executing the MEDIA mode Utility page menu command Convert to ISO9660 Format, an error occurred while rewriting the UDF area. To solve this problem:• Use other media.
Error in mount process. Please backup filesMeaning: An error was found on a UDF-format CD-R/RW or DVD-R/RW disk. To solve this problem:• Make a backup of the data, and stop using the disk which
caused the error.
Error in reading from mediumMeaning: An error occurred while reading data from media. This error may also appear when data is being written to media by a Save or Copy operation. To solve this problem:• Execute the reading operation once again. If the same
error occurs, it is possible that the data on the drive has been damaged.
Error in writing to mediumMeaning: A verification error occurred while writing data to the internal disk or USB storage device. To solve this problem:• Use the Disk Utility page menu command Check
Medium to detect and repair errors on the media. For more information, see “Check Medium” on page 728 of the PG.
• It is possible that the media has been physically damaged. Try another storage device, and avoid using the one that produced the error.
Error: invalid option fileMeaning: While preparing to install an option (such as an EXs), the system has detected corrupted data in the files to be installed. To solve this problem: • Copy the file to the USB media again, or if that fails,
download the data again.
Error loading Drumsamples.Error loading Multisamples.Meaning: When executing Change load method, a sample could not be loaded correctly.
Error: not enough disk space for the installationMeaning: There is not enough space left on the internal drive. To solve this problem: • Remove data from the internal drive, backing it up to
USB media, in order to free up space.
Error unloading Drumsamples.Error unloading Multisamples.Error unloading ExsError unloading RAMMeaning: When executing Change load method or Unload all data from selected bank, a sample could not be unloaded correctly.
Exceeded 1000 measure limitMeaning: The length of the Standard MIDI file being loaded would exceed the maximum of 1,000 measures.
Exceeded 16 ProgramsMeaning: You exceeded 16 programs while performing Advanced Conversion Load. When an AKAI Program is loaded, it will be converted into multiple programs and one combination according to its structure. At this time, the maximum number of NAUTILUS programs resulting from this conversion is limited to 16, which is the maximum number of programs that can be used in a combination. To solve this problem:• Load the AKAI programs individually, and edit them on
the NAUTILUS.• Instead of using Advanced Conversion Load, load the
multisamples or samples, and edit them on the NAUTILUS.

Error and confirmation messages F (File–Front)
245
F (File–Front)
Failed. Source device not foundFailed. Bad install.info - invalid SOURCEFailed. Bad install.info - VERSION missingFailed. Bad install.info - CRC failsMeaning: When executing the GLOBAL mode Update System Software command, these messages will appear if the update could not be performed correctly. To solve this problem:• Try the update again. Alternatively, try again using
another CD/DVD or USB flash memory.
File already existsMeaning: When executing a Create Directory or File Rename operation, a directory or file of the same name already exists on the drive.Or, when using the MEDIA mode Copy command without using wildcards, the copy destination contained a file with the same name as the copy source.Or, when using the MEDIA mode Save Sampling Data command (for All, All Multisamples, All Samples, or One Multisample), a directory already existed on the drive with the same name as the directory which would be created by the save operation.Or, when sampling to disk, an identically-named file exists in the destination directory.To solve any of these problems:• Either delete the existing directory or file, or specify a
different name.Meaning: When recording an audio track, an identically-named WAVE file exists in the directory.• Either delete the existing file, or use the SEQUENCER >
Home– Recording Setup page to specify a different name.
Meaning: If an audio track recorded before the last power-off was not saved as an .SNG file, the following message will appear when you turn on the power.
/TEMP folder detected.This folder may contain unsaved WAVE files from a previous audio track recording session.Do you want to restore the /TEMP folder, or delete it from the disk?[Restore] [Delete]
If you choose Restore, a folder named TEMP will remain on the internal disk. If you then record audio tracks in this state, and use the default name in the Preference page, the name may be identical to the already-existing WAVE file, causing this message to appear.• Specify a different name. (SEQUENCER > Home–
Recording Setup page)• Use the Disk Utility page menu Delete command to
delete the TEMP folder.
Meaning: When saving a .SNG file, a separate directory is created for the Song’s audio files. The directory’s name consists of the .SNG file name followed by “_A” (for “Audio”). If this error appears when saving a .SNG file, it can mean that a directory with this name already exists. To solve this problem:• Change the .SNG file name to something other than the
name of an existing directory, and then save the data again.
File contains unsupported dataMeaning: You attempted to load an AIFF, WAVE, or KSF file that was in a format not supported by the NAUTILUS. • In the case of a AIFF or WAVE file, use a computer (if
possible) to convert the file into a format that is supported on the NAUTILUS, and then load it.
File is read-only protectedMeaning: You attempted to write to a file or to delete a file that had a read-only attribute.Meaning: You attempted to save a file to media that contained a read-only file of the same name.• Save the file with a different name.Meaning: You attempted to save a file or directory in a Locked directory.• Use the page menu command Lock/Unlock to unlock
the directory.
File name conflictsMeaning: When saving a .SNG file, the directory in which the WAVE file used by the region is to be saved already contains a directory with the same name as the .SNG file , followed by “_A,” and that directory contains an identically-named WAVE file.Meaning: When saving a SNG file, the WAVE files being saved are such that some of them would have the same filenames as files in the save-destination.• Using the text edit field shown below “Rename,” edit the
name of the WAVE file being saved so that it does not conflict. Then press “OK.” If you press “Cancel,” that WAVE will not be saved, so you should normally edit the name and save the data.
File unavailableMeaning: You attempted to load or open a file whose format was incorrect.
Appendices
246
File/path not foundMeaning: When loading a sample file in MEDIA mode, executing the Delete command, or selecting a disk or directory in a dialog box, the specified file name does not exist.Or, when executing the Copy command in the MEDIA mode Utility page, and you used a wildcard to specify the copy file name, the specified file was not found.Meaning: In MEDIA mode when you used the Open button to open a directory, the path length including the selected directory name exceeded 76 characters.Or, when using the Copy command in MEDIA mode, the length of the copy source path exceeded 76 characters.• Rename the file and/or directories using shorter names,
so that the file path fits within 76 characters. The file path includes the file name and the names of all parent directories up to the root level of the disk.
• Check the file or directory.
Front sample data used in rear sampleCan’t overwrite
Meaning: When executing Link in the SAMPLING mode Sample Edit page, the sample data of the front sample is also being used by the rear sample, and therefore cannot be overwritten. To solve this problem:• Instead of using Overwrite, specify a different sample as
the save-destination.
H
HD ProtectedMeaning: The internal SSD is protected. To solve this problem:• On the Global-Basic tab, under Memory Protect, turn off
(un-check) the Internal HDD Save check box.
I (Illegal–Index)
Illegal file descriptionMeaning: The filename that you specified when saving a file or creating a directory contained invalid characters. To solve this problem:• Change the filename you are specifying. Filenames not
permitted by MS-DOS cannot be used as a filename.
Illegal SMF dataMeaning: You attempted to load a file that was not a Standard MIDI File.
Illegal SMF divisionMeaning: You attempted to load a Standard MIDI File that was timecode-based.
Illegal SMF formatMeaning: You attempted to load a Standard MIDI File of a format other than 0 or 1.
Inconvertible file existsMeaning: A file that cannot be used with ISO9660 format exists on the media. To solve this problem:• Media that was formatted or written by a device other
than the NAUTILUS may be impossible for the NAUTILUS to convert into ISO9660 format. To perform the conversion, use the packet writing software that was used to format or write the media.
Index number over limitMeaning: When sampling into RAM in COMBINATION, PROGRAM, or SEQUENCER mode, there are too many indexes to be simultaneously converted into a multisample.• Either convert the samples into a different program or
multisample, or use SAMPLING mode to delete some of the indexes before you continue sampling.
Invalid option fileMeaning: While preparing to install an option (such as an EXs), the system has detected corrupted data in the files to be installed. To solve this problem: • Copy the file to the USB media again, or if that fails,
download the data again.

Error and confirmation messages K
247
K
NAUTILUS system version … update complete. Please restart the system.Meaning: This message will appear when you’ve used the GLOBAL > Basic Setup– Basic page Page Menu Command Update System Software, after the update is complete. Restart the system to use the updated software. • Turn the power button off, and then on again.
M (Master–Multisample)
Master Track can’t be recorded aloneMeaning: When real-time-recording a single track, you attempted to begin recording with the master track as the current track.• Select a MIDI or Audio Track for recording, instead of
the Master Track.
Master Track is emptyMeaning: You cannot open Audio Event Edit because the Master Track is empty. To solve this problem:• Execute the SEQUENCER– Track Edit page menu
command Set Song Length etc. with an appropriate length to create a master track, and then open Audio Event Edit.
Measure number over limitMeaning: The attempted edit operation would cause the track length to exceed 999 measures.• Delete unnecessary measures.
Measure size over limitMeaning: When loading a Standard MIDI File, the number of events in a measure exceeded the maximum (approximately 65,535 events).Meaning: The attempted edit operation would cause the maximum number of events in a measure (approximately 65,535) to be exceeded. To solve either of these problems:• Use event editing etc. to delete unwanted data.
Medium changedMeaning: When executing the Copy command in the MEDIA mode Utility page, the media was exchanged or ejected, and it was not possible to copy between separate media on the same drive.
Medium unavailableMeaning: You selected a medium that does not allow writing.
Medium write protectedMeaning: The other writing-destination media is write-protected.• Turn off write protect on the other media, and execute
the command once again.
Memory fullMeaning: In SEQUENCER mode when editing a song, track or pattern, the total data of all songs has used up all of the sequence data memory, and further editing is not possible. To solve this problem:• Delete other song data etc. to increase the amount of free
memory.Meaning: While real-time recording in SEQUENCER mode, there is no more free memory to accommodate the recorded data, so recording has been forcibly halted. To solve this problem:• Delete other song data etc. to increase the amount of free
memory.
Memory overflowMeaning: While receiving exclusive data in MEDIA mode Save Exclusive, all remaining internal memory was used up. To solve this problem:• If you are receiving two or more sets of exclusive data,
transmit them separately to the NAUTILUS.Meaning: In MEDIA mode, you attempted to load more sample waveform data than there was free memory capacity. To solve this problem:• In SAMPLING mode, execute Delete sample to create
free space in the sample waveform data area, and re-load the data.
Memory ProtectedMeaning: The internal program, combination, song, set list, drum kit, wave sequence, Arpeggio pattern, or Internal HDD Save is protected.• In GLOBAL mode, turn off write-protect, and execute
the write or load operation once again.

Appendices
248
MIDI data receiving errorMeaning: While receiving MIDI System Exclusive data, the format of the received data was invalid, for example because the size of the data was incorrect.
Mount ErrorMeaning: This message will appear when you execute the GLOBAL mode Update System Software command if the CD could not be executed successfully. To solve this problem:• Try again. Alternatively, try again using a different CD.
Multisample L and R are identicalMeaning: Since the destination (save location) L and R multisample numbers are the same, the editing operation could not be executed. To solve this problem:• Select a different multisample number for the L and R of
the destination (save location).
N (No data–Not enough song memory)
No dataMeaning: When loading a Standard MIDI File, the file contained no events.Meaning: When you executed Samples in One Multisample in the “Export Samples as AIF/WAV” command in the MEDIA mode Save page, there were no samples.To solve either of these problems:• Create sample data.
No mediumMeaning: When executing a command in MEDIA mode, no media was inserted in the drive. To solve this problem:• Insert media such as a mount the drive.
No recording track specifiedMeaning: When performing real-time multi-track recording, you attempted to begin recording with no tracks set to REC. To solve this problem:• Set the desired tracks for recording to REC.
No Selected ItemMeaning: When you attempted to save a single effect with Save Effect Preset, there was no effect to be saved.• If you want to save a single effect, select either the
Preset or the User check box before executing the save.Meaning: When executing Add KSC on the GLOBAL > Basic Setup– KSC Auto-Load tab, you pressed Add without selecting a file.• First select the KSC that you want to add, and then press
Add.
No space available on mediumMeaning: When you attempted to save or copy a file, or to create a directory, there was not enough free space on the other medium. To solve this problem:• Either delete an existing file, or exchange the medium
with one that has sufficient free space.
No space available on mediumDo you want to make a divided file?Meaning: When saving a .PCG or .KSF file, there was insufficient free space on the media. Please specify whether you want to save the file in divided form.• Press the OK button to save the file across multiple
volumes of media, or press the Cancel button to cancel.
Not enough Drum Track pattern locations availableMeaning: When converting a song’s user patterns to user drum track patterns, the allowable number of user drum track patterns was exceeded. To solve this problem:• As necessary, use the MEDIA mode Save PCG
command to save the user drum track patterns. Then in SEQUENCER mode, use the Erase Drum Track Pattern menu command to free up more drum track user patterns. After that, try the conversion again.
Not enough Drum Track pattern memoryMeaning: When converting a song’s user patterns to user drum track patterns, there was not enough free memory. To solve this problem:• As necessary, use the MEDIA mode Save PCG
command to save the user drum track patterns. Then in SEQUENCER mode, use the Erase Drum Track Pattern menu command to delete the other user drum track patterns to free up more memory. After that, try the conversion again.
Not enough empty slot to copyMeaning: This message will appear when you execute Copy Insert Effect or Copy From Program if there are not enough vacant insert effects in the copy-destination. To solve this problem:• Set unused insert effects in the copy-destination to 000:
No Effect so that there will be enough vacant insert effects.
Error and confirmation messages N (No data–Not enough song memory)
249
Not enough memoryMeaning: When starting real-time recording in SEQUENCER mode, the minimum amount of free memory (such as memory for the BAR events up to the recording start location) could not be allocated. To solve this problem:• Delete other song data etc. to increase the amount of free
memory.Meaning: When executing “Load Exclusive,” you attempted to load an .EXL file that required more than 1,048,576 bytes. Such a file cannot be loaded by the NAUTILUS.Meaning: When in MEDIA mode you attempted to load an EXL file from media other than the internal drive, memory for temporary use could not be allocated on the internal drive.To solve either of these problems:• On the internal disk, create free space that is larger than
the .EXL file.
Not enough memory to loadMeaning: When you attempted to load a .SNG file or a standard MIDI file in MEDIA mode, there was insufficient free memory in the sequence memory. To solve this problem:• Delete other song data etc. to increase the amount of free
memory.
Not enough memory to open patternMeaning: There was insufficient sequencer memory to open the pattern, so editing is not possible.• Either delete unwanted data such as a song, track, or
pattern, or do not open the pattern.
Not enough multisample memoryMeaning: There is insufficient multisample memory. (The number of multisamples would exceed the maximum of 4,000.) To solve this problem:• Delete multisamples to increase the amount of free
memory.
Not enough pattern locations availableMeaning: When using the Load Drum Track Pattern command, you attempted to load more than the remaining number of user patterns in the selected song. To solve this problem:• Create a new song, and reload the patterns into user
patterns of the new song. You can load up to 100 user patterns for each song. If you need to load more than this number of drum tracks or patterns, you can distribute them between two or more songs.
Meaning: When using Auto Song Setup, the new song could not be automatically created because there was no song with the initial settings. If you executed the GLOBAL mode Change all bank references command on the song, all songs will differ from the initial settings, causing the system to determine that there is no song with the initial settings.
Not enough region locations availableMeaning: The allowable number of regions was exceeded during realtime-recording, or when you attempted to load an entire SNG file, 1 Song, or Tracks with regions being appended.• In Sequencer P4– Track Edit, select the audio track and
use the page menu command Region Edit to create enough vacant space following the last region so that the allowable number of regions will not be exceeded. Then try the operation again.
Not enough relative parameter memoryMeaning: There is insufficient memory for relative parameters. (The number of samples in the multisamples would exceed the maximum of 16,000.)• Delete multisamples or indices of multisamples to
increase the amount of free memory.
Not enough sample memoryMeaning: There is insufficient sample memory (for sample parameters or sample waveform data).• Delete samples to increase the amount of free memory.
Not enough sample/multisample locations availableMeaning: The data you attempted to load would exceed the maximum number of multisamples or samples. To solve this problem:• In SAMPLING mode, use Delete Multisample or Delete
Sample to free a sufficient number, and reload the data.‘
Not enough song locations availableMeaning: When loading a .SNG file with Append specified, you attempted to load more songs than can be loaded.Meaning: This can be caused by using the GLOBAL mode “Change all bank references” command with the Song option selected, since this modifies the settings of all songs away from the defaults; after this, the system will not recognize those songs as being empty and available.• In SEQUENCER mode, use the Initialize Song
command to increase the number of Songs that can be used, and then load the song again.
Not enough song memoryMeaning: When executing the SAMPLING mode Time Slice or Save commands, the total data for all songs occupies all of the sequence data memory area, so that saving is not possible.Meaning: When sampling to RAM in SEQUENCER mode, it is not possible to create track data at the same time.• Increase the amount of free memory, for example by
deleting another song.
No unused WAVE files foundMeaning: When you executed the MEDIA– Utility page menu command Delete Unused WAVE files, no unused WAVE files were found.

Appendices
250
O (Obey copyright rules–Oscillator)
Oscillator Mode conflicts (Check PROG mode: Program Basic Page)Meaning: In SAMPLING mode when you executed Convert MS To Program with Use Destination Program Parameters checked, the conversion destination program Oscillator Mode setting did not match.
• In PROGRAM mode, set the Oscillator Mode of the conversion destination program. If converting a monaural multisample, select Single. If converting a stereo multisample, select Double.
P (Pattern–Program)
Pattern conflicts with eventsMeaning: It was not possible to execute the Bounce operation because one of the tracks contained a pattern, and the same measure of the other track contained events or a pattern.• Open the pattern.
Pattern exists across destination to-end-of-measure or source from-measureMeaning: When moving a measure, the edit operation could not be executed because a pattern had been put in the destination end measure or the source start measure, and had not been opened.• Open the pattern.
Pattern exists in destination or source track
Open pattern?Meaning: A pattern has been placed in the track that you specified as a destination or source for editing. If you wish to open the pattern and execute (the events of the pattern will be copied), press the OK button. If you wish to execute without opening the pattern, press the Cancel button.
Pattern used in song Continue?Meaning: When editing, the specified pattern has been placed in a track. If you wish to execute, press the OK button. If you decide not to execute, press the Cancel button.
Program Bank Type conflictsMeaning: When receiving a dump of an individual bank or a single program, the NAUTILUS received a program that did not match the bank type. If the bank type does not match, the program will not be received.Meaning: When receiving an All Programs dump, the NAUTILUS received a bank whose bank type did not match. Only banks of the matching bank type will be received.• Use the Set Program User -Bank Type command
(GLOBAL > Basic Setup– Basic page Page Menu Commands) to change the bank type so that it’s the same as the one being transmitted, and then try the operation again.
Program Type conflictsMeaning: This message will appear when you execute Copy Tone Adjust if the copy-source and copy-destination program types are different. You cannot copy between HD-1 and EXi Programs, or between different types of EXi Programs.
Q (Quick Layer/Split function)
Quick Layer/Split CautionMeaning: This message may appear when you execute the Quick Layer or Quick Split function.• “There is not enough empty slot to copy Layer’s IFX.”This message appears if there are not enough insert effect slots, so that the insert effect settings of the layer/split program cannot be copied.• “Main’s active T# was replaced for Layer.”• “Main’s active T# was replaced for Lower/Upper.”• “Main’s active T# was replaced for Drum Track.”This message appears if there were not enough unused timbres in the main combination, indicating that one of them was replaced by the layer/split program.
The Quick Layer/Quick Split function does not allow you to make adjustments for insufficient insert effects or timbres. If necessary, you can execute Write Combination, and then edit the combination in COMBINATION mode.

Error and confirmation messages R (Rear sample–Root)
251
R (Rear sample–Root)
Rear sample is emptyMeaning: When you executed Link in the SAMPLING mode Sample Edit page, the sample that you specified as the rear sample is empty.• Specify a sample that contains data as the rear sample,
and execute once again.
Root directory is fullMeaning: You attempted to create a file or directory in the root directory of the media, but this would exceed the maximum number of root directory entries.• Either delete an existing file or directory, or Open a
directory to move down one level before executing once again.
S (Sample–Source)
Sample data used in other sample(s)Continue?
Meaning: Other sample(s) use the same sample data as the sample that you are editing. To continue editing, press the OK button.
Sample L and R are identicalMeaning: The edit operation could not be executed because the destination (save location) L and R sample numbers are identical.• Select different sample numbers for L and R of the
destination (save location).
Sample length is shorter than minimumMeaning: You attempted to execute an editing operation that would make the sample data shorter than 8 samples.• Change the editing range so that the sample data will be
longer than 8 samples.
Sample used in other multisample(s)Continue?
Meaning: The sample you are editing is used by other multisamples. To continue editing, press the OK button.
Selected file/path is not correctMeaning: When loading a divided .PCG file, you attempted to load a .PCG file of the same name that was not divided or had differing contents.• Load the correct .PCG file.Meaning: When loading a KSF file that was split across multiple media, the order in which you attempted to load the files was incorrect.• Load the KSF file in the correct order. To view the file
number order in which the KSF files were saved, you can check the Translation page menu command. (The sample name and number of the first KSF file will be displayed.)
Slice point over limit Can’t divideMeaning: When using the SAMPLING mode Loop Edit page Time Slice or Time Stretch commands, the Slice setting would divide the sample into more samples than the maximum possible number (1000), and thus Divide cannot be executed.• Use Link to connect any Index that you do not require,
and then execute Divide.
Source file is not 44100Hz or 48000HzCan’t convert
Meaning: When executing the MEDIA mode Utility page menu command Rate Convert, you selected a WAVE file of a sampling rate other than 44.1 kHz or 48 kHz.• You cannot convert WAVE files other than 44.1 kHz or
48 kHz.
Source IFX is all emptyMeaning: This message will appear when you execute Copy Insert Effect or Copy From Program if there is no insert effect to be copied.
Source is emptyMeaning: No data exists in the track or pattern that you specified as the source.• Specify a track or pattern that contains musical data.
Source sample is emptyMeaning: When executing Insert, Mix, or Paste, the source sample is empty.• Execute the Copy operation before executing Insert, Mix,
or Paste.
Appendices
252
T (The clock–/TEMP folder detected)
The clock battery voltage is low. Please replace the battery, and set the date and time in MEDIA modeMeaning: The battery for the clock/calendar function has run low, and needs to be replaced. Your Korg Distributor can help you find a service center to replace the battery.
The data on the medium will be lost. Are You Sure?
Meaning: When you format a disk, all of the data on the disk will be erased. Make sure that you have any data backed up before proceeding! To proceed with formatting the media, press OK.
There is no readable dataMeaning: Either the file size is 0 or the file does not contain data that can be accessed by the load or open operation. Alternatively, the data is damaged etc., and cannot be loaded or accessed.
This file is already loadedMeaning: When loading a divided .PCG file, you attempted to load a file that had already been loaded.• Load the .PCG files that have not yet been loaded.
/TEMP folder detected.This folder may contain unsaved WAVE files from a previous audio track recording session.Do you want to restore the /TEMP folder, or delete it from the disk?
[Restore] [Delete]Meaning: The WAVE files created when you recorded audio tracks before powering-off were not saved as song data, and remain in the TEMP folder of the internal disk. Since the data was not saved as song data, all audio events and region data were deleted, but if necessary you can save these WAVE files and use them to create a new song.• If you want to keep this data, press Restore. If you want
to delete this data, press Delete.
U (Unable to create directory–USB Hub)
Unable to create directoryMeaning: You attempted to create a directory that would exceed the maximum path length of 76 characters. The path includes the names of the directory and all its parent directories up to the root level of the disk.• Rename the directories using shorter names, so that the
file path fits within 76 characters.
Unable to save fileMeaning: When saving a file in MEDIA mode, using the Copy command in MEDIA mode, or sampling to drive as a WAVE file, the resulting file path exceeded 76 characters.To solve this problem:• Rename the file and/or directories using shorter names,
so that the file path fits within 76 characters. The file path includes the file name and the names of all parent directories up to the root level of the drive.
Meaning: When using the Copy command in MEDIA mode, not enough temporary storage space was available.
USB HUB Power exceededPlease disconnect USB device
Meaning: The power consumption of your USB devices has exceeded the capacity of the hub to which they are connected. The USB hub will not be recognized correctly in this state. To solve this problem:• If you’re using a USB hub or device that is capable of
being self-powered, use it in self-powered mode. • If you are using more than one USB hub, try connecting
the device to a different USB hub.

Error and confirmation messages W (Wave)
253
W (Wave)
.WAV already exists. Overwrite?Meaning: When importing a WAVE file that requires conversion to 48kHz/mono, a file of the same name already exists on the drive. To solve this problem:• Either delete the existing file, or rename it before
importing.
WAVE files on this external medium will not be played with sequencer audio track playback. Copy SNG and WAVE Directory to Internal HDD, and load SNG from internal HDDMeaning: The WAVE file used by the SNG data you’re loading in MEDIA mode exists on external media, and will not play back correctly when loaded. Audio track recording and playback is available only on the internal drive. To solve this problem:• Copy the .SNG file and the directory for that .SNG file
(the directory containing the WAVE files it uses) to the same directory of the internal drive, and then load the data again.
WAVE file size over limitMeaning: When editing an audio track in SEQUENCER mode, you exceeded the maximum number of 230,400,000 samples (80 minutes at a sample rate of 48 kHz, 16-bit) allowable in a WAVE file.
Y (You)
You can’t undo this operationAre you sure?
Meaning: Once you enter event editing (even if you leave event editing without actually editing an event), it will no longer be possible to execute a Compare of the previous edit. If you wish to enter event editing, press the OK button. To cancel, press the Cancel button.
You can’t undo last operationAre you sure?
Meaning: When you exit recording or event editing in SEQUENCER mode, the memory area for Undo (Compare function) is not allocated. If you wish to keep the data that was just recorded or edited, press the OK button. If you wish to return to the previous data (i.e., to delete the data that was just recorded or edited), press the Cancel button.Meaning: When editing in SEQUENCER mode, memory area for Undo (Compare function) cannot be allocated. If you wish to execute the edit, press the OK button. (It will not be possible to return to the state before editing.) If you decide not to execute the edit, press the Cancel button.• In order to allocate memory area for Undo (Compare
function), delete unneeded data such as songs, tracks, or patterns. We recommend that you save data to media before you execute the edit operation.

Appendices
254
Internal drive and Media information
Types of media supported by the NAUTILUSInternal driveNaturally, you can read and write data using the built-in drive.
External USB storage mediaThe NAUTILUS supports USB external storage class devices, including hard drives, flash drives, magneto-optical disks, floppy disks, etc. Both MS-DOS FAT16 and FAT32 formats are supported, with the following capacities:
FAT32: up to 2 Terabytes (2,000 Gigabytes)FAT16: up to 4 Gigabytes
For more information, including requirements for external USB storage media and details on connecting USB devices, please see “4. Connecting USB devices” on page 22.
USB CD-R/RW and DVDUsing a USB CD-R/RW drive, the NAUTILUS can read and write UDF format CD-R/RW disks. For more information, see “CD-R/RW disks on the NAUTILUS: UDF and packet-writing” on page 948 of the PG.
Operations that the NAUTILUS can perform on media
Functions available with all media• Saving and Loading files (MEDIA mode)
You can save and load any data stored in memory. For details on NAUTILUS file types, please see “Files, directories, and icons” on page 695 of the PG. Loading or saving divided files is supported for USB media.
• Utility operations (MEDIA mode)You can copy or format media.
• Sampling/resampling (PROGRAM, COMBINATION, SEQUENCER, SAMPLING modes)If Save to = Disk, sampled/resampled Wave files will be written directly to media.
• Wave file playback (SEQUENCER, MEDIA modes)(Some limitations apply.)
• Convert to ISO9660 Format (MEDIA mode)The native NAUTILUS CD-R/RW format is UDF, which allows you to write repeatedly to the same CD. UDF is a standard format, but you can also convert such disks to the more common (but less flexible) ISO9660 format.
Functions available only on the internal drive• Audio recording and playback (SEQUENCER mode)
You can record and play back audio tracks.• Audio track editing (SEQUENCER mode)
You can edit the WAVE files used by audio tracks.
●: supportedx : not supported– : not applicableNote: If you have any questions regarding the media that can be used, please contact your local Korg distributor. You may also check the Korg website (http://www.korg.com).
Function Internal Drive
USB HD, Flash
Drives, MO
USB Floppy Disks
USB CD-R/RW(UDF Packet
Write)
USB CD-R/RW(ISO9660)
USB DVD-ROM (ISO9660, UDF)
Save ● ● ● ● x x
Load ● ● ● ● ● ●
Sampling/Resampling ● ● x – – x
WAVE File Play ● ● x x x x
Convert to ISO9660 Format – – – ● – x
Audio Track Recording ● x x x x x
Audio Track Edit ● x x x x x

Internal drive and Media information Restoring the factory settings
255
Restoring the factory settings
Restoring the original soundsYou can easily restore the Programs, Combinations, Drum Kits, Wave Sequences, Arpeggio Pattern, Set Lists, and EXs samples to their original state as shipped from the factory. This is done by loading the PRELOAD.PCG file, which is included on the internal drive.
This operation will erase all of the internal NAUTILUS sounds. If there are any non-factory sounds that you want to keep, save them to disk now! For more information, see “Saving data” on page 203.
Make sure that Memory Protect is offBefore loading, make sure that Memory Protect is turned off:1. Press the MODE button to select GLOBAL mode.2. Go to the Basic tab of the Basic Setup page.3. Make sure that all of the Memory Protect check-boxes
are not checked.
Loading from the internal driveGenerally, it will be more convenient to load sounds from the internal drive:1. Press the MODE button to select MEDIA mode.2. Go to the Load tab of the File page.
3. Use Drive Select to select HDD.The LCD screen will show the files and folders on the internal drive.
4. Touch the FACTORY folder to select it.5. Press the on-screen Open button.
The LCD will now show the contents of the FACTORY folder.
6. Select the PRELOAD.PCG file.7. Press the Load button.
The Load PCG dialog box will appear.
8. Use “.PCG Contents” to select the data you want to load. To completely restore the factory sounds, select All.“All” will load all of the factory sounds, including Programs, Combinations, Set Lists, Drum Kits, Wave Sequences, Drum Track patterns, and Arpeggio Patterns. For more information on the factory sounds, see “Program bank contents” on page 26, “Combination bank contents” on page 55, “Drum Kit memory structure” on page 193, “Wave Sequence banks” on page 183, and “Arpeggio Patterns” on page 157.
9. Select the PRELOAD.KSC checkbox.10.Set “.KSC Allocation” to Clear All.11.Set the Load Method for EXs and User Sample Banks
to KSC Settings.12.Press the OK button to load the data.
Next, to make sure that the KSC loads automatically at startup:
13.Go to the GLOBAL > Basic– KSC Auto-Load page.14.In the list of KSCs, check the Auto-load box next to
PRELOAD.KSC.15.Un-check all of the other KSCs.

Appendices
256
SpecificationsOperating temperature
+5 – +40 °C (no condensation)
System/Keyboard System NAUTILUS System Version 1.0 Velocity Aftertouch
Keyboard NAUTILUS-61 61-key, Natural Touch Semi-Weighted Yes No
NAUTILUS-73 73-key, Natural Touch semi-Weighted Yes No
NAUTILUS-88 88-key, RH3 (Real Weighted Hammer Action 3)*1 Yes No
*1: The key weight of the RH3 keyboard differs in four stages across the pitch range (with low notes being heavier, and high notes being lighter), delivering a playing feel similar to that of a grand piano.
Tone Generator Synthesis Types: 9 HD-1 High Definition Synthesizer (PCM) HD-1
AL-1 Analog Synthesizer (Analog Modeling) EXi (Expansion Instruments)
CX-3 Tonewheel Organ (Tonewheel Organ Modeling)
STR-1 Plucked String (Physical Modeling)
MS-20EX Component Modeling Technology (Analog Modeling)
PolysixEX Component Modeling Technology (Analog Modeling)
MOD-7 Waveshaping VPM Synthesizer (VPM Synthesis)
SGX-2 Premium Piano (Acoustic Piano)
EP-1 MDS Electric Piano (Electric Piano)
Maximum Polyphony*2*3 HD-1 140 voices
AL-1 80 voices
CX-3 200 voices
STR-1 40 voices
MS-20EX 40 voices
PolysixEX 180 voices
MOD-7 52 voices
SGX-2 100 voices*4
EP-1 104 voices
*2: In rare cases, when a large number of processor-intensive effects are active simultaneously (for instance, more than 14 O-Verbs), polyphony may be slightly reduced.
*3: A portion of the multicore processor in NAUTILUS is devoted to generating voices, and a separate portion is devoted to generating effects. NAUTILUS dynamically allocates the voice processing power between the engines as necessary. The quoted maximum numbers of voices apply when 100% of the voice processing power is devoted to a single engine.
*4: 100 dual-stereo notes (equivalent to 400 mono voices)
Preset PCM RAM 496 MB / Drive 2.3 GB (ROM 1,771 multisamples, 3,955 Drumsamples)
Build-in Expansion PCM Libraries
EXs301: German2 D PianoEXs302: Italian F PianoEXs303: Japanese Upright U PianoEXs304: Prepared PianoEXs305: Historical KeyboardsEXs306: Vintage Keyboards 2EXs307: Strings & SynthsEXs308: Guitar CollectionEXs309: Bass CollectionEXs310: World EssenceEXs311: Background LoopsEXs312: SFX & HitsEXs313: Found PercussionsEXs314: Expansion Drums
PCM RAM capacity About 2 GB*5
*5: The memory available for SAMPLING mode will change based on the use of Expansion PCM libraries and User Sample Banks.
Wave Sequences Preload 377 Wave Sequences
User Memory 598 Wave Sequences
Support for stereo multisamples, synchronization of individual notes, and tempo-based settings.
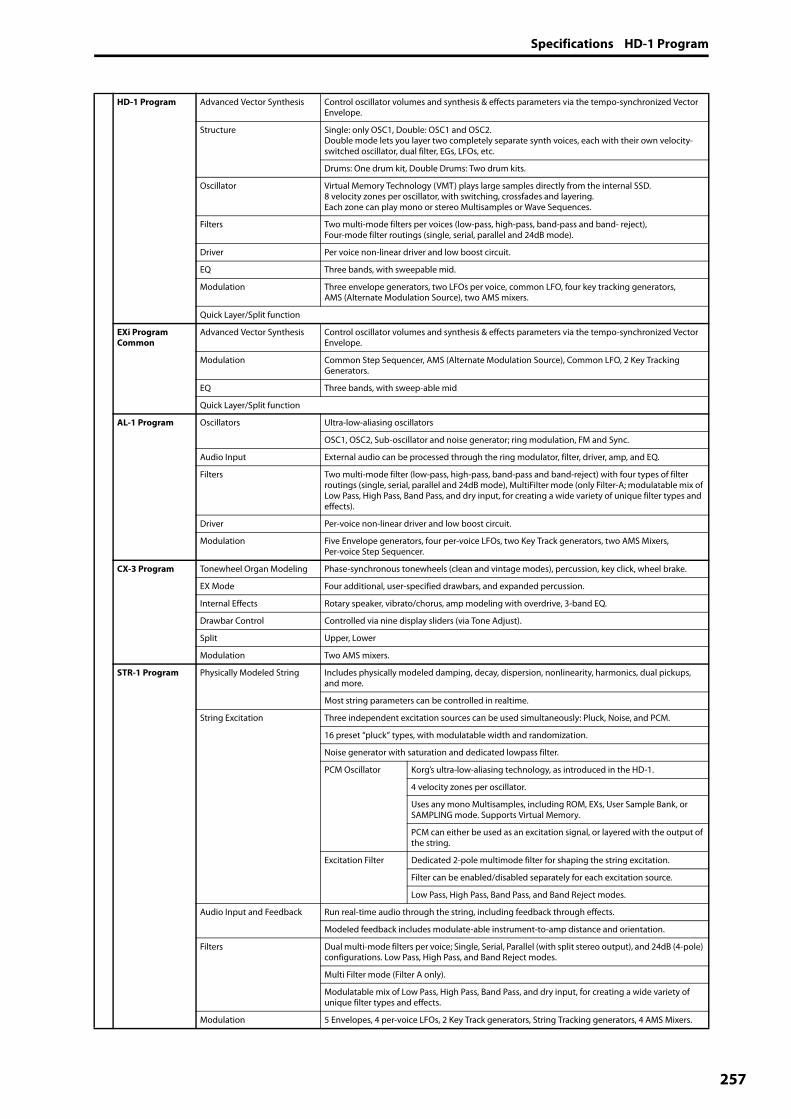
Specifications HD-1 Program
257
HD-1 Program Advanced Vector Synthesis Control oscillator volumes and synthesis & effects parameters via the tempo-synchronized Vector Envelope.
Structure Single: only OSC1, Double: OSC1 and OSC2.Double mode lets you layer two completely separate synth voices, each with their own velocity-switched oscillator, dual filter, EGs, LFOs, etc.
Drums: One drum kit, Double Drums: Two drum kits.
Oscillator Virtual Memory Technology (VMT) plays large samples directly from the internal SSD.8 velocity zones per oscillator, with switching, crossfades and layering.Each zone can play mono or stereo Multisamples or Wave Sequences.
Filters Two multi-mode filters per voices (low-pass, high-pass, band-pass and band- reject),Four-mode filter routings (single, serial, parallel and 24dB mode).
Driver Per voice non-linear driver and low boost circuit.
EQ Three bands, with sweepable mid.
Modulation Three envelope generators, two LFOs per voice, common LFO, four key tracking generators, AMS (Alternate Modulation Source), two AMS mixers.
Quick Layer/Split function
EXi Program Common
Advanced Vector Synthesis Control oscillator volumes and synthesis & effects parameters via the tempo-synchronized Vector Envelope.
Modulation Common Step Sequencer, AMS (Alternate Modulation Source), Common LFO, 2 Key Tracking Generators.
EQ Three bands, with sweep-able mid
Quick Layer/Split function
AL-1 Program Oscillators Ultra-low-aliasing oscillators
OSC1, OSC2, Sub-oscillator and noise generator; ring modulation, FM and Sync.
Audio Input External audio can be processed through the ring modulator, filter, driver, amp, and EQ.
Filters Two multi-mode filter (low-pass, high-pass, band-pass and band-reject) with four types of filter routings (single, serial, parallel and 24dB mode), MultiFilter mode (only Filter-A; modulatable mix of Low Pass, High Pass, Band Pass, and dry input, for creating a wide variety of unique filter types and effects).
Driver Per-voice non-linear driver and low boost circuit.
Modulation Five Envelope generators, four per-voice LFOs, two Key Track generators, two AMS Mixers, Per-voice Step Sequencer.
CX-3 Program Tonewheel Organ Modeling Phase-synchronous tonewheels (clean and vintage modes), percussion, key click, wheel brake.
EX Mode Four additional, user-specified drawbars, and expanded percussion.
Internal Effects Rotary speaker, vibrato/chorus, amp modeling with overdrive, 3-band EQ.
Drawbar Control Controlled via nine display sliders (via Tone Adjust).
Split Upper, Lower
Modulation Two AMS mixers.
STR-1 Program Physically Modeled String Includes physically modeled damping, decay, dispersion, nonlinearity, harmonics, dual pickups, and more.
Most string parameters can be controlled in realtime.
String Excitation Three independent excitation sources can be used simultaneously: Pluck, Noise, and PCM.
16 preset “pluck” types, with modulatable width and randomization.
Noise generator with saturation and dedicated lowpass filter.
PCM Oscillator Korg’s ultra-low-aliasing technology, as introduced in the HD-1.
4 velocity zones per oscillator.
Uses any mono Multisamples, including ROM, EXs, User Sample Bank, or SAMPLING mode. Supports Virtual Memory.
PCM can either be used as an excitation signal, or layered with the output of the string.
Excitation Filter Dedicated 2-pole multimode filter for shaping the string excitation.
Filter can be enabled/disabled separately for each excitation source.
Low Pass, High Pass, Band Pass, and Band Reject modes.
Audio Input and Feedback Run real-time audio through the string, including feedback through effects.
Modeled feedback includes modulate-able instrument-to-amp distance and orientation.
Filters Dual multi-mode filters per voice; Single, Serial, Parallel (with split stereo output), and 24dB (4-pole) configurations. Low Pass, High Pass, and Band Reject modes.
Multi Filter mode (Filter A only).
Modulatable mix of Low Pass, High Pass, Band Pass, and dry input, for creating a wide variety of unique filter types and effects.
Modulation 5 Envelopes, 4 per-voice LFOs, 2 Key Track generators, String Tracking generators, 4 AMS Mixers.
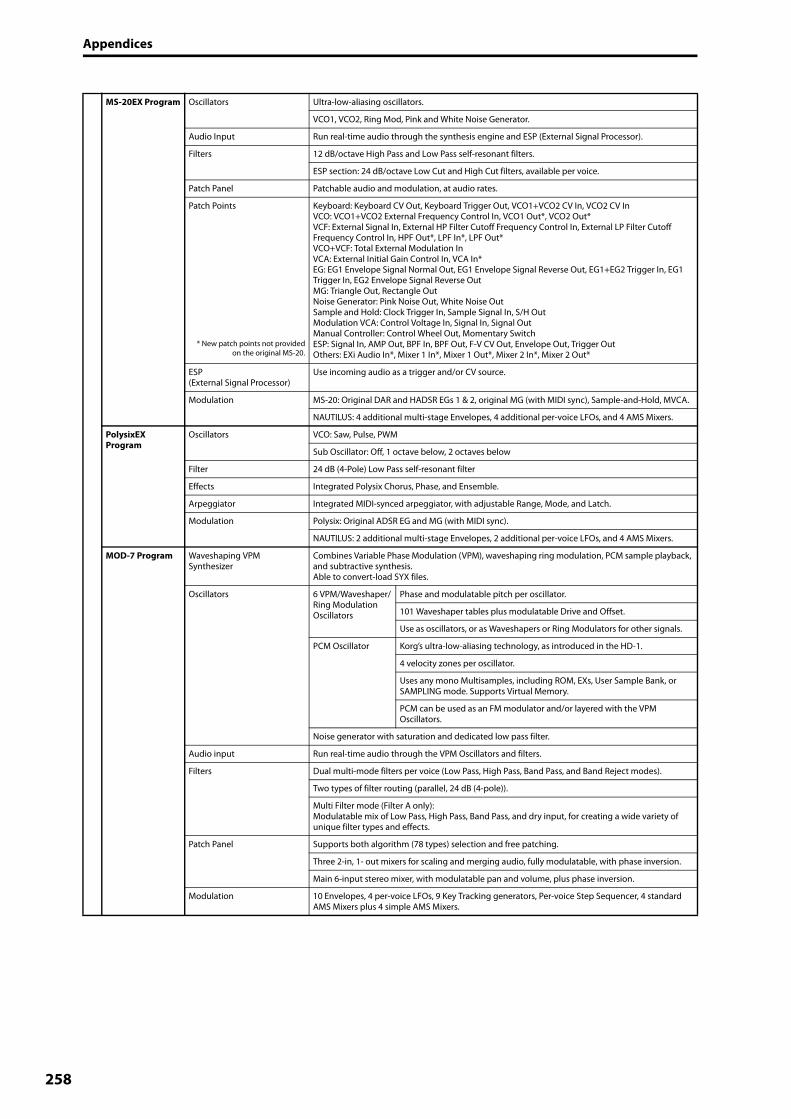
Appendices
258
MS-20EX Program Oscillators Ultra-low-aliasing oscillators.
VCO1, VCO2, Ring Mod, Pink and White Noise Generator.
Audio Input Run real-time audio through the synthesis engine and ESP (External Signal Processor).
Filters 12 dB/octave High Pass and Low Pass self-resonant filters.
ESP section: 24 dB/octave Low Cut and High Cut filters, available per voice.
Patch Panel Patchable audio and modulation, at audio rates.
Patch Points
* New patch points not providedon the original MS-20.
Keyboard: Keyboard CV Out, Keyboard Trigger Out, VCO1+VCO2 CV In, VCO2 CV InVCO: VCO1+VCO2 External Frequency Control In, VCO1 Out*, VCO2 Out*VCF: External Signal In, External HP Filter Cutoff Frequency Control In, External LP Filter Cutoff Frequency Control In, HPF Out*, LPF In*, LPF Out*VCO+VCF: Total External Modulation InVCA: External Initial Gain Control In, VCA In*EG: EG1 Envelope Signal Normal Out, EG1 Envelope Signal Reverse Out, EG1+EG2 Trigger In, EG1 Trigger In, EG2 Envelope Signal Reverse OutMG: Triangle Out, Rectangle OutNoise Generator: Pink Noise Out, White Noise OutSample and Hold: Clock Trigger In, Sample Signal In, S/H OutModulation VCA: Control Voltage In, Signal In, Signal OutManual Controller: Control Wheel Out, Momentary SwitchESP: Signal In, AMP Out, BPF In, BPF Out, F-V CV Out, Envelope Out, Trigger OutOthers: EXi Audio In*, Mixer 1 In*, Mixer 1 Out*, Mixer 2 In*, Mixer 2 Out*
ESP (External Signal Processor)
Use incoming audio as a trigger and/or CV source.
Modulation MS-20: Original DAR and HADSR EGs 1 & 2, original MG (with MIDI sync), Sample-and-Hold, MVCA.
NAUTILUS: 4 additional multi-stage Envelopes, 4 additional per-voice LFOs, and 4 AMS Mixers.
PolysixEX Program
Oscillators VCO: Saw, Pulse, PWM
Sub Oscillator: Off, 1 octave below, 2 octaves below
Filter 24 dB (4-Pole) Low Pass self-resonant filter
Effects Integrated Polysix Chorus, Phase, and Ensemble.
Arpeggiator Integrated MIDI-synced arpeggiator, with adjustable Range, Mode, and Latch.
Modulation Polysix: Original ADSR EG and MG (with MIDI sync).
NAUTILUS: 2 additional multi-stage Envelopes, 2 additional per-voice LFOs, and 4 AMS Mixers.
MOD-7 Program Waveshaping VPM Synthesizer
Combines Variable Phase Modulation (VPM), waveshaping ring modulation, PCM sample playback, and subtractive synthesis.Able to convert-load SYX files.
Oscillators 6 VPM/Waveshaper/Ring Modulation Oscillators
Phase and modulatable pitch per oscillator.
101 Waveshaper tables plus modulatable Drive and Offset.
Use as oscillators, or as Waveshapers or Ring Modulators for other signals.
PCM Oscillator Korg’s ultra-low-aliasing technology, as introduced in the HD-1.
4 velocity zones per oscillator.
Uses any mono Multisamples, including ROM, EXs, User Sample Bank, or SAMPLING mode. Supports Virtual Memory.
PCM can be used as an FM modulator and/or layered with the VPM Oscillators.
Noise generator with saturation and dedicated low pass filter.
Audio input Run real-time audio through the VPM Oscillators and filters.
Filters Dual multi-mode filters per voice (Low Pass, High Pass, Band Pass, and Band Reject modes).
Two types of filter routing (parallel, 24 dB (4-pole)).
Multi Filter mode (Filter A only):Modulatable mix of Low Pass, High Pass, Band Pass, and dry input, for creating a wide variety of unique filter types and effects.
Patch Panel Supports both algorithm (78 types) selection and free patching.
Three 2-in, 1- out mixers for scaling and merging audio, fully modulatable, with phase inversion.
Main 6-input stereo mixer, with modulatable pan and volume, plus phase inversion.
Modulation 10 Envelopes, 4 per-voice LFOs, 9 Key Tracking generators, Per-voice Step Sequencer, 4 standard AMS Mixers plus 4 simple AMS Mixers.

Specifications SGX-2 Program
259
SGX-2 Program Premium Piano Virtual Memory Technology (VMT) plays large samples directly from the internal SSD.Chromatically sampled at up to 12 velocity levels, no looping.Damper resonance and mechanical noise.Modeled String Resonance.Una Corda sample support.
PCM EXs301: German2 D Piano12-step velocity layered sound with ambient piano type samples
EXs302: Italian F Piano12-step velocity layered sound samples, without soft pedal
EXs303: Japanese Upright U Piano8-step velocity layered sound
EXs304: Prepared Piano1–4-steps velocity layered sound
Piano Type 64
Oscillator Control Damper Resonance, Damper Noise, Mechanical Noise, Note Release, String Resonance, Una Corda
EP-1 Program MDS Electric Piano Tine-type and reed-type electric pianos powered by Multi-Dimensional Synthesis (MDS), and vintage effects.
Electric Piano Model Types: 7 Tine EP 1 Early, Tine EP 1 Late, Tine EP II, Tone EP V, Tine EP DMP, Reed EP200, Reed EP200A
Oscillator Control Harmonic Sound Level, Attack Noise Level, Release Noise Level, Attack Brightness, Hammer Width
Panel Control Tine Type Preamp Volume, Tone (Treble, Bass), Vibrate (On/Off, Intensity, Speed), Amp/Cabinet (On/Off, Drive)
Reed Type Preamp Volume, Tone (Treble, Bass), Vibrate (Intensity, Speed), Amp/Cabinet (On/Off, Drive)
Effect Types: 9 Small Phase, Orange Phase, Clack Phase, Vintage Chorus, Black Chorus, EP Chorus, Vintage Flanger, Red Comp, VOX Wah
Combination Number of Timbres 16 Maximum
Master Keyboard Functionality
Keyboard and velocity splits, layers, and crossfades of up to 16 Programs and/or external MIDI devices.
Advanced Vector Synthesis Control oscillator volumes and synthesis & effects parameters via the tempo-synchronized Vector Envelope.
Quick Layer/Split function
Drum kit Assignable stereo/mono samples with 8 velocity zones per oscillator (with crossfade functions).
Number of Programs/Combinations/Drum kits
User memory programs 2,560 (1280HD-1 + 640EXi=1920 preload)
User memory combinations 1,792 (256 or more preloaded)
User memory drum kits 264 (104 or more preloaded)
256 GM Level2 preset programs+ 9 GM Level 2 drum preset programs
Set lists Number of set lists/slots 128 set lists, 128 slots per set list
Each set list provides a 9-band graphic EQ, and a Tone Adjust function that allows program settings to be adjusted.
Hold Time setting of Smooth Sound Transition (SST) supported for each slot.
Sampling System Open Sampling System (resampling, In-Track sampling)
Bit/Frequency RAM: 16bit/48kHz Stereo/Mono SamplingDrive: 16 or 24 bit/48kHz
Sampling time RAM: Depends on the amount of available PCM RAMDrive: Maximum of 80 minutes stereo (879 MB: 16bit)
Samples 16,000 samples/4,000 multisamples (128 indexes per multisample)
Formats Korg format, AKAI S1000/S3000 data (with advanced Program parameter conversion); SoundFont 2.0, AIFF, and WAVE formats
Editing Time Stretch, Time Slice, Crossfade Loop, and other standard editing features.
Effects Insert Effects 12, Stereo in / stereo out
Master Effects 2, Stereo in / stereo out
Total Effects 2, Stereo in / stereo out
Timbre/Track EQ One 3-band EQ for each timbre/track
Effect Types 197 different Effects types (Any Effect type may be used for Insert, Master, or Total Effects.)
Modulation Dynamic Modulation and Common LFO
Effects Control Busses Stereo side-chaining for compressors, gates, vocoders, etc.
Effect Presets 783, Maximum 32 per 1 effect (Preset User)
Arpeggiator Arpeggiator One module in PROGRAM mode, two modules in COMBINATION and SEQUENCER modes.
Arpeggio Pattern 5 presets + ARP A 2,048 slots (1,593 preload) + ARP B 128 slots
Controllers On/Off, Latch, Gate, Velocity, Length, Swing, Tempo

Appendices
260
Drum Track Preset patterns 1,272 preset (common with the preset patterns of the MIDI sequencer)
User patterns 1,000 patternsPatterns created in SEQUENCER mode can be converted to drum track user patterns.
Controllers DRUM On/Off
Trigger Mode, Sync, Zone, Swing, Drum SD and Tempo settings can be specified.
Step Sequence User patterns 4 patterns (Drum Track cannot be used simultaneously.)
Sequencer/HDR Tracks 16-track MIDI sequencer + 16-track hard disk recorder + master track.
Number of Songs 200 songs
Resolution � /480
Tempo 40.00–300.00 (1/100 BPM resolution)
Maximum memory 400,000 MIDI events (with MIDI data only) or 300,000 Audio events (with Audio data only)
MIDI Tracks 16 tracks plus the master track718 preset/100 user patterns (per song)18 preset/16 user template songsFormat: Korg (NAUTILUS, KRONOS, OASYS) format, SMF formats 0 and 1
Audio Tracks 16-track playback, 4-track simultaneous recording, WAV file format 16 bit/24 bitAutomation: Volume, Pan, EQ, and Send1/210,000 regions (max.), Event Anchors, BPM Adjust
Other Functions RPPR (Realtime Pattern Play and Record): 1 Pattern set per song.
General Media Load, save, utility, data filer function (save/load MIDI System Exclusive data), CD-R/RW (UDF format read/write), ISO9660 Level 1
Controllers Joystick, switches 1 & 2
ARP Controller Section
Switches = ON/OFF, LATCHKnobs = gate, Velocity, Length, Swing, Tempo
DRUM Controller Section
Switches = ON/OFFKnobs = Swing, Drum SD, Tempo
Display TouchView graphical user interface, 7 inch TFT, WVGA (800x480 dots), adjustable brightness.
Principal specifications Frequency response 20 Hz–22 kHz ±1.0 dB, 10 kΩ load
THD+N 20 Hz–22 kHz 0.01%, 10 kΩ load (typical)
Signal to noise ratio 95 dB (typical)
Dynamic range 95 dB (typical)
Crosstalk 95 dB, at 1 kHz (typical)
Audio Outputs (Analog)
(Digital)
Audio Outputs (main) L/MONO, R
Audio Outputs (individual) 1–4
1/4" TRS balanced
Output Impedance: 350 Ω stereo; 175 Ω mono (L/Mono only)
Nominal Level: +4.0 dBu
Maximum Level: +16.0 dBu
Load Impedance: 600 Ω or greater
MASTER VOLUME slider controls only Audio Outputs (main) L/MONO and R
Headphones 1/4" stereo phone jack
Output Impedance: 33 Ω
Maximum Level: 60+60 mW @33 Ω
MASTER VOLUME slider (link with Audio Outputs (main))
USB B Format: 24 bit
Sample Rate: 48 kHz
2 channels (Digital output of the same signals as Audio Outputs (main) L/MONO and R)
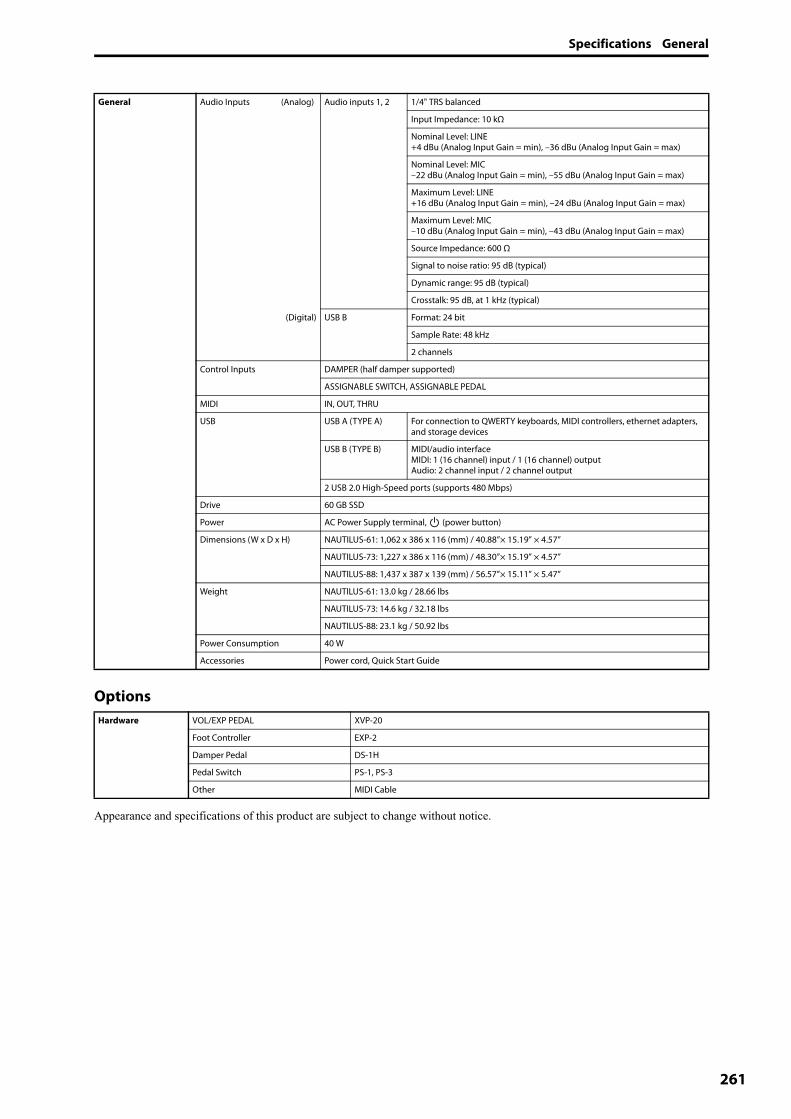
Specifications General
261
Options
Appearance and specifications of this product are subject to change without notice.
General Audio Inputs (Analog)
(Digital)
Audio inputs 1, 2 1/4" TRS balanced
Input Impedance: 10 kΩ
Nominal Level: LINE+4 dBu (Analog Input Gain = min), –36 dBu (Analog Input Gain = max)
Nominal Level: MIC–22 dBu (Analog Input Gain = min), –55 dBu (Analog Input Gain = max)
Maximum Level: LINE+16 dBu (Analog Input Gain = min), –24 dBu (Analog Input Gain = max)
Maximum Level: MIC–10 dBu (Analog Input Gain = min), –43 dBu (Analog Input Gain = max)
Source Impedance: 600 Ω
Signal to noise ratio: 95 dB (typical)
Dynamic range: 95 dB (typical)
Crosstalk: 95 dB, at 1 kHz (typical)
USB B Format: 24 bit
Sample Rate: 48 kHz
2 channels
Control Inputs DAMPER (half damper supported)
ASSIGNABLE SWITCH, ASSIGNABLE PEDAL
MIDI IN, OUT, THRU
USB USB A (TYPE A) For connection to QWERTY keyboards, MIDI controllers, ethernet adapters, and storage devices
USB B (TYPE B) MIDI/audio interfaceMIDI: 1 (16 channel) input / 1 (16 channel) outputAudio: 2 channel input / 2 channel output
2 USB 2.0 High-Speed ports (supports 480 Mbps)
Drive 60 GB SSD
Power AC Power Supply terminal, (power button)
Dimensions (W x D x H) NAUTILUS-61: 1,062 x 386 x 116 (mm) / 40.88”× 15.19” × 4.57”
NAUTILUS-73: 1,227 x 386 x 116 (mm) / 48.30”× 15.19” × 4.57”
NAUTILUS-88: 1,437 x 387 x 139 (mm) / 56.57”× 15.11” × 5.47”
Weight NAUTILUS-61: 13.0 kg / 28.66 lbs
NAUTILUS-73: 14.6 kg / 32.18 lbs
NAUTILUS-88: 23.1 kg / 50.92 lbs
Power Consumption 40 W
Accessories Power cord, Quick Start Guide
Hardware VOL/EXP PEDAL XVP-20
Foot Controller EXP-2
Damper Pedal DS-1H
Pedal Switch PS-1, PS-3
Other MIDI Cable
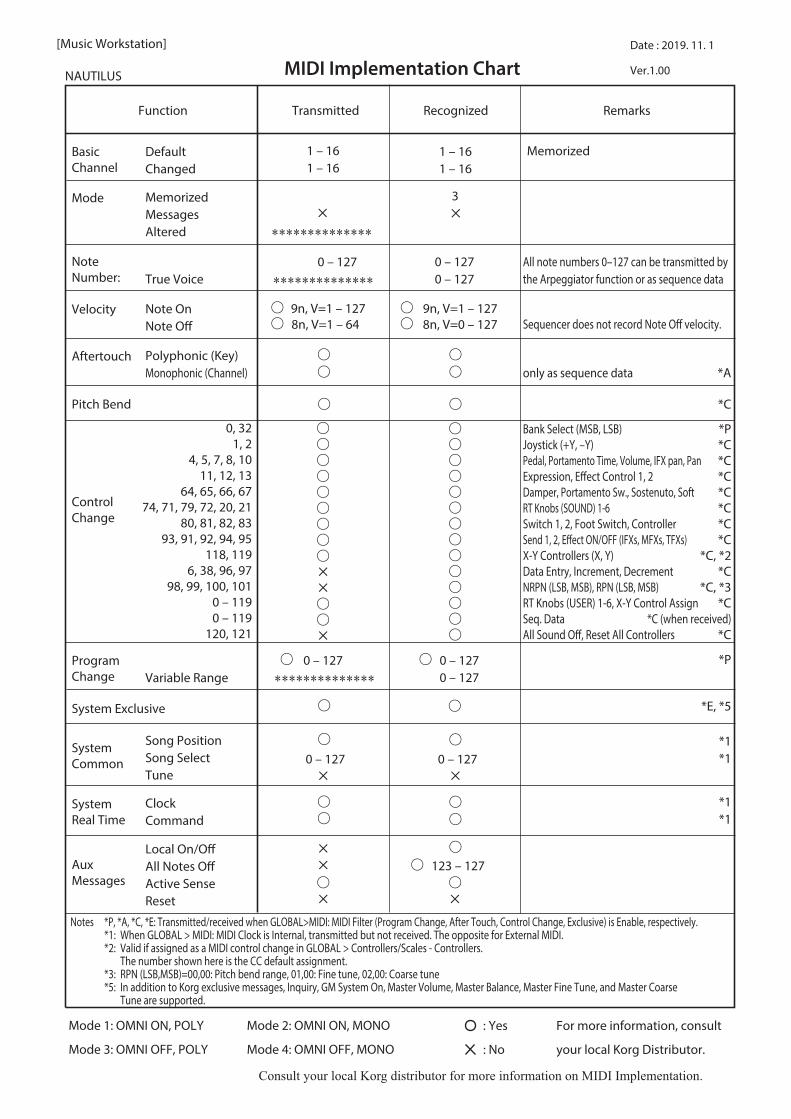
MIDI Implementation Chart
Date : 2019. 11. 1
Ver.1.00 NAUTILUS
*C
*E, *5
*1 *1
*1 *1
*P
Memorized
[Music Workstation]
only as sequence data *A
All note numbers 0–127 can be transmitted by the Arpeggiator function or as sequence data
Sequencer does not record Note Off velocity.
Bank Select (MSB, LSB) *PJoystick (+Y, –Y) *CPedal, Portamento Time, Volume, IFX pan, Pan *CExpression, Effect Control 1, 2 *CDamper, Portamento Sw., Sostenuto, Soft *CRT Knobs (SOUND) 1-6 *CSwitch 1, 2, Foot Switch, Controller *CSend 1, 2, Effect ON/OFF (IFXs, MFXs, TFXs) *CX-Y Controllers (X, Y) *C, *2Data Entry, Increment, Decrement *CNRPN (LSB, MSB), RPN (LSB, MSB) *C, *3RT Knobs (USER) 1-6, X-Y Control Assign *CSeq. Data *C (when received)All Sound Off, Reset All Controllers *C
0, 321, 2
4, 5, 7, 8, 1011, 12, 13
64, 65, 66, 6774, 71, 79, 72, 20, 21
80, 81, 82, 8393, 91, 92, 94, 95
118, 1196, 38, 96, 97
98, 99, 100, 1010 – 1190 – 119
120, 121
Notes *P, *A, *C, *E: Transmitted/received when GLOBAL>MIDI: MIDI Filter (Program Change, After Touch, Control Change, Exclusive) is Enable, respectively. *1: When GLOBAL > MIDI: MIDI Clock is Internal, transmitted but not received. The opposite for External MIDI. *2: Valid if assigned as a MIDI control change in GLOBAL > Controllers/Scales - Controllers. The number shown here is the CC default assignment. *3: RPN (LSB,MSB)=00,00: Pitch bend range, 01,00: Fine tune, 02,00: Coarse tune *5: In addition to Korg exclusive messages, Inquiry, GM System On, Master Volume, Master Balance, Master Fine Tune, and Master Coarse Tune are supported.
SystemReal Time
ClockCommand
AuxMessages
Local On/OffAll Notes OffActive SenseReset
Function Transmitted Recognized Remarks
Basic Channel
DefaultChanged
Aftertouch
Pitch Bend
Polyphonic (Key)Monophonic (Channel)
Program Change Variable Range
System Exclusive
SystemCommon
Song PositionSong SelectTune
Velocity Note OnNote Off
Note Number: True Voice
Mode MemorizedMessagesAltered
Control Change
Mode 1: OMNI ON, POLY
Mode 3: OMNI OFF, POLY
Mode 2: OMNI ON, MONO
Mode 4: OMNI OFF, MONO
0 – 127
9n, V=1 – 127 8n, V=1 – 64
0 – 127
0 – 127
1 – 161 – 16
0 – 1270 – 127
9n, V=1 – 127 8n, V=0 – 127
0 – 127 0 – 127
0 – 127
123 – 127
1 – 161 – 16
3
For more information, consult
your local Korg Distributor.
: Yes
: No
Consult your local Korg distributor for more information on MIDI Implementation.
MIDI Implementation Chart

Published 11/2020