MX Logic Email Defense Control Console ... - EasyStreet Support
126
MX Logic Email Defense Service Proprietary and Confidential MX Logic Email Defense Admin Guide Page i MX Logic Email Defense Control Console Administrator Guide Product Version: 5.7_F3 Version Release Date: May 8, 2009 Document Version: Email Defense Administrator Guide v.5.7_F3 Version
-
Upload
khangminh22 -
Category
Documents
-
view
3 -
download
0
Transcript of MX Logic Email Defense Control Console ... - EasyStreet Support
MX Logic Email Defense Service
Proprietary and Confidential MX Logic Email Defense Admin Guide Page i
MX Logic Email Defense Control Console Administrator Guide
Product Version: 5.7_F3 Version
Release Date: May 8, 2009
Document Version: Email Defense Administrator Guide v.5.7_F3 Version
MX Logic Email Defense Service
Proprietary and Confidential MX Logic Email Defense Admin Guide Page ii
Proprietary and Confidential
Copyright © 2009 MX Logic
RESTRICTION ON USE, PUBLICATION, OR DISCLOSURE OF PROPRIETARY INFORMATION.
This document contains information that is proprietary and confidential to MX Logic . No part of this document may be reproduced, stored in a retrieval system, or transmitted, in any form or by any means (electronic, mechanical, photocopying, recording, or otherwise) without prior written permission from MX Logic. All copies of this document are the sole property of MX Logic and must be returned promptly upon request.
MX Logic, Inc. 9781 Meridian Blvd, Suite 400 Englewood, CO 80112 USA Direct: +1.720-895-5700 Toll Free: +1.877.MXLOGIC Fax: +1.720-895-5757 Web site: www.mxlogic.com Documentation Feedback: [email protected]

MX Logic Email Defense Service
Proprietary and Confidential MX Logic Email Defense Admin Guide Page iii
Table of Contents
1. Overview of the MX Logic Email Defense Service.. ....................................... 1-1 1.1. Module Objectives .................................................................................. 1-1 1.2. The MX Logic Email Defense Service....................................................... 1-1 1.3. Email Defense Outbound Authorized Use Policy ...................................... 1-1 1.4. Control Console Entities ........................................................................... 1-2 1.5. Redirecting MX Records........................................................................... 1-2 1.6. Locking Down the Firewall ........................................................................ 1-3 1.7. Supporting Documentation ....................................................................... 1-3
2. Accessing the Control Console................... ................................................... 2-1 2.1. Module Objectives.................................................................................... 2-1 2.2. Signing into the Control Console............................................................... 2-1 2.3. The Customer Overview Window.............................................................. 2-2 2.4. Navigation Options ................................................................................... 2-3
2.4.1. Product Selectors ............................................................................ 2-3 2.4.2. Main Menu Options ......................................................................... 2-3 2.4.3. Global Search Tool.......................................................................... 2-4 2.4.4. Managing the Administrator’s Password .......................................... 2-5
3. Account Management .............................. ....................................................... 3-1 3.1. Module Objectives.................................................................................... 3-1 3.2. Functional Areas in Account Management................................................ 3-1 3.3. Account Management Overview Concepts ............................................... 3-2 3.4. Customers................................................................................................ 3-3
3.4.1. Customer Distribution Lists .............................................................. 3-3 3.4.2. Distribution Groups.......................................................................... 3-6 3.4.3. Performance Reports....................................................................... 3-6
3.5. Domain Management ............................................................................... 3-9 3.5.1. Primary Domains............................................................................. 3-9 3.5.2. Primary Domain Details ................................................................. 3-10 3.5.3. Domain Aliases ............................................................................. 3-12
3.6. User Management .................................................................................. 3-13 3.6.1. Control Console Entities and User Roles ....................................... 3-13
3.7. Control Console Entities and User Roles ................................................ 3-13 3.7.1. Reseller Administrator Role ........................................................... 3-13 3.7.2. Customer Administrator Role......................................................... 3-14 3.7.3. Domain Administrator Role............................................................ 3-14
MX Logic Email Defense Service
Proprietary and Confidential MX Logic Email Defense Admin Guide Page iv
3.7.4. Quarantine Manager Role.............................................................. 3-14 3.7.5. Reports Manager Role................................................................... 3-15 3.7.6. User Role ...................................................................................... 3-15
3.8. Creating User Accounts.......................................................................... 3-16 3.8.1. User Accounts Page...................................................................... 3-16
3.8.1.1. User Details.......................................................................... 3-17 3.8.1.2. Edit User Details................................................................... 3-17 3.8.1.3. User Status........................................................................... 3-17 3.8.1.4. On-demand Spam Quarantine Report................................... 3-19
3.8.2. General Settings............................................................................ 3-21 3.8.2.1. User Aliases ......................................................................... 3-21 3.8.2.2. Change Group...................................................................... 3-21
3.9. Email Defense Settings/ Preferences...................................................... 3-21 3.9.1. User Account Quarantine............................................................... 3-22 3.9.2. User Account Message Continuity ................................................. 3-23 3.9.3. User Account Allow / Deny List ...................................................... 3-23 3.9.4. Email Activity ................................................................................. 3-24 3.9.5. Web Defense - Web Activity .......................................................... 3-24 3.9.6. My Account.................................................................................... 3-24 3.9.7. Delete Users.................................................................................. 3-24 3.9.8. User Aliases .................................................................................. 3-26 3.9.9. User Authentication ....................................................................... 3-26
4. Group Configuration ............................. .......................................................... 4-1 4.1. Creating Groups ....................................................................................... 4-1
4.1.1. Adding Users to a Group ................................................................. 4-3 4.1.2. View User Account Group Assignment ............................................ 4-4
5. MX Logic Directory Sync ......................... ....................................................... 5-1 5.1. Module Objective...................................................................................... 5-1 5.2. Customer Configuration............................................................................ 5-1
5.2.1. Sync Setup...................................................................................... 5-2 5.2.1.1. Sync Setup Fields................................................................... 5-3 5.2.1.2. Automatic Synchronization Settings........................................ 5-6
5.3. User Synchronization ............................................................................... 5-6 5.3.1. The Synchronization Process .......................................................... 5-8
5.3.1.1. Sync History ........................................................................... 5-9 5.3.1.2. User Synchronization Details................................................ 5-10 5.3.1.3. Add Records......................................................................... 5-11 5.3.1.4. Delete Records..................................................................... 5-12 5.3.1.5. Alias Switch .......................................................................... 5-13 5.3.1.6. Alias to Primary .................................................................... 5-13 5.3.1.7. Primary to Alias .................................................................... 5-14 5.3.1.8. Type Changes ...................................................................... 5-14 5.3.1.9. Rejections............................................................................. 5-15
5.3.2. The Distribution List Type .............................................................. 5-17
MX Logic Email Defense Service
Proprietary and Confidential MX Logic Email Defense Admin Guide Page v
6. Email Defense Setup ............................. .......................................................... 6-1 6.1. Module Objectives.................................................................................... 6-1
6.1.1. Inbound Servers .............................................................................. 6-1 6.1.2. Outbound Servers ........................................................................... 6-1 6.1.3. Outbound Disclaimer ....................................................................... 6-2
6.2. Disaster Recovery .................................................................................... 6-2 6.3. MX Records ............................................................................................. 6-2 6.4. Locking Down the Customer Environment ................................................ 6-2 6.5. User Creation Settings ............................................................................. 6-2
6.5.1. SMTP Discovery.............................................................................. 6-3 6.5.2. Explicit............................................................................................. 6-6 6.5.3. When a Recipient is Invalid.............................................................. 6-6
7. Disaster Recovery ............................... ............................................................ 7-1 7.1. Module Objectives.................................................................................... 7-1 7.2. Disaster Recovery Overview..................................................................... 7-1
7.2.1. Disaster Recovery Modes................................................................ 7-2 7.2.2. Disaster Recovery Configuration ..................................................... 7-2
7.2.2.1. Fail Safe ................................................................................. 7-3 7.2.2.2. Message Continuity ................................................................ 7-4
7.2.3. Message Continuity Requirements .................................................. 7-4 7.2.4. Message Continuity Configuration ................................................... 7-4 7.2.5. View Messages in Message Continuity............................................ 7-5
7.2.5.1. Administrator View.................................................................. 7-5 7.2.5.2. Working in the Message Continuity Inbox ............................. 7-10 7.2.5.3. Sending Messages from the Message Continuity Inbox ........ 7-10 7.2.5.4. Intelligent Unspool ................................................................ 7-11
7.2.6. Message Continuity Technical Considerations............................... 7-11 7.3. Non-Local Email Accounts...................................................................... 7-12
7.3.1. SMTP Discovery User Creation Mode with MC.............................. 7-12 7.3.2. Explicit User Creation Mode with MC............................................. 7-12 7.3.3. Accessing Non-Local Email Accounts............................................ 7-13
7.3.3.1. Using the Disaster Recovery method.................................... 7-13 7.3.3.2. Using the Non-Local E-Mail Accounts link method. ............... 7-16
8. Configuring Policy Sets – Inbound Filtering..... ............................................. 8-1 8.1. Module Objectives.................................................................................... 8-1 8.2. Policy Configuration.................................................................................. 8-1
8.2.1. Policy Actions .................................................................................. 8-1 8.2.2. Applying Changes to Policy Filtering Options................................... 8-2 8.2.3. Default Inbound Policy Set............................................................... 8-2 8.2.4. Creating a new Inbound Policy Set .................................................. 8-2 8.2.5. Subscribing to Default Inbound Lists................................................ 8-3 8.2.6. Anti-Virus......................................................................................... 8-3 8.2.7. Anti-Spam ....................................................................................... 8-4
MX Logic Email Defense Service
Proprietary and Confidential MX Logic Email Defense Admin Guide Page vi
8.3. Spam Quarantine Reports ........................................................................ 8-7 8.3.1. Spam Quarantine Report – HTML Format with Actions.................... 8-7 8.3.2. Spam Quarantine Report – HTML Format without actions ............... 8-8 8.3.3. Spam Quarantine Report – Text Only Summary .............................. 8-9
9. Content Filtering............................... ............................................................... 9-1 9.1. Content Groups ........................................................................................ 9-1 9.2. Attachments ............................................................................................. 9-2 9.3. Allow / Deny ............................................................................................. 9-3
9.3.1. Policy Allow / Deny Scenarios ......................................................... 9-4 9.3.2. User Allow/ Deny Scenarios ............................................................ 9-5 9.3.3. Policy vs. User Allow / Deny Scenarios............................................ 9-6
9.4. Recipient Shield ....................................................................................... 9-7 9.5. Notifications.............................................................................................. 9-8 9.6. Disaster Recovery .................................................................................... 9-8 9.7. Group Subscriptions ................................................................................. 9-8
10. Configuring Outbound Filtering Policy Sets..... ......................................... 10-1 10.1. Module Objectives ................................................................................ 10-1 10.2. Policy Configuration.............................................................................. 10-1
10.2.1. Policy Actions .............................................................................. 10-1 10.2.2. Applying Changes to the Policy Sets ........................................... 10-2
10.3. Default Outbound Policy Set................................................................. 10-2 10.4. New Outbound Policy Set..................................................................... 10-2
10.4.1. Anti-Virus..................................................................................... 10-2 10.4.2. Content........................................................................................ 10-3 10.4.3. Attachments ................................................................................ 10-4 10.4.4. Notifications................................................................................. 10-5
10.5. Group Subscriptions ............................................................................. 10-6
11. Manage Quarantined Messages .................... ............................................. 11-1 11.1. Module Objectives ................................................................................ 11-1 11.2. Message Quarantine ............................................................................ 11-1 11.3. Search for Quarantine Messages ......................................................... 11-1 11.4. Safe Message View.............................................................................. 11-4 11.5. Virus Quarantine................................................................................... 11-5 11.6. Spam Quarantine ................................................................................. 11-5 11.7. Attachment Quarantine......................................................................... 11-5 11.8. Content Quarantine .............................................................................. 11-6 11.9. My Spam.............................................................................................. 11-6 11.10. Quarantine Actions ............................................................................. 11-6
11.10.1. Release ..................................................................................... 11-6
MX Logic Email Defense Service
Proprietary and Confidential MX Logic Email Defense Admin Guide Page vii
11.10.2. Delete........................................................................................ 11-6 11.10.3. Always allow for user ................................................................. 11-6 11.10.4. Delete All ................................................................................... 11-7
12. Examining Reports and Statistics ............... ............................................... 12-1 12.1. Module Objectives ................................................................................ 12-1 12.2. Reports and Statistics........................................................................... 12-1 12.3. Recommended Report Generation ....................................................... 12-1
12.3.1.1. Threats: Overview............................................................... 12-2 12.3.1.2. Quarantine Release Overview ............................................ 12-3 12.3.1.3. Event Log ........................................................................... 12-4 12.3.1.4. Performance Report ........................................................... 12-4

MX Logic Email Defense Service
Proprietary and Confidential MX Logic Email Defense Admin Guide Page 1-1
1. Overview of the MX Logic Email
Defense Service
1.1. Module Objectives
� Describe features of the MX Logic Email Defense Manage Service
� Discuss Entities used within the Control Console
� Identify the MX Record and the MX Logic IP Subnet addresses
� Review Supporting documentation
1.2. The MX Logic Email Defense Service
MX Logic Email Defense automatically detects and blocks email threats at a company’s network before they can enter or leave an organization. Email Defense Service filters email at the network’s perimeter for inbound and outbound email.
Features:
� Email Attack Protection
� Spam Blocking
� Virus and Worm Scanning
� Content and Attachment Filtering
� Sophisticated Quarantine Management
� Policy-based Email Threat Management Reporting
1.3. Email Defense Outbound Authorized Use Policy
The Email Defense service was designed to filter daily outbound business email for content keywords, attachments and viruses.
MX Logic prohibits the transmission of bulk mail or otherwise automated email and will deliver outbound email up to 100 recipients. Emails with more than 100 recipients will be denied.

MX Logic Email Defense Service
Proprietary and Confidential MX Logic Email Defense Admin Guide Page 1-2
MX Logic will deliver outbound messages with attachments up to 100MB. Emails with attachments that exceed 100MB will be denied.
Complaints and/or blacklists from reasonable and credible sources will be considered as basis for denying outbound filtering.
MX Logic will attempt to reach the technical contact of any customer that may be in violation of the Outbound Email management policy before service is denied.
For more information on Outbound filtering, please refer to the MX Logic Bulk Email Policy and Outbound Message Filtering documents located on the support web page.
1.4. Control Console Entities
1.5. Redirecting MX Records
The Customer must redirect all MX records for their corporate email server(s) to point to the MX Logic Email Defense Service. If they do not redirect all MX records for their corporate email, then MX Logic cannot provide full protection against Spam, viruses, content keywords, attachments and other threats.
MX Logic Email Defense Service
Proprietary and Confidential MX Logic Email Defense Admin Guide Page 1-3
The recommended MX Logic Inbound MX Records are referenced in the welcome email or listed under the MX Records link in the Control Console. The recommended MX Record settings can also be viewed in the Control Console using the Email Defense ���� Setup ���� MX Records screen.
It may take 24 – 48 hours to fully propagate the MX record changes.
1.6. Locking Down the Firewall
It is important the customer lock down their mail server(s) five to seven days after the MX Record change.
� This prevents senders from bypassing filtering by sending messages directly to customer’s mail servers
� The customer’s email servers will only accept SMTP traffic from the MX Logic filtering service mail servers
The IP subnets currently hosting MX Logic filtering service mail servers are referenced in the welcome email or listed under the MX Records link in the Control Console. The IP address can also be viewed in the Control Console using the Email Defense ���� Setup ���� MX Records screen.
1.7. Supporting Documentation
The MX Logic suite of supporting documentation is located in the MX Logic eService Portal at www.mxlogic.com/support
Once logged in, click the Reference Materials link towards the top of the page.
Please see chapter on MX Logic Support for additional information.
Note: you must be supported by MX Logic in order to have access to the eService Portal

MX Logic Email Defense Service
Proprietary and Confidential MX Logic Email Defense Admin Guide Page 1-4
MX Logic Email Defense Service
Proprietary and Confidential MX Logic Email Defense Admin Guide Page 2-1
2. Accessing the Control Console
2.1. Module Objectives
� Identify address location of the Control Console
� Understand how to access the Control Console
� Interpret the Customer Overview page
� Locate the navigation methods used within the Control Console
� Manage Passwords
2.2. Signing into the Control Console
The Control Console Address is referenced in the customers Service Activation Guide. The login window will allow users to select their language preference.
The drop down menu lists all six languages available; the default language is English:
� English
� French (universal)
� Italian
� German
� Spanish (universal)
� Japanese
Users may also select their language preference via the Setup/Preferences window.
The only windows changed to the selected language are user-level windows.

MX Logic Email Defense Service
Proprietary and Confidential MX Logic Email Defense Admin Guide Page 2-2
Access the Control Console using your login credentials:
� Email Address
� Password
� When signing into the Control Console, you must use the login ID (email address) for the users Primary User Account; no access to the Control Console is granted when using the login ID (email address) listed as a User Alias
The following is a list of supported browsers running on Windows:
� Windows® Internet Explorer 6.0 and 7.0 for Windows® XP
� Windows® Internet Explorer 7.0 for Windows® VISTA
� Netscape 8.0 and later versions
� Mozilla 1.7
� FireFox 2.x and 3.x
2.3. The Customer Overview Window
� Provides a 24 hour snap shots of email activity for customer’s domains
� Inbound and outbound message traffic
Policy Enforcement activity:
� Disaster Recovery / Fail Safe Activity and Storage details (if applicable)
� Enhancements/changes to the service
� MX Logic News Updates
The Overview page statistics are minimized initially upon entry. If you wish to see the 24 hour statistics, click the Display Statistics button.
MX Logic Email Defense Service
Proprietary and Confidential MX Logic Email Defense Admin Guide Page 2-3
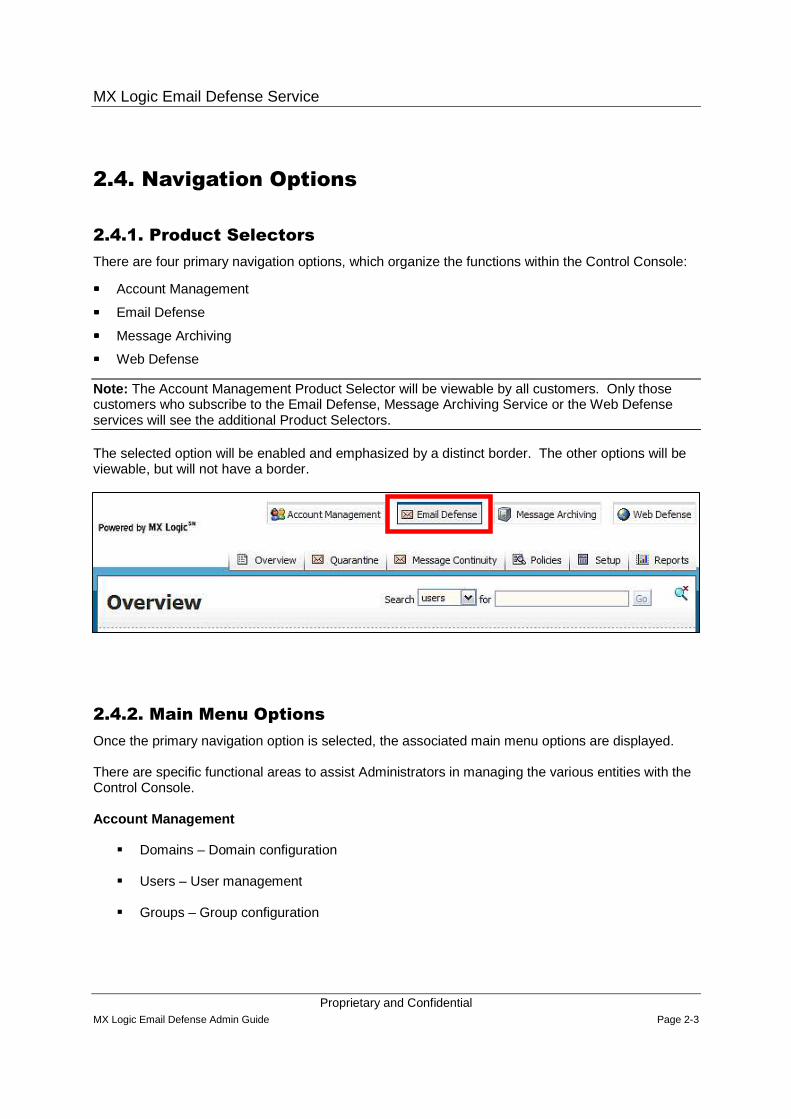
2.4. Navigation Options
2.4.1. Product Selectors
There are four primary navigation options, which organize the functions within the Control Console:
���� Account Management
���� Email Defense
���� Message Archiving
���� Web Defense
Note: The Account Management Product Selector will be viewable by all customers. Only those customers who subscribe to the Email Defense, Message Archiving Service or the Web Defense services will see the additional Product Selectors.
The selected option will be enabled and emphasized by a distinct border. The other options will be viewable, but will not have a border.
2.4.2. Main Menu Options
Once the primary navigation option is selected, the associated main menu options are displayed.
There are specific functional areas to assist Administrators in managing the various entities with the Control Console.
Account Management
� Domains – Domain configuration
� Users – User management
� Groups – Group configuration
MX Logic Email Defense Service
Proprietary and Confidential MX Logic Email Defense Admin Guide Page 2-4
Email Defense
� Overview – 24 hour snap shot of activities
� Quarantine – Message Quarantine
� Policies – Policy configuration
� Setup - Configuration
� Reports – Reporting and Statistics
Message Archiving
� Overview – Current snap shot of the overall status of Message Archiving
� Message Archiving – Searching and Exporting of archived messages
� Mail Source – Configuration setting for the Message Archiving Mail Sources
Web Defense
� Policies – Policy configuration
� Setup - Configuration
� Reports – Reporting and Statistics
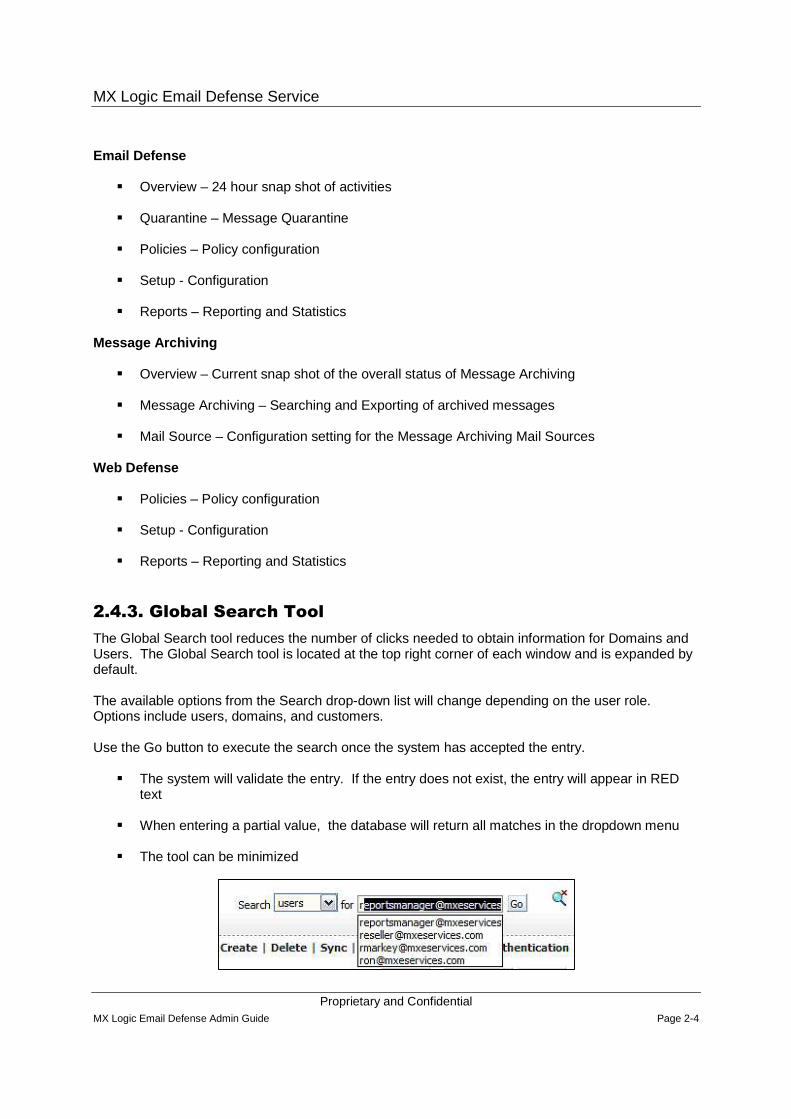
2.4.3. Global Search Tool
The Global Search tool reduces the number of clicks needed to obtain information for Domains and Users. The Global Search tool is located at the top right corner of each window and is expanded by default.
The available options from the Search drop-down list will change depending on the user role. Options include users, domains, and customers.
Use the Go button to execute the search once the system has accepted the entry.
� The system will validate the entry. If the entry does not exist, the entry will appear in RED text
� When entering a partial value, the database will return all matches in the dropdown menu
� The tool can be minimized
MX Logic Email Defense Service
Proprietary and Confidential MX Logic Email Defense Admin Guide Page 2-5
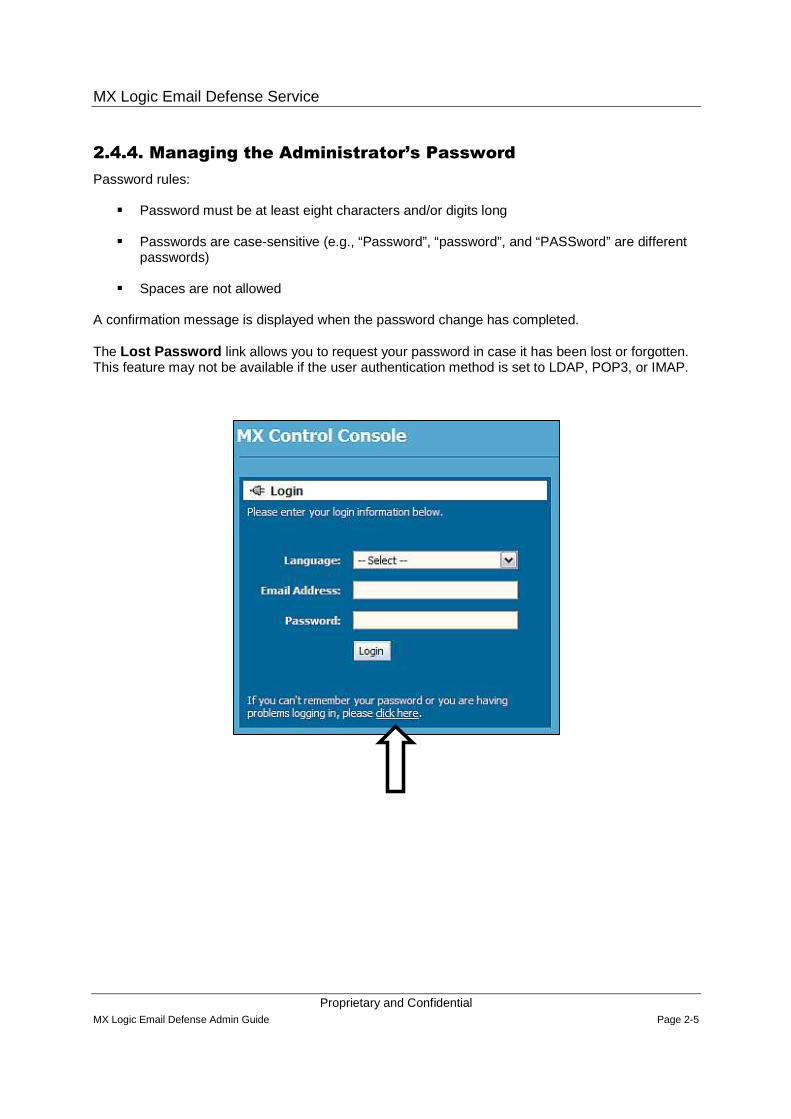
2.4.4. Managing the Administrator’s Password
Password rules:
� Password must be at least eight characters and/or digits long
� Passwords are case-sensitive (e.g., “Password”, “password”, and “PASSword” are different passwords)
� Spaces are not allowed
A confirmation message is displayed when the password change has completed.
The Lost Password link allows you to request your password in case it has been lost or forgotten. This feature may not be available if the user authentication method is set to LDAP, POP3, or IMAP.


Proprietary and Confidential MX Logic Email Defense Admin Guide Page 3-1
3. Account Management
3.1. Module Objectives
� Describe the functional areas within Account Management
� Explain how the information within Account Management relates to the Email and the Web Defense services
� Create Distribution Lists and schedule delivery of Performance Reports
� Configure Domain information
� Identify scenarios in which to use Domain Aliases
� Describe and configure the User Account details
� Create new User Accounts individually or via batch
� Understand User Authentication options
� Create and manage groups
� Explain how groups are associated to Policy Sets
3.2. Functional Areas in Account Management
There are specific functional areas to assist Administrators in managing the entities with the Account Management Service.
� Customers – Distribution Lists and Performance Reports
� Domains – Domain Management
� Users – User Management
� Groups – Group Management
MX Logic Email Defense Service
Proprietary and Confidential MX Logic Email Defense Admin Guide Page 3-2
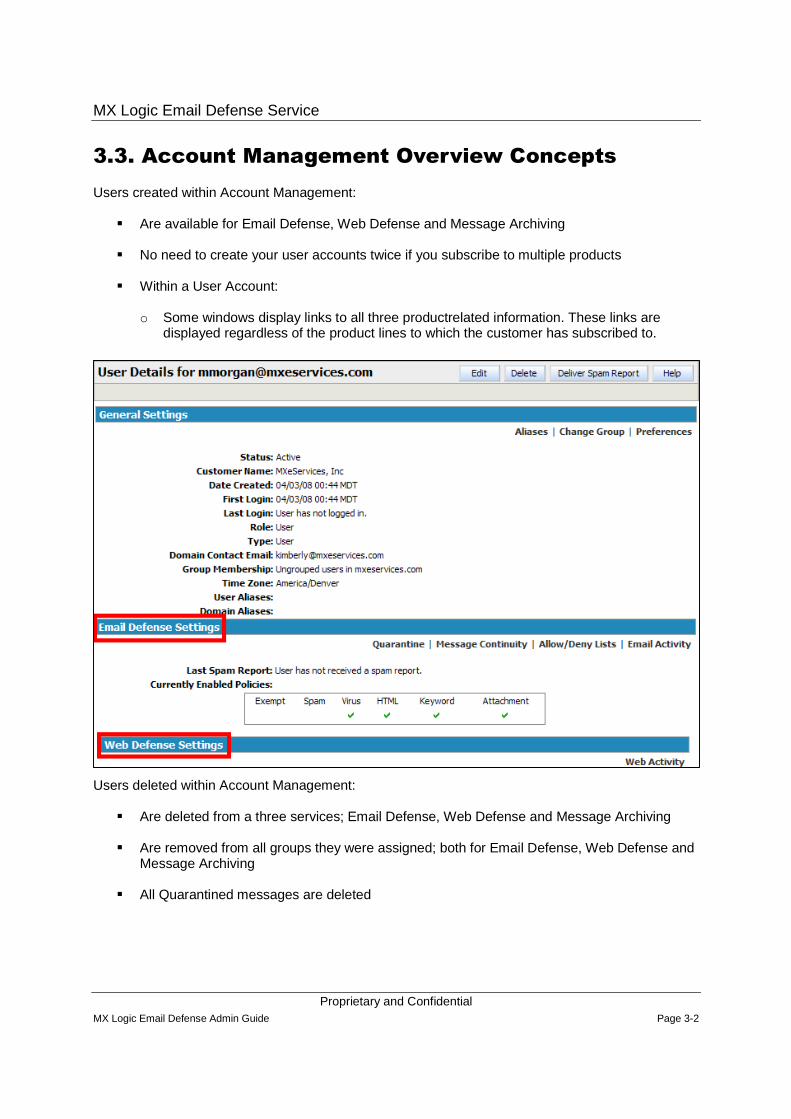
3.3. Account Management Overview Concepts
Users created within Account Management:
� Are available for Email Defense, Web Defense and Message Archiving
� No need to create your user accounts twice if you subscribe to multiple products
� Within a User Account:
o Some windows display links to all three productrelated information. These links are displayed regardless of the product lines to which the customer has subscribed to.
Users deleted within Account Management:
� Are deleted from a three services; Email Defense, Web Defense and Message Archiving
� Are removed from all groups they were assigned; both for Email Defense, Web Defense and Message Archiving
� All Quarantined messages are deleted
MX Logic Email Defense Service
Proprietary and Confidential MX Logic Email Defense Admin Guide Page 3-3
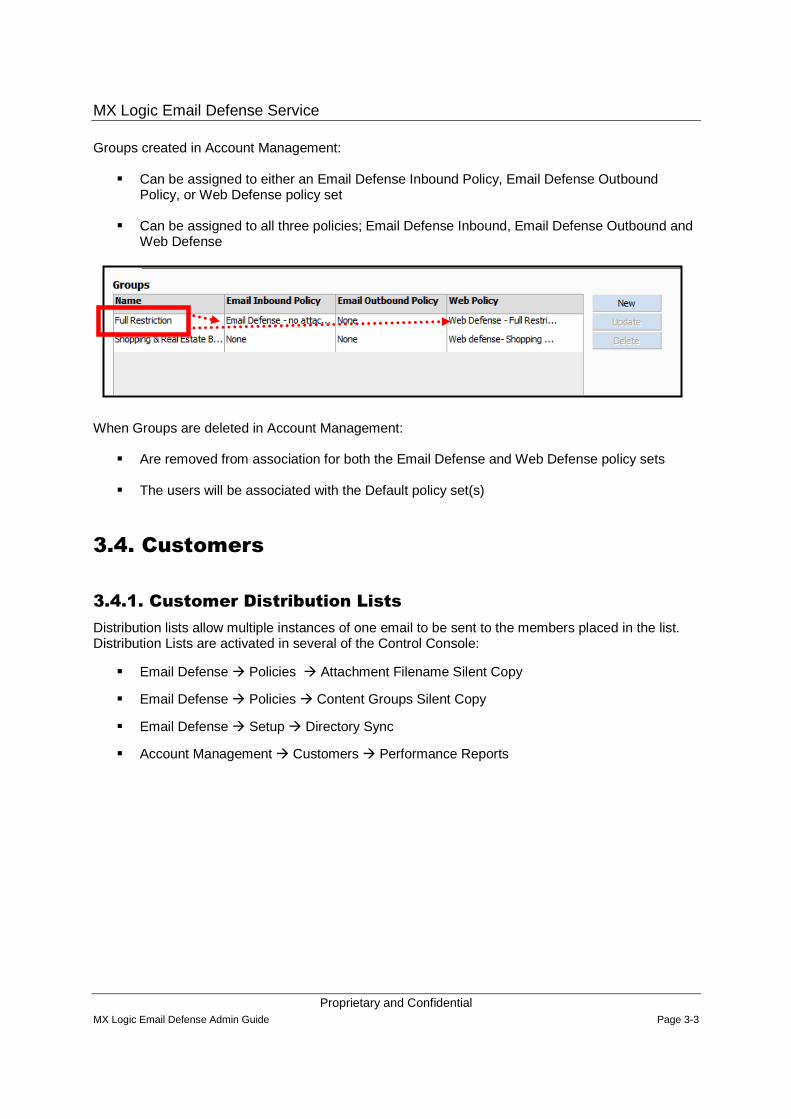
Groups created in Account Management:
� Can be assigned to either an Email Defense Inbound Policy, Email Defense Outbound Policy, or Web Defense policy set
� Can be assigned to all three policies; Email Defense Inbound, Email Defense Outbound and Web Defense
When Groups are deleted in Account Management:
� Are removed from association for both the Email Defense and Web Defense policy sets
� The users will be associated with the Default policy set(s)
3.4. Customers
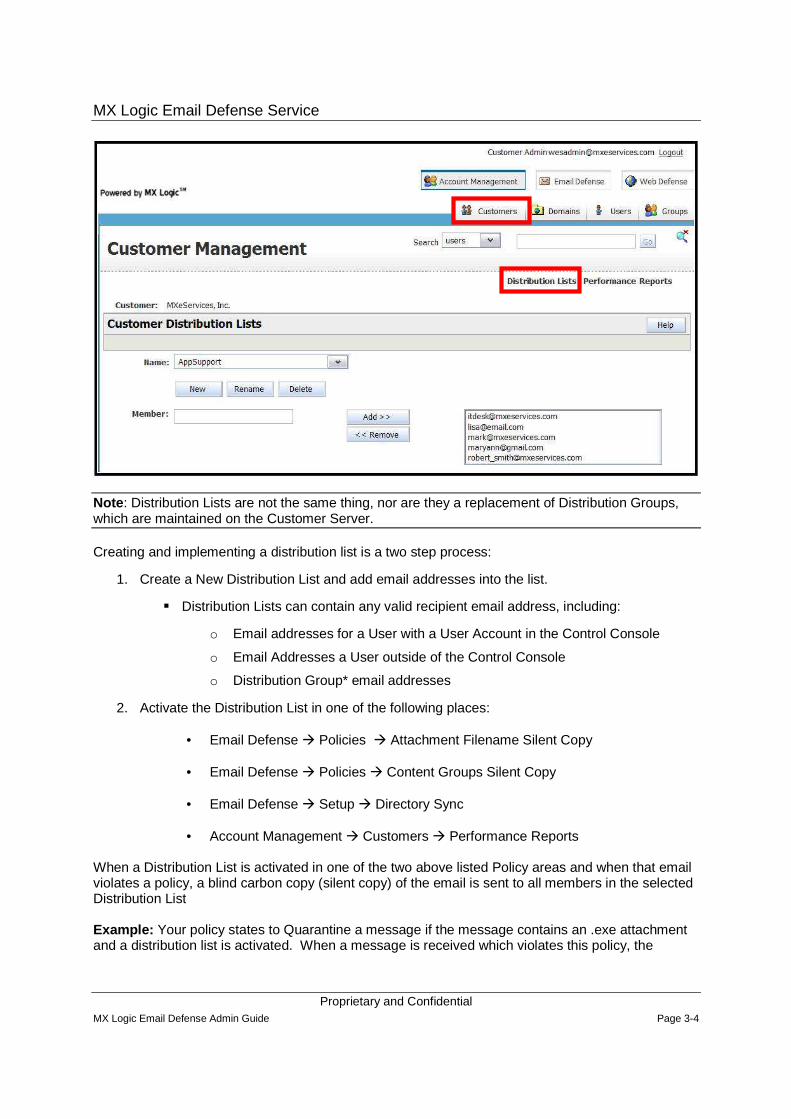
3.4.1. Customer Distribution Lists
Distribution lists allow multiple instances of one email to be sent to the members placed in the list. Distribution Lists are activated in several of the Control Console:
� Email Defense � Policies � Attachment Filename Silent Copy
� Email Defense � Policies � Content Groups Silent Copy
� Email Defense � Setup � Directory Sync
� Account Management � Customers � Performance Reports
MX Logic Email Defense Service
Proprietary and Confidential MX Logic Email Defense Admin Guide Page 3-4
Note : Distribution Lists are not the same thing, nor are they a replacement of Distribution Groups, which are maintained on the Customer Server.
Creating and implementing a distribution list is a two step process:
1. Create a New Distribution List and add email addresses into the list.
� Distribution Lists can contain any valid recipient email address, including:
o Email addresses for a User with a User Account in the Control Console
o Email Addresses a User outside of the Control Console
o Distribution Group* email addresses
2. Activate the Distribution List in one of the following places:
• Email Defense � Policies � Attachment Filename Silent Copy
• Email Defense � Policies � Content Groups Silent Copy
• Email Defense � Setup � Directory Sync
• Account Management � Customers � Performance Reports
When a Distribution List is activated in one of the two above listed Policy areas and when that email violates a policy, a blind carbon copy (silent copy) of the email is sent to all members in the selected Distribution List
Example: Your policy states to Quarantine a message if the message contains an .exe attachment and a distribution list is activated. When a message is received which violates this policy, the
MX Logic Email Defense Service
Proprietary and Confidential MX Logic Email Defense Admin Guide Page 3-5
message is placed into Quarantine and a blind carbon copy of the message is sent to all email addresses in the Distribution List.
MX Logic Email Defense Service
Proprietary and Confidential MX Logic Email Defense Admin Guide Page 3-6
3.4.2. Distribution Groups
MX Logic distribution lists are not the same thing, nor are they a replacement of the customer’s email distribution groups.
� Distribution groups are created and maintained on the customer’s email server
� Distribution lists are created and assigned using the MX Logic Control Console
Any distribution group maintained on the customer’s email server must have an associated primary user account in the MX Logic Control Consol e. When a valid email is received for that primary user account, the service delivers the message to the customer’s email server, once and to the primary user account. The customer’s mail server distributes that message to all members of the customer’s distribution group.
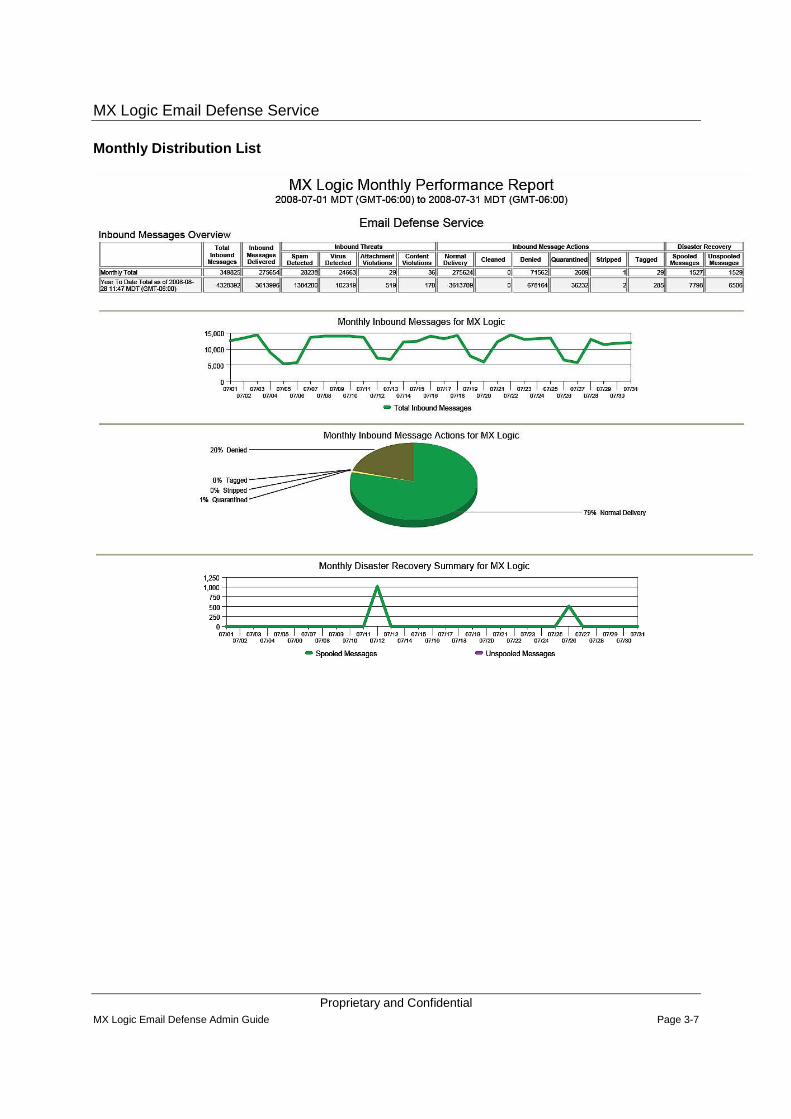
3.4.3. Performance Reports
The Inbound Performance Report provides an overview and actions taken on inbound threats, inbound message actions and disaster recovery. Performance reports are accessed from Account Management ���� Customer ���� Performance link .
Distribution of the Performance report requires the use of a Distribution list. The Distribution list can contain the email address of any user using any ISP. When a Distribution List is activated in Performance Reports, all members in the selected Distribution List are emailed a PDF version of the Customer Performance Report based on the selected report schedule. Distribution lists can be created for weekly, monthly or both reporting periods.
After the Distribution list(s) have been created, the Performance report can be ran immediately.
Performance reports contain:
� Statistical information on the performance of Email Defense Service and Web Defense Service
� Contain tabular, graphical traffic and threat data
� Can be formatted in grid, pie chart or line graph formats, and represent a wide variety of traffic and threat categories
� Gives greater insight into the on-going performance of the Email and Web security services
� Include a list of definitions for each report field and can be configured for weekly or monthly delivery
� Reports are emailed to the distribution lists recipients using a .pdf attachment
Modifying the Time Zone field under Performance Reports only apply to the Performance Reports and not to individual users.
� When Weekly is selected, the report includes data for the previous full week
� When Monthly is selected, the report includes data for the previous full month
MX Logic Email Defense Service
Proprietary and Confidential MX Logic Email Defense Admin Guide Page 3-7
Monthly Distribution List
MX Logic Email Defense Service
Proprietary and Confidential MX Logic Email Defense Admin Guide Page 3-8
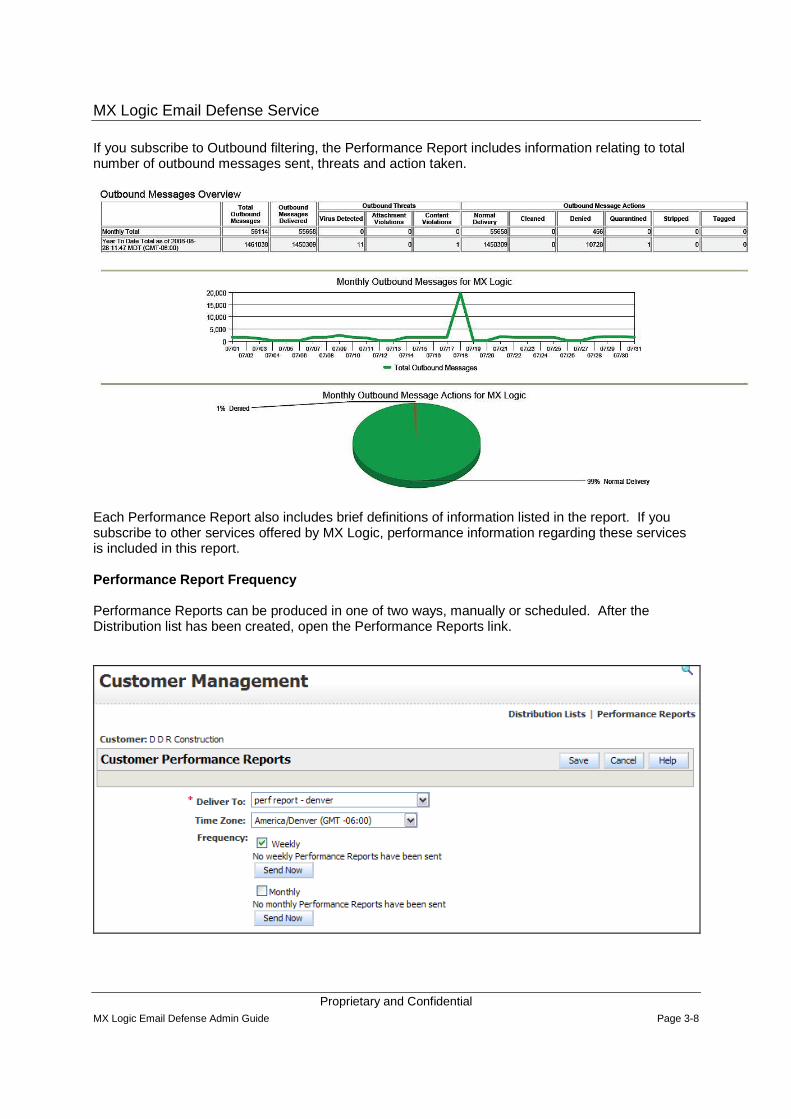
If you subscribe to Outbound filtering, the Performance Report includes information relating to total number of outbound messages sent, threats and action taken.
Each Performance Report also includes brief definitions of information listed in the report. If you subscribe to other services offered by MX Logic, performance information regarding these services is included in this report.
Performance Report Frequency
Performance Reports can be produced in one of two ways, manually or scheduled. After the Distribution list has been created, open the Performance Reports link.
MX Logic Email Defense Service
Proprietary and Confidential MX Logic Email Defense Admin Guide Page 3-9
���� Deliver To - Select the distribution list to send the report to
���� Time Zone – The time zone used to create the report
���� Frequency - Check the box to specify the frequency of the Performance Reports.
o Weekly Total - Sum from 12:00 am. Monday until 11:59 pm. Sunday.
o Monthly Total - Sum from the beginning of the first day of the month at 12:00 am until the last day of the month at 11:59 pm.
The Send Now button emails the Performance Report from the last reporting period using distribution list.
3.5. Domain Management
If multiple domains are being filtered by MX Logic, your domains can be configured one of two ways:
� Separate Primary Domains
� Primary Domain with Domain Aliases
3.5.1. Primary Domains
Each Primary Domain has its own characteristics (servers, policies, users, IP address), and is configured separately.
Primary Domains should be created when any of the following are true:
� Inbound messages for each domain must route to unique inbound server(s)
� Outbound messages for each domain route from unique outbound server(s)
� User accounts are unique each primary domain:
[email protected] – located in Seattle, WA
[email protected] – located in Chicago, IL
MX Logic Email Defense Service
Proprietary and Confidential MX Logic Email Defense Admin Guide Page 3-10
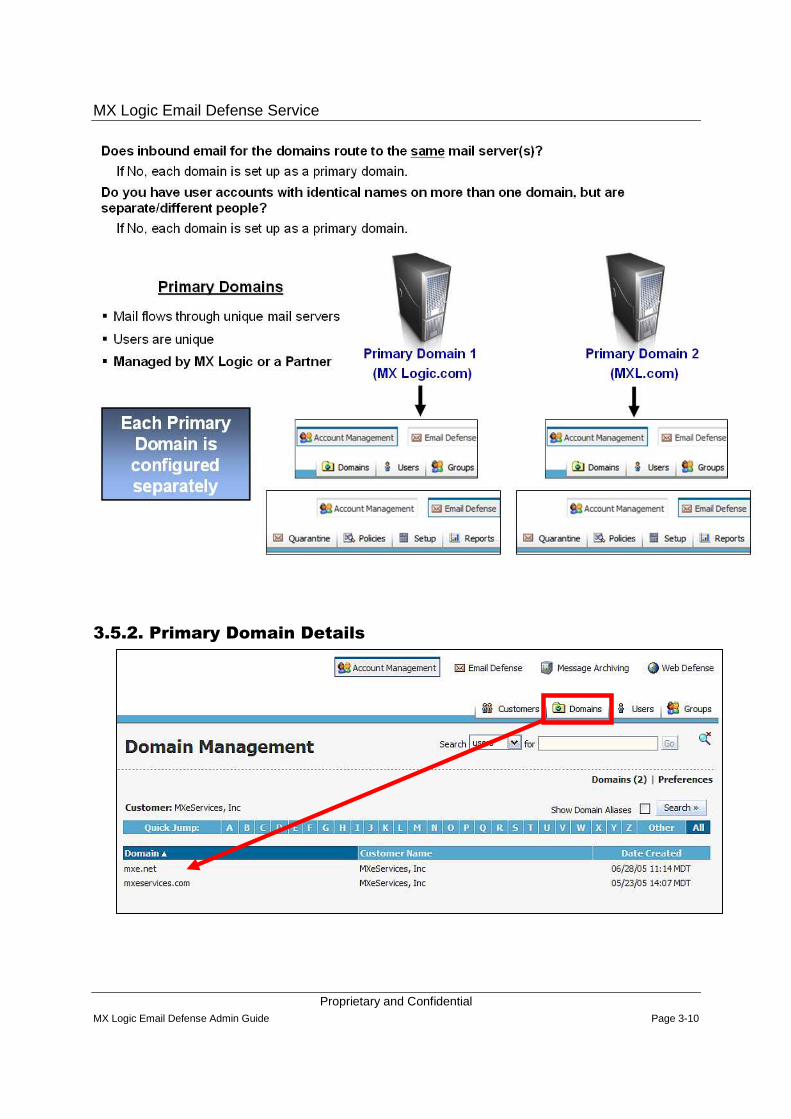
3.5.2. Primary Domain Details

MX Logic Email Defense Service
Proprietary and Confidential MX Logic Email Defense Admin Guide Page 3-11
To open the Domain Details screen, double click the Primary domain name.
Review the Domain information and contact whoever provisioned your service if any changes are needed to your primary domain(s).
The options available on the Domain Details window will vary depending on which user role has logged in.
As the Customer Administrator, some of the items you are able to do are:
� View your Domain Details
� Add Domain Aliases
MX Logic Email Defense Service
Proprietary and Confidential MX Logic Email Defense Admin Guide Page 3-12
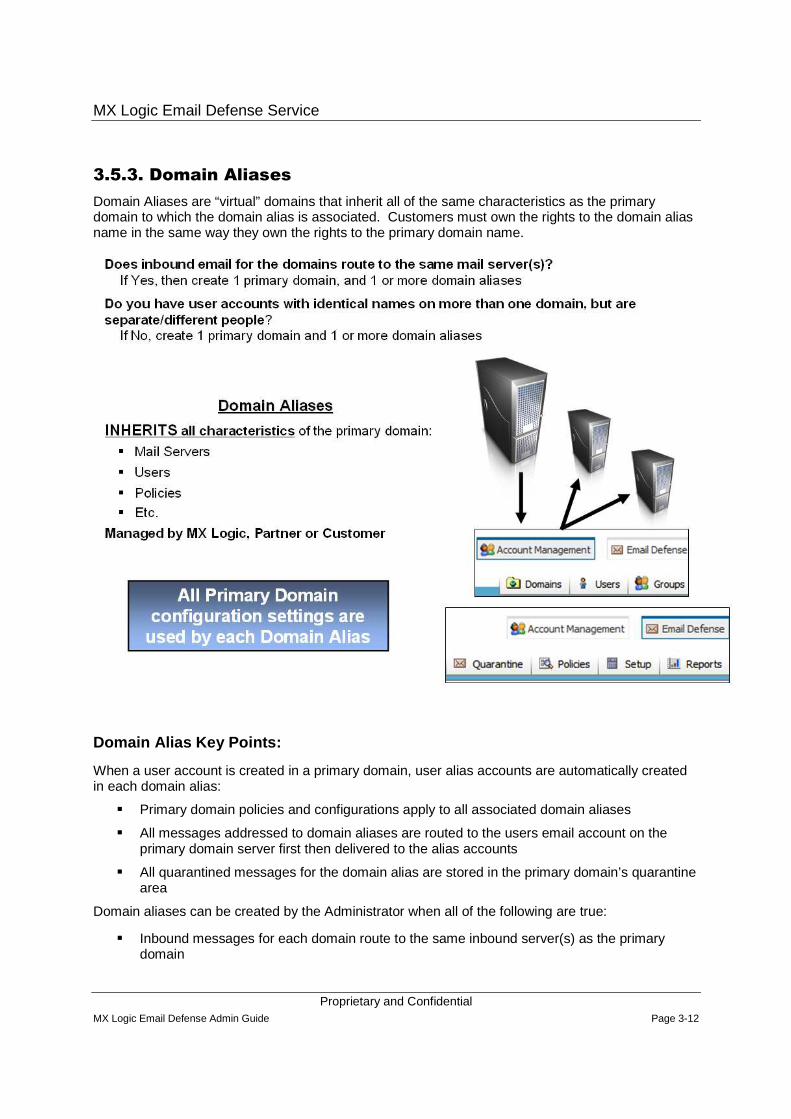
3.5.3. Domain Aliases
Domain Aliases are “virtual” domains that inherit all of the same characteristics as the primary domain to which the domain alias is associated. Customers must own the rights to the domain alias name in the same way they own the rights to the primary domain name.
Domain Alias Key Points:
When a user account is created in a primary domain, user alias accounts are automatically created in each domain alias:
� Primary domain policies and configurations apply to all associated domain aliases
� All messages addressed to domain aliases are routed to the users email account on the primary domain server first then delivered to the alias accounts
� All quarantined messages for the domain alias are stored in the primary domain’s quarantine area
Domain aliases can be created by the Administrator when all of the following are true:
� Inbound messages for each domain route to the same inbound server(s) as the primary domain
MX Logic Email Defense Service
Proprietary and Confidential MX Logic Email Defense Admin Guide Page 3-13
� Outbound messages for each domain route from the same outbound server(s) as the primary domain
User accounts belong to the same person such as [email protected] are the same person as [email protected] and [email protected].
3.6. User Management
In addition to managing the domain, the Customer Administrator can:
� Create, manage and delete user accounts
� Create user alias accounts
� Manage user account details, including passwords
� Assign user roles
� Determine Spam quarantine report preferences
The User Management window lists all user’s email addresses in the designated domain. Click the users email address to edit / view specific details. The Customer Administrator account can change and view information for all users.
Customer Administrator can assign a User any of the following user roles:
� Customer Administrator
� Domain Administrator
� Quarantine Manager
� Reports Manager
� User
3.6.1. Control Console Entities and User Roles
A Role is assigned to each User account created in the console. The Roles determine what permissions this User Account has when they sign into the console.
3.7. Control Console Entities and User Roles
A Role will be assigned to each User account created in the Console. The Roles determine what permissions the User Account has when he/she logs into the console.
3.7.1. Reseller Administrator Role
Administrative Functions, All*:
���� Highest Non-MX Logic Role
���� Only Customer Role that can:

MX Logic Email Defense Service
Proprietary and Confidential MX Logic Email Defense Admin Guide Page 3-14
� Create new Customers
� Create Primary Domains
���� Can manage their own user account
* Has access to manage all of their downstream customers information, except the Customers Message Continuity Inbox
3.7.2. Customer Administrator Role
Administrative Functions (highest customer level role):
� Has access to manage all of their customer account information, except cannot create or edit Primary Domains.
� Create Users
� Manage all User Account information
� Create Email & Web Defense Policies
� Setup Message Archiving services
� Search for all users archived messages
� Configure Email & Web Defense Setup
� Generate Email & Web Defense Reports
� Manage Quarantine
���� Can manage their own User Account
3.7.3. Domain Administrator Role
Administrative Functions:
� Domain Setup
� Manage Quarantine Mail
� Generate Email & Web Defense Reports
� Manage User Level Quarantine
� Manage User Level Allow/ Deny Lists
� Can manage their own User Account
� Can view information only for the logged into. Example: The customer has two primary domains, the Domain Admin logs in with a login ID to one of those primary domains; they can only see the information relevant to that primary domain.
3.7.4. Quarantine Manager Role
Administrative Functions:
� Manage Quarantine Mail
� Generate Email & Web Defense Reports
� Manage User Level Quarantine

MX Logic Email Defense Service
Proprietary and Confidential MX Logic Email Defense Admin Guide Page 3-15
� Manage User Level Allow/ Deny Lists
���� Can manage their own User Account
� Can view information only for the logged into. Example: The customer has two primary domains, the Quarantine Manager logs in with a login ID to one of those primary domains; they can only see the information relevant to that primary domain
3.7.5. Reports Manager Role
Administrative Functions:
� Generate Email & Web Defense Reports
All other areas are to manage their own User Account:
� Spam Quarantined Mail
� Message Continuity Inbox
� Personal Allow List (300 entries)
� Personal Deny List (200 entries)
Setup:
� Password
� Preferences
� User Aliases
3.7.6. User Role
Administrative Functions:
� None
Can manage their own user account:
� Spam Quarantined Mail
� Message Continuity Inbox
� Personal Allow List (300 entries)
� Personal Deny List (200 entries)
Setup:
� Password
� Preferences
� User Aliases
Note: Users only have access to Email Defense & Message Archiving. If a user and the customer only subscribes to Web Defense, the user will have no access to the Control Console (even if they have a login ID and password).
MX Logic Email Defense Service
Proprietary and Confidential MX Logic Email Defense Admin Guide Page 3-16
3.8. Creating User Accounts
There are two ways to manually create User Accounts.
1. Individual Creation Mode - Create one primary user account at a time:
� Define the mailbox name, role and password for the account
Note: User Accounts with the role of Customer Administrators can assign individual user passwords. User Accounts logged in with the Role of Reseller Administrator cannot assign passwords for any User Account other than their own
� Can select the time zone and group membership
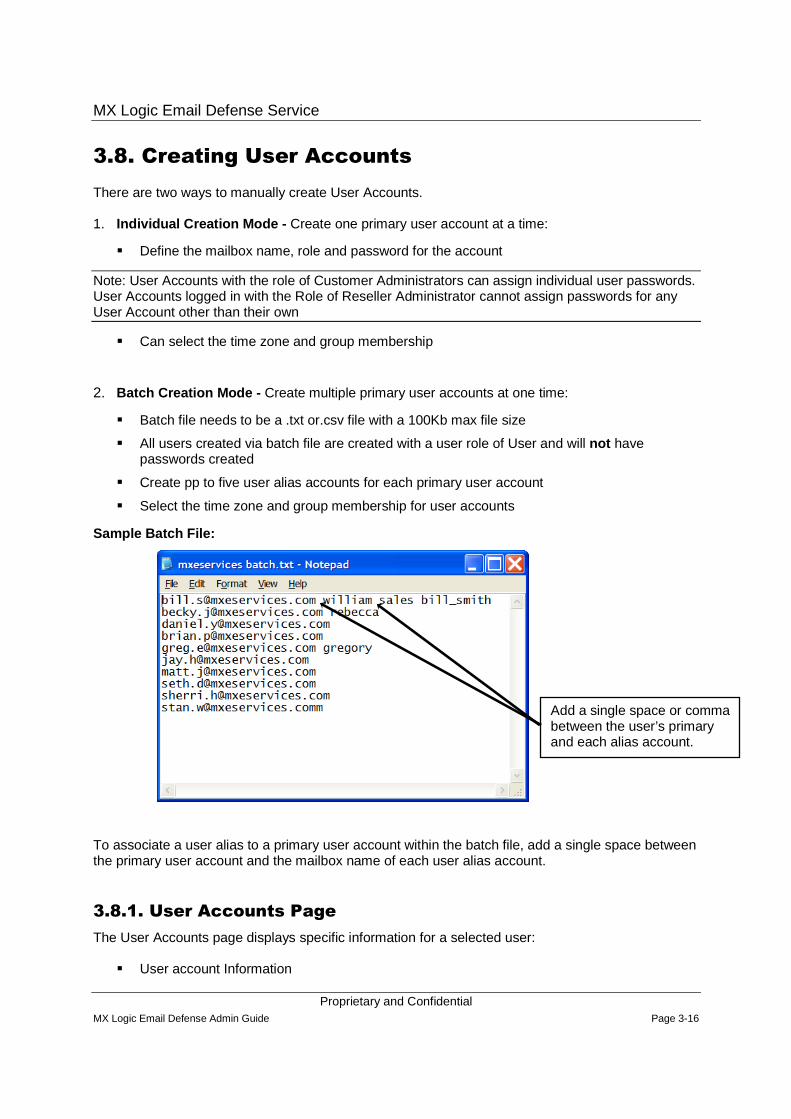
2. Batch Creation Mode - Create multiple primary user accounts at one time:
� Batch file needs to be a .txt or.csv file with a 100Kb max file size
� All users created via batch file are created with a user role of User and will not have passwords created
� Create pp to five user alias accounts for each primary user account
� Select the time zone and group membership for user accounts
Sample Batch File:
To associate a user alias to a primary user account within the batch file, add a single space between the primary user account and the mailbox name of each user alias account.
3.8.1. User Accounts Page
The User Accounts page displays specific information for a selected user:
� User account Information
Add a single space or comma between the user’s primary and each alias account.
MX Logic Email Defense Service
Proprietary and Confidential MX Logic Email Defense Admin Guide Page 3-17
� Role
� Status
� Group assignment
� User alias accounts (if checkbox is selected)
User Accounts created within Account Management.
� Are available for both Email Defense and Web Defense
� You do not need to create your user accounts twice if you subscribe to both products
Within a User Account.
� Some windows display links to both Web Defense and Email Defense related information
� These links are displayed regardless of the product lines to which the customer has subscribed
To download a list of all primary user accounts, click the Download button. This downloads a list of all primary user accounts into a MS Excel .csv file. This file is useful when using SMTP Discovery as your user creation mode.
If using Active Directory Sync, compare the downloaded list against your Active Directory OU to ensure all user accounts have automatically been created. Add any user accounts not yet created, and delete any unwanted user accounts.
Another use for the downloaded user list is that it provides a jump start in creating a new batch file to mass upload passwords to your existing primary user accounts.
3.8.1.1. User Details
User details are organized into several areas; General, Email Defense and Web Defense.
3.8.1.2. Edit User Details
Clicking the Edit button allows you to change some general user preferences such as their time zone, user role and Spam quarantine preferences.
3.8.1.3. User Status
One of three status types can be assigned to each primary user account.
Active Status
� The user is active within the Control Console and will be granted the appropriate resources and functionality as provided through policy settings
Note: All new users added to the console, using SMTP Discovery, Explicit or Active Directory Integration are added with an Active status, have the role of User and are Ungrouped . Messages for Active users are filtered using the Default Policy Settings for the customer in the Control Console.
MX Logic Email Defense Service
Proprietary and Confidential MX Logic Email Defense Admin Guide Page 3-18
Inactive Status
� If the user creation mode for a domain is currently set for Explicit user creation, email will not be delivered to users set to Inactive
� The user account will be de-activated for access to the Control Console either through direct login or via execution of links within the Spam Quarantine Report (SQR).
� The user account will be de-activated for access to functionality associated with user authentication for web defense
� Allow/Deny lists will not be applied prior to message delivery
With regard to Directory Integration, Inactive users are user accounts in the Control Console that are not in the customers Active Directory. Upon synchronization, these user accounts are not deleted, instead they are to Inactive until the administrator changes the status on the Control Console or adds the user to your Active Directory.
Note : Mail will still be processed for the user account but will not be accessible until status is changed to Active on the Control Console.
Protected Status
� Normally used for Customer Administrative type accounts and insures that accidental deletion, via bulk or batch processes, does not occur
� Can not be deleted via bulk or batch processes within the Control Console
� The account can not be bulk deleted until the account is set to “Active” or “Inactive” or deleted from within the user account
� Will not set the account to inactive when an Directory Sync is performed (see below)
Using Active Directory Sync
If the administrator does not want the user account added to the Windows Active Directory but needs the account to remain active, the account should be assign the Protected user status.
The Protected user status is given to primary user accounts that;
� Do not have a corresponding user in the customer’s Active Directory (Customer Administrator, Domain Administrator, Quarantine Manager, or Reports Manager) and still need access to the console functionality. e.g, these accounts do not receive email and are used only in the Control Console
� Are user accounts the customer does not want deleted from the Control Console if they are removed from their Active Directory
� Users accounts are not set to “Inactive” in the Control Console

MX Logic Email Defense Service
Proprietary and Confidential MX Logic Email Defense Admin Guide Page 3-19
Status Behaviors
Active Inactive Protected
SMTP Discovery User Creation Mode; mail flows normally X X X
SMTP Discovery User Creation Mode; mail follows policy to which user is associated
X X X
Explicit User Creation Mode; mail flows normally X No X
Explicit User Creation Mode; mail follows policy to which user is associated
X No X
Explicit User Creation Mode; mail gets denied; no delivery to server, no policy enforcement (recipient is considered invalid)
No X No
User account can be edited by an Administrator X X X
User Account can be edited by User X No X
Spam Quarantine Links remain active X No X
All previous Spam Quarantine Links become disabled No X No
Spam Quarantine Report delivered according to policy X No X
Quarantined Mail is managed at Domain Quarantine Area X X X
User Account can be deleted by an Administrator X X X
User can sign into the Control Console from the blue login screen X No X
User Account counts in Active User Count X No X
Web Defense User Authentication; user still gets authenticated X No X
3.8.1.4. On-demand Spam Quarantine Report
Click the “Deliver Spam Report” to request an on-demand generation of the users Spam Quarantine Report (SQR). This bypasses the user level SQR delivery frequency. SQR delivery is resumed based on the user level SQR delivery frequency and available quarantined mail.
� Sending an on-demand SQR will not utilize all of the users SQR selections
� If the users SQR is set to HTML, it always follows the “All Quarantine Messages” rule
� If a users SQR is set to Text Only Summary, it sends a text only summary report
� The SQR delivered contains quarantine mail for the past seven days, even if the customer is set up for a 14 day quarantine period
� If the user is in a group policy where SQR is Disabled, this overrides that policy and sends the SQR to the user(s)

MX Logic Email Defense Service
Proprietary and Confidential MX Logic Email Defense Admin Guide Page 3-20
� Administrative only function; the user does not have access to this button
If the SQR Delivery Successful:
� SQR is delivered to the user
� Deliver Spam Report button becomes disabled
� Spam report delivered message is displayed
The Deliver Spam Report will be disabled once click ed and the delivery was successful
� Prevents Administrator from clicking button several times, initiating several SQRs
Note: If the Administrator navigates away from the User Details page and re-accesses, the Deliver Spam Report button is re-enabled.
If SQR Delivery Unsuccessful:
� Deliver Spam Report button stays enabled
� Report not sent – no quarantine items found message is displayed
The following shows which roles have access to the Deliver Spam Report Button
Role Deliver Spam
Report Button
User
Customer Admin X
Domain Admin X
Quarantine Manager X
Reports Manager
Reseller Admin X
Support Admin X
Global Admin X

MX Logic Email Defense Service
Proprietary and Confidential MX Logic Email Defense Admin Guide Page 3-21
3.8.2. General Settings
� The Last Login indicates the last time the user accessed the Control Console from the website sign in window or from the SQR
� The Administrator can also view the user’s alias accounts (both user alias and domain alias)
3.8.2.1. User Aliases
Click the Aliases link to add a User Alias to the selected primary user account. Up to five user alias accounts can be added to each primary user account.
If the user account already has domain aliases created, the Control Console will automatically create new accounts for the user for each domain alias.
3.8.2.2. Change Group
To change a users Group assignment:
1. Click the Change Group link. All pre-defined user groups are displayed.
2. Select the radio button of the group to which this user should be assigned. The user is automatically transferred into the new group.
3.9. Email Defense Settings/ Preferences
The Administrator can modify a user’s email defense preference options. Some of the user preferences that can be modified are determined by policy types.
Anti-Spam > Reporting
MX Logic Email Defense Service
Proprietary and Confidential MX Logic Email Defense Admin Guide Page 3-22
� Allow users to personalize Spam filtering actions
� Allow users to “opt out” of Spam filtering
� Allow Users to set a password
The Time Zone settings are available to all user accounts.
Determine the language in which the SQR is displayed. The default language is English. Selecting the language localization option determines which language fields for user-level windows are displayed.
Note: The Administrator can not change their language option from their Preferences window. The Administrator can only change their language option from the Control Console login window.
The Entries per page drop list identifies up to how many entries will be displayed when the user accesses an “index” page. The default selection is 25 entries.
The following table shows which index pages will be affected for each role. The Entries per page selection applies to all index pages to which the user has access.
3.9.1. User Account Quarantine
Each user has one quarantine area to manage for the ir primary address and all their alias email addresses.
The Administrator can view all of the selected user’s quarantined mail.
Index Page User Accounts
Domains Customers Resellers Audit Trail Report
Event Log Report
Click Log Report
Quarantine Report
Disaster Recovery Log
User No access
Reports Mgr.
x x x x x
Quarantine Mgr.
x x x x x
Domain Admin.
x x x x x x
Customer Admin
x x x x x x x
Reseller Admin
x x x x x x x x
Global Admin.
x x x x x x x x x
Support Admin.
x x x x x x x x x
MX Logic Email Defense Service
Proprietary and Confidential MX Logic Email Defense Admin Guide Page 3-23
Select Quarantine search criteria by selecting options in the Threat drop list, Day and Direction. The Administrator can view each user’s quarantined mail: Spam, Virus, Attachment, and Content Keyword.
The Administrator can take action on any of these quarantined messages; Release, Delete or Release the message and place the sender on the user’s allow list by clicking Always Allow for User.
Note: When a user logs into their own account, the only quarantine messages they can view are Spam quarantine messages. He/she is never allowed to view messages quarantined due to a Virus, Attachment, or Content Keyword violation.
3.9.2. User Account Message Continuity
The Message Continuity link is displayed if you subscribe to the Disaster Recovery Message Continuity product. Clicking the Message Continuity link within a user account will open the users Inbox. Messages will only be displayed in the Message Continuity Inbox if the domain to which the user is associated is in Disaster Recovery mode and MX Logic is spooling the domain mail. See the Disaster Recovery Topic within this guide for additional details.
3.9.3. User Account Allow / Deny List
This allows the user or the Administrators to place entries on the user level allow list.
The User Allow list has a limit of 300 entries .
If an entry is made on the User Level allow list, this overrides the Spam policy. All other policies are enforced; Attachment, Virus, and Content Keyword.
If there is an entry on the user level allow list and the same entry is made on the Policy Level Deny list, the message is denied.
The User Deny List has a limit of 200 entries .
If an entry is made on the user level deny list, any messages from the entered sender is denied delivery. The users deny list is used when senders are known to the user, but the user wishes not to receive inbound messages from this sender.
If an entry is made on the user deny list, and the same entry is made on the Policy Allow, the message is denied.
Entries on the Allow and Deny list can be a fully qualified email address or a wildcard character (*) can be used in the address.
� Entries can be made manually, or by uploading a batch file in a .txt or .csv format
� The batch file has a 100Kb file size limit
� You can also download the Allow or Sender list to a .csv spreadsheet file

MX Logic Email Defense Service
Proprietary and Confidential MX Logic Email Defense Admin Guide Page 3-24
3.9.4. Email Activity
The Email Activity page indicates the number of messages inbound and outbound (if using that service) that have been filtered for this user in the last seven days. You can also view the average size of this user’s messages. A graphical view will be available to indicate the inbound / outbound message details.
3.9.5. Web Defense - Web Activity
The Web Activity page allows user-level Web Activity reports to be generated. This option contains data if you subscribe to the Web Defense service, and you have chosen Explicit User Authentication as the Web Defense Access Control Type. See the Web Defense Customer Administration Training Guide for additional details.
3.9.6. My Account
The My Account option redirects the Administrator to their account, allowing access to all areas of their user account.
The Administrator may perform the following actions on their own User Account:
� Edit
� General Settings
� Aliases
� Change Group
� Email Defense Preferences
� Quarantine
� Message Continuity
� Allow / Deny List
� Email Activity
� Web Activity
3.9.7. Delete Users
The Delete Users screen is used to remove a primary user account. This is needed when:
� An employee leaves the organization
� You use SMTP Discovery for your User Creation Mode
� Need to delete any invalid user accounts that were auto-created
Using the filter options can help you identify user accounts you may need to delete. A maximum of 1,000 users can be displayed within the filter list and 100 users can be deleted at one time. When you delete a user account, the user’s primary account, all user alias accounts and all quarantine mail for the selected user(s) are deleted. The user account is also deleted for any group he/she was associated to.
MX Logic Email Defense Service
Proprietary and Confidential MX Logic Email Defense Admin Guide Page 3-25
User accounts with the status of Protected are not displayed and cannot be deleted from the Delete Users page. Protected accounts can be deleted only from within their individual user account.
Protected Users are not displayed in the Users list.
MX Logic Email Defense Service
Proprietary and Confidential MX Logic Email Defense Admin Guide Page 3-26
The More Options button is used to upload a batch file containing names that can be deleted. Example: A portion of the company was sold and the employees now have new email addresses.
3.9.8. User Aliases
Up to five user alias accounts can be associated to each primary user account (see User Details); the Administrator can always create the user alias accounts. The Administrator can determine whether to allow users to create their own user aliases when the user accesses their user account from their SQR.
To stop users from creating their own alias accounts, deselect the “Allow users to manage user aliases” check box located in the User Management page, Aliases link.
3.9.9. User Authentication
There are two functions on the User Authentication Page: Authentication Type and Batch Password Upload.
Note: User Accounts with the role of Customer Administrators can batch assign user passwords. User Accounts logged in with the Role of Reseller Administrator cannot batch assign passwords.
The Authentication Type determines the method used to validate accounts signing into the Control Console via the Login window.
The four authentication type methods are:
���� Passwords - Validate the users credential against the User Account information maintained via the Control Console. Password is the default authentication type.
If one of the following options is selected, you will be asked to enter additional criteria, allowing MX Logic to query your server:
���� LDAP Authentication - When the user logs into the Control Consol, the password is authenticated against the user’s password in Active Directory (AD)
���� POP3 Authentication - When the user logs into the Control Consol, the password is authenticated against the user’s password on the mail server
���� IMAP Authentication - When the user logs into the Control Consol, the password is authenticated against the user’s password on the mail server
LDAP (Active Directory) Authentication
When the user logs in to the Control Console, the user,s login password is verified against the information on your AD server.
Should a user attempt to login following the TTL, the Control Console will attempt to connect to your AD server to verify user password information again.
MX Logic Email Defense Service
Proprietary and Confidential MX Logic Email Defense Admin Guide Page 3-27
If the Control Console is able to connect to your server, the Control Console verifies the user’s login credentials using any new credentials found or using the same credentials if there was no change. This means the user’s password must match what is stored in the encrypted store.
Example:
1. The user logs into the Control Console with a password of “mypassword” and the password is cached in the Control Console.
2. A month later, the user changes their network logon password.
3. The user logs in to the Control Console. If the Control Console can not authenticate the user’s new network password using Active Directory, the user must login to the Control Console using their old password (mypassword).
Passwords obtained using LDAP, POP3 or IMAP are cached (Time To Live - TTL) in the MX Logic store for four hours.
Note: If users did not attempt a login before the loss of server access, the user will NOT have a password stored and therefore cannot access the Control Console. Therefore, it is HIGHLY RECOMMENDED that all users login to the console once their accounts and credentials are established in the Control Console.
The Batch Passwords Update option allows you to assign or change existing user’s password. Passwords can be assigned for an individual user account, or by uploading a batch file.
To assign/update an individual password, enter the following:
� Email Address
� Password
� Confirm the password
� Click the Save button to add the entry to the list (right side)
� Click the Save button (at the top) to apply the password change
Example: LDAP is selected and your Active Directory is unavailable, no one will be able to sign into the Control Console from the blue sign in screen.
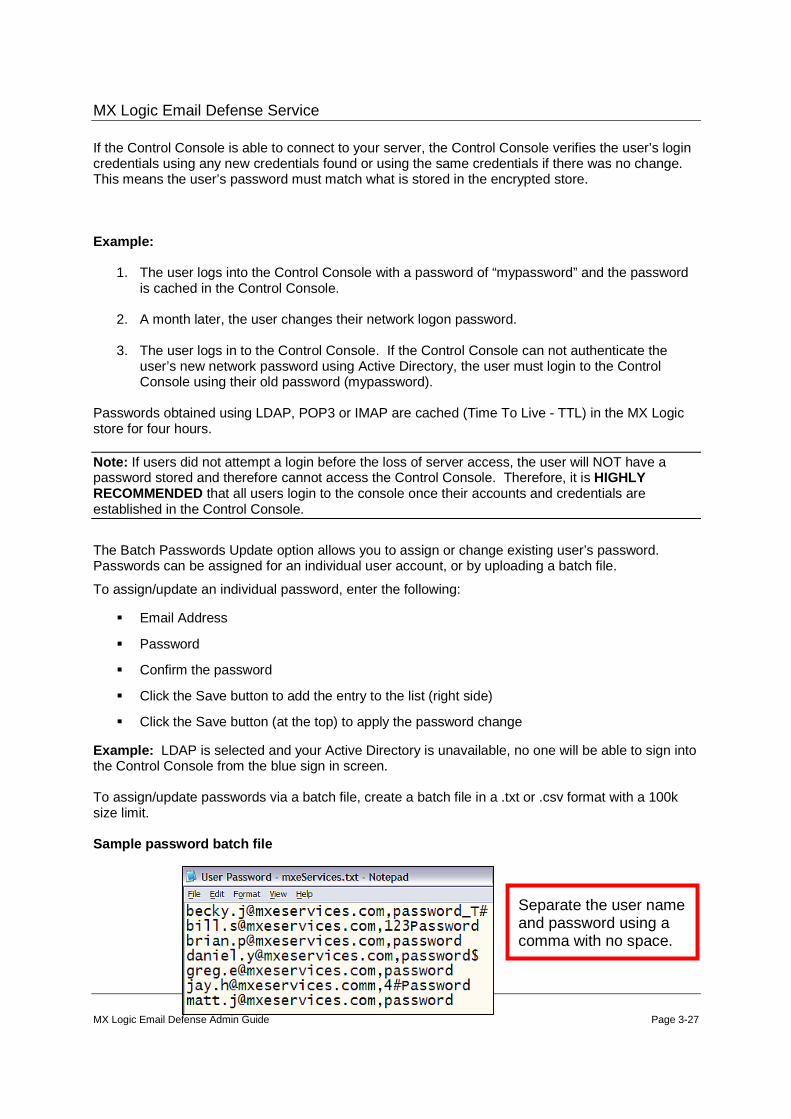
To assign/update passwords via a batch file, create a batch file in a .txt or .csv format with a 100k size limit.
Sample password batch file
Separate the user name and password using a comma with no space.
MX Logic Email Defense Service
Proprietary and Confidential MX Logic Email Defense Admin Guide Page 3-28
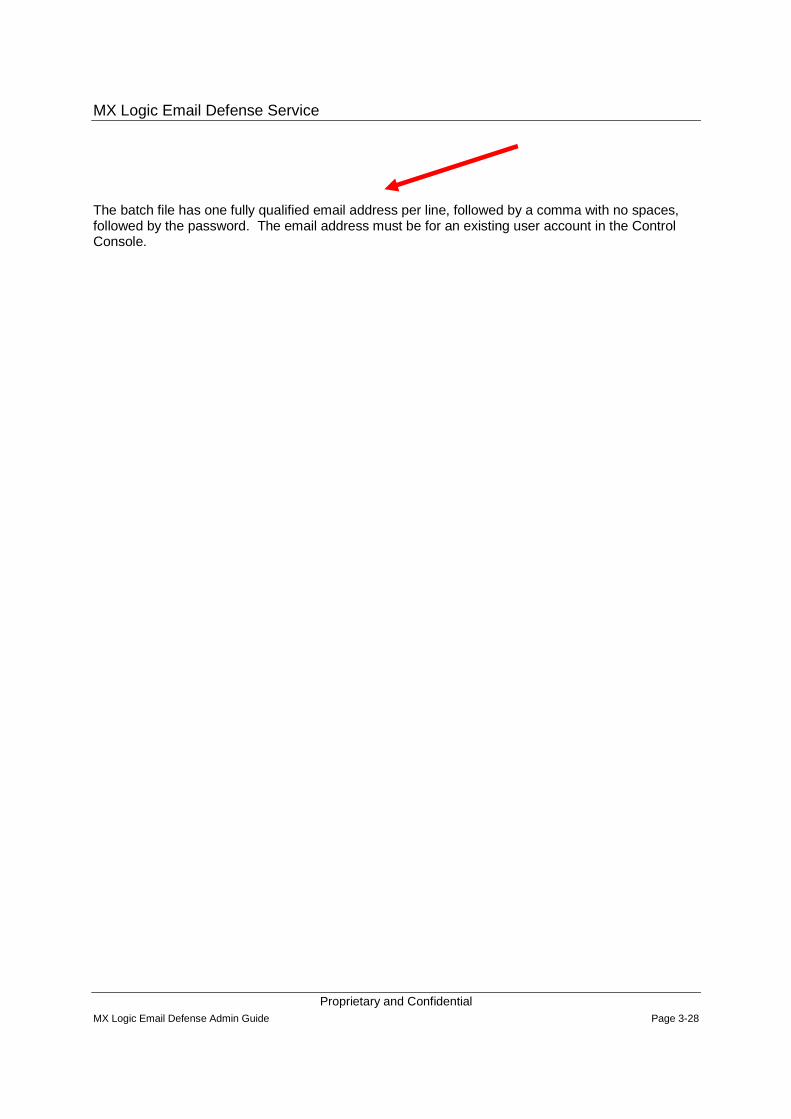
The batch file has one fully qualified email address per line, followed by a comma with no spaces, followed by the password. The email address must be for an existing user account in the Control Console.
Proprietary and Confidential MX Logic Email Defense Admin Guide Page 4-1
4. Group Configuration
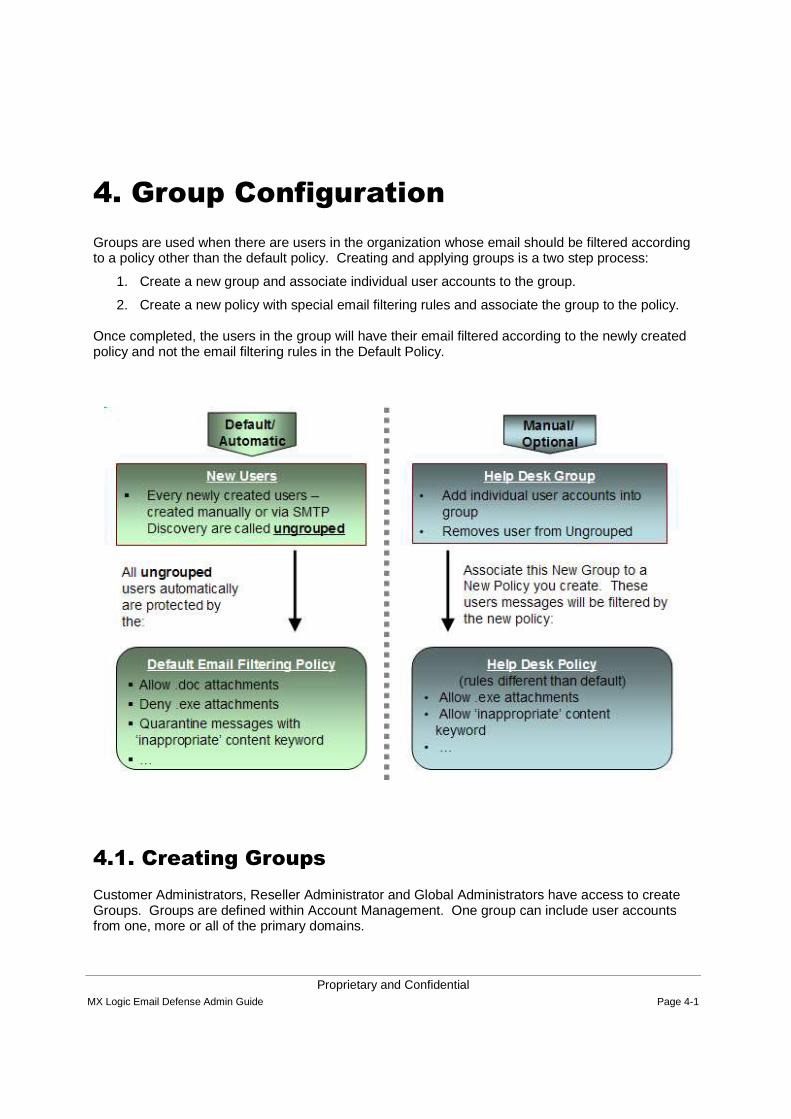
Groups are used when there are users in the organization whose email should be filtered according to a policy other than the default policy. Creating and applying groups is a two step process:
1. Create a new group and associate individual user accounts to the group.
2. Create a new policy with special email filtering rules and associate the group to the policy.
Once completed, the users in the group will have their email filtered according to the newly created policy and not the email filtering rules in the Default Policy.
4.1. Creating Groups
Customer Administrators, Reseller Administrator and Global Administrators have access to create Groups. Groups are defined within Account Management. One group can include user accounts from one, more or all of the primary domains.

MX Logic Email Defense Service
Proprietary and Confidential MX Logic Email Defense Admin Guide Page 4-2
Groups from multiple domains can be associated with the same policy. User accounts not associated to the Sales Group or Marketing Group Policy are considered an Ungrouped user . All Ungrouped users are automatically associated to the Default Policy.
Note: There is no limit to the number of user accounts that can be associated to a group. However, each user account can only be associated to one group.
Once a Group is created, it can be associated to up to three policies (Inbound, Outbound and Web Defense), depending on the services the customer subscribes to.
A user account can be associated with a group at the time of user account creation or at any time after the account has been created.
When creating a group name, enter the group name and description. While the description field is not required, other administrators will find it helpful in understanding the purpose of the group.

MX Logic Email Defense Service
Proprietary and Confidential MX Logic Email Defense Admin Guide Page 4-3
4.1.1. Adding Users to a Group
Select the Group to add users to and click the Users tab.
All users for the selected primary domain are displayed. Use the Shift key, the Ctrl key, or add users one by one to the group.
You can filter the users listed by selecting “Users Not in this Group” or “Users Not in a Group”. You can search for user accounts by using the filter at the bottom of the window.
Click Apply to save the user accounts to the group.
You can add users from multiple primary domains into one group.
1. Add the users from the first primary domain.
2. Select a different domain in the domain drop list.
3. Re-select the group & click the users tab.
4. Add the user accounts from the second domain to the group.
MX Logic Email Defense Service
Proprietary and Confidential MX Logic Email Defense Admin Guide Page 4-4
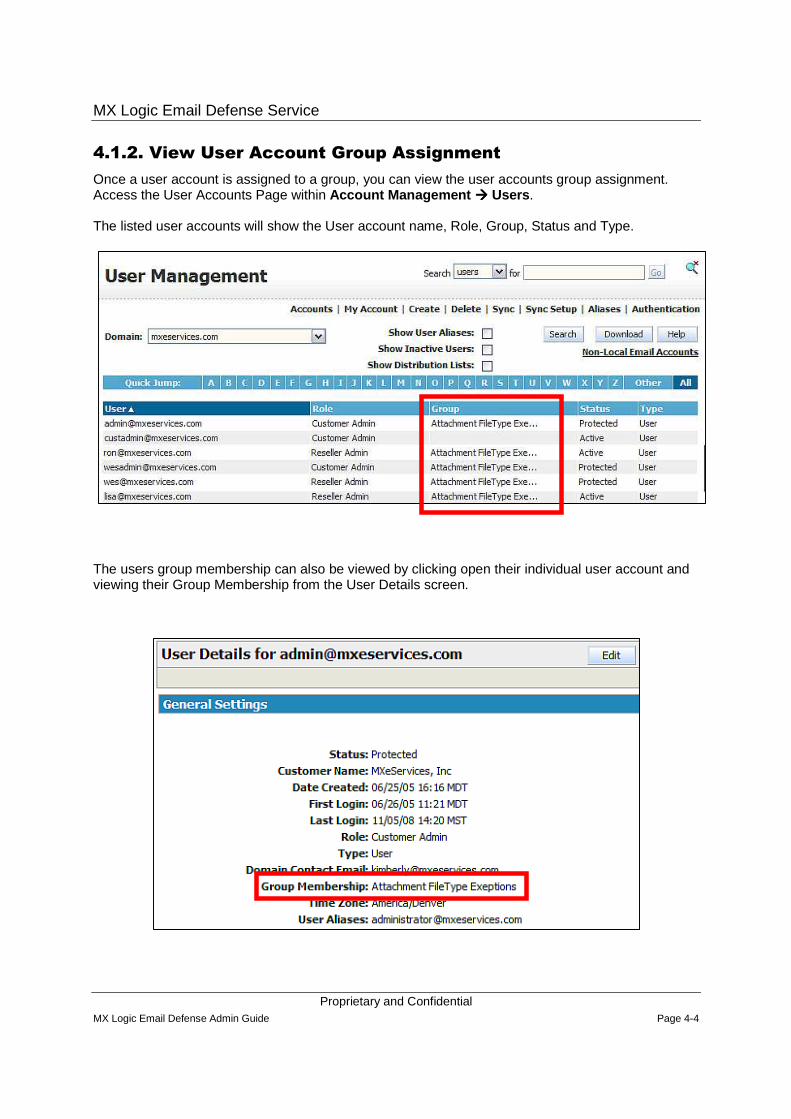
4.1.2. View User Account Group Assignment
Once a user account is assigned to a group, you can view the user accounts group assignment. Access the User Accounts Page within Account Management ���� Users .
The listed user accounts will show the User account name, Role, Group, Status and Type.
The users group membership can also be viewed by clicking open their individual user account and viewing their Group Membership from the User Details screen.
MX Logic Email Defense Service
Proprietary and Confidential MX Logic Email Defense Admin Guide Page 5-1
5. MX Logic Directory Sync
5.1. Module Objective
� Review and Perform Directory Sync Setup
� Identify Required Sync Setup Fields
� Configure Automatic Synchronization Settings
� Review and Perform the User Synchronization Process
� Review the User Sync Details
� Explain Distribution List Type for Directory Integration
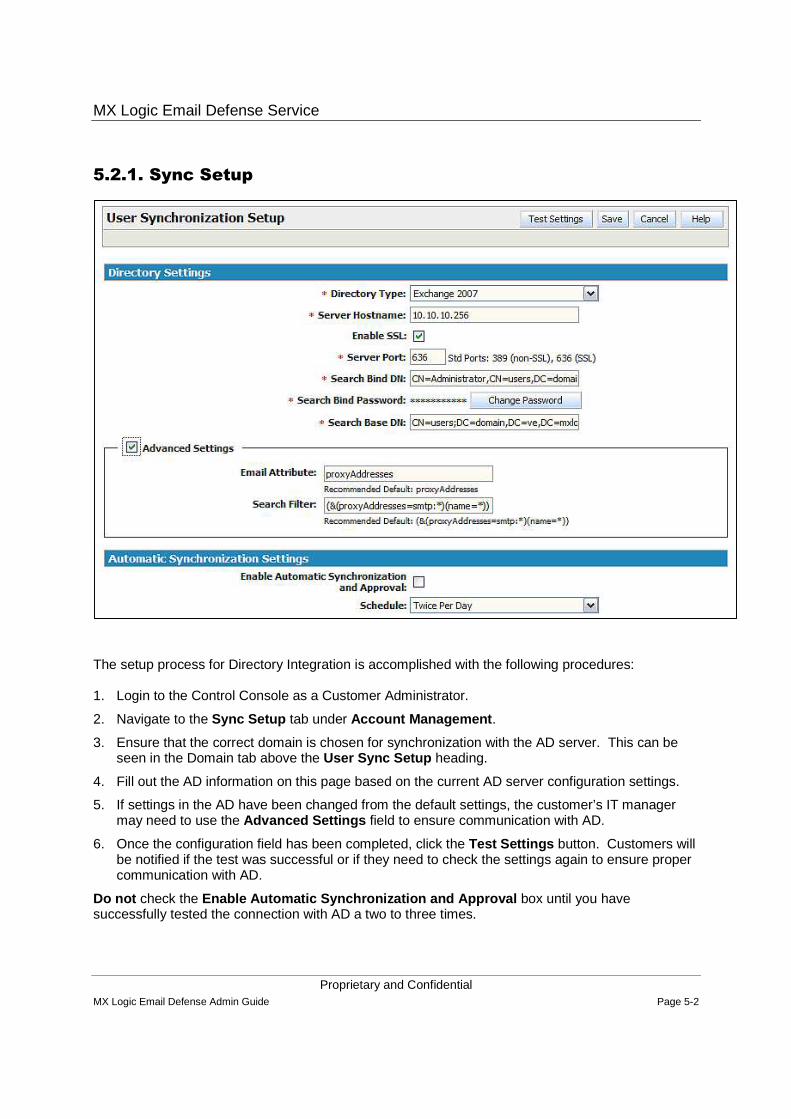
5.2. Customer Configuration
In order to use MX Logic Directory Integration, MX Logic must be able to reach your Microsoft® Active Directory (AD) server via either static IP or resolvable hostname. This can be accomplished through port routing at the firewall, and using the Light Weight Directory Access Protocol (LDAP) to copy the email accounts into the Control Console.
By default, email is used as the attribute key. There is no need to add an AD username since the search queries by email address.
Note: When configuring MX Logic Directory Integration, make sure to set the User Creation Mode to Explicit to prevent any duplication of users or conflicts within the Control Console.
MX Logic Email Defense Service
Proprietary and Confidential MX Logic Email Defense Admin Guide Page 5-2
5.2.1. Sync Setup
The setup process for Directory Integration is accomplished with the following procedures:
1. Login to the Control Console as a Customer Administrator.
2. Navigate to the Sync Setup tab under Account Management .
3. Ensure that the correct domain is chosen for synchronization with the AD server. This can be seen in the Domain tab above the User Sync Setup heading.
4. Fill out the AD information on this page based on the current AD server configuration settings.
5. If settings in the AD have been changed from the default settings, the customer’s IT manager may need to use the Advanced Settings field to ensure communication with AD.
6. Once the configuration field has been completed, click the Test Settings button. Customers will be notified if the test was successful or if they need to check the settings again to ensure proper communication with AD.
Do not check the Enable Automatic Synchronization and Approval box until you have successfully tested the connection with AD a two to three times.

MX Logic Email Defense Service
Proprietary and Confidential MX Logic Email Defense Admin Guide Page 5-3
5.2.1.1. Sync Setup Fields
Test Settings button: Click this button to request a test transaction to your Microsoft® Active Directory (AD) server. This button is enabled after you have completed the Setup form or when any changes have been made to a saved Directory Settings.
The test includes connection to the Server Hostname or IP, validates a successful connection to the server managing AD and when successful, provides a sample listing of user accounts discovered by Directory Integration.
Save button : Click this button to apply all changes in this window and set the Directory Integration method to this type. This button is not available until a successful test transaction has been completed by clicking the Test LDAP button. If you exit this window without clicking the Save button, all unsaved changes will be discarded.
Cancel button: Click this button to discard unsaved modifications to this window. The information contained within this window will reset to the previously saved information.
Help button: Click this button to open a window with help information about the current window.
Directory Type drop list: Designates the type of AD implementation used by your company. When selecting the appropriate AD type, the normal installation defaults from AD are used to assist in the configuration of Directory Integration.
Server Hostname field: Designate the fully qualified hostname or IP address of the LDAP server. For proper operation, Directory Integration requires access to either:
� An externally DNS resolvable hostname, OR
� An externally accessible IP address
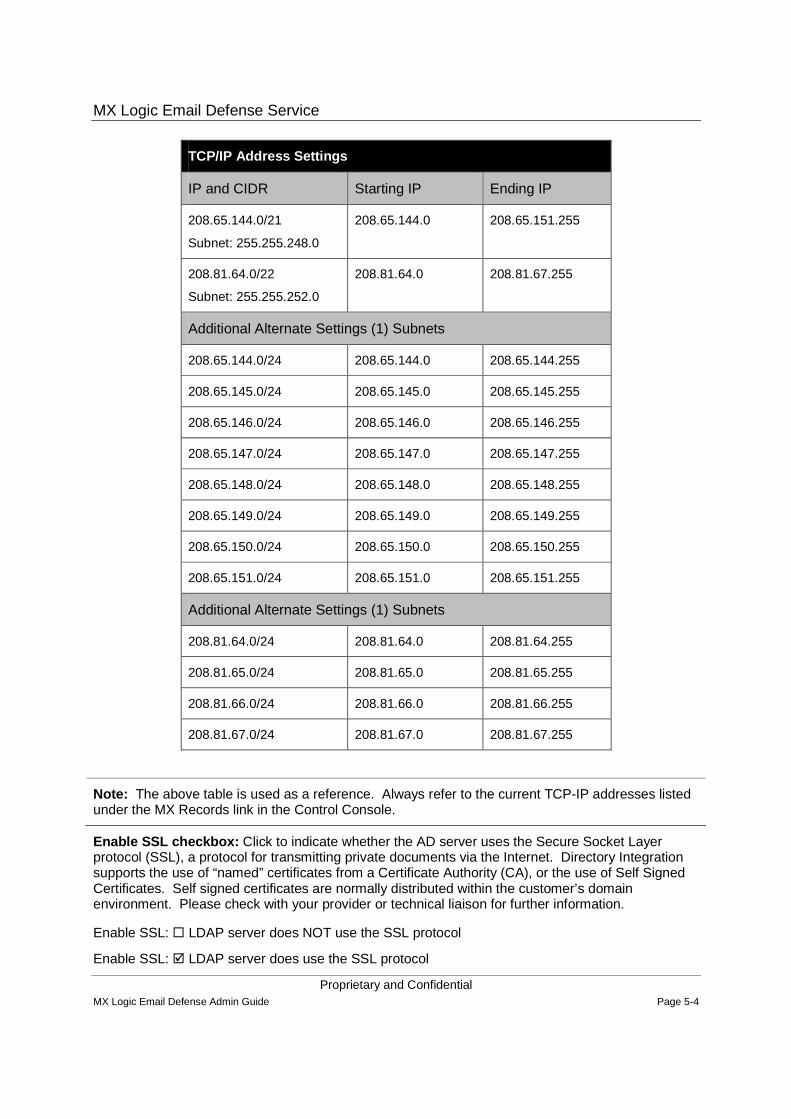
If your AD server is maintained behind a firewall and / or within a private IP network space, the firewall and routing between the external IP and your AD server should be enabled for connections from the IP addresses listed on the following page.
These IP addresses are shared between your network and the MX Logic Email Defense Solution. When updating the appropriate firewall rules to include connections from the Email Defense Solution service and the Directory Integration service, verify the settings are correct.
MX Logic Email Defense Service
Proprietary and Confidential MX Logic Email Defense Admin Guide Page 5-4
TCP/IP Address Settings
IP and CIDR Starting IP Ending IP
208.65.144.0/21
Subnet: 255.255.248.0
208.65.144.0 208.65.151.255
208.81.64.0/22
Subnet: 255.255.252.0
208.81.64.0 208.81.67.255
Additional Alternate Settings (1) Subnets
208.65.144.0/24 208.65.144.0 208.65.144.255
208.65.145.0/24 208.65.145.0 208.65.145.255
208.65.146.0/24 208.65.146.0 208.65.146.255
208.65.147.0/24 208.65.147.0 208.65.147.255
208.65.148.0/24 208.65.148.0 208.65.148.255
208.65.149.0/24 208.65.149.0 208.65.149.255
208.65.150.0/24 208.65.150.0 208.65.150.255
208.65.151.0/24 208.65.151.0 208.65.151.255
Additional Alternate Settings (1) Subnets
208.81.64.0/24 208.81.64.0 208.81.64.255
208.81.65.0/24 208.81.65.0 208.81.65.255
208.81.66.0/24 208.81.66.0 208.81.66.255
208.81.67.0/24 208.81.67.0 208.81.67.255
Note: The above table is used as a reference. Always refer to the current TCP-IP addresses listed under the MX Records link in the Control Console.
Enable SSL checkbox: Click to indicate whether the AD server uses the Secure Socket Layer protocol (SSL), a protocol for transmitting private documents via the Internet. Directory Integration supports the use of “named” certificates from a Certificate Authority (CA), or the use of Self Signed Certificates. Self signed certificates are normally distributed within the customer’s domain environment. Please check with your provider or technical liaison for further information.
Enable SSL: � LDAP server does NOT use the SSL protocol
Enable SSL: � LDAP server does use the SSL protocol

MX Logic Email Defense Service
Proprietary and Confidential MX Logic Email Defense Admin Guide Page 5-5
Server Port field: Designates the port used by the MX Logic User Account to connect to the Microsoft® Exchange server. The following is the standard AD port usage:
� 389 (If SSL is not enabled)*
� 636 (if SSL is enabled)*
Customer Configurable (Specialized Port Usage)
Note: MX Logic displays the default port setting. This information is validated when the customer clicks the Test Settings button.
Search Bind DN field: Designates the Berkeley Internet Name Daemon (BIND); Distinguished Name (DN), Common Name (CN) and the Domain Controller (DC) of the user account on the AD server that has permission to search and retrieve information from AD.
The format of this field uses “commas”, as a separator and requires the CN of the authorized account information, the CN of the attribute for Common Name (default for AD is “users”, the DC for all subdomain references, the DC for the Top Level Domain (TLD) and the DC for the Country Code Top-Level Domain (ccTLD) or the Generic Top-Level Domain (gTLD).
Example: the user account for access to the customer’s AD is called “directorysync” and the Active Directory support email services are called corporate.domain.com. The setting for Search Bind DN using the default implementation for AD would be the following:
“CN=directorysync,CN=users,DC=corporate,DC=domain,D C=com”
Search Bind Password field: Designate the password for the user with the Distinguished Name. This is the AD password for the Distinguished User that has authorized access for Directory Integration. This password is stored encrypted within the Control Console and is not accessible by support or operational personnel. This password must be synchronized between the MX Logic and the customer AD installation.
Search Base DN field: Designates the Distinguished Name of the directory entry under which all
users for the configured domain can be located within the AD.∗∗∗∗
Example: If the Search Bind DN for access to the customer AD is setup as “directorysync” and their AD support email services for corporate.domain.com, then the setting for Search Bind DN using the default implementation for AD then the Search Base DN would be the following:
“CN=users,DC=corporate,DC=domain,DC=com”
Enable Advanced Setting field:
� Advanced Setting Dis-abled
� Advanced Setting En-abled
∗∗∗∗ This will normally be configured with the same information used for Search Bind DN for the Distinguished Name.
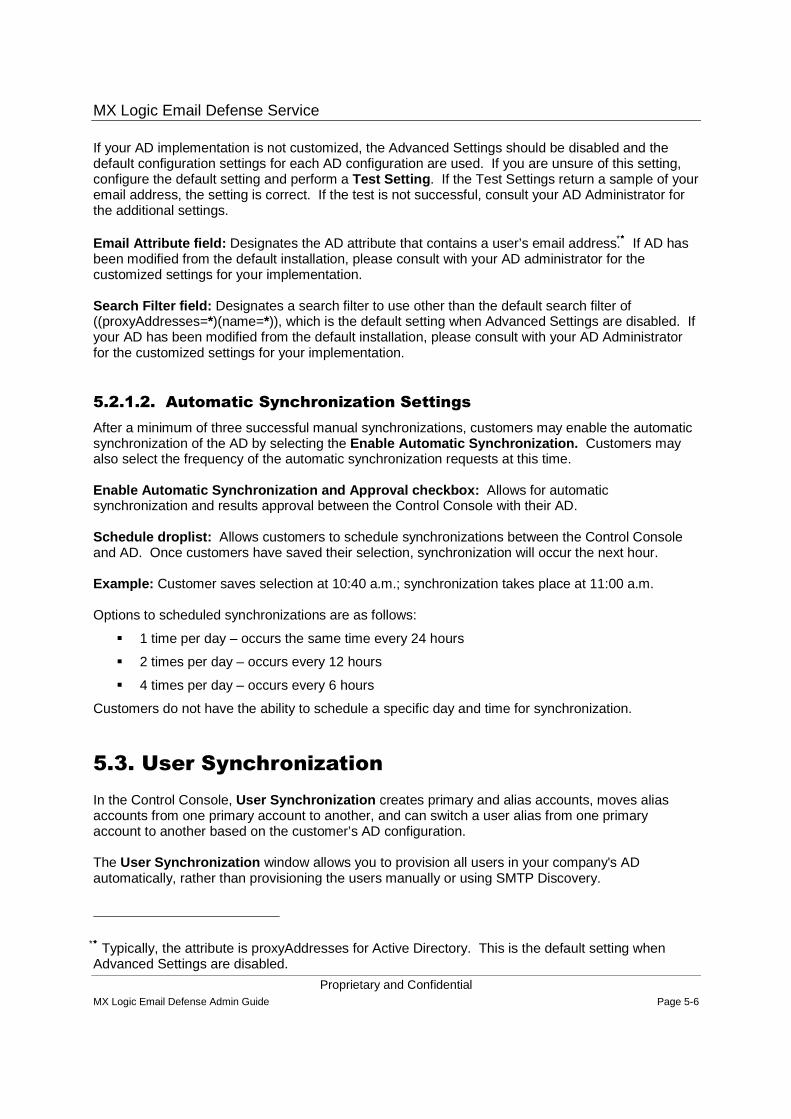
MX Logic Email Defense Service
Proprietary and Confidential MX Logic Email Defense Admin Guide Page 5-6
If your AD implementation is not customized, the Advanced Settings should be disabled and the default configuration settings for each AD configuration are used. If you are unsure of this setting, configure the default setting and perform a Test Setting . If the Test Settings return a sample of your email address, the setting is correct. If the test is not successful, consult your AD Administrator for the additional settings.
Email Attribute field: Designates the AD attribute that contains a user’s email address.∗∗∗∗ If AD has been modified from the default installation, please consult with your AD administrator for the customized settings for your implementation.
Search Filter field: Designates a search filter to use other than the default search filter of ((proxyAddresses=*)(name=*)), which is the default setting when Advanced Settings are disabled. If your AD has been modified from the default installation, please consult with your AD Administrator for the customized settings for your implementation.
5.2.1.2. Automatic Synchronization Settings
After a minimum of three successful manual synchronizations, customers may enable the automatic synchronization of the AD by selecting the Enable Automatic Synchronization. Customers may also select the frequency of the automatic synchronization requests at this time.
Enable Automatic Synchronization and Approval check box: Allows for automatic synchronization and results approval between the Control Console with their AD.
Schedule droplist: Allows customers to schedule synchronizations between the Control Console and AD. Once customers have saved their selection, synchronization will occur the next hour.
Example: Customer saves selection at 10:40 a.m.; synchronization takes place at 11:00 a.m.
Options to scheduled synchronizations are as follows:
� 1 time per day – occurs the same time every 24 hours
� 2 times per day – occurs every 12 hours
� 4 times per day – occurs every 6 hours
Customers do not have the ability to schedule a specific day and time for synchronization.
5.3. User Synchronization
In the Control Console, User Synchronization creates primary and alias accounts, moves alias accounts from one primary account to another, and can switch a user alias from one primary account to another based on the customer’s AD configuration.
The User Synchronization window allows you to provision all users in your company's AD automatically, rather than provisioning the users manually or using SMTP Discovery.
∗∗∗∗ Typically, the attribute is proxyAddresses for Active Directory. This is the default setting when Advanced Settings are disabled.
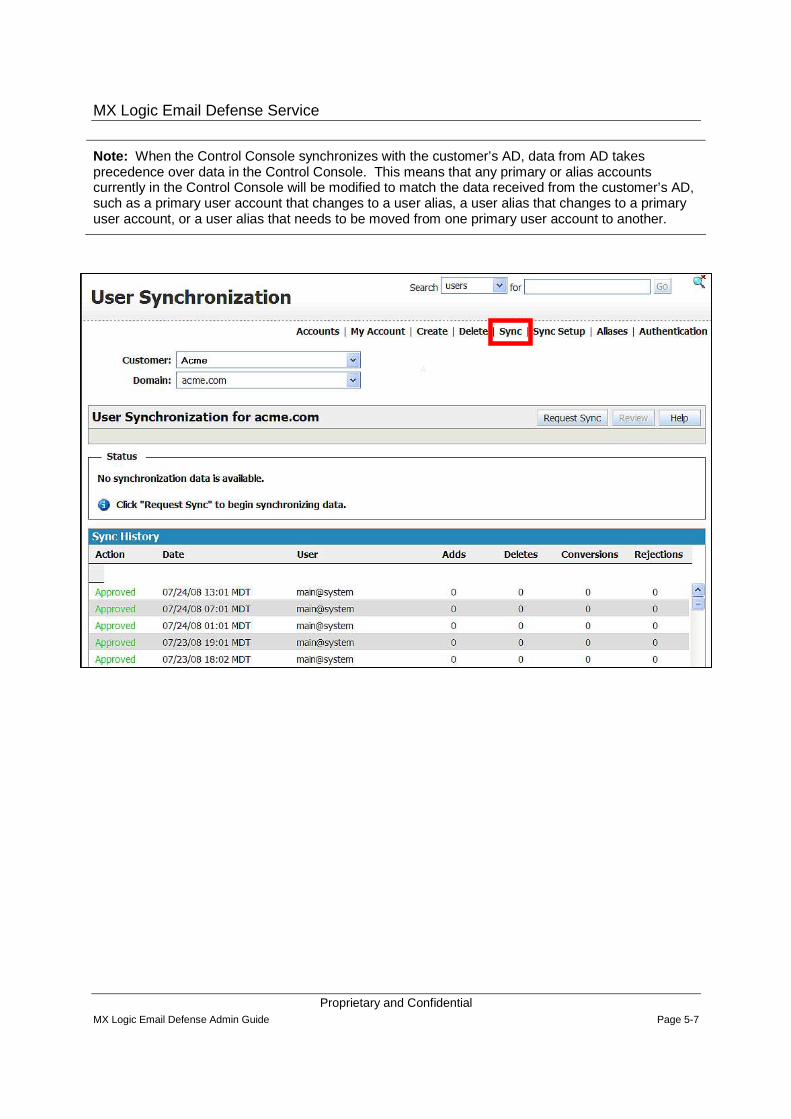
MX Logic Email Defense Service
Proprietary and Confidential MX Logic Email Defense Admin Guide Page 5-7
Note: When the Control Console synchronizes with the customer’s AD, data from AD takes precedence over data in the Control Console. This means that any primary or alias accounts currently in the Control Console will be modified to match the data received from the customer’s AD, such as a primary user account that changes to a user alias, a user alias that changes to a primary user account, or a user alias that needs to be moved from one primary user account to another.
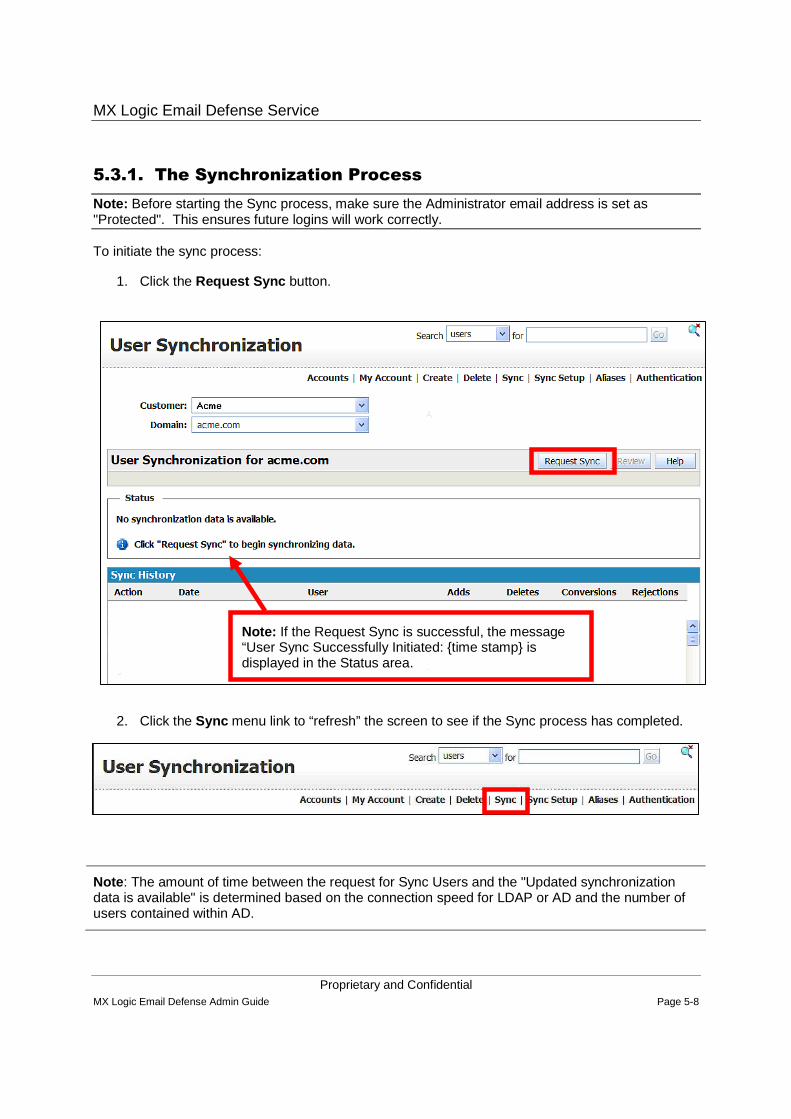
MX Logic Email Defense Service
Proprietary and Confidential MX Logic Email Defense Admin Guide Page 5-8
5.3.1. The Synchronization Process
Note: Before starting the Sync process, make sure the Administrator email address is set as "Protected". This ensures future logins will work correctly.
To initiate the sync process:
1. Click the Request Sync button.
2. Click the Sync menu link to “refresh” the screen to see if the Sync process has completed.
Note : The amount of time between the request for Sync Users and the "Updated synchronization data is available" is determined based on the connection speed for LDAP or AD and the number of users contained within AD.
Note: If the Request Sync is successful, the message “User Sync Successfully Initiated: {time stamp} is displayed in the Status area.
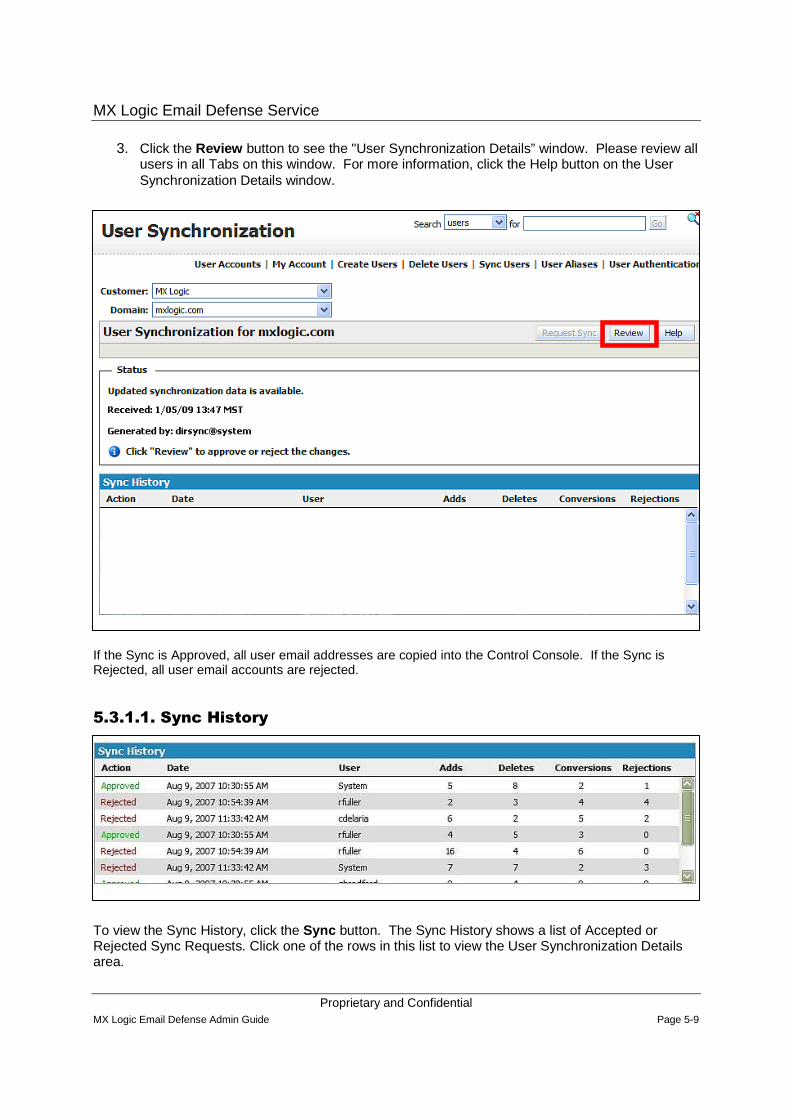
MX Logic Email Defense Service
Proprietary and Confidential MX Logic Email Defense Admin Guide Page 5-9
3. Click the Review button to see the "User Synchronization Details” window. Please review all users in all Tabs on this window. For more information, click the Help button on the User Synchronization Details window.
If the Sync is Approved, all user email addresses are copied into the Control Console. If the Sync is Rejected, all user email accounts are rejected.
5.3.1.1. Sync History
To view the Sync History, click the Sync button. The Sync History shows a list of Accepted or Rejected Sync Requests. Click one of the rows in this list to view the User Synchronization Details area.
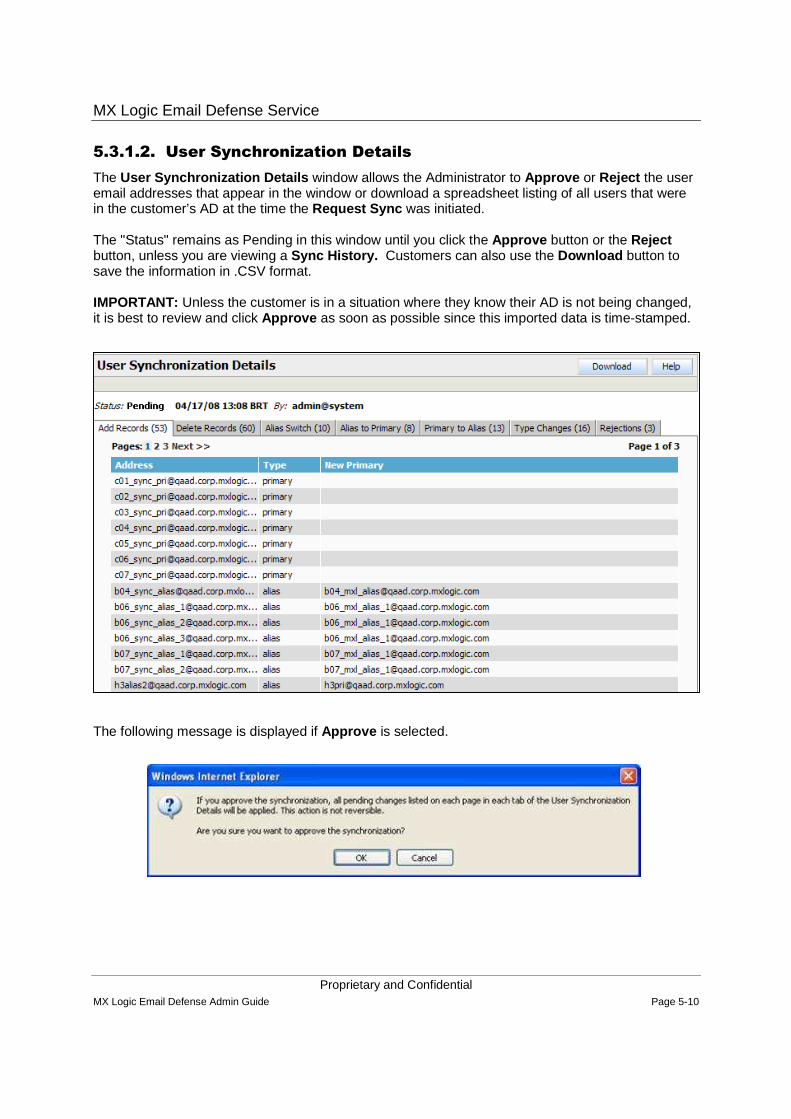
MX Logic Email Defense Service
Proprietary and Confidential MX Logic Email Defense Admin Guide Page 5-10
5.3.1.2. User Synchronization Details
The User Synchronization Details window allows the Administrator to Approve or Reject the user email addresses that appear in the window or download a spreadsheet listing of all users that were in the customer’s AD at the time the Request Sync was initiated.
The "Status" remains as Pending in this window until you click the Approve button or the Reject button, unless you are viewing a Sync History. Customers can also use the Download button to save the information in .CSV format.
IMPORTANT: Unless the customer is in a situation where they know their AD is not being changed, it is best to review and click Approve as soon as possible since this imported data is time-stamped.
The following message is displayed if Approve is selected.
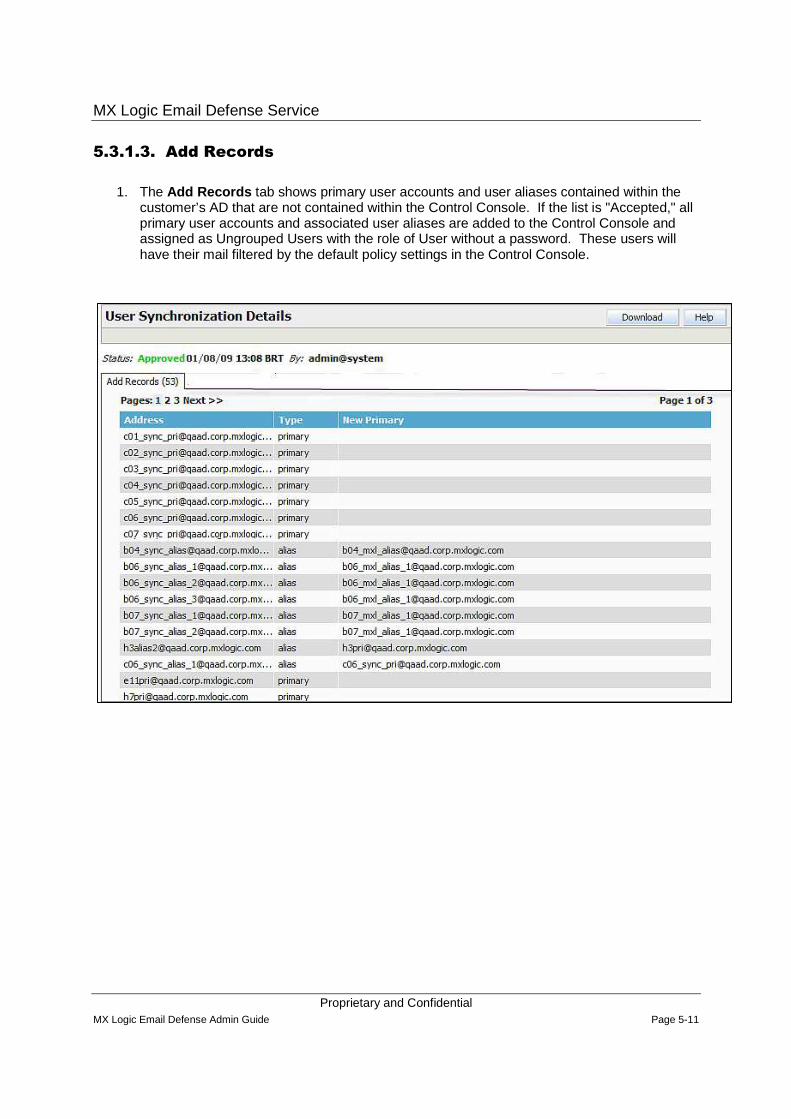
MX Logic Email Defense Service
Proprietary and Confidential MX Logic Email Defense Admin Guide Page 5-11
5.3.1.3. Add Records
1. The Add Records tab shows primary user accounts and user aliases contained within the customer’s AD that are not contained within the Control Console. If the list is "Accepted," all primary user accounts and associated user aliases are added to the Control Console and assigned as Ungrouped Users with the role of User without a password. These users will have their mail filtered by the default policy settings in the Control Console.
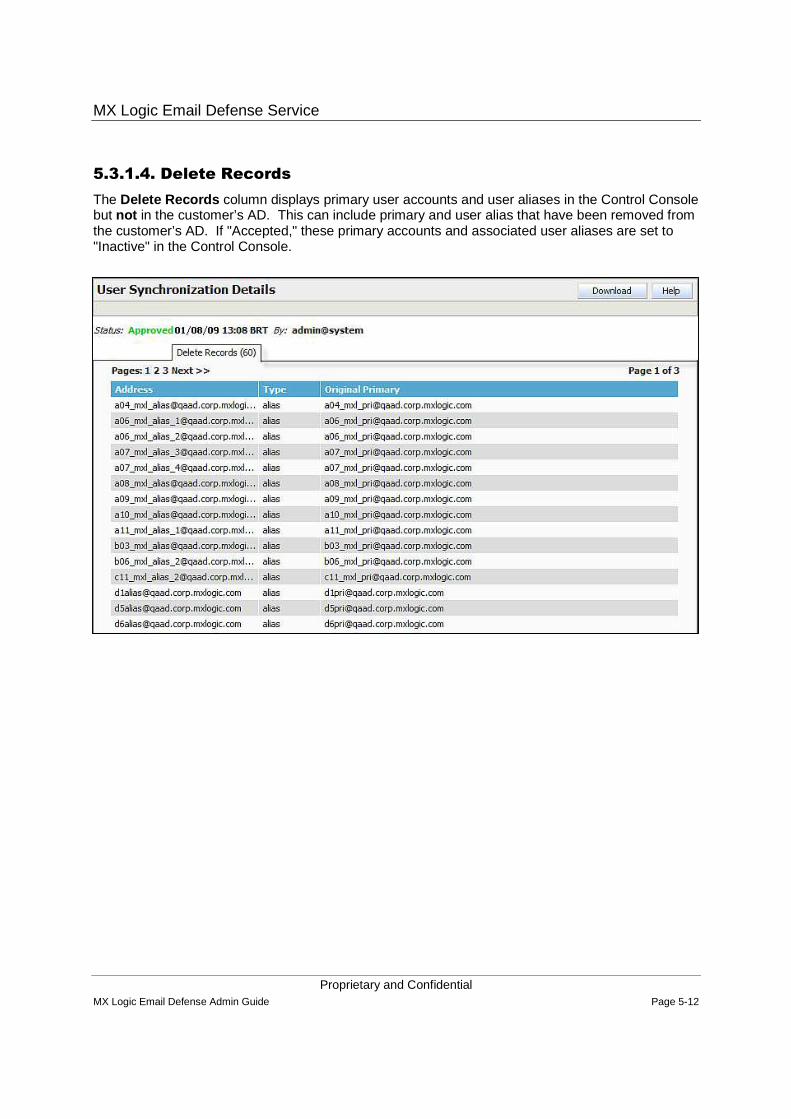
MX Logic Email Defense Service
Proprietary and Confidential MX Logic Email Defense Admin Guide Page 5-12
5.3.1.4. Delete Records
The Delete Records column displays primary user accounts and user aliases in the Control Console but not in the customer’s AD. This can include primary and user alias that have been removed from the customer’s AD. If "Accepted," these primary accounts and associated user aliases are set to "Inactive" in the Control Console.
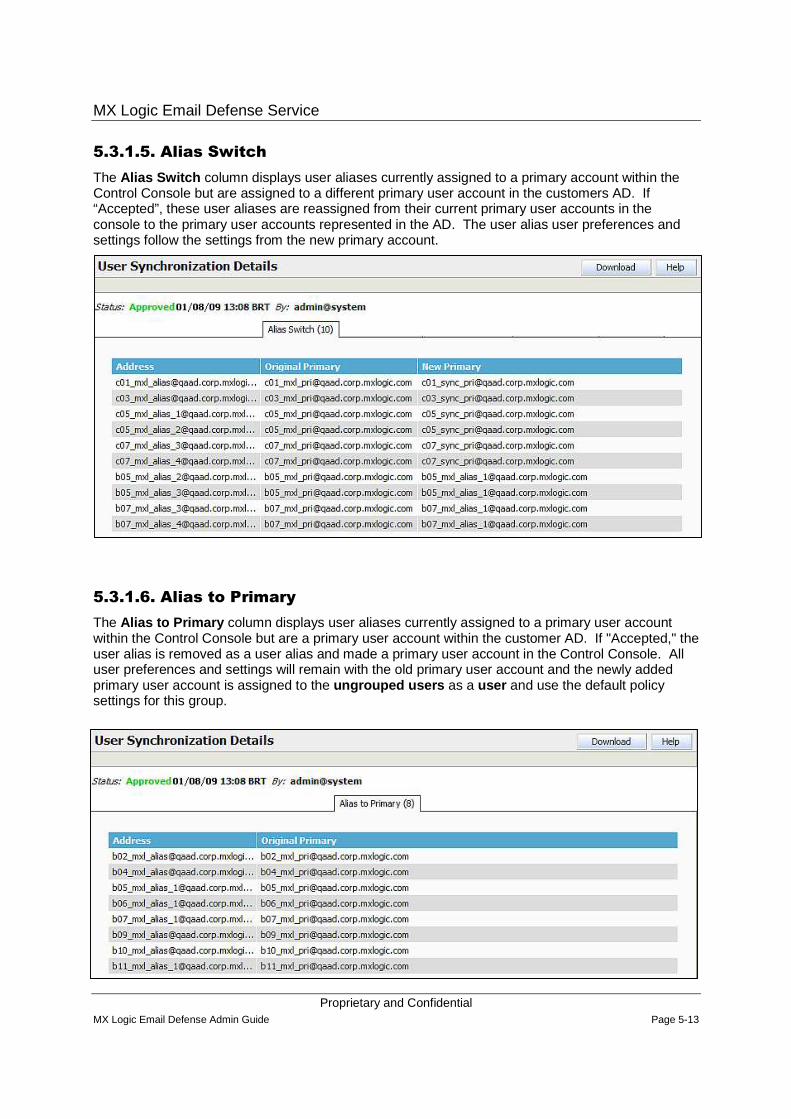
MX Logic Email Defense Service
Proprietary and Confidential MX Logic Email Defense Admin Guide Page 5-13
5.3.1.5. Alias Switch
The Alias Switch column displays user aliases currently assigned to a primary account within the Control Console but are assigned to a different primary user account in the customers AD. If “Accepted”, these user aliases are reassigned from their current primary user accounts in the console to the primary user accounts represented in the AD. The user alias user preferences and settings follow the settings from the new primary account.
5.3.1.6. Alias to Primary
The Alias to Primary column displays user aliases currently assigned to a primary user account within the Control Console but are a primary user account within the customer AD. If "Accepted," the user alias is removed as a user alias and made a primary user account in the Control Console. All user preferences and settings will remain with the old primary user account and the newly added primary user account is assigned to the ungrouped users as a user and use the default policy settings for this group.

MX Logic Email Defense Service
Proprietary and Confidential MX Logic Email Defense Admin Guide Page 5-14
5.3.1.7. Primary to Alias
The Primary to Alias column displays primary user accounts in the Control Console currently assigned as a user alias in the customer AD. If "Accepted," the primary user account is removed from the Control Console and is added as a user alias to either the existing primary user account in the console or the corresponding, newly created primary user account. The user alias user preferences and settings use the setting from the primary account.
5.3.1.8. Type Changes
Accounts will appear in the Type Changes tab if a Sync event changes their type from a User type to a Distribution List type or vice versa. Accounts now have a Type attribute that can be "User" for normal email addresses that go to a single person or Distribution List for email addresses that are intended to represent more than one recipient.
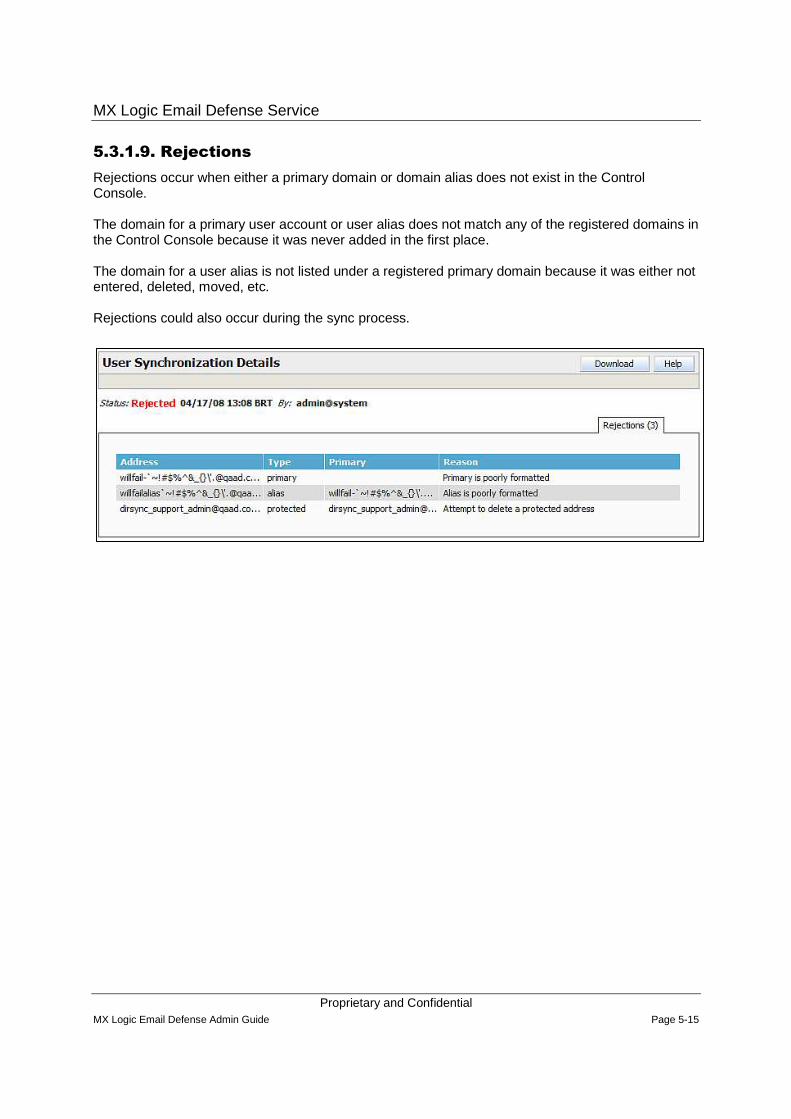
MX Logic Email Defense Service
Proprietary and Confidential MX Logic Email Defense Admin Guide Page 5-15
5.3.1.9. Rejections
Rejections occur when either a primary domain or domain alias does not exist in the Control Console.
The domain for a primary user account or user alias does not match any of the registered domains in the Control Console because it was never added in the first place.
The domain for a user alias is not listed under a registered primary domain because it was either not entered, deleted, moved, etc.
Rejections could also occur during the sync process.
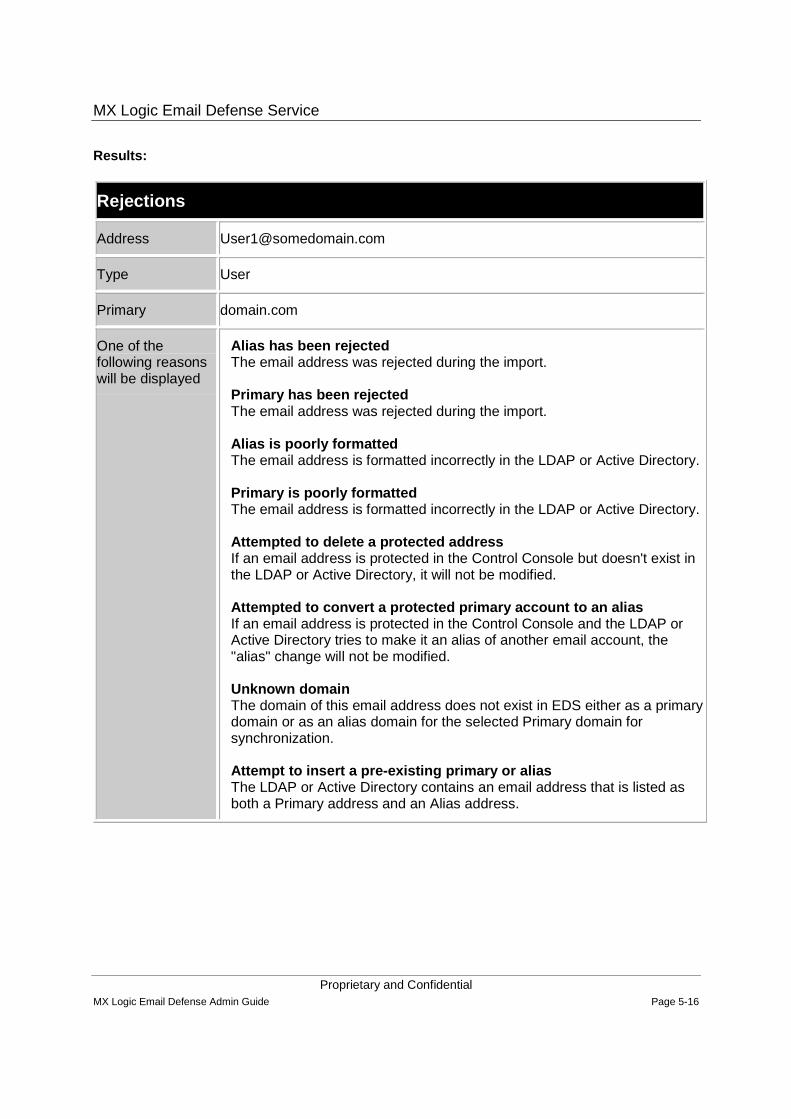
MX Logic Email Defense Service
Proprietary and Confidential MX Logic Email Defense Admin Guide Page 5-16
Results:
Rejections
Address [email protected]
Type User
Primary domain.com
One of the following reasons will be displayed
Alias has been rejected The email address was rejected during the import. Primary has been rejected The email address was rejected during the import. Alias is poorly formatted The email address is formatted incorrectly in the LDAP or Active Directory. Primary is poorly formatted The email address is formatted incorrectly in the LDAP or Active Directory. Attempted to delete a protected address If an email address is protected in the Control Console but doesn't exist in the LDAP or Active Directory, it will not be modified. Attempted to convert a protected primary account to an alias If an email address is protected in the Control Console and the LDAP or Active Directory tries to make it an alias of another email account, the "alias" change will not be modified. Unknown domain The domain of this email address does not exist in EDS either as a primary domain or as an alias domain for the selected Primary domain for synchronization. Attempt to insert a pre-existing primary or alias The LDAP or Active Directory contains an email address that is listed as both a Primary address and an Alias address.
MX Logic Email Defense Service
Proprietary and Confidential MX Logic Email Defense Admin Guide Page 5-17
5.3.2. The Distribution List Type
User accounts identified as Users in the customers Active Directory (AD), upon synchronization, are added in the Control Console under the default type of User. Users identified in the customer AD as part of a Distribution List, upon synchronization, are added in the Control Console with their Type set to Distribution List.
Changing the Type to Distribution List for a user or group of users:
� Prevents users from signing into the console
� Prevents users with a Distribution List status from being counted as a user and the account is not charged as a user account

MX Logic Email Defense Service
Proprietary and Confidential MX Logic Email Defense Admin Guide Page 5-18
MX Logic Email Defense Service
Proprietary and Confidential MX Logic Email Defense Admin Guide Page 6-1
6. Email Defense Setup
6.1. Module Objectives
� Identify Customer Administrator Domain Configuration details
� Verify and Configure Inbound / Outbound Server details
� Perform MX Record Analysis details
� Understand User Creation Options
6.1.1. Inbound Servers
The Inbound Servers page is used to configure the SMTP servers receiving inbound mail from the MX Logic Email Defense Service. Once the email messages are filtered or released from quarantine, those messages will be routed to the SMTP server(s) designated on this window.
Delivering to the TCP/IP (IP) address is typically faster than resolving the Mail Server name and then performing delivery. It is recommended the SMTP Host IP address is used instead of the mail server’s name.
The Server Port is set to 25, but may be changed if the customer uses a different firewall port number.
If more than one Inbound Mail server is identified, preference numbers should be assigned to each. The preference number instructs the MX Logic Mail Transfer Agents (MTA) which mail server to deliver mail to first. MX logic attempts to deliver mail to the lowest preference number first. If that mail server is busy, an attempt will be made to deliver mail to the next lowest preference number.
Once the preference numbers are added, click the Active checkbox if the inbound mail server is ready to receive your inbound mail. Mail server addresses are validated when you save them; the Control Console will alert you if there are errors.
6.1.2. Outbound Servers
The Outbound Servers page is used to configure the Customer’s SMTP server sending outbound email to MX Logic Email Defense Service.
���� The Outbound server value must be an IP address; a named mail server is not valid
���� The IP address must be the public IP address for the outbound mail server
���� The outbound packages include MX Ultimate Defense and MX Enterprise Defense with the Outbound Filtering add-on
���� The outbound port must be set to port 25
MX Logic Email Defense Service
Proprietary and Confidential MX Logic Email Defense Admin Guide Page 6-2
Note: The Outbound Servers menu option is only available if the MX Logic Email Defense Service package includes outbound filtering.
6.1.3. Outbound Disclaimer
The outbound disclaimer feature allows the Customer Administrator to add a text-based disclaimer up to 1,000 characters in length. This disclaimer will be added to the bottom of all outbound messages received by MX Logic from the Customers Outbound Mail Server and that pass the Customers Outbound Mail Policy.
Note: The Outbound Disclaimer menu option is only available if the MX Logic Email Defense Service package includes outbound filtering.
6.2. Disaster Recovery
See the Disaster Recovery chapter in this document.
6.3. MX Records
The Customer must redirect their MX Records to MX Logic, which can be done by the Customer’s Network Administrator or by the Customer’s Domain Registrar.
Once the MX Record has been redirected, the MX Records screen verifies whether the DNS MX Record has been redirected to the MX Logic Email Defense Service.
The recommended MX Record settings are listed in your MX Logic Service Activation Guide and on the MX records screen inside the Control Console.
6.4. Locking Down the Customer Environment
The MX Logic Filtering Subnets can be viewed at the bottom of the MX Records window.
It is recommended that your mail servers be locked down so that they only accept SMTP traffic from the MX Logic filtering service mail servers. This prevents senders from bypassing filtering by connecting directly to your mail servers.
6.5. User Creation Settings
Every person in the domain(s) that has their mail filtered by MX Logic requires a primary user account in the Control Console. The User Creation Settings determine how the Primary User Accounts will be created for the selected Domain. There are two User Creation Settings: SMTP Discovery and Explicit.
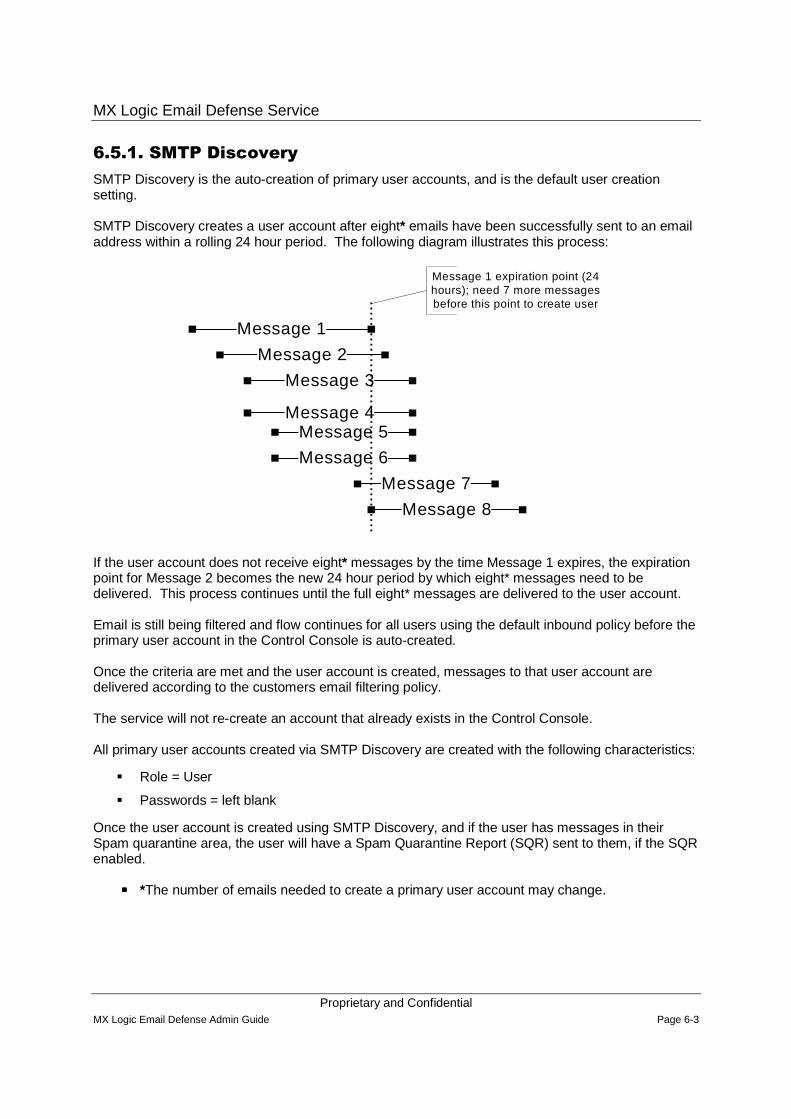
MX Logic Email Defense Service
Proprietary and Confidential MX Logic Email Defense Admin Guide Page 6-3
6.5.1. SMTP Discovery
SMTP Discovery is the auto-creation of primary user accounts, and is the default user creation setting.
SMTP Discovery creates a user account after eight* emails have been successfully sent to an email address within a rolling 24 hour period. The following diagram illustrates this process:
Message 1
Message 2
Message 3
Message 4
Message 6
Message 5
Message 7
Message 8
Message 1 expiration point (24 hours); need 7 more messages before this point to create user
If the user account does not receive eight* messages by the time Message 1 expires, the expiration point for Message 2 becomes the new 24 hour period by which eight* messages need to be delivered. This process continues until the full eight* messages are delivered to the user account.
Email is still being filtered and flow continues for all users using the default inbound policy before the primary user account in the Control Console is auto-created.
Once the criteria are met and the user account is created, messages to that user account are delivered according to the customers email filtering policy.
The service will not re-create an account that already exists in the Control Console.
All primary user accounts created via SMTP Discovery are created with the following characteristics:
� Role = User
� Passwords = left blank
Once the user account is created using SMTP Discovery, and if the user has messages in their Spam quarantine area, the user will have a Spam Quarantine Report (SQR) sent to them, if the SQR enabled.
���� *The number of emails needed to create a primary user account may change.
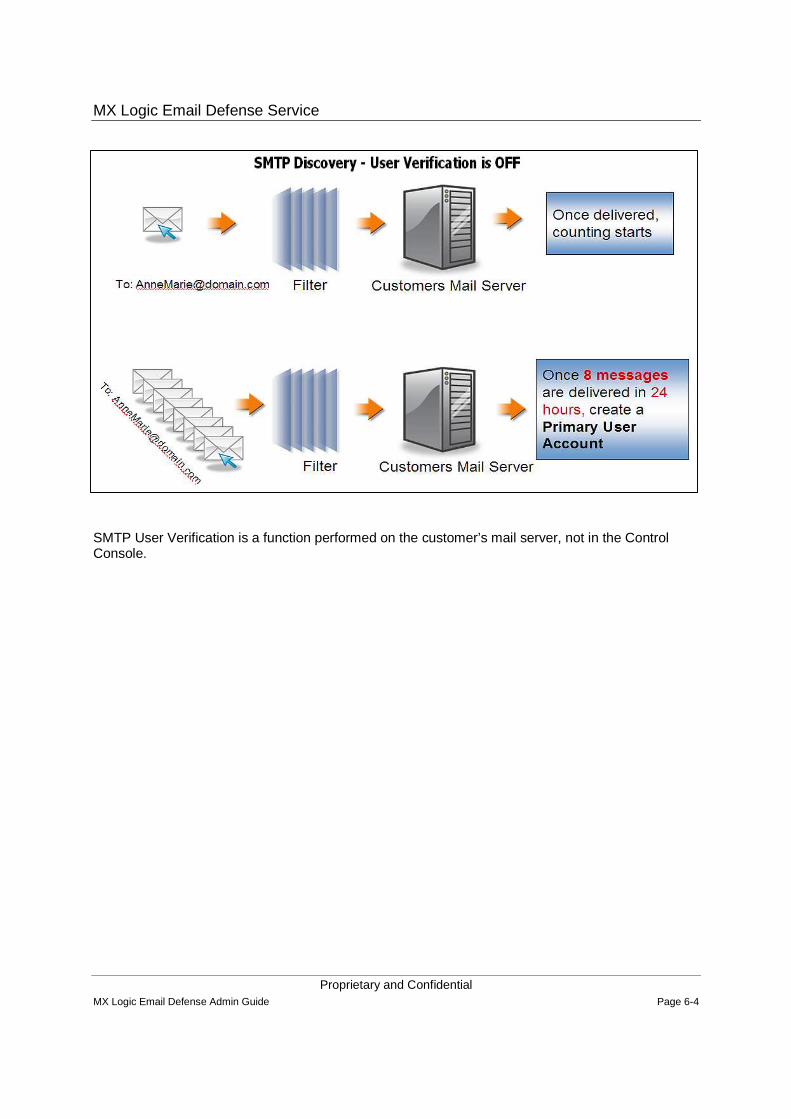
MX Logic Email Defense Service
Proprietary and Confidential MX Logic Email Defense Admin Guide Page 6-4
SMTP User Verification is a function performed on the customer’s mail server, not in the Control Console.
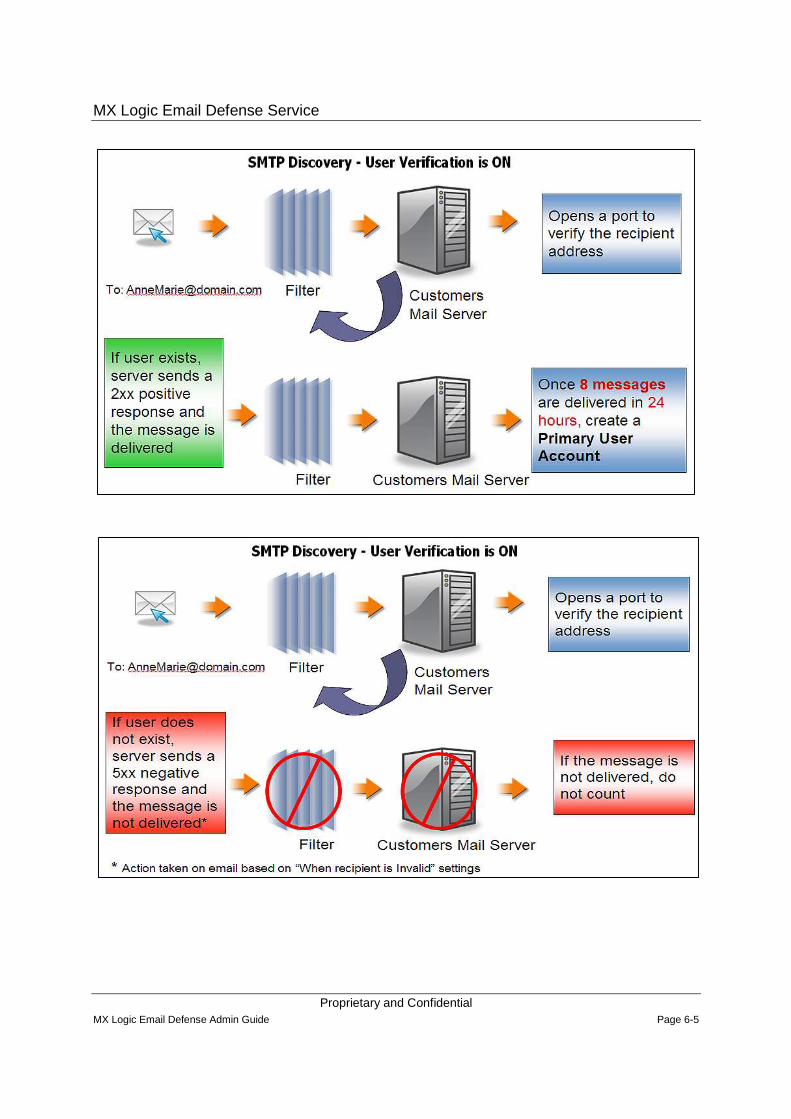
MX Logic Email Defense Service
Proprietary and Confidential MX Logic Email Defense Admin Guide Page 6-5
MX Logic Email Defense Service
Proprietary and Confidential MX Logic Email Defense Admin Guide Page 6-6
6.5.2. Explicit
The Explicit User Creation option requires that a primary user account for the recipient of an email exists in the Control Console prior to delivery of that message to the customer’s server. When a message is received, the Control Console is queried to verify the email recipient has a primary user account in the Control Console. If the user’s primary user account is verified, a communication is sent to the Mail Server and the message is delivered.
When a message is received and a primary user account in the Control Console is not verified, a communication with your mail server is not opened, and the message is not delivered. The action selected under ‘Recipient is Invalid’ is used.
Note: When creating user accounts using Dir Sync, make sure to use Explicit mode.
6.5.3. When a Recipient is Invalid
The Recipient is Invalid options are used to identify how the service will handle messages received for invalid users.
An Invalid User is identified:
� With SMTP Discovery, if a response from customer’s MTA = 5xx
� With Explicit, if the User Account does not exist in the Control Console
Accept and silently discard the message: An accept message is sent back to the sending Mail Transfer Agent (MTA), but a bounce message is not sent to the sending MTA.
Deny delivery: A accept message is not sent to the sending MTA but a bounce message is sent back to the sending MTA explaining that the message was not delivered.
Do Nothing: An accept message is not sent to the sending MTA and no bounce message is sent to the sending MTA. The message is delivered to the customer server.
MX Logic Email Defense Service
Proprietary and Confidential MX Logic Email Defense Admin Guide Page 7-1
7. Disaster Recovery
7.1. Module Objectives
� Describe the two types of disaster recovery
� Disaster recovery configurations
� Controlling the spooling options
� Viewing messages in Message Continuity
� Working with non-local email accounts
7.2. Disaster Recovery Overview
MX logic Disaster Recovery services are designed to enable email spooling if MX Logic detects that a customer’s (Mail Transfer Agent (MTA) is down or is not responding. There are two services within the MX Logic Disaster Recovery Suite; customers can subscribe to either the Fail Safe or Message Continuity service.
Both services allow MX Logic to spool the customer’s mail if their mail server goes down.
���� Fail Safe - customers can not view their spooled email
���� Message Continuity - customer can view and take action upon their spooled mail
If a customer currently subscribes to the Fail Safe product and wants to change to the Message Continuity product, the customer must not currently be in a Disaster Recovery mode.
Example: If a customer goes into Disaster Recovery with Fail Safe, they are not able to instantly change to the Message Continuity product to view their messages. The customer must come out of Disaster Recovery,all of their messages must be unspooled and then upgrade to the Message Continuity Service.
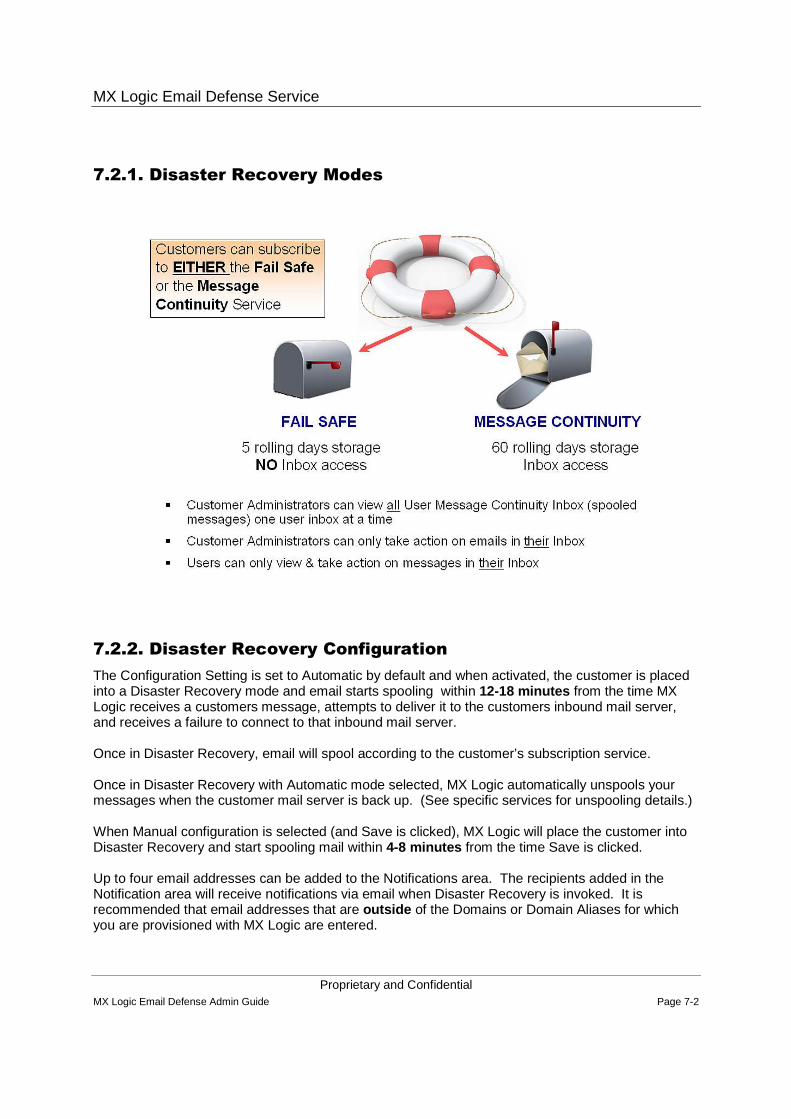
MX Logic Email Defense Service
Proprietary and Confidential MX Logic Email Defense Admin Guide Page 7-2
7.2.1. Disaster Recovery Modes
7.2.2. Disaster Recovery Configuration
The Configuration Setting is set to Automatic by default and when activated, the customer is placed into a Disaster Recovery mode and email starts spooling within 12-18 minutes from the time MX Logic receives a customers message, attempts to deliver it to the customers inbound mail server, and receives a failure to connect to that inbound mail server.
Once in Disaster Recovery, email will spool according to the customer’s subscription service.
Once in Disaster Recovery with Automatic mode selected, MX Logic automatically unspools your messages when the customer mail server is back up. (See specific services for unspooling details.)
When Manual configuration is selected (and Save is clicked), MX Logic will place the customer into Disaster Recovery and start spooling mail within 4-8 minutes from the time Save is clicked.
Up to four email addresses can be added to the Notifications area. The recipients added in the Notification area will receive notifications via email when Disaster Recovery is invoked. It is recommended that email addresses that are outside of the Domains or Domain Aliases for which you are provisioned with MX Logic are entered.
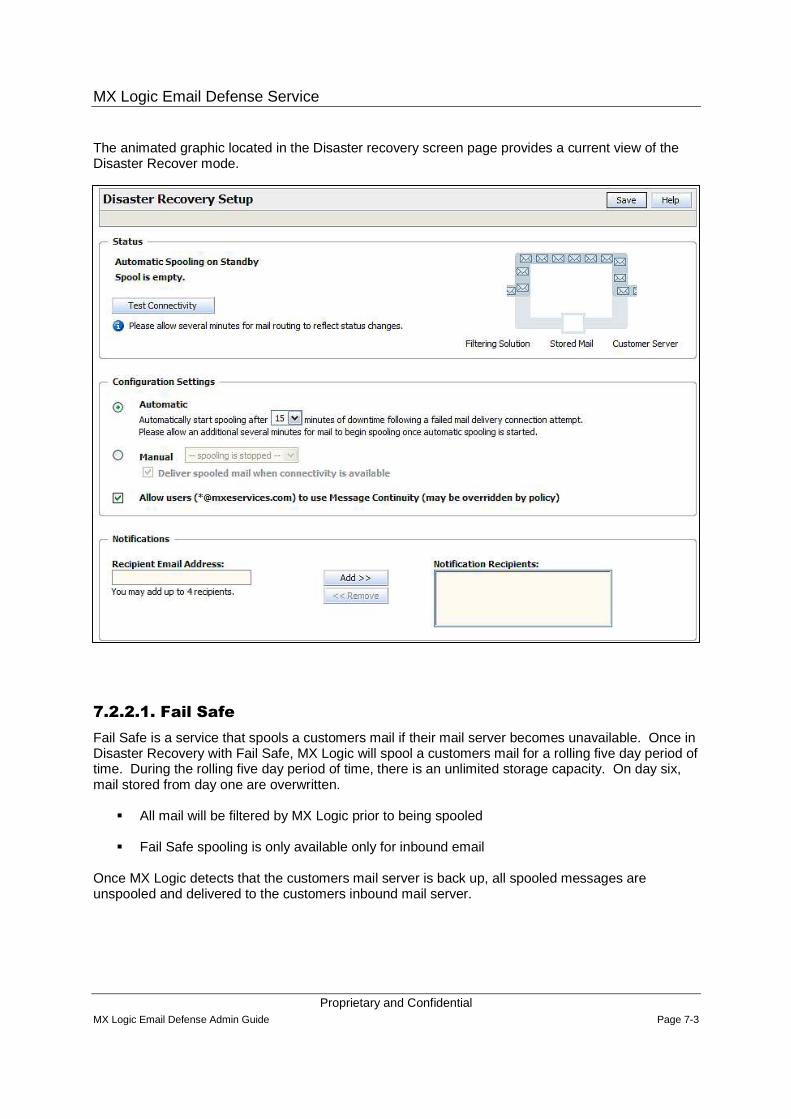
MX Logic Email Defense Service
Proprietary and Confidential MX Logic Email Defense Admin Guide Page 7-3
The animated graphic located in the Disaster recovery screen page provides a current view of the Disaster Recover mode.
7.2.2.1. Fail Safe
Fail Safe is a service that spools a customers mail if their mail server becomes unavailable. Once in Disaster Recovery with Fail Safe, MX Logic will spool a customers mail for a rolling five day period of time. During the rolling five day period of time, there is an unlimited storage capacity. On day six, mail stored from day one are overwritten.
� All mail will be filtered by MX Logic prior to being spooled
� Fail Safe spooling is only available only for inbound email
Once MX Logic detects that the customers mail server is back up, all spooled messages are unspooled and delivered to the customers inbound mail server.

MX Logic Email Defense Service
Proprietary and Confidential MX Logic Email Defense Admin Guide Page 7-4
7.2.2.2. Message Continuity
MX Logic Message Continuity helps businesses operate seamlessly during outages by maintaining two-way communication and keeping an accurate record of all email activity. The service, which is available for businesses with the MX Logic® Email Defense Service, provides full email access, management and use through a standard Web browser.
When MX Logic detects a loss in connectivity with the email server, MX Logic Message Continuity automatically engages and provides Web-based access to email and email functionality. Once connectivity is restored, MX Logic Message Continuity intelligently synchronizes all outage-period email activity with the mail server.
During the 60 day rolling period of time, there is unlimited message storage capacity.
7.2.3. Message Continuity Requirements
Set up all user accounts with Passwords
� It is important that all user accounts have passwords assigned to them so he/she can sign into the Control Console to manage their Message Continuity inbox
� Keep in mind that a user would normally access the Control Console from their Spam Quarantine Report (SQR). If the customer’s mail server is down, the user has no way to access their SQR and cannot access the Control Console using the SQR
7.2.4. Message Continuity Configuration
There are two areas within the Control Console where Message Continuity is configured:
Email Defense ���� Setup ���� Disaster Recovery Menu link
A checkbox on the Disaster Recovery screen labeled “Allow users to use Message Continuity” is displayed only if Message Continuity has been provisioned.
If checked, users are permitted to view their email Inbox via the Control Console, if disaster recovery is invoked. This selection can be overridden by policy in Email Defense Policies.
Email Defense ���� Policies ���� Disaster Recover Tab
The options within “While Inbound email is being spooled” determine if a user in the policy can view their email Inbox via the Control Console if disaster recovery is invoked.
Policy selections will override the selection made on the Email Defense � Setup � Disaster Recovery page.
The options within the “When spooling of inbound email stops” determines how long users can view their email messages via the Control Console in Message Continuity after the customer’s Inbound mail server is back in operation.
Example: A customer goes into Disaster Recovery and their mail is spooled for three days.
1. The customer’s mail server comes on-line.
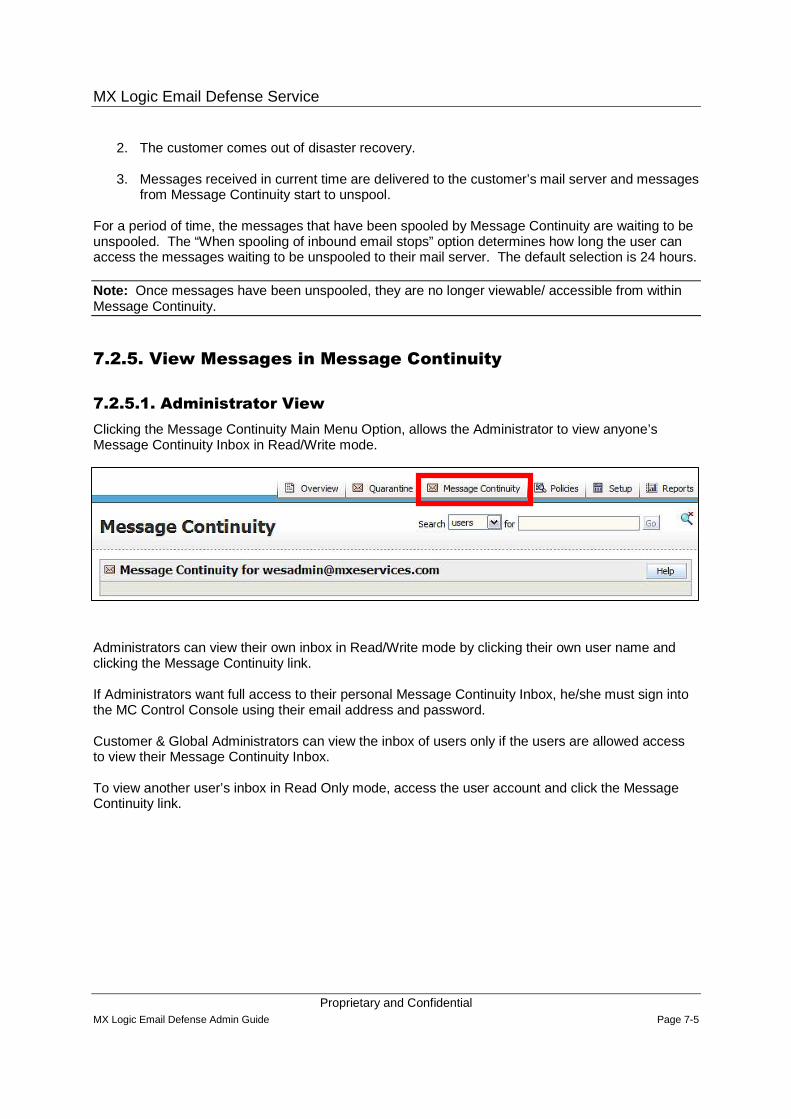
MX Logic Email Defense Service
Proprietary and Confidential MX Logic Email Defense Admin Guide Page 7-5
2. The customer comes out of disaster recovery.
3. Messages received in current time are delivered to the customer’s mail server and messages from Message Continuity start to unspool.
For a period of time, the messages that have been spooled by Message Continuity are waiting to be unspooled. The “When spooling of inbound email stops” option determines how long the user can access the messages waiting to be unspooled to their mail server. The default selection is 24 hours.
Note: Once messages have been unspooled, they are no longer viewable/ accessible from within Message Continuity.
7.2.5. View Messages in Message Continuity
7.2.5.1. Administrator View
Clicking the Message Continuity Main Menu Option, allows the Administrator to view anyone’s Message Continuity Inbox in Read/Write mode.
Administrators can view their own inbox in Read/Write mode by clicking their own user name and clicking the Message Continuity link.
If Administrators want full access to their personal Message Continuity Inbox, he/she must sign into the MC Control Console using their email address and password.
Customer & Global Administrators can view the inbox of users only if the users are allowed access to view their Message Continuity Inbox.
To view another user’s inbox in Read Only mode, access the user account and click the Message Continuity link.
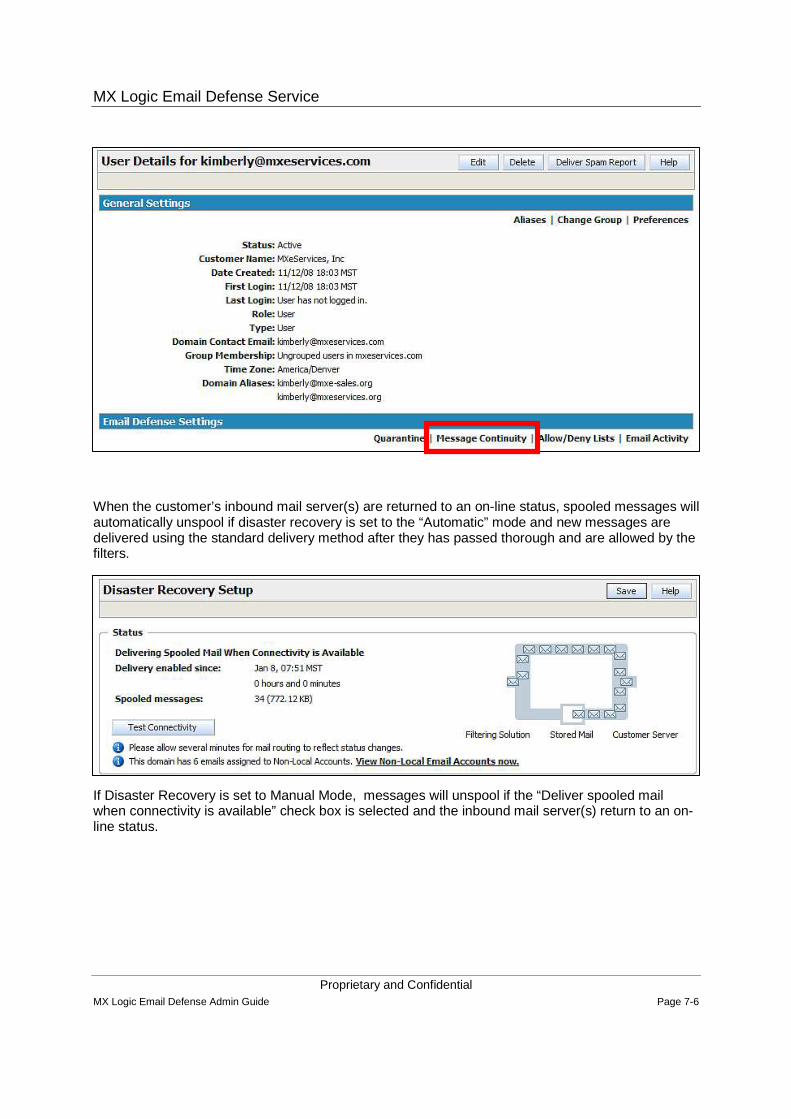
MX Logic Email Defense Service
Proprietary and Confidential MX Logic Email Defense Admin Guide Page 7-6
When the customer’s inbound mail server(s) are returned to an on-line status, spooled messages will automatically unspool if disaster recovery is set to the “Automatic” mode and new messages are delivered using the standard delivery method after they has passed thorough and are allowed by the filters.
If Disaster Recovery is set to Manual Mode, messages will unspool if the “Deliver spooled mail when connectivity is available” check box is selected and the inbound mail server(s) return to an on-line status.
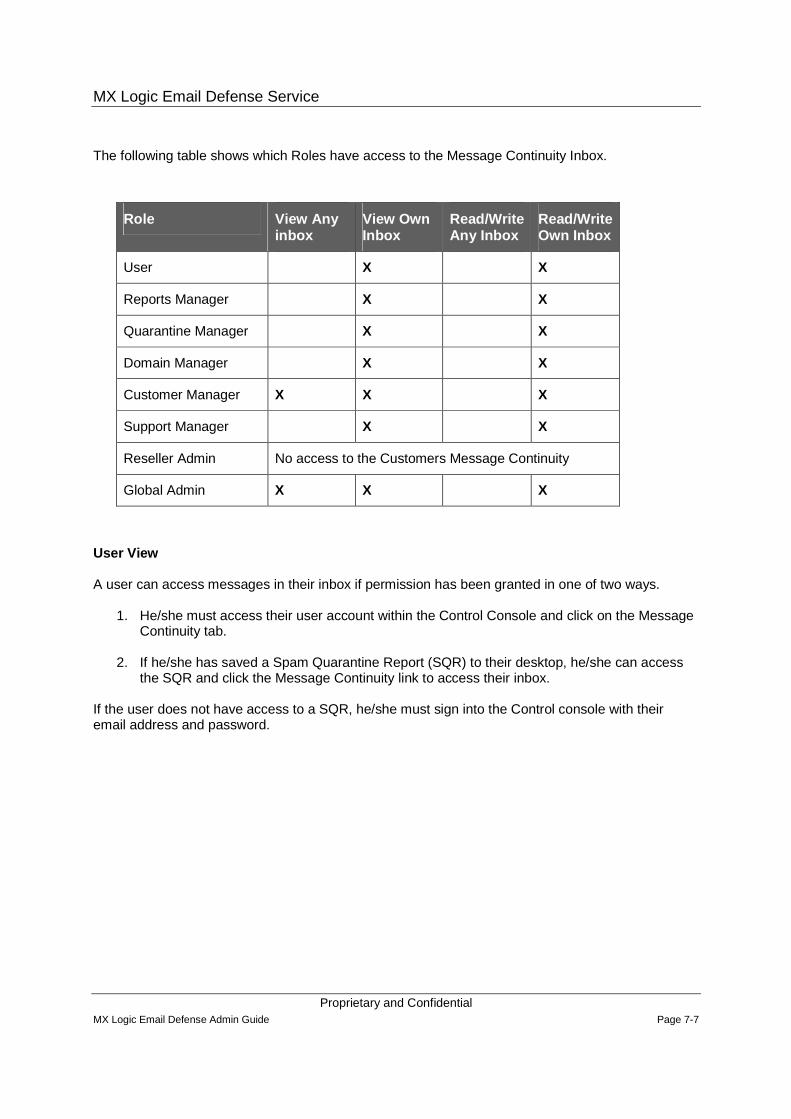
MX Logic Email Defense Service
Proprietary and Confidential MX Logic Email Defense Admin Guide Page 7-7
The following table shows which Roles have access to the Message Continuity Inbox.
Role View Any inbox
View Own Inbox
Read/Write Any Inbox
Read/Write Own Inbox
User X X
Reports Manager X X
Quarantine Manager X X
Domain Manager X X
Customer Manager X X X
Support Manager X X
Reseller Admin No access to the Customers Message Continuity
Global Admin X X X
User View
A user can access messages in their inbox if permission has been granted in one of two ways.
1. He/she must access their user account within the Control Console and click on the Message Continuity tab.
2. If he/she has saved a Spam Quarantine Report (SQR) to their desktop, he/she can access the SQR and click the Message Continuity link to access their inbox.
If the user does not have access to a SQR, he/she must sign into the Control console with their email address and password.
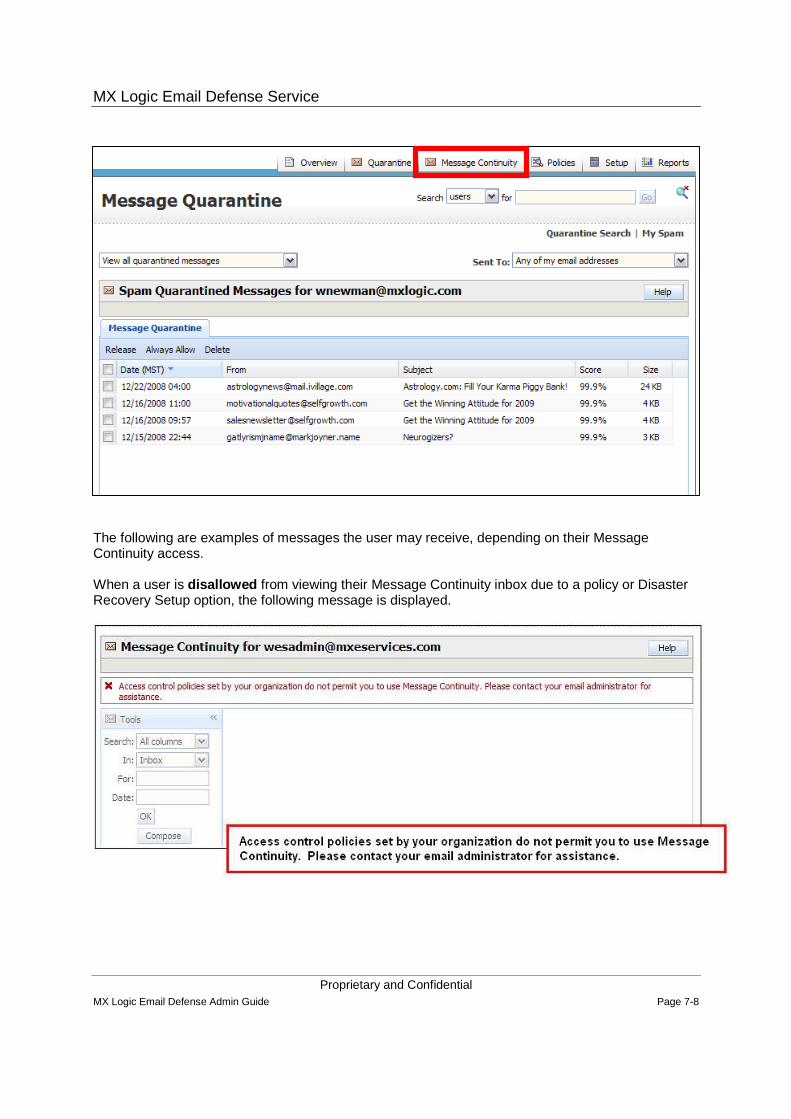
MX Logic Email Defense Service
Proprietary and Confidential MX Logic Email Defense Admin Guide Page 7-8
The following are examples of messages the user may receive, depending on their Message Continuity access.
When a user is disallowed from viewing their Message Continuity inbox due to a policy or Disaster Recovery Setup option, the following message is displayed.
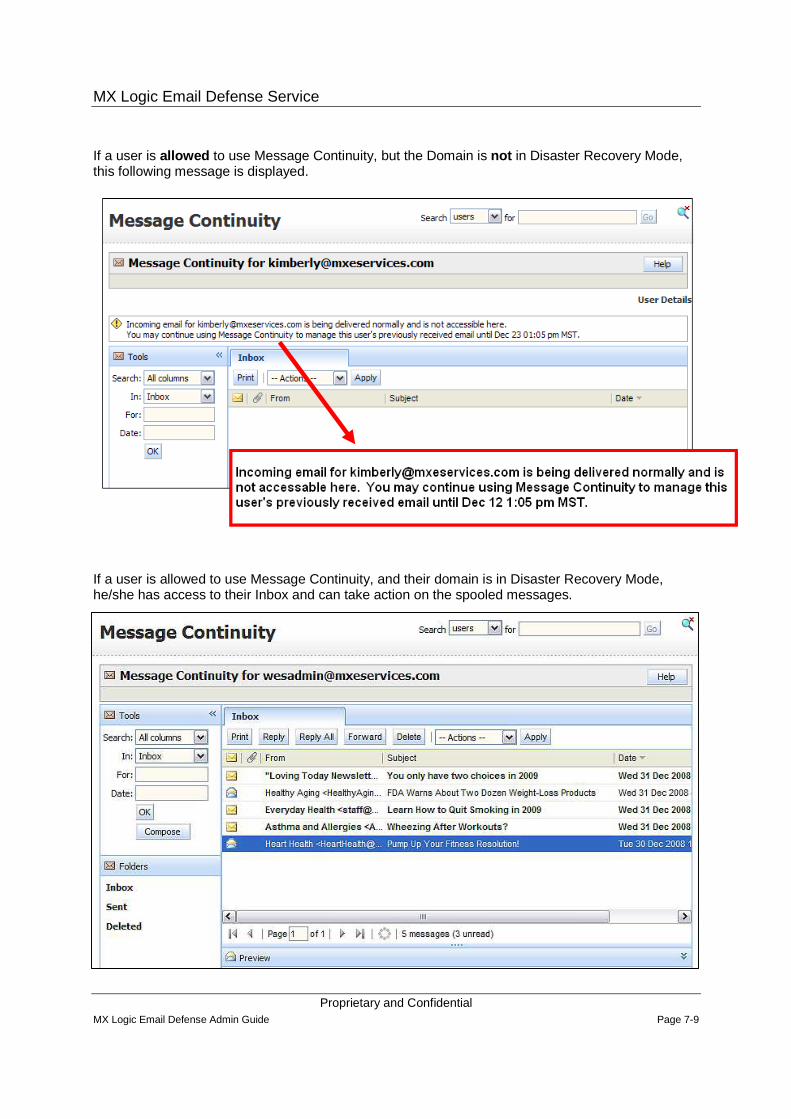
MX Logic Email Defense Service
Proprietary and Confidential MX Logic Email Defense Admin Guide Page 7-9
If a user is allowed to use Message Continuity, but the Domain is not in Disaster Recovery Mode, this following message is displayed.
If a user is allowed to use Message Continuity, and their domain is in Disaster Recovery Mode, he/she has access to their Inbox and can take action on the spooled messages.

MX Logic Email Defense Service
Proprietary and Confidential MX Logic Email Defense Admin Guide Page 7-10
7.2.5.2. Working in the Message Continuity Inbox
All spooled messages within Disaster Recovery/ Message Continuity are displayed in the Message Continuity Inbox.
The following actions can be taken within the Message Continuity Inbox:
� View – messages can be viewed in the Preview pane at the bottom of the Inbox, or can be viewed in a unique window by double clicking on the message
� Print - messages can be printed to any printer to which the users pc is connected
� Reply – this sends a reply to the original sender
� Reply All – this sends a reply to all recipients of the email message
� Forward – this forwards the message to all recipients entered in the To field
� Delete – this moves the message to the Deleted Folder
� Actions - allows the message to be Marked as read or Marked as Unread
� Compose - allows a new message to be composed and sent
� There is currently no Contact List or Global Address List connectivity
� You must enter the fully qualified email address in the To field when composing a new message
7.2.5.3. Sending Messages from the Message Continuity Inbox
� Customer Inbound Filtering Policy is enabled and will be utilized for messages received via Message Continuity
� Customers Outbound Filtering Policy is Enabled and will be utilized for messages sent via Message Continuity
� When sending a message, the “From” email address is not modifiable
� You can attach files
� Outbound Bulk Email Policy is enforced
� The sender will be notified if email format is invalid in the “To” field
� No “Check names” functionality to verify email address prior to sending
� No Address book incorporation
� No Distribution Groups in “To”
� Distribution Groups are handled on the customers Server. There is no way to decipher the group as the email will not be going through the customer Server prior to sending
� No Spell Check
� No Draft Folder

MX Logic Email Defense Service
Proprietary and Confidential MX Logic Email Defense Admin Guide Page 7-11
7.2.5.4. Intelligent Unspool
When MX Logic detects the customers mail server is operational, messages begin unspooling from Message Continuity. This includes all messages received, sent, and deleted.
Deleting a message while in Message Continuity doesn’t delete the message from the customer’s server, just from the Message Continuity inbox view. This ensures the customer will see all email to meet their archiving requirements.
The following table shows how messages are Unspooled:
Message Continuity Location or Action
Delivered to Customers
Message Appended
Inbox – message read Inbox Prepend subject to include Read
Inbox – message unread Inbox Prepend subject to include Unread
Sent Inbox Prepend subject to include Sent
Deleted Inbox Prepend subject to include Deleted
Note: A customer can create filters on their mail server to direct messages to locations other than the Inbox. I.e. write a filter where if the subject line says (Delete), to route that message to the users Deleted Mail folder.
7.2.6. Message Continuity Technical Considerations
� Will store Message Continuity messages for a rolling 60 day period
� JavaScript or Active Scripting MUST be enabled on the users Browser
� JavaScript allow = Yes (Firefox 2.x, 3.x, and Netscape 8.x)
� Active Scripting = Enabled (Internet Explorer (I.E.) 6.0, 7.0)
� Browsers CANNOT be set to High Security Setting in I.E. 7.0 Browser
� While in Message Continuity, if a message is viewed and released from Quarantine, the message goes to the M.C. Inbox
� A logging event is logged as soon as a message is taken action upon
� Logging event will identify who performed what action and when
� Logging is performed for Compliance and Auditing
� Due to amount of data in the logs the report will no display in the console and must be downloaded to view
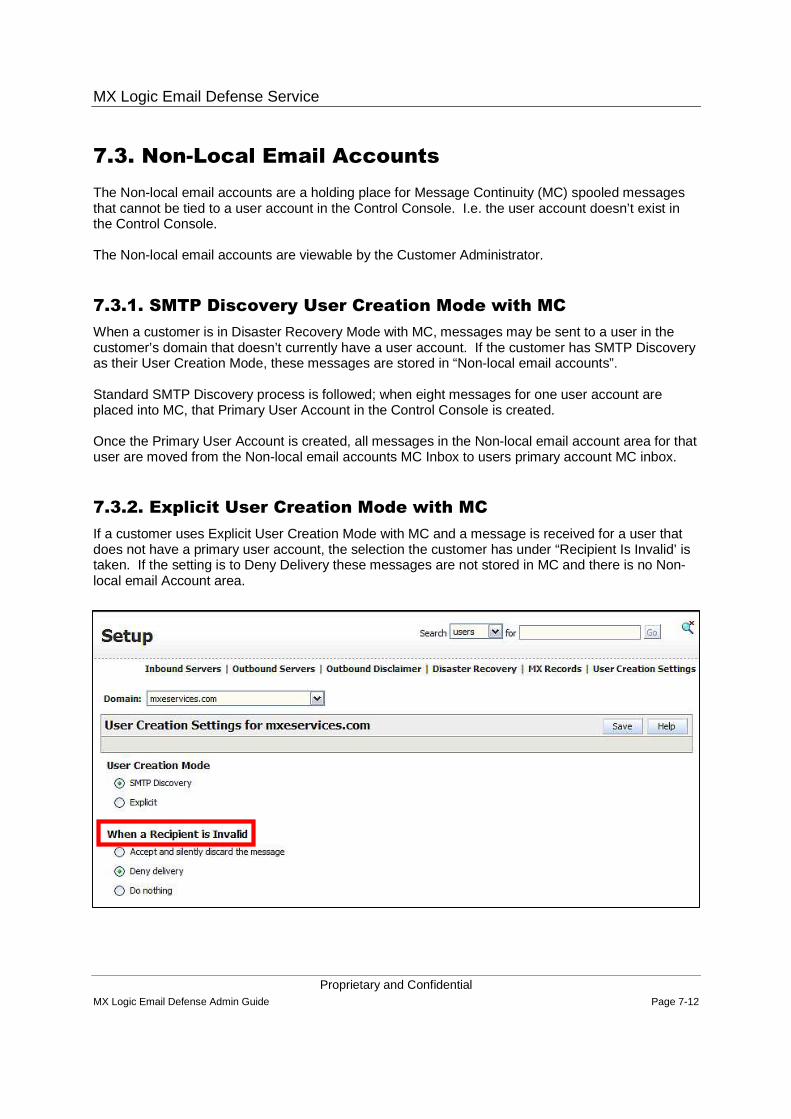
MX Logic Email Defense Service
Proprietary and Confidential MX Logic Email Defense Admin Guide Page 7-12
7.3. Non-Local Email Accounts
The Non-local email accounts are a holding place for Message Continuity (MC) spooled messages that cannot be tied to a user account in the Control Console. I.e. the user account doesn’t exist in the Control Console.
The Non-local email accounts are viewable by the Customer Administrator.
7.3.1. SMTP Discovery User Creation Mode with MC
When a customer is in Disaster Recovery Mode with MC, messages may be sent to a user in the customer’s domain that doesn’t currently have a user account. If the customer has SMTP Discovery as their User Creation Mode, these messages are stored in “Non-local email accounts”.
Standard SMTP Discovery process is followed; when eight messages for one user account are placed into MC, that Primary User Account in the Control Console is created.
Once the Primary User Account is created, all messages in the Non-local email account area for that user are moved from the Non-local email accounts MC Inbox to users primary account MC inbox.
7.3.2. Explicit User Creation Mode with MC
If a customer uses Explicit User Creation Mode with MC and a message is received for a user that does not have a primary user account, the selection the customer has under “Recipient Is Invalid’ is taken. If the setting is to Deny Delivery these messages are not stored in MC and there is no Non-local email Account area.
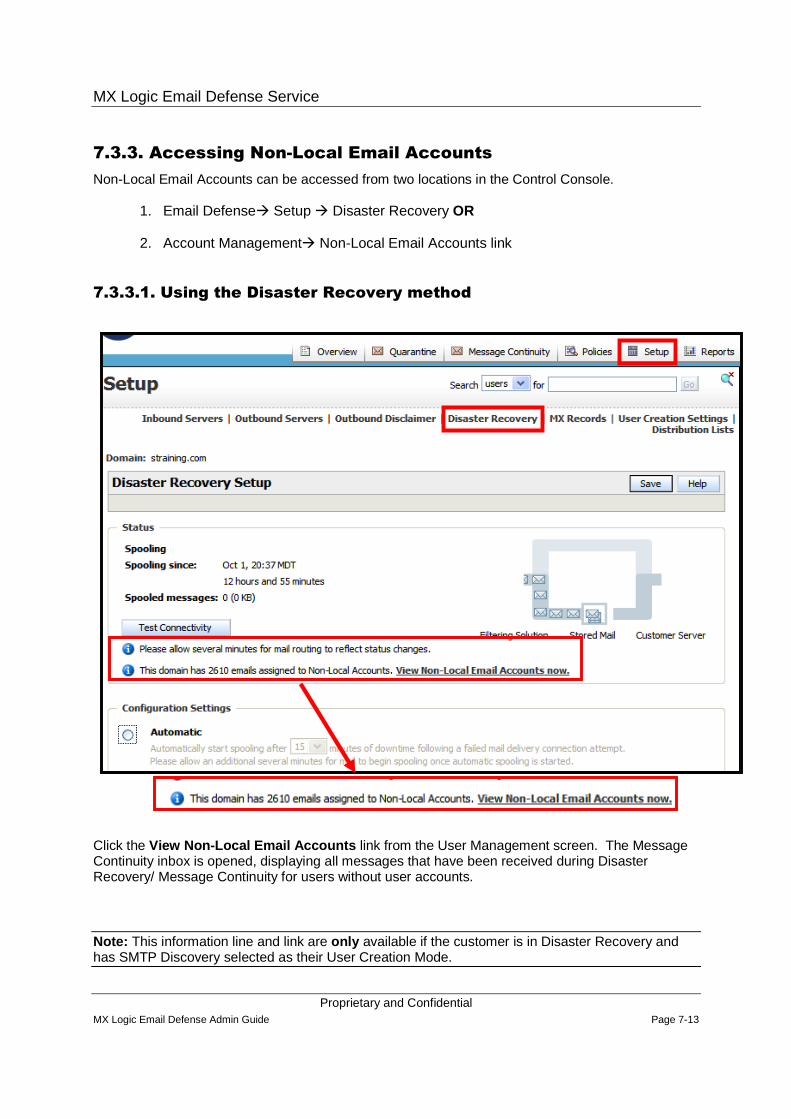
MX Logic Email Defense Service
Proprietary and Confidential MX Logic Email Defense Admin Guide Page 7-13
7.3.3. Accessing Non-Local Email Accounts
Non-Local Email Accounts can be accessed from two locations in the Control Console.
1. Email Defense� Setup � Disaster Recovery OR
2. Account Management� Non-Local Email Accounts link
7.3.3.1. Using the Disaster Recovery method
Click the View Non-Local Email Accounts link from the User Management screen. The Message Continuity inbox is opened, displaying all messages that have been received during Disaster Recovery/ Message Continuity for users without user accounts.
Note: This information line and link are only available if the customer is in Disaster Recovery and has SMTP Discovery selected as their User Creation Mode.

MX Logic Email Defense Service
Proprietary and Confidential MX Logic Email Defense Admin Guide Page 7-14
As a Customer Administrator, from within the Message Continuity inbox for Non-Local Email Accounts, you can:
� View Messages
� Reply
� Reply All
� Forward
� Compose
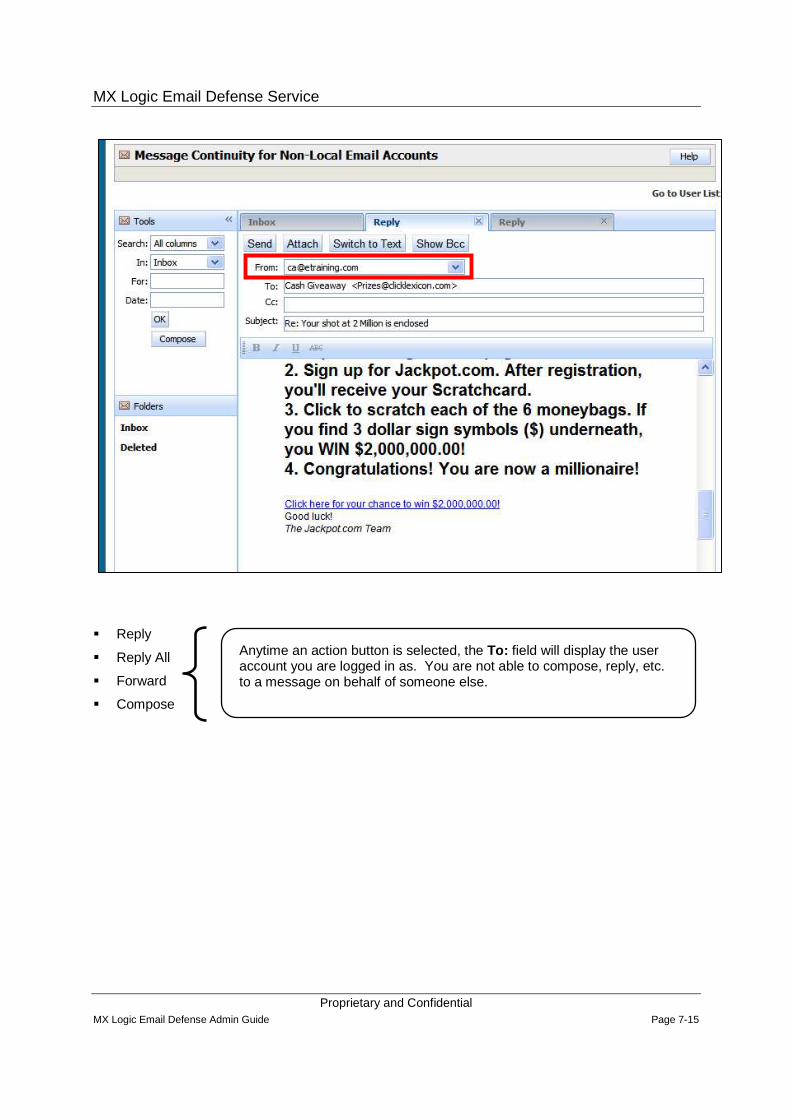
MX Logic Email Defense Service
Proprietary and Confidential MX Logic Email Defense Admin Guide Page 7-15
� Reply
� Reply All
� Forward
� Compose
Anytime an action button is selected, the To: field will display the user account you are logged in as. You are not able to compose, reply, etc. to a message on behalf of someone else.

MX Logic Email Defense Service
Proprietary and Confidential MX Logic Email Defense Admin Guide Page 7-16
7.3.3.2. Using the Non-Local E-Mail Accounts link method.
When the “Non-Local Email Accounts” link is selected, the Administrator is automatically routed to the Email Defense and the Message Continuity screen which displays all messages that have been spooled during Disaster Recovery/ Message Continuity for users without User Accounts.

MX Logic Email Defense Service
Proprietary and Confidential MX Logic Email Defense Admin Guide Page 8-1
8. Configuring Policy Sets – Inbound
Filtering
8.1. Module Objectives
� Explain how to work with the Default Inbound Policy Set
� Describe how to create new Inbound Policy Sets
� Configure the Inbound filtering options
8.2. Policy Configuration
The MX Logic Email Defense Service will perform actions on messages sent to your domain, based on the rules identified in the Inbound Policy Set(s). Every user is automatically associated with the Default Inbound filtering policy when their account is created.
The default Policy has pre-defined selections, which can be edited. The only action that is not allowable on the default Inbound policy set is delete.
When users in the organization require rules other than the default Inbound policy set, custom policy sets should be created.
Inbound Policy Sets consist of the various Policy filtering options:
� Anti-Virus
� Anti-Spam
� Content
� Attachments
� HMTL Shield
� Click Protect
� Allow / Deny Lists
� Recipient Shield
� Notifications
8.2.1. Policy Actions
Email messages violating the rules identified in the policy may have the following action taken, depending on the policy filtering option.
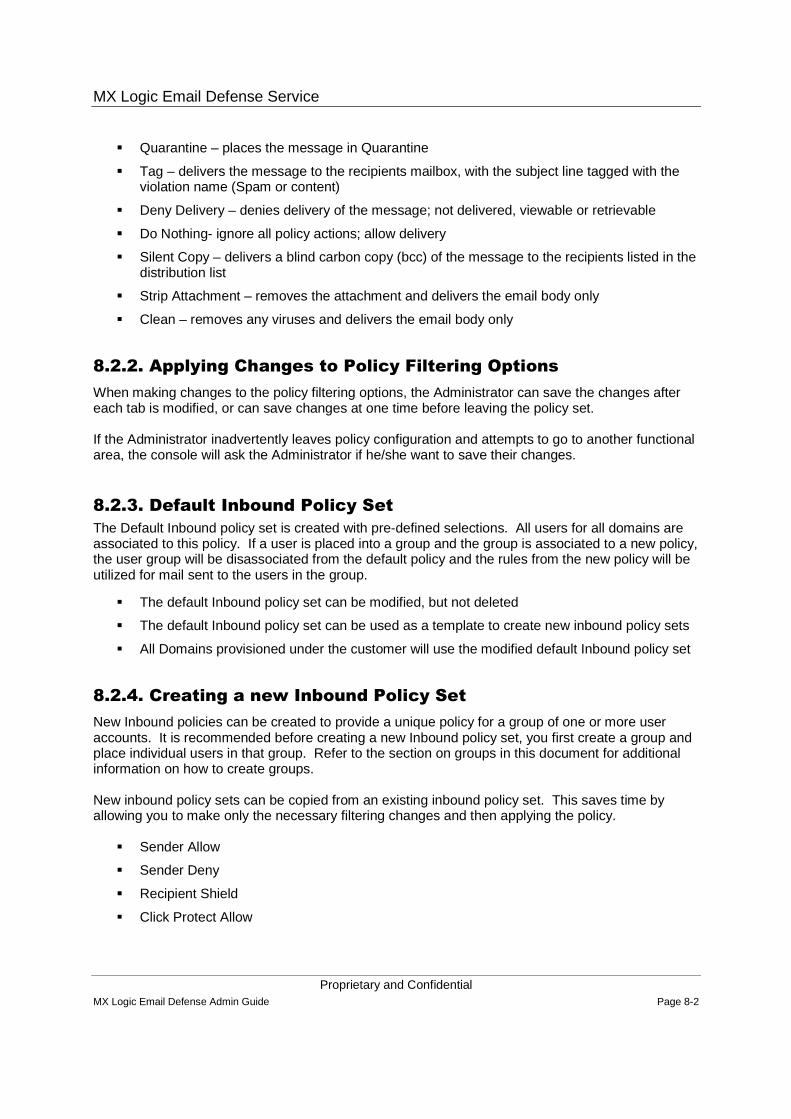
MX Logic Email Defense Service
Proprietary and Confidential MX Logic Email Defense Admin Guide Page 8-2
� Quarantine – places the message in Quarantine
� Tag – delivers the message to the recipients mailbox, with the subject line tagged with the violation name (Spam or content)
� Deny Delivery – denies delivery of the message; not delivered, viewable or retrievable
� Do Nothing- ignore all policy actions; allow delivery
� Silent Copy – delivers a blind carbon copy (bcc) of the message to the recipients listed in the distribution list
� Strip Attachment – removes the attachment and delivers the email body only
� Clean – removes any viruses and delivers the email body only
8.2.2. Applying Changes to Policy Filtering Options
When making changes to the policy filtering options, the Administrator can save the changes after each tab is modified, or can save changes at one time before leaving the policy set.
If the Administrator inadvertently leaves policy configuration and attempts to go to another functional area, the console will ask the Administrator if he/she want to save their changes.
8.2.3. Default Inbound Policy Set
The Default Inbound policy set is created with pre-defined selections. All users for all domains are associated to this policy. If a user is placed into a group and the group is associated to a new policy, the user group will be disassociated from the default policy and the rules from the new policy will be utilized for mail sent to the users in the group.
� The default Inbound policy set can be modified, but not deleted
� The default Inbound policy set can be used as a template to create new inbound policy sets
� All Domains provisioned under the customer will use the modified default Inbound policy set
8.2.4. Creating a new Inbound Policy Set
New Inbound policies can be created to provide a unique policy for a group of one or more user accounts. It is recommended before creating a new Inbound policy set, you first create a group and place individual users in that group. Refer to the section on groups in this document for additional information on how to create groups.
New inbound policy sets can be copied from an existing inbound policy set. This saves time by allowing you to make only the necessary filtering changes and then applying the policy.
� Sender Allow
� Sender Deny
� Recipient Shield
� Click Protect Allow

MX Logic Email Defense Service
Proprietary and Confidential MX Logic Email Defense Admin Guide Page 8-3
8.2.5. Subscribing to Default Inbound Lists
Once the new policy is defined, you can subscribe to the default Inbound Lists. This is beneficial if you utilize, for example, the Allow list on the default policy and you want the same entries to apply to your new policy. This eliminates the need to manage the same information on many policies.
If the Administrator chooses not to copy the list when creating the new policy, then the default Inbound list is used.
� Sender Allow
� Sender Deny
� Recipient Shield
� Click Protect Allow
8.2.6. Anti-Virus
The Anti-Virus filtering option allows the Administrator to configure how the system reacts if a received email message contains a known virus. He/she can configure what happens to the message if it can’t be cleaned.
Note: If an email message is detected that contains a wide-spread worm or virus, the system may automatically deny the email and override any Anti-Virus policy settings.
When an attachment containing a virus is stripped by the service, the attachment is replaced with a text message referencing the stripped virus. Using the default setting, MX Logic attempts to clean the message. If the message cannot be cleaned, by default, the message is denied.
From the Notifications tab, the Administrator can determine when a notification email message is sent if a message violates the policy due to a virus. Notifications can be activated when a message violates the Virus policy and was Quarantined, Denied delivery or Stripped of the Attachment. The notification can be sent to the Sender of the message, the Recipient of the message, or both.
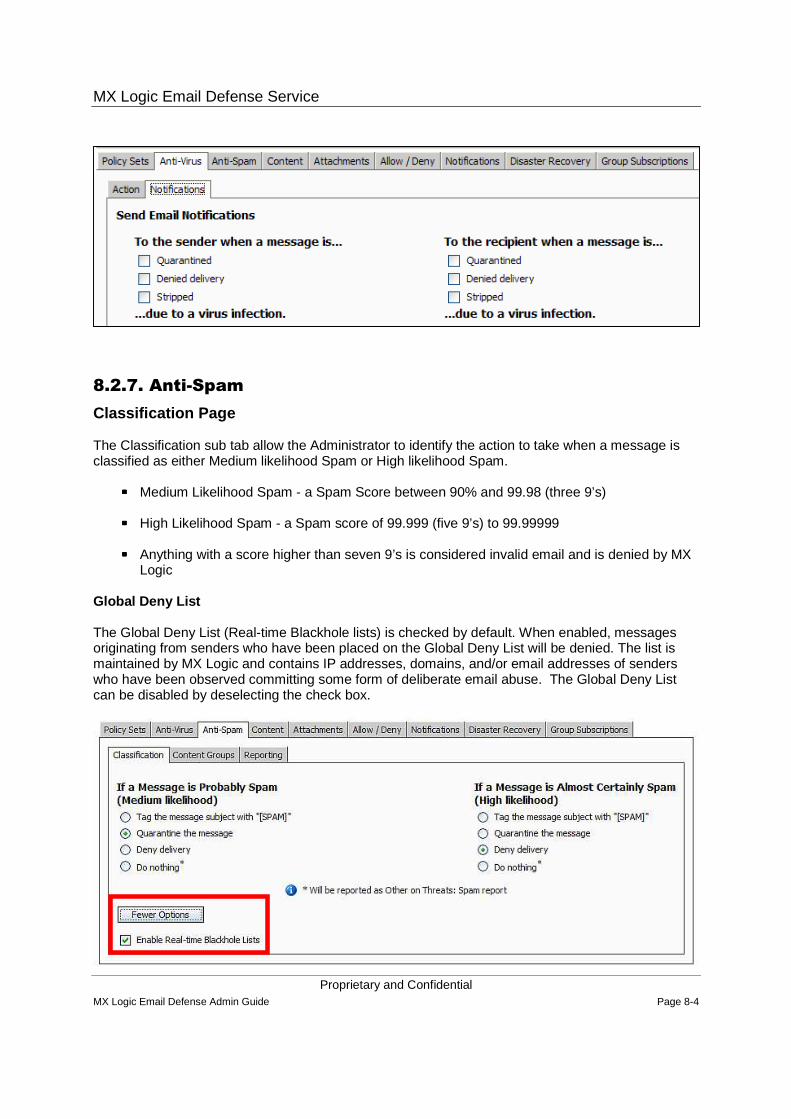
MX Logic Email Defense Service
Proprietary and Confidential MX Logic Email Defense Admin Guide Page 8-4
8.2.7. Anti-Spam
Classification Page
The Classification sub tab allow the Administrator to identify the action to take when a message is classified as either Medium likelihood Spam or High likelihood Spam.
���� Medium Likelihood Spam - a Spam Score between 90% and 99.98 (three 9’s)
���� High Likelihood Spam - a Spam score of 99.999 (five 9’s) to 99.99999
���� Anything with a score higher than seven 9’s is considered invalid email and is denied by MX Logic
Global Deny List
The Global Deny List (Real-time Blackhole lists) is checked by default. When enabled, messages originating from senders who have been placed on the Global Deny List will be denied. The list is maintained by MX Logic and contains IP addresses, domains, and/or email addresses of senders who have been observed committing some form of deliberate email abuse. The Global Deny List can be disabled by deselecting the check box.
MX Logic Email Defense Service
Proprietary and Confidential MX Logic Email Defense Admin Guide Page 8-5
Anti-Spam Content Groups
The Content Groups sub tab allows you to create content groups, add key words and designate what action to take if an email contains content that is defined in any of these customized Spam content groups.
Spam content filtering compares the key words in the Spam Content Group against the email header, subject line and the message body.
You can define a different action for each Spam content group. The action in this window overrides all other Spam actions.
Example: If the email has a medium likelihood of being Spam and contains content that is in a Spam content group, the action defined for the Spam content group is applied.
� Allow Spam content - causes the email to be accepted despite any other Spam filtering
� Deny Spam content - causes the email to be filtered as Spam with the designated email action
� Quarantine action - places the email in the Spam Quarantine area for the user account and is reported in the Spam Quarantine Report
If the same content is defined in the Spam Content tab and in the Content Groups tab, the policies in the Content Groups window will be used.
Reporting
The Reporting sub tab allows you to configure the reporting of quarantined Spam email using the Spam Quarantine Reports (SQR) and configure the options available to users within the SQR. See the Spam Quarantine Report Users Guide for a description of the SQR.
By default, the SQR is enabled for all users. Selecting “No users” disables the SQR so individuals will not receive two SQR’s (individual and group based).
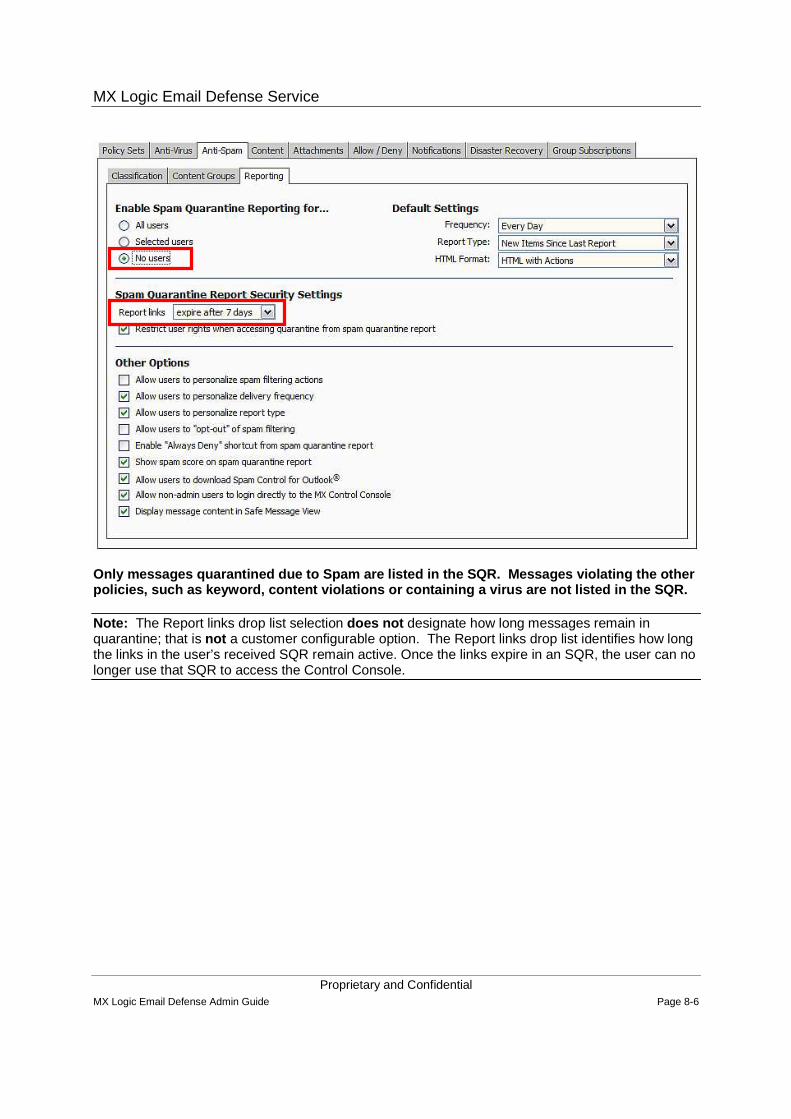
MX Logic Email Defense Service
Proprietary and Confidential MX Logic Email Defense Admin Guide Page 8-6
Only messages quarantined due to Spam are listed in the SQR. Messages violating the other policies, such as keyword, content violations or co ntaining a virus are not listed in the SQR.
Note: The Report links drop list selection does not designate how long messages remain in quarantine; that is not a customer configurable option. The Report links drop list identifies how long the links in the user’s received SQR remain active. Once the links expire in an SQR, the user can no longer use that SQR to access the Control Console.
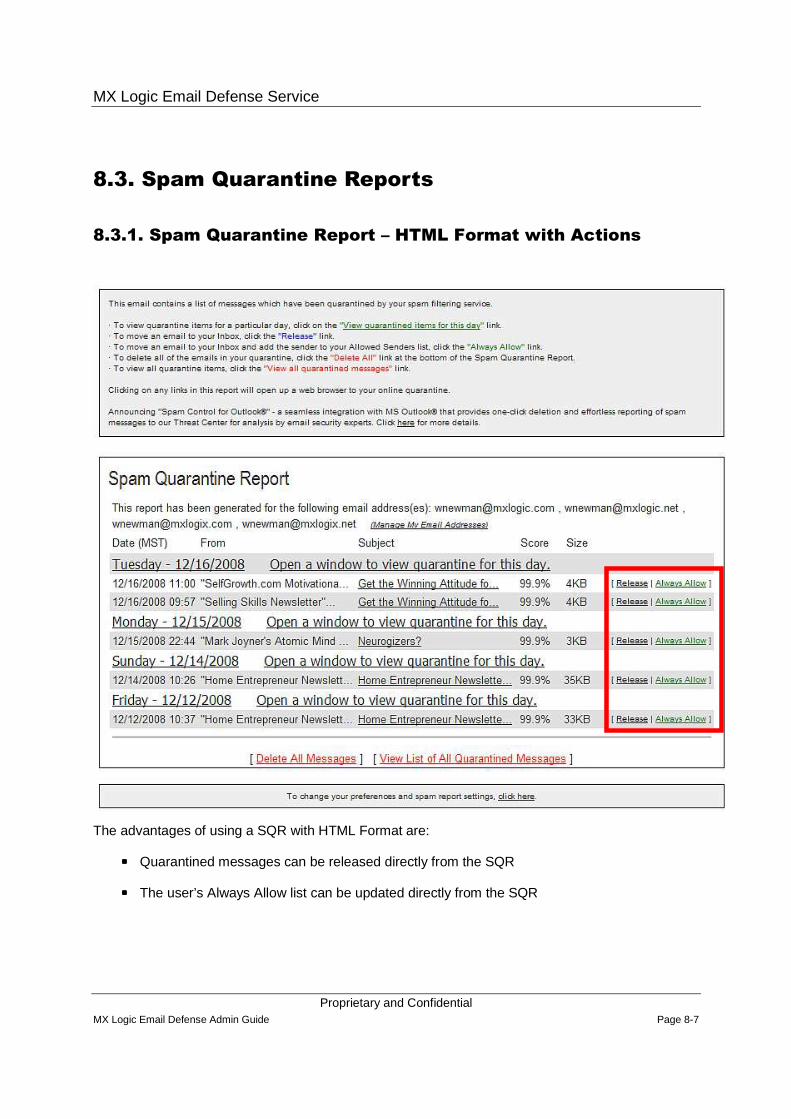
MX Logic Email Defense Service
Proprietary and Confidential MX Logic Email Defense Admin Guide Page 8-7
8.3. Spam Quarantine Reports
8.3.1. Spam Quarantine Report – HTML Format with Actions
The advantages of using a SQR with HTML Format are:
���� Quarantined messages can be released directly from the SQR
���� The user’s Always Allow list can be updated directly from the SQR
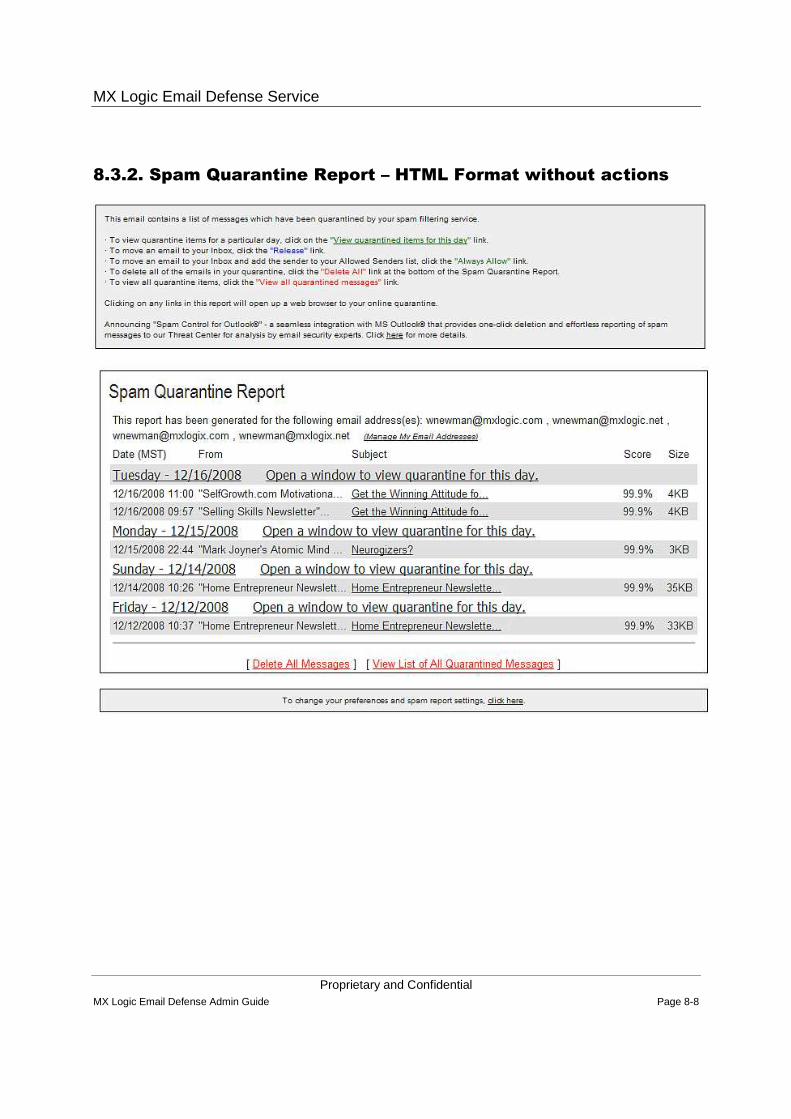
MX Logic Email Defense Service
Proprietary and Confidential MX Logic Email Defense Admin Guide Page 8-8
8.3.2. Spam Quarantine Report – HTML Format without actions
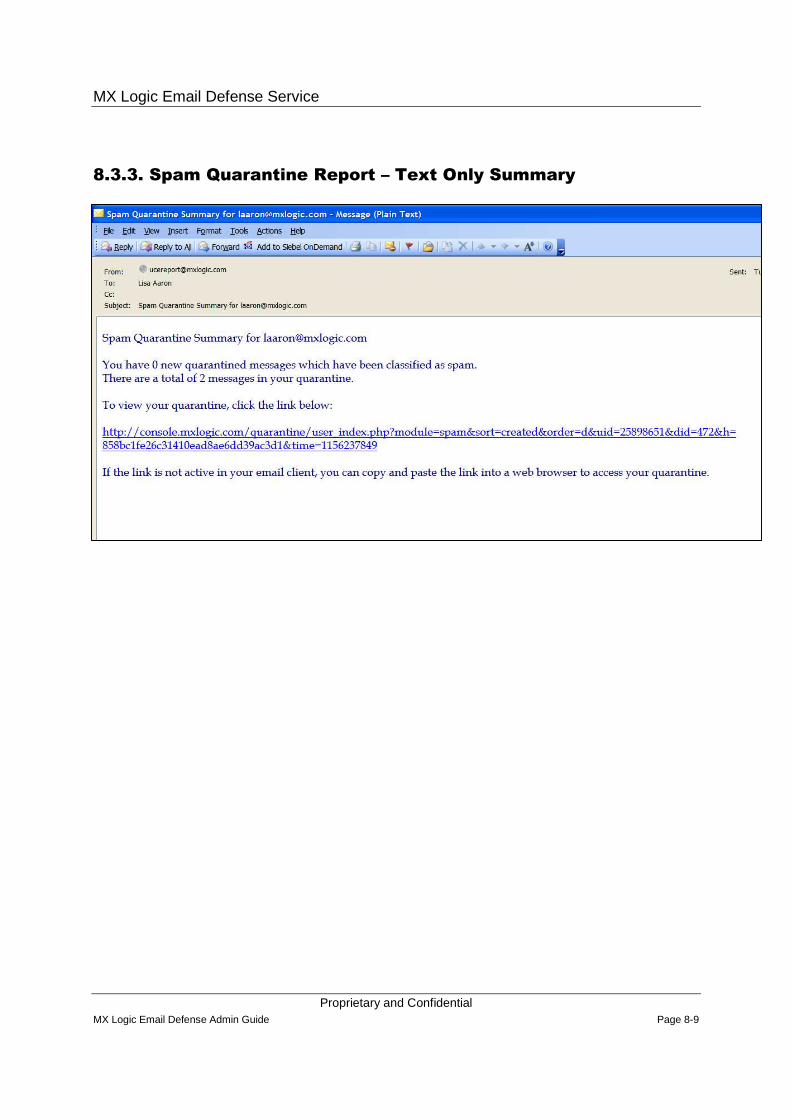
MX Logic Email Defense Service
Proprietary and Confidential MX Logic Email Defense Admin Guide Page 8-9
8.3.3. Spam Quarantine Report – Text Only Summary

MX Logic Email Defense Service
Proprietary and Confidential MX Logic Email Defense Admin Guide Page 8-10
MX Logic Email Defense Service
Proprietary and Confidential MX Logic Email Defense Admin Guide Page 9-1
9. Content Filtering
9.1. Content Groups
The Content filtering option allows the Administrator to configure how the system will react if it receives an email message that contains text that violates the Content policies.
The administrator can define different actions for each predefined Content Group, as well as define custom Content Groups.
MX Logic provides three pre-defined Groups:
� Profanity
� Racially Insensitive
� Sexual Overtones
These predefined groups are not activated by default but can be activated by selecting the group, clicking Update and checking the Active checkbox.
The predefined content groups can not be edited or deleted.
Customized lists can also be created using content keywords and phrases. Note that if you are using angle brackets (i.e., < or >), you must add an asterisk before a left bracket and after a right bracket. Thus, you would type in *< spamword >*.
Notifications
From the Notification tab, the Administrator can determine when a notification email message is sent when a message violates the policy due to a content violation. Notifications can be activated when a message violates the content policy and was Quarantined, Denied delivery or Stripped of the Attachment. The notification can be sent to the message sender, the message recipient or both.
HTML Shield
The HTML Shield sub tab allows you to configure how the system reacts if it receives an email with an HTML attachment or that contains HTML coding within the body of the email.
By Default, the HTML protection shield is set to Low.
Click Protect
The ClickProtect sub tab lets you track how many emails included clickable links, how many links were clicked upon and the visited URL.
Click Protect can only track links in messages that have originated as rich text or html; plain text email can not be tracked.
MX Logic Email Defense Service
Proprietary and Confidential MX Logic Email Defense Admin Guide Page 9-2
You can also designate an Allow List of URLs that are excluded from ClickProtect (for example, your corporate URLs).
Click Protect is disabled by default.
9.2. Attachments
File Types
The File Types sub tab allows you to configure how the system reacts when it receives an email of a specified attachment type or if an attachment violates attachment policies.
By default, all attachments which are not on the allow list are filtered with the selected action. Attachments are scrutinized by filename, MIME content type and binary composition. This means a destructive .exe can not be hidden in a .doc file.
Filename Policies
The Filename Policies sub tab designates the rules for specific filenames. The structure allows you to specify "custom" rules that override the global rules defined in the File Types tab.
Example: You may work with an outside vendor who sends you a .vbs script. However, there are over 20 file extensions designated as scripts. By allowing Scripts on the File Types page, you are allowing ALL of those script types. The Filename Policies allow you to create a rule which only allows only .vbs scripts.
Attachment-filtering policies are applied in the following order:
1. Filename policies.
2. Additional policies.
3. File Type policies.
Filename policies can be written to include files that:
� Is equal to the criteria entered
� Contains information
� Ends with a file type
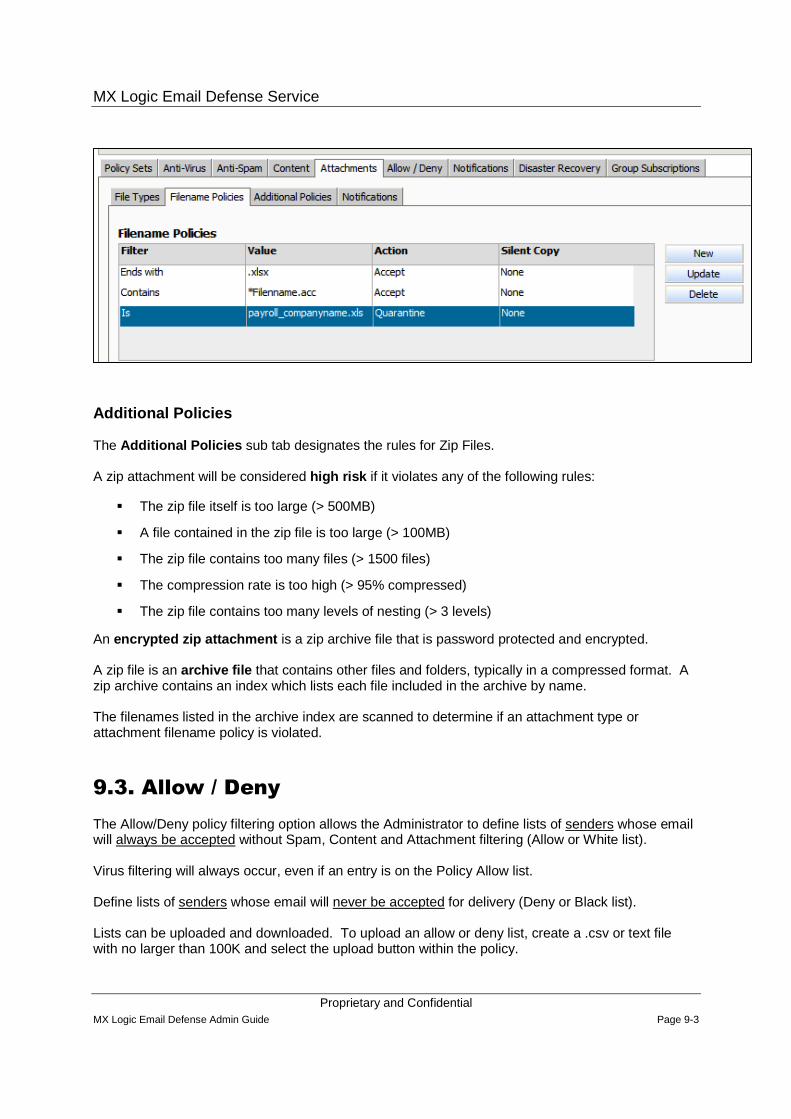
MX Logic Email Defense Service
Proprietary and Confidential MX Logic Email Defense Admin Guide Page 9-3
Additional Policies
The Additional Policies sub tab designates the rules for Zip Files.
A zip attachment will be considered high risk if it violates any of the following rules:
� The zip file itself is too large (> 500MB)
� A file contained in the zip file is too large (> 100MB)
� The zip file contains too many files (> 1500 files)
� The compression rate is too high (> 95% compressed)
� The zip file contains too many levels of nesting (> 3 levels)
An encrypted zip attachment is a zip archive file that is password protected and encrypted.
A zip file is an archive file that contains other files and folders, typically in a compressed format. A zip archive contains an index which lists each file included in the archive by name.
The filenames listed in the archive index are scanned to determine if an attachment type or attachment filename policy is violated.
9.3. Allow / Deny
The Allow/Deny policy filtering option allows the Administrator to define lists of senders whose email will always be accepted without Spam, Content and Attachment filtering (Allow or White list).
Virus filtering will always occur, even if an entry is on the Policy Allow list.
Define lists of senders whose email will never be accepted for delivery (Deny or Black list).
Lists can be uploaded and downloaded. To upload an allow or deny list, create a .csv or text file with no larger than 100K and select the upload button within the policy.
MX Logic Email Defense Service
Proprietary and Confidential MX Logic Email Defense Admin Guide Page 9-4
Allow List - (Administrators only)
� 1,500 entry limit
Deny List - (Administrators only)
� 1,500 entry limit
� If the Policy Sender Deny list denies a sender and the user adds the sender to their allow list, the sender is DENIED
� If you utilize one mail server, you can add your own domain name to your Deny List. This will prohibit Domain Spoofing and Domain Harvest Attacks. (*@Mydomain.com)
Deny List options allow you to choose
� Deny Delivery – deny and bounce the message back to the sending MTA
� Accept and silently discard the message – accept the message from the sending MTA
The Allow & Deny entries can be:
� Complete TCP/IP Address (i.e. 10.120.50.1)
� Partial address with wild cards (i.e.10.120.50.*)
� Qualified domain name (i.e. domain.com)
� Subdomains (i.e. *@*domain.com)
� Complete Sender Address (i.e. [email protected])
� Partial address (i.e. user*@gmail.com)
9.3.1. Policy Allow / Deny Scenarios
Scenarios 1 & 2 identify when a “global” domain is listed on either the policy level allow or deny list and a unique email address from the same domain is listed on the other policy level allow or deny list.
Scenario 1: � Policy Allow: 1 individual account ([email protected] )
� Policy Deny: All domain accounts (*@hotmail.com )
Results 1:
� Policy Allow: Enforced: all messages from individual hotmail account allowed
� Policy Deny: Enforced: all messages from hotmail accounts blocked

MX Logic Email Defense Service
Proprietary and Confidential MX Logic Email Defense Admin Guide Page 9-5
Scenario 2:
� Policy Allow: *@hotmail.com
� Policy Deny: [email protected]
Results 2:
� Policy Allow: Enforced: All hotmail.com messages allowed, except what is denied
� Policy Deny: Enforced: Messages from individual hotmail account denied
Scenario 3:
Note: I placed my entry on the Allow list first
� Policy Allow: [email protected]
� Policy Deny: [email protected]
Results 3:
� Policy Allow: Entry saved on allow list
� Policy Deny: REMOVED from deny list when Save was clicked
Scenario 4:
Note: I placed my entry on the Deny list first
� Policy Deny: [email protected]
� Policy Allow: [email protected]
Results 4:
� Policy Allow: REMOVED from allow list when Save was clicked
� Policy Deny: Entry saved on Deny list
9.3.2. User Allow/ Deny Scenarios
Scenario 5:
Note: I placed my entry on the Allow list first
� User Allow: [email protected]
� User Deny: [email protected]
Results 5:
� User Allow: Saved
� User Deny: Not saved to Deny list; received following message “Sender [email protected] already exists on either the Allow List or the Deny List”
MX Logic Email Defense Service
Proprietary and Confidential MX Logic Email Defense Admin Guide Page 9-6
Scenario 6:
Note: I placed my entry on the Deny list first
� User Allow: [email protected]
� User Deny: [email protected]
Results 6:
� User Allow: Not saved to Allow list; received following message “Sender [email protected] already exists on either the Allow List or the Deny List”
� User Deny: Saved
Scenario 7: � User Allow: *@hotmail.com
� User Deny: [email protected]
Results 7:
� User Allow: Enforced: Messages from Hotmail.com received, except
� User Deny: Enforced: messages from [email protected] denied
Scenario 8: � User Allow: [email protected]
� User Deny: *@hotmail.com
Results 8:
� User Allow: Overridden by User Deny list; messages from this sender denied
� User Deny: Enforced: all hotmail.com messages denied
9.3.3. Policy vs. User Allow / Deny Scenarios
When the exact same entries are made on the Policy Level allow or deny list that are made on the other User level allow or deny list, the Deny list will always take precedence, regardless of which deny list is used.
Scenario 9: � User Allow: [email protected]
� Policy Deny: [email protected]
Results 9:
� User Allow: Overridden by Policy Deny list
� Policy Deny: Enforced: messages from this email address are denied to all users on policy
MX Logic Email Defense Service
Proprietary and Confidential MX Logic Email Defense Admin Guide Page 9-7
Scenario 10: � Policy Allow: [email protected]
� User Deny: [email protected]
Results10:
� Policy Allow: Enforced: all messages to all users are allowed, except:
� User Deny: Enforced: messages from this sender to this user are denied
9.4. Recipient Shield
The Recipient Shield policy filtering option allows the Administrator to define a list of recipient email addresses that will have email messages denied.
� Up to 1,000 entries can be added to the Recipient Shield List. Any duplicate or invalid email addresses are discarded automatically
� Works with the SMTP Discovery function
Example: If a user account exists in the Control Console and that user leaves the organization, their user account is deleted by the administrator. If SMTP Discovery is selected as the User Creation Mode, and eight messages are sent to the “deleted” user account, the account will be re-created, unless the account is placed on the Recipient Shield List.
Recipient Shield lists can be uploaded and downloaded by clicking on the More Options button. Recipient Shield list can be uploaded if they are in a .csv or text format with a 100K maximum size limit.
The Downloaded Recipient Shield list will create a .csv spreadsheet file.
The following value is allowed in list entries:
� Sender Address - complete email address (for example, [email protected]). Must be associated to the same domain as stated at the top of the Policy Configuration window
If a message arrives for a recipient listed on the recipient shield list, identify what action you would like performed on each message:
� Accept and silently discard the message - an accept message is sent back to the sending MTA but a bounce message is not sent to the sending MTA
� Deny delivery - no accept message is sent to the sending MTA but a bounce message is sent back to the sending MTA explaining that the message was not delivered – restricted recipient mailbox
� Do Nothing - no accept message is sent to the sending MTA and no bounce message is sent to the sending MTA
MX Logic Email Defense Service
Proprietary and Confidential MX Logic Email Defense Admin Guide Page 9-8
9.5. Notifications
The Notifications option allows the Administrator to view and edit the email template for the Sender and/or the Recipient Notification email. There is one template available for each action allowed of:
� Virus - Quarantine, Deny and Strip
� Content - Quarantine and Deny
� Attachment - Quarantine, Deny and Strip
9.6. Disaster Recovery
The Disaster Recovery tab will be displayed if you have subscribed to the Message Continuity Service. See Disaster Recovery topic in this guide for details.
9.7. Group Subscriptions
If you have created a new Inbound Policy for a group, this is where you associate the new group with the policy.
Multiple groups may be assigned to one Inbound Policy set.
Reminder: All ungrouped User Accounts and all grouped users not associated to a different policy follow the Default Policy Set.
Click the Group Subscriptions tab to associate the group to the policy set.

MX Logic Email Defense Service
Proprietary and Confidential MX Logic Email Defense Admin Guide Page 10-1
10. Configuring Outbound Filtering
Policy Sets
10.1. Module Objectives
� Explain how to work with the Default Outbound Policy Sets
� Describe how to create new Outbound Policy Sets
� Configure the Outbound filtering options available to the Administrator for
10.2. Policy Configuration
The MX Logic Email Defense Service will perform actions on messages sent from the outbound mail server, based on rules identified in your Outbound Email Filtering Policy.
If the MX Ultimate Defense package or the MX Enterprise Defense with the Outbound Filtering add-on package was selected, then Default Inbound and Outbound Policy sets are available.
Outbound Policy Sets consist of various Policy filtering options:
� Anti-Virus
� Content
� Attachments
� Notifications
10.2.1. Policy Actions
Email messages that violate the rules identified in a policy can have any of the following actions taken, depending on the Policy filtering option:
� Quarantine – places the message in Quarantine
� Tag – delivers the message to the recipients mailbox, with the subject line tagged with the violation name (Spam or content)
� Deny Delivery – denies delivery of the message; not delivered, viewable or retrievable
� Do Nothing- ignore all policy actions; Allow Delivery
� Silent Copy – delivers a blind carbon copy (bcc) of the message to the recipients listed in the Distribution List
MX Logic Email Defense Service
Proprietary and Confidential MX Logic Email Defense Admin Guide Page 10-2
� Strip Attachment – removes the attachment and delivers the email body only
� Clean – removes any viruses and delivers the email body only
10.2.2. Applying Changes to the Policy Sets
When making changes to the policy filtering options, Administrators can save the changes after each tab is modified or save all changes at one time before leaving the policy set.
If the Administrator inadvertently leaves a policy configuration and attempts to go to another functional area, the Console will ask the Administrator if they wish to save their changes.
10.3. Default Outbound Policy Set
A Default Outbound Policy Set will be available to all domains under the customer. The default Outbound Policy set can be modified, but not deleted.
The default Outbound Policy set can be used as a template to create new outbound policy sets.
All Ungrouped User Accounts will implicitly be associated with the default Outbound Policy set.
10.4. New Outbound Policy Set
New Outbound Policies can be created to provide a unique policy set for a group.
A new policy can be copied from an existing outbound policy set.
10.4.1. Anti-Virus
The Anti-Virus filtering option allows the Administrator to configure how the system will react if an outbound email message contains a virus.
You can also determine what should happen to the message if it can’t be cleaned.
Note: If an email message is detected that contains a wide-spread worm or virus, the system may automatically deny the email and override any Anti-Virus policy settings.
When an attachment containing a virus is stripped by the policy, the attachment is replaced with a text message which lists the stripped virus.
The Anti-Virus default setting is set to clean the message. If the message cannot be cleaned, the message is denied.
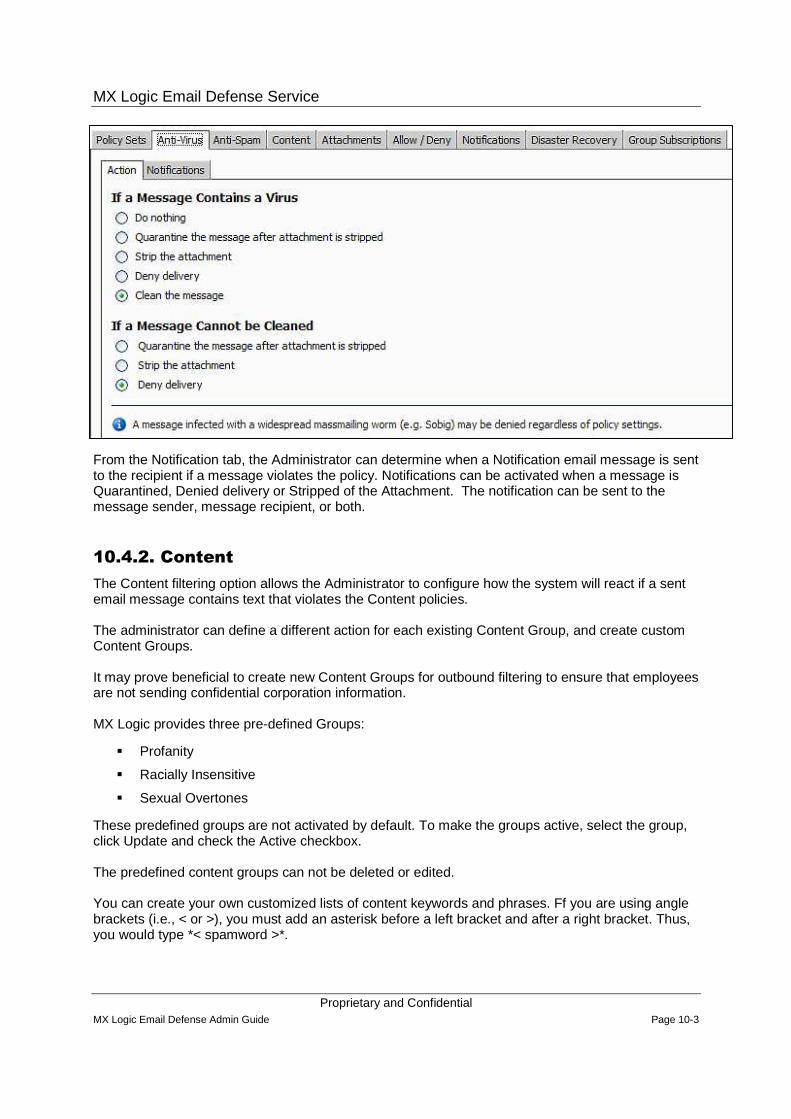
MX Logic Email Defense Service
Proprietary and Confidential MX Logic Email Defense Admin Guide Page 10-3
From the Notification tab, the Administrator can determine when a Notification email message is sent to the recipient if a message violates the policy. Notifications can be activated when a message is Quarantined, Denied delivery or Stripped of the Attachment. The notification can be sent to the message sender, message recipient, or both.
10.4.2. Content
The Content filtering option allows the Administrator to configure how the system will react if a sent email message contains text that violates the Content policies.
The administrator can define a different action for each existing Content Group, and create custom Content Groups.
It may prove beneficial to create new Content Groups for outbound filtering to ensure that employees are not sending confidential corporation information.
MX Logic provides three pre-defined Groups:
� Profanity
� Racially Insensitive
� Sexual Overtones
These predefined groups are not activated by default. To make the groups active, select the group, click Update and check the Active checkbox.
The predefined content groups can not be deleted or edited.
You can create your own customized lists of content keywords and phrases. Ff you are using angle brackets (i.e., < or >), you must add an asterisk before a left bracket and after a right bracket. Thus, you would type *< spamword >*.
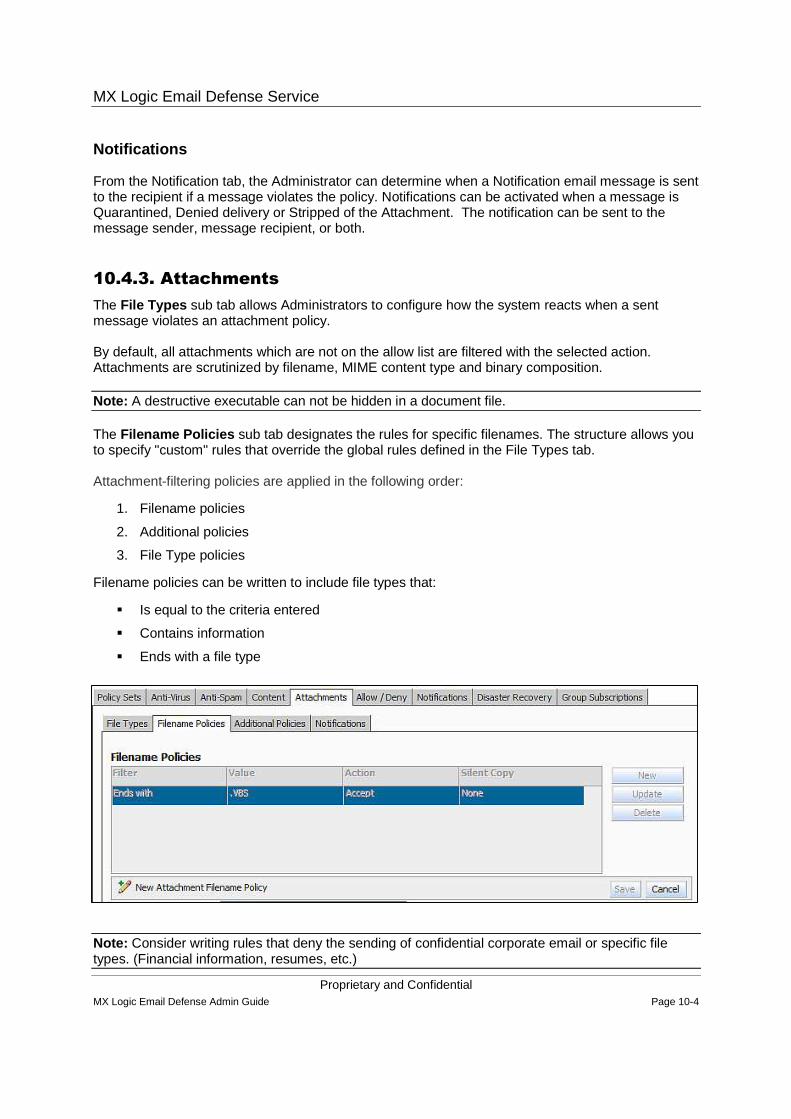
MX Logic Email Defense Service
Proprietary and Confidential MX Logic Email Defense Admin Guide Page 10-4
Notifications
From the Notification tab, the Administrator can determine when a Notification email message is sent to the recipient if a message violates the policy. Notifications can be activated when a message is Quarantined, Denied delivery or Stripped of the Attachment. The notification can be sent to the message sender, message recipient, or both.
10.4.3. Attachments
The File Types sub tab allows Administrators to configure how the system reacts when a sent message violates an attachment policy.
By default, all attachments which are not on the allow list are filtered with the selected action. Attachments are scrutinized by filename, MIME content type and binary composition.
Note: A destructive executable can not be hidden in a document file.
The Filename Policies sub tab designates the rules for specific filenames. The structure allows you to specify "custom" rules that override the global rules defined in the File Types tab.
Attachment-filtering policies are applied in the following order:
1. Filename policies
2. Additional policies
3. File Type policies
Filename policies can be written to include file types that:
� Is equal to the criteria entered
� Contains information
� Ends with a file type
Note: Consider writing rules that deny the sending of confidential corporate email or specific file types. (Financial information, resumes, etc.)
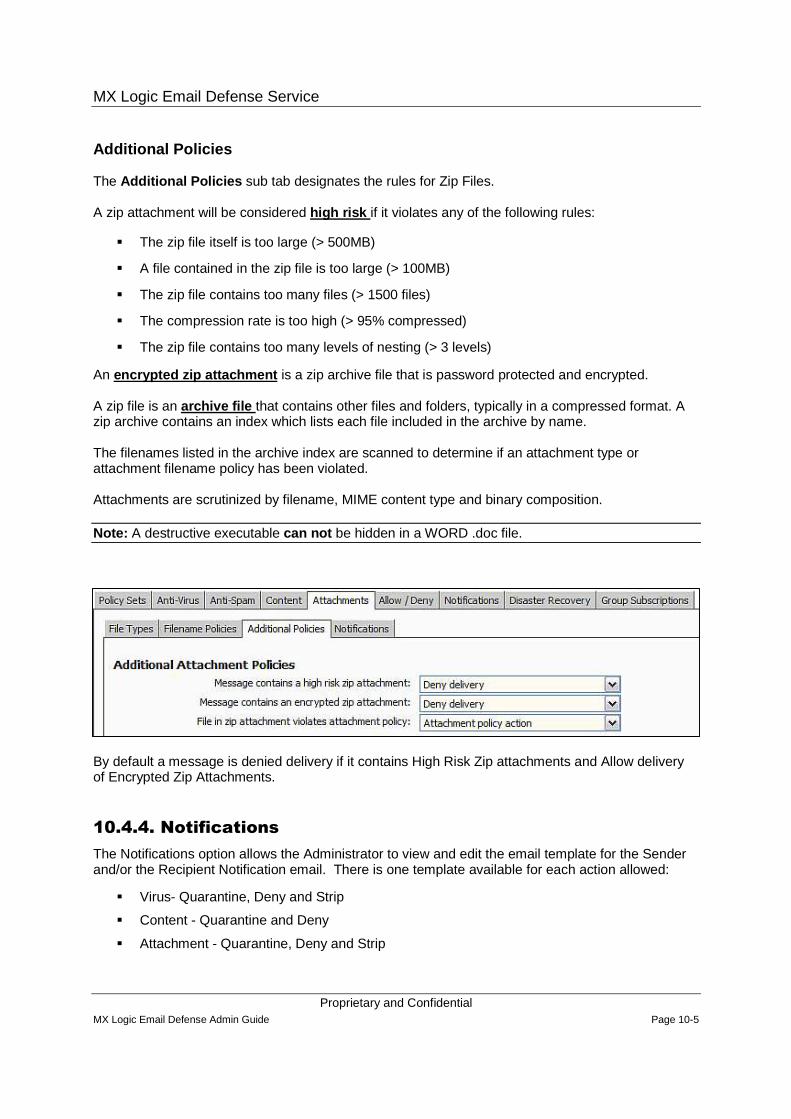
MX Logic Email Defense Service
Proprietary and Confidential MX Logic Email Defense Admin Guide Page 10-5
Additional Policies
The Additional Policies sub tab designates the rules for Zip Files.
A zip attachment will be considered high risk if it violates any of the following rules:
� The zip file itself is too large (> 500MB)
� A file contained in the zip file is too large (> 100MB)
� The zip file contains too many files (> 1500 files)
� The compression rate is too high (> 95% compressed)
� The zip file contains too many levels of nesting (> 3 levels)
An encrypted zip attachment is a zip archive file that is password protected and encrypted.
A zip file is an archive file that contains other files and folders, typically in a compressed format. A zip archive contains an index which lists each file included in the archive by name.
The filenames listed in the archive index are scanned to determine if an attachment type or attachment filename policy has been violated.
Attachments are scrutinized by filename, MIME content type and binary composition.
Note: A destructive executable can not be hidden in a WORD .doc file.
By default a message is denied delivery if it contains High Risk Zip attachments and Allow delivery of Encrypted Zip Attachments.
10.4.4. Notifications
The Notifications option allows the Administrator to view and edit the email template for the Sender and/or the Recipient Notification email. There is one template available for each action allowed:
� Virus- Quarantine, Deny and Strip
� Content - Quarantine and Deny
� Attachment - Quarantine, Deny and Strip
MX Logic Email Defense Service
Proprietary and Confidential MX Logic Email Defense Admin Guide Page 10-6
10.5. Group Subscriptions
If you created a new Outbound Policy for a Group, you must associate the new Outbound Policy with the Group.
Multiple Groups may be assigned to an Outbound Policy set.
Note: All ungrouped User Accounts are implicitly associated with the Default Outbound Policy set.
From within the Group Subscriptions Tab, select the appropriate Group and click Add and Save.
MX Logic Email Defense Service
Proprietary and Confidential MX Logic Email Defense Admin Guide Page 11-1
11. Manage Quarantined Messages
11.1. Module Objectives
� Describe and manage the email messages in specific domain Quarantine area
� Explain how to search for Quarantined Messages
� Identify how to view Quarantined Messages in Safe Message Mode
11.2. Message Quarantine
The Message Quarantine window allows the Administrator to manage quarantined email messages. Policy Violation examples: Spam messages, viruses, and unwanted content keywords.
The Administrator can view all Quarantined messages for all users within a domain, even if the Spam Quarantine Reporting is disabled for the domain’s users.
All quarantined emails show the primary email addresses as the recipient email address.
���� If email was sent to an alias address and quarantined, the recipient email address is changed to the primary email address. No alias email addresses will be listed
���� All email messages released from quarantine are sent to the primary email address of the original recipient
By default, messages remain in Quarantine for seven calendar days . If no action is taken on the Quarantined message, they are automatically deleted from Quarantine after the seven day period. Once a message is deleted from Quarantine, it is not retrievable.
Users with the role of Customer Administrator, Domain Administrator or Quarantine Manager can access messages in the domain quarantine area.
11.3. Search for Quarantine Messages
Once you access the Message Quarantine area, you have the ability to select or enter search criteria.
� Primary Domain
� An individual threat type or all threat types:
o Spam
o Virus
o Attachments
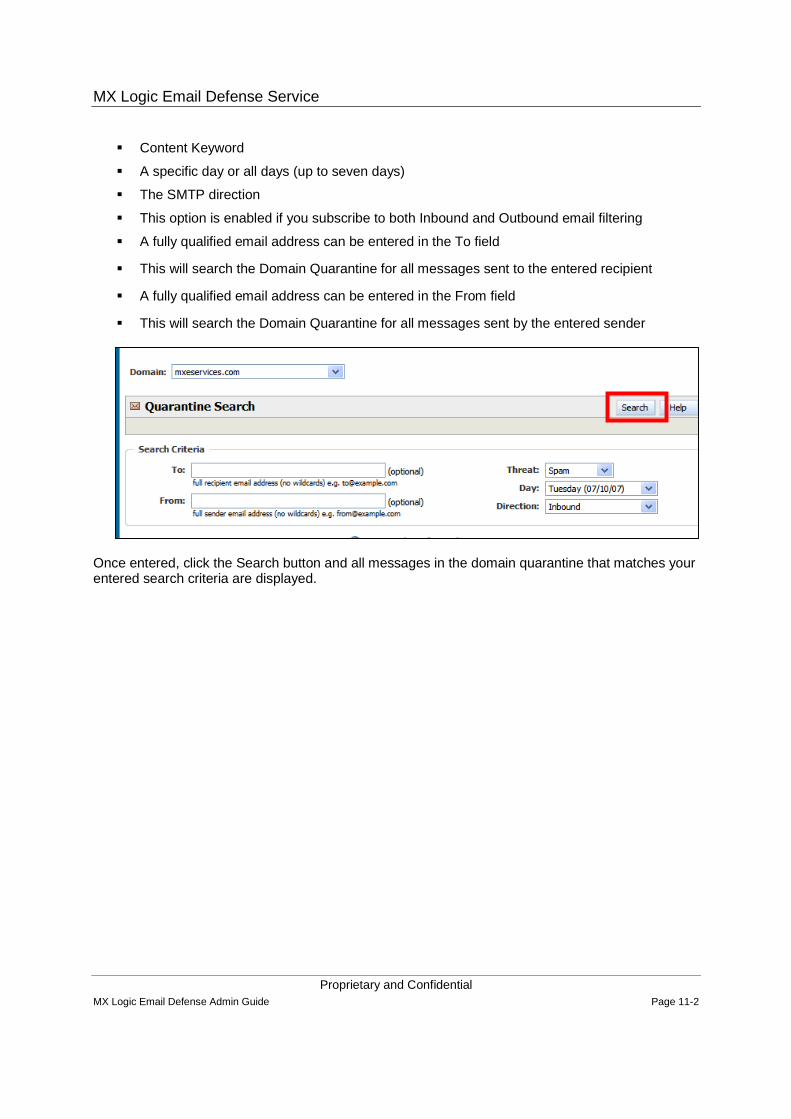
MX Logic Email Defense Service
Proprietary and Confidential MX Logic Email Defense Admin Guide Page 11-2
� Content Keyword
� A specific day or all days (up to seven days)
� The SMTP direction
� This option is enabled if you subscribe to both Inbound and Outbound email filtering
� A fully qualified email address can be entered in the To field
� This will search the Domain Quarantine for all messages sent to the entered recipient
� A fully qualified email address can be entered in the From field
� This will search the Domain Quarantine for all messages sent by the entered sender
Once entered, click the Search button and all messages in the domain quarantine that matches your entered search criteria are displayed.

MX Logic Email Defense Service
Proprietary and Confidential MX Logic Email Defense Admin Guide Page 11-3
Once the Quarantined messages matching your search criteria are displayed, the messages can be sorted by clicking a column header down arrow button and selecting the sort direction or removing some of the columns.
Columns can be resized by selecting the line between the columns heading, clicking the mouse button and dragging the column to its new size.
Changes to the columns remain active until the Message Quarantine window is closed.
If you hover the mouse over a message in the From column, the Sender, Recipient, Subject, Spam Score and Direction information is displayed.
Different information is displayed depending on the type of violation incurred.
� Spam violation, displays the Spam score
� Attachment violation, displays the attachment name that invoked the violation
� Virus violation, displays the Virus name that invoked the violation
� Content violation, displays the Content Keyword that invoked the violation
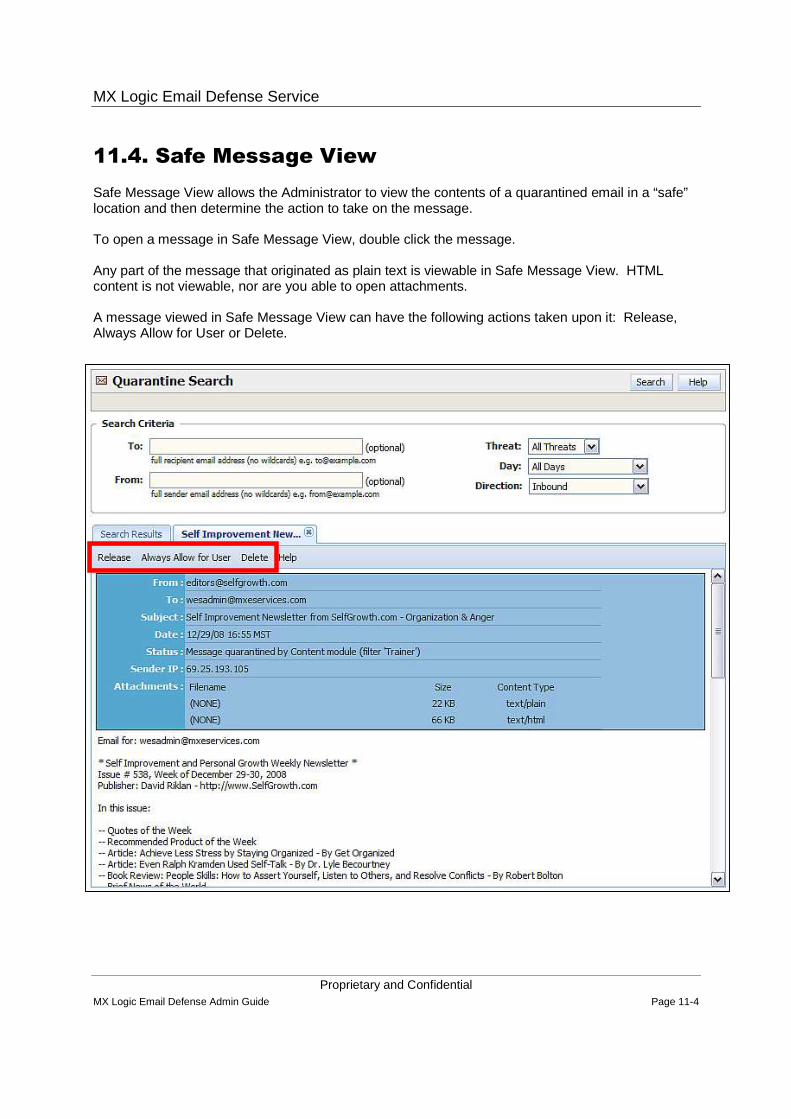
MX Logic Email Defense Service
Proprietary and Confidential MX Logic Email Defense Admin Guide Page 11-4
11.4. Safe Message View
Safe Message View allows the Administrator to view the contents of a quarantined email in a “safe” location and then determine the action to take on the message.
To open a message in Safe Message View, double click the message.
Any part of the message that originated as plain text is viewable in Safe Message View. HTML content is not viewable, nor are you able to open attachments.
A message viewed in Safe Message View can have the following actions taken upon it: Release, Always Allow for User or Delete.
MX Logic Email Defense Service
Proprietary and Confidential MX Logic Email Defense Admin Guide Page 11-5
11.5. Virus Quarantine
The Administrator can manage all messages that were quarantined due to a Virus policy violation. The virus name that invoked the policy violation is listed in the Threat Column, or by hovering over the message in the “From” column and viewing the information listed after “Virus”.
When a message is quarantined due to a Virus violation, only the original email message is quarantined. The virus has been stripped from the message.
If a message that was quarantined due to a virus was released, only the body of the email message will be released to the original recipient. The virus will not be released .
Users with the role of Customer Administrator, Domain Administrator or Quarantine Managers can access messages in the Domain quarantine area.
11.6. Spam Quarantine
The Administrator can manage all email messages that were classified as Spam.
The Spam score of the quarantined message is listed in the Threat or Spam Column, or by hovering over the message in the From column and viewing the information listed after “Spam Score”.
Users with the role of Customer Administrator, Domain Administrator or Quarantine Managers can access messages in the domain quarantine area.
User Accounts with the role of User or Reports Manager can only view their own Spam quarantined emails through links in the Spam Quarantine report or by accessing the Control Console.
11.7. Attachment Quarantine
The Administrator can manage all email messages quarantined for an attachment violation. The attachment name that invoked the policy violation is listed in the Threat Column, or by hovering over the message in the From column and viewing the information listed after “Attachment”.
When a message is quarantined for an attachment violation, both the email body and the attachment are quarantined. When viewing a message quarantined due to an attachment violation, only the original email body can be viewed. The attachment cannot be opened.
If a message that was quarantined for an attachment violation was released, the body of the email message and the attachment will be released to the original recipient.
Users with the role of Customer Administrator, Domain Administrator or Quarantine Managers can access messages quarantined for attachment violations in the quarantine area.
MX Logic Email Defense Service
Proprietary and Confidential MX Logic Email Defense Admin Guide Page 11-6
11.8. Content Quarantine
The Administrator can manage all email messages that were quarantined for a Content violation.
The keyword that invoked the policy violation is listed in the Threat Column, or by hovering over the message in the From column and viewing the information listed after “Content”.
Users with the role of Customer Administrator, Domain Administrator or Quarantine Managers can access messages quarantined for Content Keyword in the quarantine area.
11.9. My Spam
The My Spam menu option allows the Administrator, Domain Administrator or the Quarantine Manager to manage all Spam quarantined messages for the user that is currently logged into the Control Console. (Spam Quarantine for their User Account).
The user may select to which email address messages were quarantined by selecting information in the Sent To address. A user may select their primary email address or any of their user alias addresses.
Messages may be sorted by individual day or by all days.
11.10. Quarantine Actions
11.10.1. Release
� This removes the message from quarantine and delivers it to the original recipients email box
� Messages released from quarantine can only be delivered to the original recipients’ email box; administrators are not able to release a message to any other mailbox
� Selecting Release invokes a one-time release of the message(s) selected
11.10.2. Delete
� Selecting Delete will delete and remove the message from quarantine
� Once Deleted from quarantine, the message is not retrievable
� Selecting Delete invokes a one-time delete of the message(s) selected
11.10.3. Always allow for user
� Selecting Always Allow for User removes the message from quarantine, delivers it to the original recipients email box and places the sender of the message in the user’s allow list
� Entries on the users allow list will ONLY override the policy level Spam rules. Messages from the sender are delivered to the recipients email box if they pass the Attachment, Virus and Content Keyword policies
MX Logic Email Defense Service
Proprietary and Confidential MX Logic Email Defense Admin Guide Page 11-7
� Messages released from quarantine can only be delivered to the original recipients’ email box; administrators are not able to release a message to any other mailbox
� Once released from quarantine, the message is not retrievable
11.10.4. Delete All
� Selecting Delete All will delete all of the quarantined messages that have matched the search criteria
� All messages that match the search criteria will be deleted, even if the messages span several pages
� Selecting Delete All invokes a one-time delete of the message(s) selected
� The Delete All action is available only from within the Message Quarantine area (at a Domain level); the Delete All button is not an action within a user level quarantine area or from within My Spam
� Once Deleted from quarantine, the message is not retrievable

MX Logic Email Defense Service
Proprietary and Confidential MX Logic Email Defense Admin Guide Page 12-1
12. Examining Reports and Statistics
12.1. Module Objectives
Examine the system reports that assist the Administrator with domain management in monitoring:
� Email trends
� Policy actions
� Email Traffic
� Changes in the Control Console
� User and Inbound Server Activity
12.2. Reports and Statistics
The Reports window allows the Administrator to view reports with statistical information about the emails being processed by the MX Logic Email Defense Service for a single Primary Domain, Single Domain Alias, or all Domains.
Reports and Statistics assist the Administrator in analyzing trends, policy actions and traffic summaries. Prior to generating a specific report, a reporting period may be selected of:
� Today
� Daily
� Weekly
� Monthly
The Reporting period will default to the current day.
Email Defense reporting data is maintained for the current month plus 30 days back.
All reports can be downloaded into a Microsoft® Excel document in a .csv format.
12.3. Recommended Report Generation
After the MX Logic Email Defense Service has been installed and configured, it is recommend Administrators monitor the activity of the service using reports for two to three weeks. The MX Logic Email Defense Service provides you with over 15 types of reports but at a minimum, the four reports listed below verify the service is working the way your organization requires it.
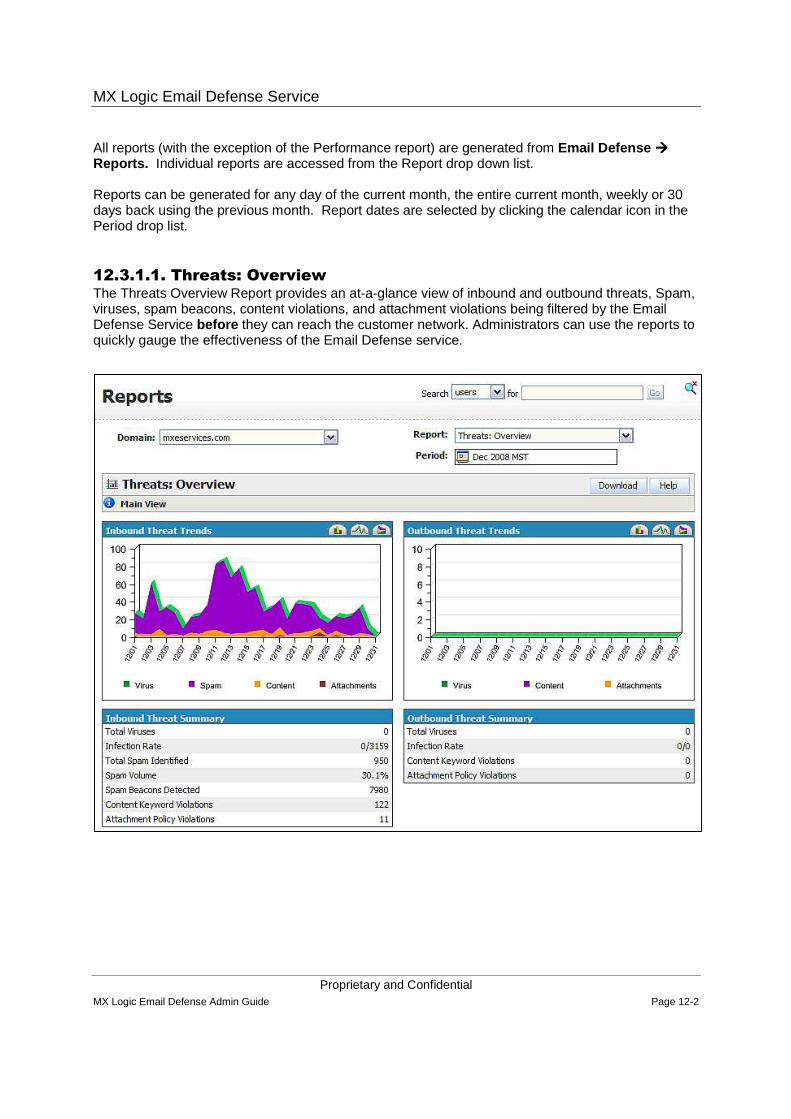
MX Logic Email Defense Service
Proprietary and Confidential MX Logic Email Defense Admin Guide Page 12-2
All reports (with the exception of the Performance report) are generated from Email Defense ���� Reports. Individual reports are accessed from the Report drop down list.
Reports can be generated for any day of the current month, the entire current month, weekly or 30 days back using the previous month. Report dates are selected by clicking the calendar icon in the Period drop list.
12.3.1.1. Threats: Overview The Threats Overview Report provides an at-a-glance view of inbound and outbound threats, Spam, viruses, spam beacons, content violations, and attachment violations being filtered by the Email Defense Service before they can reach the customer network. Administrators can use the reports to quickly gauge the effectiveness of the Email Defense service.

MX Logic Email Defense Service
Proprietary and Confidential MX Logic Email Defense Admin Guide Page 12-3
12.3.1.2. Quarantine Release Overview
The Quarantine Release Overview displays Spam and Virus Identification. This helps ensure the customer is not continuously releasing the same quarantined messages. This information is a good indication if your policy needs some adjustment.
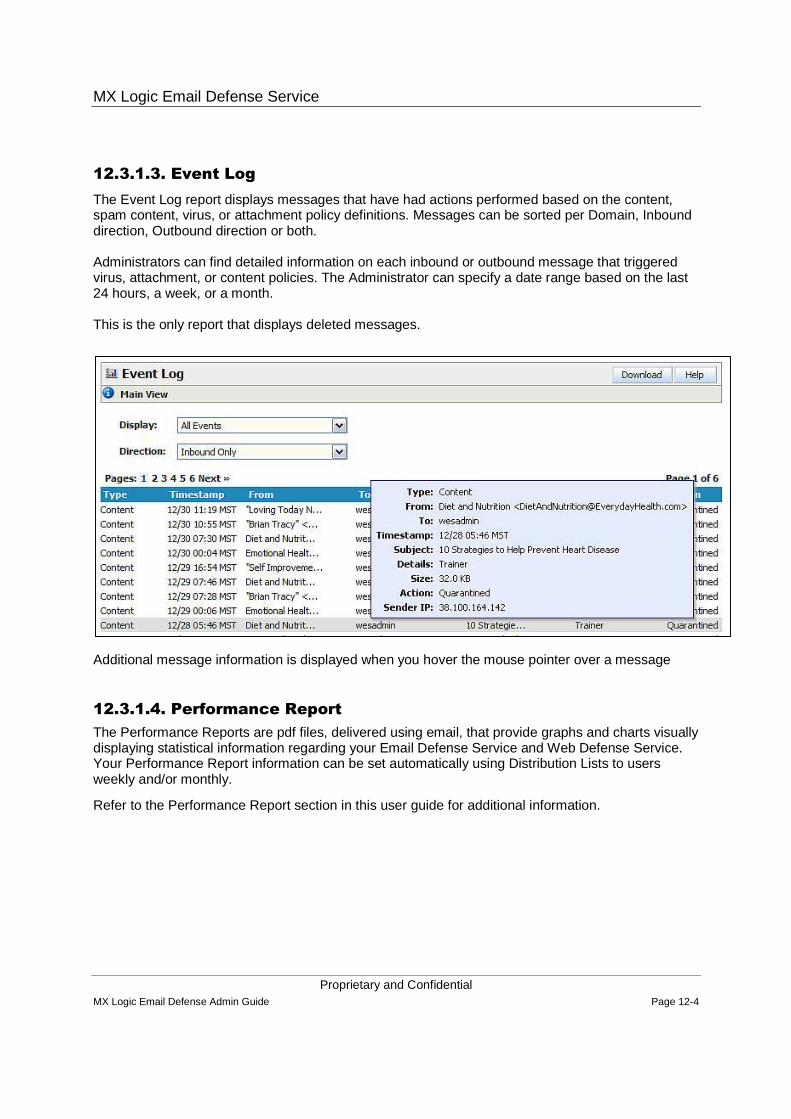
MX Logic Email Defense Service
Proprietary and Confidential MX Logic Email Defense Admin Guide Page 12-4
12.3.1.3. Event Log
The Event Log report displays messages that have had actions performed based on the content, spam content, virus, or attachment policy definitions. Messages can be sorted per Domain, Inbound direction, Outbound direction or both.
Administrators can find detailed information on each inbound or outbound message that triggered virus, attachment, or content policies. The Administrator can specify a date range based on the last 24 hours, a week, or a month.
This is the only report that displays deleted messages.
Additional message information is displayed when you hover the mouse pointer over a message
12.3.1.4. Performance Report
The Performance Reports are pdf files, delivered using email, that provide graphs and charts visually displaying statistical information regarding your Email Defense Service and Web Defense Service. Your Performance Report information can be set automatically using Distribution Lists to users weekly and/or monthly.
Refer to the Performance Report section in this user guide for additional information.