Mixtures and separation - Savvas Learning Company
32
© Pearson 1 This unit revises and builds on work in KS2 on materials, specifically on mixtures, solutions and separation techniques using the context of providing clean drinking water. This provides opportunities to introduce the methods of working in a science lab, which will differ from the science learning experience that most students will have had previously. Recommended teaching time for unit: 7.5–10 hours There is an opportunity for focused development of communication skills in Topic 7Ea. In 7Ec there is an opportunity for students to develop skills in working scientifically. You may wish to spend additional time on these units should you feel that your students would benefit from these skills-development opportunities. From KS2 most students will: • observe that some materials change state when they are heated or cooled, and measure the temperature at which this happens in degrees Celsius (°C) (Year 4) • identify the part played by evaporation and condensation in the water cycle and associate the rate of evaporation with temperature (Year 4) • understand how some materials dissolve in liquid to form a solution (Year 5) • describe how to recover a substance from a solution (Year 5) • use knowledge of solids, liquids and gases to decide how mixtures might be separated, including through filtering, sieving and evaporating (Year 5) • demonstrate that dissolving, mixing and changes of state are reversible changes (Year 5). Note that this unit avoids reference to particle theory, which is introduced in Unit 7G. The main aim of this unit is to clarify, consolidate and extend work on mixtures and separation methods from KS2, and to use this work to develop basic science skills that students will use in the rest of their science learning. Topic 7Ea introduces the unit in the context of providing clean drinking water, revising the concepts of mixtures, sieving and filtering from KS2. There is an opportunity to develop communication skills in terms of writing a method, both in presenting a clear written text and in the use of apparatus diagrams to convey information clearly. Basic knowledge of the states of matter, mixtures and separation methods of sieving and filtration is explored. The text introduces suspensions and colloids, which may be unfamiliar to students. Topic 7Eb covers solutions as a specific type of mixture, and introduces related terminology. It also covers how the solubility of salts is affected by the temperature of the solution. Topic 7Ec starts with an opportunity to consider hazards, risks and safety in the lab, particularly in relation to using a Bunsen burner for heating and carrying out evaporation to dryness of a salt solution. Evaporation, using the context of producing table salt from brine, is looked at, with the introduction of boiling and boiling points. Topic 7Ed looks at chromatography as a way of identifying the substances within mixtures. Topic 7Ee introduces distillation as one example of desalination, in order to produce drinking water from salty water. The unit concludes by looking at the range of problems we need to overcome so that we can produce clean drinking water for everyone, and provides an opportunity for a class discussion on this. National Curriculum coverage This unit covers the following statements from the UK National Curriculum for Science (2013): • mixtures, including dissolving • simple techniques for separating mixtures: filtration, evaporation, evaporation, distillation and chromatography. In addition to covering a variety of Working Scientifically statements, this unit has a focus on: • use appropriate techniques, apparatus, and materials during fieldwork and laboratory work, paying attention to health and safety. This unit also focuses on the aim to ‘equip students with the scientific knowledge required to understand the uses and implications of science, today and for the future’. Literacy & Communication skills • Use flow charts to present sequences. • Appreciate that the way in which scientific ideas are presented is determined by the purpose and format of the communication. • Use conventions and symbols when communicating science. Cross-curricular opportunities Design and technology – design and construction of a solar still (7Ee). 7E Mixtures and separation
-
Upload
khangminh22 -
Category
Documents
-
view
1 -
download
0
Transcript of Mixtures and separation - Savvas Learning Company
© Pearson 1
This unit revises and builds on work in KS2 on materials, specifically on mixtures, solutions and separation techniques using the context of providing clean drinking water. This provides opportunities to introduce the methods of working in a science lab, which will differ from the science learning experience that most students will have had previously.
Recommended teaching time for unit: 7.5–10 hours
There is an opportunity for focused development of communication skills in Topic 7Ea. In 7Ec there is an opportunity for students to develop skills in working scientifically. You may wish to spend additional time on these units should you feel that your students would benefit from these skills-development opportunities.
From KS2 most students will:
• observe that some materials change state when they are heated or cooled, and measure the temperature at which this happens in degrees Celsius (°C) (Year 4)
• identify the part played by evaporation and condensation in the water cycle and associate the rate of evaporation with temperature (Year 4)
• understand how some materials dissolve in liquid to form a solution (Year 5)
• describe how to recover a substance from a solution (Year 5)
• use knowledge of solids, liquids and gases to decide how mixtures might be separated, including through filtering, sieving and evaporating (Year 5)
• demonstrate that dissolving, mixing and changes of state are reversible changes (Year 5).
Note that this unit avoids reference to particle theory, which is introduced in Unit 7G. The main aim of this unit is to clarify, consolidate and extend work on mixtures and separation methods from KS2, and to use this work to develop basic science skills that students will use in the rest of their science learning.
Topic 7Ea introduces the unit in the context of providing clean drinking water, revising the concepts of mixtures, sieving and filtering from KS2. There is an opportunity to develop communication skills in terms of writing a method, both in presenting a clear written text and in the use of apparatus diagrams to convey information clearly. Basic knowledge of the states of matter, mixtures and separation methods of sieving and filtration is explored. The text introduces suspensions and colloids, which may be unfamiliar to students.
Topic 7Eb covers solutions as a specific type of mixture, and introduces related terminology. It also covers how the solubility of salts is affected by the temperature of the solution.
Topic 7Ec starts with an opportunity to consider hazards, risks and safety in the lab, particularly in relation to using a Bunsen burner for heating and carrying out evaporation to dryness of a salt solution. Evaporation, using the context of producing table salt from brine, is looked at, with the introduction of boiling and boiling points.
Topic 7Ed looks at chromatography as a way of identifying the substances within mixtures.
Topic 7Ee introduces distillation as one example of desalination, in order to produce drinking water from salty water. The unit concludes by looking at the range of problems we need to overcome so that we can produce clean drinking water for everyone, and provides an opportunity for a class discussion on this.
National Curriculum coverage
This unit covers the following statements from the UK National Curriculum for Science (2013):
• mixtures, including dissolving • simple techniques for separating mixtures:
filtration, evaporation, evaporation, distillation and chromatography.
In addition to covering a variety of Working Scientifically statements, this unit has a focus on:
• use appropriate techniques, apparatus, and materials during fieldwork and laboratory work, paying attention to health and safety.
This unit also focuses on the aim to ‘equip students with the scientific knowledge required to understand the uses and implications of science, today and for the future’.
Literacy & Communication skills
• Use flow charts to present sequences.• Appreciate that the way in which scientific ideas
are presented is determined by the purpose and format of the communication.
• Use conventions and symbols when communicating science.
Cross-curricular opportunities
Design and technology – design and construction of a solar still (7Ee).
7EMixtures and separation
Mixtures and separation
7 E
2 © Pearson
7E Background information
7Ea Mixtures Students may have learnt at KS2 that a mixture is a combination of two or more substances that can be separated by means such as sieving, filtering and evaporation. Mixing is therefore a reversible change. This is to distinguish mixtures from compounds, in which two or more substances combine to form a new substance; this kind of change is not usually reversible.
The term ‘colloid’ is introduced in this topic, a term used for a range of different types of mixtures that are difficult to separate but can be separated by physical means.
Students should notice that a mixture can be formed from substances in a range of physical states, and are not just ‘something that is mixed in water’.
Make sure students distinguish between ‘suspension’, where particles of a solid mix with a liquid but are large enough to eventually settle out (due to gravity), as in a suspension, and ‘dispersion’, where particles of a solid are too small to settle out of a mixture with a liquid, in this case forming a colloid. Students will be given an opportunity to classify familiar substances that are colloids, including emulsions, gels and foams.
Another common error is the confusion between the meanings of the words ‘clear’ and ‘colourless’. The use of ‘clear’ as a description of colourless glass bottles at the bottle bank will not help. In the Student Book the word ‘clear’ is used to mean transparent, with the colour of the liquid being an independent description. A full description of the liquid will therefore involve a minimum of two words (e.g. clear blue, misty yellow, clear and colourless). It may also be worth stressing to some students the difference between ‘colourless’ and ‘white’, perhaps by showing them a test tube full of water and one containing milk.
Filtering is a way of sorting items by size that students may be familiar with from KS2 work. Filter papers act as very fine sieves, allowing only tiny particles through and trapping the rest. Filtering will only separate insoluble solids (which do not dissolve) from the liquid or solvent in which they are found, as dissolved particles are small enough to pass through the paper. In a water treatment plant, filtration can only be used to separate the ‘lumps’ from dirty water – floating branches, paper waste, solid human waste and particles of soil or dirt. Filtration will not remove the bacteria that live in the water (as they are too small) and it will not remove substances that are dissolved in the water.
7Eb SolutionsDissolving is a topic that is superficially very simple, but can lead to some very complex ideas. One of the key ideas to be brought out is that true dissolving will only occur when the solute is broken down into ‘bits’ that are too small to be seen with the naked eye. (Note that this unit avoids reference to particle theory, which is introduced in Topic 7Gb, so it is up to you whether you introduce the term ‘particle’ here.) A common error will be to assume that any form of dispersion is evidence of dissolving – the fact that ‘soluble’ aspirins are often in fact only partially soluble may be a source of this misunderstanding.
Technically, solubility refers to the amount of solute that will dissolve in a particular mass or volume of solvent. In this topic, the only solvent that students will use is water, although other examples are mentioned. However, the overwhelming majority of data available will relate to aqueous solutions.
Although some people filter tap water in the UK, this does not mean that the tap water is unsafe to drink. The filter’s main purpose is to remove many dissolved solids and gases, and so change the taste of the water. A filter may also be used to ‘soften’ tap water, to prevent hard scale deposits forming in pipes and appliances such as washing machines and kettles. This topic does not discuss hard water in detail, because the formation of scale deposits is mainly a chemical reaction, when soluble hydrogencarbonates dissolved in the water are chemically converted to insoluble carbonates as water temperature increases. The ‘softening’ of water is also a chemical reaction, as calcium and magnesium ions in the water are removed and replaced by sodium ions (sodium salts are all soluble). If a student raises the subject of hard and soft water, discuss this in terms of different amounts of different substances dissolved in the water, thus giving it a different taste and different behaviour in appliances.
7Ec EvaporationEvaporation is a way of extracting dissolved solids from a liquid. If a sample of pure water is evaporated, no solid residue will be left behind but, if a solution (water containing a dissolved solid, or mixture of solids) is heated, the water will evaporate leaving the solids behind.
Evaporation of solutions in the laboratory needs care. The solution should be heated until a little remains so that the solid can be formed as the heat stored in the watch glass or evaporating basin evaporates this remaining amount. This will help to stop the solid residue from ‘spitting’ at the students and also limit the number of breakages. This process is known as ‘heating to dryness’. If the
Mixtures and separation
7 E
© Pearson 3
solid is heated beyond this point, it may ‘jump’ out of the container and may also be changed by the heat.
Copper sulfate is ideal for demonstrating evaporation as its blue colour means that it can be easily seen. Also, the effect of heating it too strongly is a very clear change in colour – anhydrous copper sulfate is produced, which is white if too much water (the water of crystallisation) is removed. The blue colour returns if a little water is added to the white crystals.
Students often confuse boiling with evaporation. It is important that they realise that evaporation happens at any temperature (although it happens faster as temperature increases). Other factors also affect the rate of evaporation, but these are not covered in this unit. During evaporation, the change of state only occurs at the surface of the liquid. Boiling happens at a temperature when all of the liquid is changing into a gas at the same time (the bubbles are bubbles of the liquid that have turned to gas).
7Ed ChromatographyChromatography is a way of separating different solids dissolved in a liquid. At school level, chromatography is typically used to separate coloured compounds such as dyes in ink or food colouring. In industry, the substances being separated are not necessarily coloured, and the technique may be only part of a more complex analysis process involving other identification techniques such as mass spectrometry that measure the amount of each substance in the sample. This is used not only in the water industry, to analyse the concentration of specific solutes, but also for drug testing in sports competition, and for forensic analysis.
The separation of substances is a result of the relative attraction of the solvent and the stationary phase (e.g. the paper in paper chromatography) for each substance. (Note that the term ‘stationary phase’ is not used in this unit. At this stage, it is better to name the solid, such as paper or gel.) This means that different substances in the sample move at different speeds, resulting in a spread-out series of ‘spots’. If two samples on the chromatogram contain the same substance, that substance will move the same distance from the start point as the chromatogram is made.
7Ee DistillationDistillation is a process used to separate a liquid from a mixture of either a liquid and a dissolved solid, or several liquids, so that the liquid is not lost.
Simple distillation involves separating a liquid from dissolved solids. The method is effectively the same as evaporation, except that the vapour is collected and condensed to form a liquid.
When using a Liebig condenser in distillation, ensure that the cooling water goes in at the bottom and out at the top. This ensures that the cooling jacket remains full of water. When demonstrating the Liebig condenser to students it is worth setting it up the wrong way round to show them that if water is fed in at the top it just runs down the lower surface and does not remain in contact with the central tube.
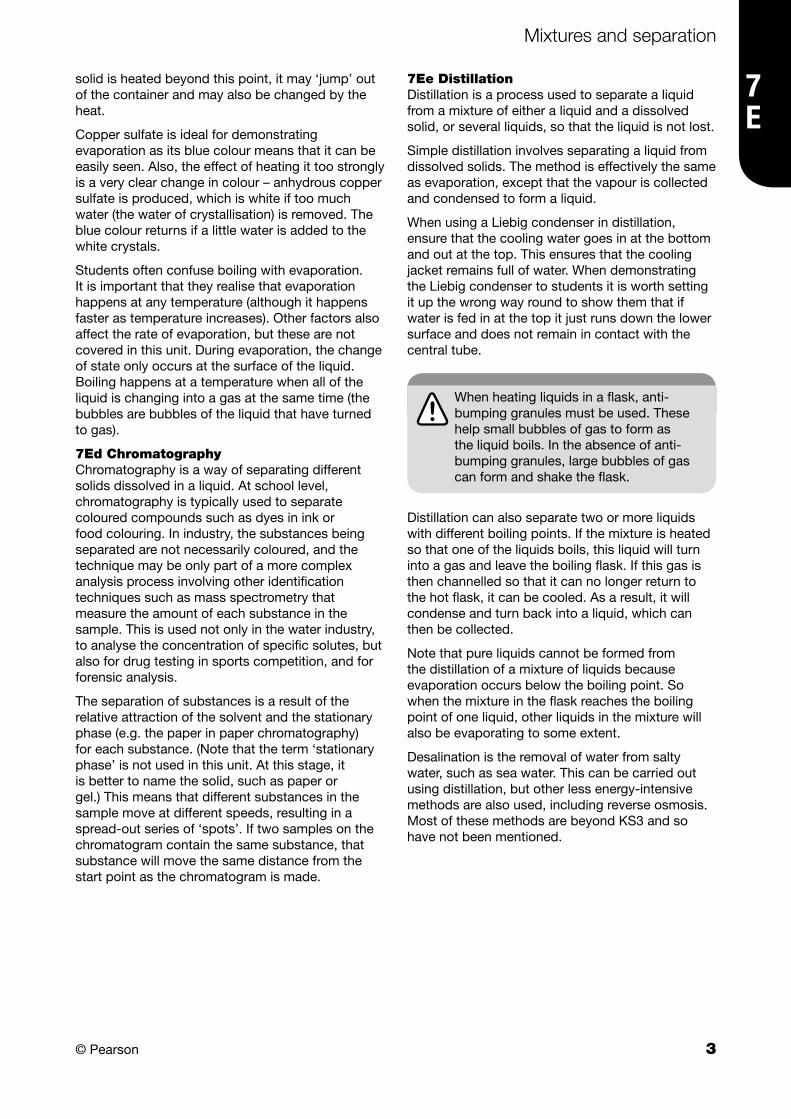
When heating liquids in a flask, anti-bumping granules must be used. These help small bubbles of gas to form as the liquid boils. In the absence of anti-bumping granules, large bubbles of gas can form and shake the flask.
Distillation can also separate two or more liquids with different boiling points. If the mixture is heated so that one of the liquids boils, this liquid will turn into a gas and leave the boiling flask. If this gas is then channelled so that it can no longer return to the hot flask, it can be cooled. As a result, it will condense and turn back into a liquid, which can then be collected.
Note that pure liquids cannot be formed from the distillation of a mixture of liquids because evaporation occurs below the boiling point. So when the mixture in the flask reaches the boiling point of one liquid, other liquids in the mixture will also be evaporating to some extent.
Desalination is the removal of water from salty water, such as sea water. This can be carried out using distillation, but other less energy-intensive methods are also used, including reverse osmosis. Most of these methods are beyond KS3 and so have not been mentioned.
4 © Pearson
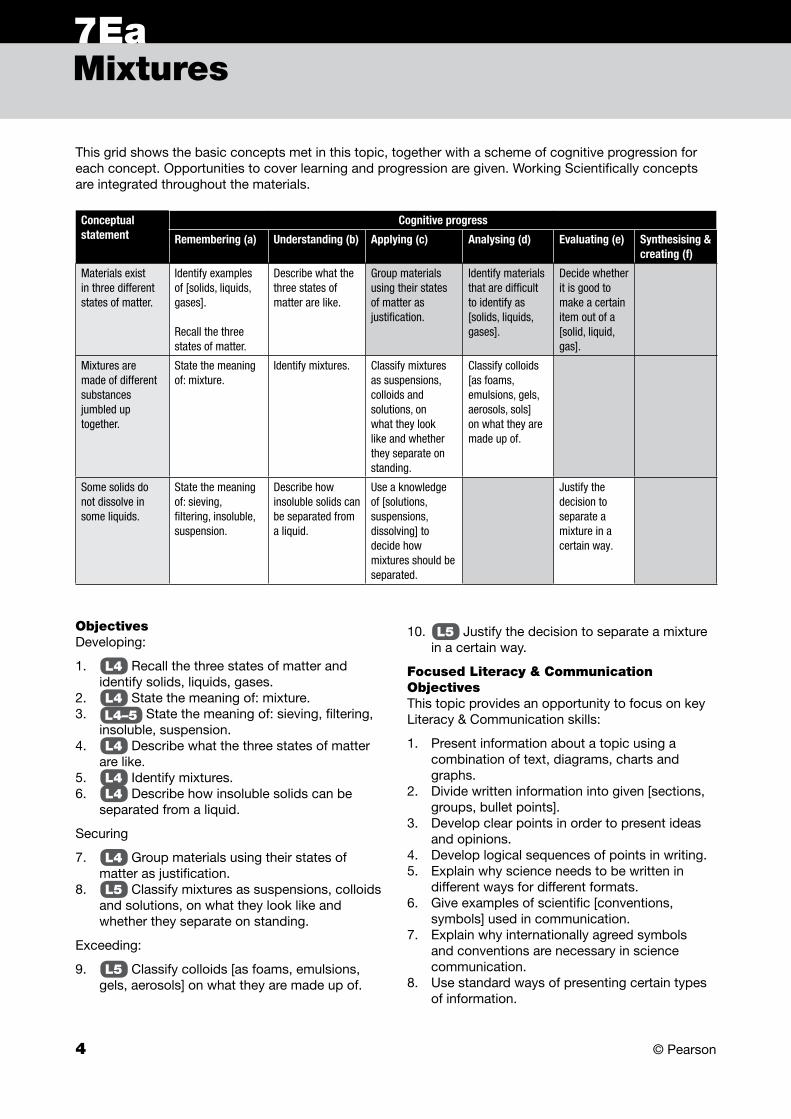
This grid shows the basic concepts met in this topic, together with a scheme of cognitive progression for each concept. Opportunities to cover learning and progression are given. Working Scientifically concepts are integrated throughout the materials.
Conceptual statement
Cognitive progress
Remembering (a) Understanding (b) Applying (c) Analysing (d) Evaluating (e) Synthesising & creating (f)
Materials exist in three different states of matter.
Identify examples of [solids, liquids, gases].
Recall the three states of matter.
Describe what the three states of matter are like.
Group materials using their states of matter as justification.
Identify materials that are difficult to identify as [solids, liquids, gases].
Decide whether it is good to make a certain item out of a [solid, liquid, gas].
Mixtures are made of different substances jumbled up together.
State the meaning of: mixture.
Identify mixtures. Classify mixtures as suspensions, colloids and solutions, on what they look like and whether they separate on standing.
Classify colloids [as foams, emulsions, gels, aerosols, sols] on what they are made up of.
Some solids do not dissolve in some liquids.
State the meaning of: sieving, filtering, insoluble, suspension.
Describe how insoluble solids can be separated from a liquid.
Use a knowledge of [solutions, suspensions, dissolving] to decide how mixtures should be separated.
Justify the decision to separate a mixture in a certain way.
7EaMixtures
ObjectivesDeveloping:
1. L4 Recall the three states of matter and identify solids, liquids, gases.
2. L4 State the meaning of: mixture.3. L4–5 State the meaning of: sieving, filtering,
insoluble, suspension.4. L4 Describe what the three states of matter
are like.5. L4 Identify mixtures.6. L4 Describe how insoluble solids can be
separated from a liquid.
Securing
7. L4 Group materials using their states of matter as justification.
8. L5 Classify mixtures as suspensions, colloids and solutions, on what they look like and whether they separate on standing.
Exceeding:
9. L5 Classify colloids [as foams, emulsions, gels, aerosols] on what they are made up of.
10. L5 Justify the decision to separate a mixture in a certain way.
Focused Literacy & Communication ObjectivesThis topic provides an opportunity to focus on key Literacy & Communication skills:
1. Present information about a topic using a combination of text, diagrams, charts and graphs.
2. Divide written information into given [sections, groups, bullet points].
3. Develop clear points in order to present ideas and opinions.
4. Develop logical sequences of points in writing.5. Explain why science needs to be written in
different ways for different formats.6. Give examples of scientific [conventions,
symbols] used in communication.7. Explain why internationally agreed symbols
and conventions are necessary in science communication.
8. Use standard ways of presenting certain types of information.
Mixtures and separation
© Pearson 5
7 E a
Student materials
Topic notes • Students may be familiar with the basic ideas
of mixtures and their separation by sieving and filtering from KS2. The focus of this topic is to bring a more formal structure to learning and recording of this information.
3: Mixture examples 1L4–5 BA
Provide students with a display of a range of mixtures as objects or pictures. Suitable examples include: sand/water mix, a piece of granite or other rock showing a mixture of different crystals, an ‘empty’ beaker labelled air, shaving foam or other foam, a glass of milk, some jelly (with a brief description of how it is made by mixing gelatine with water).
Students should work in pairs or small groups to discuss how the mixtures are similar and how they are different. They should also identify any questions that they need answering as they work through the topic. It is hoped that they will be familiar with solids, liquids and gases but, if these words are not appearing in students’ notes, put an extra focus on revising the terms in Explaining 3. The notes can be returned to in Plenary 5.
Be prepared• Starter 3 needs a wide range of mixtures,
some of which are common household substances.
• Explaining 4 requires arranging a visit to a local water treatment plant. Alternatively invite someone from a local water treatment plant or water company to visit the lesson to answer questions. Note that Exploring 3 in Topic 7Ed suggests questions that could be asked about water analysis from the same visitor, so it could be helpful to gather this information in the same visit.
STARTERS
1: Quick Quiz L3–5 BA
Use the 7E Quick Quiz for baseline assessment. Students can use the 7E Quick Quiz Answer Sheet to record their answers. You could use all of the Quick Quiz as a starter for the whole unit and then again at the end of the unit to show progress. Or just use the first four questions, which relate to this topic. These questions could be revisited formatively in a plenary for this topic. See the ASP for more information about Quick Quizzes.
Course resourcesASP: 7E Quick Quiz; 7E Quick Quiz Answer Sheet.
2: Sandy water descriptions 1
L3–5 BA Prac WS Show students a beaker of water and add some sand. Mix the water and sand thoroughly by stirring, then leave to stand so that some of the sand can be seen to settle. Students should work in pairs or small groups to think of any suitable science words that are related to the contents of the beaker, and how the water and sand might be separated again. Each group should write a list of words. They could also identify any questions they have about the mixture, and what they have seen, and add these to their lists. These lists could be photocopied and the originals returned to students for use in Plenary 4.
EquipmentBeaker, water, sand, paper, access to photocopier.
EXPLORING TASKS
1: Filtering mixtures
L3–5 FA Lit Prac WS Students should remember this simple practical activity on filtering from KS2. Here, the focus is to write a clear method for the experiment. Students may need any apparatus that is not familiar from KS2 work to be introduced.
Introduce the rules of writing a good method from Student Book spread 7Ea Writing a method. Students should note the difference between writing the method with imperative verbs, as a set of instructions to be followed by others, and writing in the past tense when describing how they carried out an experiment. Briefly demonstrate the setting up of the apparatus and filtering of the mixture. Students then work in pairs or small groups to write the method for the experiment using imperative verbs.
EquipmentWide range of examples of mixtures, e.g. sand/water mix from Starter 2, a piece of granite or other rock showing a mixture of different crystals, an ‘empty’ beaker labelled air, shaving foam or other foam, a glass of milk, some jelly (with a brief description of how it is made by mixing gelatine with water).
Mixtures and separation
6 © Pearson
7 E a
Developing: Work with students to complete the process of filtering step by step. At the end of a step, students describe what they have done and then discuss how to write their description in a clear and simple way. Remind them to use a separate instruction for each step in their method. Some students could use a cut-up copy of Worksheet 7Ea-3, selecting the best description for each step to paste into their workbook in the correct order. The AT interactive A good method is an interactive version of Worksheet 7Ea-1. This can be used with a group to develop discussion on what is the best description for each step and why.
Securing: Encourage students to exchange the method they have written with another group. They should test the method they have received by following the instructions and carrying out the experiment. They should then point out two good things about the method they were using and something that needs improving, and return the method to the original group for improvement. The AT interactive Writing scientifically asks students
to decide whether a sentence is an instruction or written for a report.
diagram of the same apparatus using conventional symbols for the apparatus. Students should note any similarities and differences between the two images.
In pairs or small groups, students discuss any obvious differences, including drawing apparatus symbols in 2D, leaving the top of the beaker and the top and end of the funnel open. They should think of as many reasons as they can why apparatus diagrams are drawn like this rather than trying to make them look realistic. (They should be able to suggest that it speeds up the drawing process, makes the diagrams clearer, and using standard symbols makes it easier for others to interpret the drawing.) Point out to students that using certain ways of drawing apparatus is called a ‘convention’. Conventions are common in science (see Unit 7B).
Using the apparatus set up for filtering in the lab, students draw their own apparatus diagram using all they have learnt about standard symbols. They should compare their diagram with the example in the AT link and make any amendments needed to their diagram.
They could then draw up a set of rules for drawing apparatus diagrams correctly. These can be compared with the rules given on the last page/slide of the document/presentation. Skills Sheet SC 3 can be used for this activity.
Developing: The demand of this activity could be reduced by giving students Worksheet 7Ea-5.
Course resourcesAP: Worksheet 7Ea-3.AT: Interactives A good method; Writing scientifically.
EquipmentConical flask, filter funnel, filter paper, beaker of sand/water mixture.
2: Classifying mixtures L4–6
Present students with a range of real examples of colloids, such as jelly, shaving foam, milk, polystyrene foam, fizzy drink. Students classify the mixtures in the presentation using the information on Worksheet 7Ea-4. The AT interactive Mixtures asks students to match scientific words for mixtures and what they look like with their descriptions, which may help students decide upon the language to use when discussing the similarities and differences of the mixtures.
Course resourcesAP: Worksheet 7Ea-4.AT: Interactive Mixtures.
3: Apparatus diagrams L4–5 FA Lit
The AT presentation Drawing apparatus diagrams contains a drawing of filtering apparatus and a
Course resourcesAP: Skills Sheet SC 3. Worksheet 7Ea-5.AT: Presentation Drawing apparatus diagrams.
EquipmentApparatus set up for filtering, see Student Book spread 7Ea Writing a method.
4: Cleaning water L4–6 WS
Students carry out research to find out how waste water from homes and offices is cleaned and treated to produce water that is safe for release into the environment, and even for drinking. They should focus on the physical aspects of removing suspended and dispersed solids in the water, including the addition of chemical substances to cause flocculation (clumping) of dispersed solids so that they are easier to remove. Students could use what they find to produce a flowchart showing the stages of treatment. They should also identify the roles of sieving and filtering in these stages.
The AT video How salty is sea water? shows students a sequence of clips explaining why sea
Mixtures and separation
© Pearson 7
7 E a
water tastes salty and how sea water is made safe to drink.
link opens Water treatment, which describes the various stages used to clean drinking water. An AT link allows you to turn the labels on and off on
diagram B.Course resourcesAT: Video How salty is sea water?
Course resourcesAP: Worksheet 7Ea-2.
5: Access to clean drinking water L4–6
The AT video Water supply and drought shows a news clip looking at some of the problems of maintaining water supply in areas of the UK at risk of drought. The AT video Water supply in developing countries looks at the problems of providing clean drinking water in rapidly expanding cities in developing countries.
Students should watch the videos and then work in pairs or small groups to discuss the problems that need to be addressed so that everyone has access to clean drinking water.
Course resourcesAT: Videos Water supply and drought; Water supply in developing countries.
Course resourcesAP: Worksheet 7Ea-1.AT: Interactive A good method.
Course resourcesAT: Animation Water treatment. Labels on/off A diagram of the apparatus shown in photo A. Videos Water supply and drought; Water supply in developing countries.
6: Apparatus diagrams databaseStudents could use their diagrams from Exploring 3 to set up a database of lab apparatus, using a suitable program. (There are free online versions if no other is available.) The database should, for each piece of apparatus, ideally contain a photo or 3D drawing of the apparatus, and the apparatus symbol with notes on how to draw it. Notes about what the apparatus is used for and how it should be used safely could also be included. For this topic, filter funnel, filter paper and conical flask could be added to the database. Opportunities to include other apparatus occur in later topics in this unit.
EquipmentStudents’ apparatus diagrams from Exploring 3; lab apparatus database program.
EXPLAINING TASKS
1: 7Ea Mixtures and separation (Student Book) L3–6
This unit starts with a brief introduction on the problems of producing sufficient clean water for drinking in a range of circumstances. This provides a way of revising some KS2 work on mixtures and their separation. The AT videos Water supply and drought and Water supply in developing countries were also used in Exploring 5. The AT animation
2: 7Ea Writing a method (Student Book) L4–6 FA Lit WS
This spread introduces the skills of writing a method clearly and drawing apparatus using standard symbols. Worksheet 7Ea-1 is the Access Sheet. Question 7 can be used for formative assessment, with students working in groups to answer the question. See the ASP Introduction for ideas on how to run the feedback and action components for this formative assessment. This also contains mini-plenary ideas.
The AT interactive A good method is an interactive version of Worksheet 7Ea-1 for use in Exploring 1.
3: 7Ea Mixtures (Student Book) L4–5 FA WS
This spread classifies mixtures into categories, and uses filtering of suspensions as an example of a method that separates the substances in a mixture. Worksheet 7Ea-2 is the Access Sheet.
Question 8 can be used for formative assessment, with students working in groups to answer the question. See the ASP Introduction for ideas on how to run the feedback and action components for this formative assessment. This also contains mini-plenary ideas.
4: Local water treatment L3–6
If possible, arrange a visit to a water treatment plant, or invite someone who works there to come and talk to the students about the stages in water treatment. In preparation for the visit, students
Mixtures and separation
8 © Pearson
7 E a
should prepare questions. Students could use a copy of Skills Sheet TS 6 to organise their thoughts and plan their questions. During the visit, students should take notes of answers to any of their questions, so that they can complete the right-hand column of the grid in class later. Alternatively, students could find some of their answers in the AT animation Water treatment. This describes the
various stages used to clean drinking water.
3: Thinking skills L4–6 FA
Assessment: Consider All Possibilities: A mixture is formed from two liquids. (Possible answers: it is a suspension such as oil and water; it is a colloid that will not separate on standing such as mayonnaise; it is a mixture of liquids that form a solution such as ethanol and water.)
Plus, Minus, Interesting: Chemicals should be added during water treatment to make small solid particles clump together. (Possible answers: Plus – this makes it easier and simpler to remove the particles to clean the water; Minus – the added chemicals may change of the flavour of the water; Interesting – people use water filters at home to make water taste nicer. Are people ever harmed by the chemicals added to water?)
Odd One Out: oil/water mix, jelly, frothy cream. (Possible answers: muddy water because the oil and water separated on standing; frothy cream because one of the substances in the mixture is a gas.)
Consider All Possibilities: When Jack tried to filter a mixture, no filtrate was left in the filter paper. (Possible answers: the mixture was a colloid so can not be separated by filtering; the substance mixed in the liquid was not a solid that does not dissolve.)
Feedback: Students answer the thinking skills questions in groups, thereby feeding back their thoughts to one another through discussion. Ask students to agree on what the best answers are and write them down. They should also consider why they are the best answers.
Action: Ask a spokesperson from a number of groups to read out their best answers. Identify any ideas that are missing and share them with the class, reinforcing ideas that students are having difficulties with.
The AT presentation 7Ea Thinking skills can be used for this activity.
Course resourcesAP: Skills Sheet TS 6.AT: Animation Water treatment.
PLENARIES
Most plenaries can be used for formative assessment. Suggested assessment, feedback and action strands of formative assessment can all be modified. See the ASP for further information and ideas on formative assessment.
1: Quick Check Literacy L4–5 FA Lit WS
Assessment: Students complete the 7Ea Quick Check Literacy sheet, which consists of a description that students are asked to rewrite as a method.
Feedback: Students work in pairs to compare their answers and agree how to improve each step to satisfy the bulleted points on the sheet.
Action: Students write their own instructions to help them remember how to write a method clearly.
Course resourcesASP: 7Ea Quick Check Literacy.
Course resourcesASP: 7Ea Quick Check.
Course resourcesAT: Presentation 7Ea Thinking skills.
2: Quick Check L4–5 FA
Assessment: Students cut out and arrange the dominoes in the 7Ea Quick Check sheet for the standard pages of this topic, which consists of a set of dominoes containing terms covered in this topic and their definitions.
Feedback: Students compare their answers with each other and their smiley faces (to indicate how easy they felt that the sheet was/how confident they feel about their answers overall). Ask the students for areas of difficulty and then explain the answers.
Action: If there is one persistent area of difficulty, revisit this material using a different approach from the list of ‘Approaches for learning’ (see ASP Introduction).
4: Sandy water descriptions 2 L3–6 FA
Assessment: Return the word and question lists from Starter 2 to the pairs or groups of students. Ask them to use what they have learnt in the lesson
Mixtures and separation
© Pearson 9
7 E a
to make any changes that they think are needed to the words and to try to answer any questions that they had. They should write a sentence to explain any answers or changes that they have made.
Feedback: Take examples of any changes from around the class, and the explanations of why the changes have been made.
Action: Compare the photocopied word and question lists from Starter 2 with the final lists to find any remaining misconceptions so that these can be tackled at the start of the next lesson.
Course resourcesAP: Worksheet 7Ea-6.
Course resourcesAP: Worksheet 7Ea-7.
EquipmentStudents’ word and question lists from Starter 2.
5: Mixture examples 2 L3–6 FA
Assessment: Show students the range of mixtures that they looked at in Starter 3. Ask them to repeat the activity, by making notes of the similarities and differences between the mixtures. They should use what they have learnt in the lesson to improve their comparisons.
Feedback: Take examples from around the class and make sure that all the key terms used in the lesson have been covered, including ideas of how they might be separated.
Action: Compare the lists that the students produced in Starter 3 and this plenary, to check for any remaining misconceptions or weaknesses in understanding. These can be covered at the start of the next lesson/topic.
method for filtering muddy water, and drawing correct symbols for apparatus used in a filtering experiment.
EquipmentExamples of mixtures used in Starter 3.
HOMEWORK TASKS
1: The right steps L4–5 Lit WS
Worksheet 7Ea-6 contains straightforward questions on rewriting the statements of a
2: Different mixtures L4–5
Worksheet 7Ea-7 contains straightforward questions on mixtures.
3: An emergency water filter L4–5 Lit WS
Worksheet 7Ea-8 invites students to use their knowledge of filtering and writing experimental methods to answer questions about an emergency water filter.
Course resourcesAP: Worksheet 7Ea-8.
Course resourcesAP: Worksheet 7Ea-9.
4: Different kinds of colloids L5–6
Worksheet 7Ea-9 challenges students to analyse and organise information about colloids.
ActiveLearnThree ActiveLearn exercises are available for this topic: Mixtures 1; Mixtures 2; Mixtures 3.

10 © Pearson
This grid shows the basic concepts met in this topic, together with a scheme of cognitive progression for each concept. Opportunities to cover learning and progression are given. Working Scientifically concepts are integrated throughout the materials.
Conceptual statement
Cognitive progress
Remembering (a) Understanding (b) Applying (c) Analysing (d) Evaluating (e) Synthesising & creating (f)
Some solid substances dissolve in some liquids, which is a reversible change.
Describe what is seen when a solid dissolves.
State the meaning of: soluble, solution, solvent, solute.
Describe how some solids can be used to form a solution.
Identify the [solvent, solute] in a solution.
Describe how soluble solids can be separated from a liquid.
Use a knowledge of dissolving to decide how a solution should be separated.
Justify the decision to separate a solution in a certain way.
The solubility of a substance is a measure of how much will dissolve.
Describe what happens when a liquid will not dissolve any more of a solid.
State the meaning of: solubility, saturated solution.
Describe how factors affect how much of a substance dissolves.
Describe how we know that different solutes have different solubilities.
Plan a fair test to discover how different factors affect the solubility of a substance.
When physical changes take place, mass is conserved.
State what happens to mass in a physical change.
Explain the decrease in mass seen during [boiling, evaporation].
7EbSolutions
ObjectivesDeveloping:
1. L4 Describe what is seen when a solid dissolves, and correctly use the terms: soluble, solute, solvent, solution.
2. L4 Describe how some solids can be used to form a solution, and identify the solvent and solute in a solution.
3. L5 Describe what happens when a liquid will not dissolve any more of a solid and use correctly the terms: solubility, saturated solution.
4. L5 State what happens to mass in a physical change.
Securing:
5. L5 Describe how factors affect how much of a substance dissolves.
6. L5 Describe how we know that different solutes have different solubilities.
Exceeding:
7. L6 Plan a fair test to discover how different factors affect the solubility of a substance.
Student materials
Topic notes • This topic revisits KS2 learning on solutions in a
more thorough and formal way.
Be preparedStarter 2 requires bottled water.

Mixtures and separation
© Pearson 11
7 E b
STARTERS
1: Solution anagrams L4–5 BA
Write the words ‘no bullies’ and ‘solve dis’ on the board and ask students what science terms they are anagrams of. If needed, give the hint that they are both something to do with liquids. Prompt further as needed, and when the words are guessed (insoluble and dissolve) challenge students to make up a sentence to link the two words.
If there is time, repeat with other pairs of words, such as ‘lo blues’ (soluble) and ‘is solved’ (dissolve), or ‘lion outs’ (solution) and ‘lo vents’ (solvent).
2: Different kinds of water L4 BA
Show students some bottles of water:
• small half-full bottle of sparkling water• small half-full bottle of still mineral water• small half-full bottle containing tap water (labelled
‘from tap’).
Ask students to work in groups to discuss what the differences are between the waters without opening the bottles. They can then experiment by shaking the bottles and examining the labels. Take examples from around the class, then discuss what practical work they could do to identify further differences. Encourage them to consider what is in the water, rather than the water itself.
7EbSolutions
2: How much will dissolve?
L4–5 Prac WS Students investigate the solubility of table salt and table sugar. (The solubility of sodium chloride (table salt) at 25 °C is approximately 36 g/100 cm3, and the solubility of sucrose (table sugar) is over 200 g/100 cm3.) Make sure students use small volumes of water.
Normally solubilities are quoted as g/100 g of water. However, it is acceptable to quote them as g/100 cm3 of water and, given that students will find it easier to measure out volumes of water, Worksheets 7Eb-3 and 7Eb-4 have assumed that solubilities will be calculated using g/100 cm3. Most students, should, however, be able to convert between the units if told that 1 cm3 of water has a mass of 1 g.
Developing: Students follow a simple method based on, for example, counting the number of spatulas of solid that will dissolve in a given volume of water.
Securing: Students should be encouraged to use a more sophisticated approach based on measuring out masses of solid. The solid should be added until no more dissolves. They could also investigate the law of conservation of mass, to show that the mass of the solution is the same as the mass of solute added to the mass of solvent.
EquipmentSmall bottles of sparkling water and still mineral water (still labelled to show contents), small bottle of tap water labelled ‘from tap’.
EquipmentSodium chloride (table salt), sucrose (table sugar), beaker (10 cm3), spatula. Optional: access to balances.
EXPLORING TASKS
1: Does it dissolve?
L4 Prac WS Students should work in pairs or small groups to test what happens when different substances are stirred into a beaker of tap water. They should add a similar amount of each substance (e.g. a spatula full) and empty and rinse clean the beaker after each test. Provide a range of soluble and insoluble substances for testing. They should record their results in a table using any suitable science language they already know.
Take examples of results from around the class and make sure the terms dissolve, soluble and insoluble are discussed and defined.
If included in the range of substances offered, students should not eat sugar or salt. Make students aware of safety information relating to any chemical substances used.
EquipmentGlass beaker, access to tap water, access to sink, spatula, range of water-soluble and -insoluble substances such as table salt, flour, instant coffee, ground coffee, baking soda, liquid detergent, vegetable oil.
Students should not eat sugar or salt.
Mixtures and separation
12 © Pearson
7 E b
3: Temperature and solubility
L3–6 Prac WS Students investigate the effect of the temperature of a solvent on the solubility of a solute. A variety of methods are possible. This practical can be used to carry out a Working Scientifically investigation. A set of level descriptions is provided in the ASP. Note that the use of Worksheet 7Eb-3 or 7Eb-4 will limit the range of any assessment.
Developing: Worksheet 7Eb-3 presents the simplest method, where students find out how many spatulas of potassium chloride (referred to as ‘a white substance’ on the worksheet, for simplicity) dissolve in a fixed quantity of water at different temperatures. Ensure that students understand that it is the quantity of solute they are investigating, not how fast it dissolves. The first test is carried out at room temperature, the other two tests in water baths at 30 °C and 50 °C.
If available, students should stand their beakers in water baths at appropriate temperatures. Students should be encouraged to read the temperatures on thermometers in the water baths and left in a tray on a lab bench so they can find out what the air temperature of the room is. Students should not touch any of the thermometers if glass thermometers are used.
Securing: A more accurate method is to prepare hot solutions with different quantities of solute and cool them until crystals start to appear. This method is outlined on Worksheet 7Eb-4 using copper sulfate, as coloured crystals will be easier to see.
Beakers or tube racks for supporting test tubes should be placed in water baths at a range of different temperatures.
Students can prepare a range of solutions, or each group can be allocated a particular mass of solute and results can be pooled. Alternatively, different groups investigate the solubility of different salts with temperature. Students produce graphs of solubility against temperature.
If there is time, students could plan this practical before they are given the method on Worksheet 7Eb-4. This could be carried out as homework – see Homework 3 below. Students should attempt to identify the variables in this experiment and also any possible safety issues. Discuss with them the difficulty of deciding on an end-point and how they will record their results.
At the end of the practical, discuss the reliability of the results and whether students have sufficient data to be able to draw a conclusion. Any suggestions about improvements to the practical should be accompanied by a reason for
the suggested change. Students could also be encouraged to pool their results and think about how these could be manipulated to help provide further evidence for their conclusion.
Exceeding: Students could be asked to extend their investigation to the solubility of various substances in different solvents.
Eye protection should be worn. Copper sulfate is harmful.
Course resourcesAP: Worksheets 7Eb-3 or 7Eb-4.ASP: 7E WS Investigations.
EquipmentPotassium chloride, measuring cylinder, copper sulfate, boiling tube, spatula, heating apparatus or access to kettle, eye protection. Optional: access to balances.
4: Solvents and solutions L4–5
Worksheet 7Eb-2 provides a set of drawings of solvents and solutions for students to cut out and match up. Students’ responses will let you see if they have grasped the idea of conservation of mass on dissolving, and the idea of saturated solutions. (Alternatively, this activity could be used as a plenary.) The AT presentation Solutions before and after provides the same drawings as on the worksheet so that this activity can be done as a class discussion.
Course resourcesAP: Worksheet 7Eb-2.AT: Presentation Solutions before and after.
5: Solutions apparatus diagrams L4 Lit WS
Give students Skills Sheet SC 3. Students should use the symbols to draw the apparatus diagram for the practical. They could then add these symbols to the symbols database they began in Topic 7Ea, with drawings or images of the real apparatus, notes on what to remember when drawing the symbol and notes on what the apparatus is used for.
Course resourcesAP: Skills Sheet SC 3.
Mixtures and separation
© Pearson 13
7 E b
6: The taste of water L5–6
Students research the effect of water supply (i.e. whether the water is stored in a surface reservoir or pumped from an underground aquifer) and geology on the taste of drinking water. This will introduce them to the concepts of hard and soft water, which will be covered further in Topic 7Ec. Ask students to use the Internet to search for information regarding the effect of water supplies. Students could record their findings as a labelled map of the UK, or another format such as a presentation. The AT weblink opens Water taste – The North v The South, where students could begin their research.
Students could record their findings as a labelled map of the UK, or another format such as a presentation.
Course resourcesAP: Worksheet 7Eb-1.AT: Interactive Solubility. Presentation Solutions before and after. Weblink Water taste – The North v The South.
Course resourcesAT: Weblink Water taste – The North v The South.
of solvent pieces (e.g. comparing lump sugar with granulated sugar).
Securing: Students work together to plan and carry out their experiment.
Exceeding: Students should plan their experiments individually, though they could carry them out in pairs or small groups.
EXPLAINING TASKS
1: 7Eb Solutions (Student Book) L3–6 FA
These pages define and use terms related to solutions, particularly solutions in which the solvent is water. They also introduce the idea of solubility and some of the factors that can affect it. Worksheet 7Eb-1 is the Access Sheet. Question 7 can be used for formative assessment, with students working in groups to answer the question. See the ASP Introduction for ideas on how to run the feedback and action components for this formative assessment. This also contains mini-plenary ideas. The AT weblink Water taste – The North v The South links to where students could begin their research in Exploring 6.
The AT presentation Solutions before and after provides the same drawings as on Worksheet 7Eb-2 so that Exploring 4 can be done as a class discussion.
The AT interactive Solubility supports this task by asking students to select the correct scientific words to complete a paragraph describing what happens when table salt is added to water.
7: Graphing solubility L4–6 BA WS
Worksheets 7Eb-5 and 7Eb-6 provide an opportunity to revise and assess graph-drawing and interpretation skills, using solubility as the example.
Developing: Work with students using Worksheet 7Eb-5 to complete the graph and discuss the choices for the answers to Question 2.
Securing: Students work individually to complete Worksheet 7Eb-5.
Exceeding: Students answer the questions on Worksheet 7Eb-6. Note that this worksheet requires students to put two sets of data on the same axes, something that students may not have done before. You may want to check their understanding of what is required before they do the sheet.
Course resourcesAP: Worksheets 7Eb-5; 7Eb-6.
EquipmentGraph paper.
8: Other variables in solubility L5–6 WS
Students adapt the method used in Exploring 3 to investigate the effect of factors other than temperature on how much of a substance dissolves. Factors that could be considered include the speed of stirring, volume of solvent and size
2: Solubility L5–6
The AT presentation Different solubilities provides a graph showing how the solubilities of different salts change with temperature, and includes comprehension questions. This is best used after students have worked through the material in the Student Book.
Securing: Project the graph using an interactive whiteboard and discuss the answers to the questions.
Mixtures and separation
14 © Pearson
7 E b
Exceeding: Students work through the questions individually or in pairs.
Feedback: Students compare their answers with each other and their smiley faces (to indicate how easy they felt that the sheet was/how confident they feel about their answers overall). Ask the students for areas of difficulty and then explain the answers.
Action: If there is one persistent area of difficulty, revisit this material using a different approach from our list of ‘Approaches for learning’ (see ASP Introduction). Students should also consider how they could address their own areas of difficulty.
Course resourcesAT: Presentation Different solubilities.
Course resourcesASP: 7Eb Quick Check.
3: Snowstorm in a test tube
L4–5 Prac WS Lead iodide provides a very good visual demonstration of the change of solubility with temperature, although this does not lead to the production of large crystals. Heat a little lead iodide in a boiling tube about half-full of distilled water. Alternatively, the lead iodide may be precipitated by mixing equal volumes of dilute potassium iodide and lead nitrate solutions. The solid will dissolve when the water is close to boiling point.
Allow the solution to cool slowly and crystals of lead iodide will precipitate as a ‘golden snowstorm’ effect – the glittering crystals give quite a spectacular effect as they float in the water. Once a row of tubes has been set up, they can be re-used repeatedly.
Show students the demonstration, and ask them to explain why it happens.
Lead compounds are toxic. Wear gloves and wash hands after handling them. Eye protection should be worn. Take care with waste products; refer to the CLEAPSS Handbook for more information.
EquipmentBoiling tubes, lead iodide (solid), 250 cm3 beakers. Alternatively, use dilute lead nitrate and potassium iodide solutions (0.005 mol/dm3), eye protection.
PLENARIES
Most plenaries can be used for formative assessment. Suggested assessment, feedback and action strands of formative assessment can all be modified. See the ASP for further information and ideas on formative assessment.
1: Quick CheckL3–6 FA
Assessment: Students complete the Quick Check sheet for this topic, which consists of a set of answers for which students write the questions.
2: Thinking skillsL4–6 FA
Assessment: Consider All Possibilities: When a spoonful of a solid substance is added to a beaker of solvent, the solid does not dissolve. (Possible answers: the solid is insoluble in that solvent; the solution is already saturated with solute.)
Odd One Out: copper sulfate, vegetable oil, liquid detergent. (Possible answers: copper sulfate is a solid, the others are liquids; vegetable oil is not soluble in water, the others are.)
Consider All Possibilities: Kate dissolves more of solute A in a beaker of water than she does of solute B in a different beaker of water. (Possible answers: solute A has a higher solubility in water than solute B; the water in the beaker with solute B is warmer than the water with solute A; there is more water in the beaker with solute B than with solute A.)
Plus, Minus, Interesting: Teabags should be made bigger, and have bigger holes. (Possible answers: Plus – more water would get into the bag so the soluble substances in the tea would dissolve out faster; Minus – the pieces of tea would need to be bigger so they stay in the bag; Interesting – would this change the flavour of the tea? In May 2013 a food company in Australia unveiled a teabag with a mass of 151 kg – enough for 100 000 cups of tea).
Feedback: Students answer the thinking skills questions in groups, thereby feeding back their thoughts to one another through discussion. Ask students to agree on what the best answers are and write them down.
Action: Ask a spokesperson from a number of groups to read out their best answers. Identify any ideas that are missing and share them with the class, reinforcing ideas that students are having difficulties with. If there is time, students could also consider what makes a ‘good answer’. The AT
Mixtures and separation
© Pearson 15
7 E b
presentation 7Eb Thinking skills can be used for this activity.
Course resourcesAT: Presentation 7Eb Thinking skills.
Course resourcesAP: Worksheet 7Eb-8.
Course resourcesAP: Worksheet 7Eb-4.
Course resourcesAP: Worksheet 7Eb-7.
3: Solvents and solutionsL4 FA
If Worksheet 7Eb-2 was not used earlier in Exploring 4, it can be used here as a plenary. The AT presentation Solutions before and after provides the same drawings as on the worksheet so that this activity can be done as a class discussion.
Students should identify the correct numbered image and label for each match. They should compare their choices with another student and identify any differences, discussing and deciding on the best choice. Take answers from around the class to complete the activity.
3: Planning Exploring 3L5
If students are to produce their own plans for Exploring 3, consider setting the planning for homework.
Securing: Students should be given the method from Worksheet 7Eb-4, and asked to identify the variable they are going to change and the variable they are going to measure. They should also identify variables that will need to be controlled (e.g. size of beaker, type of solute) and explain how they will be controlled to make it a fair test.
Exceeding: Students should plan the investigation of the effect of temperature on the solubility of copper sulfate without additional support.
Course resourcesAP: Worksheet 7Eb-2.AT: Presentation Solutions before and after.
HOMEWORK TASKS
1: Solution questionsL4–5
Worksheet 7Eb-7 contains questions on solutions and solubility.
2: Solution experimentsL4–5
Worksheet 7Eb-8 asks students to use their knowledge of solutions and solubility to interpret experimental data.
4: Hot water and oxygenL6
Worksheet 7Eb-9 challenges students to apply their knowledge of solutions and solubility to link the use of cooling towers in power stations to the effect of temperature on oxygen solubility in water. Ensure that students know how to draw a line graph. Skills Sheet PD 5 could be used to provide support.
Course resourcesAP: Skills Sheet PD 5. Worksheet 7Eb-9.
EquipmentGraph paper.
ActiveLearnThree ActiveLearn exercises are available for this topic: Solutions 1; Solutions 2; Solutions 3.

16 © Pearson
This grid shows the basic concepts met in this topic, together with a scheme of cognitive progression for each concept. Opportunities to cover learning and progression are given. Working Scientifically concepts are integrated throughout the materials.
Conceptual statement
Cognitive progress
Remembering (a) Understanding (b) Applying (c) Analysing (d) Evaluating (e) Synthesising & creating (f)
Some solid substances dissolve in some liquids, which is a reversible change.
Describe what is seen when a solid dissolves.
State the meaning of: soluble, solubility, solution, solvent, solute.
Describe how some solids can be used to form a solution.
Identify the [solvent, solute] in a solution.
Describe how soluble solids can be separated from a liquid.
Describe how we know that different solutes have different solubilities.
Use a knowledge of dissolving to decide how mixtures should be separated.
Justify the decision to separate a solution in a certain way.
Plan a fair test to discover how different factors affect the solubility of a substance.
States of matter can be changed reversibly.
Describe what happens during [melting, freezing, evaporating, condensing, a reversible change].
State what happens at a material’s [melting, freezing, boiling] point.
Explain why materials can be [solids, liquids, gases].
Use knowledge of [melting, freezing, boiling] points to predict the state of a substance at a given temperature.
Evaluate how well the [melting point, boiling point] of a substance provides evidence for identification.
Find out the [melting, freezing, boiling] points for some substances.
7EcEvaporation
ObjectivesDeveloping:
1. L4 Describe what happens during evaporating.
2. L5 State what happens at a material’s boiling point.
Securing:
3. L5 Use a knowledge of dissolving to decide how mixtures should be separated.
Exceeding:
4. L6 Justify the decision to separate a solution in a certain way.
Focused Working Scientifically ObjectivesThis topic provides an opportunity to focus on key Working Scientifically skills:
1. Identify risks to themselves and others and state the meaning of: risk, hazard.
2. Explain why a certain safety instruction has been given, and describe how to control familiar risks.
3. Recognise a range of risks and plan appropriate safety precautions.
4. Justify chosen methods of risk reduction.5. Carry out an experiment safely by following all
safety recommendations.
Student materials
Topic notes • This topic focuses on the differences between
evaporation and boiling, and the use of evaporation to recover dissolved solutes from a solution.
• Students should learn that evaporation can happen at any temperature from the surface of the liquid, but that increasing the temperature increases the rate of evaporation. Note that other factors (e.g. surface area of liquid, wind speed) can also affect rate of evaporation, but that these are not considered in this unit.
• Only boiling point is covered in this unit, though freezing point (as the temperature at which a substance changes between its liquid and solid forms) could also be mentioned if desired.
Mixtures and separation
© Pearson 17
7 E c
7EcEvaporation vehicle/another person). They should then consider
ways of reducing those risks (e.g. look both ways, do not get distracted by things such as mobile phone, do not use earphones while crossing, look where you are going, don’t cross on a blind corner).
EXPLORING TASKS
1: Evaporating solutions
L4–6 Prac WS Students analyse three or more different water samples to determine which contains the least amount of dissolved solid. Heating a known and fixed volume of each of the water samples will enable a fair comparison to be made. Water samples could be taken from ‘hard’ and ‘soft’ water areas, which should produce results as shown in figure E on Student Book spread 7Eb Solutions. Alternatively, a range of bottled mineral waters, selected from hard water (chalk or limestone) regions and soft water (peat or acid soil) regions, could be used. Or you could prepare water samples from distilled water plus different quantities of soluble salts. If you do this, keep a note of the quantities used to help you assess the accuracy of students’ findings. You may wish to carry out Explaining 1 or Explaining 2 (demonstrating how to evaporate a solution to dryness safely) before students carry this out. The AT interactive Making salt asks students to put the steps for an evaporation practical in the correct order.
Developing: Instructions are provided on Worksheet 7Ec-3.
Securing: An apparatus list and hints for students to plan their own method are provided on Worksheet 7Ec-4.
Exceeding: Students follow Worksheet 7Ec-4, but should note hazards and explain how the risks from those hazards should be minimised. They could also collate results from each group for comparison and evaluation of technique.
Be prepared• Exploring 1 uses water samples of ‘hard’ and
‘soft’ water. Samples of drinking water from hard water and soft water areas contain too small a concentration of dissolved solutes to produce a difference in masses of solids that can be measured sufficiently accurately in the lab, unless very large water samples are used. Instead, for the hard water sample, make up a solution of calcium nitrate in water at a concentration of between 10 and 20 g/dm3. A balance that weighs to an accuracy of 2 decimal places will be needed.
• Keep one sample of the salts recovered from a solution in Exploring 1 or 2 for Starter 1 in the next topic.
STARTERS
1: Recovering solids from solutionL4–5 BA
Stir a large spoonful of a soluble salt into a small beaker of water until the solid has fully dissolved. Then ask a question such as ‘How could we get the solid back out of the mixture?’ or ‘What would happen if we left the solution for a few days?’ Give students a few minutes to write an answer to the question that includes a description of what they think will happen, and to suggest an explanation for this. Take examples from around the class to help you assess what they remember from KS2 work on this.
EquipmentSmall beaker of water, soluble salt, spatula or spoon.
2: Evaporation cloud 1L4–5 BA
Write the word evaporation in the middle of the board and ask students to suggest related words and identify how they should be linked to produce a word cloud diagram. Encourage students to suggest definitions for any related terms.
The diagram could be kept until the end of the lesson and used in Plenary 4 to help students identify what they have learnt.
3: Hazards and risksL4–5 BA
Introduce the term hazard as anything that could cause harm and risk as how great the chance is that someone will be harmed by that hazard. Students work in pairs or small groups to identify the hazards in a familiar situation, such as crossing a road (e.g. getting hit by a vehicle, tripping over, walking into a
Check students’ plans before they start. Eye protection must be worn.
Course resourcesAP: Worksheets 7Ec-3; 7Ec-4.AT: Interactive Making salt.
EquipmentMeasuring cylinder, balance, labelled water samples (made up with different quantities of dissolved salts), evaporating basin, heating apparatus, eye protection, accurate weighing balance.

Mixtures and separation
18 © Pearson
7 E c
2: Making salt from rock salt
L4–6 Prac WS Students can obtain samples of pure salt from rock salt. This will provide further practice in the techniques of filtering and evaporation. You can give this practical a context by providing ‘samples’ of rock salt from different mines, and ask students to determine which would be the best ‘mine’ to use for making salt. They should be encouraged to use distilled water to avoid any salts in tap water affecting their results.
You may wish to carry out Explaining 1 or Explaining 2 (demonstrating how to evaporate a solution to dryness safely) before students carry this out.
Developing: Show students how to do the practical, and then ask them to use Worksheet 7Ec-5 to explain the process.
Securing: Students follow the instructions on Worksheet 7Ec-6 and answer the questions.
Exceeding: Ask students to work in groups to plan their own method, and to explain the reasons for each step.
notes on what to remember when drawing the symbol.
Eye protection must be worn. Do NOT heat the salt to dryness in the evaporating basin. Hot specks of salt will spit out. Stop heating when crystals are forming at the edge and let the last of the water evaporate without heating.
Course resourcesAP: Worksheets 7Ec-5; 7Ec-6.
EquipmentRock salt, or a variety of rock salt samples (see below), access to electronic top pan balance, mortar and pestle, evaporating basin, filter funnels and papers, beaker, conical flask, stirring rod, heating apparatus, eye protection.
‘Mine’ 4 1 6 3 5 2
sand (g) 975 900 850 800 750 700
salt (g) 25 100 150 200 250 300
3: Evaporation apparatus diagramsL4–5 WS
Give students Skills Sheet SC 3. Students should use the symbols to draw the apparatus diagram for the practical. They could then add any new symbols to the symbols database they began in Topic 7Ea, with drawings or images of the real apparatus and
Course resourcesAP: Skills Sheet SC 3.
EquipmentLab apparatus database program 7Ea (optional).
4: Salts in waterL5–6
The AT spreadsheet Salts in water provides details of the masses of different salts found in different samples of water. Students should use this to plot different kinds of chart to compare the different waters and to decide which kind of chart displays patterns in the data most effectively.
Course resourcesAT: Spreadsheet Salts in water.
EXPLAINING TASKS
1: 7Ec Safety when heating (Student Book)L4–6 FA WS
These pages cover working safely when using a Bunsen burner, and when heating to dryness. They introduce the concepts of hazard and risk. Worksheet 7Ec-1 is the Access Sheet. Question 5 can be used for formative assessment, with students working in groups to answer the question. See the ASP Introduction for ideas on how to run the feedback and action components for this formative assessment. This also contains mini-plenary ideas.
The AT presentation Bunsen burner safety can be used to help teach this lesson.
Course resourcesAP: Worksheet 7Ec-1.AT: Presentation Bunsen burner safety.
2: Heating to dryness demonstration
L4–6 Prac WS Demonstrate or let students practise evaporation of a solution to dryness using what they have learnt from the Student Book.
Heat some copper sulfate solution until a little remains, so that the solid can be formed as the heat stored in the watch glass or evaporating basin evaporates this remaining amount. If the solution
Mixtures and separation
© Pearson 19
7 E c
is heated beyond this point, it may spit out of the container, causing a risk of harm to skin, clothing or surfaces. If the solid is heated too long, the blue copper sulfate crystals will be changed by the heat from blue crystals to anhydrous copper sulfate, which is a white powder which can be very harmful when it starts fuming.
Course resourcesASP: 7Ec Quick Check WS.
The AT presentation Evaporation and boiling gives students the opportunity to compare boiling and evaporation. The AT video Mining rock salt describes the mining of rock salt and its processing, and also the production of sea salt in evaporation pans.
Copper sulfate is harmful when solid or in concentrated solution. Eye protection must be worn.
EquipmentEvaporating basin or watchglass, copper sulfate solution, tripod and gauze, eye protection, Bunsen burner, safety mat.
3: The heat of a Bunsen flame
L4 Prac WS Demonstrate the heat of a Bunsen burner flame by holding a fresh wooden splint horizontally in the flame for 2–3 seconds and then withdrawing it. Students should note how charred the wood is, and where it is charred. This can be repeated for different flames, and particularly with the hotter flames, at different heights in the flame. In the noisy blue (roaring) flame, when the splint is just above the top of the barrel, there may be no charring at all, while just above the pale blue cone in the flame it will probably burst into flames.
Discuss this with students and ask them to decide which is the best position and flame to use for heating something rapidly, or for just warming it.
EquipmentWooden splint, eye protection, Bunsen burner, safety mat.
4: 7Ec Evaporation (Student Book)L4–6 FA
These pages cover evaporation to recover the dissolved solids in a solution. Make sure students realise that evaporation can happen at any temperature above the freezing point of the solvent and learn to distinguish between evaporation and boiling. Worksheet 7Ec-2 is the Access Sheet. Question 7 can be used for formative assessment, with students working in groups to answer the question. See the ASP Introduction for ideas on how to run the feedback and action components for this formative assessment. This also contains mini-plenary ideas.
Course resourcesAP: Worksheet 7Ec-2.AT: Presentation Evaporation and boiling. Video Mining rock salt.
PLENARIES
Most plenaries can be used for formative assessment. Suggested assessment, feedback and action strands of formative assessment can all be modified. See the ASP for further information and ideas on formative assessment.
1: Quick Check WSL4–6 FA WS
Assessment: Students complete the 7Ec Quick Check WS sheet, which consists of a cartoon of students heating a solution to dryness. Students identify hazards and risks, and suggest how risks can be reduced.
Feedback: Students work in pairs to check one another’s answers. They agree correct answers for any that they have wrong and write a list of safety instructions for use when heating a solution to dryness.
Action: Ask students to submit their safety instructions for a list on the board. Identify any that are missing from the list on page 79 of the Student Book and remind students of these and their importance.
2: Quick CheckL4–5 FA
Assessment: Students complete the 7Ec Quick Check sheet, which consists of a set of cards containing instructions, apparatus and explanations related to preparing salt from rock salt. Students sort the cards into related groups.
Feedback: Students compare their answers with each other and their smiley faces (to indicate how easy they felt that the sheet was/how confident they feel about their answers overall). Ask the students for areas of difficulty and then explain the answers.
Mixtures and separation
20 © Pearson
7 E c
Action: If there is one persistent area of difficulty, revisit this material using a different approach from our list of ‘Approaches for learning’ (see ASP Introduction).
4: Evaporation cloud 2L4–6 FA
Assessment: Students return to their word clouds from Starter 2. Using a different colour pen, they should add or amend anything that they think is appropriate from the lesson.
Feedback: Students discuss the changes that they have made.
Action: Take a class vote on the most important new fact they have learnt from the lesson.
Course resourcesASP: 7Ec Quick Check.
Course resourcesAT: Presentation 7Ec Thinking skills.
Course resourcesAP: Worksheet 7Ec-7.
3: Thinking skillsL5–6 FA
Assessment: Consider All Possibilities: A Bunsen burner is a hazard. (Possible answers: it is hot because it is burning or has been burning recently; the hose is damaged and will leak gas; the air hole is open so the flame is very hot.)
Odd One Out: rock salt, sea salt, sodium chloride. (Possible answers: sodium chloride does not contain anything else and the others are mixtures; rock salt would not be used in cooking but the other two would.)
Consider All Possibilities: Two samples of water were evaporated: sample A left more solids behind than sample B. (Possible answers: sample A contained more dissolved solids in the same amount of water; sample A was a larger sample of water than sample B.)
Odd One Out: drying nail varnish, boiling water, disappearing rain puddle. (Possible answers: boiling water because the other two are examples of evaporation; drying nail varnish because it involves a solvent other than water.)
Plus, Minus, Interesting: Bunsen burners should only be used by fully trained professionals. (Possible answers: Plus – this would reduce the risk of harm because these people would know what to do to stay safe; Minus – many school experiments would no longer be allowed; Interesting – are there videos on the Internet of all these experiments that you could watch instead?)
Feedback: Students answer the thinking skills questions in groups, thereby feeding back their thoughts to one another through discussion. Ask students to agree on what the best answers are and write them down.
Action: Ask a spokesperson from a number of groups to read out their best answers. Identify any ideas that are missing and share them with the class, reinforcing ideas that students are having difficulties with. If there is time, students could also consider what makes a ‘good answer’.
The AT presentation 7Ec Thinking skills can be used for this activity.
EquipmentStudents’ word clouds from Starter 2.
5: Extracting saltL4–5 FA
The AT interactive The process of making salt asks students to match the description of each step of the process with the explanation of why it is carried out. This is an opportunity to revise aspects of dissolving and filtering as well as evaporation. The AT presentation Extracting salt shows two groups of students extracting salt from rock salt.
Show students all the cartoons, and ask them to note on the final cartoon which group has produced the most salt from their original sample of rock salt (Group A). Then go through the cartoons again one by one, asking what Group A did better than Group B, and why this would make a difference. This is an opportunity to revise aspects of dissolving and filtering as well as evaporation.
Course resourcesAT: Interactive The process of making salt. Presentation Extracting salt.
HOMEWORK TASKS
1: EvaporationL5–6
Worksheet 7Ec-7 contains straightforward questions on evaporation and hazards.

Mixtures and separation
© Pearson 21
7 E c
2: Gandhi and the Salt ActL5–6
Worksheet 7Ec-8 invites students to use their knowledge of evaporation of brine to answer questions about the Indian protest over salt.
Course resourcesAP: Worksheet 7Ec-8.
Course resourcesAP: Worksheet 7Ec-9.
assessment for a class of students in a science lab. Students will need hazard information about any chemicals used in the experiment.
3: Carrying out a risk assessment L7
Worksheet 7Ec-9 challenges students to use a recent experiment on evaporation to write a risk
ActiveLearnFive ActiveLearn exercises are available for this topic: Evaporation 1; Evaporation 2; Evaporation 3; Mixtures and separation; Safety when heating.
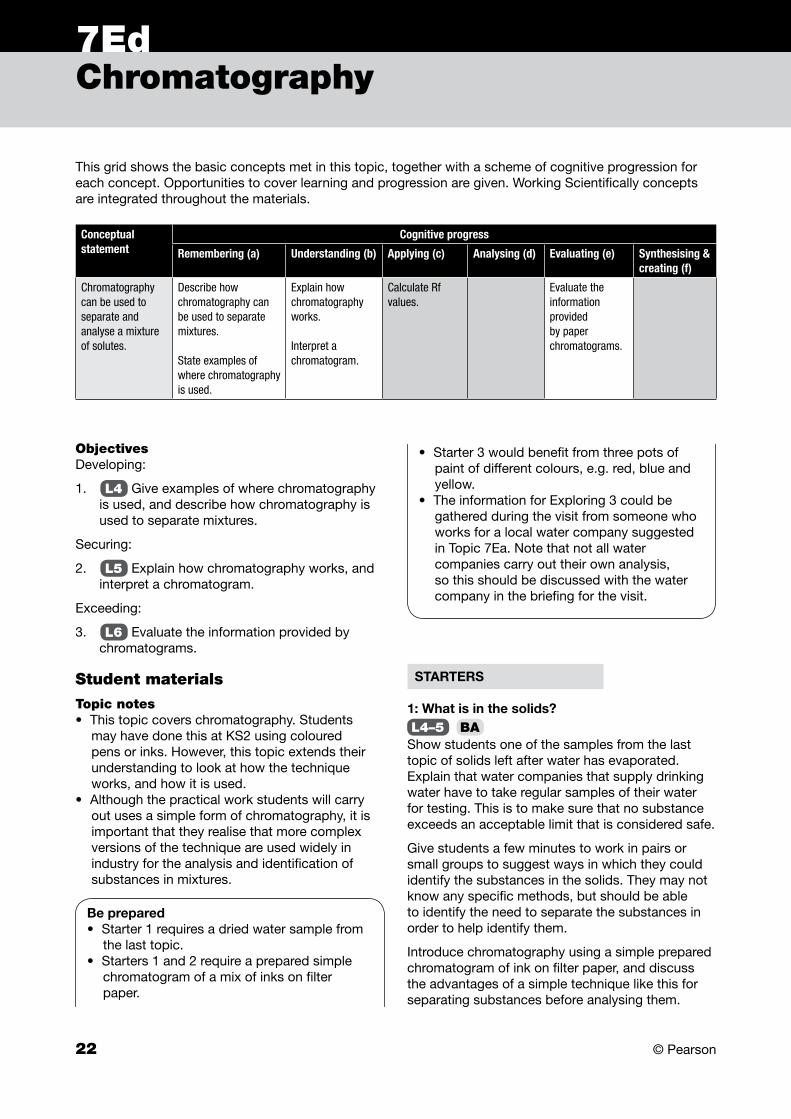
22 © Pearson
This grid shows the basic concepts met in this topic, together with a scheme of cognitive progression for each concept. Opportunities to cover learning and progression are given. Working Scientifically concepts are integrated throughout the materials.
Conceptual statement
Cognitive progress
Remembering (a) Understanding (b) Applying (c) Analysing (d) Evaluating (e) Synthesising & creating (f)
Chromatography can be used to separate and analyse a mixture of solutes.
Describe how chromatography can be used to separate mixtures. State examples of where chromatography is used.
Explain how chromatography works. Interpret a chromatogram.
Calculate Rf values.
Evaluate the information provided by paper chromatograms.
7EdChromatography
ObjectivesDeveloping:
1. L4 Give examples of where chromatography is used, and describe how chromatography is used to separate mixtures.
Securing:
2. L5 Explain how chromatography works, and interpret a chromatogram.
Exceeding:
3. L6 Evaluate the information provided by chromatograms.
Student materials
Topic notes • This topic covers chromatography. Students
may have done this at KS2 using coloured pens or inks. However, this topic extends their understanding to look at how the technique works, and how it is used.
• Although the practical work students will carry out uses a simple form of chromatography, it is important that they realise that more complex versions of the technique are used widely in industry for the analysis and identification of substances in mixtures.
STARTERS
1: What is in the solids?L4–5 BA
Show students one of the samples from the last topic of solids left after water has evaporated. Explain that water companies that supply drinking water have to take regular samples of their water for testing. This is to make sure that no substance exceeds an acceptable limit that is considered safe.
Give students a few minutes to work in pairs or small groups to suggest ways in which they could identify the substances in the solids. They may not know any specific methods, but should be able to identify the need to separate the substances in order to help identify them.
Introduce chromatography using a simple prepared chromatogram of ink on filter paper, and discuss the advantages of a simple technique like this for separating substances before analysing them.
Be prepared• Starter 1 requires a dried water sample from
the last topic. • Starters 1 and 2 require a prepared simple
chromatogram of a mix of inks on filter paper.
• Starter 3 would benefit from three pots of paint of different colours, e.g. red, blue and yellow.
• The information for Exploring 3 could be gathered during the visit from someone who works for a local water company suggested in Topic 7Ea. Note that not all water companies carry out their own analysis, so this should be discussed with the water company in the briefing for the visit.
Mixtures and separation
© Pearson 23
7 E d
2: Chromatography introduction
L4–5 BA Prac WS Demonstrate chromatography to the whole class using a dark-coloured water-based ink that includes a range of different colours. If time is short, you may wish to have a ready-prepared chromatogram made from the same ink, so that you do not have to wait too long for the water to travel up the paper. Ask students to predict what will happen as the water travels up the paper, and to explain the results.
Some students may have used chromatography at KS2 to investigate the mix of colours in ink or in the dye used to colour some kinds of sweets, so this starter is a good way of finding out what they already know.
7EdChromatography EXPLORING TASKS
1: A chromatography method
L4–5 Lit Prac WS If you have not carried out Starter 2, quickly demonstrate the setting up of a simple chromatography experiment with one sample using the second method on Skills Sheet UE 6. Students then work in pairs or small groups to write a method for an experiment using several samples at the same time. Students could start by answering the questions on Worksheet 7Ed-2. This will help them remember key points that they need to include in their method. Remind students of what they learnt in Topic 7Eb about how to write a good method.
Developing: The AT interactive A chromatography method contains the steps for a method that students can arrange into the correct order. The methods could be exchanged with another group for testing in Exploring 2, or compared with the methods used in Skills Sheet UE 6, to identify instructions that need to be improved. An AT link allows the labels to be turned on and off on diagram D on Student Book spread 7Ed Chromatography.
EquipmentDried water sample from Topic 7Ec, simple chromatogram of water-soluble ink on filter paper.
EquipmentMix of coloured ink, chromatography paper or filter paper, beaker of water, support for paper, pipette or pre-prepared chromatogram made from a mix of coloured inks.
3: Colour mixtures L4 BA
Show students three pots of paint – red, yellow and blue – or tell them that you are about to paint something and have only those three colours. Ask what you should do if you want to paint something orange, purple or green.
Follow this up by asking students to discuss how the police can identify the make (and sometimes model) of a car from a scraping of paint left at a crime scene, or the type of pen used to write a letter or sign a fraudulent cheque. Give students 5 minutes to discuss the questions in groups, and then ask them to report back. If necessary, elicit the idea that many colours are made from mixtures of other colours, and could be identified if the component colours could be separated.
EquipmentOptional pots of paint in red, yellow and blue.
Course resourcesAP: Skills Sheet UE 6. Worksheet 7Ed-2. AT: Interactive A chromatography method. Labels on/off Paper chromatography of six different inks.
2: Chromatography analysis
L4–6 Prac WS This practical uses the second method described on Skills Sheet UE 6, for comparing several samples using chromatography. Students use either a method written in Exploring 1, to test its effectiveness, or the method given on the Skills Sheet. Suitable substances for analysis are water soluble and include:
• a range of water-soluble felt-tip pens of different colours
• a range of water-soluble black felt-tip pens of different makes – these should be tested beforehand to check that they separate into different colours (this activity could be presented in the context of forensic analysis, e.g. to identify the pen that wrote an incriminating letter related to a crime)
• colours from the hard sugar coating of coloured sweets.
• food colours.
Mixtures and separation
24 © Pearson
7 E d
From their chromatograms, students should identify how many colours each initial sample contained. They should also identify any similarities or differences between the results and draw a conclusion about how different colours are created.
The AT interactive Chromatography analysis asks students to analyse a chromatogram to identify a suspect in a crime. The AT presentation Analysing a chromatogram can also help with the delivery of this lesson.
Exceeding: Using the information on the worksheet as a starting point, students should compare the two methods and evaluate their usefulness for different kinds of analysis.
Students should not eat any foods used in this practical.
3: Drinking water analysis L4–6 WS
Students carry out research into the substances that a water company tests for in the drinking water they supply and the reasons why these substances are tested for. This can be done either from data tables given on a water company website, or by asking someone from the local water company to visit and answer questions about water supply. In preparation, students could use the Know, Want to know, Learned approach (see Introduction) for deciding on which information they need to gather. Skills Sheets TS 5 and TS 6 can help with this.
Course resourcesAP: Skills Sheet UE 6.AT: Interactive Chromatography analysis. Presentation Analysing a chromatogram.
EquipmentFilter paper or chromatography paper, substances for analysis (see above).
4: Different kinds of chromatographyL4–6
Worksheet 7Ed-3 provides some information about gas–liquid chromatography and thin-layer chromatography. Additional information can be found on the Internet.
Developing: Students work in pairs or small groups and use the text and diagrams on the worksheet to prepare a poster about one of the methods described.
Securing: Students should use information on the worksheet, and from their own research, to prepare a poster on one of the methods described.
EXPLAINING TASKS
1: Chromatography using other solvents
L5 Prac WS Demonstrate that a chromatogram can be made from non-water-soluble substances by using a solvent in which the substances do dissolve. Possible examples include:
• separating the colours in biro ink or a ‘permanent’ marker pen using ethanol or methylated spirits
• separating chlorophylls and other coloured substances found in leaves using propanone (details can be found on the Nuffield Foundation Practical Chemistry website)
• other examples, such as separating the colours in lipsticks using a mixture of acetone and surgical spirit (ethanol and isopropyl alcohol), are described on the Internet, but may take two days to complete.
While carrying out the demonstration, you could challenge students to suggest situations where this analysis could be useful (e.g. in a forensic examination).
Ethanol is highly flammable. Methylated spirits are highly flammable and harmful. Propanone is highly flammable and an irritant.
EquipmentEither biro/permanent marker pen and ethanol/methylated spirits or leaves, mortar and pestle, propanone.
2: 7Ed Chromatography (Student Book)L4–6 FA
This spread describes chromatography as a technique for separating substances. Worksheet 7Ed-1 is the Access Sheet.
Question 9 can be used for formative assessment, with students working in groups to answer the
Course resourcesAP: Worksheet 7Ed-3.
EquipmentOptional: Internet access.
Course resourcesAP: Skills Sheets TS 5; TS 6.
EquipmentOptional: Internet access.
Mixtures and separation
© Pearson 25
7 E d
question. See the ASP Introduction for ideas on how to run the feedback and action components for this formative assessment. This also contains mini-plenary ideas.
The AT animation Paper chromatography shows the procedure for producing a chromatogram.
Course resourcesAT: Presentation Improving a method.
Course resourcesASP: 7Ed Quick Check.
1 – I am guessing completely and I have no idea whether my response is correct.
2 – I am guessing but I might be correct.3 – I am fairly confident that my response is
correct.4 – I am confident that my response is correct.5 – I am certain that my response is correct.
Ask the students for areas of difficulty and then explain the answers.
Action: If there is one persistent area of difficulty, encourage students to write their own statements for improvement. Encourage students to follow up on their ideas. Alternatively, revisit this material using a different approach from our list of ‘Approaches for learning’ (see ASP Introduction).
Course resourcesAP: Worksheet 7Ed-1.AT: Animation Paper chromatography.
3: Improving a methodL4–6 Lit WS
The AT presentation Improving a method includes a summary screen of how to write a good method, followed by a method for a chromatography experiment that has some obvious weaknesses. Students should make notes on what should be changed to improve the method.
Prompt students to find the weaknesses by asking questions such as:
• Do any of the steps contain more than one instruction?
• Are any of the steps in the wrong order?• Has any step been missed out?• Could any step be written more clearly?
The following screens present each step of the method, one at a time. Ask students to identify the faults and suggest corrections. Type in the corrections, making sure that students understand why each correction is a good one to make.
PLENARIES
Most plenaries can be used for formative assessment. Suggested assessment, feedback and action strands of formative assessment can all be modified. See the ASP for further information and ideas on formative assessment.
1: Quick CheckL4–5 FA
Assessment: Students complete the Quick Check sheet for this topic, which consists of some statements about paper chromatography that need correcting.
Feedback: Students use a Confidence of Response Index score to say how confident they are about their answers and understanding, such as:
2: Thinking skillsL4–6 FA
Assessment: Consider All Possibilities: A chromatogram shows only one colour. (Possible answers: there was only one substance in the solution; the chromatogram has not been run long enough to separate the substances in the mixture,; the substances in the mixture are not soluble in the solvent used.)
What Was The Question: paper chromatography. (Possible questions: which simple method could you use to separate different colours of ink in an ink mixture? Which chromatography method shows what was in the mixture but not how much of each substance was present?)
Plus, Minus, Interesting: All students should be tested for drugs using chromatography before taking part in sport. (Possible answers: Plus – this could identify cheats; Minus – testing every student would be very expensive and time-consuming; Interesting – can all drugs that affect sports performance be identified using school science apparatus? Some medical drugs, such as some cold and flu remedies, contain drugs that affect sporting performance.)
Odd One Out: evaporation, chromatography, filtration. (Possible answers: chromatography because it separates dissolved substances; filtration because it starts with a mixture containing an undissolved (insoluble) solid.)
Feedback: Students answer the thinking skills questions in groups, thereby feeding back their thoughts to one another through discussion. Ask
Mixtures and separation
26 © Pearson
7 E d
students to agree on what the best answers are and write them down.
Action: Ask a spokesperson from a number of groups to read out their best answers. Identify any ideas that are missing and share them with the class, reinforcing ideas that students are having difficulties with. If there is time, students could also consider what makes a ‘good answer’.
The AT presentation 7Ed Thinking skills can be used for this activity.
HOMEWORK TASKS
1: Chromatography questionsL4
Worksheet 7Ed-4 contains straightforward questions on the apparatus used in chromatography and the interpretation of a chromatogram.
Course resourcesAT: Presentation 7Ed Thinking skills.
Course resourcesAP: Worksheet 7Ed-4.
Course resourcesAP: Worksheet 7Ed-5.
Course resourcesAP: Skills Sheet SC 2. Worksheet 7Ed-6.
3: Chromatography jigsawL4–6 FA
Assessment: Divide the class into four groups and give each group one of the following questions:
• What is chromatography?• What can chromatography be used for?• What happens during chromatography?• What information can we get from a
chromatogram?
Give students a few minutes to write two sentences in answer to their question.
Feedback: Students should select the best two sentences within their group to answer the question.
Action: Ask each group in turn to give their sentences, and ask other groups to comment on the responses. (Note there will be overlap between answers from different groups, but this should aid discussion.)
2: Forensic chromatographyL5
Worksheet 7Ed-5 invites students to use their knowledge of chromatography to interpret the results from a forensic investigation.
3: Gas chromatography in water analysisL5–6
Worksheet 7Ed-6 challenges students to interpret a graph and answer questions on the use of chromatography for analysing drinking water samples. Note that ‘milligrams’, ‘nanograms’ and ‘cubic decimetres’ are all mentioned on this sheet. These will not be familiar to students from maths. Although help for using these units is given on the sheet, some practice conversions between units and a look at Skills Sheet SC 2 may be useful.
ActiveLearnFour ActiveLearn exercises are available for this topic: Chromatography 1; Chromatography 2; Chromatography 3; Chromatography extended answer.
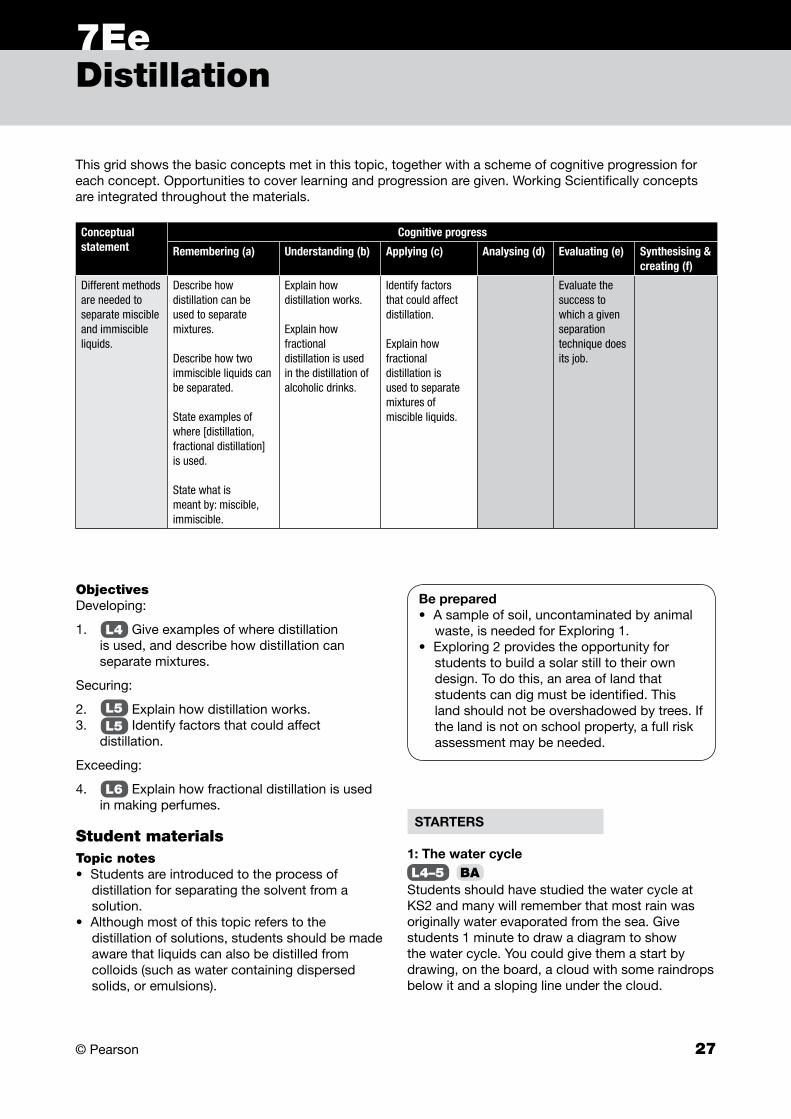
© Pearson 27
This grid shows the basic concepts met in this topic, together with a scheme of cognitive progression for each concept. Opportunities to cover learning and progression are given. Working Scientifically concepts are integrated throughout the materials.
Conceptual statement
Cognitive progress
Remembering (a) Understanding (b) Applying (c) Analysing (d) Evaluating (e) Synthesising & creating (f)
Different methods are needed to separate miscible and immiscible liquids.
Describe how distillation can be used to separate mixtures.
Describe how two immiscible liquids can be separated.
State examples of where [distillation, fractional distillation] is used.
State what is meant by: miscible, immiscible.
Explain how distillation works.
Explain how fractional distillation is used in the distillation of alcoholic drinks.
Identify factors that could affect distillation.
Explain how fractional distillation is used to separate mixtures of miscible liquids.
Evaluate the success to which a given separation technique does its job.
7EeDistillation
ObjectivesDeveloping:
1. L4 Give examples of where distillation is used, and describe how distillation can separate mixtures.
Securing:
2. L5 Explain how distillation works. 3. L5 Identify factors that could affect
distillation.
Exceeding:
4. L6 Explain how fractional distillation is used in making perfumes.
Student materialsTopic notes • Students are introduced to the process of
distillation for separating the solvent from a solution.
• Although most of this topic refers to the distillation of solutions, students should be made aware that liquids can also be distilled from colloids (such as water containing dispersed solids, or emulsions).
STARTERS
1: The water cycleL4–5 BA
Students should have studied the water cycle at KS2 and many will remember that most rain was originally water evaporated from the sea. Give students 1 minute to draw a diagram to show the water cycle. You could give them a start by drawing, on the board, a cloud with some raindrops below it and a sloping line under the cloud.
Be prepared• A sample of soil, uncontaminated by animal
waste, is needed for Exploring 1.• Exploring 2 provides the opportunity for
students to build a solar still to their own design. To do this, an area of land that students can dig must be identified. This land should not be overshadowed by trees. If the land is not on school property, a full risk assessment may be needed.

Mixtures and separation
28 © Pearson
7 E e
Then ask students to share their ideas about the water cycle in groups and explain why rain is not salty. Ask one student from each group to give their answer to the rest of the class.
The AT animation State changes does not include any references to particles and is to consolidate KS2 knowledge.
used to consolidate learning and as an opportunity for students to apply their understanding. Ask students to reflect on the cartoon individually before sharing their ideas in small group discussion. Class feedback could involve a vote on alternative answers and students could be asked to justify their responses. There should be an opportunity for students to change their ideas and to reflect on this.
Possible answers include: less/more salt reaches the water because the rocks it flows through are less/more salty; the Dead Sea is in a hotter area and so the water evaporates faster and salt is left behind; fresh water from melting polar ice reduces the average salinity of the Atlantic Ocean.
Course resourcesAT: Animation State changes.
2: Distillation ideas
L4–6 BA Prac WS Start by asking students to think about evaporating a solution and what is left in the basin, and what they would need to do if it was the water from the solution they wanted to keep, rather than the solute. Put students into groups and pose questions for them to discuss in their groups before having a class feedback session.
Developing: Show students the apparatus needed for simple distillation and ask them to suggest how it works, including any safety precautions they should take.
Securing: Ask students to work out how to obtain water from a solution without showing them the apparatus first. They should describe the kind of apparatus they would need and how to use it.
Exceeding: As for Securing, but have a further discussion session to see if students can work out what might happen if a mixture of two liquids with different boiling points was heated.
EquipmentLiebig condenser, flask or side-arm test tube, thermometer, beaker, Bunsen burner, tripod, gauze, heat-resistant mat.
3: Why is there a difference?L4–5 BA
Tell students that the saltiness of the Dead Sea (between Israel, Jordan and Palestine) is almost 10 times greater than the saltiness of the Atlantic Ocean. (If an atlas or globe is available, show students the position of the Dead Sea and Atlantic Ocean.) Students should work in pairs or small groups to suggest as many reasons for this difference as they can. This should provide an opportunity to revise various aspects of what they have learnt so far. The AT interactive Concept cartoon: Fresh water from the sea? shows a cartoon where speech balloons are shown discussing how to get fresh water from sea water, which could aid students’ discussions. The concept cartoon can be
Course resourcesAT: Interactive Concept cartoon: Fresh water from the sea?
EquipmentMaps showing the position of the Dead Sea and Atlantic Ocean. Optional: globe of the world.
EXPLORING TASKS
1: Distilling dirty water
L4–6 Prac WS Students distil ‘dirty’ water using side-arm test tubes. The water should be prepared safely before the lesson by mixing soil from a site that is not contaminated with animal waste or other pollutants.
Ensure that the tube or flask is not allowed to boil dry. (If boiling tubes with delivery tubes are used, bungs with two holes will be needed so that a thermometer can be used.) Students should be instructed to heat the dirty water gently to avoid it bubbling over into the delivery tube. Note that, if the apparatus has been used for distilling dirty water by earlier classes, the water produced may not be clear if earlier users have allowed the water to boil over.
Eye protection should be worn. Do not fill the boiling tube more than one-third full. Students should wash their hands thoroughly if they touch the water.
EquipmentSide-arm test tubes or boiling tubes with delivery tubes, heating apparatus, heat-resistant mat, ‘dirty’ water made by mixing tap water with uncontaminated soil, anti-bumping granules, thermometer already fitted to bung (to fit test tubes), collecting beaker, eye protection.
Mixtures and separation
© Pearson 29
7 E e
2: Designing a survival still
L4–6 Prac WS In this group activity, students use a range of information to improve the design of a simple solar still. Worksheet 7Ee-2 supports this activity. Divide students into groups of five and ask them to number each member of the group from 1 to 5. Give each group a copy of the top section of the worksheet, to introduce the activity. Then ask students with the same number to form groups. Give each numbered group the appropriately numbered statement from the worksheet. Allow a few minutes for the numbered groups to discuss how their statement could be used to change the design of the still, and what effect this might have.
Students then return to their original groups and bring together what they have learnt in their numbered groups to design a new solar still that they think will be as efficient as possible. If there is time, they could then build and test their stills, comparing them with those of other groups to see which is the most effective.
Course resourcesAP: Skills Sheet RC 3. Worksheet 7Ee-3.
Course resourcesAP: Skills Sheet SC 3.AT: Labels on/off A basin solar still.
EquipmentApparatus database started in Topic 7Ea. Optional: distillation apparatus set up as on Student Book spread 7Ee Distillation.
4: Providing safe drinking waterL4–6 WS
Worksheet 7Ee-3 outlines a range of problems that affect the provision of safe drinking water both now and in the future, in the UK and across the world. This research activity could be run as a ‘jigsaw’ in which each group of students chooses one of the problem areas given in the worksheet, and then carries out research to find out how the problem is being tackled and what else could be done. They should focus particularly on using what they have learnt in this unit about water treatment to suggest solutions to the problems. This provides an opportunity for students to develop their note-making skills, as described in Skills Sheet RC 3.
The information could then be used in an ‘Ask the expert’ session. Each group selects a spokesperson to answer questions posed by students from other groups.
At the end of the question session, the class could select and vote on the three most urgent problems in the provision of safe drinking water, and then draw up an action plan of how those problems could be tacked.
Alternatively, the information from research could support the debate described in the Explaining 3 activity below.
Water collected in the container should not be tasted.
EquipmentIf stills are to be built: spade, black or clear plastic sheet, clean container to capture water, large stones. Other materials may be suggested by students.
3: Distillation apparatusL4–5 WS
Using apparatus correctly set up for the distillation of dirty water and Skills Sheet SC 3 as references, students should draw an apparatus diagram for distillation. They should exchange their completed diagram with another student, and identify any weaknesses in the diagram they have received. They should then return the diagram to the student who drew it, and consider how they could improve their own diagram to tackle any weaknesses indicated.
Any apparatus symbols that they have not previously come across could be added to the symbol database that they started in Topic 7Ea.
An AT link allows you to turn the labels on and off on diagram D.
EXPLAINING TASKS
1: 7Ee Distillation (Student Book) L3–6 FA
These pages introduce desalination as a way to remove salts from salt water to make it suitable for drinking, and describe distillation as one method of desalination. When discussing photo B, students may need to be told that 800 million is equivalent to 800 000 000. Worksheet 7Ee-1 is the Access Sheet.

Mixtures and separation
30 © Pearson
7 E e
Question 9 can be used for formative assessment, with students working in groups to answer the question. See the ASP Introduction for ideas on how to run the feedback and action components for this formative assessment. This also contains mini-plenary ideas. For help with this activity, an AT link allows you to turn the labels on and off on
diagram C.
PLENARIES
Most plenaries can be used for formative assessment. Suggested assessment, feedback and action strands of formative assessment can all be modified. See the ASP for further information and ideas on formative assessment.
1: Quick Check L4–5 FA
Assessment: Students complete the Quick Check sheet for this topic, which consists of cards that can be sorted to identify the correct description of the techniques covered in this unit.
Feedback: Students compare their answers with one another and identify those that differ. Students then discuss these answers and try to work out why there are differences, agreeing on a correct answer (which they can check with the teacher if necessary). If agreement cannot be reached it is a sign that misconceptions have arisen and the learning strategy may need modification.
Action: Using Skills Sheet TS 9, students fill in the last column: ‘What else I might try so that I can learn or understand’. Students should then be encouraged to follow up on their ideas.
Course resourcesAP: Worksheet 7Ee-1.AT: Labels on/off Equipment used in a distillation experiment.
Course resourcesAP: Skills Sheet TS 9.ASP: 7Ee Quick Check.
2: 7Ee Safe drinking water (Student Book)L4–6 FA
This page looks at some of the problems of providing safe drinking water for a growing human population and as climate changes.
Question 3 can be used for formative assessment, with students working on their own individual answers before exchanging papers and asking their peers to point out two good features of their work and one area that could be improved. See the ASP Introduction for ideas on how to run the action component for this formative assessment.
3: Safe water for everyone – the debateL4–6 WS
There is an opportunity for a debate on Student Book spread 7Ee Safe drinking water. Students should consider the different causes of problems with providing safe drinking water, including issues of cost, appropriateness to need and problems that might occur for each of the methods suggested.
Refer to Skills Sheet RC 5 for ideas on how to run a debate. Skills Sheet RC 3 may be useful for students to refer to if they are going to consult secondary resources as part of their preparation for the debate.
Course resourcesAP: Skills Sheets RC 3; RC 5.
4: Liebig condenser
L4–6 Prac WS Demonstrate the distillation of dirty (or inky) water, using a Liebig condenser. Heat the flask gently whilst the mixture boils. Point out the reading on the thermometer, condensation inside the condenser and collection of the pure water. Discuss with students the reason why the water in the cooling jacket goes in at the bottom.
Eye protection should be worn.
EquipmentLong neck, side-arm round-bottomed flask, Liebig condenser, water supply, anti-bumping granules, thermometer already fitted to bung, Bunsen burner, ink/water mixture, heatproof mat, eye protection.
2: Thinking skillsL4–6 FA
Assessment: What Was The Question: distillation. (Possible questions: How could you get drinking water from sea water? Which separation process involves condensing a gas?)
Plus, Minus, Interesting: We should get all our drinking water by distilling sea water. (Possible

Mixtures and separation
© Pearson 31
7 E e
answers: Plus – there should never be a problem of running out of water; Minus – places not by the sea would have to transport the sea water somehow; Interesting – would this affect marine environments? Thames Water has built a desalination plant in the Thames.)
Odd One Out: distillation, chromatography, heating to dryness. (Possible answers: chromatography can separate out each of the solid substances, not just one substance; chromatography does not require warmth.)
Feedback: Students answer the thinking skills questions in groups, thereby feeding back their thoughts to one another through discussion. Ask students to agree on what the best answers are and write them down.
Action: Ask a spokesperson from a number of groups to read out their best answers. Identify any ideas that are missing and share them with the class, reinforcing ideas that students are having difficulties with. If there is time, students could also consider what makes a ‘good answer’.
The AT presentation 7Ee Thinking skills can be used for this activity.
Course resourcesASP: 7E Progression Check.
Course resourcesASP: 7E Quick Quiz; 7E Quick Quiz Answer Sheet.
Course resourcesASP: 7E Assess Yourself!; 7E Open-ended Assessment Task.
Course resourcesAT: Presentation 7Ee Thinking skills.
Course resourcesASP: 7E End of Unit Test; 7E Mark Scheme; 7E Summary Sheets.
Course resourcesAT: Interactive Separation summary.
Course resourcesAT: Interactive Separating mixtures.
Feedback: Encourage students to identify for themselves areas where their understanding is still weak.
Action: Discuss with students how they are going to remedy any weaknesses.
3: Explaining separation techniquesL4–6 FA
The AT interactive Separation summary provides a table for students to complete to summarise the four different separation methods covered in this unit.
4: Separating mixturesThe AT interactive Separating mixtures asks students to match scientific words for mixtures and how to separate them with their meanings.
5: Quick Quiz revisitedL3–5 FA
Assessment: Revisit the 7E Quick Quiz to test students’ knowledge of the content of this unit. Students could fill in their answers on the 7E Quick Quiz Answer Sheet.
6: End of Unit TestL4–6 SA
Use the End of Unit Test. A Mark Scheme is given in the ASP. Encourage students to identify areas that are still weak and to formulate plans to strengthen those areas. Summary Sheets are provided to help students with revision.
7: Progression CheckL3–6 SA
Students should circle the stars next to each statement on the Progression Check to record what they feel they know, and how certain they are of it. Encourage students to plan how to do further work on the things about which they remain unsure.
8: Open-ended Assessment TaskL4–6 SA
Assessment: Students complete the 7E Open-ended Assessment Task, which challenges students to prepare labelled diagrams that explain the different ways that water can be purified and analysed to make sure it is safe for drinking. The instructions for the task are on the 7E Assess Yourself! sheet.
You can assess this activity by using the Open-ended Assessment Task sheet or students can level their own performance by using the Assess Yourself! sheet (see the ASP).

Mixtures and separation
32 © Pearson
7 E e
HOMEWORK TASKS
1: A solar still L4–5
Worksheet 7Ee-4 contains straightforward questions on how a solar still works.
3: Distilling scents for perfumesL5–6
Worksheet 7Ee-6 challenges students to use their knowledge of solvents and distillation to answer questions on the production of plant oils for the perfume industry.
Course resourcesAP: Worksheet 7Ee-4.
Course resourcesAP: Worksheet 7Ee-6.
Course resourcesAP: Worksheet 7Ee-5.
2: How a solar still worksL4–6
Worksheet 7Ee-5 invites students to use their knowledge of distillation to explain how a solar still works and how a simple design could be improved to produce more clean water.
ActiveLearnThree ActiveLearn exercises are available for this topic: Distillation 1; Distillation 2; Distillation 3.