MCE Society's Abeda Inamdar Senior College of Arts Science ...
46
MCE Society’s Abeda Inamdar Senior College of Arts Science and Commerce Animation Department PG Diploma in 3D Animation
-
Upload
khangminh22 -
Category
Documents
-
view
3 -
download
0
Transcript of MCE Society's Abeda Inamdar Senior College of Arts Science ...

MCE Society’s
Abeda Inamdar Senior College of Arts Science and Commerce
Animation Department
PG Diploma in 3D Animation

PG Diploma in 3D Animation
2021-22 (CBCS – Autonomy 21 Pattern)
Course/ Paper Title Advance Poly Engineering and Sculpting
Course Code 21AUPD3D101
Semester 1
No. of Credits 4
Aims & Objectives of the Course
Sr.
No.
Objectives
1. To introduce the fundamentals of visual design.
2. To develop the understanding of core concepts of modeling
techniques.
3. Understanding the observation-based approach for creating realism.
4. Creating photorealistic outputs using various renderers.
5. Understanding the body dynamics & principles of animation.
Expected Course Specific Learning Outcomes
Sr.
No.
Learning Outcome
1. Explore the various techniques & concepts of
animation.
2. Develop & create effective 3D art with visualization & concept.
Syllabus:
M. C. E. Society’s
Abeda Inamdar Senior College
Of Arts, Science and Commerce, Camp, Pune-1
(Autonomous) Affiliated to Savitribai Phule Pune University
NAAC accredited ‘A’ Grade

Unit No. Title with Contents No. of
Lectures
Unit I. Installation upgrading & activation 3
1. System Requirements
2. Installation and Activation
3. Upgrading
4. Auto Update, Auto Update in Action
5. Un-installation
6. Support Registration
7. Backward Compatibility of ZBrush Files
1
1
1
Unit II. Thumbnail 3
1. How Thumbnail Works
2. Thumbnail Functions
3. Thumbnail
4. Silhouette Mode
5. Size Slider
6. Magnify Slider
7. Export Thumbnail
8. Import
9. Background
10. Thumbnail Hotkeys
11. Thumbnail Magnify
12. Import Thumbnail Background Image
13. Move/Pan Thumbnail Background Image
14. Scale Thumbnail Background Image
15. Assign Document Snapshot to Thumbnail
Background
1
1
1
Unit III. Camview 3
1. How CamView Works
2. CamView Functions
1

3. CamView On
4. Next
5. Size
6. Make CamView
7. Selecting & Storing CamView Defaults
8. Creating a Custom CamView
1
1
Unit IV. Draw draft analysis 4
1. How Draw Draft Analysis Works
2. Draw Draft Analysis Functions
3. Draft Angle
4. SetDir
5. InvDir
6. Draw Draft Analysis in Action
2
2
Unit V. Polypaint from thickness 2
1. How PolyPaint From Thickness Works
2. From Thickness Functions
3. Quality Slider
4. Max Range Slider
5. Min Range Slider
6. Preferences Analysis (PolyPaint Color
Spectrum)
7. How Color Analysis S - C5 Slots are
Calculated
8. Polypaint From Thickness in Action
2
2
Unit VI. Polypaint from draft 2
1. How PolyPaint From Draft Works
2. PolyPaint From Draft Functions
3. Draft Angle
4. SetDirInvDir
1
1
Unit VII. Mask by draft 4

1. How Draw Draft Masking Works
2. Mask by Draft Functions
3. Draft Angle
4. SetDir
5. InvDir
2
2
Unit VIII. Adjust colors 3
1. How Adjust Colors with PolyPaint Works
2. How Adjust Colors with UV Texture Works
3. Adjust Colors in Action
4. Adjust Colors Functions
5. Hide Colors
6. Hide Materials
7. Tolerance Slider
8. Hide Mask
9. Inverse Mask
10. Blur Mask
11. Overwrite
12. Mask
13. Unmask
1
1
1
Unit IX. Mask by polypaint 3
1. How Mask by PolyPaint Works
2. Mask by PolyPaint Functions
3. Hide Colors
4. Hide Materials
5. Hide Mask
6. Inverse Mask
7. Blur Mask
8. Overwrite
9. Mask
10. Unmask
1
1
1

Unit X. Sculpt & paint morph uv 3
1. How Sculpting & Painting to Morph UV
Works
2. Morph UV Functions
3. Morph UV
4. Bump Slider
1
1
1
Unit XI. Deco curve brushes 2
1. How from Brush Works
2. Strokes functions with From Brush
3. Freehand Stroke
4. DragRect Stroke
5. Dots Stroke
6. DragDot Stroke
7. DragDot Stroke
8. Spray Strokes
1
1
Unit XI1. HATCH BRUSHES 6
1. Hatch Brushes & How They Work
(i) Hatch Brush
(ii) HatchBackTrack Brush
6
Unit XIII. HISTORY RECALL BRUSH 2
1. How HistoryRecall Works
2. History Recall Brush in Action
1
1
Unit XIV. MOVE INFINITE DEPTH BRUSH 4
1. Move Infinite Depth Brush in Action
2. Move Infinite Depth Brush with Surface
Curvature
2
2
Unit XV. NO BACK & FORTH MODE 4

1. How No Back & Forth Mode Works
2. No Back & Forth in Action
2
2
Unit XVI. PROJECT UNDO HISTORY 2
1. How Project Undo History Works
2. Project Undo History in Action
3. Project History/Project All Functions
(i) Geometry
(ii) Color
(iii) Farthest
1
1
Unit XVII. XTRACTOR BRUSHES 5
1. XTractor Brush Types & How They Works
(i) From Brush
(ii) XTractor Brush
(iii) XTractor DragDot Brush
(iv) XTractor DragRect Brush
2. Xtractor Brush in Action
3. XtractorDot Brush in Action
4. XtractorDragRect Brush in Action
1
1
1
Unit VIII. FADE OPACITY 5
1. Fade opacity in action
2. Fade opacity Functions
(i) Fade Opacity Slider
(ii) Fade Color
2
3
References:
1. ZBrush 2020 What’s New Guide by Pixologic,Pixologic

PG Diploma in 3D Animation
2021-22 (CBCS – Autonomy 21 Pattern)
Course/ Paper Title Poly Painting Techniques
Course Code 21AUPD3D102
Semester 1
No. of Credits 4
Aims & Objectives of the Course
Sr.
No.
Objectives
1. To introduce the fundamentals of visual design.
2. To develop the understanding of core concepts of modeling
techniques.
3. Understanding the observation-based approach for creating realism.
4. Creating photorealistic outputs using various renderers.
5. Understanding the body dynamics & principles of animation.
Expected Course Specific Learning Outcomes
Sr.
No.
Learning Outcome
1. Explore the various techniques & concepts of
animation.
2. Develop & create effective 3D art with visualization & concept.
M. C. E. Society’s
Abeda Inamdar Senior College
Of Arts, Science and Commerce, Camp, Pune-1
(Autonomous) Affiliated to Savitribai Phule Pune University
NAAC accredited ‘A’ Grade

Syllabus
Unit No. Title with Contents No. of
Lectures
Unit I. Texturing Workflow 4
1. Game Texturing Pipeline
2. Useful Tips for Texture Artists
3. What Is UV Mapping?
4. Types of Textures
1
1
1
1
Unit II. Texturing Games vs. Texturing Movies 3
1. Texture Pipeline for Movies
2. Texture Pipeline for Games
3. Common Pipelines and Similarities for
Games and Film
1
1
1
Unit III. PBR Texturing vs. Traditional Texturing 4
1. Texturing Using 3D Painting Applications.
2. Texturing Using 2D Painting Applications.
3. PBR Textures in the Gaming Industry
1
1
2
Unit IV. Substance Suite and Substance Painter 4
1. Why Substance?
2. Uses of Other Substance Suite Applications
(i) Substance Source
(ii) Substance Alchemist
(iii) Substance Designer
2
2

Unit V. Hardware Specifications for Your Computer 4
1. GPU vs. CPU
2. Recommended Hardwar
2
2
Unit VI. Painters’ Graphical User Interface 6
1. The UI and Tools
2. Guide to the Shelf
3
3
Unit VII. Viewport Navigation in Painter 4
1. Keyboard Shortcuts
2. Guide to Commonly Used Tools
2
2
Unit VIII. Setting Up a Project 4
1. Getting Started with Substance Painter
2. Project Configuration in Detail
2
2
Unit IX. Baking and the Importance of Mesh Maps 4
1. Introduction to the Baker
2. Uses of Mesh Maps
2
2
Unit X. Working with Materials, Layers, and Masks 3
1. Materials and Smart Materials
2. Layers and Masks
3. Layer Operations
4. Masks
5. Smart Masks
6. Mask Operations
1
1
1
Unit XI. Working with Procedural Maps 5
1. Filters
(i) Applying a Filter
(ii) Commonly Used Filters
2. Generators
(i) Dirt Generator
(ii) Metal Edge Wear Generator
(iii) Dripping Rust Generator
1
2

(iv) Auto Stitcher
(v) Legacy and Mask Editor
3. Uses of Grunges and Other Procedural Maps
(i) Using Patterns as Height
(ii) Patterns as Masks
(iii) Procedural Images as Maps
2
Unit XII. Substance Anchors 2
1. What Is an Anchor?
2. Using Anchor Points in a Practical Way
1
1
Unit XIII. Rendering with Iray 4
1. Launching the Renderer
2. Renderer Settings
2
2
Unit XIV. Integrating with Blender, Maya, and Marmoset 6
1. Low Poly and High Poly Workflow
2. Blender to Substance Workflow
3. Maya to Substance Painter Workflow
4. Importing into Blender, Maya, and Marmoset
(i) Exporting from Substance for Use in Blender
(ii) Exporting from Substance for Use in Maya
(iii) Exporting from Substance for Use in
Marmoset Toolbag.
1
1
1
3
Unit XV. Rendering a Portfolio 1
1. Integration with Blender
2. Integration with Maya
3. Integration with Marmoset Tool bag
1
Unit XVI. Integration with Unreal Engine 4 2
1. Exporting to Unreal Engine 4
2. Importing into Unreal Engine 4
1
1
Unit XVII. Tips and Tricks of Substance Painter 1
1. Using Brushes and Alphas 1

2. Creating Stitches
3. Creating Damage Using the Height Channel
References:
1. Beginning PBR Texturing, Abhishek Kumar, Apress Publications

PG Diploma in 3D Animation
2021-22 (CBCS – Autonomy 21 Pattern)
Course/ Paper Title Digital Lighting and Rendering
Course Code 21AUPD3D103
Semester 1
No. of Credits 4
Aims & Objectives of the Course
Sr.
No.
Objectives
1. To introduce the fundamentals of visual design.
2. To develop the understanding of core concepts of modeling
techniques.
3. Understanding the observation-based approach for creating realism.
4. Creating photorealistic outputs using various renderers.
5. Understanding the body dynamics & principles of animation.
Expected Course Specific Learning Outcomes
Sr.
No.
Learning Outcome
1. Explore the various techniques & concepts of
animation.
2. Develop & create effective 3D art with visualization & concept.
M. C. E. Society’s
Abeda Inamdar Senior College
Of Arts, Science and Commerce, Camp, Pune-1
(Autonomous) Affiliated to Savitribai Phule Pune University
NAAC accredited ‘A’ Grade

Syllabus
Unit No. Title with Contents No. of
Lectures
Unit I. Fundamentals of Lighting Design 5
1. Motivation
2. Cheating
3. Visual Goals of Lighting Design
4. Lighting Challenges
5. Your Workspace
6. Creative Control
1
2
2
Unit II. Lighting Basics and Good Practices 5
1. Starting the Creative Process
2. Types of Lights
3. Adjusting Controls and Options
2
2
1
Unit III. Shadows and Occlusion 5
1. The Visual Functions of Shadows
2. The Appearance of Shadows
3. Shadow Algorithms
4. Occlusion
5. Faking Shadows and Occlusion
1
1
1
1
1
Unit IV. Lighting Environments and Architecture 5
1. Creating Daylight
2. Working with Indoor Natural Light
3. Practical Lights
4. Night Scenes
5. Distance and Dept
1
1
1
1
1
Unit V. Lighting Creatures, Characters, and Animation 5
1. Modeling with Light
2. Three-Point Lighting
1
2
3. Functions of Lights
4. Issues in Lighting Character Animation
1
1
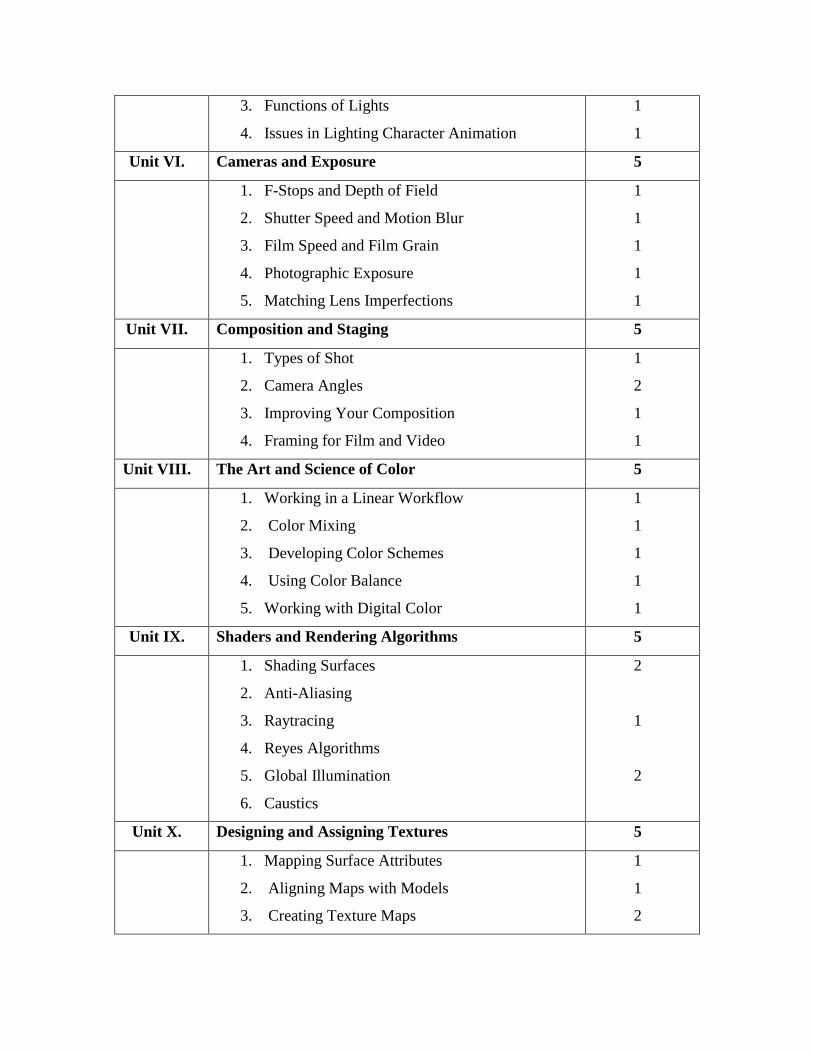
Unit VI. Cameras and Exposure 5
1. F-Stops and Depth of Field
2. Shutter Speed and Motion Blur
3. Film Speed and Film Grain
4. Photographic Exposure
5. Matching Lens Imperfections
1
1
1
1
1
Unit VII. Composition and Staging 5
1. Types of Shot
2. Camera Angles
3. Improving Your Composition
4. Framing for Film and Video
1
2
1
1
Unit VIII. The Art and Science of Color 5
1. Working in a Linear Workflow
2. Color Mixing
3. Developing Color Schemes
4. Using Color Balance
5. Working with Digital Color
1
1
1
1
1
Unit IX. Shaders and Rendering Algorithms 5
1. Shading Surfaces
2. Anti-Aliasing
3. Raytracing
4. Reyes Algorithms
5. Global Illumination
6. Caustics
2
1
2
Unit X. Designing and Assigning Textures 5
1. Mapping Surface Attributes
2. Aligning Maps with Models
3. Creating Texture Maps
1
1
2

4. Using Procedural Textures 1
Unit XI. Rendering in Layers and Passes for Compositing 5
1. Rendering in Layers
2. Rendering in Passes
3. Matching Live-Action Background Plates
4. Managing Colors in Your Composite
5. Choosing Your Approach
1
1
1
1
1
Unit XII. Production Pipelines and Professional Practices 5
1. Production Pipelines
2. Lighting on Larger Productions
3. Advancing in Your Career
2
2
1
References:
1. Jeremy Birn - LIGHTING & RENDERING (Third Edition) By new rider’s publications

PG Diploma in 3D Animation
2021-22 (CBCS – Autonomy 21 Pattern)
Course/ Paper Title Practical course on Modeling and Sculpting
Course Code 21AUPD3D104
Semester 1
No. of Credits 4
Aims & Objectives of the Course
Sr.
No.
Objectives
1. With the help of various tools & techniques of the 3D software
application, one can create impressive models starting from basic to
advanced, the tools allow the user to effectively manipulate the
objects to get desired results.
2. 3D art looks extraordinary when it has powerful aesthetics, using
various surfacing techniques one can achieve the appealing quality
in the design.
Expected Course Specific Learning Outcomes
Sr.
No.
Learning Outcome
1. Creating real-world simulation effects.
2. Creating realistic looking fluids & rigid body simulations.
3. Recognize the importance of render passes.
M. C. E. Society’s
Abeda Inamdar Senior College
Of Arts, Science and Commerce, Camp, Pune-1
(Autonomous) Affiliated to Savitribai Phule Pune University
NAAC accredited ‘A’ Grade

4. Creating photorealistic outputs with compositing.
Guidelines:
Sr.
No.
Objectives
1. Lab Book:
The lab book is to be used as a hands-on resource, reference, and
record of assignment submission and completion by the student. The
lab book contains the set of assignments that the student must
complete as a part of this course.
2. Submission:
The assignments are to be submitted by the student in the form of a
Project folder, .ma, .mb, or FBX Format, Compositing file, and
videos. Each assignment includes the Assignment Title, Date of
submission, Name of Students.
3. Modeling:
Assignments should be done individually by the student. The
submission should include a JPEG image.
Aesthetics Development:
Assignments should be done individually by the student. Students
have to texture & light the model. The submission should include the
final render in JPG or PNG format.
4. Assessment:
Continuous assessment of laboratory work is to be done based on
overall performance and lab assignments performance of students.
Each lab assignment assessment will be assigned grade/marks based
on parameters with appropriate weightage. Suggested parameters for
overall assessment as well as each lab assignment assessment
include- timely completion, performance, and creativity.

5. Operating Environment:
For Poly Modeling and Aesthetics development
Operating system: Windows 10
Software: Autodesk Maya, Zbrush
Syllabus:
Unit
No.
Title with Contents No. of
Lectures
Suggested List of Assignments: 90
1. Vehicle Modeling.
2. Stylized Character Modeling & Texturing
3. Low Poly Character Modeling & Texturing
(Maya/Zbrush)
4. Digital Sculpting with Zbrush (the art of sculpting)
5. Realistic Character Modeling & Texturing
(Maya/ZBrush)
6. Sculpting & Blend Shapes
15
15
15
15
15
15
References:
Books: Laboratory handbook

PG Diploma in 3D Animation
2021-22 (CBCS – Autonomy 21 Pattern)
Course/ Paper Title Practical course on Advanced Shading and Texturing
Course Code 21AUPD3D105
Semester 1
No. of Credits 4
Aims & Objectives of the Course
Sr.
No.
Objectives
1. With the help of various tools & techniques of the 3D software
application, one can create impressive models starting from basic to
advanced, the tools allow the user to effectively manipulate the
objects to get desired results.
2. 3D art looks extraordinary when it has powerful aesthetics, using
various surfacing techniques one can achieve the appealing quality
in the design.
Expected Course Specific Learning Outcomes
Sr.
No.
Learning Outcome
1. Creating real-world simulations effects.
2. Creating realistic looking fluids & rigid body simulations.
3. Recognize the importance of render passes.
4. Creating photorealistic outputs with compositing.
M. C. E. Society’s
Abeda Inamdar Senior College
Of Arts, Science and Commerce, Camp, Pune-1
(Autonomous) Affiliated to Savitribai Phule Pune University
NAAC accredited ‘A’ Grade

Guidelines:
Sr.
No.
Objectives
1. Lab Book:
The lab book is to be used as a hands-on resource, reference, and
record of assignment submission and completion by the student. The
lab book contains the set of assignments that the student must
complete as a part of this course.
2. Submission:
The assignments are to be submitted by the student in the form of a
Project folder, .ma, .mb, or FBX Format, Compositing file, and
videos. Each assignment includes the Assignment Title, Date of
submission, Name of Students.
3. Texturing:
Assignments should be done individually by the student. The
submission should include either the playblast or a compiled
sequence render of simulation with lighting.
Aesthetics Development:
Assignments should be done individually by the student. Students
have to texture & light the model. The submission should include the
final render in JPG or PNG format.
4. Assessment:
Continuous assessment of laboratory work is to be done based on
overall performance and lab assignments performance of students.
Each lab assignment assessment will be assigned grade/marks based
on parameters with appropriate weightage. Suggested parameters
for overall assessment as well as each lab assignment assessment
include- timely completion, performance, and creativity.

5. Operating Environment:
For Advanced Shading and Texturing
Operating system: Windows 10
Software: Autodesk Maya, Zbrush
Syllabus:
Unit
No.
Title with Contents No. of
Lectures
Suggested List of Assignments: 90
1. Stylized Character Texturing.
2. Uv Layout - Planning, Techniques
3. Texturing-
Planning,Techniques,Basics,Details,file Cleanup
,Final Touchup
4. UV space and Texturing, Poly paint, Z App link.
5. Realistic Character Texturing
(Maya/ZBrush/Arnold)
6. Pass extraction and composition
15
15
15
15
15
15
References:
Books: Laboratory handbook

PG Diploma in 3D Animation
2021-22 (CBCS – Autonomy 21 Pattern)
Course/ Paper Title Practical course on Advanced Lighting
Course Code 21AUPD3D106
Semester 1
No. of Credits 4
Aims & Objectives of the Course
Sr.
No.
Objectives
1. With the help of various tools & techniques of the 3D software
application, one can create impressive models starting from basic to
advanced, the tools allow the user to effectively manipulate the
objects to get desired results.
2. 3D art looks extraordinary when it has powerful aesthetics, using
various surfacing techniques one can achieve the appealing quality
in the design.
Expected Course Specific Learning Outcomes
Sr.
No.
Learning Outcome
1. Creating real-world simulations effects.
2. Creating realistic looking fluids & rigid body simulations.
3. Recognize the importance of render passes.
4. Creating photorealistic outputs with compositing.
M. C. E. Society’s
Abeda Inamdar Senior College
Of Arts, Science and Commerce, Camp, Pune-1
(Autonomous) Affiliated to Savitribai Phule Pune University
NAAC accredited ‘A’ Grade

Guidelines:
Sr.
No.
Objectives
1. Lab Book:
The lab book is to be used as a hands-on resource, reference, and
record of assignment submission and completion by the student. The
lab book contains the set of assignments that the student must
complete as a part of this course.
2. Submission:
The assignments are to be submitted by the student in the form of a
Project folder, .ma, .mb, or FBX Format, Compositing file, and
videos. Each assignment includes the Assignment Title, Date of
submission, Name of Students.
3. Lighting:
Assignments should be done individually by the student. The
submission should include either the playblast or a compiled
sequence render of simulation with lighting.
Aesthetics Development:
Assignments should be done individually by the student. Students
have to texture & light the model. The submission should include the
final render in JPG or PNG format.
4. Assessment:
Continuous assessment of laboratory work is to be done based on
overall performance and lab assignments performance of students.
Each lab assignment assessment will be assigned grade/marks based
on parameters with appropriate weightage. Suggested parameters
for overall assessment as well as each lab assignment assessment
include- timely completion, performance, and creativity.

5. Operating Environment:
For Advanced Lighting
Operating system: Windows 10
Software: Autodesk Maya, Zbrush, Arnold
Syllabus:
Unit
No.
Title with Contents No. of
Lectures
Suggested List of Assignments: 90
1. CG Lighting & Use of Shaders.
2. Lighting Environments and Architecture
3. Arnold Shader
30
30
30
References:
Books: Laboratory handbook

PG Diploma in 3D Animation
2021-22 (CBCS – Autonomy 21 Pattern)
Course/ Paper Title Practical course on Rendering and Compositing
Course Code 21AUPD3D107
Semester 1
No. of Credits 4
Aims & Objectives of the Course
Sr.
No.
Objectives
1. With the help of various tools & techniques of the 3D software
application, one can create impressive models starting from basic to
advanced, the tools allow the user to effectively manipulate the
objects to get desired results.
2. 3D art looks extraordinary when it has powerful aesthetics, using
various surfacing techniques one can achieve the appealing quality
in the design.
Expected Course Specific Learning Outcomes
Sr.
No.
Learning Outcome
1. Creating real-world simulations effects.
2. Creating realistic looking fluids & rigid body simulations.
3. Recognize the importance of render passes.
4. Creating photorealistic outputs with compositing.
M. C. E. Society’s
Abeda Inamdar Senior College
Of Arts, Science and Commerce, Camp, Pune-1
(Autonomous) Affiliated to Savitribai Phule Pune University
NAAC accredited ‘A’ Grade

Guidelines:
Sr.
No.
Objectives
1. Lab Book:
The lab book is to be used as a hands-on resource, reference, and
record of assignment submission and completion by the student.
The lab book contains the set of assignments that the student must
complete as a part of this course.
2. Submission:
The assignments are to be submitted by the student in the form of a
Project folder, .ma, .mb, or FBX Format, Compositing file, and
videos. Each assignment includes the Assignment Title, Date of
submission, Name of Students.
3. Compositing:
Assignments should be done individually by the student. The
submission should include either the playblast or a compiled
sequence render of simulation with lighting.
Aesthetics Development:
Assignments should be done individually by the student. Students
have to texture & light the model. The submission should include the
final render in JPG or PNG format.
4. Assessment:
Continuous assessment of laboratory work is to be done based on
overall performance and lab assignments performance of students.
Each lab assignment assessment will be assigned grade/marks based
on parameters with appropriate weightage. Suggested parameters
for overall assessment as well as each lab assignment assessment
include- timely completion, performance, and creativity.

5. Operating Environment:
For Rendering and Compositing
Operating system: Windows 10
Software: Autodesk Maya, Arnold, After Effects and Nuke
Syllabus:
Unit
No.
Title with Contents No. of
Lectures
Suggested List of Assignments: 90
1. Lighting a Scene with Passes
2. BG lighting with multiple passes
3. Character lighting with multiple passes
4. Lighting for an underwater scene
5. Lighting for FX shot
18
18
18
18
18
References:
Books: Laboratory handbook

PG Diploma in 3D Animation
2021-22 (CBCS – Autonomy 21 Pattern)
Course/ Paper Title Advance Rigging
Course Code 21AUPD3D201
Semester 2
No. of Credits 4
Aims & Objectives of the Course
Sr.
No.
Objectives
1. To introduce the fundamentals of visual design.
2. To develop the understanding of core concepts of modeling
techniques.
3. Understanding the observation-based approach for creating realism.
4. Creating photorealistic outputs using various renderers.
5. Understanding the body dynamics & principles of animation.
Expected Course Specific Learning Outcomes
Sr.
No.
Learning Outcome
1. Explore the various techniques & concepts of
animation.
2. Develop & create effective 3D art with visualization & concept.
M. C. E. Society’s
Abeda Inamdar Senior College
Of Arts, Science and Commerce, Camp, Pune-1
(Autonomous) Affiliated to Savitribai Phule Pune University
NAAC accredited ‘A’ Grade

Syllabus
Unit No. Title with Contents No. of
Lectures
Unit I. Introduction to Rigging 8
1. Introduction
2. Outcomes
3. Terminology
1
1
1
Unit II. Working with Constraints 9
1. Adding/Removing a Constraint
2. Relationship
3. Child of Constraint
1
1
1
Unit III. Introduction to Working with Armature 8
1. Introduction
2. Outcomes
3. Terminology
4. Working with Armature
5. If the Active Element is a Disconnected
Root:
6. If the Active Element is a Connected Root:
7. Armature Deform Parent
1
1
1
1
1
1
1
1
Unit IV. Introduction to Working with Armature Part II 8
1. With Automatic Weights
2. Unit summary
3. Assignment
4. Assessment
5. Resources
1
2
1
2
2
Unit V. Skinning and Advanced Deformers 10
1. Introduction
2. Unit Objectives
(i) Introduction to Skinning
2

(ii) Methods of Skinning
(iii) Changing a skinned Object’s deformation
order
(iv) Point tweaking skinned objects
(v) Editing node behavior to improve
performance
(vi) Workflow summary
(vii) Rigid skinning
(viii) Understanding Rigid Skinning
(ix) Rigid Bind Process
(x) Editing Rigid Skin
(xi) Flexors
3. Tutorial on Smooth Skinning a Character
(i) Understanding Smooth Skinning
(ii) Binding Smooth Skin
(iii) Editing smooth skin
(iv) Using Smooth Skin Influence Objects
(v) Instance
1
2
3
2
Unit VI. Connecting Attributes 10
1. Introduction
2. Unit Objectives
3. Dependency Graph
i) Nodes
ii) Attributes
iii) Connections
iv) Types of Connections
v) Keyed Relationships
4. Expressions
i) Animation Expressions
1
1
3

ii) Creating Animation Expressions
iii) Attributes and Drivers
iv) Time and Frame Keywords
v) Editing Expressions
vi) Editing Text in Animation Expression
vii) Animation Expression with Text Editor
viii) Deleting Animation Expression
5. Understanding Constraints
i) Constraint Node Behavior
ii) Enabling and Disabling Constraint Nodes
iii) Workflow Summary
iv) Using Point Constraints
v) Using Geometry Constraints
2
2
1
Unit VII. Character Controls 7
1. Introduction
2. Unit Objectives
3. Characters
Character Node Behaviour
(i) Defining Characters
(ii) Creating Characters
(iii) Editing Characters
(iv) Deleting Characters
(v) Animating Characters
4. Introducing Skeletons
(i) Understanding Skeletons
(ii) Editing Node Behaviour to Improve
Performance
(iii) Workflow Summary
5. Building Skeletons
1
1
1

References:
1. Character setup and animation in maya - rohan page
2. 3D Animation Block –III: 3D Animation & Rigging, ODL
(i) Understanding Skeleton Construction
(ii) Creating Joint Chains and Limbs
(iii) Editing Joints
6. Posing Skeletons
(i) Forward Kinematics
(ii) Inverse Kinematics
(iii) Handles and Chains of Inverse
Kinematics
7. Tutorial on Building a Control Rig
(i) Control Objects
(ii) Rig Controls
(iii) IK or FK
(iv) Setup Theory
(v) The Hips
(vi) The Legs and Feet
(vii) Automatic Foot Roll
(viii) Arms and Wrist
(ix) Shoulder Blades
(x) Chain Up Vectors: The Third
Dimension
(xi) Controlling the Head Using a Position
and Orientation Constraint
(xii) Invert the Constraints
(xiii) Fine-Tuning and Parenting the Rig
(xiv) Creating a Model Space
1
1
1
1

PG Diploma in 3D Animation
2021-22 (CBCS – Autonomy 21 Pattern)
Course/ Paper Title Digital Animation
Course Code 21AUPD3D202
Semester 2
No. of Credits 4
Aims & Objectives of the Course
Sr.
No.
Objectives
1. To introduce the fundamentals of visual design.
2. To develop the understanding of core concepts of modeling
techniques.
3. Understanding the observation-based approach for creating realism.
4. Creating photorealistic outputs using various renderers.
5. Understanding the body dynamics & principles of animation.
Expected Course Specific Learning Outcomes
Sr.
No.
Learning Outcome
1. Explore the various techniques & concepts of
animation.
2. Develop & create effective 3D art with visualization & concept.
M. C. E. Society’s
Abeda Inamdar Senior College
Of Arts, Science and Commerce, Camp, Pune-1
(Autonomous) Affiliated to Savitribai Phule Pune University
NAAC accredited ‘A’ Grade
Syllabus
Unit No. Title with Contents No. of
Lectures
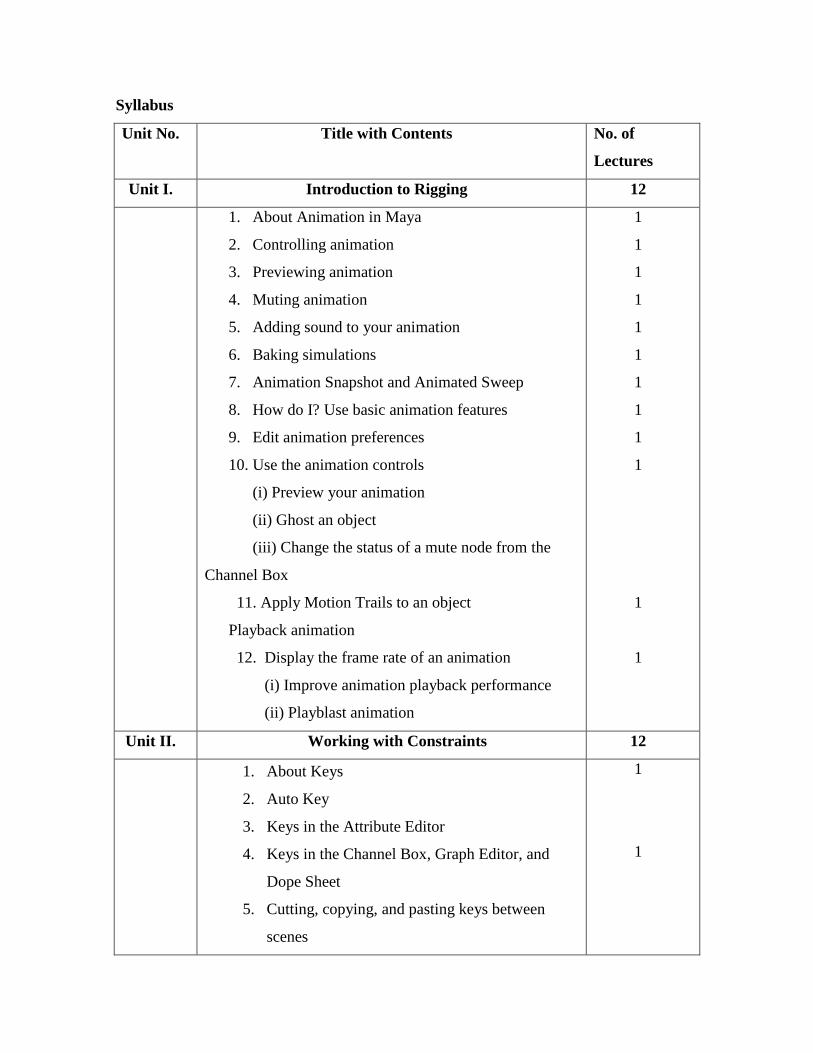
Unit I. Introduction to Rigging 12
1. About Animation in Maya
2. Controlling animation
3. Previewing animation
4. Muting animation
5. Adding sound to your animation
6. Baking simulations
7. Animation Snapshot and Animated Sweep
8. How do I? Use basic animation features
9. Edit animation preferences
10. Use the animation controls
(i) Preview your animation
(ii) Ghost an object
(iii) Change the status of a mute node from the
Channel Box
11. Apply Motion Trails to an object
Playback animation
12. Display the frame rate of an animation
(i) Improve animation playback performance
(ii) Playblast animation
1
1
1
1
1
1
1
1
1
1
1
1
Unit II. Working with Constraints 12
1. About Keys
2. Auto Key
3. Keys in the Attribute Editor
4. Keys in the Channel Box, Graph Editor, and
Dope Sheet
5. Cutting, copying, and pasting keys between
scenes
1
1

6. Keys clipboard
7. Driven keys
8. Breakdowns
9. Inbetweens
10. Graph Editor overview
(i) Dope Sheet
(ii) How do I? Set keys
11. Set key preferences
(i) Add keys
(ii) Set key options
(iii) Modify key attributes
(iv) Edit the key ability of an object
(v) Disable the editability of attributes without
deleting them
12. Edit keys
(i) Cut keys
(ii) Copy keys
(iii) Paste keys
(iv) Delete keys
(v) Scale keys
(vi) Snap keys
(vii) Bake keys
(viii) Use Auto Key
(ix) Use Auto Key
13. Set Breakdowns
14. Set Breakdowns
15. Convert keys to Breakdowns
17. Convert Breakdowns to keys
18. Set In between
1
1
1
1
1
1
1
1
1
1

19. Set Inbetweens
20. Set Driven Keys
21. Set Driven Keys
22. Set a driven key relationship
Unit III. Use the Graph Editor and Dope Sheet 12
1. Display the Graph Editor and Dope Sheet
2. Navigate the Graph Editor graph view or Dope
Sheet view area
3. Mute or unmute a channel in the Dope Sheet
or Graph Editor
4. Mute keys in the Dope Sheet or Graph Editor
5. Edit curves
6. View curves while editing
7. Set curve behavior
(i) Set rotation interpolation for curves
(ii) Smooth curves
(iii) Simplify curves
8. Resample curves
9. Scale curves
10. Fix my curves when they have been
corrupted
1
1
1
1
1
2
1
1
1
2
Unit IV. Nonlinear Animation 12
1. About Nonlinear animation.
(i) Nonlinear animation tools in Maya.
(ii) Nonlinear animation components in Trax
2. How do I? Open and view the Trax Editor
(i) Open the Trax Editor
(ii) Set the Trax Editor view
(iii) Set the Time Slider’s playback range to reflect
the range of clips in Trax
1
2
1

(iv) Use the Outliner and Visor with Trax.
(v) Use the Outliner with Trax
(vi) Use the Visor with Trax
3. Create, load, and highlight character sets.
(i) Create character sets
(ii) Load character sets.
(iii) Highlight characters, groups, or sub-
characters in Trax
(iv) Collapse, expand, and edit summaries
4. Expand and collapse a summary track
5. Edit the summary clip
6. Create clips and poses
7. Create clips.
8. Create expression or constraint clips
9. Create poses
(i) Cut, copy and paste clips
(ii) Duplicate clips
(iii) Manipulate clips
(iv) Edit a clip’s weighting
(v) Move clips
(vi) Trim clips
(vii) Scale clips
(viii) Cycle clips
(ix) Hold clips
(x) Split clips
(xi) Merge clips
(xii) Enable or disable clips
(xiii) Activate or deactivate clips
2
2
1
1
2

(xiv) Create and edit blends
Unit V. Motion Capture Animation 12
1. About Motion capture devices
2. Motion capture devices
(i) Server
(ii) Axis
(iii) Button
(iv) Attachments
(v) Virtual devices
(vi) Multiple devices
3. Motion capture systems
(i) Optical capture system.
(ii) Magnetic capture system
(iii) Motion capture process
(iv) Rehearsing the motion
(v) Recording the motion.
(vi) Reviewing the motion
3. Filters and Re samplers
4. Saving files to disk
5. Motion capture tips
6. Tips for full-body motion capture
7. Tips for working with the data.
1
1
1
1
2
1
1
2
1
References:
1. Animation Version 6, Alias

PG Diploma in 3D Animation
2021-22 (CBCS – Autonomy 21 Pattern)
Course/ Paper Title Compositing for 3d
Course Code 21AUPD3D203
Semester 2
No. of Credits 4
Aims & Objectives of the Course
Sr.
No.
Objectives
1. To introduce the fundamentals of visual design.
2. To develop the understanding of core concepts of modeling
techniques.
3. Understanding the observation-based approach for creating realism.
4. Creating photorealistic outputs using various renderers.
5. Understanding the body dynamics & principles of animation.
Expected Course Specific Learning Outcomes
Sr.
No.
Learning Outcome
1. Explore the various techniques & concepts of
animation.
2. Develop & create effective 3D art with visualization & concept.
M. C. E. Society’s
Abeda Inamdar Senior College
Of Arts, Science and Commerce, Camp, Pune-1
(Autonomous) Affiliated to Savitribai Phule Pune University
NAAC accredited ‘A’ Grade

Syllabus
Unit No. Title with Contents No. of
Lectures
Unit I. The Nuke Interface 5
1. Navigating the interface
2. Building Node Graphs
3. Creating keyframes
4. The Curve Editor
1
1
1
2
Unit II. Transformations and Animation 5
1. Keyframe animation
2. Math expressions and linking
3. Creating animated elements
4. Correcting for lens distortion
1
1
1
2
Unit III. Color and Rotoscoping 5
1. Nuke’s color management
2. Color correcting composites
3. Rotoscoping
4. Masking operations
1
1
1
2
Unit IV. Compositing CGI and Channels 5
1. Mastering Nuke’s channels system
2. Multi-pass CG compositing
3. Adding motion blur
4. Adding depth of field
1
2
1
1
Unit V. Keying 5
1. Lumakeys
2. All four of Nuke’s chroma keyers
3. Proper use of Addmix and Keymix nodes
4. How to merge multiple keys
2
1
1
1

Unit VI. Tracking, Warping, and Retiming 5
1. The Tracker node
2. How to do a match move
3. Spline warp and Grid warp
4. Retiming clips with optical flow
1
1
1
2
Unit VII. 3D Basics 5
1. Navigating Nuke’s 3D workspace
2. Working with geometric primitives
3. Projecting texture maps
4. Rendering 3D scenes
2
1
1
1
Unit VIII. 3D Animation and Shaders 5
1. Animating 3D geometry
2. Deforming 3D geometry
3. Adding lights, shaders, and materials to geometry
4. Normals relighting
1
2
1
1
Unit IX. Production Workflows 5
1. Adding a 3D background to a CG render
2. Camera projection
3. Rig removal
4. Set extension
1
1
1
2
Unit X. Keying 5
1. Camera Tracking
2. How to do camera tracking
3. Converting point clouds to meshes
4. Compensating for lens distortion
5. Getting 3D information to the 2D composite
1
1
1
1
1
Unit XI. Planar Tracker and Particles 5
1. How to do planar tracking
2. How to use planar tracking results
1
2

3. Using Nuke’s 3D particle system
4. Creating your own particles
1
1
Unit XII. Advanced 3D Nodes 5
1. Deep compositing
2. Alembic geometry
3. Modeling 3D geometry from a 2D scene
4. Creating point clouds from CG renders
1
2
2
1
References:
1. Nuke VFX Compositing Course with Steve Wright, Steve Wright

PG Diploma in 3D Animation
2021-22 (CBCS – Autonomy 21 Pattern)
Course/ Paper Title Practical course on Character setup
Course Code 21AUPD3D204
Semester 2
No. of Credits 4
Aims & Objectives of the Course
Sr.
No.
Objectives
1. With the help of various tools & techniques of the 3D software
application, one can create impressive models starting from basic to
advanced, the tools allow the user to effectively manipulate the
objects to get desired results.
2. 3D art looks extraordinary when it has powerful aesthetics, using
various surfacing techniques one can achieve the appealing quality
in the design.
Expected Course Specific Learning Outcomes
Sr.
No.
Learning Outcome
1. Creating real-world simulation effects.
2. Creating realistic looking fluids & rigid body simulations.
3. Recognize the importance of render passes.
M. C. E. Society’s
Abeda Inamdar Senior College
Of Arts, Science and Commerce, Camp, Pune-1
(Autonomous) Affiliated to Savitribai Phule Pune University
NAAC accredited ‘A’ Grade

4. Creating photorealistic outputs with compositing.
Guidelines:
Sr.
No.
Objectives
1. Lab Book:
The lab book is to be used as a hands-on resource, reference, and
record of assignment submission and completion by the student. The
lab book contains the set of assignments that the student must
complete as a part of this course.
2. Submission:
The assignments are to be submitted by the student in the form of a
Project folder, .ma, .mb, or FBX Format, Compositing file, and
videos. Each assignment includes the Assignment Title, Date of
submission, Name of Students.
3. Character Setup (Rigging/Animation):
Assignments should be done individually by the student. The
submission should include a final render video.
4. Assessment:
Continuous assessment of laboratory work is to be done based on
overall performance and lab assignments performance of students.
Each lab assignment assessment will be assigned grade/marks based
on parameters with appropriate weightage. Suggested parameters for
overall assessment as well as each lab assignment assessment
include- timely completion, performance, and creativity.
5. Operating Environment:
For Rigging/Animation
Operating system: Windows 10
Software: Autodesk Maya, Zbrush.Arnold, Nuke

Syllabus:
Unit
No.
Title with Contents No. of
Lectures
Suggested List of Assignments: 90
1. Human and Animal Anatomy. Body mechanics
2. Body rigging I. Basic rigging structures.
3. Body rigging II. Advanced structures
4. Dynamic Rig and Basic Simulations. Secondary
Animation Systems
5. Facial Anatomy. Facial Musculature
6. Facial Rigging: fundamentals
7. Structure and design of facial systems
8. Facial Rigging: control and distortion
9. Distortion I. Skin Systems. Conceptualization.
Technology. Processes and methods
10. Walk and Stop - Weight Shift
11. Head Turn and Eyeblink.
12. Hand and Head Gesture.
13. Character Jump and Settle - Blocking and Key
Posing
14. Character Jump and Settle - Finalizing the shot
15. Quadruped Walk Cycle
16. Mechanical Animation- Vehicle animation
17. Animation for VFX- Rotomation
18. Baking, Importing, and exporting animation.
5
5
5
5
5
5
5
5
5
5
5
5
5
5
5
5
5
5
References:
Books: Laboratory handbook