Manual Monitor MI-17 - UTICOR.de
20
Manual Monitor MI-17
-
Upload
khangminh22 -
Category
Documents
-
view
1 -
download
0
Transcript of Manual Monitor MI-17 - UTICOR.de

Manual Monitor MI-17

Page 2
Contents: Page 1 General 4 2 Technical data 5 3 Power Supply 6 3.1 Monitor with 12 VDC power supply 3.2 Monitor with 24 VDC power supply 3.3 Monitor with 230 VAC power supply 4 Backside Monitor 7 5 OSD Menu 7 5.1 Picture 8 Adjust of the backlight Adjust the brightness Contrast setting Adjust the Sharpness 5.2 Display 9 Optimal picture adjustment H. position V. position Pixel clock Phase 5.3 Color 10 Gamma value Color Temp Color Effect Color Demo Color Format Hue Saturation 5.4 Advance 11 Aspect Ratio Overscan DDCCI Ultra Vivid 5.5 Input 12 VGA / DVI / DP 5.6 Other 13 Reset Menu Time OSD H Position OSD V Position Language Transparency Rotate 5.7 Information 14

Contents: Page 6 Touch Screen 15 7 Monitor care 16 8 8 Screensaver 16 9 security 16 10 Mechanical dimensions 17 10.1 Monitor with Standard or Stainless Steel Front Plate 17 10.2 Monitor with 19“ Front Plate 11 Front panel cutout monitor with 18 Standard or stainless steel front plate Notes 19
Page 3

1 - General The monitor has a 17 "TFT display with a resolution of 1280 x 1024 pixels. The connection to the PC takes place via a VGA interface with 15-pin VGA plug or via a DVI interface with DVI-I Dual Link plug (24 + 1 pin) or the dis-play port for the transmission of digital image signals. Optionally, the monitor can be equipped with a resistive touch screen. The touch has a USB interface.
Monitor with 19“ Front Plate, RAL 9006
If the monitor is equipped without a touch, the display is protected against contact and contact with moisture and aggressive substances through a glass. There is a standard protective glass and a visually anti-glare protective glass available. The monitor is available with a standard or stainless steel front plate and mounting bolts on the back. These two versions are intended for installation in a control cabinet or control panel. The front panel has a gasket. The degree of protection is IP 65. The monitor with 19 "front panel has 4 mounting holes on both sides and is installed in a 19" rack.
Page 4
Monitor Back with standard front plate and mounting bolts
The monitors have a standard 12 VDC power supply and are supplied with an external 230 VAC / 12 VDC power supply. All monitors are optional with a supply voltage of 24 VDC or with an in-ternal power supply of 230 VAC available.

2 - Technical specifications
Page 5
Reserve technical changes.
Technical specifications
LCD - Type 17“ TFT
resolution (Pixel) 1280 x 1024
act. screen area(mm) 337,9 x 270,3
pixel density (mm) 0,264 x 0,264
brightness (cd / m²) 350
contrast 1000 : 1
reaction time TR/TF (msec.) 3,5 / 1,5
Colors 16,7 Mio
Angle of view horizontally vertical
R / L = 85° / 85° O / U = 80° / 80°
Lifetime illumination (half-life)
LED backlight / 50,000 hours
Touch (Option) Analog resistive touch with USB interface
VGA Port SXGA
DVI Port DVI D Dual Link (24 + 1 Pin connector)
DP Port Display Port (digital image signals)
OSD - Menü Yes
supply voltage 12 VDC optional 24 VDC (intern)
optional 100 - 230 VAC (intern)
power consumption 40 W
operating temperatur 0 to 50 °C
storage temperature -25 to60 °C
Front Plate Front panel black powder coated, RAL 9005, with fixing bolts
Stainless steel front plate with mounting bolts Front panel for 19 "installation, RAL 9006
Degree of protection front panel IP 65 (Stainless steel and standard front)
VESA connection No
weight 7,5 KG

3 - Power supply
Page 6
3.1 Monitor with 12 VDC power supply The connector is located on the back of the monitor. The inner pin is plus, the outer minus. The inner plug has a diameter of 2.5 mm. An external power supply unit with a supply voltage of 100 - 240 VAC / 12 VDC and 60 VA output is included in this ver-sion.
- Attention: pay attention to polarity
3.2 Monitor with 24 VDC power supply On the back there is a 3-pin screw terminal connection. The supply voltage is 20 - 28 VDC. The power consumption is about 40 watts.
GN
D
- M
INU
S
+ P
LU
S
24 VDC
External power supply unit 230 VAC / 12 VDC
3.3 Monitor with 230 VAC power supply On the back there is a 3-pin screw terminal connection. The supply voltage is 100 - 230 VAC The power consumption is about 40 watts.
100 - 230 VAC
GN
D
L2
L1

Page 7
On the back of the monitor is the power supply connector, the VGA input, the DVI input, the DP connector, the connector on the Touch if the monitor is equipped with a touch screen, and 5 buttons for adjusting the OSD menu Die Tasten sind bezeichnet mit:
4 - Monitor Back
Button OSD menu on the back of the monitor
POWER: Monitor on / off.
MENU: Enable and disable the OSD menu.
SELECT: Confirm selection in OSD main menu or OSD submenu.
DOWN: Selection of icons in the main and submenu as well as setting the values. The value to be set is lowered. UP: Selection of icons in the main and submenu as well as setting the values. The value to be set is increased.
5 - OSD Menü After pressing the MENU button, the OSD menu is displayed as shown in the lower picture. Then you can use the UP / DOWN buttons to select the various main menus. By pressing the SELECT key, the selected main menu with the associated submenu items is selected and the submenu items can be selected using the UP / DOWN keys. These are also acknowledged with the SELECT key. Then select the desired value with the UP / DOWN keys and confirm with SELECT. Exit vari-ous menu items by pressing the MENU key.
Attention: The OSD menu can only be activated when the input signal is present!

Page 8
5.1 Picture
Backlight: Adjustment of the backlight Brightness: Adjust the brightness Contrast: Contrast adjustment Sharpness: Adjust the focus

Page 9
5.2 Display
Auto Adjustment: The optimal picture setting is activated H. Position: The horizontal position can be adjusted V. Position: The vertical position can be adjusted Pixel Clock: The clock frequency can be adjusted Phase: The clock rate can be adjusted

Page 10
5.3 Color
Gamma: The gamma value can be adjusted Color Temp.: The color temperature can be adjusted Color Effect: A color effect can be set Color Demo: Selection for hue and saturation Color Format: Color space selection Hue: Adjust the color balance Saturation: Adjust the saturation

Page 11
5.4 Advance
Aspect ratio: Adjust aspect ratio Overscan: Overscan function on or off DDCCI: Turn DDCCI support on or off Ultra Vivid: Select the type of color mode

5.5 Input
VGA: Select VGA as the input source DVI: Select DVI as the input source DP: Select DP as the input source
Page 12

5.6 more settings
Reset: Auf Werkseinstellungen zurücksetzen Menu Time: Darstellungszeit OSD Menü OSD H Position: Horizontaleinstellung OSD Menü OSD V Position: Vertikaleinstellung OSD Menü Language: Sprache: Deutsch oder Englisch Transparencey: Transparenz OSD Menü Einstellung Rotate: Drehen OSD Menü Ein/Aus
Seite 13

5.7 Information
Information about: signal input H and V frequency clock speed HDCP functional status Firmware version
Page 14

If the monitor is equipped with a resistive touch screen, the CD comes with the driver software for the touch screen. When touched with a USB interface, the touch is powered by the PC. The connection to the PC is made via a USB plug type A. The plug is located on the back of the monitor. A connecting cable of 3 meters is included. To install the driver software, insert the CD-ROM into the drive. Do not connect the USB cable to the PC. Enter D: \ Setup.exe and confirm with OK. Instructions on the screen. For USB interface: DMC, TSC-10 Series, select USB. The driver software is now installed. After completing the installation, connect the USB cable to the PC. The New Hardware Installation Wizard appears. When asked, "Connect to the Internet" - NO this time - Select and select Next. Click on "Install software automatically" and select Next. When asking for verification - continue installation - select. Select Finish. Select Close. The software and driver are now installed and the touch should be at fingertip react. Calibrate Touch Screen Now (Start, All Programs, UPDD, Calibrate) ATTENTION: If a different touch driver is installed on the PC, remove it completely from the PC before installation. A not completely uninstalled driver can cause the touch does not work. If necessary, restart PC after installation.
6 - Touch Screen
Seite 15

8 - Screensaver Avoid displaying the same image over a long period of time. Even with TFT monitors, this can lead to "burn in" the display. It is called the "memory effect". Therefore use a screensaver. If a different picture is displayed for a longer time, the "Memory Effect" will disappear automati-cally.
Page 16
9 - Safety The operating voltage of the device may only be in the specified range. The device complies with the requirements of the applicable European standards and EMC guidelines. The front of the monitor is splash-proof. There are ventilation slots on the back. These must remain free and it must be ensured that there is sufficient space for air circulation. No objects should be put through the slots. There must be no moisture or liquid in the monitor. The monitor is not intended for use in hazardous areas.
7 - Monitor maintenance
Only clean the touch with a damp cloth!
DO NOT use a pressure washer. Touch only with your fingers, do not use hard and sharp objects.

10 - Mechanical dimensions
All dimensions in mm, technical changes reserved
Page 17
10.1 monitor with standard or stainless steel front plate
10.2 Monitor with 19 "front panel
HE = 8 HE L1 = 482,6 mm L2 = 417 mm H1 = 354,8 mm (8HE) H2 = 342 mm H3 = 279,4 mm H4 = 76,2 mm T = 60 mm Front plate thickness = 3 mm
L1 = 455 mm L2 = 417 mm H1 = 380 mm H2 = 342 mm T = 60 mm Front plate thickness = 3 mm Cut Out: 419 x 344 mm
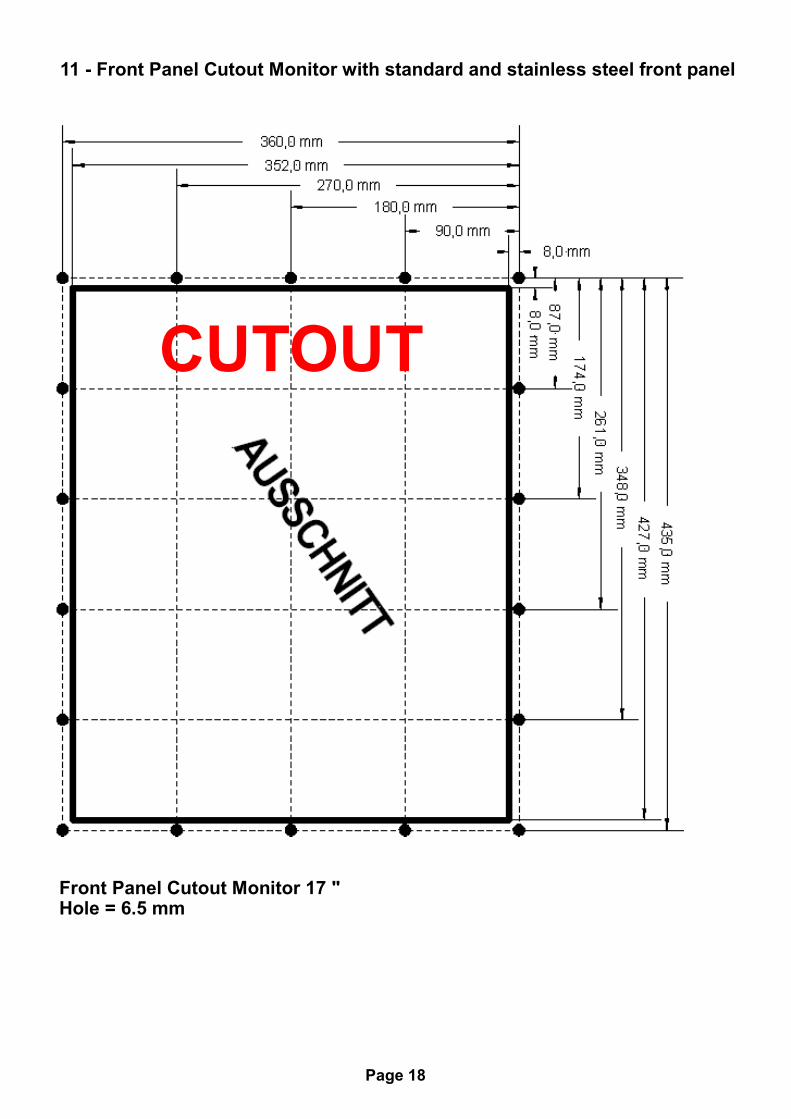
11 - Front Panel Cutout Monitor with standard and stainless steel front panel
Page 18
Front Panel Cutout Monitor 17 " Hole = 6.5 mm
CUTOUT

Notes:
Page 19

UTICOR Automation GmbH Künkelstrasse 44 D - 41063 Mönchengladbach Tel.: 02161 - 23015 Fax: 02161 - 182655 Email: [email protected] www.uticor.de Manual MI-17 E Rev. D