MANUAL - Leon's Chainsaw Parts & Repair
12
165 STRING TRIMMER FIRST EDITION PART NO. 17861 Printed in U.S.A. Extra Copies $1.00 OWNER'S OPERATION AND MAINTENANCE MANUAL I M PORTANT: READ SAFETY PRECAUTIONS BEFORE OPERATI NG NOTICE: For Servicing Dealer tnformation see back page.
-
Upload
khangminh22 -
Category
Documents
-
view
0 -
download
0
Transcript of MANUAL - Leon's Chainsaw Parts & Repair

165STRING TRIMMER
FIRST EDITIONPART NO. 17861Printed in U.S.A.Extra Copies $1.00
OWNER'SOPERATION AND MAINTENANCE
MANUAL
I M PORTANT:READ SAFETYPRECAUTIONS
BEFOREOPERATI NG
NOTICE: For Servicing Dealer tnformation see back page.

SAFETY PRECAUTIOI,IS
PERSONAL SAFETY PRECAUTIONSo The whirling string could cause debris, stones or other
loose items to become flying projectiles which couldcause serious or permanent injury. Therefore do thefollowing to reduce the risk of injury:(1) Wear goggles and full eye protection while you
operate this unit at all times.(2) Keep all bystanders, children and pets away from'the cutting area.
. Always hold the String Trimmer with both hands whenoperating. Use a f irm grip on the f ront and rear handles.
o Use only Ftomelite@ monof ilament string designed foryour String Trimmer. Under no circumstances shouldmetal wire or metal-reinforced string be used, becausepieces can break off and become dangerous projectiles.
o Wear full length slacks and sturdy shoes to protectagainst the whirling string and small objects thrown byit.
. Do not wear loose articles such as scarfs or ties whichcould be drawn into the engine air intake.
. Long or continuous exposure to the noise level pro-duced by a String Trimmer may cause hearing impair-ment" Hearing protection devices are available throughyour dealer.
. Do not let any part of your body contact the hot muff leror cylinder. The muffler is the black box next to thespark plug. lt will become hot while the unit is beinEoperated and will remain hot for a short period aftershutdown.
r lt has been reported that vibrations from hand-heldtools (chain saws, pneumatic hammers, grinders, sledgehammers, etc.) may contribute to a condition calledRaynaud's Syndrome in certain individuals. Symptomsmay include tingling, numbness and blanching of thef ingers, usually apparent upon exposure to cold. Heredi-tary factors, exposure to cold and dampness, diet,smoking and work practices are allthoughtto contributeto the development of these symptoms. lt is presentlyunknown what, if any, vibrations or extent of exposuremay contribute to the condition.
There are measures that can be taken by the operator topossibly reduce the effects of vibration:
a) Keep your body warm in cold weather. When oper-ating the unit, wear gloves to keep the hands andwrists warm. lt is reported that cold weather is amajor factor contributing to Raynaud's Syndrome.
b) Relrain from smoking (anothersuspected contribut-ing factor).
c) After each period of operation, exercise to increaseblood circulation.
d) Take frequent work breaks. Limit the amount ofexposure per day.
e) Keep the tool well maintained, fasteners tightenedand worn parts replaced.
lf you experience any of the symptoms of this condiiion.immediately discontinue use and see your physicianabout these symptoms.
OPERATING AND STRING HAZARDSr The string head assembly operated closetothe ground. and slightly tilted, will car.ise Erass trimmings, stones
and other loose objects to be thrown away from you.Flying projectiles can be hazardous- -*,.
o Do rrol attempt to toi.rch or stop the string when it isrotating-
. Do not leave the String Trimmer unattended where itcould be started by untrained persons or minors.
. All String Trirnmer service, other than items in theOwner's Manual maintenance instructions, should beperformeC by competent service personnel. (lf impropertools are used to remove the flywheel, structuraldamage to the flywheel could occur which couldsubsequently cause the f lywheel to burst.)
FUELING AND MAINTENANCE HAZARDS. Always shut-off the engine before fueling.
. Always use caution when handling f uel. Move the StringTrimmerat least 10 feet (3 m) irom the fueling pointbefore starting the engine.
r Do not operate if there is a fuel leak. A fuel leak cancause a fire.
o Run this unit only out of doors. Carbon monoxideexhaust fumes can be lethal in a confined area.
o Store gasoline and fuel only in containers designed forthe safe storage of such materials.
o Also shut-off the engine and disconnect the spark plugwire before servicing a String Trimmer.
o lf the muffler is worn, replace it. Excessive enginespeed in this condition is hazardous.
ti
i
t
2 "'tsau
rextron tnc.

1 DE-VIBE HANDLE2 THROTTLE TRIGGER3 CHOKE4 FUEL CAP r5 GRASS DEFLECTOR6 STRING HEAD7 STRING EYELET8 STRING9 "STOP'' BUTTON
1O MUFFLER11 SPARK PIUG BOOT12 AIR FILTER COVER13 STARTER GRIP
THE FACTS OF STRINGThe E-Z-LINE'" String Advance System is as simple as1-2-3- to operate:1. Run the engine at full throttle.2. Tap string head on ground to advance string.3. Besume trimming. For f urther details of string advance
operation, refer to page 5 of this manual.
Your String Trimmer was factory-tested. Be sure that you
TRIMMER OPERATIONreceive a String Trimmer Limited Warranty with yourString Trimmer. Check the unit for any damage whichmight have occurred during either transportation or stor-age. lf you discover damage to the String Trimmer, notifyyour dealer or shippqr immediately.PleaSe read this Owner's Manual carefully and make surethat you understand how to operate the unit properly andsafely.
165 ASSEMBLY INSTRUCTIONS
Grass Deflectorto DriveTube: Hold the grass def lectorupside down and insert the two large (10-24) squarenuts into the slots provided (see illustration).Hold the drive tube so that the string head is upsidedown. Assemble the grass deflector to the tube asillustrated, making sure that the two screw heads onthe tube are located in the slot in the grass deflectorand the hole in the clamp. lnstall the two 10-24 x 1 3/B^inch screws through the clamp and into the squarenuts. Ti ghten securely.
GRASS DEFLECTOR
1.
SLOTS FOR LARGESOUARE NUTS
STRINGHEAD
FRONTSCREWHEAD
3
DRIVE TUBE

Front Handle to Drive Tube: Remove the protective capfrom the end of the drive tube. Place the De-vibehandle on the tube with the open end of the handle tothe right side of the trimmer. Spread the clamps of thehandle so that it will slide down the tube withoutdisturbing the decal on the tube. The handle can beadjusted to a comfortable position after assembly iscomplete. lnstallthe 1/4-20 x 2 inch bolt from the lefthand side. Use the wing nut and tighten securely.Engine Housing to Drive Tube: lnsert the drive tubeinto the engrne housing until the decal is as close aspossible. There should be no more than 1/B inchbetween the engine housing and the decal (see illus-tration). Rotate the string head back and forth toengage the flexible shaft. Align ihe tube so that thebend is downward. Place the four small square nuts(10-32) in the pockets on the left side of the enginehousi ng. I nstal I the four smal I screws (1 0-32 x 3/ 4) andtighten secu rely.
SMALLSCREWS
DECAL TOLOCATE DRIVE TUBE Y
WING NUT1/4-20 x 2 in.
BOLT
PREPARING FOR USE
FUELINGWARNING
The tuel tank may be under pressure. Remove the capslowly to avoid spurting ol luel.
CAUTIONSelect bare ground for fueling. DO NOT SMOKE or bringany flame or sparks near ,uel. Move at leasl 10 feet (3m)lrom the lueling spot betore cranking the engine.
1. Recommended Fuel lngredients:a) Unleaded gasoline is preferable as leaded gasoline
will result in spark plug fouling at a faster rate.
b) Your 2-cycle engine is lubricated by oil mixed withgasoline. We recommend the exclusive use of aHomelite@ high quality 2-cycle engine oil. AnyHomelite 2-cycle engine oil, when mixed with gas-oline according to the instructions on the oil pack-age, will provide complete lubrication protection.
c) All Homelite 2-cycle engine oils contain an anti-oxidant f uel stabilizer. Under average conditions, f uel
mixed with Homelite oils will stay fresh up to 12
months.d) lf Homelite oils are not used, we recommend stabil-
ization of fuel with an anti-oxidant fuel stabilizer,such as Sta-bil, a product of Knox Laboratories,Chicago, lL 60616. Unstabilized f uel will stay f resh foronly up to three months and should not be used afterthat time.
e) lf otherthan Homelite oils are used. mix in the ratio of16 parts gasoline to 1 part 2-cycle oil(1 gallon: 8 oz')
regardless of the ratio given by the manufacturer ofthe oil.
WARNINGAlways use clean luel cans for both mixing and storage olfuel. Do not use glass bottles (which can shatter orexplode) or plastic jugs not intended lor gasoline storage.
2. How to Mix Fuel Thoroughly:a) Measure out the quantities or gasoirne and orl to be
mixed.b) Put some of the gasoiine rnto the mrxine can.c) Pour in all of theoil and agitatecontents by strrrrno or
by shaking the can.d) Pour in all of the gasoline. Again stir or agitate-thrs
time for at least one minute.3. Do Not Use:
a) GASOHOL. Alcohol draws moisture causing "per-oxides" and acids to form in the fuel. These sub-stances may damage the engine.
b) MULTI-GRADE OILS or any other oils not expresslylabelled tor 2-cycle engine use. Products formulatedfor 4-cycle engines usually contain additrves whichare either harmful or of no value in 2-cycle engineservice.
HOW TO FUELWARNING
Loosen fuel cap slowly to allow sa{e release of pressurelrom luel tank.1. Untwist and remove the fuel cap. Rest the cap on a
clean surface so that it will not be a source of f uel con-tamination.Pour in fuel carefully to the top. Avoid spiilage by notoverf illing.Screw the f uel cap on tightly. Wipe up any f uel spillageimmediately.
2.
4

STARTING AND STOPPING
SELECT FLAT, BARE GROUND.REST UNIT ON ENGINE ANDGRASS OEFLECTOR WHILECRANKING TO START ENGINE,
HOLDING DURING CRANKINGOn a ilat bare surface rest the unit on its grass deflectorand engine i-rousing. Hold the unit down with your lefthand and puli the starter with your right hand.
STARTING AND STOPPING ENGINE1. Position StringTrimmerforcranking (See illustration.)2. Pull out CHOKE to start a cold engine.
(Full-choke position.)
3. Pull starter ROPE until engine tries to run.
4. Push in CHOKE halfway. (Half-choke position.)
5. Again pull starter ROPE untilthe engine starts. lf theengine does not keep running, it may be necessary torepeat Steps 2,3 and 4.
6. After warm-up: (Up to three minutes warm-up may berequired, depending on ouiside temperature.) Depressthe TRIGGEH and push in the CHOKE. The trimmermay be used in haif-choke position forfasterwarm-up.
7. To stop. push and hold the "STOP" button until the unitstops.
8. When restarting a warm engine, pull out CHOKE onlyhalfway.
OPERATING CONTROLSSTOP BUTTON-This engine incorporates a spring loadedstop button located in the starter housing. The engine is
ready to start at all times. Push and hold the stop button in
to stop the engine.
STRING ADVANCE
The user controls advancement of string by tapping stringhead on ground:
1. Run engine at f ull throttle2. f ap string head on ground to advance string. String
advances each time head is taPPed.
3. Several taps may be required until string strikesthecutoff blade.
4. Resume trimming.
NOTEThis unit is equipped with a line Iimiting cut-olf blade onthe grass dellector. Overadvancing string will only resultin wasted string. Advance string jusi enough to reach themaximum '15" cutting swalh. Advance string wheneveryou hear engine running laster than the normal "fullstring" speed. This will prevent wearing string too short toadvance properly. ll string has been worn very short, orthe spool is nearly empty, several taps on ground may berequired to reeslablish full cutting swath.
The advance system may not operate properly if length ofstring outside string head is reduced to less lhan 1 1/2
inches. lf this should occur and string will not advancewhen the string head is tapped on ground, STOP THEENGINE, remove string spool and advance five inches ofstring manually per instructions and illustrations onpage B.
5

OPERATING DO'S AND DONT'S
i:iI
l
1. DO use String Trimmer on a slight tilt sostring contact occurs at one point (awayfrom you, for best cutting and minimumstring wear).
2. DO keep the String Trimmer head tiltedto confine trimming action to the seg.ment of the string circle away from you.Recommended segments of the cuttingcircle are illustrated. Best point of con.tact is marked. lf you do not cut with therecommended segment, debris will bethrown toward you.
3. DO approach your target positiongradually, - so that you will cut only withthe tip of the string and not smash itbroadside into a barrier.
4. DON'T ,se the whote 300 degreestring circle to cut. lf you do, you'll use uptoo much string.
IITIII
DANGEROUS CUTTINSEGMENT, DIS THROWNYOU.
o
BESTAREA
FORCUTTING
.llr,,:l::1r:,ili]*i€#*,1,;i'ial'j'ri:1,:g,r-ar€t;u'.:;i;i+.\\\ ., ;;+ilfi.,*,
);"./
TIP OF STRING SHOULD JUST,,t-t,,a::Q,,, :sq,, . ]L",a:\
;:3**;*,;:o/7vf>t\cc
tEYt\<'co-1*
A|{:::i;
'W:€,;l;::*?::;
,,ir€1,,S,rie*%L1*l
,,:j!Lt,:1iai],:::la,:rri::i3,r.
u4:} ,'#
6

<o##\1
l:,{:\:ri*i.
I r\r\
t;iji
I,I, H,,
tllull', r\.r,ii I {,.
,} l,
\
5. DON'T overfeed string, - overfedstring will break off.
6. Wire and picket fences are hard on string.Learn to feed slowly. Every time youcatch the string around a wire or picket itwill break off.
7. Stone and brick walls and curbs wearstring rapidly. Be sure not to overfeed.Even with minimum exposure ol the stringtip to the barrier, string wear will be highduring this kind of trimming.
8. Trim around trees. Take your time. Walkaround the tree. Do not whip the bark withan excessive length of string.
7

MAINTENANCE and ADJUSTMENT"".
STRING HEADYou should be aware of the construction of the string headso that you can reinstall parts properly if they ever get outof place.
Replacement string is available in coils of i 00 ft. (30.4 m)lengths (enough for four reloads) as well as on prewoundspools.Follow Steps 3 through 7 in the spool replacementinstructions for installing the prewound spool into thestring head.
STRING REPLACEMENT(Winding Reptacement String Onto Spoot)Use only Homelite@ monofilament string which has adiameter of .080" (2.0 mm)
1. Remove retainer cap by turning clockwise2 Lift out spool and spring.3 The spool is designed to hold a maximum ol 25lt. (7 6 m)
of .080" diameter stnng. Winding too much string onthe spool will adversely affect the performance of thestring advance system.
4. To rewind string on spool, insert one end of the stringthrough one of the two small holes in the spool f langeand then back through the remaining hole (seeillustration). Pull tobp tight.
5. Wind the string onto the spool in drrection of the arrowon. the bottom of the spool. Wind tightly in an evenpattern. After winding there should be 1/4,, betweenwound string and outside edge of spool (see illustration ).
SPOOL REPLACEMENT AND MANUALADVANCE'1 . Remove retainer cap by turning clockwise.2. Lift out the spool and spring. Remove the spring f rom
the old spool and install it on the new spool.3. Feed end of string through string head eyelet. Leave4,,
to 5" (10 to 12 cm) of string protruding f rom the stringhead.
4. Hold exposed string securely.5. Place spool (with spring) into string head. Make sure
that string does not get tangled on spool lugs.
7.
Reinstall the retainer cap by tu rning it cou nterclbckwiseand tighten securely. Once a year lightly grease .the POSTthreads on the retainer cap bolt.To test operation.of string advance, pull on string whilealternately pressing down on and releasing retainer.
RETAINER
LOWER SPOOLFLANGE
PLACE STBINGBETWEENTWO LUGSDURINGASSEMBLY
SPRING
UPPERSPOOLFLANGE
SPOOLLUG
6.
STBINGHEAD
1/4"REWINDSTRING TOTHISDIMENSION
8
TIGHTEN
EYELET

AIR FILTERAny time your Trimmer seems sluggrsh, or low on power,the filter should be cleaned in warm, soapy water andallowed to air dry before reassembling ontoTrimmer.Remove the f ilter covcr as shown.
,/AIR FILTER covER
LIFT COVER LOOSEAT THIS CORNER
FUEL CAP FILTERThe f uel cap contains a f ilter and a check valve. A cloggedfilter wi I cause failure to accelerate, and lean running. lfperformance improves when the fuel cap is loosened,suspect a faulty check valve or clogged f ilter. Replace fuelcap as requirec A leaking fuel cap is a fire hazard andshould be replaced.
FUEL CAP
a
4
GREASING THE DRIVE SHAFTThe flexible shaft should be inspected and greased every year.
1. Remove the drive tube from the engine housing.2. Pull the flexible drive shaft completely from the drive
tube.Clean the drive shaft with a cloth.Beverse the shall end to end lo add to its service lite. Asyou feed it back into the drive tube, lightly grease with amolybdenum disulfide grease product.lnsert the drive tube into the engind housing until thedecal lines up with the front handle clamp. (Seeillustration.) Rotate the string head during insertion toinsure engagement of'the f lexibte shaft with the driveshaft. Engagement has occurred it the string headbecomes diff icult to rotate.
Align the tube so the bend is downward. Then securethe drive tube in the engine housing by installing andtightening the four drivtj screws and nuts.
INSERT TUBE UPTO THE OECAL
NOTEAdjustments and repairs often can be attended to by thestring trirnmer owner. Exceptions are where special diag-nostic equipment.or tools, and training in small enginerepair work are re{uired. ln lhese cases where we believeit best lor the unit to be looked al by Homelite trainedpersonnel, we will tell you lo have the unit serviced by anauthorized Homelite Dealer. Most authorized HomeliteServicing Dealers, listed under "Saws" in the yellowpages, service our string trimmers as well as chain saws.
q
\_r\
DUCK BILLCHECK VALVE
)
FUEL TANK
9
AIR FILTER
-/ .ARBURET.R
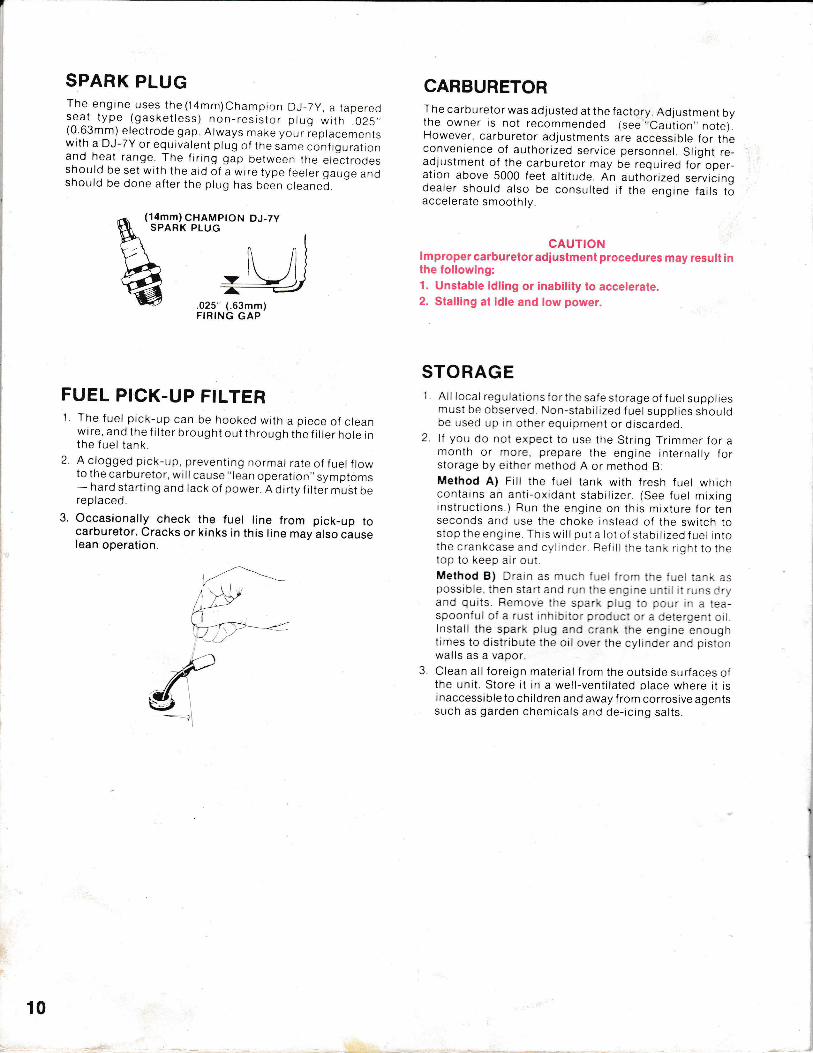
SPARK PLUGThe.engine uses the(l 4mm)Champion DJ_7y, a taperedsgqt type (gasketless) non-resistor plug with.025,,t!.QSm1n) electrode gap. Atways make your ieptacementswith a DJ-7Y or equivalent plug of the same conf igurationand heat range. The firing gap between the electrodesshould be set with the aid of a wire type feeler gauge andshould be done after the plug has been cleaned.
FUEL PICK.UP FILTER1. The fuel pick-up can be hooked with a piece of clean
wire, and the f ilter brought out through the f iller hole inthe fuel tank.
2. A clogged pick-up, preventing normal rate of fuel flowto the carburetor, will cause,,lean operation,, symptoms- hard starting and lack of power. A dirty f ilter must bereplaced.
3. Occasionally check the fuel line from pick-up tocarburetor. Cracks or kinks in this line may also causelean operation.
ffi-l\
H'i'*
w) CHAMPION OJ-7YK PLUG
^ ^[
-lL,/li---------€.025" (.63mm)FIRING GAP
CARBURETORThe carburetor was adjusted at the factory. Adjustment bythe owner is not recommended (see-,,Caution" note).However, carburetor adjustments are accessible for theconvenience of authorized service personnel. Slight re_adiustment of the carburetor may be required foioper_ation above 5000 feet altitude. An authorized servicingdealer should also be consulted if the engine fails t5accelerate smoothly.
CAUTIONlmproper carburetor adjustment procedures may result inthe lollowing:1. Unstable idling or inability to accelerate.2. Stalling at idle and low power.
STORAGE1 . All local regulations for the safe storage of f uel supplies
musl be observed. Non-stabilized fuel supplies shouldbe used up in other equipment or discarded.
2. ll you do not expect to use the String Trimmer for amonth or more, prepare the engine internally forstorage by either method A or method B:Melhod A) Fill the fuel tank with fresh fuel whichcontains an anti-oxidant stabilizer. (See fuel mixinginstructions.) Run the engine on this mixture for tenseconds and use the choke instead of the switch tostop the engine. This will put a lot of stabilized f uel intothe crankcase and cylinder. Refillthe tank right to thetop to keep air out.Method B) Drain as much luel from the fuel tank aspossible, then start and run the engine until it runs dryand quits. Remove the spark plug to pour in a tea-spoonful of a rust inhibitor product or a detergent oil.lnstall the spark plug and crank the engine enoughtimes to distribute the oil over the cylinder and pistonwalls as a vapor.
3. Clean all foreign material f rom the outside surfaces ofthe unit. Store lt in a well-ventilated place where it isinaccessible to children and away f rom corrosive agentssuch as garden chemicals and de-icing salts.
10

REPLACEMENT .080" (2mm) DIAMETER STRING
DA-97951
3" (8 cm) DIAMETER SPOOL AND STRING PACKThis pack contains 25 feet (7.6m) of string prewound on aspool.
DA-97952-A
lOO FT. LOOP OF STRTNGThis 100 feet long (30.4m) loop of string can be cut into 25feet (7.6m) lengths- enough fgr four reloads.
25 FT. SPOOLED STRING
1OO FT. LOOP STRING ONLY
FILL IN THIS INFORMATION FOR YOUR RECQRD
MODEL NO. /a{UT NO. 3o93bSERIAL NO t€osfDArE oF PUR.H or, - {/rq/raNAME oF DEALER /J0 /+RP {4 A N S
ADDRESS /2tualAuf,ltr, r.{lNVorcENo. of-tW

SERVICING DEALER INFORMATIONFor the location of your nearest HomeliteServicing Dealer in the coritiguous UnitedStates, Hawaii, puefio Rico, and the Virginlslands.
GALL: 1-8()()-242-46221-8OO-521 15l O5 N.C. Res. only
NOTE: Only DEaler Location lnlormationcan be obtaine"i at this number.
HOMELITE DIVISION OF TEXTRON INC.,P.O. Box 7O47
1 4401 Ca rowinds.BoulevardChartotte, N.C. ZBZ17
'i,t { u 11 Efiyf,4L e;qtaL
{k zbs z% zzzo
Ye@o
HOMELITE o
omelite Division of Textron lnc.