Manual Beckhoff Service Tool - download
28
AS2000 Blindtext Blindtext Blindtext Manual | EN BST Beckhoff Service Tool 1/19/2021 | Version: 1.0
-
Upload
khangminh22 -
Category
Documents
-
view
1 -
download
0
Transcript of Manual Beckhoff Service Tool - download
AS2000
Blindtext Blindtext Blindtext
Manual | EN
BSTBeckhoff Service Tool
1/19/2021 | Version: 1.0

Table of contents
BST 3Version: 1.0
Table of contents1 Notes on the documentation .................................................................................................................... 5
1.1 Explanation of symbols...................................................................................................................... 61.2 Documentation issue status .............................................................................................................. 7
2 Overview..................................................................................................................................................... 82.1 Supported Platforms.......................................................................................................................... 92.2 BST start page................................................................................................................................. 10
3 ApplyBST tool .......................................................................................................................................... 11
4 Remote access with TightVNC............................................................................................................... 12
5 Create and restore images ..................................................................................................................... 135.1 Start the Beckhoff Service Tool (BST)............................................................................................. 135.2 Create image ................................................................................................................................... 145.3 Restore image ................................................................................................................................. 16
6 Configuration ........................................................................................................................................... 196.1 Using Easy mode ............................................................................................................................ 196.2 Manage images ............................................................................................................................... 216.3 Enable General – Check Platforms ................................................................................................. 226.4 Configuring Linked buttons.............................................................................................................. 236.5 Connect to network drive................................................................................................................. 246.6 Set up Fallback................................................................................................................................ 25
7 Appendix .................................................................................................................................................. 267.1 Support and Service ........................................................................................................................ 26

Table of contents
BST4 Version: 1.0
Notes on the documentation
BST 5Version: 1.0
1 Notes on the documentationThis description is only intended for the use of trained specialists in control and automation engineering whoare familiar with applicable national standards.It is essential that the documentation and the following notes and explanations are followed when installingand commissioning the components. It is the duty of the technical personnel to use the documentation published at the respective time of eachinstallation and commissioning.
The responsible staff must ensure that the application or use of the products described satisfy all therequirements for safety, including all the relevant laws, regulations, guidelines and standards.
Disclaimer
The documentation has been prepared with care. The products described are, however, constantly underdevelopment.We reserve the right to revise and change the documentation at any time and without prior announcement.No claims for the modification of products that have already been supplied may be made on the basis of thedata, diagrams and descriptions in this documentation.
Trademarks
Beckhoff®, TwinCAT®, EtherCAT®, EtherCAT G®, EtherCAT G10®, EtherCAT P®, Safety over EtherCAT®,TwinSAFE®, XFC®, XTS® and XPlanar® are registered trademarks of and licensed by Beckhoff AutomationGmbH.Other designations used in this publication may be trademarks whose use by third parties for their ownpurposes could violate the rights of the owners.
Patent Pending
The EtherCAT Technology is covered, including but not limited to the following patent applications andpatents:EP1590927, EP1789857, EP1456722, EP2137893, DE102015105702with corresponding applications or registrations in various other countries.
EtherCAT® is a registered trademark and patented technology, licensed by Beckhoff Automation GmbH,Germany
Copyright
© Beckhoff Automation GmbH & Co. KG, Germany.The reproduction, distribution and utilization of this document as well as the communication of its contents toothers without express authorization are prohibited.Offenders will be held liable for the payment of damages. All rights reserved in the event of the grant of apatent, utility model or design.
Notes on the documentation
BST6 Version: 1.0
1.1 Explanation of symbolsThe following symbols with corresponding warnings or explanatory text are used in the documentation. Readand follow the warnings.
Symbols that warn of personal injury:
DANGERSerious risk of injuryNote this warning. Hazard with high risk of death or serious injury.
WARNINGRisk of injuryNote this warning. Hazard with medium risk of death or serious injury.
CAUTIONPersonal injuriesNote this warning. Hazard with a low degree of risk, which could lead to minor or moderate injury.
Symbols that warn of damage to property or equipment:
NOTEDamage to the devices or environmentNote this warning. Risk of damage to the environment and equipment.
Symbols indicating further information or tips:
Tip or pointerThis symbol indicates information that contributes to better understanding.

Notes on the documentation
BST 7Version: 1.0
1.2 Documentation issue statusVersion Changes1.0 First Version
Overview
BST8 Version: 1.0
2 OverviewThe Beckhoff Service Tool, BST for short, is an easy-to-use graphical backup and recovery program forIndustrial PCs with a Windows operating system.
With the Beckhoff Service Tool (BST) you can create an image of your operating system at any time and useit to back up your operating system. You can then restore the created images in the event of an error, or youcan use the images to create PC systems with identical configurations and settings.
The BST is supplied on a BST stick. The BST sticks are available in sizes of 4, 8, 16 or 32 GB. The BSTstarts as soon as you boot the Industrial PC from the BST stick. You can save the images on the IndustrialPC, on a network drive or directly on the BST stick.
BST versions and supported platforms
The BST is available in two versions:
• With Flat Boot. Platforms with less than 2 GB and Legacy BIOS mode are supported.• With RAM Boot. Platforms with 2 GB or higher and Legacy/UEFI (x64) BIOS mode are supported.
For a detailed listing of order numbers and a feature matrix, see Supported Platforms [} 9].
Updating the BST stick with the ApplyBST tool
You can use the ApplyBST tool to update a BST stick. You can download the latest BST versions from theBeckhoff website. ApplyBST tool [} 11]
Remote access with TightVNC
The program TightVNC enables remote access to the BST. TightVNC can be downloaded free of charge.Use remote access if no input and output devices are available for configuring the BST on an Industrial PC.Remote access with TightVNC [} 12]
Overview
BST 9Version: 1.0
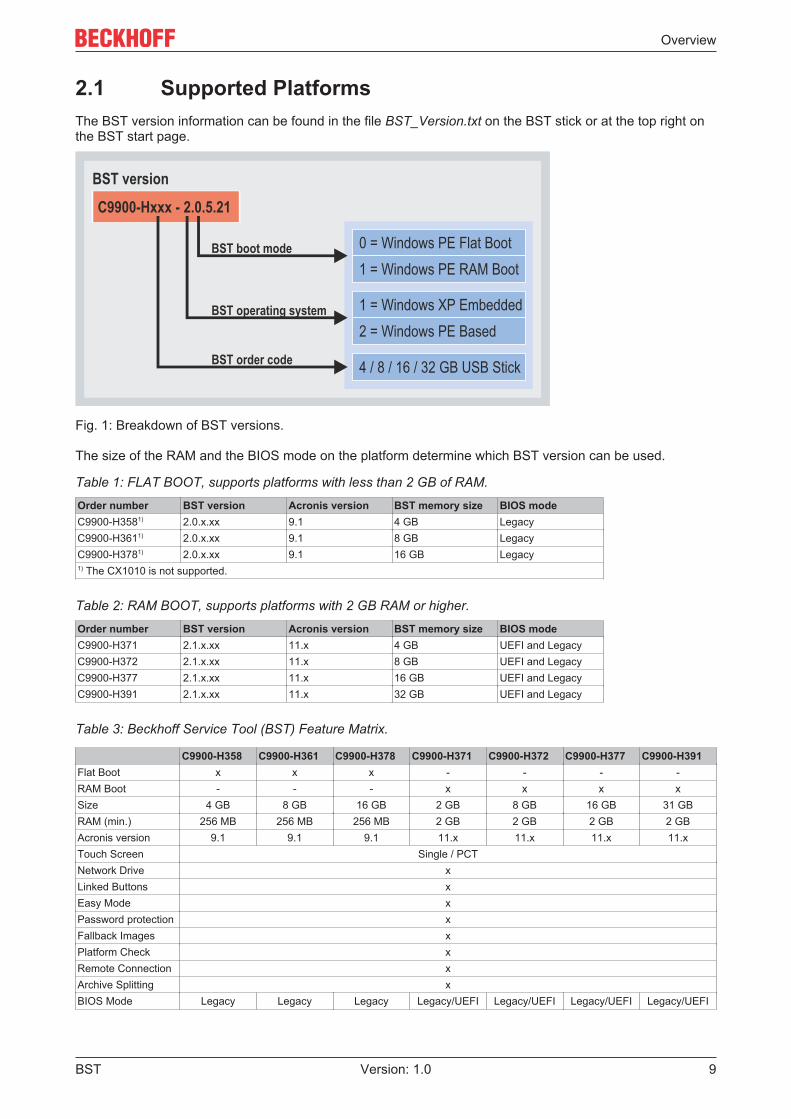
2.1 Supported PlatformsThe BST version information can be found in the file BST_Version.txt on the BST stick or at the top right onthe BST start page.
BST version
C9900-Hxxx - 2.0.5.21
0 = Windows PE Flat Boot1 = Windows PE RAM Boot
1 = Windows XP Embedded2 = Windows PE Based
4 / 8 / 16 / 32 GB USB Stick
BST boot mode
BST operating system
BST order code
Fig. 1: Breakdown of BST versions.
The size of the RAM and the BIOS mode on the platform determine which BST version can be used.
Table 1: FLAT BOOT, supports platforms with less than 2 GB of RAM.
Order number BST version Acronis version BST memory size BIOS modeC9900-H3581) 2.0.x.xx 9.1 4 GB LegacyC9900-H3611) 2.0.x.xx 9.1 8 GB LegacyC9900-H3781) 2.0.x.xx 9.1 16 GB Legacy1) The CX1010 is not supported.
Table 2: RAM BOOT, supports platforms with 2 GB RAM or higher.
Order number BST version Acronis version BST memory size BIOS modeC9900-H371 2.1.x.xx 11.x 4 GB UEFI and LegacyC9900-H372 2.1.x.xx 11.x 8 GB UEFI and LegacyC9900-H377 2.1.x.xx 11.x 16 GB UEFI and LegacyC9900-H391 2.1.x.xx 11.x 32 GB UEFI and Legacy
Table 3: Beckhoff Service Tool (BST) Feature Matrix.
C9900-H358 C9900-H361 C9900-H378 C9900-H371 C9900-H372 C9900-H377 C9900-H391Flat Boot x x x - - - -RAM Boot - - - x x x xSize 4 GB 8 GB 16 GB 2 GB 8 GB 16 GB 31 GBRAM (min.) 256 MB 256 MB 256 MB 2 GB 2 GB 2 GB 2 GBAcronis version 9.1 9.1 9.1 11.x 11.x 11.x 11.xTouch Screen Single / PCTNetwork Drive xLinked Buttons xEasy Mode xPassword protection xFallback Images xPlatform Check xRemote Connection xArchive Splitting xBIOS Mode Legacy Legacy Legacy Legacy/UEFI Legacy/UEFI Legacy/UEFI Legacy/UEFI

Overview
BST10 Version: 1.0
2.2 BST start pageThe start page of the Beckhoff Service Tool (BST) appears as soon as the Industrial PC has successfullybooted from the BST stick.
1
2
3
6
4
5
Fig. 2: Graphical user interface of the Beckhoff Service Tool (BST) after startup.
Table 4: Legend for the start page setup.
No. Button Description1 Backup [} 14] Creates an Acronis image of storage media or individual partitions
in *.tib format.2 Easy mode [} 19] Enables or disables Easy mode. With Easy mode enabled, the
Backup or Restore button can be used to automatically create orrestore an image with predefined default settings.The default settings for the Easy mode can be configured underSettings.
3 Manage Images [} 21] Use this button to manage the images4 Settings Further settings, e.g. user-defined buttons, Easy mode, network
drives and Fallback.5 CalibrateELO Starts the calibration program, e.g. to calibrate touchscreens
directly from the BST.6 Restore [} 16] This button can be used to restore previously created images or to
install Beckhoff images.
ApplyBST tool
BST 11Version: 1.0
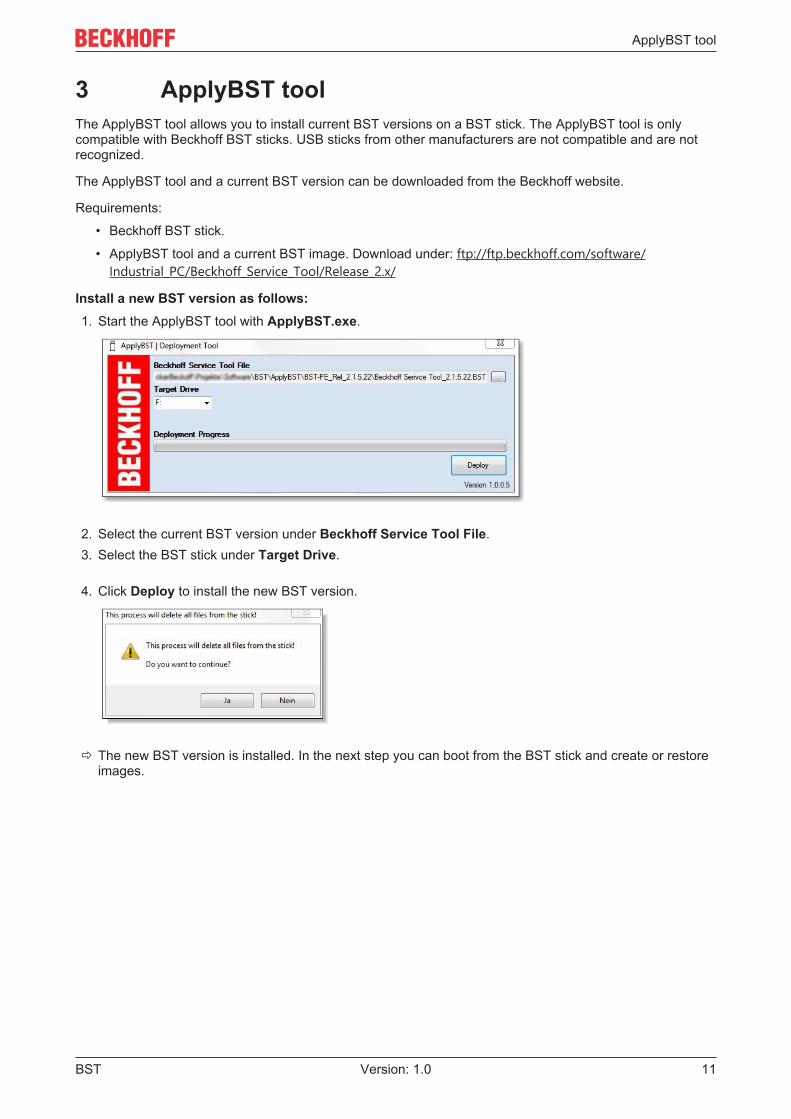
3 ApplyBST toolThe ApplyBST tool allows you to install current BST versions on a BST stick. The ApplyBST tool is onlycompatible with Beckhoff BST sticks. USB sticks from other manufacturers are not compatible and are notrecognized.
The ApplyBST tool and a current BST version can be downloaded from the Beckhoff website.
Requirements:
• Beckhoff BST stick.
• ApplyBST tool and a current BST image. Download under: ftp://ftp.beckhoff.com/software/Industrial_PC/Beckhoff_Service_Tool/Release_2.x/
Install a new BST version as follows:1. Start the ApplyBST tool with ApplyBST.exe.
2. Select the current BST version under Beckhoff Service Tool File.3. Select the BST stick under Target Drive.
4. Click Deploy to install the new BST version.
ð The new BST version is installed. In the next step you can boot from the BST stick and create or restoreimages.
Remote access with TightVNC
BST12 Version: 1.0
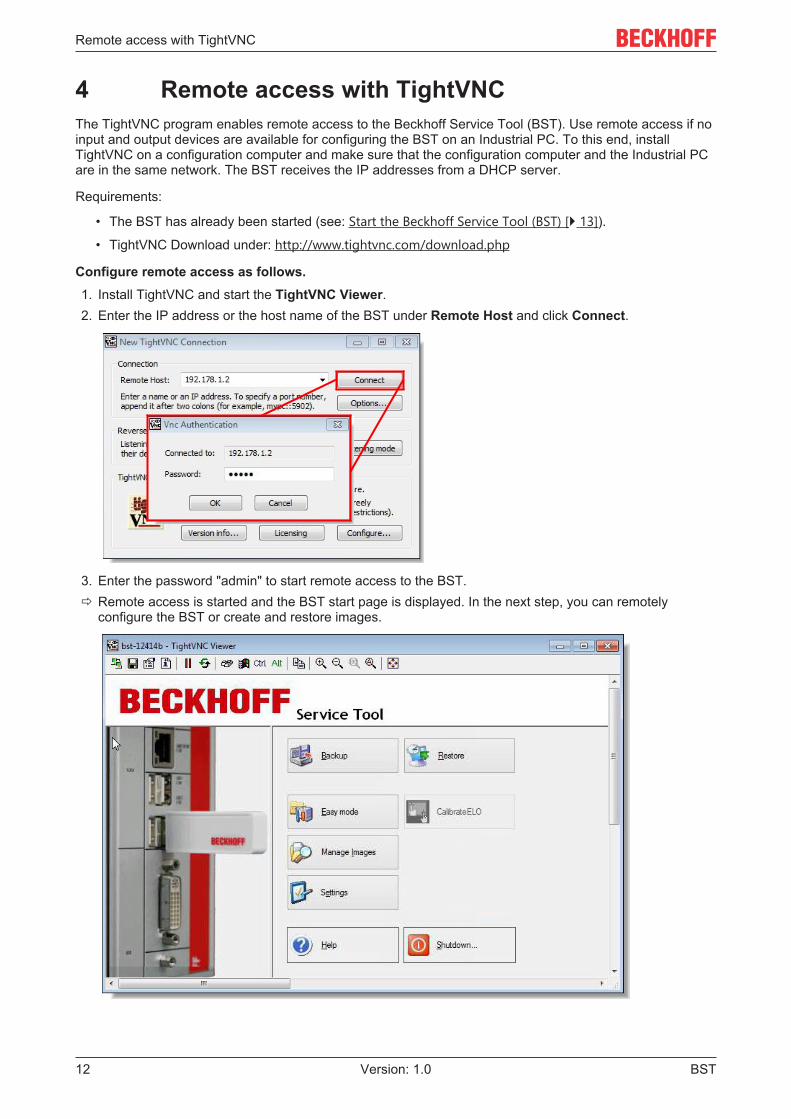
4 Remote access with TightVNCThe TightVNC program enables remote access to the Beckhoff Service Tool (BST). Use remote access if noinput and output devices are available for configuring the BST on an Industrial PC. To this end, installTightVNC on a configuration computer and make sure that the configuration computer and the Industrial PCare in the same network. The BST receives the IP addresses from a DHCP server.
Requirements:
• The BST has already been started (see: Start the Beckhoff Service Tool (BST) [} 13]).
• TightVNC Download under: http://www.tightvnc.com/download.php
Configure remote access as follows.1. Install TightVNC and start the TightVNC Viewer.2. Enter the IP address or the host name of the BST under Remote Host and click Connect.
3. Enter the password "admin" to start remote access to the BST.ð Remote access is started and the BST start page is displayed. In the next step, you can remotely
configure the BST or create and restore images.
Create and restore images
BST 13Version: 1.0
5 Create and restore images
5.1 Start the Beckhoff Service Tool (BST)The Industrial PC must be booted from the BST USB flash drive in order to start the BST. Observe the bootorder in the BIOS.
If the BST doesn't start, this means that the boot order has been changed or you are not using the correctBST version for the Industrial PC in use. Check the boot order in the BIOS and whether you are using thecorrect BST version.
Requirements
• BST USB flash drive is connected to an Industrial PC. The BST USB flash drive must be connecteddirectly to the Industrial PC without a USB hub or a USB extension.
• The USB flash drive is the first boot medium in the BIOS.
• Correct BST version for the Industrial PC in use (see: Supported Platforms [} 9]).
Start the BST as follows:1. Connect the BST USB flash drive to the Industrial PC and start the Industrial PC.
2. The BST is started and the start page is displayed.
- if the BST doesn't start -
3. Restart the Industrial PC and press [Del].The BIOS is started.
4. Check under Boot > FIXED BOOT ORDER Priorities whether the option Beckhoff Stick is set underBoot Option #1.
5. Check under Boot > Boot mode select whether the correct boot mode is selected for your BST. InDUAL mode the correct boot mode is selected automatically, depending on the BST.
6. Save the settings and exit from the BIOS.
ð The BST is started with the correct boot order and the correct BST for Legacy or UEFI BIOS.
Create and restore images
BST14 Version: 1.0
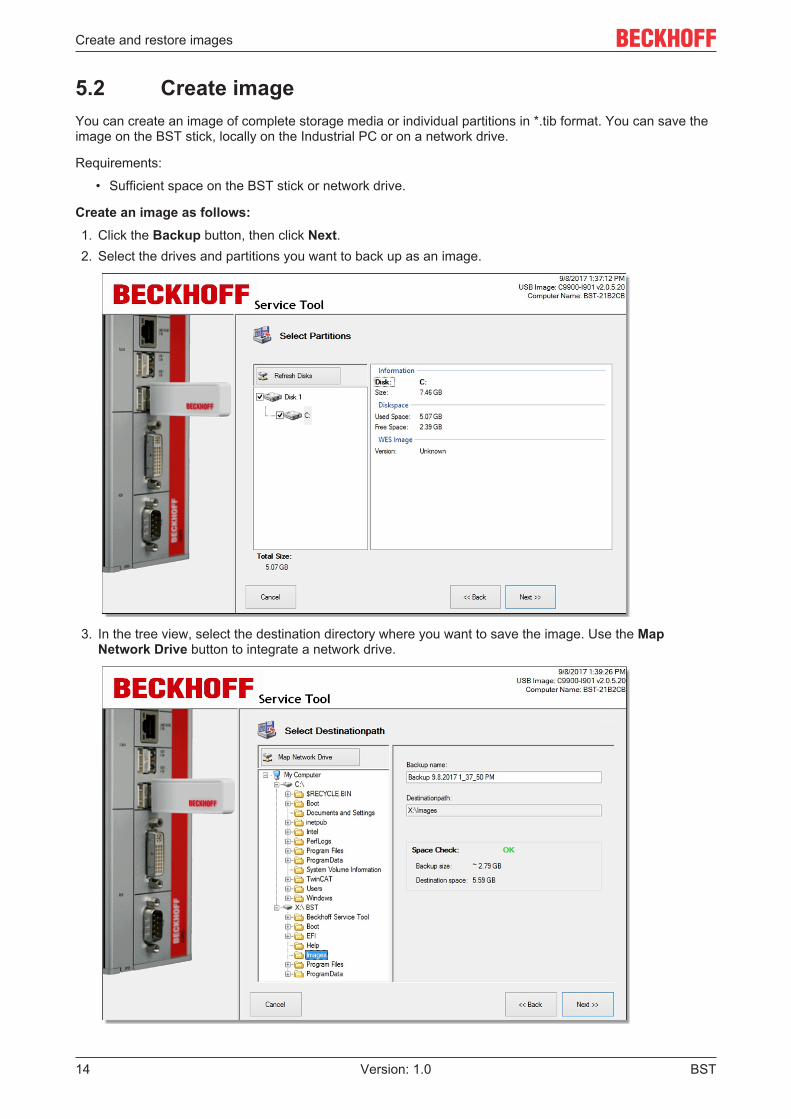
5.2 Create imageYou can create an image of complete storage media or individual partitions in *.tib format. You can save theimage on the BST stick, locally on the Industrial PC or on a network drive.
Requirements:
• Sufficient space on the BST stick or network drive.
Create an image as follows:1. Click the Backup button, then click Next.2. Select the drives and partitions you want to back up as an image.
3. In the tree view, select the destination directory where you want to save the image. Use the MapNetwork Drive button to integrate a network drive.
Create and restore images
BST 15Version: 1.0
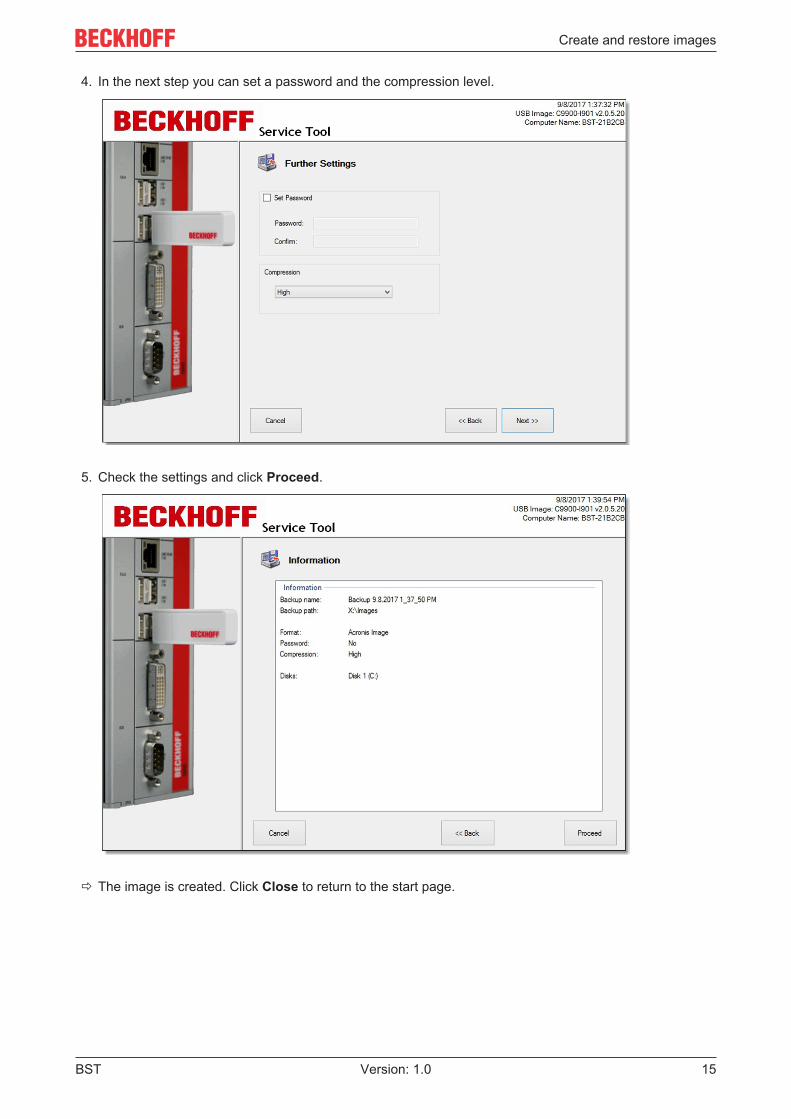
4. In the next step you can set a password and the compression level.
5. Check the settings and click Proceed.
ð The image is created. Click Close to return to the start page.
Create and restore images
BST16 Version: 1.0
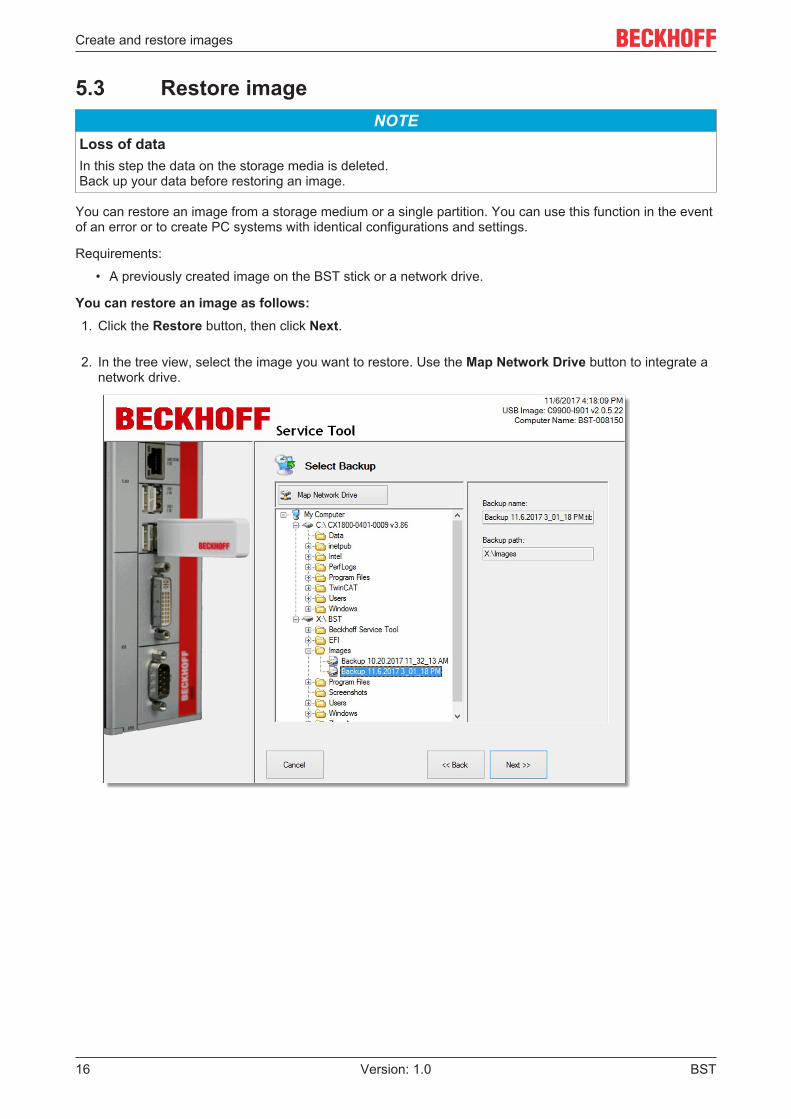
5.3 Restore imageNOTE
Loss of dataIn this step the data on the storage media is deleted.Back up your data before restoring an image.
You can restore an image from a storage medium or a single partition. You can use this function in the eventof an error or to create PC systems with identical configurations and settings.
Requirements:
• A previously created image on the BST stick or a network drive.
You can restore an image as follows:1. Click the Restore button, then click Next.
2. In the tree view, select the image you want to restore. Use the Map Network Drive button to integrate anetwork drive.
Create and restore images
BST 17Version: 1.0
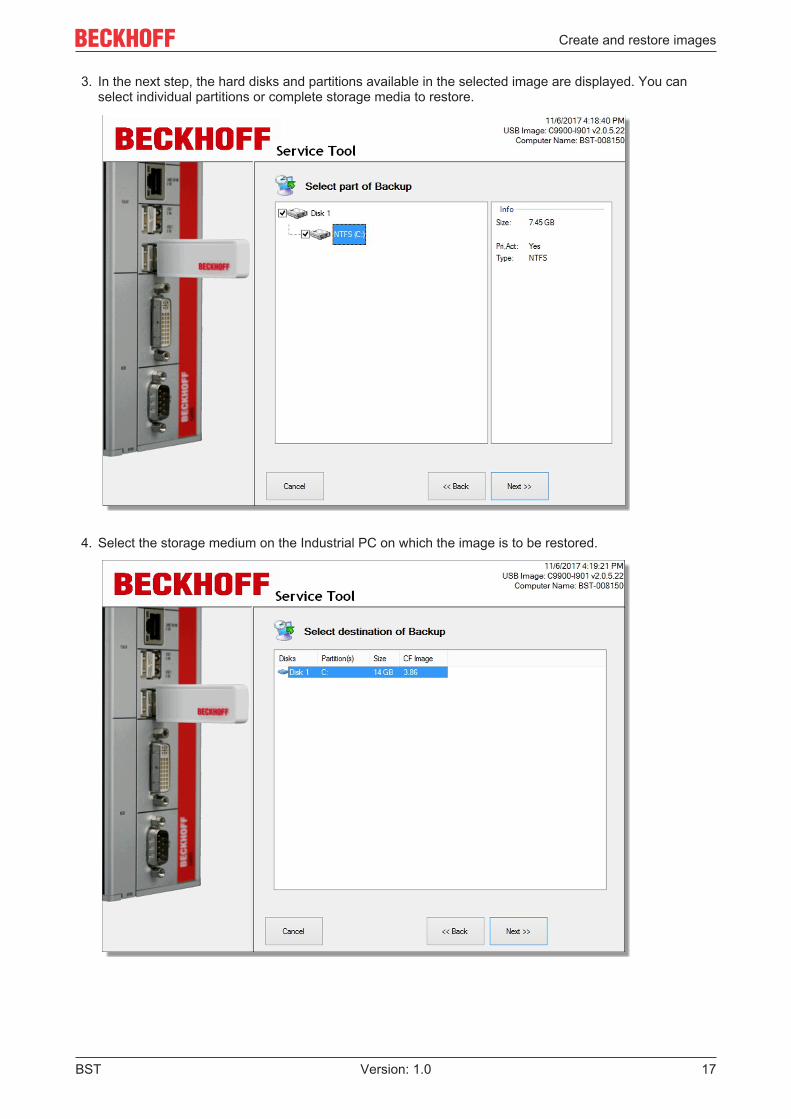
3. In the next step, the hard disks and partitions available in the selected image are displayed. You canselect individual partitions or complete storage media to restore.
4. Select the storage medium on the Industrial PC on which the image is to be restored.
Create and restore images
BST18 Version: 1.0
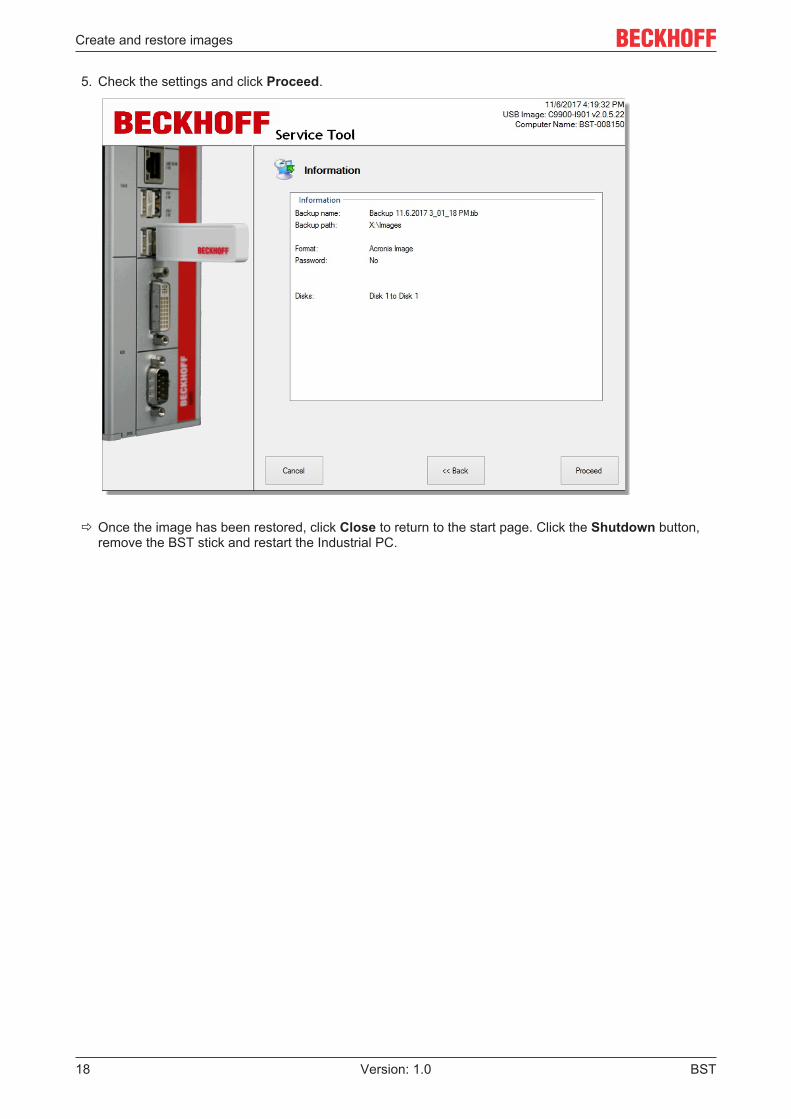
5. Check the settings and click Proceed.
ð Once the image has been restored, click Close to return to the start page. Click the Shutdown button,remove the BST stick and restart the Industrial PC.
Configuration
BST 19Version: 1.0
6 Configuration
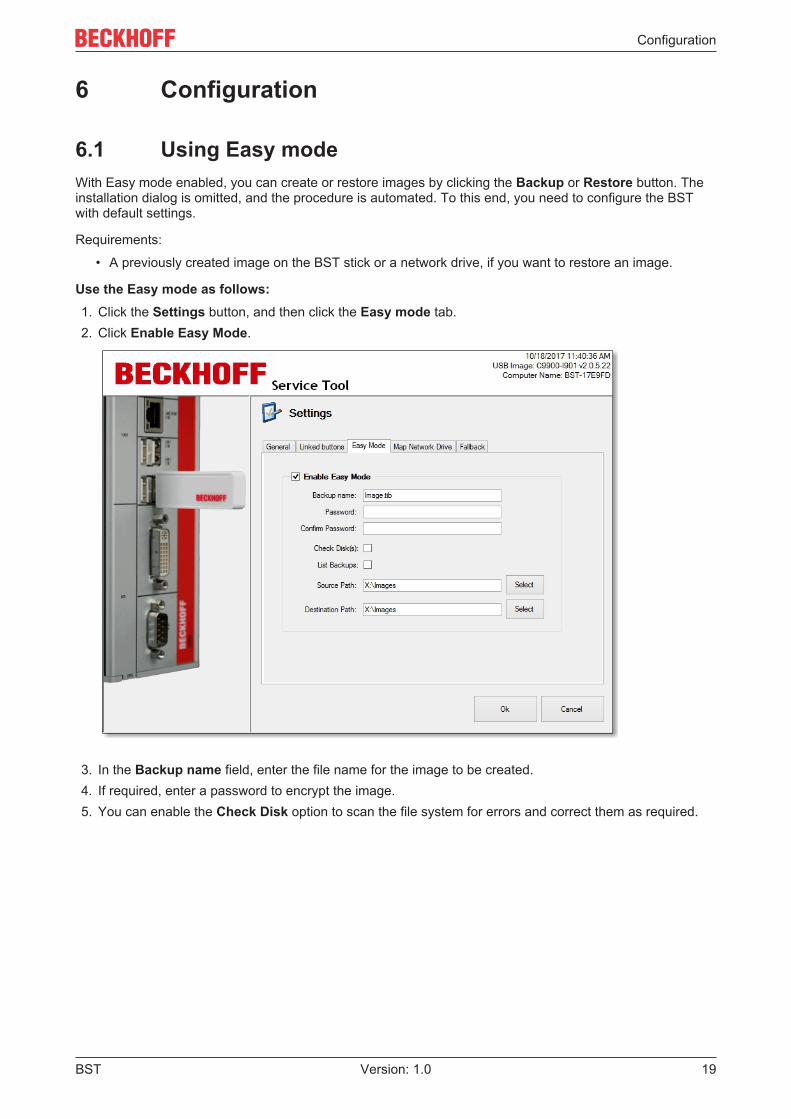
6.1 Using Easy modeWith Easy mode enabled, you can create or restore images by clicking the Backup or Restore button. Theinstallation dialog is omitted, and the procedure is automated. To this end, you need to configure the BSTwith default settings.
Requirements:
• A previously created image on the BST stick or a network drive, if you want to restore an image.
Use the Easy mode as follows:1. Click the Settings button, and then click the Easy mode tab.2. Click Enable Easy Mode.
3. In the Backup name field, enter the file name for the image to be created.4. If required, enter a password to encrypt the image.5. You can enable the Check Disk option to scan the file system for errors and correct them as required.
Configuration
BST20 Version: 1.0
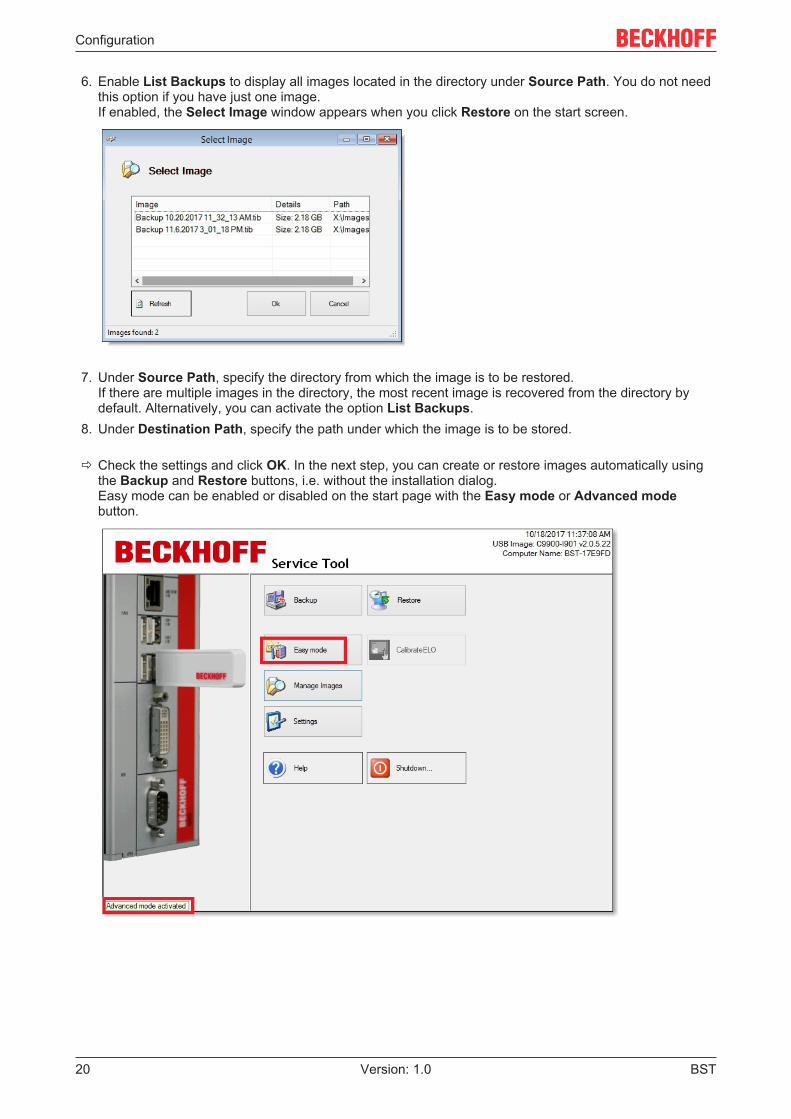
6. Enable List Backups to display all images located in the directory under Source Path. You do not needthis option if you have just one image.If enabled, the Select Image window appears when you click Restore on the start screen.
7. Under Source Path, specify the directory from which the image is to be restored.If there are multiple images in the directory, the most recent image is recovered from the directory bydefault. Alternatively, you can activate the option List Backups.
8. Under Destination Path, specify the path under which the image is to be stored.
ð Check the settings and click OK. In the next step, you can create or restore images automatically usingthe Backup and Restore buttons, i.e. without the installation dialog.Easy mode can be enabled or disabled on the start page with the Easy mode or Advanced modebutton.
Configuration
BST 21Version: 1.0
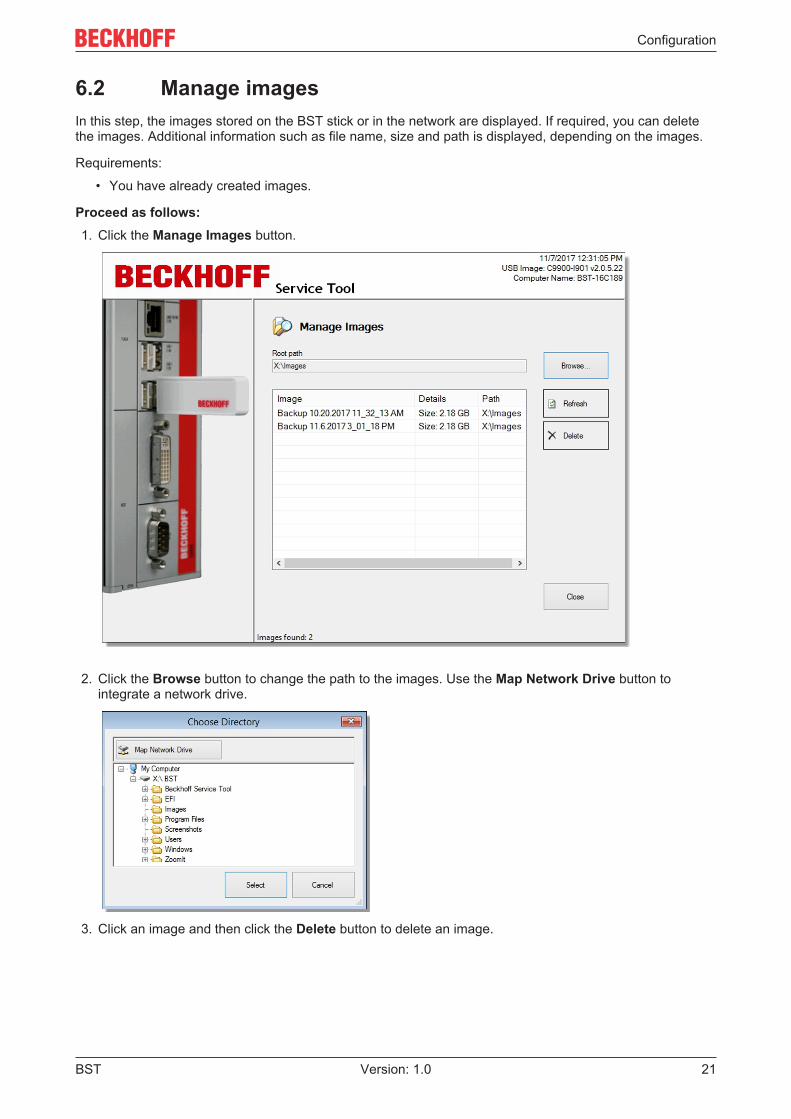
6.2 Manage imagesIn this step, the images stored on the BST stick or in the network are displayed. If required, you can deletethe images. Additional information such as file name, size and path is displayed, depending on the images.
Requirements:
• You have already created images.
Proceed as follows:1. Click the Manage Images button.
2. Click the Browse button to change the path to the images. Use the Map Network Drive button tointegrate a network drive.
3. Click an image and then click the Delete button to delete an image.
Configuration
BST22 Version: 1.0
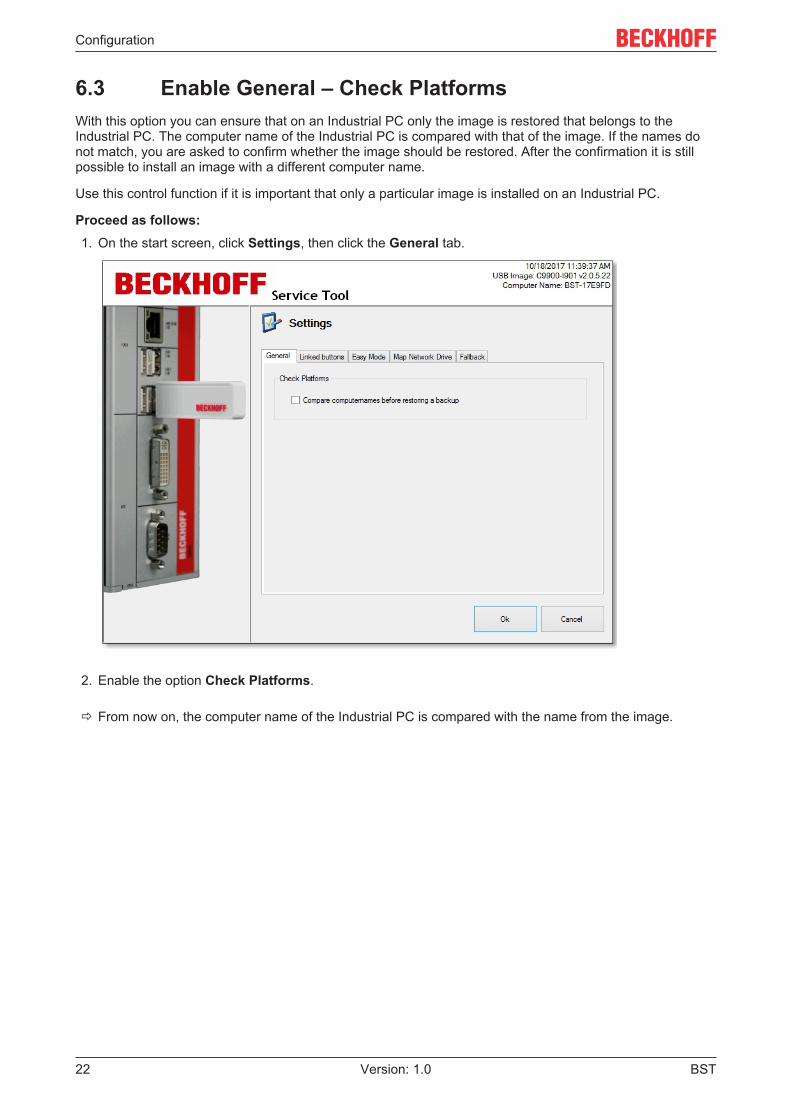
6.3 Enable General – Check PlatformsWith this option you can ensure that on an Industrial PC only the image is restored that belongs to theIndustrial PC. The computer name of the Industrial PC is compared with that of the image. If the names donot match, you are asked to confirm whether the image should be restored. After the confirmation it is stillpossible to install an image with a different computer name.
Use this control function if it is important that only a particular image is installed on an Industrial PC.
Proceed as follows:1. On the start screen, click Settings, then click the General tab.
2. Enable the option Check Platforms.
ð From now on, the computer name of the Industrial PC is compared with the name from the image.
Configuration
BST 23Version: 1.0
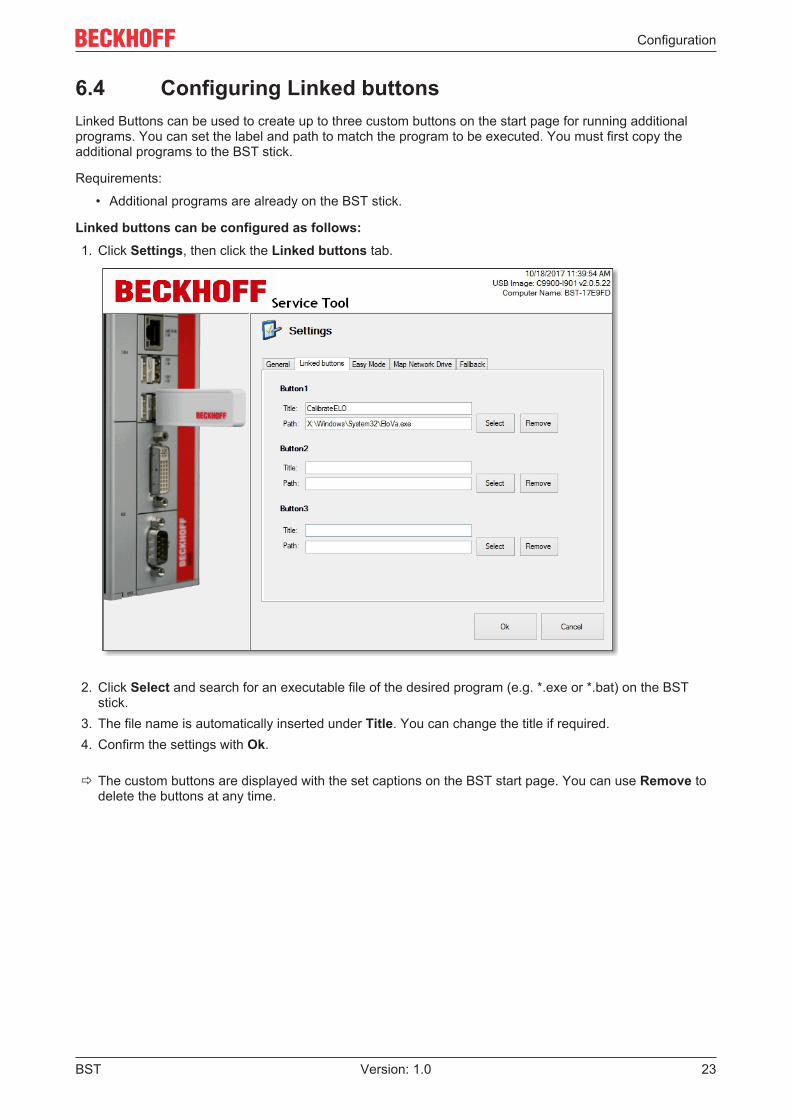
6.4 Configuring Linked buttonsLinked Buttons can be used to create up to three custom buttons on the start page for running additionalprograms. You can set the label and path to match the program to be executed. You must first copy theadditional programs to the BST stick.
Requirements:
• Additional programs are already on the BST stick.
Linked buttons can be configured as follows:1. Click Settings, then click the Linked buttons tab.
2. Click Select and search for an executable file of the desired program (e.g. *.exe or *.bat) on the BSTstick.
3. The file name is automatically inserted under Title. You can change the title if required.4. Confirm the settings with Ok.
ð The custom buttons are displayed with the set captions on the BST start page. You can use Remove todelete the buttons at any time.
Configuration
BST24 Version: 1.0
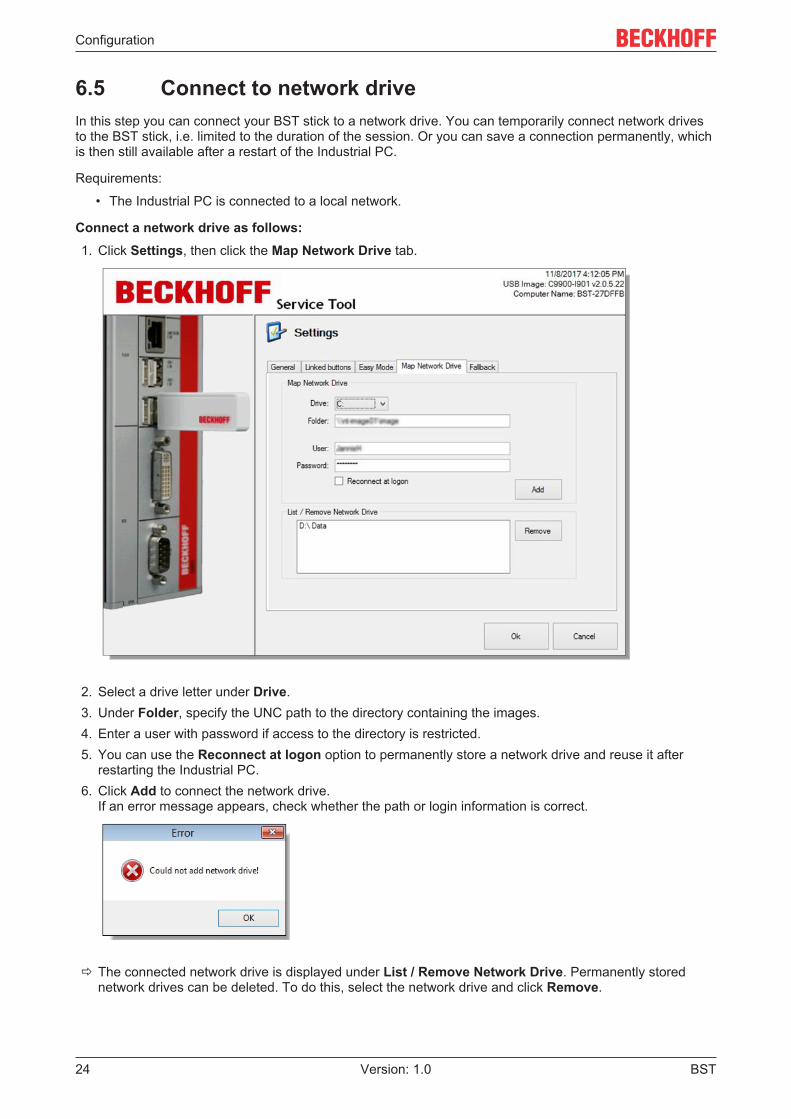
6.5 Connect to network driveIn this step you can connect your BST stick to a network drive. You can temporarily connect network drivesto the BST stick, i.e. limited to the duration of the session. Or you can save a connection permanently, whichis then still available after a restart of the Industrial PC.
Requirements:
• The Industrial PC is connected to a local network.
Connect a network drive as follows:1. Click Settings, then click the Map Network Drive tab.
2. Select a drive letter under Drive.3. Under Folder, specify the UNC path to the directory containing the images.4. Enter a user with password if access to the directory is restricted.5. You can use the Reconnect at logon option to permanently store a network drive and reuse it after
restarting the Industrial PC.6. Click Add to connect the network drive.
If an error message appears, check whether the path or login information is correct.
ð The connected network drive is displayed under List / Remove Network Drive. Permanently storednetwork drives can be deleted. To do this, select the network drive and click Remove.
Configuration
BST 25Version: 1.0
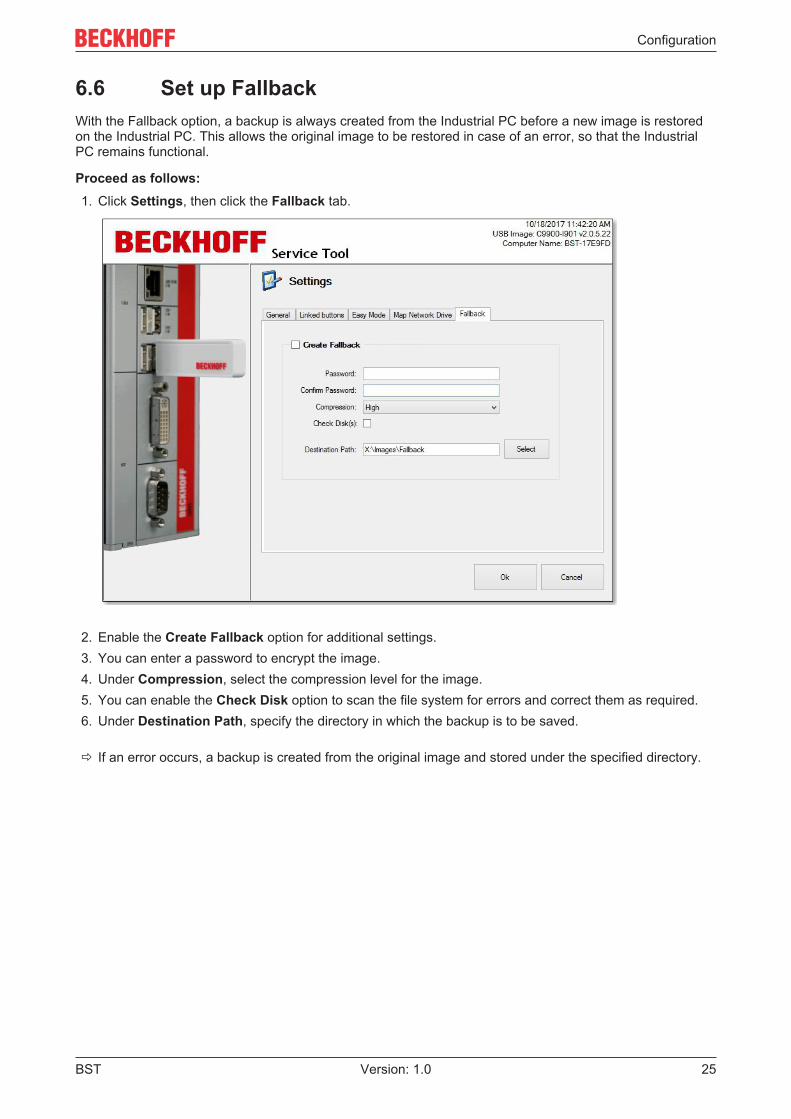
6.6 Set up FallbackWith the Fallback option, a backup is always created from the Industrial PC before a new image is restoredon the Industrial PC. This allows the original image to be restored in case of an error, so that the IndustrialPC remains functional.
Proceed as follows:1. Click Settings, then click the Fallback tab.
2. Enable the Create Fallback option for additional settings.3. You can enter a password to encrypt the image.4. Under Compression, select the compression level for the image.5. You can enable the Check Disk option to scan the file system for errors and correct them as required.6. Under Destination Path, specify the directory in which the backup is to be saved.
ð If an error occurs, a backup is created from the original image and stored under the specified directory.
Appendix
BST26 Version: 1.0
7 Appendix
7.1 Support and ServiceBeckhoff and their partners around the world offer comprehensive support and service, making available fastand competent assistance with all questions related to Beckhoff products and system solutions.
Beckhoff's branch offices and representatives
Please contact your Beckhoff branch office or representative for local support and service on Beckhoffproducts!
The addresses of Beckhoff's branch offices and representatives round the world can be found on her internetpages:http://www.beckhoff.com
You will also find further documentation for Beckhoff components there.
Beckhoff Headquarters
Beckhoff Automation GmbH & Co. KG
Huelshorstweg 2033415 VerlGermany
Phone: +49(0)5246/963-0Fax: +49(0)5246/963-198e-mail: [email protected]
Beckhoff Support
Support offers you comprehensive technical assistance, helping you not only with the application ofindividual Beckhoff products, but also with other, wide-ranging services:
• support• design, programming and commissioning of complex automation systems• and extensive training program for Beckhoff system components
Hotline: +49(0)5246/963-157Fax: +49(0)5246/963-9157e-mail: [email protected]
Beckhoff Service
The Beckhoff Service Center supports you in all matters of after-sales service:
• on-site service• repair service• spare parts service• hotline service
Hotline: +49(0)5246/963-460Fax: +49(0)5246/963-479e-mail: [email protected]


Beckhoff Automation GmbH & Co. KGHülshorstweg 2033415 VerlGermanyPhone: +49 5246 [email protected]