Little Sound Dj v3.1.7 Operation Manual
41
Little Sound Dj v3.1.7 Operation Manual
-
Upload
khangminh22 -
Category
Documents
-
view
0 -
download
0
Transcript of Little Sound Dj v3.1.7 Operation Manual

Little Sound Dj v3.1.7
Operation Manual

Little Sound Dj Operation Manual Copyright © 2000-2004, Johan Kotlinski Logo design by David Lindecrantz ([email protected]) Typeface design by Ola Persson ([email protected]) Disclaimer Nintendo, Game Boy and Game Boy Color are registered trademarks of Nintendo, Inc. Nintendo, Inc. has not authorized, approved of, or licensed Little Sound Dj. General Instruments, Roland, Boss, E-mu, Linn, Korg and Oberheim are registered trademarks of the respective companies. This program was developed using The Game Boy Developer’s Kit (GBDK). Little Sound Headquarters E-Mail: [email protected] Web: http://www.littlesounddj.com Thank You 1.000.000 Boys Daniel Viksporre Jonna Olsson Ola Persson Starpaws Tobias von Hofsten Timothy Lamb Conny Brunnkvist Michael Hope H. Mulder Jeff Frohwein Hex125 VORC …And all the people on the Little Sound Dj mailing list!

1. Introduction ................................................................................................................................. 5 1.1. Welcome!................................................................................................................................ 5 1.2. Important Message ............................................................................................................... 5 1.3. Game Boy Sound .................................................................................................................. 5 1.4. Hexadecimal Number System ............................................................................................ 6 1.5. Key Presses ............................................................................................................................ 6 1.6. Getting Started ...................................................................................................................... 7 1.7. Making some noise ............................................................................................................... 7
2. The Screens .................................................................................................................................. 9 2.1. Screen Map ............................................................................................................................ 9 2.2. Starting and Stopping .......................................................................................................... 9 2.3. Song Screen............................................................................................................................ 9 2.4. Chain Screen........................................................................................................................ 10 2.5. Phrase Screen....................................................................................................................... 11 2.6. Instrument Screen............................................................................................................... 12 2.7. Table Screen......................................................................................................................... 15 2.8. Groove Screen ..................................................................................................................... 17 2.9. Synth Screen ........................................................................................................................ 18 2.10. Wave Screen ...................................................................................................................... 19 2.11. Project Screen..................................................................................................................... 19 2.12. File Screen .......................................................................................................................... 20 2.13. Border Information........................................................................................................... 21
3. Advanced Techniques.............................................................................................................. 22 3.1. Copy and Paste.................................................................................................................... 22 3.2. Cloning................................................................................................................................. 22 3.3. Muting and Soloing Individual Channels....................................................................... 22 3.4. Live Mode ............................................................................................................................ 23 3.5. Chain Loops......................................................................................................................... 23 3.6. Creating Synthetic Drum Instruments............................................................................. 23
4. Speech Programming ............................................................................................................... 26 4.1. Guidelines for using the allophones ................................................................................ 27
5. Synchronization ........................................................................................................................ 29 5.1. Game Boy to Game Boy sync ............................................................................................ 29 5.2. MIDI Sync ............................................................................................................................ 30 5.3. Nanoloop Sync .................................................................................................................... 30 5.4. Keyboard Control ............................................................................................................... 30
6. Commands.................................................................................................................................. 32 A: Run Arpeggiator Table ........................................................................................................ 32 C: Chord...................................................................................................................................... 32 D: Delay....................................................................................................................................... 32 E: Amplitude Envelope............................................................................................................. 32 F: Wave Frame (wave and kit instruments only) .................................................................. 33 G: Groove Select......................................................................................................................... 33 H: Hop......................................................................................................................................... 33 K: Kill note .................................................................................................................................. 34 L: Slide......................................................................................................................................... 34 M: Master Volume ..................................................................................................................... 34

O: Set Output.............................................................................................................................. 35 P: Pitch Bend/Pitch Shift (pulse and wave channels only)................................................... 35 R: Re-Trig the Latest Played Note ........................................................................................... 35 S: Sweep/Shape (pulse 1, kit and noise instruments only)................................................... 35 T: Tempo ..................................................................................................................................... 36 V: Vibrato (pulse, kit and wave channels only)..................................................................... 36 W: Wave (pulse channels only) ............................................................................................... 36
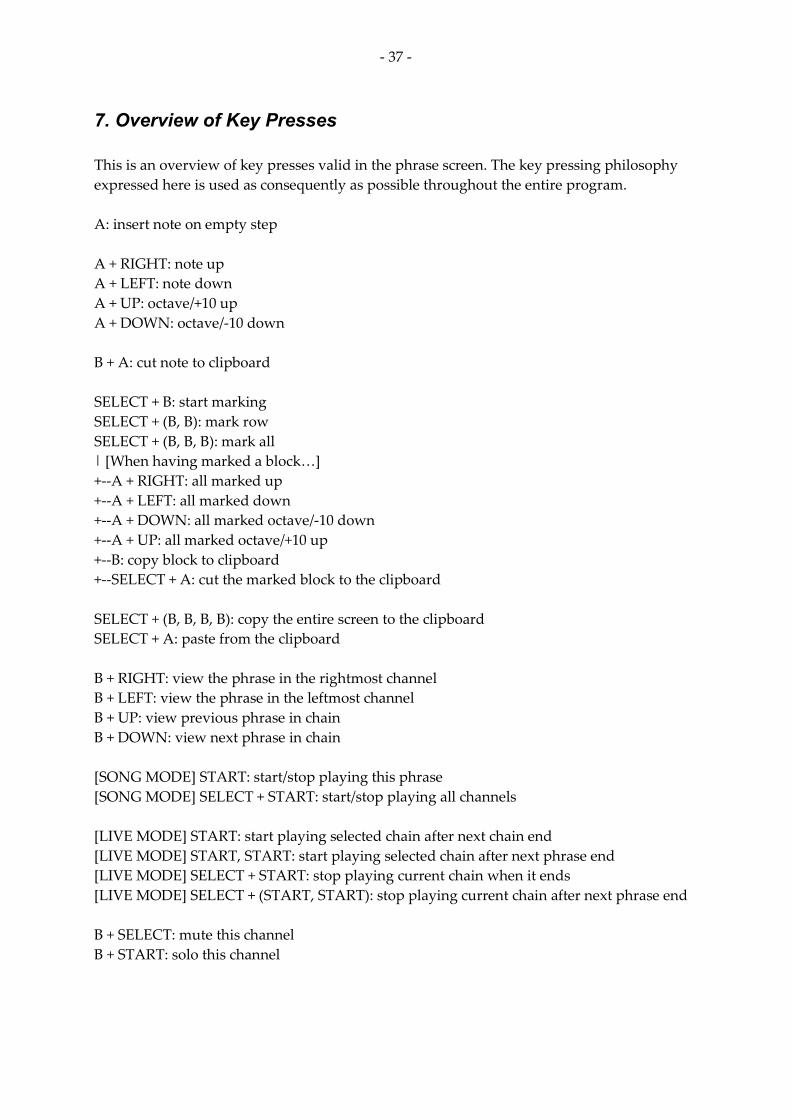
7. Overview of Key Presses ......................................................................................................... 37
8. The Sample Kits ........................................................................................................................ 38

- 5 -
1. Introduction
1.1. Welcome! Thank you and congratulations for purchasing Little Sound Dj! A lot of hard work has been done to make the program as fast-worked and powerful as possible. With version 3, the stability has been significantly improved, and there was also a big overhaul of the user interface, so that the program should now be easier to grasp and use than ever. If you don’t have any experience with the “tracker” type of music editors from before, the amount of new concepts may seem a bit daunting. I can only advice you not to stress about it. Learn step by step, try to keep it fun and progress at your own pace. Within one or two days, you should know enough about the program to make your own first songs. This manual is mostly written as an absolute beginners guide, and as a reference manual. The goal with the manual is to be clear and cover all areas. There is however a lot of experience-based knowledge that doesn’t fit into a manual like this. I highly recommend checking out the user-maintained Wiki site at http://wiki.littlesounddj.com - it contains a lot of useful information, like tutorials, tips and tricks. Also, the LSDj mailing list at http://groups.yahoo.com is highly useful for getting in touch with other users. Have fun! /Johan
1.2. Important Message Turning off the Game Boy while playing music might corrupt your song data. Remember to stop playing before turning off your Game Boy!
1.3. Game Boy Sound The Game Boy sound chip has four channels, each with 4-bit resolution. Pulse Channel 1: Square wave with envelope and sweep functions. Pulse Channel 2: Square wave with envelope function. Wave Channel: Soft synthesizer, sample playback and speech synthesis. Noise Channel: Noise with envelope and shape functions.

- 6 -
1.4. Hexadecimal Number System Little Sound Dj uses the hexadecimal number system for representing values. It works just the same way as the traditional decimal number system. The only difference is that it has base 16, and thus consists of 16 unique symbols: the digits 0 to 9, followed by the letters A to F. For clarity, this manual will mark hexadecimal values with a dollar sign. As an example, let’s print a list of numbers twice – first with decimal digits, then with hexadecimal digits… 1 2 3 4 5 6 7 8 9 10 11 12 13 14 15 16 17 18 19 $1 $2 $3 $4 $5 $6 $7 $8 $9 $A $B $C $D $E $F $10 $11 $12 $13 Note that the values of the two lists are really identical; just the representations differ. The reason to use the hexadecimal system here is to save screen space; with hexadecimal numbers, it is possible to represent every byte value using no more than two digits. (The value range is 0 to 255 – that is, $0 to $FF.) Representing negative numbers with two digits only can be a problem. In Little Sound Dj, the numbers are wrapping. That means, when subtracting one from the smallest possible number ($0), it will jump to the highest possible value ($FF). So $FF can represent -1 as well as 255, depending on the situation.
1.5. Key Presses In this documentation, key presses are marked up in this fashion: A – A button B – B button START – start button SELECT – select button LEFT – left arrow RIGHT – right arrow UP – up arrow DOWN – down arrow CURSOR – pressing any arrow key LEFT/RIGHT – pressing left or right arrow UP/DOWN – pressing up or down arrow SELECT + A – pressing A while holding SELECT SELECT + (B, B) – pressing B twice, while holding SELECT

- 7 -
1.6. Getting Started After starting up LSDJ, you should be facing a screen like this:
The title at the top left of the window indicates that this is the song screen, which is the window where you arrange your songs. The four columns with dashes each represent a Game Boy sound channel. There are two pulse wave channels, one custom wave channel (which uses sampled drum kits or soft-synthesized wave forms), and one noise channel. You can move around between the different channels using the cursor key. Little Sound Dj uses several screens, which are laid out on a 5x3 map, represented in the bottom right of the screen. The most useful screens are laid out in the middle row, also called the main row. It contains the song, chain, phrase, instrument and table screens. These screens are ordered after level detail. The leftmost song screen presents an overview over the entire song, whereas the rightmost table screen is for detailed instrument programming. You can navigate between the different screens by holding SELECT and pressing the cursor key. The song, chain and phrase screens are used for sequencing, and work together in a tree-structure fashion. The phrase screen is a 16-step sequencer where the actual note data is entered. The chain screen is a 16-step sequencer where you can enter sequences of phrases to be played back. The song screen is a 256 step long sequencer, where you enter sequences of chains to be played back.
1.7. Making some noise Navigate to the song screen, and put the cursor on the PU1 column. Now tap the A button twice to insert a new chain. The digit 00 now appears at the cursor. You can now edit that chain by pressing SELECT+RIGHT and entering the chain screen. There, go through the same procedure: tap A twice to insert a new phrase, and press SELECT+RIGHT to go to the phrase screen.

- 8 -
In the phrase screen, you can enter notes to be played back. Move the cursor to the note column and press A to enter a note. The text “C-3” will appear – C being the note, and 3 the octave. Press START to play back the phrase. Note how the phrase is played back from the top of the screen to the bottom. You can change the note value by holding A and pressing the cursor button. A+LEFT/RIGHT changes the note, and A+UP/DOWN changes octave. You can now try to move the cursor up and down and insert more notes in other positions. If you want to delete a note, press A while holding B. When you have finished listening, press START again to stop the phrase. The clean pulse sound might get a bit dull after while. Let’s move on to the instrument screen by pressing SELECT+RIGHT.
In the instrument screen, we can make the sound a little bit more interesting. Try to change the envelope and wave fields by moving the cursor there and pressing A+LEFT/RIGHT. Try to modify the envelope setting from “A8” to “A3.” Now, press START again to hear any change in sound. The sound amplitude should decay after a note is played. The type field sets the instrument type. The instrument types are specific for different channels – pulse instruments should only be played back in the pulse channels, wave and kit instruments in the wave channel, and noise instruments in the noise channel. Let’s try out the sampled drum kits. Now, we have to change channel to the wave channel. Go back to the song screen, move the cursor over to the wave channel, and create a new chain and a new phrase the way you did before (tapping A twice on empty steps). Then, move over to the “instr” column in the phrase screen, and tap A twice to insert a new instrument. Press SELECT+RIGHT to edit that instrument, change the instrument type to “KIT” by pressing A+RIGHT once on the type field, then go back to the phrase screen. Now, you should be able to enter drum sounds the same way you entered notes before.

- 9 -
2. The Screens As stated before, Little Sound Dj has several screens, laid out in a 5x3 screen map. You can navigate between the screens by pressing SELECT+CURSOR.
2.1. Screen Map __________________________ ________ ________ | | | | | PROJECT | WAVE |PROJECT | |__________________________|________|________| | | | | | TABLE/ | | SONG | CHAIN | PHRASE | INSTR | WORD | main row |________|________|________|________|________| | | | | | GROOVE | SYNTH | GROOVE | |__________________________|________|________|
The SONG, CHAIN and PHRASE screens are used for sequencing and arranging. The WAVE, INSTR, SYNTH, TABLE and WORD screens are used for sound programming. The other screens have more general purposes.
2.2. Starting and Stopping When pressing START in the song screen, Little Sound Dj will always try to play all four channels. When pressing START in the other screens, Little Sound Dj will only try to play the channel thatʹs indicated in the three-letter field at the right edge of the screen (“PU1”, “PU2”, “WAV” or “NOI”). If you want to start playing all four channels from some other screen than the song screen, you can do that by pressing SELECT + START.
2.3. Song Screen
The song screen is the highest level of the sequencer. This is where you arrange your songs. The screen contains 4 columns, one for each channel. The columns contain lists of chains, which will be played up to down. Different chains are used for different channels.

- 10 -
To insert a chain, move the cursor to an empty step and press A. If you want to add a new chain, press A twice. To edit a chain, move the cursor to the chain number and press SELECT + RIGHT. To remove a chain, press B+A. The number of rows in the song screen is limited to 256 ($100).
2.4. Chain Screen Chains are used for stringing phrases together, thus creating a unit built out of many phrases. A chain can represent a longer rhythm block, a melody or a bass line. The chain screen contains two columns. The first column contains the list of phrases that are to be stringed together, while the second column transposes the phrase on the same row. Example:
This chain would play phrase 3, adding 5 semitones to each note, and then play each of the phrases 4, 5, 6, without transposing. To add a phrase to the chain, move the cursor to an empty step and press A. If you want to insert a new phrase, press A twice. To edit a phrase, move the cursor to the phrase number and press SELECT + RIGHT. When editing a chain, you can go to the chain in a neighboring channel by pressing B + LEFT/RIGHT. It is also possible to go to the next or previous chain in the song screen by pressing B + UP/DOWN. The different channels all share the same set of chains; that is, no chain is ever assigned to a specific channel. The number of chains is limited to 128 ($80).

- 11 -
2.5. Phrase Screen
The phrase screen is the most fundamental part of the sequencer; this is where you enter the actual note data. The phrase screen has four columns: the note column, the instrument column, and the command and command value columns. As in the other screens, you can enter data by pressing A+CURSOR. A+LEFT/RIGHT changes the values in small steps (+-1), A+UP/DOWN changes the values in big steps (+-$10). You can delete a value by pressing B+A. The different channels all share the same set of phrases; that is, any phrase may be played back on any channel. A phrase might however sound very different, depending on the channel it is played back on. Example: If you have programmed a phrase to play a melody using a pulse instrument, that phrase can be played back in either of the pulse channels with good results, but it usually doesn’t make sense to play back the phrase in the wave or noise channels. The note column may look a different depending on which instrument type is used. Most instruments present the note followed by octave. Instruments that play back samples (KIT, SPEECH) do however present the sample names instead. The instrument column is used for selecting instruments. In total, you can use 64 different instruments, editable in the instrument screen. The command columns can be used to add effects to your phrase. For example, the K command kills the sound on the channel. The number of phrases is limited to 255 ($FF). The number of the phrase that is being edited is displayed in the top left corner of the screen. All phrases are 16 steps long by default, but it is also possible to set a shorter length by using the H (“HOP”) command.

- 12 -
2.6. Instrument Screen
Here, you can edit instruments. There are five types of instruments available:
• PULSE. This instrument type produces square waves, and is used in pulse channels 1 and 2.
• WAVE. This instrument type used in the wave channel. It can play back waves synthesized using the SYNTH screen.
• KIT. This instrument type plays sampled kits, stored in ROM. (The samples are stored in 4 bits, 11.468 kHz.) It is used in the wave channel.
• NOISE. This instrument type produces filtered noise, and is used in the noise channel.
• SPEECH. This instrument is locked to instrument number $40, and is used for programming speech. For learning how to generate speech, please look up chapter 4.
You can change the instrument type by going to the type column and pressing A+CURSOR. Remember that instruments don’t automatically play in the right channel. For example, if you want to use a kit instrument to play drum samples, you have to do the following:
1) Go to the song screen, move cursor to the wave column, and insert a new chain by tapping A twice.
2) Edit the chain by pressing SELECT+RIGHT. 3) Insert a new phrase by tapping A twice. 4) Edit the phrase by pressing SELECT+RIGHT. Now, you have a new phrase that is
mapped to the wave channel. 5) Create a new instrument by moving the cursor to the instrument column and tapping
A twice. 6) Press SELECT+RIGHT to edit the instrument. 7) Change the instrument type to KIT. 8) Go back to the phrase screen to start using your new instrument.
TIP: In the instrument screen, press SELECT+B to copy instruments and SELECT+A to paste.

- 13 -
General Instrument Parameters These parameters are used in most instrument types. NAME – name the instrument by pressing A. This is useful for keeping track on your instruments. The instrument name will also be shown in the border when selecting instruments in the phrase screen. TYPE – use this to specify the instrument type. LENGTH - change the sound length. PAN - pan the sound to left/right/both/none speakers. (Use the headphone output to hear the difference!) VIB. TYPE - change the effect of the Vibrato (‘V’) command. The “HF” vibrato type is short for High Frequency Modulation, and can be used for creating quite interesting timbres. The other vibrato types are more conventional. TABLE - if not “OFF”, Little Sound Dj will start running the specified table when a note is played. If you want to edit the table, press SELECT+RIGHT to get to the TABLE screen. If you want to use a new table, tap A twice. AUTOMATE – an option that extends the TABLE functionality. When AUTOMATE is activated, Little Sound Dj advances through the tables by one step for each time the instrument is triggered. Pulse Instrument Parameters
These parameters are special for pulse instruments: ENVELOPE - first digit is initial amplitude (0-$F); second digit is release (0, 8: none, 1-7: decrease amplitude, 9-$F: increase amplitude). WAVE - choose the wave type to be used. SWEEP - modulate the frequency. This only works on pulse channel 1. See Sweep/Shape (‘S’) command documentation for further information. The PU2 detune settings can be used to create interesting phase effects, when the same phrase is played on both pulse channels: PU2 TUNE – detune pulse channel 2 in semitones. PU2 FINE – detune pulse channel 2 with a small amount.

- 14 -
Wave Instrument Parameters The wave instrument can play back synth sounds generated by the soft synthesizer found in the SYNTH screen.
VOLUME – set amplitude (0=0%, 1=25%, 2=50%, 3=100%) SYNTH – select the synth sound to play back. To edit the synth sound being used, press SELECT+DOWN to go to the SYNTH screen. PLAY – how to play back the synth sound: Once, loop, ping-pong loop or off. By selecting “off,” only the first wave in the synth sound will be played, allowing you to step through the sound manually using the F command. LENGTH – set the length of the synth sound. REPEAT – set the loop point of the synth sound. SPEED – set how fast the synth sound should be played back. Kit Instrument Parameters
These parameters are special for kit instruments: KIT – choose the kits to use. The first kit will be used in the left note column in the phrase screen; the second kit will be used in the right note column in the phrase screen. PITCH – pitch shift. OFFSET –set the start loop point. If LOOP is set to OFF, this value can be used for skipping the initial part of a sound. LEN – set the sound length. (AUT=always play the sample to its end.) LOOP – loop the sample. (OFF=don’t loop, ON=loop sound and start playing from custom offset, ATK=loop sample and start playing from the beginning.) SPEED – select full speed or half speed. DIST – select the algorithm that should be used when two kits are mixed together. CLIP is the default type. SHAPE and SHAP2 sound similar to CLIP, but with more high frequencies

- 15 -
and less bass. WRAP can be used to add some interesting digital distortion. When pressing A+(LEFT, LEFT) while CLIP value is selected, the program will jump out of range and play back sound from raw memory when clipping. Noise Instrument Parameters
These parameters are special for noise instruments: ENVELOPE - first digit is initial amplitude (0-$F); second digit is release (0, 8: none, 1-7: decrease amplitude, 9-$F: increase amplitude). SHAPE - modulate the noise filter. See Sweep/Shape (‘S’) command for further information. Speech Instrument Parameters For information about how to generate speech, please read chapter 4. The number of instruments is limited to 32 (hexadecimal: 20).
2.7. Table Screen Tables are essentially sequences of transposes, commands and amplitude changes, which can be played at any speed (typically very fast) and applied to any channel. If you want to, you can assign tables to instruments (by setting the TABLE setting in the instrument screen), so that a table will be started every time you play the instrument. It is the key to creating truly complex instruments in Little Sound Dj. Tables contain six columns, which are played up-to-down. First out is the envelope column, by which it is possible to create custom amplitude envelopes. Next is the transpose column, that can be used to transpose the note being played by a given number of semitones. The other columns are command columns, just like the one in the phrase screen. The transpose column has special functionality when using KIT or NOISE type instruments. For KIT, the transpose column works as a pitch shifter. For NOISE, the transpose column has the same effect as issuing the S (“shape”) command.

- 16 -
Custom envelope example The first digit in the envelope column sets the amplitude; the second digit sets for how many ticks that amplitude should remain.
The table above creates an amplitude envelope with short attack and medium sustain. It could be used for a base instrument. Arpeggiato example A typical use for tables is to create arpeggiatos. This is a musical term for playing scales very fast, so that the listener will get the impression that a chord is played.
This table would emulate striking a major chord. Shorter arpeggios can just as well be created using the C (“chord”) command in phrases. Tables however still have to be used for creating longer arpeggiatos. To view different tables, press B + CURSOR. TIP: To make an instruments attack sound more interesting, it can be useful to let the first row in a table be transposed a few steps up or down. TIP 2: There is a shortcut between the PHRASE and TABLE screens. It is activated when standing in the phrase screen, and pressing SELECT+RIGHT while standing on an A command. Then you can edit the table selected with the A command, and when you are done, jump back using SELECT+LEFT. The number of tables is limited to 32 ($20).

- 17 -
2.8. Groove Screen Grooves define the speed with which your phrases and tables are played back. They can be used for giving your songs some extra swing. The different sound channels do not need to be synchronized to each other; this means that you can use a separate groove for each phrase and table. For understanding the groove concept, you need to know that the sequencerʹs time handling is based on an abstract time period called “tick.” The length of a tick varies with the song tempo, but is typically around 1/60th of a second. In the groove screen, you can specify for how many ticks each note step should be played. Example:
This groove would make the sequencer spend approximately 6/60th of a second on every note step. You can also use the groove screen to create custom rhythms. Example:
This groove would make the sequencer spend 8/60th of a second on even note steps, and 5/60th of a second on odd note steps. This would create a swing feeling, described by the percentage value, which is calculated by the formula (even step ticks)/(even step ticks + odd step ticks). With thoughtful programming, grooves can also be used to create triplets, and other complex rhythm structures. Groove 0 is the default groove for all phrases. If you want to, you can easily switch to another groove by using the Groove (ʺGʺ) command in the phrase screen.

- 18 -
You can select the groove you wish to edit by pressing B + CURSOR. TIP: Pressing A + UP/DOWN will change the swing percentage, while keeping the total number of ticks – and thus, the resulting song speed – constant. (Example: 6/6 50% => A + UP => 7/5 58%) TIP 2: If you switch to the groove screen when the cursor is standing on a groove command in the phrase or table screens, Little Sound Dj will display the groove that is selected with the groove command.
2.9. Synth Screen
The synth screen features a soft synthesizer that generates sounds to be played back by the wave instruments. In total, there are 16 synth programs. You can choose the program to edit by pressing B+CURSOR. General parameters WAVE – square, saw tooth or triangle FILTER – low-pass, high-pass, band-pass or all-pass Q – also known as resonance; this value accentuates the cutoff frequency DIST – use clip or wrap distortion PHASE (type) – normal phase transforms the wave using a simple phase algorithm; resync and resyn2 create effects similar to what happens when you sync one oscillator to another in an analog synthesizer. The easiest way to understand what phasing does is to experiment and analyze the resulting waveforms in the WAVE screen. Start and end parameters For these settings, it is possible to set different values for the start and end of the sound. The program will then create a smooth fade between the start and end values. VOLUME – wave volume CUTOFF – filter cutoff frequency PHASE – phase value VSHIFT – vertical shift

- 19 -
2.10. Wave Screen
Here, you can view and edit the individual waveforms of the synth sounds. There are 16 synth sounds, and each sound has 16 waves. This means that synth sound 0 uses waves $0-$F, synth sound 1 uses waves $10-$1F, and so on. To view a different wave, press B+CURSOR.
2.11. Project Screen
The project screen contains settings that affect the entire program.
• TEMPO – change the tempo. It is possible to set a new tempo either by pressing A+CURSOR, or by tapping the A button in pace with the desired tempo.
• TRANSPOSE – adjust the pitch of the pulse and wave instruments, by a given number of semitones.
• SYNC – activate link-up over the serial port. (Read more about this in chapter 5!) • CLONE – deep or slim chain cloning. Deep chain cloning will clone the phrases of a
chain when cloning, whereas slim cloning will use the old phrases. Read chapter 3 for a full explanation of cloning.
• LOOK – change the font and color set. • KEY DELAY – set the delay time before key repeat is activated. • KEY REPEAT – set the speed of the key repeat. • PURGE SEQUENCER – clear all phrases and chains that are not used in the song. • PURGE INSTRUMENTS – clear all instruments that are not used in the song. • LOAD/SAVE FILE – enter file screen.
This screen also contains two clocks. The “TIME USED” clock displays the time Little Sound Dj has been used since the last memory reset, in hours and minutes. When playing, the clock

- 20 -
is replaced by a “PLAYTIME” clock, which shows for how long the song has been playing. The “TOTAL” clock displays the time Little Sound Dj has been used in total, in days, hours and minutes. Total Memory Reset By pressing SELECT+A on the LOAD/SAVE FILE button, you can choose to reset all memory. This can be useful if your memory somehow gets scrambled.
2.12. File Screen
The file screen is used for saving songs you are working on to the storage memory. It can also be used to load songs from the storage memory to the work memory. It allows you to keep up to 32 songs on one cartridge. FILE – shows the file name of the song you are working on. The exclamation mark (“!”) indicates when changes have been made to a song. LOAD – load a song. Press A, select the file to load and press A again. SAVE – save song. Press A, select the slot to save to and enter the file name. DEL – delete a song. Press A, select the file to delete and press A again. BACK – go back to project screen. BLOCKS USED – shows how much of the storage memory that is used. If you want to cancel an operation in this screen, simply press B. Song List The song list presents song name, version number and file size. When saving, the song is compressed, so the resulting file size will vary with different songs. If you want to start a new project, load from the “(empty)” slot.

- 21 -
2.13. Border Information A lot of useful data is displayed in the screen border.
1. Screen name. 2. Frame/groove/phrase/chain/instrument/table number. 3. The active channel. 4. The chain position being edited. 5. The current tempo, in beats per minute (BPM). 6. Played notes. 7. Sync information. 8. Mute. (The characters will be lit when pressing B + SELECT or B + START.) 9. Info row, for display of different information. 10. Screen map.

- 22 -
3. Advanced Techniques
3.1. Copy and Paste Little Sound Dj has a clipboard for temporary data storage. Pressing B+A will cut the value under the cursor and store it on the clipboard. The value can then be pasted by pressing SELECT+A. In most screens, it is possible to mark up blocks by pressing SELECT+B and moving around the cursor. When having marked up a block, it can be copied to the clipboard by pressing B, or cut to the clipboard by pressing SELECT+A. The clipboard contents can then be pasted by pressing SELECT+A. Some quick-mark button presses are implemented: SELECT+(B, B) - quick-mark a column SELECT+(B, B, B) - quick-mark an entire screen When having marked a block, you can change all data inside that block by pressing A+CURSOR.
3.2. Cloning Cloning is a shortcut that can save you much unnecessary copy and paste action. It allows you to create copies of chains or phrases directly from the song and chain screens. Usage from SONG screen: Move the cursor to the chain number representing the chain you wish to clone. Press SELECT+(B, A). Little Sound Dj now replaces the previous chain number with the one of the new clone. Usage from CHAIN screen: Move the cursor to the phrase number representing the phrase you wish to clone. Press SELECT+(B, A). Little Sound Dj now replaces the previous phrase number with the one of the new clone.
3.3. Muting and Soloing Individual Channels It is always possible to mute a channel temporarily by pressing B+SELECT. If the B button is released before SELECT, the channel will stay muted until B is pressed again. Correspondingly, a channel can be played solo by pressing B+START. If the B button is released before START, the other channels will stay muted. If the START button is released first, all channels will be turned on again.

- 23 -
3.4. Live Mode The live mode is a special flavor of the song screen. It can be reached by pressing B + (LEFT/RIGHT, LEFT/RIGHT) while standing in the song screen. In the live mode, it is possible to start and stop playing chains one by one. In contrast to the usual song screen, the different channels can be started and stopped independently. It is also possible to jump between different song positions while playing, without causing audio glitches or lost synchronization. To begin playing a chain, move the cursor to the chain and press START. To stop playing a chain, go to that channel and press SELECT+START. If chains are already playing, the starts and stops will be synchronized to the next chain end. If you want to synchronize to the next phrase end instead, tap START twice to speed up the switch.
3.5. Chain Loops Using chain loops is a useful live mode technique. This technique is based on the fact that the song sequencer (when being in the live mode) won’t rewind the song position all the way up to the first song sequencer step when encountering end of track; instead, it stops rewinding as soon as it encounters an empty step. Example: We have a setup that looks like this…
Assume that we start playing pulse channel 1 at song position 4. The player will now loop chains 2 and 3. Defining a number of such chain loops to alternate between would provide a good starting point for a live performance.
3.6. Creating Synthetic Drum Instruments Creating good-sounding drum instruments without using the sampled drum kits might be a bit tricky, if you’ve had no prior experience with drum synthesis. Nevertheless, it’s a very useful technique once you know it. Here are some starting-out ideas.

- 24 -
Kick
Use pulse channel 1 for creating kick drum sounds. The amplitude envelope should have a strong attack and fast decay – try setting it to $C1. Wave should be 50-50 high/low, even though other waves can be used for making the instrument sound more distorted. The sweep value is maybe the most important part in creating a successful kick instrument. It should have a high initial frequency and decay. Try setting it to a value of $E3, and playing the instrument at note C-3. For a more snappy sounding kick, try experimenting with the envelope and length parameters. Snare
Use the noise channel for creating snare drum sounds. The amplitude envelope should have a strong attack and fast decay – try setting it to $C1. Use the length parameter to create more snappy sounding snares. The shape parameter can be used for adjusting the timbre – shape values close to $EC might prove useful. Hi-Hats and Cymbals
Hi-hats are created using the noise channel. Use a shape value of $FF for selecting a timbre with high frequency content. Change the envelope and length parameters for creating the

- 25 -
desired amplitude envelope. For emulating cymbals, use a shape value near $EE to create a somewhat rougher timbre. Taking Advantage of Tables
For adding that extra punch to snares, you can use a table that uses the transpose column to change the noise shape rapidly.

- 26 -
4. Speech Programming Introduction Little Sound Dj contains fifty-nine discrete speech sounds (called allophones), stored in the first four kit banks. By combining these sounds, it is possible to create any English word or phrase. Linguistics A few basic linguistic concepts will help you create your own library of words. First, there is no one-to-one correspondence between written letters and speech sounds; secondly, speech sounds are acoustically different depending on their position within a word. The first problem compares to the problem that a child encounters when it learns to read. Each sound in a language may be represented by more than one letter, and conversely, each letter may represent more than one sound. Because of these spelling irregularities, it is necessary to think in terms of sounds, not letters, when using allophones. The second, and equally important, point to understand is that the acoustic signal of a speech sound may differ depending on its position within a word. For example, the initial K sound in coop will be acoustically different from the K’s in keep and speak. Programming Words Little Sound Dj has a special speech instrument. It is locked to instrument number $20 and can be used in the wave channel. It contains a set of 42 words, mapped out from note C-3 to note F-6.
If you want to edit a word, press SELECT + RIGHT to get to the WORD screen. It has two columns; the left column contains the allophones to be played, the right column sets duration. The word above is programmed to say “Little Sound Dj”. In order to make things easy to remember, it is possible to rename the words by tapping A in the speech instrument screen. If you want to, it is also possible to cut and paste words in the speech instrument screen.

- 27 -
4.1. Guidelines for using the allophones Short vowels *IH – sitting, stranded *EH – extent, gentlemen *AE – extract, acting *UH – cookie, full *AD – talking, song *AX – lapel, instruct Long vowels IY – treat, people, penny EY – great, statement, tray AY – kite, sky, mighty OI – noise, toy, voice UW1 – after clusters with YY: computer UW2 – in monosyllabic words: two, food OW – zone, close, snow AW – sound, mouse, down EL – little, angle, gentlemen R-colored vowels ER1 – letter, furniture, interrupt ER2 – monosyllables: bird, fern, burn OR – fortune, adorn, store AR – farm, alarm, garment YR – hear, earring, irresponsible XR – hair, declare, stare Resonants WW – we, warrant, linguist RR1 – initial position: read, write, x-ray RR2 – initial clusters: brown, crane, grease LL – like, hello, steel YY1 – clusters: cute, beauty, computer YY2 – initial position: yes, yarn, yo-yo
Voiced fricatives VV – vest, prove, even DH1 – word-initial position: this, then, they DH2 – word-final and between vowels: bathe, bathing ZZ – zoo, phase ZH – beige, pleasure Voiceless fricatives *FF – fire, fox *TH – this, they *SS – sit, smile SH – shirt, leash, nation HH1 – before front vowels: YR, IY, IH, EY, EH, XR, AE HH2 – before back vowels: UW, UH, OW, OY, AO, OR, AR WH – white, whim, twenty Voiced stops BB1 – final position: rib; between vowels: fibber, in clusters: bleed, brown BB2 – initial position before a vowel: beast DD1 – final position: played, end DD2 – initial position: down; clusters: drain GG1 – before high front vowels: YR, IY, IH, EY, EH, XR GG2 – before high back vowels: UW, UH, OW, OY, AX; and clusters: green, glue GG3 – before low vowels: AE, AW, AY, AR, AA, AO, OR, ER; and medial clusters: anger; and final position: peg

- 28 -
Voiceless stops PP – pleasure, ample, trip TT1 – final clusters before SS: tests, its TT2 – all other positions: test, street KK1 – before front vowels: YR, IY, IH, EY, EH, XR, AY, AE, ER, AX; initial clusters: cute, clown, scream KK2 – final position: speak; final clusters: task KK3 – before back vowels: UW, UH, OW, OY, OR, AR, AO; initial clusters: crane, quick, clown, scream
Affricates CH – church, feature JH – judge, injure Nasal MM – milk, alarm, example NN1 – before front and central vowels: YR, IY, IH, EY, EH, XR, AE, ER, AX, AW, AY, UW; final clusters: earn NN2 – before back vowels: UH, OW, OY, OR, AR, AA * These allophones loop indefinitely.

- 29 -
5. Synchronization Little Sound Dj can be synchronized with other devices, so it is possible to run both in exactly the same tempo. This can be useful, as the Little Sound Dj BPM meter isn’t 100% accurate. You can activate synchronization by changing the SYNC mode in the PROJECT screen.
5.1. Game Boy to Game Boy sync Little Sound Dj implements Game Boy to Game Boy sync. This requires two Game Boys, two Little Sound Dj cartridges and one Game Boy link cable. (Link cables can be purchased in most toy stores.) Important! You must never plug or unplug the link cable to a Game Boy that is turned on. You should also make sure that the SYNC mode is set to OFF before turning off your Game Boys. Doing otherwise might cause song data corruption. Activating sync Make sure that both Game Boys are turned off. Connect the Game Boys using the link cable. Now, turn on the Game Boys, and go to the PROJECT screens. In the PROJECT screen, you’ll find a SYNC parameter, which can be adjusted by pressing A + LEFT or A + RIGHT. Set the first Game Boy to MASTER and the second Game Boy to SLAVE. Now, the second Game Boy will receive ticks from the first Game Boy through the link cable, ensuring that they will play at the same tempo. The sync works in two different ways, depending on whether the sequencer is in live mode or not… Using sync with both carts in song play mode Press START on the slave Game Boy. It will display the text “WAIT” in the bottom right corner, indicating that it is waiting for tick signals from the master Game Boy. Now, press START on the master Game Boy, and the slave Game Boy will start playing on the same song position as the master Game Boy. Pressing START again on the master Game Boy will stop both Game Boys, putting the slave Game Boy in WAIT mode. Using sync with both carts in live play mode Both Game Boys are operated as usual, the difference being that they stay synced.

- 30 -
Sync will be lost on one occasion only: when the master Game Boy is stopped, and the slave Game Boy is still playing. Then, stop the slave Game Boy and start again.
5.2. MIDI Sync MIDI sync requires a special MIDI sync cable for Game Boy. For information on how to build a MIDI<->Game Boy adapter, please refer to the website at http://www.littlesounddj.com. Usage: Plug in the sync device before turning on your Game Boy. Then, set Little Sound Dj to “MIDI” slave sync mode. Pressing START will now make Little Sound Dj wait for and sync with any incoming MIDI clock signals. Little Sound Dj should use grooves based on 6 ticks.
5.3. Nanoloop Sync Nanoloop is a Game Boy music program that can be found on http://www.nanoloop.de. Nanoloop can sync to Little Sound Dj using a normal Game Boy link cable. Usage: Set Little Sound Dj to ʺNANOʺ master sync mode, and set Nanoloop to MIDI slave mode. Little Sound Dj should use grooves based on 6 ticks.
5.4. Keyboard Control The “KEYBD” sync mode is not really about synchronization. Instead, it allows connecting a standard PC keyboard to the Game Boy, so it can be played as a piano. This is useful for live shows and improvisation. For information on how to build a PC keyboard<->Game Boy adapter, please refer to the website at http://www.littlesounddj.com. Important: To get a sound when playing on the keyboard, the sequencer must already be running. (Press START first!) The notes you play will be played back on the next step in the phrase sequencer. To get finer timing, use a faster groove for the phrase you are playing. Keyboard Note Layout

- 31 -
Keyboard mappings SPACE: play using custom table F1/F2: octave down/up F3/F4: instrument down/up F5/F6: select custom table to assign to SPACE F8: change pulse instrument playback channels (PU1, PU2, PU1+2) F9-F12: toggle channel mute (switches on key press) CTRL+(F9-F12): tap channel mute (switches on key press and release)

- 32 -
6. Commands Commands can be used in phrases and tables for altering the sound. There is a lot of power hidden in the commands, so it is suggested that you read through this chapter to get an idea of what they can do for you. TIP: Tapping A on a command letter will display a scrolling help text in the top of the screen. A+CURSOR can then be used to browse through the existing commands. The text can be paused by holding SELECT.
A: Run Arpeggiator Table Run a table. This command can be used in phrases or inside a table, for jumping to another table. Example: A03 – run table 3
C: Chord Produce chords by doing a simple arpeggiato that extends the base note with the given semitones. Examples: C37 – plays 0, 3, 7, 0, 3, 7, 0, 3, 7, ... C0C – plays 0, 0, C, 0, 0, C, 0, 0, C, ... CC0 – plays 0, C, 0, C, 0, C, ... CCC – plays 0, C, C, 0, C, C, 0, C, C, ...
D: Delay Delay the triggering of a note with the given number of ticks.
E: Amplitude Envelope For pulse and noise channels: The first value digit sets the initial amplitude (0=min, $F=max); the second digit sets the release (0,8: no change, 1-7: decrease, 9-$F: increase).

- 33 -
For the wave channel: E00 – volume 0% E01 – volume 25% E02 – volume 50% E03 – volume 100%
F: Wave Frame (wave and kit instruments only) For kit instruments: Modify the start offset of the sample. For wave instruments: Change the wave frame that’s being played on the wave channel. This command is relative, meaning that the command value will be added to the current frame number. This can be used for playing through synth sounds manually. TIP: Since a synth sound contains 16 ($10) waves, issuing the command F10 will in effect jump to the next synth sound. Example: F01 – if wave frame 3 is being played, advance 1 frame and start playing frame number 4
G: Groove Select Select the groove to use when playing phrases or tables. Example: G04 – select groove 4
H: Hop This command has two different functions, depending on whether it is used in the phrase or the table screen. In the phrase screen, it is used for jumping to the next phrase, without playing the current phrase to its end. Example: H00 – hop to next phrase H03 – hop to next phrase and start play at phrase row 3 In the table screen, it is used for creating loops. Loops can be nested if wanted.

- 34 -
Example: H21 – hop to table position 1, 2 times. H04 – hop to table position 4 forever.
K: Kill note Example: K00 – kill note instantly K03 – kill note after 3 ticks
L: Slide The L command performs a pitch bend that stops when it reaches a given note. Example: C-4 --- F-4 L04 --- --- --- ---
This will result in a pitch bend that starts with C-4 and then bends to F-4 with the speed 4. For pitching down, use negative command values (e.g., $80-$FF). Warning: If using the L command next to an empty note value (“---“), results will be undefined.
M: Master Volume This command changes the master output volume. The first digit modifies the left output, the second digit the right. The volume can either be set with an absolute value, or changed by a relative value. Values 0-7 are used to specify absolute volumes. Values 8-$F give the volume a relative change; 8 is no change, 9-$B increase, $D-$F decrease. Examples: M77 – maximize volume M08 – turn off left output channel, leave right output channel as is M99 – increase master volume with 1 step

- 35 -
MFE – decrease left volume with 1 step, right volume with 2 steps
O: Set Output Pan channel to left, right, none or both outputs.
P: Pitch Bend/Pitch Shift (pulse and wave channels only) Bend the pitch. When this command is used on “kit” instruments, it sounds more like a pitch shifter. Example: P02 – bend up pitch with speed 2 PFE – bend down pitch with speed 2 ($FE=-2)
R: Re-Trig the Latest Played Note Play the latest played note again. The first digit modulates the volume (0=no change, 1-7=increase, 8-$F=decrease). The second digit sets a period for the re-triggering. If a value larger than zero is given, the re-triggering will be repeated with a period of n ticks. On some drum-machines, this effect is called ʺflamʺ. Example: R00 – re-trig note once RF3 – medium speed flam, decreasing amplitude (echo effect) R01 – very fast flam
S: Sweep/Shape (pulse 1, kit and noise instruments only) This command has different effects for different channels. On pulse channel 1, ‘S’ modulates the pitch, using the Game Boy hardware. It is useful for creating bass drums and percussion. The first digit affects pitch, the second change velocity. When used on kit instruments, ‘S’ changes the loop points. The first digit modulates the offset value; the second digit modulates the loop length. (1-7=increase, 9-$F=decrease.) On the noise channel, ‘S’ works like a shape filter. The first digit alters pitch, the second digit alters the noise modulation. The command is relative, meaning that the pitch/noise modulation values will be added to the currently used values.

- 36 -
T: Tempo Change the tick frequency so that the given BPM will be produced. The BPM setting will be accurate only if the active groove has 6 ticks per note step. If the groove has some other number of ticks per note step, the BPM value should be adjusted according to the formula LSDJ_BPM=(DESIRED_BPM*TICKS_PER_STEP)/6. Example: T80 – set tempo to 128 ($80) BPM
V: Vibrato (pulse, kit and wave channels only) Example: V42 – period=4, depth=2
W: Wave (pulse channels only) Select one of the four different waveforms available for the pulse channels.
- 37 -
7. Overview of Key Presses This is an overview of key presses valid in the phrase screen. The key pressing philosophy expressed here is used as consequently as possible throughout the entire program. A: insert note on empty step A + RIGHT: note up A + LEFT: note down A + UP: octave/+10 up A + DOWN: octave/-10 down B + A: cut note to clipboard SELECT + B: start marking SELECT + (B, B): mark row SELECT + (B, B, B): mark all | [When having marked a block…] +--A + RIGHT: all marked up +--A + LEFT: all marked down +--A + DOWN: all marked octave/-10 down +--A + UP: all marked octave/+10 up +--B: copy block to clipboard +--SELECT + A: cut the marked block to the clipboard SELECT + (B, B, B, B): copy the entire screen to the clipboard SELECT + A: paste from the clipboard B + RIGHT: view the phrase in the rightmost channel B + LEFT: view the phrase in the leftmost channel B + UP: view previous phrase in chain B + DOWN: view next phrase in chain [SONG MODE] START: start/stop playing this phrase [SONG MODE] SELECT + START: start/stop playing all channels [LIVE MODE] START: start playing selected chain after next chain end [LIVE MODE] START, START: start playing selected chain after next phrase end [LIVE MODE] SELECT + START: stop playing current chain when it ends [LIVE MODE] SELECT + (START, START): stop playing current chain after next phrase end B + SELECT: mute this channel B + START: solo this channel

- 38 -
8. The Sample Kits Kit Origin Year Info Samples Speech General
Instruments 1981
The SP0256-AL2 Speech Processor IC contains a programmable digital filter that can be made to model a vocal tract. The 16k ROM stores both data and instructions. The pulse width modulated output can produce speech with a frequency range of 5kHz and a dynamic range of 42 dB.
59
TR-606 Roland 1981
The Roland TR-606 Drumatix is a programmable analogue drum machine. It was designed to couple with the TB-303 Bassline. The TR-606 has a very original sound and remains popular today.
8
TR-707 Roland 1984
The Roland TR-707 has the same functions as the TR-909 with all PCM sounds. Starting with this model, Roland began using an LCD display to show the rhythm matrix and tempo.
15
TR-727 Roland 1985 The Roland TR-727 is identical to the TR-707, with the exception that its sounds are Ethnic/Latin percussion. It is meant to complement a rhythm section, rather than be a main unit.
15

- 39 -
TR-808 Roland 1980
The Roland TR-808 has played a defining role for the 80’s Hip Hop and Electro movement. It is still highly popular, thanks to its unmistakably original sounds.
16
TR-909 Roland 1983
The Roland TR-909 is one of the most popular drum machines ever. It has PCM sounds for cymbal and hi-hat but all other instruments still come from analogue circuitry. The sounds are very useful for House and Techno music.
11
CR-78 Roland 1978
The Roland CR-78 is perhaps the most luxurious rhythm machine ever made. The guiro and tambourine are still unique as of today, and bass, snare and bongos are very soft and rich sound.
14

- 40 -
CR-8000 Roland 1981
The Roland CR-8000 was introduced after the TR-808 -- it has the same analog engine. The hi-hat sounds more realistic than older rhythm machines, but the hand clap sounds like an electric snare.
14
DR-55 Boss 1979
The Boss Dr. Rhythm range of drum machines is especially designed for guitar players who need a mobile drummer. The DR-55 is a simple analogue drum machine with a very rough and direct sound.
5
DR-110 Boss 1983
The DR-110, the successor of the DR-55, has analogue sound but is programmed digitally using a LCD rhythm matrix. It quite possibly has the best analogue handclap ever.
6
LinnDrum Linn 1982
15

- 41 -
The LinnDrum originally sold for $3,000 and about 5.000 units were produced. It provided the rhythm tracks of many 1980’s hit records.
Rhythm Ace
Ace Tone 1973
Ace Tone was the first company to produce electric rhythm boxes in Japan. In the UK, Bentley Pianos (who put stickers on all their products) distributed Ace Tone, and thus the machine is also known as the Bentley Rhythm Ace.
9
Sequential Circuits
Tom 1984
The sounds are a bit dirty and harsh sounding, especially next to its older brother Drumtraks, but that also gives Tom its character. The snare sounds like nothing else on this planet - it’s electric!
8
Acieed House 1990’s
This set of vocal samples was derived from a bunch of popular Acid House tracks. Can you dig it?
14
Ghetto Bass 1990’s
A bunch of samples derived from classic Detroit/Chicago ghetto bass tracks.
8