
LifePort Kidney Transporter Operator's Manual 1.1 - Organ ...
65
LifePort Kidney Transporter Operator’s Manual 1.1
-
Upload
khangminh22 -
Category
Documents
-
view
0 -
download
0
Transcript of LifePort Kidney Transporter Operator's Manual 1.1 - Organ ...

LifePort Kidney TransporterOperator’s Manual 1.1

This Operator’s Manual referencesLifePort Kidney TransporterModel Number: LKT101P
2460
For technical assistance and to reorder suppliesand single use disposables, please contact:
Organ Recovery Systems Organ Recovery Systems NV ORS Representacoes do Brasil Ltda.One Pierce Place, Ste 475W DaVincilaan 2, Box 6 170 Moema Avenue, Suite 11 & 12Itasca, IL 60143 1831 Diegem Sao Paulo, SP 04077-020USA Belgium BrazilT +1.847.824.2600 T +32.2.715.0000 T +55.11.3586.6259F +1.847.824.0234 F +32.2.715.0009 F +55.11.3586.4944Perfusion Helpline: Perfusion Helpline: Perfusion Helpline: +1.866.682.4800 +32.2.715.0005 +55.11.98638.0086
www.organ-recovery.comwww.patents-organrecoverysystems.com
Emergo Europe Prinsessegracht 202514 AP The Hague
The Netherlands T +31.70.345.8570 F +31.70.346.7299
LifePort Kidney Transporter manufactured in the USA for Organ Recovery Systems.
©2018 Organ Recovery Systems, Inc. 10/2018Made and printed in the USA.
LifePort Kidney Transporter Operator’s Manual 755-00002 Rev K
EC REP

755-00002 Rev K LifePort Kidney Transporter Operator’s Manual 3
Retain the following in your records:
Institution___________________________________________________________________
Contact____________________________________________________________________
Model Number______________________________________________________________
Serial Number______________________________________________________________
Date of Purchase____________________________________________________________

LifePort Kidney Transporter Operator’s Manual 755-00002 Rev K4
Table of Contents
How To Use This Manual Introduction……………………………………………………………………………………………………………..7 Purpose of Manual…………………………………………………………………………………………………….7 Abbreviations..…………………………………………………………………………………………………………8System Description Intended Use………………………………………………………………………………………………………….. 9 Safety…………………………………………………………………………………………………………………...9 Physical Description…………………………………………………………………………………………………..9 Main Enclosure……………………………………………………………………………………………………10 Ice Container………………………………………………………………………………………………………10 Pump Deck………………………………………………………………………………………………………..10 Electronics…………………………………………………………………………………………………………11 External Communications………………………………………………………………………………...11 Circuit Breaker……………………………………………………………………………………………..11 Control Panel………………………………………………………………………………………………………11 Outer Display………………………………………………………………………………………………………12 LifePort Kidney Transporter Disposables………………………………………………………………………12 LifePort Kidney Transporter Disposable Kidney Perfusion Circuit.................………………………13 LifePort Kidney Transporter Disposable Kidney Cannulas…………………………………………...13 LifePort Kidney Transporter Disposable Kidney Sterile Drape……………………………………….13 Operational Accessories…………………………………………………………………………………………13 Power Cord………………………………………………………………………………………………………. 13 Batteries…………………………………………………………………………………………………………… 14 Battery Charger (Optional)……………………………………………………………………………………….14 Data Cable………………………………………………………………………………………………………...14 Perfusion Mode………………………………………………………………………………………………….. 15 Label Graphics Explanations…………………………………………………………………………………….15 Safe Disposal of LifePort and LifePort Batteries………………………………………………………………15Unpacking, Setup and Preliminary Testing Overview……………………………………………………………………………………………………………….16 Introduction…………………………………………………………………………………………………………….16 Selecting a Home Base Station…………………………………………………………………………………….16 Unpacking and Inspecting………………………………………………………………………………………….. 16 Running Preliminary Tests…………………………………………………………………………………………..16 Setting Up the LifePort Kidney Transporter …………………………………………………………………...17 Filling the Ice Container…………………………………………………………………………………………..17 Loading the Perfusion Circuit………………………………………………………….................…………….17 Energizing LifePort Kidney Trasporter………………………………………………………………………….18 Testing Operating Modes…………………………………………………………………………………………….18 Set Pressure………………………………………………………………………………………………………..18 Wash……………………………………………………………………………………………………………….. 19 Prime………………………………………………………………………………………………………………..19 Infuse………………………………………………………………………………………………………………..19

755-00002 Rev K LifePort Kidney Transporter Operator’s Manual 5
Testing the Batteries…………………………………………………………………………………………………..20 Checking Duration of Operation (Optional)…………………………………………………………………………20 Entering Device Information………………………………………………………………………………………….20 External Communications using Data Station………………………………………………………………………20 GPS/GPRS Tracking Capability……………………………………………………………………………………...21 Cleaning Up and Review after Use …………………………………………………………………………………21Using LifePort Kidney Transporter Introduction…………………………………………………………………………………………………………….22 Professional Overview………………………………………………………………………………………………..22 Maintaining LifePort Kidney Transporter for Quick Response Use………………………………………………22 Preparing the Home Base Station……………………………………………………………………………….22 Preparing LifePort Kidney Transporter for Recovery………………………………………………………………23 Cooling Down LifePort Kidney Transporter……………………………………………………………………..23 Traveling with LifePort Kidney Transporter and Supplies……………………………………………………..23 Setting Up the Disposable Kidney Perfusion Circuit…………………………………………………………...24 Isolating the Kidney Vascular Structure……………………………………………………………………………..27 Cannulating the Kidney……………………………………………………………………………………………….28 Using the Disposable Kidney SealRing® cannula……..……………………………………………………….28 Using the Disposable Kidney Straight cannula…………………………………………………………………29 Using the Disposable Kidney Coupler…………………………………………………………………………...30 Using the Disposable Kidney Universal SealRing® cannula…..………………………………………………32 Placing the Kidney in LifePort Kidney Transporter…………………………………………………………………34 Entering ORGAN ID Information…………………………………………………………………………………34 Placing the Kidney…………………………………………………………………………………………………35 Priming the Infuse Line …………………………………………………………………………………………...36 Preliminary Testing for Leaks…………………………………………………………………………………….37 Initiating Perfusion…………………………………………………………………………………………………38 Checking the Kidney After Placement………………………………………………………………………………38 Visual Inspection…………………………………………………………………………………………………..38 Cannula Leakage?…………………………………………………………………………………………………38 Artery Filled?……………………………………………………………………………………………………….38 Side Branches Closed?……………………………………………………………………………………………39 Vein Positioned on Top? ………………………………………………………………………………………….39 Presence of Blood or Perfusate?…………………………………………………………………………………39 Color of Kidney?……………………………………………………………………………………………………39 Closing LifePort Kidney Transporter…………………………………………………………………………………40 Monitoring Options for a Kidney on LifePort Kidney Trasporter………………………………………………….40 Monitoring Via LifePort Kidney Transporter Outer Display……………………………………………………41 Data Station Monitoring……………………………………………………………………………………………42 GPS/GPRS Tracking……………………………………………………………………………………………….42 Typical Behavior of a Kidney on LifePort Kidney Transporter………………………………………………...43 Leakage at Cannula or Open Side Branch………………………………………………………………….43 Nonresponding Kidney…………………………………………………………………………………..........43 Remote Monitoring…………………………………………………………………………………………………44 Preparing to Travel to the Transplant Site…………………………………………………………………………. 44 Transplant from the Recovery Site…………………………………………………………………………….. 44 Transport the LifePort Kidney Transporter and Supplies……………………………………………………..44

LifePort Kidney Transporter Operator’s Manual 755-00002 Rev K6
Delivering to the Transplant OR…………………………………………………………………………………….. 44 Checking Battery Power and Ice……………………………………………………………………………….... 44 Adding More Ice………………………………………………………………………………………………........44 Replacing Batteries…………………………………………………………………………………………….......44 At the Transplant OR ……………………………………………………………………………………………...45 Waiting until Recipient Surgery Is Ready.……………………………………………………………………….45 Removing the Kidney from LifePort Kidney Transporter for Transplant.…………………………………….45 Capturing and Downloading Data (Optional)……………………………………………………………………48 Introduction………………………………………………………………………………………………….48 To Flash Drive……………………………………………………………………………………………….49 Downloading a File……………………………………………………………………………………. 49Troubleshooting and Diagnostics Troubleshooting Procedures………………………………………………………………………………………50 Error Message Explanations……………………………………………………………………………………...51 Power On Self Test (POST)………………………………………………………………………………………54Maintenance Overview……………………………………………………………………………………………………………55 Cleaning Up after a Case ………………………………………………………………………………………...55 Storage.……………………………………………………………………………………………………………..55 Shipping by Common Carrier …………………………………………………………………………………….55Specifications, Precautions, Limitations Product Specifications…………………………………………………………………………………………….56 Device Classifications……………………………………………………………………………………………..57 Electromagnetic Compatibility……………………………………………………………………………………57 Operational Precautions and Limitations………………………………………………………………………..60Hazards Overview……………………………………………………………………………………………………………62

755-00002 Rev K LifePort Kidney Transporter Operator’s Manual 7
How To Use This ManualIntroduction
It is important that all personnel who will operate the LifePort Kidney Transporter (LifePort) should:
• Read and understand this manual before operating the LifePort Kidney Transporter.• Follow all warnings and precautions outlined in the sections Operational Precautions and
Limitations on page 60 and Hazards on page 62 for their own safety and the safety of those around them.
LifePort Kidney Transporter is intended to be used for the hypothermic machine perfusion of kidneys. If more information is needed about installation, organ perfusion or if you have any questions, please contact the Organ Recovery Systems Perfusion Helpline.
Purpose of ManualThe instructions within this manual should be carefully followed for safe, trouble-free and effective equipment use.
This manual provides the essential information necessary for installation, operation and routine servicing of LifePort Kidney Transporter. It contains important operation and maintenance information for personnel who have been trained in organ perfusion.
This manual is NOT to be used as a replacement for training in the art or science of organ perfusion. This manual does NOT contain information for servicing internal components of the system.
In this manual, the following definitions apply for all WARNING and CAUTION statements.
WARNING: A warning statement covers any operation, procedure, practice, etc., which if not strictly observed, might result in injury or long-term health hazards to personnel or patients.
CAUTION: A caution statement covers any operation, procedure, practice, etc., which if not strictly observed, might result in damage or destruction of equipment or loss of treatment effectiveness.
LifePort Kidney Transporter Operator’s Manual 755-00002 Rev K8
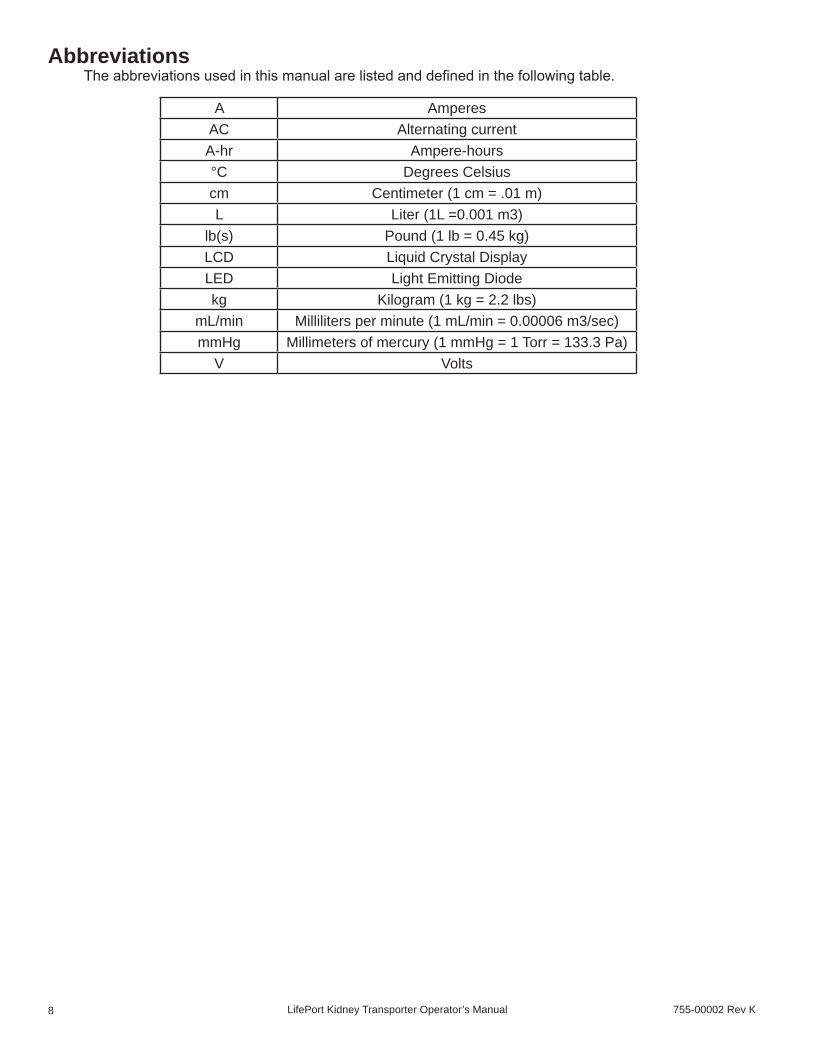
AbbreviationsThe abbreviations used in this manual are listed and defined in the following table.
A AmperesAC Alternating currentA-hr Ampere-hours°C Degrees Celsiuscm Centimeter (1 cm = .01 m)L Liter (1L =0.001 m3)
lb(s) Pound (1 lb = 0.45 kg)LCD Liquid Crystal DisplayLED Light Emitting Diodekg Kilogram (1 kg = 2.2 lbs)
mL/min Milliliters per minute (1 mL/min = 0.00006 m3/sec)mmHg Millimeters of mercury (1 mmHg = 1 Torr = 133.3 Pa)
V Volts

755-00002 Rev K LifePort Kidney Transporter Operator’s Manual 9
System DescriptionIntended Use
LifePort Kidney Transporter is intended for use in continuous hypothermic machine perfusion of kidneys.
SafetyThe responsibility for safety when using LifePort Kidney Transporter resides within the healthcare professionals who use it. LifePort Kidney Transporter is safe when used as described in this manual. It is designed to meet recognized U.S. and International standards for medical equipment and systems, as stated by the Underwriters Laboratories and the International Electro-technical Commission.
Electrical and mechanical safety features have been designed into LifePort Kidney Transporter to ensure safe operation.
These features are as follows:• The electrical and electronic components are contained within a secure enclosure.• Perfusate temperature, flow rates and pressure levels are only adjustable within a set range,
which cannot be changed by the operator. • Perfusate pressure, flow rate and temperature are continuously monitored.• Display screens illuminate when the power is on. Stop, Wash, Prime and Infuse controls are
provided and identified, depending on the mode and options available.• Acceptable operating ranges are established within LifePort Kidney Transporter for pressure,
temperature, flow rate, battery charge state, bubbles in the perfusate and configuration integrity. Hard-wired and software interlocks are built-in to bring LifePort Kidney Transporter to a failsafe condition if an unacceptable operating state is detected.
• An audible alert and a descriptive message are given by LifePort Kidney Transporter if an unacceptable operating state is detected.
Physical DescriptionLifePort Kidney Transporter is a portable transport device designed to maintain a transplantable kidney under cold and aseptic conditions, while simultaneously perfusing it. An insulated, plastic housing encloses the kidney and perfusate within a disposable Perfusion Circuit. LifePort Kidney Transporter’s components also include an Ice Container, Pump Deck, four lithium-ion batteries, electronics, Bubble Detectors, sensors, Control Panel and an Outer Display.
Ice Container
Ice Container Pump Deck
Bubble Detectors
Infusion Pump
Control Panel
Safety Latch
Insulating Cover
Ergonomic Handles
Outer Display
LifePort Kidney Transporter Operator’s Manual 755-00002 Rev K10
LifePort Kidney Transporter is designed to integrate with the clinical environment by using readily available supplies, requiring minimal user intervention, and by being easy to use. Once the Ice Container is properly loaded, even when LifePort Kidney Transporter is powered off, it preserves kidneys hypothermically to the same degree as conventional static (ice-pack) storage methods.
Main EnclosureLifePort Kidney Transporter is enclosed in a rugged, insulated plastic housing designed for easy carrying. The lower section contains an Ice Container, Perfusion Circuit, Pump Deck, batteries, electronics, sensors, Bubble Detectors, Control Panel, Outer Display and Disposables. Two handles make the unit easy to lift and carry.
An insulated, removable, latched Lid covers the lower housing during perfusion to keep the kidney secure and at the proper temperature.
Ice ContainerThe Ice Container is a sealed enclosure with a removable lid, which is filled with a mixture of ice and water to provide a stable cold temperature environment for the kidney.
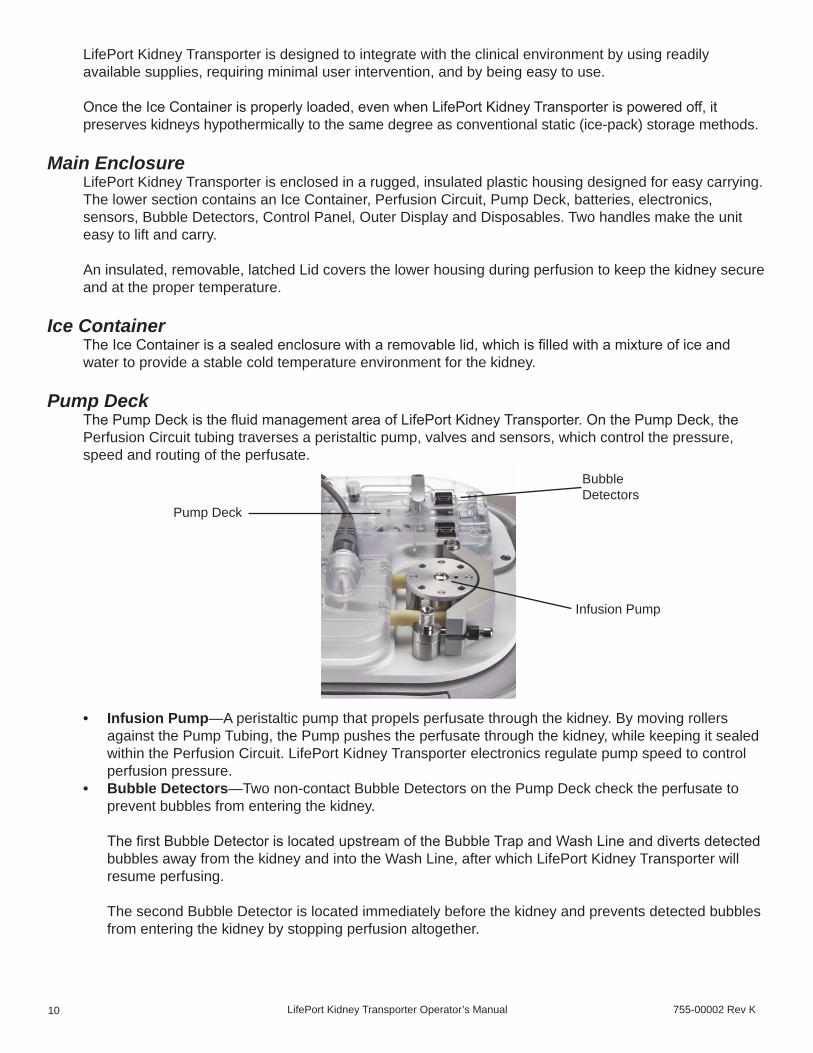
Pump DeckThe Pump Deck is the fluid management area of LifePort Kidney Transporter. On the Pump Deck, the Perfusion Circuit tubing traverses a peristaltic pump, valves and sensors, which control the pressure, speed and routing of the perfusate.
• Infusion Pump—A peristaltic pump that propels perfusate through the kidney. By moving rollers against the Pump Tubing, the Pump pushes the perfusate through the kidney, while keeping it sealed within the Perfusion Circuit. LifePort Kidney Transporter electronics regulate pump speed to control perfusion pressure.
• Bubble Detectors—Two non-contact Bubble Detectors on the Pump Deck check the perfusate to prevent bubbles from entering the kidney.
The first Bubble Detector is located upstream of the Bubble Trap and Wash Line and diverts detected bubbles away from the kidney and into the Wash Line, after which LifePort Kidney Transporter will resume perfusing.
The second Bubble Detector is located immediately before the kidney and prevents detected bubbles from entering the kidney by stopping perfusion altogether.
Pump Deck
Bubble Detectors
Infusion Pump

755-00002 Rev K LifePort Kidney Transporter Operator’s Manual 11
• Pressure Sensor Cable—Provides LifePort Kidney Transporter computer with information about the perfusion pressure felt by the kidney. If the Pressure Sensor connection is broken, LifePort Kidney Transporter stops and displays an error message.
• The Infuse and Wash Valves—Determine whether the perfusate enters (Infuse Valve) or bypasses (Wash Valve) the kidney. In INFUSE mode, the Infuse Valve is open and the Wash Valve is closed, allowing perfusate to flow into the kidney. In WASH Mode and during bubble purge, the Wash Valve is open and the Infuse Valve is closed, directing the perfusate through the bypass line, directly back into the perfusate reservoir. The valves are electrically activated.
ElectronicsElectronic circuits control LifePort Kidney Transporter functions and user interactions, manage power and enable communications over standard computer interfaces. All circuits are contained within LifePort Kidney Transporter electronics module and include:
• Computer• Batteries and battery charger• Communications interface• Sensor interface • Power supply (a hospital-grade Power Cord is supplied…do not substitute.)• Pump and valve driver circuits• Fan
External ConnectionsLifePort Kidney Transporter connects with an external power source and other devices through its back panel, which provides a standard AC Power Cord connector and USB-A and USB-B Data Ports.
Circuit BreakerTwo Circuit Breakers, located on the back panel, trip if a short circuit occurs. Depressing the button resets the breaker.
Control PanelThe Control Panel is located next to the Pump Deck. The panel can be accessed only when the Cover is removed, which prevents inadvertent and unauthorized access to the controls.
The display indicates when the Power, Stop, Wash, Prime and Infuse Modes have been selected.
POWEROff / On
RAISE AND LOWER infusion pressure (by 1-mmHg increments)
PRESSURE SETPOINT display (default 30 mmHg)
DATA ENTRY / DISPLAY screen
5-WAY KEYPAD(allows navigation forhighlighting, selecting and entering information)
SELECT MODE (Wash, Prime, Infuse, Stop)
30SET
mmHg
Wash
Prime
Infuse
Organ ID: ABC123Kidney - RightBlood Type - O+Cross Clamp Time:23:00 CST
Circuit BreakersData Port
BatteriesAC Plug

LifePort Kidney Transporter Operator’s Manual 755-00002 Rev K12
Outer DisplayThe Outer Display—a horizontal panel visible whether the Cover is in place or removed—provides information on operational parameters as well as additional information about the perfusion history.
LifePort Kidney Transporter Kidney DisposablesSingle-use Disposables, an integral part of LifePort Kidney Transporter, are used to contain the kidney and perfusate under aseptic conditions during transport, to connect the kidney to the Perfusion Circuit and to help maintain aseptic conditions while working inside the Perfusion Circuit. Each Disposable is factory pre-sterilized and delivered in an easy-to-open sterile pack.
NOTE: To reorder LifePort Kidney Transporter Kidney Disposables, please contact Organ Recovery Systems. (See inside front cover for contact details).
The primary Kidney Disposables are shown—separated for easier visualization—in the illustration below. A full description follows.
30/18PRESSURE
mmHg120
FLOW
ml/min0.18
RESISTANCE
mmHg/ml/min
2.3°C
TEMPERATURE
Ice
5.0°C
Trap
ICE TEMPERATUREwithin the insulated cold section
MESSAGE DISPLAY PANEL shows ORGAN ID, Kidney Side, Blood Type, Unit ID, 0peration Mode, Pump Time (if in Infuse Mode), Power Source icon, and error messages (if any)
PERFUSATETEMPERATUREmeasured at theBubble Trap
SYSTOLIC AND DIASTOLICpressure within the kidney
FLOW RATE ofperfusate throughthe kidney
VASCULARRESISTANCEwithin the kidney
PLOT / CLEARBUTTON togglesbetween display ofnumerical values and a trend line of values for FLOW and RESISTANCE—also clears error messages
Ready
ID: ABC123Kidney - RightBlood - O+TPG_1
Cannula MountPerfusion Circuit
Universal SealRing CannulaSealRing
Kidney Cradle
Coupler Straight Cannula
Perfusion Circuit and Tubeframe
Inner/Outer Perfusion Circuit Lids
755-00002 Rev K LifePort Kidney Transporter Operator’s Manual 13
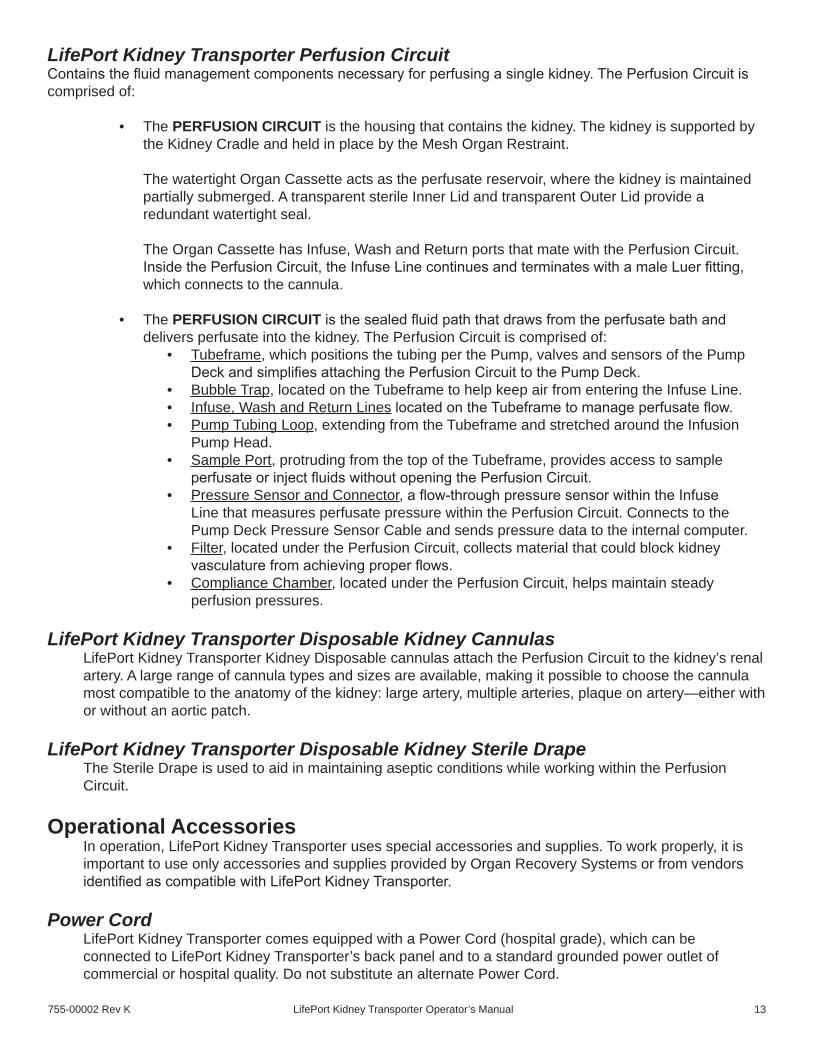
LifePort Kidney Transporter Perfusion CircuitContains the fluid management components necessary for perfusing a single kidney. The Perfusion Circuit is comprised of:
• The PERFUSION CIRCUIT is the housing that contains the kidney. The kidney is supported by the Kidney Cradle and held in place by the Mesh Organ Restraint.
The watertight Organ Cassette acts as the perfusate reservoir, where the kidney is maintained partially submerged. A transparent sterile Inner Lid and transparent Outer Lid provide a redundant watertight seal.
The Organ Cassette has Infuse, Wash and Return ports that mate with the Perfusion Circuit. Inside the Perfusion Circuit, the Infuse Line continues and terminates with a male Luer fitting, which connects to the cannula.
• The PERFUSION CIRCUIT is the sealed fluid path that draws from the perfusate bath and delivers perfusate into the kidney. The Perfusion Circuit is comprised of:
• Tubeframe, which positions the tubing per the Pump, valves and sensors of the Pump Deck and simplifies attaching the Perfusion Circuit to the Pump Deck.
• Bubble Trap, located on the Tubeframe to help keep air from entering the Infuse Line.• Infuse, Wash and Return Lines located on the Tubeframe to manage perfusate flow.• Pump Tubing Loop, extending from the Tubeframe and stretched around the Infusion
Pump Head.• Sample Port, protruding from the top of the Tubeframe, provides access to sample
perfusate or inject fluids without opening the Perfusion Circuit.• Pressure Sensor and Connector, a flow-through pressure sensor within the Infuse
Line that measures perfusate pressure within the Perfusion Circuit. Connects to the Pump Deck Pressure Sensor Cable and sends pressure data to the internal computer.
• Filter, located under the Perfusion Circuit, collects material that could block kidney vasculature from achieving proper flows.
• Compliance Chamber, located under the Perfusion Circuit, helps maintain steady perfusion pressures.
LifePort Kidney Transporter Disposable Kidney CannulasLifePort Kidney Transporter Kidney Disposable cannulas attach the Perfusion Circuit to the kidney’s renal artery. A large range of cannula types and sizes are available, making it possible to choose the cannula most compatible to the anatomy of the kidney: large artery, multiple arteries, plaque on artery—either with or without an aortic patch.
LifePort Kidney Transporter Disposable Kidney Sterile DrapeThe Sterile Drape is used to aid in maintaining aseptic conditions while working within the Perfusion Circuit.
Operational AccessoriesIn operation, LifePort Kidney Transporter uses special accessories and supplies. To work properly, it is important to use only accessories and supplies provided by Organ Recovery Systems or from vendors identified as compatible with LifePort Kidney Transporter.
Power Cord
LifePort Kidney Transporter comes equipped with a Power Cord (hospital grade), which can be connected to LifePort Kidney Transporter’s back panel and to a standard grounded power outlet of commercial or hospital quality. Do not substitute an alternate Power Cord.

LifePort Kidney Transporter Operator’s Manual 755-00002 Rev K14
BatteriesLifePort Kidney Transporter uses four specially designed lithium-ion rechargeable batteries as its portable source of power.
CAUTION: Do not substitute batteries. Use only LifePort batteries (SM201-6) from Organ Recovery Systems. For information, contact the Organ Recovery Systems Perfusion Helpline.
LifePort Kidney Transporter draws power from one battery at a time, using the batteries in series. Therefore, it is possible to operate with any number from one to four batteries, since each delivers the 11 to 12 volts required. However, it is recommended to use all four batteries, which you should keep as fully charged as possible.
NOTE: Total battery life can be found under the device information tab (Message Display Panel).
Access the batteries through the Battery Door on LifePort Kidney Transporter’s rear panel. Each battery can be slid in and out of its slot. When inserted in the proper orientation, the battery should be flush with the slot panel, with the fabric-pull visible and available for removing the battery. If the battery does not push flush, it may be in the wrong orientation. Turn the battery 180 degrees and try again.
• The following tips will help you obtain maximum life and serviceability from the batteries.• Always replace the Battery Door. LifePort Kidney Transporter should not be operated or shipped
without the Battery Door in place. • LifePort Kidney Transporter’s built-in charger will replenish the batteries whenever the LifePort is plugged into
an external power supply. It’s a good idea to plug in the LifePort whenever not in transit, keeping the batteries at the highest possible charge. Normally, it takes five hours to completely recharge all four batteries.
NOTE: Keep spare charged batteries handy for long transportations or successive LifePort uses.
• During storage of LifePort Kidney Transporter without connection to an external power supply, the batteries will slowly drain. After 30 days the batteries could have little or no charge and will need a full five-hour recharge.
• For periods of storage for longer than 30 days, remove the batteries from LifePort Kidney Transporter.
NOTE: Long periods of storage may damage the batteries.
• Lithium-ion batteries must be disposed of according to local regulations. If in doubt, call the Organ Recovery Systems Perfusion Helpline.
Battery Charger (Optional)In addition to charging installed batteries by connecting LifePort Kidney Transporter to an external power supply, you can use an optional Battery Charger to charge them separately. This enables you to maintain a supply of spare charged batteries. The Battery Charger is available from Organ Recovery Systems.
1. Plug the Battery Charger into an external power supply.2. Insert the batteries into their respective slots and charging begins.
NOTE: A charge state indicator displays when the batteries are fully charged.
Data Cable The 6-ft (2m) Data Cable connects LifePort Kidney Transporter to an external computer. The USB-A end connects to the Data Port on the LifePort and the USB-B end connects to the USB port of a personal computer.
755-00002 Rev K LifePort Kidney Transporter Operator’s Manual 15
Perfusion Mode LifePort Kidney Transporter operates in Pulsatile Mode. A LifePort Kidney Transporter will pulse the pressure at a fixed pulse repetition rate to a systolic pressure set on the Control Panel. The diastolic pressure is determined in response to the kidney vascular resistance. Both pressures are shown on the Outer Display.
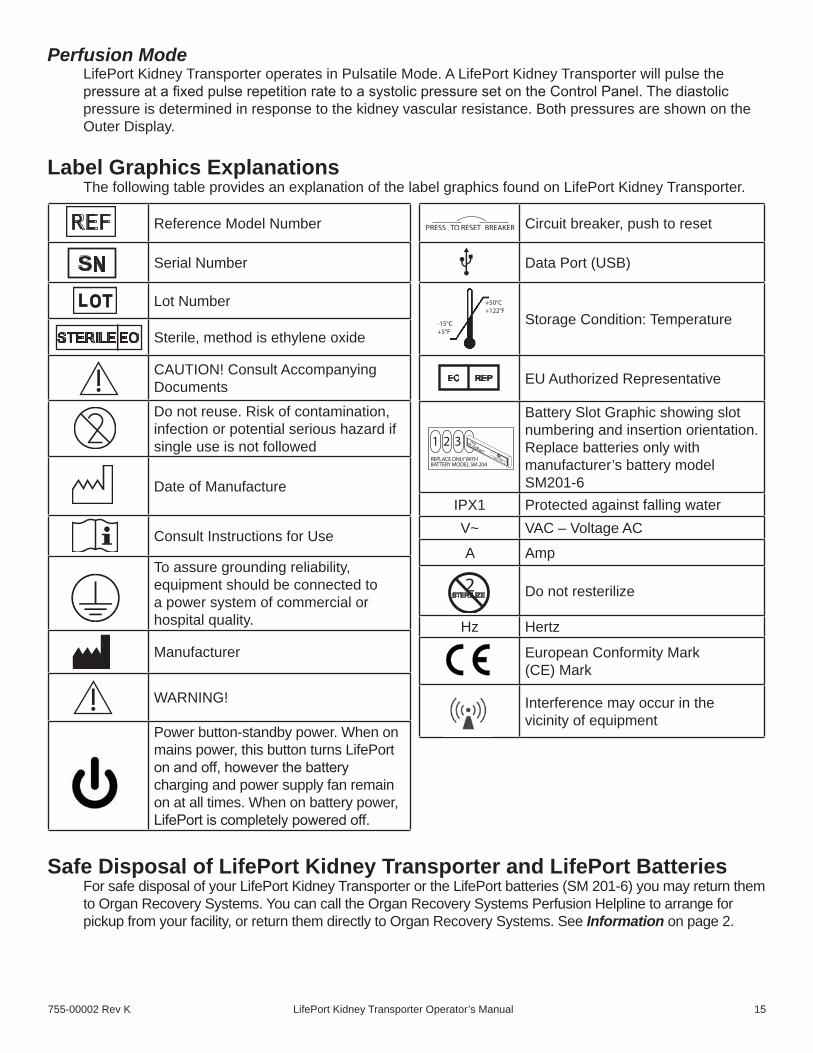
Label Graphics ExplanationsThe following table provides an explanation of the label graphics found on LifePort Kidney Transporter.
Safe Disposal of LifePort Kidney Transporter and LifePort BatteriesFor safe disposal of your LifePort Kidney Transporter or the LifePort batteries (SM 201-6) you may return them to Organ Recovery Systems. You can call the Organ Recovery Systems Perfusion Helpline to arrange for pickup from your facility, or return them directly to Organ Recovery Systems. See Information on page 2.
Reference Model Number
Serial Number
Lot Number
Sterile, method is ethylene oxide
CAUTION! Consult Accompanying DocumentsDo not reuse. Risk of contamination, infection or potential serious hazard if single use is not followed
Date of Manufacture
Consult Instructions for Use
To assure grounding reliability, equipment should be connected to a power system of commercial or hospital quality.
Manufacturer
WARNING!
Power button-standby power. When on mains power, this button turns LifePort on and off, however the battery charging and power supply fan remain on at all times. When on battery power, LifePort is completely powered off.
Circuit breaker, push to reset
Data Port (USB)
Storage Condition: Temperature
EU Authorized Representative
Battery Slot Graphic showing slot numbering and insertion orientation. Replace batteries only with manufacturer’s battery model SM201-6
IPX1 Protected against falling waterV~ VAC – Voltage ACA Amp
Do not resterilize
Hz Hertz
European Conformity Mark (CE) Mark
Interference may occur in the vicinity of equipment
EC REP
SN
REF
STERILE EO
STERILIZE2
1 2 3REPLACE ONLY WITH BATTERY MODEL SM 204
412-00049 REV 1

LifePort Kidney Transporter Operator’s Manual 755-00002 Rev K16
Unpacking, Setup and Preliminary TestingOverview
This section provides information for use upon receiving, unpacking, setting up and preliminarily testing LifePort Kidney Transporter. The instructions provided in this section are to be performed one-time only. Routine operating instructions are provided in the section titled Using LifePort Kidney Transporter on page 22.
IntroductionLifePort Kidney Transporter is shipped in a special container that is marked for appropriate handling. It should be opened and checked only by a responsible person trained and qualified in working with electronic medical equipment.
Selecting a Home Base Station A home base station should be designated for each LifePort Kidney Transporterwhere it can be set up and recharged between cases. The home base station should be a secure area and provide a clean bench top or tabletop space. The following facilities and utilities are required:
• Climate controlled 24 hours a day to standard office or laboratory conditions (approximately 21°C, 50% humidity).
• No direct sunlight.• AC electrical outlets (2 to 4 plugs: 120V/15A in the USA).• Storage for LifePort Kidney Transporter Kidney Disposables, batteries, tools and spares.• Space to place the LifePort Kidney Transporter Cover when it is removed.• Easy access to crushed or cubed ice (hollow cubes not recommended).• Easy access to a sink for clean-up and to provide water for the ice bath.• Easy access to medical waste disposal.• Easy access to refrigerated storage for perfusate and other medications.• Tabletop space for Battery Charger (optional) and computer with USB port (recommended).• Storage for transplant coordinator gear: cart, bags, procedure kits and coolers.• Proximity to operating rooms and ready access to car, ambulance or helicopter loading areas.
Unpacking and InspectingCarefully remove LifePort Kidney Transporter and its accessories from the Shipping Container. Save the packing materials for shipping and storage.
After unpacking, thoroughly inspect the system and all accessories for damage. During this inspection, ensure that:
• LifePort Kidney Transporter housing is not bent or distorted.• There are no dents, chips or cracks in the housing surface.• Manual controls and movable parts, such as connectors, operate properly.• Control Panels are properly aligned.• All items listed on the shipping documents are present.
Report any damage found from this inspection to the carrier immediately. If you have any concerns about the condition of LifePort Kidney Transporter or Accessories, contact the Organ Recovery Systems Perfusion Helpline.
Running Preliminary TestsPerform the following trial run with LifePort Kidney Transporter to make sure that it is working properly. After each step, observe the system to make sure that it functions as described and that there are no malfunctions, leaks or irresolvable errors. If difficulties arise during setup and checkout, refer to the section titled Troubleshooting and Diagnostics on page 50.
755-00002 Rev K LifePort Kidney Transporter Operator’s Manual 17
Setting Up LifePort Kidney TransporterCAUTION: LifePort Kidney Transporter weighs 45 lbs (20.4 kg) fully loaded. Use proper lifting procedures to avoid injury.
1. Holding the handles, lift LifePort Kidney Transporter and place on its home base station table or countertop so that the Outer Display is easily accessible and facing you.
2. Unlatch and remove LifePort Kidney Transporter Cover and store it nearby. 3. Complete your review of LifePort Kidney Transporter—making sure that it is complete, secure and
intact and that nothing appears broken—before starting these tests.
Filling the Ice Container1. Open the Ice Container Lid and fill it with crushed or cubed ice, making sure to push the ice as far as
possible into the ice bath. 2. Pour about 1.0 Liter of cold water (less than 10°C) into the Ice Container, which will gradually loosen
the ice. 3. Add more ice and another 0.5-1.0 Liter water until the Ice Container is filled with an ice and water
mixture, maximizing the amount of ice added. 4. Close and lock the Ice Container Lid.
Loading the Perfusion Circuit
NOTE: For detailed instructions, refer to the document LifePort Kidney Transporter Disposable Kidney Perfusion Circuit Instructions For Use.
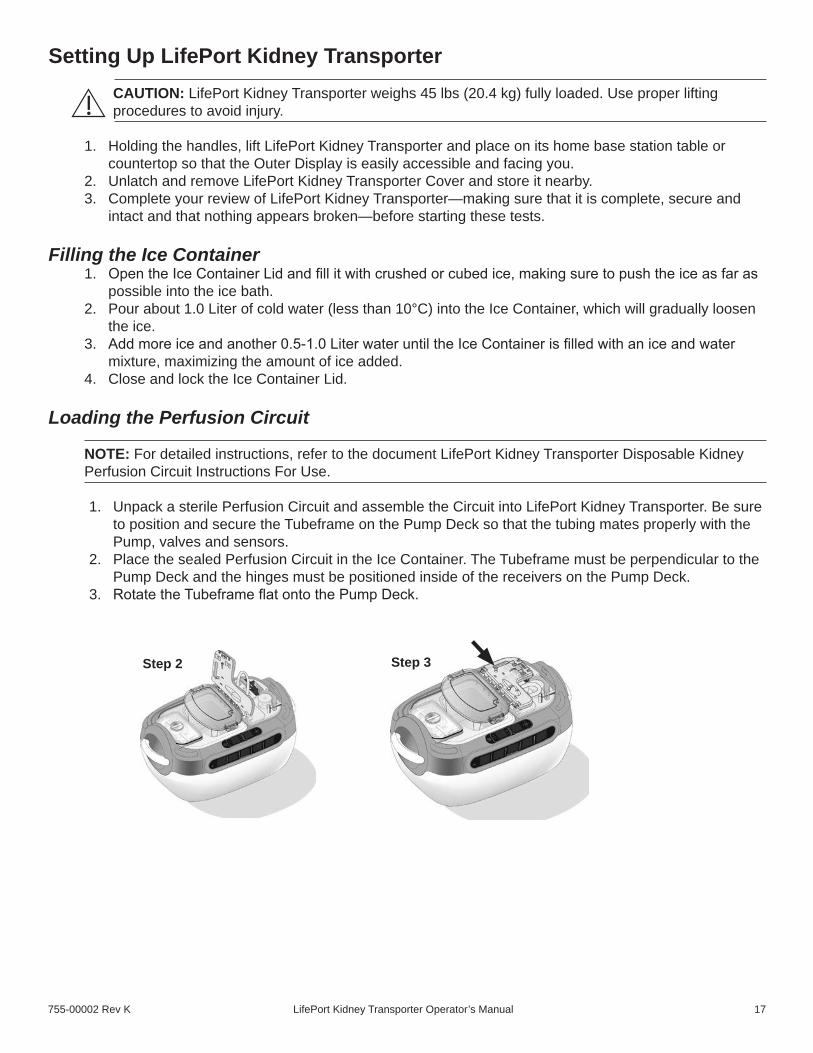
1. Unpack a sterile Perfusion Circuit and assemble the Circuit into LifePort Kidney Transporter. Be sure
to position and secure the Tubeframe on the Pump Deck so that the tubing mates properly with the Pump, valves and sensors.
2. Place the sealed Perfusion Circuit in the Ice Container. The Tubeframe must be perpendicular to the Pump Deck and the hinges must be positioned inside of the receivers on the Pump Deck.
3. Rotate the Tubeframe flat onto the Pump Deck.
Step 2 Step 3

LifePort Kidney Transporter Operator’s Manual 755-00002 Rev K18
4. Open the Pump Head and stretch the tubing over the wheel.5. Close and latch the Pump Head Loop to clamp the tubing.6. Rotate the Pump Deck Locking Arm 90° and snap into place.7. Connect the Pressure Sensor Cable from the Pump Deck to the connector on the Tubeframe.
8. Remove the Inner and Outer Cassette Lids and pour 1 Liter of cold (less than 10°C) saline into the Perfusion Circuit housing.
9. Replace the Inner and Outer Cassette Lids.
Energizing the LifePort1. Connect the Power Cord to LifePort Kidney Transporter back panel and plug it into an external power
supply. 2. Press the POWER button:
• On the Control Panel, observe the following:• The Control Panel screens illuminate• The Pressure Set Point Display show a default value of 30 mmHg• Mode control displays show WASH, PRIME and INFUSE.
• On the Outer Display panel, observe the following:• The Outer Display panel screens illuminate.• The values displayed read:
• PRESSURE—00• FLOW—0• RESISTANCE—0.0• TEMPERATURE—temperature of the Ice Container.
NOTE: It is common that the temperature of LifePort Kidney Transporter will be high when first energized. When the Ice Container temperature is above 8°C, the LifePort will beep and indicate that the temperature is elevated.
NOTE: LifePort Kidney Transporter will not function in any mode until the temperature is below 8°C.
Other errors may also occur at power on. If they do, refer to the section titled Troubleshooting and Diagnostics on page 50 for information on how to proceed.
Testing Operating ModesSet Pressure
1. Press the pressure UP/DOWN arrow buttons and verify that the pressure setpoint changes up or down by 1 mmHg with each press.
2. Using the UP/DOWN arrow buttons, set the pressure to 40 mmHg.
Step 4 Step 6 & 7Step 5

755-00002 Rev K LifePort Kidney Transporter Operator’s Manual 19
Wash1. Press the WASH button and verify pump rotation. 2. Verify that perfusate is drawn from the Perfusion Circuit, into the Pump and then down into the
filter.
NOTE: Within a couple of minutes, perfusate should flow out of the filter, into the Bubble Trap, then into the wash port of the Perfusion Circuit.
3. Verify that perfusate is contained within the tubing without leaks and is not flowing through the Infuse Line into the Perfusion Circuit.
4. Press the STOP button.
Prime1. Press the PRIME button and observe that the flow diverts into the Infuse Line of the Perfusion
Circuit. 2. Verify that perfusate is contained within the tubing without leaks and is flowing only into the
Infuse Line of the Perfusion Circuit (and not into the Wash Port). 3. Remove the Perfusion Circuit Lids and squeeze or clamp the Infuse Tubing. LifePort Kidney
Transporter should beep, the Pump should stop and the Message display should read: High Pressure.
4. Release the tubing and press the STOP button, which should clear the error message.
InfuseAttach a flow restrictor onto the Luer fitting on the Infuse Tubing (a 20-ga. or smaller syringe needle will also work). You must make an entry under ORGAN ID, KIDNEY and BLOOD TYPE before you can run an Infuse test.
1. Press OK to enter ORGAN INFORMATION.2. Make sure ORGAN INFORMATION is selected (use arrow buttons if necessary), then press OK.3. Make sure ORGAN ID is selected (use arrow buttons if necessary), then press OK.4. Use the arrow buttons to scroll through the alpha-numerics. Select the letters in TEST, pressing
OK with each selection.5. Scroll to DONE and click OK, then select SAVE to confirm.6. Use the arrow buttons to select KIDNEY, then press OK.7. Use the arrow buttons to scroll through the options and select N/A.8. Click OK, then select SAVE to confirm. 9. Use the arrow buttons to select BLOOD TYPE, then press OK.10. Use the arrow buttons to scroll through the options and select N/A.11. Click OK, then select SAVE to confirm. 12. Press the INFUSE button. The Pump should start up and begin regulating pressure toward
the setpoint level. 13. Verify that pressure, flow, resistance and temperature readings are displayed on the
Front Panel.
NOTE: TRAP temperature represents the temperature measured at the Bubble Trap, which is only displayed during active infusion.
14. Verify that the test ID and test blood type information are displayed.15. Press the STOP button to end the infuse test. 16. Turn the LifePort off by pressing the POWER button.

LifePort Kidney Transporter Operator’s Manual 755-00002 Rev K20
Testing the Batteries1. OpenLifePort Kidney Transporter Battery Door by sliding it away from the product label. 2. Insert the batteries. 3. Replace the LifePort Kidney Transporter Battery Door.
NOTE: LifePort Kidney Transporter Battery Door should be in place whenever LifePort Kidney Transporter is operated or transported.
4. Allow the batteries to charge in LifePort Kidney Transporter for at least five hours. Fully charged batteries should be ready to run the LifePort for 24 hours.
NOTE: The Outer Display shows that LifePort Kidney Transporter is plugged in. (Whenever plugged in, LifePort Kidney Transporter is charging.)
5. Re-run the ENERGIZE and TEST OPERATING MODES tests as described above, using Battery power.
Checking Duration of Operation (Optional) 1. Press OK.2. Use the arrow buttons to select DEVICE INFORMATION, then press OK.3. View percentage of battery charge. The screen returns to the main screen in 10 seconds.4. With the batteries fully charged and the Ice Container full, operate LifePort Kidney Transporter in
INFUSE mode for 24 hours. During this test:• Keep the Flow Restrictor positioned on the Infuse Line.• Keep the lid closed for the entire 24 hours.
5. Verify that the ice and batteries last throughout the entire 24-hour duration of the test.
Entering Device Information1. Press OK, then use the arrow buttons to select DEVICE INFORMATION.2. Make sure DEVICE ID is selected (use arrow buttons if necessary), then press OK.3. Use the arrow buttons to scroll through the alpha-numerics. Select the letters for the name you wish
to assign to the LifePort, pressing OK with each selection.4. Scroll to DONE and click OK, then select SAVE to confirm.5. Use the arrow buttons to select DATE.6. Use the arrow buttons to enter the current month, day and year, then press OK.7. Select SAVE to confirm.8. Use the arrow buttons to select TIME.9. Use the arrow buttons to enter the current hour and minutes, then press OK.10. Select SAVE to confirm.11. Use the arrow buttons to select TIME ZONE (TMZ).12. Use the arrow buttons to scroll through the alphabet. Select the letters for the name of the time zone
you wish to enter, pressing OK with each selection.13. Scroll to DONE and click OK, then select SAVE to confirm.14. Use the arrow buttons to select LANGUAGE.15. Use the arrow buttons to scroll through the options and select the language you want LifePort Kidney
Transporter to display.16. Scroll to DONE and click OK, then select SAVE to confirm.
External Communications using Data StationAvailable Data Station software allows communication between a LifePort and a computer, making it possible to monitor LifePort Kidney Transporter operations with the computer and any other computers networked to it.

755-00002 Rev K LifePort Kidney Transporter Operator’s Manual 21
Consult the User Guide provided with the Data Station software to install the application on the computer(s) you plan to use for monitoring, for synchronizing the LifePort Kidney Transporter with the computer(s) and for using the software.
GPS/GPRS Tracking CapabilityLifePort Kidney Transporter 1.1 contains a built in GPS/GPRS that will interact with an online website portal. Using LifePort Kidney Transporter’s Portal, users can:
• Locate, track and view an entire history of travel forLifePort Kidney Transporter. • Read information from LifePort Kidney Transporter such as renal resistance and temperature,
allowing customers to vigilantly monitor the kidney as it travels to its destination. Access to the customized portal will be setup prior to initial use by the customer for convenience. The web address for the LifePort Kidney Transporter Portal is https://lifeport.blacklinegps.com.
Cleaning Up and Review after Use1. Press the STOP button.2. Press the POWER button. 3. Remove the Perfusion Circuit and properly dispose of it. 4. Empty the Ice Container.
Problems uncovered during any of these tests should be investigated and resolved. Be aware to look for leaks, misrouted flow and extra or missing error messages.
The system should always stay dry and error-free.
If you need assistance, contact the Organ Recovery Systems Perfusion Helpline.

LifePort Kidney Transporter Operator’s Manual 755-00002 Rev K22
Using the LifePortIntroduction
This section provides information on routine use of the LifePort from preparing to receive a kidney to returning the unit for storage until its next use.
NOTE: Be sure to keep the batteries plugged in and charging when LifePort Kidney Transporter is not in use.
Professional OverviewBefore using LifePort Kidney Transporter in a clinical setting, thoroughly familiarize yourself with the device and kidney perfusion. Consider practicing on discarded or animal kidneys. Various settings should be tried and a sense obtained as to the effects on the kidney.
Be aware of the following important factors:• Select an infusion pressure for use according to good clinical practice to assure sufficient flow,
while preventing vascular damage. • Secure cannulas to avoid perfusate leaks, while preventing damage to the transplanted artery. • Inspect and position the cannulated artery to avoid any twists or kinks that would occlude the
flow of perfusate.• Maintain aseptic conditions for the kidney and perfusate at all times. Sealing the Organ
Cassette while following sterile procedures is required.• Maintain cold conditions for the kidney by keeping LifePort Kidney Transporter Ice Container
filled. Use only ice and water to prevent freezing.
Maintaining LifePort Kidney Transporter for Quick Response UseBefore you receive the call that LifePort Kidney Transporter is needed, keep it ready to go at a moment’s notice by performing the following procedures.
Preparing the Home Base StationLifePort Kidney Transporter and its supplies and accessories are designed to be an integral part of the recovery team’s supply pack, to be seamlessly included in the recovery and transplant process.
The following preparations will keepLifePort Kidney Transporter in a ready-to-use state:• Cubed or crushed ice—10 lbs. (5-6 kg.) or more—readily available in a freezer or ice maker.• Batteries loaded in LifePort Kidney Transporter and kept fully charged. Maintain the batteries’
charge by keeping LifePort Kidney Transporter plugged into an external power supply.• Perfusion Circuit, Sterile Drapes and cannula packed and ready.• Portable wheeled cart available and ready.• Surgical instruments, suture, solution decanter and supplies packed and ready.• Distilled, sterile or regular tap water (about 5 Liters)—chilled in the refrigerator.• Perfusion solution and organ flush solution—chilled in the refrigerator.
CAUTION: Use only machine perfusion solution. LifePort Kidney Transporter is designed to work with machine perfusion solutions only. Check the labeling of the perfusion solution and make sure that it is intended for machine perfusion.
If you are uncertain about which solutions are appropriate, contact the Organ Recovery Systems Perfusion Helpline for information on recommended perfusates that work best in LifePort Kidney Transporter.
• Spare parts at hand, such as additional charged batteries, Power Cord, spare cannula, etc.

755-00002 Rev K LifePort Kidney Transporter Operator’s Manual 23
Preparing LifePort Kidney Transporter for RecoveryYou can modify these instructions according to your institution’s procedures. When you receive the call that LifePort Kidney Transporter is needed, perform the following procedures to prep the device before taking it to receive a kidney.
Make Sure You Have Everything You NeedUsing a checklist, double check all your equipment and supplies to make sure it is all packed and on the cart.
Recheck the BatteriesCheck the batteries to make sure that all are fully charged. Press the POWER button and verify that the LifePort Kidney Transporter powers up. Press the POWER button again to turn it off.
Visually Check LifePort Kidney Transporter and Perfusion CircuitVisually check LifePort Kidney Transporter and Perfusion Circuit for overall integrity and transport- worthiness before each use. Do not use if parts are loose, cracked, broken or liquid is leaking.
Turn LifePort Kidney Transporter ON, check ice and battery levels and check its operation using the startup methods outlined below.
Cooling Down LifePort Kidney Transporter
CAUTION: To avoid inadvertently freezing the kidney, USE ONLY ICE AND WATER in LifePort Kidney Transporter Ice Container. A mixture of ice and water in the Ice Container will assure that temperatures remain within the appropriate range for kidney preservation.
NOTE: As a safeguard to the kidney, LifePort Kidney Transporter will not operate unless the Ice Container temperature is chilled below 8°C. After installation of the Ice Container, it may take several minutes before the display reads a temperature below 8°C.
1. Remove the Cover from LifePort Kidney Transporter and remove the Ice Container. 2. Open and fill the Ice Container with crushed or cubed ice, then pour in about 1 Liter of cold
water. Add more ice and water until filled, maximizing the amount of ice.
3. Close the Ice Container when filled and make sure it is properly sealed.4. Place the Ice Container in LifePort Kidney Transporter and replace the Cover on LifePort Kidney
Transporter.
Traveling with LifePort Kidney Transporter and SuppliesIf you’re traveling with LifePort Kidney Transporter, be sure to take the following precautions: if you are taking a vehicle, push the cart with LifePort Kidney Transporter and supplies to the vehicle and place the LifePort Kidney Transporter on the seat or in the trunk. Secure LifePort Kidney Transporter from sliding or rolling. The cart and supply packs can also be loaded onto the seats or into the trunk.
Step 1 Step 2

LifePort Kidney Transporter Operator’s Manual 755-00002 Rev K24
LifePort Kidney Transporter can withstand the normal handling involved in traveling between hospitals; however, it should be kept in an upright orientation to minimize the potential for leaks, spills or air bubbles. If LifePort Kidney Transporter is transported in a vehicle seat, the normal seatbelt can be used to restrain LifePort Kidney Transporter while driving.
At a remote recovery site, LifePort Kidney Transporter and supply packs can be reloaded onto the cart, which can be pushed to the donor operating room.
Setting Up the Kidney Perfusion CircuitOnce you have verified the kidney and checked for any contraindications against proceeding, use these instructions to set up the Perfusion Circuit.
NOTE: The following instructions are designed for two operators, one being gowned and gloved. In the case of a single operator, pay special attention to procedures performed inside an aseptic field.
CAUTION: Use Aseptic Procedures with LifePort Kidney Transporter Disposable Kidney Perfusion Circuit. The Perfusion Circuit is provided pre-sterilized. To minimize the potential for infection of the kidney (and its eventual recipient), aseptic procedures must be used whenever handling the kidney and perfusate or whenever opening the Perfusion Circuit. Aseptic procedures include the use of sterile field, gown, gloves and instruments and aseptic management of IV tubing, as would be typical in surgical and nursing practice.
1. Using aseptic technique, open a LifePort Kidney Transporter Disposable Kidney Perfusion Circuit and
bring it into your sterile field. 2. Using aseptic technique, open both Lids. 3. Using aseptic technique, remove the Kidney Cradle.4. Using aseptic technique, decant 1 Liter of chilled perfusate into the Perfusion Circuit.
Step 1 Step 2
Step 3 Step 4

755-00002 Rev K LifePort Kidney Transporter Operator’s Manual 25
5. Using aseptic technique, cover the Perfusion Circuit with the Inner Lid. 6. Using aseptic technique, cover the Perfusion Circuit with the Outer Lid.7. Place the sealed Perfusion Circuit in the Ice Container. The Tubeframe must be perpendicular to the
Pump Deck and the hinges must be positioned inside of the receivers on the Pump Deck. 8. Rotate the Tubeframe flat onto the Pump Deck.
9. Open the Pump Head and stretch the tubing over the wheel.10. Close and latch the Pump Head Loop to clamp the tubing.11. Rotate the Pump Deck Locking Arm and snap into place.12. Connect the Pressure Sensor Cable from the Pump Deck to the connector on the Tubeframe. 13. Press the POWER button on the Control Panel to energize the unit.
14. Check the external display and verify that the displays are illuminated and showing the ice temperature.15. Press the WASH button to circulate perfusate until ready to receive the kidney. This will only work if
the temperature is below 8°C.
Step 5 Step 6
Step 7 Step 8
Step 9 Step 10
Step 11 & 12 Step 13
LifePort Kidney Transporter Operator’s Manual 755-00002 Rev K26
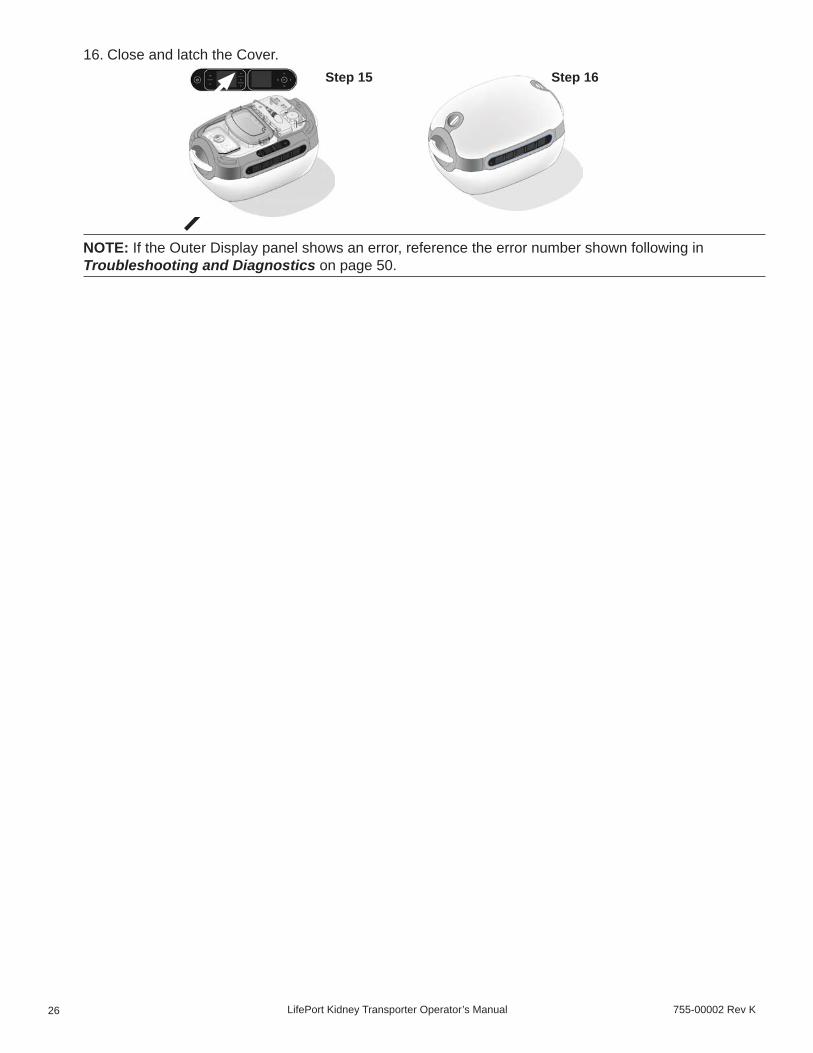
16. Close and latch the Cover.
NOTE: If the Outer Display panel shows an error, reference the error number shown following in Troubleshooting and Diagnostics on page 50.
Step 15 Step 16

755-00002 Rev K LifePort Kidney Transporter Operator’s Manual 27
Isolating the Kidney Vascular StructureUse the procedures specified by your institution for isolating the kidney vascular structure. The following suggestions will facilitate the preparation of kidneys for placement in LifePort Kidney Transporter Disposable Kidney cannulas.
1. Visually inspect the kidneys from a gross anatomy standpoint, paying close attention to the aorta, artery(s), vein(s) and ureter.
2. Direct a non-sterile assistant to note any anomalies into the perfusion record.
NOTE: If a non-sterile assistant is not available, write the anomalies initially on the sterile table covers. Transfer the information to the perfusion record as soon as the procedure is finished.
3. Isolate the renal artery(s) and vein, making sure that no small polar arteries are transected. 4. Feel the renal artery(s) for plaque inside the lumen of the artery. 5. Inspect the orifice of the artery to see if there is a partial or completely occluded artery. Make a
decision according to the following decision tree: • If the artery is not occluded, proceed to cannulation.
Aorta
Inferiorvena cava
Left adrenal gland
Left renal v.
Left kidney
Left ureter
Right ureter
Right kidney
Right renal v.
Right adrenal gland

LifePort Kidney Transporter Operator’s Manual 755-00002 Rev K28
• If the artery has any type of occlusion, determine whether the plaque will break off and block the artery or if cannulation will cause damage to the artery.
• If you determine that cannulation will be safe, proceed to cannulation.
Cannulating the KidneyUsing LifePort Kidney Transporter Disposable Kidney SealRing cannula
INDICATIONS FOR USE: The SealRing cannula is used when the vessel to be perfused terminates with an aortic patch or similar. The example shown in the illustration is a kidney with isolated anatomical structures and aortic patch.
Choose the size appropriate to the aortic patch.
NOTE: Patches that contain multiple arteries may be able to be placed into one SealRing cannula.
NOTE: Perform the following procedure on an aseptic field using aseptic technique.
1. Using standard aseptic technique, introduce the cannula onto the sterile field.2. Open the SealRing cannula.
3. Slide the aortic patch through the center of the cannula ring.4. Lay the patch flat making sure the tissue covers the entire sealing ring. If necessary, instruments
may be used to temporarily hold the tissue in place until the cannula is secure.
5. Hinge the cannula closed, securing the tissue between the two halves.6. Wrap each strap—straight and securely—around both cannula halves and fix the straps to their
posts.
Step 1 Step 2
Step 3 Step 4
Step 5 Step 6

755-00002 Rev K LifePort Kidney Transporter Operator’s Manual 29
7. Gravity-flow small amounts of flush solution into the cannula, then check for and repair any leaks that occurred in the surgical process or with the cannula.
8. Place the kidney in the Kidney Cradle and snap the cannula into the Cannula Mount.
9. Adjust the height and rotation of the Cannula Mount to comfortably position the vessel.10. Visually inspect the vessel, ensuring there are no twists or occlusions. 11. Drape the Mesh Organ Restraint over the kidney and secure the organ in the Kidney Cradle.
Using LifePort Kidney Transporter Disposable Kidney Straight CannulaINDICATIONS FOR USE: The Straight cannula is used when the vessel to be perfused terminates without a patch or when intimal damage to the lining is not a concern. The example shown in the illustration is a kidney with isolated anatomical structures and without an aortic patch.
Choose the size appropriate to the diameter of the vessel orifice.
NOTE: Perform the following procedure on an aseptic field using aseptic technique.
1. Using standard aseptic technique, introduce the Straight cannula onto the sterile field.2. Insert the Straight cannula tip no further than necessary into the vessel.
Step 8
Step 11
Step 1 Step 2

LifePort Kidney Transporter Operator’s Manual 755-00002 Rev K30
3. Secure the vessel in place using silk ties, vessel loops or another appropriate material. A groove in the tip is provided for positioning and securing.
4. Gravity-flow small amounts of flush solution into the cannula, then check for and repair any leaks that occurred in the surgical process or with the cannula.
5. Place the kidney in the Kidney Cradle and snap the Straight cannula into the Cannula Mount.
6. Adjust the height and rotation of the Cannula Mount to comfortably position the vessel.7. Visually inspect the vessel, ensuring there are no twists or occlusions.8. Drape the Mesh Organ Restraint over the kidney and secure the organ in the Kidney Cradle.
Using LifePort Kidney Transporter Disposable Kidney CouplerINDICATIONS FOR USE: The Coupler is used to connect two or more SealRing or Straight cannulas when multiple vessels must be perfused. The example shown in the illustration is a kidney with isolated anatomical structures and aortic patch, but may also apply to any combination of vessel and cannula types.
NOTE: Perform the following procedure on an aseptic field using aseptic technique.
1. Using standard aseptic technique, introduce the cannulas onto the sterile field.2. Open the SealRing cannulas.
Step 3
Step 5
Step 8
Step 1 Step 2

755-00002 Rev K LifePort Kidney Transporter Operator’s Manual 31
3. Slide aortic patches through the center of each cannula ring.4. Lay each patch flat, making sure the tissue covers the entire sealing ring. If necessary,
instruments may be used to temporarily hold the tissue in place until the cannula is secure.
5. Hinge the cannulas closed securing the tissue between the two halves.6. Wrap each strap—straight and securely—around both cannula halves and fix the straps to
their posts.
7. Gravity-flow small amounts of flush solution into the cannula, then check for and repair any leaks that occurred in the surgical process or with the cannula.
8. Identify a main vessel.9. Place the organ in the Kidney Cradle and snap the cannula connected to the main vessel into
the Cannula Mount.
10. Adjust the height and rotation of the Cannula Mount to comfortably position the vessel.11. Visually inspect the vessel, ensuring there are no twists or occlusions.12. Drape the Mesh Organ Restraint over the kidney to secure the organ in the Kidney Cradle.
Step 3 Step 4
Step 5 Step 6
Step 9
Step 12

LifePort Kidney Transporter Operator’s Manual 755-00002 Rev K32
13. Replace the End Cap of the main cannula with one end of the Coupler.
14. Attach the second end of the Coupler to the Infuse Port of the next cannula. Using LifePort Kidney Transporter Disposable Kidney Universal SealRing
INDICATIONS FOR USE: The Universal SealRing is designed for use when the vessel to be perfused terminates with or without an aortic patch or similar condition. The example shown in the illustration is a kidney with isolated anatomical structures and an irregular/incomplete aortic patch.
Choose the size appropriate to the diameter of the vessel orifice.
NOTE: Perform the following procedure on an aseptic field using aseptic technique.
1. Using standard aseptic technique, introduce the cannula onto the sterile field. 2. Open the Universal SealRing cannula by unhooking the straps, unsnapping and opening the
right anvil.
3. Position the vessel in the center of the anvils so the terminated end of the vessel is approximately 1.5-2.0mm above the top surface of the anvils.
Close the right anvil capturing the vessel with an audible click.
NOTE: If necessary, retention stays can be added to the vessel using suture or other appropriate material. Suture Tie Down Cleats and slots have been provided to facilitate positioning.
Step 13
Coupler
Step 1 Step 2
Step 3

755-00002 Rev K LifePort Kidney Transporter Operator’s Manual 33
4. Lower the upper portion of the cannula carefully bringing the conical seal into the interior of the vessel. Viewing through the magnified sight-glass, verify that the vessel orifice is centered, circular in shape and not occluded. Wrap each strap, straight and securely, around both cannula halves and fix the straps to their posts.
5. Gravity-flow small amounts of flush solution into the cannula, then check for and repair any leaks that occurred in the surgical process or with the cannula.
6. Place the kidney in the Kidney Cradle and snap the cannula into the Cannula Mount.
7. Adjust the height and rotation of the Cannula Mount to comfortably position the vessel. 8. Visually inspect the vessel, ensuring there are no twists or occlusions.
9. Drape the Mesh Organ Restraint over the kidney and secure the organ to the Kidney Cradle.
Step 8
Step 9
Step 5 Step 6

LifePort Kidney Transporter Operator’s Manual 755-00002 Rev K34
Placing the Kidney in LifePort Kidney TransporterBEFORE YOU BEGIN: Make sure you have prepared LifePort Kidney Transporter following instructions provided in the Professional Overview on page 22.
1. A person outside the aseptic field, remove the LifePort Kidney Transporter Cover. 2. A person outside the aseptic field, press the STOP button to halt the wash cycle circulating
perfusate in prep for use.
Entering ORGAN ID InformationYou may make an organ entry under ORGAN ID, KIDNEY and BLOOD TYPE before infusing the kidney. Should you choose not to enter organ information, those fields will default as outlined below.
NOTE: The ability to enter the ORGAN ID, BLOOD TYPE, KIDNEY TYPE and CROSS CLAMP TIME are for your convenience. The official information regarding ORGAN ID, BLOOD TYPE, KIDNEY TYPE and CROSS CLAMP TIME are part of the clinical record. Once perfusion has begun, the information entered is locked. User has the ability to change information in the data station upon perfusion completion.
1. ORGAN ID will default to the time stamp when Infuse Mode begins. The timestamp format is MMDDYYHHMMSS.
2. KIDNEY TYPE will default to NA.3. BLOOD TYPE will default to NA.
When downloading files to a USB stick, the files stored in the LifePort will be identified on the display with the ORGAN ID (either the default time stamp or the ID entered by the user).
Should you choose to enter ORGAN ID, KIDNEY and BLOOD TYPE before infusing the kidney, the following steps should be performed.
1. Press OK to enter ORGAN INFORMATION.2. Make sure ORGAN INFORMATION is selected (use arrow buttons if necessary), then
press OK.3. Make sure ORGAN ID is selected (use arrow buttons if necessary), then press OK.4. Use the arrow buttons to scroll through the alpha-numerics. Select the letters and numbers in
the ORGAN ID, pressing OK with each selection.5. Scroll to DONE and click OK, then select SAVE to confirm.6. Use the arrow buttons to select KIDNEY, then press OK.7. Use the arrow buttons to scroll through the options and select LEFT or RIGHT as appropriate.8. Click OK, then select SAVE to confirm. 9. Use the arrow buttons to select BLOOD TYPE, then press OK.10. Use the arrow buttons to scroll through the options and select the appropriate blood type.11. Click OK, then select SAVE to confirm. 12. Use the arrow buttons to select CLAMP (cross clamp time), then press OK. 13. Use the arrow buttons to enter the correct cross clamp time.14. Click OK, then select SAVE to confirm.
Step 1 Step 2

755-00002 Rev K LifePort Kidney Transporter Operator’s Manual 35
15. Use the arrow buttons to enter the correct cross clamp time zone.
NOTE: The time zone must be in 3 characters, e.g., “CST” for “Central Standard Time”.
16. Click OK, then select SAVE to confirm. 17. Use the arrow buttons to select DATE, then press OK. 18. Use the arrow buttons to enter the date.19. Click OK, then select SAVE to confirm.
Placing the KidneyWhere noted, perform the following procedures using aseptic technique—ideally the same surgical field used when placing the kidney in the Kidney Cradle.
1. A person outside the aseptic field, remove the Outer Lid from the Perfusion Circuit.2. Using aseptic technique, position the folded LifePort Kidney Transporter Disposable Kidney
Sterile Drape (supplied) over the Perfusion Circuit as shown.
3. Using aseptic technique, unfold the Sterile Drape along the length of LifePort Kidney Transporter.4. Using aseptic technique, fully unfold the Sterile Drape, side-to-side.
5. Using aseptic technique, position the drape opening down around the covered Perfusion Circuit. 6. Using aseptic technique, remove the Inner Perfusion Circuit Lid.
Step 1 Step 2
Step 3 Step 4
Step 5 Step 6

LifePort Kidney Transporter Operator’s Manual 755-00002 Rev K36
7. Using aseptic technique, place the Kidney Cradle in the Perfusion Circuit.
Priming the Infuse LineWhen the Kidney Cradle containing the kidney has been placed in the Perfusion Circuit, use the following procedure to prime the Infuse Line, removing bubbles from the line and renal artery. This procedure is performed using aseptic technique:
NOTE: For better clarity, the following illustrations of the Perfusion Circuit and Kidney Cradle with kidney will be shown outside LifePort Kidney Transporter.
1. Connect the Infuse Line as shown and tighten the Luer Lock fitting.
Step 7
Connect the Infuse Line
With the SealRing cannula:
Connect the Infuse Line
With the Straight cannula:
With the Coupler:
755-00002 Rev K LifePort Kidney Transporter Operator’s Manual 37
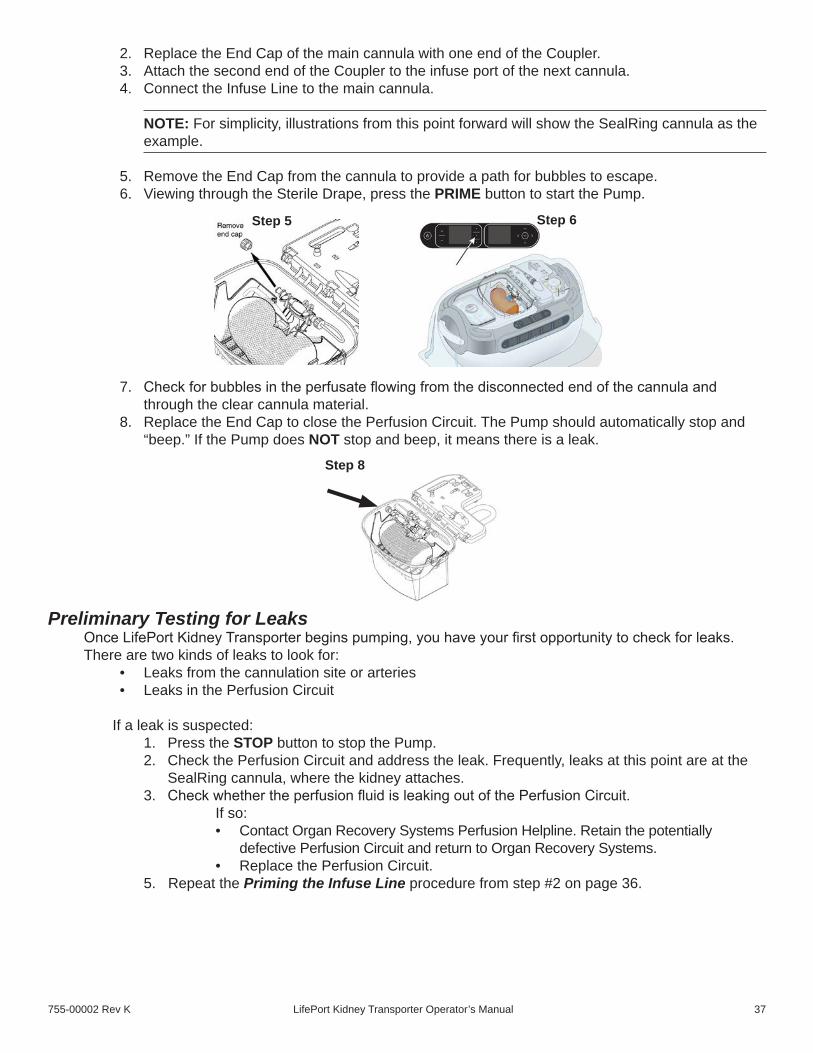
2. Replace the End Cap of the main cannula with one end of the Coupler.3. Attach the second end of the Coupler to the infuse port of the next cannula.4. Connect the Infuse Line to the main cannula.
NOTE: For simplicity, illustrations from this point forward will show the SealRing cannula as the example.
5. Remove the End Cap from the cannula to provide a path for bubbles to escape.6. Viewing through the Sterile Drape, press the PRIME button to start the Pump.
7. Check for bubbles in the perfusate flowing from the disconnected end of the cannula and through the clear cannula material.
8. Replace the End Cap to close the Perfusion Circuit. The Pump should automatically stop and “beep.” If the Pump does NOT stop and beep, it means there is a leak.
Preliminary Testing for Leaks Once LifePort Kidney Transporter begins pumping, you have your first opportunity to check for leaks. There are two kinds of leaks to look for:
• Leaks from the cannulation site or arteries• Leaks in the Perfusion Circuit
If a leak is suspected:1. Press the STOP button to stop the Pump.2. Check the Perfusion Circuit and address the leak. Frequently, leaks at this point are at the
SealRing cannula, where the kidney attaches.3. Check whether the perfusion fluid is leaking out of the Perfusion Circuit.
If so:• Contact Organ Recovery Systems Perfusion Helpline. Retain the potentially
defective Perfusion Circuit and return to Organ Recovery Systems. • Replace the Perfusion Circuit.
5. Repeat the Priming the Infuse Line procedure from step #2 on page 36.
Step 8
Step 5 Step 6

LifePort Kidney Transporter Operator’s Manual 755-00002 Rev K38
Initiating Perfusion 1. Viewing through the Sterile Drape, press the UP/DOWN arrow button to choose the pumping pressure.
NOTE: The default setting is 30 mmHg.
2. Having resolved any preliminary issues with leaks, press the INFUSE button to start the infusion process. This will begin the recording of perfusion data and other parameters.
3. Viewing through the Sterile Drape, check the operating parameters on the Outer Display, including: • Pressure• Flow• Vascular Resistance• Temperature
4. Visually check the kidney as described in the following section.
Checking the Kidney After PlacementOnce you have the kidney in LifePort Kidney Transporter, there are several simple checks to verify that cannulation and placement are optimal during perfusion.
Visual InspectionThere are several visual inspections to make that will maximize pumping effectiveness.
Cannula Leakage?Look for visible leaks around the gasket, where it attaches to the artery of the kidney. Depending on the kidney, a small amount of leakage may be acceptable, though it is usually best if there are no leaks at all.
Artery Filled?Once the pump is applying pressure to the artery, the artery should expand. If it is not filled, this is evidence that fluid is not being pumped into the artery. Make sure the artery is patent.
Step 1 Step 2
30/18PRESSURE
mmHg
120FLOW
ml/min0.18
RESISTANCE
mmHg/ml/min
2.3°C
TEMPERATURE
Ice
5.0°C
Trap
Step 3

755-00002 Rev K LifePort Kidney Transporter Operator’s Manual 39
Side Branches Closed?There may be small branches coming off of the main renal artery that go to other arteries that have been snipped off during the recovery process. If these have not been effectively tied off, perfusate can leak from them during perfusion.
Most of these will already be tied off but others may reveal themselves once perfusion begins. Tie them off or clamp them as best you can. Depending on conditions:
• You may not be physically able to identify the leaking vessels.• You may not be physically capable of tying off or clamping these vessels.
Vein Positioned on Top?Having the vein positioned on top of the kidney makes it easy to verify that perfusate is effectively entering the kidney through the artery and exiting from the vein.
You may encounter situations where flow is seen entering the kidney but is not exiting through the vein. In this case, the kidney is likely not being effectively perfused—a situation that should be addressed. Just because perfusate is entering the artery does not automatically mean it is actually moving through the organ as desired.
Conversely, if you detect a slow leak somewhere but a large volume is coming from the vein, there may be no reason to be concerned.
Presence of Blood or Perfusate?Observe the progress and efficacy of the pumping process by observing the nature of the fluid exiting the kidney. Ideally, as pumping begins, after a short while blood will be flushed from the kidney and will be seen exiting from the vein. Once the blood has been flushed from the kidney, the exiting fluid should clear as it becomes mostly perfusate.
This is a subjective observation, depending on how much blood was flushed from the kidney during removal.
Color of Kidney?The color of the kidney is another indicator of whether the kidney is being effectively perfused. Typically, the color of the cortex will initially be darker. As perfusion takes place and begins to flush out the blood, the kidney will become blanched and more pale. This is an indication that the pumping procedure is effective. In case some area stays dark, this might be an indication one has missed an artery, such as the polar artery. Look for this extra artery, cannulate this extra artery and use a Coupler to connect it to the Circuit. Use prime mode to remove air from the Coupler and extra cannula before starting to perfuse again.
NOTE: If some part of the kidney is not being perfused, this might have an effect on the recorded flow and resistance.
LifePort Kidney Transporter Operator’s Manual 755-00002 Rev K40
Closing LifePort Kidney TransporterHaving completed the visual inspection, close LifePort Kidney Transporter.
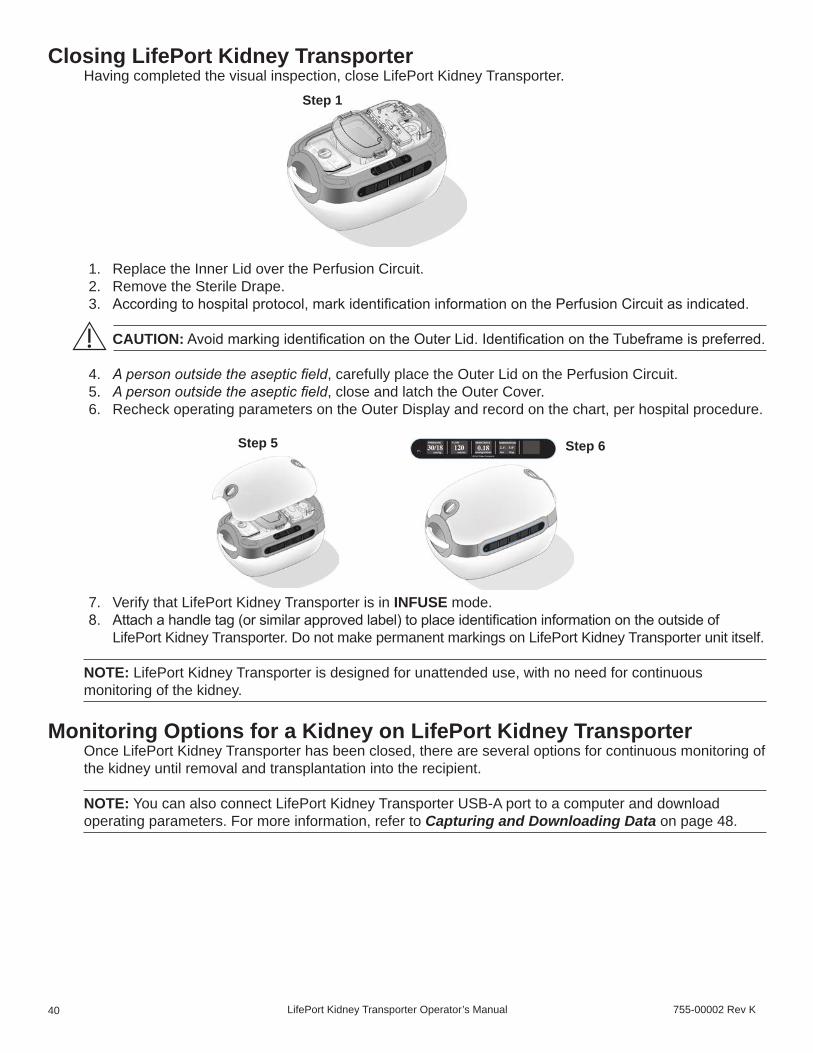
1. Replace the Inner Lid over the Perfusion Circuit.2. Remove the Sterile Drape.3. According to hospital protocol, mark identification information on the Perfusion Circuit as indicated.
CAUTION: Avoid marking identification on the Outer Lid. Identification on the Tubeframe is preferred.
4. Apersonoutsidetheasepticfield, carefully place the Outer Lid on the Perfusion Circuit.5. Apersonoutsidetheasepticfield, close and latch the Outer Cover.6. Recheck operating parameters on the Outer Display and record on the chart, per hospital procedure.
7. Verify that LifePort Kidney Transporter is in INFUSE mode.8. Attach a handle tag (or similar approved label) to place identification information on the outside of
LifePort Kidney Transporter. Do not make permanent markings on LifePort Kidney Transporter unit itself.
NOTE: LifePort Kidney Transporter is designed for unattended use, with no need for continuous monitoring of the kidney.
Monitoring Options for a Kidney on LifePort Kidney TransporterOnce LifePort Kidney Transporter has been closed, there are several options for continuous monitoring of the kidney until removal and transplantation into the recipient.
NOTE: You can also connect LifePort Kidney Transporter USB-A port to a computer and download operating parameters. For more information, refer to Capturing and Downloading Data on page 48.
Step 1
Step 5 Step 6

755-00002 Rev K LifePort Kidney Transporter Operator’s Manual 41
Monitoring Via LifePort Kidney Transporter Outer DisplayThe LifePort Kidney Transporter Outer Display provides comprehensive information on the status of the pumping procedure during perfusion, providing the following information:
• Pressure—these are the actual systolic and diastolic pressures of the perfusion process, as the LifePort attempts to achieve the systolic pressure you have set. The systolic value is often lower but should never be higher than the set pressure.
• Flow—is the volume of perfusate moving through the kidney over time. Flow changes, depending on how the kidney is responding to the pumping. This value is expected to increase over time, as the kidney vasodilates, thus allowing the set pressure to deliver a growing flow rate.
• Resistance—is the force required to pump perfusate through the kidney. This value is expected to decrease, as kidney “loosening” provides less and less resistance to the pumping, over time. Resistance and Flow are inversely proportional.
• Temperature—is the temperature of the ice bath and/or of the perfusate, as measured in the Bubble Trap prior to entering the kidney. The ice bath value will increase as the ice melts, prompting the user to add more ice. An audible alert is triggered and perfusion stops when temperatures reaches 8°C (an audible alert occurs at 5°C). The trap value increases as ice bath values increase and is only displayed during active infusion.
Press the PLOT/CLEAR button on the far left side of the display panel to temporarily display trending data for flow and resistance.
The far right side of the Display Panel provides a range of ID, error and functional information.
• Current Mode of Operation—the upper left corner tells LifePort Kidney Transporter’s current mode of operation, corresponding to the controls on the top of the unit: INFUSE, STOPPED, PRIME or WASH.
• Battery vs. AC Power—the icon in the upper right corner tells whether LifePort Kidney Trans-porter is operating on AC or battery power.
NOTE: If the unit is connected to a power source but is not operating, the unit is charging and the front panel shows an “electric plug” icon.
• Organ and Device ID Information—is displayed in the far right panel when no errors are present.
• Errors—are displayed in the far right panel, accompanied by an audible alert. In addition, the field affected by the error flashes its information in yellow or red.
For complete information on resolving errors, see Error Message Explanations on page 51.
The number to the left of the battery icon provides infuse time, telling how long LifePort Kidney Transporter has been pumping the kidney. The timer will start as soon as Infuse Mode has been pressed for the first time and will continue keeping track of the time when LifePort Kidney Transporter is in Infuse Mode.
30/18PRESSURE
mmHg
120FLOW
ml/min0.18
RESISTANCE
mmHg/ml/min
2.3°C
TEMPERATURE
Ice
5.0°C
Trap
30/18PRESSURE
mmHg
FLOW RESISTANCE
2.3°C
TEMPERATURE
Ice
5.0°C
Trap
LifePort Kidney Transporter Operator’s Manual 755-00002 Rev K42
NOTE: LifePort Kidney Transporter will create a data file that starts when you press the INFUSE button. The unit will store up to five files in memory. When five files are in memory, the unit will prompt you to delete the oldest file(s) before it will allow a new procedure to begin. Therefore, it is advisable to download the data from a procedure when it is completed and then to delete the file from LifePort Kidney Transporter.
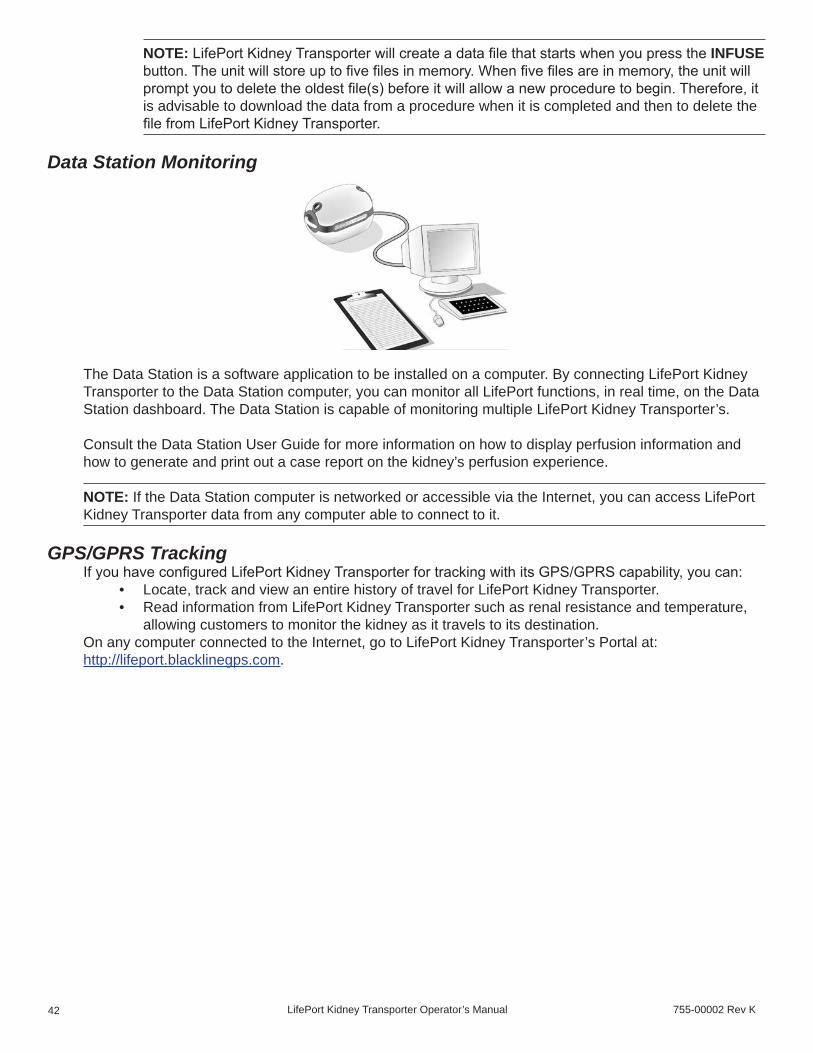
Data Station Monitoring
The Data Station is a software application to be installed on a computer. By connecting LifePort Kidney Transporter to the Data Station computer, you can monitor all LifePort functions, in real time, on the Data Station dashboard. The Data Station is capable of monitoring multiple LifePort Kidney Transporter’s.
Consult the Data Station User Guide for more information on how to display perfusion information and how to generate and print out a case report on the kidney’s perfusion experience.
NOTE: If the Data Station computer is networked or accessible via the Internet, you can access LifePort Kidney Transporter data from any computer able to connect to it.
GPS/GPRS TrackingIf you have configured LifePort Kidney Transporter for tracking with its GPS/GPRS capability, you can:
• Locate, track and view an entire history of travel for LifePort Kidney Transporter. • Read information from LifePort Kidney Transporter such as renal resistance and temperature,
allowing customers to monitor the kidney as it travels to its destination. On any computer connected to the Internet, go to LifePort Kidney Transporter’s Portal at: http://lifeport.blacklinegps.com.

755-00002 Rev K LifePort Kidney Transporter Operator’s Manual 43
Typical Behavior of a Kidney on LifePort Kidney TransporterThe graphs below—excerpted from the 2nd page of a Data Station case report—show four parameters of the typical behavior of a kidney on LifePort Kidney Transporter: Pressure, Flow, Resistance and Temperature.
It is normal to see flow increase while resistance decreases. This indicates that the kidney is opening (vasodilating). LifePort Kidney Transporter automatically adjusts the flow rate to achieve the indicated pressure and should never exceed this setting to avoid barotraumas or specifically, endothelial injury.
Leakage at Cannula or Open Side BranchThis graph shows immediate flow but no build-up of resistance. This can indicate leakage at the cannula site or an open lateral branch of the renal artery.
Nonresponding KidneyA nonresponding kidney—not responding to mechanical perfusion—typically shows some degree of flow, however no concurrent decrease in resistance. In this case, it may be appropriate to review available donor, kidney, procurement and recipient data before making any decision.
Temperature (ºC)
Resistance (mmHg/ml/min)
Flow (ml/min)
Pressure (mmHg)
Resistance (mmHg/ml/min)
Flow (ml/min)

LifePort Kidney Transporter Operator’s Manual 755-00002 Rev K44
Remote MonitoringLifePort Kidney Transporter has the capability of detecting certain situations with the kidney and providing a physical and audible alert on such events.
When LifePort Kidney Transporter is connected to a network computer, the Data Station software can be set up to send these alerts via email or text message to any smartphone.
Preparing to Travel to the Transplant SiteThese instructions may be modified according to your institution’s procedures.
Transport from the Recovery SiteAfter the recovery, secure LifePort Kidney Transporter and supplies for travel. Recheck LifePort Kidney Transporter Cover to make sure it is closed and latched. Place the other supply packs containing the Disposables, instruments and supplies on the cart as well. Reviewing your checklist, double check all your equipment and supplies to make sure that nothing is being left behind.
Transport LifePort Kidney Transporter and SuppliesIf you are transporting LifePort Kidney Transporter in a vehicle, push the cart with LifePort Kidney Transporter and supplies to the vehicle and place LifePort Kidney Transporter on the seat or in the trunk. Secure LifePort Kidney Transporter from sliding or rolling. The cart and supply packs can also be loaded onto the seats or into the trunk. If transported in a vehicle seat, the normal seatbelt can be used to restrain LifePort Kidney Transporter while driving.
CAUTION: Keep LifePort Kidney Transporter upright during transportation. Avoid direct sunlight and hot or cold temperature extremes. Extended exposure to outdoor conditions (sunlight, heat or cold), can affect the time that LifePort Kidney Transporter can maintain proper temperatures. If LifePort Kidney Transporter must to be operated under these conditions, frequently monitor the temperature and maintain proper ice levels.
Delivering to the Transplant ORWhen the transplant team is ready, LifePort Kidney Transporter and supplies can be transported to the transplant team via a combination of the wheeled cart and vehicles, as required.
Checking Battery Power and IceLifePort Kidney Transporter is designed so the batteries and ice will last for 24 hours of operation with the Cover in place and latched. Monitor battery and ice levels during kidney preservation on LifePort Kidney Transporter.
NOTE: LifePort Kidney Transporter will alert when the batteries have two hours remaining or when the temperature in the Ice Container reaches 8°C. However, make a habit of checking temperature and battery level.
Adding More IceCheck the temperature on the Outer Display to make sure that it is steady and below 8°C.
• If the temperature is climbing toward 5.0°C, LifePort Kidney Transporter displays a soft alert (visual alert and an audible beep), open LifePort Kidney Transporter Cover and visually check the ice level.
• If the ice is mostly melted, remove some water from the Ice Container (using a cup, scoop, hand pump or electrical pump) and refill with ice. This is part of the non-sterile section of the unit and can be performed while LifePort Kidney Transporter stays in Perfusion Mode.

755-00002 Rev K LifePort Kidney Transporter Operator’s Manual 45
Replacing BatteriesCheck the battery level on the Message Display. Whenever LifePort Kidney Transporter is not in transit, plug LifePort Kidney Transporterinto an external power supply so the batteries are maintained in a charged condition.
• If the batteries are running low, plug LifePort Kidney Transporter into an external power supply if possible.
• If an external power supply is not available, the depleted LifePort batteries may be replaced with fully charged LifePort batteries. Batteries may be replaced one at a time without disrupting LifePort Kidney Transporter function.
CAUTION: Be sure to replace the batteries one at a time, to ensure that LifePort Kidney Transporter will continue to operate during battery replacement.
At the Transplant ORObserve the following when arriving in the OR.
• Follow hospital procedures for moving equipment into the OR. • Find a non-sterile table in the OR for the LifePort or park the wheeled cart in the OR, where the
cart can act as a table. The table or parking place should be near the sterile back table to ease the process of transferring the kidney from the LifePort to the back table.
• If a power outlet is nearby, plug in LifePort Kidney Transporter to power, charge and preserve the batteries.
• Monitor perfusion parameters to make sure that the LifePort is working properly at all times.
Waiting until Recipient Surgery Is ReadyIf there is a waiting period before the recipient surgery is ready, the kidney is perfused and monitored inside LifePort Kidney Transporter to maintain its transplantable condition. During such a period of perfusion, the following activities may take place:
• Monitoring the kidney—Pressure, Flow, Vascular Resistance and Temperature can be regularly recorded to observe the vascular trends in the kidney during perfusion.
• Monitoring the perfusate—Perfusate samples may be taken aseptically, via the needleless port, to watch for pH, osmolality, electrolytes, biomarkers, etc., according to hospital protocol.
• Recharging the supplies—LifePort Kidney Transporter may be plugged into an external power supply to enable continued operation while recharging the batteries. The Ice Container should be checked occasionally and replenished when the ice is running low and temperature is beginning to rise.
• Sterility and hypothermia maintenance—The kidney is maintained under cold and aseptic conditions, while it is sealed in the Perfusion Circuit and surrounded by ice in LifePort Kidney Transporter’s ice bath.
Removing the Kidney from LifePort Kidney Transporter for TransplantThere are several procedures for removing the kidney from LifePort Kidney Transporter when the transplant surgeon is ready for the kidney. Two are detailed below.
NOTE: These procedures can be modified as necessary.
1. Unlatch and remove LifePort Kidney Transporter Cover.2. Remove the Outer Perfusion Circuit Lid and place it upside-down on a table where it will be undis-
turbed.

LifePort Kidney Transporter Operator’s Manual 755-00002 Rev K46
3. Using aseptic technique, position a folded LifePort Sterile Drape over the Perfusion Circuit as shown.4. Using aseptic technique, unfold the Sterile Drape along the length of LifePort Kidney Transporter .
5. Using aseptic technique, fully unfold the Sterile Drape, side-to-side.6. Using aseptic technique, position the Sterile Drape opening down around the covered Perfusion
Circuit.
7. Using aseptic technique, remove the Inner Lid from the Perfusion Circuit.
Option A:
1. Press the STOP button to stop the Infusion Pump. 2. Using aseptic technique, unscrew or cut the Pump Hose.
Step 5 Step 6
Step 7
Step 3 Step 4

755-00002 Rev K LifePort Kidney Transporter Operator’s Manual 47
Option B:
1. Using aseptic technique, unscrew the Pump Hose and direct the Infuse Line into a stainless steel bowl/basin.
2. Press the PRIME button to flow cold perfusate into the bowl.
Option A continued:
3. When enough perfusate has been transferred, press the STOP button to stop the flow.4. Using aseptic technique, carry the Kidney Cradle to the sterile field. 5. Using aseptic technique, unhook the Mesh Organ Restraint.
Option B continued: 3. Using aseptic technique, detach the clamp/ cannula from mount.
4. Using aseptic technique, lift the Kidney Cradle containing the kidney from the Perfusion Circuit and place in the bowl/basin for transfer to back table.
5. Carry the bowl/basin to back table or to recipient table to remove the Mesh Organ Restraint and cannula.
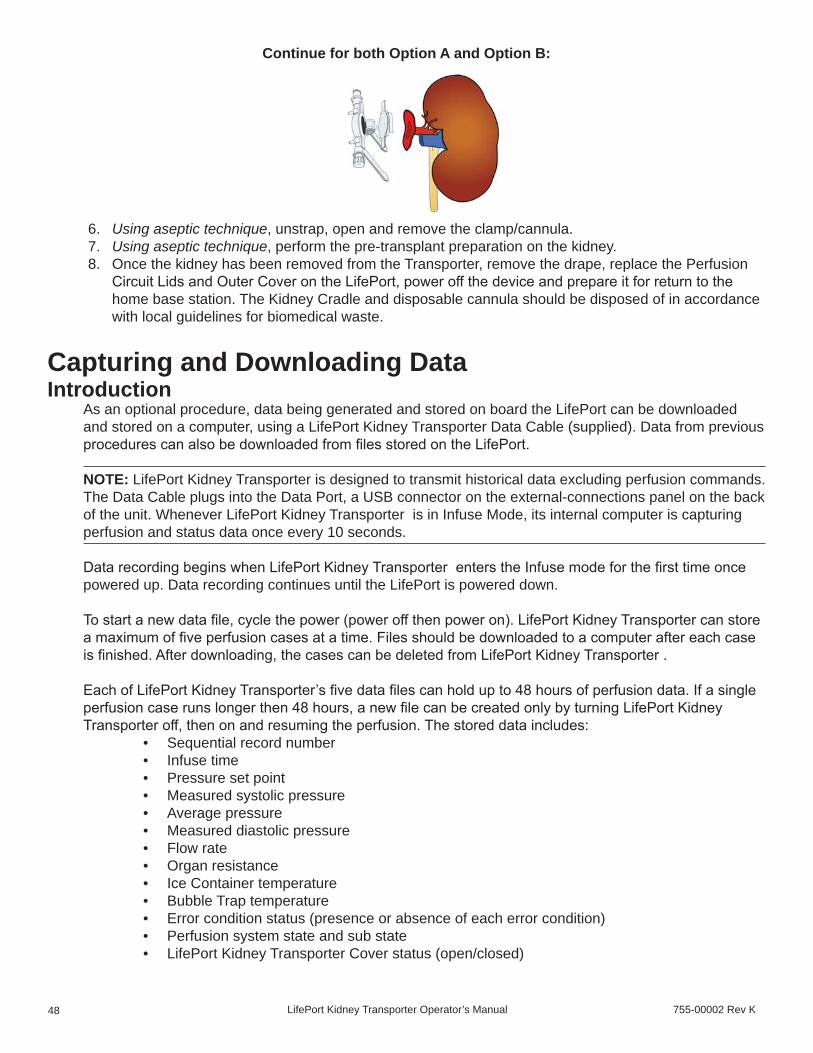
LifePort Kidney Transporter Operator’s Manual 755-00002 Rev K48
Continue for both Option A and Option B:
6. Using aseptic technique, unstrap, open and remove the clamp/cannula.7. Using aseptic technique, perform the pre-transplant preparation on the kidney.8. Once the kidney has been removed from the Transporter, remove the drape, replace the Perfusion
Circuit Lids and Outer Cover on the LifePort, power off the device and prepare it for return to the home base station. The Kidney Cradle and disposable cannula should be disposed of in accordance with local guidelines for biomedical waste.
Capturing and Downloading DataIntroduction
As an optional procedure, data being generated and stored on board the LifePort can be downloaded and stored on a computer, using a LifePort Kidney Transporter Data Cable (supplied). Data from previous procedures can also be downloaded from files stored on the LifePort.
NOTE: LifePort Kidney Transporter is designed to transmit historical data excluding perfusion commands. The Data Cable plugs into the Data Port, a USB connector on the external-connections panel on the back of the unit. Whenever LifePort Kidney Transporter is in Infuse Mode, its internal computer is capturing perfusion and status data once every 10 seconds.
Data recording begins when LifePort Kidney Transporter enters the Infuse mode for the first time once powered up. Data recording continues until the LifePort is powered down.
To start a new data file, cycle the power (power off then power on). LifePort Kidney Transporter can store a maximum of five perfusion cases at a time. Files should be downloaded to a computer after each case is finished. After downloading, the cases can be deleted from LifePort Kidney Transporter .
Each of LifePort Kidney Transporter’s five data files can hold up to 48 hours of perfusion data. If a single perfusion case runs longer then 48 hours, a new file can be created only by turning LifePort Kidney Transporter off, then on and resuming the perfusion. The stored data includes:
• Sequential record number• Infuse time• Pressure set point • Measured systolic pressure• Average pressure• Measured diastolic pressure• Flow rate• Organ resistance • Ice Container temperature• Bubble Trap temperature• Error condition status (presence or absence of each error condition) • Perfusion system state and sub state• LifePort Kidney Transporter Cover status (open/closed)

755-00002 Rev K LifePort Kidney Transporter Operator’s Manual 49
CAUTION: Accessory equipment connected to the Data Port must be certified IEC950 for data processing equipment. Furthermore, all configurations shall comply with the systems standard IEC60601-1-Sec. 16. Any person who connects additional equipment to the Data Port configures a medical system and is therefore responsible for ensuring that the system complies with the system standard IEC60601-1-Sec. 16. If in doubt, consult the Organ Recovery Systems Perfusion Helpline.
To Flash DriveIf a computer is not readily available for evaluating the data file, you can download the file onto a flash drive, then later evaluate the data in a computer when one is available.
Downloading a File1. Power on LifePort Kidney Transporter.2. Insert USB flash drive in USB-A port on LifePort Kidney Transporter device.3. Use the arrow buttons to select DOWNLOAD FILE.4. Use arrow buttons to select file to download.5. Press OK and SAVE. Top display will flash SAVING FILE until complete. When download is
complete display will return to download file screen.6. You can download additional files if desired or use the arrow buttons to select DONE and press OK. 7. Remove the USB flash drive.
NOTE: You will not be able to download current files unless LifePort Kidney Transporter has been powered off first. By powering off first you will allow the files to store in the memory.

LifePort Kidney Transporter Operator’s Manual 755-00002 Rev K50
Troubleshooting and DiagnosticsMost problems that you encounter in operating LifePort Kidney Transporter will be easily solved. The first thing to check when troubleshooting the system is to make sure that power is available from either the batteries or through the Power Cord plugged into a standard electrical outlet. If the power light comes on but LifePort Kidney Transporter still does not work, check the following guide.
Troubleshooting Procedures
Trouble Probable Cause Action
No power
Dead batteries, batteries not charged, and disconnected from an external power supply.
1. Replace with fresh batteries or plug into an external power supply.2. Make sure batteries are fully charged before using.
No power at outlet. Make sure outlet has power.
Tripped Circuit Breaker.
1. Reset breaker by pressing in the button on the external connections panel located on the back of the unit.2. If problem is not resolved, call Organ Recovery Systems Perfusion Helpline.
Beeping or flashing LEDs Errors detected internally by LifePort Kidney Transporter.
Follow the instructions in the Error Message Explanation section on page 51.
Missing or incorrect display elements at power-on
Failure of displays or internal computer
Call Organ Recovery Systems Perfusion Helpline.
Leaking perfusate Loose fitting or defective Perfusion Circuit.
1. Retighten all fittings.2. Replace Perfusion Circuit if defective.
Leaking coolant
• Broken container or seal.• Perfusion Circuit Lids not
tightened
1. Latch Lids and look for leads.2. If problem is not resolved, call Organ Recovery Systems Perfusion Helpline.
Powers on, but buttons are unresponsive
LifePort Kidney Transporter is internally locked-up.
1. Power OFF.2. Disconnect external power supply.3. Remove all batteries.4. Wait 30 seconds.5. Return batteries to the unit.6. Power back ON.7. If problem is not resolved, call Organ Recovery Systems Perfusion Helpline.
Message Display is blank. (Unit functioning properly) Electronic shock reset display
1. Power OFF then back ON.2. If problem is not resolved, call Organ Recovery Systems Perfusion Helpline.

755-00002 Rev K LifePort Kidney Transporter Operator’s Manual 51
Error Message ExplanationsLifePort Kidney Transporter sounds audible alerts when it encounteres out-of-range conditions for bubbles, pressure, flow and temperature. The LifePort can recover from many of these errors and perfusion will automatically resume.
LifePort Kidney Transporter enters a fail-safe mode if any unrecoverable fault condition is encountered.
Scroll the Message Display to view all of the fault conditions. The error indicators will remain viewable until you clear them.
To clear the indicators for errors, which are no longer vaild, press either the STOP or PLOT/CLEAR button, as advised on the screen.
Check the following list of abbreviationss, observed problems, probable causes and recommended actions. In most cases the audible alert can be cancelled or temporarily muted by pressing either the STOP or PLOT/CLEAR button, depending on the type of alert.
Error Message Observed Problem Probable Cause Actions
Bubbles in Infuse Line
System becomes unable to remove air without user intervention.
Air bubble in the Infuse Line
Check Perfusion Circuit for leaks and loose fittings.Re-prime the Perfusion Circuit and kidney under aseptic conditions.
Can’tReachPressure
LifePort Kidney Transporter cannot achieve the set arterial pressure.
Leaking cannula or artery
Visually inspect and correct all leaks under aseptic conditions.
Leak in Perfusion Circuit
1. Tighten loose fittings.2. Replace Perfusion Circuit if leaking.
No action for maximum flow or reduce the set pressure.Low resistance kidney
Check IceThe Ice Container Temperature is reading between 5 ◦C and 8 ◦C, but the system is still infusing.
Replenish ice before temperature reads 8°C to prevent Pump stoppage.
CheckFilter Filter may be clogged.
1. Remove obstruction from filter tubing.
2. Call Organ Recovery Systems Perfusion Helpline.
High Pressure
System is sensing unexpected conditions in the Perfusion Circuit (Cassette).
A pressure greater than 120% of the set pressure is persisting.
Inspect pressure sensor and call Organ Recovery Systems Perfusion Helpline.
Fluid pressure is not equalizing during non-infuse modes
Check for arterial and venous occlusions, check valves and call Organ Recovery Systems Perfusion Helpline.
KidneyHigh Resistance
System is measuring excessively high resistance
3. Loosen Mesh Organ Restraint4. Adjust position of renal artery5. Check for occlusion in Perfusion
Circuit6. Consult supervising physician

LifePort Kidney Transporter Operator’s Manual 755-00002 Rev K52
Error Message Observed Problem Probable Cause Actions
Kidney NotConnected
System is sensing unexpected conditions in the Perfusion Circuit.
Tubeframe not positioned properly
Check Tubeframe and Locking Arm position.
Kidney not connectedVisually inspect kidney and cannula and correct all leaks under aseptic conditions.
Load PerfusionCircuit(Cassette)
The Tubeframe is not properly installed or latched.
Make sure that the Tubeframe is properly installed and the Tubeframe Locking Arm is in the correct position.
2. If the problem is not resolved, a sensor failsure may exist. Call Organ Recovery Systems Perfusion Helpline.
LowBattery
Only 4 hours of battery life remaining: 2 hours of infusion plus 2 hours of temperature monitoring.
Plug into external power supply or exchange for charged batteries.
MotorCurrentFailure
Pump not responding normally Call the Organ Recovery Systems Perfusion Helpline.
NearFreezing
The Ice Container Temperature Sensor is reading below 0.1°C.
Incorrect coolant Use ice slush made from ice and water only.
Environmental conditions too cold
1. Move LifePort into a warmer 2. environment.3. If problem is not resolved, a sensor
failure may exist. Call the Organ Recovery Systems Perfusion Helpline.
OcclusionSystem is sensing unexpected pressures during Infuse Mode.
Blocked Infuse Line Tubing or twisted or occluded artery
Find and remove blockage or untwist artery.
POSTFailure
An error occurred during the Power On Self Test (POST)
1. Remove all power to LifePort Kidney Transporter:
a. Remove all four (4) LifePort Batteries. b. Uplug LifePort Kidney
Transporter from mains power9. Restore power to LifePort Kidney
Transporter a. Reinstall batteries b. Plug into mains power12. If problem persists, note the
message in the Display Screen and call the Organ Recovery Systems Perfusion Helpline. See List of POST test errors at the end of this section.
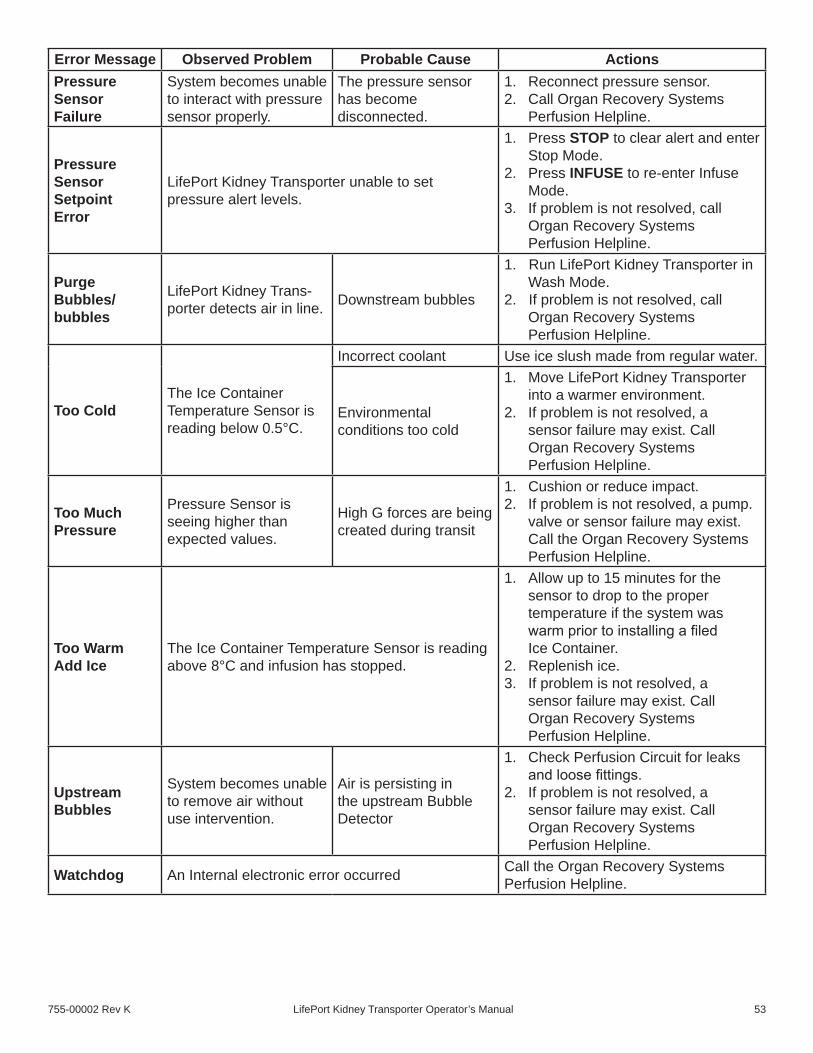
755-00002 Rev K LifePort Kidney Transporter Operator’s Manual 53
Error Message Observed Problem Probable Cause ActionsPressureSensorFailure
System becomes unable to interact with pressure sensor properly.
The pressure sensor has become disconnected.
1. Reconnect pressure sensor.2. Call Organ Recovery Systems
Perfusion Helpline.
PressureSensorSetpointError
LifePort Kidney Transporter unable to set pressure alert levels.
1. Press STOP to clear alert and enter Stop Mode.
2. Press INFUSE to re-enter Infuse Mode.
3. If problem is not resolved, call Organ Recovery Systems Perfusion Helpline.
Purge Bubbles/ bubbles
LifePort Kidney Trans-porter detects air in line. Downstream bubbles
1. Run LifePort Kidney Transporter in Wash Mode.
2. If problem is not resolved, call Organ Recovery Systems Perfusion Helpline.
Too ColdThe Ice Container Temperature Sensor is reading below 0.5°C.
Incorrect coolant Use ice slush made from regular water.
Environmental conditions too cold
1. Move LifePort Kidney Transporter into a warmer environment.
2. If problem is not resolved, a sensor failure may exist. Call Organ Recovery Systems Perfusion Helpline.
Too MuchPressure
Pressure Sensor is seeing higher than expected values.
High G forces are being created during transit
1. Cushion or reduce impact.2. If problem is not resolved, a pump.
valve or sensor failure may exist. Call the Organ Recovery Systems Perfusion Helpline.
Too WarmAdd Ice
The Ice Container Temperature Sensor is reading above 8°C and infusion has stopped.
1. Allow up to 15 minutes for the sensor to drop to the proper temperature if the system was warm prior to installing a filed Ice Container.
2. Replenish ice.3. If problem is not resolved, a
sensor failure may exist. Call Organ Recovery Systems Perfusion Helpline.
UpstreamBubbles
System becomes unable to remove air without use intervention.
Air is persisting in the upstream Bubble Detector
1. Check Perfusion Circuit for leaks and loose fittings.
2. If problem is not resolved, a sensor failure may exist. Call Organ Recovery Systems Perfusion Helpline.
Watchdog An Internal electronic error occurred Call the Organ Recovery Systems Perfusion Helpline.

LifePort Kidney Transporter Operator’s Manual 755-00002 Rev K54
Power On Self Test (POST)On Each power up, LifePort Kidney Transporter performs a Power On Self Test or “POST”. The CPU within LifePort Kidney Transporter checks its memory functions, temperature sensors, air Bubble Detectors and its internal failure routines. In the unlikely event that one of these tests fail, LifePort Kidney Transporter will display “POST failure” and it will list the POST error message as shown in the table below. Should one of these errors occur, remove all power to LifePort Kidney Transporter by reinstalling the batteries and the mains Power Cord. If the POST message continues to display, call the Organ Recovery Systems Perfusion Helpline.
POST Error Message IndicationPOST AT error Ice Bucket temperature errorPOST failure Power on self test failedPOST Flash error Integrity check of Flash memoryPOST HPS error High pressure shutdown errorPOST IB error Infusion Bubble Detector errorPOST MD error Motor drive errorPOST MOC error Motor overcurrent shutdown errorPOST PS error Pressure Sensor errorPOST PT error Perfusion temperature sensor errorPOST RAM error Integrity check of Read Only MemoryPOST ROM error Integrity check of Read Only MemoryPOST UB error Upstream Bubble Detector errorPOST WD error Watchdog error
755-00002 Rev K LifePort Kidney Transporter Operator’s Manual 55
MaintenanceOverview
LifePort Kidney Transporter has no user serviceable parts.
Maintain, clean and keep LifePort Kidney Transporter ready to use according to directions in this manual. If LifePort Kidney Transporter is not functioning properly, refer to Troubleshooting and Diagnostics on page 50 or contact the Organ Recovery Systems Perfusion Helpline.
Cleaning Up After a CaseThe perfusate, Perfusion Circuit and cannula are single use devices and should go into medical waste disposal.
LifePort Kidney Transporter and Power Cord should return to home station where LifePort Kidney Transporter can be cleaned with a 70% Isopropanol solution to remove perfusate residue.
Use Universal Precautions when performing perfusate cleanup to prevent possible contact with bloodborne pathogens. Once home, the batteries should be recharged and the supply kits should be repacked in preparation for the next transplant.
CAUTION: Do not clean LifePort Kidney Transporter with the external power supply connected.
CAUTION: Do not immerse LifePort Kidney Transporter.
CAUTION: Do not allow cleaning solutions to enter the rear panel electrical connectors, the ventilation holes or the Battery area.
CAUTION: Ice Container and Lid are re-usable parts of LifePort Kidney Transporter, which needs to be cleaned and dried after each case. This is not a single use item.
StorageIf LifePort Kidney Transporter will not be used for several days or weeks, clean the device according to Cleaning Up After a Case before storing. LifePort Kidney Transporter should be stored indoors in a dry location out of direct sunlight.
For periods of storage for longer than 30 days, remove the batteries from LifePort Kidney Transporter. Long periods of storage could damage the batteries. Store LifePort Kidney Transporter in a temperature-controlled space. LifePort Kidney Transporter will operate normally after storage in conditions ranging from -15°C to 50°C, 0 to 90% humidity and at a pressure of 700 to 1060 hectopascal (hPa) (equivalent to an elevation of -380m to 3,000m or -1,250ft to 10,000ft).
Shipping by Common CarrierIf LifePort Kidney Transporter requires shipping by common carrier, be sure to use the corrugated carton, with foam inserts—either the original carton or the carton containing the loaner—as provided by Organ Recovery Systems.
Follow instructions for packing that were provided with the loaner or contact the Organ Recovery Systems Perfusion Helpline for instructions.
Make sure the Ice Container is empty, with the Lid removed for shipment.

LifePort Kidney Transporter Operator’s Manual 755-00002 Rev K56
Specifications, Precautions, LimitationsProduct Specifications
Description Portable, self-contained renal preservation system, which utilizes hypothermic perfusion.
Indications for Use
LifePort Kidney Transporter is intended to be used for the continuous hypothermic machine perfusion of kidneys for the preservation, optional transportation and eventual transplantation into a recipient.
Capacity Single kidney
Power SourceAC or batteryVoltage – 110 to 240 VAC, Frequency – 50 to 60 Hz , Current – 1 Amp
Coolant Source Ice/water bath, 5-1/2 LitersPerfusate Pump Peristaltic pumpPressure Control Closed loop pressure regulation, 10 to 65 mmHgPerfusion Modes Pulsatile
Flow Rates 0 to 240 mL/min (maximum rates decrease by 25% when powered by batteries)
Dimensions 24” x 14.5” x 14.25” (61.96cm x 36.83cm x 36.195cm)Approximate Weight 45 lbs (20.4 kg) fully loaded
Transport Duration Up to 24 hours between ice replenishment and battery replacement (or recharge)
Batteries Four x 11.1 V lithium-ion batteriesBattery Life 24 hours (fully charged)Perfusate Used Hypothermic machine perfusate
Data DownloadUSB data download of all perfusion and status data collected since the point when the INFUSE state was begun following Power ON.
Storage Conditions
Temperature: -15°C to 50°CHumidity: 0 to 90%Pressure: 700 to 1060 hPa (equivalent to an elevation of -380 m to 3,000 m or 1250 ft to 10,000 ft)
Operating Conditions Not to exceed 35°C on MainsNot to exceed 40°C on battery

755-00002 Rev K LifePort Kidney Transporter Operator’s Manual 57
Device Classifications
Equipment is suitable for Continuous Operation.
CAUTION: Equipment is NOT suitable for use in the presence of a FLAMMABLE ANESTHETIC MIXTURE WITH AIR, OXYGEN or NITROUS OXIDE.
Electromagnetic CompatibilityLifePort Kidney Transporter needs special precautions regarding electromagnetic compatibility (EMC) and should be used in accordance with the EMC information provided in this manual.
LifePort Kidney Transporter can radiate radio frequency energy and, if not installed and used in accordance with the instructions, may cause harmful interference to radio or television reception. However, there is no guarantee that the interference will not occur in a particular installation. LifePort Kid-ney Transporter does cause interference, which can be determined by turning LifePort Kidney Transporter on and off, try to correct the interference by one or more of the following measures:
• Reorient the receiving antenna.• Increase the distance between LifePort Kidney Transporter and receiver.• Connect LifePort Kidney Transporter to an outlet on a separate circuit from that to which the
receiver is connected.
Portable and mobile RF communications equipment can affect LifePort Kidney Transporter.
WARNING: To assure compliance with EMC requirements, use only manufacturer-supplied cables, as shown below. If you have questions, contact the Organ Recovery Systems Perfusion Helpline.
Data Cable Part # AK67222Power Cord Part # 17664 (US only, contact the Organ Recovery Systems Perfusion Helpline for international Power Cord part numbers)
WARNING: Use of Power Cords or communications cables, other than those specified, may result in increased emissions or decreased immunity of LifePort Kidney Transporter.
WARNING: LifePort Kidney Transporter should not be used adjacent to or stacked with other equipment and if adjacent or stacked use is necessary, LifePort Kidney Transporter should be observed to verify normal operation in the configuration in which it will be used.
Medical DeviceClass II FDA listed device
Class IIa MEDDEV EU Directive93/42 EEC
Type of protection from electric shock Class I / Internally Powered
Protection from water ingress IPX1 LifePort Kidney Transporter is
protected from vertical water droplets
Cleaning recommendations LifePort Kidney Transporter can be cleaned with a 70% Isopropanol solution to remove perfusate residue and other detritus.

LifePort Kidney Transporter Operator’s Manual 755-00002 Rev K58
Guidance and Manufacturer’s Declaration — ELECTROMAGNETIC EMISSIONSLifePort Kidney Transporter is intended for use in the electromagnetic environment specified below. The customer or the user of the LifePort should assure that it is used in such an environment.
Emissions test Compliance Electromagnetic Environment: Guidance
RF emissionsCISPR11
Group 1 LifePort Kidney Transporter uses RF energy only for its internal function. Therefore, its RF emissions are very low and are not likely to cause any interference in nearby electronic equipment.
RF emissionsCISPR11
Class A The LifePort is suitable for use in all establishments, other than domestic establishments and those directly connected to the public low-voltage power supply network that supplies buildings used for domestic purposes.
Harmonic emissionsIEC 61000-3-2
Class A
Voltage fluctuations/flicker emissions
IEC 61000-3-3
Complies
Guidance and Manufacturer’s Declaration — ELECTROMAGNETIC IMMUNITYLifePort Kidney Transporter is intended for use in the electromagnetic environment specified below. The customer or the user of LifePort Kidney Transporter should assure that it is used in such an environment.
Immunity Test IEC 60601 test level Compliance levelElectromagnetic
Environment: GuidanceElectrostatic discharge (ESD)IEC 61000-4-2
±6 kV contact±8 kV air
±6 kV contact±8 kV air
Floors should be wood, concrete or ceramic tile. If floors are covered with synthetic material, the relative humidity should be at least 30%.
Electrical fast transient/burstIEC 61000-4-4
±2 kV for power supply lines
±2 kV for power supply lines
Mains power quality should be that of a typical commercial or hospital environment.
SurgeIEC 61000-4-5
±1 kV differential mode±2 kV common mode
±1 kV differential mode±2 kV common mode
Mains power quality should be that of a typical commercial or hospital environment.
Voltage dips, short interruptions and voltage variations on power supply input linesIEC 61000-4-11
<5 % UT(>95 % dip in UT)for 0.5 cycle40 % UT(60 % dip in UT) for 5 cycles70% UT(30 % dip in UT)for 25 cycles<5 % UT(>95 % dip in UT)for 5 sec
<5 % UT(>95 % dip in UT)for 0.5 cycle40 % UT(60 % dip in UT) for 5 cycles70% UT(30 % dip in UT)for 25 cycles<5 % UT(>95 % dip in UT)for 5 sec
Mains power quality should be that of a typical commercial or hospital environment. If the user of LifePort Kidney Transporter requires continued operation during mains power interruptions, LifePort Kidney Transporter can be lowered from the internal battery.
Power frequency (50-60 Hz) magnetic fieldIEC 61000-4-8
3 A/m 3 A/m Power frequency magnetic fields should be at levels characteristic of a typical location in a typical commercial or hospital environment.
UT is the AC mains voltage prior to application of the test level.

755-00002 Rev K LifePort Kidney Transporter Operator’s Manual 59
Conducted RFIEC 61000-4-6
Radiated RFIEC 61000-4-3
3 Vrms150 kHz to 80 MHz
3 V/m80 MHz to 2.5 GHz
3 V
3 V/m
Portable and mobile RF communications equipment should be used no closer to any part of LifePort Kidney Transporter, including cables, than the recommended separation distance calculated from the equation applicable to the frequency of the transmitter.Recommended separation distance
80 MHz to 800 MHz
800 MHz to 2.5 GHz
…where P is the maximum output power rating of the transmitter in watts (W) according to the transmitter manufacturer and d is the recommended separation distance in metres (m).
Field strengths from fixed RF transmitters, as determined by an electromagnetic site survey,a should be less than the compliance level in each frequency range.b
Interference may occur in the vicinity of equipment marked with the following symbol:
NOTE 1: At 80 MHz and 800 MHz, the higher frequency range applies.NOTE 2: These guidelines may not apply in all situations. Electromagnetic propagation is affected by absorption and reflection from structures, objects and people.a Field strengths from fixed transmitters, such as base stations for radio (cellular/cordless) telephones and land mobile radios, amateur radio, AM and FM radio broadcast and TV broadcast cannot be predicted theoretically with accuracy. To assess the electromagnetic environment due to fixed RF transmitters, an electromagnetic site survey should be considered. If the measured field strength in the location in which LifePort Kidney Transporter is used, exceeds the applicable RF compliance level above, LifePort Kidney Transporter should be observed to verify normal operation. If abnormal performance is observed, additional measures may be necessary, such as reorienting or relocating LifePort Kidney Transporter. b Over the frequency range 150 kHz to 80 MHz, field strengths should be less than 3 V/m.
Guidance and Manufacturer’s Declaration — ELECTROMAGNETIC IMMUNITYLifePort Kidney Transporter is intended for use in the electromagnetic environment specified below. The customer or the user of LifePort Kidney Transporter should assure that it is used in such an environment.
Immunity Test IEC 60601 test level Compliance levelElectromagnetic
Environment: Guidance
D= 3.5 P 3[ ]√D= 3.5 P 10[ ]√
D= 7 P 10[ ]√

LifePort Kidney Transporter Operator’s Manual 755-00002 Rev K60
Recommended Separation Distances Between Portable and Mobile RF Communications Equipment and LifePort Kidney Transporter
LifePort Kidney Transporter is intended for use in an electromagnetic environment in which radiated RF disturbances are controlled. The customer or the user of LifePort Kidney Transporter can help prevent electromagnetic interference by maintaining a minimum distance between portable and mobile RF communications equipment (transmitters) and LifePort Kidney Transporter as recommended below, according to the maximum output power of the communications equipment.
Rated maximum output power or transmitter (W)
Separation distance according to frequency of transmmitter (m)150 kHz to 80 MHz
80 MHz to 800 MHz
808 MHz to2.5 GHz
0.01 0.12 0.04 0.070.1 0.37 0.11 0.221 1.17 0.35 0.7010 3.69 1.11 2.21100 11.67 3.50 7.00For transmitters rated at a maximum output power not listed above, the recommended separation distance d in meters (m) can be estimated using the equation applicable to the frequency of the transmitter, where P is the maximum output power rating of the transmitter in watts (W) according to the transmitter manufacturer.NOTE 1: At 80 MHz and 800 MHz, the separation distance for the higher frequency range applies.NOTE 2: These guidelines may not apply in all situations. Electromagnetic propagation is affected by absorption and reflection from structures, objects and people.
Operational Precautions and LimitationsThe following information will affect the success in using LifePort Kidney Transporter.
Should Be Used Only By Trained Professionals — Federal law restricts the sale of this device to physicians and medical professionals only. Use of the device in procedures other than those described in this manual may result in injury.
Do Not Reuse Perfusion Circuits or Cannulas — The Perfusion Circuits, tube-sets, and cannula are sterile as supplied, method of sterilization is ethylene oxide gas, and are intended for single-use. After use, they should be disposed of in accordance with local guidelines for biomedical waste.
Use Only Manufacturer-Approved Accessories — Only manufacturer-approved accessories (e.g., batteries, Perfusion Circuits, Power Cable, data cable) are designed to work properly with LifePort Kidney Transporter. Do not substitute other batteries, Perfusion Circuits, cables, or accessories.
Use Only Ice and Water in the LifePort Ice Container — A mixture of ice and water in the Ice Container will assure that temperatures remain within the appropriate range for kidney preservation in LifePort Kidney Transporter. To avoid inadvertently freezing the kidney, ONLY USE ICE AND WATER in LifePort Kidney Transporter’s Ice Container.
Single Use Only Disposables — LifePort Kidney Transporter Disposable Kidney Accessories are intended for single use only.
Disposables Already Sterile — LifePort Kidney Transporter Disposable Kidney Accessories are sterile as supplied. Do not re-sterilize any LifePort Kidney Transporter Disposable Kidney Accessory.
D= 3.5 P 3[ ]√ D= 3.5 P
10[ ]√ D= 7 P 10[ ]√
LifePort Kidney Transporter Operator’s Manual 755-00002 Rev K61
Connect the System to an External Power Supply According to Labeling—LifePort Kidney Transporter uses externally supplied electricity to operate. Check the voltage and amperage ratings of the external supplies and make sure they match the labeled ratings for electricity inputs shown on the rear of LifePort Kidney Transporter.
Assure Adequate Ventilation—Do not block the ventilation areas on the side and bottom of LifePort Kidney Transporter, especially when external power is connected.
Electromagnetic Compliance—LifePort Kidney Transporter has been tested and found to comply with the limits for a Class A digital device, pursuant to Part 18 of the FCC rules and to the Medical Device Directive 93/42/EEC and to the Electromagnetic Compliance (EMC) Directive 89/336/EEC . These limits are designed to provide a reasonable protection against normal interference in a commercial or hospital setting.
LifePort Kidney Transporter needs special precautions regarding EMC and should be used in accordance with the EMC information provided in this manual. Please refer to Electromagnetic Compatibility on page 57 for details.
Air Transport—Prior to beginning air transport, make sure that ice and Battery levels are sufficient for entire transport duration. Do not connect LifePort Kidney Transporter to an external electrical power source on a commercial aircraft. Do not connect the Data Cable to LifePort Kidney Transporter during flight on a commercial aircraft.
CAUTION: All LifePort Kidney Transporter users should be familiar with Organ Recovery Systems kidney perfusion solution (KPS-1®) instruction for use (IFU).

755-00002 Rev K LifePort Kidney Transporter Operator’s Manual 62
HazardsOverview
This section contains information on hazards involved in using LifePort Kidney Transporter that can pose risk to the operator as well as to the environment—information that will affect clinician and staff safety when using LifePort Kidney Transporter.
WARNING: Possible Explosion Hazard. Do not use LifePort Kidney Transporter in the presence of flammable anesthetics. LifePort Kidney Transporter is not designed for use in the presence of explosive mixtures of anesthetic gases with air, oxygen or nitrous oxide. USE ONLY IN SAFE ENVIRONMENTS.
WARNING: Do not open LifePort Kidney Transporter to service it. Shock hazard exists if Pump Deck is removed. All aspects of LifePort Kidney Transporter that are meant to be attended by the Operator are accessible without opening the Device. If there is a service problem, please call the Organ Recovery Systems Perfusion Helpline.
WARNING: Beware of rotating parts. Keep hands, clothing, jewelry, ID lanyards, etc. away from the vicinity of the Infusion Pump when the LifePort is turned on.
WARNING: Unauthorized modifications to LifePort Kidney Transporter will void the warranty and may damage the device and/or organ. This may also result in user being harmed.
CAUTION: Use Universal Precautions with the kidney and perfusate. The kidney and perfusate may carry undetected from the donor. Use proper precautions (e.g. gloves, masks, gowns, goggles or equivalent eye protection, biohazard bags) in handling the kidney and in handling and disposing of the Perfusion Circuit and perfusate to prevent the possible transmission of pathogens to medical personnel.
CAUTION: Do not clean LifePort Kidney Transporter while connected to an external power supply.
CAUTION: Do not immerse LifePort Kidney Transporter.
CAUTION: Do not allow cleaning solutions to enter the rear panel electrical connectors, the ventilation holes or the battery area.
CAUTION: Use precautions when lifting. A fully loaded LifePort Kidney Transporter weighs 45 lbs (20.4 kg). Use proper lifting practices to avoid injury.
CAUTION: Local regulations must be followed for the disposal of LifePort Kidney Transporter and lithium-ion Batteries. If in doubt, call the Organ Recovery Systems Perfusion Helpline.
CAUTION: Use only grounded electrical connections. Connect LifePort Kidney Transporter to a grounded electrical outlet rated for voltage and amperage according to the labeled ratings on the product back panel. If there is any question about the ground integrity, operate LifePort Kidney Transporter from internal power.
CAUTION: You may remove mains power by unplugging the Power Cord from the back of the unit. Exercise care when choosing the location of your LifePort Kidney Transporter such that removal of Power Cord is not difficult.

LifePort Kidney Transporter Operator’s Manual 755-00002 Rev K63
IndexAbbreviations, 8AC Plug (Connection), 11Adding More Ice, 44Arriving at the Transplant OR, 45Batteries Charger, 14, 16 Disposal, 15 Door, 14, 20 Life, 55 Replacing, 44 Testing, 20Battery Life, 55 Beeping (Trouble), 50 Message Display is Blank (Trouble), 50Bubble Detectors, 9, 10 Trap, 10, 13Buttons, unresponsive (Trouble), 50Cable, Data, 14Cannula Coupler, 30 SealRing, 28 Straight, 29 Universal SealRing, 32Cannula Mount, 12Cannulating the Kidney, 28Capacity, 55Capturing and Downloading Data, 48Charge State Indicator, 14Checking Battery Power, 44 Duration of Operation, 20 Ice, 44, 51Checking the Kidney After Placement, 38Circuit Breaker, 11Circuits, Electronic, 11Cleaning Solutions, Caution When Using, 55, 62Cleaning Up After a Case, 55Closing the LifePort, 40Common Carrier, Shipping by, 55Compatibility, Electromagnetic, 57Compliance Chamber, 13Connections, External, 11Control Panel, 11Coolant Source, 56Cooling Down the LifePort, 23Coupler, 30Data Cable, 14 Download, 56
Port (Connection), 11, 14Description, 9, 56Diagnostics, 50Dimensions, 56Display Outer, 12Disposables, LifePort, 10, 12Downloading Capturing Data, 48Drape, Sterile, 13Duration of Operation, 20Electrical Connections, 62Electromagnetic Compliance, 61 Emissions, 58 Environment, Guidance, 58, 59 Immunity, 58, 59Electromagnetic Compatibility, 57Electronic Circuits, 11EMC Information, 57Emissions, Electromagnetic, 58Energizing the LifePort, 18Error Message Explanations, 51 Power up Self Test (POST) Failure, 52, 54Explosion (Hazard), 62External Connections, 11Filling the Ice Container, 17Filter, 13, 51Flow Rate (Outer Display), 41 Rates, 56Fluid Management, 10, 13GPS Tracking Capability, 21Hazards, 62High Resistance, Kidney (Error Message), 52Home Base Station Preparing, 22 Selecting, 16Hypothermia, Maintaining, 45Ice Container Filling, 17Ice, Adding More, 44Indications for Use, 56Infuse Button, 19, 38 Mode, 11, 20, 34, 40, 41, 48, 52, 53 Valve, 11, 19, 20, 36, 37, 46Infuse Line, 13Priming, 36Inspecting, Visual, 38

755-00002 Rev K LifePort Kidney Transporter Operator’s Manual 64
Intended Use, 9Isolating the Kidney Vascular Structure, 27Kidney Cannulating, 28 Monitoring, 45 Placing in the LifePort, 34 Vascular Structure, Isolating, 27Kidney Cradle, 12, 13, 29, 30, 31, 33, 35, 36, 47Label Graphics Explanations, 15Leaking Coolant (Trouble), 50Leaking Perfusate (Trouble), 50Leaks, Preliminary Testing, 37LifePort Disposables, 12Loading the Perfusion Circuit, 17Low Battery (Error Message), 52Maintenance, 55Message Display (Outer Display), 12Message Display Blank (Trouble), 50Missing or Incorrect Display Elements (Trouble), 50Mode Infuse, 19 Wash,19Monitoring Kidney, 45 Perfusate, 45Monitoring, Data Station, 42Monitoring, via LifePort Outer Display, 41Monitoring, Remote, 44No power (Trouble), 50Near Freezing (Error Message), 52Occlusion (Error Message), 52Operating Modes, Testing, 18Organ Cassette, 13Outer Display, 12Overview, Professional, 22Perfusion Circuit (Cassette) Setting Up, 24 Loading, 17Perfusate Monitoring, 45Perfusion Circuit (Cassette), 13 Circuit (Cassette), Loading, 17 Circuit (Cassette), Setting Up, 23 Modes, 56Peristaltic Pump, 10, 56Placing the Kidney in the LifePort, 34Power Button, 15 Cord, 13 Source, 56 Status (Outer Display), 12
Power on Self Test (POST) Failure (Error Message), 52Preliminary Tests, Running, 16Preparing Home Base Station, 22 To Travel to the Transplant Site, 44 LifePort for Recovery, 23Pressure Control, 56 Sensor, 13 Sensor Cable, 10 Sensor Connector, 13Pressure (Outer Display), 12Pressure Sensor Failure (Error Message), 53Pressure Sensor Setpoint Error (Error Message), 53Prime Button, 19Priming the Infuse Line, 36Product Specifications, 56Professional Overview, 22Pump Deck, 10 Tubing Loop, 13 Quick Response Use, 22Recharging the Supplies, 45Recipient Surgery, Waiting Until Ready, 45Remote Monitoring, 44Removing Kidney from LifePort for Transplant, 45Replacing Batteries, 44Return Line, 13Rotating Parts (Hazard), 62Safety, 9Sample Port, 13Scroll Buttons (Control Panel), 11SealRing Cannula, 28Shipping by Common Carrier, 55Shock (Hazard), 62Specifications, 56Sterile Drape, 13Stop, Button, 11Storage Conditions, 56Straight Cannula, 29Supplies, Recharging the, 45Temperature (Outer Display), 12, 41Testing Batteries, 20 Operating Modes, 18Testing for Preliminary Leaks, 37Too Much Pressure (Error Message), 53Transplant Site, Preparing to Travel to, 44Transport Duration, 56Traveling With the LifePort, 23Troubleshooting and Diagnostics, 50Tubeframe, 13

LifePort Kidney Transporter Operator’s Manual 755-00002 Rev K65
Typical Behavior of a Kidney on LifePort, 43Universal Precautions, Use of, 55Universal SealRing Cannula, 32Unpacking, Setup and Preliminary Testing, 16Unresponsive, buttons (Trouble), 50Use, Intended, 9Valve Infuse, 11 Wash, 11Vein Position, 39Waiting until Recipient Surgery Is Ready, 45Wash Button, 11 Line, 10 Mode, 11 Valve, 11Weight, 56