Lab 8: RMON
10
NET311 Dr. Mostafa Dahshan Page 1 of 10 Lab 8: RMON NET311 - Computer Network Management Instructor: Dr. Mostafa Dahshan Objectives 1. Understand RMON. 2. Configure remote monitoring on Cisco devices. 3. Generate network traffic to test RMON probes. 4. Access RMON probes using an SNMP manager. References 1. RMON | Bits and Beans. 2. Configuring RMON Support - Cisco. 3. CCIE - RMON - Remote MONitoring. 4. VPCs Tutorial | RedNectar's Blog. 5. SNMP Counters: Frequently Asked Questions - Cisco. 6. RMON Commands - Cisco. Instructions 1. Read the lab instructions. 2. Provide question answers and screenshots in the supplied answer sheet. 3. After finishing the lab, upload your saved answer sheet to LMS.
-
Upload
khangminh22 -
Category
Documents
-
view
6 -
download
0
Transcript of Lab 8: RMON

NET311 Dr. Mostafa Dahshan Page 1 of 10
Lab 8: RMON NET311 - Computer Network Management
Instructor: Dr. Mostafa Dahshan
Objectives
1. Understand RMON.
2. Configure remote monitoring on Cisco devices.
3. Generate network traffic to test RMON probes.
4. Access RMON probes using an SNMP manager.
References
1. RMON | Bits and Beans.
2. Configuring RMON Support - Cisco.
3. CCIE - RMON - Remote MONitoring.
4. VPCs Tutorial | RedNectar's Blog.
5. SNMP Counters: Frequently Asked Questions - Cisco.
6. RMON Commands - Cisco.
Instructions
1. Read the lab instructions.
2. Provide question answers and screenshots in the supplied answer sheet.
3. After finishing the lab, upload your saved answer sheet to LMS.

NET311 Dr. Mostafa Dahshan Page 2 of 10
Part 1: Lab Setup
The lab setup required is the same as the lab setup for Lab 05. If you have not performed Lab 05, you must perform
Part 1 in Lab 05 before completing this lab.
NET311 Dr. Mostafa Dahshan Page 3 of 10
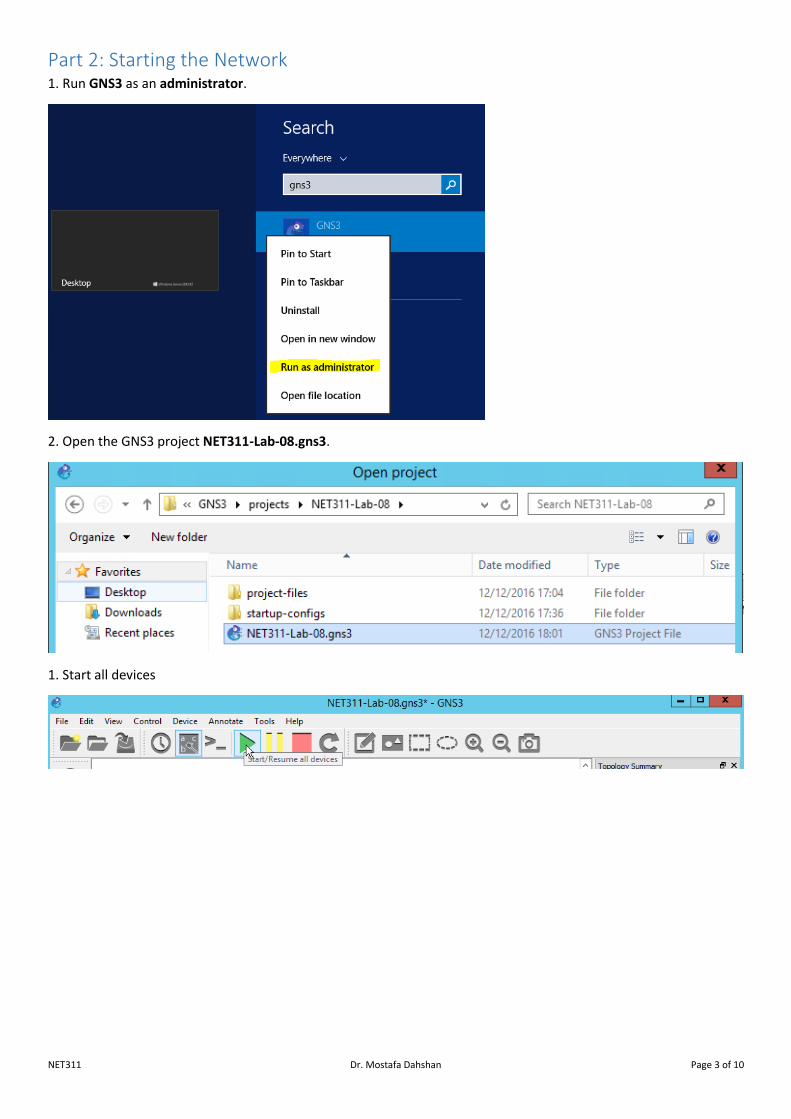
Part 2: Starting the Network 1. Run GNS3 as an administrator.
2. Open the GNS3 project NET311-Lab-08.gns3.
1. Start all devices

NET311 Dr. Mostafa Dahshan Page 4 of 10
Lab sheet 2.1: provide a screenshot of the running network.

NET311 Dr. Mostafa Dahshan Page 5 of 10
Part 3: Configure RMON on a Cisco Router 1. Double-click on R1 to open its console.
We want to configure an RMON alarm to monitor the total number of octets received on the interface e1/0, defined
by the OID ifInOctets (1.3.6.1.2.1.2.2.1.10). The alarm will sample every 10 seconds. If the increase amount (delta) is
2000 octets or larger, it will trigger event 1. If the decrease amount is 1000 or lower, it will trigger event 2.
2. Configure the two RMON events.
config t
rmon event 1 log description HighInput owner NET311
rmon event 2 log description LowInput owner NET311
Before configuring the RMON alarm, we need to find out the ifIndex that corresponds to the interface e1/0.
3. Find the interface index of e1/0 (Ethernet1/0)
end
show snmp mib ifmib ifindex

NET311 Dr. Mostafa Dahshan Page 6 of 10
4. Configure the RMON alarm.
config t
rmon alarm 1 ifInOctets.2 10 delta rising-threshold 2000 1 falling-threshold
1000 2 owner NET311
Note that, after 10 second, the falling trap is generated because no packets have been received on the interface.
5. Verify the RMON alarm and events you have created:
end
show rmon alarms
Lab sheet 3.1: provide a screenshot showing the RMON alarms.
show rmon events
Lab sheet 3.2: provide a screenshot showing the RMON events.

NET311 Dr. Mostafa Dahshan Page 7 of 10
Part 4: Generate Traffic To test the raising trap, we need to generate some traffic on the interface e1/0 of R1. We do that by using the ping
command from PC1 that needs to be routed to PC3 through the interface e1/0 of R1.
1. Double-click on PC1 to open its console.
2. Send 1000 ICMP packets to PC3 with 10 ms delay between them.
ping 172.16.0.103 -c 1000 -i 10
3. Check the console window of R1. It should show that rising trap is generated.
Lab sheet 4.1: provide a screenshot of R1's console showing the Rising trap.
4. After another 10 seconds with no activity, check the console window of R1. The falling trap is again generated.
Lab sheet 4.2: provide a screenshot of R1's console showing the falling trap.

NET311 Dr. Mostafa Dahshan Page 8 of 10
Part 5: Access RMON Probe using an SNMP Manager
As a network manager, you may want to periodically check RMON probes located at different parts of your
enterprise's network.
1. On your Windows computer, run the SnmpB application and configure the agent profile to access R1.
2. From the SnmpB Modules tab, load the two modules RMON-MIB and RMON2-MIB.
NET311 Dr. Mostafa Dahshan Page 9 of 10
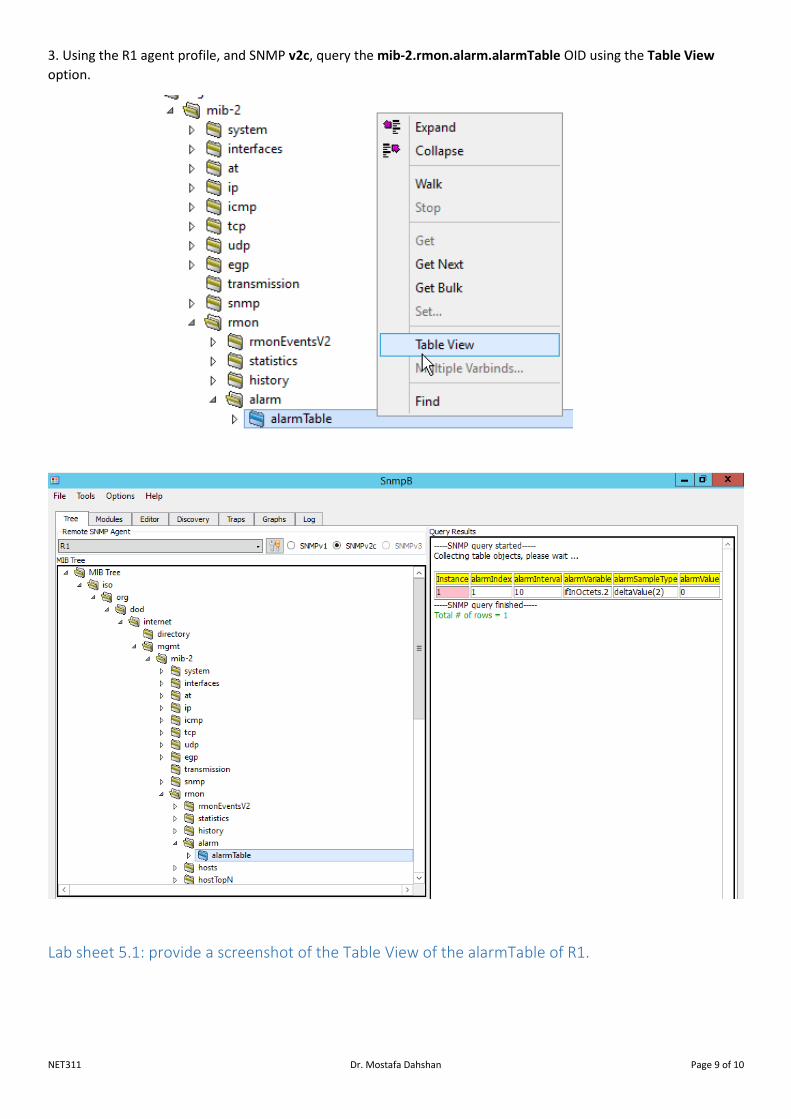
3. Using the R1 agent profile, and SNMP v2c, query the mib-2.rmon.alarm.alarmTable OID using the Table View
option.
Lab sheet 5.1: provide a screenshot of the Table View of the alarmTable of R1.
NET311 Dr. Mostafa Dahshan Page 10 of 10
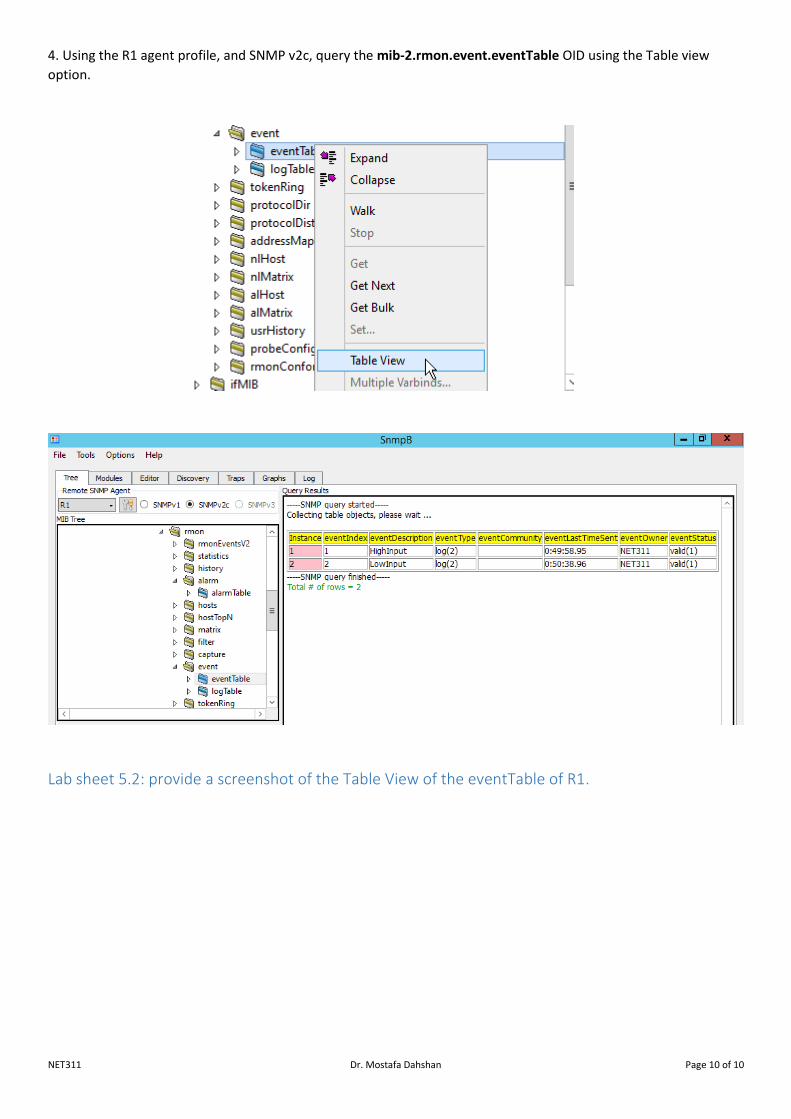
4. Using the R1 agent profile, and SNMP v2c, query the mib-2.rmon.event.eventTable OID using the Table view
option.
Lab sheet 5.2: provide a screenshot of the Table View of the eventTable of R1.