KW9015 RAIN GAUGE MANUAL Important! - Greenfrog ...
10
(1) KW9015 RAIN GAUGE MANUAL Important! Warranty and Support We warrant our products to be free of defects in components and workmanship, under normal use and service, for one year from the date of original purchase. For product support and warranty claims please contact the following: Purchased in UK/EU: As many issues can be a result of incorrect setup please contact our local distributor Greenfrog Scientific www.greenfrogscientific.co.uk and their team will be happy to help. Genuine faults can typically be diagnosed without requiring the unit to be returned and replacement parts sent quickly if needed. Purchased in AUSTRALIA: As many issues can be a result of incorrect setup please contact our local distributor Monax Test & Weather www.monaxtestandweather.com.au and their team will be happy to help. Genuine faults can typically be diagnosed without requiring the unit to be returned and replacement parts sent quickly if needed. Purchased in NEW ZEALAND: As many issues can be a result of incorrect setup please contact our local distributor Scientific Sales www.scientificsales.co.nz and their team will be happy to help. Genuine faults can typically be diagnosed without requiring the unit to be returned and replacement parts sent quickly if needed. For all others please contact the retailer who sold you this item.
-
Upload
khangminh22 -
Category
Documents
-
view
0 -
download
0
Transcript of KW9015 RAIN GAUGE MANUAL Important! - Greenfrog ...
(1)
KW9015 RAIN GAUGE MANUAL
Important!
Warranty and Support
We warrant our products to be free of defects in components and workmanship, under
normal use and service, for one year from the date of original purchase. For product
support and warranty claims please contact the following:
Purchased in UK/EU: As many issues can be a result of incorrect setup
please contact our local distributor Greenfrog Scientific
www.greenfrogscientific.co.uk and their team will be happy to help. Genuine
faults can typically be diagnosed without requiring the unit to be returned and
replacement parts sent quickly if needed.
Purchased in AUSTRALIA: As many issues can be a result of incorrect setup
please contact our local distributor Monax Test & Weather
www.monaxtestandweather.com.au and their team will be happy to help.
Genuine faults can typically be diagnosed without requiring the unit to be
returned and replacement parts sent quickly if needed.
Purchased in NEW ZEALAND: As many issues can be a result of incorrect
setup please contact our local distributor Scientific Sales
www.scientificsales.co.nz and their team will be happy to help. Genuine faults
can typically be diagnosed without requiring the unit to be returned and
replacement parts sent quickly if needed.
For all others please contact the retailer who sold you this item.

(2)
Features
a. Rain gauge recording and trend
b. Rain gauge range 0 - 9,999 mm or 0 - 999.9 inch
c. Rain Alert
d. IN/OUT temperature
e. Indoor temperature: -9.9C to 50C
f. Outdoor temperature: -50C to 70C
g. Temperature Alert
h. 433MHz wireless transmission
i. 12/24 Hour time display
j. Power save mode
k. Low-battery indicator for Outdoor Sensor
l. Batteries:
Main Unit : DC 1.5 V AA size x 3 pcs
Thermo Sensor Unit : DC 1.5 V AA size x 2 pcs
Display
B5
A1 A2
B6
A3 A4
A5 B7
B1
B2 C1
B4
B3
Part A - The LCD
A1 : Temperature A4 : Rain alert
A2 : Trend indicator A5 : Rain gauge bar chart
A3 : Time

(3)
Part B - The buttons
B1 : ▲ History B5 : Alert
B2 : Rain/Setting B6 : Max/Min
B3 : ▼ Since B7 : Reset
B4 : Search / In/Out Temp
Part C - The Structure
C1 : Battery Door.
Installation
When installing the rain gauge it is important to consider its location. The gauge should
be placed in an area that is protected from strong winds but is not bothered by obstacles
that could either block precipitation from reaching the gauge or cause precipitation to
splash towards it. Ideally the gauge should be installed 0.6 - 1.5mt above the ground
mounted on a single post. It is not always possible to find a perfect location. When in
doubt, do your best.
Set Up
a. Insert batteries (the battery compartment for the rain sensor is located underneath and
unscrews to open). The main unit will automatically start receiving the transmission
from the Outdoor Rain Sensor.
b. Use a pin to press the RESET (B7) button.
c. You will hear a “Beep Beep” sound and all LCD segments will turn on for 2 seconds.
d. The main unit will then go to the time setting mode.
Manual Time Setting
a. Hold the “SETTING” (B2) button for 3 seconds to enter the time setting mode.
b. Press the “SETTING”(B2) button to select item: 12/24format, hour, minute, year,
Month/Day sequence, Month, Day, mm/inch, C/F and Rain alert on/off.
c. Press ▲ (B1) and ▼(B3) buttons to adjust the corresponding settings. When you
hold down ▲ or ▼, the setting will auto advance.
(4)
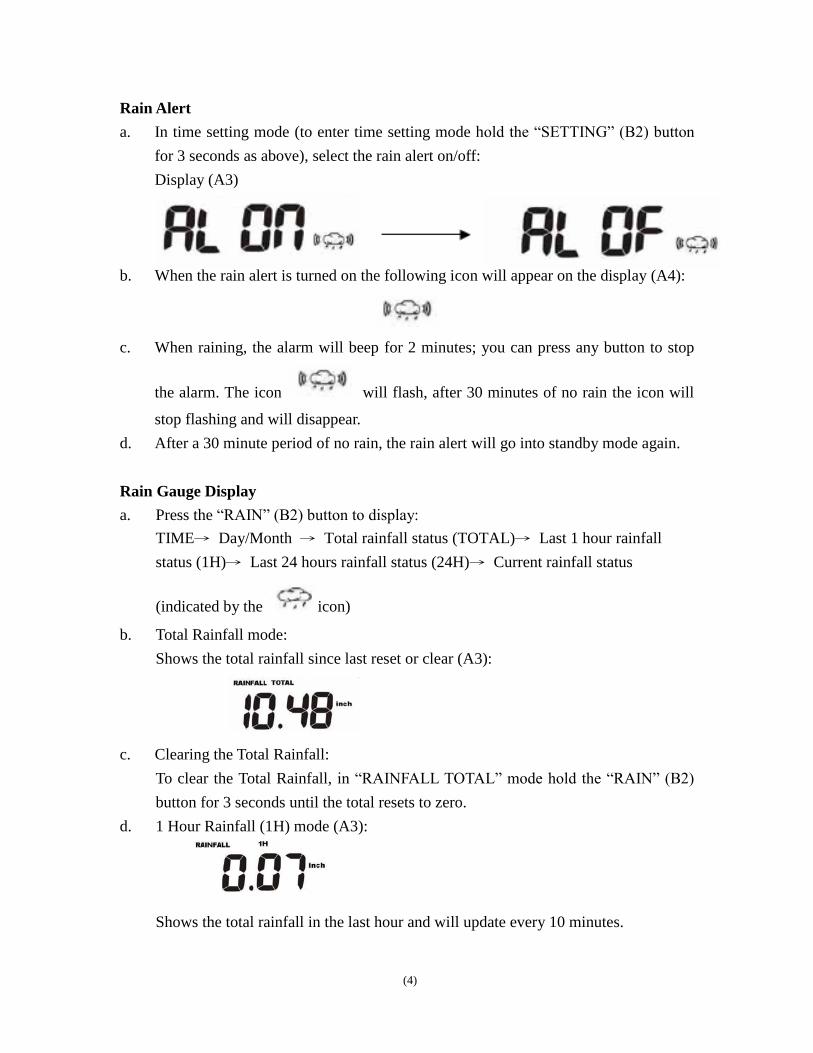
Rain Alert
a. In time setting mode (to enter time setting mode hold the “SETTING” (B2) button
for 3 seconds as above), select the rain alert on/off:
Display (A3)
b. When the rain alert is turned on the following icon will appear on the display (A4):
c. When raining, the alarm will beep for 2 minutes; you can press any button to stop
the alarm. The icon will flash, after 30 minutes of no rain the icon will
stop flashing and will disappear.
d. After a 30 minute period of no rain, the rain alert will go into standby mode again.
Rain Gauge Display
a. Press the “RAIN” (B2) button to display:
TIME→ Day/Month → Total rainfall status (TOTAL)→ Last 1 hour rainfall
status (1H)→ Last 24 hours rainfall status (24H)→ Current rainfall status
(indicated by the icon)
b. Total Rainfall mode:
Shows the total rainfall since last reset or clear (A3):
c. Clearing the Total Rainfall:
To clear the Total Rainfall, in “RAINFALL TOTAL” mode hold the “RAIN” (B2)
button for 3 seconds until the total resets to zero.
d. 1 Hour Rainfall (1H) mode (A3):
Shows the total rainfall in the last hour and will update every 10 minutes.
(5)
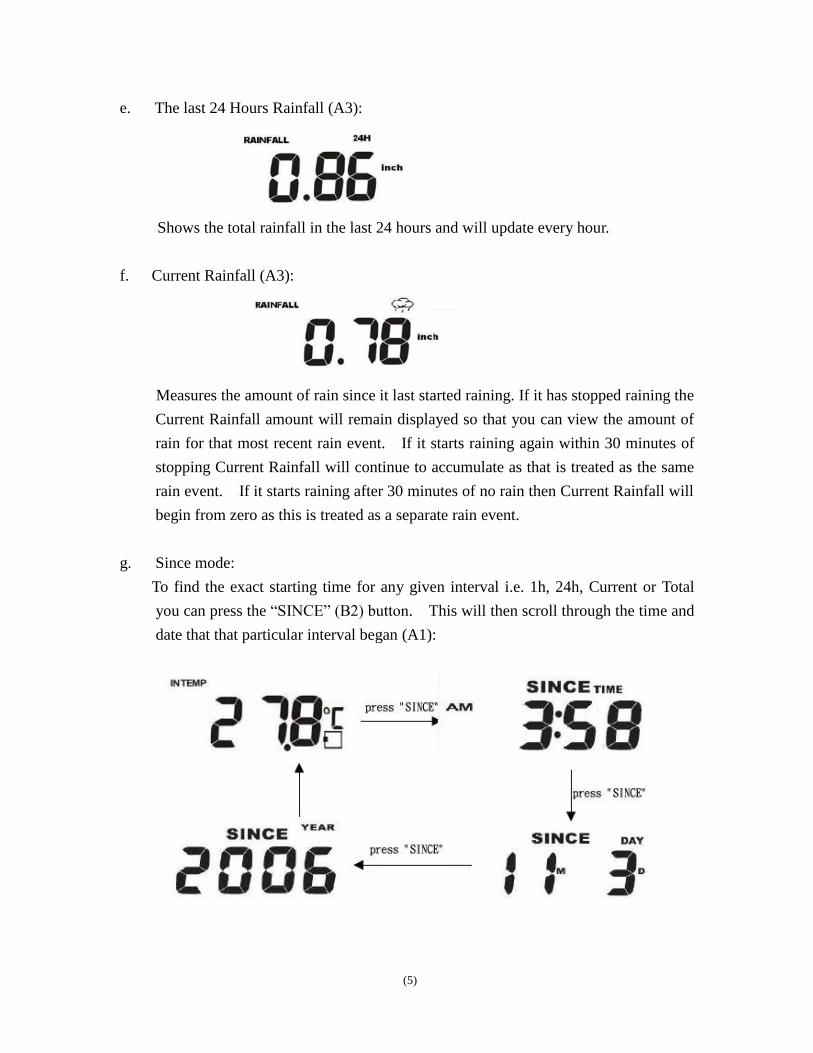
e. The last 24 Hours Rainfall (A3):
Shows the total rainfall in the last 24 hours and will update every hour.
f. Current Rainfall (A3):
Measures the amount of rain since it last started raining. If it has stopped raining the
Current Rainfall amount will remain displayed so that you can view the amount of
rain for that most recent rain event. If it starts raining again within 30 minutes of
stopping Current Rainfall will continue to accumulate as that is treated as the same
rain event. If it starts raining after 30 minutes of no rain then Current Rainfall will
begin from zero as this is treated as a separate rain event.
g. Since mode:
To find the exact starting time for any given interval i.e. 1h, 24h, Current or Total
you can press the “SINCE” (B2) button. This will then scroll through the time and
date that that particular interval began (A1):

(6)
Historic Rainfall Trend
a. Press the “HISTORY” (B1) button to select the daily, weekly or monthly rainfall
trend.
b. The bar graph (A5) will then show the last 6 days, 6 weeks, or 6 months rainfall
depending upon which interval has been selected in a. above:
To scroll through the historic records manually hold the “HISTORY” (B1) button
for 3 seconds until the unit beeps. Subsequent presses of the “HISTORY”(B1)
button will then scroll through the historic records:
(7)
Clearing Rainfall Records
a. To clear all rainfall records hold both the “HISTORY” (B1) and “SINCE” (B3)
buttons for 3 seconds until the unit beeps.
In/Out Temperature
a. Press the “IN/OUT TEMP” (B4) button to select and show the inside “IN” or
outside “OUT” temperature (A1).
b. Press the “MAX/MIN” (B6) button on the rear of the unit to scroll through the
maximum and minimum records in the following order:
IN maximumIN minimumOUT maximumOUT minimumCurrent
c. When a MAX or MIN temperature is displayed, holding the “MAX/MIN” (B6)
button for 3 seconds will reset all maximum and minimum records.
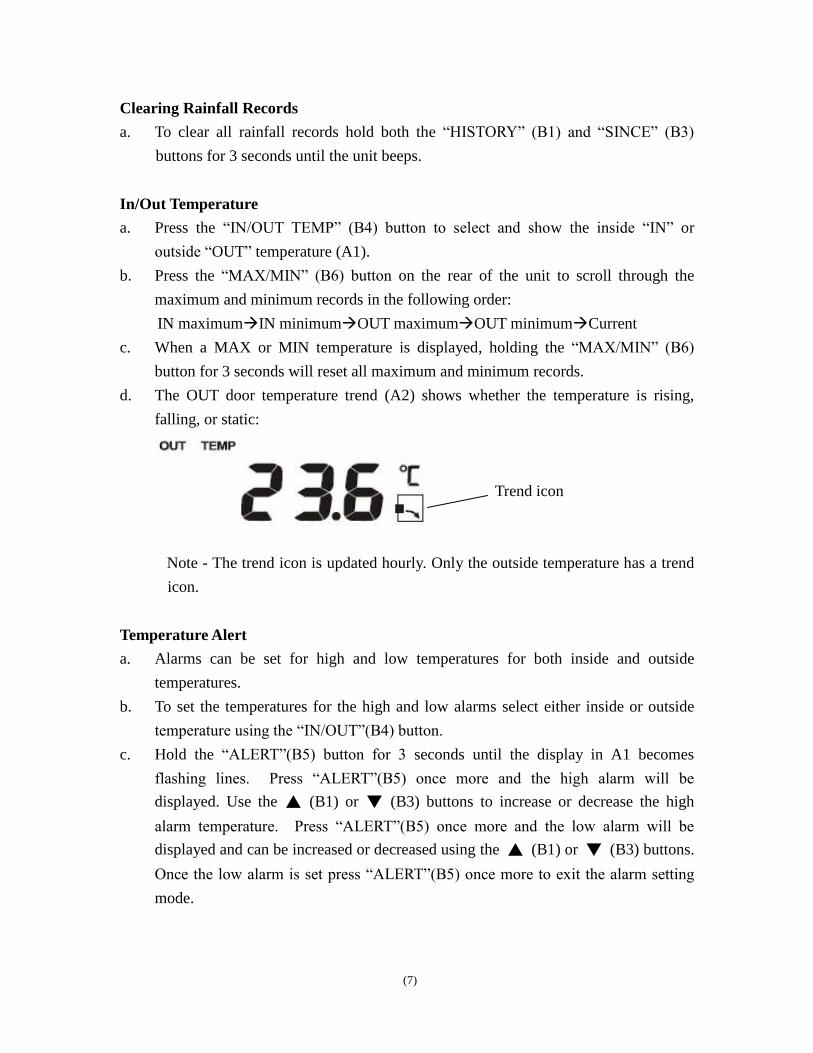
d. The OUT door temperature trend (A2) shows whether the temperature is rising,
falling, or static:
Trend icon
Note - The trend icon is updated hourly. Only the outside temperature has a trend
icon.
Temperature Alert
a. Alarms can be set for high and low temperatures for both inside and outside
temperatures.
b. To set the temperatures for the high and low alarms select either inside or outside
temperature using the “IN/OUT”(B4) button.
c. Hold the “ALERT”(B5) button for 3 seconds until the display in A1 becomes
flashing lines. Press “ALERT”(B5) once more and the high alarm will be
displayed. Use the ▲ (B1) or ▼ (B3) buttons to increase or decrease the high
alarm temperature. Press “ALERT”(B5) once more and the low alarm will be
displayed and can be increased or decreased using the ▲ (B1) or ▼ (B3) buttons.
Once the low alarm is set press “ALERT”(B5) once more to exit the alarm setting
mode.
(8)
d. Press the “ALERT”(B5) button to turn the temperature alarms on or off. The
following temperature alarm icon will display (A1) when the alarms are activated:
e. When the temperature goes above or below the corresponding thresholds an alarm
will sound and the temperature alarm icon above will flash.
Wireless Transmission
a. Every time data is received from the outside sensor the icon will flash in the
top right corner of the screen.
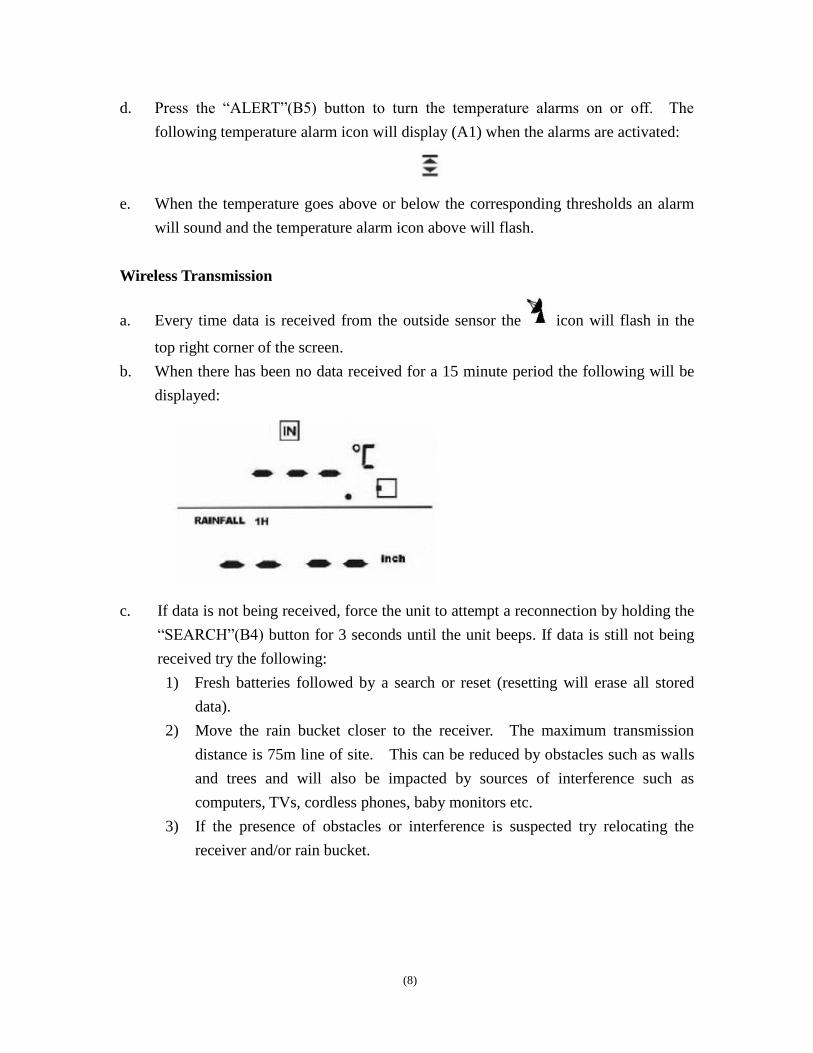
b. When there has been no data received for a 15 minute period the following will be
displayed:
c. If data is not being received, force the unit to attempt a reconnection by holding the
“SEARCH”(B4) button for 3 seconds until the unit beeps. If data is still not being
received try the following:
1) Fresh batteries followed by a search or reset (resetting will erase all stored
data).
2) Move the rain bucket closer to the receiver. The maximum transmission
distance is 75m line of site. This can be reduced by obstacles such as walls
and trees and will also be impacted by sources of interference such as
computers, TVs, cordless phones, baby monitors etc.
3) If the presence of obstacles or interference is suspected try relocating the
receiver and/or rain bucket.

(9)
Low Battery Indicator
a. When the low battery icon is displayed the batteries in the rain bucket
require replacing.
Power Save
a. Hold the “RAIN”(B2) and “SEARCH”(B4) buttons for 3 seconds.
b. The screen will turn off and the unit will stop receiving and recording data. Note:
no existing records will be lost, they will all be available when the screen is turned
back on.
c. Hold the “RAIN”(B2) and “SEARCH”(B4) buttons for 3 seconds again and the unit
will return to normal mode.
Other Notes
Use a pin to press the reset button if necessary.
The clock loses its time information when the battery is removed.
All setting modes will automatically exit in 15 seconds if idle.
Contact Information
Purchased in UK/EU: Please contact our local distributor Greenfrog Scientific
www.greenfrogscientific.co.uk and their team will be happy to help. Genuine faults can
typically be diagnosed without requiring the unit to be returned and replacement parts
sent quickly if needed.
Purchased in AUSTRALIA: Please contact our local distributor Monax Test &
Weather www.monaxtestandweather.com.au and their team will be happy to help.
Genuine faults can typically be diagnosed without requiring the unit to be returned and
replacement parts sent quickly if needed.
Purchased in NEW ZEALAND: Please contact our local distributor Scientific Sales
www.scientificsales.co.nz and their team will be happy to help. Genuine faults can
typically be diagnosed without requiring the unit to be returned and replacement parts
sent quickly if needed.
For all others please contact the retailer who sold you this item.
(10)
EU DECLARATION OF CONFORMITY
Hereby, Aercus Instruments, declares that this Wireless Weather Station (Model: WS2083) is in compliance
with the essential requirements and other relevant provisions of Directive 1999/5/EC. A copy of the
signed and dated Declaration of Conformity is available on request from [email protected].
COUNTRIES RTTE APPROVAL COMPLIED
All EU countries
This handbook may contain mistakes and printing errors. The information in this handbook is regularly
checked and corrections made in the next issue. We accept no liability for technical mistakes or printing
errors - or their consequences.