iR 3300/iR 2800/iR 2200 - Canon Europe
154
iR 3300/iR 2800/iR 2200 iR 3300/iR 2800/iR 2200 iR 3300/iR 2800/iR 2200 iR 3300/iR 2800/iR 2200 Mailbox Guide Mailbox Guide Mailbox Guide Mailbox Guide
-
Upload
khangminh22 -
Category
Documents
-
view
0 -
download
0
Transcript of iR 3300/iR 2800/iR 2200 - Canon Europe
iR 3300/iR 2800/iR 2200iR 3300/iR 2800/iR 2200iR 3300/iR 2800/iR 2200iR 3300/iR 2800/iR 2200
Mailbox GuideMailbox GuideMailbox GuideMailbox Guide

About the Manuals for the MachineAbout the Manuals for the MachineAbout the Manuals for the MachineAbout the Manuals for the MachineThe manuals for this machine are divided as follows. Please read them to suit your needs.
The manuals supplied with optional equipment are included in the list above.Depending on the system configuration and product purchased, some manuals may be unavailable (irrelevant).
For Basic UseFor Basic UseFor Basic UseFor Basic Use ............................................................................................................................................................................................................TroubleshootingTroubleshootingTroubleshootingTroubleshooting ................................................................................................................................................................................................ Reference GuideReference GuideReference GuideReference Guide
For Basic CopyingFor Basic CopyingFor Basic CopyingFor Basic Copying ....................................................................................................................................................................................For Convenient CopyingFor Convenient CopyingFor Convenient CopyingFor Convenient Copying ................................................................................................................................................ Copying GuideCopying GuideCopying GuideCopying Guide
For Basic Mail Box Function UseFor Basic Mail Box Function UseFor Basic Mail Box Function UseFor Basic Mail Box Function Use ............................................................................................For Convenient Mail Box Function UseFor Convenient Mail Box Function UseFor Convenient Mail Box Function UseFor Convenient Mail Box Function Use........................................................
Mail Box Function GuideMail Box Function GuideMail Box Function GuideMail Box Function Guide(This Document)(This Document)(This Document)(This Document)
For Fax UseFor Fax UseFor Fax UseFor Fax Use ........................................................................................................................................................................................................................For Convenient Fax UseFor Convenient Fax UseFor Convenient Fax UseFor Convenient Fax Use................................................................................................................................................ Facsimile GuideFacsimile GuideFacsimile GuideFacsimile Guide
For Remote UI UseFor Remote UI UseFor Remote UI UseFor Remote UI Use ............................................................................................................................................................................ Remote UI GuideRemote UI GuideRemote UI GuideRemote UI Guide
For Setting Up the Network Connection & For Setting Up the Network Connection & For Setting Up the Network Connection & For Setting Up the Network Connection & Installing the CD-ROM SoftwareInstalling the CD-ROM SoftwareInstalling the CD-ROM SoftwareInstalling the CD-ROM Software................................................................................................ Setup GuideSetup GuideSetup GuideSetup Guide
For Printer UseFor Printer UseFor Printer UseFor Printer Use .................................................................................................................................................................................................... PS/PCL Printer GuidePS/PCL Printer GuidePS/PCL Printer GuidePS/PCL Printer Guide
For Installing Printer Driver, etc.For Installing Printer Driver, etc.For Installing Printer Driver, etc.For Installing Printer Driver, etc. ................................................................................................ PS Driver GuidePS Driver GuidePS Driver GuidePS Driver GuidePCL Driver GuidePCL Driver GuidePCL Driver GuidePCL Driver Guide
For Connecting and Setting the NetworkFor Connecting and Setting the NetworkFor Connecting and Setting the NetworkFor Connecting and Setting the Network ............................................ Network GuideNetwork GuideNetwork GuideNetwork Guide
CD-ROM
CD-ROM
CD-ROM
CD-ROM
Guides with this symbol are PDF manuals included on the attached CD-ROM.CD-ROM
1111
2222
3333
4444
5555
How This Manual Is OrganisedHow This Manual Is OrganisedHow This Manual Is OrganisedHow This Manual Is Organised
Basic Usage of the Mail BoxBasic Usage of the Mail BoxBasic Usage of the Mail BoxBasic Usage of the Mail Box
Scanning Originals into a BoxScanning Originals into a BoxScanning Originals into a BoxScanning Originals into a Box
Using/ Arranging Documents stored in the BoxUsing/ Arranging Documents stored in the BoxUsing/ Arranging Documents stored in the BoxUsing/ Arranging Documents stored in the Box
Setting/ Storing the Mail Box SettingsSetting/ Storing the Mail Box SettingsSetting/ Storing the Mail Box SettingsSetting/ Storing the Mail Box Settings
AppendixAppendixAppendixAppendix
Chap 1Chap 1Chap 1Chap 1
Chap 2Chap 2Chap 2Chap 2
Chap 3Chap 3Chap 3Chap 3
Chap 4Chap 4Chap 4Chap 4
Chap 5Chap 5Chap 5Chap 5
Copyright 2003 by Canon, All rights reserved.
No part of this publication may be reproduced or transmitted in any form or by any means, electronic or mechanical, including photocopying and recording, or by any information storage or retrieval system without the prior written permission of Canon, Inc.
• Considerable effort has been made to make sure that this manual is free of inaccuracies and omissions.• However, as we are constantly improving our products, if you need on exact specification, please contact Canon.
Table of ContentsTable of ContentsTable of ContentsTable of ContentsHow This Manual Is OrganisedHow This Manual Is OrganisedHow This Manual Is OrganisedHow This Manual Is Organised . . . . . . . . . . . . . . . . . . . . . . . . . . . . . . . . . . . . . . . . . . . . . . . . . . . . . . . . . . . . . . . . . . . . . . . . . . . . . . . . . . . . . . . . . . . . . . . . . . . . . . . . . . . . . . . . . . . . . . . . . . . . . . . . . . . . . . . . . . . . iiii
Table of ContentsTable of ContentsTable of ContentsTable of Contents . . . . . . . . . . . . . . . . . . . . . . . . . . . . . . . . . . . . . . . . . . . . .. . . . . . . . . . . . . . . . . . . . . . . . . . . . . . . . . . . . . . . . . . . . .. . . . . . . . . . . . . . . . . . . . . . . . . . . . . . . . . . . . . . . . . . . . .. . . . . . . . . . . . . . . . . . . . . . . . . . . . . . . . . . . . . . . . . . . . . iiiiiiii
How to Use This ManualHow to Use This ManualHow to Use This ManualHow to Use This Manual. . . . . . . . . . . . . . . . . . . . . . . . . . . . . . . . . . . . . . . .. . . . . . . . . . . . . . . . . . . . . . . . . . . . . . . . . . . . . . . .. . . . . . . . . . . . . . . . . . . . . . . . . . . . . . . . . . . . . . . .. . . . . . . . . . . . . . . . . . . . . . . . . . . . . . . . . . . . . . . . vvvvSymbols Used in This Manual . . . . . . . . . . . . . . . . . . . . . . . . . . . . . . . . . . . . . vKeys Used in This Manual . . . . . . . . . . . . . . . . . . . . . . . . . . . . . . . . . . . . . . . . vDisplays Used in This Manual . . . . . . . . . . . . . . . . . . . . . . . . . . . . . . . . . . . . . viIllustrations Used in This Manual . . . . . . . . . . . . . . . . . . . . . . . . . . . . . . . . . . . vi
Chapter 1Chapter 1Chapter 1Chapter 1 Basic Use of the Mail Box Function Basic Use of the Mail Box Function Basic Use of the Mail Box Function Basic Use of the Mail Box Function
What the iR3300/iR2800/iR2200 Series Machine Can DoWhat the iR3300/iR2800/iR2200 Series Machine Can DoWhat the iR3300/iR2800/iR2200 Series Machine Can DoWhat the iR3300/iR2800/iR2200 Series Machine Can Do . . . . . . . . . . . . . . . . . . . . . . . . . . . . . . . . . . . . . . . . . . . . . . . . . . . . 1-21-21-21-2Storing Data and Printing It at Your Convenience . . . . . . . . . . . . . . . . . . . . 1-2
Flow of Mail Box OperationsFlow of Mail Box OperationsFlow of Mail Box OperationsFlow of Mail Box Operations . . . . . . . . . . . . . . . . . . . . . . . . . . . . . . . . . . . . . . . . . . . . . . . . . . . . . . . . . . . . . . . . . . . . . . . . . . . . . . . . . . . . . . . . . . . . . . . . . . . . . . . . . . . . . . . . . . . . . . . . . . . . . . . . . . . . . . . . . . . . 1-91-91-91-9Storing Originals in the Mail Box . . . . . . . . . . . . . . . . . . . . . . . . . . . . . . . . . 1-9Printing Documents Stored in the Mail Box . . . . . . . . . . . . . . . . . . . . . . . . 1-13
Chapter 2Chapter 2Chapter 2Chapter 2 Scanning Originals into a Mail BoxScanning Originals into a Mail BoxScanning Originals into a Mail BoxScanning Originals into a Mail Box
Specifying the Document Name Before Scanning (Document Name)Specifying the Document Name Before Scanning (Document Name)Specifying the Document Name Before Scanning (Document Name)Specifying the Document Name Before Scanning (Document Name) . . . . . . . . . . . . . . . . 2-32-32-32-3
Specifying Document Size (Document Size Select)Specifying Document Size (Document Size Select)Specifying Document Size (Document Size Select)Specifying Document Size (Document Size Select) . . . . . . . . . . . . . . . . . . . . . . . . . . . . . . . . . . . . . . . . . . . . . . . . . . . . . . . . . . . . . . . . . . . . 2-52-52-52-5
Adjusting the Exposure and Image Quality Before Scanning the Adjusting the Exposure and Image Quality Before Scanning the Adjusting the Exposure and Image Quality Before Scanning the Adjusting the Exposure and Image Quality Before Scanning the OriginalsOriginalsOriginalsOriginals . . . . . . . . . . . . . . . . . . . . . . . . . . . . . . . . . . . . . . . . . . . . . . . . . . . . . . . . . . . . . . . . . . . . . . . . . . . . . . . . . . . . . . . . . . . . . . . . . . . . . . . . . . . . . . . . . . . . . . . . . . . . . . . . . . . . . . . . . . . . . . . . . . . . . . . . . . . . . . . . . . . . . . . . . . . . . . . . . . . . . . . . . . . . . . . . . . . . 2-72-72-72-7
Manual Adjustment of the Scanning Exposure . . . . . . . . . . . . . . . . . . . . . . 2-7Selecting Image Quality . . . . . . . . . . . . . . . . . . . . . . . . . . . . . . . . . . . . . . . . 2-8Automatic Adjustment of Exposure and Image Quality . . . . . . . . . . . . . . . 2-10
Changing the Scanning Ratio (Copy Ratio)Changing the Scanning Ratio (Copy Ratio)Changing the Scanning Ratio (Copy Ratio)Changing the Scanning Ratio (Copy Ratio) . . . . . . . . . . . . . . . . . . . . . . . . . . . . . . . . . . . . . . . . . . . . . . . . . . . . . . . . . . . . . . . . . . . . . . . . . . . . . . . . . . . . . . . . . . . . 2-122-122-122-12Scanning Originals After Enlarging/Reducing Them to a Standard Record Size . . . . . . . . . . . . . . . . . . . . . . . . . . . . . . . . . . . . . . . . . . . . . . . . 2-12Specifying the Scanning Ratio by % . . . . . . . . . . . . . . . . . . . . . . . . . . . . . 2-13Automatically Setting the Ratio Based on the Selected Record Size (Auto) . . . . . . . . . . . . . . . . . . . . . . . . . . . . . . . . . . . . . . . . . . . . . . . . . . . . . 2-15Calculating the Scanning Ratio Based on the Original and Record Size (Zoom Program). . . . . . . . . . . . . . . . . . . . . . . . . . . . . . . . . . . . . . . . . . . . . 2-17
Scanning with the same XY scanning ratio (Zoom) . . . . . . . . . . . . . . . . 2-17Scanning with different XY scanning ratios (XY Zoom) . . . . . . . . . . . . . 2-19
Enlarging/Reducing Originals at Scanning Ratios Set Independently for X and Y Axes (XY Zoom) . . . . . . . . . . . . . . . . . . . . . . . . . . . . . . . . . . . . . . 2-21
Scanning Two-sided Originals (2-sided Original)Scanning Two-sided Originals (2-sided Original)Scanning Two-sided Originals (2-sided Original)Scanning Two-sided Originals (2-sided Original). . . . . . . . . . . . . . . . . . . . . . . . . . . . . . . . . . . . . . . . . . . . . . . . . . . . . . . . . . . . . . . . . . . . . . . . . . . . 2-242-242-242-24
Scanning Facing Pages in a Book onto Two Separate Sheets in One Scanning Facing Pages in a Book onto Two Separate Sheets in One Scanning Facing Pages in a Book onto Two Separate Sheets in One Scanning Facing Pages in a Book onto Two Separate Sheets in One Step (Two-page Separation)Step (Two-page Separation)Step (Two-page Separation)Step (Two-page Separation) . . . . . . . . . . . . . . . . . . . . . . . . . . . . . . . . . . . . . . . . . . . . . . . . . . . . . . . . . . . . . . . . . . . . . . . . . . . . . . . . . . . . . . . . . . . . . . . . . . . . . . . . . . . . . . . . . . . . . . . . . . . . . . . . . . . . . . . . 2-262-262-262-26
Scanning Originals for Use as a Booklet (Booklet Scanning)Scanning Originals for Use as a Booklet (Booklet Scanning)Scanning Originals for Use as a Booklet (Booklet Scanning)Scanning Originals for Use as a Booklet (Booklet Scanning) . . . . . . . . . . . . . . . . . . . . . . . . . . . . . . . . . . . . 2-282-282-282-28
Table of Contentsiiiiiiii
Erasing Shadows and Frame Lines (Frame Erase)Erasing Shadows and Frame Lines (Frame Erase)Erasing Shadows and Frame Lines (Frame Erase)Erasing Shadows and Frame Lines (Frame Erase) . . . . . . . . . . . . . . . . . . . . . . . . . . . . . . . . . . . . . . . . . . . . . . . . . . . . . . . . . . . . . . . . . . . . 2-302-302-302-30Erasing Frame Lines and Storing the Original (Original Frame Erase) . . . 2-31Erasing the Book Frame and Storing the Original (Book Frame Erase). . . 2-33Erasing the Binding Holes and Storing the Original (Binding Erase) . . . . . 2-36
Reducing Two, Four, or Eight Originals to Fit on a Single Print Sheet Reducing Two, Four, or Eight Originals to Fit on a Single Print Sheet Reducing Two, Four, or Eight Originals to Fit on a Single Print Sheet Reducing Two, Four, or Eight Originals to Fit on a Single Print Sheet and Storing It (Image Combination)and Storing It (Image Combination)and Storing It (Image Combination)and Storing It (Image Combination) . . . . . . . . . . . . . . . . . . . . . . . . . . . . . . . . . . . . . . . . . . . . . . . . . . . . . . . . . . . . . . . . . . . . . . . . . . . . . . . . . . . . . . . . . . . . . . . . . . . . . . . . . . . . . . . . 2-392-392-392-39
Scanning Different-size Originals Together (Different Size Originals)Scanning Different-size Originals Together (Different Size Originals)Scanning Different-size Originals Together (Different Size Originals)Scanning Different-size Originals Together (Different Size Originals) . . . . . . . . . . . . 2-422-422-422-42
Scanning Separately-set Originals as One Document (Job Build)Scanning Separately-set Originals as One Document (Job Build)Scanning Separately-set Originals as One Document (Job Build)Scanning Separately-set Originals as One Document (Job Build) . . . . . . . . . . . . . . . . . . . . . . . . 2-442-442-442-44
Inverting Original Images (Nega/Posi)Inverting Original Images (Nega/Posi)Inverting Original Images (Nega/Posi)Inverting Original Images (Nega/Posi) . . . . . . . . . . . . . . . . . . . . . . . . . . . . . . . . . . . . . . . . . . . . . . . . . . . . . . . . . . . . . . . . . . . . . . . . . . . . . . . . . . . . . . . . . . . . . . . . . . . . . . . . 2-472-472-472-47
Scanning Originals After Making Them Sharply Contrasted (Sharpness)Scanning Originals After Making Them Sharply Contrasted (Sharpness)Scanning Originals After Making Them Sharply Contrasted (Sharpness)Scanning Originals After Making Them Sharply Contrasted (Sharpness) 2-482-482-482-48
Storing/Recalling Scanning Modes (Mode Memory)Storing/Recalling Scanning Modes (Mode Memory)Storing/Recalling Scanning Modes (Mode Memory)Storing/Recalling Scanning Modes (Mode Memory) . . . . . . . . . . . . . . . . . . . . . . . . . . . . . . . . . . . . . . . . . . . . . . . . . . . . . . . . . . . . . . . . 2-502-502-502-50Storing Scanning Modes . . . . . . . . . . . . . . . . . . . . . . . . . . . . . . . . . . . . . . 2-50Storing a Memory Key Name . . . . . . . . . . . . . . . . . . . . . . . . . . . . . . . . . . . 2-53Recalling Scanning Settings . . . . . . . . . . . . . . . . . . . . . . . . . . . . . . . . . . . 2-55Erasing a Scanning Setting . . . . . . . . . . . . . . . . . . . . . . . . . . . . . . . . . . . . 2-56
Chapter 3Chapter 3Chapter 3Chapter 3 Using/Arranging Documents Stored in the Mail BoxUsing/Arranging Documents Stored in the Mail BoxUsing/Arranging Documents Stored in the Mail BoxUsing/Arranging Documents Stored in the Mail Box
Printing a Document in a Mail Box After Changing the SettingsPrinting a Document in a Mail Box After Changing the SettingsPrinting a Document in a Mail Box After Changing the SettingsPrinting a Document in a Mail Box After Changing the Settings . . . . . . . . . . . . . . . . . . . . . . . . . . . . . . . . 3-23-23-23-2Selecting the Print Paper Size (Paper Select) . . . . . . . . . . . . . . . . . . . . . . . 3-2Collating Prints (Finisher). . . . . . . . . . . . . . . . . . . . . . . . . . . . . . . . . . . . . . . 3-5
Collating Prints (Collate) . . . . . . . . . . . . . . . . . . . . . . . . . . . . . . . . . . . . . . 3-9Grouping Prints (Group) . . . . . . . . . . . . . . . . . . . . . . . . . . . . . . . . . . . . . 3-11Stapling Prints (Staple) . . . . . . . . . . . . . . . . . . . . . . . . . . . . . . . . . . . . . . 3-13
Printing on Two Sides (Two-sided Printing) . . . . . . . . . . . . . . . . . . . . . . . . 3-16Adding Job Separator Sheets, Front and Back Covers to Printed Sets (Cover/Job Separator) . . . . . . . . . . . . . . . . . . . . . . . . . . . . . . . . . . . . . . . . 3-18Making Prints for Use as a Booklet (Booklet). . . . . . . . . . . . . . . . . . . . . . . 3-22Storing/Recalling Printing Modes (Mode Memory) . . . . . . . . . . . . . . . . . . 3-25
Storing Printing Modes . . . . . . . . . . . . . . . . . . . . . . . . . . . . . . . . . . . . . . 3-25Storing a Memory Key Name . . . . . . . . . . . . . . . . . . . . . . . . . . . . . . . . . 3-28
Recalling a Printing Mode . . . . . . . . . . . . . . . . . . . . . . . . . . . . . . . . . . . . . 3-30Erasing a Print Setting . . . . . . . . . . . . . . . . . . . . . . . . . . . . . . . . . . . . . . . . 3-31Printing Multiple Documents as One Document (Merge Documents) . . . . 3-33
Checking the Print Result or the Image of the Stored Document Checking the Print Result or the Image of the Stored Document Checking the Print Result or the Image of the Stored Document Checking the Print Result or the Image of the Stored Document (Sample Print)(Sample Print)(Sample Print)(Sample Print) . . . . . . . . . . . . . . . . . . . . . . . . . . . . . . . . . . . . . . . . . . . . . . . . . . . . . . . . . . . . . . . . . . . . . . . . . . . . . . . . . . . . . . . . . . . . . . . . . . . . . . . . . . . . . . . . . . . . . . . . . . . . . . . . . . . . . . . . . . . . . . . . . . . . . . . . . . . . . . . . . . . . . . . . . . . . . . . . 3-363-363-363-36
Reserving JobsReserving JobsReserving JobsReserving Jobs . . . . . . . . . . . . . . . . . . . . . . . . . . . . . . . . . . . . . . . . . . . . . . . . . . . . . . . . . . . . . . . . . . . . . . . . . . . . . . . . . . . . . . . . . . . . . . . . . . . . . . . . . . . . . . . . . . . . . . . . . . . . . . . . . . . . . . . . . . . . . . . . . . . . . . . . . . . . . . . . . . . . . . . . . . . . 3-383-383-383-38
Changing the Exposure During PrintingChanging the Exposure During PrintingChanging the Exposure During PrintingChanging the Exposure During Printing . . . . . . . . . . . . . . . . . . . . . . . . . . . . . . . . . . . . . . . . . . . . . . . . . . . . . . . . . . . . . . . . . . . . . . . . . . . . . . . . . . . . . . . . . . . . . . . . . . . . 3-403-403-403-40
Checking the Document’s Detailed InformationChecking the Document’s Detailed InformationChecking the Document’s Detailed InformationChecking the Document’s Detailed Information . . . . . . . . . . . . . . . . . . . . . . . . . . . . . . . . . . . . . . . . . . . . . . . . . . . . . . . . . . . . . . . . . . . . . . . . . . . . . . . . 3-413-413-413-41
Changing the Name of a DocumentChanging the Name of a DocumentChanging the Name of a DocumentChanging the Name of a Document . . . . . . . . . . . . . . . . . . . . . . . . . . . . . . . . . . . . . . . . . . . . . . . . . . . . . . . . . . . . . . . . . . . . . . . . . . . . . . . . . . . . . . . . . . . . . . . . . . . . . . . . . . . . . . . . 3-423-423-423-42
Table of Contents iiiiiiiiiiii
Moving a DocumentMoving a DocumentMoving a DocumentMoving a Document . . . . . . . . . . . . . . . . . . . . . . . . . . . . . . . . . . . . . . . . . . . . . . . . . . . . . . . . . . . . . . . . . . . . . . . . . . . . . . . . . . . . . . . . . . . . . . . . . . . . . . . . . . . . . . . . . . . . . . . . . . . . . . . . . . . . . . . . . . . . . . . . . . . . . . . . . . . . . . . . 3-443-443-443-44
Erasing a Document from a Mail BoxErasing a Document from a Mail BoxErasing a Document from a Mail BoxErasing a Document from a Mail Box . . . . . . . . . . . . . . . . . . . . . . . . . . . . . . . . . . . . . . . . . . . . . . . . . . . . . . . . . . . . . . . . . . . . . . . . . . . . . . . . . . . . . . . . . . . . . . . . . . . . . . . . . . . . 3-463-463-463-46
Chapter 4Chapter 4Chapter 4Chapter 4 Setting/Storing the Mail Box Settings Setting/Storing the Mail Box Settings Setting/Storing the Mail Box Settings Setting/Storing the Mail Box Settings
Mail Box Settings TableMail Box Settings TableMail Box Settings TableMail Box Settings Table . . . . . . . . . . . . . . . . . . . . . . . . . . . . . . . . . . . . . . . . . . . . . . . . . . . . . . . . . . . . . . . . . . . . . . . . . . . . . . . . . . . . . . . . . . . . . . . . . . . . . . . . . . . . . . . . . . . . . . . . . . . . . . . . . . . . . . . . . . . . . . . . . . . . . . . . 4-24-24-24-2
Setting/Storing the Mail BoxSetting/Storing the Mail BoxSetting/Storing the Mail BoxSetting/Storing the Mail Box . . . . . . . . . . . . . . . . . . . . . . . . . . . . . . . . . . . . . . . . . . . . . . . . . . . . . . . . . . . . . . . . . . . . . . . . . . . . . . . . . . . . . . . . . . . . . . . . . . . . . . . . . . . . . . . . . . . . . . . . . . . . . . . . . . . . . . . . . . . . 4-34-34-34-3
Initialising a Mail BoxInitialising a Mail BoxInitialising a Mail BoxInitialising a Mail Box . . . . . . . . . . . . . . . . . . . . . . . . . . . . . . . . . . . . . . . . . . . . . . . . . . . . . . . . . . . . . . . . . . . . . . . . . . . . . . . . . . . . . . . . . . . . . . . . . . . . . . . . . . . . . . . . . . . . . . . . . . . . . . . . . . . . . . . . . . . . . . . . . . . . . . . . . . . . . . . . 4-64-64-64-6
Setting the Photo Mode of the Mail Box FunctionSetting the Photo Mode of the Mail Box FunctionSetting the Photo Mode of the Mail Box FunctionSetting the Photo Mode of the Mail Box Function . . . . . . . . . . . . . . . . . . . . . . . . . . . . . . . . . . . . . . . . . . . . . . . . . . . . . . . . . . . . . . . . . . . . . . . . . . . . 4-94-94-94-9
Setting the Standard Mode for ScanningSetting the Standard Mode for ScanningSetting the Standard Mode for ScanningSetting the Standard Mode for Scanning. . . . . . . . . . . . . . . . . . . . . . . . . . . . . . . . . . . . . . . . . . . . . . . . . . . . . . . . . . . . . . . . . . . . . . . . . . . . . . . . . . . . . . . . . . . . . . . . . . . . 4-104-104-104-10Storing New Standard Settings for Scanning. . . . . . . . . . . . . . . . . . . . . . . 4-10Initialising the Standard Mode for Scanning. . . . . . . . . . . . . . . . . . . . . . . . 4-12
Chapter 5Chapter 5Chapter 5Chapter 5 AppendixAppendixAppendixAppendix
Chart of Available Combination of FunctionsChart of Available Combination of FunctionsChart of Available Combination of FunctionsChart of Available Combination of Functions . . . . . . . . . . . . . . . . . . . . . . . . . . . . . . . . . . . . . . . . . . . . . . . . . . . . . . . . . . . . . . . . . . . . . . . . . . . . . . . . . . . . . . . . 5-25-25-25-2
IndexIndexIndexIndex . . . . . . . . . . . . . . . . . . . . . . . . . . . . . . . . . . . . . . . . . . . . . . . . . . . . . . . . . . . . . . . . . . . . . . . . . . . . . . . . . . . . . . . . . . . . . . . . . . . . . . . . . . . . . . . . . . . . . . . . . . . . . . . . . . . . . . . . . . . . . . . . . . . . . . . . . . . . . . . . . . . . . . . . . . . . . . . . . . . . . . . . . . . . . . . . . . . . . . . . . . . . . . . . 5-45-45-45-4
Table of Contentsiviviviv
How to Use This ManualHow to Use This ManualHow to Use This ManualHow to Use This Manual
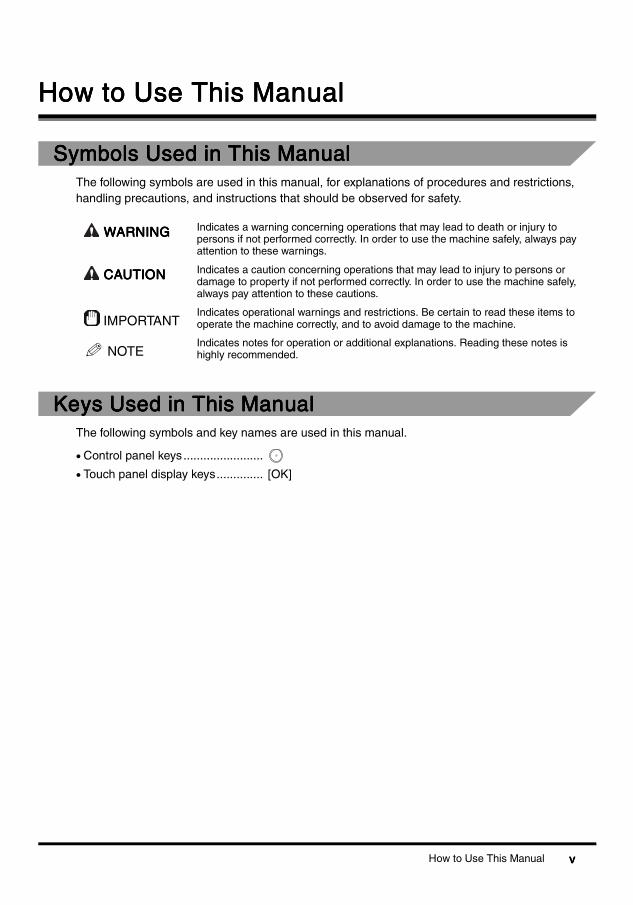
Symbols Used in This ManualSymbols Used in This ManualSymbols Used in This ManualSymbols Used in This ManualThe following symbols are used in this manual, for explanations of procedures and restrictions, handling precautions, and instructions that should be observed for safety.
Keys Used in This ManualKeys Used in This ManualKeys Used in This ManualKeys Used in This ManualThe following symbols and key names are used in this manual.
• Control panel keys........................
• Touch panel display keys.............. [OK]
WARNING WARNING WARNING WARNING Indicates a warning concerning operations that may lead to death or injury to persons if not performed correctly. In order to use the machine safely, always pay attention to these warnings.
CAUTION CAUTION CAUTION CAUTION Indicates a caution concerning operations that may lead to injury to persons or damage to property if not performed correctly. In order to use the machine safely, always pay attention to these cautions.
IMPORTANTIndicates operational warnings and restrictions. Be certain to read these items to operate the machine correctly, and to avoid damage to the machine.
NOTEIndicates notes for operation or additional explanations. Reading these notes is highly recommended.
How to Use This Manual vvvv

Displays Used in This ManualDisplays Used in This ManualDisplays Used in This ManualDisplays Used in This ManualScreenshots of the touch panel display used in this manual are those taken when the Finisher-J1, Cassette Feeding Unit-W1, Feeder (DADF-H1), Printer Kit, and Fax Board are attached to the iR3300. Note that functions that cannot be used depending on the model or options, are not displayed on the touch panel display.
The keys which you should press are marked with , as shown below. When multiple keys can be pressed on the touch panel display, all keys are marked. Select the keys which suit your needs.
Illustrations Used in This ManualIllustrations Used in This ManualIllustrations Used in This ManualIllustrations Used in This ManualUnless otherwise noted, illustrations used in this manual are those taken when the Finisher-J1 and Cassette Feeding Unit-W1 are attached to the iR3300.
Press this key for operationPress this key for operationPress this key for operationPress this key for operation
1111 Place the original, and press [Special Features]Place the original, and press [Special Features]Place the original, and press [Special Features]Place the original, and press [Special Features]
How to Use This Manualvivivivi

CHAPTERCHAPTERCHAPTERCHAPTER
1111
Basic Use of the Mail BoxBasic Use of the Mail BoxBasic Use of the Mail BoxBasic Use of the Mail BoxFunctionFunctionFunctionFunctionThis chapter describes the basic use of the Mail Box functions.
What the iR3300/iR2800/iR2200 Series Machine Can DoWhat the iR3300/iR2800/iR2200 Series Machine Can DoWhat the iR3300/iR2800/iR2200 Series Machine Can DoWhat the iR3300/iR2800/iR2200 Series Machine Can Do. . . . . . . . . . . . . . . . . . . . . . . . . .. . . . . . . . . . . . . . . . . . . . . . . . . .. . . . . . . . . . . . . . . . . . . . . . . . . .. . . . . . . . . . . . . . . . . . . . . . . . . . 1-21-21-21-2Storing Data and Printing It at Your Convenience. . . . . . . . . . . . . . . . . . . . . . . . . . . . . . . . . . . . . . . . . . . . 1-2
Flow of Mail Box OperationsFlow of Mail Box OperationsFlow of Mail Box OperationsFlow of Mail Box Operations . . . . . . . . . . . . . . . . . . . . . . . . . . . . . . . . . . . . . . . . . . . . . . . . . . . . . . . . . . . . . . . . . . . . . . . . . . . . . . . . . . . . . . . . . . . . . . . . . . . . . . . . . . . . . . . . . . . . . . . . . . . . . . . . . . . . . . . . . . . . . . . . . . . . . . . . . . . . . . . . . . . . . . . . . . . . . . . . . . . . . . . . . . . . 1-91-91-91-9Storing Originals in the Mail Box. . . . . . . . . . . . . . . . . . . . . . . . . . . . . . . . . . . . . . . . . . . . . . . . . . . . . . . . . 1-9Printing Documents Stored in the Mail Box . . . . . . . . . . . . . . . . . . . . . . . . . . . . . . . . . . . . . . . . . . . . . . . 1-13
1-11-11-11-1
Bas
ic U
se o
f the
Mai
l Box
Fun
ctio
n
1111
What the iR3300/iR2800/iR2200 Series What the iR3300/iR2800/iR2200 Series What the iR3300/iR2800/iR2200 Series What the iR3300/iR2800/iR2200 Series Machine Can DoMachine Can DoMachine Can DoMachine Can Do
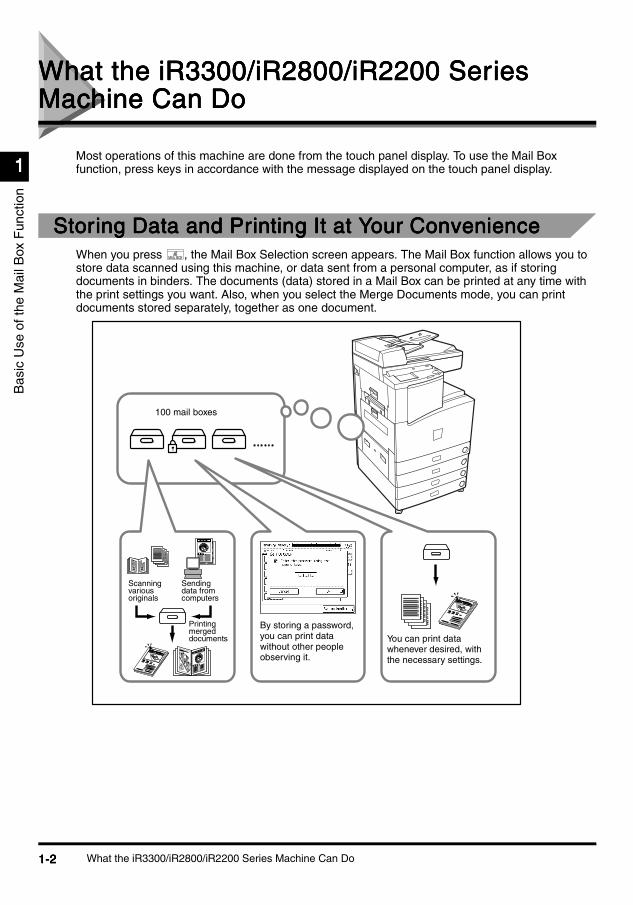
Most operations of this machine are done from the touch panel display. To use the Mail Box function, press keys in accordance with the message displayed on the touch panel display.
Storing Data and Printing It at Your ConvenienceStoring Data and Printing It at Your ConvenienceStoring Data and Printing It at Your ConvenienceStoring Data and Printing It at Your ConvenienceWhen you press , the Mail Box Selection screen appears. The Mail Box function allows you to store data scanned using this machine, or data sent from a personal computer, as if storing documents in binders. The documents (data) stored in a Mail Box can be printed at any time with the print settings you want. Also, when you select the Merge Documents mode, you can print documents stored separately, together as one document.
MAIL BOX
1
1
100 mail boxes
Scanning various originals
Sending data from computers
Printing merged documents
By storing a password, you can print data without other people observing it.
You can print data whenever desired, with the necessary settings.
What the iR3300/iR2800/iR2200 Series Machine Can Do1-21-21-21-2

1111
Bas
ic U
se o
f the
Mai
l Box
Fun
ctio
n
Start
COPY MAIL BOX SYSTEMFAX
Mail Box Selection screenMail Box Selection screenMail Box Selection screenMail Box Selection screen
Document Selection screenDocument Selection screenDocument Selection screenDocument Selection screen
Print screenPrint screenPrint screenPrint screen Print screenPrint screenPrint screenPrint screen
You can store a name for a mail box or a password in the Mail Box Settings of Additional Functions. (See ‘Setting/Storing the Mail Box Settings’ in Chapter 4.)
Scanned originals and documents sent from personal computers are stored.
Select a mail box
Select a document
Prints documents stored in a box. When you press [Change Print Settings] , you can change the Print settings. (See ‘Using/Arranging Documents Stored in the Mail Box’ in Chapter 3.)
You can select various settings when scanning originals. (See ‘Scanning Originals into a Mail Box’ in Chapter 2.)
What the iR3300/iR2800/iR2200 Series Machine Can Do 1-31-31-31-3
1111
Bas
ic U
se o
f the
Mai
l Box
Fun
ctio
n
IMPORTANT
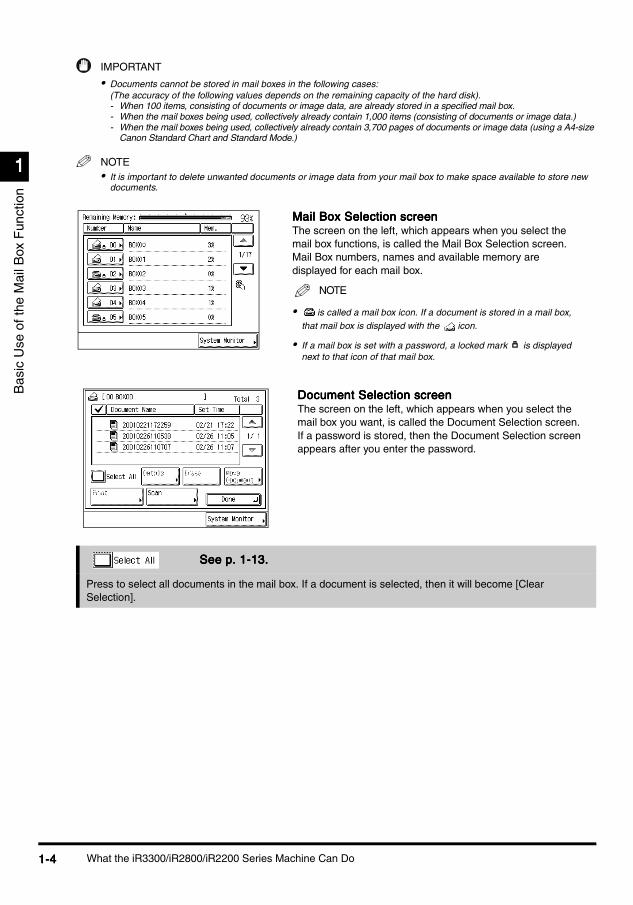
• Documents cannot be stored in mail boxes in the following cases:(The accuracy of the following values depends on the remaining capacity of the hard disk).- When 100 items, consisting of documents or image data, are already stored in a specified mail box.- When the mail boxes being used, collectively already contain 1,000 items (consisting of documents or image data.) - When the mail boxes being used, collectively already contain 3,700 pages of documents or image data (using a A4-size
Canon Standard Chart and Standard Mode.)
NOTE• It is important to delete unwanted documents or image data from your mail box to make space available to store new
documents.
Mail Box Selection screenMail Box Selection screenMail Box Selection screenMail Box Selection screenThe screen on the left, which appears when you select the mail box functions, is called the Mail Box Selection screen.Mail Box numbers, names and available memory are displayed for each mail box.
• is called a mail box icon. If a document is stored in a mail box, that mail box is displayed with the icon.
• If a mail box is set with a password, a locked mark is displayed next to that icon of that mail box.
Document Selection screenDocument Selection screenDocument Selection screenDocument Selection screenThe screen on the left, which appears when you select the mail box you want, is called the Document Selection screen.If a password is stored, then the Document Selection screen appears after you enter the password.
See p. 1-13.See p. 1-13.See p. 1-13.See p. 1-13.
Press to select all documents in the mail box. If a document is selected, then it will become [Clear Selection].
NOTE
What the iR3300/iR2800/iR2200 Series Machine Can Do1-41-41-41-4

1111
Bas
ic U
se o
f the
Mai
l Box
Fun
ctio
n
See p. 3-42.See p. 3-42.See p. 3-42.See p. 3-42.
Press to check the details of a document stored in the mail box.
See p. 3-46.See p. 3-46.See p. 3-46.See p. 3-46.
Press to erase a document stored in the mail box.
See p. 3-44.See p. 3-44.See p. 3-44.See p. 3-44.
Press to move a document to another mail box.
See p. 1-13.See p. 1-13.See p. 1-13.See p. 1-13.
Press to print documents.
See p. 1-9.See p. 1-9.See p. 1-9.See p. 1-9.
Press to scan originals.
Print screenPrint screenPrint screenPrint screenThe screen on the left, which appears when you select documents to print and press [Print] from the Document Selection screen, is called the Print screen.The Print screen allows you to print documents from the mail box.
See p. 1-13.See p. 1-13.See p. 1-13.See p. 1-13.
Press to change the settings when you print a document.
See p. 1-13.See p. 1-13.See p. 1-13.See p. 1-13.
Press to automatically erase a document after it is printed.
What the iR3300/iR2800/iR2200 Series Machine Can Do 1-51-51-51-5

1111
Bas
ic U
se o
f the
Mai
l Box
Fun
ctio
n
See p. 3-36.See p. 3-36.See p. 3-36.See p. 3-36.
Press to print an image sample for you to check the print result and the contents of a document stored in the mail box.
See p. 1-13.See p. 1-13.See p. 1-13.See p. 1-13.
Press to start printing.
Change Print Settings screenChange Print Settings screenChange Print Settings screenChange Print Settings screenThe screen on the left, which appears when you press [Change P Settings] from the Print screen is called the Change Print Settings screen.The Change Print Settings screen allows you to change the settings made when the documents are stored in the mail box, and print them.
See p. 3-2.See p. 3-2.See p. 3-2.See p. 3-2.
Press to select the paper and the paper source.
See p. 3-5.See p. 3-5.See p. 3-5.See p. 3-5.
Press to select or cancel the Collate, Group, or Staple modes.
See p. 3-16.See p. 3-16.See p. 3-16.See p. 3-16.
Press to select the Two-sided Print mode.
Press to display the screen on the right when you want to make a Booklet print and Cover/Job Separator print.Press the function keys on the screen on the right to set the desired mode.
See p. 3-33.See p. 3-33.See p. 3-33.See p. 3-33.
Press to merge multiple documents into one document.
What the iR3300/iR2800/iR2200 Series Machine Can Do1-61-61-61-6

1111
Bas
ic U
se o
f the
Mai
l Box
Fun
ctio
n
Scan screenScan screenScan screenScan screenThe screen on the left, which appears when you press [Scan] from the Document Selection screen, is called the Scan screen.The scan screen allows you to scan documents into the mail box.
See p. 2-12.See p. 2-12.See p. 2-12.See p. 2-12.
Press to make copies of the same size as the original.
See p. 2-12.See p. 2-12.See p. 2-12.See p. 2-12.
Press to make copies at a different copy ratio.
See p. 2-5.See p. 2-5.See p. 2-5.See p. 2-5.
Press to select the size of the original you want to scan.
See p. 2-24.See p. 2-24.See p. 2-24.See p. 2-24.
Press to select the Two-sided mode. The machine automatically turns over two-sided originals and scans them as two-sided image data.
See p. 2-7.See p. 2-7.See p. 2-7.See p. 2-7.
Press [Light] or [Dark] to manually control print exposure. Press [A] to select or cancel Auto Exposure Control.
See p. 2-3.See p. 2-3.See p. 2-3.See p. 2-3.
Press to name a document to be stored.
What the iR3300/iR2800/iR2200 Series Machine Can Do 1-71-71-71-7
1111
Bas
ic U
se o
f the
Mai
l Box
Fun
ctio
n
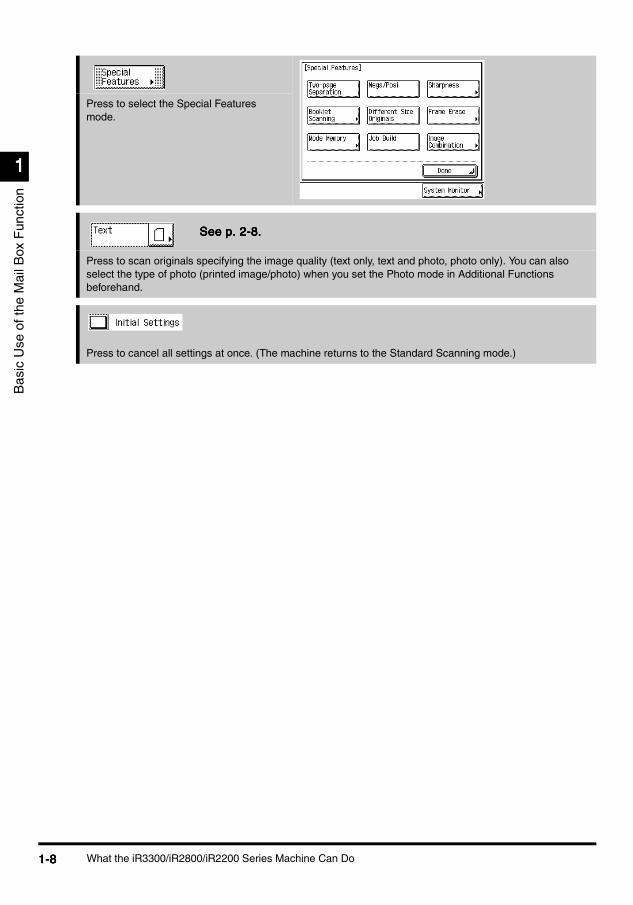
Press to select the Special Features mode.
See p. 2-8.See p. 2-8.See p. 2-8.See p. 2-8.
Press to scan originals specifying the image quality (text only, text and photo, photo only). You can also select the type of photo (printed image/photo) when you set the Photo mode in Additional Functions beforehand.
Press to cancel all settings at once. (The machine returns to the Standard Scanning mode.)
What the iR3300/iR2800/iR2200 Series Machine Can Do1-81-81-81-8
Flow of Mail Box OperationsFlow of Mail Box OperationsFlow of Mail Box OperationsFlow of Mail Box Operations
Bas
ic U
se o
f the
Mai
l Box
Fun
ctio
n
1111
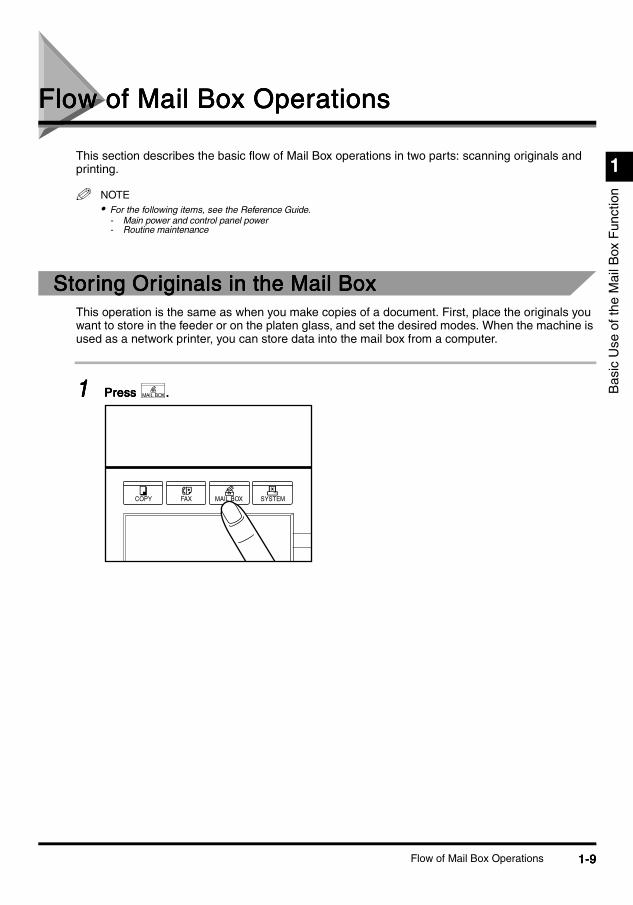
This section describes the basic flow of Mail Box operations in two parts: scanning originals and printing.NOTE• For the following items, see the Reference Guide.
- Main power and control panel power- Routine maintenance
Storing Originals in the Mail BoxStoring Originals in the Mail BoxStoring Originals in the Mail BoxStoring Originals in the Mail BoxThis operation is the same as when you make copies of a document. First, place the originals you want to store in the feeder or on the platen glass, and set the desired modes. When the machine is used as a network printer, you can store data into the mail box from a computer.
1111 PressPressPressPress ....MAIL BOX
COPY FAX MAIL BOX SYSTEM
Flow of Mail Box Operations 1-91-91-91-9

1111
Bas
ic U
se o
f the
Mai
l Box
Fun
ctio
n
2222 Select the desired mail box number.Select the desired mail box number.Select the desired mail box number.Select the desired mail box number.
If the desired mail box is not displayed, press [s] or [t].
If you enter the mail box number using - (numeric keys), press [OK] after entering the mail box number.
If you make a mistake when entering values, press [Cancel], and enter the correct value.
NOTE• If a document is stored in a mail box, that mail box is displayed with the icon.• If a mail box is set with a password, a locked mark is displayed next to the icon of that mail box.• If you make a mistake when selecting a mail box, press [Cancel].
3333 Enter the password, and press [OK]. Enter the password, and press [OK]. Enter the password, and press [OK]. Enter the password, and press [OK].
Enter the password set when the mail box was stored. (See ‘Setting/Storing the Mail Box’ on p. 4-3.)
If a password was not stored, this operation is not necessary.
0 9
Flow of Mail Box Operations1-101-101-101-10
1111
Bas
ic U
se o
f the
Mai
l Box
Fun
ctio
n
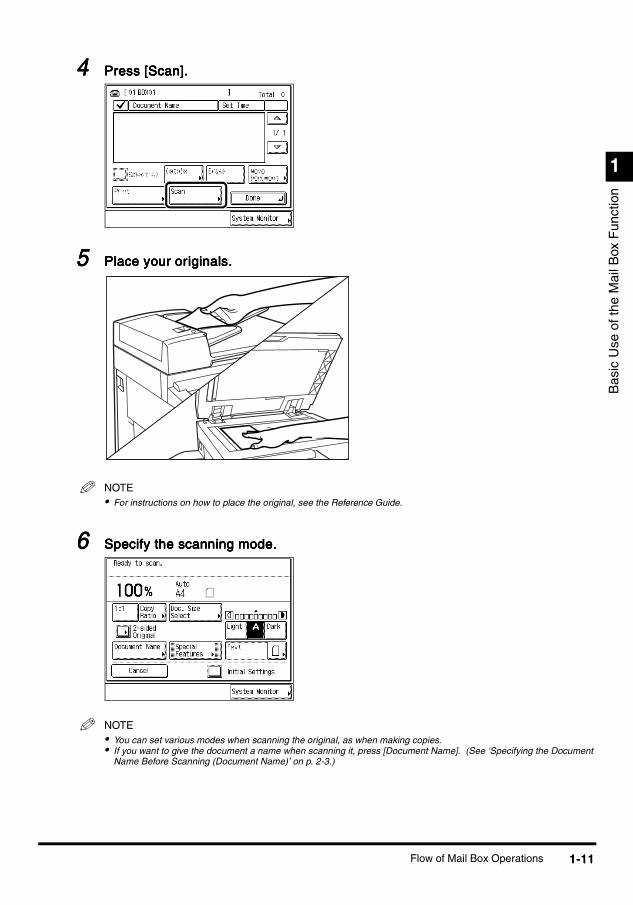
4444 Press [Scan]. Press [Scan]. Press [Scan]. Press [Scan].
5555 Place your originals.Place your originals.Place your originals.Place your originals.
NOTE• For instructions on how to place the original, see the Reference Guide.
6666 Specify the scanning mode.Specify the scanning mode.Specify the scanning mode.Specify the scanning mode.
NOTE• You can set various modes when scanning the original, as when making copies.• If you want to give the document a name when scanning it, press [Document Name]. (See ‘Specifying the Document
Name Before Scanning (Document Name)’ on p. 2-3.)
Flow of Mail Box Operations 1-111-111-111-11
1111
Bas
ic U
se o
f the
Mai
l Box
Fun
ctio
n
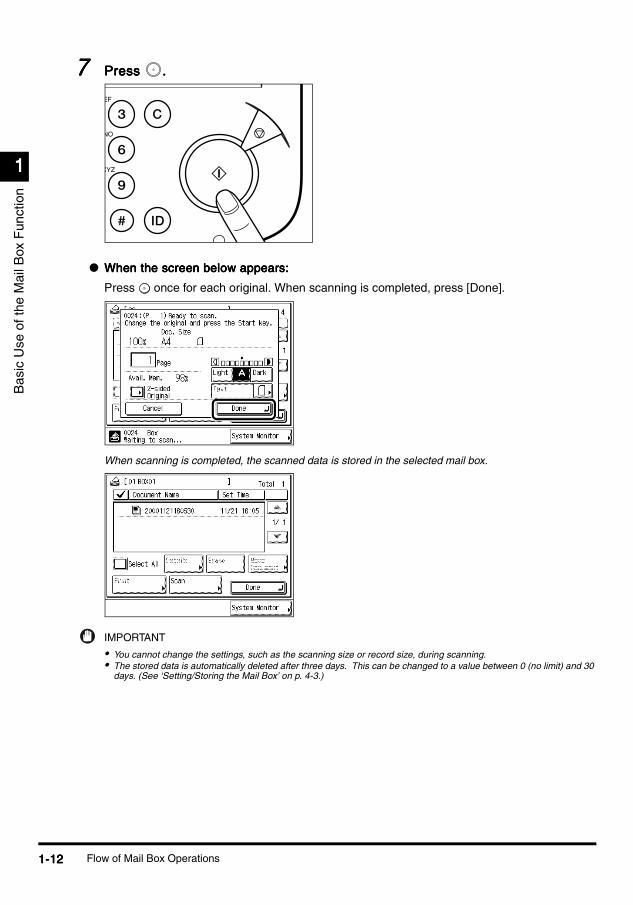
7777 PressPressPressPress ....
l When the screen below appears:When the screen below appears:When the screen below appears:When the screen below appears:
Press once for each original. When scanning is completed, press [Done].
When scanning is completed, the scanned data is stored in the selected mail box.
IMPORTANT
• You cannot change the settings, such as the scanning size or record size, during scanning.• The stored data is automatically deleted after three days. This can be changed to a value between 0 (no limit) and 30
days. (See ‘Setting/Storing the Mail Box’ on p. 4-3.)
Flow of Mail Box Operations1-121-121-121-12
1111
Bas
ic U
se o
f the
Mai
l Box
Fun
ctio
n
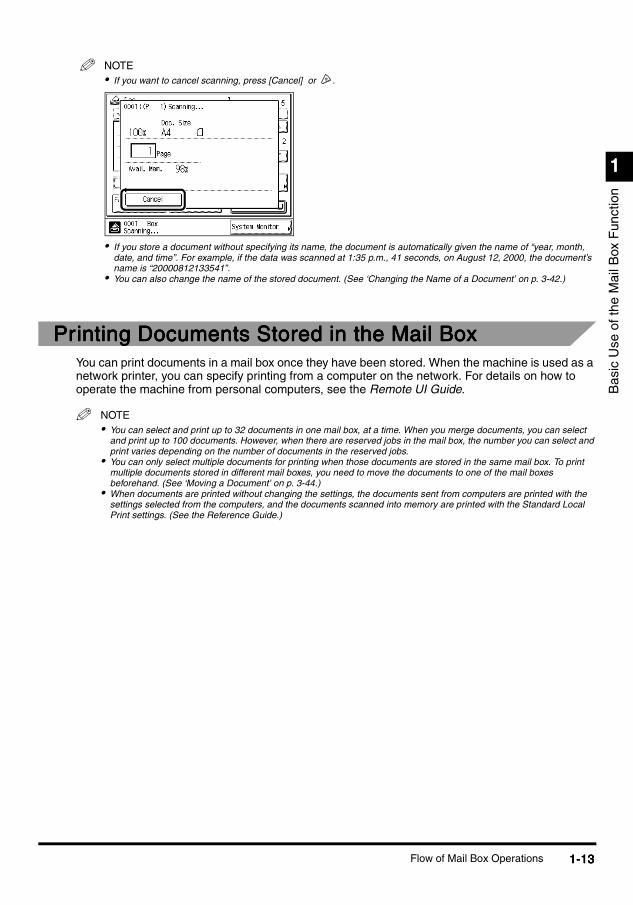
NOTE• If you want to cancel scanning, press [Cancel] or .
• If you store a document without specifying its name, the document is automatically given the name of “year, month, date, and time”. For example, if the data was scanned at 1:35 p.m., 41 seconds, on August 12, 2000, the document’s name is “20000812133541”.
• You can also change the name of the stored document. (See ‘Changing the Name of a Document’ on p. 3-42.)
Printing Documents Stored in the Mail BoxPrinting Documents Stored in the Mail BoxPrinting Documents Stored in the Mail BoxPrinting Documents Stored in the Mail BoxYou can print documents in a mail box once they have been stored. When the machine is used as a network printer, you can specify printing from a computer on the network. For details on how to operate the machine from personal computers, see the Remote UI Guide.
NOTE• You can select and print up to 32 documents in one mail box, at a time. When you merge documents, you can select
and print up to 100 documents. However, when there are reserved jobs in the mail box, the number you can select and print varies depending on the number of documents in the reserved jobs.
• You can only select multiple documents for printing when those documents are stored in the same mail box. To print multiple documents stored in different mail boxes, you need to move the documents to one of the mail boxes beforehand. (See ‘Moving a Document’ on p. 3-44.)
• When documents are printed without changing the settings, the documents sent from computers are printed with the settings selected from the computers, and the documents scanned into memory are printed with the Standard Local Print settings. (See the Reference Guide.)
Flow of Mail Box Operations 1-131-131-131-13
1111
Bas
ic U
se o
f the
Mai
l Box
Fun
ctio
n
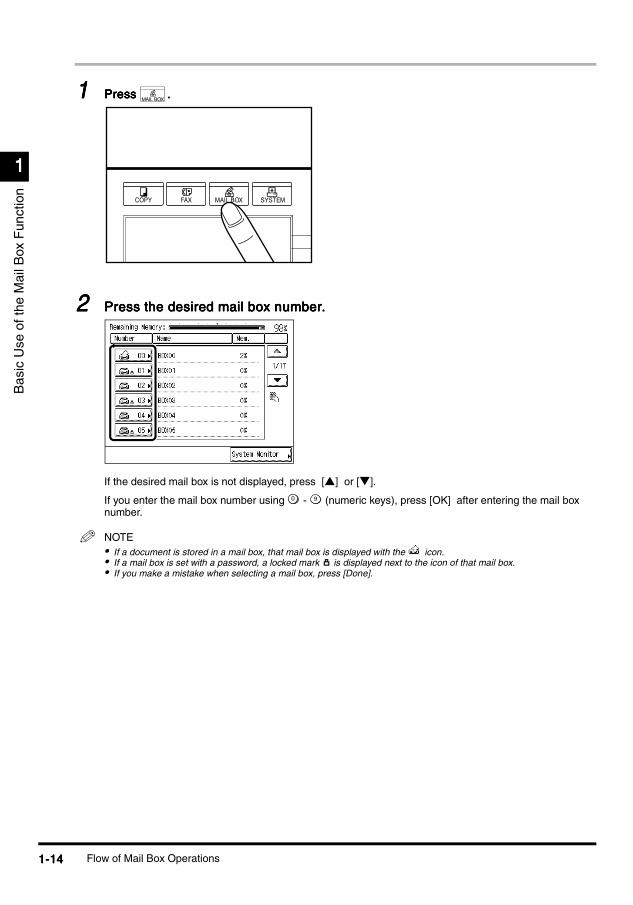
1111 PressPressPressPress ....
2222 Press the desired mail box number.Press the desired mail box number.Press the desired mail box number.Press the desired mail box number.
If the desired mail box is not displayed, press [s] or [t].
If you enter the mail box number using - (numeric keys), press [OK] after entering the mail box number.
NOTE• If a document is stored in a mail box, that mail box is displayed with the icon.• If a mail box is set with a password, a locked mark is displayed next to the icon of that mail box.• If you make a mistake when selecting a mail box, press [Done].
MAIL BOX
COPY FAX MAIL BOX SYSTEM
0 9
Flow of Mail Box Operations1-141-141-141-14

1111
Bas
ic U
se o
f the
Mai
l Box
Fun
ctio
n
3333 Enter the password, and press [OK]. Enter the password, and press [OK]. Enter the password, and press [OK]. Enter the password, and press [OK].
Enter the password set when the mail box was stored. (See ‘Setting/Storing the Mail Box’ on p. 4-3.)
If a password was not stored, this operation is not necessary.
4444 Select the document you want to print, and press [Print]. Select the document you want to print, and press [Print]. Select the document you want to print, and press [Print]. Select the document you want to print, and press [Print].
When there are more than five stored documents, press [s] or [t] to display the documents you want to select.
You can select multiple documents stored in the mail box.
If you press [Select All], you can select all documents in the mail box. ([Select All] changes to [Clear Selection] when it is pressed.)
NOTE• The selected documents are numbered in the order specified, and are printed in the order numbered.• You can cancel the selection by pressing the document again.• When you press [Clear Selection], you can cancel all selected documents. ([Clear Selection] changes to [Select All]
when it is pressed.)
Flow of Mail Box Operations 1-151-151-151-15

1111
Bas
ic U
se o
f the
Mai
l Box
Fun
ctio
n
5555 Press [Start Print]. Press [Start Print]. Press [Start Print]. Press [Start Print].
You can enter the printing quantity using - (numeric keys).
If you make a mistake when entering the values, press , and enter the correct value.
To print a copy to check your print results and stored documents, press [Sample Print]. (See ‘Checking the Print Result or the Image of the Stored Document (Sample Print)’ on p. 3-36.)
To change print settings, press [Change P Settings]. (See ‘Printing a Document in a Mail Box After Changing the Settings’ on p. 3-2.)
To delete data after it is printed, press [Print & Erase].
When you select multiple documents, you can change the number of print sets by pressing [Change The Copies].
When you select one documentWhen you select one documentWhen you select one documentWhen you select one document
When you select multiple documentsWhen you select multiple documentsWhen you select multiple documentsWhen you select multiple documents
0 9
C
Flow of Mail Box Operations1-161-161-161-16
1111
Bas
ic U
se o
f the
Mai
l Box
Fun
ctio
n
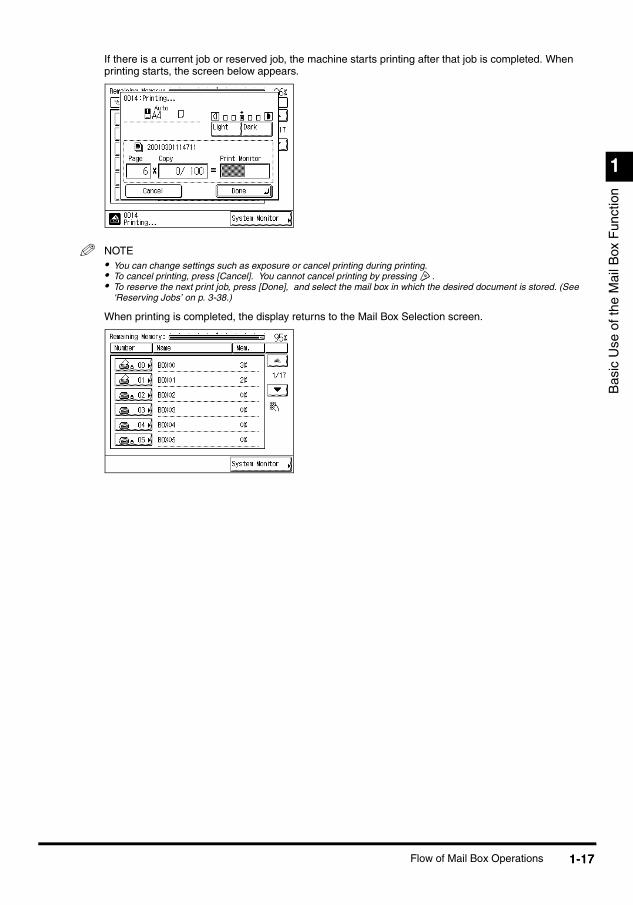
If there is a current job or reserved job, the machine starts printing after that job is completed. When printing starts, the screen below appears.
NOTE• You can change settings such as exposure or cancel printing during printing.• To cancel printing, press [Cancel]. You cannot cancel printing by pressing .• To reserve the next print job, press [Done], and select the mail box in which the desired document is stored. (See
‘Reserving Jobs’ on p. 3-38.)
When printing is completed, the display returns to the Mail Box Selection screen.
Flow of Mail Box Operations 1-171-171-171-17


CHAPTERCHAPTERCHAPTERCHAPTER
2222
Scanning Originals into Scanning Originals into Scanning Originals into Scanning Originals into a Mail Boxa Mail Boxa Mail Boxa Mail BoxThis chapter describes how to scan originals into a mail box.
Specifying the Document Name Before Scanning (Document Name)Specifying the Document Name Before Scanning (Document Name)Specifying the Document Name Before Scanning (Document Name)Specifying the Document Name Before Scanning (Document Name) . . . . . . . . . . . . . . . . . . . . . . . . . . . . . . . . . . . . . . . . . . . . . . . . . . . . . . . . . . . . . . . . . . . . 2-32-32-32-3
Specifying Document Size (Document Size Select)Specifying Document Size (Document Size Select)Specifying Document Size (Document Size Select)Specifying Document Size (Document Size Select) . . . . . . . . . . . . . . . . . . . . . . . . . . . . . . . . . . . . . . . . . . . . . . . . . . . . . . . . . . . . . . . . . . . . . . . . . . . . . . . . . . . . . . . . . . . . . . . . . . . . . . . . . . . . . . . . . . . . . . . . 2-52-52-52-5
Adjusting the Exposure and Image Quality Before Scanning the OriginalsAdjusting the Exposure and Image Quality Before Scanning the OriginalsAdjusting the Exposure and Image Quality Before Scanning the OriginalsAdjusting the Exposure and Image Quality Before Scanning the Originals . . . . . . . . . . . . . . . . . . . . . . . . . . . . . . . . . . . . . . . . . . . . . . . . . . . . 2-72-72-72-7Manual Adjustment of the Scanning Exposure. . . . . . . . . . . . . . . . . . . . . . . . . . . . . . . . . . . . . . . . . . . . . . 2-7Selecting Image Quality . . . . . . . . . . . . . . . . . . . . . . . . . . . . . . . . . . . . . . . . . . . . . . . . . . . . . . . . . . . . . . . 2-8Automatic Adjustment of Exposure and Image Quality. . . . . . . . . . . . . . . . . . . . . . . . . . . . . . . . . . . . . . . 2-10
Changing the Scanning Ratio (Copy Ratio)Changing the Scanning Ratio (Copy Ratio)Changing the Scanning Ratio (Copy Ratio)Changing the Scanning Ratio (Copy Ratio) . . . . . . . . . . . . . . . . . . . . . . . . . . . . . . . . . . . . . . . . . . . . . . . . . . . . . . . . . . . . . . . . . . . . . . . . . . . . . . . . . . . . . . . . . . . . . . . . . . . . . . . . . . . . . . . . . . . . . . . . . . . . . . . . . . . . . . . . . . . . 2-122-122-122-12Scanning Originals After Enlarging/Reducing Them to a Standard Record Size . . . . . . . . . . . . . . . . . . . 2-12Specifying the Scanning Ratio by %. . . . . . . . . . . . . . . . . . . . . . . . . . . . . . . . . . . . . . . . . . . . . . . . . . . . . 2-13Automatically Setting the Ratio Based on the Selected Record Size (Auto). . . . . . . . . . . . . . . . . . . . . . . 2-15Calculating the Scanning Ratio Based on the Original and Record Size (Zoom Program) . . . . . . . . . . . 2-17Enlarging/Reducing Originals at Scanning Ratios Set Independently for X and Y Axes (XY Zoom) . . . . 2-21
Scanning Two-sided Originals (2-sided Original)Scanning Two-sided Originals (2-sided Original)Scanning Two-sided Originals (2-sided Original)Scanning Two-sided Originals (2-sided Original) . . . . . . . . . . . . . . . . . . . . . . . . . . . . . . . . . . . . . . . . . . . . . . . . . . . . . . . . . . . . . . . . . . . . . . . . . . . . . . . . . . . . . . . . . . . . . . . . . . . . . . . . . . . . . . . . . . . . . . . . . . . . 2-242-242-242-24
Scanning Facing Pages in a Book onto Two Separate Sheets in One Step Scanning Facing Pages in a Book onto Two Separate Sheets in One Step Scanning Facing Pages in a Book onto Two Separate Sheets in One Step Scanning Facing Pages in a Book onto Two Separate Sheets in One Step (Two-page Separation)(Two-page Separation)(Two-page Separation)(Two-page Separation) . . . . . . . . . . . . . . . . . . . . . . . . . . . . . . . . . . . . . . . . . . . . . . . . . . .. . . . . . . . . . . . . . . . . . . . . . . . . . . . . . . . . . . . . . . . . . . . . . . . . . .. . . . . . . . . . . . . . . . . . . . . . . . . . . . . . . . . . . . . . . . . . . . . . . . . . .. . . . . . . . . . . . . . . . . . . . . . . . . . . . . . . . . . . . . . . . . . . . . . . . . . . 2-262-262-262-26
Scanning Originals for Use as a Booklet (Booklet Scanning)Scanning Originals for Use as a Booklet (Booklet Scanning)Scanning Originals for Use as a Booklet (Booklet Scanning)Scanning Originals for Use as a Booklet (Booklet Scanning) . . . . . . . . . . . . . . . . . . . . . . . . . . . . . . . . . . . . . . . . . . . . . . . . . . . . . . . . . . . . . . . . . . . . . . . . . . . . . . . . . . . . . . . . 2-282-282-282-28
Erasing Shadows and Frame Lines (Frame Erase)Erasing Shadows and Frame Lines (Frame Erase)Erasing Shadows and Frame Lines (Frame Erase)Erasing Shadows and Frame Lines (Frame Erase) . . . . . . . . . . . . . . . . . . . . . . . . . . . . . .. . . . . . . . . . . . . . . . . . . . . . . . . . . . . .. . . . . . . . . . . . . . . . . . . . . . . . . . . . . .. . . . . . . . . . . . . . . . . . . . . . . . . . . . . . 2-302-302-302-30Erasing Frame Lines and Storing the Original (Original Frame Erase). . . . . . . . . . . . . . . . . . . . . . . . . . . 2-31Erasing the Book Frame and Storing the Original (Book Frame Erase) . . . . . . . . . . . . . . . . . . . . . . . . . . 2-33Erasing the Binding Holes and Storing the Original (Binding Erase) . . . . . . . . . . . . . . . . . . . . . . . . . . . . 2-36
Reducing Two, Four, or Eight Originals to Fit on a Single Print Sheet and Storing It Reducing Two, Four, or Eight Originals to Fit on a Single Print Sheet and Storing It Reducing Two, Four, or Eight Originals to Fit on a Single Print Sheet and Storing It Reducing Two, Four, or Eight Originals to Fit on a Single Print Sheet and Storing It (Image Combination)(Image Combination)(Image Combination)(Image Combination) . . . . . . . . . . . . . . . . . . . . . . . . . . . . . . . . . . . . . . . . . . . . . . . . . . . . . . . . . . . . . . . . . . . . . . . . . . . . . . . . . . . . . . . . . . . . . . . . . . . . . . . . . . . . . . . . . . . . . . . . . . . . . . . . . . . . . . . . . . . . . . . . . . . . . . . . . . . . . . . . . . . . . . . . . . . . . . . . . . . . . . . . . . . . . . . . . . . . . . . . . . . . . . . . 2-392-392-392-39
Scanning Different-size Originals Together (Different Size Originals)Scanning Different-size Originals Together (Different Size Originals)Scanning Different-size Originals Together (Different Size Originals)Scanning Different-size Originals Together (Different Size Originals) . . . . . . . . . . . . . . . .. . . . . . . . . . . . . . . .. . . . . . . . . . . . . . . .. . . . . . . . . . . . . . . . 2-422-422-422-42
Scanning Separately-set Originals as One Document (Job Build)Scanning Separately-set Originals as One Document (Job Build)Scanning Separately-set Originals as One Document (Job Build)Scanning Separately-set Originals as One Document (Job Build) . . . . . . . . . . . . . . . . . . .. . . . . . . . . . . . . . . . . . .. . . . . . . . . . . . . . . . . . .. . . . . . . . . . . . . . . . . . . 2-442-442-442-44
Inverting Original Images (Nega/Posi)Inverting Original Images (Nega/Posi)Inverting Original Images (Nega/Posi)Inverting Original Images (Nega/Posi) . . . . . . . . . . . . . . . . . . . . . . . . . . . . . . . . . . . . . . . . . . . . . . . . . . . . . . . . . . . . . . . . . . . . . . . . . . . . . . . . . . . . . . . . . . . . . . . . . . . . . . . . . . . . . . . . . . . . . . . . . . . . . . . . . . . . . . . . . . . . . . . . . . . . . . . . . . . . 2-472-472-472-47
Scanning Originals After Making Them Sharply Contrasted (Sharpness)Scanning Originals After Making Them Sharply Contrasted (Sharpness)Scanning Originals After Making Them Sharply Contrasted (Sharpness)Scanning Originals After Making Them Sharply Contrasted (Sharpness) . . . . . . . . . . . . . . . . . . . . . . . . . . . . . . . . . . . . . . . . . . . . . . . . . . . . 2-482-482-482-48
Storing/Recalling Scanning Modes (Mode Memory)Storing/Recalling Scanning Modes (Mode Memory)Storing/Recalling Scanning Modes (Mode Memory)Storing/Recalling Scanning Modes (Mode Memory) . . . . . . . . . . . . . . . . . . . . . . . . . . . . .. . . . . . . . . . . . . . . . . . . . . . . . . . . . .. . . . . . . . . . . . . . . . . . . . . . . . . . . . .. . . . . . . . . . . . . . . . . . . . . . . . . . . . . 2-502-502-502-50Storing Scanning Modes. . . . . . . . . . . . . . . . . . . . . . . . . . . . . . . . . . . . . . . . . . . . . . . . . . . . . . . . . . . . . . 2-50Storing a Memory Key Name . . . . . . . . . . . . . . . . . . . . . . . . . . . . . . . . . . . . . . . . . . . . . . . . . . . . . . . . . . 2-53
2-12-12-12-1
2. Scanning Originals into a Mail Box2. Scanning Originals into a Mail Box2. Scanning Originals into a Mail Box2. Scanning Originals into a Mail BoxS
cann
ing
Ori
gina
ls in
to a
Mai
l Box
2222
Recalling Scanning Settings . . . . . . . . . . . . . . . . . . . . . . . . . . . . . . . . . . . . . . . . . . . . . . . . . . . . . . . . . . . 2-55Erasing a Scanning Setting. . . . . . . . . . . . . . . . . . . . . . . . . . . . . . . . . . . . . . . . . . . . . . . . . . . . . . . . . . . . 2-56
2-22-22-22-2

Specifying the Document Name Before Specifying the Document Name Before Specifying the Document Name Before Specifying the Document Name Before Scanning Scanning Scanning Scanning (Document Name)(Document Name)(Document Name)(Document Name)
Sca
nnin
g O
rigi
nals
into
a M
ail B
ox
2222
With this function, you can give a name to the document before you scan it.
1111 Select the desired mail box number to display the Document Selection screen, and Select the desired mail box number to display the Document Selection screen, and Select the desired mail box number to display the Document Selection screen, and Select the desired mail box number to display the Document Selection screen, and press [Scan]. press [Scan]. press [Scan]. press [Scan].
When you select a mail box set with a password, enter the password after selecting the mail box, and press [OK].
The Scan screen is displayed.
2222 Place the original, and press [Document Name]. Place the original, and press [Document Name]. Place the original, and press [Document Name]. Place the original, and press [Document Name].
Specifying the Document Name Before Scanning (Document Name) 2-32-32-32-3

2222
Sca
nnin
g O
rigi
nals
into
a M
ail B
ox
3333 Enter a name for the document, and press [OK]. Enter a name for the document, and press [OK]. Enter a name for the document, and press [OK]. Enter a name for the document, and press [OK].
The display returns to the Scan screen.
NOTE• For details of how to enter characters on the touch panel display, see the Reference Guide.• The maximum number of characters you can use for a name is 24.• If [OK] is pressed without entering any characters, the document is automatically stored with the name of “year,
month, date, and time”. For example, if the data was scanned at 1:35 p.m., 41 seconds, on August 12, 2000, the document’s name is “20000812133541”.
4444 PressPressPressPress ....
The machine starts scanning. (See ‘Storing Originals in the Mail Box’ on p. 1-9.)
NOTE• To cancel all settings at once, press [Initial Settings]. (The machine returns to the standard scanning mode.)• To return the display to the Mail Box Selection screen, press .
Specifying the Document Name Before Scanning (Document Name)2-42-42-42-4

Specifying Document Size Specifying Document Size Specifying Document Size Specifying Document Size (Document Size Select)(Document Size Select)(Document Size Select)(Document Size Select)
Sca
nnin
g O
rigi
nals
into
a M
ail B
ox
2222
With this function, you can specify the document size before you scan it. When scanning transparencies, you must use this function.
NOTE• The default setting is [Auto].
1111 Select the desired mail box number to display the Document Selection screen, and Select the desired mail box number to display the Document Selection screen, and Select the desired mail box number to display the Document Selection screen, and Select the desired mail box number to display the Document Selection screen, and press [Scan]. press [Scan]. press [Scan]. press [Scan].
When you select a mail box set with a password, enter the password after selecting the mail box, and press [OK].
The Scan screen is displayed.
2222 Place the original, and press [Doc. Size Select]. Place the original, and press [Doc. Size Select]. Place the original, and press [Doc. Size Select]. Place the original, and press [Doc. Size Select].
Specifying Document Size (Document Size Select) 2-52-52-52-5

2222
Sca
nnin
g O
rigi
nals
into
a M
ail B
ox
3333 Select the document size, and press [Done]. Select the document size, and press [Done]. Select the document size, and press [Done]. Select the document size, and press [Done].
The specified size is set and the display returns to the Scan screen.
IMPORTANT
• When the machine is operating in the Auto (Automatic Document Size Selection) mode, you cannot use the Booklet Scanning, Original Frame Erase, Book Frame Erase, or Image Combination modes.
• You cannot select [Auto] when scanning the following types of originals. Specify the size of the document manually.- Non-standard size originals- Highly transparent originals, such as transparencies- Originals with an extremely dark background- Originals smaller than A5 in size
NOTE• To select on the inch paper size, press [Inch-size].
4444 PressPressPressPress ....
The machine starts scanning. (See ‘Storing Originals in the Mail Box’ on p. 1-9.)
NOTE• To cancel all settings at once, press [Initial Settings]. (The machine returns to the standard scanning mode.)• To return the display to selecting the Mail Box Selection screen, press .
Specifying Document Size (Document Size Select)2-62-62-62-6

Adjusting the Exposure and Image Quality Adjusting the Exposure and Image Quality Adjusting the Exposure and Image Quality Adjusting the Exposure and Image Quality Before Scanning the OriginalsBefore Scanning the OriginalsBefore Scanning the OriginalsBefore Scanning the Originals
Sca
nnin
g O
rigi
nals
into
a M
ail B
ox
2222
With this function, you can adjust the exposure and image quality of a document before you scan it.
Manual Adjustment of the Scanning ExposureManual Adjustment of the Scanning ExposureManual Adjustment of the Scanning ExposureManual Adjustment of the Scanning ExposureYou can manually adjust the scanning exposure to the level best suited to the original.
1111 Select the desired mail box number to display the Document Selection screen, and Select the desired mail box number to display the Document Selection screen, and Select the desired mail box number to display the Document Selection screen, and Select the desired mail box number to display the Document Selection screen, and press [Scan]. press [Scan]. press [Scan]. press [Scan].
When you select a mail box set with a password, enter the password after selecting the mail box, and press [OK].
The Scan screen is displayed.
2222 Place your originals, and press [Light] or [Dark]. Place your originals, and press [Light] or [Dark]. Place your originals, and press [Light] or [Dark]. Place your originals, and press [Light] or [Dark].
Move the indicator above [Light] and [Dark] to the left to make the exposure lighter, or to the right to make the exposure darker.
3333 PressPressPressPress ....
The machine starts scanning. (See ‘Storing Originals in the Mail Box’ on p. 1-9.)
NOTE• To cancel all settings at once, press [Initial Settings]. (The machine returns to the standard scanning mode.)• To return the display to the Mail Box Selection screen, press .
Adjusting the Exposure and Image Quality Before Scanning the Originals 2-72-72-72-7
2222
Sca
nnin
g O
rigi
nals
into
a M
ail B
ox
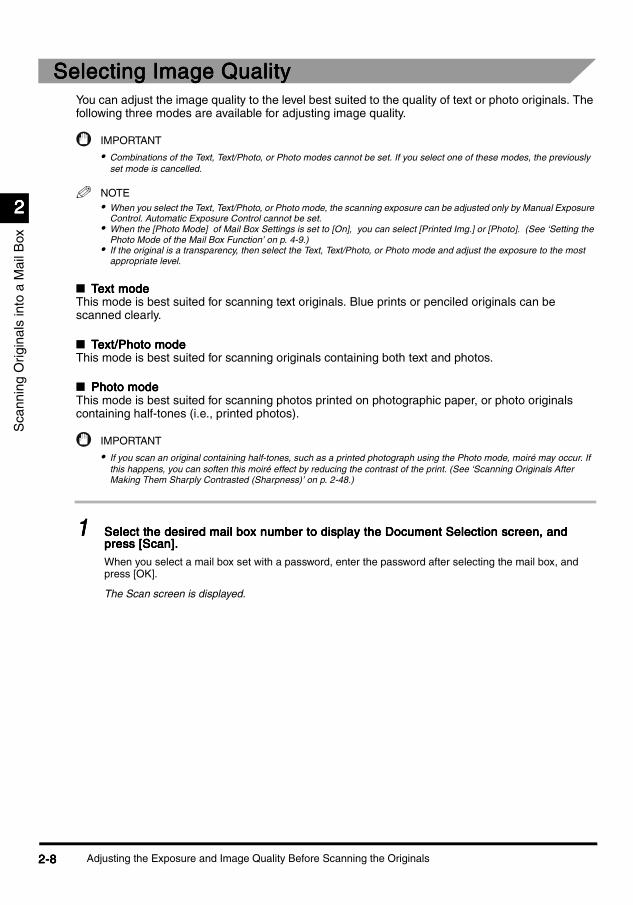
Selecting Image QualitySelecting Image QualitySelecting Image QualitySelecting Image QualityYou can adjust the image quality to the level best suited to the quality of text or photo originals. The following three modes are available for adjusting image quality.
IMPORTANT
• Combinations of the Text, Text/Photo, or Photo modes cannot be set. If you select one of these modes, the previously set mode is cancelled.
NOTE• When you select the Text, Text/Photo, or Photo mode, the scanning exposure can be adjusted only by Manual Exposure
Control. Automatic Exposure Control cannot be set.• When the [Photo Mode] of Mail Box Settings is set to [On], you can select [Printed Img.] or [Photo]. (See ‘Setting the
Photo Mode of the Mail Box Function’ on p. 4-9.)• If the original is a transparency, then select the Text, Text/Photo, or Photo mode and adjust the exposure to the most
appropriate level.
n Text modeText modeText modeText modeThis mode is best suited for scanning text originals. Blue prints or penciled originals can be scanned clearly.
n Text/Photo modeText/Photo modeText/Photo modeText/Photo modeThis mode is best suited for scanning originals containing both text and photos.
n Photo modePhoto modePhoto modePhoto modeThis mode is best suited for scanning photos printed on photographic paper, or photo originals containing half-tones (i.e., printed photos).
IMPORTANT
• If you scan an original containing half-tones, such as a printed photograph using the Photo mode, moiré may occur. If this happens, you can soften this moiré effect by reducing the contrast of the print. (See ‘Scanning Originals After Making Them Sharply Contrasted (Sharpness)’ on p. 2-48.)
1111 Select the desired mail box number to display the Document Selection screen, and Select the desired mail box number to display the Document Selection screen, and Select the desired mail box number to display the Document Selection screen, and Select the desired mail box number to display the Document Selection screen, and press [Scan]. press [Scan]. press [Scan]. press [Scan].
When you select a mail box set with a password, enter the password after selecting the mail box, and press [OK].
The Scan screen is displayed.
Adjusting the Exposure and Image Quality Before Scanning the Originals2-82-82-82-8

2222
Sca
nnin
g O
rigi
nals
into
a M
ail B
ox
2222 Place your originals Place your originals Place your originals Place your originals → press press press press → select the type of originals (Text, Text/ select the type of originals (Text, Text/ select the type of originals (Text, Text/ select the type of originals (Text, Text/Photo, Photo).Photo, Photo).Photo, Photo).Photo, Photo).
When the [Photo Mode] of Mail Box Settings is set to [On], you can select [Printed Img.] or [Photo]. (See ‘Setting the Photo Mode of the Mail Box Function’ on p. 4-9.)
3333 Press [Light] or [Dark] to adjust the scanning exposure.Press [Light] or [Dark] to adjust the scanning exposure.Press [Light] or [Dark] to adjust the scanning exposure.Press [Light] or [Dark] to adjust the scanning exposure.
Move the indicator above [Light] and [Dark] to the left to make the exposure lighter, or to the right to make the exposure darker.
Adjusting the Exposure and Image Quality Before Scanning the Originals 2-92-92-92-9

2222
Sca
nnin
g O
rigi
nals
into
a M
ail B
ox
4444 PressPressPressPress ....
The machine starts scanning. (See ‘Storing Originals in the Mail Box’ on p. 1-9.)
NOTE• To cancel the setting, press [A]. • To cancel all settings at once, press [Initial Settings]. (The machine returns to the standard scanning mode.)• To return the display to the Mail Box Selection screen, press .
Automatic Adjustment of Exposure and Image Automatic Adjustment of Exposure and Image Automatic Adjustment of Exposure and Image Automatic Adjustment of Exposure and Image QualityQualityQualityQuality
1111 Select the desired mail box number to display the Document Selection screen, and Select the desired mail box number to display the Document Selection screen, and Select the desired mail box number to display the Document Selection screen, and Select the desired mail box number to display the Document Selection screen, and press [Scan]. press [Scan]. press [Scan]. press [Scan].
When you select a mail box set with a password, enter the password after selecting the mail box, and press [OK].
The Scan screen is displayed.
2222 Place the original, and press [A]. Place the original, and press [A]. Place the original, and press [A]. Place the original, and press [A].
The scanning exposure is automatically adjusted to the level best suited to the quality of the original.
NOTE• If the original is a transparency, you may not be able to use the Automatic Exposure Control. If so, adjust the scanning
exposure using Manual Exposure Control.
Adjusting the Exposure and Image Quality Before Scanning the Originals2-102-102-102-10

2222
Sca
nnin
g O
rigi
nals
into
a M
ail B
ox
3333 PressPressPressPress ....
The machine starts scanning. (See ‘Storing Originals in the Mail Box’ on p. 1-9.)
NOTE• To cancel all settings at once, press [Initial Settings]. (The machine returns to the standard scanning mode.)• To return the display to the Mail Box Selection screen, press .
Adjusting the Exposure and Image Quality Before Scanning the Originals 2-112-112-112-11

Sca
nnin
g O
rigi
nals
into
a M
ail B
ox
2222
Changing the Scanning Ratio Changing the Scanning Ratio Changing the Scanning Ratio Changing the Scanning Ratio (Copy Ratio)(Copy Ratio)(Copy Ratio)(Copy Ratio)
With this function, you can specify the copy ratio of a document before you scan it or let the machine set the copy ratio automatically.
NOTE• To set the copy ratio 100%, press [1:1].
Scanning Originals After Enlarging/Reducing Them Scanning Originals After Enlarging/Reducing Them Scanning Originals After Enlarging/Reducing Them Scanning Originals After Enlarging/Reducing Them to a Standard Record Sizeto a Standard Record Sizeto a Standard Record Sizeto a Standard Record Size
You can scan the originals after enlarging/reducing them to a standard record size.
NOTE• The scanning ratio of 800% is available only when the original is placed on the platen glass.
1111 Select the desired mail box number to display the Document Selection screen, and Select the desired mail box number to display the Document Selection screen, and Select the desired mail box number to display the Document Selection screen, and Select the desired mail box number to display the Document Selection screen, and press [Scan]. press [Scan]. press [Scan]. press [Scan].
When you select a mail box set with a password, enter the password after selecting the mail box, and press [OK].
The Scan screen is displayed.
2222 Place the original, and press [Copy Ratio]. Place the original, and press [Copy Ratio]. Place the original, and press [Copy Ratio]. Place the original, and press [Copy Ratio].
Changing the Scanning Ratio (Copy Ratio)2-122-122-122-12

2222
Sca
nnin
g O
rigi
nals
into
a M
ail B
ox
3333 To reduce the image, select a reduction ratio. To enlarge the image, select an To reduce the image, select a reduction ratio. To enlarge the image, select an To reduce the image, select a reduction ratio. To enlarge the image, select an To reduce the image, select a reduction ratio. To enlarge the image, select an enlargement ratio, and press [Done]. enlargement ratio, and press [Done]. enlargement ratio, and press [Done]. enlargement ratio, and press [Done].
The specified mode is set and the display returns to the Scan screen.
4444 PressPressPressPress ....
The machine starts scanning. (See ‘Storing Originals in the Mail Box’ on p. 1-9.)
NOTE• To return the ratio to 100%, press [1:1]. • To cancel all settings at once, press [Initial Settings]. (The machine returns to the Standard Scanning mode.)• To return the display to the Mail Box Selection screen, press .
Specifying the Scanning Ratio by %Specifying the Scanning Ratio by %Specifying the Scanning Ratio by %Specifying the Scanning Ratio by %You can reduce or enlarge images by any scanning ratio, in 1% increments. The available scanning ratios are from 25% to 800% when the original is placed on the platen glass, and from 25% to 400% when the original is placed in the feeder.
1111 Select the desired mail box number to display the Document Selection screen, and Select the desired mail box number to display the Document Selection screen, and Select the desired mail box number to display the Document Selection screen, and Select the desired mail box number to display the Document Selection screen, and press [Scan]. press [Scan]. press [Scan]. press [Scan].
When you select a mail box set with a password, enter the password after selecting the mail box, and press [OK].
The Scan screen is displayed.
2222 Place the original, and press [Copy Ratio]. Place the original, and press [Copy Ratio]. Place the original, and press [Copy Ratio]. Place the original, and press [Copy Ratio].
Changing the Scanning Ratio (Copy Ratio) 2-132-132-132-13
2222
Sca
nnin
g O
rigi
nals
into
a M
ail B
ox
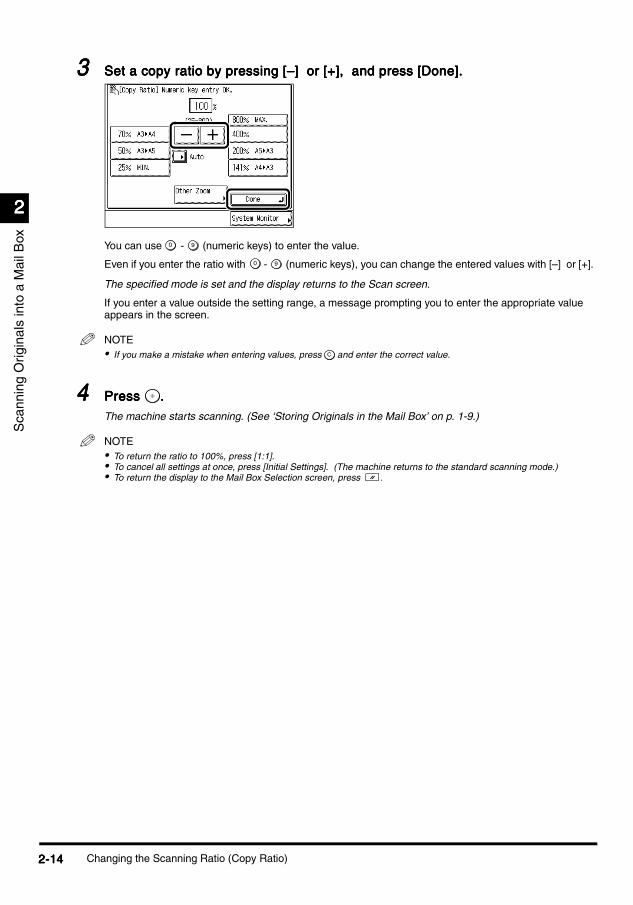
3333 Set a copy ratio by pressing [–] or [+], and press [Done]. Set a copy ratio by pressing [–] or [+], and press [Done]. Set a copy ratio by pressing [–] or [+], and press [Done]. Set a copy ratio by pressing [–] or [+], and press [Done].
You can use - (numeric keys) to enter the value.
Even if you enter the ratio with - (numeric keys), you can change the entered values with [–] or [+].
The specified mode is set and the display returns to the Scan screen.
If you enter a value outside the setting range, a message prompting you to enter the appropriate value appears in the screen.
NOTE• If you make a mistake when entering values, press and enter the correct value.
4444 PressPressPressPress ....
The machine starts scanning. (See ‘Storing Originals in the Mail Box’ on p. 1-9.)
NOTE• To return the ratio to 100%, press [1:1]. • To cancel all settings at once, press [Initial Settings]. (The machine returns to the standard scanning mode.)• To return the display to the Mail Box Selection screen, press .
0 9
0 9
C
Changing the Scanning Ratio (Copy Ratio)2-142-142-142-14

2222
Sca
nnin
g O
rigi
nals
into
a M
ail B
ox
Automatically Setting the Ratio Based on the Automatically Setting the Ratio Based on the Automatically Setting the Ratio Based on the Automatically Setting the Ratio Based on the Selected Record Size (Auto)Selected Record Size (Auto)Selected Record Size (Auto)Selected Record Size (Auto)
In this mode, the machine automatically selects the appropriate scanning ratio based on the selected record size.The available scanning ratios are from 25% to 800% when the original is placed on the platen glass, and from 25% to 400% when the original is placed in the feeder.
IMPORTANT
• You cannot scan highly transparent originals, such as transparencies, in the Auto mode. Use the Preset Zoom or Zoom Designation mode.
• To use the Auto mode, your originals must conform to a standard paper size.
• The record sizes that can be used with the Auto mode are A3, A4, A4R, A5, A5R.
NOTE• If an error occurs between the Auto scanning ratio and the actual scanning size, you can adjust this with the Zoom Fine
Adjustment function. (See the Reference Guide.)
1111 Select the desired mail box number to display the Document Selection screen, and Select the desired mail box number to display the Document Selection screen, and Select the desired mail box number to display the Document Selection screen, and Select the desired mail box number to display the Document Selection screen, and press [Scan]. press [Scan]. press [Scan]. press [Scan].
When you select a mail box set with a password, enter the password after selecting the mail box, and press [OK].
The Scan screen is displayed.
2222 Place the original, and press [Copy Ratio]. Place the original, and press [Copy Ratio]. Place the original, and press [Copy Ratio]. Place the original, and press [Copy Ratio].
3333 Press [Auto]. Press [Auto]. Press [Auto]. Press [Auto].
Changing the Scanning Ratio (Copy Ratio) 2-152-152-152-15
2222
Sca
nnin
g O
rigi
nals
into
a M
ail B
ox
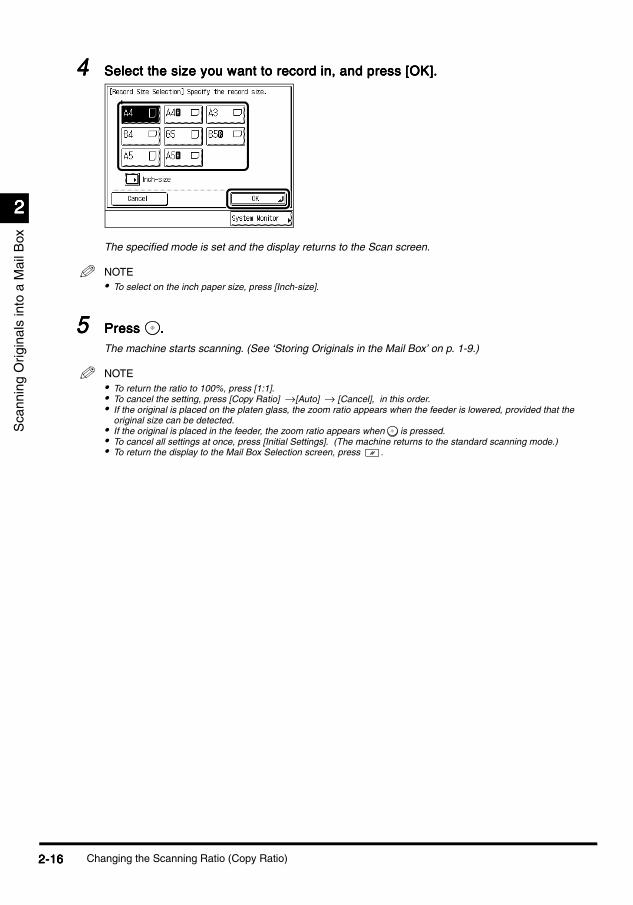
4444 Select the size you want to record in, and press [OK]. Select the size you want to record in, and press [OK]. Select the size you want to record in, and press [OK]. Select the size you want to record in, and press [OK].
The specified mode is set and the display returns to the Scan screen.
NOTE• To select on the inch paper size, press [Inch-size].
5555 PressPressPressPress ....
The machine starts scanning. (See ‘Storing Originals in the Mail Box’ on p. 1-9.)
NOTE• To return the ratio to 100%, press [1:1]. • To cancel the setting, press [Copy Ratio] →[Auto] → [Cancel], in this order.• If the original is placed on the platen glass, the zoom ratio appears when the feeder is lowered, provided that the
original size can be detected.• If the original is placed in the feeder, the zoom ratio appears when is pressed.• To cancel all settings at once, press [Initial Settings]. (The machine returns to the standard scanning mode.)• To return the display to the Mail Box Selection screen, press .
Changing the Scanning Ratio (Copy Ratio)2-162-162-162-16

2222
Sca
nnin
g O
rigi
nals
into
a M
ail B
ox
Calculating the Scanning Ratio Based on the Calculating the Scanning Ratio Based on the Calculating the Scanning Ratio Based on the Calculating the Scanning Ratio Based on the Original and Record Size (Zoom Program)Original and Record Size (Zoom Program)Original and Record Size (Zoom Program)Original and Record Size (Zoom Program)
If you enter measurements for the original and the desired scan images (or printed sheets), the machine automatically calculates and sets the appropriate scanning ratio. The available scanning ratios are from 25% to 800% when the original is placed on the platen glass, and from 25% to 400% when the original is placed in the feeder.
NOTE• The designated sizes are converted to the scanning ratio (%) as follows:
- Scanning ratio (%) = (record size ÷ original size) x 100
n Scanning with the same XY scanning ratio (Zoom):Scanning with the same XY scanning ratio (Zoom):Scanning with the same XY scanning ratio (Zoom):Scanning with the same XY scanning ratio (Zoom):Designate the same scanning ratio for the vertical and horizontal directions.
n Scanning with different XY scanning ratios (XY Zoom):Scanning with different XY scanning ratios (XY Zoom):Scanning with different XY scanning ratios (XY Zoom):Scanning with different XY scanning ratios (XY Zoom):Designate different scanning ratios for the vertical and horizontal directions.
Scanning with the same XY scanning ratio (Zoom)Scanning with the same XY scanning ratio (Zoom)Scanning with the same XY scanning ratio (Zoom)Scanning with the same XY scanning ratio (Zoom)
1111 Select the desired mail box number to display the Document Selection screen, and Select the desired mail box number to display the Document Selection screen, and Select the desired mail box number to display the Document Selection screen, and Select the desired mail box number to display the Document Selection screen, and press [Scan]. press [Scan]. press [Scan]. press [Scan].
When you select a mail box set with a password, enter the password after selecting the mail box, and press [OK].
The Scan screen is displayed.
2222 Place the original, and press [Copy Ratio]. Place the original, and press [Copy Ratio]. Place the original, and press [Copy Ratio]. Place the original, and press [Copy Ratio].
3333 Press [Other Zoom]. Press [Other Zoom]. Press [Other Zoom]. Press [Other Zoom].
Changing the Scanning Ratio (Copy Ratio) 2-172-172-172-17

2222
Sca
nnin
g O
rigi
nals
into
a M
ail B
ox
4444 Press [Zoom Program]. Press [Zoom Program]. Press [Zoom Program]. Press [Zoom Program].
5555 Press [Original Size] and enter the size Press [Original Size] and enter the size Press [Original Size] and enter the size Press [Original Size] and enter the size → press [Record Size] and enter the press [Record Size] and enter the press [Record Size] and enter the press [Record Size] and enter the size to be recorded size to be recorded size to be recorded size to be recorded → press [OK]. press [OK]. press [OK]. press [OK].
When entering values in millimetres, you can use - (numeric keys) and .
The specified mode is set and the display returns to the Scan screen.
If the zoom ratio is less than 25%, a message telling you that the ratio will be adjusted to 25% appears. If it is more than 800%, a message telling you that the ratio will be adjusted to 800% appears.
NOTE• Place the original on the platen glass if the zoom ratio is more than 400%.• If you make a mistake when entering values, press [C], and enter the correct value.• To designate the sizes of the horizontal direction (X) and the vertical direction (Y) independently, press [XY Zoom]. • If you want to enter values in inches, press [Inch]. Set the inch entry function to [On] in the Additional Functions
beforehand. (See the Reference Guide.)• For details of how to enter values in inches, see the Reference Guide.
0 9 C
Changing the Scanning Ratio (Copy Ratio)2-182-182-182-18

2222
Sca
nnin
g O
rigi
nals
into
a M
ail B
ox
6666 PressPressPressPress ....
The machine starts scanning. (See ‘Storing Originals in the Mail Box’ on p. 1-9.)
NOTE• To return the ratio to 100%, press [1:1]. • To cancel the setting, press [Copy Ratio] → [Other Zoom] → [Zoom Program] → [Cancel], in this order.• To cancel all settings at once, press [Initial Settings]. (The machine returns to the standard scanning mode.)• To return the display to the Mail Box Selection screen, press .
Scanning with different XY scanning ratios (XY Zoom)Scanning with different XY scanning ratios (XY Zoom)Scanning with different XY scanning ratios (XY Zoom)Scanning with different XY scanning ratios (XY Zoom)
1111 Select the desired mail box number to display the Document Selection screen, and Select the desired mail box number to display the Document Selection screen, and Select the desired mail box number to display the Document Selection screen, and Select the desired mail box number to display the Document Selection screen, and press [Scan]. press [Scan]. press [Scan]. press [Scan].
When you select a mail box set with a password, enter the password after selecting the mail box, and press [OK].
The Scan screen is displayed.
2222 Place the original, and press [Copy Ratio]. Place the original, and press [Copy Ratio]. Place the original, and press [Copy Ratio]. Place the original, and press [Copy Ratio].
3333 Press [Other Zoom]. Press [Other Zoom]. Press [Other Zoom]. Press [Other Zoom].
Changing the Scanning Ratio (Copy Ratio) 2-192-192-192-19

2222
Sca
nnin
g O
rigi
nals
into
a M
ail B
ox
4444 Press [Zoom Program]. Press [Zoom Program]. Press [Zoom Program]. Press [Zoom Program].
5555 Press [XY Zoom]. Press [XY Zoom]. Press [XY Zoom]. Press [XY Zoom].
6666 Press [X] (horizontal direction) then [Y] (vertical direction) for both the original Press [X] (horizontal direction) then [Y] (vertical direction) for both the original Press [X] (horizontal direction) then [Y] (vertical direction) for both the original Press [X] (horizontal direction) then [Y] (vertical direction) for both the original size and the record size size and the record size size and the record size size and the record size → enter each value for X and Y enter each value for X and Y enter each value for X and Y enter each value for X and Y → press [OK]. press [OK]. press [OK]. press [OK].
When entering values in millimetres, you can use - (numeric keys) and .
The specified mode is set and the display returns to the Scan screen.
If the zoom ratio is less than 25%, a message telling you that the ratio will be adjusted to 25% appears. If it is more than 800%, a message telling you that the ratio will be adjusted to 800% appears.
0 9 C
Changing the Scanning Ratio (Copy Ratio)2-202-202-202-20
2222
Sca
nnin
g O
rigi
nals
into
a M
ail B
ox
NOTE• Place the original on the platen glass if the zoom ratio is more than 400%.• If you make a mistake when entering values, press [C], and enter the correct values.• To set the same values for the X and Y axes, press [Zoom]. • If you want to enter values in inches, press [Inch]. Set the inch entry function to [On] in the Additional Functions
beforehand. (See the Reference Guide.)• For details of how to enter values in inches, see the Reference Guide.
7777 PressPressPressPress ....
The machine starts scanning. (See ‘Storing Originals in the Mail Box’ on p. 1-9.)
NOTE• To return the ratio to 100%, press [1:1]. • To cancel the setting, press [Copy Ratio] → [Other Zoom] → [Zoom Program] → [Cancel], in this order.• To cancel all settings at once, press [Initial Settings]. (The machine returns to the standard scanning mode.)• To return the display to the Mail Box Selection screen, press .
Enlarging/Reducing Originals at Scanning Ratios Enlarging/Reducing Originals at Scanning Ratios Enlarging/Reducing Originals at Scanning Ratios Enlarging/Reducing Originals at Scanning Ratios Set Independently for X and Y Axes (XY Zoom)Set Independently for X and Y Axes (XY Zoom)Set Independently for X and Y Axes (XY Zoom)Set Independently for X and Y Axes (XY Zoom)
If you set the XY Zoom mode, you can scan an original enlarging or reducing it to different XY scanning ratios. The available scanning ratios are from 25% to 800% when the original is placed on the platen glass, and from 25% to 400% when the original is placed in the feeder.
IMPORTANT
• You cannot scan highly transparent originals, such as transparencies, in the XY Zoom mode. Specify the scanning ratio for these originals.
NOTE• If an error occurs between the XY Zoom scanning and the actual scanning size, then you can adjust this with the Zoom
Fine Adjustment function. (See the Reference Guide.)
1111 Select the desired mail box number to display the Document Selection screen, and Select the desired mail box number to display the Document Selection screen, and Select the desired mail box number to display the Document Selection screen, and Select the desired mail box number to display the Document Selection screen, and press [Scan]. press [Scan]. press [Scan]. press [Scan].
When you select a mail box set with a password, enter the password after selecting the mail box, and press [OK].
The Scan screen is displayed.
Changing the Scanning Ratio (Copy Ratio) 2-212-212-212-21
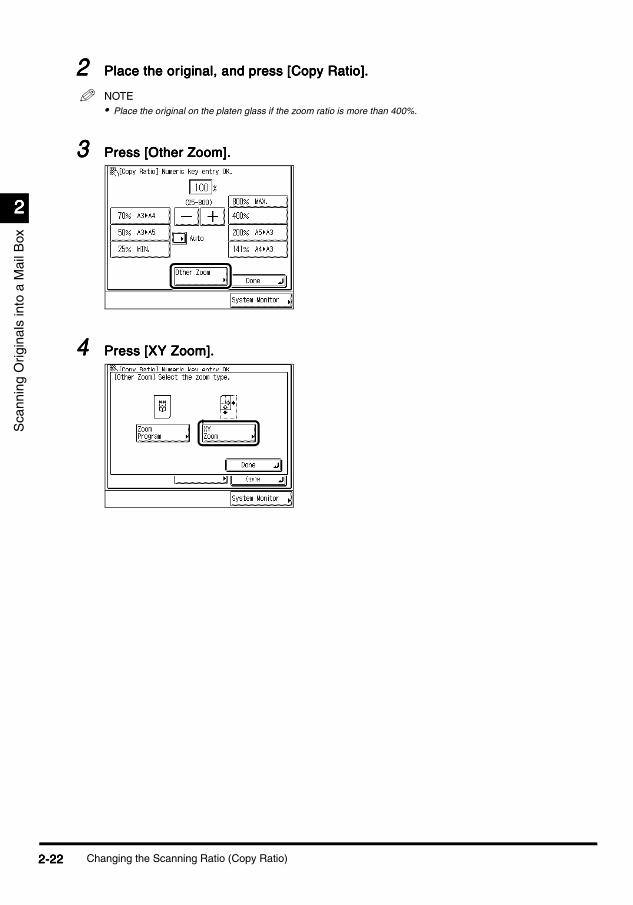
2222
Sca
nnin
g O
rigi
nals
into
a M
ail B
ox
2222 Place the original, and press [Copy Ratio]. Place the original, and press [Copy Ratio]. Place the original, and press [Copy Ratio]. Place the original, and press [Copy Ratio].
NOTE• Place the original on the platen glass if the zoom ratio is more than 400%.
3333 Press [Other Zoom]. Press [Other Zoom]. Press [Other Zoom]. Press [Other Zoom].
4444 Press [XY Zoom]. Press [XY Zoom]. Press [XY Zoom]. Press [XY Zoom].
Changing the Scanning Ratio (Copy Ratio)2-222-222-222-22

2222
Sca
nnin
g O
rigi
nals
into
a M
ail B
ox
5555 Press [X] and [Y] Press [X] and [Y] Press [X] and [Y] Press [X] and [Y] → enter each value for X and Y enter each value for X and Y enter each value for X and Y enter each value for X and Y → press [OK]. press [OK]. press [OK]. press [OK].
You can use - (numeric keys) to enter the value.
Even if you enter the copy ratio with - (numeric keys), you can change the entered values with [–] or [+].
The specified mode is set and the display returns to the Scan screen.
If you enter a value outside the setting range, a message prompting you to enter the appropriate value appears in the screen.
NOTE• If you make a mistake when entering values, press [C], and enter the correct value.
6666 PressPressPressPress ....
The machine starts scanning. (See ‘Storing Originals in the Mail Box’ on p. 1-9.)
NOTE• To return the ratio to 100%, press [1:1]. • To cancel the setting, press [Copy Ratio] → [Other Zoom] → [XY Zoom] → [Cancel], in this order.• To cancel all settings at once, press [Initial Settings]. (The machine returns to the standard scanning mode.)• To return the display to the Mail Box Selection screen, press .
0 9
0 9
Changing the Scanning Ratio (Copy Ratio) 2-232-232-232-23

Sca
nnin
g O
rigi
nals
into
a M
ail B
ox
2222
Scanning Two-sided Originals Scanning Two-sided Originals Scanning Two-sided Originals Scanning Two-sided Originals (2-sided Original)(2-sided Original)(2-sided Original)(2-sided Original)
With this function you can specify that the machine automatically turns over two-sided originals placed in the feeder to scan each side separately or that it prompts you to scan the second side of an original placed on the platen glass.
IMPORTANT
• When the machine is operating in the Two-sided Original mode, you cannot use the Two-page Separation, Booklet Scanning or Image Combination modes.
• Place the original horizontally when scanning originals such as A4R and A5R size. If these originals are placed vertically, the back side of the print is printed upside down.
1111 Select the desired mail box number to display the Document Selection screen, and Select the desired mail box number to display the Document Selection screen, and Select the desired mail box number to display the Document Selection screen, and Select the desired mail box number to display the Document Selection screen, and press [Scan]. press [Scan]. press [Scan]. press [Scan].
When you select a mail box set with a password, enter the password after selecting the mail box, and press [OK].
The Scan screen is displayed.
2222 Place the original, and press [2-sided Original]. Place the original, and press [2-sided Original]. Place the original, and press [2-sided Original]. Place the original, and press [2-sided Original].
3333 Select the type of original, and press [OK]. Select the type of original, and press [OK]. Select the type of original, and press [OK]. Select the type of original, and press [OK].
The specified mode is set and the display returns to the Scan screen.
Scanning Two-sided Originals (2-sided Original)2-242-242-242-24
2222
Sca
nnin
g O
rigi
nals
into
a M
ail B
ox
4444 PressPressPressPress ....
The machine starts scanning. (See ‘Storing Originals in the Mail Box’ on p. 1-9.)
When the original is placed on the platen glass, follow the instructions that appear on the display and press once for each original. When scanning is completed, press [Done].
NOTE• To cancel the setting, press [2-sided Original] → [Cancel], in this order.• To cancel all settings at once, press [Initial Settings]. (The machine returns to the standard scanning mode.)• To return the display to the Mail Box Selection screen, press .
Scanning Two-sided Originals (2-sided Original) 2-252-252-252-25
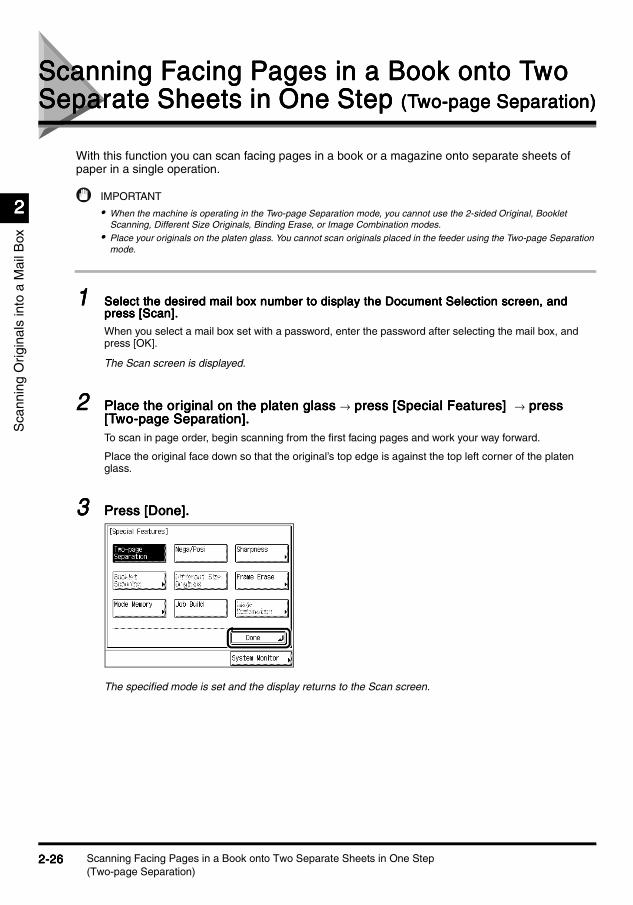
Sca
nnin
g O
rigi
nals
into
a M
ail B
ox
2222
Scanning Facing Pages in a Book onto Two Scanning Facing Pages in a Book onto Two Scanning Facing Pages in a Book onto Two Scanning Facing Pages in a Book onto Two Separate Sheets in One Step Separate Sheets in One Step Separate Sheets in One Step Separate Sheets in One Step (Two-page Separation)(Two-page Separation)(Two-page Separation)(Two-page Separation)
With this function you can scan facing pages in a book or a magazine onto separate sheets of paper in a single operation.
IMPORTANT
• When the machine is operating in the Two-page Separation mode, you cannot use the 2-sided Original, Booklet Scanning, Different Size Originals, Binding Erase, or Image Combination modes.
• Place your originals on the platen glass. You cannot scan originals placed in the feeder using the Two-page Separation mode.
1111 Select the desired mail box number to display the Document Selection screen, and Select the desired mail box number to display the Document Selection screen, and Select the desired mail box number to display the Document Selection screen, and Select the desired mail box number to display the Document Selection screen, and press [Scan]. press [Scan]. press [Scan]. press [Scan].
When you select a mail box set with a password, enter the password after selecting the mail box, and press [OK].
The Scan screen is displayed.
2222 Place the original on the platen glass Place the original on the platen glass Place the original on the platen glass Place the original on the platen glass → press [Special Features] press [Special Features] press [Special Features] press [Special Features] → press press press press [Two-page Separation]. [Two-page Separation]. [Two-page Separation]. [Two-page Separation]. To scan in page order, begin scanning from the first facing pages and work your way forward.
Place the original face down so that the original’s top edge is against the top left corner of the platen glass.
3333 Press [Done]. Press [Done]. Press [Done]. Press [Done].
The specified mode is set and the display returns to the Scan screen.
Scanning Facing Pages in a Book onto Two Separate Sheets in One Step (Two-page Separation)
2-262-262-262-26

2222
Sca
nnin
g O
rigi
nals
into
a M
ail B
ox
4444 PressPressPressPress ....
The machine starts scanning. (See ‘Storing Originals in the Mail Box’ on p. 1-9.)
NOTE• To cancel the setting, press [Special Features] → [Two-page Separation], in this order.• To cancel all settings at once, press [Initial Settings]. (The machine returns to the standard scanning mode.)• To return the display to the Mail Box Selection screen, press .
Scanning Facing Pages in a Book onto Two Separate Sheets in One Step(Two-page Separation)
2-272-272-272-27
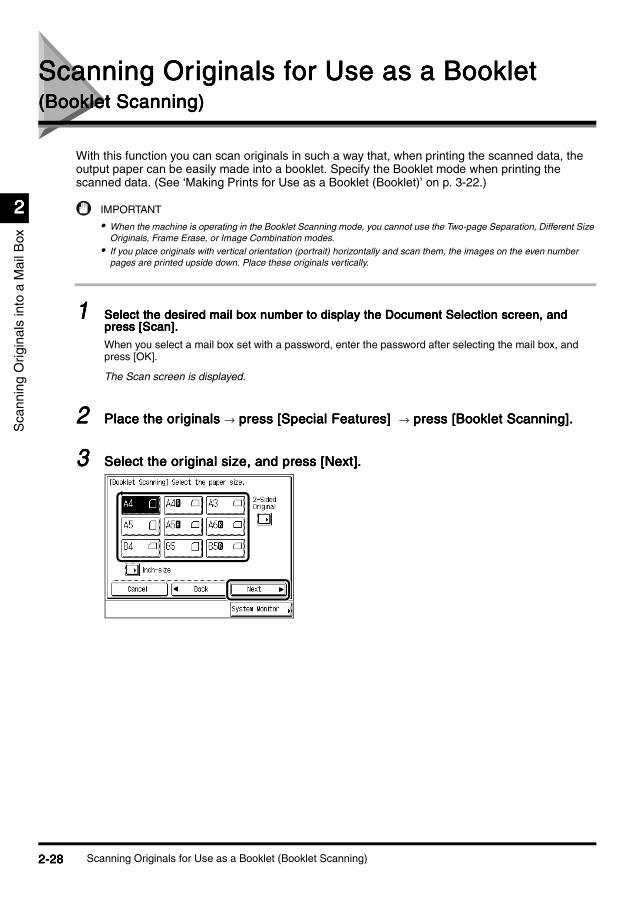
Sca
nnin
g O
rigi
nals
into
a M
ail B
ox
2222
Scanning Originals for Use as a BookletScanning Originals for Use as a BookletScanning Originals for Use as a BookletScanning Originals for Use as a Booklet(Booklet Scanning)(Booklet Scanning)(Booklet Scanning)(Booklet Scanning)
With this function you can scan originals in such a way that, when printing the scanned data, the output paper can be easily made into a booklet. Specify the Booklet mode when printing the scanned data. (See ‘Making Prints for Use as a Booklet (Booklet)’ on p. 3-22.)
IMPORTANT
• When the machine is operating in the Booklet Scanning mode, you cannot use the Two-page Separation, Different Size Originals, Frame Erase, or Image Combination modes.
• If you place originals with vertical orientation (portrait) horizontally and scan them, the images on the even number pages are printed upside down. Place these originals vertically.
1111 Select the desired mail box number to display the Document Selection screen, and Select the desired mail box number to display the Document Selection screen, and Select the desired mail box number to display the Document Selection screen, and Select the desired mail box number to display the Document Selection screen, and press [Scan]. press [Scan]. press [Scan]. press [Scan].
When you select a mail box set with a password, enter the password after selecting the mail box, and press [OK].
The Scan screen is displayed.
2222 Place the originals Place the originals Place the originals Place the originals → press [Special Features] press [Special Features] press [Special Features] press [Special Features] → press [Booklet Scanning]. press [Booklet Scanning]. press [Booklet Scanning]. press [Booklet Scanning].
3333 Select the original size, and press [Next]. Select the original size, and press [Next]. Select the original size, and press [Next]. Select the original size, and press [Next].
Scanning Originals for Use as a Booklet (Booklet Scanning)2-282-282-282-28
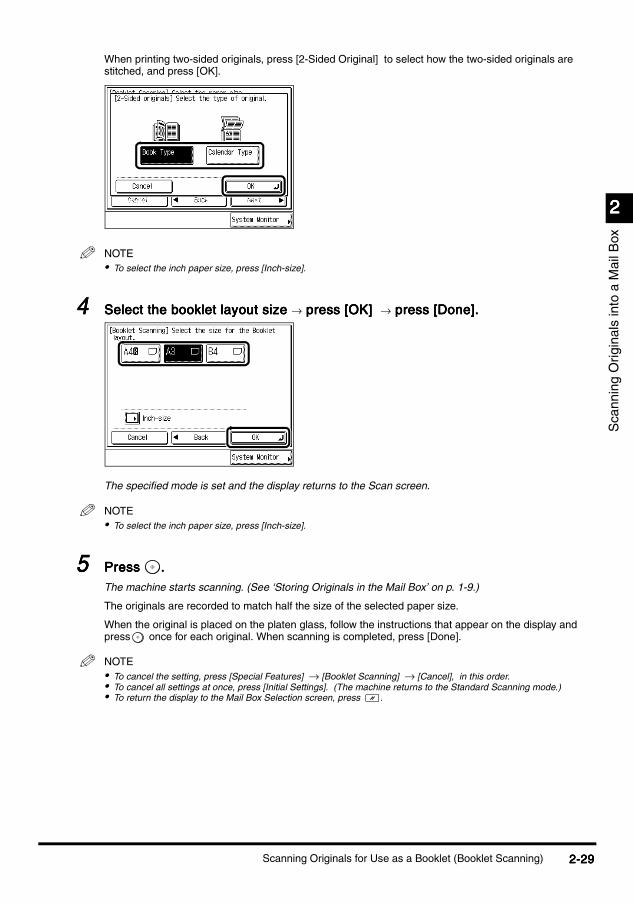
2222
Sca
nnin
g O
rigi
nals
into
a M
ail B
ox
When printing two-sided originals, press [2-Sided Original] to select how the two-sided originals are stitched, and press [OK].
NOTE• To select the inch paper size, press [Inch-size].
4444 Select the booklet layout size Select the booklet layout size Select the booklet layout size Select the booklet layout size → press [OK] press [OK] press [OK] press [OK] → press [Done]. press [Done]. press [Done]. press [Done].
The specified mode is set and the display returns to the Scan screen.
NOTE• To select the inch paper size, press [Inch-size].
5555 PressPressPressPress ....
The machine starts scanning. (See ‘Storing Originals in the Mail Box’ on p. 1-9.)
The originals are recorded to match half the size of the selected paper size.
When the original is placed on the platen glass, follow the instructions that appear on the display and press once for each original. When scanning is completed, press [Done].
NOTE• To cancel the setting, press [Special Features] → [Booklet Scanning] → [Cancel], in this order.• To cancel all settings at once, press [Initial Settings]. (The machine returns to the Standard Scanning mode.)• To return the display to the Mail Box Selection screen, press .
Scanning Originals for Use as a Booklet (Booklet Scanning) 2-292-292-292-29

Sca
nnin
g O
rigi
nals
into
a M
ail B
ox
2222
Erasing Shadows and Frame Lines Erasing Shadows and Frame Lines Erasing Shadows and Frame Lines Erasing Shadows and Frame Lines (Frame Erase)(Frame Erase)(Frame Erase)(Frame Erase)
With this function you can erase shadows and lines that appear when scanning various types of originals.
IMPORTANT
• Combinations of the Original Frame Erase, Book Frame Erase, or Binding Erase modes cannot be set. If you select one of these modes, the previously set mode is cancelled.
n Original Frame EraseOriginal Frame EraseOriginal Frame EraseOriginal Frame EraseErases the dark borders and frame lines that appear around the printed paper when the original is smaller than the selected paper size, and records the original.
IMPORTANT
• When the machine is operating in the Original Frame Erase mode, you cannot use the Automatic Document Size Select, Booklet Scanning, Different Size Originals, or Image Combination modes.
n Book Frame EraseBook Frame EraseBook Frame EraseBook Frame EraseErases the dark borders, as well as centre and contour lines that appear when printing the facing pages in a book on a single sheet of paper, and records the original.
IMPORTANT
• When the machine is operating in the Book Frame Erase mode, you cannot use the Automatic Document Size Select, Booklet Scanning, Different Size Originals, or Image Combination modes.
n Binding EraseBinding EraseBinding EraseBinding EraseErases the shadows that appear in prints from binding holes in originals, and records the original.
IMPORTANT
• When the machine is operating in the Binding Erase mode, you cannot use the Two-page Separation, or Booklet Scanning modes.
• Do not place originals with binding holes in the feeder, as this may damage the originals.
Erasing Shadows and Frame Lines (Frame Erase)2-302-302-302-30
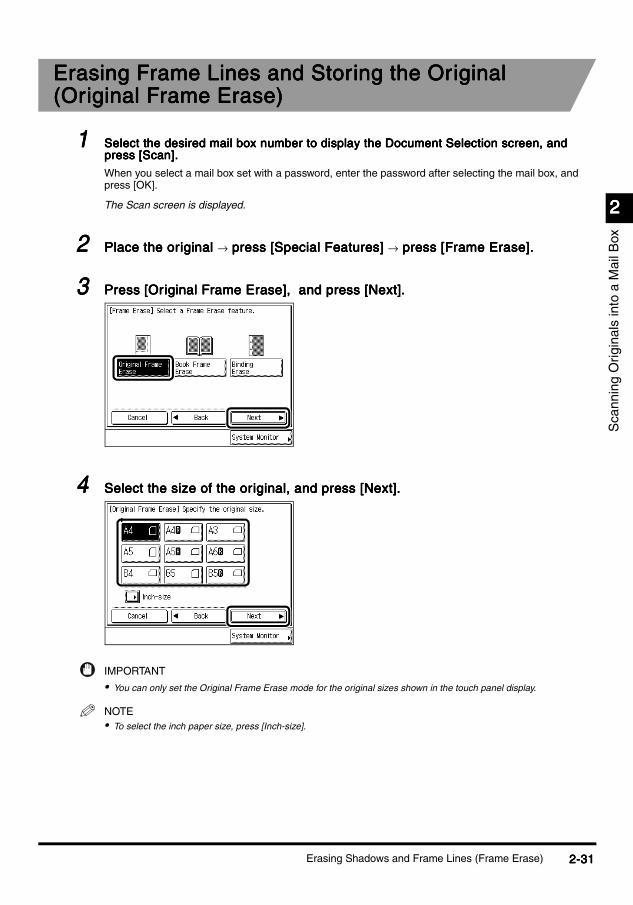
2222
Sca
nnin
g O
rigi
nals
into
a M
ail B
ox
Erasing Frame Lines and Storing the Original Erasing Frame Lines and Storing the Original Erasing Frame Lines and Storing the Original Erasing Frame Lines and Storing the Original (Original Frame Erase)(Original Frame Erase)(Original Frame Erase)(Original Frame Erase)
1111 Select the desired mail box number to display the Document Selection screen, and Select the desired mail box number to display the Document Selection screen, and Select the desired mail box number to display the Document Selection screen, and Select the desired mail box number to display the Document Selection screen, and press [Scan]. press [Scan]. press [Scan]. press [Scan].
When you select a mail box set with a password, enter the password after selecting the mail box, and press [OK].
The Scan screen is displayed.
2222 Place the original Place the original Place the original Place the original → press [Special Features] press [Special Features] press [Special Features] press [Special Features] → press [Frame Erase]. press [Frame Erase]. press [Frame Erase]. press [Frame Erase].
3333 Press [Original Frame Erase], and press [Next]. Press [Original Frame Erase], and press [Next]. Press [Original Frame Erase], and press [Next]. Press [Original Frame Erase], and press [Next].
4444 Select the size of the original, and press [Next]. Select the size of the original, and press [Next]. Select the size of the original, and press [Next]. Select the size of the original, and press [Next].
IMPORTANT
• You can only set the Original Frame Erase mode for the original sizes shown in the touch panel display.
NOTE• To select the inch paper size, press [Inch-size].
Erasing Shadows and Frame Lines (Frame Erase) 2-312-312-312-31
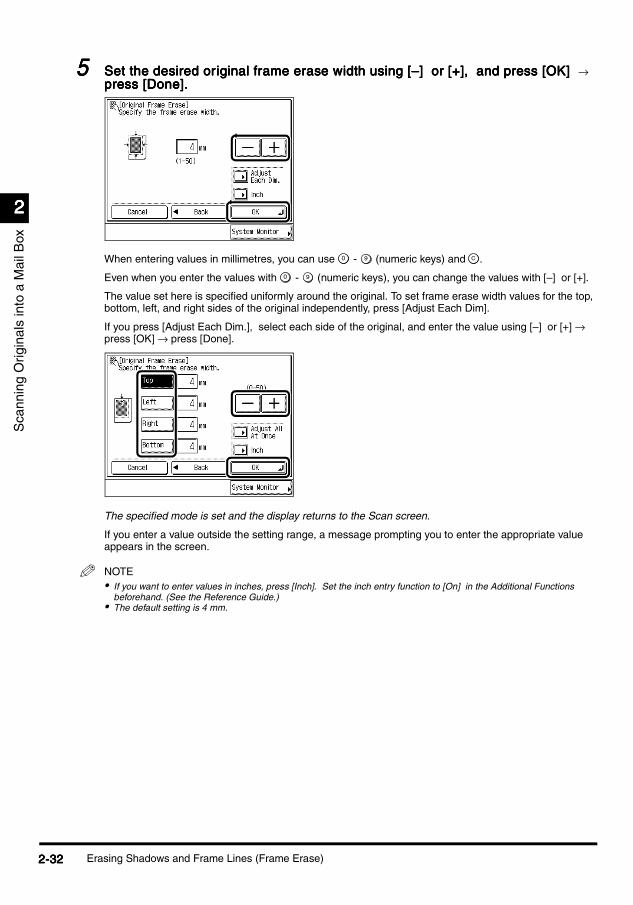
2222
Sca
nnin
g O
rigi
nals
into
a M
ail B
ox
5555 Set the desired original frame erase width using [–] or [+], and press [OK] Set the desired original frame erase width using [–] or [+], and press [OK] Set the desired original frame erase width using [–] or [+], and press [OK] Set the desired original frame erase width using [–] or [+], and press [OK] → press [Done]. press [Done]. press [Done]. press [Done].
When entering values in millimetres, you can use - (numeric keys) and .
Even when you enter the values with - (numeric keys), you can change the values with [–] or [+].
The value set here is specified uniformly around the original. To set frame erase width values for the top, bottom, left, and right sides of the original independently, press [Adjust Each Dim].
If you press [Adjust Each Dim.], select each side of the original, and enter the value using [–] or [+] → press [OK] → press [Done].
The specified mode is set and the display returns to the Scan screen.
If you enter a value outside the setting range, a message prompting you to enter the appropriate value appears in the screen.
NOTE• If you want to enter values in inches, press [Inch]. Set the inch entry function to [On] in the Additional Functions
beforehand. (See the Reference Guide.)• The default setting is 4 mm.
0 9 C
0 9
Erasing Shadows and Frame Lines (Frame Erase)2-322-322-322-32

2222
Sca
nnin
g O
rigi
nals
into
a M
ail B
ox
6666 PressPressPressPress ....
The machine starts scanning. (See ‘Storing Originals in the Mail Box’ on p. 1-9.)
NOTE• To cancel the setting, press [Special Features] → [Frame Erase] → [Cancel], in this order.• To cancel all settings at once, press [Initial Settings]. (The machine returns to the standard scanning mode.)• To return the display to the Mail Box Selection screen, press .
Erasing the Book Frame and Storing the Original Erasing the Book Frame and Storing the Original Erasing the Book Frame and Storing the Original Erasing the Book Frame and Storing the Original (Book Frame Erase)(Book Frame Erase)(Book Frame Erase)(Book Frame Erase)
1111 Select the desired mail box number to display the Document Selection screen, and Select the desired mail box number to display the Document Selection screen, and Select the desired mail box number to display the Document Selection screen, and Select the desired mail box number to display the Document Selection screen, and press [Scan]. press [Scan]. press [Scan]. press [Scan].
When you select a mail box set with a password, enter the password after selecting the mail box, and press [OK].
The Scan screen will be displayed.
2222 Place the original Place the original Place the original Place the original → press [Special Features] press [Special Features] press [Special Features] press [Special Features] → press [Frame Erase]. press [Frame Erase]. press [Frame Erase]. press [Frame Erase].
3333 Press [Book Frame Erase], and press [Next]. Press [Book Frame Erase], and press [Next]. Press [Book Frame Erase], and press [Next]. Press [Book Frame Erase], and press [Next].
Erasing Shadows and Frame Lines (Frame Erase) 2-332-332-332-33

2222
Sca
nnin
g O
rigi
nals
into
a M
ail B
ox
4444 Select the size of the book when opened, and press [Next]. Select the size of the book when opened, and press [Next]. Select the size of the book when opened, and press [Next]. Select the size of the book when opened, and press [Next].
NOTE• To select the inch paper size, press [Inch-size].
5555 Press each key ([Top], [Left], [Centre], [Right], and [Bottom] ) and set the Press each key ([Top], [Left], [Centre], [Right], and [Bottom] ) and set the Press each key ([Top], [Left], [Centre], [Right], and [Bottom] ) and set the Press each key ([Top], [Left], [Centre], [Right], and [Bottom] ) and set the desired book frame erase width using [–] or [+]. and press [OK] desired book frame erase width using [–] or [+]. and press [OK] desired book frame erase width using [–] or [+]. and press [OK] desired book frame erase width using [–] or [+]. and press [OK] → press press press press [Done]. [Done]. [Done]. [Done].
When entering values in millimetres, you can use - (numeric keys) and .
Even when you enter the values with - (numeric keys), you can change the values with [–] or [+].
The values set here are specified independently around the original. To set a value uniformly around the original, press [Adjust All At Once].
0 9 C
0 9
Erasing Shadows and Frame Lines (Frame Erase)2-342-342-342-34

2222
Sca
nnin
g O
rigi
nals
into
a M
ail B
ox
If you press [Adjust All At Once], select [Sides] and [Centre], and enter the value using [–] or [+] → press [OK] → press [Done].
The specified mode is set and the display returns to the Scan screen.
If you enter a value outside the setting range, a message prompting you to enter the appropriate value appears in the screen.
NOTE• If you want to enter values in inches, press [Inch]. Set the inch entry function to [On] in the Additional Functions
beforehand. (See the Reference Guide.)• The default settings are 10mm for [Centre] and 4mm for [Top], [Left], [Right], and [Bottom]. • If you press [Adjust Each Dim.], and want to set the frame erase width uniformly around the original, press [Adjust All
At Once].
6666 PressPressPressPress ....
The machine starts scanning. (See ‘Storing Originals in the Mail Box’ on p. 1-9.)
NOTE• To cancel the setting, press [Special Features] → [Frame Erase] → [Cancel], in this order.• To cancel all settings at once, press [Initial Settings]. (The machine returns to the standard scanning mode.)• To return the display to the Mail Box Selection screen, press .
Erasing Shadows and Frame Lines (Frame Erase) 2-352-352-352-35

2222
Sca
nnin
g O
rigi
nals
into
a M
ail B
ox
Erasing the Binding Holes and Storing the OriginalErasing the Binding Holes and Storing the OriginalErasing the Binding Holes and Storing the OriginalErasing the Binding Holes and Storing the Original(Binding Erase)(Binding Erase)(Binding Erase)(Binding Erase)
1111 Select the desired mail box number to display the Document Selection screen, and Select the desired mail box number to display the Document Selection screen, and Select the desired mail box number to display the Document Selection screen, and Select the desired mail box number to display the Document Selection screen, and press [Scan]. press [Scan]. press [Scan]. press [Scan].
When you select a mail box set with a password, enter the password after selecting the mail box, and press [OK].
The Scanning screen is displayed.
2222 Place the original on the platen glass Place the original on the platen glass Place the original on the platen glass Place the original on the platen glass → press [Special Features] press [Special Features] press [Special Features] press [Special Features] → press press press press [Frame Erase]. [Frame Erase]. [Frame Erase]. [Frame Erase].
IMPORTANT
• Do not place the original in the feeder as it may become damaged.
3333 Press [Binding Erase], and press [Next]. Press [Binding Erase], and press [Next]. Press [Binding Erase], and press [Next]. Press [Binding Erase], and press [Next].
Erasing Shadows and Frame Lines (Frame Erase)2-362-362-362-36
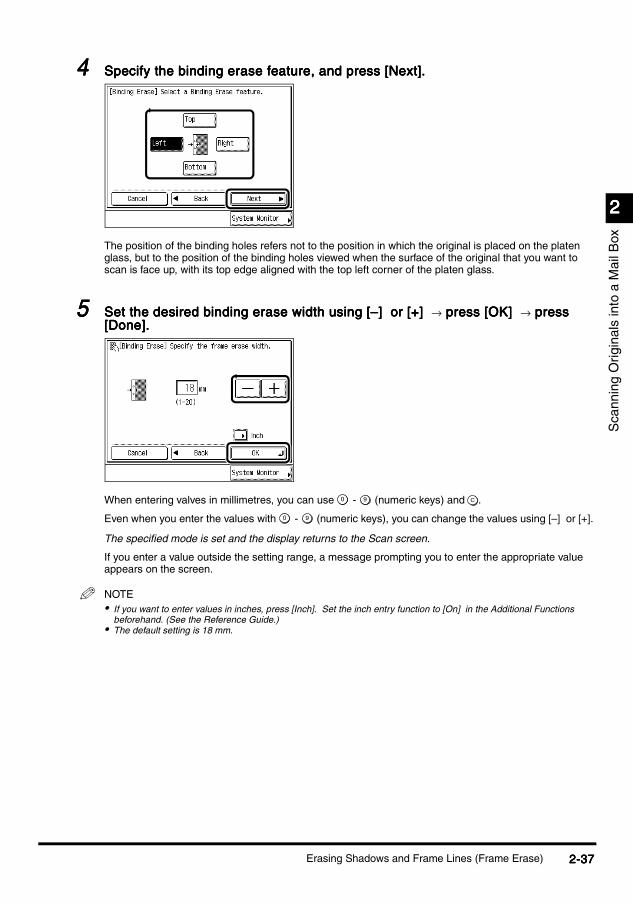
2222
Sca
nnin
g O
rigi
nals
into
a M
ail B
ox
4444 Specify the binding erase feature, and press [Next]. Specify the binding erase feature, and press [Next]. Specify the binding erase feature, and press [Next]. Specify the binding erase feature, and press [Next].
The position of the binding holes refers not to the position in which the original is placed on the platen glass, but to the position of the binding holes viewed when the surface of the original that you want to scan is face up, with its top edge aligned with the top left corner of the platen glass.
5555 Set the desired binding erase width using [–] or [+] Set the desired binding erase width using [–] or [+] Set the desired binding erase width using [–] or [+] Set the desired binding erase width using [–] or [+] → press [OK] press [OK] press [OK] press [OK] → press press press press [Done]. [Done]. [Done]. [Done].
When entering valves in millimetres, you can use - (numeric keys) and .
Even when you enter the values with - (numeric keys), you can change the values using [–] or [+].
The specified mode is set and the display returns to the Scan screen.
If you enter a value outside the setting range, a message prompting you to enter the appropriate value appears on the screen.
NOTE• If you want to enter values in inches, press [Inch]. Set the inch entry function to [On] in the Additional Functions
beforehand. (See the Reference Guide.)• The default setting is 18 mm.
0 9 C
0 9
Erasing Shadows and Frame Lines (Frame Erase) 2-372-372-372-37

2222
Sca
nnin
g O
rigi
nals
into
a M
ail B
ox
6666 PressPressPressPress ....
The machine starts scanning. (See ‘Storing Originals in the Mail Box’ on p. 1-9.)
NOTE• To cancel the setting, press [Special Features] → [Frame Erase] → [Cancel], in this order.• To cancel all settings at once, press [Initial Settings]. (The machine returns to the standard scanning mode.)• To return the display to the Mail Box Selection screen, press .
Erasing Shadows and Frame Lines (Frame Erase)2-382-382-382-38

Reducing Two, Four, or Eight Originals to Fit on a Reducing Two, Four, or Eight Originals to Fit on a Reducing Two, Four, or Eight Originals to Fit on a Reducing Two, Four, or Eight Originals to Fit on a Single Print Sheet and Storing It Single Print Sheet and Storing It Single Print Sheet and Storing It Single Print Sheet and Storing It (Image Combination)(Image Combination)(Image Combination)(Image Combination)
Sca
nnin
g O
rigi
nals
into
a M
ail B
ox
2222
With this function you can automatically reduce two, four, or eight originals and record them to fit on one side or both sides of a selected paper size.
IMPORTANT
• When the machine is operating in the Image Combination mode, you cannot use the Automatic Document Size Select, Two-page Separation, Booklet Scanning, Different Size Originals, Original Frame Erase, or Book Frame Erase modes.
• Originals to be printed in the Image Combination mode must all be the same size. You cannot use the Image Combination mode in combination with the Different Size Originals mode.
NOTE• The reduction ratio is automatically set so that the originals fit on the selected print sheet size.
n 2 On 12 On 12 On 12 On 1Reduces two 1-sided originals or one 2-sided original to fit on one side or both sides of the print sheet and records them.
n 4 On 14 On 14 On 14 On 1Reduces four 1-sided or two 2-sided originals to fit on one side or both sides of the print sheet and records them.
n 8 On 18 On 18 On 18 On 1Reduces eight 1-sided or four 2-sided originals to fit on one side or both sides of the print sheet and records them.
1111 Select the desired mail box number to display the Document Selection screen, and Select the desired mail box number to display the Document Selection screen, and Select the desired mail box number to display the Document Selection screen, and Select the desired mail box number to display the Document Selection screen, and press [Scan]. press [Scan]. press [Scan]. press [Scan].
When you select a mail box set with a password, enter the password after selecting the mail box, and press [OK].
The Scan screen is displayed.
2222 Place your originals Place your originals Place your originals Place your originals → press [Special Features] press [Special Features] press [Special Features] press [Special Features] → press [Image Combination]. press [Image Combination]. press [Image Combination]. press [Image Combination].
Reducing Two, Four, or Eight Originals to Fit on a Single Print Sheet and Storing It(Image Combination)
2-392-392-392-39
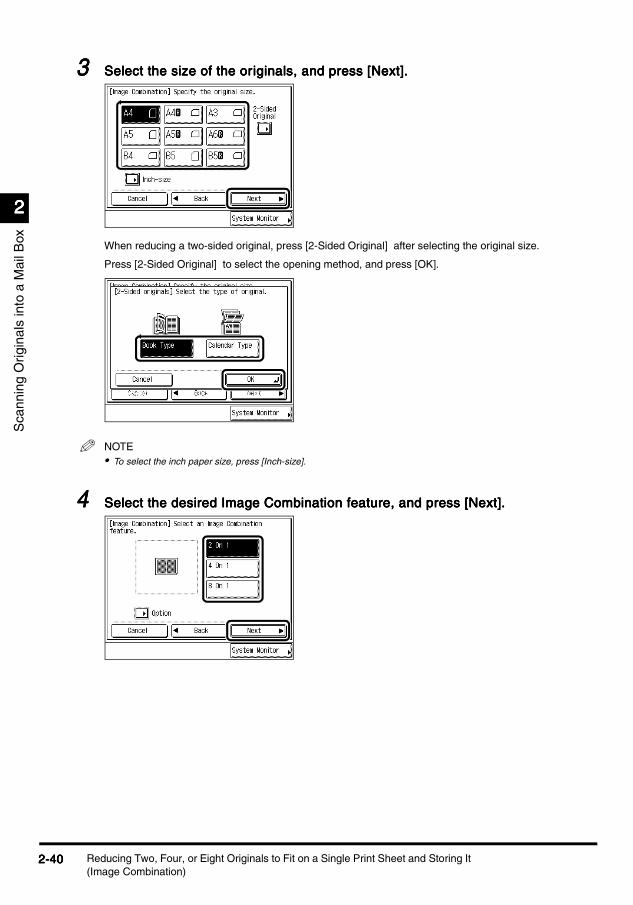
2222
Sca
nnin
g O
rigi
nals
into
a M
ail B
ox
3333 Select the size of the originals, and press [Next]. Select the size of the originals, and press [Next]. Select the size of the originals, and press [Next]. Select the size of the originals, and press [Next].
When reducing a two-sided original, press [2-Sided Original] after selecting the original size.
Press [2-Sided Original] to select the opening method, and press [OK].
NOTE• To select the inch paper size, press [Inch-size].
4444 Select the desired Image Combination feature, and press [Next]. Select the desired Image Combination feature, and press [Next]. Select the desired Image Combination feature, and press [Next]. Select the desired Image Combination feature, and press [Next].
Reducing Two, Four, or Eight Originals to Fit on a Single Print Sheet and Storing It (Image Combination)
2-402-402-402-40

2222
Sca
nnin
g O
rigi
nals
into
a M
ail B
ox
Press [Option] to select the order of image layout, and press [Done].
If you do not specify [Option], the images are printed in the following order: left → right for 2 On 1; upper left → upper right → lower left → lower right for 4 On 1 or 8 On 1.
5555 Select the size you want to record in Select the size you want to record in Select the size you want to record in Select the size you want to record in → press [OK] press [OK] press [OK] press [OK] → presspresspresspress [Done]. [Done]. [Done]. [Done].
The specified mode is set and the display returns to the Scan screen.
NOTE• To select the inch paper size, press [Inch-size].
6666 PressPressPressPress ....
The machine starts scanning. (See ‘Storing Originals in the Mail Box’ on p. 1-9.)
When the original is placed on the platen glass, follow the instructions that appear on the display and press once for each original. When scanning is completed, press [Done].
The document is scanned with the reduction ratio automatically set, depending on the selected size to record.
NOTE• To cancel the setting, press [Special Features] → [Image Combination] → [Cancel], in this order.• To cancel all settings at once, press [Initial Settings]. (The machine returns to the standard scanning mode.)• To return the display to the Mail Box Selection screen, press .
2 On 1 4 On 1, 8 On 1
Reducing Two, Four, or Eight Originals to Fit on a Single Print Sheet and Storing It(Image Combination)
2-412-412-412-41

Sca
nnin
g O
rigi
nals
into
a M
ail B
ox
2222
Scanning Different-size Originals Together Scanning Different-size Originals Together Scanning Different-size Originals Together Scanning Different-size Originals Together (Different Size Originals)(Different Size Originals)(Different Size Originals)(Different Size Originals)
With this function you can scan different-size originals of the same width, together in one group.
IMPORTANT
• When the machine is operating in the Different Size Originals mode, you cannot use the Manual Document Size Select, Two-page Separation, Booklet Scanning, Original Frame Erase, Book Frame Erase, or Image Combination modes.
• All originals placed together in the feeder/platen glass must be the same weight (paper type).
1111 Select the desired mail box number to display the Document Selection screen, and Select the desired mail box number to display the Document Selection screen, and Select the desired mail box number to display the Document Selection screen, and Select the desired mail box number to display the Document Selection screen, and press [Scan]. press [Scan]. press [Scan]. press [Scan].
When you select a mail box set with a password, enter the password after selecting the mail box, and press [OK].
The Scan screen is displayed.
2222 Place your originals Place your originals Place your originals Place your originals → press [Special Features] press [Special Features] press [Special Features] press [Special Features] → press [Different Size press [Different Size press [Different Size press [Different Size Originals]. Originals]. Originals]. Originals].
Scanning Different-size Originals Together (Different Size Originals)2-422-422-422-42

2222
Sca
nnin
g O
rigi
nals
into
a M
ail B
ox
3333 Press [Done]. Press [Done]. Press [Done]. Press [Done].
The specified mode is set and the display returns to the Scan screen.
4444 PressPressPressPress ....
The machine starts scanning. (See ‘Storing Originals in the Mail Box’ on p. 1-9.)
When the original is placed on the platen glass, follow the instructions that appear on the display and press once for each original. When scanning is completed, press [Done].
NOTE• To cancel the setting, press [Special Features] → [Different Size Originals], in this order.• To cancel all settings at once, press [Initial Settings]. (The machine returns to the Standard Scanning mode.)• To return the display to the Mail Box Selection screen, press .
Scanning Different-size Originals Together (Different Size Originals) 2-432-432-432-43

Sca
nnin
g O
rigi
nals
into
a M
ail B
ox
2222
Scanning Separately-set Originals as One Scanning Separately-set Originals as One Scanning Separately-set Originals as One Scanning Separately-set Originals as One Document Document Document Document (Job Build)(Job Build)(Job Build)(Job Build)
With this function you can scan originals that are too numerous to scan at once, by dividing them into multiple batches. You can use both the feeder and the platen glass for scanning. The originals are stored as one document after all the batches have been scanned.
IMPORTANT
• You cannot change the scan settings while scanning originals in the Job Build mode. You need to set the necessary scan settings beforehand according to the type of original and desired Finisher mode.
• You can change or specify the following before scanning the next originals, i.e., between jobs: the number of copies, image quality, exposure, and 2-sided mode.
• If you place the originals in the feeder, remove the originals sequentially from the original output area when scanning is completed.
NOTE• When you place different-size originals in the feeder, set the [Different size Originals] mode.• To scan one-sided and two-sided originals as two-sided, set the [Two-sided Original] mode beforehand, if the first batch
of original is two-sided. To scan the next original(s), set or cancel the Two-sided Original mode according to the type of original.
• It also is useful to store originals in a box and print them with the Merge Documents mode when you cannot prepare originals at once, or when you want to select different settings for each original. (See ‘Printing Multiple Documents as One Document (Merge Documents)’ on p. 3-33.)
1111 Select the desired mail box number to display the Document Selection screen, and Select the desired mail box number to display the Document Selection screen, and Select the desired mail box number to display the Document Selection screen, and Select the desired mail box number to display the Document Selection screen, and press [Scan]. press [Scan]. press [Scan]. press [Scan].
When you select a mail box set with a password, enter the password after selecting the mail box, and press [OK].
The Scan screen is displayed.
2222 Place your first original, and press [Special Features]. Place your first original, and press [Special Features]. Place your first original, and press [Special Features]. Place your first original, and press [Special Features].
Scanning Separately-set Originals as One Document (Job Build)2-442-442-442-44

2222
Sca
nnin
g O
rigi
nals
into
a M
ail B
ox
3333 Press [Job Build], and press [Done]. Press [Job Build], and press [Done]. Press [Job Build], and press [Done]. Press [Job Build], and press [Done].
The specified mode is set and the display returns to the Scan screen.
4444 PressPressPressPress ....
The machine starts scanning. (See ‘Storing Originals in the Mail Box’ on p. 1-9.)
NOTE• To cancel scanning, press [Cancel] or .
5555 When scanning is completed, place the next original, and press When scanning is completed, place the next original, and press When scanning is completed, place the next original, and press When scanning is completed, place the next original, and press ....Change the scan settings before pressing , if necessary.
- You can adjust the Exposure and the Image Quality. (See ‘Adjusting the Exposure and Image Quality Before Scanning the Originals’ on p. 2-7.)
- You can change the setting of the original type (One-sided/Two-sided). (See ‘Scanning Two-sided Originals (2-sided Original)’ on p. 2-24.)
Scanning Separately-set Originals as One Document (Job Build) 2-452-452-452-45
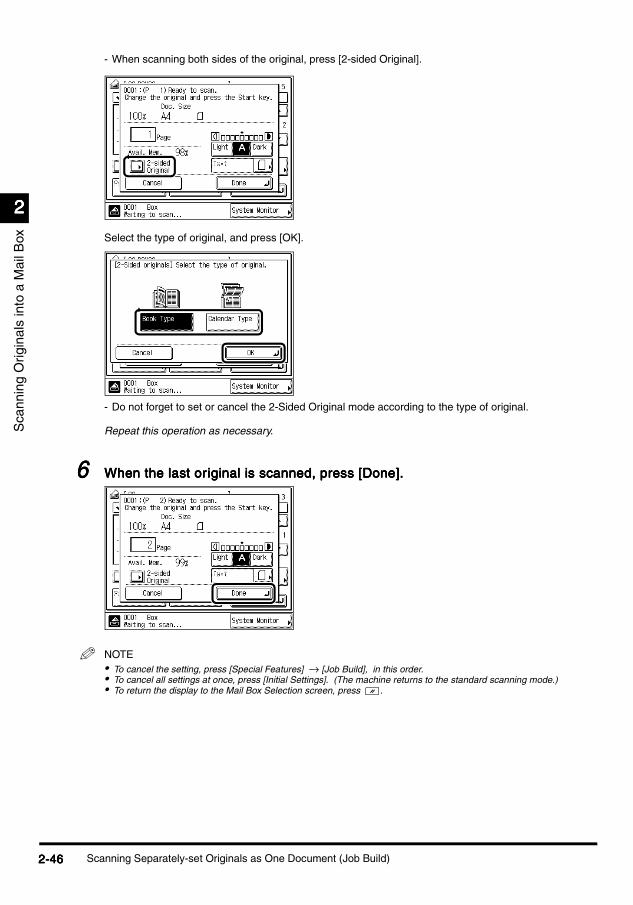
2222
Sca
nnin
g O
rigi
nals
into
a M
ail B
ox
- When scanning both sides of the original, press [2-sided Original].
Select the type of original, and press [OK].
- Do not forget to set or cancel the 2-Sided Original mode according to the type of original.
Repeat this operation as necessary.
6666 When the last original is scanned, press [Done]. When the last original is scanned, press [Done]. When the last original is scanned, press [Done]. When the last original is scanned, press [Done].
NOTE• To cancel the setting, press [Special Features] → [Job Build], in this order.• To cancel all settings at once, press [Initial Settings]. (The machine returns to the standard scanning mode.)• To return the display to the Mail Box Selection screen, press .
Scanning Separately-set Originals as One Document (Job Build)2-462-462-462-46
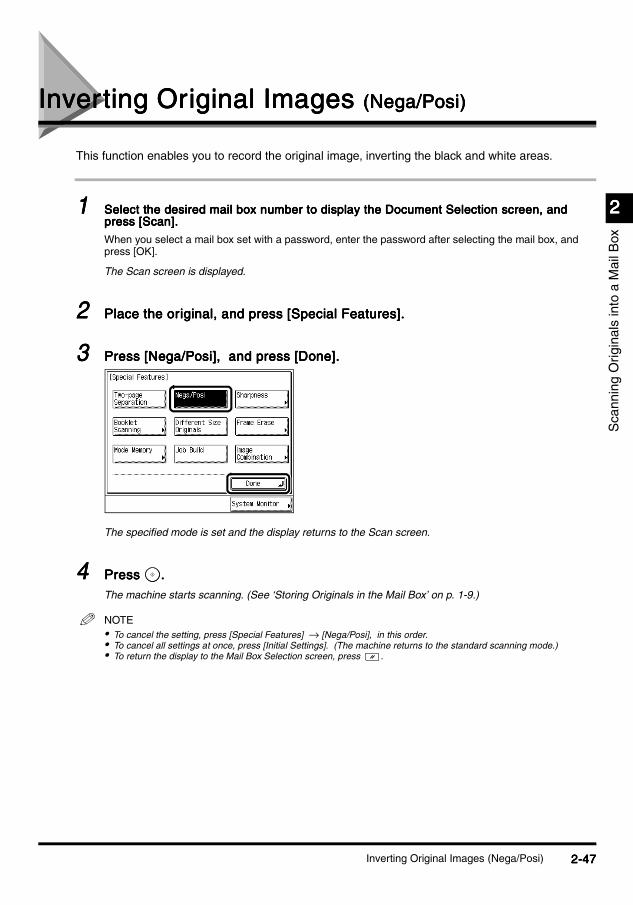
Inverting Original Images Inverting Original Images Inverting Original Images Inverting Original Images (Nega/Posi)(Nega/Posi)(Nega/Posi)(Nega/Posi)
Sca
nnin
g O
rigi
nals
into
a M
ail B
ox
2222
This function enables you to record the original image, inverting the black and white areas.
1111 Select the desired mail box number to display the Document Selection screen, and Select the desired mail box number to display the Document Selection screen, and Select the desired mail box number to display the Document Selection screen, and Select the desired mail box number to display the Document Selection screen, and press [Scan]. press [Scan]. press [Scan]. press [Scan].
When you select a mail box set with a password, enter the password after selecting the mail box, and press [OK].
The Scan screen is displayed.
2222 Place the original, and press [Special Features]. Place the original, and press [Special Features]. Place the original, and press [Special Features]. Place the original, and press [Special Features].
3333 Press [Nega/Posi], and press [Done]. Press [Nega/Posi], and press [Done]. Press [Nega/Posi], and press [Done]. Press [Nega/Posi], and press [Done].
The specified mode is set and the display returns to the Scan screen.
4444 PressPressPressPress ....
The machine starts scanning. (See ‘Storing Originals in the Mail Box’ on p. 1-9.)
NOTE• To cancel the setting, press [Special Features] → [Nega/Posi], in this order.• To cancel all settings at once, press [Initial Settings]. (The machine returns to the standard scanning mode.)• To return the display to the Mail Box Selection screen, press .
Inverting Original Images (Nega/Posi) 2-472-472-472-47
Sca
nnin
g O
rigi
nals
into
a M
ail B
ox
2222
Scanning Originals After Making Them Scanning Originals After Making Them Scanning Originals After Making Them Scanning Originals After Making Them Sharply Contrasted Sharply Contrasted Sharply Contrasted Sharply Contrasted (Sharpness)(Sharpness)(Sharpness)(Sharpness)
This mode allows you to scan original images with the contrast reproduced more sharply or more softly. To scan originals with text or lines reproduced more sharply, use [High]. To scan originals with photographs or other half-tones reproduced more softly, use [Low].
n LowLowLowLowIf you want to scan an original containing half-tones, such as a printed photograph, using the Photo mode, moiré may occur. However, by using [Low], you can soften this moiré effect so that the print is easier on the eyes.
n HighHighHighHighThis feature enhances the edges of original images so that faint or fine text is reproduced more sharply. This feature is particularly suited to blueprints and faint pencil-drawn originals.
1111 Select the desired mail box number to display the Document Selection screen, and Select the desired mail box number to display the Document Selection screen, and Select the desired mail box number to display the Document Selection screen, and Select the desired mail box number to display the Document Selection screen, and press [Scan]. press [Scan]. press [Scan]. press [Scan].
When you select a mail box set with a password, enter the password after selecting the mail box, and press [OK].
The Scan screen is displayed.
2222 Place your originals Place your originals Place your originals Place your originals → press [Special Features] press [Special Features] press [Special Features] press [Special Features] → press [Sharpness]. press [Sharpness]. press [Sharpness]. press [Sharpness].
Scanning Originals After Making Them Sharply Contrasted (Sharpness)2-482-482-482-48

2222
Sca
nnin
g O
rigi
nals
into
a M
ail B
ox
3333 Adjust the sharpness by pressing [Low] or [High], Adjust the sharpness by pressing [Low] or [High], Adjust the sharpness by pressing [Low] or [High], Adjust the sharpness by pressing [Low] or [High], → press [OK] press [OK] press [OK] press [OK] → press press press press [Done]. [Done]. [Done]. [Done].
To scan text and lines clearly, the setting should be towards [High]. To scan photographs or other half-tones, the setting should be towards [Low].
The specified mode is set and the display returns to the Scan screen.
4444 PressPressPressPress ....
The machine starts scanning. (See ‘Storing Originals in the Mail Box’ on p. 1-9.)
NOTE• To cancel the setting, press [Special Features] → [Sharpness] → [Cancel], in this order.• To cancel all settings at once, press [Initial Settings]. (The machine returns to the standard scanning mode.)• To return the display to the Mail Box Selection screen, press .
Scanning Originals After Making Them Sharply Contrasted (Sharpness) 2-492-492-492-49

Sca
nnin
g O
rigi
nals
into
a M
ail B
ox
2222
Storing/Recalling Scanning Modes Storing/Recalling Scanning Modes Storing/Recalling Scanning Modes Storing/Recalling Scanning Modes (Mode Memory)(Mode Memory)(Mode Memory)(Mode Memory)
With this function you can store up to nine settings, each setting consisting of any possible combination of the Scanning functions, in a memory key which you can name. This feature is useful when you want to store the settings used frequently.
NOTE• The scanning modes in memory are not erased even when you turn the machine’s power off.• The scanning modes you can store in a memory key are: Document Name, Image Quality, Document Size Select,
Scanning Exposure, Copy Ratio, 2-sided Original, Two-page Separation, Booklet Scanning, Frame Erase, Image Combination, Different Size Originals, Job Build, Nega/Posi, and Sharpness.
Storing Scanning ModesStoring Scanning ModesStoring Scanning ModesStoring Scanning Modes
1111 Select the desired mail box number to display the Document selection screen, and press Select the desired mail box number to display the Document selection screen, and press Select the desired mail box number to display the Document selection screen, and press Select the desired mail box number to display the Document selection screen, and press [Scan]. [Scan]. [Scan]. [Scan].
When you select a mail box set with a password, enter the password after selecting the mail box, and press [OK].
The Scanning screen is display.
2222 Set the scan settings that you want to store, in either the Scan screen or Set the scan settings that you want to store, in either the Scan screen or Set the scan settings that you want to store, in either the Scan screen or Set the scan settings that you want to store, in either the Scan screen or Special Features screen.Special Features screen.Special Features screen.Special Features screen.
NOTE• In the case shown above, the Two-page Separation and Job Build modes are set.
Storing/Recalling Scanning Modes (Mode Memory)2-502-502-502-50
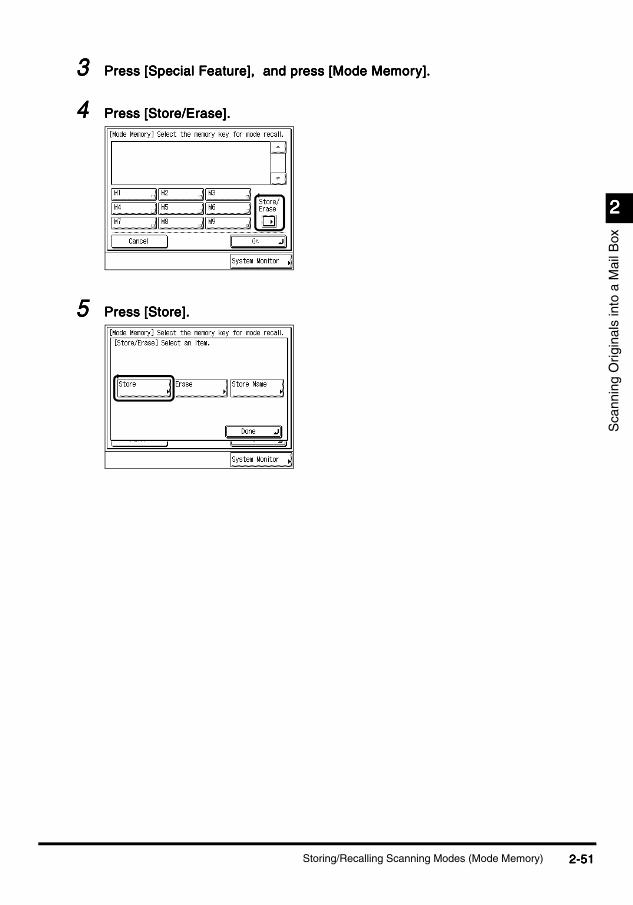
2222
Sca
nnin
g O
rigi
nals
into
a M
ail B
ox
3333 Press [Special Feature], and press [Mode Memory]. Press [Special Feature], and press [Mode Memory]. Press [Special Feature], and press [Mode Memory]. Press [Special Feature], and press [Mode Memory].
4444 Press [Store/Erase]. Press [Store/Erase]. Press [Store/Erase]. Press [Store/Erase].
5555 Press [Store]. Press [Store]. Press [Store]. Press [Store].
Storing/Recalling Scanning Modes (Mode Memory) 2-512-512-512-51
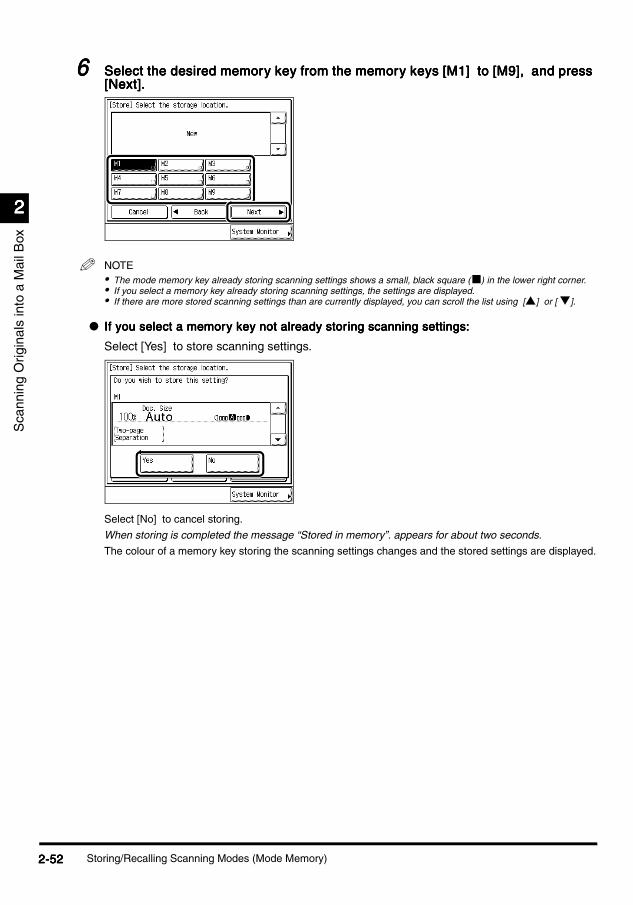
2222
Sca
nnin
g O
rigi
nals
into
a M
ail B
ox
6666 Select the desired memory key from the memory keys [M1] to [M9], and press Select the desired memory key from the memory keys [M1] to [M9], and press Select the desired memory key from the memory keys [M1] to [M9], and press Select the desired memory key from the memory keys [M1] to [M9], and press [Next]. [Next]. [Next]. [Next].
NOTE• The mode memory key already storing scanning settings shows a small, black square (n) in the lower right corner.• If you select a memory key already storing scanning settings, the settings are displayed.• If there are more stored scanning settings than are currently displayed, you can scroll the list using [s] or [ t].
l If you select a memory key not already storing scanning settings:If you select a memory key not already storing scanning settings:If you select a memory key not already storing scanning settings:If you select a memory key not already storing scanning settings:
Select [Yes] to store scanning settings.
Select [No] to cancel storing.
When storing is completed the message “Stored in memory”. appears for about two seconds.
The colour of a memory key storing the scanning settings changes and the stored settings are displayed.
Storing/Recalling Scanning Modes (Mode Memory)2-522-522-522-52

2222
Sca
nnin
g O
rigi
nals
into
a M
ail B
ox
l If you select a memory key already storing a scanning setting:If you select a memory key already storing a scanning setting:If you select a memory key already storing a scanning setting:If you select a memory key already storing a scanning setting:
Select [Yes] to overwrite the stored settings.
Select [No] to cancel storing.
When storing is completed, the message “Stored in memory”. appears for about two seconds.
The colour of the memory key storing the scanning settings changes, and the stored settings are displayed.
7777 Press [OK], and press [Done]. Press [OK], and press [Done]. Press [OK], and press [Done]. Press [OK], and press [Done].
The display returns to the Scan screen.
Storing a Memory Key NameStoring a Memory Key NameStoring a Memory Key NameStoring a Memory Key Name
1111 Select the desired mail box number to display the Document Selection screen, and Select the desired mail box number to display the Document Selection screen, and Select the desired mail box number to display the Document Selection screen, and Select the desired mail box number to display the Document Selection screen, and press [Scan]. press [Scan]. press [Scan]. press [Scan].
When you select a mail box set with a password, enter the password after selecting the mail box, and press [OK].
The Scan screen is displayed.
2222 Press [Special Features], and press [Mode Memory]. Press [Special Features], and press [Mode Memory]. Press [Special Features], and press [Mode Memory]. Press [Special Features], and press [Mode Memory].
Storing/Recalling Scanning Modes (Mode Memory) 2-532-532-532-53
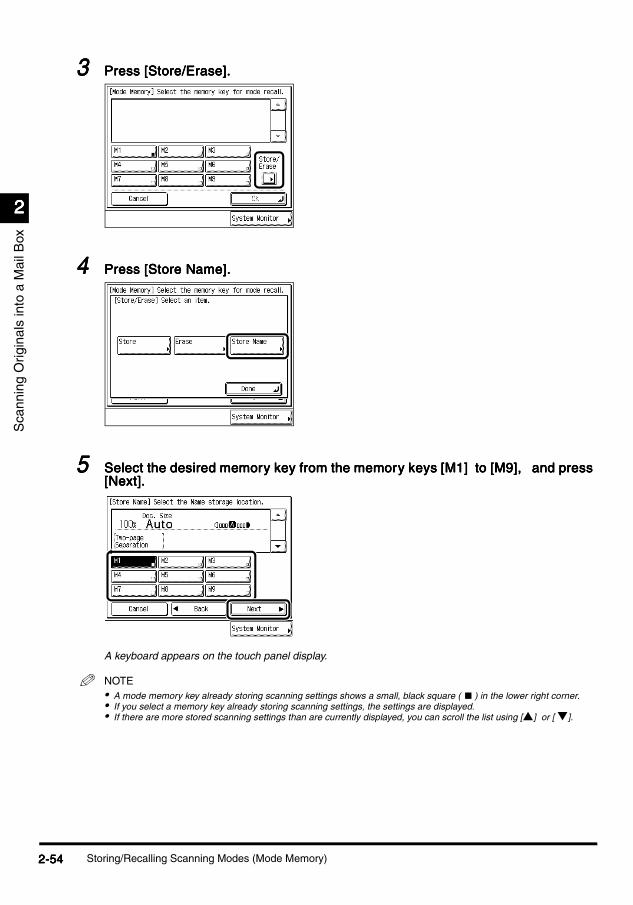
2222
Sca
nnin
g O
rigi
nals
into
a M
ail B
ox
3333 Press [Store/Erase]. Press [Store/Erase]. Press [Store/Erase]. Press [Store/Erase].
4444 Press [Store Name]. Press [Store Name]. Press [Store Name]. Press [Store Name].
5555 Select the desired memory key from the memory keys [M1] to [M9], and press Select the desired memory key from the memory keys [M1] to [M9], and press Select the desired memory key from the memory keys [M1] to [M9], and press Select the desired memory key from the memory keys [M1] to [M9], and press [Next]. [Next]. [Next]. [Next].
A keyboard appears on the touch panel display.
NOTE• A mode memory key already storing scanning settings shows a small, black square ( n ) in the lower right corner.• If you select a memory key already storing scanning settings, the settings are displayed.• If there are more stored scanning settings than are currently displayed, you can scroll the list using [s] or [ t].
Storing/Recalling Scanning Modes (Mode Memory)2-542-542-542-54

2222
Sca
nnin
g O
rigi
nals
into
a M
ail B
ox
6666 Enter the new name, and press [OK]. Enter the new name, and press [OK]. Enter the new name, and press [OK]. Enter the new name, and press [OK].
The maximum number of characters you can use for the name is 10.
The name appears on the memory key.
NOTE• For details of how to enter characters from the touch panel display, see the Reference Guide.• If you press [OK] without any characters entered, the name of the memory key returns back to its default setting, e.g.,
[M1] or [M2].
7777 Press [OK], and press [Done]. Press [OK], and press [Done]. Press [OK], and press [Done]. Press [OK], and press [Done].
The display returns to the Scan screen.
Recalling Scanning SettingsRecalling Scanning SettingsRecalling Scanning SettingsRecalling Scanning Settings
1111 Select the desired mail box number to display the Document Selection screen, and Select the desired mail box number to display the Document Selection screen, and Select the desired mail box number to display the Document Selection screen, and Select the desired mail box number to display the Document Selection screen, and press [Scan]. press [Scan]. press [Scan]. press [Scan].
When you select a mail box set with a password, enter the password after selecting the mail box, and press [OK].
The Scan screen is displayed.
2222 Press [Special Features], and press [Mode Memory]. Press [Special Features], and press [Mode Memory]. Press [Special Features], and press [Mode Memory]. Press [Special Features], and press [Mode Memory].
Storing/Recalling Scanning Modes (Mode Memory) 2-552-552-552-55
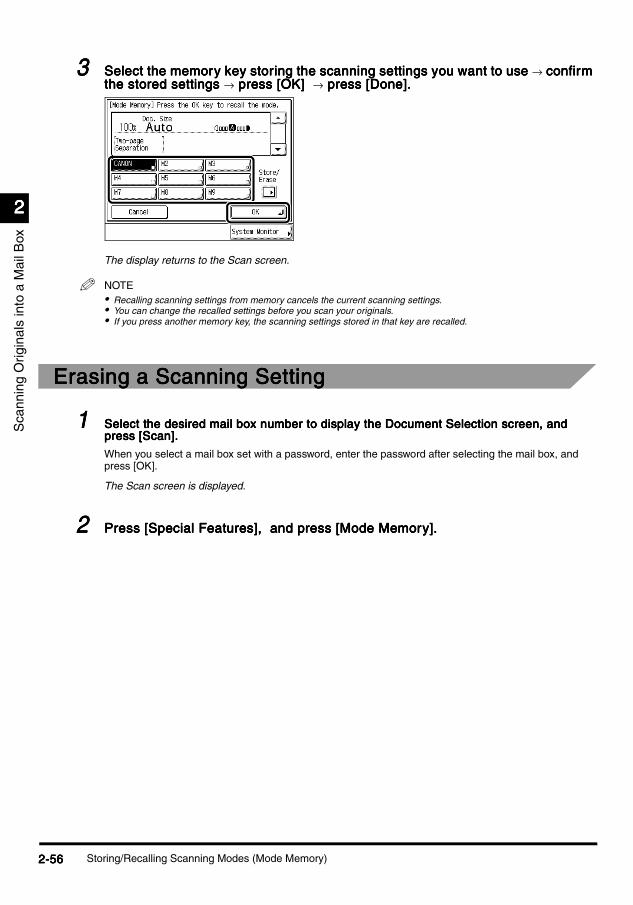
2222
Sca
nnin
g O
rigi
nals
into
a M
ail B
ox
3333 Select the memory key storing the scanning settings you want to use Select the memory key storing the scanning settings you want to use Select the memory key storing the scanning settings you want to use Select the memory key storing the scanning settings you want to use → confirm confirm confirm confirm the stored settings the stored settings the stored settings the stored settings → press [OK] press [OK] press [OK] press [OK] → press [Done]. press [Done]. press [Done]. press [Done].
The display returns to the Scan screen.
NOTE• Recalling scanning settings from memory cancels the current scanning settings.• You can change the recalled settings before you scan your originals.• If you press another memory key, the scanning settings stored in that key are recalled.
Erasing a Scanning SettingErasing a Scanning SettingErasing a Scanning SettingErasing a Scanning Setting
1111 Select the desired mail box number to display the Document Selection screen, and Select the desired mail box number to display the Document Selection screen, and Select the desired mail box number to display the Document Selection screen, and Select the desired mail box number to display the Document Selection screen, and press [Scan]. press [Scan]. press [Scan]. press [Scan].
When you select a mail box set with a password, enter the password after selecting the mail box, and press [OK].
The Scan screen is displayed.
2222 Press [Special Features], and press [Mode Memory]. Press [Special Features], and press [Mode Memory]. Press [Special Features], and press [Mode Memory]. Press [Special Features], and press [Mode Memory].
Storing/Recalling Scanning Modes (Mode Memory)2-562-562-562-56
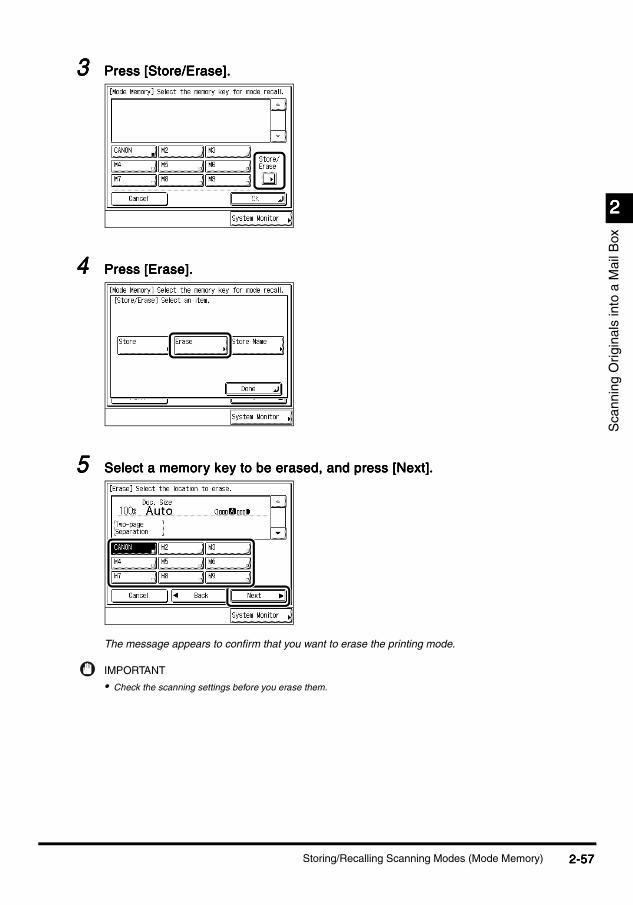
2222
Sca
nnin
g O
rigi
nals
into
a M
ail B
ox
3333 Press [Store/Erase]. Press [Store/Erase]. Press [Store/Erase]. Press [Store/Erase].
4444 Press [Erase]. Press [Erase]. Press [Erase]. Press [Erase].
5555 Select a memory key to be erased, and press [Next]. Select a memory key to be erased, and press [Next]. Select a memory key to be erased, and press [Next]. Select a memory key to be erased, and press [Next].
The message appears to confirm that you want to erase the printing mode.
IMPORTANT
• Check the scanning settings before you erase them.
Storing/Recalling Scanning Modes (Mode Memory) 2-572-572-572-57
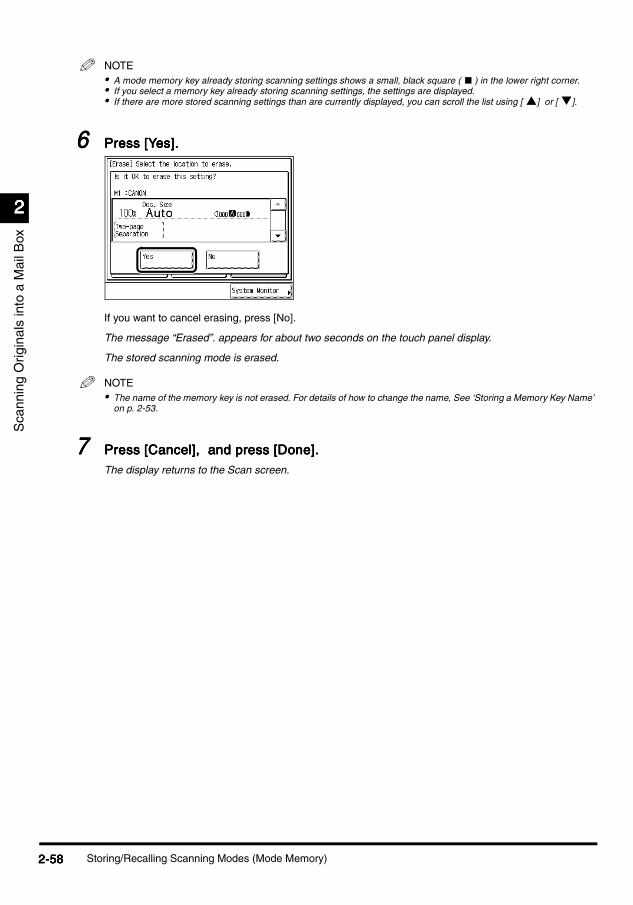
2222
Sca
nnin
g O
rigi
nals
into
a M
ail B
ox
NOTE• A mode memory key already storing scanning settings shows a small, black square ( n ) in the lower right corner.• If you select a memory key already storing scanning settings, the settings are displayed.• If there are more stored scanning settings than are currently displayed, you can scroll the list using [ s] or [ t].
6666 Press [Yes]. Press [Yes]. Press [Yes]. Press [Yes].
If you want to cancel erasing, press [No].
The message “Erased”. appears for about two seconds on the touch panel display.
The stored scanning mode is erased.
NOTE• The name of the memory key is not erased. For details of how to change the name, See ‘Storing a Memory Key Name’
on p. 2-53.
7777 Press [Cancel], and press [Done]. Press [Cancel], and press [Done]. Press [Cancel], and press [Done]. Press [Cancel], and press [Done].
The display returns to the Scan screen.
Storing/Recalling Scanning Modes (Mode Memory)2-582-582-582-58

CHAPTERCHAPTERCHAPTERCHAPTER
3333
Using/Arranging Documents Using/Arranging Documents Using/Arranging Documents Using/Arranging Documents Stored in the Mail BoxStored in the Mail BoxStored in the Mail BoxStored in the Mail BoxThis chapter describes functions that allow you to use and arrange documents stored in a mail box.
Printing a Document in a Mail Box After Changing the SettingsPrinting a Document in a Mail Box After Changing the SettingsPrinting a Document in a Mail Box After Changing the SettingsPrinting a Document in a Mail Box After Changing the Settings . . . . . . . . . . . . . . . . . . . . . . . . . . . . . . . . . . . . . . . . . . . . . . . . . . . . . . . . . . . . . . . . . . . . . . . . . . . . . . . . . . . . 3-23-23-23-2Selecting the Print Paper Size (Paper Select) . . . . . . . . . . . . . . . . . . . . . . . . . . . . . . . . . . . . . . . . . . . . . . 3-2Collating Prints (Finisher) . . . . . . . . . . . . . . . . . . . . . . . . . . . . . . . . . . . . . . . . . . . . . . . . . . . . . . . . . . . . . . 3-5Printing on Two Sides (Two-sided Printing). . . . . . . . . . . . . . . . . . . . . . . . . . . . . . . . . . . . . . . . . . . . . . . . 3-16Adding Job Separator Sheets, Front and Back Covers to Printed Sets (Cover/Job Separator) . . . . . . . . 3-18Making Prints for Use as a Booklet (Booklet) . . . . . . . . . . . . . . . . . . . . . . . . . . . . . . . . . . . . . . . . . . . . . . 3-22Storing/Recalling Printing Modes (Mode Memory) . . . . . . . . . . . . . . . . . . . . . . . . . . . . . . . . . . . . . . . . . . 3-25Recalling a Printing Mode. . . . . . . . . . . . . . . . . . . . . . . . . . . . . . . . . . . . . . . . . . . . . . . . . . . . . . . . . . . . . 3-30Erasing a Print Setting . . . . . . . . . . . . . . . . . . . . . . . . . . . . . . . . . . . . . . . . . . . . . . . . . . . . . . . . . . . . . . . 3-31Printing Multiple Documents as One Document (Merge Documents) . . . . . . . . . . . . . . . . . . . . . . . . . . . 3-33
Checking the Print Result or the Image of the Stored Document (Sample Print)Checking the Print Result or the Image of the Stored Document (Sample Print)Checking the Print Result or the Image of the Stored Document (Sample Print)Checking the Print Result or the Image of the Stored Document (Sample Print) . . . . . . . .. . . . . . . .. . . . . . . .. . . . . . . . 3-363-363-363-36
Reserving JobsReserving JobsReserving JobsReserving Jobs . . . . . . . . . . . . . . . . . . . . . . . . . . . . . . . . . . . . . . . . . . . . . . . . . . . . . . . . . . . . . . . . . . . . . . . . . . . . . . . . . . . . . . . . . . . . . . . . . . . . . . . . . . . . . . . . . . . . . . . . . . . . . . . . . . . . . . . . . . . . . . . . . . . . . . . . . . . . . . . . . . . . . . . . . . . . . . . . . . . . . . . . . . . . . . . . . . . . . . . . . . . . . . . . . . . . . . . . . . . . . . . . 3-383-383-383-38
Changing the Exposure During PrintingChanging the Exposure During PrintingChanging the Exposure During PrintingChanging the Exposure During Printing . . . . . . . . . . . . . . . . . . . . . . . . . . . . . . . . . . . . . .. . . . . . . . . . . . . . . . . . . . . . . . . . . . . . . . . . . . . .. . . . . . . . . . . . . . . . . . . . . . . . . . . . . . . . . . . . . .. . . . . . . . . . . . . . . . . . . . . . . . . . . . . . . . . . . . . . 3-403-403-403-40
Checking the Document’s Detailed InformationChecking the Document’s Detailed InformationChecking the Document’s Detailed InformationChecking the Document’s Detailed Information . . . . . . . . . . . . . . . . . . . . . . . . . . . . . . . . . . . . . . . . . . . . . . . . . . . . . . . . . . . . . . . . . . . . . . . . . . . . . . . . . . . . . . . . . . . . . . . . . . . . . . . . . . . . . . . . . . . . . . . . . . . . . . . . 3-413-413-413-41
Changing the Name of a DocumentChanging the Name of a DocumentChanging the Name of a DocumentChanging the Name of a Document . . . . . . . . . . . . . . . . . . . . . . . . . . . . . . . . . . . . . . . . . . . . . . . . . . . . . . . . . . . . . . . . . . . . . . . . . . . . . . . . . . . . . . . . . . . . . . . . . . . . . . . . . . . . . . . . . . . . . . . . . . . . . . . . . . . . . . . . . . . . . . . . . . . . . . . . . . . . . . . . . . . . 3-423-423-423-42
Moving a DocumentMoving a DocumentMoving a DocumentMoving a Document . . . . . . . . . . . . . . . . . . . . . . . . . . . . . . . . . . . . . . . . . . . . . . . . . . . . .. . . . . . . . . . . . . . . . . . . . . . . . . . . . . . . . . . . . . . . . . . . . . . . . . . . . .. . . . . . . . . . . . . . . . . . . . . . . . . . . . . . . . . . . . . . . . . . . . . . . . . . . . .. . . . . . . . . . . . . . . . . . . . . . . . . . . . . . . . . . . . . . . . . . . . . . . . . . . . . 3-443-443-443-44
Erasing a Document from a Mail BoxErasing a Document from a Mail BoxErasing a Document from a Mail BoxErasing a Document from a Mail Box . . . . . . . . . . . . . . . . . . . . . . . . . . . . . . . . . . . . . . . .. . . . . . . . . . . . . . . . . . . . . . . . . . . . . . . . . . . . . . . .. . . . . . . . . . . . . . . . . . . . . . . . . . . . . . . . . . . . . . . .. . . . . . . . . . . . . . . . . . . . . . . . . . . . . . . . . . . . . . . . 3-463-463-463-46
3-13-13-13-1
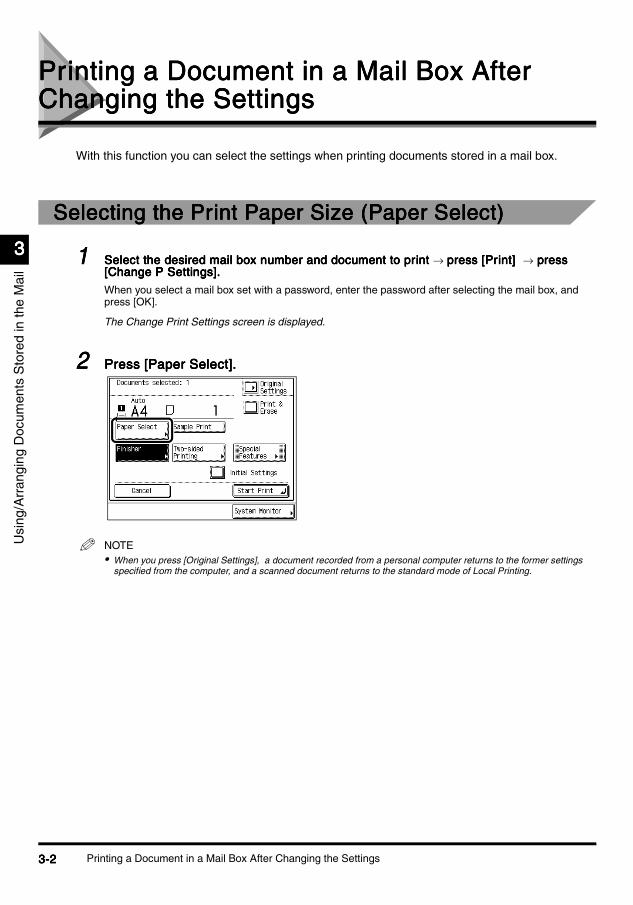
Usi
ng/A
rran
ging
Doc
umen
ts S
tore
d in
the
Mai
l
3333
Printing a Document in a Mail Box After Printing a Document in a Mail Box After Printing a Document in a Mail Box After Printing a Document in a Mail Box After Changing the SettingsChanging the SettingsChanging the SettingsChanging the Settings
With this function you can select the settings when printing documents stored in a mail box.
Selecting the Print Paper Size (Paper Select)Selecting the Print Paper Size (Paper Select)Selecting the Print Paper Size (Paper Select)Selecting the Print Paper Size (Paper Select)
1111 Select the desired mail box number and document to print Select the desired mail box number and document to print Select the desired mail box number and document to print Select the desired mail box number and document to print → press [Print] press [Print] press [Print] press [Print] → press press press press [Change P Settings]. [Change P Settings]. [Change P Settings]. [Change P Settings].
When you select a mail box set with a password, enter the password after selecting the mail box, and press [OK].
The Change Print Settings screen is displayed.
2222 Press [Paper Select]. Press [Paper Select]. Press [Paper Select]. Press [Paper Select].
NOTE• When you press [Original Settings], a document recorded from a personal computer returns to the former settings
specified from the computer, and a scanned document returns to the standard mode of Local Printing.
Printing a Document in a Mail Box After Changing the Settings3-23-23-23-2
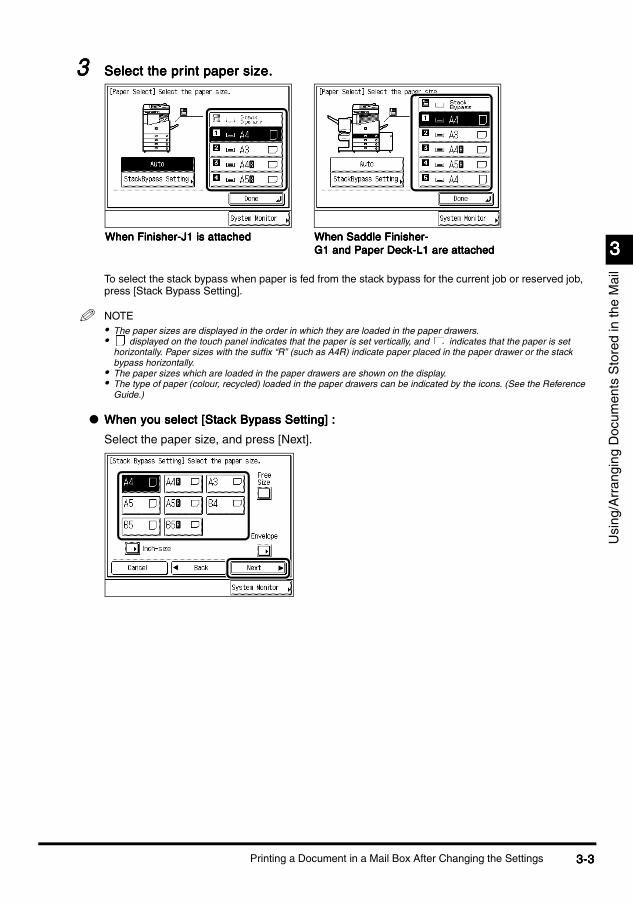
3333
Usi
ng/A
rran
ging
Doc
umen
ts S
tore
d in
the
Mai
l
3333 Select the print paper size.Select the print paper size.Select the print paper size.Select the print paper size.
To select the stack bypass when paper is fed from the stack bypass for the current job or reserved job, press [Stack Bypass Setting].
NOTE• The paper sizes are displayed in the order in which they are loaded in the paper drawers.• displayed on the touch panel indicates that the paper is set vertically, and indicates that the paper is set
horizontally. Paper sizes with the suffix “R” (such as A4R) indicate paper placed in the paper drawer or the stack bypass horizontally.
• The paper sizes which are loaded in the paper drawers are shown on the display.• The type of paper (colour, recycled) loaded in the paper drawers can be indicated by the icons. (See the Reference
Guide.)
l When you select [Stack Bypass Setting] :When you select [Stack Bypass Setting] :When you select [Stack Bypass Setting] :When you select [Stack Bypass Setting] :
Select the paper size, and press [Next].
When Finisher-J1 is attachedWhen Finisher-J1 is attachedWhen Finisher-J1 is attachedWhen Finisher-J1 is attached When Saddle Finisher-When Saddle Finisher-When Saddle Finisher-When Saddle Finisher-G1 and Paper Deck-L1 are attachedG1 and Paper Deck-L1 are attachedG1 and Paper Deck-L1 are attachedG1 and Paper Deck-L1 are attached
Printing a Document in a Mail Box After Changing the Settings 3-33-33-33-3

3333
Usi
ng/A
rran
ging
Doc
umen
ts S
tore
d in
the
Mai
l
Select the type of paper, and press [OK].
NOTE• Some sizes/types of paper cannot be selected depending on the set mode.• When placing paper other than a standard size, press [Free Size]. • When placing envelopes, press [Envelope]. • To select the inch paper size, press [Inch-size].
4444 Press [Done]. Press [Done]. Press [Done]. Press [Done].
The specified mode is set and the display returns to the Print screen.
5555 Press [Start Print]. Press [Start Print]. Press [Start Print]. Press [Start Print].
The machine starts printing. (See ‘Printing Documents Stored in the Mail Box’ on p. 1-13.)
If there is a current job or reserved job, the machine starts printing after that job is completed.
NOTE• To cancel all settings at once, press [Initial Settings]. (The machine returns to the standard mode of Local Printing.)• To return the display to the Mail Box Selection screen, press .
Printing a Document in a Mail Box After Changing the Settings3-43-43-43-4

3333
Usi
ng/A
rran
ging
Doc
umen
ts S
tore
d in
the
Mai
l
Collating PrintsCollating PrintsCollating PrintsCollating Prints (Finisher) (Finisher) (Finisher) (Finisher)The Finisher mode can be selected to collate the copies in various ways by pages or copy sets.
NOTE• When envelopes, tracing paper, transparencies, or labels are selected, Finisher functions cannot be set.• When heavyweight paper is selected, the Staple or Hole Punch mode cannot be set.
Below is a list of finishing functions and paper sizes available for each optional unit.Below is a list of finishing functions and paper sizes available for each optional unit.Below is a list of finishing functions and paper sizes available for each optional unit.Below is a list of finishing functions and paper sizes available for each optional unit.
*1 If Tray A is selected as a designated tray in the Additional Functions→ Common Settings→ Tray Designation screen, Offset is applied. If it is not selected, Rotate is applied.
*2 Stapling position cannot be selected.
Optional units Offset RotateStaple
Hole PunchCorner Double Saddle Stitch
None – A4,A4R,A5,A5R
– – – –
Finisher-J1 A3,A4,A4R,
A5
–
*2,
A3:15 sheets;A4,A4R:
30 sheets
– – –
Inner 2way Tray-A1– A4,A4R,
A5,A5R– – – –
Copy Tray-F1
Saddle Finisher-G1
*1
A3A4,A4R,
A5
*1
A4,A4R,A5,A5R
A3:25 sheetsA4,A4R:
50 sheets
A3:25 sheetsA4,A4R:
50 sheets
A3,A4R:10 sheets
–
Puncher Unit-J1 A3,A4,A4R: 2 holes
Puncher Unit-G1 A3,A4: 4 holes
Printing a Document in a Mail Box After Changing the Settings 3-53-53-53-5

3333
Usi
ng/A
rran
ging
Doc
umen
ts S
tore
d in
the
Mai
l
n When “Collate” Is Set:When “Collate” Is Set:When “Collate” Is Set:When “Collate” Is Set:Prints are automatically collated into sets arranged in page order, and output into the trays as follows:
n When “Group” Is Set:When “Group” Is Set:When “Group” Is Set:When “Group” Is Set:All copies of the same original page are automatically collated and grouped together, and output into the trays as follows:
n When “Staple” Is Set:When “Staple” Is Set:When “Staple” Is Set:When “Staple” Is Set:Prints are automatically collated into sets arranged in page order, automatically stapled, and output into the trays, as shown below.• When you select [Corner] (Top Left):
43
21
43
21
43
21
43
21
Print set 3Print set 3Print set 3Print set 3Print set 2Print set 2Print set 2Print set 2Print set 1Print set 1Print set 1Print set 1Three sets of Three sets of Three sets of Three sets of prints specifiedprints specifiedprints specifiedprints specified
Selected documentsSelected documentsSelected documentsSelected documents
44
33
22
11
4
4
3
32
21 1
Grouped Grouped Grouped Grouped prints of prints of prints of prints of page 1page 1page 1page 1
Selected documentsSelected documentsSelected documentsSelected documentsThree sets of Three sets of Three sets of Three sets of prints specifiedprints specifiedprints specifiedprints specified
Grouped Grouped Grouped Grouped prints of prints of prints of prints of page 2page 2page 2page 2
Grouped Grouped Grouped Grouped prints of prints of prints of prints of page 3page 3page 3page 3
Grouped Grouped Grouped Grouped prints of prints of prints of prints of page 4page 4page 4page 4
43
21
1 1 1
Print set 1Print set 1Print set 1Print set 1Selected documentsSelected documentsSelected documentsSelected documentsThree sets of Three sets of Three sets of Three sets of prints specifiedprints specifiedprints specifiedprints specified
Print set 2Print set 2Print set 2Print set 2 Print set 3Print set 3Print set 3Print set 3
Printing a Document in a Mail Box After Changing the Settings3-63-63-63-6

3333
Usi
ng/A
rran
ging
Doc
umen
ts S
tore
d in
the
Mai
l
• When you select [Double] (Left):
• When you select [Saddle Stitch] :
IMPORTANT
• You cannot select the position to be stapled when the Finisher-J1 (option) is attached. (See the Reference Guide for staple position.)
• Folds may appear differently depending on the type of paper.
NOTE• You must place the completed original as a Booklet, as shown in the above illustration. (See ‘Making Prints for Use as
a Booklet (Booklet)’ on p. 3-25.)• [Saddle Stitch] can only be set when the 1 2-Sided or 2 2-Sided mode is selected. (See ‘Printing on Two Sides
(Two-sided Printing)’ on p. 3-18.)
n When “Non-collate” Is Set:When “Non-collate” Is Set:When “Non-collate” Is Set:When “Non-collate” Is Set:When neither Collate, Group, nor Staple is set, prints are output into the trays as shown below.
43
21
1 1 1
Print set 1Print set 1Print set 1Print set 1Selected documentsSelected documentsSelected documentsSelected documentsThree sets of Three sets of Three sets of Three sets of print specifiedprint specifiedprint specifiedprint specified
Print set 2Print set 2Print set 2Print set 2 Print set 3Print set 3Print set 3Print set 3
6
5 4
3 3
8
7 2
1
6
8 1
36
8 1
36
8 1
Print set 1Print set 1Print set 1Print set 1Selected Selected Selected Selected Three sets of Three sets of Three sets of Three sets of print specifiedprint specifiedprint specifiedprint specified
Print set 2Print set 2Print set 2Print set 2 Print set 3Print set 3Print set 3Print set 3
43
4
3
22
1
1
PrintsPrintsPrintsPrintsSelected documentsSelected documentsSelected documentsSelected documents
Printing a Document in a Mail Box After Changing the Settings 3-73-73-73-7

3333
Usi
ng/A
rran
ging
Doc
umen
ts S
tore
d in
the
Mai
l
n When “Hole Punch” Is Set:When “Hole Punch” Is Set:When “Hole Punch” Is Set:When “Hole Punch” Is Set:The machine punches holes in the printed sheets.
n When “Rotate” Is Set:When “Rotate” Is Set:When “Rotate” Is Set:When “Rotate” Is Set:When originals of the same size are printed, prints are automatically collated into sets arranged in page order, and are output into the output trays in alternating directions.
n When “Offset” Is Set:When “Offset” Is Set:When “Offset” Is Set:When “Offset” Is Set:Prints are shifted to the front and back, alternately.
43
21
1
PrintsPrintsPrintsPrintsSelected documentsSelected documentsSelected documentsSelected documents
43
21 1
1
1
PrintsPrintsPrintsPrintsSelected documentsSelected documentsSelected documentsSelected documents
1
43
21
1
1
PrintsPrintsPrintsPrintsSelected documentsSelected documentsSelected documentsSelected documents
Printing a Document in a Mail Box After Changing the Settings3-83-83-83-8

3333
Usi
ng/A
rran
ging
Doc
umen
ts S
tore
d in
the
Mai
l
Collating Prints (Collate)Collating Prints (Collate)Collating Prints (Collate)Collating Prints (Collate)1111 Select the desired mail box number and document to print Select the desired mail box number and document to print Select the desired mail box number and document to print Select the desired mail box number and document to print → press [Print] press [Print] press [Print] press [Print] → press press press press
[Change P Settings]. [Change P Settings]. [Change P Settings]. [Change P Settings].
When you select a mail box set with a password, enter the password after selecting the mail box, and press [OK].
The Change Print Settings screen is displayed.
2222 Press [Finisher]. Press [Finisher]. Press [Finisher]. Press [Finisher].
NOTE• When you press [Original Settings], a document recorded from a personal computer returns to the former settings
specified from the computer, and a scanned document returns to the standard mode of Local Printing.
3333 Press [Collate], and press [OK]. Press [Collate], and press [OK]. Press [Collate], and press [OK]. Press [Collate], and press [OK].
When Saddle Finisher-G1 and When Saddle Finisher-G1 and When Saddle Finisher-G1 and When Saddle Finisher-G1 and Puncher Unit-J1/G1 are attached, and Puncher Unit-J1/G1 are attached, and Puncher Unit-J1/G1 are attached, and Puncher Unit-J1/G1 are attached, and Tray A exit slot is selectedTray A exit slot is selectedTray A exit slot is selectedTray A exit slot is selected
When Finisher-J1 is attachedWhen Finisher-J1 is attachedWhen Finisher-J1 is attachedWhen Finisher-J1 is attached
Printing a Document in a Mail Box After Changing the Settings 3-93-93-93-9

3333
Usi
ng/A
rran
ging
Doc
umen
ts S
tore
d in
the
Mai
l
When you want hole punches made, press [Hole Punch].l When you select [Rotate] :When you select [Rotate] :When you select [Rotate] :When you select [Rotate] :
When the Automatic Paper Selection is set, press [Next] → select the A4, A4R, A5 or A5R-size paper → press [OK].
Press [OK] in the following cases:
- Available paper size is selected manually.
- Available paper size is loaded in both horizontal and vertical directions.
- Drawer Eligibility for APS/ADS of the paper drawers loaded with the available paper size, is set to [On].
4444 Press [Start Print]. Press [Start Print]. Press [Start Print]. Press [Start Print].
The machine starts printing. (See ‘Printing Documents Stored in the Mail Box’ on p. 1-13.)
If there is a current job or reserved job, the machine starts printing after that job is completed.
When saddle Finisher-G1 and When saddle Finisher-G1 and When saddle Finisher-G1 and When saddle Finisher-G1 and Puncher Unit-J1/G1 are attached, and Puncher Unit-J1/G1 are attached, and Puncher Unit-J1/G1 are attached, and Puncher Unit-J1/G1 are attached, and Tray A exit slot is not selectedTray A exit slot is not selectedTray A exit slot is not selectedTray A exit slot is not selected
When no finisher is attached, or when When no finisher is attached, or when When no finisher is attached, or when When no finisher is attached, or when only Inner 2way tray-A1 is attachedonly Inner 2way tray-A1 is attachedonly Inner 2way tray-A1 is attachedonly Inner 2way tray-A1 is attached
Printing a Document in a Mail Box After Changing the Settings3-103-103-103-10

3333
Usi
ng/A
rran
ging
Doc
umen
ts S
tore
d in
the
Mai
l
NOTE• To cancel the setting, press [Finisher] → [Cancel], in this order.• To cancel all settings at once, press [Initial Settings]. (The machine returns to the standard mode of Local Printing.)• To return the display to the Mail Box Selection screen, press .
Grouping Prints (Group)Grouping Prints (Group)Grouping Prints (Group)Grouping Prints (Group)1111 Select the desired mail box number and document to print Select the desired mail box number and document to print Select the desired mail box number and document to print Select the desired mail box number and document to print → press [Print] press [Print] press [Print] press [Print] → press press press press
[Change P Settings]. [Change P Settings]. [Change P Settings]. [Change P Settings].
When you select a mail box set with a password, enter the password after selecting the mail box, and press [OK].
The Change Print Settings screen is displayed.
2222 Press [Finisher]. Press [Finisher]. Press [Finisher]. Press [Finisher].
NOTE• When you press [Original Settings], a document recorded from a personal computer returns to the former settings
specified from the computer, and a scanned document returns to the standard mode of Local Printing.
Printing a Document in a Mail Box After Changing the Settings 3-113-113-113-11

3333
Usi
ng/A
rran
ging
Doc
umen
ts S
tore
d in
the
Mai
l
3333 Press [Group], and press [OK]. Press [Group], and press [OK]. Press [Group], and press [OK]. Press [Group], and press [OK].
When you want hole punches mode, press [Hole Punch].
l When you select [Rotate] :When you select [Rotate] :When you select [Rotate] :When you select [Rotate] :
When the Automatic Paper Selection is set, press [Next] → select the A4, A4R, A5, A5R-size paper → press [OK].
When Saddle Finisher-G1 and When Saddle Finisher-G1 and When Saddle Finisher-G1 and When Saddle Finisher-G1 and Puncher Unit-J1/G1 are attached, and Puncher Unit-J1/G1 are attached, and Puncher Unit-J1/G1 are attached, and Puncher Unit-J1/G1 are attached, and Tray A exit slot is selectedTray A exit slot is selectedTray A exit slot is selectedTray A exit slot is selected
When Finisher-J1 is attachedWhen Finisher-J1 is attachedWhen Finisher-J1 is attachedWhen Finisher-J1 is attached
When no finisher is attached, or when When no finisher is attached, or when When no finisher is attached, or when When no finisher is attached, or when only Inner 2way Tray-A1 is attachedonly Inner 2way Tray-A1 is attachedonly Inner 2way Tray-A1 is attachedonly Inner 2way Tray-A1 is attached
When Saddle Finisher-G1 and When Saddle Finisher-G1 and When Saddle Finisher-G1 and When Saddle Finisher-G1 and Puncher Unit-J1/G1 are attached, and Puncher Unit-J1/G1 are attached, and Puncher Unit-J1/G1 are attached, and Puncher Unit-J1/G1 are attached, and Tray A exit slot is not selectedTray A exit slot is not selectedTray A exit slot is not selectedTray A exit slot is not selected
Printing a Document in a Mail Box After Changing the Settings3-123-123-123-12
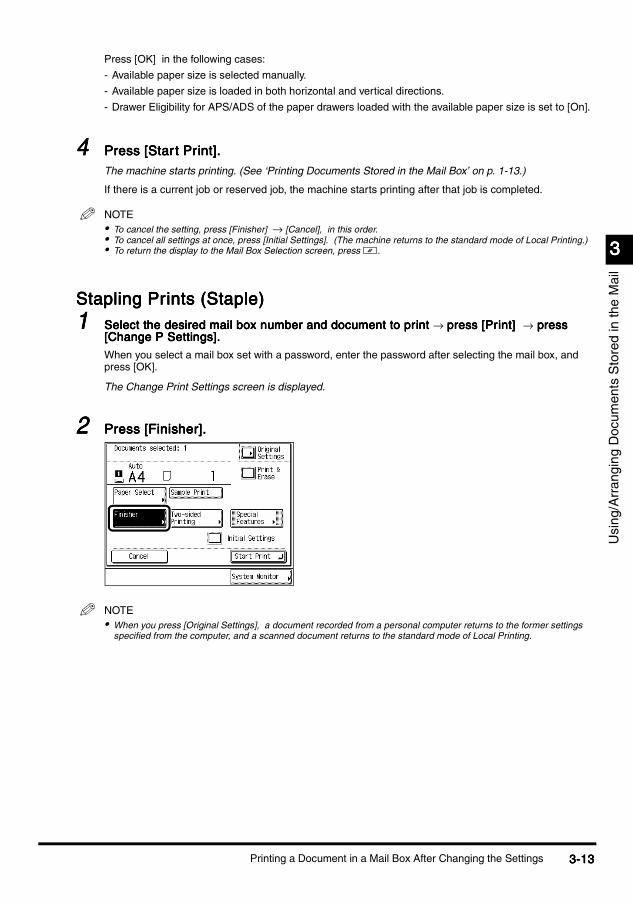
3333
Usi
ng/A
rran
ging
Doc
umen
ts S
tore
d in
the
Mai
l
Press [OK] in the following cases:
- Available paper size is selected manually.
- Available paper size is loaded in both horizontal and vertical directions.
- Drawer Eligibility for APS/ADS of the paper drawers loaded with the available paper size is set to [On].
4444 Press [Start Print]. Press [Start Print]. Press [Start Print]. Press [Start Print].
The machine starts printing. (See ‘Printing Documents Stored in the Mail Box’ on p. 1-13.)
If there is a current job or reserved job, the machine starts printing after that job is completed.
NOTE• To cancel the setting, press [Finisher] → [Cancel], in this order.• To cancel all settings at once, press [Initial Settings]. (The machine returns to the standard mode of Local Printing.)• To return the display to the Mail Box Selection screen, press .
Stapling Prints (Staple)Stapling Prints (Staple)Stapling Prints (Staple)Stapling Prints (Staple)1111 Select the desired mail box number and document to print Select the desired mail box number and document to print Select the desired mail box number and document to print Select the desired mail box number and document to print → press [Print] press [Print] press [Print] press [Print] → press press press press
[Change P Settings]. [Change P Settings]. [Change P Settings]. [Change P Settings].
When you select a mail box set with a password, enter the password after selecting the mail box, and press [OK].
The Change Print Settings screen is displayed.
2222 Press [Finisher]. Press [Finisher]. Press [Finisher]. Press [Finisher].
NOTE• When you press [Original Settings], a document recorded from a personal computer returns to the former settings
specified from the computer, and a scanned document returns to the standard mode of Local Printing.
Printing a Document in a Mail Box After Changing the Settings 3-133-133-133-13

3333
Usi
ng/A
rran
ging
Doc
umen
ts S
tore
d in
the
Mai
l
3333 Press [Staple]. Press [Staple]. Press [Staple]. Press [Staple].
When you want hole punches made, press [Hole Punch].
When Finisher-J1 (option) is attached, you cannot select the position of the staples. See the Reference Guide for staple positions.
When Saddle Finisher-G1 and When Saddle Finisher-G1 and When Saddle Finisher-G1 and When Saddle Finisher-G1 and Puncher Unit-J1/G1 are attached, and Puncher Unit-J1/G1 are attached, and Puncher Unit-J1/G1 are attached, and Puncher Unit-J1/G1 are attached, and Tray A exit slot is selectedTray A exit slot is selectedTray A exit slot is selectedTray A exit slot is selected
When Finisher-J1 is attachedWhen Finisher-J1 is attachedWhen Finisher-J1 is attachedWhen Finisher-J1 is attached
When Saddle Finisher-G1 and When Saddle Finisher-G1 and When Saddle Finisher-G1 and When Saddle Finisher-G1 and Puncher Unit-J1/G1 are attached, Puncher Unit-J1/G1 are attached, Puncher Unit-J1/G1 are attached, Puncher Unit-J1/G1 are attached, and Tray A exit slot is not selectedand Tray A exit slot is not selectedand Tray A exit slot is not selectedand Tray A exit slot is not selected
Printing a Document in a Mail Box After Changing the Settings3-143-143-143-14

3333
Usi
ng/A
rran
ging
Doc
umen
ts S
tore
d in
the
Mai
l
l When you select [Staple] with the Saddle Finisher-G1 attached:When you select [Staple] with the Saddle Finisher-G1 attached:When you select [Staple] with the Saddle Finisher-G1 attached:When you select [Staple] with the Saddle Finisher-G1 attached:
Press [Next] → select the type of staple ([Corner], [Double], or [Saddle Stitch] ) → select the staple position.
If [Saddle Stitch] is selected, follow these steps.- Press [Next].
- Select the paper size, and press [OK].
NOTE• You can adjust the saddle stitch position. (See the Reference Guide.)
4444 Press [OK]. Press [OK]. Press [OK]. Press [OK].
The specified mode is set and the display returns to the Print screen.
Printing a Document in a Mail Box After Changing the Settings 3-153-153-153-15
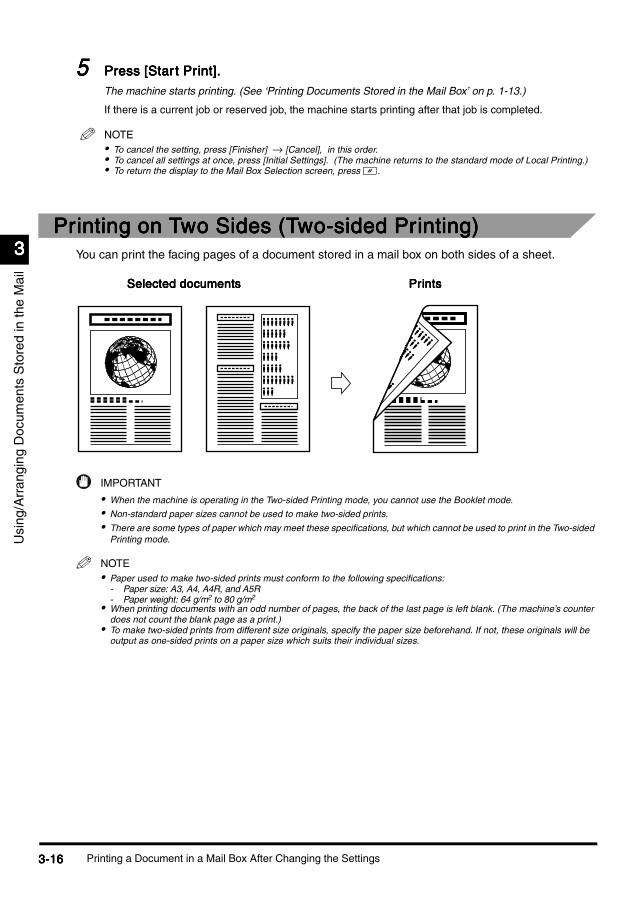
3333
Usi
ng/A
rran
ging
Doc
umen
ts S
tore
d in
the
Mai
l
5555 Press [Start Print]. Press [Start Print]. Press [Start Print]. Press [Start Print].
The machine starts printing. (See ‘Printing Documents Stored in the Mail Box’ on p. 1-13.)
If there is a current job or reserved job, the machine starts printing after that job is completed.
NOTE• To cancel the setting, press [Finisher] → [Cancel], in this order.• To cancel all settings at once, press [Initial Settings]. (The machine returns to the standard mode of Local Printing.)• To return the display to the Mail Box Selection screen, press .
Printing on Two Sides (Two-sided Printing)Printing on Two Sides (Two-sided Printing)Printing on Two Sides (Two-sided Printing)Printing on Two Sides (Two-sided Printing)You can print the facing pages of a document stored in a mail box on both sides of a sheet.
IMPORTANT
• When the machine is operating in the Two-sided Printing mode, you cannot use the Booklet mode.
• Non-standard paper sizes cannot be used to make two-sided prints.
• There are some types of paper which may meet these specifications, but which cannot be used to print in the Two-sided Printing mode.
NOTE• Paper used to make two-sided prints must conform to the following specifications:
- Paper size: A3, A4, A4R, and A5R- Paper weight: 64 g/m2 to 80 g/m2
• When printing documents with an odd number of pages, the back of the last page is left blank. (The machine’s counter does not count the blank page as a print.)
• To make two-sided prints from different size originals, specify the paper size beforehand. If not, these originals will be output as one-sided prints on a paper size which suits their individual sizes.
Selected documentsSelected documentsSelected documentsSelected documents PrintsPrintsPrintsPrints
Printing a Document in a Mail Box After Changing the Settings3-163-163-163-16

3333
Usi
ng/A
rran
ging
Doc
umen
ts S
tore
d in
the
Mai
l
1111 Select the desired mail box number and document to print Select the desired mail box number and document to print Select the desired mail box number and document to print Select the desired mail box number and document to print → press [Print] press [Print] press [Print] press [Print] → press press press press [Change P Settings]. [Change P Settings]. [Change P Settings]. [Change P Settings].
When you select a mail box set with a password, enter the password after selecting the mail box, and press [OK].
The Change Print Settings screen is displayed.
2222 Press [Two-sided Printing]. Press [Two-sided Printing]. Press [Two-sided Printing]. Press [Two-sided Printing].
NOTE• When you press [Original Settings], the document recorded from a personal computer returns to the former settings
selected from the computer, and the scanned document returns to the standard mode of Local Printing.
3333 Select the appropriate orientation, and press [OK]. Select the appropriate orientation, and press [OK]. Select the appropriate orientation, and press [OK]. Select the appropriate orientation, and press [OK].
If you want to print the first page of each document on the front when documents are merged and the Finisher mode is selected (except for [Group] ), press [Non Continuous]. If you want to print continuously without inserting any blank sides of a page between the documents, press [Continuous].
The specified mode is set and the display returns to the Print screen.
Printing a Document in a Mail Box After Changing the Settings 3-173-173-173-17

3333
Usi
ng/A
rran
ging
Doc
umen
ts S
tore
d in
the
Mai
l
4444 Press [Start Print]. Press [Start Print]. Press [Start Print]. Press [Start Print].
The machine starts printing. (See ‘Printing Documents Stored in the Mail Box’ on p. 1-13.)
If there is a current job or reserved job, the machine starts printing after that job is completed.
NOTE• To cancel the setting, press [Two-sided Printing] → [Cancel], in this order.• To cancel all settings at once, press [Initial Settings]. (The machine returns to the standard mode of Local Printing.)• To return the display to the Mail Box Selection screen, press .
Adding Job Separator Sheets, Front and Back Adding Job Separator Sheets, Front and Back Adding Job Separator Sheets, Front and Back Adding Job Separator Sheets, Front and Back Covers to Printed Sets (Cover/Job Separator)Covers to Printed Sets (Cover/Job Separator)Covers to Printed Sets (Cover/Job Separator)Covers to Printed Sets (Cover/Job Separator)
When you select multiple documents and set the Merge Documents mode, you can set the machine to automatically add front and back covers, or job separator sheets, to divide each document, using a different type of paper stock from what is used for the main text.
IMPORTANT
• When the machine is operating in the Cover/Job Separator mode, you cannot use the Non-collate, Group, Offset Group, Rotate Collating, Rotate Grouping, or Booklet modes.
• You can set this mode only when you select multiple documents and set the Merge Documents mode. (See ‘Printing Multiple Documents as One Document (Merge Documents)’ on p. 3-33.)
• You cannot print on the front cover, back cover, or job separator sheets.
• If the Finisher-J1 (option) is attached, stapling is not possible when the total number of prints including insertion sheets exceeds 30 sheets (for A4 and A4R size), or 15 sheets (for A3 size).
• If the Saddle Finisher-G1 (option) is attached, stapling is not possible when the total number of prints including insertion sheets exceeds 50 sheets (for A4, and A4R size) or 25 sheets (for A3 size).
Printing a Document in a Mail Box After Changing the Settings3-183-183-183-18

3333
Usi
ng/A
rran
ging
Doc
umen
ts S
tore
d in
the
Mai
l
n Front CoverFront CoverFront CoverFront CoverAdds a front cover sheet to each set of print output. The cover sheet cannot be printed on.
n Back CoverBack CoverBack CoverBack CoverAdds a back cover sheet to each set of print output. The back cover cannot be printed on.
R E P O R T
Selected documentsSelected documentsSelected documentsSelected documents PrintsPrintsPrintsPrints
Selected documentsSelected documentsSelected documentsSelected documents PrintsPrintsPrintsPrints
Printing a Document in a Mail Box After Changing the Settings 3-193-193-193-19
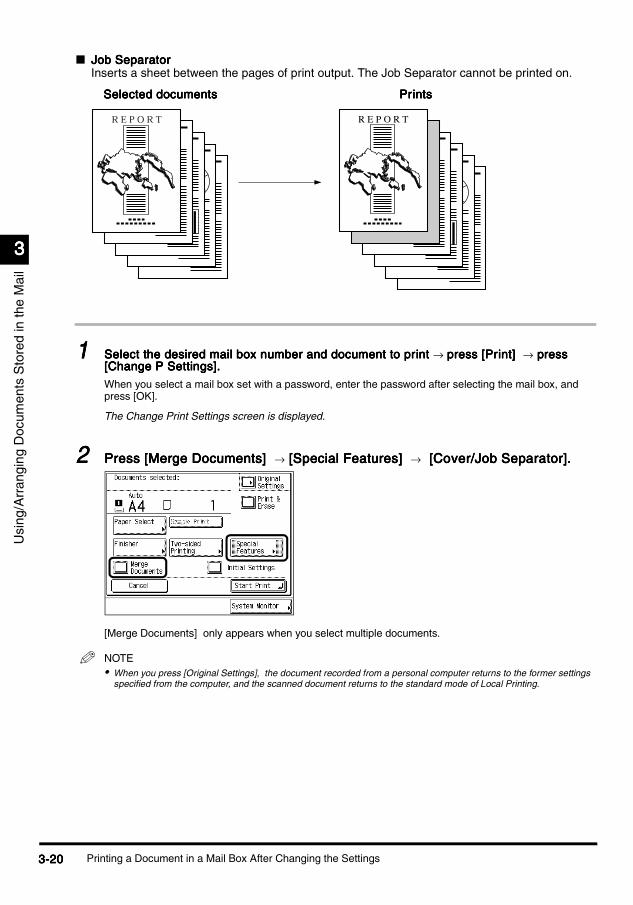
3333
Usi
ng/A
rran
ging
Doc
umen
ts S
tore
d in
the
Mai
l
n Job SeparatorJob SeparatorJob SeparatorJob SeparatorInserts a sheet between the pages of print output. The Job Separator cannot be printed on.
1111 Select the desired mail box number and document to print Select the desired mail box number and document to print Select the desired mail box number and document to print Select the desired mail box number and document to print → press [Print] press [Print] press [Print] press [Print] → press press press press [Change P Settings]. [Change P Settings]. [Change P Settings]. [Change P Settings].
When you select a mail box set with a password, enter the password after selecting the mail box, and press [OK].
The Change Print Settings screen is displayed.
2222 Press [Merge Documents] Press [Merge Documents] Press [Merge Documents] Press [Merge Documents] → [Special Features] [Special Features] [Special Features] [Special Features] → [Cover/Job Separator]. [Cover/Job Separator]. [Cover/Job Separator]. [Cover/Job Separator].
[Merge Documents] only appears when you select multiple documents.
NOTE• When you press [Original Settings], the document recorded from a personal computer returns to the former settings
specified from the computer, and the scanned document returns to the standard mode of Local Printing.
Selected documentsSelected documentsSelected documentsSelected documents PrintsPrintsPrintsPrints
Printing a Document in a Mail Box After Changing the Settings3-203-203-203-20

3333
Usi
ng/A
rran
ging
Doc
umen
ts S
tore
d in
the
Mai
l
3333 Select the desired Cover/Job Separator feature, and press [Next]. Select the desired Cover/Job Separator feature, and press [Next]. Select the desired Cover/Job Separator feature, and press [Next]. Select the desired Cover/Job Separator feature, and press [Next].
NOTE• You cannot print on the front cover, back cover, or job separator sheets.• You can cancel a mode by pressing the mode key again.
4444 Select the paper source for each insertion sheet Select the paper source for each insertion sheet Select the paper source for each insertion sheet Select the paper source for each insertion sheet → press [OK] press [OK] press [OK] press [OK] → press [Done]. press [Done]. press [Done]. press [Done].
The selected mode is set and the display returns to the Change Print Settings screen.
IMPORTANT
• Select the same paper size for the front and back covers and the job separator sheets.• When a paper size is changed into another size, the other two will be changed automatically. But when only the
cassette is changed, the other two sizes will not be changed, as long as the cassettes contain the same size paper.
NOTE• The display will vary, depending on the mode selected.
5555 Press [Start Print]. Press [Start Print]. Press [Start Print]. Press [Start Print].
The machine starts printing. (See ‘Printing Documents Stored in the Mail Box’ on p. 1-13.)
If there is a current job or reserved job, the machine starts printing after that job is completed.
Printing a Document in a Mail Box After Changing the Settings 3-213-213-213-21

3333
Usi
ng/A
rran
ging
Doc
umen
ts S
tore
d in
the
Mai
l
NOTE• To cancel the setting, press [Special Features] → [Cover/Job Separator] → [Cancel], in this order.• To cancel all settings at once, press [Initial Settings]. (The machine returns to the standard mode of Local Printing.)• To return the display to the Mail Box Selection screen, press .
Making Prints for Use as a Booklet (Booklet)Making Prints for Use as a Booklet (Booklet)Making Prints for Use as a Booklet (Booklet)Making Prints for Use as a Booklet (Booklet)You can make prints which can easily be made into a booklet.
IMPORTANT
• When the machine is operating in the Booklet mode, you cannot use the Collate, Two-sided Printing, or Cover/Job Separator modes.
• You cannot set the Booklet mode to record a size other than A4, or A5.
• Saddle stitching is not performed when there is only one sheet.
• [Saddle Stitch] can only be specified when the Saddle Finisher-G1 (option) is attached.
• Folds may appear differently depending on the type of paper.
NOTE• When you want to print documents for use as a booklet, we recommend that you scan the original with the Booklet
Scanning mode beforehand. (See ‘Scanning Originals for Use as a Booklet (Booklet Scanning)’ on p. 2-28.)
When the Saddle When the Saddle When the Saddle When the Saddle Finisher-G1 is attachedFinisher-G1 is attachedFinisher-G1 is attachedFinisher-G1 is attached
Selected documentsSelected documentsSelected documentsSelected documents PrintsPrintsPrintsPrints
Printing a Document in a Mail Box After Changing the Settings3-223-223-223-22

3333
Usi
ng/A
rran
ging
Doc
umen
ts S
tore
d in
the
Mai
l
1111 Select the desired box number and document to print Select the desired box number and document to print Select the desired box number and document to print Select the desired box number and document to print → press [Print] press [Print] press [Print] press [Print] → press [Change press [Change press [Change press [Change P Settings]. P Settings]. P Settings]. P Settings].
When you select a mail box set with a password, enter the password after selecting the mail box, and press [OK].
The Change Print Settings screen is displayed.
2222 Press [Special Features], and press [Booklet]. Press [Special Features], and press [Booklet]. Press [Special Features], and press [Booklet]. Press [Special Features], and press [Booklet].
NOTE• When you press [Original Settings], the document recorded from a personal computer returns to the former settings
selected from the computer, and the scanned document returns to the standard mode of Local Printing.
3333 Select the paper size, and press [Next]. Select the paper size, and press [Next]. Select the paper size, and press [Next]. Select the paper size, and press [Next].
Press [OK] → [Done], and proceed to step 5 when the Saddle Finisher-G1 (option) is not attached.
A3, and A4R-size paper can be selected.
To add a cover page, press [Add Cover].
NOTE• Insert the paper for the cover page face down in the stack bypass.
Printing a Document in a Mail Box After Changing the Settings 3-233-233-233-23

3333
Usi
ng/A
rran
ging
Doc
umen
ts S
tore
d in
the
Mai
l
l When you select [Add Cover] :When you select [Add Cover] :When you select [Add Cover] :When you select [Add Cover] :
Select the type of paper, and press [Next].
Press [OK] → [Done], and proceed to step 5 when the Saddle Finisher-G1 (option) is not attached.
IMPORTANT
• The paper used for the cover page must be the same size as the other pages.• The paper used for the main text or the cover page must be from 64 g/m2 to 80 g/m2.• You cannot print on the cover page.• When you select [Add Cover], you cannot set the paper used for the main text in the stack bypass.
4444 Select whether or not to saddle stitch the bookletSelect whether or not to saddle stitch the bookletSelect whether or not to saddle stitch the bookletSelect whether or not to saddle stitch the booklet → press [OK] press [OK] press [OK] press [OK] → press [Done]. press [Done]. press [Done]. press [Done].
The specified mode is set and the display returns to the Print screen.
NOTE• When the number of sheets exceeds 11, stapling is not performed, and the prints are output to the output tray.• The Booklet tray can hold up to 10 sets of copies at a time for saddle-stitching.
Printing a Document in a Mail Box After Changing the Settings3-243-243-243-24

3333
Usi
ng/A
rran
ging
Doc
umen
ts S
tore
d in
the
Mai
l
5555 Press [Start Print]. Press [Start Print]. Press [Start Print]. Press [Start Print].
The machine starts printing. (See ‘Printing Documents Stored in the Mail Box’ on p. 1-13.)
If there is a current job or reserved job, the machine starts printing after that job is completed.
NOTE• To cancel the setting, press [Special Features] →[Booklet] → [Cancel], in this order.• To cancel all settings at once, press [Initial Settings]. (The machine returns to the standard mode of Local Printing.)• To return the display to the Mail Box Selection screen, press .
Storing/Recalling Printing Modes Storing/Recalling Printing Modes Storing/Recalling Printing Modes Storing/Recalling Printing Modes (Mode Memory)(Mode Memory)(Mode Memory)(Mode Memory)With this function you can store up to nine settings, each setting consisting of any possible combination of the Print functions, in a memory key which you can name. This feature is useful when you want to store the settings used frequently.
NOTE• The printing modes in memory are not erased even when you turn the machine’s power off.• The printing modes you can store in a memory key are: Sample Print, Finisher, Two-sided Printing, Booklet, Cover/Job
Separator, and Merge Documents.
Storing Printing ModesStoring Printing ModesStoring Printing ModesStoring Printing Modes
1111 Select the desired mail box number and document to print Select the desired mail box number and document to print Select the desired mail box number and document to print Select the desired mail box number and document to print → press [Print] press [Print] press [Print] press [Print] → press press press press [Change P Settings]. [Change P Settings]. [Change P Settings]. [Change P Settings].
When you select a mail box set with a password, enter the password after selecting the mail box, and press [OK].
The Change Print Settings screen is displayed.
Printing a Document in a Mail Box After Changing the Settings 3-253-253-253-25

3333
Usi
ng/A
rran
ging
Doc
umen
ts S
tore
d in
the
Mai
l
2222 Specify the print settings that you want to store in the Change Print Settings Specify the print settings that you want to store in the Change Print Settings Specify the print settings that you want to store in the Change Print Settings Specify the print settings that you want to store in the Change Print Settings screen or Special Features screen.screen or Special Features screen.screen or Special Features screen.screen or Special Features screen.
NOTE• In the case shown above, the Booklet mode is set.
3333 Press [Special Feature], and press [Mode Memory]. Press [Special Feature], and press [Mode Memory]. Press [Special Feature], and press [Mode Memory]. Press [Special Feature], and press [Mode Memory].
4444 Press [Store/Erase]. Press [Store/Erase]. Press [Store/Erase]. Press [Store/Erase].
Printing a Document in a Mail Box After Changing the Settings3-263-263-263-26
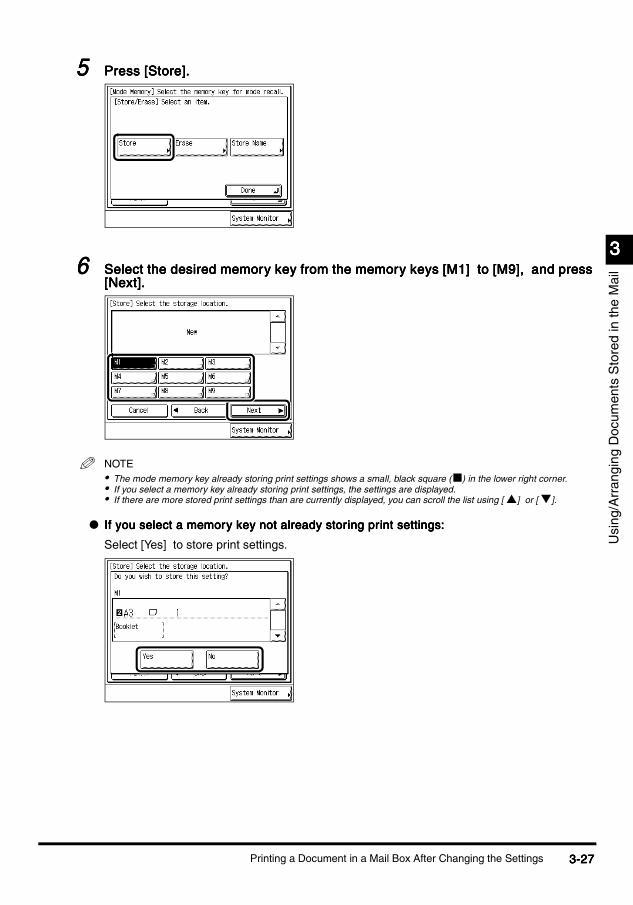
3333
Usi
ng/A
rran
ging
Doc
umen
ts S
tore
d in
the
Mai
l
5555 Press [Store]. Press [Store]. Press [Store]. Press [Store].
6666 Select the desired memory key from the memory keys [M1] to [M9], and press Select the desired memory key from the memory keys [M1] to [M9], and press Select the desired memory key from the memory keys [M1] to [M9], and press Select the desired memory key from the memory keys [M1] to [M9], and press [Next]. [Next]. [Next]. [Next].
NOTE• The mode memory key already storing print settings shows a small, black square ( n) in the lower right corner.• If you select a memory key already storing print settings, the settings are displayed.• If there are more stored print settings than are currently displayed, you can scroll the list using [ s] or [ t].
l If you select a memory key not already storing print settings:If you select a memory key not already storing print settings:If you select a memory key not already storing print settings:If you select a memory key not already storing print settings:
Select [Yes] to store print settings.
Printing a Document in a Mail Box After Changing the Settings 3-273-273-273-27

3333
Usi
ng/A
rran
ging
Doc
umen
ts S
tore
d in
the
Mai
l
Select [No] to cancel storing.
When storing is completed, the message “Stored in memory”. appears for about two seconds.
The colour of a memory key storing the print settings changes, and the stored settings are displayed.
l If you select a memory key already storing print settings:If you select a memory key already storing print settings:If you select a memory key already storing print settings:If you select a memory key already storing print settings:
Select [Yes] to overwrite the stored settings.
Select [No], to cancel storing.
When storing is complete, the message “Stored in memory”. appears for about two seconds.
The colour of a memory key storing the print settings changes, and the stored settings are displayed.
7777 Press [OK], and press [Done]. Press [OK], and press [Done]. Press [OK], and press [Done]. Press [OK], and press [Done].
The display returns to the Change Print Settings screen.
Storing a Memory Key NameStoring a Memory Key NameStoring a Memory Key NameStoring a Memory Key Name
1111 Select the desired mail box number and document to print Select the desired mail box number and document to print Select the desired mail box number and document to print Select the desired mail box number and document to print → press [Print] press [Print] press [Print] press [Print] → press press press press [Change P Settings]. [Change P Settings]. [Change P Settings]. [Change P Settings].
When you select a mail box set with a password, enter the password after selecting the mail box, and press [OK].
The Change Print Settings screen is displayed.
2222 Press [Special Features], and press [Mode Memory]. Press [Special Features], and press [Mode Memory]. Press [Special Features], and press [Mode Memory]. Press [Special Features], and press [Mode Memory].
Printing a Document in a Mail Box After Changing the Settings3-283-283-283-28

3333
Usi
ng/A
rran
ging
Doc
umen
ts S
tore
d in
the
Mai
l
3333 Press [Store/Erase]. Press [Store/Erase]. Press [Store/Erase]. Press [Store/Erase].
4444 Press [Store Name]. Press [Store Name]. Press [Store Name]. Press [Store Name].
5555 Select the memory key ([M1] to [M9] ) to which you want to store a name, and Select the memory key ([M1] to [M9] ) to which you want to store a name, and Select the memory key ([M1] to [M9] ) to which you want to store a name, and Select the memory key ([M1] to [M9] ) to which you want to store a name, and press [Next]. press [Next]. press [Next]. press [Next].
A keyboard appears in the touch panel display.
NOTE• A mode memory key already storing print settings shows a small, black square ( n) in the lower right corner.• If you select a memory key already storing print settings, the settings are displayed.• If there are more stored print settings than are currently displayed, you can scroll the list using [ s] or [ t].
Printing a Document in a Mail Box After Changing the Settings 3-293-293-293-29

3333
Usi
ng/A
rran
ging
Doc
umen
ts S
tore
d in
the
Mai
l
6666 Enter the new name, and press [OK]. Enter the new name, and press [OK]. Enter the new name, and press [OK]. Enter the new name, and press [OK].
The maximum number of characters you can use for the name is 10.
For details of how to enter characters from the touch panel display, see the Reference Guide.
The name appears on the memory key.
NOTE• If you press [OK] without any characters entered, the name of the memory key returns to its default setting, e.g., [M1]
or [M2].
7777 Press [OK], and press [Done]. Press [OK], and press [Done]. Press [OK], and press [Done]. Press [OK], and press [Done].
The display returns to the Change Print Settings screen.
Recalling a Printing ModeRecalling a Printing ModeRecalling a Printing ModeRecalling a Printing Mode
1111 Select the desired mail box number and document to print Select the desired mail box number and document to print Select the desired mail box number and document to print Select the desired mail box number and document to print → press [Print] press [Print] press [Print] press [Print] → press press press press [Change P Settings]. [Change P Settings]. [Change P Settings]. [Change P Settings].
When you select a mail box set with a password, enter the password after selecting the mail box, and press [OK].
The Change Print Settings screen is displayed.
2222 Press [Special Features], and press [Mode Memory]. Press [Special Features], and press [Mode Memory]. Press [Special Features], and press [Mode Memory]. Press [Special Features], and press [Mode Memory].
Printing a Document in a Mail Box After Changing the Settings3-303-303-303-30

3333
Usi
ng/A
rran
ging
Doc
umen
ts S
tore
d in
the
Mai
l
3333 Select the memory key storing the print settings you want to use Select the memory key storing the print settings you want to use Select the memory key storing the print settings you want to use Select the memory key storing the print settings you want to use → confirm the confirm the confirm the confirm the stored settings stored settings stored settings stored settings → press [OK] press [OK] press [OK] press [OK] → press [Done]. press [Done]. press [Done]. press [Done].
The display returns to the Change Print Settings screen.
NOTE• Recalling print settings from memory cancels the current print settings.• You can change the recalled settings before you print your originals.• If you press another memory key, the print settings stored in that key are recalled.
Erasing a Print SettingErasing a Print SettingErasing a Print SettingErasing a Print Setting
1111 Select the desired mail box number and document to print Select the desired mail box number and document to print Select the desired mail box number and document to print Select the desired mail box number and document to print → press [Print] press [Print] press [Print] press [Print] → press press press press [Change P Settings]. [Change P Settings]. [Change P Settings]. [Change P Settings].
When you select a mail box set with a password, enter the password after selecting the mail box, and press [OK].
The Change Print Settings screen is displayed.
2222 Press [Special Features], and press [Mode Memory]. Press [Special Features], and press [Mode Memory]. Press [Special Features], and press [Mode Memory]. Press [Special Features], and press [Mode Memory].
3333 Press [Store/Erase]. Press [Store/Erase]. Press [Store/Erase]. Press [Store/Erase].
Printing a Document in a Mail Box After Changing the Settings 3-313-313-313-31

3333
Usi
ng/A
rran
ging
Doc
umen
ts S
tore
d in
the
Mai
l
4444 Press [Erase]. Press [Erase]. Press [Erase]. Press [Erase].
5555 Select a memory key to be erased, and press [Next]. Select a memory key to be erased, and press [Next]. Select a memory key to be erased, and press [Next]. Select a memory key to be erased, and press [Next].
The message appears to confirm that you want to erase the printing mode.
IMPORTANT
• Check the print settings before you erase them.
Printing a Document in a Mail Box After Changing the Settings3-323-323-323-32

3333
Usi
ng/A
rran
ging
Doc
umen
ts S
tore
d in
the
Mai
l
NOTE• A mode memory key already storing print settings shows a small, black square (n) in the lower right corner.• If you select a memory key already storing print settings, the settings are displayed.• If there are more stored print settings than currently displayed, you can scroll the list using [s] or [t].
6666 Press [Yes]. Press [Yes]. Press [Yes]. Press [Yes].
If you want to cancel erasing, press [No].
The message “Erased”. appears for about two seconds on the touch panel display.
The stored print mode is erased.
NOTE• The name of the memory key is not erased. For details of how to change the name, See ‘Storing a Memory Key Name’
on p. 2-53.
7777 Press [Cancel], and press [Done]. Press [Cancel], and press [Done]. Press [Cancel], and press [Done]. Press [Cancel], and press [Done].
The display returns to the Change Print Settings screen.
Printing Multiple Documents as One Document Printing Multiple Documents as One Document Printing Multiple Documents as One Document Printing Multiple Documents as One Document (Merge Documents)(Merge Documents)(Merge Documents)(Merge Documents)
You can print multiple documents, such as scanned documents and documents sent from a computer, as one document if they are stored in the same mail box. This mode enables you to combine documents with different settings into one document, and is useful when you want to print the following kinds of documents:
• When printing and stapling data created with different software, or data made by multiple users into one document.
• When printing paste-up or transparency originals, and data sent from a computer into one document with the Booklet mode setting.
Printing a Document in a Mail Box After Changing the Settings 3-333-333-333-33

3333
Usi
ng/A
rran
ging
Doc
umen
ts S
tore
d in
the
Mai
l
IMPORTANT
• You can set this mode only when you select multiple documents.
NOTE• When you use this function to combine documents, the settings for each document are cleared, and prints are made
with the standard mode settings. When printing is completed, the settings of each document return to the settings selected when the documents were stored.
• You can change the settings of the standard mode. (See the Reference Guide.)
1111 Select the desired mail box number Select the desired mail box number Select the desired mail box number Select the desired mail box number → specify documents in the order to be merged specify documents in the order to be merged specify documents in the order to be merged specify documents in the order to be merged → press [Print]. press [Print]. press [Print]. press [Print].
When you select a mail box set with a password, enter the password after selecting the mail box, and press [OK].
When you press [Select All], you can select all documents in the mail box. ([Select All] changes to [Clear Selection] when you press the key.)
The selected documents are numbered in the order specified.
NOTE• You can cancel a selection by pressing the document again.• When you press [Clear Selection], you can cancel all selected documents. ([Clear Selection] changes to [Select All]
when you press the key.)
2222 Press [Change P Settings]. Press [Change P Settings]. Press [Change P Settings]. Press [Change P Settings].
Printing a Document in a Mail Box After Changing the Settings3-343-343-343-34

3333
Usi
ng/A
rran
ging
Doc
umen
ts S
tore
d in
the
Mai
l
3333 Press [Merge Documents]. Press [Merge Documents]. Press [Merge Documents]. Press [Merge Documents].
4444 Press [Start Print]. Press [Start Print]. Press [Start Print]. Press [Start Print].
The machine starts printing. (See ‘Printing Documents Stored in the Mail Box’ on p. 1-13.)
If there is a current job or reserved job, the machine starts printing after that job is completed.
NOTE• While printing merged documents, only the name of the document specified first is displayed in the screen.• To cancel all settings at once, press [Initial Settings]. (The machine returns to the standard mode of Local Printing.)• To return the display to the Mail Box Selection screen, press .
Printing a Document in a Mail Box After Changing the Settings 3-353-353-353-35

Usi
ng/A
rran
ging
Doc
umen
ts S
tore
d in
the
Mai
l
3333
Checking the Print Result or the Image of the Checking the Print Result or the Image of the Checking the Print Result or the Image of the Checking the Print Result or the Image of the Stored Document Stored Document Stored Document Stored Document (Sample Print)(Sample Print)(Sample Print)(Sample Print)
With this function you can print one set when you want to check the image before printing, or when you want to check the settings and the image data of the document stored in a mail box.
IMPORTANT
• [Sample Print] only appears when you set the Collate, Offset Collate, Staple, or Rotate Collating mode. This key does not appear when the Group mode is set.
• In addition, when you select multiple documents, this key does not appear unless you set the Merge Documents mode.
NOTE• You can make a sample print even when the number of print sets is one.
1111 Select the desired mail box number and document to print Select the desired mail box number and document to print Select the desired mail box number and document to print Select the desired mail box number and document to print → press [Print] press [Print] press [Print] press [Print] → press press press press [Change P Settings]. [Change P Settings]. [Change P Settings]. [Change P Settings].
When you select a mail box set with a password, enter the password after selecting the mail box, and press [OK].
The Print screen is displayed.
2222 Press [Sample Print], and press [Start Print]. Press [Sample Print], and press [Start Print]. Press [Sample Print], and press [Start Print]. Press [Sample Print], and press [Start Print].
The sample set printing starts, and one print set is made.
The printing quantity that you request is not changed when the sample set is made.
Checking the Print Result or the Image of the Stored Document (Sample Print)3-363-363-363-36

3333
Usi
ng/A
rran
ging
Doc
umen
ts S
tore
d in
the
Mai
l
3333 Check the prints, and press [Start Print], [Cancel], or [Change Settings]. Check the prints, and press [Start Print], [Cancel], or [Change Settings]. Check the prints, and press [Start Print], [Cancel], or [Change Settings]. Check the prints, and press [Start Print], [Cancel], or [Change Settings].
To print the remaining sets, press [Start Print].
To cancel printing, press [Cancel].
To change print settings, press [Change Settings] → press [Change P Settings] → change the desired settings → press [Done].
- To change the number of copies, use - (numeric keys).
- To select the print paper, press [Paper Select]. (See ‘Selecting the Print Paper Size (Paper Select)’ on p. 3-2.)
- To collate the prints, press [Finisher]. (See ‘Collating Prints (Finisher)’ on p. 3-5.)
- To make two-sided prints, press [Two-sided Printing]. (See ‘Printing on Two Sides (Two-sided Printing)’ on p. 3-16.)
- To make a Booklet, press [Special Features] → press [Booklet]. (See ‘Making Prints for Use as a Booklet (Booklet)’ on p. 3-22.)
- To select Mode Memory, press [Special Features] → [Mode Memory]. (See ‘Storing/Recalling Printing Modes (Mode Memory)’ on p. 3-25.)
NOTE• To cancel all settings at once, press [Initial Settings]. (The machine returns to the standard mode of Local Printing.)• When you have made a sample print without changing the print settings, press [Change P Settings], and reset the
mode.
0 9
Checking the Print Result or the Image of the Stored Document (Sample Print) 3-373-373-373-37

Usi
ng/A
rran
ging
Doc
umen
ts S
tore
d in
the
Mai
l
3333
Reserving JobsReserving JobsReserving JobsReserving Jobs
You can select copy settings and scan originals even if the machine is currently printing.Your scanned documents are processed after the current job is completed.
NOTE• You can reserve up to 32 documents, including the current job. However, interrupt copy jobs are not counted in this
number.• You can set a different mode for each job.
1111 Press [Done] in the screen below which appears during printing.Press [Done] in the screen below which appears during printing.Press [Done] in the screen below which appears during printing.Press [Done] in the screen below which appears during printing.
If the job displayed in the job monitor is a job of functions other than the Mail Box function, press to display the Mail Box Selection screen.
Reserving Jobs3-383-383-383-38

3333
Usi
ng/A
rran
ging
Doc
umen
ts S
tore
d in
the
Mai
l
2222 Select the desired mail box number and document to print, and press [Print]. Select the desired mail box number and document to print, and press [Print]. Select the desired mail box number and document to print, and press [Print]. Select the desired mail box number and document to print, and press [Print].
When you select a mail box set with a password, enter the password after selecting the mail box, and press [OK].
If the Mail Box Selection screen appears after step 1, specify the desired mail box number.
l To print without changing the settings:To print without changing the settings:To print without changing the settings:To print without changing the settings:
Press [Start Print].
l To print after changing the settings:To print after changing the settings:To print after changing the settings:To print after changing the settings:
Press [Change P Settings], and set the desired mode. Then press [Start Print]. For details of printing after changing the settings, See ‘Printing a Document in a Mail Box After Changing the Settings’ on p. 3-2.
NOTE• To make a sample print, press [Sample Print]. (See ‘Checking the Print Result or the Image of the Stored Document
(Sample Print)’ on p. 3-36.)• To erase the data after printing, press [Print & Erase].
Reserving Jobs 3-393-393-393-39

Usi
ng/A
rran
ging
Doc
umen
ts S
tore
d in
the
Mai
l
3333
Changing the Exposure During PrintingChanging the Exposure During PrintingChanging the Exposure During PrintingChanging the Exposure During Printing
With this function, you can change the print exposure during printing.
1111 Press [Light] or [Dark] in the screen which appears during printing.Press [Light] or [Dark] in the screen which appears during printing.Press [Light] or [Dark] in the screen which appears during printing.Press [Light] or [Dark] in the screen which appears during printing.
Move the indicator that is between [Light] and [Dark] to the left to make the exposure lighter, or to the right to make the exposure darker.
The printing exposure is changed. When printing is completed, the display returns to the Mail Box Selection screen.
Adjusting the exposure after printing has started produces a different result than adjusting the exposure before scanning the original.
Changing the Exposure During Printing3-403-403-403-40

Checking the Document’s Detailed InformationChecking the Document’s Detailed InformationChecking the Document’s Detailed InformationChecking the Document’s Detailed Information
Usi
ng/A
rran
ging
Doc
umen
ts S
tore
d in
the
Mai
l
3333
With this function you can check the detailed information of documents stored in a mail box.
1111 Select the desired mail box number and document, and press [Details]. Select the desired mail box number and document, and press [Details]. Select the desired mail box number and document, and press [Details]. Select the desired mail box number and document, and press [Details].
When you select a mail box set with a password, enter the password after selecting the mail box, and press [OK].
NOTE• When you select multiple documents, and press [Details], only the details of the selected (highlighted) document are
displayed.
2222 Check the detailed information, and press [Done]. Check the detailed information, and press [Done]. Check the detailed information, and press [Done]. Check the detailed information, and press [Done].
Repeat this procedure.
The display returns to the Mail Box Selection screen.
Checking the Document’s Detailed Information 3-413-413-413-41

Usi
ng/A
rran
ging
Doc
umen
ts S
tore
d in
the
Mai
l
3333
Changing the Name of a DocumentChanging the Name of a DocumentChanging the Name of a DocumentChanging the Name of a Document
With this function you can change the name of a document stored in a mail box.
1111 Select the desired mail box number and document, and press [Details]. Select the desired mail box number and document, and press [Details]. Select the desired mail box number and document, and press [Details]. Select the desired mail box number and document, and press [Details].
When you select a mail box set with a password, enter the password after selecting the mail box, and press [OK].
NOTE• When you select multiple documents, and press [Details], only the details of the selected (highlighted) document are
displayed.
2222 Press [Change document name]. Press [Change document name]. Press [Change document name]. Press [Change document name].
Changing the Name of a Document3-423-423-423-42

3333
Usi
ng/A
rran
ging
Doc
umen
ts S
tore
d in
the
Mai
l
3333 Enter the name of the document you want to change, and press [OK]. Enter the name of the document you want to change, and press [OK]. Enter the name of the document you want to change, and press [OK]. Enter the name of the document you want to change, and press [OK].
The maximum number of characters you can use for a name is 24.
For details of how to enter characters from the touch panel display, see the Reference Guide.
IMPORTANT
• You cannot store a document without a name.
NOTE• If you want to cancel storing, press [Cancel].
4444 Press [Done]. Press [Done]. Press [Done]. Press [Done].
Repeat this procedure.
The display returns to the Mail Box Selection screen.
Changing the Name of a Document 3-433-433-433-43

Usi
ng/A
rran
ging
Doc
umen
ts S
tore
d in
the
Mai
l
3333
Moving a DocumentMoving a DocumentMoving a DocumentMoving a Document
With this function you can move a desired document to a different mail box.
1111 Select the mail box number and document you want to move, and press [Move Select the mail box number and document you want to move, and press [Move Select the mail box number and document you want to move, and press [Move Select the mail box number and document you want to move, and press [Move Document]. Document]. Document]. Document].
When you select a mail box set with a password, enter the password after selecting the mail box, and press [OK].
If you press [Select All], you can select all documents in a mail box. (The key changes to [Clear Selection]. )
2222 Specify the mail box to which you want to move the document, and press Specify the mail box to which you want to move the document, and press Specify the mail box to which you want to move the document, and press Specify the mail box to which you want to move the document, and press [Start]. [Start]. [Start]. [Start].
You cannot move a document to multiple mail boxes.
Moving a Document3-443-443-443-44
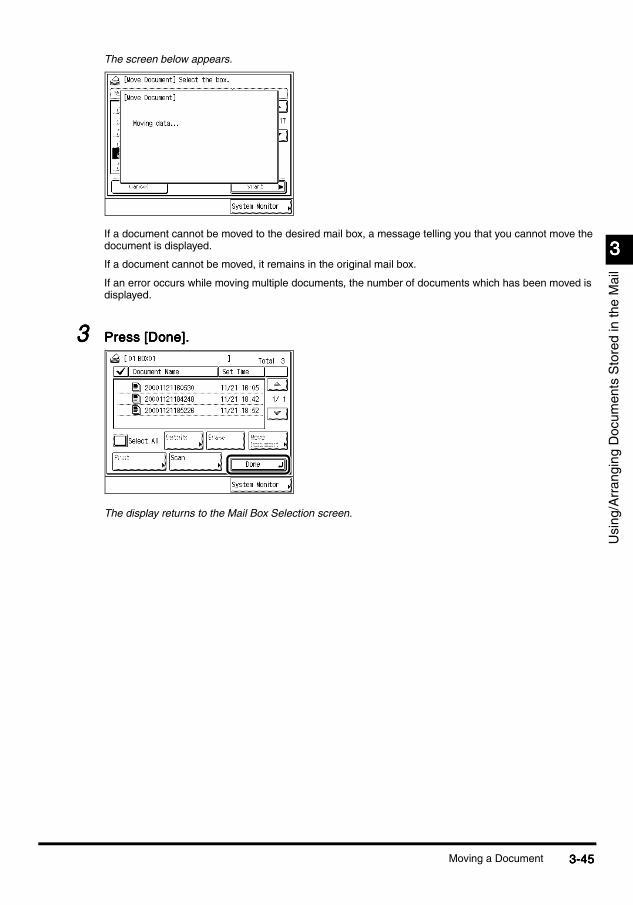
3333
Usi
ng/A
rran
ging
Doc
umen
ts S
tore
d in
the
Mai
l
The screen below appears.
If a document cannot be moved to the desired mail box, a message telling you that you cannot move the document is displayed.
If a document cannot be moved, it remains in the original mail box.
If an error occurs while moving multiple documents, the number of documents which has been moved is displayed.
3333 Press [Done]. Press [Done]. Press [Done]. Press [Done].
The display returns to the Mail Box Selection screen.
Moving a Document 3-453-453-453-45

Usi
ng/A
rran
ging
Doc
umen
ts S
tore
d in
the
Mai
l
3333
Erasing a Document from a Mail BoxErasing a Document from a Mail BoxErasing a Document from a Mail BoxErasing a Document from a Mail Box
With this function you can erase a document stored in a mail box.
1111 Select the mail box number and document you want to erase, and press [Erase]. Select the mail box number and document you want to erase, and press [Erase]. Select the mail box number and document you want to erase, and press [Erase]. Select the mail box number and document you want to erase, and press [Erase].
When you select a mail box set with a password, enter the password after selecting the mail box, and press [OK].
If you press [Select All], you can select all documents in a mail box. (The key changes to [Clear Selection]. )
2222 Press [Yes]. Press [Yes]. Press [Yes]. Press [Yes].
If you do not want to erase the document, press [No].
Erasing a Document from a Mail Box3-463-463-463-46

3333
Usi
ng/A
rran
ging
Doc
umen
ts S
tore
d in
the
Mai
l
3333 Press [Done]. Press [Done]. Press [Done]. Press [Done].
The display returns to the Mail Box Selection screen.
Erasing a Document from a Mail Box 3-473-473-473-47


CHAPTERCHAPTERCHAPTERCHAPTER
4444
Setting/Storing Setting/Storing Setting/Storing Setting/Storing the Mail Box Settingsthe Mail Box Settingsthe Mail Box Settingsthe Mail Box SettingsThis chapter describes how to store and change the default settings of the Mail Box function to suit your needs.
Mail Box Settings TableMail Box Settings TableMail Box Settings TableMail Box Settings Table . . . . . . . . . . . . . . . . . . . . . . . . . . . . . . . . . . . . . . . . . . . . . . . . . . . . . . . . . . . . . . . . . . . . . . . . . . . . . . . . . . . . . . . . . . . . . . . . . . . . . . . . . . . . . . . . . . . . . . . . . . . . . . . . . . . . . . . . . . . . . . . . . . . . . . . . . . . . . . . . . . . . . . . . . . . . . . . . . . . . . . . . . . . . . . . . . . . . . . . . . . . . 4-24-24-24-2
Setting/Storing the Mail BoxSetting/Storing the Mail BoxSetting/Storing the Mail BoxSetting/Storing the Mail Box . . . . . . . . . . . . . . . . . . . . . . . . . . . . . . . . . . . . . . . . . . . . . . . .. . . . . . . . . . . . . . . . . . . . . . . . . . . . . . . . . . . . . . . . . . . . . . . .. . . . . . . . . . . . . . . . . . . . . . . . . . . . . . . . . . . . . . . . . . . . . . . .. . . . . . . . . . . . . . . . . . . . . . . . . . . . . . . . . . . . . . . . . . . . . . . . 4-34-34-34-3
Initialising a Mail BoxInitialising a Mail BoxInitialising a Mail BoxInitialising a Mail Box . . . . . . . . . . . . . . . . . . . . . . . . . . . . . . . . . . . . . . . . . . . . . . . . . . . . .. . . . . . . . . . . . . . . . . . . . . . . . . . . . . . . . . . . . . . . . . . . . . . . . . . . . .. . . . . . . . . . . . . . . . . . . . . . . . . . . . . . . . . . . . . . . . . . . . . . . . . . . . .. . . . . . . . . . . . . . . . . . . . . . . . . . . . . . . . . . . . . . . . . . . . . . . . . . . . . 4-64-64-64-6
Setting the Photo Mode of the Mail Box FunctionSetting the Photo Mode of the Mail Box FunctionSetting the Photo Mode of the Mail Box FunctionSetting the Photo Mode of the Mail Box Function . . . . . . . . . . . . . . . . . . . . . . . . . . . . . . . .. . . . . . . . . . . . . . . . . . . . . . . . . . . . . . . .. . . . . . . . . . . . . . . . . . . . . . . . . . . . . . . .. . . . . . . . . . . . . . . . . . . . . . . . . . . . . . . . 4-94-94-94-9
Setting the Standard Mode for ScanningSetting the Standard Mode for ScanningSetting the Standard Mode for ScanningSetting the Standard Mode for Scanning . . . . . . . . . . . . . . . . . . . . . . . . . . . . . . . . . . . . . . . . . . . . . . . . . . . . . . . . . . . . . . . . . . . . . . . . . . . . . . . . . . . . . . . . . . . . . . . . . . . . . . . . . . . . . . . . . . . . . . . . . . . . . . . . . . . . . . . . . . . . . . . . . . . . 4-104-104-104-10Storing New Standard Settings for Scanning . . . . . . . . . . . . . . . . . . . . . . . . . . . . . . . . . . . . . . . . . . . . . . 4-10Initialising the Standard Mode for Scanning . . . . . . . . . . . . . . . . . . . . . . . . . . . . . . . . . . . . . . . . . . . . . . . 4-12
4-14-14-14-1

Set
ting/
Sto
ring
the
Mai
l Box
Set
tings
4444
Mail Box Settings TableMail Box Settings TableMail Box Settings TableMail Box Settings Table
The following items can be stored or set in the Mail Box Settings of the Additional Functions screen.
Settings marked * are default settings.
NOTE• For how to set the modes not described in this manual, refer to the Other operation manuals available.
Additional Function Available settings Applicable pageApplicable pageApplicable pageApplicable page
Mail Box Settings
Box Set/Store
Number: 0 to 99Password: 7 digit number max.Store Name: 24 characters max.Doc. Auto Erase: 1, 2, 3, 6, 12 hours, 1, 2, 3*, 7, 30 days, 0 (no limit)Initialise
P.4-3
Photo Mode On/Off* P.4-9
Standard Scan Settings
Store, Initialise P.4-10
Mail Box Settings Table4-24-24-24-2

Setting/Storing the Mail BoxSetting/Storing the Mail BoxSetting/Storing the Mail BoxSetting/Storing the Mail Box
Set
ting/
Sto
ring
the
Mai
l Box
Set
tings
4444
With this function you can set and store each mail box item.
NOTE• You can store up to 100 items in a mail box (Mail Box number: 00 to 99).
1111 Call up the desired screen as follows:Call up the desired screen as follows:Call up the desired screen as follows:Call up the desired screen as follows:
2222 Press the desired mail box number.Press the desired mail box number.Press the desired mail box number.Press the desired mail box number.
When entering the mail box number using - (numeric keys), press [OK] after entering the mail box number.
0 9
Setting/Storing the Mail Box 4-34-34-34-3
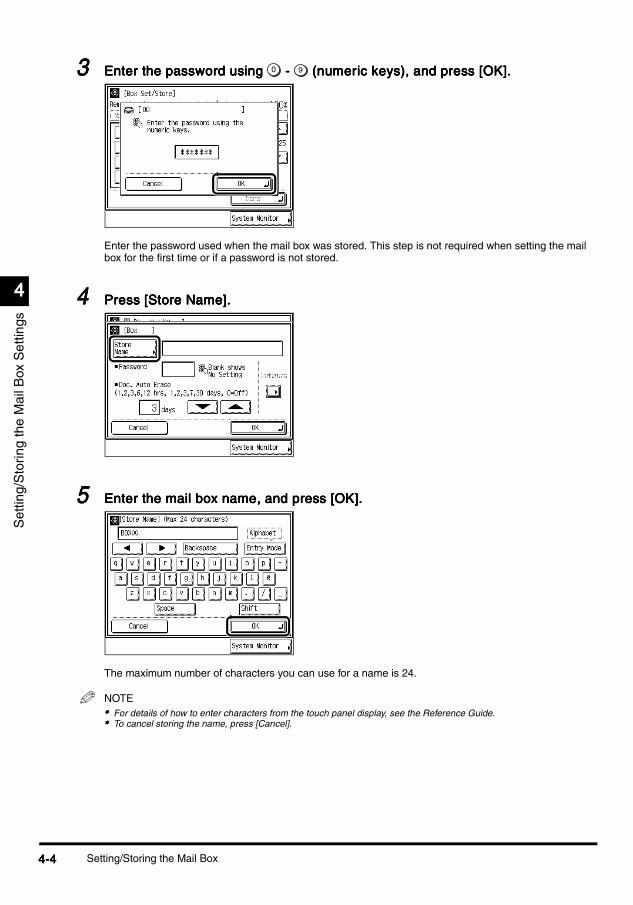
4444
Set
ting/
Sto
ring
the
Mai
l Box
Set
tings
3333 Enter the password usingEnter the password usingEnter the password usingEnter the password using ---- (numeric keys), and press [OK]. (numeric keys), and press [OK]. (numeric keys), and press [OK]. (numeric keys), and press [OK].
Enter the password used when the mail box was stored. This step is not required when setting the mail box for the first time or if a password is not stored.
4444 Press [Store Name]. Press [Store Name]. Press [Store Name]. Press [Store Name].
5555 Enter the mail box name, and press [OK]. Enter the mail box name, and press [OK]. Enter the mail box name, and press [OK]. Enter the mail box name, and press [OK].
The maximum number of characters you can use for a name is 24.
NOTE• For details of how to enter characters from the touch panel display, see the Reference Guide.• To cancel storing the name, press [Cancel].
0 9
Setting/Storing the Mail Box4-44-44-44-4

4444
Set
ting/
Sto
ring
the
Mai
l Box
Set
tings
6666 Enter the password withEnter the password withEnter the password withEnter the password with ---- (numeric keys).(numeric keys).(numeric keys).(numeric keys).If no password was stored, proceed to step 7.
IMPORTANT
• Since there is no way to check a stored password, please record the password you stored and keep the record, separately.
NOTE• You can delete the number you entered by pressing .• To cancel storing the password, press [Cancel].
7777 Set the amount of time to elapse before received documents are automatically Set the amount of time to elapse before received documents are automatically Set the amount of time to elapse before received documents are automatically Set the amount of time to elapse before received documents are automatically deleted by pressing [deleted by pressing [deleted by pressing [deleted by pressing [t] or [] or [] or [] or [s], and press [OK]. ], and press [OK]. ], and press [OK]. ], and press [OK].
NOTE• The default setting is [3 days].
8888 Press [Done]. Press [Done]. Press [Done]. Press [Done]. Repeat this procedure.
The display returns to the Basic Features screen.
0 9
C
Setting/Storing the Mail Box 4-54-54-54-5

Set
ting/
Sto
ring
the
Mai
l Box
Set
tings
4444
Initialising a Mail BoxInitialising a Mail BoxInitialising a Mail BoxInitialising a Mail Box
With this function you can initialise the set/stored password, name, and Automatic Erase Period.
IMPORTANT
• You cannot initialise a mail box if there is data remaining in it.
1111 Call up the desired screen as follows:Call up the desired screen as follows:Call up the desired screen as follows:Call up the desired screen as follows:
2222 Select the mail box that you want to initialise.Select the mail box that you want to initialise.Select the mail box that you want to initialise.Select the mail box that you want to initialise.
When entering the mail box number using - (numeric keys), press [OK] after entering the mail box number.
0 9
Initialising a Mail Box4-64-64-64-6
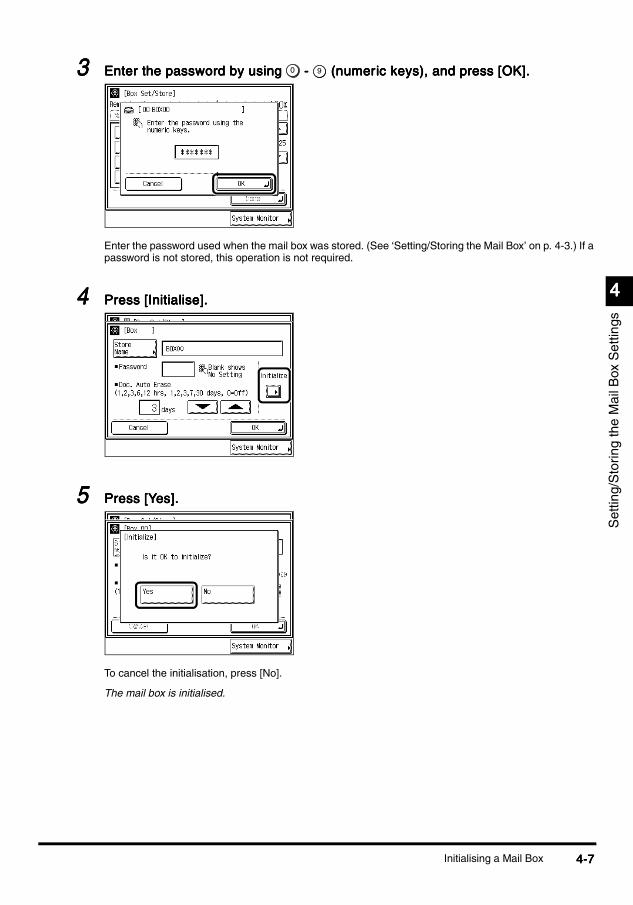
4444
Set
ting/
Sto
ring
the
Mai
l Box
Set
tings
3333 Enter the password by usingEnter the password by usingEnter the password by usingEnter the password by using ---- (numeric keys), and press [OK]. (numeric keys), and press [OK]. (numeric keys), and press [OK]. (numeric keys), and press [OK].
Enter the password used when the mail box was stored. (See ‘Setting/Storing the Mail Box’ on p. 4-3.) If a password is not stored, this operation is not required.
4444 Press [Initialise]. Press [Initialise]. Press [Initialise]. Press [Initialise].
5555 Press [Yes]. Press [Yes]. Press [Yes]. Press [Yes].
To cancel the initialisation, press [No].
The mail box is initialised.
0 9
Initialising a Mail Box 4-74-74-74-7
4444
Set
ting/
Sto
ring
the
Mai
l Box
Set
tings
6666 Press [Done]. Press [Done]. Press [Done]. Press [Done]. Repeat this procedure.
The display returns to the Basic Features screen.
Initialising a Mail Box4-84-84-84-8
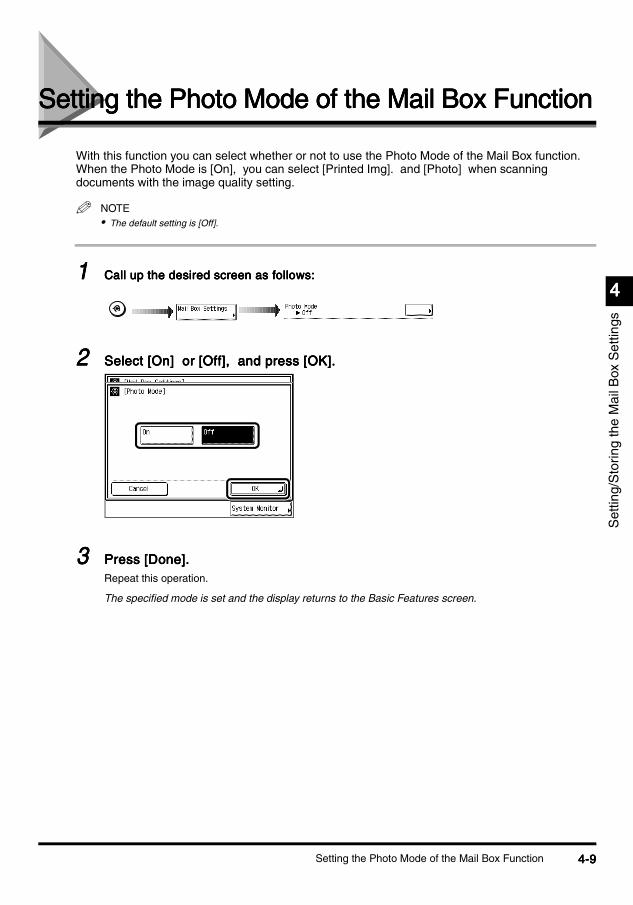
Setting the Photo Mode of the Mail Box FunctionSetting the Photo Mode of the Mail Box FunctionSetting the Photo Mode of the Mail Box FunctionSetting the Photo Mode of the Mail Box Function
Set
ting/
Sto
ring
the
Mai
l Box
Set
tings
4444
With this function you can select whether or not to use the Photo Mode of the Mail Box function. When the Photo Mode is [On], you can select [Printed Img]. and [Photo] when scanning documents with the image quality setting.
NOTE• The default setting is [Off].
1111 Call up the desired screen as follows:Call up the desired screen as follows:Call up the desired screen as follows:Call up the desired screen as follows:
2222 Select [On] or [Off], and press [OK]. Select [On] or [Off], and press [OK]. Select [On] or [Off], and press [OK]. Select [On] or [Off], and press [OK].
3333 Press [Done]. Press [Done]. Press [Done]. Press [Done]. Repeat this operation.
The specified mode is set and the display returns to the Basic Features screen.
Setting the Photo Mode of the Mail Box Function 4-94-94-94-9

Set
ting/
Sto
ring
the
Mai
l Box
Set
tings
4444
Setting the Standard Mode for ScanningSetting the Standard Mode for ScanningSetting the Standard Mode for ScanningSetting the Standard Mode for Scanning
Standard Settings refers to a combination of Mail Box modes that the machine automatically sets after the power is turned on or when is pressed.The Standard Settings can be changed, to suit your needs, or be returned to the default settings.
NOTE• The default settings are as follows:
- Document Size: Auto- Record Size: Auto- Exposure/Image Quality: A
Storing New Standard Settings for ScanningStoring New Standard Settings for ScanningStoring New Standard Settings for ScanningStoring New Standard Settings for ScanningTo store mail box settings as Standard Settings, you need to specify the settings you wish to store from the Basic Features screen, and the Special Features screen, and then follow the procedure below.
1111 Call up the desired screen as follows:Call up the desired screen as follows:Call up the desired screen as follows:Call up the desired screen as follows:
2222 Press [Store]. Press [Store]. Press [Store]. Press [Store].
Setting the Standard Mode for Scanning4-104-104-104-10
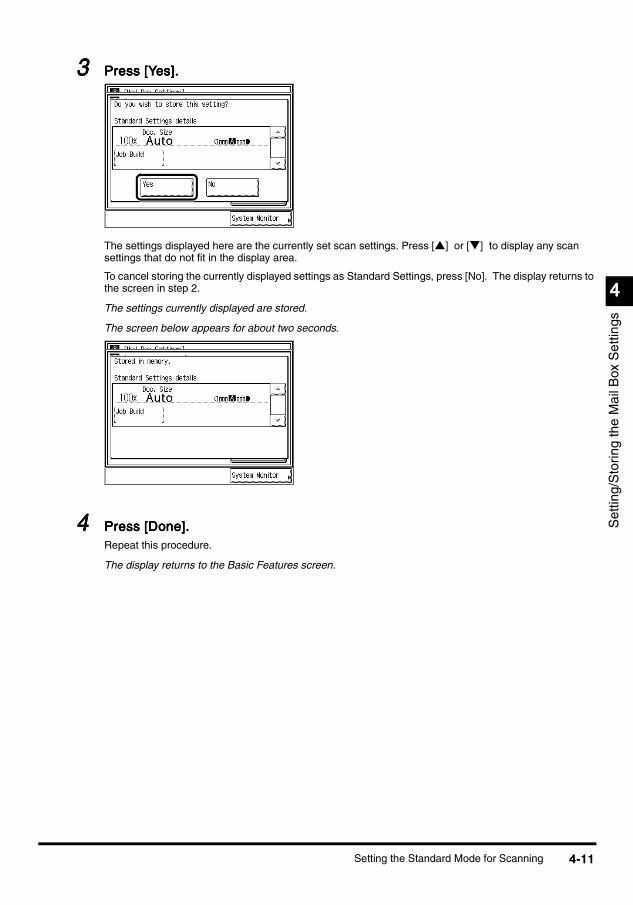
4444
Set
ting/
Sto
ring
the
Mai
l Box
Set
tings
3333 Press [Yes]. Press [Yes]. Press [Yes]. Press [Yes].
The settings displayed here are the currently set scan settings. Press [s] or [t] to display any scan settings that do not fit in the display area.
To cancel storing the currently displayed settings as Standard Settings, press [No]. The display returns to the screen in step 2.
The settings currently displayed are stored.
The screen below appears for about two seconds.
4444 Press [Done]. Press [Done]. Press [Done]. Press [Done]. Repeat this procedure.
The display returns to the Basic Features screen.
Setting the Standard Mode for Scanning 4-114-114-114-11

4444
Set
ting/
Sto
ring
the
Mai
l Box
Set
tings
Initialising the Standard Mode for ScanningInitialising the Standard Mode for ScanningInitialising the Standard Mode for ScanningInitialising the Standard Mode for Scanning
1111 Call up the desired screen as follows:Call up the desired screen as follows:Call up the desired screen as follows:Call up the desired screen as follows:
2222 Select [Initialise]. Select [Initialise]. Select [Initialise]. Select [Initialise].
3333 Check the settings, and press [Yes]. Check the settings, and press [Yes]. Check the settings, and press [Yes]. Check the settings, and press [Yes].
To cancel the initialisation, press [No]. The display returns to the screen in step 2.
The Standard Settings are initialised.
Setting the Standard Mode for Scanning4-124-124-124-12

4444
Set
ting/
Sto
ring
the
Mai
l Box
Set
tings
The screen below appears for about two seconds.
4444 Press [Done]. Press [Done]. Press [Done]. Press [Done]. Repeat this procedure.
The display returns to the Basic Features screen.
Setting the Standard Mode for Scanning 4-134-134-134-13

CHAPTERCHAPTERCHAPTERCHAPTER
5555
AppendixAppendixAppendixAppendixChart of Available Combination of FunctionsChart of Available Combination of FunctionsChart of Available Combination of FunctionsChart of Available Combination of Functions . . . . . . . . . . . . . . . . . . . . . . . . . . . . . . . . . . . . . . . . . . . . . . . . . . . . . . . . . . . . . . . . . . . . . . . . . . . . . . . . . . . . . . . . . . . . . . . . . . . . . . . . . . . . . . . . . . . . . . . . . . . . . . . . . . . . . . . . . . . . 5-25-25-25-2
IndexIndexIndexIndex . . . . . . . . . . . . . . . . . . . . . . . . . . . . . . . . . . . . . . . . . . . . . . . . . . . . . . . . . . . . . . . . . . . . . . . . . . . . . . . . . . . . . . . . . . . . . . . . . . . . . . . . . . . . . . . . . . . . . . . . . . . . . . . . . . . . . . . . . . . . . . . . . . . . . . . . . . . . . . . . . . . . . . . . . . . . . . . . . . . . . . . . . . . . . . . . . . . . . . . . . . . . . . . . . . . . . . . . . . . . . . . . . . . . . . . . . . . . . . . . . . . . . . . . . . . . . . . . .... 5-45-45-45-4
5-15-15-15-1

App
endi
x
5555
Chart of Available Combination of FunctionsChart of Available Combination of FunctionsChart of Available Combination of FunctionsChart of Available Combination of Functions
The chart shows the settings combinations when you want to reconfigure the functions.
n Scan FunctionScan FunctionScan FunctionScan Function
*1 You cannot combine these modes when the Job Build mode is set.*2 Specify the document size when the Image Combination and/or Booklet Scanning mode is set.
Combination available
Combination unavailable
Priority to latest set mode
Priority to image Combination and Booklet mode(Ratio can be changed)
F FFFu uuun nnn
c ccct ttti iiio ooo
n nnn a aaal lll
r rrre eeea aaad ddd
y yyy s ssse eee
t ttt
Pla
ten
Gla
ss S
cann
ing
Feed
er S
cann
ing
Doc
umen
t Siz
e A
uto
Sel
ect
Doc
umen
t Siz
e M
anua
l Sel
ect
Rec
ord
Siz
e A
uto
Sel
ect
Rec
ord
Siz
e M
anua
l Sel
ect
Enl
arge
men
t
Zoom
Des
igna
tion
XY
Zoo
m
Aut
o Zo
om
Zoom
Pro
gram
Aut
omat
ic E
xpos
ure
Con
trol
Prin
ted
Imag
e
Pho
to
Text
Text
/Pho
to
1-S
ided
Sca
nnin
g
2-S
ided
Sca
nnin
g
Two-
page
Sep
arat
ion
Imag
e C
ombi
natio
n
Orig
inal
Fra
me
Era
se
Boo
k Fr
ame
Era
se
Bin
ding
Era
se
Boo
klet
Sca
nnin
g
Diff
eren
t Siz
e O
rigin
als
Job
Bui
ld
Sha
rpne
ss
Neg
a/Po
si
Function intend to setFunction intend to setFunction intend to setFunction intend to setPlaten Glass Scanning *1Feeder Scanning *1 5
Document Size Auto Select 5 5 5 5 5 5
Document Size Manual Select 5 5 *2 5
Record Size Auto Select 5 5 5 5
Record Size Manual Select 5 5 5 5 5 5 5 5 5 5 5 5 5 5 5 5 5 5 5 5 5 5
Enlargement 5 s s s s l l
Zoom Designation 5 s s s s l l
XY Zoom 5 s s s s l l
Auto Zoom *1 5 s s s s
Zoom Program 5 s s s s l l
Automatic Exposure Control 5 s s s s
Printed Image 5 s s s s
Photo 5 s s s s
Text 5 s s s s
Text/Photo 5 s s s s
1-Sided Scanning 5 s
2-Sided Scanning 5 s 5
Two-page Separation 5 5 5 5 5 5
Image Combination 5 5 l l l l 5 5 5 5 s 5
Original Frame Erase 5 5 5 5 s s 5
Book Frame Erase 5 5 5 s s 5
Binding Erase 5 5 5 s s 5
Booklet Scanning 5 5 l l l l s 5 5 5 5
Different Size Originals 5 5 5 5 5
Job Build 5
Sharpness 5
Nega/Posi 5
5555
s
llll
Chart of Available Combination of Functions5-25-25-25-2
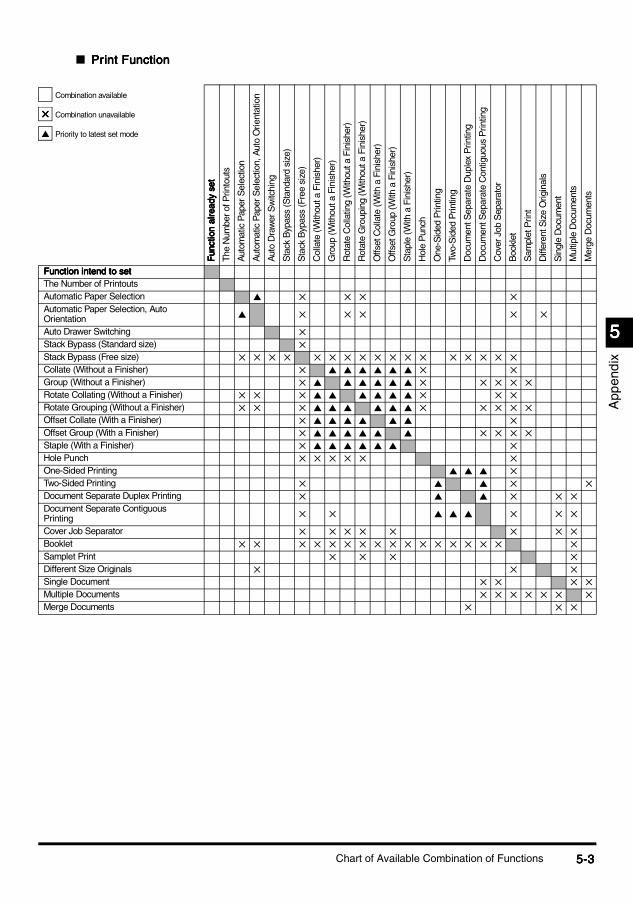
5555
App
endi
x
n Print FunctionPrint FunctionPrint FunctionPrint Function
Combination available
Combination unavailable
Priority to latest set mode
FFFFu uuun nnnc ccc
t ttti iiio ooon nnn a aaa
l lllr rrre eeea aaa
d dddy yyy s sss
e eeet ttt
The
Num
ber o
f Prin
tout
s
Aut
omat
ic P
aper
Sel
ectio
n
Aut
omat
ic P
aper
Sel
ectio
n, A
uto
Orie
ntat
ion
Aut
o D
raw
er S
witc
hing
Sta
ck B
ypas
s (S
tand
ard
size
)
Sta
ck B
ypas
s (F
ree
size
)
Col
late
(With
out a
Fin
ishe
r)
Gro
up (W
ithou
t a F
inis
her)
Rot
ate
Col
latin
g (W
ithou
t a F
inis
her)
Rot
ate
Gro
upin
g (W
ithou
t a F
inis
her)
Offs
et C
olla
te (W
ith a
Fin
ishe
r)
Offs
et G
roup
(With
a F
inis
her)
Sta
ple
(With
a F
inis
her)
Hol
e P
unch
One
-Sid
ed P
rintin
g
Two-
Sid
ed P
rintin
g
Doc
umen
t Sep
arat
e D
uple
x P
rintin
g
Doc
umen
t Sep
arat
e C
ontig
uous
Prin
ting
Cov
er J
ob S
epar
ator
Boo
klet
Sam
plet
Prin
t
Diff
eren
t Siz
e O
rigin
als
Sin
gle
Doc
umen
t
Mul
tiple
Doc
umen
ts
Mer
ge D
ocum
ents
Function intend to setFunction intend to setFunction intend to setFunction intend to setThe Number of PrintoutsAutomatic Paper Selection s 5 5 5 5
Automatic Paper Selection, Auto Orientation s 5 5 5 5 5
Auto Drawer Switching 5
Stack Bypass (Standard size) 5
Stack Bypass (Free size) 5 5 5 5 5 5 5 5 5 5 5 5 5 5 5 5 5
Collate (Without a Finisher) 5 s s s s s s 5 5
Group (Without a Finisher) 5 s s s s s s 5 5 5 5 5
Rotate Collating (Without a Finisher) 5 5 5 s s s s s s 5 5 5
Rotate Grouping (Without a Finisher) 5 5 5 s s s s s s 5 5 5 5 5
Offset Collate (With a Finisher) 5 s s s s s s 5
Offset Group (With a Finisher) 5 s s s s s s 5 5 5 5
Staple (With a Finisher) 5 s s s s s s 5
Hole Punch 5 5 5 5 5 5
One-Sided Printing s s s 5
Two-Sided Printing 5 s s 5 5
Document Separate Duplex Printing 5 s s 5 5 5
Document Separate Contiguous Printing 5 5 s s s 5 5 5
Cover Job Separator 5 5 5 5 5 5 5 5
Booklet 5 5 5 5 5 5 5 5 5 5 5 5 5 5 5 5 5
Samplet Print 5 5 5 5
Different Size Originals 5 5 5
Single Document 5 5 5 5
Multiple Documents 5 5 5 5 5 5 5
Merge Documents 5 5 5
5555
s
Chart of Available Combination of Functions 5-35-35-35-3

App
endi
x
5555
IndexIndexIndexIndex
1:1 ...............................................................................................................................................2-12
2 On 1 .........................................................................................................................................2-39
2-sided Original ...........................................................................................................................2-24
4 On 1 .........................................................................................................................................2-39
8 On 1 .........................................................................................................................................2-39
AAAAAuto .............................................................................................................................................2-15
BBBBBack Cover .................................................................................................................................3-19
Binding Erase .............................................................................................................................2-36
Book Frame Erase ......................................................................................................................2-33
Booklet ........................................................................................................................................3-22
Booklet Scanning ........................................................................................................................2-28
CCCCChange Print Settings screen .......................................................................................................1-6
Collate ................................................................................................................................... 3-6, 3-9
Copy Ratio ..................................................................................................................................2-12
Cover/Job Separator ...................................................................................................................3-18
DDDDDifferent Size Originals ...............................................................................................................2-42
Document Name ................................................................................................................. 2-3, 3-42
Document Selection Screen ................................................................................................. 1-3, 1-4
Document Size Select ..................................................................................................................2-5
Index5-45-45-45-4
5555
App
endi
x
EEEEExposure ............................................................................................................................. 2-7, 3-40
FFFFFinisher .........................................................................................................................................3-5
Frame Erase ...............................................................................................................................2-30
Front Cover .................................................................................................................................3-19
GGGGGroup .................................................................................................................................. 3-6, 3-11
HHHHHole Punch ...................................................................................................................................3-8
IIIIImage ............................................................................................................................................2-8
Image Combination .....................................................................................................................2-39
JJJJJob Build .....................................................................................................................................2-44
Job Separator .............................................................................................................................3-20
MMMMMail Box Selection screen ..................................................................................................... 1-3, 1-4
Merge Documents ......................................................................................................................3-33
Mode Memory ................................................................................................................... 2-50, 3-25
Move Document ..........................................................................................................................3-44
Index 5-55-55-55-5

5555
App
endi
x
NNNNNega/Posi ................................................................................................................................... 2-47
Non-collate ................................................................................................................................... 3-7
OOOOOffset ............................................................................................................................................ 3-8
Original Frame Erase ................................................................................................................. 2-31
PPPPPaper Select ................................................................................................................................. 3-2
Photo Mode ...........................................................................................................................2-8, 4-9
Print Screen ..........................................................................................................................1-3, 1-5
RRRRReserving Jobs .......................................................................................................................... 3-38
Rotate .........................................................................................................................3-8, 3-10, 3-12
SSSSSample Print ............................................................................................................................... 3-36
Scan Screen ..........................................................................................................................1-3, 1-7
Sharpness .................................................................................................................................. 2-48
Standard Mode ........................................................................................................................... 4-10
Staple ..................................................................................................................................3-6, 3-13
TTTTText Mode ..................................................................................................................................... 2-8
Text/Photo Mode .......................................................................................................................... 2-8
Two-page Separation ................................................................................................................. 2-26
Two-sided Printing ...................................................................................................................... 3-16
Index5-65-65-65-6

5555
App
endi
x
XXXXXY Zoom ........................................................................................................................... 2-19, 2-21
ZZZZZoom ...........................................................................................................................................2-17
Zoom Program ............................................................................................................................2-17
Index 5-75-75-75-7
5555
App
endi
x
Index5-85-85-85-8