Introduction to Microsoft PowerPoint 2013 Placeholders
10
Once you have a couple of slides, click on the thumbnail to jump to that slide. At the top is the “Ribbon.” Find similar tasks located together. Zoom File Tab: Print and more Groups: common tasks Open PowerPoint 2013 – When you open PowerPoint you will see templates you can use. Tabs - Click the tabs to see more options. Introduction to Microsoft PowerPoint 2013 Placeholders Click in the 1 st box and type My Yellowstone Trip Click in the 2 nd box and type by (then your name) The boxes with dotted outlines are called placeholders. Different slide layouts have different types of placeholders. Click into the placeholder to easily add content. The slide pane shows the current slide. This is where you will do most of your work. Add a slide Drag and drop here to change the order of your slides. Now click on the image above the words New Slide to add another slide. Click Blank Presentation The side bar gives you an overview of your presentation
-
Upload
khangminh22 -
Category
Documents
-
view
0 -
download
0
Transcript of Introduction to Microsoft PowerPoint 2013 Placeholders

Once you havea couple of slides,click on the thumbnail to jump to that slide.
At the top is the “Ribbon.” Find similar tasks located together.
Zoom
File Tab: Print and more
Groups: common tasks
Open PowerPoint 2013 – When you open PowerPoint you will see templates you can use.
Tabs - Click the tabs to see more options.
Introduction to Microsoft PowerPoint 2013
Placeholders
Click in the 1st box and type My Yellowstone TripClick in the 2nd box and type by (then your name)
The boxes with dotted outlines are called placeholders. Different slide layouts have
different types of placeholders. Click into the placeholder to easily add content.
The slide pane shows the current
slide.This is where you will do
most of your work.
Add a slide
Drag and drop here to change the order of your slides.
Now click on the image above the words New Slide to add another slide.
Click Blank Presentation
The side bar gives you an overview of
your presentation

Each new slide will be the same layout until you choose another layout.
PowerPoint starts to look
in the Pictures on your
computer
Another slide
Slide options
More slide type options
1. Click Layout
Add a picture
5. Click Insert
1. Click here to start adding a picture
Note the new slide shows up on the Side Bar
2. ClickPicture with Caption
4. Click picture of buffalo
Insert a chart
Insert a tableCreate your own page design
(SmartArt)
Insert a movieInsert a picture from
your computer
Insert a picture from the internet
3. Click Insert
2. Click Yellowstone
You can now see some more options for this slide

Click into box and type Buffalo
Add a title
Change font size and align the title
Add a shape - Box
1. Click on the rectangle to select the shape.
Home Tab
Resize and move the box
1. Resize Box: Hover your mouse over lower right corner of the box until pointer turns into a double arrow, click
and drag the corner to make the box larger.
2. Move the Box: Use your arrow keys on the keyboard to move the box to a different location.
2. Font Size
3. Align to center
1. Highlight Text
2. Click into the slide to add the shape.
Shapes
Note that when an individual item on the page is “active” you see a border around the item.
(You activate an item by clicking on it.)
Animated text box

Add text to the box
Change the color of the box
Add the animation
Click on Shape Fill hover mouse over a color, and click to select a
color for the box
View the presentation
To leave the slide show at anytime press the Esc button on
your keyboard or you will exit at the end of your presentation if you keep moving
forward.
Another slide show option
Click here to show Slide Show view of current slide
In the slide show:To move to the next slide you have a couple of options:1. Click your mouse button (left click)2. Press the space bar on your keyboard3. Press the arrow down on your keyboard
Type:Buffalo at the side of the road
1. Click Animations tab
2. Click Fly In
1. Click Slide Show tab
2. ClickFrom Beginning
Make sure box is “active” by
clicking on it to select (If needed)

Printing your PowerPoint project
File Tab
Saving the presentation
Preview of what will print.
If you think you might need to use the presentation with an older version of PowerPoint: Select Save as type and choose PowerPoint 97-2003 Presentation to save a compatible version.
1. Click on Save Icon
2. Choose a place to save the presentationFor class, click Computer, then Desktop
3. Name your project here
4. Click Save
1. Click File
2. Click Print
3. Click option under Slides
Click arrow to return
4.Choose how many slides you want to print per page for handouts
5. Click Print

Themes -
Start with a preset template or theme
Online templates
To make your presentation more visually pleasing you can easily add a preset design “theme”
2. Click New3. Search here
Click here for more options
1. Click Design tab
2. Hover mouse over sample to see theme on your slide. Click the theme to select.
1. Click File
2. Click New
3. Click a Theme
4. ClickCreate
1. Click File
4. Click the project and it will download
5. Type your own information in the placeholders

SmartArt - Convert Existing Text
Smart Art
Start with SmartArt
2. ClickConvert to Smart Art
1. Click in the block of text to select that placeholder
Home Tab
3. Hover over the design to see a preview
and click to choose
2. Click SmartArt
Or click in a slide with Content
1. Click Insert tab
4. Choose option3. Choose category View
suggested use
5. Click OK

Add information to SmartArt
Edit the SmartArt design
Undo SmartArt – Return back to the text
2. SmartArt Design tab
3. Click Convert
4. Convert to Text
SmartArt Design tab
2. Click color option
3. Click design option
1. Click Change Colors
Use this box to add info(this option allows you to progress from box to box by using the arrow
keys to minimize the amount of clicking you need to do)
Or click into each box and type to add info
1. Click intoSmartArt design
to select

Using PowerPoint for printing documents
1. Click Design tab
Maximize: Select this option to increase the size of your slide content when you are scaling to a larger slide size. Choosing this option could result in your content not fitting on the slide.Ensure Fit: Select this option to decrease the size of your content when scaling to a smaller slide size. This could make your content appear smaller, but you’ll be able to see all content on your slide.
Add music to the slide show
Settings for Audio
2. Click into Start box and click Automatically
1. Click Playback
3. Check boxes for:Play Across SlidesLoop until StoppedHide During Show
1. Select first slide
6. Click a song,then click Insert
5. Select Music to locate your music
2. Click Slide Size
7. Click Ensure Fit
4. Click Audio on
my PC
Click icon to activate(if needed)
2. Click Insert tab 3. Click Audio
4. Click Portrait for both Slides and Handouts
5. Click into box here and choose paper size
6. Click OK
3. Click Custom…
Copyright free music – musopen.org
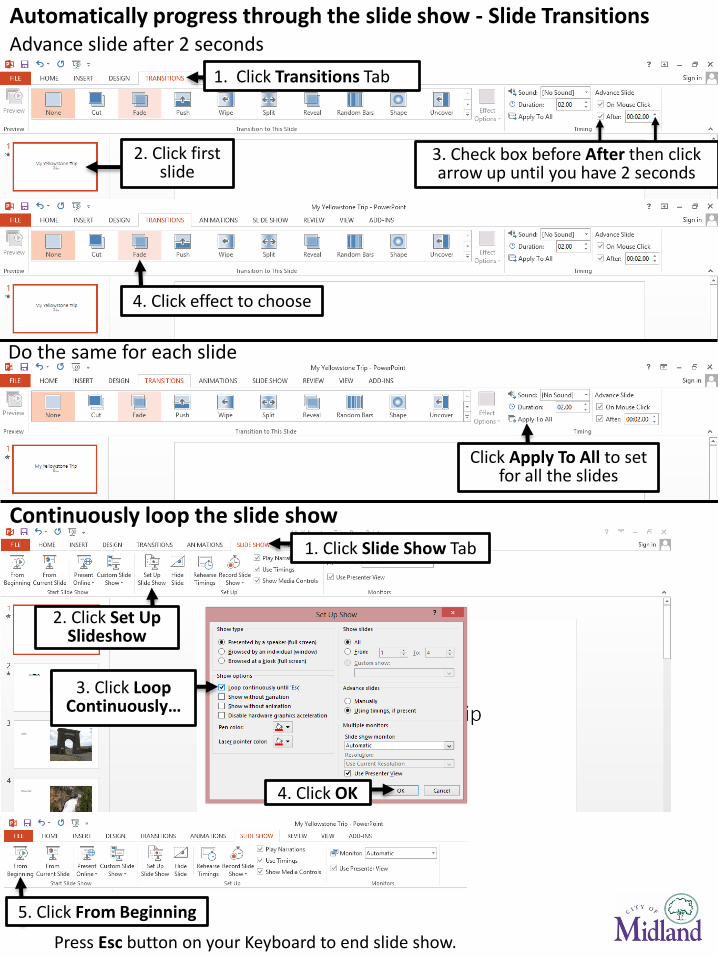
Advance slide after 2 seconds
2. Click first slide
Automatically progress through the slide show - Slide Transitions
3. Check box before After then click arrow up until you have 2 seconds
1. Click Transitions Tab
Continuously loop the slide show
Do the same for each slide
Press Esc button on your Keyboard to end slide show.
4. Click effect to choose
Click Apply To All to set for all the slides
1. Click Slide Show Tab
2. Click Set Up Slideshow
3. Click Loop Continuously…
5. Click From Beginning
4. Click OK


![Microsoft PowerPoint - powerpoint_to_print.ppt [Read-Only] [Compatibility Mode](https://static.fdokumen.com/doc/165x107/632119038a1d893baa0ce804/microsoft-powerpoint-powerpointtoprintppt-read-only-compatibility-mode.jpg)