Microsoft PowerPoint 2016 - Essentials - Central Short Course
114
Microsoft PowerPoint 2016 INFOCUS COURSEWARE Designed to fast-track you through the process of learning about computers and information technology, the In Focus range is a unique and innovative concept in learning. A quick reference summary of key procedures is provided at the bottom of each page together with handy tips and additional information. Each title in the In Focus series can be used as: a classroom workbook for instructor-led teaching and training; a self-study guide for self-paced learning; a tutorial guide for distance education programs; a resource collection of just-in-time support and information for help desk users and support staff; a handy, desk-side reference for computer users. This publication has been created using EngineRoom Desktop™ document management and publishing software developed by Watsonia Publishing. Microsoft PowerPoint 2016 Essentials © 2017 The University of Nottingham Essentials
-
Upload
khangminh22 -
Category
Documents
-
view
0 -
download
0
Transcript of Microsoft PowerPoint 2016 - Essentials - Central Short Course

Microsoft PowerPoint 2016
INFOCUS COURSEWARE
Designed to fast-track you through the process of learning about computers and information technology, the In Focus range is a unique and innovative concept in learning.
A quick reference summary of key procedures is provided at the bottom of each page together with handy tips and additional information.
Each title in the In Focus series can be used as:
a classroom workbook for instructor-led teaching and training;
a self-study guide for self-paced learning;
a tutorial guide for distance education programs;
a resource collection of just-in-time support and information for help desk users and support staff;
a handy, desk-side reference for computer users.
This publication has been created using EngineRoom Desktop™ document management and publishing software developed by Watsonia Publishing.
Microsoft PowerPoint 2016
Essentials
© 2017 The University of Nottingham
Essentials

MICROSOFT POWERPOINT 2016 ESSENTIALS . . . . . . . . . . . . . . . . . . . . . . . . . . . . . . . . . . . . . . . .
Copyright 2017 Melbourne by Watsonia Software Pty Ltd (ABN 64 060 335 748) Published by Watsonia Publishing
47 Greenaway Street Bulleen Vic Australia 3105 Telephone: (61 3) 9851 4000 Facsimile: (61 3) 9851 4001 Web site: www.watsoniapublishing.com
Product Code PowerPointEssentials
Build: 20/07/17
. . . . . . . . . . . . . . . . . . . . . . . . . . . . . . . . . . . . . . . .
Trademark Acknowledgments
All terms mentioned in this manual that are known to be trademarks or service marks have been appropriately acknowledged or capitalised. Watsonia Software cannot attest to the accuracy of this information. Use of a term in this manual should not be regarded as affecting the validity of any trademark or service mark.
Screen Shots © 1983-2017 Microsoft. All rights reserved.
Disclaimer
Every effort has been made to provide accurate and complete information. However, Watsonia Software assumes no responsibility for any direct, indirect, incidental, or consequential damages arising from the use of information in this document. Data and case study examples are intended to be fictional. Any resemblance to real persons or companies is coincidental.
Copyright Notice
This publication is protected in accordance with the provisions of the Copyright Act. Apart from permissions expressed in the Copyright Act pertaining to copying for study, review, or research, no part of this publication may be reproduced in any form, or stored in a database or retrieval system, or transmitted or distributed in any form by any means, electronic, mechanical photocopying, recording, or otherwise without written permission from Watsonia Software Pty Ltd.

© 2017 The University of Nottingham The University of Nottingham - i - Preface
READ ME FIRST
1
4
In case you're not familiar with the terminology, Read Me First is quite often the name given to a computer file that contains important information for people to know prior to using an application.
This section contains some important information to help you use this book so we thought we'd start with a Read Me First section.
What skills and knowledge you will acquire...
The skills and knowledge acquired in Microsoft PowerPoint 2016 - Essentials are sufficient to be able to use and operate the software effectively.
What you'll need to know before beginning this course...
Microsoft PowerPoint 2016 - Essentials assumes little or no knowledge of the software. However, it would be beneficial to have a general understanding of personal computers and the Windows operating system environment.
The objectives of this guide… At the completion of this course you should be able to:
work with the basic features of PowerPoint
work with presentations
create a new presentation
create and work effectively with themes
work with the various slide layouts
insert text into a slide and apply basic formatting
insert and edit images
create and work with charts
What you get in a chapter... Each chapter begins with a summary page listing the topics covered in that chapter. The chapter then consists of single-page topic sheets pertaining to the theme of the chapter.
What you'll need to have before commencing this course...
Many of the topics in this learning guide require you to open an existing file with data in it. These files can be obtained from your instructor and
need the product code for this course which is PowerPointEssentials.
As you work through this guide…
It is strongly recommended that you close all open files, if any, prior to commencing each new chapter in this learning guide. Each chapter, where relevant, has its own set of exercise files and any from a previous chapter are no longer required.
Where to from here... Have a look at the next page which explains how a topic page works, ensure that you have access to the exercise files (see above), and you're ready to make a start.

© 2017 The University of Nottingham The University of Nottingham - ii - Preface
The majority of this book comprises single-page topic sheets. There are two types of topic sheets: task and reference. The layout of both is similar – an overview at the top, detail in the centre and
additional reference (optional) material at the bottom. Task sheets contain a Try This Yourself step-by-step exercise panel in the detail area as shown below.
Topic name
General topic overview provides an introduction to the topic
Try This Yourself (Task-based topic sheets) is a detailed step-by-step practice exercise for you to work through. In Reference topic sheets this is usually replaced by a box with reference information.
In Task topic sheets screen shots and graphics provide a visual clue as to what will happen when you work through the Try This Yourself practice exercise. In Reference topic sheets the screen shots and graphics are used to visually represent information and concepts.
The For Your Reference (optional) element provides a quick summary of the steps required to perform a task. These usually only appear in Task-based topic sheets.
The Handy To Know (optional) element provides additional information such as alternate ways of accomplishing a task or further information providing handy tips.
1
2
3
4
5 6
WORKING WITH TOPIC SHEETS

© 2017 The University of Nottingham The University of Nottingham - iii - Preface
CONTENTS
Chapter 1 Getting To Know PowerPoint ..................................................................................... 1
Starting PowerPoint From The Desktop .................................................................................. 2
Understanding The Start Screen ............................................................................................. 3
Creating A New Blank Presentation ........................................................................................ 4
The PowerPoint Screen ........................................................................................................... 5
How Microsoft PowerPoint 2016 Works .................................................................................. 6
Using The Ribbon .................................................................................................................... 7
Using Ribbon KeyTips ............................................................................................................. 8
Showing And Collapsing The Ribbon ...................................................................................... 9
Understanding Backstage View ............................................................................................. 10
Accessing Backstage View .................................................................................................... 11
Changing The Office Theme .................................................................................................. 12
Using Shortcut Menus ............................................................................................................ 13
Understanding Dialog Boxes ................................................................................................. 14
Launching Dialog Boxes ........................................................................................................ 15
Understanding The Quick Access Toolbar ............................................................................ 16
Adding Commands To The QAT ............................................................................................ 17
Understanding The Status Bar ............................................................................................... 18
Customising The Status Bar .................................................................................................. 19
Exiting Safely From PowerPoint ............................................................................................ 20
Chapter 2 Working With Presentations ..................................................................................... 21
The Open Place ..................................................................................................................... 22
The Open Dialog Box ............................................................................................................. 23
Opening A Presentation ......................................................................................................... 24
Opening Multiple Presentations ............................................................................................. 25
Switching Between Open Presentations ................................................................................ 26
Understanding Presentation Views ........................................................................................ 27
Changing Presentation Views ................................................................................................ 28
Navigating A Presentation ..................................................................................................... 29
Using The Zoom Tool ............................................................................................................ 30
Opening A Recent Presentation ............................................................................................ 31
Chapter 3 Your First Presentation ............................................................................................. 33
Creating Presentations In PowerPoint ................................................................................... 34
Creating A Presentation ......................................................................................................... 35
Applying Theme Variants ....................................................................................................... 36
The Save As Place ................................................................................................................ 37
The Save As Dialog Box ........................................................................................................ 38
Typing Text Into A Slide ......................................................................................................... 39
Inserting New Slides .............................................................................................................. 40
Typing Text Using The Outline Pane ..................................................................................... 41

© 2017 The University of Nottingham The University of Nottingham - iv - Preface
Applying Slide Transitions ...................................................................................................... 42
Saving A Presentation ........................................................................................................... 43
Previewing A Slide Show ....................................................................................................... 44
Closing A Presentation .......................................................................................................... 45
Chapter 4 Themes ....................................................................................................................... 47
Understanding Themes .......................................................................................................... 48
Applying A Theme .................................................................................................................. 49
Changing The Theme Colours ............................................................................................... 50
Creating Custom Theme Colours .......................................................................................... 51
Changing The Theme Fonts .................................................................................................. 52
Changing The Slide Background ........................................................................................... 53
Saving A Customised Theme ................................................................................................ 54
Using A Customised Theme .................................................................................................. 55
Deleting A Customised Theme .............................................................................................. 56
Chapter 5 Slide Layouts ............................................................................................................. 57
Understanding Slide Layouts ................................................................................................. 58
Inserting A Title Slide ............................................................................................................. 59
Inserting A Title And Content Slide ........................................................................................ 60
Inserting A Section Header Slide ........................................................................................... 61
Inserting A Table .................................................................................................................... 62
Inserting A Picture With Caption Slide ................................................................................... 63
Inserting A Chart .................................................................................................................... 64
Changing The Slide Layout .................................................................................................... 65
Chapter 6 Working With Text ..................................................................................................... 67
Editing Text ............................................................................................................................ 68
Checking Spelling .................................................................................................................. 69
Understanding Font Formatting ............................................................................................. 70
Applying Font Formatting ....................................................................................................... 71
Applying Paragraph Formatting ............................................................................................. 72
Changing Bullet And Numbering Styles ................................................................................. 73
Moving And Resizing Placeholders ....................................................................................... 74
Applying WordArt To Text ...................................................................................................... 75
Converting Text To SmartArt ................................................................................................. 76
Chapter 7 Images ........................................................................................................................ 77
Understanding Pictures .......................................................................................................... 78
Understanding Online Pictures .............................................................................................. 79
Working With PowerPoint Designer ....................................................................................... 80
Inserting A Picture From File ................................................................................................. 81
Inserting An Online Picture .................................................................................................... 82
Resizing An Image ................................................................................................................. 83
Positioning An Image ............................................................................................................. 84
Rotating And Flipping Images ................................................................................................ 85
Inserting A Screenshot ........................................................................................................... 86

© 2017 The University of Nottingham The University of Nottingham - v - Preface
Inserting A Screen Clip .......................................................................................................... 87
Creating A Photo Album ........................................................................................................ 88
Chapter 8 Charts ......................................................................................................................... 89
Understanding Charts ............................................................................................................ 90
Inserting A Chart Using The Ribbon ...................................................................................... 91
Changing The Chart Type ...................................................................................................... 92
Chart Elements ...................................................................................................................... 93
Using Quick Layouts .............................................................................................................. 94
Understanding Chart Buttons ................................................................................................. 95
Changing The Layout Of Chart Elements .............................................................................. 96
Applying A Chart Style ........................................................................................................... 97
Understanding The Chart Format Panes ............................................................................... 98
Formatting Chart Elements .................................................................................................... 99
Editing A Data Series ........................................................................................................... 100
Hiding Data Series ............................................................................................................... 101
Working With Pie Charts ...................................................................................................... 102

© 2017 The University of Nottingham The University of Nottingham - vi - Preface
NOTES:

Microsoft PowerPoint 2016 - Essentials
© 2017 The University of Nottingham Page 1 Chapter 1 - Getting to Know PowerPoint
CHAPTER 1 GETTING TO KNOW POWERPOINT
In this session you will:
learn how to start PowerPoint from the desktop
gain an understanding of the PowerPoint start screen
learn how to create a new blank presentation
gain an understanding of the PowerPoint screen
gain an understanding of how PowerPoint works
learn how to use the ribbon
learn how to use ribbon keytips
learn how to show and hide the ribbon
gain an understanding of Backstage view
learn how to access the Backstage View
learn how to change the office theme
learn how to use shortcut menus
gain an understanding of dialog boxes
learn how to launch dialog boxes
gain an understanding of the quick access toolbar
learn how to add commands to the Quick Access Toolbar
gain an understanding of the status bar
learn how to customise the status bar
learn how to exit safely from PowerPoint.
Microsoft PowerPoint 2016 is part of the suite of programs known as Microsoft Office. You can use PowerPoint to create and share dynamic presentations, or slide shows as they are most commonly called.
Before you start to use PowerPoint, let’s spend a bit of time learning about the PowerPoint window and its features.
INFOCUS

Microsoft PowerPoint 2016 - Essentials
© 2017 The University of Nottingham Page 2 Chapter 1 - Getting to Know PowerPoint
STARTING POWERPOINT FROM THE DESKTOP
To create or edit a presentation, you must first start PowerPoint. If your computer uses Windows 10 it will open to the desktop. Unless you have previously created a shortcut icon on the desktop
you will need to open PowerPoint by using either the All apps option in the Start menu or the
Search the web and windows bar.
Try This Yourself:
Before you begin, ensure that your computer is switched on and the desktop is displayed...
If there is no PowerPoint icon in the taskbar at the bottom of the desktop, click on the Windows icon, as shown, to display the Start screen
Click on All apps to display a list of all the apps on your computer
Scroll down to the W section
PowerPoint 2016 is listed here…
Click on PowerPoint 2016 to start Word
Right-click on the Word icon in the taskbar to display a menu of options, as shown, then select Pin this program to taskbar
You can now click on this icon to open Word from the desktop. This icon will remain in the taskbar unless you remove it…
Repeat step 5 to select Close window to close Word
Click on the Word icon in the taskbar to open Word again
For Your Reference…
To add a PowerPoint icon to the desktop taskbar:
1. Display the Start menu, then click on All apps
2. Right-click on PowerPoint 2016
3. Select Pin to taskbar
1
Handy to Know…
You can start PowerPoint by clicking in the taskbar Search… bar, typing word, then clicking on PowerPoint in the list of search results.
Pin PowerPoint to the Start menu by displaying the All apps list, right-clicking on PowerPoint 2016 and selecting Pin to Start.

Microsoft PowerPoint 2016 - Essentials
© 2017 The University of Nottingham Page 3 Chapter 1 - Getting to Know PowerPoint
UNDERSTANDING THE START SCREEN
Most of the time, when you open PowerPoint, the start screen will display. From this initial screen you can choose the kind of presentation you want to work with. You can choose to work with one of
your most recently accessed files, open a document which has been saved to Computer or OneDrive or create a new document using the available templates.
Microsoft PowerPoint 2016 Start Screen
The Microsoft PowerPoint 2016 start screen is very helpful if you want to quickly access files you have worked on recently or create a new presentation based on one of the available templates (including the default Blank Presentation template).
If you have already worked on a document or several documents in PowerPoint, these files will display below Recent in the orange pane on the left of the window. If you haven’t worked on any presentations yet (as shown below), you can still open existing documents by clicking on the Open Other Presentations link, located below Recent. This lets you open an existing presentation from your computer or OneDrive.
The main pane of the start screen displays the available templates you can use to create a new presentation and a search box at the top that you can use to search the internet for additional templates. Templates are simply layouts that have already been created with themes applied, that you can customise to suit your needs and then enter the relevant content. If you want to start with a clean slate, select the Blank Presentation template – you will probably find this is the one that you use the most, unless you have corporate or business templates already set up that you must use. There is also a Welcome to PowerPoint template that you can click on to create a short presentation on using PowerPoint effectively.
In the top right corner of the screen you will see information about the account that you have used to
sign in to Windows as well as the Help, Minimise, Maximise/Restore Down and Close tools.
The start screen will only display when you launch PowerPoint 2016 directly – that is, by clicking on PowerPoint in the All apps list of the Start menu, selecting it from the list of search results, or by clicking on the taskbar icon if the application has been pinned to the desktop Taskbar.
PowerPoint 2016 can also be started in Windows 10 by double-clicking on a PowerPoint file in the File Explorer. When this occurs, PowerPoint 2016 will start with the document open on the screen and the start screen will be by-passed.
Microsoft PowerPoint 2016 - Essentials
© 2017 The University of Nottingham Page 4 Chapter 1 - Getting to Know PowerPoint
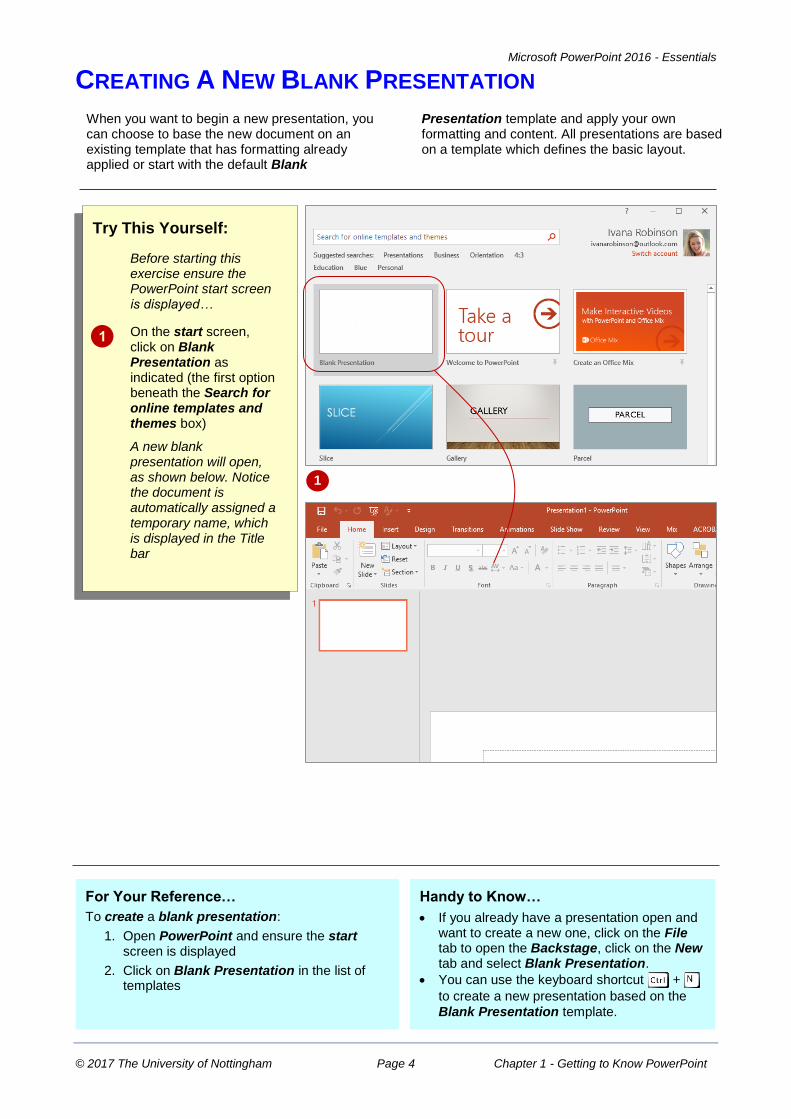
CREATING A NEW BLANK PRESENTATION
When you want to begin a new presentation, you can choose to base the new document on an existing template that has formatting already applied or start with the default Blank
Presentation template and apply your own formatting and content. All presentations are based on a template which defines the basic layout.
Try This Yourself:
Before starting this exercise ensure the PowerPoint start screen is displayed…
On the start screen, click on Blank Presentation as indicated (the first option beneath the Search for online templates and themes box)
A new blank presentation will open, as shown below. Notice the document is automatically assigned a temporary name, which is displayed in the Title bar
1
For Your Reference…
To create a blank presentation:
1. Open PowerPoint and ensure the start screen is displayed
2. Click on Blank Presentation in the list of templates
Handy to Know…
If you already have a presentation open and want to create a new one, click on the File tab to open the Backstage, click on the New tab and select Blank Presentation.
You can use the keyboard shortcut +
to create a new presentation based on the
Blank Presentation template.

Microsoft PowerPoint 2016 - Essentials
© 2017 The University of Nottingham Page 5 Chapter 1 - Getting to Know PowerPoint
THE POWERPOINT SCREEN
The PowerPoint 2016 screen is made up of a number of different components which are described on this page. Some of these components, such as the ribbon and Backstage
view are common to all Office 2016 applications, so once you know how they are used, you can transfer this knowledge across to Microsoft Word, Excel, and so on.
1
2
3
4 5
6
7
The File tab is used to access the Backstage view which contains file management functions, such as saving, opening, closing, printing, sharing, and so on. There is also information contained here such as your document Properties. Options are also available so that you can set your working preferences.
The ribbon is the tabbed band that appears across the top of the window. It is the control centre of PowerPoint. You use the tabs on the ribbon to access the commands that are categorised into groups.
The Slides pane provides a preview thumbnail of each slide in your presentation. You can also use the pane to re-order your slide sequence.
The Status bar appears across the bottom of the window. It displays the current slide number and will display a spelling icon once you have entered text. If the document contains any spelling errors it will be indicated on the icon.
The View buttons and the Zoom slider are used to change the view and to increase or decrease the zoom ratio (magnification) of your slides.
The Notes and Comments tools enable you to enter notes and comments for the presenter that won’t be seen by the audience.
The Slide window shows the content of the slide and this is also where you edit the presentation to add effects, objects, text and so on.
Microsoft PowerPoint 2016 - Essentials
© 2017 The University of Nottingham Page 6 Chapter 1 - Getting to Know PowerPoint
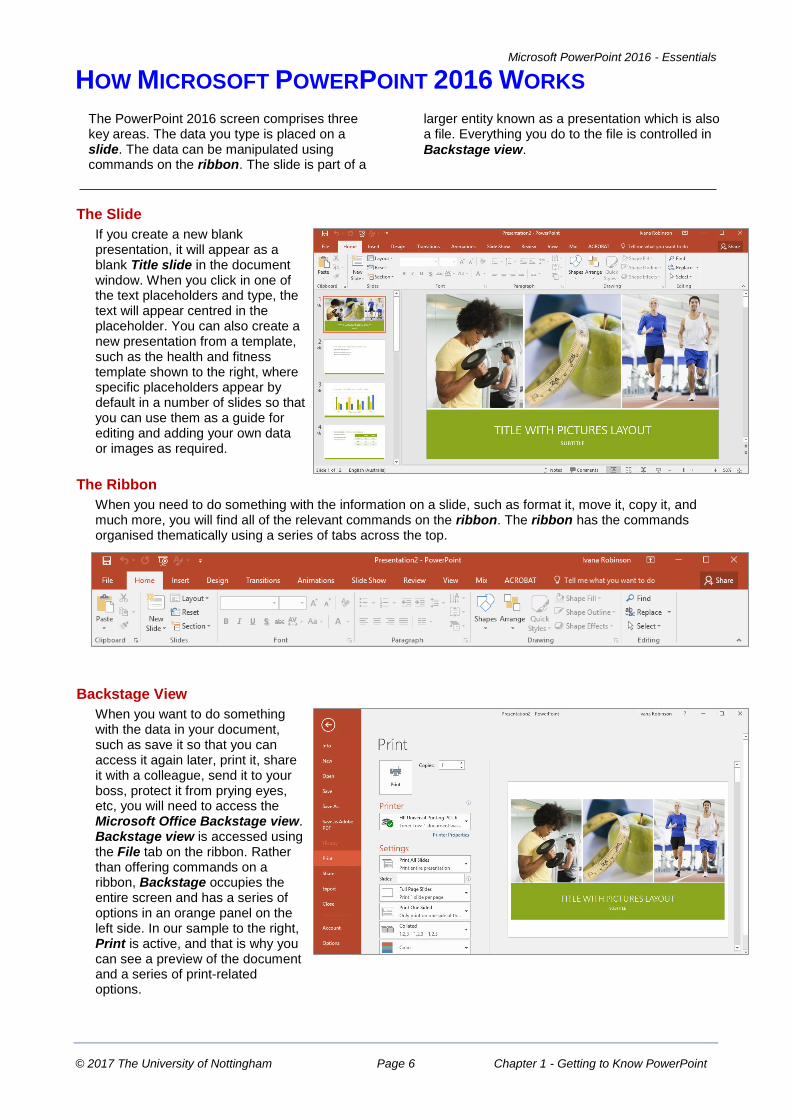
HOW MICROSOFT POWERPOINT 2016 WORKS
The PowerPoint 2016 screen comprises three key areas. The data you type is placed on a slide. The data can be manipulated using commands on the ribbon. The slide is part of a
larger entity known as a presentation which is also a file. Everything you do to the file is controlled in
Backstage view.
The Slide
If you create a new blank presentation, it will appear as a blank Title slide in the document window. When you click in one of the text placeholders and type, the text will appear centred in the placeholder. You can also create a new presentation from a template, such as the health and fitness template shown to the right, where specific placeholders appear by default in a number of slides so that you can use them as a guide for editing and adding your own data or images as required.
The Ribbon
When you need to do something with the information on a slide, such as format it, move it, copy it, and much more, you will find all of the relevant commands on the ribbon. The ribbon has the commands organised thematically using a series of tabs across the top.
Backstage View
When you want to do something with the data in your document, such as save it so that you can access it again later, print it, share it with a colleague, send it to your boss, protect it from prying eyes, etc, you will need to access the Microsoft Office Backstage view. Backstage view is accessed using the File tab on the ribbon. Rather than offering commands on a ribbon, Backstage occupies the entire screen and has a series of options in an orange panel on the left side. In our sample to the right, Print is active, and that is why you can see a preview of the document and a series of print-related options.

Microsoft PowerPoint 2016 - Essentials
© 2017 The University of Nottingham Page 7 Chapter 1 - Getting to Know PowerPoint
USING THE RIBBON
The ribbon is the command centre for PowerPoint. It provides a series of commands organised into groups that are placed on relevant tabs. Tabs are activated by clicking on
their name to display the command groups. Commands are activated by clicking on a button, tool or gallery option. Everything you could possibly want to do in PowerPoint will be on this ribbon.
Try This Yourself:
Before you begin, ensure that PowerPoint has started and a blank presentation is open…
Examine the groups on the Home tab, e.g. Clipboard, Slides, Font etc
These are the commands most commonly used...
Click on the Insert tab
The commands on this tab are used to insert items, such as tables and pictures...
Click on Shapes in the Illustrations group to display the Shapes gallery
This includes a huge range of shapes...
Click on each of the tabs and examine the commands
Some of these commands will open a dialog box...
Click on the View tab, then click on Zoom in the Zoom group to open the Zoom dialog box
Click on [Cancel], then click on the Home tab
1
3
For Your Reference…
To use the ribbon:
1. Click on a tab to display the commands
2. Click on a button to activate a command,
display a gallery or open a dialog box
Handy to Know…
Additional tabs known as Contextual tabs appear in specific circumstances. For example, if you insert a picture or have selected a picture, the Picture Tools: Format tab will appear. This provides quick access to all of the tools you may need to modify and work with the picture.
5

Microsoft PowerPoint 2016 - Essentials
© 2017 The University of Nottingham Page 8 Chapter 1 - Getting to Know PowerPoint
USING RIBBON KEYTIPS
Ribbon commands are normally accessed with a mouse, however, you can also use the keyboard to do so. When you press , letters known as
KeyTips or access keys will appear next to
commands on the ribbon. Pressing the access key letter on the keyboard will then activate the corresponding command on the ribbon just as if you had clicked on the command with the mouse.
Try This Yourself:
Op
en
Fil
e
Before starting this exercise, ensure you have a blank presentation open…
Press to display the
KeyTips in the ribbon
Press to activate the
Design tab and display the KeyTips for the Design commands
Press to display the
Slide Size options
Press twice to return to
the previous level of access keys
Press several times to
cycle through the commands on the Design tab
To activate a selected command, you would
simply press …
Press to return to text
entry mode
1
2
For Your Reference…
To use KeyTips to access commands:
1. Press to display the KeyTips
2. Press the letter key of the command or tab to the command that you want to select
3. Press to return to text entry mode
Handy to Know…
You can still use the shortcut keys for menu commands that were available in previous versions of Office. For example + applies bold to selected text.
3
Microsoft PowerPoint 2016 - Essentials
© 2017 The University of Nottingham Page 9 Chapter 1 - Getting to Know PowerPoint
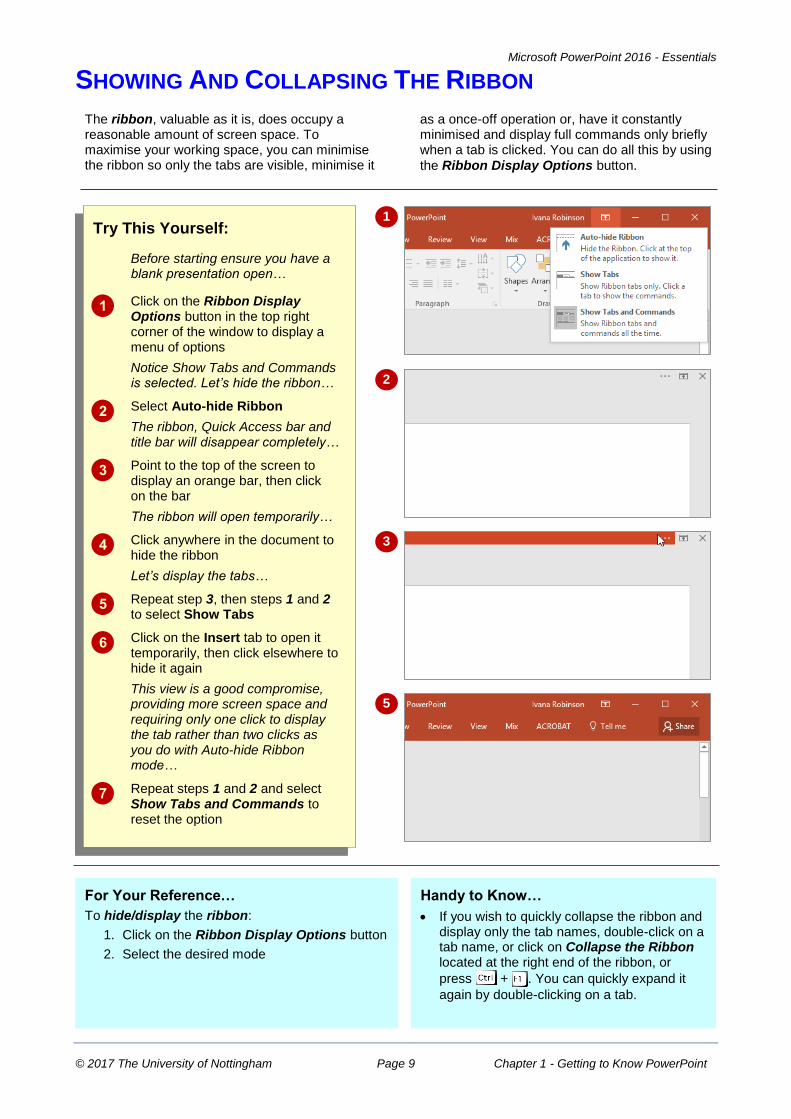
SHOWING AND COLLAPSING THE RIBBON
The ribbon, valuable as it is, does occupy a reasonable amount of screen space. To maximise your working space, you can minimise the ribbon so only the tabs are visible, minimise it
as a once-off operation or, have it constantly minimised and display full commands only briefly when a tab is clicked. You can do all this by using
the Ribbon Display Options button.
Try This Yourself:
Before starting ensure you have a blank presentation open…
Click on the Ribbon Display Options button in the top right corner of the window to display a menu of options
Notice Show Tabs and Commands is selected. Let’s hide the ribbon…
Select Auto-hide Ribbon
The ribbon, Quick Access bar and title bar will disappear completely…
Point to the top of the screen to display an orange bar, then click on the bar
The ribbon will open temporarily…
Click anywhere in the document to hide the ribbon
Let’s display the tabs…
Repeat step 3, then steps 1 and 2 to select Show Tabs
Click on the Insert tab to open it temporarily, then click elsewhere to hide it again
This view is a good compromise, providing more screen space and requiring only one click to display the tab rather than two clicks as you do with Auto-hide Ribbon mode…
Repeat steps 1 and 2 and select Show Tabs and Commands to reset the option
1
2
3
For Your Reference…
To hide/display the ribbon:
1. Click on the Ribbon Display Options button
2. Select the desired mode
Handy to Know…
If you wish to quickly collapse the ribbon and display only the tab names, double-click on a tab name, or click on Collapse the Ribbon located at the right end of the ribbon, or
press + . You can quickly expand it
again by double-clicking on a tab.
5
Microsoft PowerPoint 2016 - Essentials
© 2017 The University of Nottingham Page 10 Chapter 1 - Getting to Know PowerPoint
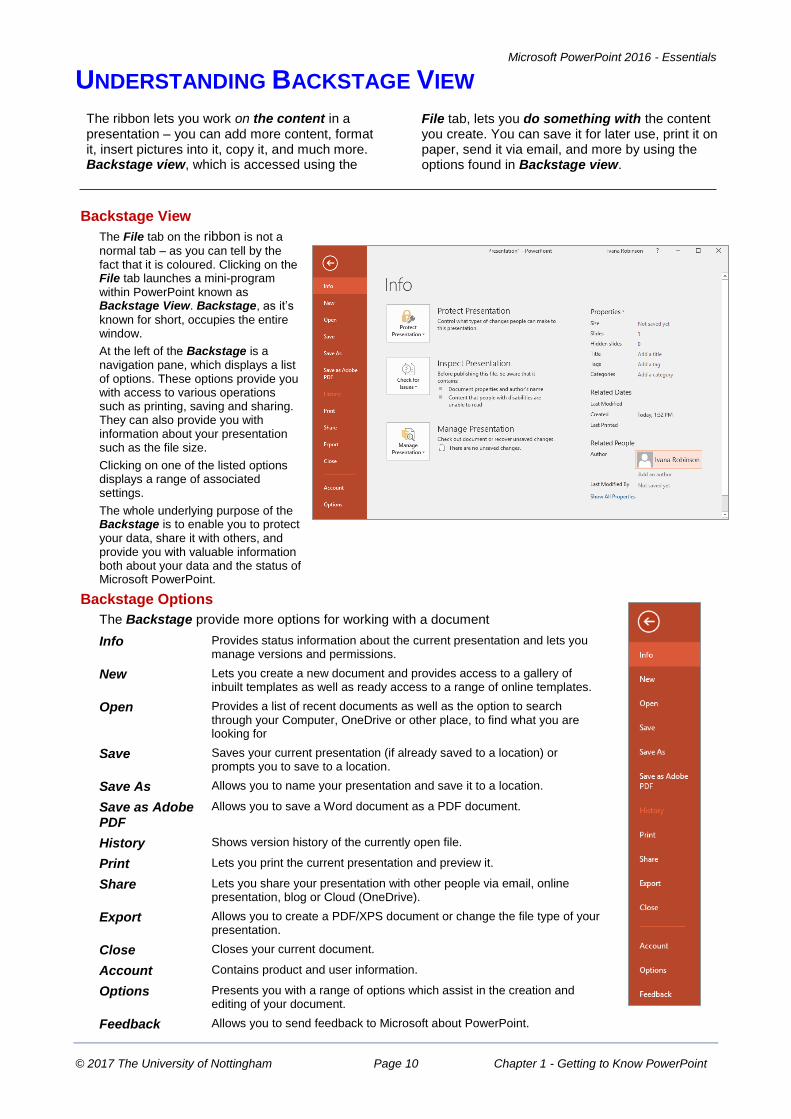
UNDERSTANDING BACKSTAGE VIEW
The ribbon lets you work on the content in a presentation – you can add more content, format it, insert pictures into it, copy it, and much more. Backstage view, which is accessed using the
File tab, lets you do something with the content you create. You can save it for later use, print it on paper, send it via email, and more by using the options found in Backstage view.
Backstage View
The File tab on the ribbon is not a
normal tab – as you can tell by the fact that it is coloured. Clicking on the File tab launches a mini-program within PowerPoint known as Backstage View. Backstage, as it’s
known for short, occupies the entire window.
At the left of the Backstage is a navigation pane, which displays a list of options. These options provide you with access to various operations such as printing, saving and sharing. They can also provide you with information about your presentation such as the file size.
Clicking on one of the listed options displays a range of associated settings.
The whole underlying purpose of the Backstage is to enable you to protect your data, share it with others, and provide you with valuable information both about your data and the status of Microsoft PowerPoint.
Backstage Options
The Backstage provide more options for working with a document
Info Provides status information about the current presentation and lets you manage versions and permissions.
New Lets you create a new document and provides access to a gallery of inbuilt templates as well as ready access to a range of online templates.
Open Provides a list of recent documents as well as the option to search through your Computer, OneDrive or other place, to find what you are looking for
Save Saves your current presentation (if already saved to a location) or prompts you to save to a location.
Save As Allows you to name your presentation and save it to a location.
Save as Adobe PDF
Allows you to save a Word document as a PDF document.
History Shows version history of the currently open file.
Print Lets you print the current presentation and preview it.
Share Lets you share your presentation with other people via email, online presentation, blog or Cloud (OneDrive).
Export Allows you to create a PDF/XPS document or change the file type of your presentation.
Close Closes your current document.
Account Contains product and user information.
Options Presents you with a range of options which assist in the creation and editing of your document.
Feedback Allows you to send feedback to Microsoft about PowerPoint.

Microsoft PowerPoint 2016 - Essentials
© 2017 The University of Nottingham Page 11 Chapter 1 - Getting to Know PowerPoint
ACCESSING BACKSTAGE VIEW
Backstage view provides options for working on presentations and displays key information about the status of your presentation and of Microsoft PowerPoint 2016. It is typically accessed by
clicking on the File tab on the ribbon but it can also appear when keyboard shortcuts for specific commands are used.
Try This Yourself:
Before starting this exercise, ensure that you have a blank presentation open…
Click on the File tab to display Backstage view
Click on Info in the orange panel if it is not already selected, to view information relating to your presentation such as the Properties
Click on Print to see the printing options
A preview will appear of how the presentation will look when printed…
Click on Account to see the account options and product licensing information
Click on the Back arrow at the top of the panel to close Backstage view and return to the presentation
1
4
For Your Reference…
To access Backstage view:
1. Click on the File tab
2. Click on the required option in the orange panel to display the settings
Handy to Know…
You can close Backstage view by pressing .

Microsoft PowerPoint 2016 - Essentials
© 2017 The University of Nottingham Page 12 Chapter 1 - Getting to Know PowerPoint
CHANGING THE OFFICE THEME
4
Try This Yourself:
Op
en
Fil
e Before starting this
exercise you MUST ensure that you have a blank presentation open…
Click on the File tab to display the Backstage
Click on Account to display the account options
Click on the drop arrow beneath Office Theme to display a number of options
Select White
Click on the Back arrow to return to the presentation so that you can see how the white theme appears
Repeat steps 1 to 4 and select the Black theme
Click on the Back arrow to return to the presentation so that you can see how the Black theme appears
Repeat the above steps to select the default theme again - Colourful
2
Microsoft provides you with the ability to change the look and feel of the user interface by changing the office theme. Different themes can provide greater visibility in different situations.
Note that some of the theme options are only available to Office 365 users.
3
7
For Your Reference…
To change the office theme:
1. Click on the File tab
2. Click on Account
3. Click on the drop arrow beneath Office Theme
4. Select an option
Handy to Know…
If you change the Office theme in one program, it will apply the theme to any other Office applications you have installed on your computer.

Microsoft PowerPoint 2016 - Essentials
© 2017 The University of Nottingham Page 13 Chapter 1 - Getting to Know PowerPoint
USING SHORTCUT MENUS
In addition to the ribbon, PowerPoint also features shortcut menus – context-sensitive menus that appear when you right-click on areas of the screen or slide. Shortcut menus provide
an (often faster) alternative method for locating operations and commands specific to the object or area you have right-clicked on. In some instances a mini toolbar may also appear.
Try This Yourself:
Before starting this exercise ensure that you have a blank presentation open…
Point to any of the tabs on the ribbon, then right-click to display the shortcut menu
This menu will display options relating to the toolbar and ribbon…
Click elsewhere on the slide with the left mouse button to close the shortcut menu
Point to one of the text placeholders on the slide, then right-click to display the shortcut menu and a mini toolbar
Because you clicked on a text placeholder, the menu contains Font and Paragraph options. Cut, Copy and Paste are greyed out when no actual text is selected…
Press to close the
menu
Right-click on an area of the slide outside of the text placeholders
This shortcut menu offers slide-specific options…
Press to close the
shortcut menu
1
3
For Your Reference…
To display a shortcut menu:
1. Point to the object or area of the screen on which you want to perform an operation
2. Right-click to display the shortcut menu
5
Handy to Know…
Once a shortcut menu appears, you can select an option in it by clicking on that option with the left mouse button.

Microsoft PowerPoint 2016 - Essentials
© 2017 The University of Nottingham Page 14 Chapter 1 - Getting to Know PowerPoint
UNDERSTANDING DIALOG BOXES
Dialog boxes contain a series of controls that are used to adjust settings for a particular aspect of a document. They appear either when you click on a dialog box launcher in the bottom
right corner of a group on the ribbon, or when you click on a command that displays a dialog box. Dialog boxes are often used for adjusting some of the more advanced aspects of a document.
Typical Dialog Box Controls
Dialog boxes have various tools to help you perform tasks. These tools are known as controls and some typical ones are shown below.
Text boxes are used to enter text such as font or size.
Tabs are used to provide grouped settings in the one dialog box.
Drop arrows provide a list of options for the text box when the arrow is clicked. The list “drops down” from the arrow.
Command buttons provide a means of saving the changed settings [OK], or closing the dialog box without accepting any changes made [Cancel].
Spinner arrows allow you to type a specific value or use the up or down arrows to increase or decrease the value respectively.
Check boxes turn settings either on or off. When on they display a tick and therefore these controls are also known as tick boxes.

Microsoft PowerPoint 2016 - Essentials
© 2017 The University of Nottingham Page 15 Chapter 1 - Getting to Know PowerPoint
LAUNCHING DIALOG BOXES
Dialog boxes can be launched either as a result of clicking on a dialog box launcher or a command button, or by selecting a command from a menu. In a menu, the presence of three
dots … (an ellipsis) after a menu option indicates that selecting the menu option will display a dialog box. Dialog boxes are generally used for advanced features or detailed settings.
Try This Yourself:
Before starting this exercise ensure that you have a blank presentation open…
Click in a text placeholder on the slide, click on the Home tab then point to the dialog box launcher in the Font group to display the tooltip
Click on the dialog box launcher to open the Font dialog box
This dialog box contains advanced options for font formatting. Click on the tabs to display more options…
Click on [Cancel] to close the dialog box
Let’s try a different method…
Click on the Insert tab, then click on Header & Footer in the Text group to open the Header and Footer dialog box
Click on [Cancel]
Some menu options open a dialog box…
Click on the Design tab, click on Slide Size in the Customise group to open a menu of options, then select Custom Slide Size to open the Slide Size dialog box
Click on [Cancel] to close the dialog box
1
2
For Your Reference…
To launch a dialog box:
Click on a dialog box launcher, relevant
command button or menu option
Handy to Know…
In some situations, the command or dialog box launcher actually opens a task pane. For instance, if you click on Format Background in the Customise group on the Design tab, the Format Background task pane will appear on the right side of the screen.
6

Microsoft PowerPoint 2016 - Essentials
© 2017 The University of Nottingham Page 16 Chapter 1 - Getting to Know PowerPoint
UNDERSTANDING THE QUICK ACCESS TOOLBAR
The Quick Access Toolbar, also known as the QAT, is the small toolbar that appears in the top left corner of the PowerPoint window. It is designed to provide access to the tools you use
most frequently, such as Save. By default, the QAT also contains the Undo and Repeat buttons. You can add buttons to the Quick Access Toolbar to make finding your favourite commands easier.
The Quick Access Toolbar
The Quick Access Toolbar is positioned in the top left corner of the Microsoft PowerPoint 2016 screen. In its default state, it includes the Save tool, the Undo tool and the Repeat tool.
The Save tool
The Undo tool
The Repeat tool
Customising the Quick Access Toolbar
Appearing immediately to the right of the Quick Access Toolbar is the Customise Quick Access Toolbar tool, as shown below. Clicking on this tool displays a list of commonly used commands that you can add to the toolbar. You can select the items you want to add from the list by clicking on them. The ticks that appear to the left of the menu options show which options already appear on the QAT. You can add additional commands by selecting More Commands.
You can also add commands to the Quick Access Toolbar by right-clicking on a command in the ribbon and selecting Add to Quick Access Toolbar.

Microsoft PowerPoint 2016 - Essentials
© 2017 The University of Nottingham Page 17 Chapter 1 - Getting to Know PowerPoint
ADDING COMMANDS TO THE QAT
The Quick Access Toolbar is a handy place to store the commands from the ribbon that you use most frequently. Adding commands from the ribbon involves locating the command, right-
clicking on it to display the shortcut menu and
selecting Add to Quick Access Toolbar.
Try This Yourself:
Before starting this exercise ensure you have a blank presentation open...
Point to the first button on the Quick Access Toolbar to see the name of the tool and its shortcut
In our case, it’s the Save tool…
Click on the Home tab, then right-click on Format Painter in the Clipboard group to display a shortcut menu
Select Add to Quick Access Toolbar to add the tool to the QAT
Click on Customise Quick Access Toolbar at the end of the QAT to display the menu
Select Open to add the Open tool to the QAT
It’s just as easy to remove a tool from the QAT…
Right-click on the Format Painter tool on the QAT and select Remove from Quick Access Toolbar
Repeat step 6 to remove the Open tool from the QAT
2
3
For Your Reference…
To customise the Quick Access Toolbar:
1. Right-click on the command in the ribbon that you want to add and select Add to Quick Access Toolbar, or
Click on Customise Quick Access Toolbar and select a command
Handy to Know…
You can position the QAT under the ribbon by clicking on Customise Quick Access Toolbar and selecting Show Below the Ribbon. This places the tools that you use most frequently closer to your presentation, making it quicker to access them.
4

Microsoft PowerPoint 2016 - Essentials
© 2017 The University of Nottingham Page 18 Chapter 1 - Getting to Know PowerPoint
UNDERSTANDING THE STATUS BAR
The status bar is the bar across the bottom of the PowerPoint window. It is a useful aid that displays information such as the current slide number and spelling errors (if there are any). It
also contains tools that can change the presentation view and magnification. You can customise the status bar to change the information that is shown.
Slide Number The Slide Number indicates which slide is currently on view in the
slide window. In this example, slide 1 is in the slide window. This indicator also tells you how many slides there are in the entire presentation – in this case, there is only one.
Spelling Errors This tells you when there are spelling errors in the presentation – a small cross will replace the tick in the icon. You can click on the spelling icon to display the Spelling task pane in which you can correct the errors.
Notes Click on Notes to display the Notes pane where you can type
information for the presenter that does not appear in a slide show.
Comments Click on Comments to display the Comments task pane and enter
comments about the presentation. These do not appear in the slide show.
View Tools The View tools allow you to change the view of the presentation. You can select from Normal, Slide Sorter, Reading View and Slide Show.
Zoom Slider The Zoom Slider indicates the current zoom level, where the centre
mark indicates 100%. You can either drag the marker to adjust zoom, or click on a specific point of the slider bar to set a zoom percentage. You can also click on the buttons at either end of the slider to zoom in or zoom out.
Zoom Level This button displays the current magnification. If you click on the
button, the Zoom dialog box will appear so that you can select or type a specific zoom percentage to increase or decrease magnification.
Fit Slide To Current Window
If you have altered the zoom level of the slide in the slide window, you can quickly restore it to fit the slide by clicking on Fit Slide To Current Window.
1 2 3 4 5 6 8 7

Microsoft PowerPoint 2016 - Essentials
© 2017 The University of Nottingham Page 19 Chapter 1 - Getting to Know PowerPoint
CUSTOMISING THE STATUS BAR
The status bar, which is positioned at the bottom of the PowerPoint window, comprises two areas. The left side displays options and information relevant to the current presentation and the right
side displays viewing and zooming tools. You can customise the status bar by adding or removing options to suit your working requirements.
Try This Yourself:
Before starting this exercise ensure that a blank presentation is open…
Click on the Zoom In icon on the status bar several times
Magnification increases by 10% with each click…
On the status bar, click on the vertical line in the centre of the zoom slider to reset Zoom to 100%, then click on Fit slide to current window in the bottom right corner to adjust the zoom to the window size
The zoom level shown at this point will depend on your window size…
Right-click on the status bar to display the shortcut menu
The menu lists options you can choose to display on the status bar…
Click on Theme so it appears with a tick
The current theme is now displayed on the status bar
Click on Theme again to remove the tick and remove the information from the status bar
Press to close the shortcut
menu
2
3
For Your Reference…
To customise the status bar
1. Right-click on the status bar
2. Click on the option(s) that you want to add or remove
3. Press to close the menu
Handy to Know…
If you prefer working with the keyboard, you can press to activate the Zoom level tool
in the status bar. You can then press the arrow keys to move between the other options on the status bar and press to
activate an option. Press to deactivate
the status bar.

Microsoft PowerPoint 2016 - Essentials
© 2017 The University of Nottingham Page 20 Chapter 1 - Getting to Know PowerPoint
EXITING SAFELY FROM POWERPOINT
When you are finished working with PowerPoint you will find there are several ways to exit the application. If you have made changes to the presentation, PowerPoint will ask you to save
these changes before exiting. You will learn about saving a little later on. If you don’t want to retain any changes, you can decline the offer and simply close the application immediately.
Try This Yourself:
Before starting this exercise ensure a blank presentation is open…
Click on the Click to add title placeholder and type your name
This simply ensures that you have an unsaved change in your presentation…
Click on the Close button in the top right corner of the window
You will be prompted to save your document and retain the changes.
As we have no reason for keeping this presentation, we will decline the opportunity to save it…
Click on [Don’t Save] to exit PowerPoint
If you click on [Save], the Save As dialog box will open and you will be required to specify a file name and location for the presentation. Once you have saved your presentation, PowerPoint will close
1
2
For Your Reference…
To safely exit PowerPoint 2016:
1. Click on Close
2. If you want to keep your changes, then click on [Save] and specify a document name and
location. Otherwise, click on [Don’t Save]
Handy to Know…
Whenever you are in doubt about whether or not to save, you should err on the side of caution and save the presentation. You can delete unwanted presentations at a later date, but you can seldom retrieve data that has not been saved.
It is possible to have more than one presentation open at a time. If this is the case, you need to close each one using the steps in this exercise. Alternatively, you can right-click on the PowerPoint icon in the taskbar and select Close all windows. This will close all presentations at once. When the last presentation is closed, PowerPoint will terminate.

Microsoft PowerPoint 2016 - Essentials
© 2017 The University of Nottingham Page 21 Chapter 2 - Working With Presentations
CHAPTER 2 WORKING WITH PRESENTATIONS
In this session you will:
gain an understanding of the Open place
gain an understanding of the Open dialog box
learn how to open existing presentations
learn how to open multiple presentations simultaneously
learn how to switch between open presentations
gain an understanding of the main PowerPoint views
learn how to switch presentation views
learn how to navigate a presentation
learn how to use the Zoom tool
learn how to open a recently opened presentation.
Before creating presentations in PowerPoint, let’s first have a look at some of the basics when working with presentations. In this chapter we look at how to open and navigate a presentation, change the way you view a presentation, and how to close a presentation.
INFOCUS

Microsoft PowerPoint 2016 - Essentials
© 2017 The University of Nottingham Page 22 Chapter 2 - Working With Presentations
THE OPEN PLACE
The Open place provides easy access to recently opened files, as well as access to locations where your files may be stored such as your hard drive or OneDrive. The Open place is
displayed when you click on the File tab and select Open or when you use the keyboard shortcut +
.
The Open Place
When you access the Backstage and click on Open, the Open place will be displayed as shown below. By default, Recent Presentations is selected in the middle pane making it very easy for you to open a file you have been working on recently.
If the document you wish to open doesn’t appear in the Recent Presentations list, you can either access the folders on your This PC or in OneDrive by clicking on the appropriate option in the middle pane. Clicking on Browse in the right pane for either place will display the Open dialog box where you can navigate to the desired folder and select the file to open.
You can change the number of Recent Presentations that display in the right pane by selecting File > Options > Advanced and then selecting a number between 0 and 50 in the options box for Show this number of Recent Presentations.
Keyboard Shortcuts
To quickly access the Open place you can use the keyboard shortcut + . You may find this handy if you tend to open and work on the same files or regularly open files located in different places. You can
access the Open dialog box directly if preferred by using the keyboard shortcut + .
If you prefer to bypass the Open place altogether, you can adjust the settings so that the shortcut
+ displays the Open dialog box rather than the Open place. This may be useful if you don’t use SkyDrive or if you simply prefer to always display the Open dialog box. To do this:
1. Click on the File tab to open the Backstage
2. Click on Options to open the Options dialog box
3. Click on Save in the left pane
4. Click on Don’t show the Backstage when opening or saving files under Save presentations
5. Click on [OK]
Note: Selecting this option also means the Backstage will not appear when you save your document
using the shortcut + . Instead, the Save As dialog box will display automatically.
Also note that selecting this option in Microsoft Word or any other Microsoft Office program will change the setting in all Office programs.

Microsoft PowerPoint 2016 - Essentials
© 2017 The University of Nottingham Page 23 Chapter 2 - Working With Presentations
THE OPEN DIALOG BOX
To access documents that have previously been created and saved on your computer, network or other storage device (but not OneDrive), you will need to display the Open options in Backstage
view and access the Open dialog box. The options available in the Open dialog box for files saved to
your Computer are explained below.
3 4 5 2
1 6
7
The Open Dialog Box Options
The Navigation Pane lists the available storage devices and displays the folders and subfolders contained within these. There are two parts to this pane; a list of Favourites and Libraries in the top half of the pane and a list of all Folders in the lower half. You can use the Navigation Pane to browse through the available folders and subfolders to locate the required document. Click on the arrows to expand and collapse folders, thereby displaying and hiding the hierarchy within folders. Click on a folder name to display the folder’s contents in the File List pane (see 6 below).
The Toolbar buttons enable you to control the display and organisation of the files displayed in the dialog box. For instance, you can move and rename files using the Organise tool, or change the File List to display the files as icons instead of as a list using the Change your view tool.
When you click on a folder in the Navigation pane, the folders you click on are recorded in the background. The Back button enables you to backtrack through the previously visited folders and the Forward button enables you to move forward through them again.
The Address Bar displays the file path location of the files that are currently displayed in the File List pane.
The Search box enables you to use search criteria to locate a file. This criteria can be based on file
name, file type or author and can incorporate Boolean filters (e.g. AND, NOT, OR etc) for more advanced searching.
The File List pane displays a list of files and subfolders contained within the folder currently selected in the Navigation pane. You can double-click on a folder or file in this list to open it.
In this area at the bottom of the dialog box, there are a number of options. The File name field displays the selected file’s name. You can click on the File name drop arrow to display a list of files recently opened. The Tools option lists a selection of additional tools related to the dialog box. Click on [Open] to open the file displayed in File name or [Cancel] to close the dialog box without opening a file.
Microsoft PowerPoint 2016 - Essentials
© 2017 The University of Nottingham Page 24 Chapter 2 - Working With Presentations
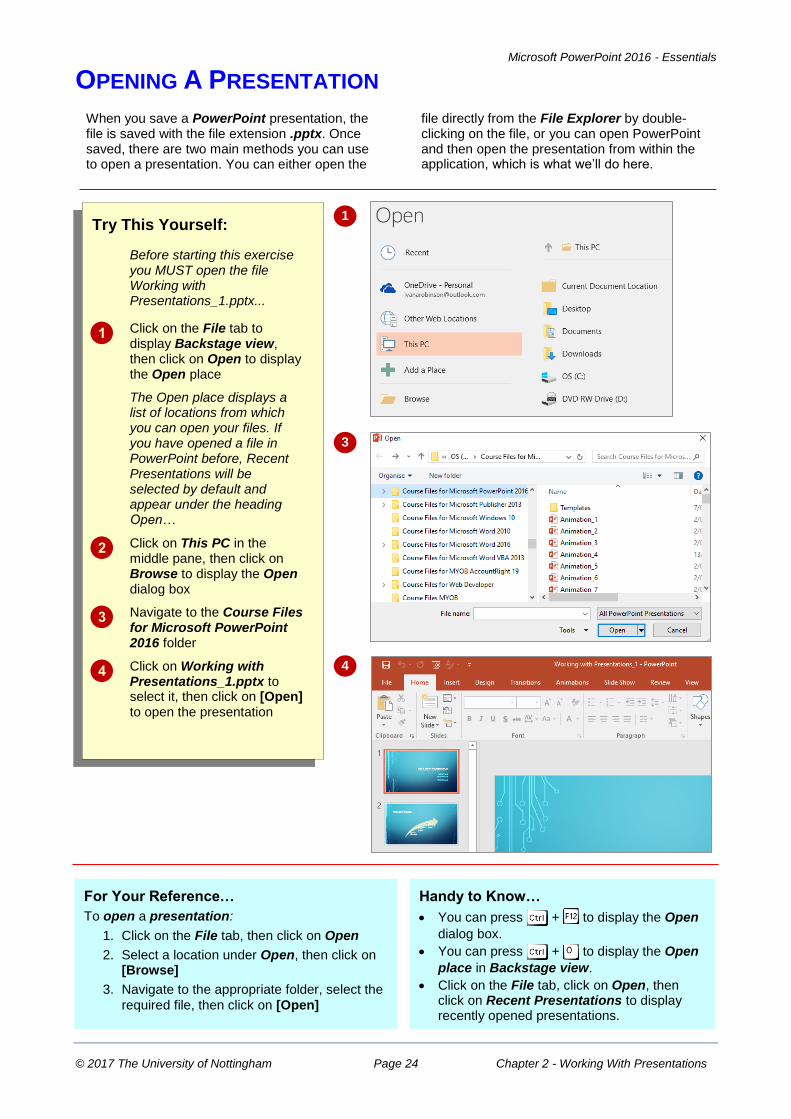
OPENING A PRESENTATION
When you save a PowerPoint presentation, the file is saved with the file extension .pptx. Once saved, there are two main methods you can use to open a presentation. You can either open the
file directly from the File Explorer by double-clicking on the file, or you can open PowerPoint and then open the presentation from within the application, which is what we’ll do here.
Try This Yourself:
Before starting this exercise you MUST open the file Working with Presentations_1.pptx...
Click on the File tab to display Backstage view, then click on Open to display the Open place
The Open place displays a list of locations from which you can open your files. If you have opened a file in PowerPoint before, Recent Presentations will be selected by default and appear under the heading Open…
Click on This PC in the middle pane, then click on Browse to display the Open dialog box
Navigate to the Course Files for Microsoft PowerPoint 2016 folder
Click on Working with Presentations_1.pptx to select it, then click on [Open] to open the presentation
1
3
For Your Reference…
To open a presentation:
1. Click on the File tab, then click on Open
2. Select a location under Open, then click on [Browse]
3. Navigate to the appropriate folder, select the
required file, then click on [Open]
Handy to Know…
You can press + to display the Open
dialog box.
You can press + to display the Open
place in Backstage view.
Click on the File tab, click on Open, then click on Recent Presentations to display recently opened presentations.
4

Microsoft PowerPoint 2016 - Essentials
© 2017 The University of Nottingham Page 25 Chapter 2 - Working With Presentations
OPENING MULTIPLE PRESENTATIONS
Opening multiple presentations in PowerPoint enables you to work with them at the one time. This is convenient if you want to locate information from a presentation created
previously and insert it into another. You now know how to open one presentation at a time – let’s see how to open multiple presentations.
Try This Yourself:
Before starting this exercise you should close all PowerPoint presentations that are currently open...
Click on the File tab then click on Open to display the Open place
Click on This PC in the middle pane, then click on Browse to display the Open dialog box
Navigate to and click on the Course Files for Microsoft PowerPoint 2016 folder
Locate and click on Working with Presentations_1.pptx,
then hold down and click on Working with Presentations_3.pptx to select both files
Click on [Open]
You will now have two presentations open though only one presentation will be visible if the application window is maximised…
Repeat steps 1 to 4 to open Working With Presentations_2.pptx
4
5
For Your Reference…
To open multiple documents simultaneously:
1. Click on the File tab and display the Open dialog box
2. Hold down and click on the documents
to open
3. Click on [Open]
Handy to Know…
To select a range of contiguous files in the Open dialog box, click on the first file then hold down and click on the last file in
the range to select all files in between.
6
Microsoft PowerPoint 2016 - Essentials
© 2017 The University of Nottingham Page 26 Chapter 2 - Working With Presentations
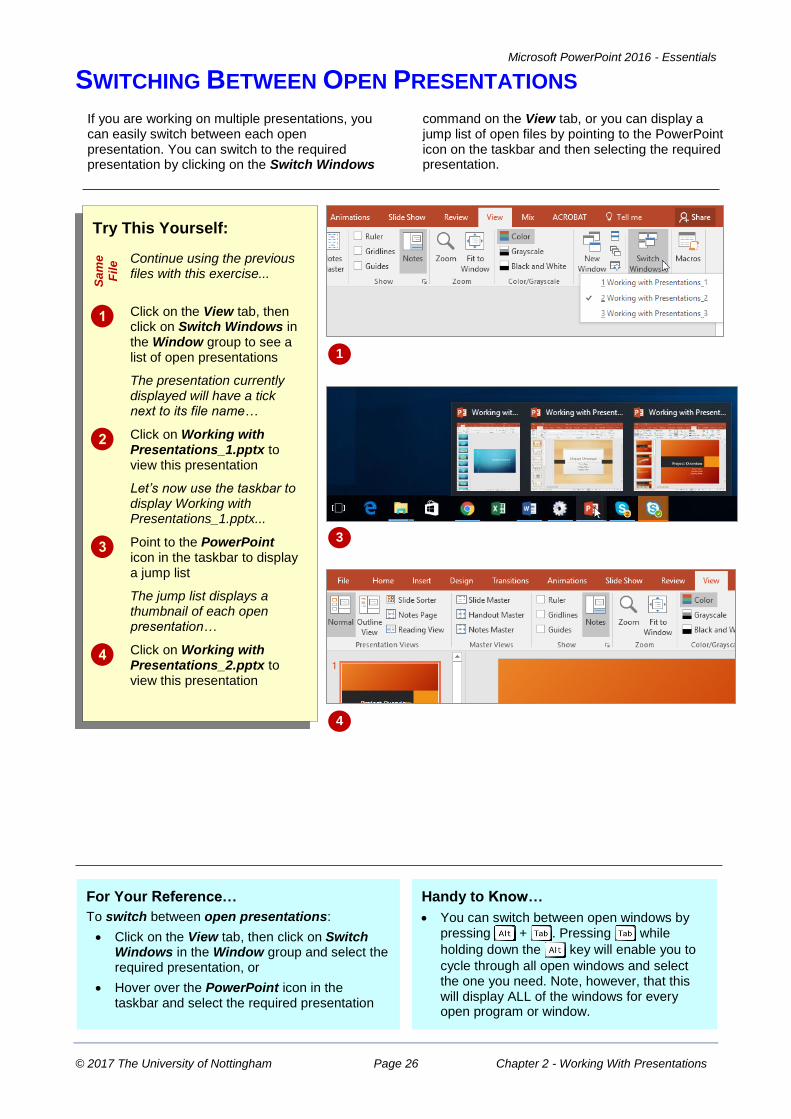
SWITCHING BETWEEN OPEN PRESENTATIONS
If you are working on multiple presentations, you can easily switch between each open presentation. You can switch to the required presentation by clicking on the Switch Windows
command on the View tab, or you can display a jump list of open files by pointing to the PowerPoint icon on the taskbar and then selecting the required presentation.
Try This Yourself:
Sa
me
Fil
e Continue using the previous
files with this exercise...
Click on the View tab, then click on Switch Windows in the Window group to see a list of open presentations
The presentation currently displayed will have a tick next to its file name…
Click on Working with Presentations_1.pptx to view this presentation
Let’s now use the taskbar to display Working with Presentations_1.pptx...
Point to the PowerPoint icon in the taskbar to display a jump list
The jump list displays a thumbnail of each open presentation…
Click on Working with Presentations_2.pptx to view this presentation
1
3
For Your Reference…
To switch between open presentations:
Click on the View tab, then click on Switch Windows in the Window group and select the required presentation, or
Hover over the PowerPoint icon in the taskbar and select the required presentation
Handy to Know…
You can switch between open windows by pressing + . Pressing while
holding down the key will enable you to
cycle through all open windows and select the one you need. Note, however, that this will display ALL of the windows for every open program or window.
4

Microsoft PowerPoint 2016 - Essentials
© 2017 The University of Nottingham Page 27 Chapter 2 - Working With Presentations
UNDERSTANDING PRESENTATION VIEWS
Normal View
You will spend most of your time working in Normal view when designing presentations. Normal view has three working areas.
The Thumbnails pane on the left displays thumbnails of your slides, allowing you to quickly navigate to the desired slide.
The Slides pane (main area of the window) displays the current slide.
The Notes pane at the bottom of the screen displays slide notes.
You can increase or decrease the size of any of the panes by dragging the pane borders.
Slide Sorter View
Slide Sorter view displays your slides as thumbnails.
From this view it is easy to move, add and delete slides; add speaker notes; create sections, preview transition and animation effects; and create summary slides.
PowerPoint has five views: Normal view, Outline view, Slide Sorter view, Slide Show view and Reading view. Normal is the main editing view for designing and writing your presentation. Slide
Sorter displays your slides as thumbnails. Slide Show is a full-screen slide show. Reading allows you to view your presentation as a slide show but with access to other open windows.
Outline View
Outline view is the same as Normal view, except that the thumbnails in the left pane are replaced with the slide text displayed in outline mode, making it an ideal view for adding text.
Outline view
Slide Show View
Slide Show view displays your presentation as a slide show. It displays on the full monitor and looks just as the show will look to your audience.
From this view you can check your graphics, timings, animations and transition effects and test the slide show.
Slide Sorter view
Reading view
Reading View
Reading view displays your presentation as a slide show and looks just as your audience will see it. However, unlike Slide Show view, you can still switch between open windows and work on other tasks.
From this view you can check your graphics, timings, animations and transition effects and test the slide show without having to exit the slide show if you need to switch to another window or task.
Microsoft PowerPoint 2016 - Essentials
© 2017 The University of Nottingham Page 28 Chapter 2 - Working With Presentations
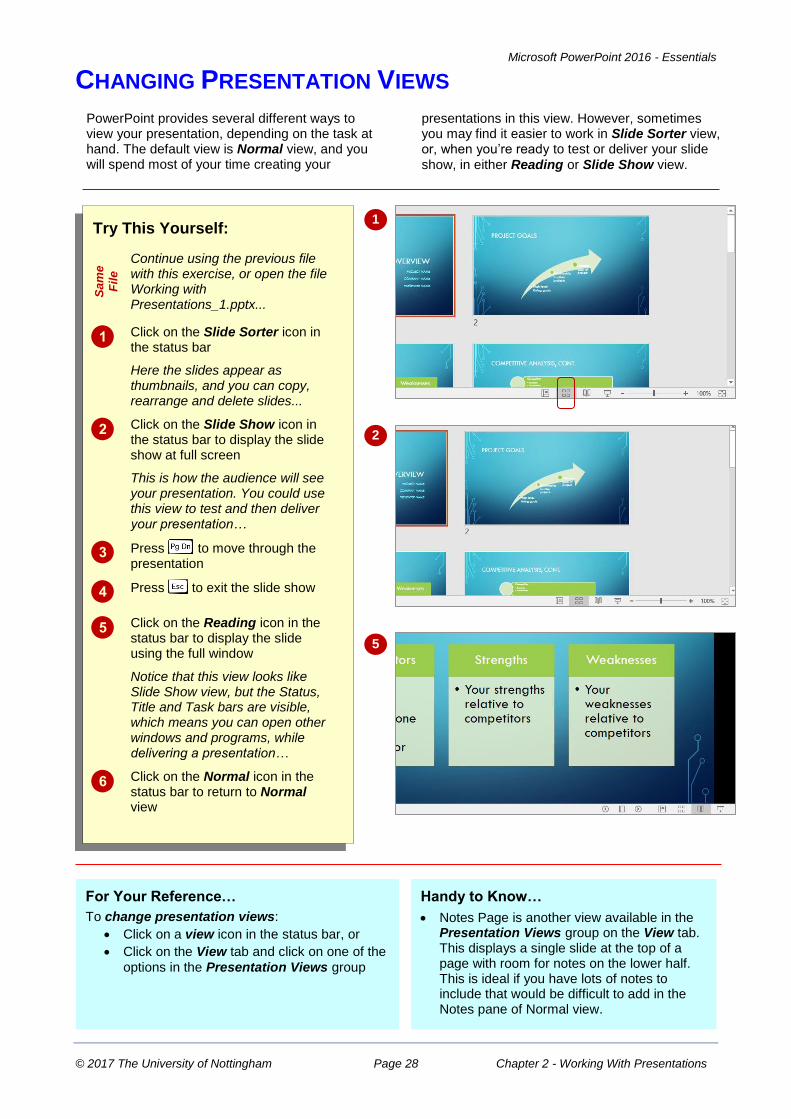
CHANGING PRESENTATION VIEWS
PowerPoint provides several different ways to view your presentation, depending on the task at hand. The default view is Normal view, and you will spend most of your time creating your
presentations in this view. However, sometimes you may find it easier to work in Slide Sorter view, or, when you’re ready to test or deliver your slide
show, in either Reading or Slide Show view.
Try This Yourself:
Sa
me
Fil
e
Continue using the previous file with this exercise, or open the file Working with Presentations_1.pptx...
Click on the Slide Sorter icon in the status bar
Here the slides appear as thumbnails, and you can copy, rearrange and delete slides...
Click on the Slide Show icon in the status bar to display the slide show at full screen
This is how the audience will see your presentation. You could use this view to test and then deliver your presentation…
Press to move through the presentation
Press to exit the slide show
Click on the Reading icon in the status bar to display the slide using the full window
Notice that this view looks like Slide Show view, but the Status, Title and Task bars are visible, which means you can open other windows and programs, while delivering a presentation…
Click on the Normal icon in the status bar to return to Normal view
1
2
For Your Reference…
To change presentation views:
Click on a view icon in the status bar, or
Click on the View tab and click on one of the
options in the Presentation Views group
Handy to Know…
Notes Page is another view available in the Presentation Views group on the View tab. This displays a single slide at the top of a page with room for notes on the lower half. This is ideal if you have lots of notes to include that would be difficult to add in the Notes pane of Normal view.
5
Microsoft PowerPoint 2016 - Essentials
© 2017 The University of Nottingham Page 29 Chapter 2 - Working With Presentations
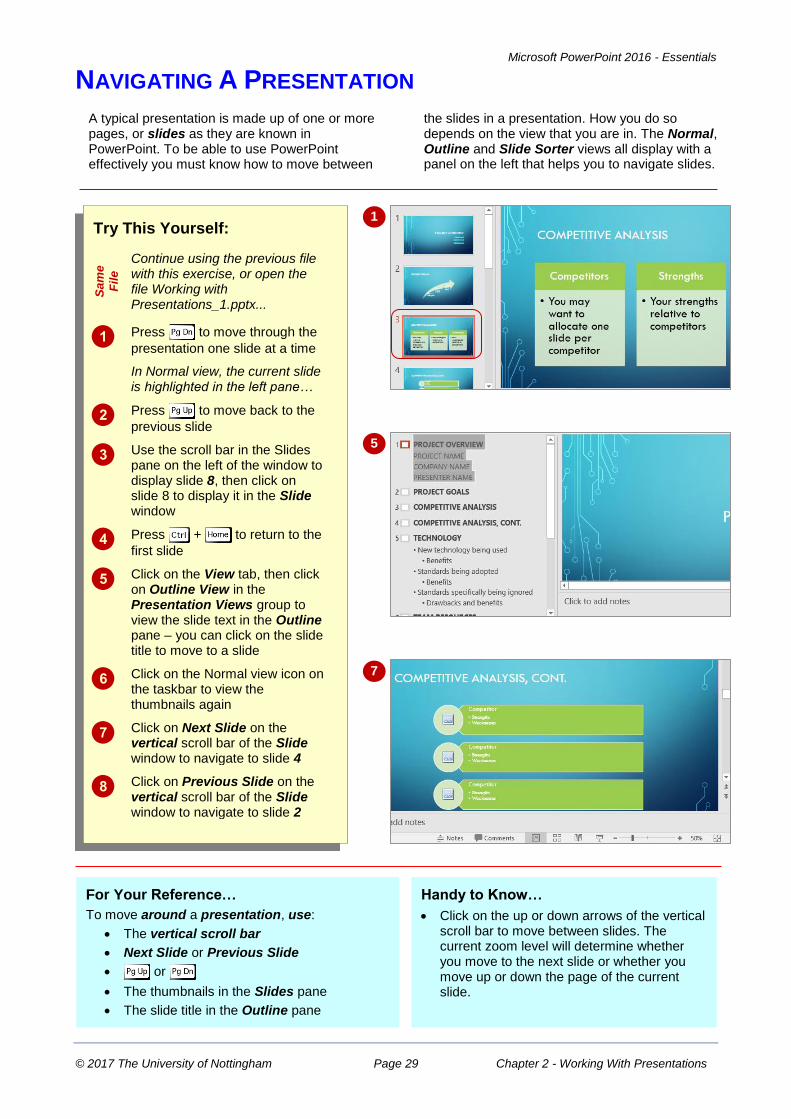
NAVIGATING A PRESENTATION
A typical presentation is made up of one or more pages, or slides as they are known in PowerPoint. To be able to use PowerPoint effectively you must know how to move between
the slides in a presentation. How you do so depends on the view that you are in. The Normal, Outline and Slide Sorter views all display with a panel on the left that helps you to navigate slides.
Try This Yourself:
Sa
me
Fil
e
Continue using the previous file with this exercise, or open the file Working with Presentations_1.pptx...
Press to move through the
presentation one slide at a time
In Normal view, the current slide is highlighted in the left pane…
Press to move back to the
previous slide
Use the scroll bar in the Slides pane on the left of the window to display slide 8, then click on slide 8 to display it in the Slide window
Press + to return to the
first slide
Click on the View tab, then click on Outline View in the Presentation Views group to view the slide text in the Outline pane – you can click on the slide title to move to a slide
Click on the Normal view icon on the taskbar to view the thumbnails again
Click on Next Slide on the vertical scroll bar of the Slide window to navigate to slide 4
Click on Previous Slide on the vertical scroll bar of the Slide window to navigate to slide 2
1
5
7
For Your Reference…
To move around a presentation, use:
The vertical scroll bar
Next Slide or Previous Slide
or
The thumbnails in the Slides pane
The slide title in the Outline pane
Handy to Know…
Click on the up or down arrows of the vertical scroll bar to move between slides. The current zoom level will determine whether you move to the next slide or whether you move up or down the page of the current slide.

Microsoft PowerPoint 2016 - Essentials
© 2017 The University of Nottingham Page 30 Chapter 2 - Working With Presentations
USING THE ZOOM TOOL
There will be many occasions when you will find it handy to be able to increase or decrease the magnification of the slide in the Slide window. You can use the Zoom tools on the status bar or
in the View tab to alter the magnification of the slide. You can also use the Zoom tools to alter the magnification of the contents in the Slides and Outline panes as well.
Try This Yourself:
Sa
me
Fil
e
Continue using the previous file with this exercise, or open the file Working with Presentations_1.pptx...
Display slide 2 in the Slide window
On the View tab, click on Zoom in the Zoom group to open the Zoom dialog box
Your percentage value may differ to the one shown here…
Click on 200% then click on [OK] to increase the slide magnification to 200%
On the View tab, click on Fit to Window in the Zoom group
You can also adjust the magnification of the information in the left pane…
Switch to Outline view then click on any word in the Outline pane on the left
Click on Zoom in the Zoom group to open the Zoom dialog box, then click on 50% and click on [OK]
The outline text will change size…
Switch back to Normal view
You can also change the zoom level of the slide thumbnails in Normal view
Note: If you don’t click on the slide in the Slide window prior to displaying this dialog box, the 200% and 400% options will be greyed out, because PowerPoint thinks you want to change the zoom in the Navigation pane on the left (not the Slide window).
2
3
5 6
For Your Reference…
To use the Zoom tool:
1. Click on a slide
2. Click on the View tab, then click on Zoom in the Zoom group
3. Select or type the required percentage
4. Click on [OK]
Handy to Know…
You can display the Slide thumbnails or Outline panes at a maximum zoom level of 100%.

Microsoft PowerPoint 2016 - Essentials
© 2017 The University of Nottingham Page 31 Chapter 2 - Working With Presentations
OPENING A RECENT PRESENTATION
One of the most time-consuming tasks you face when using your computer is navigating to and locating the files that you are currently working on. Microsoft aims to save you time by keeping a
list of the files that you have most recently worked on. In this exercise, you will reopen a recently opened presentation without having to go hunting through the folders.
Try This Yourself:
Before starting this exercise ensure that PowerPoint has started and that you have a presentation open...
Click on the File tab to display Backstage view and ensure that Open is selected
If necessary, click on Recent to display a list of recently opened files on the right side of the screen…
Click on Working with Presentations_2.pptx in the right pane to open this presentation
Click on the File tab, then click on Close to close the presentation
1
2
For Your Reference…
To open a recent presentation:
1. Click on the File tab, then click on Open
2. Click on Recent Presentations
3. Click on the required presentation
Handy to Know…
You can press + to open Backstage
view.

Microsoft PowerPoint 2016 - Essentials
© 2017 The University of Nottingham Page 32 Chapter 2 - Working With Presentations
NOTES:

Microsoft PowerPoint 2016 - Essentials
© 2017 The University of Nottingham Page 33 Chapter 3 - Your First Presentation
CHAPTER 3 YOUR FIRST PRESENTATION
In this session you will:
gain an understanding of the process of creating a presentation
learn how to create a presentation
learn how to apply theme variants
gain an understanding of the Save As place
gain an understanding of the Save As dialog box
learn how to type text into a slide
learn how to insert new slides
learn how to type text in the outline pane
learn how to apply slide transitions
learn how to save a presentation
learn how to preview a slide show
learn how to close a presentation.
In order to create your first presentation there are a few things you need to know such as how to choose a theme, add text and slides, edit text and of course, preview your slide show.
INFOCUS

Microsoft PowerPoint 2016 - Essentials
© 2017 The University of Nottingham Page 34 Chapter 3 - Your First Presentation
CREATING PRESENTATIONS IN POWERPOINT
Creating presentations in PowerPoint is designed to be instinctive, based on your experience with pen and paper or other applications in the Office suite such as Word. The steps required to create
a presentation are very simple but as you become more experienced, you will be able to utilise an extensive range of tools and features to create a professional-looking presentation.
Choose A Template Or Theme
Templates and themes are available under New in the Backstage. Microsoft no longer separates themes and templates into two categories which can make it a little tricky for a first time user to differentiate between the two. One way of remembering is to understand that templates contain information and guidance on the kind of content to include in your slide, whereas themes contain design elements such as patterns and colours to guide you in the appearance of your presentation.
Most of the available themes are displayed under New when you first open the Backstage. Once you have chosen a theme, you can modify and customise it by changing colours, fonts, patterns and more.
If you are looking for a template to help you with a specific presentation, simply type a word or term (such as ‘Nature’) into the search for themes and templates box located in New in the Backstage and
press .
You can further narrow down your search by selecting from the Categories that appear on the right side of the screen when you perform a search.
To keep matters simple and apply your own formatting, you can use the default PowerPoint presentation (the Blank template). When creating a new presentation, the Blank template appears as the first template option under File > New.
As you become more experienced with PowerPoint, you can create your own templates bearing logos, customised themes, and so on, and use these instead for your new documents.
Add Content
Once you have chosen a template or theme to base your presentation on, you are ready to start adding content. You can easily add text by typing directly onto the slide which appears in the Slide window and you can add additional slides by clicking on New Slide in the Slides group on the Home tab.
Save The Presentation
Once you have added some content, it is critical to save the new presentation to ensure the information is not inadvertently lost. This also enables you to store the presentation for later use. The process of saving a presentation moves the presentation content from the computer’s short-term memory (also known as RAM, or Random Access Memory) to a source of long-term memory. This latter form of memory might be the computer’s hard disk drive, a network drive or perhaps a portable drive such as a memory stick.
Just like filing a paper document in a folder in a filing cabinet in your office, you will need to locate a suitable electronic folder for your PowerPoint presentation in the filing system of your computer or network.
When storing a presentation on your computer, you are required to assign a name to it. This enables you to easily search for and distinguish individual files.
Once you have completed this initial save process, you will then need to regularly save any new changes you make to the presentation.
Preview The Slide Show
When you think you are almost finished with your presentation, it’s important to preview it as a slide show before you present it to an audience. This ensures that you have time to correct any mistakes, see how long the presentation will take and iron out any issues you may encounter.

Microsoft PowerPoint 2016 - Essentials
© 2017 The University of Nottingham Page 35 Chapter 3 - Your First Presentation
CREATING A PRESENTATION
If you are creating your first presentation, it’s much easier to choose a theme as it does much of the design work for you. A theme is a set of colours, fonts and effects you can apply to your
presentation for a professional looking finish. The best thing is, you can always modify a theme to suit your requirements. Once you have applied a theme, all you really need to do is to type the text.
Try This Yourself:
Before starting this exercise, ensure the PowerPoint start screen is displayed…
If necessary, click on the File tab and select New, then scroll down to see the available themes and templates displayed on the right side of the screen
Templates generally have a name describing what they can be used for, such as ‘Business Meeting’, whereas theme names are more abstract, such as ‘Droplet’, which describes their appearance…
Click on Vapour Trail to view a preview
Notice there are a selection of smaller thumbnails next to the preview which display the variants (alternative colour schemes) for this theme…
Click on the four variant thumbnails next to the main preview to view the effect
Click on the More Images arrows below the thumbnail to see previews of how the theme appears on slides with varying content
Click on the original colour scheme then click on [Create] to open a new presentation with the Vapour Trail theme applied
2
For Your Reference…
To create a presentation based on a theme:
1. Click on the File tab, then click on New
2. Select a theme from the list
3. Click on [Create]
Handy to Know…
Templates contain placeholders and suggestions you can use as a guide when adding content. This is useful if you are stuck for ideas. Simply type a term or word into the search for online templates and themes box under New in the Backstage, press
and select an option.
4
5

Microsoft PowerPoint 2016 - Essentials
© 2017 The University of Nottingham Page 36 Chapter 3 - Your First Presentation
APPLYING THEME VARIANTS
Each theme comes with a set of colour variations or schemes called Variants. You can choose the desired variation either when you preview the theme in Backstage via the variant thumbnails
available in the preview, or you can select a
variation later on via the Design tab.
Try This Yourself:
Op
en
Fil
e Before starting this exercise you
MUST open the file Your First Presentation_1.pptx…
Click on the Design tab
Click on the More arrow for the Variants gallery in the Variants group to display a menu of options, then click elsewhere to close it
Let’s apply a variant to the current theme…
Point to the options available in the Variants gallery in the Variants group to see a Live Preview of the effect on the slide in the Slide window
Let’s see the variants available for other themes…
Click on the More arrow for the Themes gallery in the Themes group and select the Integral theme to apply it to your slides
Click on the More arrow for the Variants gallery in the Variants group to see the variants for the Integral theme, then repeat step 3
Notice the variants for the Integral theme include colour and pattern variations…
Repeat step 4 to select the Vapour trail theme again
2
For Your Reference…
To apply a theme variant:
1. Click on the Design tab
2. Ensure a theme is selected in the Themes gallery
3. Click on the desired option in the Variants gallery
Handy to Know…
You can manually change various elements of your theme. To do so, click on the More arrow for Variants, point to Colours, Fonts, Effects, or Background Styles and select an option to alter these elements. Selecting an option in Variants at a later time will override manual changes.
4
5
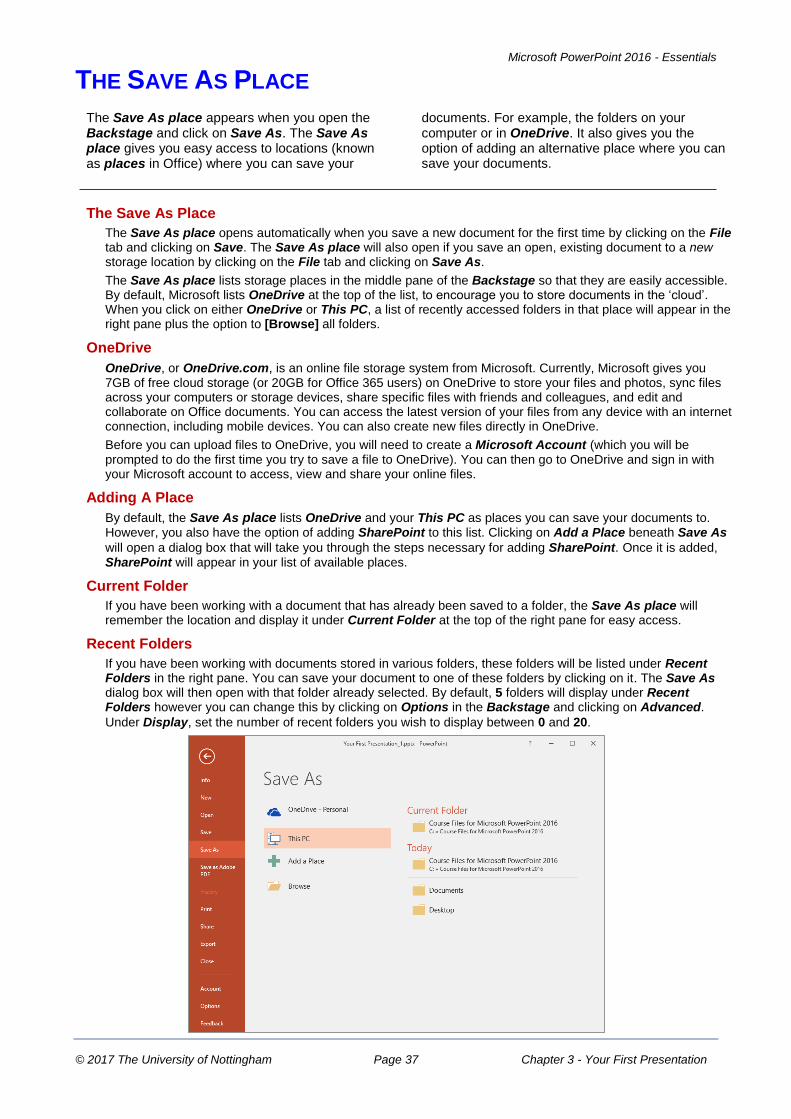
Microsoft PowerPoint 2016 - Essentials
© 2017 The University of Nottingham Page 37 Chapter 3 - Your First Presentation
THE SAVE AS PLACE
The Save As place appears when you open the Backstage and click on Save As. The Save As place gives you easy access to locations (known as places in Office) where you can save your
documents. For example, the folders on your computer or in OneDrive. It also gives you the option of adding an alternative place where you can save your documents.
The Save As Place
The Save As place opens automatically when you save a new document for the first time by clicking on the File tab and clicking on Save. The Save As place will also open if you save an open, existing document to a new storage location by clicking on the File tab and clicking on Save As.
The Save As place lists storage places in the middle pane of the Backstage so that they are easily accessible. By default, Microsoft lists OneDrive at the top of the list, to encourage you to store documents in the ‘cloud’. When you click on either OneDrive or This PC, a list of recently accessed folders in that place will appear in the right pane plus the option to [Browse] all folders.
OneDrive
OneDrive, or OneDrive.com, is an online file storage system from Microsoft. Currently, Microsoft gives you 7GB of free cloud storage (or 20GB for Office 365 users) on OneDrive to store your files and photos, sync files across your computers or storage devices, share specific files with friends and colleagues, and edit and collaborate on Office documents. You can access the latest version of your files from any device with an internet connection, including mobile devices. You can also create new files directly in OneDrive.
Before you can upload files to OneDrive, you will need to create a Microsoft Account (which you will be prompted to do the first time you try to save a file to OneDrive). You can then go to OneDrive and sign in with your Microsoft account to access, view and share your online files.
Adding A Place
By default, the Save As place lists OneDrive and your This PC as places you can save your documents to. However, you also have the option of adding SharePoint to this list. Clicking on Add a Place beneath Save As
will open a dialog box that will take you through the steps necessary for adding SharePoint. Once it is added, SharePoint will appear in your list of available places.
Current Folder
If you have been working with a document that has already been saved to a folder, the Save As place will remember the location and display it under Current Folder at the top of the right pane for easy access.
Recent Folders
If you have been working with documents stored in various folders, these folders will be listed under Recent Folders in the right pane. You can save your document to one of these folders by clicking on it. The Save As dialog box will then open with that folder already selected. By default, 5 folders will display under Recent Folders however you can change this by clicking on Options in the Backstage and clicking on Advanced.
Under Display, set the number of recent folders you wish to display between 0 and 20.

Microsoft PowerPoint 2016 - Essentials
© 2017 The University of Nottingham Page 38 Chapter 3 - Your First Presentation
THE SAVE AS DIALOG BOX
When you have typed some text into a document, it is vital that you save the document if you plan to keep it. By saving a document, you move the information from temporary memory to a source
of more permanent memory (such as the computer’s hard disk drive). To save the document you must access and use the Save As dialog box, as described below.
It doesn’t matter whether you want to save your document to your computer or to OneDrive, you still have to use the Save As dialog box. This dialog box allows you to choose a name for your document and the location you wish to store your document in so that you can easily access the document again.
The Navigation pane, located on the left side of the dialog box, enables you to browse through the files and folders in your computer or OneDrive in order to choose an appropriate location to save your document.
When you point to the Navigation pane, some folders will display a small, light grey, right-pointing arrow– this indicates that the folder contains subfolders. When you click on the light grey arrow, the folder will expand to display a hierarchy of subfolders. The arrow will then change to a small, dark grey, down-pointing arrow.
Click on a drive or a folder in the Navigation pane to identify the folder in which you want to save the file. The current contents of the folder will be displayed in the pane on the right side of the dialog box.
You can also use the Address bar at the top of the dialog box to move up or down one or more levels in the folder structure if desired. To do this, simply click on the name of the folder you wish to open in the Address bar. For instance, in the example below clicking on Documents in the Address bar would take you
back to the Documents folder.
The Address bar
Navigation pane
The contents of the folder you have selected in the Navigation pane (the Presentations folder in our case) are displayed here.
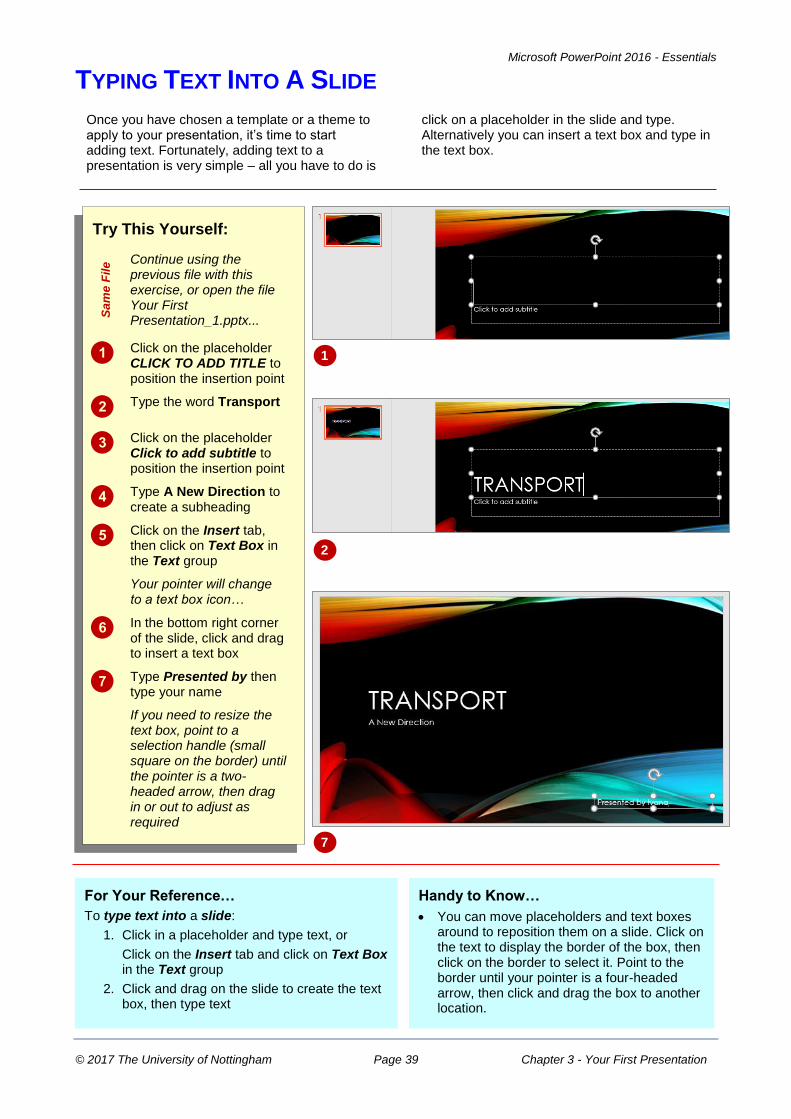
Microsoft PowerPoint 2016 - Essentials
© 2017 The University of Nottingham Page 39 Chapter 3 - Your First Presentation
TYPING TEXT INTO A SLIDE
Once you have chosen a template or a theme to apply to your presentation, it’s time to start adding text. Fortunately, adding text to a presentation is very simple – all you have to do is
click on a placeholder in the slide and type. Alternatively you can insert a text box and type in the text box.
Try This Yourself:
Sa
me
File Continue using the
previous file with this exercise, or open the file Your First Presentation_1.pptx...
Click on the placeholder CLICK TO ADD TITLE to position the insertion point
Type the word Transport
Click on the placeholder Click to add subtitle to position the insertion point
Type A New Direction to create a subheading
Click on the Insert tab, then click on Text Box in the Text group
Your pointer will change to a text box icon…
In the bottom right corner of the slide, click and drag to insert a text box
Type Presented by then type your name
If you need to resize the text box, point to a selection handle (small square on the border) until the pointer is a two-headed arrow, then drag in or out to adjust as required
1
For Your Reference…
To type text into a slide:
1. Click in a placeholder and type text, or
Click on the Insert tab and click on Text Box in the Text group
2. Click and drag on the slide to create the text box, then type text
Handy to Know…
You can move placeholders and text boxes around to reposition them on a slide. Click on the text to display the border of the box, then click on the border to select it. Point to the border until your pointer is a four-headed arrow, then click and drag the box to another location.
7
2

Microsoft PowerPoint 2016 - Essentials
© 2017 The University of Nottingham Page 40 Chapter 3 - Your First Presentation
INSERTING NEW SLIDES
In order to create a successful slide show, you will need more than one slide. Often templates have multiple slides already inserted into a presentation but, even if this is the case, you will
probably need to change the content at some point and insert additional slides. In this example we will be starting with just one slide.
Try This Yourself:
Sa
me
Fil
e Continue using the previous file,
or open Your First Presentation_2.pptx...
Click on the Insert tab, then click on the top half of New Slide in the Slides group
PowerPoint automatically inserts a slide with the Title and Content layout which you will learn more about later.
Let’s try a different method…
Ensure the second slide in the Slides pane is selected then
press to insert a third slide
Use either of the above methods to add two more slides so that you have a total of 5
At the moment all of the new slides are blank. Let’s add some content…
Select the second slide in the Slides pane so it appears in the Slide window
Add the title Personal then click in the Click to add text placeholder, type Electric cars and press to create a new
bullet point
Add two more bullet points, as shown
Repeat steps 5 and 6 to add content to the third slide, as shown
1
6
For Your Reference…
To insert a slide:
Click on the Insert tab, then click on the top half of New Slide in the Slides group, or
Click on a slide in the Slide pane and press
Handy to Know…
You can insert a new slide via the Home tab by clicking on the top half of New Slide in the Slides group.
You can delete slides by clicking on the slide
in the Slides pane and pressing or
or by right-clicking on a slide in the Slides pane and selecting Delete Slide.
7

Microsoft PowerPoint 2016 - Essentials
© 2017 The University of Nottingham Page 41 Chapter 3 - Your First Presentation
TYPING TEXT USING THE OUTLINE PANE
People
Text serves as the framework for your presentation. It is the key to the concepts that you are trying to communicate. You can type text directly onto a slide or you can type it into the
Outline pane. By typing text into the Outline pane, you are able to focus purely on the content, ensuring the sequence and structure of each slide is correct.
Try This Yourself:
Sa
me
Fil
e Continue using the previous
file, or open P1303 Your First Presentation_3.pptx...
Click on the View tab, then click on Outline View in the Presentation Views group
The Slides pane will now display an outline of the content of each slide…
Click to the right of the slide 4 icon in the Outline pane to position the cursor, then type Freight to insert a title
Press + to insert
a subheading, then type A New Direction
Press + to start a
bulleted list then type the text as shown, pressing
at the end of a line to
create the next bullet point
Click on the slide 5 icon in the Outline pane, then repeat steps 2 and 4 to add the content as shown
Click to position your cursor after A New Direction and
press until the
subheading is deleted
If necessary press
once more to remove the space
2
4
For Your Reference…
To type text in the Outline pane:
Select a slide in the Outline pane and type text
To type a subheading in the Outline pane:
Type a heading then press +
To type a bulleted list:
Type a heading then press +
Handy to Know…
You can resize the Outline pane by pointing to the border between the Outline pane and the Slide window until a two-headed arrow appears, then clicking and dragging inwards to make it smaller or outwards to make it larger. You can also resize the Slides pane using this method.
5

Microsoft PowerPoint 2016 - Essentials
© 2017 The University of Nottingham Page 42 Chapter 3 - Your First Presentation
APPLYING SLIDE TRANSITIONS
Slide transitions, when used in moderation, can make your presentation appear more polished. A slide transition is a visual effect that takes place before or after each slide so rather than the next
slide in your presentation simply appearing, you can, for instance, make it fade in, or you can make the previous slide peel off so it looks like you are turning a page in a book.
Try This Yourself:
Sa
me
Fil
e Continue using the previous file
or open P1303 Your First Presentation_4.pptx...
In Normal view, display Slide 1 then click on the Transitions tab
Click on the More arrow for the Transitions gallery in the Transitions to This Slide group to display a gallery of options
Select Curtains in Exciting to apply this transition to slide 1
A preview will automatically display. Notice also that in the Slides pane, slide 1 appears with a star to the left of it, signifying a transition has been applied to it…
Click on Preview in the Preview group to view the effect again
So far the effect is only applied to slide 1. Let’s apply a slide transition to all slides…
Repeat steps 2 and 3 to select Fade in Subtle, then click on Apply To All in the Timing group
All slides in the Slide pane now have a star to the left…
Click on slide 2 in the Slides pane to display it in the Slide window, then click on Preview in the Preview group to see slide 1 transition to slide 2
2
3
For Your Reference…
To apply slide transition effects:
1. Display the slide
2. Click on the Transitions tab
3. Click on the More arrow for the Transitions gallery in the Transitions to This Slide group
4. Select an option
5
Handy to Know…
On the Transitions tab in the Timing group, you have the option of making slide transitions automatic so that during your presentation one slide will automatically transition to the next after a specified amount of time. This is instead of clicking on the presentation to transition manually.

Microsoft PowerPoint 2016 - Essentials
© 2017 The University of Nottingham Page 43 Chapter 3 - Your First Presentation
SAVING A PRESENTATION
When you save a presentation, all changes made to the presentation will be stored in a file. You can then open the file at any time and continue working. It cannot be stressed enough
just how important it is to save your work regularly. Once you have saved the presentation for the first time, you should then save your work every few minutes where possible.
Try This Yourself:
Sa
me
Fil
e
Continue using the previous file with this exercise, or open the file Your First Presentation_5.pptx...
Click on the File tab, then click on Save As to open the Save As place
Click on This PC in the middle pane, then click on [Browse] to open the Save As dialog box
If you are saving the file that you created at the start of this chapter, PowerPoint will insert a file name based on the title of the presentation – in this case Transport.pptx. However, If you have opened the file listed above, the file name Your First Presentation_5.pptx is retained…
If necessary, type Transport.pptx in File name then navigate to the Course Files for Microsoft PowerPoint 2016 folder
Click on [Save] to save the presentation as Transport.pptx
You can now safely close your presentation
1
For Your Reference…
To save a presentation:
1. Click on the File tab, then click on Save As
2. Type the file name in File name
3. Navigate to the desired folder
4. Click on [Save]
Handy to Know…
Once you have saved your presentation the first time, you can save regularly by clicking on Save in the Quick Access Toolbar or by
pressing + .
To change the file name or location of a presentation, use the Save As dialog box.
3
4

Microsoft PowerPoint 2016 - Essentials
© 2017 The University of Nottingham Page 44 Chapter 3 - Your First Presentation
PREVIEWING A SLIDE SHOW
Normal view will give you some idea about how your presentation will appear to the audience when presented. But the best way to test the presentation is to preview it as a slide show in
Slide Show view. It’s a good idea to test your presentation regularly, especially when you’ve inserted slides, animations and transitions, for example, to make sure you’ve got it right.
Try This Yourself:
Sa
me
File Continue using the
previous file with this exercise, or open the file Your First Presentation_6.pptx...
Click on the Slide Show tab, then click on From Beginning in the Start Slide Show group
The slide show begins from slide 1 and fills the entire screen…
Click on the back and forward arrows in the bottom left corner of the screen or click with the left mouse button to step through the slide show until you return to Normal view
Switch to Outline view then click in the heading text on slide 3 in the Outline pane to display this slide in the Slide window
Let's start the slide show from this page…
Click on the Slide Show tab, then click on From Current Slide in the Start Slide Show group
Press to exit the slide
show
1
3
For Your Reference… To preview a slide show from the beginning:
Click on the Slide Show tab, then click on From Beginning in the Start Slide Show group
To preview a slide show from the current slide:
Click on the Slide Show tab, then click on From Current Slide in the Start Slide Show group
4
Handy to Know… You can preview a slide show from the
beginning by pressing .
You can preview a slide show in Reading View which allows you to view the slide show with the taskbar displayed, giving you access to other windows and tasks during the slide show if required.

Microsoft PowerPoint 2016 - Essentials
© 2017 The University of Nottingham Page 45 Chapter 3 - Your First Presentation
CLOSING A PRESENTATION
When you have finished with a presentation, you should close it and ensure that any changes that you have made are saved if required. Closing a presentation means that it has been filed away
safely, but PowerPoint will still remain open so that you can either work with another open presentation or create a new presentation.
Try This Yourself:
Sa
me
File Continue using the
previous file with this exercise, or open the file Your First Presentation_7.pptx...
Click on the File tab, then click on Close
PowerPoint will detect if you have made any changes and if so, will prompt you to save them. Because this is only an exercise, we won't save any changes…
Click on [Don’t Save] (if asked), to close the presentation without saving any changes and leave PowerPoint open
1
For Your Reference…
To close a presentation:
1. Click on the File tab, then click on Close
2. To save changes if asked, click on [Save] or to close without saving changes, click on
[Don’t Save]
2
Handy to Know…
You do not have to close a presentation before you create or open another one. You can have many presentations open at once, and jump between them using + or
by selecting the required presentation from the jump list that appears when you point to the PowerPoint icon on the taskbar.

Microsoft PowerPoint 2016 - Essentials
© 2017 The University of Nottingham Page 46 Chapter 3 - Your First Presentation
NOTES:

Microsoft PowerPoint 2016 - Essentials
© 2017 The University of Nottingham Page 47 Chapter 4 - Themes
CHAPTER 4 THEMES
In this session you will:
gain an understanding of themes
learn how to apply a theme
learn how to modify the theme colours
learn how to create a custom colour theme
learn how to change theme fonts
learn how to change the slide background
learn how to save a customised theme
learn how to use a customised theme
learn how to delete a customised theme.
A theme is a co-ordinated set of colours, fonts, effects and backgrounds that you can apply to create a professional looking presentation with a consistent design. PowerPoint includes many built-in themes. Once you’ve applied a theme, you rarely need to concern yourself with the design of your presentation — the theme already includes all of the required layout and formatting. All you really need to do is type the text. However, you can modify an existing theme, such as changing the theme colours or theme fonts, to suit your needs.
INFOCUS

Microsoft PowerPoint 2016 - Essentials
© 2017 The University of Nottingham Page 48 Chapter 4 - Themes
UNDERSTANDING THEMES
PowerPoint provides its users with powerful, yet simple tools for creating professional, high quality presentations. Themes is one such tool that can dramatically improve the appearance of your
presentation by allowing you to quickly and easily apply the work of professional designers. You can also modify themes to suit your own requirements, such as by adding a logo or company colours.
What Is A Theme?
A theme is a coordinated set of colours, styles and effects that enable you to create well-designed and professional-looking documents quickly and easily. Each theme includes a set of theme colours, theme fonts (such as heading styles and body text fonts) and theme effects (which apply a pre-chosen set of line, fill and special effects to objects that you have inserted, such as charts, shapes, SmartArt graphics and images).
Every presentation has an underlying theme. For example, a new blank presentation has the Office theme applied to it by default. This means that every element of your new presentation – be it the text you insert or a style you apply to an inserted table or picture – is controlled by a theme.
Themes are available under New in the Backstage. All themes also come with a set of Variants. Variants can be seen as variations of the same theme with slightly different colour schemes. If you don’t like the variants, there is always the option of customising the theme to suit your requirements. You can alter the colours, fonts, backgrounds and much more to create the perfect theme for you.
These are some of the themes available under New in the Backstage.
Why Use Themes?
There are several advantages to using themes.
To save time. Instead of spending copious amounts of time formatting every aspect of your presentation, such as styles, slide layout, colour backgrounds, formatting and the rest, graphic designers have done the work for you. By choosing a theme, you can create professional, high-quality documents with a coordinated set of colours, fonts and backgrounds.
To keep it consistent. The PowerPoint themes are also available in other Microsoft Office applications like Excel and Word. This means that you can maintain a consistent look, if desired, across all of your organisational documents. For example, you can create your annual report with a similar design to your brochures, monthly newsletters, end-of-year financials, your presentation to the Board, and your website.
Themes can also be applied to PowerPoint’s range of templates.
This is a preview of the Vapor Trail theme. Notice the four variants for this theme to the right of the main thumbnail.

Microsoft PowerPoint 2016 - Essentials
© 2017 The University of Nottingham Page 49 Chapter 4 - Themes
APPLYING A THEME
Microsoft PowerPoint includes a variety of themes. Each theme has been carefully designed so that the fonts, styles, colours and formatting complement each other to create
professional-looking, consistent and well-designed presentations. As well as creating new presentations based on a theme, you can also apply themes to existing presentations.
Try This Yourself:
Op
en
Fil
e Before starting this
exercise you MUST open the file Themes_1.pptx…
Click on the Design tab, then click on the More arrow for the Themes gallery in the Themes group to display a gallery of options
Here you will find all built-in themes. Currently the default Office theme is applied to the presentation, as shown under the heading This Presentation. Let’s apply a different theme ...
Point to the various themes in the gallery to see them applied to the presentation in Live Preview
Click on Wisp to apply this theme to the presentation
All design, layout and formatting within the theme have been applied, instantly transforming the presentation…
Scroll through the presentation to see how the theme has been applied to the various elements
1
3
For Your Reference…
To apply a theme to a presentation:
1. Click on the Design tab
2. Click on the More arrow for the Themes gallery in the Themes group
3. Select the desired theme
4
Handy to Know…
You can change the default theme for all new presentations if you would rather not use the Office theme. To do this, click on the Design tab, then click on the More arrow in the Themes group, right-click on the theme that you want to set as the default and select Set
as Default.

Microsoft PowerPoint 2016 - Essentials
© 2017 The University of Nottingham Page 50 Chapter 4 - Themes
CHANGING THE THEME COLOURS
For each theme, designers have selected twelve colours that complement each other. These include light-coloured text with a dark background (and vice versa), six accent colours for charts,
tables and other inserted objects, plus two colours for hyperlinks. Once you have applied a theme, you can easily apply a different colour scheme to the current theme.
Try This Yourself:
Sa
me
Fil
e
Continue using the previous file with this exercise, or open the file Themes_2.pptx...
Click on the Design tab, then point to each of the thumbnail options available in the Variants gallery in the Variants group to see the effect on the slides in Live Preview
We didn’t like any of those variants so let’s apply a different colour theme…
Click on the More arrow for the Variants gallery in the Variants group to display a menu of options
Point to Colours to display the colour options
Point to the various theme colours options to see them applied to the presentation in Live Preview
Scroll down and click on Green to apply this colour theme to the presentation
Scroll through the presentation to see how the theme colours have been applied to the various elements
1
2
For Your Reference…
To change theme colours:
1. Click on the Design tab
2. Click on Colours in the Themes group
3. Click on the desired theme colours
Handy to Know…
When applying themes, the available variants will change depending on the theme that you have selected.
5

Microsoft PowerPoint 2016 - Essentials
© 2017 The University of Nottingham Page 51 Chapter 4 - Themes
CREATING CUSTOM THEME COLOURS
PowerPoint provides you with the option of creating your own custom colour theme. This is useful, for instance, if you want to use colours based on your company logo or simply on your
own personal preferences. You can save custom colour themes so that they appear in the Colours gallery, giving you the option to apply them to other presentations.
Try This Yourself:
Sa
me
Fil
e Continue using the previous file with
this exercise, or open the file Themes_3.pptx...
Click on the Design tab, then click on the More arrow for the Variants gallery in the Variants group to display a menu of options
Point to Colours to display a menu of options, then select Customise Colours to open the Create New Theme Colours dialog box
Let’s change a few colours to create our own version of the current colour theme – Green…
Click on the drop arrow for Text/ Background – Dark 1 and select Lime Accent 3
Notice the preview in the right pane …
Click on Text/Background – Light 2 and select Turquoise Accent 6
In Name, type My Theme and click on [Save] to save the custom theme
The theme will be saved to the Colours gallery…
Repeat step 1, point to Colours and right-click on My Theme to display a menu
Select Delete to open the Microsoft PowerPoint dialog box and click on [Yes] to delete the theme
Repeat step 1, point to Colours and select Green to reapply this theme colour
3
For Your Reference…
To create a customised colour theme:
1. Click on the Design tab, then click on the More arrow for the Variants gallery in the Variants group
2. Point to Colours, select Customise Colours, apply the changes and click on
[Save]
Handy to Know…
Once you have created a custom theme you can edit it by clicking on the Design tab, clicking on the More arrow for the Variants gallery on the Variants group, pointing to Colours, right-clicking on the theme and selecting Edit to open the Edit Theme
Colours dialog box.
6

Microsoft PowerPoint 2016 - Essentials
© 2017 The University of Nottingham Page 52 Chapter 4 - Themes
CHANGING THE THEME FONTS
Designers at Microsoft have spent time working out which groups of fonts work well together and have saved these in the Theme Fonts gallery. However, you can easily change the theme fonts
applied to a theme in your presentation. You may need to do this to meet organisational requirements, for example. A quick way to do this is
to select an alternative set of theme fonts.
Try This Yourself:
Sa
me
Fil
e
Continue using the previous file with this exercise, or open the file Themes_4.pptx...
Navigate to and display slide 4 in the Slides window
It helps to have both the heading and body theme fonts displayed when previewing alternative theme fonts in Live Preview…
Click on the Design tab, then click on the More arrow for the Variants gallery in the Variants group to display a menu of options
Point to Fonts to display the font options then point to the various theme fonts to see them applied temporarily to the presentation in Live Preview
Click on Franklin Gothic to apply this font style
Scroll through the presentation to view the result
1
3
4
For Your Reference…
To change the theme fonts:
1. Click on the Design tab
2. Click on the More arrow for the Variants gallery in the Variants group
3. Click on Fonts
4. Click on the desired theme fonts
Handy to Know…
To create and save custom theme fonts, click on the Design tab, click on the More arrow in the Variants group, then point to Fonts to display a menu. Select Customise Fonts to display the Create New Theme Fonts dialog box, apply the desired settings, type a Name
and click on [Save].

Microsoft PowerPoint 2016 - Essentials
© 2017 The University of Nottingham Page 53 Chapter 4 - Themes
CHANGING THE SLIDE BACKGROUND
Background Styles are variations of the background of the current theme. Each theme has a particular background style applied by default which generally consists of a combination
of fill colours and effects, such as gradient or texture effects. You can change the background by applying a new style or by modifying the current style on the Format Background pane.
Try This Yourself:
Sa
me
Fil
e Continue using the previous file with
this exercise, or open the file Themes_5.pptx...
Navigate to and display slide 1 in the Slides window
Click on the Design tab, then click on the More arrow for the Variants gallery in the Variants group to display a menu of options
Point to Background Styles to display a gallery of background style options
The available background styles depend on the theme or variant currently applied to your slides…
Click on Style 3 to apply this background style to all slides
Let’s customise this background…
Repeat steps 2 and 3 to open the Background Styles gallery and select Format Background to open the Format Background pane
Select Pattern fill under Fill to display the pattern fill options
Select Plaid to apply this pattern fill
You can select different Foreground or Background colours for your pattern to create a different effect…
Click on [Reset Background] to undo the changes you made
Click on Close to close the Format Background pane
4
For Your Reference…
To change the slide background:
1. Select the slide, click on the Design tab, click on the More arrow for the Variants gallery in the Variants group
2. Point to Background Styles, then select a style option or select Format Background
Handy to Know…
Using the Format Background pane, you can apply background changes to one slide, or you can apply the changes to all slides by
clicking on [Apply to All].
5 6

Microsoft PowerPoint 2016 - Essentials
© 2017 The University of Nottingham Page 54 Chapter 4 - Themes
SAVING A CUSTOMISED THEME
If you have applied a theme and then changed theme fonts, colours, and/or background styles, it would be a shame to waste all that effort in making those changes, and then have to redo
them each time you apply that theme. Instead, you can save your customised theme for future use. When you save a theme, it is added to the Themes gallery and can be applied to any presentation.
Try This Yourself:
Sa
me
Fil
e
Continue using the previous file with this exercise, or open the file Themes_6.pptx...
Click on the Design tab, then click on the More arrow in the Themes group to display the Themes gallery
The gallery displays the theme for This Presentation, which is really a customised version of the Wisp theme. Let’s save this theme for future use…
Select Save Current Theme to open the Save Current Theme dialog box
The default save location for themes is the Document Themes folder in the Templates folder. We just need to give the theme a name…
In File name, type wisp2, then click on [Save]
Click on Close to close the presentation
1
For Your Reference…
To save a customised theme:
1. Click on the Design tab, then click on the More arrow in the Themes group
2. Select Save Current Theme
3. Type a File name, then click on [Save]
2
Handy to Know…
Once saved, you can apply the custom theme to selected slides in a presentation by selecting the desired slides, opening the theme gallery and right-clicking on the required custom theme to open a shortcut menu. You can then select Apply to
Selected Slides.
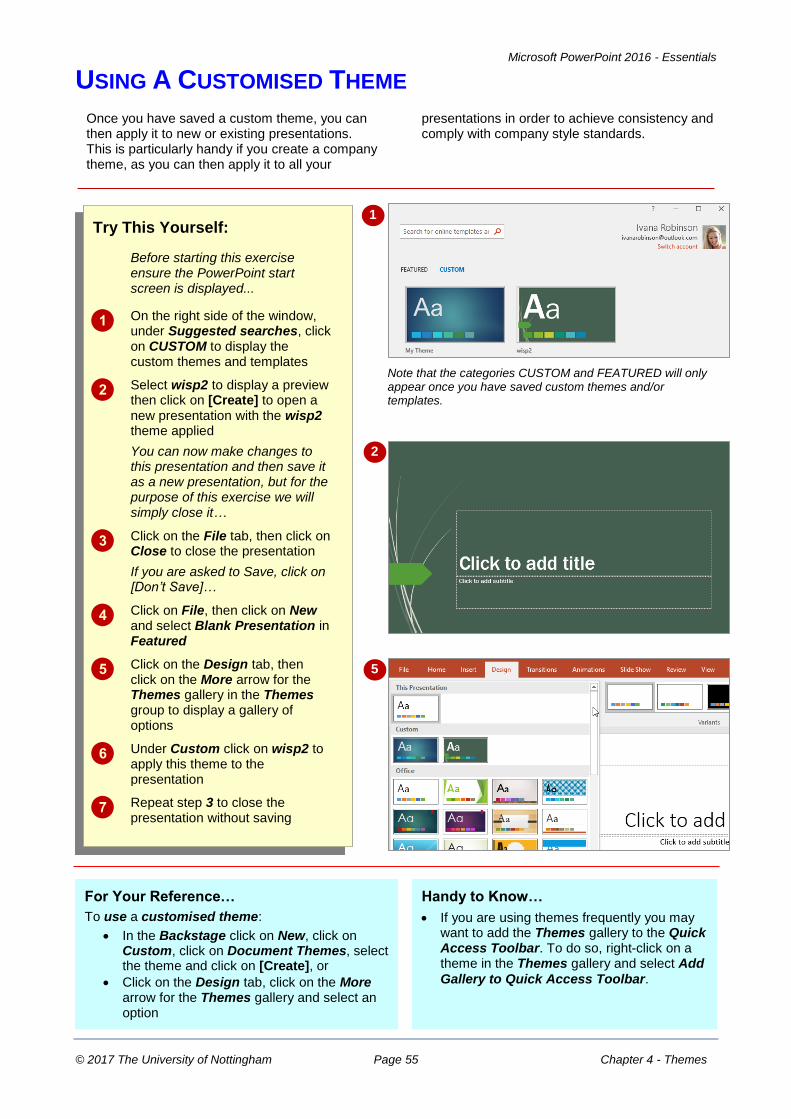
Microsoft PowerPoint 2016 - Essentials
© 2017 The University of Nottingham Page 55 Chapter 4 - Themes
USING A CUSTOMISED THEME
Once you have saved a custom theme, you can then apply it to new or existing presentations. This is particularly handy if you create a company theme, as you can then apply it to all your
presentations in order to achieve consistency and comply with company style standards.
Try This Yourself:
Before starting this exercise ensure the PowerPoint start screen is displayed...
On the right side of the window, under Suggested searches, click on CUSTOM to display the custom themes and templates
Select wisp2 to display a preview then click on [Create] to open a new presentation with the wisp2 theme applied
You can now make changes to this presentation and then save it as a new presentation, but for the purpose of this exercise we will simply close it…
Click on the File tab, then click on Close to close the presentation
If you are asked to Save, click on [Don’t Save]…
Click on File, then click on New and select Blank Presentation in Featured
Click on the Design tab, then click on the More arrow for the Themes gallery in the Themes group to display a gallery of options
Under Custom click on wisp2 to apply this theme to the presentation
Repeat step 3 to close the presentation without saving
1
2
For Your Reference…
To use a customised theme:
In the Backstage click on New, click on Custom, click on Document Themes, select the theme and click on [Create], or
Click on the Design tab, click on the More arrow for the Themes gallery and select an option
Handy to Know…
If you are using themes frequently you may want to add the Themes gallery to the Quick Access Toolbar. To do so, right-click on a theme in the Themes gallery and select Add
Gallery to Quick Access Toolbar.
5
Note that the categories CUSTOM and FEATURED will only appear once you have saved custom themes and/or templates.

Microsoft PowerPoint 2016 - Essentials
© 2017 The University of Nottingham Page 56 Chapter 4 - Themes
DELETING A CUSTOMISED THEME
There are times when you may need to delete customised themes that you have created. For instance you may only need to use a theme a couple of times. Or you may create many themes
while you are experimenting with design aspects and they may be crowding the Themes gallery. Fortunately deleting customised themes is very easy.
Try This Yourself:
Op
en
Fil
e Before starting this
exercise you MUST open the file Themes_7.pptx...
Click on the Design tab
Click on the More arrow for the Themes gallery in the Themes group to display a gallery of options
Under Custom, right-click on wisp2 to display a menu of options
Select Delete to open the Microsoft PowerPoint dialog box
Click on Yes to delete the custom theme wisp2
Repeat step 2 to expand the Themes gallery and view the result
The wisp2 custom theme will no longer be listed…
Close all open presentations
2
3
6
For Your Reference…
To delete customised themes:
1. Click on the Design tab, then click on the More arrow for the Themes gallery in the Themes group
2. Right-click on the desired theme under Custom
3. Select Delete then click on [Yes]
Handy to Know…
When you delete a custom theme from the Themes gallery it is deleted from its file location so will no longer be accessible via
the Backstage or anywhere else.

Microsoft PowerPoint 2016 - Essentials
© 2017 The University of Nottingham Page 57 Chapter 5 - Slide Layouts
CHAPTER 5 SLIDE LAYOUTS
In this session you will:
gain an understanding of slide layouts
learn how to insert a title slide
learn how to insert a title and content slide
learn how to insert a section header slide
learn how to insert a table
learn how to insert a picture with caption slide
learn how to insert a chart
learn how to change the layout of a slide.
PowerPoint includes a range of slide layouts, complete with placeholders that allow you to quickly and easily insert text, headings, pictures and the like, onto a slide. Each slide layout is predesigned and the gallery of available layouts should satisfy your slide design needs. Alternatively, you can modify an existing layout or insert a blank slide and work from scratch.
INFOCUS

Microsoft PowerPoint 2016 - Essentials
© 2017 The University of Nottingham Page 58 Chapter 5 - Slide Layouts
UNDERSTANDING SLIDE LAYOUTS
In PowerPoint, a slide layout is like a slide template, and contains placeholders so that you know what kind of content to add and where. A placeholder is a container that holds text and
graphics, such as pictures, clip art, tables, charts and more. Each placeholder is positioned in certain areas of the slide, such as a text placeholder for the heading.
The Layouts Gallery
The following predesigned slide layouts are available in the Layouts gallery which can be accessed by clicking on either the Insert tab (as shown above) or the Home tab, or by right-clicking on a slide in the Slide window and selecting Layout. The above image shows the basic layout options available for a blank presentation. Depending on the theme or template you choose, you may have additional or slightly different slide layout options available.
Title Slide The Title Slide layout is the default layout when you open a blank presentation in PowerPoint. It comprises two text placeholders: the first for the presentation title and the second for a subtitle.
Title and Content The Title and Content layout is the most commonly-used layout. It comprises a title placeholder and a content placeholder. Click on Click to add text to type a bulleted list.
Section Header The Section Header layout is ideal for slides that introduce new sections within the presentation. It includes two placeholders: a title placeholder and a text placeholder.
Two Content The Two Content layout has a title placeholder and two content placeholders that appear side-by-side.
Comparison The Comparison layout has a title placeholder, two text placeholders and two content placeholders.
Title Only The Title Only layout is the same as a Title Slide except that it doesn’t have a subtitle placeholder.
Blank The Blank layout is just that – blank.
Content with Caption The Content with Caption layout has a title and caption placeholder on the left and a content placeholder on the right.
Picture with Caption The Picture with Caption layout has a title placeholder, a caption placeholder and a placeholder for images.
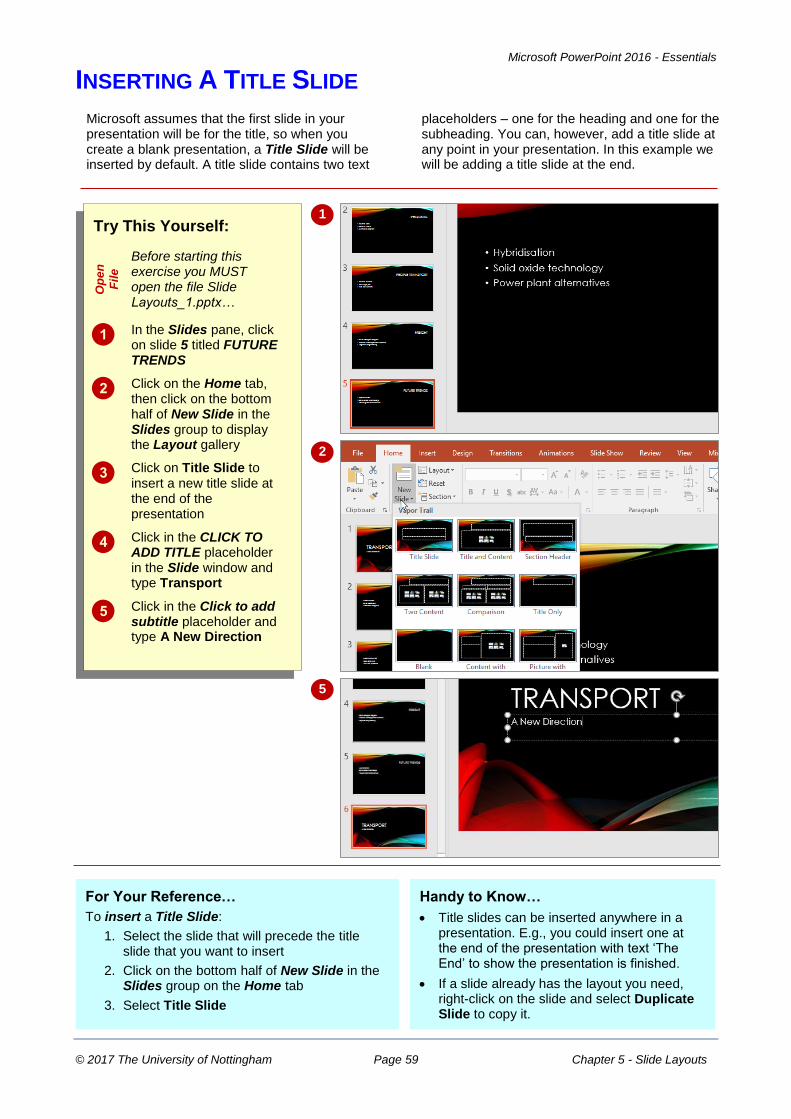
Microsoft PowerPoint 2016 - Essentials
© 2017 The University of Nottingham Page 59 Chapter 5 - Slide Layouts
INSERTING A TITLE SLIDE
Microsoft assumes that the first slide in your presentation will be for the title, so when you create a blank presentation, a Title Slide will be inserted by default. A title slide contains two text
placeholders – one for the heading and one for the subheading. You can, however, add a title slide at any point in your presentation. In this example we will be adding a title slide at the end.
1 Try This Yourself:
Op
en
Fil
e
Before starting this exercise you MUST open the file Slide Layouts_1.pptx…
In the Slides pane, click on slide 5 titled FUTURE TRENDS
Click on the Home tab, then click on the bottom half of New Slide in the Slides group to display the Layout gallery
Click on Title Slide to insert a new title slide at the end of the presentation
Click in the CLICK TO ADD TITLE placeholder in the Slide window and type Transport
Click in the Click to add subtitle placeholder and type A New Direction
2
5
For Your Reference…
To insert a Title Slide:
1. Select the slide that will precede the title slide that you want to insert
2. Click on the bottom half of New Slide in the Slides group on the Home tab
3. Select Title Slide
Handy to Know…
Title slides can be inserted anywhere in a presentation. E.g., you could insert one at the end of the presentation with text ‘The End’ to show the presentation is finished.
If a slide already has the layout you need, right-click on the slide and select Duplicate Slide to copy it.

Microsoft PowerPoint 2016 - Essentials
© 2017 The University of Nottingham Page 60 Chapter 5 - Slide Layouts
INSERTING A TITLE AND CONTENT SLIDE
The Title and Content slide is one of the most commonly used slide layouts, and as such can be put to all sorts of good use. You can use this layout to quickly add a title and bulleted list, as
we will do in this exercise. You can also insert objects into the content placeholder, such as pictures, tables, charts, clip art and other media.
Try This Yourself:
Sa
me
Fil
e Continue using the previous file
with this exercise, or open the file Slide Layouts_2.pptx...
In the Slides pane, click on slide 1 titled TRANSPORT
Click on the Home tab, then click on the bottom half of New Slide in the Slides group to display the Layout gallery
Click on Title and Content to insert a new slide with two placeholders
Type New Directions in the CLICK TO ADD TITLE placeholder
Click on the Click to add text placeholder and type Current Solutions
Press then click on the
Home tab and click on Increase List Level in the Paragraph group to create a second-level bulleted list
Type the text as shown, pressing for each new
bullet, then click on Decrease List Level in the Paragraph group to create the second first-level bullet (Renewable Solutions)
As you type the last bulleted list entry you may notice the space between each line is reduced so the text can fit the placeholder
1
For Your Reference…
To insert a Title and Content slide:
1. Click on the slide that will precede the title and content slide
2. Click on the Home tab, then click on the bottom half of New Slide in the Slides group
3. Select Title and Content
Handy to Know…
Instead of using Increase List Level and Decrease List Level to change bulleted list levels, you can press to indent a bulleted
list entry and + to outdent a bulleted
list entry.
3
7
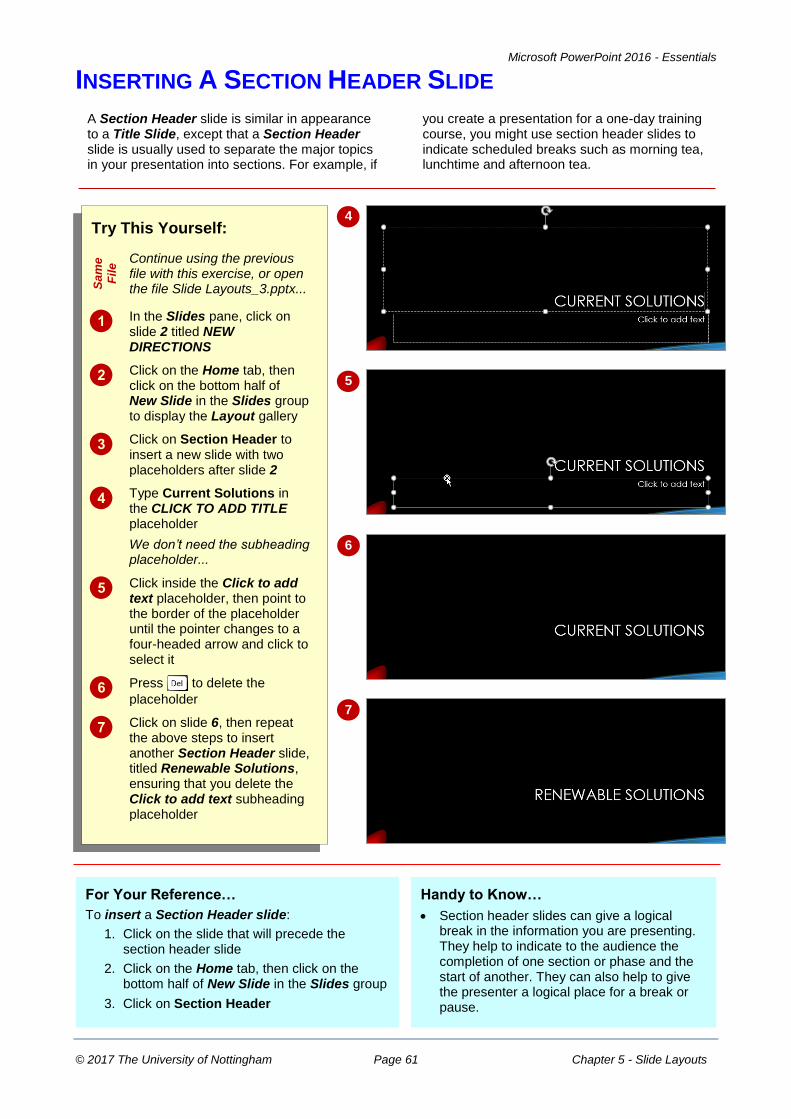
Microsoft PowerPoint 2016 - Essentials
© 2017 The University of Nottingham Page 61 Chapter 5 - Slide Layouts
INSERTING A SECTION HEADER SLIDE
A Section Header slide is similar in appearance to a Title Slide, except that a Section Header slide is usually used to separate the major topics in your presentation into sections. For example, if
you create a presentation for a one-day training course, you might use section header slides to indicate scheduled breaks such as morning tea, lunchtime and afternoon tea.
Try This Yourself:
Sa
me
Fil
e Continue using the previous
file with this exercise, or open the file Slide Layouts_3.pptx...
In the Slides pane, click on slide 2 titled NEW DIRECTIONS
Click on the Home tab, then click on the bottom half of New Slide in the Slides group to display the Layout gallery
Click on Section Header to insert a new slide with two placeholders after slide 2
Type Current Solutions in the CLICK TO ADD TITLE placeholder
We don’t need the subheading placeholder...
Click inside the Click to add text placeholder, then point to the border of the placeholder until the pointer changes to a four-headed arrow and click to select it
Press to delete the
placeholder
Click on slide 6, then repeat the above steps to insert another Section Header slide, titled Renewable Solutions, ensuring that you delete the Click to add text subheading placeholder
4
5
6
For Your Reference…
To insert a Section Header slide:
1. Click on the slide that will precede the section header slide
2. Click on the Home tab, then click on the bottom half of New Slide in the Slides group
3. Click on Section Header
Handy to Know…
Section header slides can give a logical break in the information you are presenting. They help to indicate to the audience the completion of one section or phase and the start of another. They can also help to give the presenter a logical place for a break or pause.
7

Microsoft PowerPoint 2016 - Essentials
© 2017 The University of Nottingham Page 62 Chapter 5 - Slide Layouts
INSERTING A TABLE
Tables are a great way to present data. They add a graphical element to your slides, and can be formatted using the many tools on the Drawing Tools: Format tab. You can insert a
table into any of the content placeholders on the various slide layouts. Alternatively, you can create a new table from scratch and insert it anywhere you like.
Try This Yourself:
Sa
me
Fil
e Continue using the previous file
with this exercise, or open the file Slide Layouts_4.pptx...
In the Slides pane, click on slide 6, titled FREIGHT
Click on the Home tab, then click on the bottom half of New Slide in the Slides group and click on Title and Content to insert a new slide
Type Current Usage in the CLICK TO ADD TITLE placeholder
Click on the Insert Table icon in the centre of the content placeholder to open the Insert Table dialog box
Type 2 in Number of columns,
press , then type 4 in
Number of rows and click on [OK] to insert the table
The table will be formatted using the applied theme colours...
Type the following data into the table, pressing after each
entry to move to the next cell:
Category Percentage Personal 25 Public 40 Freight 35
Click outside the table to deselect it
4
For Your Reference…
To insert a table:
1. Click on the Insert Table icon in the content placeholder
2. Type the Number of columns and Number of rows, then click on [OK]
3. Enter the table data
Handy to Know…
Once you have created a table, you can move it by clicking on the table border and dragging to a new location. You can also drag the borders in or out to resize the table.
Use the Table Tools: Design and Layout tabs to add extra rows and columns or to format a table.
6

Microsoft PowerPoint 2016 - Essentials
© 2017 The University of Nottingham Page 63 Chapter 5 - Slide Layouts
INSERTING A PICTURE WITH CAPTION SLIDE
Pictures, such as photos and images, can add life and interest to otherwise dull text-based slides. There are several ways to insert pictures into your slides. You can insert a picture
anywhere on a slide using Pictures on the Insert tab or, you can insert a picture into a content placeholder by clicking on the Pictures icon in the placeholder.
Try This Yourself:
Sa
me
Fil
e Continue using the previous file
with this exercise, or open the file Slide Layouts_5.pptx...
In the Slides pane, click on slide 9 titled FUTURE TRENDS
Let’s replace this slide...
Click on the Home tab, then click on the bottom half of New Slide in the Slides group and click on Picture with Caption to insert a new slide
Type Future Trends in the CLICK TO ADD TITLE placeholder
In the Click icon to add picture placeholder, click on the Pictures icon to open the Insert Picture dialog box, then navigate to the course files folder
Click on Slide Layouts Picture.jpg, then click on [Insert]
Click in the Click to add text placeholder and type the following text, pressing to
create each new point:
Hybridisation Solid oxide technology Power plant alternatives
In the Slides pane, click on slide 9 titled FUTURE TRENDS and press
4
For Your Reference…
To insert a Picture with Caption slide:
1. Click on the slide that will precede the picture with caption slide
2. Click on the Home tab, then click on the bottom half of New Slide in the Slides group
3. Click on Picture with Caption
Handy to Know…
In a Picture with Caption slide, the picture and caption are held in separate placeholders so they move independently. However, if select them both by holding down and clicking on each placeholder,
you can then move them around as one object.
6

Microsoft PowerPoint 2016 - Essentials
© 2017 The University of Nottingham Page 64 Chapter 5 - Slide Layouts
INSERTING A CHART
Charts allow you to represent statistical data and the like graphically and as such can enhance the look of a slide as well as providing information. Once you insert a chart, you then enter the data
which will automatically update the chart. You can insert a chart via the Insert tab or you can click on the Insert Chart icon in any of the content placeholders.
Try This Yourself:
Sa
me
Fil
e
Continue using the previous file with this exercise, or open the file Slide Layouts_6.pptx...
In the Slides pane, click on slide 7, titled CURRENT USAGE
We’ll replace the table with a pie chart…
Click in the table, then click on the border of the table to select it and press
An empty content placeholder replaces the table…
In the content placeholder, click on the Insert Chart icon to open the Insert Chart dialog box
Click on Pie, then click on [OK] to open a Microsoft Excel window
Enter the data in rows 2 to 4 as shown, pressing and
to move between cells,
then drag the lower right corner of the blue box up until the blue line excludes the data in row 5
Click on Close to close Excel and return to PowerPoint
The pie chart is inserted in the slide
3
5
For Your Reference…
To insert a chart:
1. Click on the Insert Chart icon in the placeholder
2. Select the required graph type and enter the required data
3. Close Microsoft Excel
Handy to Know…
To change chart data, click on the chart, click on the Design tab, then click on Edit Data in the Data group to re-open Excel.
You can quickly and easily format a chart by clicking on the Chart buttons located near the top right of the chart.
6

Microsoft PowerPoint 2016 - Essentials
© 2017 The University of Nottingham Page 65 Chapter 5 - Slide Layouts
CHANGING THE SLIDE LAYOUT
Slide layouts provide a range of placeholder combinations to suit most situations. One of the great things about slide layouts is that once a layout has been applied to a slide, it is not fixed.
You can easily change the layout of an existing slide whenever required. This is useful for instance, if you decide one of your slides would look better with a photo.
Try This Yourself:
Sa
me
Fil
e
Continue using the previous file with this exercise, or open the file Slide Layouts_7.pptx...
In the Slides pane, click on slide 9, titled FUTURE TRENDS
Currently this slide has the Picture with Caption layout applied...
Click on the Home tab, then click on Layout in the Slides group to display the Layout gallery
Click on Two Content to apply this layout to the slide
The content is rearranged according to the placeholder positions in the new layout.
Let’s tidy up the layout…
Click on any of the bulleted list entries to display the placeholder border, then move the pointer to the border until it changes to a four-headed arrow and click on the border to select it
Press to move the
placeholder across as shown
Click outside the placeholder to see the result
1
3
For Your Reference…
To apply a different slide layout:
1. Display the slide
2. Click on the Home tab, then click on Layout in the Slides group
3. Select the layout
4. Reposition the placeholders as required
Handy to Know…
Placeholders are positioned to create balance and contrast between each object on the slide. When moving placeholders, remember to keep related objects close together, as well as to create white space around those objects that you want the audience to be drawn to in particular.
5

Microsoft PowerPoint 2016 - Essentials
© 2017 The University of Nottingham Page 66 Chapter 5 - Slide Layouts
NOTES:

Microsoft PowerPoint 2016 - Essentials
© 2017 The University of Nottingham Page 67 Chapter 6 - Working With Text
CHAPTER 6 WORKING WITH TEXT
In this session you will:
learn how to edit text
learn how to check the spelling in a document
gain an understanding of font formatting
learn how to apply font formatting to text
learn how to apply paragraph formatting
learn how to change bullet and numbering styles
learn how to move and resize placeholders
learn how to apply WordArt to text
learn how to convert text to SmartArt.
When you create presentations in PowerPoint using available templates and themes, all the formatting is built into the theme or template and is applied automatically to text as it is entered. However, there will be times when you need to format a particular word or phrase, such as applying bold or changing the font colour, for example. This chapter will introduce you to these tools and more basic text formatting and editing techniques.
INFOCUS
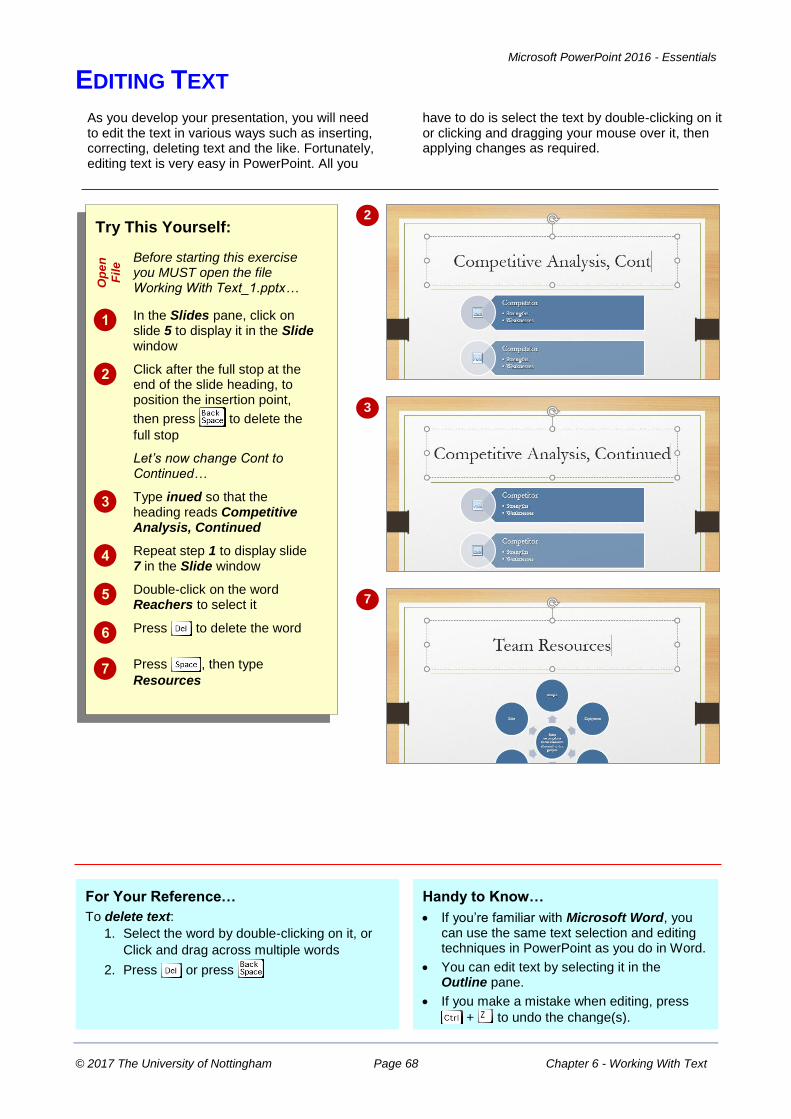
Microsoft PowerPoint 2016 - Essentials
© 2017 The University of Nottingham Page 68 Chapter 6 - Working With Text
EDITING TEXT
7
3
2
As you develop your presentation, you will need to edit the text in various ways such as inserting, correcting, deleting text and the like. Fortunately, editing text is very easy in PowerPoint. All you
have to do is select the text by double-clicking on it or clicking and dragging your mouse over it, then applying changes as required.
Try This Yourself:
Op
en
Fil
e Before starting this exercise
you MUST open the file Working With Text_1.pptx…
In the Slides pane, click on slide 5 to display it in the Slide window
Click after the full stop at the end of the slide heading, to position the insertion point,
then press to delete the
full stop
Let’s now change Cont to Continued…
Type inued so that the heading reads Competitive Analysis, Continued
Repeat step 1 to display slide 7 in the Slide window
Double-click on the word Reachers to select it
Press to delete the word
Press , then type
Resources
For Your Reference…
To delete text:
1. Select the word by double-clicking on it, or
Click and drag across multiple words
2. Press or press
Handy to Know…
If you’re familiar with Microsoft Word, you can use the same text selection and editing techniques in PowerPoint as you do in Word.
You can edit text by selecting it in the Outline pane.
If you make a mistake when editing, press
+ to undo the change(s).

Microsoft PowerPoint 2016 - Essentials
© 2017 The University of Nottingham Page 69 Chapter 6 - Working With Text
CHECKING SPELLING
One of the most powerful tools in PowerPoint is Spelling. Spelling runs a spell check that highlights each misspelt word or instance of incorrect grammar and suggests a correction.
You can then accept the suggestion or make a correction of your own. Using it regularly before you print is an excellent practice to get into as it can help save a lot of paper.
Try This Yourself:
Sa
me
File Continue using the
previous file with this exercise, or open the file Working With Text_2.pptx...
Click on the Review tab
Click on Spelling in the Proofing group
The Spelling pane will open, displaying the first instance PowerPoint detects as a spelling error. In the example shown here, the word ‘Project’ is detected as being misspelt...
Click on [Change] to accept the highlighted suggestion
If there are more errors, the next error will be displayed – ‘Competitive’ is also misspelt…
Click on [Change]
When errors have been reviewed, PowerPoint will advise that the spelling check is complete...
Click on [OK] to close the dialog box
1
Handy to Know…
If there is a word in your document that PowerPoint doesn’t recognise, such as a company name, you can click on [Add] to add it to the dictionary so that PowerPoint no longer recognises it as an error. Alternatively, you can click on [Ignore] so that no changes are made to the word.
2
For Your Reference…
To check the spelling:
1. Click on the Review tab
2. Click on Spelling in the Proofing group
3. Click on [Add], [Change] or [Ignore] for each instance, until complete
4. Click on [OK]
4

Microsoft PowerPoint 2016 - Essentials
© 2017 The University of Nottingham Page 70 Chapter 6 - Working With Text
UNDERSTANDING FONT FORMATTING
PowerPoint provides a range of font formatting tools which can be used to change the appearance of the text to suit the type of presentation you are creating. These tools are
easy to access as most of them are located on the ribbon. You can also locate some font formatting tools from a mini toolbar.
Font Formatting Tools
Because text can be added to a presentation in so many ways, it stands to reason that you will want your font formatting tools on hand wherever text appears. Font tools appear in the Font group on the Home tab (as shown below in the first image) and in the mini toolbar that appears when text is selected or when you right-click on text to display a shortcut menu (as shown in the second image).
The tools can function in a number of ways. Either as:
toggles, such as Bold, which turn a tool either on or off
single-use buttons such as Increase Font Size which only ever do what their tool tip says
buttons to display a menu of choices, such as Change Case
multi-purpose tools such as Font Colour which can be used to either apply the displayed colour or to display a menu of alternatives. These have two-part buttons which usually consist of an icon and a drop arrow.
The Home tab
The Mini Toolbar and Shortcut Menu
An even quicker and easier way to access common font formatting tools is to use the shortcut menu and mini toolbar. You can display the mini toolbar by selecting text and right-clicking on it. The mini toolbar contains a few of the most popular font formatting tools as well as tools from other groups on the Home tab, including (from left to right) Font, Font size, Increase Font Size, Decrease Font Size, Decrease List Level, Increase List Level (from the Paragraph group), Bold, Italic, Underline, Align Left, Align Centre, Align Right (from the Paragraph group), Font Colour and Format Painter (from the Clipboard group).
To find out what each tool icon represents, point to the icon to see a tool tip which displays the tool’s name and a brief description of its function. The names of some of the commonly used font tools are shown above.
The shortcut menu allows you to open various dialog boxes such as the Font and Paragraph dialog boxes and also allows you quick and easy access to some of the common tools and galleries such as Bullets.
Bold
Italic
Underline
Text Shadow
Font
Increase Font Size
Decrease Font Size

Microsoft PowerPoint 2016 - Essentials
© 2017 The University of Nottingham Page 71 Chapter 6 - Working With Text
APPLYING FONT FORMATTING
When you type text onto a slide, the text is formatted automatically with the applied template or theme fonts. Theme fonts already contain a range of formatting attributes to suit that theme,
such as the font type, size, colour and so on. However, you may need to apply font formatting to increase or decrease the size of text, change the font, or any other number of formatting techniques.
Try This Yourself:
Sa
me
Fil
e Continue using the previous file with
this exercise, or open the file Working With Text_3.pptx...
Click on slide 1 in the Slides pane to display it in the Slide window
Let’s increase the font size of the title…
Click before the word Project then hold down and click after the word
Overview to select both words
Click on the Home tab, then click on the drop arrow for Font Size in the Font group and select 60 to increase the font size, then click outside the placeholder to deselect it and view the result
Let’s apply some colour…
Re-select the heading Project Overview then click on the drop arrow for Font Colour in the Font group to open a gallery of options
Point to the various options to see the effect on the text in Live Preview, then click on Teal Accent 2 Darker 25% to select it
Display slide 4 in the Slide window
Let’s apply bold to selected text…
Click and drag to select the text under Competitors then click on Bold in the Font group to apply bold to the selected text
Repeat step 7 to apply bold to the text beneath the subheadings Strengths and Weaknesses
2
3
For Your Reference…
To format text:
1. Select the text to be formatted
2. Click on the Home tab and click on the desired tool(s) in the Font group
Handy to Know…
You can use keyboard shortcuts for some formatting commands. For instance +
for Bold, + for Italic and + for
Underline.
You can also quickly change elements such as Font colour using the mini toolbar.
8

Microsoft PowerPoint 2016 - Essentials
© 2017 The University of Nottingham Page 72 Chapter 6 - Working With Text
APPLYING PARAGRAPH FORMATTING
Those who use Microsoft Word may be used to thinking of paragraphs as blocks of text, however in PowerPoint, paragraphs are more often one or two sentences or bullet points. While font
formatting changes the appearance of selected text, paragraph formatting in PowerPoint changes the appearance of all text within a placeholder and can include alignment, numbering and the like.
Try This Yourself:
Sa
me
Fil
e
Continue using the previous file with this exercise, or open the file Working With Text_4.pptx...
Click on slide 6 in the Slides pane to display it in the Slide window
Let’s increase the spacing between bullet points…
Click anywhere in the text placeholder to display the border, then click on the border to select it
Formatting will be applied to all text in the placeholder…
Click on the Home tab, then click on the drop arrow for Line Spacing in the Paragraph group and select 1.5 to increase the spacing between each paragraph
Let’s create a numbered list…
Display slide 3 in the Slide window, then repeat step 2 to select the placeholder
Click on the drop arrow for Numbering in the Paragraph group to display a gallery of options
Click on the option 1)2)3) to apply it to the bullet points
2
3
For Your Reference…
To apply paragraph formatting:
1. Select the placeholder or the paragraphs to be formatted
2. Click on the Home tab, then click on the desired tools in the Paragraph group
5
7
Handy to Know…
You can change both the horizontal alignment of text (left-aligned, centre, right-aligned, justified or placed in columns) and vertical alignment (top, middle and bottom) of text within a placeholder, as well as indent selected text using the tools in the
Paragraph group on the Home tab.
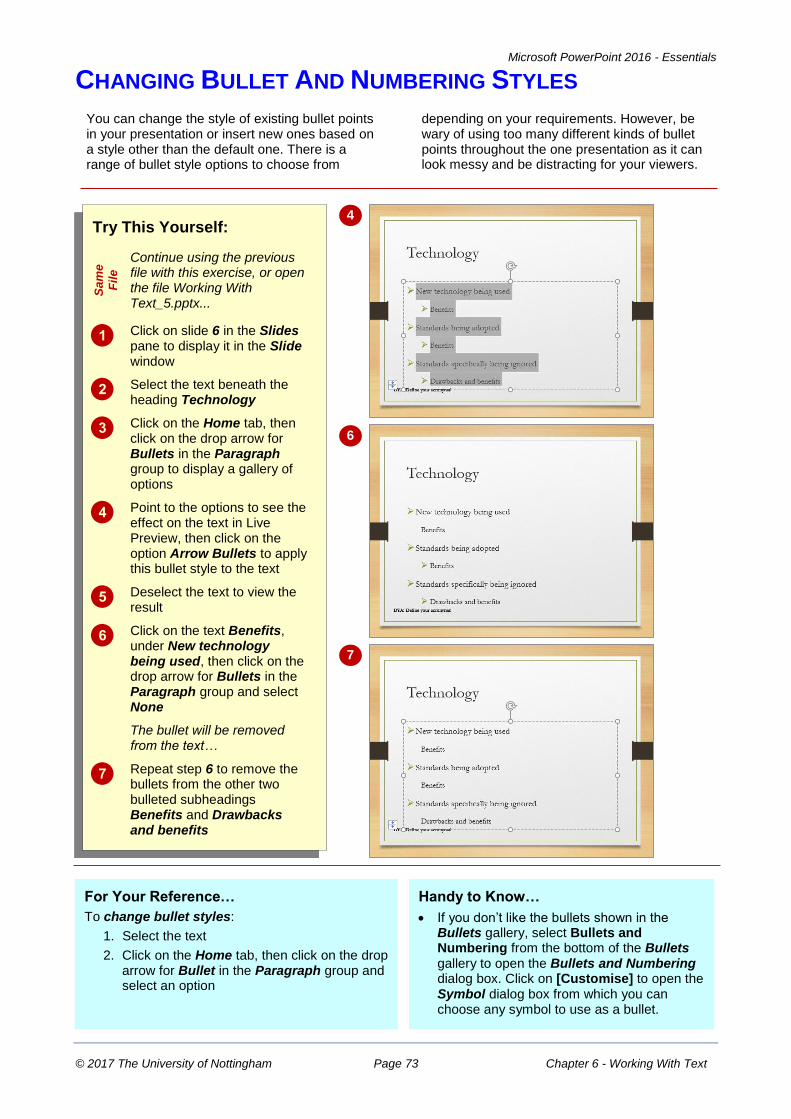
Microsoft PowerPoint 2016 - Essentials
© 2017 The University of Nottingham Page 73 Chapter 6 - Working With Text
CHANGING BULLET AND NUMBERING STYLES
You can change the style of existing bullet points in your presentation or insert new ones based on a style other than the default one. There is a range of bullet style options to choose from
depending on your requirements. However, be wary of using too many different kinds of bullet points throughout the one presentation as it can look messy and be distracting for your viewers.
Try This Yourself:
Sa
me
Fil
e
Continue using the previous file with this exercise, or open the file Working With Text_5.pptx...
Click on slide 6 in the Slides pane to display it in the Slide window
Select the text beneath the heading Technology
Click on the Home tab, then click on the drop arrow for Bullets in the Paragraph group to display a gallery of options
Point to the options to see the effect on the text in Live Preview, then click on the option Arrow Bullets to apply this bullet style to the text
Deselect the text to view the result
Click on the text Benefits, under New technology being used, then click on the drop arrow for Bullets in the Paragraph group and select None
The bullet will be removed from the text…
Repeat step 6 to remove the bullets from the other two bulleted subheadings Benefits and Drawbacks and benefits
4
6
For Your Reference…
To change bullet styles:
1. Select the text
2. Click on the Home tab, then click on the drop arrow for Bullet in the Paragraph group and select an option
Handy to Know…
If you don’t like the bullets shown in the Bullets gallery, select Bullets and Numbering from the bottom of the Bullets gallery to open the Bullets and Numbering dialog box. Click on [Customise] to open the Symbol dialog box from which you can choose any symbol to use as a bullet.
7

Microsoft PowerPoint 2016 - Essentials
© 2017 The University of Nottingham Page 74 Chapter 6 - Working With Text
MOVING AND RESIZING PLACEHOLDERS
When you type text into a placeholder, the text is formatted according to the applied theme fonts, including font size. If there is more text than can fit in the placeholder, PowerPoint will
resize the text to fit the placeholder. However, you can resize the placeholder manually to fit in extra content or to better fit on the slide. You can also reposition placeholders anywhere on the slide.
Try This Yourself:
Continue using the previous file with this exercise, or open the file Working With Text_6.pptx...
Click on slide 6 in the Slides pane to display it in the Slide window
The text is in the wrong position, so we’ll move the placeholder…
Click anywhere in the bulleted text to display the placeholder border, then click on the border to select the placeholder
Let’s resize the placeholder…
Click on the Drawing Tools: Format tab, then click on the down arrow for Shape Width in the Size group until it reads 15
Ensure the text placeholder is still selected then click on it and drag up towards the heading and position it as shown
Onscreen guides may appear, to help you align the placeholder…
Navigate to and click on slide 10 so it appears in the Slide window
Repeat step 2 to select the placeholder
Click and drag the placeholder to the left as shown
Point to the middle control handle on the right border of the placeholder until the cursor changes to a two-headed arrow, then click and drag to the right, as shown, to resize the placeholder
4
7
For Your Reference…
To move a placeholder:
Select the placeholder, then click and drag to position the placeholder in its new location
To resize a placeholder:
Select the placeholder and adjust the Height and Width in the Size group on the Drawing Tools: Format tab
Handy to Know…
To delete a placeholder, select the placeholder, then press .
You can use the keyboard to move a selected placeholder. Press , , , or
to move the placeholder in the required
direction.
8

Microsoft PowerPoint 2016 - Essentials
© 2017 The University of Nottingham Page 75 Chapter 6 - Working With Text
APPLYING WORDART TO TEXT
WordArt is simply that. Art that has been applied to text. In this case, WordArt refers to a range of pre-set effects, such as glow and reflection that can be applied to text to make it stand out. As
such, WordArt is ideal for headings and titles. WordArt can also be used to emphasise a key word. WordArt should be used sparingly unless you have a specific need for it.
Try This Yourself:
Sa
me
Fil
e Continue using the previous file
with this exercise, or open the file Working With Text_7.pptx...
Click on slide 1 in the Slides pane to display it in the Slide window
Let's make the title slide look more interesting…
Select the heading Project Overview
Click on the Drawing Tools: Format tab, then click on the More arrow for the WordArt Styles gallery in the WordArt Styles group to display the WordArt gallery
PowerPoint presents a range of styles that will complement the applied theme…
Click on Fill – White, Outline – Accent 1, Shadow (row 1, column 4) to apply this style, then click away from the placeholder to view the result
Re-select the heading, then click on the drop arrow for Text Fill in the WordArt Styles group to display a gallery of options and point to the options to see the effect in Live Preview
Click on Orange Accent 5 Lighter 40% to apply this fill to the heading
3
4
For Your Reference…
To apply WordArt to text:
1. Select the placeholder or text
2. Click on the Drawing Tools: Format tab, then click on the More arrow for the WordArt Styles gallery in the WordArt Styles group and select an option.
Handy to Know…
Once you have inserted a WordArt style, you can then format the style via the options in the WordArt Styles group. For instance, Text Effects provides you with a huge range of options such as applying a reflection or even making your text appear 3D.
6

Microsoft PowerPoint 2016 - Essentials
© 2017 The University of Nottingham Page 76 Chapter 6 - Working With Text
CONVERTING TEXT TO SMARTART
Sometimes you can’t avoid having slides in your presentation that are purely text, with no interesting graphics or the like to enhance the slide. In these situations you might consider
dressing up the text by applying a SmartArt graphic to it. SmartArt includes graphics for bulleted lists, but you could also use SmartArt graphics to depict processes or steps.
Try This Yourself:
Sa
me
File Continue using the
previous file with this exercise, or open the file Working With Text_8.pptx...
Click on slide 6 in the Slides pane to display it in the Slide window
Let’s apply SmartArt to the bulleted list…
Select the text placeholder that contains the bulleted list
Click on the Home tab, then click on Convert to SmartArt in the Paragraph group to display the SmartArt gallery
You can hover over each option to view the effect in Live Preview…
Click on More SmartArt Graphics to open the Choose a SmartArt Graphic dialog box
Click on List in the left pane, then click on Vertical Box List in the middle pane and click on [OK]
3
For Your Reference…
To convert text to SmartArt:
1. Select the placeholder, click on the Home tab, then click on Convert to SmartArt in the Paragraph group
2. Click on an option in the gallery, or Click on More SmartArt Graphics, then
select a graphic and click on [OK]
Handy to Know…
SmartArt graphics can be customised once inserted. You can click on any shape within the graphic, then use the tools on the SmartArt Tools: Design tab to format the shape as desired.
4
5

Microsoft PowerPoint 2016 - Essentials
© 2017 The University of Nottingham Page 77 Chapter 7 - Images
CHAPTER 7 IMAGES
In this session you will:
gain an understanding of pictures
gain an understanding of online pictures
gain an understanding of PowerPoint Designer
learn how to insert a picture
learn how to insert an online picture
learn how to resize an image
learn how to position an image
learn how to rotate and flip an image
learn how to take a screenshot
learn how to insert a screen clip
learn how to create a photo album.
Images in PowerPoint refer to pictures, such as photos, clip art and screenshots. PowerPoint makes it easy to insert images into your presentation. Images can be used to add visual interest to a slide, engage your audience, supplement the text on the slide, or help get your message across when presenting dry subject matter.
INFOCUS
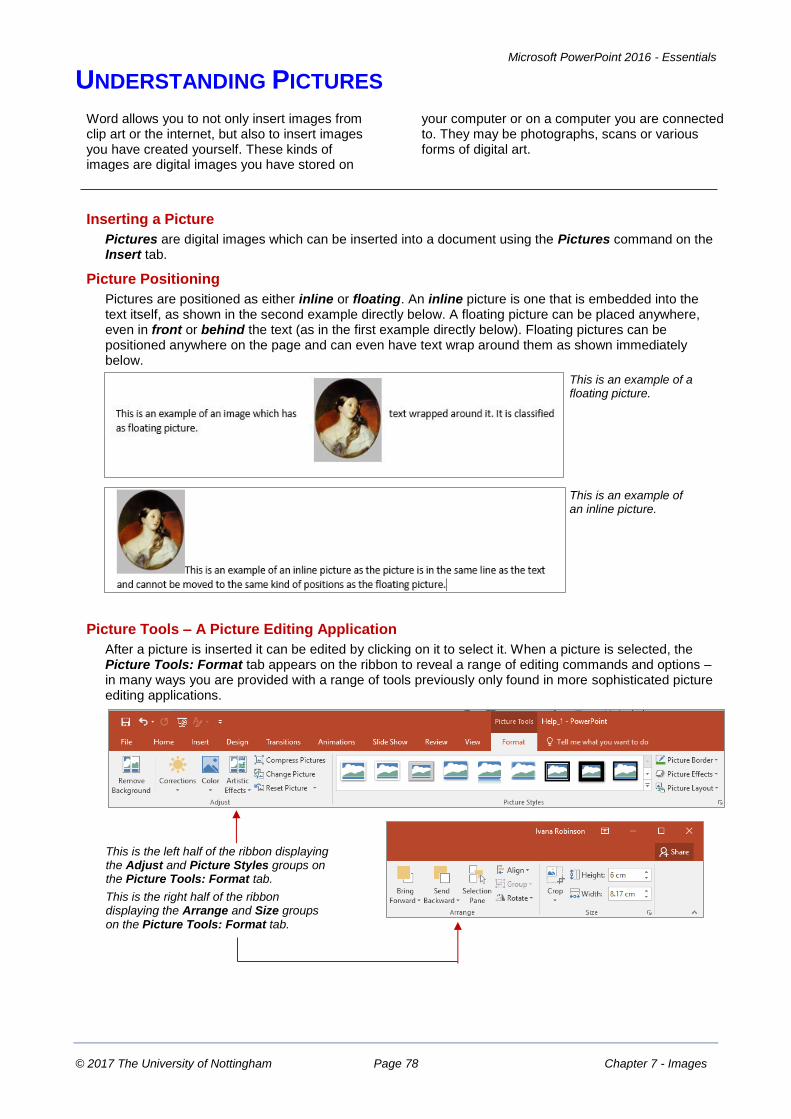
Microsoft PowerPoint 2016 - Essentials
© 2017 The University of Nottingham Page 78 Chapter 7 - Images
UNDERSTANDING PICTURES
Word allows you to not only insert images from clip art or the internet, but also to insert images you have created yourself. These kinds of images are digital images you have stored on
your computer or on a computer you are connected to. They may be photographs, scans or various forms of digital art.
Inserting a Picture
Pictures are digital images which can be inserted into a document using the Pictures command on the Insert tab.
Picture Positioning
Pictures are positioned as either inline or floating. An inline picture is one that is embedded into the text itself, as shown in the second example directly below. A floating picture can be placed anywhere, even in front or behind the text (as in the first example directly below). Floating pictures can be positioned anywhere on the page and can even have text wrap around them as shown immediately below.
Picture Tools – A Picture Editing Application
After a picture is inserted it can be edited by clicking on it to select it. When a picture is selected, the Picture Tools: Format tab appears on the ribbon to reveal a range of editing commands and options – in many ways you are provided with a range of tools previously only found in more sophisticated picture editing applications.
This is the left half of the ribbon displaying the Adjust and Picture Styles groups on the Picture Tools: Format tab.
This is the right half of the ribbon displaying the Arrange and Size groups on the Picture Tools: Format tab.
This is an example of a floating picture.
This is an example of an inline picture.

Microsoft PowerPoint 2016 - Essentials
© 2017 The University of Nottingham Page 79 Chapter 7 - Images
UNDERSTANDING ONLINE PICTURES
If you want to insert images into your presentation, you have three options. You can choose to download and insert clip art (these include photographs, cartoons and other kinds of
graphics), your own images which have been saved to your computer or online images from the Bing search engine. You can then edit these images using the Picture Tools: Format tab.
What Is An Online Picture?
You can access clip art by clicking on the Insert tab then clicking on Online Pictures in the Images group. To search for online pictures, type your search term in the search box next to Bing Image Search and press .
The difference between inserting an image via the Pictures function and the Online Pictures function is that Pictures directs you to images stored on your device, whereas Online Pictures directs you to images stored online. Both Pictures and Online Pictures can be photographic images.
or vector artwork. If you are using Online Pictures to specifically search for either vector or photographic images, you will not be able to specify using the Insert Pictures pane. Instead you must open Bing in a browser window, click on the Images tab and select the required options to specify the type of image you wish to search for. You can then download the image, save it and insert it into Word using the Insert Picture function (as it is now saved to your PC).
If you are signed in with your Microsoft account you can link certain social media accounts such as Facebook and Flickr in order access photos stored in these accounts.
Copy Right And Online Images
Copyright is the legal right (automatically given to the creator of the content) to print, publish, perform or film the content. Images found on the internet are usually protected by some kind of copyright that means it is illegal to reproduce or use the image in certain contexts or quantities. Sometimes you have the ability to purchase copyright for an image which may allow you to use an image with a number of conditions such as for a fixed amount of time, or a number of times. When you search for an image using the Online Picture function, the search results displayed will automatically be those that are licensed under Creative Commons copyright. Creative Commons allows copyright owners to obtain free licenses that mean they can share reuse and remix their material legally. This means that most images under Creative Commons can be used in documents for your own personal use or even in some publications. If you don’t require a Creative Commons license you can click on [Show all web results] in the Insert Pictures pane. This displays images that have all different kinds of copyright licenses.
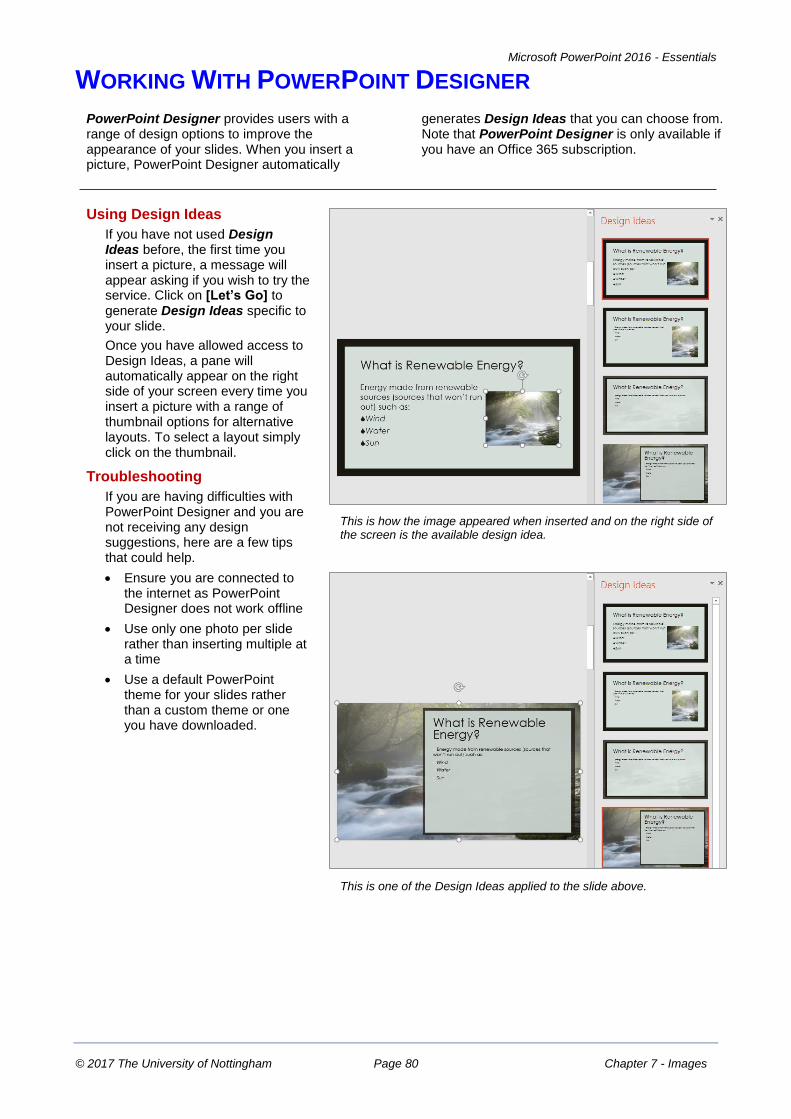
Microsoft PowerPoint 2016 - Essentials
© 2017 The University of Nottingham Page 80 Chapter 7 - Images
WORKING WITH POWERPOINT DESIGNER
PowerPoint Designer provides users with a range of design options to improve the appearance of your slides. When you insert a picture, PowerPoint Designer automatically
generates Design Ideas that you can choose from. Note that PowerPoint Designer is only available if you have an Office 365 subscription.
Using Design Ideas
If you have not used Design Ideas before, the first time you insert a picture, a message will appear asking if you wish to try the service. Click on [Let’s Go] to generate Design Ideas specific to your slide.
Once you have allowed access to Design Ideas, a pane will automatically appear on the right side of your screen every time you insert a picture with a range of thumbnail options for alternative layouts. To select a layout simply click on the thumbnail.
Troubleshooting
If you are having difficulties with PowerPoint Designer and you are not receiving any design suggestions, here are a few tips that could help.
Ensure you are connected to the internet as PowerPoint Designer does not work offline
Use only one photo per slide rather than inserting multiple at a time
Use a default PowerPoint theme for your slides rather than a custom theme or one you have downloaded.
This is how the image appeared when inserted and on the right side of the screen is the available design idea.
This is one of the Design Ideas applied to the slide above.

Microsoft PowerPoint 2016 - Essentials
© 2017 The University of Nottingham Page 81 Chapter 7 - Images
INSERTING A PICTURE FROM FILE
A picture is a photo or other kind of image file, such as a .jpeg or .png file. Pictures can be used to reinforce your message, highlight a point, or to supplement text. When inserting a picture, ask
yourself whether it adds to your presentation, or whether it may distract the audience from receiving your message. Pictures can be inserted into placeholders or anywhere on the slide.
Try This Yourself:
Op
en
Fil
e Before starting this
exercise you MUST open the file Images_1.pptx…
Click on slide 2 in the Slides pane to display it in the Slide window
Let’s insert a picture saved on the computer previously…
Click on the Insert tab, then click on Pictures in the Images group to open the Insert Picture dialog box
Navigate to the course files folder, then click on Images Picture_1.jpg to select it
Click on [Insert] to insert the picture onto the slide
The image will be automatically inserted into the existing placeholder
2
3
For Your Reference…
To insert a picture:
1. Click on the Insert tab, then click on Picture in the Images group
2. Navigate to and select the image file, then click on [Insert]
Handy to Know…
If you have inserted the wrong picture you can easily replace it. To do this, click on the picture to select it, then click on Change Picture on the Picture Tools: Format tab and select another picture.
4
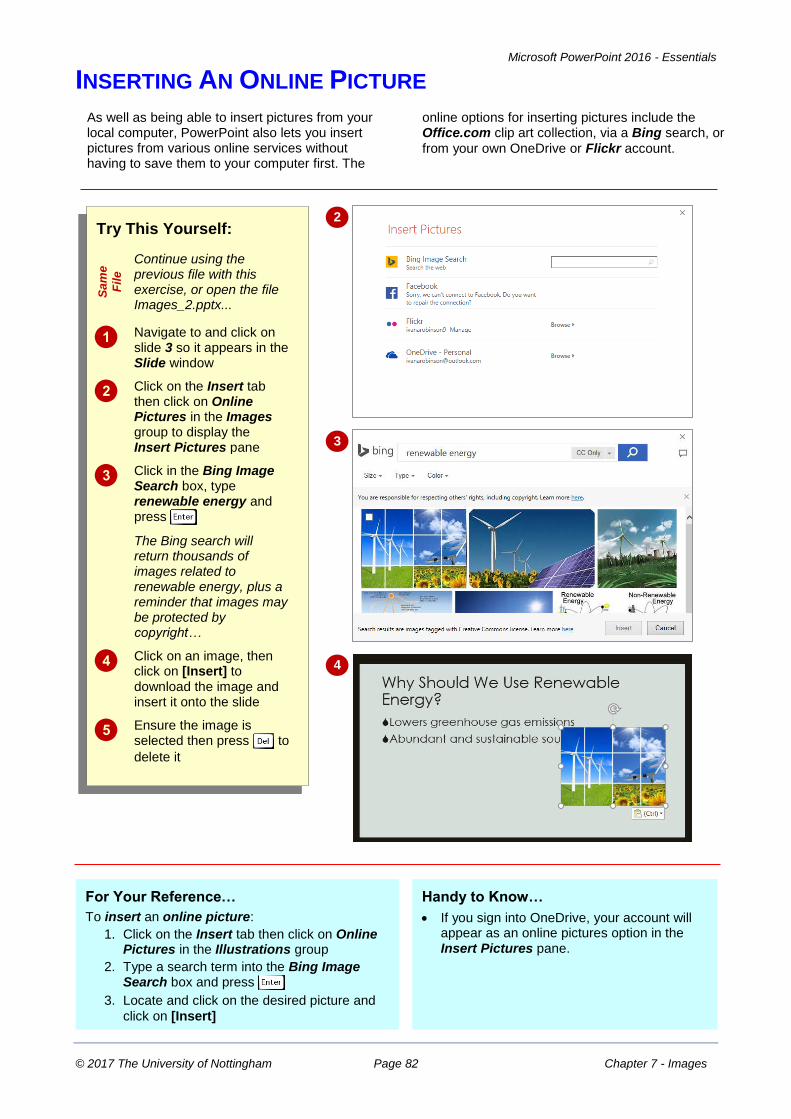
Microsoft PowerPoint 2016 - Essentials
© 2017 The University of Nottingham Page 82 Chapter 7 - Images
INSERTING AN ONLINE PICTURE
As well as being able to insert pictures from your local computer, PowerPoint also lets you insert pictures from various online services without having to save them to your computer first. The
online options for inserting pictures include the Office.com clip art collection, via a Bing search, or
from your own OneDrive or Flickr account.
Try This Yourself:
Sa
me
Fil
e
Continue using the previous file with this exercise, or open the file Images_2.pptx...
Navigate to and click on slide 3 so it appears in the Slide window
Click on the Insert tab then click on Online Pictures in the Images group to display the Insert Pictures pane
Click in the Bing Image Search box, type renewable energy and press
The Bing search will return thousands of images related to renewable energy, plus a reminder that images may be protected by copyright…
Click on an image, then click on [Insert] to download the image and insert it onto the slide
Ensure the image is selected then press to
delete it
2
3
For Your Reference…
To insert an online picture:
1. Click on the Insert tab then click on Online Pictures in the Illustrations group
2. Type a search term into the Bing Image Search box and press
3. Locate and click on the desired picture and
click on [Insert]
Handy to Know…
If you sign into OneDrive, your account will appear as an online pictures option in the Insert Pictures pane.
4
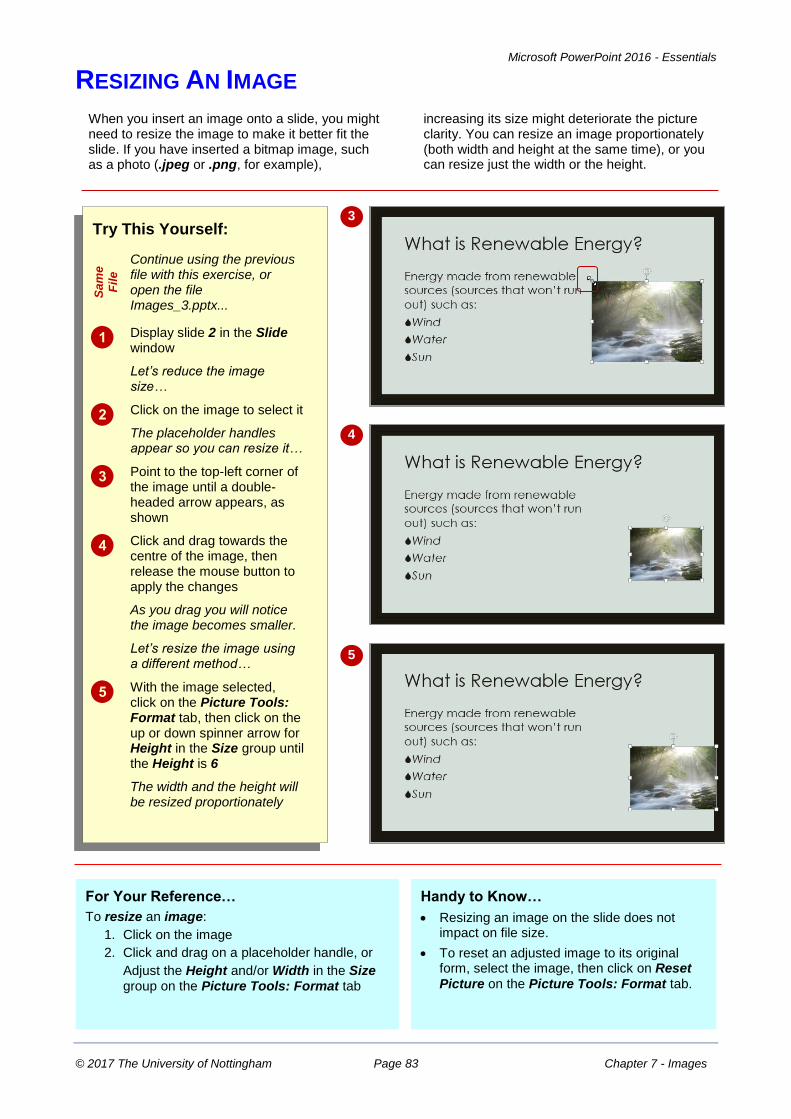
Microsoft PowerPoint 2016 - Essentials
© 2017 The University of Nottingham Page 83 Chapter 7 - Images
RESIZING AN IMAGE
When you insert an image onto a slide, you might need to resize the image to make it better fit the slide. If you have inserted a bitmap image, such as a photo (.jpeg or .png, for example),
increasing its size might deteriorate the picture clarity. You can resize an image proportionately (both width and height at the same time), or you can resize just the width or the height.
Try This Yourself:
Sa
me
Fil
e
Continue using the previous file with this exercise, or open the file Images_3.pptx...
Display slide 2 in the Slide window
Let’s reduce the image size…
Click on the image to select it
The placeholder handles appear so you can resize it…
Point to the top-left corner of the image until a double-headed arrow appears, as shown
Click and drag towards the centre of the image, then release the mouse button to apply the changes
As you drag you will notice the image becomes smaller.
Let’s resize the image using a different method…
With the image selected, click on the Picture Tools: Format tab, then click on the up or down spinner arrow for Height in the Size group until the Height is 6
The width and the height will be resized proportionately
3
4
For Your Reference…
To resize an image:
1. Click on the image
2. Click and drag on a placeholder handle, or
Adjust the Height and/or Width in the Size group on the Picture Tools: Format tab
Handy to Know…
Resizing an image on the slide does not impact on file size.
To reset an adjusted image to its original form, select the image, then click on Reset
Picture on the Picture Tools: Format tab.
5

Microsoft PowerPoint 2016 - Essentials
© 2017 The University of Nottingham Page 84 Chapter 7 - Images
POSITIONING AN IMAGE
When inserting images, there’s a good chance you’ll need to move the image into position. There are several ways to position images on a slide. You can use the arrow keys on the
keyboard, or you can drag the image to its new location. For more precise positioning, you can also use the Align tools in the Arrange group on the Picture Tools: Format tab.
Try This Yourself:
Sa
me
Fil
e
Continue using the previous file with this exercise, or open the file Images_4.pptx...
Display slide 2 in the Slide window
Click on the image to select it, then click and drag the image until it is positioned as shown
Let’s align the image with the other content placeholder…
With the image selected, hold down and click on
the other content placeholder to select both objects
Click on the Picture Tools: Format tab, then click on Align in the Arrange group and select Align Top
Click elsewhere to deselect the two placeholders, then click and drag the image slightly to the right until the alignment guides appear and align the image with the guides as shown
2
4
For Your Reference…
To position an image:
Click and drag the image to its new location, or
Click on the image, click on the Picture Tools: Format tab, then click on Align and select an alignment option
Handy to Know…
When aligning objects, such as placeholders and images, the border of the placeholder determines the size of the object, not the object itself. So, if your text placeholder is bigger than is required, resize the placeholder first to fit the text so that the text aligns better with the other objects.
5
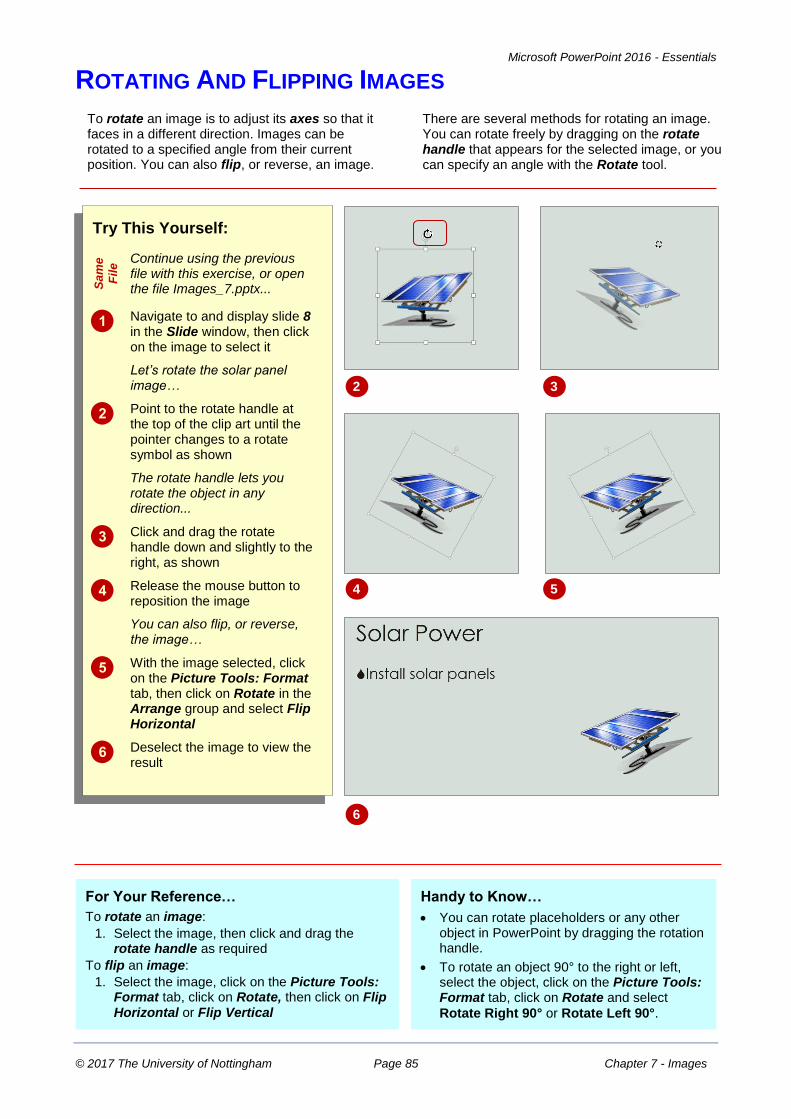
Microsoft PowerPoint 2016 - Essentials
© 2017 The University of Nottingham Page 85 Chapter 7 - Images
ROTATING AND FLIPPING IMAGES
To rotate an image is to adjust its axes so that it faces in a different direction. Images can be rotated to a specified angle from their current position. You can also flip, or reverse, an image.
There are several methods for rotating an image. You can rotate freely by dragging on the rotate handle that appears for the selected image, or you can specify an angle with the Rotate tool.
Try This Yourself:
Sa
me
Fil
e Continue using the previous
file with this exercise, or open the file Images_7.pptx...
Navigate to and display slide 8 in the Slide window, then click on the image to select it
Let’s rotate the solar panel image…
Point to the rotate handle at the top of the clip art until the pointer changes to a rotate symbol as shown
The rotate handle lets you rotate the object in any direction...
Click and drag the rotate handle down and slightly to the right, as shown
Release the mouse button to reposition the image
You can also flip, or reverse, the image…
With the image selected, click on the Picture Tools: Format tab, then click on Rotate in the Arrange group and select Flip Horizontal
Deselect the image to view the result
2 3
For Your Reference…
To rotate an image:
1. Select the image, then click and drag the rotate handle as required
To flip an image:
1. Select the image, click on the Picture Tools: Format tab, click on Rotate, then click on Flip Horizontal or Flip Vertical
Handy to Know…
You can rotate placeholders or any other object in PowerPoint by dragging the rotation handle.
To rotate an object 90° to the right or left, select the object, click on the Picture Tools: Format tab, click on Rotate and select
Rotate Right 90° or Rotate Left 90°.
4
6
5

Microsoft PowerPoint 2016 - Essentials
© 2017 The University of Nottingham Page 86 Chapter 7 - Images
INSERTING A SCREENSHOT
PowerPoint provides you with the ability to capture images on a computer screen and insert them into a presentation. Computer screen images are usually referred to as screenshots
and can be used for a variety of purposes ranging from training people in the use of a particular piece of software to quickly grabbing a shot of the screen to email someone or present at a meeting.
Try This Yourself:
Sa
me
Fil
e Continue using the previous file
with this exercise, or open the file Images_10.pptx...
Ensure Images_10.pptx is displayed at full screen size (if necessary, click on Maximise next to Close at the top of the screen), then display slide 4 in the Slide window
We want to insert a screenshot of this slide into P1307 Images_8.pptx so we will have to switch to that presentation…
Click on the View tab, then click on Switch Windows in the Window group and select Images_8.pptx to switch to this presentation
Click on slide 4, then click on the Insert tab and click on Screenshot in the Images group
Click on the thumbnail image of the Images_10.pptx window to insert the screenshot into the slide
Notice the screenshot is automatically cropped to fit this slide. As we already have the content contained in this screenshot, let’s delete it…
With the screenshot selected, press to delete it
1
For Your Reference…
To insert a screenshot:
1. Display the window or screen that you want to capture
2. Click on the Insert tab, then click on Screenshot and select the screenshot to insert
Handy to Know…
Screenshots can be formatted and edited the same as other image types.
To save a screenshot for future use, right-click on it in the presentation and select Save as Picture. Type a file name, select a location, then click on [Save]. Microsoft will save the image as a PNG file by default.
2
4

Microsoft PowerPoint 2016 - Essentials
© 2017 The University of Nottingham Page 87 Chapter 7 - Images
INSERTING A SCREEN CLIP
If you don’t necessarily want to insert a full screen shot you can actually create a clip. A clip is a smaller area of the screen that you define by dragging a cross pointer to create a rectangle
around the area to use as the clip. Operationally, things work much the same as a full screenshot capture except that you manually click and drag to select the area to clip.
Try This Yourself:
Sa
me
Fil
e Continue using the previous file with
this exercise, or open the file Images_9.pptx...
In Images_10.pptx, navigate to and display slide 4
Ensure the window is displayed at full screen size (if necessary click on Maximise next to Close at the top of the screen).
We’ll need to open the right window before we can take a screen clip…
Click on the View tab, then click on Switch Windows and select Images_9.pptx
Navigate to and display slide 4 in the Slide window
Click on the Insert tab, click on Screenshot in the Images group and select Screen Clipping
PowerPoint switches to the last active window. The cursor changes to a cross pointer, enabling you to select the area to capture, and the window is greyed out…
Click and drag to select the slide, as shown, then release the mouse
The screen clipping will be inserted into the slide…
Click away from the image to view the result, then reselect it and press
to delete it
4
5
For Your Reference…
To insert a screen clip:
1. Click on the Insert tab, click on Screenshot and select Screen clipping
2. Click and drag to select the area that you want to include in the clipping
Handy to Know…
Unlike a full screenshot, you can’t specify which of the open windows to clip. Only the last active window can be used for clipping.
6

Microsoft PowerPoint 2016 - Essentials
© 2017 The University of Nottingham Page 88 Chapter 7 - Images
CREATING A PHOTO ALBUM
Photo Album is another image tool. Using Photo Album, you can choose the images you want to include in the album and within seconds PowerPoint will create a photo slideshow. Perfect
for distributing your holiday pictures to friends and family. You can then insert captions on each photo, or set a musical accompaniment to the slide show.
Try This Yourself:
Before starting this exercise ensure there is a new, blank presentation open...
Click on the Insert tab, then click on the top half of Photo Album in the Images group to display the Photo Album dialog box
Here you can select the images that you want to include…
Click on [File/Disk], then navigate to the course files folder, press and hold and
click on Images Picture_1.jpg, Images Picture _2.jpg and Images Picture_3.jpg to select the three images
Click on [Insert] to add the images to the photo album
Click on the drop arrow for Picture layout and select 1 picture, then under Picture Options, tick Captions below ALL pictures
Click on [Browse] for Theme, locate and click on Organic, then click on [Select] to apply this theme to the album
Click on [Create] to create the album
Scroll through the album to view the result, then close without saving
1
4
For Your Reference…
To create a photo album:
1. Click on the Insert tab, click on the top half of Photo Album in the Images group, then click on [File/Disk]
2. Navigate to and select the images to include
3. Apply settings as required, then click on
[Create]
Handy to Know…
Once you’ve created a photo album, you can format the album in the same way as a slide show, such as editing and formatting text, inserting shapes and the like.
To edit a photo album, click on the bottom half of Photo Album in the Images group and select Edit Photo Album.
6

Microsoft PowerPoint 2016 - Essentials
© 2017 The University of Nottingham Page 89 Chapter 8 - Charts
CHAPTER 8 CHARTS
In this session you will:
gain an understanding of charts
learn how to insert a chart using the ribbon
learn how to change the chart type
gain an understanding of chart elements
learn how to change the chart layout
gain an understanding of chart buttons
learn how to change the layout of chart elements
learn how to apply a chart style
gain an understanding of the chart format panes
learn how to format chart elements
learn how to edit data series
learn how to hide and show data series
learn how to work with pie charts.
You can display data in rows and columns within a table on a slide. Alternatively, you can display the same data in a chart.
Because charts let you present data in a visual format, you will find a chart is not only more visually appealing than a table but its data is often easier to understand.
INFOCUS

Microsoft PowerPoint 2016 - Essentials
© 2017 The University of Nottingham Page 90 Chapter 8 - Charts
UNDERSTANDING CHARTS
Charts are used primarily to depict numerical data such as statistics or percentages in a graphical format that is easier to understand and quicker to digest than a list of numbers and
figures. There are many different kinds of charts and some chart types suit certain purposes better than others.
Charts
Creating a chart in PowerPoint is easy. Simply click on the Insert tab, then click on Chart in the Illustrations group to display the Insert Chart dialog box. Click on a category in the left pane and select an option from the top of the right pane to display a thumbnail. If you point to the thumbnail in the right pane, it will zoom in so you can see it in greater detail. Once you have chosen a chart, click on [OK] and the chart will be inserted into the slide with the Excel worksheet open by default. The Excel worksheet contains the data to be displayed in the chart. Any data you add to the worksheet will be immediately reflected in the chart.
Excel Worksheet
When a chart is opened for editing, the data that is used to draw the chart is displayed in an Excel worksheet. Changes to the information in the Excel worksheet are immediately reflected in the chart.
Chart Area The chart area contains the entire chart and all its elements.
Vertical (Value) Axis
An axis is a line that borders one side of the plot area providing a frame of reference for measurement or comparison in a chart. For most charts, data values are plotted along the value axis, which is usually vertical (the Y axis). In the example above, a vertical (value) axis title has not been included.
Horizontal (Category) Axis
Categories are usually plotted along the category axis, which is usually horizontal (the X axis).
Data Series
A data series is a collection of related data. Each data series relates to a column or row of data in the Excel worksheet and is usually represented in the chart by a colour, pattern or object depending on what kind of chart it is. For example, the yellow bars in the above chart represent a data series – in this case, the data in the column for Canada in the Excel worksheet.
1
2
3
4
5
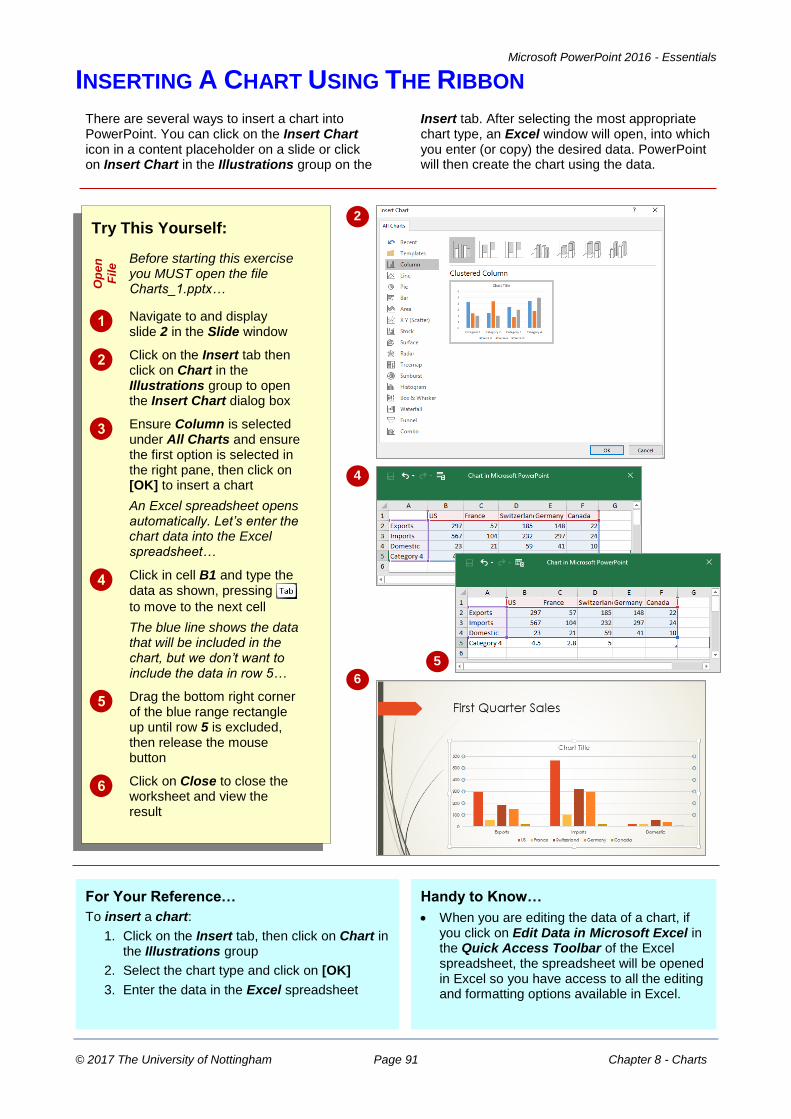
Microsoft PowerPoint 2016 - Essentials
© 2017 The University of Nottingham Page 91 Chapter 8 - Charts
INSERTING A CHART USING THE RIBBON
There are several ways to insert a chart into PowerPoint. You can click on the Insert Chart icon in a content placeholder on a slide or click on Insert Chart in the Illustrations group on the
Insert tab. After selecting the most appropriate chart type, an Excel window will open, into which you enter (or copy) the desired data. PowerPoint will then create the chart using the data.
Try This Yourself:
Op
en
Fil
e Before starting this exercise
you MUST open the file Charts_1.pptx…
Navigate to and display slide 2 in the Slide window
Click on the Insert tab then click on Chart in the Illustrations group to open the Insert Chart dialog box
Ensure Column is selected under All Charts and ensure the first option is selected in the right pane, then click on [OK] to insert a chart
An Excel spreadsheet opens automatically. Let’s enter the chart data into the Excel spreadsheet…
Click in cell B1 and type the data as shown, pressing
to move to the next cell
The blue line shows the data that will be included in the chart, but we don’t want to include the data in row 5…
Drag the bottom right corner of the blue range rectangle up until row 5 is excluded, then release the mouse button
Click on Close to close the worksheet and view the result
2
4
5
For Your Reference…
To insert a chart:
1. Click on the Insert tab, then click on Chart in the Illustrations group
2. Select the chart type and click on [OK]
3. Enter the data in the Excel spreadsheet
Handy to Know…
When you are editing the data of a chart, if you click on Edit Data in Microsoft Excel in the Quick Access Toolbar of the Excel spreadsheet, the spreadsheet will be opened in Excel so you have access to all the editing and formatting options available in Excel.
6

Microsoft PowerPoint 2016 - Essentials
© 2017 The University of Nottingham Page 92 Chapter 8 - Charts
CHANGING THE CHART TYPE
Sometimes you may use different types of charts to represent the same data. Or you may decide, for example, that your data would be better displayed in a pie chart rather than a column
chart. You can easily convert an existing chart to a different chart type in PowerPoint. You can also use this feature to test different chart types to find the one that will best represent your data.
Try This Yourself:
Sa
me
Fil
e Continue using the previous file
with this exercise, or open the file Charts_2.pptx...
Navigate to and display slide 2 in the Slide window if required, then click on the chart to activate it
The placeholder will display which means the chart can now be edited…
Click on the Chart Tools: Design tab, then click on Change Chart Type in the Type group to open the Change Chart Type dialog box
Click on Line in the left pane, then click on Line with Markers to select this chart type and click on [OK] to apply the change
Repeat steps 2 and 3 to change the chart to a Stacked Area chart (under Area)
Probably not the best way to represent our data…
Repeat steps 2 and 3 to change the chart to a Clustered Bar chart (under Bar)
Our data is represented clearly in this chart type
3
4
5
For Your Reference…
To change the chart type:
1. Click on the chart, then click on the Chart Tools: Design tab and click on Change Chart Type in the Type group
2. Select the chart type
3. Click on [OK]
Handy to Know…
Some chart types will not be suitable for some data. For example, if you have defined five data series, you could not change the chart type to a pie chart, as pie charts represent data for only one data series.

Microsoft PowerPoint 2016 - Essentials
© 2017 The University of Nottingham Page 93 Chapter 8 - Charts
CHART ELEMENTS
Charts are made up of many chart elements – the chart title, data labels, legend, and more. Each of these elements can be individually formatted, moved, and in some cases, hidden or
shown, to create exactly the chart you want for your presentation. The following diagram and accompanying text describes some of the main elements in a chart.
Chart Title The name of the chart.
Plot Area In a 2-D chart, the plot area is the area bounded by the axes and includes the data
series. In a 3-D chart the plot area is the area bounded by the axes and includes the data series, category names and axes titles. In the example above, it also includes the horizontal gridlines.
Chart Buttons
There are three chart buttons and they are chart elements, chart styles and chart filters. These buttons only appear when a chart is selected and can be used to perform a range of basic functions.
Legend The legend identifies the patterns or colours assigned to the data series or
categories in a chart.
Data Labels
A data label is a label that provides additional information about a data marker, which represents a single data point or value that originates from a worksheet cell. Data labels can be applied to a single data marker, an entire data series or all data markers in a chart.
1 2
5
4
3

Microsoft PowerPoint 2016 - Essentials
© 2017 The University of Nottingham Page 94 Chapter 8 - Charts
USING QUICK LAYOUTS
After creating a chart, you can instantly change the layout of its various elements to one of the predefined layouts (known as quick layouts) provided by PowerPoint. Depending on the chart
type, you can choose to display or hide the legend, chart titles, axes’ titles, data labels, data tables and gridlines. You can also change the location of the legend.
Try This Yourself:
Sa
me
Fil
e Continue using the previous
file with this exercise, or open the file Charts_3.pptx...
Navigate to and display slide 2 in the Slide window if required, then click in the chart to activate it
Click on the Chart Tools: Design tab, then click on Quick Layout in the Chart Layouts group to open a gallery of options
Although no options are highlighted, Layout 3 is the default layout for this chart...
Click on Layout 8
Notice there are now Axis Titles…
This layout has also displayed the chart title, which in our case, is superfluous since the slide title is the same as the chart title. But that’s ok, as you can quickly delete it using the Chart Tools: Layout tab or the Chart buttons as you’ll see later in this chapter
1
2
For Your Reference…
To use the quick layouts:
1. Click on the chart
2. Click on the Chart Tools: Design tab, then click on Quick Layout in the Chart Layouts group
3. Click on the desired layout
Handy to Know…
The number and style of the quick layouts that appear in the Chart Layouts gallery will depend on the current chart type.
3
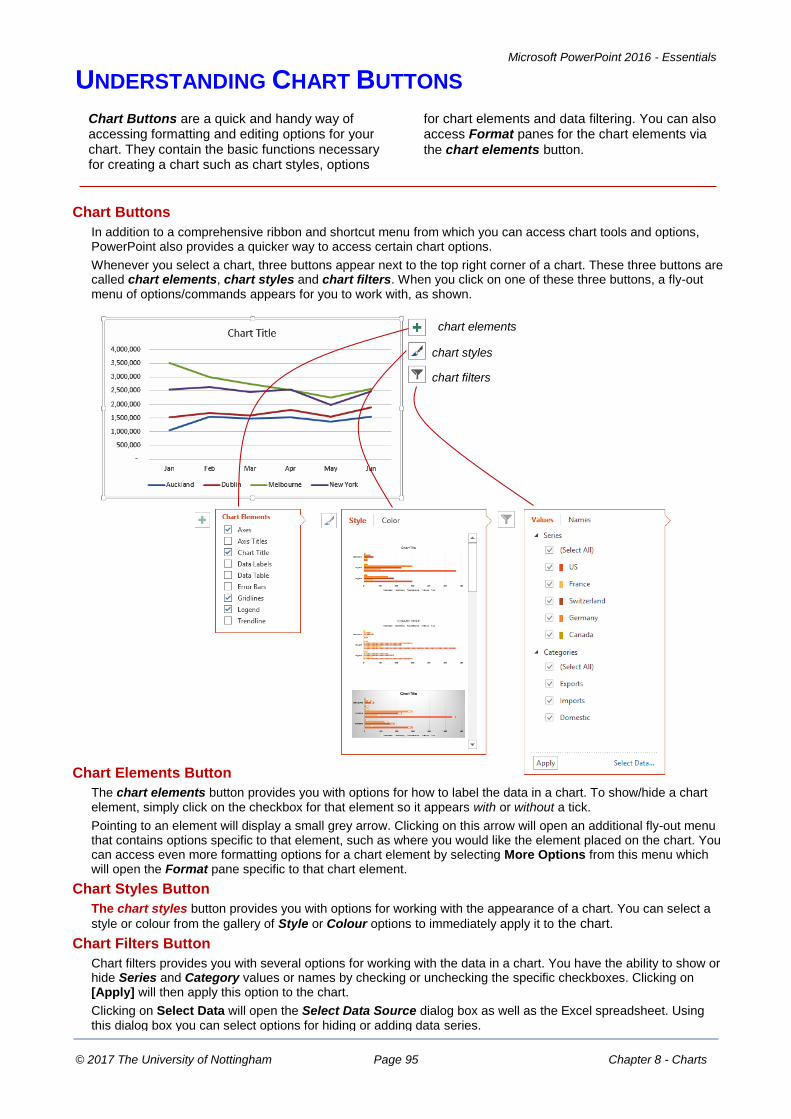
Microsoft PowerPoint 2016 - Essentials
© 2017 The University of Nottingham Page 95 Chapter 8 - Charts
UNDERSTANDING CHART BUTTONS
Chart Buttons are a quick and handy way of accessing formatting and editing options for your chart. They contain the basic functions necessary for creating a chart such as chart styles, options
for chart elements and data filtering. You can also access Format panes for the chart elements via
the chart elements button.
Chart Buttons
In addition to a comprehensive ribbon and shortcut menu from which you can access chart tools and options, PowerPoint also provides a quicker way to access certain chart options.
Whenever you select a chart, three buttons appear next to the top right corner of a chart. These three buttons are called chart elements, chart styles and chart filters. When you click on one of these three buttons, a fly-out menu of options/commands appears for you to work with, as shown.
cchart elements
chart styles
chart filters
Chart Elements Button
The chart elements button provides you with options for how to label the data in a chart. To show/hide a chart element, simply click on the checkbox for that element so it appears with or without a tick.
Pointing to an element will display a small grey arrow. Clicking on this arrow will open an additional fly-out menu that contains options specific to that element, such as where you would like the element placed on the chart. You can access even more formatting options for a chart element by selecting More Options from this menu which will open the Format pane specific to that chart element.
Chart Styles Button
The chart styles button provides you with options for working with the appearance of a chart. You can select a
style or colour from the gallery of Style or Colour options to immediately apply it to the chart.
Chart Filters Button
Chart filters provides you with several options for working with the data in a chart. You have the ability to show or hide Series and Category values or names by checking or unchecking the specific checkboxes. Clicking on [Apply] will then apply this option to the chart.
Clicking on Select Data will open the Select Data Source dialog box as well as the Excel spreadsheet. Using this dialog box you can select options for hiding or adding data series.

Microsoft PowerPoint 2016 - Essentials
© 2017 The University of Nottingham Page 96 Chapter 8 - Charts
CHANGING THE LAYOUT OF CHART ELEMENTS
PowerPoint provides numerous standard layouts for the selected chart type. While these may be fine for some situations, you can manually alter the layout of the various chart elements until you
achieve the desired result. For example, you can add, remove or position labels including axis titles and legends. You can also display or hide trendlines, turn the plot area on or off, and more.
Try This Yourself:
Sa
me
Fil
e
Continue using the previous file with this exercise, or open the file Charts_4.pptx...
On slide 2, click on the chart to select it, then click on the chart elements button to display a fly-out menu
Let’s remove the chart title...
Click on the Chart Title checkbox so it appears without a tick
The chart will expand to occupy the extra space.
Because the bars are fairly small, let’s add data labels to clarify the figures...
If necessary, repeat step 1, then point to Data Labels until a small black arrow appears to the right, then click on the arrow to display a fly-out menu
Click on Outside End to apply these data labels
Data labels will appear to the right of each bar showing their actual value
1
2
For Your Reference…
To manually change the layout of chart elements:
1. Click on the chart
2. Click on the Chart Tools: Design tab
3. Make the desired changes
Handy to Know…
You can use the ribbon to change the layout of chart elements by clicking on the Chart Tools: Design tab and applying the options in the Chart Layouts group.
3

Microsoft PowerPoint 2016 - Essentials
© 2017 The University of Nottingham Page 97 Chapter 8 - Charts
APPLYING A CHART STYLE
One advantage of applying a theme to a presentation is that each object you insert – be it a table, shape or chart – will be formatted with a default style that reflects the theme elements,
such as the theme colours. In addition to the default chart style, you can apply one of many other built-in styles to your charts to ensure they complement your presentation.
Try This Yourself:
Sa
me
Fil
e Continue using the previous
file with this exercise, or open the file Charts_5.pptx...
On slide 2, click on the chart to activate it
Click on the Chart Tools: Design tab, then click on the More arrow in the Chart Styles group to display the Chart Styles gallery
The gallery displays a range of complementary styles for the current chart. The current style is highlighted in orange...
Point to the options to display a tooltip with the style name, then click on Style 7 to apply this style
Let’s try a quicker method…
Click on the chart styles button to the right of the chart to display a gallery of style options
Ensure the Styles tab is selected, then click on Style 5 to apply this style
Notice this style overrides the Quick Layout applied previously
4
For Your Reference…
To apply a chart style:
1. Click on the chart
2. Click on the Chart Tools: Design tab, click on the More arrow in the Chart Styles group and select a style, or
Click on the chart styles button and select a style
Handy to Know…
You can save a chart as a template by right-clicking on the chart and selecting Save as Template. You can then type a name in the Save Chart Template dialog box and click on [Save].
Templates are listed under Templates in the Chart Type dialog box.
5

Microsoft PowerPoint 2016 - Essentials
© 2017 The University of Nottingham Page 98 Chapter 8 - Charts
UNDERSTANDING THE CHART FORMAT PANES
The chart Format panes allow you to edit the elements of a chart with greater control than simply using the tools available on the Chart Tools tab. Currently the only downside is that
Live Preview is not available with this feature. However as changes you make in the chart Format panes update live in the presentation, this is not too much of an inconvenience.
Accessing Chart Format Panes
There is a Format pane for every element in the Chart Elements menu (accessible via the chart elements button), as well as for some aspects of the chart not included in the Chart Elements menu such as the chart area. These Format panes contain advanced options for a particular chart element.
You can access these Format panes using several different methods. You can access them via the chart elements button by pointing to the desired chart element until a black arrow appears, then clicking on the arrow and selecting More Options, as shown to the right.
For instance, clicking on More Options for Chart Title will open the Format Chart Title pane, as shown below to the right.
Alternatively, you can access the Format panes by clicking on the dialog box launchers on the Chart Tools: Format tab. Or you may choose to open a Format pane by selecting certain options from some of the menus on the Chart Tools: Format tab. For instance, if you click on Shape Outline in the Shape Styles group, point to Weight and select More Lines, a Format pane will open.
When you choose to open a Format pane using these methods, the particular Format pane that opens will depend on what section of the chart is currently selected.
Using The Chart Format Panes
Though many of the options available in the Format panes are also available on the ribbon, there are many advantages to using the Format pane. For instance, many of the Format panes offer greater control over certain formatting options. One example is if you want to apply a gradient shape fill to your chart. Using the ribbon, you can select from a range of preset gradient options. However, using the Format pane, you can modify the gradient in a number of ways including deciding the type, direction, angle, transparency and brightness of the gradient.
You can also move Format panes around the screen as required, by pointing to the top of the Format pane until a four-headed arrow appears then clicking and dragging it to wherever you require. This can be handy when you are working on a complex chart, or a number of charts and are going to be frequently using the formatting tools.
Another advantage of using Format panes is that once one is open, you don’t have to close it in order to open another. You can open the specific Format panes for the other elements by simply double-clicking on the desired element within the chart. For example, once the Format Chart Title pane is open, you can double-click on the plot area to open the Format Plot Area pane or double-click on the data
labels to open the Format Data Labels pane etc.
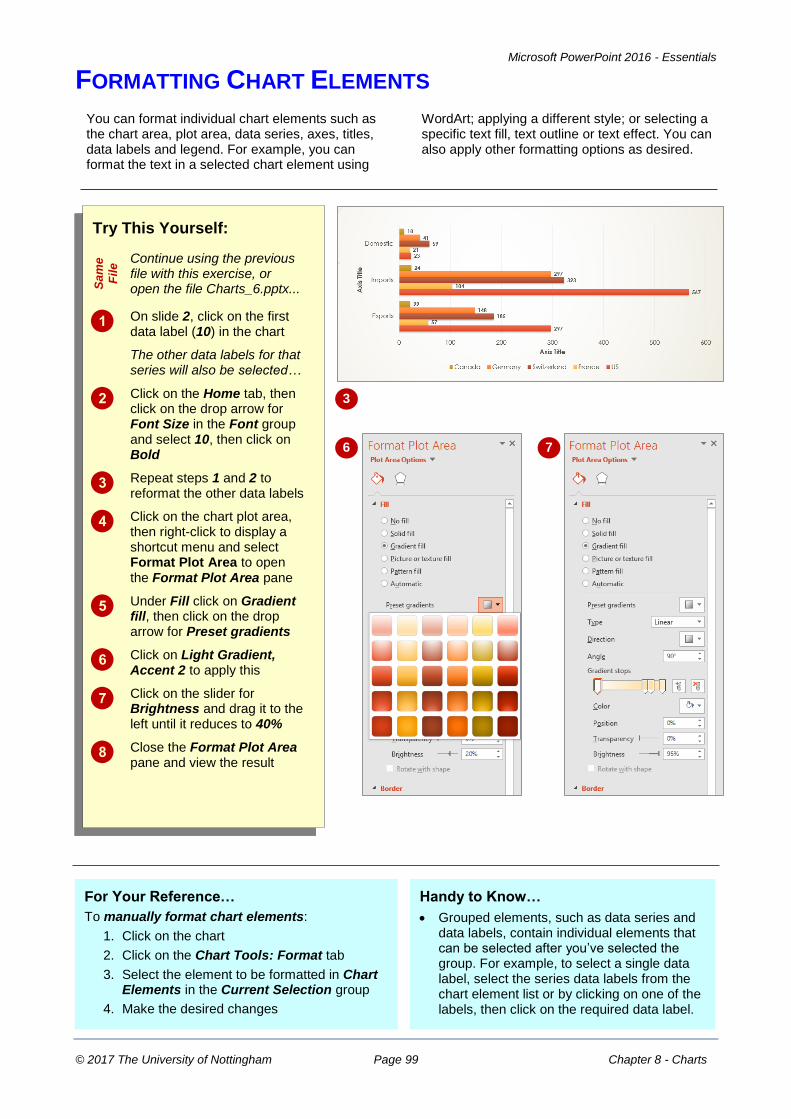
Microsoft PowerPoint 2016 - Essentials
© 2017 The University of Nottingham Page 99 Chapter 8 - Charts
FORMATTING CHART ELEMENTS
You can format individual chart elements such as the chart area, plot area, data series, axes, titles, data labels and legend. For example, you can format the text in a selected chart element using
WordArt; applying a different style; or selecting a specific text fill, text outline or text effect. You can also apply other formatting options as desired.
Try This Yourself:
Sa
me
Fil
e Continue using the previous
file with this exercise, or open the file Charts_6.pptx...
On slide 2, click on the first data label (10) in the chart
The other data labels for that series will also be selected…
Click on the Home tab, then click on the drop arrow for Font Size in the Font group and select 10, then click on Bold
Repeat steps 1 and 2 to reformat the other data labels
Click on the chart plot area, then right-click to display a shortcut menu and select Format Plot Area to open the Format Plot Area pane
Under Fill click on Gradient fill, then click on the drop arrow for Preset gradients
Click on Light Gradient, Accent 2 to apply this
Click on the slider for Brightness and drag it to the left until it reduces to 40%
Close the Format Plot Area pane and view the result
3
6 7
For Your Reference…
To manually format chart elements:
1. Click on the chart
2. Click on the Chart Tools: Format tab
3. Select the element to be formatted in Chart Elements in the Current Selection group
4. Make the desired changes
Handy to Know…
Grouped elements, such as data series and data labels, contain individual elements that can be selected after you’ve selected the group. For example, to select a single data label, select the series data labels from the chart element list or by clicking on one of the labels, then click on the required data label.

Microsoft PowerPoint 2016 - Essentials
© 2017 The University of Nottingham Page 100 Chapter 8 - Charts
EDITING A DATA SERIES
A big advantage of using an application like PowerPoint to make visual presentations of numeric data is that when the data changes you can easily reflect those changes in a PowerPoint
chart. By displaying the underlying data, you can delete an unwanted data series using the standard Excel functions.
Try This Yourself:
Sa
me
Fil
e
Continue using the previous file with this exercise, or open the file Charts_7.pptx...
On slide 2, click on the chart to select it
Click on the Chart Tools: Design tab then click on the bottom half of Edit Data in the Data group
Select Edit Data to display the spreadsheet
In the Canada column, edit the data as shown, then press or click in
another cell to apply the change
Notice the chart updates automatically…
Close the spreadsheet to view the changes in the chart
3
4
5
For Your Reference…
To edit a data series:
1. Select the chart, then click on the Chart Tools: Design tab
2. Click on Edit Data in the Data group
3. Edit the data as required
Handy to Know…
If you want to add another data series to your chart, open the Excel worksheet and drag the blue line out to include however many additional columns you wish to add (each column is a data series). Then simply enter the data as required and the chart will update automatically.

Microsoft PowerPoint 2016 - Essentials
© 2017 The University of Nottingham Page 101 Chapter 8 - Charts
HIDING DATA SERIES
The data on which a chart is based is stored in an Excel worksheet. When you click on the Edit Data tool, the worksheet will open in Excel allowing you to modify it just like other Excel
worksheets. To change chart data, simply click in the cell containing the data that you want to change and type the new information. PowerPoint will then update the chart to reflect the changes.
Try This Yourself:
Sa
me
Fil
e Continue using the previous
file with this exercise, or open the file Charts_8.pptx...
On slide 2, ensure the chart is selected, then click on the chart filters button to display a fly-out menu of options
Under Series, point to Canada – this greys out the other data series in the chart so you can clearly see the Canada data series
Notice that an Edit Series button appears. Clicking on this button will open the Excel spreadsheet and an Edit Series dialog box.
Let’s hide the Canada data series…
Click on the checkbox for Canada so it appears without a tick, then click on [Apply] to apply this change and close the fly out-menu of options
The bars representing the Canada data series no longer appear in the chart…
Repeat step 1, then click on the checkbox for Canada so it appears with a tick and click on [Apply] so that the data series is shown in the chart again
1
For Your Reference…
To filter data:
1. Select the chart
2. Click on the chart filters button
3. Select the Series or Categories you wish to hide/show and click on [Apply]
3
Handy to Know…
You can click on NAMES at the top of the chart filters fly-out menu to specify whether you want the names for the series and categories displayed.
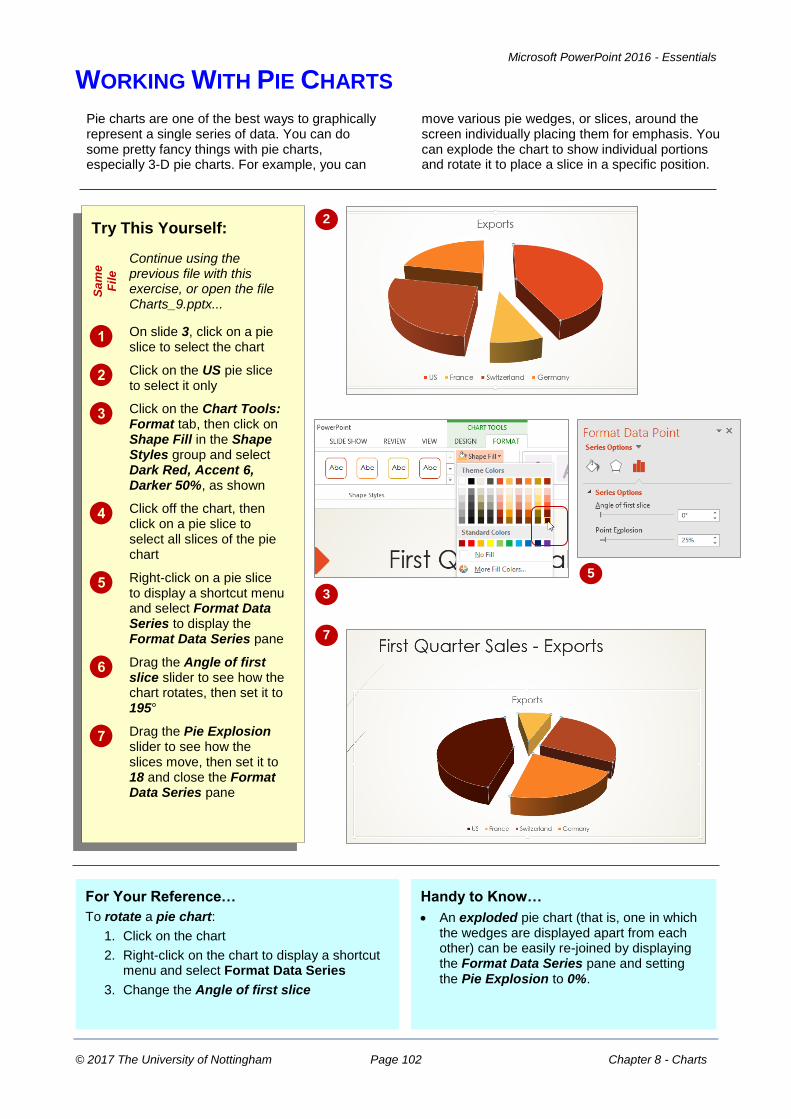
Microsoft PowerPoint 2016 - Essentials
© 2017 The University of Nottingham Page 102 Chapter 8 - Charts
WORKING WITH PIE CHARTS
Pie charts are one of the best ways to graphically represent a single series of data. You can do some pretty fancy things with pie charts, especially 3-D pie charts. For example, you can
move various pie wedges, or slices, around the screen individually placing them for emphasis. You can explode the chart to show individual portions and rotate it to place a slice in a specific position.
Try This Yourself:
Sa
me
Fil
e
Continue using the previous file with this exercise, or open the file Charts_9.pptx...
On slide 3, click on a pie slice to select the chart
Click on the US pie slice to select it only
Click on the Chart Tools: Format tab, then click on Shape Fill in the Shape Styles group and select Dark Red, Accent 6, Darker 50%, as shown
Click off the chart, then click on a pie slice to select all slices of the pie chart
Right-click on a pie slice to display a shortcut menu and select Format Data Series to display the Format Data Series pane
Drag the Angle of first slice slider to see how the chart rotates, then set it to 195°
Drag the Pie Explosion slider to see how the slices move, then set it to 18 and close the Format Data Series pane
2
3
5
For Your Reference…
To rotate a pie chart:
1. Click on the chart
2. Right-click on the chart to display a shortcut menu and select Format Data Series
3. Change the Angle of first slice
7
Handy to Know…
An exploded pie chart (that is, one in which the wedges are displayed apart from each other) can be easily re-joined by displaying the Format Data Series pane and setting the Pie Explosion to 0%.

Microsoft PowerPoint 2016 - Essentials
© 2017 The University of Nottingham The University of Nottingham Concluding Remarks
CONCLUDING REMARKS
Congratulations!
You have now completed Microsoft PowerPoint 2016 - Essentials. Microsoft PowerPoint 2016 - Essentials was designed to get you to the point where you can competently perform a variety of operations.
We have tried to build up your skills and knowledge by having you work through specific tasks. The step by step approach will serve as a reference for you when you need to repeat a task.
Where To From Here?
The following is a little advice about what to do next:
Spend some time playing with what you have learnt. You should reinforce the skills that you have acquired and use some of the application's commands. This will test just how much of the concepts and features have stuck! Don't try a big task just yet if you can avoid it - small is a good way to start.
Some aspects of the course may now be a little vague. Go over some of the points that you may be unclear about. Use the examples and exercises in these notes and have another go - these step-by-step notes were designed to help you in the classroom and in the work place!
Here are a few techniques and strategies that we've found handy for learning more about technology:
read computer magazines - there are often useful articles about specific techniques
if you have the skills and facilities browse the Internet, specifically the technical pages of the application that you have just learnt
take an interest in what your work colleagues have done and how they did it - we don't suggest that you plagiarise but you can certainly learn from the techniques of others
if your software came with a manual (which is rare nowadays) spend a bit of time each day reading a few pages. Then try the techniques out straight away - over a period of time you'll learn a lot this way
and of course, there are also more courses and books for you to work through.
Hungry for More?
We live in an ever-changing world where we all need to review and upgrade our skills.
If you have received this course book on a training course why not ask the tutor or trainer for other courses that may be of benefit to you. If you are attending a college ask for one of their brochures.
Alternatively, if you’ve enjoyed using this course book you can find others that cover a wide range of topics at our web site www.watsoniapublishing.com.

INDEX
A
add commands .............................. 17 add slide ........................................ 40 adding content to a slide ............... 39 adding text to a slide ..................... 39 Address bar .................................... 23 align ............................................... 84 applying themes ............................ 49 Apps view ........................................ 2
B
Back button ................................... 23 Background styles .......................... 53 Backstage view .............. 6, 10, 11, 31 Bing Image Search ......................... 82 black theme ................................... 12 blank presentation .......................... 4 blank presentation template ........... 4 Blank Slide ..................................... 58 Bold ............................................... 71 Boolean.......................................... 23 bullet styles ................................... 73 bullets ............................................ 73 bullets Indent ................................ 60 bullets Outdent .............................. 60
C
change bullets ............................... 73 change numbering style ................ 73 change the chart type .................... 92 changing theme fonts .................... 52 chart area ...................................... 90 chart buttons ........................... 93, 95 chart elements ............................... 98 chart elements button ................... 96 chart layout ................................... 94 chart style ...................................... 97 chart styles button......................... 97 chart title ....................................... 93 Chart Title ...................................... 96 chart type ................................ 90, 92 chart, insert ................................... 91 chart, quick layout ......................... 94 charts Edit ...................................... 64 charts Insert ................................... 64 charts New ..................................... 64 checkboxes .................................... 14 clip art Flip ..................................... 85 clip art Rotate ................................ 85 clip art, move ................................. 84 clip art, position ............................. 84 clip art, reset .................................. 83 clip art, resize ................................ 83 close presentation ......................... 45 Colour scheme, new ...................... 50
commands ....................................... 5 commands Add .............................. 17 Content with Caption slide ............ 58 contextual tabs ................................ 7 convert text to SmartArt ................ 76 copyright, pictures ......................... 79 creating presentations ................... 34 current folder ................................. 37 custom colour theme ..................... 51 Custom Theme, delete ................... 56 custom theme, use ........................ 55
D
data Edit ......................................... 64 data labels ................................ 93, 96 data series .............................. 90, 101 data series, edit ........................... 100 data series, hide ........................... 101 data series, show ......................... 101 Decrease List Level ......................... 60 delete slide .................................... 63 delete, Custom Theme ................... 56 Design ideas ................................... 80 desktop ............................................ 2 dialog box controls......................... 14 dialog boxes ................................... 14 dialog boxes launching................... 15 document information ............. 10, 11 drop arrows ................................... 14 drop-down lists .............................. 14
E
Edit Chart ....................................... 64 edit data series ............................ 100 Excel worksheet ............................. 90 exit PowerPoint ............................. 20 exploded pie chart ....................... 102
F
Favourites ...................................... 23 File List ........................................... 23 filter data ..................................... 101 flipping images ............................... 85 font formatting ........................ 70, 71 font formatting tools ..................... 70 font size Adjust .............................. 71 Format Background pane .............. 53 format chart elements ................... 99 Format Chart Title pane ................. 98 Format pane ...................... 95, 98, 99 Format pane, access ...................... 98 Format pane, move ........................ 98 Format pane, use ........................... 98 Format Plot Area pane ................... 99 formatting paragraphs ................... 72 formatting text......................... 70, 71
Forward button .............................. 23 From Beginning .............................. 44 From Current Slide ......................... 44
H
Height ............................................. 74 help ................................................ 10 Help options ................................... 11 Home tab ......................................... 7 horizontal axis ................................ 90
I
image files ...................................... 81 images ............................................ 81 images Change ............................... 81 images Delete ................................ 81 images Flip ..................................... 85 images Insert .................................. 81 images Replace .............................. 81 images Rotate ................................ 85 images, align .................................. 84 images, move ................................. 84 images, position ............................. 84 images, reset .................................. 83 images, resize ................................. 83 Increase List Level .......................... 60 insert chart ..................................... 91 Insert Chart .................................... 64 insert online picture ....................... 82 insert slide ...................................... 40
J
jump list ......................................... 26
K
keytips .............................................. 8
L
layout Apply ................................... 65 layout Change ................................ 65 legend ............................................ 93 Libraries.......................................... 23 licensing information ..................... 11 Line Spacing ................................... 72
M
magnify .......................................... 30 mini-formatting toolbar ................. 71 minimise ribbon ............................... 9

multiple presentations .................. 25
N
Navigation pane............................. 23 new presentation ............................ 4 Next Slide ....................................... 29 Normal view ............................ 27, 28 Notes pane .................................... 27 numbered lists ............................... 73 numbering style ............................. 73
O
objects Flip .................................... 85 objects Rotate ............................... 85 office theme, change ..................... 12 OneDrive ........................................ 37 online picture, insert ..................... 82 online pictures ............................... 79 open .............................................. 22 open dialog box ............................. 25 Open dialog box ....................... 23, 24 open place ..................................... 22 open presentations ....................... 25 option buttons ............................... 14 Outline pane ............................ 29, 41 Outline pane resize ........................ 41 Outline view .................................. 27
P
page ................................................. 6 pane buttons ................................. 14 paragraphs Align ............................ 72 paragraphs Formatting .................. 72 paragraphs Spacing ....................... 72 photo album Create....................... 88 photo album Edit ........................... 88 photo album New .......................... 88 photos............................................ 78 Picture with Caption slide ........ 58, 63 pictures .......................................... 78 pictures Change ............................. 81 pictures Delete .............................. 81 pictures Flip ................................... 85 pictures Insert .......................... 63, 81 pictures Replace ............................ 81 pictures, align ................................ 84 pictures, move ............................... 84 pictures, position ........................... 84 pictures, reset ................................ 83 pictures, resize ............................... 83 pie chart....................................... 102 pin to taskbar................................... 2 placeholder border ........................ 74 placeholder handles ...................... 74 placeholders Delete ....................... 61 placeholders Flip ............................ 85 placeholders Move ........................ 74 placeholders Position .................... 74
placeholders Resize ....................... 74 placeholders Rotate ....................... 85 placeholders Select ........................ 74 plot area......................................... 93 PowerPoint Designer ..................... 80 PowerPoint start screen .................. 3 presentation Create ....................... 35 presentation Navigate ................... 29 presentation New .......................... 35 presentation Open ................... 24, 31 presentation Recent ...................... 31 presentation Run ........................... 44 presentation Save .......................... 43 presentation Test ........................... 44 presentation View.................... 27, 28 presentations Switching ................ 26 preview .......................................... 44 preview presentation ..................... 34 Previous Slide ................................. 29 printing options ............................. 11
Q
QAT .......................................... 16, 17 Quick Access Toolbar ............... 16, 17
R
Reading view ...................... 27, 28, 44 Recent ...................................... 24, 31 recent documents .......................... 22 recent folders................................. 37 Recent Locations ............................ 31 resetting images ............................ 83 resize Outline pane ........................ 41 resize Slides pane ........................... 41 resizing images............................... 83 ribbon .................................. 5, 6, 7, 8 ribbon display .................................. 9 ribbon minimise ............................... 9 rotating images .............................. 85
S
save ................................................ 34 Save ............................................... 37 Save As ..................................... 37, 43 Save As dialog box ................... 38, 43 Save As place ................................. 37 screen Capture ............................... 86 screen clip Insert ............................ 87 Screen clipping ............................... 87 screen elements ............................... 3 Screenshot ..................................... 86 screenshots Insert .................... 86, 87 screenshots Save ........................... 86 Section Header slide ................ 58, 61 shortcut menu ............................... 13 slide .................................................. 6 slide background, change .............. 53 slide layout Change ........................ 65
slide layouts ............................. 58, 61 Slide pane ....................................... 27 slide show Preview ......................... 44 Slide Show view ....................... 27, 28 Slide Sorter view ............................ 28 slide transitions .............................. 42 slide window .................................... 5 Slider Sorter view ........................... 27 slides Copy ..................................... 59 slides Delete ................................... 63 slides Duplicate .............................. 59 slides Insert .................. 59, 60, 61, 63 slides New .................... 59, 60, 61, 63 Slides pane ..................................... 29 Slides pane resize ........................... 41 SmartArt ......................................... 76 spell check ...................................... 69 Spelling ........................................... 68 spinner arrows ............................... 14 start PowerPoint .............................. 2 start screen .................................. 3, 4 Start screen ...................................... 2 status.............................................. 10 status bar ................................... 5, 18 status bar Customising ................... 19 switch windows .............................. 26
T
tables Delete .................................. 64 tables Design .................................. 62 tables Format ................................. 62 tables Insert ................................... 62 tables Layout .................................. 62 tables New ..................................... 62 tabs ............................................ 5, 14 take screenshots ............................ 86 task bar .......................................... 26 taskbar, Pin to .................................. 2 templates ....................................... 34 text boxes ....................................... 14 text Edit .......................................... 68 Text Effects ..................................... 75 Text Fill ........................................... 75 text Format .............................. 71, 72 text Insert ....................................... 41 Text Outline.................................... 75 text Replace ................................... 68 Theme colour, custom ................... 51 Theme colours................................ 50 Theme colours, change .................. 50 Theme colours, modify .................. 50 Theme fonts, apply ........................ 52 Theme fonts, change ...................... 52 theme variants ............................... 36 themes ..................................... 34, 35 Themes ........................................... 48 Themes gallery ................... 35, 48, 49 Themes, apply ................................ 49 Themes, Default ............................. 49 Themes, modify.............................. 52 Themes, new .................................. 54 Themes, overview .......................... 48 Themes, save.................................. 54

Themes, set default ....................... 49 tick boxes ....................................... 14 Title and Content slide ................... 58 Title and Content Slide .................. 60 Title slide ....................................... 59 Title Slide ....................................... 58 tools Add ....................................... 17 Two Content slide .......................... 58 typing text ..................................... 39
V
variants .......................................... 48 vertical axis .................................... 90 vertical scroll bar............................ 29 view Switch .................................... 28 views .............................................. 27
W
Width ............................................. 74 window Capture ............................ 86
WordArt ......................................... 75 WordArt Apply ............................... 75 WordArt Modify ............................. 75 WordArt styles ............................... 75
Z
zoom slider ....................................... 5 Zoom tool ....................................... 30
![(Microsoft PowerPoint - MI2oct 09.ppt [tryb zgodno\234ci])](https://static.fdokumen.com/doc/165x107/6334652f4e43a4bcd80d3474/microsoft-powerpoint-mi2oct-09ppt-tryb-zgodno234ci.jpg)