INTRODUCTION - Piggyback.com
8
INTRODUCTION In a word? Everything. Pro Evolution Soccer 6: The Expert Guide is an all-new companion to PES6, with a focus on ease of use and professional-level advice. For readers familiar with last year’s Pro Evolution Soccer 5 guide, we’ve prepared the following introduction to some of the key new features. Coaching Manual – Moves Index (page 19): This massive table details over 130 moves, each with complete button instructions for PlayStation 2, Xbox 360 and PC versions. If you require further information, you can follow the page references to reach detailed advice on each and every move. Guide Companion DVD: With over 150 moves, tricks and techniques to view, the Guide Companion DVD is an invaluable accompaniment to the guidance offered in the Coaching Manual and Secret Moves & Tricks chapters. With real-time executions of every move and onscreen demonstrations of button commands, it makes the process of learning new techniques much, much easier. Secret Moves & Tricks (page 60): Beginning with its own master Moves Index (as with the Coaching Manual), the Secret Moves & Tricks chapter reveals undocumented moves, features and exploits used by the world’s best Pro Evo players. Even dedicated PES veterans may struggle to perform some of these advanced techniques. Master League (page 82): An accessible yet deep guide to Pro Evo’s primary single-player mode, this chapter also reveals a huge selection of the finest transfer targets available in PES6, from promising youngsters to world-class stars. How to Play (page 8): We’ve included a very short chapter to help Pro Evo newcomers to get started, but don’t expect a blow-by-blow account of every available option – this is, after all, the Expert Guide. If you need assistance with configuring options or menu navigation, consult your game manual. Coaching Manual – Move Descriptions (page 23): We’ve completely overhauled last year’s Coaching Manual chapter, and now explain each move in a unique “table” format. From relative difficulty of execution to useful tips – and, of course, where you can find a demonstration on the Guide Companion DVD – you’ll have all the information you need at your fingertips. Tactics & Strategies (page 68): If you’re one of the many Pro Evo players who feel intimidated by the wealth of options available at the Formation Settings screen, worry no more: we explain the use of every single feature, from the powerful Manual Strategies to the creation of unique formations. We also take a close look at the systems that govern how players perform on the pitch, from special abilities to condition arrows and stamina loss. Team & Player Guide (page 100): Featuring 23 national and international sides, plus the Master League Default Team, the Team & Player Guide tells you everything you need to know about PES6’s best sides. With recommended formations, tips on strengths and weaknesses, and unbelievably detailed player tables – including unique special moves – this exhaustively researched chapter is designed to help you take your understanding of Pro Evolution 6 to an entirely new level. After inserting the Guide Companion disc into your DVD player, you will be asked to choose a language. After this you will reach the Main Menu, where you will find five options to choose from: Coaching Manual, Secret Moves, Situation Guide, Beautiful Goals and Interview. For more information on the features and functionality of the DVD, please turn to page 58-59. The Coaching Manual section features demonstrations of every single move in the Coaching Manual chapter of the guide, divided into categories that correspond with the DVD numbers provided in each move table. Every move is played twice: once at normal speed, and then again in slow motion. While this happens, you will see the required button commands highlighted on the Xbox 360 and PlayStation 2 controller diagrams. If you would like to view a specific move, simply select a category, and then use the Chapter functions of your DVD remote controller to skip to the required section. The Situation Guide provides a series of visual tutorials designed to improve your PES6 play in a variety of ways. Interview leads to an informal, illuminating chat with PES producer Shingo “Seabass” Takatsuka. The Secret Moves section works in exactly the same way as the Coaching Manual. Beautiful Goals is a showreel of goals and sublime moments of skill recorded during the creation of the guide. Enjoy! INTRODUCTION HOW TO PLAY COACHING MANUAL SECRET MOVES & TRICKS TACTICS & STRATEGIES MASTER LEAGUE TEAM & PLAYER GUIDE EXTRAS INDEX WHAT’S NEW? USING THE DVD PES6: NEW FEATURES EXPERT TIPS 5 4 THE GUIDE: WHAT’S NEW? USING THE GUIDE COMPANION DVD
-
Upload
khangminh22 -
Category
Documents
-
view
0 -
download
0
Transcript of INTRODUCTION - Piggyback.com
INTRODUCTIONIn a word? Everything. Pro Evolution Soccer 6: The Expert Guide is an all-new companion to PES6, with a focus on ease of use and professional-level advice. For readers familiar with last year’s Pro Evolution Soccer 5 guide, we’ve prepared the following introduction to some of the key new features.
Coaching Manual – Moves Index (page 19): This massive table details over 130 moves, each with complete button instructions for PlayStation 2, Xbox 360 and PC versions. If you require further information, you can follow the page references to reach detailed advice on each and every move.
Guide Companion DVD: With over 150 moves, tricks and techniques to view, the Guide Companion DVD is an invaluable accompaniment to the guidance offered in the Coaching Manual and Secret Moves & Tricks chapters. With real-time executions of every move and onscreen demonstrations of button commands, it makes the process of learning new techniques much, much easier.
Secret Moves & Tricks (page 60): Beginning with its own master Moves Index (as with the Coaching Manual), the Secret Moves & Tricks chapter reveals undocumented moves, features and exploits used by the world’s best Pro Evo players. Even dedicated PES veterans may struggle to perform some of these advanced techniques.
Master League (page 82): An accessible yet deep guide to Pro Evo’s primary single-player mode, this chapter also reveals a huge selection of the finest transfer targets available in PES6, from promising youngsters to world-class stars.
How to Play (page 8): We’ve included a very short chapter to help Pro Evo newcomers to get started, but don’t expect a blow-by-blow account of every available option – this is, after all, the Expert Guide. If you need assistance with configuring options or menu navigation, consult your game manual.
Coaching Manual – Move Descriptions (page 23): We’ve completely overhauled last year’s Coaching Manual chapter, and now explain each move in a unique “table” format. From relative difficulty of execution to useful tips – and, of course, where you can find a demonstration on the Guide Companion DVD – you’ll have all the information you need at your fingertips.
Tactics & Strategies (page 68): If you’re one of the many Pro Evo players who feel intimidated by the wealth of options available at the Formation Settings screen, worry no more: we explain the use of every single feature, from the powerful Manual Strategies to the creation of unique formations. We also take a close look at the systems that govern how players perform on the pitch, from special abilities to condition arrows and stamina loss.
Team & Player Guide (page 100): Featuring 23 national and international sides, plus the Master League Default Team, the Team & Player Guide tells you everything you need to know about PES6’s best sides. With recommended formations, tips on strengths and weaknesses, and unbelievably detailed player tables – including unique special moves – this exhaustively researched chapter is designed to help you take your understanding of Pro Evolution 6 to an entirely new level.
After inserting the Guide Companion disc into your DVD player, you will be asked to choose a language. After this you will reach the Main Menu, where you will find five options to choose from: Coaching Manual, Secret Moves, Situation Guide, Beautiful Goals and Interview. For more information on the features and functionality of the DVD, please turn to page 58-59.
The Coaching Manual section features demonstrations of every single move in the Coaching Manual chapter of the guide, divided into categories that correspond with the DVD numbers provided in each move table. Every move is played twice: once at normal speed, and then again in slow motion. While this happens, you will see the required button commands highlighted on the Xbox 360 and PlayStation 2 controller diagrams. If you would like to view a specific move, simply select a category, and then use the Chapter functions of your DVD remote controller to skip to the required section.
The Situation Guide provides a series of visual tutorials designed to improve your PES6 play in a variety of ways.
Interview leads to an informal, illuminating chat with PES producer Shingo “Seabass” Takatsuka.
The Secret Moves section works in exactly the same way as the Coaching Manual.
Beautiful Goals is a showreel of goals and sublime moments of skill recorded during the creation of the guide. Enjoy!
INTRODUCTION
HOW TO PLAY
COACHING MANUAL
SECRET MOVES & TRICKS
TACTICS & STRATEGIES
MASTER LEAGUE
TEAM & PLAYER GUIDE
EXTRAS
INDEX
WHAT’S NEW?
USING THE DVD
PES6: NEW FEATURES
EXPERT TIPS
54
THE GUIDE: WHAT’S NEW?
USING THE GUIDE COMPANION DVD
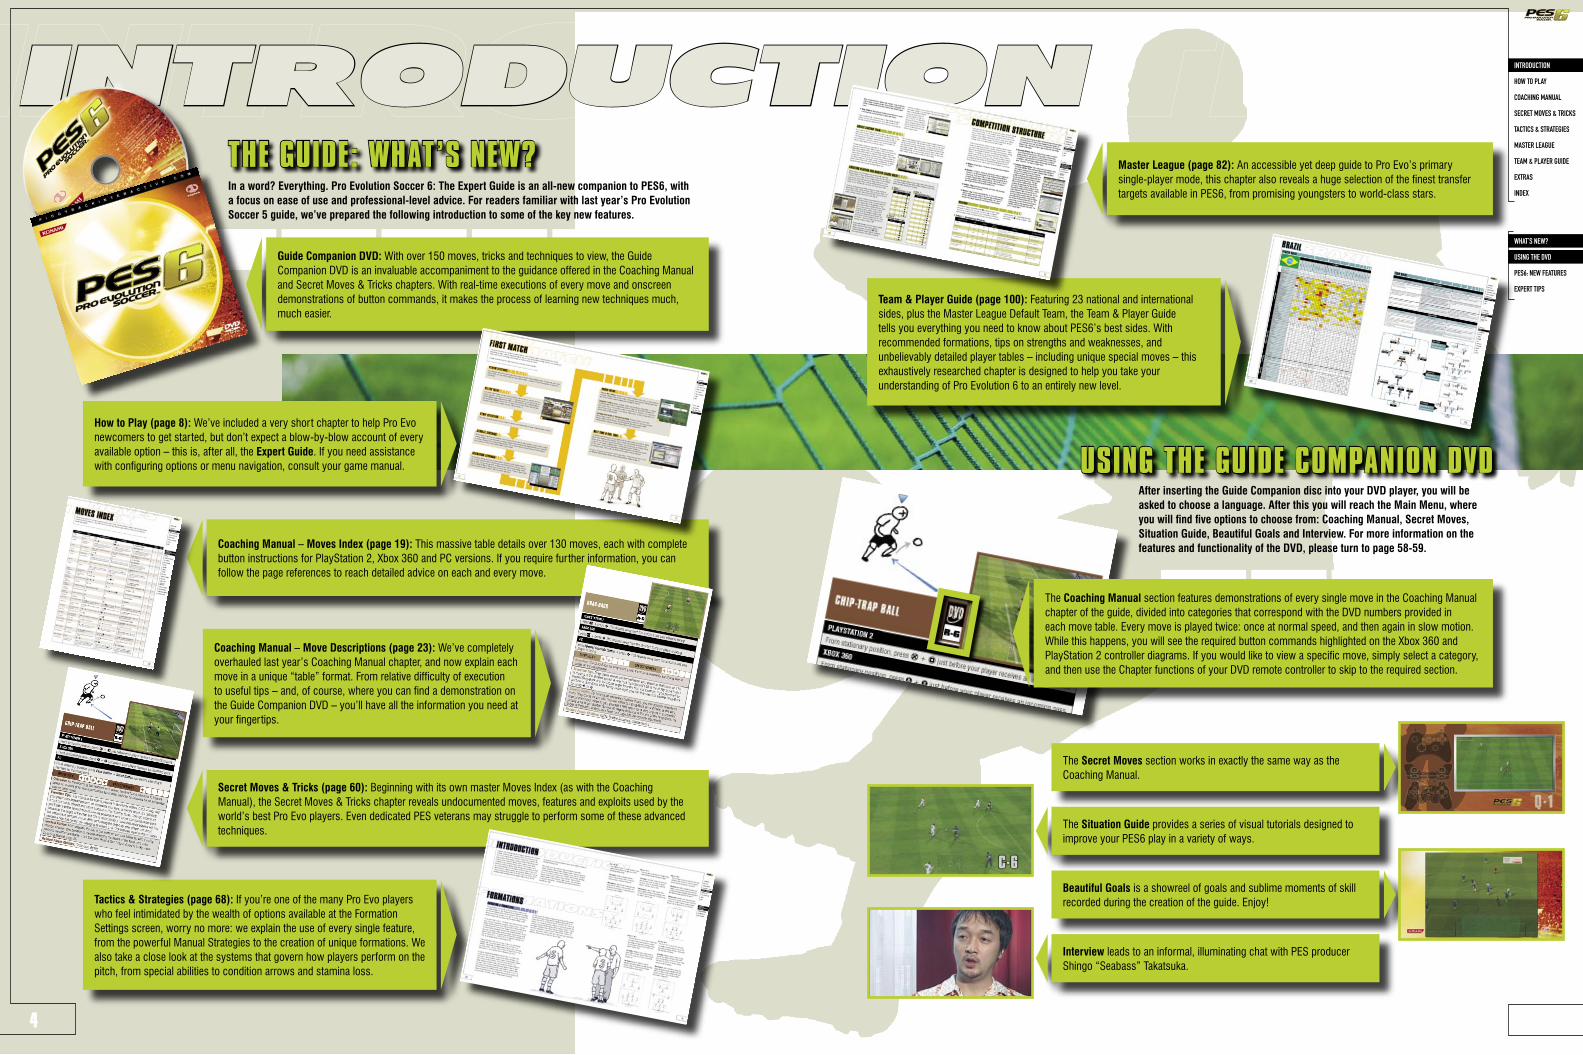
NEW MOVESWe can guess that you’re probably eager to try out some of the new tricks and techniques introduced in PES6, and we’re more than happy to help you find them. The following table reveals a selection of new PES6 moves – and, of course, where you can locate each one in the Coaching Manual chapter.
MOVE DESCRIPTION SEE PAGE
Revised Sidestep The “Sidestep” move is no longer activated with ƒ alone; veterans will notice that the system used prior to PES5 has been reinstated 31
Slow Dribble The “intermediate” running speed has been replaced by a slow dribble, which has many new applications 31
Backheel Shot This new context-sensitive move can be used to score some impudent goals. Our Shooting: Expert Advice section in the Coaching Manual features a diagram that illustrates how to perform it
42
V-Feint This eye-catching new trick combines a drag-back with a sudden turn and burst of pace 51
Inside-Outside Trick This new move is exclusive to a tiny handful of “flair” players. We tell you not merely how to execute it (and how it can be used), but also who can perform it 52
Quick Feint Taunt opponents with this all-new stamp of the foot 53
Matthews Feint Use this excellent new trick to wrong-foot defenders from a stationary position 53
90-Degree Turn A new abrupt turn that enables players with a requisite 90+ Dribble Accuracy rating to suddenly twist away from onrushing opponents 53
NEW GAMEPLAY BALANCEWe asked legendary Pro Evo producer Shingo “Seabass” Takatsuka to explain some of the changes he and the PES6 team have made to the way that this year’s update plays. To relate every single difference between PES5 and PES6 would take dozens of pages, so we’ve simply focused on some of the more interesting developments. If you’d like to hear more from Seabass,
you can watch an interview with the man himself on the Guide Companion DVD.
Less fouls, more flowing moves: “One of the biggest changes from PES5 to PES6 is the referee, and how he detects fouls. The team felt with PES5 that we had to accurately simulate the number of fouls in a real football match. We found
that this interfered with the gameplay in PES6, and so there are now fewer interruptions to the flow of each match.”
All-new goalkeeper AI: “We’ve been working intensively on the goalkeeper AI. It’s now calculated in a more realistic way, and is much more true to life. Goalkeepers are now stronger in certain areas, but are still authentically
weak in specific scenarios; they can’t always perform Superman-style saves. A goalkeeper’s ability level is now much more important. You will notice the difference between a stopper with a Keeper Skills rating of 95, and another with a rating of 75 – the latter will be more prone to fumbling the ball, and will be less reliable.”
Influence of the World Cup on PES6: “When we watched World Cup matches during the summer, we noticed certain key differences between teams, and decided to revise the game engine accordingly. An example? In PES5, the passing ability of teams didn’t vary too widely, meaning that even a weak team could pass, pass, pass, pass and then make a shot. In the World Cup, though, you could see that weaker teams passed much more slowly, and had more difficulty putting passing moves together – especially when compared to better sides with a faster, more fluid style of football. You’ll see this when you play PES6.”
Dribbling in PES6, and the removal of the “Medium Sprint”: “The main reason was that we wanted the R2 button [Xbox 360: Right Trigger; PC:
Special Controls Button] to be the “trap” button, so we removed the Medium Sprint from R2 because we felt it was confusing for many players. This does not mean that the Medium Sprint is no longer in the game, though. You will notice that if you press Sprint button and run, players are not quite as fast as they were in previous
PES games; this is effectively the Medium Sprint now. There are exceptions, though. If you’re controlling a player noted for their ability to dribble at speed, such as Ronaldinho and Giuly, they will still move very quickly if you hold the Sprint button down.
Where has the big sprint gone? You have to tap the sprint button or direction of movement rapidly to reach a player’s maximum possible speed with the ball at his feet. In the world of football, there’s no player who can regularly beat an entire team with his dribbling skills alone. That’s why we’ve made it more realistic. You’ll still notice a difference with real stars, but most players with the ball at their feet are authentically slower than opponents running without the ball.”
A secret: “There is a hidden player statistic called “Cool”. It doesn’t directly affect gameplay, but if a player has it, he will not lose his cool after scoring a goal, and during the goal celebrations.”
Player abilities, and world-class skills: “Player abilities of 95 or above are in what we call the “God Region”, and we’ve adjusted the stats so that there are now fewer players with this level of proficiency. Henry, for example, is very special, and has a few abilities in this range, so you can really notice – for example – his superior acceleration and technique. The philosophy is that if a player has an ability of 95 or more, it’s a real world-class talent, and there’s a much bigger
gulf in ability. As in real life, this only applies to a relatively small number of players.”
6MORE SAMPLE PAGES AVAILABLE AT WWW.PIGGYBACKINTERACTIVE.COM
PRO EVOLUTION SOCCER 6: NEW FEATURES
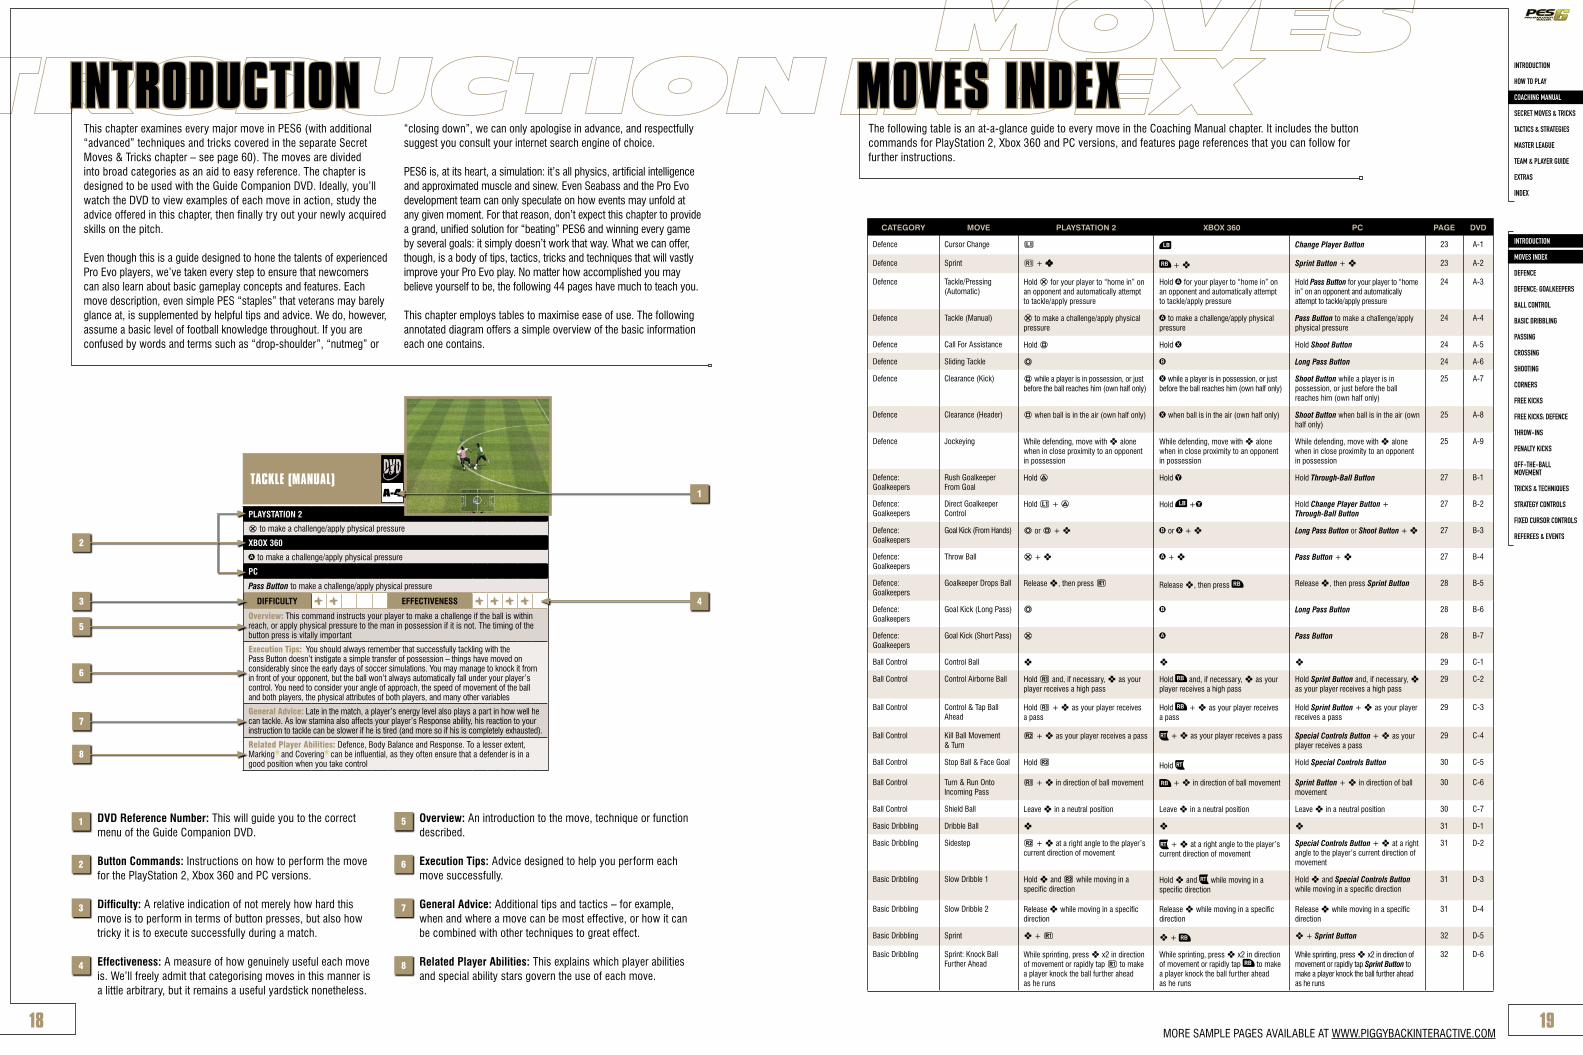
INTRODUCTION MOVES INDEXThis chapter examines every major move in PES6 (with additional “advanced” techniques and tricks covered in the separate Secret Moves & Tricks chapter – see page 60). The moves are divided into broad categories as an aid to easy reference. The chapter is designed to be used with the Guide Companion DVD. Ideally, you’ll watch the DVD to view examples of each move in action, study the advice offered in this chapter, then finally try out your newly acquired skills on the pitch.
Even though this is a guide designed to hone the talents of experienced Pro Evo players, we’ve taken every step to ensure that newcomers can also learn about basic gameplay concepts and features. Each move description, even simple PES “staples” that veterans may barely glance at, is supplemented by helpful tips and advice. We do, however, assume a basic level of football knowledge throughout. If you are confused by words and terms such as “drop-shoulder”, “nutmeg” or
“closing down”, we can only apologise in advance, and respectfully suggest you consult your internet search engine of choice.
PES6 is, at its heart, a simulation: it’s all physics, artificial intelligence and approximated muscle and sinew. Even Seabass and the Pro Evo development team can only speculate on how events may unfold at any given moment. For that reason, don’t expect this chapter to provide a grand, unified solution for “beating” PES6 and winning every game by several goals: it simply doesn’t work that way. What we can offer, though, is a body of tips, tactics, tricks and techniques that will vastly improve your Pro Evo play. No matter how accomplished you may believe yourself to be, the following 44 pages have much to teach you.
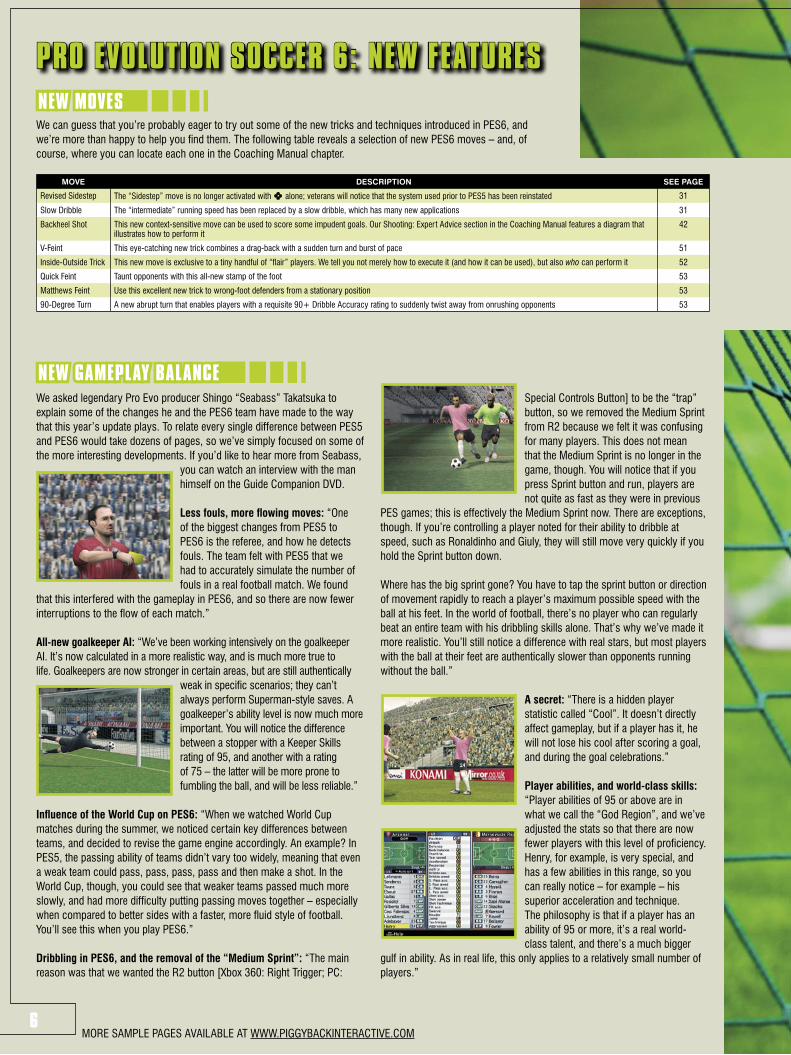
This chapter employs tables to maximise ease of use. The following annotated diagram offers a simple overview of the basic information each one contains.
CATEGORY MOVE PLAYSTATION 2 XBOX 360 PC PAGE DVD
Defence Cursor Change i Change Player Button 23 A-1
Defence Sprint p + ƒ + ƒ Sprint Button + ƒ 23 A-2
Defence Tackle/Pressing (Automatic)
Hold q for your player to “home in” on an opponent and automatically attempt to tackle/apply pressure
Hold A for your player to “home in” on an opponent and automatically attempt to tackle/apply pressure
Hold Pass Button for your player to “home in” on an opponent and automatically attempt to tackle/apply pressure
24 A-3
Defence Tackle (Manual) q to make a challenge/apply physical pressure
A to make a challenge/apply physical pressure
Pass Button to make a challenge/apply physical pressure
24 A-4
Defence Call For Assistance Hold w Hold x Hold Shoot Button 24 A-5
Defence Sliding Tackle r s Long Pass Button 24 A-6
Defence Clearance (Kick) w while a player is in possession, or just before the ball reaches him (own half only)
x while a player is in possession, or just before the ball reaches him (own half only)
Shoot Button while a player is in possession, or just before the ball reaches him (own half only)
25 A-7
Defence Clearance (Header) w when ball is in the air (own half only) x when ball is in the air (own half only) Shoot Button when ball is in the air (own half only)
25 A-8
Defence Jockeying While defending, move with ƒ alone when in close proximity to an opponent in possession
While defending, move with ƒ alone when in close proximity to an opponent in possession
While defending, move with ƒ alone when in close proximity to an opponent in possession
25 A-9
Defence: Goalkeepers
Rush Goalkeeper From Goal
Hold e Hold y Hold Through-Ball Button 27 B-1
Defence: Goalkeepers
Direct Goalkeeper Control
Hold i + e Hold +Y Hold Change Player Button + Through-Ball Button
27 B-2
Defence: Goalkeepers
Goal Kick (From Hands) r or w + ƒ s or x + ƒ Long Pass Button or Shoot Button + ƒ 27 B-3
Defence: Goalkeepers
Throw Ball q + ƒ a + ƒ Pass Button + ƒ 27 B-4
Defence: Goalkeepers
Goalkeeper Drops Ball Release ƒ, then press p Release ƒ, then press Release ƒ, then press Sprint Button 28 B-5
Defence: Goalkeepers
Goal Kick (Long Pass) r s Long Pass Button 28 B-6
Defence: Goalkeepers
Goal Kick (Short Pass) q A Pass Button 28 B-7
Ball Control Control Ball ƒ ƒ ƒ 29 C-1
Ball Control Control Airborne Ball Hold p and, if necessary, ƒ as your player receives a high pass
Hold and, if necessary, ƒ as your player receives a high pass
Hold Sprint Button and, if necessary, ƒ as your player receives a high pass
29 C-2
Ball Control Control & Tap Ball Ahead
Hold p + ƒ as your player receives a pass
Hold + ƒ as your player receives a pass
Hold Sprint Button + ƒ as your player receives a pass
29 C-3
Ball Control Kill Ball Movement & Turn
ü + ƒ as your player receives a pass + ƒ as your player receives a pass Special Controls Button + ƒ as your player receives a pass
29 C-4
Ball Control Stop Ball & Face Goal Hold ü Hold Hold Special Controls Button 30 C-5
Ball Control Turn & Run Onto Incoming Pass
p + ƒ in direction of ball movement + ƒ in direction of ball movement Sprint Button + ƒ in direction of ball movement
30 C-6
Ball Control Shield Ball Leave ƒ in a neutral position Leave ƒ in a neutral position Leave ƒ in a neutral position 30 C-7
Basic Dribbling Dribble Ball ƒ ƒ ƒ 31 D-1
Basic Dribbling Sidestep ü + ƒ at a right angle to the player’s current direction of movement
+ ƒ at a right angle to the player’s current direction of movement
Special Controls Button + ƒ at a right angle to the player’s current direction of movement
31 D-2
Basic Dribbling Slow Dribble 1 Hold ƒ and ü while moving in a specific direction
Hold ƒ and while moving in a specific direction
Hold ƒ and Special Controls Button while moving in a specific direction
31 D-3
Basic Dribbling Slow Dribble 2 Release ƒ while moving in a specific direction
Release ƒ while moving in a specific direction
Release ƒ while moving in a specific direction
31 D-4
Basic Dribbling Sprint ƒ + p ƒ + ƒ + Sprint Button 32 D-5
Basic Dribbling Sprint: Knock Ball Further Ahead
While sprinting, press ƒ x2 in direction of movement or rapidly tap p to make a player knock the ball further ahead as he runs
While sprinting, press ƒ x2 in direction of movement or rapidly tap to make a player knock the ball further ahead as he runs
While sprinting, press ƒ x2 in direction of movement or rapidly tap Sprint Button to make a player knock the ball further ahead as he runs
32 D-6
The following table is an at-a-glance guide to every move in the Coaching Manual chapter. It includes the button commands for PlayStation 2, Xbox 360 and PC versions, and features page references that you can follow for further instructions.
TACKLE (MANUAL)
PLAYSTATION 2
q to make a challenge/apply physical pressure
XBOX 360
a to make a challenge/apply physical pressure
PC
Pass Button to make a challenge/apply physical pressure
DIFFICULTY + + EFFECTIVENESS + + + +Overview: This command instructs your player to make a challenge if the ball is within reach, or apply physical pressure to the man in possession if it is not. The timing of the button press is vitally important
Execution Tips: You should always remember that successfully tackling with the Pass Button doesn’t instigate a simple transfer of possession – things have moved on considerably since the early days of soccer simulations. You may manage to knock it from in front of your opponent, but the ball won’t always automatically fall under your player’s control. You need to consider your angle of approach, the speed of movement of the ball and both players, the physical attributes of both players, and many other variables
General Advice: Late in the match, a player’s energy level also plays a part in how well he can tackle. As low stamina also affects your player’s Response ability, his reaction to your instruction to tackle can be slower if he is tired (and more so if his is completely exhausted).
Related Player Abilities: Defence, Body Balance and Response. To a lesser extent, Marking and Covering can be influential, as they often ensure that a defender is in a good position when you take control
A-4
DVD Reference Number: This will guide you to the correct menu of the Guide Companion DVD.
Button Commands: Instructions on how to perform the move for the PlayStation 2, Xbox 360 and PC versions.
Difficulty: A relative indication of not merely how hard this move is to perform in terms of button presses, but also how tricky it is to execute successfully during a match.
Effectiveness: A measure of how genuinely useful each move is. We’ll freely admit that categorising moves in this manner is a little arbitrary, but it remains a useful yardstick nonetheless.
Overview: An introduction to the move, technique or function described.
Execution Tips: Advice designed to help you perform each move successfully.
General Advice: Additional tips and tactics – for example, when and where a move can be most effective, or how it can be combined with other techniques to great effect.
Related Player Abilities: This explains which player abilities and special ability stars govern the use of each move.
1
2
3
4 8
7
6
5
2
3 4
1
5
6
7
8
INTRODUCTION
HOW TO PLAY
COACHING MANUAL
SECRET MOVES & TRICKS
TACTICS & STRATEGIES
MASTER LEAGUE
TEAM & PLAYER GUIDE
EXTRAS
INDEX
INTRODUCTION
MOVES INDEX
DEFENCE
DEFENCE: GOALKEEPERS
BALL CONTROL
BASIC DRIBBLING
PASSING
CROSSING
SHOOTING
CORNERS
FREE KICKS
FREE KICKS: DEFENCE
THROW-INS
PENALTY KICKS
OFF-THE-BALL MOVEMENT
TRICKS & TECHNIQUES
STRATEGY CONTROLS
FIXED CURSOR CONTROLS
REFEREES & EVENTS
18 19MORE SAMPLE PAGES AVAILABLE AT WWW.PIGGYBACKINTERACTIVE.COM

MORE SAMPLE PAGES AVAILABLE AT WWW.PIGGYBACKINTERACTIVE.COM
Body PositionAs with passing, players are (as a rule) most effective at striking the ball in the direction they are facing. The further away your aim is from, approximately, a 90 degree “cone” in front of a player, the less powerful and accurate a shot will potentially be. If a player has high Shot Accuracy, Shot Power and Shot Technique stats (and, ideally, the Scoring special ability star), he will be far more proficient at shooting while running parallel to his opponent’s goalmouth, but the odds of even a great player scoring are always reduced by facing further away from the goal.
If a player has his back to his opponent’s goal, the precision and pace of shots is vastly reduced. As in real life, the difficulty of twisting to shoot from oblique angles – even at close range – means that the quality of contact will be lower, with the ball more likely to be scuffed harmlessly into a grateful keeper’s hands. Players with the Scoring star are much, much better at turning to drill the ball into either corner, but only inside the penalty area. Unless you’re deep inside your opponent’s 18-yard box, a shot made while facing away from goal may be a waste of possession.
PLAYSTATION 2
w+ ƒ to shoot, p when the gauge appears
XBOX 360
x + ƒ to shoot, when the gauge appears
PC
Shoot Button + ƒ to shoot, Sprint Button when the gauge appears
DIFFICULTY + + + + EFFECTIVENESS + + +Overview: This chip shot type is generally much lower and hangs in the air for less time than the “Type 1” chip shot. As an additional benefit, the manner in which your player shapes to shoot can fool goalkeepers into believing that you are attempting a standard shot on goal
Execution Tips: The timing of the Sprint Button press is critical: if it’s too late, your player will blast the ball instead. This can occasionally be a problem with players that have a very high Agility rating. As they are more inclined to make immediate (or at least quicker) kicks, the timing of the Sprint Button press can sometimes be tricky
General Advice: If you select the “Type 2” option for Chip Shot 2 at the Button Configuration screen, you can also perform this kick by rapidly tapping the Shoot Button
Related Player Abilities: Technique, Attack, Body Balance, Agility, Shot Accuracy, Shot Power, Shot Technique, Scoring , 1-On-1 Score
CHIP SHOT 2G-4
PLAYSTATION 2
ƒ + w just before the ball reaches a player
XBOX 360
ƒ + x just before the ball reaches a player
PC
ƒ + Shoot Button just before the ball reaches a player
DIFFICULTY +to +++++ EFFECTIVENESS +to +++++Overview: There are many different types of context-sensitive shots and headers that players can perform from corners, crosses, long passes and free kicks. The vast majority of these are performed instantaneously (there is no power gauge), and are context sensitive. Which move takes place depends on a number of variables, including ball height, speed, player position, player speed, the presence of an opposing player, and much more. Turn to page 43 for a visual guide to when each move is likely to occur
Execution Tips: With first-time shots & headers, the power bar rarely appears (and if it does, it has much less influence on the resultant kick). Far more important is the timing of the button press – generally, a quick tap just before the ball reaches a player is best – and the direction specified with ƒ. Equally significant is a player’s position in relation to both the goalmouth and ball. If the latter is above head height, he will attempt a header; a scissor kick, or stooping to head the ball is more likely between chest and waist height; below the waist, diving headers, volleys and toe-pokes are more frequent outcomes
General Advice: Moving a player with the Special Controls Button before the ball reaches him (see Off The Ball Movement, page 49) can enable you to manually engineer certain types of shots and headers
Related Player Abilities: Technique, Attack, Body Balance, Agility, Shot Accuracy, Shot Power, Shot Technique, Swerve, Scoring , 1-On-1 Score , Middle Shooting , 1-Tch Pass
FIRST-TIME SHOTS & HEADERS G-5
EXPERT ADVICE: SHOOTINGShot AimDue to the bewildering variety of variables involved in every attempt on goal, though, it’s near impossible to offer hard-and-fast rules on when, where and how to shoot. One thing we can say, though, is that shot power and accuracy is greatly increased if your player has a slight run-up to the ball – such as while knocking the ball further ahead while sprinting, or after any one of a number of dribbling techniques or tricks.
First-Time Shots & HeadersWhen your player meets an incoming ball, the type of contact he makes depends on his body position and orientation, and the speed and height of the ball. These diagrams provide a rough approximation of where the ball must be for your player to perform the specified context-sensitive moves.
Tiny adjustments of your player’s position with the Special Controls Button (see Off-The-Ball Movement, page 49) as a cross or long pass
travels towards him can change the style of kick or header used. This is an expert-level technique, though: if you lack experience, you may find that you often accidentally move your player out of position, or provide a defender with a clear run forward to make a clearance.
Moving Player Standing Position Back to Goal
Favoured FootAnother factor that you must take into account when shooting is your player’s dominant foot, and his Weak Foot Accuracy and Weak Foot Frequency stats. In the heat of the moment, even the most quick-thinking PES6 expert will not have time to consider these, which is why a few hours on the training ground with your favourite team can be hugely advantageous. Practice shooting from various angles and ranges with each player, and see how the contact made can vary. A player with high Weak Foot Accuracy and Weak Foot Frequency ratings will be comfortable striking the ball with either foot; a player with lower ratings will go out of his way to use his preferred foot. If a one-footed player has the Outside special ability star, he may instead use the outside of his stronger foot to strike the ball.
Physical PressureWhen a defender is in close physical proximity to a player, the potential power and accuracy of his shots is reduced. The degree to which this affects him depends primarily on his Shot Technique rating, but is also influenced by his Body Balance and Attack stats. If you are controlling a player with low Shot Technique, it can be better to try to escape your marker before kicking, or pass the ball to a teammate in space.
HeaderScissor Kick
Volley
Hidden Strong Shot
Header Diving Header
Sliding StrikeVolleyToepoke Volley
Scissor Kick
Jumping Header Overhead Kick
Collapsing Kick
Backheel ShotRabona ShotIf you‘re curious as to where the context-sensitive Rabona shot has gone, worry not - it hasn‘t been removed. It can now only be performed by players with a Weak Foot Frequency of 3 or less, and a 90+ Technique value. Only two players fall into this category: Malgani, the number 10 of Classic Argentina, and Rivaldo of Olympiacos Piraeus. To perform it, run parallel to and in front of the goal with either player, „strong“ foot goalside, and they will perform the unique Rabona when you shoot.
INTRODUCTION
HOW TO PLAY
COACHING MANUAL
SECRET MOVES & TRICKS
TACTICS & STRATEGIES
MASTER LEAGUE
TEAM & PLAYER GUIDE
EXTRAS
INDEX
INTRODUCTION
MOVES INDEX
DEFENCE
DEFENCE: GOALKEEPERS
BALL CONTROL
BASIC DRIBBLING
PASSING
CROSSING
SHOOTING
CORNERS
FREE KICKS
FREE KICKS: DEFENCE
THROW-INS
PENALTY KICKS
OFF-THE-BALL MOVEMENT
TRICKS & TECHNIQUES
STRATEGY CONTROLS
FIXED CURSOR CONTROLS
REFEREES & EVENTS
42 43

One-two pass variations
INTRODUCTION
If a picture paints a thousand words, the guide DVD companion is the most knowledgeable and verbose Pro Evolution Soccer 6 coach you could ever hope to train with. With over 100 minutes of in-game footage – and plenty of extras, too – it is designed to be an all-encompassing visual accompaniment to the paper guide you hold before you.
USING THE DVD
While this guide aims to explain PES6 moves and gameplay concepts in a clear and concise manner, it can often be hard to interpret (let alone perform) complicated, situation-specific button commands. This is where the Coaching Manual section of the DVD is worth its weight in goals – both scored and averted. It demonstrates all “standard” moves and tricks in PES6, with PlayStation 2 and Xbox 360 controllers to the left side of the video display illustrating the correct timing for all button presses. There’s a slow-motion replay of every move after the initial performance, and you’re free to use the features on your DVD to review the footage in any order or at any speed you please.
Using the same format as the Coaching Manual, this section of the DVD acts as an accompaniment to the Secret Moves & Tricks chapter. Even with assistance in video and text form, you may still find the difficulty of performing these moves rather extreme. For that reason, it’s a good idea to watch each demonstration repeatedly until you’ve memorised the correct timing.
SECRET MOVES
The Situation Guide is designed to compliment the raw instructions provided in the Coaching Manual and Secret Moves sections of the DVD, showing you how to use a variety of skills, tricks and techniques in real match situations. We have chosen ten scenarios that players will frequently encounter in PES6, and offer five “solutions” for each one. In each case we begin with the easiest, gradually working up to the most complicated (yet stylish) way to triumph in a particular exchange. By watching this footage you’ll acquire a better understanding of how effective certain moves can be, from using
Super Cancel to meet a cross, to jockeying an attacker in defence. While watching each situation, pay attention to the Coaching Manual and Secret Moves references (A-1, N-19, and so forth) that appear on screen. These link to the relevant sections of both guide and DVD, where you can learn how to use each move and (with the paper guide) gain further inspiration on ways to improve your Pro Evo play.
Let’s take a look at the ten scenarios featured in the Situation Guide…
SITUATION GUIDE
COACHING MANUAL
C-4: Kill Ball Movement & Turn
C-6: Turn & Run Onto Incoming Pass
N-1: Leave Ball/Jump Ball
N-21: Kick Feint 1
R-3: Secret Ball Control
In this situation, the stationary player receiving a pass can safely trap the ball, or choose to beat his opponent with varying degrees of skill.
If your player is in motion as he receives a pass, you have a different range of options. Should you choose to trap the ball, or cleverly change his trajectory with subtle use of the powerful Super Cancel feature?
C-3: Control & Tap Ball Ahead
C-5: Stop Ball & Face Goal
M-1: Super Cancel
Q-4: Leave/Jump Through-Ball
S-1: “La Ginola”
When you initiate a one-two pass and see the instigating player make his forward run, you have a variety of options at your disposal. You can obviously play the natural return ball, but you could also initiate a more involved team move…
E-13: One-Two Pass
E-14: One-Two With Lofted Return Ball
N-6: Drag-Back
One-Two: Combination With 3 Players
One-Two: Combination With 4 Players
Moving player receives incoming pass
There are many different ways to beat an opponent from a stationary position in PES6. This section shows a mere selection of techniques – depending on your playing ability, there are many more.
1-on-1 with stationary attacker
If you are running at an opponent, you can use the following tricks to pass him stylishly and effectively. The Acceleration, Dribble Speed, and Dribble Accuracy player abilities are hugely important in these situations.
D-2: Sidestep
N-5: Quick Turn
N-8: Marseille Roulette
R-4: Sprint: Diagonal Dash
R-5: Step-Over Into Diagonal Dash
1-on-1 with attacker moving
No matter the relative ability of the goalkeeper you face, attacking players have a far greater number of moves at their disposal in one-on-one situations…
G-4: Chip Shot 2
N-21: Kick Feint 1
N-23: Chip Ball
N-27: Fake Shot/Pass
R-1, R-7:Immediate Angled Sprint, Disguised Pass
1-on-1 with attacker against goalkeeper
Stationary player receives incoming pass
Defending can be hard work in PES6: you need to concentrate at all times, and experiment with different techniques to break up attacks. This section of the Situation Guide explores five ways to disrupt the opposing team’s march towards your goal.
A-3: Tackle/Pressing (Automatic)
A-4, A-5:Tackle (Manual), Call For Assistance
A-6: Sliding Tackle
A-9: Jockeying
S-2: Body Check
1-on-1 with defenderWith all good Pro Evo players appreciating the importance of restricting free space on the wings, creating sufficient room to put in a pin-point cross or pass can be tricky. The following techniques are always useful in these situations.
D-9: Quick Stop & Turn to Face Opponent’s Goal
N-2: Backheel Turn
D-3, N-10: Slow Dribble 1, Both-Feet Feint
N-19: Step-Over Into Dash
N-27: Fake Shot/Pass
Wing play
There are more ways to cross than many Pro Evo players suspect. In this section, we reveal which cross types can be most effective – and perhaps more pertinently, when they should be used.
E-1: Short Pass
E-17: Manual Long Pass
F-2: Medium Cross
F-3: High Arc Cross
Q-1: Hidden Low Cross
CrossingAs a cross speeds towards its target, you’re not obliged to simply head or shoot the ball – sometimes, an alternative technique can be used to create an improved (or if you prefer, more spectacular) goalscoring opportunity.
Attacking crosses
During the creation of both guide and DVD, Piggyback’s Pro Evolution Soccer 6 team scored literally thousands of goals. You can view (and perhaps derive inspiration from) some of these in this ten-minute “Beautiful Goals” compilation.
In this section, you can watch an interview with legendary PES producer Shingo “Seabass” Takatsuka, who provides insights into the creation of PES6 and the future of the series on next-gen consoles, and reveals how the 2006 World Cup influenced the Pro Evo team.
INTERVIEW
BEAUTIFUL GOALS
N-7: V-Feint
N-14: Matthews Feint
N-23: Chip Ball
N-12, N-3: Stationary Feint, Stop & Play
Q-6: Fake Turn 2
G-5: First-Time Shots & Headers
C-2, G-5:Control Airborne Ball,First-Time Shots & Headers
E-4: Header (Pass)
E-8: First-Time Long Pass
M-2, G-5:Control Player While Ball Is Airborne,First-Time Shots & Headers
INTRODUCTION
HOW TO PLAY
COACHING MANUAL
SECRET MOVES & TRICKS
TACTICS & STRATEGIES
MASTER LEAGUE
TEAM & PLAYER GUIDE
EXTRAS
INDEX
INTRODUCTION
MOVES INDEX
DEFENCE
DEFENCE: GOALKEEPERS
BALL CONTROL
BASIC DRIBBLING
PASSING
CROSSING
SHOOTING
CORNERS
FREE KICKS
FREE KICKS: DEFENCE
THROW-INS
PENALTY KICKS
OFF-THE-BALL MOVEMENT
TRICKS & TECHNIQUES
STRATEGY CONTROLS
FIXED CURSOR CONTROLS
REFEREES & EVENTS
USING THE DVD
58 59MORE SAMPLE PAGES AVAILABLE AT WWW.PIGGYBACKINTERACTIVE.COM
MORE SAMPLE PAGES AVAILABLE AT WWW.PIGGYBACKINTERACTIVE.COM
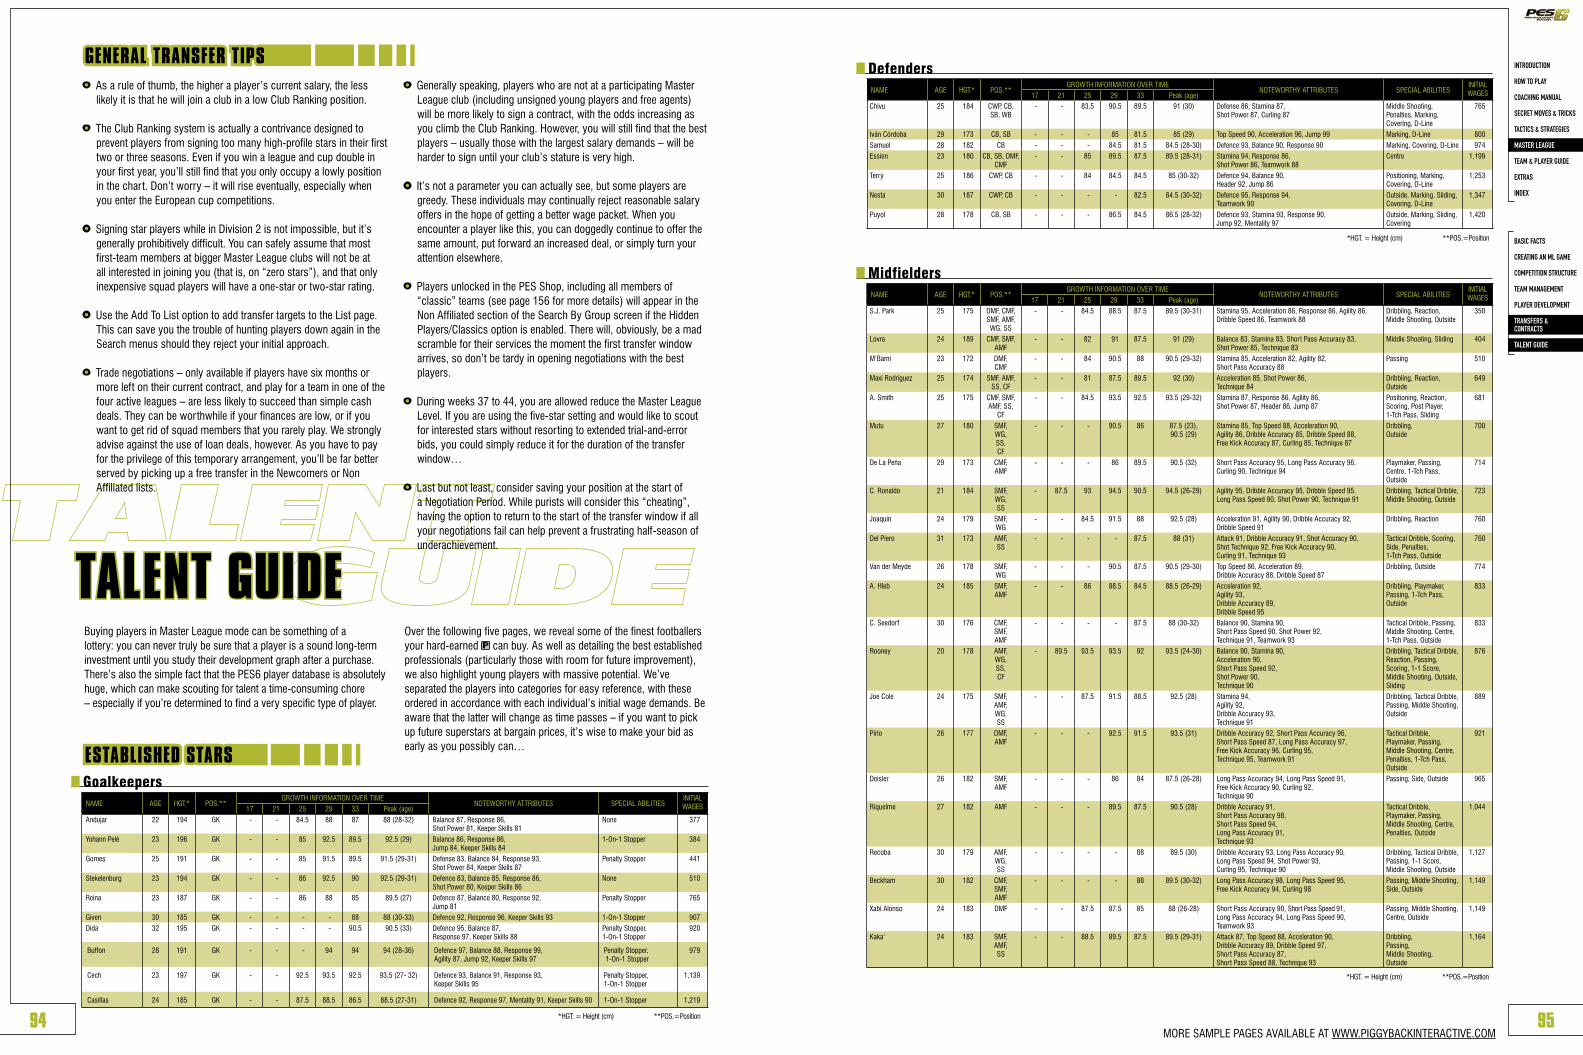
TALENT GUIDE
GENERAL TRANSFER TIPS• As a rule of thumb, the higher a player’s current salary, the less
likely it is that he will join a club in a low Club Ranking position.
• The Club Ranking system is actually a contrivance designed to prevent players from signing too many high-profile stars in their first two or three seasons. Even if you win a league and cup double in your first year, you’ll still find that you only occupy a lowly position in the chart. Don’t worry – it will rise eventually, especially when you enter the European cup competitions.
• Signing star players while in Division 2 is not impossible, but it’s generally prohibitively difficult. You can safely assume that most first-team members at bigger Master League clubs will not be at all interested in joining you (that is, on “zero stars”), and that only inexpensive squad players will have a one-star or two-star rating.
• Use the Add To List option to add transfer targets to the List page. This can save you the trouble of hunting players down again in the Search menus should they reject your initial approach.
• Trade negotiations – only available if players have six months or more left on their current contract, and play for a team in one of the four active leagues – are less likely to succeed than simple cash deals. They can be worthwhile if your finances are low, or if you want to get rid of squad members that you rarely play. We strongly advise against the use of loan deals, however. As you have to pay for the privilege of this temporary arrangement, you’ll be far better served by picking up a free transfer in the Newcomers or Non Affiliated lists.
• Generally speaking, players who are not at a participating Master League club (including unsigned young players and free agents) will be more likely to sign a contract, with the odds increasing as you climb the Club Ranking. However, you will still find that the best players – usually those with the largest salary demands – will be harder to sign until your club’s stature is very high.
• It’s not a parameter you can actually see, but some players are greedy. These individuals may continually reject reasonable salary offers in the hope of getting a better wage packet. When you encounter a player like this, you can doggedly continue to offer the same amount, put forward an increased deal, or simply turn your attention elsewhere.
• Players unlocked in the PES Shop, including all members of “classic” teams (see page 156 for more details) will appear in the Non Affiliated section of the Search By Group screen if the Hidden Players/Classics option is enabled. There will, obviously, be a mad scramble for their services the moment the first transfer window arrives, so don’t be tardy in opening negotiations with the best players.
• During weeks 37 to 44, you are allowed reduce the Master League Level. If you are using the five-star setting and would like to scout for interested stars without resorting to extended trial-and-error bids, you could simply reduce it for the duration of the transfer window…
• Last but not least, consider saving your position at the start of a Negotiation Period. While purists will consider this “cheating”, having the option to return to the start of the transfer window if all your negotiations fail can help prevent a frustrating half-season of underachievement.
Buying players in Master League mode can be something of a lottery: you can never truly be sure that a player is a sound long-term investment until you study their development graph after a purchase. There’s also the simple fact that the PES6 player database is absolutely huge, which can make scouting for talent a time-consuming chore – especially if you’re determined to find a very specific type of player.
Over the following five pages, we reveal some of the finest footballers your hard-earned can buy. As well as detailing the best established professionals (particularly those with room for future improvement), we also highlight young players with massive potential. We’ve separated the players into categories for easy reference, with these ordered in accordance with each individual’s initial wage demands. Be aware that the latter will change as time passes – if you want to pick up future superstars at bargain prices, it’s wise to make your bid as early as you possibly can…
NAME AGE HGT.* POS.**GROWTH INFORMATION OVER TIME
NOTEWORTHY ATTRIBUTES SPECIAL ABILITIESINITIAL WAGES17 21 25 29 33 Peak (age)
Andujar 22 194 GK - - 84.5 88 87 88 (28-32) Balance 87, Response 86, Shot Power 81, Keeper Skills 81
None 377
Yohann Pelé 23 196 GK - - 85 92.5 89.5 92.5 (29) Balance 86, Response 86, Jump 84, Keeper Skills 84
1-On-1 Stopper 384
Gomes 25 191 GK - - 85 91.5 89.5 91.5 (29-31) Defense 83, Balance 84, Response 93, Shot Power 84, Keeper Skills 87
Penalty Stopper 441
Stekelenburg 23 194 GK - - 86 92.5 90 92.5 (29-31) Defence 83, Balance 85, Response 86, Shot Power 80, Keeper Skills 86
None 510
Reina 23 187 GK - - 86 88 85 89.5 (27) Defence 87, Balance 80, Response 92, Jump 81
Penalty Stopper 765
Given 30 185 GK - - - - 88 88 (30-33) Defence 92, Response 96, Keeper Skills 93 1-On-1 Stopper 907Dida 32 195 GK - - - - 90.5 90.5 (33) Defence 95, Balance 87,
Response 97, Keeper Skills 88Penalty Stopper, 1-On-1 Stopper
920
Buffon 28 191 GK - - - 94 94 94 (28-36) Defence 97, Balance 88, Response 99, Agility 87, Jump 92, Keeper Skills 97
Penalty Stopper, 1-On-1 Stopper
979
Cech 23 197 GK - - 92.5 93.5 92.5 93.5 (27- 32) Defence 93, Balance 91, Response 93, Keeper Skills 95
Penalty Stopper, 1-On-1 Stopper
1,139
Casillas 24 185 GK - - 87.5 88.5 86.5 88.5 (27-31) Defence 92, Response 97, Mentality 91, Keeper Skills 90 1-On-1 Stopper 1,219
Goalkeepers
ESTABLISHED STARS
S.J. Park 25 175 DMF, CMF, SMF, AMF, WG, SS
- - 84.5 88.5 87.5 89.5 (30-31) Stamina 95, Acceleration 86, Response 86, Agility 86, Dribble Speed 86, Teamwork 88
Dribbling, Reaction, Middle Shooting, Outside
350
Lovre 24 189 CMF, SMF, AMF
- - 82 91 87.5 91 (29) Balance 83, Stamina 83, Short Pass Accuracy 83, Shot Power 85, Technique 83
Middle Shooting, Sliding 404
M‘Bami 23 172 DMF, CMF
- - 84 90.5 88 90.5 (29-32) Stamina 85, Acceleration 82, Agility 82, Short Pass Accuracy 88
Passing 510
Maxi Rodríguez 25 174 SMF, AMF, SS, CF
- - 81 87.5 89.5 92 (30) Acceleration 85, Shot Power 86, Technique 84
Dribbling, Reaction, Outside
649
A. Smith 25 175 CMF, SMF, AMF, SS,
CF
- - 84.5 93.5 92.5 93.5 (29-32) Stamina 87, Response 86, Agility 86, Shot Power 87, Header 86, Jump 87
Positioning, Reaction, Scoring, Post Player, 1-Tch Pass, Sliding
681
Mutu 27 180 SMF, WG, SS, CF
- - - 90.5 86 87.5 (23), 90.5 (29)
Stamina 85, Top Speed 88, Acceleration 90, Agility 86, Dribble Accuracy 85, Dribble Speed 88, Free Kick Accuracy 87, Curling 85, Technique 87
Dribbling, Outside
700
De La Peña 29 173 CMF, AMF
- - - 86 89.5 90.5 (32) Short Pass Accuracy 95, Long Pass Accuracy 96, Curling 90, Technique 94
Playmaker, Passing, Centre, 1-Tch Pass, Outside
714
C. Ronaldo 21 184 SMF, WG, SS
- 87.5 93 94.5 90.5 94.5 (26-29) Agility 95, Dribble Accuracy 95, Dribble Speed 95, Long Pass Speed 90, Shot Power 90, Technique 91
Dribbling, Tactical Dribble, Middle Shooting, Outside
723
Joaquin 24 179 SMF, WG
- - 84.5 91.5 88 92.5 (28) Acceleration 91, Agility 90, Dribble Accuracy 92, Dribble Speed 91
Dribbling, Reaction 760
Del Piero 31 173 AMF, SS
- - - - 87.5 88 (31) Attack 91, Dribble Accuracy 91, Shot Accuracy 90, Shot Technique 92, Free Kick Accuracy 90, Curling 91, Technique 93
Tactical Dribble, Scoring, Side, Penalties, 1-Tch Pass, Outside
760
Van der Meyde 26 178 SMF, WG
- - - 90.5 87.5 90.5 (29-30) Top Speed 86, Acceleration 89, Dribble Accuracy 88, Dribble Speed 87
Dribbling, Outside 774
A. Hleb 24 185 SMF, AMF
- - 86 88.5 84.5 88.5 (26-29) Acceleration 92, Agility 93, Dribble Accuracy 89, Dribble Speed 95
Dribbling, Playmaker, Passing, 1-Tch Pass, Outside
833
C. Seedorf 30 176 CMF, SMF, AMF
- - - - 87.5 88 (30-32) Balance 90, Stamina 90, Short Pass Speed 90, Shot Power 92, Technique 91, Teamwork 93
Tactical Dribble, Passing, Middle Shooting, Centre, 1-Tch Pass, Outside
833
Rooney 20 178 AMF, WG, SS, CF
- 89.5 93.5 93.5 92 93.5 (24-30) Balance 90, Stamina 90, Acceleration 90,Short Pass Speed 92, Shot Power 90, Technique 90
Dribbling, Tactical Dribble, Reaction, Passing, Scoring, 1-1 Score, Middle Shooting, Outside, Sliding
876
Joe Cole 24 175 SMF, AMF, WG, SS
- - 87.5 91.5 88.5 92.5 (28) Stamina 94, Agility 92, Dribble Accuracy 93, Technique 91
Dribbling, Tactical Dribble, Passing, Middle Shooting, Outside
889
Pirlo 26 177 DMF, AMF
- - - 92.5 91.5 93.5 (31) Dribble Accuracy 92, Short Pass Accuracy 96, Short Pass Speed 87, Long Pass Accuracy 97, Free Kick Accuracy 96, Curling 95, Technique 95, Teamwork 91
Tactical Dribble, Playmaker, Passing, Middle Shooting, Centre, Penalties, 1-Tch Pass, Outside
921
Deisler 26 182 SMF, AMF
- - - 86 84 87.5 (26-28) Long Pass Accuracy 94, Long Pass Speed 91,Free Kick Accuracy 90, Curling 92, Technique 90
Passing, Side, Outside 965
Riquelme 27 182 AMF - - - 89.5 87.5 90.5 (28) Dribble Accuracy 91, Short Pass Accuracy 98, Short Pass Speed 94, Long Pass Accuracy 91, Technique 93
Tactical Dribble, Playmaker, Passing, Middle Shooting, Centre, Penalties, Outside
1,044
Recoba 30 179 AMF, WG, SS
- - - - 88 89.5 (30) Dribble Accuracy 93, Long Pass Accuracy 90, Long Pass Speed 94, Shot Power 93, Curling 95, Technique 90
Dribbling, Tactical Dribble, Passing, 1-1 Score, Middle Shooting, Outside
1,127
Beckham 30 182 CMF, SMF, AMF
- - - - 88 89.5 (30-32) Long Pass Accuracy 98, Long Pass Speed 95, Free Kick Accuracy 94, Curling 98
Passing, Middle Shooting, Side, Outside
1,149
Xabi Alonso 24 183 DMF - - 87.5 87.5 85 88 (26-28) Short Pass Accuracy 90, Short Pass Speed 91,Long Pass Accuracy 94, Long Pass Speed 90, Teamwork 93
Passing, Middle Shooting, Centre, Outside
1,149
Kaka‘ 24 183 SMF, AMF, SS
- - 88.5 89.5 87.5 89.5 (29-31) Attack 87, Top Speed 88, Acceleration 90, Dribble Accuracy 89, Dribble Speed 97, Short Pass Accuracy 87, Short Pass Speed 88, Technique 93
Dribbling, Passing, Middle Shooting, Outside
1,164
NAME AGE HGT.* POS.**GROWTH INFORMATION OVER TIME
NOTEWORTHY ATTRIBUTES SPECIAL ABILITIESINITIAL WAGES17 21 25 29 33 Peak (age)
Midfielders
NAME AGE HGT.* POS.**GROWTH INFORMATION OVER TIME
NOTEWORTHY ATTRIBUTES SPECIAL ABILITIESINITIAL WAGES17 21 25 29 33 Peak (age)
Defenders
Chivu 25 184 CWP, CB, SB, WB
- - 83.5 90.5 89.5 91 (30) Defense 86, Stamina 87, Shot Power 87, Curling 87
Middle Shooting, Penalties, Marking, Covering, D-Line
765
Iván Córdoba 29 173 CB, SB - - - 85 81.5 85 (29) Top Speed 90, Acceleration 96, Jump 99 Marking, D-Line 800Samuel 28 182 CB - - - 84.5 81.5 84.5 (28-30) Defence 93, Balance 90, Response 90 Marking, Covering, D-Line 974Essien 23 180 CB, SB, DMF,
CMF - - 85 89.5 87.5 89.5 (28-31) Stamina 94, Response 86,
Shot Power 86, Teamwork 88Centre 1,199
Terry 25 186 CWP, CB - - 84 84.5 84.5 85 (30-32) Defence 94, Balance 90, Header 92, Jump 86
Positioning, Marking, Covering, D-Line
1,253
Nesta 30 187 CWP, CB - - - - 82.5 84.5 (30-32) Defence 95, Response 94, Teamwork 90
Outside, Marking, Sliding, Covering, D-Line
1,347
Puyol 28 178 CB, SB - - - 86.5 84.5 86.5 (28-32) Defence 93, Stamina 93, Response 90, Jump 92, Mentality 97
Outside, Marking, Sliding, Covering
1,420
*HGT. = Height (cm) **POS.=Position
*HGT. = Height (cm) **POS.=Position
*HGT. = Height (cm) **POS.=Position
INTRODUCTION
HOW TO PLAY
COACHING MANUAL
SECRET MOVES & TRICKS
TACTICS & STRATEGIES
MASTER LEAGUE
TEAM & PLAYER GUIDE
EXTRAS
INDEX
BASIC FACTS
CREATING AN ML GAME
COMPETITION STRUCTURE
TEAM MANAGEMENT
PLAYER DEVELOPMENT
TRANSFERS & CONTRACTS
TALENT GUIDE
94 95

INTRODUCTION INTRODUCTION
HOW TO PLAY
COACHING MANUAL
SECRET MOVES & TRICKS
TACTICS & STRATEGIES
MASTER LEAGUE
TEAM & PLAYER GUIDE
EXTRAS
INDEX
INTRODUCTION
PES6 SUPERSTARS
NATIONAL SIDES
CLUB SIDES
MASTER LEAGUE DEFAULT
102 103
1
1 Player Guide: This page provides an at-a-glance guide to the strengths and weaknesses of the 23 most important players in every squad.
Player Abilities: With every attribute detailed in an easy-to-read table, you can study each team to gain a better understanding of how each player can potentially perform on the pitch.
Special Abilities: As with basic player attributes, we detail each and every “special” ability that players possess.
Tricks: Certain players in PES6 can perform rare dribbling techniques and tricks, and these are highlighted here. Consult the Coaching Manual chapter for more information on each move.
TRICK ABBREVIATION PAGE
Drop Shoulder DS 52Both-Feet Feint BFF 52Inside-Outside Trick IO 52Cruyff Turn CT 5390-Degree Turn 90 53Special Curling Chip Shot CS 55Elastico EL 54
2
3
4
Ratings: Taking all relevant abilities and special abilities into account, this section rates each player in several key categories; see “PES6 Superstars” for a brief overview of each one. An arrow pointing upwards denotes world-class ability; an arrow facing downwards acts as a warning that a player is perhaps weak in that particular area of his game. Where no arrow is present, you can safely assume (with all categories bar Set Piece Specialist) that a player is at least reasonably competent, given his specific role in the squad.
Team Guide: This page offers tried-and-tested formations and strategies for each team, including a wide range of playing tips.
Strengths & Weaknesses: This section highlights some of the most important attributes and intrinsic foibles of each side, and offers insights on individual players, particular areas of the team (such as defence, midfield and attack), and the strengths or relative shortcomings of the squad as a whole.
Suggested Formation: The product of many weeks of careful testing; taking the strengths and weaknesses of each squad into account, we specify a “balanced” playing system for every team. Of course, selecting a formation in Pro Evo games is a highly subjective decision; if there are aspects of the formation that don’t work for you, by all means make adjustments to suit your playing style.
Alternative Formations: As discussed on page 73 of the Tactics & Strategies chapter, we strongly recommend that you consider creating alternative formations that can be assigned to Manual Strategy buttons. These “defensive” and “attacking” systems are designed to be used with the team selection specified in the main formation diagram. If you make personnel changes, it’s sensible to ensure that the selected players can adapt to the different roles that each of the three systems may require they play in.
Tactical Settings: Adjusting the Back Line and Offside Trap options (see page 77 of the Tactics & Strategies chapter) at the Formation Settings screen can make a big difference to how your team behaves. We specify the ideal settings for each formation.
5
6
7
8
9
10
2 3
4 5
6 7
8
9
10
MORE SAMPLE PAGES AVAILABLE AT WWW.PIGGYBACKINTERACTIVE.COM
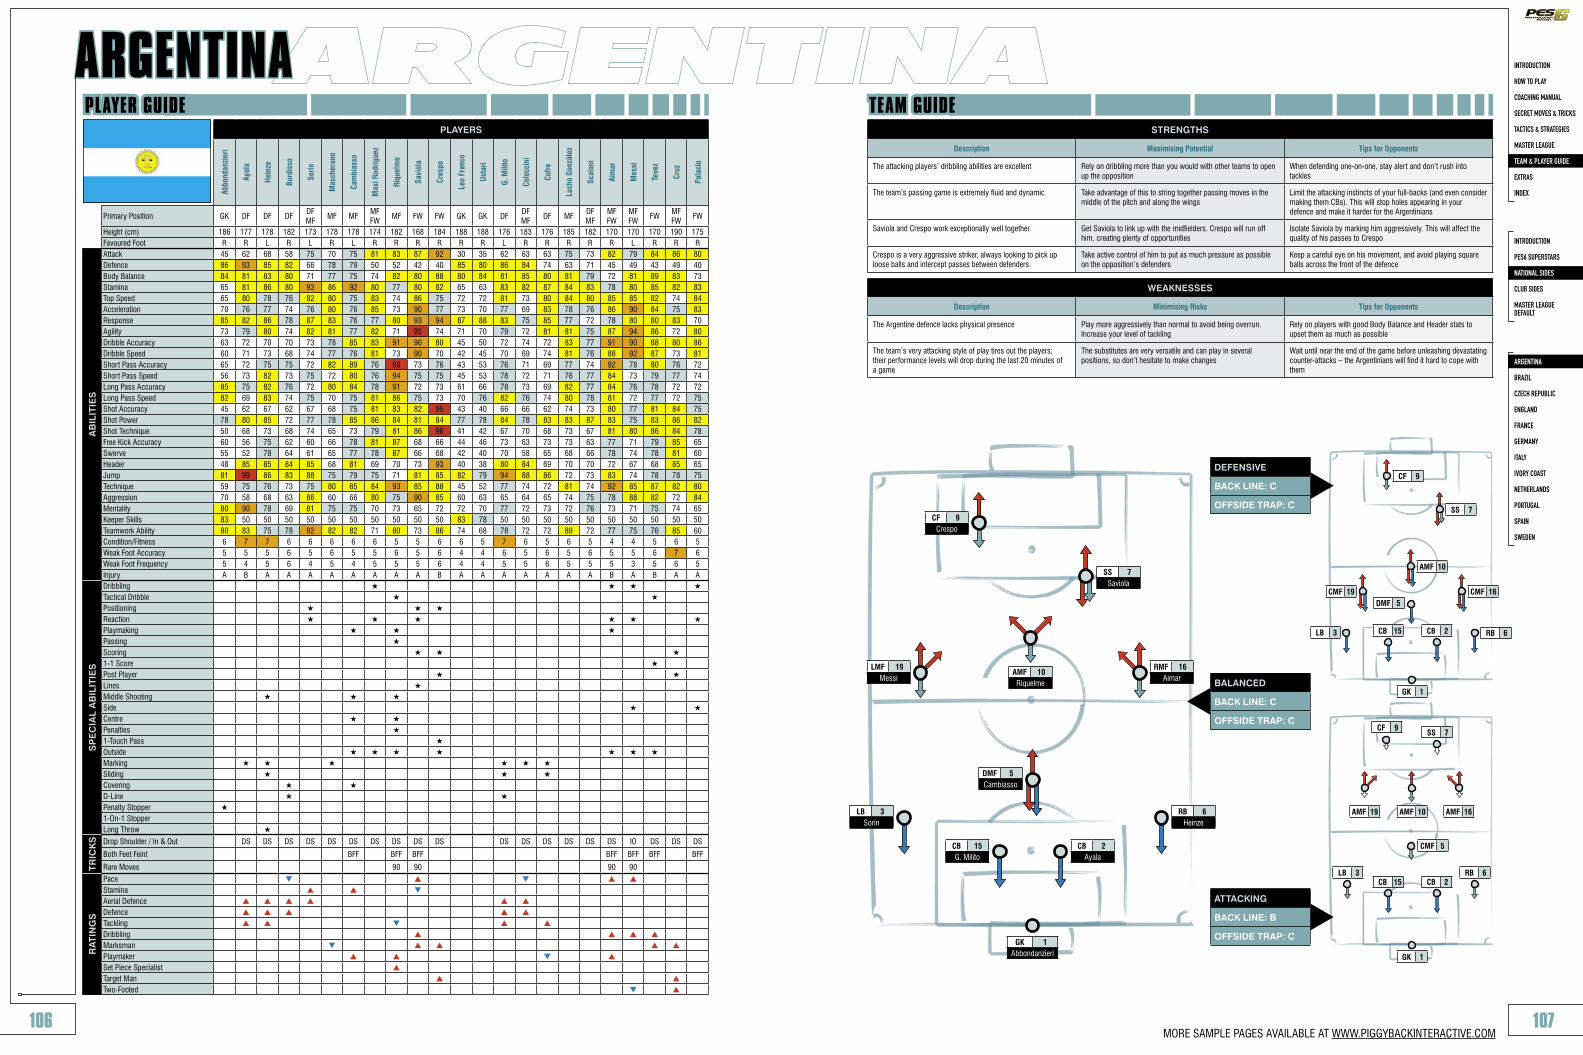
ARGENTINATEAM GUIDE
STRENGTHS
Description Maximising Potential Tips for Opponents
The attacking players’ dribbling abilities are excellent Rely on dribbling more than you would with other teams to open up the opposition
When defending one-on-one, stay alert and don’t rush into tackles
The team’s passing game is extremely fluid and dynamic Take advantage of this to string together passing moves in the middle of the pitch and along the wings
Limit the attacking instincts of your full-backs (and even consider making them CBs). This will stop holes appearing in your defence and make it harder for the Argentinians
Saviola and Crespo work exceptionally well together Get Saviola to link up with the midfielders. Crespo will run off him, creating plenty of opportunities
Isolate Saviola by marking him aggressively. This will affect the quality of his passes to Crespo
Crespo is a very aggressive striker, always looking to pick up loose balls and intercept passes between defenders
Take active control of him to put as much pressure as possible on the opposition’s defenders
Keep a careful eye on his movement, and avoid playing square balls across the front of the defence
WEAKNESSES
Description Minimising Risks Tips for Opponents
The Argentine defence lacks physical presence Play more aggressively than normal to avoid being overrun. Increase your level of tackling
Rely on players with good Body Balance and Header stats to upset them as much as possible
The team’s very attacking style of play tires out the players; their performance levels will drop during the last 20 minutes of a game
The substitutes are very versatile and can play in several positions, so don’t hesitate to make changes
Wait until near the end of the game before unleashing devastating counter-attacks – the Argentinians will find it hard to cope with them
PLAYER GUIDEPLAYERS
Abbo
ndan
zier
i
Ayal
a
Hein
ze
Burd
isso
Sorín
Mas
cher
ano
Cam
bias
so
Max
i Rod
rígue
z
Riqu
elm
e
Savi
ola
Cres
po
Leo
Fran
co
Usta
ri
G. M
ilito
Colo
ccin
i
Cufr
e
Luch
o Go
nzál
ez
Scal
oni
Aim
ar
Mes
si
Teve
z
Cruz
Pala
cio
Primary Position GK DF DF DFDF MF
MF MFMF FW
MF FW FW GK GK DFDF MF
DF MFDF MF
MF FW
MF FW
FWMF FW
FW
Height (cm) 186 177 178 182 173 178 178 174 182 168 184 188 188 176 183 176 185 182 170 170 170 190 175Favoured Foot R R L R L R L R R R R R R L R R R R R L R R R
AB
ILIT
IES
Attack 45 62 68 58 75 70 75 81 83 87 92 30 35 62 63 63 75 73 82 79 84 86 80Defence 86 93 85 82 66 78 79 50 52 42 40 85 80 86 84 74 63 71 45 49 43 49 40Body Balance 84 81 83 80 71 77 75 74 82 80 88 80 84 81 85 80 81 79 72 81 89 83 73Stamina 65 81 86 80 93 86 92 80 77 80 82 65 63 83 82 87 84 83 78 80 85 82 83Top Speed 65 80 78 76 82 80 75 83 74 86 75 72 72 81 73 80 84 80 85 85 82 74 84Acceleration 70 76 77 74 76 80 76 85 73 90 77 73 70 77 69 83 78 76 86 90 84 75 83Response 85 82 86 78 87 83 76 77 80 93 94 87 88 83 75 85 77 72 78 80 80 83 70Agility 73 79 80 74 82 81 77 82 71 95 74 71 70 79 72 81 81 75 87 94 86 72 80Dribble Accuracy 63 72 70 70 73 78 85 83 91 90 80 45 50 72 74 72 83 77 91 90 88 80 86Dribble Speed 60 71 73 68 74 77 76 81 73 90 70 42 45 70 69 74 81 76 88 92 87 73 81Short Pass Accuracy 65 72 75 75 72 82 89 76 98 73 76 43 53 76 71 69 77 74 92 78 80 76 72Short Pass Speed 56 73 82 73 75 72 80 76 94 75 75 45 53 78 72 71 76 77 84 73 79 77 74Long Pass Accuracy 85 75 82 76 72 80 84 78 91 72 73 61 66 78 73 69 82 77 84 76 78 72 72Long Pass Speed 82 69 83 74 75 70 75 81 86 75 73 70 76 82 76 74 80 78 81 72 77 72 75Shot Accuracy 45 62 67 62 67 68 75 81 83 82 95 43 40 66 66 62 74 73 80 77 81 84 75Shot Power 78 80 85 72 77 78 85 86 84 81 84 77 78 84 78 83 83 87 83 75 83 86 82Shot Technique 50 68 73 68 74 65 73 79 81 86 96 41 42 67 70 68 73 67 81 80 86 84 78Free Kick Accuracy 60 56 75 62 60 66 78 81 87 68 66 44 46 73 63 73 73 63 77 71 79 85 65Swerve 55 52 78 64 61 65 77 78 87 66 68 42 40 70 58 65 68 66 78 74 78 81 60Header 48 85 85 84 85 68 81 69 70 73 93 40 38 80 84 69 70 70 72 67 68 85 65Jump 81 99 86 83 88 75 79 75 71 81 85 82 79 94 88 86 72 73 83 74 78 78 75Technique 59 75 76 73 75 80 85 84 93 85 88 45 52 77 74 72 81 74 92 85 87 82 80Aggression 70 58 68 63 86 60 66 80 75 90 85 60 63 65 64 65 74 75 78 88 82 72 84Mentality 80 90 78 69 81 75 75 70 73 65 72 72 70 77 72 73 72 76 73 71 75 74 65Keeper Skills 83 50 50 50 50 50 50 50 50 50 50 83 78 50 50 50 50 50 50 50 50 50 50Teamwork Ability 80 83 75 78 92 82 82 71 80 73 86 74 68 78 72 72 89 72 77 75 76 85 60Condition/Fitness 6 7 7 6 6 6 6 6 5 5 6 6 5 7 6 5 6 5 4 4 5 6 5Weak Foot Accuracy 5 5 5 6 5 6 5 5 6 5 6 4 4 6 5 6 5 6 5 5 6 7 6Weak Foot Frequency 5 4 5 6 4 5 4 5 5 5 6 4 4 5 5 6 5 5 5 3 5 6 5Injury A B A A A A A A A A B A A A A A A A B A B A A
SP
EC
IAL
AB
ILIT
IES
DribblingTactical DribblePositioningReactionPlaymakingPassingScoring1-1 ScorePost PlayerLinesMiddle ShootingSideCentrePenalties1-Touch PassOutsideMarkingSlidingCoveringD-LinePenalty Stopper1-On-1 StopperLong Throw
TRIC
KS Drop Shoulder / In & Out DS DS DS DS DS DS DS DS DS DS DS DS DS DS DS DS IO DS DS DS
Both Feet Feint BFF BFF BFF BFF BFF BFF BFF
Rare Moves 90 90 90 90
RAT
ING
S
PaceStaminaAerial DefenceDefenceTacklingDribblingMarksmanPlaymakerSet Piece SpecialistTarget ManTwo-Footed
INTRODUCTION
HOW TO PLAY
COACHING MANUAL
SECRET MOVES & TRICKS
TACTICS & STRATEGIES
MASTER LEAGUE
TEAM & PLAYER GUIDE
EXTRAS
INDEX
INTRODUCTION
PES6 SUPERSTARS
NATIONAL SIDES
CLUB SIDES
MASTER LEAGUE DEFAULT
ARGENTINA
BRAZIL
CZECH REPUBLIC
ENGLAND
FRANCE
GERMANY
ITALY
IVORY COAST
NETHERLANDS
PORTUGAL
SPAIN
SWEDEN
106 107
BALANCED
BACK LINE: C
OFFSIDE TRAP: C
DEFENSIVE
BACK LINE: C
OFFSIDE TRAP: C
ATTACKING
BACK LINE: B
OFFSIDE TRAP: C
CF 9Crespo
SS 7Saviola
DMF 5Cambiasso
GK 1Abbondanzieri
CF 9
SS 7
RB 6LB 3
GK 1
DMF 5
CB 2
GK 1
LMF 19Messi
RMF 16Aimar
AMF 10Riquelme
LB 3Sorín
RB 6Heinze
CB 15G. Milito
CB 2Ayala
AMF 10
CMF 16CMF 19
CB 15
CB 2CB 15RB 6LB 3
CMF 5
AMF 10AMF 19 AMF 16
SS 7CF 9
MORE SAMPLE PAGES AVAILABLE AT WWW.PIGGYBACKINTERACTIVE.COM