Installation Wizard and User Manual - METZ Blue
28
Installation Wizard and User Manual for Android TVs
-
Upload
khangminh22 -
Category
Documents
-
view
0 -
download
0
Transcript of Installation Wizard and User Manual - METZ Blue

Installation Wizard andUser Manualfor Android TVs

The installation wizardThe installation wizard will appear the first time you switch on theAndroid TV. This installation wizard will guide you through the menuduring the initial installation of the TV.
Start installation wizard1. Press the button and switch on the TV.
2. Use the cursor buttons pq to select the desired language andpress the button.
3. If you want to connect your smartphone to the Android TV, press the button to confirm ‘Yes’.If you do not want to connect your smartphone to the TV, use thecursor button q to select ‘Skip’ and press the button.This will cause some Google services not to be available. If youselect ‘Skip’, continue as described in step 12.
4. Activate the Bluetooth feature on your smartphone.
5. Open the Google app on your smartphone.This will set up your Google account and your smartphone’s Wi-Fi access.
6. Confirm ‘NEXT’ by pressing the button on the TV remotecontrol.
7. In the search box on your smartphone, enter the text ‘Set up mydevice’ or say ‘Okay Google, set up my device’. The menu for thefirst steps will appear. The Bluetooth function is activated on thesmartphone if it is not already switched on. Steps 7 to 11 offer anoutline rather that a detailed description, as the exact processwill vary depending on your smartphone.Follow the instructions on your smartphone.
7.1 Touch the ‘NEXT’ button.
7.2 Select the device which has the same name code as shown onthe TV screen.
8. A code will automatically be generated.
9. Touch the button with the displayed code.
OK
OK
OK
OK
Welcome English
Čeština
Dansk
Francais
Eesti
Deutsch
Set your TV with an An-droid phone or tablet?You can easily fansfer account and network details from a compstibleAndroid device with a few simple clicks.
Skip
Yes
Set your TV with Android
NEXT>< BACK
1. Open the app labeled „Google“ onyour phone.The Google app comes pre-installed onyour Android phone. You can find it in yourphone’s list of apps.Google
Set your TV with Android
CANCEL
2. In the search box, type „set up my device“, orjust say „Ok Google, set up my device“.
3. Tap globe (_ _ _) on the list, and followthe instructions.
NEXT
Set up TV with AndroidVerify code on your device.
EQZHR
Device connectedContinue setup on the other device
First stepsSetting up your other device turns onyour smartphone's Bluetooth module(if it's not already on)
Select a device

10. Select the account on your smartphone.
11. Touch the ‘COPY’ button.
If the TV is set up with Android, continue as described in step 15.
12. Select Wi-Fi.12.1 Use the cursor buttons pq to select the desired Wi-Fi
connection and press the button.12.2 Enter the password using the keyboard displayed. Use the
cursor buttons tupq to select the desired character andconfirm your selection with the . When the password is entered, select the button on theon-screen keyboard and press the button. The Wi-Fi connection will be made.
13. ‘Get the most out of your TV’If you press the button to confirm ‘Sign in’, new apps,recommendations, movies and much more will be providedfrom Google.Later in the menu, you will have to select between ‘Phone orcomputer’ or ‘Use remote control’. Press the button toconfirm your selection.If you press the button to ‘Skip’, proceed with the terms ofuse, see 15.
14. Google loginEnter your email address or smartphone phone number usingthe keyboard that appears. Use the cursor buttonstupq to select the desired characterand confirm your selection with the button. Once you have entered it, press the button on the on-screen keyboard and press the button. The connection willbe made. Re-enter the password for security reasons.
15. You must agree to the terms of use. Use the cursor buttons pqto select the menu line ‘Accept’ and press the button toconfirm.
16. You can select whether or not to share your location withGoogle to improve your experience". Use the cursor buttonscursor buttons pq to select the corresponding menu line andpress the button.
17. You can select whether or not to allow Google to help improveyour device's performance. Use the cursor buttons cursorbuttons pq to select the corresponding menu line and pressthe button.
18. Use the cursor buttons cursor buttons pq select the desiredTV device name, e.g. ‘Android TV’, and press the button.You can also assign an individual name.
19. Use the cursor buttons pq to scroll though the software notes.Press the to agree.
20. The installation wizard will next attempt to pair with externalBluetooth devices. Switch the external devices to Bluetooth pairing mode. The remote control belonging to the TV must also be linked tothe TV via Bluetooth for voice input. Press the and t buttons on the remote control simulta-neously until the green LED flashes. The remote control is nowin pairing mode.
OK
OK®½
OK®
HOME
OK
OK
OK
OK
OK
OK
OK
OK
OK
OK
Select your WLAN network WLAN-Home
WLAN-2
WLAN-3
Make the most of your TVSign in to get new apps, recommendations, movies, the Assitant,and more freom Google
Sign in
Skip
Make the most of your TVSign in to get new apps, recommendations, movies, the Assitant,and more freom Google
Use your phone or computer
Use your remote
Terms of ServiceBy continuing, your agree to the Goohle Terms of Service, the GooglePrivacy Policy, and the Google Play terms of Service.The device may also receive ans install updates and apps from Google,your device’s manufacturer, or your operator. Some of these apps mayoffer optional in-app purchases. You can remove or adjust their permissi-ons at any time from the device settings.
Accept
View Google Terms of Service
View Google Privacy Policy
View Google Play term of Service
LocationLet Google use your device’s location to improve your experience. Certain appli-cation or platform capabilities, such as streaming local content or live program-ming, may require your device’s location to function correctly. You may choosewhether to share this information with a third party app at the moment that app isinstalled or run. You can adjust these permissions at time from settings.
Yes
No
Help improve Android performanceHelp improve Andriod performance by automatically sending diagnostic infor-mation, like crash reports and device and apps usage data to Google. This in-formation won’t be used to identify you. Learn more at: g.co/AndroidUsagehelp.
Yes
No
GoogleregistrationSign in with Google Account
COPY
Select account Copy to another device ?Copy my Google Accounts and, ifavailable, restore my Google Drivebackup
Max MustermannMax [email protected]

20.1 The screen will display the ‘TV BLE Remote’ logo for theremote control.
20.2 Use the cursor buttonu to select the ‘TV BLE Remote’ logoand press the button. The remote control is now in Bluetooth pairing mode. The TV and the remote control will bepaired.When the remote control is paired, a message will appear onthe screen. Press the button to agree. Other additionalcomponents such as Bluetooth headphones can also beconnected
20.3 To exit the Bluetooth search mode, use the cursor buttonstu to select the menu item ‘Skip’ and press the button.This will close the Bluetooth search mode.
21. To operate the Android TV at home, press the button toconfirm the selection ‘Home’. The ‘Store’ setting is reserved for presentation use by dealers.
22. Use the cursor buttons pq to select your country and pressthe button.
23. With the ‘LCN switch’, your local provider offers sorting accor-ding to location or country. If your local provider offers channel sorting, the ‘LCN switch’(logical channel numbering) feature must be set to ‘on’ beforesearching. Use the cursor buttons pq to select the desiredsetting and press the .
24. Use the cursor buttonspq to select your reception mode andpress the button. For ‘satellite’ reception mode, proceedas described in step 26..
24.1 For ‘cable’ or ‘Terrestrial’ reception mode, use the cursorbuttons pq to select ‘All’, ‘Free’ or ‘Encrypted’ and press the
button.
24.2 Press the button to confirm the menu item ‘Scan’.
24.3 For "Cable" reception mode in Germany, Switzerland or Austria,press cursor buttons pq to select the "Tuning Type" :Network,Standard, Full or UPC, which vary depending on different coun-tries. If you select Network, Standard or UPC, you also need tosetup Frequency, Modulation, Symbol and Network ID.
25. Press the button to start scan mode.
OK
OK
OK
OK
OK
OK
OK
OK
OK
OK
Choose Home or StoreMode?
Home
Store
CountryPlease select your country:
Germany
Algeria
France
LCN SwitchAre there Icn numbers in the channel list?
Off
On
Channel ScanFirst, please connect antenna.Start channel scan now?If you skip the step, the channel scan could beperformed in Menu.
Scan
Skip Scan
TV SourcePlease select the TV source:
Analog TV
Terrestrial
Cable
Satellite
Pairing
Return
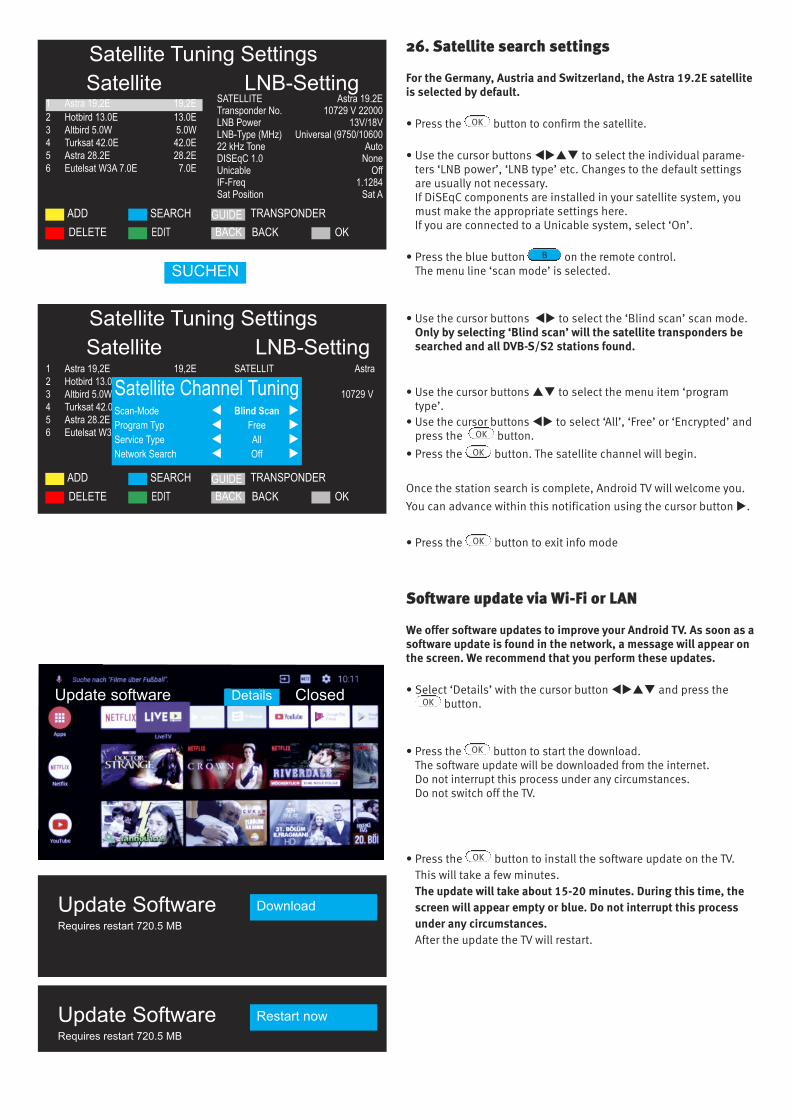
26. Satellite search settings
For the Germany, Austria and Switzerland, the Astra 19.2E satelliteis selected by default.
• Press the button to confirm the satellite.
• Use the cursor buttons tupq to select the individual parame-ters ‘LNB power’, ‘LNB type’ etc. Changes to the default settingsare usually not necessary. If DiSEqC components are installed in your satellite system, youmust make the appropriate settings here. If you are connected to a Unicable system, select ‘On’.
• Press the blue button on the remote control.The menu line ‘scan mode’ is selected.
• Use the cursor buttons tu to select the ‘Blind scan’ scan mode.Only by selecting ‘Blind scan’ will the satellite transponders besearched and all DVB-S/S2 stations found.
• Use the cursor buttonspq to select the menu item ‘programtype’.
• Use the cursor buttonstu to select ‘All’, ‘Free’ or ‘Encrypted’ andpress the button.
• Press the button. The satellite channel will begin.
Once the station search is complete, Android TV will welcome you.
You can advance within this notification using the cursor button u.
• Press the button to exit info mode
Software update via Wi-Fi or LAN
We offer software updates to improve your Android TV. As soon as asoftware update is found in the network, a message will appear onthe screen. We recommend that you perform these updates.
• Select ‘Details’ with the cursor button tupq and press thebutton.
• Press the button to start the download.The software update will be downloaded from the internet.Do not interrupt this process under any circumstances.Do not switch off the TV.
• Press the button to install the software update on the TV.This will take a few minutes.The update will take about 15-20 minutes. During this time, thescreen will appear empty or blue. Do not interrupt this processunder any circumstances.After the update the TV will restart.
OK
B
OK
OK
OK
OK
OK
OK
Satellite1 Astra 19,2E 19,2E2 Hotbird 13.0E 13.0E3 Altbird 5.0W 5.0W4 Turksat 42.0E 42.0E5 Astra 28.2E 28.2E6 Eutelsat W3A 7.0E 7.0E
LNB-SettingSATELLITE Astra 19.2ETransponder No. 10729 V 22000LNB Power 13V/18VLNB-Type (MHz) Universal (9750/1060022 kHz Tone AutoDISEqC 1.0 NoneUnicable OffIF-Freq 1.1284Sat Position Sat A
ADDDELETE
Satellite Tuning Settings
SEARCHEDIT
TRANSPONDERBACK OK
GUIDEBACK
Satellite1 Astra 19,2E 19,2E2 Hotbird 13.0E 13.0E3 Altbird 5.0W 5.0W4 Turksat 42.0E 42.0E5 Astra 28.2E 28.2E6 Eutelsat W3A 7.0E 7.0E
LNB-SettingSATELLIT Astra19.2ETransponder Nr. 10729 V22000LNB-Leistung13V/18V22 kHz TonAutom.
ADDDELETE
Satellite Tuning Settings
SEARCHEDIT
TRANSPONDERBACK OK
GUIDEBACK
1 Astra 19,2E 19,2E
SUCHEN
Satellite Channel TuningScan-Mode t Blind Scan uProgram Typ t Free uService Type t All uNetwork Search t Off u
Update software Details ClosedDetails
Update SoftwareRequires restart 720.5 MB
Download
Update SoftwareRequires restart 720.5 MB
Restart now
6
Dear Customer,thank you very much for choosing a Metz product.
We have created menu navigation in this TV set that provides youwith an easy- to-understand user interface.
You can access the help menu during all modes of operation inorder to make adjustments to your settings.
But before switching on for the first time, you should at any rateread chapters 1 to 5 of the user's guide.
In the box• TV set
• Remote control + two AAA batteries
• Power cord
• Operating instructions
• Datasheet
• Energylabel
• Energy data sheet
• Unit base
This user guide is for Android TV devices.
Explanation
Hint, note
Beware of health risks!
"Metz Consumer Electronics GmbH hereby declares that all the TVsets listed on the attached data sheet comply with the basicrequirements and other relevant regulations of Guide-line2014/53/EU “.
Web address where you can find the declarations of conformity:www.metzblue.com/Support/Downloads.
This product contains free software distributed under the GNUGeneral Public License (GPL) and/or the GNU Lesser GeneralPublic License (LGPL). You may redistribute and / or publish itunder the terms of the GNU General Public License and/or theGNU Lesser General Public License, as published by the Free Soft-ware Foundation, either according to version 2 of the license, or(depending on your option) any later version.
This programme is distributed in the hope that it will be useful,but WITHOUT ANY WARRANTY, especially without the impliedwarranty of MERCHANTABILITY or FITNESS FOR A PARTICULARPURPOSE. Details can be found in the GNU General Public License(GPL) and the GNU Lesser General Public License (LGPL).You can obtain the software from the Metz Consumer ElectronicsGmbH customer service ([email protected] or by writing toOhmstraße 55, D-90513 Zirndorf, Germany). You can downloadthe GNU General Public License (GPL) and the GNU Lesser GeneralPublic License (LGPL) from http://www.gnu.org/licenses/.
+
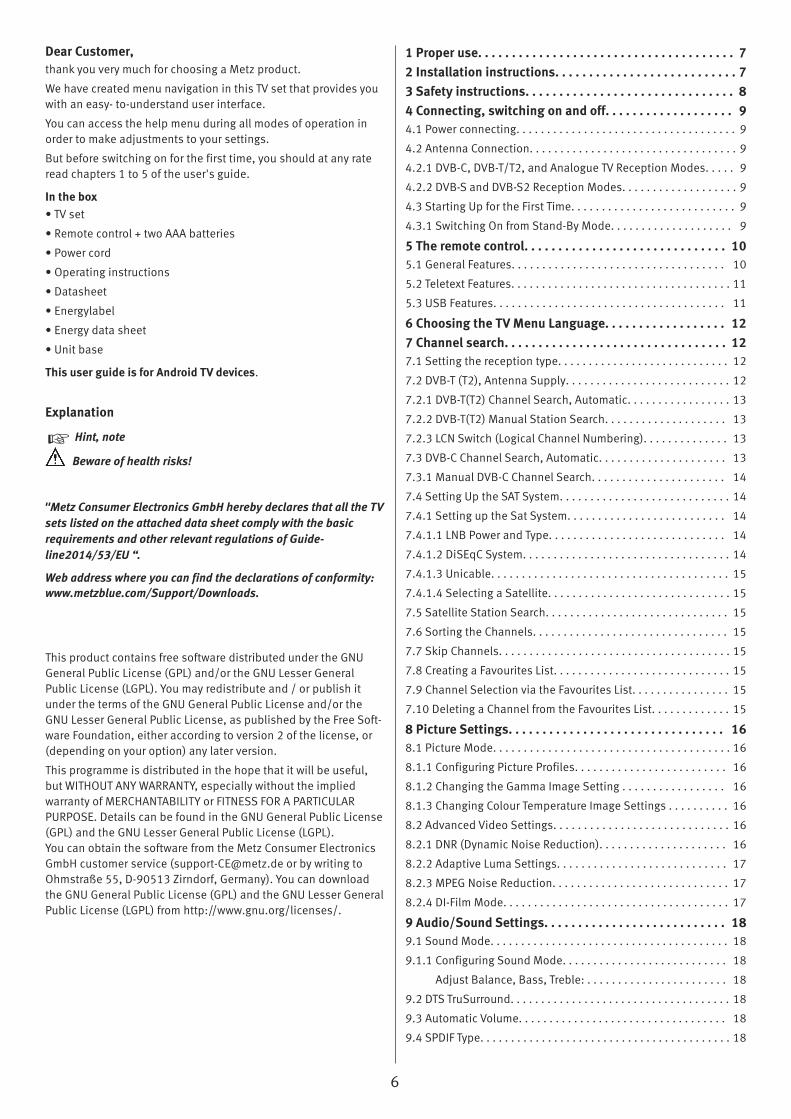
1 Proper use. . . . . . . . . . . . . . . . . . . . . . . . . . . . . . . . . . . . . . 72 Installation instructions. . . . . . . . . . . . . . . . . . . . . . . . . . . 73 Safety instructions. . . . . . . . . . . . . . . . . . . . . . . . . . . . . . . 84 Connecting, switching on and off. . . . . . . . . . . . . . . . . . . 94.1 Power connecting. . . . . . . . . . . . . . . . . . . . . . . . . . . . . . . . . . . . 9
4.2 Antenna Connection. . . . . . . . . . . . . . . . . . . . . . . . . . . . . . . . . . 9
4.2.1 DVB-C, DVB-T/T2, and Analogue TV Reception Modes. . . . . 9
4.2.2 DVB-S and DVB-S2 Reception Modes. . . . . . . . . . . . . . . . . . . 9
4.3 Starting Up for the First Time. . . . . . . . . . . . . . . . . . . . . . . . . . . 9
4.3.1 Switching On from Stand-By Mode. . . . . . . . . . . . . . . . . . . . 9
5 The remote control. . . . . . . . . . . . . . . . . . . . . . . . . . . . . . 105.1 General Features. . . . . . . . . . . . . . . . . . . . . . . . . . . . . . . . . . . 10
5.2 Teletext Features. . . . . . . . . . . . . . . . . . . . . . . . . . . . . . . . . . . . 11
5.3 USB Features. . . . . . . . . . . . . . . . . . . . . . . . . . . . . . . . . . . . . . 11
6 Choosing the TV Menu Language. . . . . . . . . . . . . . . . . . 127 Channel search. . . . . . . . . . . . . . . . . . . . . . . . . . . . . . . . . 127.1 Setting the reception type. . . . . . . . . . . . . . . . . . . . . . . . . . . . 12
7.2 DVB-T (T2), Antenna Supply. . . . . . . . . . . . . . . . . . . . . . . . . . . 12
7.2.1 DVB-T(T2) Channel Search, Automatic. . . . . . . . . . . . . . . . . 13
7.2.2 DVB-T(T2) Manual Station Search. . . . . . . . . . . . . . . . . . . . 13
7.2.3 LCN Switch (Logical Channel Numbering). . . . . . . . . . . . . . 13
7.3 DVB-C Channel Search, Automatic. . . . . . . . . . . . . . . . . . . . . 13
7.3.1 Manual DVB-C Channel Search. . . . . . . . . . . . . . . . . . . . . . 14
7.4 Setting Up the SAT System. . . . . . . . . . . . . . . . . . . . . . . . . . . . 14
7.4.1 Setting up the Sat System. . . . . . . . . . . . . . . . . . . . . . . . . . 14
7.4.1.1 LNB Power and Type. . . . . . . . . . . . . . . . . . . . . . . . . . . . . 14
7.4.1.2 DiSEqC System. . . . . . . . . . . . . . . . . . . . . . . . . . . . . . . . . . 14
7.4.1.3 Unicable. . . . . . . . . . . . . . . . . . . . . . . . . . . . . . . . . . . . . . . 15
7.4.1.4 Selecting a Satellite. . . . . . . . . . . . . . . . . . . . . . . . . . . . . . 15
7.5 Satellite Station Search. . . . . . . . . . . . . . . . . . . . . . . . . . . . . . 15
7.6 Sorting the Channels. . . . . . . . . . . . . . . . . . . . . . . . . . . . . . . . 15
7.7 Skip Channels. . . . . . . . . . . . . . . . . . . . . . . . . . . . . . . . . . . . . . 15
7.8 Creating a Favourites List. . . . . . . . . . . . . . . . . . . . . . . . . . . . . 15
7.9 Channel Selection via the Favourites List. . . . . . . . . . . . . . . . 15
7.10 Deleting a Channel from the Favourites List. . . . . . . . . . . . . 15
8 Picture Settings. . . . . . . . . . . . . . . . . . . . . . . . . . . . . . . . 168.1 Picture Mode. . . . . . . . . . . . . . . . . . . . . . . . . . . . . . . . . . . . . . . 16
8.1.1 Configuring Picture Profiles. . . . . . . . . . . . . . . . . . . . . . . . . 16
8.1.2 Changing the Gamma Image Setting . . . . . . . . . . . . . . . . . 16
8.1.3 Changing Colour Temperature Image Settings . . . . . . . . . . 16
8.2 Advanced Video Settings. . . . . . . . . . . . . . . . . . . . . . . . . . . . . 16
8.2.1 DNR (Dynamic Noise Reduction). . . . . . . . . . . . . . . . . . . . . 16
8.2.2 Adaptive Luma Settings. . . . . . . . . . . . . . . . . . . . . . . . . . . . 17
8.2.3 MPEG Noise Reduction. . . . . . . . . . . . . . . . . . . . . . . . . . . . . 17
8.2.4 DI-Film Mode. . . . . . . . . . . . . . . . . . . . . . . . . . . . . . . . . . . . . 17
9 Audio/Sound Settings. . . . . . . . . . . . . . . . . . . . . . . . . . . 189.1 Sound Mode. . . . . . . . . . . . . . . . . . . . . . . . . . . . . . . . . . . . . . . 18
9.1.1 Configuring Sound Mode. . . . . . . . . . . . . . . . . . . . . . . . . . . 18
Adjust Balance, Bass, Treble: . . . . . . . . . . . . . . . . . . . . . . . 18
9.2 DTS TruSurround. . . . . . . . . . . . . . . . . . . . . . . . . . . . . . . . . . . . 18
9.3 Automatic Volume. . . . . . . . . . . . . . . . . . . . . . . . . . . . . . . . . . 18
9.4 SPDIF Type. . . . . . . . . . . . . . . . . . . . . . . . . . . . . . . . . . . . . . . . . 18

7
9.4.1 SPDIF Verzögerung. . . . . . . . . . . . . . . . . . . . . . . . . . . . . . . . 18
10 TV Settings. . . . . . . . . . . . . . . . . . . . . . . . . . . . . . . . . . . 1910.1 Fast Startup. . . . . . . . . . . . . . . . . . . . . . . . . . . . . . . . . . . . . . 19
10.2 Auto-Standby. . . . . . . . . . . . . . . . . . . . . . . . . . . . . . . . . . . . . 19
10.3 Screen Mode. . . . . . . . . . . . . . . . . . . . . . . . . . . . . . . . . . . . . 19
10.4 Subtitels. . . . . . . . . . . . . . . . . . . . . . . . . . . . . . . . . . . . . . . . . 19
10.4.1 Selecting the Subtitle Language. . . . . . . . . . . . . . . . . . . . 19
10.4.2 Setting Subtitles for the Hearing Impaired. . . . . . . . . . . . 19
10.5 Sleep Timer. . . . . . . . . . . . . . . . . . . . . . . . . . . . . . . . . . . . . . . 20
11 TV Guide. . . . . . . . . . . . . . . . . . . . . . . . . . . . . . . . . . . . . 2011.1 Broadcast Reminders. . . . . . . . . . . . . . . . . . . . . . . . . . . . . . . 20
11.2 Recording Broadcasts. . . . . . . . . . . . . . . . . . . . . . . . . . . . . . 20
12 Android on the Smart TV. . . . . . . . . . . . . . . . . . . . . . . . 2112.1 Apps. . . . . . . . . . . . . . . . . . . . . . . . . . . . . . . . . . . . . . . . . . . . 21
12.1.1 Angebotene Apps downloaden und installieren. . . . . . . . 21
12.1.2 Download and install apps through Google Play Store. . 21
12.2 Setting the Remote Control for Voice Input. . . . . . . . . . . . . 21
12.3 YouTube. . . . . . . . . . . . . . . . . . . . . . . . . . . . . . . . . . . . . . . . . 21
12.3.1 YouTube Search, Handwriting Recognition. . . . . . . . . . . . 21
12.3.2 Search on YouTube, Speech Input. . . . . . . . . . . . . . . . . . . 21
12.4 Google Account. . . . . . . . . . . . . . . . . . . . . . . . . . . . . . . . . . . 21
12.4.1 Google Play. . . . . . . . . . . . . . . . . . . . . . . . . . . . . . . . . . . . . 21
12.5 Hide Apps and Return to TV Programme. . . . . . . . . . . . . . . 21
13 Connecting External Devices via Bluetooth. . . . . . . . . 2214 DVB-Radio. . . . . . . . . . . . . . . . . . . . . . . . . . . . . . . . . . . . 2215 Teletext. . . . . . . . . . . . . . . . . . . . . . . . . . . . . . . . . . . . . . 2215.1 Basic Teletext Functions. . . . . . . . . . . . . . . . . . . . . . . . . . . . 22
15.1.1 Selecting a Specific Teletext Page. . . . . . . . . . . . . . . . . . . 22
15.2 Answer Sharing or Puzzle Solving. . . . . . . . . . . . . . . . . . . . . 22
15.3 Display Teletext Transparently . . . . . . . . . . . . . . . . . . . . . . . 22
15.4 Exit Teletext . . . . . . . . . . . . . . . . . . . . . . . . . . . . . . . . . . . . . . 22
16 Parental Controls. . . . . . . . . . . . . . . . . . . . . . . . . . . . . . 2317 HbbTV. . . . . . . . . . . . . . . . . . . . . . . . . . . . . . . . . . . . . . . 2318 Digital/USB Recording to Hard Disk. . . . . . . . . . . . . . 2418.1 Notes on Using Hard Disks. . . . . . . . . . . . . . . . . . . . . . . . . . 24
18.2 Activating Your TV for USB Recording. . . . . . . . . . . . . . . . . . 24
18.2.1 Activation. . . . . . . . . . . . . . . . . . . . . . . . . . . . . . . . . . . . . . 24
18.3 Format an External USB Drive. . . . . . . . . . . . . . . . . . . . . . . . 25
18.3.1 External Hard Disk. . . . . . . . . . . . . . . . . . . . . . . . . . . . . . . 25
18.4 Start/Stop Timeshift. . . . . . . . . . . . . . . . . . . . . . . . . . . . . . . 25
18.5 Instant Recording. . . . . . . . . . . . . . . . . . . . . . . . . . . . . . . . . . 25
18.6 Timer Recording. . . . . . . . . . . . . . . . . . . . . . . . . . . . . . . . . . . 25
18.7 Media (Playing Recordings). . . . . . . . . . . . . . . . . . . . . . . . . . 25
19 AV Devices. . . . . . . . . . . . . . . . . . . . . . . . . . . . . . . . . . . . 2619.1 Connecting Devices. . . . . . . . . . . . . . . . . . . . . . . . . . . . . . . . 26
19.2 Selecting Signal Source (AV Devices). . . . . . . . . . . . . . . . . . 26
20 Cleaning the device. . . . . . . . . . . . . . . . . . . . . . . . . . . . 2621 Special Instructions for OLED TV Sets. . . . . . . . . . . . . 2722 Resetting the TV to Factory Settings and Restarting
the Configuration Wizard. . . . . . . . . . . . . . . . . . . . . . . 27
1 Proper useThis TV set is exclusively designed for the reception and playbackof picture and sound signals.
The TV set is designed for dry rooms (living rooms and offices).
The room climate should be in a range from +5°C to +35°C with amaximum of 75% air humidity.
The TV set may not be used in rooms with higher air humidity (e.g. bathroom, sauna, etc.).
The TV set must not be used in rooms with a high concentration ofdust (e.g. a workshop).
If, as an exception, you operate the TV set outdoors, then pleasemake sure it is protected against moisture (rain, water spray,dew).
2 Installation instructions• Make sure no bright light or sunshine falls on the screen. This
can lead to reflections that impair the brilliance of the picture.
• The most favourable viewing distance is three times the screendiagonal, in sets with- 43” screen approx 3,3 m - 49/50” screen approx 3,7 m- 55” screen approx 4,2 m - 58” screen approx 4,4 m- 65” screen approx 5,0 mThis distance can also be reduced by one half for HDTV.
• Antenna connecting cables and other components between thepermanently installed antenna-/broadband plug and the radioreceiver (e.g. TV set, video recorder) must comply with the Eurostandard EN 60966-2-4.
• To connect the antenna and HDMI, you should use cables withgood quality HF shielding to ensure effective contact with theconnection ports. Shielding of > 85 dB is required for theantenna connection cable.
• If unauthorised cables and components are used, the operatingpermit of the radio receiver lapses.
• Use only Metz device stands to set up the TV set on a horizontal,non-slip surface.
• The TV set must not protrude beyond the edge of the footprint.
• Heavy smoking in the vicinity of the TV set can lead to nicotineand soot deposits behind the front panel glass and as a result toan impairment of the picture quality. Such deposits can only be removed by an expert. In extreme cases this can lead to permanent damage of the panel, making replacement of thepanel necessary. Cleaning or replacement of the panel is notcovered by the guarantee.
If you want to mount the TV on the wall, we recommend usinga Metz wall mount. If you decide a commercial wall mount solution, we ask to be noted that the connection must beexecuted properly. Due to the device the use of a Metzadapter plate may be required. The wall mount should only beperformed by qualified persons. When using a third-party-solution we wish to emphasize that we have to excludewarranty, if the unit should be damaged caused by Installingthe Wall Mount.
The TV set should not be mounted on the ceiling.
To prevent injuries, the TV set must be fastened safely to thefloor / wall in accordance with the installation instructions.

8
Do not place the TV set on high furniture without anchoringboth the furniture and the TV set to suitable support.
No other materials (e.g. table cloths etc.) may be placedbetween the TV set and the furniture.
To prevent injuries, the TV set must be fastened safely to thefloor/wall in accordance with the installation instructions.
Educate children about the dangers of climbing furniture to reachthe TV and its controls.
In some unfortunate cases, direct sunlight can cause the heatgenerated on the rear panel of the device to rise to tempera-tures that can cause damage.
3 Safety instructionsYour set is designed for operation in dry rooms. If, as an exception, you operate the TV set outdoors, then please makesure that it is protected against moisture (rain, water spray,dew).
Do not expose TV set to dripping or splashes (e.g. rain)!
Unplug electrical equipment before cleaning!
Do not hold the remote control directly in front of your eyesand press a key! Infrared light!
The TV set may only be run with a power voltage of 100-240V~ 50/60Hz.
For maintenance and repair work the mains plug or the deviceplug-and-socket of the power cable of the TV set – in themeaning of the applicable standard – are to be regarded asthe means for disconnection from the mains and kept inworking order.
Candles and other open flames must be kept away from thisproduct at all times to prevent fire spreading.
The unit may only be opened and repaired by a qualified specialist. RISK OF FATAL INJURIES !Please contact your authorised dealer if any repairs are necessary.
Bluetooth® devices work with shortwave radio signals. Thesecan interfere with other electronic or medical devices incertain cases.
Radio waves can interfere with pacemakers and other medicaldevices. Maintain a distance of at least 20 cm!
Never use cleaning solution on the screen surface! If anycleaning solution penetrates beneath the screen’s lowerframe, it will result in irreparable damage to the components!
The remote control comes with two LR03/AM4/AAA 1.5VMicro batteries. If a battery is swallowed, it can cause seriousand potentially lethal internal injuries within 2 hours. If yoususpect that batteries may have been swallowed or got intoany part of the body, seek medical attention immediately.Keep new and used batteries away from children.
• No rechargeable batteries may be inserted in the battery compartment of the remote control. Only two LR03/AM4/AAA 1.5 V micro batteries may be used.
• A cold device may only be turned on in a cold room once any condensation on the screen has evaporated.
• TV sets require adequate cooling. The openings at the back maynot be covered by curtains, etc. The ventilation slits on the bottom of the set must remain freelyaccessible, since this is how the device draws in cool air.
• Make sure there is an adequate cooling air flow if you put yourdevice into a built-in cabinet.
• Do not set up/suspend your device directly next to or above aheater; this could impair the device cooling.
• No burning candles or vessels with liquid may be placed on orabove the TV set.Hot wax and liquids that get into the interior of the devicedestroy the electric components of your TV set. In these cases the electrical safety of the device can no longerbe guaranteed.
• Thunder storms are a danger for electrical devices. If lightninghits the power cable or antenna, the device can be damaged,even if it is switched off. Before thunder storms disconnect themains plug and antenna plug from the socket or the TV set.
• This TV set is exclusively designed for the reception and play-back of picture and sound signals.
• Do not display still pictures, logos, 4:3 formats with margins, etc for a long period. There is a risk that these still pictures couldlead to markings on the screen.
• Soot and dust deposits can accumulate behind the front panelglass of the TV set without a visible source of soot being present. These soot and dust deposits are also known as “fogging” or “magic dust”. There are scattered instances of thisphenomenon, but especially during the warm-up period andafter renovation work or in new constructions. Various factorsare mentioned as the cause, see too the reports on the Internet.In such cases cleaning or replacement of the panel is excludedfrom the guarantee, since it does not involve a set defect, butrather an external influence.
• The screen surface should only be cleaned with a soft, drycleaning cloth (e.g. microfibre cloth).
• To remove stubborn dirt or smears, it is possible to clean thescreen with a slightly damp, soft cloth. Also see Chap. 20.

9
4 Connecting, switching on and off4.1 Power connectingConnect the TV set to the wall socket with the accompanyingpower cord.
4.2 Antenna ConnectionConnect the TV to the antenna box with an antenna cable.
4.2.1 DVB-C, DVB-T/T2, and Analogue TV Reception ModesThe settings instructions for the DVB-T antenna are in Chapter 7.2.
4.2.2 DVB-S and DVB-S2 Reception ModesWhen using a standard satellite system with an antenna feederline, and when using a single-cable or Unicable satellite system.
The settings instructions for the satellite antenna are in Chapter7.4.
4.3 Starting Up for the First TimeThe red stand-by indicator lights up.
4.3.1 Switching On from Stand-By ModeThe key is used to switch on the TV from stand-by mode atthe program slot or the status that was active before switching off.- the LED indicator lights up green.
When the TV set is switched on for the first time, the Instal-lation Wizard appears. It will guide you through the menuso that you can start using your system.
Switching Off with the Remote Control• Press the button on the remote control.
The TV will switch to stand-by mode and the LED display will lightup red.
+
DVB-C,DVB-T/T2
DVB-S/S2
HDMI2 HDMI3Audio inL RLAN
USB15V/500mA
USB25V/900mA
HDMI1
PCMCIA (CA-Modul)
Video in
The digital audio signal pro-vided can be transmitted forexternal processing with anoptical audio cable (“Tos-link” available in accessoriesshop).
Audio out digital
When connecting HDMI devices, high-quality cables with suitably effectiveshielding must be used.
AV connection panelfor TV series
G2A52B, Q3652A
AV connectionpanel for TV series
S9A62A
USB15V/500mA
USB25V/900mA
HDMI1
PCMCIA (CA-Modul)

10
5 The remote controlThe remote control conveys commands to the TV set via infraredlight. The remote control must always be directed at the TV set.Other infrared controlled devices or systems (e.g. infrared headphones) within its range could be destroyed.
Direct sunlight on the TV set may lead to disruptions, because theTV set is unable to recognise the infrared signals of the remotecontrol. To enable the TV set to be controlled by the remotecontrol, it cannot be switched off with the power switch.
No rechargeable batteries may be inserted in the battery com-partment of the remote control!Only two LR03/AM4/AAA 1.5 V micro batteries may be used.
The batteries that are used must not be exposed to excessiveheat such as sunshine, fire or the like!
5.1 General Features
Mute/stop sound
Voice input
Show selection of signal sources
Open the Menu
Cursor button
EXIT Leave the menu, close current feature
Google Play Open selection
INFO Open programme information
Programme + -
Stopp playback
Audio language Open selection
Enable/disable Audio Discription
Enter the channel number
On, return to the mode selectedwhen the device was switched off
OK Confirm selection in TV mode: Open Quick Button
Back Go one step back in the menuSwitch between the current channeland the previous channel
Open NETFLIX media library
Volume + -
EPG Open the electronic programme guide
Open Subtitles Language
Open favourites list
Open HbbTV
Voice input
Mute/stop sound
Select list of TV stations
Opens the Home/Selection page

11
5.2 Teletext Features
5.3 USB Features
Show hidden text
Scroll backwards through subpage
Teletext Press button repeatedlyto increase page size
Open Teletext
Open subpage (if available)
Transparent simultaneous operation
Open index page
Hide teletext page
Go to next page
Show next topic
Open subpage (if available)
Next chapter
Scroll teletext page forwards
Enter the teletext page number
Scroll teletext page backwards
Scroll subpage forwards
Start playback / Play Timeshift after rewind
Stop Timeshift/Playback
Fast Forward for Timeshift/Playback
Pause playback/Start Timeshift
Fast rewind for Timeshift/Playback

12
6 Choosing the TV Menu LanguageLanguage Selection in the MenuIn the Settings menu, you can set a language according to theselection offered. All menus and help guides (information) will beshown in the chosen language.
Set Language: • Press the button.
The selection will appear.
• Use the cursor keys pu to select Settings.
• Press the button.
• Use the cursor key q to select Language and press the button.
• Use the cursor keys pq to select the desired language.
• Press the button and confirm your selection.The language is set and the TV will restart.
OK
OK
OK
HOME
7 Channel search7.1 Setting the reception typeThis TV set is equipped for up to four different reception types:
Analog-TV:The broadcasting technology that has existed fordecades and which in the meantime can only bereceived via cable.
DVB-C:The digital broadcasting technology that can be receivedvia a cable connection. Ask your local cable provider.
DVB-T(T2):The digital broadcasting technology that can bereceived via the up to now customary house antenna orroom antenna (depending on reception conditions).Ask your local TV dealer about this, or find out more at„www.ueberallfernsehen.de/dvbt175.html“ or„www.dvb-t2hd.de”.
DVB-S(2):The digital broadcasting technology that can bereceived via a satellite. Ask your local TV dealer aboutthis, or find out more at „www.lyngsat.com/europe.html“
Set the reception type that you have set up.
Set the Reception Mode, e.g. DVB-C:• Press the button.
The port selection will be displayed.
• Use the cursor keys pq to select the desired reception modeand press the button .
7.2 DVB-T (T2), Antenna SupplySet the DVB-T/T2 (Terrestrial) Reception Mode, see Chapter 7.1.If an active antenna is used for the DVB-T/T2 reception, anantenna supply can be set.
On: Antenna supply is constantly switched on.
Off: Setting for passive antenna or joint antenna systems.
Set antenna supply:• Press the button.
The Picture Mode menu will be active.• Use the cursor key q to select More and press the button.
The Settings menu will open. The menu line for TV Settings willbe selected.
• Press the button and open the menu item.• Use the cursor keys pq to select the menu item 5V Antenna
Power and press the button .
• Use the cursor keys pq dto switch the function on or off andpress the button.The setting then becomes active.
SOURCE
OK
MENU
OK
OK
OK
OK

13
7.2.1 DVB-T(T2) Channel Search, Automatic
Set the DVB-T/T2 (Terrestrial) Reception Mode, See Chapter 7.1.The automatic channel search checks the reception area for TVand radio channels. The channels found are stored in a TV and aradio channel list.
If you are not satisfied with the order of the channels found, thechannels can still be moved or deleted. See Chapters 7.6, 7.7 and7.8.
If your local provider offers channel sorting, the LCN (logicalchannel numbering) feature must be set to On before searching.See Chapter 7.2.3.
Automatic search:• Press the button.
The Picture Mode menu will be active.• Use the cursor key q to select More and press the button.
The Settings menu will open. The menu line for TV Settings willbe selected.
• Press the button and open the menu item.
• Use the cursor keys pq to select Channels and press thebutton. The menu line "Program Type" is selected.
• Use the cursor keystu to select All, Free or Encrypted. The setting then becomes active.
• Use the cursor keys pq to select Tuning type.
• Use the cursor keys tu to select the Auto feature and press thebutton.
The setting then becomes active.
• Select the menu item SCAN with the cursor key q and press thebutton.
The channel search will begin.
Once your station search is complete, the programmes found areshown in a list of TV channels
7.2.2 DVB-T(T2) Manual Station Search
Select the DVB-T/T2 (Terrestrial) Reception Mode, see Chapter7.1.To search manually for stations, you need to know the channel ofthe programme you want to change settings for.
Manual Search:• Press the button.
The Picture Mode menu will be active.• Use the cursor key q to select More and press the button.
The Settings menu will open. The menu line for TV Settings willbe selected.
• Press the button and open the menu item.
• Use the cursor keys pq to select Channels and press thebutton.
• Use the cursor keys pq to select Tuning type.
• Use the cursor keys tu to select Manual and press thebutton. The setting then becomes active.
• Use the cursor key q to select RF Channel.
• Use the number keys or the cursor keys tu to enter theRF Channel.
• Select SCAN with the cursor key q and press the button.The channel search will begin.
Once your station search is complete, the programmes found areshown in a list of TV channels.
MENU
OK
OK
OK
OK
OK
OK
OK
OK
MENU
OK
OK
7.2.3 LCN Switch (Logical Channel Numbering)With the LCN feature, your local supplier makes it possible to sortvia location or country (ask your local supplier).
Set LCN Switch:• Press the button.
The Picture Mode menu will be active.• Use the cursor key q to select More and press the button.
The Settings menu will open. The menu line for TV Settings willbe selected.
• Press the button and open the menu item.• Use the cursor keys pq to select the LCN Switch menu item and
press the button.
• Select On with the cursor keys pq and press the button. The setting then becomes active.
The next time a channel search is performed, the provider’slogical sorting will be used.
7.3 DVB-C Channel Search, AutomaticSet the DVB-C (Cable) Reception Mode, see Chapter 7.1.The reception range is searched for TV channels and radio chan-nels in the automatic channel search. The programmes found arestored in a TV channel and radio station list. You can move ordelete stations that are found if you are not satisfied with theorder they are in (Chapter 11, Edit Favourites List).
Automatic Search:• Press the button.
The Picture Mode menu will be active.• Use the cursor key q to select More and press the button.
The Settings menu will open. The menu line for TV Settings willbe selected.
• Press the button and open the menu item.• Use the cursor keys pq to select Channels and press the
button. The menu line for Program Type will be selected.• Use the cursor keystu to select All, Free or Encrypted.
The setting then becomes active.
• Use the cursor keys pq to select Tuning type.
• Use the cursor keys tu to select the Full feature and press thebutton.
The setting then becomes active.
• Select SCAN with the cursor key q and press the button.The channel search will begin.
Once your station search is complete, the programmes found areshown in a list of TV channels.
MENU
OK
OK
OK
OK
MENU
OK
OK
OK
OK
OK

14
7.3.1 Manual DVB-C Channel SearchTo search manually for stations, you need to know the channel orthe frequency of the channel you want to change settings for.
Set the programme position you want to reset via the stationsearch.
Manual Search:• Press the button.
The Picture Mode menu will be active.• Use the cursor key q to select More and press the button.
The Settings menu will open. The menu line for TV Settings willbe selected.
• Press the button and open the menu item.
• Use the cursor keys pq to select Channels and press thebutton. The menu line for Programme Type will be selected.
• Use the cursor keystu to select All, Free or Encrypted. The setting then becomes active.
• Use the cursor keys q to select the Tuning type.
• Use the cursor keys tu to select Manual.
• Use the cursor key q to select the menu item Frequency andpress the button.
• Press the button and use the cursor keys tupq toselect the delete symbol Õ on the on-screen keyboard anddelete the displayed frequency by pressing the buttonseveral times.
• Enter the new frequency using the number buttons on theremote control and confirm with the tick 3 on the on-screenkeyboard.
• Select Modulation with the cursor button q.
• Use the cursor keys tu to select the desired setting from Auto.16 QAM, 32 QAM, 64 QAM, 128 QAM or 256 QAM.
• Select Symbol with the cursor button q.
• Use the cursor keys tu to select Enter and press thebutton.
• Press the button and use the cursor keys tupq toselect the delete symbol Õ on the on-screen keyboard anddelete the displayed value by pressing the button severaltimes.
• Enter the new frequency using the number buttons on theremote control and confirm with the tick 3 on the on-screenkeyboard.
• Select Scan with the cursor key q and press the button.
Once your station search is complete, the programmes found areshown in a list of TV channels.
MENU
OK
OK
OK
OK
OK
OK
OK
OK
OK
OK
7.4 Setting Up the SAT SystemSet the DVB-S/S2 (Satellite) Reception Mode, see Chapter 7.1.Before the satellite channel search, the TV set must be configuredfor the SAT antenna system.
7.4.1 Setting up the Sat System• Press the button.
The Picture Mode menu will be active.• Use the cursor key q to select More and press the button.
The Settings menu will open. The menu line for TV Settings willbe selected.
• Press the button and open the menu item.• Use the cursor keys pq to select Channels and press the
button.
The settings should be carried out in the following order:
LNB power,
LNB type,
DiSEqC system,
etc.
7.4.1.1 LNB Power and Type• Use the cursor keystupq to select the menu line LNB Power
and press the button.
• Use the cursor keys pq to select the desired setting.
The LNB supply voltages are permanently set for selection of thepolarisation (horizontal H = 18V, vertical V = 13V).
Normally, you do not need to change anything.
If the correct voltage supply of the LNB is no longer guaranteed asa result of a long antenna cable, the supply voltage can beincreased by 1V with the power compensation.
If changes are necessary, please take the following steps.
If the TV set is connected to a single-cable SAT system, theLNB power voltage must always be set to Off.
LNB-TypeThe LNB type is set to Universal by default.
Generally, no changes are required here.
7.4.1.2 DiSEqC System
With DiSEqC, digital management of the satellite system via theexisting antenna cable is possible and is a prerequisite for the re-ception of more than two satellites (e.g. Astra, Eutelsat, Hotbird).
Management of the satellite system without DiSEqC is no longerpossible with three satellites or more (e.g. ASTRA 19.2°, Eutelsat16°, Hotbird 13°).
Switching DiSEqC On and Off:• Select DiSEqC 1.0 with the cursor key in the shortcut menu and
press the button.
• If DiSEqC components are integrated in your SAT antennasystem, use the cursor key to enter LNB 1 . . 4 for the DiSEqCFunction and press the button.
MENU
OK
OK
OK
OK
+
OK
OK
15
7.4.1.3 UnicableThe antenna system with a channel router feeds one cable and isdesigned to receive the full programme selection. For thispurpose, each receiver is assigned one specific frequency in theSAT frequency range (950-2150 MHz).
7.4.1.4 Selecting a SatelliteUp to 4 satellites can be set in the Satellite menu if DiSEqC is swit-ched on.
Setting Additional Satellites:• Select the desired satellite in the context menu with the cursor
and press the button.If your satellite system is equipped to receive signals from twosatellites, then you also have to configure the second satellite.
7.5 Satellite Station Search• Press the button.
The Picture Mode menu will be active.• Use the cursor key q to select More and press the button.
The Settings menu will open. The menu line for TV Settings willbe selected.
• Press the button and open the menu item.
• Use the cursor keys pq to select Channels and press thebutton.
• Use the cursor keys pq to select the desired satellite and pressthe button.
• Press the button. The Satellite Channel Tuning submenuwill appear.
• Use the cursor keys tu to select Blind Scan.Only by selecting Blind Scan will the satellite transponders besearched and all DVB-S/S2 stations found.
• Use the cursor keys pq to select the menu item ProgramType.
• Use the cursor keys tu to select All, Free or Encrypted.
• Use the cursor keys pq to select Service Type.
• Use the cursor keys tu to confirm the desired selection.
• Press button.Confirm the info displayed with Yes by pressing thebutton.
7.6 Sorting the ChannelsWhen the channel search is complete, the channels found arepresented in a channel list. You can sort this channel list accor-ding to your own requirements.
Move or swap channels: • In LiveTV mode, press the button.
The station table will appear on the screen.
• Use the cursor keys tupq to select the channel position youwant to move or swap.
• Press and hold the button. The feature selection list willappear on the screen.
• Use the cursor keys pq to select Move or Swap and press thebutton.
• Enter the new channel position with the number keys or selectthe new channel location with the tupq cursor keys.
• Press the button. The selected channel is stored at thenewly selected location.
• Press the button and release the channel at the new loca-tion.
• Press the button and exit the menu.
OK
MENU
OK
OK
OK
OK
Blue
OK
OK
CH LIST
OK
OK
OK
OK
EXIT
7.7 Skip ChannelsIn the channel list, you can mark channels to be skipped with thepPq button when you are flipping forward through the channels.
Skipping a channel: • In normal television mode, press the button.
The station table will appear on the screen.
• Use the cursor keys tupq dto select the channel you wish tobe skipped.
• Press and hold the button. The feature selection list willappear on the screen.
• Use the cursor keys pq to select Skip.
• Press the button. The channel will be marked with anarrow.If the button pq is pressed several times, the marked channelis skipped.
• Press the button and exit the menu.
7.8 Creating a Favourites ListYou can select channels in the channel list and copy them to aFavourites list.
Select and export a channel: • In normal television mode, press the button.
The station table will appear on the screen.
• Use the cursor keystupq to select the channel position youwant to export to the Favourites list.
• Press and hold the button. The feature selection list willappear on the screen.
• Use the cursor keys pq to select the Favourites function.
• Press the button. The channel will be selected.
• Press the button. The channel will be marked with a and exported to theFavourite list.The stations will be transferred to the Favourites list in the orderin which they are marked and exported.You cannot sort the Favourites list later.
• Press the button and exit the menu.
7.9 Channel Selection via the Favourites List• Press the button.
The Favourites list will be displayed.
• Use the cursor keys pq to select the desired channel and pressthe button.
• Press the button and exit the menu.
7.10 Deleting a Channel from the Favourites List• Press the button.
The Favourites list will be displayed
• Use the cursor keys pq to select the desired channel and pressthe button more than 2 Seconds.
• Select Yes with the cursor keys tu and press the button.
CH LIST
OK
OK
EXIT
CH LIST
OK
OK
OK
©
EXIT
FAV
OK
EXIT
FAV
OK
OK

16
8 Picture Settings8.1 Picture ModeThe picture settings are stored in the Picture Mode menu.
Here the picture modes Vivid, Standard, Sport, User and Game arepre-programmed.
In the following example, the picture mode is set. All other picturesettings can be adjusted in the same way.
Set the picture mode: • Press the button.
The Picture Mode menu will be active.
• Use the cursor keys tu to change the picture mode. The following settings are possible: Vivid, Standard, Sport, User,Game.
• Press the button and exit the menu.
8.1.1 Configuring Picture ProfilesThe User picture mode can be set and saved with your own picturesettings for brightness, contrast, saturation, sharpness, gammaand color temperature.
Configuring preset values: • Press the button.
The Picture Mode menu will be active.• Use the cursor key q to select More and press the button.
The Settings menu will open. The menu line for TV Settings willbe selected.
• Press the button and open the menu item.
• Use the cursor keys pq to select the desired setting.
• Use the cursor keys tu to change the setting.The setting then becomes active.
• Press the button and exit the menu.
8.1.2 Changing the Gamma Image Setting Gamma affects the image’s grey gradation but not the white or theblack. A higher gamma value makes the medium shades of greydarker and makes images easier to see in a darker viewing envi-ronment, while a lower gamma value is more suited to lighterenvironments.
• Press the button. The Picture Mode menu will be active
• Use the cursor key q to select More and press the button.The Settings menu will open. The menu line for TV Settings willbe selected.
• Press the button and open the menu item.
• Select Gamma with the cursor keys pq dand press thebutton.
• Use the cursor keys pq to select the desired setting and pressthe button.The setting then becomes active.
• Press the button and exit the menu.
MENU
EXIT
MENU
OK
OK
EXIT
MENU
OK
OK
OK
OK
EXIT
8.1.3 Changing Color Temperature Image Settings The colour temperature can be set in three levels: Warm, Standardand Cool.
• Press the button. The Picture Mode menu will be active.
• Use the cursor key qto select More and press the button.The Settings menu will open. The menu line for TV Settings willbe selected
• Press the button and open the menu item.
• Select Color Temperature with the cursor keys pq and pressthe button.
• Use the cursor keys pq to select the desired setting and pressthe button.The setting then becomes active.
• Press the button and exit the menu.
8.2 Advanced Video Settings8.2.1 DNR (Dynamic Noise Reduction)Image noise is disturbance in the video signal. It appears asgranular patches. This can be caused by low lighting, nearby inter-ference, heat or device algorithms.
DNR is a technique for removing picture noise from a video signalby applying a digital comb filter. It makes images clearer andreduces the video file size.
A 2D filter reduces the noise that can occur in low-light condi-tions. This type of filter is sometimes confused by movement,resulting in blurred patches.
A 3D filter goes one step further and effectively reduces noise instatic and moving images.
Switching on DNR: • Press the button.
The Picture Mode menu will be active.• Use the cursor key qto select More and press the button.
The Settings menu will open. The menu line for TV Settings willbe selected.
• Press the button and open the menu item.
• Select Advanced Video with the cursor keys pq and press thebutton.
• Press the button and open the DNR menu.
• Use the cursor keys pq to select the desired setting and pressthe button.The setting then becomes active.
• Press the button and exit the menu.
MENU
OK
OK
OK
OK
EXIT
MENU
OK
OK
OK
OK
OK
EXIT

17
8.2.2 Adaptive Luma SettingsThe luminosity of the image is automatically adjusted dependingon the video signal.
Adaptive Luma Settings: • Press the button.
The Picture Mode menu will be active.• Use the cursor key qto select More and press the button.
The Settings menu will open. The menu line for TV Settings willbe selected.
• Press the button and open the menu item.
• Select Advanced Video with the cursor keys pq and press thebutton.
• Select Adaptive Luma Control with the cursor keys pq andpress the button.
• Use the cursor keys pq to select the desired setting and pressthe button.The setting then becomes active.
• Press the button and exit the menu.
8.2.3 MPEG Noise ReductionSystem-related digital picture errors can occur in TV broadcaststhat were produced digitally. These picture defects can appear asa rectangular pattern (formation of tiny blocks) in moving areas.
These picture faults can be reduced using MPEG noise reduction.The rectangular pattern (formation of tiny blocks) can be correctedin the MPEG Noise Reduction menu.
Setting MPEG NR: • Press the button.
The Picture Mode menu will be active.• Use the cursor key qto select More and press the button.
The Settings menu will open. The menu line for TV Settings willbe selected.
• Press the button and open the menu item.
• Select Advanced Video with the cursor keys pq and press thebutton.
• Select MPEG NR with the cursor keys pq and press thebutton.
• Use the cursor keys pq to select the desired setting and pressthe button.The setting then becomes active.
• Press the button and exit the menu.
MENU
OK
OK
OK
OK
OK
EXIT
MENU
OK
OK
OK
OK
OK
EXIT
8.2.4 DI-Film Mode
Suppression of image shake for stable and smooth playback ofmoving images.
Setting DI-Filmmode: • Press the button.
The Picture Mode menu will be active.• Use the cursor key qto select More and press the button.
The Settings menu will open. The menu line for TV Settings willbe selected
• Press the button and open the menu item.
• Select Advanced Video with the cursor keys pq and press thebutton.
• Select DI Film Modeo with the cursor keys pq and press thebutton.
• Use the cursor keys pq to select the desired setting and pressthe button.The setting then becomes active.
• Press the button and exit the menu.
MENU
OK
OK
OK
OK
OK
EXIT

18
9 Audio/Sound Settings9.1 Sound ModeThe sound settings are stored in the Sound Mode menu.
The sound modes Standard, Sport, Movie and Music are pre-pro-grammed.
In the following example the sound mode is set. All other soundsettings can be adjusted in the same way.
Choosing the Sound Moden: • Press the button.
• Use the cursor key q to select Sound Mode.
• Use the cursor buttons tu to select the Sound Mode menu. The following settings are possible: Standard, Music, Sport andMovie.
• Press the button and exit the menu.
9.1.1 Configuring Sound Mode• Press the button.• Use the cursor key q to select More and press the button.
The Settings menu will open. The menu line for TV Settings willbe selected.
• Press the button and open the menu item.
• Use the cursor key qto select Sound Mode and press thebutton.
• Use the cursor keyspq to change the setting.The setting then becomes active.
• Press the button and exit the menu.
Adjust Balance, Bass, Treble:
Balance, bass and treble can only be adjusted if the menuitem DTS TruSurround is switched off.
• Press the button. The Picture Mode menu will be active.
• Use the cursor key q to select More and press the button.The Settings menu will open. The menu line for TV Settings willbe selected.
• Press the button and open the menu item.
• Use the cursor keyq to select the desired sound setting.
• Use the cursor keystu to change the setting.The setting then becomes active.
• Press the button and exit the menu.
OK
+
OK
EXIT
EXIT
MENU
EXIT
MENU
MENU
OK
OK
OK
9.2 DTS TruSurroundDTS TruSurround is a proprietary audio technology. This techno-logy is built into the TV set and requires only the built-in speakersto produce a surround sound effect.
• Press the button. The Picture Mode menu will be active.
• Use the cursor key q to select More and press the button.The Settings menu will open. The menu line for TV Settings willbe selected.
• Press the button and open the menu item.
• Use the cursor key qto select DTS TruSurround.• Press the button and switch the feature on or off.
9.3 Automatic VolumeThe menu item Automatic Volume ensures an equal volume levelacross all programme positions.
• Press the button. The Picture Mode menu will be active.
• Use the cursor key q to select More and press the button.The Settings menu will open. The menu line for TV Settings willbe selected.
• Press the button and open the menu item.• Use the cursor keyq to select Auto Volume.• Press the button and switch the feature on or off.
9.4 SPDIF TypeSPDIF is a digital audio format used to transport digital stereoaudio signals. SPDIF is used on PC sound cards, CD players, DVDplayers, car audio systems, and other systems that transmit orreceive digital stereo audio. With this technology, you can sendyour audio signal to various other devices, such as a suitableamplifier, by means of fibre optic cables.
SPDIF is also marked as S/PDIF, S/P-DIF.• Press the button.
The Picture Mode menu will be active.• Use the cursor key q to select More and press the button.
The Settings menu will open. The menu line for TV Settings willbe selected.
• Press the button and open the menu item.• Use the cursor key q to select SPDIF Type and press the
button.• Use the cursor keyspq to make your choice and press the
button.The new setting will then be saved.
9.4.1 SPDIF DelaySPDIF Delay provides the lip sync based on the external receiver.
• Press the button. The Picture Mode menu will be active.
• Use the cursor key q to select More and press the button.The Settings menu will open. The menu line for TV Settings willbe selected.
• Press the button and open the menu item.• Use the cursor key q to select SPDIF Delay.
• Use the cursor keystu to change the setting.The setting then becomes active.
OK
OK
OK
MENU
MENU
MENU
MENU
OK
OK
OK
OK
OK
OK
OK
OK
OK
19
10 TV Settings10.1 Fast StartupThe TV set starts faster from standby mode when this feature isactivated.
However, this significantly increases standby power consumption.
• Press the button. The Picture Mode menu will be active.
• Use the cursor key q to select More and press the button.The Settings menu will open. The menu line for TV Settings willbe selected.
• Press the button and open the menu item.
• Use the cursor key q to select Fast Boot.
• Press the button and switch the feature on or off. Thesetting then becomes active.
• Press the button and exit the menu.
10.2 Auto-StandbyThe TV set automatically switches to standby mode if no signal ispresent for a period of time (approx. 15 minutes). When the lastminute starts, a reminder will appear on the screen.
• Press the button. The Picture Mode menu will be active.
• Use the cursor key q to select More and press the button.The Settings menu will open. The menu line for TV Settings willbe selected.
• Press the button and open the menu item.
• Select Auto Standby with the cursor button q.• Press the button and switch the feature on or off. The
setting then becomes active.
• Press the button and exit the menu.
10.3 Screen ModeThe Screen Mode of the TV can be selected.
Auto = recommended setting.
16:9 = Image in normal 16:9 format.
4:3 = Image in 4:3 format.
Panorama = image in 4: 3 format in width.
Zoom = The TV picture is enlarged.
P2P = Picture format for security camera.
• Press the button. The Picture Mode menu will be active.
• Use the cursor key q to select More and press the button.The Settings menu will open. The menu line for TV Settings willbe selected.
• Press the button and open the menu item.• Use the cursor key q to select Screen Mode and press the
button.
• Select the desired screen mode with the cursor keyspq andpress the button.The new setting will then be saved
• Press the button and exit the menu.
MENU
OK
OK
EXIT
MENU
OK
OK
OK
EXIT
MENU
OK
OK
OK
EXIT
OK
OK
10.4 SubtitlesPeople with hearing impairments can make use of the subtitlesfeature. The Subtitle feature must usually be activated in themenu beforehand.
The provision of subtitles is subject to the respective broadca-sters.
Activate subtitles: • Press the button.
The Picture Mode menu will be active.• Use the cursor key q to select More and press the button.
The Settings menu will open. The menu line for TV Settings willbe selected.
• Press the button and open the menu item.
• Select Subtitle Language with the cursor key q and press the button.
• Press the button and open the Subtitle Language menu.• Use the cursor key q to select On and press the button.
The new setting will then be saved.Then select the subtitle language.
10.4.1 Selecting the Subtitle LanguageYou can select the language to show subtitles from a list.
Set Subtitle Language: • Press the button.
The Picture Mode menu will be active.• Use the cursor key q to select More and press the button.
The Settings menu will open. The menu line for TV Settings willbe selected.
• Press the button and open the menu item.
• Select Subtitle Language with the cursor key q and press thebutton.
• Use the cursor keyspq to select the desired subtitle languageand press the button.The set language is only displayed if it is offered by the station.
• Press the button and exit the menu.
10.4.2 Setting Subtitles for the Hearing Impaired
Configuring Subtitles: • Press the button.
The Picture Mode menu will be active.• Use the cursor key q to select More and press the button.
The Settings menu will open. The menu line for TV Settings willbe selected.
• Press the button and open the menu item.• Select Subtitle Language with the cursor key q and press the
button.• Select Subtitle Type with the cursor key ▲ and press the
button.• Use the cursor key q to select Hearing Impaired and press the
button. The subtitles are displayed automatically if they are offered bythe station.
• Press the button and exit the menu.
OK
OK
OK
OK
OK
OK
EXIT
MENU
MENU
MENU
OK
OK
OK
OK
OK
EXIT
OK
OK
OK

20
10.5 Sleep TimerThe Sleep Timer switches the TV set off after a period of timechosen by you.
• Press the button. The Picture Mode menu will be active.
• Select Sleep Timer with the cursor button q.
• Use the cursor keys tu to set the desired time to 15, 30, 60,90, or 120 minutes.The setting then becomes active.
MENU
11 TV GuideIn the TV Guide you can see current and future DTV mode from thesaved channel list.
DVB-SI data is transmitted in the TV signal (DVB-S, DVB-C, or DVB-T).
DVB-SI (Digital Video Broadcasting-Service Information) is aservice provided by various broadcasters. Each channel digitallybroadcasts programme data for each station it broadcasts.
• Press the button.The overview will appear
• Use the cursor keys pq to select channels.
• Press the button and open the Date Function.
• The date can be changed with the cursor keys tu The previewperiod is approx. 8 days.
• With the cursor key u you can look into the future for theselected channel.
• Press the button. The programme information for theselected broadcast will appear. Press the button to hidethe info.
11.1 Broadcast Reminders• Press the button.
The overview will appear
• Use the cursor keys pq to select channels.
• Use the cursor keys tupq to select programs.
• Press the button and open Edit Mode.
• Select Remind with the cursor key q and press the button.When the broadcast of the selected programme starts, a fade-inwill occur and the TV will switch to the programme.
11.2 Recording BroadcastsA DTV broadcast can only be recorded if an external harddisk is connected to a USB port. The hard disk must be for-matted in FAT32 format.
• Press the button.The overview will appear
• Use the cursor keys pq to select channels.
• Use the cursor keys tupq to select programs.
• Press the button and open Edit mode.
• Select Record with the cursor key q and press the button.An activation key has to be requested on thewww.metzblue.com website with the request key given on thescreen.A recording overlay will appear at the bottom of the screen.
• Select the right column with the cursor button u.
• The cursor keyspq can be used to programme either one-offrecording or repeat (series) recording.
GUIDE
Green
OK
BACK
Red
OK
+
OK
GUIDE
Red
GUIDE

21
12 Android on the Smart TVAndroid is the central operating system on the TV set, just like onsmartphones. Android provides online services, apps and allother media content.
Via the TV set, users have access to Google stores for movies,music and games as well as to the NETFLIX media library and toYouTube and various web browsers.
12.1 AppsJust like on your smartphone or tablet, the apps installed on yourTV set offer various features for a comprehensive television experi-ence.
• Press the button. A selection of apps will appear.
• With the cursor keys tupq , the various apps can beselected.
• Press the button to open the desired app.
12.1.1 Download and install offered apps• Press the button.
A selection of apps will appear.
• Search the app offer with the cursor keys tupq .or
• Press the cursor key q several times and select the selectionline of the apps.
• Use the cursor keys tu to make a selection tile, e.g. Select"Media Apps", "Music Apps," News Apps "or" Tools & Utilities ".
• Press the button and open the selection.• Use the cursor keystupq to select the desired app and
press the button.• To install the app, select the "Install" tile and press the
button.
12.1.2 Download and install apps through Google PlayStore
• Press the button. A selection of apps will appear.
• Press the voice input key, keep it pressed and speak the searchterm into the microphone.
• Use the cursor keystu to select the desired app tile and pressthe button.
• To install the app, select the "Install" tile and press thebutton.
12.2 Setting the Remote Control for Voice Input• Press the button.
The Picture Mode menu will be active.• Use the cursor key q to select More and press the button.
The Settings menu will open. The menu line for TV Settings willbe selected.
• Use the cursor key q to select Add Accessory and press thebutton.
• Press and the cursor keyt simultaneously until thegreen light flashes.
• TV BLE Remote will be displayed on the screen.
• Press the button. The remote control will now be in Blue-tooth pairing mode. The accessory search will start.
HOME
OK
Google Play
OK
OK
OK
OK
HOME
OK
OK
Google Play
OK
MENU
OK
12.3 YouTube• Press the button.
A selection of apps will appear.
• Use the cursor keys tupq to select the YouTube tile andpress the button. The contents will be displayed according to the recommenda-tions of the editorial staff.
• Select the desired content with the cursor keys tupq andpress the button. The selection will be opened.
12.3.1 YouTube Search, Handwriting Recognition• Use the cursor keys tupq to select the L and press the
button. The search feature will open.
• Press the cursor key u 3 times and select the keypad for hand-writing recognition.
• Use the cursor keys tupq to select the characters one afterthe other and then press the button.
• Use the cursor key p to choose a selection line.
• Use the cursor keys tu to make your selection and press thebutton.
12.3.2 Search on YouTube, Speech Input• Press and hold the Speech Input button and speak the search
term into the microphone.
12.4 Google AccountTo be able to use all features of the TV, you should log in with yourGoogle account.
By signing in, you can play games, videos and music on yoursmartphone, tablet or TV.
Use your existing Google Account to sign in to Google on your TV.
A Google Account consists of an email address and a password.
12.4.1 Google Play• Use the cursor keys tupq to select a Google tile.
• Press the button to open the desired app.You will need to sign in to your TV using your Google Account.
• Choose a setting with the cursor keys tupq and then selectthe desired tile and press the button.
12.5 Hide Apps and Return to TV Programme• Press the button to close the app.
• Press the button.The selection of possible signal types will appear at the bottomright of the screen. The signal type installed on the TV set willalready be selected.
• Press the button and switch to the TV programme.The last TV programme watched will be displayed.
OK
OK
EXIT
SOURCE
OK
OK
OK
OK
OK
OK
HOME

22
13 Connecting External Devices via Bluetooth
External devices, such as Bluetooth headphones, can beconnected to the TV set via Bluetooth.
• Press the button. The Picture Mode menu will be active.
• Use the cursor key q to select More and press the button.The Settings menu will open. The menu line for TV Settings willbe selected.
• Select Add accessory with the cursor key q and press thebutton.
• Switch the external Bluetooth device to pairing mode. If theexternal device has been found, a pop-up will appear on theright in the menu.
• Press the button and activate Bluetooth pairing mode.When the pairing is complete, a message will appear.
14 DVB-RadioDuring the channel search (see Chapter 7), the DVB radio stationsare automatically searched for and stored in a station list at theradio control level.
Switching to DVB Radio Mode• In normal television mode, press the button.
The station table will appear on the screen.
• Use the cursor keys tupq button to select the Radio TVheader.
• Select the desired station with the cursor keystupq andpress the button.
MENU
OK
OK
OK
CH LIST
OK
15 TeletextTeletext is a free, additional information service provided bybroadcasters. There are various ways of browsing in this electronicnewspaper.
Opening Teletext: • Press the button.
Page 100 (Table of Contents) will appear on the screen.
15.1 Basic Teletext FunctionsColor buttons are used to change pages randomly, and pleaseoperate as shown at the bottom of the screen.
15.1.1 Selecting a Specific Teletext PageIf you know the teletext page you want to visit, you can enter thepage number using the number keys.The selected page number will appear at the top left of the screen.The search will be started. If the page is found, it will be displayedon the screen.During the search, if you want to switch to this station and watchthe programme that is currently on the air, press the button(CANCEL). The teletext will be hidden but not closed. On the topleft of the screen, the symbol flashes to indicate that the search isin progress.When the page is found, the character is replaced by the pagenumber.To display the teletext page, press the (CANCEL) buttonagain.
Selecting a Multiple Teletext PageMany teletext pages have multiple pages. This multiple page iden-tifier is usually found below the time, appearing in this format:1/9. The individual subpages are switched to automatically.To access a specific subpage, press the cursor key tu.
15.2 Answer Sharing or Puzzle SolvingHidden answers to quiz or puzzle questions are displayed whenyou press the (REVEAL) button.Press the button (REVEAL) again to hide the answers.
15.3 Display Teletext Transparently Press the button (MIX). The teletext will be displayedtransparently.Press the button (MIX) button again to return to normal tele-text.
15.4 Exit Teletext Press the button.The TV programme will be displayed again.
TEXT
¢
¢
tt
tt
uu
uu
EXIT

23
17 HbbTVHbbTV is not available in all countries.
For legal reasons, recording to an external hard disk is notpermitted when the HbbTV feature is switched on.
Broadcasters offering HbbTV can be identified by the Red Buttonlogo at the bottom right of the screen
Setting HbbTV • Press the button.
The Picture Mode menu will be active.• Use the cursor key q to select More and press the button.
The Settings menu will open. The menu line for TV Settings willbe selected.
• Press the button and open the menu item.
• Use the cursor keys pq to select the HbbTV menu and pressthe button.
• Select On with the cursor keys pq and press the button. The setting then becomes active.
• Press the button.HbbTV will now be active.
Opening HbbTV:• Press the button.
The HbbTV service will appear.
• Use the cursor buttonstupq or the coloured buttons tomake the desired selection and press the button. The selection will appear on the screen.
Closing HbbTV:• Press the button.
++
OK
OK
EXIT
Red
OK
EXIT
MENU
OK
OK
16 Parental Controls• Press the button.
The Picture Mode menu will be active.• Use the cursor key q to select More and press the button.
The Settings menu will open. The menu line for TV Settings willbe selected.
• Press the button and open the menu item.
• Select Please enter password with the cursor button q.
• Press the button and enter the factory code "0000" withthe number keysThe Parental Controls menu will open. The menu for ChannelBlock will be selected.
Block Channel• Use the cursor keys pq to select the channel you want to block
and press the button.The switch symbol is moved to the right and the channel willnow be blocked. Several channels can also be selected andblocked.
• Press the button and exit the menu.
Temporarily Unblock a Blocked Channel• When switching to a blocked channel, the password input
screen will appear. Enter the PIN code to unblock this channel.
The channel will be available until you select a different channelagain.
Unlock Channel Permanently• Press the button.
The Picture Mode menu will be active.• Use the cursor key q to select More and press the button.
The Settings menu will open. The menu line for TV Settings willbe selected.
• Press the button and open the menu item.
• Select Please enter password with the cursor button q.
• Press the button and enter the previously entered codeusing the number keys.The menu for Channel Block will be selected.
• Press the button twice and display the channel table.
• Use the cursor keys pq to select the channel you want tounblock and press the button.The switch symbol will be moved from the right to the left andthe channel will now be unblocked.
• Press the button and exit the menu.
OK
OK
OK
OK
EXIT
EXIT
MENU
OK
OK
MENU
OK
OK
OK
Master-Pin
Code: 8899

24
18 Digital/USB Recording to Hard DiskIt is possible to connect an external hard disk (not includedwith the TV set) to a USB port on the TV set.
USB recording makes it possible to record TV or radio broadcaststo an external hard disk via the USB socket.
The electronic programme guide (TV Guide) is available for recor-ding TV broadcasts, see Chapter 11.2.
We recommend external hard disks as recording media forUSB recording.
Flash drive storage can only be used to a very limited extent. Thisis because the storage medium needs to provide sufficientstorage capacity for recording broadcasts (at least 8 GB) and fulfilcertain minimum read and write-speed requirements
18.1 Notes on Using Hard DisksHard Disk DriveA hard disk drive is very sensitive. The hard disk may fail if it isused long-term improperly or in an unsuitable environment. Indi-cations of this include things like playback being unexpectedlyblocked or strange mosaics appearing in the picture.If the hard disk drive fails, recordings cannot be played.In such a case, please contact your dealer.
Important Recordings on the Internal Hard DiskAn internal hard disk is not intended to serve as permanentstorage for your recordings. Data and/or recordings that areimportant to the user should also be backed up on an externalstorage medium, such as an external hard disk.METZ cannot assume any liability for recorded material that is lostor damaged as a result of a malfunction or disruption of the harddisk, whether directly or indirectly.
Installation and Use• Do not subject the external hard disk to shocks or vibrations,
especially if the TV set is in operation.• Place the TV set and external hard disk on an even, stable
surface that is free of vibrations.• Do not cover or block the cooling vents or other ventilation
openings on the external hard disk or the TV set.
+
+
Notes for External Hard DisksTo make recordings, an external hard disk must be enabled.
Connect the external hard disk to TV set via USB. Format the externalhard disk.
18.2 Activating Your TV for USB RecordingYou can connect an external hard disk to your TV set and use it torecord broadcasts and for the Timeshift feature.
We call this USB recording. This feature is very useful and easy for youto set up. All you have to do is visit the Metz website athttps://www.metzblue.com/support/ and note down the release code.Enter this code on your TV set. This service is free of charge and doesnot require registration.
18.2.1 ActivationYour Metz TV set has a specific 20-digit Request Key. You can use thisto request the 7-digit Activation Key via the Metz website atwww.metzblue.com.
• Press the button. The info bar will be displayed.
• Use the cursor key u to select Record and press thebutton.
• If the TV set has not yet been activated, the information for therequest key will appear here.
Visit our website at www.metzblue.com / Support /USB-Recording andenter the request key which is displayed by the TV set.
Please enter only capital letters.
Once you have entered the request key, you will receive an activationkey (number code).
• Use the numeric buttons on the remote control to enter the acti-vation key.
After you have entered the activation key, use the cursor buttonq toselect Done and press the button.
The TV set will start recording immediately.
i+
OK
+
OK
Please ask on www.metzblue.com with the requestkey for the free
activation key and enter it into the input field below.
Request key JWWW-XXXXX-YYYYY-ZZZZZ
Activation key - - - - - - -
Cancel

25
18.3 Format an External USB DriveAn external hard disk up to a capacity of 1 terabyte will be suitableand must be formatted as the primary partition with FAT16 orFAT32.
18.3.1 External Hard DiskAn external hard disk with a capacity of up to 1 terabyte will besuitable.
If the external hard disk is not formatted, the installation guidewill ask you to format it.
If the External Hard Disk is Not Recognised/Formatting theExternal Hard Disk via the TV
• Press the button. The Picture Mode menu will be active.
• Use the cursor key qto select More and press the button.The Settings menu will open. The menu line for TV Settings willbe selected.
• Press the button and open the menu item.
• Use the cursor keys pq to select Record Settings and press the button.
• Press the button and call up the USB storage device.• Press the button and select Format with the cursor keyspq .
• Use the cursor keys tu an select Yes or No and press thebutton.
• Press the button and exit the menu.
18.4 Start/Stop TimeshiftIf you want to pause during a running DTV broadcast, you can startTimeshift mode.
• Press the (TIMESHIFT) button. The current broadcast will be stopped and the image will befrozen (freeze frame).
• Press the (INDEX) button and the broadcast will bestarted in Timeshift mode. The broadcast will continue with atime delay.
• Press the button (CANCEL) to stop Timeshift mode.
For security reasons, a request will appear on screen.
Confirm this with Yes.
II
u
¢
MENU
OK
OK
OK
OK
OK
EXIT
OK
18.5 Instant RecordingIn DTV mode, you can start an instant recording at any time.
• Press the button. The info bar will be displayed.
• Use the cursor key u to select Record and press thebutton.
• If the TV set has not yet been activated, the information for therequest key will appear here. Proceed as described in section18.2.1.A flashing red dot will appear at the top right of the screen toindicate that a recording is in progress.
• Press the button (CANCEL) to stop the instant recording.For security reasons, a request will appear on screen.
18.6 Timer RecordingSee Chapter . 11.2.
18.7 Media (Playing Recordings)(Only for Devices with External Hard Disks)
The Media Server enables the playback of stored content on theexternal hard disk.
• Press the button. A selection of apps will appear.
• Use the cursor keys tupq to select the Media tile and pressthe OK button.The media content will be displayed.
• Select the desired content with the cursor keys tupq andpress the button. The selection will be opened.
i+
OK
¢
HOME
OK

26
19 AV Devices19.1 Connecting DevicesAV devices (audio/video) are additional devices which emitpicture and/or sound signals (e.g. video recorders, DVD players,DVD recorders, PCs, decoders, etc) and can be connected to a TVdevice.
19.2 Selecting Signal Source (AV Devices)To view the image of a connected AV device, select its connectionsocket.
20 Cleaning the deviceSwitch off the device with the power switch before cleaning !
Improper handling and cleaning can cause irreparabledamage to the screen. Consequently, pay attention to therules on handling and caring for the device.
• Handle the screen surface very carefully and gently.
• Avoid any mechanical stress to the screen surface by knocking,shocks, pressure, scratching, scraping, etc, since this can leadto damage.
• Avoid contact with pointed, sharp or hard objects.
• The screen surface must be preserved against dirt.
Care and cleaning:• Switch off and unplug the device before cleaning.
• Take care that water or other liquids never gets into the device,since these can cause damage to the device.
• Cleaning of the screen surface must occur with a soft, drycleaning cloth (e.g. microfibre cloth).
• If significant soiling nevertheless occurs, the screen surface canbe cleaned with a slightly moist, soft cloth. A special TFT cleaning solution (commercially available at specialised dealers) is the perfect cleaning solution.
Never use cleaning solution on the screen surface!If any cleaning solution penetrates beneath the screen's lowerframe, it will result in irreparable damage to the components.
Unplug the set immediately if foreign bodies like water, otherliquids, metal parts, etc get into the screen.
Never attempt to touch the inside of the set with any objects or with your hands. Danger of electric shock or accident.
+

27
21 Special Instructions for OLED TV SetsOLED TV sets are equipped with OLED screen technology.
OLED’s major advantage in image quality is due to OLED being anindividually controllable self-illuminating technology at the sub-pixel level. When differentiated display controls are available, thewear caused by still images and image components is worse. Stillimages should thus be avoided or limited if possible.
In LiveTV mode, the device has various internal mechanisms thatprevent a negative influence on the picture quality. However, theprescribed automatic calibration cycles must be performed instandby mode.
To ensure that your OLED TV always delivers a first-class image,you should pay attention to the following notes:
• Avoid still images over longer time periods.
• Avoid images with static elements (e.g. a static outer framecontaining a moving image) over long periods.
• Avoid using presentation mode.
• After every 4 hours of operation, the device starts an RScompensation cycle as soon as it is put in standby mode. The TVscreen will remain dark. This process lasts a few minutes andremoves residual stress in the OLED panel control.
• After around 1500 hours of operation, JB compensation will beperformed as soon as the device is put in standby mode.The TV screen will remain dark. During the last few minutes of JBcompensation, a thin white line will be visible, travelling fromtop to bottom. Irregularly aged subpixels will be captured andcompensated for.This process lasts about 70 minutes and removes residual stressin the OLED panel control.
• Do not switch off the TV set with the mains switch until the redstandby indicator is the only one which is still lit.
22 Resetting the TV to Factory Settingsand Restarting the ConfigurationWizard
• Press the button. The Picture Mode menu will be active.
• Use the cursor key q to select More and press the button.The Settings menu will open. The menu line for TV Settings willbe selected.
• Select Storage & reset with the cursor key q and press thebutton.
• Use the cursor key q to select Factory data reset and press thebutton.
The TV set will be reset to the factory settings. All saved settingswill be deleted.
MENU
OK
OK
OK
Subject to technical changes and errors!
Your Metz product was developed and manufactured withhigh-quality materials and components which can be recycled and/or re-used.
This symbol indicates that electrical and electronicequipment must be disposed of separately from normalgarbage at the end of its operational lifetime.
Please dispose of this product by bringing it to your localcollection point or recycling centre for such equipment.
This will help to protect the environment in which we alllive.
k
Battery DisposalDo not dispose of batteries with domestic rubbish! Please returnspent batteries to collecting points should they exist in yourcountry.
Please only return fully discharged batteries. Normally, batteriesare fully discharged if the device they power
• switches itself off and indicates “batteries spent”
• they no longer function flawlessly after prolonged use.
To prevent short circuits, please cover the battery poles withadhesive tape strips.
These symbols can be found on batteries containing harmfulsubstances:
Pb = the battery contains leadCd = the battery contains cadmiumHg = the battery contains mercuryLi = the battery contains lithium

U1899_40139_04METZ blue - always your choice
Metz Consumer Electronics GmbH • Ohmstraße 55 • 90513 Zirndorf/Germany • www.metzblue.com