Installation, Operation & Maintenance of Solar PV Microgrid ...
Upload
khangminh22Category
view
3download
0
EN
INSTALLATION, MAINTENANCE & WARRANTY

2
10/2021
OUR COMPANYThe history of Floover began to take shape in 2006 with the union of Andrea Prati and Joan Ferrer, friends and co-owners with ex-tensive experience in the flooring business . Based on the needs and requests of their customers, they developed a new product, Floover, multilayer rigid flooring with designs based on high-end vinyl with the Unilin click system. Later, they developed other versions and incorporated waterproof unlimited designs with re-markable success.
The aim of Floover is the continuous search for new and ama-zing products always based on the latest design and fashion, in-tending to improve the quality of life. Innovation and imagination have always been the basis of the brand and are key to its repu-tation in the market place, involving designers and architects to provide added value to the product. To date, Floover has achie-ved significant international presence.
OUR PRODUCTSFloover’s production is mainly located in Müstair, Switzerland, where the entire production process complies with Swiss law and with the European norms and standards, in addition to the very strict quality controls.
Floover provides products for both domestic and commercial use, always using new technologies and creating solutions demanded by the market, from gluing systems (Glue Down), through the floor with click system, to exterior solutions. All Floover products are easy to install and are specifically designed for high durability and longevity. All this is complemented with accessories needed to complete any project.
The extensive collection of designs can be installed in any space, including wet areas like bathrooms or terraces, Floover is the ul-timate solution to your project.

3
10/2021
INSTALLATION & MAINTENANCE
GLUE DOWNBEFORE INSTALLATIONWhen gluing the LVT-adhesive tiles, care should be taken to bond to a clean, dry, even and tensile and pressure-resistant and crack-free surface. The laying is suitable for cement screeds, anhydrite / flow coating, hot asphalt / mastic asphalt screed and dry screed installation panels. Substrates and/or subfloors with adhesive residues must be sanded off and cleaned. The substrate must be primed with a suitable precoat concentrate, after drying with a more suitable leve- ling com-pound, a layer thickness of min. 2 mm to be compensated. The maximum permissible unevenness of the subfloor must not exceed 2 mm to 1 m length (according to DIN 18202 line 4). The residual moisture content must not exceed 2.0 CM-% (an-hydrite / floating screed 0.5 CM-%), 1.8 CM-% for anhydrous underfloor heating (anhydrite / floating screed 1.8 CM-%). Dry screed / installation panels, bumps in the joint area must be sanded off and, if necessary, filled. If the laying plates are laid floating, they should be glued together firmly in the joint area and have a thickness of 20 mm. Cork adhesive tiles should be acclimatized before installation at a room tempe-rature of 15-25° C and a relative humidity of approx. 40-60%, 24 hours in a closed, surface-mounted package. Please also note that the underground at the time of laying must have a temperature of at least 15° C. Cork adhesive tiles can also be installed on underfloor hea-ting, with a maximum surface temperature of 28° C. The adhesive sheets should be checked in day- light for their perfect condition, any transport and material damage must be complained before laying. Differences in color and structure are material-related and therefore no reason for complaint. Adhesive variants are released for installation in damp rooms and wet rooms.
INSTALLATIONFor the first row, a landing line is drawn on the ground with the help of a slat or a chalk line. This line should be recor-ded at a distance of three rows from the wall. Then, only this part of the area about 45 cm (from the line to the wall) with a suitable notched trowel and with a suitable contact adhesive for cork-adhesive tiles are painted. Follow the instructions of your adhesive supplier. The plates should be wetted with ad-hesive over the whole area, they should be pressed strongly. Before the adhesive binds, the plates should be rolled flat with a follower roller (weight 14-25 kg). A bottoming knife or cutter
knife can be used to cut the plates. Scrape the plates from above with the knife and break them at the interface.
RECOMMENDED ADHESIVES- Fixed gluing: we recommend our Primacola, a water-based adhesive for one-sided application, free of solvents. It has a short aeration time, fast initial hold, high final resistance and good elasticity.
- Self-supporting gluing: we recommend our R-2000 adhesi-ve that allows you to install and remove the pieces while en-suring a strong adhesive grip. It offers easy application, high performance, constant elasticity and great anti-slip power.
- Wall gluing: in order to achieve a secure grip, we recommend using our Novopren, a solvent-borne chloroprene rubber-ba-sed contact adhesive, with adhesion-enhancing additives.
CLEANING AND CAREThe life of your floor depends on its use, cleaning and care. As a first care for LVT-adhesive tiles, a basic protection must be applied thinly and evenly. Depending on the load, regular main-tenance care should be carried out. Use suitable cleaning agents for regular cleaning (e.g. LOBA Cleaner). We recommend to use a doormat or dirt carpet in the entrance area. The floor is protected by the use of felt glides on table and chair legs.
Primacola Novopren R-2000

4
10/2021
INSTALLATION & MAINTENANCE
HDFBEFORE INSTALLATIONFloover floors with HDF-Click (high-density wood fiberboard) is laid floating (i.e. not glued to the underground) on a clean, per-manently dry, tensile and pressure-resistant as well as level and crack-free surface. The laying is suitable on ceramics and natu-ral stone floors, on PVC, linoleum and plastic coverings, wooden planks and chipboard subfloors as well as all mineral screeds. The substrate must not contain substances which adversely affect the floor or cause interactions. Old floor sand carpets should be removed for hygiene reasons. The maximum permissible unevenness of the subfloor may not exceed 2 mm over a length of 1 m (according to DIN 18202 line 4), otherwise it must be compensated with leveling compound. The residual moisture must not exceed 2.0 CM-%. The floor should be acclimatized before installation at a room temperature of 15-25° C and a relative humidity of approx. 40-60%, 24 hours in a closed, flat stored in a package. Between your HDF-Click and the sub-floor, a PE foil or other vapor barrier must always be laid. HDF-Click can also be installed on hot water floor heating, with a maximum surface temperature of 28° C. The boards should be checked in daylight for their perfect condition, any transport and material damage must be complained before laying. Differences in color and structure are material-related and therefore no rea-son for complaint. Please also check before laying that the tongue and groove are free of swarf or other particles. Floover floors with HDF-Click are not released for installation in humid rooms and/or wet cells.
INSTALLATIONStart laying in a corner of the room and consider an expan-sion joints of 10 mm against the wall and every other solid construction element.
Angle Snap version 1 Set the long side of the planks at a slight angle to approx. 10° / 2-3 cm and click them by pushing on and pressing down. On the front side, the panels are clicked by a tapping block by gently tapping.
Always apply the tapping block (at least 20 cm long) to the ton-gue, or to the lower groove cheek, not to the “good edge“.
Angle to Angle version 2 Slightly raise the panels to the end face by approx. 10° and then click on the next panel also on the end face. Subsequently lift the panels and the adjacent ones-which is already clicked, lightly, on max 10° / 2-3 cm and slide respectively click the panels together. Lay the following panels in direct extension of the first ones. The remaining piece of the first row is used as the first panel of, the second row. This panel should be at least 30 cm long. To cut the panels, it is recommended to use a hand circular saw, jigsaw or laminate cutter. Maximum permissible area without additional expansion joints is 15 m x 10 m. For pipe connections holes are drilled whose diameter is about 20 mm larger than that of the pipe. The covering is done afterwards with rosettes. Door frames are shortened accordingly, so that the panels below can be laid floating. Skirting and transition strips (insertion rail) are used as conclusion.
CLEANING AND CAREThe life of your floor depends on its use, cleaning and care. As a first care for HDF-Click, a basic protection must be applied thinly and evenly. Depending on the use, regular maintenance care should be carried out. Use suitable cleaning sup- plies for regular cleaning (e.g. LOBA Cleaner). We recommend to use a doormat or dirt trap car- pet in the entrance area. The floor is protected by the use of felt pads on table and chair legs.
ca. 10 mm
ca. 10ca. 10˚̊(2 -3 cm)(2 -3 cm)
(Installation angle snap version 1)
ca. 10ca. 10˚̊ ca. 10ca. 10˚̊(2 -3 cm)(2 -3 cm)
(Installation angle snap version 2)

5
10/2021
CLIC SYSTEMFOR WATER RESISTANT FLOORSBEFORE INSTALLATIONFloover waterproof floors in clic system are usually laid floating (ie not guted to the underground) on a clean, permanently dry, tensile and pressure-resistant as well as level and crack- free surface. Alternatively, SplasH2O can also be glued on the entire subfloor with a suitable LVT-adhesive. The laying is suitable on ceramics and natural stone floors, wooden planks and chipboard subfloors as well as all mineral screeds. Carpeting is recommended to remove for hygienic reasons. The substrate must not contain substances such as softener or solvents. The maximum permissible unevenness of the subfloor may not exceed 2 mm over a length of 1 m (according to DIN 18202 line 4), otherwise it must be compensated with leveling compound. The residual moisture must not exceed 2.0 CM-%. The floor should be acclimatized before installation at a room temperature of 15-25° C and a relative humidity of approx. 40-60%, 24 hours in a closed, flat stored in a package. This floor can also be installed on hot water underfloor and electric underfloor heating, with a maximum surface temperature of 28° C. The boards should be checked in daylight for their perfect condition, any transport and material damage must be complained before laying. Differences in color and structure are material related and therefore no reason for complaint. Before laying check that the tongue and groove are free of swarf or other particles. Floover waterproof floors are suitable for installation in humid rooms, wash rooms and wet cells. In such areas a full-surface- bonding is recommended.
INSTALLATIONStart laying in a corner of the room and consider an expansion joints of 10 mm against the wall and every other solid construction element.
Angle Snap version 1 Set the long side of the planks at a slight angle to approx. 10° / 2-3 cm and click them by pushing on and pressing down. On the front side, the panels are clicked by a tapping block by gently tapping. Do not place the tapping block (at least 20 cm long) on the spring, but on the lower groove cheek of the groove side or on the “good edge“ of the spring side.
Angle to Angle version 2 Slightly raise the panels to the end face by approx. 10° and then click on the next panel also on the end face. Subsequently lift the panels and the adjacent ones- which is already clicked, lightly, on max 10° / 2-3 cm and slide respectively click the panels together.Lay the following panels in direct extension of the first ones. The remaining piece of the first row is used as the first panel of, the second row. This panel should be at least 30 cm long. To cut the panels, it is recommended to use a hand circular saw, jigsaw or laminate cutter. Maximum permissible area without additional expansion joints is 12 m x 10 m. For pipe connections holes are drilled whose diameter is about 20 mm larger than that of the pipe. The covering is done afterwards with rosettes. Door frames are shortened accordingly, so that the panels below can be laid floating. Skirting and transition strips (insertion rail) are used as conclusion.
ca. 10ca. 10˚̊(2 -3 cm)(2 -3 cm)
(Instalación angle snap versión 1)
INSTALLATION SPLASH2O, SPLASH2O LIGHT, SPLASH2O DESIGN, RSVP, INNOVA 4.0 & SPC
ca. 10 mm
ca. 10ca. 10˚̊ ca. 10ca. 10˚̊(2 -3 cm)(2 -3 cm)
(Instalación angle snap versión 2)

6
10/2021
CLIC SYSTEMFOR WATER RESISTANT FLOORSRECOMMENDATIONSWe recommend a PE foil or other vapor barrier for the installation of our waterproof floors to achieve correct thermal and/or acoustic insulation. This aspect is increasingly relevant in residential and commercial installations.
Floover pavement should always be laid on a flat and dry floor. When installing there must be a perimeter joint of at least 10mm.
- Floover SplasH2O. Available our 2mm vapor barrier (economical option) or 2mm plus vapor barrier, with higher density and suitable for radiant heating. It is possible to place a fourth layer of 1.5mm Floover Flex foam base from the factory to reinforce the thermal insulation (in this case the PE foils mentioned above would not be necessary). Installation up to 288m2 without expansion joints (18 length / 16 width).
- Floover SplasH2O Light. We recommend our 1,2mm thick foam. It is possible to place a fourth layer of 1.5mm Floover Flex foam base from the factory to reinforce the thermal insultaiton (in this case the polyethylenes mentioned above would not be necessary). Installation up to 120m2 without expansion joints (12 length / 10 width).
- Floover Innova 4.0. Available our 1,5mm thick foam suitable for underfloor heating. No glue or other materials
are necessary. Installation up to 120m2 without expansion joints (12 length / 10 width). Free joint installation leaving a minimum of 30cm in the heads.
Other solutions: SplasH2O Design, RSVP and SPC have the PE foam incorporated, so no independent vapor barrier should be used a fact that saves time and labour costs.
We recommend requesting the technical sheets of the products to obtain more information.
CLEANING AND MAINTENANCEThe life of your floor depends highly on the use, cleaning and care. As a first care for SplasH2O, a basic protection must be applied thinly and evenly. Depending on the use, regular main-tenance care should be carried out. Use suitable cleaning supplies for regular cleaning (e.g. LOBA Cleaner).We recommend using a doormat or dirt trap carpet in the en-trance area. The floor is protected by the use of felt pads on table and chair legs.
INFOFloover flooring is thermoplastic and therefore it reacts to heat and cold. That means, the soil expands when exposed to heat (e.g., from sunlight) and contracts in the cold. The floor should be protected from direct strong sunlight and laid so that the floor can move freely.
INSTALLATION SPLASH2O, SPLASH2O LIGHT, SPLASH2O DESIGN, RSVP, INNOVA 4.0 & SPC

7
10/2021
INSTALLATION & MAINTENANCE
HERRINGBONEWHEN PLACING THE ORDERHerringbone has two parts:1. Right side (A)2. Left side (B)When you have to install a surface of 60m2 you have to order 30m2 left and 30m2 right. Keep in mind that this type of installation has a higher merma in the installation and you should calculate an extra 20%.
BEFORE INSTALLATION- Leave the boxes closed in the place where the material will be installed 48 hours before starting the installation.- Make sure that the sub floor on which the material will be installed is clean, well levelled, hard and dry.- Define the direction of the installation.- If you are installing a floating floor with clic use a high density sublayer with a thickness of 1,5mm or you can use Silent Red sublayer with a thickness of up to 2,5mm.- If you are installing with glue use the recommended glue and the A2 trowel.- Separate the boxes on the left side and the right side to avoid confusions.
PLEASE NOTE IN THE INSTALLATION- Define the direction of the placement. It is recommended the installation direction should be to the light.- Control the number of pieces on the left side and the right side.- The professional installer will decide where to start and where to install the “master”. For a perfect installation it is recommended to install in the longest and central part.- The limit distances without expansion joins are 10 metres length by 10 metres width. When it exceeds this surface they must install expansion joins following the criteria of their professional installer.- Leave an expansion distance of 10mm at all joins between the flooring and the wall or other fixed element. Pay close attention to the door frames, you can cut them but always take into account the expansion space.- We recommend using the FLOOVER skirting and expansions joins for a perfect finish.
AT TIME OF INSTALLINGImage. 1It is necessary to divide the room into two equal parts, drawing a 45º diagonal line, and always leaving a 10mm expansion space from the wall. The installation will start from the left corner opposite to the door, placing the side with the tongue of the left board (B) against the wall to later place perpendicular the right board (A). To install the other rest, you will need to follow the same steps cutting the excess part when placing the boards against the wall.
Image. 2In order to get started with the installation, you will need to cut the 5 main pieces that will make up the initial triangle. You will need a total of five boards (one cut per piece). Starter set:
B1: 110x110mm; B2: 330x220x110mm; B3: 550x440x110mmA1: 220x110x110mm; A2: 440x330x110mm
You will need to measure how many starter kits you will need based on the width of the room, always leaving a 10mm expansion gap from the wall.
CLEANING AND CAREThe life of the flooring depends on its use, cleaning and care. Depending on the use, you should carry out regular maintenance. Use products for regular cleaning (e.g. Soapclean). The flooring should be protected by the use of felt pads on table and chair legs.
B1 B2 B3
A1 A2
B2
B3
A1
A2
B1
Image 1
1 2
Image 2

8
10/2021
INSTALLATION & MAINTENANCE
LOOSE LAY ANTISKIDLoose Lay Antiskid is designed to be installed without or with little quantity of adhesive inside any type of building as long as the indications detailed in “Subfloor Conditions” are fo-llowed. Its floating installation system allows you, apart from a quick and easy installation, to be able to replace a single piece without disassemble the whole installation.
BEFORE INSTALLATIONBefore the installation, make sure the product has not been damaged during transportation. Damaged material will be not replaced once installed. Check the product in the daylight and if any manufacturing defect, wrong colour or brightness is found during the inspection, please immediately contact the retailer from which the flooring was purchased. Complaints on any flaws should be made prior to installation.Some differences of colour and structure are due to the nature of the material and so they cannot be an object of a claim. As with all natural products once exposed to sunlight or some chemicals there is a possibility that there will be some minor alteration in the colour. Also, once the product is subjected to extreme ambient conditions of temperature and/or humidity some modifications of the dimensions of the board can occur. Damage due to misuse of the material will be excluded from the warranty.
AIR-CONDITIONINGThe installation area must be climate controlled for at least one week before installation, during installation, and conti-nuously after installation. Proper conditions are between 18-29ºC. This product is not suitable for installation in non-climate controlled areas such as covered decks, porches or outdoors. Acclimatize the product to the room’s temperature for at least 48 hours before starting installation.
SUBFLOOR CONDITIONSSubfloor preparation is very important for a successful installa-tion. Roughness or unevenness of the subfloor may affect the new floor. All subfloors should be smooth and flat with a tole-rance of 3 mm over 1,8 m or less. Product can be installed over most existing hard-surfaces as long as it is smooth or can be made smooth. Existing floors must be solid. Fix any loose areas. Deeply embossed existing resilient floors require the use of an embossing leveller. Excessively cushioned vinyl flooring or vinyl flooring consisting of multiple layers are not suitable subfloors for installation.
Concrete subfloors: they must be dry, smooth and free from dust, solvent, paint, wax, grease, oil, asphalt sealing compounds or other materials. The floor should have a moisture reading of less than 75% RH. New concrete slabs must be thoroughly dry, at least six weeks old and completely cured. The final responsi-bility for determining if the concrete is dry enough for installation of the flooring lies with the floor covering installer. Holes, groo-ves, expansion joints and other depressions must be filled with a Portland cement based underlayment and troweled smooth and feathered even with the surrounding surface.
Existing ceramic tile: they must be made smooth by applying a cementitious overlay such as patching or levelling compound.
Wood: All wood and wood composite panels, including plywood, OSB, flake board and particle board are acceptable subfloors as long as they are dry, smooth, flat, structurally solid and free of deflection. Joints should be sanded if they exhibit peaking.
Metal and Painted Floors: remove any loose paint or other finis-hes. Existing adhesive residue must be removed or encapsulated. Never scrape adhesive residue that may contain asbestos.
FUNDAMENTAL NORMS FOR THE INSTALLATIONTools Needed: Utility Knife, Carpenters Square or Straight Edge, measuring tape. If using adhesive, follow adhesive supplier’s instructions.
a) Before installation, make sure the subfloor is dry and dust free.
b) Flooring should be laid directly against walls, fixed with a bead of silicone after installation completed. Open transition areas with no wall to lay against should be fixed with 10 cm wide adhesive.
c) It is important for outer planks to fit snug against the wall or cabinets (fixed items), otherwise a 10 cm wide strip of tape or adhesive is required to hold the perimeter in place.
d) Make sure each plank is fit tightly to the next piece. Very light tapping to get a tight fit is fine, but take care not to compress the plank you are tapping into. Firm and tight is correct, overly tight will lead to compression and later peaking joints when the com¬pressed planks try to return to normal length or width.
9
10/2021
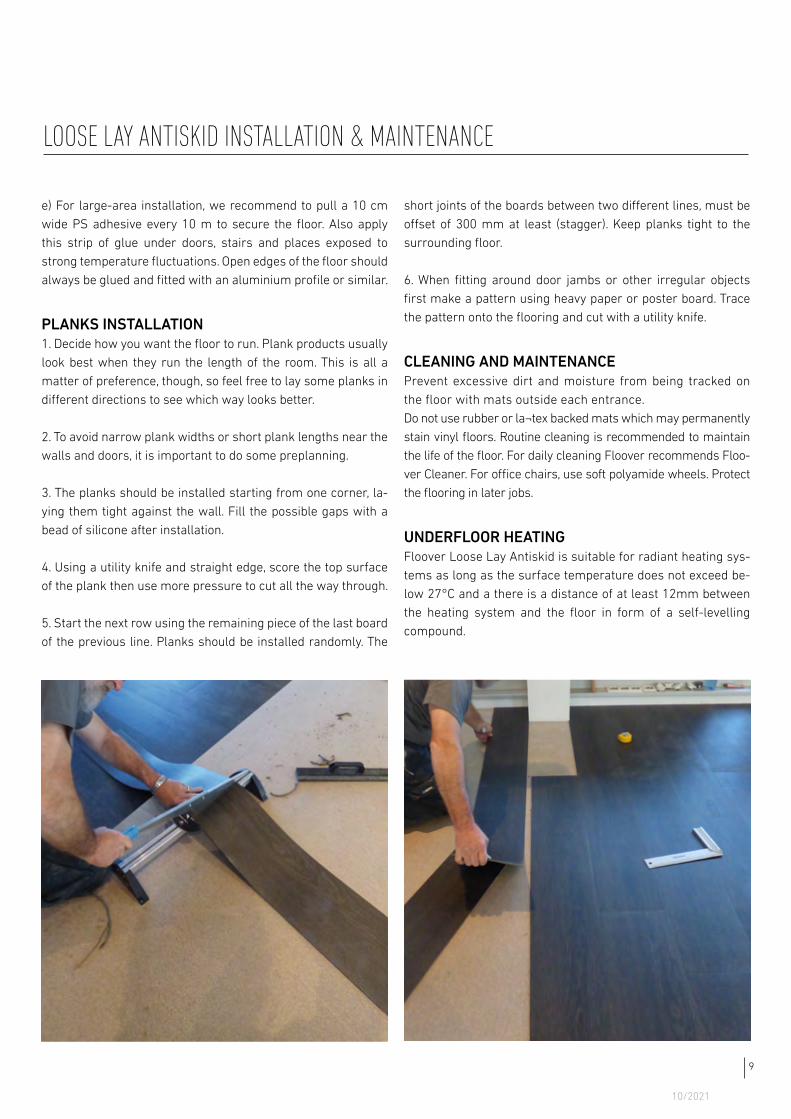
e) For large-area installation, we recommend to pull a 10 cm wide PS adhesive every 10 m to secure the floor. Also apply this strip of glue under doors, stairs and places exposed to strong temperature fluctuations. Open edges of the floor should always be glued and fitted with an aluminium profile or similar.
PLANKS INSTALLATION1. Decide how you want the floor to run. Plank products usually look best when they run the length of the room. This is all a matter of preference, though, so feel free to lay some planks in different directions to see which way looks better.
2. To avoid narrow plank widths or short plank lengths near the walls and doors, it is important to do some preplanning.
3. The planks should be installed starting from one corner, la-ying them tight against the wall. Fill the possible gaps with a bead of silicone after installation.
4. Using a utility knife and straight edge, score the top surface of the plank then use more pressure to cut all the way through. 5. Start the next row using the remaining piece of the last board of the previous line. Planks should be installed randomly. The
short joints of the boards between two different lines, must be offset of 300 mm at least (stagger). Keep planks tight to the surrounding floor.
6. When fitting around door jambs or other irregular objects first make a pattern using heavy paper or poster board. Trace the pattern onto the flooring and cut with a utility knife.
CLEANING AND MAINTENANCEPrevent excessive dirt and moisture from being tracked on the floor with mats outside each entrance. Do not use rubber or la¬tex backed mats which may permanently stain vinyl floors. Routine cleaning is recommended to maintain the life of the floor. For daily cleaning Floover recommends Floo-ver Cleaner. For office chairs, use soft polyamide wheels. Protect the flooring in later jobs.
UNDERFLOOR HEATINGFloover Loose Lay Antiskid is suitable for radiant heating sys-tems as long as the surface temperature does not exceed be-low 27°C and a there is a distance of at least 12mm between the heating system and the floor in form of a self-levelling compound.
LOOSE LAY ANTISKID INSTALLATION & MAINTENANCE

10
10/2021
INSTALLATION
UNDERFLOOR HEATING
GENERAL INSTRUCTIONSAll Floover floorings can be used in conjunction with low temperature underfloor heating, under the following conditions. These radiant heating systems can be by hot water or by electric resistances, both embedded in the floor. The underfloor heating must be installed in accordance with the supplier’s instructions and the generally accepted instructions and rules. The general installa¬tion instructions for Floover flooring without underfloor heating also apply of course, unless explicitly mentioned below. The flooring must be laid floating, except the Glue Down range. With floating floors it is necessary to lay film of a minimum of 0.2 mm which works as moisture barrier. The different pieces of the film must overlap at least 20 cm and the joints must be sealed with adhesive tape.
PERFORMANCESThe maximum heat resistance allowed (R) of a floor covering is 0.15 m2KJW (according to the norm EN 4725), in order to achieve Energy saving rules established by CE organization and specified generally. All Floover products accomplish those requirements as it is indicated in each technical data sheet.
STANDART HDF CONSTRUCTION SPLASH2O VERSION FLOOVER ORIGINAL 0,088 K*m2/W 0,060 K*m2/WFLOOVER SYNCHRO 0,089 K*m2/W 0,061 K*m2/WFLOOVER PLUS 0,090 K*m2/W 0,062 K*m2/W
It´s important to accomplish limitations of m2 in an installation without joints: < 120 m2 for Floover SplasH2O and SplasH2O light / < 150 m2 for HDF and HDF light.

11
10/2021
INSTALLATION OVER UNDERFLOOR HEATING
CONCRETE OR SCREED AS SUB-FLOORThe type of screed and the installation method, combined with the underfloor heating, must comply with the instructions of the suppliers of the screed and the underfloor heating system. To obtain a homogeneous heat distribution across the entire floor, the distance between the heating elements must not be greater than 300 mm. The depth of the elements is determined by the fitter of the underfloor heating. The sub-floor must be sufficiently DRY across its complete thickness when installing the floor covering. This is maximum 1 .5% humidity according to the CM method for cement-bound floors and maximum 0.3% humidity for anhydrite-bound screed. This can only be guaranteed, when installed in new buildings, by turning on the underfloor heating. Turn up the underfloor hea-ting gradually at least two weeks before laying your FLOOVER flooring, and minimum 21 days AFTER laying the screed (max. 5°C per day). - at 50% of the capacity for 2 weeks - 100% for the last two days. For newly spread screed, follow the guidelines of your installer for the start up period. A heating protocol should be presented; ask for it if necessary.
FLOOR COOLINGMore and more systems that combine heating and cooling are being installed in homes. A heat resistance of less than or equal to 0.09 m2K/W is normally recommended for floor cooling. The heat resistance of all Floover products complies with that requirement. Floover products are fully suitable for installation over these systems as long as they meet certain requirements: Refrigeration sys-tems must be equipped with a good safety mechanism and internal condensation control. The cooling water temperature does not be below dew point. Below that temperature, water would be produced by condensation of the moisture from the atmosphere on the pavement surface. Room thermostats should never be set under 24°C. In addition, thermostats must never be set at a temperature which is 5°C lower than the room temperature. So at a temperature of 32°C, the room thermostat must not be set lower than 27°C.If these guidelines are not respected, it may result in excess moisture below the floating floor, being able to cause damages to the flooring.
HEATING FILMS“New” heating systems such as electric heating films have now appeared on the market, they are installed directly over the subfloor and under the floating flooring. These films have a very small thickness so they affect very little to the looking of the room and can be installed without the need of great works. They should always be installed follow-ing the manufacturer’s instructions and a 0.2 mm PE film must be placed between radiant sheet and Floover floor. A second type of heating systems for renovation is a system with warm water pipes or electrical resistances embed-ded in frames. These frames are usually polystyrene panels that can be combined with metal plates. Floover considers that these systems are more reliable because they ensure a more homogeneous distribution of heat, provide thermal insulation under the radiant floor, and provide stable subsoil under the floating floor.Floover can be installed on this type of system, as long as the temperature of these elements on its surface does not exceed 27° C and are homogeneously distributed throughout the pavement area.

12
10/2021
INSTALLATION
STAIRS
1. Before installation, the surface should be cleaned and smoothed. Steps must be smooth and level. If necessary, pre-coat with MDF piec-es or similar.
2. Cut the stair nosing to an appropriate length for the step*. If there are two or more parts, cut at 45º to make two sides. The stair nosing will always have the same length as the piece from the chosen range, as it is manufactured with the same piece as the flooring. The click is on the long, head side of the stair nosing.
3. Take the measurement and cut the piece to fit it on the top of the step, using the click system to complete the tread. We recom-mend using glue for a better grip.
4. Install the step in its place and then fit the vertical part. Once the tread is installed, cut the riser and install it by gluing. You can then start over with the next tread by installing the mounted stair nosing over the previously installed tread piece.
5. Repeat this procedure step by step until your Floover stair is com-pleted.
* Same lenght and thickness as flooring piece as it is made of the same PVC.

13
10/2021
GENERAL RECOMMENDATIONS
LVT MAINTENANCEFloover products have a high resistance against stains, abrasion, UV rays, and other factors, which makes the product suita-ble for a wide variety of uses, even in the outdoors. However, the durability of this flooring will depend also on a good insta-llation, use and maintenance. We show you below some instructions to maintaining your Floover floor in a perfect condition.
RECOMMENDATIONS FOR USE• In construction works, Floover flooring installation should be the last step to follow, by having the area clean and without any dust.• When you do later works, Floover floors should be protected with a plastic sheet to avoid drops of any construction mate-rials or painting that can damage the product.• Once the work is finished, we recommend avoiding any entry of dirt or abrasives particles by installing a cleaning system, like doormats in the accesses.• Please place soft pads under chairs, tables and any other furniture legs in order to avoid scratches.• When moving heavy furniture, please lift it and do not drag it.• Office chair wheels should be made of polyamide. Nylon wheels can damage the surface and rubbers wheels can leave marks.
SPECIAL CARE• The use of aggressive cleaning agents can damage the product, same as for abrasive and sharp cleaning tools.• Floover does not recommend and neither guarantees the use of chlorine, bleach or any other cleaning products notdesigned for cleaning vinyl flooring.• Avoid any contact with burning cigarettes because they can leave burns.
REGULAR CLEANINGProtect the higher risk areas and install systems like doormats on the entrances to not allow the dirt to get inside.To keep the best appearance of your Floover floor it is important to have a daily cleaning and to not leave any stains since this can affect finally the colour or become very difficult to remove. Follow the next steps that we recommend:• To avoid dirt and abrasive particle accumulations, we recceomend a daily vacuum clean.• For the regular cleaning, after vacuuming, use a mop and a neutral cleaning agent diluted in warm water. Floover recommends BLANCHON CLEANER.• Floover products are suitable for the use of scrubbing machines with soft brushes, using warm water and diluted neutral cleaner. These kind of machines are recommended for big areas.• Avoid the cleaning water accumulation, do not soak the floor. No need to rinse.• You can let it dry naturally or dry the floor with a soft dry mop.
STAINS CLEANINGEven if Floover products have a very high stain resistance, when there is a stain, it should be cleaned straight away, otherwise the long term exposure to certain chemicals may damage the product surface on a irreparably way.• Clean the stains as soon as possible to avoid getting harder to clean. Do not wait more than 24 hours.• When the stain is fresh, use first a dry cloth to absorb it. Using a wet cloth it can spread.• Keep in mind that if you use an aggressive cleaner, you need to rinse straight away otherwise the floor can be damaged.• Dry the floor and then rinse it with a dry cloth.• Always follow the manufacturer instructions and always use recommended products.• There are stains that can leave a shadow or mark after the cleaning, especially if you let them dry.
Blanchon Cleaner

14
10/2021
LVT RESTOREIt is possible to renovate Floover flooring after heavy or aggressive use or after many years of transit. Due to the chemical composition of the protective layer, the flooring can wear out in two ways: deterioration of the polyurethane varnish or deterioration of the protective PVC layer.To restore the surface of Floover flooring you must some important steps. First it is necessary to clean the whole area with an intensive cleaner as BLANCHON HIPERACTIVE to remove all the stain and remains of other products used before.
How to use Blanchon Hiperactive cleaner:• Dilute 1 litre of cleaner in 10 litres of water (preferably hot water for better results)• Spread the solution on the floor with a floor cloth or fill in the buffing-machine tank.• Clean with a buffing machine fitted with a black or thick green pad, or use a long-handled scrubbing brush.• Remove any loose dirt and rinse with clean water.*• Aspirate and mop any loose dirt should be removed quickly by vacuuming or wiping with a scraper then a dust mop. We recommend rinsing first with a small amount of white vinegar added to the water to neutralize product alkalinity.
Then use BLANCHON RENOVATOR or BLANCHON INTENSIVE if you want a higher protection layer. Also it is possible to restore scratches using a polishing sponge be-fore cleaning.*NOTE: Take care not to create any water stagnation, especially on the Floover Woven HDF, the excess moisture can generate the swelling of the board.
RESTORATION & RENOVATION
LVT MAINTENANCE
Blanchon Hiperactive
Blanchon Intensiv Blanchon Renovator
FURTHER INFORMATION ABOUT CLEANING AND MAINTENANCE UPON REQUEST
PRODUCT DESCRIPTIONNatural soap cream with creamy texture, neutral white colour. Supplied in 500gr tins which include an application sponge and a cleaning cloth. Does not contain allergenic products, solvents or chemical abrasives. 100% natural product.
COMPOSITION 50% neutral soap. 30% natural enhancer (patented formula). 20% perfume
METHOD OF APPLICATIONScrub and clean the area to be treated. Place a small amount of the stain removing soap onto the dampened sponge. Apply over the stain area. Rub it in using circular movements. It is not necessary to apply a lot of pressure. Once the mixture has been rubbed into the stain, clean it off with the cloth (which needs to be dampened beforehand) to remove any residues. On difficult stains, it may be necessary to repeat the process. In this case, apply the soap and leave it to work on the stain for a few minutes, then rub lightly with the damp sponge and clean the soap off with the damp cloth. If you have had to repeat the soap process, clean with the damp cloth until no more lather is produced.
TREATABLE SURFACESAll types of textiles, upholstery, curtains, shirts, trousers, etc.Natural leathers. Synthetic leathers. Leatherette. Ceramics. Hard surfaces, cement, (unvarnished) plastics, glass. Vinyl surfaces on floors and walls. Linoleum. Synthetic parquet flooring. NOTE: To ensure the proper action of the product, do a test application on an invisible area before treating the whole stain area
STAINS CLEANING WITH FLOOVER STAIN REMOVER
Our kit includes tin, sponge, cloth and glovees

15
10/2021
Blanchon Hiperactive
INSTALLATION & MAINTENANCE
WOVEN ROLLSPREPARATIONNote the following requirements depending on the different surface material:1. Concrete: Standard practice shall be followed. If the moisture condition of substrate is not reaching the standards, please treat the substrate with heavyduty epoxy-based moisture control system and wait until it is completely dry.2. Wood: Standard practice shall be followed. Please do not install our flooring products directly over plywood, treated wood or other uneven or unstable wood substrates. Always make sure the surface is clean, completely dry, flat and free of cracks. Dirt on the surface will affect the performance of adhesive and may telegraph to the surface.
ADHESIVES AND SEALERTo reach a better adhesive result, please choose proper glue for different using areas and always follow user guides from the supplier. Here is a simple guide of how to choose the glue for:- Low to moderate levels of traffic: choose an acrylic high quality glue such as Henkel K188E, Mapei ECO350 or similar.- High levels of traffic: Use polyurethane compound glues, such as Henkel R710, or similar.- Humid and wet areas: Use a water-resistant adhesive depending on subfloor material.Cold welded sealer is necessary for roll installations; all the joints must be sealed with a cold welded sealer such as Werner- Muller-Gmbh type A, or similar.When fixing the flooring to the stairs, a protection mould is required for the front edge of each stair.To seal an indoor floor with high levels of traffic (hotels, restaurants, shops, offices ...) that require products of high resistance to dirt and much durability we recommend polyurethane compounds.
UNDERFLOOR HEAT SYSTEMA proper way to take care and maintain the product will extend the life time of wall covering products.• Please do not damage the product by any of sharp substance by moving something.• Wet cleaning, you may use warm water or gentle detergent cleaners (PH 7-8.5). DO NOT use acetone orpolish that will damage the products.
BEFORE INSTALLATIONBefore the installation, make sure the product has not been damaged during transportation. Damaged material will be not replaced once installed. Check the product in the daylight and if any manufacturing defect, wrong colour or brightness is found during the inspection, please contact immediately the retailer from which the flooring was purchased, It should be indicated the production date which is record on the etiquette.Please make a photo of the sticker.Some differences of colour and structure are due to the nature of the material and so they cannot be an object of a claim. As with all natural products once exposed to sunlight or some chemicals there is a possibility that there may be some minor alteration in the colour.Check the production lot on the roll label and separate the rolls according to these batches. The rolls must be extended in the area of the installation at least 24 hours before being glued. Try not to mix different batches of production.Roll-packed products are finished in approx. 200cm with some extra material allowing overlapping for proper installation. The installation must be done at a temperature of 15ºC or above.We recommend rolling out the material in the lengthwise direction of the room and always in the same direction (refer to the arrow sign marked on the back side of the rolls). Try to avoid the excess of joint seams, this will create a nicer visual appear-ance of the flooring and simplify the maintenance.
INSTALLATION1. Draw a line on the floor 196cm distant from the wall. 2. Lay out the first roll following the line’s outer edge. 3. The next roll must overlap by approx. 4cm (pic 1). For stripe designs, adjust overlap until the design meets. 4. Cut through both lengths in the direction of the seam (pic 2).5. Remove the surplus pieces (pic 3). 6. Spread the adhesive evenly on a half part of the area and allow it to aerate (pic 4).*7. Lay the roll down and erase any bubble using a heavy roller of 75 kg at least. Use a little roller to run over the joints.8. Repeat the same process with the other half.
*NOTE: it is possible to apply the glue before “step 3” but the cut must be made until the adhesive is still fresh to be able to remove the surplus pieces.

16
10/2021
WOVEN ROLLS INSTALLATION & MAINTENANCE
COLD- WELDING WORKING INSTRUCTIONWe recommend to work without masking tape when cold-welding woven vinyl material. Because of the woven top layer of this kind of floor coverings the masking tape will most likely not stick properly and the welding liquid can penetrate under the tape. If the tape is lifted later on it is impossible to dab the remaining cold welding liquid, the top layer literally melts and the seam is clearly visible. The seam area is welded but the visible result is poor. We recommend, if the top layer of a floor-covering is uneven and because of that it is likely that the tape will not stick properly, to work without the tape and to weld and instantly dab instead. Best is if one person does the welding and another is dabbing, following the first with a bit of distance. This avoids unnecessary melting of the top layer and ensures the best results. For dabbing use an uncoloured cotton cloth (colour in the cloth could stain the seam area), as long as it is clean and able to absorb the liquid. If the cloth has been used and if it is hard because of the absorbed cold-welding liquid replace with a new one.
AFTER LAYINGImmediately after installation, clean the floor with a damp cloth to remove dust and dirt. For daily cleaning, use suitable neu-tral cleaners such as Floover Cleaner. For an intensive cleaning you can use a brusher machine. Protect the higher risk areas and install systems like doormats on the entrances to not allow the dirt and abrasive particles to get inside. Protect your floor in future works. Apply felt pads under tables, chairs etc. Lift heavy furniture to avoid trailing marks. The office chairs must have soft polyamide wheels in respect of the norms. For an intensive cleaning or restoration after a long period of use, the use of the Syntilor Special Composites cleaner is recommended.
CARE AND MAINTENANCE1. A proper way to take care and maintain the product will extend the life time of our flooring products.2. To protect the surface of the floor, please do not place any sharp items on the floor.3. As for the chair wheels, we recommend polyamide to prevent unnecessary tear or scratches.4. Wet cleaning, you may use warm water or gentle detergent cleaners (PH 7-8.5). DO NOT use acetone or polish that will damage the flooring.5. 85% of the dirt comes from outside/outdoor, so a well-function entrance system to install will be helpful to prevent most of dust and dirt.6. Our products can be cleaned either manually or in mechanical way. Frequently cleaning will help to extend the life time.7. To remove different type of stains as following cleaning suggestions:
STAINS CLEANING SUGGESTIONS
Coffee, juice, chocolate, cream Warm water with heavy cleaners
Blood Cold water perhaps with ammonia
Rust Light acidic cleaner (PH3-4)
Glue (Water based) Hot water
Glue (Solvent based) Chemically pure petrol
Shoe marks Dry cloth
Chewing Gum Chewing gum remover or ice spray
1
6
2
7
3
8
4
9
5
10

17
10/2021
TECHNICAL PROPERTIES/DETAILS
WOVEN ROLLS5. FLAWS
Flaws must be accepted in the maximum quantity of 1 per roll, and always considering really minor and just visual ef-fect. Flaws will be marked with a red strip on the sides and also indicated in the Flaw label (width the position in ml af-fected from the inner core).
When a Flaw is detected, in that roll will be added 0,5 ml as a compensation.
6. TONE DIFFERENCES ON THE ROLL
Small differences in tonality may occur within the same roll, this effect is due to the production system, not to the color of the thread or to the tone or batch of the coil; When we manufacture the fabric we do it in a coil 2 meters wide by 250 meters long (500m2), the thread tension may vary de-pending on the tension of the threads and the mechanical winding, that is, small tension differences may appear in the fabric that can create an optical effect of change of tonality in some areas of the coil along or across the width and is only visualized from one side of the roll because it is a visual effect of reflection of light, from the other side you will not see the difference. This effect is normal and common in any woven product. It is not correct when this effect is seen from all sides of the roll, in this case, the installer must cut the af-fected piece, discard it and join with another coil.
7. DIRECTION OF THE ROLL
For a consistency in the design, it is important to maintain the same arrow direction on every roll. This arrow is printed on the back of each roll.
Flaws According to Levi’s Four Point System Criteria
1. BATCH LOT
Because of the textile weaving process, the batch control must be con sidered, since it is possible to find some difference in to-nality from one batch to another.
Floover controls these variations and identifies each tonality in the labels. When installing the material, finish one pro-duction lot first before starting the next one. Do not mix rolls from different batches
Special designs can be considered, please ask your sales-man or customer service for specific offers. The minimum quantity for special designs is 1000 m² and the price will be adjusted too.
2. ROLL WIDTH
The width of the roll is minimum 2000 mm, with possible + 50 mm. Special sizes / slight variations of the size will be discussed upon order
A special width can be considered, please ask your sales-man or customer service for specific offers.
Also pallet system will be affected.
3. ROLL LENGTH
The length of the roll is min. 10 m, some extra length can be considered in some cases.
Special lengths can be considered, please ask your sales-man or customer service for specific offers.
Also pallet system will be affected.
4. SKEW AND BOW
Due to the textile manufacturing process, there could ap pear certain deviations that would affect the final result of the roll.
Deviations lower than 2 % must be accepted, it means that for every lineal meter the threat must not be deviated more than 20 mm.

18
10/2021
INSTALLATION
WOVEN LOOSE LAYREQUIREMENT OF BASE CONDITION Note the following requirements depending on the different surface material:1. Concrete: If the moisture condition of substrate does not conform to the standards, treat the substrate with heavy duty epoxy-based moisture control system and wait until it is completely dry.2. Wood: Do not install our flooring products directly over plywood, treated wood or other uneven or unstable wood substrates.3. Existing ceramic tiles: It must be made smooth by applying a cementitious overlay such as patching or levelling compound.For levelling the base it is recommended to use the UZIN NC-145 Rayt self-levelling compound with the previous BLU-MECRIL C1346-A Rayt primer.Always make sure the surface is clean, completely dry, flat and free of cracks. Dirt on the surface will affect the per-formance of adhesive and may reveal bulges on the surface once the product is installed. The lev¬el of humidity must comply with the values prescribed in current norms: as a general rule, a maximum of 2,5-3% for cementitious sub-strates and 0,5% for gypsum or anhydrite-based substrates.
ADHESIVES AND SEALER To reach a better adhesive result, please choose proper glue for different using areas and always follow user guides from the supplier. We highly recommend Ultrabond Eco Tack LVT. The use of non-permanent glue allows you to replace easily a single tile and a easy access to the subfloor.When fixing the flooring to the stairs, a protection mould is required for the front edge of each stair.To seal an indoor floor with high levels of traffic (hotels, restaurants, shops, offices ...) that require products of high resistance to dirt and much durability we recommend polyurethane compounds.
UNDERFLOOR HEAT SYSTEM When installed on floors with underfloor heat system, the surface tem¬perature cannot be higher than 29ºC. Install your floor at least 7 days after the installation of under floor heat system is completed.
BEFORE INSTALLATIONBefore the installation, make sure the product has not been damaged during transportation. Damaged material will be not replaced once installed. Check the product in the daylight and if any manufacturing defect, wrong colour or bright-ness is found during the inspection, please contact immediately the retailer from which the flooring was purchased. Complaints on any flaws should be made prior to installation. Some differences of colour and structure are due to the nature of the material and so they cannot be an object of a claim. As with all natural products once exposed to sunlight or some chemicals there is a possibility that there may be some minor alteration in the colour.Check the production lot on the box label and separate the boxes according to these batches. The boxes must be placed in the installation area at least 24 hours before being opened. Try not to mix different production batches.Woven Loose Lay product is produced in square shape of 500x500 mm. The installation must be done at a temperature of 15ºC or above.
TILES INSTALLATION 1. Before installation, we recommend drawing a draft of laying plan. Start drawing two perpendicular lines, each one parallel to a wall, near from the room entrance (pic 1). 2. Spread the adhesive evenly over the entire surface (pic 2). 3. Wait until the water has completely evaporated, before starting with the installation of the floor. This waiting time can vary, depending on the type of substrate, surrounding temperature and the amount of product applied. Please let the product aerate for at least 1 hour and follow the manufacturer’s instructions.

19
10/2021
WOVEN LOOSE LAY INSTALLATION
4. You can create different designs depending on the direction of the tiles (marked with an arrow on the back of the tiles). Being a product that can have slight differences of tonality, we recommend installing Woven Loose Lay in chessboard system (pic 3) with the excepcion of Jacquard range.5. Install the first tile from this cross section (pic 4) and follow the lines to fill the surface progressively (pic 5). 6. Make sure each panel is firmly attached and straight against one another otherwise it will affect the final result of the whole installation (pic 5).7. Complete the installation of all the tiles that must not be cut (pic 6). 8. To fit the perimeter cut the pieces before installing them. Place the tile that has to be cut on the last one installed. Push another tile to the wall and cut (pic 7). Then fit the cut piece (pic 8).9. After installation, use minimum weight 50 kg roller lengthways and transversely to erase any glue bubble (photo 6). Use a little roller to run over the joints (photo 7).
RECOMMENDED ADHESIVEWe recommend our R-2000 adhesive that allows you to install and remove the pieces while ensuring a strong adhesive grip. It offers easy application, high performance, constant elasticity and great anti-slip power.
AFTER LAYINGImmediately after installation, clean the floor with a damp cloth to remove dust and dirt. For daily cleaning, use suitable neutral cleaners such as Floover Cleaner. For an intensive cleaning you can use a brusher machine. Protect the higher risk areas and install systems like doormats on the entrances to not allow the dirt and abrasive particles to get inside. Protect your floor in future works. Apply felt pads under tables, chairs etc. Lift heavy furniture to avoid trailing marks. The office chairs must have soft polyamide wheels in respect of the norms. For an intensive cleaning or restoration after a long period of use, the use of the Syntilor Special Composites cleaner is recommended.
3 4
7 8
1
6
2
5
R-2000
Only the Jacquard collection can be installed at the same direction

20
10/2021
INSTALLATION & MAINTENANCEWOVEN WALLSPREPARATIONWarning: Do not cut or install our products until you have read these instructions. Should a discrepancy occur, please contact the manufacturer or dealers for immediate assistance and service.Please check your order and corresponding document or product label and make sure that all products information is correct. Please also check if the product have possible defects prior to installation. Due to the nature of this woven vinyl wallcovering, which is sometimes woven with bi-color yarn, it is often possible that there are slight irregularities or a visible color variation. This is not a defect but if this is not acceptable, please do not install it and contact your dealer immediately. We do not accept any of claim due to colour variation after product has been hung. Prior to installation, draw a draft of installation plan and always follow the same direction as it is not recommended for woven vinyl wallcovering to reverse hanging. Make sure the product hanging in the same direction.Adhesives: Acrylic high quality glues, ex. Henkel K188E, Mapei ECO 350 (Roll), Mapie Ultrabond ECO 800 or similar products.Humid and wet areas: Polyurethane compound glues, ex. Henkel R710 or similar products.Wall condition:a. Proper surface preparation is always the key point to have a good hanging result. We recommend hanging the product on different kind of wall substrate which all need the same condition of smooth mirror and free of flaking paint or old adhesives.b. Monitor wall moisture levels. A wall that is not properly prepared or that has too much moisture content may not be condu-cive to proper adhesion.c. If necessary, apply wall with primer or sealer according to product’s manual instruction.d. First, make a straight vertical plumb line. Most homes, however, have walls and ceilings that are often slightly out of align-ment. To compensate this, you must begin your installation with a truly vertical plumb line. This is very important step to ensure that you hang the strips straight. Repeat this plumb line again for all the new wall.
INSTALLATION INSTRUCTIONS1. Before installation, the ambient temperature must be above 15ºC and the relative air humidity must be between 35% and 60%. The location must also be air conditioned. 2. Our product is pre-cut but however and in to get better joint seam, and if the cutting is necessary, we recommend that our product be table cut with overlapping by cutting it in 1 time and removing the extra.3. Using “Paste the Wall” method for hanging. For this method, simply apply the paste onto wall and wait for the right curing time, then hang the products.4. Time to hang your first strip! According to your install plan, you may decide to start either from the beginning of the corner behind the door or from a definite focal point in the room such as a fireplace. In that case, position the first strip so that a promi-nent section of the design is centered over the mantel. Unfold the top of the strip and place it against the marked plumb line on the wall. Make sure you have 5-10 cm of extra product at the top and bottom for cutting. Use your hands to gently smooth the top half of the product and unfold the bottom half then using a soft smoothing tool to press the product to the wall and remove any air bubbles. It is better to smooth from the center to the edges by diagonal movements.5. Repeat the same method for the following strips. You shall match the pattern by eye level and do not overlap the strips, just butt the edge. Do not over work the strip by pushing or pulling…This can stretch the product. Reposition by lifting it away from the wall and sliding into position.6. Make sure the seam is tight by using press roller or a smoothing tool.7. Thoroughly rinse the strip with a sponge or a soft cloth and clean water for any of dirt or glue leaking immediately before it gets dry.8. Use razor knife and a cutting guide to cut any excess product at the top and bottom.Use a white and damp clean cloth to wipe the product surface. Use mild/soft detergent when needed.
CLEANING AND MAINTENANCEA proper way to take care and maintain the product will extend the life time of wall covering products.• Please do not damage the product by any sharp object by moving something.• Wet cleaning, you may use warm water or gentle detergent cleaners (PH 7-8.5). DO NOT use acetone or polish that would dam-age the products.

21
10/2021
Floover products have a high resistance against stains, abrasion, UV rays, etc… ,which make the product suitable for a wide variety of end uses, even outdoor. However, the durability of this flooring will depend also on a good installation, use and maintenance. We would like to show you some instructions to maintaining your Floover floor in a perfect condition.
RECOMMENDATIONS FOR USE• In construction works, Floover flooring installation should be the last step to follow, by having the area clean and without any dust.• When you do later works, Floover floors should be protected with a plastic sheet to avoid the drop of any construction materials or painting that can damage the product.• Once the work is finished, we recommend avoiding any entry of dirt or abrasives particles by installing a cleaning system, like doormats in the accesses.• You should place soft pads under chairs, tables and any other furniture legs in order to avoid scratches.• When heavy furniture is moved, you should carry it by lifting, never drag it.• Office chair wheels should be made of polyamide. Nylon wheels can damage the surface and rubbers wheels can leave marks.
SPECIAL CARE• The use of aggressive cleaning agents can damage the product, same as for abrasive and sharp cleaning tools.• Floover does not recommend and neither guarantees the use of chlorine, bleach or any other cleaning products notdesigned for cleaning vinyl flooring.• Avoid any contact with burning cigarettes because they can leave burns.
REGULAR CLEANINGProtect the higher risk areas and install systems like doormats on the entrances to not allow the dirt to get inside.To keep the best appearance of your Floover floor it is important to have a daily cleaning and to not leave any stains since this can affect finally the colour or become very difficult to remove. Follow the next steps that we recommend:• To avoid dirt and abrasive particle accumulations, we recceomend a daily vacuum clean.• For the regular cleaning, after vacuuming, use a mop and a neutral cleaning agent diluted in warm water. Floover recommends BLANCHON CLEANER.• Floover products are suitable for the use of scrubbing machines with soft brushes, using warm water and diluted neutral cleaner. These kind of machines are recommended for big areas.• Avoid the cleaning water accumulation, do not soak the floor. No need to rinse.• You can let it dry naturally or dry the floor with a soft dry mop.
STAINS CLEANINGEven if Floover products have a very high stain resistance, when there is a stain, it should be cleaned straight away, otherwise the long term exposure to certain chemicals may damage on a irreparably way the product surface. For stains cleaning we recommend FLOOVER WOVEN STAIN REMOVER.• Clean the stains as soon as possible to avoid getting harder to clean. Do not wait more than 24 hours.• When the stain is fresh, use first a dry cloth to absorb it. Using a wet cloth it can spread.• Keep in mind that if you use an aggressive cleaner, you need to rinse straight away otherwise the floor can be damaged.• Dry the floor and then rinse it with a dry cloth.• Always follow the manufacturer instructions and always use recommended products.• There are stains that can leave a shadow or mark after the cleaning, especially if you let them dry.
GENERAL RECOMMENDATIONS
WOVEN MAINTENANCE
Blanchon Cleaner

22
10/2021
WOVEN RENOVATIONPeriodically, you need to do a deep clean to recover the initial feature of your Floover Woven. For this, follow the next steps:• Firstly, vacuum any dust or dirt.• Rinse and brush the floor to eliminate any accumulates adhered dust.• Dilute Special COMPOSITES CLEANER SYNTILOR: 2 glasses for 2 litters of warm water• Apply (we recommend to use a sprayer) over an area of 5 to 8m2.• Let it work for 5 to 15 min, without drying. Brush the floor, that should now appear clean.• Rinse with water*• Do the same for the rest of the floor, always on areas from 5 to 8m2.• If necessary, for the embedded stains, repeat the process or use the Cleaning Agent with a hig-her concentration (2 glasses for 1l of warm water)
*NOTE: Take care not to create any water stagnation, especially on the Floover Woven HDF, the excessmoisture can generate the swelling of the board
WOVEN MAINTENANCE
Composies cleaner Syntilor
FURTHER INFORMATION ABOUT CLEANING AND MAINTENANCE UPON REQUEST
RESTORATION & RENOVATION
DESCRIPTION DU PRODUITNatural soap cream with creamy texture, neutral white colour. Supplied in 500gr tins which in-clude an application sponge and a cleaning cloth. Does not contain allergenic products, solvents or chemical abrasives. 100% natural product.
COMPOSITION 50% neutral soap30% natural enhancer (patented formula)20% perfume
METHOD OF APPLICATIONScrub and clean the area to be treated. Place a small amount of the stain removing soap onto the dampened sponge. Apply over the stain area. Rub it in using circular movements. It is not necessary to apply a lot of pressure. Once the mixture has been rubbed into the stain, clean it off with the cloth (which needs to be dampened beforehand) to remove any residues.On difficult stains, it may be necessary to repeat the process. In this case, apply the soap and leave it to work on the stain for a few minutes, then rub lightly with the damp sponge and clean the soap off with the damp cloth. Repeat this process until the stain disappears.If you have had to repeat the soap process, clean with the damp cloth until no more lather is produced.
TREATABLE SURFACESAll types of textiles, upholstery, curtains, shirts, trousers, etc.Natural leathers. Synthetic leathers. Leatherette. Ceramics. Hard surfaces, cement, (unvarnished) plastics, glass. Vinyl surfaces on floors and walls. Linoleum. Synthetic parquet flooringDo not use on natural wood or varnished surfaces.
NOTE: To ensure the proper action of the product, do a test application on an invisible area before treating the whole stain area
STAINS CLEANING WITH FLOOVER STAIN REMOVER
Our kit includes tin, sponge, cloth and glovees

23
10/2021
INSTALLATION & MAINTENANCEMINERALBEFORE INSTALLATIONFloover Mineral is laid floating on a clean, dry, level, as well as tensile and pressure-resistant substrate (DIN 18356).The maximum permissible unevenness of the subfloor must not exceed 2 mm to 1 m length, otherwise it must be leveled with filler. We recommend laying Mineral floating and not gluing it over the entire surface. When using a pallet truck or similar- up to 1000 kg total load the floor must be glued in addition at the click connection (D3 glue). Before installation, Mineral should be acclimatized at a room temperature of 15-25° C and a relative humidity of approx. 40-60%, 24h in the closed, plain bearing package. A PE foil is recommended, the subfloor has to comply with the humidity standard, i.e. max. 2,0 CM-% for cement subfloor and max. 0,5 CM-% for anhydrite subfloor. Mineral can also be installed on hot water and electric floor heating. For application in the wet area, where there is danger of standing water or flooding, it is imperative to use a so-called jointing compound (for example “Clic Seal“ or “Seal & Click“).It must be avoided that moisture or constant moisture can act on the back of the floor. The boards should be checked for their perfect condition at daylight, any defects must be complained before the laying. Please also check that the tongues and grooves are free from chips or other particles. Differences in colour and structure can occur due to the properties of the material and underline the authenticity of this natural product.
INSTALLATIONFloover Mineral can be installed with two standard variants: Angle Snap (version 1) or Angle to Angle (version 2). Start laying in a corner of the room and consider a dilatation joints of 2-3 mm against the wall and every other solid construction element. Even larger surfaces can be laid without a separation/dilatation joint.
Angle Snap versión 1Set the long side of the planks at a slight angle to approx. 10° / 2-3 cm and click them by pushing on and pressing down.
On the front side, the panels are clicked by a tapping block by gently tapping.
Angle Snap versión 2Slightly raise the panels to the end face by approx. 10° and then click on the next panel also on the end face. Subsequently lift the panels and the adjacent ones- which is already clicked, lightly, on max 10° / 2-3 cm and slide respectively click the panels together. Lay the following panels in the direct extension of the first. The remainder of the first row is the first panel of the second row. It should be at least 30 cm long. For cutting the panels, a hand circular saw or laminate punch is recommended. It is also possible to cut the cutting line on the surface with a cutter knife and “buckle“ the plate. Place the panels slightly obliquely at approx. 20° and click on them by pressing and gently rocking. On the front, the panels are clicked by means of a tapping block by gentle beating. Always place the tapping block (at least 20 cm long) against the spring (tongue or the lower cheek, never at the “good edge“.
CLEANING AND CAREThe floor can be dampened but also wet cleaned, also the use of brush wet cleaning machines is possible. After the first cleaning of the newly laid flooring, it is recommended to mop the surface. We recommend using a doormat or dirt trap carpet in the entrance area. The floor must be protected by the use of felt pads on table and chair legs. Waste of Mineral can be disposed as construction waste and fully recycled.
ca. 10 mm
ca. 10ca. 10˚̊(2 -3 cm)(2 -3 cm)
(Installation angle snap version 1)
ca. 10ca. 10˚̊ ca. 10ca. 10˚̊(2 -3 cm)(2 -3 cm)
(Installation angle snap version 2)

24
10/2021
Floover Wall Covering is a new application specially designed to be installed on walls, ceilings and furniture. It is produced in strips 3000 mm long and different widths depending on the chosen material (between 68 and 137 cm). It is aviable in 4 different supports, light, easy to handle and install and without big maintenance requirements.
BEFORE THE INSTALLATIONOnce the material is received, store it without any weight above. Check and make sure that all the content comes from the same reference and the amount is the requested. In case of any problem stop immediately the installation and contact your dealer.
TOOLSThe basic tools are:• pencil • plastic spatulas• roller• spirit level • traditional plumb-line• glues
During the gluing phase, always have a bucket of clear water and a sponge to remove the traces of glue, to clean the roller, the cutter and the scissors or even to wash your hands.
SURFACE PREPARATIONThe surface must be smooth, free of dust and humidity or mold. In dry environments, please use Mapei Ultrabond Eco Decor Dry or Adesilex MT32 glue ready for use, to be applied by roller directly on the wall. For humid environments such as bathrooms, it is necessary the specific Mapei ultrabond Eco Decor Wet ready-to-use glue, to be applied by roller directly on the wall.
INSTALLATION INSTRUCTIONS
INSTALLATIONWALLCOVERING

25
10/2021
WALLCOVERING INSTALLATION
All sheets are marked with a number. The laying rendering will show you the arrangement of the sheets according to the
image you provide.
Start on one side of the wall. Mark a vertical line with a pencil to place the first strip. Apply wallpaper glue uniformly with a
roller directly on the wall.
Place the first strip along the line drawn considering that there may be extra material on the corners, such as on the ceiling
or the floor. Press the strip with the special spatula or a soft brush to remove all the air bubbles that are formed between
the paper and the support.
In the case of external corners it is recommended to cover them whenever possible.
The strips have to be applied one after the other without overlapping them. The glue should not come out at the joints. Clean
the excess of glue with a sponge when the glue is still wet and press on the joints with a roller to allow perfect adhesion of
the paper. To cut excess material in corners, on the ceiling and on the floor, use the appropriate cutter.
Vinyl, woven vinyl and pearl opalescent papers can be washed with a wet cloth and neutral detergent. The silk, on the other
hand, can be sponged with a damp cloth and the use of natural mineral water is recommended.

26
10/2021
INSTALLATION & MAINTENANCERIGID WALLCOVERINGFloover Rigid Wallcovering is a 100% water resistant product, suitable for installation in bathrooms. It can also be installed in hotel bedrooms, corridors, communal areas, restaurants,... for the purpose of decorating any area quickly and affordably. The aesthetic and functional quality of the product is spectacular - it enables bathroom walls to be fully covered (including the shower area), bed headboards, corridor walls, etc... providing maximum impact resistance, improving the soundproofing of the areas and preventing dust.
INSTALLATIONThe selling point of this innovation is that it facilitates easy and fast installation of a wall covering (in hours), without noise or dust. Our wall covering can be installed on any surface (tiles, plastered wall, etc.) without the need to smooth or prepare the support. It is advisable to leave 3cm from the panel to the floor and/or ceiling for a better ventilation/ airing of the support.
1. On a base of battenswalls are uneven, with cracks or areas with a high level of humidity (for example, basements) and where air circulation bet-ween the wall and panel is required. Water resistant battens (made of aluminium, copper treated pine, or similar) should be installed horizontally approximately every 30 centimetres, leaving a distance of a minimum of 3cm between battens for every 1.5 metres to enable the circulation of air between the battens. The battens should be screwed to the wall and the panels should be glued to the battens, fixing them with stainless steel tips. The panels will be joined with the tongue and groove of the pieces.
2. Glued directly on to the surfaceAlways onto smooth, upright and clean walls. Wall supports with ceramic tile type joints are acceptable. This installation sys-tem can be used in showers, bathrooms or damp areas which do not have humidity on the existing wall or support. To glue the panels, we recommend our SPRINT MS POLYMER glue sealant: Hybrid MS polymer, transparent on rubber, giving perfect adhesion and especially designed for our Rigid Wallcovering vertical panels. Good application in low temperatures. It does not pollute the environment: free from solvents, isocyanates and silicones. Resistant to the formation of mould. Apply lines of glue sealant every 20 centimetres and install the panel directly onto the support. Continue joining the panels with the tongue-and-groove of each piece.
MAINTENANCEThis is a very practical option for hotels or commercial premises since it does not require maintenance (fresh coats of paint each year). The material is pleasant to touch and is convenient and quick to clean since it can be washed with water. It does not retain dust mites or bacteria as it is a non-porous product. It enables walls to be kept clean and scratch-free. It improves the acoustics of the room.

27
10/2021
INSTALLATION & MAINTENANCE OPTIONAL ADHESIVE FOR WET AND/OR PUBLIC AREASWALLCOVERINGThe installation of wall coverings in areas of direct contact with water, such as showers, require a glue and a special protec-tive treatment in order for the material to maintain all its characteristics and does not take off or lose color.
DECOR WET ADHESIVEReady to use, silylated polymer-based adhesive for laying decorative fiberglass and wallpaper onto all kinds of absorbing and non-absorbing, substrates, also in wet areas.Characteristics:• Very easy to apply by trowel and roll• Excellent wetting• Fast setting, low consumption and long open time• Colorless, anti-yellowing• Resistant to UV• It doesn’t stain the sheets and the joints• EMICODE EC1 Plus (very low emission)• Density (g/cm³): 1• Performance: 12-15m2• Weight: 3kg
APPLICATION1. Preparing the substrateSubstrates must be dry, level, sound, mechanically strong, free of dust, loose parts, cracks, paints, wax, oil, rust, traces of gypsum or other products that can interfere with bonding.
2. AcclimatisationMake sure that the level of moisture in environment is suitable for the laying operation. Install at recommended temperatu-res, normally between +15°C and +35°C + 15°C y + 35°C.
3. Adhesive applicationUltrabond Eco Decor Wet is ready to use and does not need any preparation. Open the bucket, remove the sealing alluminium sheet and apply the required quantity of adhesive evenly to the substrate with a suitable notched trowel or a roller. If left-over adhesive from previous applications is to be used, open the bucket, remove the skin formed on the surface (intended to preserve the left- over adhesive), and proceed as above.
Apply as much adhesive as can be covered before a surface skin is formed (90 minutos a + 23 ° C - 50% HR) in order to guarantee a suitable transfer to the backing of the covering. Lay the covering into adhesive bed while it is still wet: the ad-hesive ridges have to be impressed. Take care to avoid air pockets and carefully rub the wall covering down to ensure good adhesive transfer to the backing.
CLEANINGWhile still fresh, Ultrabond Eco Decor Wet may be removed with a cotton cloth or Cleaner H. Once hardened it can be remo-ved only mechanically or by means of Pulicol 2000.
STORAGEis stable for at least 12 months in its original sealed packaging. When transported over long distances, thermally insulated containers may be required.

28
10/2021
WALLCOVERINGOPTIONAL WATERPROOF KIT FOR WET AND/OR PUBLIC AREAS
MAPECOAT DECOR PROTECTION KITTwo component aliphatic, polyurethane finish in water dispersion for decorative fibreglass and wallpaper. Transparent pro-tective matt finish for decorative fibreglass and wallpaper, also in wet environments. Provides a high resistance to wear and abrasion and makes the cleaning operations easier, protecting the printing.Characteristics:• Seals joints in wall coverings that are splashed or need to be washed or rinsed frequently• Resistant to certain aggressive chemicals• Brookfield viscosity (mPa·s): 1800 (spindle 5 - RPM 20)• High resistance to abrasion• Resistant to ultra-violet rays• Very easy to apply• Solvent-free• Matt finish• Does not yellow• Gloss level: 10 gloss• Density (g/cm³): 1.05 / 1.12• Performance: 12-15m2• Weight: 1,2kg• Packaging: box containing A+B kit
When used in combination with Ultrabond Eco Decor Wet, silylated polymer-based reactive adhesive, along with the most suitable substrate preparation products and sealants for these types of application, it forms a complete, safe system for installing decorative fibreglass and vinyl wall coverings with no-woven backing in damp environments, including shower cabins.
APPLICATIONPreparation and application of the product:Shake component A before use and pour the product into a suitable clean basin. Add component B at a ratio of comp. A: comp. B = 5: 1 (by weight) and mix thoroughly until it is completely blended. Apply one crossed coat by mean of a short pile roller (such as Ultracoat Roller T3 or Ultracoat Roller T5). Use the mix within 90 minutes from blending.
CLEANINGTools and residuals of Mapecoat:May be cleaned with water while the product is still fresh. Once hardened, the product may only be removed mechanically.
STORAGE12 months in its original, sealed packaging in a dry place. Protect from frost. For transport at low temperatures, use vehicles with temperature-controlled units.

29
10/2021
WARRANTY AND CLAIMS OF INTERIOR PRODUCTSGARANTÍAFloover’s warranty applies for a period of 30-years for residential use and a 20-years for commercial use on 0.5 finishes. For the 0.3 finish the warranty is 15 years for residential us and 10 years for commercial use. This warranty is valid as the following conditions are met:
1. The range is recommended for bedrooms and the 0.5 or 0.7 range for shared areas or areas with heavy footfall. It is important to respect the usage suggestions for each class following these recommendations.
2. Prior to beginning installation, the site must meet a series of conditions: a) the humidity of the underlying floor and the walls must not exceed 2.5%, b) in the case of ground floors, the underlying floor must be waterproofed to avoid damp, c) any type of pipe that passes under the sub-flooring must be thermally insulated and at a minimum depth of 4 centimetres, d) the premises or home where our pavements are to be installed must be completely closed to the exterior, all aluminium carpentry that seals the premises such as windows and entrance doors in place, e) before the installation of any flooring, the correct operation of the plumbing, heating and sanitary facilities will have been checked, f) flooring adjoining our floor will have to be previously installed, to avoid damp (kitchen floors, bathrooms, etc.), g) the base flooring must be clean of plaster and materials prior to the installation of our floor, h) when the product is glued or loose lay, we recommend using the glues available in our catalogue. This is the basis if everything is to function properly and must be respected.
3. The support for the installation of our flooring, a) must be hard, horizontal, level and free of debris or other construction materials. It must also present a regular and flat appearance. At the time of installation, humidity may not exceed 2.5%, b) the ideal underlying floor is terrazzo, in the case of mortar the correct dosage will be 3x1, c) in the case of heating installations passing under the flooring, they must be at a depth of no less than 3cm and always properly insulated. The support must respect these parameters if a good result is to be achieved.
4. To keep our floors in good condition, we must take into account the following observations: a) maintain an ambient humidity in the premises that ranges between 50 and 60%. To achieve this in heated homes, we must use room humidifiers and natural plants. These humidifiers will at the same time facilitate the proper conservation of any wooden elements (carpentry, furniture, etc.) and, in accordance with
WHO recommendations, contribute to maintaining optimum health, since an excessively dry environment dries the nose and throat, with consequent damage to health, b) avoid any knocks to the flooring with blunt objects, c) protect the feet of chairs and other furniture with felt discs. They are easy to find at the market, d) high-heeled shoes will mark the surface of the parquet, no matter how hard the wood is, e) clean the floor regularly with a vacuum cleaner, then clean with a slightly moistened cloth or chamois. We recommend using our cleaning products. Maintenance is very important to ensure that the material remains in good condition and lasts well over time.
5. Doors and carpentry work: a) The nature of the materials that we are using for wood carpentry means that there may be aesthetic variations in their tones (in mouldings, jambs, end panels or in the comb of the doors), which lie within the tolerance margin allowed for in the use of such material. The standard is concerned with functional details not aesthetics, b) on ground floors and 1st floors, which have unheated rooms beneath them, there may be damp, whether environmental or as a result of capillary action, which can bypass any slab or pavement, causing the lower parts of any carpentry elements to occasion black stains of humidity if they are not well insulated. In HDF-based products, it is essential to install a 30-centimetre overlapped vapour barrier at the joints. Inter-floor insulation is very important to avoid damp.
6. Joints: Our flooring, like other natural products, reacts to environmental changes in their surroundings, due to their own nature and dryness. Most joints are due to loss of humidity (heating, air conditioning, direct heat sources, etc.). The advice we give is: as far as possible, minimize climatic changes inside the house or building, using humidifiers, containers with water, plants, etc.
The maximum length and width standards, without expansion joints, that we indicate in our technical specifications must be respected so that the material can expand and contract correctly. Respect perimeter and longitudinal expansion joints.
7. We recommend the use of our accessories and finishes such as polypropylene, glues, levelling pastes, baseboards, reducers, “T” strip and stair nosings, etc. to get a good finish on your floor. Use materials certified by our company.

30
10/2021
WARRANTY AND CLAIMS OF INTERIOR PRODUCTSGARANTÍA8. Returns or changes to the order will not be accepted once it has been confirmed. In the case of FLOOVER flooring as well as the Wall Covering product, changes to the order or returns are not allowed as these materials are manufactured to or-der.
9. No claim will be accepted as regards the quality, colour or appearance of the material once it has been installed by the customer, so please verify the material before fitting it. Our products pass very high levels of quality control but we can make mistakes. Check the material piece by piece before ins-talling, because once handled we will not accept claims.
10. No claim will be accepted due to ignorance on the part of the client as to the technical characteristics of our floors or walls, such as texture, appearance, colour, stability, hardness, etc. Our technical sales team is perfectly trained or you can request a sample before ordering to check our finishes. Ex-plain your needs to the sales team and they will recommend the most suitable product for your project.
11. We reserve the right of ownership over all the supplied material until the amount has been paid, even if it is in the possession of third parties. Retention of title.
12. We will always accept responsibility for hidden defects or liabilities that the product may present due to manufacturing defects. Under no circumstances will claims for defective material be accepted if it has been damaged during trans-port and the damage not recorded on the delivery note, if it has been subsequently transformed or improperly used, or if more than 4 days have elapsed since its delivery. When you receive the material, check it thoroughly and write down any incident on the delivery note or send an email to your sales manager.
13. We will not under any circumstances accept responsibility for defects or liabilities that the product may present, both in terms of quality and quantity, when these could have been spotted by the customer upon delivery of the goods. If a pro-blem is detected, you must write it down on the delivery note. Check quantities delivered.
14. Failure by the client to pay any invoice issued within the agreed term will accrue interest equivalent to the legal rate of late payment for commercial operations, according to the provisions of Law 3/2004, of 29 December, which establishes measures against payment in commercial operations. We are not required to give prior notice of expiration. If a specific pe-riod is not agreed for the payment of the goods, the interest referred to in the previous section will accrue from the mo-ment the goods are received by the Customer. Fulfilment of payment is linked to the guarantee of the material.
15. In the event of any legal claim, both parties submit to the Courts and Tribunals of the city of Barcelona - Spain, ex-pressly waiving any other jurisdiction. They are also subject to the application of Spanish legislation.

WHICH ARE THE MAIN APPLICATIONS FOR FLOOVER?Main applications are offices, hotel rooms and corridors, VIP rooms and common areas, gyms and bathrooms, retail stores and exhibition points. It is also commonly applied in walls and furniture covers. Always used in indoor applications.
IS FLOOVER A RESIDENTIAL OR COMMERCIAL PRODUCT?Floover is a professional floorcovering for commercial areas where all technical properties of the material correspond to this use. Of course this is also appropriate for residential use.
IS IT SUITABLE FOR SUBFLOOR HEATING SYSTEM?Yes, it is. Just need to follow the procedures on the instal-lations instruction. Also good heat transmition ratio for environmental and efficiency aspect has been prove ac-cording CE standards.
IS FLOOVER SUITABLE FOR CHILDREN AREAS? Yes, it is. Floover is also used in kindergartens, playgrounds and game rooms. Its core structure is soft and smooth.
IS IT SUITABLE FOR HOSPITALS?Yes it is. It is used in treatment rooms, corridors, guest rooms, cafeterias and other public areas. Note: Floover Woven range is not recommended in surgery rooms
IS IT SUITABLE FOR HIGH TRAFFIC-AREAS?Yes, it is. Floover products are mainly classified Class 33, suit-able for heavy traffic due to the special yarn construction. Floover Original collection is classified as Class 32, which is recommended for housing, but the rest of the products are Class 33 specially recommended for high traffic areas, such as shops, open-plan offices and public halls.
DOES IT SOUND WHEN WALKING ON THEM?Impact sound insulation varies for different products from 12dB to 22 dB, depending on the product construction and sub-floor installation.
IS IT SUITABLE FOR CHAIR CASTORS?Yes, use chairs with hard castors whenever possible (polyamide).
IS FLOOVER FLOORING ANTI-STATIC?Floover flooring does not generate a static charge because of the construction of the multi-layer. Floover flooring products have been tested and fulfils the requirements of the Euro-pean Directive ISO1815.
WHAT ARE THE DIFFERENT INSTALLATIONS SYSTEMS FOR?Floover products on click system are suitable for medium and small areas, where the floor is not perfectly flat and floating system is accepted. They can be produced on HDF boards to be used when there is no humidity risk, or in waterproof boards (Splash) and these are used in bigger areas (>200m² up to 400m²) where joints are not required.Floover rolls are the perfect application for professionals when required for bigger areas – glue down system and welding joints are needed.Floover tiles is the easiest solution when it comes to glue-down system.
DOES FLOOVER FLOORING NEED ANY PARTICULAR MAINTENANCE?Floover flooring systems can be easily cleaned with water and soap. We strongly recommend using Floover Cleaner, or in any case a specific vinyl cleaner.Floover floors can be restored periodically with an intensive or heavy cleaner product and would look as good as new. See our maintenance guide” for more details. You can also watch our tutorials on Floover Flooring Channel in Youtube (www.youtube.com/flooverflooring)
IS IT POSSIBLE TO CUSTOMIZE A FLOORING SOLUTION IN COLOUR OR DESIGN?Yes, it is. Check specific requirements in quantities.
DOES FLOOVER PROVIDE A SKIRTING SYSTEM?Yes, we do. Floover supplies traditional skirting but also wa-terproof skirting, stair nose, transition and dilatation joints for all the colours available in Floover range.
DOES FLOOVER HAVE GREEN CERTIFICATES?All our products hold a high class rating certificate based on different criteria. The product holds CE for health and fire concerns, as well as ASTM tests. Floover presents all its vi-nyl collections with a technology evolution that allows us to improve the emisions performance by eliminating completely any phthalate emision from its products, making them the saf-est for your children.
FREQUENTLY ASKED QUESTIONS
FAQ

HEADQUARTERSC/ Selva, 4 2nd Floor
08820 El Prat de Llobregat · Barcelona (Spain)T. +34 938 913 310 [email protected]
FACTORYPalü Daint
CH-7537 Müstair (Switzerland)T. +41 818 503 944
Copyright © 2022 FDOKUMEN


![[NN40170-305] Installation and Maintenance Guide](https://static.fdokumen.com/doc/165x107/63376cb7d293c4548c06b868/nn40170-305-installation-and-maintenance-guide.jpg)