Inline Processing Engine User Guide - Oracle Help Center
102
Inline Processing Engine User Guide Release: 8.0.1.0.0 July 2015 E60863-01
-
Upload
khangminh22 -
Category
Documents
-
view
0 -
download
0
Transcript of Inline Processing Engine User Guide - Oracle Help Center
Inline Processing Engine User Guide
Release: 8.0.1.0.0 July 2015
E60863-01

Inline Processing Engine User GuideRelease: 8.0.1.0.0 July 2015
E60863-01
Oracle Financial Services Software LimitedOracle ParkOff Western Express HighwayGoregaon (East)Mumbai, Maharashtra 400 063India

E60863-01 First Edition (July 2015)
Copyright © 2015, Oracle and/or its affiliates. All rights reserved.
TrademarksOracle is a registered trademark of Oracle Corporation and/or its affiliates.Other names may be trademarks of their respective owners.
Oracle Financial Services Software LimitedOracle ParkOff Western Express HighwayGoregaon (East)Mumbai, Maharashtra 400 063IndiaInternet: www.oracle.com/financialservices

Contents
List of Figures ................................................................................................................. ix
Preface xiAudience ................................................................................................................................................................................xiRelated Documents ..............................................................................................................................................................xiConventions..........................................................................................................................................................................xiiAcronyms..............................................................................................................................................................................xii
CHAPTER 1 About Inline Processing Engine (IPE) ........................................... 1
Overview.................................................................................................................................................................................1Key Features....................................................................................................................................................................1
Workflow of Inline Processing Engine application..........................................................................................................2Users and User Groups ........................................................................................................................................................3
Users.................................................................................................................................................................................3User Groups....................................................................................................................................................................3
CHAPTER 2 Getting Started ................................................................................. 5
Accessing OFSAA Applications .........................................................................................................................................5Top Menu ........................................................................................................................................................................6Left Hand Side (LHS)....................................................................................................................................................7
Applications Tab ........................................................................................................................................................7Object Administration Tab .........................................................................................................................................8...................................................................................................................................................................................8Sandbox Tab..............................................................................................................................................................8System Configuration and Identity Management Tab ...................................................................................................9
Right Hand Side (RHS) ...............................................................................................................................................10Navigating to Inline Processing Engine Home Page.....................................................................................................10
.........................................................................................................................................................................................11Using Common Buttons in IPE........................................................................................................................................11
CHAPTER 3 Association and Configuration .................................................... 13
Accessing Association and Configuration Menu............................................................................................................13Managing Processing Segments.........................................................................................................................................14
Accessing Processing Segments.................................................................................................................................14Adding Processing Segment .......................................................................................................................................14Searching Processing Segment ...................................................................................................................................15Editing Processing Segment .......................................................................................................................................15Deleting Processing Segment .....................................................................................................................................16
Inline Processing Engine User Guide iii

Contents
Managing Business Entities................................................................................................................................................16Accessing Business Entities........................................................................................................................................17.........................................................................................................................................................................................17Adding Business Entities ............................................................................................................................................17Searching Business Entity ...........................................................................................................................................18Editing Business Entity ...............................................................................................................................................18Deleting Business Entity .............................................................................................................................................19
Synchronizing Business Entities.................................................................................................................................19Importing Tables..........................................................................................................................................................19
Updating Table Details.............................................................................................................................................21Deleting a Table........................................................................................................................................................21
Updating Business Entity Attributes.........................................................................................................................21Managing Inline Datasets ...................................................................................................................................................22
Overview .......................................................................................................................................................................22Accessing Inline Datasets ...........................................................................................................................................23Adding Inline Datasets................................................................................................................................................23
Adding Inline DataSet Condition .............................................................................................................................24Searching Inline Dataset..............................................................................................................................................24Editing Inline Dataset..................................................................................................................................................24Deleting Inline Dataset ...............................................................................................................................................25
Managing Traversal Paths ...................................................................................................................................................25Overview .......................................................................................................................................................................25Accessing Traversal Paths ...........................................................................................................................................26Adding Traversal Path .................................................................................................................................................26
Adding Traversal Path Flow.....................................................................................................................................27Searching Traversal Path .............................................................................................................................................27Deleting Traversal Path ...............................................................................................................................................28
CHAPTER 4 Managing Expressions.................................................................. 29
Overview...............................................................................................................................................................................29Accessing Expressions Menu ............................................................................................................................................30Adding an Expression.........................................................................................................................................................30
Adding Variables .....................................................................................................................................................31Searching an Expression.....................................................................................................................................................32Deleting an Expression.......................................................................................................................................................32Displaying Dependant Metadata Expression List ..........................................................................................................33
CHAPTER 5 Managing Post Processing Actions............................................. 35
Overview...............................................................................................................................................................................35Accessing Post Processing Actions....................................................................................................................... Menu35Adding Post Processing Actions .......................................................................................................................................36
Adding a Post Processing Action ..............................................................................................................................36Adding an Action Parameter ......................................................................................................................................37
iv Inline Processing Engine User Guide

Contents
Searching Post Processing Action.....................................................................................................................................37Editing Post Processing Action.........................................................................................................................................38Deleting Post Processing Action.......................................................................................................................................38
CHAPTER 6 Managing Profiles.......................................................................... 39
Overview...............................................................................................................................................................................39Accessing Profiles Menu ....................................................................................................................................................39Adding a Profile ...................................................................................................................................................................40
Adding Standard Measures .........................................................................................................................................42Adding Custom Measures...........................................................................................................................................42Adding Filters ...............................................................................................................................................................42Adding Measure Aggregation Groups......................................................................................................................43
Adding an Expression from Profiles Menu.....................................................................................................................43Searching a Profile ...............................................................................................................................................................43Editing a Profile ...................................................................................................................................................................44Deleting a Profile .................................................................................................................................................................44
CHAPTER 7 Managing Virtual Profiles.............................................................. 45
Overview...............................................................................................................................................................................45Accessing Virtual Profile Menu.........................................................................................................................................45Adding Virtual Profile.........................................................................................................................................................46
Adding Linked Profile ..............................................................................................................................................47Adding Measures ......................................................................................................................................................47Adding Associated Inline Datasets............................................................................................................................47Adding Associated Paths ..........................................................................................................................................48
Searching Virtual Profile.....................................................................................................................................................48Editing Virtual Profile.........................................................................................................................................................48Deleting Virtual Profile.......................................................................................................................................................49
CHAPTER 8 Managing Evaluations................................................................... 51
Overview...............................................................................................................................................................................51Accessing Evaluation Menu...............................................................................................................................................52Adding an Evaluation .........................................................................................................................................................52
Adding Filters ...............................................................................................................................................................53Adding Evaluation Scoring.........................................................................................................................................54
Adding an Expression from Evaluations Menu .............................................................................................................54Searching an Evaluation .....................................................................................................................................................54Editing an Evaluation .........................................................................................................................................................55Deleting an Evaluation .......................................................................................................................................................55
CHAPTER 9 Managing Assessments................................................................ 57
Inline Processing Engine User Guide v

Contents
Overview...............................................................................................................................................................................57Accessing Assessments Menu............................................................................................................................................57Adding an Assessment........................................................................................................................................................58
Mapping Associated Evaluations...............................................................................................................................59Adding Assessment Score and Outcome .................................................................................................................60Adding Action Parameters and Schedule .................................................................................................................61
Exporting an Assessment...................................................................................................................................................61................................................................................................................................................................................................62Searching an Assessment....................................................................................................................................................62Editing an Assessment........................................................................................................................................................62Deleting an Assessment......................................................................................................................................................62
CHAPTER 10 Executing an Assessment Batch ................................................. 63
Overview...............................................................................................................................................................................63Executing an Assessment Batch................................................................................ through Rules Run Framework63
Creating a Process ........................................................................................................................................................63Creating a Hierarchy filter...........................................................................................................................................66Creating a Run and Executing it ................................................................................................................................69
Executing an Assessment Batch through Operations ...................................................................................................74
CHAPTER 11 Displaying Assessment Results .................................................... 1
Overview.................................................................................................................................................................................1Accessing Assessments Results ...........................................................................................................................................1Displaying Assessments Results ..........................................................................................................................................2
CHAPTER 12 Managing Import and Export Utilities ............................................ 3
Overview.................................................................................................................................................................................3Import Functionality .............................................................................................................................................................3..................................................................................................................................................................................................3Export Functionality .............................................................................................................................................................4
APPENDIX A Configuring a User Defined Function in IPE ................................ 5
Configuring a User Defined Function in RTI...................................................................................................................5Configuring any User defined function..............................................................................................................................6
APPENDIX B Configuring a User Defined Assessment ..................................... 7
Example Scenario: ......................................................................................................................................................7Focus ..........................................................................................................................................................................7Scenario Class .............................................................................................................................................................7Scenario Objective........................................................................................................................................................7Alert Generation.........................................................................................................................................................7
vi Inline Processing Engine User Guide

Contents
Filters .........................................................................................................................................................................9Data Streams of Interest..............................................................................................................................................9
Inline Processing Engine User Guide vii

Contents
viii Inline Processing Engine User Guide

List of Figures
Figure 1. IPE Workflow...............................................................................................................................................................2Figure 2. OFSAA Login page .....................................................................................................................................................5Figure 3. OFSAA Home page.....................................................................................................................................................6Figure 4. Figure 4: Object Administration tab .........................................................................................................................8Figure 5. Sandbox tab...................................................................................................................................................................9Figure 6. System Configuration and Identity Management Tab..........................................................................................10Figure 7. OFSAA Home page (Inline Processing Engine)...................................................................................................10Figure 8. Association and Configuration page .......................................................................................................................13Figure 9. Processing Segments page ........................................................................................................................................14Figure 10. Adding Processing Segment ...................................................................................................................................15Figure 11. Modifying Processing Segment ..............................................................................................................................16Figure 12. Business Entities page .............................................................................................................................................17Figure 13. Adding Business Entities ........................................................................................................................................17Figure 14. Adding Business Entity Details..............................................................................................................................18Figure 15. Synchronizing Business Entities ............................................................................................................................19Figure 16. Importing Tables page.............................................................................................................................................20Figure 17. Updating Table .........................................................................................................................................................21Figure 18. Updating Business Entity Attributes.....................................................................................................................22Figure 19. Inline Datasets Details page ...................................................................................................................................23Figure 20. Adding Inline Dataset..............................................................................................................................................23Figure 21. Traversal Paths Details page ...................................................................................................................................26Figure 22. Adding Traversal Path .............................................................................................................................................26Figure 23. Expressions Details page ........................................................................................................................................30Figure 24. Adding an Expression .............................................................................................................................................30Figure 25. Variable page .............................................................................................................................................................31Figure 26. Adding Variables ......................................................................................................................................................32Figure 27. Associated metadata of Expression Details page................................................................................................33Figure 28. Post Processing Actions Details page ...................................................................................................................36Figure 29. Adding a Post Processing Action ..........................................................................................................................36Figure 30. Adding an Action Parameter ..................................................................................................................................37Figure 31. Profiles Details page ................................................................................................................................................40Figure 32. Adding a Profile........................................................................................................................................................41Figure 33. Virtual Profile Details page.....................................................................................................................................45Figure 34. Adding a Virtual Profile ..........................................................................................................................................46Figure 35. Evaluation Details page...........................................................................................................................................52Figure 36. Adding an Evaluation ..............................................................................................................................................53Figure 37. Assessment Details page .........................................................................................................................................58Figure 38. Adding an Assessment ............................................................................................................................................59Figure 39. Assessment Evaluation Window............................................................................................................................60
Installation Guide - Stage 3 Release 6.2.1 ix
List of Figures
Figure 40. Process Definition page ..........................................................................................................................................64Figure 41. Process Details Run Rule Framework page .........................................................................................................64Figure 42. Folder Selector window...........................................................................................................................................65Figure 43. Process RRF..............................................................................................................................................................65Figure 44. Build Hierarchy page ...............................................................................................................................................66Figure 45. Adding Business Hierarchy Details .......................................................................................................................67Figure 46. Entity and Attribute details page ...........................................................................................................................68Figure 47. Adding Hierarchy Levels.........................................................................................................................................68Figure 48. Run definition page..................................................................................................................................................69Figure 49. New Run Definition details page...........................................................................................................................70Figure 50. Job RRF window ......................................................................................................................................................71Figure 51. Jobs for Run RRF page ...........................................................................................................................................71Figure 52. Hierarchy Browser window ....................................................................................................................................72Figure 53. Job Hierarchy RRF page .........................................................................................................................................72Figure 54. Fire Run Page............................................................................................................................................................73Figure 55. Fire Run Details Page ..............................................................................................................................................73Figure 56. Assessments Details Page .........................................................................................................................................1Figure 57. Assessment Results page...........................................................................................................................................2
x Installation Guide - Stage 1 Release 6.2.1

Preface
This guide explains the concept behind the Inline Processing Engine (IPE) and step-by-step instruction to use the framework.
This preface includes the following topics.
Audience
Related Documents
Conventions
Audience
This guide is intended for the following users:
Business Users and Administrators who are instrumental in solution designing and creation of statistical models using historical data and also to maintain and execute batches, make the Infrastructure Application secure and operational.
Related Documents
For more information about the Inline Processing Engine, refer to the following documents in OHC:
OFS Inline Processing Engine Configuration Guide 8.0.1.0.0
OFS Inline Processing Engine Sample Application Installation Guide 8.0.1.0.0
OFS Advanced Analytical Applications Infrastructure Application Pack Installation and Configuration Guide 8.0.1.0.0
OFS Analytical Applications Environment Check Utility Guide 8.0.1.0.0
Inline Processing Engine User Guide xi
ConventionsPreface
Conventions
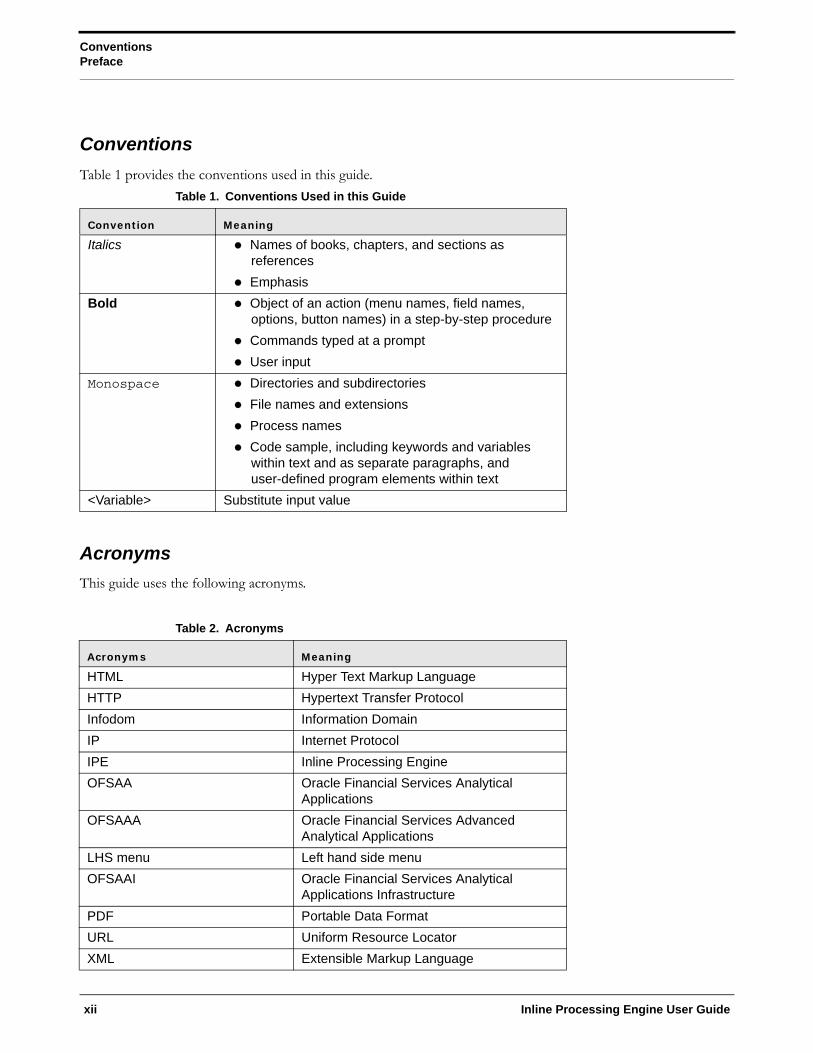
Table 1 provides the conventions used in this guide.
Acronyms
This guide uses the following acronyms.
Table 1. Conventions Used in this Guide
Convention Meaning
Italics Names of books, chapters, and sections as references
Emphasis
Bold Object of an action (menu names, field names, options, button names) in a step-by-step procedure
Commands typed at a prompt
User input
Monospace Directories and subdirectories
File names and extensions
Process names
Code sample, including keywords and variables within text and as separate paragraphs, and user-defined program elements within text
<Variable> Substitute input value
Table 2. Acronyms
Acronyms Meaning
HTML Hyper Text Markup Language
HTTP Hypertext Transfer Protocol
Infodom Information Domain
IP Internet Protocol
IPE Inline Processing Engine
OFSAA Oracle Financial Services Analytical Applications
OFSAAA Oracle Financial Services Advanced Analytical Applications
LHS menu Left hand side menu
OFSAAI Oracle Financial Services Analytical Applications Infrastructure
PDF Portable Data Format
URL Uniform Resource Locator
XML Extensible Markup Language
xii Inline Processing Engine User Guide
AcronymsPreface
Inline Processing Engine User Guide xiii
AcronymsPreface
xiv Inline Processing Engine User Guide
CHAPTER 1 About Inline Processing Engine (IPE)
The Oracle Financial Services Inline Processing Engine application creates an infrastructure for real time monitoring of incoming messages. This capability will enable you to identify fraud events earlier, avert more losses, and minimize customer service and retention issues.
This chapter covers the following topics:
Overview
Workflow of Inline Processing Engine application
Users and User Groups
Overview
The Inline Processing Engine supports the ability to rapidly provide knowledge of related suspicious behavior back to individual business units, and even alert customers about any unpredicted activity.
This capability helps to identify events earlier, avert more losses, and minimize customer service and retention issues. This combination of real-time detection and interdiction, real-time alert correlation, and sophisticated behavior detection provided by the application, will result in a competitive fraud prevention offering.
The system uses cases from risk and performance OFSAA Applications, where real time monitoring is required.
Key Features
The Inline Processing Application has the following key features:
Association and Configuration- The Association and Configuration menu has the following sections:
Processing Segments
Business Entities
Inline Datasets
Traversal Path
Expressions - Expressions are used in Evaluation scoring and Filters.
Post Processing Actions - Post Processing Actions are the actions which can be triggered by the outcome of the Assessment.
Profiles - A profile is an aggregation of information. Profiles can be based on different grouping entities (for example, account, customer, and so on). This can be filtered to only look at particular kinds of transactions. Profiles can be based on time (last three months) or transaction counts (last 100 transactions).
Inline Processing Engine User Guide 1
Workflow of Inline Processing Engine applicationChapter 1—About Inline Processing Engine
Evaluations - An assessment is made up of multiple individual evaluations. These evaluations start with information on the incoming transaction and check logical conditions.
Assessments - When a transaction is received, an Assessment is performed. The assessment is a collection of individual evaluations, each of which can return a score.
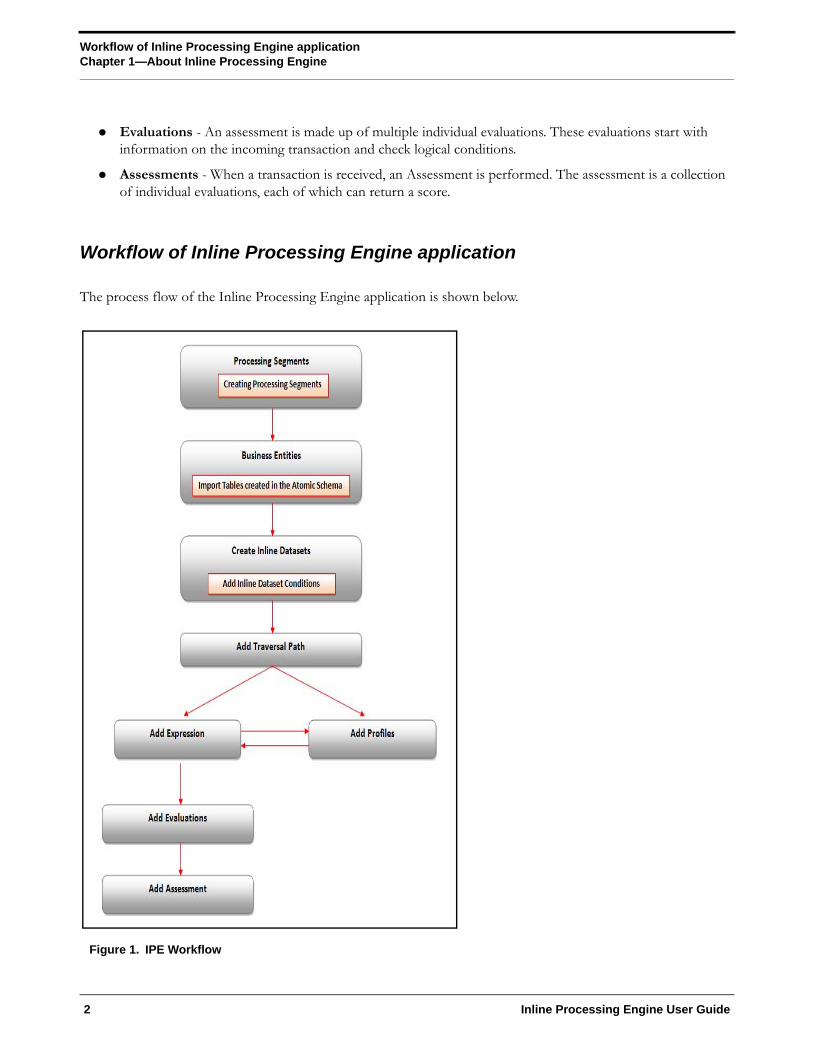
Workflow of Inline Processing Engine application
The process flow of the Inline Processing Engine application is shown below.
Figure 1. IPE Workflow
2 Inline Processing Engine User Guide

Users and User GroupsChapter 1—About Inline Processing Engine
Users and User Groups
The Inline Processing Engine application consists of the following users and their actions:
Users
IPE Administrators who maintain and execute batches, make the Infrastructure Application secure and operational, and configure users and security.
User Groups
The user group IPEADMN must be mapped to the user to access IPE.
Inline Processing Engine User Guide 3

Users and User GroupsChapter 1—About Inline Processing Engine
4 Inline Processing Engine User Guide
CHAPTER 2 Getting Started
This chapter describes how to get started with Inline Processing Engine.
This chapter discusses the following topics:
Accessing OFSAA Applications
Navigating to Inline Processing Engine Home Page
Using Common Buttons in IPE
Accessing OFSAA Applications
To access the OFSAA Applications, follow these steps.
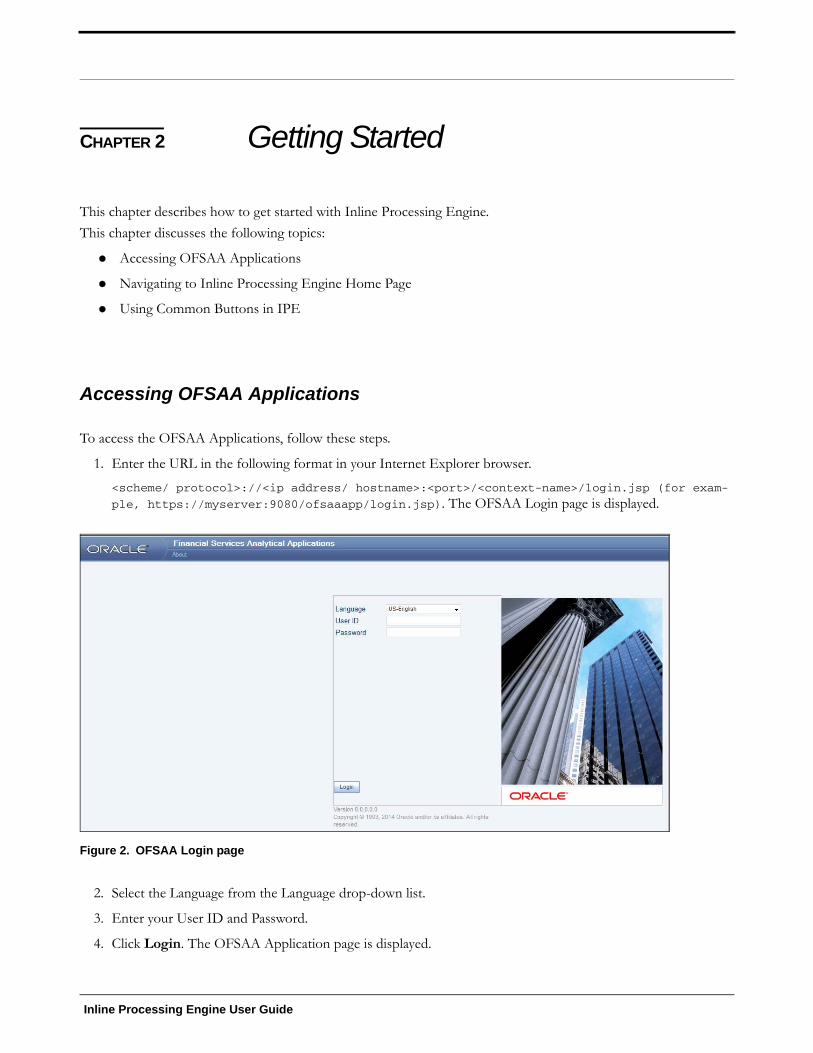
1. Enter the URL in the following format in your Internet Explorer browser.
<scheme/ protocol>://<ip address/ hostname>:<port>/<context-name>/login.jsp (for exam-
ple, https://myserver:9080/ofsaaapp/login.jsp). The OFSAA Login page is displayed.
Figure 2. OFSAA Login page
2. Select the Language from the Language drop-down list.
3. Enter your User ID and Password.
4. Click Login. The OFSAA Application page is displayed.
Inline Processing Engine User Guide

Accessing OFSAA ApplicationsChapter 2–Getting Started
Figure 3. OFSAA Home page
The OFSAA Home page has multiple tabs and each tab has specific links to OFSAA Infrastructure and/or Application modules. Depending on the user roles, you are mapped and depending on the OFSAA Application you select, the relevant tabs and links are displayed.
This page contains the following sections:
Top menu
Left Hand Side (LHS)
Right Hand Side (RHS)
Top Menu
This section displays the logged in User information and Information Domain. The Top menu contains the following buttons:
Last Login Date: This option allows you to view the last login date and time. It also displays the last failed login date and time.
Connected To: This option allows you to view the Information Domain you are connected to and the Environment Details set in the Configuration page.
Language: This option allows you to view the language selected.
6 Inline Processing Engine User Guide
Accessing OFSAA ApplicationsChapter 2–Getting Started
User Name: Displays the user name of the person logged in. click the user name to view the following options:
Preferences: This option allows you to set the Home Page.
About: This option displays the copyright information.
Change Password: This option opens the Change Password window.
Logout: This option allows you to log out of the application.
Left Hand Side (LHS)
This section displays the menu which allows you to navigate to the required module. The items displayed in the Menu depend upon the access rights of the logged in user.
The LHS menu changes depending on the application selected from the Select Application drop-down list. For more details, refer to the Oracle Financial Services Analytical Application Infrastructure User Guide.
When you select Financial Services Inline Processing Engine, the following menu items are displayed in the Home Page:
Applications Tab
Object Administration Tab
Sandbox Tab
System Configuration and Identity Management Tab
Applications Tab
The following menu items are available in the Applications tab:
Financial Services Inline Processing Engine
Inline Processing
Inline Processing Reports
Data Management
For more information, refer to the Oracle Financial Services Analytical Applications Infrastructure User Guide.
Data Management Framework
For more information, refer to the Oracle Financial Services Analytical Applications Infrastructure User Guide.
IPE Execution
This module allows the user to execute an assessment in IPE. For more information, refer to the Rules Run Framework module and Operation module in Oracle Financial Services Analytical Applications Infrastructure User Guide. To execute the assessment in batch mode for IPE, refer Executing an Assessment Batch.
Metadata Browser
For more information, refer to the Oracle Financial Services Analytical Applications Infrastructure User Guide.
Inline Processing Engine User Guide

Accessing OFSAA ApplicationsChapter 2–Getting Started
Common Tasks
For more information, refer to the Oracle Financial Services Analytical Applications Infrastructure User Guide.
Data Model Management
Unified Analytical Metadata
Object Administration Tab
Object Administration is an integral part of the Infrastructure system and facilitates system administrators to define the security framework with the capacity to restrict access to the data and metadata in the warehouse, based on a flexible, fine-grained access control mechanism. These activities are mainly done at the initial stage and later, when required.
This document deals with the information related to the workflow of Infrastructure Administration process with associated procedures to assist, configure, and manage the administrative tasks effectively.
The Object Administration tab lists the various OFSAA Information Domains created in the OFSAA setup based on the logged in user and the mapped OFSAA Application User Group(s).
To access the Object Administration tab, select the required Information Domains from the Select Information Domains drop-down list.
Based on your selection, the page refreshes the menus and links across the pane.
Figure 4. Figure 4: Object Administration tab
Sandbox Tab
Sandbox is a restricted environment in which you can analyze the data on a trial and errors basis and come up with actual analysis that helps predict the risks and business opportunities for banking institutions. You can create a sandbox by selecting the required datasets and the information domain which you want to implement as the sandbox.
The Sandbox tab lists the various Sandboxes created in the OFSAA setup based on the logged in user and mapped OFSAA Application User Group(s).
To access the Sandbox tab, select the required Sandbox from the Select Sandbox drop-down list.
8 Inline Processing Engine User Guide

Accessing OFSAA ApplicationsChapter 2–Getting Started
Figure 5. Sandbox tab
System Configuration and Identity Management Tab
System Configuration and Object Administration is an integral part of Infrastructure administration process and facilitates System Administrators to provide security and operational framework required for Infrastructure.
System Administrators can configure the Server details, Database details, OLAP details, and Information Domain along with the other Configuration process such as segment and metadata mapping, mapping segment to security and rules setup. System Configuration is mostly a one time activity which helps System administrator to make the Infrastructure system operational for use.
The System Configuration and Identity Management tab lists the OFSAA Infrastructure System Configuration and Identity Management modules.
The Create New Application feature allows you (System Administrator) to create a new Application other than the standard OFSAA Applications and associate the standard/default platform framework menu with it, thereby enabling the new application for usage. The standard platform framework menu is seeded and rendered.
After you create an Application, a new Role is created as <APP_CODE>ACC. This role along with the IPE Write role (RTIADMIN) need to be mapped to the user group IPEADMN. The users mapped to that user group will get the new Application listed in the Select Applications drop-down from the Applications tab. Only Enabled applications are listed in the drop-down list.
To access the System Configuration and Identity Management tab, select the required Information Domains from the Select Information Domains drop-down list.
Based on your selection, the page refreshes the menus and links across the pane.
Inline Processing Engine User Guide
Navigating to Inline Processing Engine Home PageChapter 2–Getting Started
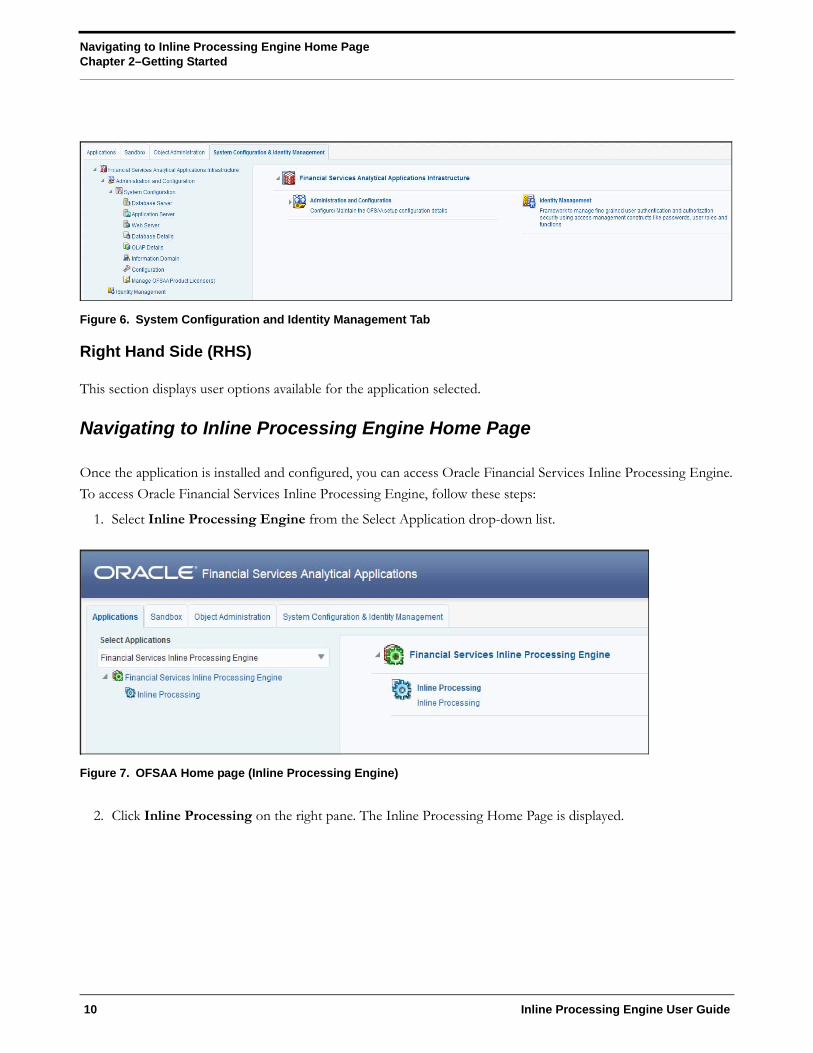
Figure 6. System Configuration and Identity Management Tab
Right Hand Side (RHS)
This section displays user options available for the application selected.
Navigating to Inline Processing Engine Home Page
Once the application is installed and configured, you can access Oracle Financial Services Inline Processing Engine.
To access Oracle Financial Services Inline Processing Engine, follow these steps:
1. Select Inline Processing Engine from the Select Application drop-down list.
Figure 7. OFSAA Home page (Inline Processing Engine)
2. Click Inline Processing on the right pane. The Inline Processing Home Page is displayed.
10 Inline Processing Engine User Guide

Using Common Buttons in IPEChapter 2–Getting Started
Using Common Buttons in IPE
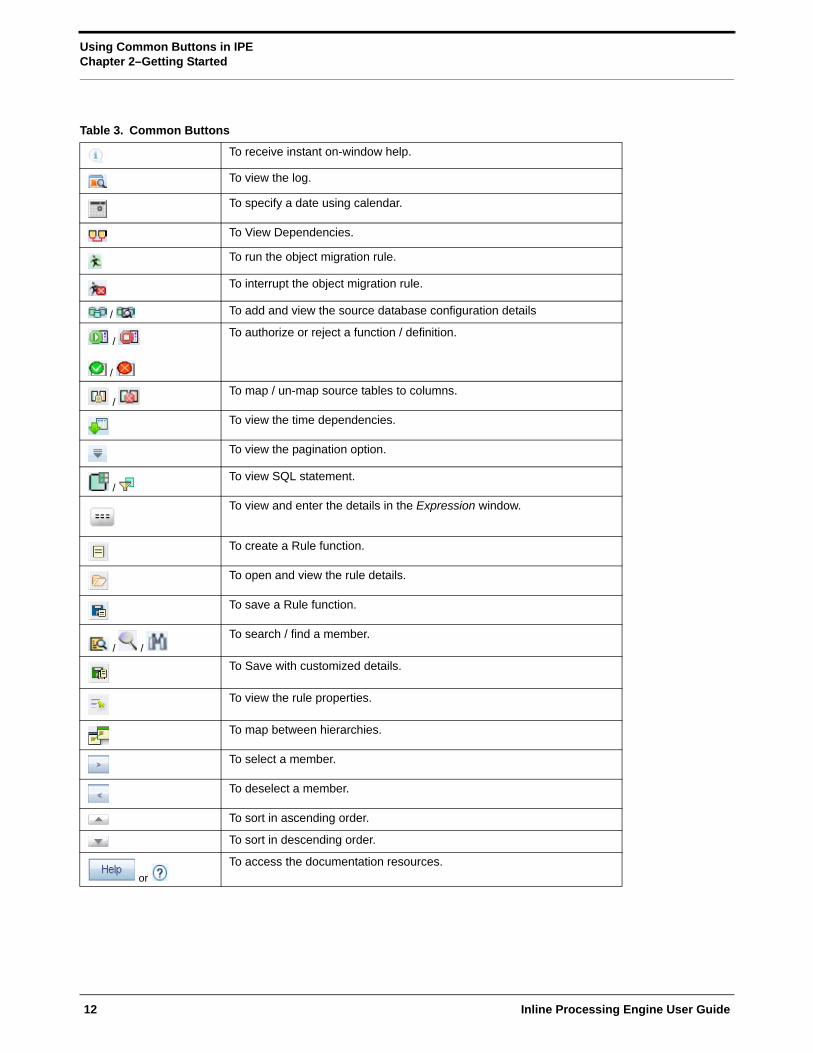
Table 3. Common Buttons
Button Description
To create a function.
To view the details of a function.
To edit the details of a function.
To clear the fields and reset to default values.
To select a new member.
To select a filter / run condition/ define sub process.
To select a source / component / job.
To select a hierarchies / measures / job condition.
To set precedence for members.
To execute a Run definition.
To select hierarchical members
To delete a function.
To select the entities.
To validate grid data.
To save the details.
/ / To view the properties.
To Refresh the grid details.
To erase a specific value.
To define an expression.
To generate source model.
To add attributes / add Source Configuration / Authorize a function.
To generate Source Models.
To generate a logic and view the SQL query / check syntax of the stored procedure.
To add the source database configuration details.
To view the dependencies of the selected Object.
/ To Export data.
To trace a definition details.
Inline Processing Engine User Guide
Using Common Buttons in IPEChapter 2–Getting Started
To receive instant on-window help.
To view the log.
To specify a date using calendar.
To View Dependencies.
To run the object migration rule.
To interrupt the object migration rule.
/ To add and view the source database configuration details
/
/
To authorize or reject a function / definition.
/ To map / un-map source tables to columns.
To view the time dependencies.
To view the pagination option.
/ To view SQL statement.
To view and enter the details in the Expression window.
To create a Rule function.
To open and view the rule details.
To save a Rule function.
/ / To search / find a member.
To Save with customized details.
To view the rule properties.
To map between hierarchies.
To select a member.
To deselect a member.
To sort in ascending order.
To sort in descending order.
or
To access the documentation resources.
Table 3. Common Buttons
12 Inline Processing Engine User Guide
CHAPTER 3 Association and Configuration
This chapter provides detailed information about Association and Configuration functionality and step-by-step instructions to use this module.
Association and Configuration allows a user to define the base metadata required for usage of other components of IPE.
This chapter discusses the following topics:
Accessing Association and Configuration Menu
Managing Processing Segments
Managing Business Entities
Managing Inline Datasets
Managing Traversal Paths
Accessing Association and Configuration Menu
To access the Association and Configuration menu, follow these steps:
1. Navigate to the Inline Processing Home Page.
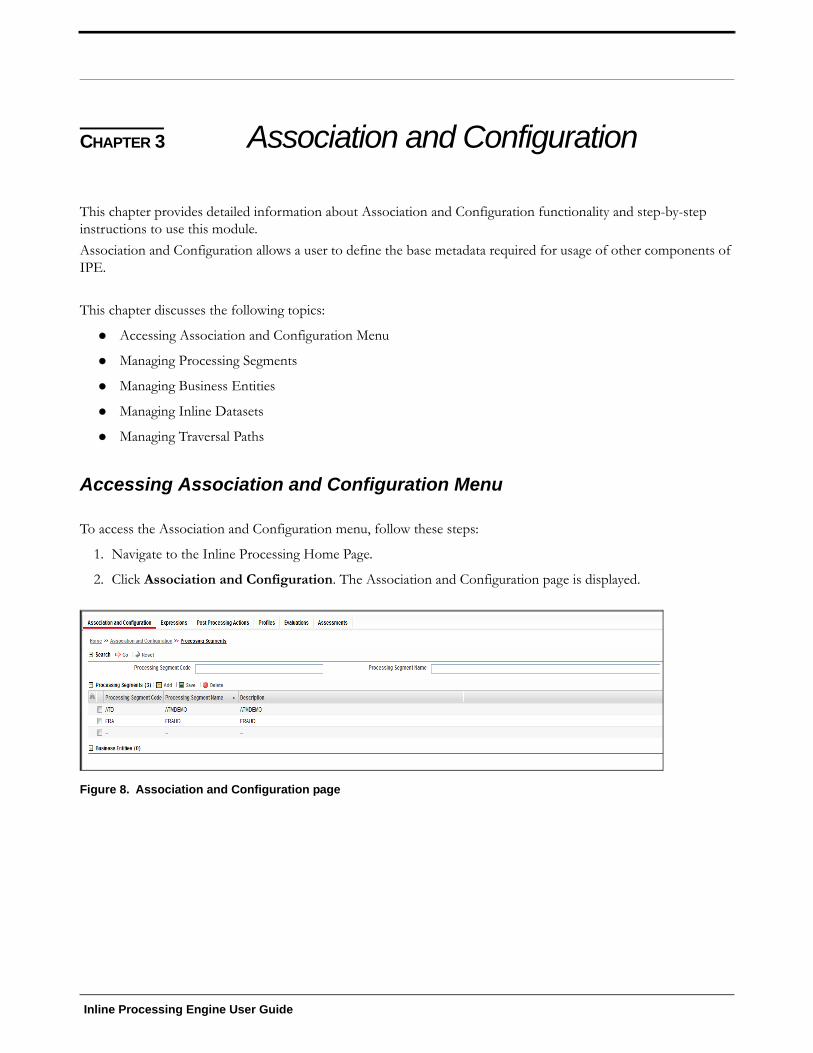
2. Click Association and Configuration. The Association and Configuration page is displayed.
Figure 8. Association and Configuration page
Inline Processing Engine User Guide

Managing Processing SegmentsChapter 3–Managing Association and Configuration
Managing Processing Segments
Processing segments allows the user to logically group the metadata required for Assessments and its sub-components. Through Processing Segments, you can add and save a new segment or search for existing segments (for modification) or remove a segment.
This section covers the following topics:
Accessing Processing Segments
Adding Processing Segment
Searching Processing Segment
Editing Processing Segment
Deleting Processing Segment
Accessing Processing Segments
To access the Processing Segment page, follow these steps:
1. Navigate to the Inline Processing Home Page.
2. On the Association and Configuration menu, click Processing Segments. The Processing Segments page is displayed.
Figure 9. Processing Segments page
Adding Processing Segment
This option allows you to add a new processing segment, which is used to classify all the metadata in the selected Infodom logically.
To add a Processing Segment, follow these steps:
1. Navigate to the Processing Segments page.
14 Inline Processing Engine User Guide
Managing Processing SegmentsChapter 3–Managing Association and Configuration
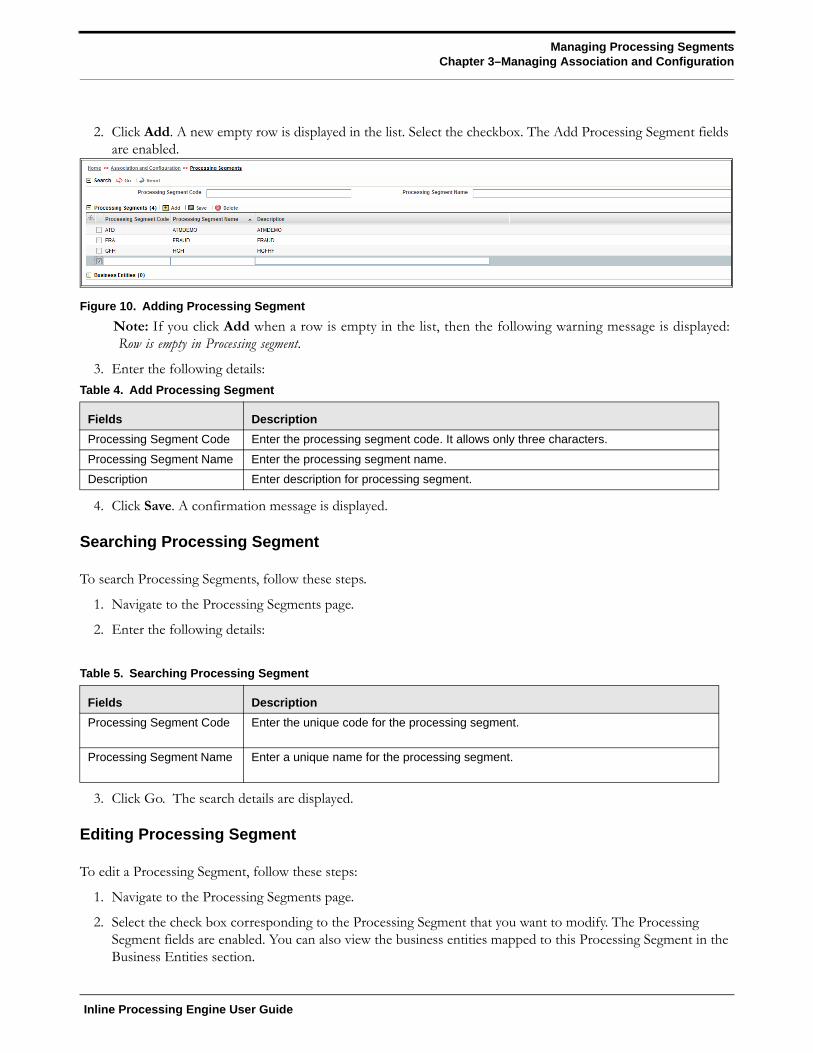
2. Click Add. A new empty row is displayed in the list. Select the checkbox. The Add Processing Segment fields are enabled.
Figure 10. Adding Processing Segment
Note: If you click Add when a row is empty in the list, then the following warning message is displayed: Row is empty in Processing segment.
3. Enter the following details:
4. Click Save. A confirmation message is displayed.
Searching Processing Segment
To search Processing Segments, follow these steps.
1. Navigate to the Processing Segments page.
2. Enter the following details:
3. Click Go. The search details are displayed.
Editing Processing Segment
To edit a Processing Segment, follow these steps:
1. Navigate to the Processing Segments page.
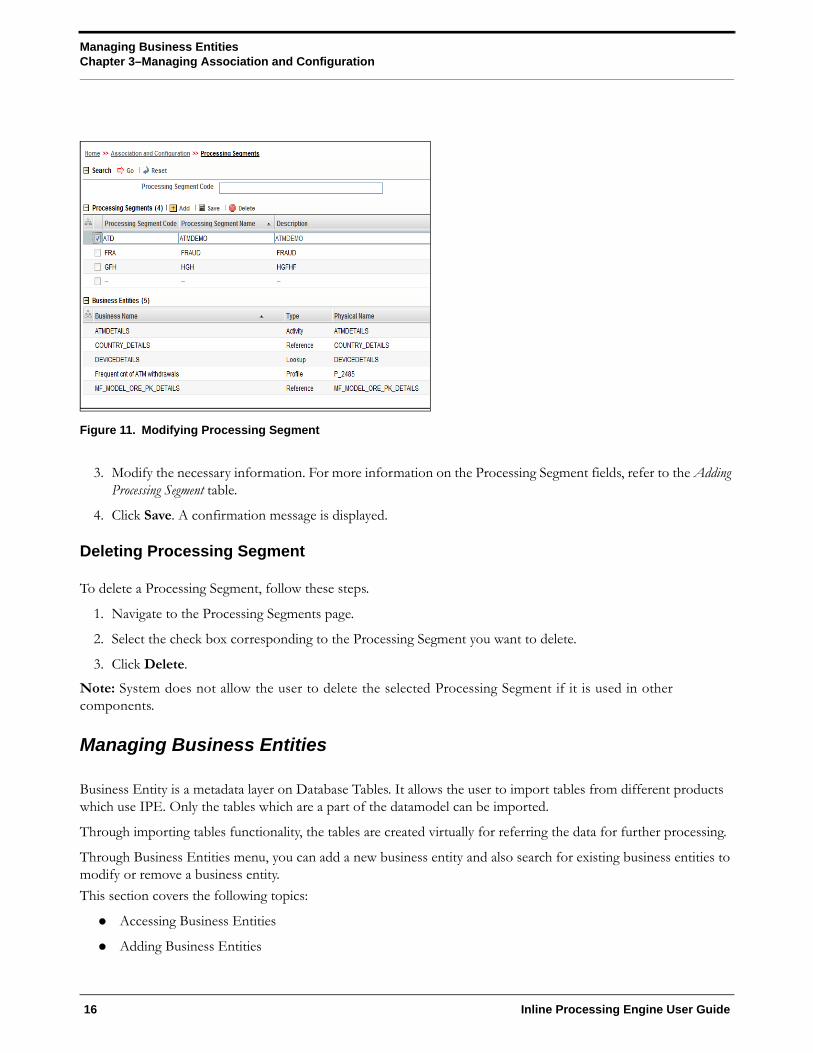
2. Select the check box corresponding to the Processing Segment that you want to modify. The Processing Segment fields are enabled. You can also view the business entities mapped to this Processing Segment in the Business Entities section.
Table 4. Add Processing Segment
Fields Description
Processing Segment Code Enter the processing segment code. It allows only three characters.
Processing Segment Name Enter the processing segment name.
Description Enter description for processing segment.
Table 5. Searching Processing Segment
Fields Description
Processing Segment Code Enter the unique code for the processing segment.
Processing Segment Name Enter a unique name for the processing segment.
Inline Processing Engine User Guide
Managing Business EntitiesChapter 3–Managing Association and Configuration
Figure 11. Modifying Processing Segment
3. Modify the necessary information. For more information on the Processing Segment fields, refer to the Adding Processing Segment table.
4. Click Save. A confirmation message is displayed.
Deleting Processing Segment
To delete a Processing Segment, follow these steps.
1. Navigate to the Processing Segments page.
2. Select the check box corresponding to the Processing Segment you want to delete.
3. Click Delete.
Note: System does not allow the user to delete the selected Processing Segment if it is used in other components.
Managing Business Entities
Business Entity is a metadata layer on Database Tables. It allows the user to import tables from different products which use IPE. Only the tables which are a part of the datamodel can be imported.
Through importing tables functionality, the tables are created virtually for referring the data for further processing.
Through Business Entities menu, you can add a new business entity and also search for existing business entities to modify or remove a business entity.
This section covers the following topics:
Accessing Business Entities
Adding Business Entities
16 Inline Processing Engine User Guide

Managing Business EntitiesChapter 3–Managing Association and Configuration
Searching Business Entity
Editing Business Entity
Deleting Business Entity
Importing Tables
Updating Table Details
Updating Business Entity Attributes
Accessing Business Entities
To access the Processing Segment page, follow these steps:
1. Navigate to the Inline Processing Home Page.
2. On the Association and Configuration menu, click Business Entities. The Business Entities page is displayed.
Figure 12. Business Entities page
Adding Business Entities
To add Business Entities, follow these steps:
1. Navigate to the Business Entities page.
Figure 13. Adding Business Entities
2. Select the table you wish to add as a business entity to from the Choose Table drop-down list.
Inline Processing Engine User Guide
Managing Business EntitiesChapter 3–Managing Association and Configuration
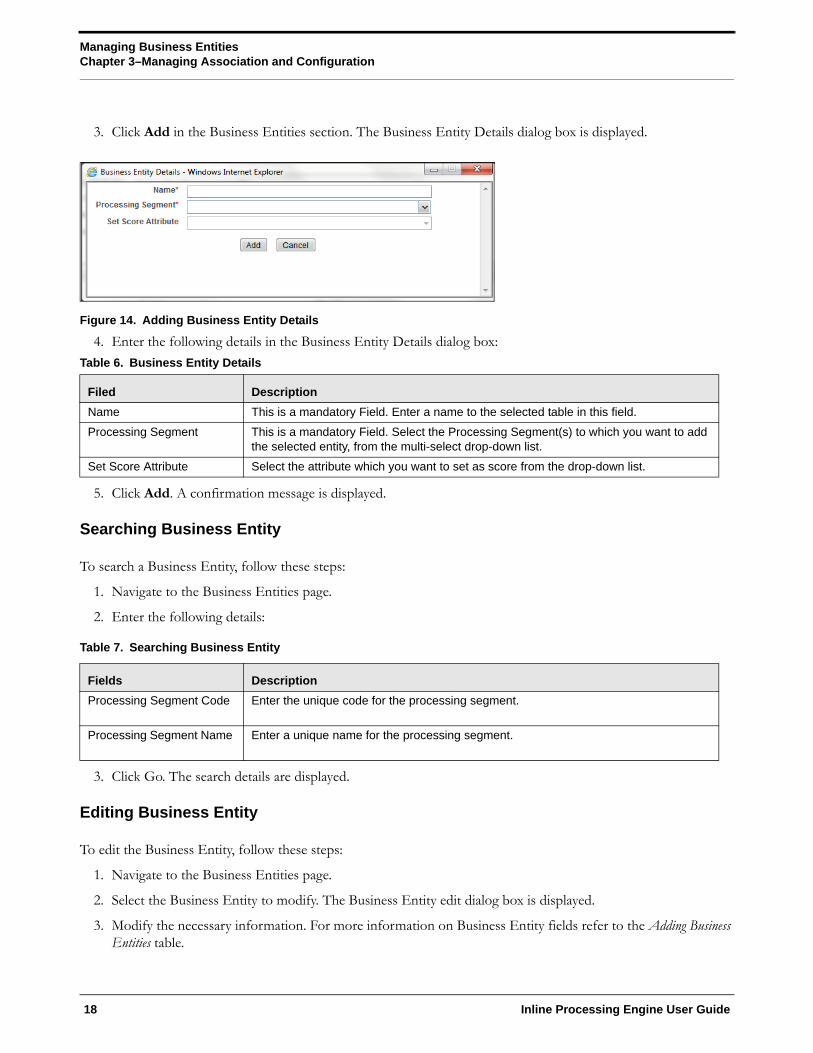
3. Click Add in the Business Entities section. The Business Entity Details dialog box is displayed.
Figure 14. Adding Business Entity Details
4. Enter the following details in the Business Entity Details dialog box:
5. Click Add. A confirmation message is displayed.
Searching Business Entity
To search a Business Entity, follow these steps:
1. Navigate to the Business Entities page.
2. Enter the following details:
Table 7. Searching Business Entity
3. Click Go. The search details are displayed.
Editing Business Entity
To edit the Business Entity, follow these steps:
1. Navigate to the Business Entities page.
2. Select the Business Entity to modify. The Business Entity edit dialog box is displayed.
3. Modify the necessary information. For more information on Business Entity fields refer to the Adding Business Entities table.
Table 6. Business Entity Details
Filed Description
Name This is a mandatory Field. Enter a name to the selected table in this field.
Processing Segment This is a mandatory Field. Select the Processing Segment(s) to which you want to add the selected entity, from the multi-select drop-down list.
Set Score Attribute Select the attribute which you want to set as score from the drop-down list.
Fields Description
Processing Segment Code Enter the unique code for the processing segment.
Processing Segment Name Enter a unique name for the processing segment.
18 Inline Processing Engine User Guide

Managing Business EntitiesChapter 3–Managing Association and Configuration
4. Click Save. A confirmation message is displayed.
Deleting Business Entity
This option allows you to delete a Business Entity which is not required.
To delete Business Entity, follow these steps.
1. Navigate to the Business Entities page.
2. Select the Business Entity to delete.
3. Click Delete.
Note: System does not allow the user to delete the selected Business Entity if it is used in other components.
Synchronizing Business Entities
To synchronize business entities, follow these steps:
1. Navigate to the Business Entities page.
2. Select the table from the Choose Table drop-down list.
3. Click Synchronize in the Business Entities section. The Synchronize Business Entities dialog box is displayed.
Figure 15. Synchronizing Business Entities
4. Select the business attributes from the Existing Attributes and New Attributes sections that have to be synchronized.
5. Click Save. A confirmation message is displayed.
Importing Tables
This option allows you to import database tables to Inline Processing. All the tables available in the data model can be imported to Inline Processing.
To import a Table, follow these steps:
1. Navigate to the Business Entities page.
2. Go to Select Table section. Click Import Table. The Import Table page is displayed.
Inline Processing Engine User Guide
Managing Business EntitiesChapter 3–Managing Association and Configuration
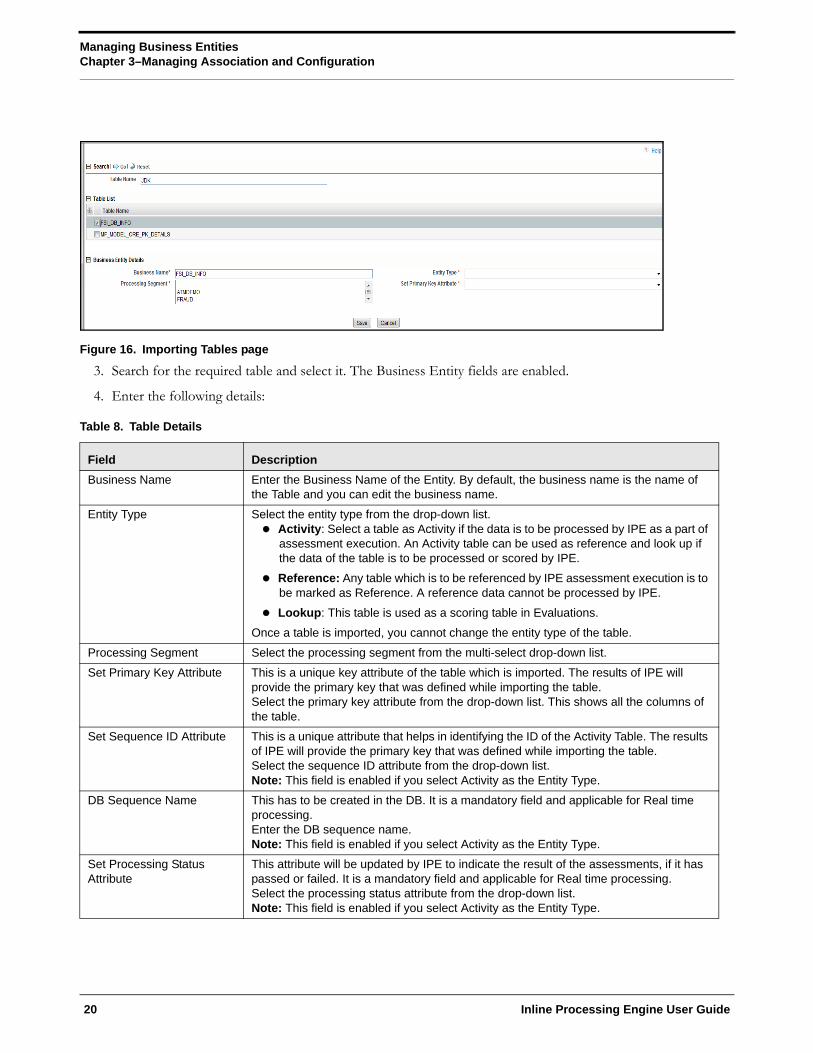
Figure 16. Importing Tables page
3. Search for the required table and select it. The Business Entity fields are enabled.
4. Enter the following details:
Table 8. Table Details
Field Description
Business Name Enter the Business Name of the Entity. By default, the business name is the name of the Table and you can edit the business name.
Entity Type Select the entity type from the drop-down list. Activity: Select a table as Activity if the data is to be processed by IPE as a part of
assessment execution. An Activity table can be used as reference and look up if the data of the table is to be processed or scored by IPE.
Reference: Any table which is to be referenced by IPE assessment execution is to be marked as Reference. A reference data cannot be processed by IPE.
Lookup: This table is used as a scoring table in Evaluations.
Once a table is imported, you cannot change the entity type of the table.
Processing Segment Select the processing segment from the multi-select drop-down list.
Set Primary Key Attribute This is a unique key attribute of the table which is imported. The results of IPE will provide the primary key that was defined while importing the table. Select the primary key attribute from the drop-down list. This shows all the columns of the table.
Set Sequence ID Attribute This is a unique attribute that helps in identifying the ID of the Activity Table. The results of IPE will provide the primary key that was defined while importing the table.Select the sequence ID attribute from the drop-down list. Note: This field is enabled if you select Activity as the Entity Type.
DB Sequence Name This has to be created in the DB. It is a mandatory field and applicable for Real time processing.Enter the DB sequence name.Note: This field is enabled if you select Activity as the Entity Type.
Set Processing Status Attribute
This attribute will be updated by IPE to indicate the result of the assessments, if it has passed or failed. It is a mandatory field and applicable for Real time processing.Select the processing status attribute from the drop-down list. Note: This field is enabled if you select Activity as the Entity Type.
20 Inline Processing Engine User Guide
Managing Business EntitiesChapter 3–Managing Association and Configuration
5. Click Save. A confirmation message is displayed.
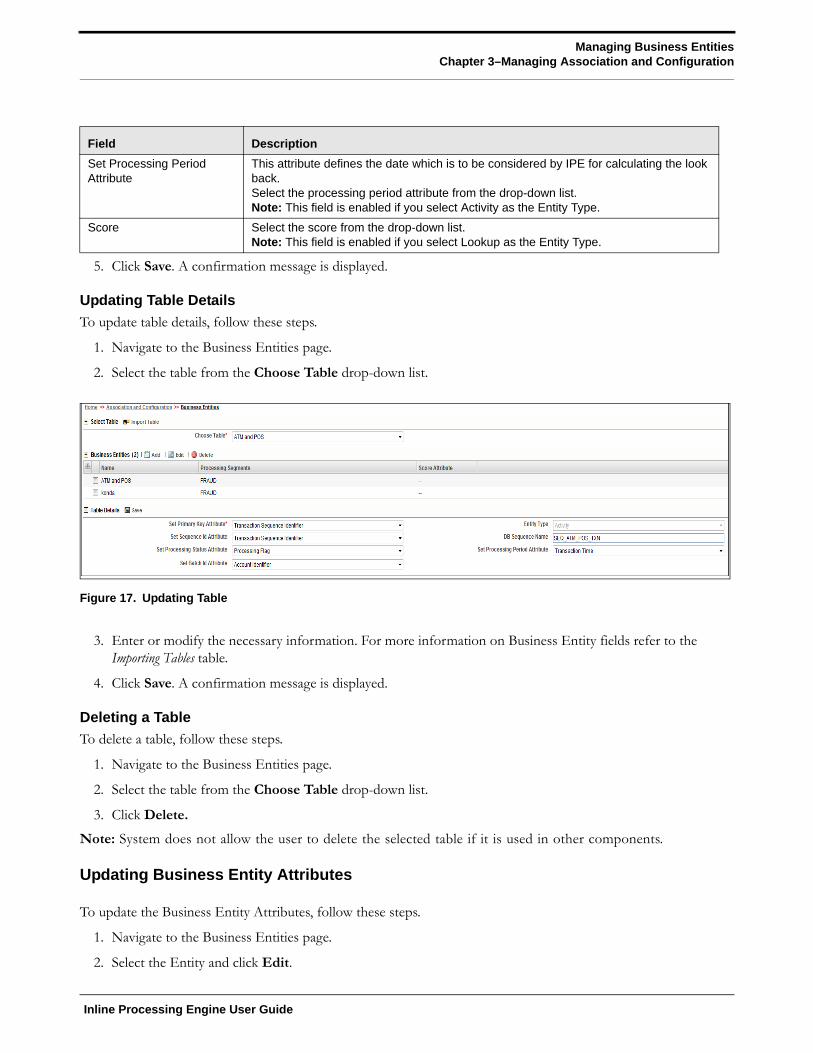
Updating Table Details
To update table details, follow these steps.
1. Navigate to the Business Entities page.
2. Select the table from the Choose Table drop-down list.
Figure 17. Updating Table
3. Enter or modify the necessary information. For more information on Business Entity fields refer to the Importing Tables table.
4. Click Save. A confirmation message is displayed.
Deleting a Table
To delete a table, follow these steps.
1. Navigate to the Business Entities page.
2. Select the table from the Choose Table drop-down list.
3. Click Delete.
Note: System does not allow the user to delete the selected table if it is used in other components.
Updating Business Entity Attributes
To update the Business Entity Attributes, follow these steps.
1. Navigate to the Business Entities page.
2. Select the Entity and click Edit.
Set Processing Period Attribute
This attribute defines the date which is to be considered by IPE for calculating the look back.Select the processing period attribute from the drop-down list. Note: This field is enabled if you select Activity as the Entity Type.
Score Select the score from the drop-down list. Note: This field is enabled if you select Lookup as the Entity Type.
Field Description
Inline Processing Engine User Guide
Managing Inline DatasetsChapter 3–Managing Association and Configuration
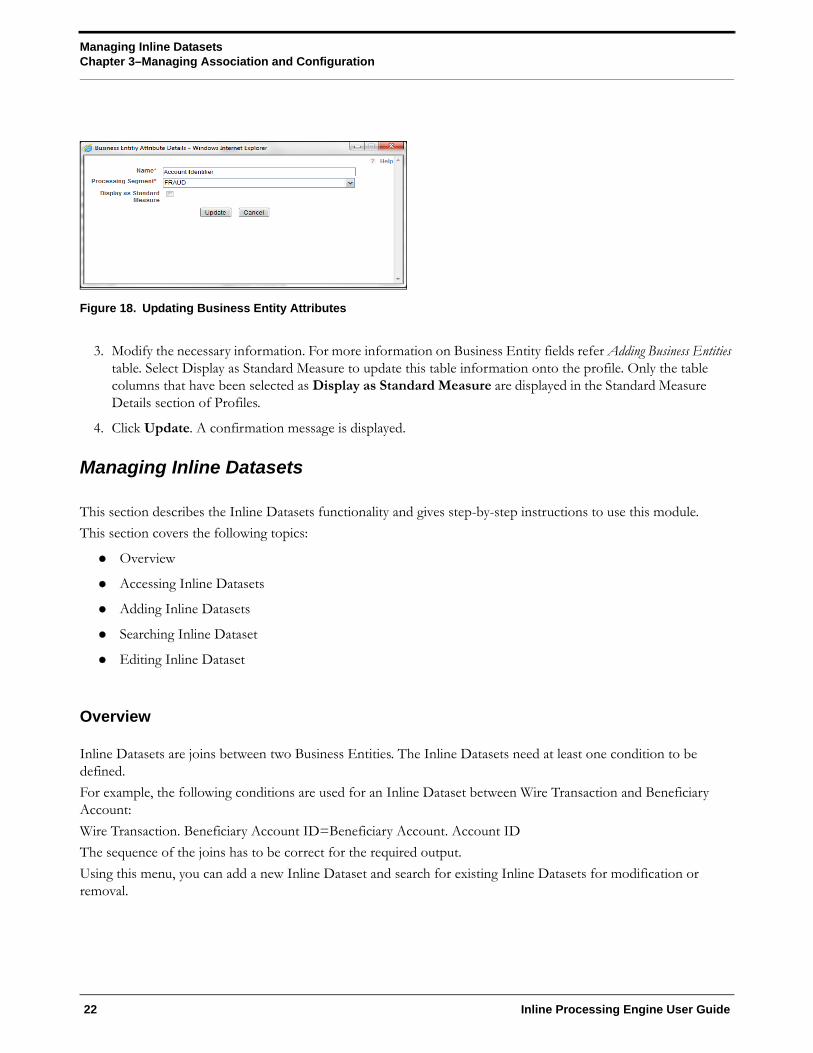
Figure 18. Updating Business Entity Attributes
3. Modify the necessary information. For more information on Business Entity fields refer Adding Business Entities table. Select Display as Standard Measure to update this table information onto the profile. Only the table columns that have been selected as Display as Standard Measure are displayed in the Standard Measure Details section of Profiles.
4. Click Update. A confirmation message is displayed.
Managing Inline Datasets
This section describes the Inline Datasets functionality and gives step-by-step instructions to use this module.
This section covers the following topics:
Overview
Accessing Inline Datasets
Adding Inline Datasets
Searching Inline Dataset
Editing Inline Dataset
Overview
Inline Datasets are joins between two Business Entities. The Inline Datasets need at least one condition to be defined.
For example, the following conditions are used for an Inline Dataset between Wire Transaction and Beneficiary Account:
Wire Transaction. Beneficiary Account ID=Beneficiary Account. Account ID
The sequence of the joins has to be correct for the required output.
Using this menu, you can add a new Inline Dataset and search for existing Inline Datasets for modification or removal.
22 Inline Processing Engine User Guide
Managing Inline DatasetsChapter 3–Managing Association and Configuration
Accessing Inline Datasets
To access Inline Datasets, follow these steps:
1. Navigate to the Inline Processing Home Page.
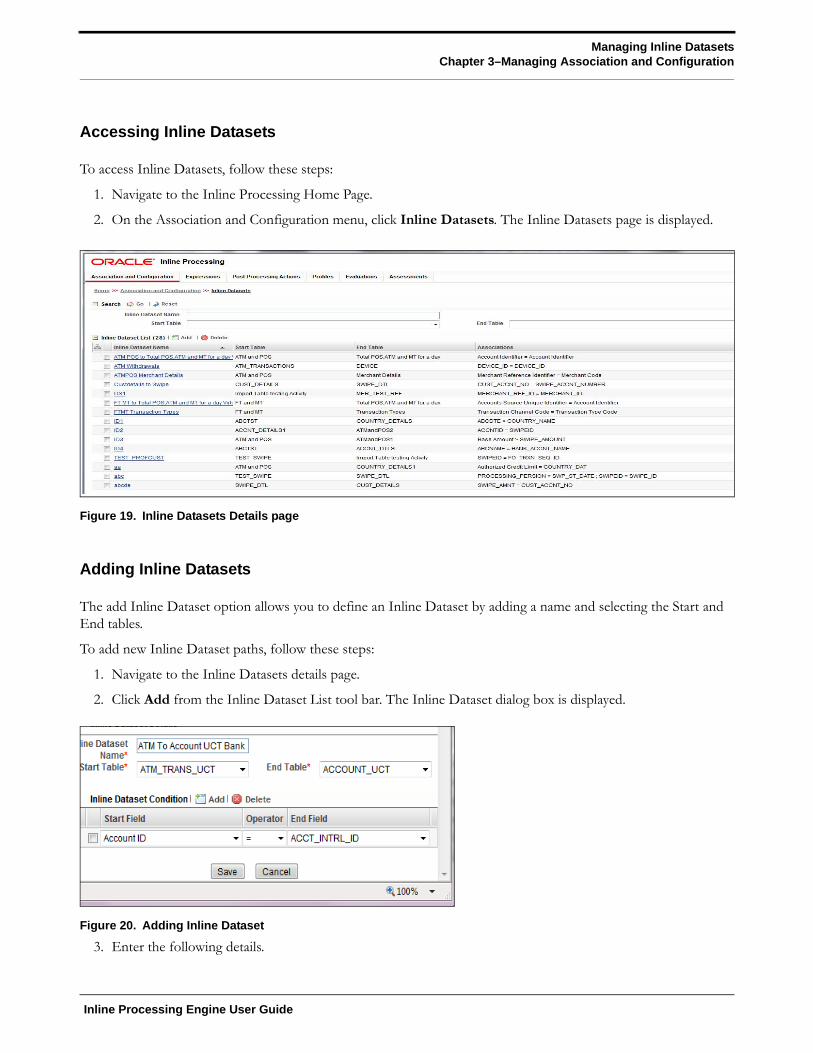
2. On the Association and Configuration menu, click Inline Datasets. The Inline Datasets page is displayed.
Figure 19. Inline Datasets Details page
Adding Inline Datasets
The add Inline Dataset option allows you to define an Inline Dataset by adding a name and selecting the Start and End tables.
To add new Inline Dataset paths, follow these steps:
1. Navigate to the Inline Datasets details page.
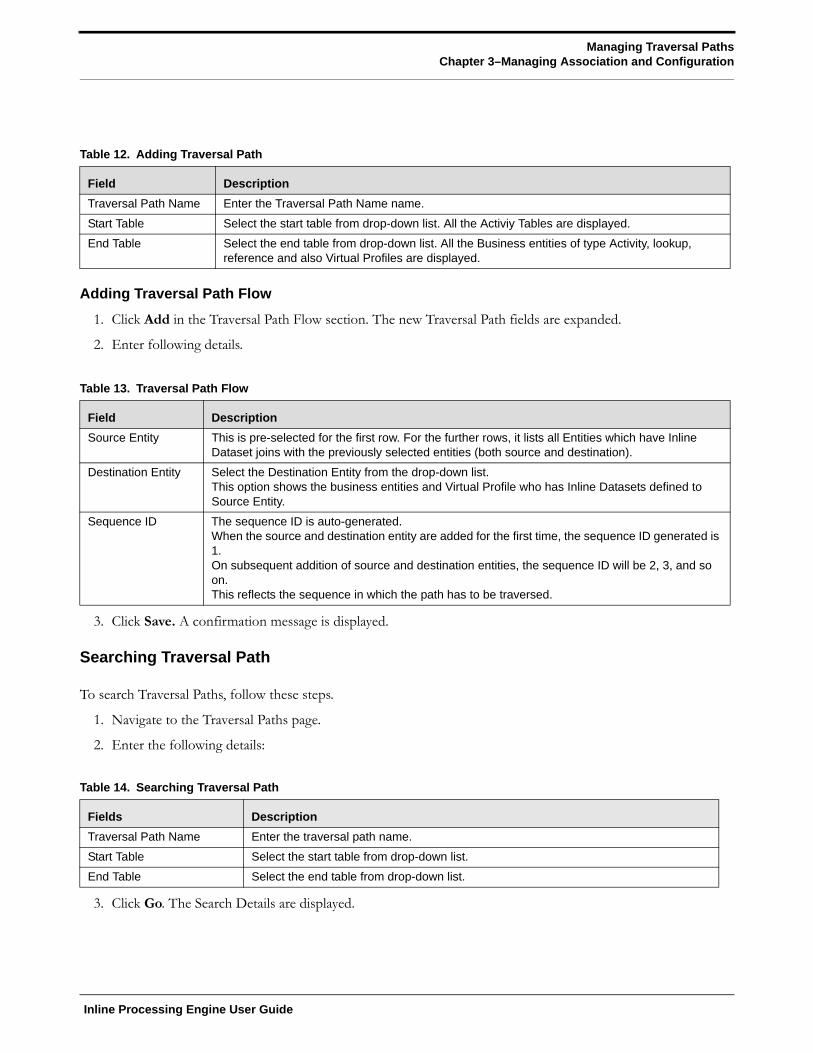
2. Click Add from the Inline Dataset List tool bar. The Inline Dataset dialog box is displayed.
Figure 20. Adding Inline Dataset
3. Enter the following details.
Inline Processing Engine User Guide

Managing Inline DatasetsChapter 3–Managing Association and Configuration
Adding Inline DataSet ConditionTo add new Inline Dataset condition follow these steps:
1. Click Add from the Inline Dataset Condition tool bar. The Inline Dataset Condition dialog box is displayed.
2. Enter following details.
3. Click Save. A confirmation message is displayed.
Searching Inline Dataset
To search Inline Dataset, follow these steps.
1. Navigate to the Inline Datasets details page.
2. Enter the following details:
Table 11. Inline Dataset Table Details
3. Click Go. The Search Details are displayed.
Editing Inline Dataset
To edit Inline Dataset, follow these steps:
1. Navigate to the Inline Dataset Details page.
Table 9. Adding Inline Dataset
Field Description
Inline Dataset Name Enter the Inline Dataset Name.
Start Table Select the start table from drop-down list. All the Business entities of type Activity, lookup, reference and also Virtual Profiles are displayed.
End Table Select the end table from drop-down list. All the Business entities of type Activity, lookup, reference and also Virtual Profiles are displayed, except the selected Start Table.
Table 10. Adding Inline DataSet Condition
Field Description
Start Field Select the start field of the condition from the drop-down list. This shows all Fields (Columns) of the Start Table.
Operator Select the operator from the drop-down list. The available operators are =, >, <, >=, <=, and <>.
End Field Select the end field of the condition from the drop-down list. This shows all the Fields (Columns) of the End Table.
Fields Description
Inline Dataset Name Enter the Inline Dataset name.
Start Table Select the start table from drop-down list.
End Table Select the end table from drop-down list.
24 Inline Processing Engine User Guide

Managing Traversal PathsChapter 3–Managing Association and Configuration
2. Select the Inline Dataset to modify. The Inline Dataset Edit dialog box is displayed.
3. Modify the necessary information. For more information on Business Entity fields refer to the Adding Inline Datasets table.
Note: Start and end tables cannot be edited. Only inline dataset condition can be edited.
4. Click Save. A confirmation message is displayed.
Deleting Inline Dataset
This option allows the user to delete an Inline Dataset if it is not used by other components of IPE. To delete the Inline Dataset, follow these steps:
1. Navigate to the Inline Datasets details page.
2. Select the Inline Dataset to delete.
3. Click Delete.
Note: System does not allow the user to delete the selected Inline Dataset if it is used in other components.
Managing Traversal Paths
This section describes the Traversal Path functionality and provides step-by-step instructions to use this module.
This section discusses the following topics:
Overview
Accessing Traversal Paths
Adding Traversal Path
Searching Traversal Path
Deleting Traversal Path
Overview
Traversal Paths are the paths between two or more entities. The traversal paths defined can be used for creation of expressions, evaluations, and profiles. The start entity for the path should be the Activity Entity. There are intermediate Entities in the path.
For example, if we must have a path between Wire Transaction and Beneficiary Customer E-mail entities, then we must have path like Wire Transaction' Beneficiary Account' Beneficiary Customer' Beneficiary Customer E-mail.
Inline Dataset (Joins) between are compulsory.
Wire Transaction-Beneficiary Account
Beneficiary Account- Beneficiary Customer
Beneficiary Customer- Beneficiary Customer E-mail
Inline Processing Engine User Guide

Managing Traversal PathsChapter 3–Managing Association and Configuration
Accessing Traversal Paths
To access the Traversal Paths, follow these steps:
1. Navigate to the Inline Processing Home Page.
2. On the Association and Configuration menu, click Traversal Paths. The Traversal Paths page is displayed.
Figure 21. Traversal Paths Details page
Adding Traversal Path
This option allows you to define a traversal path by adding a name and selecting the Start and End tables.
To add a new Traversal Path, follow these steps:
1. Navigate to the Traversal Paths page.
2. Click Add from the Traversal Path List tool bar. The Traversal Path Maintenance dialog is displayed.
Figure 22. Adding Traversal Path
3. Enter the following details.
26 Inline Processing Engine User Guide
Managing Traversal PathsChapter 3–Managing Association and Configuration
Adding Traversal Path Flow
1. Click Add in the Traversal Path Flow section. The new Traversal Path fields are expanded.
2. Enter following details.
3. Click Save. A confirmation message is displayed.
Searching Traversal Path
To search Traversal Paths, follow these steps.
1. Navigate to the Traversal Paths page.
2. Enter the following details:
3. Click Go. The Search Details are displayed.
Table 12. Adding Traversal Path
Field Description
Traversal Path Name Enter the Traversal Path Name name.
Start Table Select the start table from drop-down list. All the Activiy Tables are displayed.
End Table Select the end table from drop-down list. All the Business entities of type Activity, lookup, reference and also Virtual Profiles are displayed.
Table 13. Traversal Path Flow
Field Description
Source Entity This is pre-selected for the first row. For the further rows, it lists all Entities which have Inline Dataset joins with the previously selected entities (both source and destination).
Destination Entity Select the Destination Entity from the drop-down list.This option shows the business entities and Virtual Profile who has Inline Datasets defined to Source Entity.
Sequence ID The sequence ID is auto-generated.When the source and destination entity are added for the first time, the sequence ID generated is 1.On subsequent addition of source and destination entities, the sequence ID will be 2, 3, and so on.This reflects the sequence in which the path has to be traversed.
Table 14. Searching Traversal Path
Fields Description
Traversal Path Name Enter the traversal path name.
Start Table Select the start table from drop-down list.
End Table Select the end table from drop-down list.
Inline Processing Engine User Guide
Managing Traversal PathsChapter 3–Managing Association and Configuration
Deleting Traversal Path
To delete a Traversal Path, follow these steps.
1. Navigate to the Traversal Paths page.
2. Select the Traversal Path ID or name to delete.
3. Click Delete. The Traversal Path Details page is updated.
Note: System does not allow the user to delete the selected Traversal Path if it is used in other components.
28 Inline Processing Engine User Guide

CHAPTER 4 Managing Expressions
This chapter provides detailed information about Expressions functionality and provides step-by-step instructions to use this module.
This chapter discusses the following topics:
Overview
Accessing Expressions Menu
Adding an Expression
Searching an Expression
Deleting an Expression
Displaying Dependant Metadata Expression List
Overview
Expression for a Profile is used as a filter in the evaluations. Expressions are to be created on the activity table on whom an evaluation or profile will be created.
An Expression Builder is used to build expressions using Entities, Attributes, Functions, Mathematical Operators, and Constant Values. For example,
FT and MT Amount for a day: Accounts Source Unique Identifier_cnt.
The examples of expressions are as follows:
A
A+B
(A + B)/C
(ATM and POS: Base Amount)
(Get Last Characters ((ATM and POS: Merchant Address) 2)
The Expression Builder allows you to add and remove expressions.
Inline Processing Engine User Guide
Accessing Expressions MenuChapter 4–Managing Expressions
Accessing Expressions Menu
To access the Expressions menu, follow these steps:
1. Navigate to the Inline Processing Home Page.
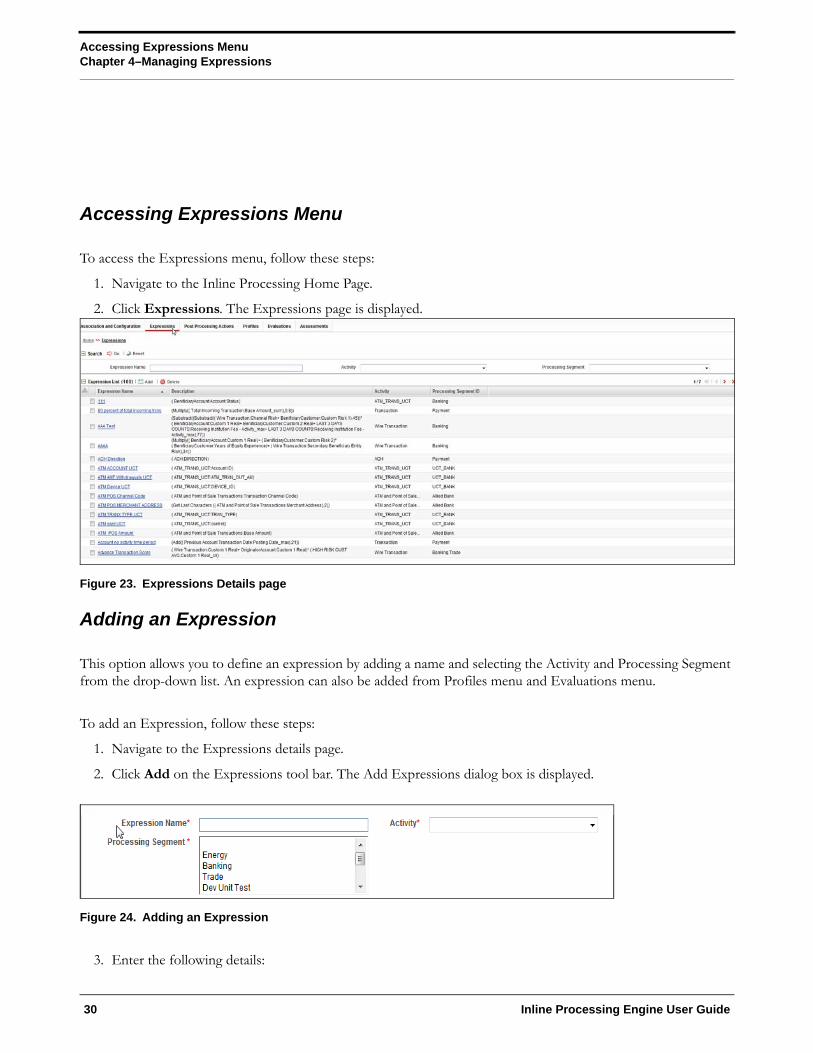
2. Click Expressions. The Expressions page is displayed.
Figure 23. Expressions Details page
Adding an Expression
This option allows you to define an expression by adding a name and selecting the Activity and Processing Segment from the drop-down list. An expression can also be added from Profiles menu and Evaluations menu.
To add an Expression, follow these steps:
1. Navigate to the Expressions details page.
2. Click Add on the Expressions tool bar. The Add Expressions dialog box is displayed.
Figure 24. Adding an Expression
3. Enter the following details:
30 Inline Processing Engine User Guide

Adding an ExpressionChapter 4–Managing Expressions
Adding VariablesThis is used to define variables for expressions.
4. Click Add on the Variables tool bar. The Add Variables dialog box is displayed.
Figure 25. Variable page
5. Enter the following details:
Table 15. Adding an Expression
Field Description
Expression Name Enter a name for the expression.
Activity Select the activity from the drop-down list.
Processing segment Select the processing segment from the drop-down list (Energy, Banking, and so on).
Table 16. Adding Variables
Fields Description
Operator Select the operator from the drop-down list. This is disabled for the first variable.
Business Entity Select the business entity from the drop-down list. The list is based on selected Activity and processing segment.
Business Attribute Select the business attribute from the drop-down list. The list is based on the selected business entity.
Create New Group If this option is selected, new Group ID is created.
Add to Current Group If this option is selected, new variable is added to existing selected Group ID.
Apply Function to Group Select the function from the drop-down list. The list of function is based on variable data type and function argument data type.If the selected function has additional argument mapped, then Literal Value should be entered in the Text box.
Remove Function from Group
Select a group and then click Remove the Function from Group to remove the function from the selected group.
Apply Function to Expression
Select the function from the drop-down list. The list of function will be based on variable data type of expression and variable. If the selected function has additional argument mapped, then Literal Value should be entered in the Text box.
Inline Processing Engine User Guide

Searching an ExpressionChapter 4–Managing Expressions
6. Click Save to refresh the Variables Grid.
Figure 26. Adding Variables
7. Click Submit. A confirmation message is displayed.
Searching an Expression
To search Expressions, follow these steps:
1. Navigate to the Expressions details page.
2. Enter the following details:
3. Click Go. The Search Details are displayed.
Deleting an Expression
To delete an Expression, follow these steps:
1. Navigate to the Expressions details page.
2. Select the required Expression.
3. Click Delete.
Note: System does not allow the user to delete the selected Expression if it is used in other components.
Table 17. Searching Expression
Fields Description
Expression Name Enter the Profile Name.
Activity Select the activity from the drop-down.
Processing Segment Select the Processing Segment from the drop-down.
32 Inline Processing Engine User Guide
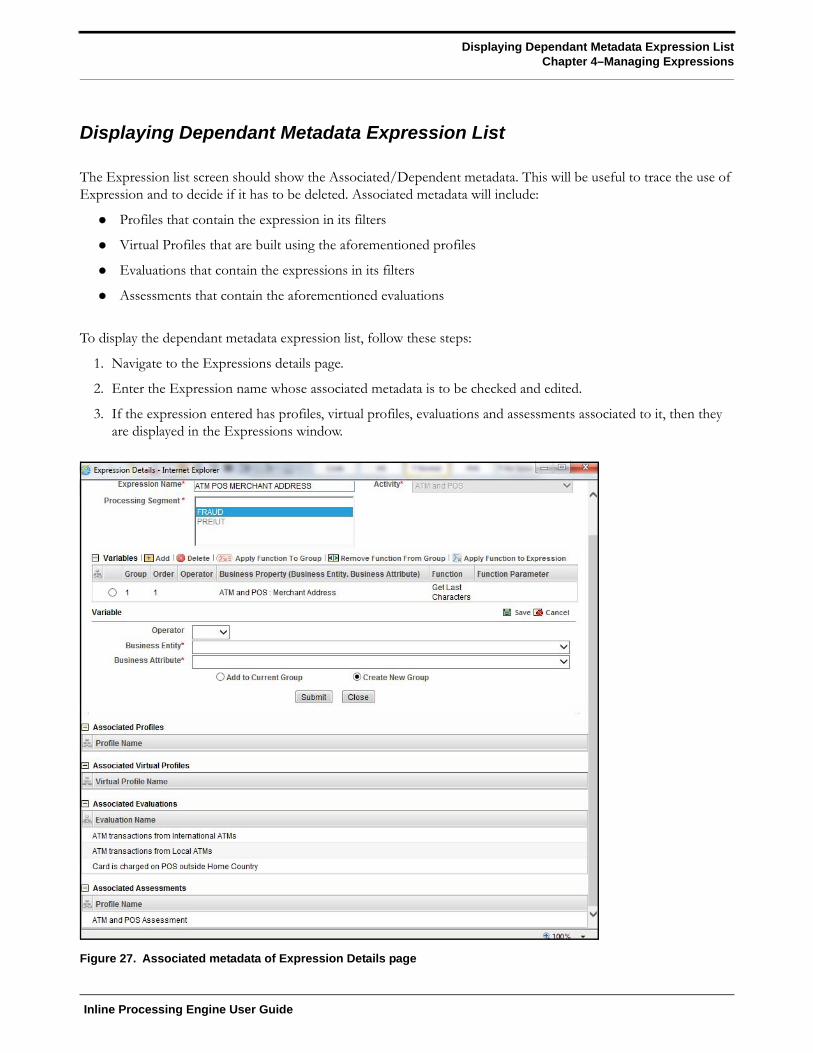
Displaying Dependant Metadata Expression ListChapter 4–Managing Expressions
Displaying Dependant Metadata Expression List
The Expression list screen should show the Associated/Dependent metadata. This will be useful to trace the use of Expression and to decide if it has to be deleted. Associated metadata will include:
Profiles that contain the expression in its filters
Virtual Profiles that are built using the aforementioned profiles
Evaluations that contain the expressions in its filters
Assessments that contain the aforementioned evaluations
To display the dependant metadata expression list, follow these steps:
1. Navigate to the Expressions details page.
2. Enter the Expression name whose associated metadata is to be checked and edited.
3. If the expression entered has profiles, virtual profiles, evaluations and assessments associated to it, then they are displayed in the Expressions window.
Figure 27. Associated metadata of Expression Details page
Inline Processing Engine User Guide

Displaying Dependant Metadata Expression ListChapter 4–Managing Expressions
34 Inline Processing Engine User Guide

CHAPTER 5 Managing Post Processing Actions
This chapter describes Post Processing Actions functionality and provides step-by-step instructions to use this module.
Note: Managing Post Processing actions is applicable only for Real Time Processing.
This chapter discusses the following topics:
Overview
Accessing Post Processing Actions Menu
Adding Post Processing Actions
Searching Post Processing Action
Editing Post Processing Action
Deleting Post Processing Action
Overview
Post Processing Actions are the actions which can be triggered by the outcome of Assessment.
In Post Processing Actions, you can add a new post processing action and also search for existing post processing actions for modification or removing a post processing action.
Accessing Post Processing Actions Menu
To access the Post Processing Actions page, follow these steps:
1. Navigate to the Inline Processing Home Page.
2. Click Post Processing Actions. The Post Processing Actions page is displayed.
Inline Processing Engine User Guide

Adding Post Processing ActionsChapter 5–Managing Post Processing Actions
Figure 28. Post Processing Actions Details page
Adding Post Processing Actions
This option allows you to define a post processing action.
This section covers following topics:
Adding a Post Processing Action
Adding an Action Parameter
Adding a Post Processing Action
To add a Post Processing Action, follow these steps:
1. Navigate to the Post Processing Actions details page.
2. Click Add on the Post Processing Actions tool bar. The Add Post Processing Actions dialog box is displayed.
Figure 29. Adding a Post Processing Action
3. Enter the following details:
36 Inline Processing Engine User Guide

Searching Post Processing ActionChapter 5–Managing Post Processing Actions
4. Click Add. A confirmation message is displayed.
Adding an Action Parameter
To add Action Parameters, follow these steps:
1. Navigate to the Post Processing Actions details page.
2. Click Add on the Action Parameters tool bar. The Add Action Parameters dialog box is displayed.
Figure 30. Adding an Action Parameter
3. Enter the following details:
4. Click Save. A confirmation message is displayed.
Searching Post Processing Action
To search Post Processing Action, follow these steps:
1. Click Post Processing Actions on the Inline Processing Engine Home page. The Post Processing Actions Details page is displayed. .
2. Enter the Post Processing Action name.
Table 18. Post Processing Actions
Field Description
Name Enter the name of Post Processing Actions.
Action Type Select the Post Processing Actions from the drop-down list. (For example, Generate Alert, sent JMS Message, and Send RTD Message)Note: Additionally, the user can also add a new Action Type.
Table 19. Action Parameter
Field Description
Action Parameter Code Enter the code of action parameter.
Action Parameter Name Enter the name of action parameter.
Action Parameter Type Select the action parameter type from the drop-down list (Text or Password )
Action Parameter Value Enter the value for action parameter. If the action parameter type is text, enter text box.
If the action parameter type is password, enter password field.
Inline Processing Engine User Guide
Editing Post Processing ActionChapter 5–Managing Post Processing Actions
3. Click Go. The Search Details are displayed.
Editing Post Processing Action
To modify Post Processing Action details, follow these steps:
1. Click Post Processing Actions on the Inline Processing Engine Home page. The Post Processing Actions Details page is displayed. .
2. Select the required Post Processing Action.
3. Modify the necessary information. For more information on Processing Segment fields, refer to the Adding Post Processing Actions table.
4. Click Save. A confirmation message is displayed.
Deleting Post Processing Action
To delete a Post Processing Action, follow these steps:
1. Click Post Processing Actions on the Inline Processing Engine Home page. The Post Processing Actions Details page is displayed.
2. Select the required Post Processing Action.
3. Click Delete.
Note: System does not allow the user to delete the selected Post Processing Action if it is used in other components.
38 Inline Processing Engine User Guide

CHAPTER 6 Managing Profiles
This chapter describes Profiles functionality and provides step-by-step instructions to use this module.
This chapter discusses the following topics:
Overview
Accessing Profiles Menu
Adding a Profile
Adding an Expression from Profiles Menu
Searching a Profile
Editing a Profile
Deleting a Profile
Overview
Profiles are an aggregation of information. Profiles can be based on different grouping entities (For example, account and customer) and can be filtered to only look at particular kinds of transactions. Profiles can also be based on time (last three months) or activity counts (last 100 transactions).
Accessing Profiles Menu
To access the Profile, follow these steps:
1. Navigate to the Inline Processing Home Page.
2. Click Profiles. The Profiles page is displayed.
Inline Processing Engine User Guide

Adding a ProfileChapter 6–Managing Profiles
Figure 31. Profiles Details page
Adding a Profile
This section covers following topics:
Adding Standard Measures
Adding Custom Measures
Adding Filters
Adding Measure Aggregation Groups
To add a Profile, follow these steps:
1. Navigate to the Profiles details page.
2. Click Add on the Profile tool bar. The Add Profile fields are expanded.
40 Inline Processing Engine User Guide
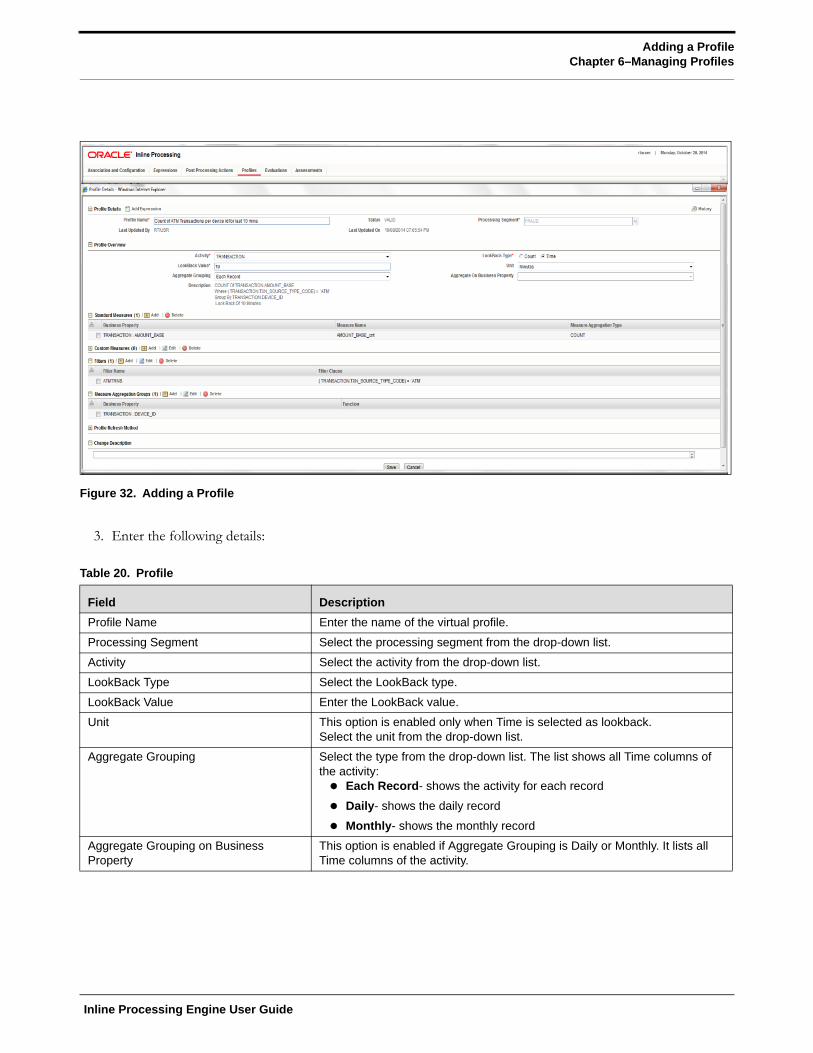
Adding a ProfileChapter 6–Managing Profiles
Figure 32. Adding a Profile
3. Enter the following details:
Table 20. Profile
Field Description
Profile Name Enter the name of the virtual profile.
Processing Segment Select the processing segment from the drop-down list.
Activity Select the activity from the drop-down list.
LookBack Type Select the LookBack type.
LookBack Value Enter the LookBack value.
Unit This option is enabled only when Time is selected as lookback.Select the unit from the drop-down list.
Aggregate Grouping Select the type from the drop-down list. The list shows all Time columns of the activity: Each Record- shows the activity for each record
Daily- shows the daily record
Monthly- shows the monthly record
Aggregate Grouping on Business Property
This option is enabled if Aggregate Grouping is Daily or Monthly. It lists all Time columns of the activity.
Inline Processing Engine User Guide
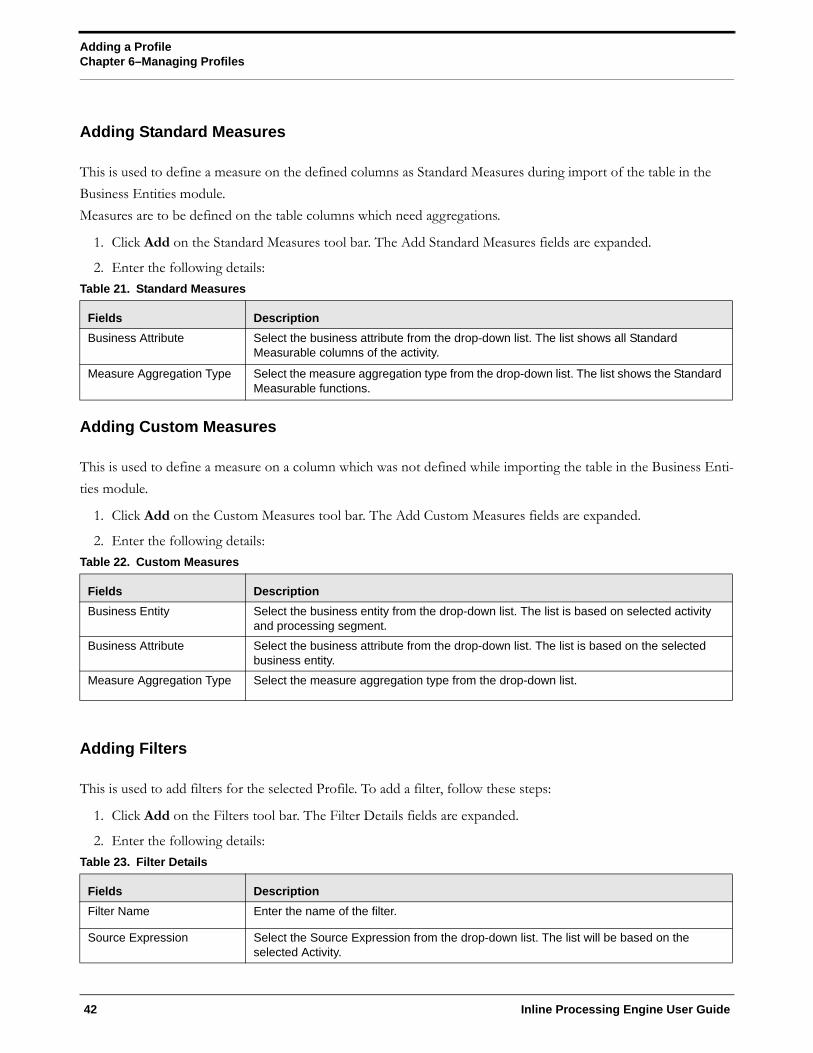
Adding a ProfileChapter 6–Managing Profiles
Adding Standard Measures
This is used to define a measure on the defined columns as Standard Measures during import of the table in the
Business Entities module.
Measures are to be defined on the table columns which need aggregations.
1. Click Add on the Standard Measures tool bar. The Add Standard Measures fields are expanded.
2. Enter the following details:
Adding Custom Measures
This is used to define a measure on a column which was not defined while importing the table in the Business Enti-
ties module.
1. Click Add on the Custom Measures tool bar. The Add Custom Measures fields are expanded.
2. Enter the following details:
Adding Filters
This is used to add filters for the selected Profile. To add a filter, follow these steps:
1. Click Add on the Filters tool bar. The Filter Details fields are expanded.
2. Enter the following details:
Table 21. Standard Measures
Fields Description
Business Attribute Select the business attribute from the drop-down list. The list shows all Standard Measurable columns of the activity.
Measure Aggregation Type Select the measure aggregation type from the drop-down list. The list shows the Standard Measurable functions.
Table 22. Custom Measures
Fields Description
Business Entity Select the business entity from the drop-down list. The list is based on selected activity and processing segment.
Business Attribute Select the business attribute from the drop-down list. The list is based on the selected business entity.
Measure Aggregation Type Select the measure aggregation type from the drop-down list.
Table 23. Filter Details
Fields Description
Filter Name Enter the name of the filter.
Source Expression Select the Source Expression from the drop-down list. The list will be based on the selected Activity.
42 Inline Processing Engine User Guide
Adding an Expression from Profiles MenuChapter 6–Managing Profiles
3. Click Save. A confirmation message is displayed.
Adding Measure Aggregation Groups
This is used to define an Aggregation Group on the defined columns as Measure Aggregation Groups during
import of the table in the Business Entities module.
1. Click Add on the Measure Aggregation Groups tool bar. The Measures Aggregation Group fields are expanded.
2. Enter the following details:
Adding an Expression from Profiles Menu
An expression can be added from the Profiles menu apart from the Expression menu itself. To add an expression from Profile menu, follow these steps:
1. Navigate to the Profiles details page.
2. Click Add on the Profile tool bar. The Add Profile fields are expanded.
3. Click the Activity from the drop down list.
4. Click Add Expressions on the Profile Details tool bar. The Expression Details page is displayed.
5. Add an expression. For more information, refer to the Adding an Expression table.
Searching a Profile
To search a Profile, follow these steps:
1. Navigate to the Profiles details page.
Operator Select the operator from the drop-down list for the expression and also the expression that it is to be operated on.
Comparator Type Select the Comparator type: If Expression type is selected, then a drop-down list is displayed.
If Literal Value is selected, then a text field is displayed to enter the details.
Table 24. Measure Aggregation Groups
Fields Description
Business Entity Select the business entity from the drop-down list. The list is based on selected Activity and processing segment
Business Attribute Select the business attribute from the drop-down list. The list is based on the selected business entity.
Function Select the function from the drop-down list. The list will be based on the selected Business Attribute type.
Table 23. Filter Details
Inline Processing Engine User Guide
Editing a ProfileChapter 6–Managing Profiles
2. Enter the following details:
3. Click Go. The Search Details are displayed.
Editing a Profile
To modify the Profile details, follow these steps.
1. Navigate to the Profiles details page.
2. Select the required Profile.
3. Modify the necessary information. For more information on Processing Segment fields, refer to the Adding a Profile table.
4. Click Save. A confirmation message is displayed.
Note: When you edit the filters, standard measures, custom measures and measure aggregation groups of a profile and cancel the same, the modifications are still saved, even if the Profile itself is not saved.
Note: When you edit a profile, the associated Expression has to be re-saved.
When a Standard Measure, Custom Measure, and so on are added in profile, the same would get saved to the profile definition irrespective of saving or cancelling the Profile changes, as these measure creations have the Save button in the popup during which it is saved to the database. This holds good for similar operations everywhere in the Framework.
Once a Profile is re-saved, irrespective of the changes to the profile, the profile tables p_<profile_id> will be recreated. Hence all the existing records get deleted.
Deleting a Profile
To delete a Profile, follow these steps:
1. Navigate to the Profiles details page.
2. Select the required Profile.
3. Click Delete.
Note: System does not allow the user to delete the selected Profile if it is used in other components.
Table 25. Search Profile
Fields Description
Profile Name Enter the Profile Name.
Activity Select the activity from the drop-down.
Processing Segment Select the Processing Segment from the drop-down.
44 Inline Processing Engine User Guide
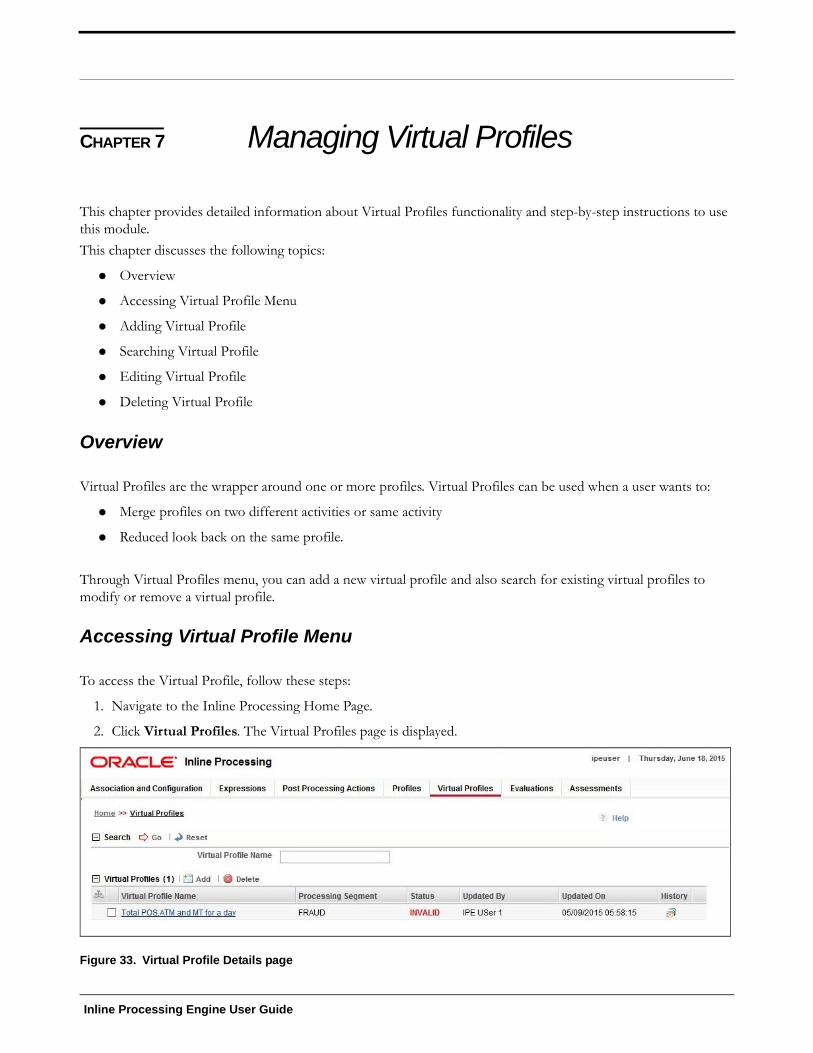
CHAPTER 7 Managing Virtual Profiles
This chapter provides detailed information about Virtual Profiles functionality and step-by-step instructions to use this module.
This chapter discusses the following topics:
Overview
Accessing Virtual Profile Menu
Adding Virtual Profile
Searching Virtual Profile
Editing Virtual Profile
Deleting Virtual Profile
Overview
Virtual Profiles are the wrapper around one or more profiles. Virtual Profiles can be used when a user wants to:
Merge profiles on two different activities or same activity
Reduced look back on the same profile.
Through Virtual Profiles menu, you can add a new virtual profile and also search for existing virtual profiles to modify or remove a virtual profile.
Accessing Virtual Profile Menu
To access the Virtual Profile, follow these steps:
1. Navigate to the Inline Processing Home Page.
2. Click Virtual Profiles. The Virtual Profiles page is displayed.
Figure 33. Virtual Profile Details page
Inline Processing Engine User Guide

Adding Virtual ProfileChapter 7–Managing Virtual Profiles
Adding Virtual Profile
Adding a Virtual Profile allows you to define a virtual profile by adding the profile details.
This section covers following topics:
Adding Linked Profile
Adding Measures
Adding Associated Inline Datasets
Adding Associated Paths
To add a Virtual Profile, follow these steps:
1. Navigate to the Virtual Profiles details page.
2. Click Add on the Virtual Profile tool bar.
Figure 34. Adding a Virtual Profile
3. Enter the following details:
Table 26. Virtual Profile
Field Description
Profile Name Enter the name of the virtual profile.
Processing Segment Select the processing segment from the drop-down list.
Activity Select the activity from the drop-down list.
LookBack Type Select the LookBack Type value. The options are: Count or Time
LookBack Value Enter the LookBack Value.
Unit This option is enabled only when Time is selected as lookback.Select the unit from the drop-down list.
Aggregate Grouping Select the type from the drop-down list. The list will show all the Time columns of the Activity: Each Record- Shows the activity for each record.
Daily- Shows the daily record
Monthly- Shows the monthly record
46 Inline Processing Engine User Guide
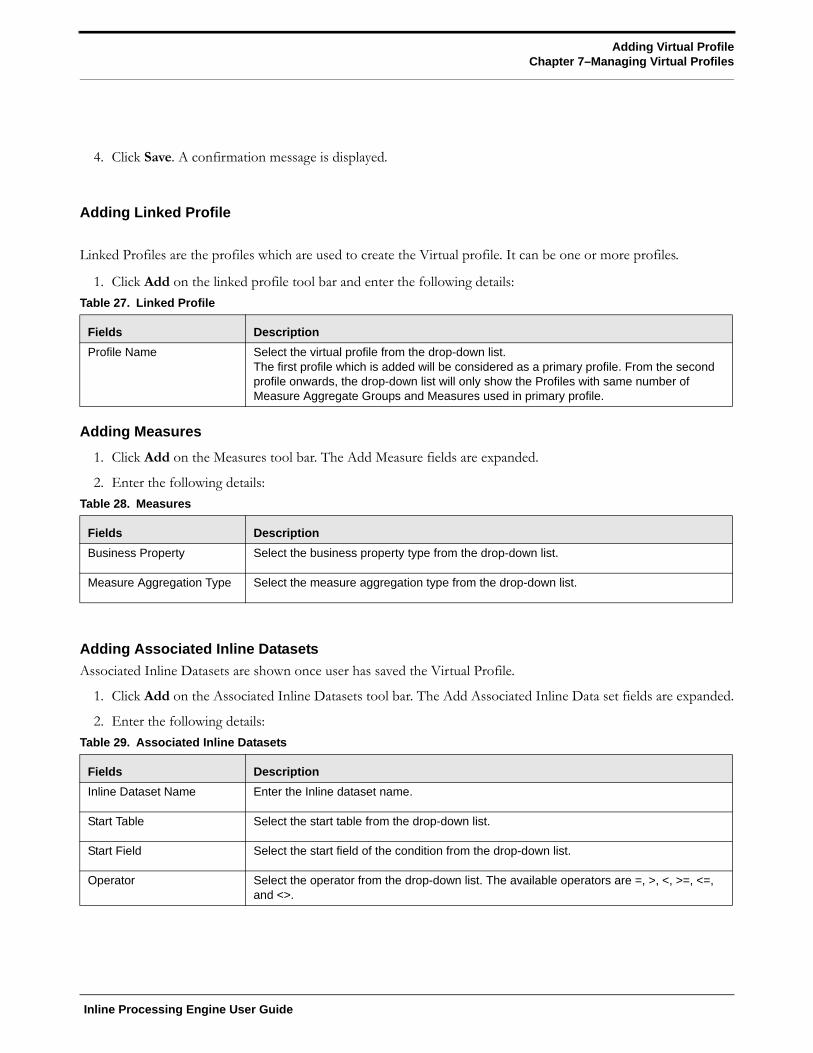
Adding Virtual ProfileChapter 7–Managing Virtual Profiles
4. Click Save. A confirmation message is displayed.
Adding Linked Profile
Linked Profiles are the profiles which are used to create the Virtual profile. It can be one or more profiles.
1. Click Add on the linked profile tool bar and enter the following details:
Adding Measures
1. Click Add on the Measures tool bar. The Add Measure fields are expanded.
2. Enter the following details:
Adding Associated Inline Datasets
Associated Inline Datasets are shown once user has saved the Virtual Profile.
1. Click Add on the Associated Inline Datasets tool bar. The Add Associated Inline Data set fields are expanded.
2. Enter the following details:
Table 27. Linked Profile
Fields Description
Profile Name Select the virtual profile from the drop-down list.The first profile which is added will be considered as a primary profile. From the second profile onwards, the drop-down list will only show the Profiles with same number of Measure Aggregate Groups and Measures used in primary profile.
Table 28. Measures
Fields Description
Business Property Select the business property type from the drop-down list.
Measure Aggregation Type Select the measure aggregation type from the drop-down list.
Table 29. Associated Inline Datasets
Fields Description
Inline Dataset Name Enter the Inline dataset name.
Start Table Select the start table from the drop-down list.
Start Field Select the start field of the condition from the drop-down list.
Operator Select the operator from the drop-down list. The available operators are =, >, <, >=, <=, and <>.
Inline Processing Engine User Guide

Searching Virtual ProfileChapter 7–Managing Virtual Profiles
Adding Associated PathsAssociated Paths are shown once the user has saved the Virtual Profile.
1. Click Add on the Associated Paths tool bar. The Add Associated Paths fields are expanded
2. Enter the following details:
Note: It is to be noted that while adding the Traversal Path and Inline Dataset from Virtual Profiles, the current Virtual Profile should either be the Start table or the End table. If it is not so, then the added Inline Dataset or the Traversal Path will not be displayed under the corresponding tool bar. The same Traversal Path or Virtual Profile should be added in the Inline dataset list and traversal path list under Associations and configurations. Additionally, once the associated traversal path or associated the Inline Dataset is deleted from Virtual profiles window, the same should be deleted from the Inline dataset list and the Traversal Path list under Associations and Configurations.
3. Click Save. A confirmation message is displayed.
Searching Virtual Profile
To search Virtual Profile, follow these steps.
1. Navigate to the Virtual Profiles details page.
2. Enter the following details:
3. Click Go. The Search Details are displayed.
Editing Virtual Profile
To modify Virtual Profile Details, follow these steps.
1. Navigate to the Virtual Profiles details page.
Table 30. Associated Paths
Fields Description
Traversal Path Name Enter the traversal path name.
Start Table Select the start table from the drop-down list.
End Table Select the end table from the drop-down list.
Source Entity Select the source entity from the drop-down list.
Destination Entity Select the destination entity from the drop-down list.
Change Description Enter the details in the field. This is a mandatory field.
Table 31. Searching Virtual Profile
Fields Description
Profile Name Enter the Profile Name.
Activity Select the activity from the drop-down list.
Processing Segment Select the Processing Segment from the drop-down list.
48 Inline Processing Engine User Guide

Deleting Virtual ProfileChapter 7–Managing Virtual Profiles
2. Select the required Virtual Profile.
3. Modify the necessary information. For more information on Processing Segment fields, refer to the Adding Virtual Profile table.
4. Click Save. A confirmation message is displayed.
Deleting Virtual Profile
To delete the Virtual Profile details, follow these steps.
1. Navigate to the Virtual Profiles details page.
2. Select the required Virtual Profile.
3. Click Delete.
Note: System does not allow the user to delete the selected Virtual Profile if it is used in other components.
Inline Processing Engine User Guide

Deleting Virtual ProfileChapter 7–Managing Virtual Profiles
50 Inline Processing Engine User Guide
CHAPTER 8 Managing Evaluations
This chapter describes Evaluations functionality and provides step-by-step instructions to use this module.
This chapter discusses the following topics:
Overview
Accessing Evaluation Menu
Adding an Evaluation
Adding an Expression from Evaluations Menu
Searching an Evaluation
Editing an Evaluation
Deleting an Evaluation
Overview
Evaluations are logical comparisons against conditions that result in a score.
The essential evaluation types are listed below:
Condition Evaluations: These can be checks against literals or against other attributes.
For examples,
If the Transaction Origination Country is “Nigeria”, then 10 points.
If the Transaction Origination Country is in High Risk Countries List, then 10 points.
These can involve other logical expressions for evaluating multiple conditions.
Profile Comparison: These are not materially different than the condition evaluations. One of the things that can be on the right side of the equation is the profile check.
For example:
If the Transaction Amount is > High Risk Country Transactions 75th Percentile Amount then 10 points.
Value Lookups: These evaluations use a dimensional table where the attribute values lead to a score that we lookup. This may not necessarily be a separate evaluation type, but rather a mechanism for getting the associated points. For example, the Conditional Checks evaluation could be an evaluation that awards points from a table, but only for transactions originated in Nigeria.
For example,
If the Transaction Origination Country is 'Nigeria', then points based on High Risk Countries List using Transaction Origination Country.
For example, the evaluation only applies to Nigeria. If that was left out, the evaluation could simply be the following:
Get points based on High Risk Countries List using Transaction Origination Country.
Through Evaluations, you can add a new evaluation and also search for existing evaluations for modification or removing an evaluation.
Inline Processing Engine User Guide
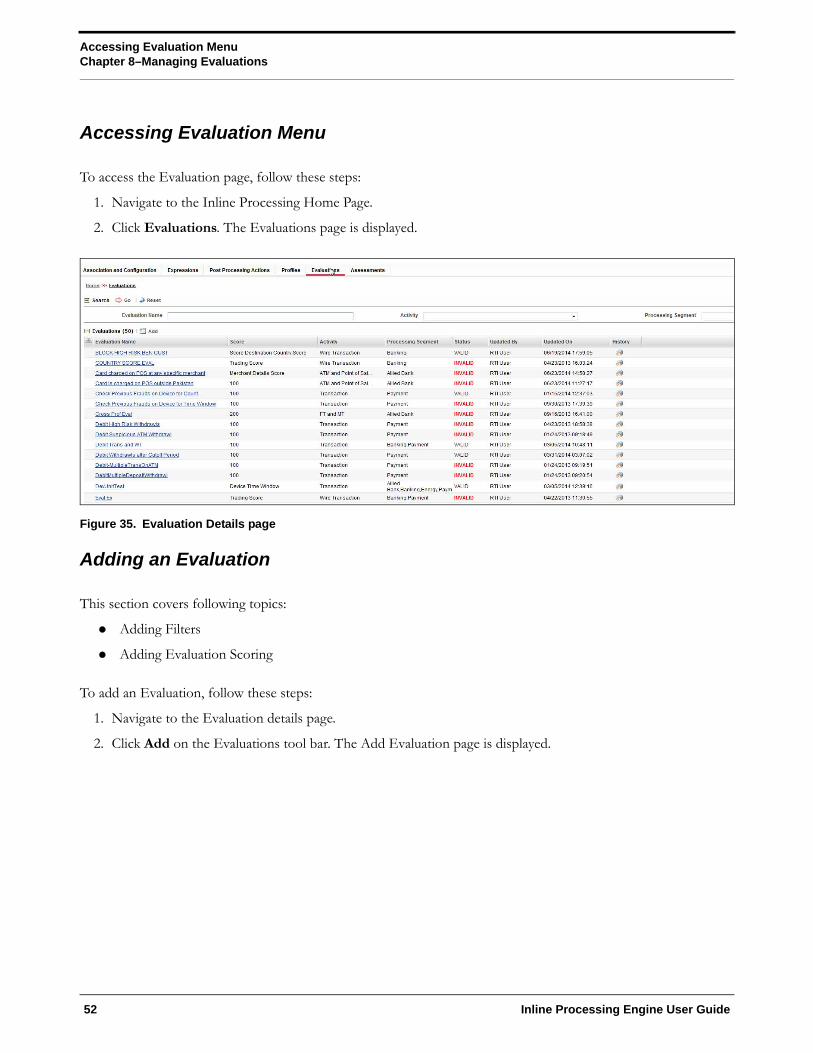
Accessing Evaluation MenuChapter 8–Managing Evaluations
Accessing Evaluation Menu
To access the Evaluation page, follow these steps:
1. Navigate to the Inline Processing Home Page.
2. Click Evaluations. The Evaluations page is displayed.
Figure 35. Evaluation Details page
Adding an Evaluation
This section covers following topics:
Adding Filters
Adding Evaluation Scoring
To add an Evaluation, follow these steps:
1. Navigate to the Evaluation details page.
2. Click Add on the Evaluations tool bar. The Add Evaluation page is displayed.
52 Inline Processing Engine User Guide

Adding an EvaluationChapter 8–Managing Evaluations
Figure 36. Adding an Evaluation
3. Enter the following details:
4. Click Save. A confirmation message is displayed.
Adding Filters
1. Click Add on the Filters tool bar. The Add Filter Dialog box is displayed.
2. Enter the following details:
3. Click Save. A confirmation message is displayed.
Table 32. Expression
Field Description
Expression Name Enter the name of the evaluation.
Processing Segment Select the processing segment from the drop-down list.
Activity Select the activity from the drop-down list.
Table 33. Adding Filters
Fields Description
Filter Name Enter the name of the filter.
Source Expression Select the source expression from the drop-down list. The list will be based on the selected Activity.
Operator Select the operator from the drop-down list for the expression and also the expression that it is to be operated on.
Comparator Type Select the Comparator type: If Expression type is selected, then a drop-down list is displayed.
If Literal Value is selected, then a text field is displayed to enter the details.
Inline Processing Engine User Guide

Adding an Expression from Evaluations MenuChapter 8–Managing Evaluations
Adding Evaluation Scoring
1. Expand Evaluation Scoring. Enter the following details:
2. Click Save. A confirmation message is displayed.
Adding an Expression from Evaluations Menu
An expression can be added from the Evaluations menu apart from the Expression menu itself. To add an expression from Evaluations menu, follow these steps:
1. Navigate to the Evaluation details page.
2. Click Add on the Evaluations tool bar. The Add Evaluation fields are expanded.
3. Click the Activity from the drop down list.
4. Click Add Expressions on the Evaluations Details tool bar. The Expression Details page is displayed.
5. Add an expression. For more information, refer to the Adding an Expression table.
Searching an Evaluation
To search an Evaluation, follow these steps.
1. Navigate to the Evaluation details page.
2. Enter the following details:
3. Click Go. The Search Details are displayed.
Table 34. Evaluation Scoring
Fields Description
Evaluation Scoring Select the score type. The options are: Fixed: If this option is selected, then the score should be entered in the text box
displayed.
Lookup: This option shows the lookup tables.
Expression: This option shows the list based on the selected Activity.
Change Description Enter the change description details. This is a mandatory field.
Table 35. Searching Evaluation
Fields Description
Evaluation Name Enter the Profile Name.
Activity Select the activity from the drop-down.
Processing Segment Select the Processing Segment from the drop-down.
54 Inline Processing Engine User Guide

Editing an EvaluationChapter 8–Managing Evaluations
Editing an Evaluation
To modify Evaluation details, follow these steps.
1. Navigate to the Evaluation details page.
2. Select the required Evaluation.
3. Modify the necessary information. For more information on Evaluation fields, refer to the Adding an Evaluation table.
4. Click Save. A confirmation message is displayed.
Deleting an Evaluation
To delete an Evaluation, follow these steps.
1. Navigate to the Evaluation details page.
2. Select the required Evaluation.
3. Click Delete.
Note: System does not allow the user to delete the selected Evaluation if it is used in other components.
Inline Processing Engine User Guide

Deleting an EvaluationChapter 8–Managing Evaluations
56 Inline Processing Engine User Guide
CHAPTER 9 Managing Assessments
This chapter explains about Assessments functionality and provides step-by-step instructions to use this module.
This chapter discusses the following topics:
Overview
Accessing Assessments Menu
Adding an Assessment
Exporting an Assessment
Searching an Assessment
Editing an Assessment
Deleting an Assessment
Overview
Analysis of incoming data is handled in by a combination of Evaluations or a single Evaluation, which are created in Assessments.
The final decision on an activity is made by an Assessment, which can be made up of one or more Evaluations. A set of evaluations are assembled into an Assessment. Assessment performs the complete validation and returns a score.
Assessment will check multiple evaluation logic and consider the Sum of all Evaluation Score for the output score.
There are two assessment scoring types:
Normalized Base: It is the adjustments of score or distributions in statistics.
Sum of Evaluation Score: It is the total sum score of all selected evaluations.
Through assessments, you can add a new assessment and also search for existing assessments for modification or removing an assessment.
Accessing Assessments Menu
To access the Assessments menu, follow these steps:
1. Navigate to the Inline Processing Home Page.
2. Click Assessments. The Assessments page is displayed.
Inline Processing Engine User Guide

Adding an AssessmentChapter 9–Managing Assessments
Figure 37. Assessment Details page
Adding an Assessment
This option allows you to define an assessment by adding the assessment details.
This section covers the following topics:
Mapping Associated Evaluations
Adding Assessment Score and Outcome
Adding Action Parameters and Schedule
To add an Assessment, follow these steps:
1. Navigate to the Assessments details home page.
2. Click Add on the Assessment tool bar. The Add Assessment page is displayed.
58 Inline Processing Engine User Guide

Adding an AssessmentChapter 9–Managing Assessments
Figure 38. Adding an Assessment
3. Enter the following details:
Mapping Associated Evaluations
To map associated evaluations to an assessment, follow these steps:
1. Navigate to Associated Evaluations section. Click Map. The Associated Evaluations Mapping Dialog box is displayed.
Table 36. Adding Assessment
Field Description
Assessment Name Enter the name of the assessment.
Processing Segment Select the processing segment from the drop-down list.
Activity Select the activity from the drop-down list.
Execution Mode Select the execution mode. The options are: Live- Assessments are used for scoring.
Test- Assessments are used for offline analysis.
Inline Processing Engine User Guide
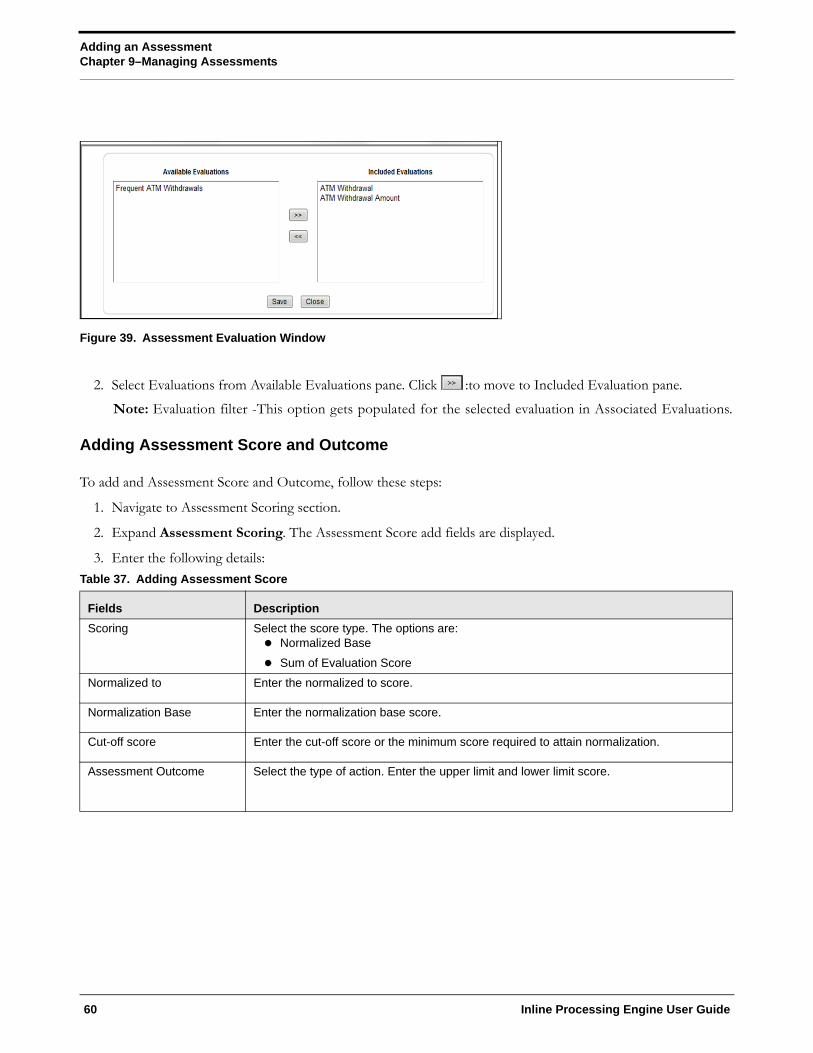
Adding an AssessmentChapter 9–Managing Assessments
Figure 39. Assessment Evaluation Window
2. Select Evaluations from Available Evaluations pane. Click :to move to Included Evaluation pane.
Note: Evaluation filter -This option gets populated for the selected evaluation in Associated Evaluations.
Adding Assessment Score and Outcome
To add and Assessment Score and Outcome, follow these steps:
1. Navigate to Assessment Scoring section.
2. Expand Assessment Scoring. The Assessment Score add fields are displayed.
3. Enter the following details:
Table 37. Adding Assessment Score
Fields Description
Scoring Select the score type. The options are: Normalized Base
Sum of Evaluation Score
Normalized to Enter the normalized to score.
Normalization Base Enter the normalization base score.
Cut-off score Enter the cut-off score or the minimum score required to attain normalization.
Assessment Outcome Select the type of action. Enter the upper limit and lower limit score.
60 Inline Processing Engine User Guide
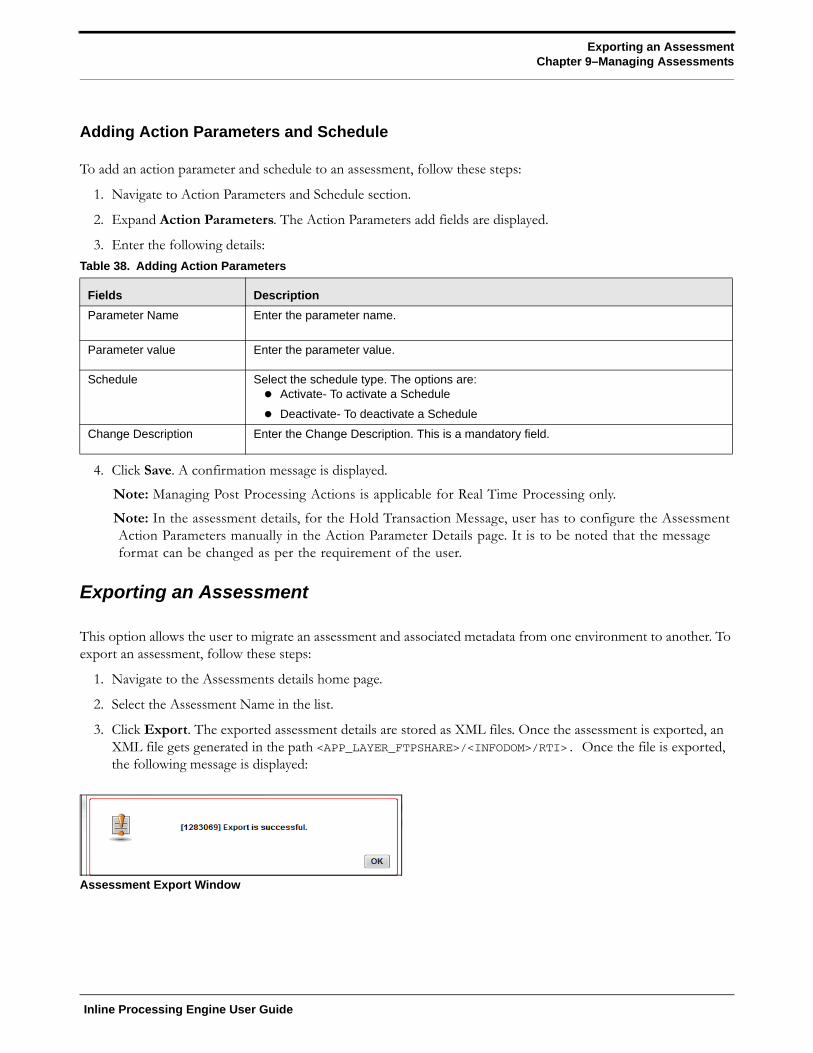
Exporting an AssessmentChapter 9–Managing Assessments
Adding Action Parameters and Schedule
To add an action parameter and schedule to an assessment, follow these steps:
1. Navigate to Action Parameters and Schedule section.
2. Expand Action Parameters. The Action Parameters add fields are displayed.
3. Enter the following details:
4. Click Save. A confirmation message is displayed.
Note: Managing Post Processing Actions is applicable for Real Time Processing only.
Note: In the assessment details, for the Hold Transaction Message, user has to configure the Assessment Action Parameters manually in the Action Parameter Details page. It is to be noted that the message format can be changed as per the requirement of the user.
Exporting an Assessment
This option allows the user to migrate an assessment and associated metadata from one environment to another. To export an assessment, follow these steps:
1. Navigate to the Assessments details home page.
2. Select the Assessment Name in the list.
3. Click Export. The exported assessment details are stored as XML files. Once the assessment is exported, an XML file gets generated in the path <APP_LAYER_FTPSHARE>/<INFODOM>/RTI>. Once the file is exported, the following message is displayed:
Assessment Export Window
Table 38. Adding Action Parameters
Fields Description
Parameter Name Enter the parameter name.
Parameter value Enter the parameter value.
Schedule Select the schedule type. The options are: Activate- To activate a Schedule
Deactivate- To deactivate a Schedule
Change Description Enter the Change Description. This is a mandatory field.
Inline Processing Engine User Guide
Chapter 9–Managing Assessments
Searching an Assessment
To search an Assessment, follow these steps.
1. Click Assessments on the Inline Processing Home Page. The Assessment Details page is displayed.
2. Enter the following details:
3. Click Go. The search details are displayed.
Editing an Assessment
To modify Assessment details, follow these steps:
1. Navigate to the Assessments details home page.
2. Select the required Assessment.
3. Modify the necessary information. For more information on Processing Segment fields, refer to the Adding an Assessment table.
4. Click Save. A confirmation message is displayed.
Deleting an Assessment
To delete an Assessment, follow these steps:
1. Navigate to the Assessments details home page.
2. Select the required Assessment.
3. Click Delete.
Note: System does not allow the user to delete the selected Assessment if it is used in other components.
Table 39. Searching Assessment
Fields Description
Assessment Name Enter the Assessment Name.
Activity Select the activity from the drop-down.
Processing Segment Select the Processing Segment from the drop-down.
62 Inline Processing Engine User Guide
CHAPTER 10 Executing an Assessment Batch
This chapter provides detailed information about executing a batch of assessments and step-by-step instructions to use this module.
This chapter discusses the following topics:
Overview
Executing an Assessment Batch through Rules Run Framework
Executing an Assessment Batch through Operations
Overview
This chapter explains the procedure of executing an assessment batch in two ways, i.e. Rules Run Framework and Operations.
Executing an Assessment Batch through Rules Run Framework
To execute an Assessment Batch, it involves the following procedures:
Creating a Process
Creating a Hierarchy filter
Creating a Run and Executing it
Creating a Process
To create a Process, follow these steps:
1. Navigate to the OFSAA Home Page and select IPE Execution from Select Application drop-down list.
2. Select Process Management under it and then Orchestration.
3. Select Process Definition. The Process Definition page is displayed.
Inline Processing Engine User Guide
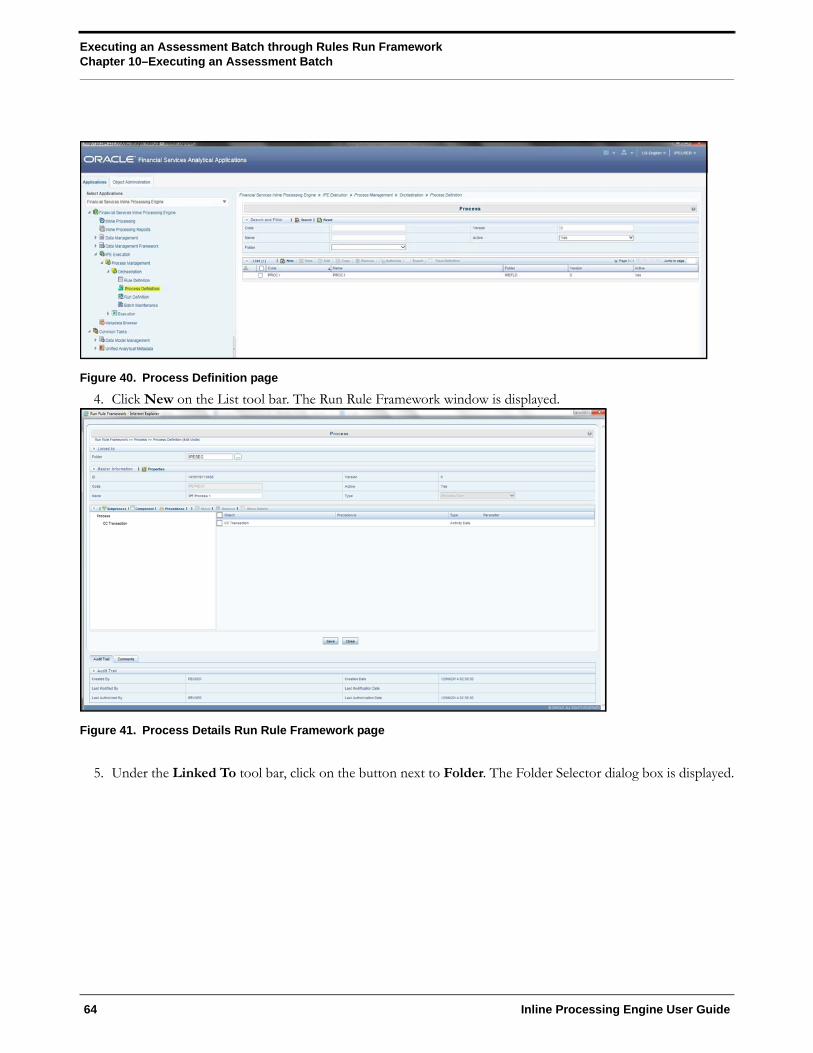
Executing an Assessment Batch through Rules Run FrameworkChapter 10–Executing an Assessment Batch
Figure 40. Process Definition page
4. Click New on the List tool bar. The Run Rule Framework window is displayed.
Figure 41. Process Details Run Rule Framework page
5. Under the Linked To tool bar, click on the button next to Folder. The Folder Selector dialog box is displayed.
64 Inline Processing Engine User Guide
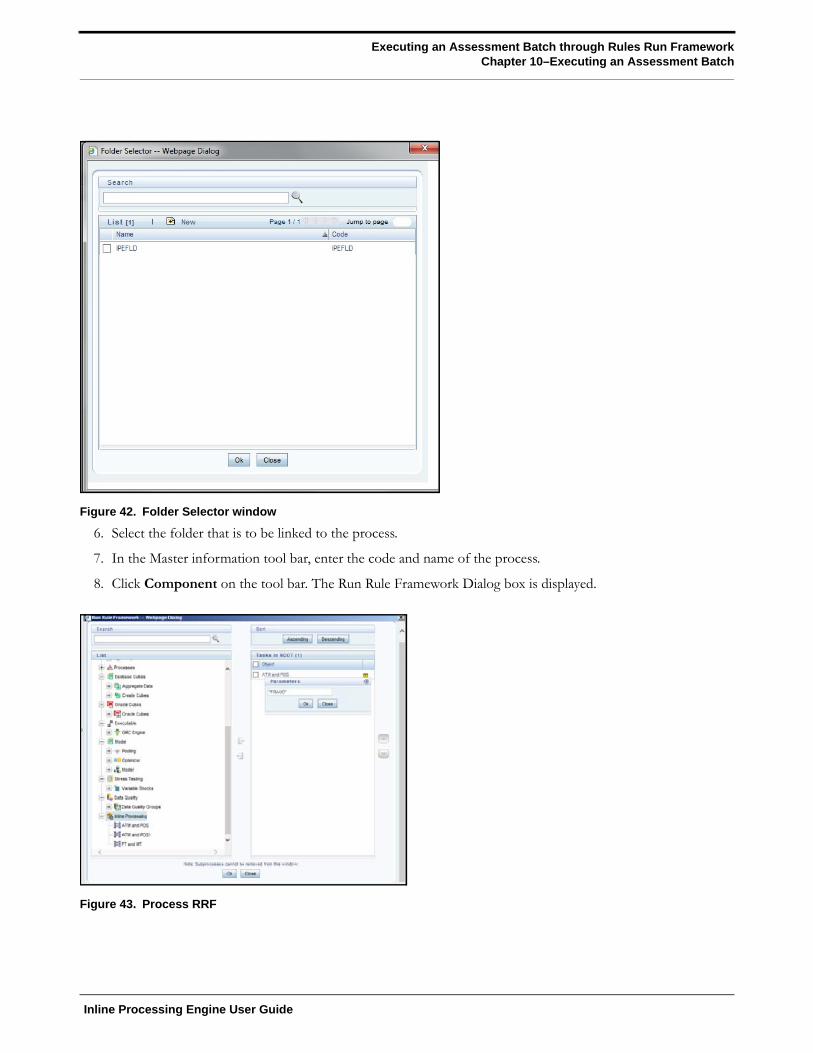
Executing an Assessment Batch through Rules Run FrameworkChapter 10–Executing an Assessment Batch
Figure 42. Folder Selector window
6. Select the folder that is to be linked to the process.
7. In the Master information tool bar, enter the code and name of the process.
8. Click Component on the tool bar. The Run Rule Framework Dialog box is displayed.
Figure 43. Process RRF
Inline Processing Engine User Guide

Executing an Assessment Batch through Rules Run FrameworkChapter 10–Executing an Assessment Batch
9. Click Inline Processing from the List on the left and select the activity that is to be executed. The activity is displayed on the right under Tasks in ROOT.
10. Click on the button next to the activity. The parameter dialog box is displayed. Enter the segment under this Activity that is to be executed. If no segment is entered, then all the segments under that activity are executed.
11. Click OK. The activity is displayed under Process.
12. Click Save. A confirmation message is displayed.
Creating a Hierarchy filter
To create a Hierarchy Filter, follow these steps:
1. Navigate to the OFSAA Home Page and select Common Tasks from Select Application drop-down list.
2. Select Unified Analytical Metadata under it and then Dimension Management.
3. Select Build Hierarchy. The Business Hierarchy page is displayed.
Figure 44. Build Hierarchy page
66 Inline Processing Engine User Guide

Executing an Assessment Batch through Rules Run FrameworkChapter 10–Executing an Assessment Batch
4. Click Add (+) on the Business Hierarchy tool bar. The Add Business Hierarchy window is displayed.
Figure 45. Adding Business Hierarchy Details
5. Enter the following details:
6. Click on the button next to Entity. The Entity and Attribute dialog box is displayed.
Table 40. Adding Business Hierarchy
Fields Description
Code Enter the Code.
Short Description Enter the short description.
Long Description Enter the long description.
Hierarchy Type Select Hierarchy Type. It has the following options: Regular
Measure
Time
From these options, select Regular
Hierarchy Subtype Select Hierarchy Subtype. It has the following options: Business Intelligence Enabled
Non Business Intelligence Enabled
Parent Child
From these options, select Non Business Intelligence Enabled
Inline Processing Engine User Guide
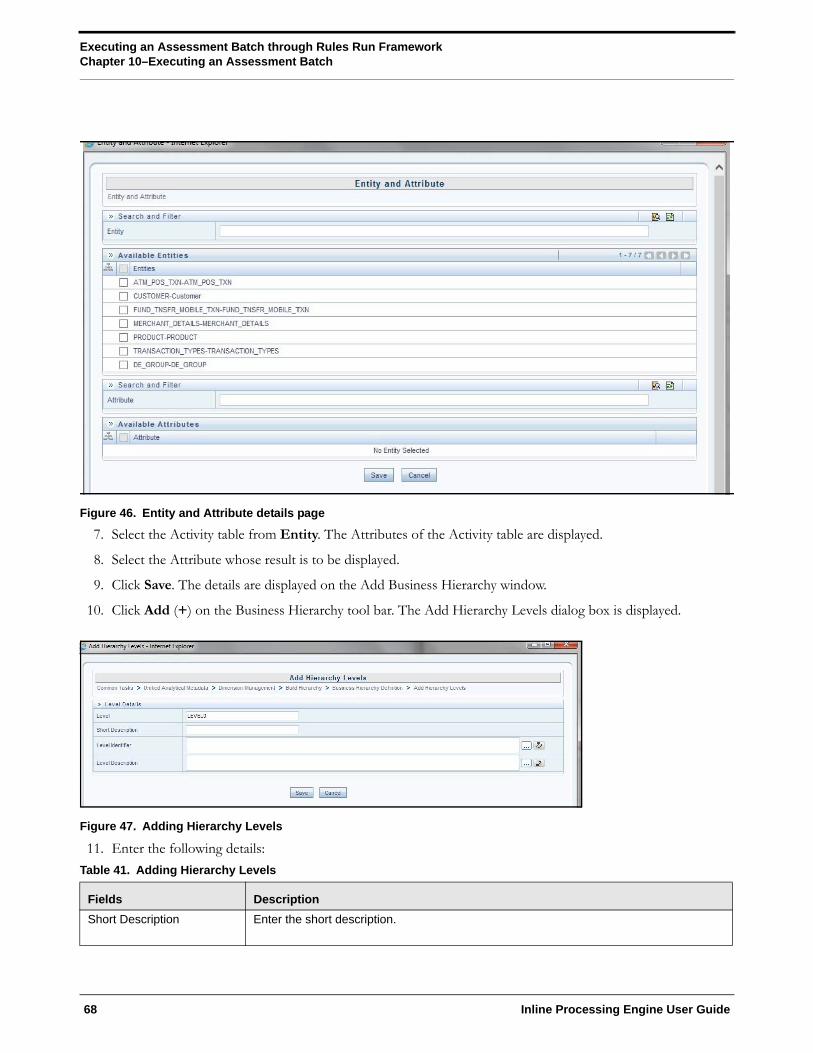
Executing an Assessment Batch through Rules Run FrameworkChapter 10–Executing an Assessment Batch
Figure 46. Entity and Attribute details page
7. Select the Activity table from Entity. The Attributes of the Activity table are displayed.
8. Select the Attribute whose result is to be displayed.
9. Click Save. The details are displayed on the Add Business Hierarchy window.
10. Click Add (+) on the Business Hierarchy tool bar. The Add Hierarchy Levels dialog box is displayed.
Figure 47. Adding Hierarchy Levels
11. Enter the following details:
Table 41. Adding Hierarchy Levels
Fields Description
Short Description Enter the short description.
68 Inline Processing Engine User Guide

Executing an Assessment Batch through Rules Run FrameworkChapter 10–Executing an Assessment Batch
12. Click Save. A confirmation message is displayed.
Creating a Run and Executing it
To create a run and execute it, follow these steps:
1. Navigate to the OFSAA Home Page and select IPE Execution from Select Application drop-down list.
2. Select Process Management under it and then Orchestration.
3. Select Run Definition. The Run Definition page is displayed.
Figure 48. Run definition page
4. Click New (+) on the List tool bar. The Run Rule framework window is displayed.
Level Identifier Enter the Level Identifier from the Expressions dialog box.
Level Description Enter the Level Identifier from the Expressions dialog box.
Table 41. Adding Hierarchy Levels
Inline Processing Engine User Guide

Executing an Assessment Batch through Rules Run FrameworkChapter 10–Executing an Assessment Batch
Figure 49. New Run Definition details page
5. Select the folder that is to be linked to the process run.
6. In the Master Information tool bar, enter the following details:
7. Click Selector on the List tool bar. From the options displayed, select Job. The Job Details page is displayed.
Table 42. Adding Run Definition
Fields Description
Code Enter the Code of the process.
Name Enter the Name of the process.
Type Select Type. It has the following options: Simulation Run
Base Run
From these options, select Base Run
70 Inline Processing Engine User Guide

Executing an Assessment Batch through Rules Run FrameworkChapter 10–Executing an Assessment Batch
Figure 50. Job RRF window
8. Select the Process from the list. The process gets displayed on the right.
9. Click OK. The job is displayed on the Run Rule Framework window.
Figure 51. Jobs for Run RRF page
10. Click Next. Add the required hierarchy to the jobs.
11. Select the filter to be added to the job.
Inline Processing Engine User Guide

Executing an Assessment Batch through Rules Run FrameworkChapter 10–Executing an Assessment Batch
Figure 52. Hierarchy Browser window
12. Click OK. The required hierarchy for the job is selected and is displayed on the Run Rule Framework window.
Figure 53. Job Hierarchy RRF page
13. Click Save. A confirmation message is displayed. The run is created and displayed on the Run Definition page.
72 Inline Processing Engine User Guide

Executing an Assessment Batch through Rules Run FrameworkChapter 10–Executing an Assessment Batch
Figure 54. Fire Run Page
14. Select the run from the Run definition page that is to be executed and click Fire Run. The Fire Run Rule Framework dialog box is displayed.
Figure 55. Fire Run Details Page
Inline Processing Engine User Guide

Executing an Assessment Batch through OperationsChapter 10–Executing an Assessment Batch
15. Enter the following details:
16. Click OK to run the batch.
Executing an Assessment Batch through Operations
To execute an Assessment Batch through Operations, refer to the Operation module in Oracle Financial Services Analytical Applications Infrastructure User Guide.
While executing the batch, provide the following parameters when you add Task Details:
$RUNID=<RUN_ID>
$PHID=1
$EXEID=<EXECUTION_ID>
$RUNSK=0
Table 43. Adding Fire Run Details
Fields Description
Request Type Select Request Type based on the following options: Single: If the batch has to be executed once.
Multiple: If the batch has to be executed multiple times at different intervals.
Batch Select Batch. It has the following options: Create
Create & Execute
From these options, select Create & Execute
Wait Select Wait. It has the following options: Yes: This will execute the batch after a certain duration. Enter the duration as
required.
No: This will execute the batch immediately.
Filters Enter the filter details.Note: $MISDATE option can be used to execute the run for that particular day. The format for it to enter in the filter details is:to_date(<ACTIVITY_TABLE_NAME>.<ACTIVITY_DT_COL>)=$MISDATENote: For $MISDATE option: For either Date or Timestamp datatypes, to_date is mandatory for the filter.
Activity Table Name and Activity Column Name should be in capital.
74 Inline Processing Engine User Guide
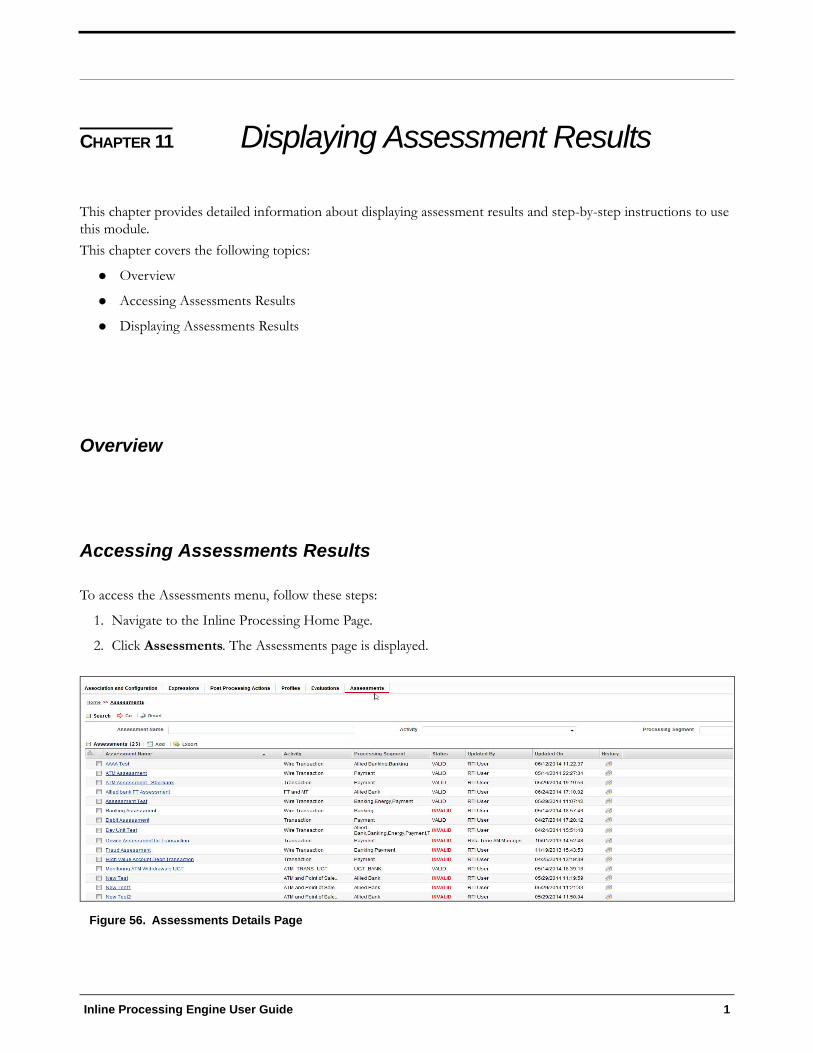
CHAPTER 11 Displaying Assessment Results
This chapter provides detailed information about displaying assessment results and step-by-step instructions to use this module.
This chapter covers the following topics:
Overview
Accessing Assessments Results
Displaying Assessments Results
Overview
Accessing Assessments Results
To access the Assessments menu, follow these steps:
1. Navigate to the Inline Processing Home Page.
2. Click Assessments. The Assessments page is displayed.
Figure 56. Assessments Details Page
Inline Processing Engine User Guide 1

Displaying Assessments ResultsChapter 11—About Inline Processing Engine
Displaying Assessments Results
To display Assessment Results, follow these steps:
1. Navigate to the Assessments details page.
2. Enter the following details:
3. The Assessment Results is displayed.
Figure 57. Assessment Results page
Table 44. Assessment Results Details
Fields Description
Activity Select the Activity.
Assessment Select the Assessment whose result is to be displayed.
Result Select the Result Type. The options are: Pass
Fail
Score Select the Score.
Activity Property To Display Select the properties to be displayed.
Additional Filter Click Add and select the Activity Property and operator.
2 Inline Processing Engine User Guide
CHAPTER 12 Managing Import and Export Utilities
This chapter provides detail information about Import and Export functionality and step-by-step instructions to use this module.
This chapter discusses the following topics:
Overview
Import Functionality
Export Functionality
Overview
Import and Export utilities are provided, when performed through command line RTIImport.sh and RTIExport.sh. These are available in <FIC_HOME>/ficapp/common/FICServer/bin
Import Functionality
To Import functionality, follow these steps:
1. Login to the Server where application layer is installed.
2. Navigate to the path.
<FIC_HOME>/ficapp/common/FICServer/bin
Execute the below command
./RTIImport.sh $1 $2 $3
Where $1 is the File name which has to be imported along with the absolute path where file exists.
$2 is infodom and $3 should always be false.
For example,
RTIImport.sh <APP LAYER FTPSHARE>/<INFO-DOM>/RTI/RTIExport_RTIINFO_2014.06.10.19.39.38.xml RTIINFO false
Note: The Import file name should always start with RTIExport_
Inline Processing Engine User Guide

Export FunctionalityChapter 12–Managing Import and Export Utilities
Export Functionality
To Export functionality, follow these steps:
1. Login to the Server where application layer is installed.
2. Navigate to the path.
<FIC_HOME>/ficapp/common/FICServer/bin
Execute the below command.
./RTIExport.sh $1 $2 $3
$2 is the Infodom name and $3 is Assessment IDs Separated by Comma.
For example,
./RTIExport.sh <APP_LAYTER ftpshare>/RTIINFO/RTI RTIINFO 1790,1802
4 Inline Processing Engine User Guide
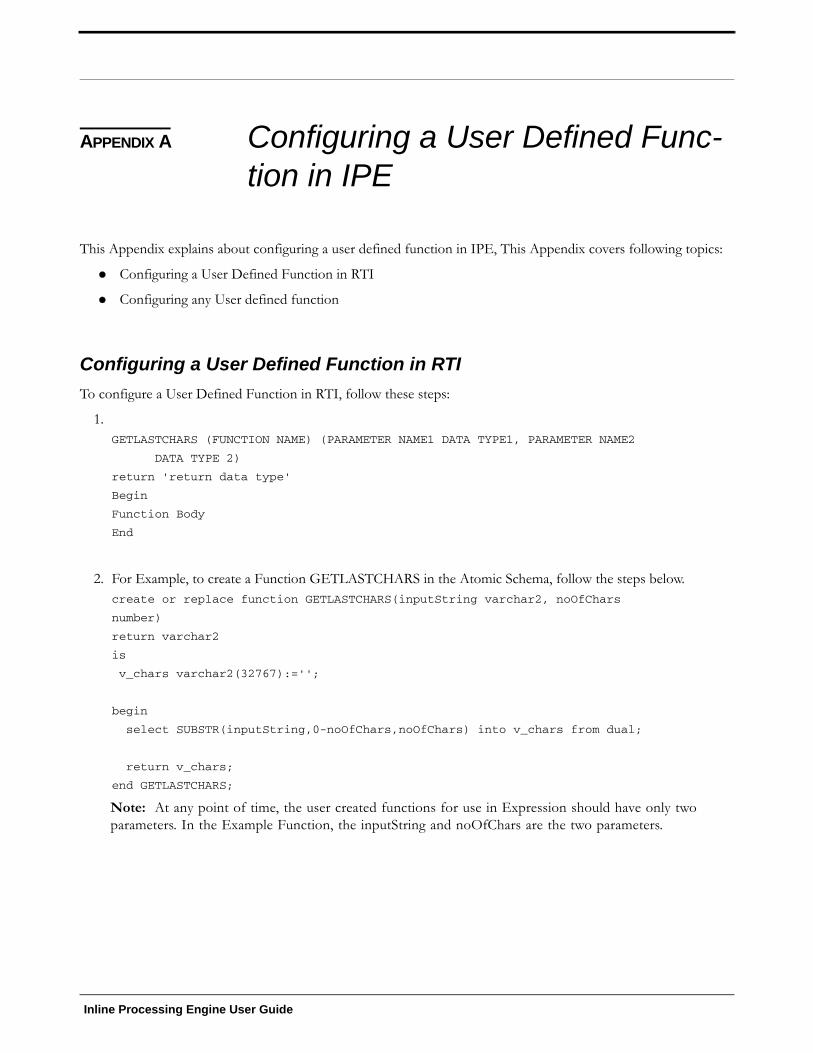
APPENDIX A Configuring a User Defined Func-tion in IPE
This Appendix explains about configuring a user defined function in IPE, This Appendix covers following topics:
Configuring a User Defined Function in RTI
Configuring any User defined function
Configuring a User Defined Function in RTI
To configure a User Defined Function in RTI, follow these steps:
1.GETLASTCHARS (FUNCTION NAME) (PARAMETER NAME1 DATA TYPE1, PARAMETER NAME2
DATA TYPE 2)
return 'return data type'
Begin
Function Body
End
2. For Example, to create a Function GETLASTCHARS in the Atomic Schema, follow the steps below.create or replace function GETLASTCHARS(inputString varchar2, noOfChars
number)
return varchar2
is
v_chars varchar2(32767):='';
begin
select SUBSTR(inputString,0-noOfChars,noOfChars) into v_chars from dual;
return v_chars;
end GETLASTCHARS;
Note: At any point of time, the user created functions for use in Expression should have only two parameters. In the Example Function, the inputString and noOfChars are the two parameters.
Inline Processing Engine User Guide

Configuring any User defined functionAppendix A—Configuring a User Defined Function in IPE
Configuring any User defined function
To Configure any User defined function, follow these steps.
1. The information to be inserted into the tables rti_function, rti_func_arg_map and rti_func_data_type.
2. To configure the above Created Function to appear in the Select Function drop-down, execute the below Scripts in the Config Schema.
The values should be added to the tables according to the format shown below:
insert into RTI_FUNC_ARG_MAP (N_MAP_ID, N_FUNC_ID, V_ARG_DESC, V_ARG_DATA_TYPE, N_ARG_NUM)
values(value1,value2,value3….)
Example,
insert into RTI_FUNCTION (N_FUNC_ID, V_RETURN_TYPE, V_FUNC_CODE, V_FUNC_NAME, V_DESC, V_NOTES, V_FUNC_TYPE, V_FUNC_STR, V_MAX_PARAM)
values (30, 'VARCHAR2(200)', 'GETLASTCHARS', 'Get Last Characters ', 'Gets
the Last Characters.', null, 'F', 'GETLASTCHARS(@1@,@2@ )', 2);
insert into RTI_FUNC_ARG_MAP (N_MAP_ID, N_FUNC_ID, V_ARG_DESC, V_ARG_DATA_TYPE, N_ARG_NUM)
values(value1,value2,value3…..)
Example,
insert into RTI_FUNC_ARG_MAP (N_MAP_ID, N_FUNC_ID, V_ARG_DESC,
V_ARG_DATA_TYPE, N_ARG_NUM) values (40, 30, 'Char Value to be evaluated', 'char', 1);
insert into RTI_FUNC_ARG_MAP (N_MAP_ID, N_FUNC_ID, V_ARG_DESC,
V_ARG_DATA_TYPE, N_ARG_NUM)
values (41, 30, 'Number of places', 'char', 2);
insert into RTI_FUNC_DATA_TYPE (N_MAP_ID, N_FUNC_ID, V_DATA_TYPE)
values (70, 30, 'CHAR');
values(value1,value2,value3….)
Example,insert into RTI_FUNC_DATA_TYPE (N_MAP_ID, N_FUNC_ID, V_DATA_TYPE)
values (70, 30, 'CHAR');
insert into RTI_FUNC_DATA_TYPE (N_MAP_ID, N_FUNC_ID, V_DATA_TYPE)
values (71, 30, 'VARCHAR');
6 Inline Processing Engine User Guide
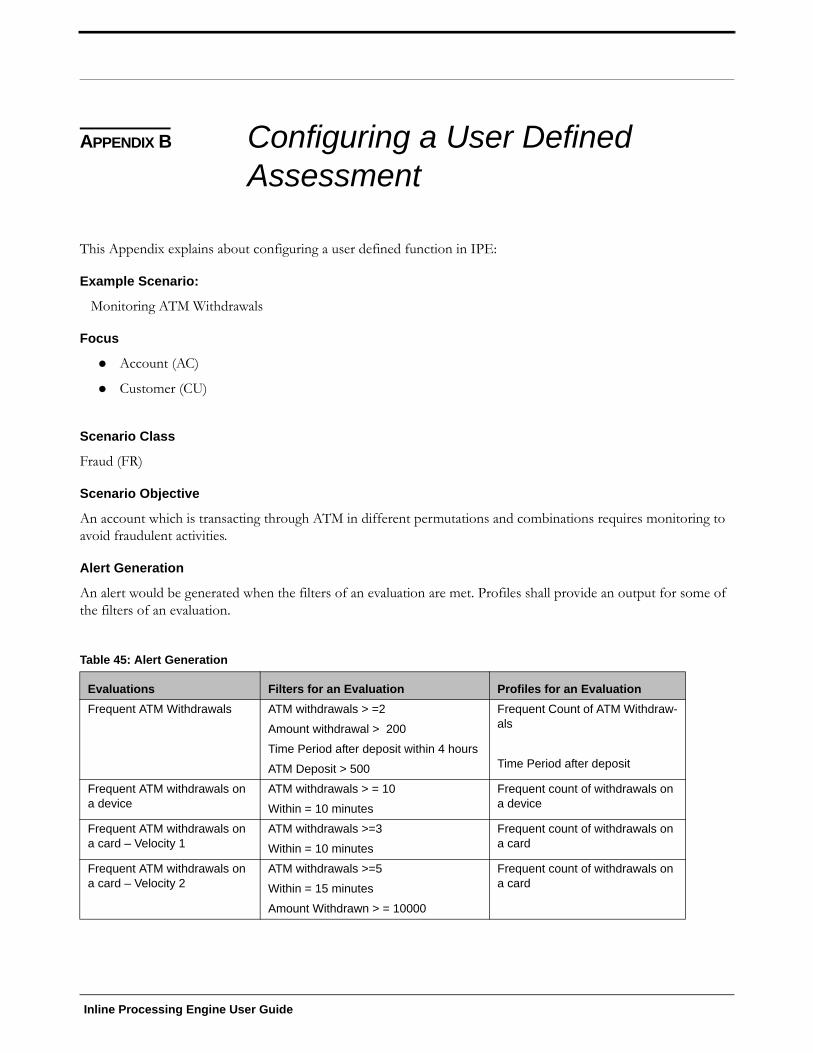
APPENDIX B Configuring a User Defined Assessment
This Appendix explains about configuring a user defined function in IPE:
Example Scenario:
Monitoring ATM Withdrawals
Focus
Account (AC)
Customer (CU)
Scenario Class
Fraud (FR)
Scenario Objective
An account which is transacting through ATM in different permutations and combinations requires monitoring to avoid fraudulent activities.
Alert Generation
An alert would be generated when the filters of an evaluation are met. Profiles shall provide an output for some of the filters of an evaluation.
Table 45: Alert Generation
Evaluations Filters for an Evaluation Profiles for an Evaluation
Frequent ATM Withdrawals ATM withdrawals > =2
Amount withdrawal > 200
Time Period after deposit within 4 hours
ATM Deposit > 500
Frequent Count of ATM Withdraw-als
Time Period after deposit
Frequent ATM withdrawals on a device
ATM withdrawals > = 10
Within = 10 minutes
Frequent count of withdrawals on a device
Frequent ATM withdrawals on a card – Velocity 1
ATM withdrawals >=3
Within = 10 minutes
Frequent count of withdrawals on a card
Frequent ATM withdrawals on a card – Velocity 2
ATM withdrawals >=5
Within = 15 minutes
Amount Withdrawn > = 10000
Frequent count of withdrawals on a card
Inline Processing Engine User Guide
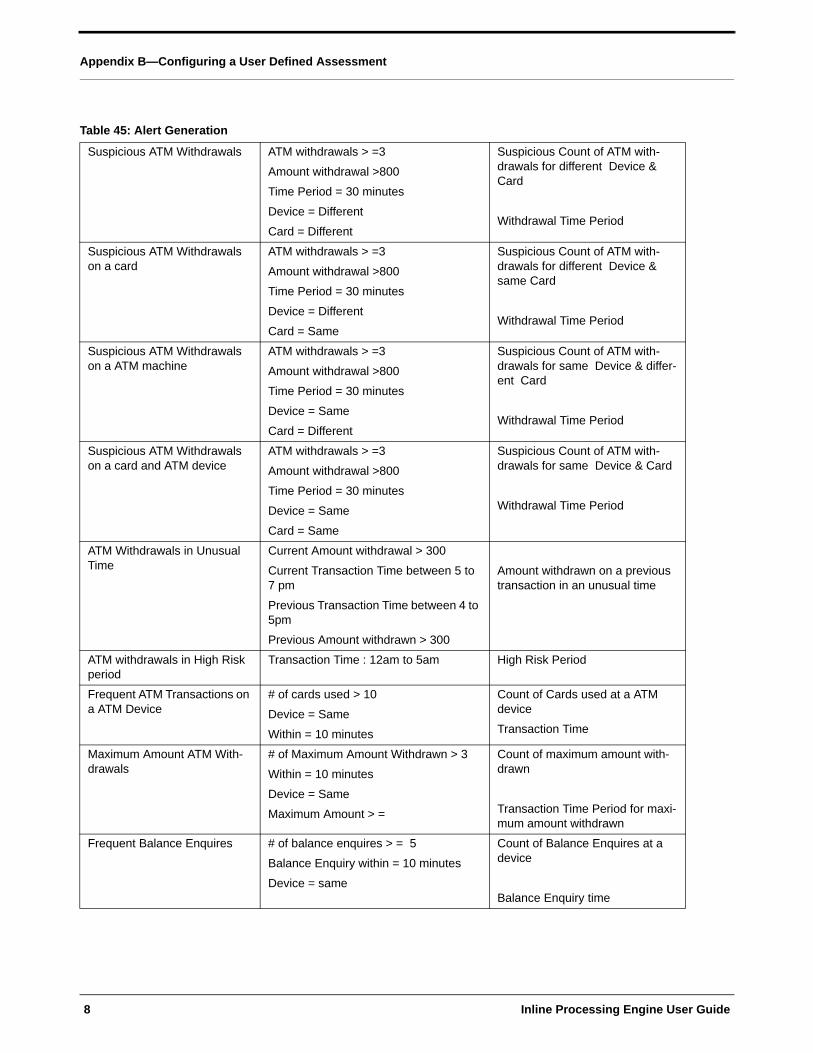
Appendix B—Configuring a User Defined Assessment
Suspicious ATM Withdrawals ATM withdrawals > =3
Amount withdrawal >800
Time Period = 30 minutes
Device = Different
Card = Different
Suspicious Count of ATM with-drawals for different Device & Card
Withdrawal Time Period
Suspicious ATM Withdrawals on a card
ATM withdrawals > =3
Amount withdrawal >800
Time Period = 30 minutes
Device = Different
Card = Same
Suspicious Count of ATM with-drawals for different Device & same Card
Withdrawal Time Period
Suspicious ATM Withdrawals on a ATM machine
ATM withdrawals > =3
Amount withdrawal >800
Time Period = 30 minutes
Device = Same
Card = Different
Suspicious Count of ATM with-drawals for same Device & differ-ent Card
Withdrawal Time Period
Suspicious ATM Withdrawals on a card and ATM device
ATM withdrawals > =3
Amount withdrawal >800
Time Period = 30 minutes
Device = Same
Card = Same
Suspicious Count of ATM with-drawals for same Device & Card
Withdrawal Time Period
ATM Withdrawals in Unusual Time
Current Amount withdrawal > 300
Current Transaction Time between 5 to 7 pm
Previous Transaction Time between 4 to 5pm
Previous Amount withdrawn > 300
Amount withdrawn on a previous transaction in an unusual time
ATM withdrawals in High Risk period
Transaction Time : 12am to 5am High Risk Period
Frequent ATM Transactions on a ATM Device
# of cards used > 10
Device = Same
Within = 10 minutes
Count of Cards used at a ATM device
Transaction Time
Maximum Amount ATM With-drawals
# of Maximum Amount Withdrawn > 3
Within = 10 minutes
Device = Same
Maximum Amount > =
Count of maximum amount with-drawn
Transaction Time Period for maxi-mum amount withdrawn
Frequent Balance Enquires # of balance enquires > = 5
Balance Enquiry within = 10 minutes
Device = same
Count of Balance Enquires at a device
Balance Enquiry time
Table 45: Alert Generation
8 Inline Processing Engine User Guide
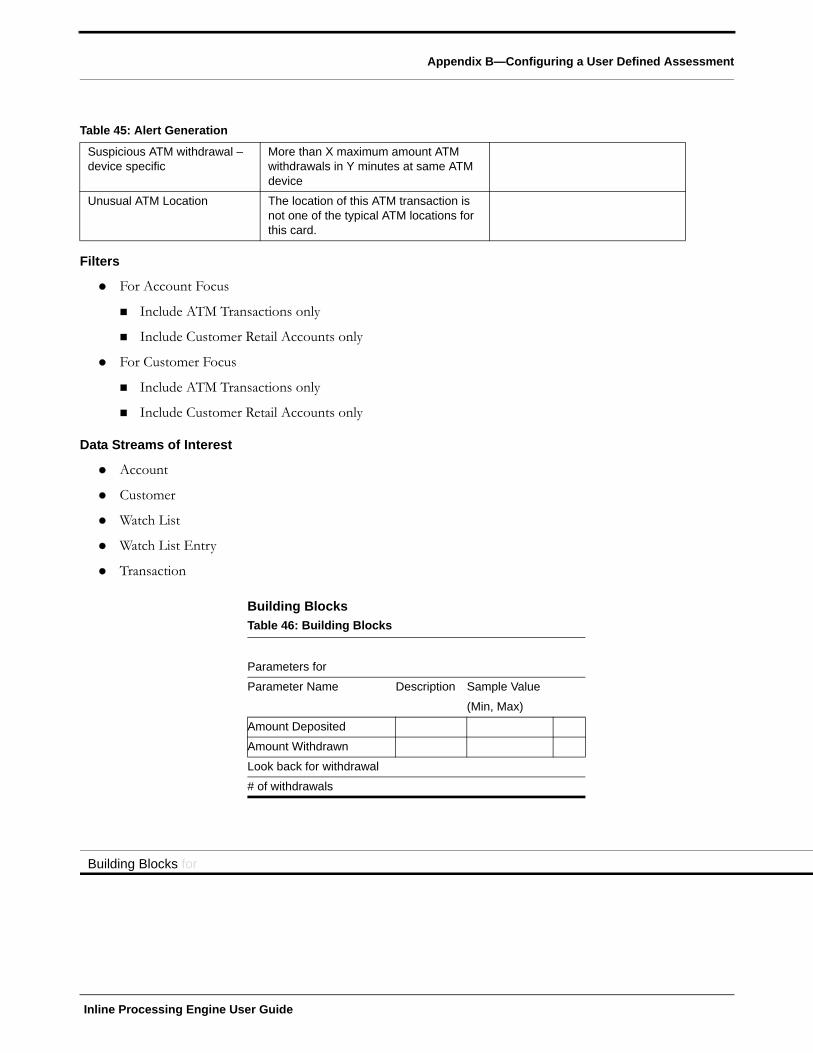
Appendix B—Configuring a User Defined Assessment
Filters
For Account Focus
Include ATM Transactions only
Include Customer Retail Accounts only
For Customer Focus
Include ATM Transactions only
Include Customer Retail Accounts only
Data Streams of Interest
Account
Customer
Watch List
Watch List Entry
Transaction
Building Blocks
Suspicious ATM withdrawal – device specific
More than X maximum amount ATM withdrawals in Y minutes at same ATM device
Unusual ATM Location The location of this ATM transaction is not one of the typical ATM locations for this card.
Table 45: Alert Generation
Table 46: Building Blocks
Parameters for
Parameter Name Description Sample Value
(Min, Max)
Amount Deposited
Amount Withdrawn
Look back for withdrawal
# of withdrawals
Building Blocks for
Inline Processing Engine User Guide
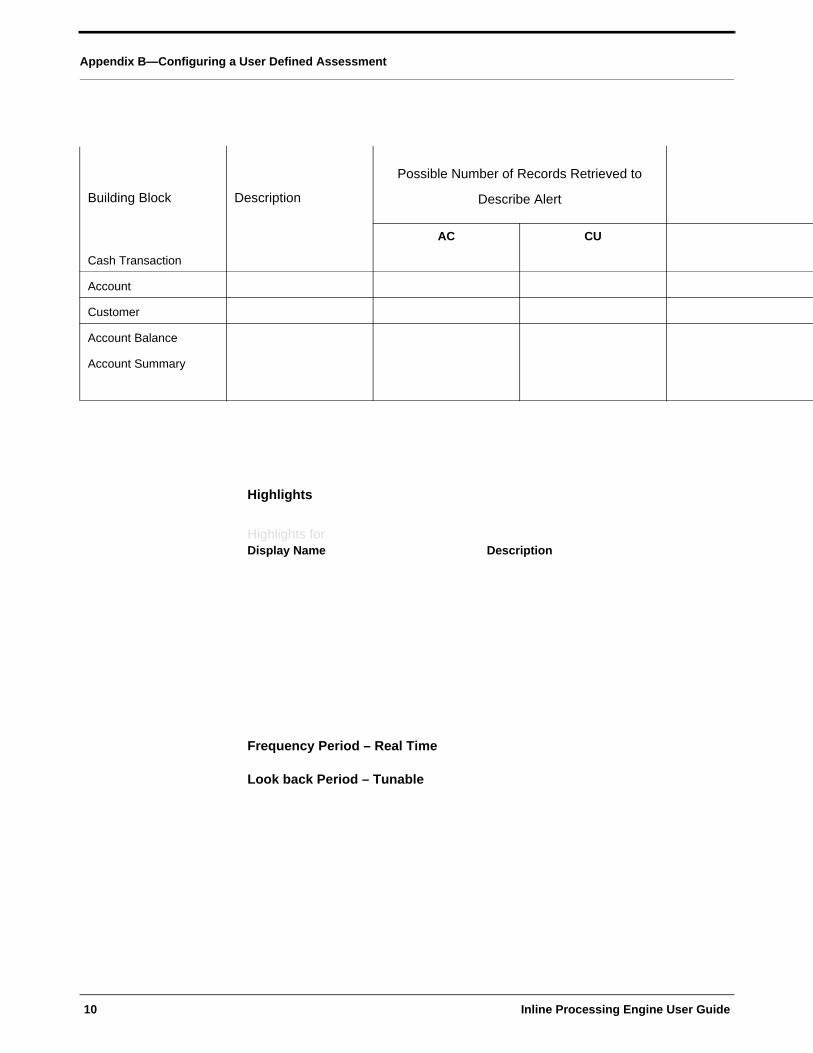
Appendix B—Configuring a User Defined Assessment
Highlights
Frequency Period – Real Time
Look back Period – Tunable
Building Block Description
Possible Number of Records Retrieved to
Describe Alert
AC CU
Cash Transaction
Account
Customer
Account Balance
Account Summary
Highlights for Display Name Description
10 Inline Processing Engine User Guide