Informatica PowerExchange for Netezza
30
Informatica ® PowerExchange for Netezza 10.2 HotFix 1 User Guide for PowerCenter
-
Upload
khangminh22 -
Category
Documents
-
view
0 -
download
0
Transcript of Informatica PowerExchange for Netezza

Informatica® PowerExchange for Netezza10.2 HotFix 1
User Guide for PowerCenter
Informatica PowerExchange for Netezza User Guide for PowerCenter10.2 HotFix 1August 2018
© Copyright Informatica LLC 2009, 2022
This software and documentation are provided only under a separate license agreement containing restrictions on use and disclosure. No part of this document may be reproduced or transmitted in any form, by any means (electronic, photocopying, recording or otherwise) without prior consent of Informatica LLC.
Informatica, the Informatica logo, PowerCenter, and PowerExchange are trademarks or registered trademarks of Informatica LLC in the United States and many jurisdictions throughout the world. A current list of Informatica trademarks is available on the web at https://www.informatica.com/trademarks.html. Other company and product names may be trade names or trademarks of their respective owners.
U.S. GOVERNMENT RIGHTS Programs, software, databases, and related documentation and technical data delivered to U.S. Government customers are "commercial computer software" or "commercial technical data" pursuant to the applicable Federal Acquisition Regulation and agency-specific supplemental regulations. As such, the use, duplication, disclosure, modification, and adaptation is subject to the restrictions and license terms set forth in the applicable Government contract, and, to the extent applicable by the terms of the Government contract, the additional rights set forth in FAR 52.227-19, Commercial Computer Software License.
Portions of this software and/or documentation are subject to copyright held by third parties. Required third party notices are included with the product.
The information in this documentation is subject to change without notice. If you find any problems in this documentation, report them to us at [email protected].
Informatica products are warranted according to the terms and conditions of the agreements under which they are provided. INFORMATICA PROVIDES THE INFORMATION IN THIS DOCUMENT "AS IS" WITHOUT WARRANTY OF ANY KIND, EXPRESS OR IMPLIED, INCLUDING WITHOUT ANY WARRANTIES OF MERCHANTABILITY, FITNESS FOR A PARTICULAR PURPOSE AND ANY WARRANTY OR CONDITION OF NON-INFRINGEMENT.
Publication Date: 2022-03-30

Table of Contents
Preface . . . . . . . . . . . . . . . . . . . . . . . . . . . . . . . . . . . . . . . . . . . . . . . . . . . . . . . . . . . . . . . . . . . . . . 5Informatica Resources. . . . . . . . . . . . . . . . . . . . . . . . . . . . . . . . . . . . . . . . . . . . . . . . . . . 5
Informatica Network. . . . . . . . . . . . . . . . . . . . . . . . . . . . . . . . . . . . . . . . . . . . . . . . . 5
Informatica Knowledge Base. . . . . . . . . . . . . . . . . . . . . . . . . . . . . . . . . . . . . . . . . . . . 5
Informatica Documentation. . . . . . . . . . . . . . . . . . . . . . . . . . . . . . . . . . . . . . . . . . . . . 5
Informatica Product Availability Matrixes. . . . . . . . . . . . . . . . . . . . . . . . . . . . . . . . . . . . 6
Informatica Velocity. . . . . . . . . . . . . . . . . . . . . . . . . . . . . . . . . . . . . . . . . . . . . . . . . . 6
Informatica Marketplace. . . . . . . . . . . . . . . . . . . . . . . . . . . . . . . . . . . . . . . . . . . . . . . 6
Informatica Global Customer Support. . . . . . . . . . . . . . . . . . . . . . . . . . . . . . . . . . . . . . 6
Chapter 1: Introduction to PowerExchange for Netezza. . . . . . . . . . . . . . . . . . . . . . . . 7PowerExchange for Netezza Overview. . . . . . . . . . . . . . . . . . . . . . . . . . . . . . . . . . . . . . . . . 7
Code Pages. . . . . . . . . . . . . . . . . . . . . . . . . . . . . . . . . . . . . . . . . . . . . . . . . . . . . . . . . . 7
Chapter 2: PowerExchange for Netezza Configuration. . . . . . . . . . . . . . . . . . . . . . . . 8PowerExchange for Netezza Configuration Overview. . . . . . . . . . . . . . . . . . . . . . . . . . . . . . . . 8
Prerequisites. . . . . . . . . . . . . . . . . . . . . . . . . . . . . . . . . . . . . . . . . . . . . . . . . . . . . . . . . 8
Registering the Plug-in. . . . . . . . . . . . . . . . . . . . . . . . . . . . . . . . . . . . . . . . . . . . . . . . . . . 9
Connecting to a Netezza Database from Windows. . . . . . . . . . . . . . . . . . . . . . . . . . . . . . . . . 9
Configuring ODBC Connectivity. . . . . . . . . . . . . . . . . . . . . . . . . . . . . . . . . . . . . . . . . . 10
Connecting to a Netezza Database from UNIX. . . . . . . . . . . . . . . . . . . . . . . . . . . . . . . . . . . 10
Configuring ODBC Connectivity. . . . . . . . . . . . . . . . . . . . . . . . . . . . . . . . . . . . . . . . . . 10
Upgrading PowerExchange for Netezza. . . . . . . . . . . . . . . . . . . . . . . . . . . . . . . . . . . . . . . 12
Chapter 3: Netezza Sources and Targets. . . . . . . . . . . . . . . . . . . . . . . . . . . . . . . . . . . . 13Netezza Sources and Targets Overview. . . . . . . . . . . . . . . . . . . . . . . . . . . . . . . . . . . . . . . 13
Source Qualifier Properties. . . . . . . . . . . . . . . . . . . . . . . . . . . . . . . . . . . . . . . . . . . . . . . 13
Importing Netezza Source Definitions. . . . . . . . . . . . . . . . . . . . . . . . . . . . . . . . . . . . . . . . . 14
Importing Netezza Target Definitions. . . . . . . . . . . . . . . . . . . . . . . . . . . . . . . . . . . . . . . . . 14
Chapter 4: Netezza Sessions and Workflows. . . . . . . . . . . . . . . . . . . . . . . . . . . . . . . . . 16Data Transfer Modes in Netezza. . . . . . . . . . . . . . . . . . . . . . . . . . . . . . . . . . . . . . . . . . . . 16
Normal Mode. . . . . . . . . . . . . . . . . . . . . . . . . . . . . . . . . . . . . . . . . . . . . . . . . . . . . 16
Bulk Mode. . . . . . . . . . . . . . . . . . . . . . . . . . . . . . . . . . . . . . . . . . . . . . . . . . . . . . . 16
Normal and Bulk Mode Features. . . . . . . . . . . . . . . . . . . . . . . . . . . . . . . . . . . . . . . . . 17
PowerExchange for Netezza Connections. . . . . . . . . . . . . . . . . . . . . . . . . . . . . . . . . . . . . . 18
Netezza Connection Properties. . . . . . . . . . . . . . . . . . . . . . . . . . . . . . . . . . . . . . . . . . 18
Creating a Netezza Connection. . . . . . . . . . . . . . . . . . . . . . . . . . . . . . . . . . . . . . . . . . 18
Session Configuration with a Netezza Source. . . . . . . . . . . . . . . . . . . . . . . . . . . . . . . . . . . . 19
Parameterization for Netezza Sources. . . . . . . . . . . . . . . . . . . . . . . . . . . . . . . . . . . . . . . . 19
Table of Contents 3
Session Configuration with a Netezza Target. . . . . . . . . . . . . . . . . . . . . . . . . . . . . . . . . . . . 20
Target Properties. . . . . . . . . . . . . . . . . . . . . . . . . . . . . . . . . . . . . . . . . . . . . . . . . . . 20
Null Values and Empty Strings. . . . . . . . . . . . . . . . . . . . . . . . . . . . . . . . . . . . . . . . . . 22
Unprojected Columns. . . . . . . . . . . . . . . . . . . . . . . . . . . . . . . . . . . . . . . . . . . . . . . . 22
Pipeline Partitioning. . . . . . . . . . . . . . . . . . . . . . . . . . . . . . . . . . . . . . . . . . . . . . . . . 22
Target Connection Groups. . . . . . . . . . . . . . . . . . . . . . . . . . . . . . . . . . . . . . . . . . . . . 23
Multiple Targets Configuration for the Same Target Table. . . . . . . . . . . . . . . . . . . . . . . . . 23
Parameterization for Netezza Targets. . . . . . . . . . . . . . . . . . . . . . . . . . . . . . . . . . . . . . . . 24
Netezza Target Data Update. . . . . . . . . . . . . . . . . . . . . . . . . . . . . . . . . . . . . . . . . . . . . . . 24
Update As Insert. . . . . . . . . . . . . . . . . . . . . . . . . . . . . . . . . . . . . . . . . . . . . . . . . . . 24
Update Else Insert. . . . . . . . . . . . . . . . . . . . . . . . . . . . . . . . . . . . . . . . . . . . . . . . . . 25
Netezza Session Configuration for Optimal Performance. . . . . . . . . . . . . . . . . . . . . . . . . . . . 26
Netezza Distribution Key. . . . . . . . . . . . . . . . . . . . . . . . . . . . . . . . . . . . . . . . . . . . . . 26
Troubleshooting Netezza Sessions. . . . . . . . . . . . . . . . . . . . . . . . . . . . . . . . . . . . . . . . . . 27
Appendix A: Datatype Reference. . . . . . . . . . . . . . . . . . . . . . . . . . . . . . . . . . . . . . . . . . . . . 28Netezza and Transformation Datatypes. . . . . . . . . . . . . . . . . . . . . . . . . . . . . . . . . . . . . . . 28
Index. . . . . . . . . . . . . . . . . . . . . . . . . . . . . . . . . . . . . . . . . . . . . . . . . . . . . . . . . . . . 30
4 Table of Contents
PrefaceThe Informatica PowerExchange® for Netezza User Guide for PowerCenter® provides information about extracting data from a Netezza source and loading data into a Netezza target. It is written for database administrators and developers who are responsible for extracting data from Netezza and loading data to Netezza. This book assumes you have knowledge of Netezza and PowerCenter.
Informatica Resources
Informatica NetworkInformatica Network hosts Informatica Global Customer Support, the Informatica Knowledge Base, and other product resources. To access Informatica Network, visit https://network.informatica.com.
As a member, you can:
• Access all of your Informatica resources in one place.
• Search the Knowledge Base for product resources, including documentation, FAQs, and best practices.
• View product availability information.
• Review your support cases.
• Find your local Informatica User Group Network and collaborate with your peers.
Informatica Knowledge BaseUse the Informatica Knowledge Base to search Informatica Network for product resources such as documentation, how-to articles, best practices, and PAMs.
To access the Knowledge Base, visit https://kb.informatica.com. If you have questions, comments, or ideas about the Knowledge Base, contact the Informatica Knowledge Base team at [email protected].
Informatica DocumentationTo get the latest documentation for your product, browse the Informatica Knowledge Base at https://kb.informatica.com/_layouts/ProductDocumentation/Page/ProductDocumentSearch.aspx.
If you have questions, comments, or ideas about this documentation, contact the Informatica Documentation team through email at [email protected].
5
Informatica Product Availability MatrixesProduct Availability Matrixes (PAMs) indicate the versions of operating systems, databases, and other types of data sources and targets that a product release supports. If you are an Informatica Network member, you can access PAMs at https://network.informatica.com/community/informatica-network/product-availability-matrices.
Informatica VelocityInformatica Velocity is a collection of tips and best practices developed by Informatica Professional Services. Developed from the real-world experience of hundreds of data management projects, Informatica Velocity represents the collective knowledge of our consultants who have worked with organizations from around the world to plan, develop, deploy, and maintain successful data management solutions.
If you are an Informatica Network member, you can access Informatica Velocity resources at http://velocity.informatica.com.
If you have questions, comments, or ideas about Informatica Velocity, contact Informatica Professional Services at [email protected].
Informatica MarketplaceThe Informatica Marketplace is a forum where you can find solutions that augment, extend, or enhance your Informatica implementations. By leveraging any of the hundreds of solutions from Informatica developers and partners, you can improve your productivity and speed up time to implementation on your projects. You can access Informatica Marketplace at https://marketplace.informatica.com.
Informatica Global Customer SupportYou can contact a Global Support Center by telephone or through Online Support on Informatica Network.
To find your local Informatica Global Customer Support telephone number, visit the Informatica website at the following link: http://www.informatica.com/us/services-and-training/support-services/global-support-centers.
If you are an Informatica Network member, you can use Online Support at http://network.informatica.com.
6 Preface
C h a p t e r 1
Introduction to PowerExchange for Netezza
This chapter includes the following topics:
• PowerExchange for Netezza Overview, 7
• Code Pages, 7
PowerExchange for Netezza OverviewPowerExchange for Netezza provides bidirectional connectivity between PowerCenter and IBM Netezza Platform Software to read and write data.
The Designer uses a relational connector to connect to the Netezza database. You can import Netezza tables as sources and target definitions. You can connect to the Netezza Performance Server to read data from Netezza tables and load data to Netezza tables. The Netezza Performance Server integrates database, server, and storage in a single system.
Configure a Netezza database connection in a mapping to read data from and write to Netezza.
Code PagesWhen the PowerCenter Integration Service runs in Unicode mode, it encodes Netezza data of the Nchar(m) and NVarchar(m) datatypes in UTF-8. It encodes Netezza data of the Varchar and Char datatypes in Latin-9.
If the data contains extended ASCII characters or UTF-8 characters, run the PowerCenter Integration Service in Unicode mode.
7
C h a p t e r 2
PowerExchange for Netezza Configuration
This chapter includes the following topics:
• PowerExchange for Netezza Configuration Overview, 8
• Prerequisites, 8
• Registering the Plug-in, 9
• Connecting to a Netezza Database from Windows, 9
• Connecting to a Netezza Database from UNIX, 10
• Upgrading PowerExchange for Netezza, 12
PowerExchange for Netezza Configuration OverviewPowerExchange for Netezza installs with PowerCenter.
To configure PowerExchange for Netezza, complete the following steps:
1. Complete the prerequisites.
2. Register the PowerExchange for Netezza plug-in if you want to read or write data in bulk mode. To read or write data in normal mode, you do not need to perform configuration steps.
PrerequisitesBefore you configure PowerExchange for Netezza, complete the following tasks:
• Install or upgrade PowerCenter.
• Install the client and server components of the Netezza Performance Server.
• Verify that the Netezza database user has the following privileges on the database:
- CREATE TABLE
- CREATE EXTERNAL TABLE
- DELETE
8
- DROP
- INSERT
- LIST
- SELECT
- TRUNCATE
- UPDATE
Registering the Plug-inTo read or write Netezza data in bulk mode, you need to register the plug-in with the repository. You do not need to register the plug-in with the repository to read or write Netezza data in normal mode.
To register the plug-in, the repository must be running in exclusive mode. Use the Informatica Administrator or the pmrep RegisterPlugin command to register the plug-in.
The plug-in file for PowerExchange for Netezza is pmnetezza.xml. When you install the Service component, the installer copies pmnetezza.xml to the following directory:
<PowerCenter Installation Directory>\server\bin\Plugin
Note: If you do not have the correct privileges to register the plug-in, contact the user who manages the PowerCenter Repository Service.
Connecting to a Netezza Database from WindowsInstall and configure ODBC on the machines where the PowerCenter Integration Service process runs and where you install the PowerCenter Client. You must configure connectivity to the following Informatica components on Windows:
• PowerCenter Integration Service. Install the Netezza ODBC driver on the machine where the PowerCenter Integration Service process runs. Use the Microsoft ODBC Data Source Administrator to configure ODBC connectivity.
• PowerCenter Client. Install the Netezza ODBC driver on each PowerCenter Client machine that accesses the Netezza database. Use the Microsoft ODBC Data Source Administrator to configure ODBC connectivity. Use the Workflow Manager to create a database connection object for the Netezza database.
Registering the Plug-in 9
Configuring ODBC ConnectivityYou can configure ODBC connectivity to a Netezza database.
The following steps provide a guideline for configuring ODBC connectivity. For specific instructions, see the database documentation.
1. Create an ODBC data source for each Netezza database that you want to access.
To create the ODBC data source, use the driver provided by Netezza.
Create a System DSN if you start the Informatica service with a Local System account logon. Create a User DSN if you select the This account log in option to start the Informatica service.
After you create the data source, configure the properties of the data source.
2. Enter a name for the new ODBC data source.
3. Enter the IP address/host name and port number for the Netezza server.
4. Enter the name of the Netezza schema where you plan to create database objects.
5. Configure the path and file name for the ODBC log file.
6. Verify that you can connect to the Netezza database.
You can use the Microsoft ODBC Data Source Administrator to test the connection to the database. To test the connection, select the Netezza data source and click Configure. On the Testing tab, click Test Connection and enter the connection information for the Netezza schema.
Connecting to a Netezza Database from UNIXInstall and configure Netezza ODBC driver on the machine where the PowerCenter Integration Service process runs. Use the DataDirect Driver Manager in the DataDirect driver package shipped with the Informatica product to configure the Netezza data source details in the odbc.ini file.
Configuring ODBC ConnectivityYou can configure ODBC connectivity to a Netezza database.
The following steps provide a guideline for configuring ODBC connectivity. For specific instructions, see the database documentation.
1. To configure connectivity for the integration service process, log in to the machine as a user who can start a service process.
2. Set the ODBCHOME, NZ_ODBC_INI_PATH, and PATH environment variables.
ODBCHOME. Set the variable to the ODBC installation directory. For example:
Using a Bourne shell:
$ ODBCHOME=<Informatica server home>/ODBC7.1; export ODBCHOMEUsing a C shell:
$ setenv ODBCHOME =<Informatica server home>/ODBC7.1PATH. Set the variable to the ODBCHOME/bin directory. For example:
Using a Bourne shell:
PATH="${PATH}:$ODBCHOME/bin"
10 Chapter 2: PowerExchange for Netezza Configuration
Using a C shell:
$ setenv PATH ${PATH}:$ODBCHOME/binNZ_ODBC_INI_PATH. Set the variable to point to the directory that contains the odbc.ini file. For example, if the odbc.ini file is in the $ODBCHOME directory:
Using a Bourne shell:
NZ_ODBC_INI_PATH=$ODBCHOME; export NZ_ODBC_INI_PATHUsing a C shell:
$ setenv NZ_ODBC_INI_PATH $ODBCHOME3. Set the shared library environment variable.
The shared library path must contain the ODBC libraries. It must also include the Informatica services installation directory (server_dir).
Set the shared library environment variable based on the operating system. Set the Netezza library folder to <NetezzaInstallationDir>/lib64.
The following table describes the shared library variables for each operating system:
Operating System Variable
Solaris LD_LIBRARY_PATH
Linux LD_LIBRARY_PATH
AIX LIBPATH
For example, use the following syntax for Solaris and Linux:
• Using a Bourne shell:
$ LD_LIBRARY_PATH="${LD_LIBRARY_PATH}:$HOME/server_dir:$ODBCHOME/lib:<NetezzaInstallationDir>/lib64”export LD_LIBRARY_PATH
• Using a C shell:
$ setenv LD_LIBRARY_PATH "${LD_LIBRARY_PATH}:$HOME/server_dir:$ODBCHOME/lib:<NetezzaInstallationDir>/lib64"
For AIX
• Using a Bourne shell:
$ LIBPATH=${LIBPATH}:$HOME/server_dir:$ODBCHOME/lib:<NetezzaInstallationDir>/lib64; export LIBPATH
• Using a C shell:
$ setenv LIBPATH ${LIBPATH}:$HOME/server_dir:$ODBCHOME/lib:<NetezzaInstallationDir>/lib64
4. Edit the existing odbc.ini file or copy the odbc.ini file to the home directory and edit it.
This file exists in $ODBCHOME directory.
$ cp $ODBCHOME/odbc.ini $HOME/.odbc.iniAdd an entry for the Netezza data source under the section [ODBC Data Sources] and configure the data source.
For example:
[NZSQL]Driver = /export/home/appsqa/thirdparty/netezza/lib64/libnzodbc.soDescription = NetezzaSQL ODBC
Connecting to a Netezza Database from UNIX 11
Servername = netezza1.informatica.comPort = 5480Database = infaUsername = adminPassword = passwordDebuglogging = trueStripCRLF = falsePreFetch = 256Protocol = 7.0ReadOnly = falseShowSystemTables = falseSocket = 16384DateFormat = 1TranslationDLL =TranslationName =TranslationOption =NumericAsChar = false
For more information about Netezza connectivity, see the Netezza ODBC driver documentation.
5. Verify that the last entry in the odbc.ini file is InstallDir and set it to the ODBC installation directory.
For example:
InstallDir=<Informatica install directory>/<ODBCHOME directory>6. Edit the .cshrc or .profile file to include the complete set of shell commands.
7. Restart the Informatica services.
Upgrading PowerExchange for NetezzaTo upgrade PowerExchange for Netezza from earlier versions, complete the prerequisite tasks. Update the PowerExchange for Netezza plug-in registration if you want to read or write data in bulk mode.
12 Chapter 2: PowerExchange for Netezza Configuration

C h a p t e r 3
Netezza Sources and TargetsThis chapter includes the following topics:
• Netezza Sources and Targets Overview, 13
• Source Qualifier Properties, 13
• Importing Netezza Source Definitions, 14
• Importing Netezza Target Definitions, 14
Netezza Sources and Targets OverviewNetezza source and target definitions represent metadata for Netezza tables. When you import Netezza definitions, you can choose to preview data in the tables.
You can edit definitions to configure the properties that you did not import from Netezza. If you want to enforce key constraints, define them in the Designer. When you run a session, the PowerCenter Integration Service establishes relationships within the pipeline based on source and target definitions. Netezza does not enforce key constraints.
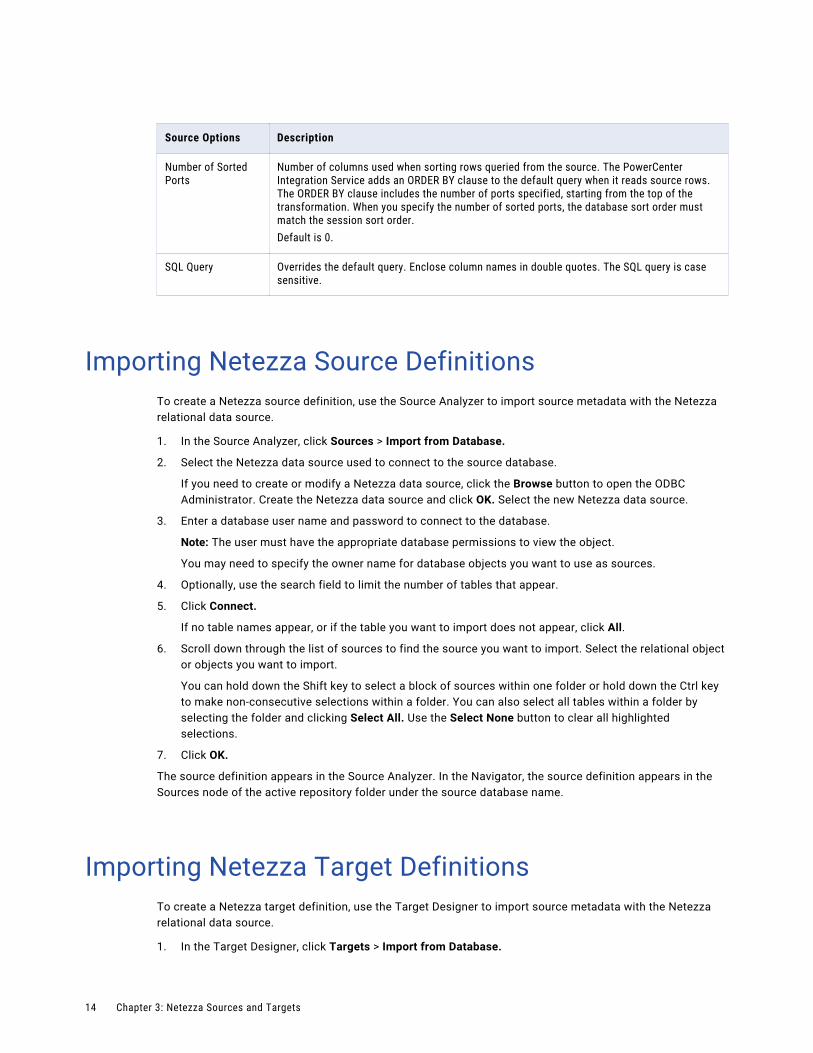
Source Qualifier PropertiesYou can configure source qualifier properties to sort the number of input ports and to retrieve distinct data from a Netezza source. You can override the values in the session properties.
The following table describes the source qualifier properties:
Source Options Description
Select Distinct Selects unique values. Netezza ignores trailing spaces. Therefore, the PowerCenter Integration Service might extract fewer rows than expected.
Source Filter Reduces the number of rows the PowerCenter Integration Service queries.Use the following syntax:
<table name>.”<field name>” <operator> <value>The filter condition is case sensitive.
13
Source Options Description
Number of Sorted Ports
Number of columns used when sorting rows queried from the source. The PowerCenter Integration Service adds an ORDER BY clause to the default query when it reads source rows. The ORDER BY clause includes the number of ports specified, starting from the top of the transformation. When you specify the number of sorted ports, the database sort order must match the session sort order.Default is 0.
SQL Query Overrides the default query. Enclose column names in double quotes. The SQL query is case sensitive.
Importing Netezza Source DefinitionsTo create a Netezza source definition, use the Source Analyzer to import source metadata with the Netezza relational data source.
1. In the Source Analyzer, click Sources > Import from Database.
2. Select the Netezza data source used to connect to the source database.
If you need to create or modify a Netezza data source, click the Browse button to open the ODBC Administrator. Create the Netezza data source and click OK. Select the new Netezza data source.
3. Enter a database user name and password to connect to the database.
Note: The user must have the appropriate database permissions to view the object.
You may need to specify the owner name for database objects you want to use as sources.
4. Optionally, use the search field to limit the number of tables that appear.
5. Click Connect.
If no table names appear, or if the table you want to import does not appear, click All.
6. Scroll down through the list of sources to find the source you want to import. Select the relational object or objects you want to import.
You can hold down the Shift key to select a block of sources within one folder or hold down the Ctrl key to make non-consecutive selections within a folder. You can also select all tables within a folder by selecting the folder and clicking Select All. Use the Select None button to clear all highlighted selections.
7. Click OK.
The source definition appears in the Source Analyzer. In the Navigator, the source definition appears in the Sources node of the active repository folder under the source database name.
Importing Netezza Target DefinitionsTo create a Netezza target definition, use the Target Designer to import source metadata with the Netezza relational data source.
1. In the Target Designer, click Targets > Import from Database.
14 Chapter 3: Netezza Sources and Targets
2. Select the Netezza data source used to connect to the target database.
If you need to create or modify a Netezza data source, click the Browse button to open the ODBC Administrator. Create the Netezza data source and click OK. Select the new Netezza data source.
3. Enter the user name and password to connect to the database, and click Connect.
If you are not the owner of the table you want to use as a target, specify the owner name.
4. Drill down through the list of database objects to view the available tables as targets.
5. Select the relational table or tables to import the definitions into the repository.
You can hold down the Shift key to select a block of tables, or hold down the Ctrl key to make non-consecutive selections. You can also use the Select All and Select None buttons to select or clear all available targets.
6. Click OK.
The selected target definitions appear in the Navigator under the Targets node.
Importing Netezza Target Definitions 15
C h a p t e r 4
Netezza Sessions and WorkflowsThis chapter includes the following topics:
• Data Transfer Modes in Netezza, 16
• PowerExchange for Netezza Connections, 18
• Session Configuration with a Netezza Source, 19
• Parameterization for Netezza Sources, 19
• Session Configuration with a Netezza Target, 20
• Parameterization for Netezza Targets, 24
• Netezza Target Data Update, 24
• Netezza Session Configuration for Optimal Performance, 26
• Troubleshooting Netezza Sessions, 27
Data Transfer Modes in NetezzaYou can transfer data in Netezza by using normal and bulk mode.
Normal ModeIn normal mode, the PowerCenter Integration Service extracts and loads data row by row.
Bulk ModeYou can transfer data in Netezza by using bulk mode. Use bulk mode to increase session performance.
In bulk mode, the PowerCenter Integration Service reads and writes Netezza data through an external table. An external table definition is stored within the Netezza database but the data is saved externally in a location that is accessible to the Netezza host or the client system. Create external tables to structure your loading operation and manipulate data by using Netezza SQL.
When the PowerCenter Integration Service extracts from Netezza, it creates an external table in the pipe directory path specified for extraction. When the PowerCenter Integration Service loads to Netezza, it creates an external table in the pipe directory path specified for loading. You can load data from the external table to the target. If duplicate row handling is configured, data is loaded from the external table to a temporary table and then finally to the target.
16

To transfer data in Netezza in bulk mode, complete the following steps:
1. Verify that the Netezza database user has the LIST and CREATE EXTERNAL TABLE privileges on the database.
2. Register the PowerExchange for Netezza plug-in with the repository.
3. Configure the session to use a Netezza bulk reader and Netezza bulk writer.
4. Configure the session properties as described in the following sections.
Normal and Bulk Mode FeaturesThe following table lists the features supported in normal and bulk modes:
Feature Normal Mode Bulk Mode
Source and target table name override
Supported Supported
Source and target schema name override
Supported Supported
Recovery Supported Unsupported
Real-time sessions Supported Unsupported
Session on grid Supported Limited support
Commit interval Supported Unsupported
Implicit join based on primary key and foreign key
Supported Unsupported
Pushdown optimization Supported Unsupported
Duplicate row handling Unsupported Supported
Pre-SQL Supported Supported
Post-SQL Supported Supported
Truncate target table Supported. Run the delete command. If you specify an SQL statement in the Pre-SQL property, the PowerCenter Integration Service runs the SQL statement after the data in the table is deleted.
Supported. Run the truncate table command. If you specify an SQL statement in the Pre-SQL property, the PowerCenter Integration Service runs the SQL statement before the table is truncated.
Target connection group Supported Limited support. Follow the criteria, and rules and guidelines applicable for using target connection groups in bulk mode.
Partitioning Database, hash, key range, pass-through, and round-robin partitioning are supported.
Pass-through partitioning is supported.
Data Transfer Modes in Netezza 17
PowerExchange for Netezza ConnectionsUse a relational connection object for each Netezza source or target that you want to access.
The relational database connection defines how the PowerCenter Integration Service accesses the underlying database for Netezza Performance Server. When you configure a Netezza connection, you specify the connection attributes that the PowerCenter Integration Service uses to connect to Netezza.
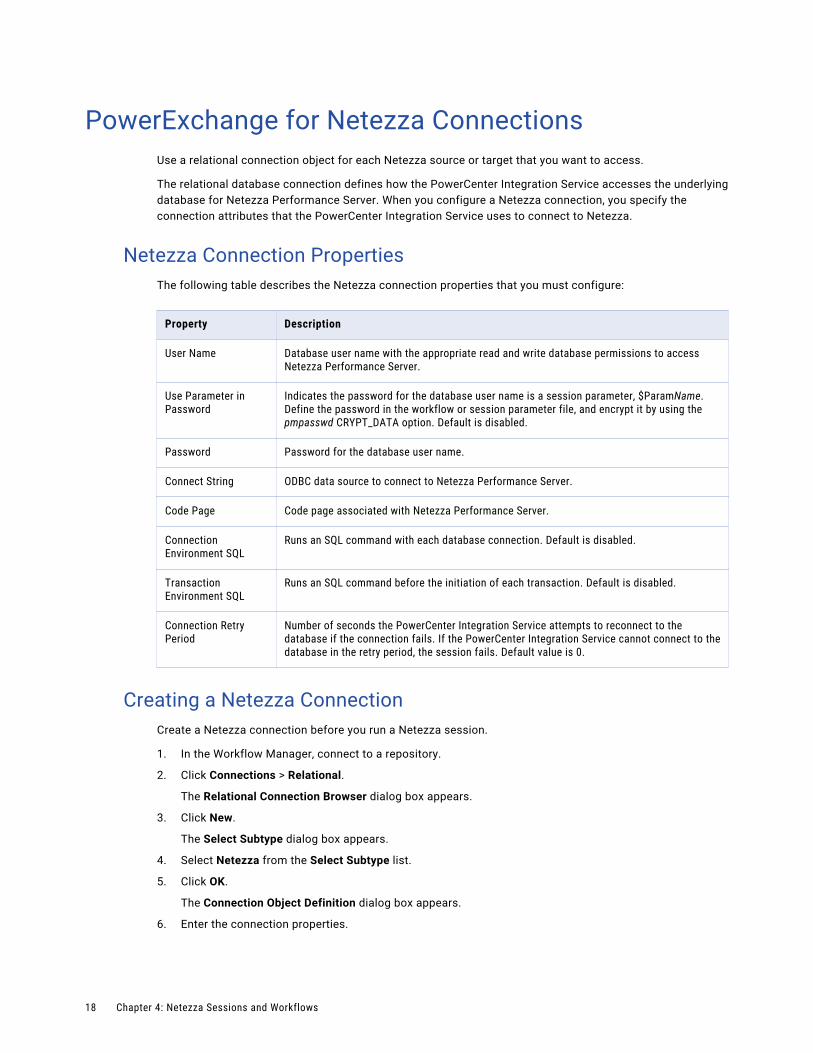
Netezza Connection PropertiesThe following table describes the Netezza connection properties that you must configure:
Property Description
User Name Database user name with the appropriate read and write database permissions to access Netezza Performance Server.
Use Parameter in Password
Indicates the password for the database user name is a session parameter, $ParamName. Define the password in the workflow or session parameter file, and encrypt it by using the pmpasswd CRYPT_DATA option. Default is disabled.
Password Password for the database user name.
Connect String ODBC data source to connect to Netezza Performance Server.
Code Page Code page associated with Netezza Performance Server.
Connection Environment SQL
Runs an SQL command with each database connection. Default is disabled.
Transaction Environment SQL
Runs an SQL command before the initiation of each transaction. Default is disabled.
Connection Retry Period
Number of seconds the PowerCenter Integration Service attempts to reconnect to the database if the connection fails. If the PowerCenter Integration Service cannot connect to the database in the retry period, the session fails. Default value is 0.
Creating a Netezza ConnectionCreate a Netezza connection before you run a Netezza session.
1. In the Workflow Manager, connect to a repository.
2. Click Connections > Relational.
The Relational Connection Browser dialog box appears.
3. Click New.
The Select Subtype dialog box appears.
4. Select Netezza from the Select Subtype list.
5. Click OK.
The Connection Object Definition dialog box appears.
6. Enter the connection properties.
18 Chapter 4: Netezza Sessions and Workflows
7. Click OK.
The Netezza connection appears in the Connection Browser list.
Session Configuration with a Netezza SourceYou can configure the session properties for a Netezza source on the Mapping tab. Define the properties for each source instance in the session.
To extract data in normal mode, configure the session to use a relational reader. To extract data in bulk mode, configure the session to use a Netezza bulk reader. The session properties for normal mode are the same as that of any other relational source.
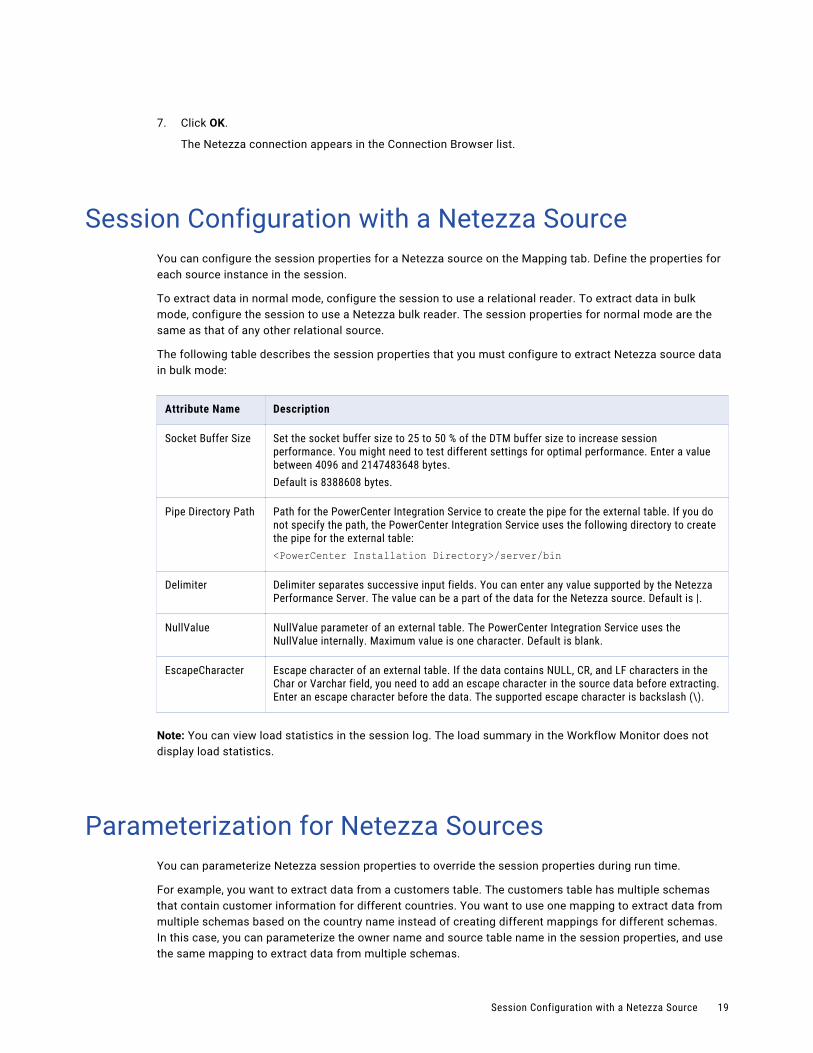
The following table describes the session properties that you must configure to extract Netezza source data in bulk mode:
Attribute Name Description
Socket Buffer Size Set the socket buffer size to 25 to 50 % of the DTM buffer size to increase session performance. You might need to test different settings for optimal performance. Enter a value between 4096 and 2147483648 bytes.Default is 8388608 bytes.
Pipe Directory Path Path for the PowerCenter Integration Service to create the pipe for the external table. If you do not specify the path, the PowerCenter Integration Service uses the following directory to create the pipe for the external table:<PowerCenter Installation Directory>/server/bin
Delimiter Delimiter separates successive input fields. You can enter any value supported by the Netezza Performance Server. The value can be a part of the data for the Netezza source. Default is |.
NullValue NullValue parameter of an external table. The PowerCenter Integration Service uses the NullValue internally. Maximum value is one character. Default is blank.
EscapeCharacter Escape character of an external table. If the data contains NULL, CR, and LF characters in the Char or Varchar field, you need to add an escape character in the source data before extracting. Enter an escape character before the data. The supported escape character is backslash (\).
Note: You can view load statistics in the session log. The load summary in the Workflow Monitor does not display load statistics.
Parameterization for Netezza SourcesYou can parameterize Netezza session properties to override the session properties during run time.
For example, you want to extract data from a customers table. The customers table has multiple schemas that contain customer information for different countries. You want to use one mapping to extract data from multiple schemas based on the country name instead of creating different mappings for different schemas. In this case, you can parameterize the owner name and source table name in the session properties, and use the same mapping to extract data from multiple schemas.
Session Configuration with a Netezza Source 19
In normal mode, you can parameterize the following session properties for Netezza sources:
• Owner Name
• Pre SQL
• Post SQL
• Source Filter
• Source Table Name
• SQL Query
• User Defined Join
In bulk mode, you can parameterize the following session properties for Netezza sources:
• Delimiter
• EscapeCharacter
• NullValue
• Owner Name
• Pre SQL
• Post SQL
• Source Filter
• Source Table Name
• SQL Query
• User Defined Join
Session Configuration with a Netezza TargetYou can configure target properties for a session that writes data to Netezza targets:
• Target database connection
• Target properties
• Update strategy
• Multiple targets referring to the same table
• Pipeline partitioning
Target PropertiesYou can configure the session properties for Netezza targets in the Transformations view on the Mapping tab. Define the properties for each target instance in the session.
To load data in normal mode, configure the session to use a relational writer. To load data in bulk mode, configure the session to use a Netezza bulk writer. The session properties for normal mode are the same as that of any other relational target.
20 Chapter 4: Netezza Sessions and Workflows
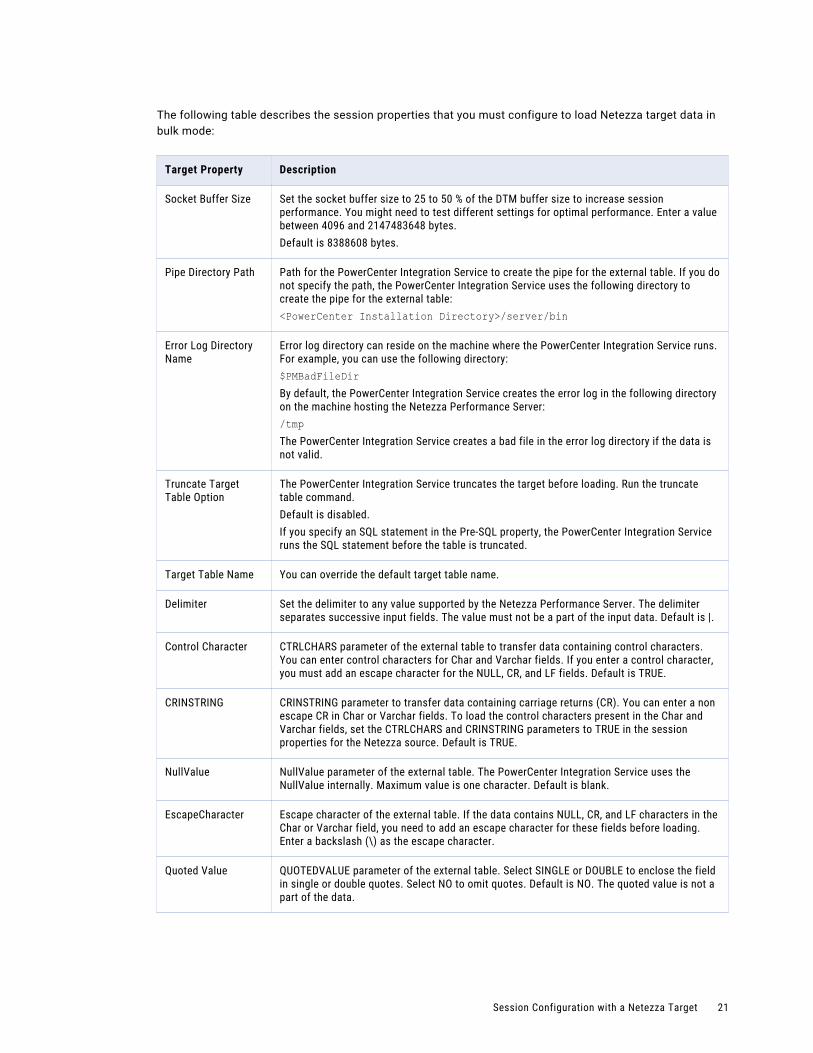
The following table describes the session properties that you must configure to load Netezza target data in bulk mode:
Target Property Description
Socket Buffer Size Set the socket buffer size to 25 to 50 % of the DTM buffer size to increase session performance. You might need to test different settings for optimal performance. Enter a value between 4096 and 2147483648 bytes.Default is 8388608 bytes.
Pipe Directory Path Path for the PowerCenter Integration Service to create the pipe for the external table. If you do not specify the path, the PowerCenter Integration Service uses the following directory to create the pipe for the external table:<PowerCenter Installation Directory>/server/bin
Error Log Directory Name
Error log directory can reside on the machine where the PowerCenter Integration Service runs. For example, you can use the following directory:$PMBadFileDirBy default, the PowerCenter Integration Service creates the error log in the following directory on the machine hosting the Netezza Performance Server:/tmpThe PowerCenter Integration Service creates a bad file in the error log directory if the data is not valid.
Truncate Target Table Option
The PowerCenter Integration Service truncates the target before loading. Run the truncate table command.Default is disabled.If you specify an SQL statement in the Pre-SQL property, the PowerCenter Integration Service runs the SQL statement before the table is truncated.
Target Table Name You can override the default target table name.
Delimiter Set the delimiter to any value supported by the Netezza Performance Server. The delimiter separates successive input fields. The value must not be a part of the input data. Default is |.
Control Character CTRLCHARS parameter of the external table to transfer data containing control characters. You can enter control characters for Char and Varchar fields. If you enter a control character, you must add an escape character for the NULL, CR, and LF fields. Default is TRUE.
CRINSTRING CRINSTRING parameter to transfer data containing carriage returns (CR). You can enter a non escape CR in Char or Varchar fields. To load the control characters present in the Char and Varchar fields, set the CTRLCHARS and CRINSTRING parameters to TRUE in the session properties for the Netezza source. Default is TRUE.
NullValue NullValue parameter of the external table. The PowerCenter Integration Service uses the NullValue internally. Maximum value is one character. Default is blank.
EscapeCharacter Escape character of the external table. If the data contains NULL, CR, and LF characters in the Char or Varchar field, you need to add an escape character for these fields before loading. Enter a backslash (\) as the escape character.
Quoted Value QUOTEDVALUE parameter of the external table. Select SINGLE or DOUBLE to enclose the field in single or double quotes. Select NO to omit quotes. Default is NO. The quoted value is not a part of the data.
Session Configuration with a Netezza Target 21

Target Property Description
Ignore Key Constraints
Ignores constraints on primary key fields. When you select this option, the PowerCenter Integration Service can write duplicate rows with the same primary key to the target. Default is disabled. The PowerCenter Integration Service ignores this value when the target operation is “update as update” or “update else insert.”
Duplicate Row Handling Mechanism
Determines how the PowerCenter Integration Service handles duplicate rows. Select one of the following values:- First Row. The PowerCenter Integration Service passes the first row to the target and
rejects the rows that follow with the same primary key.- Last Row. The PowerCenter Integration Service passes the last duplicate row to the target
and discards the rest of the rows.Default is First Row.
Null Values and Empty StringsThe target may contain null values even if you configure a column in the source definition to be not null. The PowerCenter Integration Service loads empty strings as null values to the target.
Unprojected ColumnsWhen the PowerCenter Integration Service generates SQL to load to a Netezza target, it ignores target columns that are not connected in the mapping. If a default value is defined in Netezza for an unconnected column, Netezza updates or populates the column with the default value.
Pipeline PartitioningYou can increase the number of partitions in a pipeline to improve session performance. When you increase the number of partitions, the PowerCenter Integration Service can create multiple connections to sources and targets and process partitions of sources and target data concurrently.
The Netezza Performance Server divides data into data slices. In a partitioned session that reads data from Netezza, each partition reads a different data slice to prevent data duplication except in the following cases:
• You enter an SQL override query for a partition.
• You enter different values for the source filter across partitions.
• You enter different values for the user-defined join across partitions.
Rules and Guidelines for Pipeline PartitioningUse the following rules and guidelines when you configure multiple partitions in a Netezza session:
• If you load in bulk mode, use pass-through partitioning. If you load in normal mode, you can use database, hash, key range, pass-through, or round-robin partitioning.
• Verify that the session properties for delete and update on the Mapping tab are not enabled for more than one partition. You cannot perform multiple updates, multiple deletes, or update and delete simultaneously on a Netezza target.
• To avoid unpredictable session results, configure the session properties for insert, delete, update, and duplicate row handling to have the same value for each partition.
22 Chapter 4: Netezza Sessions and Workflows

• If you run a partitioned session that joins multiple sources, link the first column in the Source Qualifier transformation to a source column that represents data for the Netezza table with the best distribution in Netezza. This means that the Netezza table is more uniformly distributed across Snippet Processing Units (SPU) than other tables.
• If you run a partitioned session with key constraints, only one partition shows load statistics.
Target Connection GroupsA target connection group is a group of targets that the PowerCenter Integration Service uses to determine commits and loading. When the PowerCenter Integration Service writes to Netezza, it commits data in the same transaction for all targets in a target connection group. When the PowerCenter Integration Service needs to perform a rollback, the PowerCenter Integration Service rolls back all targets in the target connection group.
Criteria for using Target Connection Groups in Bulk ModeWhen you load data in bulk mode, all Netezza targets in the same target connection group must meet the following criteria:
• Belong to the same pipeline.
• Belong to the same partition.
• Have the same database connection name, user name, and password.
Rules and Guidelines for using Target Connection Groups in Bulk ModeThe following table describes the rules and guidelines that you can use when you configure multiple targets in a target connection group to write to the same Netezza target table in bulk mode:
Target Load Type
Target Options Rules and Guidelines
Insert InsertUpdate as Insert
Select the Ignore Key Constraints target property for insert targets.
Update Update as UpdateUpdate else Insert
Use a maximum of one update table for any target.Do not use with delete tables.
Delete Delete Use a maximum of one delete table for any target.Do not use with update tables.
Multiple Targets Configuration for the Same Target TableYou can configure multiple targets to write to the same Netezza table, even if they are not in the same target connection group. When you configure targets in different partitions or pipelines to write to the same target table, use the same rules and guidelines as for target connection groups.
Session Configuration with a Netezza Target 23

Parameterization for Netezza TargetsYou can parameterize Netezza session properties to override the session properties during run time.
For example, you want to load data to a sales table. The sales table has multiple schemas to store sales information for different countries. You want to use one mapping to load data to multiple schemas based on the country name instead of creating different mappings for different schemas. In this case, you can parameterize the target table name and table name prefix in the session properties, and use the same mapping to load data to multiple schemas.
In normal mode, you can parameterize the following session properties for Netezza targets:
• Pre SQL
• Post SQL
• Reject Filename
• Table Name Prefix
• Target Table Name
In bulk mode, you can parameterize the following session properties for Netezza targets:
• Bad File Name
• Delimiter
• Error Log Directory Name
• EscapeCharacter
• NullValue
• Pipe Directory Path
• Pre SQL
• Post SQL
• Table Name Prefix
• Target Table Name
Netezza Target Data UpdateIn bulk mode, the PowerCenter Integration Service updates target rows based on the update options and the duplicate row handling.
Update As InsertWhen you configure the session to update as insert rows, the PowerCenter Integration Service uses the following process to update target rows:
• If the source key value matches a target key value, the PowerCenter Integration Service does not insert the source row.
• If the source primary key value does not exist in the target, the PowerCenter Integration Service inserts the source row.
24 Chapter 4: Netezza Sessions and Workflows
The following table describes how the PowerCenter Integration Service updates the target:
Source Data Target Data Updated Target Data
Comment
1,a,1a1 - - The source primary key is found in the target. The row is not inserted.
1,b,1b1 - 1,b,1b1 Inserts 1,b,1b1.
1,a,1a2 - - The source primary key is found in the target. The row is not inserted.
1,c,1c1 1,c,1c1 1,c,1c1 The source primary key is found in the target. The existing row 1,c,1c1 is retained. No insert is required.
1,d,1d1 - 1,d,1d1 Inserts 1,d,1d1.
1,a,1a3 1,a,1a3 1,a,1a3 The source primary key is found in the target. The existing row 1,a,1a3 is retained. No insert is required.
Note: In the pair of values, the first two values are the primary key, for example 1 (primary key), a (primary key), 1a1. The session is configured to consider key constraints.
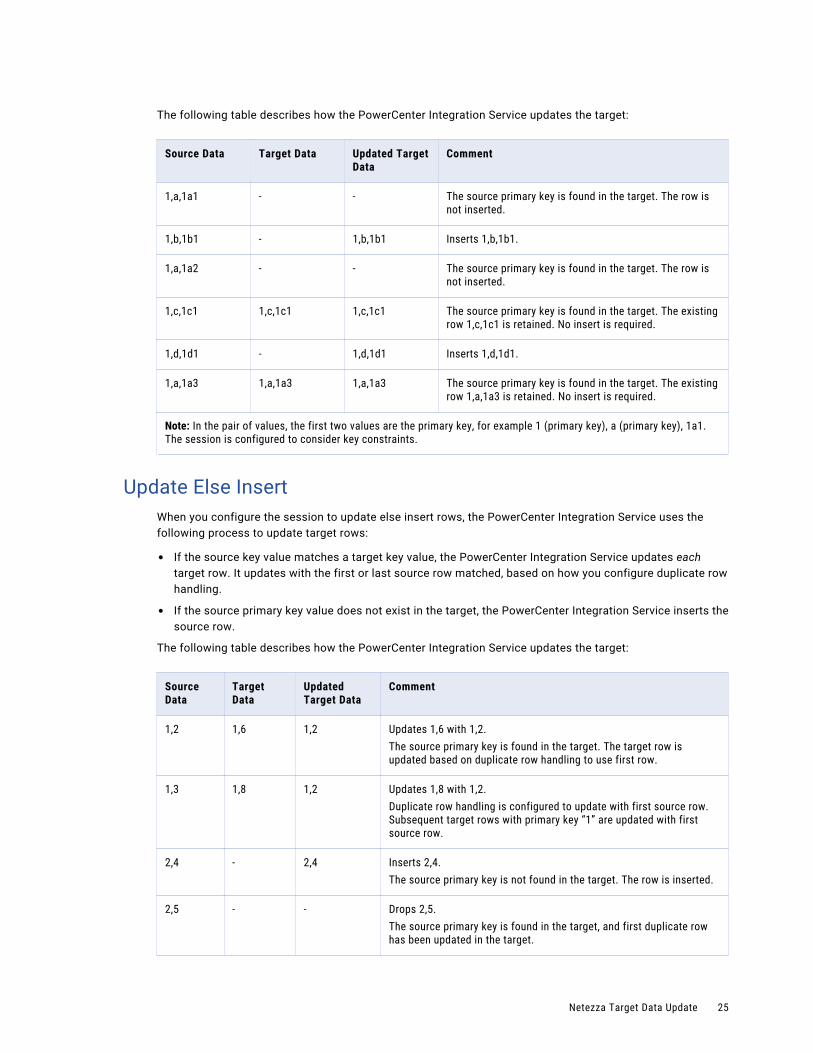
Update Else InsertWhen you configure the session to update else insert rows, the PowerCenter Integration Service uses the following process to update target rows:
• If the source key value matches a target key value, the PowerCenter Integration Service updates each target row. It updates with the first or last source row matched, based on how you configure duplicate row handling.
• If the source primary key value does not exist in the target, the PowerCenter Integration Service inserts the source row.
The following table describes how the PowerCenter Integration Service updates the target:
Source Data
Target Data
Updated Target Data
Comment
1,2 1,6 1,2 Updates 1,6 with 1,2.The source primary key is found in the target. The target row is updated based on duplicate row handling to use first row.
1,3 1,8 1,2 Updates 1,8 with 1,2.Duplicate row handling is configured to update with first source row. Subsequent target rows with primary key “1” are updated with first source row.
2,4 - 2,4 Inserts 2,4.The source primary key is not found in the target. The row is inserted.
2,5 - - Drops 2,5.The source primary key is found in the target, and first duplicate row has been updated in the target.
Netezza Target Data Update 25
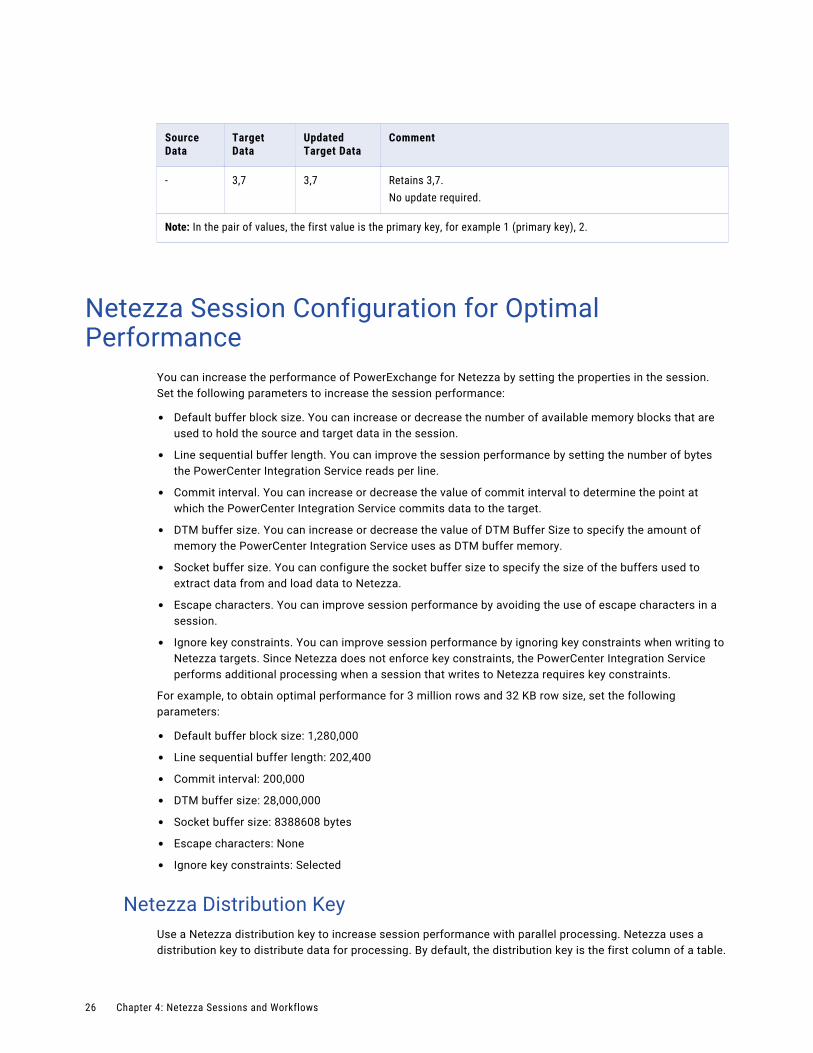
Source Data
Target Data
Updated Target Data
Comment
- 3,7 3,7 Retains 3,7.No update required.
Note: In the pair of values, the first value is the primary key, for example 1 (primary key), 2.
Netezza Session Configuration for Optimal Performance
You can increase the performance of PowerExchange for Netezza by setting the properties in the session. Set the following parameters to increase the session performance:
• Default buffer block size. You can increase or decrease the number of available memory blocks that are used to hold the source and target data in the session.
• Line sequential buffer length. You can improve the session performance by setting the number of bytes the PowerCenter Integration Service reads per line.
• Commit interval. You can increase or decrease the value of commit interval to determine the point at which the PowerCenter Integration Service commits data to the target.
• DTM buffer size. You can increase or decrease the value of DTM Buffer Size to specify the amount of memory the PowerCenter Integration Service uses as DTM buffer memory.
• Socket buffer size. You can configure the socket buffer size to specify the size of the buffers used to extract data from and load data to Netezza.
• Escape characters. You can improve session performance by avoiding the use of escape characters in a session.
• Ignore key constraints. You can improve session performance by ignoring key constraints when writing to Netezza targets. Since Netezza does not enforce key constraints, the PowerCenter Integration Service performs additional processing when a session that writes to Netezza requires key constraints.
For example, to obtain optimal performance for 3 million rows and 32 KB row size, set the following parameters:
• Default buffer block size: 1,280,000
• Line sequential buffer length: 202,400
• Commit interval: 200,000
• DTM buffer size: 28,000,000
• Socket buffer size: 8388608 bytes
• Escape characters: None
• Ignore key constraints: Selected
Netezza Distribution KeyUse a Netezza distribution key to increase session performance with parallel processing. Netezza uses a distribution key to distribute data for processing. By default, the distribution key is the first column of a table.
26 Chapter 4: Netezza Sessions and Workflows
You can configure the distribution key to include up to four columns in a database table. When you configure a distribution key to evenly distribute data across available data slices, you can greatly increase session performance. For more information, see the Netezza documentation.
Troubleshooting Netezza Sessions
A Netezza session stops responding with no definite error messages in the logs
A Netezza session can stop responding because of the following reasons:
• The source data contains special characters like delimiter.A Netezza Reader session can stop responding if the source contains special characters like delimiter. Add escape characters in the session to eliminate the delimiters. This is a Netezza issue and the reference number is SWS-40577.
• The environment variables are set incorrectly.Check whether the environment variables PATH, LIBPATH, ODBCINI, and NZ_ODBC_INI_PATH are set correctly.
• The permissions for the file paths in the session properties are set incorrectly.Ensure that all the file paths in the session properties set for Netezza reader and writer sessions are correct and have proper permission. Check out for the ones which need directory path specification.
If the issue persists, you can try killing the blocking Netezza sessions or disable Netezza ODBC tracing and ODBC tracing.
How can I kill blocking Netezza sessions?
Use the nzsession utility, which comes with client tools, to kill blocking Netezza sessions.
Run the following command to view the active Netezza sessions:
nzsession show -host <hostname> -u <user> -pw <password> -maxColW <column width> |grep -i "active
Run the following command to kill active sessions:
-host <hostname> -u <user> -pw <password> -id <session id> [-force]
How can I enable or disable Netezza ODBC tracing?
In the odbcinst.ini file, set the parameter debugLogging as true to enable Netezza ODBC tracing and as false to disable Netezza ODBC tracing.
How can I enable or disable ODBC tracing?
In the odbc.ini file, set the parameter Trace as 1 to enable Netezza ODBC tracing and as 0 to disable Netezza ODBC tracing.
Troubleshooting Netezza Sessions 27
A p p e n d i x A
Datatype ReferenceThis appendix includes the following topic:
• Netezza and Transformation Datatypes, 28
Netezza and Transformation DatatypesPowerCenter uses the following datatypes in Netezza mappings:
• Netezza native datatypes. Netezza datatypes appear in Netezza definitions in a mapping.
• Transformation datatypes. Set of datatypes that appear in the transformations. They are internal datatypes based on ANSI SQL-92 generic datatypes, which the PowerCenter Integration Service uses to move data across platforms. They appear in all transformations in a mapping.
When the PowerCenter Integration Service reads source data, it converts the native datatypes to the comparable transformation datatypes before transforming the data. When the PowerCenter Integration Service writes to a target, it converts the transformation datatypes to the comparable native datatypes.
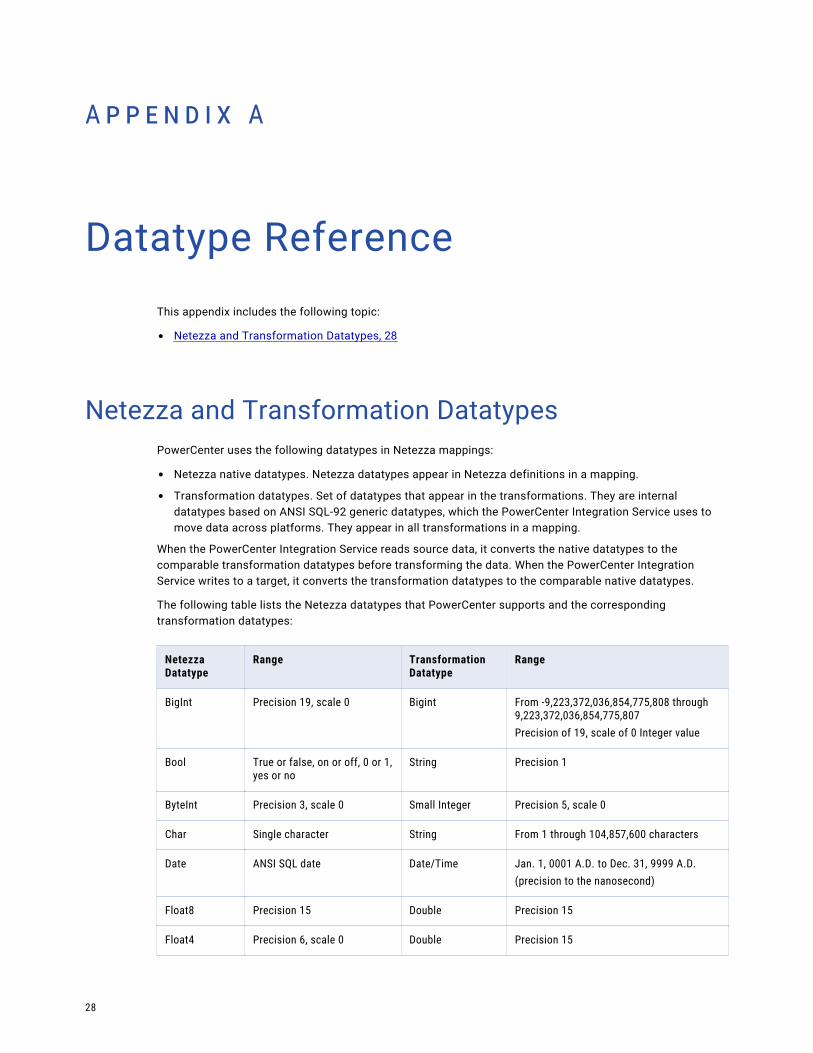
The following table lists the Netezza datatypes that PowerCenter supports and the corresponding transformation datatypes:
Netezza Datatype
Range Transformation Datatype
Range
BigInt Precision 19, scale 0 Bigint From -9,223,372,036,854,775,808 through 9,223,372,036,854,775,807Precision of 19, scale of 0 Integer value
Bool True or false, on or off, 0 or 1, yes or no
String Precision 1
ByteInt Precision 3, scale 0 Small Integer Precision 5, scale 0
Char Single character String From 1 through 104,857,600 characters
Date ANSI SQL date Date/Time Jan. 1, 0001 A.D. to Dec. 31, 9999 A.D.(precision to the nanosecond)
Float8 Precision 15 Double Precision 15
Float4 Precision 6, scale 0 Double Precision 15
28
Netezza Datatype
Range Transformation Datatype
Range
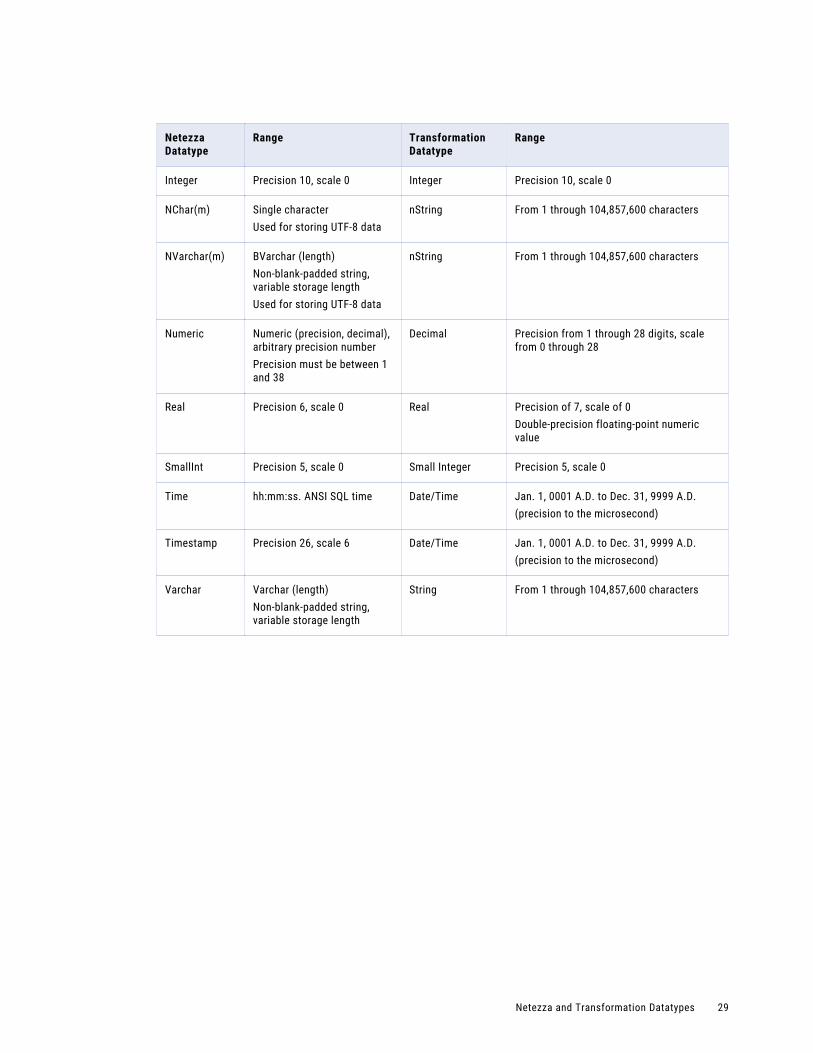
Integer Precision 10, scale 0 Integer Precision 10, scale 0
NChar(m) Single characterUsed for storing UTF-8 data
nString From 1 through 104,857,600 characters
NVarchar(m) BVarchar (length)Non-blank-padded string, variable storage lengthUsed for storing UTF-8 data
nString From 1 through 104,857,600 characters
Numeric Numeric (precision, decimal), arbitrary precision numberPrecision must be between 1 and 38
Decimal Precision from 1 through 28 digits, scale from 0 through 28
Real Precision 6, scale 0 Real Precision of 7, scale of 0Double-precision floating-point numeric value
SmallInt Precision 5, scale 0 Small Integer Precision 5, scale 0
Time hh:mm:ss. ANSI SQL time Date/Time Jan. 1, 0001 A.D. to Dec. 31, 9999 A.D.(precision to the microsecond)
Timestamp Precision 26, scale 6 Date/Time Jan. 1, 0001 A.D. to Dec. 31, 9999 A.D.(precision to the microsecond)
Varchar Varchar (length)Non-blank-padded string, variable storage length
String From 1 through 104,857,600 characters
Netezza and Transformation Datatypes 29
I n d e x
Ddatabases
connecting to Netezza (UNIX) 10connecting to Netezza (Windows) 9
datatypes PowerExchange for Netezza 28
default values Netezza targets 22
Eempty strings
in Netezza 22
HHP-UX
pipe directory path, setting 19
Iinstallation
Netezza prerequisites 8
Kkey constraints
example 24
Mmultiple targets
for the same Netezza table 23
NNetezza
connecting from Informatica clients(Windows) 9connecting from Integration Service (Windows) 9connecting to Informatica clients (UNIX) 10connecting to Integration Service (UNIX) 10
Netezza target connection groups using multiple targets for the same table 23
null values in Netezza 22
Ppartitioning
Netezza sessions 22pipe directory path
setting 19setting for HP-UX 19
plug-ins registering for Netezza 9
PowerExchange for Netezza connections creating 18overview 18properties 18
prerequisites Netezza installation 8
Ssocket buffer size
target property 19, 20Source Qualifier
Netezza, overview 13
Ttarget connection groups
using with Netezza 23target property
socket buffer size 19, 20targets
Netezza default values 22unprojected columns in Netezza 22using multiple for the same Netezza table 23
Uupdate as insert
description for Netezza 24update else insert
description for Netezza 25update strategy
example 24update as insert for Netezza 24update else insert for Netezza 25
30