Informatica PowerExchange for Essbase - 10.4.0
56
Informatica ® PowerExchange for Essbase 10.4.0 User Guide for PowerCenter
-
Upload
khangminh22 -
Category
Documents
-
view
5 -
download
0
Transcript of Informatica PowerExchange for Essbase - 10.4.0
Informatica® PowerExchange for Essbase10.4.0
User Guide for PowerCenter

Informatica PowerExchange for Essbase User Guide for PowerCenter10.4.0December 2019
© Copyright Informatica LLC 2009, 2020
This software and documentation are provided only under a separate license agreement containing restrictions on use and disclosure. No part of this document may be reproduced or transmitted in any form, by any means (electronic, photocopying, recording or otherwise) without prior consent of Informatica LLC.
Informatica, the Informatica logo, PowerCenter, and PowerExchange are trademarks or registered trademarks of Informatica LLC in the United States and many jurisdictions throughout the world. A current list of Informatica trademarks is available on the web at https://www.informatica.com/trademarks.html. Other company and product names may be trade names or trademarks of their respective owners.
U.S. GOVERNMENT RIGHTS Programs, software, databases, and related documentation and technical data delivered to U.S. Government customers are "commercial computer software" or "commercial technical data" pursuant to the applicable Federal Acquisition Regulation and agency-specific supplemental regulations. As such, the use, duplication, disclosure, modification, and adaptation is subject to the restrictions and license terms set forth in the applicable Government contract, and, to the extent applicable by the terms of the Government contract, the additional rights set forth in FAR 52.227-19, Commercial Computer Software License.
Portions of this software and/or documentation are subject to copyright held by third parties, including without limitation: Copyright DataDirect Technologies. All rights reserved. Copyright © Sun Microsystems. All rights reserved. Copyright © RSA Security Inc. All Rights Reserved. Copyright © Ordinal Technology Corp. All rights reserved. Copyright © Aandacht c.v. All rights reserved. Copyright Genivia, Inc. All rights reserved. Copyright Isomorphic Software. All rights reserved. Copyright © Meta Integration Technology, Inc. All rights reserved. Copyright © Intalio. All rights reserved. Copyright © Oracle. All rights reserved. Copyright © Adobe Systems Incorporated. All rights reserved. Copyright © DataArt, Inc. All rights reserved. Copyright © ComponentSource. All rights reserved. Copyright © Microsoft Corporation. All rights reserved. Copyright © Rogue Wave Software, Inc. All rights reserved. Copyright © Teradata Corporation. All rights reserved. Copyright © Yahoo! Inc. All rights reserved. Copyright © Glyph & Cog, LLC. All rights reserved. Copyright © Thinkmap, Inc. All rights reserved. Copyright © Clearpace Software Limited. All rights reserved. Copyright © Information Builders, Inc. All rights reserved. Copyright © OSS Nokalva, Inc. All rights reserved. Copyright Edifecs, Inc. All rights reserved. Copyright Cleo Communications, Inc. All rights reserved. Copyright © International Organization for Standardization 1986. All rights reserved. Copyright © ej-technologies GmbH. All rights reserved. Copyright © Jaspersoft Corporation. All rights reserved. Copyright © International Business Machines Corporation. All rights reserved. Copyright © yWorks GmbH. All rights reserved. Copyright © Lucent Technologies. All rights reserved. Copyright © University of Toronto. All rights reserved. Copyright © Daniel Veillard. All rights reserved. Copyright © Unicode, Inc. Copyright IBM Corp. All rights reserved. Copyright © MicroQuill Software Publishing, Inc. All rights reserved. Copyright © PassMark Software Pty Ltd. All rights reserved. Copyright © LogiXML, Inc. All rights reserved. Copyright © 2003-2010 Lorenzi Davide, All rights reserved. Copyright © Red Hat, Inc. All rights reserved. Copyright © The Board of Trustees of the Leland Stanford Junior University. All rights reserved. Copyright © EMC Corporation. All rights reserved. Copyright © Flexera Software. All rights reserved. Copyright © Jinfonet Software. All rights reserved. Copyright © Apple Inc. All rights reserved. Copyright © Telerik Inc. All rights reserved. Copyright © BEA Systems. All rights reserved. Copyright © PDFlib GmbH. All rights reserved. Copyright © Orientation in Objects GmbH. All rights reserved. Copyright © Tanuki Software, Ltd. All rights reserved. Copyright © Ricebridge. All rights reserved. Copyright © Sencha, Inc. All rights reserved. Copyright © Scalable Systems, Inc. All rights reserved. Copyright © jQWidgets. All rights reserved. Copyright © Tableau Software, Inc. All rights reserved. Copyright© MaxMind, Inc. All Rights Reserved. Copyright © TMate Software s.r.o. All rights reserved. Copyright © MapR Technologies Inc. All rights reserved. Copyright © Amazon Corporate LLC. All rights reserved. Copyright © Highsoft. All rights reserved. Copyright © Python Software Foundation. All rights reserved. Copyright © BeOpen.com. All rights reserved. Copyright © CNRI. All rights reserved.
This product includes software developed by the Apache Software Foundation (http://www.apache.org/), and/or other software which is licensed under various versions of the Apache License (the "License"). You may obtain a copy of these Licenses at http://www.apache.org/licenses/. Unless required by applicable law or agreed to in writing, software distributed under these Licenses is distributed on an "AS IS" BASIS, WITHOUT WARRANTIES OR CONDITIONS OF ANY KIND, either express or implied. See the Licenses for the specific language governing permissions and limitations under the Licenses.
This product includes software which was developed by Mozilla (http://www.mozilla.org/), software copyright The JBoss Group, LLC, all rights reserved; software copyright © 1999-2006 by Bruno Lowagie and Paulo Soares and other software which is licensed under various versions of the GNU Lesser General Public License Agreement, which may be found at http:// www.gnu.org/licenses/lgpl.html. The materials are provided free of charge by Informatica, "as-is", without warranty of any kind, either express or implied, including but not limited to the implied warranties of merchantability and fitness for a particular purpose.
The product includes ACE(TM) and TAO(TM) software copyrighted by Douglas C. Schmidt and his research group at Washington University, University of California, Irvine, and Vanderbilt University, Copyright (©) 1993-2006, all rights reserved.
This product includes software developed by the OpenSSL Project for use in the OpenSSL Toolkit (copyright The OpenSSL Project. All Rights Reserved) and redistribution of this software is subject to terms available at http://www.openssl.org and http://www.openssl.org/source/license.html.
This product includes Curl software which is Copyright 1996-2013, Daniel Stenberg, <[email protected]>. All Rights Reserved. Permissions and limitations regarding this software are subject to terms available at http://curl.haxx.se/docs/copyright.html. Permission to use, copy, modify, and distribute this software for any purpose with or without fee is hereby granted, provided that the above copyright notice and this permission notice appear in all copies.
The product includes software copyright 2001-2005 (©) MetaStuff, Ltd. All Rights Reserved. Permissions and limitations regarding this software are subject to terms available at http://www.dom4j.org/ license.html.
The product includes software copyright © 2004-2007, The Dojo Foundation. All Rights Reserved. Permissions and limitations regarding this software are subject to terms available at http://dojotoolkit.org/license.
This product includes ICU software which is copyright International Business Machines Corporation and others. All rights reserved. Permissions and limitations regarding this software are subject to terms available at http://source.icu-project.org/repos/icu/icu/trunk/license.html.
This product includes software copyright © 1996-2006 Per Bothner. All rights reserved. Your right to use such materials is set forth in the license which may be found at http:// www.gnu.org/software/ kawa/Software-License.html.
This product includes OSSP UUID software which is Copyright © 2002 Ralf S. Engelschall, Copyright © 2002 The OSSP Project Copyright © 2002 Cable & Wireless Deutschland. Permissions and limitations regarding this software are subject to terms available at http://www.opensource.org/licenses/mit-license.php.
This product includes software developed by Boost (http://www.boost.org/) or under the Boost software license. Permissions and limitations regarding this software are subject to terms available at http:/ /www.boost.org/LICENSE_1_0.txt.
This product includes software copyright © 1997-2007 University of Cambridge. Permissions and limitations regarding this software are subject to terms available at http:// www.pcre.org/license.txt.
This product includes software copyright © 2007 The Eclipse Foundation. All Rights Reserved. Permissions and limitations regarding this software are subject to terms available at http:// www.eclipse.org/org/documents/epl-v10.php and at http://www.eclipse.org/org/documents/edl-v10.php.
This product includes software licensed under the terms at http://www.tcl.tk/software/tcltk/license.html, http://www.bosrup.com/web/overlib/?License, http://www.stlport.org/doc/ license.html, http://asm.ow2.org/license.html, http://www.cryptix.org/LICENSE.TXT, http://hsqldb.org/web/hsqlLicense.html, http://httpunit.sourceforge.net/doc/ license.html, http://jung.sourceforge.net/license.txt , http://www.gzip.org/zlib/zlib_license.html, http://www.openldap.org/software/release/license.html, http://www.libssh2.org, http://slf4j.org/license.html, http://www.sente.ch/software/OpenSourceLicense.html, http://fusesource.com/downloads/license-agreements/fuse-message-broker-v-5-3- license-agreement; http://antlr.org/license.html; http://aopalliance.sourceforge.net/; http://www.bouncycastle.org/licence.html; http://www.jgraph.com/jgraphdownload.html; http://www.jcraft.com/jsch/LICENSE.txt; http://jotm.objectweb.org/bsd_license.html; . http://www.w3.org/
Consortium/Legal/2002/copyright-software-20021231; http://www.slf4j.org/license.html; http://nanoxml.sourceforge.net/orig/copyright.html; http://www.json.org/license.html; http://forge.ow2.org/projects/javaservice/, http://www.postgresql.org/about/licence.html, http://www.sqlite.org/copyright.html, http://www.tcl.tk/software/tcltk/license.html, http://www.jaxen.org/faq.html, http://www.jdom.org/docs/faq.html, http://www.slf4j.org/license.html; http://www.iodbc.org/dataspace/iodbc/wiki/iODBC/License; http://www.keplerproject.org/md5/license.html; http://www.toedter.com/en/jcalendar/license.html; http://www.edankert.com/bounce/index.html; http://www.net-snmp.org/about/license.html; http://www.openmdx.org/#FAQ; http://www.php.net/license/3_01.txt; http://srp.stanford.edu/license.txt; http://www.schneier.com/blowfish.html; http://www.jmock.org/license.html; http://xsom.java.net; http://benalman.com/about/license/; https://github.com/CreateJS/EaselJS/blob/master/src/easeljs/display/Bitmap.js; http://www.h2database.com/html/license.html#summary; http://jsoncpp.sourceforge.net/LICENSE; http://jdbc.postgresql.org/license.html; http://protobuf.googlecode.com/svn/trunk/src/google/protobuf/descriptor.proto; https://github.com/rantav/hector/blob/master/LICENSE; http://web.mit.edu/Kerberos/krb5-current/doc/mitK5license.html; http://jibx.sourceforge.net/jibx-license.html; https://github.com/lyokato/libgeohash/blob/master/LICENSE; https://github.com/hjiang/jsonxx/blob/master/LICENSE; https://code.google.com/p/lz4/; https://github.com/jedisct1/libsodium/blob/master/LICENSE; http://one-jar.sourceforge.net/index.php?page=documents&file=license; https://github.com/EsotericSoftware/kryo/blob/master/license.txt; http://www.scala-lang.org/license.html; https://github.com/tinkerpop/blueprints/blob/master/LICENSE.txt; http://gee.cs.oswego.edu/dl/classes/EDU/oswego/cs/dl/util/concurrent/intro.html; https://aws.amazon.com/asl/; https://github.com/twbs/bootstrap/blob/master/LICENSE; https://sourceforge.net/p/xmlunit/code/HEAD/tree/trunk/LICENSE.txt; https://github.com/documentcloud/underscore-contrib/blob/master/LICENSE, and https://github.com/apache/hbase/blob/master/LICENSE.txt.
This product includes software licensed under the Academic Free License (http://www.opensource.org/licenses/afl-3.0.php), the Common Development and Distribution License (http://www.opensource.org/licenses/cddl1.php) the Common Public License (http://www.opensource.org/licenses/cpl1.0.php), the Sun Binary Code License Agreement Supplemental License Terms, the BSD License (http:// www.opensource.org/licenses/bsd-license.php), the new BSD License (http://opensource.org/licenses/BSD-3-Clause), the MIT License (http://www.opensource.org/licenses/mit-license.php), the Artistic License (http://www.opensource.org/licenses/artistic-license-1.0) and the Initial Developer’s Public License Version 1.0 (http://www.firebirdsql.org/en/initial-developer-s-public-license-version-1-0/).
This product includes software copyright © 2003-2006 Joe WaInes, 2006-2007 XStream Committers. All rights reserved. Permissions and limitations regarding this software are subject to terms available at http://xstream.codehaus.org/license.html. This product includes software developed by the Indiana University Extreme! Lab. For further information please visit http://www.extreme.indiana.edu/.
This product includes software Copyright (c) 2013 Frank Balluffi and Markus Moeller. All rights reserved. Permissions and limitations regarding this software are subject to terms of the MIT license.
See patents at https://www.informatica.com/legal/patents.html.
DISCLAIMER: Informatica LLC provides this documentation "as is" without warranty of any kind, either express or implied, including, but not limited to, the implied warranties of noninfringement, merchantability, or use for a particular purpose. Informatica LLC does not warrant that this software or documentation is error free. The information provided in this software or documentation may include technical inaccuracies or typographical errors. The information in this software and documentation is subject to change at any time without notice.
NOTICES
This Informatica product (the "Software") includes certain drivers (the "DataDirect Drivers") from DataDirect Technologies, an operating company of Progress Software Corporation ("DataDirect") which are subject to the following terms and conditions:
1. THE DATADIRECT DRIVERS ARE PROVIDED "AS IS" WITHOUT WARRANTY OF ANY KIND, EITHER EXPRESSED OR IMPLIED, INCLUDING BUT NOT LIMITED TO, THE IMPLIED WARRANTIES OF MERCHANTABILITY, FITNESS FOR A PARTICULAR PURPOSE AND NON-INFRINGEMENT.
2. IN NO EVENT WILL DATADIRECT OR ITS THIRD PARTY SUPPLIERS BE LIABLE TO THE END-USER CUSTOMER FOR ANY DIRECT, INDIRECT, INCIDENTAL, SPECIAL, CONSEQUENTIAL OR OTHER DAMAGES ARISING OUT OF THE USE OF THE ODBC DRIVERS, WHETHER OR NOT INFORMED OF THE POSSIBILITIES OF DAMAGES IN ADVANCE. THESE LIMITATIONS APPLY TO ALL CAUSES OF ACTION, INCLUDING, WITHOUT LIMITATION, BREACH OF CONTRACT, BREACH OF WARRANTY, NEGLIGENCE, STRICT LIABILITY, MISREPRESENTATION AND OTHER TORTS.
The information in this documentation is subject to change without notice. If you find any problems in this documentation, report them to us at [email protected].
Informatica products are warranted according to the terms and conditions of the agreements under which they are provided. INFORMATICA PROVIDES THE INFORMATION IN THIS DOCUMENT "AS IS" WITHOUT WARRANTY OF ANY KIND, EXPRESS OR IMPLIED, INCLUDING WITHOUT ANY WARRANTIES OF MERCHANTABILITY, FITNESS FOR A PARTICULAR PURPOSE AND ANY WARRANTY OR CONDITION OF NON-INFRINGEMENT.
Publication Date: 2020-06-25

Table of Contents
Preface . . . . . . . . . . . . . . . . . . . . . . . . . . . . . . . . . . . . . . . . . . . . . . . . . . . . . . . . . . . . . . . . . . . . . . 7Informatica Resources. . . . . . . . . . . . . . . . . . . . . . . . . . . . . . . . . . . . . . . . . . . . . . . . . . . 7
Informatica Network. . . . . . . . . . . . . . . . . . . . . . . . . . . . . . . . . . . . . . . . . . . . . . . . . 7
Informatica Knowledge Base. . . . . . . . . . . . . . . . . . . . . . . . . . . . . . . . . . . . . . . . . . . . 7
Informatica Documentation. . . . . . . . . . . . . . . . . . . . . . . . . . . . . . . . . . . . . . . . . . . . . 7
Informatica Product Availability Matrices. . . . . . . . . . . . . . . . . . . . . . . . . . . . . . . . . . . . 8
Informatica Velocity. . . . . . . . . . . . . . . . . . . . . . . . . . . . . . . . . . . . . . . . . . . . . . . . . . 8
Informatica Marketplace. . . . . . . . . . . . . . . . . . . . . . . . . . . . . . . . . . . . . . . . . . . . . . . 8
Informatica Global Customer Support. . . . . . . . . . . . . . . . . . . . . . . . . . . . . . . . . . . . . . 8
Chapter 1: Understanding PowerExchange for Essbase. . . . . . . . . . . . . . . . . . . . . . . . 9PowerExchange for Essbase Overview. . . . . . . . . . . . . . . . . . . . . . . . . . . . . . . . . . . . . . . . . 9
Essbase Source Definitions. . . . . . . . . . . . . . . . . . . . . . . . . . . . . . . . . . . . . . . . . . . . . 9
Essbase Target Definitions. . . . . . . . . . . . . . . . . . . . . . . . . . . . . . . . . . . . . . . . . . . . 10
Essbase Administration. . . . . . . . . . . . . . . . . . . . . . . . . . . . . . . . . . . . . . . . . . . . . . 10
PowerCenter and Essbase Integration. . . . . . . . . . . . . . . . . . . . . . . . . . . . . . . . . . . . . . . . 10
PowerCenter Integration Service and Essbase Integration. . . . . . . . . . . . . . . . . . . . . . . . . 10
Chapter 2: PowerExchange for Essbase Configuration. . . . . . . . . . . . . . . . . . . . . . . 12PowerExchange for Essbase Configuration Overview. . . . . . . . . . . . . . . . . . . . . . . . . . . . . . . 12
Configuring PowerExchange for Essbase. . . . . . . . . . . . . . . . . . . . . . . . . . . . . . . . . . . 12
Registering the Plug-in. . . . . . . . . . . . . . . . . . . . . . . . . . . . . . . . . . . . . . . . . . . . . . . . . . 13
Registering the Plug-in from the Administrator Tool. . . . . . . . . . . . . . . . . . . . . . . . . . . . . 13
Registering the Plug-in from the Command Line Program. . . . . . . . . . . . . . . . . . . . . . . . . 13
Installing the Essbase Client. . . . . . . . . . . . . . . . . . . . . . . . . . . . . . . . . . . . . . . . . . . . . . . 14
Setting the Library Paths. . . . . . . . . . . . . . . . . . . . . . . . . . . . . . . . . . . . . . . . . . . . . . . . . 14
Setting the Library Path on Windows. . . . . . . . . . . . . . . . . . . . . . . . . . . . . . . . . . . . . . 14
Setting the Library Paths on UNIX. . . . . . . . . . . . . . . . . . . . . . . . . . . . . . . . . . . . . . . . 16
Upgrading PowerExchange for Essbase. . . . . . . . . . . . . . . . . . . . . . . . . . . . . . . . . . . . . . . 17
Chapter 3: Essbase Sources. . . . . . . . . . . . . . . . . . . . . . . . . . . . . . . . . . . . . . . . . . . . . . . . . 18Essbase Sources Overview. . . . . . . . . . . . . . . . . . . . . . . . . . . . . . . . . . . . . . . . . . . . . . . 18
Creating a DSN. . . . . . . . . . . . . . . . . . . . . . . . . . . . . . . . . . . . . . . . . . . . . . . . . . . . . . . 19
Type 1 and Type 2 Essbase Source Definitions. . . . . . . . . . . . . . . . . . . . . . . . . . . . . . . . . . . 19
Connecting to Essbase Server . . . . . . . . . . . . . . . . . . . . . . . . . . . . . . . . . . . . . . . . . . 20
Creating Type 1 and Type 2 Source Definitions . . . . . . . . . . . . . . . . . . . . . . . . . . . . . . . 20
Creating Columns for Type 1 and Type 2 Source Definitions. . . . . . . . . . . . . . . . . . . . . . . 20
Adding Attribute Dimensions. . . . . . . . . . . . . . . . . . . . . . . . . . . . . . . . . . . . . . . . . . . 20
Editing Report Scripts. . . . . . . . . . . . . . . . . . . . . . . . . . . . . . . . . . . . . . . . . . . . . . . . 20
Type 3 Source Definitions. . . . . . . . . . . . . . . . . . . . . . . . . . . . . . . . . . . . . . . . . . . . . . . . 21
4 Table of Contents
Connecting to the Essbase Server . . . . . . . . . . . . . . . . . . . . . . . . . . . . . . . . . . . . . . . . 21
Creating Type 3 Source Definition. . . . . . . . . . . . . . . . . . . . . . . . . . . . . . . . . . . . . . . . 21
Importing Columns for Type 3 Source Definition. . . . . . . . . . . . . . . . . . . . . . . . . . . . . . . 21
Example of Setting Filter Criteria. . . . . . . . . . . . . . . . . . . . . . . . . . . . . . . . . . . . . . . . . 22
Creating Essbase Source Definitions. . . . . . . . . . . . . . . . . . . . . . . . . . . . . . . . . . . . . . . . . 24
Creating Columns for Type 1 and Type 2 Source Definitions. . . . . . . . . . . . . . . . . . . . . . . 24
Creating Columns for Type 3 Source Definition. . . . . . . . . . . . . . . . . . . . . . . . . . . . . . . . 25
Editing the Essbase Source Definition. . . . . . . . . . . . . . . . . . . . . . . . . . . . . . . . . . . . . . . . . 26
Steps to Add Attribute Dimensions. . . . . . . . . . . . . . . . . . . . . . . . . . . . . . . . . . . . . . . . . . 26
Adding All Attribute Dimensions to Columns. . . . . . . . . . . . . . . . . . . . . . . . . . . . . . . . . 26
Adding Specific Attribute Dimensions to Columns. . . . . . . . . . . . . . . . . . . . . . . . . . . . . . 26
Editing Report Script. . . . . . . . . . . . . . . . . . . . . . . . . . . . . . . . . . . . . . . . . . . . . . . . . . . . 27
Troubleshooting Essbase Source Definitions. . . . . . . . . . . . . . . . . . . . . . . . . . . . . . . . . . . . 28
Chapter 4: Essbase Targets. . . . . . . . . . . . . . . . . . . . . . . . . . . . . . . . . . . . . . . . . . . . . . . . . 30Essbase Targets Overview. . . . . . . . . . . . . . . . . . . . . . . . . . . . . . . . . . . . . . . . . . . . . . . . 30
Type 1 and Type 2 Target Definitions. . . . . . . . . . . . . . . . . . . . . . . . . . . . . . . . . . . . . . . . . 30
Connecting to Essbase Server . . . . . . . . . . . . . . . . . . . . . . . . . . . . . . . . . . . . . . . . . . 31
Creating Type 1 and Type 2 Target Definitions. . . . . . . . . . . . . . . . . . . . . . . . . . . . . . . . 31
Creating Columns for Type 1 Target Definitions. . . . . . . . . . . . . . . . . . . . . . . . . . . . . . . 31
Columns in Type 2 Target Definitions. . . . . . . . . . . . . . . . . . . . . . . . . . . . . . . . . . . . . . 31
Creating Filter Expressions. . . . . . . . . . . . . . . . . . . . . . . . . . . . . . . . . . . . . . . . . . . . 31
Type 3 Target Definitions. . . . . . . . . . . . . . . . . . . . . . . . . . . . . . . . . . . . . . . . . . . . . . . . . 31
Connecting to Essbase Server . . . . . . . . . . . . . . . . . . . . . . . . . . . . . . . . . . . . . . . . . . 32
Creating Type 3 Target Definition. . . . . . . . . . . . . . . . . . . . . . . . . . . . . . . . . . . . . . . . 32
Creating Columns for a Type 3 Target Definition. . . . . . . . . . . . . . . . . . . . . . . . . . . . . . . 32
Creating Essbase Target Definitions . . . . . . . . . . . . . . . . . . . . . . . . . . . . . . . . . . . . . . . . . 32
Creating Columns for Type 1 Target Definition. . . . . . . . . . . . . . . . . . . . . . . . . . . . . . . . 33
Creating Columns for Type 3 Target Definition. . . . . . . . . . . . . . . . . . . . . . . . . . . . . . . . 33
Editing the Essbase Target Definition. . . . . . . . . . . . . . . . . . . . . . . . . . . . . . . . . . . . . . . . . 34
Loading Data with a Rules File. . . . . . . . . . . . . . . . . . . . . . . . . . . . . . . . . . . . . . . . . . . . . 35
Troubleshooting Essbase Target Definitions. . . . . . . . . . . . . . . . . . . . . . . . . . . . . . . . . . . . 35
Chapter 5: Essbase Administration. . . . . . . . . . . . . . . . . . . . . . . . . . . . . . . . . . . . . . . . . . 37Essbase Administration Overview. . . . . . . . . . . . . . . . . . . . . . . . . . . . . . . . . . . . . . . . . . . 37
Creating an Application. . . . . . . . . . . . . . . . . . . . . . . . . . . . . . . . . . . . . . . . . . . . . . . . . . 38
Deleting an Application. . . . . . . . . . . . . . . . . . . . . . . . . . . . . . . . . . . . . . . . . . . . . . . . . . 38
Creating a Database. . . . . . . . . . . . . . . . . . . . . . . . . . . . . . . . . . . . . . . . . . . . . . . . . . . . 39
Deleting a Database. . . . . . . . . . . . . . . . . . . . . . . . . . . . . . . . . . . . . . . . . . . . . . . . . . . . 39
Adding a Dimension. . . . . . . . . . . . . . . . . . . . . . . . . . . . . . . . . . . . . . . . . . . . . . . . . . . . 40
Adding a Member. . . . . . . . . . . . . . . . . . . . . . . . . . . . . . . . . . . . . . . . . . . . . . . . . . . . . 41
Modifying a Member. . . . . . . . . . . . . . . . . . . . . . . . . . . . . . . . . . . . . . . . . . . . . . . . . . . . 42
Deleting a Member. . . . . . . . . . . . . . . . . . . . . . . . . . . . . . . . . . . . . . . . . . . . . . . . . . . . . 43
Table of Contents 5

Chapter 6: Essbase Mappings. . . . . . . . . . . . . . . . . . . . . . . . . . . . . . . . . . . . . . . . . . . . . . . 44Creating Essbase Mappings. . . . . . . . . . . . . . . . . . . . . . . . . . . . . . . . . . . . . . . . . . . . . . . 44
Example. . . . . . . . . . . . . . . . . . . . . . . . . . . . . . . . . . . . . . . . . . . . . . . . . . . . . . . . . . . 45
Chapter 7: Essbase Sessions. . . . . . . . . . . . . . . . . . . . . . . . . . . . . . . . . . . . . . . . . . . . . . . . 47Configuring Application Connections. . . . . . . . . . . . . . . . . . . . . . . . . . . . . . . . . . . . . . . . . 47
PowerExchange for Essbase Connections. . . . . . . . . . . . . . . . . . . . . . . . . . . . . . . . . . . 48
Configuring a Session for an Essbase Source. . . . . . . . . . . . . . . . . . . . . . . . . . . . . . . . . . . . 48
Setting the Partition Query Condition. . . . . . . . . . . . . . . . . . . . . . . . . . . . . . . . . . . . . . 48
Configuring a Session for an Essbase Target. . . . . . . . . . . . . . . . . . . . . . . . . . . . . . . . . . . . 49
Using Calculation Scripts. . . . . . . . . . . . . . . . . . . . . . . . . . . . . . . . . . . . . . . . . . . . . . . . . 50
Running Calculation Scripts. . . . . . . . . . . . . . . . . . . . . . . . . . . . . . . . . . . . . . . . . . . . 50
Troubleshooting Essbase Sessions. . . . . . . . . . . . . . . . . . . . . . . . . . . . . . . . . . . . . . . . . . 50
Appendix A: Datatype Reference. . . . . . . . . . . . . . . . . . . . . . . . . . . . . . . . . . . . . . . . . . . . . 51Essbase and Transformation Datatypes. . . . . . . . . . . . . . . . . . . . . . . . . . . . . . . . . . . . . . . 51
Appendix B: Error Messages. . . . . . . . . . . . . . . . . . . . . . . . . . . . . . . . . . . . . . . . . . . . . . . . . 52Designer Error Messages . . . . . . . . . . . . . . . . . . . . . . . . . . . . . . . . . . . . . . . . . . . . . . . . 52
Appendix C: Glossary. . . . . . . . . . . . . . . . . . . . . . . . . . . . . . . . . . . . . . . . . . . . . . . . . . . . . . . . 53
Index. . . . . . . . . . . . . . . . . . . . . . . . . . . . . . . . . . . . . . . . . . . . . . . . . . . . . . . . . . . . 55
6 Table of Contents

PrefaceUse the Informatica® PowerExchange® for Essbase User Guide to learn how to read data from an Essbase source, write data to an Essbase target, and modify the Essbase outline by using the PowerCenter Client. Learn to create an Essbase connection, develop mappings, and run sessions in an Informatica domain.
Informatica ResourcesInformatica provides you with a range of product resources through the Informatica Network and other online portals. Use the resources to get the most from your Informatica products and solutions and to learn from other Informatica users and subject matter experts.
Informatica NetworkThe Informatica Network is the gateway to many resources, including the Informatica Knowledge Base and Informatica Global Customer Support. To enter the Informatica Network, visit https://network.informatica.com.
As an Informatica Network member, you have the following options:
• Search the Knowledge Base for product resources.
• View product availability information.
• Create and review your support cases.
• Find your local Informatica User Group Network and collaborate with your peers.
Informatica Knowledge BaseUse the Informatica Knowledge Base to find product resources such as how-to articles, best practices, video tutorials, and answers to frequently asked questions.
To search the Knowledge Base, visit https://search.informatica.com. If you have questions, comments, or ideas about the Knowledge Base, contact the Informatica Knowledge Base team at [email protected].
Informatica DocumentationUse the Informatica Documentation Portal to explore an extensive library of documentation for current and recent product releases. To explore the Documentation Portal, visit https://docs.informatica.com.
If you have questions, comments, or ideas about the product documentation, contact the Informatica Documentation team at [email protected].
7
Informatica Product Availability MatricesProduct Availability Matrices (PAMs) indicate the versions of the operating systems, databases, and types of data sources and targets that a product release supports. You can browse the Informatica PAMs at https://network.informatica.com/community/informatica-network/product-availability-matrices.
Informatica VelocityInformatica Velocity is a collection of tips and best practices developed by Informatica Professional Services and based on real-world experiences from hundreds of data management projects. Informatica Velocity represents the collective knowledge of Informatica consultants who work with organizations around the world to plan, develop, deploy, and maintain successful data management solutions.
You can find Informatica Velocity resources at http://velocity.informatica.com. If you have questions, comments, or ideas about Informatica Velocity, contact Informatica Professional Services at [email protected].
Informatica MarketplaceThe Informatica Marketplace is a forum where you can find solutions that extend and enhance your Informatica implementations. Leverage any of the hundreds of solutions from Informatica developers and partners on the Marketplace to improve your productivity and speed up time to implementation on your projects. You can find the Informatica Marketplace at https://marketplace.informatica.com.
Informatica Global Customer SupportYou can contact a Global Support Center by telephone or through the Informatica Network.
To find your local Informatica Global Customer Support telephone number, visit the Informatica website at the following link: https://www.informatica.com/services-and-training/customer-success-services/contact-us.html.
To find online support resources on the Informatica Network, visit https://network.informatica.com and select the eSupport option.
8 Preface

C h a p t e r 1
Understanding PowerExchange for Essbase
This chapter includes the following topics:
• PowerExchange for Essbase Overview, 9
• PowerCenter and Essbase Integration, 10
PowerExchange for Essbase OverviewPowerExchange for Essbase provides bidirectional connectivity between PowerCenter and the Essbase server to extract and load data.
Use PowerExchange for Essbase to perform the following tasks:
• Import metadata.
• Create source definitions.
• Create target definitions.
• Administer outlines.
• Transfer data into Relational Online Analytical Processing (ROLAP) model cube.
Essbase Source DefinitionsA source definition is a logical representation of columns and dimensions used to read metadata from the Essbase server. When you create a source definition in PowerCenter, you import the Essbase from the Essbase server and create a logical definition used to read metadata from the Essbase server.
Use the Designer Wizard to create Type 1, Type 2, and Type 3 source definitions:
• Accounts dimension member as a column (Type 1). Create Type 1 source definitions to map accounts dimension members to the source definition columns. You can map any number of accounts dimension members to columns.
• Accounts dimension as a column (Type 2). Create Type 2 source definitions to map accounts dimension to source definition columns. Essbase creates a data column for Type 2 source definitions. The data column receives data and reads data from the Essbase database.
• Extract members (Type 3). Create Type 3 source definitions to map any standard dimension, level, or attribute dimension under the dimension to source definition columns. The data is extracted for all the descendents under the dimension or level.
9
Essbase Target DefinitionsA target definition is a logical representation of columns and dimensions used to write metadata to the Essbase server. When you create a target definition in PowerCenter, you import metadata from the Essbase server and create a logical definition used to write metadata to the Essbase server.
Use the Designer Wizard to create Type 1, Type 2, and Type 3 target definitions:
• Accounts dimension member as a column (Type 1). Create Type 1 target definitions to map accounts dimension members to the target definition columns. You can map any number of account dimension members to columns.
• Accounts dimension as a column (Type 2). Essbase creates the definition for Type 2 target definition. Essbase adds all the standard dimensions, plus one data column to the Type 2 table. The value in the data column is loaded to Essbase.
• Dynamic dimension building (Type 3). Create Type 3 target definitions to add members to an Essbase outline. To add members to the outline, you must create columns based on the rule file defined.
Essbase AdministrationYou can connect to Essbase from the PowerCenter Designer to perform some of the Essbase administrative tasks that you can also perform in the Essbase Administration Console.
PowerCenter and Essbase IntegrationThe Designer connects to the Essbase server to import the Essbase source and target definitions. After establishing the connection, the Designer starts an Essbase session and accesses the Essbase database to import the source or target metadata.
PowerCenter Integration Service and Essbase IntegrationCreate a connection object in the Workflow Manager to connect to the Essbase server. The PowerCenter Integration Service uses the connection information to connect to the Essbase server through the Essbase C SDK.
10 Chapter 1: Understanding PowerExchange for Essbase
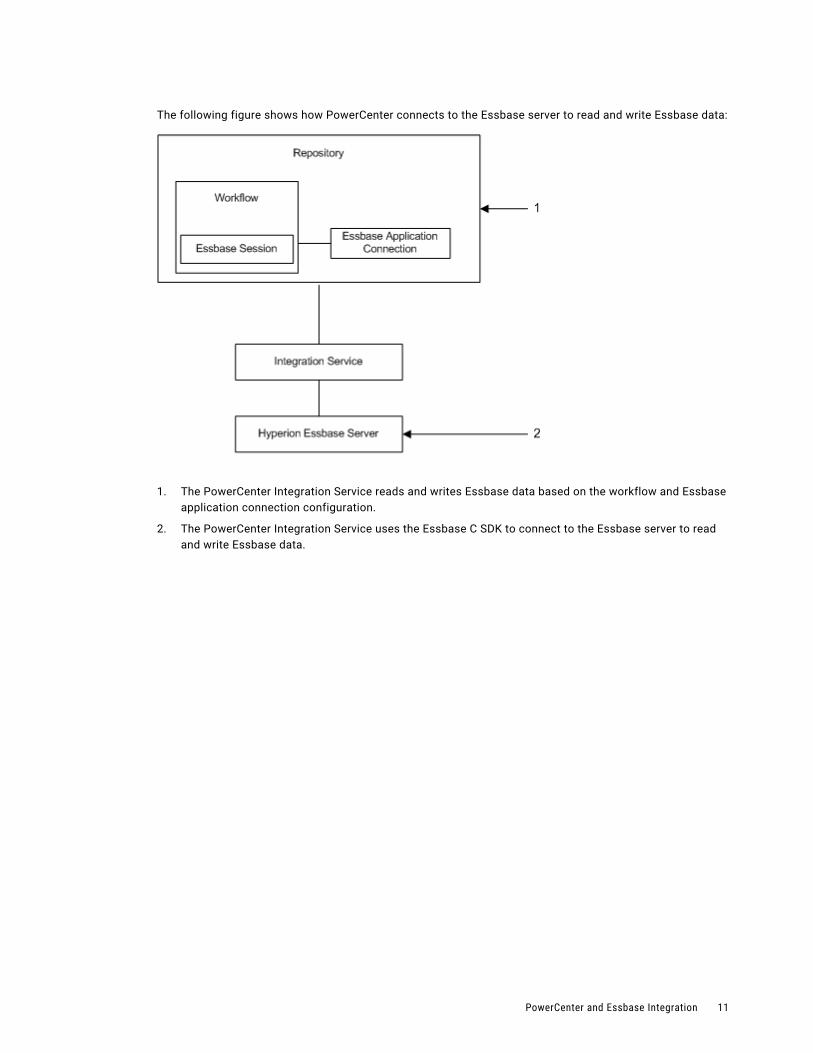
The following figure shows how PowerCenter connects to the Essbase server to read and write Essbase data:
1. The PowerCenter Integration Service reads and writes Essbase data based on the workflow and Essbase application connection configuration.
2. The PowerCenter Integration Service uses the Essbase C SDK to connect to the Essbase server to read and write Essbase data.
PowerCenter and Essbase Integration 11

C h a p t e r 2
PowerExchange for Essbase Configuration
This chapter includes the following topics:
• PowerExchange for Essbase Configuration Overview, 12
• Registering the Plug-in, 13
• Installing the Essbase Client, 14
• Setting the Library Paths, 14
• Upgrading PowerExchange for Essbase, 17
PowerExchange for Essbase Configuration OverviewPowerExchange for Essbase installs with PowerCenter.
If you upgrade from a previous version, you must register the PowerExchange for Essbase plug-in with the PowerCenter repository.
Configuring PowerExchange for EssbaseTo configure PowerExchange for Essbase, complete the following steps:
1. Create a registry entry for PowerExchange for Essbase on the client machine:
a. Go to the following location:<Informatica client installation directory>\clients\PowerCenterClient\client\bin
b. Run the PWX_ESSBASE_64.reg file to create the registry entry.
2. Register the plug-in.
3. Install Essbase Libraries.
4. Set the library paths.
After you install informatica services, you must install the Essbase Libraries. You can then create connections to access Essbase. Create connection objects in the Workflow Manager so that the PowerCenter Integration Service can connect to Essbase at run time.
12
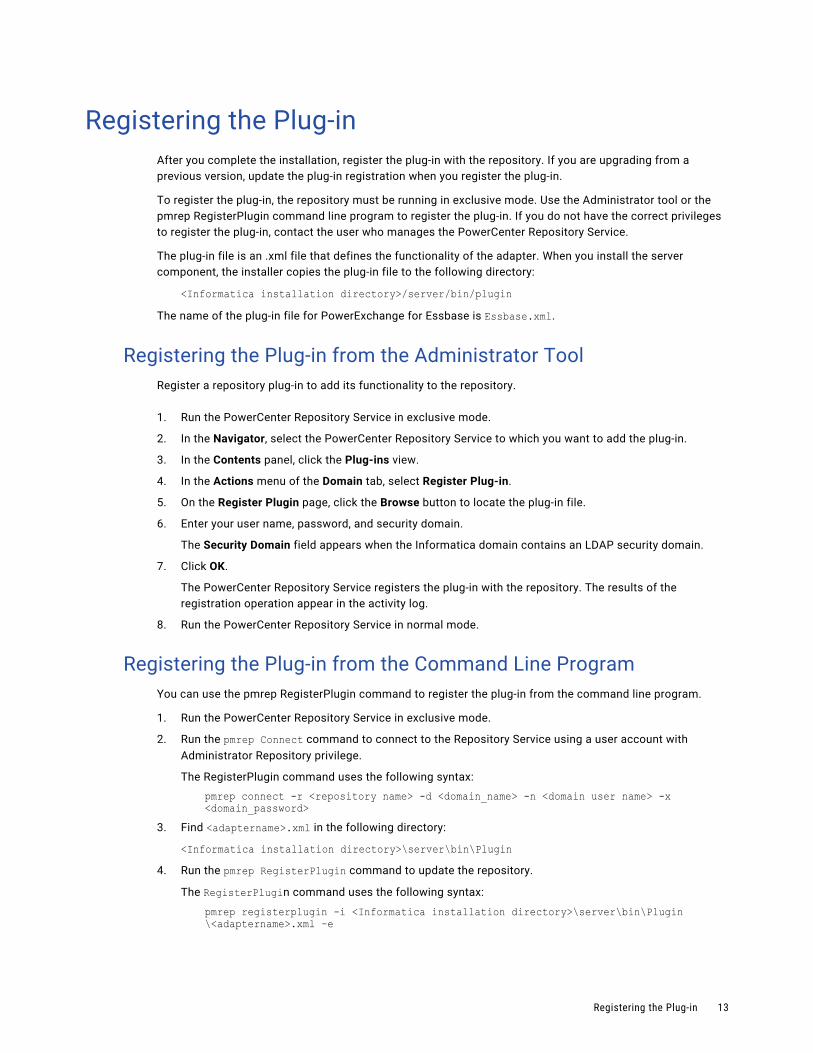
Registering the Plug-inAfter you complete the installation, register the plug-in with the repository. If you are upgrading from a previous version, update the plug-in registration when you register the plug-in.
To register the plug-in, the repository must be running in exclusive mode. Use the Administrator tool or the pmrep RegisterPlugin command line program to register the plug-in. If you do not have the correct privileges to register the plug-in, contact the user who manages the PowerCenter Repository Service.
The plug-in file is an .xml file that defines the functionality of the adapter. When you install the server component, the installer copies the plug-in file to the following directory:
<Informatica installation directory>/server/bin/pluginThe name of the plug-in file for PowerExchange for Essbase is Essbase.xml.
Registering the Plug-in from the Administrator ToolRegister a repository plug-in to add its functionality to the repository.
1. Run the PowerCenter Repository Service in exclusive mode.
2. In the Navigator, select the PowerCenter Repository Service to which you want to add the plug-in.
3. In the Contents panel, click the Plug-ins view.
4. In the Actions menu of the Domain tab, select Register Plug-in.
5. On the Register Plugin page, click the Browse button to locate the plug-in file.
6. Enter your user name, password, and security domain.
The Security Domain field appears when the Informatica domain contains an LDAP security domain.
7. Click OK.
The PowerCenter Repository Service registers the plug-in with the repository. The results of the registration operation appear in the activity log.
8. Run the PowerCenter Repository Service in normal mode.
Registering the Plug-in from the Command Line ProgramYou can use the pmrep RegisterPlugin command to register the plug-in from the command line program.
1. Run the PowerCenter Repository Service in exclusive mode.
2. Run the pmrep Connect command to connect to the Repository Service using a user account with Administrator Repository privilege.
The RegisterPlugin command uses the following syntax:
pmrep connect -r <repository name> -d <domain_name> -n <domain user name> -x <domain_password>
3. Find <adaptername>.xml in the following directory:
<Informatica installation directory>\server\bin\Plugin4. Run the pmrep RegisterPlugin command to update the repository.
The RegisterPlugin command uses the following syntax:
pmrep registerplugin -i <Informatica installation directory>\server\bin\Plugin\<adaptername>.xml –e
Registering the Plug-in 13

Installing the Essbase ClientInstall the Essbase client specific to the operating system that hosts the PowerCenter Client and the PowerCenter Integration Service.
To install the Essbase client, complete the following steps:
1. If you have an Essbase client earlier than version 11.1.2.0.0, you must uninstall the client components and install the Essbase client version 11.1.2.0.0.
2. After you install the Essbase client, ensure that the ESSBASEPATH and ARBORPATH environment variables are pointing to the Essbase 11.1.2.0.0 installation location.
3. Set the ESSLANG environment variable to specify the Essbase locale for the machines that host the PowerCenter Client and PowerCenter Integration Service. For example, you can use the ESSLANG variable value, English_UnitedStates.Latin1@Binary. For more information about the supported ESSLANG variable values, see the Essbase documentation.
4. Set the library path and PATH environment variables to point to the Essbase client bin directory.
5. When you install Oracle Enterprise Performance Management (EPM) client version 11.1.2.2 and later, Oracle branded DataDirect drivers are installed. You might get unexpected results when the Oracle branded DataDirect drivers are installed.
6. To ensure that you install Informatica branded DataDirect drivers, perform copy the Essbase client libraries from the following directory: <Essbase Installation Directory>\products\Essbase \EssbaseClient\lib to the following directory: <Essbase Installation Directory>\products\Essbase \EssbaseClient\bin after you install the Oracle EPM client or install the Oracle EPM client before you install Informatica.
Setting the Library Paths
Setting the Library Path on WindowsAfter you install the Essbase client and Oracle EPM client, you need to set environment variables.
For example, after you install the Essbase client version 11.1.2.0.0, set the following environment variables to the specified locations:
Environment Variable Machine Locations
PATH PowerCenter Integration Service <PowerCenter Installation Directory>\server\bin
PATH PowerCenter Integration Service <Essbase Installation Directory>\products\Essbase\EssbaseClient\bin
PATH PowerCenter Client <PowerCenter Installation Directory>\client\bin
PATH PowerCenter Client <Essbase Installation Directory>\products\Essbase\EssbaseClient\bin
14 Chapter 2: PowerExchange for Essbase Configuration
Environment Variable Machine Locations
ESSBASEPATH PowerCenter Integration Service <Essbase Installation Directory>\products\Essbase\EssbaseClient\bin
ESSBASEPATH PowerCenter Client <Essbase Installation Directory>\products\Essbase\EssbaseClient
ARBORPATH PowerCenter Integration Service <Essbase Installation Directory>\products\Essbase\EssbaseClient
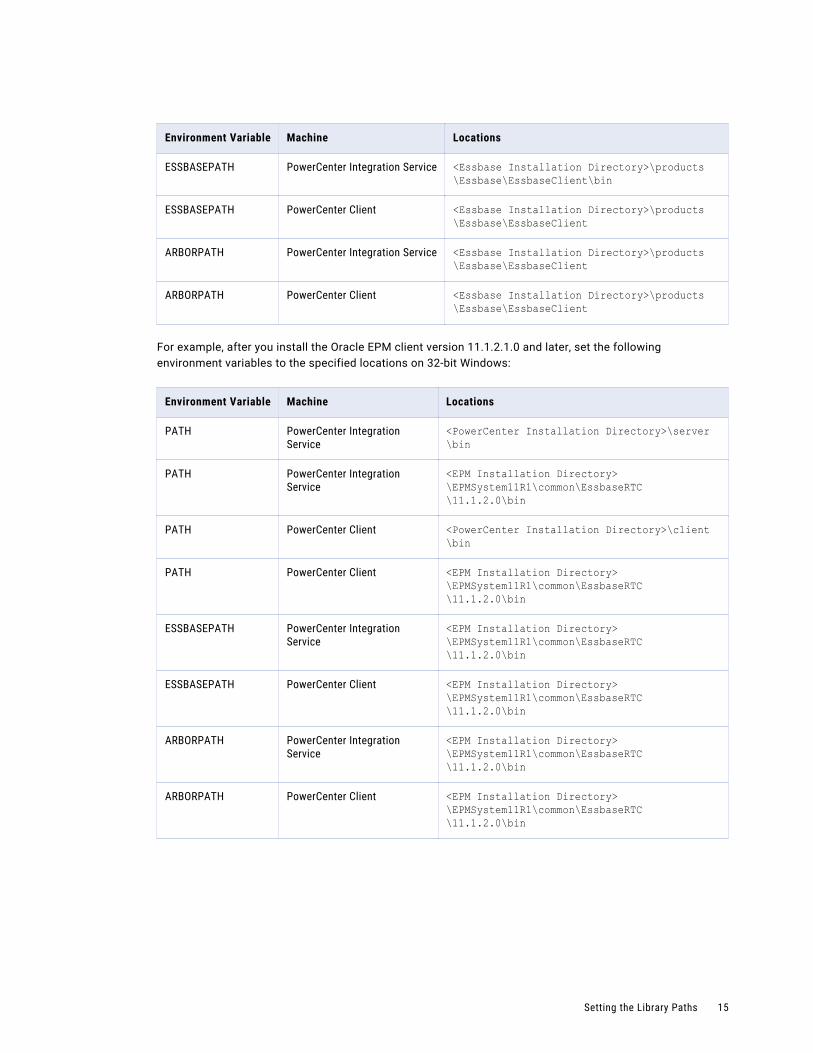
ARBORPATH PowerCenter Client <Essbase Installation Directory>\products\Essbase\EssbaseClient
For example, after you install the Oracle EPM client version 11.1.2.1.0 and later, set the following environment variables to the specified locations on 32-bit Windows:
Environment Variable Machine Locations
PATH PowerCenter Integration Service
<PowerCenter Installation Directory>\server\bin
PATH PowerCenter Integration Service
<EPM Installation Directory>\EPMSystem11R1\common\EssbaseRTC\11.1.2.0\bin
PATH PowerCenter Client <PowerCenter Installation Directory>\client\bin
PATH PowerCenter Client <EPM Installation Directory>\EPMSystem11R1\common\EssbaseRTC\11.1.2.0\bin
ESSBASEPATH PowerCenter Integration Service
<EPM Installation Directory>\EPMSystem11R1\common\EssbaseRTC\11.1.2.0\bin
ESSBASEPATH PowerCenter Client <EPM Installation Directory>\EPMSystem11R1\common\EssbaseRTC\11.1.2.0\bin
ARBORPATH PowerCenter Integration Service
<EPM Installation Directory>\EPMSystem11R1\common\EssbaseRTC\11.1.2.0\bin
ARBORPATH PowerCenter Client <EPM Installation Directory>\EPMSystem11R1\common\EssbaseRTC\11.1.2.0\bin
Setting the Library Paths 15
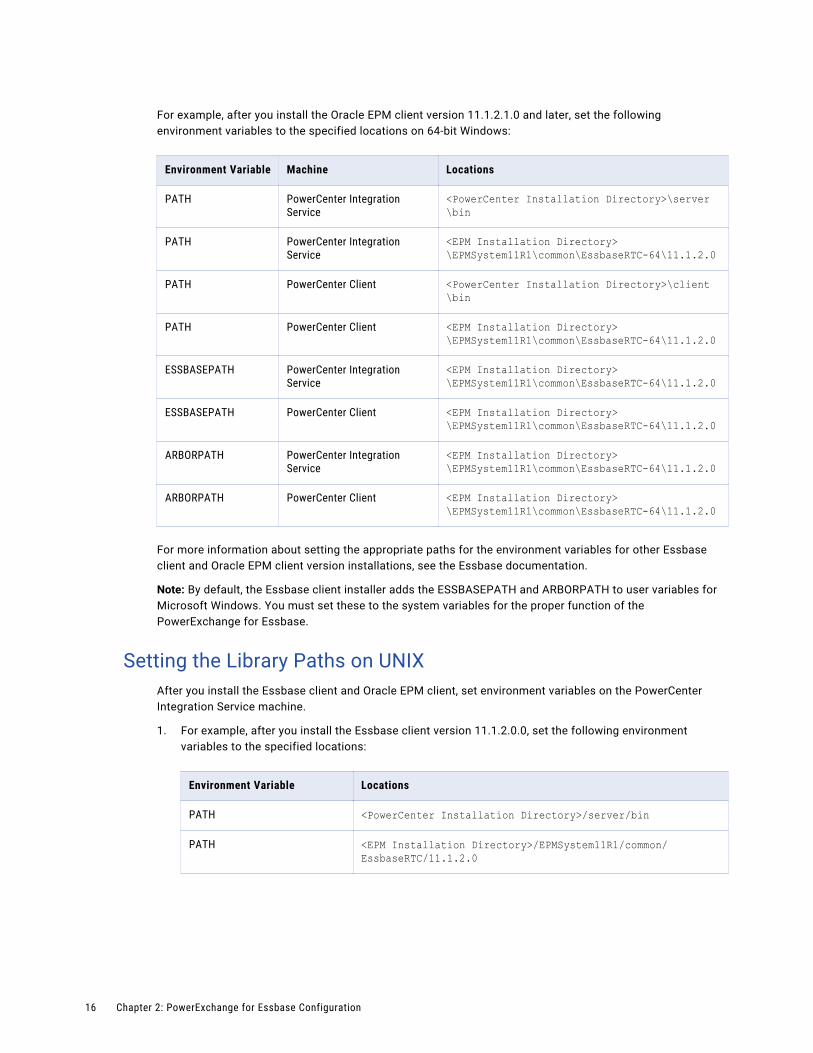
For example, after you install the Oracle EPM client version 11.1.2.1.0 and later, set the following environment variables to the specified locations on 64-bit Windows:
Environment Variable Machine Locations
PATH PowerCenter Integration Service
<PowerCenter Installation Directory>\server\bin
PATH PowerCenter Integration Service
<EPM Installation Directory>\EPMSystem11R1\common\EssbaseRTC-64\11.1.2.0
PATH PowerCenter Client <PowerCenter Installation Directory>\client\bin
PATH PowerCenter Client <EPM Installation Directory>\EPMSystem11R1\common\EssbaseRTC-64\11.1.2.0
ESSBASEPATH PowerCenter Integration Service
<EPM Installation Directory>\EPMSystem11R1\common\EssbaseRTC-64\11.1.2.0
ESSBASEPATH PowerCenter Client <EPM Installation Directory>\EPMSystem11R1\common\EssbaseRTC-64\11.1.2.0
ARBORPATH PowerCenter Integration Service
<EPM Installation Directory>\EPMSystem11R1\common\EssbaseRTC-64\11.1.2.0
ARBORPATH PowerCenter Client <EPM Installation Directory>\EPMSystem11R1\common\EssbaseRTC-64\11.1.2.0
For more information about setting the appropriate paths for the environment variables for other Essbase client and Oracle EPM client version installations, see the Essbase documentation.
Note: By default, the Essbase client installer adds the ESSBASEPATH and ARBORPATH to user variables for Microsoft Windows. You must set these to the system variables for the proper function of the PowerExchange for Essbase.
Setting the Library Paths on UNIXAfter you install the Essbase client and Oracle EPM client, set environment variables on the PowerCenter Integration Service machine.
1. For example, after you install the Essbase client version 11.1.2.0.0, set the following environment variables to the specified locations:
Environment Variable Locations
PATH <PowerCenter Installation Directory>/server/bin
PATH <EPM Installation Directory>/EPMSystem11R1/common/EssbaseRTC/11.1.2.0
16 Chapter 2: PowerExchange for Essbase Configuration
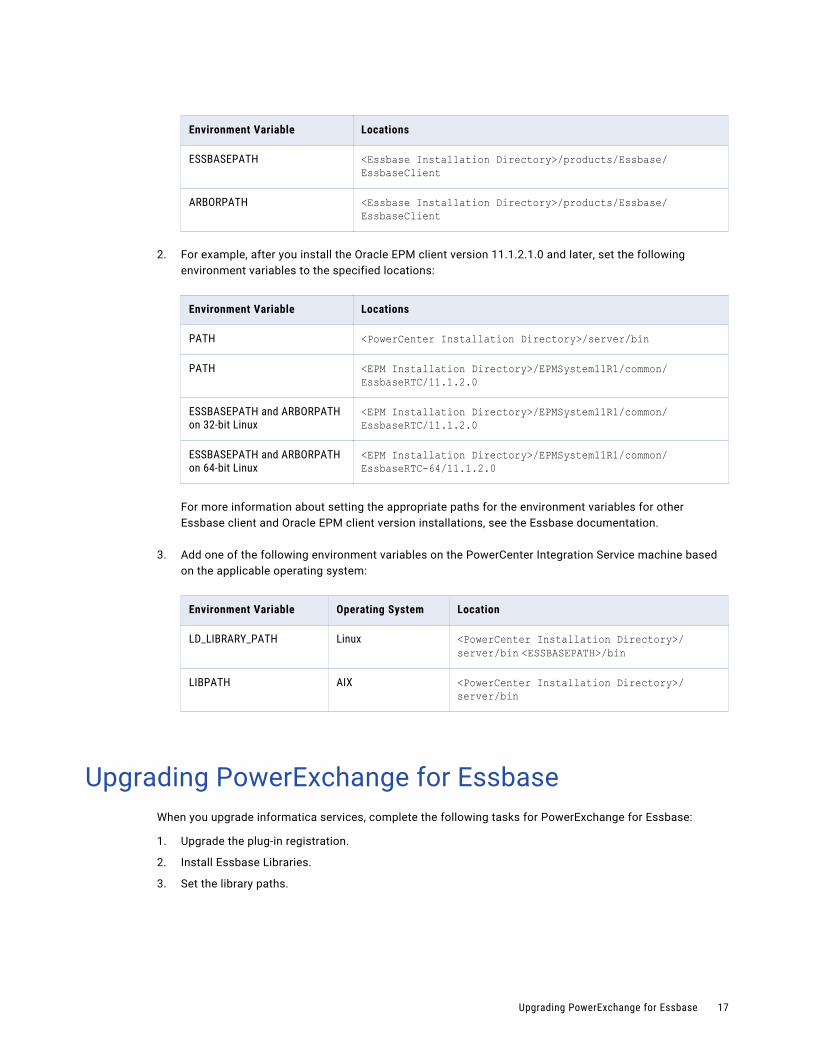
Environment Variable Locations
ESSBASEPATH <Essbase Installation Directory>/products/Essbase/EssbaseClient
ARBORPATH <Essbase Installation Directory>/products/Essbase/EssbaseClient
2. For example, after you install the Oracle EPM client version 11.1.2.1.0 and later, set the following environment variables to the specified locations:
Environment Variable Locations
PATH <PowerCenter Installation Directory>/server/bin
PATH <EPM Installation Directory>/EPMSystem11R1/common/EssbaseRTC/11.1.2.0
ESSBASEPATH and ARBORPATH on 32-bit Linux
<EPM Installation Directory>/EPMSystem11R1/common/EssbaseRTC/11.1.2.0
ESSBASEPATH and ARBORPATH on 64-bit Linux
<EPM Installation Directory>/EPMSystem11R1/common/EssbaseRTC-64/11.1.2.0
For more information about setting the appropriate paths for the environment variables for other Essbase client and Oracle EPM client version installations, see the Essbase documentation.
3. Add one of the following environment variables on the PowerCenter Integration Service machine based on the applicable operating system:
Environment Variable Operating System Location
LD_LIBRARY_PATH Linux <PowerCenter Installation Directory>/server/bin <ESSBASEPATH>/bin
LIBPATH AIX <PowerCenter Installation Directory>/server/bin
Upgrading PowerExchange for EssbaseWhen you upgrade informatica services, complete the following tasks for PowerExchange for Essbase:
1. Upgrade the plug-in registration.
2. Install Essbase Libraries.
3. Set the library paths.
Upgrading PowerExchange for Essbase 17
C h a p t e r 3
Essbase SourcesThis chapter includes the following topics:
• Essbase Sources Overview, 18
• Creating a DSN, 19
• Type 1 and Type 2 Essbase Source Definitions, 19
• Type 3 Source Definitions, 21
• Creating Essbase Source Definitions, 24
• Editing the Essbase Source Definition, 26
• Steps to Add Attribute Dimensions, 26
• Editing Report Script, 27
• Troubleshooting Essbase Source Definitions, 28
Essbase Sources OverviewEssbase source definitions represent metadata in the Essbase system. When the PowerCenter Integration Service extracts from an Essbase source, it converts the data based on the datatypes in the Application Source Qualifier transformation associated with the source. Use the Designer Wizard to import metadata from Essbase and create source definitions to read data from the Essbase server.
Use the Designer Wizard to perform the following tasks:
• Create and modify a Data Source Name (DSN). Create and modify a DSN in the Powercenter Designer.
• Import metadata by creating source definitions. Create Type 1, Type 2, and Type 3 source definitions.
• Create columns. Create columns and map them to the standard and accounts dimensions. Use the columns to read data from the Essbase server.
• Set filter criteria for columns. Define a data category to filter dimensions under Type 1 and Type 2 source definitions. For Type 3 source definition, you can set the filter criteria to import metadata.
• Edit report script. Use report scripts to set data filters, command parameters, and the member selection commands to filter dimensions under Type 1 and Type 2 source definitions.
• Perform administrative tasks. Connect to Essbase from the PowerCenter Designer to perform some of the Essbase administrative tasks that you can also perform through the Essbase Administration Console.
• View details. View information about a DSN, a source definition, or a column.
• Preview data. Preview data in the Essbase source after importing a source definition. You can preview data for Type 1 and Type 2 source definitions.
18

Creating a DSNA DSN is a name given to a set of information used to connect and extract data from the Essbase server. Every DSN that you create is associated with a particular Essbase server and has a unique user name and password.
You can create a DSN in the following situations:
• You need to connect to the Essbase server for which a DSN is not available.
• You need to connect to the Essbase server for which a DSN is available. However, you do not have the privileges to connect to the Essbase server through the DSN.
To create a DSN:
1. In the Source Analyzer, click Sources > Import Essbase Source.
The Designer Wizard appears.
2. Right-click Essbase, and select Create DSN.
The DSN Creation Wizard appears.
3. Enter the following information:
Parameter Description
DSN Name Name for the DSN.
Description Description for the DSN.
Server Name Name of the Essbase server you want to connect to.
User Name Essbase user name.
Password Password for the user name.
4. To verify that the connection is successful, click Test Connectivity.
5. Click Save.
Type 1 and Type 2 Essbase Source DefinitionsUse the Designer Wizard to perform the following tasks:
• Connect to the Essbase server.
• Create source definitions to import metadata.
• Create columns associated with accounts and standard dimensions.
• Create filter expressions.
• Add attribute dimensions.
• Edit report scripts.
Creating a DSN 19

Connecting to Essbase ServerUse a DSN to connect to the Essbase server. Use the Designer Wizard to enter user name and password and to connect to the Essbase server through the DSN. The Designer Wizard displays the source definitions associated with the DSN.
Creating Type 1 and Type 2 Source DefinitionsWhen you select a DSN, the Designer Wizard displays the Create Table option. Use this option to access the Table Creation Wizard and create a source definition.
Creating Columns for Type 1 and Type 2 Source DefinitionsAfter you create Type 1 and Type 2 source definitions, you can create columns in the source definitions. Use the Column Creation Wizard to create columns.
For Type 1 source definitions, add at least one dimension and one member of the account dimension as columns. The Type 1 source defintion generates a column for the alias associated with the selected dimension.
For Type 2 source definitions, add at least one dimension as a column. The Type 2 source definition generates the data column in addition to the columns that you create. The Type 2 source definition also generates a column for the alias associated with the selected dimension.
Note: The alias column appears in the Type 1 or Type 2 source definition if the selected dimension has an alias associated with it.
Adding Attribute DimensionsYou can add attribute dimensions to the columns in Type 1 and Type 2 source definitions. Add attributes dimensions to the columns that have attributes associated with them.
You can add either all attribute dimensions or a specific attribute dimension to a column.
Editing Report ScriptsYou can edit the report script to filter data for Type 1 and Type 2 source definitions.
You can edit the report script for the standard dimension columns. You must create standard dimension columns before you edit the report script. If you add, change, or delete columns in the table, the filter conditions in the report script reset to the default values.
From the Designer Wizard, select a source definition, and select the Report Script option. The Edit Report Script dialog box appears. Configure the Member Selection parameters and the data filters for the selected column.
You can also select the member sort order for the selected dimension column, specify the sort options, or select the member selection.
20 Chapter 3: Essbase Sources
Type 3 Source DefinitionsUse the Designer Wizard to perform the following tasks:
• Connect to the Essbase server.
• Create source definitions to import metadata.
• Create columns mapped to accounts and standard dimensions.
• Set filter expressions.
• Specify column names and attributes
Connecting to the Essbase ServerUse a DSN to connect to the Essbase server. Use the Designer Wizard to enter your user name and password and to connect to the Essbase server through the DSN. The Designer Wizard displays the associated source definitions that were created with this DSN.
Creating Type 3 Source DefinitionWhen you select a DSN, the Designer Wizard displays the Create Table option. You can use this option to access the Table Creation Wizard and create a source definition. In the Table Creation Wizard, select the Extract Members (Type 3) option to create Type 3 source definitions. The Type 3 source definition maintains a read-only set of properties for a specified dimension in Essbase.
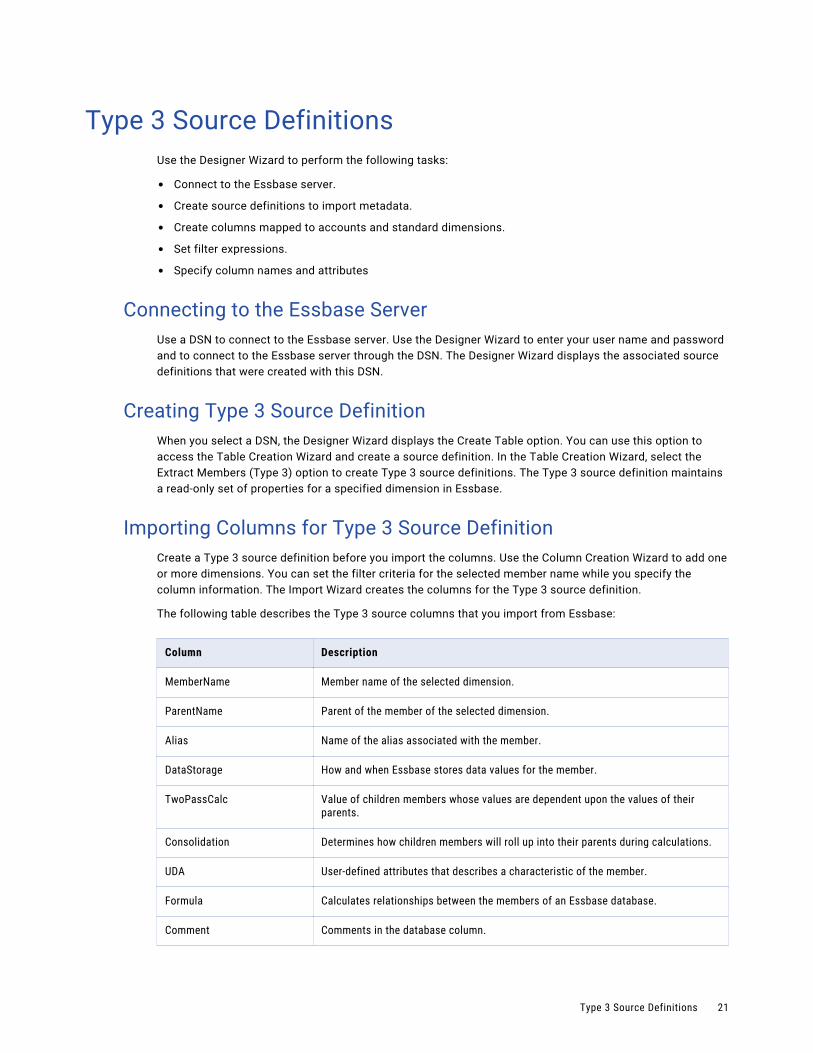
Importing Columns for Type 3 Source DefinitionCreate a Type 3 source definition before you import the columns. Use the Column Creation Wizard to add one or more dimensions. You can set the filter criteria for the selected member name while you specify the column information. The Import Wizard creates the columns for the Type 3 source definition.
The following table describes the Type 3 source columns that you import from Essbase:
Column Description
MemberName Member name of the selected dimension.
ParentName Parent of the member of the selected dimension.
Alias Name of the alias associated with the member.
DataStorage How and when Essbase stores data values for the member.
TwoPassCalc Value of children members whose values are dependent upon the values of their parents.
Consolidation Determines how children members will roll up into their parents during calculations.
UDA User-defined attributes that describes a characteristic of the member.
Formula Calculates relationships between the members of an Essbase database.
Comment Comments in the database column.
Type 3 Source Definitions 21
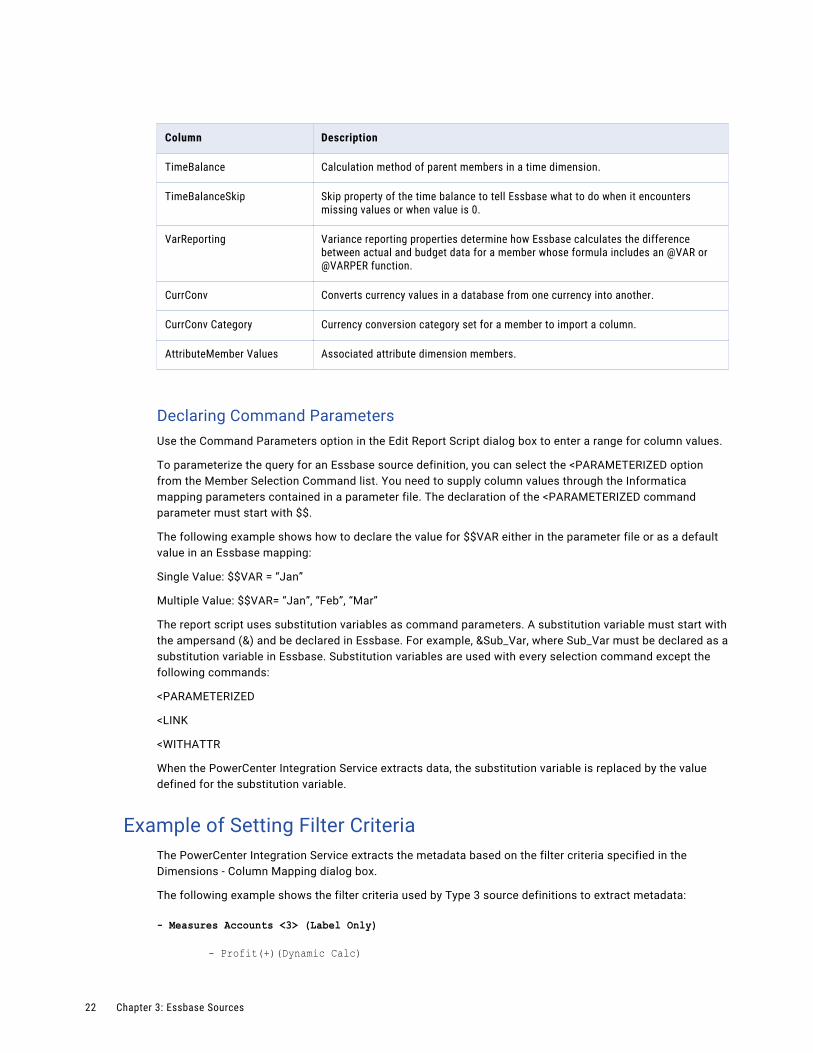
Column Description
TimeBalance Calculation method of parent members in a time dimension.
TimeBalanceSkip Skip property of the time balance to tell Essbase what to do when it encounters missing values or when value is 0.
VarReporting Variance reporting properties determine how Essbase calculates the difference between actual and budget data for a member whose formula includes an @VAR or @VARPER function.
CurrConv Converts currency values in a database from one currency into another.
CurrConv Category Currency conversion category set for a member to import a column.
AttributeMember Values Associated attribute dimension members.
Declaring Command ParametersUse the Command Parameters option in the Edit Report Script dialog box to enter a range for column values.
To parameterize the query for an Essbase source definition, you can select the <PARAMETERIZED option from the Member Selection Command list. You need to supply column values through the Informatica mapping parameters contained in a parameter file. The declaration of the <PARAMETERIZED command parameter must start with $$.
The following example shows how to declare the value for $$VAR either in the parameter file or as a default value in an Essbase mapping:
Single Value: $$VAR = “Jan”
Multiple Value: $$VAR= “Jan”, “Feb”, “Mar”
The report script uses substitution variables as command parameters. A substitution variable must start with the ampersand (&) and be declared in Essbase. For example, &Sub_Var, where Sub_Var must be declared as a substitution variable in Essbase. Substitution variables are used with every selection command except the following commands:
<PARAMETERIZED
<LINK
<WITHATTR
When the PowerCenter Integration Service extracts data, the substitution variable is replaced by the value defined for the substitution variable.
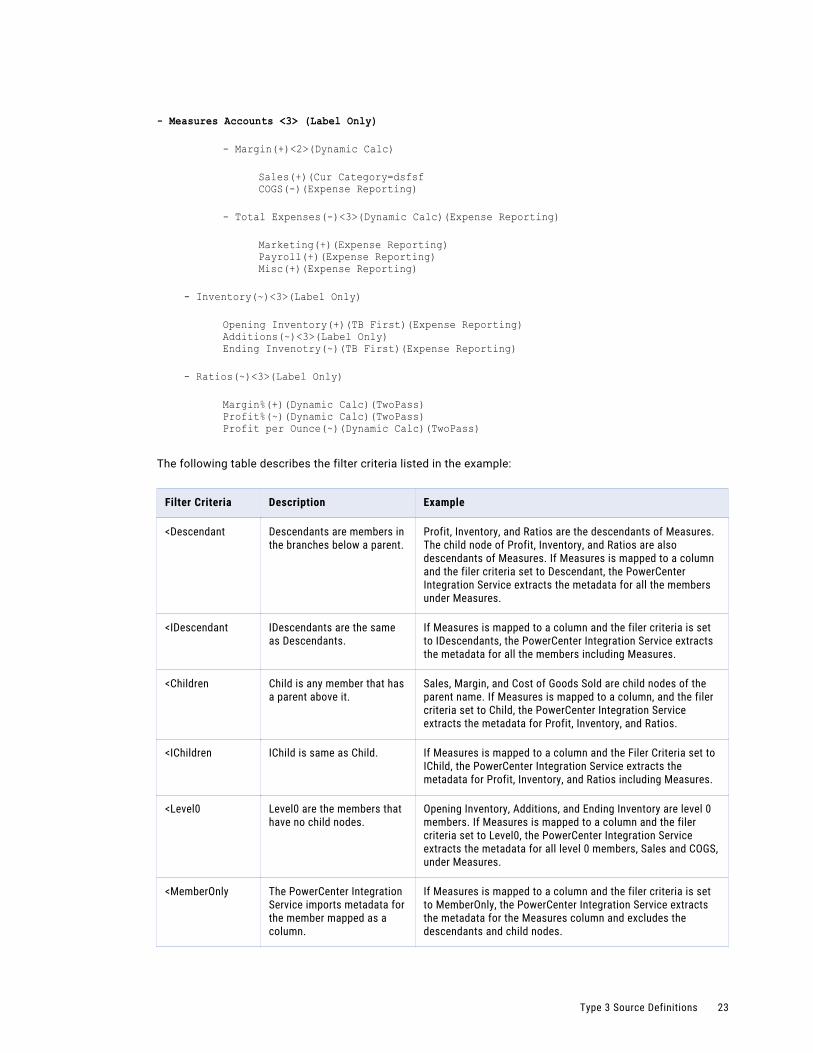
Example of Setting Filter CriteriaThe PowerCenter Integration Service extracts the metadata based on the filter criteria specified in the Dimensions - Column Mapping dialog box.
The following example shows the filter criteria used by Type 3 source definitions to extract metadata:
- Measures Accounts <3> (Label Only)
- Profit(+)(Dynamic Calc)
22 Chapter 3: Essbase Sources
- Measures Accounts <3> (Label Only)
- Margin(+)<2>(Dynamic Calc)
Sales(+)(Cur Category=dsfsfCOGS(-)(Expense Reporting)
- Total Expenses(-)<3>(Dynamic Calc)(Expense Reporting)
Marketing(+)(Expense Reporting)Payroll(+)(Expense Reporting)Misc(+)(Expense Reporting)
- Inventory(~)<3>(Label Only)
Opening Inventory(+)(TB First)(Expense Reporting)Additions(~)<3>(Label Only)Ending Invenotry(~)(TB First)(Expense Reporting)
- Ratios(~)<3>(Label Only)
Margin%(+)(Dynamic Calc)(TwoPass)Profit%(~)(Dynamic Calc)(TwoPass)Profit per Ounce(~)(Dynamic Calc)(TwoPass)
The following table describes the filter criteria listed in the example:
Filter Criteria Description Example
<Descendant Descendants are members in the branches below a parent.
Profit, Inventory, and Ratios are the descendants of Measures. The child node of Profit, Inventory, and Ratios are also descendants of Measures. If Measures is mapped to a column and the filer criteria set to Descendant, the PowerCenter Integration Service extracts the metadata for all the members under Measures.
<IDescendant IDescendants are the same as Descendants.
If Measures is mapped to a column and the filer criteria is set to IDescendants, the PowerCenter Integration Service extracts the metadata for all the members including Measures.
<Children Child is any member that has a parent above it.
Sales, Margin, and Cost of Goods Sold are child nodes of the parent name. If Measures is mapped to a column, and the filer criteria set to Child, the PowerCenter Integration Service extracts the metadata for Profit, Inventory, and Ratios.
<IChildren IChild is same as Child. If Measures is mapped to a column and the Filer Criteria set to IChild, the PowerCenter Integration Service extracts the metadata for Profit, Inventory, and Ratios including Measures.
<Level0 Level0 are the members that have no child nodes.
Opening Inventory, Additions, and Ending Inventory are level 0 members. If Measures is mapped to a column and the filer criteria set to Level0, the PowerCenter Integration Service extracts the metadata for all level 0 members, Sales and COGS, under Measures.
<MemberOnly The PowerCenter Integration Service imports metadata for the member mapped as a column.
If Measures is mapped to a column and the filer criteria is set to MemberOnly, the PowerCenter Integration Service extracts the metadata for the Measures column and excludes the descendants and child nodes.
Type 3 Source Definitions 23
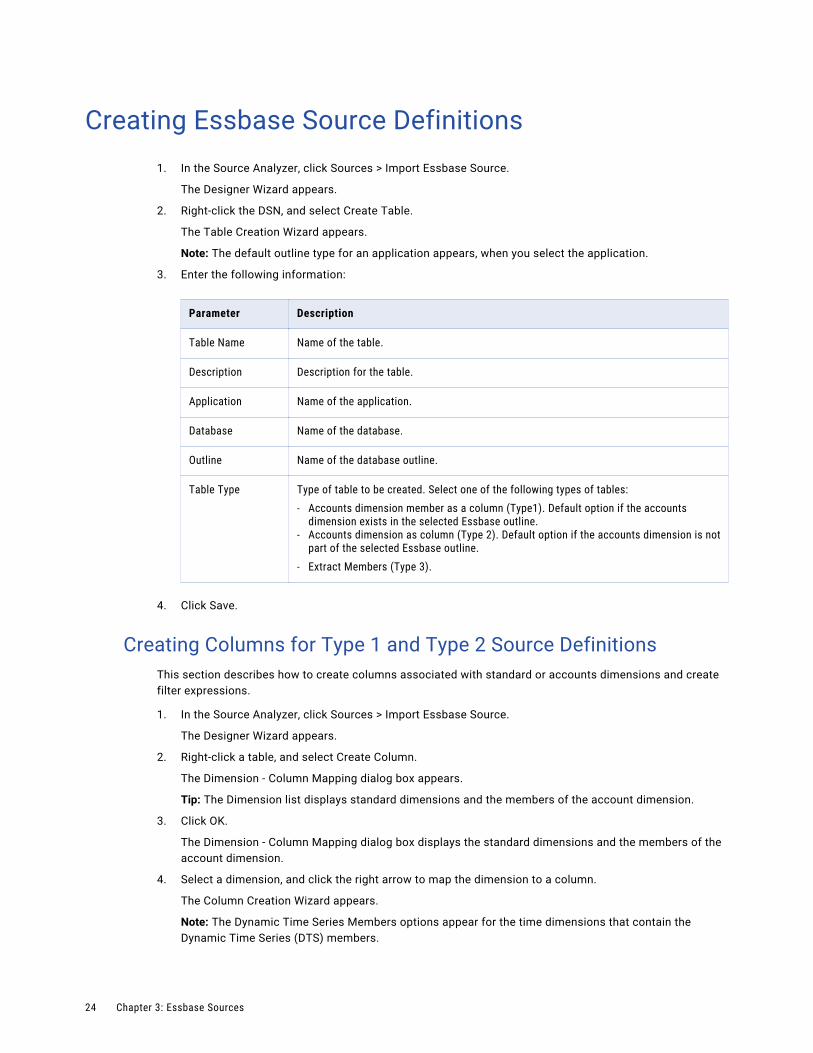
Creating Essbase Source Definitions1. In the Source Analyzer, click Sources > Import Essbase Source.
The Designer Wizard appears.
2. Right-click the DSN, and select Create Table.
The Table Creation Wizard appears.
Note: The default outline type for an application appears, when you select the application.
3. Enter the following information:
Parameter Description
Table Name Name of the table.
Description Description for the table.
Application Name of the application.
Database Name of the database.
Outline Name of the database outline.
Table Type Type of table to be created. Select one of the following types of tables:- Accounts dimension member as a column (Type1). Default option if the accounts
dimension exists in the selected Essbase outline.- Accounts dimension as column (Type 2). Default option if the accounts dimension is not
part of the selected Essbase outline.- Extract Members (Type 3).
4. Click Save.
Creating Columns for Type 1 and Type 2 Source DefinitionsThis section describes how to create columns associated with standard or accounts dimensions and create filter expressions.
1. In the Source Analyzer, click Sources > Import Essbase Source.
The Designer Wizard appears.
2. Right-click a table, and select Create Column.
The Dimension - Column Mapping dialog box appears.
Tip: The Dimension list displays standard dimensions and the members of the account dimension.
3. Click OK.
The Dimension - Column Mapping dialog box displays the standard dimensions and the members of the account dimension.
4. Select a dimension, and click the right arrow to map the dimension to a column.
The Column Creation Wizard appears.
Note: The Dynamic Time Series Members options appear for the time dimensions that contain the Dynamic Time Series (DTS) members.
24 Chapter 3: Essbase Sources
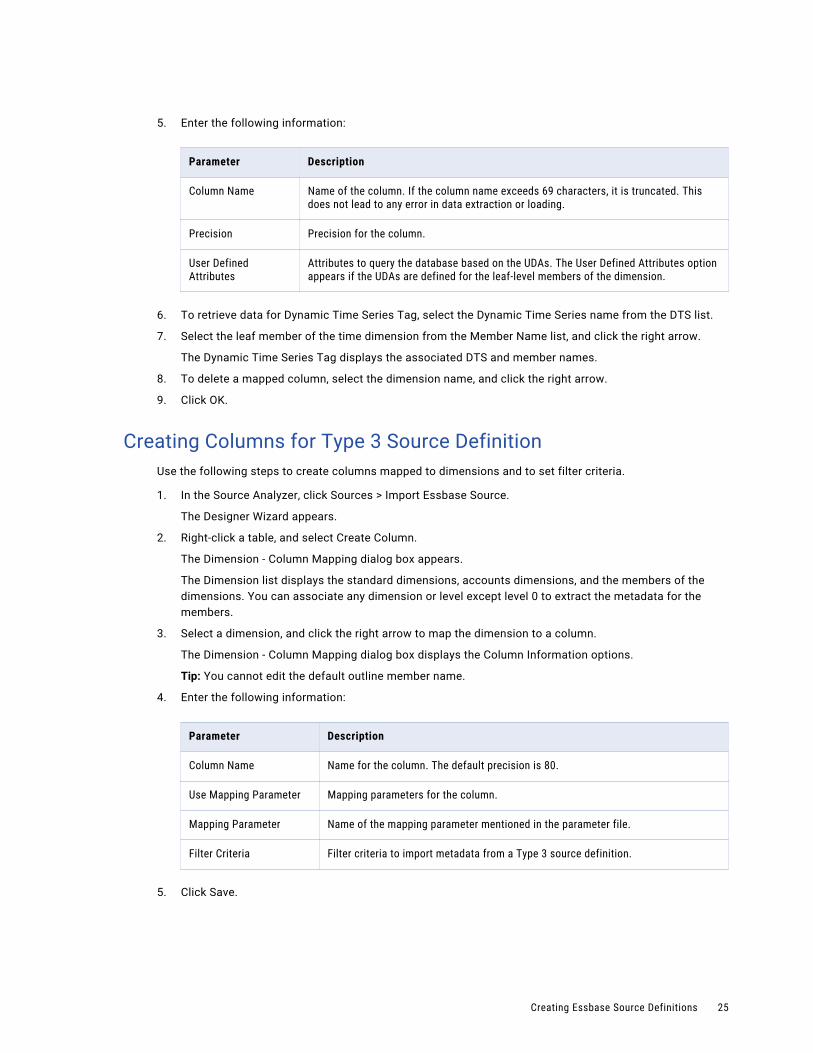
5. Enter the following information:
Parameter Description
Column Name Name of the column. If the column name exceeds 69 characters, it is truncated. This does not lead to any error in data extraction or loading.
Precision Precision for the column.
User Defined Attributes
Attributes to query the database based on the UDAs. The User Defined Attributes option appears if the UDAs are defined for the leaf-level members of the dimension.
6. To retrieve data for Dynamic Time Series Tag, select the Dynamic Time Series name from the DTS list.
7. Select the leaf member of the time dimension from the Member Name list, and click the right arrow.
The Dynamic Time Series Tag displays the associated DTS and member names.
8. To delete a mapped column, select the dimension name, and click the right arrow.
9. Click OK.
Creating Columns for Type 3 Source DefinitionUse the following steps to create columns mapped to dimensions and to set filter criteria.
1. In the Source Analyzer, click Sources > Import Essbase Source.
The Designer Wizard appears.
2. Right-click a table, and select Create Column.
The Dimension - Column Mapping dialog box appears.
The Dimension list displays the standard dimensions, accounts dimensions, and the members of the dimensions. You can associate any dimension or level except level 0 to extract the metadata for the members.
3. Select a dimension, and click the right arrow to map the dimension to a column.
The Dimension - Column Mapping dialog box displays the Column Information options.
Tip: You cannot edit the default outline member name.
4. Enter the following information:
Parameter Description
Column Name Name for the column. The default precision is 80.
Use Mapping Parameter Mapping parameters for the column.
Mapping Parameter Name of the mapping parameter mentioned in the parameter file.
Filter Criteria Filter criteria to import metadata from a Type 3 source definition.
5. Click Save.
Creating Essbase Source Definitions 25
Editing the Essbase Source DefinitionUse the Designer Wizard to edit Essbase definitions. When you edit a table, you also edit the report script associated with the table.
1. To import the Essbase definition in the Source Analyzer, click Sources > Import Essbase Source.
The Designer Wizard appears.
2. Select the table to edit, and select Create Column.
The Dimension-Column Mapping Wizard appears.
3. Select the node that you want to edit.
4. To map or unmap the selected node, use the Add or Remove button between the dimension column and the columns mapped.
5. Click Save.
Steps to Add Attribute DimensionsThis section describes how to use the Designer Wizard to perform the following tasks:
• Add all attribute dimensions to columns.
• Add specific attribute dimensions to columns.
Adding All Attribute Dimensions to Columns1. In the Source Analyzer, click Sources > Import Essbase Source.
The Designer Wizard appears.
2. Right-click the column name, and select Add All Attributes.
The Designer Wizard adds and displays the attributes associated with the dimension.
Adding Specific Attribute Dimensions to Columns
1. In the Source Analyzer, click Sources > Import Essbase Source.
The Designer Wizard appears.
2. Right-click the column name, and select Select Attributes.
The Select Attributes list appears.
3. From the attribute list, select the attributes to be added.
4. Click OK.
26 Chapter 3: Essbase Sources
Editing Report Script1. In the Source Analyzer, click Sources > Import Essbase Source.
The Designer Wizard appears.
2. Right-click a table, and select Report Script.
The Edit Report Script dialog box appears.
3. Select the column and dimension name.
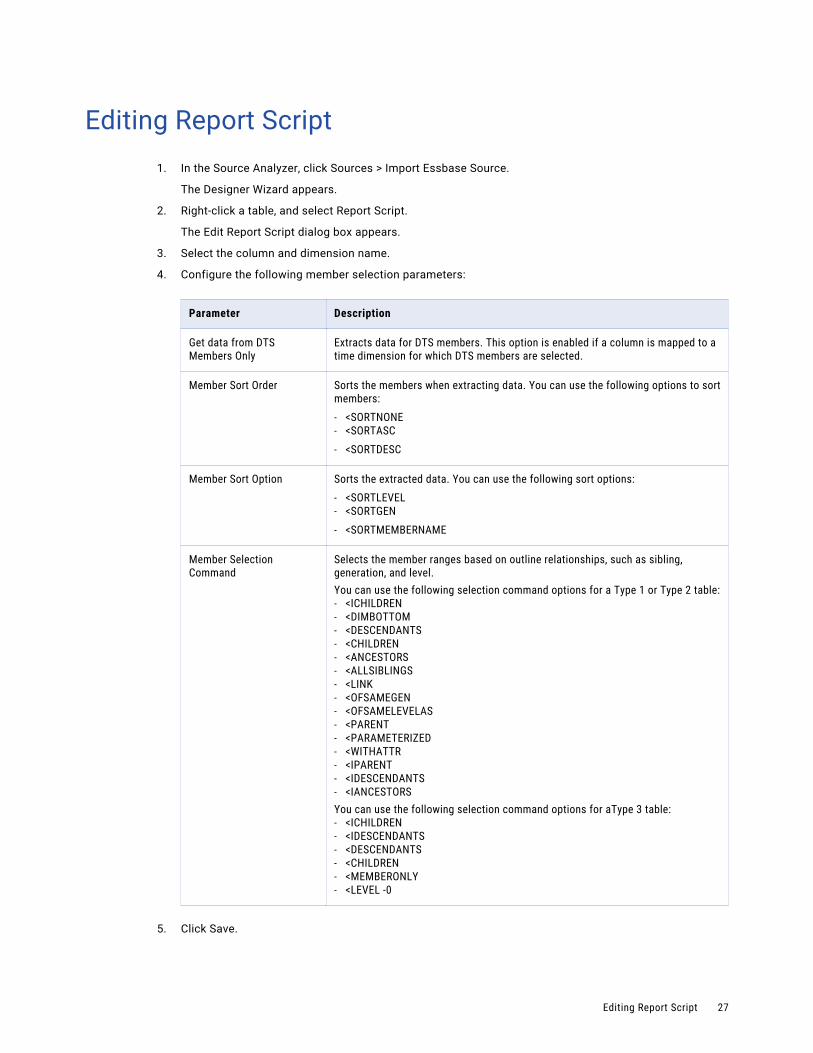
4. Configure the following member selection parameters:
Parameter Description
Get data from DTS Members Only
Extracts data for DTS members. This option is enabled if a column is mapped to a time dimension for which DTS members are selected.
Member Sort Order Sorts the members when extracting data. You can use the following options to sort members:- <SORTNONE- <SORTASC
- <SORTDESC
Member Sort Option Sorts the extracted data. You can use the following sort options:- <SORTLEVEL- <SORTGEN
- <SORTMEMBERNAME
Member Selection Command
Selects the member ranges based on outline relationships, such as sibling, generation, and level.You can use the following selection command options for a Type 1 or Type 2 table:- <ICHILDREN- <DIMBOTTOM- <DESCENDANTS- <CHILDREN- <ANCESTORS- <ALLSIBLINGS- <LINK- <OFSAMEGEN- <OFSAMELEVELAS- <PARENT- <PARAMETERIZED- <WITHATTR- <IPARENT- <IDESCENDANTS- <IANCESTORSYou can use the following selection command options for aType 3 table:- <ICHILDREN- <IDESCENDANTS- <DESCENDANTS- <CHILDREN- <MEMBERONLY- <LEVEL -0
5. Click Save.
Editing Report Script 27

6. Configure the following data filters:
Parameter Description
Data Range Command Filters the Essbase command dimensions. You can use the following options:- <RESTRICT- <TOP
- <BOTTOM
Command Parameters Defines the range for column values in the Command Parameters field.
7. Click Save.
8. Click Show Report Script.
The Report Script dialog box appears.
9. Click Validate Report Script to verify the resulting script.
10. To restore all the Member Selection and Data Filter conditions, click Reset.
11. Click OK to save the report script.
The report script must be valid before you close the Report Script dialog box.
Troubleshooting Essbase Source Definitions
The Designer Wizard fails to create the DSN with the following error:Essbase Initialization Failed.
Verify that the environment variables ESSBASEPATH and PATH used by the Essbase database are set to the following location:
<Essbase Installation Directory>\products\Essbase\EssbaseClient
When the data in Essbase contains a set locale character, you might get incorrect or missing information while reading data from Essbase.
Complete the following tasks:
• Ensure that the machine where the Essbase server is installed and the machine where the PowerCenter Integration Service runs have the same locale.
• Ensure that if the ESSLANG variable locale is configured on the machine where the PowerCenter Integration Service runs, the ESSLANG variable locale matches the system locale.
If the comctl32.ocx and msflxgrd.ocx files are missing in the Windows operating system, you might not be able to edit the report script.
To resolve the issue, complete the following tasks:
1. Download comctl32.ocx and msflxgrd.ocx files from an official Microsoft download center or from a Microsoft website. For example, for a Windows 7 machine, download the msflxgrd.ocx file from the website: http://activex.microsoft.com/controls/vb5/msflxgrd.cab
28 Chapter 3: Essbase Sources

2. Copy comctl32.ocx and msflxgrd.ocx files to the Windows\System directory.
• For Windows 32-bit platform, copy files to Windows\System32 directory.
• For Windows 64-bit platform, copy files to Windows\SysWOW64 directory.
3. Register comctl32.ocx and msflxgrd.ocx files on the Windows platform.
• To register ocx files on Windows 32-bit platform, run the following command:C:\Windows\System32\regsvr32 comctl32.ocxC:\Windows\System32\regsvr32 msflxgrd.ocx
• To register ocx files on Windows 64-bit platform, run the following command:C:\Windows\SysWOW64\regsvr32 comctl32.ocxC:\Windows\SysWOW64\regsvr32 msflxgrd.ocx
Troubleshooting Essbase Source Definitions 29
C h a p t e r 4
Essbase TargetsThis chapter includes the following topics:
• Essbase Targets Overview, 30
• Type 1 and Type 2 Target Definitions, 30
• Type 3 Target Definitions, 31
• Creating Essbase Target Definitions , 32
• Editing the Essbase Target Definition, 34
• Loading Data with a Rules File, 35
• Troubleshooting Essbase Target Definitions, 35
Essbase Targets OverviewEssbase target definitions represent metadata in the Essbase system. Use the Designer Wizard to import metadata from Essbase and create target definitions to write data in the Essbase server.
Use the Designer Wizard to perform the following tasks:
• Create and modify a DSN (Data Source Name). Create and modify a DSN in the PowerCenter Designer.
• Import metadata by creating target definitions. Create Type 1, Type 2, and Type 3 target definitions.
• Create columns. Create columns and map them to the standard and accounts dimensions. Use the columns to write data to the Essbase server.
• Configure rules file to load data. Specify a rules file and a valid separator as a metadata extension in the target definition. Essbase uses the rules file to load data into the Essbase server. Type 1 and Type 2 target definitions use rules file when loading data into the database.
• Perform administrative tasks. Connect to Essbase from the PowerCenter Designer to perform some of the Essbase administrative tasks that you can also perform through the Essbase Administration Console.
• View details. View information about a DSN, target definition, or column.
Type 1 and Type 2 Target DefinitionsUse the Designer Wizard to perform the following tasks:
• Connect to the Essbase server.
30
• Create target definitions to import metadata.
• Create columns mapped to accounts dimensions.
• Create filter expressions.
Connecting to Essbase ServerYou can use a DSN to connect to the Essbase server. Use the Designer Wizard to enter user name and password and to connect to the Essbase server through the DSN. The Designer Wizard displays the target definitions associated with the DSN.
Creating Type 1 and Type 2 Target DefinitionsWhen you select a DSN, the Create Table option appears in the Designer Wizard. Use this option to access the Table Creation Wizard used to create a target definition.
Creating Columns for Type 1 Target DefinitionsAfter you create a Type 1 target definition, you can create columns for it. When you select a target definition, the Designer Wizard displays the Create Table option. You can use this option to open the Dimension - Column Mapping dialog box.
Use the Dimension - Column Mapping dialog box to select dimensions and create a column mapped to the selected dimensions. You must map at least one accounts dimension and one measure to a column in the table.
Columns in Type 2 Target DefinitionsWhen you create a Type 2 target definition, the Designer Wizard performs the following tasks:
• Add columns for all the dimensions in the Essbase outline.
• Add a data column to receive the data loaded into Essbase.
Note: You cannot create columns for Type 2 target definitions.
Creating Filter ExpressionsUse the Set Outline Filter option on the Dimension - Column Mapping dialog box, to create filter expressions for standard and accounts dimensions.
Type 3 Target DefinitionsUse the Designer Wizard to perform the following tasks:
• Connect to the Essbase server.
• Create target definitions to import metadata.
• Create columns mapped to accounts and standard dimensions.
Type 3 Target Definitions 31

Connecting to Essbase ServerUse DSN to connect to the Essbase server. Use the Designer Wizard to enter user name and password and to connect to the Essbase server through the DSN. The Designer Wizard displays the target definitions associated with the DSN.
Creating Type 3 Target DefinitionUse the Designer Wizard to create Type 3 target definition and write data to the Essbase server.
When you select a DSN, the Designer Wizard displays the Create Table option. You can use this option to access the Table Creation Wizard used to create a target definition. In the Table Creation Wizard, select the Dynamic dimension building (Type 3) option to create Type 3 target definition.
Creating Columns for a Type 3 Target DefinitionAfter you create a Type 3 target definition, you can create columns for it. When you select a target definition, the Designer Wizard displays the Create Columns option. You can use this option to open the Dynamic Dimension Building dialog box used to create columns and specify the data type and column precision.
You can also specify the location of the rules files on the Dynamic Dimension Building dialog box. The rules file is used to load data into the target tables.
Creating Essbase Target Definitions1. In the Target Designer, click Target > Import Essbase Target.
The Designer Wizard appears.
2. In the Designer Wizard, right-click the DSN, and select Create Table.
The Table Creation Wizard appears.
Note: The default outline type for an application appears when you select the application.
3. Enter the following information to create the table:
Parameter Description
Table Name Name of the table.
Description Description for the table.
Application Name of the application.
Database Name of the database.
32 Chapter 4: Essbase Targets
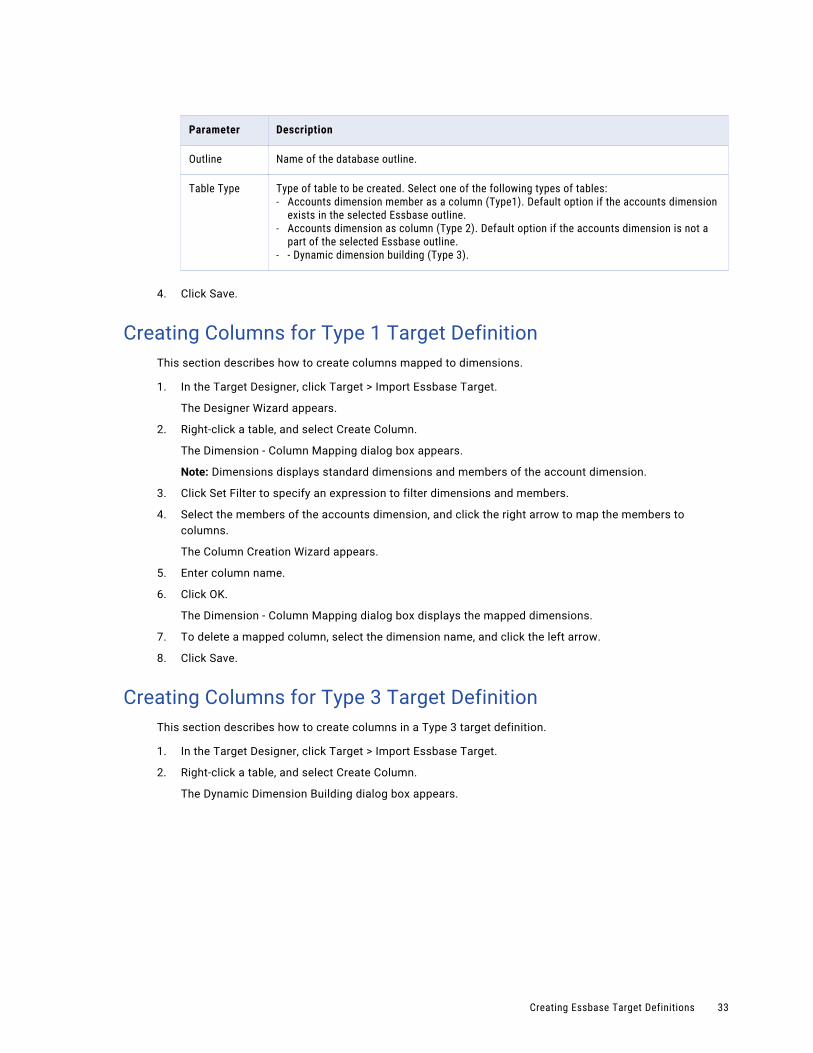
Parameter Description
Outline Name of the database outline.
Table Type Type of table to be created. Select one of the following types of tables:- Accounts dimension member as a column (Type1). Default option if the accounts dimension
exists in the selected Essbase outline.- Accounts dimension as column (Type 2). Default option if the accounts dimension is not a
part of the selected Essbase outline.- - Dynamic dimension building (Type 3).
4. Click Save.
Creating Columns for Type 1 Target DefinitionThis section describes how to create columns mapped to dimensions.
1. In the Target Designer, click Target > Import Essbase Target.
The Designer Wizard appears.
2. Right-click a table, and select Create Column.
The Dimension - Column Mapping dialog box appears.
Note: Dimensions displays standard dimensions and members of the account dimension.
3. Click Set Filter to specify an expression to filter dimensions and members.
4. Select the members of the accounts dimension, and click the right arrow to map the members to columns.
The Column Creation Wizard appears.
5. Enter column name.
6. Click OK.
The Dimension - Column Mapping dialog box displays the mapped dimensions.
7. To delete a mapped column, select the dimension name, and click the left arrow.
8. Click Save.
Creating Columns for Type 3 Target DefinitionThis section describes how to create columns in a Type 3 target definition.
1. In the Target Designer, click Target > Import Essbase Target.
2. Right-click a table, and select Create Column.
The Dynamic Dimension Building dialog box appears.
Creating Essbase Target Definitions 33
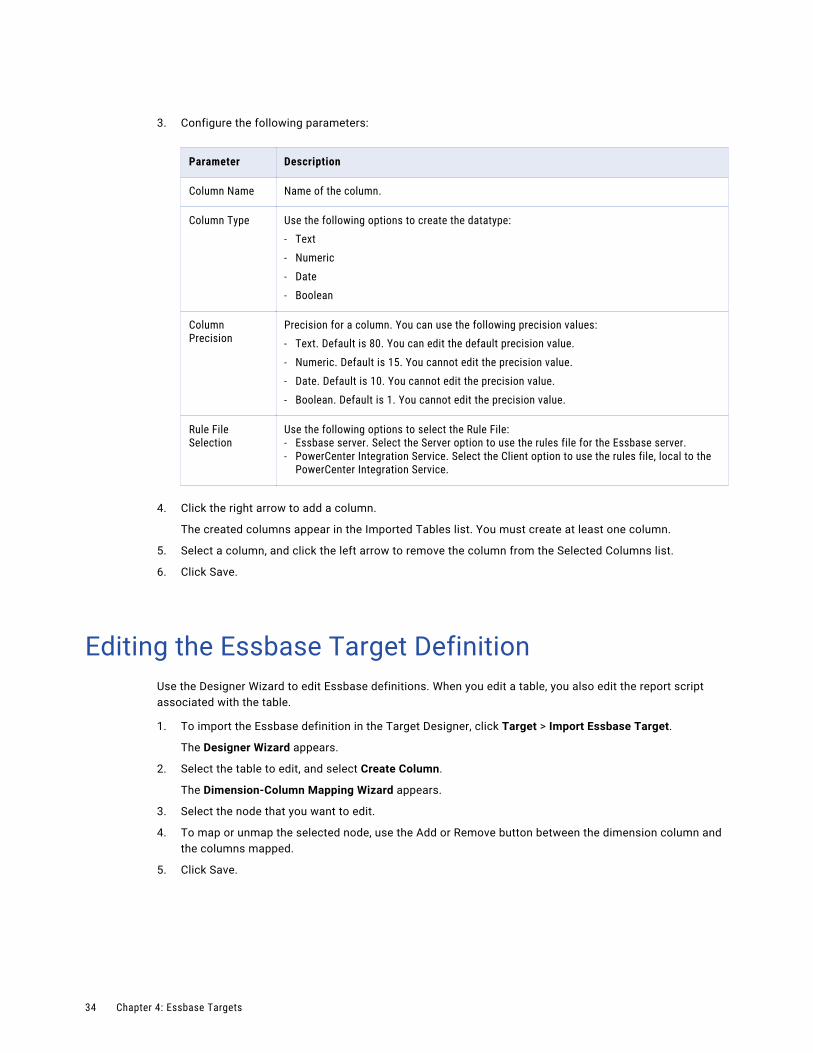
3. Configure the following parameters:
Parameter Description
Column Name Name of the column.
Column Type Use the following options to create the datatype:- Text
- Numeric
- Date
- Boolean
Column Precision
Precision for a column. You can use the following precision values:- Text. Default is 80. You can edit the default precision value.
- Numeric. Default is 15. You cannot edit the precision value.
- Date. Default is 10. You cannot edit the precision value.
- Boolean. Default is 1. You cannot edit the precision value.
Rule File Selection
Use the following options to select the Rule File:- Essbase server. Select the Server option to use the rules file for the Essbase server.- PowerCenter Integration Service. Select the Client option to use the rules file, local to the
PowerCenter Integration Service.
4. Click the right arrow to add a column.
The created columns appear in the Imported Tables list. You must create at least one column.
5. Select a column, and click the left arrow to remove the column from the Selected Columns list.
6. Click Save.
Editing the Essbase Target DefinitionUse the Designer Wizard to edit Essbase definitions. When you edit a table, you also edit the report script associated with the table.
1. To import the Essbase definition in the Target Designer, click Target > Import Essbase Target.
The Designer Wizard appears.
2. Select the table to edit, and select Create Column.
The Dimension-Column Mapping Wizard appears.
3. Select the node that you want to edit.
4. To map or unmap the selected node, use the Add or Remove button between the dimension column and the columns mapped.
5. Click Save.
34 Chapter 4: Essbase Targets

Loading Data with a Rules FileEssbase uses the rules file to load data into Essbase. A rules file stores the logical pattern that determines how the data is loaded into the database. Type 3 target definitions use a rules file to write data into the database.
You can define a rules file as a metadata extension in the target definition. Specify the name and the separator for the rules file. Use the following valid separators in the rules file:
• comma
• tab
• space
• custom characters
Specify the absolute path for the rules file in the RulesFile metadata extension if the rules file resides on the machine hosting the PowerCenter Integration Service. Ensure that the separator specified in the metadata extension matches the value in the rules file.
The rules file can reside on either the Essbase server or PowerCenter Integration Service:
• Essbase server. If the rules file resides on the Essbase server, enter the rules file name in the RuleFile extension name. For example, if you use ‘LoadRule’ that resides on the Essbase server, enter ‘LoadRule’ as the value for the RuleFile extension name. See Essbase documentation for the default location of the rules file.
• PowerCenter Integration Service. If the rules file resides on the machine hosting PowerCenter Integration Service, enter the absolute path of the rules file. For example, if you use the LoadRule.rul file that resides in the C:\Rulesfiles folder, enter C:\Rulesfiles\LoadRule.rul as the value for the RuleFile extension name. You can select the rules file and rules file separator on the Metadata Extensions tab.
Troubleshooting Essbase Target Definitions
The Designer Wizard fails to create the DSN and the following error appears:Essbase Initialization Failed.
Verify that the environment variables ESSBASEPATH and PATH used by the Essbase database are set to the following location:
<Essbase Installation Directory>\products\Essbase\EssbaseClient
Error occurs when using the Designer Wizard.
Complete the following tasks:
1. Verify that the Essbase API libraries are installed.
2. Verify that the environment variables ESSBASEPATH and PATH are set to the following location:
ESSBASEPATH/bin3. Read the Essbase error code from the PWX_ESSBASE_TraceLog.log file generated in the following
directory:
<Essbase Installation Directory>/products/Essbase/EssbaseClient
Loading Data with a Rules File 35

When the data in Essbase contains a set locale character, you might get incorrect or missing information while writing data in Essbase.
Complete the following tasks:
• Ensure that the machine where the Essbase server is installed and the machine where the PowerCenter Integration Service runs have the same locale.
36 Chapter 4: Essbase Targets

C h a p t e r 5
Essbase AdministrationThis chapter includes the following topics:
• Essbase Administration Overview, 37
• Creating an Application, 38
• Deleting an Application, 38
• Creating a Database, 39
• Deleting a Database, 39
• Adding a Dimension, 40
• Adding a Member, 41
• Modifying a Member, 42
• Deleting a Member, 43
Essbase Administration OverviewYou can perform administrative tasks within the Designer Wizard. These tasks are similar to the tasks you can perform in the Essbase Console.
Use the Administration dialog box to perform the following administrative tasks:
• Create an application. You can connect to an Essbase server to create or delete an application.
• Create a database. You can connect to an Essbase server to create or delete a database.
• Add dimensions. You can add dimensions to a database. Add standard or attribute dimensions and specify properties. You can modify the properties of an existing dimension.
• Add members. You can select a dimension and add members to it. Add consolidation, calculation, and data storage properties to a member. You can modify the properties of an existing member.
37
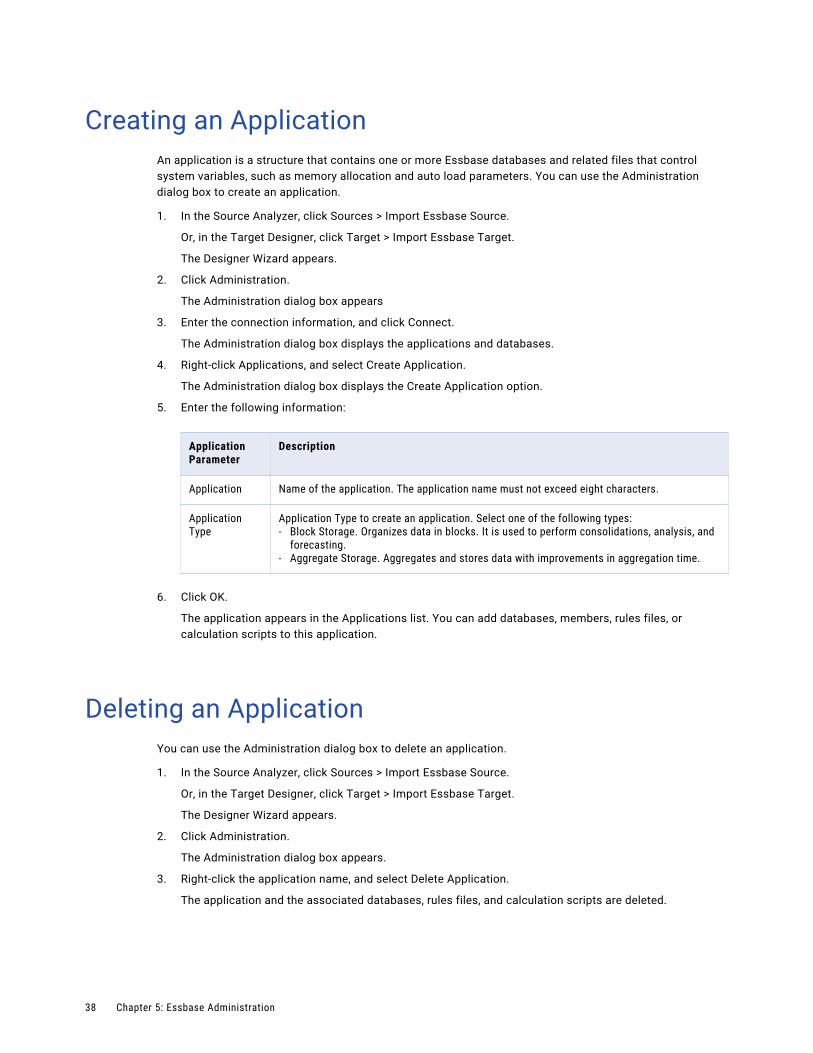
Creating an ApplicationAn application is a structure that contains one or more Essbase databases and related files that control system variables, such as memory allocation and auto load parameters. You can use the Administration dialog box to create an application.
1. In the Source Analyzer, click Sources > Import Essbase Source.
Or, in the Target Designer, click Target > Import Essbase Target.
The Designer Wizard appears.
2. Click Administration.
The Administration dialog box appears
3. Enter the connection information, and click Connect.
The Administration dialog box displays the applications and databases.
4. Right-click Applications, and select Create Application.
The Administration dialog box displays the Create Application option.
5. Enter the following information:
Application Parameter
Description
Application Name of the application. The application name must not exceed eight characters.
Application Type
Application Type to create an application. Select one of the following types:- Block Storage. Organizes data in blocks. It is used to perform consolidations, analysis, and
forecasting.- Aggregate Storage. Aggregates and stores data with improvements in aggregation time.
6. Click OK.
The application appears in the Applications list. You can add databases, members, rules files, or calculation scripts to this application.
Deleting an ApplicationYou can use the Administration dialog box to delete an application.
1. In the Source Analyzer, click Sources > Import Essbase Source.
Or, in the Target Designer, click Target > Import Essbase Target.
The Designer Wizard appears.
2. Click Administration.
The Administration dialog box appears.
3. Right-click the application name, and select Delete Application.
The application and the associated databases, rules files, and calculation scripts are deleted.
38 Chapter 5: Essbase Administration
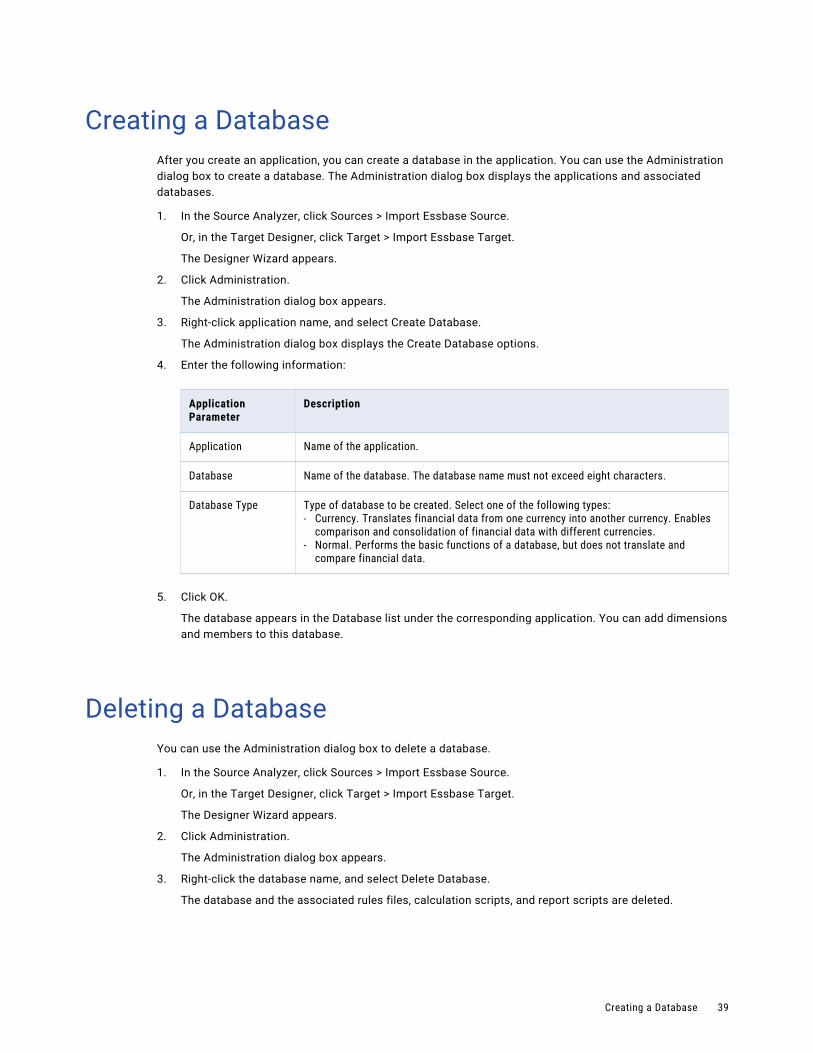
Creating a DatabaseAfter you create an application, you can create a database in the application. You can use the Administration dialog box to create a database. The Administration dialog box displays the applications and associated databases.
1. In the Source Analyzer, click Sources > Import Essbase Source.
Or, in the Target Designer, click Target > Import Essbase Target.
The Designer Wizard appears.
2. Click Administration.
The Administration dialog box appears.
3. Right-click application name, and select Create Database.
The Administration dialog box displays the Create Database options.
4. Enter the following information:
Application Parameter
Description
Application Name of the application.
Database Name of the database. The database name must not exceed eight characters.
Database Type Type of database to be created. Select one of the following types:- Currency. Translates financial data from one currency into another currency. Enables
comparison and consolidation of financial data with different currencies.- Normal. Performs the basic functions of a database, but does not translate and
compare financial data.
5. Click OK.
The database appears in the Database list under the corresponding application. You can add dimensions and members to this database.
Deleting a DatabaseYou can use the Administration dialog box to delete a database.
1. In the Source Analyzer, click Sources > Import Essbase Source.
Or, in the Target Designer, click Target > Import Essbase Target.
The Designer Wizard appears.
2. Click Administration.
The Administration dialog box appears.
3. Right-click the database name, and select Delete Database.
The database and the associated rules files, calculation scripts, and report scripts are deleted.
Creating a Database 39
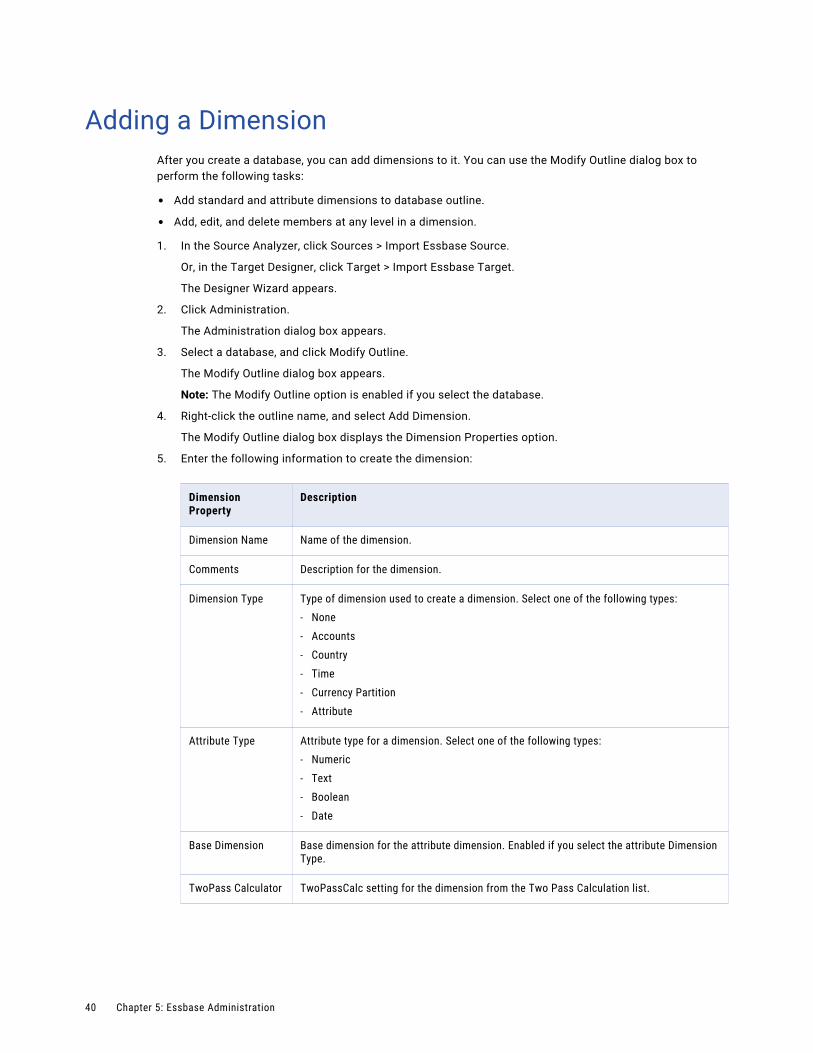
Adding a DimensionAfter you create a database, you can add dimensions to it. You can use the Modify Outline dialog box to perform the following tasks:
• Add standard and attribute dimensions to database outline.
• Add, edit, and delete members at any level in a dimension.
1. In the Source Analyzer, click Sources > Import Essbase Source.
Or, in the Target Designer, click Target > Import Essbase Target.
The Designer Wizard appears.
2. Click Administration.
The Administration dialog box appears.
3. Select a database, and click Modify Outline.
The Modify Outline dialog box appears.
Note: The Modify Outline option is enabled if you select the database.
4. Right-click the outline name, and select Add Dimension.
The Modify Outline dialog box displays the Dimension Properties option.
5. Enter the following information to create the dimension:
Dimension Property
Description
Dimension Name Name of the dimension.
Comments Description for the dimension.
Dimension Type Type of dimension used to create a dimension. Select one of the following types:- None
- Accounts
- Country
- Time
- Currency Partition
- Attribute
Attribute Type Attribute type for a dimension. Select one of the following types:- Numeric
- Text
- Boolean
- Date
Base Dimension Base dimension for the attribute dimension. Enabled if you select the attribute Dimension Type.
TwoPass Calculator TwoPassCalc setting for the dimension from the Two Pass Calculation list.
40 Chapter 5: Essbase Administration
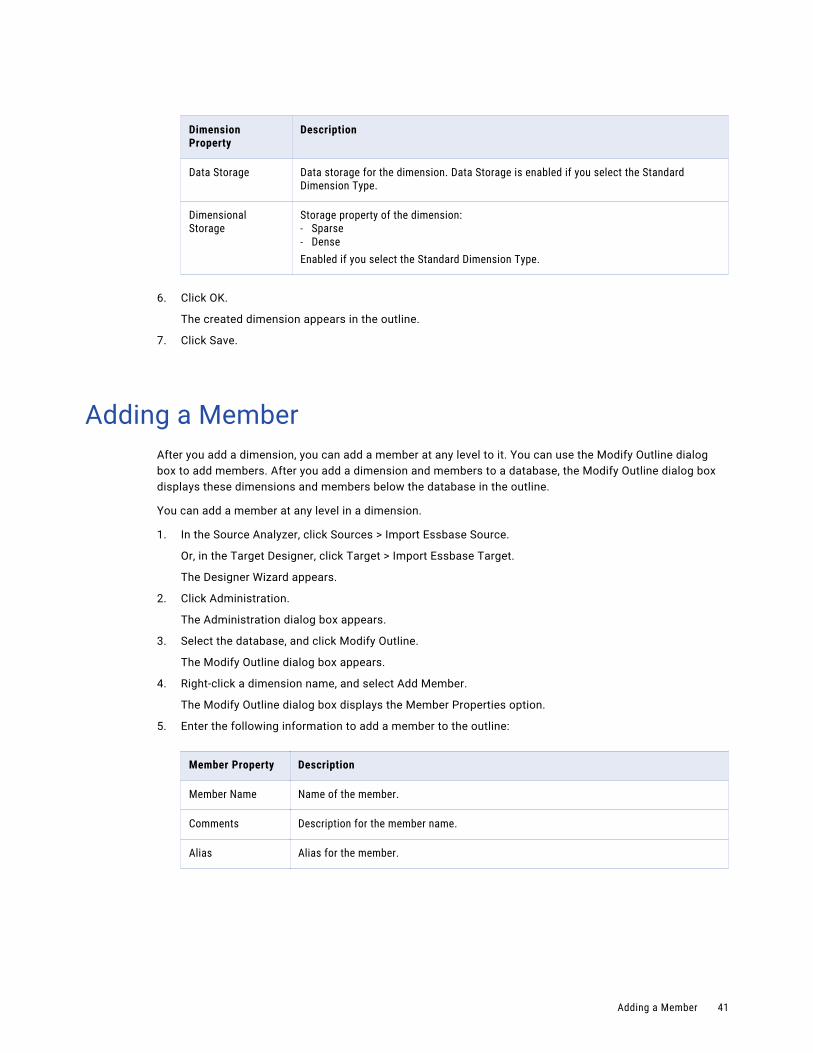
Dimension Property
Description
Data Storage Data storage for the dimension. Data Storage is enabled if you select the Standard Dimension Type.
Dimensional Storage
Storage property of the dimension:- Sparse- DenseEnabled if you select the Standard Dimension Type.
6. Click OK.
The created dimension appears in the outline.
7. Click Save.
Adding a MemberAfter you add a dimension, you can add a member at any level to it. You can use the Modify Outline dialog box to add members. After you add a dimension and members to a database, the Modify Outline dialog box displays these dimensions and members below the database in the outline.
You can add a member at any level in a dimension.
1. In the Source Analyzer, click Sources > Import Essbase Source.
Or, in the Target Designer, click Target > Import Essbase Target.
The Designer Wizard appears.
2. Click Administration.
The Administration dialog box appears.
3. Select the database, and click Modify Outline.
The Modify Outline dialog box appears.
4. Right-click a dimension name, and select Add Member.
The Modify Outline dialog box displays the Member Properties option.
5. Enter the following information to add a member to the outline:
Member Property Description
Member Name Name of the member.
Comments Description for the member name.
Alias Alias for the member.
Adding a Member 41

Member Property Description
Consolidation Consolidation properties of the member name. Select the consolidation property from one of the following:- (+) Addition
- (-) Subtraction
- (*) Multiplication
- (/) Division
- (%) Percent
- Ignore.
Two-Pass Calculation
TwoPassCalc setting for the dimension from the Two Pass Calculation list.
Data Storage Data Storage type for the Member name. Select the data storage type from the following:- Store Data
- Dynamic Calc and Store
- Dynamic Calc
- Never Share
- Label Only
- Shared Member
6. Click OK.
The member appears in the outline under the corresponding application and database.
7. Click Save.
Modifying a MemberYou can use the Modify Outline dialog box to modify members.
1. In the Source Analyzer, click Sources > Import Essbase Source.
Or, in the Target Designer, click Target > Import Essbase Target.
The Designer Wizard appears.
2. Click Administration.
The Administration dialog box appears.
3. Select the database, and click Modify Outline.
The Modify Outline dialog box appears.
4. Right-click member name, and select Update Member.
5. Change the member properties.
6. Click Save.
42 Chapter 5: Essbase Administration
Deleting a MemberYou can use the Modify Outline dialog box to delete members.
u In the Modify Outline dialog box, right-click the member name, and select Delete Member.
Deleting a Member 43

C h a p t e r 6
Essbase MappingsThis chapter includes the following topics:
• Creating Essbase Mappings, 44
• Example, 45
Creating Essbase MappingsPowerExchange for Essbase integrates Essbase Online Analytical Processing (OLAP) Server with PowerCenter. You can use the Normalize Essbase cube feature to extract OLAP data in a relational format for planning, analysis, and management.
The Essbase database stores data in a multi-dimensional format. Essbase extracts the OLAP data into a fact table in a relational format.
The dimension tables store all the members under the associated dimensions. Essbase converts the OLAP source into a relational model for normalization.
The relational model is based on a star schema model that contains a central fact table and multiple dimension tables. After the source definition is normalized, generate and execute SQL in the Target Designer to create the dimension tables.
Note: You can create a relational model for Type 1 and Type 2 source definitions.
1. In the Mapping Designer, click Mapping > Normalize Essbase Cube.
The Normalize Essbase Cube dialog box appears.
2. Select a source from the list.
3. Enter the target name.
The names of the dimension tables correspond to the column names in the Essbase source definition. Oracle is the default target database.
4. Click Finish.
The mapping is generated with the source definition, normalized fact tables, and dimension tables. You can use the Target Designer to change the default target database and load the relational data to the non-Essbase system.
44
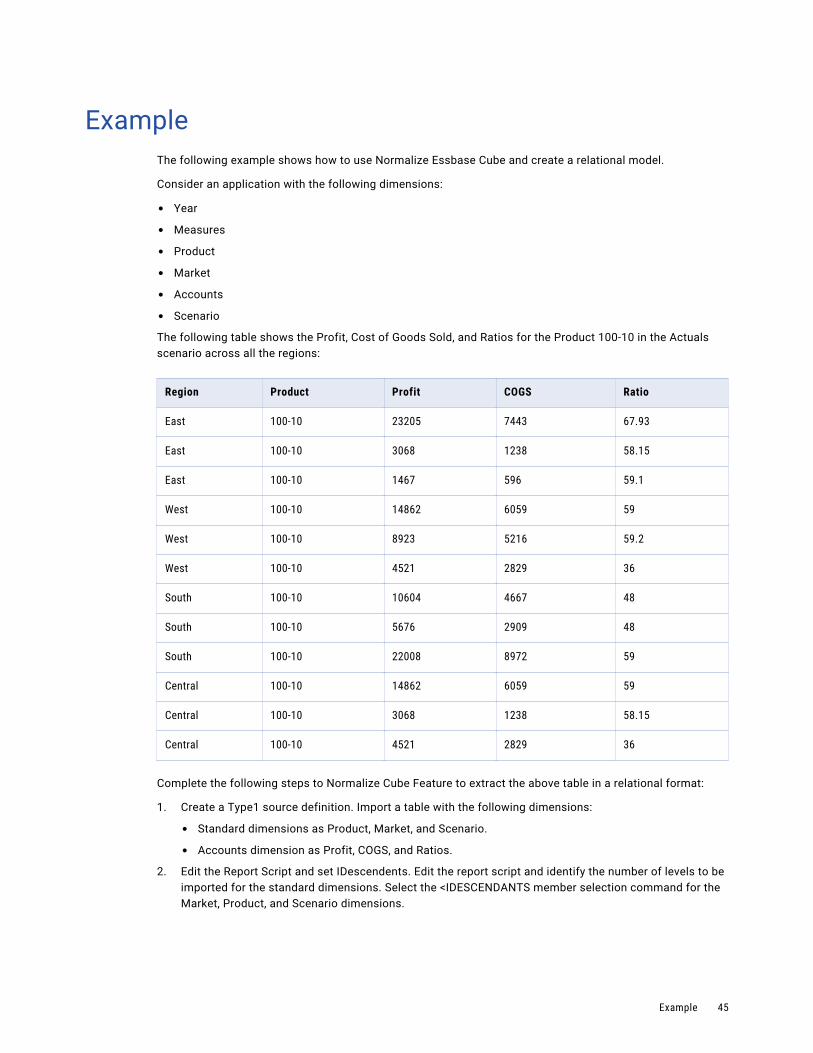
ExampleThe following example shows how to use Normalize Essbase Cube and create a relational model.
Consider an application with the following dimensions:
• Year
• Measures
• Product
• Market
• Accounts
• Scenario
The following table shows the Profit, Cost of Goods Sold, and Ratios for the Product 100-10 in the Actuals scenario across all the regions:
Region Product Profit COGS Ratio
East 100-10 23205 7443 67.93
East 100-10 3068 1238 58.15
East 100-10 1467 596 59.1
West 100-10 14862 6059 59
West 100-10 8923 5216 59.2
West 100-10 4521 2829 36
South 100-10 10604 4667 48
South 100-10 5676 2909 48
South 100-10 22008 8972 59
Central 100-10 14862 6059 59
Central 100-10 3068 1238 58.15
Central 100-10 4521 2829 36
Complete the following steps to Normalize Cube Feature to extract the above table in a relational format:
1. Create a Type1 source definition. Import a table with the following dimensions:
• Standard dimensions as Product, Market, and Scenario.
• Accounts dimension as Profit, COGS, and Ratios.
2. Edit the Report Script and set IDescendents. Edit the report script and identify the number of levels to be imported for the standard dimensions. Select the <IDESCENDANTS member selection command for the Market, Product, and Scenario dimensions.
Example 45

3. Normalize the Essbase cube. Select source definition and enter a target fact table. When you normalize a cube, the Designer creates the following objects:
• Mapplet containing a transformation for each dimension
• Fact table
• Dimension target tables for each standard dimension
4. Create mappings. You can use the mapplet to create mappings in the Designer. You can extract the data in a relational format and load data to the following targets:
• Fact table
• Market
• Product
• Scenario
46 Chapter 6: Essbase Mappings

C h a p t e r 7
Essbase SessionsThis chapter includes the following topics:
• Configuring Application Connections, 47
• Configuring a Session for an Essbase Source, 48
• Configuring a Session for an Essbase Target, 49
• Using Calculation Scripts, 50
• Troubleshooting Essbase Sessions, 50
Configuring Application ConnectionsConfigure an application connection before the PowerCenter Integration Service extracts data from the sources or loads data into targets. When you configure an Essbase application connection, specify the connection attributes that the PowerCenter Integration Service uses to connect to an Essbase database.
You can use the connection parameters to specify the connection settings. Specify the values for application and database in the connection object to define the default application and database names stored in the table definition. Essbase uses the values specified in the connection object.
1. In the Workflow Manager, click Connection > Application.
The Application Connection Browser dialog box appears.
2. Click New.
3. From the Select Subtype list, select EssbaseConnection.
4. Click OK.
The Connection Object Definition dialog box appears.
5. Enter the connection information.
47

PowerExchange for Essbase ConnectionsWhen you configure a Essbase connection, you define the connection attributes that the PowerCenter Integration Service uses to connect to Essbase.
The following table describes the Essbase connection properties that you must configure:
Connection Attribute Description
User Name User name to connect to Essbase.
Password Password to connect to Essbase.
ServerHost Essbase server name.
Application Name of the application. Default is none.Note: For a Unicode application, specify the name of the Unicode application.
Database Name of the database. Default is none.
Configuring a Session for an Essbase SourceThe following table describes the session properties for an Essbase source:
Session Property Description
Run Calculation Script only
Executes the calculation script on the Essbase database. Disable this option to extract data from the database.
Calculation Script Name
Provides name of the calculation script to calculate the database.
Suppress data Indicates how to suppress data:- None. No data is suppressed.- Missing. Data with missing values is suppressed.- Zeros. Data with zero values is suppressed.- Missing and Zeros. Data with missing values and zero values is suppressed.
Suppress shared members
Suppresses the shared members when data is extracted.
Partition Query Condition
Queries each partition based on attribute dimensions, Accounts dimension members, or UDAs.
Setting the Partition Query ConditionUse the following syntax to specify the partition query condition.
• To extract data based on the attribute dimension, use the following syntax:
{ATTR <standard-dimension-name>} <attribute-dim-name> operator value
48 Chapter 7: Essbase Sessions
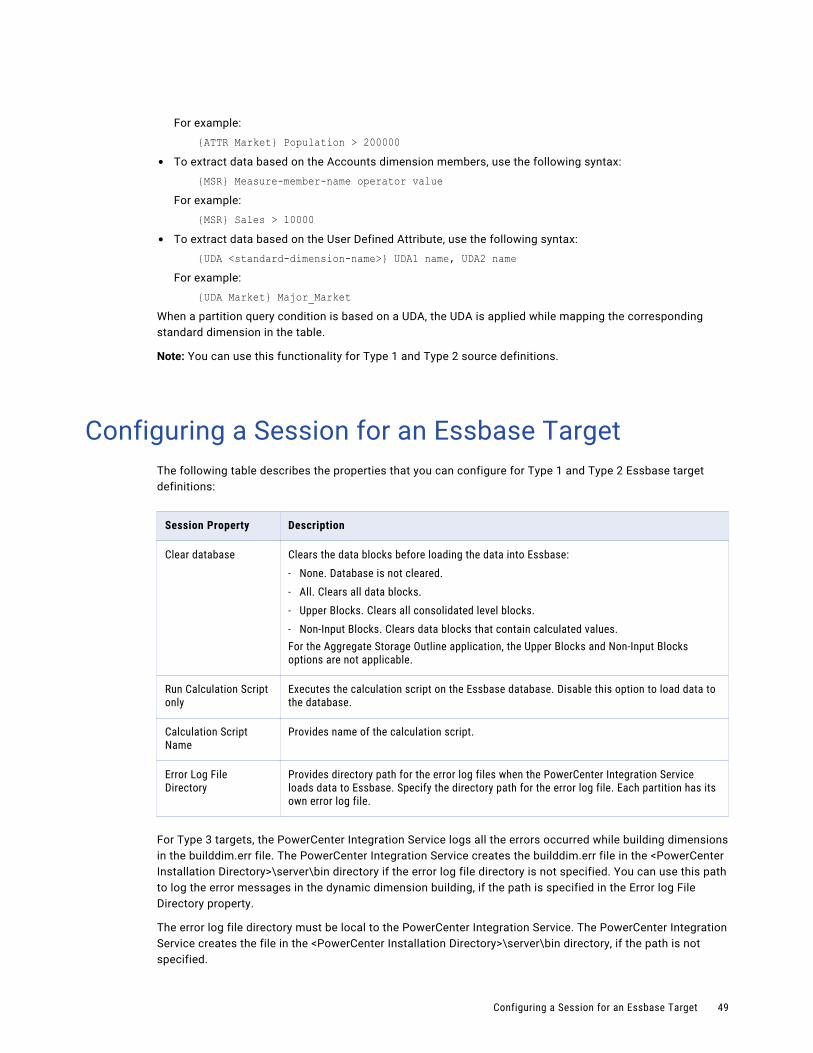
For example:
{ATTR Market} Population > 200000• To extract data based on the Accounts dimension members, use the following syntax:
{MSR} Measure-member-name operator valueFor example:
{MSR} Sales > 10000 • To extract data based on the User Defined Attribute, use the following syntax:
{UDA <standard-dimension-name>} UDA1 name, UDA2 nameFor example:
{UDA Market} Major_MarketWhen a partition query condition is based on a UDA, the UDA is applied while mapping the corresponding standard dimension in the table.
Note: You can use this functionality for Type 1 and Type 2 source definitions.
Configuring a Session for an Essbase TargetThe following table describes the properties that you can configure for Type 1 and Type 2 Essbase target definitions:
Session Property Description
Clear database Clears the data blocks before loading the data into Essbase:- None. Database is not cleared.- All. Clears all data blocks.- Upper Blocks. Clears all consolidated level blocks.- Non-Input Blocks. Clears data blocks that contain calculated values.For the Aggregate Storage Outline application, the Upper Blocks and Non-Input Blocks options are not applicable.
Run Calculation Script only
Executes the calculation script on the Essbase database. Disable this option to load data to the database.
Calculation Script Name
Provides name of the calculation script.
Error Log File Directory
Provides directory path for the error log files when the PowerCenter Integration Service loads data to Essbase. Specify the directory path for the error log file. Each partition has its own error log file.
For Type 3 targets, the PowerCenter Integration Service logs all the errors occurred while building dimensions in the builddim.err file. The PowerCenter Integration Service creates the builddim.err file in the <PowerCenter Installation Directory>\server\bin directory if the error log file directory is not specified. You can use this path to log the error messages in the dynamic dimension building, if the path is specified in the Error log File Directory property.
The error log file directory must be local to the PowerCenter Integration Service. The PowerCenter Integration Service creates the file in the <PowerCenter Installation Directory>\server\bin directory, if the path is not specified.
Configuring a Session for an Essbase Target 49
Note: You can view load statistics in the session log. The load summary in the Workflow Monitor does not display load statistics.
Using Calculation ScriptsA calculation script contains a series of commands, equations, and formulas that describe how to calculate a database and retrieve aggregate data. You can create scripts for all types of calculations except predefined outline calculations.
Running Calculation ScriptsConfigure the Calculation Script Name session attribute to run calculation scripts. Enter the absolute path for the calculation script if it resides on the machine hosting the PowerCenter Client.
The PowerCenter Integration Service runs the calculation script before reading data from Essbase or after writing data into Essbase.
If you do not provide a calculation script, the dynamic calculation members are calculated using the default formulas defined in the outline.
Note: You can run calculation scripts for Type 1 and Type 2 source and target definitions.
If you select the Run Calculation Script only option, no data is extracted or loaded, and only the Calculation Script is executed on the Essbase server.
Troubleshooting Essbase Sessions
Essbase libraries could not be loaded on UNIX.
Verify the library path settings. If the problem persists even after setting the correct library path, restart the PowerCenter Integration Service.
50 Chapter 7: Essbase Sessions
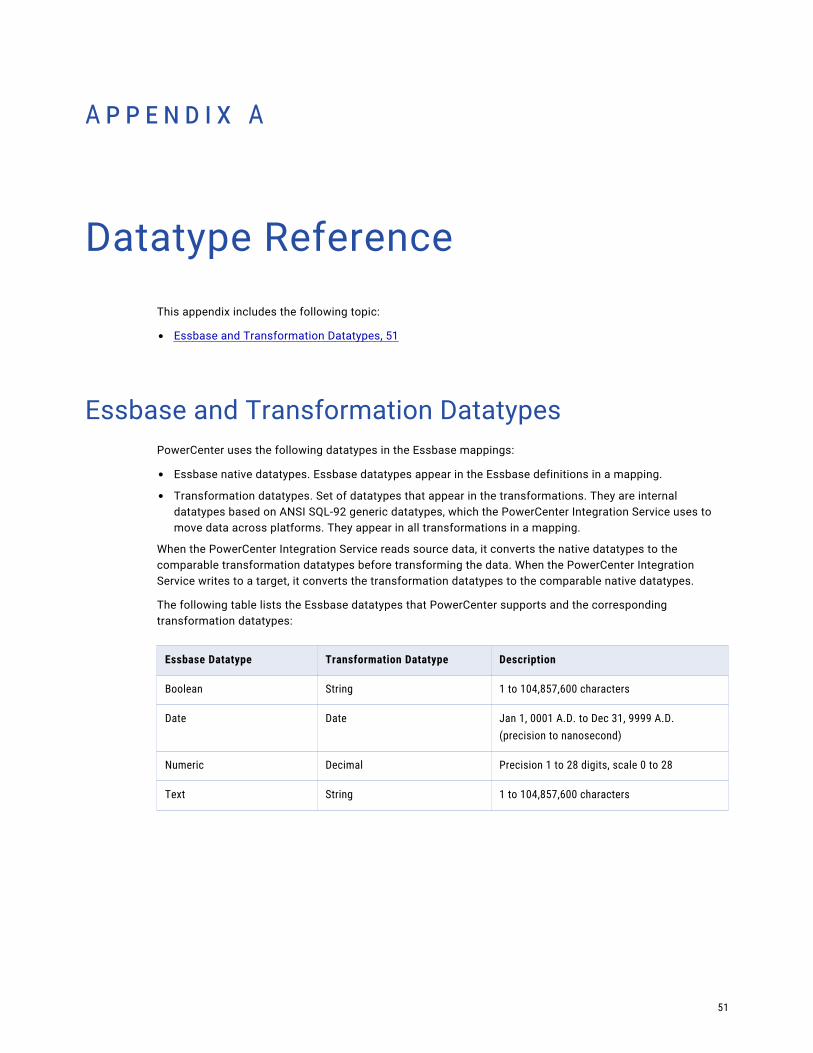
A p p e n d i x A
Datatype ReferenceThis appendix includes the following topic:
• Essbase and Transformation Datatypes, 51
Essbase and Transformation DatatypesPowerCenter uses the following datatypes in the Essbase mappings:
• Essbase native datatypes. Essbase datatypes appear in the Essbase definitions in a mapping.
• Transformation datatypes. Set of datatypes that appear in the transformations. They are internal datatypes based on ANSI SQL-92 generic datatypes, which the PowerCenter Integration Service uses to move data across platforms. They appear in all transformations in a mapping.
When the PowerCenter Integration Service reads source data, it converts the native datatypes to the comparable transformation datatypes before transforming the data. When the PowerCenter Integration Service writes to a target, it converts the transformation datatypes to the comparable native datatypes.
The following table lists the Essbase datatypes that PowerCenter supports and the corresponding transformation datatypes:
Essbase Datatype Transformation Datatype Description
Boolean String 1 to 104,857,600 characters
Date Date Jan 1, 0001 A.D. to Dec 31, 9999 A.D.(precision to nanosecond)
Numeric Decimal Precision 1 to 28 digits, scale 0 to 28
Text String 1 to 104,857,600 characters
51
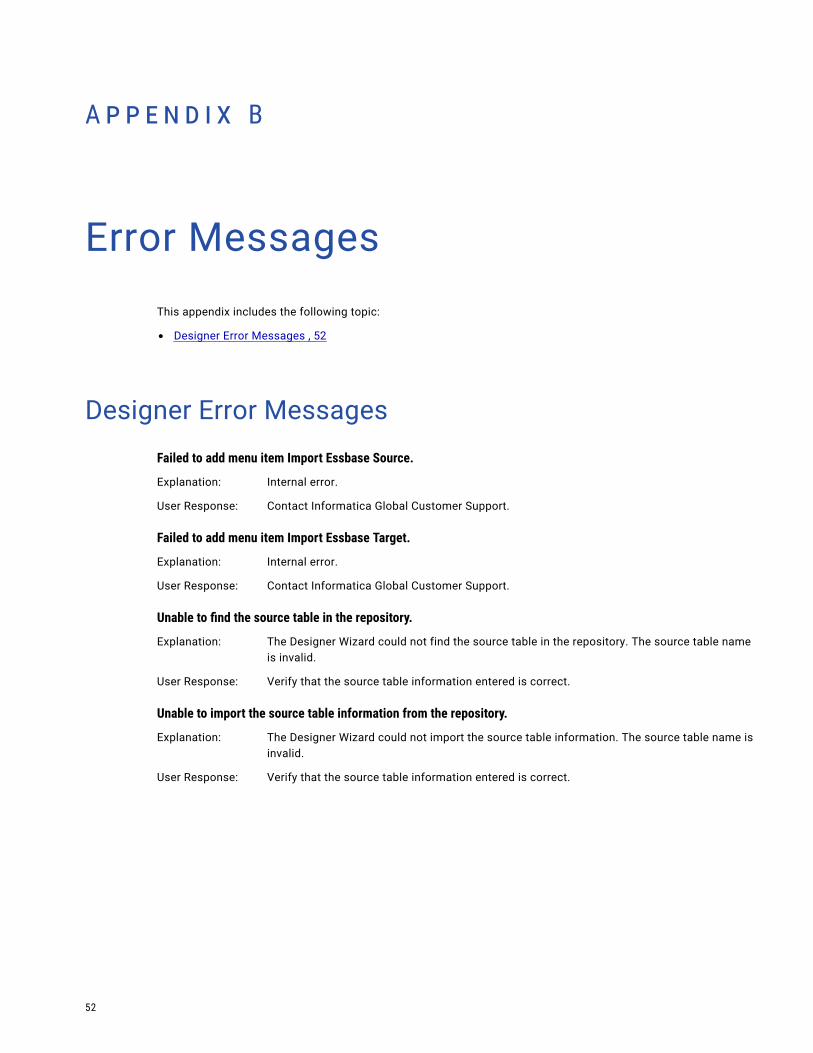
A p p e n d i x B
Error MessagesThis appendix includes the following topic:
• Designer Error Messages , 52
Designer Error MessagesFailed to add menu item Import Essbase Source.
Explanation: Internal error.
User Response: Contact Informatica Global Customer Support.
Failed to add menu item Import Essbase Target.
Explanation: Internal error.
User Response: Contact Informatica Global Customer Support.
Unable to find the source table in the repository.
Explanation: The Designer Wizard could not find the source table in the repository. The source table name is invalid.
User Response: Verify that the source table information entered is correct.
Unable to import the source table information from the repository.
Explanation: The Designer Wizard could not import the source table information. The source table name is invalid.
User Response: Verify that the source table information entered is correct.
52
A p p e n d i x C
Glossaryalias
An alternate name for a dimension, member, or description.
application
A structure containing one or more Essbase databases and related files that control system variables, such as memory allocation and auto load parameters.
attribute
A classification of a member in a dimension. Use an attribute to select and group members associated with the attribute. You can also use an attribute to perform calculations and application-specific functions.
attribute association
A relationship in a database outline where a member in an attribute dimension describes a characteristic of a member in the attribute base dimension.
attribute dimension
A type of dimension that describes the attributes or qualities of a member and base dimension.
base dimension
A standard dimension that is associated with an attribute dimension. To classify a member of a base dimension, associate it with a member of an attribute dimension that describes the classification.
calculation
The process of aggregating data or running a calculation script.
calculation script
A text file containing a set of instructions that defines the logic to calculate a database.
dimension
A data category used to organize business data for retrieving and consolidating. A dimension contains a hierarchy of related members grouped within the dimension.
dimension build rules
Specifications that Essbase uses to modify an outline. The outline is modified based on an external data source file.
Dynamic Calc Members
Members that the Essbase server calculates only during retrieval time.
Dynamic Time Series
A process used to perform dynamic period-to-date reporting.
Dynamic Time Series Members
Predefined members that are used to perform Dynamic Time Series reporting.
ESSBASEPATH
An environment variable that specifies the Essbase root directory.
leaf member
A member that has no child nodes.
member
A unique component within a dimension.
Member Selection Report Command
A command that selects a range of members based on database outline relationships, such as sibling, generation, and level.
missing data
A (#MISSING) marker indicating that data in the labeled location does not exist, contains no meaningful value, or was not entered or loaded.
outline
The database structure of a multi-dimensional database, including all dimensions, members, tags, types, consolidations, and mathematical relationships. Data is stored in the database according to the structure defined in the outline.
standard dimension
A dimension that is not an attribute dimension.
substitution variable
A global placeholder for information changes regularly.
suppress rows
An option to exclude rows that contain missing values.
time series reporting
A process of reporting data based on a calendar.
User-Defined Attribute
An attribute used to describe the unique characteristic of a member.
54 Glossary
I n d e x
Aalias
creating columns, Type 3 source definition 21application connections
configuring for PowerExchange for Essbase 47attribute association
creating columns, Type 1, and Type 2 source definition 20attribute dimensions
adding 26identifying 25
Bbase dimension
modifying outline 40
Ccalculation scripts
running 50configuring
session, Essbase source 48session, Essbase target 49
Ddatabase
adding 39deleting 39
database and aggregate data calculating 50
datatypes Essbase and transformation 51PowerExchange for Essbase 51
dimension adding 40creating columns and filter expressions 24
dimension building creating Type 3 target definitions 10
Dynamic Calc Members modifying outline 41
Dynamic Time Series retrieving data 24
Dynamic Time Series Members creating columns, Type 1 and Type 2 source definitions 24
EEssbase application
adding 38definition 38
Essbase application (continued)deleting 38
Essbase client installing 14
Essbase mappings creating a relational model 44creating Essbase mappings 44normalizing an Essbase cube 44
Essbase source definitions creating columns for Type 1, Type 2, and Type 3 24
Essbase target definitions creating columns for Type 1, Type 2, and Type 3 31
ESSBASEPATH setting library path 14
Mmember
updating 43member selection command
parameterization 22
Ooutline
creating a member 41deleting a member 43modifying 40
Pplug-ins
registering 13registering PowerExchange for Essbase 13updating the registration 13
PowerCenter Integration Service Essbase integration 10
PowerExchange for Essbase connections properties 48
Rregistering
plug-ins 13relational models
creating for Essbase 44report scripts
declaring command parameters 26
55
Ssession
configuring, Essbase source 48configuring, Essbase target 49
source definitions creating columns for Type 1, Type 2, and Type 3 24setting filter criteria, Type 3 22troubleshooting 28
standard dimension mapping source definition 9
substitution variable declaring command parameter 22
suppress data session, Essbase source 48
Ttarget definitions
creating columns for Type 1, Type 2, and Type 3 31
target definitions (continued)creating filter expressions 31troubleshooting 35
Uunderstanding
administering outlines 10Essbase source definitions 9Essbase target definitions 10
upgrading PowerExchange for Essbase upgrade tasks 17
User-Defined attribute creating columns, Type 3 source definition 21
56 Index