10.2.2 - Developer Tool Guide - Informatica Documentation ...
Upload
khangminh22Category
view
4download
0
Informatica® ActiveVOS9.2.4.6
4. Server Installation, Configuration, and Deployment

Informatica ActiveVOS 4. Server Installation, Configuration, and Deployment9.2.4.6March 2020
© Copyright Informatica LLC 1993, 2021
This software and documentation contain proprietary information of Informatica LLC and are provided under a license agreement containing restrictions on use and disclosure and are also protected by copyright law. Reverse engineering of the software is prohibited. No part of this document may be reproduced or transmitted in any form, by any means (electronic, photocopying, recording or otherwise) without prior consent of Informatica LLC. This Software may be protected by U.S. and/or international Patents and other Patents Pending.
Use, duplication, or disclosure of the Software by the U.S. Government is subject to the restrictions set forth in the applicable software license agreement and as provided in DFARS 227.7202-1(a) and 227.7702-3(a) (1995), DFARS 252.227-7013©(1)(ii) (OCT 1988), FAR 12.212(a) (1995), FAR 52.227-19, or FAR 52.227-14 (ALT III), as applicable.
The information in this product or documentation is subject to change without notice. If you find any problems in this product or documentation, please report them to us in writing.
Informatica, Informatica Platform, Informatica Data Services, PowerCenter, PowerCenterRT, PowerCenter Connect, PowerCenter Data Analyzer, PowerExchange, PowerMart, Metadata Manager, Informatica Data Quality, Informatica Data Explorer, Informatica B2B Data Transformation, Informatica B2B Data Exchange Informatica On Demand, Informatica Identity Resolution, Informatica Application Information Lifecycle Management, Informatica Complex Event Processing, Ultra Messaging, Informatica Master Data Management, and Live Data Map are trademarks or registered trademarks of Informatica LLC in the United States and in jurisdictions throughout the world. All other company and product names may be trade names or trademarks of their respective owners.
Portions of this software and/or documentation are subject to copyright held by third parties, including without limitation: Copyright DataDirect Technologies. All rights reserved. Copyright © Sun Microsystems. All rights reserved. Copyright © RSA Security Inc. All Rights Reserved. Copyright © Ordinal Technology Corp. All rights reserved. Copyright © Aandacht c.v. All rights reserved. Copyright Genivia, Inc. All rights reserved. Copyright Isomorphic Software. All rights reserved. Copyright © Meta Integration Technology, Inc. All rights reserved. Copyright © Intalio. All rights reserved. Copyright © Oracle. All rights reserved. Copyright © Adobe Systems Incorporated. All rights reserved. Copyright © DataArt, Inc. All rights reserved. Copyright © ComponentSource. All rights reserved. Copyright © Microsoft Corporation. All rights reserved. Copyright © Rogue Wave Software, Inc. All rights reserved. Copyright © Teradata Corporation. All rights reserved. Copyright © Yahoo! Inc. All rights reserved. Copyright © Glyph & Cog, LLC. All rights reserved. Copyright © Thinkmap, Inc. All rights reserved. Copyright © Clearpace Software Limited. All rights reserved. Copyright © Information Builders, Inc. All rights reserved. Copyright © OSS Nokalva, Inc. All rights reserved. Copyright Edifecs, Inc. All rights reserved. Copyright Cleo Communications, Inc. All rights reserved. Copyright © International Organization for Standardization 1986. All rights reserved. Copyright © ej-technologies GmbH. All rights reserved. Copyright © Jaspersoft Corporation. All rights reserved. Copyright © International Business Machines Corporation. All rights reserved. Copyright © yWorks GmbH. All rights reserved. Copyright © Lucent Technologies. All rights reserved. Copyright © University of Toronto. All rights reserved. Copyright © Daniel Veillard. All rights reserved. Copyright © Unicode, Inc. Copyright IBM Corp. All rights reserved. Copyright © MicroQuill Software Publishing, Inc. All rights reserved. Copyright © PassMark Software Pty Ltd. All rights reserved. Copyright © LogiXML, Inc. All rights reserved. Copyright © 2003-2010 Lorenzi Davide, All rights reserved. Copyright © Red Hat, Inc. All rights reserved. Copyright © The Board of Trustees of the Leland Stanford Junior University. All rights reserved. Copyright © EMC Corporation. All rights reserved. Copyright © Flexera Software. All rights reserved. Copyright © Jinfonet Software. All rights reserved. Copyright © Apple Inc. All rights reserved. Copyright © Telerik Inc. All rights reserved. Copyright © BEA Systems. All rights reserved. Copyright © PDFlib GmbH. All rights reserved. Copyright © Orientation in Objects GmbH. All rights reserved. Copyright © Tanuki Software, Ltd. All rights reserved. Copyright © Ricebridge. All rights reserved. Copyright © Sencha, Inc. All rights reserved. Copyright © Scalable Systems, Inc. All rights reserved. Copyright © jQWidgets. All rights reserved. Copyright © Tableau Software, Inc. All rights reserved. Copyright© MaxMind, Inc. All Rights Reserved. Copyright © TMate Software s.r.o. All rights reserved. Copyright © MapR Technologies Inc. All rights reserved. Copyright © Amazon Corporate LLC. All rights reserved. Copyright © Highsoft. All rights reserved. Copyright © Python Software Foundation. All rights reserved. Copyright © BeOpen.com. All rights reserved. Copyright © CNRI. All rights reserved.
This product includes software developed by the Apache Software Foundation (http://www.apache.org/), and/or other software which is licensed under various versions of the Apache License (the "License"). You may obtain a copy of these Licenses at http://www.apache.org/licenses/. Unless required by applicable law or agreed to in writing, software distributed under these Licenses is distributed on an "AS IS" BASIS, WITHOUT WARRANTIES OR CONDITIONS OF ANY KIND, either express or implied. See the Licenses for the specific language governing permissions and limitations under the Licenses.
This product includes software which was developed by Mozilla (http://www.mozilla.org/), software copyright The JBoss Group, LLC, all rights reserved; software copyright © 1999-2006 by Bruno Lowagie and Paulo Soares and other software which is licensed under various versions of the GNU Lesser General Public License Agreement, which may be found at http:// www.gnu.org/licenses/lgpl.html. The materials are provided free of charge by Informatica, "as-is", without warranty of any kind, either express or implied, including but not limited to the implied warranties of merchantability and fitness for a particular purpose.
The product includes ACE(TM) and TAO(TM) software copyrighted by Douglas C. Schmidt and his research group at Washington University, University of California, Irvine, and Vanderbilt University, Copyright (©) 1993-2006, all rights reserved.
This product includes software developed by the OpenSSL Project for use in the OpenSSL Toolkit (copyright The OpenSSL Project. All Rights Reserved) and redistribution of this software is subject to terms available at http://www.openssl.org and http://www.openssl.org/source/license.html.
This product includes Curl software which is Copyright 1996-2013, Daniel Stenberg, <[email protected]>. All Rights Reserved. Permissions and limitations regarding this software are subject to terms available at http://curl.haxx.se/docs/copyright.html. Permission to use, copy, modify, and distribute this software for any purpose with or without fee is hereby granted, provided that the above copyright notice and this permission notice appear in all copies.
The product includes software copyright 2001-2005 (©) MetaStuff, Ltd. All Rights Reserved. Permissions and limitations regarding this software are subject to terms available at http://www.dom4j.org/ license.html.
The product includes software copyright © 2004-2007, The Dojo Foundation. All Rights Reserved. Permissions and limitations regarding this software are subject to terms available at http://dojotoolkit.org/license.
This product includes ICU software which is copyright International Business Machines Corporation and others. All rights reserved. Permissions and limitations regarding this software are subject to terms available at http://source.icu-project.org/repos/icu/icu/trunk/license.html.
This product includes software copyright © 1996-2006 Per Bothner. All rights reserved. Your right to use such materials is set forth in the license which may be found at http:// www.gnu.org/software/ kawa/Software-License.html.
This product includes OSSP UUID software which is Copyright © 2002 Ralf S. Engelschall, Copyright © 2002 The OSSP Project Copyright © 2002 Cable & Wireless Deutschland. Permissions and limitations regarding this software are subject to terms available at http://www.opensource.org/licenses/mit-license.php.
This product includes software developed by Boost (http://www.boost.org/) or under the Boost software license. Permissions and limitations regarding this software are subject to terms available at http:/ /www.boost.org/LICENSE_1_0.txt.
This product includes software copyright © 1997-2007 University of Cambridge. Permissions and limitations regarding this software are subject to terms available at http:// www.pcre.org/license.txt.
This product includes software copyright © 2007 The Eclipse Foundation. All Rights Reserved. Permissions and limitations regarding this software are subject to terms available at http:// www.eclipse.org/org/documents/epl-v10.php and at http://www.eclipse.org/org/documents/edl-v10.php.

This product includes software licensed under the terms at http://www.tcl.tk/software/tcltk/license.html, http://www.bosrup.com/web/overlib/?License, http://www.stlport.org/doc/ license.html, http://asm.ow2.org/license.html, http://www.cryptix.org/LICENSE.TXT, http://hsqldb.org/web/hsqlLicense.html, http://httpunit.sourceforge.net/doc/ license.html, http://jung.sourceforge.net/license.txt , http://www.gzip.org/zlib/zlib_license.html, http://www.openldap.org/software/release/license.html, http://www.libssh2.org, http://slf4j.org/license.html, http://www.sente.ch/software/OpenSourceLicense.html, http://fusesource.com/downloads/license-agreements/fuse-message-broker-v-5-3- license-agreement; http://antlr.org/license.html; http://aopalliance.sourceforge.net/; http://www.bouncycastle.org/licence.html; http://www.jgraph.com/jgraphdownload.html; http://www.jcraft.com/jsch/LICENSE.txt; http://jotm.objectweb.org/bsd_license.html; . http://www.w3.org/Consortium/Legal/2002/copyright-software-20021231; http://www.slf4j.org/license.html; http://nanoxml.sourceforge.net/orig/copyright.html; http://www.json.org/license.html; http://forge.ow2.org/projects/javaservice/, http://www.postgresql.org/about/licence.html, http://www.sqlite.org/copyright.html, http://www.tcl.tk/software/tcltk/license.html, http://www.jaxen.org/faq.html, http://www.jdom.org/docs/faq.html, http://www.slf4j.org/license.html; http://www.iodbc.org/dataspace/iodbc/wiki/iODBC/License; http://www.keplerproject.org/md5/license.html; http://www.toedter.com/en/jcalendar/license.html; http://www.edankert.com/bounce/index.html; http://www.net-snmp.org/about/license.html; http://www.openmdx.org/#FAQ; http://www.php.net/license/3_01.txt; http://srp.stanford.edu/license.txt; http://www.schneier.com/blowfish.html; http://www.jmock.org/license.html; http://xsom.java.net; http://benalman.com/about/license/; https://github.com/CreateJS/EaselJS/blob/master/src/easeljs/display/Bitmap.js; http://www.h2database.com/html/license.html#summary; http://jsoncpp.sourceforge.net/LICENSE; http://jdbc.postgresql.org/license.html; http://protobuf.googlecode.com/svn/trunk/src/google/protobuf/descriptor.proto; https://github.com/rantav/hector/blob/master/LICENSE; http://web.mit.edu/Kerberos/krb5-current/doc/mitK5license.html; http://jibx.sourceforge.net/jibx-license.html; https://github.com/lyokato/libgeohash/blob/master/LICENSE; https://github.com/hjiang/jsonxx/blob/master/LICENSE; https://code.google.com/p/lz4/; https://github.com/jedisct1/libsodium/blob/master/LICENSE; http://one-jar.sourceforge.net/index.php?page=documents&file=license; https://github.com/EsotericSoftware/kryo/blob/master/license.txt; http://www.scala-lang.org/license.html; https://github.com/tinkerpop/blueprints/blob/master/LICENSE.txt; http://gee.cs.oswego.edu/dl/classes/EDU/oswego/cs/dl/util/concurrent/intro.html; https://aws.amazon.com/asl/; https://github.com/twbs/bootstrap/blob/master/LICENSE; https://sourceforge.net/p/xmlunit/code/HEAD/tree/trunk/LICENSE.txt; https://github.com/documentcloud/underscore-contrib/blob/master/LICENSE, and https://github.com/apache/hbase/blob/master/LICENSE.txt.
This product includes software licensed under the Academic Free License (http://www.opensource.org/licenses/afl-3.0.php), the Common Development and Distribution License (http://www.opensource.org/licenses/cddl1.php) the Common Public License (http://www.opensource.org/licenses/cpl1.0.php), the Sun Binary Code License Agreement Supplemental License Terms, the BSD License (http:// www.opensource.org/licenses/bsd-license.php), the new BSD License (http://opensource.org/licenses/BSD-3-Clause), the MIT License (http://www.opensource.org/licenses/mit-license.php), the Artistic License (http://www.opensource.org/licenses/artistic-license-1.0) and the Initial Developer’s Public License Version 1.0 (http://www.firebirdsql.org/en/initial-developer-s-public-license-version-1-0/).
This product includes software copyright © 2003-2006 Joe WaInes, 2006-2007 XStream Committers. All rights reserved. Permissions and limitations regarding this software are subject to terms available at http://xstream.codehaus.org/license.html. This product includes software developed by the Indiana University Extreme! Lab. For further information please visit http://www.extreme.indiana.edu/.
This product includes software Copyright (c) 2013 Frank Balluffi and Markus Moeller. All rights reserved. Permissions and limitations regarding this software are subject to terms of the MIT license.
See patents at https://www.informatica.com/legal/patents.html.
DISCLAIMER: Informatica LLC provides this documentation "as is" without warranty of any kind, either express or implied, including, but not limited to, the implied warranties of noninfringement, merchantability, or use for a particular purpose. Informatica LLC does not warrant that this software or documentation is error free. The information provided in this software or documentation may include technical inaccuracies or typographical errors. The information in this software and documentation is subject to change at any time without notice.
NOTICES
This Informatica product (the "Software") includes certain drivers (the "DataDirect Drivers") from DataDirect Technologies, an operating company of Progress Software Corporation ("DataDirect") which are subject to the following terms and conditions:
1. THE DATADIRECT DRIVERS ARE PROVIDED "AS IS" WITHOUT WARRANTY OF ANY KIND, EITHER EXPRESSED OR IMPLIED, INCLUDING BUT NOT LIMITED TO, THE IMPLIED WARRANTIES OF MERCHANTABILITY, FITNESS FOR A PARTICULAR PURPOSE AND NON-INFRINGEMENT.
2. IN NO EVENT WILL DATADIRECT OR ITS THIRD PARTY SUPPLIERS BE LIABLE TO THE END-USER CUSTOMER FOR ANY DIRECT, INDIRECT, INCIDENTAL, SPECIAL, CONSEQUENTIAL OR OTHER DAMAGES ARISING OUT OF THE USE OF THE ODBC DRIVERS, WHETHER OR NOT INFORMED OF THE POSSIBILITIES OF DAMAGES IN ADVANCE. THESE LIMITATIONS APPLY TO ALL CAUSES OF ACTION, INCLUDING, WITHOUT LIMITATION, BREACH OF CONTRACT, BREACH OF WARRANTY, NEGLIGENCE, STRICT LIABILITY, MISREPRESENTATION AND OTHER TORTS.
Publication Date: 2021-08-05
Table of Contents
Preface . . . . . . . . . . . . . . . . . . . . . . . . . . . . . . . . . . . . . . . . . . . . . . . . . . . . . . . . . . . . . . . . . . . . . . 6
Chapter 1: Apache Tomcat. . . . . . . . . . . . . . . . . . . . . . . . . . . . . . . . . . . . . . . . . . . . . . . . . . . . 7General Information. . . . . . . . . . . . . . . . . . . . . . . . . . . . . . . . . . . . . . . . . . . . . . . . . . . . . 7
Quick Start. . . . . . . . . . . . . . . . . . . . . . . . . . . . . . . . . . . . . . . . . . . . . . . . . . . . . . . . 7
Prerequisites. . . . . . . . . . . . . . . . . . . . . . . . . . . . . . . . . . . . . . . . . . . . . . . . . . . . . . 8
Installation Folders. . . . . . . . . . . . . . . . . . . . . . . . . . . . . . . . . . . . . . . . . . . . . . . . . 12
Process Server and Resource Configuration. . . . . . . . . . . . . . . . . . . . . . . . . . . . . . . . . . 13
Installation Checklist. . . . . . . . . . . . . . . . . . . . . . . . . . . . . . . . . . . . . . . . . . . . . . . . 16
Glossary. . . . . . . . . . . . . . . . . . . . . . . . . . . . . . . . . . . . . . . . . . . . . . . . . . . . . . . . 17
Configuration. . . . . . . . . . . . . . . . . . . . . . . . . . . . . . . . . . . . . . . . . . . . . . . . . . . . . . . . 19
Configuration and Deployment. . . . . . . . . . . . . . . . . . . . . . . . . . . . . . . . . . . . . . . . . . 19
Engine Configuration. . . . . . . . . . . . . . . . . . . . . . . . . . . . . . . . . . . . . . . . . . . . . . . . 20
JNDI Configuration. . . . . . . . . . . . . . . . . . . . . . . . . . . . . . . . . . . . . . . . . . . . . . . . . . 20
Security Configuration. . . . . . . . . . . . . . . . . . . . . . . . . . . . . . . . . . . . . . . . . . . . . . . 22
Clustering Configuration. . . . . . . . . . . . . . . . . . . . . . . . . . . . . . . . . . . . . . . . . . . . . . 24
ActiveVOS Central Configuration. . . . . . . . . . . . . . . . . . . . . . . . . . . . . . . . . . . . . . . . . 25
Database Configuration. . . . . . . . . . . . . . . . . . . . . . . . . . . . . . . . . . . . . . . . . . . . . . . 25
Deployment Options. . . . . . . . . . . . . . . . . . . . . . . . . . . . . . . . . . . . . . . . . . . . . . . . . 27
Deployment Targets. . . . . . . . . . . . . . . . . . . . . . . . . . . . . . . . . . . . . . . . . . . . . . . . . 28
Chapter 2: WebLogic. . . . . . . . . . . . . . . . . . . . . . . . . . . . . . . . . . . . . . . . . . . . . . . . . . . . . . . . 29General Information. . . . . . . . . . . . . . . . . . . . . . . . . . . . . . . . . . . . . . . . . . . . . . . . . . . . 29
Quick Start. . . . . . . . . . . . . . . . . . . . . . . . . . . . . . . . . . . . . . . . . . . . . . . . . . . . . . . 29
Prerequisites. . . . . . . . . . . . . . . . . . . . . . . . . . . . . . . . . . . . . . . . . . . . . . . . . . . . . 30
Installation Folders. . . . . . . . . . . . . . . . . . . . . . . . . . . . . . . . . . . . . . . . . . . . . . . . . 34
WebLogic Configuration. . . . . . . . . . . . . . . . . . . . . . . . . . . . . . . . . . . . . . . . . . . . . . 35
Multisite Configuration. . . . . . . . . . . . . . . . . . . . . . . . . . . . . . . . . . . . . . . . . . . . . . . 39
Installation Checklist. . . . . . . . . . . . . . . . . . . . . . . . . . . . . . . . . . . . . . . . . . . . . . . . 45
Glossary. . . . . . . . . . . . . . . . . . . . . . . . . . . . . . . . . . . . . . . . . . . . . . . . . . . . . . . . 46
Configuration. . . . . . . . . . . . . . . . . . . . . . . . . . . . . . . . . . . . . . . . . . . . . . . . . . . . . . . . 47
Configuration and Deployment. . . . . . . . . . . . . . . . . . . . . . . . . . . . . . . . . . . . . . . . . . 47
Engine Configuration. . . . . . . . . . . . . . . . . . . . . . . . . . . . . . . . . . . . . . . . . . . . . . . . 48
JNDI Configuration. . . . . . . . . . . . . . . . . . . . . . . . . . . . . . . . . . . . . . . . . . . . . . . . . . 48
Internal Work Manager Configuration. . . . . . . . . . . . . . . . . . . . . . . . . . . . . . . . . . . . . . 51
Security Configuration. . . . . . . . . . . . . . . . . . . . . . . . . . . . . . . . . . . . . . . . . . . . . . . 51
ActiveVOS Central Configuration. . . . . . . . . . . . . . . . . . . . . . . . . . . . . . . . . . . . . . . . . 53
Deployment Options. . . . . . . . . . . . . . . . . . . . . . . . . . . . . . . . . . . . . . . . . . . . . . . . . 53
Database Configuration. . . . . . . . . . . . . . . . . . . . . . . . . . . . . . . . . . . . . . . . . . . . . . . 54
Deployment Targets. . . . . . . . . . . . . . . . . . . . . . . . . . . . . . . . . . . . . . . . . . . . . . . . . 55
4 Table of Contents
Chapter 3: IBM Websphere. . . . . . . . . . . . . . . . . . . . . . . . . . . . . . . . . . . . . . . . . . . . . . . . . . 57General Information. . . . . . . . . . . . . . . . . . . . . . . . . . . . . . . . . . . . . . . . . . . . . . . . . . . . 57
Quick Start. . . . . . . . . . . . . . . . . . . . . . . . . . . . . . . . . . . . . . . . . . . . . . . . . . . . . . . 57
Prerequisites. . . . . . . . . . . . . . . . . . . . . . . . . . . . . . . . . . . . . . . . . . . . . . . . . . . . . 58
Installation Folders. . . . . . . . . . . . . . . . . . . . . . . . . . . . . . . . . . . . . . . . . . . . . . . . . 62
Configuration. . . . . . . . . . . . . . . . . . . . . . . . . . . . . . . . . . . . . . . . . . . . . . . . . . . . . 63
Installation Checklist. . . . . . . . . . . . . . . . . . . . . . . . . . . . . . . . . . . . . . . . . . . . . . . . 68
Glossary. . . . . . . . . . . . . . . . . . . . . . . . . . . . . . . . . . . . . . . . . . . . . . . . . . . . . . . . 69
Configuration. . . . . . . . . . . . . . . . . . . . . . . . . . . . . . . . . . . . . . . . . . . . . . . . . . . . . . . . 70
Configuration and Deployment. . . . . . . . . . . . . . . . . . . . . . . . . . . . . . . . . . . . . . . . . . 70
Engine Configuration. . . . . . . . . . . . . . . . . . . . . . . . . . . . . . . . . . . . . . . . . . . . . . . . 71
JNDI Configuration. . . . . . . . . . . . . . . . . . . . . . . . . . . . . . . . . . . . . . . . . . . . . . . . . . 71
Global Security Configuration. . . . . . . . . . . . . . . . . . . . . . . . . . . . . . . . . . . . . . . . . . . 73
JAAS Login Configuration. . . . . . . . . . . . . . . . . . . . . . . . . . . . . . . . . . . . . . . . . . . . . 74
Security Configuration. . . . . . . . . . . . . . . . . . . . . . . . . . . . . . . . . . . . . . . . . . . . . . . 74
Work Manager Configuration. . . . . . . . . . . . . . . . . . . . . . . . . . . . . . . . . . . . . . . . . . . 76
Timer Manager Configuration. . . . . . . . . . . . . . . . . . . . . . . . . . . . . . . . . . . . . . . . . . . 76
ActiveVOS Central Configuration. . . . . . . . . . . . . . . . . . . . . . . . . . . . . . . . . . . . . . . . . 77
Deployment Options. . . . . . . . . . . . . . . . . . . . . . . . . . . . . . . . . . . . . . . . . . . . . . . . . 77
Database Configuration. . . . . . . . . . . . . . . . . . . . . . . . . . . . . . . . . . . . . . . . . . . . . . . 78
Deployment Targets. . . . . . . . . . . . . . . . . . . . . . . . . . . . . . . . . . . . . . . . . . . . . . . . . 80
Chapter 4: JBoss. . . . . . . . . . . . . . . . . . . . . . . . . . . . . . . . . . . . . . . . . . . . . . . . . . . . . . . . . . . . 81General Information. . . . . . . . . . . . . . . . . . . . . . . . . . . . . . . . . . . . . . . . . . . . . . . . . . . . 81
Quick Start. . . . . . . . . . . . . . . . . . . . . . . . . . . . . . . . . . . . . . . . . . . . . . . . . . . . . . . 81
Prerequisites. . . . . . . . . . . . . . . . . . . . . . . . . . . . . . . . . . . . . . . . . . . . . . . . . . . . . 82
Installation Folders. . . . . . . . . . . . . . . . . . . . . . . . . . . . . . . . . . . . . . . . . . . . . . . . . 86
Process Server and Resource Configuration. . . . . . . . . . . . . . . . . . . . . . . . . . . . . . . . . . 87
Installation Checklist. . . . . . . . . . . . . . . . . . . . . . . . . . . . . . . . . . . . . . . . . . . . . . . . 91
Glossary. . . . . . . . . . . . . . . . . . . . . . . . . . . . . . . . . . . . . . . . . . . . . . . . . . . . . . . . 92
Configuration. . . . . . . . . . . . . . . . . . . . . . . . . . . . . . . . . . . . . . . . . . . . . . . . . . . . . . . . 93
Configuration and Deployment. . . . . . . . . . . . . . . . . . . . . . . . . . . . . . . . . . . . . . . . . . 93
Engine Configuration. . . . . . . . . . . . . . . . . . . . . . . . . . . . . . . . . . . . . . . . . . . . . . . . 94
JNDI Configuration. . . . . . . . . . . . . . . . . . . . . . . . . . . . . . . . . . . . . . . . . . . . . . . . . . 94
Security Configuraton. . . . . . . . . . . . . . . . . . . . . . . . . . . . . . . . . . . . . . . . . . . . . . . . 96
ActiveVOS Central Configuration. . . . . . . . . . . . . . . . . . . . . . . . . . . . . . . . . . . . . . . . . 98
Database Configuration. . . . . . . . . . . . . . . . . . . . . . . . . . . . . . . . . . . . . . . . . . . . . . . 98
Deployment Options. . . . . . . . . . . . . . . . . . . . . . . . . . . . . . . . . . . . . . . . . . . . . . . . 100
Application Server Path. . . . . . . . . . . . . . . . . . . . . . . . . . . . . . . . . . . . . . . . . . . . . . 101
Table of Contents 5

PrefaceThis module contains information on how to install, configure, and deploy a server for Informatica ActiveVOS. You can use Apache Tomcat, Oracle Weblogic, IBM Websphere, or JBOSS.
6

C h a p t e r 1
Apache TomcatThis chapter includes the following topics:
• General Information, 7
• Configuration, 19
General InformationThe Process Server Setup Wizard lets you install a new server or update an existing one.
1. Download and obtain a license for Process Server.
2. Download and run the Process Server installation.
3. To configure and deploy a server, open quickstart_server.html, which directs you to the file you are reading now.
4. Review the Prerequisites and Release Notes for Process Server by selecting the links in the navigation bar on the right.
Note: If the Setup Wizard detects an existing installation, it lets you either update the existing installation or install the server in a different directory. When you update an existing installation, the Wizard replaces any file that a previous Wizard had installed. All other files in your server's install directory remain as they were.
Quick StartPreconfiguration
1. Create a database (or tablespace) for Process Server. Select the Configuration link in the navigation bar for details.
2. Process Server needs to be granted the following permissions on your schema:GRANT SELECT, INSERT, UPDATE, DELETE, CREATE, DROP, REFERENCES, INDEX, ALTER, CREATE TEMPORARY TABLES, LOCK TABLES, EXECUTE, CREATE VIEW, SHOW VIEW, CREATE ROUTINE, ALTER ROUTINEIf Process Server does not have the permissions it needs, you will see an error message that begins as follows: Failed to get version info from the AeMetaInfo table.
3. Collect the following information that you will be prompted for during configuration:
• Host, port number, and database name where you are deploying Process Server
• The full path to a supported JDBC database driver
7
• Driver implementation class name
• Database username and passwordHints and examples of this information are provided in the appropriate page of the Configuration utility's online Help.
4. For an upgrade installation of Process Server, manually install the database schema. For a new installation, you can automatically install the database schema during configuration.
5. Ensure that the JAVA_HOME environment variable is set.Note for Tomcat and JBoss: To avoid issues with multiple JDKs, we recommend that you set JAVA_HOME in the application server startup file instead of in the system environment.
6. Ensure that your JVM memory settings in your application server match the recommendations described in “Prerequisites” on page 8.
7. MultiSite Installations Only: To configure MultiSite clustering, be sure to review the instructions in Process Server MultiSite Configuration. Access the instructions from the Configuration link in the navigation bar on the right.
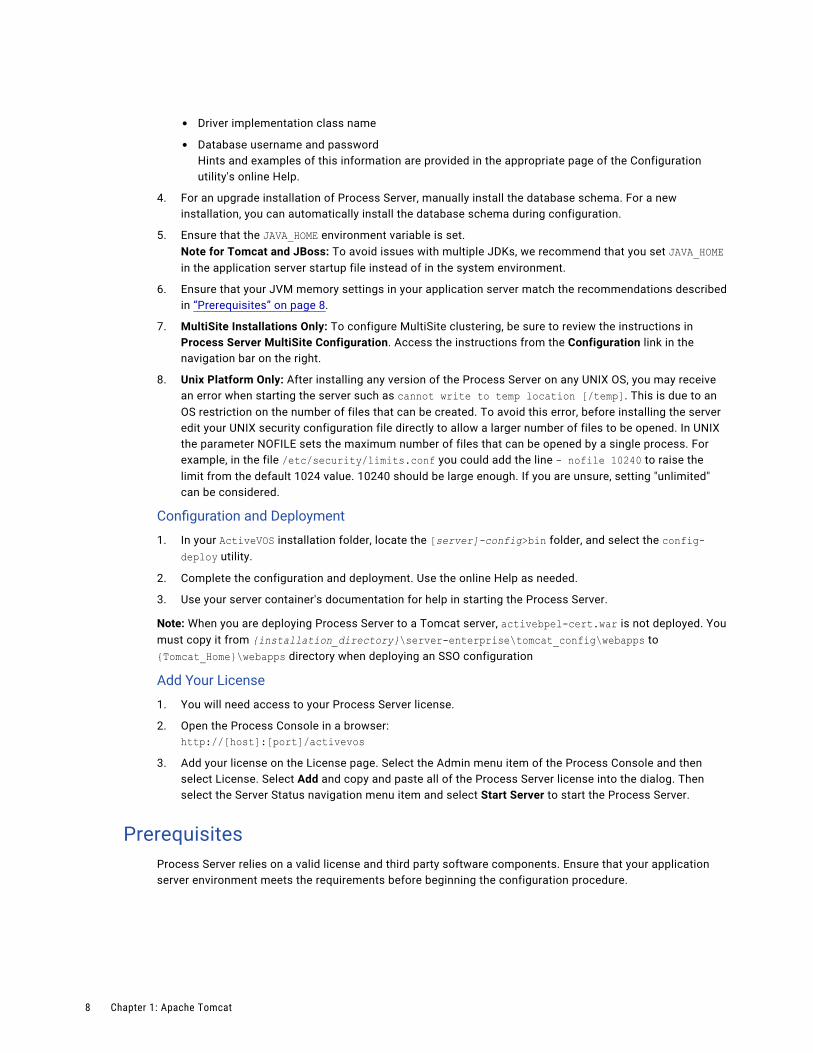
8. Unix Platform Only: After installing any version of the Process Server on any UNIX OS, you may receive an error when starting the server such as cannot write to temp location [/temp]. This is due to an OS restriction on the number of files that can be created. To avoid this error, before installing the server edit your UNIX security configuration file directly to allow a larger number of files to be opened. In UNIX the parameter NOFILE sets the maximum number of files that can be opened by a single process. For example, in the file /etc/security/limits.conf you could add the line - nofile 10240 to raise the limit from the default 1024 value. 10240 should be large enough. If you are unsure, setting "unlimited" can be considered.
Configuration and Deployment
1. In your ActiveVOS installation folder, locate the [server]-config>bin folder, and select the config-deploy utility.
2. Complete the configuration and deployment. Use the online Help as needed.
3. Use your server container's documentation for help in starting the Process Server.
Note: When you are deploying Process Server to a Tomcat server, activebpel-cert.war is not deployed. You must copy it from {installation_directory}\server-enterprise\tomcat_config\webapps to {Tomcat_Home}\webapps directory when deploying an SSO configuration
Add Your License
1. You will need access to your Process Server license.
2. Open the Process Console in a browser:http://[host]:[port]/activevos
3. Add your license on the License page. Select the Admin menu item of the Process Console and then select License. Select Add and copy and paste all of the Process Server license into the dialog. Then select the Server Status navigation menu item and select Start Server to start the Process Server.
PrerequisitesProcess Server relies on a valid license and third party software components. Ensure that your application server environment meets the requirements before beginning the configuration procedure.
8 Chapter 1: Apache Tomcat

Process Server Licensing
A valid license is required to run Process Server. You enter the license information after you've configured Process Server. Do this as follows:
1. Start Process Console.
2. Select Admin | License. (Admin is in the toolbar; License is about a third of the way down on the left.)
3. Press the Add License button, copy and paste all of the Process Server license into the dialog, and then press the Add License button.
4. Select the Server Status link near the ver top of the left area press the Start Server button to start the Process Server
Obtaining a License Key
If you did not receive your license prior to receiving the software, contact the Informatica sales department.
Our sales support staff can assist you with licensing questions.
Hardware Requirements
Application Server Hardware
Process Server runs within different server containers, and the hardware requirements of the server are superseded by the requirements of the container.
Database Hardware
Process Server application supports multiple database servers and has no additional requirements besides those of your selected database server.
Note: For maximum performance, we recommend that you run Process Server and its database schema on separate servers.
JVM Memory Requirements
We strongly recommend that you run your application server with at least the following memory settings:
-Xms256m -Xmx1024m -XX:MaxPermSize=384m
where Xms is starting memory, Xmx is maximum memory, and MaxPermSize is the amount of memory set aside for loading class files.
Disk Space Requirements
At least 1 GB of disk space is required to install the Process Server application.
Note: Considerably more disk space is required to run your applications. The amount is dependent on several factors including logging levels you select, number of processes you run, and size of processes.
Software Requirements
Specific versions of Eclipse, client and server operating systems, application and database servers are supported. Support means that Informatica will assist customers with the installation and operation of Business Process Manager products on these 3rd party product versions.
Also certified are specific combinations of 3rd party products. Use of Certified Systems described here will reduce the risk of problems as a result of extensive testing of Business Process Manager with these specific versions. Database connectivity is required for Process Server persistence and version control of deployed processes. It is recommended that the database resides on a dedicated server.
The following software is supported for use with Process Server:
General Information 9
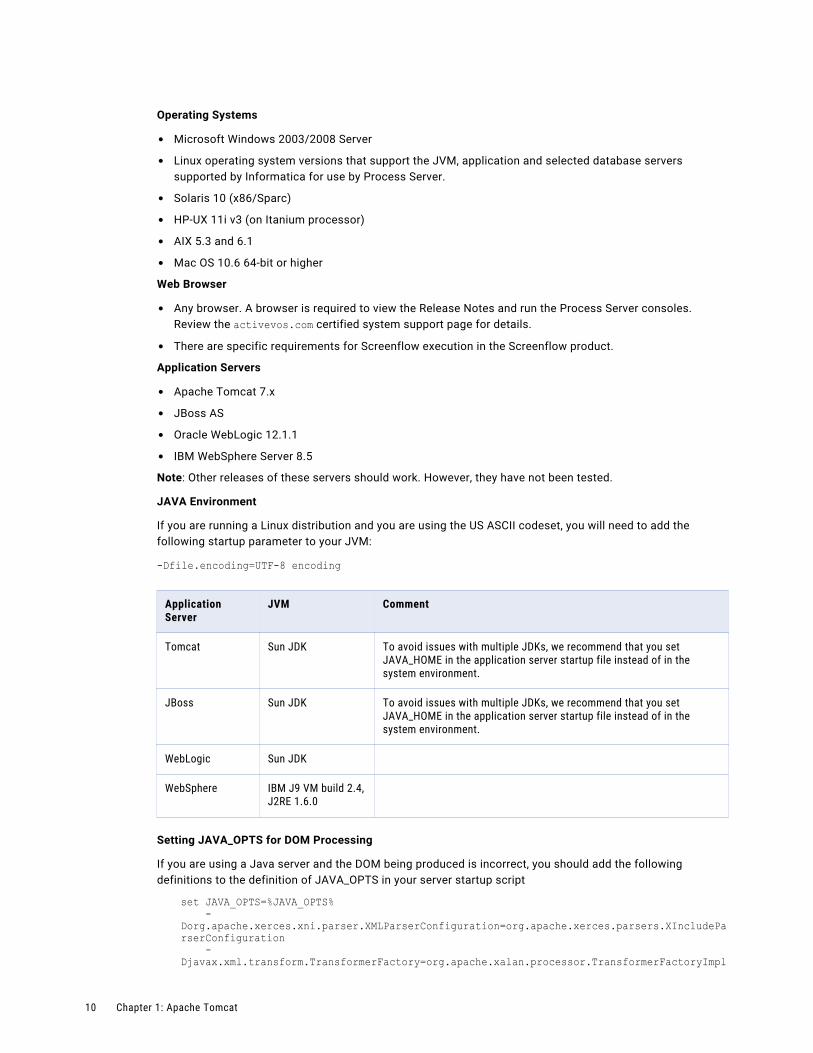
Operating Systems
• Microsoft Windows 2003/2008 Server
• Linux operating system versions that support the JVM, application and selected database servers supported by Informatica for use by Process Server.
• Solaris 10 (x86/Sparc)
• HP-UX 11i v3 (on Itanium processor)
• AIX 5.3 and 6.1
• Mac OS 10.6 64-bit or higher
Web Browser
• Any browser. A browser is required to view the Release Notes and run the Process Server consoles. Review the activevos.com certified system support page for details.
• There are specific requirements for Screenflow execution in the Screenflow product.
Application Servers
• Apache Tomcat 7.x
• JBoss AS
• Oracle WebLogic 12.1.1
• IBM WebSphere Server 8.5
Note: Other releases of these servers should work. However, they have not been tested.
JAVA Environment
If you are running a Linux distribution and you are using the US ASCII codeset, you will need to add the following startup parameter to your JVM:
-Dfile.encoding=UTF-8 encoding
Application Server
JVM Comment
Tomcat Sun JDK To avoid issues with multiple JDKs, we recommend that you set JAVA_HOME in the application server startup file instead of in the system environment.
JBoss Sun JDK To avoid issues with multiple JDKs, we recommend that you set JAVA_HOME in the application server startup file instead of in the system environment.
WebLogic Sun JDK
WebSphere IBM J9 VM build 2.4, J2RE 1.6.0
Setting JAVA_OPTS for DOM Processing
If you are using a Java server and the DOM being produced is incorrect, you should add the following definitions to the definition of JAVA_OPTS in your server startup script
set JAVA_OPTS=%JAVA_OPTS% -Dorg.apache.xerces.xni.parser.XMLParserConfiguration=org.apache.xerces.parsers.XIncludeParserConfiguration -Djavax.xml.transform.TransformerFactory=org.apache.xalan.processor.TransformerFactoryImpl
10 Chapter 1: Apache Tomcat

Note: If this is not set, the classloader must search through the classpath to locate the appropriate class. Depending on the size of the classpath, this operation can degrade performance.
Database Servers
Process Server uses standard database servers as the persistent storage mechanism. You must have access to one of the supported database servers with the proper privileges to create databases and tables as well as privileges to update, insert and delete into those tables.
Supported Databases
• MySQL 5.5
• MySQL 5.1.x (For more information, see the MySQL Configuration Note below.)
• Microsoft SQL Server 2005, 2008, 2008 R2, 2012
• Oracle Database 10g, 11g
• IBM DB2 9.7
Certified JDBC Database Drivers
A JDBC database driver is required. For certain configurations, you will be asked to provide the location of driver during configuration. For other configurations, you will be instructed to use your application server administration console to configure the database.
Note: For a clustered environment, you must install the driver to each node in the cluster.
Database Server JDBC Driver
MySQL mysql-connector-java-5.1.6-bin.jar
Microsoft SQL Server sqljdbc.jar (1.2), sqljdbc4.jar. JBoss 7.x requires sqljdbc4.jar
Oracle ojdbc6.jar
DB2 9.7 db2jcc_license_cu.jar, db2jcc.jar.JBoss 7.x requires db2jcc4.jar
Process Server
Process Server supports 64-bit Java Virtual Machines (JVM) for the Windows and Linux systems listed above. When installing Process Server on a 64-bit server, the 64-bit JVM supported for a given application server is required.
Process Developer
Process Developer embeds Eclipse 3.7.2 and a 32-bit version of JRE 7 for Windows systems allowing it to run on both 32-bit and 64-bit Windows operating systems and hardware environments. The Linux distribution of Process Developer does not embed the required 32-bit version of JRE 7. Users must install JRE 7 separately. Users wishing to use a 64-bit version of Eclipse must download the 64-bit version of Eclipse for RCP and RAP Developers, and then use the Process Developer Plugin installation.
Before You Configure and Deploy Process Server
Third party software components are required to be installed prior to configuring and deploying Process Server.
Application Server must be Installed
An application server provides Process Server a framework within which to run. Install the appropriate supported server container according to software vendor's documentation on each machine intended to run Process Server.
General Information 11
Note: Set up clustering according to your software vendor's documentation. Once clustering is set up on the application server, follow our documentation for configuring clustering.
Database Server must be Installed
Process Server requires only one database server per any number of application servers running in a cluster.
All databases require a user with administrative rights to the computer in order to install them. Process Server also requires a connection to your database server. This user needs the proper privileges to connect to the Process Server database, update, insert and delete records within that database.
MySQL Configuration Note
A BPEL process can send and receive variables with attachments such as images or documents. Attachments may be large or numerous, causing database connection errors.
To avoid connection errors to MySQL Server, you may need to configure MySQL with more allocated memory than the default of 1MB.
To configure MySQL:
1. Open MySQL Administrator. (If unavailable, see the note below.)
2. Select Startup Variables.
3. Select Advanced Networking.
4. In the Data/Memory Size panel, enable Max Packet Size.
5. Set the packet size higher than the default of 1MB. The size depends on the attachment sizes you expect.
6. Apply changes.
Note: If MySQL Administrator is not available, refer to the MySQL documentation regarding how to set the max_allowed_packet setting for your environment.
About the Process Server Database Schema
Process Server provides database schema definition files for all supported databases. Before you start the configuration and deploy utility, refer to Configuration topic in this help for specific recommendations on how to install the schema for your database.
Installation FoldersDownload and extract the installation folders as described in Quick Start. The following describes the contents of the Process Server installation:
{install_dir}/server-enterprisequickstart_server.html. Open this file for quick start and complete details for configuration and deployment.
{install_dir}/server-enterprise/tomcat_config/binConfiguration and deployment tool
{install_dir}/server-enterprise/tomcat_config/confConfiguration files needed by the configuration and deploy utility
{install_dir}/server-enterprise/tomcat_config/ddlsDatabase schema to be installed automatically (recommended) or manually, as described in Configuration
12 Chapter 1: Apache Tomcat

{install_dir}/server-enterprise/tomcat_config/doc/html/configCopies of the Configuration utility's online help files. These files are accessible from the Help button within the utility.
{install_dir}/server-enterprise/tomcat_config/sharedFiles that will be automatically copied to your deployed Process Server
{install_dir}/server-enterprise/tomcat_config/webappsFiles that will be automatically copied to your deployed Process Server
Process Server and Resource ConfigurationThis topic leads you through configuration of the resources required for Process Server. You must configure your database, Apache Tomcat Server and Process Server before deploying and running Process Server. The sections below provide information for completing the configuration.
Configuration Instructions
Before running the Configuration utility, perform the following pre-configuration steps:
• Create a database (or tablespace) where Process Server persistence information will be stored
• Create a default user with administrative rights to the computer and database for use by Process Server
• Note both the database name and port number, which you will be asked for during configuration.
• Process Server requires a JDBC driver to connect to your database. During configuration, you will be prompted for:
- The full path to a supported JDBC database driver
- The driver implementation class name
Note that the Microsoft SQL Server 2005 JDBC Driver 1.2 driver, or the JDTS-1.2.jar drivers are supported. Version 1.1 of the Microsoft SQL Server will not function as it does not include all required functionality.
First Time or New Install
If you are performing a clean installation, that is, a first-time install or a new database, you can use the Configuration utility to automatically install the database schema.
Manual Install or Update of Database Schema
It is strongly recommended that you automatically install the database schema; however, you can manually install it. Customers migrating from an earlier version should follow the instructions below.
Migrating from ActiveVOS to Process Developer
If you are migrating from ActiveVOS, perform the following steps:
• Manually update the Process Server database schema using the DDL patches provided in {install_dir}/server/tomcat_config/ddls/updates
• Run the Configuration utility
• Review the Release Notes for late breaking migration information
• Review the Process Developer help topic, Migrating from Earlier Versions
Process Server can be configured to use an RDBMS database.
Relational Database Schemas
General Information 13

These instructions are generalized to make sure they can be followed for each database. When creating the database schema for Process Server, you can either create a new database definition or upgrade an existing definition.
• Refer to the install a new database schema section for a new installation.
• Refer to upgrade a database schema when performing a version upgrade.
Install a new database schema
1. Identify your DDL. Use the information provided in the table below to locate the correct DDL file.
Database Server
DDL File Name and Location Notes
MYSQL {install_dir}/server/tomcat_config/ddls/ActiveBPEL_Enterprise-MYSQL.SQL
The default database name, ActiveVOS is defined within the DDL file. If you edit this name, ensure that you do not replace ActiveVOS Enterprise, a name that is inserted into the AeMetaInfo table.
MS SQL SERVER
{install_dir}/server /tomcat_config/ddls/ActiveBPEL_Enterprise-MYSQL.SQL
The default database name, ActiveVOS is defined within the DDL file. If you edit this name, ensure that you do not replace ActiveVOS Enterprise, a name that is inserted into the AeMetaInfo table.
ORACLE {install_dir}/server/ tomcat_config/ddls/ ActiveBPEL_Enterprise- ORACLE.SQL
Create a tablespace prior to running the DDL.
DB2 {install_dir}/server/ tomcat_config/ddls/ ActiveBPEL_Enterprise- DB2.SQL
2. Copy the DDL file from above, and rename it.Note: The original files must remain unchanged for the Configuration utility to work properly
3. (Optional) Modify the database name. Be sure to see the notes above.
4. Execute the DDL script.
5. Permissions must be set for Process Server to access your schema. For example, GRANT SELECT, INSERT, UPDATE, DELETE, CREATE, DROP, REFERENCES, INDEX, ALTER, CREATE TEMPORARY TABLES, LOCK TABLES, EXECUTE, CREATE VIEW, SHOW VIEW, CREATE ROUTINE, ALTER ROUTINEIf Process Server does not have the permissions it needs, you will see an error message that begins as follows: Failed to get version info from the AeMetaInfo table.
Each database server provides its own mechanism or utility for executing a DDL script file. Execute the DDL script file using the appropriate utility. For example, if you are using Oracle, the utility to execute the DDL script file would be SQL Plus.
Upgrade an existing database schema
To upgrade your existing Process Server database to be compatible with the new version of software, follow the instructions below:
1. Shutdown Process Server before executing a database upgrade.
2. Make a backup copy of your database.
3. Identify your current running version of Process Server. Database upgrades are provided to upgrade from one version back at a time. This means that more than one upgrade script may need to be applied to
14 Chapter 1: Apache Tomcat
your database. For example, if you are running ActiveVOS version 8.0.x, you must go to the updates folder, and apply all patch scripts with higher numbers, starting with [database name]-Patch-9.0.sql. Be sure to run the patch scripts in ascending order. Do not run any upgrade script with a version number equal to or less than your current running version.
4. For each upgrade that needs to be applied perform the following:
a. Identify your DDL. Use the information provided in the table below to locate the correct DDL file. Note: The updates must be applied in ascending order.MYSQL
Tomcat: {install_dir}/server/tomcat_config/ddls/updates/enterprise/ActiveBPEL_Enterprise-MYSQL-PATCH-{patch number}.SQL
MS SQL SERVER
Tomcat: {install_dir}/server/tomcat_config/ddls/updates/enterprise/ActiveBPEL_Enterprise-SQLSERVER-PATCH-{patch number}.SQL
ORACLE
Tomcat: {install_dir}/server/tomcat_config/ddls/updates/enterprise/ActiveBPEL_Enterprise-ORACLE-PATCH-{patch number}.SQL
DB2
Tomcat: {install_dir}/server/tomcat_config/ddls/updates/enterprise/ActiveBPEL_Enterprise-DB2-PATCH-{patch number}.SQL
b. Execute the DDL script.Each database server provides its own mechanism or utility for executing a DDL script file. Execute the DDL upgrade script file using the appropriate utility. For example, if you are using Oracle, the utility to execute the DDL script file would be SQL Plus.
Multisite Configuration
For details, see Process Server MultiSite Configuration.
Tomcat Security Configuration
You can find details on configuring Process Server security roles in Process Developer Help or in the Infocenter.
Configuration for Headless Mode
Process Server relies on GUI components from the Java's SWT package, such as fonts. If you are running on a headless server (that is, the server does not have a graphic subsystem), you may see one of the following errors in the stack trace:
• java.lang.NoClassDefFoundError: sun/awt/X11GraphicsEnvironment
• Can't connect to X11 window server using ':0.0' as the value of the DISPLAY variable
• org.eclipse.birt.report.service.api.ReportServiceException
Use one of the following techniques to correct the errors:
• Configure the JVM system property java.awt.headless=true and at the command line, start the JVM with the argument: -Djava.awt.headless=true
• Run a X-windows virtual frame buffer (Xvfb)
In a Linux environment that uses Azul Zulu JDK, when you run the ActiveVOS installer, the following error appears:
java.lang.Error: Probable fatal error:No fonts found...
General Information 15

Workaround: To install the missing fonts, run the following command:
sudo yum install fontconfig dejavu-sans-fonts dejavu-serif-fonts
Using the Configuration Utility
The Configuration utility walks through the steps required to provide the property values for Process Server and selected resources.
Note: Before running the utility, ensure that your server container is stopped.
Starting the Configuration Utility
Execute one of the following utilities based on your operating system:Windows
{install_dir}/server/tomcat_config/bin/config_deploy.batLinux
{install_dir}/server/tomcat_config/bin/config_deploy.sh
If You Have Manually Installed or Updated the Database Schema
If you have manually installed or updated the database schema, when prompted, you must not select the "Install Database Schema" checkbox.
Running the Configuration Utility in Different Modes
The Configuration utility can be run with a graphical interface (default), in console mode or silently. When you run the utility your configuration options are automatically written to the install.properties file and they will be used as the defaults the next time the application is configured. One of the following parameters is accepted by the Configuration utility:Help: help
This option displays the usage for console and silent modes.
Console mode: consoleRuns the Configuration utility in text mode within a command window.
Silent mode: silentSilent mode: silent. Runs in the background requiring no user interaction. This option requires that you have already run the Configuration utility in default mode, which sets configuration options in the install.properties file.
An example of running the Configuration utility from the command line is config_deploy help
Configuration Help
The Configuration utility contains online help for each panel of the utility. Access Help by clicking the Help button in each panel. Additionally you can access the help from {install_dir}/server/tomcat_config/doc/html/config.
Installation ChecklistThis section provides a list of most of the items that you should either have completed or information noted prior to attempting to install Process Server.
Hardware
• Server hardware must meet the requirements listed for each third-party application, including server container, database server and Java environment.
16 Chapter 1: Apache Tomcat
Software
• A user account with administrative rights to install or manage all required software including the application and database servers and the Process Server.
• A supported database server installed and accessible.
• The supported Server container installed on each machine intended to host Process Server.
• JVM Memory arguments have been added to your environment variable: -Xms256m -Xmx1024m -XX:MaxPermSize=384m. (See “Prerequisites” on page 8.)
• Process Server must be configured for WS-Security. (See Configuring Process Server for WS-Security.)
• In your Identity Service (JDBC, LDAP, or XML), add the abTaskClient role to each Process Central user. This security role, described in the web.xml file, is required for access to Process Central.
• On the URN Mappings page of the Process Console, update the host and port for Process Central to match your installation, if needed. The default address is http://localhost:8080/activevos-central/avc.
License Information
• Valid license keys for the total number of sockets intended to host Process Server.
Database Information
• Permissions must be set for Process Server to access your schema. For example, GRANT SELECT, INSERT, UPDATE, DELETE, CREATE, DROP, REFERENCES, INDEX, ALTER, CREATE TEMPORARY TABLES, LOCK TABLES, EXECUTE, CREATE VIEW, SHOW VIEW, CREATE ROUTINE, and ALTER ROUTINE.
• For WebLogic and WebSphere, configuration of a JNDI data source.
• The URL to use to connect to the Process Server database.
• The database user name and password to be used by Process Server to connect to the database.
• If you are using an Oracle database, the Process Server tablespace created.
• For RDBMS, if you are not using the database driver and information supplied with the Application Server you must also have the following two:
- A JDBC database driver that provides the required functionality.
- The class name of the JDBC database driver.
Server Container Information
• The installation location of your Server containers.
GlossaryAPI
Application Program Interface, a set of routines, protocols, and tools for building software applications.
Application Server
Also called an appserver. A program that handles all application operations between users and an organization's backend business applications or databases. Application servers are typically used for complex transaction-based applications. To support high-end needs, an application server has to have built-in redundancy, monitors for high-availability, high-performance distributed application services and support for complex database access.
DDL
Data Definition Language is used to specify a database scheme as a set of definitions expressed in a DDL script. The basic idea is to hide implementation details of the database schemes from the users.
General Information 17

EAR
J2EE modules that comprise an application are assembled into a single application Enterprise Archive (EAR) file.
J2EE
Java 2 Platform Enterprise Edition, a platform-independent, Java-centric environment from Sun for developing, building and deploying Web-based enterprise applications online.
Java
A high-level programming language developed by Sun Microsystems. Java is an object-oriented language similar to C++, but simplified to eliminate language features that cause common programming errors. Java source code files (files with a .java extension) are compiled into a format called bytecode (files with a .class extension), which can then be executed by a Java interpreter.
JAR
Java Archive, a file format used to bundle all components required by a Java applet. JAR files simplify the downloading of applets since all the components (.class files, images, sounds, and the like) can be packaged into a single file. In addition, JAR supports data compression, which further decreases download times.
JNDI
Java Naming and Directory Interface (JNDI). Allows Java-enabled applications to use a unified interface to multiple naming and directory services in the enterprise. Part of the Java Enterprise API set. JNDI works with other J2EE technologies to organize and locate components in a distributed computing environment.
JVM
Java Virtual Machine. An abstract computing machine, or virtual machine, JVM is a platform-independent programming language that converts Java bytecode into machine language and executes it.
URL
Uniform Resource Locator, the global address of documents and other resources on the World Wide Web.
WAR
Java modules that comprise an application are assembled into a single application Web Archive (WAR) file.
Web Server
A Web Server a computer that delivers (serves up) Web pages. Every Web server has an IP address and possibly a domain name. For example, if you enter the URL http://www.pcwebopedia.com/index.html in your browser, this sends a request to the server whose domain name is pcwebopedia.com. The server then fetches the page named index.html and sends it to your browser. That request can also cause complex logic to be executed and manage database access.
XML
Extensible Markup Language, a specification developed by the W3C. XML is a pared-down version of SGML, designed especially for Web documents. It allows designers to create their own customized tags, enabling the definition, transmission, validation, and interpretation of data between applications and between organizations.
18 Chapter 1: Apache Tomcat

ConfigurationThe topics in the section provide information on pages within the Configuration Wizard.
Configuration and DeploymentPlease review the important information in Prerequisites and Installation Checklist before running ActiveVOS Server configuration.
For Tomcat, WebSphere, and JBoss: This panel allows you to select what operations you would like to perform. Subsequent panels show the details of each option. The selections and the results are described in the table below.
For WebLogic: The configuration wizard collects details for ActiveVOS Server to communicate with a selected database, a work manager, and ActiveVOS Central. It can deploy applications and install the database schema. Select the options you want to execute.
Note: Many of the options presented in the configuration wizard are only used within development servers. The availability of these options on production servers may be limited or unavailable due to security restrictions or other limitations imposed by the administrators of the target server, or by your particular configuration and situation.
Select the options you would like to perform and click Next to continue.
Selection Description
Configure ActiveVOS Server Allows the setting of the parameters required to start and run the ActiveVOS Server and set the security options for the application.
Configure ActiveVOS Central When enabled, allows setting of configuration parameters for the ActiveVOS Central application.
For WebSphere: Configure Application Resources
Allows configuration of your work manager4, timer manager, JAAS logins, and database resource.
For Tomcat and JBoss: Configure Database
Configuration of an application server's native data source files or wizards.
For Tomcat, WebSphere, and JBoss: Deploy Applications and Resources
Deployment of ActiveVOS Server and datasource.
For WebLogic: Deploy Applications
Select deployment of ActiveVOS Server and ActiveVOS Central. It also allows you install the database schema. Note that you can run the config-deploy tool more than once on separate servers, to deploy ActiveVOS Central to different machines.
Configuration 19
Engine ConfigurationThis panel provides information required for ActiveVOS Server to access your database server. Choices on this panel change the settings in the configuration of the aeEngineConfig.xml file, which is contained in the activevos.war file.
Field Name Default Value Descripton
Database MySQL This setting is used internally by ActiveVOS Server to handle communication for the supported database.
Select Next to save your value and continue.
JNDI ConfigurationThe Server JNDI Configuration panel allows configuration of the various files that contain JNDI references.
For Tomcat and JBoss: In general, if you have not preconfigured resources on your application server, it is not necessary to change the default values. If you have already configured resources you must match the field to your corresponding resource.
For WebLogic: You should configure JNDI resources before completing this configuration. Refer to Configuration for guidelines on configuring a JDBC Data Source and a Work Manager.
20 Chapter 1: Apache Tomcat
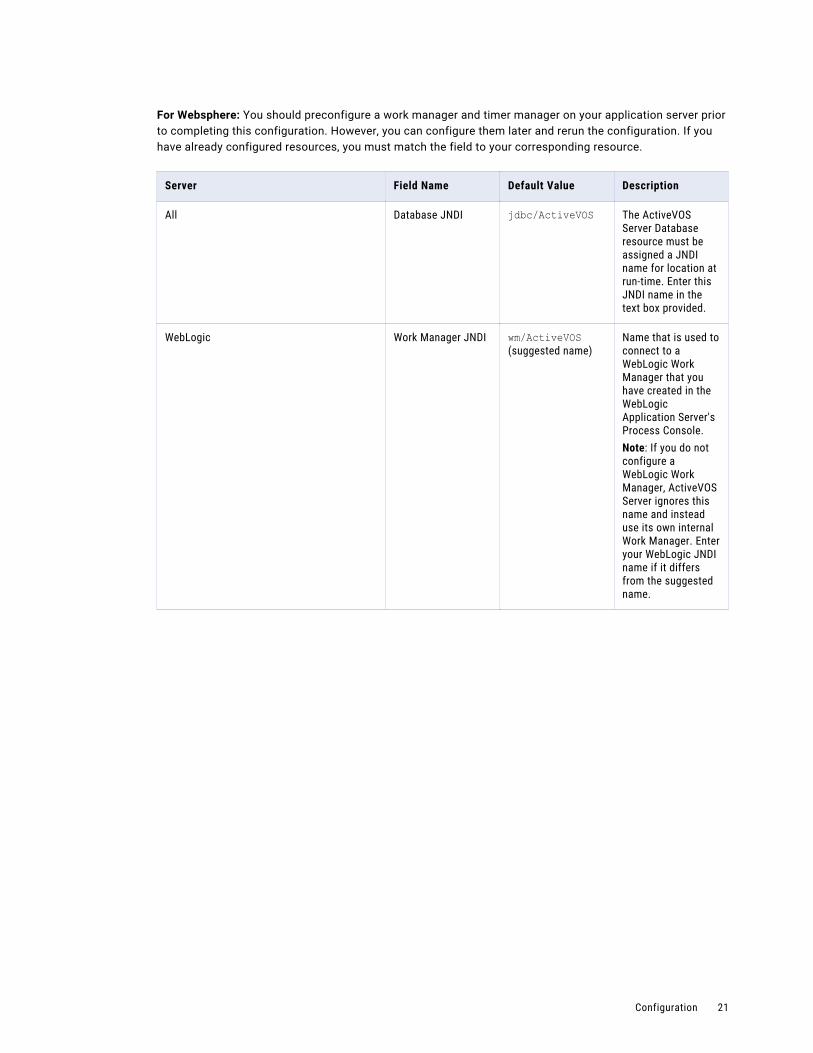
For Websphere: You should preconfigure a work manager and timer manager on your application server prior to completing this configuration. However, you can configure them later and rerun the configuration. If you have already configured resources, you must match the field to your corresponding resource.
Server Field Name Default Value Description
All Database JNDI jdbc/ActiveVOS The ActiveVOS Server Database resource must be assigned a JNDI name for location at run-time. Enter this JNDI name in the text box provided.
WebLogic Work Manager JNDI wm/ActiveVOS (suggested name)
Name that is used to connect to a WebLogic Work Manager that you have created in the WebLogic Application Server's Process Console.Note: If you do not configure a WebLogic Work Manager, ActiveVOS Server ignores this name and instead use its own internal Work Manager. Enter your WebLogic JNDI name if it differs from the suggested name.
Configuration 21
Server Field Name Default Value Description
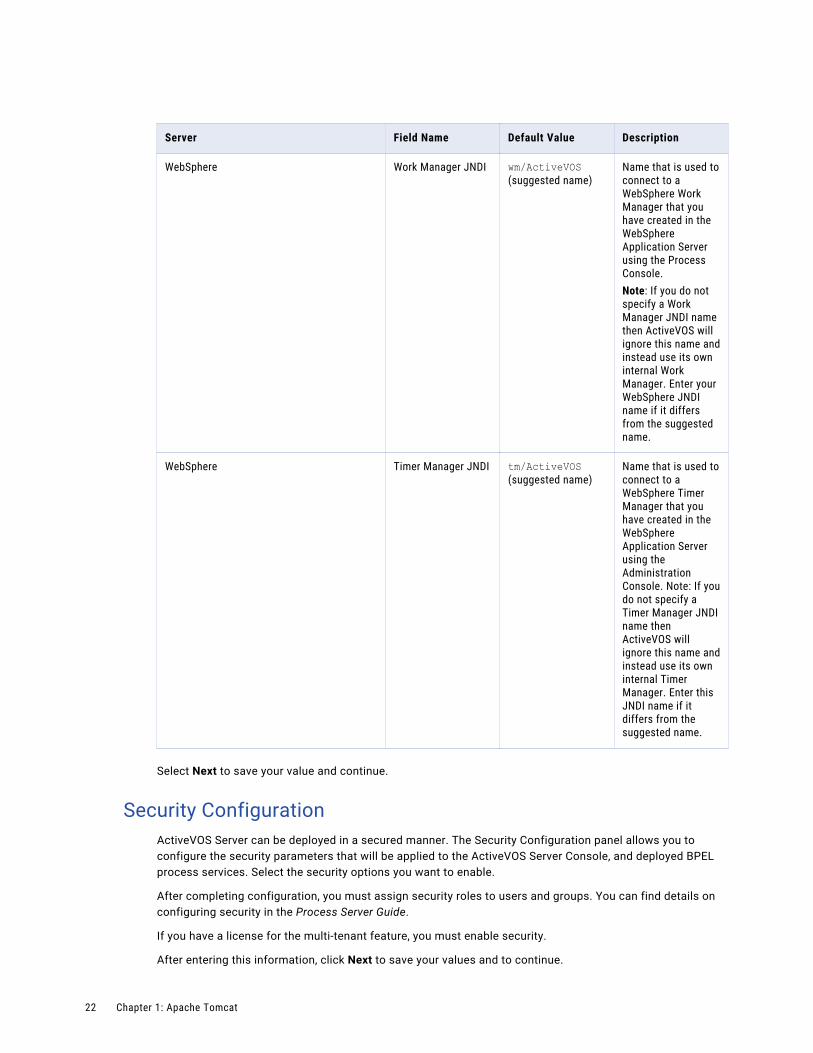
WebSphere Work Manager JNDI wm/ActiveVOS (suggested name)
Name that is used to connect to a WebSphere Work Manager that you have created in the WebSphere Application Server using the Process Console.Note: If you do not specify a Work Manager JNDI name then ActiveVOS will ignore this name and instead use its own internal Work Manager. Enter your WebSphere JNDI name if it differs from the suggested name.
WebSphere Timer Manager JNDI tm/ActiveVOS (suggested name)
Name that is used to connect to a WebSphere Timer Manager that you have created in the WebSphere Application Server using the Administration Console. Note: If you do not specify a Timer Manager JNDI name then ActiveVOS will ignore this name and instead use its own internal Timer Manager. Enter this JNDI name if it differs from the suggested name.
Select Next to save your value and continue.
Security ConfigurationActiveVOS Server can be deployed in a secured manner. The Security Configuration panel allows you to configure the security parameters that will be applied to the ActiveVOS Server Console, and deployed BPEL process services. Select the security options you want to enable.
After completing configuration, you must assign security roles to users and groups. You can find details on configuring security in the Process Server Guide.
If you have a license for the multi-tenant feature, you must enable security.
After entering this information, click Next to save your values and to continue.
22 Chapter 1: Apache Tomcat

Administrative Functions
These functions add security parameters to the ActiveVOS Consoles and services by setting the following roles:
abAdmin
Users associated with this role have full administrative rights to ActiveVOS Server.
abBusinessManager
Users associated with this role have access to process instance details (but cannot operate on them). They can monitor active processes and tasks, and work queues. They have a read-only view of process instance details.
abDeployer
Users associated with this role have rights restricted to deploying business process archive files to ActiveVOS Server.
abDeveloper
Users associated with this role have rights restricted to service artifacts, endpoint information, and sample messages for the services they consume and expose (that is, processes) after they are deployed. Developers need the ability to deploy process deployment archives, initiate process execution and analyze them. Developers also need to configure global function contexts for custom functions, URN mappings, and the ability to schedule process execution. Specifically, this user has access to the Active Process list, the Process Instance View, the Active Task and Work Queues lists, the Server Log, the Dashboard and all reports, and the catalog's content.
abOperator
Users associated with this role have rights restricted to operating the system. These include observing the functionality of processes, managing process instances using the process instance detail view, running reports, logging, viewing exceptions, acquiring information on service operations, adding and removing tenants, and managing the scheduled database delete schedule.
abTaskClient
Required. You must configure permission to access ActiveVOS Central for all users. In addition, users who interact with the Human Task (WS-HT) API must have this role.
ActiveVOS Central presents a login page to users.
Process Services
The process services adds security parameters to the Web Services handler for all deployed BPEL services with a role. The services listed at http://[host]:[port]/active-bpel/services are secured. The process services (roles) are:
abRestrictedServiceConsumer
Users associated with this role cannot access a service unless it is deployed with allowed roles specified in the pdd and the user belongs to at least of these roles. If no roles are specified in the pdd, access to services with no roles specified in the pdd are also denied. Users in this role can view the wsdl files for other services like abServiceConsumer; however, they are blocked at runtime.
abServiceConsumer
Users associated with this role have rights restricted to start process instances of deployed processes, including from ActiveVOS Central, the Eclipse Web Tools Project, or other client application,such as SOAPUI.
Configuration 23
abTenantAdmin
(For a Multi-Tenant licensed server only.) Users associated with this role have rights to deploy and manage contributions into a configured tenant on the server.
Based on a Tenant Definition configured by the ActiveVOS Server administrator (with the abAdmin role), a tenant administrator user can log into the tenant context on the server. A service consumer user can create process instances for processes deployed to the tenant context.
Identity Service Consumer
The identity service consumer adds security parameters to the Web Services handler for Process Identity service used by the ActiveVOS Central application using the following roles:
abIdentityListConsumer
Only users associated with this role or abAdmin have rights to submit Web Service requests to the identity service from Process Developer.
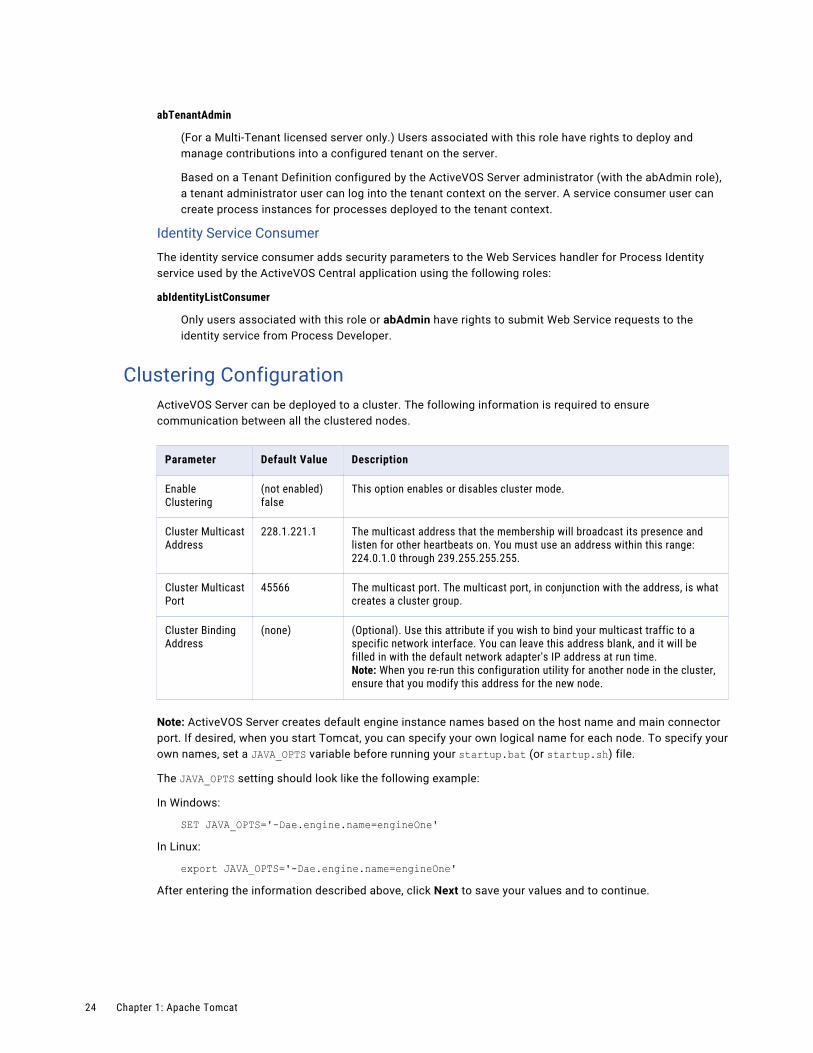
Clustering ConfigurationActiveVOS Server can be deployed to a cluster. The following information is required to ensure communication between all the clustered nodes.
Parameter Default Value Description
Enable Clustering
(not enabled) false
This option enables or disables cluster mode.
Cluster Multicast Address
228.1.221.1 The multicast address that the membership will broadcast its presence and listen for other heartbeats on. You must use an address within this range: 224.0.1.0 through 239.255.255.255.
Cluster Multicast Port
45566 The multicast port. The multicast port, in conjunction with the address, is what creates a cluster group.
Cluster Binding Address
(none) (Optional). Use this attribute if you wish to bind your multicast traffic to a specific network interface. You can leave this address blank, and it will be filled in with the default network adapter's IP address at run time.Note: When you re-run this configuration utility for another node in the cluster, ensure that you modify this address for the new node.
Note: ActiveVOS Server creates default engine instance names based on the host name and main connector port. If desired, when you start Tomcat, you can specify your own logical name for each node. To specify your own names, set a JAVA_OPTS variable before running your startup.bat (or startup.sh) file.
The JAVA_OPTS setting should look like the following example:
In Windows:
SET JAVA_OPTS='-Dae.engine.name=engineOne' In Linux:
export JAVA_OPTS='-Dae.engine.name=engineOne' After entering the information described above, click Next to save your values and to continue.
24 Chapter 1: Apache Tomcat

ActiveVOS Central ConfigurationThe ActiveVOS Central Communications Configuration panel allows setting of the connection information to be used when ActiveVOS Central communicates with the ActiveVOS Server. This panel allows the configuration of the following parameters:
Parameter Default Value Description
Session Timeout 30 seconds The session timeout sets the duration that an inactive session will remain connected to the ActiveVOS Central database.
ActiveVOS Central AeTaskService URL
http://[hostname.domainname]:[port]/active-bpel/services/AeB4PTaskClient-taskOperations
(Required) ActiveVOS Server can run on the same or a different server than the ActiveVOS Central. Modify this URL to specify the host and port where ActiveVOS Server runs. Modify the protocol, to add security, if needed. The URL displayed is the default URL of the Web service that ActiveVOS Central needs to call ActiveVOS Server.
After entering this information, click Next to save your values and to continue.
Database ConfigurationNote: It is highly recommended that these panels only be used for development servers. Refer to your application server user guide and your database administrators guide for configuring data sources for production installations.
Configuration 25

The panels that follow provide the ability to configure a data source file. The information that is entered here is only a subset of the options that can be configured for a data source. Ensure that you have completed the configuration of a JNDI data source prior to completing this step. For details, see Configuration.
Setting Default Value
Description
Driver class None (Required.) The name of your JDBC driver's implementation of java.sql.driver. Some driver examples are shown here:- MySQL: com.mysql.jdbc.Driver- MS SQL SERVER: com.microsoft.sqlserver.jdbc.SQLServerDriver - ORACLE: oracle.jdbc.OracleDriver- DB2: com.ibm.db2.jcc.DB2Driver
Driver url None (Required.) Used to connect to your database. Typical URLS are shown here; however, refer to your database and JDBC driver documentation for further information.- MySQL: jdbc:mysql://[host]:[port]/[database_name]?useUnicode=true&characterEncoding=UTF-8&characterSetResults=utf8(Default port is 3306) UTF-8 encoding is required.
- MS SQL SERVER: jdbc:sqlserver://[host]:[port];databaseName=[database_name](Default port is 1433) UTF-8 encoding is highly recommended.
- Oracle: jdbc:oracle:thin:@//[host]:[port]/[database_name] (Default port is 1521) UTF-8 encoding is highly recommended.
- DB2: jdbc:db2://[host]:[port]/[database_name] DB2 = (Default port is 50000) UTF-8 encoding is highly recommended.
Example: jdbc:mysql://localhost:3306/ActiveVOS?useUnicode=true&characterEncoding=UTF-8&characterSetResults=utf8
Database name
ActiveVOS (Required.) The name of your database. It must match the database_name provided in the Driver URL.
Driver jar None Driver .jar file must be selected using the Select File button to the right of this field. Select your driver file so that is can be copied to the correct location.Some driver file examples are shown here, but we strongly recommend you check the Prerequisites details before making your selection.- MySQL: mysql-connector-java-5.0.7-bin.jar- MS SQL SERVER: sqljdbc.jar- Oracle: ojdbc14.jar- DB2: db2jcc.jar and db2jcc_license_cu.jar
Username bpeluser (Required by default.) The name associated with the privileges to access your database. Unless you modified this name, it is described in the DDL schema.
Password bpel (Required by default.) The password of the above user name. Unless you modified this name, it is described in the DDL schema.
For Tomcat and JBoss: Connection Timeout
1000 The maximum time to wait in milliseconds for a database connection to become available.
For Tomcat and JBoss: Minimum Connections
10 The maximum number of idle connections in the database pool.
26 Chapter 1: Apache Tomcat
Setting Default Value
Description
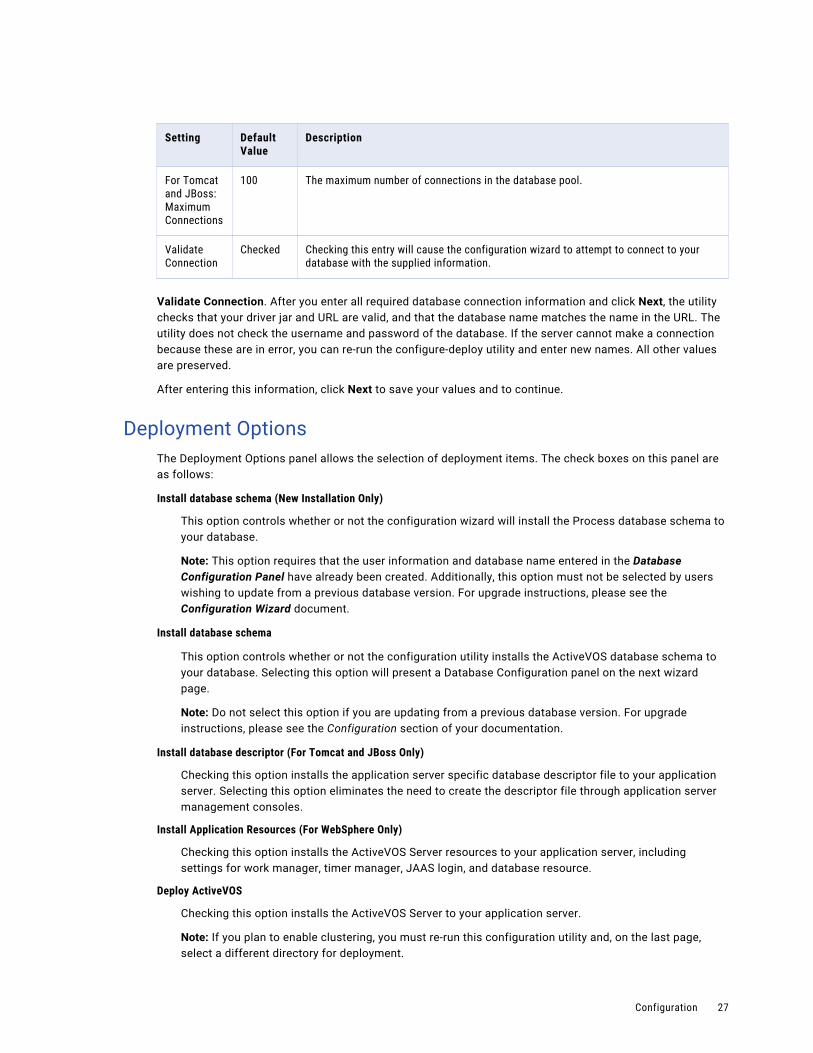
For Tomcat and JBoss: Maximum Connections
100 The maximum number of connections in the database pool.
Validate Connection
Checked Checking this entry will cause the configuration wizard to attempt to connect to your database with the supplied information.
Validate Connection. After you enter all required database connection information and click Next, the utility checks that your driver jar and URL are valid, and that the database name matches the name in the URL. The utility does not check the username and password of the database. If the server cannot make a connection because these are in error, you can re-run the configure-deploy utility and enter new names. All other values are preserved.
After entering this information, click Next to save your values and to continue.
Deployment OptionsThe Deployment Options panel allows the selection of deployment items. The check boxes on this panel are as follows:
Install database schema (New Installation Only)
This option controls whether or not the configuration wizard will install the Process database schema to your database.
Note: This option requires that the user information and database name entered in the Database Configuration Panel have already been created. Additionally, this option must not be selected by users wishing to update from a previous database version. For upgrade instructions, please see the Configuration Wizard document.
Install database schema
This option controls whether or not the configuration utility installs the ActiveVOS database schema to your database. Selecting this option will present a Database Configuration panel on the next wizard page.
Note: Do not select this option if you are updating from a previous database version. For upgrade instructions, please see the Configuration section of your documentation.
Install database descriptor (For Tomcat and JBoss Only)
Checking this option installs the application server specific database descriptor file to your application server. Selecting this option eliminates the need to create the descriptor file through application server management consoles.
Install Application Resources (For WebSphere Only)
Checking this option installs the ActiveVOS Server resources to your application server, including settings for work manager, timer manager, JAAS login, and database resource.
Deploy ActiveVOS
Checking this option installs the ActiveVOS Server to your application server.
Note: If you plan to enable clustering, you must re-run this configuration utility and, on the last page, select a different directory for deployment.
Configuration 27

Include Process Console
Selecting this option installs Process Console on your application server. Process Console is an optional component that you can choose to install.
Note: If you select the Include Process Console option, you must also select the Deploy ActiveVOS option.
Deploy ActiveVOS Central
Checking this option installs ActiveVOS Central to your application server.
If you want to install ActiveVOS Central to a different server, re-run the config-deploy utility on that server.
After entering this information, click Next to save your values and to continue.
Deployment TargetsFor each node in a Tomcat cluster, provide a new directory.
After entering this information, click Next to save your values and to continue.
28 Chapter 1: Apache Tomcat
C h a p t e r 2
WebLogicThis chapter includes the following topics:
• General Information, 29
• Configuration, 47
General InformationThe Process Server Setup Wizard lets you install a new server or update an existing one.
1. Download and obtain a license for Process Server.
2. Download and run the Process Server installation.
3. To configure and deploy a server, open quickstart_server.html, which directs you to the file you are reading now.
4. Review the Prerequisites and Release Notes for Process Server by selecting the links in the navigation bar on the right.
Note: If the Setup Wizard detects an existing installation, it lets you either update the existing installation or install the server in a different directory. When you update an existing installation, the Wizard replaces any file that a previous Wizard had installed. All other files in your server's install directory remain as they were.
Quick StartPreconfiguration
1. Create a database (or tablespace) for Process Server. Select the Configuration link in the navigation bar for details.
2. Process Server needs to be granted the following permissions on your schema:GRANT SELECT, INSERT, UPDATE, DELETE, CREATE, DROP, REFERENCES, INDEX, ALTER, CREATE TEMPORARY TABLES, LOCK TABLES, EXECUTE, CREATE VIEW, SHOW VIEW, CREATE ROUTINE, ALTER ROUTINEIf Process Server does not have the permissions it needs, you will see an error message that begins as follows: Failed to get version info from the AeMetaInfo table.
3. Collect the following information that you will be prompted for during configuration:
• Host, port number, and database name where you are deploying Process Server
• The full path to a supported JDBC database driver
29

• Driver implementation class name
• Database username and passwordHints and examples of this information are provided in the appropriate page of the Configuration utility's online Help.
4. For an upgrade installation of Process Server, manually install the database schema. For a new installation, you can automatically install the database schema during configuration.
5. Ensure that the JAVA_HOME environment variable is set.Note for Tomcat and JBoss: To avoid issues with multiple JDKs, we recommend that you set JAVA_HOME in the application server startup file instead of in the system environment.
6. Ensure that your JVM memory settings in your application server match the recommendations described in “Prerequisites” on page 8.
7. MultiSite Installations Only: To configure MultiSite clustering, be sure to review the instructions in Process Server MultiSite Configuration. Access the instructions from the Configuration link in the navigation bar on the right.
8. Unix Platform Only: After installing any version of the Process Server on any UNIX OS, you may receive an error when starting the server such as cannot write to temp location [/temp]. This is due to an OS restriction on the number of files that can be created. To avoid this error, before installing the server edit your UNIX security configuration file directly to allow a larger number of files to be opened. In UNIX the parameter NOFILE sets the maximum number of files that can be opened by a single process. For example, in the file /etc/security/limits.conf you could add the line - nofile 10240 to raise the limit from the default 1024 value. 10240 should be large enough. If you are unsure, setting "unlimited" can be considered.
Configuration and Deployment
1. In your ActiveVOS installation folder, locate the [server]-config>bin folder, and select the config-deploy utility.
2. Complete the configuration and deployment. Use the online Help as needed.
3. Use your server container's documentation for help in starting the Process Server.
Note: When you are deploying Process Server to a Tomcat server, activebpel-cert.war is not deployed. You must copy it from {installation_directory}\server-enterprise\tomcat_config\webapps to {Tomcat_Home}\webapps directory when deploying an SSO configuration
Add Your License
1. You will need access to your Process Server license.
2. Open the Process Console in a browser:http://[host]:[port]/activevos
3. Add your license on the License page. Select the Admin menu item of the Process Console and then select License. Select Add and copy and paste all of the Process Server license into the dialog. Then select the Server Status navigation menu item and select Start Server to start the Process Server.
PrerequisitesProcess Server relies on a valid license and third party software components. Ensure that your application server environment meets the requirements before beginning the configuration procedure.
30 Chapter 2: WebLogic

Process Server Licensing
A valid license is required to run Process Server. You enter the license information after you've configured Process Server. Do this as follows:
1. Start Process Console.
2. Select Admin | License. (Admin is in the toolbar; License is about a third of the way down on the left.)
3. Press the Add License button, copy and paste all of the Process Server license into the dialog, and then press the Add License button.
4. Select the Server Status link near the ver top of the left area press the Start Server button to start the Process Server
Obtaining a License Key
If you did not receive your license prior to receiving the software, contact the Informatica sales department.
Our sales support staff can assist you with licensing questions.
Hardware Requirements
Application Server Hardware
Process Server runs within different server containers, and the hardware requirements of the server are superseded by the requirements of the container.
Database Hardware
Process Server application supports multiple database servers and has no additional requirements besides those of your selected database server.
Note: For maximum performance, we recommend that you run Process Server and its database schema on separate servers.
JVM Memory Requirements
We strongly recommend that you run your application server with at least the following memory settings:
-Xms256m -Xmx1024m -XX:MaxPermSize=384m
where Xms is starting memory, Xmx is maximum memory, and MaxPermSize is the amount of memory set aside for loading class files.
Disk Space Requirements
At least 1 GB of disk space is required to install the Process Server application.
Note: Considerably more disk space is required to run your applications. The amount is dependent on several factors including logging levels you select, number of processes you run, and size of processes.
Software Requirements
Specific versions of Eclipse, client and server operating systems, application and database servers are supported. Support means that Informatica will assist customers with the installation and operation of Business Process Manager products on these 3rd party product versions.
Also certified are specific combinations of 3rd party products. Use of Certified Systems described here will reduce the risk of problems as a result of extensive testing of Business Process Manager with these specific versions. Database connectivity is required for Process Server persistence and version control of deployed processes. It is recommended that the database resides on a dedicated server.
The following software is supported for use with Process Server:
General Information 31

Operating Systems
• Microsoft Windows 2003/2008 Server
• Linux operating system versions that support the JVM, application and selected database servers supported by Informatica for use by Process Server.
• Solaris 10 (x86/Sparc)
• HP-UX 11i v3 (on Itanium processor)
• AIX 5.3 and 6.1
• Mac OS 10.6 64-bit or higher
Web Browser
• Any browser. A browser is required to view the Release Notes and run the Process Server consoles. Review the activevos.com certified system support page for details.
• There are specific requirements for Screenflow execution in the Screenflow product.
Application Servers
• Apache Tomcat 7.x
• JBoss AS
• Oracle WebLogic 12.1.1
• IBM WebSphere Server 8.5
Note: Other releases of these servers should work. However, they have not been tested.
JAVA Environment
If you are running a Linux distribution and you are using the US ASCII codeset, you will need to add the following startup parameter to your JVM:
-Dfile.encoding=UTF-8 encoding
Application Server
JVM Comment
Tomcat Sun JDK To avoid issues with multiple JDKs, we recommend that you set JAVA_HOME in the application server startup file instead of in the system environment.
JBoss Sun JDK To avoid issues with multiple JDKs, we recommend that you set JAVA_HOME in the application server startup file instead of in the system environment.
WebLogic Sun JDK
WebSphere IBM J9 VM build 2.4, J2RE 1.6.0
Setting JAVA_OPTS for DOM Processing
If you are using a Java server and the DOM being produced is incorrect, you should add the following definitions to the definition of JAVA_OPTS in your server startup script
set JAVA_OPTS=%JAVA_OPTS% -Dorg.apache.xerces.xni.parser.XMLParserConfiguration=org.apache.xerces.parsers.XIncludeParserConfiguration -Djavax.xml.transform.TransformerFactory=org.apache.xalan.processor.TransformerFactoryImpl
32 Chapter 2: WebLogic

Note: If this is not set, the classloader must search through the classpath to locate the appropriate class. Depending on the size of the classpath, this operation can degrade performance.
Database Servers
Process Server uses standard database servers as the persistent storage mechanism. You must have access to one of the supported database servers with the proper privileges to create databases and tables as well as privileges to update, insert and delete into those tables.
Supported Databases
• MySQL 5.5
• MySQL 5.1.x (For more information, see the MySQL Configuration Note below.)
• Microsoft SQL Server 2005, 2008, 2008 R2, 2012
• Oracle Database 10g, 11g
• IBM DB2 9.7
Certified JDBC Database Drivers
A JDBC database driver is required. For certain configurations, you will be asked to provide the location of driver during configuration. For other configurations, you will be instructed to use your application server administration console to configure the database.
Note: For a clustered environment, you must install the driver to each node in the cluster.
Database Server JDBC Driver
MySQL mysql-connector-java-5.1.6-bin.jar
Microsoft SQL Server sqljdbc.jar (1.2), sqljdbc4.jar. JBoss 7.x requires sqljdbc4.jar
Oracle ojdbc6.jar
DB2 9.7 db2jcc_license_cu.jar, db2jcc.jar.JBoss 7.x requires db2jcc4.jar
Process Server
Process Server supports 64-bit Java Virtual Machines (JVM) for the Windows and Linux systems listed above. When installing Process Server on a 64-bit server, the 64-bit JVM supported for a given application server is required.
Process Developer
Process Developer embeds Eclipse 3.7.2 and a 32-bit version of JRE 7 for Windows systems allowing it to run on both 32-bit and 64-bit Windows operating systems and hardware environments. The Linux distribution of Process Developer does not embed the required 32-bit version of JRE 7. Users must install JRE 7 separately. Users wishing to use a 64-bit version of Eclipse must download the 64-bit version of Eclipse for RCP and RAP Developers, and then use the Process Developer Plugin installation.
Before You Configure and Deploy Process Server
Third party software components are required to be installed prior to configuring and deploying Process Server.
Application Server must be Installed
An application server provides Process Server a framework within which to run. Install the appropriate supported server container according to software vendor's documentation on each machine intended to run Process Server.
General Information 33

Note: Set up clustering according to your software vendor's documentation. Once clustering is set up on the application server, follow our documentation for configuring clustering.
Database Server must be Installed
Process Server requires only one database server per any number of application servers running in a cluster.
All databases require a user with administrative rights to the computer in order to install them. Process Server also requires a connection to your database server. This user needs the proper privileges to connect to the Process Server database, update, insert and delete records within that database.
MySQL Configuration Note
A BPEL process can send and receive variables with attachments such as images or documents. Attachments may be large or numerous, causing database connection errors.
To avoid connection errors to MySQL Server, you may need to configure MySQL with more allocated memory than the default of 1MB.
To configure MySQL:
1. Open MySQL Administrator. (If unavailable, see the note below.)
2. Select Startup Variables.
3. Select Advanced Networking.
4. In the Data/Memory Size panel, enable Max Packet Size.
5. Set the packet size higher than the default of 1MB. The size depends on the attachment sizes you expect.
6. Apply changes.
Note: If MySQL Administrator is not available, refer to the MySQL documentation regarding how to set the max_allowed_packet setting for your environment.
About the Process Server Database Schema
Process Server provides database schema definition files for all supported databases. Before you start the configuration and deploy utility, refer to Configuration topic in this help for specific recommendations on how to install the schema for your database.
Installation FoldersDownload and extract the installation folders as described in Quick Start. The following describes the contents of the Process Server installation:
{install_dir}/server-enterprisequickstart_server.html. Open this file for quick start and complete details for configuration and deployment.
{install_dir}/server-enterprise/weblogic_config/binConfiguration and deployment tool
{install_dir}/server-enterprise/weblogic_config/ddlsDatabase schema to be installed automatically (recommended) or manually, as described in Configuration
{install_dir}/server-enterprise/weblogic_config/deployFiles to be installed automatically by the configuration and deploy utility
34 Chapter 2: WebLogic
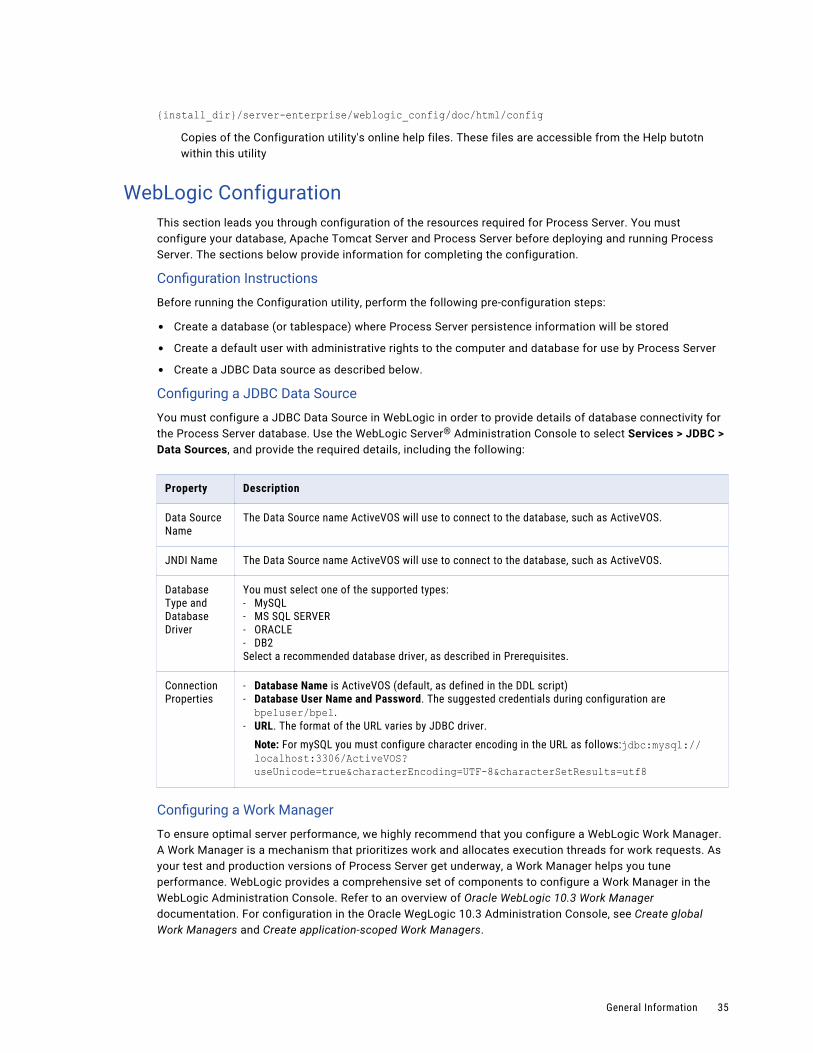
{install_dir}/server-enterprise/weblogic_config/doc/html/configCopies of the Configuration utility's online help files. These files are accessible from the Help butotn within this utility
WebLogic ConfigurationThis section leads you through configuration of the resources required for Process Server. You must configure your database, Apache Tomcat Server and Process Server before deploying and running Process Server. The sections below provide information for completing the configuration.
Configuration Instructions
Before running the Configuration utility, perform the following pre-configuration steps:
• Create a database (or tablespace) where Process Server persistence information will be stored
• Create a default user with administrative rights to the computer and database for use by Process Server
• Create a JDBC Data source as described below.
Configuring a JDBC Data Source
You must configure a JDBC Data Source in WebLogic in order to provide details of database connectivity for the Process Server database. Use the WebLogic Server® Administration Console to select Services > JDBC > Data Sources, and provide the required details, including the following:
Property Description
Data Source Name
The Data Source name ActiveVOS will use to connect to the database, such as ActiveVOS.
JNDI Name The Data Source name ActiveVOS will use to connect to the database, such as ActiveVOS.
Database Type and Database Driver
You must select one of the supported types:- MySQL- MS SQL SERVER- ORACLE- DB2Select a recommended database driver, as described in Prerequisites.
Connection Properties
- Database Name is ActiveVOS (default, as defined in the DDL script)- Database User Name and Password. The suggested credentials during configuration are bpeluser/bpel.
- URL. The format of the URL varies by JDBC driver.Note: For mySQL you must configure character encoding in the URL as follows:jdbc:mysql://localhost:3306/ActiveVOS?useUnicode=true&characterEncoding=UTF-8&characterSetResults=utf8
Configuring a Work Manager
To ensure optimal server performance, we highly recommend that you configure a WebLogic Work Manager. A Work Manager is a mechanism that prioritizes work and allocates execution threads for work requests. As your test and production versions of Process Server get underway, a Work Manager helps you tune performance. WebLogic provides a comprehensive set of components to configure a Work Manager in the WebLogic Administration Console. Refer to an overview of Oracle WebLogic 10.3 Work Manager documentation. For configuration in the Oracle WegLogic 10.3 Administration Console, see Create global Work Managers and Create application-scoped Work Managers.
General Information 35

If there is no Work Manager configured when you execute the Config-Deploy utility, Process Server provides its own internal work manager. The internal work manager is configured with a basic set of minimum and maximum execution threads.
First Time or New Install
If you are performing a clean installation, that is, a first-time install or a new database, you can use the Configuration utility to automatically install the database schema.
Manual Install or Update of Database Schema
It is strongly recommended that you automatically install the database schema; however, you can manually install it. Customers migrating from an earlier version should follow the instructions below.
Migrating from an earlier release of ActiveVOS to Process Server
If you are migrating from ActiveVOS, perform the following steps:
• Manually update the Process Server database schema using the DDL patches provided in {install_dir}/server/tomcat_config/ddls/updates
• Run the Configuration utility
• Review the Release Notes for late breaking migration information
• Review the Process Developer help topic, Migrating from Earlier Versions
Process Server can be configured to use an RDBMS database.
Relational Database Schemas
These instructions are generalized to make sure they can be followed for each database. When creating the database schema for Process Server, you can either create a new database definition or upgrade an existing definition.
• Refer to the install a new database schema section for a new installation.
• Refer to upgrade a database schema when performing a version upgrade.
Install a new database schema
1. Identify your DDL. Use the information provided in the table below to locate the correct DDL file.
Database Server
DDL File Name and Location Notes
MYSQL {install_dir}/server /weblogic_config/ddls/ ActiveBPEL-Enterprise-MYSQL.SQL
The default database name, ActiveVOS is defined within the DDL file. If you edit this name, ensure that you do not replace ActiveVOS Enterprise, a name that is inserted into the AeMetaInfo table.
MS SQL SERVER
{install_dir}/server /weblogic_config/ddls/ ActiveBPEL-Enterprise-SQLSERVER.SQL
The default database name, ActiveVOS is defined within the DDL file. If you edit this name, ensure that you do not replace ActiveVOS Enterprise, a name that is inserted into the AeMetaInfo table.
36 Chapter 2: WebLogic

Database Server
DDL File Name and Location Notes
ORACLE {install_dir}/server/weblogic_config/ddls/ActiveBPEL-Enterprise-ORACLE.SQL
Create a tablespace prior to running the DDL.
DB2 {install_dir}/server/weblogic_config/ddls/ ActiveBPEL-Enterprise-DB2.SQL
2. Copy the DDL file from above, and rename it.Note: The original files must remain unchanged for the Configuration utility to work properly
3. (Optional) Modify the database name. Be sure to see the notes above.
4. Execute the DDL script.
5. Permissions must be set for Process Server to access your schema. For example, GRANT SELECT, INSERT, UPDATE, DELETE, CREATE, DROP, REFERENCES, INDEX, ALTER, CREATE TEMPORARY TABLES, LOCK TABLES, EXECUTE, CREATE VIEW, SHOW VIEW, CREATE ROUTINE, ALTER ROUTINEIf Process Server does not have the permissions it needs, you will see an error message that begins as follows: Failed to get version info from the AeMetaInfo table
Each database server provides its own mechanism or utility for executing a DDL script file. Execute the DDL script file using the appropriate utility. For example, if you are using Oracle, the utility to execute the DDL script file would be SQL Plus.
Upgrade an Existing Database Schema
To upgrade your Process Server database to be compatible with the new version of software, follow the instructions below:
1. Shutdown Process Server before executing a database upgrade.
2. Make a backup copy of your database.
3. Identify your current running version of Process Server. Database upgrades are provided to upgrade from one version back at a time. This means that more than one upgrade script may need to be applied to your database. For example, if you are running ActiveVOS version 8.0.x, you must go to the updates folder, and apply all patch scripts with higher numbers, starting with [database name]-Patch-9.0.sql. Be sure to run the patch scripts in ascending order. Do not run any upgrade script with a version number equal to or less than your current running version.
General Information 37
4. For each upgrade that needs to be applied perform the following:
a. Identify your DDL. Use the information provided in the table below to locate the correct DDL file. Note: The updates must be applied in ascending order.MYSQL
{install_dir}/server/weblogic_config/ddls/updates/enterprise/ActiveBPEL-Enterprise-MYSQL-PATCH-{patch number}.SQL
MS SQL SERVER
{install_dir}/server/weblogic_config/ddls/updates/enterprise/ActiveBPEL-Enterprise-SQLSERVER-PATCH-{patch number}.SQL
ORACLE
{install_dir}/server/weblogic_config/ddls/updates/enterprise/ActiveBPEL-Enterprise-ORACLE-PATCH-{patch number}.SQL
DB2
{install_dir}/server/weblogic_config/ddls/updates/enterprise/ActiveBPEL-Enterprise-DB2-PATCH-{patch number}.SQL
b. Execute the DDL script.Each database server provides its own mechanism or utility for executing a DDL script file. Execute the DDL upgrade script file using the appropriate utility. For example, if you are using Oracle, the utility to execute the DDL script file would be SQL Plus.
Versions of WebLogic Prior to 12.2 Have File Upload Issues
Versions of WebLogic prior to 12.2 have file upload issues and you may see one or more of the following:
• Cannot deploy bpr.
• Cannot import the identity configuration settings: after you import the configuration file, the data does not get filled.
• Cannot add an attachment using a Task Screenflow > Add attachment automated action where the screen allows you to browse a file. The guide hangs in this step. You get the message "the Guide session is not available and cannot be used"
This is a known issue with weblogic 12.1.1. You either need to install a later versio or obtain the patch 13657792 and install it. If you wish to install the patch, enter this value in the Patch Number Search field on the Patches > Updates tab of My Oracle Support.
A second Weblogic problem is that that Servlet 3.0 file upload is enabled by default and cannot be disabled using a flag in the WebLogic Server. This causes problems when using other file upload frameworks.
Multisite Configuration
For details, see Process Server MultiSite Configuration.
Security Configuration
You can find details on configuring Process Server security roles in Process Developer Help or in the Infocenter.
Configuration for Headless Mode
Process Server relies on GUI components from the Java's SWT package, such as Fonts. If you are running on a headless server (i.e., the server does not have a graphic subsystem), you may see one of the following errors in the stack trace:
• java.lang.NoClassDefFoundError: sun/awt/X11GraphicsEnvironment
38 Chapter 2: WebLogic

• Can't connect to X11 window server using ':0.0' as the value of the DISPLAY variable
• org.eclipse.birt.report.service.api.ReportServiceException
Use one of the following techniques to correct errors:
• Configure the JVM system property java.awt.headless=true and at the command line, start the JVM with the argument: -Djava.awt.headless=true
• Run a X-windows virtual frame buffer (Xvfb)
Using the Configuration Utility
The Configuration utility walks through the steps required to provide the property values for Process Server and selected resources.
Note: Before running the utility, ensure that your server container is stopped.
Starting the Configuration Utility
Execute one of the following utilities based on your operating system:Windows
{install_dir}/server/weblogic_config/bin/config_deploy.batLinux
{install_dir}/server/weblogic_config/bin/config_deploy.sh
If You Have Manually Installed or Updated the Database Schema
If you have manually installed or updated the database schema, when prompted, you must not select the "Install Database Schema" checkbox.
Running the Configuration Utility in Different Modes
The Configuration utility can be run with a graphical interface (default), in console mode or silently. When you run the utility your configuration options are automatically written to the install.properties file and they will be used as the defaults the next time the application is configured. One of the following parameters is accepted by the Configuration utility:
• Help: help. This option displays the usage for console and silent modes.
• Console mode: console. Runs the Configuration utility in text mode within a command window.
• Silent mode: silent. Runs in the background requiring no user interaction. This option requires that you have already run the Configuration utility in default mode, which sets configuration options in the install.properties file.
An example of running the Configuration utility from the command line is: config_deploy help
Configuration Help
The Configuration utility contains online help for each panel of the utility. Access Help by clicking the Help button on each panel. Additionally you can access the help from {install_dir}/server/weblogic_config/doc/html/config.
Multisite ConfigurationThe prerequisites for using Multisite Clustering include the following:
• This feature requires a Multisite license. Be sure to obtain a license to enable this feature in Process Server. The server configuration instructions describe how to enter your license. Enter the license into one server in your Multisite environment.
General Information 39

• You must use either an Oracle or MySQL database. Currently Multisite supports Oracle Database 11g and MySql.
• Use of Multisite requires that the Process Server Eventing Service is disabled. Eventing is disabled in a Multisite license.
• Follow all instructions below to ensure successful Multisite configuration.
What is Multisite?
Process Server supports a site configuration, which allows a cluster of process servers to replicate its database to other databases serving other sites. Each site has a cluster of Process Servers (one or more servers) with a single persistent database, and the site operates independently of other sites. All process instances are available for execution at each site. In the event of a server failure, a process can start execution on one site and complete on a different site. In addition, most Process Server configuration properties are replicated from site to site. This means you can configure server properties in one site, and they are automatically copied to another site's administration console.
The following illustration shows a sample Multisite environment. The database setup is a master-master replication, as shown below. This technique allows you to replicate data in tables across separate databases.
Oracle and MySQL
The procedures you follow when you are using Oracle differ from those you use when using MySQL. Use the following links to jump to the description for your database.
• Oracle
• MySQL
Following these descriptions is a section describing "Pausing Replication When Performing Database Updates. This section applies to Oracle and MySQL.
Oracle Multisite SetupOn each site, complete all Process Server prerequisites as well as the following:
• Step One: Configure WS-Security
• Step Two: Enable Archivelog Mode in Oracle
• Step Three: Install the Process Server database schema for Oracle database
• Step Four: Perform Oracle Streams set up using Process Server-provided scripts
• Step Five: Test Oracle Streams set up using Process Server-provided scripts
• Step Six: Configure and deploy Process Server
• Step Seven: Add the MultiSite license
• Step Eight: Configure and enable MultiSite properties
40 Chapter 2: WebLogic

Step One. Configure WS-Security
Configure WS-Security in each server node in each site, if desired, to enable the MultiSite WS-Security property for site communication. For details, refer to Configuring Process Server for WS-Security elsewhere in this help. Alternately, go to activevos.com to link to the product documentation.
Step Two: Enable Archivelog Mode in Oracle
The Oracle Streams capture process reads information from the redo log files of the database. This requires that the database is run in ARCHIVELOG mode. In this mode, Oracle archives the filled online redo log files before reusing them in the cycle. A Recovery Manager (RMAN) utility can be setup to periodically clear or backup these files before they fill up the allocation.
Step Three. Install the Process Server Database Schema
Install the Process Server database schema for Oracle database. The database DDL files are located in your installation folder. For instructions, see Process Server and Resource Configuration.
Step Four: Set up Oracle Streams
Process Server provides an automated setup environment for Oracle Streams. The setup files are in the Process Server installation folder in the following location:
<applicationserver>_config/bin/multisite_setupNote: The automated setup configures two databases at a time. If your environment requires multiple databases, you can reconfigure setup.
The setup files include the following:
File Description
streams_readme.txt Contains instructions for configuring MultiSite
database.properties Contains your values for user/password of the Oracle user with administrative (DBA) rights
multisite.properties Contains your values for setup of two MultiSite databases to replicate
setup.cmd Command line script to perform Oracle Streams setup with your values
teardown.cmd Command line script to remove Oracle Streams setup
multisite.xml Ant file used in setup and teardown commands
Complete Streams setup as follows:
1. Read all instructions in the streams_readme.txt file.
2. As described in streams_readme.txt, edit database.properties and add your values.
3. As described in streams_readme.txt, edit multisite.properties and add your values. See the example below.
4. Execute setup.cmd now or just create the completed setup file to run later. By default, when you execute the setup file, Streams is configured. However, you can set a multisite.execute.scripts flag to false in the multisite.xml Ant script to create an executable script that you can run later.
5. Execute the setup script.
6. Test database replication, as described below in Step Five.
General Information 41
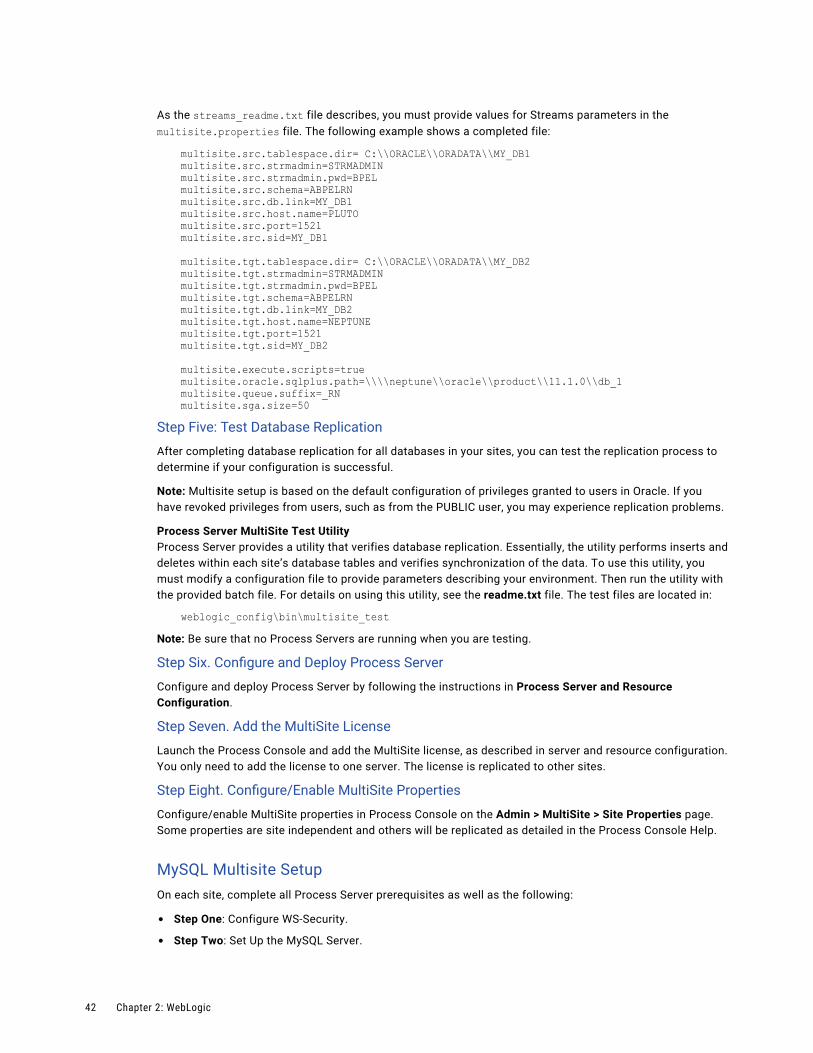
As the streams_readme.txt file describes, you must provide values for Streams parameters in the multisite.properties file. The following example shows a completed file:
multisite.src.tablespace.dir= C:\\ORACLE\\ORADATA\\MY_DB1multisite.src.strmadmin=STRMADMINmultisite.src.strmadmin.pwd=BPELmultisite.src.schema=ABPELRNmultisite.src.db.link=MY_DB1multisite.src.host.name=PLUTOmultisite.src.port=1521multisite.src.sid=MY_DB1
multisite.tgt.tablespace.dir= C:\\ORACLE\\ORADATA\\MY_DB2multisite.tgt.strmadmin=STRMADMINmultisite.tgt.strmadmin.pwd=BPELmultisite.tgt.schema=ABPELRNmultisite.tgt.db.link=MY_DB2multisite.tgt.host.name=NEPTUNEmultisite.tgt.port=1521multisite.tgt.sid=MY_DB2
multisite.execute.scripts=truemultisite.oracle.sqlplus.path=\\\\neptune\\oracle\\product\\11.1.0\\db_1multisite.queue.suffix=_RNmultisite.sga.size=50
Step Five: Test Database Replication
After completing database replication for all databases in your sites, you can test the replication process to determine if your configuration is successful.
Note: Multisite setup is based on the default configuration of privileges granted to users in Oracle. If you have revoked privileges from users, such as from the PUBLIC user, you may experience replication problems.
Process Server MultiSite Test UtilityProcess Server provides a utility that verifies database replication. Essentially, the utility performs inserts and deletes within each site’s database tables and verifies synchronization of the data. To use this utility, you must modify a configuration file to provide parameters describing your environment. Then run the utility with the provided batch file. For details on using this utility, see the readme.txt file. The test files are located in:
weblogic_config\bin\multisite_testNote: Be sure that no Process Servers are running when you are testing.
Step Six. Configure and Deploy Process Server
Configure and deploy Process Server by following the instructions in Process Server and Resource Configuration.
Step Seven. Add the MultiSite License
Launch the Process Console and add the MultiSite license, as described in server and resource configuration. You only need to add the license to one server. The license is replicated to other sites.
Step Eight. Configure/Enable MultiSite Properties
Configure/enable MultiSite properties in Process Console on the Admin > MultiSite > Site Properties page. Some properties are site independent and others will be replicated as detailed in the Process Console Help.
MySQL Multisite SetupOn each site, complete all Process Server prerequisites as well as the following:
• Step One: Configure WS-Security.
• Step Two: Set Up the MySQL Server.
42 Chapter 2: WebLogic

• Step Three: Install the Process Server database schema for the MySQL database
• Step Four: Test MySQL set up using Process Server-provided scripts.
• Step Five: Configure and deploy Process Server.
• Step Six: Add the MultiSite license.
• Step Seven: Configure and enable MultiSite properties.
Step One: Configure WS-Security (Optional)
If desired, configure WS-Security in each server node in each site to enable the MultiSite WS-Security property for site communication. For details, refer to Configuring Process Server for WS-Security elsewhere in this help. Alternately, go to activevos.com to link to the product documentation.
Step Two: Set Up the MySQL Server
You will need to perform the actions described in the following list on each target server. Note that the minimum MySQL version is 5.5.
1. Create a MySQL config file for each server based on the following file:
my-innodb-heavy-4G.iniCopy this information to your activevos.ini files.
2. Start the server and log in as root.
3. Create a user who will have permissions to perform replication. For example:User: replication Password: activevos
4. Assign the following rights to the replication user:
• RELOAD
• REPLICATION CLIENT
• REPLICATION SLAVE
• SUPER
Step Three: Install the Process Server Database Schema for the MySQL Database
1. Login in using your administrator password.
2. Create activevos schema and install Process Server tables and views.
3. Stop the MySQL server.
4. Edit the activevos.ini file on each server as follows:On Server A:
server-id = 1replicate-same-server-id = 0auto-increment-increment = 2auto-increment-offset = 1master-connect-retry = 60
sync_binlog=1log-bin = C:\mysql\log\log-bin.log # change this to a path/name appropriate to your systemrelay-log=MySQLStreamA-relay-bin# replicate all changes to activevos database, but ignore specific tablesreplicate-ignore-table=activevos.AeCounterreplicate-ignore-table=activevos.AeMetaInforeplicate-ignore-table=activevos.AeLockreplicate-ignore-table=activevos.AeURNValues
General Information 43

On Server B:
server-id = 2replicate-same-server-id = 0auto-increment-increment = 2auto-increment-offset = 2master-connect-retry = 60sync_binlog=1log-bin = C:\mysql\log\log-bin.log # change this to a path/name appropriate to your systemrelay-log=MySQLStreamB-relay-bin# replicate all changes to activevos database, but ignore specific tablesreplicate-ignore-table=activevos.AeCounterreplicate-ignore-table=activevos.AeMetaInforeplicate-ignore-table=activevos.AeLockreplicate-ignore-table=activevos.AeURNValues
5. Perform the following query on each database:
CHANGE MASTER TO MASTER_HOST='[ip address or hostname of master]', MASTER_USER='replication', MASTER_PASSWORD='activevos'
6. On each database, start replication using the following statement:START SLAVE
Step Four: Test MySQL Set Up Using Process Server-provided Scripts
After completing database replication for all databases in your sites, you can test the replication process to determine if your configuration is successful.
Note: Multisite setup is based on the default configuration of privileges granted to users in MySQL. If you have revoked privileges from users, such as from the PUBLIC user, you may experience replication problems.
Process Server MultiSite Test Utility
Process Server has a utility that verifies database replication. Essentially, the utility performs inserts and deletes within each site’s database tables and verifies synchronization of the data. To use this utility, you must modify a configuration file to provide parameters describing your environment. Then run the utility with the provided batch file. For details on using this utility, see the readme.txt file. The test files are located in:
mysql_config\bin\multisite_testNote: Be sure that no Process Servers are running when you are testing.
Step Five: Configure and Deploy Process Server
Configure and deploy Process Server by following the instructions in Process Server and Resource Configuration.
Step Six: Add the MultiSite license
Launch the Process Console and add the MultiSite license, as described in server and resource configuration. You only need to add the license to one server. The license is replicated to other sites.
Step Seven: Configure and Enable MultiSite Properties
Configure and enable MultiSite properties in Process Console on the Admin > MultiSite > Site Properties page. Some properties are site independent and others are replicated. For information, see the Process Console Help.
Pausing Replication When Performing Database UpdatesWhen you upgrade the database schema for a new version of Process Server, be sure to follow the instructions below and then to perform the upgrade as described in Process Server and Resource Configuration.
44 Chapter 2: WebLogic
Do the following:
• You must temporarily stop database replication.In Oracle Streams, follow the instructions to stop the Capture and Apply processes for each database in replication. These tasks are located on the Oracle Enterprise Manager's Streams > Manage > Capture and Oracle Enterprise Manager's Streams > Manage > Apply pages.
• You must ensure that all servers are stopped before upgrading. the schema. Upgrade each site database before starting any server.
• When all databases have been upgraded, you can start up the Streams Capture and Apply processes and the Process Server servers.
Installation ChecklistThis section provides a list of most of the items that you should either have completed or information noted prior to attempting to install Process Server.
Hardware
• Server hardware must meet the requirements listed for each third-party application, including server container, database server and Java environment.
Software
• A user account with administrative rights to install or manage all required software including the application and database servers and the Process Server.
• A supported database server installed and accessible.
• The supported Server container installed on each machine intended to host Process Server.
• JVM Memory arguments have been added to your environment variable: -Xms256m -Xmx1024m -XX:MaxPermSize=384m. (See “Prerequisites” on page 8.)
• Process Server must be configured for WS-Security. (See Configuring Process Server for WS-Security.)
• In your Identity Service (JDBC, LDAP, or XML), add the abTaskClient role to each Process Central user. This security role, described in the web.xml file, is required for access to Process Central.
• On the URN Mappings page of the Process Console, update the host and port for Process Central to match your installation, if needed. The default address is http://localhost:8080/activevos-central/avc.
License Information
• Valid license keys for the total number of sockets intended to host Process Server.
Database Information
• Permissions must be set for Process Server to access your schema. For example, GRANT SELECT, INSERT, UPDATE, DELETE, CREATE, DROP, REFERENCES, INDEX, ALTER, CREATE TEMPORARY TABLES, LOCK TABLES, EXECUTE, CREATE VIEW, SHOW VIEW, CREATE ROUTINE, and ALTER ROUTINE.
• For WebLogic and WebSphere, configuration of a JNDI data source.
• The URL to use to connect to the Process Server database.
• The database user name and password to be used by Process Server to connect to the database.
• If you are using an Oracle database, the Process Server tablespace created.
• For RDBMS, if you are not using the database driver and information supplied with the Application Server you must also have the following two:
- A JDBC database driver that provides the required functionality.
General Information 45

- The class name of the JDBC database driver.
Server Container Information
• The installation location of your Server containers.
GlossaryAPI
Application Program Interface, a set of routines, protocols, and tools for building software applications.
Application Server
Also called an appserver. A program that handles all application operations between users and an organization's backend business applications or databases. Application servers are typically used for complex transaction-based applications. To support high-end needs, an application server has to have built-in redundancy, monitors for high-availability, high-performance distributed application services and support for complex database access.
DDL
Data Definition Language is used to specify a database scheme as a set of definitions expressed in a DDL script. The basic idea is to hide implementation details of the database schemes from the users.
EAR
J2EE modules that comprise an application are assembled into a single application Enterprise Archive (EAR) file.
J2EE
Java 2 Platform Enterprise Edition, a platform-independent, Java-centric environment from Sun for developing, building and deploying Web-based enterprise applications online.
Java
A high-level programming language developed by Sun Microsystems. Java is an object-oriented language similar to C++, but simplified to eliminate language features that cause common programming errors. Java source code files (files with a .java extension) are compiled into a format called bytecode (files with a .class extension), which can then be executed by a Java interpreter.
JAR
Java Archive, a file format used to bundle all components required by a Java applet. JAR files simplify the downloading of applets since all the components (.class files, images, sounds, and the like) can be packaged into a single file. In addition, JAR supports data compression, which further decreases download times.
JNDI
Java Naming and Directory Interface (JNDI). Allows Java-enabled applications to use a unified interface to multiple naming and directory services in the enterprise. Part of the Java Enterprise API set. JNDI works with other J2EE technologies to organize and locate components in a distributed computing environment.
JVM
Java Virtual Machine. An abstract computing machine, or virtual machine, JVM is a platform-independent programming language that converts Java bytecode into machine language and executes it.
URL
Uniform Resource Locator, the global address of documents and other resources on the World Wide Web.
46 Chapter 2: WebLogic
WAR
Java modules that comprise an application are assembled into a single application Web Archive (WAR) file.
Web Server
A Web Server a computer that delivers (serves up) Web pages. Every Web server has an IP address and possibly a domain name. For example, if you enter the URL http://www.pcwebopedia.com/index.html in your browser, this sends a request to the server whose domain name is pcwebopedia.com. The server then fetches the page named index.html and sends it to your browser. That request can also cause complex logic to be executed and manage database access.
XML
Extensible Markup Language, a specification developed by the W3C. XML is a pared-down version of SGML, designed especially for Web documents. It allows designers to create their own customized tags, enabling the definition, transmission, validation, and interpretation of data between applications and between organizations.
ConfigurationThe topics in the section provide information on pages within the Configuration Wizard.
Configuration and DeploymentPlease review the important information in Prerequisites and Installation Checklist before running ActiveVOS Server configuration.
For Tomcat, WebSphere, and JBoss: This panel allows you to select what operations you would like to perform. Subsequent panels show the details of each option. The selections and the results are described in the table below.
For WebLogic: The configuration wizard collects details for ActiveVOS Server to communicate with a selected database, a work manager, and ActiveVOS Central. It can deploy applications and install the database schema. Select the options you want to execute.
Note: Many of the options presented in the configuration wizard are only used within development servers. The availability of these options on production servers may be limited or unavailable due to security restrictions or other limitations imposed by the administrators of the target server, or by your particular configuration and situation.
Select the options you would like to perform and click Next to continue.
Selection Description
Configure ActiveVOS Server Allows the setting of the parameters required to start and run the ActiveVOS Server and set the security options for the application.
Configure ActiveVOS Central When enabled, allows setting of configuration parameters for the ActiveVOS Central application.
For WebSphere: Configure Application Resources
Allows configuration of your work manager4, timer manager, JAAS logins, and database resource.
Configuration 47

Selection Description
For Tomcat and JBoss: Configure Database
Configuration of an application server's native data source files or wizards.
For Tomcat, WebSphere, and JBoss: Deploy Applications and Resources
Deployment of ActiveVOS Server and datasource.
For WebLogic: Deploy Applications
Select deployment of ActiveVOS Server and ActiveVOS Central. It also allows you install the database schema. Note that you can run the config-deploy tool more than once on separate servers, to deploy ActiveVOS Central to different machines.
Engine ConfigurationThis panel provides information required for ActiveVOS Server to access your database server. Choices on this panel change the settings in the configuration of the aeEngineConfig.xml file, which is contained in the activevos.war file.
Field Name Default Value Descripton
Database MySQL This setting is used internally by ActiveVOS Server to handle communication for the supported database.
Select Next to save your value and continue.
JNDI ConfigurationThe Server JNDI Configuration panel allows configuration of the various files that contain JNDI references.
For Tomcat and JBoss: In general, if you have not preconfigured resources on your application server, it is not necessary to change the default values. If you have already configured resources you must match the field to your corresponding resource.
For WebLogic: You should configure JNDI resources before completing this configuration. Refer to Configuration for guidelines on configuring a JDBC Data Source and a Work Manager.
48 Chapter 2: WebLogic

For Websphere: You should preconfigure a work manager and timer manager on your application server prior to completing this configuration. However, you can configure them later and rerun the configuration. If you have already configured resources, you must match the field to your corresponding resource.
Server Field Name Default Value Description
All Database JNDI jdbc/ActiveVOS The ActiveVOS Server Database resource must be assigned a JNDI name for location at run-time. Enter this JNDI name in the text box provided.
WebLogic Work Manager JNDI wm/ActiveVOS (suggested name)
Name that is used to connect to a WebLogic Work Manager that you have created in the WebLogic Application Server's Process Console.Note: If you do not configure a WebLogic Work Manager, ActiveVOS Server ignores this name and instead use its own internal Work Manager. Enter your WebLogic JNDI name if it differs from the suggested name.
Configuration 49
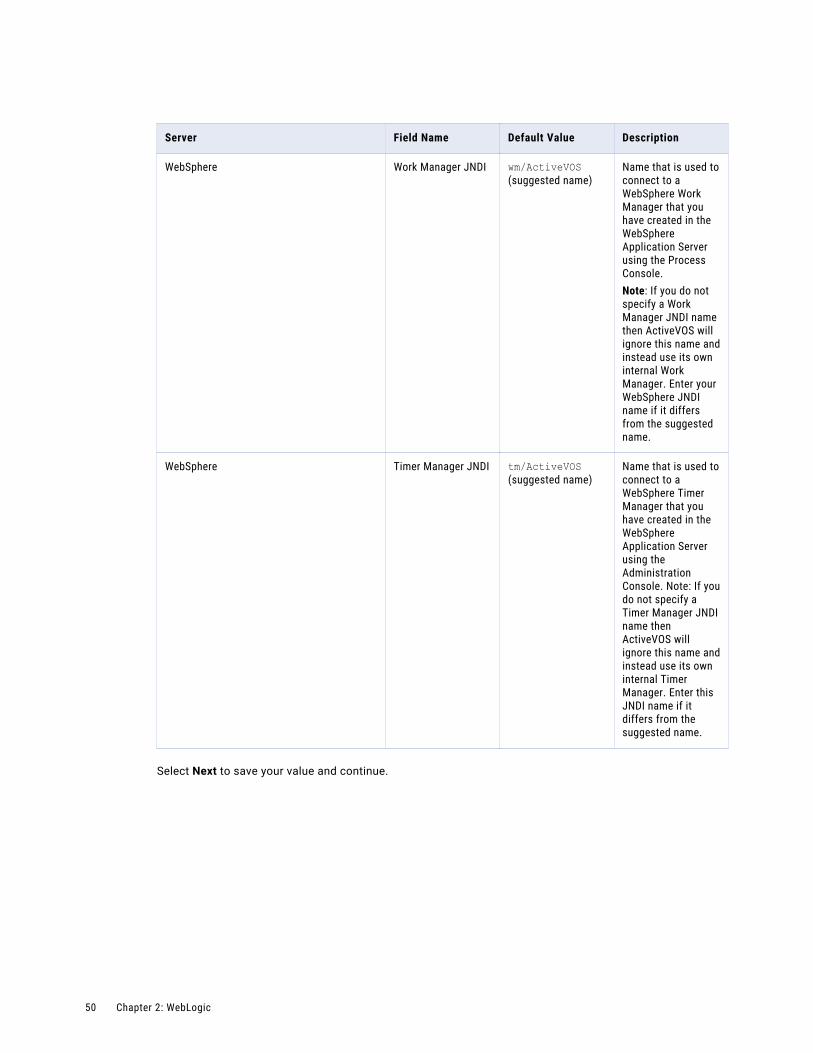
Server Field Name Default Value Description
WebSphere Work Manager JNDI wm/ActiveVOS (suggested name)
Name that is used to connect to a WebSphere Work Manager that you have created in the WebSphere Application Server using the Process Console.Note: If you do not specify a Work Manager JNDI name then ActiveVOS will ignore this name and instead use its own internal Work Manager. Enter your WebSphere JNDI name if it differs from the suggested name.
WebSphere Timer Manager JNDI tm/ActiveVOS (suggested name)
Name that is used to connect to a WebSphere Timer Manager that you have created in the WebSphere Application Server using the Administration Console. Note: If you do not specify a Timer Manager JNDI name then ActiveVOS will ignore this name and instead use its own internal Timer Manager. Enter this JNDI name if it differs from the suggested name.
Select Next to save your value and continue.
50 Chapter 2: WebLogic
Internal Work Manager ConfigurationThe execution thread values displayed are used for the internal ActiveVOS Server work manager. We highly recommend that you configure a WebLogic Work Manager. You can accept these initial values for the internal work manager. In the ActiveVOS Console, you can modify these values, as desired.
Value Description
Minimum Threads (Optional). The minimum number of threads that are available for performing process work. The default is 10.
Maximum Threads (Optional). The maximum number of threads that are available for performing process work. The default is 50.
If the number of threads being run is equal to this value, processes can fault as no threads are available when a node needs to broadcast information to other nodes. To be safe, you should create a secondary pool to be used by ActiveVOS Server. (This is done in the app server's console. ActiveVOS Server will only use threads in the pool when critical system work must be performed.
After entering this information, click Next to save your values and to continue.
Security ConfigurationActiveVOS Server can be deployed in a secured manner. The Security Configuration panel allows you to configure the security parameters that will be applied to the ActiveVOS Server Console, and deployed BPEL process services. Select the security options you want to enable.
After completing configuration, you must assign security roles to users and groups. You can find details on configuring security in the Process Server Guide.
If you have a license for the multi-tenant feature, you must enable security.
After entering this information, click Next to save your values and to continue.
Administrative Functions
These functions add security parameters to the ActiveVOS Consoles and services by setting the following roles:
abAdmin
Users associated with this role have full administrative rights to ActiveVOS Server.
abBusinessManager
Users associated with this role have access to process instance details (but cannot operate on them). They can monitor active processes and tasks, and work queues. They have a read-only view of process instance details.
abDeployer
Users associated with this role have rights restricted to deploying business process archive files to ActiveVOS Server.
abDeveloper
Users associated with this role have rights restricted to service artifacts, endpoint information, and sample messages for the services they consume and expose (that is, processes) after they are deployed. Developers need the ability to deploy process deployment archives, initiate process execution and analyze them. Developers also need to configure global function contexts for custom functions, URN
Configuration 51

mappings, and the ability to schedule process execution. Specifically, this user has access to the Active Process list, the Process Instance View, the Active Task and Work Queues lists, the Server Log, the Dashboard and all reports, and the catalog's content.
abOperator
Users associated with this role have rights restricted to operating the system. These include observing the functionality of processes, managing process instances using the process instance detail view, running reports, logging, viewing exceptions, acquiring information on service operations, adding and removing tenants, and managing the scheduled database delete schedule.
abTaskClient
Required. You must configure permission to access ActiveVOS Central for all users. In addition, users who interact with the Human Task (WS-HT) API must have this role.
ActiveVOS Central presents a login page to users.
Process Services
The process services adds security parameters to the Web Services handler for all deployed BPEL services with a role. The services listed at http://[host]:[port]/active-bpel/services are secured. The process services (roles) are:
abRestrictedServiceConsumer
Users associated with this role cannot access a service unless it is deployed with allowed roles specified in the pdd and the user belongs to at least of these roles. If no roles are specified in the pdd, access to services with no roles specified in the pdd are also denied. Users in this role can view the wsdl files for other services like abServiceConsumer; however, they are blocked at runtime.
abServiceConsumer
Users associated with this role have rights restricted to start process instances of deployed processes, including from ActiveVOS Central, the Eclipse Web Tools Project, or other client application,such as SOAPUI.
abTenantAdmin
(For a Multi-Tenant licensed server only.) Users associated with this role have rights to deploy and manage contributions into a configured tenant on the server.
Based on a Tenant Definition configured by the ActiveVOS Server administrator (with the abAdmin role), a tenant administrator user can log into the tenant context on the server. A service consumer user can create process instances for processes deployed to the tenant context.
Identity Service Consumer
The identity service consumer adds security parameters to the Web Services handler for Process Identity service used by the ActiveVOS Central application using the following roles:
abIdentityListConsumer
Only users associated with this role or abAdmin have rights to submit Web Service requests to the identity service from Process Developer.
52 Chapter 2: WebLogic
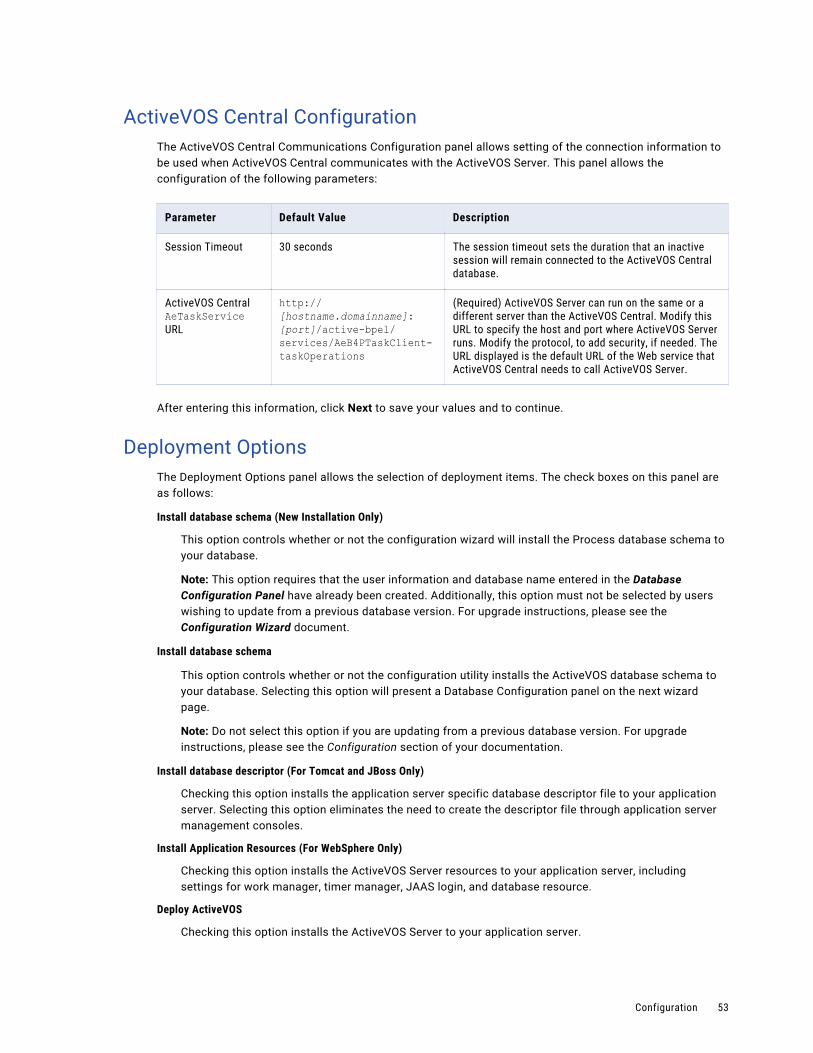
ActiveVOS Central ConfigurationThe ActiveVOS Central Communications Configuration panel allows setting of the connection information to be used when ActiveVOS Central communicates with the ActiveVOS Server. This panel allows the configuration of the following parameters:
Parameter Default Value Description
Session Timeout 30 seconds The session timeout sets the duration that an inactive session will remain connected to the ActiveVOS Central database.
ActiveVOS Central AeTaskService URL
http://[hostname.domainname]:[port]/active-bpel/services/AeB4PTaskClient-taskOperations
(Required) ActiveVOS Server can run on the same or a different server than the ActiveVOS Central. Modify this URL to specify the host and port where ActiveVOS Server runs. Modify the protocol, to add security, if needed. The URL displayed is the default URL of the Web service that ActiveVOS Central needs to call ActiveVOS Server.
After entering this information, click Next to save your values and to continue.
Deployment OptionsThe Deployment Options panel allows the selection of deployment items. The check boxes on this panel are as follows:
Install database schema (New Installation Only)
This option controls whether or not the configuration wizard will install the Process database schema to your database.
Note: This option requires that the user information and database name entered in the Database Configuration Panel have already been created. Additionally, this option must not be selected by users wishing to update from a previous database version. For upgrade instructions, please see the Configuration Wizard document.
Install database schema
This option controls whether or not the configuration utility installs the ActiveVOS database schema to your database. Selecting this option will present a Database Configuration panel on the next wizard page.
Note: Do not select this option if you are updating from a previous database version. For upgrade instructions, please see the Configuration section of your documentation.
Install database descriptor (For Tomcat and JBoss Only)
Checking this option installs the application server specific database descriptor file to your application server. Selecting this option eliminates the need to create the descriptor file through application server management consoles.
Install Application Resources (For WebSphere Only)
Checking this option installs the ActiveVOS Server resources to your application server, including settings for work manager, timer manager, JAAS login, and database resource.
Deploy ActiveVOS
Checking this option installs the ActiveVOS Server to your application server.
Configuration 53
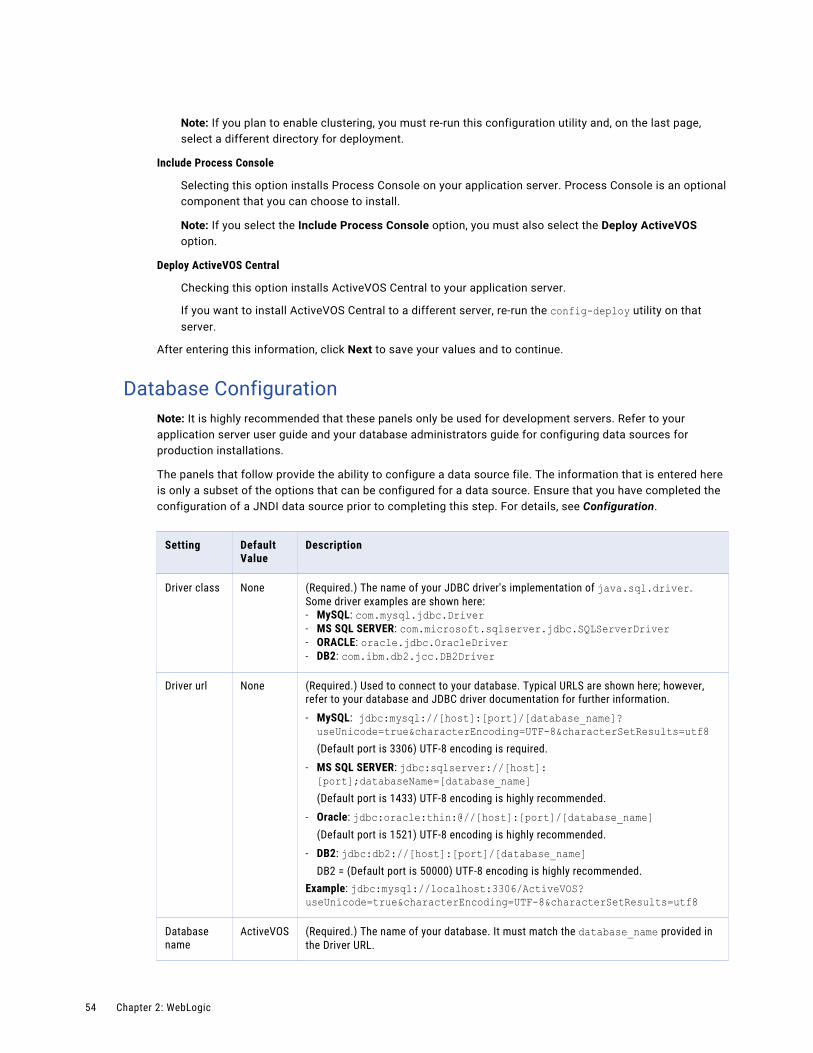
Note: If you plan to enable clustering, you must re-run this configuration utility and, on the last page, select a different directory for deployment.
Include Process Console
Selecting this option installs Process Console on your application server. Process Console is an optional component that you can choose to install.
Note: If you select the Include Process Console option, you must also select the Deploy ActiveVOS option.
Deploy ActiveVOS Central
Checking this option installs ActiveVOS Central to your application server.
If you want to install ActiveVOS Central to a different server, re-run the config-deploy utility on that server.
After entering this information, click Next to save your values and to continue.
Database ConfigurationNote: It is highly recommended that these panels only be used for development servers. Refer to your application server user guide and your database administrators guide for configuring data sources for production installations.
The panels that follow provide the ability to configure a data source file. The information that is entered here is only a subset of the options that can be configured for a data source. Ensure that you have completed the configuration of a JNDI data source prior to completing this step. For details, see Configuration.
Setting Default Value
Description
Driver class None (Required.) The name of your JDBC driver's implementation of java.sql.driver. Some driver examples are shown here:- MySQL: com.mysql.jdbc.Driver- MS SQL SERVER: com.microsoft.sqlserver.jdbc.SQLServerDriver - ORACLE: oracle.jdbc.OracleDriver- DB2: com.ibm.db2.jcc.DB2Driver
Driver url None (Required.) Used to connect to your database. Typical URLS are shown here; however, refer to your database and JDBC driver documentation for further information.- MySQL: jdbc:mysql://[host]:[port]/[database_name]?useUnicode=true&characterEncoding=UTF-8&characterSetResults=utf8(Default port is 3306) UTF-8 encoding is required.
- MS SQL SERVER: jdbc:sqlserver://[host]:[port];databaseName=[database_name](Default port is 1433) UTF-8 encoding is highly recommended.
- Oracle: jdbc:oracle:thin:@//[host]:[port]/[database_name] (Default port is 1521) UTF-8 encoding is highly recommended.
- DB2: jdbc:db2://[host]:[port]/[database_name] DB2 = (Default port is 50000) UTF-8 encoding is highly recommended.
Example: jdbc:mysql://localhost:3306/ActiveVOS?useUnicode=true&characterEncoding=UTF-8&characterSetResults=utf8
Database name
ActiveVOS (Required.) The name of your database. It must match the database_name provided in the Driver URL.
54 Chapter 2: WebLogic

Setting Default Value
Description
Driver jar None Driver .jar file must be selected using the Select File button to the right of this field. Select your driver file so that is can be copied to the correct location.Some driver file examples are shown here, but we strongly recommend you check the Prerequisites details before making your selection.- MySQL: mysql-connector-java-5.0.7-bin.jar- MS SQL SERVER: sqljdbc.jar- Oracle: ojdbc14.jar- DB2: db2jcc.jar and db2jcc_license_cu.jar
Username bpeluser (Required by default.) The name associated with the privileges to access your database. Unless you modified this name, it is described in the DDL schema.
Password bpel (Required by default.) The password of the above user name. Unless you modified this name, it is described in the DDL schema.
For Tomcat and JBoss: Connection Timeout
1000 The maximum time to wait in milliseconds for a database connection to become available.
For Tomcat and JBoss: Minimum Connections
10 The maximum number of idle connections in the database pool.
For Tomcat and JBoss: Maximum Connections
100 The maximum number of connections in the database pool.
Validate Connection
Checked Checking this entry will cause the configuration wizard to attempt to connect to your database with the supplied information.
Validate Connection. After you enter all required database connection information and click Next, the utility checks that your driver jar and URL are valid, and that the database name matches the name in the URL. The utility does not check the username and password of the database. If the server cannot make a connection because these are in error, you can re-run the configure-deploy utility and enter new names. All other values are preserved.
After entering this information, click Next to save your values and to continue.
Deployment TargetsProvide communication and other details for the deployment targets.
Target Information
Description
WebLogic Home Select the root folder of your application server. For example C:\bea\wlserver_10.3.
WebLogic URL URL of the WebLogic Administration Server.
Configuration 55

Target Information
Description
User Name A username that has administrative rights to your application server.
Password Password for the user name.
WebLogic Domain The name of your WebLogic domain. Adomain is the basic administration unit for WebLogic Server instances. A domain consists of one or more WebLogic Server instances (and their associated resources) that you manage with a single Administration Server.
Deployment Target Type
A deployment target is the server, virtual host, or cluster to which you deploy an application. Identify the type of your deployment target.According to the WebLogic documentation, in most production environments, you typically deploy applications to one or more Managed Servers configured in a Weblogic Server domain. In some cases, the servers may be included as part of a WebLogic Server cluster, or a virtual host may be used for directing Web application requests.
Deployment Target
A deployment target is the server, cluster, or virtual host to which you deploy an application. Identify the name of your deployment target. Consult your application server Administration Console to identify the name you want to use.
After entering this information, click Next to save your values and to continue.
56 Chapter 2: WebLogic
C h a p t e r 3
IBM WebsphereThis chapter includes the following topics:
• General Information, 57
• Configuration, 70
General InformationThe Process Server Setup Wizard lets you install a new server or update an existing one.
1. Download and obtain a license for Process Server.
2. Download and run the Process Server installation.
3. To configure and deploy a server, open quickstart_server.html, which directs you to the file you are reading now.
4. Review the Prerequisites and Release Notes for Process Server by selecting the links in the navigation bar on the right.
Note: If the Setup Wizard detects an existing installation, it lets you either update the existing installation or install the server in a different directory. When you update an existing installation, the Wizard replaces any file that a previous Wizard had installed. All other files in your server's install directory remain as they were.
Quick StartPreconfiguration
1. Create a database (or tablespace) for Process Server. Select the Configuration link in the navigation bar for details.
2. Process Server needs to be granted the following permissions on your schema:GRANT SELECT, INSERT, UPDATE, DELETE, CREATE, DROP, REFERENCES, INDEX, ALTER, CREATE TEMPORARY TABLES, LOCK TABLES, EXECUTE, CREATE VIEW, SHOW VIEW, CREATE ROUTINE, ALTER ROUTINEIf Process Server does not have the permissions it needs, you will see an error message that begins as follows: Failed to get version info from the AeMetaInfo table.
3. Collect the following information that you will be prompted for during configuration:
• Host, port number, and database name where you are deploying Process Server
• The full path to a supported JDBC database driver
57

• Driver implementation class name
• Database username and passwordHints and examples of this information are provided in the appropriate page of the Configuration utility's online Help.
4. For an upgrade installation of Process Server, manually install the database schema. For a new installation, you can automatically install the database schema during configuration.
5. Ensure that the JAVA_HOME environment variable is set.Note for Tomcat and JBoss: To avoid issues with multiple JDKs, we recommend that you set JAVA_HOME in the application server startup file instead of in the system environment.
6. Ensure that your JVM memory settings in your application server match the recommendations described in “Prerequisites” on page 8.
7. MultiSite Installations Only: To configure MultiSite clustering, be sure to review the instructions in Process Server MultiSite Configuration. Access the instructions from the Configuration link in the navigation bar on the right.
8. Unix Platform Only: After installing any version of the Process Server on any UNIX OS, you may receive an error when starting the server such as cannot write to temp location [/temp]. This is due to an OS restriction on the number of files that can be created. To avoid this error, before installing the server edit your UNIX security configuration file directly to allow a larger number of files to be opened. In UNIX the parameter NOFILE sets the maximum number of files that can be opened by a single process. For example, in the file /etc/security/limits.conf you could add the line - nofile 10240 to raise the limit from the default 1024 value. 10240 should be large enough. If you are unsure, setting "unlimited" can be considered.
Configuration and Deployment
1. In your ActiveVOS installation folder, locate the [server]-config>bin folder, and select the config-deploy utility.
2. Complete the configuration and deployment. Use the online Help as needed.
3. Use your server container's documentation for help in starting the Process Server.
Note: When you are deploying Process Server to a Tomcat server, activebpel-cert.war is not deployed. You must copy it from {installation_directory}\server-enterprise\tomcat_config\webapps to {Tomcat_Home}\webapps directory when deploying an SSO configuration
Add Your License
1. You will need access to your Process Server license.
2. Open the Process Console in a browser:http://[host]:[port]/activevos
3. Add your license on the License page. Select the Admin menu item of the Process Console and then select License. Select Add and copy and paste all of the Process Server license into the dialog. Then select the Server Status navigation menu item and select Start Server to start the Process Server.
PrerequisitesProcess Server relies on a valid license and third party software components. Ensure that your application server environment meets the requirements before beginning the configuration procedure.
58 Chapter 3: IBM Websphere

Process Server Licensing
A valid license is required to run Process Server. You enter the license information after you've configured Process Server. Do this as follows:
1. Start Process Console.
2. Select Admin | License. (Admin is in the toolbar; License is about a third of the way down on the left.)
3. Press the Add License button, copy and paste all of the Process Server license into the dialog, and then press the Add License button.
4. Select the Server Status link near the ver top of the left area press the Start Server button to start the Process Server
Obtaining a License Key
If you did not receive your license prior to receiving the software, contact the Informatica sales department.
Our sales support staff can assist you with licensing questions.
Hardware Requirements
Application Server Hardware
Process Server runs within different server containers, and the hardware requirements of the server are superseded by the requirements of the container.
Database Hardware
Process Server application supports multiple database servers and has no additional requirements besides those of your selected database server.
Note: For maximum performance, we recommend that you run Process Server and its database schema on separate servers.
JVM Memory Requirements
We strongly recommend that you run your application server with at least the following memory settings:
-Xms256m -Xmx1024m -XX:MaxPermSize=384m
where Xms is starting memory, Xmx is maximum memory, and MaxPermSize is the amount of memory set aside for loading class files.
Disk Space Requirements
At least 1 GB of disk space is required to install the Process Server application.
Note: Considerably more disk space is required to run your applications. The amount is dependent on several factors including logging levels you select, number of processes you run, and size of processes.
Software Requirements
Specific versions of Eclipse, client and server operating systems, application and database servers are supported. Support means that Informatica will assist customers with the installation and operation of Business Process Manager products on these 3rd party product versions.
Also certified are specific combinations of 3rd party products. Use of Certified Systems described here will reduce the risk of problems as a result of extensive testing of Business Process Manager with these specific versions. Database connectivity is required for Process Server persistence and version control of deployed processes. It is recommended that the database resides on a dedicated server.
The following software is supported for use with Process Server:
General Information 59

Operating Systems
• Microsoft Windows 2003/2008 Server
• Linux operating system versions that support the JVM, application and selected database servers supported by Informatica for use by Process Server.
• Solaris 10 (x86/Sparc)
• HP-UX 11i v3 (on Itanium processor)
• AIX 5.3 and 6.1
• Mac OS 10.6 64-bit or higher
Web Browser
• Any browser. A browser is required to view the Release Notes and run the Process Server consoles. Review the activevos.com certified system support page for details.
• There are specific requirements for Screenflow execution in the Screenflow product.
Application Servers
• Apache Tomcat 7.x
• JBoss AS
• Oracle WebLogic 12.1.1
• IBM WebSphere Server 8.5
Note: Other releases of these servers should work. However, they have not been tested.
JAVA Environment
If you are running a Linux distribution and you are using the US ASCII codeset, you will need to add the following startup parameter to your JVM:
-Dfile.encoding=UTF-8 encoding
Application Server
JVM Comment
Tomcat Sun JDK To avoid issues with multiple JDKs, we recommend that you set JAVA_HOME in the application server startup file instead of in the system environment.
JBoss Sun JDK To avoid issues with multiple JDKs, we recommend that you set JAVA_HOME in the application server startup file instead of in the system environment.
WebLogic Sun JDK
WebSphere IBM J9 VM build 2.4, J2RE 1.6.0
Setting JAVA_OPTS for DOM Processing
If you are using a Java server and the DOM being produced is incorrect, you should add the following definitions to the definition of JAVA_OPTS in your server startup script
set JAVA_OPTS=%JAVA_OPTS% -Dorg.apache.xerces.xni.parser.XMLParserConfiguration=org.apache.xerces.parsers.XIncludeParserConfiguration -Djavax.xml.transform.TransformerFactory=org.apache.xalan.processor.TransformerFactoryImpl
60 Chapter 3: IBM Websphere
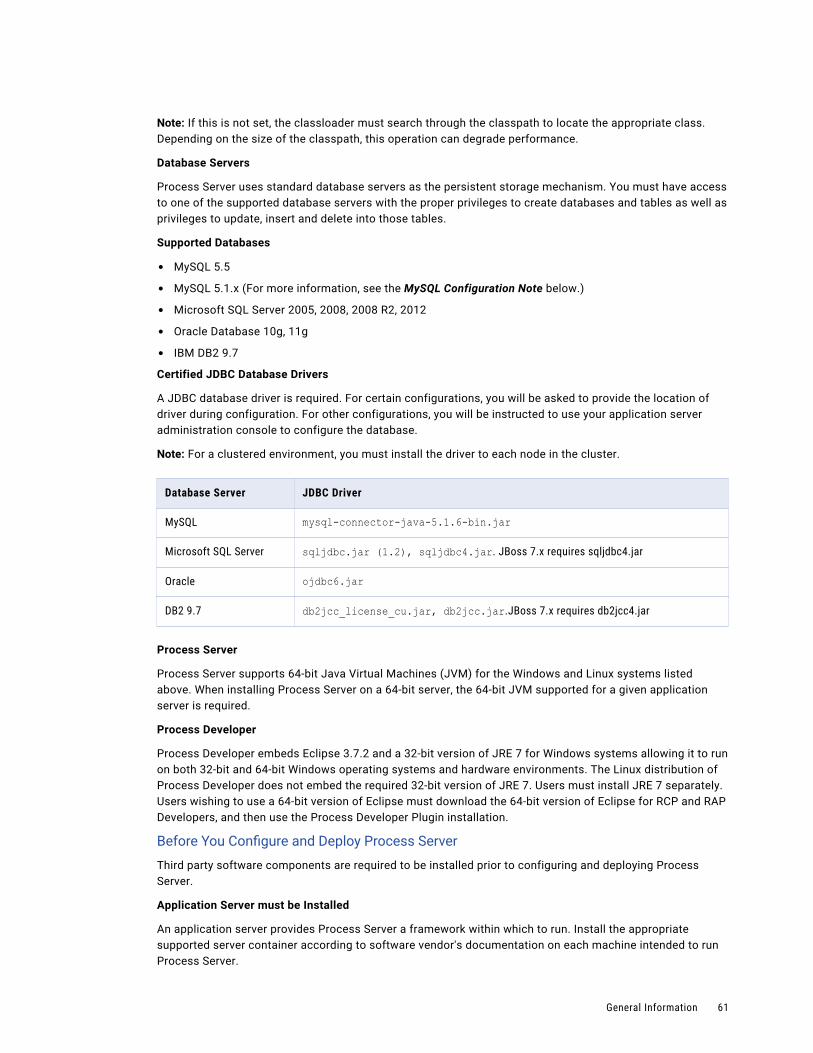
Note: If this is not set, the classloader must search through the classpath to locate the appropriate class. Depending on the size of the classpath, this operation can degrade performance.
Database Servers
Process Server uses standard database servers as the persistent storage mechanism. You must have access to one of the supported database servers with the proper privileges to create databases and tables as well as privileges to update, insert and delete into those tables.
Supported Databases
• MySQL 5.5
• MySQL 5.1.x (For more information, see the MySQL Configuration Note below.)
• Microsoft SQL Server 2005, 2008, 2008 R2, 2012
• Oracle Database 10g, 11g
• IBM DB2 9.7
Certified JDBC Database Drivers
A JDBC database driver is required. For certain configurations, you will be asked to provide the location of driver during configuration. For other configurations, you will be instructed to use your application server administration console to configure the database.
Note: For a clustered environment, you must install the driver to each node in the cluster.
Database Server JDBC Driver
MySQL mysql-connector-java-5.1.6-bin.jar
Microsoft SQL Server sqljdbc.jar (1.2), sqljdbc4.jar. JBoss 7.x requires sqljdbc4.jar
Oracle ojdbc6.jar
DB2 9.7 db2jcc_license_cu.jar, db2jcc.jar.JBoss 7.x requires db2jcc4.jar
Process Server
Process Server supports 64-bit Java Virtual Machines (JVM) for the Windows and Linux systems listed above. When installing Process Server on a 64-bit server, the 64-bit JVM supported for a given application server is required.
Process Developer
Process Developer embeds Eclipse 3.7.2 and a 32-bit version of JRE 7 for Windows systems allowing it to run on both 32-bit and 64-bit Windows operating systems and hardware environments. The Linux distribution of Process Developer does not embed the required 32-bit version of JRE 7. Users must install JRE 7 separately. Users wishing to use a 64-bit version of Eclipse must download the 64-bit version of Eclipse for RCP and RAP Developers, and then use the Process Developer Plugin installation.
Before You Configure and Deploy Process Server
Third party software components are required to be installed prior to configuring and deploying Process Server.
Application Server must be Installed
An application server provides Process Server a framework within which to run. Install the appropriate supported server container according to software vendor's documentation on each machine intended to run Process Server.
General Information 61

Note: Set up clustering according to your software vendor's documentation. Once clustering is set up on the application server, follow our documentation for configuring clustering.
Database Server must be Installed
Process Server requires only one database server per any number of application servers running in a cluster.
All databases require a user with administrative rights to the computer in order to install them. Process Server also requires a connection to your database server. This user needs the proper privileges to connect to the Process Server database, update, insert and delete records within that database.
MySQL Configuration Note
A BPEL process can send and receive variables with attachments such as images or documents. Attachments may be large or numerous, causing database connection errors.
To avoid connection errors to MySQL Server, you may need to configure MySQL with more allocated memory than the default of 1MB.
To configure MySQL:
1. Open MySQL Administrator. (If unavailable, see the note below.)
2. Select Startup Variables.
3. Select Advanced Networking.
4. In the Data/Memory Size panel, enable Max Packet Size.
5. Set the packet size higher than the default of 1MB. The size depends on the attachment sizes you expect.
6. Apply changes.
Note: If MySQL Administrator is not available, refer to the MySQL documentation regarding how to set the max_allowed_packet setting for your environment.
About the Process Server Database Schema
Process Server provides database schema definition files for all supported databases. Before you start the configuration and deploy utility, refer to Configuration topic in this help for specific recommendations on how to install the schema for your database.
Installation FoldersDownload and extract the installation folders as described in Quick Start. The following describes the contents of the Process Server installation:
{install_dir}/server-enterprisequickstart_server.html. Open this file for quick start and complete details for configuration and deployment.
{install_dir}/server-enterprise/websphere_config/binConfiguration and deployment tool
{install_dir}/server-enterprise/websphere_config/ddlsDatabase schema to be installed automatically (recommended) or manually, as described in Configuration
{install_dir}/server-enterprise/websphere_config/deployFiles to be installed automatically by the configuration and deploy utility.
62 Chapter 3: IBM Websphere

{install_dir}/server-enterprise/websphere_config/doc/html/configCopies of the Configuration utility's online help files. These files are accessible from the Help button within the utility.
ConfigurationThis section leads you through configuration of the resources required for Process Server. You must configure your database, Apache Tomcat Server and Process Server before deploying and running Process Server. The sections below provide information for completing the configuration.
Configuring a JDBC Data Source
To configure a JDBC Datasource within WebSphere, perform the following steps
1. Navigate to JDBC Providers under Resources.
2. Select Create a New Database Provider.
3. Select either a known database provider type (e.g., DB2 Universal JDBC Driver Provider) or create a new user defined provider (i.e., User-defined JDBC Provider). The table below provides information on the parameters that must be filled in.
Parameter Description
Name User defined or the value from the drop-down list
Description User defined.
Classpath The classpath for the jar(s) that contain the JDBC Driver, for example:- ${DB2_JDBC_DRIVER_PATH}/db2jcc.jar- ${DB2_JDBC_DRIVER_PATH}/db2jcc_license_cu.jar
Implementation Classname The implementation name for the data source; for example:- DB2= com.ibm.db2.jcc.DB2ConnectionPoolDataSource- mySQL = com.mysql.jdbc.jdbc2.optional.MysqlConnectionPoolDataSource
4. Apply changes.
5. Select the Data Sources link under Additional Properties.
6. Create a new data source. The table below describes the properties and associated values:
Propety Description
Name Process Server data source
JNDI Name jdbc/ActiveVOS
Data storage helper classname (for DB2 only)
com.ibm.websphere.rsadapter.GenericDataStoreHelperClasspath
7. Apply changes
8. Select Additional Properties then Connection Pool.
9. Set the Min Connections and the Max Connections. The suggested values are min = 10 and max = 50.
10. Select the link J2EE Connector Architecture (J2C) authentication data entries from the DataSource definition page.
General Information 63

11. Create a database authorization alias to be used during EAR deployment. You should use ActiveVOSDBAlias as the name of the alias.
12. Provide the user name and password to access the database.
13. Press OK to return to the Data Source configuration page.
14. Select Additional Properties then Connection Pool.
15. Select Custom Properties and add/modify the property values as required. The table below provides examples of the properties and associated values for DB2 and MySQL:
Property DB2 Value MySQL Value
databaseName ABPEL ActiveVOS
serverName host name where DB2 installed host name where MySQL installed
portNumber 50000 3306
user db user name db user name
password db password db password
useUnicode N/A true
characterEncoding N/A UTF-8
characterSetResults N/A utf8
16. Save the changes.
17. Test the newly created connection.
18. Provide the user name and password to access the database.
Configuration Instructions
Before running the Configuration utility, perform the following pre-configuration steps:
• Create a database (or tablespace) where Process Server persistence information will be stored
• Create a default user with administrative rights to the computer and database for use by Process Server
• Configure a JDBC Data source as described above.
First Time or New Install
If you are performing a clean installation, that is, a first-time install or a new database, you can use the Configuration utility to automatically install the database schema.
Manual Install or Update of Database Schema
It is strongly recommended that you automatically install the database schema; however, you can manually install it. Customers migrating from an earlier version should follow the instructions below.
Migrating from ActiveVOS to Process Server
If you are migrating from an earlier release of ActiveVOS, perform the following steps:
• Manually update the Process Server database schema using the DDL patches provided in {install_dir}/server/tomcat_config/ddls/updates
• Run the Configuration utility
64 Chapter 3: IBM Websphere
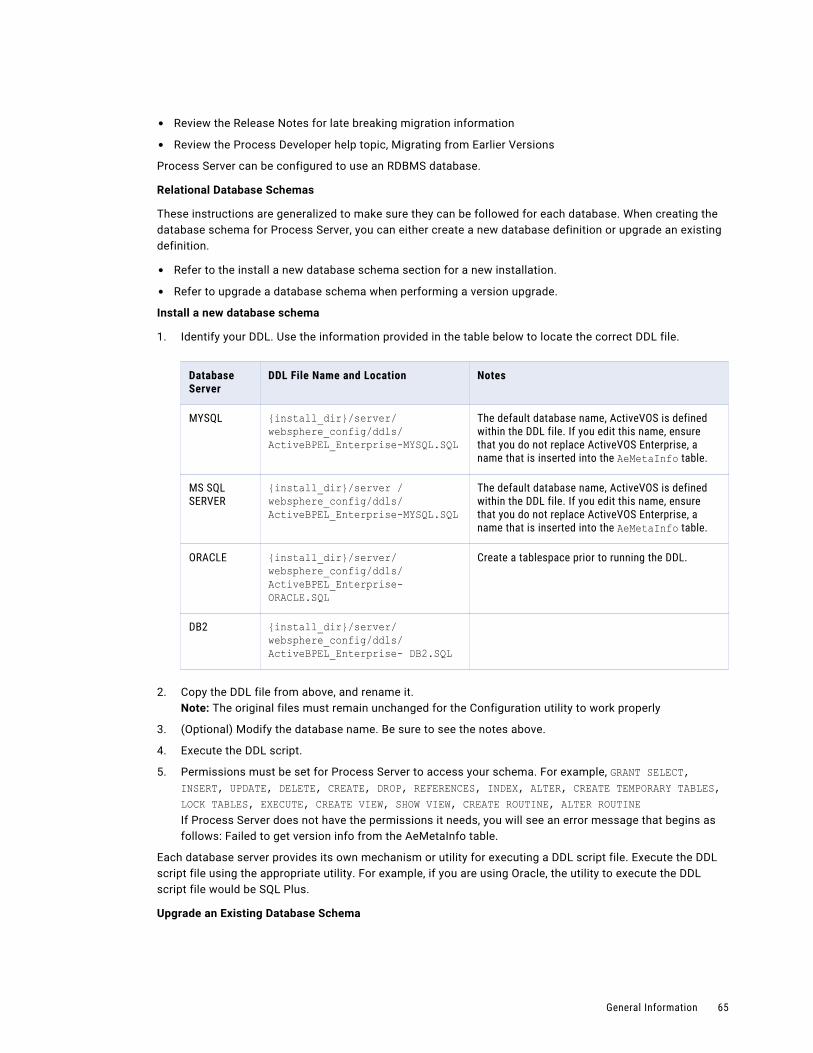
• Review the Release Notes for late breaking migration information
• Review the Process Developer help topic, Migrating from Earlier Versions
Process Server can be configured to use an RDBMS database.
Relational Database Schemas
These instructions are generalized to make sure they can be followed for each database. When creating the database schema for Process Server, you can either create a new database definition or upgrade an existing definition.
• Refer to the install a new database schema section for a new installation.
• Refer to upgrade a database schema when performing a version upgrade.
Install a new database schema
1. Identify your DDL. Use the information provided in the table below to locate the correct DDL file.
Database Server
DDL File Name and Location Notes
MYSQL {install_dir}/server/websphere_config/ddls/ActiveBPEL_Enterprise-MYSQL.SQL
The default database name, ActiveVOS is defined within the DDL file. If you edit this name, ensure that you do not replace ActiveVOS Enterprise, a name that is inserted into the AeMetaInfo table.
MS SQL SERVER
{install_dir}/server /websphere_config/ddls/ActiveBPEL_Enterprise-MYSQL.SQL
The default database name, ActiveVOS is defined within the DDL file. If you edit this name, ensure that you do not replace ActiveVOS Enterprise, a name that is inserted into the AeMetaInfo table.
ORACLE {install_dir}/server/ websphere_config/ddls/ ActiveBPEL_Enterprise- ORACLE.SQL
Create a tablespace prior to running the DDL.
DB2 {install_dir}/server/ websphere_config/ddls/ ActiveBPEL_Enterprise- DB2.SQL
2. Copy the DDL file from above, and rename it.Note: The original files must remain unchanged for the Configuration utility to work properly
3. (Optional) Modify the database name. Be sure to see the notes above.
4. Execute the DDL script.
5. Permissions must be set for Process Server to access your schema. For example, GRANT SELECT, INSERT, UPDATE, DELETE, CREATE, DROP, REFERENCES, INDEX, ALTER, CREATE TEMPORARY TABLES, LOCK TABLES, EXECUTE, CREATE VIEW, SHOW VIEW, CREATE ROUTINE, ALTER ROUTINEIf Process Server does not have the permissions it needs, you will see an error message that begins as follows: Failed to get version info from the AeMetaInfo table.
Each database server provides its own mechanism or utility for executing a DDL script file. Execute the DDL script file using the appropriate utility. For example, if you are using Oracle, the utility to execute the DDL script file would be SQL Plus.
Upgrade an Existing Database Schema
General Information 65
To upgrade your existing Process Server database to be compatible with the new version of software, follow the instructions below:
1. Shutdown Process Server before executing a database upgrade.
2. Make a backup copy of your database.
3. Identify your current running version of Process Server. Database upgrades are provided to upgrade from one version back at a time. This means that more than one upgrade script may need to be applied to your database. For example, if you are running ActiveVOS version 8.0.x, you must go to the updates folder, and apply all patch scripts with higher numbers, starting with [database name]-Patch-9.0.sql. Be sure to run the patch scripts in ascending order. Do not run any upgrade script with a version number equal to or less than your current running version.
4. For each upgrade that needs to be applied perform the following:
a. Identify your DDL. Use the information provided in the table below to locate the correct DDL file. Note: The updates must be applied in ascending order.MYSQL
{install_dir}/server/websphere_config/ddls/updates/enterprise/ActiveBPEL_Enterprise-MYSQL-PATCH-{patch number}.SQL
MS SQL SERVER
{install_dir}/server/wwebsphere_config/ddls/updates/enterprise/ActiveBPEL-Enterprise-SQLSERVER-PATCH-{patch number}.SQL
ORACLE
{install_dir}/server/websphere_config/ddls/updates/enterprise/ActiveBPEL-Enterprise-ORACLE-PATCH-{patch number}.SQL
DB2
{install_dir}/server/websphere_config/ddls/updates/enterprise/ActiveBPEL-Enterprise-DB2-PATCH-{patch number}.SQL
b. Execute the DDL script.Each database server provides its own mechanism or utility for executing a DDL script file. Execute the DDL upgrade script file using the appropriate utility. For example, if you are using Oracle, the utility to execute the DDL script file would be SQL Plus.
Multisite Configuration
For details, see Process Server MultiSite Configuration.
Security Configuration
You can find details on configuring Process Server security roles in Process Developer Help or in the Infocenter.
Configuration for Headless Mode
Process Server relies on GUI components from the Java's SWT package, such as Fonts. If you are running on a headless server (i.e., the server does not have a graphic subsystem), you may see one of the following errors in the stack trace:
• java.lang.NoClassDefFoundError: sun/awt/X11GraphicsEnvironment
• Can't connect to X11 window server using ':0.0' as the value of the DISPLAY variable
• org.eclipse.birt.report.service.api.ReportServiceException
66 Chapter 3: IBM Websphere
Use one of the following techniques to correct errors:
• Configure the JVM system property java.awt.headless=true and at the command line, start the JVM with the argument: -Djava.awt.headless=true
• Run a X-windows virtual frame buffer (Xvfb)
Configuration for Process Central when Using MultiTenant Feature
There an issue with WebSphere that prevents Process Central from working properly in a multi-tenant environment. There is a simple fix, however. In order to get Websphere 6.1 and 7.0 to handle servlet filters properly, you need to set the following web container property:
com.ibm.ws.webcontainer.invokefilterscompatibility = trueSee http://www-01.ibm.com/support/docview.wss?uid=swg24014758 for a description of the defect
See http://www-01.ibm.com/support/docview.wss?rss=180&uid=swg21284395 for general instructions on how to set web container properties
Using the Configuration Utility
The Configuration utility walks through the steps required to provide the property values for Process Server and selected resources.
Note: Before running the utility, ensure that your server container is stopped.
Starting the Configuration Utility
Execute one of the following utilities based on your operating system:Windows
{install_dir}/server/websphere_config/bin/config_deploy.batLinux
{install_dir}/server/websphere_config/bin/config_deploy.sh
If You Have Manually Installed or Updated the Database Schema
If you have manually installed or updated the database schema, when prompted, you must not select the "Install Database Schema" checkbox.
Running the Configuration Utility in Different Modes
The Configuration utility can be run with a graphical interface (default), in console mode or silently. When you run the utility your configuration options are automatically written to the install.properties file and they will be used as the defaults the next time the application is configured. One of the following parameters is accepted by the Configuration utility:
• Help: help. This option displays the usage for console and silent modes.
• Console mode: console. Runs the Configuration utility in text mode within a command window.
• Silent mode: silent. Runs in the background requiring no user interaction. This option requires that you have already run the Configuration utility in default mode, which sets configuration options in the install.properties file.
An example of running the Configuration utility from the command line is: config_deploy help
Configuration Help
The Configuration utility contains online help for each panel of the utility. Access Help by clicking the Help button on each panel. Additionally you can access the help from {install_dir}/server/tomcat_config/doc/html/config.
General Information 67

Configuring a JMS Messaging Service
You can configure a JMS Messaging Service in ActiveVOS in order to communicate with external clients and services over JMS. To set up a listener on a JMS queue or topic, you must deploy a message-driven bean
For details, refer to the JMS Messaging Service help topic from the Help link in the Process Console
Installation ChecklistThis section provides a list of most of the items that you should either have completed or information noted prior to attempting to install Process Server.
Hardware
• Server hardware must meet the requirements listed for each third-party application, including server container, database server and Java environment.
Software
• A user account with administrative rights to install or manage all required software including the application and database servers and the Process Server.
• A supported database server installed and accessible.
• The supported Server container installed on each machine intended to host Process Server.
• JVM Memory arguments have been added to your environment variable: -Xms256m -Xmx1024m -XX:MaxPermSize=384m. (See “Prerequisites” on page 8.)
• Process Server must be configured for WS-Security. (See Configuring Process Server for WS-Security.)
• In your Identity Service (JDBC, LDAP, or XML), add the abTaskClient role to each Process Central user. This security role, described in the web.xml file, is required for access to Process Central.
• On the URN Mappings page of the Process Console, update the host and port for Process Central to match your installation, if needed. The default address is http://localhost:8080/activevos-central/avc.
License Information
• Valid license keys for the total number of sockets intended to host Process Server.
Database Information
• Permissions must be set for Process Server to access your schema. For example, GRANT SELECT, INSERT, UPDATE, DELETE, CREATE, DROP, REFERENCES, INDEX, ALTER, CREATE TEMPORARY TABLES, LOCK TABLES, EXECUTE, CREATE VIEW, SHOW VIEW, CREATE ROUTINE, and ALTER ROUTINE.
• For WebLogic and WebSphere, configuration of a JNDI data source.
• The URL to use to connect to the Process Server database.
• The database user name and password to be used by Process Server to connect to the database.
• If you are using an Oracle database, the Process Server tablespace created.
• For RDBMS, if you are not using the database driver and information supplied with the Application Server you must also have the following two:
- A JDBC database driver that provides the required functionality.
- The class name of the JDBC database driver.
Server Container Information
• The installation location of your Server containers.
68 Chapter 3: IBM Websphere
GlossaryAPI
Application Program Interface, a set of routines, protocols, and tools for building software applications.
Application Server
Also called an appserver. A program that handles all application operations between users and an organization's backend business applications or databases. Application servers are typically used for complex transaction-based applications. To support high-end needs, an application server has to have built-in redundancy, monitors for high-availability, high-performance distributed application services and support for complex database access.
DDL
Data Definition Language is used to specify a database scheme as a set of definitions expressed in a DDL script. The basic idea is to hide implementation details of the database schemes from the users.
EAR
J2EE modules that comprise an application are assembled into a single application Enterprise Archive (EAR) file.
J2EE
Java 2 Platform Enterprise Edition, a platform-independent, Java-centric environment from Sun for developing, building and deploying Web-based enterprise applications online.
Java
A high-level programming language developed by Sun Microsystems. Java is an object-oriented language similar to C++, but simplified to eliminate language features that cause common programming errors. Java source code files (files with a .java extension) are compiled into a format called bytecode (files with a .class extension), which can then be executed by a Java interpreter.
JAR
Java Archive, a file format used to bundle all components required by a Java applet. JAR files simplify the downloading of applets since all the components (.class files, images, sounds, and the like) can be packaged into a single file. In addition, JAR supports data compression, which further decreases download times.
JNDI
Java Naming and Directory Interface (JNDI). Allows Java-enabled applications to use a unified interface to multiple naming and directory services in the enterprise. Part of the Java Enterprise API set. JNDI works with other J2EE technologies to organize and locate components in a distributed computing environment.
JVM
Java Virtual Machine. An abstract computing machine, or virtual machine, JVM is a platform-independent programming language that converts Java bytecode into machine language and executes it.
URL
Uniform Resource Locator, the global address of documents and other resources on the World Wide Web.
WAR
Java modules that comprise an application are assembled into a single application Web Archive (WAR) file.
General Information 69

Web Server
A Web Server a computer that delivers (serves up) Web pages. Every Web server has an IP address and possibly a domain name. For example, if you enter the URL http://www.pcwebopedia.com/index.html in your browser, this sends a request to the server whose domain name is pcwebopedia.com. The server then fetches the page named index.html and sends it to your browser. That request can also cause complex logic to be executed and manage database access.
XML
Extensible Markup Language, a specification developed by the W3C. XML is a pared-down version of SGML, designed especially for Web documents. It allows designers to create their own customized tags, enabling the definition, transmission, validation, and interpretation of data between applications and between organizations.
ConfigurationThe topics in the section provide information on pages within the Configuration Wizard.
Configuration and DeploymentPlease review the important information in Prerequisites and Installation Checklist before running ActiveVOS Server configuration.
For Tomcat, WebSphere, and JBoss: This panel allows you to select what operations you would like to perform. Subsequent panels show the details of each option. The selections and the results are described in the table below.
For WebLogic: The configuration wizard collects details for ActiveVOS Server to communicate with a selected database, a work manager, and ActiveVOS Central. It can deploy applications and install the database schema. Select the options you want to execute.
Note: Many of the options presented in the configuration wizard are only used within development servers. The availability of these options on production servers may be limited or unavailable due to security restrictions or other limitations imposed by the administrators of the target server, or by your particular configuration and situation.
Select the options you would like to perform and click Next to continue.
Selection Description
Configure ActiveVOS Server Allows the setting of the parameters required to start and run the ActiveVOS Server and set the security options for the application.
Configure ActiveVOS Central When enabled, allows setting of configuration parameters for the ActiveVOS Central application.
For WebSphere: Configure Application Resources
Allows configuration of your work manager4, timer manager, JAAS logins, and database resource.
For Tomcat and JBoss: Configure Database
Configuration of an application server's native data source files or wizards.
70 Chapter 3: IBM Websphere
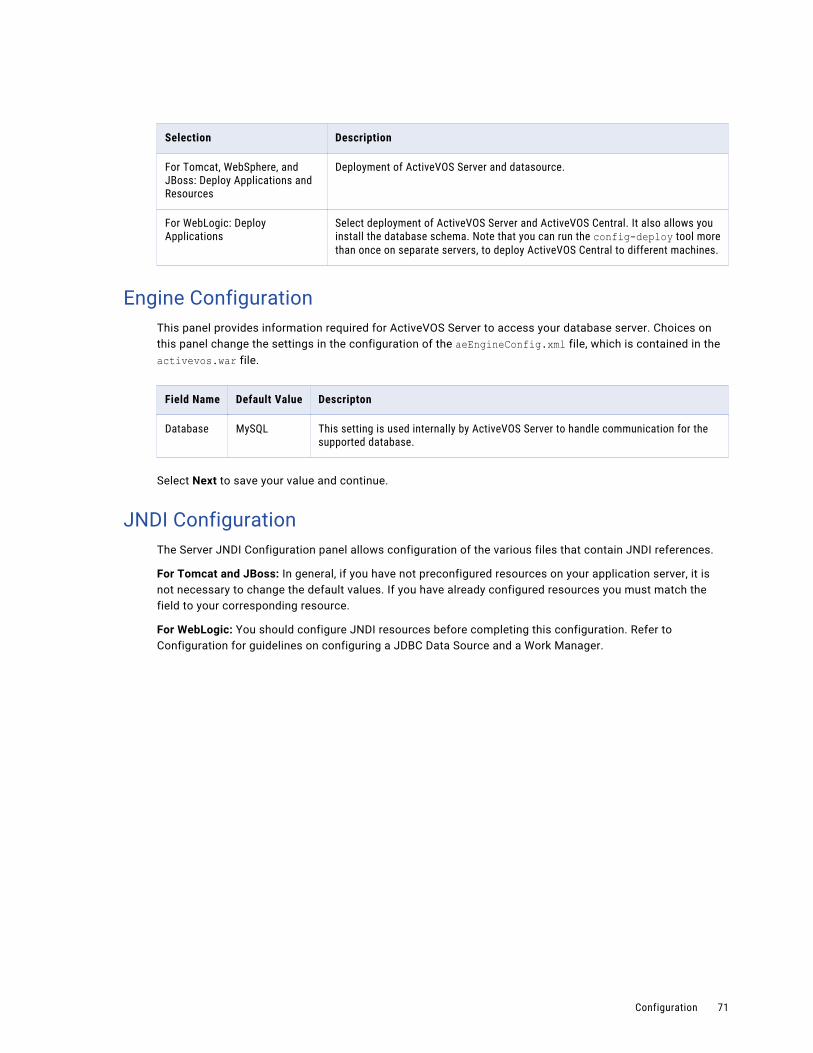
Selection Description
For Tomcat, WebSphere, and JBoss: Deploy Applications and Resources
Deployment of ActiveVOS Server and datasource.
For WebLogic: Deploy Applications
Select deployment of ActiveVOS Server and ActiveVOS Central. It also allows you install the database schema. Note that you can run the config-deploy tool more than once on separate servers, to deploy ActiveVOS Central to different machines.
Engine ConfigurationThis panel provides information required for ActiveVOS Server to access your database server. Choices on this panel change the settings in the configuration of the aeEngineConfig.xml file, which is contained in the activevos.war file.
Field Name Default Value Descripton
Database MySQL This setting is used internally by ActiveVOS Server to handle communication for the supported database.
Select Next to save your value and continue.
JNDI ConfigurationThe Server JNDI Configuration panel allows configuration of the various files that contain JNDI references.
For Tomcat and JBoss: In general, if you have not preconfigured resources on your application server, it is not necessary to change the default values. If you have already configured resources you must match the field to your corresponding resource.
For WebLogic: You should configure JNDI resources before completing this configuration. Refer to Configuration for guidelines on configuring a JDBC Data Source and a Work Manager.
Configuration 71

For Websphere: You should preconfigure a work manager and timer manager on your application server prior to completing this configuration. However, you can configure them later and rerun the configuration. If you have already configured resources, you must match the field to your corresponding resource.
Server Field Name Default Value Description
All Database JNDI jdbc/ActiveVOS The ActiveVOS Server Database resource must be assigned a JNDI name for location at run-time. Enter this JNDI name in the text box provided.
WebLogic Work Manager JNDI wm/ActiveVOS (suggested name)
Name that is used to connect to a WebLogic Work Manager that you have created in the WebLogic Application Server's Process Console.Note: If you do not configure a WebLogic Work Manager, ActiveVOS Server ignores this name and instead use its own internal Work Manager. Enter your WebLogic JNDI name if it differs from the suggested name.
72 Chapter 3: IBM Websphere
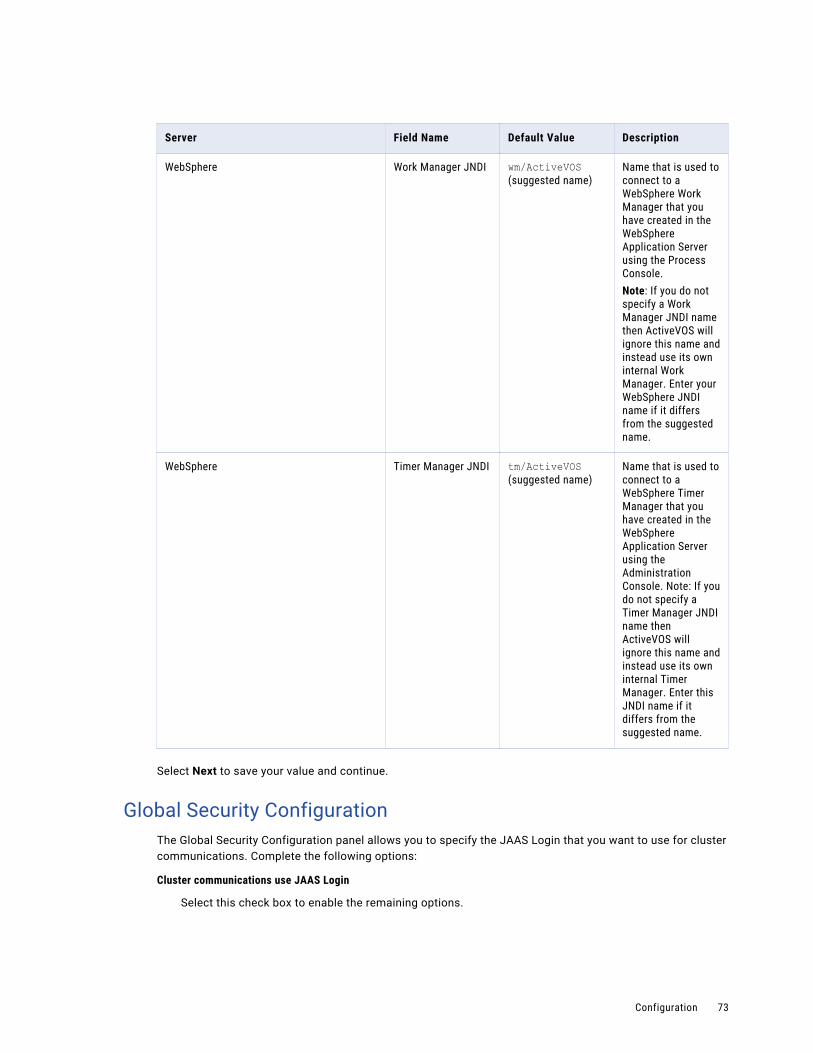
Server Field Name Default Value Description
WebSphere Work Manager JNDI wm/ActiveVOS (suggested name)
Name that is used to connect to a WebSphere Work Manager that you have created in the WebSphere Application Server using the Process Console.Note: If you do not specify a Work Manager JNDI name then ActiveVOS will ignore this name and instead use its own internal Work Manager. Enter your WebSphere JNDI name if it differs from the suggested name.
WebSphere Timer Manager JNDI tm/ActiveVOS (suggested name)
Name that is used to connect to a WebSphere Timer Manager that you have created in the WebSphere Application Server using the Administration Console. Note: If you do not specify a Timer Manager JNDI name then ActiveVOS will ignore this name and instead use its own internal Timer Manager. Enter this JNDI name if it differs from the suggested name.
Select Next to save your value and continue.
Global Security ConfigurationThe Global Security Configuration panel allows you to specify the JAAS Login that you want to use for cluster communications. Complete the following options:
Cluster communications use JAAS Login
Select this check box to enable the remaining options.
Configuration 73
Security JAAS Login Name
• ActiveVOSProvidedUser. This name is passed through to the WebSphere Application Server through the login credentials of the ActiveVOS Console. On the next page of this wizard, you can create the login and provide the credentials.
• ActiveVOSIdentityAssertion. This name is defined on the WebSphere Application Server and uses the WebSphere identity assertion authentication method. On the next page of this wizard, you can create the login.
• Custom
Custom Name
Enter the login name that you wish to use. You must create this login in the WebSphere Application Server Administration Console.
After entering the above information, click Next to save your values and to continue.
JAAS Login ConfigurationThiThe JAAS Login Configuration panel allows you create JAAS application logins for cluster communication in a secured environment. You can create a login for both the ActiveVOSIdentityAssertion and the ActiveVOS Provided User. If you select to create ActiveVOS Provided User, you must enter a user name and password. Please note that ActiveVOS Server with MultiSite capabilities requires the ActiveVOS Provided User selection. Complete the following options:
If you do not complete this panel, you must provide the information in the WebSphere Application Server Administration Console.
ActiveVOSIdentityAssertion
(Optional). Name that is displayed in the WebSphere Administration Console for this JAAS user. Uses the WebSphere identity assertion authentication method.
ActiveVOS Provided User
(Optional). Name that is displayed in the WebSphere Administration Console as described by the user name and password below.
Provided Username (for ActiveVOS Provided User)
The actual user name associated with this JAAS user. This must be a valid user defined to the WebSphere application server and the user must have Monitor rights.
Provided Password
The password associated with the user.
After entering the above information, click Next to save your values and to continue.
Security ConfigurationActiveVOS Server can be deployed in a secured manner. The Security Configuration panel allows you to configure the security parameters that will be applied to the ActiveVOS Server Console, and deployed BPEL process services. Select the security options you want to enable.
After completing configuration, you must assign security roles to users and groups. You can find details on configuring security in the Process Server Guide.
If you have a license for the multi-tenant feature, you must enable security.
After entering this information, click Next to save your values and to continue.
74 Chapter 3: IBM Websphere

Administrative Functions
These functions add security parameters to the ActiveVOS Consoles and services by setting the following roles:
abAdmin
Users associated with this role have full administrative rights to ActiveVOS Server.
abBusinessManager
Users associated with this role have access to process instance details (but cannot operate on them). They can monitor active processes and tasks, and work queues. They have a read-only view of process instance details.
abDeployer
Users associated with this role have rights restricted to deploying business process archive files to ActiveVOS Server.
abDeveloper
Users associated with this role have rights restricted to service artifacts, endpoint information, and sample messages for the services they consume and expose (that is, processes) after they are deployed. Developers need the ability to deploy process deployment archives, initiate process execution and analyze them. Developers also need to configure global function contexts for custom functions, URN mappings, and the ability to schedule process execution. Specifically, this user has access to the Active Process list, the Process Instance View, the Active Task and Work Queues lists, the Server Log, the Dashboard and all reports, and the catalog's content.
abOperator
Users associated with this role have rights restricted to operating the system. These include observing the functionality of processes, managing process instances using the process instance detail view, running reports, logging, viewing exceptions, acquiring information on service operations, adding and removing tenants, and managing the scheduled database delete schedule.
abTaskClient
Required. You must configure permission to access ActiveVOS Central for all users. In addition, users who interact with the Human Task (WS-HT) API must have this role.
ActiveVOS Central presents a login page to users.
Process Services
The process services adds security parameters to the Web Services handler for all deployed BPEL services with a role. The services listed at http://[host]:[port]/active-bpel/services are secured. The process services (roles) are:
abRestrictedServiceConsumer
Users associated with this role cannot access a service unless it is deployed with allowed roles specified in the pdd and the user belongs to at least of these roles. If no roles are specified in the pdd, access to services with no roles specified in the pdd are also denied. Users in this role can view the wsdl files for other services like abServiceConsumer; however, they are blocked at runtime.
abServiceConsumer
Users associated with this role have rights restricted to start process instances of deployed processes, including from ActiveVOS Central, the Eclipse Web Tools Project, or other client application,such as SOAPUI.
Configuration 75
abTenantAdmin
(For a Multi-Tenant licensed server only.) Users associated with this role have rights to deploy and manage contributions into a configured tenant on the server.
Based on a Tenant Definition configured by the ActiveVOS Server administrator (with the abAdmin role), a tenant administrator user can log into the tenant context on the server. A service consumer user can create process instances for processes deployed to the tenant context.
Identity Service Consumer
The identity service consumer adds security parameters to the Web Services handler for Process Identity service used by the ActiveVOS Central application using the following roles:
abIdentityListConsumer
Only users associated with this role or abAdmin have rights to submit Web Service requests to the identity service from Process Developer.
Work Manager ConfigurationConfigure your application server work manager by completing the following options:
Number of Alarm Threads
(Optional). The maximum number of threads to use for processing alarms. A single thread is used to monitor pending alarms and dispatch them. An additional pool of threads is used for dispatching the threads. The default is 10.
Thread Priority
(Optional). The order of the priority for threads available in the thread pool. The default is 10.
Minimum Threads
(Optional). The minimum number of threads that are available for performing process work. The default is 25.
Maximum Threads
(Optional). The maximum number of threads that are available for performing process work. The default is 150. The maximum number of threads can be exceeded temporarily if the Growable option is true. These additional threads are discarded when the work on the thread completes.
Growable
(Optional). Indicates whether or not the number of threads available should be allowed to increase temporarily.
Note: If the number of threads being run is equal to this value, processes can fault as no threads are available when a node needs to broadcast information to other nodes. To be safe, you must create a secondary pool to be used by ActiveVOS Server. (This is done in the app server's console. ActiveVOS Server will only use threads in the pool when critical system work must be performed.
After entering this information, click Next to save your values and to continue.
Timer Manager ConfigurationA timer manager allows ActiveVOS Server to schedule future timer notifications and receive timer notifications. Specify the minimum threads for the pool.
Minimum Threads
(Required). The minimum number of threads to use for timers. The default is 50.
76 Chapter 3: IBM Websphere
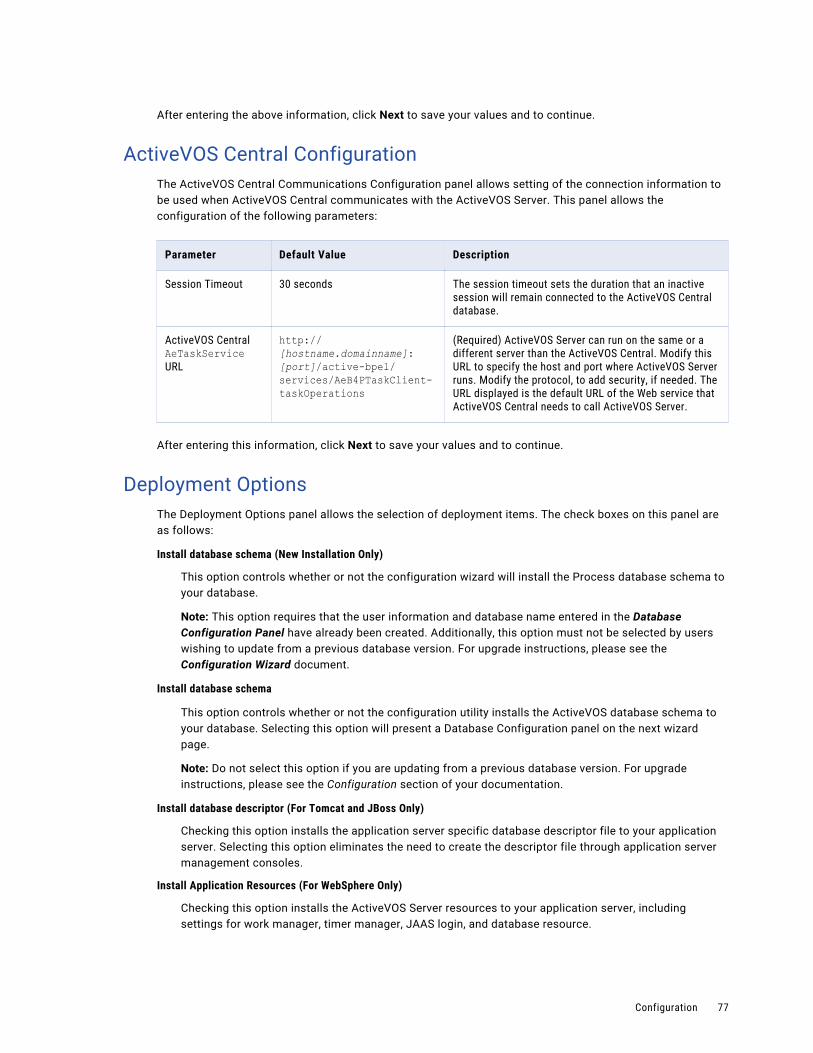
After entering the above information, click Next to save your values and to continue.
ActiveVOS Central ConfigurationThe ActiveVOS Central Communications Configuration panel allows setting of the connection information to be used when ActiveVOS Central communicates with the ActiveVOS Server. This panel allows the configuration of the following parameters:
Parameter Default Value Description
Session Timeout 30 seconds The session timeout sets the duration that an inactive session will remain connected to the ActiveVOS Central database.
ActiveVOS Central AeTaskService URL
http://[hostname.domainname]:[port]/active-bpel/services/AeB4PTaskClient-taskOperations
(Required) ActiveVOS Server can run on the same or a different server than the ActiveVOS Central. Modify this URL to specify the host and port where ActiveVOS Server runs. Modify the protocol, to add security, if needed. The URL displayed is the default URL of the Web service that ActiveVOS Central needs to call ActiveVOS Server.
After entering this information, click Next to save your values and to continue.
Deployment OptionsThe Deployment Options panel allows the selection of deployment items. The check boxes on this panel are as follows:
Install database schema (New Installation Only)
This option controls whether or not the configuration wizard will install the Process database schema to your database.
Note: This option requires that the user information and database name entered in the Database Configuration Panel have already been created. Additionally, this option must not be selected by users wishing to update from a previous database version. For upgrade instructions, please see the Configuration Wizard document.
Install database schema
This option controls whether or not the configuration utility installs the ActiveVOS database schema to your database. Selecting this option will present a Database Configuration panel on the next wizard page.
Note: Do not select this option if you are updating from a previous database version. For upgrade instructions, please see the Configuration section of your documentation.
Install database descriptor (For Tomcat and JBoss Only)
Checking this option installs the application server specific database descriptor file to your application server. Selecting this option eliminates the need to create the descriptor file through application server management consoles.
Install Application Resources (For WebSphere Only)
Checking this option installs the ActiveVOS Server resources to your application server, including settings for work manager, timer manager, JAAS login, and database resource.
Configuration 77
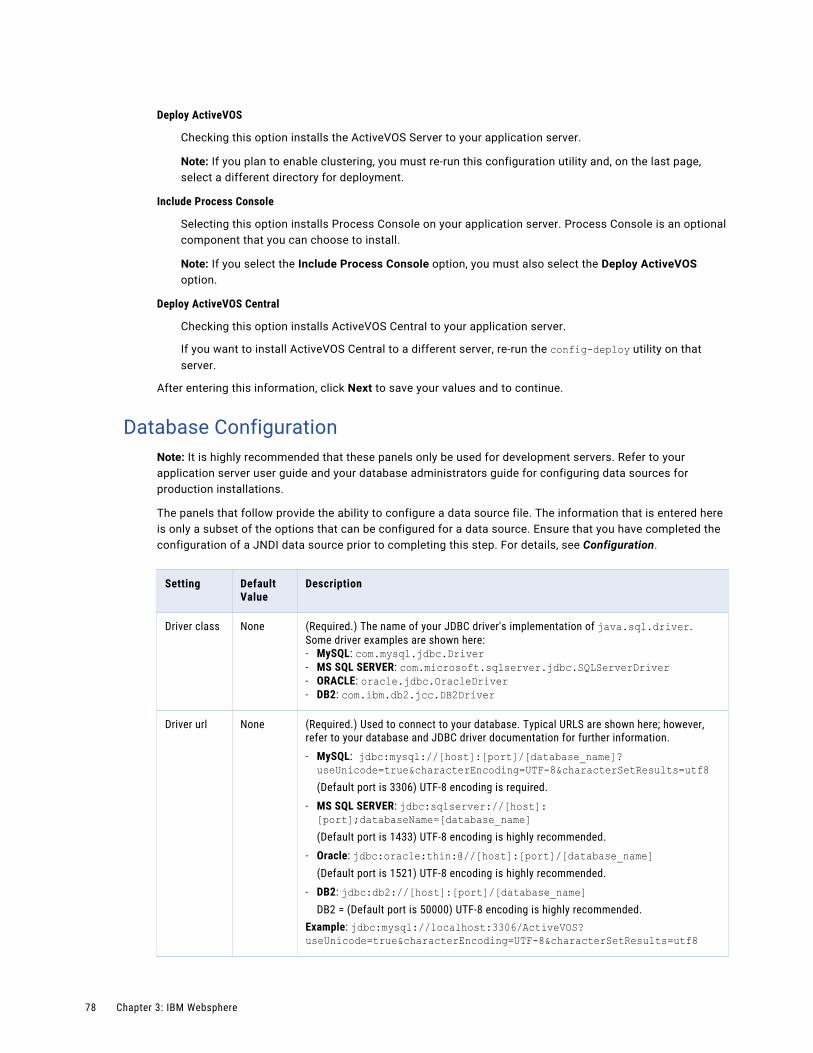
Deploy ActiveVOS
Checking this option installs the ActiveVOS Server to your application server.
Note: If you plan to enable clustering, you must re-run this configuration utility and, on the last page, select a different directory for deployment.
Include Process Console
Selecting this option installs Process Console on your application server. Process Console is an optional component that you can choose to install.
Note: If you select the Include Process Console option, you must also select the Deploy ActiveVOS option.
Deploy ActiveVOS Central
Checking this option installs ActiveVOS Central to your application server.
If you want to install ActiveVOS Central to a different server, re-run the config-deploy utility on that server.
After entering this information, click Next to save your values and to continue.
Database ConfigurationNote: It is highly recommended that these panels only be used for development servers. Refer to your application server user guide and your database administrators guide for configuring data sources for production installations.
The panels that follow provide the ability to configure a data source file. The information that is entered here is only a subset of the options that can be configured for a data source. Ensure that you have completed the configuration of a JNDI data source prior to completing this step. For details, see Configuration.
Setting Default Value
Description
Driver class None (Required.) The name of your JDBC driver's implementation of java.sql.driver. Some driver examples are shown here:- MySQL: com.mysql.jdbc.Driver- MS SQL SERVER: com.microsoft.sqlserver.jdbc.SQLServerDriver - ORACLE: oracle.jdbc.OracleDriver- DB2: com.ibm.db2.jcc.DB2Driver
Driver url None (Required.) Used to connect to your database. Typical URLS are shown here; however, refer to your database and JDBC driver documentation for further information.- MySQL: jdbc:mysql://[host]:[port]/[database_name]?useUnicode=true&characterEncoding=UTF-8&characterSetResults=utf8(Default port is 3306) UTF-8 encoding is required.
- MS SQL SERVER: jdbc:sqlserver://[host]:[port];databaseName=[database_name](Default port is 1433) UTF-8 encoding is highly recommended.
- Oracle: jdbc:oracle:thin:@//[host]:[port]/[database_name] (Default port is 1521) UTF-8 encoding is highly recommended.
- DB2: jdbc:db2://[host]:[port]/[database_name] DB2 = (Default port is 50000) UTF-8 encoding is highly recommended.
Example: jdbc:mysql://localhost:3306/ActiveVOS?useUnicode=true&characterEncoding=UTF-8&characterSetResults=utf8
78 Chapter 3: IBM Websphere

Setting Default Value
Description
Database name
ActiveVOS (Required.) The name of your database. It must match the database_name provided in the Driver URL.
Driver jar None Driver .jar file must be selected using the Select File button to the right of this field. Select your driver file so that is can be copied to the correct location.Some driver file examples are shown here, but we strongly recommend you check the Prerequisites details before making your selection.- MySQL: mysql-connector-java-5.0.7-bin.jar- MS SQL SERVER: sqljdbc.jar- Oracle: ojdbc14.jar- DB2: db2jcc.jar and db2jcc_license_cu.jar
Username bpeluser (Required by default.) The name associated with the privileges to access your database. Unless you modified this name, it is described in the DDL schema.
Password bpel (Required by default.) The password of the above user name. Unless you modified this name, it is described in the DDL schema.
For Tomcat and JBoss: Connection Timeout
1000 The maximum time to wait in milliseconds for a database connection to become available.
For Tomcat and JBoss: Minimum Connections
10 The maximum number of idle connections in the database pool.
For Tomcat and JBoss: Maximum Connections
100 The maximum number of connections in the database pool.
Validate Connection
Checked Checking this entry will cause the configuration wizard to attempt to connect to your database with the supplied information.
Validate Connection. After you enter all required database connection information and click Next, the utility checks that your driver jar and URL are valid, and that the database name matches the name in the URL. The utility does not check the username and password of the database. If the server cannot make a connection because these are in error, you can re-run the configure-deploy utility and enter new names. All other values are preserved.
After entering this information, click Next to save your values and to continue.
Configuration 79

Deployment TargetsProvide communication and other details for the deployment targets.
Target Information Description
Application Server Home
Select the root folder of your application server. For example C:\Program Files\IBM\WebSphere\AppServe.
WebSphere Host Name of the server where WebSphere is installed. The default is localhost.
WebSphere Port Port number used by WebSphere to perform administrative tasks. The default is 8879.
Username A user name that has administrative rights to your application server.
Password Password for the user name.
Deployment Target Type
A deployment target is the server (single application server) or cluster (cluster of application servers) to which you deploy ActiveVOS Server. Identify the type of your deployment target. Select the default WebSphere server or ensure that another server or cluster is already configured.
Deployment Targets A deployment target is the server or cluster to which you deploy ActiveVOS. Identify the name of your server or cluster. To do so, on the WebSphere Administrative Console, review your deployment targets on Servers > Server Types > WebSphere application servers or Servers > Clusters > WebSphere application server clusters.
After entering this information, click Next to save your values and to continue.
80 Chapter 3: IBM Websphere

C h a p t e r 4
JBossThis chapter includes the following topics:
• General Information, 81
• Configuration, 93
General InformationThe Process Server Setup Wizard lets you install a new server or update an existing one.
1. Download and obtain a license for Process Server.
2. Download and run the Process Server installation.
3. To configure and deploy a server, open quickstart_server.html, which directs you to the file you are reading now.
4. Review the Prerequisites and Release Notes for Process Server by selecting the links in the navigation bar on the right.
Note: If the Setup Wizard detects an existing installation, it lets you either update the existing installation or install the server in a different directory. When you update an existing installation, the Wizard replaces any file that a previous Wizard had installed. All other files in your server's install directory remain as they were.
Quick StartPreconfiguration
1. Create a database (or tablespace) for Process Server. Select the Configuration link in the navigation bar for details.
2. Process Server needs to be granted the following permissions on your schema:GRANT SELECT, INSERT, UPDATE, DELETE, CREATE, DROP, REFERENCES, INDEX, ALTER, CREATE TEMPORARY TABLES, LOCK TABLES, EXECUTE, CREATE VIEW, SHOW VIEW, CREATE ROUTINE, ALTER ROUTINEIf Process Server does not have the permissions it needs, you will see an error message that begins as follows: Failed to get version info from the AeMetaInfo table.
3. Collect the following information that you will be prompted for during configuration:
• Host, port number, and database name where you are deploying Process Server
• The full path to a supported JDBC database driver
81

• Driver implementation class name
• Database username and passwordHints and examples of this information are provided in the appropriate page of the Configuration utility's online Help.
4. For an upgrade installation of Process Server, manually install the database schema. For a new installation, you can automatically install the database schema during configuration.
5. Ensure that the JAVA_HOME environment variable is set.Note for Tomcat and JBoss: To avoid issues with multiple JDKs, we recommend that you set JAVA_HOME in the application server startup file instead of in the system environment.
6. Ensure that your JVM memory settings in your application server match the recommendations described in “Prerequisites” on page 8.
7. MultiSite Installations Only: To configure MultiSite clustering, be sure to review the instructions in Process Server MultiSite Configuration. Access the instructions from the Configuration link in the navigation bar on the right.
8. Unix Platform Only: After installing any version of the Process Server on any UNIX OS, you may receive an error when starting the server such as cannot write to temp location [/temp]. This is due to an OS restriction on the number of files that can be created. To avoid this error, before installing the server edit your UNIX security configuration file directly to allow a larger number of files to be opened. In UNIX the parameter NOFILE sets the maximum number of files that can be opened by a single process. For example, in the file /etc/security/limits.conf you could add the line - nofile 10240 to raise the limit from the default 1024 value. 10240 should be large enough. If you are unsure, setting "unlimited" can be considered.
Configuration and Deployment
1. In your ActiveVOS installation folder, locate the [server]-config>bin folder, and select the config-deploy utility.
2. Complete the configuration and deployment. Use the online Help as needed.
3. Use your server container's documentation for help in starting the Process Server.
Note: When you are deploying Process Server to a Tomcat server, activebpel-cert.war is not deployed. You must copy it from {installation_directory}\server-enterprise\tomcat_config\webapps to {Tomcat_Home}\webapps directory when deploying an SSO configuration
Add Your License
1. You will need access to your Process Server license.
2. Open the Process Console in a browser:http://[host]:[port]/activevos
3. Add your license on the License page. Select the Admin menu item of the Process Console and then select License. Select Add and copy and paste all of the Process Server license into the dialog. Then select the Server Status navigation menu item and select Start Server to start the Process Server.
PrerequisitesProcess Server relies on a valid license and third party software components. Ensure that your application server environment meets the requirements before beginning the configuration procedure.
82 Chapter 4: JBoss

Process Server Licensing
A valid license is required to run Process Server. You enter the license information after you've configured Process Server. Do this as follows:
1. Start Process Console.
2. Select Admin | License. (Admin is in the toolbar; License is about a third of the way down on the left.)
3. Press the Add License button, copy and paste all of the Process Server license into the dialog, and then press the Add License button.
4. Select the Server Status link near the ver top of the left area press the Start Server button to start the Process Server
Obtaining a License Key
If you did not receive your license prior to receiving the software, contact the Informatica sales department.
Our sales support staff can assist you with licensing questions.
Hardware Requirements
Application Server Hardware
Process Server runs within different server containers, and the hardware requirements of the server are superseded by the requirements of the container.
Database Hardware
Process Server application supports multiple database servers and has no additional requirements besides those of your selected database server.
Note: For maximum performance, we recommend that you run Process Server and its database schema on separate servers.
JVM Memory Requirements
We strongly recommend that you run your application server with at least the following memory settings:
-Xms256m -Xmx1024m -XX:MaxPermSize=384m
where Xms is starting memory, Xmx is maximum memory, and MaxPermSize is the amount of memory set aside for loading class files.
Disk Space Requirements
At least 1 GB of disk space is required to install the Process Server application.
Note: Considerably more disk space is required to run your applications. The amount is dependent on several factors including logging levels you select, number of processes you run, and size of processes.
Software Requirements
Specific versions of Eclipse, client and server operating systems, application and database servers are supported. Support means that Informatica will assist customers with the installation and operation of Business Process Manager products on these 3rd party product versions.
Also certified are specific combinations of 3rd party products. Use of Certified Systems described here will reduce the risk of problems as a result of extensive testing of Business Process Manager with these specific versions. Database connectivity is required for Process Server persistence and version control of deployed processes. It is recommended that the database resides on a dedicated server.
The following software is supported for use with Process Server:
General Information 83

Operating Systems
• Microsoft Windows 2003/2008 Server
• Linux operating system versions that support the JVM, application and selected database servers supported by Informatica for use by Process Server.
• Solaris 10 (x86/Sparc)
• HP-UX 11i v3 (on Itanium processor)
• AIX 5.3 and 6.1
• Mac OS 10.6 64-bit or higher
Web Browser
• Any browser. A browser is required to view the Release Notes and run the Process Server consoles. Review the activevos.com certified system support page for details.
• There are specific requirements for Screenflow execution in the Screenflow product.
Application Servers
• Apache Tomcat 7.x
• JBoss AS
• Oracle WebLogic 12.1.1
• IBM WebSphere Server 8.5
Note: Other releases of these servers should work. However, they have not been tested.
JAVA Environment
If you are running a Linux distribution and you are using the US ASCII codeset, you will need to add the following startup parameter to your JVM:
-Dfile.encoding=UTF-8 encoding
Application Server
JVM Comment
Tomcat Sun JDK To avoid issues with multiple JDKs, we recommend that you set JAVA_HOME in the application server startup file instead of in the system environment.
JBoss Sun JDK To avoid issues with multiple JDKs, we recommend that you set JAVA_HOME in the application server startup file instead of in the system environment.
WebLogic Sun JDK
WebSphere IBM J9 VM build 2.4, J2RE 1.6.0
Setting JAVA_OPTS for DOM Processing
If you are using a Java server and the DOM being produced is incorrect, you should add the following definitions to the definition of JAVA_OPTS in your server startup script
set JAVA_OPTS=%JAVA_OPTS% -Dorg.apache.xerces.xni.parser.XMLParserConfiguration=org.apache.xerces.parsers.XIncludeParserConfiguration -Djavax.xml.transform.TransformerFactory=org.apache.xalan.processor.TransformerFactoryImpl
84 Chapter 4: JBoss

Note: If this is not set, the classloader must search through the classpath to locate the appropriate class. Depending on the size of the classpath, this operation can degrade performance.
Database Servers
Process Server uses standard database servers as the persistent storage mechanism. You must have access to one of the supported database servers with the proper privileges to create databases and tables as well as privileges to update, insert and delete into those tables.
Supported Databases
• MySQL 5.5
• MySQL 5.1.x (For more information, see the MySQL Configuration Note below.)
• Microsoft SQL Server 2005, 2008, 2008 R2, 2012
• Oracle Database 10g, 11g
• IBM DB2 9.7
Certified JDBC Database Drivers
A JDBC database driver is required. For certain configurations, you will be asked to provide the location of driver during configuration. For other configurations, you will be instructed to use your application server administration console to configure the database.
Note: For a clustered environment, you must install the driver to each node in the cluster.
Database Server JDBC Driver
MySQL mysql-connector-java-5.1.6-bin.jar
Microsoft SQL Server sqljdbc.jar (1.2), sqljdbc4.jar. JBoss 7.x requires sqljdbc4.jar
Oracle ojdbc6.jar
DB2 9.7 db2jcc_license_cu.jar, db2jcc.jar.JBoss 7.x requires db2jcc4.jar
Process Server
Process Server supports 64-bit Java Virtual Machines (JVM) for the Windows and Linux systems listed above. When installing Process Server on a 64-bit server, the 64-bit JVM supported for a given application server is required.
Process Developer
Process Developer embeds Eclipse 3.7.2 and a 32-bit version of JRE 7 for Windows systems allowing it to run on both 32-bit and 64-bit Windows operating systems and hardware environments. The Linux distribution of Process Developer does not embed the required 32-bit version of JRE 7. Users must install JRE 7 separately. Users wishing to use a 64-bit version of Eclipse must download the 64-bit version of Eclipse for RCP and RAP Developers, and then use the Process Developer Plugin installation.
Before You Configure and Deploy Process Server
Third party software components are required to be installed prior to configuring and deploying Process Server.
Application Server must be Installed
An application server provides Process Server a framework within which to run. Install the appropriate supported server container according to software vendor's documentation on each machine intended to run Process Server.
General Information 85

Note: Set up clustering according to your software vendor's documentation. Once clustering is set up on the application server, follow our documentation for configuring clustering.
Database Server must be Installed
Process Server requires only one database server per any number of application servers running in a cluster.
All databases require a user with administrative rights to the computer in order to install them. Process Server also requires a connection to your database server. This user needs the proper privileges to connect to the Process Server database, update, insert and delete records within that database.
MySQL Configuration Note
A BPEL process can send and receive variables with attachments such as images or documents. Attachments may be large or numerous, causing database connection errors.
To avoid connection errors to MySQL Server, you may need to configure MySQL with more allocated memory than the default of 1MB.
To configure MySQL:
1. Open MySQL Administrator. (If unavailable, see the note below.)
2. Select Startup Variables.
3. Select Advanced Networking.
4. In the Data/Memory Size panel, enable Max Packet Size.
5. Set the packet size higher than the default of 1MB. The size depends on the attachment sizes you expect.
6. Apply changes.
Note: If MySQL Administrator is not available, refer to the MySQL documentation regarding how to set the max_allowed_packet setting for your environment.
About the Process Server Database Schema
Process Server provides database schema definition files for all supported databases. Before you start the configuration and deploy utility, refer to Configuration topic in this help for specific recommendations on how to install the schema for your database.
Installation FoldersDownload and extract the installation folders as described in “Quick Start” on page 7. The following describes the contents of the Process Server installation:
{install_dir}/server-enterprisequickstart_server.html. Open this file for quick start and complete details for configuration and deployment.
{install_dir}/server-enterprise/jboss_config/binConfiguration and deployment tool
{install_dir}/server-enterprise/jboss_config/ddlsDatabase schema to be installed automatically (recommended) or manually, as described in Configuration
{install_dir}/server-enterprise/jboss_config/deployFiles to be installed automatically by the configuration and deploy utility.
86 Chapter 4: JBoss

{install_dir}/server-enterprise/jboss_config/doc/html/configCopies of the Configuration utility's online help files. These files are accessible from the Help button within the utility.
Process Server and Resource ConfigurationThis topic leads you through configuration of the resources required for Process Server. You must configure your database, JBoss Server and Process Server before deploying and running Process Server. The sections below provide information for completing the configuration.
Configuration Instructions
Note: You will need to manually alter the install.properties file in you are using JBoss AS 7 (EAP 6) and up. for information, see #unique_9/unique_9_Connect_42_SECTION_A964A43C83E543B8B266BBBF4065D9C0.
Before running the Configuration utility, perform the following pre-configuration steps:
• Create a database (or tablespace) where Process Server persistence information will be stored
• Create a default user with administrative rights to the computer and database for use by Process Server
• Note both the database name and port number, which you will be asked for during configuration.
• Process Server requires a JDBC driver to connect to your database. During configuration, you will be prompted for:
- The full path to a supported JDBC database driver
- The driver implementation class name
Note that the Microsoft SQL Server 2005 JDBC Driver 1.2 driver, or the JDTS-1.2.jar drivers are supported. Version 1.1 of the Microsoft SQL Server will not function as it does not include all required functionality. JBoss 7.x requires sqljdbc4.jar. For DB2, JBoss 7.x requires db2jcc4.jar.
First Time or New Install
If you are performing a clean installation, that is, a first-time install or a new database, you can use the Configuration utility to automatically install the database schema.
Manual Install or Update of Database Schema
It is strongly recommended that you automatically install the database schema; however, you can manually install it. Customers migrating from an earlier version should follow the instructions below.
Migrating from ActiveVOS to Process Developer
If you are migrating from ActiveVOS, perform the following steps:
• Manually update the Process Server database schema using the DDL patches provided in {install_dir}/server/tomcat_config/ddls/updates
• Run the Configuration utility
• Review the Release Notes for late breaking migration information
• Review the Process Developer help topic, Migrating from Earlier Versions
Process Server can be configured to use an RDBMS database.
Relational Database Schemas
General Information 87

These instructions are generalized to make sure they can be followed for each database. When creating the database schema for Process Server, you can either create a new database definition or upgrade an existing definition.
• Refer to the install a new database schema section for a new installation.
• Refer to upgrade a database schema when performing a version upgrade.
Install a new database schema
1. Identify your DDL. Use the information provided in the table below to locate the correct DDL file.
Database Server
DDL File Name and Location Notes
MYSQL {install_dir}/server/tomcat_config/ddls/ActiveBPEL_Enterprise-MYSQL.SQL
The default database name, ActiveVOS is defined within the DDL file. If you edit this name, ensure that you do not replace ActiveVOS Enterprise, a name that is inserted into the AeMetaInfo table.
MS SQL SERVER
{install_dir}/server /tomcat_config/ddls/ActiveBPEL_Enterprise-MYSQL.SQL
The default database name, ActiveVOS is defined within the DDL file. If you edit this name, ensure that you do not replace ActiveVOS Enterprise, a name that is inserted into the AeMetaInfo table.
ORACLE {install_dir}/server/ tomcat_config/ddls/ ActiveBPEL_Enterprise- ORACLE.SQL
Create a tablespace prior to running the DDL.
DB2 {install_dir}/server/ tomcat_config/ddls/ ActiveBPEL_Enterprise- DB2.SQL
2. Copy the DDL file from above, and rename it.Note: The original files must remain unchanged for the Configuration utility to work properly
3. (Optional) Modify the database name. Be sure to see the notes above.
4. Execute the DDL script.
5. Permissions must be set for Process Server to access your schema. For example, GRANT SELECT, INSERT, UPDATE, DELETE, CREATE, DROP, REFERENCES, INDEX, ALTER, CREATE TEMPORARY TABLES, LOCK TABLES, EXECUTE, CREATE VIEW, SHOW VIEW, CREATE ROUTINE, ALTER ROUTINEIf Process Server does not have the permissions it needs, you will see an error message that begins as follows: Failed to get version info from the AeMetaInfo table.
Each database server provides its own mechanism or utility for executing a DDL script file. Execute the DDL script file using the appropriate utility. For example, if you are using Oracle, the utility to execute the DDL script file would be SQL Plus.
Upgrade an existing database schema
To upgrade your existing Process Server database to be compatible with the new version of software, follow the instructions below:
1. Shutdown Process Server before executing a database upgrade.
2. Make a backup copy of your database.
3. Identify your current running version of Process Server. Database upgrades are provided to upgrade from one version back at a time. This means that more than one upgrade script may need to be applied to
88 Chapter 4: JBoss
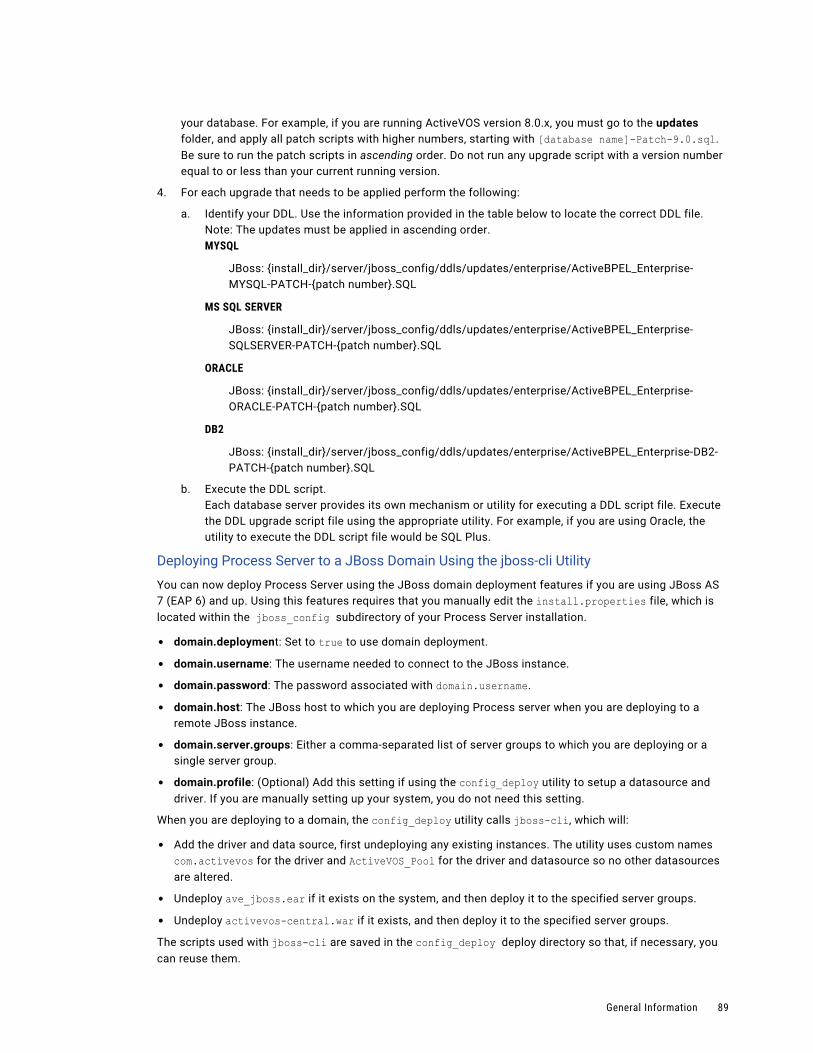
your database. For example, if you are running ActiveVOS version 8.0.x, you must go to the updates folder, and apply all patch scripts with higher numbers, starting with [database name]-Patch-9.0.sql. Be sure to run the patch scripts in ascending order. Do not run any upgrade script with a version number equal to or less than your current running version.
4. For each upgrade that needs to be applied perform the following:
a. Identify your DDL. Use the information provided in the table below to locate the correct DDL file. Note: The updates must be applied in ascending order.MYSQL
JBoss: {install_dir}/server/jboss_config/ddls/updates/enterprise/ActiveBPEL_Enterprise-MYSQL-PATCH-{patch number}.SQL
MS SQL SERVER
JBoss: {install_dir}/server/jboss_config/ddls/updates/enterprise/ActiveBPEL_Enterprise-SQLSERVER-PATCH-{patch number}.SQL
ORACLE
JBoss: {install_dir}/server/jboss_config/ddls/updates/enterprise/ActiveBPEL_Enterprise-ORACLE-PATCH-{patch number}.SQL
DB2
JBoss: {install_dir}/server/jboss_config/ddls/updates/enterprise/ActiveBPEL_Enterprise-DB2-PATCH-{patch number}.SQL
b. Execute the DDL script.Each database server provides its own mechanism or utility for executing a DDL script file. Execute the DDL upgrade script file using the appropriate utility. For example, if you are using Oracle, the utility to execute the DDL script file would be SQL Plus.
Deploying Process Server to a JBoss Domain Using the jboss-cli Utility
You can now deploy Process Server using the JBoss domain deployment features if you are using JBoss AS 7 (EAP 6) and up. Using this features requires that you manually edit the install.properties file, which is located within the jboss_config subdirectory of your Process Server installation.
• domain.deployment: Set to true to use domain deployment.
• domain.username: The username needed to connect to the JBoss instance.
• domain.password: The password associated with domain.username.
• domain.host: The JBoss host to which you are deploying Process server when you are deploying to a remote JBoss instance.
• domain.server.groups: Either a comma-separated list of server groups to which you are deploying or a single server group.
• domain.profile: (Optional) Add this setting if using the config_deploy utility to setup a datasource and driver. If you are manually setting up your system, you do not need this setting.
When you are deploying to a domain, the config_deploy utility calls jboss-cli, which will:
• Add the driver and data source, first undeploying any existing instances. The utility uses custom names com.activevos for the driver and ActiveVOS_Pool for the driver and datasource so no other datasources are altered.
• Undeploy ave_jboss.ear if it exists on the system, and then deploy it to the specified server groups.
• Undeploy activevos-central.war if it exists, and then deploy it to the specified server groups.
The scripts used with jboss-cli are saved in the config_deploy deploy directory so that, if necessary, you can reuse them.
General Information 89
When running Process Server unsecured on JBoss 7/EAP6, a security domain is still required and one is set up for you. However, this domain is not automatically created when you are deploying JBoss as described in this section and you will have to create it. While what you create will be unique to your environment, it will take the following form:
<security-domain name="ActiveVOS"> <authentication> <login-module code="org.jboss.security.auth.spi.IdentityLoginModule" flag="required"> <module-option name="principal" value="aeadmin"/> <module-option name="roles" value="abAdmin,abTaskClient"/> </login-module> </authentication></security-domain>
Multisite Configuration
For details, see Process Server MultiSite Configuration.
JBoss Application Server Requirements and Considerations
Installation of the JDBC Driver
Process Server requires that you provide a JDBC driver to connect to your database. You must install the database driver into each server in the cluster, if you are making server clustering available. Refer to your application server's user guide for information on installing the appropriate JDBC driver
Note: The Microsoft SQL Server 2005 JDBC Driver 1.2 driver, or the JDTS-1.2.jar drivers are supported. Version 1.1 of the Microsoft SQL Server will not function as it does not include all required functionality. For DB2, JBoss 7.x requires db2jcc4.jar.
High Availability and Clustering
The default JBoss server configuration is not configured for high availability or clustering. The standalone server that is provided with JBoss has standalone-ha.xml and standalone-full-ha.xml configuration files that enables these features.
Configuring Security
You can find details on configuring security roles in Process Develoepr Help or in the Infocenter
Configuration for Headless Mode
Process Server relies on GUI components from the Java's SWT package, such as Fonts. If you are running on a headless server (that is, the server does not have a graphic subsystem), you may see one of the following errors in the stack trace:
• java.lang.NoClassDefFoundError: sun/awt/X11GraphicsEnvironment
• Can't connect to X11 window server using ':0.0' as the value of the DISPLAY variable
• org.eclipse.birt.report.service.api.ReportServiceException
Use one of the following techniques to correct errors:
• Configure the JVM system property java.awt.headless=true and at the command line, start the JVM with the argument: -Djava.awt.headless=true
• Run a X-windows virtual frame buffer (Xvfb)
Using the Configuration Utility
The Configuration utility walks through the steps required to provide the property values for Process Server and selected resources.
Note: Before running the utility, ensure that your server container is stopped.
Starting the Configuration Utility
90 Chapter 4: JBoss
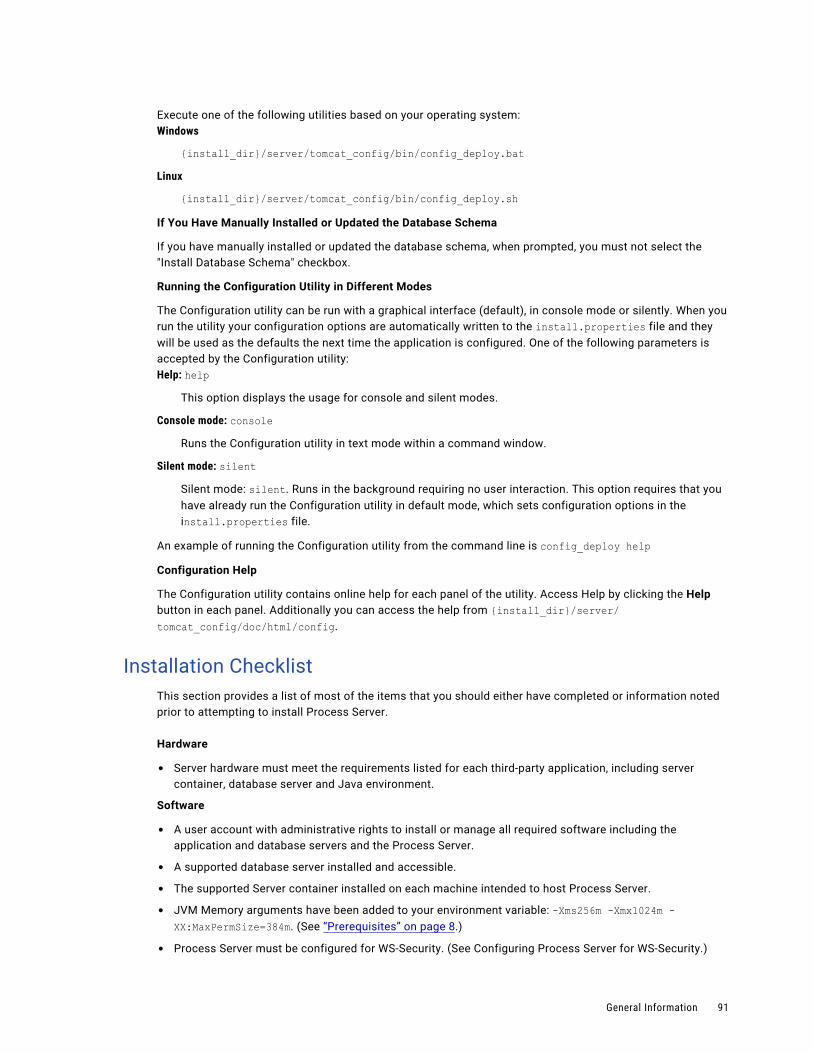
Execute one of the following utilities based on your operating system:Windows
{install_dir}/server/tomcat_config/bin/config_deploy.batLinux
{install_dir}/server/tomcat_config/bin/config_deploy.sh
If You Have Manually Installed or Updated the Database Schema
If you have manually installed or updated the database schema, when prompted, you must not select the "Install Database Schema" checkbox.
Running the Configuration Utility in Different Modes
The Configuration utility can be run with a graphical interface (default), in console mode or silently. When you run the utility your configuration options are automatically written to the install.properties file and they will be used as the defaults the next time the application is configured. One of the following parameters is accepted by the Configuration utility:Help: help
This option displays the usage for console and silent modes.
Console mode: consoleRuns the Configuration utility in text mode within a command window.
Silent mode: silentSilent mode: silent. Runs in the background requiring no user interaction. This option requires that you have already run the Configuration utility in default mode, which sets configuration options in the install.properties file.
An example of running the Configuration utility from the command line is config_deploy help
Configuration Help
The Configuration utility contains online help for each panel of the utility. Access Help by clicking the Help button in each panel. Additionally you can access the help from {install_dir}/server/tomcat_config/doc/html/config.
Installation ChecklistThis section provides a list of most of the items that you should either have completed or information noted prior to attempting to install Process Server.
Hardware
• Server hardware must meet the requirements listed for each third-party application, including server container, database server and Java environment.
Software
• A user account with administrative rights to install or manage all required software including the application and database servers and the Process Server.
• A supported database server installed and accessible.
• The supported Server container installed on each machine intended to host Process Server.
• JVM Memory arguments have been added to your environment variable: -Xms256m -Xmx1024m -XX:MaxPermSize=384m. (See “Prerequisites” on page 8.)
• Process Server must be configured for WS-Security. (See Configuring Process Server for WS-Security.)
General Information 91

• In your Identity Service (JDBC, LDAP, or XML), add the abTaskClient role to each Process Central user. This security role, described in the web.xml file, is required for access to Process Central.
• On the URN Mappings page of the Process Console, update the host and port for Process Central to match your installation, if needed. The default address is http://localhost:8080/activevos-central/avc.
License Information
• Valid license keys for the total number of sockets intended to host Process Server.
Database Information
• Permissions must be set for Process Server to access your schema. For example, GRANT SELECT, INSERT, UPDATE, DELETE, CREATE, DROP, REFERENCES, INDEX, ALTER, CREATE TEMPORARY TABLES, LOCK TABLES, EXECUTE, CREATE VIEW, SHOW VIEW, CREATE ROUTINE, and ALTER ROUTINE.
• For WebLogic and WebSphere, configuration of a JNDI data source.
• The URL to use to connect to the Process Server database.
• The database user name and password to be used by Process Server to connect to the database.
• If you are using an Oracle database, the Process Server tablespace created.
• For RDBMS, if you are not using the database driver and information supplied with the Application Server you must also have the following two:
- A JDBC database driver that provides the required functionality.
- The class name of the JDBC database driver.
Server Container Information
• The installation location of your Server containers.
GlossaryAPI
Application Program Interface, a set of routines, protocols, and tools for building software applications.
Application Server
Also called an appserver. A program that handles all application operations between users and an organization's backend business applications or databases. Application servers are typically used for complex transaction-based applications. To support high-end needs, an application server has to have built-in redundancy, monitors for high-availability, high-performance distributed application services and support for complex database access.
DDL
Data Definition Language is used to specify a database scheme as a set of definitions expressed in a DDL script. The basic idea is to hide implementation details of the database schemes from the users.
EAR
J2EE modules that comprise an application are assembled into a single application Enterprise Archive (EAR) file.
J2EE
Java 2 Platform Enterprise Edition, a platform-independent, Java-centric environment from Sun for developing, building and deploying Web-based enterprise applications online.
92 Chapter 4: JBoss
Java
A high-level programming language developed by Sun Microsystems. Java is an object-oriented language similar to C++, but simplified to eliminate language features that cause common programming errors. Java source code files (files with a .java extension) are compiled into a format called bytecode (files with a .class extension), which can then be executed by a Java interpreter.
JAR
Java Archive, a file format used to bundle all components required by a Java applet. JAR files simplify the downloading of applets since all the components (.class files, images, sounds, and the like) can be packaged into a single file. In addition, JAR supports data compression, which further decreases download times.
JNDI
Java Naming and Directory Interface (JNDI). Allows Java-enabled applications to use a unified interface to multiple naming and directory services in the enterprise. Part of the Java Enterprise API set. JNDI works with other J2EE technologies to organize and locate components in a distributed computing environment.
JVM
Java Virtual Machine. An abstract computing machine, or virtual machine, JVM is a platform-independent programming language that converts Java bytecode into machine language and executes it.
URL
Uniform Resource Locator, the global address of documents and other resources on the World Wide Web.
WAR
Java modules that comprise an application are assembled into a single application Web Archive (WAR) file.
Web Server
A Web Server a computer that delivers (serves up) Web pages. Every Web server has an IP address and possibly a domain name. For example, if you enter the URL http://www.pcwebopedia.com/index.html in your browser, this sends a request to the server whose domain name is pcwebopedia.com. The server then fetches the page named index.html and sends it to your browser. That request can also cause complex logic to be executed and manage database access.
XML
Extensible Markup Language, a specification developed by the W3C. XML is a pared-down version of SGML, designed especially for Web documents. It allows designers to create their own customized tags, enabling the definition, transmission, validation, and interpretation of data between applications and between organizations.
ConfigurationThe topics in the section provide information on pages within the Configuration Wizard.
Configuration and DeploymentPlease review the important information in Prerequisites and Installation Checklist before running ActiveVOS Server configuration.
Configuration 93

For Tomcat, WebSphere, and JBoss: This panel allows you to select what operations you would like to perform. Subsequent panels show the details of each option. The selections and the results are described in the table below.
For WebLogic: The configuration wizard collects details for ActiveVOS Server to communicate with a selected database, a work manager, and ActiveVOS Central. It can deploy applications and install the database schema. Select the options you want to execute.
Note: Many of the options presented in the configuration wizard are only used within development servers. The availability of these options on production servers may be limited or unavailable due to security restrictions or other limitations imposed by the administrators of the target server, or by your particular configuration and situation.
Select the options you would like to perform and click Next to continue.
Selection Description
Configure ActiveVOS Server Allows the setting of the parameters required to start and run the ActiveVOS Server and set the security options for the application.
Configure ActiveVOS Central When enabled, allows setting of configuration parameters for the ActiveVOS Central application.
For WebSphere: Configure Application Resources
Allows configuration of your work manager4, timer manager, JAAS logins, and database resource.
For Tomcat and JBoss: Configure Database
Configuration of an application server's native data source files or wizards.
For Tomcat, WebSphere, and JBoss: Deploy Applications and Resources
Deployment of ActiveVOS Server and datasource.
For WebLogic: Deploy Applications
Select deployment of ActiveVOS Server and ActiveVOS Central. It also allows you install the database schema. Note that you can run the config-deploy tool more than once on separate servers, to deploy ActiveVOS Central to different machines.
Engine ConfigurationThis panel provides information required for ActiveVOS Server to access your database server. Choices on this panel change the settings in the configuration of the aeEngineConfig.xml file, which is contained in the activevos.war file.
Field Name Default Value Descripton
Database MySQL This setting is used internally by ActiveVOS Server to handle communication for the supported database.
Select Next to save your value and continue.
JNDI ConfigurationThe Server JNDI Configuration panel allows configuration of the various files that contain JNDI references.
94 Chapter 4: JBoss

For Tomcat and JBoss: In general, if you have not preconfigured resources on your application server, it is not necessary to change the default values. If you have already configured resources you must match the field to your corresponding resource.
For WebLogic: You should configure JNDI resources before completing this configuration. Refer to Configuration for guidelines on configuring a JDBC Data Source and a Work Manager.
For Websphere: You should preconfigure a work manager and timer manager on your application server prior to completing this configuration. However, you can configure them later and rerun the configuration. If you have already configured resources, you must match the field to your corresponding resource.
Server Field Name Default Value Description
All Database JNDI jdbc/ActiveVOS The ActiveVOS Server Database resource must be assigned a JNDI name for location at run-time. Enter this JNDI name in the text box provided.
WebLogic Work Manager JNDI wm/ActiveVOS (suggested name)
Name that is used to connect to a WebLogic Work Manager that you have created in the WebLogic Application Server's Process Console.Note: If you do not configure a WebLogic Work Manager, ActiveVOS Server ignores this name and instead use its own internal Work Manager. Enter your WebLogic JNDI name if it differs from the suggested name.
Configuration 95

Server Field Name Default Value Description
WebSphere Work Manager JNDI wm/ActiveVOS (suggested name)
Name that is used to connect to a WebSphere Work Manager that you have created in the WebSphere Application Server using the Process Console.Note: If you do not specify a Work Manager JNDI name then ActiveVOS will ignore this name and instead use its own internal Work Manager. Enter your WebSphere JNDI name if it differs from the suggested name.
WebSphere Timer Manager JNDI tm/ActiveVOS (suggested name)
Name that is used to connect to a WebSphere Timer Manager that you have created in the WebSphere Application Server using the Administration Console. Note: If you do not specify a Timer Manager JNDI name then ActiveVOS will ignore this name and instead use its own internal Timer Manager. Enter this JNDI name if it differs from the suggested name.
Select Next to save your value and continue.
Security ConfiguratonActiveVOS Server can be deployed in a secured manner. The Security Configuration panel allows you to configure the security parameters that will be applied to the ActiveVOS Server Console, and deployed BPEL process services. Select the security options you want to enable.
After completing configuration, you must assign security roles to users and groups. You can find details on configuring security in the Process Server Guide.
If you have a license for the multi-tenant feature, you must enable security.
After entering this information, click Next to save your values and to continue.
96 Chapter 4: JBoss

Administrative Functions
These functions add security parameters to the ActiveVOS Consoles and services by setting the following roles:
abAdmin
Users associated with this role have full administrative rights to ActiveVOS Server.
abBusinessManager
Users associated with this role have access to process instance details (but cannot operate on them). They can monitor active processes and tasks, and work queues. They have a read-only view of process instance details.
abDeployer
Users associated with this role have rights restricted to deploying business process archive files to ActiveVOS Server.
abDeveloper
Users associated with this role have rights restricted to service artifacts, endpoint information, and sample messages for the services they consume and expose (that is, processes) after they are deployed. Developers need the ability to deploy process deployment archives, initiate process execution and analyze them. Developers also need to configure global function contexts for custom functions, URN mappings, and the ability to schedule process execution. Specifically, this user has access to the Active Process list, the Process Instance View, the Active Task and Work Queues lists, the Server Log, the Dashboard and all reports, and the catalog's content.
abOperator
Users associated with this role have rights restricted to operating the system. These include observing the functionality of processes, managing process instances using the process instance detail view, running reports, logging, viewing exceptions, acquiring information on service operations, adding and removing tenants, and managing the scheduled database delete schedule.
abTaskClient
Required. You must configure permission to access ActiveVOS Central for all users. In addition, users who interact with the Human Task (WS-HT) API must have this role.
ActiveVOS Central presents a login page to users.
Process Services
The process services adds security parameters to the Web Services handler for all deployed BPEL services with a role. The services listed at http://[host]:[port]/active-bpel/services are secured. The process services (roles) are:
abRestrictedServiceConsumer
Users associated with this role cannot access a service unless it is deployed with allowed roles specified in the pdd and the user belongs to at least of these roles. If no roles are specified in the pdd, access to services with no roles specified in the pdd are also denied. Users in this role can view the wsdl files for other services like abServiceConsumer; however, they are blocked at runtime.
abServiceConsumer
Users associated with this role have rights restricted to start process instances of deployed processes, including from ActiveVOS Central, the Eclipse Web Tools Project, or other client application,such as SOAPUI.
Configuration 97
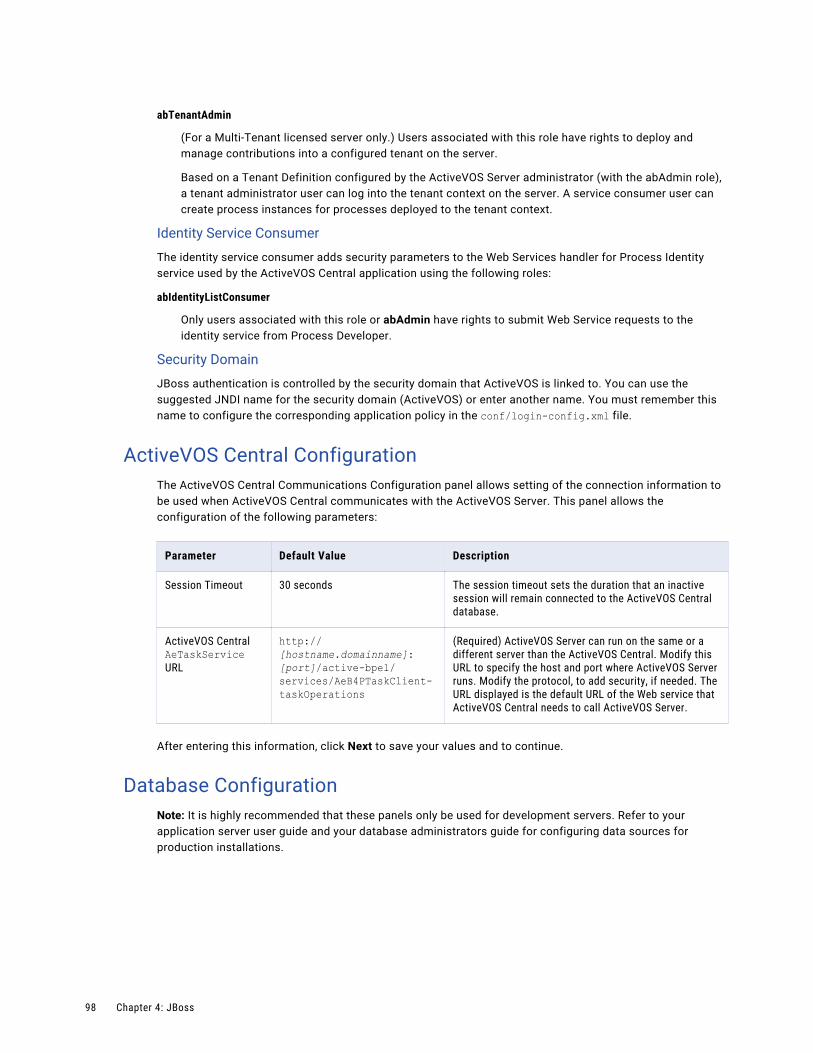
abTenantAdmin
(For a Multi-Tenant licensed server only.) Users associated with this role have rights to deploy and manage contributions into a configured tenant on the server.
Based on a Tenant Definition configured by the ActiveVOS Server administrator (with the abAdmin role), a tenant administrator user can log into the tenant context on the server. A service consumer user can create process instances for processes deployed to the tenant context.
Identity Service Consumer
The identity service consumer adds security parameters to the Web Services handler for Process Identity service used by the ActiveVOS Central application using the following roles:
abIdentityListConsumer
Only users associated with this role or abAdmin have rights to submit Web Service requests to the identity service from Process Developer.
Security Domain
JBoss authentication is controlled by the security domain that ActiveVOS is linked to. You can use the suggested JNDI name for the security domain (ActiveVOS) or enter another name. You must remember this name to configure the corresponding application policy in the conf/login-config.xml file.
ActiveVOS Central ConfigurationThe ActiveVOS Central Communications Configuration panel allows setting of the connection information to be used when ActiveVOS Central communicates with the ActiveVOS Server. This panel allows the configuration of the following parameters:
Parameter Default Value Description
Session Timeout 30 seconds The session timeout sets the duration that an inactive session will remain connected to the ActiveVOS Central database.
ActiveVOS Central AeTaskService URL
http://[hostname.domainname]:[port]/active-bpel/services/AeB4PTaskClient-taskOperations
(Required) ActiveVOS Server can run on the same or a different server than the ActiveVOS Central. Modify this URL to specify the host and port where ActiveVOS Server runs. Modify the protocol, to add security, if needed. The URL displayed is the default URL of the Web service that ActiveVOS Central needs to call ActiveVOS Server.
After entering this information, click Next to save your values and to continue.
Database ConfigurationNote: It is highly recommended that these panels only be used for development servers. Refer to your application server user guide and your database administrators guide for configuring data sources for production installations.
98 Chapter 4: JBoss
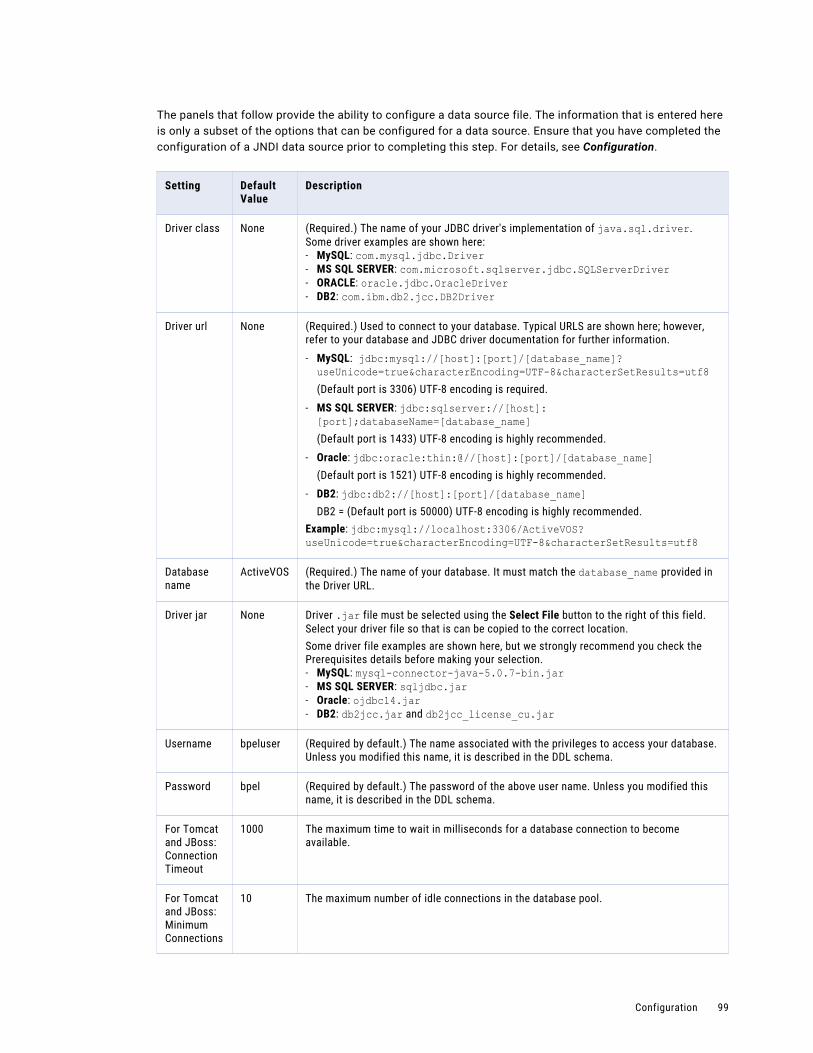
The panels that follow provide the ability to configure a data source file. The information that is entered here is only a subset of the options that can be configured for a data source. Ensure that you have completed the configuration of a JNDI data source prior to completing this step. For details, see Configuration.
Setting Default Value
Description
Driver class None (Required.) The name of your JDBC driver's implementation of java.sql.driver. Some driver examples are shown here:- MySQL: com.mysql.jdbc.Driver- MS SQL SERVER: com.microsoft.sqlserver.jdbc.SQLServerDriver - ORACLE: oracle.jdbc.OracleDriver- DB2: com.ibm.db2.jcc.DB2Driver
Driver url None (Required.) Used to connect to your database. Typical URLS are shown here; however, refer to your database and JDBC driver documentation for further information.- MySQL: jdbc:mysql://[host]:[port]/[database_name]?useUnicode=true&characterEncoding=UTF-8&characterSetResults=utf8(Default port is 3306) UTF-8 encoding is required.
- MS SQL SERVER: jdbc:sqlserver://[host]:[port];databaseName=[database_name](Default port is 1433) UTF-8 encoding is highly recommended.
- Oracle: jdbc:oracle:thin:@//[host]:[port]/[database_name] (Default port is 1521) UTF-8 encoding is highly recommended.
- DB2: jdbc:db2://[host]:[port]/[database_name] DB2 = (Default port is 50000) UTF-8 encoding is highly recommended.
Example: jdbc:mysql://localhost:3306/ActiveVOS?useUnicode=true&characterEncoding=UTF-8&characterSetResults=utf8
Database name
ActiveVOS (Required.) The name of your database. It must match the database_name provided in the Driver URL.
Driver jar None Driver .jar file must be selected using the Select File button to the right of this field. Select your driver file so that is can be copied to the correct location.Some driver file examples are shown here, but we strongly recommend you check the Prerequisites details before making your selection.- MySQL: mysql-connector-java-5.0.7-bin.jar- MS SQL SERVER: sqljdbc.jar- Oracle: ojdbc14.jar- DB2: db2jcc.jar and db2jcc_license_cu.jar
Username bpeluser (Required by default.) The name associated with the privileges to access your database. Unless you modified this name, it is described in the DDL schema.
Password bpel (Required by default.) The password of the above user name. Unless you modified this name, it is described in the DDL schema.
For Tomcat and JBoss: Connection Timeout
1000 The maximum time to wait in milliseconds for a database connection to become available.
For Tomcat and JBoss: Minimum Connections
10 The maximum number of idle connections in the database pool.
Configuration 99

Setting Default Value
Description
For Tomcat and JBoss: Maximum Connections
100 The maximum number of connections in the database pool.
Validate Connection
Checked Checking this entry will cause the configuration wizard to attempt to connect to your database with the supplied information.
Validate Connection. After you enter all required database connection information and click Next, the utility checks that your driver jar and URL are valid, and that the database name matches the name in the URL. The utility does not check the username and password of the database. If the server cannot make a connection because these are in error, you can re-run the configure-deploy utility and enter new names. All other values are preserved.
After entering this information, click Next to save your values and to continue.
Deployment OptionsThe Deployment Options panel allows the selection of deployment items. The check boxes on this panel are as follows:
Install database schema (New Installation Only)
This option controls whether or not the configuration wizard will install the Process database schema to your database.
Note: This option requires that the user information and database name entered in the Database Configuration Panel have already been created. Additionally, this option must not be selected by users wishing to update from a previous database version. For upgrade instructions, please see the Configuration Wizard document.
Install database schema
This option controls whether or not the configuration utility installs the ActiveVOS database schema to your database. Selecting this option will present a Database Configuration panel on the next wizard page.
Note: Do not select this option if you are updating from a previous database version. For upgrade instructions, please see the Configuration section of your documentation.
Install database descriptor (For Tomcat and JBoss Only)
Checking this option installs the application server specific database descriptor file to your application server. Selecting this option eliminates the need to create the descriptor file through application server management consoles.
Install Application Resources (For WebSphere Only)
Checking this option installs the ActiveVOS Server resources to your application server, including settings for work manager, timer manager, JAAS login, and database resource.
Deploy ActiveVOS
Checking this option installs the ActiveVOS Server to your application server.
Note: If you plan to enable clustering, you must re-run this configuration utility and, on the last page, select a different directory for deployment.
100 Chapter 4: JBoss
Include Process Console
Selecting this option installs Process Console on your application server. Process Console is an optional component that you can choose to install.
Note: If you select the Include Process Console option, you must also select the Deploy ActiveVOS option.
Deploy ActiveVOS Central
Checking this option installs ActiveVOS Central to your application server.
If you want to install ActiveVOS Central to a different server, re-run the config-deploy utility on that server.
After entering this information, click Next to save your values and to continue.
Application Server PathFor each node in a cluster, provide a new Directory for deployment; for example, jboss\[your server]\deployments.
After entering this information, click Next to save your values and to continue.
Configuration 101
Copyright © 2022 FDOKUMEN