
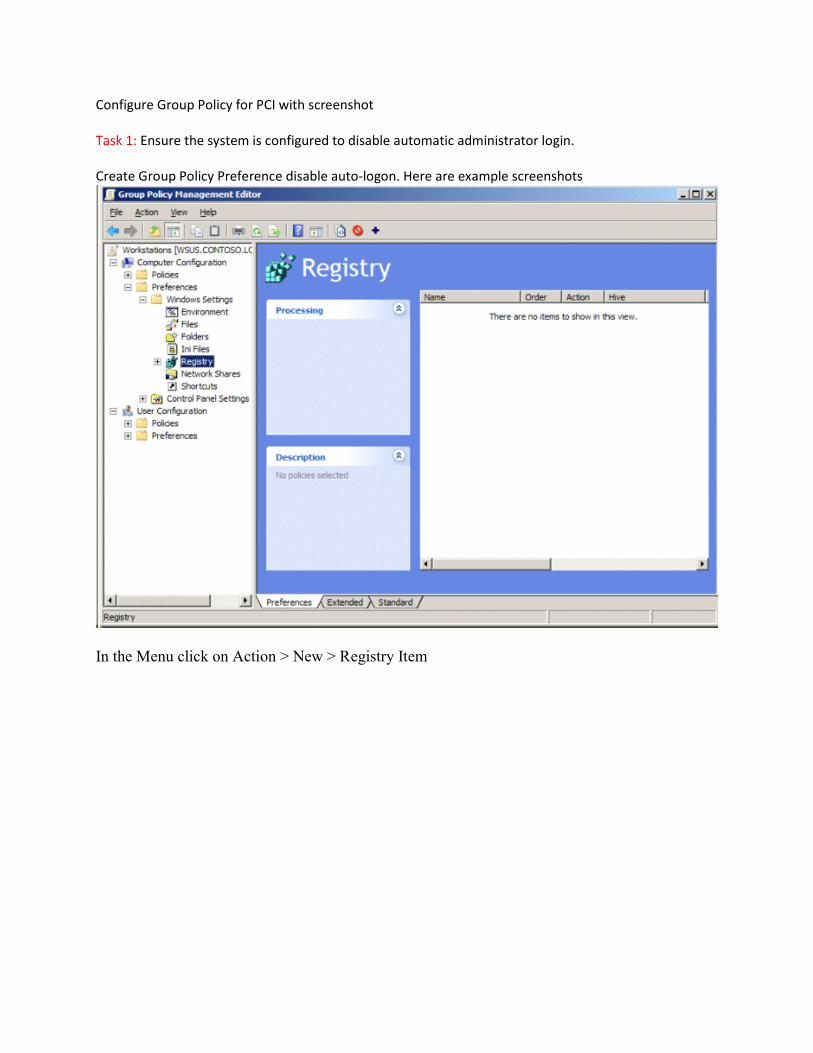
In the Menu click on Action > New > Registry Item
59
Configure Group Policy for PCI with screenshot Task 1: Ensure the system is configured to disable automatic administrator login. Create Group Policy Preference disable auto-logon. Here are example screenshots In the Menu click on Action > New > Registry Item
-
Upload
khangminh22 -
Category
Documents
-
view
3 -
download
0
Transcript of In the Menu click on Action > New > Registry Item
Configure Group Policy for PCI with screenshot Task 1: Ensure the system is configured to disable automatic administrator login. Create Group Policy Preference disable auto-logon. Here are example screenshots
In the Menu click on Action > New > Registry Item
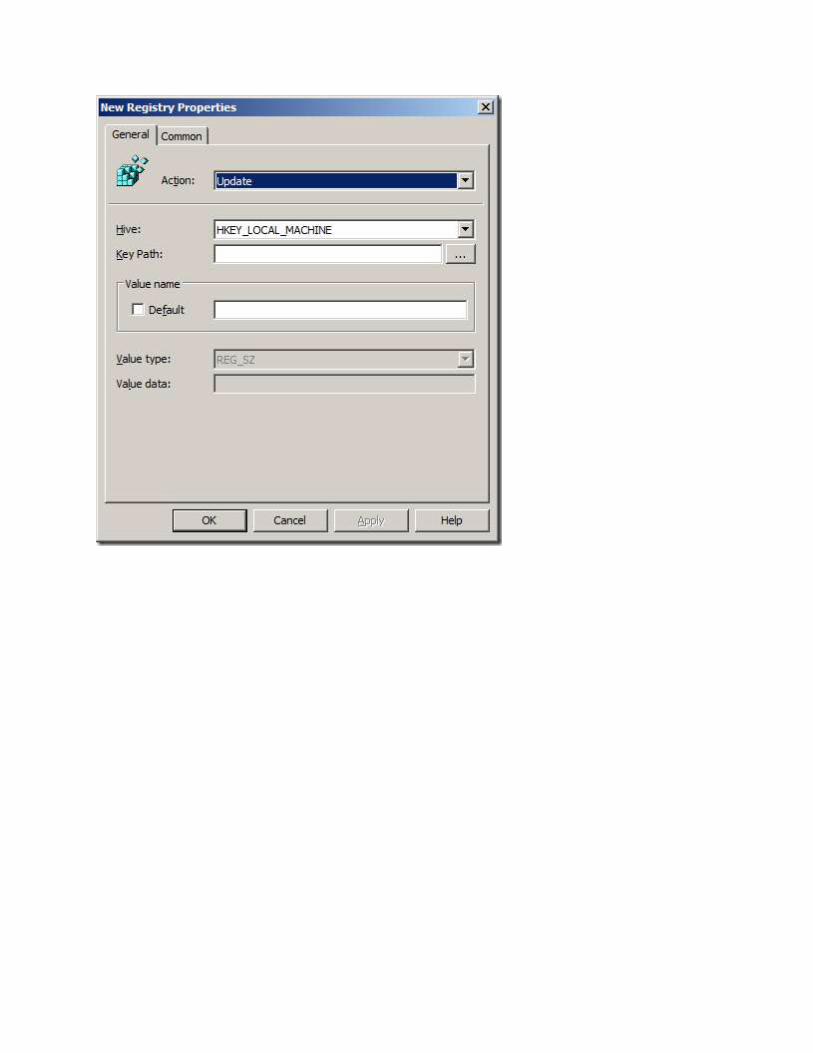
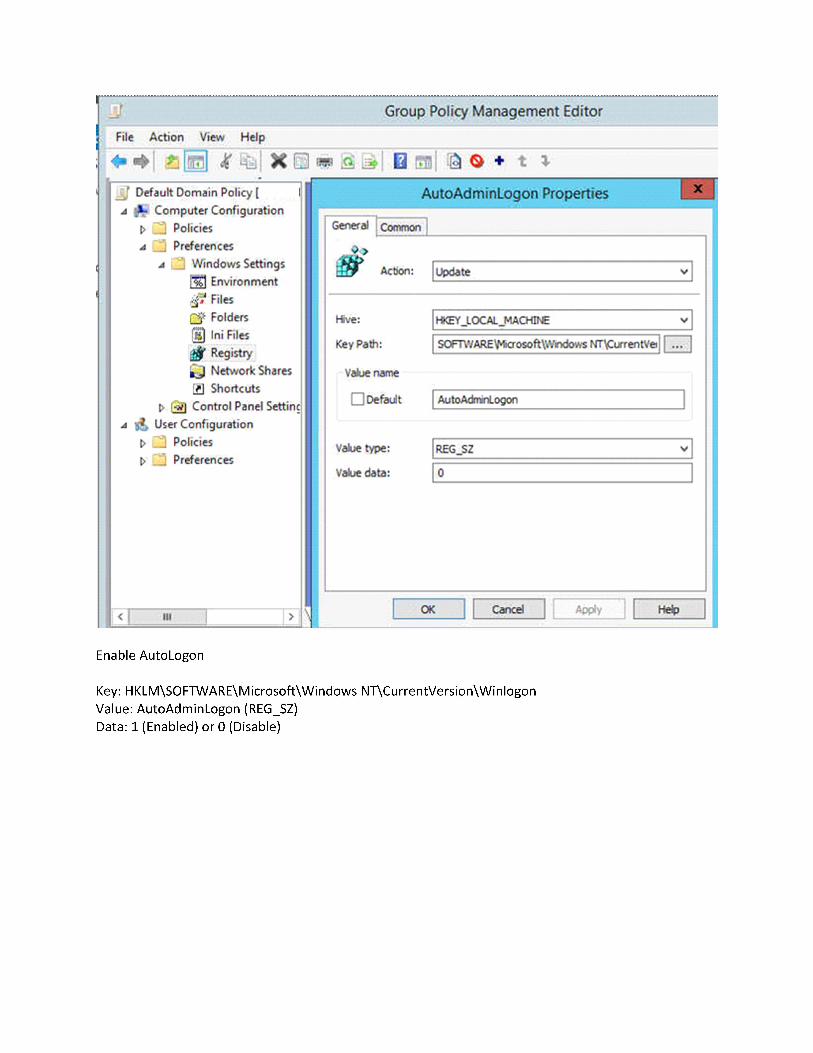
Enable AutoLogon Key: HKLM\SOFTWARE\Microsoft\Windows NT\CurrentVersion\Winlogon Value: AutoAdminLogon (REG_SZ) Data: 1 (Enabled) or 0 (Disable)

Task 2: The built in Administrator and Guest accounts should be renamed to something other an Administrator or Guest or disabled. To disable local administrative accounts throughout the domain I would use group policy to accomplish the task. The GPO can be created by using the Computer Policy | Windows Settings | Security Settings | Local policies | Security Options and then using the Accounts:Administrator account status setting. If this setting is GPO is linked to the domain level it can effective disable all of the local admin accounts.

Task 3: The system screen saver settings should be configured to lock the screen as required by organizational or regulatory policy. You can enable Group Policy settings that control whether users use screen savers and whether they can change screen saver properties. Table 8.8 lists and describes each Group Policy setting. Other Group Policy settings you enforce can affect screen saver Group Policy settings. For additional information, right-click the Group Policy setting, click Properties , and then click the Explain tab, or refer to the Group Policy Reference on the Windows 2000 Resource Kit companion CD. The Group Policy settings listed in Table 8.8 are located in the Group Policy snap-in under Local Computer Policy\User Configuration\Administrative Templates\Control Panel\ Personalization.

Task 4: The Application, System, and Security Event log files should have ACLs set as follows: Administrators – Read and Execute. System – Full Control.

For DC, I applied Above steps are enough. For other computers, we may apply Group policy.
Use the Computer's Local Group Policy to Set Your Application and System Log Security
1. Click Start, click Run, type gpedit.msc, and then click OK.
2. In the Group Policy editor, expand Windows Setting, expand Security Settings, expand Local Policies, and then expand Security Options.
3. Double-click Event log: Application log SDDL, type the SDDL string that you want for the log security, and then click OK.
4. Double-click Event log: System log SDDL, type the SDDL string that you want for the log security, and then click OK.
Use Group Policy to Set Your Application and System Log Security for a Domain, Site, or Organizational Unit in Active Directory
Important: To view the group policy settings that are described in this article in the Group Policy editor, first complete the following steps, and then continue to the "Use Group Policy to Set Your Application and System Log Security" section:
1. Use a text editor such as Notepad to open the Sceregvl.inf in the %Windir%\Inf folder.
2. Add the following lines to the [Register Registry Values] section:
MACHINE\System\CurrentControlSet\Services\Eventlog\Application\CustomSD,1,%AppCustomSD%,2 MACHINE\System\CurrentControlSet\Services\Eventlog\Security\CustomSD,1,%SecCustomSD%,2

MACHINE\System\CurrentControlSet\Services\Eventlog\System\CustomSD,1,%SysCustomSD%,2 MACHINE\System\CurrentControlSet\Services\Eventlog\Directory Service\CustomSD,1,%DSCustomSD%,2 MACHINE\System\CurrentControlSet\Services\Eventlog\DNS Server\CustomSD,1,%DNSCustomSD%,2 MACHINE\System\CurrentControlSet\Services\Eventlog\File Replication Service\CustomSD,1,%FRSCustomSD%,2
3. Add the following lines to the [Strings] section:
AppCustomSD="Eventlog: Security descriptor for Application event log" SecCustomSD="Eventlog: Security descriptor for Security event log" SysCustomSD="Eventlog: Security descriptor for System event log" DSCustomSD="Eventlog: Security descriptor for Directory Service event log" DNSCustomSD="Eventlog: Security descriptor for DNS Server event log" FRSCustomSD="Eventlog: Security descriptor for File Replication Service event log"
4. Save the changes you made to the Sceregvl.inf file, and then run the regsvr32 scecli.dll command.
5. Start Gpedit.msc, and then double-click the following branches to expand them:
Computer Configuration Windows Settings Security Settings Local Policies Security Options
6. View the right panel to find the new "Eventlog" settings.
Use Group Policy to Set Your Application and System Log Security
1. In the Active Directory Sites and Services snap-in or the Active Directory Users and Computers snap-in, right-click the object for which you want to set the policy, and then click Properties.
2. Click the Group Policy tab.
3. If you must create a new policy, click New, and then define the policy's name. Otherwise, go to step 5.
4. Select the policy that you want, and then click Edit. The Local Group Policy MMC snap-in appears.
5. Expand Computer Configuration, expand Windows Settings, expand Security Settings, expand Local Policies, and then click Security Options.
6. Double-click Event log: Application log SDDL, type the SDDL string that you want for the log security, and then click OK.
7. Double-click Event log: System log SDDL, type the SDDL string that you want for the log security, and then click OK.
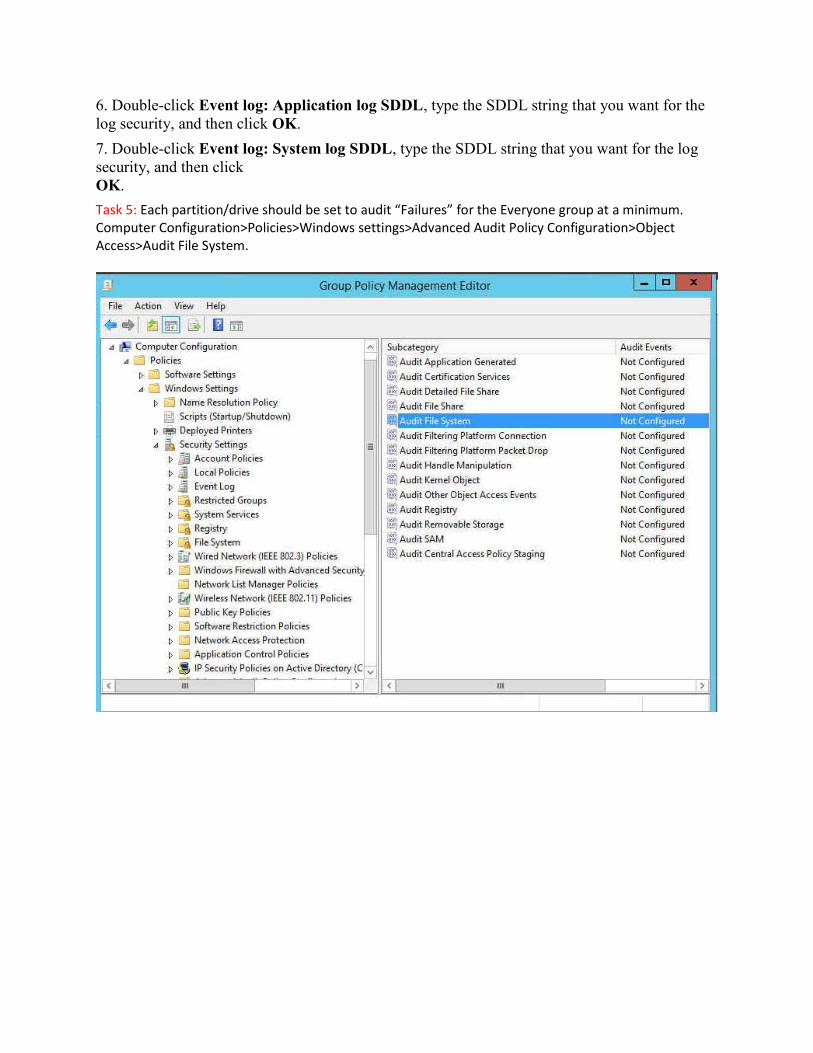
Task 5: Each partition/drive should be set to audit “Failures” for the Everyone group at a minimum. Computer Configuration>Policies>Windows settings>Advanced Audit Policy Configuration>Object Access>Audit File System.

Task 6: Configure the system to disallow guest access to the Event logs. Computer configuration>Policies>Windows settings> Security settings>Local Policy>Security options>
Task 7: The HKEY_LOCAL_MACHINE\SOFTWARE and HKEY_LOCAL_MACHINE\SYEM registry hives should have auditing set to record “Failures” for the everyone group at a minimum.
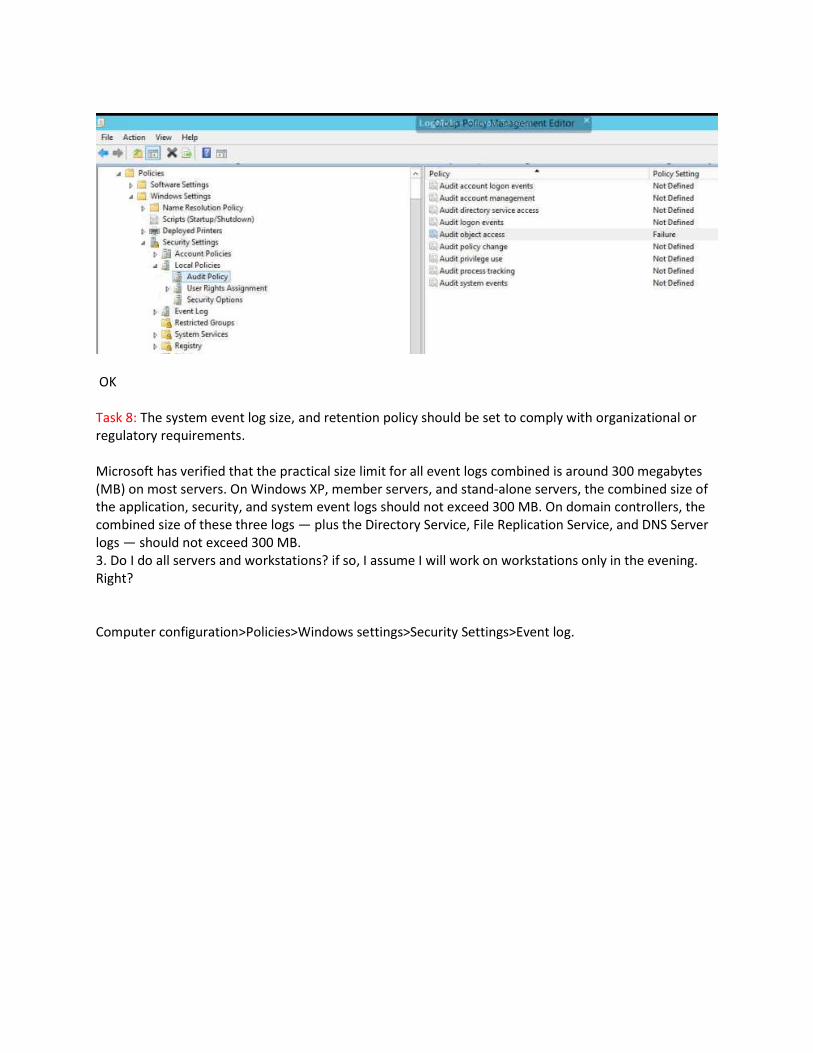
OK Task 8: The system event log size, and retention policy should be set to comply with organizational or regulatory requirements. Microsoft has verified that the practical size limit for all event logs combined is around 300 megabytes (MB) on most servers. On Windows XP, member servers, and stand-alone servers, the combined size of the application, security, and system event logs should not exceed 300 MB. On domain controllers, the combined size of these three logs — plus the Directory Service, File Replication Service, and DNS Server logs — should not exceed 300 MB. 3. Do I do all servers and workstations? if so, I assume I will work on workstations only in the evening. Right? Computer configuration>Policies>Windows settings>Security Settings>Event log.


Task 9: The system should be configured to override audit policy subcategory settings, in order to take advantage of the more precise auditing features included in Windows Vista or later. Resolution:
Disable the policy setting by using Group Policy Object Editor
Verify that the policy setting was enabled by using Group Policy, and then disable the policy setting by using Group Policy Object Editor. To do this, follow these steps:
1. Verify that the "Force audit policy subcategory settings (Windows Vista or later) to override audit policy category settings" policy setting was enabled by using Group Policy. To do this, follow these steps:
1. On the computer, click Start, point to All Programs, click Accessories, click Run, type rsop.msc in the Open box, and then click OK.
2. Expand Computer Configuration, expand Windows Settings, expand Security Settings, expand Local Policies, and then click Security Options.
3. Double-click Audit: Force audit policy subcategory settings (Windows Vista or later) to override audit policy category settings.
4. Verify that the policy setting is set to Enabled, and then note the Group Policy object (GPO).
2. Disable the "Force audit policy subcategory settings (Windows Vista or later) to override audit policy category settings" policy setting in the GPO. To do this, follow these steps:
1. In Group Policy Object Editor, open the GPO.
2. Expand Computer Configuration, expand Windows Settings, expand Security Settings, expand Local Policies, and then click Security Options.
3. Double-click Audit: Force audit policy subcategory settings (Windows Vista or later) to override audit policy category settings.
4. Click Disabled, and then click OK.
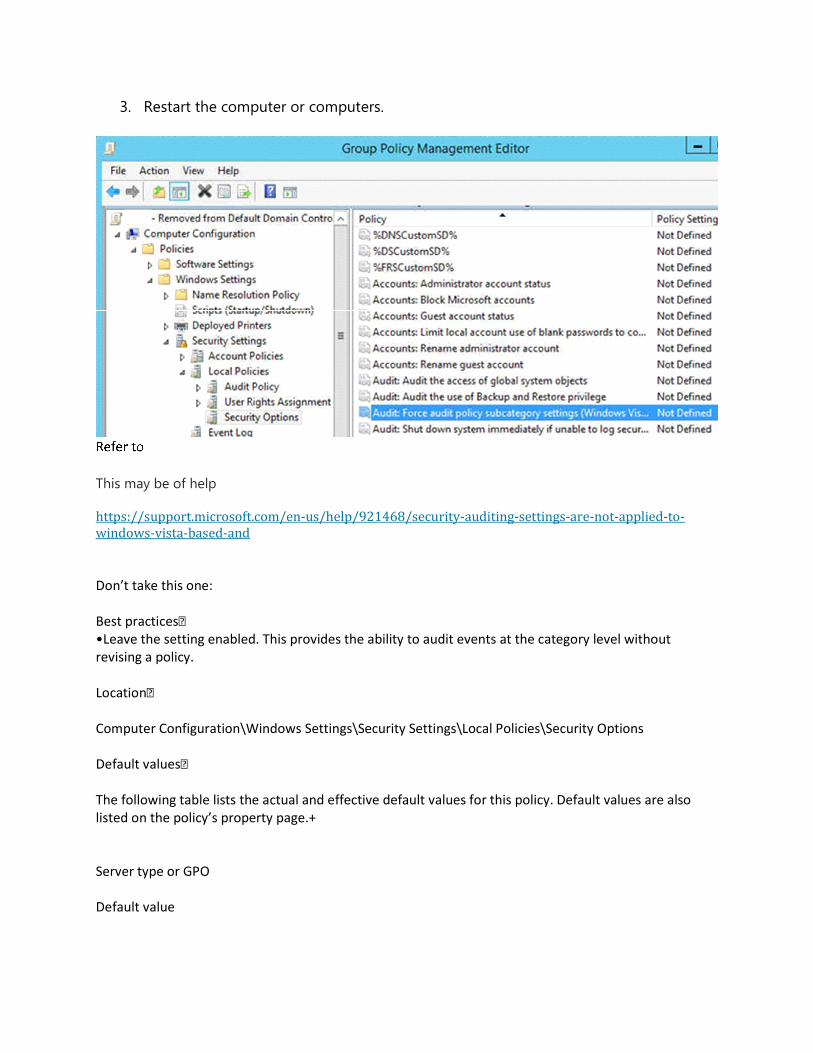
3. Restart the computer or computers.
Refer to This may be of help
https://support.microsoft.com/en-us/help/921468/security-auditing-settings-are-not-applied-to-windows-vista-based-and Don’t take this one: Best practices •Leave the setting enabled. This provides the ability to audit events at the category level without revising a policy. Location Computer Configuration\Windows Settings\Security Settings\Local Policies\Security Options Default values The following table lists the actual and effective default values for this policy. Default values are also listed on the policy’s property page.+ Server type or GPO Default value
Default Domain Policy Not defined Default Domain Controller Policy Not defined Stand-Alone Server Default Settings Enabled DC Effective Default Settings Enabled Member Server Effective Default Settings Enabled Client Computer Effective Default Settings Enabled Reference: Audit Force audit policy subcategory settings (Windows Vista or later ...
Apr 19, 2017 ... Describes the best practices, location, values, and security considerations for the Audit Force audit policy subcategory settings (Windows Vista or later) to override audit policy category settings security policy setting. docs.microsoft.com
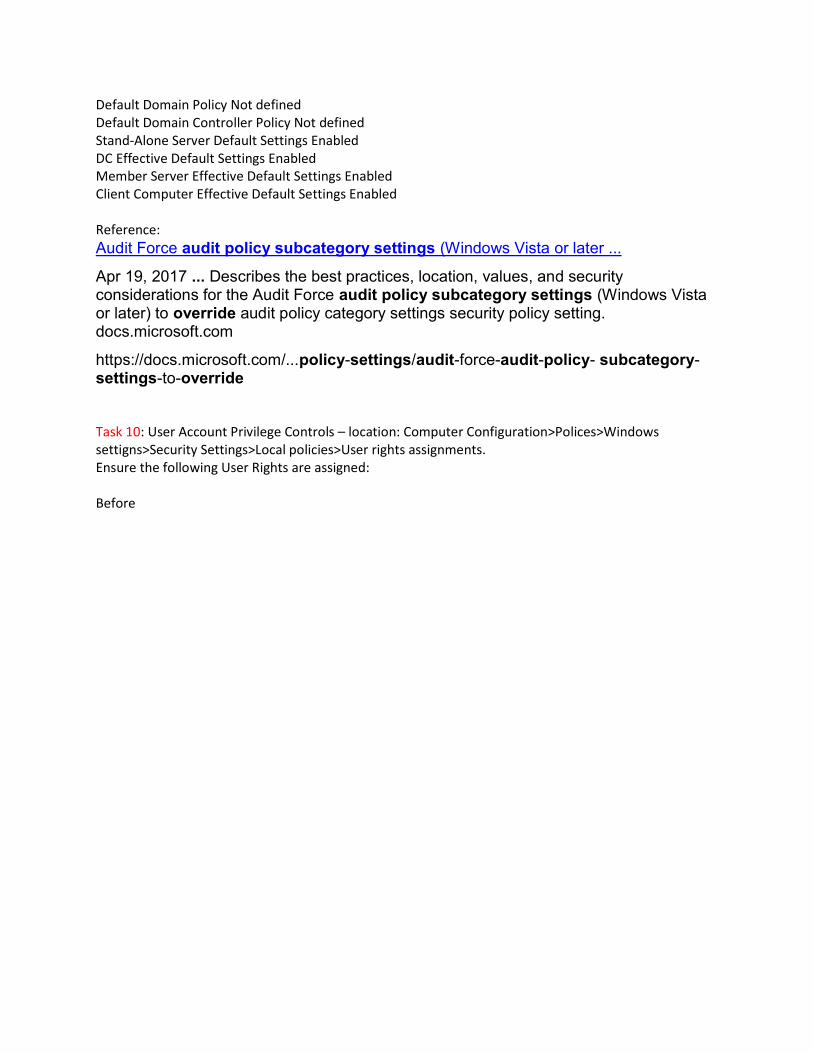
https://docs.microsoft.com/...policy-settings/audit-force-audit-policy- subcategory-settings-to-override Task 10: User Account Privilege Controls – location: Computer Configuration>Polices>Windows settigns>Security Settings>Local policies>User rights assignments. Ensure the following User Rights are assigned: Before
After

Add workstations to domain – Administrators Before
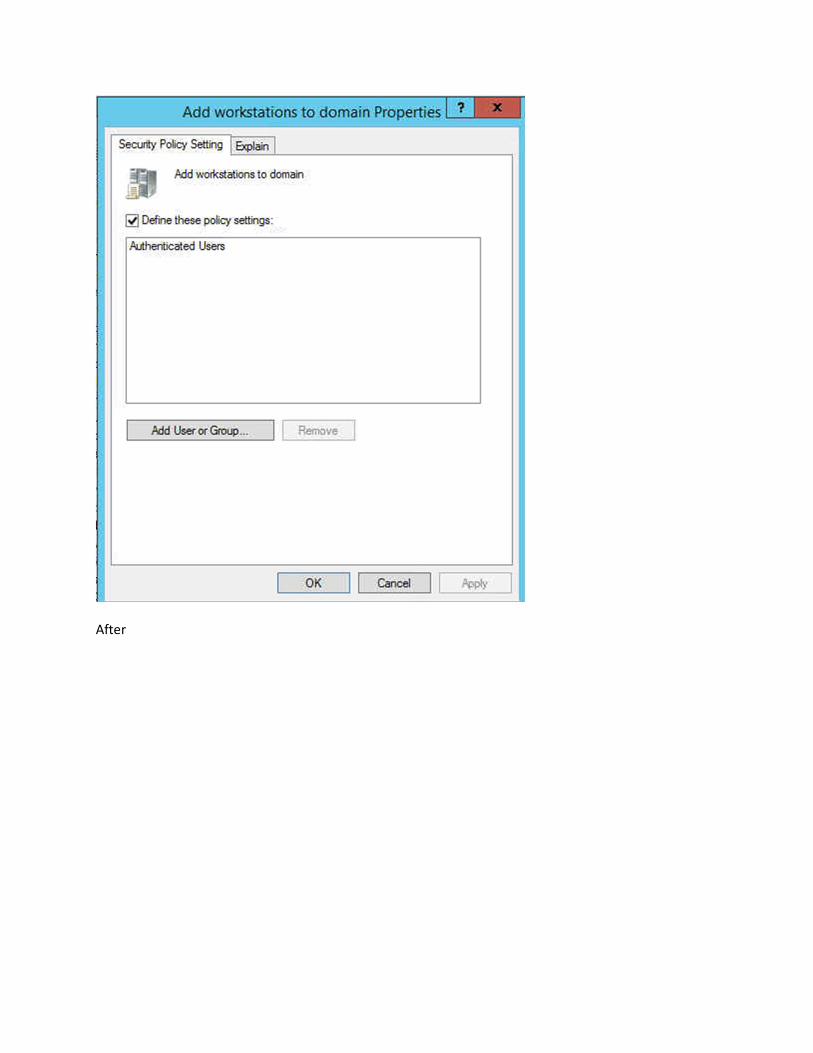
After

Adjust memory quotas for a process – Administrators, Local Service, Network Service Before

After

Allow log on locally – Administrators Before

After
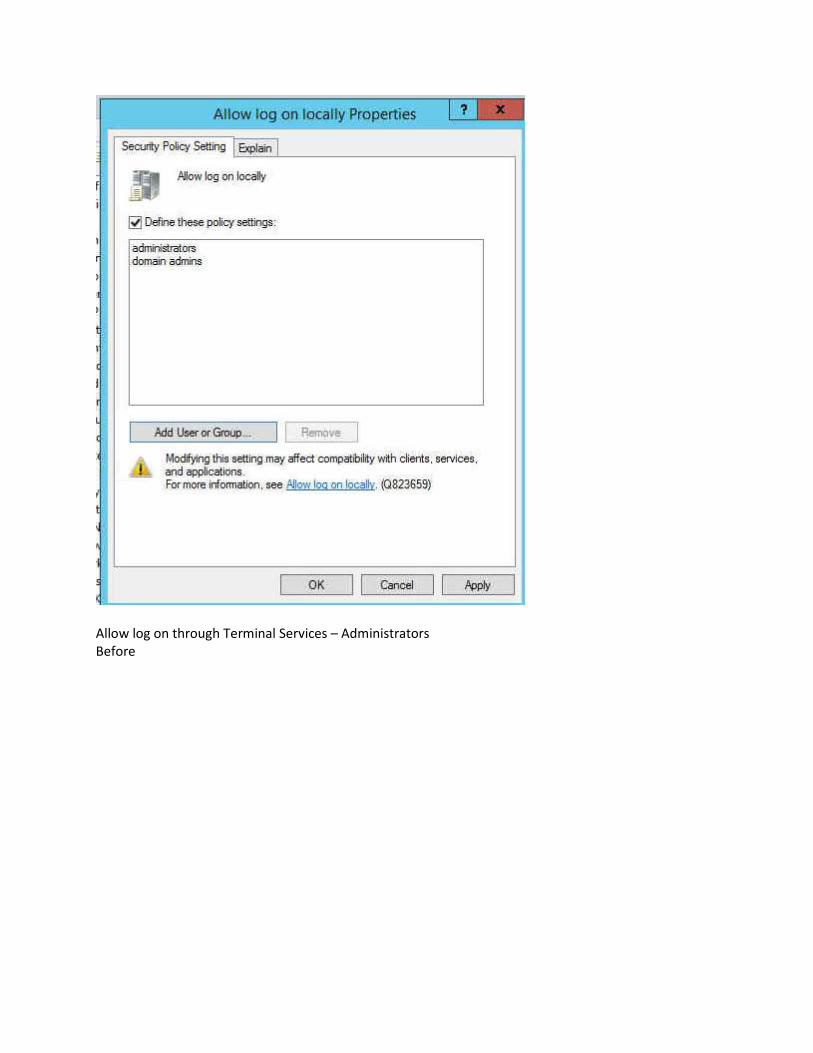
Allow log on through Terminal Services – Administrators Before

After

Backup files and directories – Administrators Before
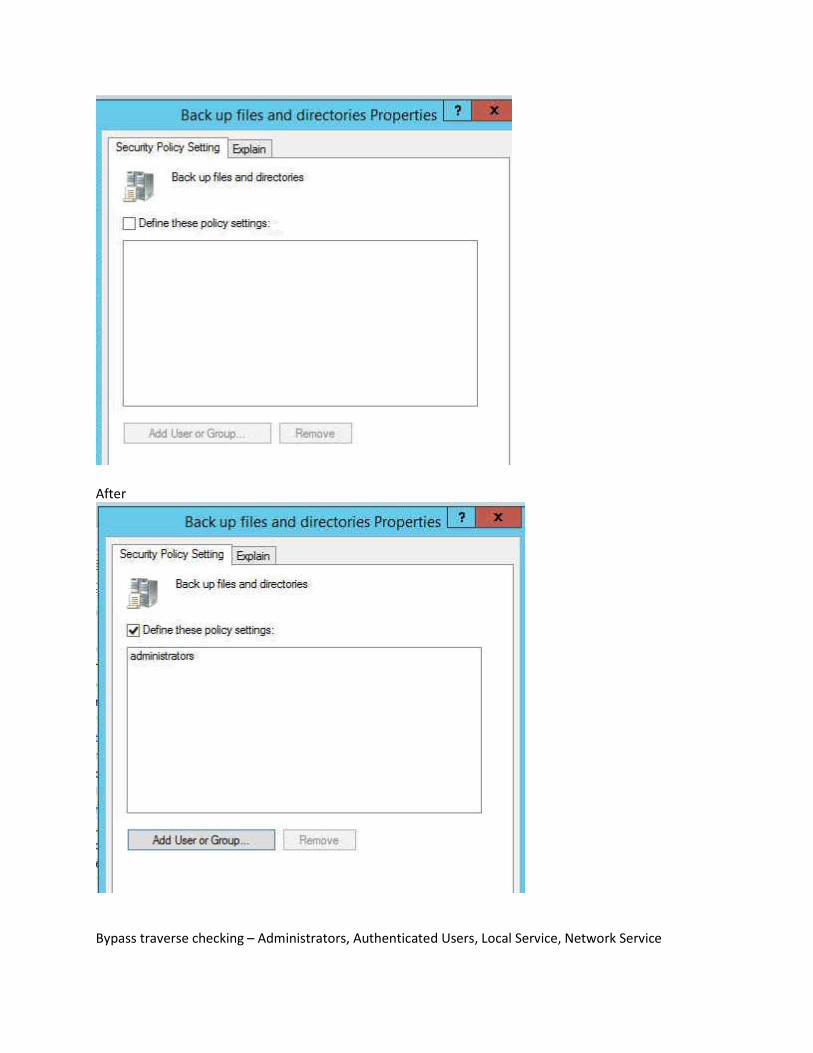
After
Bypass traverse checking – Administrators, Authenticated Users, Local Service, Network Service

Before
After
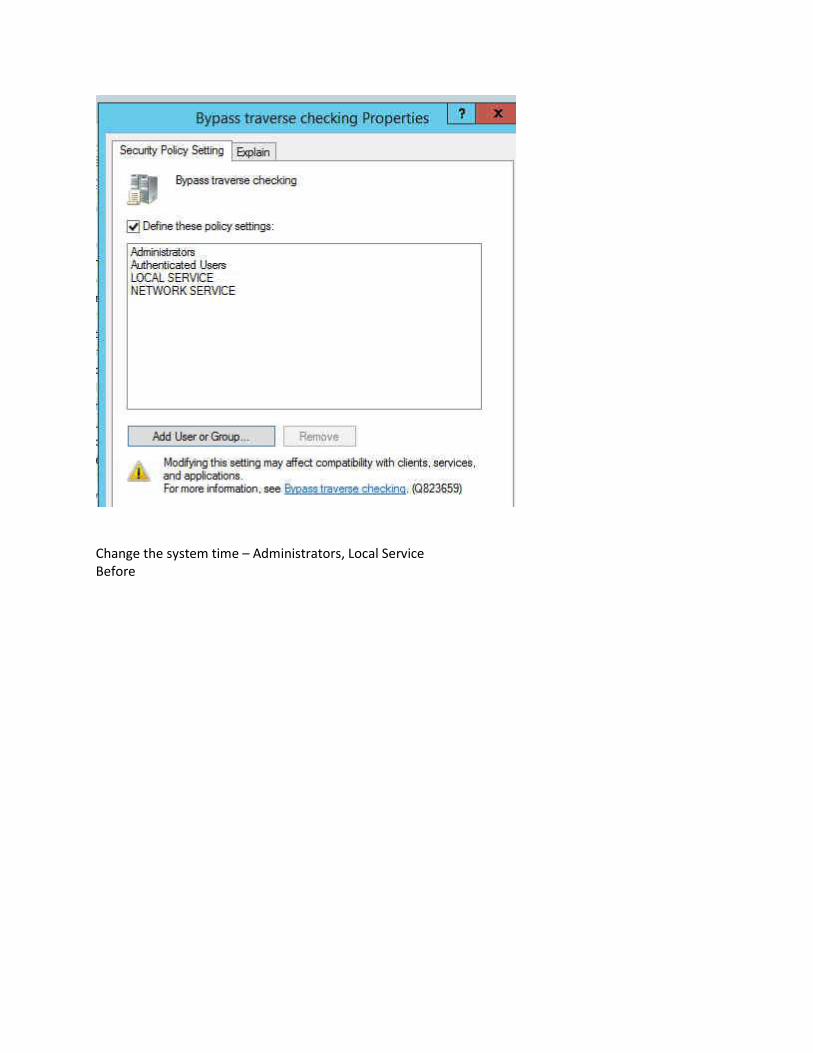
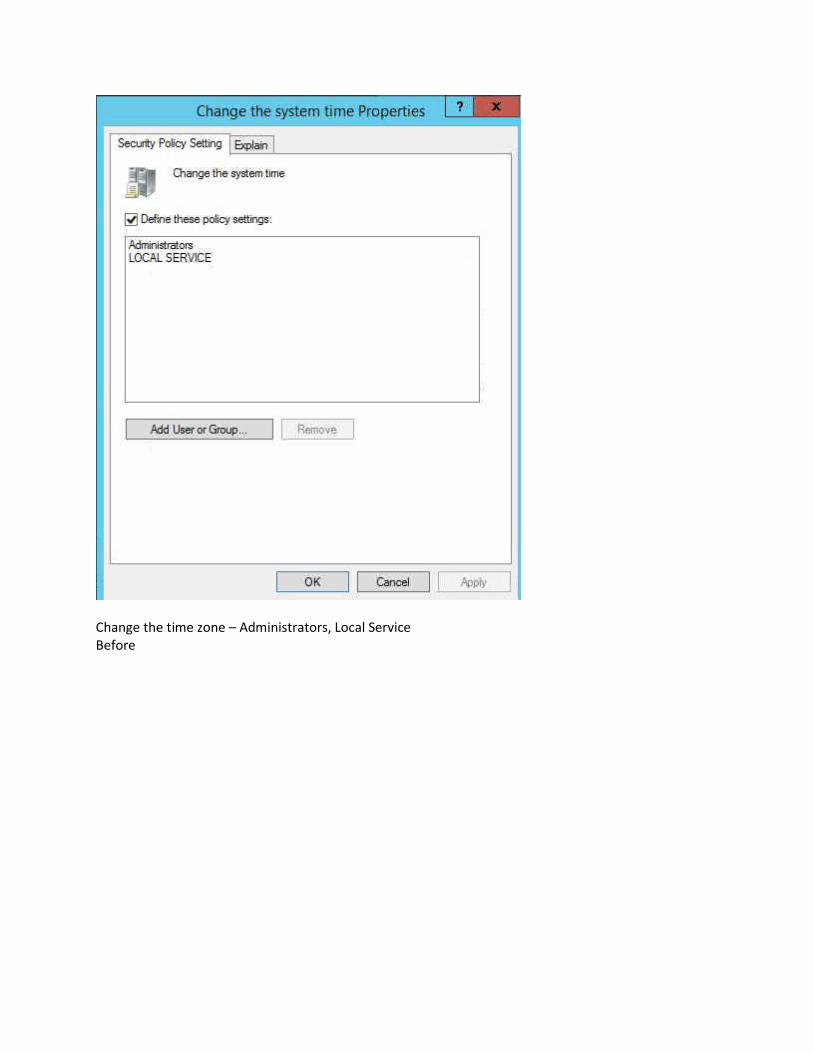
Change the system time – Administrators, Local Service Before

After
Change the time zone – Administrators, Local Service Before
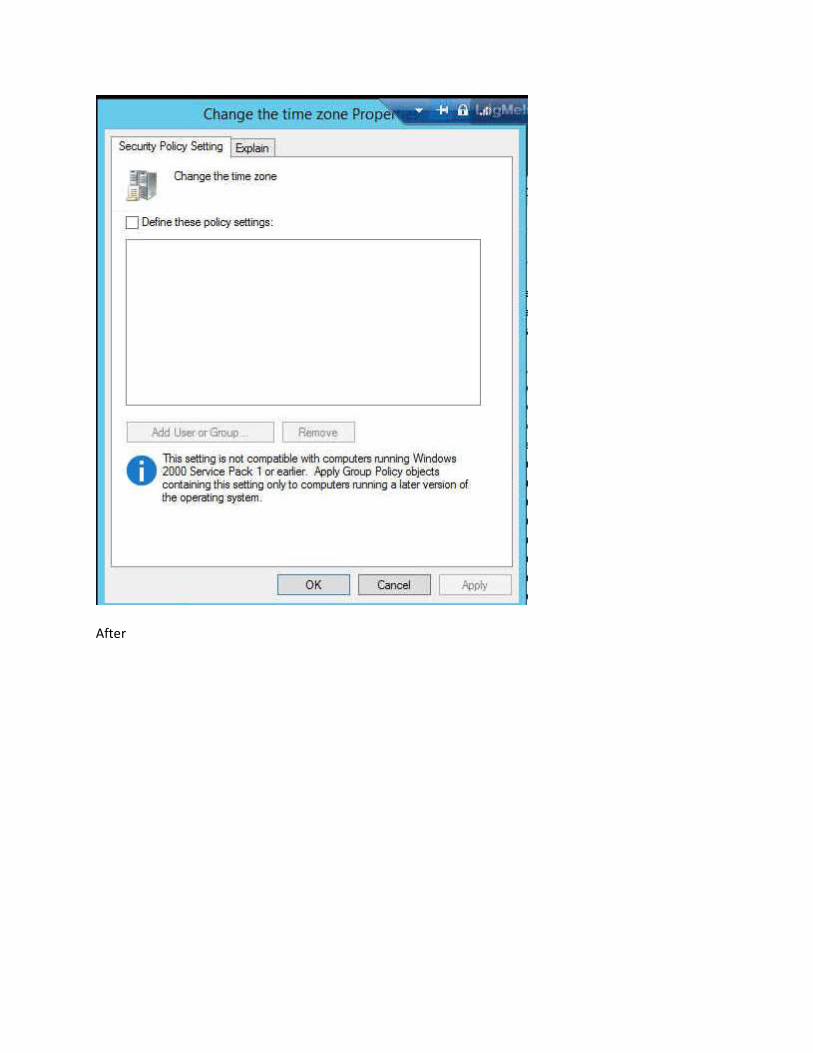
After
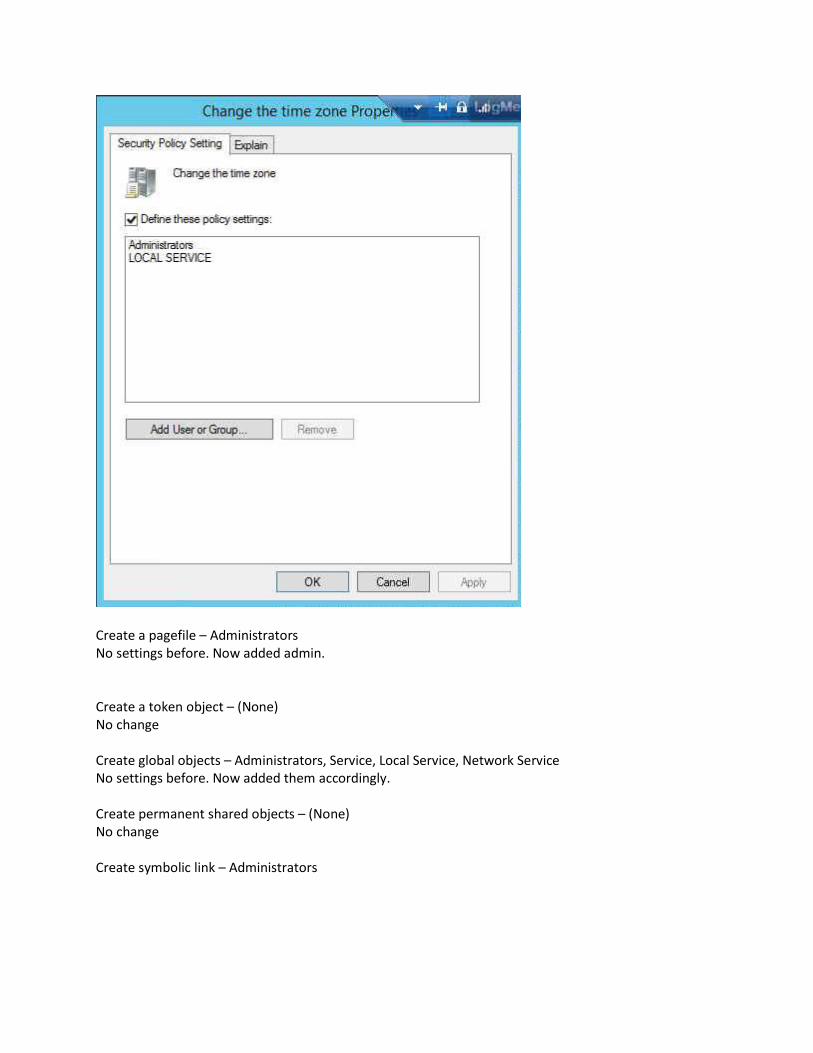
Create a pagefile – Administrators No settings before. Now added admin. Create a token object – (None) No change Create global objects – Administrators, Service, Local Service, Network Service No settings before. Now added them accordingly. Create permanent shared objects – (None) No change Create symbolic link – Administrators
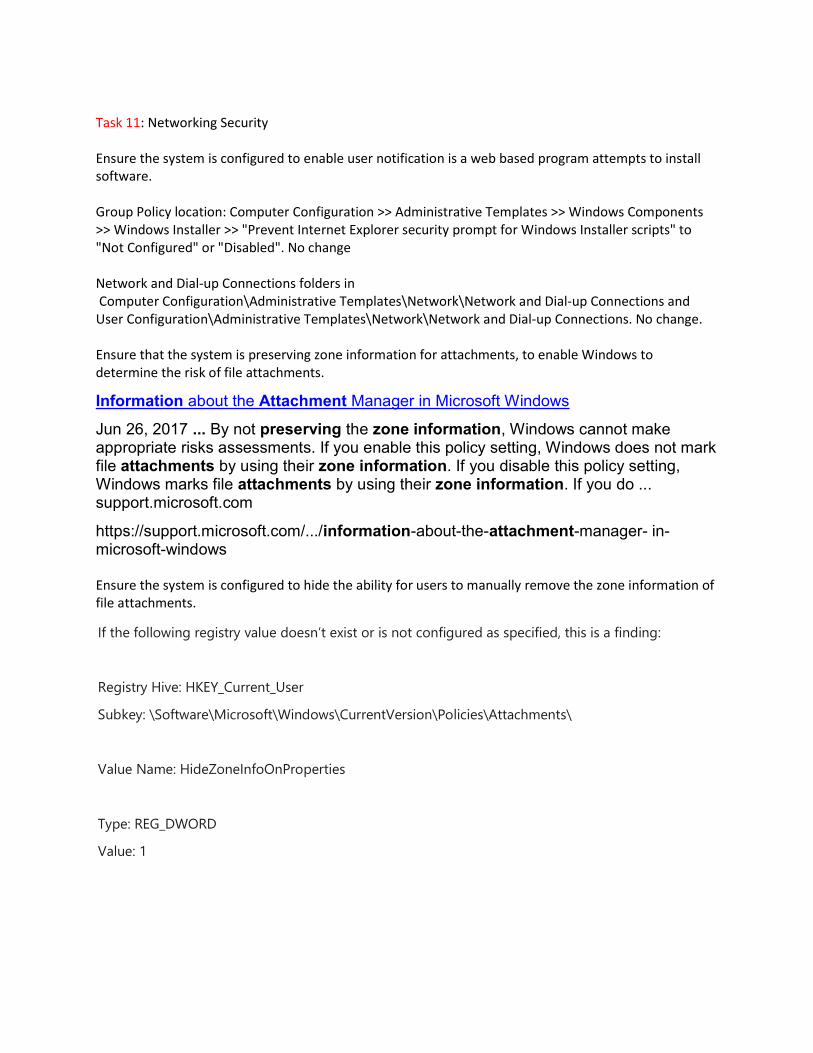
Task 11: Networking Security Ensure the system is configured to enable user notification is a web based program attempts to install software. Group Policy location: Computer Configuration >> Administrative Templates >> Windows Components >> Windows Installer >> "Prevent Internet Explorer security prompt for Windows Installer scripts" to "Not Configured" or "Disabled". No change Network and Dial-up Connections folders in Computer Configuration\Administrative Templates\Network\Network and Dial-up Connections and User Configuration\Administrative Templates\Network\Network and Dial-up Connections. No change. Ensure that the system is preserving zone information for attachments, to enable Windows to determine the risk of file attachments.
Information about the Attachment Manager in Microsoft Windows
Jun 26, 2017 ... By not preserving the zone information, Windows cannot make appropriate risks assessments. If you enable this policy setting, Windows does not mark file attachments by using their zone information. If you disable this policy setting, Windows marks file attachments by using their zone information. If you do ... support.microsoft.com
https://support.microsoft.com/.../information-about-the-attachment-manager- in-microsoft-windows Ensure the system is configured to hide the ability for users to manually remove the zone information of file attachments.
If the following registry value doesn’t exist or is not configured as specified, this is a finding:
Registry Hive: HKEY_Current_User
Subkey: \Software\Microsoft\Windows\CurrentVersion\Policies\Attachments\
Value Name: HideZoneInfoOnProperties
Type: REG_DWORD
Value: 1
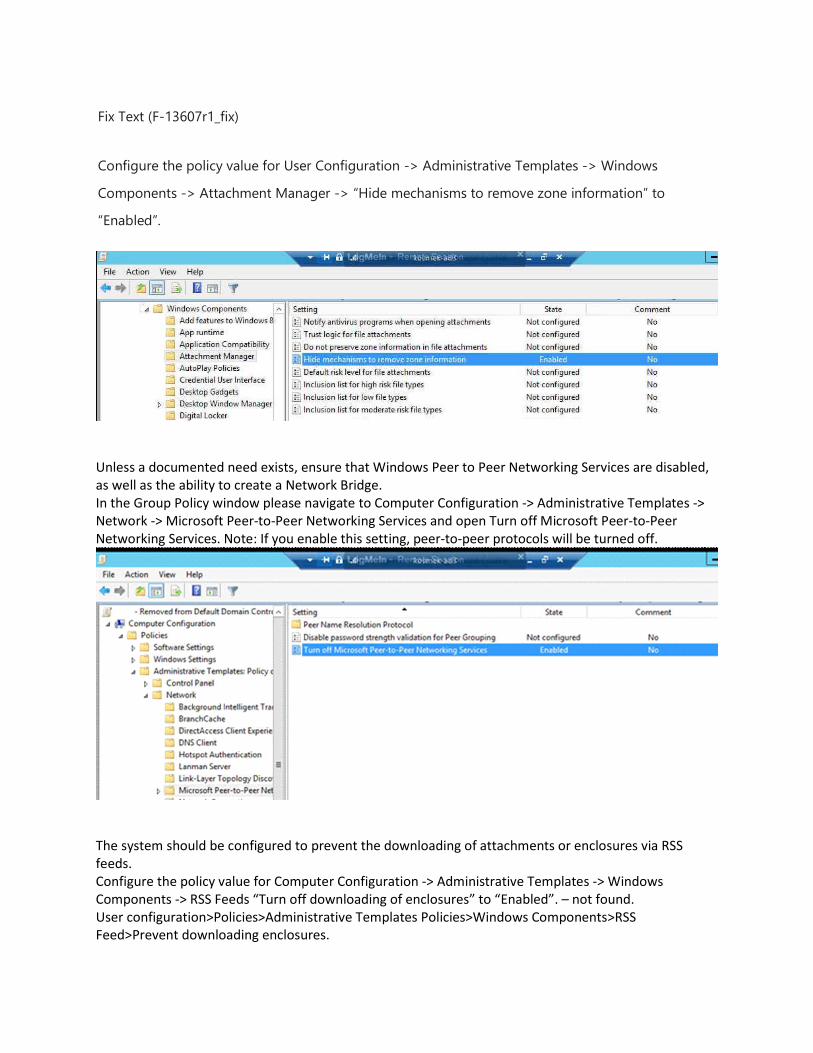
Fix Text (F-13607r1_fix)
Configure the policy value for User Configuration -> Administrative Templates -> Windows
Components -> Attachment Manager -> “Hide mechanisms to remove zone information” to
“Enabled”.
Unless a documented need exists, ensure that Windows Peer to Peer Networking Services are disabled, as well as the ability to create a Network Bridge. In the Group Policy window please navigate to Computer Configuration -> Administrative Templates -> Network -> Microsoft Peer-to-Peer Networking Services and open Turn off Microsoft Peer-to-Peer Networking Services. Note: If you enable this setting, peer-to-peer protocols will be turned off.
The system should be configured to prevent the downloading of attachments or enclosures via RSS feeds. Configure the policy value for Computer Configuration -> Administrative Templates -> Windows Components -> RSS Feeds “Turn off downloading of enclosures” to “Enabled”. – not found. User configuration>Policies>Administrative Templates Policies>Windows Components>RSS Feed>Prevent downloading enclosures.
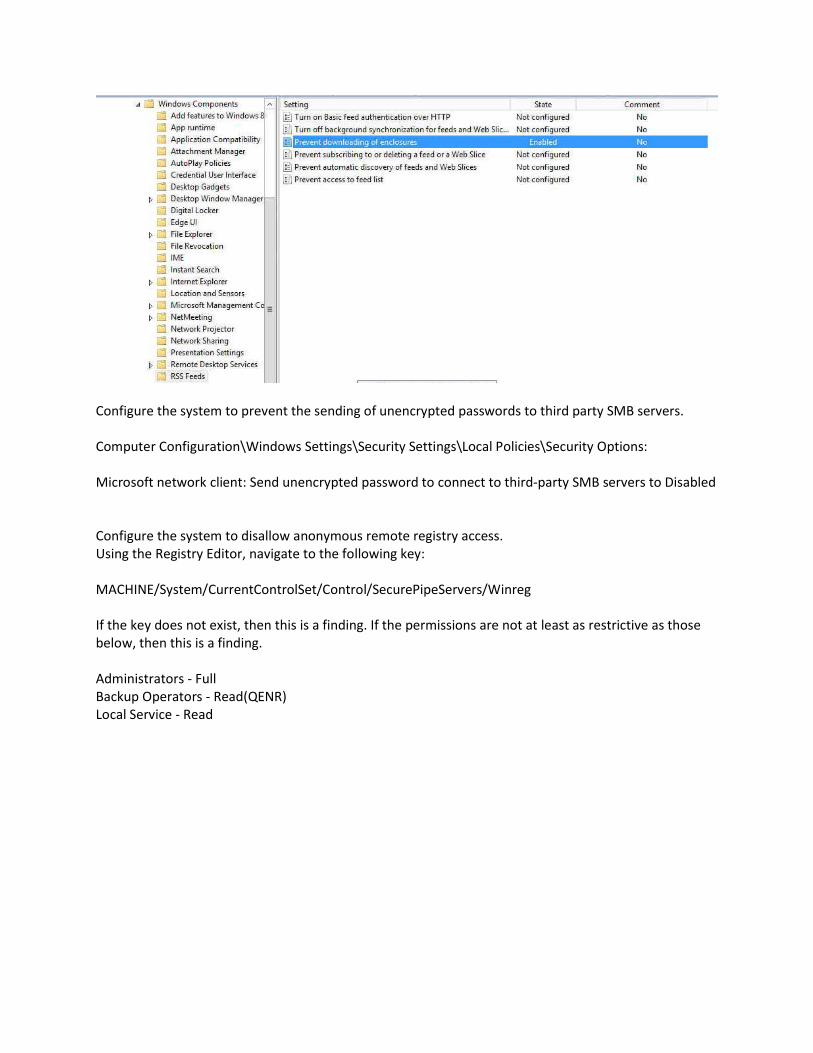
Configure the system to prevent the sending of unencrypted passwords to third party SMB servers. Computer Configuration\Windows Settings\Security Settings\Local Policies\Security Options: Microsoft network client: Send unencrypted password to connect to third-party SMB servers to Disabled Configure the system to disallow anonymous remote registry access. Using the Registry Editor, navigate to the following key: MACHINE/System/CurrentControlSet/Control/SecurePipeServers/Winreg If the key does not exist, then this is a finding. If the permissions are not at least as restrictive as those below, then this is a finding. Administrators - Full Backup Operators - Read(QENR) Local Service - Read
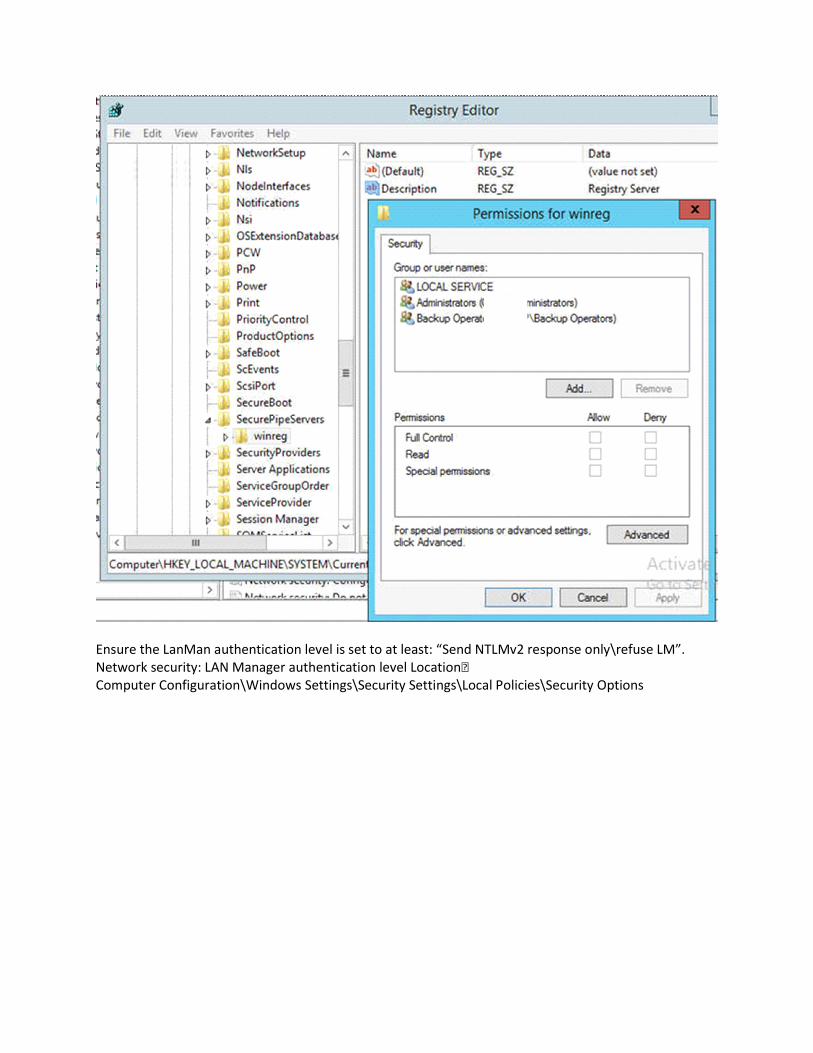
Ensure the LanMan authentication level is set to at least: “Send NTLMv2 response only\refuse LM”. Network security: LAN Manager authentication level Location Computer Configuration\Windows Settings\Security Settings\Local Policies\Security Options

The Guests account group should be denied the ability to login to the machine remotely.
The system should be configured to perform SMB packet signing and encryption wherever possible You can configure this method by enabling the Microsoft network client: Digitally sign communications (always) and the Microsoft network server: Digitally sign communications (always) options Computer Configuration > Policies > Windows Settings > Security Settings > Local Policies > Security Options.
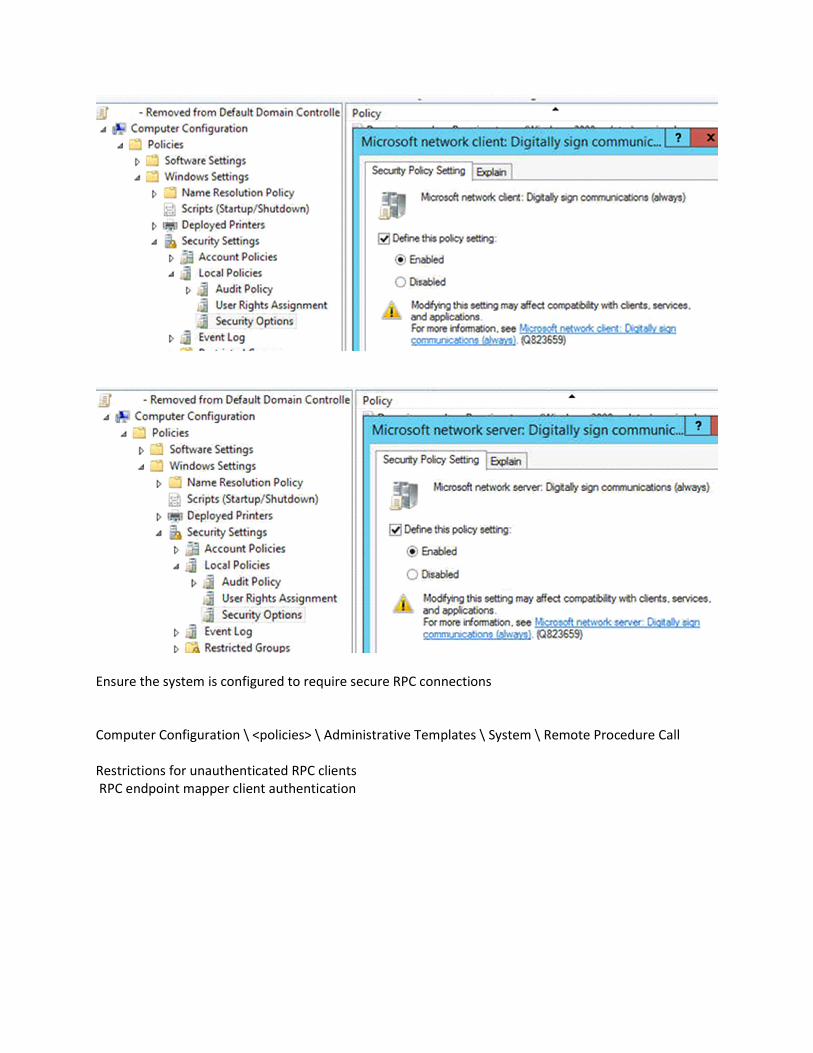
Ensure the system is configured to require secure RPC connections Computer Configuration \ <policies> \ Administrative Templates \ System \ Remote Procedure Call Restrictions for unauthenticated RPC clients RPC endpoint mapper client authentication
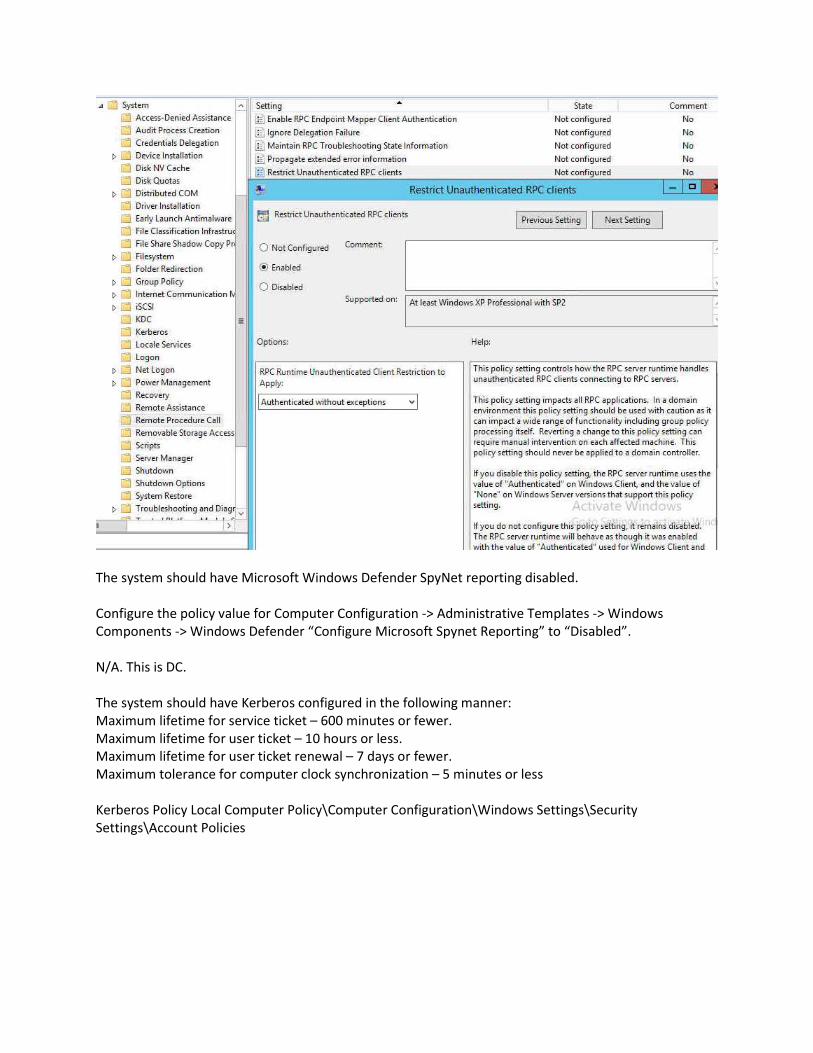
The system should have Microsoft Windows Defender SpyNet reporting disabled. Configure the policy value for Computer Configuration -> Administrative Templates -> Windows Components -> Windows Defender “Configure Microsoft Spynet Reporting” to “Disabled”. N/A. This is DC. The system should have Kerberos configured in the following manner: Maximum lifetime for service ticket – 600 minutes or fewer. Maximum lifetime for user ticket – 10 hours or less. Maximum lifetime for user ticket renewal – 7 days or fewer. Maximum tolerance for computer clock synchronization – 5 minutes or less Kerberos Policy Local Computer Policy\Computer Configuration\Windows Settings\Security Settings\Account Policies

Configure the system to ignore NetBIOS name release requests from all systems except WINS servers. Configure the policy value for Computer Configuration -> Windows Settings -> Security Settings -> Local Policies -> Security Options -> “MSS: (NoNameReleaseOnDemand) Allow computer to ignore NetBIOS name release requests except from WINS servers” to “Enabled”. I don’t see “MSS: (NoNameReleaseOnDemand) Allow computer to ignore NetBIOS name release requests except from WINS servers” because this reason: The mystery of the missing 'MSS:' setting on Windows 2008
Nov 22, 2010 ... For this purpose we created an .adm file, which can be loaded into the Group Policy editor as a Classic Administrative template. All the MSS settings ... Setting: MSS: (NoNameReleaseOnDemand) Allow the computer to ignore Description: NetBIOS name release requests except from WINS servers. Defines ... stories.schubergphilis.com
https://stories.schubergphilis.com/the-mistery-of-the-missing-mss-setting-on- windows-2008-6279d2745f0a If the value for “MSS: (NoNameReleaseOnDemand) Allow computer to ignore NetBIOS name release requests except from WINS servers” is not set to “Enabled”, then this is a finding. The policy referenced configures the following registry value: Registry Hive: HKEY_LOCAL_MACHINE Registry Path: \System\CurrentControlSet\Services\Netbt\Parameters\ Value Name: NoNameReleaseOnDemand Value Type: REG_DWORD Value: 1 Note: The NetBIOS name for the system will no longer appear under ‘My Network Places’.

The system should be configured to disable AutoRun for all drives and removable media. Under Computer Configuration, expand Administrative Templates, expand Windows Components, and then click Autoplay Policies.
Anonymous SID/Name translation should be disabled. Location: Computer Configuration\Windows Settings\Security Settings\Local Policies\Security Options

Network access: Allow anonymous SID/Name translation
Anonymous access to named pipes should be limited to the following: COMNAP, COMNODE, SQL\QUERY, SPOOLSS, LLSRPC, BROWSER, NETLOGON, Lsarpc, samr”. Location: Computer Configuration\Windows Settings\Security Settings\Local Policies\Security Options Enable: Network access: Restrict anonymous access to Named Pipes and Shares
If smartcard's in use, ensure that the system is configured to “lock the workstation”, or “force logoff” on smartcard removal. User Configuration\Policies\Administrative Templates\Control Panel\Personalization. The required settings are: 'Enable screen saver', 'Screen saver timeout', 'Force specific screen saver' (this is important because if the system has no screensaver configured this won't work) and finally 'Password protect the screensaver'. This DC and don’t use smartcard. N/A. Remote accessible registry paths should be restricted to the following: System\CurrentControlSet\Control\ProductOptions System\CurrentControlSet\Control\Server Applications Software\Microsoft\Windows NT\CurrentVersion

Location Computer Configuration\Windows Settings\Security Settings\Local Policies\Security Options Network access: Remotely accessible registry paths and subpaths
No unapproved account should be able to “Debug programs” or have more than read access to Winlogon registry keys. Location: Computer Configuration\Windows Settings\Security Settings\Local Policies\User Rights Assignment By default, members of the Administrators group have this right. No change. 7. The ACLs for all disabled services should be set as follows: Administrators – Full Control, System – Full Control, Interactive – Read. ??? 8. Configure the system to disallow the storing of passwords using reversible encryption. Should not enabled
9. Ensure the system is configured to only allow Administrators to perform task scheduling. Domain controller: Allow server operators to schedule tasks Location Computer Configuration\Windows Settings\Security Settings\Local Policies\Security Options

? 10. All file shares should have ACLs set to provide the minimum permissions possible to accounts which require access. ?Most share drives have everyone with full permission? ? 11. The system should be configured to require “Strong Session Keys”, in order to prevent systems prior to Windows 2000 from authenticating or joining the domain. Location: Computer Configuration\Windows Settings\Security Settings\Local Policies\Security Options Network security: LAN Manager authentication level is set send NTLM response only
12. Configure the system to disallow the storage of credentials or .NET passports for network authentication. Enable Network access: Do not allow storage of passwords and credentials for network authentication Location: Computer Configuration\Windows Settings\Security Settings\Local Policies\Security Options
13. The “Sharing and security model for local accounts” setting should be set to “Classic – local accounts authenticate as themselves.” Network access: Sharing and security model for local accounts Location Computer Configuration\Windows Settings\Security Settings\Local Policies\Security Options

14. Ensure the system is configured to disallow the storage of the LanMangager password hash value. Enable Network security: Do not store LAN Manager hash value on next password change. In Group Policy, expand Computer Configuration, expand Windows Settings, expand Security Settings, expand Local Policies, and then click Security Options.
15. The system should be configured to use FIPS compliant algorithms for encryption, hashing, and signing. Enable System cryptography: Use FIPS compliant algorithms for encryption, hashing, and signing Location Computer Configuration\Windows Settings\Security Settings\Local Policies\Security Options
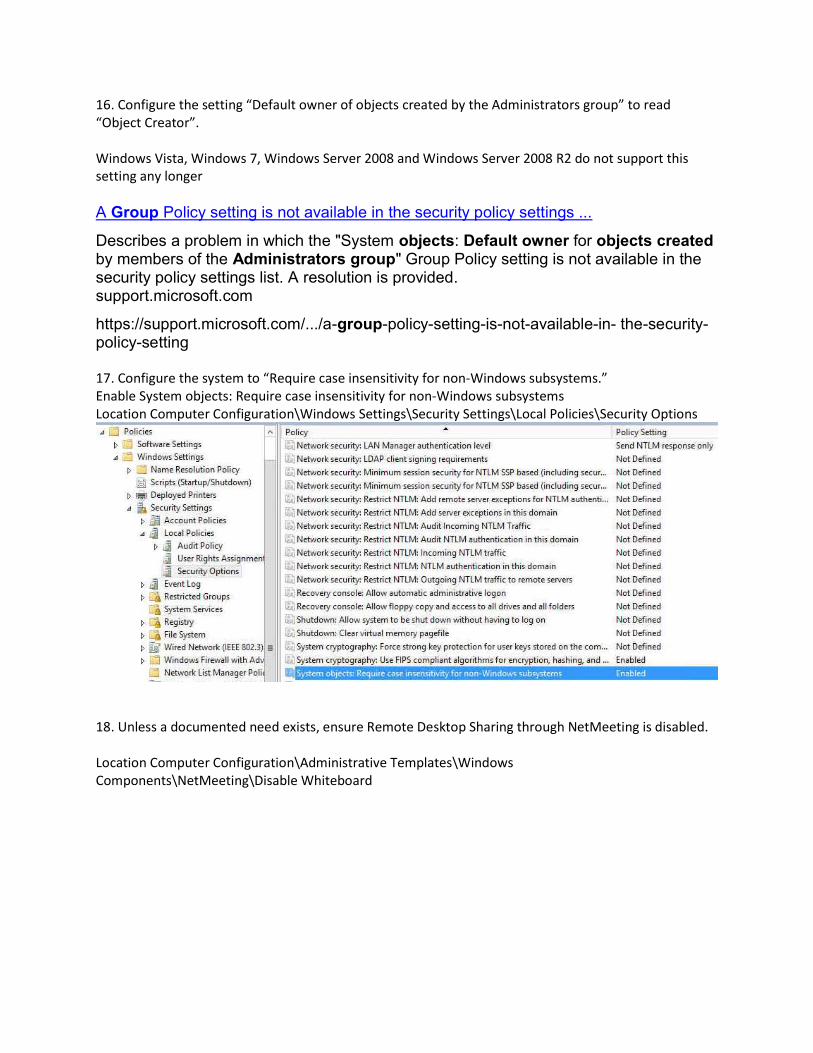
16. Configure the setting “Default owner of objects created by the Administrators group” to read “Object Creator”. Windows Vista, Windows 7, Windows Server 2008 and Windows Server 2008 R2 do not support this setting any longer A Group Policy setting is not available in the security policy settings ...
Describes a problem in which the "System objects: Default owner for objects created by members of the Administrators group" Group Policy setting is not available in the security policy settings list. A resolution is provided. support.microsoft.com
https://support.microsoft.com/.../a-group-policy-setting-is-not-available-in- the-security-policy-setting 17. Configure the system to “Require case insensitivity for non-Windows subsystems.” Enable System objects: Require case insensitivity for non-Windows subsystems Location Computer Configuration\Windows Settings\Security Settings\Local Policies\Security Options
18. Unless a documented need exists, ensure Remote Desktop Sharing through NetMeeting is disabled. Location Computer Configuration\Administrative Templates\Windows Components\NetMeeting\Disable Whiteboard
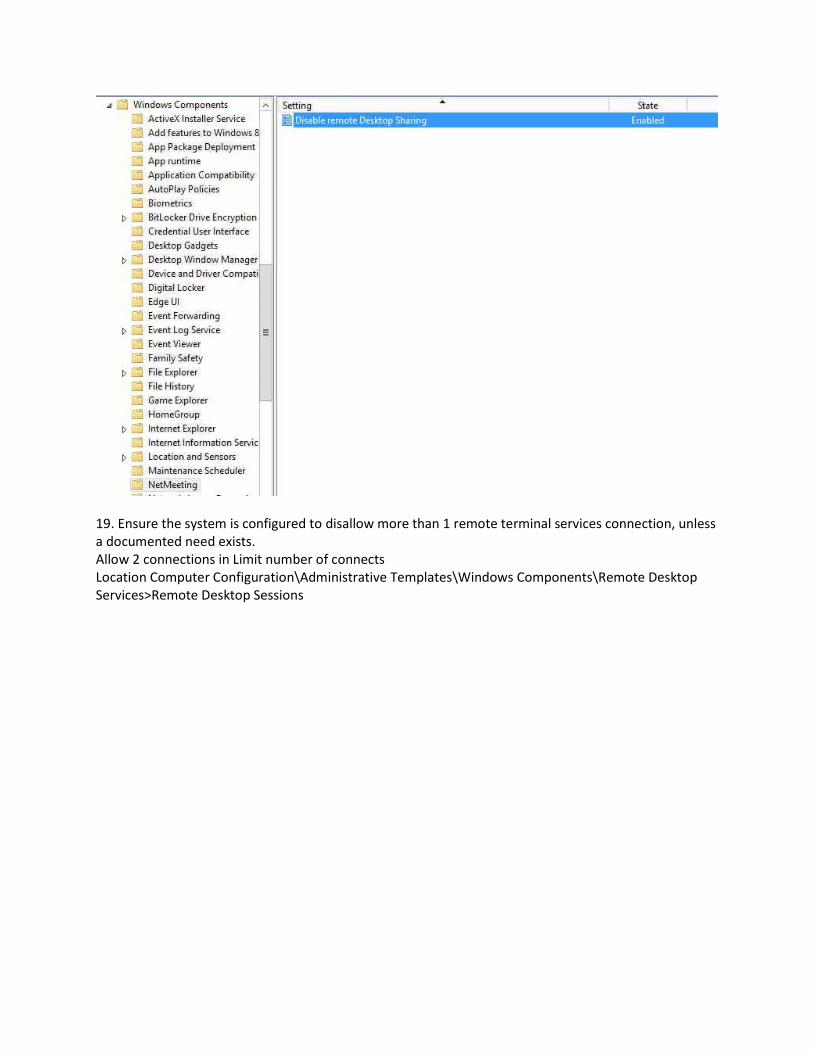
19. Ensure the system is configured to disallow more than 1 remote terminal services connection, unless a documented need exists. Allow 2 connections in Limit number of connects Location Computer Configuration\Administrative Templates\Windows Components\Remote Desktop Services>Remote Desktop Sessions
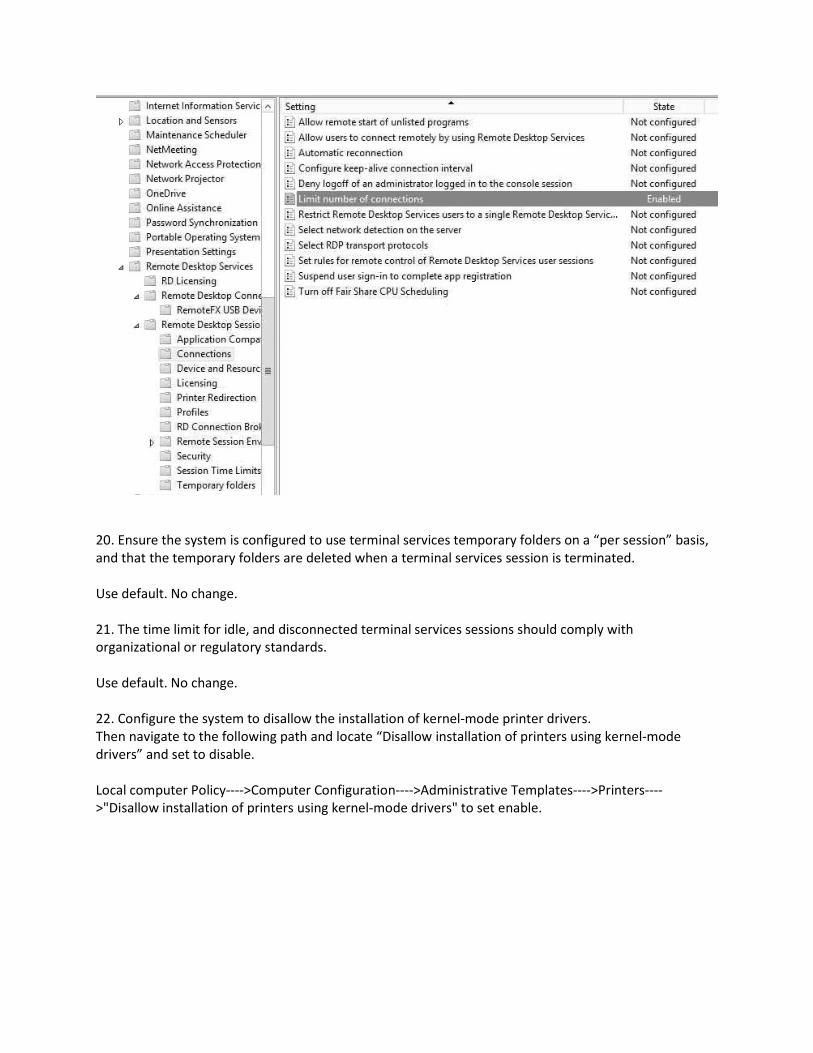
20. Ensure the system is configured to use terminal services temporary folders on a “per session” basis, and that the temporary folders are deleted when a terminal services session is terminated. Use default. No change. 21. The time limit for idle, and disconnected terminal services sessions should comply with organizational or regulatory standards. Use default. No change. 22. Configure the system to disallow the installation of kernel-mode printer drivers. Then navigate to the following path and locate “Disallow installation of printers using kernel-mode drivers” and set to disable. Local computer Policy---->Computer Configuration---->Administrative Templates---->Printers---->"Disallow installation of printers using kernel-mode drivers" to set enable.
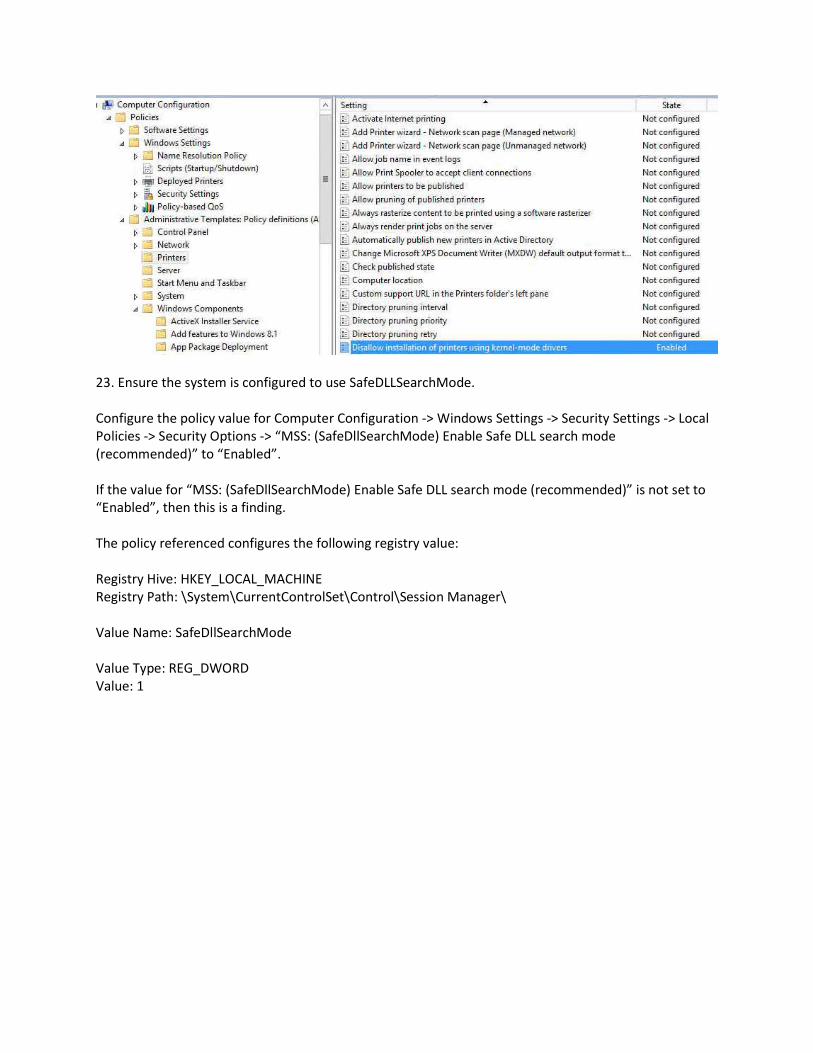
23. Ensure the system is configured to use SafeDLLSearchMode. Configure the policy value for Computer Configuration -> Windows Settings -> Security Settings -> Local Policies -> Security Options -> “MSS: (SafeDllSearchMode) Enable Safe DLL search mode (recommended)” to “Enabled”. If the value for “MSS: (SafeDllSearchMode) Enable Safe DLL search mode (recommended)” is not set to “Enabled”, then this is a finding. The policy referenced configures the following registry value: Registry Hive: HKEY_LOCAL_MACHINE Registry Path: \System\CurrentControlSet\Control\Session Manager\ Value Name: SafeDllSearchMode Value Type: REG_DWORD Value: 1

24. The system should be configured to disallow “Windows Media Player from conducting automatic updates, and automatic CODEC downloads”.
Enable Windows Media Player to periodically check for updates by using a Group Policy setting
To enable Windows Media Player to automatically check for updates by using a Group Policy setting, follow these steps:
1. In Group Policy Microsoft Management Console (MMC), under Computer Configuration expand Administrative Templates, expand Windows Components, and then click Windows Media Player.
2. In the list of available policies, double-click Prevent Automatic Updates.
3. Click Disabled or click Not Configured, and then click OK.
4. Close Group Policy MMC.
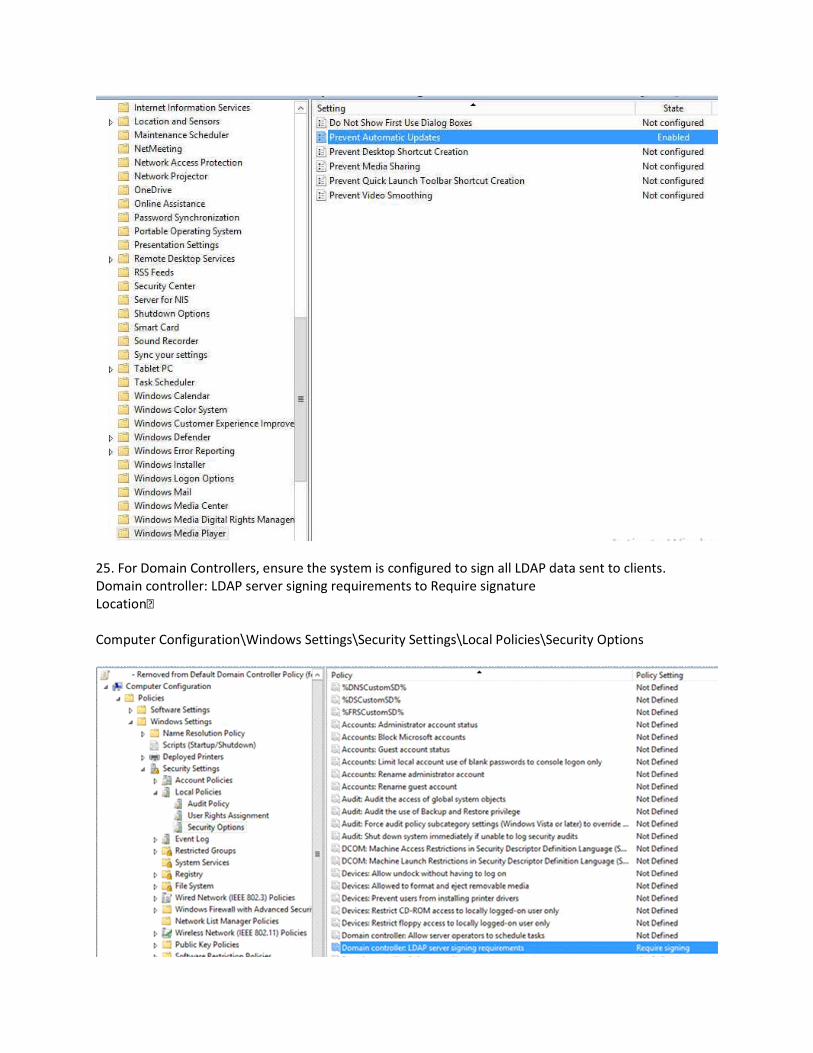
25. For Domain Controllers, ensure the system is configured to sign all LDAP data sent to clients. Domain controller: LDAP server signing requirements to Require signature Location Computer Configuration\Windows Settings\Security Settings\Local Policies\Security Options

26. Configure the system to software certificate restriction rules. Enable System settings: Use certificate rules on Windows executables for Software Restriction Policies Location Computer Configuration\Windows Settings\Security Settings\Local Policies\Security Options
27. Configure the system to match domain-based registry policies No change. 28. The system should be configured to disallow DCOM object calls from all users except Administrators. Use the default settings. No change. 29. Ensure the system is configured to disallow the ability to “turn off background refresh of Group Policy.” Location: Computer Configuration\Administrative Templates\System\Group Policy
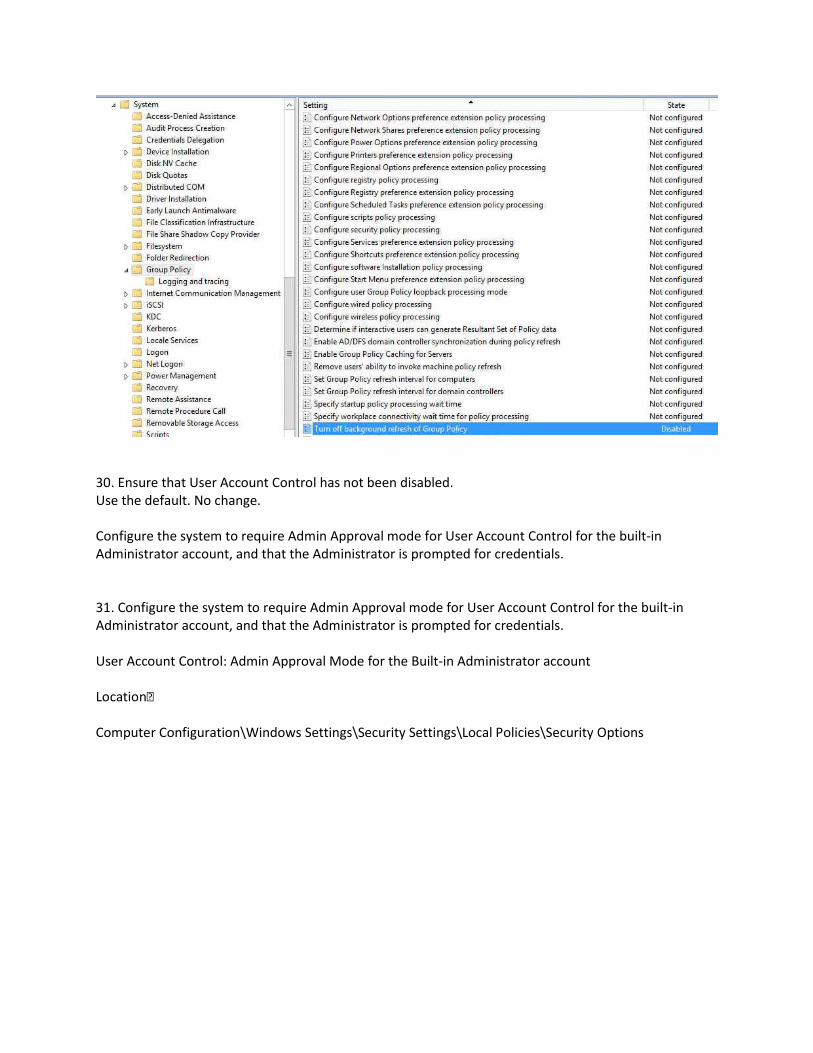
30. Ensure that User Account Control has not been disabled. Use the default. No change. Configure the system to require Admin Approval mode for User Account Control for the built-in Administrator account, and that the Administrator is prompted for credentials. 31. Configure the system to require Admin Approval mode for User Account Control for the built-in Administrator account, and that the Administrator is prompted for credentials. User Account Control: Admin Approval Mode for the Built-in Administrator account Location Computer Configuration\Windows Settings\Security Settings\Local Policies\Security Options
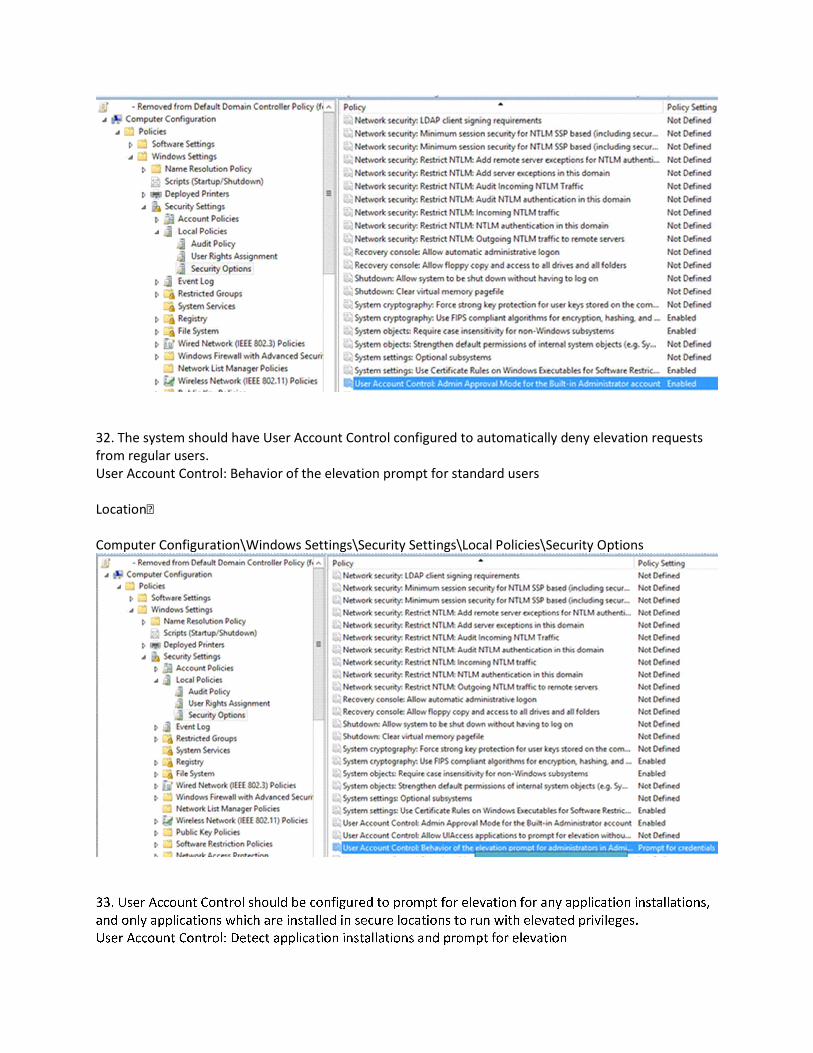
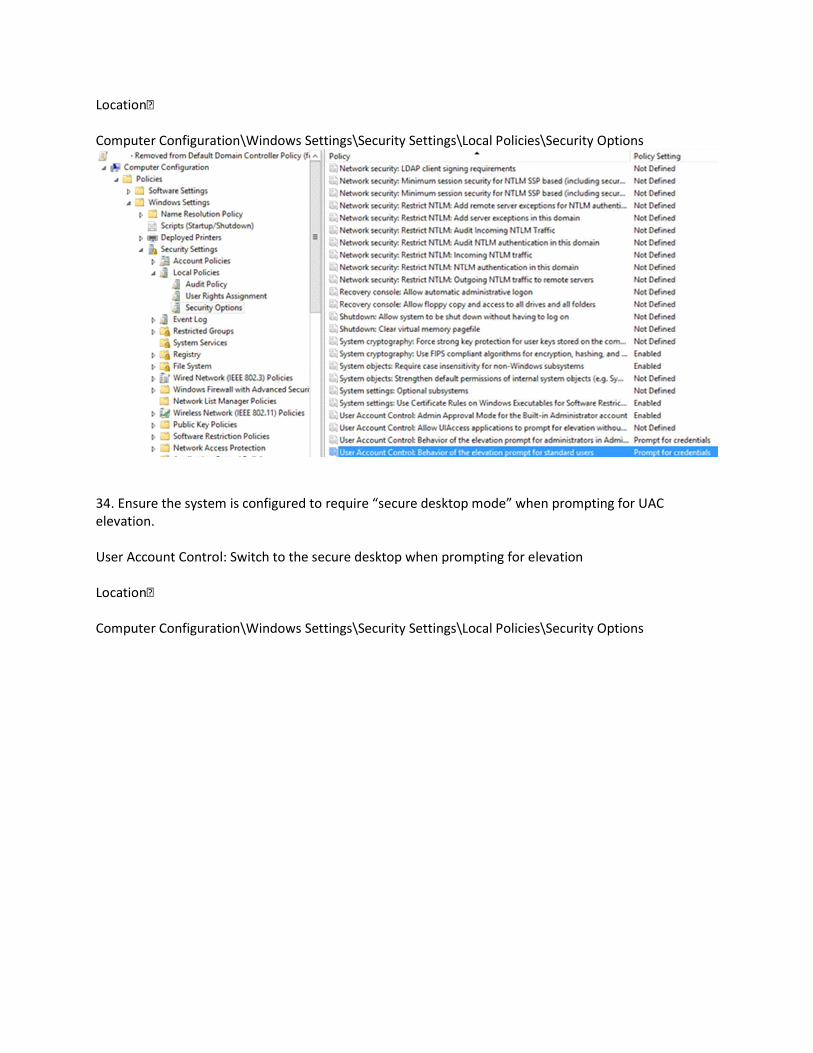
32. The system should have User Account Control configured to automatically deny elevation requests from regular users. User Account Control: Behavior of the elevation prompt for standard users Location Computer Configuration\Windows Settings\Security Settings\Local Policies\Security Options
33. User Account Control should be configured to prompt for elevation for any application installations, and only applications which are installed in secure locations to run with elevated privileges. User Account Control: Detect application installations and prompt for elevation
Location Computer Configuration\Windows Settings\Security Settings\Local Policies\Security Options
34. Ensure the system is configured to require “secure desktop mode” when prompting for UAC elevation. User Account Control: Switch to the secure desktop when prompting for elevation Location Computer Configuration\Windows Settings\Security Settings\Local Policies\Security Options

35. Configure the system to run non-UAC compliant applications in a virtualized state. User Account Control: Run all administrators in Admin Approval Mode No change. 36. The system should be configured to disallow the enumeration of administrator accounts upon elevation. Navigate to "Local Computer Policy", "Computer Configuration" "Administrative Templates", "Windows Components", "Credential User Interface". Set "Enumerate administrator accounts on elevation" to "disabled".
37. Ensure that the system is set to disallow the redirection of shared drives during terminal services sessions. Procedure In the Group Policy Editor, go to Computer Configuration\Policies\Administrative Templates\Windows Components\Remote Desktop Services\Remote Desktop Session Host\Device and Resource Redirection. Enable the Do not allow drive redirection group policy setting

38. Configure the system to disallow the ability to publish to the web via the files and folders task scheduler. Navigate to the following section: Computer Configuration > Administrative Templates > System > Internet Communication Management > Internet Communication settings.
39. The system should be configured to disallow downloading provider lists for Web publishing, and online ordering wizards. Navigate to the following section: Computer Configuration > Administrative Templates > System > Internet Communication Management > Internet Communication settings.
40. The system should be configured to prevent Windows Messenger Customer Experience Improvement program data collection. Navigate to the following section: Computer Configuration > Administrative Templates > System > Internet Communication Management > Internet Communication settings.

41. Ensure the system is not allowing the downloading of program and file content updates via Search Companion. Configure the policy value for Computer Configuration -> Administrative Templates -> System -> Internet Communication Management -> Internet Communication setting ‘Turn off Search Companion content file updates’ to “Enabled”.
42. Configure the system to disable the ability to download drivers via Windows Update. No change. 43. Ensure “system shell protected mode” is enabled. No change 44. The system should be configured to disallow the ability for “UIAccess applications to prompt for elevation without using the secure desktop.” User Account Control: Allow UIAccess applications to prompt for elevation without using the secure desktop Location Computer Configuration\Windows Settings\Security Settings\Local Policies\Security Options
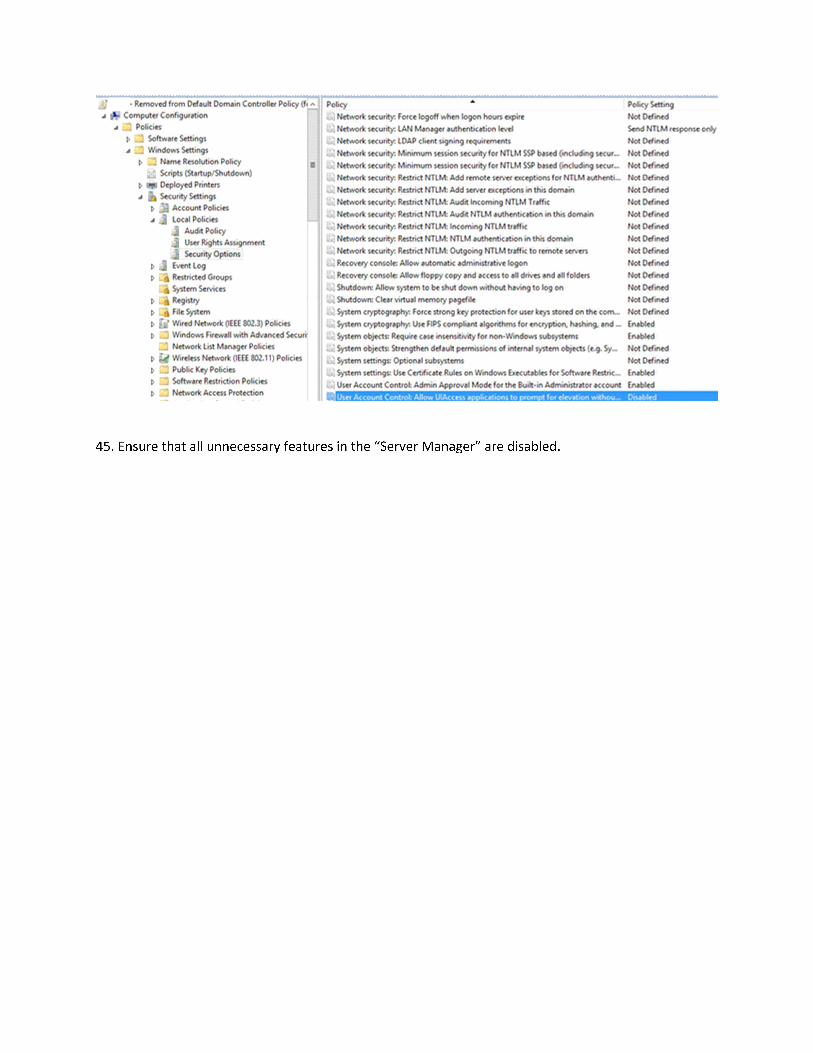
45. Ensure that all unnecessary features in the “Server Manager” are disabled.