Image-Pro Plus Version 7.0 for Windows™ Auto-Pro Reference
907
Image-Pro Plus Version 7.0 for Windows Auto-Pro Reference Media Cybernetics, Inc. 4340 East West Highway Bethesda MD 20815 (301) 495-3305, FAX (301) 495-5964 MAN AP 41N70000 20100108
-
Upload
khangminh22 -
Category
Documents
-
view
0 -
download
0
Transcript of Image-Pro Plus Version 7.0 for Windows™ Auto-Pro Reference

Image-Pro Plus Version 7.0 for Windows Auto-Pro Reference Media Cybernetics, Inc. 4340 East West Highway Bethesda MD 20815 (301) 495-3305, FAX (301) 495-5964 MAN AP 41N70000 20100108

COPYRIGHT NOTICE Copyright 1994 - 2010 Media Cybernetics, Inc. All Rights Reserved
TRADEMARK ACKNOWLEDGMENTS
HALO Image File Format Library, HALO, HALO Desktop Imager, AFA, Image-Pro, Image-Pro Plus, Stage-Pro, and Scope-Pro are registered trademarks of Media Cybernetics, Inc. Image-Pro Plus is protected by U.S. patent: #7,489,828. Additional patents are pending. All other trademarks in this document are trademarks or registered trademarks of their respective companies.

IMPORTANT: PLEASE READ CAREFULLY
LICENSE AGREEMENT
THIS LICENSE AGREEMENT ("AGREEMENT") IS BETWEEN YOU, THE END USER, AND MEDIA CYBERNETICS, INC. ("MEDIA"). IT GOVERNS THE USE OF THE SOFTWARE, PROGRAM MEDIA AND DOCUMENTATION KNOWN AS Image-Pro® Plus (THE "PRODUCT"). IF YOU USE THE PRODUCT, THEN YOU AGREE TO THE TERMS OF THIS AGREEMENT. IF YOU ARE NOT WILLING TO BE BOUND BY THE TERMS OF THIS AGREEMENT, PROMPTLY RETURN THIS PACKAGE TO THE PLACE OF PURCHASE WITH A COPY OF THE RECEIPT, AND YOUR LICENSE FEE WILL BE REFUNDED.
Media licenses use of the PRODUCT, which may be manufactured and distributed by Media or by a third party (either, the "Manufacturer").
You, the end-user, assume responsibility for the selection of the PRODUCT to achieve your intended results, and for its installation and subsequent use.
GRANT OF LICENSE Media hereby grants you a non-exclusive license to use the PRODUCT in object code form only, upon the terms and conditions contained in this Agreement.
You may:
Use the PRODUCT on a single workstation that is owned, leased or otherwise controlled by you, whether in a network or other configuration.
Create a backup copy of the PRODUCT, in any machine-readable or printed form.
Transfer the PRODUCT and your rights under this Agreement to another party if the other party agrees to accept the terms and conditions of this Agreement. If you transfer the PRODUCT, you must, at the same time, either transfer all copies of PRODUCT to the same party, or destroy any copies not transferred. You must immediately notify Media of the transfer.
Print out one copy of the PRODUCT documentation from the program media. If you print out any part of the PRODUCT documentation from the program media, you must reproduce and include all the copyright notices that appear in the documentation on any such copy of the documentation.
You may not:
Use or copy the PRODUCT, in whole or in part, except as expressly provided in this Agreement.
Use the PRODUCT concurrently on more than one workstation.
Copy, rent, distribute, sell, license or sublicense, or otherwise transfer the PRODUCT or this license, in whole or in part, to another party, except as specifically set forth above.
Incorporate the PRODUCT or any portion of the PRODUCT into, or use the PRODUCT, or any portion of the PRODUCT to develop, other software without a license from Media, or otherwise modify or create a derivative work from the PRODUCT without a license from Media.
Reverse engineer, decompile or disassemble the PRODUCT.
To use the PRODUCT as described in Sections 2 or 4 above, or for any other use not specifically set forth above, additional licensing from Media is required. For further information, please contact Media at:
Media Cybernetics, Inc. Phone: (301) 495-3305
4340 East West Highway Fax: (301) 495-5964
Bethesda, Maryland 20814 WorldwideWeb:http://www.mediacy.com
U.S.A. E-Mail: [email protected]

PROPRIETARY RIGHTS
This Agreement gives you ownership only of the physical program media on which the PRODUCT is stored, but not of the PRODUCT itself. You acknowledge that Media owns all right, title and interest in the PRODUCT, and that you will acquire no rights in the PRODUCT through your use of it. You agree that you will take no action that interferes with Media's rights in the PRODUCT.
TERM
This Agreement is effective until terminated. You may terminate it at any time by destroying the PRODUCT together with all copies and documentation in any form. This Agreement will also terminate automatically and without notice from Media if you fail to comply with any term or condition of this Agreement. You agree upon such termination to destroy the PRODUCT and all copies of the PRODUCT.
DISCLAIMER; LIMITED WARRANTY EXCEPT AS PROVIDED BELOW, THE PRODUCT IS PROVIDED "AS IS" WITHOUT WARRANTY OF ANY KIND, EITHER EXPRESSED OR IMPLIED, INCLUDING, BUT NOT LIMITED TO THE IMPLIED WARRANTIES OF MERCHANTABILITY AND FITNESS FOR A PARTICULAR PURPOSE. THE ENTIRE RISK AS TO THE QUALITY AND PERFORMANCE OF THE PRODUCT IS WITH YOU. SOME JURISDICTIONS DO NOT ALLOW THE EXCLUSION OF IMPLIED WARRANTIES, SO THE ABOVE EXCLUSION MAY NOT APPLY TO YOU.
NEITHER MEDIA NOR MANUFACTURER WARRANT THAT THE FUNCTIONS CONTAINED IN THE PRODUCT WILL MEET YOUR REQUIREMENTS OR THAT THE OPERATION OF THE PRODUCT WILL BE UNINTERRUPTED OR ERROR-FREE. However, where Media is the Manufacturer, Media warrants that the program media on which the software is furnished will be free from defects in materials and workmanship under normal use for a period of ninety (90) days from the date of delivery as evidenced by a copy of your receipt.
LIMITATION OF REMEDIES Where Media is the Manufacturer, Manufacturer’s entire liability and your exclusive remedy shall be:
1. the replacement of the program media not meeting the Limited Warranty, which is returned to Manufacturer with a copy of your receipt; or
2. if Manufacturer is unable to deliver replacement program media which is free of defects in materials or workmanship, you may terminate this Agreement by returning the PRODUCT and a copy of your receipt to the place of purchase, and your money will be refunded.
Where Media is not the Manufacturer, Media shall have no liability to replace or refund, and you agree to look to Manufacturer to meet the obligations described above.
LIMITATION OF LIABILITY IN NO EVENT WILL MEDIA OR MANUFACTURER BE LIABLE TO YOU FOR ANY DAMAGES, INCLUDING, BUT NOT LIMITED TO, ANY LOST PROFITS, LOST SAVINGS, OR OTHER INDIRECT, SPECIAL, EXEMPLARY, INCIDENTAL OR CONSEQUENTIAL DAMAGES, ARISING OUT OF THE USE OR INABILITY TO USE THIS PRODUCT, EVEN IF MEDIA OR MANUFACTURER HAS BEEN ADVISED OF THE POSSIBILITY OF SUCH DAMAGES. FURTHER, IN NO EVENT WILL MEDIA OR MANUFACTURER BE LIABLE FOR ANY CLAIM BY ANY OTHER PARTY ARISING OUT OF YOUR USE OF THE PRODUCT. SOME JURISDICTIONS DO NOT ALLOW THE LIMITATION OR EXCLUSION OF LIABILITY FOR INCIDENTAL OR CONSEQUENTIAL DAMAGES, SO THE ABOVE LIMITATION OR EXCLUSION MAY NOT APPLY TO YOU.
TRADEMARKS Image-Pro® Plus is a registered trademark of Media Cybernetics, Inc. and Media Cybernetics® is a registered trademark of Media Cybernetics, Inc.
No right, license, or interest in such trademarks is granted hereunder.
U.S. GOVERNMENT RESTRICTED RIGHTS IN DATA This computer software product and documentation are provided with Restricted Rights. Use, duplication, or disclosure by the U.S. Government is subject to restrictions as set forth in the Rights in Technical Data and Computer Software clause at DFARS 252.227-7013, or subparagraphs (c)(1) and (2) of the Commercial Computer Software - Restricted Rights at 48 CFR 52.227-19, as applicable. Contractor/Manufacturer is Media Cybernetics, Inc., 8484 Georgia Avenue, Silver Spring, Maryland 20910.

EXPORT CONTROLS You agree not to export or re-export the PRODUCT, directly or indirectly, to any countries, end-users or for any end uses that are restricted by U.S. export laws and regulations, without first obtaining permission to do so as required by the U.S. Department of Commerce's Bureau of Industry and Security, or other appropriate government agency. These restrictions change from time to time. If you have any questions regarding your obligations under U.S. export regulations, you should contact the Bureau of Industry and Security, U.S. Department of Commerce, Exporter Counseling Division, Washington D.C. (202) 482-4811, http://www.bis.doc.gov.
GENERAL
1. You may not sublicense, assign or transfer the license or the PRODUCT, in whole or in part, except as expressly provided in this Agreement. Any attempt to do so is null and void.
2. This Agreement will be governed by the law of the State of Maryland applicable to agreements made and to be performed in the State of Maryland, but shall not be governed by the Uniform Computer Information Transactions Act as adopted in Maryland, or the United Nations Convention on Contracts for the International Sale of Goods.
3. Should any part of this agreement be declared void or unenforceable by a court of competent jurisdiction, the remaining terms shall remain in full effect.
4. Failure of Media to enforce any of its rights in this agreement shall not be considered a waiver of its rights, including its rights to respond to subsequent breaches.
5. This Agreement is the complete and exclusive statement of the agreement between you and Media and supersedes any proposal or prior agreement, oral or written, any other communication between you and Media relating to the subject matter of this Agreement.
Should you have any questions concerning this Agreement, you may contact Media in writing at the address above.
BY USING THIS SOFTWARE YOU ACKNOWLEDGE THAT YOU HAVE READ THIS AGREEMENT, UNDERSTAND IT, AND AGREE TO BE BOUND BY ITS TERMS AND CONDITIONS.


Contents
i
Contents Section 1 - Overview.........................................................................................1-1
About Auto-Pro...........................................................................................1-1 This Manual...................................................................................................... 1-2 What’s New in Version 7.0 .............................................................................. 1-2 Macros .............................................................................................................. 1-3 Script Files........................................................................................................ 1-3
Creating An Auto-Pro macro.....................................................................1-7 Auto-Pro Functions .......................................................................................... 1-8 Auto-Pro Parameters ........................................................................................ 1-8 Auto-Pro Arrays & Defined Types................................................................... 1-9 Template Mode............................................................................................... 1-10 Issuing A Message To The User .................................................................... 1-11 Obtaining Data From The User ...................................................................... 1-12 Working With Multiple Image Files .............................................................. 1-12 Interactive Processes ...................................................................................... 1-13 Getting Data From An Image ......................................................................... 1-13
IPBasic.......................................................................................................1-14 Statement Structure......................................................................................... 1-14 Using Comments ............................................................................................ 1-15 Subroutines and Functions ............................................................................. 1-15 Variables, Constants, Data Types................................................................... 1-17 Expressions..................................................................................................... 1-20 Flow Control................................................................................................... 1-25 For...Next Statements ..................................................................................... 1-27
Errors.........................................................................................................1-29 Run-Time Errors............................................................................................. 1-29
Version 4.0 ................................................................................................1-30

Contents
ii
Compatibility Issues.................................................................................1-31 Print ................................................................................................................ 1-31 RTrim$ ........................................................................................................... 1-31 Str$ ................................................................................................................. 1-32 IpDocGet, IpAppGet ...................................................................................... 1-33 Dim................................................................................................................. 1-33 Option Explicit ............................................................................................... 1-34 Image Updates ................................................................................................ 1-34
Using Auto-Pro with Visual Basic ..........................................................1-35
Section 2 - Auto-Pro Function Reference ......................................................2-1
Section 3 - IPBasic Commands .......................................................................3-1 Appendix A - Function & Command Summary ......................................4-1 Appendix B - Auto-Pro Keywords ............................................................5-1 Appendix C - ANSI Characters..................................................................6-1 Appendix D - Data Types ...........................................................................7-1 Appendix E - Shortcut Key Assignments ................................................8-1 Appendix F – Error Messages...................................................................9-1

About Auto-Pro
Page 1-1
Section 1 - Overview As you become proficient with Image-Pro, you may find that you need to automate routine procedures or tailor its interface to your specific needs. For example, you may want to automate a series of steps that are performed daily, or perform certain steps only when certain conditions exist. You might also want to call Image-Pro functions from a program of your own creation. These levels of customization can be achieved with the Auto-Pro scripting facility.
Auto-Pro lets you translate a sequence of actions into a set of written instructions that can be recalled and “played back” whenever they are needed. The Auto-Pro scripting facility also lets you add variable definition and flow control statements (e.g., looping and branching) to these instructions, so that you can specify when and how often the actions are performed.
About Auto-Pro The Auto-Pro scripting facility is made up of two basic components:
The Auto-Pro function set: Auto-Pro functions are used to perform Image-Pro actions. For example, the IpFltSobel function performs a Sobel filtering operation, and the IpLutReset function resets the Lookup Table. These functions are written to a script file when a macro is recorded, and are “called” when the macro is played back. Auto-Pro functions can also be called from your own Visual Basic™ programs, allowing you to add the image-processing power of Image-Pro to programs of your own design.
Image-Pro BASIC (IPBasic): IPBasic is the language in which Image-Pro macros are written and interpreted. When an Image-Pro action is recorded, it is written as an IPBasic call to the appropriate Auto-Pro function. The macro itself is defined as an IPBasic sub-routine.
The IPBasic component of Auto-Pro also provides many commands that can be used to add variable definition, flow control and string manipulation to your macro. These commands are a subset of the BASIC language, and conform to Visual Basic syntax.

Image-Pro Plus
Page 1-2
This Manual This manual describes the Auto-Pro function set scripting facility.
The first section provides a discussion of the key elements in each component. It also describes how Auto-Pro is used with a Visual Basic program.
The second section contains alphabetically arranged descriptions of the functions and commands in the Auto-Pro function set . IPBasic functions are described in the IPBasic online help, where you will find complete descriptions and other important information.
The appendices list the functions, commands, reserved words, data types and character codes used by the Auto-Pro scripting facility.
What’s New in Version 7.0 New macro functions have been added to support Live EDF, Live Tiling, and
Bayer Interpolation. Improvements have been made to the AFA macros.
The Scope-Pro and Stage-Pro macros have been integrated into this manual.

About Auto-Pro
Page 1-3
Macros When you record a macro with the Record Macro command, your actions are translated into a sequence of Auto-Pro function calls written in IPBasic. These instructions are stored in a script file. When you play the macro back, the commands are read and executed by Image-Pro's built-in BASIC interpreter, IPBasic.
The tools used to create and play back macros are located on the Macro menu. These are:
Record Macro - the command used to create a macro by writing Auto-Pro functions, representing the actions you perform, to a script file.
Macro Management – the command which invokes the Macro Management dialog. This dialog allows you to load and work with the contents of different script files, including tasks such as running, editing, deleting, and renaming macros.
The Macro Menu – The end of the macro menu itself lists the macro commands that are available from the currently loaded script (use the Macro Management item to load different scripts). Clicking the name of the macro in this menu will run that function from the macro script.
These commands are explained in full detail in your Image-Pro Plus Reference Manual. For the automation of simple routine procedures, these commands may be all the functionality you will ever need. However, to create powerful routines that branch on condition or loop when instructed, you will need to edit the macro to add this capability.
Script Files A script file is a collection of macros that you have recorded — when you record a new macro, its instructions are appended to the file. By default, macros are written to the DEFAULT.IPM script file. You may have as many script files as you choose, but Image-Pro can record to and play back from only one at a time — the one that is currently loaded. Script files are loaded using the Change button in the Macro dialog box. Once a script file is loaded, the macros within it are available for playback.
You can at any time examine the current script file (which is a simple text file) by using the Edit button in the Macro dialog box. Furthermore, you can modify the file according to the rules laid out in this manual. Be sure to reload the script file after you have saved your changes.
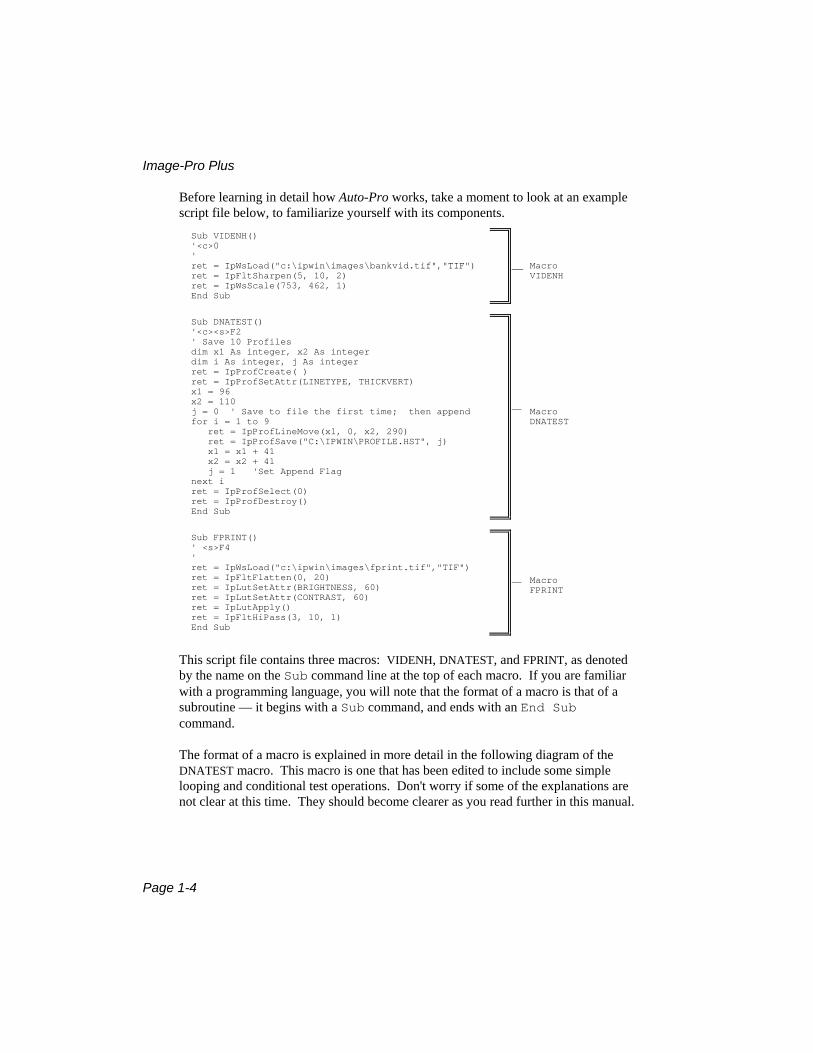
Image-Pro Plus
Page 1-4
Before learning in detail how Auto-Pro works, take a moment to look at an example script file below, to familiarize yourself with its components.
Sub VIDENH() '<c>0 ' ret = IpWsLoad("c:\ipwin\images\bankvid.tif","TIF") ret = IpFltSharpen(5, 10, 2) ret = IpWsScale(753, 462, 1) End Sub
__
Macro VIDENH
Sub DNATEST() '<c><s>F2 ' Save 10 Profiles dim x1 As integer, x2 As integer dim i As integer, j As integer ret = IpProfCreate( ) ret = IpProfSetAttr(LINETYPE, THICKVERT) x1 = 96 x2 = 110 j = 0 ' Save to file the first time; then append for i = 1 to 9 ret = IpProfLineMove(x1, 0, x2, 290) ret = IpProfSave("C:\IPWIN\PROFILE.HST", j) x1 = x1 + 41 x2 = x2 + 41 j = 1 'Set Append Flag next i ret = IpProfSelect(0) ret = IpProfDestroy() End Sub
__
Macro DNATEST
Sub FPRINT() ' <s>F4 ' ret = IpWsLoad("c:\ipwin\images\fprint.tif","TIF") ret = IpFltFlatten(0, 20) ret = IpLutSetAttr(BRIGHTNESS, 60) ret = IpLutSetAttr(CONTRAST, 60) ret = IpLutApply() ret = IpFltHiPass(3, 10, 1) End Sub
__
Macro FPRINT
This script file contains three macros: VIDENH, DNATEST, and FPRINT, as denoted by the name on the Sub command line at the top of each macro. If you are familiar with a programming language, you will note that the format of a macro is that of a subroutine — it begins with a Sub command, and ends with an End Sub command.
The format of a macro is explained in more detail in the following diagram of the DNATEST macro. This macro is one that has been edited to include some simple looping and conditional test operations. Don't worry if some of the explanations are not clear at this time. They should become clearer as you read further in this manual.

About Auto-Pro
Page 1-5
1. __ Sub DNATEST()
2. __ ' <c><s>F2
3. __ ' Save 10 Profiles
dim x1 As integer, x2 As integer 4. dim i As integer, j As integer
ret = IpProfCreate() 5. ret = IpProfSetAttr(LINETYPE, THICKVERT)
x1 = 96 6. x2 = 110 j = 0 ' Save to file the first time; then append
for i = 1 to 9 ret = IpProfLineMove(x1, 0, x2, 290) ret = IpProfSave("C:\IPWIN\PROFILE.HST", j) 7. x1 = x1 + 41 x2 = x2 + 41 j = 1 ' Set Append next i
ret = IpProfSelect(0) ret = IpProfDestroy() 8. __ End Sub
1. The keyword “Sub,” followed by the macro name identifies a macro. A Sub
statement must be the first statement in any macro. The macro can be given any valid variable name (See Variable, Constants and Data Types later in this section for variable name rules). This line is automatically written when you record a macro.
2. This comment line is used to identify the shortcut key assigned to the macro. A shortcut key does not have to be assigned to a macro, but if it is, its name must be placed before the first operational statement (i.e., non-comment statement) in the macro (see Appendix E - Shortcut Key Assignments for valid key names). This line is automatically placed on the second line when you record a macro that has been assigned a shortcut key. If you do not assign a shortcut key when you record your macro, this comment line will not appear.
3. This comment line is used to record the macro's description, which is displayed in the Macro dialog box. A description does not have to be included with your macro, but if you choose to include it, it must be placed before the first operational statement (i.e., non-comment statement) in the macro. It may appear before or after the shortcut key comment, if one has been included.
The description line is automatically written when you record a macro that has been given a description. If you do not assign a description, this line will not

Image-Pro Plus
Page 1-6
appear. You may include multiple lines of descriptive comments, however, only the first line will be appear in the Macro dialog box.
Note - if you manually add a shortcut key or description line to your macro, be sure to type the apostrophe in the first position of the comment line.
4. The fourth line of the macro contains its first operational statement. This is a good place to begin declaring variables that will be used later in your macro. These types of statements are not written by the macro recorder. They are ones that you might include to support flow control commands that you add to the macro. In this example, these statements declare variables that are used as parameter values and counters by the For...Next loop in this macro (see element 6).
5. These two lines execute Image-Pro commands, in this case the Line Profile and Thick Vert commands. These lines are automatically written to the macro when the Line Profile and Thick Vert commands are recorded.
6. These three statements set the initial values of variables used in the For...Next loop. These types of statements are not written by the macro recorder. They are ones that must be added manually. In this example, these variables establish parameter values used by the subsequent IpProfLineMove and IpProfSave commands.
7. This group of statements comprise a For...Next. In this case the loop performs 9 line profiles and stores each result to a disk file. The IpProfLineMove and IpProfSave statements in this segment were initially recorded, and the variable assignment statements and For...Next structure were manually written around them.
8. The End Sub statement signals the end of the macro. An End Sub statement must be the last statement in a macro. This line is automatically written when you record a macro.

Creating An Auto-Pro macro
Page 1-7
Creating An Auto-Pro macro There are two ways to create an Auto-Pro program:
Record a macro and, if needed, edit the script file to incorporate the control structures you want; or...
Type the commands directly into a script file.
By far the easiest way to create your program is to record a macro, then, if needed, edit the script file with the macro editor or a text editor of your choice. As you gain experience with Auto-Pro and learn the function names, you may prefer to type the statements yourself. There are, however, both obvious and subtle problems with doing so: besides having to type all function names with no typing errors, there can also be difficulties in the sequence of commands selected.
When a script file is interpreted (during playback), many Auto-Pro functions are expected to occur in a prescribed sequence. If they do not, errors may occur. If you can't resist a challenge, then you may certainly type the program in yourself. However, most of you will probably want to edit a ready-made macro.
Whether you edit your script file or create it directly, you will want to play it back. To do so, you may do one of the following:
♦ From the Macro menu, select the Macro Management command, use the Change button to load the script (if your script is not the current script file), select the macro name that you wish to run, and click the Run button.
♦ From the Macro menu, find the name of the macro function that you wish to run on the bottom of the menu, and click it to invoke the macro.
♦ If you assigned a shortcut key when you named the macro, you may press the shortcut key without accessing the Macro menu, so long as the currently loaded script file contains the particular macro that you want to run.
Your macro can also be played back from a Visual Basic program. To learn more about doing this, see the Using Auto-Pro with Visual Basic section in this manual.

Image-Pro Plus
Page 1-8
Auto-Pro Functions Auto-Pro functions can be readily recognized because all are prefixed with the characters “Ip” — for example, the IpDocClose function closes the active image, and the IpFltMedian function applies the Median filter.
In a macro, Auto-Pro functions are called using standard BASIC function syntax, where the function name, and its parameters, are written as the source element of an assignment statement, as shown in the example below.
ret = IpWsLoad("c:\ipwin\images\count.tif","TIF")
The destination element (the left half) of the assignment statement is a variable to which the function writes its return value. This return value is always an integer. By default, the variable name ret is used to store the return value when a macro is recorded. However, you may use any variable, as long as it is one that will accept an integer value.
In general, the return code indicates whether the function completed successfully or not (a return code of zero indicates that no errors were detected). However, a handful of functions attribute additional significance to the return code. When this is the case, the return code's meaning is expressly described in the Auto-Pro Function Reference later in this manual.
Auto-Pro Parameters Most Auto-Pro functions require data, which is usually passed to the function via its parameters. Parameter values are supplied, separated by commas, between parentheses that follow the function name. In the examples below, two parameters are being given to the IpWsLoad function: the file name, c:\images\count.tif, and the format type, “TIF”. Four parameters are being passed to the IpPalSetPaletteColor function: 55, 100, 0 and 0.
ret = IpWsLoad("c:\images\count.tif","TIF")
ret = IpPalSetPaletteColor(55,100,0,0)
Every function has its own specific parameter requirements in terms of the number of parameters, the order of the parameters and the data it expects. These requirements are completely described in the Auto-Pro Function Reference section of this manual.
In the examples above, the parameters have been filled with actual data — the file name is specified “literally” by the character string within the first set of double-
Creating An Auto-Pro macro
Page 1-9
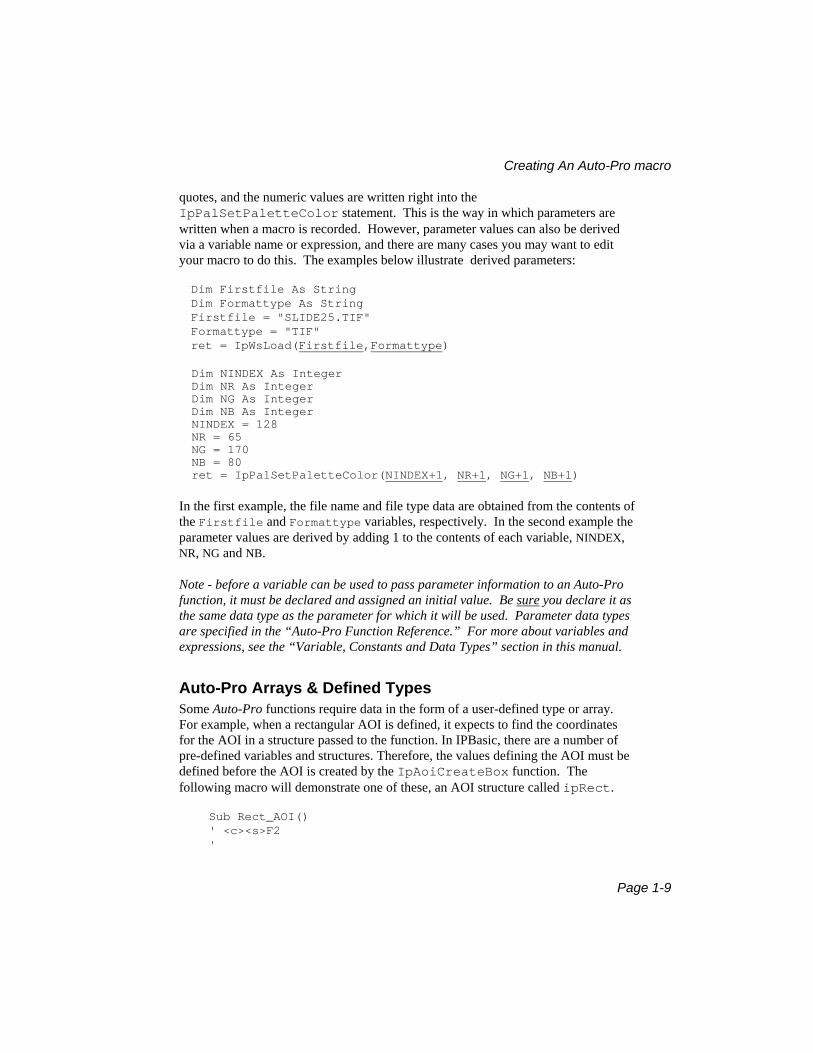
quotes, and the numeric values are written right into the IpPalSetPaletteColor statement. This is the way in which parameters are written when a macro is recorded. However, parameter values can also be derived via a variable name or expression, and there are many cases you may want to edit your macro to do this. The examples below illustrate derived parameters:
Dim Firstfile As String Dim Formattype As String Firstfile = "SLIDE25.TIF" Formattype = "TIF" ret = IpWsLoad(Firstfile,Formattype) Dim NINDEX As Integer Dim NR As Integer Dim NG As Integer Dim NB As Integer NINDEX = 128 NR = 65 NG = 170 NB = 80 ret = IpPalSetPaletteColor(NINDEX+1, NR+1, NG+1, NB+1)
In the first example, the file name and file type data are obtained from the contents of the Firstfile and Formattype variables, respectively. In the second example the parameter values are derived by adding 1 to the contents of each variable, NINDEX, NR, NG and NB.
Note - before a variable can be used to pass parameter information to an Auto-Pro function, it must be declared and assigned an initial value. Be sure you declare it as the same data type as the parameter for which it will be used. Parameter data types are specified in the “Auto-Pro Function Reference.” For more about variables and expressions, see the “Variable, Constants and Data Types” section in this manual.
Auto-Pro Arrays & Defined Types Some Auto-Pro functions require data in the form of a user-defined type or array. For example, when a rectangular AOI is defined, it expects to find the coordinates for the AOI in a structure passed to the function. In IPBasic, there are a number of pre-defined variables and structures. Therefore, the values defining the AOI must be defined before the AOI is created by the IpAoiCreateBox function. The following macro will demonstrate one of these, an AOI structure called ipRect.
Sub Rect_AOI() ' <c><s>F2 '
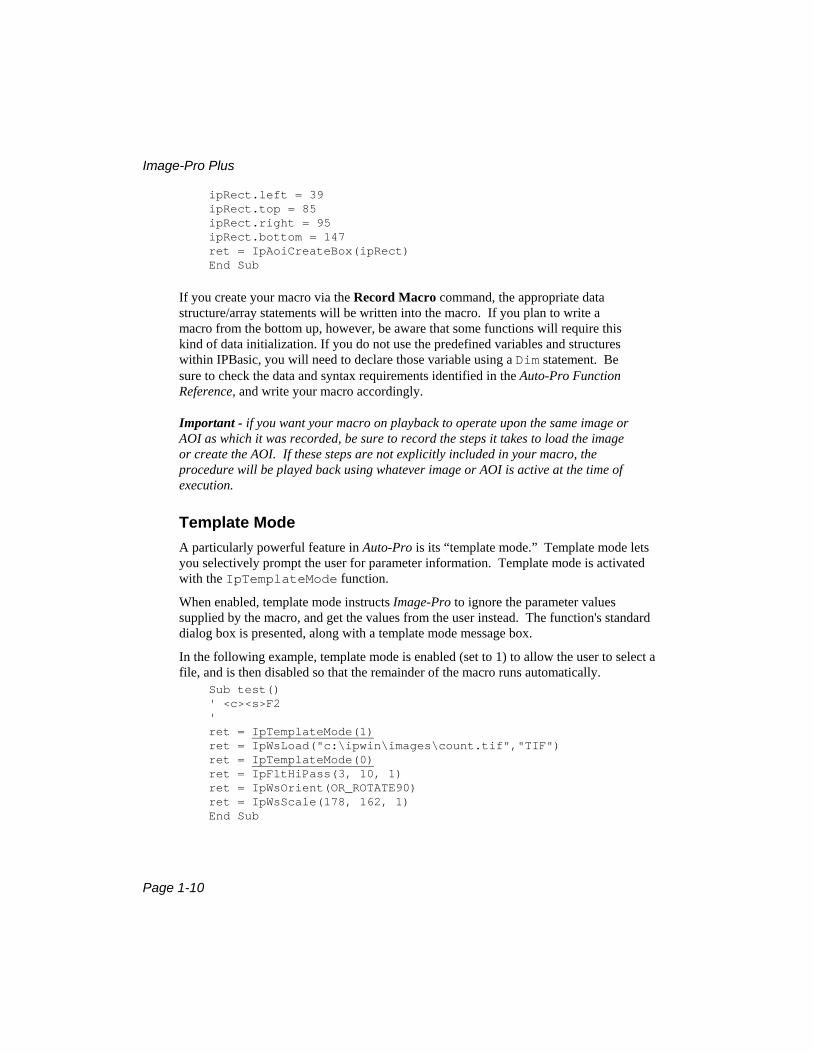
Image-Pro Plus
Page 1-10
ipRect.left = 39 ipRect.top = 85 ipRect.right = 95 ipRect.bottom = 147 ret = IpAoiCreateBox(ipRect) End Sub
If you create your macro via the Record Macro command, the appropriate data structure/array statements will be written into the macro. If you plan to write a macro from the bottom up, however, be aware that some functions will require this kind of data initialization. If you do not use the predefined variables and structures within IPBasic, you will need to declare those variable using a Dim statement. Be sure to check the data and syntax requirements identified in the Auto-Pro Function Reference, and write your macro accordingly.
Important - if you want your macro on playback to operate upon the same image or AOI as which it was recorded, be sure to record the steps it takes to load the image or create the AOI. If these steps are not explicitly included in your macro, the procedure will be played back using whatever image or AOI is active at the time of execution.
Template Mode A particularly powerful feature in Auto-Pro is its “template mode.” Template mode lets you selectively prompt the user for parameter information. Template mode is activated with the IpTemplateMode function.
When enabled, template mode instructs Image-Pro to ignore the parameter values supplied by the macro, and get the values from the user instead. The function's standard dialog box is presented, along with a template mode message box.
In the following example, template mode is enabled (set to 1) to allow the user to select a file, and is then disabled so that the remainder of the macro runs automatically.
Sub test() ' <c><s>F2 ' ret = IpTemplateMode(1) ret = IpWsLoad("c:\ipwin\images\count.tif","TIF") ret = IpTemplateMode(0) ret = IpFltHiPass(3, 10, 1) ret = IpWsOrient(OR_ROTATE90) ret = IpWsScale(178, 162, 1) End Sub

Creating An Auto-Pro macro
Page 1-11
Playback behavior during template mode is determined by the functions to which it is applied. If a dialog box is associated with a function, it will be presented. However, for operations that have no associated dialog (e.g., creating an AOI), only the template-mode message box will appear.
The IpTemplateMode function statement can be edited into the script file, or it can be automatically inserted while a macro is being recorded by enabling “Template Mode” in the Recording message box.
Issuing A Message To The User You may edit your macro so that it issues a message to the user when the macro is played back. This is accomplished using the IpMacroStop function. This function will interrupt the macro, and present a message box containing a message that you specify. Macro execution will not continue until your user clicks a button in the message box.
The IpMacroStop function can be used to issue message boxes in one of two ways: Modal or Modeless. Modal message boxes are ones that “lock-out” Image-Pro — i.e., the user cannot select an image or perform an Image-Pro operation while the message box is open. Modal message boxes are useful for notifying the user of events that do not require any action on their part. For example you might use the following statement:
ret = IpMacroStop("Last Image Processed; Program Complete", 1)
at the end of a macro to inform the user that all images have been processed. You might also use modal message boxes to alert your user to errors that force your macro to terminate.
Note - modal message boxes can be outfitted with a variety of button combinations such as “Yes”/“No”, “OK”/“Cancel” and so forth. Each button click returns a different value, which can be tested and used by your program to transfer control to the appropriate procedure (see IpMacroStop in the Auto-Pro Function Reference).
Modeless message boxes are ones that allow the user to access Image-Pro while the message is displayed. You might use a Modeless message box to instruct the user to select certain options, or open certain images. For example, you might issue the following message
ret = IpMacroStop("Set Bright, Contrast, Gamma; Then Click Resume", 0)

Image-Pro Plus
Page 1-12
to instruct your user to perform a manual procedure, in this case setting the BCG controls, before continuing with the macro. In many instances IpMacroStop can be used instead of template mode to obtain input from the user. It has the added benefit of being able to provide instructive information.
Obtaining Data From The User Auto-Pro gives you a variety of ways to get input from your user. The IpStGetFloat, IpStGetInt and IpStGetString functions can be used to issue a dialog prompting for a floating-point number, an integer or a string of character data, respectively. These functions pass the data entered by the user to a variable that you assign in your program. These functions also let your program know whether the dialog was closed with the OK or Cancel button, so that your program can process the event appropriately. See the IpStGetFloat, IpStGetInt and IpStGetString descriptions in the Auto-Pro Function Reference for examples of this.
Working With Multiple Image Files Quite often you may find that you need to apply a process to many files automatically. Auto-Pro gives you several ways to do this using the following special functions:
The IpStAutoName function lets you create file names by automatically assigning to them, unique numeric digits. For example, you might automatically capture and save 10 images, and use the IpStAutoName function to create names such as IMG001, IMG002, IMG003...IMG010. This function is usually used in conjunction with a loop, where the numeric digits are derived from the loop's counter. See the IpStAutoName function description in the Auto-Pro Function Reference for an example of how this is accomplished.
The IpStSearchDir function lets you automatically apply a process to all or some of the files in a specified directory. It does this by letting you refer to a file by its position within a directory, rather than by its file name. Written into a looping procedure, it can be used to automatically process the contents of an entire directory. The IpStSearchDir function description in the Auto-Pro Function Reference shows you how this can be accomplished.
The IpStGetName function lets you prompt your user for a file name. This allows you to build a loop that continues until your user chooses to end it. See IpStGetName in the Auto-Pro Function Reference to see how this is done.

Creating An Auto-Pro macro
Page 1-13
These three functions are ones that must be edited into your macro manually — they will not be generated by the macro recorder. And, to use them to full potential, they must be implemented into some type of IPBasic looping structure. See the next section for more about IPBasic and the looping mechanisms it provides.
Interactive Processes Virtually all of the commands contained in Image-Pro can be automated in a macro. The only exceptions involve functions that are, by their nature, interactive. The following actions will not be recorded in a macro:
Measurement actions taken with the Measurement command
Selecting or acquiring images with the Scan command
Manually splitting or combining counted objects
Although these interactive actions themselves cannot be programmed, many useful supporting steps, such as opening dialog boxes and setting certain options, can be. For example, the disposition of the Measurements window and the setting of measurement options can be automated, as can the commands that load and save measurement data. This lets you automate the front- and back-ends of an interactive process.
Getting Data From An Image Auto-Pro offers numerous ways to get data from an image. For example, the IpProfGet function can be used to get information about a line profile, including the number of points in the profile, it statistics (e.g., mean, minimum and maximum) and the intensity values on the line. Most commands that create data (e.g., "Count/Size", "Histogram") have a similar "get" function that can be used to pass its data to your program (e.g., IpBlbGet, IpHstGet). You can even use the IpDocGet and IpDocGetArea functions to get information about an image (e.g., size and class) and its pixel values.
Functions that get data require that you create a variable into which the data can be written. In the following example, the IpProfGet function is used to get the number of points in a profile. Note that before the function is called, a variable called profpts is declared. This variable is specified in the last parameter of the IpProfGet statement.
Dim profpts As Integer ret = IpProfGet(GETNUMPTS, 0, profpts)

Image-Pro Plus
Page 1-14
When using this type of function, it is very important that you carefully consult the function description in your Auto-Pro Function Reference and define a variable of the type it specifies — in some cases the variable will even be an array of a required length (for more information about declaring and using variables, refer to Variables, Constants and Data Types in the next section).
Data obtained with the “get data” functions can be printed to the Macro Output Window using the IpOutput function . This lets you format the data in any manner you choose, and then save it to the Clipboard or an ASCII file.
IPBasic The Image-Pro BASIC (IPBasic) statements, can be used to set variables, evaluate expressions and control the execution of the Auto-Pro functions. This set of commands is styled after BASIC, a programming language familiar to many programmers. If you are already conversant with BASIC, you will find the IPBasic statements very easy to work with.
The syntax for the IPBasic statements is identical to the syntax for the comparable statements in Visual Basic. Therefore, Auto-Pro macros can be ported, without modification, directly into a Visual Basic program (see Using Auto-Pro with Visual Basic for more information about integrating the two).
Statement Structure An IPBasic statement is made up of variables, expressions, operators, and reserved words. These elements are identified as those characters and symbols that occur between blank spaces. That is, a space or a sequence of spaces is a delimiter for these “word” elements (certain operators, such as Less Than (<), serve as a delimiter even when not surrounded by spaces). The end of line also delimits these elements.
Note - key words in IPBasic are not case sensitive — for example, the keyword Dim, could be entered as Dim, DIM or dim.
In general, IPBasic statements appear one per line; the end of the line terminates a statement. You may choose, however, to put several short, related statements on the same line. When you do, separate the statements with a colon (:).
Sometimes a statement that might appear on one line may also occur as a block placed on multiple lines. Consider, for example, the statement
If A > B Then C = A Else C = B

IPBasic
Page 1-15
If the variable names were longer, the statement might overflow to the next line. In that event, the multi-line If...Then...Else...End If statements would be appropriate:
If X > Beta_Male Then Charlie = Alpha_Male Else Charlie = Beta_Male End If
A line may begin with a statement, such as If; an assignment variable, such as CHARLIE; or a comment.
Using Comments It is important to provide remarks, or comments, to explain your code. This helps you recall at a later time what your code is expected to do. It also helps anyone else reading the code to understand the steps involved. Auto-Pro offers two ways of inserting comments into your code: the Rem statement and the apostrophe ('). These are some examples of their use:
Rem This is a comment. The interpreter ignores the whole line.
Rem Dim A As String 'You can use a Rem statement to disable code
Dim A As String : Rem A Rem on the same line as code needs a colon
' An apostrophe can also introduce a comment on a line by itself.
Dim A As String 'A comment after an apostrophe does not need a colon
Subroutines and Functions Other than variable declaration statements, which should appear at the top of your script file, and comments, which may appear anywhere, all other code in your script file must be contained within a subroutine or function procedure. Most of your procedures will be macros you have recorded, which will appear as IPBasic subroutines in your script file. However, your file may also include subroutines and functions that you have defined.
Note - a procedure defined as a subroutine can either be invoked as a macro or called from another Auto-Pro procedure. A function, however, can only be called from within an Auto-Pro procedure.
The following script file contains two subroutines and one macro function.
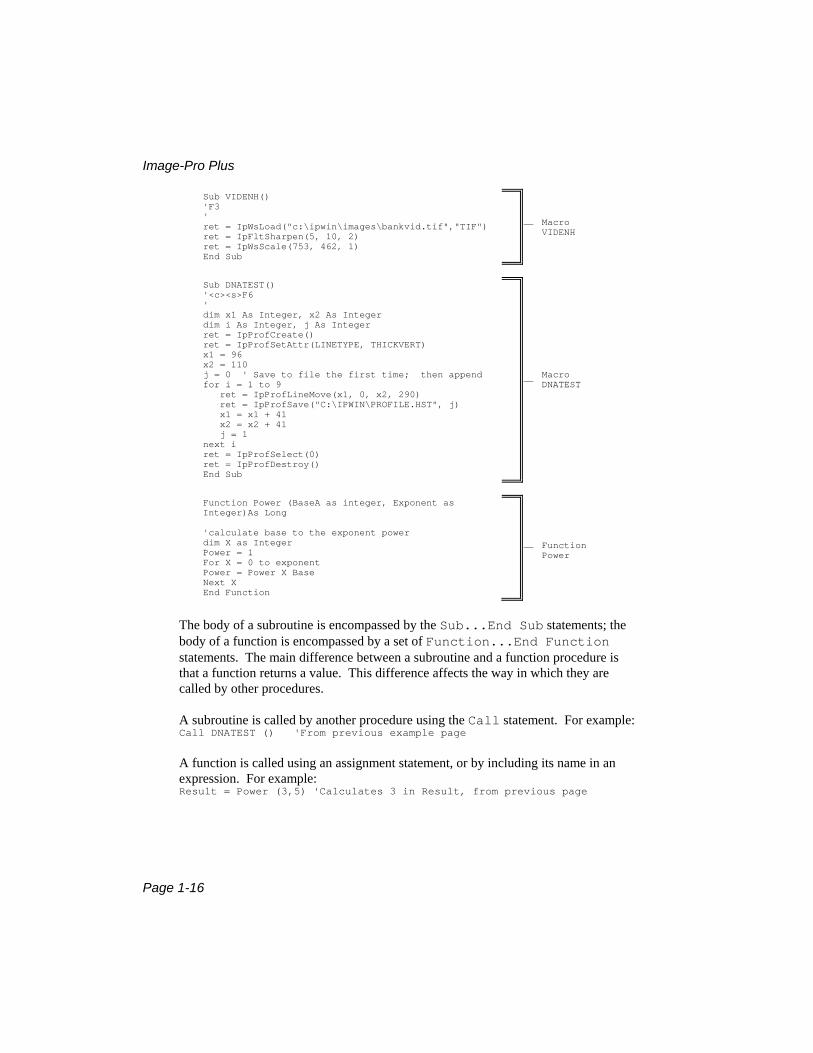
Image-Pro Plus
Page 1-16
Sub VIDENH() 'F3 ' ret = IpWsLoad("c:\ipwin\images\bankvid.tif","TIF") ret = IpFltSharpen(5, 10, 2) ret = IpWsScale(753, 462, 1) End Sub
__
Macro VIDENH
Sub DNATEST() '<c><s>F6 ' dim x1 As Integer, x2 As Integer dim i As Integer, j As Integer ret = IpProfCreate() ret = IpProfSetAttr(LINETYPE, THICKVERT) x1 = 96 x2 = 110 j = 0 ' Save to file the first time; then append for i = 1 to 9 ret = IpProfLineMove(x1, 0, x2, 290) ret = IpProfSave("C:\IPWIN\PROFILE.HST", j) x1 = x1 + 41 x2 = x2 + 41 j = 1 next i ret = IpProfSelect(0) ret = IpProfDestroy() End Sub
__
Macro DNATEST
Function Power (BaseA as integer, Exponent as Integer)As Long 'calculate base to the exponent power dim X as Integer Power = 1 For X = 0 to exponent Power = Power X Base Next X End Function
__
Function Power
The body of a subroutine is encompassed by the Sub...End Sub statements; the body of a function is encompassed by a set of Function...End Function statements. The main difference between a subroutine and a function procedure is that a function returns a value. This difference affects the way in which they are called by other procedures.
A subroutine is called by another procedure using the Call statement. For example: Call DNATEST () 'From previous example page
A function is called using an assignment statement, or by including its name in an expression. For example: Result = Power (3,5) 'Calculates 3 in Result, from previous page

IPBasic
Page 1-17
Variables, Constants, Data Types Variables and constants are used to provide data to a macro. A variable is a symbolic construct that contains a value. Variables are identified by name. When a macro references a variable name, the current value of the variable is used by the macro. The value in a variable typically changes during the course of the macro, hence its name.
Variable Names Each variable must have a name. Like all programming languages, IPBasic has certain naming conventions. These are as follows:
The first character of the variable name must be a letter (A through Z or a through z).
The remaining character(s) may be any combination of letters (A through Z or a through z), numbers (0 through 9), or underscores (_).
The variable name must not be an Auto-Pro or IPBasic reserved word. Reserved words include Auto-Pro function names and IPBasic keywords. A list of reserved words appears in Appendix B - Auto-Pro Keywords.
Variable names in IPBasic are not case-sensitive (for example, a variable name of “VName” and a variable name of “vname” will be treated as the same variable).
Variable Types Because variables represent many different kinds of information (numbers and names, for example), a macro needs to know what kind of data to expect in order to allocate sufficient storage and use the right routines to manipulate it. Please refer to the data type descriptions in the on-line Help (language reference) for more information.
Scope Of A Variable Variables declared within a subroutine or function are local to that procedure. That is, any variable declared within Sub VIDENH, although it may have the same name as a variable in Sub FPRINT, will be treated as a different variable. If you want both procedures to share a variable, it must be declared at the beginning of the script file, preceding any Sub statements, i.e. in Global scope.

Image-Pro Plus
Page 1-18
All variables, regardless of how they are declared, are local to a script file. That is, when a new script file is loaded, the variables associated with the previous script file are released.
Note that variables declared in subroutines and functions “hide” variables with the same names in the global scope.
Declaring Variables Before a variable can be referenced in a macro, it must be explicitly declared, within the script file in which it is referenced, using the Dim, Static,Redim, or Global statements.
Variable declaration is done to inform IPBasic of the variable's name, type, size, and number of dimensions. A variable must be declared before it is used. For that reason, and for ready reference to the variables in a procedure, variable declaration statements should be the first thing to appear in a subroutine or function procedure. Declaration statements for variables that are global, should be the first thing to appear in the script file.
To declare a variable, you may use either the Dim,ReDim, or Static statement. For example:
Dim A As String 'Declare a string variable named A
Dim A25 As String *25 'Declare a 25-character string
ReDim B(100) As Single 'Declare a static, array variable
The Dim statement causes the allocation of storage for the variable each time the procedure is entered; it is de-allocated upon exiting the procedure. The value of the variable is not available outside the procedure, nor is it preserved for successive calls to the procedure (including recursive calls).
The Static statement causes the allocation of storage for the variable once; it is de-allocated upon termination of the program. The value of the variable is not available outside the procedure but retains its value during successive calls to the procedure.
To declare a global variable for the script file, use the Global statement, or place the Dim or Static statements at the top of the file, before any subroutine or function definitions.

IPBasic
Page 1-19
Every variable declaration statement must define the type of data for which it will be used, where the type must be String, Integer, Long, or Single (see type definitions under Variable Types). For example:
Global Xnum As Integer 'Declares Global integer
Dim ImgName As String 'Declares a string variable
Static ImLg As Long 'Declares a long static variable
Passing An Array To Auto-Pro When you record an Auto-Pro macro, functions that take an array are recorded with both the name of the array and the subscript of its first element. Referencing the first element of the array ensures that the array header, which Basic automatically attaches to every array it generates, is not passed as data to the Auto-Pro function. Auto-Pro functions use "C" arrays that do not have that header.
If you should choose to type Auto-Pro functions into your Basic program, rather than recording them in and copying them from Image-Pro, be sure that you reference all arrays that you pass to Auto-Pro, in this way. The following example shows how an array called myPts must be passed to the IpAoiCreateIrregular function:
ret = IpAoiCreateIrregular(myPts(0), Numpoints%)
By specifying myPts's first element (0), you force Visual Basic to skip its header, and pass the address of the first piece of data to Auto-Pro.
Constants A constant is a particular kind of variable, whose value is assigned only once during the program and not changed thereafter. The advantage to using a constant is that IPBasic will not allow a change to its value; hence, any attempt to modify the variable will be flagged as an error.
The name of a constant follows the same rules as any variable; by convention, a constant is usually typed in uppercase characters, to mark it as a constant. To declare a constant, use the Const statement:

Image-Pro Plus
Page 1-20
Const TRUE = -1 'Assigns constant value of -1 to TRUE
Const FALSE = 0 'Assigns constant value of 0 to FALSE
Const PI = 3.14159265 'Declares constant to save typing
Const EMPLOYEES = 10 'Sets employee population
User-defined Types IPBasic allows you to define a data type, comprised of one or more variables, which are often of different types. This structure is often used to hold and operate upon record-like data that contains several fields of information. The Type statement introduces the definition of your record structure, and the End Type statement concludes it.
Type RECT left As Integer top As Integer right As Integer bottom As Integer End Type
A variable of this type can then be declared:
Dim ipRect As RECT
and its elements individually referenced by using variable.elementname notation, as shown below:
ipRect.left = 53 ipRect.right = 102 ipRect.top = 111 ipRect.bottom = 162
The type that you define is global. The variables that you declare using the type may be global or local.
Expressions An expression is some valid combination of operators and operands. An operator is a symbol that tells IPBasic what action you want performed on the operand(s), such as adding two numbers or testing two expressions for equality.
In IPBasic, operators fall into four classes:
Assignment,
Arithmetic,
IPBasic
Page 1-21
Relational, and
Logical.
The Assignment Operator The Assignment Operator is used to change an operand's value. It can be used to change the value of a variable. The IPBasic Assignment Operator is the Equal Sign (=). In the statement X= 7, the value of X is to be assigned (set to) the value of 7 (you cannot say 7 = X however). If X has the value 214 before this statement is executed, the value 214 will be lost, or overwritten, with the value 7.
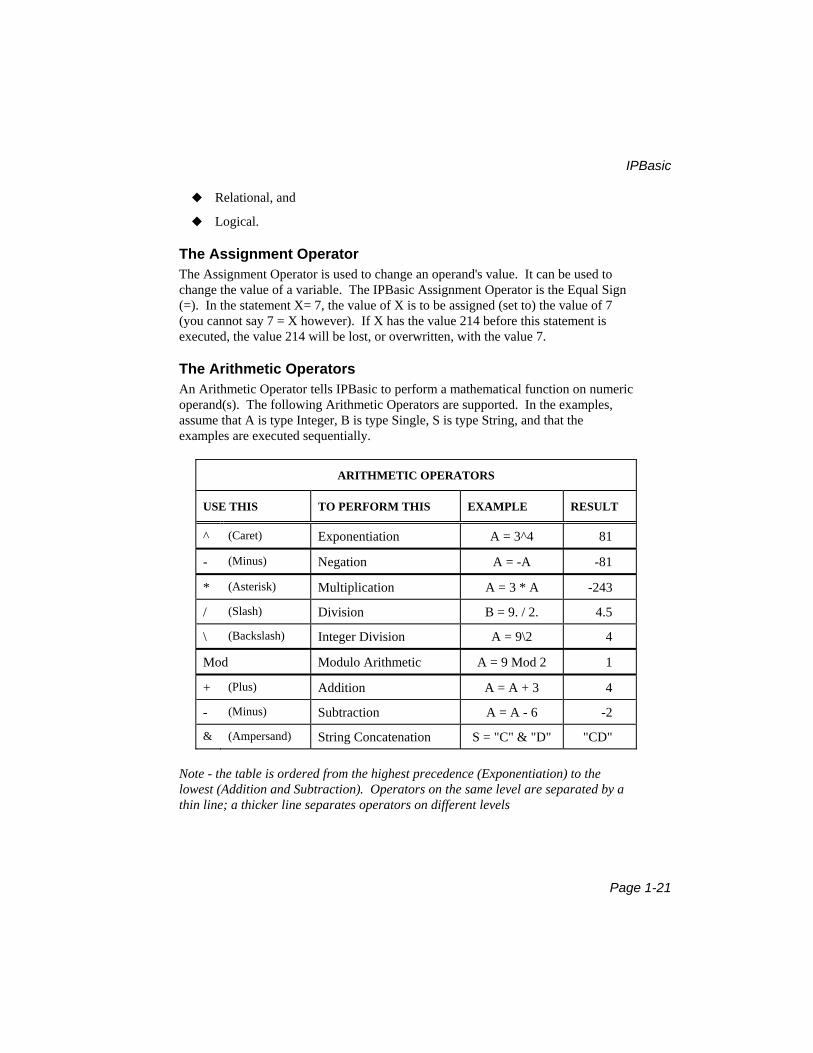
The Arithmetic Operators An Arithmetic Operator tells IPBasic to perform a mathematical function on numeric operand(s). The following Arithmetic Operators are supported. In the examples, assume that A is type Integer, B is type Single, S is type String, and that the examples are executed sequentially.
ARITHMETIC OPERATORS
USE THIS TO PERFORM THIS EXAMPLE RESULT
^ (Caret) Exponentiation A = 3^4 81
- (Minus) Negation A = -A -81
* (Asterisk) Multiplication A = 3 * A -243
/ (Slash) Division B = 9. / 2. 4.5
\ (Backslash) Integer Division A = 9\2 4
Mod Modulo Arithmetic A = 9 Mod 2 1
+ (Plus) Addition A = A + 3 4
- (Minus) Subtraction A = A - 6 -2
& (Ampersand) String Concatenation S = "C" & "D" "CD"
Note - the table is ordered from the highest precedence (Exponentiation) to the lowest (Addition and Subtraction). Operators on the same level are separated by a thin line; a thicker line separates operators on different levels

Image-Pro Plus
Page 1-22
The minus sign (-) is used for both Negation and Subtraction. When it immediately precedes a single operand, it signals Negation and will change the sign of that number. When it separates two operands, it implies Subtraction.
The Division Operator (/) produces a floating-point result. Use the Integer Division Operator (\) for an integer result. For example, 5.0 / 2.0 (division) yields 2.5, while 5 \ 2 (integer division) yields 2. Before integer division, operands are rounded to Integer or Long expressions. Any fractional portion of the result of an integer division is truncated.
Modulo Arithmetic is used to obtain the remainder from a division operation. For example, when 5 is divided by 2, there is a remainder of 1. The operation, 5 Mod 2, will produce that remainder.
Most Common Relational Operators A Relational Operator causes two expressions to be compared, to determine their relationship to each other. A true relational operation has a resulting value of -1. False relational operations have a value of zero. IPBasic defines the true and false constants for use in relational operations.
The following relational operators are supported by IPBasic. In the table below, assume that A = 3, B = 4, and C = 4.
RELATIONAL OPERATORS
USE THIS TO TEST FOR THIS EXAMPLE RESULT
= Equality A = B 0
<> Nonequality A <> B -1
> Greater than A > B 0
< Less than A < B -1
>= Greater than or equal to B >= C -1
<= Less than or equal to A <= C -1
Note - all Relational Operators have the same precedence (i.e., they are evaluated as they occur from left to right).
The relational operators can be used upon string values as well as numeric values. The relationship of a string is determined by it ANSI character value. Therefore, the string "J" is not equal to the string "j". Refer to Appendix C - ANSI Characters.

IPBasic
Page 1-23
Most Common Logical Operators A Logical Operator tells IPBasic to operate on each bit in the operand(s) in a prescribed way. For this reason, it is sometimes called a Bitwise Operator.
Not (Logical Negation) changes every bit in its one operand to the opposite value (0 to 1, 1 to 0). All the other Logical Operators require two operands.
And returns a 1 bit where both operands have a 1 bit, and a 0 otherwise.
Or (Inclusive Or) returns a 0 bit where both operands have a 0 bit, and a 1 otherwise.
Xor (Exclusive Or) returns a 0 bit where both operands have the same bit (both 0s or both 1s), and a 1 bit otherwise.
Eqv (Logical Equivalence) returns a 1 bit where both operands have the same bit (both 0s or both 1s), and a 0 bit otherwise.
Imp (Implication) first examines the first operand: where that operand has a 0 bit, it returns a 1; where that operand has a 1 bit, it returns whatever bit the second operand contains.
The following table illustrates bitwise operations. It assumes the following values for each variable:
ByteA = 00001111
ByteB = 00111100
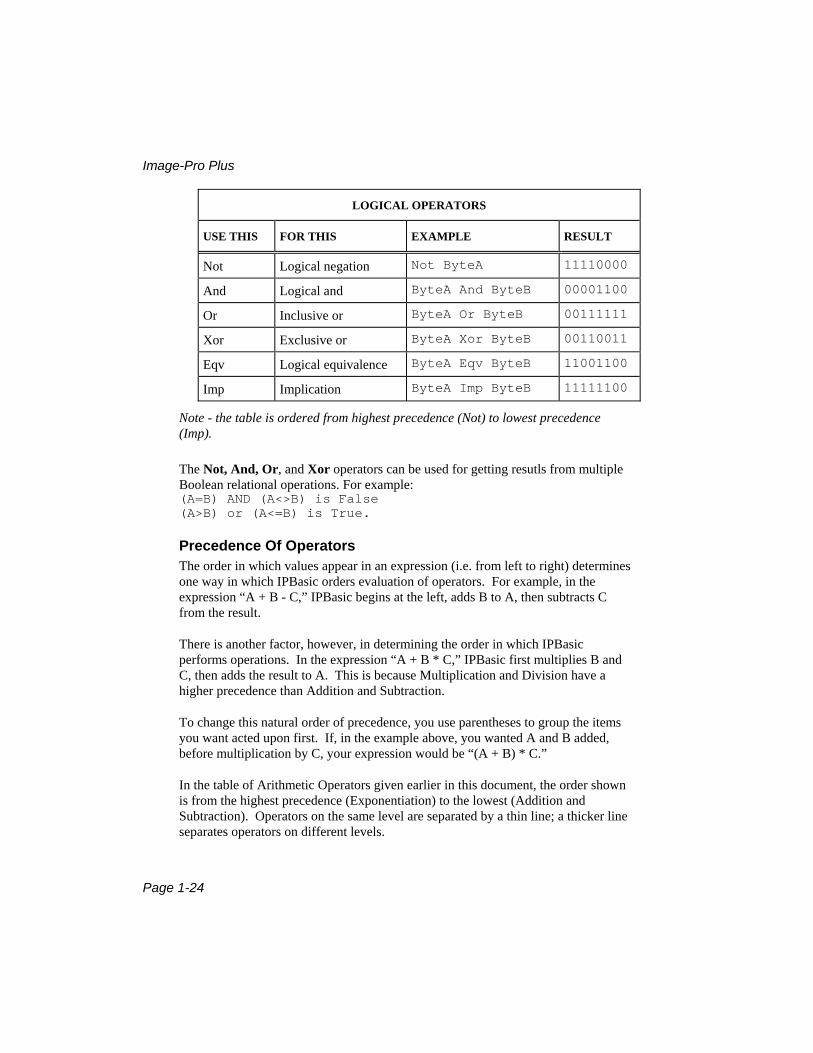
Image-Pro Plus
Page 1-24
LOGICAL OPERATORS
USE THIS FOR THIS EXAMPLE RESULT
Not Logical negation Not ByteA 11110000
And Logical and ByteA And ByteB 00001100
Or Inclusive or ByteA Or ByteB 00111111
Xor Exclusive or ByteA Xor ByteB 00110011
Eqv Logical equivalence ByteA Eqv ByteB 11001100
Imp Implication ByteA Imp ByteB 11111100
Note - the table is ordered from highest precedence (Not) to lowest precedence (Imp).
The Not, And, Or, and Xor operators can be used for getting resutls from multiple Boolean relational operations. For example: (A=B) AND (A<>B) is False (A>B) or (A<=B) is True.
Precedence Of Operators The order in which values appear in an expression (i.e. from left to right) determines one way in which IPBasic orders evaluation of operators. For example, in the expression “A + B - C,” IPBasic begins at the left, adds B to A, then subtracts C from the result.
There is another factor, however, in determining the order in which IPBasic performs operations. In the expression “A + B * C,” IPBasic first multiplies B and C, then adds the result to A. This is because Multiplication and Division have a higher precedence than Addition and Subtraction.
To change this natural order of precedence, you use parentheses to group the items you want acted upon first. If, in the example above, you wanted A and B added, before multiplication by C, your expression would be “(A + B) * C.”
In the table of Arithmetic Operators given earlier in this document, the order shown is from the highest precedence (Exponentiation) to the lowest (Addition and Subtraction). Operators on the same level are separated by a thin line; a thicker line separates operators on different levels.

IPBasic
Page 1-25
All Relational Operators have the same precedence (i.e., they are evaluated as they occur from left to right), and are at a lower precedence than Arithmetic Operators.
The Logical Operator's order of precedence is that shown in the table of logical operators earlier in this section. Logical operations are lower in precedence than Relational operations.
Flow Control When a macro is recorded, your actions are written as a long series of instructions. Unaltered, this series of instructions must always follow the same sequence. If you want to change the sequence, to branch to another location, for instance, if a certain condition is met, or to loop through the same steps a certain number of times, you need to modify the flow of control. IPBasic provides several statements that let you do this.
Loops A loop is a portion of program code (a sequence of instructions) that is repeated a certain number of times or while a specified condition is true or false. It usually implies that some condition or counter is tested, either before or after the command sequence is executed.
If the loop is tested before executing the command sequence, then the command sequence may not be executed at all. If the loop is tested after executing the command sequence, then the command sequence will be executed at least once.
Counting Iterations vs. Testing A Condition When a loop is iterated for a set number of times, you specify a counter, the start amount for the counter, the stop amount for the counter, and the amount to increment (or decrement) the counter. All of these arguments are numeric.
When a terminal condition is used to determine when to stop execution of the loop, that condition is an expression that evaluates to either zero (False) or nonzero (True). This is known as a Boolean expression.

Image-Pro Plus
Page 1-26
Most Common IPBasic Loop Structures IPBasic provides the following types of loop structures:
For...Next, which allows you to repeat a sequence of commands a predetermined number of times
Do...Loop Until and Do Until...Loop, which allow you to repeat the code until a specified condition is reached,
Do...Loop While, Do While...Loop, and While...Wend, which allow you to repeat the code while a specified condition holds
Most of these statements allow you to exit prematurely from the loop and return control back to the calling program (on an error condition, for example).
The structures that IPBasic provides for looping each have their own features. To determine which one is most appropriate for the task at hand, consider the following table:
LOOP STRUCTURE
END OF LOOP DETERMINED BY...
TESTED PERFORMED IF CONDITION IS
EARLY EXIT AVAILABLE?
For...Next Counter After loop In bounds Yes Do...Loop — — — Yes Do Until...-Loop
Boolean expression
Before loop False Yes
Do...Loop Until
Boolean expression
After loop False Yes
Do...Loop While
Boolean expression
After loop True Yes
Do While...Loop
Boolean expression
Before loop True Yes
While...Wend Boolean expression
Before loop True No

IPBasic
Page 1-27
For...Next Statements Use the For and Next statements to repeat a command sequence a given number of times. The following example shows how a For...Next loop could be used to obtain and save data from 9 line profiles in an image. The following sequence would accomplish this:
for i = 1 to 9 ret = IpProfLineMove(x1, 0, x2, 290) ret = IpProfSave("C:\IPWIN\PROFILE.HST", 0) x1 = x1 + 40 x2 = x2 + 40 next i
Do...Loop Statements Use the Do...Loop statements when you want a command sequence to repeat while or until a certain condition is met. If you wanted to open the four images listed at the bottom of the File menu, you might use the following sequence:
A = 1 Do Call IpWsLoadNumber (A) A = A + 1 Loop While A < 5
Typically, you want to avoid an infinite loop (a loop in which the code is repeated endlessly, with no condition ever succeeding in terminating the loop). There are a few instances, however, when it is desirable to set up the outer loop structure as an endless loop, with an exit condition that is met while executing the body of the loop. For this instance, you may use the Do...Loop statements with no While or Until clause.
While...Wend Statements You may use the While and Wend statements when you want a command sequence to repeat as long as a condition is met. These statements are equivalent to the Do While...Loop statements, which we recommend that you use. The While...Wend statements do not allow you to exit the loop prematurely. The following example of a While…Wend loop rewrites the previous example:
A = 1 While A < 5 Call IpWsLoadNumber(A) A = A + 1 Wend

Image-Pro Plus
Page 1-28
Nested Loops Loops may be nested (one loop placed totally inside another loop) to any level, in order to achieve the command sequence you want. You need to be sure that each inner loop is completely contained within its surrounding loop(s). A visual aid in doing this, and in making the code more readable, is to indent the body of an inner loop and correlate the counter of the Next statement with that of the For statement, as the following example shows:
Dim I As Integer Dim J As Integer For I = 1 To 10 For J = 1 To 10 ... Next J Next I
Note that it would be incorrect in this example for Next I to precede Next J. It is possible, however, to use the Next statement without the J or I. It is also permitted to use a single Next statement for both counters, as follows:
Dim I As Integer Dim J As Integer For I = 1 To 10 For J = 1 To 10 ... Next J, I
Note that whether you use one Next statement or several, the order in which you place the counter names must be inverse to the order in which they were introduced by the For statements.
Branching When you want to change the order in which commands are executed, use one of the branching statements that IPBasic provides. These include the following:
If...Then...Else
If...Then...ElseIf...End If
On…Error…GoTo
GoTo

Errors
Page 1-29
Decision Structures When the value of some condition determines whether or not you want to branch to another location, use a decision structure. In IPBasic, these include:
If...Then...Else
If...Then...ElseIf...End If
On...Error…GoTo
Use either If...Then...Else or If...Then...ElseIf...End If to test a condition or sequence of conditions, with differing responses according to the value of the conditional expression.
The If...Then...Else statement is a one-line construct: if the statement cannot be completed on a single line, use If...Then...ElseIf...End If. The latter is a multi-line construct that allows you to embed any number of Else conditions. The Else and ElseIf conditions are optional. The End If statement is required to mark the end of the multi-line statement; it must not be used with the single-line statement.
Unconditional Branching When you want to transfer control to another location regardless of the condition, use the GoTo statement.
Errors When a statement contains an error in syntax, IPBasic will tell you that an error has occurred, the line number nearest where the problem was identified, and an error message describing the general type of error.
Run-Time Errors Many operations macy cause errors that can only be detected when the macro runs, such as an attempt to open a non-existant file, or writing to a file on a full disk. The following statements ca be used to specify how to handle run-time errors:
On…Error…GoTo On…Error…Resume…Next

Image-Pro Plus
Page 1-30
On…Error…Resume…Next can be used to specify a line label indicating where to continue after an error occurs. On…Error…GoTo restores the default handling (which terminates the macro if an error is encountered). n…Error…Resume…Next can also be used to cause any error to be ignored.
Version 4.0 IPBASIC 4.0 comes with a new and improved editor/debugger. A few of the improvements are listed below. For more details, please refer to the to the IPBasic online help.
♦ You can keep the editor open at all time. There is no need to close it after editing. You can run a macro with the editor open or closed.
♦ As in Visual Basic, the editor has a Run button which loads and parses the script file. Any Basic error will be reported at that time. If parsing is successful, the Run button will gray out and the Stop button will be active. You have to press the Stop button in order to edit the script file or close the editor. If you start editing the script file before you press Stop, the program will ask you whether you want to stop and edit. Macros must still be run from the Macro menu in Image-Pro however.
♦ You can set break points for debugging purposes, or as in the previous version, you can execute the macro step by step.
♦ IPBASIC 4.0 looks for all the Auto-Pro functions and constants declarations in IPC32.BAS (That same file can be included in any Visual Basic project in order to run macros from that environment). More generally, any function declaration or implementation found in any .BAS file located in the BAS sub-directory, will be read-in by IPBASIC at start-up, and available during script execution. You could for instance reduce the size and complexity of your script files by moving commonly used functions to one or more .BAS files. These functions would then be available from any active script file. IPUTIL32.BAS, which is installed by the program, is an example of such file.
♦ The new editor features a References dialog which lists all the OLE Automation Servers available in the system (See Edit:References in the Image-Pro Plus Reference Guide). These servers can be used to communicate, send or query data, to an from other applications. Excel, Word, Access can all be controlled via their OLE Automation Server. For more information, see the section on GetObject/CreateObject in the IPBASIC Language online help file.

Compatibility Issues
Page 1-31
Compatibility Issues In order to make IPBASIC 4.0 fully compatible with Visual Basic, a few non-standard IPBASIC formats had to be abandoned:
♦ No function, subroutine, or variable name starting with an underscore ( _ ) is allowed.
Print The print statement is now used to print text or numerical values to file. In order to print to the Output window, you must now call Debug.print or IpOutput. Debug.print will print text both on the Output window and on the Immediate window of the macro editor. You can also replace print with iprint. iprint eventually calls IpOutput and is found in IPUTIL32.BAS.
Note that Debug.Print and iprint do not support the comma character used to insert a tab between string expressions:
print "hello", "world"
Must be written as:
Debug.print "hello" + chr$(9) + "world"
RTrim$ This functions takes out all trailing spaces. This is useful when concatenating several fixed length strings into one. For example:
' This worked in IPP 3.0 but not in IPP 4.0 and/or VB. Sub BuildFileName() dim mypath as string * 256 dim myname as string * 32 ret = IpStGetString("Enter path(ex:c:\IPWIN\)", mypath, 255) ret = IpStGetString("Enter filename", myname, 31) ret = IpWsLoad(RTrim$(mypath) + RTrim$(myname), "TIF") End Sub

Image-Pro Plus
Page 1-32
Auto-Pro functions such as IpStGetString take fixed length strings and fill them with characters ending with a zero (so that C calling programs will work). In IPP 3.0, RTrim used to remove trailing spaces AND zeros. The new version removes spaces only, leaving a zero at the end which causes the concatenation to fail. Now you can use IpTrim instead of RTrim$:
ret = IpWsLoad(IpTrim(mypath) + IpTrim(myname), "TIF")
IpTrim is defined in IPUTILS.BAS as:
Function IpTrim(ByVal mystring As String) As String iptrim = RTrim$(Replace(mystring, Chr$(0), " ")) End Function
Str$ This is another concatenation issue. Str$ returns the string representation of a value (e.g. Str$(123) returns "123"). In VB and in IPP 4.0, positive values result in strings starting with a space character (where the minus sign would be if it were a negative value). In IPP 3.0, the space was removed. This example demonstrates the problem:
' This worked in IPP 3.0 but not in IPP 4.0 or VB Sub BuildFileName2() dim mysuffix as integer ret = IpStGetInt("Enter a number", mysuffix, 0, 0, 999) ret = IpWsLoad("images\file" + Str$(mysuffix) + ".tif", "TIF") End Sub In IPP 5.0 or VB you can use instead Format$() or LTrim$(Str$(...)). Format$, which was not available in IPP 3.0, offers a wide array of date and number formatting capabilities.
ret = IpWsLoad("images\file" + Format(mysuffix) + ".tif", "TIF")
Compatibility Issues
Page 1-33
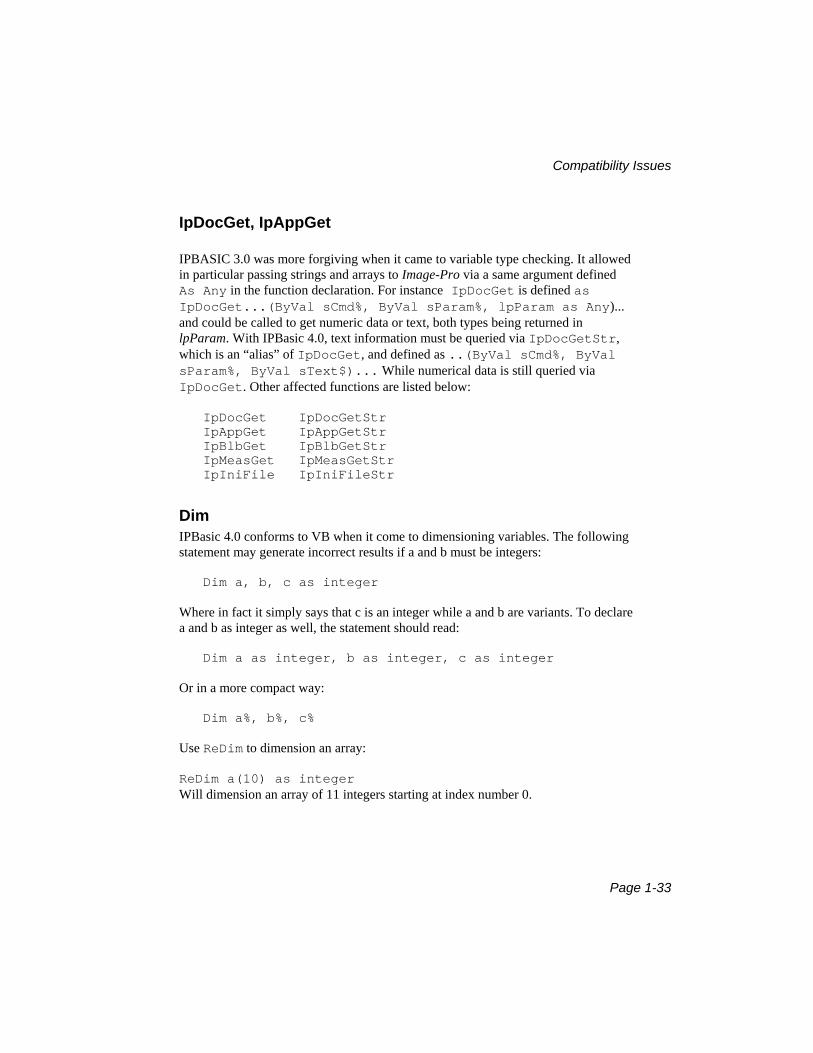
IpDocGet, IpAppGet
IPBASIC 3.0 was more forgiving when it came to variable type checking. It allowed in particular passing strings and arrays to Image-Pro via a same argument defined As Any in the function declaration. For instance IpDocGet is defined as IpDocGet...(ByVal sCmd%, ByVal sParam%, lpParam as Any)... and could be called to get numeric data or text, both types being returned in lpParam. With IPBasic 4.0, text information must be queried via IpDocGetStr, which is an “alias” of IpDocGet, and defined as ..(ByVal sCmd%, ByVal sParam%, ByVal sText$)... While numerical data is still queried via IpDocGet. Other affected functions are listed below:
IpDocGet IpDocGetStr IpAppGet IpAppGetStr IpBlbGet IpBlbGetStr IpMeasGet IpMeasGetStr IpIniFile IpIniFileStr
Dim IPBasic 4.0 conforms to VB when it come to dimensioning variables. The following statement may generate incorrect results if a and b must be integers:
Dim a, b, c as integer
Where in fact it simply says that c is an integer while a and b are variants. To declare a and b as integer as well, the statement should read:
Dim a as integer, b as integer, c as integer
Or in a more compact way:
Dim a%, b%, c%
Use ReDim to dimension an array:
ReDim a(10) as integer Will dimension an array of 11 integers starting at index number 0.

Image-Pro Plus
Page 1-34
Note that:
Dim a$ as string
is redundant, and will generate an error message. Correct declarations are:
Dim a$ or
Dim a as string
Option Explicit This line is added automatically at the beginning of every script file. It tells IPBasic to display an error message when undeclared variables are encountered. Without Option explicit, IPBasic and Visual Basic will assign a type automatically to such variables. That type will depend on the context under which they are encountered. This may however hide mistyped variable names, which can in turn cause the macro not to behave correctly. Therefore it is much safer to force variable declaration.
Image Updates Versions 3.0 and 4.0/4.5 of IPBasic differ in the way they refresh image display during the execution of a macro. In version 3.0, image display was refreshed when the macro stopped for a message, or when it ended. In version 4.0/4.5, image display is refreshed after any instruction that changes the image contents. In this respect, macros run from IPBasic 4.04.5 behave in the way that those run from Visual Basic. Albeit marginal, some speed improvements can be gained by not refreshing image display too often, new instructions were added to prevent image display during macro execution. These instructions can be inserted at any time during macro recording (See Macro:Insert in the Image-Pro Plus Reference Guide. Also see IpAppUpdate(DOCSEL_NONE) and IpAppUpdate(DOCSEL_ALL) later in this manual).

Using Auto-Pro with Visual Basic
Page 1-35
Using Auto-Pro with Visual Basic You can also include Auto-Pro functions in a Visual Basic™ program. Visual Basic is a complete software development environment from Microsoft™ that lets you create Windows™ applications quickly and easily. The ability to include Auto-Pro commands in a Visual Basic program allows you to create customized versions of Image-Pro — you can create a tailored user-interface, provide support for a unique external device, or add custom operations, for example. You might also decide to use Visual Basic if your macro application requires custom dialog boxes, or requires a function that is not provided by Image-Pro's IPBasic statements.
Calling an Auto-Pro function from your Visual Basic program involves the following basic steps:
1. If you will be making API calls to an online database, serial port connection, or similar feature, you must include the WIN32API.TXT file, which is supplied with Visual Basic. This file is usually found in the VB subdirectory called WINAPI.
If you include the file WIN32API.TXT, it will need to be modified because it is too large to include in a VB executable program. Only the declarations necessary to perform the specific API calls need to be added (copy and pasted from WIN32API.TXT) and the new module will need to be renamed (not WIN32API.TXT).
2. The IPC32.BAS file must be included in your project. This file is located in the BAS subdirectory of the folder where Image-Pro Plus is installed. This file must be copied to your hard drive and added to the file list in your program's project window (use the Add File command on the Visual Basic Project menu).
3. The IPUTIL32.BAS file in the BAS subdirectory must be included in your project for backward compatiblity. It allows you to run some fuctions from earlier versions of Auto-Pro.
4. An Auto-Pro function must be invoked as a function in your program, just like an Auto-Pro script file. As such, it must be formatted as the source element (right half) of an assignment statement. The destination element (left half) of this statement must be a variable to which the Auto-Pro command can write its return value. The following statement would cause your Visual Basic program to perform an exponential histogram equalization on the active image:
ret = IpHstEqualize(EQ_EXPONENTIAL)
Image-Pro Plus
Page 1-36
The variable name ret has been used above, and is the name used when a macro is recorded in Image-Pro. However, the name of this variable is really up to you, as long as it is a type that will accommodate an integer value (for concise code you might want to assign it a name that includes the “%” integer-type declaration character rather than defining it as a Variant data type, or explicitly declare it as an Integer).
Note - most Auto-Pro functions return a zero when the function executes successfully. However, some functions returning other meaningful values such as Document or Button IDs. You will need to consult the “AutoPro Function Reference” for the specific values returned by each function (if there is no return value listed for a function, it is one that returns a 0 upon success).
You may type the Auto-Pro functions into your program yourself, or you may cut-and-paste the commands directly from a macro that you have already recorded (you can use the Copy to Clipboard button in the Macro command to accomplish this). As discussed earlier in this manual, recording, rather than typing, is the recommended way to generate a stream of Auto-Pro functions to insure they are typed without error and are properly sequenced.
The following example illustrates a Visual Basic procedure that includes several Auto-Pro functions (bolded). This procedure 1) loads an image file, 2) performs a histogram equalization, 3) applies the results to the image bitmap, then 4) sharpens and 5) enlarges the image.
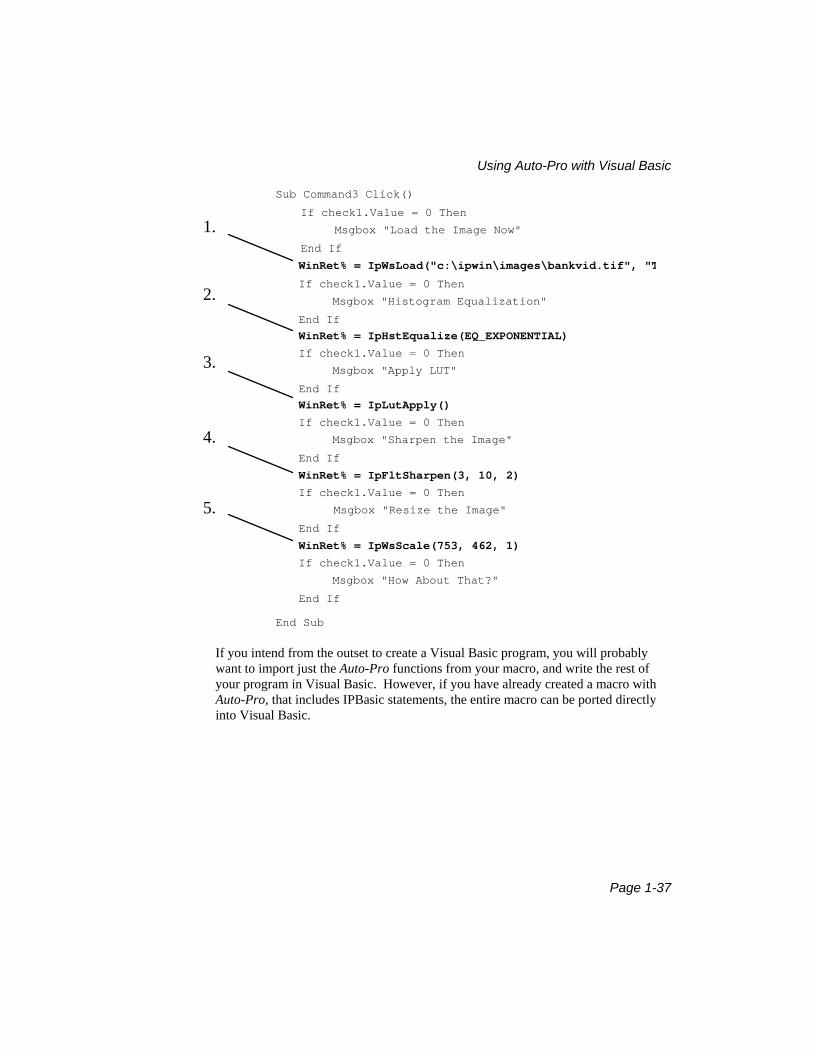
Using Auto-Pro with Visual Basic
Page 1-37
Sub Command3 Click()
If check1.Value = 0 Then
Msgbox "Load the Image Now"
End If
If check1.Value = 0 Then
Msgbox "Histogram Equalization"
End If
If check1.Value = 0 Then
Msgbox "Apply LUT"
End If
If check1.Value = 0 Then
Msgbox "Sharpen the Image"
End If
If check1.Value = 0 Then
Msgbox "Resize the Image"
End If
If check1.Value = 0 Then
Msgbox "How About That?"
End If
WinRet% = IpWsLoad("c:\ipwin\images\bankvid.tif", "T
WinRet% = IpHstEqualize(EQ_EXPONENTIAL)
WinRet% = IpLutApply()
WinRet% = IpFltSharpen(3, 10, 2)
WinRet% = IpWsScale(753, 462, 1)
End Sub
1.
2.
3.
4.
5.
If you intend from the outset to create a Visual Basic program, you will probably want to import just the Auto-Pro functions from your macro, and write the rest of your program in Visual Basic. However, if you have already created a macro with Auto-Pro, that includes IPBasic statements, the entire macro can be ported directly into Visual Basic.
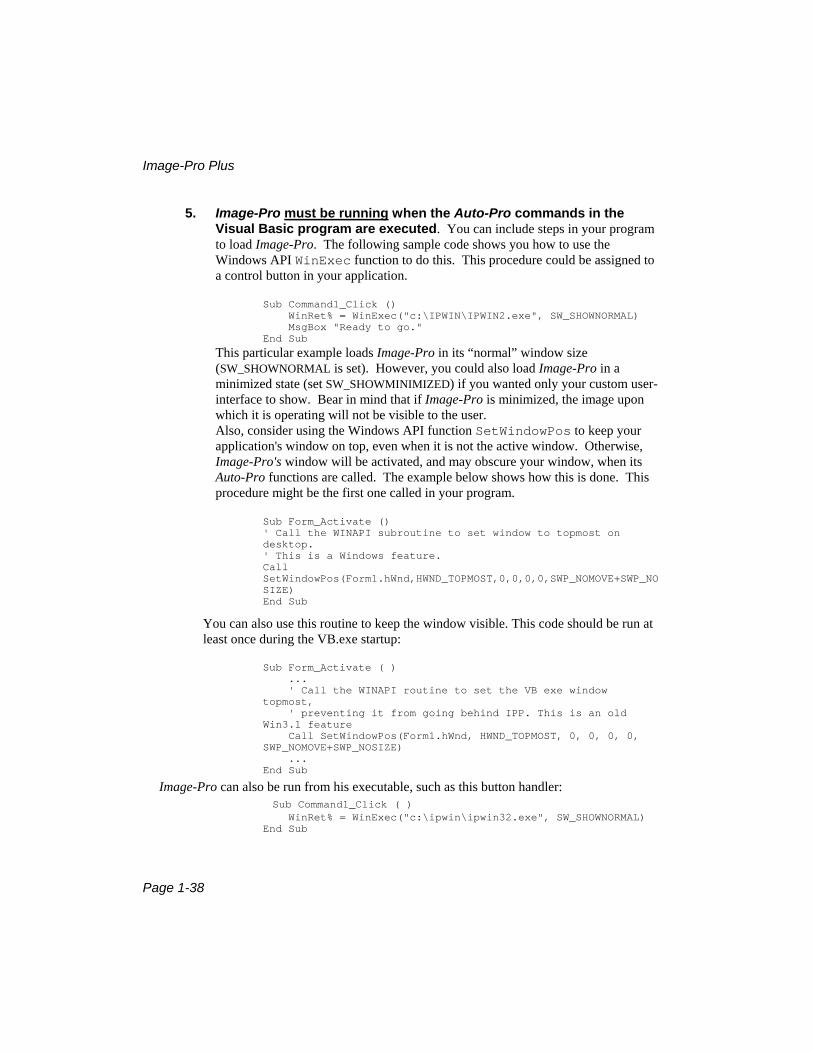
Image-Pro Plus
Page 1-38
5. Image-Pro must be running when the Auto-Pro commands in the Visual Basic program are executed. You can include steps in your program to load Image-Pro. The following sample code shows you how to use the Windows API WinExec function to do this. This procedure could be assigned to a control button in your application.
Sub Command1_Click () WinRet% = WinExec("c:\IPWIN\IPWIN2.exe", SW_SHOWNORMAL) MsgBox "Ready to go." End Sub
This particular example loads Image-Pro in its “normal” window size (SW_SHOWNORMAL is set). However, you could also load Image-Pro in a minimized state (set SW_SHOWMINIMIZED) if you wanted only your custom user-interface to show. Bear in mind that if Image-Pro is minimized, the image upon which it is operating will not be visible to the user. Also, consider using the Windows API function SetWindowPos to keep your application's window on top, even when it is not the active window. Otherwise, Image-Pro's window will be activated, and may obscure your window, when its Auto-Pro functions are called. The example below shows how this is done. This procedure might be the first one called in your program.
Sub Form_Activate () ' Call the WINAPI subroutine to set window to topmost on desktop. ' This is a Windows feature. Call SetWindowPos(Form1.hWnd,HWND_TOPMOST,0,0,0,0,SWP_NOMOVE+SWP_NOSIZE) End Sub
You can also use this routine to keep the window visible. This code should be run at least once during the VB.exe startup:
Sub Form_Activate ( ) ... ' Call the WINAPI routine to set the VB exe window topmost, ' preventing it from going behind IPP. This is an old Win3.1 feature Call SetWindowPos(Form1.hWnd, HWND_TOPMOST, 0, 0, 0, 0, SWP_NOMOVE+SWP_NOSIZE) ... End Sub
Image-Pro can also be run from his executable, such as this button handler: Sub Command1_Click ( ) WinRet% = WinExec("c:\ipwin\ipwin32.exe", SW_SHOWNORMAL) End Sub

Function Syntax
Page 2-1
Section 2 - Auto-Pro Function Reference
Function Syntax The diagram below describes the notation used in this reference.
IpCalSetOptDens
Syntax IpICalSetOptDens(BlackLevel, IncidentLevel)
Description This function establishes the Black level and Incident level to be applied to the optical density curve. Equivalent to completing the Optical Density Calibration dialog box.
Parameters BlackLevel Single A number (of IPBasic type, Single) specifying the value representing the pixel intensity of totally opaque material.
IncidentLevel Single A number (of IPBasic type, Single) specifying the value representing the pixel intensity of totally transparent material.
Example ret = IpICalSetOptDens(23.0, 179.5) This statement will set the Black level to 23.0 and the Incident level to 179.5.
Comments Call IpICalShowFormat to set the calibration curve to OD.
See Also IpICalShowFormat
This line identifies the function name. Functions are listed in alphabetic order by this
name.
This line contains the function syntax consisting of the following two components:
COMPONENT EXAMPLE EXPLANATION
FunctionName IpICalSetOptDens The name of the function as it must appear in the statement.
Parameters BlackLevel Data that must be given to the function.

(IpCalSetOptDens
Page 2-2
This block describes the function's use. This block will also document the equivalent Image-Pro command. This lets you know the action that is required to record the described function. This also informs you of the command/dialog box to which you can refer in your Image-Pro Reference Manual for additional information about it.
Note - Auto-Pro functions for which there are no Image-Pro equivalent actions, will be so noted.
This block explains the parameters, as follows:
COMPONENT EXAMPLE DESCRIPTION
Parameter Name BlackLevel This is the parameter name, as given in the function syntax.
Parameter Type Integer This block documents the data type of the parameter. as it is defined in IPBasic.
Description The value used to represent the transmission of no light.
This block describes the parameter's purpose and its possible values.
This block provides an example of the function as it would be written in an Auto-Pro macro.
This block provides additional information about the function.
This block suggests other functions that are relevant to the one described.
Note - many Auto-Pro functions take an “enumerated integer” as a parameter value. An enumerated integer is an integer that is represented by a symbolic name. For example, the measurement names, BLBM_AREA, BLBM_ASPECT, and BLBM_BOX_AREA, actually represent the integer values, 0, 1 and 2, respectively. You generally do not need to concern yourself with these values except in the rare instance where you want to operate upon it logically or arithmetically..

IpAcqAverage
Page 2-3
IpAcqAverage Syntax IpAcqAverage(Frames, Divider)
Description This function captures and averages (or accumulates) the specified number of frames from the frame-grabber and displays the result in a new image window. Equivalent to the Video Average command.
Parameters Frames Integer An integer specifying the number of consecutive frames to accumulate.
Divider Integer An integer from 1 - 255 specifying the value to be used as the divisor for the accumulated total in each pixel. Specify a value equal to Frames to obtain the mean; specify 1 to obtain the sum.
Return Value This function returns the Document ID of the new image, which will be an integer greater than 0. A negative return value indicates an error.
Example ret = IpAcqAverage(16,16)
This statement will average 16 frames acquired from the frame-grabber.
Comments The capture will be performed using the Acquire options that are currently in effect on the system.
See Also IpAcqSnap, IpAcqTimed
IpAcqControl Syntax IpAcqControl(Cmd, Param, lpParam)
Description This function is used to set various options assocated with particular frame-grabbers. It is equivalent to setting the options button in the Video Capture menu.
Parameters Cmd Integer Specifies the type of option that will be set on the video capture board.
Param Integer A value that specifies data required by the option.
lpParam Integer A value that specifies the data required by the option. The data type of this value will vary depending on the value in the Cmd.
Cmd wParam lpParam
48 (Capture Area) 0 = preview 1 = acquire
Address or pointer to a rectangular structure.
Example Dim captarea as RECT captarea.left = 10 captarea.top = 20 captarea.right = 300 captarea.bottom = 400 ret = IpAcqControl(48, 1, captarea)
49 (Exposure Time) 0 = preview 1 = acquire
Address or pointer to a long containing the exposure time in milliseconds.
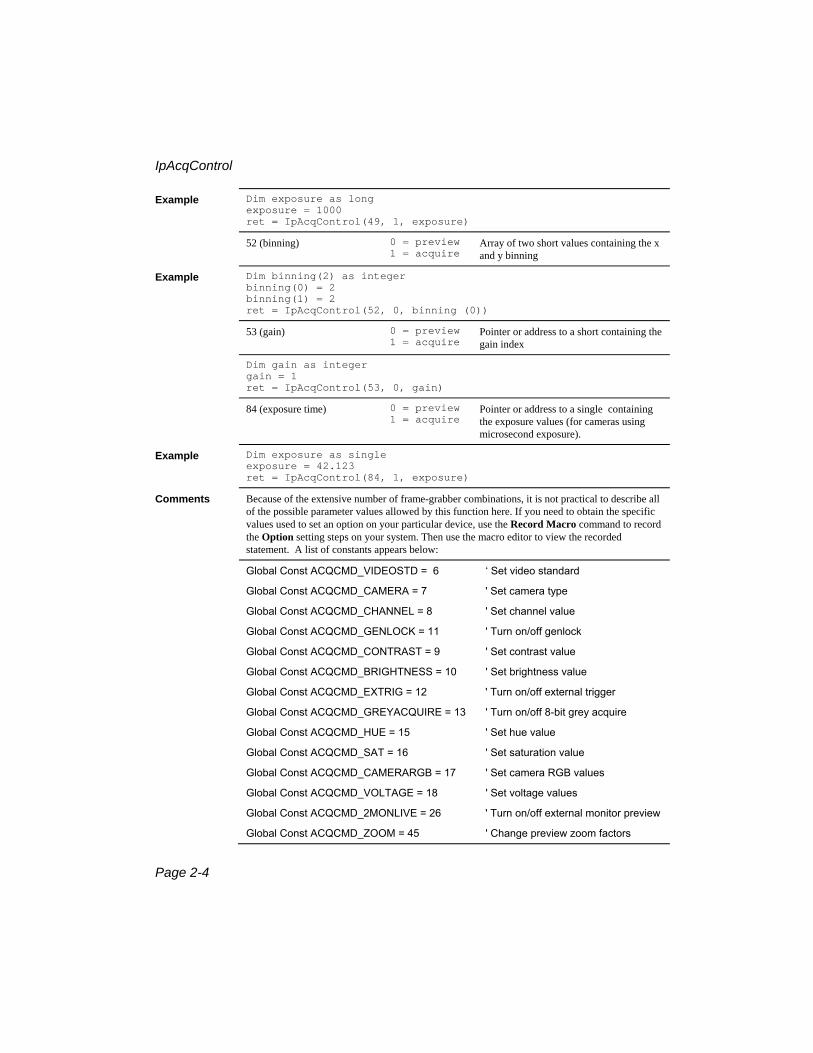
IpAcqControl
Page 2-4
Example Dim exposure as long exposure = 1000 ret = IpAcqControl(49, 1, exposure)
52 (binning) 0 = preview 1 = acquire
Array of two short values containing the x and y binning
Example Dim binning(2) as integer binning(0) = 2 binning(1) = 2 ret = IpAcqControl(52, 0, binning (0))
53 (gain) 0 = preview 1 = acquire
Pointer or address to a short containing the gain index
Dim gain as integer gain = 1 ret = IpAcqControl(53, 0, gain)
84 (exposure time) 0 = preview 1 = acquire
Pointer or address to a single containing the exposure values (for cameras using microsecond exposure).
Example Dim exposure as single exposure = 42.123 ret = IpAcqControl(84, 1, exposure)
Comments Because of the extensive number of frame-grabber combinations, it is not practical to describe all of the possible parameter values allowed by this function here. If you need to obtain the specific values used to set an option on your particular device, use the Record Macro command to record the Option setting steps on your system. Then use the macro editor to view the recorded statement. A list of constants appears below:
Global Const ACQCMD_VIDEOSTD = 6 ‘ Set video standard
Global Const ACQCMD_CAMERA = 7 ' Set camera type
Global Const ACQCMD_CHANNEL = 8 ' Set channel value
Global Const ACQCMD_GENLOCK = 11 ' Turn on/off genlock
Global Const ACQCMD_CONTRAST = 9 ' Set contrast value
Global Const ACQCMD_BRIGHTNESS = 10 ' Set brightness value
Global Const ACQCMD_EXTRIG = 12 ' Turn on/off external trigger
Global Const ACQCMD_GREYACQUIRE = 13 ' Turn on/off 8-bit grey acquire
Global Const ACQCMD_HUE = 15 ' Set hue value
Global Const ACQCMD_SAT = 16 ' Set saturation value
Global Const ACQCMD_CAMERARGB = 17 ' Set camera RGB values
Global Const ACQCMD_VOLTAGE = 18 ' Set voltage values
Global Const ACQCMD_2MONLIVE = 26 ' Turn on/off external monitor preview
Global Const ACQCMD_ZOOM = 45 ' Change preview zoom factors
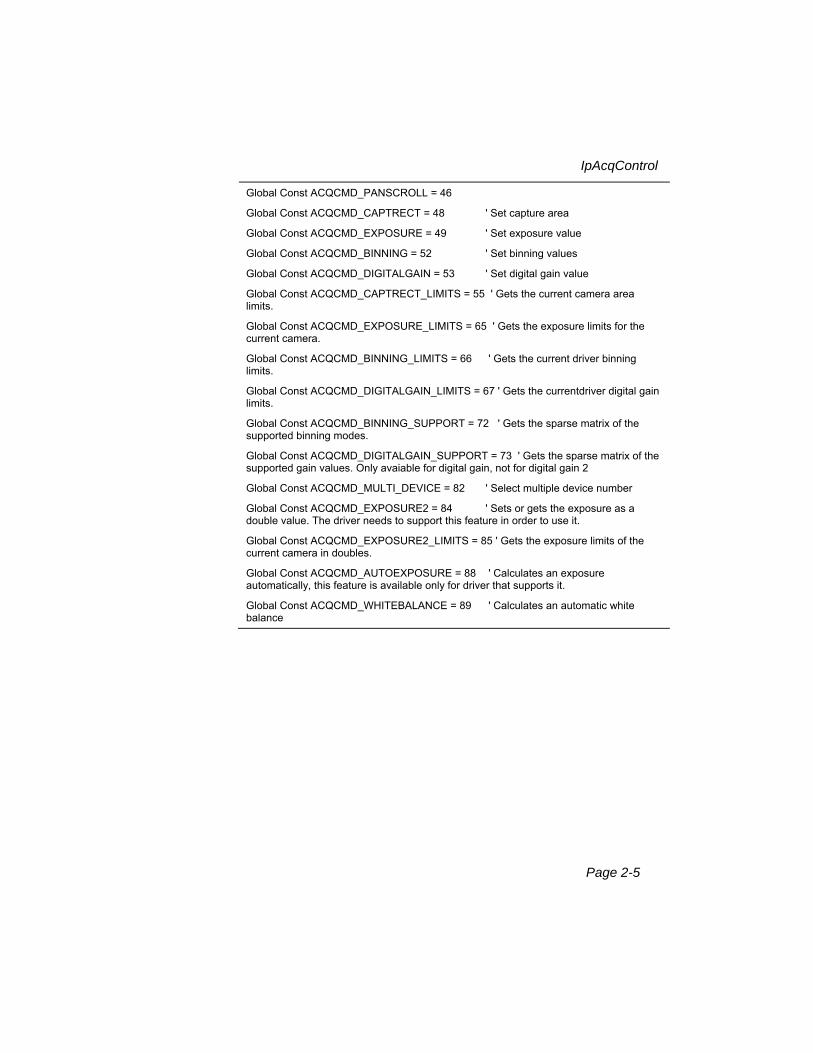
IpAcqControl
Page 2-5
Global Const ACQCMD_PANSCROLL = 46
Global Const ACQCMD_CAPTRECT = 48 ' Set capture area
Global Const ACQCMD_EXPOSURE = 49 ' Set exposure value
Global Const ACQCMD_BINNING = 52 ' Set binning values
Global Const ACQCMD_DIGITALGAIN = 53 ' Set digital gain value
Global Const ACQCMD_CAPTRECT_LIMITS = 55 ' Gets the current camera area limits.
Global Const ACQCMD_EXPOSURE_LIMITS = 65 ' Gets the exposure limits for the current camera.
Global Const ACQCMD_BINNING_LIMITS = 66 ' Gets the current driver binning limits.
Global Const ACQCMD_DIGITALGAIN_LIMITS = 67 ' Gets the currentdriver digital gain limits.
Global Const ACQCMD_BINNING_SUPPORT = 72 ' Gets the sparse matrix of the supported binning modes.
Global Const ACQCMD_DIGITALGAIN_SUPPORT = 73 ' Gets the sparse matrix of the supported gain values. Only avaiable for digital gain, not for digital gain 2
Global Const ACQCMD_MULTI_DEVICE = 82 ' Select multiple device number
Global Const ACQCMD_EXPOSURE2 = 84 ' Sets or gets the exposure as a double value. The driver needs to support this feature in order to use it.
Global Const ACQCMD_EXPOSURE2_LIMITS = 85 ' Gets the exposure limits of the current camera in doubles.
Global Const ACQCMD_AUTOEXPOSURE = 88 ' Calculates an exposure automatically, this feature is available only for driver that supports it.
Global Const ACQCMD_WHITEBALANCE = 89 ' Calculates an automatic white balance

IpAcqControl
Page 2-6
Global Const ACQCMD_RESOLUTION_ACQ = 91 ' Sets or gets the index for the current acquire resolution (only if the driver supports it).
Global Const ACQCMD_RESOLUTION_PVW = 92 ' Sets or gets the index for the current preview resolution (only if the driver supports it).
Global Const ACQCMD_BITDEPTH = 93 ' Sets the bitdepth for acquire (only if the driver supports it).
Global Const ACQCMD_DIGITALOFFSET = 95 ' Sets or gets the digital offset value.
Global Const ACQCMD_GAMMA = 97 ' Sets or gets the gamma value.
Global Const ACQCMD_GAMMA_LIMITS = 98 ' Gets the gamma limits supported by the current driver.
Global Const ACQCMD_FRAMEOFFSET = 99 ' Sets or gets the frame offset for analog cameras.
Global Const ACQCMD_RESET2DEFAULT = 102 ' Resets to defaults the setting for the current camera (only if the driver supports it).
Global Const ACQCMD_DFS = 103 ' Sets or gets the status of the Dark frame subtraction (only if the driver supports it).
Global Const ACQCMD_BGC = 104 ' Sets or gets the status of the Background image (only if the driver supports it).
Global Const ACQCMD_HISTOGRAM = 105 ' Starts and positions the histogram window (only if the driver supports it)..
Global Const ACQCMD_DIGITALGAIN_2 = 106 ' Sets or gets the digital gain as a double value.
Global Const ACQCMD_DIGITALGAIN_LIMITS_2 = 107 ' Gets the current limits of the digital gain as a double.
Global Const ACQCMD_DYNAMIC_AE = 108 ' Starts/stops the dynamic auto exposure.
Global Const ACQCMD_DYNAMIC_AC = 111 ' Starts/stops the dynamic auto contrast.
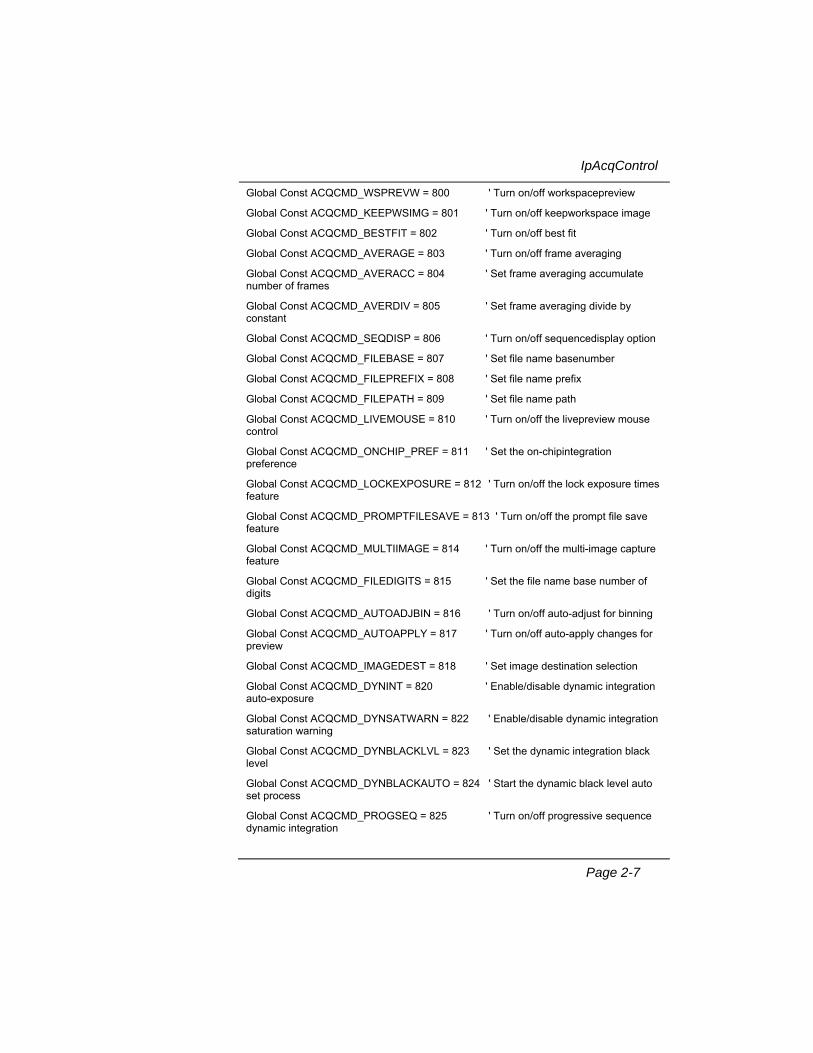
IpAcqControl
Page 2-7
Global Const ACQCMD_WSPREVW = 800 ' Turn on/off workspacepreview
Global Const ACQCMD_KEEPWSIMG = 801 ' Turn on/off keepworkspace image
Global Const ACQCMD_BESTFIT = 802 ' Turn on/off best fit
Global Const ACQCMD_AVERAGE = 803 ' Turn on/off frame averaging
Global Const ACQCMD_AVERACC = 804 ' Set frame averaging accumulate number of frames
Global Const ACQCMD_AVERDIV = 805 ' Set frame averaging divide by constant
Global Const ACQCMD_SEQDISP = 806 ' Turn on/off sequencedisplay option
Global Const ACQCMD_FILEBASE = 807 ' Set file name basenumber
Global Const ACQCMD_FILEPREFIX = 808 ' Set file name prefix
Global Const ACQCMD_FILEPATH = 809 ' Set file name path
Global Const ACQCMD_LIVEMOUSE = 810 ' Turn on/off the livepreview mouse control
Global Const ACQCMD_ONCHIP_PREF = 811 ' Set the on-chipintegration preference
Global Const ACQCMD_LOCKEXPOSURE = 812 ' Turn on/off the lock exposure times feature
Global Const ACQCMD_PROMPTFILESAVE = 813 ' Turn on/off the prompt file save feature
Global Const ACQCMD_MULTIIMAGE = 814 ' Turn on/off the multi-image capture feature
Global Const ACQCMD_FILEDIGITS = 815 ' Set the file name base number of digits
Global Const ACQCMD_AUTOADJBIN = 816 ' Turn on/off auto-adjust for binning
Global Const ACQCMD_AUTOAPPLY = 817 ' Turn on/off auto-apply changes for preview
Global Const ACQCMD_IMAGEDEST = 818 ' Set image destination selection
Global Const ACQCMD_DYNINT = 820 ' Enable/disable dynamic integration auto-exposure
Global Const ACQCMD_DYNSATWARN = 822 ' Enable/disable dynamic integration saturation warning
Global Const ACQCMD_DYNBLACKLVL = 823 ' Set the dynamic integration black level
Global Const ACQCMD_DYNBLACKAUTO = 824 ' Start the dynamic black level auto set process
Global Const ACQCMD_PROGSEQ = 825 ' Turn on/off progressive sequence dynamic integration

IpAcqControl
Page 2-8
Global Const ACQCMD_DYNSEQ = 826 ' Turn on/off dynamic integration to
sequence
Global Const ACQCMD_PRGSEQINT = 827 ' Set progressive
sequence interval mode
Global Const ACQCMD_PRGSEQREGNUM = 828 ' Set progressive sequence regular interval number of images
Global Const ACQCMD_PRGSEQREGTME = 829 ' Set progressive sequence regular interval total time
Global Const ACQCMD_DYNSEQNUM = 830 ' Set dynamic sequence number of images
Global Const ACQCMD_DYNSEQTIME = 831 ' Set dynamic sequence total time
Global Const ACQCMD_ONCHIPINT = 832 ' Turn on/off on-chip integration
Global Const ACQCMD_STOPDYNINT = 833 ' Stop performing dynamic integration
Global Const ACQCMD_PRGSEQIRGSEL = 834 ' Set progressive sequence irregular interval selection
Global Const ACQCMD_LOCKDIGTALOFFSET = 835 ' Locks digital offset
Global Const ACQCMD_LOCKGAIN = 836 ' Locks gain values
Global Const ACQCMD_LOCKGAMMA = 837 ' Locks gamma values
Global Const ACQCMD_LOCKAOI = 838 ' Locks AOI settings
Global Const ACQCMD_WBRESET = 839 ' Resets the white balance
Global Const ACQCMD_WB_SET = 840 ' Sets the whitebalance per channel. wParam indicates the channel and lParam a pointer to a double to set it.
Global Const ACQCMD_CC_BUTTON = 841 ' Custom control button
Global Const ACQCMD_CC_SLIDER = 842 ' Custom control slider
Global Const ACQCMD_CC_CHECKBOX = 843 ' Custom control check box
Global Const ACQCMD_CC_COMBO = 844 ' Custom control combo box.
Global Const ACQCMD_AUTOSET = 846 ' Resets to defaults, calculates an auto exposure and auto white balance (if available).

IpAcqDynIntSnap
Page 2-9
Global Const ACQCMD_GETVALUE = 32768 When added to an IpAcqControl command will change those IpAcqControl commands from _setting_ a value to _getting_ a value, placing it into the lpParam argument of the call. This can be used to ask capture what the current exposure time is, what the binning values are set to, whether or not workspace preview is set, and any number of other queries about how capture is set to perform. This is used in any of the values where our current documentation says that the command 'sets or gets' some value.
IpAcqDynIntSnap Syntax IpAcqDynIntSnap (bTotTimeExp, NumImages, TotalTime)
Description This function captures a dynamic integration sequence of images using the specified dynamic integration options.
Parameters bTotTimeExp Integer An integer value of 0 or 1 specifying whether to perform a total time exposure dynamic integration capture.
0 - perform normal dynamic integration 1 - perform total time exposure dynamic integration
NumImages Long A long integer specifying the number of images to be captured in a total time exposure dynamic integration capture. This parameter is not used for normal dynamic integration captures and should be set to -1.
TotalTime Long An integer specifying the total exposure time, in milliseconds that will be used to calculate the interval exposure time for total time exposure dynamic integration captures. This parameter is not used for normal dynamic integration captures and should be set to -1.
Example ret = IpAcqDynIntSnap(0, -1, -1)
This statement will acquire a normal dynamic integration.
ret = IpAcqDynIntSnap(1, 100, 30000) This statement will acquire a total time exposure dynamic integration of 100 frames and 30 seconds of total exposure time.
Comments Note that any of the parameters in this function may be set to -1 to be ignored and use the current setting of that parameter.
Return Value Document ID of the last image created.
See Also IpAcqSnap, IpAcqAverage, IpAcqSeqIntSnap, IpAcqMultiSnap, IpAcqTimed

IpAcqMultiSnap
Page 2-10
IpAcqMultiSnap Syntax IpAcqMultiSnap(Startframe, Numframe, destVri )
Description This function captures multiple image from the frame-grabber.
Parameters destVri Integer An enumerated integer specifying the window into which the image will be captured. Must be one of the following:
ACQ_CURRENT ACQ _NEW ACQ _SEQUENCE
ACQ _FILE ACQ _SEQUENCE_APPEND where, ACQ_NEW saves the captured image to a new image window, and ACQ_CURRENT saves it to the active image window. ACQ_SEQUENCE saves it to a sequencer file. ACQ_SEQUENCE_APPEND appends captured images as frames to the active image window.
Startframe Integer The number of the first frame in the range to be captured.
Numframe Integer The total number of frames to be captured
Example To capture 4 new images: IpAcqMultiSnap (0, 4, ACQ_NEW) To capture a 5-frame sequence: IpAcqMultiSnap (0,5,ACQ_SEQUENCE)
Comments The capture will be performed using the Acquire options currently in effect on the system. Note that in previous versions of this program, the last parameter, destVri, was used to indicate whether to capture the frames to the frame grabber's memory, or to store them in this program as new images. Therefore, acquiring a series of frames was a two-step process, and was only possible if your hardware supported multiple frames in memory. In the current version of this program, IpAcquMultiSnap will automatically use the frame grabber's multiple frame support if possible, or will simulate this capability if necessary. For this reason, the start frame parameter should be set to zero, and the old true/false parameter (toVri) has been replaced by destVri.
Return Value Document ID of the last image created.
See Also IpAcqSnap
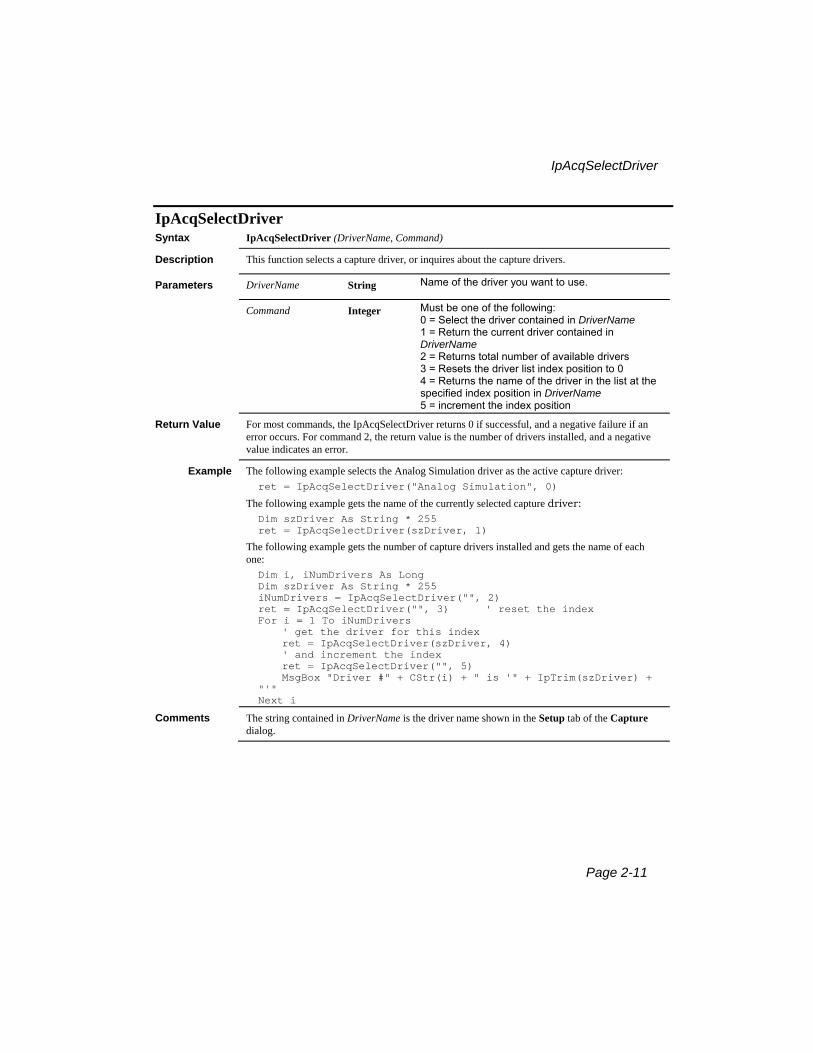
IpAcqSelectDriver
Page 2-11
IpAcqSelectDriver Syntax IpAcqSelectDriver (DriverName, Command)
Description This function selects a capture driver, or inquires about the capture drivers.
Parameters DriverName String Name of the driver you want to use.
Command Integer Must be one of the following: 0 = Select the driver contained in DriverName 1 = Return the current driver contained in DriverName 2 = Returns total number of available drivers 3 = Resets the driver list index position to 0 4 = Returns the name of the driver in the list at the specified index position in DriverName 5 = increment the index position
Return Value For most commands, the IpAcqSelectDriver returns 0 if successful, and a negative failure if an error occurs. For command 2, the return value is the number of drivers installed, and a negative value indicates an error.
Example The following example selects the Analog Simulation driver as the active capture driver: ret = IpAcqSelectDriver("Analog Simulation", 0)
The following example gets the name of the currently selected capture driver: Dim szDriver As String * 255 ret = IpAcqSelectDriver(szDriver, 1)
The following example gets the number of capture drivers installed and gets the name of each one: Dim i, iNumDrivers As Long Dim szDriver As String * 255 iNumDrivers = IpAcqSelectDriver("", 2) ret = IpAcqSelectDriver("", 3) ' reset the index For i = 1 To iNumDrivers ' get the driver for this index ret = IpAcqSelectDriver(szDriver, 4) ' and increment the index ret = IpAcqSelectDriver("", 5) MsgBox "Driver #" + CStr(i) + " is '" + IpTrim(szDriver) + "'" Next i
Comments The string contained in DriverName is the driver name shown in the Setup tab of the Capture dialog.

IpAcqSettings
Page 2-12
IpAcqSettings Syntax IpAcqSettings (File, bSave)
Description This function loads or saves a settings file.
Parameters File String String containing the full path to the settings file that you want to load or save.
bSave Integer 0 = Read settings to the settings file specified in File 1 = Save settings from the settings file specified in File. 2 = Return current settings file pathname.
Example IpAcqSettings("newvpf", 0)
Comments This function can be used to save and reload complicated capture settings. These settings are recorded when you use the Load, Save, or Default buttons on the Setup page.
IpAcqShow Syntax IpAcqShow(Dialog, bShow)
Description This function displays or hides the video acquisition dialogs, and selects the active page.
Parameters Dialog Integer An enumerated integer that specifies the dialog to be displayed or hidden. Must be one of the following:
ACQ_AVG ACQ_ISLIVE ACQ_ISSHOWN ACQ_LIVE ACQ_MULTI ACQ_SETTINGS ACQ_SETUP ACQ_SNAP ACQ_TIMED ACQ_ISINITIALIZED
ACQ_MACROS See definitions under Comments, below
bShow Integer A value of 0, 1, or 3 specifying whether the dialog is to be displayed or suppressed. Where:
0 - hides the dialog 1 - shows the dialog 2 - not used 3 - show the basic dialog (ACQ_SNAP only)
Return Value For ACQ_ISLIVE and ACQ_ISSHOWN, 1 if the dialog is visible, 0 if not shown. For ACQ_ISINITIALIZED, 1 if capture is initialized, 0 if not initialized. For all others, 0 if successful, a negative value indicates an error.
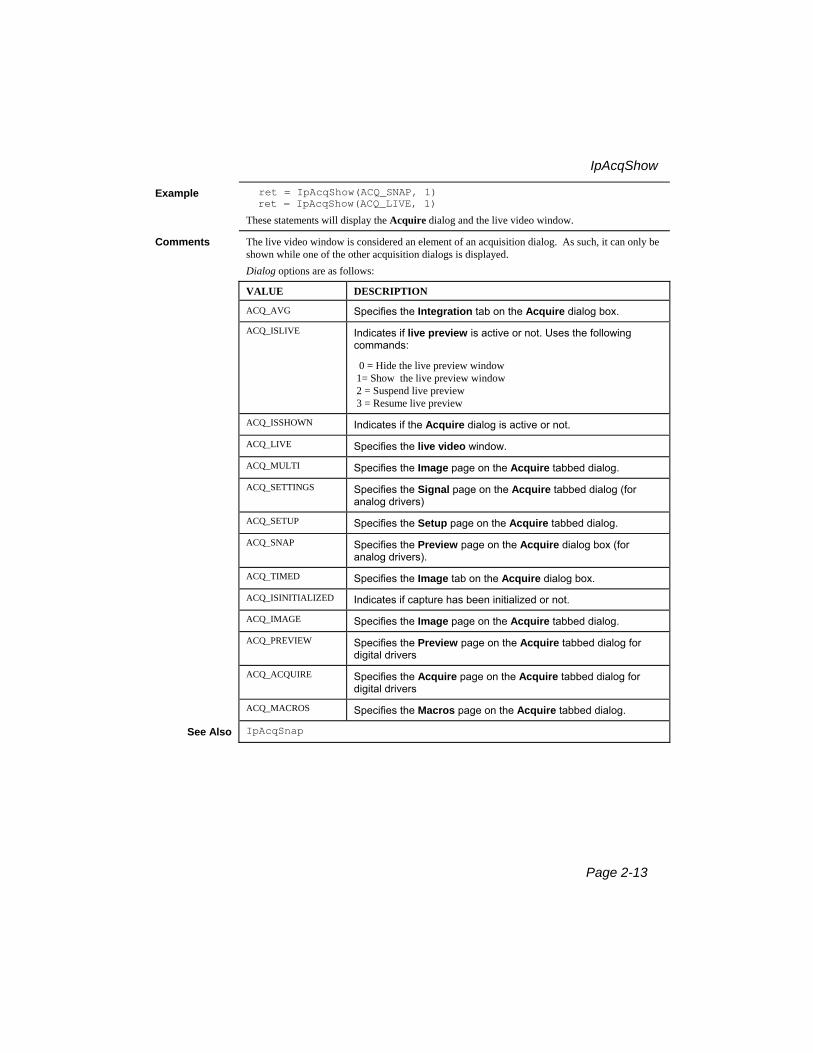
IpAcqShow
Page 2-13
Example ret = IpAcqShow(ACQ_SNAP, 1) ret = IpAcqShow(ACQ_LIVE, 1)
These statements will display the Acquire dialog and the live video window.
Comments The live video window is considered an element of an acquisition dialog. As such, it can only be shown while one of the other acquisition dialogs is displayed. Dialog options are as follows:
VALUE DESCRIPTION
ACQ_AVG Specifies the Integration tab on the Acquire dialog box.
ACQ_ISLIVE Indicates if live preview is active or not. Uses the following commands:
0 = Hide the live preview window 1= Show the live preview window 2 = Suspend live preview 3 = Resume live preview
ACQ_ISSHOWN Indicates if the Acquire dialog is active or not.
ACQ_LIVE Specifies the live video window.
ACQ_MULTI Specifies the Image page on the Acquire tabbed dialog.
ACQ_SETTINGS Specifies the Signal page on the Acquire tabbed dialog (for analog drivers)
ACQ_SETUP Specifies the Setup page on the Acquire tabbed dialog.
ACQ_SNAP Specifies the Preview page on the Acquire dialog box (for analog drivers).
ACQ_TIMED Specifies the Image tab on the Acquire dialog box.
ACQ_ISINITIALIZED Indicates if capture has been initialized or not.
ACQ_IMAGE Specifies the Image page on the Acquire tabbed dialog.
ACQ_PREVIEW Specifies the Preview page on the Acquire tabbed dialog for digital drivers
ACQ_ACQUIRE Specifies the Acquire page on the Acquire tabbed dialog for digital drivers
ACQ_MACROS Specifies the Macros page on the Acquire tabbed dialog.
See Also IpAcqSnap
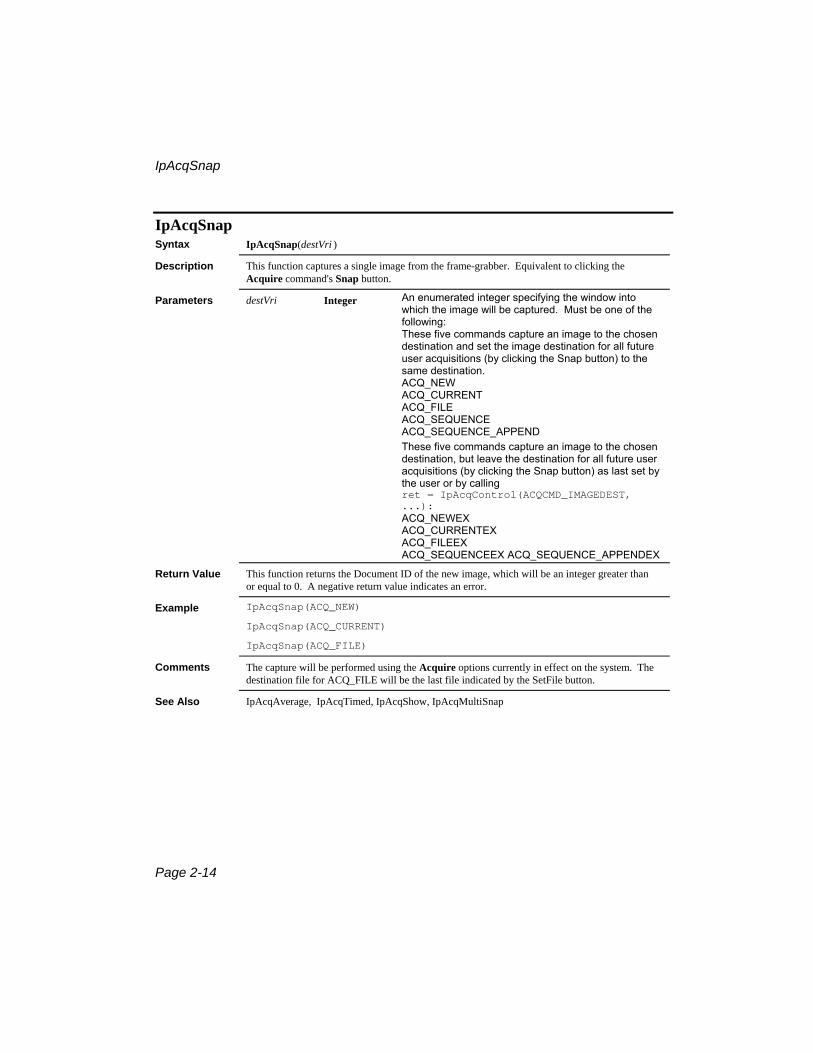
IpAcqSnap
Page 2-14
IpAcqSnap Syntax IpAcqSnap(destVri )
Description This function captures a single image from the frame-grabber. Equivalent to clicking the Acquire command's Snap button.
Parameters destVri Integer An enumerated integer specifying the window into which the image will be captured. Must be one of the following: These five commands capture an image to the chosen destination and set the image destination for all future user acquisitions (by clicking the Snap button) to the same destination. ACQ_NEW ACQ_CURRENT ACQ_FILE ACQ_SEQUENCE ACQ_SEQUENCE_APPEND These five commands capture an image to the chosen destination, but leave the destination for all future user acquisitions (by clicking the Snap button) as last set by the user or by calling ret = IpAcqControl(ACQCMD_IMAGEDEST, ...): ACQ_NEWEX ACQ_CURRENTEX ACQ_FILEEX ACQ_SEQUENCEEX ACQ_SEQUENCE_APPENDEX
Return Value This function returns the Document ID of the new image, which will be an integer greater than or equal to 0. A negative return value indicates an error.
Example IpAcqSnap(ACQ_NEW)
IpAcqSnap(ACQ_CURRENT)
IpAcqSnap(ACQ_FILE)
Comments The capture will be performed using the Acquire options currently in effect on the system. The destination file for ACQ_FILE will be the last file indicated by the SetFile button.
See Also IpAcqAverage, IpAcqTimed, IpAcqShow, IpAcqMultiSnap
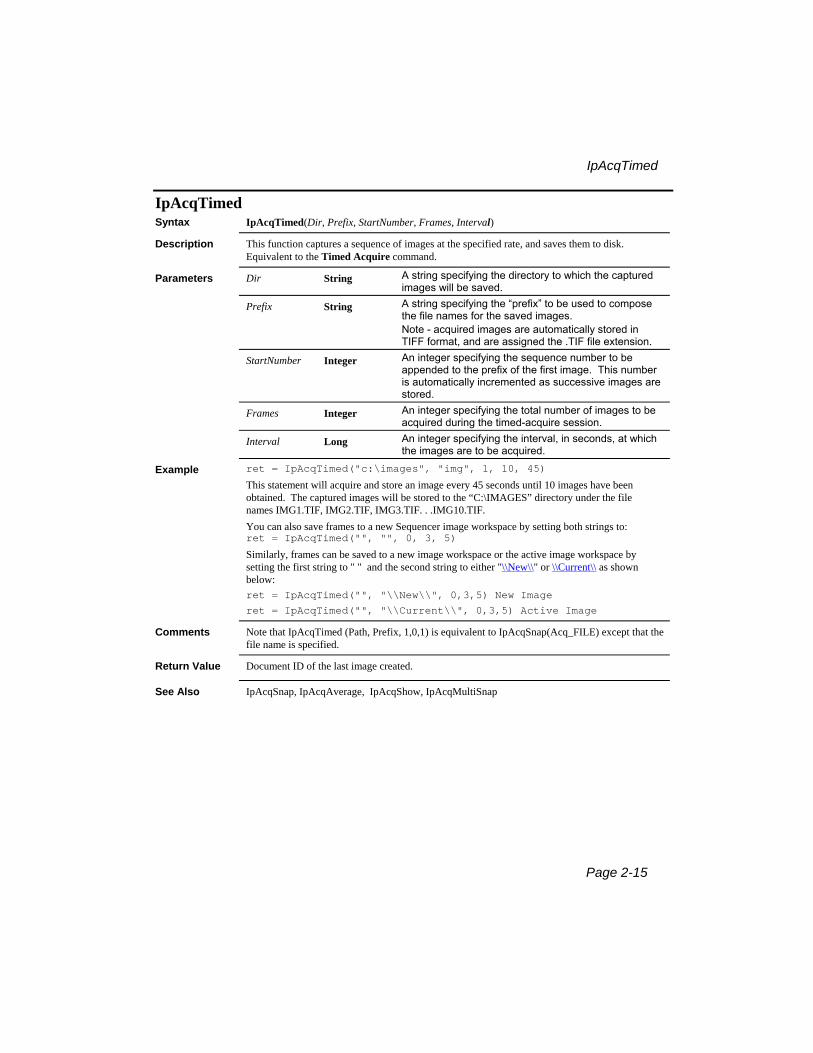
IpAcqTimed
Page 2-15
IpAcqTimed Syntax IpAcqTimed(Dir, Prefix, StartNumber, Frames, Interval)
Description This function captures a sequence of images at the specified rate, and saves them to disk. Equivalent to the Timed Acquire command.
Parameters Dir String A string specifying the directory to which the captured images will be saved.
Prefix String A string specifying the “prefix” to be used to compose the file names for the saved images. Note - acquired images are automatically stored in TIFF format, and are assigned the .TIF file extension.
StartNumber Integer An integer specifying the sequence number to be appended to the prefix of the first image. This number is automatically incremented as successive images are stored.
Frames Integer An integer specifying the total number of images to be acquired during the timed-acquire session.
Interval Long An integer specifying the interval, in seconds, at which the images are to be acquired.
Example ret = IpAcqTimed("c:\images", "img", 1, 10, 45)
This statement will acquire and store an image every 45 seconds until 10 images have been obtained. The captured images will be stored to the “C:\IMAGES” directory under the file names IMG1.TIF, IMG2.TIF, IMG3.TIF. . .IMG10.TIF. You can also save frames to a new Sequencer image workspace by setting both strings to: ret = IpAcqTimed("", "", 0, 3, 5)
Similarly, frames can be saved to a new image workspace or the active image workspace by setting the first string to " " and the second string to either "\\New\\" or \\Current\\ as shown below: ret = IpAcqTimed("", "\\New\\", 0,3,5) New Image
ret = IpAcqTimed("", "\\Current\\", 0,3,5) Active Image
Comments Note that IpAcqTimed (Path, Prefix, 1,0,1) is equivalent to IpAcqSnap(Acq_FILE) except that the file name is specified.
Return Value Document ID of the last image created.
See Also IpAcqSnap, IpAcqAverage, IpAcqShow, IpAcqMultiSnap

IpAcqTimedEx
Page 2-16
IpAcqTimedEx Syntax IpAcqTimedEx(Dir, Prefix, StartNumber, Frames, Interval)
Description This function captures a sequence of images at the specified rate, and saves them to disk. Equivalent to the Timed Acquire command.
Parameters Dir String A string specifying the directory to which the captured images will be saved.
Prefix String A string specifying the “prefix” to be used to compose the file names for the saved images. Note - acquired images are automatically stored in TIFF format, and are assigned the .TIF file extension.
StartNumber Integer An integer specifying the sequence number to be appended to the prefix of the first image. This number is automatically incremented as successive images are stored.
Frames Integer An integer specifying the total number of images to be acquired during the timed-acquire session.
Interval Long An integer specifying the interval, in milliseconds, at which the images are to be acquired.
Example ret = IpAcqTimedEx("c:\images", "img", 1, 10, 200)
This statement will acquire and store an image every 200 milliseconds until 10 images have been obtained. The captured images will be stored to the “C:\IMAGES” directory under the file names IMG1.TIF, IMG2.TIF, IMG3.TIF. . .IMG10.TIF. You can also save frames to a new Sequencer image workspace by setting both strings to: ret = IpAcqTimedEx("", "", 0, 3, 50)
Similarly, frames can be saved to a new image workspace or the active image workspace by setting the first string to " " and the second string to either "\\New\\" or \\Current\\ as shown below: ret = IpAcqTimedEx("", "\\New\\", 0,3,50) New Image
ret = IpAcqTimedEx("", "\\Current\\", 0,3,50) Active Image
Comments Note that IpAcqTimedEx (Path, Prefix, 1,0,1) is equivalent to IpAcqSnap(Acq_FILE) except that the file name is specified.
Return Value Document ID of the last image created.
See Also IpAcqSnap, IpAcqAverage, IpAcqShow, IpAcqMultiSnap, IpAcqTimed
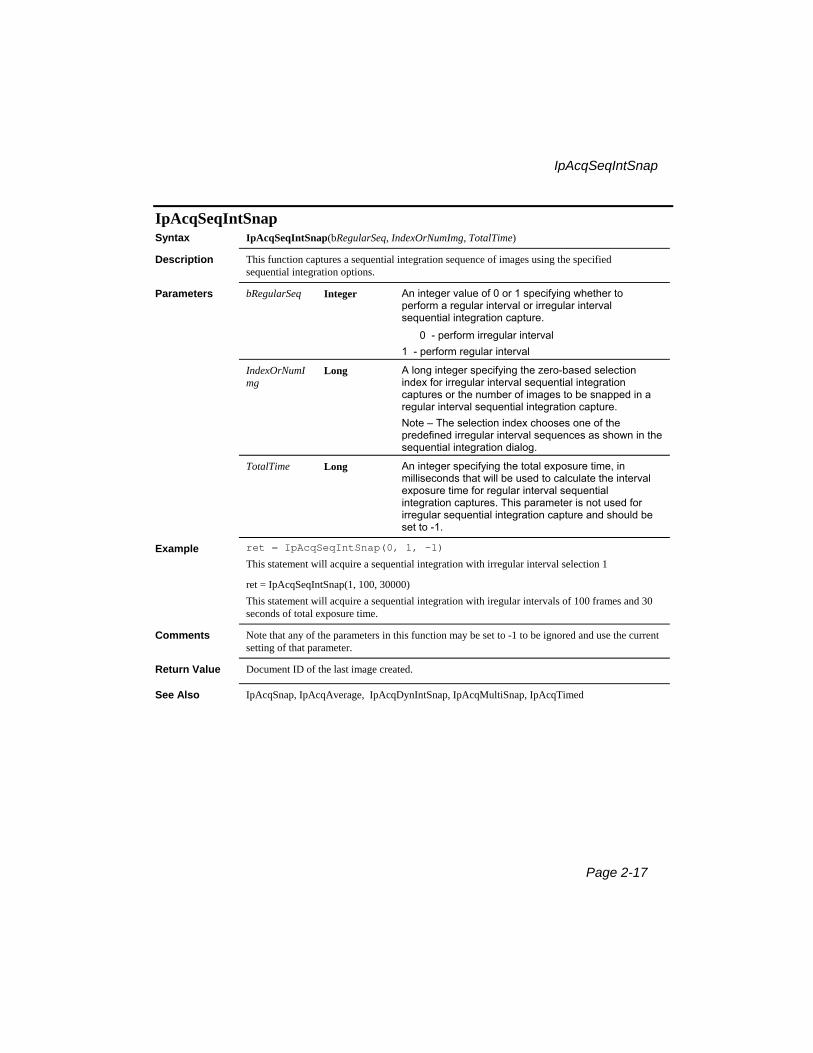
IpAcqSeqIntSnap
Page 2-17
IpAcqSeqIntSnap Syntax IpAcqSeqIntSnap(bRegularSeq, IndexOrNumImg, TotalTime)
Description This function captures a sequential integration sequence of images using the specified sequential integration options.
Parameters bRegularSeq Integer An integer value of 0 or 1 specifying whether to perform a regular interval or irregular interval sequential integration capture.
0 - perform irregular interval 1 - perform regular interval
IndexOrNumImg
Long A long integer specifying the zero-based selection index for irregular interval sequential integration captures or the number of images to be snapped in a regular interval sequential integration capture. Note – The selection index chooses one of the predefined irregular interval sequences as shown in the sequential integration dialog.
TotalTime Long An integer specifying the total exposure time, in milliseconds that will be used to calculate the interval exposure time for regular interval sequential integration captures. This parameter is not used for irregular sequential integration capture and should be set to -1.
Example ret = IpAcqSeqIntSnap(0, 1, -1)
This statement will acquire a sequential integration with irregular interval selection 1
ret = IpAcqSeqIntSnap(1, 100, 30000) This statement will acquire a sequential integration with iregular intervals of 100 frames and 30 seconds of total exposure time.
Comments Note that any of the parameters in this function may be set to -1 to be ignored and use the current setting of that parameter.
Return Value Document ID of the last image created.
See Also IpAcqSnap, IpAcqAverage, IpAcqDynIntSnap, IpAcqMultiSnap, IpAcqTimed

IpAFAAddChan
Page 2-18
IpAFAAddChan Syntax IpAFAAddChan (lpChanName)
Description This function adds a channel using the current name
Parameters lpChan Name String Indicates the set to examine.
Return Value 0 if successful, a negative error code if failed.
Comments Acquisition of multiple channels must be selected, using IpAFASetInst(AFA_MCHAN,0,1)
The new channel is added to the end of the list of channels. You can use IpAFAGet to inquire the number of channels before calling IpAFAAddChan – this number can then be used as the index to the new channel when using IpAFASetInt, IpAFASetSingle and IpAFASetEx to set the channel’s properties.
Example Dim NewChan as Integer ‘ Get the current number of channels ret = IpAFAGet(AFA_NUMCHANNELS, 0, NewChan) ‘ Add a new channel called “New Channel” ret = IpAFAAddChan(“New Channel”) ‘ Set the wavelength of the new channel to 400nM ret = IpAFASetSingle(AFA_WAVELENGTH, NewChan, 400)
See Also IpAFAGet, IpAFASetEx, IpAFASetInt, IpAFASetSingle

IpAFADelChan
Page 2-19
IpAFADelChan Syntax IpAFADelChan (nChannel)
Description This function deletes a channel by number.
Parameters nChannel Integer The index of the channel to delete.
Return Value 0 if successful, a negative error code if failed.
Comments The number may be obtained by using AFA_NUMCHANNELS to find the channel count and iterating through to find the channel with the required name or values.
See Also IpAFADelChanStr
IpAFADelChanStr Syntax IpAFADelChanStr (ChanName)
Description This function deletes a channel by name rather than by number
Parameters ChanName String Name of the channel to delete
Return Value 0 if successful, a negative error code if failed.
See Also IpAFADelChan

IpAFAGet
Page 2-20
IpAFAGet Syntax IpAFAGet (sAttribute, sParam, sValue)
Description This function gets the current value of an AFA attribute.
Parameters sAttribute Integer The setting to inquire. See Comments.
sParam Integer Optional parameter, usually not used (set to zero), or may specify the index of the channel of interest or other required parameter. See the sParam column in the Comments table.
sValue (varies) Variable to receive the setting’s current value. See the Type column in the Comments table for the type of variable required for each attribute.
Return Value
0 if successful, a negative error code if failed.
Comments This function is used for all attributes returning numeric values. For several attributes taking a dimension identifier in sParam, the following constants are used:
AFA_CHAN – Channel AFA_Z – Z Position AFA_SCAN – X/Y Scan position AFA_SAMPLE – Sampling position (well, slide, or user-defined position) AFA_TIMEPOINT – Time point.
If the value is listed as a ‘Stage’, it is a boolean value with 0 for off or 1 for on.
sAttribute sValue sParam Type
AFA_ACQUISITION_TONE Indicates if program should beep at the end of each acquisiton
N/A Integer
AFA_AUTOEXPOSE State of autoexposure N/A Integer
AFA_BACKGROUNDSET Set number associated with background images
N/A Integer
AFA_BOTTOM_UP Capture Z planes from the bottom up of the stack upwards
N/A Integer
AFA_CAPTCHANNEL Is channel active/inactive for this capture
Channel index
Integer

IpAFAGet
Page 2-21
sAttribute sValue sParam Type
AFA_CAPTUREORDER Enumerated integer describing capture order, values of AFA_ORDER_FOCUSFIRST, AFA_ORDER_CHANNELFIRST
N/A Integer
AFA_CAPTURESUBSET State of All/Selected channels
N/A Integer
AFA_CAPTURETO Destination type, values AFA_DEST_MEM, AFA_DEST_DISK
N/A Integer
AFA_CHANGEPHASE Change current time phase, return change state
N/A Integer
Defines for AFA_CHANGEPHASE, only valid during acquisition. Phase numbers of 0 to (AFA_NUMTIMEPHASES-1) will move directly to that portion of the time lapse acquisition. AFA_SET_PHASENEXT -1 // Go to next phase AFA_SET_PHASEPREV -2 // Go to previous phase
AFA_COMPOSITEMATCH Does composite doc match? Boolean result.
N/A Integer
AFA_DELCHANNEL Delete channel by number
Channel index
Integer
AFA_CHAN_NAME AFA_CHAN_NAME is obsolete, and is replaced by AFA_DYE. Both commands do the same thing, which is for IpAFAGet is to return the channel/dye name.
AFA_DELTIMEPHASE Delete time phase specified by sParam (write only)
N/A Integer
AFA_DELTAZ Microns distance between planes
N/A Single
AFA_DIVISION Division of channel or time phase
Channel or time phase
Integer

IpAFAGet
Page 2-22
sAttribute sValue sParam Type
AFA_EDOFSTYPE Type of software focus, values AFA_EDOF_LOCAL, AFA_EDOF_MAX, AFA_EDOF_MIN, AFA_EDOF_DEPTH
N/A Integer
AFA_EXPOSURE Exposure time of channel
Channel Single
AFA_EXWAVELENGTH Sets the excitation wavelength for the channel specified by the sParam parameter. Setting the excitation wavelength by using AFA_WAVELENGTH with IpAFASetSingle modifies the dye file for the channel
Channel Integer
AFA_FOCUS State of multiple focus acquisition
N/A Integer
AFA_FOCUSCHANNEL This command gets the channel used as the Focus Channel. The focus offset for the Focus Channel is also set to 0.0
N/A Integer
AFA_FOCUSOFFSET Gets the focus offset for the channel specified by the sParam parameter. The focus offset for a channel is applied to the Z focus position determined for the focus channel when determining the Z focus position for the channel of interest. The focus offset for the current focus channel should not be set – trying to do so will return an IPCERR_INVARG error code
Channel Integer

IpAFAGet
Page 2-23
sAttribute sValue sParam Type
AFA_GENCOMPOSITE State of color composite enabling
N/A Integer
AFA_GENCOMPOSITE_ACQ Generate composite while acquiring. 0 or 1
N/A Integer
AFA_HOLDTIME Seconds time refocus hold
N/A Single
AFA_INTEGRATION Integration of channel or time phase
Channel index or time phase
Integer
AFA_ISMODIFIED State of document modification
N/A Integer
AFA_LAPSETIME Seconds time lapse N/A Single
AFA_LAST_IMAGE_SET Get the set manager ID of the set most recently acquired using IpAFASnap or the Acquire button on the AFA user interface. Bested us immediately after an acquisition.
AFA_MCHAN State of multiple channel acquisition
N/A Integer
AFA_MINTIME State of minimum time lapse
N/A Integer
AFA_MOVEMENT Return the current position along the specified dimension
AFA_CHAN, AFA_Z, AFA_SCAN, AFA_SAMPLE, AFA_TIMEPOINT
Integer
AFA_NA NA of specific channel Channel Single
AFA_NUMALLTIMEPOINTS Total number of time points for all phases (read-only)
Time phase Integer
AFA_NUMCHANNELS Number of channels defined (one-based)
N/A Integer
AFA_NUMFOCUS Number of focal planes N/A Integer
AFA_NUMSAMPLES Number of samples N/A Integer
AFA_NUMSCAN Number of scan images
N/A Integer

IpAFAGet
Page 2-24
sAttribute sValue sParam Type
AFA_NUMTIMEPOINTS Number of time points Time phase Integer
AFA_NUMTIMEPHASES Number of time phases N/A Integer
AFA_PREVIEW Is AFA currently previewing?
N/A Integer
AFA_PREVIEWHOLD Will the specified dimension be held steady when viewing all in Preview
AFA_CHAN, AFA_Z, AFA_SCAN, AFA_ SAMPLE, AFA_ TIMEPOINT
Integer
AFA_PREVIEWSET Will the specified dimension be previewed?
AFA_CHAN, AFA_Z, AFA_SCAN, AFA_ SAMPLE, AFA_ TIMEPOINT
Integer
AFA_PREVIEWTIME Time of preview hold, in seconds
N/A Single
AFA_RECORDLAYOUT (w rite only) 1 = record layout from current set 0 = clear layout parameters
Not used, set to 0
Integer
AFA_REFINDEX RI of immersion of specific channel
Channel Single
AFA_REFOCUS State of refocus during acquisition
N/A Integer
AFA_REFOCUSFREQ Frequency of refocusing
N/A Integer
AFA_REFOCUSTYPE Type of refocus during acquisition
N/A Integer

IpAFAGet
Page 2-25
sAttribute sValue sParam Type
AFA_RETAIN Type of image retained from focus: Integer
AFA_RETAIN_STACK = Keep all planes of focus AFA_RETAIN_BESTFOCUS = Keep only the best focused image from the Z planes AFA_RETAIN_COMPOSITE = Create a composite image using the EDOF functions with every pixel individually focused. AFA_RETAIN_SINGLE = Keep a single plane at the focus point.
AFA_RESTART_AFTER_ PAUSE
Set the current experiment’s default resume option, which should be one of the following: AFA_RESTART_IMMEDIATELY – start the next acquisition immediately AFA_RESTART_ON SCHEDULE – start the next acquisition at the next regularly scheduled time point
AFA_SAMPLECOORD XYZ coordinates of a sample position
Sample number
Array of 3 singles
AFA_SCANAREA State of scanned acquisition
N/A Integer
AFA_SETMATCH Does set number match AFA set? Returns a state.
set number Integer
AFA_SINGLEOBJECTIVE Gets whether all channels should use the same objective information. When the single objective option is set to TRUE (any non-zero value), the lens information (AFA_NA, AFA_REFINDEX and AFA_LENS) will be set for all existing channels.
Integer
Setting the single objective option to TRUE makes it unnecessary to specify the objective when adding new channels.

IpAFAGet
Page 2-26
sAttribute sValue sParam Type
AFA_STAGE State of multiple position acquisition
N/A Integer
AFA_STAGETYPE Type of stage movement, values of AFA_STAGE_ WELLS, AFA_STAGE_ RANDOM
N/A Integer
AFA_TIME State of multiple time acquisition
N/A Integer
AFA_TIMEPHASE Current time phase
AFA_TIMEPHASEDESCR Phase number Starting from 0
String
AFA_TIMEPREVIEW State of preview during time lapse
N/A Integer
AFA_TINT Gets the tine used to represent the channel specified by sParam. Modifying the tint will update the underlying dye file for the channel.
Channel Integer
AFA_TILEANGLE Angle of tiling in radians Double Integer
AFA_TILEBLEND Tiling blend method for scans
N/A
String
AFA_TILEDIRPOS Stage movement positive
0 = X 1 = Y
Integer
AFA_TILEIMAGES State of tiled acquisition N/A
AFA_TILEOFFSET POINTAPI of specificed offset
0 = X 1 = Y
Integer
AFA_TILESIZE Size of tile (array of 2 hsort/interger) for mosaic
N/A Integer
AFA_TILESTAGESCALE Stage movement Calibrated pixel distance
Integer
AFA_TILETYPE Tiling method for scans N/A String
AFA_Z_SCAN_NOMINAL Z nominal position for a scan location
scan location
Single
AFA_Z_STG_NOMINAL Z nominal position for a stage location
stage location
Single

IpAFAGetInt
Page 2-27
Example Dim nScan as Integer ret = IpAFAGet(AFA_NUMSCAN, 0, nScan) ‘ Index to the 3rd scan point in the 5th stage position Dim fPosition As Single ret = IpAFAGet(AFA_Z_SCAN_NOMINAL, 4*nScan + 2, fPosition)
Debug.Print “Stage 5, Scan 3”; fPosition
See Also IpAFAGetStr
IpAFAGetInt Syntax IpAFAGetInt (sAttribute, sParam, lpData)
Description This function gets AFA attributes taking an integer value to a new value.
Parameters sAttribute Integer Attribute to modify. See Comments.
sParam Integer Optional parameter, usually not used (set to zero), or may specify the index of the channel of interest or other required parameter. See the sParam column in the Comments table.
shData Integer New value for the attribute.
Return Value 0 if successful, a negative error code if failed.
Comments This function is used for all attributes taking integer values. For several attributes taking a dimension identifier in sParam, the following constants are used: AFA_CHAN – Channel AFA_Z – Z Position AFA_SCAN – X/Y Scan position AFA_SAMPLE – Sampling position (well, slide, or user-defined position) AFA_TIMEPOINT – Time point.
sAttribute shData sParam
AFA_ACQUISITION_TONE Indi cates if program should beep at the end of each acquisiton
N/A
AFA_ARCHIVE_SET Archives the set and all set images to the Image Database
N/A
AFA_AUTOEXPOSE Stage of autoexposure N/A
AFA_BACKGROUNDSET Set number associated with background
N/A
AFA_BOTTOM_UP Acquire set from the bottom of the stack upwards
N/A
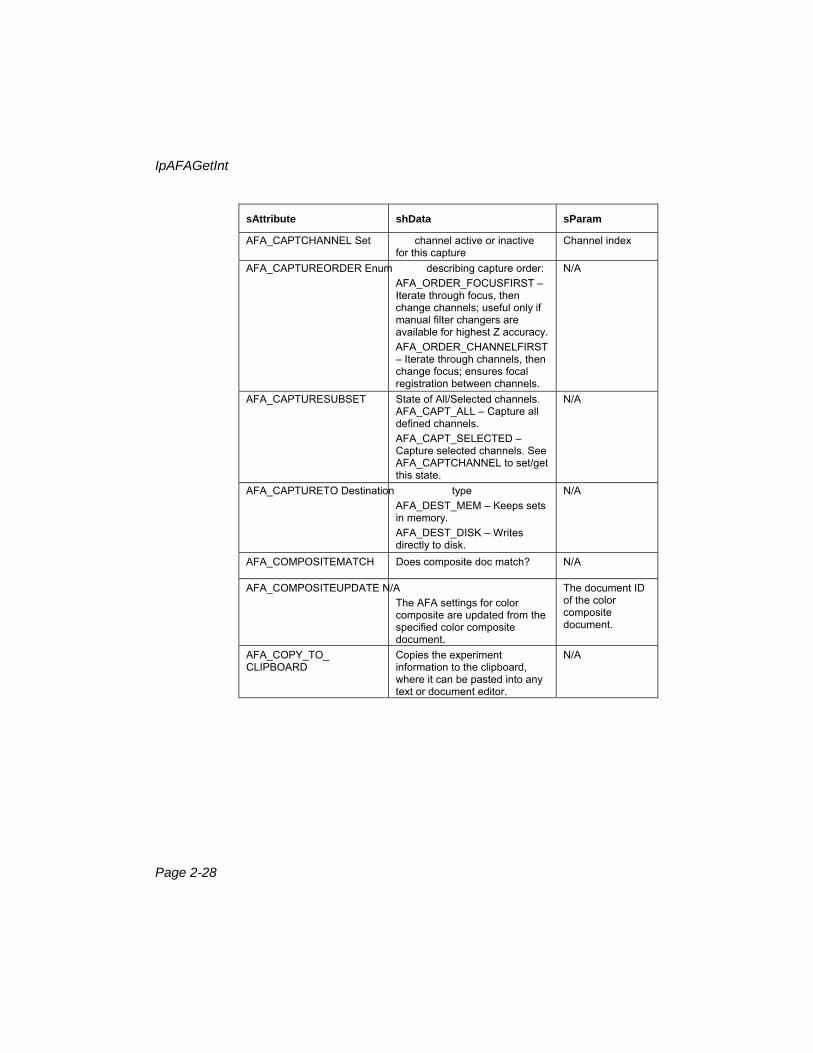
IpAFAGetInt
Page 2-28
sAttribute shData sParam
AFA_CAPTCHANNEL Set channel active or inactive for this capture
Channel index
AFA_CAPTUREORDER Enum describing capture order: AFA_ORDER_FOCUSFIRST – Iterate through focus, then change channels; useful only if manual filter changers are available for highest Z accuracy. AFA_ORDER_CHANNELFIRST – Iterate through channels, then change focus; ensures focal registration between channels.
N/A
AFA_CAPTURESUBSET State of All/Selected channels. AFA_CAPT_ALL – Capture all defined channels. AFA_CAPT_SELECTED – Capture selected channels. See AFA_CAPTCHANNEL to set/get this state.
N/A
AFA_CAPTURETO Destination type AFA_DEST_MEM – Keeps sets in memory. AFA_DEST_DISK – Writes directly to disk.
N/A
AFA_COMPOSITEMATCH Does composite doc match? N/A
AFA_COMPOSITEUPDATE N/A The AFA settings for color composite are updated from the specified color composite document.
The document ID of the color composite document.
AFA_COPY_TO_ CLIPBOARD
Copies the experiment information to the clipboard, where it can be pasted into any text or document editor.
N/A
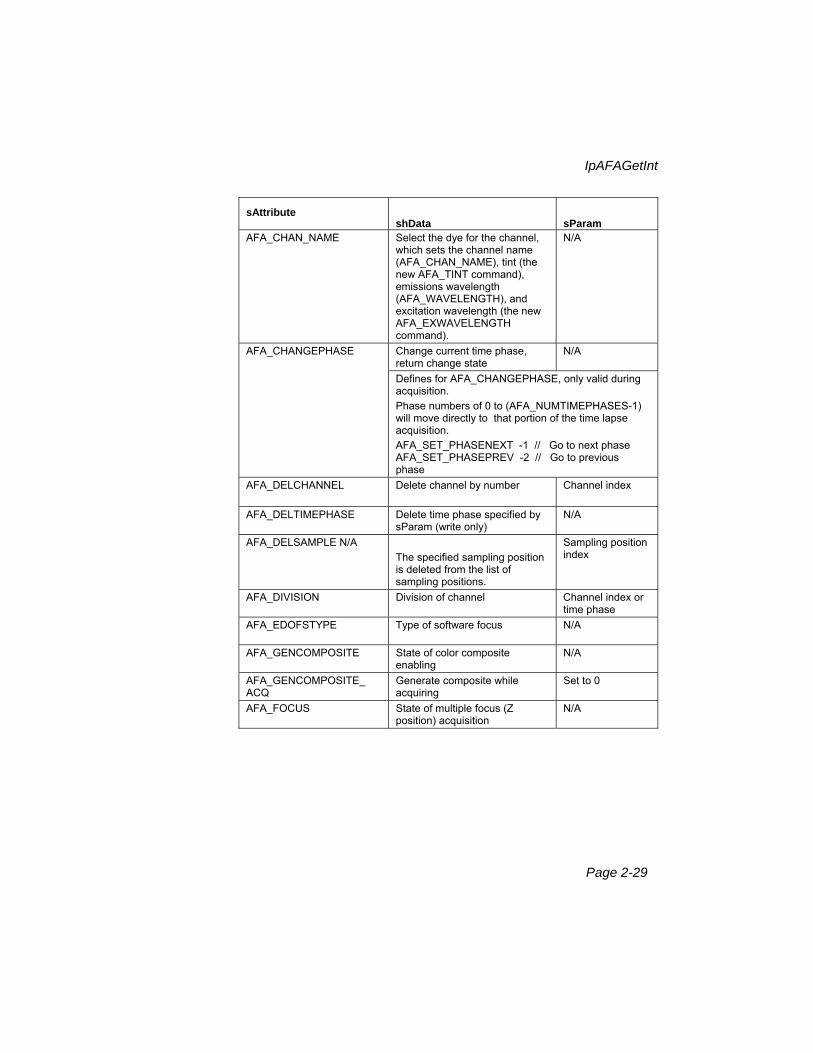
IpAFAGetInt
Page 2-29
sAttribute
shData sParam AFA_CHAN_NAME Select the dye for the channel,
which sets the channel name (AFA_CHAN_NAME), tint (the new AFA_TINT command), emissions wavelength (AFA_WAVELENGTH), and excitation wavelength (the new AFA_EXWAVELENGTH command).
N/A
AFA_CHANGEPHASE Change current time phase, return change state
N/A
Defines for AFA_CHANGEPHASE, only valid during acquisition. Phase numbers of 0 to (AFA_NUMTIMEPHASES-1) will move directly to that portion of the time lapse acquisition. AFA_SET_PHASENEXT -1 // Go to next phase AFA_SET_PHASEPREV -2 // Go to previous phase
AFA_DELCHANNEL Delete channel by number Channel index
AFA_DELTIMEPHASE Delete time phase specified by sParam (write only)
N/A
AFA_DELSAMPLE N/A The specified sampling position is deleted from the list of sampling positions.
Sampling position index
AFA_DIVISION Division of channel Channel index or time phase
AFA_EDOFSTYPE Type of software focus N/A
AFA_GENCOMPOSITE State of color composite enabling
N/A
AFA_GENCOMPOSITE_ ACQ
Generate composite while acquiring
Set to 0
AFA_FOCUS State of multiple focus (Z position) acquisition
N/A
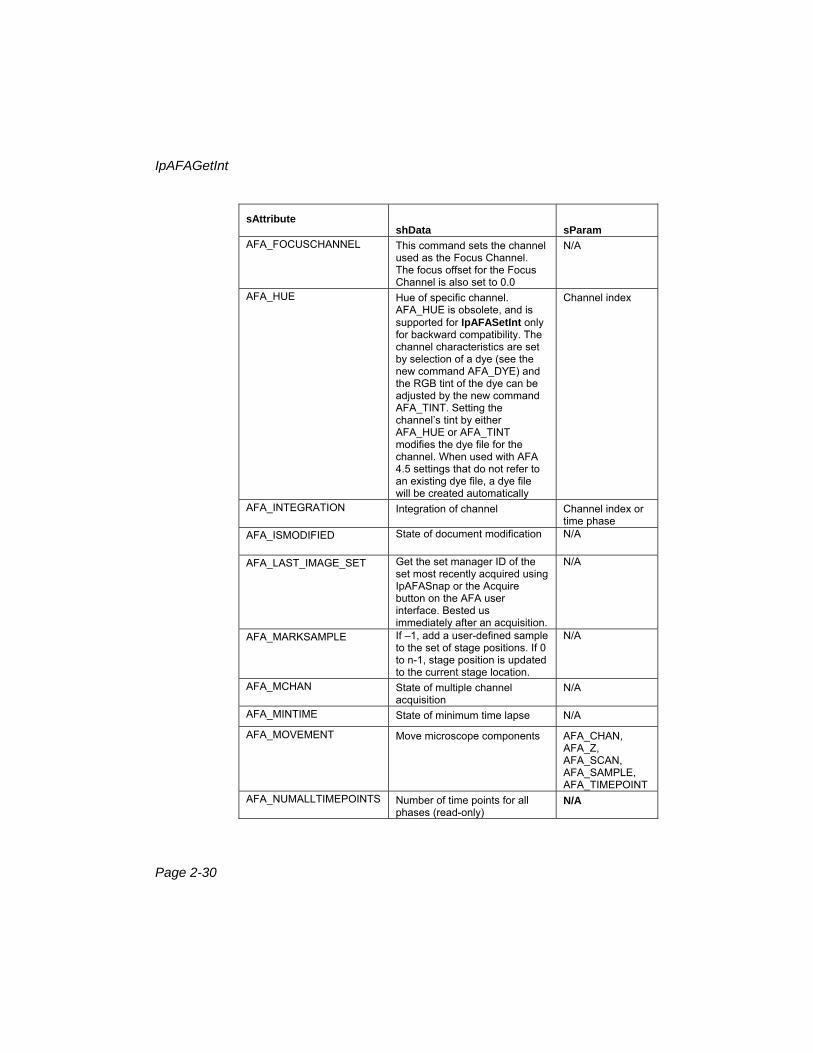
IpAFAGetInt
Page 2-30
sAttribute
shData sParam AFA_FOCUSCHANNEL This command sets the channel
used as the Focus Channel. The focus offset for the Focus Channel is also set to 0.0
N/A
AFA_HUE Hue of specific channel. AFA_HUE is obsolete, and is supported for IpAFASetInt only for backward compatibility. The channel characteristics are set by selection of a dye (see the new command AFA_DYE) and the RGB tint of the dye can be adjusted by the new command AFA_TINT. Setting the channel’s tint by either AFA_HUE or AFA_TINT modifies the dye file for the channel. When used with AFA 4.5 settings that do not refer to an existing dye file, a dye file will be created automatically
Channel index
AFA_INTEGRATION Integration of channel Channel index or time phase
AFA_ISMODIFIED State of document modification N/A
AFA_LAST_IMAGE_SET Get the set manager ID of the set most recently acquired using IpAFASnap or the Acquire button on the AFA user interface. Bested us immediately after an acquisition.
N/A
AFA_MARKSAMPLE If –1, add a user-defined sample to the set of stage positions. If 0 to n-1, stage position is updated to the current stage location.
N/A
AFA_MCHAN State of multiple channel acquisition
N/A
AFA_MINTIME State of minimum time lapse N/A
AFA_MOVEMENT Move microscope components AFA_CHAN, AFA_Z, AFA_SCAN, AFA_SAMPLE, AFA_TIMEPOINT
AFA_NUMALLTIMEPOINTS Number of time points for all phases (read-only)
N/A

IpAFAGetInt
Page 2-31
sAttribute shData sParam
AFA_NUMTIMEPOINTS Number of time points N/A
AFA_NUMTIMEPHASES Number of time phases Time phase
AFA_NUMFOCUS Number of focal planes N/A
AFA_PREVIEW Start/stop preview N/A
AFA_PREVIEWHOLD Hold the dimension specified by sParam steady when viewing all in Preview
AFA_CHAN, AFA_Z, AFA_SCAN, AFA_SAMPLE, AFA_TIMEPOINT
AFA_PREVIEWSET Set the preview position for the dimension specified by sParam
AFA_CHAN, AFA_Z, AFA_SCAN, AFA_SAMPLE, AFA_TIMEPOINT
AFA_RECORDLAYOUT (write only) 1 = record layout from current set 0 = clear layout parameters
Not used, set to 0
AFA_RESTART_AFTER_ PAUSE
Set the current experiment’s default resume option, which should be one of the following: AFA_RESTART_IMMEDIATELY = start the next acquisition immediately AFA_RESTART_ON SCHEDULE = start the next acquisition at the next regularly scheduled time point
AFA_REFOCUS State of refocus during acquisition. Equivalent to the state of the Focus while acquiring checkbox on the Focus tab of the AFA interface.
N/A

IpAFAGetInt
Page 2-32
sAttribute shData sParam
AFA_REFOCUSFREQ Frequency of refocusing AFA_REFOC_FRAME = Refocus every time the XY location changes AFA_REFOC_SCAN = Refocus before each scan, that is once per sample. AFA_REFOC_CHANNEL = Refocus every time the channel changes. AFA_REFOC-EACHTIME = Refocus on the first sample of each timepoint.
N/A
AFA_REFOCUSTYPE Type of refocus during acquisition AFA_FOCUS_MANUAL = User will be prompted to manually refocus stage AFA_FOCUS_SOFTWARE = Software evaluation of focus will be performed AFA_FOCUS_HARDWARE = Requires hardware autofocus capability.
N/A
AFA_RETAIN Type of image retained from focus AFA_RETAIN_STACK = Keep all planes of focus AFA_RETAIN_BESTFOCUS = Keep only the best focused image from the Z planes AFA_RETAIN_COMPOSITE = Create a composite image using the EDOF functions with every pixel individually focused. AFA_RETAIN_SINGLE = Keep a single plane at the focus point. See AFA_EDOFSTYPE to specify how the focus is determined.
N/A

IpAFAGetInt
Page 2-33
sAttribute shData sParam
AFA_SAMPLESORT N/A The user-defined sampling positions will be sorted for minimum travel during capture.
N/A
AFA_SCANAREA State of scanned acquisition N/A
AFA_SEND_TO_EXCEL Sends the experiment information to an Excel spreadsheeet
N/A
AFA_SEND_TO_OUTPUT Copies the experiment information to the Output Window
N/A
AFA_SETCOMPOSITE Set number to composite N/A
AFA_SETMATCH Does set number match AFA set?
Set ID to compare
AFA_STAGE State of multiple position acquisition
N/A
AFA_STAGETYPE Type of stage movement AFA_STAGE_WELLS – Stage-Pro sample pattern of wells or slides AFA_STAGE_RANDOM – User defined positions.
N/A
AFA_SINGLEOBJECTIVE Sets whether all channels should use the same objective information. When the single objective option is set to TRUE (any non-zero value), the lens information (AFA_NA, AFA_REFINDEX and AFA_LENS) will be set for all existing channels. Setting the single objective option to TRUE makes it unnecessary to specify the objective when adding new channels.
N/A

IpAFAGetInt
Page 2-34
sAttribute shData sParam
AFA_TILEBLEND Tiling blend method for scans N/A
AFA_TILEDIRPOS Stage movement positive 0 = X 1 = Y
AFA_TILEIMAGES State of tiled acquisition N/A
AFA_TILETYPE Tiling method for scans N/A
AFA_TIME State of multiple time acquisition N/A
AFA_TIMEPREVIEW State of preview during time lapse
N/A
AFA_TIMEPHASE Current time phase N/A
AFA_USESHUTTER Gets shutter behavior See notes below
AFA_WRITEREVIEW The Review of the current capture settings will be sent to the Output Window.
N/A
SParam for AFA_USESHUTTER. Must be one of the following: Enumeration values: AFA_SHUTTER_NONE 0 // Don’t control the shutter at all AFA_SHUTTER_ALL 1 // Close for any transition AFA_SHUTTER_CHANNELS 2 // Leave open until all channels acquired AFA_SHUTTER_ZSTACK 3 // Leave open for entire Z stack AFA_SHUTTER_STAGE 4 // Open for entire stage position AFA_SHUTTER_TIMEPOINT 5 // Open for entire time point AFA_SHUTTER_EXPERIMENT 6 // Open and close once for the experiment
See Also IpAFASetEx, IpAFASetSingle, IpAFASetStr, IpAFASetInt

IpAFAGetStr
Page 2-35
IpAFAGetStr Syntax IpAFAGetStr (sCommand,, sParam, Value)
Description This function gets the current value of an AFA string attribute.
Parameters sAttribute Integer The setting to inquire. See Comments.
sParam Integer Optional parameter, usually not used (set to zero), or may specify the index of the channel of interest or other required parameter. See the sParam column in the Comments table.
Value String A fixed-length string to receive the attribute’s current value.
Return Value 0 if successful, a negative error code if failed.
Comments This function is used for all attributes returning strings.
Attribute Value sParam
AFA_CAPTUREFILE Capture file of specific channel Channel
AFA_CAPTUREPATH Get path of Capture file Channel
AFA_CHAN_NAME Name of specific channel Channel
AFA_DEFDIRNAME Directory for saving .AFA files N/A
AFA_DELCHANNELSTR Delete channel by name (see also IpAFADelChanStr)
N/A
AFA_DESTDIR Name of captured file destination directory
N/A
AFA_DESTEXT Extension/file type for captured files. i.e. .jpg, .tif, etc.
N/A

IpAFAGetStr
Page 2-36
Attribute Value sParam
AFA_DESCRIPTION A description of the AFA experiment and image set.
N/A
AFA_DRIVERNAME Name of capture driver/ camera N/A
AFA_DYE This command replaces AFA_CHAN_NAME and is used in a similar fashion. In addition to specifying the name for the channel specified by sParam, the AFA_DYE command also sets the channel tint (AFA_TINT), emissions wavelength (AFA_WAVELENGTH), and excitation wavelength (AFA_EXWAVELENGTH) from the characteristics of the specified dye
Channel
AFA_EXP_TITLE The title of the experiement and the image set that goes with it. Also used as the default Set_Filename.
N/A
AFA_EXPERIMENTER The experimenter or technician. N/A
AFA_FILENAME Name of settings N/A
AFA_OBJECTIVE Gets the objective. If sParam is -1 or the AFA_SINGLEOBJECTIVE option is set, the information for all channels will be updated – otherwise sParam should specify the channel to update. Setting the objective for one or more channels updates the numeric aperture (AFA_NA) and refractive index (AFA_REFINDEX) in addition to the objective name.
Channel to update
AFA_SAMPLEPATTERN Name of the Stage-Pro sample pattern
N/A
AFA_SCANPATTERN Name of the Stage-Pro scan area pattern
N/A
AFA_SCOPEFILE Scope file of specific channel Channel
AFA_SCOPEPATH Get path of Scope file Channel
AFA_SETFILENAME Target IPS file for saves during acquisition
N/A
See Also IpAFAGet

IpAFALoad
Page 2-37
IpAFALoad Syntax IpAFALoad (fName)
Description This function loads an AFA settings file.
Parameters fName String Specifies the settings file to load
Return Value 0 if successful, a negative error code if failed.
IpAFAMacroGet Syntax IpAFAMacroGet (nCallpoint, lpScriptFile, lpMacroName)
Description This function gets the name and call point for an AFA macro.
Parameters nCallPoint Short An expression of the location where the macro is to be invoked. See Comments.
lpScriptFile LPSTR A string specifiying the name of the script file
lpMacroName LPSTR A string specifiying the name of the macro
Return Value IpAFAMacroGet will return IPCERR_INVARG if nCallPoint is not in range, and -1 if there is no macro defined for that calling point.
Comments These are the values for the Call Point parameter:
AFA_M_STRTACQ 0 // Before acquiring, setup AFA_M_STRTTIME 1 // Time loop start AFA_M_STRTSTAGE 2 // Stage loop start AFA_M_STRTSCAN 3 // Scan loop start AFA_M_STRTFOC 4 // Focus loop start AFA_M_STRTCHAN 5 // Channel loop start AFA_M_STRTSNAP 6 // Just before snap AFA_M_ENDSNAP 7 // Just after snap AFA_M_ENDCHAN 8 // Channel loop end AFA_M_ENDFOC 9 // Focus loop end AFA_M_ENDSCAN 10 // Scan loop end AFA_M_ENDSTAGE 11 // Stage loop end AFA_M_ENDTIME 12 // Time loop end AFA_M_ENDACQ 13 // After acquiring, cleanup
See Also IpAFAMacroSet

IpAFAMacroSet
Page 2-38
IpAFAMacroSet Syntax IpAFAMacroSet (nCallpoint, lpScriptFile, lpMacroName)
Description This function sets the name and call point for an AFA macro.
Parameters nCallPoint Short An expression of the location where the macro is to be invoked. See Comments.
lpScriptFile LPSTR A string specifiying the name of the script file
lpMacroName LPSTR A string specifiying the name of the macro
Return Value IpAFAMacroSet will return IPCERR_INVARG if nCallPoint is not in range.
Comments These are the values for the Call Point parameter:
AFA_M_STRTACQ 0 // Before acquiring, setup AFA_M_STRTTIME 1 // Time loop start AFA_M_STRTSTAGE 2 // Stage loop start AFA_M_STRTSCAN 3 // Scan loop start AFA_M_STRTFOC 4 // Focus loop start AFA_M_STRTCHAN 5 // Channel loop start AFA_M_STRTSNAP 6 // Just before snap AFA_M_ENDSNAP 7 // Just after snap AFA_M_ENDCHAN 8 // Channel loop end AFA_M_ENDFOC 9 // Focus loop end AFA_M_ENDSCAN 10 // Scan loop end AFA_M_ENDSTAGE 11 // Stage loop end AFA_M_ENDTIME 12 // Time loop end AFA_M_ENDACQ 13 // After acquiring, cleanup
See Also IpAFAMacroGet
IpAFANew Syntax IpAFANew ()
Description This function creates a new AFA settings file
Return Value 0 if successful, a negative error code if failed.
Comments Create a new settings file with default values, the settings file name is reset so the original settings will not be overwritten. You must use IpAFASaveAs to save the settings since they will not have a default file name.
See Also IpAFASaveAs

IpAFASave
Page 2-39
IpAFASave Syntax IpAFASave ()
Description This function saves the current AFA settings file under its existing file name
Return Value 0 if successful, a negative error code if failed.
Comments You must have loaded a settings file, or saved one using IpAFASaveAs, to have set the settings file name.
See Also IpAFASaveAs
IpAFASaveAs Syntax IpAFASaveAs (fName)
Description This function saves current settings under a new name.
Parameters fName String Full path name of AFA file
Return Value 0 if successful, a negative error code if failed.
See Also IpAFASave

IpAFASetEx
Page 2-40
IpAFASetEx Syntax IpAFASetEx (sAttribute, sParam, lpData)
Description This function sets attribute values for AFA
Parameters SAttribute Integer AFA attribute to set, from the following: AFA_SAMPLECOORD - XYZ coordinates of a sample position.
SParam Integer For AFA_SAMPLECOORD, the index of the sample position to modify. For AFA_TINT, sets the tint used to represent the channel specified. Modifying the tint will update the underlying dye file for that channel.
LpData Single An array of 3 singles for the XYZ coordinates (in that order).
Return Value 0 if successful, a negative error code if failed.
Comments This is the base form for setting values in AFA – the calls to IpAFASetInt, IpAFASetSingle, and IPAFASetStr all resolve to this call eventually.
sAttribute shData sParam
AFA_TILEOFFSET POINTAPI of specificed offset
0 = X 1 = Y
AFA_TILESIZE Size of tile (array of 2 hsort/interger) for mosaic
N/A
See Also IpAFASetInt, IpAFASetSingle, IpAFASetStr
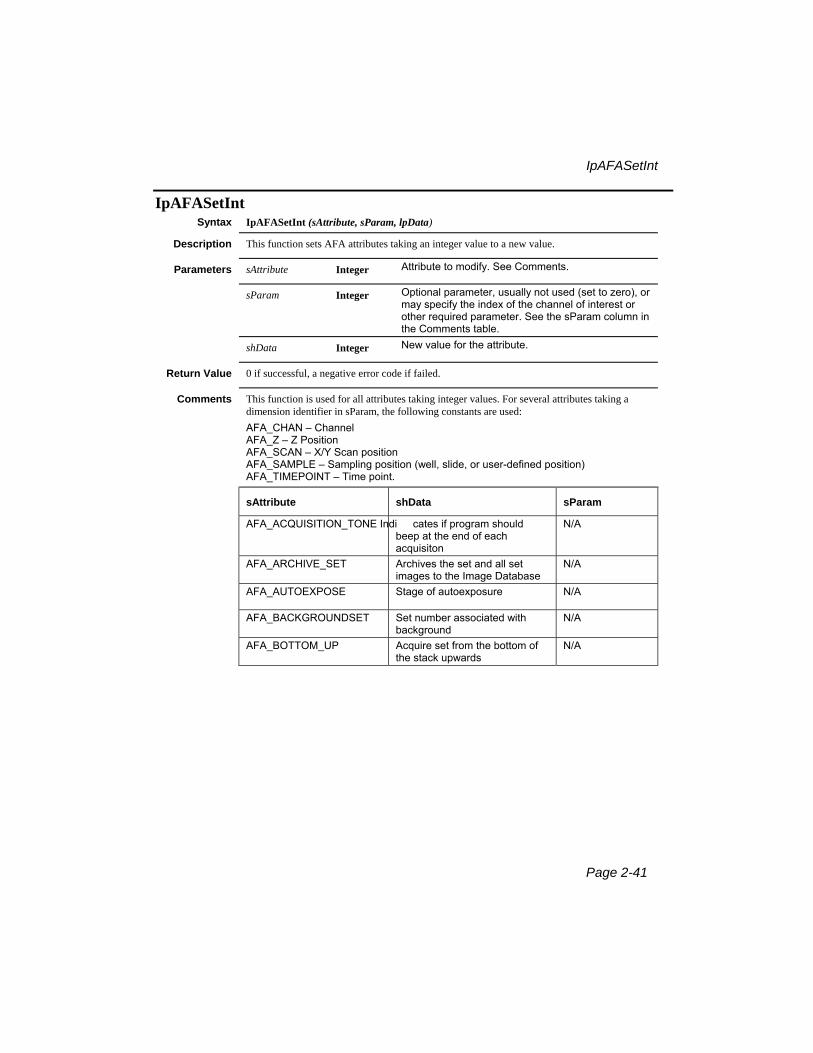
IpAFASetInt
Page 2-41
IpAFASetInt Syntax IpAFASetInt (sAttribute, sParam, lpData)
Description This function sets AFA attributes taking an integer value to a new value.
Parameters sAttribute Integer Attribute to modify. See Comments.
sParam Integer Optional parameter, usually not used (set to zero), or may specify the index of the channel of interest or other required parameter. See the sParam column in the Comments table.
shData Integer New value for the attribute.
Return Value 0 if successful, a negative error code if failed.
Comments This function is used for all attributes taking integer values. For several attributes taking a dimension identifier in sParam, the following constants are used: AFA_CHAN – Channel AFA_Z – Z Position AFA_SCAN – X/Y Scan position AFA_SAMPLE – Sampling position (well, slide, or user-defined position) AFA_TIMEPOINT – Time point.
sAttribute shData sParam
AFA_ACQUISITION_TONE Indi cates if program should beep at the end of each acquisiton
N/A
AFA_ARCHIVE_SET Archives the set and all set images to the Image Database
N/A
AFA_AUTOEXPOSE Stage of autoexposure N/A
AFA_BACKGROUNDSET Set number associated with background
N/A
AFA_BOTTOM_UP Acquire set from the bottom of the stack upwards
N/A

IpAFASetInt
Page 2-42
sAttribute shData sParam
AFA_CAPTCHANNEL Set channel active or inactive for this capture
Channel index
AFA_CAPTUREORDER Enum describing capture order: AFA_ORDER_FOCUSFIRST – Iterate through focus, then change channels; useful only if manual filter changers are available for highest Z accuracy. AFA_ORDER_CHANNELFIRST – Iterate through channels, then change focus; ensures focal registration between channels.
N/A
AFA_CAPTURESUBSET State of All/Selected channels. AFA_CAPT_ALL – Capture all defined channels. AFA_CAPT_SELECTED – Capture selected channels. See AFA_CAPTCHANNEL to set/get this state.
N/A
AFA_CAPTURETO Destination type AFA_DEST_MEM – Keeps sets in memory. AFA_DEST_DISK – Writes directly to disk.
N/A
AFA_COMPOSITEMATCH Does composite doc match? N/A
AFA_COMPOSITEUPDATE N/A The AFA settings for color composite are updated from the specified color composite document.
The document ID of the color composite document.
AFA_COPY_TO_ CLIPBOARD
Copies the experiment information to the clipboard, where it can be pasted into any text or document editor.
N/A

IpAFASetInt
Page 2-43
sAttribute
shData sParam AFA_CHAN_NAME Select the dye for the channel,
which sets the channel name (AFA_CHAN_NAME), tint (the new AFA_TINT command), emissions wavelength (AFA_WAVELENGTH), and excitation wavelength (the new AFA_EXWAVELENGTH command).
N/A
AFA_CHANGEPHASE Change current time phase, return change state
N/A
Defines for AFA_CHANGEPHASE, only valid during acquisition. Phase numbers of 0 to (AFA_NUMTIMEPHASES-1) will move directly to that portion of the time lapse acquisition. AFA_SET_PHASENEXT -1 // Go to next phase AFA_SET_PHASEPREV -2 // Go to previous phase
AFA_DELCHANNEL Delete channel by number Channel index
AFA_DELTIMEPHASE Delete time phase specified by sParam (write only)
N/A
AFA_DELSAMPLE N/A The specified sampling position is deleted from the list of sampling positions.
Sampling position index
AFA_DIVISION Division of channel Channel index or time phase
AFA_EDOFSTYPE Type of software focus N/A
AFA_GENCOMPOSITE State of color composite enabling
N/A
AFA_GENCOMPOSITE_ACQ
Generate composite while acquiring
Set to 0
AFA_FOCUS State of multiple focus (Z position) acquisition
N/A

IpAFASetInt
Page 2-44
sAttribute
shData sParam AFA_FOCUSCHANNEL This command sets the channel
used as the Focus Channel. The focus offset for the Focus Channel is also set to 0.0
N/A
AFA_HUE Hue of specific channel. AFA_HUE is obsolete, and is supported for IpAFASetInt only for backward compatibility. The channel characteristics are set by selection of a dye (see the new command AFA_DYE) and the RGB tint of the dye can be adjusted by the new command AFA_TINT. Setting the channel’s tint by either AFA_HUE or AFA_TINT modifies the dye file for the channel. When used with AFA 4.5 settings that do not refer to an existing dye file, a dye file will be created automatically
Channel index
AFA_INTEGRATION Integration of channel Channel index or time phase
AFA_ISMODIFIED State of document modification N/A
AFA_LAST_IMAGE_SET Get the set manager ID of the set most recently acquired using IpAFASnap or the Acquire button on the AFA user interface. Bested us immediately after an acquisition.
N/A
AFA_MARKSAMPLE If –1, add a user-defined sample to the set of stage positions. If 0 to n-1, stage position is updated to the current stage location.
N/A
AFA_MCHAN State of multiple channel acquisition
N/A
AFA_MINTIME State of minimum time lapse N/A
AFA_MOVEMENT Move microscope components AFA_CHAN, AFA_Z, AFA_SCAN, AFA_SAMPLE, AFA_TIMEPOINT
AFA_NUMALLTIMEPOINTS Number of time points for all phases (read-only)
N/A

IpAFASetInt
Page 2-45
sAttribute shData sParam
AFA_NUMTIMEPOINTS Number of time points N/A
AFA_NUMTIMEPHASES Number of time phases Time phase
AFA_NUMFOCUS Number of focal planes N/A
AFA_PREVIEW Start/stop preview N/A
AFA_PREVIEWHOLD Hold the dimension specified by sParam steady when viewing all in Preview
AFA_CHAN, AFA_Z, AFA_SCAN, AFA_SAMPLE, AFA_TIMEPOINT
AFA_PREVIEWSET Set the preview position for the dimension specified by sParam
AFA_CHAN, AFA_Z, AFA_SCAN, AFA_SAMPLE, AFA_TIMEPOINT
AFA_RECORDLAYOUT (write only) 1 = record layout from current set 0 = clear layout parameters
Not used, set to 0
AFA_RESTART_AFTER_ PAUSE
Set the current experiment’s default resume option, which should be one of the following: AFA_RESTART_IMMEDIATELY = start the next acquisition immediately AFA_RESTART_ON SCHEDULE = start the next acquisition at the next regularly scheduled time point
AFA_REFOCUS State of refocus during acquisition. Equivalent to the state of the Focus while acquiring checkbox on the Focus tab of the AFA interface.
N/A

IpAFASetInt
Page 2-46
sAttribute shData sParam
AFA_REFOCUSFREQ Frequency of refocusing AFA_REFOC_FRAME = Refocus every time the XY location changes AFA_REFOC_SCAN = Refocus before each scan, that is once per sample. AFA_REFOC_CHANNEL = Refocus every time the channel changes. AFA_REFOC-EACHTIME = Refocus on the first sample of each timepoint.
N/A
AFA_REFOCUSTYPE Type of refocus during acquisition AFA_FOCUS_MANUAL = User will be prompted to manually refocus stage AFA_FOCUS_SOFTWARE = Software evaluation of focus will be performed AFA_FOCUS_HARDWARE = Requires hardware autofocus capability.
N/A
AFA_RETAIN Type of image retained from focus AFA_RETAIN_STACK = Keep all planes of focus AFA_RETAIN_BESTFOCUS = Keep only the best focused image from the Z planes AFA_RETAIN_COMPOSITE = Create a composite image using the EDOF functions with every pixel individually focused. AFA_RETAIN_SINGLE = Keep a single plane at the focus point. See AFA_EDOFSTYPE to specify how the focus is determined.
N/A
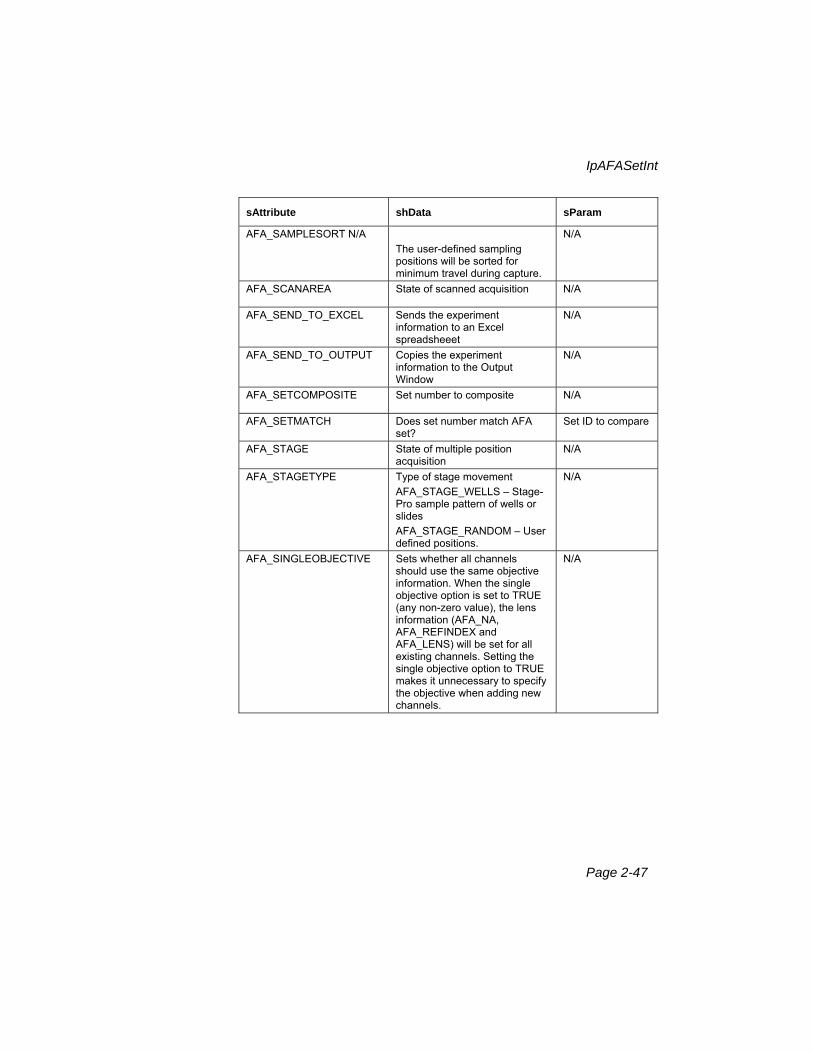
IpAFASetInt
Page 2-47
sAttribute shData sParam
AFA_SAMPLESORT N/A The user-defined sampling positions will be sorted for minimum travel during capture.
N/A
AFA_SCANAREA State of scanned acquisition N/A
AFA_SEND_TO_EXCEL Sends the experiment information to an Excel spreadsheeet
N/A
AFA_SEND_TO_OUTPUT Copies the experiment information to the Output Window
N/A
AFA_SETCOMPOSITE Set number to composite N/A
AFA_SETMATCH Does set number match AFA set?
Set ID to compare
AFA_STAGE State of multiple position acquisition
N/A
AFA_STAGETYPE Type of stage movement AFA_STAGE_WELLS – Stage-Pro sample pattern of wells or slides AFA_STAGE_RANDOM – User defined positions.
N/A
AFA_SINGLEOBJECTIVE Sets whether all channels should use the same objective information. When the single objective option is set to TRUE (any non-zero value), the lens information (AFA_NA, AFA_REFINDEX and AFA_LENS) will be set for all existing channels. Setting the single objective option to TRUE makes it unnecessary to specify the objective when adding new channels.
N/A

IpAFASetInt
Page 2-48
sAttribute shData sParam
AFA_TILEBLEND Tiling blend method for scans N/A
AFA_TILEDIRPOS Stage movement positive 0 = X 1 = Y
AFA_TILEIMAGES State of tiled acquisition N/A
AFA_TILETYPE Tiling method for scans N/A
AFA_TIME State of multiple time acquisition N/A
AFA_TIMEPREVIEW State of preview during time lapse
N/A
AFA_TIMEPHASE Current time phase N/A
AFA_USESHUTTER Sets shutter behavior Must be one of the following:
AFA_SHUTTER_NONE 0 // Don’t control the shutter at all AFA_SHUTTER_ALL 1 // Close for any transition AFA_SHUTTER_CHANNELS 2 // Leave open until all channels acquired AFA_SHUTTER_ZSTACK 3 // Leave open for entire Z stack AFA_SHUTTER_STAGE 4 // Open for entire stage position AFA_SHUTTER_TIMEPOINT 5 // Open for entire time point AFA_SHUTTER_EXPERIMENT 6 // Open and close once for the experiment
AFA_WRITEREVIEW N/A
The Review of the current capture settings will be sent to the Output Window.
N/A
See Also IpAFASetEx, IpAFAGetInt, IpAFASetStr

IpAFASetSingle
Page 2-49
IpAFASetSingle Syntax IpAFASetSingle (sAttribute, sParam, fData)
Description This function sets AFA attributes taking a floating-point value to a new value.
Parameters sAttribute Integer The attribute to modify. See Comments.
sParam Integer Optional parameter, usually not used (set to zero), or may specify the index of the channel of interest or other required parameter. See the sParam column in the Comments table. (The sParam is 0-based.)
fData Float New value for the attribute.
Return Value 0 if successful, a negative error code if failed.
Comments This function is used for all attributes taking floating-point values.
sAttribute fData sParam
AFA_EXPOSURE Exposure time of channel Channel
AFA_NA Numeric aperture (NA) of specific channel. Modifies the lens file for the objective specified for the channel. When used with AFA 4.5 settings that do not refer to an existing lens file, a lens file will be created automatically if the objective is known (see AFA_OBJECTIVE).
Channel
AFA_LAPSETIME Seconds time lapse N/A
AFA_HOLDTIME Seconds time refocus hold N/A
AFA_DELTAZ Microns distance between planes N/A
AFA_EXWAVELENGTH Sets the excitation wavelength for the channel specified by the sParam parameter. Setting the excitation wavelength by using AFA_WAVELENGTH with IpAFASetSingle modifies the dye file for the channel
Channel

IpAFASetSingle
Page 2-50
sAttribute fData sParam
AFA_FOCUSOFFSET Sets the focus offset for the channel specified by the sParam parameter. The focus offset for a channel is applied to the Z focus position determined for the focus channel when determining the Z focus position for the channel of interest. The focus offset for the current focus channel should not be set – trying to do so will return an IPCERR_INVARG error code
Channel
AFA_REFINDEX Refractive Index (RI) of immersion of specific channel. Modifies the lens file for the objective specified for the channel. When used with AFA 4.5 settings that do not refer to an existing lens file, a lens file will be created automatically if the objective is known (see AFA_OBJECTIVE).
Channel
AFA_PREVIEWTIME Seconds time preview hold N/A
AFA_TILEANGLE Angle of tiling in radians Double
AFA_TILESTAGESCALE Stage movement Calibrated pixel distance
AFA_WAVELENGTH Modifies the dye file for the channel. When used with AFA 4.5 settings that do not refer to an existing dye file, a dye file will be created automatically.
Channel
AFA_Z_SCAN_NOMINAL Z nominal position for a scan location scan location
AFA_Z_STG_NOMINAL Z nominal position for a stage location stage location
Example ' Set stage position 4 to the current focus position. ' Start by getting the absolute (not relative) stage ' position in X, Y, Z: Dim posArr(0 to 2) As Single ret = IpStageGetAbsPosition(posArr(0)) ' Set the 4th position to this Z value: ret = IpAFASetSingle(AFA_Z_STG_NOMINAL, 3, posArr(2))
See Also IpAFASetEx, IpAFASetInt, IpAFASetStr
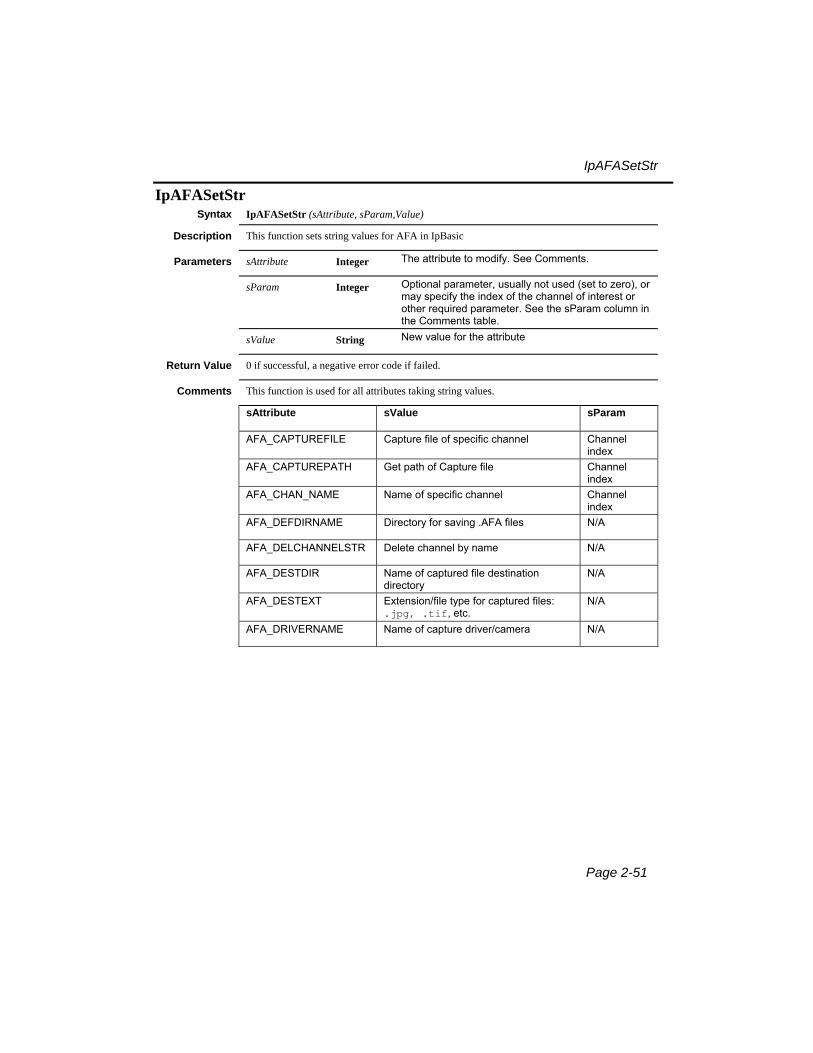
IpAFASetStr
Page 2-51
IpAFASetStr Syntax IpAFASetStr (sAttribute, sParam,Value)
Description This function sets string values for AFA in IpBasic
Parameters sAttribute Integer The attribute to modify. See Comments.
sParam Integer Optional parameter, usually not used (set to zero), or may specify the index of the channel of interest or other required parameter. See the sParam column in the Comments table.
sValue String New value for the attribute
Return Value 0 if successful, a negative error code if failed.
Comments This function is used for all attributes taking string values.
sAttribute sValue sParam
AFA_CAPTUREFILE Capture file of specific channel Channel index
AFA_CAPTUREPATH Get path of Capture file Channel index
AFA_CHAN_NAME Name of specific channel Channel index
AFA_DEFDIRNAME Directory for saving .AFA files N/A
AFA_DELCHANNELSTR Delete channel by name N/A
AFA_DESTDIR Name of captured file destination directory
N/A
AFA_DESTEXT Extension/file type for captured files: .jpg, .tif, etc.
N/A
AFA_DRIVERNAME Name of capture driver/camera N/A
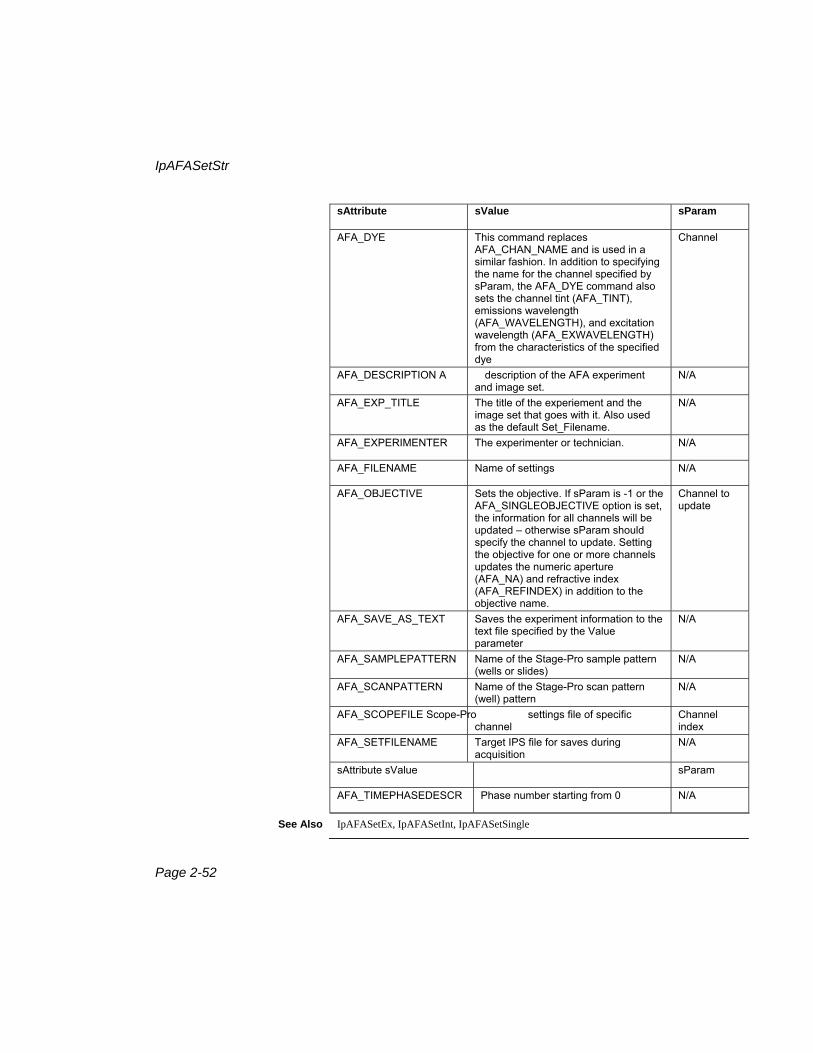
IpAFASetStr
Page 2-52
sAttribute sValue sParam
AFA_DYE This command replaces AFA_CHAN_NAME and is used in a similar fashion. In addition to specifying the name for the channel specified by sParam, the AFA_DYE command also sets the channel tint (AFA_TINT), emissions wavelength (AFA_WAVELENGTH), and excitation wavelength (AFA_EXWAVELENGTH) from the characteristics of the specified dye
Channel
AFA_DESCRIPTION A description of the AFA experiment and image set.
N/A
AFA_EXP_TITLE The title of the experiement and the image set that goes with it. Also used as the default Set_Filename.
N/A
AFA_EXPERIMENTER The experimenter or technician. N/A
AFA_FILENAME Name of settings N/A
AFA_OBJECTIVE Sets the objective. If sParam is -1 or the AFA_SINGLEOBJECTIVE option is set, the information for all channels will be updated – otherwise sParam should specify the channel to update. Setting the objective for one or more channels updates the numeric aperture (AFA_NA) and refractive index (AFA_REFINDEX) in addition to the objective name.
Channel to update
AFA_SAVE_AS_TEXT Saves the experiment information to the text file specified by the Value parameter
N/A
AFA_SAMPLEPATTERN Name of the Stage-Pro sample pattern (wells or slides)
N/A
AFA_SCANPATTERN Name of the Stage-Pro scan pattern (well) pattern
N/A
AFA_SCOPEFILE Scope-Pro settings file of specific channel
Channel index
AFA_SETFILENAME Target IPS file for saves during acquisition
N/A
sAttribute sValue sParam
AFA_TIMEPHASEDESCR Phase number starting from 0 N/A
See Also IpAFASetEx, IpAFASetInt, IpAFASetSingle
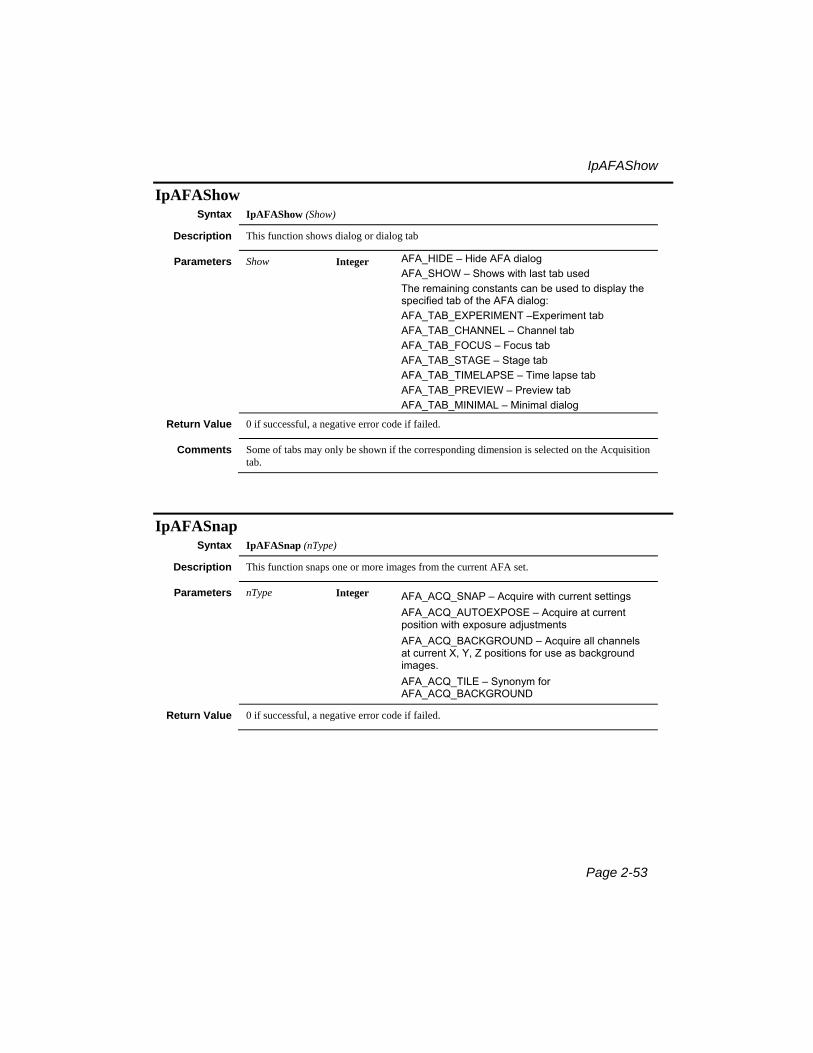
IpAFAShow
Page 2-53
IpAFAShow Syntax IpAFAShow (Show)
Description This function shows dialog or dialog tab
Parameters Show Integer AFA_HIDE – Hide AFA dialog AFA_SHOW – Shows with last tab used The remaining constants can be used to display the specified tab of the AFA dialog: AFA_TAB_EXPERIMENT –Experiment tab AFA_TAB_CHANNEL – Channel tab AFA_TAB_FOCUS – Focus tab AFA_TAB_STAGE – Stage tab AFA_TAB_TIMELAPSE – Time lapse tab AFA_TAB_PREVIEW – Preview tab AFA_TAB_MINIMAL – Minimal dialog
Return Value 0 if successful, a negative error code if failed.
Comments Some of tabs may only be shown if the corresponding dimension is selected on the Acquisition tab.
IpAFASnap Syntax IpAFASnap (nType)
Description This function snaps one or more images from the current AFA set.
Parameters nType Integer AFA_ACQ_SNAP – Acquire with current settings AFA_ACQ_AUTOEXPOSE – Acquire at current position with exposure adjustments AFA_ACQ_BACKGROUND – Acquire all channels at current X, Y, Z positions for use as background images. AFA_ACQ_TILE – Synonym for AFA_ACQ_BACKGROUND
Return Value 0 if successful, a negative error code if failed.
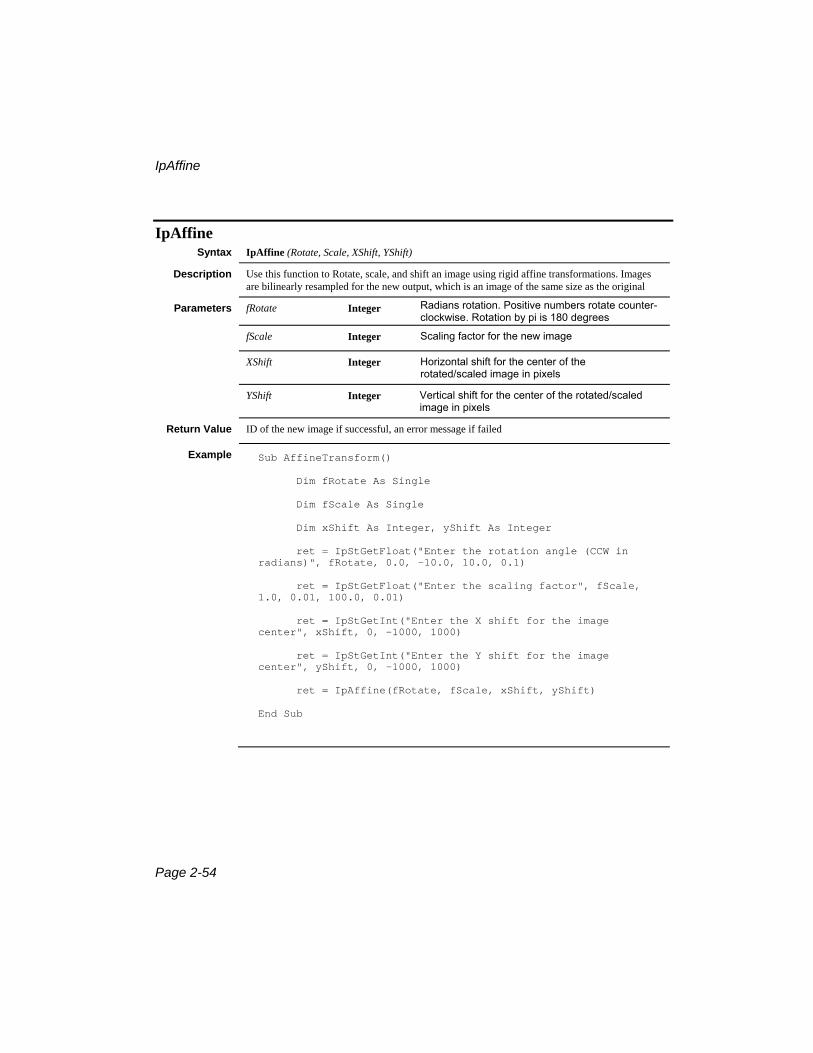
IpAffine
Page 2-54
IpAffine Syntax IpAffine (Rotate, Scale, XShift, YShift)
Description Use this function to Rotate, scale, and shift an image using rigid affine transformations. Images are bilinearly resampled for the new output, which is an image of the same size as the original
Parameters fRotate Integer Radians rotation. Positive numbers rotate counter-clockwise. Rotation by pi is 180 degrees
fScale Integer Scaling factor for the new image
XShift Integer Horizontal shift for the center of the rotated/scaled image in pixels
YShift Integer Vertical shift for the center of the rotated/scaled image in pixels
Return Value ID of the new image if successful, an error message if failed
Example Sub AffineTransform()
Dim fRotate As Single
Dim fScale As Single
Dim xShift As Integer, yShift As Integer
ret = IpStGetFloat("Enter the rotation angle (CCW in radians)", fRotate, 0.0, -10.0, 10.0, 0.1)
ret = IpStGetFloat("Enter the scaling factor", fScale, 1.0, 0.01, 100.0, 0.01)
ret = IpStGetInt("Enter the X shift for the image center", xShift, 0, -1000, 1000)
ret = IpStGetInt("Enter the Y shift for the image center", yShift, 0, -1000, 1000)
ret = IpAffine(fRotate, fScale, xShift, yShift)
End Sub
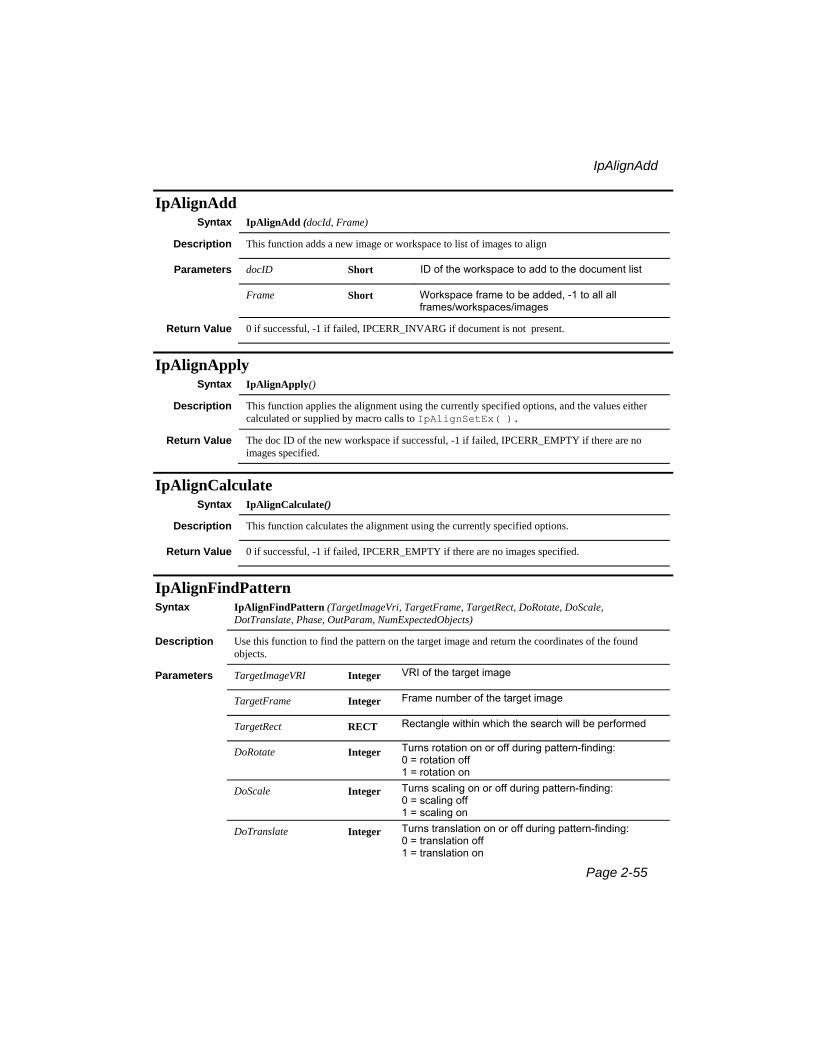
IpAlignAdd
Page 2-55
IpAlignAdd Syntax IpAlignAdd (docId, Frame)
Description This function adds a new image or workspace to list of images to align
Parameters docID Short ID of the workspace to add to the document list
Frame Short Workspace frame to be added, -1 to all all frames/workspaces/images
Return Value 0 if successful, -1 if failed, IPCERR_INVARG if document is not present.
IpAlignApply Syntax IpAlignApply()
Description This function applies the alignment using the currently specified options, and the values either calculated or supplied by macro calls to IpAlignSetEx( ).
Return Value The doc ID of the new workspace if successful, -1 if failed, IPCERR_EMPTY if there are no images specified.
IpAlignCalculate Syntax IpAlignCalculate()
Description This function calculates the alignment using the currently specified options.
Return Value 0 if successful, -1 if failed, IPCERR_EMPTY if there are no images specified.
IpAlignFindPattern Syntax IpAlignFindPattern (TargetImageVri, TargetFrame, TargetRect, DoRotate, DoScale,
DotTranslate, Phase, OutParam, NumExpectedObjects)
Description Use this function to find the pattern on the target image and return the coordinates of the found objects.
Parameters TargetImageVRI Integer VRI of the target image
TargetFrame Integer Frame number of the target image
TargetRect RECT Rectangle within which the search will be performed
DoRotate Integer Turns rotation on or off during pattern-finding: 0 = rotation off 1 = rotation on
DoScale Integer Turns scaling on or off during pattern-finding: 0 = scaling off 1 = scaling on
DoTranslate Integer Turns translation on or off during pattern-finding: 0 = translation off 1 = translation on
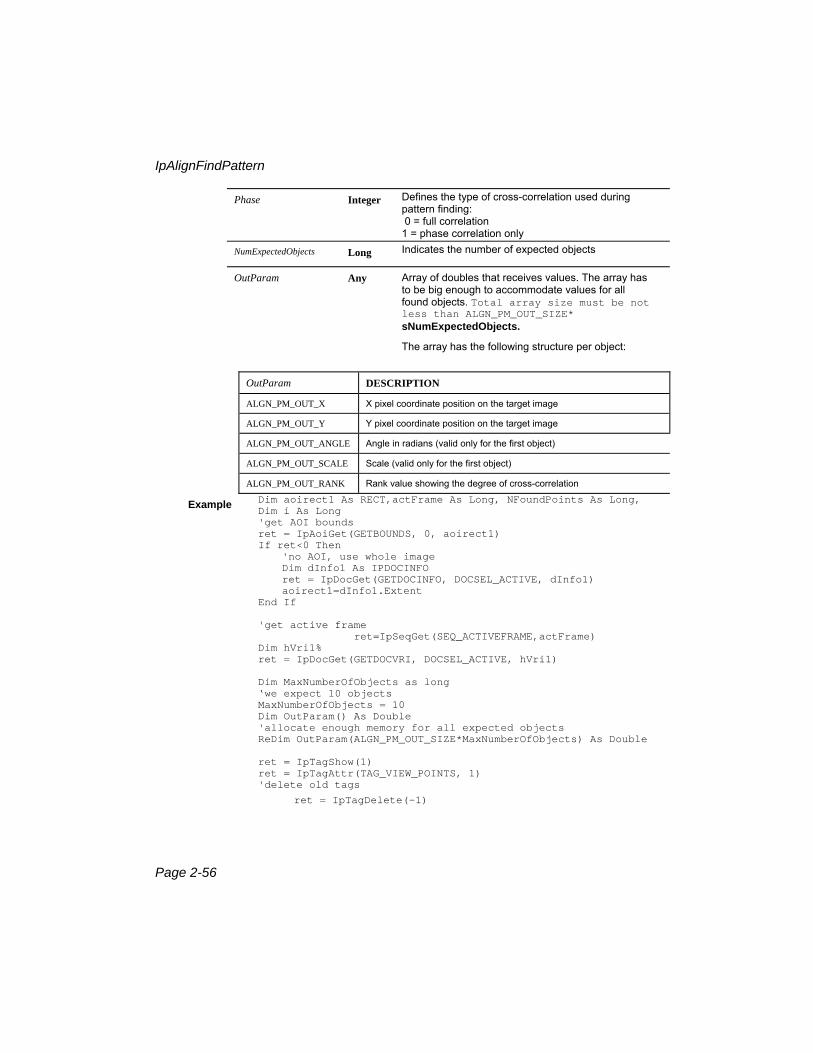
IpAlignFindPattern
Page 2-56
Phase Integer Defines the type of cross-correlation used during pattern finding: 0 = full correlation 1 = phase correlation only
NumExpectedObjects Long Indicates the number of expected objects
OutParam Any Array of doubles that receives values. The array has to be big enough to accommodate values for all found objects. Total array size must be not less than ALGN_PM_OUT_SIZE* sNumExpectedObjects.
The array has the following structure per object:
OutParam DESCRIPTION
ALGN_PM_OUT_X X pixel coordinate position on the target image
ALGN_PM_OUT_Y Y pixel coordinate position on the target image
ALGN_PM_OUT_ANGLE Angle in radians (valid only for the first object)
ALGN_PM_OUT_SCALE Scale (valid only for the first object)
ALGN_PM_OUT_RANK Rank value showing the degree of cross-correlation
Example Dim aoirect1 As RECT,actFrame As Long, NFoundPoints As Long, Dim i As Long 'get AOI bounds ret = IpAoiGet(GETBOUNDS, 0, aoirect1) If ret<0 Then 'no AOI, use whole image Dim dInfo1 As IPDOCINFO ret = IpDocGet(GETDOCINFO, DOCSEL_ACTIVE, dInfo1) aoirect1=dInfo1.Extent End If 'get active frame
ret=IpSeqGet(SEQ_ACTIVEFRAME,actFrame) Dim hVri1% ret = IpDocGet(GETDOCVRI, DOCSEL_ACTIVE, hVri1) Dim MaxNumberOfObjects as long ‘we expect 10 objects MaxNumberOfObjects = 10 Dim OutParam() As Double 'allocate enough memory for all expected objects ReDim OutParam(ALGN_PM_OUT_SIZE*MaxNumberOfObjects) As Double ret = IpTagShow(1) ret = IpTagAttr(TAG_VIEW_POINTS, 1) 'delete old tags
ret = IpTagDelete(-1)

IpAlignFindPattern
Page 2-57
Example Dim NumFoundObjects As Long NumFoundObjects=0 'find pattern using translation only and Full correlation NFoundPoints=IpAlignFindPattern(hVri1, actFrame, aoirect1, _ 0, 0, 1, 0, OutParam(0),MaxNumberOfObjects) Dim AcceptanceThreshold as double ‘set acceptance threshold to ignore false objects AcceptanceThreshold=0.5 Debug.Print "Number of found points = " & NFoundPoints For i=0 To NFoundPoints-1 'check rank with acceptance threshold If OutParam(4 + ALGN_PM_OUT_SIZE*i)>= _ AcceptanceThreshold Then 'print data Debug.Print "Point Index = " & i Debug.Print "Position X=" & _ OutParam(ALGN_PM_OUT_X + ALGN_PM_OUT_SIZE*i) Debug.Print "Position Y=" & _ OutParam(ALGN_PM_OUT_Y + ALGN_PM_OUT_SIZE*i) ‘angle and scale values are valid only ‘for the first object If i=0 Then Debug.Print "Angle =" & _ OutParam(ALGN_PM_OUT_ANGLE + ALGN_PM_OUT_SIZE*i)*180/3.1415 Debug.Print "Scale =" & _ OutParam(ALGN_PM_OUT_SCALE + ALGN_PM_OUT_SIZE*i) End If Debug.Print "Rank =" & _ OutParam(ALGN_PM_OUT_RANK + ALGN_PM_OUT_SIZE*i)
'mark the position with a tag
ret = IpTagPt(OutParam(ALGN_PM_OUT_X + _ ALGN_PM_OUT_SIZE*i), _ OutParam(ALGN_PM_OUT_Y + _ ALGN_PM_OUT_SIZE*i), 0) End If Next i
Return Value Number of found objects if successful, an error code if failed.
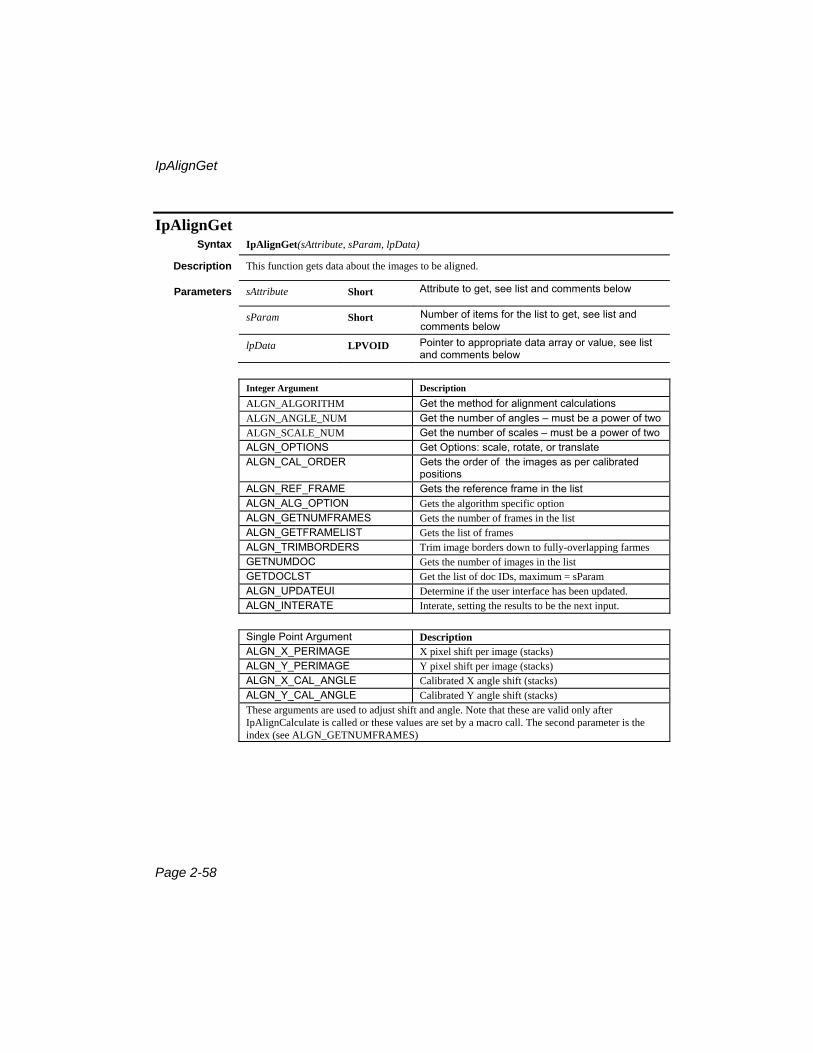
IpAlignGet
Page 2-58
IpAlignGet Syntax IpAlignGet(sAttribute, sParam, lpData)
Description This function gets data about the images to be aligned.
Parameters sAttribute Short Attribute to get, see list and comments below
sParam Short Number of items for the list to get, see list and comments below
lpData LPVOID Pointer to appropriate data array or value, see list and comments below
Integer Argument Description
ALGN_ALGORITHM Get the method for alignment calculations ALGN_ANGLE_NUM Get the number of angles – must be a power of two ALGN_SCALE_NUM Get the number of scales – must be a power of two ALGN_OPTIONS Get Options: scale, rotate, or translate ALGN_CAL_ORDER Gets the order of the images as per calibrated
positions ALGN_REF_FRAME Gets the reference frame in the list ALGN_ALG_OPTION Gets the algorithm specific option ALGN_GETNUMFRAMES Gets the number of frames in the list ALGN_GETFRAMELIST Gets the list of frames ALGN_TRIMBORDERS Trim image borders down to fully-overlapping farmes GETNUMDOC Gets the number of images in the list GETDOCLST Get the list of doc IDs, maximum = sParam ALGN_UPDATEUI Determine if the user interface has been updated. ALGN_INTERATE Interate, setting the results to be the next input.
Single Point Argument Description ALGN_X_PERIMAGE X pixel shift per image (stacks) ALGN_Y_PERIMAGE Y pixel shift per image (stacks) ALGN_X_CAL_ANGLE Calibrated X angle shift (stacks) ALGN_Y_CAL_ANGLE Calibrated Y angle shift (stacks) These arguments are used to adjust shift and angle. Note that these are valid only after IpAlignCalculate is called or these values are set by a macro call. The second parameter is the index (see ALGN_GETNUMFRAMES)
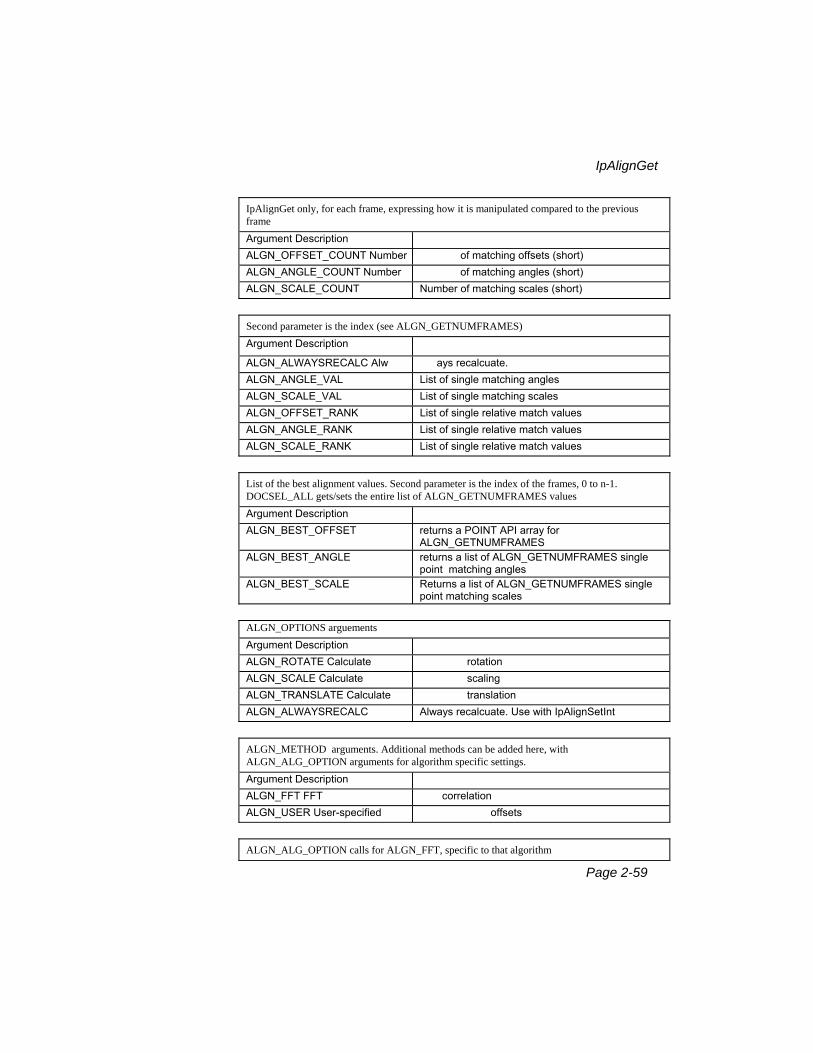
IpAlignGet
Page 2-59
IpAlignGet only, for each frame, expressing how it is manipulated compared to the previous frame Argument Description ALGN_OFFSET_COUNT Number of matching offsets (short) ALGN_ANGLE_COUNT Number of matching angles (short) ALGN_SCALE_COUNT Number of matching scales (short)
Second parameter is the index (see ALGN_GETNUMFRAMES) Argument Description
ALGN_ALWAYSRECALC Alw ays recalcuate. ALGN_ANGLE_VAL List of single matching angles ALGN_SCALE_VAL List of single matching scales ALGN_OFFSET_RANK List of single relative match values ALGN_ANGLE_RANK List of single relative match values ALGN_SCALE_RANK List of single relative match values
List of the best alignment values. Second parameter is the index of the frames, 0 to n-1. DOCSEL_ALL gets/sets the entire list of ALGN_GETNUMFRAMES values Argument Description ALGN_BEST_OFFSET returns a POINT API array for
ALGN_GETNUMFRAMES ALGN_BEST_ANGLE returns a list of ALGN_GETNUMFRAMES single
point matching angles ALGN_BEST_SCALE Returns a list of ALGN_GETNUMFRAMES single
point matching scales
ALGN_OPTIONS arguements Argument Description ALGN_ROTATE Calculate rotation ALGN_SCALE Calculate scaling ALGN_TRANSLATE Calculate translation ALGN_ALWAYSRECALC Always recalcuate. Use with IpAlignSetInt
ALGN_METHOD arguments. Additional methods can be added here, with ALGN_ALG_OPTION arguments for algorithm specific settings. Argument Description ALGN_FFT FFT correlation ALGN_USER User-specified offsets
ALGN_ALG_OPTION calls for ALGN_FFT, specific to that algorithm

IpAlignOpen
Page 2-60
Argument Description ALGN_FFTFULL Set to full FFT correlation ALGN_FFTPHASE Set to FFT phase correlation ALGN_FFT_NANGLES Number of angles of rotation (power of 2) ALGN_FFT_NSCALES Number of scales (power of 2) ALGN_FFT_APODIZE Boolean, prefilter for rotation/scaling may help with
some images.
ALGN_ALG_OPTION calls for ALGN_USER, specific to that algorithm. These are based on spatial calibration values Argument Description ALGN_USER_X X shift per plane (single) ALGN_USER_Y Y shift per plane (single) ALGN_USER_XANGLE X shift angle (single, degrees) ALGN_USER_YANGLE Y shift angle (single, degrees) ALGN_USER_XDIST X shift distance (single, degrees) ALGN_USER_YDIST Y shift distance (single, degrees) ALGN_USER_ZDIST Z shift distance (single, degrees)
IpAlignOpen Syntax IpAlignOpen(FileName)
Description This function loads the current offset values.
Parameters FileName LSPTR Load offset values. Fails if the number of offsets does not match the current number of selected frames/images, or if the tile layouts are different.
Return Value 0 if successful, -1 if failed, IPCERR_EMPTY if there are no values to load.
IpAlignRemove Syntax IpAlignRemove(docID, Frame)
Description This function removes the specified workspace/image/frame from the alignment list.
Parameters docID Short ID of the workspace to remove from the document list. DOCSEL_ALL to clear the list.
Frame Short Workspace frame to be removed, -1 remove all frames/workspaces/images
Return Value 0 if successful, -1 if failed

IpAlignSave
Page 2-61
IpAlignSave Syntax IpAlignSave(FileName)
Description This function saves the current offset values.
Parameters FileName LSPTR Save offset values. Fails if the number of offsets does not match the current number of selected frames/images, or if the tile layouts are different.
Return Value 0 if successful, -1 if failed, IPCERR_EMPTY if there are no values to save
IpAlignSetEx Syntax IpAlignSetEx (sAttribute, sParam, lpData)
Description This function sets the alignment attributes.
Parameters sAttribute Short Attribute to set, see list and comments in IpAlignGet
sParam Short Number of items for the list to set, see list and comments in IpAlignGet
lpData LPVOID Pointer to appropriate data array or value, see list and comments in IpAlignGet
Return Value 0 if successful, IPCERR_INVCOMMAND if failed, number of values for list function.
See Also IpAlignSetInt, IpAlignSetSingle
IpAlignSetInt Syntax IpAlignSetInt (sAttribute, sParam, sData)
Description This function sets the alignment attributes
Parameters sAttribute Short Attribute to set, see list and comments in IpAlignGet
sParam Short Number of items for the list to set, see list and comments in IpAlignGet
sData Short Pointer to appropriate data array or value, see list and comments in IpAlignGet
Return Value 0 if successful, IPCERR_INVCOMMAND if failed, number of values for list function.
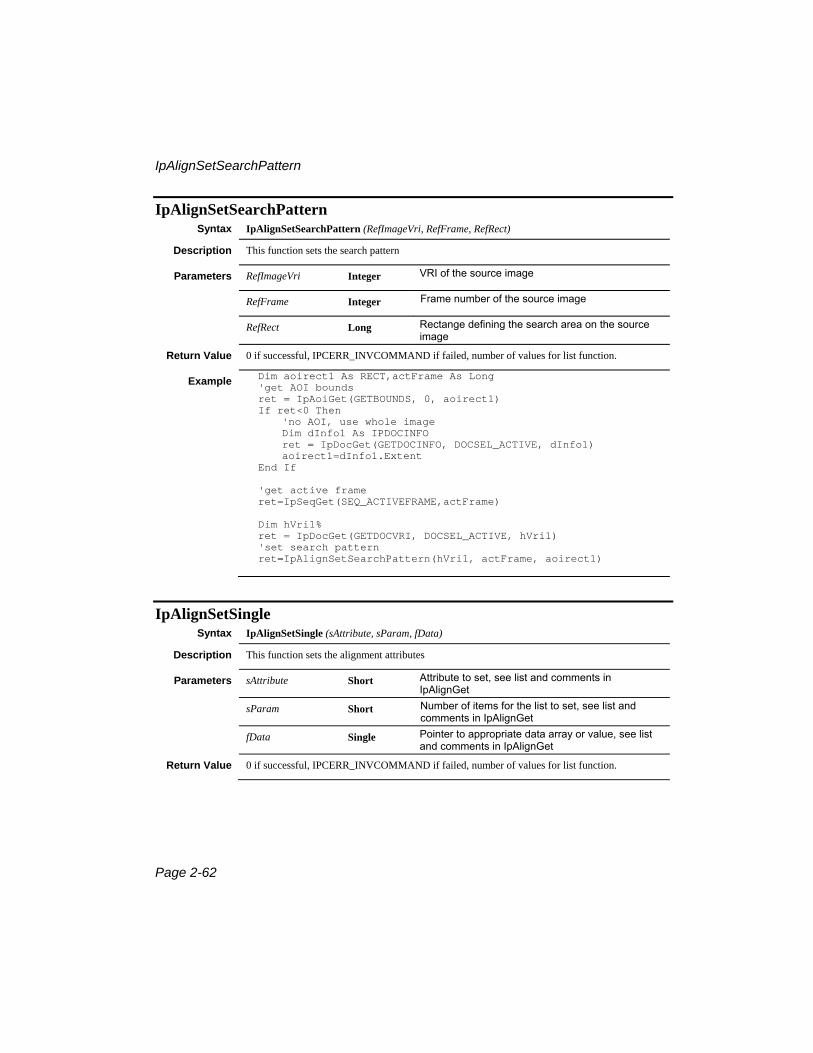
IpAlignSetSearchPattern
Page 2-62
IpAlignSetSearchPattern Syntax IpAlignSetSearchPattern (RefImageVri, RefFrame, RefRect)
Description This function sets the search pattern
Parameters RefImageVri Integer VRI of the source image
RefFrame Integer Frame number of the source image
RefRect Long Rectange defining the search area on the source image
Return Value 0 if successful, IPCERR_INVCOMMAND if failed, number of values for list function.
Example Dim aoirect1 As RECT,actFrame As Long 'get AOI bounds ret = IpAoiGet(GETBOUNDS, 0, aoirect1) If ret<0 Then 'no AOI, use whole image Dim dInfo1 As IPDOCINFO ret = IpDocGet(GETDOCINFO, DOCSEL_ACTIVE, dInfo1) aoirect1=dInfo1.Extent End If 'get active frame ret=IpSeqGet(SEQ_ACTIVEFRAME,actFrame) Dim hVri1% ret = IpDocGet(GETDOCVRI, DOCSEL_ACTIVE, hVri1) 'set search pattern ret=IpAlignSetSearchPattern(hVri1, actFrame, aoirect1)
IpAlignSetSingle Syntax IpAlignSetSingle (sAttribute, sParam, fData)
Description This function sets the alignment attributes
Parameters sAttribute Short Attribute to set, see list and comments in IpAlignGet
sParam Short Number of items for the list to set, see list and comments in IpAlignGet
fData Single Pointer to appropriate data array or value, see list and comments in IpAlignGet
Return Value 0 if successful, IPCERR_INVCOMMAND if failed, number of values for list function.

IpAlignShow
Page 2-63
IpAlignShow Syntax IpAlignShow(nDialgo, bShow)
Description This function shows or hides the alignment dialog.
Parameters nDialog Short Use one of the following to indicate which dialog to hide or show: ALGN_IMAGETAB ALGN_OPTIONTAB ALGN_PREVIEW
bShow Bool A value of 0 or 1, indicates whether to show or hide the selected alignment dialog 0 = hide the dialog 1 = show the dialog
Return Value 0 if successful, IPCERR_INVCOMMAND if the dialog cannot be shown

IpAnActivateAll
Page 2-64
IpAnActivateAll Syntax IpAnActivateAll()
Description This function selects all annotation objects in the current window.
Return Value Returns an error code if no annotation objects are present.
See Also IpAnDeleteAll
IpAnActivateDefaultObj Syntax IpAnActivateDefaultObj(nObjType)
Description Activates the default object of the specified type.
Parameters nObjType Integer Type of object created. Must be one of the following: GO_OBJ_LINE GO_OBJ_RECT GO_OBJ_ROUNDRECT GO_OBJ_ELLIPSE GO_OBJ_TEXT GO_OBJ_POLY
Return Value Returns the object ID of the default object or an error code.
See Also IpAnCreateObj, IpAnDeleteObj
Comments Default objects are not displayed and used only to keep attributes. New object will be created with attributes, copied from the default object. This macro is not recorded.
IpAnActivateObjID Syntax IpAnActivateObjID(nObjID)
Description Activates the specified object.
Parameters nObjID Integer The document ID of the object to be activated.
See Also IpAnCreateObj, IpAnDeleteObj
Comments This macro is recorded when the user selects an annotation object.
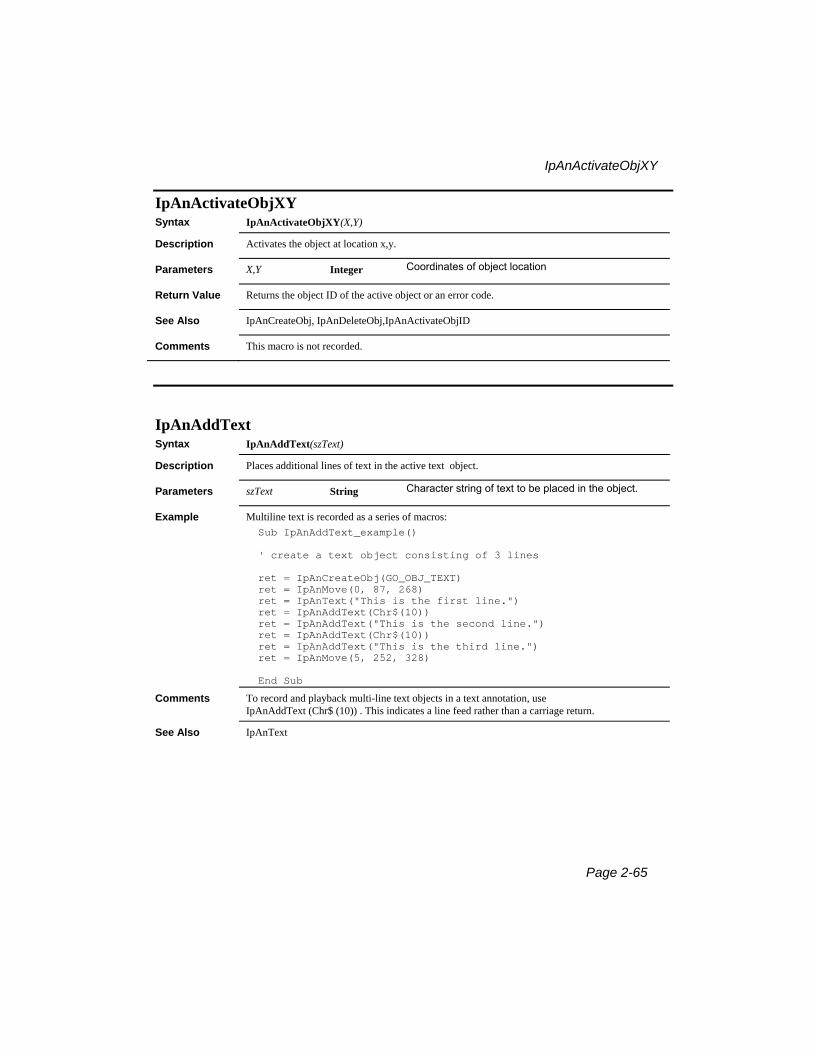
IpAnActivateObjXY
Page 2-65
IpAnActivateObjXY Syntax IpAnActivateObjXY(X,Y)
Description Activates the object at location x,y.
Parameters X,Y Integer Coordinates of object location
Return Value Returns the object ID of the active object or an error code.
See Also IpAnCreateObj, IpAnDeleteObj,IpAnActivateObjID
Comments This macro is not recorded.
IpAnAddText Syntax IpAnAddText(szText)
Description Places additional lines of text in the active text object.
Parameters szText String Character string of text to be placed in the object.
Example Multiline text is recorded as a series of macros: Sub IpAnAddText_example() ' create a text object consisting of 3 lines ret = IpAnCreateObj(GO_OBJ_TEXT) ret = IpAnMove(0, 87, 268) ret = IpAnText("This is the first line.") ret = IpAnAddText(Chr$(10)) ret = IpAnAddText("This is the second line.") ret = IpAnAddText(Chr$(10)) ret = IpAnAddText("This is the third line.") ret = IpAnMove(5, 252, 328) End Sub
Comments To record and playback multi-line text objects in a text annotation, use IpAnAddText (Chr$ (10)) . This indicates a line feed rather than a carriage return.
See Also IpAnText

IpAnBurn
Page 2-66
IpAnBurn Syntax IpAnBurn()
Description This function permanently “burns” the drawing object into the image
Example Sub IpAnBurn_example()
' draw a filled rectangle and then burn it into the image ret = IpAnCreateObj(GO_OBJ_RECT) ret = IpAnMove(0, 122, 248) ret = IpAnMove(5, 259, 339) ret = IpAnSet(GO_ATTR_PENWIDTH, 4) ret = IpAnSet(GO_ATTR_RECTSTYLE, GO_RECTSTYLE_BORDER_FILL) ret = IpAnSet(GO_ATTR_PENCOLOR, 255) ret = IpAnSet(GO_ATTR_BRUSHCOLOR, 16711680) ret = IpAnBurn()
End Sub
IpAnCreateObj Syntax IpAnCreateObj(nObjType)
Description Creates an annotater object of the type nObject
Parameters nObjType Integer Type of object created. Must be one of the following: GO_OBJ_LINE GO_OBJ_RECT GO_OBJ_ROUNDRECT GO_OBJ_ELLIPSE GO_OBJ_TEXT GO_OBJ_POLY
Return Value Returns the Object ID of the new object or an error code.
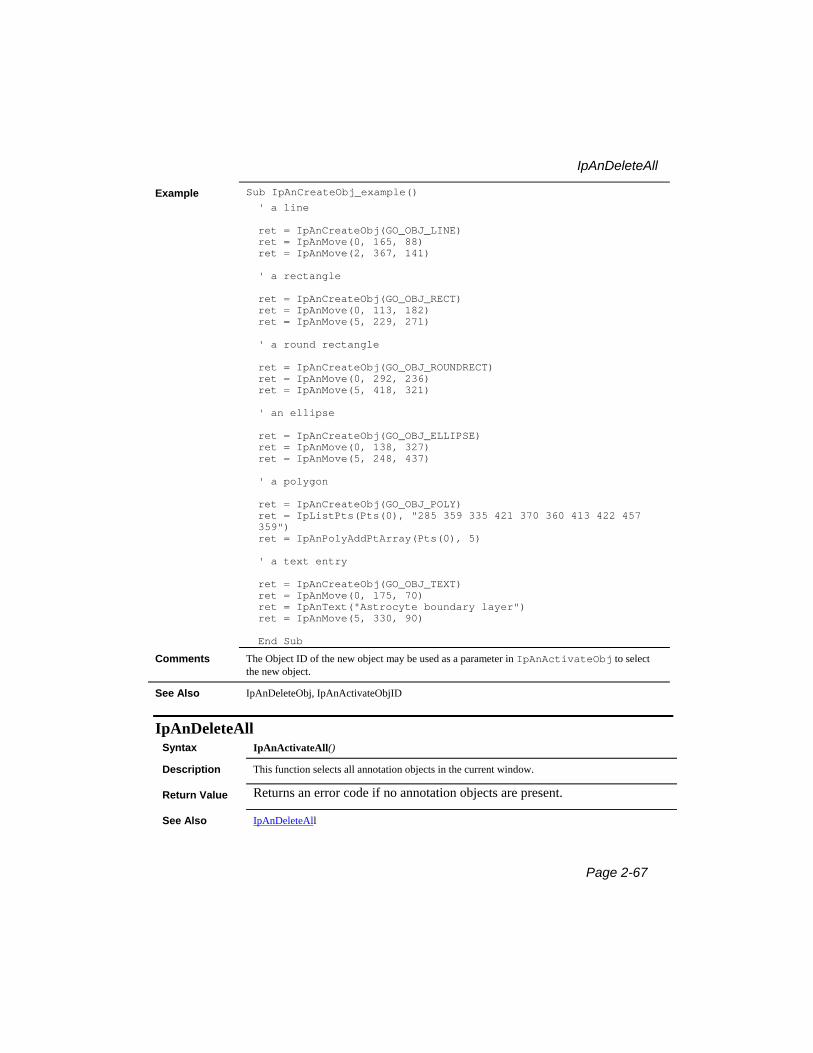
IpAnDeleteAll
Page 2-67
Example Sub IpAnCreateObj_example()
' a line ret = IpAnCreateObj(GO_OBJ_LINE) ret = IpAnMove(0, 165, 88) ret = IpAnMove(2, 367, 141) ' a rectangle ret = IpAnCreateObj(GO_OBJ_RECT) ret = IpAnMove(0, 113, 182) ret = IpAnMove(5, 229, 271) ' a round rectangle ret = IpAnCreateObj(GO_OBJ_ROUNDRECT) ret = IpAnMove(0, 292, 236) ret = IpAnMove(5, 418, 321) ' an ellipse ret = IpAnCreateObj(GO_OBJ_ELLIPSE) ret = IpAnMove(0, 138, 327) ret = IpAnMove(5, 248, 437) ' a polygon ret = IpAnCreateObj(GO_OBJ_POLY) ret = IpListPts(Pts(0), "285 359 335 421 370 360 413 422 457 359") ret = IpAnPolyAddPtArray(Pts(0), 5) ' a text entry ret = IpAnCreateObj(GO_OBJ_TEXT) ret = IpAnMove(0, 175, 70) ret = IpAnText("Astrocyte boundary layer") ret = IpAnMove(5, 330, 90) End Sub
Comments The Object ID of the new object may be used as a parameter in IpAnActivateObj to select the new object.
See Also IpAnDeleteObj, IpAnActivateObjID
IpAnDeleteAll Syntax IpAnActivateAll()
Description This function selects all annotation objects in the current window.
Return Value Returns an error code if no annotation objects are present.
See Also IpAnDeleteAll

IpAnDeleteObj
Page 2-68
IpAnDeleteObj Syntax IpAnDeleteObj()
Description Deletes the active object
Example Sub IpAnDeleteObj_example() ' create three rectangles then delete the second one Dim obj_id As Long ' variable to hold id of second rectangle ret = IpAnCreateObj(GO_OBJ_RECT) ret = IpAnMove(0, 86, 108) ret = IpAnMove(5, 189, 188) obj_id = IpAnCreateObj(GO_OBJ_RECT) ret = IpAnMove(0, 228, 186) ret = IpAnMove(5, 345, 282) ret = IpAnCreateObj(GO_OBJ_RECT) ret = IpAnMove(0, 88, 298) ret = IpAnMove(5, 207, 389) ret = IpAnActivateObjID(obj_id) ' make second rectangle active ret = IpAnDeleteObj() ' delete it End Sub
See Also IpAnCreateObj, IpAnActivateObjID
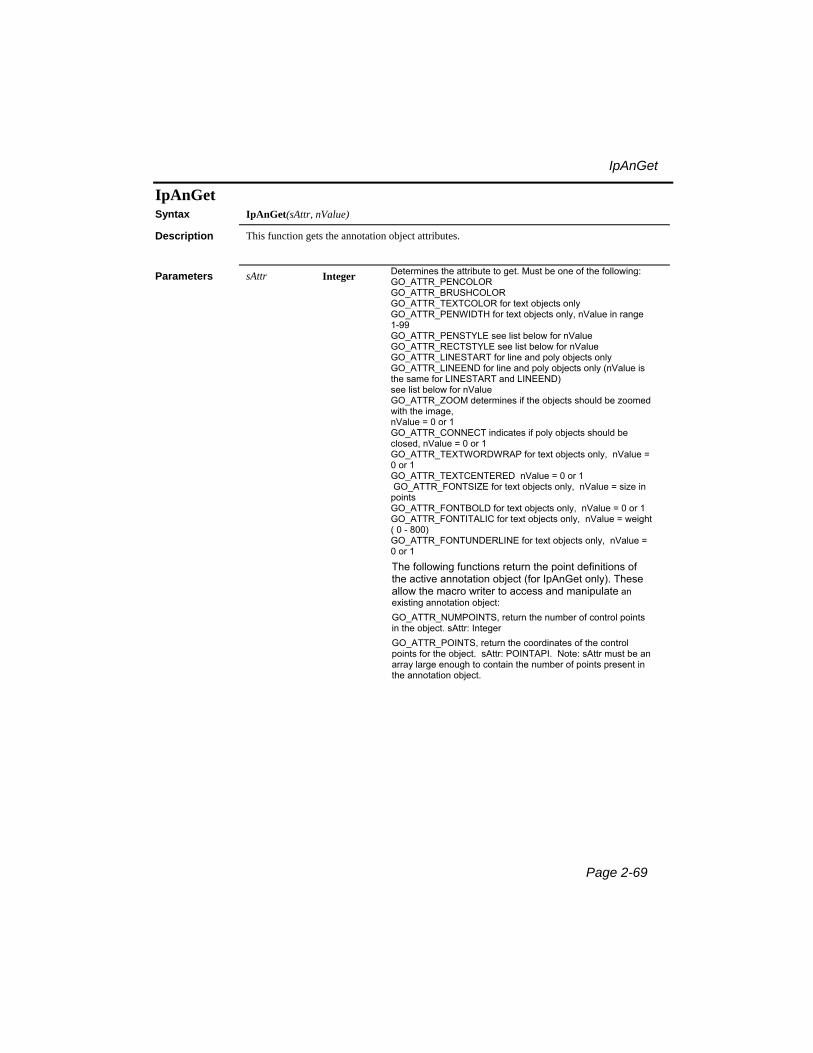
IpAnGet
Page 2-69
IpAnGet Syntax IpAnGet(sAttr, nValue)
Description This function gets the annotation object attributes.
Parameters sAttr Integer Determines the attribute to get. Must be one of the following: GO_ATTR_PENCOLOR GO_ATTR_BRUSHCOLOR GO_ATTR_TEXTCOLOR for text objects only GO_ATTR_PENWIDTH for text objects only, nValue in range 1-99 GO_ATTR_PENSTYLE see list below for nValue GO_ATTR_RECTSTYLE see list below for nValue GO_ATTR_LINESTART for line and poly objects only GO_ATTR_LINEEND for line and poly objects only (nValue is the same for LINESTART and LINEEND) see list below for nValue GO_ATTR_ZOOM determines if the objects should be zoomed with the image, nValue = 0 or 1 GO_ATTR_CONNECT indicates if poly objects should be closed, nValue = 0 or 1 GO_ATTR_TEXTWORDWRAP for text objects only, nValue = 0 or 1 GO_ATTR_TEXTCENTERED nValue = 0 or 1 GO_ATTR_FONTSIZE for text objects only, nValue = size in points GO_ATTR_FONTBOLD for text objects only, nValue = 0 or 1 GO_ATTR_FONTITALIC for text objects only, nValue = weight ( 0 - 800) GO_ATTR_FONTUNDERLINE for text objects only, nValue = 0 or 1
The following functions return the point definitions of the active annotation object (for IpAnGet only). These allow the macro writer to access and manipulate an existing annotation object: GO_ATTR_NUMPOINTS, return the number of control points in the object. sAttr: Integer GO_ATTR_POINTS, return the coordinates of the control points for the object. sAttr: POINTAPI. Note: sAttr must be an array large enough to contain the number of points present in the annotation object.
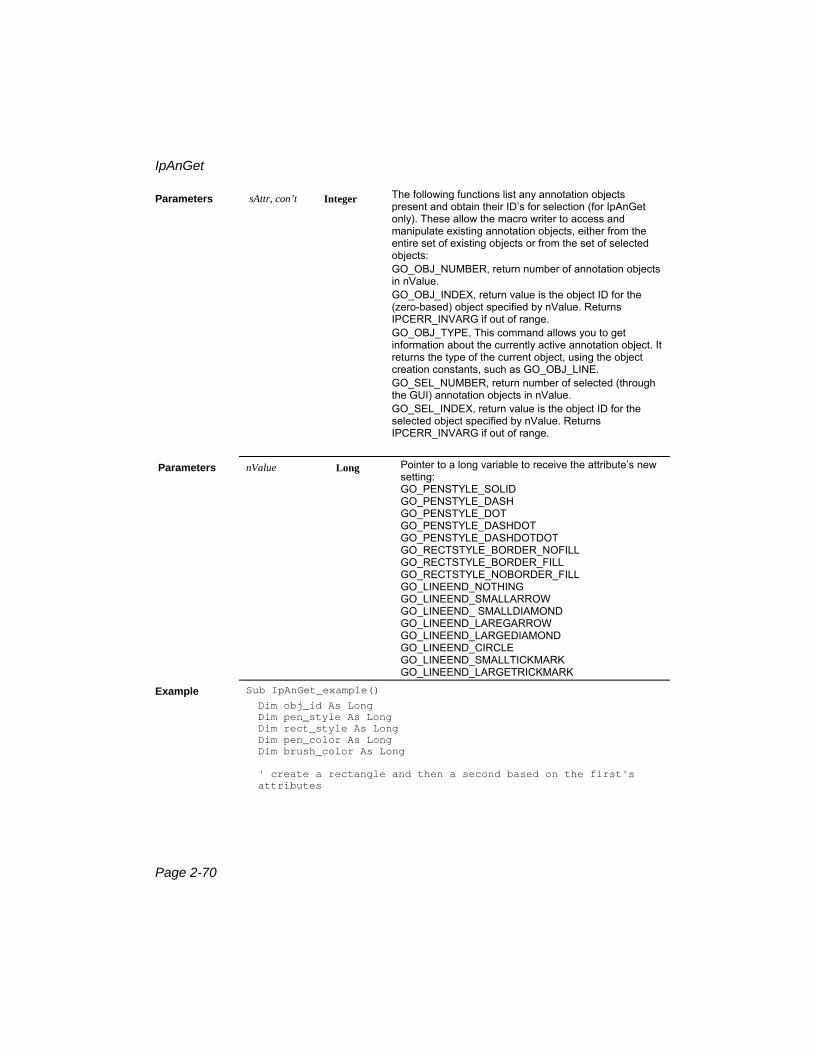
IpAnGet
Page 2-70
Parameters sAttr, con’t Integer The following functions list any annotation objects present and obtain their ID’s for selection (for IpAnGet only). These allow the macro writer to access and manipulate existing annotation objects, either from the entire set of existing objects or from the set of selected objects: GO_OBJ_NUMBER, return number of annotation objects in nValue. GO_OBJ_INDEX, return value is the object ID for the (zero-based) object specified by nValue. Returns IPCERR_INVARG if out of range. GO_OBJ_TYPE, This command allows you to get information about the currently active annotation object. It returns the type of the current object, using the object creation constants, such as GO_OBJ_LINE. GO_SEL_NUMBER, return number of selected (through the GUI) annotation objects in nValue. GO_SEL_INDEX, return value is the object ID for the selected object specified by nValue. Returns IPCERR_INVARG if out of range.
Parameters nValue Long Pointer to a long variable to receive the attribute’s new
setting: GO_PENSTYLE_SOLID GO_PENSTYLE_DASH GO_PENSTYLE_DOT GO_PENSTYLE_DASHDOT GO_PENSTYLE_DASHDOTDOT GO_RECTSTYLE_BORDER_NOFILL GO_RECTSTYLE_BORDER_FILL GO_RECTSTYLE_NOBORDER_FILL GO_LINEEND_NOTHING GO_LINEEND_SMALLARROW GO_LINEEND_ SMALLDIAMOND GO_LINEEND_LAREGARROW GO_LINEEND_LARGEDIAMOND GO_LINEEND_CIRCLE GO_LINEEND_SMALLTICKMARK GO_LINEEND_LARGETRICKMARK
Example Sub IpAnGet_example()
Dim obj_id As Long Dim pen_style As Long Dim rect_style As Long Dim pen_color As Long Dim brush_color As Long ' create a rectangle and then a second based on the first's attributes
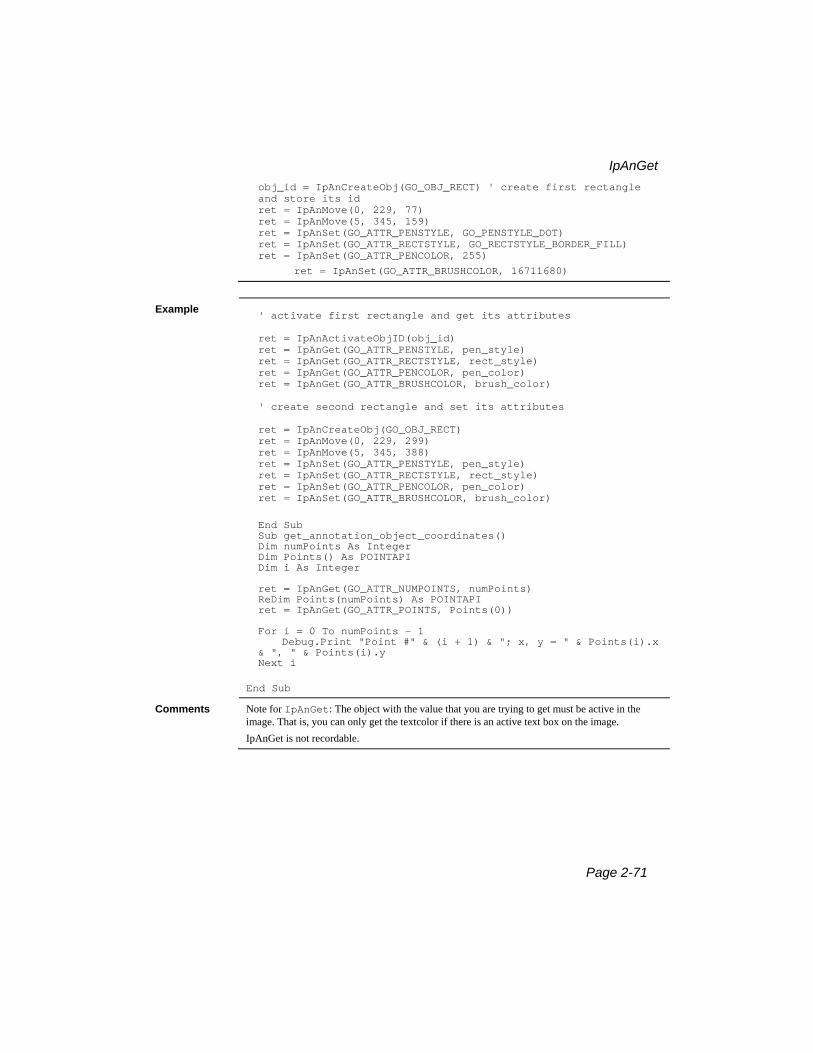
IpAnGet
Page 2-71
obj_id = IpAnCreateObj(GO_OBJ_RECT) ' create first rectangle and store its id ret = IpAnMove(0, 229, 77) ret = IpAnMove(5, 345, 159) ret = IpAnSet(GO_ATTR_PENSTYLE, GO_PENSTYLE_DOT) ret = IpAnSet(GO_ATTR_RECTSTYLE, GO_RECTSTYLE_BORDER_FILL) ret = IpAnSet(GO_ATTR_PENCOLOR, 255)
ret = IpAnSet(GO_ATTR_BRUSHCOLOR, 16711680)
Example
' activate first rectangle and get its attributes ret = IpAnActivateObjID(obj_id) ret = IpAnGet(GO_ATTR_PENSTYLE, pen_style) ret = IpAnGet(GO_ATTR_RECTSTYLE, rect_style) ret = IpAnGet(GO_ATTR_PENCOLOR, pen_color) ret = IpAnGet(GO_ATTR_BRUSHCOLOR, brush_color) ' create second rectangle and set its attributes ret = IpAnCreateObj(GO_OBJ_RECT) ret = IpAnMove(0, 229, 299) ret = IpAnMove(5, 345, 388) ret = IpAnSet(GO_ATTR_PENSTYLE, pen_style) ret = IpAnSet(GO_ATTR_RECTSTYLE, rect_style) ret = IpAnSet(GO_ATTR_PENCOLOR, pen_color) ret = IpAnSet(GO_ATTR_BRUSHCOLOR, brush_color)
End Sub Sub get_annotation_object_coordinates() Dim numPoints As Integer Dim Points() As POINTAPI Dim i As Integer ret = IpAnGet(GO_ATTR_NUMPOINTS, numPoints) ReDim Points(numPoints) As POINTAPI ret = IpAnGet(GO_ATTR_POINTS, Points(0)) For i = 0 To numPoints - 1 Debug.Print "Point #" & (i + 1) & "; x, y = " & Points(i).x & ", " & Points(i).y Next i
End Sub
Comments Note for IpAnGet: The object with the value that you are trying to get must be active in the image. That is, you can only get the textcolor if there is an active text box on the image. IpAnGet is not recordable.
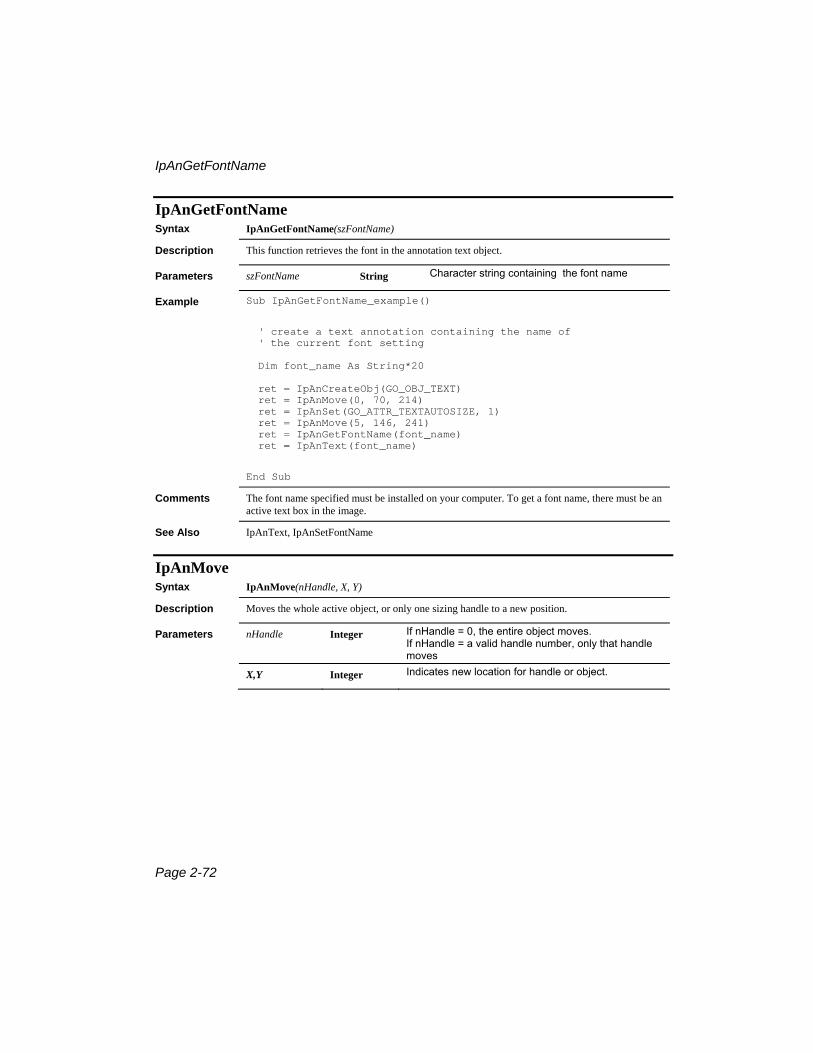
IpAnGetFontName
Page 2-72
IpAnGetFontName Syntax IpAnGetFontName(szFontName)
Description This function retrieves the font in the annotation text object.
Parameters szFontName String Character string containing the font name
Example Sub IpAnGetFontName_example()
' create a text annotation containing the name of ' the current font setting Dim font_name As String*20 ret = IpAnCreateObj(GO_OBJ_TEXT) ret = IpAnMove(0, 70, 214) ret = IpAnSet(GO_ATTR_TEXTAUTOSIZE, 1) ret = IpAnMove(5, 146, 241) ret = IpAnGetFontName(font_name) ret = IpAnText(font_name)
End Sub
Comments The font name specified must be installed on your computer. To get a font name, there must be an active text box in the image.
See Also IpAnText, IpAnSetFontName
IpAnMove Syntax IpAnMove(nHandle, X, Y)
Description Moves the whole active object, or only one sizing handle to a new position.
Parameters nHandle Integer If nHandle = 0, the entire object moves. If nHandle = a valid handle number, only that handle moves
X,Y Integer Indicates new location for handle or object.

IpAnPolyAddPtArray
Page 2-73
Example Sub IpAnMove_example() ' lines have 2 handles, one at each end ret = IpAnCreateObj(GO_OBJ_LINE) ret = IpAnMove(0, 53, 72) ' inital handle becomes handle 1 after object is drawn ret = IpAnMove(2, 228, 72) ' rectangles have 8 handles starting wth handle 1 at the upper left corner ' and proceeding clockwise ret = IpAnCreateObj(GO_OBJ_RECT) ret = IpAnMove(0, 54, 114) ret = IpAnMove(5, 174, 185) ' handle 5 is the lower right corner. ' roundrectangles have 1 additional handle (9) that adjusts the ' radius of the corners ret = IpAnCreateObj(GO_OBJ_ROUNDRECT) ret = IpAnMove(0, 55, 223) ret = IpAnMove(5, 172, 301) ' ellipses have 8 handles like rectangles ret = IpAnCreateObj(GO_OBJ_ELLIPSE) ret = IpAnMove(0, 264, 116) ret = IpAnMove(5, 347, 199) ' polygons have as many handles as vertices ret = IpAnCreateObj(GO_OBJ_POLY) ret = IpListPts(Pts(0), "247 233 287 299 322 234 360 302 403 232") ret = IpAnPolyAddPtArray(Pts(0), 5) ' text objects have 8 handles like rectangles ret = IpAnCreateObj(GO_OBJ_TEXT) ret = IpAnMove(0, 45, 359) ret = IpAnText("Text example") ret = IpAnMove(5, 138, 378)
End Sub
See Also IpAnDeleteObj, IpAnActivateObj
IpAnPolyAddPtArray Syntax IpAnPolyAddPtArray(Points, nCount)
Description This function adds a point array for an active annotater poly object.
Parameters Points POINTAPI
The address (name) of the array of point coordinates (BASIC type, POINTAPI) that contains the number of coordinate points in the array.
NCount Integer A variable indicating the size of the array.
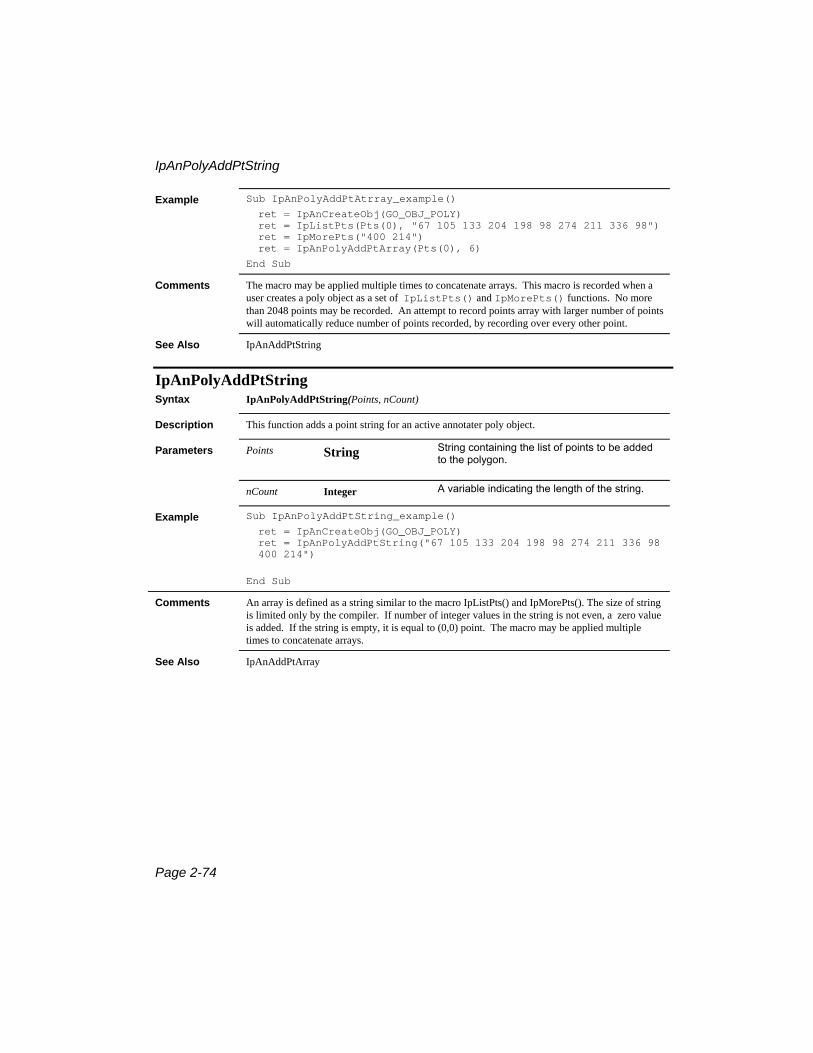
IpAnPolyAddPtString
Page 2-74
Example Sub IpAnPolyAddPtAtrray_example()
ret = IpAnCreateObj(GO_OBJ_POLY) ret = IpListPts(Pts(0), "67 105 133 204 198 98 274 211 336 98") ret = IpMorePts("400 214") ret = IpAnPolyAddPtArray(Pts(0), 6)
End Sub
Comments The macro may be applied multiple times to concatenate arrays. This macro is recorded when a user creates a poly object as a set of IpListPts() and IpMorePts() functions. No more than 2048 points may be recorded. An attempt to record points array with larger number of points will automatically reduce number of points recorded, by recording over every other point.
See Also IpAnAddPtString
IpAnPolyAddPtString Syntax IpAnPolyAddPtString(Points, nCount)
Description This function adds a point string for an active annotater poly object.
Parameters Points String
String containing the list of points to be added to the polygon.
nCount Integer A variable indicating the length of the string.
Example Sub IpAnPolyAddPtString_example()
ret = IpAnCreateObj(GO_OBJ_POLY) ret = IpAnPolyAddPtString("67 105 133 204 198 98 274 211 336 98 400 214")
End Sub
Comments An array is defined as a string similar to the macro IpListPts() and IpMorePts(). The size of string is limited only by the compiler. If number of integer values in the string is not even, a zero value is added. If the string is empty, it is equal to (0,0) point. The macro may be applied multiple times to concatenate arrays.
See Also IpAnAddPtArray

IpAnSet
Page 2-75
IpAnSet Syntax IpAnSet (sAttr, nValue)
Description This function sets the object attributes.
Parameters sAttr Integer Determines the attribute to get. Must be one of the following: GO_ATTR_PENCOLOR GO_ATTR_BRUSHCOLOR GO_ATTR_TEXTCOLOR for text objects only GO_ATTR_PENWIDTH for text objects only, nValue in range 1-99 GO_ATTR_PENSTYLE see list below for nValue GO_ATTR_RECTSTYLE see list below for nValue GO_ATTR_LINESTART for line and poly objects only GO_ATTR_LINEEND for line and poly objects only (nValue is the same for LINESTART and LINEEND) see list below for nValue GO_ATTR_ZOOM determines if the objects should be zoomed with the image, nValue = 0 or 1 GO_ATTR_CONNECT indicates if poly objects should be closed, nValue = 0 or 1 GO_ATTR_TEXTWORDWRAP for text objects only, nValue = 0 or 1 GO_ATTR_TEXTCENTERED nValue = 0 or 1 GO_ATTR_USEASDEFAULT for IpAnSetAttr only, nValue ignored GO_ATTR_FONTSIZE for text objects only, nValue = size in points GO_ATTR_FONTBOLD for text objects only, nValue = 0 or 1 GO_ATTR_FONTITALIC for text objects only, nValue = weight ( 0 - 800) GO_ATTR_FONTUNDERLINE for text objects only, nValue = 0 or 1
nValue Long Pointer to a long variable to receive the attribute’s new setting: GO_PENSTYLE_SOLID GO_PENSTYLE_DASH GO_PENSTYLE_DOT GO_PENSTYLE_DASHDOT GO_PENSTYLE_DASHDOTDOT GO_RECTSTYLE_BORDER_NOFILL GO_RECTSTYLE_BORDER_FILL GO_RECTSTYLE_NOBORDER_FILL GO_LINEEND_NOTHING GO_LINEEND_SMALLARROW GO_LINEEND_LAREGARROW GO_LINEEND_LARGEDIAMOND GO_LINEEND_ SMALLDIAMOND GO_LINEEND_CIRCLE GO_LINEEND_SMALLTICKMARK GO_LINEEND_LARGETICKMARK
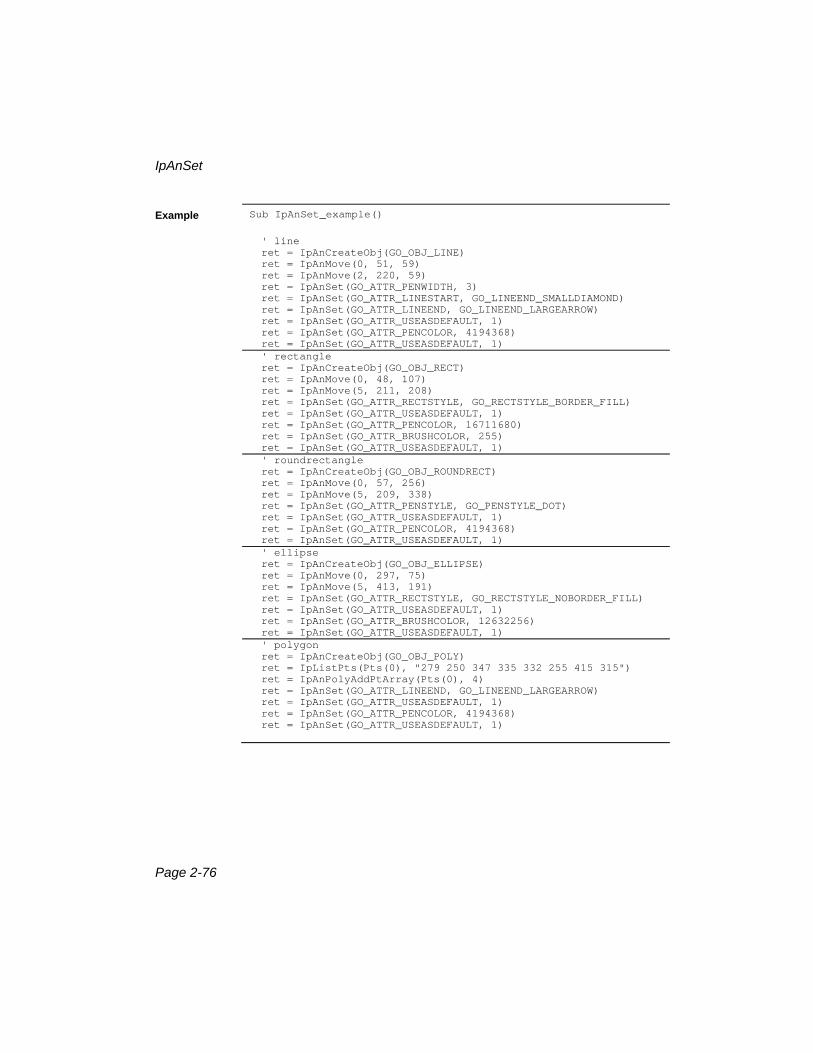
IpAnSet
Page 2-76
Example Sub IpAnSet_example()
' line ret = IpAnCreateObj(GO_OBJ_LINE) ret = IpAnMove(0, 51, 59) ret = IpAnMove(2, 220, 59) ret = IpAnSet(GO_ATTR_PENWIDTH, 3) ret = IpAnSet(GO_ATTR_LINESTART, GO_LINEEND_SMALLDIAMOND) ret = IpAnSet(GO_ATTR_LINEEND, GO_LINEEND_LARGEARROW) ret = IpAnSet(GO_ATTR_USEASDEFAULT, 1) ret = IpAnSet(GO_ATTR_PENCOLOR, 4194368) ret = IpAnSet(GO_ATTR_USEASDEFAULT, 1)
' rectangle ret = IpAnCreateObj(GO_OBJ_RECT) ret = IpAnMove(0, 48, 107) ret = IpAnMove(5, 211, 208) ret = IpAnSet(GO_ATTR_RECTSTYLE, GO_RECTSTYLE_BORDER_FILL) ret = IpAnSet(GO_ATTR_USEASDEFAULT, 1) ret = IpAnSet(GO_ATTR_PENCOLOR, 16711680) ret = IpAnSet(GO_ATTR_BRUSHCOLOR, 255) ret = IpAnSet(GO_ATTR_USEASDEFAULT, 1)
' roundrectangle ret = IpAnCreateObj(GO_OBJ_ROUNDRECT) ret = IpAnMove(0, 57, 256) ret = IpAnMove(5, 209, 338) ret = IpAnSet(GO_ATTR_PENSTYLE, GO_PENSTYLE_DOT) ret = IpAnSet(GO_ATTR_USEASDEFAULT, 1) ret = IpAnSet(GO_ATTR_PENCOLOR, 4194368) ret = IpAnSet(GO_ATTR_USEASDEFAULT, 1)
' ellipse ret = IpAnCreateObj(GO_OBJ_ELLIPSE) ret = IpAnMove(0, 297, 75) ret = IpAnMove(5, 413, 191) ret = IpAnSet(GO_ATTR_RECTSTYLE, GO_RECTSTYLE_NOBORDER_FILL) ret = IpAnSet(GO_ATTR_USEASDEFAULT, 1) ret = IpAnSet(GO_ATTR_BRUSHCOLOR, 12632256) ret = IpAnSet(GO_ATTR_USEASDEFAULT, 1)
' polygon ret = IpAnCreateObj(GO_OBJ_POLY) ret = IpListPts(Pts(0), "279 250 347 335 332 255 415 315") ret = IpAnPolyAddPtArray(Pts(0), 4) ret = IpAnSet(GO_ATTR_LINEEND, GO_LINEEND_LARGEARROW) ret = IpAnSet(GO_ATTR_USEASDEFAULT, 1) ret = IpAnSet(GO_ATTR_PENCOLOR, 4194368) ret = IpAnSet(GO_ATTR_USEASDEFAULT, 1)

IpAnSetFontName
Page 2-77
' text ret = IpAnCreateObj(GO_OBJ_TEXT) ret = IpAnMove(0, 51, 382) ret = IpAnText("Text attributes") ret = IpAnSet(GO_ATTR_FONTSIZE, 24) ret = IpAnSet(GO_ATTR_FONTBOLD, 1) ret = IpAnSet(GO_ATTR_FONTITALIC, 700) ret = IpAnSet(GO_ATTR_FONTUNDERLINE, 1) ret = IpAnSetFontName("Times New Roman") ret = IpAnSet(GO_ATTR_TEXTAUTOSIZE, 1) ret = IpAnSet(GO_ATTR_USEASDEFAULT, 1) ret = IpAnSet(GO_ATTR_TEXTCOLOR, 255) ret = IpAnSet(GO_ATTR_USEASDEFAULT, 1) ret = IpAnMove(5, 178, 406)
End Sub
IpAnSetFontName Syntax IpAnSetFontName(szFontName)
Description This function changes the font in the annotation text object.
Parameters szFontName String Character string containing the font name
Example Sub IpAnSetFontName_example()
ret = IpAnCreateObj(GO_OBJ_TEXT) ret = IpAnMove(0, 97, 276) ret = IpAnSetFontName("Times New Roman") ret = IpAnSet(GO_ATTR_TEXTAUTOSIZE, 1) ret = IpAnSet(GO_ATTR_USEASDEFAULT, 1) ret = IpAnText("This is Times New Roman") ret = IpAnSet(GO_ATTR_TEXTAUTOSIZE, 1) ret = IpAnMove(5, 291, 296)
End Sub
Comments The font specified must be installed on your computer. To set a font, there must be an active text box in the image.
See Also IpAnText, IpAnGetFontName
IpAnShow Syntax IpAnShow(Show)
Description This function show or hides the annotation dialog.
Parameters Show Integer Shows or hides the annotation dialog: 0 = hide the dialog, anything non-zerio shows it.

IpAnShowAnnot
Page 2-78
IpAnShowAnnot Syntax IpAnShowAnnot(bShow)
Description This function show or hides the annotations on all images.
Parameters bShow Integer Shows or hides the annotations: 0 = hide the annotations, anything non-zerio shows the annotations if they exist.
Comments The IpAnShowAnnot function shows or hides image annotations on ALL of the currently open images. The annotations cannot be printed or modified in any way while they are hidden.
IpAnText Syntax IpAnText(szText)
Description Places the first line of text in the active annotation text object.
Parameters szText String Character string of text to be placed in the object.
Example Sub IpAnText_example
ret = IpAnCreateObj(GO_OBJ_TEXT) ret = IpAnMove(0, 97, 276) ret = IpAnSet(GO_ATTR_TEXTAUTOSIZE, 1) ret = IpAnSet(GO_ATTR_USEASDEFAULT, 1) ret = IpAnText("This is annotated text.") ret = IpAnSet(GO_ATTR_TEXTAUTOSIZE, 1) ret = IpAnMove(5, 291, 296)
End Sub
See Also IpAnAddText
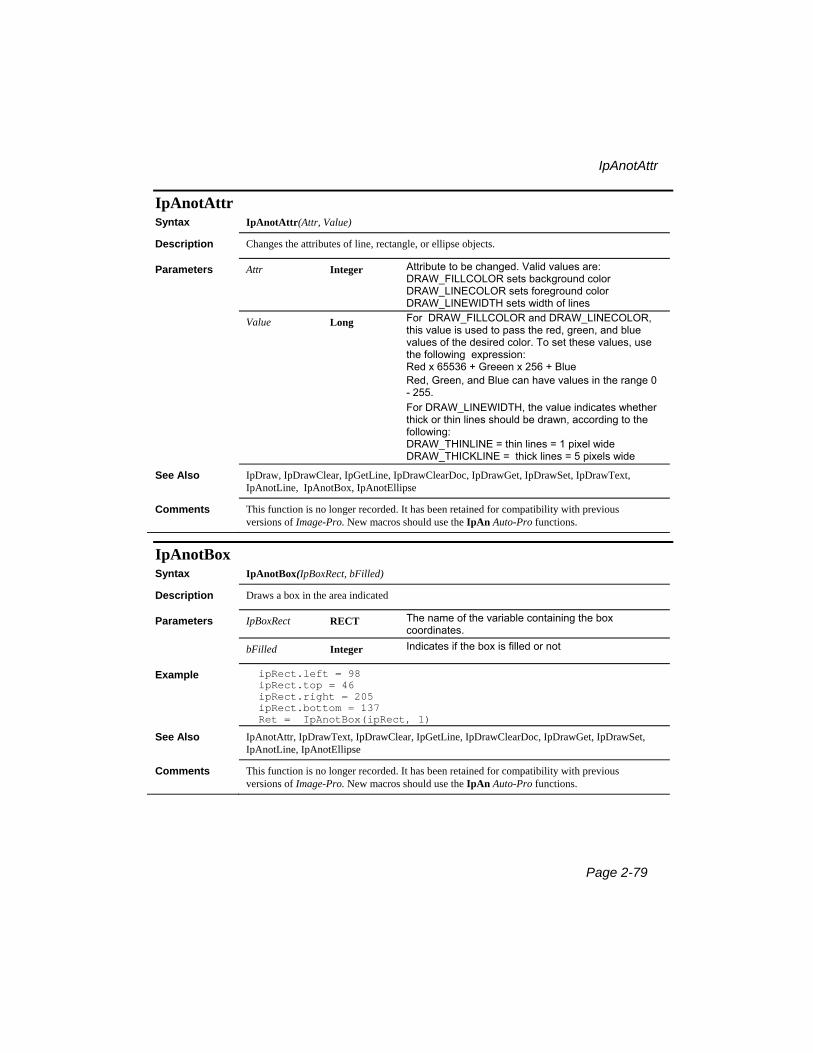
IpAnotAttr
Page 2-79
IpAnotAttr Syntax IpAnotAttr(Attr, Value)
Description Changes the attributes of line, rectangle, or ellipse objects.
Parameters Attr Integer Attribute to be changed. Valid values are: DRAW_FILLCOLOR sets background color DRAW_LINECOLOR sets foreground color DRAW_LINEWIDTH sets width of lines
Value Long For DRAW_FILLCOLOR and DRAW_LINECOLOR, this value is used to pass the red, green, and blue values of the desired color. To set these values, use the following expression: Red x 65536 + Greeen x 256 + Blue Red, Green, and Blue can have values in the range 0 - 255. For DRAW_LINEWIDTH, the value indicates whether thick or thin lines should be drawn, according to the following: DRAW_THINLINE = thin lines = 1 pixel wide DRAW_THICKLINE = thick lines = 5 pixels wide
See Also IpDraw, IpDrawClear, IpGetLine, IpDrawClearDoc, IpDrawGet, IpDrawSet, IpDrawText, IpAnotLine, IpAnotBox, IpAnotEllipse
Comments This function is no longer recorded. It has been retained for compatibility with previous versions of Image-Pro. New macros should use the IpAn Auto-Pro functions.
IpAnotBox Syntax IpAnotBox(IpBoxRect, bFilled)
Description Draws a box in the area indicated
Parameters IpBoxRect RECT The name of the variable containing the box coordinates.
bFilled Integer Indicates if the box is filled or not
Example ipRect.left = 98 ipRect.top = 46 ipRect.right = 205 ipRect.bottom = 137 Ret = IpAnotBox(ipRect, 1)
See Also IpAnotAttr, IpDrawText, IpDrawClear, IpGetLine, IpDrawClearDoc, IpDrawGet, IpDrawSet, IpAnotLine, IpAnotEllipse
Comments This function is no longer recorded. It has been retained for compatibility with previous versions of Image-Pro. New macros should use the IpAn Auto-Pro functions.

IpAnotEllipse
Page 2-80
IpAnotEllipse Syntax IpAnotEllipse(lpCenter, XRadius, Yradius, bFilled)
Description Draws an ellipse in the area indicated
Parameters lpCenter POINTAPI Indicates the center point of the ellipse
XRadius Integer Indicates the length of the x-axis radius
YRadius Integer Indicates the length of the y-axis radius
bFilled Integer A value of 0 or 1 specifying if the ellipse will be filled or not. 0 = not filled 1 = filled
See Also IpAnotAttr, IpDrawText, IpDrawClear, IpGetLine, IpDrawClearDoc, IpDrawGet, IpDrawSet, IpAnotLine
Comments This function is no longer recorded. It has been retained for compatibility with previous versions of Image-Pro. New macros should use the IpAn Auto-Pro functions.
IpAnotLine Syntax IpAnotLine(IpPoints, Numpoints, Endtype, Filled)
Description Draws a line throught the points indicated.
Parameters IpPoints LPPOINT The name and first element of an array containing the vertices of the line.
Numpoints Integer Number of points to be drawn
Endtype Integer For single lines, indicates the type of line ending. Must be one of the following
Value Description
DRAW_PLAINLINE No endpoints.
DRAW_LARGEARROWRIGHT A large arrow on the right endpoint.
DRAW_LARGEARROWLEFT A large arrow on the left endpoint.
DRAW_LARGEARROWBOTH A large arrow on both endpoints.
DRAW_SMALLARROWRIGHT A small arrow on the right endpoint.
DRAW_SMALLARROWLEFT A small arrow on the left endpoint.
DRAW_SMALLARROWBOTH A small arrow on both endpoints.
DRAW_CIRCLEARROW A circle on the left endpoint and a large arrow on the right endpoint

IpAoiChangeName
Page 2-81
DRAW_ARROWCIRCLE A largearrow on the left endpoint and a circle on the right endpoint
DRAW_DIAMONDBOTH Diamonds on both endpoints
DRAW_CIRCLEBOTH Circles on both endpoints
Filled Integer Indicates if the line is filled or not
Example ret = IpListPts(Pts(0), “36 151 99 87 130 171 147 111”) ret = IpAnotLine (Pts(0), 4, DRAWSMALLARROWRIGHT,0)
See Also IpAnotAttr, IpDrawText, IpDrawClear, IpGetLine, IpDrawClearDoc, IpDrawGet, IpDrawSet, IpAnotLine, IpAnotBox,IpAnotEllipse
Comments This function is no longer recorded. It has been retained for compatibility with previous versions of Image-Pro. New macros should use the IpAn Auto-Pro functions.
IpAoiChangeName Syntax IpAoiChangeName(oldName, newName)
Description This function changes the name of the specified AOI. Equivalent to retyping the name of the selected AOI in the AOI Manager dialog box.
Parameters oldName String A string specifying the name of the AOI that is to be renamed. Must not exceed 20 characters in length.
newName String A string specifying the new name to be given to the AOI. Must not exceed 20 characters in length.
Example ret = IpAoiChangeName("Box1", "Quadrant0")
This statement will rename the “Box1” AOI to “Quadrant0”.
IpAoiCreateBox Syntax IpAoiCreateBox(ipRect)
Description This function creates a rectangular AOI of the size specified by ipRect. Equivalent to drawing a rectangular AOI using the Rectangular AOI drawing tool on the Ribbon.
Parameters ipRect RECT The name of the variable containing the AOI coordinates. By default this variable is defined as ipRect.
Example The following statements will create a rectangular AOI positioned from 53,111 (upper-left corner) to 102,162 (lower-right corner). The ipRect definitions preceding the IpAoiCreateBox statement specify the AOI's coordinates.
ipRect.left = 53 ipRect.right = 102 ipRect.top = 111 ipRect.bottom = 162 ret = IpAoiCreateBox(ipRect)
See Also IpAoiCreateEllipse, IpAoiCreateIrregular, IpAoiShow
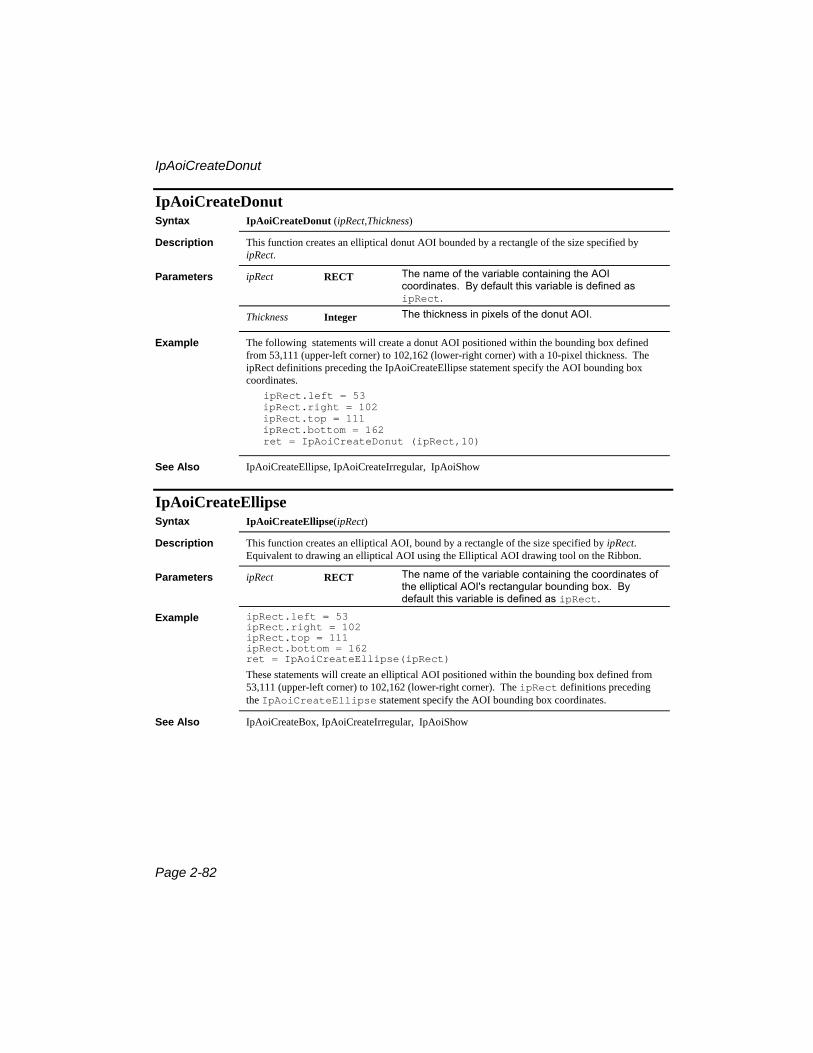
IpAoiCreateDonut
Page 2-82
IpAoiCreateDonut Syntax IpAoiCreateDonut (ipRect,Thickness)
Description This function creates an elliptical donut AOI bounded by a rectangle of the size specified by ipRect.
Parameters ipRect RECT The name of the variable containing the AOI coordinates. By default this variable is defined as ipRect.
Thickness Integer The thickness in pixels of the donut AOI.
Example The following statements will create a donut AOI positioned within the bounding box defined from 53,111 (upper-left corner) to 102,162 (lower-right corner) with a 10-pixel thickness. The ipRect definitions preceding the IpAoiCreateEllipse statement specify the AOI bounding box coordinates.
ipRect.left = 53 ipRect.right = 102 ipRect.top = 111 ipRect.bottom = 162 ret = IpAoiCreateDonut (ipRect,10)
See Also IpAoiCreateEllipse, IpAoiCreateIrregular, IpAoiShow
IpAoiCreateEllipse Syntax IpAoiCreateEllipse(ipRect)
Description This function creates an elliptical AOI, bound by a rectangle of the size specified by ipRect. Equivalent to drawing an elliptical AOI using the Elliptical AOI drawing tool on the Ribbon.
Parameters ipRect RECT The name of the variable containing the coordinates of the elliptical AOI's rectangular bounding box. By default this variable is defined as ipRect.
Example ipRect.left = 53 ipRect.right = 102 ipRect.top = 111 ipRect.bottom = 162 ret = IpAoiCreateEllipse(ipRect)
These statements will create an elliptical AOI positioned within the bounding box defined from 53,111 (upper-left corner) to 102,162 (lower-right corner). The ipRect definitions preceding the IpAoiCreateEllipse statement specify the AOI bounding box coordinates.
See Also IpAoiCreateBox, IpAoiCreateIrregular, IpAoiShow

IpAoiCreateIrregular
Page 2-83
IpAoiCreateIrregular Syntax IpAoiCreateIrregular(ipAoiPoint, NumPoints)
Description This function creates a freeform AOI of the size and shape specified by ipAoiPoint and NumPoints. Equivalent to drawing a polygonal AOI using the Freeform AOI drawing tool on the Ribbon.
Parameters ipAoiPoint POINTAPI The name and first element of an array containing the coordinate-pairs specifying the position of each vertex in the shape. By default this array is defined as Pts.
NumPoints Integer An integer specifying the total number of coordinate-pairs defined in Pts.
Example Sub IpAoiCreateIrregular_example()
ret = IpListPts(Pts(0), "162 93 112 150 151 212 233 216 263 153 219 119 210 67 ") ret = IpAoiCreateIrregular(Pts(0), 7)
End Sub
See Also IpAoiCreateBox, IpAoiCreateEllipse, IpAoiShow

IpAoiGet
Page 2-84
IpAoiGet Syntax IpAoiGet(Cmd, Param, OutVal)
Description Use this function to get information relating to the active AOI. There is no Image-Pro command equivalent to this function; it is one that must be manually written with the macro editor.
Parameters Cmd Integer A command ID, which specifies the type of AOI information you want to retrieve. Must be one of the following:
GETTYPE GETNUMPTS GETBOUNDS GETPOINTS AOIMGR_GET_NUM See definitions under Comments, below
Param Integer An integer specifying data with which Cmd will operate. See definitions under Comments, below for the values used by each command
OutVal See below The address (name) of the variable that will receive the requested data. Be sure this variable is of the type required by Cmd. See Cmd description under Comments, below.
Return Value The value returned by IpAoiGet depends upon the command that was used. The table below describes the return value produced by each command.
Cmd RETURN VALUE GETTYPE None
GETNUMPTS None
GETBOUNDS None
GETPOINTS Number of points stored in OutVal. If this value is equal to Param, OutVal was probably not big enough to hold the entire list of coordinates.
AOIMGR_GET_NUM None
Example The following example uses IpAoiGet to identify the active AOI's type, and then moves the AOI 100 pixels to the right.
Dim aoitype As Integer Dim numpoints As Integer Dim aoirect As RECT Dim i As Integer
ret = IpAoiGet(GETTYPE, 0, aoitype)
If aoitype = AOI_BOX Then ret = IpAoiGet(GETBOUNDS, 0, aoirect) aoirect.left = aoirect.left + 100 aoirect.right = aoirect.right + 100 ret = IpAoiCreateBox(aoirect)

IpAoiGet
Page 2-85
ElseIf aoitype = AOI_ELLIPSE Then ret = IpAoiGet(GETBOUNDS, 0, aoirect) aoirect.left = aoirect.left + 100 aoirect.right = aoirect.right + 100 ret = IpAoiCreateEllipse(aoirect)
ElseIf aoitype = AOI_POLYGON Then ret = IpAoiGet(GETNUMPTS, 0, numpoints) Redim aoipts(numpoints) As pointapi ret = IpAoiGet(GETPOINTS, numpoints, aoipts(0)) For i = 0 To numpoints - 1 aoipts(i).x = aoipts(i).x + 100 Next i ret = IpAoiCreateIrregular(aoipts(0), numpoints) End If
Comments When passing an array from a BASIC program, pass the first element of the array by reference (see example above). Cmd options are as follows:
Cmd VALUE DESCRIPTION Param VALUE OutVal TYPE
GETTYPE Use this command to determine the type of AOI that is active. OutVal will be set to one of the following: 0 AOI_BOX AOI_ELLIPSE AOI_POLYGON 0 signals that no AOI is currently active.
Not used by GETTYPE. Must be set to 0.
Integer
GETNUMPTS Use this command to determine the number of points in the outline of a freeform AOI. OutVal will be set to this value.
Not used by GETNUMPTS. Must be set to 0.
Integer
Note - GETNUMPTS is applicable to freeform AOIs, only (i.e., AOI_POLYGON).
GETBOUNDS Use this command to get the coordinates defining the AOI's bounding box. The coordinates will be written to OutVal.
Not used by GETBOUNDS. Must be set to 0.
RECT

IpAoiGetStr
Page 2-86
Cmd VALUE DESCRIPTION Param VALUE OutVal TYPE GETPOINTS Use this command to get
the coordinates defining the outline of a freeform AOI. The coordinates will be written to the array specified in OutVal. Note - this command is applicable to freeform AOIs, only (i.e., AOI_POLYGON).
The maximum number of points that can be written to OutVal (i.e., the length of your array).
Note - you can use GETNUMPTS to determine the number of elements needed in this array.
POINTAPI Note - OutVal must specify an array.
AOIMGR_GET_NUM Use this command to
determine the number of AOIs available in the AOI manager.
Not used. Must be set to zero.
LONG
See Also IpAoiMove, IpAoiCreate, IpDocOpenAoi
IpAoiGetStr Syntax IpAoiGetStr(Cmd, Param, OutVal)
Description Use this command to determine the name of an AOI in the AOI manager.
Parameters Cmd String See below
Param Integer An integer specifying data with which Cmd will operate.
OutVal See below The address (name) of the variable that will receive the requested data. Be sure this variable is of the type required by Cmd. See Cmd description under Comments, below.
Cmd VALUE DESCRIPTION Param VALUE OutVal TYPE
AOIMGR_GET_ NAME
Use this command to determine the name of an AOI available in the AOI manager.
The index of the AOI of interest, from 0 to the number of AOIs, -1.
STRING
Return Value The name of the available AOI.

IpAoiManager
Page 2-87
IpAoiManager Syntax IpAoiManager(FuncId, Name)
Description This function is used to manipulate AOIs in the AOI list. Equivalent to using the Add, Del, Set, Load and Save buttons in the AOI Manager dialog box.
Parameters FuncId Integer An enumerated integer specifying the type of AOI management action that is to be performed. Must be one of the following: AOIADD AO IDELETE AOIHIDEDLG AO ILOAD AO ISAVE AO ISET AO ISHOWDLG See definitions under Comments, below.
Name String A string specifying the data upon which FuncId is to operate. See definitions under Comments, below, for the values allowed by each option.
Example ipRect.left = 21 ipRect.top = 18 ipRect.right = 85 ipRect.bottom = 50 ret = IpAoiCreateBox(ipRect) ret = IpAoiManager(AOIADD, "Box1")
This set of statements will create the rectangular AOI defined by ipRect and add it to the current AOI list as “Box1”.
Comments When the Name parameter is an empty string, all AOIs are deleted from the list. FuncId options are as follows:
VALUE DESCRIPTION Name VALUES AOIADD Adds the active AOI to the AOI list,
assigning it the name specified by the Name parameter.
Note - If the name specified by the Name parameter is one that already exists in the current AOI list, the new AOI definition will replace the existing one.
The string in Name must specify the name to be given to the added AOI.
AOIDELETE Deletes the AOI specified by the Name parameter. When the Name paramter is an empty string, all AOIs are deleted from the list
The string in Name must specify the name of the AOI to be deleted or an empty string to delete all AOIs.

IpAoiManager
Page 2-88
VALUE DESCRIPTION Name VALUES AOIHIDEDLG Closes the AOI Manager dialog box
if it is open. The Name parameter is ignored when AOIHIDEDLG is used. When this is the case, just set Name to an empty string (i.e., "").
AOILOAD Loads an AOI list from the file specified by Name.
The string in Name must specify the name of the file containing the AOI list.
AOISAVE Saves the current AOI list to the file specified by Name.
The string in Name must specify the name of the file to which you want the AOI list stored.
AOISET Assigns the AOI specified by Name to the active image.
The string in Name must specify the name of the AOI to be assigned.
AOISHOWDLG Displays the AOI Manager dialog box.
The Name parameter is ignored when AOISHOWDLG is used. When this is the case, just set Name to an empty string (i.e., "").
See Also IpAoiChangeName

IpAoiMove
Page 2-89
IpAoiMove Syntax IpAoiMove(deltaX, deltaY)
Description This function moves the active AOI. Equivalent to dragging the current AOI to a new position with your mouse.
Parameters deltaX Integer An integer specifying the distance, in pixels, by which the AOI is to be moved horizontally. Positive values move the AOI to the right; negative values to the left.
deltaY Integer An integer specifying the distance, in pixels, by which the AOI is to be moved vertically. Positive values move the AOI down; negative values up.
Example ret = IpAoiMove(0, -20)
This statement will move the active AOI 20 pixels up from its current position.
IpAoiMultAppend Syntax IpAoiMultAppend(Append)
Description This function adds the current regular AOI to the current multiple AOI or clears the current multiple AOI.
Parameters Append Integer 1 = add the current AOI to the multiple AOI 0 = clear/reset the current multiple AOI
Example ipRect.left = 94 ipRect.top = 131 ipRect.right = 200 ipRect.bottom = 189 ret = ApAoiCreateBox(ipRect) ret = IpAoiMultShow(1) ret = IpAoiMultAppend(1)
Comments IpAoiMultShow must be included in the commands for this macro to work.
See Also IpAoiMultShow
IpAoiMultShow Syntax IpAoiMultShow(Mode)
Description This function shows or hides the current multiple AOI.
Parameters Mode Integer 1 = show the current multiple AOI 0 = hide the current multiple AOI
See Also IpAoiMultAppend

IpAoiShow
Page 2-90
IpAoiShow Syntax IpAoiShow(FrameType)
Description This function activates or deactivates the currently defined AOI. Equivalent to clicking any of the AOI tool buttons on the Ribbon.
Parameters FrameType Integer An enumerated integer specifying the kind of AOI to be activated. Must be one of the following: FRAME_NONE FRAME_RECTANGLE FRAME_ELLIPSE FRAME_IRREGULAR FRAME_INVIEW FRAME_RESET See definitions under Comments, below.
Comments FrameType options are as follows:
VALUE DESCRIPTION FRAME_NONE
Deactivates the current AOI. Equivalent to clicking an enabled AOI tool button to deactivate it.
FRAME_RECTANGLE Activates the currently defined rectangular AOI. FRAME_ELLIPSE Activates the currently defined elliptical AOI. FRAME_RESET Activates a new AOI. FRAME_IRREGULAR Activates the currently defined freeform AOI. FRAME_INVIEW Moves the AOI so it can be seen. Useful in Zoom
and Pan modes.
See Also IpAoiShow, IpAoiCreateBox, IpAoiCreateEllipse, IpAoiCreateIrregular
IpAoiValidate Syntax IpAoiValidate( )
Description This function refreshes the image's internal AOI description, based on the AOI currently shown on the screen. For performance reasons the internal AOI is not maintained in real-time (i.e., it is not updated every time the user moves, resizes or deactivates an AOI). Instead, it is the responsibility of each AOI-constrained operation to initialize this description (from the screen) when it begins. Image-Pro commands perform this function implicitly. Similarly, if you are developing your own AOI-constrained process, your procedure must call IpAoiValidate when it begins. This ensures that the region affected by your program is the one most recently defined by your user.
See Also IpAoiCreateBox, IpAoiCreateEllipse, IpAoiCreateIrregular
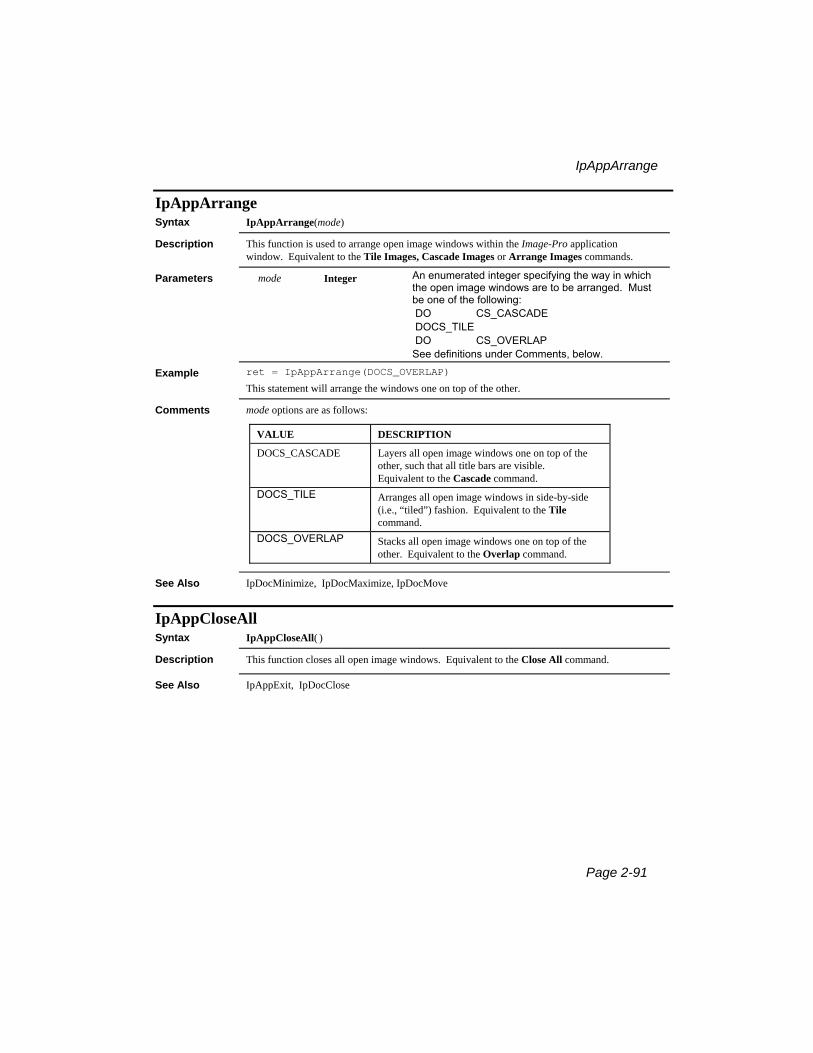
IpAppArrange
Page 2-91
IpAppArrange Syntax IpAppArrange(mode)
Description This function is used to arrange open image windows within the Image-Pro application window. Equivalent to the Tile Images, Cascade Images or Arrange Images commands.
Parameters mode Integer An enumerated integer specifying the way in which the open image windows are to be arranged. Must be one of the following: DO CS_CASCADE DOCS_TILE DO CS_OVERLAP See definitions under Comments, below.
Example ret = IpAppArrange(DOCS_OVERLAP)
This statement will arrange the windows one on top of the other.
Comments mode options are as follows:
VALUE DESCRIPTION
DOCS_CASCADE Layers all open image windows one on top of the other, such that all title bars are visible. Equivalent to the Cascade command.
DOCS_TILE Arranges all open image windows in side-by-side (i.e., “tiled”) fashion. Equivalent to the Tile command.
DOCS_OVERLAP Stacks all open image windows one on top of the other. Equivalent to the Overlap command.
See Also IpDocMinimize, IpDocMaximize, IpDocMove
IpAppCloseAll Syntax IpAppCloseAll( )
Description This function closes all open image windows. Equivalent to the Close All command.
See Also IpAppExit, IpDocClose
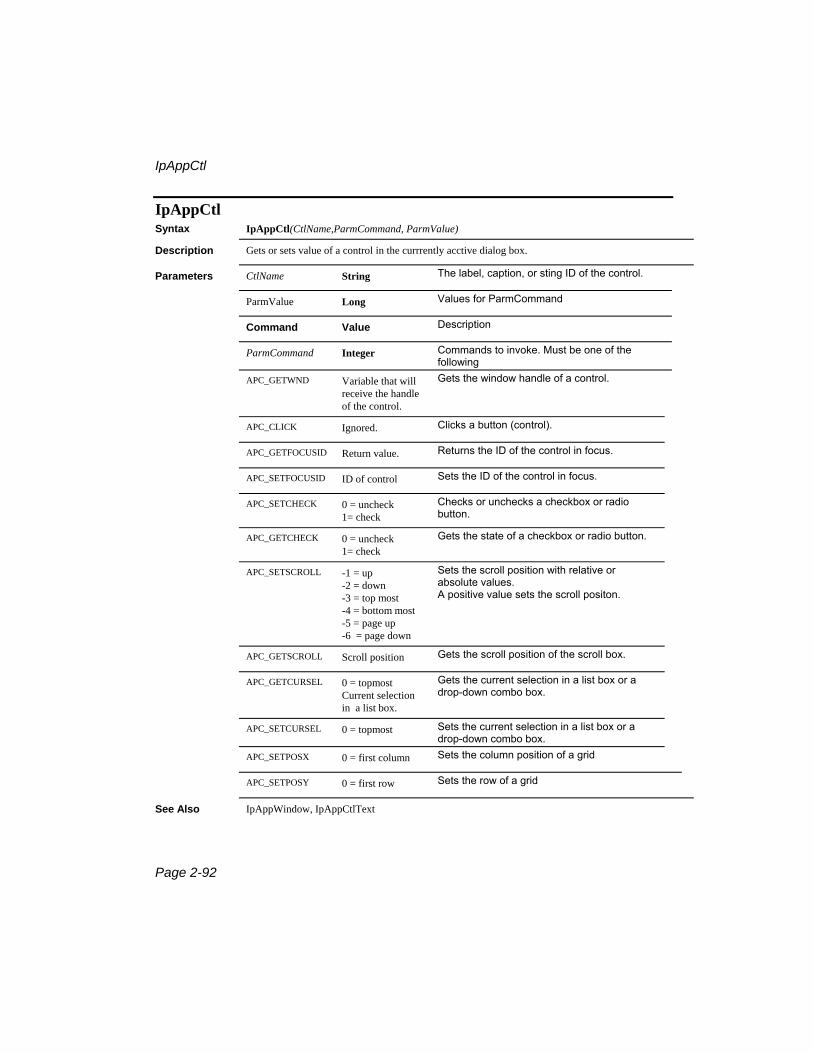
IpAppCtl
Page 2-92
IpAppCtl Syntax IpAppCtl(CtlName,ParmCommand, ParmValue)
Description Gets or sets value of a control in the currrently acctive dialog box.
Parameters CtlName String The label, caption, or sting ID of the control.
ParmValue Long Values for ParmCommand
Command Value Description
ParmCommand Integer Commands to invoke. Must be one of the following
APC_GETWND Variable that will receive the handle of the control.
Gets the window handle of a control.
APC_CLICK Ignored. Clicks a button (control).
APC_GETFOCUSID Return value. Returns the ID of the control in focus.
APC_SETFOCUSID ID of control Sets the ID of the control in focus.
APC_SETCHECK 0 = uncheck 1= check
Checks or unchecks a checkbox or radio button.
APC_GETCHECK 0 = uncheck 1= check
Gets the state of a checkbox or radio button.
APC_SETSCROLL -1 = up -2 = down -3 = top most -4 = bottom most -5 = page up -6 = page down
Sets the scroll position with relative or absolute values. A positive value sets the scroll positon.
APC_GETSCROLL Scroll position Gets the scroll position of the scroll box.
APC_GETCURSEL 0 = topmost Current selection in a list box.
Gets the current selection in a list box or a drop-down combo box.
APC_SETCURSEL 0 = topmost Sets the current selection in a list box or a drop-down combo box.
APC_SETPOSX 0 = first column Sets the column position of a grid
APC_SETPOSY 0 = first row Sets the row of a grid
See Also IpAppWindow, IpAppCtlText
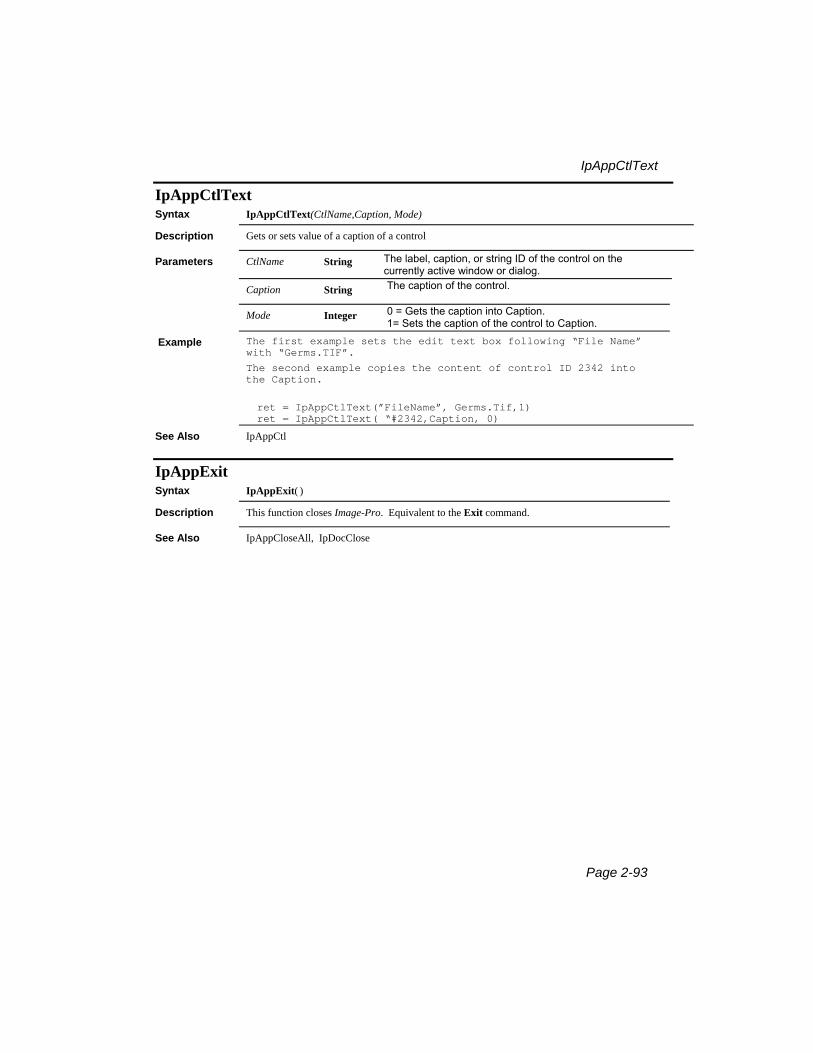
IpAppCtlText
Page 2-93
IpAppCtlText Syntax IpAppCtlText(CtlName,Caption, Mode)
Description Gets or sets value of a caption of a control
Parameters CtlName String The label, caption, or string ID of the control on the currently active window or dialog.
Caption String The caption of the control.
Mode Integer 0 = Gets the caption into Caption. 1= Sets the caption of the control to Caption.
Example The first example sets the edit text box following “File Name” with “Germs.TIF”.
The second example copies the content of control ID 2342 into the Caption.
ret = IpAppCtlText(”FileName”, Germs.Tif,1) ret = IpAppCtlText( “#2342,Caption, 0)
See Also IpAppCtl
IpAppExit Syntax IpAppExit( )
Description This function closes Image-Pro. Equivalent to the Exit command.
See Also IpAppCloseAll, IpDocClose
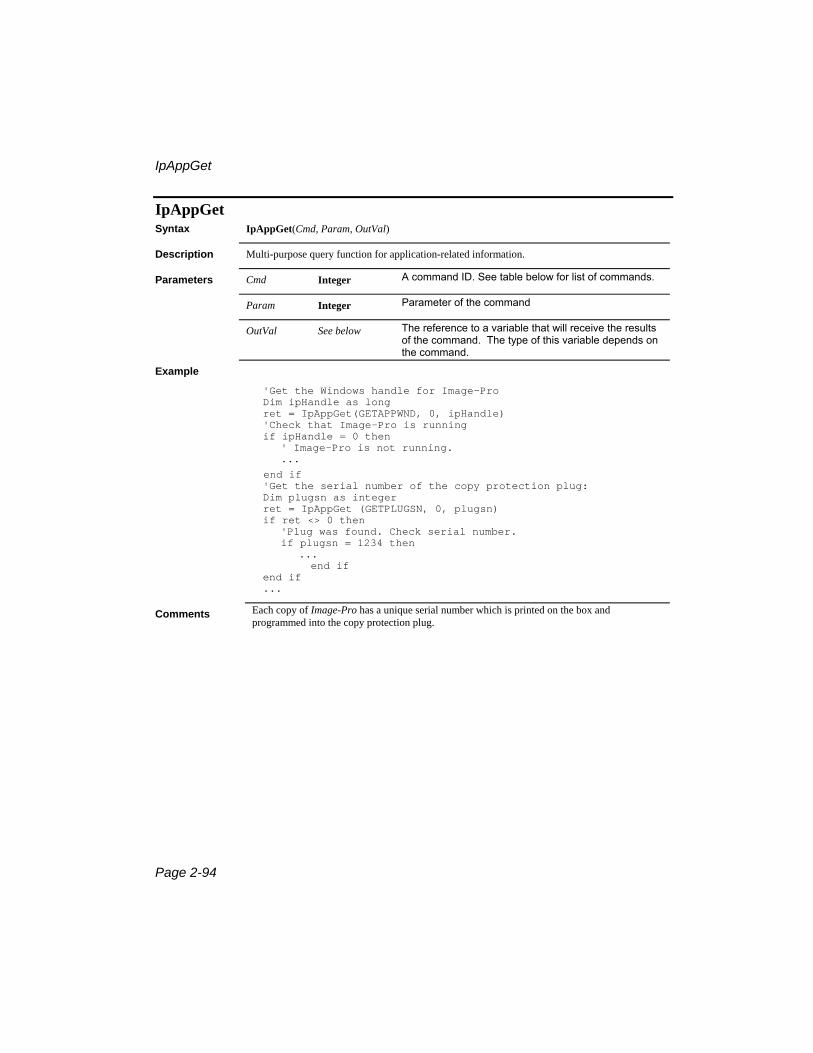
IpAppGet
Page 2-94
IpAppGet Syntax IpAppGet(Cmd, Param, OutVal)
Description Multi-purpose query function for application-related information.
Parameters Cmd Integer A command ID. See table below for list of commands.
Param Integer Parameter of the command
OutVal See below The reference to a variable that will receive the results of the command. The type of this variable depends on the command.
Example 'Get the Windows handle for Image-Pro Dim ipHandle as long ret = IpAppGet(GETAPPWND, 0, ipHandle) 'Check that Image-Pro is running if ipHandle = 0 then ' Image-Pro is not running. ...
end if 'Get the serial number of the copy protection plug: Dim plugsn as integer ret = IpAppGet (GETPLUGSN, 0, plugsn) if ret <> 0 then 'Plug was found. Check serial number. if plugsn = 1234 then ... end if end if ...
Comments Each copy of Image-Pro has a unique serial number which is printed on the box and programmed into the copy protection plug.

IpAppGet
Page 2-95
Command Param OutVal Return Value Description
GETAPPWND Not used. Must be 0.
Long None. Gets the Windows handle to Image-Pro. When called from an external program, this command will return 0 if Image-Pro is not running.
GETPLUGSN Not used. Must be 0.
Integer 0 if plug is not found. 1 if plug is found.
Gets the serial number of the copy protection plug. Each copy of Image-Pro has a unique serial number.
MACRO_ PAUSE_TYPE
Not used. Must be 0.
Integer None MACRO_PAUSE_ TYPE. This command is used to determine how the new IpMacroPause function will behave when the macro uses the MP_ RESPECTSETTING mode. When this mode is specified and the MACRO_PAUSE_ TYPE command is set to any non-zero value, the IpMacroPause function will behave like the MP_WAITFORRESPONSE mode was selected and will wait for the user to make a selection by clicking one of the dialog buttons.
PST_BLEND_PREVIEW
Not used. Must be 0.
Integer None Gets a value indicating whether paste preview will be blended (if the value is non-zero) or not.
PST_BLEND_APPLY
Not used. Must be 0.
Integer None Gets a value indicating whether paste will be blended when it is applied to the image (if the value is non-zero) or not.

IpAppGet
Page 2-96
Command Param OutVal Return Value Description PST_BLEND_SOURCE
Not used. Must be 0.
Integer None Gets a value indicating the contribution of the pasted data during blending. This is expressed as a percentage, where 100 indicates that the pasted data will be used with no blending, 50 indicates an equal contribution of the pasted data and target image data, and 0 indicates the target image data will not be modified by the paste. Note that the PST_BLEND_PREVIEW and PST_BLEND_APPLY attributes determine whether the blending percentage is used to preview or during paste application, or neither.
PST_APPLY_TYPE
Not used. Must be 0.
Integer None Gets a value indicating the type of blending that will apply when pasting, from the following types:
PST_APPLY_ALL: All pasted data will be applied according to the current blending.
PST_APPLY_LIGHTER:only pixels in the pasted data that are lighter than the destination image will be applied.
PST_APPLY_DARKER:Only darker pixels will be applied.

IpAppGet
Page 2-97
Command Param OutVal Return Value Description WINDOW_ TILING_ TYPE
Not used. Must be 0.
Integer None Controls whether to modify the standard behavior of the Windows, Tile command and the IpAppArrange(DOCS_TILE…) Auto-Pro function. The tiling type can be set to TILE_NORMAL (the standard Windows tiling behavior) or any combination of the following constants (with one exception noted below):
TILE_ZOOM_TO_FIT Changes the zoom factor of the images to try to display as much of the image as possible in the tiled workspace.
TILE_REORDER Reorders the workspaces by the age of the document, by columns first and then by rows. The oldest document will be in the top-left corner of the Image-Pro workspace, the next oldest under it in the first column, and so on until the first column is full and a new column is added to the right of the first.
TILE_SAMESIZE All workspaces will be set to the same size as the smallest workspace. The workspaces may be different sizes after tiling if the images are different sizes, or in some cases when the tiled layout results in some columns having more images than others.
TILE_COMPACT Arranges the workspaces so that they are directly next to each other in the columns and rows, such that any unused space in the Image-Pro Plus workspace will be found at the bottom and/or right side. TILE_COMPACT is only VALID when TILE_SAMESIZE is also specified.
See Also IpDocGet, IpAppGetStr
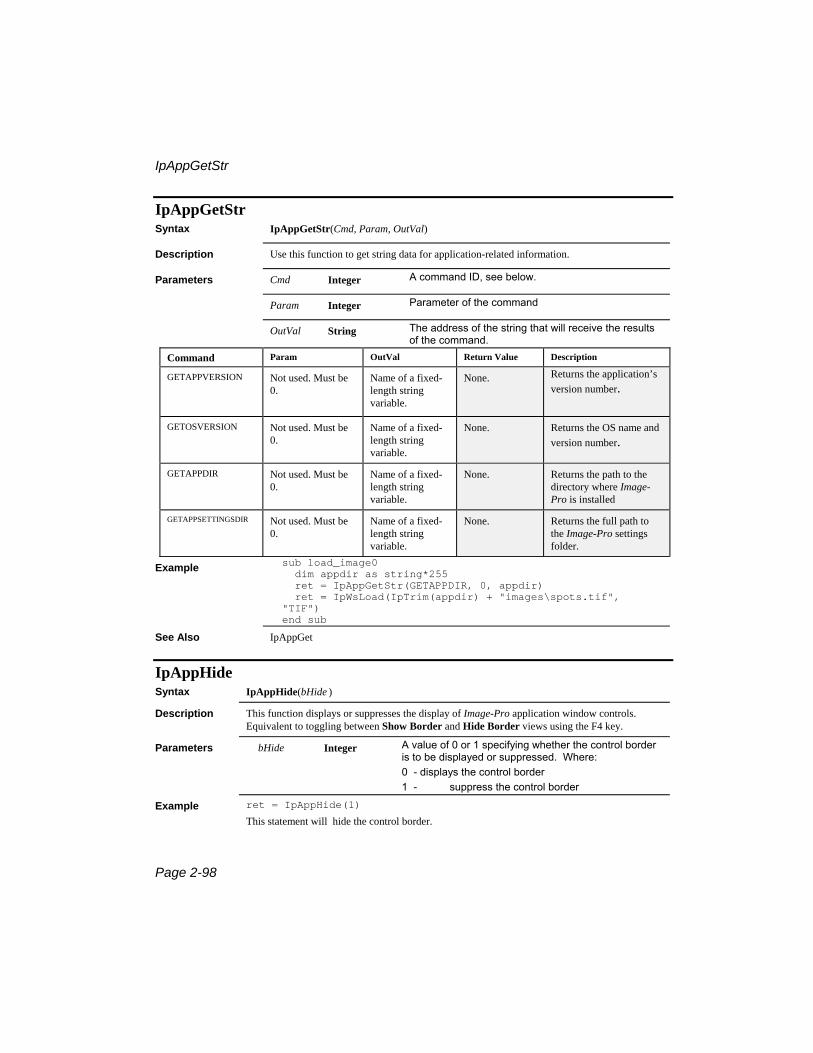
IpAppGetStr
Page 2-98
IpAppGetStr Syntax IpAppGetStr(Cmd, Param, OutVal)
Description Use this function to get string data for application-related information.
Parameters Cmd Integer A command ID, see below.
Param Integer Parameter of the command
OutVal String The address of the string that will receive the results of the command.
Command Param OutVal Return Value Description
GETAPPVERSION Not used. Must be 0.
Name of a fixed-length string variable.
None. Returns the application’s version number.
GETOSVERSION Not used. Must be 0.
Name of a fixed-length string variable.
None. Returns the OS name and version number.
GETAPPDIR Not used. Must be 0.
Name of a fixed-length string variable.
None. Returns the path to the directory where Image-Pro is installed
GETAPPSETTINGSDIR Not used. Must be 0.
Name of a fixed-length string variable.
None. Returns the full path to the Image-Pro settings folder.
Example sub load_image0 dim appdir as string*255 ret = IpAppGetStr(GETAPPDIR, 0, appdir) ret = IpWsLoad(IpTrim(appdir) + "images\spots.tif", "TIF") end sub
See Also IpAppGet
IpAppHide Syntax IpAppHide(bHide )
Description This function displays or suppresses the display of Image-Pro application window controls. Equivalent to toggling between Show Border and Hide Border views using the F4 key.
Parameters bHide Integer A value of 0 or 1 specifying whether the control border is to be displayed or suppressed. Where: 0 - displays the control border 1 - suppress the control border
Example ret = IpAppHide(1)
This statement will hide the control border.

IpAppMaximize
Page 2-99
IpAppMaximize Syntax IpAppMaximize( )
Description This function maximizes (enlarges to maximum size) the Image-Pro application window. Equivalent to clicking the Maximize button on the Control bar.
See Also IpAppMinimize, IpAppRestore, IpAppSize, IpDocMaximize
IpAppMenuSelect Syntax IpAppMenuSelect(Id1, Id2, ItemName, Mode)
Description This function is used to invoke a menu item from the main Image-Pro command bar. This command is never recorded; it is one that must be manually written into your macro if it is needed. It will work ONLY with the menu where it was created (see the Menu Selection portion of your Reference Guide).
Parameters Id1 Integer An integer specifying the menu or menu item to be invoked. The values required by Id1 are determined by Mode. See Mode definitions below.
Id2 Integer An integer specifying the sub-menu item to be invoked. The values required by Id2 are determined by Mode. See Mode definitions below.
ItemName String A string specifying the menu item name, as it is defined in the IPWIN32.MNU file. This parameter is used when Mode is set to MENU_NAME.
Mode Integer An enumerated integer specifying the method by which the menu item is being specified. Must be one of the following:
MENU_ID MENU_NAME MENU_COORD See definitions under Comments, below.
Example The following statements illustrate three ways in which the Open menu command could be invoked, assuming its default IPWIN32.MNU definition had not been modified. ret = IpAppMenuSelect(102, 0, "", MENU_ID) ret = IpAppMenuSelect(0, 0, "&Open...", MENU_NAME) ret = IpAppMenuSelect(0, 1, "", MENU_COORD)
Comments Mode options, and their associated Id1, Id2 and ItemName values are as follows. Shaded parameters are ones that are ignored when the described Mode is used. For the DLG commands to work, the dialog box containing the menu or tab must be active and in focus.
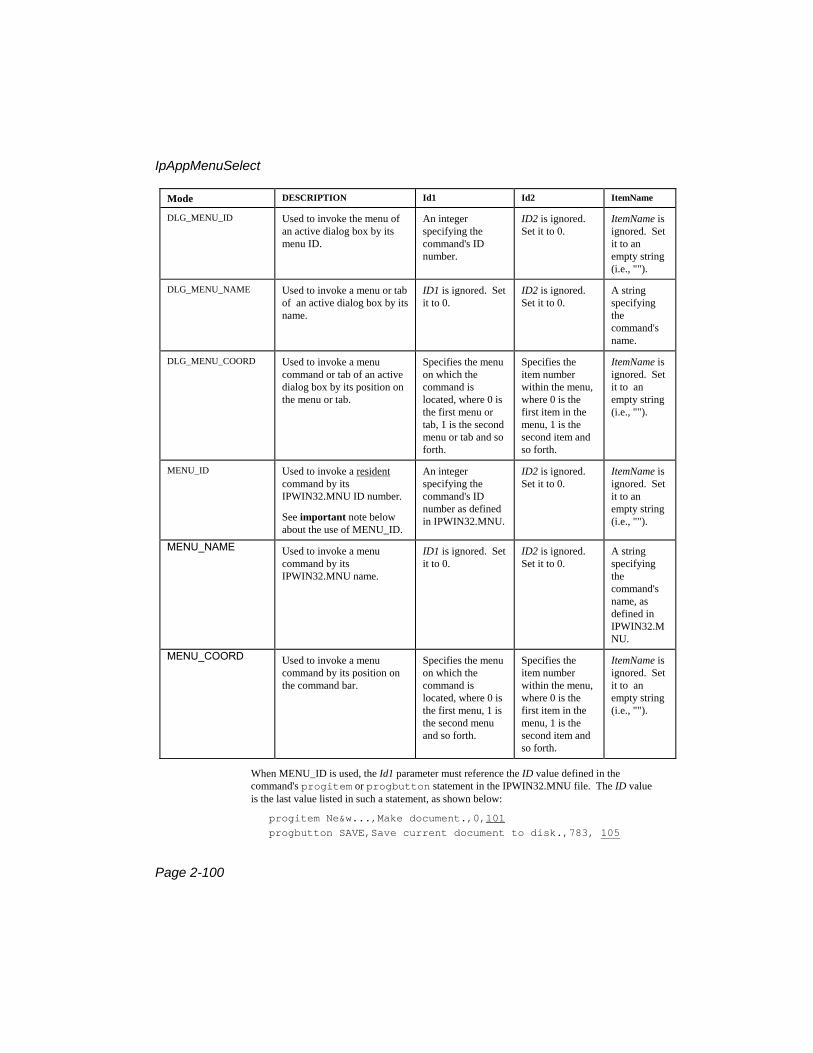
IpAppMenuSelect
Page 2-100
Mode DESCRIPTION Id1 Id2 ItemName
DLG_MENU_ID Used to invoke the menu of an active dialog box by its menu ID.
An integer specifying the command's ID number.
ID2 is ignored. Set it to 0.
ItemName is ignored. Set it to an empty string (i.e., "").
DLG_MENU_NAME Used to invoke a menu or tab of an active dialog box by its name.
ID1 is ignored. Set it to 0.
ID2 is ignored. Set it to 0.
A string specifying the command's name.
DLG_MENU_COORD Used to invoke a menu command or tab of an active dialog box by its position on the menu or tab.
Specifies the menu on which the command is located, where 0 is the first menu or tab, 1 is the second menu or tab and so forth.
Specifies the item number within the menu, where 0 is the first item in the menu, 1 is the second item and so forth.
ItemName is ignored. Set it to an empty string (i.e., "").
MENU_ID Used to invoke a resident command by its IPWIN32.MNU ID number.
See important note below about the use of MENU_ID.
An integer specifying the command's ID number as defined in IPWIN32.MNU.
ID2 is ignored. Set it to 0.
ItemName is ignored. Set it to an empty string (i.e., "").
MENU_NAME Used to invoke a menu command by its IPWIN32.MNU name.
ID1 is ignored. Set it to 0.
ID2 is ignored. Set it to 0.
A string specifying the command's name, as defined in IPWIN32.MNU.
MENU_COORD Used to invoke a menu command by its position on the command bar.
Specifies the menu on which the command is located, where 0 is the first menu, 1 is the second menu and so forth.
Specifies the item number within the menu, where 0 is the first item in the menu, 1 is the second item and so forth.
ItemName is ignored. Set it to an empty string (i.e., "").
When MENU_ID is used, the Id1 parameter must reference the ID value defined in the command's progitem or progbutton statement in the IPWIN32.MNU file. The ID value is the last value listed in such a statement, as shown below:
progitem Ne&w...,Make document.,0,101
progbutton SAVE,Save current document to disk.,783, 105

IpAppMinimize
Page 2-101
Important - the MENU_ID option can only be used to call commands that are resident within the main Image-Pro program, not commands that reside in a Dynamic Link Library (DLL). Therefore, it cannot be used to invoke commands that are defined with item or button statements in IPWIN32.MNU.
When MENU_NAME is used, the ItemName parameter must contain the name of the command exactly as it is defined by the progitem or item statement in the IPWIN32.MNU file, including the & symbol and any embedded spaces or punctuation (such as an ellipsis). The name is contained in the Title parameter of a IPWIN32.MNU progitem or item statement, as shown in the examples below:
progitem Ne&w...,Make document.,0,101
item &Color Transform...,Color Models.,colordlg.dll,56,100
Note that the name includes all characters up to, but not including, the comma that separates the name from the following parameter.
See Also IpAppSize, IpDocMove
IpAppMinimize Syntax IpAppMinimize( )
Description This function minimizes (reduces to an icon) the Image-Pro application window. Equivalent to clicking the Minimize button on the Control bar.
See Also IpAppMaximize, IpAppRestore, IpAppSize, IpDocMinimize
IpAppMove Syntax IpAppMove(X, Y)
Description This function moves the Image-Pro application window to the screen position specified by x,y, where x,y specifies the new position for the upper-left corner of the window. Equivalent to dragging the Image-Pro application window to a new position.
Parameters X Integer An integer specifying the x-coordinate of the pixel to which the upper-left corner of the Image-Pro window is to be moved.
Y Integer An integer specifying the y-coordinate of the pixel to which the upper-left corner of the Image-Pro window is to be moved.
Example ret = IpAppMove(20,40)
This statement will move the Image-Pro application window to screen position 20,40.
See Also IpAppSize, IpDocMove

IpAppRestore
Page 2-102
IpAppRestore Syntax IpAppRestore( )
Description This function returns the Image-Pro application window to its previous screen position and size, from a minimized or maximized state. Equivalent to clicking the Restore button on a maximized window or double-clicking the icon of a minimized window.
See Also IpAppMaximize, IpAppMinimize
IpAppRun Syntax IpAppRun(CommandLine, ShowMode, RunMode)
Description This function executes a DOS or Windows application program. There is no Image-Pro command equivalent for this function; it is one that must be manually written to your macro with the macro editor.
Parameters CommandLine String A string specifying the program file name (if it is a Windows application) or the PIF file name (if it is a DOS application) and any required arguments.
ShowMode Integer An enumerated integer specifying the way in which the application's window is to be displayed after the program is loaded. Must be one of the following: RUN_NORMAL RUN_MINIMIZED RUN_MAXIMIZED See definitions under Comments, below.
RunMode Integer An enumerated integer specifying the way in which control is to be transferred between Image-Pro and the application. Must be one of the following: RUN_AUTOCLOSE RUN_MODAL 0 See definitions under Comments, below.
Example ret = IpAppRun("DEMO10.EXE", RUN_NORMAL, RUN_AUTOCLOSE)
This statement loads the DEMO10 program and displays its window at its normal size and position. This program will automatically close when Image-Pro is closed.
Comments Allowable ShowMode options are as follows:
ShowMode DESCRIPTION
RUN_NORMAL Displays the application window in its default size and position. RUN_MINIMIZED Displays the application window as an icon. RUN_MAXIMIZED Displays the application window in full-screen mode.

IpAppSelectDoc
Page 2-103
Allowed RunMode options are as follows:
RunMode DESCRIPTION
0 The macro will continue executing after the application is loaded. The application will remain open when Image-Pro is closed.
RUN_AUTOCLOSE The macro will continue executing after the application is loaded. The application will automatically close when Image-Pro is closed.
RUN_MODAL The macro will stop and resume only after the other application is terminated (Image-Pro will be disabled while the application is active).
IpAppSelectDoc Syntax IpAppSelectDoc(DocId)
Description This function makes the specified image window the active image, where DocId specifies the number associated with an open image.
Parameters DocId Integer An integer identifying the ID of the open image (where the first image opened is image 0) or one of the following: DOCSEL_NEXTID DOCSEL_PREVID See definitions under Comments, below.
Example ret = IpAppSelectDoc(2) This statement will select image window number 2 as the active image.
Comments A document “ID” (DocId) is assigned to an image window when it is opened. It retains this ID for the duration of its existence. IDs are assigned consecutively, in the order in which images are opened. The next higher ID number is used when a new window is created — e.g., if image 4 is already open, the next image is assigned an ID of 5. Because of the dynamic nature of DocId (the mix and sequence of images on your desktop varies from session to session), macros involving multiple images should be recorded and played back from an empty imaging area (i.e., one in which there are no images open), or images should be selected relatively using the DOCSEL_NEXTID and DOCSEL_PREVID options described below. These measures will ensure that the recorded image numbers select the intended images on playback.
DocId DESCRIPTION
DOCSEL_NEXTID Selects the image with the next-higher ID, relative to the active image. If the active image has the highest ID, the image with the lowest ID is selected.
DOCSEL_PREVID Selects the image with the next-lower ID, relative to the active image. If the active image has the lowest ID, the image with the highest ID is selected.

IpAppSet
Page 2-104
IpAppSet Syntax IpAppSet(Attribute, Value)
Description This function sets the application attributes.
Parameters Attribute Integer Must be one of the following: PST_BLEND_PREVIEW = Set whether to blend on paste preview. PST_BLEND_APPLY = Set whether to blend on paste apply. PST_BLEND_SOURCE = Set the blending percentage. See Comments, below. PST_APPLY_TYPE = Set the type of blending that will be applied. See Comments, below. MACRO_PAUSE_TYPE = Determins how IpMacroPause will behave. See comments below.
Value Integer The new value for the specified attribute.
Comments The PST attributes modify the behavior of the IpWsPaste function. The PST_BLEND_PREVIEW and PST_BLEND_APPLY are flags where if the value is non-zero, the blending will be applied. The PST_BLEND_SOURCE value is only used if blending is applied, and must be specified as a percentage, where 100 indicates that the pasted data will be used with no blending, 50 indicates an equal contribution of the pasted data and target image data, and 0 indicates the target image data will not be modified by the paste.
The PST_APPLY_TYPE value modifies the paste so that an pixel-by-pixel intensity comparison is to decide whether to apply the paste, and must be one of the following values: PST_APPLY_ALL = All pasted data will be applied according to the current blending. PST_APPLY_LIGHTER = Only pixels in the pasted data that are lighter than the destination image will be applied. PST_APPLY_DARKER = Only darker pixels will be applied.

IpAppSize
Page 2-105
Comments WINDOW_TILING_TYPE= Modifies the selection oof the Windows, Tile command. The tiling type can be set to TILE_NORMAL (the standard Windows tiling behavior) or any combination of the following constants (with one exception noted below):
TILE_ZOOM_TO_FIT= Changes the zoom factor of the images to try to display as much of the image as possible in the tiled workspace.
TILE_REORDER = Reorders the workspaces by the age of the document, by columns first and then by rows. The oldest document will be in the top-left corner of the Image-Pro workspace, the next oldest under it in the first column, and so on until the first column is full and a new column is added to the right of the first.
TILE_SAMESIZE = All workspaces will be set to the same size as the smallest workspace. The workspaces may be different sizes after tiling if the images are different sizes, or in some cases when the tiled layout results in some columns having more images than others.
TILE_COMPACT = Arranges the workspaces so that they are directly next to each other in the columns and rows, such that any unused space in the Image-Pro Plus workspace will be found at the bottom and/or right side.
MACRO_PAUSE_TYPE = This command is used to determine how the new IpMacroPause function will behave when the macro uses the MP_RESPECTSETTING mode. When this mode is specified and the MACRO_PAUSE_TYPE command is set to any non-zero value, the IpMacroPause function will behave like the MP_WAITFORRESPONSE mode was selected and will wait for the user to make a selection by clicking one of the dialog buttons.
IpAppSize Syntax IpAppSize(Width, Height)
Description This function changes the size of the Image-Pro application window to the specified width and height.
Parameters Width Integer An integer specifying the width, in pixels, at which the Image-Pro application window is to be displayed.
Height Integer An integer specifying the height, in pixels, at which the Image-Pro application window is to be displayed.
Example ret = IpAppSize(800, 400)
This statement will resize the Image-Pro application window to half-screen length on a super-VGA monitor.
Comments Be aware that there is a minimum size to which the Image-Pro application window can be set. If you specify dimensions below this minimum, your values will be ignored, and the minimum will be used. The minimum values vary depending upon the resolution of your screen and the font that is used.
See Also IpAppRestore, IpAppMove

IpAppUpdateDoc
Page 2-106
IpAppUpdateDoc Syntax IpAppUpdateDoc(DocId)
Description This function directs Image-Pro to repaint the specified image window, repaint all open image windows or refrain from repainting any image window. From an Auto-Pro macro, it can be used to force a repaint before macro termination, so that the results of intermediate macro steps can be viewed as they occur. From a Visual Basic or Visual C++ program, it can be used to improve program performance by selectively updating the screen. There is no command equivalent for this function; it is one that must be manually written into your macro with the macro editor.
Parameters DocId Integer An integer identifying the ID of the open image (where the first image opened is image 0) or one of the following: DOCSEL_ACTIVE DOCSEL_ALL DOCSEL_NONE See definitions under Comments, below.
Example The following Auto-Pro macro segment will adjust the brightness and contrast characteristics of the active image, and then sharpen it. After each operation the image will be repainted. This allows the viewer to see the result of each step as it is executed. Without the IpAppUpdateDoc statements in this macro, the user would see only the final result when the macro was finished. Note - if this segment were executed from a Visual Basic or Visual C++ program, the screen would automatically be updated after each step. See second example, below.
ret = IpLutSetAttr(LUT_BRIGHTNESS, 78) ret = IpAppUpdateDoc(DOCSEL_ACTIVE) ret = IpLutSetAttr(LUT_CONTRAST, 60) ret = IpAppUpdateDoc(DOCSEL_ACTIVE) ret = IpLutApply() ret = IpFltSharpen(5, 8, 2)
If the following sequence were called from a Visual Basic or Visual C++ program, the active image would not be updated until the entire sequence of LUT and filtering statements had been performed. ret = IpLutSetAttr(LUT_BRIGHTNESS, 78) ret = IpAppUpdateDoc(DOCSEL_ACTIVE) ret = IpLutSetAttr(LUT_CONTRAST, 60) ret = IpAppUpdateDoc(DOCSEL_ACTIVE) ret = IpLutApply() ret = IpFltSharpen(5, 8, 2) ret = IpAppUpdateDoc(DOCSEL_NONE) ret = IpLutSetAttr(LUT_BRIGHTNESS, 78) ret = IpLutSetAttr(LUT_CONTRAST, 60) ret = IpLutApply() ret = IpFltSharpen(5, 8, 2) ret = IpFltMedian(5, 2) ret = IpAppUpdateDoc(DOCSEL_ACTIVE)

IpAppUpdateDoc
Page 2-107
Comments Update the image window only when it is truly necessary. Frequent repainting will slow down a macro. DocId options are as follows:
DocId VALUE DESCRIPTION
DOCSEL_ACTIVE Specifies that the active image is to be repainted.
DOCSEL_ALL Specifies that all open images are to be repainted.
DOCSEL_NONE Specifies that no images are to be repainted until the next call to IpAppUpdateDoc with DOCSEL_ACTIVE or DOCSEL_ALL is performed. In a Visual Basic or Visual C++ program, you might want to use DOCSEL_NONE to eliminate screen painting for performance reasons, since the screen is, otherwise, updated every time an Auto-Pro function is called (DOCSEL_NONE can be set in an Auto-Pro macro, too, however, there is really no purpose in doing so, since by default, the screen is updated only when the macro ends or is interrupted by a message box). In any event, regardless of what program called DOCSEL_NONE, it must, at some point before its termination, disable this mode by calling DOCSEL_ALL or DOCSEL_ACTIVE. If this isn't done, the non-painting mode will continue to be in effect even after the macro or program terminates, and Image-Pro returns to its normal, interactive mode.
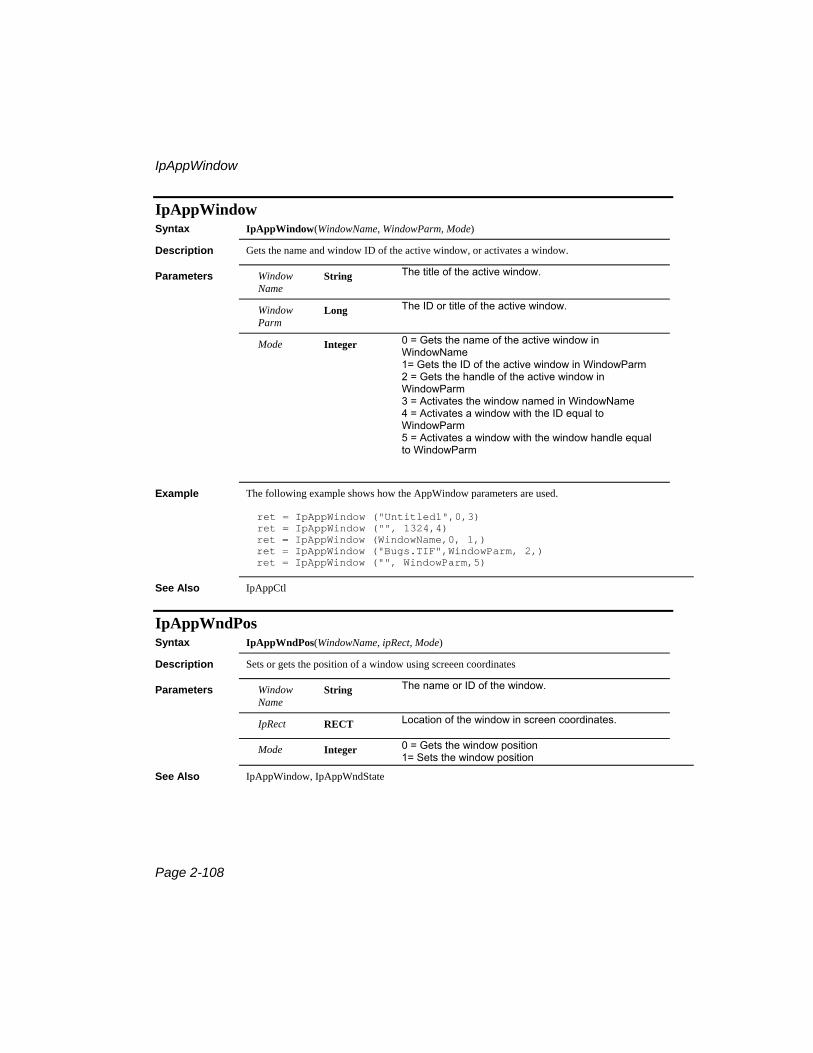
IpAppWindow
Page 2-108
IpAppWindow Syntax IpAppWindow(WindowName, WindowParm, Mode)
Description Gets the name and window ID of the active window, or activates a window.
Parameters Window Name
String The title of the active window.
Window Parm
Long The ID or title of the active window.
Mode Integer 0 = Gets the name of the active window in WindowName 1= Gets the ID of the active window in WindowParm 2 = Gets the handle of the active window in WindowParm 3 = Activates the window named in WindowName 4 = Activates a window with the ID equal to WindowParm 5 = Activates a window with the window handle equal to WindowParm
Example The following example shows how the AppWindow parameters are used.
ret = IpAppWindow ("Untitled1",0,3) ret = IpAppWindow ("", 1324,4) ret = IpAppWindow (WindowName,0, 1,) ret = IpAppWindow ("Bugs.TIF",WindowParm, 2,) ret = IpAppWindow ("", WindowParm,5)
See Also IpAppCtl
IpAppWndPos Syntax IpAppWndPos(WindowName, ipRect, Mode)
Description Sets or gets the position of a window using screeen coordinates
Parameters Window Name
String The name or ID of the window.
IpRect RECT Location of the window in screen coordinates.
Mode Integer 0 = Gets the window position 1= Sets the window position
See Also IpAppWindow, IpAppWndState

IpAppWndState
Page 2-109
IpAppWndState Syntax IpAppWndState(WindowName, Statet, Mode)
Description Sets or gets the state of a window.
Parameters Window Name
String The name or ID of the window.
State Integer WST_ENABLED WST_VISIBLE WST_NORMAL WST_MINIMIZED WST_MAXIMIZED
Mode Integer 0 = Get the window state 1= Set the window state
See Also IpAppWindow, IppAppWndPos
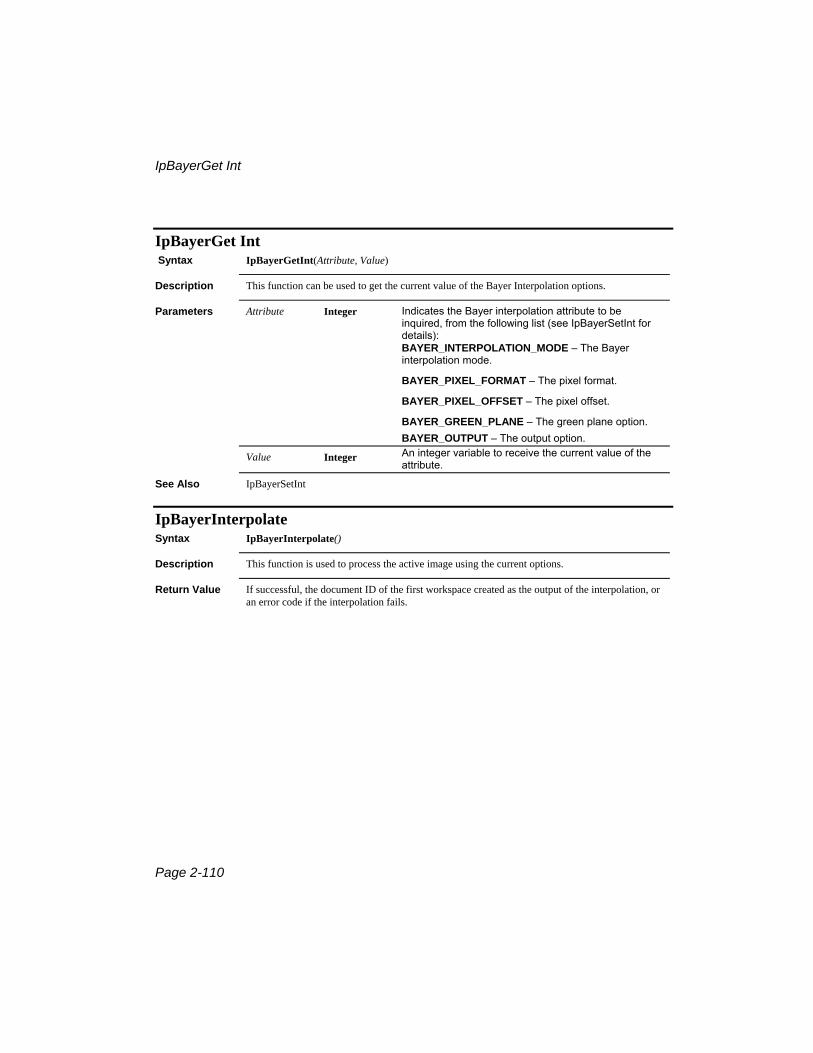
IpBayerGet Int
Page 2-110
IpBayerGet Int Syntax IpBayerGetInt(Attribute, Value)
Description This function can be used to get the current value of the Bayer Interpolation options.
Parameters Attribute Integer Indicates the Bayer interpolation attribute to be inquired, from the following list (see IpBayerSetInt for details): BAYER_INTERPOLATION_MODE – The Bayer interpolation mode.
BAYER_PIXEL_FORMAT – The pixel format.
BAYER_PIXEL_OFFSET – The pixel offset.
BAYER_GREEN_PLANE – The green plane option. BAYER_OUTPUT – The output option.
Value Integer An integer variable to receive the current value of the attribute.
See Also IpBayerSetInt
IpBayerInterpolate Syntax IpBayerInterpolate()
Description This function is used to process the active image using the current options.
Return Value If successful, the document ID of the first workspace created as the output of the interpolation, or an error code if the interpolation fails.
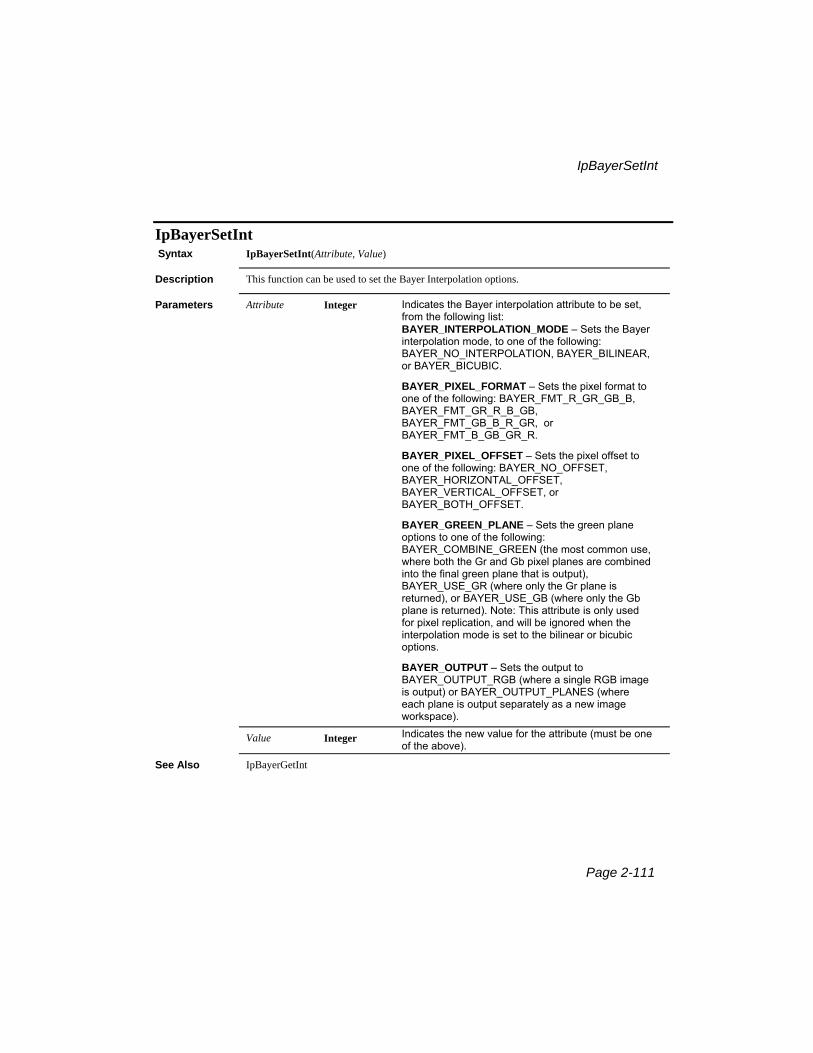
IpBayerSetInt
Page 2-111
IpBayerSetInt Syntax IpBayerSetInt(Attribute, Value)
Description This function can be used to set the Bayer Interpolation options.
Parameters Attribute Integer Indicates the Bayer interpolation attribute to be set, from the following list: BAYER_INTERPOLATION_MODE – Sets the Bayer interpolation mode, to one of the following: BAYER_NO_INTERPOLATION, BAYER_BILINEAR, or BAYER_BICUBIC.
BAYER_PIXEL_FORMAT – Sets the pixel format to one of the following: BAYER_FMT_R_GR_GB_B, BAYER_FMT_GR_R_B_GB, BAYER_FMT_GB_B_R_GR, or BAYER_FMT_B_GB_GR_R.
BAYER_PIXEL_OFFSET – Sets the pixel offset to one of the following: BAYER_NO_OFFSET, BAYER_HORIZONTAL_OFFSET, BAYER_VERTICAL_OFFSET, or BAYER_BOTH_OFFSET.
BAYER_GREEN_PLANE – Sets the green plane options to one of the following: BAYER_COMBINE_GREEN (the most common use, where both the Gr and Gb pixel planes are combined into the final green plane that is output), BAYER_USE_GR (where only the Gr plane is returned), or BAYER_USE_GB (where only the Gb plane is returned). Note: This attribute is only used for pixel replication, and will be ignored when the interpolation mode is set to the bilinear or bicubic options.
BAYER_OUTPUT – Sets the output to BAYER_OUTPUT_RGB (where a single RGB image is output) or BAYER_OUTPUT_PLANES (where each plane is output separately as a new image workspace).
Value Integer Indicates the new value for the attribute (must be one of the above).
See Also IpBayerGetInt

IpBayerShow
Page 2-112
IpBayerShow Syntax IpBayerShow(Show)
Description This function shows or hides the Bayer Interpolation feature
Parameters Show Integer 0 = hide Bayer Interpolation 1 (or greater) = show Bayer Interpolation
IpBitAttr Syntax IpBitAttr(Attribute, Value)
Description This function selects, sets, or deselects options relating to the Bitmap Analysis command.
Parameters Attribute Integer An enumerated integer identifying the option to be set. Must be one of the following: BIT_SAMPLE BIT_CALIB BIT_SAVEALL See definitions under Comments, below.
Value Integer An integer specifying how the option specified in Attrib is to be set. See definitions below for the values allowed by each option.
Example The following example sets the sampling rate to every other pixel on every other line.
ret = IpBitAttr(BIT_SAMPLE, 2)
Comments Attrib options are as follows:
Attribute DESCRIPTION Value VALUES
BIT_SAMPLE Sets the sampling rate to the interval specified in Value. Equivalent to the Bitmap Analysis window's Sampling command.
1 - Every pixel. 2 - Every other pixel. 3 - Every 3rd pixel. . . .
BIT_CALIB Specifies whether the bitmap values are reported in calibrated or uncalibrated format. Equivalent to the Bitmap Analysis window's Intensity Cal command.
0 - Display actual. 1 - Display calibrated.
BIT_SAVEALL Specifies whether the top row and left column will be saved with the bitmap values. Equivalent to the Bitmap Analysis window's Pixel Values Only command.
0 - Save pixels only. 1 - Save pixels with row
and column legends.
See Also IpBitShow, IpBitSaveData
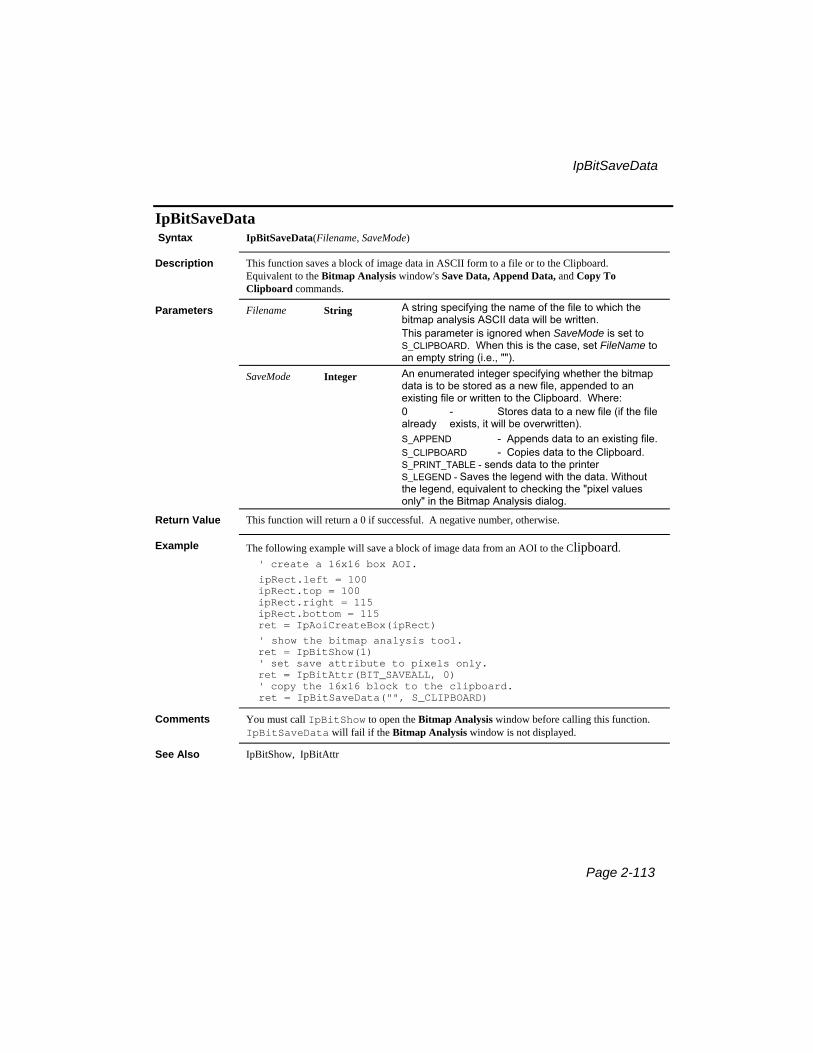
IpBitSaveData
Page 2-113
IpBitSaveData Syntax IpBitSaveData(Filename, SaveMode)
Description This function saves a block of image data in ASCII form to a file or to the Clipboard. Equivalent to the Bitmap Analysis window's Save Data, Append Data, and Copy To Clipboard commands.
Parameters Filename String A string specifying the name of the file to which the bitmap analysis ASCII data will be written. This parameter is ignored when SaveMode is set to S_CLIPBOARD. When this is the case, set FileName to an empty string (i.e., "").
SaveMode Integer An enumerated integer specifying whether the bitmap data is to be stored as a new file, appended to an existing file or written to the Clipboard. Where: 0 - Stores data to a new file (if the file already exists, it will be overwritten). S_APPEND - Appends data to an existing file. S_CLIPBOARD - Copies data to the Clipboard. S_PRINT_TABLE - sends data to the printer S_LEGEND - Saves the legend with the data. Without the legend, equivalent to checking the "pixel values only" in the Bitmap Analysis dialog.
Return Value This function will return a 0 if successful. A negative number, otherwise.
Example The following example will save a block of image data from an AOI to the Clipboard. ' create a 16x16 box AOI.
ipRect.left = 100 ipRect.top = 100 ipRect.right = 115 ipRect.bottom = 115 ret = IpAoiCreateBox(ipRect)
' show the bitmap analysis tool. ret = IpBitShow(1) ' set save attribute to pixels only. ret = IpBitAttr(BIT_SAVEALL, 0) ' copy the 16x16 block to the clipboard. ret = IpBitSaveData("", S_CLIPBOARD)
Comments You must call IpBitShow to open the Bitmap Analysis window before calling this function. IpBitSaveData will fail if the Bitmap Analysis window is not displayed.
See Also IpBitShow, IpBitAttr

IpBitShow
Page 2-114
IpBitShow Syntax IpBitShow(bShow)
Description This function is used to display, hide and update the Bitmap Analysiswindow. Equivalent to selecting the Bitmap Analysiscommand to open the window or clicking the Updatemenu or Close button within it to update or close it.
Parameters bShow Integer An integer value of 0, 1 or 2, specifying whether the Bitmap Analysis command window is to be shown, closed or updated. Where:
0 - Closes the window if it is already open. 1 - Opens the window. 2 - Updates the window.
Example ret = IpBitShow(1)
The statement above will open the Bitmap Analysis command window.
Comments If you intend to save bitmap data using IpBitSaveData, you must first call this function with its bShow flag enabled. Otherwise, IpBitSaveData will fail.
See Also IpBitSaveData, IpBitAttr
IpBlbCount Syntax IpBlbCount( )
Description This function counts and measures the objects in the active image or AOI. Equivalent to clicking the Count button in the Count/Sizecommand window.
Return Value This function returns an integer representing the number of counted objects within range, or 0 if no objects were found.
Comments Image-Pro will utilize the current intensity, option and measurement settings if you have not explicitly set them using the IpBlbSetRange, IpBlbSetAttr and IpBlbEnableMeas functions.
When it is necessary to ensure that your counting macro operates under specific intensity, options and measurement values, consider saving these values to an environment file. Your program can then initialize the environment by loading this file via the IpBlbLoadSetting function. Or you may set them explicitly via the IpBlbSetAttr function. Generally, this is the second of three steps for obtaining measurement data from objects. The first and third steps are IpBlbEnableMeas and IpBlbData.
See Also IpBlbSetAttr, IpBlbEnableMeas, IpBlbSetRange, IpBlbLoadSetting, IpBlbMeasure

IpBlbCreateMask
Page 2-115
IpBlbCreateMask Syntax IpBlbCreateMask( )
Description This function makes a mask from the current count/size result. Equivalent to selecting the Make Mask command from the Image menu in the Count/Size window.
Comments This statement does nothing if there is no count associated with the active image.
IpBlbData Syntax IpBlbData(Measure, FromObj, ToObj, DataArray)
Description This function is used to get the measurement data associated with the active object count. There is no Image-Pro command equivalent to this function; it is one that must be manually written with the macro editor.
Parameters Measure Integer An enumerated integer specifying the measurement type for which data is to be obtained. See list in IpBlbEnableMeas for standard count/size measurements. This function also supports the following population density measurements: BPOP_OBJECTS - A population density measurement that returns an array containing the number of objects found in each site. BPOP_AREA - A population density measurement that returns an array containing the calibrated area of each site. BPOP_DENSITY - A population density measurement that returns an array containing the density of each site. Density is calculated as the object count divided by the calibrated area. BPOP_CORRDENSITY - A population density measurement that returns an array containing the corrected density of each site. Corrected density is calculated as thedensity minus the background density. Use the GETNUMSITES command for IpBlbGet to obtain the length of an array necessary to hold the population data.

IpBlbData
Page 2-116
BPOP_OBJECTS_STATS – returns an array of 4 singles: mean, sum, background, and total, in that order. BPOP_AREA_STATS - returns an array of 4 singles: mean, sum, background, and total, in that order. BPOP_DENSITY_STATS - returns an array of 4 singles: mean, sum, background, and total, in that order. BPOP_CORRDENSITY_STATS - returns an array of 4 singles: mean, sum, background, and total, in that order. BCLUSTER_STATS - returns an array of 6 singles: original count, cluster count, single object count, number of objects in clusters, total objects, and total object area, in that order. BLEX_RADIUS - list of radii BLEX_DIAMETER - list of diameters BLEX_CALIPER - list of calipers BLEX_BRANCHLEN - list of branch lengths
FromObj Integer An integer representing the ID number of the first object for which you want measurements (the very first object in the counted set is considered object 0).
ToObj Integer An integer representing the ID number of the last object for which you want measurements (the very first object in the counted set is considered object 0).
DataArray Single The address (name) of the array (of BASIC type, Single) that will receive the measurement data. This array should be large enough to store (ToObj - FromObj + 1) numbers.

IpBlbData
Page 2-117
Comments When passing an array to Image-Pro from a BASIC program, be sure to pass the first element of
the array by reference (see example below). Generally, this is the third of three steps for obtaining measurement data from objects. The first and second steps are IpBlbEnableMeas and IpBlbCount or IpBlbMeasure. You can find more information about segmentation range macros on the Media Cybernetics website. For all of the BLOBM_ measurements, the FromObj parameter should specify the first object and the ToObj parameter the last object of the set of objects to inquire. Typically, FromObj is specified as 0 (zero) and ToObj specified as the number of objects - 1. For the BLEX_ measurements, the function returns an array of measurements per object. The FromObj parameter specifies the object number. For the BLEX_RADIUS, BLEX_DIAMETER, and BLEX_CALIPER measurements, the ToObj parameter is used to specify the number of radial measurements that should be calculated and returned. If ToObj is specified as 0 (zero), the function returns the number of measurements by default (32), or the number of measurements set via BLBCMD_SETNUMANGLES. For the BLEX_BRANCHLEN measurement, ToObj indicates the length of array provided. To inquire the number of branches for a given object, use IpBlbData to get the BLBM_DENDRITES measurement. To save Count/Size data together with the active image, use IpGalAdd with an empty string parameter in your macro.
Return Value 0 if successful.
See Also IpBlbGet, IpBlbCount, IpBlbMeasure, IpBlbFilter, IpBlbEnableMeas
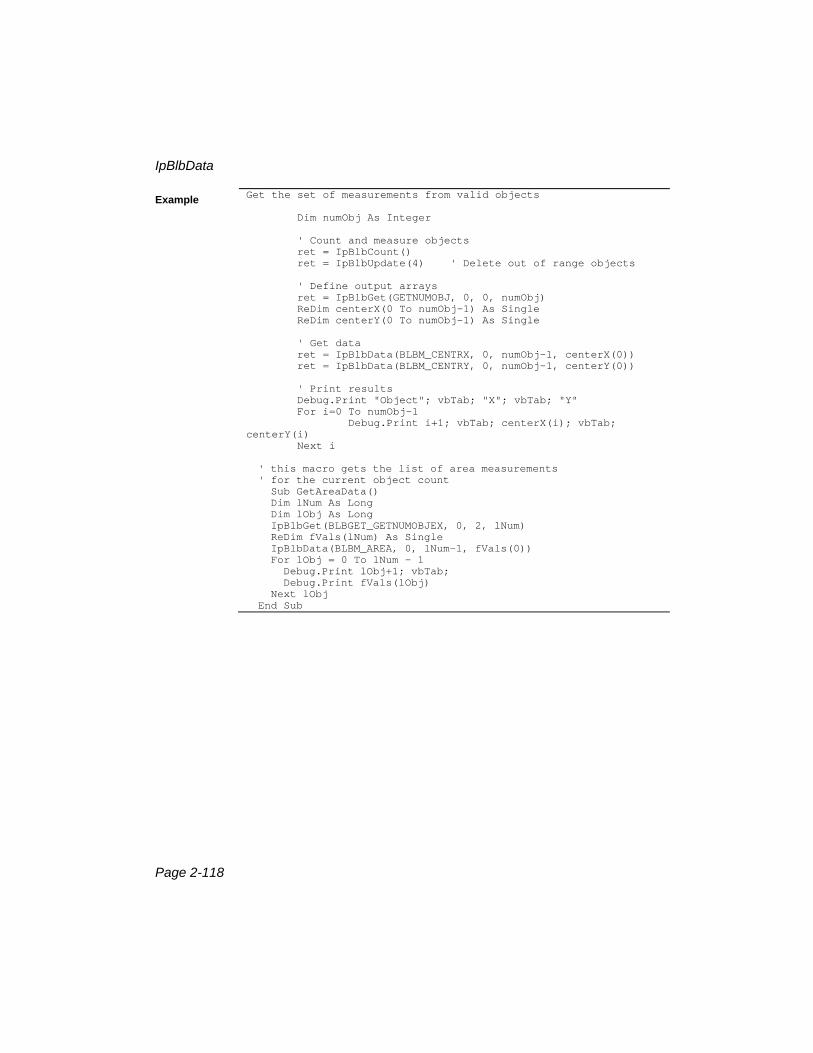
IpBlbData
Page 2-118
Example Get the set of measurements from valid objects Dim numObj As Integer ' Count and measure objects ret = IpBlbCount() ret = IpBlbUpdate(4) ' Delete out of range objects ' Define output arrays ret = IpBlbGet(GETNUMOBJ, 0, 0, numObj) ReDim centerX(0 To numObj-1) As Single ReDim centerY(0 To numObj-1) As Single ' Get data ret = IpBlbData(BLBM_CENTRX, 0, numObj-1, centerX(0)) ret = IpBlbData(BLBM_CENTRY, 0, numObj-1, centerY(0)) ' Print results Debug.Print "Object"; vbTab; "X"; vbTab; "Y" For i=0 To numObj-1 Debug.Print i+1; vbTab; centerX(i); vbTab; centerY(i) Next i ' this macro gets the list of area measurements ' for the current object count Sub GetAreaData() Dim lNum As Long Dim lObj As Long IpBlbGet(BLBGET_GETNUMOBJEX, 0, 2, lNum) ReDim fVals(lNum) As Single IpBlbData(BLBM_AREA, 0, lNum-1, fVals(0)) For lObj = 0 To lNum - 1 Debug.Print lObj+1; vbTab; Debug.Print fVals(lObj) Next lObj End Sub

IpBlbData
Page 2-119
Example Attribute VB_Name = "Module1" 'this macro prompts the user for how many radius measurements 'to perform and which object to perform them on. Sub get_radii() Dim radii(90) As Single Dim objid As Integer, i As Integer Dim numangles As Integer Dim fangle As Single numangles = 32 ret = IpStGetInt("number of radii?", numangles, 32, _ 2, 90) fangle = 360.0 / numangles ret = IpOutputShow(1) ret = IpOutputClear() ret = IpBlbGet(GETHIT, 0, 0, objid) If objid > 0 Then ret = IpBlbData(BLEX_RADIUS, objid-1, _ numangles, radii(0)) Debug.Print "object: " + Str$(objid) + _ " # angles: " + Str$(numangles) Debug.Print "angle:" + vbTab + vbTab + _ "radius:" For i = 0 To numangles - 1 Debug.Print Str$(fangle * i) + vbTab _ + vbTab + Str$(radii(i)) Next i End If
End Sub

IpBlbData
Page 2-120
Example 'same as above, but with diameters instead of radii. Sub get_diameters() Dim radii(90) As Single Dim objid As Integer, i As Integer Dim numangles As Integer Dim fangle As Single numangles = 16 ret = IpStGetInt("number of diameters?", _ numangles, 16, 2, 90) fangle = 180.0 / numangles ret = IpOutputShow(1) ret = IpOutputClear() ret = IpBlbGet(GETHIT, 0, 0, objid) If objid > 0 Then ret = IpBlbData(BLEX_DIAMETER, objid-1, _ numangles, radii(0)) Debug.Print "object: " + Str$(objid) + _ " # angles: " + Str$(numangles) Debug.Print "angle:" + vbTab + vbTab + _ "diameter:" For i = 0 To numangles - 1 Debug.Print Str$(fangle * i) + _ vbTab + vbTab + _ Str$(radii(i)) Next i End If End Sub

IpBlbData
Page 2-121
Sub GetMultiRangeData() Dim iRng As Integer Dim iNumRng As Integer Dim iObj As Integer Dim iNumObj As Integer ret = IpBlbGet(GETNUMRANGES, 0, 0, iNumRng) If (ret < 0) Then Exit Sub End If For iRng = 0 To iNumRng - 1 IpBlbRange(iRng) ret = IpBlbGet(GETNUMOBJ, 0, 2, iNumObj) ReDim Ranges(iNumObj) As Single ret = IpBlbData(BLBM_SRANGE, 0, iNumObj-1, _ Ranges(0)) For iObj = 0 To iNumObj - 1 Debug.Print iObj+1; vbTab; Debug.Print Ranges(iObj) Next iObj Next iRng End Sub
Sub GetCaliper() Dim caliper(90) As Single Dim i As Integer, objid As Integer ret = IpBlbGet(GETHIT, 0, 0, objid) ret = IpBlbData(BLEX_CALIPER, objid - 1, 90, _ caliper(0)) Debug.Print "Object ID: "; objid For i = 0 To 90 - 1 Debug.Print i*2; " degrees "; caliper(i) Next i Debug.Print End Sub

IpBlbData
Page 2-122
'The following is example code for getting population 'density and/or cluster data: Dim iNumSites As Integer Dim i As Integer Dim sOut As String ret = IpBlbGet(BLBGET_GETNUMSITES, 0, 0, iNumSites) If ret = IPCERR_NONE And iNumSites > 0 Then ReDim fObj(iNumSites) As Single ReDim fArea(iNumSites) As Single ReDim fDens(iNumSites) As Single ReDim fCorr(iNumSites) As Single ret = IpBlbData(BPOP_OBJECTS, 0, iNumSites-1, _ fObj(0)) ret = IpBlbData(BPOP_AREA, 0, iNumSites-1, _ fArea(0)) ret = IpBlbData(BPOP_DENSITY, 0, iNumSites-1, _ fDens(0)) ret = IpBlbData(BPOP_CORRDENSITY, 0, iNumSites-1, _ fCorr(0)) sOut = "# sites: " + CStr(iNumSites) + vbCrLf ret = IpOutput(sOut)
For i = 0 To iNumSites - 1 sOut = "#" + CStr(i + 1) + ":" + vbTab + _ CStr(fObj(i)) + vbTab + _ CStr(fArea(i)) + vbTab + _ CStr(fDens(i)) + vbTab + _ CStr(fCorr(i)) + vbCrLf ret = IpOutput(sOut) Next i ReDim fObj(4) As Single ReDim fArea(4) As Single ReDim fDens(4) As Single ReDim fCorr(4) As Single ret = IpBlbData(BPOP_OBJECTS_STATS, 0, 0, fObj(0)) ret = IpBlbData(BPOP_AREA_STATS, 0, 0, fArea(0)) ret = IpBlbData(BPOP_DENSITY_STATS, 0, 0, fDens(0)) ret = IpBlbData(BPOP_CORRDENSITY_STATS, 0, 0, _ fCorr(0)) sOut = "Pop Dens statistics: " + vbCrLf ret = IpOutput(sOut) For i = 0 To 3 sOut = "#" + CStr(i) + ":" + vbTab + _ CStr(fObj(i)) + vbTab + _ CStr(fArea(i)) + vbTab + _ CStr(fDens(i)) + vbTab + _ CStr(fCorr(i)) + vbCrLf ret = IpOutput(sOut) Next i End If
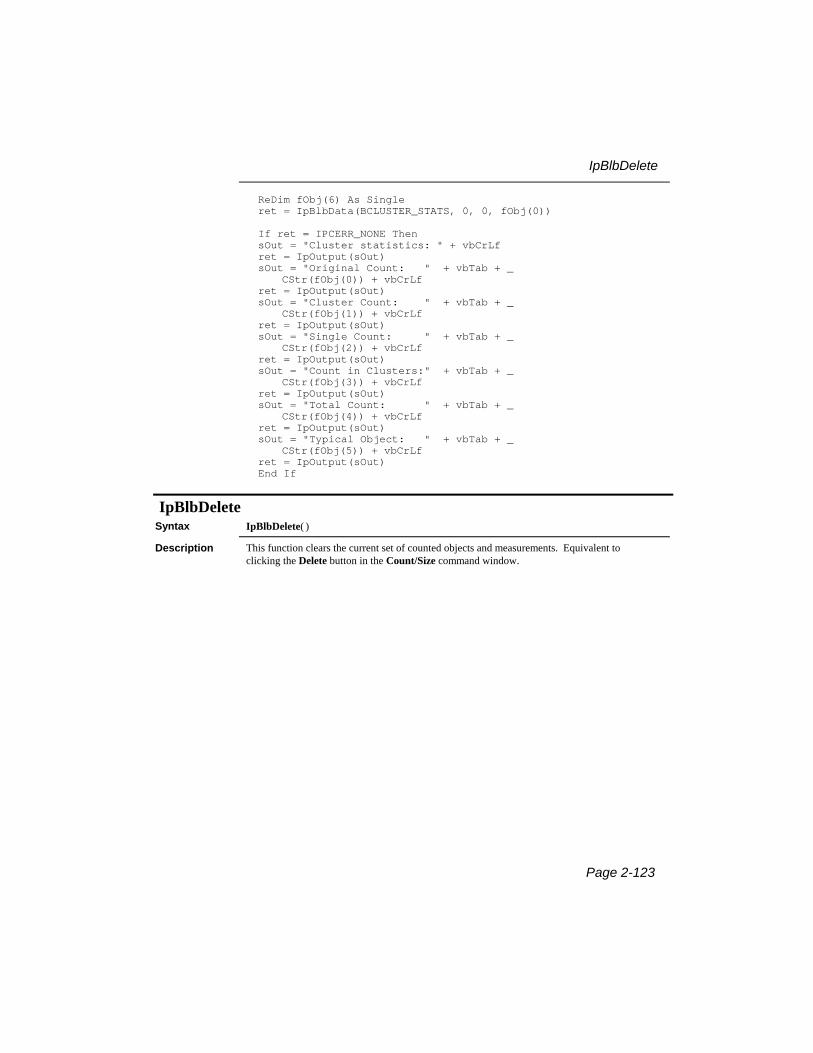
IpBlbDelete
Page 2-123
ReDim fObj(6) As Single ret = IpBlbData(BCLUSTER_STATS, 0, 0, fObj(0)) If ret = IPCERR_NONE Then sOut = "Cluster statistics: " + vbCrLf ret = IpOutput(sOut) sOut = "Original Count: " + vbTab + _ CStr(fObj(0)) + vbCrLf ret = IpOutput(sOut) sOut = "Cluster Count: " + vbTab + _ CStr(fObj(1)) + vbCrLf ret = IpOutput(sOut) sOut = "Single Count: " + vbTab + _ CStr(fObj(2)) + vbCrLf ret = IpOutput(sOut) sOut = "Count in Clusters:" + vbTab + _ CStr(fObj(3)) + vbCrLf ret = IpOutput(sOut) sOut = "Total Count: " + vbTab + _ CStr(fObj(4)) + vbCrLf ret = IpOutput(sOut) sOut = "Typical Object: " + vbTab + _ CStr(fObj(5)) + vbCrLf ret = IpOutput(sOut) End If
IpBlbDelete Syntax IpBlbDelete( )
Description This function clears the current set of counted objects and measurements. Equivalent to clicking the Delete button in the Count/Size command window.

IpBlbEnableMeas
Page 2-124
IpBlbEnableMeas Syntax IpBlbEnableMeas(MeasurementType, bEnable)
Description This function enables or disables the specified measurement type in preparation for a Count/Size operation. Equivalent to selecting or deselecting a measurement type with the Select Measurements command.
Parameters MeasurementType Integer An enumerated integer specifying the measurement to be selected or deselected. Must be one of the following:
BLBM_ALL BLBM_AREA BLBM_AREAPOLY BLBM_ASPECT BLBM_BLUE BLBM_BOXX BLBM_BOXY BLBM_BOX_AREA BLBM_BOX_XY BLBM_BRANCHLEN BLBM_CENTRX BLBM_CENTRY BLBM_CLASS BLBM_CLUMPINESS BLBM_CLUSTER BLBM_CMASSX BLBM_CMASSY BLBM_DENDRITES
BLBM_DENSDEV
BLBM_DENSITY BLBM_DENSMAX BLBM_DENSSMIN BLBM_DENSSUM BLBM_DIRECTION BLBM_ENDPOINTS BLBM_FRACTDIM BLBM_GREEN BLBM_HETEROGENEITY BLBM_HOLEAREA BLBM_HOLEAREARATIO BLBM_IOD BLBM_LENGTH BLBM_MAJORAX

IpBlbEnableMeas
Page 2-125
Measurement
Type, con’t Integer BLBM_MARGINATION
BLBM_MAXCALIP BLBM_MAXFERRET BLBM_MAXRADIUS BLBM_MEANCALIP BLBM_MEANFERRET BLBM_MINCALIP BLBM_MINFERRET BLBM_MINORAX BLBM_MINRADIUS BLBM_NUMHOLES BLBM_PCONVEX BLBM_PELLIPSE BLBM_PERAREA BLBM_PERIMETER BLBM_PERIMETER2 BLBM_PERIMETER3 BLBM_PERIIMETERLEN BLBM_PRATIO BLBM_RADIUSRATIO BLBM_RANGE BLBM_RED BLBM_ROUNDNESS BLBM_SIZECOUNT BLBM_SRANGE BLBM_WIDTH
BEnable Integer An integer value of 0 or 1 that will select or deselect the measurement type specified in MeasurementType as follows: 0 - Deselects the specified measurement 1 - Selects the specified measurement
Example ret = IpBlbEnableMeas(BLBM_PERIMETER,1)
This statement selects the perimeter measurement. When the IpBlbCount or IpBlbMeasure function is subsequently performed, the perimeter measurement (and any other currently selected measurements) of all counted objects are recorded.
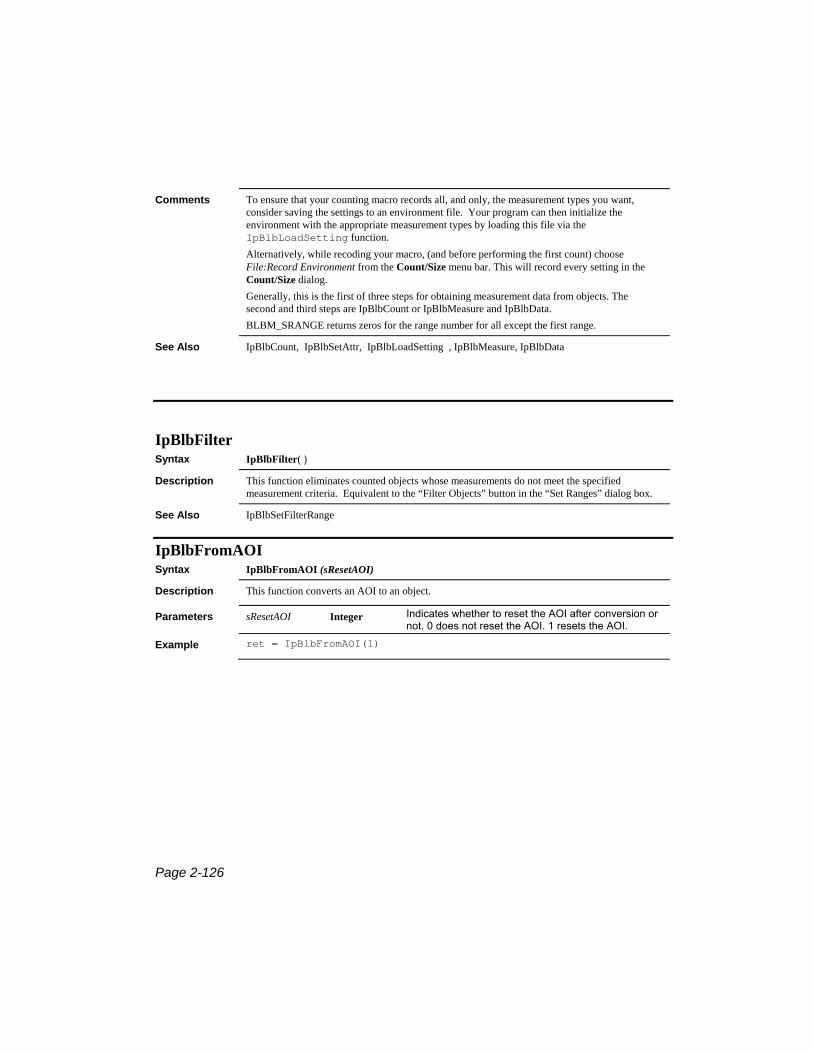
Page 2-126
Comments To ensure that your counting macro records all, and only, the measurement types you want, consider saving the settings to an environment file. Your program can then initialize the environment with the appropriate measurement types by loading this file via the IpBlbLoadSetting function. Alternatively, while recoding your macro, (and before performing the first count) choose File:Record Environment from the Count/Size menu bar. This will record every setting in the Count/Size dialog. Generally, this is the first of three steps for obtaining measurement data from objects. The second and third steps are IpBlbCount or IpBlbMeasure and IpBlbData. BLBM_SRANGE returns zeros for the range number for all except the first range.
See Also IpBlbCount, IpBlbSetAttr, IpBlbLoadSetting , IpBlbMeasure, IpBlbData
IpBlbFilter Syntax IpBlbFilter( )
Description This function eliminates counted objects whose measurements do not meet the specified measurement criteria. Equivalent to the “Filter Objects” button in the “Set Ranges” dialog box.
See Also IpBlbSetFilterRange
IpBlbFromAOI Syntax IpBlbFromAOI (sResetAOI)
Description This function converts an AOI to an object.
Parameters sResetAOI Integer Indicates whether to reset the AOI after conversion or not. 0 does not reset the AOI. 1 resets the AOI.
Example ret = IpBlbFromAOI(1)

IpBlbGet
Page 2-127
IpBlbGet Syntax IpBlbGet(Cmd, Param1, Param2, OutVal)
Description Use this function to get information relating to the object count in the current image. There is no command equivalent to this function; it is one that must be manually written with the macro editor.
Parameters Cmd Integer A command ID, which specifies the type of information you want to retrieve. Must be one of the following:
GETNUMOBJEX GETSTATUS GETPOINTS GETRANGE GETSTATS GETHIT GETTHRESH GETHBLOB GETMEASENABLED GETNUMSAMPLES GETNUMPTS GETNUMRANGES GETNUMSITES GETSITESTATS GETRANGESTATS GETIPPSETTINGS GETSEGMENTATION GETBOUNDS
Or one of the BLOB attributes used with GETIPPSETTINGS. See definitions under Comments, below.
Param1 Long An integer specifying data with which Cmd will operate. See definitions under Comments, below, for the values required by each command.
Param2 Long An integer specifying additional data with which Cmd will operate. See definitions under Comments, below, for the values required by each command
OutVal See below The address (name) of the variable that will receive the requested data. Be sure this variable is of the type required by Cmd. See Cmd description under Comments, below.
Return Value IpBlbGet returns a 0 if successful except when used with the GETPOINTS command. Then it will return the number of points stored to OutVal. If this value is equal to Param2, chances are that OutVal was not large enough to hold all of the points. See GETPOINTS under Comments, below.
Example The following statements perform an XOR on the inside of all visible objects.

IpBlbGet
Page 2-128
Redim blbpts(1000) As POINTAPI Dim numpoints As Integer, numobj As Integer Dim status As Integer, i As Integer ' get the total number of objects, in-range and out-of-range, ' hidden and visible. ret = IpBlbGet(GETNUMOBJ, 0, 0, numobj) For i = 0 To numobj - 1 ret = IpBlbGet(GETSTATUS, i, 0, status) Debug.print ret ' (status) ' if object in-range and visible... If status >= 0 Then 'get the outline of the object numpoints = IpBlbGet(GETPOINTS, i, 1000, blbpts(0)) Debug.print numpoints If numpoints > 0 Then ' create AOI out of the object outline and XOR it. ret = IpAoiCreateIrregular(blbpts(0), numpoints) ret = IpOpNumberLogic(0, OPL_NOT, 0) End If End If Next i
The following statements binarizes the active image based upon the threshold established by the count.
Dim threshold As Single
ret = IpBlbGet(GETTHRESH, 0, 0, threshold) ret = IpLutBinarize(0, threshold, 0)
The following statement gets the number of points. Sub testBlbGet() Dim iNum As Integer ret = IpBlbGet(GETNUMPTS, 22, 0, iNum) MsgBox("Returns " & CStr(iNum)) ReDim ptTmp(iNum) As POINTAPI iNum = IpBlbGet(GETPOINTS, 22, iNum, ptTmp(0)) MsgBox("Returns " & CStr(iNum)) End Sub The following macro gets multiple ranges and other data. Sub PrintObjectRanges() Dim iRng As Integer Dim iNumRng As Integer Dim iObj As Integer Dim iNumObj As Integer Dim NextRng As Integer Dim iAllObj As Integer Dim i As Integer, j As Integer 'count the number of segmentation ranges ret = IpBlbGet(GETNUMRANGES, 0, 0, _ iNumRng)

IpBlbGet
Page 2-129
If (ret < 0) Then Exit Sub End If 'Make sure that the Range measurement is 'enabled and get rid of hidden objects ret = IpBlbEnableMeas(BLBM_AREA, 1) ret = IpBlbEnableMeas(BLBM_SRANGE, 1) ret = IpBlbMeasure() ret = IpBlbUpdate(4) 'create arrays to hold all of the data 'from all ranges ret = IpBlbGet(GETNUMOBJ, 0, _ BLB_ALLOBJECTS, iAllObj) ReDim Areas(iAllObj) As Single ReDim Ranges(iAllObj) As Single NextRng = 0 'Label the output ret = IpOutputShow(1) ret = IpOutputClear() Debug.Print "Objects by Range" Debug.Print "Rng-Obj"; Debug.Print Chr(9); "Area"; Chr(9); Debug.Print "Range" 'Iterate through the ranges For iRng = 0 To iNumRng - 1 IpBlbRange(iRng) ret = IpBlbGet(GETNUMOBJ, 0, _ BLB_ACTIVERANGE, iNumObj) ReDim tmpAreas(iNumObj) As Single ReDim tmpRanges(iNumObj) As Single ret = IpBlbData(BLBM_AREA, 0, _ iNumObj-1, tmpAreas(0)) ret = IpBlbData(BLBM_SRANGE, 0, _ iNumObj-1, tmpRanges(0)) 'iterate through the objects in the 'current range and build data lists 'for all objects in the image For iObj = 0 To iNumObj - 1 Debug.Print iObj+1; Debug.Print Chr(9); tmpAreas(iObj); Debug.Print Chr(9); tmpRanges(iObj) Areas(NextRng + iObj) = _ tmpAreas(iObj) Ranges(NextRng + iObj) = _ tmpRanges(iObj) Next iObj NextRng = NextRng + iNumObj Next iRng 'label the output Debug.Print ""

IpBlbGet
Page 2-130
Debug.Print "The entire list of objects" Debug.Print "Obj #"; Debug.Print Chr(9); "Area"; Debug.Print Chr(9); "Range" 'iterate through all objects in the image For iObj = 0 To iAllObj - 1 Debug.Print iObj+1; Debug.Print Chr(9); Areas(iObj); Debug.Print Chr(9); Ranges(iObj) Next iObj End Sub ' Requires that Count/Size be run with whatever segmentation ranges have been chosen Sub GetSegmentation() Dim Range(10) As Single Dim i As Integer ret = IpBlbGet(GETRANGE, 0, 0, Range(0)) Debug.Print Range(0); Range(1) ret = IpBlbGet(GETRANGE, 0, 1, Range(0)) Debug.Print Range(0); Range(1) ret = IpBlbGet(GETRANGE, 0, 2, Range(0)) Debug.Print Range(0); Range(1) End Sub
Comments When passing an array to the program from a BASIC program, be sure to pass the first element of the array by reference (see example, above). Note that as of Ipp 6.1. GETNUMOBJ has been replaced with GETNUMOBJEX. Commands are listed below:
Cmd DESCRIPTION
GETNUMOBJEX This command gets the number of objects that have been counted in the active image. The variable to receive the object count must be a long. This number will be written to OutVal.
Param1 VALUE Param2 VALUE OutVal TYPE
An integer from 1 to 255 specifying the class, or 0 for all classes.
BLB_ALLOBJECTS = 0 BLB_INRANGE = 1 BLB_ACTIVERANGE = 2
Long
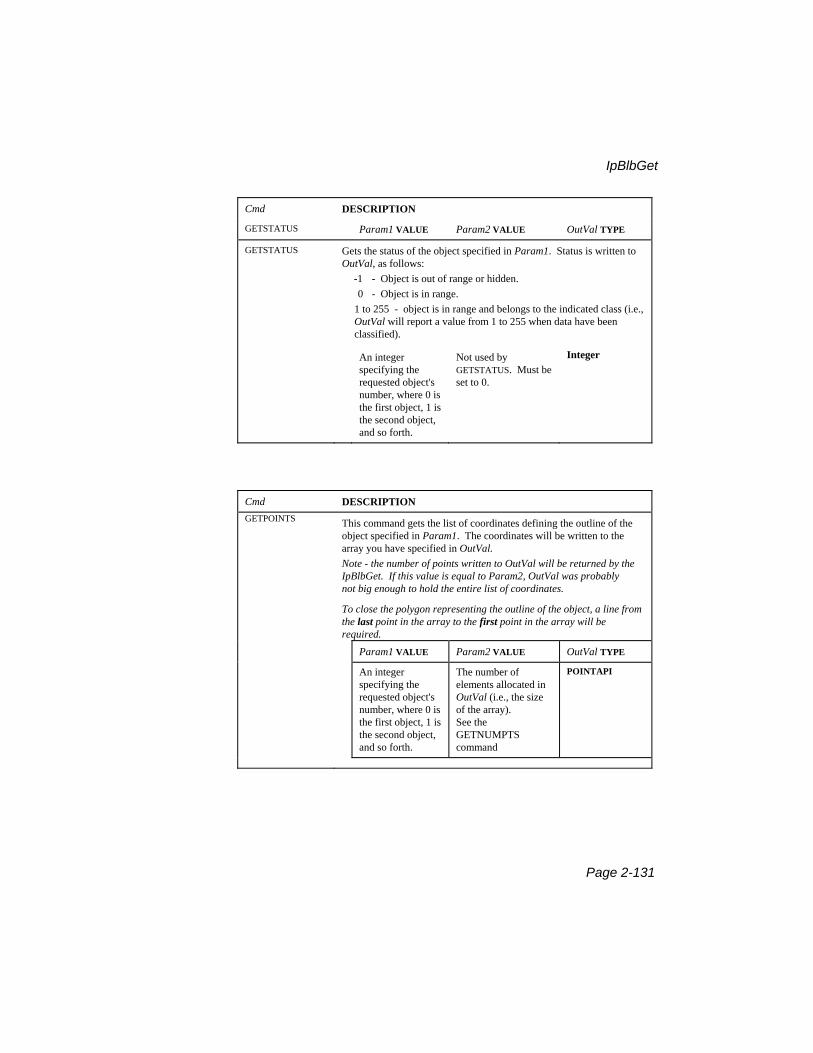
IpBlbGet
Page 2-131
Cmd DESCRIPTION
GETSTATUS Param1 VALUE Param2 VALUE OutVal TYPE
GETSTATUS Gets the status of the object specified in Param1. Status is written to OutVal, as follows:
-1 - Object is out of range or hidden. -0 - Object is in range. 1 to 255 - object is in range and belongs to the indicated class (i.e., OutVal will report a value from 1 to 255 when data have been classified).
An integer specifying the requested object's number, where 0 is the first object, 1 is the second object, and so forth.
Not used by GETSTATUS. Must be set to 0.
Integer
Cmd DESCRIPTION GETPOINTS This command gets the list of coordinates defining the outline of the
object specified in Param1. The coordinates will be written to the array you have specified in OutVal. Note - the number of points written to OutVal will be returned by the IpBlbGet. If this value is equal to Param2, OutVal was probably not big enough to hold the entire list of coordinates.
To close the polygon representing the outline of the object, a line from the last point in the array to the first point in the array will be required.
Param1 VALUE Param2 VALUE OutVal TYPE
An integer specifying the requested object's number, where 0 is the first object, 1 is the second object, and so forth.
The number of elements allocated in OutVal (i.e., the size of the array). See the GETNUMPTS command
POINTAPI

IpBlbGet
Page 2-132
Cmd DESCRIPTION
GETRANGE This command returns the starting and ending values of the range specified in Param1. This range values will be written to OutVal. Note that OutVal must be an array of two singles. The starting value will be in the first and the ending value in the second.
Param1 VALUE Param2 VALUE OutVal TYPE
An integer specifying the range to inquire, from 0 to the number of ranges –1.
Not used. Single
Note: To return array values for upper and lower range limits, use: Dim Array ( 0 to 1) as Single … IPBLBGET (GETRANGE, BLBM_AREA, 0, ARRAY (0)) 1st single = lower range, 2nd single = upper range
Cmd DESCRIPTION
GETSTATS This command gets the statistical data for the measurement type specified by Param2. It will write the statistics to a 10-element array in OutVal, as follows:
OutVal (0) - Mean value OutVal (1) - Standard Deviation OutVal (2) - Minimum measurement OutVal (3) - Maximum measurement OutVal (4) - Range OutVal (5) - Sum OutVal (6) - Object ID-1 with Minimum measurement OutVal (7) - Object ID-1 with Maximum measurement OutVal (8) - Number of objects OutVal (9) - Not Currently Used
An integer from 1 to 255 specifying a specific class, or 0 for all classes.
An enumerated integer specifying the requested measurement type (e.g., BLBM_AREA, BLBM_ASPECT, BLBM_RED). See IpBlbEnableMeas for a complete list of the allowed measurement types.
Single Note - OutVal must specify a 10-element array.

IpBlbGet
Page 2-133
Cmd DESCRIPTION
GETRANGESTATS Param1 VALUE Param2 VALUE OutVal TYPE
An integer from 1 to 255 specifying a specific range, or 0 for all ranges (equivalent to using GETSTATS with class = 0).
An enumerated integer specifying the requested measurement type (e.g., BLBM_AREA, BLBM_ASPECT, BLBM_RED). See IpBlbEnableMeas for a complete list of the allowed measurement types.
Single Note - OutVal must specify a 10-element array.
This commands gets the statistical data for a range of objects, instead of a class of obeject (use GETSTATS for a class). It will write the statistics to a 10-element array in OutVal, as follows:
OutVal (0) - Mean value OutVal (1) - Standard Deviation OutVal (2) - Minimum measurement OutVal (3) - Maximum measurement OutVal (4) - Range OutVal (5) - Sum OutVal (6) - Object ID-1 with Minimum measurement OutVal (7) - Object ID-1 with Maximum measurement OutVal (8) - Number of object OutVal (9) - Not Currenly Used
Cmd DESCRIPTION
GETHIT Param1 VALUE Param2 VALUE OutVal TYPE
Not used by GETHIT. Must be set to 0.
Not used by GETHIT. Must be set to 0.
Long
This command prompts the user to click on an object. It will write the object's label number to OutVal. A 0 will be written to OutVal if the user does not select a valid object. Note - an object's label number is its external number the one the user sees on the screen when the labels are displayed. External numbering begins with 1, not 0.

IpBlbGet
Page 2-134
Cmd DESCRIPTION
GETTHRESH This command calculates the threshold between objects and background. It writes the threshold value to OutVal.
Param1 VALUE Param2 VALUE OutVal TYPE
Not used by GETTHRESH. Must be set to 0.
Not used by GETTHRESH. Must be set to 0.
Single
Cmd DESCRIPTION
GETNUMSAMPLES This parameter gets information about the number sample measurements.
Param1 VALUE Param2 VALUE OutVal TYPE
BLEX_RADIUS BLEX_CALIPER BLEX_DIAMETER BLEX_BRANCHLEN
Indicates the number of samples taken while finding all the radial mesurements.
Long
Cmd DESCRIPTION
GETNUMPTS This command will return the number of points in the outline +1. Therefore, you should always check the return from the GETPOINTS command because it will never return the maximum number that you’ve passed. In all cases, GETPOINTS will return the number of valid points in your point array.
Param1 VALUE Param2 VALUE OutVal TYPE
An integer specifying the requested object's number, where 0 is the first object, 1 is the second object, and so forth.
Not used by GETNUMPTS. Must be set to 0.
Integer
Cmd DESCRIPTION
GETNUMRANGES This command returns the number of segmentation ranges to the integer variable provided.
Param1 VALUE Param2 VALUE OutVal TYPE
Not used by GETNUMRANGES. Must be set to 0.
Not used by GETNUMRANGES. Must be set to 0.
Integer
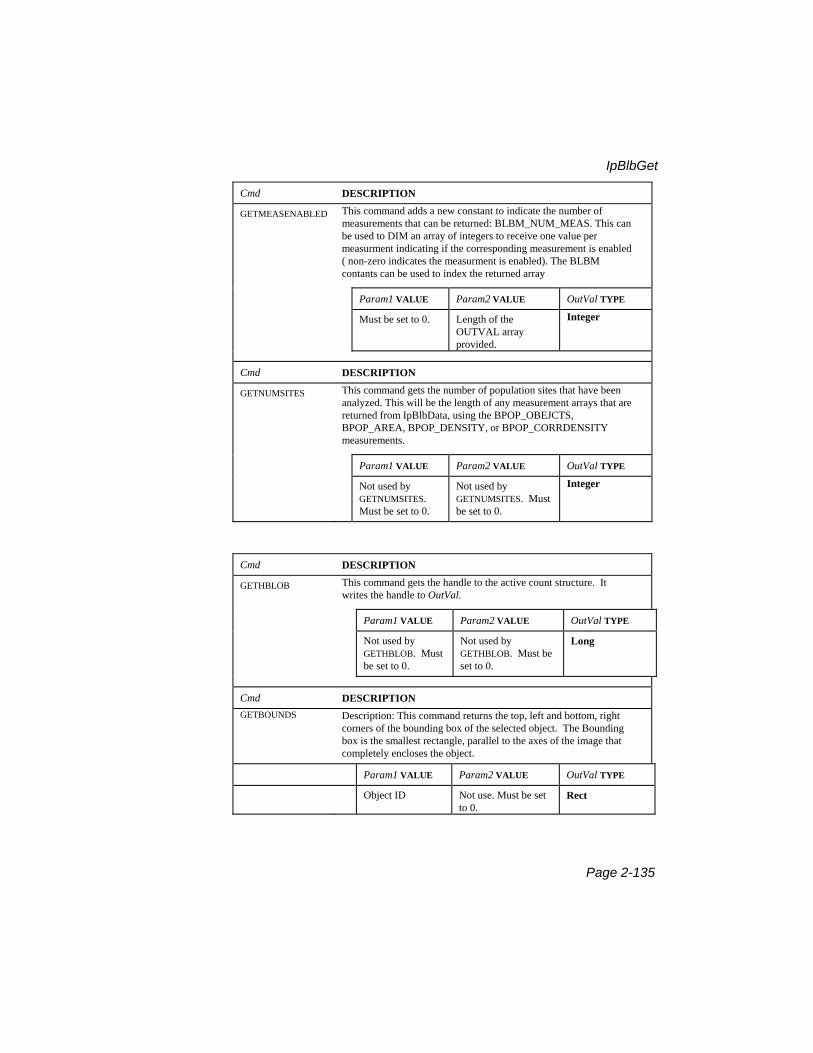
IpBlbGet
Page 2-135
Cmd DESCRIPTION
GETMEASENABLED This command adds a new constant to indicate the number of measurements that can be returned: BLBM_NUM_MEAS. This can be used to DIM an array of integers to receive one value per measurment indicating if the corresponding measurement is enabled ( non-zero indicates the measurment is enabled). The BLBM contants can be used to index the returned array
Param1 VALUE Param2 VALUE OutVal TYPE
Must be set to 0. Length of the OUTVAL array provided.
Integer
Cmd DESCRIPTION
GETNUMSITES This command gets the number of population sites that have been analyzed. This will be the length of any measurement arrays that are returned from IpBlbData, using the BPOP_OBEJCTS, BPOP_AREA, BPOP_DENSITY, or BPOP_CORRDENSITY measurements.
Param1 VALUE Param2 VALUE OutVal TYPE
Not used by GETNUMSITES. Must be set to 0.
Not used by GETNUMSITES. Must be set to 0.
Integer
Cmd DESCRIPTION
GETHBLOB This command gets the handle to the active count structure. It writes the handle to OutVal.
Param1 VALUE Param2 VALUE OutVal TYPE
Not used by GETHBLOB. Must be set to 0.
Not used by GETHBLOB. Must be set to 0.
Long
Cmd DESCRIPTION GETBOUNDS Description: This command returns the top, left and bottom, right
corners of the bounding box of the selected object. The Bounding box is the smallest rectangle, parallel to the axes of the image that completely encloses the object.
Param1 VALUE Param2 VALUE OutVal TYPE
Object ID Not use. Must be set to 0.
Rect
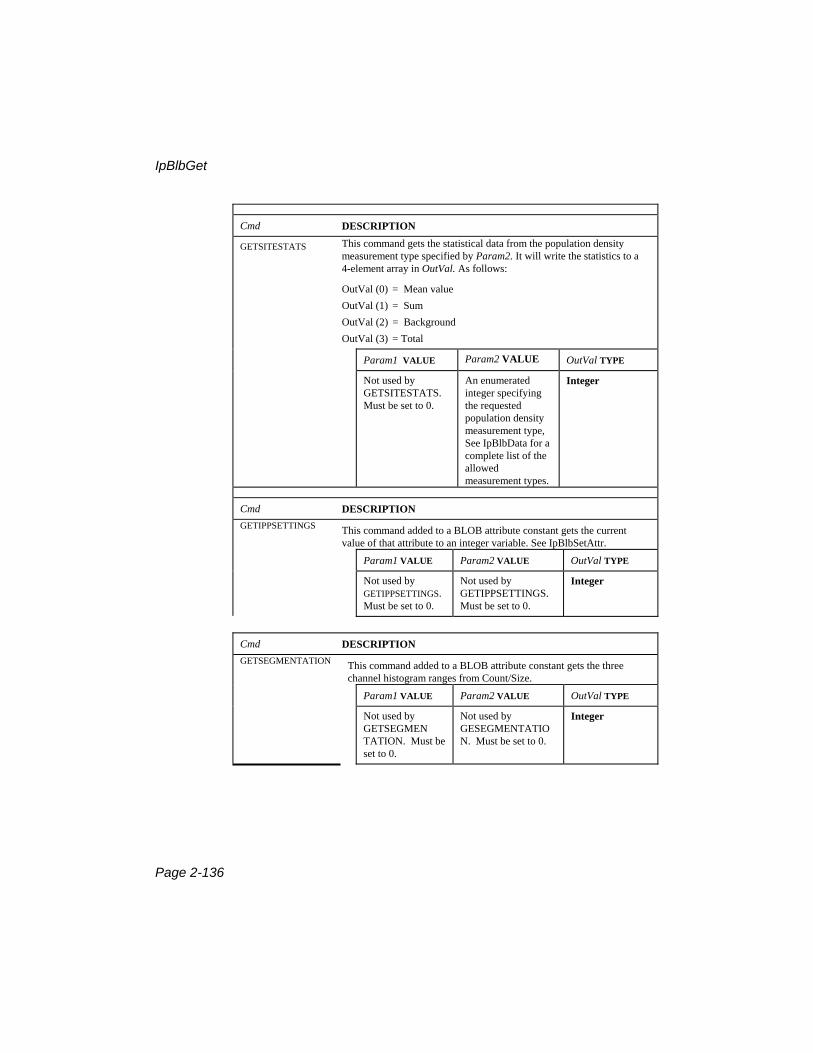
IpBlbGet
Page 2-136
Cmd DESCRIPTION
GETSITESTATS This command gets the statistical data from the population density measurement type specified by Param2. It will write the statistics to a 4-element array in OutVal. As follows:
OutVal (0) = Mean value OutVal (1) = Sum OutVal (2) = Background OutVal (3) = Total
Param1 VALUE Param2 VALUE OutVal TYPE
Not used by GETSITESTATS. Must be set to 0.
An enumerated integer specifying the requested population density measurement type, See IpBlbData for a complete list of the allowed measurement types.
Integer
Cmd DESCRIPTION GETIPPSETTINGS This command added to a BLOB attribute constant gets the current
value of that attribute to an integer variable. See IpBlbSetAttr.
Param1 VALUE Param2 VALUE OutVal TYPE
Not used by GETIPPSETTINGS. Must be set to 0.
Not used by GETIPPSETTINGS. Must be set to 0.
Integer
Cmd DESCRIPTION GETSEGMENTATION This command added to a BLOB attribute constant gets the three
channel histogram ranges from Count/Size.
Param1 VALUE Param2 VALUE OutVal TYPE
Not used by GETSEGMEN TATION. Must be set to 0.
Not used by GESEGMENTATION. Must be set to 0.
Integer

IpBlbGet
Page 2-137
Comments Note: With regard to the GETNUMPTS and GETPOINTS commands, the outlines that are returned by these commands (the first returns the number of points, and the second the points themselves) are assumed to be closed polygons, but the last point that would close the polygon is NOT included in the count or the array of points. So to draw the polygon, you would draw an additional line from the last point of the array to the first point. When the outlines are saved to an outline file, the first point of the polygon is replicated at the end so that other software that may import these files will be able to tell that the outlines are closed polygons. Consequently, the outline files will show one more point per outline than you will see when using the Auto-Pro functions.
See Also IpBlbCount, IpBlbData, IpBlbGetStr, IpBlbSetAttr
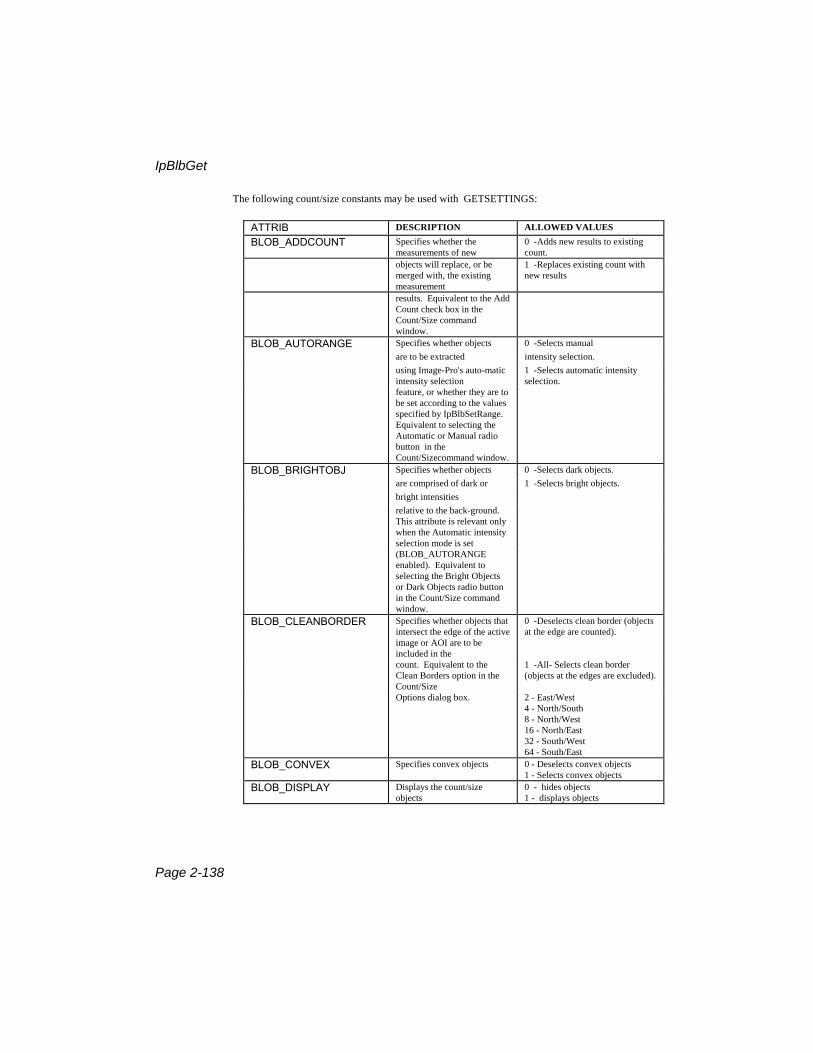
IpBlbGet
Page 2-138
The following count/size constants may be used with GETSETTINGS:
ATTRIB DESCRIPTION ALLOWED VALUES
BLOB_ADDCOUNT Specifies whether the measurements of new
0 -Adds new results to existing count.
objects will replace, or be merged with, the existing measurement
1 -Replaces existing count with new results
results. Equivalent to the Add Count check box in the Count/Size command window.
BLOB_AUTORANGE Specifies whether objects 0 -Selects manual are to be extracted intensity selection. using Image-Pro's auto-matic
intensity selection 1 -Selects automatic intensity selection.
feature, or whether they are to be set according to the values specified by IpBlbSetRange. Equivalent to selecting the Automatic or Manual radio button in the Count/Sizecommand window.
BLOB_BRIGHTOBJ Specifies whether objects 0 -Selects dark objects. are comprised of dark or 1 -Selects bright objects. bright intensities relative to the back-ground.
This attribute is relevant only when the Automatic intensity selection mode is set
(BLOB_AUTORANGE enabled). Equivalent to selecting the Bright Objects or Dark Objects radio button in the Count/Size command window.
BLOB_CLEANBORDER Specifies whether objects that intersect the edge of the active image or AOI are to be included in the
0 -Deselects clean border (objects at the edge are counted).
count. Equivalent to the Clean Borders option in the Count/Size
1 -All- Selects clean border (objects at the edges are excluded).
Options dialog box. 2 - East/West 4 - North/South 8 - North/West 16 - North/East 32 - South/West 64 - South/East
BLOB_CONVEX Specifies convex objects 0 - Deselects convex objects 1 - Selects convex objects
BLOB_DISPLAY Displays the count/size objects
0 - hides objects 1 - displays objects

IpBlbGet
Page 2-139
ATTRIB DESCRIPTION ALLOWED VALUES
BLOB_FILLHOLES Specifies whether all 1 - Selects fill holes pixels encompassed by 1 - Selects fill holes an object's perimeter belong
to the object, or whether just the pixels possessing a value within the selected intensity range are part of the object. Equivalent to the Fill Holes option in the Count/Size Options dialog box.
BLOB_FILTEROBJECTS Specifies whether the measurement criteria
0 -Ignore range criteria.
will be applied during the count process.
1 -Apply range criteria.
Equivalent to the Apply Ranges check box in the Count/Sizecommand window.
BLOB_LABELCOLOR Specifies the color to be 0 - Red used to label the counted 1 - Green objects. Equivalent to 2 - Blue selecting the label color 3 - Yellow in the Count/Size 4 - Cyan options dialog box. 5 - Magenta 6 - White 7 - Black 8 - Dark Red 9 - Brown
BLOB_LABELMODE Selects the label style 0 - None
to be used to tag the 1 - Object #
counted objects. 2 - Class
Equivalent to selecting
the label style in the
Count/Size options
dialog box.
BLOB_MEASUREOBJECTS
Specifies whether objects will simply be counted,
0 - Do not measure objects.
or whether they will be counted and measured.
1 - Count and measure objects.
Equivalent to the Measure Objects checkbox in the Count/Sizewindow.
BLOB_MINAREA Specifies whether the 0 - Deselects Pre-filter
total object population 1 - Selects Pre-filter
will be comprised of all intensity-matching objects, or just objects meeting the specified measurement criteria. Equivalent to the Pre-filter option in the Count/Sizeoptions dialog box
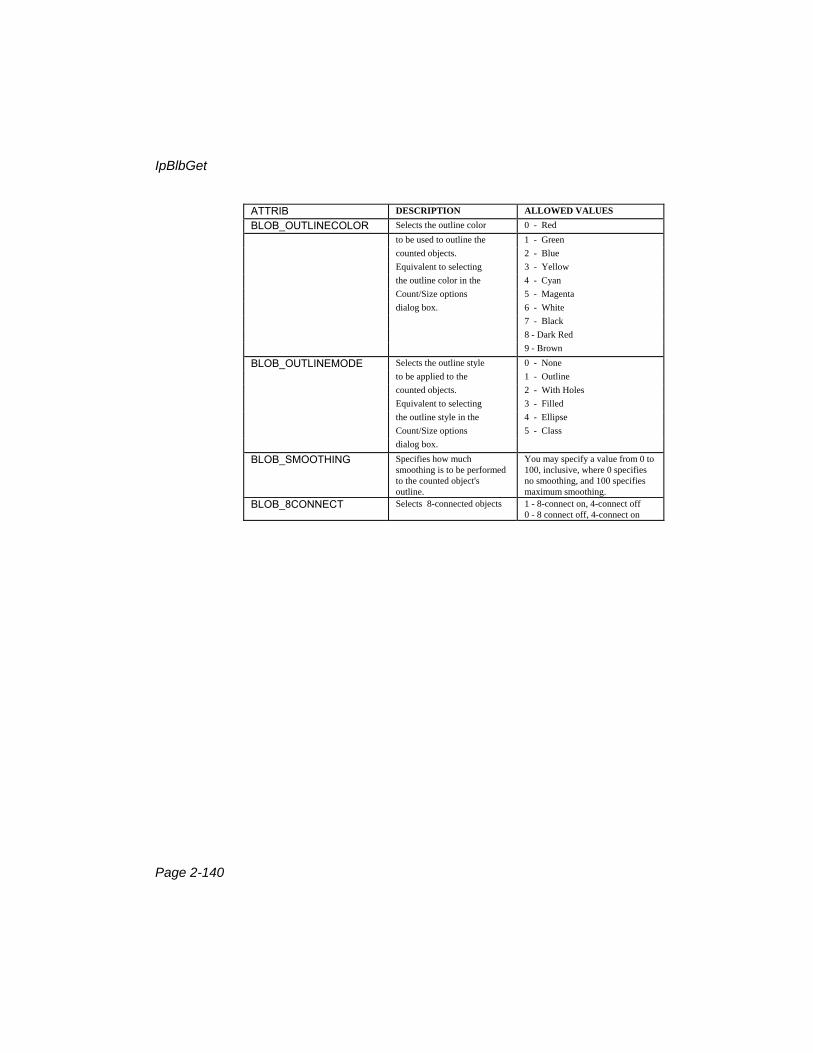
IpBlbGet
Page 2-140
ATTRIB DESCRIPTION ALLOWED VALUES
BLOB_OUTLINECOLOR Selects the outline color 0 - Red
to be used to outline the 1 - Green counted objects. 2 - Blue Equivalent to selecting 3 - Yellow the outline color in the 4 - Cyan Count/Size options 5 - Magenta dialog box. 6 - White 7 - Black 8 - Dark Red 9 - Brown
BLOB_OUTLINEMODE Selects the outline style 0 - None to be applied to the 1 - Outline counted objects. 2 - With Holes Equivalent to selecting 3 - Filled the outline style in the 4 - Ellipse Count/Size options 5 - Class dialog box.
BLOB_SMOOTHING Specifies how much smoothing is to be performed to the counted object's outline.
You may specify a value from 0 to 100, inclusive, where 0 specifies no smoothing, and 100 specifies maximum smoothing.
BLOB_8CONNECT Selects 8-connected objects 1 - 8-connect on, 4-connect off 0 - 8 connect off, 4-connect on
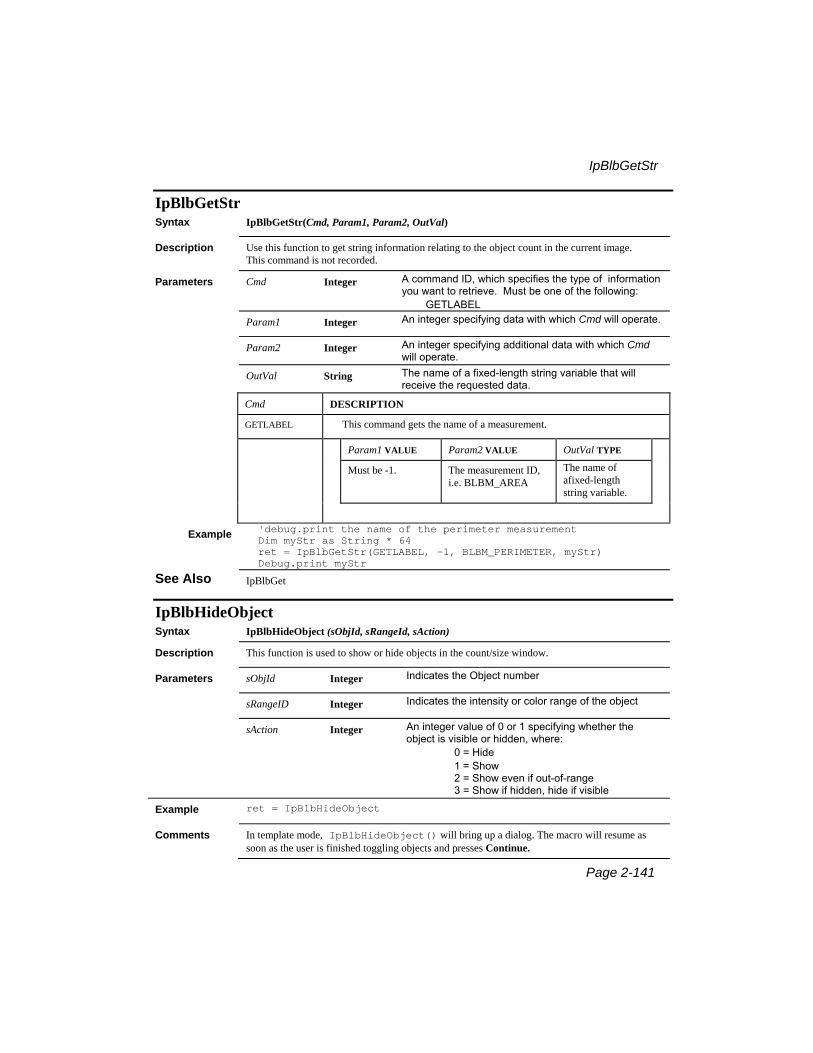
IpBlbGetStr
Page 2-141
IpBlbGetStr Syntax IpBlbGetStr(Cmd, Param1, Param2, OutVal)
Description Use this function to get string information relating to the object count in the current image. This command is not recorded.
Parameters Cmd Integer A command ID, which specifies the type of information you want to retrieve. Must be one of the following:
GETLABEL Param1 Integer An integer specifying data with which Cmd will operate.
Param2 Integer An integer specifying additional data with which Cmd will operate.
OutVal String The name of a fixed-length string variable that will receive the requested data.
Cmd DESCRIPTION
GETLABEL This command gets the name of a measurement.
Param1 VALUE Param2 VALUE OutVal TYPE
Must be -1. The measurement ID, i.e. BLBM_AREA
The name of afixed-length string variable.
Example 'debug.print the name of the perimeter measurement Dim myStr as String * 64 ret = IpBlbGetStr(GETLABEL, -1, BLBM_PERIMETER, myStr) Debug.print myStr
See Also IpBlbGet
IpBlbHideObject Syntax IpBlbHideObject (sObjId, sRangeId, sAction)
Description This function is used to show or hide objects in the count/size window.
Parameters sObjId Integer Indicates the Object number
sRangeID Integer Indicates the intensity or color range of the object
sAction Integer An integer value of 0 or 1 specifying whether the object is visible or hidden, where: 0 = Hide 1 = Show 2 = Show even if out-of-range 3 = Show if hidden, hide if visible
Example ret = IpBlbHideObject
Comments In template mode, IpBlbHideObject() will bring up a dialog. The macro will resume as soon as the user is finished toggling objects and presses Continue.
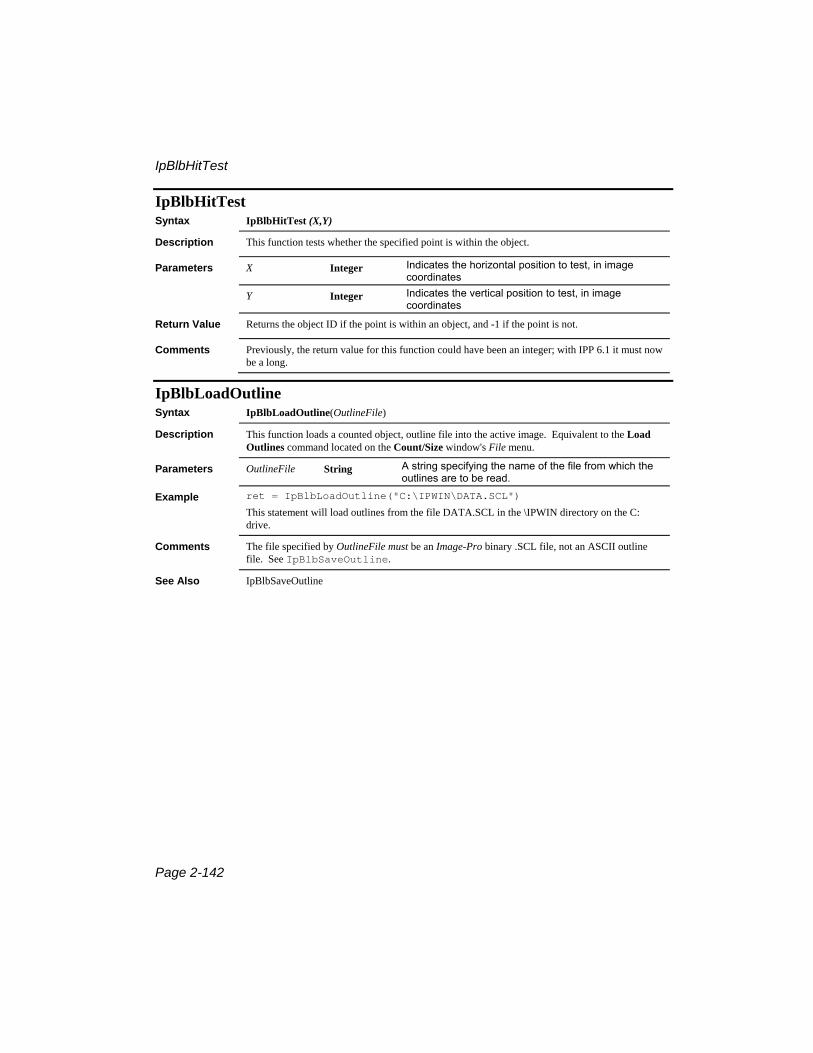
IpBlbHitTest
Page 2-142
IpBlbHitTest Syntax IpBlbHitTest (X,Y)
Description This function tests whether the specified point is within the object.
Parameters X Integer Indicates the horizontal position to test, in image coordinates
Y Integer Indicates the vertical position to test, in image coordinates
Return Value Returns the object ID if the point is within an object, and -1 if the point is not.
Comments Previously, the return value for this function could have been an integer; with IPP 6.1 it must now be a long.
IpBlbLoadOutline Syntax IpBlbLoadOutline(OutlineFile)
Description This function loads a counted object, outline file into the active image. Equivalent to the Load Outlines command located on the Count/Size window's File menu.
Parameters OutlineFile String A string specifying the name of the file from which the outlines are to be read.
Example ret = IpBlbLoadOutline("C:\IPWIN\DATA.SCL")
This statement will load outlines from the file DATA.SCL in the \IPWIN directory on the C: drive.
Comments The file specified by OutlineFile must be an Image-Pro binary .SCL file, not an ASCII outline file. See IpBlbSaveOutline.
See Also IpBlbSaveOutline

IpBlbLoadSetting
Page 2-143
IpBlbLoadSetting Syntax IpBlbLoadSetting(SettingFile)
Description This function loads the environment values (i.e., the intensity, option and measurement selections) from an environment file. Equivalent to the Load Settings command located on the Count/Size window's File menu.
Example ret = IpBlbLoadSetting("C:\IPWIN\SPORES.ENV")
This statement will initialize the environment with values from the SPORES.ENV file located in the \IPWIN directory on the C: drive.
Comments Consider using this function to initialize the environment if you are developing a counting macro that must be executed under the same conditions each time it is run.
See Also IpBlbSaveSetting
IpBlbMeasure Syntax IpBlbMeasure( )
Description This function performs the selected measurements upon the current set of counted objects. Equivalent to clicking the Measure button in the Select Measurements dialog box.
Example ret = IpBlbEnableMeas(BLBM_CENTRX, 1) ret = IpBlbEnableMeas(BLBM_MAXFERRET, 1) ret = IpBlbMeasure()
This set of statements will select the Centr-X (BLBM_CENTRX) and Max. Dia. (BLBM_MAXFERRET) measurements, and will then measure the counted objects.
See Also IpBlbEnableMeas, IpBlbFilter, IpBlbData
IpBlbMultiRanges Syntax IpBlbMultiRanges(intRanges, NumRanges )
Description This function sets multiple range limits for gray-scale images. It is equivalent to the "Select Ranges" command in the Count/Size window. Do not use this command with RGB-class images.
Parameters intRanges Single(Basic)
LPSINGLE (C)
It contains 2*numranges of single type values specifying the starting and ending values of each range.
numranges Integer Indicates the total number of ranges specified.
See Also IpBlbSetRange

IpBlbRange
Page 2-144
IpBlbRange Syntax IpBlbRange (Range )
Description This function selects a new active range.
Parameters Ranges Integer Indicates the range to activate. Must be between 0 and the maximum range currently defined.
Return Value 0 if successful, an error code if failed.
See Also IpBlbSetRange
IpBlbRemoveHoles Syntax IpBlbRemoveHoles( )
Description This function eliminates counted objects that are embedded within other counted objects, and considers all pixels encompassed by the perimeter of an object as belonging to the object. Equivalent to the Remove Holes command on the Edit menu in the Count/Sizecommand window.
See Also IpBlbSetAttr
IpBlbSaveClasses Syntax IpBlbSaveClasses(szDataFile, sAppend)
Description This function saves or appends the class data to a file, or writes the data to the Clipboard.
Parameters szDataFile String A string specifying the name of the file to which the measurement data will be written. This parameter is ignored when Append is set to S_CLIPBOARD. When this is the case, set DataFile to an empty string (i.e., "").
SAppend Integer An enumerated integer specifying whether the measurement data is to be stored as a new file, appended to an existing file or written to the Clipboard. Where: 0 - Stores data to a new file (if the file already exists, it will be overwritten). S_APPEND - Appends data to existing file. S_CLIPBOARD - Copies data to the Clipboard.
Example ret = IpBlbSaveClasses("C:\IPWIN\CLUSTER.CNT", 0)

IpBlbSaveData
Page 2-145
IpBlbSaveData Syntax IpBlbSaveData(DataFile, Append)
Description This function saves, or appends, the current measurements or statistics to a file or the Clipboard. Equivalent to the Save Data, Append Data and Copy to Clipboard commands on the Measurements and Statistics windows' File menus.
Parameters DataFile String A string specifying the name of the file to which the measurement data will be written. The file extension determines the file format. Where: .WK1 - Lotus WK1 format. .XLS - Microsoft Excel XLS format.
Anything else specifies ASCII format.
Append Integer An expression involving the addition of two enumerated integers, where the first operand specifies whether the measurement data or statistics are to be stored, as follows: S_DATA - Measurement Data S_STATS - Measurement Statistics and the second operand specifies whether the measurement data is stored as a new file, appended to an existing file or written to the Clipboard, as follows: S_DDE - Sends data to an Excel worksheet S_APPEND - Appends data to existing file. S_CLIPBOARD - Copies data to the Clipboard S_PRINT_TABLE - sends the data to the printer If no second operand is supplied, the data is saved to a new file (if the file already exists, it will be overwritten). See the examples below for usage.
Example ret = IpBlbSaveData("C:\IPWIN\DATA.CNT", S_DATA)
This statement will save the current measurement data to a new file called DATA.CNT in the \IPWIN directory on the C: drive.
ret = IpBlbSaveData("C:\IPWIN\DATA.CNT", S_DATA+S_APPEND)
This statement will append the current measurement data to a file called DATA.CNT in the \IPWIN directory on the C: drive.
ret = IpBlbSaveData("", S_STATS+S_CLIPBOARD)
This statement will append the current statistic data to the Clipboard. The DataFile parameter is set to a zero-length string, as this data is not required for a Clipboard operation.

IpBlbSaveOutline
Page 2-146
IpBlbSaveOutline Syntax IpBlbSaveOutline(OutlineFile)
Description This function saves the current counted-object outlines to a file. Equivalent to the Save Outlines command on the File menu in the Count/Sizecommand window.
Parameters OutlineFile String A string specifying the name of the file to which the current object outlines will be written. The file name's extension determines the format in which it is saved, where: .SCL - Specifies a binary outline file. Anything else specifies an ASCII-format outline file.
Example ret = IpBlbSaveOutline("C:\IPWIN\PERIM.SCL")
This statement will save the current outlines in binary form to the PERIM.OUT file in the \IPWIN directory on the C: drive.
See Also IpBlbLoadOutline
IpBlbSavePopDensities Syntax IpBlbSavePopDensities(DataFile, Append)
Description This function saves, or appends, the current population density results to a file or the Clipboard. Equivalent to the Save, Append and Copy to Clipboard commands on the Population Density windows' File menu.
Parameters DataFile String A string specifying the name of the file to which the population density data will be written. This parameter is ignored when append is set to S_CLIPBOARD. When this is the case, set DataFile to an empty string (i.e., "").
Append Integer An enumerated integer specifying whether the population density data is to be stored as a new file, appended to an existing file or written to the Clipboard. Where: 0 - Stores data to a new file (if the file already exists, it will be overwritten). S_APPEND - Appends data to existing file S_CLIPBOARD - Copies data to the Clipboard S_PRINT_TABLE - Sends the data to the printer

IpBlbSaveSetting
Page 2-147
Example ret = IpBlbSavePopDensities("C:\IPWIN\PD1.cnt", 0)
This statement will save the contents of the Population Density window to the PD1.CNT file in the \IPWIN directory on the C: drive.
ret = IpBlbSavePopDensities("C:\IPWIN\PD1.cnt", S_APPEND)
This statement will append the contents of the Population Density window to the PD1.CNT file in the \IPWIN directory on the C: drive.
ret = IpBlbSavePopDensities("", S_CLIPBOARD)
This statement will save the contents of the Population Density window to the Clipboard. The DataFile parameter is set to a zero-length string, as this data is not required for a Clipboard operation.
Comments The IpBlbShowPopDens function, with its bShow flag enabled, must be called before this function. Otherwise, no data will be saved.
See Also IpBlbShowPopDen
IpBlbSaveSetting Syntax IpBlbSaveSetting(SettingFile)
Description This function saves the current Count/Size intensity, option and measurement settings to a file. Equivalent to the Count/Size window's Save Settings command.
Parameters SettingFile String A string specifying the name of the file to which the current environment settings will be written.
Example ret = IpBlbSaveSetting("C:\IPWIN\SPORES.ENV")
This statement will save the current Count/Size environment settings to the SPORES.ENV file in the \IPWIN directory on the C: drive.
See Also IpBlbLoadSetting

IpBlbSetAttr
Page 2-148
IpBlbSetAttr Syntax IpBlbSetAttr(Attrib, Value)
Description This function selects, sets or deselects options relating to the Count/Size command.
Parameters Attrib Integer An enumerated integer which identifies the option to be set. Must be one of the following: BLOB_ADDCOUNT BLOB_AUTORANGE BLOB_BRIGHTOBJ BLOB_CLEANBORDER BLOB_CONVEX BLOB_DISPLAY BLOB_FILLHOLES BLOB_FILTEROBJECTS BLOB_LABELMODE BLOB_LABELCOLOR BLOB_LABELMEAS BLOB_MEASUREOBJECTS BLOB_MINAREA BLOB_OUTLINEMODE BLOB_OUTLINECOLOR BLOB_SMOOTHING BLOB_8CONNECT
See definitions under Comments, below.
Value Integer An integer specifying how the option specified in Attrib is to be set. See definitions below for the values allowed by each option.
Example ret = IpBlbSetAttr(BLOB_LABELCOLOR,2)
This statement sets the label color to blue.
Comments Attrib options are as follows:

IpBlbSetAttr
Page 2-149
ATTRIB DESCRIPTION ALLOWED VALUES
BLOB_ADDCOUNT Specifies whether the measurements of new
0 - Adds new results to existing count.
objects will replace, or be merged with, the existing measurement
1 - Replaces existing count with new results
results. Equivalent to the Add Count check box in the Count/Size command window.
BLOB_AUTORANGE Specifies whether objects
0 - Selects manual
are to be extracted intensity selection. using Image-Pro's auto-
matic intensity selection 1 - Selects automatic intensity
selection. feature, or whether they
are to be set according to the values specified by IpBlbSetRange. Equivalent to selecting the Automatic or Manual radio button in the Count/Sizecommand window.
BLOB_BRIGHTOBJ Specifies whether objects
0 - Selects dark objects.
are comprised of dark or 1 - Selects bright bright intensities objects. relative to the back-
ground. This attribute is relevant only when the Automatic intensity selection mode is set
(BLOB_AUTORANGE enabled). Equivalent to selecting the Bright Objects or Dark Objects radio button in the Count/Size command window.

IpBlbSetAttr
Page 2-150
ATTRIB DESCRIPTION ALLOWED VALUES
BLOB_CLEANBORDER Specifies whether objects that intersect the edge of the active image or AOI are to be included in the
0 - Deselects clean border (objects at the edge are counted).
count. Equivalent to the Clean Borders option in the Count/Size
1 - All- Selects clean border (objects at the edges are excluded).
Options dialog box. Combinations of these values can be used to specify combinations of clean border settings. For example, 18 (16{N/E} + 2{E/W}) will specify clean N/W/E borders
2 - East/West 4 - North/South 8 - North/West 16 - North/East 32 - South/West 64 - South/East
BLOB_CONVEX Specifies convex objects 0 - Deselects convex objects 1 - Selects convex objects
BLOB_DISPLAY Displays the count/size objects
0 - hides objects 1 - displays objects
BLOB_FILLHOLES Specifies whether all 1 - Selects fill holes pixels encompassed by 1 - Selects fill holes an object's perimeter
belong to the object, or whether just the pixels possessing a value within the selected intensity range are part of the object. Equivalent to the Fill Holes option in the Count/Size Options dialog box.
BLOB_FILTEROBJECTS Specifies whether the measurement criteria
0 - Ignore range criteria.
will be applied during the count process.
1 - Apply range criteria.
Equivalent to the Apply Ranges check box in the Count/Sizecommand window.
BLOB_LABELCOLOR Specifies the color to be 0 - Red used to label the counted 1 - Green objects. Equivalent to 2 - Blue selecting the label color 3 - Yellow in the Count/Size 4 - Cyan options dialog box. 5 - Magenta 6 - White 7 - Black 8 - Dark Red

IpBlbSetAttr
Page 2-151
9 - Brown
ATTRIB DESCRIPTION ALLOWED VALUES
BLOB_LABELMODE Selects the label style 0 - None to be used to tag the 1 - Object # counted objects. 2 - Class Equivalent to selecting 3 – Selected measurement value the label style in the Count/Size options dialog box. BLOB_MEASUREOBJECTS
Specifies whether objects will simply be counted,
0 - Do not measure objects.
or whether they will be counted and measured.
1 - Count and measure objects.
Equivalent to the Measure Objects checkbox in the Count/Sizewindow.
BLOB_MINAREA Specifies whether the 0 - Deselects Pre-filter total object population 1 - Selects Pre-filter will be comprised of all
intensity-matching objects, or just objects meeting the specified measurement criteria. Equivalent to the Pre-filter option in the Count/Sizeoptions dialog box
BLOB_OUTLINECOLOR Selects the outline color 0 - Red to be used to outline the 1 - Green counted objects. 2 - Blue Equivalent to selecting 3 - Yellow the outline color in the 4 - Cyan Count/Size options 5 - Magenta dialog box. 6 - White 7 - Black 8 - Dark Red 9 - Brown BLOB_OUTLINEMODE Selects the outline style 0 - None to be applied to the 1 - Outline counted objects. 2 - With Holes Equivalent to selecting 3 - Filled the outline style in the 4 - Ellipse Count/Size options 5 - Class dialog box.
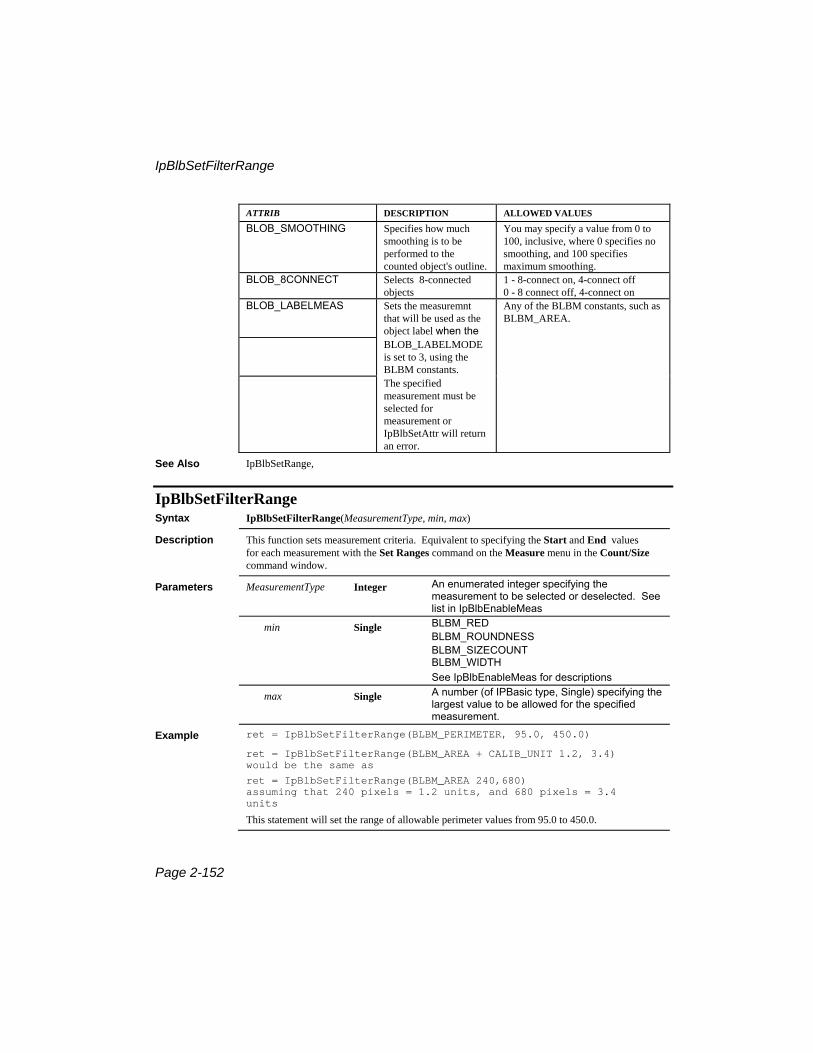
IpBlbSetFilterRange
Page 2-152
ATTRIB DESCRIPTION ALLOWED VALUES
BLOB_SMOOTHING Specifies how much smoothing is to be performed to the counted object's outline.
You may specify a value from 0 to 100, inclusive, where 0 specifies no smoothing, and 100 specifies maximum smoothing.
BLOB_8CONNECT Selects 8-connected objects
1 - 8-connect on, 4-connect off 0 - 8 connect off, 4-connect on
BLOB_LABELMEAS Sets the measuremnt that will be used as the object label when the
Any of the BLBM constants, such as BLBM_AREA.
BLOB_LABELMODE is set to 3, using the BLBM constants.
The specified measurement must be selected for measurement or IpBlbSetAttr will return an error.
See Also IpBlbSetRange,
IpBlbSetFilterRange Syntax IpBlbSetFilterRange(MeasurementType, min, max)
Description This function sets measurement criteria. Equivalent to specifying the Start and End values for each measurement with the Set Ranges command on the Measure menu in the Count/Size command window.
Parameters MeasurementType Integer An enumerated integer specifying the measurement to be selected or deselected. See list in IpBlbEnableMeas
min Single BLBM_RED BLBM_ROUNDNESS BLBM_SIZECOUNT BLBM_WIDTH See IpBlbEnableMeas for descriptions
max Single A number (of IPBasic type, Single) specifying the largest value to be allowed for the specified measurement.
Example ret = IpBlbSetFilterRange(BLBM_PERIMETER, 95.0, 450.0)
ret = IpBlbSetFilterRange(BLBM_AREA + CALIB_UNIT 1.2, 3.4) would be the same as
ret = IpBlbSetFilterRange(BLBM_AREA 240,680) assuming that 240 pixels = 1.2 units, and 680 pixels = 3.4 units This statement will set the range of allowable perimeter values from 95.0 to 450.0.

IpBlbSetRange
Page 2-153
Comments The min and max values are expessed by default in terms of pixels or pixel square. To pass the min and max values in terms of the current spatial calibration, add the flag CALIB_UNIT to the first parameter, as shown here:
ret = IpBlbSetFilterRange(BLBM_AREA + CALIB_UNIT, 0.01, 0.02)
CALIB_UNIT is defined as 0 x 4000 (in C) or &4000 (in Basic)
See Also IpBlbFilter
IpBlbSetRange Syntax IpBlbSetRange(Start, End)
Description This function specifies the range of intensities that define objects to be counted when Automatic intensity selection is disabled (BLOB_AUTORANGE off). Equivalent to clicking the Set Range button in the Count/Size command window and selecting the intensity range manually.
Parameters Start Integer An integer between 0 and 255 (inclusive) that defines the smallest allowed value in the range.
End Integer An integer between 0 and 255 (inclusive) that defines the largest allowed value in the range.
Example ret = IpBlbSetRange(58, 109)
This statement specifies that pixels possessing intensity values between 58 to 109 (inclusive) comprise objects. Note - in 12-bit and single-point images, the normalized equivalents to these values will be used.
Comments For RGB images, the Start and End values represent the values of the luminance channel.
See Also IpBlbSetAttr(BLOB_AUTORANGE,0), IpBlbRange
IpBlbSetRangeEx Syntax IpBlbSetRangeEx(Range, Start, End)
Description This function allows you to specify multiple intensity ranges.
Parameters Range Integer Indicates the intensity range to add or modify.
Start Single Indicates the first value in the specified range.
End Single Indicates the last value in the specified range.
Return Value 0 if successful, a negative error code if failed.
See Also IpBlbRange, IpBlbSetRange

IpBlbShow
Page 2-154
IpBlbShow Syntax IpBlbShow(bShow)
Description This function is used to open or close the Count/Sizecommand window. Equivalent to selecting the Count/Size command to open the window, and clicking the Close button within it to close it.
Parameters bShow Integer Am integer value of 0 or 1 specifying whether the Count/Size command window is to be shown. Where: 0 - Closes the window if it is already open. 1 - Opens the window.
Example ret = IpBlbShow(1)
This statement will make the Count/Size command window visible during execution of the macro.
Comments The Count/Size command window does not have to be open during execution of any of the count macro functions. Its disposition, visible or hidden, is entirely your choice. You will want to display the window if your users will be required to make choices within it, but if your objective is simply to obtain measurement results, you may want to run without opening it.
See Also IpBlbSaveStatistics, IpBlbSaveClasses, IpBlbSavePopDensities
IpBlbShowAutoClass Syntax IpBlbShowAutoClass(ipClassifiers, NumMeas, NumClasses, bIterate, bShow)
Description This function performs an auto-classification process on the current set of measurement results. Equivalent to the Auto-classification command located on the Measure menu in the Count/Sizecommand window.
Parameters ipClassifiers Integer (Basic)
LPSHORT (C)
The name and first element of an array containing the integers representing the measurement types that are to be used for classification. By default this array is defined as ipClassifiers(0). See Comments, below, for valid classifier values.
NumMeas Integer An integer from 1 to 3 (inclusive) specifying the number of types by which auto-classification is to be done. Equivalent to counting the number of Classifiers selected in the Auto-Classification dialog box. This value identifies the number of elements in the ipClassifiers array.
NumClasses Integer An integer from 1 to 16 (inclusive) specifying the maximum number of categories into which the data will be classified. Equivalent to the value entered into the Max. Classes: field in the Auto-Classification dialog box.
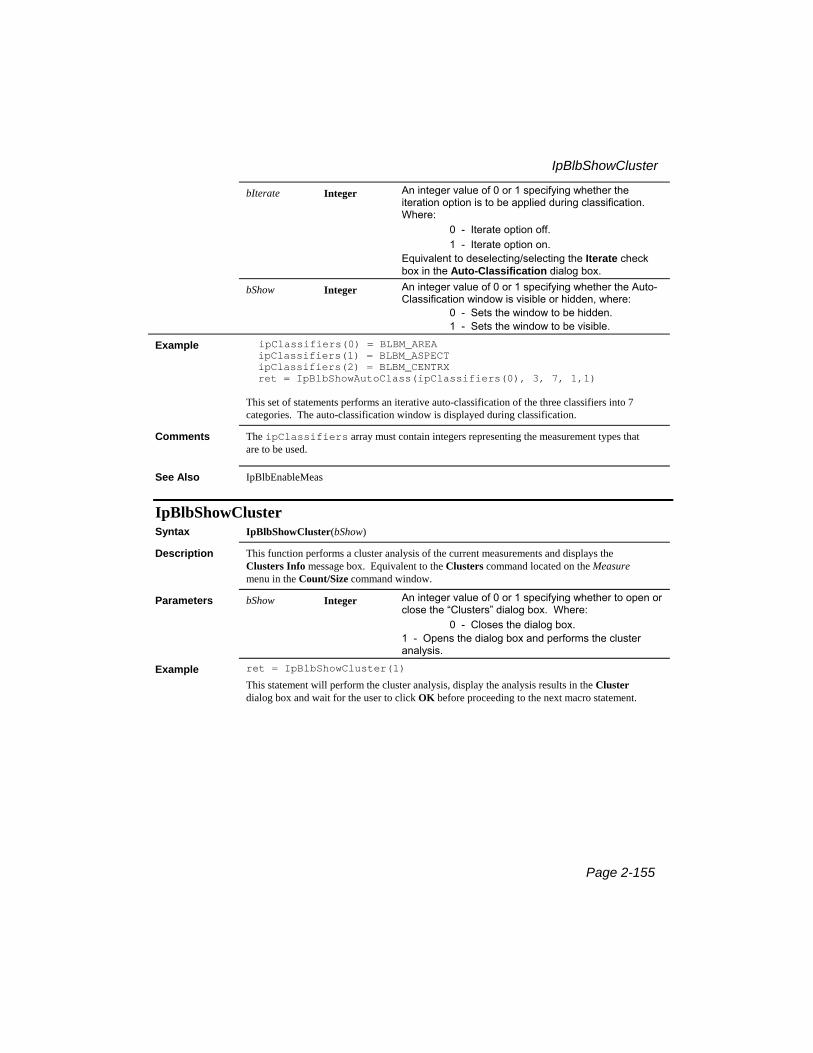
IpBlbShowCluster
Page 2-155
bIterate Integer An integer value of 0 or 1 specifying whether the iteration option is to be applied during classification. Where: 0 - Iterate option off. 1 - Iterate option on. Equivalent to deselecting/selecting the Iterate check box in the Auto-Classification dialog box.
bShow Integer An integer value of 0 or 1 specifying whether the Auto-Classification window is visible or hidden, where: 0 - Sets the window to be hidden. 1 - Sets the window to be visible.
Example ipClassifiers(0) = BLBM_AREA ipClassifiers(1) = BLBM_ASPECT ipClassifiers(2) = BLBM_CENTRX ret = IpBlbShowAutoClass(ipClassifiers(0), 3, 7, 1,1)
This set of statements performs an iterative auto-classification of the three classifiers into 7 categories. The auto-classification window is displayed during classification.
Comments The ipClassifiers array must contain integers representing the measurement types that are to be used.
See Also IpBlbEnableMeas
IpBlbShowCluster Syntax IpBlbShowCluster(bShow)
Description This function performs a cluster analysis of the current measurements and displays the Clusters Info message box. Equivalent to the Clusters command located on the Measure menu in the Count/Size command window.
Parameters bShow Integer An integer value of 0 or 1 specifying whether to open or close the “Clusters” dialog box. Where: 0 - Closes the dialog box. 1 - Opens the dialog box and performs the cluster analysis.
Example ret = IpBlbShowCluster(1)
This statement will perform the cluster analysis, display the analysis results in the Cluster dialog box and wait for the user to click OK before proceeding to the next macro statement.
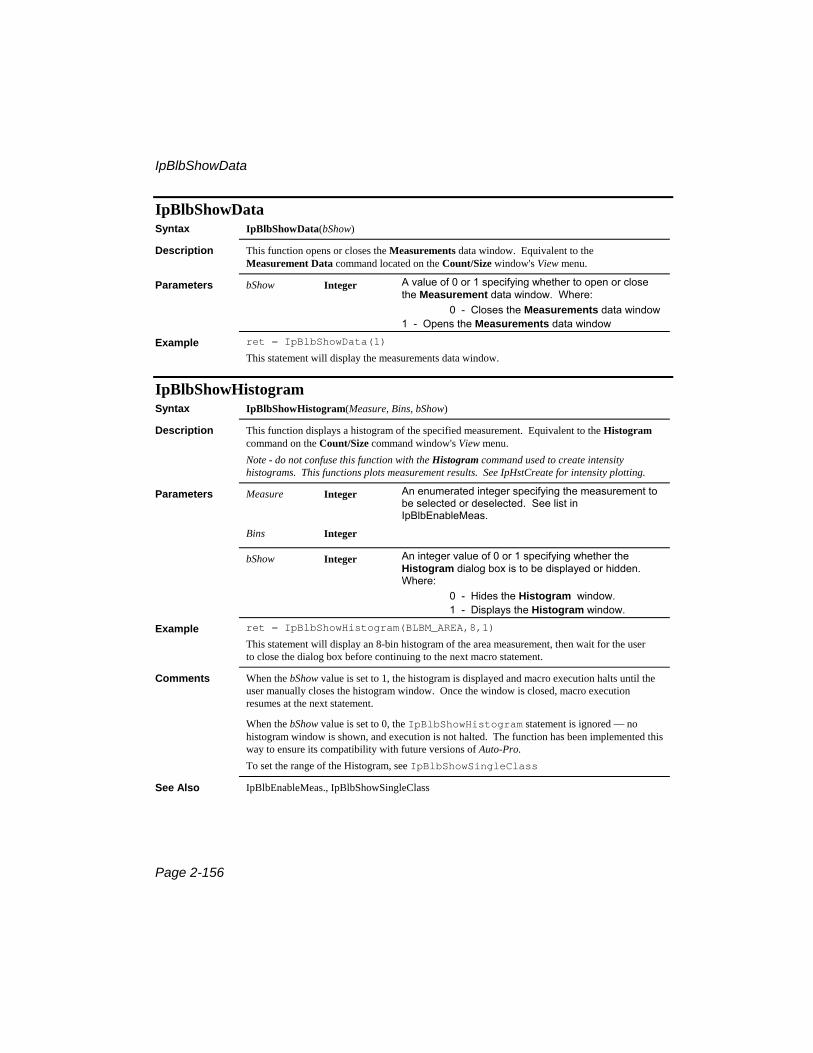
IpBlbShowData
Page 2-156
IpBlbShowData Syntax IpBlbShowData(bShow)
Description This function opens or closes the Measurements data window. Equivalent to the Measurement Data command located on the Count/Size window's View menu.
Parameters bShow Integer A value of 0 or 1 specifying whether to open or close the Measurement data window. Where: 0 - Closes the Measurements data window 1 - Opens the Measurements data window
Example ret = IpBlbShowData(1)
This statement will display the measurements data window.
IpBlbShowHistogram Syntax IpBlbShowHistogram(Measure, Bins, bShow)
Description This function displays a histogram of the specified measurement. Equivalent to the Histogram command on the Count/Size command window's View menu. Note - do not confuse this function with the Histogram command used to create intensity histograms. This functions plots measurement results. See IpHstCreate for intensity plotting.
Parameters Measure Integer An enumerated integer specifying the measurement to be selected or deselected. See list in IpBlbEnableMeas.
Bins Integer
bShow Integer An integer value of 0 or 1 specifying whether the Histogram dialog box is to be displayed or hidden. Where: 0 - Hides the Histogram window. 1 - Displays the Histogram window.
Example ret = IpBlbShowHistogram(BLBM_AREA,8,1)
This statement will display an 8-bin histogram of the area measurement, then wait for the user to close the dialog box before continuing to the next macro statement.
Comments When the bShow value is set to 1, the histogram is displayed and macro execution halts until the user manually closes the histogram window. Once the window is closed, macro execution resumes at the next statement.
When the bShow value is set to 0, the IpBlbShowHistogram statement is ignored — no histogram window is shown, and execution is not halted. The function has been implemented this way to ensure its compatibility with future versions of Auto-Pro. To set the range of the Histogram, see IpBlbShowSingleClass
See Also IpBlbEnableMeas., IpBlbShowSingleClass

IpBlbShowObjectWindow
Page 2-157
IpBlbShowObjectWindow Syntax IpBlbShowObjectWindow(bShow)
Description This function displays the object window. Equivalent to the Object Window command located on the Count/Size command window's View menu.
Parameters bShow Integer An integer value of 0 or 1 specifying whether to open or close the Object information window. Where: 0 - Closes the Object window. 1 - Opens the Object window.
Example ret = IpBlbShowObjectWindow(1)
This statement will display the Object window.
IpBlbShowPopDens Syntax IpBlbShowPopDens(OutlineFile, bShow)
Description This function performs a population density analysis. Equivalent to the Population Density command located on the Count/Sizewindow's Measure menu.
Parameters OutlineFile String A string specifying the name of the file from which the site outlines will be read.
bShow Integer An integer value of 0 or 1 specifying whether the Population Density window and the site outlines are to be displayed . Where: 0 - Closes the Population Density window if it is already open, or suppresses its display if a population density measurement is being performed. 1 - Displays the Population Density window and site outlines.
Example ret = IpBlbShowPopDens("C:\IPWIN\CELLS.OUT", 1)
This statement will perform a population density analysis using the site outlines from the CELLS.OUT file in the \IPWIN directory on the C: drive. The Population Density window, and the cell site outlines will be displayed.
Comments To close the Population Density window, set the bShow parameter to 0 and specify a zero-length string in OutlineFile, as shown in the following example: ret = IpBlbShowPopDens("", 0) If you intend to save population density information to the Clipboard or a file, you must first call this function with its bShow flag enabled. Otherwise, no data will be saved.
See Also IpBlbSavePopDensities, IpBlbShow
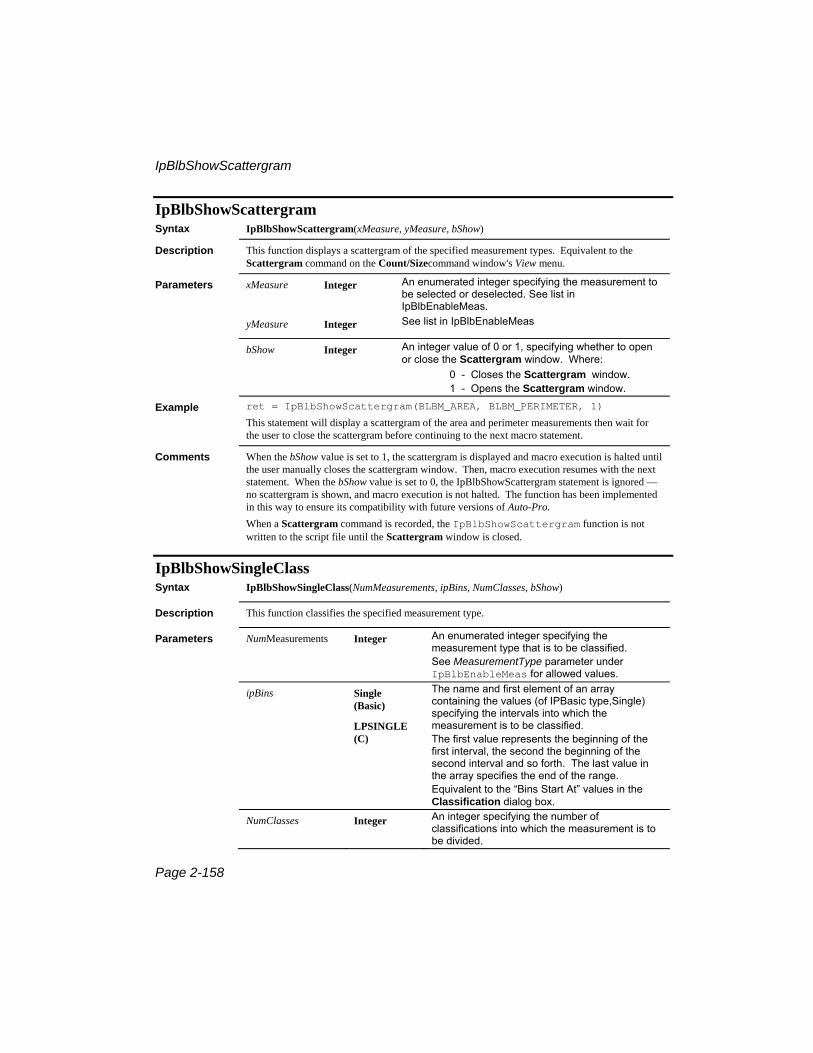
IpBlbShowScattergram
Page 2-158
IpBlbShowScattergram Syntax IpBlbShowScattergram(xMeasure, yMeasure, bShow)
Description This function displays a scattergram of the specified measurement types. Equivalent to the Scattergram command on the Count/Sizecommand window's View menu.
Parameters xMeasure Integer An enumerated integer specifying the measurement to be selected or deselected. See list in IpBlbEnableMeas.
yMeasure Integer See list in IpBlbEnableMeas
bShow Integer An integer value of 0 or 1, specifying whether to open or close the Scattergram window. Where: 0 - Closes the Scattergram window. 1 - Opens the Scattergram window.
Example ret = IpBlbShowScattergram(BLBM_AREA, BLBM_PERIMETER, 1)
This statement will display a scattergram of the area and perimeter measurements then wait for the user to close the scattergram before continuing to the next macro statement.
Comments When the bShow value is set to 1, the scattergram is displayed and macro execution is halted until the user manually closes the scattergram window. Then, macro execution resumes with the next statement. When the bShow value is set to 0, the IpBlbShowScattergram statement is ignored — no scattergram is shown, and macro execution is not halted. The function has been implemented in this way to ensure its compatibility with future versions of Auto-Pro. When a Scattergram command is recorded, the IpBlbShowScattergram function is not written to the script file until the Scattergram window is closed.
IpBlbShowSingleClass Syntax IpBlbShowSingleClass(NumMeasurements, ipBins, NumClasses, bShow)
Description This function classifies the specified measurement type.
Parameters NumMeasurements Integer An enumerated integer specifying the measurement type that is to be classified. See MeasurementType parameter under IpBlbEnableMeas for allowed values.
ipBins Single (Basic)
LPSINGLE (C)
The name and first element of an array containing the values (of IPBasic type,Single) specifying the intervals into which the measurement is to be classified. The first value represents the beginning of the first interval, the second the beginning of the second interval and so forth. The last value in the array specifies the end of the range. Equivalent to the “Bins Start At” values in the Classification dialog box.
NumClasses Integer An integer specifying the number of classifications into which the measurement is to be divided.

IpBlbShowSingleClass
Page 2-159
bShow Integer An integer value of 0 or 1 specifying whether to display the Classification window. Where: 0 - Closes the Classification window. 1 - Opens the Classification window. 2 - Open the Histogram window and set the histogram range. When bShow is set to 0, the NumMeasurements, ipBins and NumClasses parameters are ignored.
Example The following set of statements divides the perimeter into 6 classes, as defined by the values in ipBins. The results are displayed in the Classification window and saved to the file CLASS2.CNT. The window is then closed.
ipBins(0) = 8.0 ipBins(1) = 51.83333 ipBins(2) = 95.66666 ipBins(3) = 139.50 ipBins(4) = 183.3333 ipBins(5) = 227.1667 ipBins(6) = 271.0 ret = IpBlbShowSingleClass(18, ipBins(), 6, 1) ret = IpBlbSaveClasses("C:\IPWIN\CLASS2.CNT", 0) ret = IpBlbShowSingleClass(0, ipBins(0), 0, 0)
The following example shows how to display the area classification results as a histogram with 10 equally spaced classes between 0 and 100 calibrated area units. ipBins(0) = 0 ipBins(1) = 100 ret = IpBlbShowSingleClass(BLBM_AREA, ipBins(0), 10, 2)
When the class intervals are equal, you can display the classification data as a graph (bShow = 2), where each class is represented as a bar, and the height of the bar represents how many objects fall in the class. In this mode, calling IpBlbShowSingleClass is the same as calling IpBlbShowHistogram, with the added functionality of being able to set the start and end limits of the histogram (see example).
Comments If you intend to save classification data to the Clipboard or a file, you must first call this function with its bShow flag enabled. Otherwise, no data will be saved. When bShow is set to 0, the NumMeasurements, ipBins, and NumClasses parameters are ignored.
See Also IpBlbSaveClasses, IpBlbShowHistogram

IpBlbShowStatistics
Page 2-160
IpBlbShowStatistics Syntax IpBlbShowStatistics(bShow)
Description This function calculates and, optionally, displays the statistics window. Equivalent to the Statistics command on the Count/Size command window's View menu.
Parameters bShow Integer An integer value of 0 or 1 specifying whether to open or close the Statistics information window. Where: 0 - Closes the Statistics window. 1 - Opens the Statistics window. 2 - Closes the Range Statistics window. 3 - Opens the Range Statistics window
Example ret = IpBlbShowStatistics(1)
This statement will calculate statistics for the current measurement results, show the Statistics window then append the data to the STATS.CNT file.
See Also IpBlbSaveStats
IpBlbSmoothObjects Syntax IpBlbSmoothObjects(smoothing)
Description This function smoothes object outlines. Equivalent to the Smooth Objects command on the Edit menu in the Count/Sizecommand window.
Parameters smoothing Integer An integer between 1 and 100 (inclusive) specifying the degree of smoothing that is to be applied.
Example ret = IpBlbSmoothObjects(50)
This statement will apply smoothing to the counted outlines using a smoothing degree of 50.
See Also IpBlbSetAttr
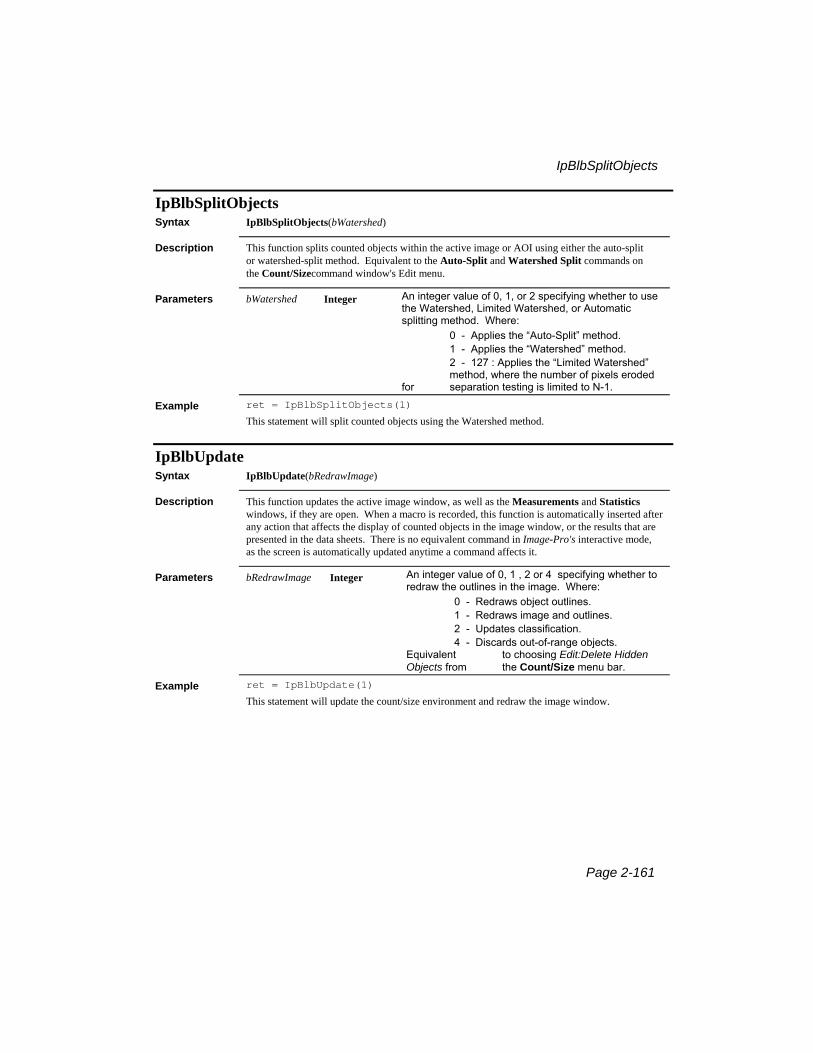
IpBlbSplitObjects
Page 2-161
IpBlbSplitObjects Syntax IpBlbSplitObjects(bWatershed)
Description This function splits counted objects within the active image or AOI using either the auto-split or watershed-split method. Equivalent to the Auto-Split and Watershed Split commands on the Count/Sizecommand window's Edit menu.
Parameters bWatershed Integer An integer value of 0, 1, or 2 specifying whether to use the Watershed, Limited Watershed, or Automatic splitting method. Where: 0 - Applies the “Auto-Split” method. 1 - Applies the “Watershed” method. 2 - 127 : Applies the “Limited Watershed” method, where the number of pixels eroded for separation testing is limited to N-1.
Example ret = IpBlbSplitObjects(1)
This statement will split counted objects using the Watershed method.
IpBlbUpdate Syntax IpBlbUpdate(bRedrawImage)
Description This function updates the active image window, as well as the Measurements and Statistics windows, if they are open. When a macro is recorded, this function is automatically inserted after any action that affects the display of counted objects in the image window, or the results that are presented in the data sheets. There is no equivalent command in Image-Pro's interactive mode, as the screen is automatically updated anytime a command affects it.
Parameters bRedrawImage Integer An integer value of 0, 1 , 2 or 4 specifying whether to redraw the outlines in the image. Where: 0 - Redraws object outlines. 1 - Redraws image and outlines. 2 - Updates classification. 4 - Discards out-of-range objects. Equivalent to choosing Edit:Delete Hidden Objects from the Count/Size menu bar.
Example ret = IpBlbUpdate(1)
This statement will update the count/size environment and redraw the image window.

IpCalGet
Page 2-162
IpCalGet Syntax IpCalGet(ByVal, sAttrib)
Description This function returns various attributes of the intensity or spatial calibration attached to the active image.
Parameters <sAttrib>
String Command (see list below):
<sOutput> fixed length String Result (see example)
Command Name Description
iName intensity calibration name
iUnitName intensity unit name
iType calibration type (0 = free form, 1 = OD, 2 = response curve)
iNumPoints number of calibration points
iFitMode fitting method
iBlack black OD level
iIncidend incident OD level
sName spatial calibration name
sUnitName spatial unit name
sXUnitPerPix number of units per pixel horizontally
sYUnitPerPix number of units per pixel vertically
sXOrigin X- origin
sYOrigin Y -origin
sAngleOffset Angle offset (0 deg. = vertical axis
Comments IpCalGet can be called to inquire one of fourteen attributes. More attributes are likely to be added in future versions.
Return Value 0 if successful, -7 if no calibration found on active image.
Example The following example prints out all calibration settings to the output window. sub get_calib_param()
dim szout as string * 255 dim xratio as single, yratio as single ret = IpCalGet("iName", szout) if ret < 0 then debug.print "no intensity calibration" goto end_intensity end if debug.print "intensity calibration:" debug.print "calib name = " + szout ret = IpCalGet("iUnitName", szout) debug.print "unit name = " + szout ret = IpCalGet("iType", szout)

IpCalGet
Page 2-163
if val(szout) = 0 then debug.print "type = free form" ret = IpCalGet("iNumPoints", szout) debug.print "number of points = " + str$(val(szout)) ret = IpCalGet("iFitMode", szout) debug.print "fitting method = " + str$(val(szout)) end if if val(szout) = 1 then debug.print "type = optical density" ret = IpCalGet("iBlack", szout) debug.print "black level = " + str$(val(szout)) ret = IpCalGet("iIncident", szout) debug.print "incident level = " + str$(val(szout)) end if if val(szout) = 2 then debug.print "type = response curve" end if end_intensity: ret = IpCalGet("sName", szout) if ret < 0 then debug.print "no spatial calibration" exit sub end if debug.print "spatial calibration:" debug.print "calib name = " + szout ret = IpCalGet("sUnitName", szout) debug.print "unit name = " + szout ret = IpCalGet("sXUnitPerPix", szout) xratio = val(szout) debug.print "unit/pix (x) = " + str$(xratio) ret = IpCalGet("sYUnitPerPix", szout) yratio = val(szout) debug.print "unit/pix (y) = " + str$(yratio) debug.print "aspect ratio = " + str$(yratio / xratio) ret = IpCalGet("sXOrigin", szout) debug.print "origin (x) = " + str$(val(szout)) ret = IpCalGet("sYOrigin", szout) debug.print "origin (y) = " + str$(val(szout)) ret = IpCalGet("sAngleOffset", szout) debug.print "angle offset = " + str$(val(szout)) end sub

IpCalLoad
Page 2-164
IpCalLoad Syntax IpCalLoad(FileName)
Description This function loads the specified calibration file from disk. Equivalent to the Calibration command's Open menu item.
Parameters FileName String A string specifying the name of the file from which the calibration values will be read.
Example ret = IpCalLoad("C:\IPWIN\MICRONS.CAL")
This statement will load the calibration values from the MICRONS.CAL file in the \IPWIN directory on the C: drive.
Comments All of the calibrations found in the specified file will be added to the lists of Spatial and Intensity Calibrations. None of the calibrations will be applied to the active image or made the active calibration. Note: It may be preferable to use IpICalLoad or IpScalLoad to load calibrations into either the General or Reference Calibration lists. This function is retained for backward compatibility with earlier versions.
IpCalSave Syntax IpCalSave(FileName)
Description This function saves the current calibration values to disk. Equivalent to the Calibration command's Save menu item.
Parameters FileName String A string specifying the name of the file to which the calibration values will be written.
Example ret = IpCalSave("C:\IPWIN\MICRONS.CAL")
This statement will save the current intensity and spatial calibration values to the MICRONS.CAL file in the \IPWIN directory on the C: drive.
Comments If the file you specify already exists, it will automatically be overwritten.
IpCalSaveAll Syntax IpCalSaveAll(FileName)
Description This function saves the current calibration values to disk. Equivalent to the Calibration command's Save All menu item.
Parameters FileName String A string specifying the name of the file to which the calibration values will be written.
Example ret = IpCalSaveAll("C:\IPWIN\MICRONS.CAL")
This statement will save the current intensity and spatial calibration values to the MICRONS.CAL file in the \IPWIN directory on the C: drive.
Comments If the file you specify already exists, it will automatically be overwritten.
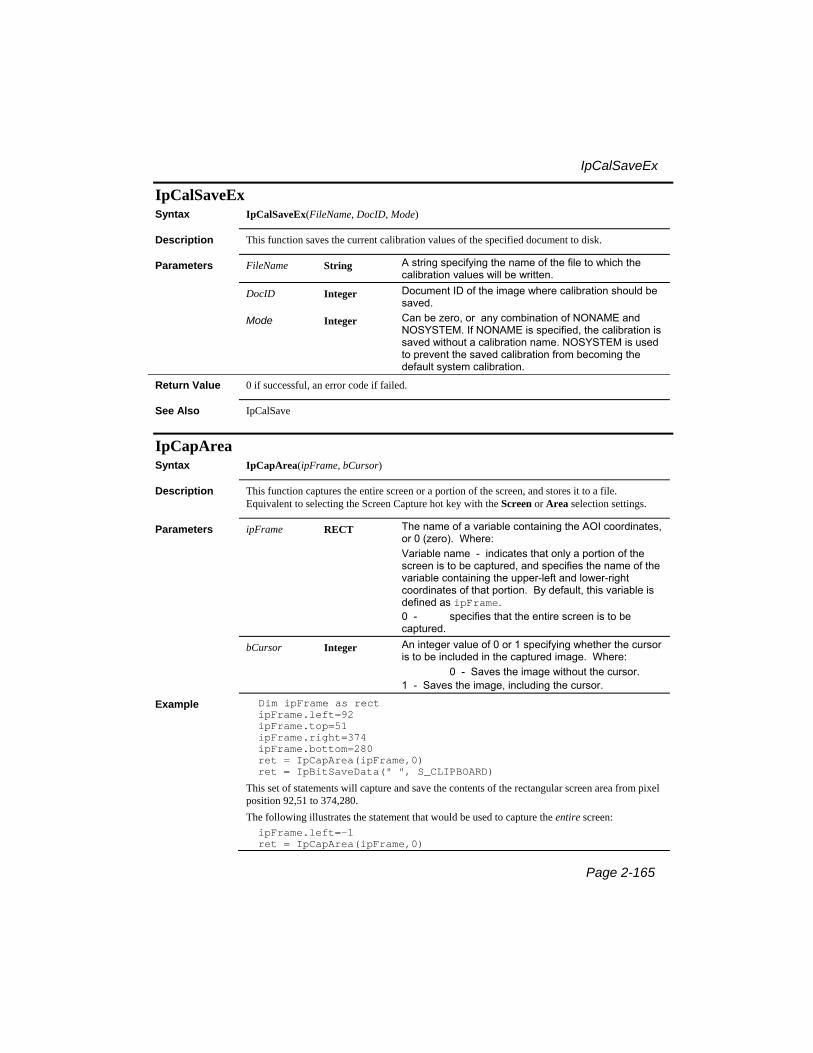
IpCalSaveEx
Page 2-165
IpCalSaveEx Syntax IpCalSaveEx(FileName, DocID, Mode)
Description This function saves the current calibration values of the specified document to disk.
Parameters FileName String A string specifying the name of the file to which the calibration values will be written.
DocID Integer Document ID of the image where calibration should be saved.
Mode Integer Can be zero, or any combination of NONAME and NOSYSTEM. If NONAME is specified, the calibration is saved without a calibration name. NOSYSTEM is used to prevent the saved calibration from becoming the default system calibration.
Return Value 0 if successful, an error code if failed.
See Also IpCalSave
IpCapArea Syntax IpCapArea(ipFrame, bCursor)
Description This function captures the entire screen or a portion of the screen, and stores it to a file. Equivalent to selecting the Screen Capture hot key with the Screen or Area selection settings.
Parameters ipFrame RECT The name of a variable containing the AOI coordinates, or 0 (zero). Where: Variable name - indicates that only a portion of the screen is to be captured, and specifies the name of the variable containing the upper-left and lower-right coordinates of that portion. By default, this variable is defined as ipFrame. 0 - specifies that the entire screen is to be captured.
bCursor Integer An integer value of 0 or 1 specifying whether the cursor is to be included in the captured image. Where: 0 - Saves the image without the cursor. 1 - Saves the image, including the cursor.
Example Dim ipFrame as rect ipFrame.left=92 ipFrame.top=51 ipFrame.right=374 ipFrame.bottom=280 ret = IpCapArea(ipFrame,0) ret = IpBitSaveData(" ", S_CLIPBOARD)
This set of statements will capture and save the contents of the rectangular screen area from pixel position 92,51 to 374,280. The following illustrates the statement that would be used to capture the entire screen:
ipFrame.left=-1 ret = IpCapArea(ipFrame,0)
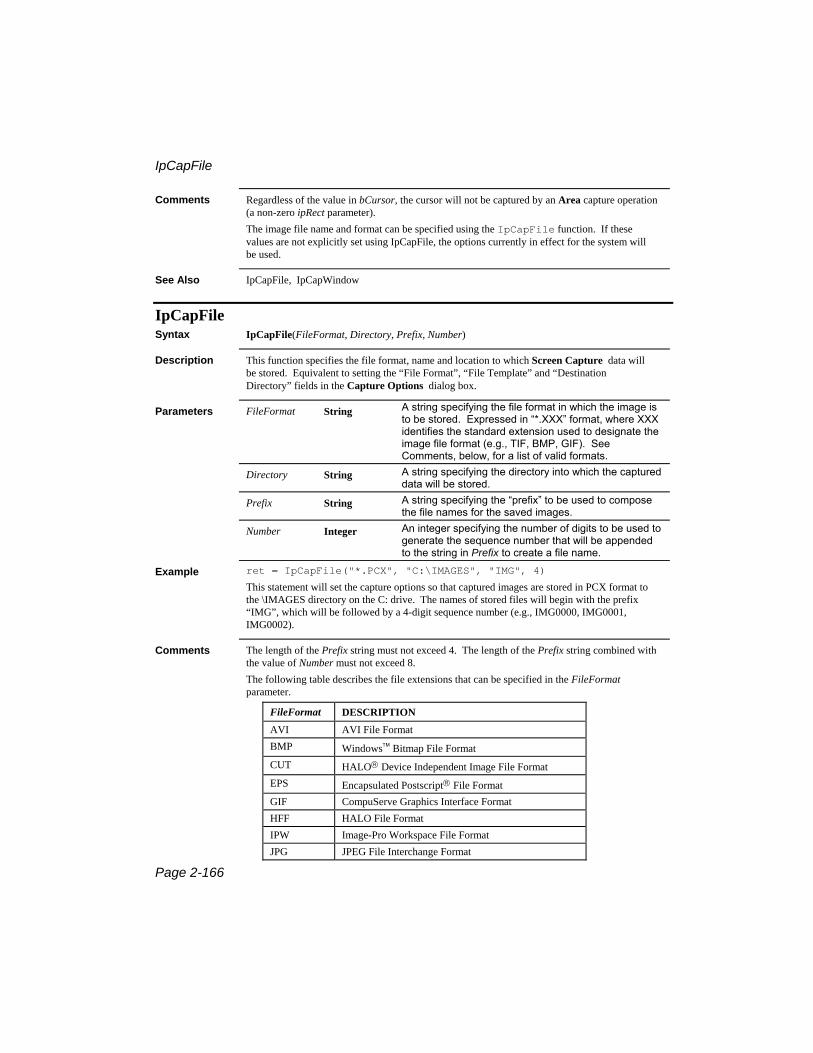
IpCapFile
Page 2-166
Comments Regardless of the value in bCursor, the cursor will not be captured by an Area capture operation (a non-zero ipRect parameter). The image file name and format can be specified using the IpCapFile function. If these values are not explicitly set using IpCapFile, the options currently in effect for the system will be used.
See Also IpCapFile, IpCapWindow
IpCapFile Syntax IpCapFile(FileFormat, Directory, Prefix, Number)
Description This function specifies the file format, name and location to which Screen Capture data will be stored. Equivalent to setting the “File Format”, “File Template” and “Destination Directory” fields in the Capture Options dialog box.
Parameters FileFormat String A string specifying the file format in which the image is to be stored. Expressed in “*.XXX” format, where XXX identifies the standard extension used to designate the image file format (e.g., TIF, BMP, GIF). See Comments, below, for a list of valid formats.
Directory String A string specifying the directory into which the captured data will be stored.
Prefix String A string specifying the “prefix” to be used to compose the file names for the saved images.
Number Integer An integer specifying the number of digits to be used to generate the sequence number that will be appended to the string in Prefix to create a file name.
Example ret = IpCapFile("*.PCX", "C:\IMAGES", "IMG", 4)
This statement will set the capture options so that captured images are stored in PCX format to the \IMAGES directory on the C: drive. The names of stored files will begin with the prefix “IMG”, which will be followed by a 4-digit sequence number (e.g., IMG0000, IMG0001, IMG0002).
Comments The length of the Prefix string must not exceed 4. The length of the Prefix string combined with the value of Number must not exceed 8. The following table describes the file extensions that can be specified in the FileFormat parameter.
FileFormat DESCRIPTION
AVI AVI File Format
BMP Windows Bitmap File Format CUT HALO Device Independent Image File Format EPS Encapsulated Postscript File Format GIF CompuServe Graphics Interface Format
HFF HALO File Format
IPW Image-Pro Workspace File Format
JPG JPEG File Interchange Format
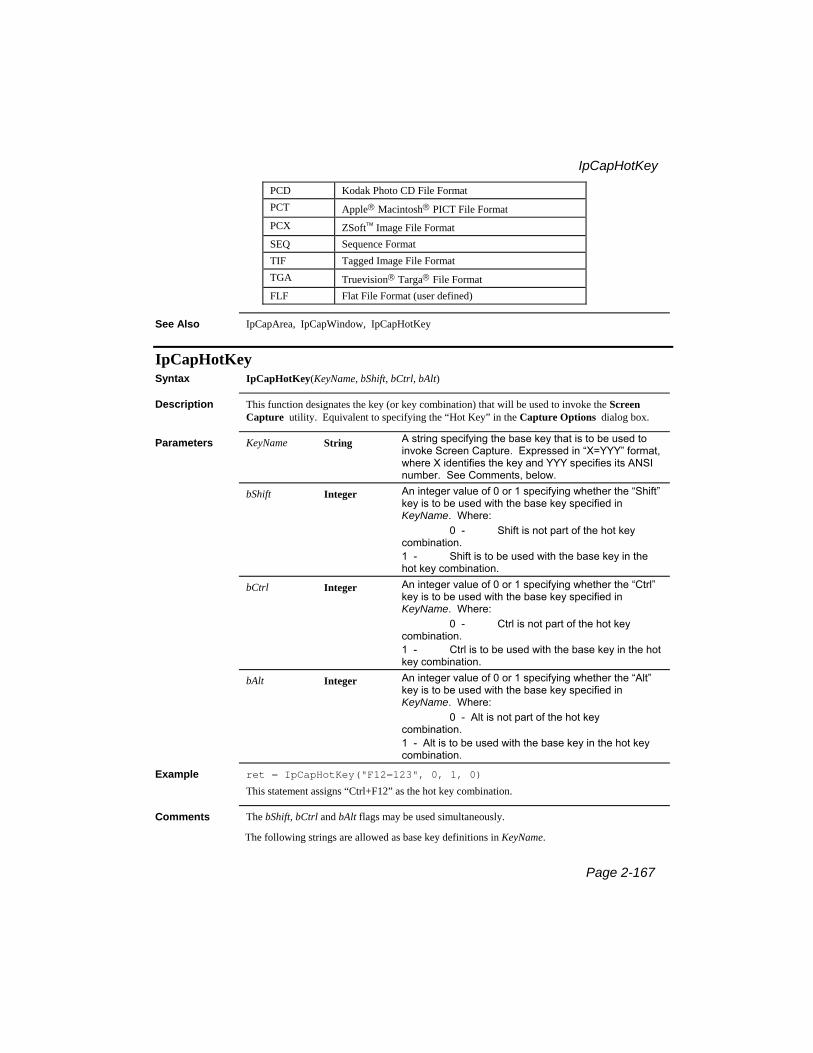
IpCapHotKey
Page 2-167
PCD Kodak Photo CD File Format
PCT Apple Macintosh PICT File Format PCX ZSoft Image File Format SEQ Sequence Format
TIF Tagged Image File Format
TGA Truevision Targa File Format FLF Flat File Format (user defined)
See Also IpCapArea, IpCapWindow, IpCapHotKey
IpCapHotKey Syntax IpCapHotKey(KeyName, bShift, bCtrl, bAlt)
Description This function designates the key (or key combination) that will be used to invoke the Screen Capture utility. Equivalent to specifying the “Hot Key” in the Capture Options dialog box.
Parameters KeyName String A string specifying the base key that is to be used to invoke Screen Capture. Expressed in “X=YYY” format, where X identifies the key and YYY specifies its ANSI number. See Comments, below.
bShift Integer An integer value of 0 or 1 specifying whether the “Shift” key is to be used with the base key specified in KeyName. Where: 0 - Shift is not part of the hot key combination. 1 - Shift is to be used with the base key in the hot key combination.
bCtrl Integer An integer value of 0 or 1 specifying whether the “Ctrl” key is to be used with the base key specified in KeyName. Where: 0 - Ctrl is not part of the hot key combination. 1 - Ctrl is to be used with the base key in the hot key combination.
bAlt Integer An integer value of 0 or 1 specifying whether the “Alt” key is to be used with the base key specified in KeyName. Where: 0 - Alt is not part of the hot key combination. 1 - Alt is to be used with the base key in the hot key combination.
Example ret = IpCapHotKey("F12=123", 0, 1, 0)
This statement assigns “Ctrl+F12” as the hot key combination.
Comments The bShift, bCtrl and bAlt flags may be used simultaneously.
The following strings are allowed as base key definitions in KeyName.

IpCapHotKey
Page 2-168
String String String String
"A=65" "N=78" "0=48" "F1=112"
"B=66" "O=79" "1=49" "F2=113"
"C=67" "P=80" "2=50" "F3=114"
"D=68" "Q=81" "3=51" "F4=115"
"E=69" "R=82" "4=52" "F5=116"
"F=70" "S=83" "5=53" "F6=117"
"G=71" "T=84" "6=54" "F7=118"
"H=72" "U=85" "7=55" "F8=119"
"I=73" "V=86" "8=56" "F9=120"
"J=74" "W=87" "9=57" "F10=121"
"K=75" "X=88" "F11=122"
"L=76" "Y=89" "F12=123"
"M=77" "Z=90"
See Also IpCapFile, IpCapArea, IpCapWindow

IpCapWindow
Page 2-169
IpCapWindow Syntax IpCapWindow(Title, bClientOnly, bCursor)
Description This function captures the specified window or the contents of the specified window, and stores it to a file. Equivalent to pressing the Screen Capture hot key with the Window or Client selection settings.
Parameters Title String A string specifying the name of the window to be captured (as defined by the name in its Title bar). A zero-length string (i.e., "") can be used to specify the active window.
bClientOnly Integer An integer value of 0 or 1 specifying whether the entire window (including borders, Title bar and so forth) is to be captured, or just its contents. Where:
0 - Specifies that entire window is to be captured (including its borders and bars). 1 - Specifies that just the contents of the window is to be captured.
bCursor Integer An integer value of 0 or 1 specifying whether the cursor is to be included in the captured image. Where: 0 - Saves the image without the cursor. 1 - Saves the image, including the cursor.
Example ret = IpCapWindow("Histogram - circuit.tif", 1, 1)
This statement will capture and save the contents of the “Histogram - circuit.tif” window. If the cursor is within the window when the capture is performed, it will be included in the image.
Comments The image file name and format can be specified using the IpCapFile function. If these values are not explicitly set using IpCapFile, the options currently in effect for the system will be used.
See Also IpCapFile, IpCapArea
IpChrt2DCreate Syntax IpChrt2DCreate (szTitle, sChartType)
Description This function creates a new chart window.
Parameters szTitle String Title of the new chart window
sChartType Integer Defines the type of chart window to create. Must be one of the following:
CHRT_TYPE_GRAPH = data graph CHRT_TYPE_HIST = histogram CHRT_TYPE_SCAT = scattergram
Return Value The new chart ID if successful. A negative value with error code if failed.
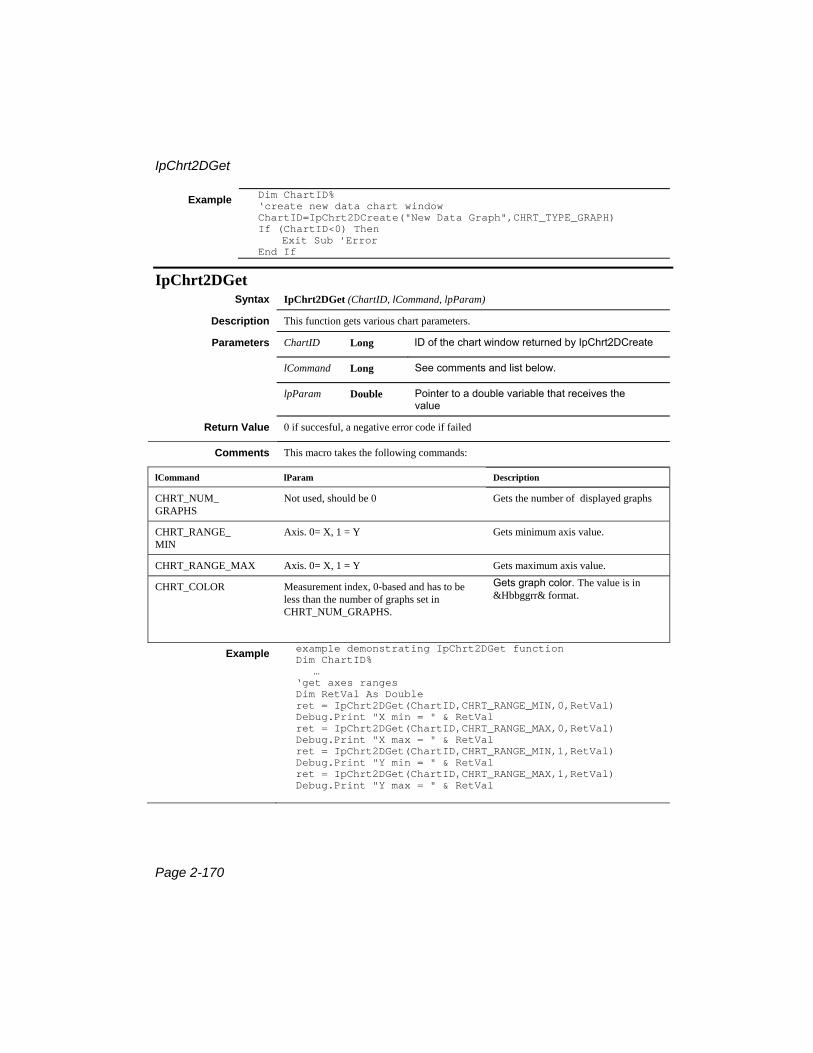
IpChrt2DGet
Page 2-170
Example Dim ChartID% ‘create new data chart window ChartID=IpChrt2DCreate("New Data Graph",CHRT_TYPE_GRAPH) If (ChartID<0) Then Exit Sub 'Error End If
IpChrt2DGet Syntax IpChrt2DGet (ChartID, lCommand, lpParam)
Description This function gets various chart parameters.
Parameters ChartID Long ID of the chart window returned by IpChrt2DCreate
lCommand Long See comments and list below.
lpParam Double Pointer to a double variable that receives the value
Return Value 0 if succesful, a negative error code if failed
Comments This macro takes the following commands:
lCommand lParam Description
CHRT_NUM_ GRAPHS
Not used, should be 0 Gets the number of displayed graphs
CHRT_RANGE_ MIN
Axis. 0= X, 1 = Y Gets minimum axis value.
CHRT_RANGE_MAX Axis. 0= X, 1 = Y Gets maximum axis value.
CHRT_COLOR Measurement index, 0-based and has to be less than the number of graphs set in CHRT_NUM_GRAPHS.
Gets graph color. The value is in &Hbbggrr& format.
Example example demonstrating IpChrt2DGet function Dim ChartID% … ‘get axes ranges Dim RetVal As Double ret = IpChrt2DGet(ChartID,CHRT_RANGE_MIN,0,RetVal) Debug.Print "X min = " & RetVal ret = IpChrt2DGet(ChartID,CHRT_RANGE_MAX,0,RetVal) Debug.Print "X max = " & RetVal ret = IpChrt2DGet(ChartID,CHRT_RANGE_MIN,1,RetVal) Debug.Print "Y min = " & RetVal ret = IpChrt2DGet(ChartID,CHRT_RANGE_MAX,1,RetVal) Debug.Print "Y max = " & RetVal

IpChrt2DGraphToClipboard
Page 2-171
IpChrt2DGraphToClipboard Syntax IpChrt2DGraphToClipboard (ChartID)
Description This function copies the graph to the Windows clipboard in enhanced metafile format.
Parameters ChartID Long ID of the chart returned by IpChrt2DCreate
Return Value 0 if successful, a negative error code if failed.
IpChrt2DMove Syntax IpChrt2DMove(ChartID, X, Y)
Description This function moves the chart window to a new location.
Parameters ChartID Long ID of the chart returned by IpChrt2DCreate
X Long X coordinate of the top-left corner of the window
Y Long Y coordinate of the top-left corner of the window
Return Value The new chart ID if successful. A negative value with error code if failed.
Example Dim ChartID% … ‘move window to 93,32 coordinate ret = IpChrt2DMove(ChartID, 93, 32)

IpChrt2DSet
Page 2-172
IpChrt2DSet Syntax IpChrt2DSet (ChartID, lCommand, lParam,dValue)
Description This function sets various chart parameters.
Parameters ChartID Long ID of the chart window returned by IpChrt2DCreate
lCommand Long See comments and list below.
lParam Long Long option, which depends on the chart lCommand selected (see below)
dValue Double Double option, which depends on the chart lCommand selected (see below)
Return Value 0 if succesful, a negative error code if failed
Comments This macro takes the following commands:
lCommand lParam dValue Description
CHRT_NUM_GRAPHS Not used, should be 0 The number of graphs Sets the number of graphs
CHRT_ADD_VALUE Graph ID, the ID is 0-based and has to be less than the number of graphs set in CHRT_NUM_ GRAPHS
The value. adds one value point to graph. If the CHRT_BUFFER_SIZE is set and the new value exceeds the buffer size, the value from the head is removed from the buffer.
CHRT_BUFFER_SIZE Not used, should be 0 The size of the buffer, or -1 to turn the rolling buffer off
Sets maximum buffer size (size of the rolling buffer)

IpChrt2DSet
Page 2-173
lCommand lParam dValue Description
CHRT_DATA_POOL Not used, should be 0 ChartID of the window that holds the data pool. After executing of this function all chart data operations have to be done with ChartID (source data pool). The data will be updated automatically in the current chart when the window with ChartID is updated
Sets the data pool of another chart to share data
CHRT_DSPL_MEAS Not used, should be 0 Measurement index. Selecting one measurement the index is 0-based and has to be less than the number of graphs set is CHRT_NUM_GRAPHS. If the value is CHDSP_MEAS_ALL , all added measurements are shown in the graph CHDSP_MEAS_SEL, only selected measurements are shown. See CHRT_RESET_SEL_MEAS and CHRT_ADD_EL_MEAS.
Sets the display measurements for the data graph and histogram
CHRT_DSPL_LABEL Not used, should be 0 Measurement index, 0-based and must be less than the number of graphs set by CHRT_NUM_ GRAPHS. If the value is CHDSP_ LABEL_OBJ, the object number is used as a label.
Sets the label measurement for the data graph
CHRT_DSPL_MEAS_X Not used, should be 0 Measurement index, 0-based and must be less than the number of graphs set by CHRT_NUM_ GRAPHS
Sets X measurement for scatterplot

IpChrt2DSet
Page 2-174
lCommand lParam dValue Description CHRT_DSPL_MEAS_Y Not used, should be 0 Measurement index, 0-
based and must be less than the number of graphs set by CHRT_NUM_ GRAPHS
Sets Y measurement for scatterplot
CHRT_RESET_SEL_ MEAS
Not used, should be 0 Not used, should be 0 Resets the list of selected measurements
CHRT_ADD_SEL_MEAS Not used, should be 0 Measurement index, 0-based and must be less than the number of graphs set by CHRT_NUM_ GRAPHS
Adds measurement to the selected list. After adding of all measurements the CHRT_DSPL_MEAS has to be set to CHDSP_MEAS_SEL.
CHRT_HIST_BINS Not used, should be 0 The number of bins Sets number of bins in histogram
CHRT_RANGE_AUTO Axis: 0 = X, 1 = Y
1= on 0 = off
Sets auto-range chart parameter
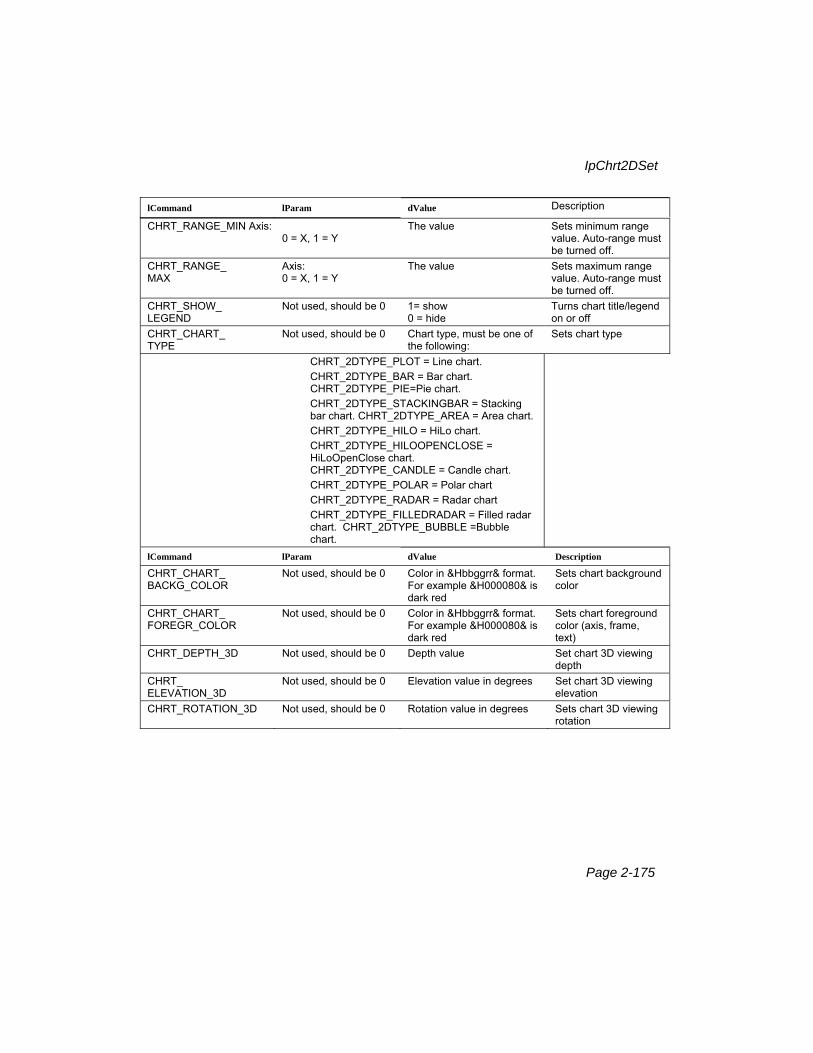
IpChrt2DSet
Page 2-175
lCommand lParam dValue Description
CHRT_RANGE_MIN Axis: 0 = X, 1 = Y
The value Sets minimum range value. Auto-range must be turned off.
CHRT_RANGE_ MAX
Axis: 0 = X, 1 = Y
The value Sets maximum range value. Auto-range must be turned off.
CHRT_SHOW_ LEGEND
Not used, should be 0 1= show 0 = hide
Turns chart title/legend on or off
CHRT_CHART_ TYPE
Not used, should be 0 Chart type, must be one of the following:
Sets chart type
CHRT_2DTYPE_PLOT = Line chart. CHRT_2DTYPE_BAR = Bar chart. CHRT_2DTYPE_PIE=Pie chart. CHRT_2DTYPE_STACKINGBAR = Stacking bar chart. CHRT_2DTYPE_AREA = Area chart. CHRT_2DTYPE_HILO = HiLo chart. CHRT_2DTYPE_HILOOPENCLOSE = HiLoOpenClose chart. CHRT_2DTYPE_CANDLE = Candle chart. CHRT_2DTYPE_POLAR = Polar chart CHRT_2DTYPE_RADAR = Radar chart CHRT_2DTYPE_FILLEDRADAR = Filled radar chart. CHRT_2DTYPE_BUBBLE =Bubble chart.
lCommand lParam dValue Description
CHRT_CHART_ BACKG_COLOR
Not used, should be 0 Color in &Hbbggrr& format. For example &H000080& is dark red
Sets chart background color
CHRT_CHART_ FOREGR_COLOR
Not used, should be 0 Color in &Hbbggrr& format. For example &H000080& is dark red
Sets chart foreground color (axis, frame, text)
CHRT_DEPTH_3D Not used, should be 0 Depth value Set chart 3D viewing depth
CHRT_ ELEVATION_3D
Not used, should be 0 Elevation value in degrees Set chart 3D viewing elevation
CHRT_ROTATION_3D Not used, should be 0 Rotation value in degrees Sets chart 3D viewing rotation

IpChrt2DSet
Page 2-176
lCommand lParam dValue Description
CHRT_COLOR Measurement index, 0-based and has to be less than the number of graphs set in CHRT_NUM_ GRAPHS.
Color in &Hbbggrr& format. For example &H000080& is dark red
Sets color for measurement graph (set to bar,line,symbol). The color is linked to the data pool, so if the data pool is shared other graphs will use this color displaying the measurement.
CHRT_LINE_STYLE Measurement index, 0-based and has to be less than the number of graphs set in CHRT_NUM_ GRAPHS.
Line style, can be one of the following:
Sets line style for measurements. Can be used only with CHRT_2DTYPE_PLOT chart type
CHRT_2DLINE_STYLE_NONE = None CHRT_2DLINE_STYLE_SOLID = Solid CHRT_2DLINE_STYLE_LONGDASH = Long Dash CHRT_2DLINE_STYLE_DOTTED = Dotted CHRT_2DLINE_STYLE_SHORTDASH = Short Dash CHRT_2DLINE_STYLE_LONGSHORTLONGDASH = Long Short Long Dash CHRT_2DLINE_STYLE_DASHDOT = Dash Dot
CHRT_LINE_WIDTH Measurement index, 0-based and has to be less than the number of graphs set in CHRT_NUM_ GRAPHS.
Line width Sets line width for measurements. Can be used only with CHRT_2DTYPE_PLOT chart type
CHRT_SYMB_SIZE Measurement index, 0-based and has to be less than the number of graphs set in CHRT_NUM_ GRAPHS.
Symbol size Sets symbol size for measurements. Can be used only with CHRT_2DTYPE_PLOT chart type
CHRT_SYMB_STYLE Measurement index, 0-based and has to be less than the number of graphs set in CHRT_NUM_ GRAPHS.
Symbol style, can be one of the following:
Sets symbol style for measurements. Can be used only with CHRT_2DTYPE_PLOT chart type
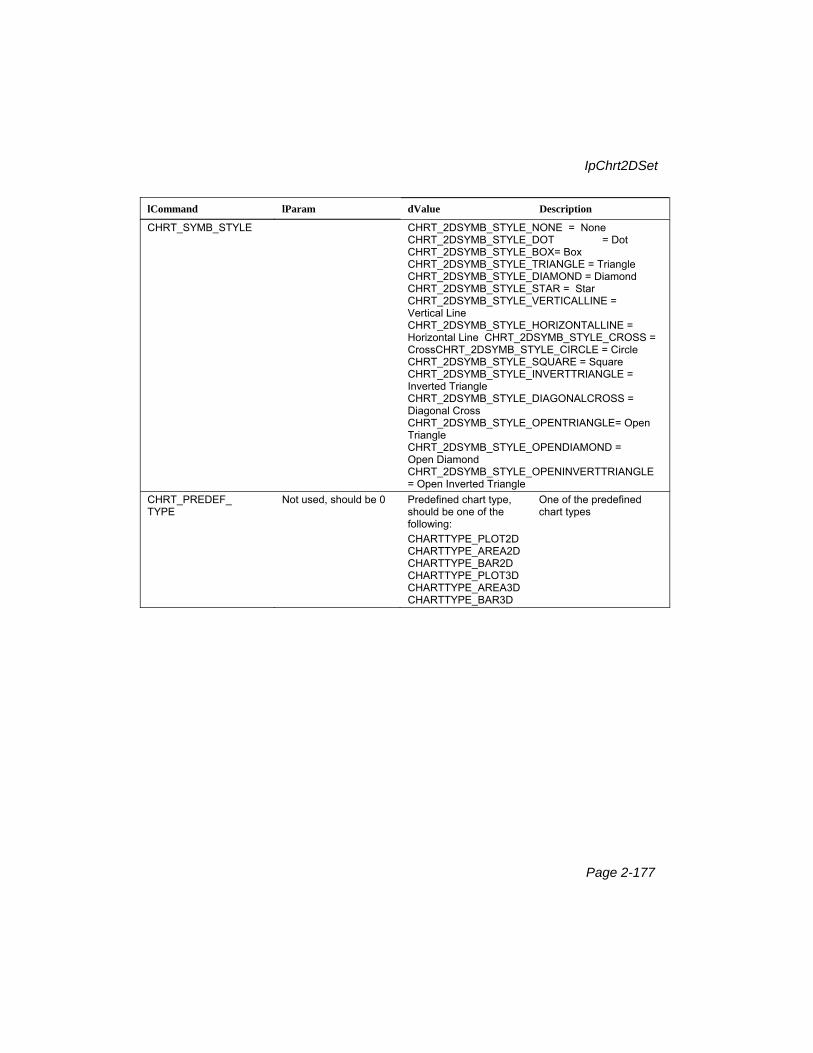
IpChrt2DSet
Page 2-177
lCommand lParam dValue Description
CHRT_SYMB_STYLE CHRT_2DSYMB_STYLE_NONE = None CHRT_2DSYMB_STYLE_DOT = Dot CHRT_2DSYMB_STYLE_BOX= Box CHRT_2DSYMB_STYLE_TRIANGLE = Triangle CHRT_2DSYMB_STYLE_DIAMOND = Diamond CHRT_2DSYMB_STYLE_STAR = Star CHRT_2DSYMB_STYLE_VERTICALLINE = Vertical Line CHRT_2DSYMB_STYLE_HORIZONTALLINE = Horizontal Line CHRT_2DSYMB_STYLE_CROSS = CrossCHRT_2DSYMB_STYLE_CIRCLE = Circle CHRT_2DSYMB_STYLE_SQUARE = Square CHRT_2DSYMB_STYLE_INVERTTRIANGLE = Inverted Triangle CHRT_2DSYMB_STYLE_DIAGONALCROSS = Diagonal Cross CHRT_2DSYMB_STYLE_OPENTRIANGLE= Open Triangle CHRT_2DSYMB_STYLE_OPENDIAMOND = Open Diamond CHRT_2DSYMB_STYLE_OPENINVERTTRIANGLE = Open Inverted Triangle
CHRT_PREDEF_ TYPE
Not used, should be 0 Predefined chart type, should be one of the following:
One of the predefined chart types
CHARTTYPE_PLOT2D CHARTTYPE_AREA2D CHARTTYPE_BAR2D CHARTTYPE_PLOT3D CHARTTYPE_AREA3D CHARTTYPE_BAR3D

IpChrt2DSet
Page 2-178
lCommand lParam dValue Description
CHRT_DC_BLOCKS Not used, should be 0 Predefined chart type, should be one of the following:
Sets block configuration. Can be used only with Data Collector charts.
CHRT_BLOCKS_LAST = last block of data in the data collector CHRT_BLOCKS_ALL_IN_ONE = all blocks of data in the data collector, one measurement in one graph CHRT_BLOCKS_ALL_SEPARATE = all blocks of data in the data collector; every block in separate graph (only 1 measurement possible), number of graphs corresponds to the number of blocks CHRT_BLOCKS_ALL_SEP_BY_VAL = chart all blocks of data in the data collector; every measurement value in a block in a separate graph; number of graphs corresponds to the number of values in the longest measurement
CHRT_NUM_SGNF_ DIG
Not used, should be 0 Number of significant digits
Sets the number of significant digits in the data values.
CHRT_NUM_X_ ARRAYS
Not used, should be 0 The number of X arrays Sets the number of X arrays. If the number is not set or 0, then the object index is used as X coordinate; if the value is set the X coordinates set by CHRT_ADD_X_VALUE used for the graphs. If the value is 1, points with the same index on multiple graphs will use the same X value. The name of the X axis in that case can be set using CHRT_X_NAME option. If the number of X arrays is more than 1, every graph will use separate XY coordinate pairs. The option can be used only with Data Graphs.

IpChrt2DSet
Page 2-179
lCommand lParam dValue Description
CHRT_ADD_X_ VALUE
Graph ID, the ID is 0-based and has to be less than the number of graphs set is CHRT_NUM _X_ARRAYS
The value Add one X coordinate value to graph. The function should be paired with CHRT_ADD_VALUE. The option can be used only with Data Graphs. If the CHRT_BUFFER_SIZE is set and the new value exceeds the buffer size, the value from the head is removed from the buffer.
CHRT_RESET_ALL Not used, should be 0 Not used, should be 0 Resets the graph and the data pool associated with the graph
CHRT_TITLE_TXT_ROTATION
Not used, should be 0 Rotation, can be one of the following:
Sets Y-axis text title rotation
CHRT_2D_ROTATENONE = No rotation. CHRT_2D_ROTATE90DEGREES = Rotate 90 degrees. CHRT_2D_ROTATE270DEGREES =Rotate 270 degrees.

IpChrt2DSet
Page 2-180
Example ‘example demonstrating multiple graphs Sub RollingMultiGraph() Dim ChartID%,HistID%,ScattID% ChartID=IpChrt2DCreate("New Data Graph",CHRT_TYPE_GRAPH) If (ChartID<0) Then Exit Sub 'Error End If HistID=IpChrt2DCreate("New Histogram",CHRT_TYPE_HIST) If (HistID<0) Then Exit Sub 'Error End If ScattID=IpChrt2DCreate("New Scatterplot",CHRT_TYPE_SCAT) If (ScattID<0) Then Exit Sub 'Error End If 'share ChartID data pool with HistID and ScattID ret = IpChrt2DSet(HistID,CHRT_DATA_POOL,0,ChartID) ret = IpChrt2DSet(ScattID,CHRT_DATA_POOL,0,ChartID) 'set rolling buffer size to 100 ret = IpChrt2DSet(ChartID,CHRT_BUFFER_SIZE,0,100) ret=IpChrt2DShow(ChartID,1) ret=IpChrt2DShow(HistID,1) ret=IpChrt2DShow(ScattID,1) 'set data to ChartID and it will be automatically ‘shown in HistID and ScattID ret = IpChrt2DSet(ChartID,CHRT_NUM_GRAPHS,0,3) 'set measurement names ret = IpChrt2DSetStr(ChartID,CHRT_GRAPH_NAME,0,"Energy") ret = IpChrt2DSetStr(ChartID,CHRT_GRAPH_NAME,1,"Entropy") ret = IpChrt2DSetStr(ChartID,CHRT_GRAPH_NAME,2,"Efficiency") 'set colors ret=IpChrt2DSet(ChartID,CHRT_COLOR,0,&H000080&) ret=IpChrt2DSet(ChartID,CHRT_COLOR,1,&H008000&) ret=IpChrt2DSet(ChartID,CHRT_COLOR,2,&H800000&) 'update chart ret=IpChrt2DUpdate(ChartID) 'display ALL measurements in data graph ret = IpChrt2DSet(ChartID,CHRT_DSPL_MEAS,0,CHDSP_MEAS_ALL) 'object number as label ret = IpChrt2DSet(ChartID,CHRT_DSPL_LABEL,0,CHDSP_LABEL_OBJ)
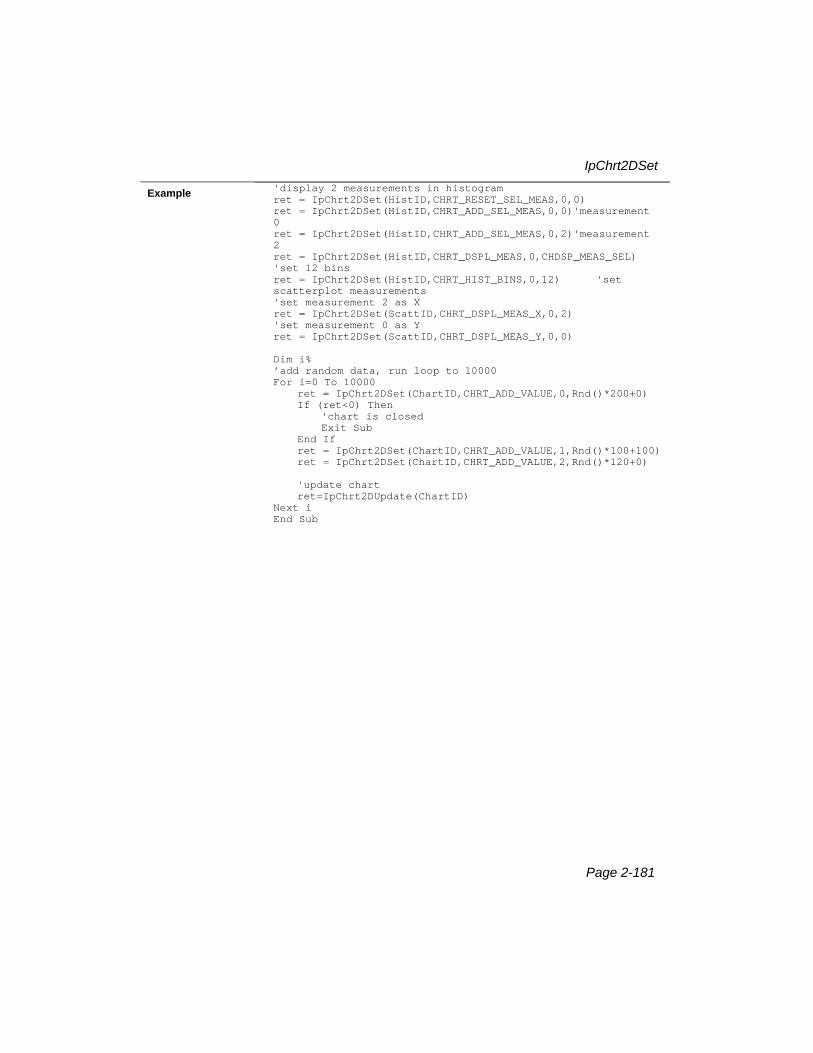
IpChrt2DSet
Page 2-181
Example 'display 2 measurements in histogram ret = IpChrt2DSet(HistID,CHRT_RESET_SEL_MEAS,0,0) ret = IpChrt2DSet(HistID,CHRT_ADD_SEL_MEAS,0,0)'measurement 0 ret = IpChrt2DSet(HistID,CHRT_ADD_SEL_MEAS,0,2)'measurement 2 ret = IpChrt2DSet(HistID,CHRT_DSPL_MEAS,0,CHDSP_MEAS_SEL) 'set 12 bins ret = IpChrt2DSet(HistID,CHRT_HIST_BINS,0,12) 'set scatterplot measurements 'set measurement 2 as X ret = IpChrt2DSet(ScattID,CHRT_DSPL_MEAS_X,0,2) 'set measurement 0 as Y ret = IpChrt2DSet(ScattID,CHRT_DSPL_MEAS_Y,0,0) Dim i% ’add random data, run loop to 10000 For i=0 To 10000 ret = IpChrt2DSet(ChartID,CHRT_ADD_VALUE,0,Rnd()*200+0) If (ret<0) Then 'chart is closed Exit Sub End If ret = IpChrt2DSet(ChartID,CHRT_ADD_VALUE,1,Rnd()*100+100) ret = IpChrt2DSet(ChartID,CHRT_ADD_VALUE,2,Rnd()*120+0) 'update chart ret=IpChrt2DUpdate(ChartID) Next i End Sub
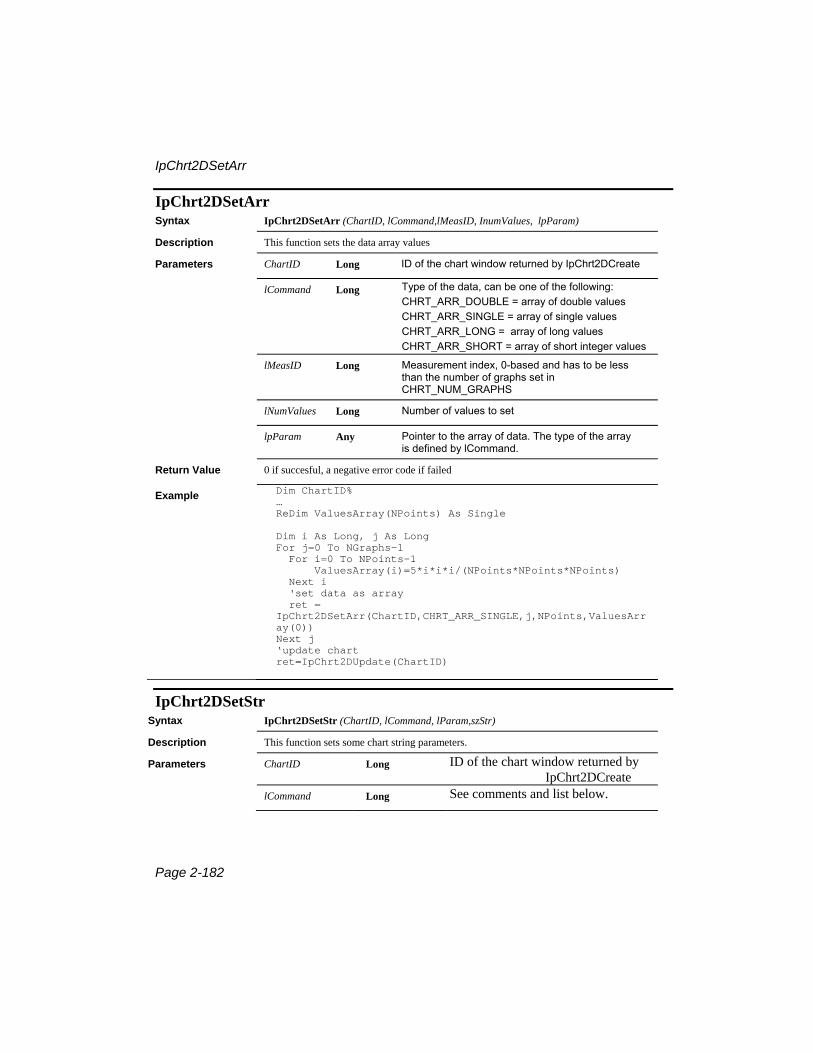
IpChrt2DSetArr
Page 2-182
IpChrt2DSetArr Syntax IpChrt2DSetArr (ChartID, lCommand,lMeasID, InumValues, lpParam)
Description This function sets the data array values
Parameters ChartID Long ID of the chart window returned by IpChrt2DCreate
lCommand Long Type of the data, can be one of the following: CHRT_ARR_DOUBLE = array of double values CHRT_ARR_SINGLE = array of single values CHRT_ARR_LONG = array of long values CHRT_ARR_SHORT = array of short integer values
lMeasID Long Measurement index, 0-based and has to be less than the number of graphs set in CHRT_NUM_GRAPHS
lNumValues Long Number of values to set
lpParam Any Pointer to the array of data. The type of the array is defined by lCommand.
Return Value 0 if succesful, a negative error code if failed
Example Dim ChartID% … ReDim ValuesArray(NPoints) As Single Dim i As Long, j As Long For j=0 To NGraphs-1 For i=0 To NPoints-1 ValuesArray(i)=5*i*i*i/(NPoints*NPoints*NPoints) Next i ‘set data as array ret = IpChrt2DSetArr(ChartID,CHRT_ARR_SINGLE,j,NPoints,ValuesArray(0)) Next j ‘update chart ret=IpChrt2DUpdate(ChartID)
IpChrt2DSetStr Syntax IpChrt2DSetStr (ChartID, lCommand, lParam,szStr)
Description This function sets some chart string parameters.
Parameters ChartID Long ID of the chart window returned by IpChrt2DCreate
lCommand Long See comments and list below.

IpChrt2DSetStr
Page 2-183
lParam Long Long option, which depends on the chart lCommand selected (see below)
szStr String Sting, which depends on the chart lCommand selected (see below)
Return Value 0 if succesful, a negative error code if failed
Comments This macro takes the following commands:
lCommand lParam szStr Description
CHRT_GRAPH_ NAME
Graph ID, the ID is 0-based and has to be less than the number of graphs set is CHRT_NUM_ GRAPHS
Graph name Sets graph name
CHRT_X_NAME X array ID, the ID is 0-based and has to be less than the number of graphs set is CHRT_NUM _X_ARRAYS
X array name Sets the name for the corresponding X array. If the number of the X array is one, the name is displayed in the Label combo box. This option can only be used with Data Graphs.
CHRT_AXIS-TITLE 0 = X axis 1 = Y axis
Axis title Sets X or Y axis title. This option can be used with Data Graph and Histogram
CHRT_TEMPLATE 0 = load 1 = save
Template name
Loads/saves chart template. It can be used to set multiple display options such as colors, chart types, fonts etc.
CHRT_EXPORT_ DATA
Destination type, must be one of the following:
File name, ignored for Data Export
Exports chart data to file or data exchange
CHRT_EXPORT = export to data exchange target program (Excel, Origin) CHRT_FILE_TAB = save to tab-delimited file CHRT_FILE_CSV =comma-delimited file CHRT_FILE_HTML = html file

IpChrt2DShow
Page 2-184
Example Dim ChartID% … Dim TmplName As String TmplName="C:\Temp\TestHistTemplate.oc2" 'load new histogram template ret = IpChrt2DSetStr(ChartID,CHRT_TEMPLATE,0,TmplName) ‘update window ret=IpChrt2DUpdate(ChartID) … ‘export data to Excel (or Origin) ret = IpChrt2DSetStr(ChartID,CHRT_EXPORT_DATA,CHRT_EXPORT,"")
‘save data to tab-delimited file
ret = IpChrt2DSetStr(ChartID,CHRT_EXPORT_DATA,_ CHRT_FILE_TAB,"C:\TabFile.txt") ‘save data to HTML file ret = IpChrt2DSetStr(ChartID,CHRT_EXPORT_DATA,_ CHRT_FILE_HTML,"C:\ TestHTML.htm") ‘save data to CSV file ret = IpChrt2DSetStr(ChartID,CHRT_EXPORT_DATA,_ CHRT_FILE_CSV,"C:\ TestCSV.csv")
IpChrt2DShow Syntax IpChrt2DShow (ChartID, bShow)
Description This function shows or hides the chart window.
Parameters ChartID Long ID of the chart returned by IpChrt2DCreate
sChartType Integer 1 = show chart 0 = hide chart
Return Value 0 if successful, a negative error code if failed.
Example Dim ChartID% ‘create new data chart window ChartID=IpChrt2DCreate("New Data Graph",CHRT_TYPE_GRAPH) If (ChartID<0) Then Exit Sub 'Error End If ‘show chart ret=IpChrt2DShow(ChartID,1)

IpChrt2DSize
Page 2-185
IpChrt2DSize Syntax IpChrt2Size (ChartID, X, Y)
Description This function resizes the chart window.
Parameters ChartID Long ID of the chart returned by IpChrt2DCreate
X Long New width of the chart window
Y Long New height of the chart window
Return Value 0 if successful, a negative error code if failed.
Example Dim ChartID% … ‘set new chart window size 1076x494
ret = IpChrt2DSize(ChartID, 1076, 494)
IpChrt2DUpdate Syntax IpChrt2Update (ChartID)
Description This function updates the data and/or display options in the chart window.
Parameters ChartID Long ID of the chart returned by IpChrt2DCreate
Return Value 0 if successful, a negative error code if failed.
Example 'set colors ret=IpChrt2DUpdate(ChartID,CHRT_COLOR,0,&H000080&) ret=IpChrt2DUpdate(ChartID,CHRT_COLOR,1,&H008000&) ret=IpChrt2DUpdate(ChartID,CHRT_COLOR,2,&H800000&) 'update chart ret=IpChrt2DUpdate(ChartID
IpClprClipboard Syntax IpClprClipboard(nCommand)
Description This function cuts, copies, or pastes the sampling tool to the clipboard.
Parameters nCommand Integer Must be one of the following: CLPR_CUT - cut the selected tool(s) to the clipboard CLPR_COPY - copies the selected tool(s) to the clipboard CLPR_PASTE - pastes the selected tool(s) from the clipboard

IpClprCreateDerivativeEdge
Page 2-186
IpClprCreateDerivativeEdge Syntax IpClprCreateDerivativeEdge(szName, szLabel, lColor, nOffset, nStyle)
Description This function creates a edge detector using the derivative method.
Parameters szName String Name of the edge detector without the label, i.e. “Peak”.
szLabel String Single character label, i.e. “A”.
lColor Long Color of the markers. Value is in BGR format.
nOffset Integer Number of pixels from the detected position to where the marker will be displayed. Negative number puts the marker before the detected position. Positive number puts the marker after the detected position.
nStyle Integer CLPR_PEAK – peak CLPR_VALLEY – valley CLPR_RISING – rising point of inflection CLPR_FALLING – falling point of inflection.
Peak is found where the first derivative is zero and the second derivative is negative number. Valley if found where the first derivative is zero and the second derivative is positive number. Rising point of inflection is found where the second derivative is zero and the first derivative is a positive number. Falling point of inflection is found where the second derivative is zero and the first derivative is a negative number
Example Sub IpClprCreateDerivativeEdge_ex() ' create 4 edge detectors, 1 of each type and make them different colors ret = IpClprCreateDerivativeEdge("Peak", "A", 255, 0, CLPR_PEAK) ret = IpClprCreateDerivativeEdge("Valley", "B", 4259584, 0, CLPR_VALLEY) ret = IpClprCreateDerivativeEdge("Rising", "C", 16711680, 0, CLPR_RISING) ret = IpClprCreateDerivativeEdge("Falling", "D", 33023, 0, CLPR_FALLING)
End Sub
See Also IpClprCreatePatternMatchEdge
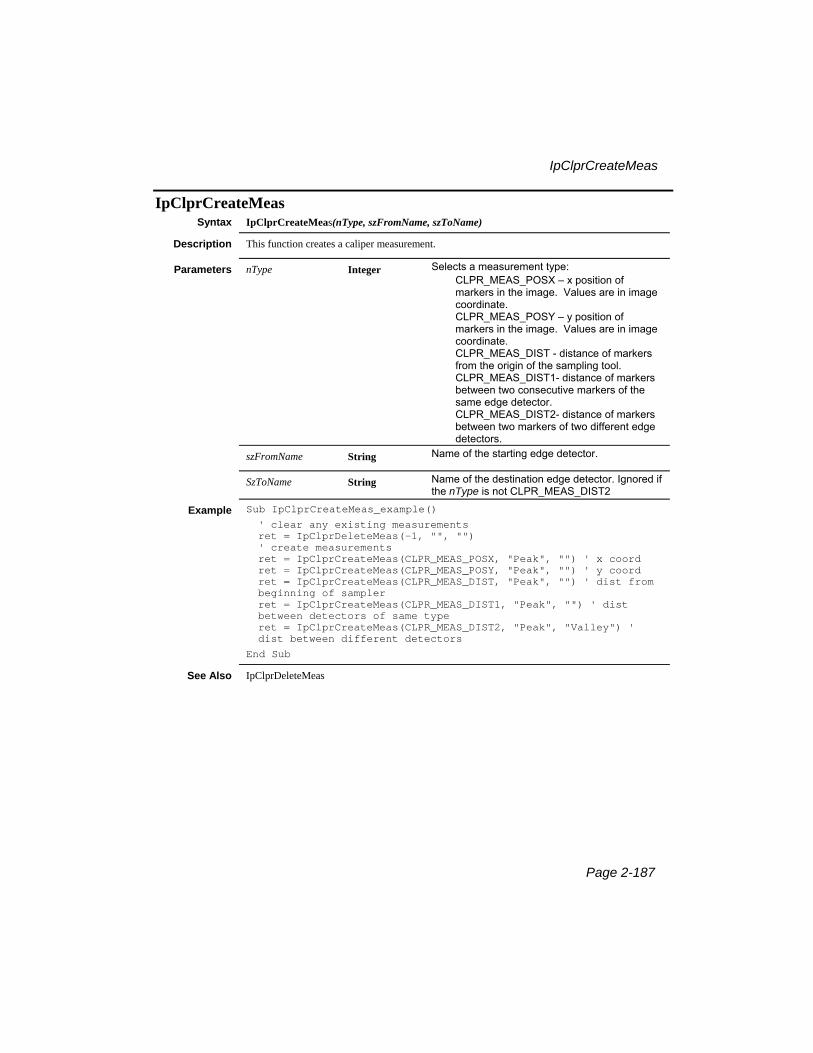
IpClprCreateMeas
Page 2-187
IpClprCreateMeas Syntax IpClprCreateMeas(nType, szFromName, szToName)
Description This function creates a caliper measurement.
Parameters nType Integer Selects a measurement type: CLPR_MEAS_POSX – x position of markers in the image. Values are in image coordinate. CLPR_MEAS_POSY – y position of markers in the image. Values are in image coordinate. CLPR_MEAS_DIST - distance of markers from the origin of the sampling tool. CLPR_MEAS_DIST1- distance of markers between two consecutive markers of the same edge detector. CLPR_MEAS_DIST2- distance of markers between two markers of two different edge detectors.
szFromName String Name of the starting edge detector.
SzToName String Name of the destination edge detector. Ignored if the nType is not CLPR_MEAS_DIST2
Example Sub IpClprCreateMeas_example()
' clear any existing measurements ret = IpClprDeleteMeas(-1, "", "") ' create measurements ret = IpClprCreateMeas(CLPR_MEAS_POSX, "Peak", "") ' x coord ret = IpClprCreateMeas(CLPR_MEAS_POSY, "Peak", "") ' y coord ret = IpClprCreateMeas(CLPR_MEAS_DIST, "Peak", "") ' dist from beginning of sampler ret = IpClprCreateMeas(CLPR_MEAS_DIST1, "Peak", "") ' dist between detectors of same type ret = IpClprCreateMeas(CLPR_MEAS_DIST2, "Peak", "Valley") ' dist between different detectors
End Sub
See Also IpClprDeleteMeas

IpClprCreatePatternMatchEdge
Page 2-188
IpClprCreatePatternMatchEdge Syntax IpClprCreatePatternMatchEdge(szName, szLabel, lColor, nOffset, nThreshold, ptPattern,
nNumPoints)
Description This function creates an edge detector using the pattern match method.
Parameters szName String Name of the edge detector without the label, i.e. “Pattern”.
szLabel String Single character label, i.e. “A”.
lColor Long Color of the markers. Value is in BGR format.
nOffset Integer Number of pixels from the detected position to where the marker will be displayed. Negative number puts the marker before the detected position. Positive number puts the marker after the detected position.
nThreshold Integer Number in the range of 0 to 100 indicating the degree of match. 100% = perfect match.
ptPattern Single LPSINGLE (C)
Pattern template. Values are normalized to numbers between 0 and 100.
nNumPoints Integer Number of points in ptPattern.
Example Sub IpClprCreatePatternMatchEdge_e() ' gather up points for pattern ipPattern( 0) = 77.28 : ipPattern( 1) = 77.06 : ipPattern( 2) = 77.09 ipPattern( 3) = 75.31 : ipPattern( 4) = 73.87 : ipPattern( 5) = 72.13 ipPattern( 6) = 70.16 : ipPattern( 7) = 68.04 : ipPattern( 8) = 65.85 ipPattern( 9) = 63.66 : ipPattern(10) = 61.54 : ipPattern(11) = 59.54 ipPattern(12) = 57.69 : ipPattern(13) = 56.13 : ipPattern(14) = 54.57 ipPattern(15) = 53.33 : ipPattern(16) = 52.32 : ipPattern(17) = 51.56 ipPattern(18) = 51.02 : ipPattern(19) = 50.70 : ipPattern(20) = 50.59 ' create first detector ret = IpClprCreatePatternMatchEdge("Pattern1", "A", 255, 0, 50, ipPattern(0), 21)
End Sub
See Also IpClprCreateDerivativeEdge
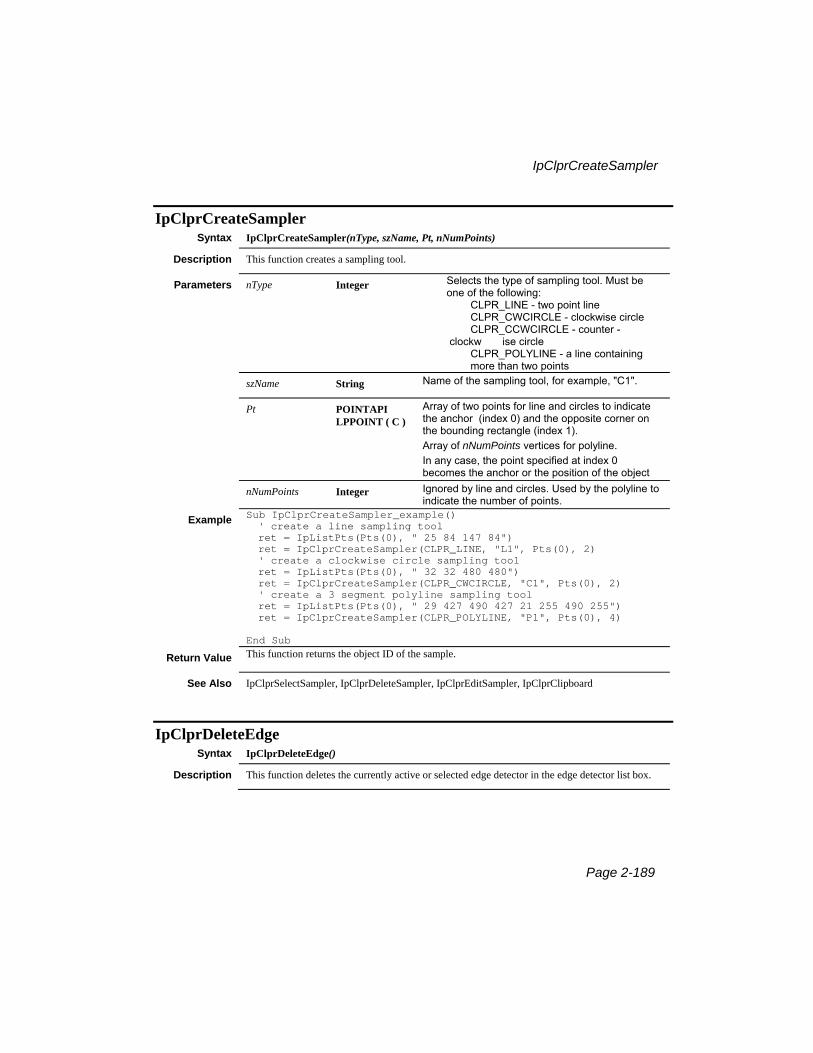
IpClprCreateSampler
Page 2-189
IpClprCreateSampler Syntax IpClprCreateSampler(nType, szName, Pt, nNumPoints)
Description This function creates a sampling tool.
Parameters nType Integer Selects the type of sampling tool. Must be one of the following: CLPR_LINE - two point line CLPR_CWCIRCLE - clockwise circle CLPR_CCWCIRCLE - counter - clockw ise circle CLPR_POLYLINE - a line containing more than two points
szName String Name of the sampling tool, for example, "C1".
Pt POINTAPI LPPOINT ( C )
Array of two points for line and circles to indicate the anchor (index 0) and the opposite corner on the bounding rectangle (index 1). Array of nNumPoints vertices for polyline. In any case, the point specified at index 0 becomes the anchor or the position of the object
nNumPoints Integer Ignored by line and circles. Used by the polyline to indicate the number of points.
Example Sub IpClprCreateSampler_example() ' create a line sampling tool ret = IpListPts(Pts(0), " 25 84 147 84") ret = IpClprCreateSampler(CLPR_LINE, "L1", Pts(0), 2) ' create a clockwise circle sampling tool ret = IpListPts(Pts(0), " 32 32 480 480") ret = IpClprCreateSampler(CLPR_CWCIRCLE, "C1", Pts(0), 2) ' create a 3 segment polyline sampling tool ret = IpListPts(Pts(0), " 29 427 490 427 21 255 490 255") ret = IpClprCreateSampler(CLPR_POLYLINE, "P1", Pts(0), 4)
End Sub
Return Value This function returns the object ID of the sample.
See Also IpClprSelectSampler, IpClprDeleteSampler, IpClprEditSampler, IpClprClipboard
IpClprDeleteEdge Syntax IpClprDeleteEdge()
Description This function deletes the currently active or selected edge detector in the edge detector list box.
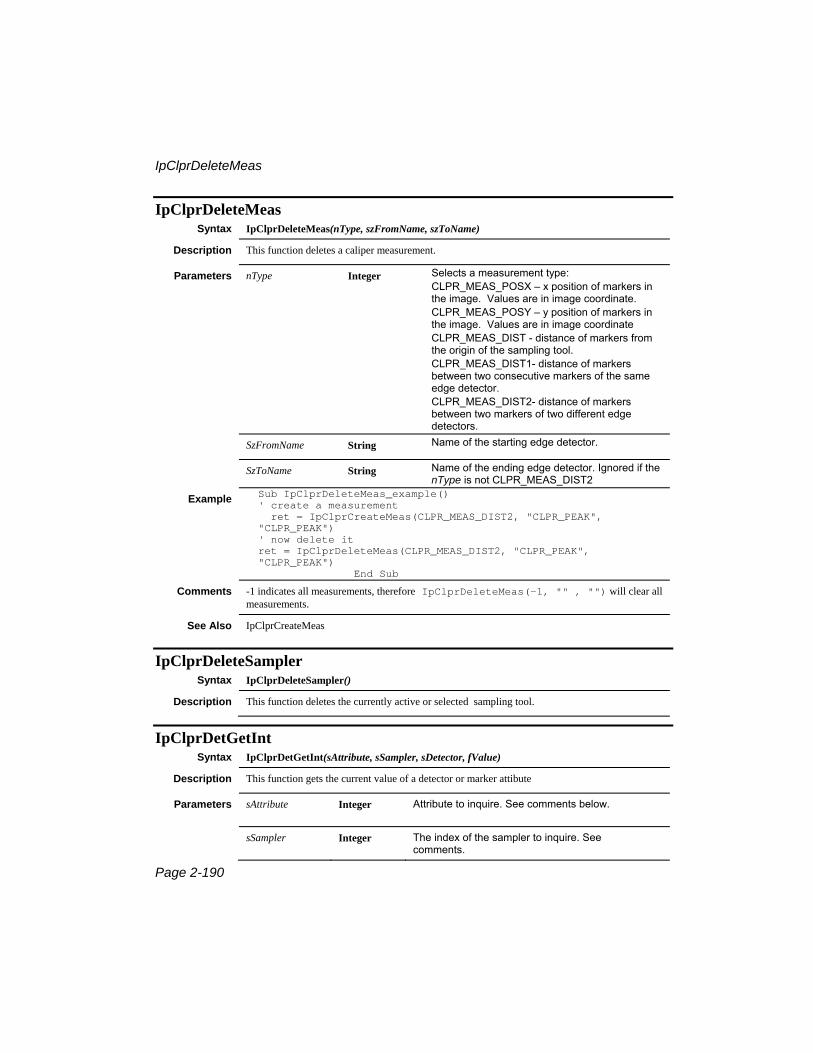
IpClprDeleteMeas
Page 2-190
IpClprDeleteMeas Syntax IpClprDeleteMeas(nType, szFromName, szToName)
Description This function deletes a caliper measurement.
Parameters nType Integer Selects a measurement type: CLPR_MEAS_POSX – x position of markers in the image. Values are in image coordinate. CLPR_MEAS_POSY – y position of markers in the image. Values are in image coordinate CLPR_MEAS_DIST - distance of markers from the origin of the sampling tool. CLPR_MEAS_DIST1- distance of markers between two consecutive markers of the same edge detector. CLPR_MEAS_DIST2- distance of markers between two markers of two different edge detectors.
SzFromName String Name of the starting edge detector.
SzToName String Name of the ending edge detector. Ignored if the nType is not CLPR_MEAS_DIST2
Example Sub IpClprDeleteMeas_example() ' create a measurement ret = IpClprCreateMeas(CLPR_MEAS_DIST2, "CLPR_PEAK", "CLPR_PEAK") ' now delete it ret = IpClprDeleteMeas(CLPR_MEAS_DIST2, "CLPR_PEAK", "CLPR_PEAK")
End Sub
Comments -1 indicates all measurements, therefore IpClprDeleteMeas(-1, "" , "") will clear all measurements.
See Also IpClprCreateMeas
IpClprDeleteSampler Syntax IpClprDeleteSampler()
Description This function deletes the currently active or selected sampling tool.
IpClprDetGetInt Syntax IpClprDetGetInt(sAttribute, sSampler, sDetector, fValue)
Description This function gets the current value of a detector or marker attibute
Parameters sAttribute Integer Attribute to inquire. See comments below.
sSampler Integer The index of the sampler to inquire. See comments.
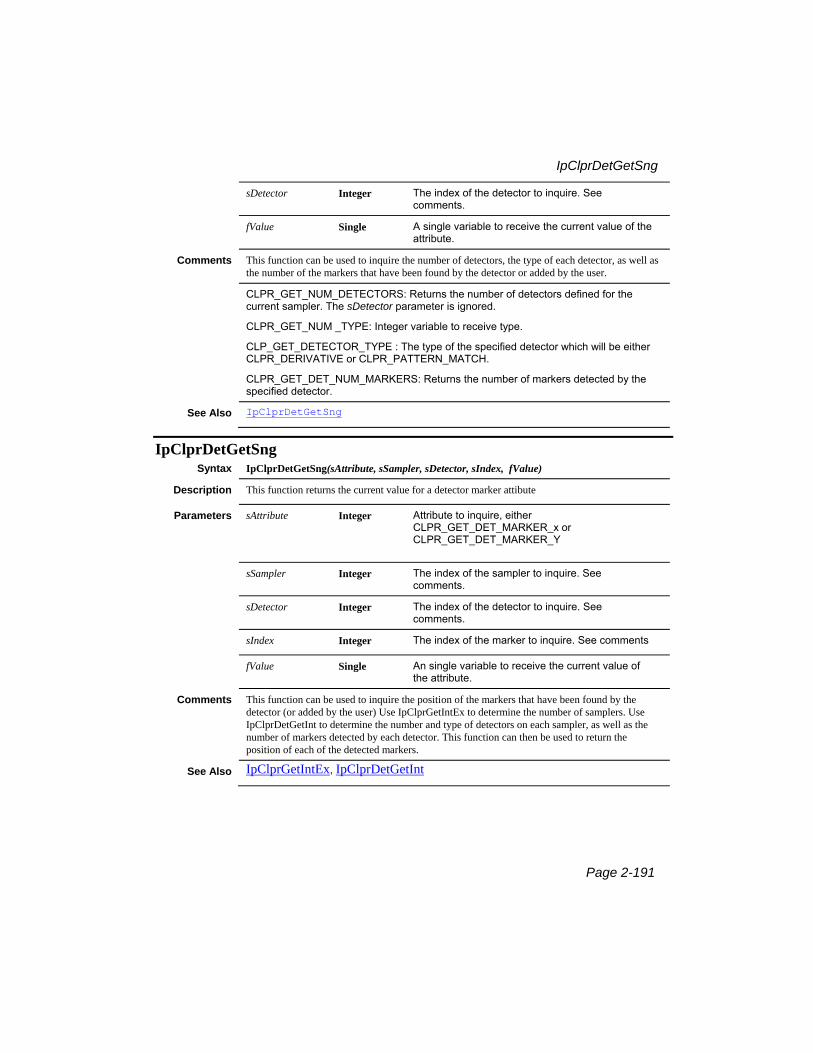
IpClprDetGetSng
Page 2-191
sDetector Integer The index of the detector to inquire. See comments.
fValue Single A single variable to receive the current value of the attribute.
Comments This function can be used to inquire the number of detectors, the type of each detector, as well as the number of the markers that have been found by the detector or added by the user.
CLPR_GET_NUM_DETECTORS: Returns the number of detectors defined for the current sampler. The sDetector parameter is ignored.
CLPR_GET_NUM _TYPE: Integer variable to receive type.
CLP_GET_DETECTOR_TYPE : The type of the specified detector which will be either CLPR_DERIVATIVE or CLPR_PATTERN_MATCH.
CLPR_GET_DET_NUM_MARKERS: Returns the number of markers detected by the specified detector.
See Also IpClprDetGetSng
IpClprDetGetSng Syntax IpClprDetGetSng(sAttribute, sSampler, sDetector, sIndex, fValue)
Description This function returns the current value for a detector marker attibute
Parameters sAttribute Integer Attribute to inquire, either CLPR_GET_DET_MARKER_x or CLPR_GET_DET_MARKER_Y
sSampler Integer The index of the sampler to inquire. See
comments.
sDetector Integer The index of the detector to inquire. See comments.
sIndex Integer The index of the marker to inquire. See comments
fValue Single An single variable to receive the current value of the attribute.
Comments This function can be used to inquire the position of the markers that have been found by the detector (or added by the user) Use IpClprGetIntEx to determine the number of samplers. Use IpClprDetGetInt to determine the number and type of detectors on each sampler, as well as the number of markers detected by each detector. This function can then be used to return the position of each of the detected markers.
See Also IpClprGetIntEx, IpClprDetGetInt
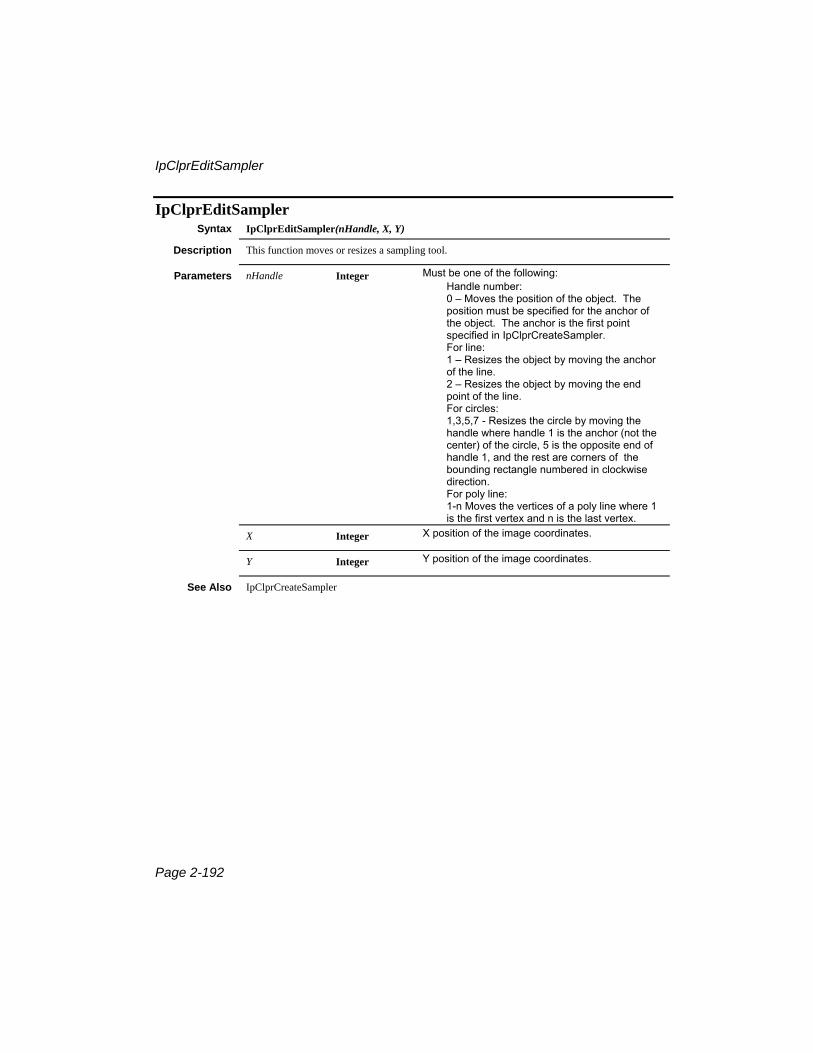
IpClprEditSampler
Page 2-192
IpClprEditSampler Syntax IpClprEditSampler(nHandle, X, Y)
Description This function moves or resizes a sampling tool.
Parameters nHandle Integer Must be one of the following: Handle number: 0 – Moves the position of the object. The position must be specified for the anchor of the object. The anchor is the first point specified in IpClprCreateSampler. For line: 1 – Resizes the object by moving the anchor of the line. 2 – Resizes the object by moving the end point of the line. For circles: 1,3,5,7 - Resizes the circle by moving the handle where handle 1 is the anchor (not the center) of the circle, 5 is the opposite end of handle 1, and the rest are corners of the bounding rectangle numbered in clockwise direction. For poly line: 1-n Moves the vertices of a poly line where 1 is the first vertex and n is the last vertex.
X Integer X position of the image coordinates.
Y Integer Y position of the image coordinates.
See Also IpClprCreateSampler

IpClprGet
Page 2-193
IpClprGet Syntax IpClprGet (sAttr, fData)
Description This function gets the caliper tool attributes.
Parameters sAttr Integer See list below:
Attribute Value Description
CLPR_AUTOREFRESH Turn on/off Auto-Refresh flag during multiple attribute settings. 0 to turn-off auto-refresh, 1 to turn it back on.
CLPRE_COLOR Color of the currently selected edge detector
CLPRE_OFFSET Offset of the currently selected edge detector
CLPRE_STYLE Style of the currently selected derivative edge detector
CLPR_CIRCLE_ORIGIN Origin of circle sampling tool. Number is specified in angle (degree). 90 degree is at the top of the circle.
CLPRO_SMOOTHING Gaussian smoothing factor kernel size.
CLPRO_THICKNESS Sampling tool line thickness.
CLPRO_APPLY_ICAL Apply intensity calibration to luminance profile.
CLPRO_APPLY_SCAL Apply spatial calibration to measurement numbers.
CLPRO_AUTO_SCALE Scale luminance profile to fit minimum and maximum profile value to the graph area.
CLPR_SENS Set the sensitivity threshold.
CLPRO_SHOW_LABEL Show edge detector label on markers
CLPRO_SHOW_NUMBER Show marker’s sequence number
CLPRO_PRECISION Set number of digits after decimal point
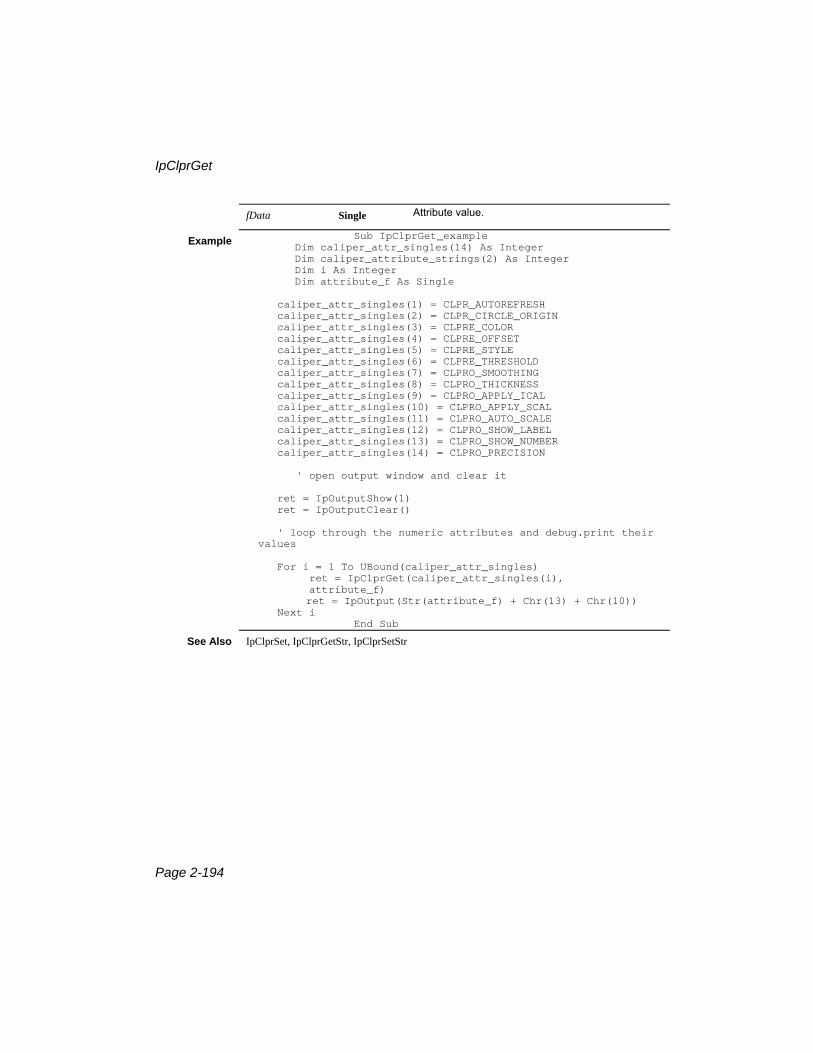
IpClprGet
Page 2-194
fData Single Attribute value.
Example Sub IpClprGet_example Dim caliper_attr_singles(14) As Integer Dim caliper_attribute_strings(2) As Integer Dim i As Integer Dim attribute_f As Single caliper_attr_singles(1) = CLPR_AUTOREFRESH caliper_attr_singles(2) = CLPR_CIRCLE_ORIGIN caliper_attr_singles(3) = CLPRE_COLOR caliper_attr_singles(4) = CLPRE_OFFSET caliper_attr_singles(5) = CLPRE_STYLE caliper_attr_singles(6) = CLPRE_THRESHOLD caliper_attr_singles(7) = CLPRO_SMOOTHING caliper_attr_singles(8) = CLPRO_THICKNESS caliper_attr_singles(9) = CLPRO_APPLY_ICAL caliper_attr_singles(10) = CLPRO_APPLY_SCAL caliper_attr_singles(11) = CLPRO_AUTO_SCALE caliper_attr_singles(12) = CLPRO_SHOW_LABEL caliper_attr_singles(13) = CLPRO_SHOW_NUMBER caliper_attr_singles(14) = CLPRO_PRECISION ' open output window and clear it ret = IpOutputShow(1) ret = IpOutputClear() ' loop through the numeric attributes and debug.print their values For i = 1 To UBound(caliper_attr_singles) ret = IpClprGet(caliper_attr_singles(i), attribute_f) ret = IpOutput(Str(attribute_f) + Chr(13) + Chr(10)) Next i
End Sub
See Also IpClprSet, IpClprGetStr, IpClprSetStr
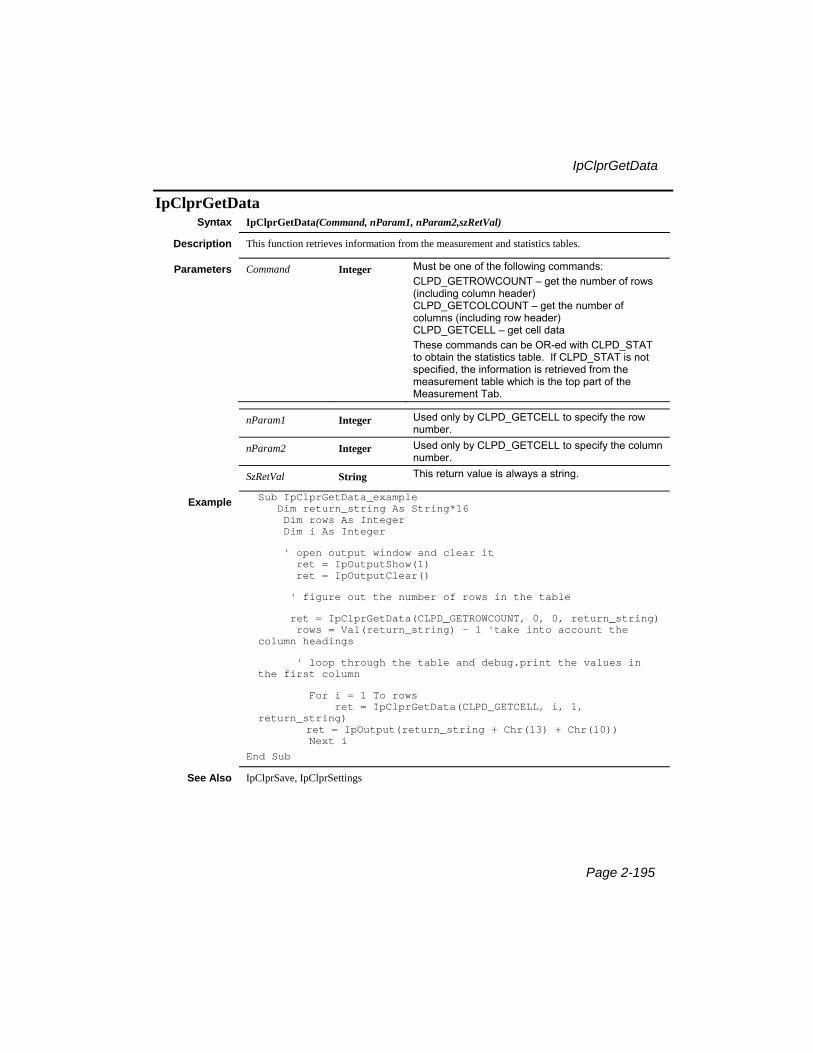
IpClprGetData
Page 2-195
IpClprGetData Syntax IpClprGetData(Command, nParam1, nParam2,szRetVal)
Description This function retrieves information from the measurement and statistics tables.
Parameters Command Integer Must be one of the following commands: CLPD_GETROWCOUNT – get the number of rows (including column header) CLPD_GETCOLCOUNT – get the number of columns (including row header) CLPD_GETCELL – get cell data These commands can be OR-ed with CLPD_STAT to obtain the statistics table. If CLPD_STAT is not specified, the information is retrieved from the measurement table which is the top part of the Measurement Tab.
nParam1 Integer Used only by CLPD_GETCELL to specify the row number.
nParam2 Integer Used only by CLPD_GETCELL to specify the column number.
SzRetVal String This return value is always a string.
Example Sub IpClprGetData_example Dim return_string As String*16 Dim rows As Integer Dim i As Integer ' open output window and clear it ret = IpOutputShow(1) ret = IpOutputClear()
' figure out the number of rows in the table ret = IpClprGetData(CLPD_GETROWCOUNT, 0, 0, return_string) rows = Val(return_string) - 1 'take into account the column headings ' loop through the table and debug.print the values in the first column For i = 1 To rows ret = IpClprGetData(CLPD_GETCELL, i, 1, return_string) ret = IpOutput(return_string + Chr(13) + Chr(10)) Next i
End Sub
See Also IpClprSave, IpClprSettings

IpClprGetDataEx
Page 2-196
IpClprGetDataEx SyntaxIpClprGetDataEx(MeasureIndex, Number, Values)
DescriptionThis function retrieves information from the measurement and statistics tables.
ParametersMeasureIndex Integer Index of the measurement to return, from 0 to the number of measurements - 1 (use the CLPR_NUM_MEASUREMENTS attribute to determine the number of measurements available).
Number Integer The number of values to return (use the CLPR_NUM_MEAS_VALUES to determine the number of values available for a particular measurement)
Values Single An array of Singles re-dimensioned to contain the specified number of measurement values.
Return Value 0 if successful, or a negative value if measurements are not available.
See Also IpClprGetData

IpClprGetIntEx
Page 2-197
IpClprGetIntEx Syntax IpClprGetIntEx(sAttribute, Index, Value)
Description This function gets the current value of the specified attribute.
Parameters Attribute Integer Must be one of the following commands: CLPR_ACTIVE_DETECTOR – Returns the index of the active detector CLPR_NUM_SAMPLERS - Returns the number of samplers. The index parameter is not used. CLPR_SAMPLER_ID - Returns the ID of the sample specified by the index parameter (0 to the number of samplers -1) CLPR_NUM_PROFILE_POINTS Returns the number of points in the caliper profile along the sampler specified by the Index parameter. The number of points can be used to dimension an array to receive the caliper luminance profile (see the CLPR_PROFILE command to IpClprGetSngEx). CLPR_NUM_SAMPLER_POINTS returns the number of CLPRPTS_SAMPLER that will be returned by IpClprGetPoints when that of point return is selected. Note that you can use the existing attribute CLPR_NUM_PROFILE_POINTS to get the number of points returned for CLPRPTS_PROFILE.
Index Integer Used to specify the sampler of interest.
Value Integer ID number of the sampler
See Also IpClprGetInt, IpClprSetIntEx
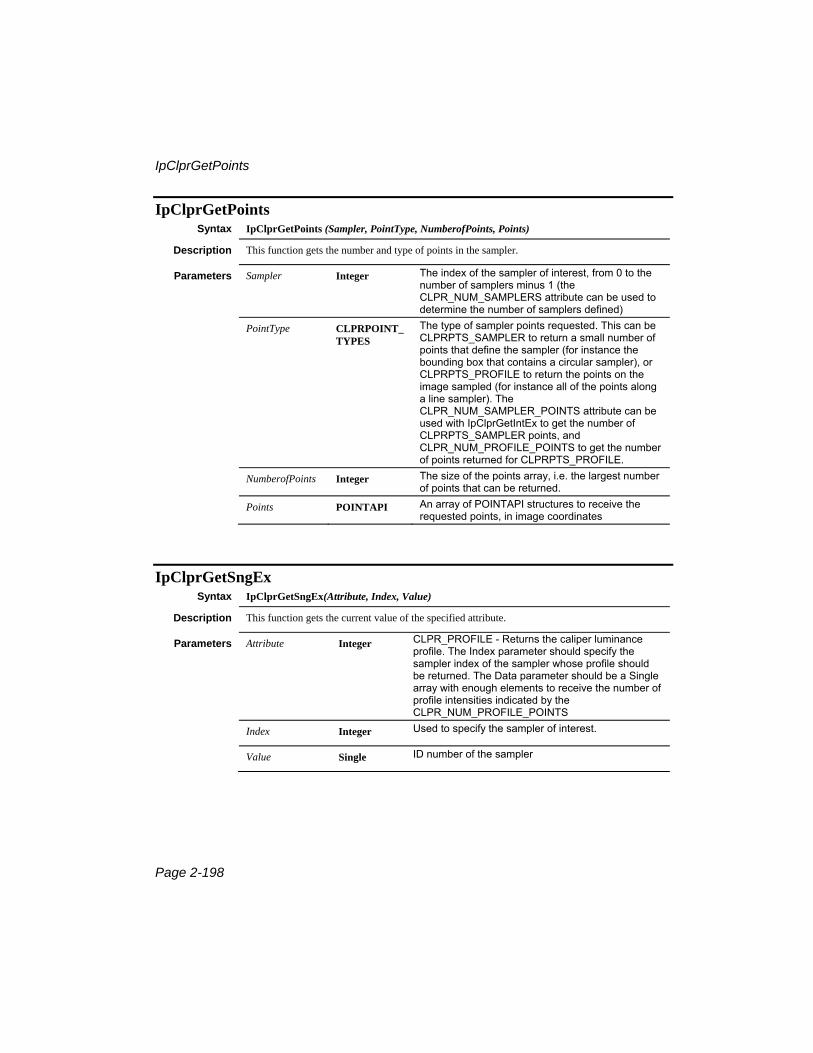
IpClprGetPoints
Page 2-198
IpClprGetPoints Syntax IpClprGetPoints (Sampler, PointType, NumberofPoints, Points)
Description This function gets the number and type of points in the sampler.
Parameters Sampler Integer The index of the sampler of interest, from 0 to the number of samplers minus 1 (the CLPR_NUM_SAMPLERS attribute can be used to determine the number of samplers defined)
PointType CLPRPOINT_TYPES
The type of sampler points requested. This can be CLPRPTS_SAMPLER to return a small number of points that define the sampler (for instance the bounding box that contains a circular sampler), or CLPRPTS_PROFILE to return the points on the image sampled (for instance all of the points along a line sampler). The CLPR_NUM_SAMPLER_POINTS attribute can be used with IpClprGetIntEx to get the number of CLPRPTS_SAMPLER points, and CLPR_NUM_PROFILE_POINTS to get the number of points returned for CLPRPTS_PROFILE.
NumberofPoints Integer The size of the points array, i.e. the largest number of points that can be returned.
Points POINTAPI An array of POINTAPI structures to receive the requested points, in image coordinates
IpClprGetSngEx Syntax IpClprGetSngEx(Attribute, Index, Value)
Description This function gets the current value of the specified attribute.
Parameters Attribute Integer CLPR_PROFILE - Returns the caliper luminance profile. The Index parameter should specify the sampler index of the sampler whose profile should be returned. The Data parameter should be a Single array with enough elements to receive the number of profile intensities indicated by the CLPR_NUM_PROFILE_POINTS
Index Integer Used to specify the sampler of interest.
Value Single ID number of the sampler

IpClprGetStr
Page 2-199
IpClprGetStr Syntax IpClprGetStr(sAttr, lpString)
Description This function gets the caliper string attribute values.
Parameters sAttr Integer CLPR_NAME - name of the currently-selected edge detector CLPR_LABEL - label of the currently-selected edge detector
lpString String Attribute value (null terminated string)
Example Sub IpClprGetStr_example Dim caliper_attribute_strings(2) As Integer Dim i As Integer Dim attribute_s As String*16 caliper_attribute_strings(1) = CLPRE_NAME caliper_attribute_strings(2) = CLPRE_LABEL ' open output window and clear it ret = IpOutputShow(1) ret = IpOutputClear() ' loop through the string attributes and print their values For i = 1 To UBound(caliper_attribute_strings) attribute_s = "" ret = IpClprGetStr(caliper_attribute_strings(i), attribute_s) ret = IpOutput(IpTrim(attribute_s) + Chr(13) + Chr(10)) Next i End Sub
See Also IpClprSet, IpClprGet, IpClprSetStr

IpClprGetStrEx
Page 2-200
IpClprGetStrEx Syntax IpClprGetStrEx(Attribute, Index,BYREF Value)
Description This function gets the current value of the specified attribute.
Parameters Attribute Integer Must be CLPR_SAMPLER_NAME – Returns the name of the sampler specified by the Index parameter using an index from 0 to the number of samples minus 1 (See also the IpClprGetIntEx attribute CLPR_NUM_SAMPLERS). CLPR_DETECTOR_NAME: Returns the name of the detector specified by the Index parameter, using an index from 0 to the number of detectors minus 1 (see also the IpClprDetGetIntEx attribute CLPR_NUM_DETECTORS).
Index Integer Used only by CLPR_SAMPLER_NAME to get the sample name
Value String Name of the sampler
IpClprSave Syntax IpClprSave(szFileName, nSaveMode)
Description This function sends caliper data to the clipboard, file, DDE, or printer.
Parameters szName String Name of the output file.
nSaveMode Integer A combination of the following: One of: S_DATA1 – Luminance Profile S_DATA2 – Measurement Table One of: S_FILE – Send data to file. SzFileName should be specified. S_CLIPBOARD – Send data to clipboard S_DDE – Send data to Excel S_PRINTER – Send data to printer Optional: S_APPEND – Append to existing file. Use with S_FILE only.

IpClprSelectEdge
Page 2-201
Example Sub IpClprSave_example()
' send the luminance profile and measurements ' table to the debug.printer ret = IpClprSave("", S_DATA1 + S_DEBUG.PRINTER) ret = IpClprSave("", S_DATA2 + S_DEBUG.PRINTER) ' append the measurements table to a file ret = IpClprSave("C:\IPWIN7\example.cpm", S_DATA2 + S_APPEND)
End Sub
Comments Luminance Profile (S_DATA1) can only be sent to clipboard and printer.
See Also IpClprSettings, IpClprGetData
IpClprSelectEdge Syntax IpClprSelectEdge(szName)
Description This function selects or activates an edge detector in the edge detector list box.
Parameters szName String Name of the edge detector without the label, i.e. “Peak”.
See Also IpClprCreateDerivativeEdge, IpClprCreatePatternMatchEdge, IpClprDeleteEdge
IpClprSelectSampler Syntax IpClprSelectSampler(nID)
Description This function selects or activates a sampling tool.
Parameters nID Integer The object ID of the sampling tool.
See Also IpClprCreateSample, IpClprEditSampler, IpClprDeleteSampler, IpClprClipboard
IpClprSet Syntax IpClprSet (sAttr, fData)
Description This function sets the caliper tool attributes.
Parameters sAttr Integer See list below:
fData Single Attribute value.
Attribute Value Description
CLPR_AUTOREFRESH Turn on/off Auto-Refresh flag during multiple attribute settings. 0 to turn-off auto-refresh, 1 to turn it back on.
CLPRE_COLOR Color of the currently selected edge detector

IpClprSet
Page 2-202
Attribute Value Description
CLPRE_OFFSET Offset of the currently selected edge detector
CLPRE_STYLE Style of the currently selected derivative edge detector
CLPR_CIRCLE_ORIGIN Origin of circle sampling tool. Number is specified in angle (degree). 90 degree is at the top of the circle.
CLPRO_SMOOTHING Gaussian smoothing factor kernel size.
CLPRO_THICKNESS Sampling tool line thickness.
CLPRO_APPLY_ICAL Apply intensity calibration to luminance profile.
CLPRO_APPLY_SCAL Apply spatial calibration to measurement numbers.
CLPR_SENS Sets sensitivity threshold
CLPRO_AUTO_SCALE Scale luminance profile to fit minimum and
maximum profile value to the graph area.
CLPRO_SHOW_LABEL Show edge detector label on markers
CLPRO_SHOW_NUMBER Show marker’s sequence number
CLPRO_PRECISION Set number of digits after decimal point
CLPRO_LOAD_AS_TEMPLATE Activates the Load as Template checkbox on the Caliper Input/Output page.
Example Sub IpClprSet_example()
' set color of current edge detector to white ret = IpClprSet(CLPRE_COLOR, 16777215)
End Sub
See Also IpClprGet, IpClprGetStr, IpClprSetStr

IpClptSetIntEx
Page 2-203
IpClptSetIntEx Syntax IpClprSetIntEx(sAttribute,sValue)
Description This function sets the new value for a specified attribute.
Parameters sAttribute Integer CLPR_ACTIVE_SAMPLER: Sets the active sampler, using an index from 0 to the number of samplers minus 1 (see also Comments and the IpClprGetIntEx attribute CLPR_NUM_SAMPLERS). CLPR_ACTIVE_DETECTOR: Sets the active detector to the specified index, using an index from 0 to the number of detectors minus 1 (see also the IpClprDetGetInt attribute CLPR_GET_NUM_DETECTORS, and IpClprSetIntEx)
sValue Integer The new value for the attribute. See comments.
Comments The active sampler is set when you select a sampler using the selection tool. The active sampler determines the set of measurements that are available, as only the measurements for the active sampler are displayed on the Measurements page or available using IpClprGetDataEx. The desired sampler is specified by its index, from zero to the number of samplers minus 1. The number of samplers can be determined using IpClprGetIntEx with the CLPR_NUM_SAMPLERS attribute.
The active detector is set when you select a detector in the detector list. The active detector can be deleted using IpClprDeleteEdge. The desired detector is specified by its index, from zero to the number of detectors minus 1. The number of detectors can be determined using IpClprGetDetIntEx with the CLPR_NUM_DETECTORS attribute.
IpClprSetStr Syntax IpClprSetStr(sAttr, lpString)
Description This function sets the caliper string attribute values.
Parameters sAttr Integer CLPR_NAME - name of the currently-selected edge detector CLPR_LABEL - label of the currently-selected edge detector
lpString String Attribute value (null terminated string)
Example Sub IpClprSetStr_example()
' change name and label of edge detector to Peak-Z and Z ret = IpClprSetStr(CLPRE_NAME, "Peak-Z") ret = IpClprSetStr(CLPRE_LABEL, "Z")
End Sub
See Also IpClprGet, IpClprGetStr, IpClprSet
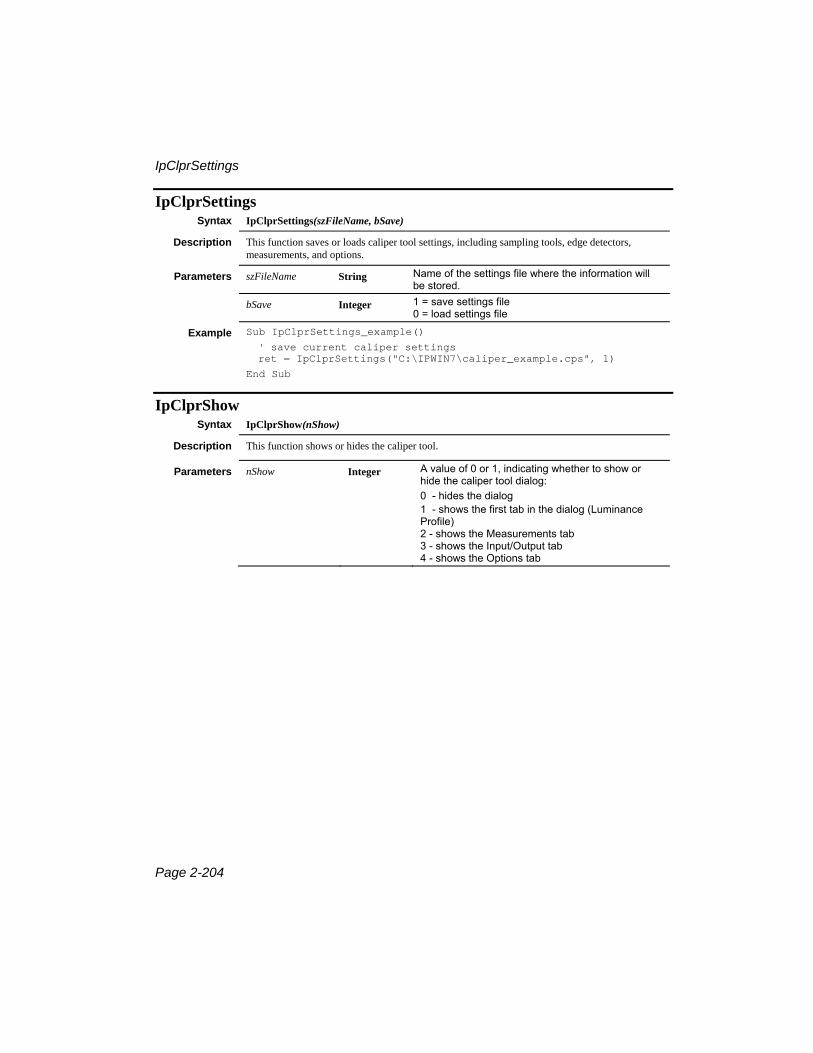
IpClprSettings
Page 2-204
IpClprSettings Syntax IpClprSettings(szFileName, bSave)
Description This function saves or loads caliper tool settings, including sampling tools, edge detectors, measurements, and options.
Parameters szFileName String Name of the settings file where the information will be stored.
bSave Integer 1 = save settings file 0 = load settings file
Example Sub IpClprSettings_example()
' save current caliper settings ret = IpClprSettings("C:\IPWIN7\caliper_example.cps", 1)
End Sub
IpClprShow Syntax IpClprShow(nShow)
Description This function shows or hides the caliper tool.
Parameters nShow Integer A value of 0 or 1, indicating whether to show or hide the caliper tool dialog: 0 - hides the dialog 1 - shows the first tab in the dialog (Luminance Profile) 2 - shows the Measurements tab 3 - shows the Input/Output tab 4 - shows the Options tab
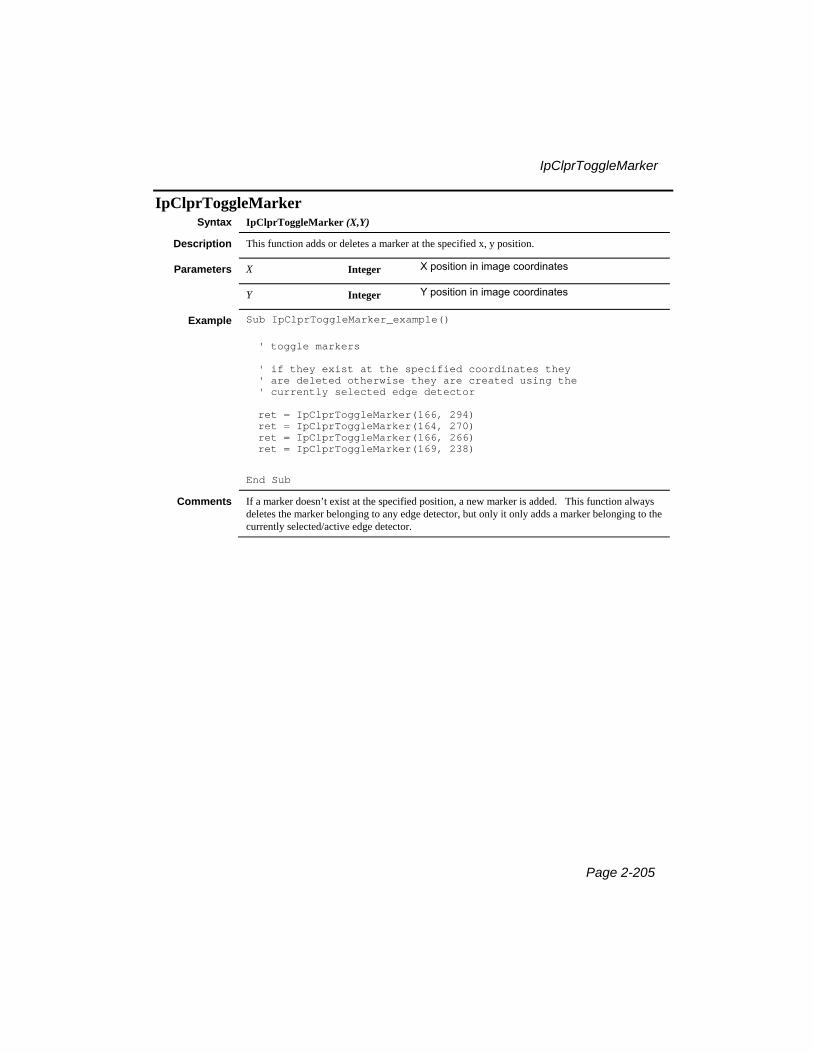
IpClprToggleMarker
Page 2-205
IpClprToggleMarker Syntax IpClprToggleMarker (X,Y)
Description This function adds or deletes a marker at the specified x, y position.
Parameters X Integer X position in image coordinates
Y Integer Y position in image coordinates
Example Sub IpClprToggleMarker_example()
' toggle markers ' if they exist at the specified coordinates they ' are deleted otherwise they are created using the ' currently selected edge detector ret = IpClprToggleMarker(166, 294) ret = IpClprToggleMarker(164, 270) ret = IpClprToggleMarker(166, 266) ret = IpClprToggleMarker(169, 238)
End Sub
Comments If a marker doesn’t exist at the specified position, a new marker is added. This function always deletes the marker belonging to any edge detector, but only it only adds a marker belonging to the currently selected/active edge detector.
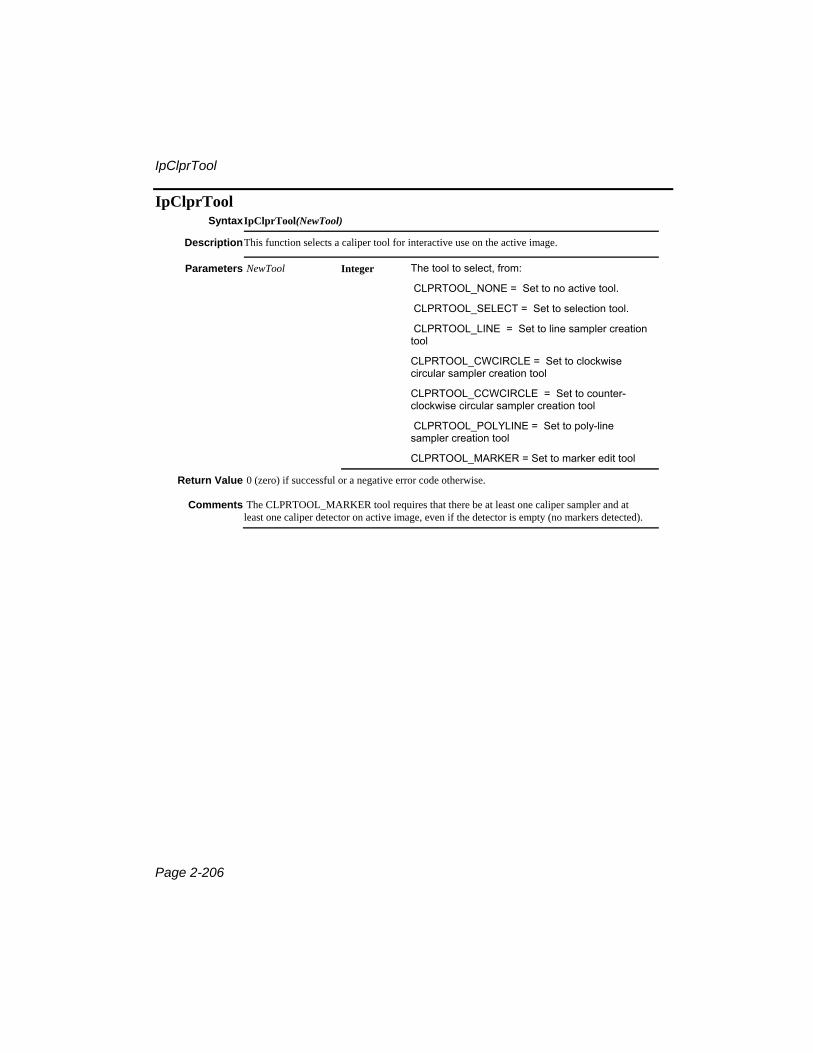
IpClprTool
Page 2-206
IpClprTool Syntax IpClprTool(NewTool)
Description This function selects a caliper tool for interactive use on the active image.
Parameters NewTool Integer The tool to select, from:
CLPRTOOL_NONE = Set to no active tool.
CLPRTOOL_SELECT = Set to selection tool.
CLPRTOOL_LINE = Set to line sampler creation tool
CLPRTOOL_CWCIRCLE = Set to clockwise circular sampler creation tool
CLPRTOOL_CCWCIRCLE = Set to counter-clockwise circular sampler creation tool
CLPRTOOL_POLYLINE = Set to poly-line sampler creation tool
CLPRTOOL_MARKER = Set to marker edit tool
Return Value 0 (zero) if successful or a negative error code otherwise.
Comments The CLPRTOOL_MARKER tool requires that there be at least one caliper sampler and at least one caliper detector on active image, even if the detector is empty (no markers detected).
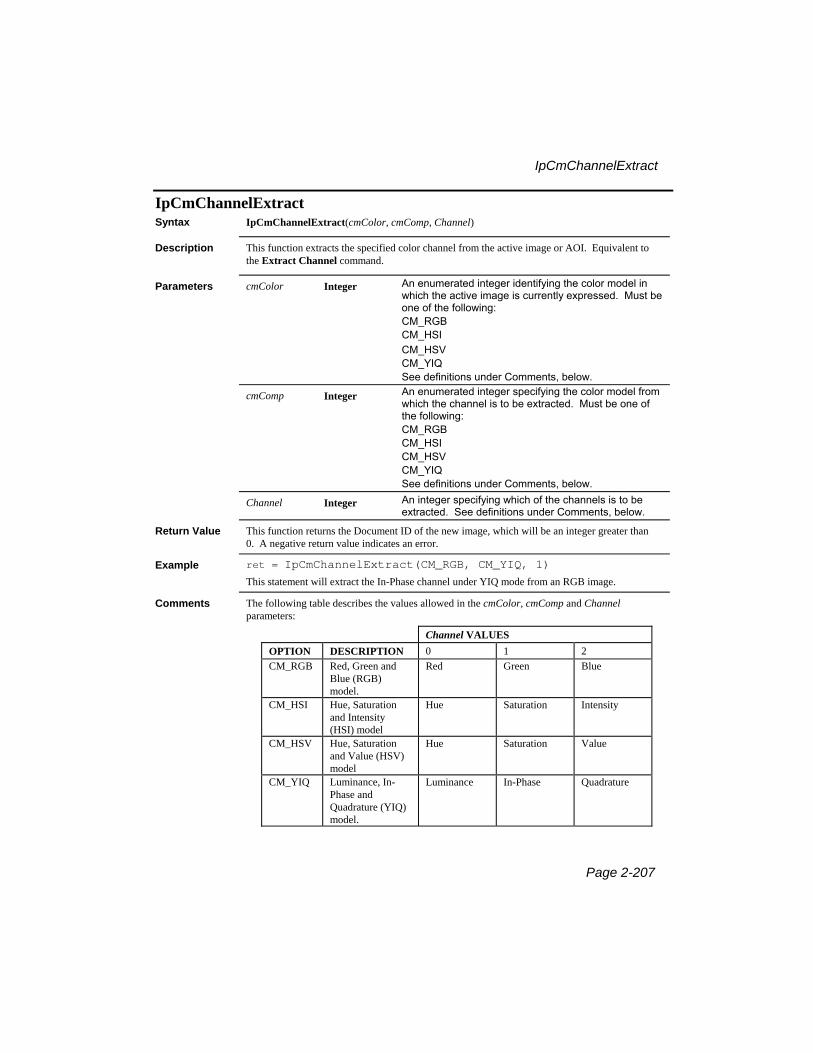
IpCmChannelExtract
Page 2-207
IpCmChannelExtract Syntax IpCmChannelExtract(cmColor, cmComp, Channel)
Description This function extracts the specified color channel from the active image or AOI. Equivalent to the Extract Channel command.
Parameters cmColor Integer An enumerated integer identifying the color model in which the active image is currently expressed. Must be one of the following: CM_RGB CM_HSI CM_HSV CM_YIQ See definitions under Comments, below.
cmComp Integer An enumerated integer specifying the color model from which the channel is to be extracted. Must be one of the following: CM_RGB CM_HSI CM_HSV
CM_YIQ See definitions under Comments, below.
Channel Integer An integer specifying which of the channels is to be extracted. See definitions under Comments, below.
Return Value This function returns the Document ID of the new image, which will be an integer greater than 0. A negative return value indicates an error.
Example ret = IpCmChannelExtract(CM_RGB, CM_YIQ, 1) This statement will extract the In-Phase channel under YIQ mode from an RGB image.
Comments The following table describes the values allowed in the cmColor, cmComp and Channel parameters:
Channel VALUES OPTION DESCRIPTION 0 1 2 CM_RGB Red, Green and
Blue (RGB) model.
Red Green Blue
CM_HSI Hue, Saturation and Intensity (HSI) model
Hue Saturation Intensity
CM_HSV Hue, Saturation and Value (HSV) model
Hue Saturation Value
CM_YIQ Luminance, In-Phase and Quadrature (YIQ) model.
Luminance In-Phase Quadrature
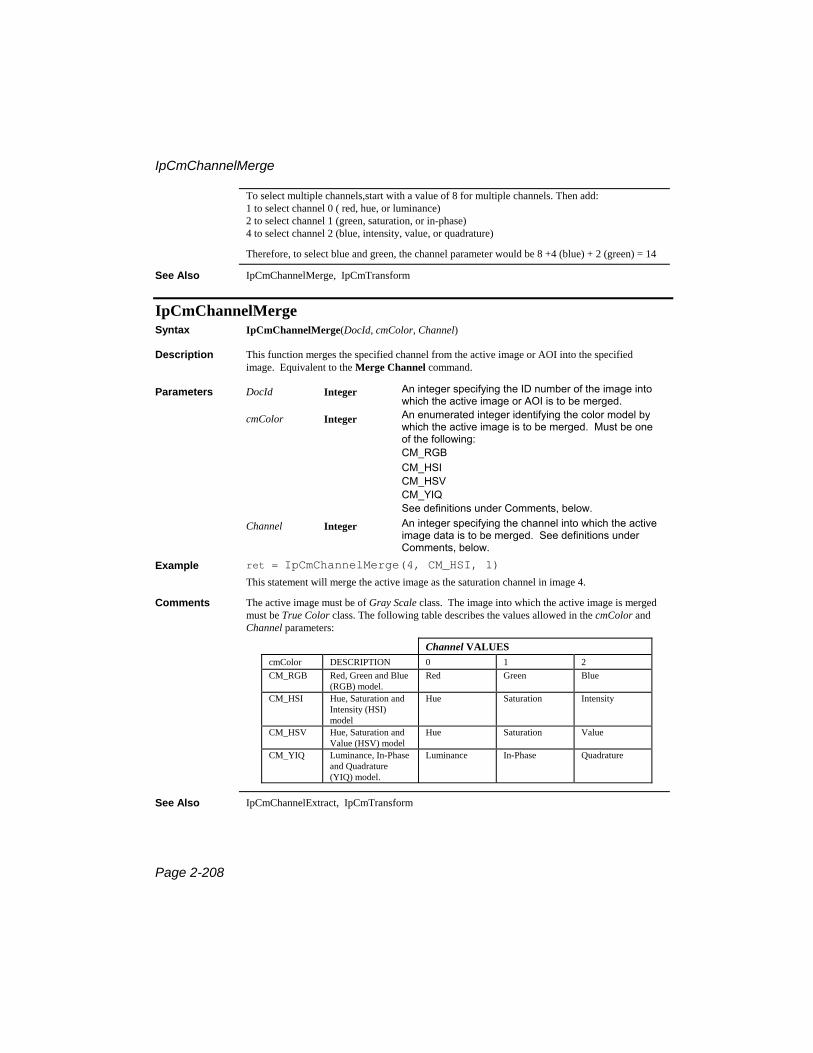
IpCmChannelMerge
Page 2-208
To select multiple channels,start with a value of 8 for multiple channels. Then add: 1 to select channel 0 ( red, hue, or luminance) 2 to select channel 1 (green, saturation, or in-phase) 4 to select channel 2 (blue, intensity, value, or quadrature)
Therefore, to select blue and green, the channel parameter would be 8 +4 (blue) + 2 (green) = 14
See Also IpCmChannelMerge, IpCmTransform
IpCmChannelMerge Syntax IpCmChannelMerge(DocId, cmColor, Channel)
Description This function merges the specified channel from the active image or AOI into the specified image. Equivalent to the Merge Channel command.
Parameters DocId Integer An integer specifying the ID number of the image into which the active image or AOI is to be merged.
cmColor Integer An enumerated integer identifying the color model by which the active image is to be merged. Must be one of the following: CM_RGB CM_HSI CM_HSV CM_YIQ See definitions under Comments, below.
Channel Integer An integer specifying the channel into which the active image data is to be merged. See definitions under Comments, below.
Example ret = IpCmChannelMerge(4, CM_HSI, 1) This statement will merge the active image as the saturation channel in image 4.
Comments The active image must be of Gray Scale class. The image into which the active image is merged must be True Color class. The following table describes the values allowed in the cmColor and Channel parameters:
Channel VALUES cmColor DESCRIPTION 0 1 2 CM_RGB Red, Green and Blue
(RGB) model. Red Green Blue
CM_HSI Hue, Saturation and Intensity (HSI) model
Hue Saturation Intensity
CM_HSV Hue, Saturation and Value (HSV) model
Hue Saturation Value
CM_YIQ Luminance, In-Phase and Quadrature (YIQ) model.
Luminance In-Phase Quadrature
See Also IpCmChannelExtract, IpCmTransform
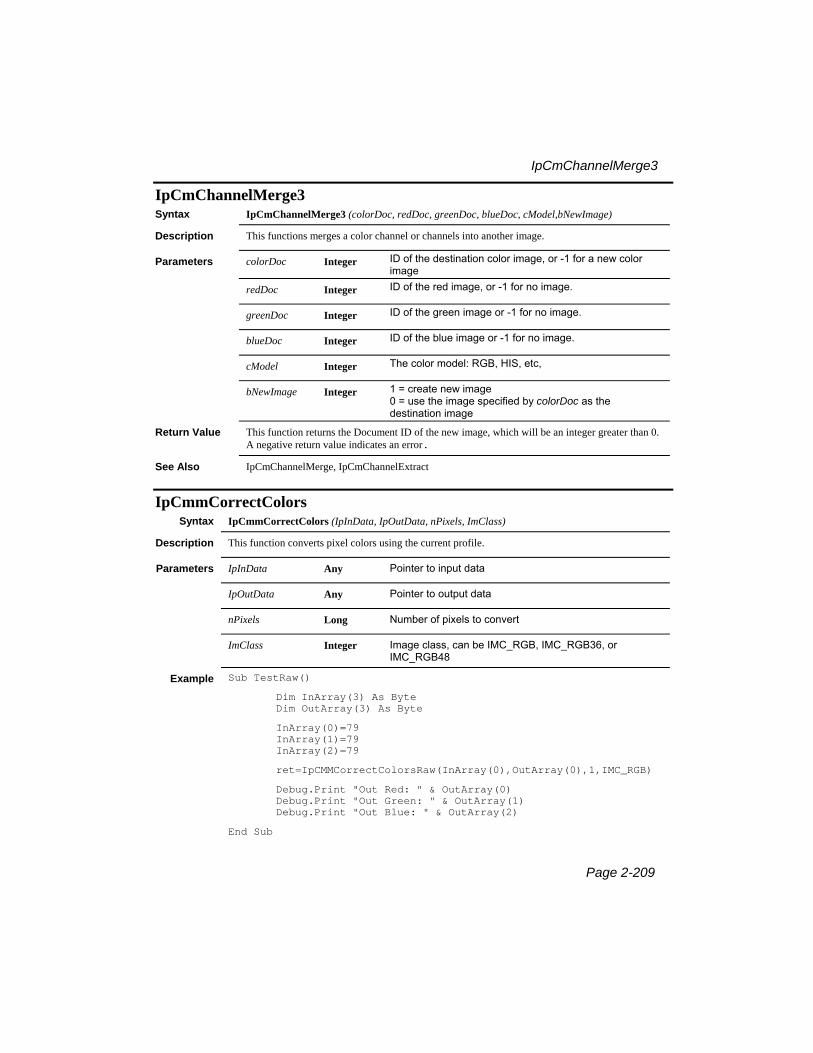
IpCmChannelMerge3
Page 2-209
IpCmChannelMerge3 Syntax IpCmChannelMerge3 (colorDoc, redDoc, greenDoc, blueDoc, cModel,bNewImage)
Description This functions merges a color channel or channels into another image.
Parameters colorDoc Integer ID of the destination color image, or -1 for a new color image
redDoc Integer ID of the red image, or -1 for no image.
greenDoc Integer ID of the green image or -1 for no image.
blueDoc Integer ID of the blue image or -1 for no image.
cModel Integer The color model: RGB, HIS, etc,
bNewImage Integer 1 = create new image 0 = use the image specified by colorDoc as the destination image
Return Value This function returns the Document ID of the new image, which will be an integer greater than 0. A negative return value indicates an error.
See Also IpCmChannelMerge, IpCmChannelExtract
IpCmmCorrectColors Syntax IpCmmCorrectColors (IpInData, IpOutData, nPixels, ImClass)
Description This function converts pixel colors using the current profile.
Parameters IpInData Any Pointer to input data
IpOutData Any Pointer to output data
nPixels Long Number of pixels to convert
ImClass Integer Image class, can be IMC_RGB, IMC_RGB36, or IMC_RGB48
Example Sub TestRaw()
Dim InArray(3) As Byte Dim OutArray(3) As Byte
InArray(0)=79 InArray(1)=79 InArray(2)=79
ret=IpCMMCorrectColorsRaw(InArray(0),OutArray(0),1,IMC_RGB)
Debug.Print "Out Red: " & OutArray(0) Debug.Print "Out Green: " & OutArray(1) Debug.Print "Out Blue: " & OutArray(2)
End Sub

IpCmmGet
Page 2-210
IpCmmGet Syntax IpCmmGet (sAttribute, sParam, pValue)
Description This function gets the various parameters of the Color-Pro module.
Parameters sAttribute Long The command ID. See table below.
sParam Integer A parameter of the command. See table below.
pValue Integer Integer value to receive the data
sAttribute sParam pValue Description
CMM_ENABLE Ignored, should be 0
1 = enable 0 = disable
Returns the enabled flag for color correction on the monitor and/or printer.
CMM_ENABLE_CAM_CORR
Ignored, should be 0
1 = enable 0 = disable
Returns the enabled flag for captured image correction
CMM_INP_INTENT Ignored, should be 0
0 = picture (default) 1 = proof 2 = graphics 3 = match print
Returns the rendering intent for color correction.
Return Value
0 if successful, a negative error code if failed
See Also IpCmmSetInt, IpCmmSetStr
IpCmmSelectCameraProfile Syntax IpCmmSelectCameraProfile ()
Description This function shows or hides the camera color profile selection dialog.
Example ret = IpCmmSelectCameraProfile()
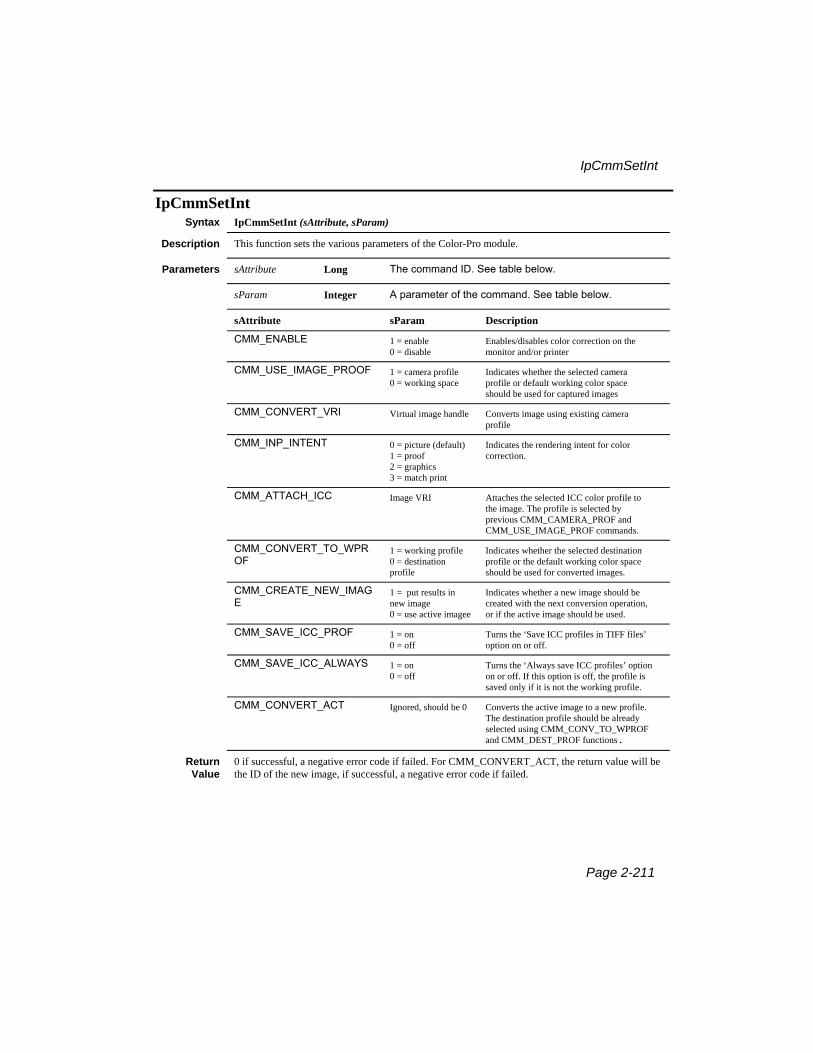
IpCmmSetInt
Page 2-211
IpCmmSetInt Syntax IpCmmSetInt (sAttribute, sParam)
Description This function sets the various parameters of the Color-Pro module.
Parameters sAttribute Long The command ID. See table below.
sParam Integer A parameter of the command. See table below.
sAttribute sParam Description
CMM_ENABLE 1 = enable 0 = disable
Enables/disables color correction on the monitor and/or printer
CMM_USE_IMAGE_PROOF 1 = camera profile 0 = working space
Indicates whether the selected camera profile or default working color space should be used for captured images
CMM_CONVERT_VRI Virtual image handle Converts image using existing camera profile
CMM_INP_INTENT 0 = picture (default) 1 = proof 2 = graphics 3 = match print
Indicates the rendering intent for color correction.
CMM_ATTACH_ICC Image VRI Attaches the selected ICC color profile to the image. The profile is selected by previous CMM_CAMERA_PROF and CMM_USE_IMAGE_PROF commands.
CMM_CONVERT_TO_WPROF
1 = working profile 0 = destination profile
Indicates whether the selected destination profile or the default working color space should be used for converted images.
CMM_CREATE_NEW_IMAGE
1 = put results in new image 0 = use active imagee
Indicates whether a new image should be created with the next conversion operation, or if the active image should be used.
CMM_SAVE_ICC_PROF 1 = on 0 = off
Turns the ‘Save ICC profiles in TIFF files’ option on or off.
CMM_SAVE_ICC_ALWAYS 1 = on 0 = off
Turns the ‘Always save ICC profiles’ option on or off. If this option is off, the profile is saved only if it is not the working profile.
CMM_CONVERT_ACT Ignored, should be 0 Converts the active image to a new profile. The destination profile should be already selected using CMM_CONV_TO_WPROF and CMM_DEST_PROF functions.
Return Value
0 if successful, a negative error code if failed. For CMM_CONVERT_ACT, the return value will be the ID of the new image, if successful, a negative error code if failed.
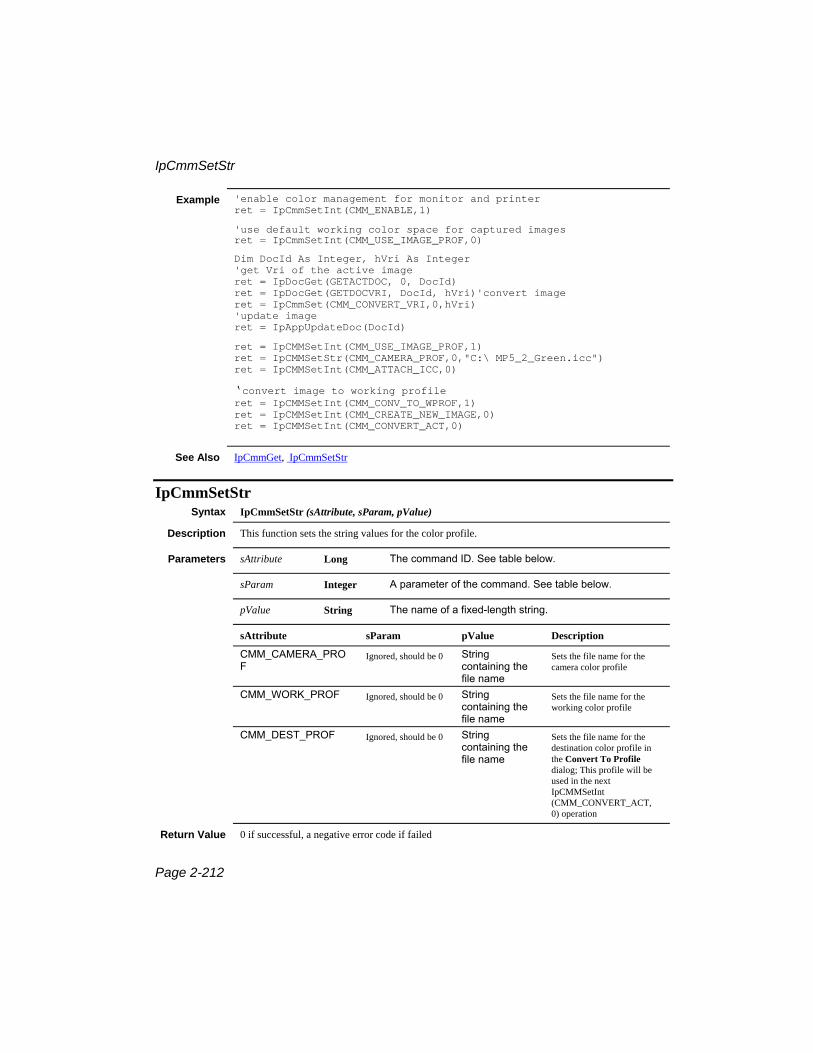
IpCmmSetStr
Page 2-212
Example 'enable color management for monitor and printer ret = IpCmmSetInt(CMM_ENABLE,1)
'use default working color space for captured images ret = IpCmmSetInt(CMM_USE_IMAGE_PROF,0)
Dim DocId As Integer, hVri As Integer 'get Vri of the active image ret = IpDocGet(GETACTDOC, 0, DocId) ret = IpDocGet(GETDOCVRI, DocId, hVri)'convert image ret = IpCmmSet(CMM_CONVERT_VRI,0,hVri) 'update image ret = IpAppUpdateDoc(DocId)
ret = IpCMMSetInt(CMM_USE_IMAGE_PROF,1) ret = IpCMMSetStr(CMM_CAMERA_PROF,0,"C:\ MP5_2_Green.icc") ret = IpCMMSetInt(CMM_ATTACH_ICC,0)
‘convert image to working profile ret = IpCMMSetInt(CMM_CONV_TO_WPROF,1) ret = IpCMMSetInt(CMM_CREATE_NEW_IMAGE,0) ret = IpCMMSetInt(CMM_CONVERT_ACT,0)
See Also IpCmmGet, IpCmmSetStr
IpCmmSetStr Syntax IpCmmSetStr (sAttribute, sParam, pValue)
Description This function sets the string values for the color profile.
Parameters sAttribute Long The command ID. See table below.
sParam Integer A parameter of the command. See table below.
pValue String The name of a fixed-length string.
sAttribute sParam pValue Description
CMM_CAMERA_PROF
Ignored, should be 0 String containing the file name
Sets the file name for the camera color profile
CMM_WORK_PROF Ignored, should be 0 String containing the file name
Sets the file name for the working color profile
CMM_DEST_PROF Ignored, should be 0 String containing the file name
Sets the file name for the destination color profile in the Convert To Profile dialog; This profile will be used in the next IpCMMSetInt (CMM_CONVERT_ACT,0) operation
Return Value 0 if successful, a negative error code if failed
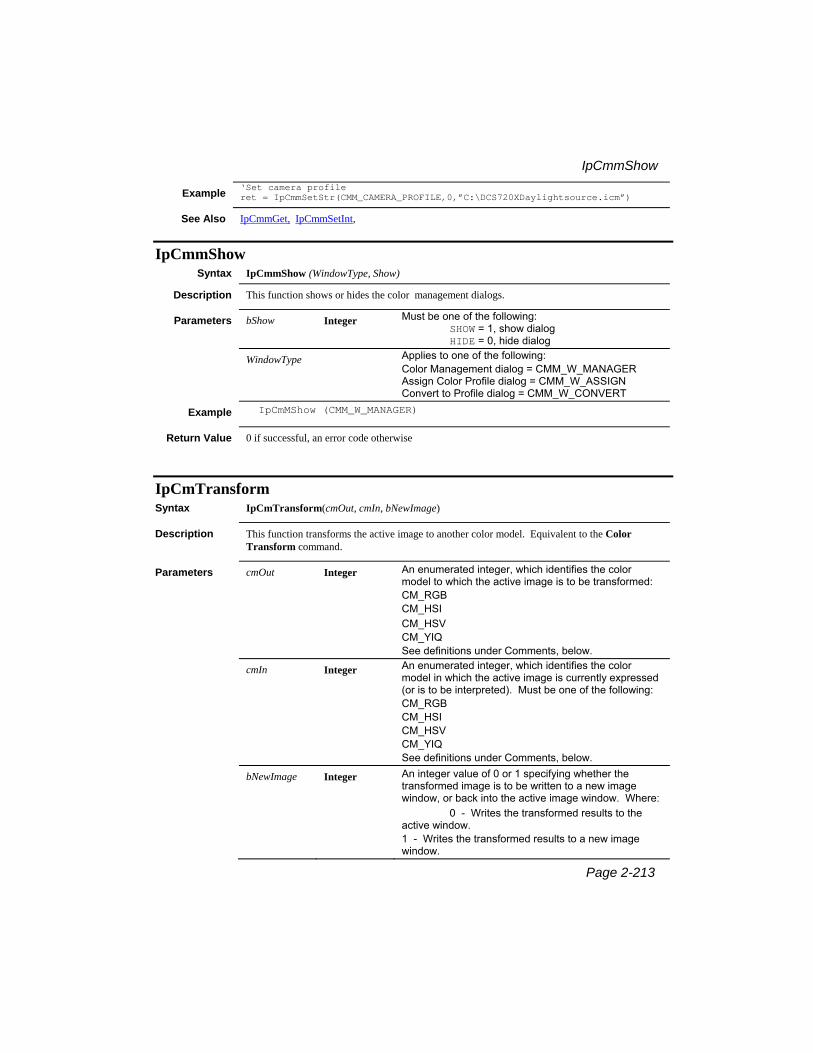
IpCmmShow
Page 2-213
Example ‘Set camera profile ret = IpCmmSetStr(CMM_CAMERA_PROFILE,0,”C:\DCS720XDaylightsource.icm”)
See Also IpCmmGet, IpCmmSetInt,
IpCmmShow Syntax IpCmmShow (WindowType, Show)
Description This function shows or hides the color management dialogs.
Parameters bShow Integer Must be one of the following: SHOW = 1, show dialog HIDE = 0, hide dialog
WindowType Applies to one of the following: Color Management dialog = CMM_W_MANAGER Assign Color Profile dialog = CMM_W_ASSIGN Convert to Profile dialog = CMM_W_CONVERT
Example IpCmMShow (CMM_W_MANAGER)
Return Value 0 if successful, an error code otherwise
IpCmTransform Syntax IpCmTransform(cmOut, cmIn, bNewImage)
Description This function transforms the active image to another color model. Equivalent to the Color Transform command.
Parameters cmOut Integer An enumerated integer, which identifies the color model to which the active image is to be transformed: CM_RGB CM_HSI CM_HSV CM_YIQ See definitions under Comments, below.
cmIn Integer An enumerated integer, which identifies the color model in which the active image is currently expressed (or is to be interpreted). Must be one of the following: CM_RGB CM_HSI CM_HSV
CM_YIQ See definitions under Comments, below.
bNewImage Integer An integer value of 0 or 1 specifying whether the transformed image is to be written to a new image window, or back into the active image window. Where: 0 - Writes the transformed results to the active window. 1 - Writes the transformed results to a new image window.
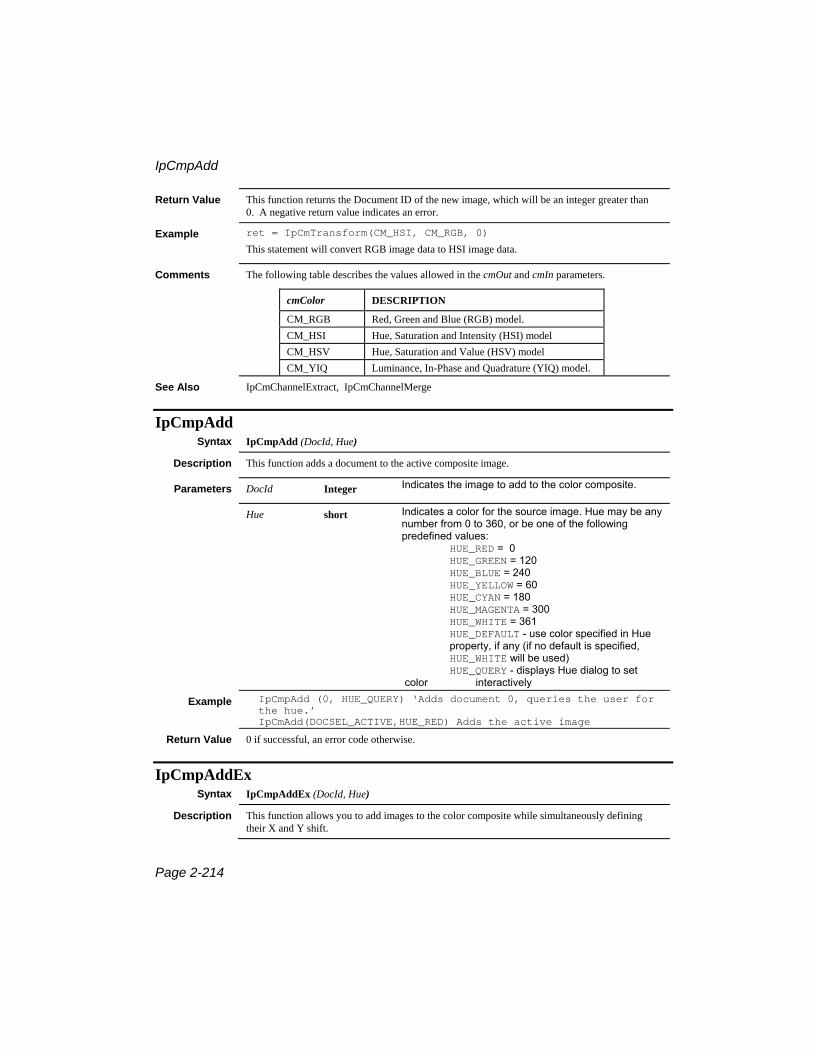
IpCmpAdd
Page 2-214
Return Value This function returns the Document ID of the new image, which will be an integer greater than 0. A negative return value indicates an error.
Example ret = IpCmTransform(CM_HSI, CM_RGB, 0)
This statement will convert RGB image data to HSI image data.
Comments The following table describes the values allowed in the cmOut and cmIn parameters.
cmColor DESCRIPTION
CM_RGB Red, Green and Blue (RGB) model. CM_HSI Hue, Saturation and Intensity (HSI) model CM_HSV Hue, Saturation and Value (HSV) model CM_YIQ Luminance, In-Phase and Quadrature (YIQ) model.
See Also IpCmChannelExtract, IpCmChannelMerge
IpCmpAdd Syntax IpCmpAdd (DocId, Hue)
Description This function adds a document to the active composite image.
Parameters DocId Integer Indicates the image to add to the color composite.
Hue short Indicates a color for the source image. Hue may be any number from 0 to 360, or be one of the following predefined values: HUE_RED = 0 HUE_GREEN = 120 HUE_BLUE = 240 HUE_YELLOW = 60 HUE_CYAN = 180 HUE_MAGENTA = 300 HUE_WHITE = 361 HUE_DEFAULT - use color specified in Hue property, if any (if no default is specified, HUE_WHITE will be used) HUE_QUERY - displays Hue dialog to set color interactively
Example IpCmpAdd (0, HUE_QUERY) ‘Adds document 0, queries the user for the hue.’ IpCmAdd(DOCSEL_ACTIVE,HUE_RED) Adds the active image
Return Value 0 if successful, an error code otherwise.
IpCmpAddEx Syntax IpCmpAddEx (DocId, Hue)
Description This function allows you to add images to the color composite while simultaneously defining their X and Y shift.

IpCmpAddTint
Page 2-215
Parameters DocId Integer Indicates the image to add to the color composite.
Hue short Indicates a color for the source image. Hue may be any number from 0 to 360, or be one of the following predefined values: HUE_RED = 0 HUE_GREEN = 120 HUE_BLUE = 240 HUE_YELLOW = 60 HUE_CYAN = 180 HUE_MAGENTA = 300 HUE_WHITE = 361 HUE_DEFAULT - use color specified in Hue property, if any (if no default is specified, HUE_WHITE will be used) HUE_QUERY - displays Hue dialog to set color interactively
Example IpCmpAddEx (0, HUE_QUERY) ‘Adds document 0, queries the user for the hue.’ IpCmAddEx(DOCSEL_ACTIVE,HUE_RED) Adds the active image
Return Value 0 if successful, an error code otherwise.
IpCmpAddTint Syntax IpCmpAddTint (DocId, Tint)
Description This function adds a new channel to the existing color composite, which must be the active image when this function is called.
Parameters DocId Long Indicates the image to use for color compositing
Tint Long Indicates the tint requested
Return Value The document ID of the image which received the new color composite channel.
Example This example assumes that you have three images on screen with ID numbers of 0,1, and 2 respectively: Sub SampleComposite() Dim CompositeID As Integer Dim Tint1 As Long, Tint2 As Long, Tint3 As Long 'You need to fill the values of Tint1, Tint2, and Tint3 ' in some way, perhaps by calling IpDyeGet CompositeID = IpCmpNewTint(0, Tint1) ret = IpAppSelectDoc(CompositeID) ret = IpCmpAddTint(1, Tint2) ret = IpAppSelectDoc(CompositeID) ret = IpCmpAddTint(2, Tint3) End Sub
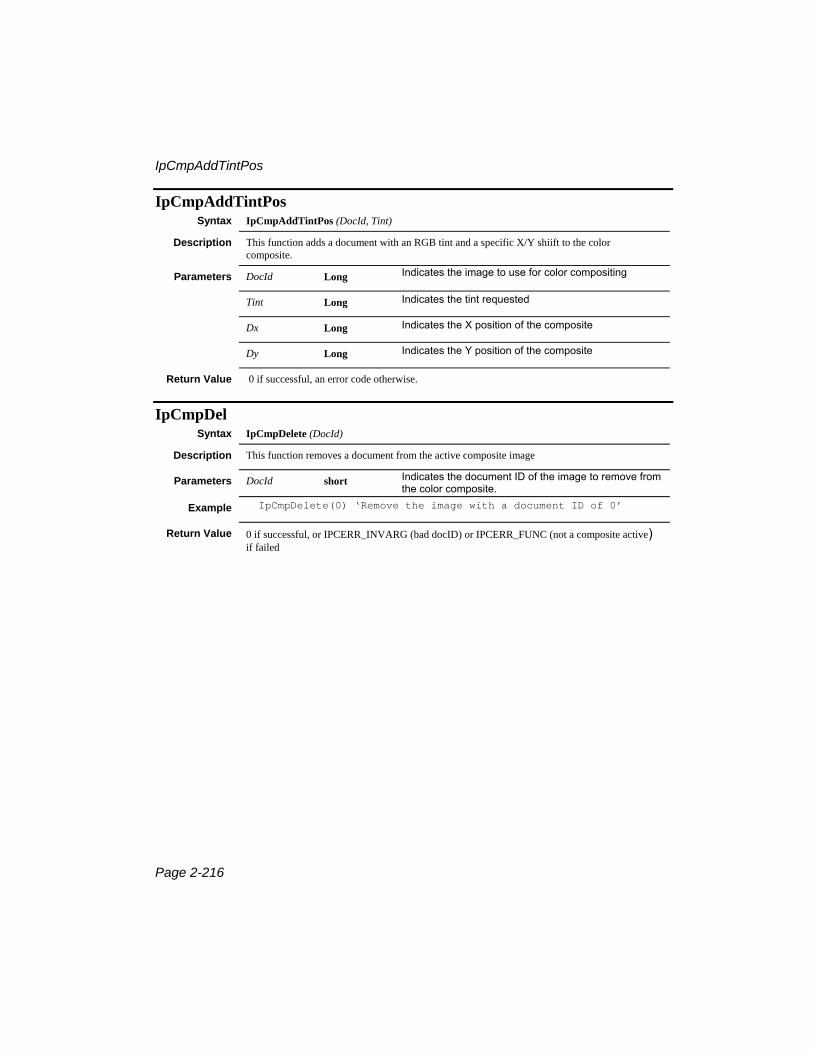
IpCmpAddTintPos
Page 2-216
IpCmpAddTintPos Syntax IpCmpAddTintPos (DocId, Tint)
Description This function adds a document with an RGB tint and a specific X/Y shiift to the color composite.
Parameters DocId Long Indicates the image to use for color compositing
Tint Long Indicates the tint requested
Dx Long Indicates the X position of the composite
Dy Long Indicates the Y position of the composite
Return Value 0 if successful, an error code otherwise.
IpCmpDel Syntax IpCmpDelete (DocId)
Description This function removes a document from the active composite image
Parameters DocId short Indicates the document ID of the image to remove from the color composite.
Example IpCmpDelete(0) ‘Remove the image with a document ID of 0’
Return Value 0 if successful, or IPCERR_INVARG (bad docID) or IPCERR_FUNC (not a composite active) if failed
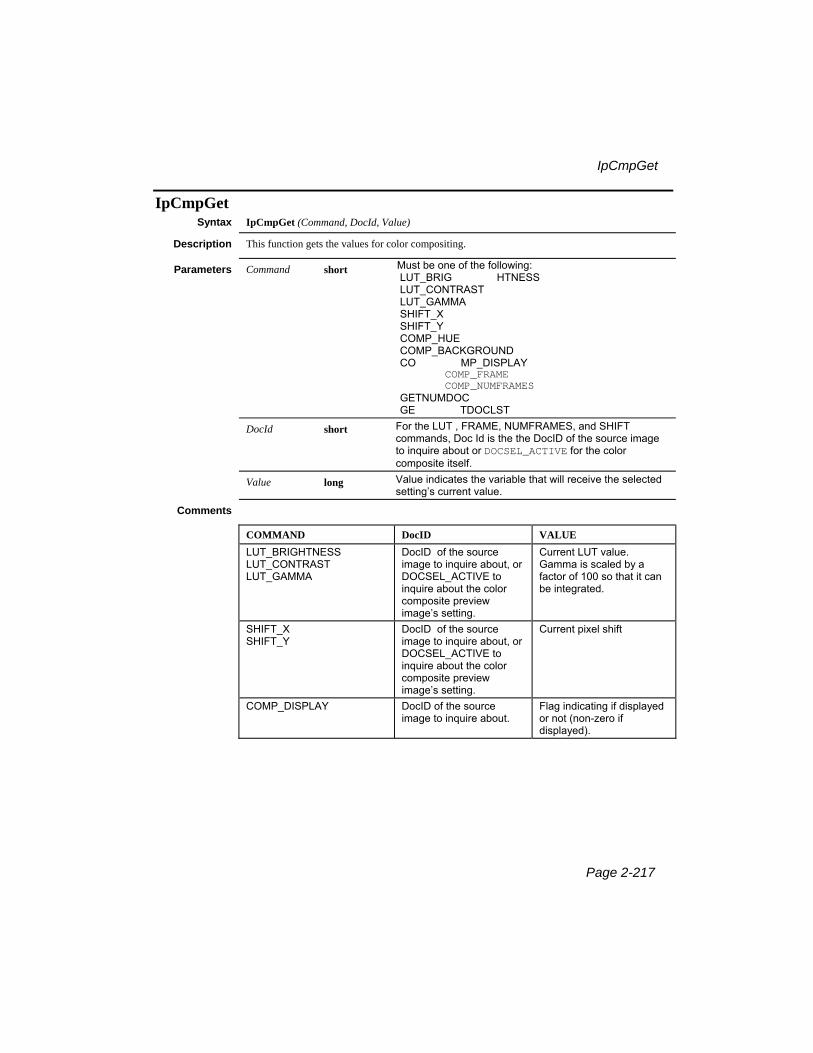
IpCmpGet
Page 2-217
IpCmpGet Syntax IpCmpGet (Command, DocId, Value)
Description This function gets the values for color compositing.
Parameters Command short Must be one of the following: LUT_BRIG HTNESS LUT_CONTRAST LUT_GAMMA SHIFT_X SHIFT_Y COMP_HUE COMP_BACKGROUND CO MP_DISPLAY COMP_FRAME COMP_NUMFRAMES GETNUMDOC GE TDOCLST
DocId short For the LUT , FRAME, NUMFRAMES, and SHIFT commands, Doc Id is the the DocID of the source image to inquire about or DOCSEL_ACTIVE for the color composite itself.
Value long Value indicates the variable that will receive the selected setting’s current value.
Comments
COMMAND DocID VALUE LUT_BRIGHTNESS LUT_CONTRAST LUT_GAMMA
DocID of the source image to inquire about, or DOCSEL_ACTIVE to inquire about the color composite preview image’s setting.
Current LUT value. Gamma is scaled by a factor of 100 so that it can be integrated.
SHIFT_X SHIFT_Y
DocID of the source image to inquire about, or DOCSEL_ACTIVE to inquire about the color composite preview image’s setting.
Current pixel shift
COMP_DISPLAY DocID of the source image to inquire about.
Flag indicating if displayed or not (non-zero if displayed).

IpCmpGet
Page 2-218
COMMAND DocID VALUE COMP_FRAME DocID of the source
image to inquire about, or DOCSEL_ACTIVE to inquire about the color composite preview image’s setting.
Current frame
COMP_HUE DocID of the source image to inquire about.
Hue
COMP_BACKGROUND none DocID of the background, -1 if none
COMP_NUMFRAMES DocID of the source image to inquire about, or DOCSEL_ACTIVE to inquire about the color composite preview image’s setting
Number of frames in the source image or composite.
GETNUMDOC none Number of documents (images) in the color composite.
GETDOCLST This parameter should indicate the size of the array provided by the Value parameter. The array should be dimensioned to the number of documents provided by the GETNUMDOC commad.
An integer array of the document Ids of all the documents in the color composite. Use the GETNUMDOC command to get the number of values that will be returned.
Example dim parm1 as integer ret = IpCmpGet (LUT_BRIGHTNESS, 0, parm1) Print parm1
Return Value 0 if successful, an error code otherwise

IpCmpNew
Page 2-219
IpCmpNew Syntax IpCmpNew (DocId, Hue)
Description This function creates a new color composite, based on the size of the supplied image.
Parameters DocId short Indicates the image to use for color compositing
Hue short Indicates a color for the source image. Hue may be any number from 0 to 360, or be one of the following predefined values: HUE_RED = 0 HUE_GREEN = 120 HUE_BLUE = 240 HUE_YELLOW = 60 HUE_CYAN = 180 HUE_MAGENTA = 300 HUE_WHITE = 361 HUE_DEFAULT - use color specified in Hue property, if any (if no default is specified, HUE_WHITE will be used) HUE_QUERY - displays Hue dialog to set color interactively
Example IpCmpNew (0, HUE_RED) ‘Creates a new color composite and adds Document 0 to that ‘color composite, and tints its channel Red.
Return Value 0 if successful, an error code otherwise.
IpCmpNewTint Syntax IpCmpNewTint (DocId, Tint)
Description This function creates a new color composite channel with a specific RGB tint.
Parameters DocId Long Indicates the image to use for color compositing
Tint Long Indicates the tint requested
Return Value The document ID of the new color composite preview image.

IpCmpSet
Page 2-220
IpCmpSet Syntax IpCmpSet (Command, DocId, Value )
Description This function sets the values for color composites.
Parameters Command short Must be one of the following: LUT_BRIG HTNESS LUT_CONTRAST LUT_GAMMA SHIFT_X SHIFT_Y COMP_HUE COMP_BACKGROUND CO MP_DISPLAY CO MP_RESET COMP_BESTFIT COMP_FRAME CO MP_MAKESEQUENCE COMP_AUTO_COMPOSITE
DocId short For the LUT, SHIFT, RESET, BESTFIT, and FRAME commands, parameter is the DocID of the souce to adjust, or DOCSEL_ACTIVE for the color composite itself.
Value long New value for the specified setting. Not used with COMP_RESET or COMP_BESTFIT.
Comments For COMP_RESET or COMP_BESTFIT the value argument is ignored, and a LUT bestfit or reset is performed on the specified image. COMP_HUE cannot be adjusted on the color composite preview image. For COMP_BACKGROUND the document ID argument is ignored, and the value argument is used to specify the background document, or –1 to reset.
COMMAND DocID VALUE LUT_BRIGHTNESS LUT_CONTRAST LUT_GAMMA
DocID of the source image to adjust, or DOCSEL_ACTIVE to adjust the color composite preview image’s setting.
New LUT value. Gamma is set to gamma*100 to allow integration.
SHIFT_X SHIFT_Y
DocID of the source image to adjust, or DOCSEL_ACTIVE to adjust the color composite preview image’s setting.
New pixel shift
COMP_DISPLAY DocID of the source image to inquire about.
New display value. The document is displayed in the color composite if Value is non-zero.
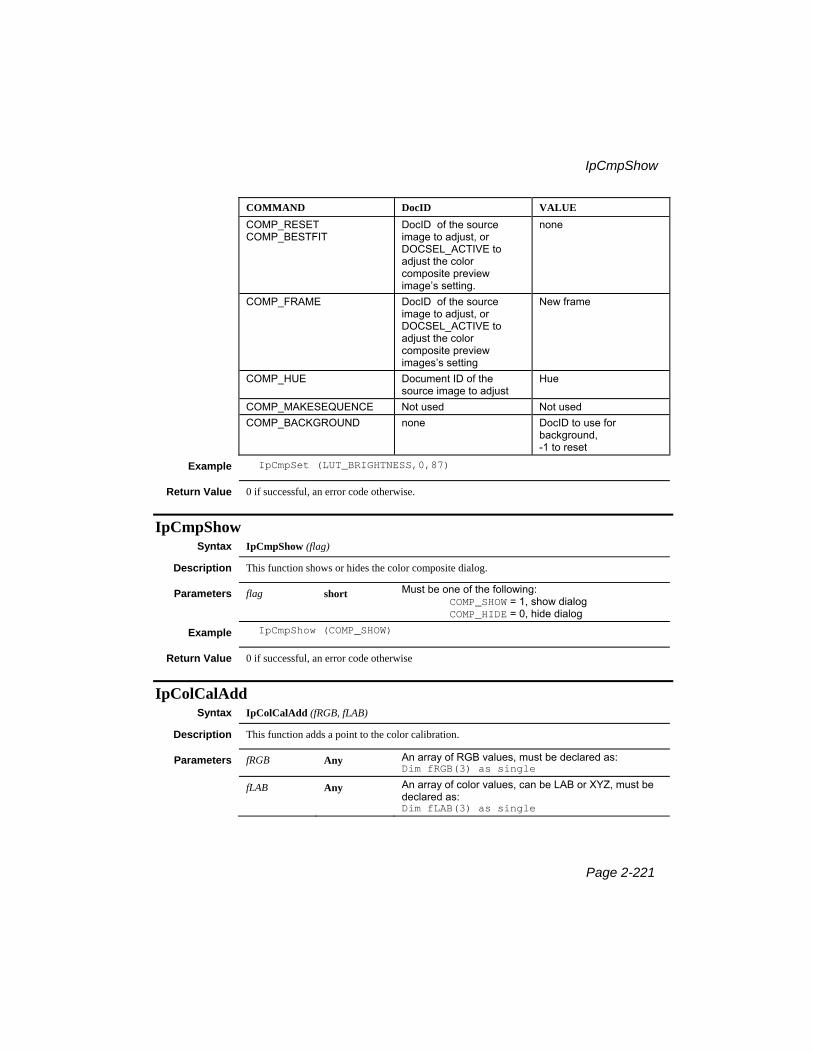
IpCmpShow
Page 2-221
COMMAND DocID VALUE COMP_RESET COMP_BESTFIT
DocID of the source image to adjust, or DOCSEL_ACTIVE to adjust the color composite preview image’s setting.
none
COMP_FRAME DocID of the source image to adjust, or DOCSEL_ACTIVE to adjust the color composite preview images’s setting
New frame
COMP_HUE Document ID of the source image to adjust
Hue
COMP_MAKESEQUENCE Not used Not used COMP_BACKGROUND none DocID to use for
background, -1 to reset
Example IpCmpSet (LUT_BRIGHTNESS,0,87)
Return Value 0 if successful, an error code otherwise.
IpCmpShow Syntax IpCmpShow (flag)
Description This function shows or hides the color composite dialog.
Parameters flag short Must be one of the following: COMP_SHOW = 1, show dialog COMP_HIDE = 0, hide dialog
Example IpCmpShow (COMP_SHOW)
Return Value 0 if successful, an error code otherwise
IpColCalAdd Syntax IpColCalAdd (fRGB, fLAB)
Description This function adds a point to the color calibration.
Parameters fRGB Any An array of RGB values, must be declared as: Dim fRGB(3) as single
fLAB Any An array of color values, can be LAB or XYZ, must be declared as: Dim fLAB(3) as single
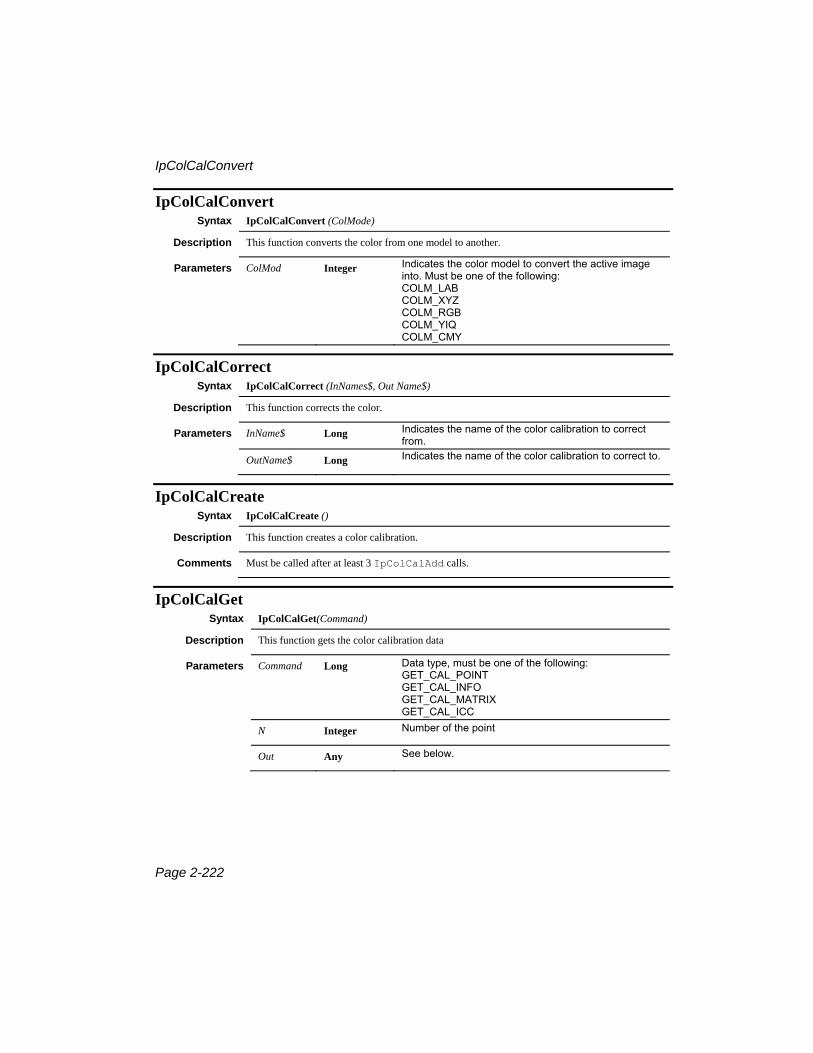
IpColCalConvert
Page 2-222
IpColCalConvert Syntax IpColCalConvert (ColMode)
Description This function converts the color from one model to another.
Parameters ColMod Integer Indicates the color model to convert the active image into. Must be one of the following: COLM_LAB COLM_XYZ COLM_RGB COLM_YIQ COLM_CMY
IpColCalCorrect Syntax IpColCalCorrect (InNames$, Out Name$)
Description This function corrects the color.
Parameters InName$ Long Indicates the name of the color calibration to correct from.
OutName$ Long Indicates the name of the color calibration to correct to.
IpColCalCreate Syntax IpColCalCreate ()
Description This function creates a color calibration.
Comments Must be called after at least 3 IpColCalAdd calls.
IpColCalGet Syntax IpColCalGet(Command)
Description This function gets the color calibration data
Parameters Command Long Data type, must be one of the following: GET_CAL_POINT GET_CAL_INFO GET_CAL_MATRIX GET_CAL_ICC
N Integer Number of the point
Out Any See below.

IpColCalGet
Page 2-223
Command N Out Description
GET_CAL_POINT 0 to 19 Returns the data. Out is an array of 6 singles: Out[0]- R input value of the point Out[1]- G input value of the point Out[2]- B input value of the point Out[3] - R (or L or X)output value of the point Out[4]- G (or a or Y)output value of the point Out[5]- B (or b or Z)output value of the point
Gets a point of input values of color calibration
GET_CAL_ICC Ignored, must be 0 Returns a single variable to receive the data
Gets ICC profile information

IpColCalGet
Page 2-224
Command N Out Description
GET_CAL_INFO Ignored, must be 0 Returns the data. Out is an array of 3 singles: Out[0] - Color mode of the calibration, can be 0=COLM_LAB, 1=COLM_XYZ, 2=COLM_RGB Out[1]- Image Class of the calibration, 0=RGB24, 1=RGB36, 2=RGB48 Out[2] - Number of points in the calibration
Gets calibration information
GET_CAL_MATRIX Color Channel Out- returns the matrix for the channel, Out is array of 20 singles :Out[0]..Out[19] - matrix data
Gets the calibration matrix
Comments For COLM_RGB the function returns coefficient of color conversion polynomial, for COLM_LAB and COLM_XYZ the function returns XYZ matrix

IpColCalGetRGB
Page 2-225
IpColCalGetRGB Syntax IpColCalGetRGB (X,Y, Size, outRGBval, )
Description This function gets the RGB values from the x and y positions of the active image.
Parameters X Long X position
Y Long Y position
Size Long Size of the array in pixels
outRGBval Single Output array of RGB values, must be declared as: Dim outRGBval(3) as single
IpColCalLoad Syntax IpColCalLoad (fNames$)
Description This function loads a color calibration.
Parameters fNames$ Long Name of the calibration to load
Return Value
IpColCalNew Syntax IpColCalNew (InpMode%, ColModel%)
Description This function starts a new color calibration.
Parameters InpMode Long Indicates the image class. Can be one of the following:0 = RGB24 1 = RGB36 2 = RGB48
ColModel Long Indicates the color model. Must be one of the following: COLM_LAB COLM_XYZ COLM_RGB COLM_YIQ COLM_CMY
IpColCalSave Syntax IpColCalSave (fNames$)
Description This function saves a color calibration.
Parameters fNames$ Long Name of the calibration to save

IpColCalSet
Page 2-226
IpColCalSet Syntax IpColCalSet(Command, N, In)
Description This function sets the color calibration data
Parameters Command Long Data type, must be one of the following: SET_CAL_POINT SET_CAL_INFO SET_CAL_MATRIX SET_CAL_ICC
N Integer Number of the point
InData Any See below.
Command N InData Description
SET_CAL_POINT 0 to 19 Returns the data. InData is an array of 6 singles: In[0]- R input value of the point In[1]- G input value of the point In[2]- B input value of the point In[3] - R (or L or X)Input value of the point In[4]- G (or a or Y)Input value of the point In[5]- B (or b or Z)Input value of the point
Sets a point of input values of color calibration
SET_CAL_ICC Ignored, must be 0
A single value. 1 = on 0 = off
Sets the ICC profile option
SET_CAL_INFO Ignored, must be 0
Returns the data. In is an array of 3 singles: In[0] - Color mode of the calibration, can be 0=COLM_LAB, 1=COLM_XYZ, 2=COLM_RGB In[1]- Image Class of the calibration, 0=RGB24, 1=RGB36, 2=RGB48 In[2] - Number of points in the calibration
Sets calibration information
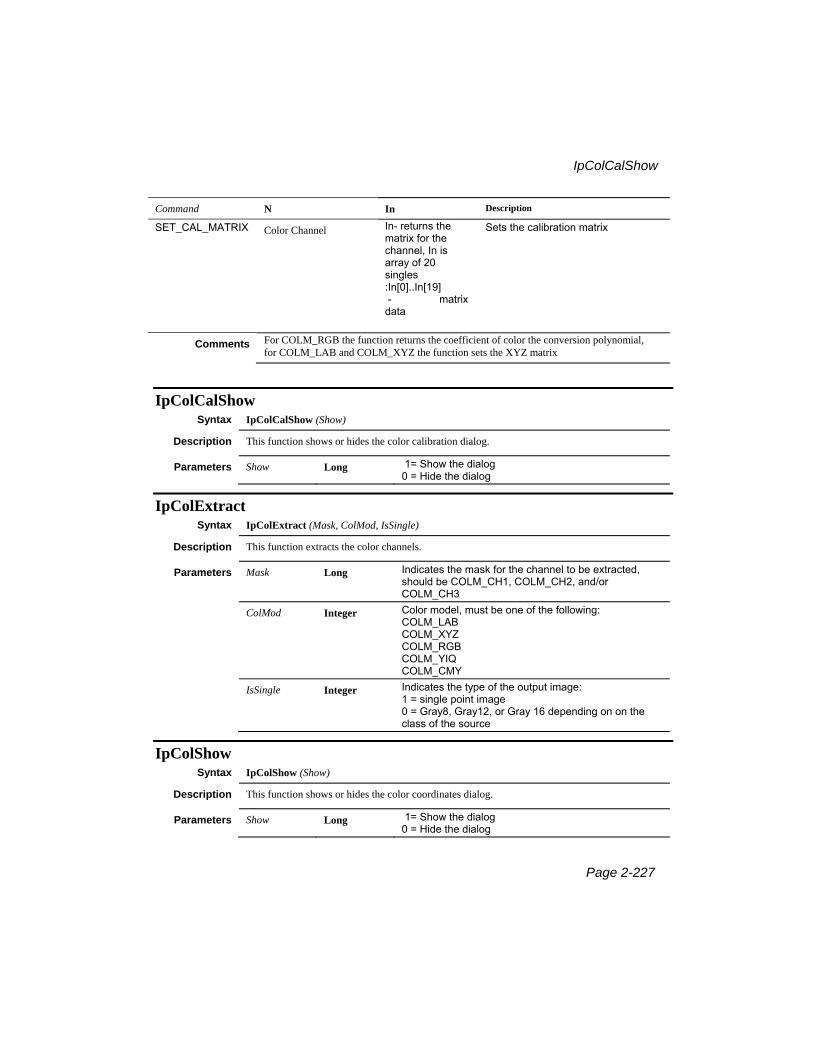
IpColCalShow
Page 2-227
Command N In Description
SET_CAL_MATRIX Color Channel In- returns the matrix for the channel, In is array of 20 singles :In[0]..In[19] - matrix data
Sets the calibration matrix
Comments For COLM_RGB the function returns the coefficient of color the conversion polynomial, for COLM_LAB and COLM_XYZ the function sets the XYZ matrix
IpColCalShow Syntax IpColCalShow (Show)
Description This function shows or hides the color calibration dialog.
Parameters Show Long 1= Show the dialog 0 = Hide the dialog
IpColExtract Syntax IpColExtract (Mask, ColMod, IsSingle)
Description This function extracts the color channels.
Parameters Mask Long Indicates the mask for the channel to be extracted, should be COLM_CH1, COLM_CH2, and/or COLM_CH3
ColMod Integer Color model, must be one of the following: COLM_LAB COLM_XYZ COLM_RGB COLM_YIQ COLM_CMY
IsSingle Integer Indicates the type of the output image: 1 = single point image 0 = Gray8, Gray12, or Gray 16 depending on on the class of the source
IpColShow Syntax IpColShow (Show)
Description This function shows or hides the color coordinates dialog.
Parameters Show Long 1= Show the dialog 0 = Hide the dialog

IpCoLocForward
Page 2-228
IpCoLocForward Syntax IpCoLocForward (SecondImage, ColorPair, Type)
Description This function calculates the co-localization scatterplot and parameters
Parameters SecondImage Integer Document ID of the image to use as the second grayscale channel (the active image is used as the first channel). The second image ID should be –1 if the first image is a color image.
ColorPair Interger Indicates the color that should be used: CP_RED_GREEN Red for first channel, green for second CP_BLUE_RED Blue for first, red for second CP_GREEN_BLUE Green for first, blue for second CP_GREEN_RED Green for first, red for second CP_RED_BLUE Red for first, blue for second CP_BLUE_GREEN Blue for first, green for second
Type Integer Indicates the type of output desired: CLOC_FWDMASK: Creates a color composite workspace only if the input images are grayscale. It will create and return the grayscale scatterplot. CLOC_FWDCOLOR : Creates a color composite workspace only if the input images are grayscale. It will create and return the color scatterplot. CLOC_FWD3D: Creates a color composite workspace only if the input images are grayscale. It will also create a grayscale scatterplot that should be the active image for the surface plot. It will create and return the color scatterplot. CLOC_FWDPARAMS: Calculates the first set of co-localization parameters and sends them to the output window.
Comments This function, IpCoLocForward, can end up creating up to 3 new workspaces (or none at all) depending on the type of image being operated on, and the co-localization option selected.
Return Value Returns the Doc ID of the co-localization scatterplot for all output types except CLOC_FWDPARAMS. A negative return value indicates an error.

Page 2-229
IpCoLocGetDocument Syntax IpCoLocGetDocument (DocType, DocID)
Description This function gets the document IDs of the documents created by IpCoLocForward.
Parameters DocType Integer Identifies the document type to return. Must be one of the following:
CLDOC_COLORCOMPOSITE – Return the document ID of the color composite or color input image. CLDOC_SCATTERPLOT - Return the document ID of the co-localization scatterplot. CLDOC_3DMASK – Return the document ID of the grayscale scatterplot used for surface plotting.
Parameters DocID Integer An integer variable to recieve the document ID.
Return Value 0 if successful. A negative return value indicates an error .
Comments The document ID returned by CLDOC_COLORCOMPOSITE may be the color iput image or a new document containing a color composite created from the grayscale imput images. The document ID returned by CLDOC_SCATTERPLOT will be the same ID returned by IpCoLocForward. The document ID returned by CLDOC_3DMASK should be the active image for proper display of the co-localization surface plot.
Example ret = IpCoLocGetDocument(CLDOC_COLORCOMPOSITE, ColorImg)
See Also IpCoLocForward

IpCoLocGetForward
Page 2-230
IpCoLocGetForward Syntax IpCoLocGetForward (SecondImage, ColorPair, Data)
Description This function gets the co-localization overlap parameters of the original image.
Parameters SecondImage Integer Document ID of the image to use as the second grayscale channel (the active image is used as the first channel). The second image ID should be –1 if the first image is a color image.
ColorPair Interger Indicates the color that should be used: CP_RED_GREEN Red for first channel, green for second CP_BLUE_RED Blue for first, red for second CP_GREEN_BLUE Green for first, blue for second CP_GREEN_RED Green for first, red for second CP_RED_BLUE Red for first, blue for second CP_BLUE_GREEN Blue for first, green for second
Data Single Data should be an array of 10 singles, which will receive the forward parameters:
Data(0) - Pearson's correlation Rr Data(1) - Overlap coefficient R Data(2) - Overlap coefficient k1 Data(3) - Overlap coefficient k2 Data(4..9) - reserved
Return Value 0 if successful, an error code otherwise.
IpCoLocGetInverse Syntax IpCoLocGetInverse (Data)
Description This function gets the co-localization parameters.
Parameters Data Single Data should be an array of 10 singles, which will receive the forward parameters:
Data(0) - Co-localization coefficient M1 Data(1) - Co-localization coefficient M2 Data(2 - 9) - reserved
Return Value 0 if successful, an error code otherwise

IpCoLocInverse
Page 2-231
IpCoLocInverse Syntax IpCoLocInverse (Type)
Description This function calculates co-localization parameters on the basis of the active AOI on the co-localization plot.
Parameters Type Integer CLOC_INVMASK: Creates a mask of co-localizing pixels on the base of an AOI on the image of co-localization plot CLOC_INVPARAMS: Calculates the second set of co-localization parameters and sends them to the output window.
Return Value If the input is CLOC_INVMASK, the return value is the document ID of the mask image. If the input is CLOC_INVPARAMS, the return value is 0.
IpCoLocShow Syntax IpCoLocShow (show)
Description This function shows or hides the co-localization dialog.
Parameters Show Integer Must be one of the following: COMP_SHOW = 1, show dialog COMP_HIDE = 0, hide dialog
Return Value 0 if successful, an error code otherwise
IpDbAddField Syntax IpDbAddField(FieldName, FieldType, FieldLength)
Description This function adds a custom field to the image record.
Parameters FieldName String Identifies the name of the field to be added.
FieldType Integer An enumarated value that specifies the type of field. Must be one of the following: DB_INT: a 2-byte integer DB_LONG: a 4-byte integer DB_MEMO: a long string, limited only by your database engine DB_STRING: 1 - 255 byte string
FieldLength Integer A number between 1 and 255 indicating the number of characters in the string field (used by DB_STRING, ignored by the others).
Example ret = IpDbAddField(“MyTextField”, DB_STRING, 40)
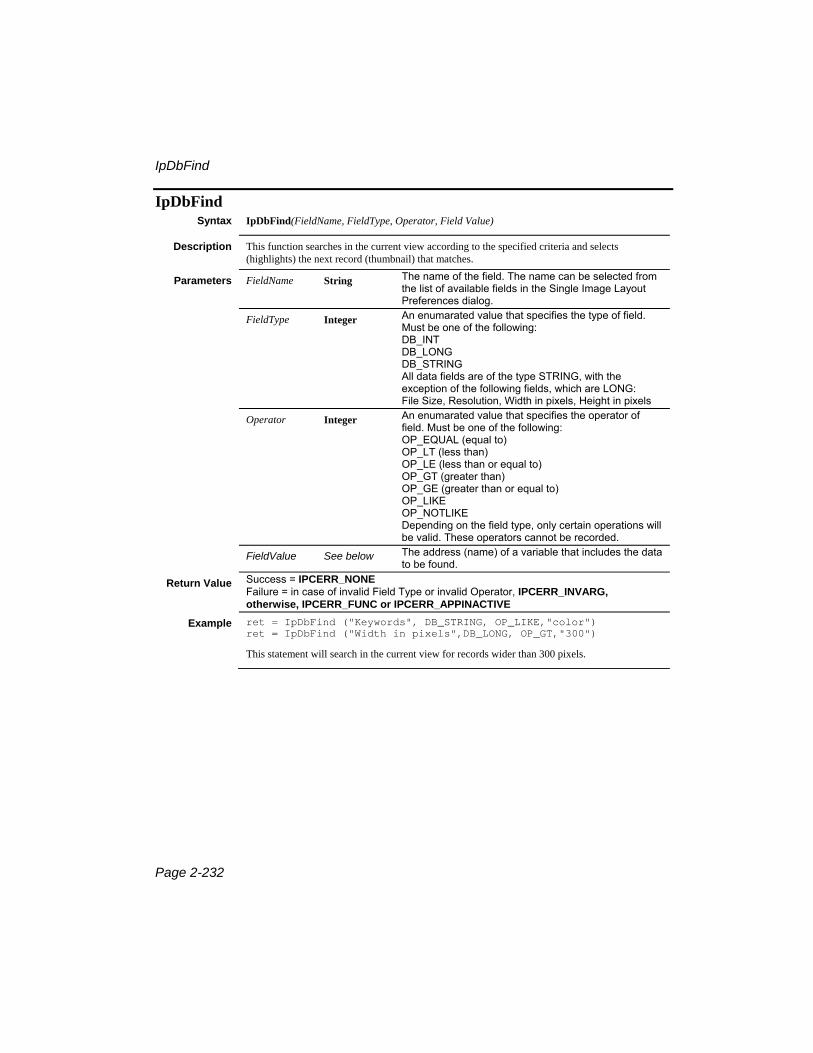
IpDbFind
Page 2-232
IpDbFind Syntax IpDbFind(FieldName, FieldType, Operator, Field Value)
Description This function searches in the current view according to the specified criteria and selects (highlights) the next record (thumbnail) that matches.
Parameters FieldName String The name of the field. The name can be selected from the list of available fields in the Single Image Layout Preferences dialog.
FieldType Integer An enumarated value that specifies the type of field. Must be one of the following: DB_INT DB_LONG DB_STRING All data fields are of the type STRING, with the exception of the following fields, which are LONG: File Size, Resolution, Width in pixels, Height in pixels
Operator Integer An enumarated value that specifies the operator of field. Must be one of the following: OP_EQUAL (equal to) OP_LT (less than) OP_LE (less than or equal to) OP_GT (greater than) OP_GE (greater than or equal to) OP_LIKE OP_NOTLIKE Depending on the field type, only certain operations will be valid. These operators cannot be recorded.
FieldValue See below The address (name) of a variable that includes the data to be found.
Return Value Success = IPCERR_NONE Failure = in case of invalid Field Type or invalid Operator, IPCERR_INVARG, otherwise, IPCERR_FUNC or IPCERR_APPINACTIVE
Example ret = IpDbFind ("Keywords", DB_STRING, OP_LIKE,"color") ret = IpDbFind ("Width in pixels",DB_LONG, OP_GT,"300")
This statement will search in the current view for records wider than 300 pixels.

IpDbGoto
Page 2-233
IpDbGoto Syntax IpDbGoto(RecordNum)
Description This function highlights a specific record in the database.
Parameters RecordNum Integer The sequential number of the record to be selected in the current view, or special values as follows: DB_FIRST - the first record in the view. DB_LAST - the last record in the view. DB_NEXT - the next record in the view. DB_PREV - the previous record in the view.
Return Value Success = IPCERR_NONE Failure = IPCERR_FUNC or IPCERR_APPINACTIVE
Example ret = IpDbGoto(5)
This statement will select (highlight) the sixth record (thumbnail) in the current view.
Comments The ‘Archive’ operation of Image-Pro Plus places the archived image as the last record in the current view.
See Also IpDbSearch()
IpDbLoadView Syntax IpDbLoadView(ViewName)
Description This function loads a saved view.
Parameters ViewName String The name of the view.
Return Value Success = IPCERR_NONE Failure = in case of invalid or null View Name, IPCERR_INVARG, otherwise, IPCERR_FUNC or IPCERR_APPINACTIVE
Example ret = IpDbLoadView(“DemoView”)
This statement will load the previously saved view ‘DemoView’.
IpDbNewFolder Syntax IpDbNewFolder(FolderName,Description)
Description This function creates a new folder.
Parameters FolderName String The name of the folder.
Description String The description of the folder (optional)
Return Value Success = IPCERR_NONE Invalid folder name = IPCERR_INVARG Failure = IPCERR_FUNC

IpDbOpenFolder
Page 2-234
Example ret = IpDbNewFolder(“Sample”, “Sample Images”)
This statement will create a new folder named‘Sample’ with the description ‘Sample Images.’
IpDbOpenFolder Syntax IpDbOpenFolder(FolderName)
Description This function opens an existing folder.
Parameters FolderName String The name of the folder.
Return Value Success = IPCERR_NONE Invalid folder name = IPCERR_INVARG Failure = IPCERR_FUNC
Example ret = IpDbOpenFolder(“Sample”)
This statement will open the folder named‘Sample’.
IpDbPrint Syntax IpDbPrint(Layout)
Description This function prints the thumbnails in a database or folder.
Parameters Layout Integer Identifies the layout to print the thumbnails. Must be one of the following: 1 = Gallery Layout 2 = Single Image Layout 3 = Gallery Layout - Tagged Images 4 = Single Image Layout - Tagged Images
Comments Thumbnails are printed from the currently open folder or “No Folder.”
Example ret = IpDbPrint (1)

IpDbReadStr
Page 2-235
IpDbReadStr Syntax IpDbReadStr(FieldName, FieldType, FieldValue, ValueLength)
Description This function reads data from the specified field in the database.
Parameters FieldName String The name of the field. The name can be selected from the list of available fields in the Single Image Layout Preferences dialog.
FieldType String An enumerated value that specifies the type of field. Must be one of the following: DB_ STRING, DB_STRING + DB_FILE
FieldValue See below The address (name) of a variable that receives the data from the field, or output filename if DB_FILE is used.
ValueLength Long The length of the data in bytes.
Return Value Success = IPCERR_NONE Failure = in case of invalid Field Type: IPCERR_IVARG otherwise, IPCERR_FUNC or IPCERR_APPINACTIVE
Example Dim theSubject as String * 30
Ret = IpDbReadStr ("Subject", DB_STRING, theSubject, 30) If ret = 0 Then Debug.Print theSubject Else Debug.Print "Operator failed" End If This statement will read up to a 30 character string stored in the ‘Subject’ field of the current image (see comments) into the string variable ‘theSubject’. The information found in the ‘Subject’ field will be printed to the Output Window. If no information is found the message “Operator failed” will be displayed in the Output Window. Dim FileDateTime as String * 30 Ret = IpDbReadStr ("FileDateTime", DB_STRING, FileDateTime, 30) If ret = 0 Then Debug.Print FileDateTime Else Debug.Print "Operator failed" End If This statement will read up to a 30 character string stored in the ‘FileDateTime’ field of the current image (see comments) into the string variable ‘FileDateTime’. The information found in the ‘FileDateTime’ field will be printed to the Output Window. If no information is found the message “Operator failed” will be displayed in the Output Window. Ret = IpDbReadStr ("Subject", DB_STRING + DB_FILE, “c:\sample.txt", 30) This statement will read the value from the subject field of the current image into a new file called sample.txt.
Comments The current image is the one in a Single Image Layout, or the selected (highlighted) image in a database view.

IpDbReadStr
Page 2-236
See Also IpDbFind(); IpDbGoto()

IpDbSetAttr
Page 2-237
IpDbSetAttr Syntax IpDbSetAttr(Atttrib, nValue, strValue)
Description This function sets the preferences for your database.
Parameters Attrib Integer DB_CAPTION - set caption display fields DB_COPYCUSTOM - set flag to copy custom fields
nValue Integer 0 = Don't set default values of custom fields in new records 1 = Set default values of custom fields in new records This parameter is used by DB_COPYCUSTOM
strValue String The field name that will be used as the caption (used by DB_CAPTION)
Example IpDbSetAttr (DB_COPYCUSTOM, 1, "")
IpDbSearch Syntax IpDbSearch(FieldName, FieldType, Operator, Field Value)
Description This function searches in the current view according to the specified criteria and creates a new view containing the results of the search.
Parameters FieldName String The name of the field. The name can be selected from the list of available fields in the Single Image Layout Preferences dialog.
FieldType Integer An enumerated value that specifies the type of field. Must be one of the following: DB_INT DB_LONG DB_STRING All data fields are of the type STRING, with the exception of the following fields, which are LONG: File Size, Resolution, Width in pixels, Height in pixels
Operator Integer An enumerated value that specifies the operator of field. Must be one of the following: OP_EQUAL (equal to) OP_LT (less than) OP_LE (less than or equal to) OP_GT (greater than) OP_GE (greater than or equal to) OP_LIKE OP_NOTLIKE Depending on the field type, only certain operations will be valid. These operators cannot be recorded.
FieldValue See below The address (name) of a variable that includes the data to search for.
Return Value Success = IPCERR_NONE Failure = in case of invalid Field Type or invalid Operator, IPCERR_INVARG, otherwise, IPCERR_FUNC or IPCERR_APPINACTIVE

IpDbViewAll
Page 2-238
Example ret = IpDbSearch("Caption", DB_STRING, OP_EQUAL, "Demo.tif") ret = IpDbSearch("Custom5", DB_LONG, OP_LE, "50")
This statement will search the current view for records that have ‘Demo.tif’ in their ‘Caption’ field and create a new view containing the results of the search.
IpDbViewAll Syntax IpDbViewAll()
Description This function displays the content of the entire database.
Return Value Success = IPCERR_NONE Failure = IPCERR_FUNC or IPCERR_APPINACTIVE
Example ret = IpDbViewAll()
This statement will display the content of the entire database.
IpDbViewFolder Syntax IpDbViewFolder(FolderName)
Description This function takes the named folder and makes it the current folder.
Parameters FolderName String The name of the folder.
Return Value Success = IPCERR_NONE Failure = IPCERR_FUNC or IPCERR_APPINACTIVE
Example ret = IpDbViewFolder(“Sample”)
This statement will display the content of the folder ‘Sample’.
IpDbWriteStr Syntax IpDbWriteStr(FieldName, FieldType, FieldValue, ValueLength)
Description This function writes data to the specified field in the database.
Parameters FieldName String The name of the field. The name can be selected from the list of available fields in the Single Image Layout Preferences dialog.
FieldType String Must be one of the following: DB_ STRING, DB_STRING + DB_FILE
FieldValue See below The address (name) of a variable that includes the data to be written in the field, or output filename if DB_FILE is used.
ValueLength Long Ignored
Return Value Success = IPCERR_NONE Failure = in case of invalid Field Type or invalid Operator, IPCERR_INVARG, otherwise, IPCERR_FUNC or IPCERR_APPINACTIVE

IpDcAddCol
Page 2-239
Example
Dim theSubject as String * 30
theSubject = “Tissue sample”
ret = IpDbWriteStr (“Subject”, DB_STRING, theSubject, 0)
This statement will write a 30 character string stored in the string variable ‘theSubject’ in the Subject field of the current image (see comments).
Dim FileDateTime as String * 30
FileDateTime = “03/11/98 12:07:00”
ret = IpDbWriteStr (“FileDateTime”, DB_STRING, FileDateTime, 0)
This statement will write a 30 character string stored in the string variable ‘FileDateTime’ in the ‘FileDateTime’ field of the current image (see comments).
Dim Custom1 as String * 30
Custom1 = “03/11/98 12:07:00”
ret = IpDbWriteStr (“Custom1”, DB_STRING, Custom1, 0)
This statement will write a 30 character string stored in the string variable ‘Custom1’ in the Custom1 field of the current image (see comments).
ret = IpDbWriteStr("Subject", DB_STRING + DB_FILE, "C:\sample.txt", 0) This statement will read the data from Sample.txt and write it into the field specified as "Subject".
Comments The current image is the one in a Single Image Layout, or the selected (highlighted) image in a database view.
See Also IpDbFind(); IpDbGoto()
IpDcAddCol Syntax IpDcAddCol(ColumnName)
Description This function adds columns to the Data Collector.
Parameters ColumnName String Indicates the name that will be displayed in the column header to identify the data.
Return Value A positive column ID if successful, a negative error code if failed.

IpDcAddSng
Page 2-240
Comments This function adds a new column to the data collector layout. This will clear any data that’s already collected (just as adding an item to the layout does in the Data Collector Layout page). Any columns that are added using this function will be visible in the Layout page, but they cannot be added or be selected to be removed from that page. They can only be removed from a script, using IpDcDeleteCol. Columns added from a macro function will be displayed in the layout using the name of macro that inserted the column. Columns added by an external program will be displayed using “External Program”.
The ColumnName that is supplied is used as the column header in the data table.
The function returns a column ID. This column ID must be used in any future operations that affect the column, e.g. adding data to the column or deleting the column. This will usually mean that the column ID should be saved to a global variable for use in other macros in the same script.
Example ‘ This macro creates two columns and adds data to them Dim ColN1 As Long ‘ variables to hold Dim ColN2 As Long ‘ the column IDs Dim nArray(3) As Single ‘ array variable to hold the data ‘ Note that the columns should only be created ‘ ONCE per session of data collection ColN1 = IpDcAddCol("Single1")‘ this is just a name, not a type ColN2 = IpDcAddCol("String1") ‘ We can repeatedly do the following nArray(0) = 30‘ sample data nArray(1) = 31 nArray(2) = 32 ‘ Add all the single data ‘ We’ve set the NewBlock parameter to 1 to create a new block ‘ with just our data. If we are adding our data to an existing ‘ block of data (e.g. already collected from Count/Size or ‘ another data source), we should set NewBlock to zero. IpDcAddSng(ColN1, 1, 3, nArray(0)) ‘ Add the string data a row at a time ‘ Note that the NewBlock parameter must be zero here, ‘ or we’ll add a new block instead of adding to the current ‘ block IpDcAddStr(ColN2, 0, 0, "First String") IpDcAddStr(ColN2, 0, 1, "Second String") IpDcAddStr(ColN2, 0, 2, "Third String")
See Also IpDcDeleteCol, IpDcAddSng, IpDcAddStr
IpDcAddSng Syntax IpDcAddSng(ColumnId, NewBlock, NumRows, Data)
Description This function adds one or more rows of single data to specified column of the Data Collector.
Parameters ColumnID Long Indicates the column where the data should be added. The Column ID must have been returned from IpDcAddCol.
NewBlock Integer Determines if the data should be added to a new block (if non-zero) or replace the data in the current block (if zero).
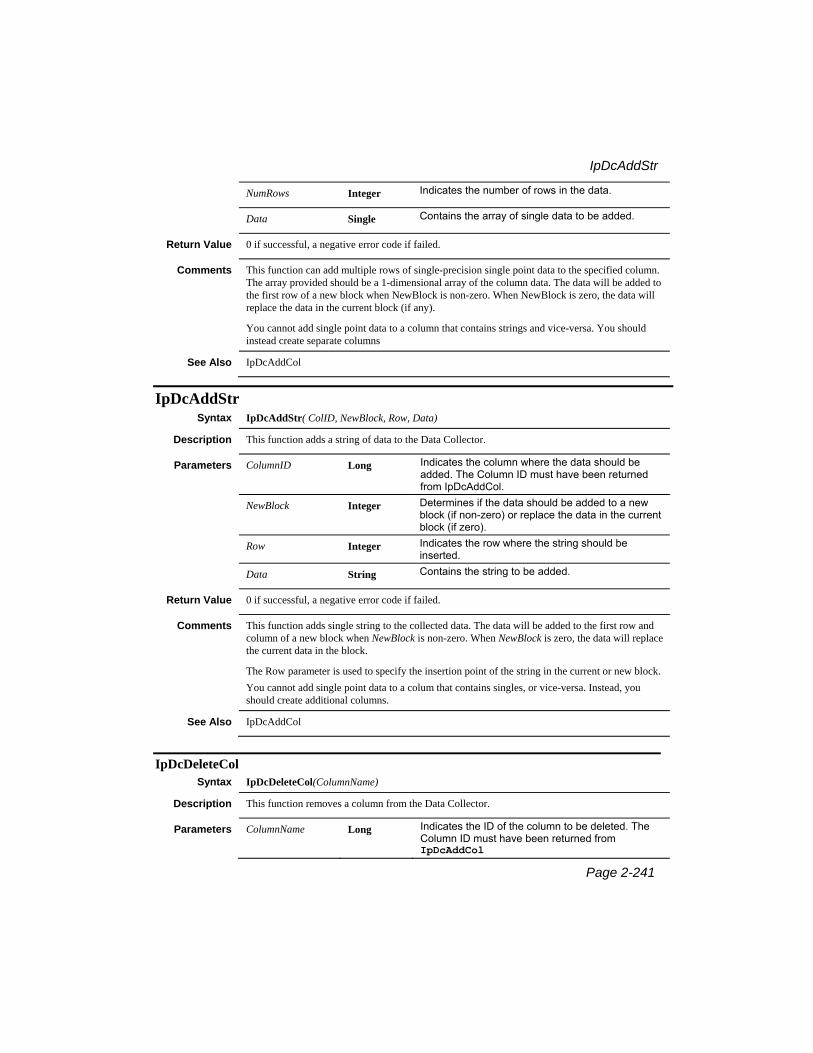
IpDcAddStr
Page 2-241
NumRows Integer Indicates the number of rows in the data.
Data Single Contains the array of single data to be added.
Return Value 0 if successful, a negative error code if failed.
Comments This function can add multiple rows of single-precision single point data to the specified column. The array provided should be a 1-dimensional array of the column data. The data will be added to the first row of a new block when NewBlock is non-zero. When NewBlock is zero, the data will replace the data in the current block (if any).
You cannot add single point data to a column that contains strings and vice-versa. You should instead create separate columns
See Also IpDcAddCol
IpDcAddStr Syntax IpDcAddStr( ColID, NewBlock, Row, Data)
Description This function adds a string of data to the Data Collector.
Parameters ColumnID Long Indicates the column where the data should be added. The Column ID must have been returned from IpDcAddCol.
NewBlock Integer Determines if the data should be added to a new block (if non-zero) or replace the data in the current block (if zero).
Row Integer Indicates the row where the string should be inserted.
Data String Contains the string to be added.
Return Value 0 if successful, a negative error code if failed.
Comments This function adds single string to the collected data. The data will be added to the first row and column of a new block when NewBlock is non-zero. When NewBlock is zero, the data will replace the current data in the block.
The Row parameter is used to specify the insertion point of the string in the current or new block. You cannot add single point data to a colum that contains singles, or vice-versa. Instead, you should create additional columns.
See Also IpDcAddCol
IpDcDeleteCol
Syntax IpDcDeleteCol(ColumnName)
Description This function removes a column from the Data Collector.
Parameters ColumnName Long Indicates the ID of the column to be deleted. The Column ID must have been returned from IpDcAddCol

IpDcGet
Page 2-242
Return Value 0 if successful, a negative error code if failed.
Comments This function deletes an exsiting column from the data collector layout. This will clear any data that’s already collected (just as adding an item to the layout does in the Data Collector Layout page).
Example ColN1 = IpDcAddCol("Example") ... IpDcDeleteCol(ColN1)‘ delete this column
See Also IpDcAddCol
IpDcGet Syntax IpDcGet (sCmd, sParam, lpParam)
Description This functions gets data from the data collector.
Parameters sCmd Integer The command ID. See table in the Comments section.
sParam Integer A parameter of the command. See table below.
lpParam Reference A variable or array name.
Return Value DC_TYPE: returns 0 = empty, 5 = text, other = numerical value
DC_STATS:returns number of values in lpParam. 0 for text columns. DC_DATA: returns number of values in lpParam. 0 for text columns.
Comments (1) The current column and the current row can be set via IpDcSet(DC_COL/DC_ROW...). The current column can also be set via IpDcGet(DC_TYPE...). (2) DC_NUMCOL and DC_TYPE will fail if the data list is empty since information about collected data items is not known yet. (3) DC_STATS and DC_DATA will return 0 (failed) if current column contains text instead of numerical values. (4) You can call DC_NUMVAL to determine how large of an array to pass to DC_DATA.
sCmd sParam lpParam Description
DC_BLOCKROW1 block number , 0 = first block
Long variable receving the result
Gets the starting row of a given block in the data list.
DC_CUSTCOLID The index of the custom column, from 0 to the number of custom columns -1.
Long variable receving the result
Gets the ID of the specified column that was added using IpDcAddColumn.

IpDcGet
Page 2-243
DC_DATA Number of values to get. An array of at least (sParam) singles.
Gets numerical values for the current column in the data list, starting at current row. Empty cells are skipped. For numerical columns only.
DC_NUMVAL -1 = number of values from current row to end block number - number of values in block, 0 = first block
Long variable receving the result
Gets the number of non-empty cells in the current column of the data list.
DC_NUMROW -1 = whole list block number, 0 = first block
Long variable receving the result
Gets the number of rows in the whole data list or a given block.
DC_NUMCOL not used, must be 0 Long variable receving the result
Gets the number of rows in the data list or statistics table.
DC_NUMCUSTCOL not used, must be 0 Long variable receving the result
Gets the number of custom columns that were added using IpDcAddColumn.
DC_NUMBLOCK not used, must be 0 Long variable receving the result
Gets the number of blocks collected.
DC_STATS not used, must be 0 An array of at least 7 singles receiving Min, Max, Mean, SD, Sum, number of samples and number of blocks in that order.
Gets the statistics for the current column.
DC_TYPE column number , 0= first column
Long variable receving the result 0 = empty 5 = text other = numerical value
Gets the type of data contained in the given column; sets the current column.
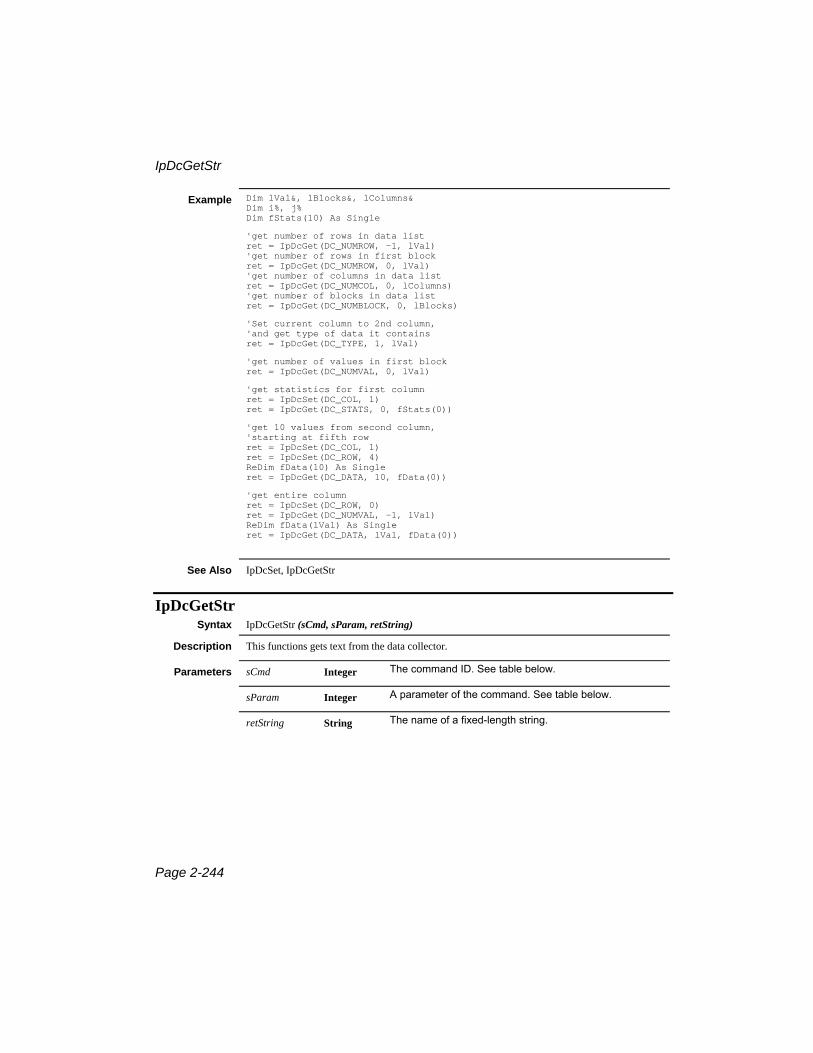
IpDcGetStr
Page 2-244
Example Dim lVal&, lBlocks&, lColumns& Dim i%, j% Dim fStats(10) As Single
'get number of rows in data list ret = IpDcGet(DC_NUMROW, -1, lVal) 'get number of rows in first block ret = IpDcGet(DC_NUMROW, 0, lVal) 'get number of columns in data list ret = IpDcGet(DC_NUMCOL, 0, lColumns) 'get number of blocks in data list ret = IpDcGet(DC_NUMBLOCK, 0, lBlocks)
'Set current column to 2nd column, 'and get type of data it contains ret = IpDcGet(DC_TYPE, 1, lVal)
'get number of values in first block ret = IpDcGet(DC_NUMVAL, 0, lVal)
'get statistics for first column ret = IpDcSet(DC_COL, 1) ret = IpDcGet(DC_STATS, 0, fStats(0))
'get 10 values from second column, 'starting at fifth row ret = IpDcSet(DC_COL, 1) ret = IpDcSet(DC_ROW, 4) ReDim fData(10) As Single ret = IpDcGet(DC_DATA, 10, fData(0))
'get entire column ret = IpDcSet(DC_ROW, 0) ret = IpDcGet(DC_NUMVAL, -1, lVal) ReDim fData(lVal) As Single ret = IpDcGet(DC_DATA, lVal, fData(0))
See Also IpDcSet, IpDcGetStr
IpDcGetStr Syntax IpDcGetStr (sCmd, sParam, retString)
Description This functions gets text from the data collector.
Parameters sCmd Integer The command ID. See table below.
sParam Integer A parameter of the command. See table below.
retString String The name of a fixed-length string.
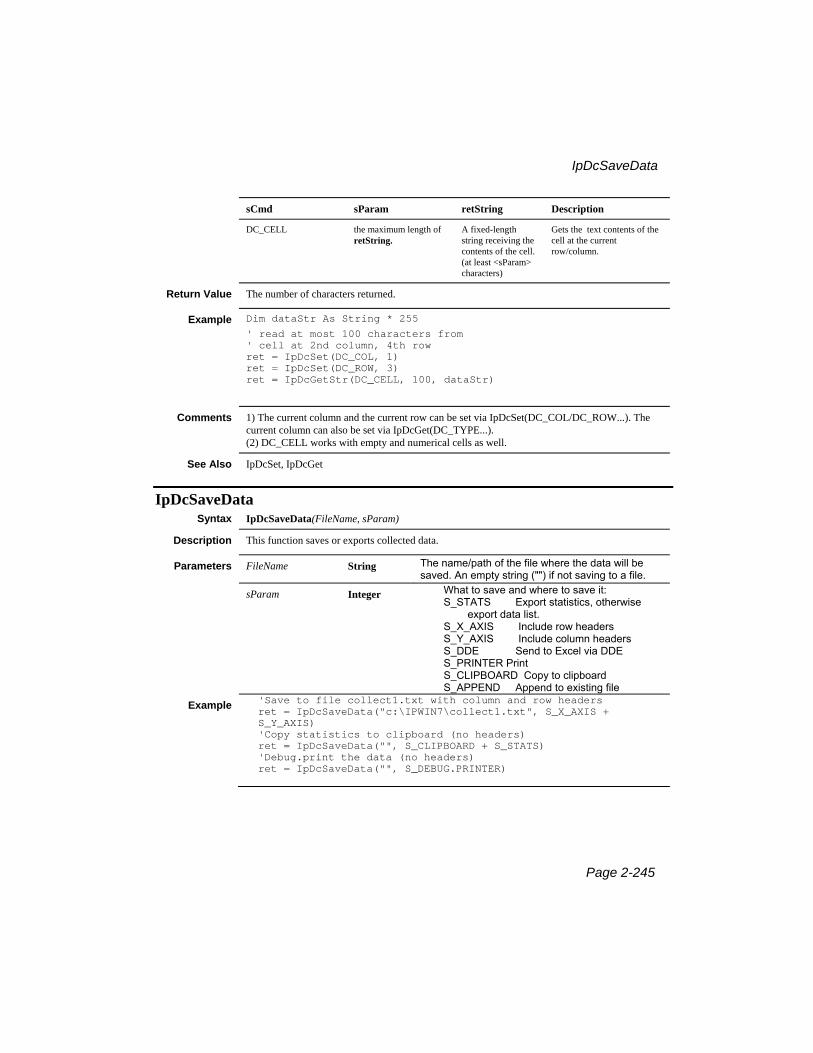
IpDcSaveData
Page 2-245
sCmd sParam retString Description
DC_CELL the maximum length of retString.
A fixed-length string receiving the contents of the cell. (at least <sParam> characters)
Gets the text contents of the cell at the current row/column.
Return Value The number of characters returned.
Example Dim dataStr As String * 255
' read at most 100 characters from ' cell at 2nd column, 4th row ret = IpDcSet(DC_COL, 1) ret = IpDcSet(DC_ROW, 3) ret = IpDcGetStr(DC_CELL, 100, dataStr)
Comments 1) The current column and the current row can be set via IpDcSet(DC_COL/DC_ROW...). The current column can also be set via IpDcGet(DC_TYPE...). (2) DC_CELL works with empty and numerical cells as well.
See Also IpDcSet, IpDcGet
IpDcSaveData Syntax IpDcSaveData(FileName, sParam)
Description This function saves or exports collected data.
Parameters FileName String The name/path of the file where the data will be saved. An empty string ("") if not saving to a file.
sParam Integer What to save and where to save it: S_STATS Export statistics, otherwise export data list. S_X_AXIS Include row headers S_Y_AXIS Include column headers S_DDE Send to Excel via DDE S_PRINTER Print S_CLIPBOARD Copy to clipboard S_APPEND Append to existing file
Example 'Save to file collect1.txt with column and row headers ret = IpDcSaveData("c:\IPWIN7\collect1.txt", S_X_AXIS + S_Y_AXIS) 'Copy statistics to clipboard (no headers) ret = IpDcSaveData("", S_CLIPBOARD + S_STATS) 'Debug.print the data (no headers) ret = IpDcSaveData("", S_DEBUG.PRINTER)

Page 2-246
IpDcSelect Syntax IpDcSelect(SourceName, ItemName, sParam)
Description This function selects data items for collection.
Parameters SourceName String The name of the data source.
ItemName String The name of the data item.
sParam Integer The representation number (if multiple representations).
Example 'collect total number of objects found ret = IpDcSelect("Count_Size","Count",0) 'collect all object area values from Count/Size ret = IpDcSelect("Count_Size","BLBM_AREA",0) 'collect object average area value ret = IpDcSelect("Count_Size","BLBM_AREA",3)
Comments SouceName and ItemName should be spelled as they appear in Data Collector's lists, on the left hand side of the Layout page.
Names are not case sensitive.
This function can only succeed when the Data List page is empty. It can be called when the Layout page is empty (i.e. before data sources are invoked).
See Also IpDcUnSelect
IpDcSet Syntax IpDcSet(sAttribute, lValue)
Description This function sets an option or parameter in the Data Collector.
Parameters sAttribute Integer Indicates the new option or parameter to set.
lValue Long The new value of the option/parameter: DC_AUTO Auto collection off (0), on(1), conditional(2) DC_AUTOMODE Auto collection options DC_BREAK Insert empty line (1), do not i nsert (0) DC_TOPLINE Add module name to column headers (1), do not add (0) DC_LEFTCOL Row headers options DC_COLWIDTH Column width in characters (8 - 50) DC_SIGNIF Number of significant digits (5 - 20) DC_COL set the current column (0 = first column) DC_ROW set the current row (0 = first row)

IpDcShow
Page 2-247
Example ' Conditional auto-collection ret = IpDcSet(DC_AUTO, 2) ' All conditional options on. Collect from single image ret = IpDcSet(DC_AUTOMODE, 7) ' All row header options on ret = IpDcSet(DC_LEFTCOL, 7) ' Insert empty line between blocks ret = IpDcSet(DC_BREAK, 1) ' make tables columns 15 char. Wide ret = IpDcSet(DC_COLWIDTH, 15) ' show 8 significant digits ret = IpDcSet(DC_SIGNIF, 8)
Comments For more details on legal values for DC_AUTOMODE and DC_LEFTCOL, please record setting these options via the Options page of Data Collector.
IpDcShow Syntax IpDcShow(bShow)
Description This function shows or hides the data collector tool.
Parameters bShow Integer A value of 0 or 1-5, indicating whether to show or hide the data collector tool tabbed dialog: 0 - hides the dialog 1 - 5 - shows the selected tab in the dialog
See Also IpDcSelect, IpDcUnSelect, IpDcSet, IpDcSaveData, IpDcSelect
IpDcUnSelect Syntax IpDcUnSelect(SourceName, ItemName, sParam)
Description This function de-selects data items from the selected list on the Layout page of the Data Collector.
Parameters SourceName String The name of the data source or <all>.
ItemName String The name of the data item.
sParam Integer The representation number (if multiple representations).
Example 'stop collecting total number of objects found ret = IpDcSelect("Count_Size","Object Count",0) 'de-select all data items ret = IpDcUnSelect("<all>","",0)
Comments SouceName and ItemName should be spelled as they appear in Data Collector's lists, on the left hand side of the Layout page.
Names are not case sensitive.
This function can only succeed when the Data List page is empty. It can be called when the Layout page is empty (i.e. before data sources are invoked).
See Also IpDcSelect
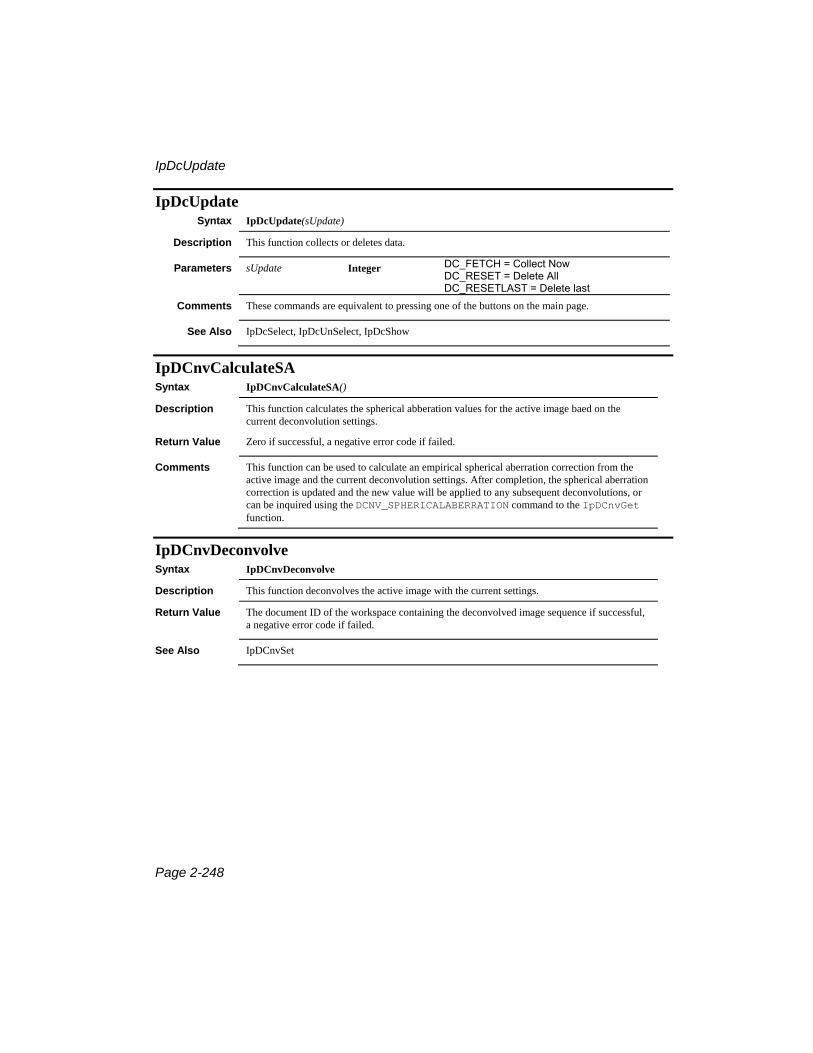
IpDcUpdate
Page 2-248
IpDcUpdate Syntax IpDcUpdate(sUpdate)
Description This function collects or deletes data.
Parameters sUpdate Integer DC_FETCH = Collect Now DC_RESET = Delete All DC_RESETLAST = Delete last
Comments These commands are equivalent to pressing one of the buttons on the main page.
See Also IpDcSelect, IpDcUnSelect, IpDcShow
IpDCnvCalculateSA Syntax IpDCnvCalculateSA()
Description This function calculates the spherical abberation values for the active image baed on the current deconvolution settings.
Return Value Zero if successful, a negative error code if failed.
Comments This function can be used to calculate an empirical spherical aberration correction from the active image and the current deconvolution settings. After completion, the spherical aberration correction is updated and the new value will be applied to any subsequent deconvolutions, or can be inquired using the DCNV_SPHERICALABERRATION command to the IpDCnvGet function.
IpDCnvDeconvolve Syntax IpDCnvDeconvolve
Description This function deconvolves the active image with the current settings.
Return Value The document ID of the workspace containing the deconvolved image sequence if successful, a negative error code if failed.
See Also IpDCnvSet

IpDCnvGet
Page 2-249
IpDCnvGet Syntax IpDCnvGet (Attribute, Value)
Description This function gets the current values of the deconvolution attributes.
Parameters Attribute Integer Indicates the attribute to be examined. See list below and Comments.
Value any Value is the variable to receive the attribute’s value. See Comments.
Return Value 0 if successful, a negative error code if failed.
Comments The Attribute parameter determines the type of data returned to the variable, and can be one of
the following:
Attribute Value Description
DCNV_TYPE Integer Type of deconvolution selected. Should be one of the following: 0 = DCTYPE_NONEIGHBOR 1 = DCTYPE_NEAREST 2 = DCTYPE_INVERSE 3 = DCTYPE _BLIND_2D 4 = DCTYOE_BLIND_3D
Attribute Value Description
DCNV_NA Single Numerical aperture DCNV_RI Single Refractive index DCNV_WL Single Emission wavelength DCNV_XSPACING Single X spacing between pixels, returned
from the spatial calibration if the image is calibrated.
DCNV_YSPACING Single Y spacing between pixels. DCNV_ZSPACING Single Z spacing between frames or images. DCNV_BRIGHTFIELD Integer Is this set for brightfield processing? DCNV_PHASEOBJECTS Integer Is this set for phase object processing? DCNV_HAZEREMOVAL Integer Percentage of haze removal required.
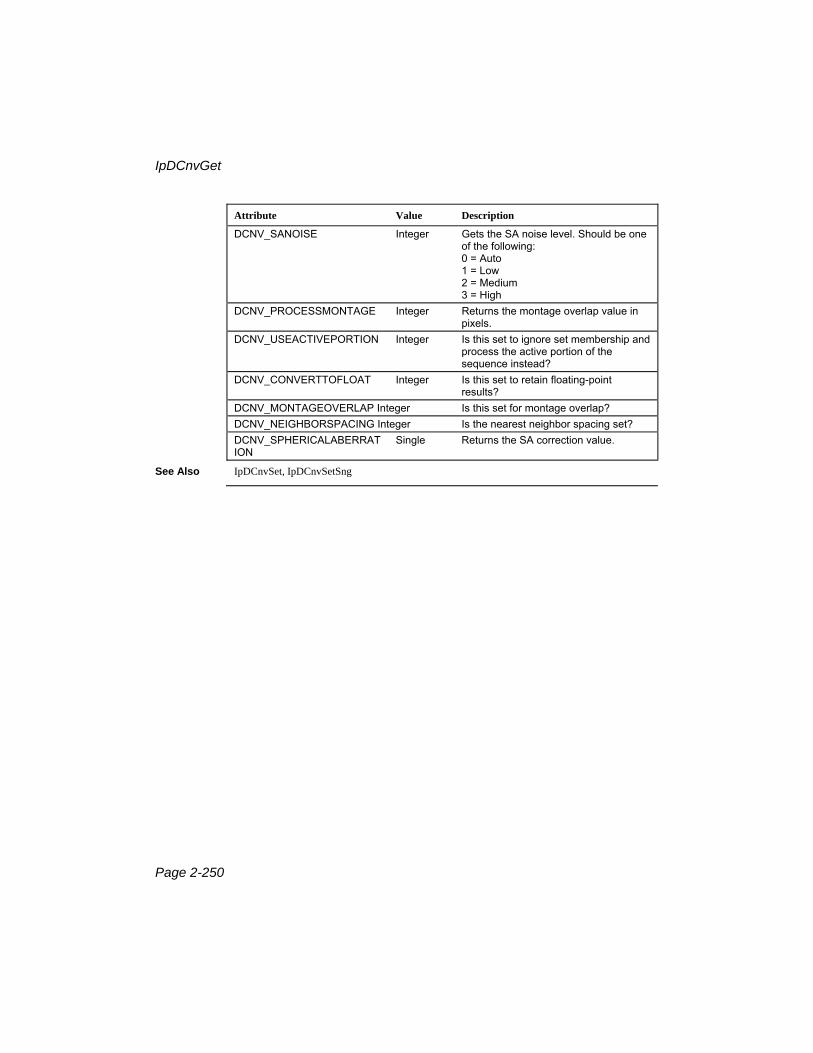
IpDCnvGet
Page 2-250
Attribute Value Description
DCNV_SANOISE Integer Gets the SA noise level. Should be one of the following: 0 = Auto 1 = Low 2 = Medium 3 = High
DCNV_PROCESSMONTAGE Integer Returns the montage overlap value in pixels.
DCNV_USEACTIVEPORTION Integer Is this set to ignore set membership and process the active portion of the sequence instead?
DCNV_CONVERTTOFLOAT Integer Is this set to retain floating-point results?
DCNV_MONTAGEOVERLAP Integer Is this set for montage overlap? DCNV_NEIGHBORSPACING Integer Is the nearest neighbor spacing set? DCNV_SPHERICALABERRATION
Single Returns the SA correction value.
See Also IpDCnvSet, IpDCnvSetSng
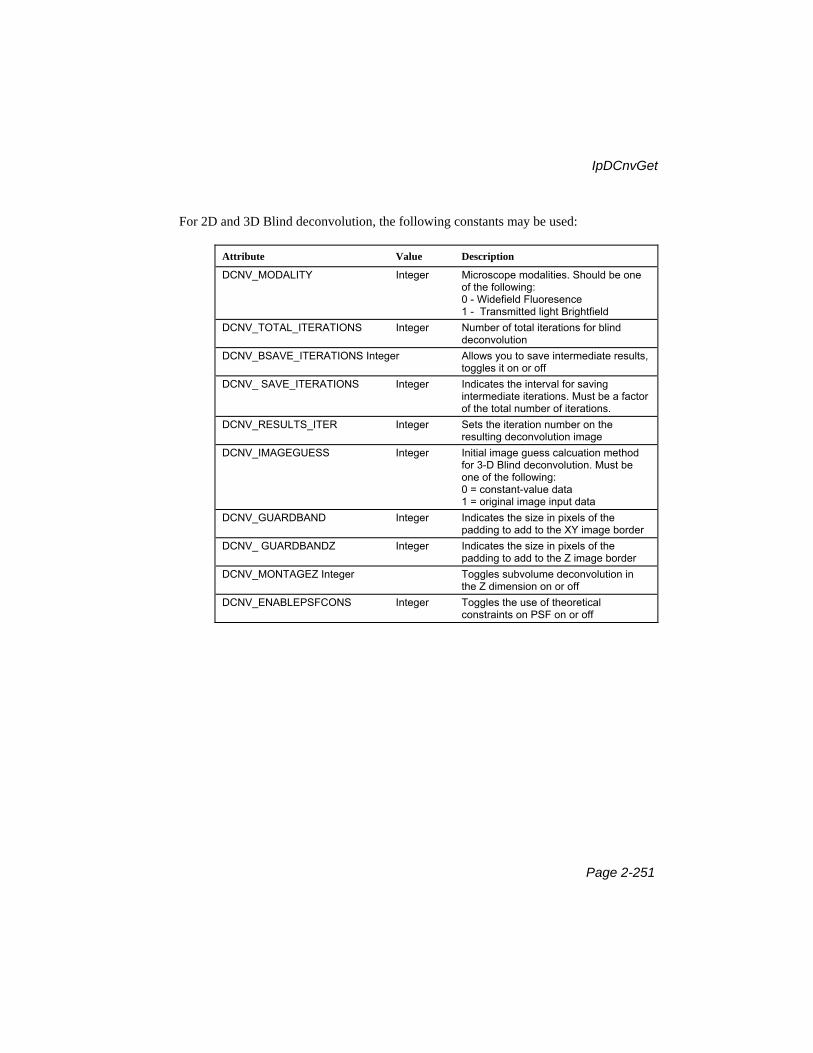
IpDCnvGet
Page 2-251
For 2D and 3D Blind deconvolution, the following constants may be used:
Attribute Value Description
DCNV_MODALITY Integer Microscope modalities. Should be one of the following: 0 - Widefield Fluoresence 1 - Transmitted light Brightfield
DCNV_TOTAL_ITERATIONS Integer Number of total iterations for blind deconvolution
DCNV_BSAVE_ITERATIONS Integer Allows you to save intermediate results, toggles it on or off
DCNV_ SAVE_ITERATIONS Integer Indicates the interval for saving intermediate iterations. Must be a factor of the total number of iterations.
DCNV_RESULTS_ITER Integer Sets the iteration number on the resulting deconvolution image
DCNV_IMAGEGUESS Integer Initial image guess calcuation method for 3-D Blind deconvolution. Must be one of the following: 0 = constant-value data 1 = original image input data
DCNV_GUARDBAND Integer Indicates the size in pixels of the padding to add to the XY image border
DCNV_ GUARDBANDZ Integer Indicates the size in pixels of the padding to add to the Z image border
DCNV_MONTAGEZ Integer Toggles subvolume deconvolution in the Z dimension on or off
DCNV_ENABLEPSFCONS Integer Toggles the use of theoretical constraints on PSF on or off

IpDCnvGet
Page 2-252
For 2D Blind deconvolution, the following constants may be used:
Attribute Value Description
DCNV_BUSEACCELERATION Integer Use acceleartion scheme for 2D-blind deconvolution
DCNV_B1DDEBLUR Integer Deblur only in the horizontal direction DCNV_BOBJSMOOTHING Integer Smooth initial object estimate flag DCNV_BPIXELSATURATION Integer Image contains saturated pixels DCNV_BREMOVESCANLINES Integer Remove the scan lines artifact DCNV_BSUPPRESSNOISE Integer Toggles noise compensation on or off DCNV_BSYMMETRICPSF Integer Forces PSF to be symmetric when
rotated 90 degrees DCNV_IMAGEGUESS2D Integer Initial image guess calcuation method
for 2-D Blind deconvolution. Must be one of the following: 0 = constant-value data 1 = original image input data
DCNV_NINTERNALPSFITERATIONS
Integer Number of PSF iterations per cycle
DCNV_SHGUARDBAND2D Integer Indicates the size in pixels of the padding to add to the Z image border for 2-D blind deconvolution
DCNV_BBACKGROUNDCORRECTION
Integer Correct background subtraction minimum intensity value
DCNV_BLIVE2D Integer Toggles the live deconvolution preview on or off
DCNV_BEDFAULTTMPPATH Integer Sets the temporary folder to the Windows default. 0 = Off 1 = On If this option is Off, the program uses the folder defined by DCNV_STMPPATH

IpDCnvGetStr
Page 2-253
IpDCnvGetStr Syntax IpDCnvGetStr(Attribute, Value)
Description This function gets the current values of the deconvolution attributes.
Parameters Attribute Integer DCNV_STMPPATH sets the folder for temporary files of deconvolution. This path is used for saving the images when DCNV_BDEFAULTTMPPATH option is 0
Value String Value is the variable to receive the attribute’s value. See Comments.
Return Value 0 if successful, a negative error code if failed.
Comments This function is reserved for future expansion.
See Also IpDCnvSet, IpDCnvSetSng
IpDCnvSet Syntax IpDCnvSet (Attribute, New Value)
Description This function sets the attribute to new values.
Parameters Attribute Integer Indicates the attribute to set. See list below and Comments.
New Value Integer New value for integer settings.
Return Value 0 if successful, a negative error code if failed.
Comments The Attribute parameter determines the attribute to set. This function is used only for Integer attributes.
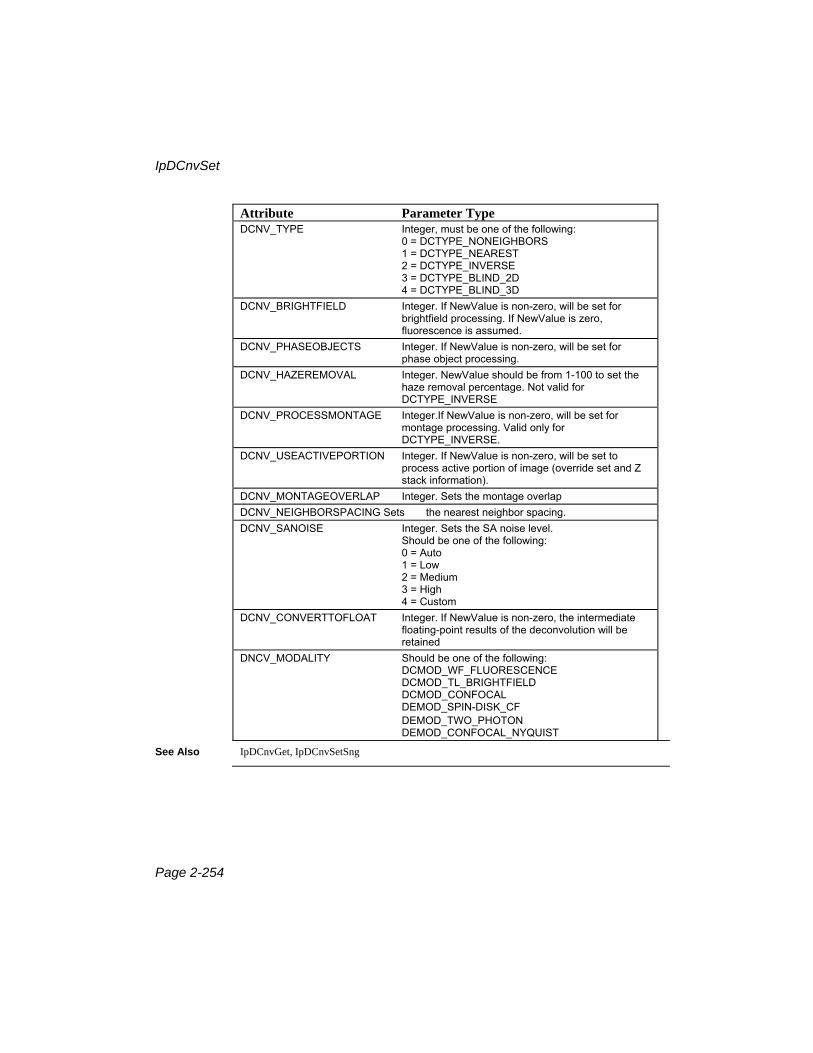
IpDCnvSet
Page 2-254
Attribute Parameter Type DCNV_TYPE Integer, must be one of the following:
0 = DCTYPE_NONEIGHBORS 1 = DCTYPE_NEAREST 2 = DCTYPE_INVERSE 3 = DCTYPE_BLIND_2D 4 = DCTYPE_BLIND_3D
DCNV_BRIGHTFIELD Integer. If NewValue is non-zero, will be set for brightfield processing. If NewValue is zero, fluorescence is assumed.
DCNV_PHASEOBJECTS Integer. If NewValue is non-zero, will be set for phase object processing.
DCNV_HAZEREMOVAL Integer. NewValue should be from 1-100 to set the haze removal percentage. Not valid for DCTYPE_INVERSE
DCNV_PROCESSMONTAGE Integer.If NewValue is non-zero, will be set for montage processing. Valid only for DCTYPE_INVERSE.
DCNV_USEACTIVEPORTION Integer. If NewValue is non-zero, will be set to process active portion of image (override set and Z stack information).
DCNV_MONTAGEOVERLAP Integer. Sets the montage overlap DCNV_NEIGHBORSPACING Sets the nearest neighbor spacing. DCNV_SANOISE Integer. Sets the SA noise level.
Should be one of the following: 0 = Auto 1 = Low 2 = Medium 3 = High 4 = Custom
DCNV_CONVERTTOFLOAT Integer. If NewValue is non-zero, the intermediate floating-point results of the deconvolution will be retained
DNCV_MODALITY Should be one of the following: DCMOD_WF_FLUORESCENCE DCMOD_TL_BRIGHTFIELD DCMOD_CONFOCAL DEMOD_SPIN-DISK_CF DEMOD_TWO_PHOTON DEMOD_CONFOCAL_NYQUIST
See Also IpDCnvGet, IpDCnvSetSng
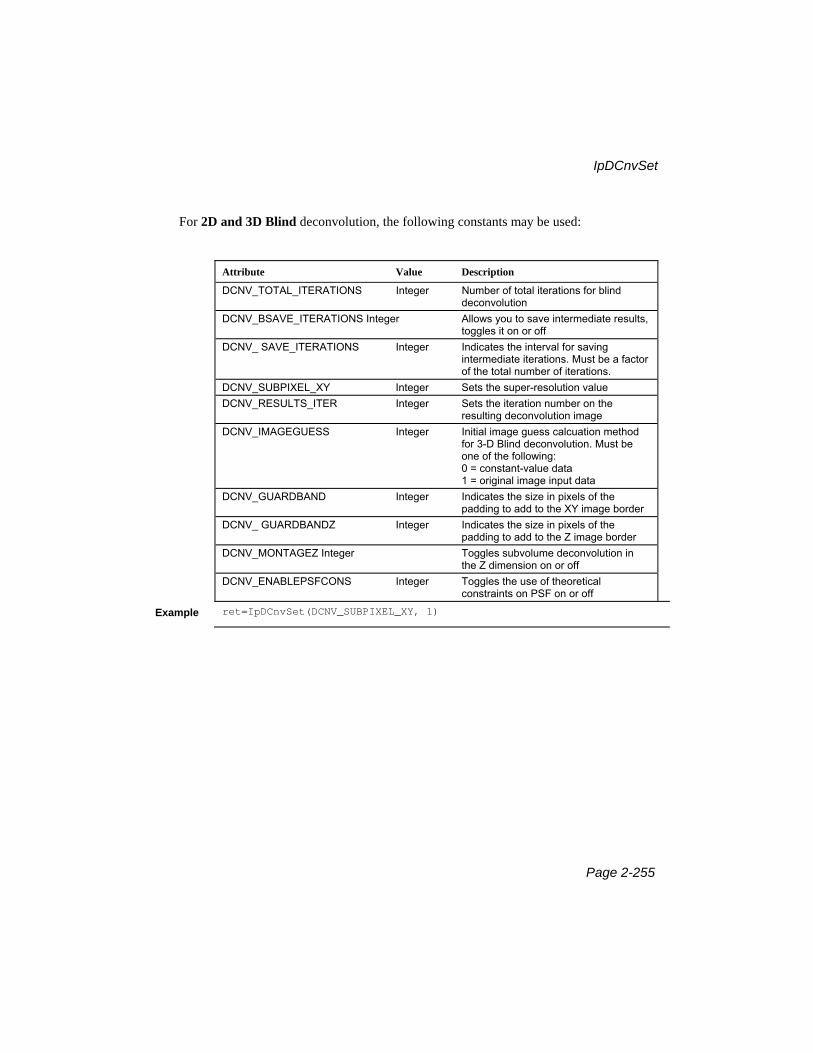
IpDCnvSet
Page 2-255
For 2D and 3D Blind deconvolution, the following constants may be used:
Attribute Value Description
DCNV_TOTAL_ITERATIONS Integer Number of total iterations for blind deconvolution
DCNV_BSAVE_ITERATIONS Integer Allows you to save intermediate results, toggles it on or off
DCNV_ SAVE_ITERATIONS Integer Indicates the interval for saving intermediate iterations. Must be a factor of the total number of iterations.
DCNV_SUBPIXEL_XY Integer Sets the super-resolution value DCNV_RESULTS_ITER Integer Sets the iteration number on the
resulting deconvolution image DCNV_IMAGEGUESS Integer Initial image guess calcuation method
for 3-D Blind deconvolution. Must be one of the following: 0 = constant-value data 1 = original image input data
DCNV_GUARDBAND Integer Indicates the size in pixels of the padding to add to the XY image border
DCNV_ GUARDBANDZ Integer Indicates the size in pixels of the padding to add to the Z image border
DCNV_MONTAGEZ Integer Toggles subvolume deconvolution in the Z dimension on or off
DCNV_ENABLEPSFCONS Integer Toggles the use of theoretical constraints on PSF on or off
Example ret=IpDCnvSet(DCNV_SUBPIXEL_XY, 1)

IpDCnvSet
Page 2-256
For 2D Blind deconvolution, the following constants may be used:
Attribute Value Description
DCNV_BUSEACCELERATION Integer Use acceleartion scheme for 2D-blind deconvolution
DCNV_B1DDEBLUR Integer Deblur only in the horizontal direction DCNV_BOBJSMOOTHING Integer Smooth initial object estimate flag DCNV_BPIXELSATURATION Integer Image contains saturated pixels DCNV_BREMOVESCANLINES Integer Remove the scan lines artifact DCNV_BSUPPRESSNOISE Integer Toggles noise compensation on or off DCNV_BSYMMETRICPSF Integer Forces PSF to be symmetric when
rotated 90 degrees DCNV_IMAGEGUESS2D Integer Initial image guess calcuation method
for 2-D Blind deconvolution. Must be one of the following: 0 = constant-value data 1 = original image input data
DCNV_NINTERNALPS FITERATIONS
Integer Number of PSF iterations per cycle
DCNV_SHGUARDBAND2D Integer Indicates the size in pixels of the padding to add to the Z image border for 2-D blind deconvolution
DCNV_BBACKGROUND CORRECTION
Integer Correct background subtraction minimum intensity value
DCNV_BLIVE2D Integer Toggles the live deconvolution preview on or off
DCNV_BEDFAULTTMPPATH Integer Sets the temporary folder to the Windows default. 0 = Off 1 = On If this option is Off, the program uses the folder defined by DCNV_STMPPATH
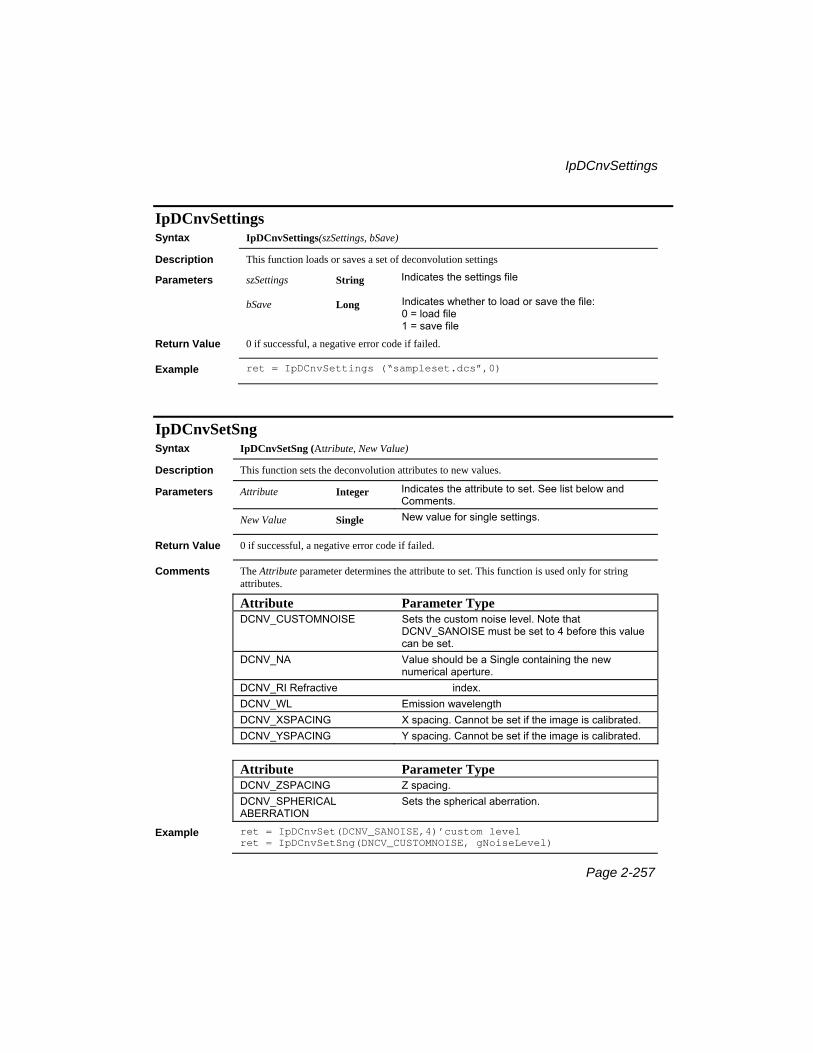
IpDCnvSettings
Page 2-257
IpDCnvSettings Syntax IpDCnvSettings(szSettings, bSave)
Description This function loads or saves a set of deconvolution settings
Parameters szSettings String Indicates the settings file
bSave Long Indicates whether to load or save the file: 0 = load file 1 = save file
Return Value 0 if successful, a negative error code if failed.
Example ret = IpDCnvSettings (“sampleset.dcs”,0)
IpDCnvSetSng Syntax IpDCnvSetSng (Attribute, New Value)
Description This function sets the deconvolution attributes to new values.
Parameters Attribute Integer Indicates the attribute to set. See list below and Comments.
New Value Single New value for single settings.
Return Value 0 if successful, a negative error code if failed.
Comments The Attribute parameter determines the attribute to set. This function is used only for string attributes.
Attribute Parameter Type DCNV_CUSTOMNOISE Sets the custom noise level. Note that
DCNV_SANOISE must be set to 4 before this value can be set.
DCNV_NA Value should be a Single containing the new numerical aperture.
DCNV_RI Refractive index. DCNV_WL Emission wavelength DCNV_XSPACING X spacing. Cannot be set if the image is calibrated. DCNV_YSPACING Y spacing. Cannot be set if the image is calibrated.
Attribute Parameter Type DCNV_ZSPACING Z spacing. DCNV_SPHERICAL ABERRATION
Sets the spherical aberration.
Example ret = IpDCnvSet(DCNV_SANOISE,4)’custom level ret = IpDCnvSetSng(DNCV_CUSTOMNOISE, gNoiseLevel)

IpDCnvSetSng
Page 2-258
See Also IpDCnvGetStr
For 3D Blind deconvolution, the following constants may be used:
Attribute Parameter Type DCNV_PSFSTREETCHFACTOR Stretch factor to apply to the calculated PSF DCNV_PSFCENTRALRADIUS Radius in pixels of the initial PSF hourglass “waist”
For 2D Blind deconvolution, the following constants may be used:
Attribute Parameter Type DCNV_FPERCENTSATURATION Percentage of the max intensity for pixels to be
considered saturated
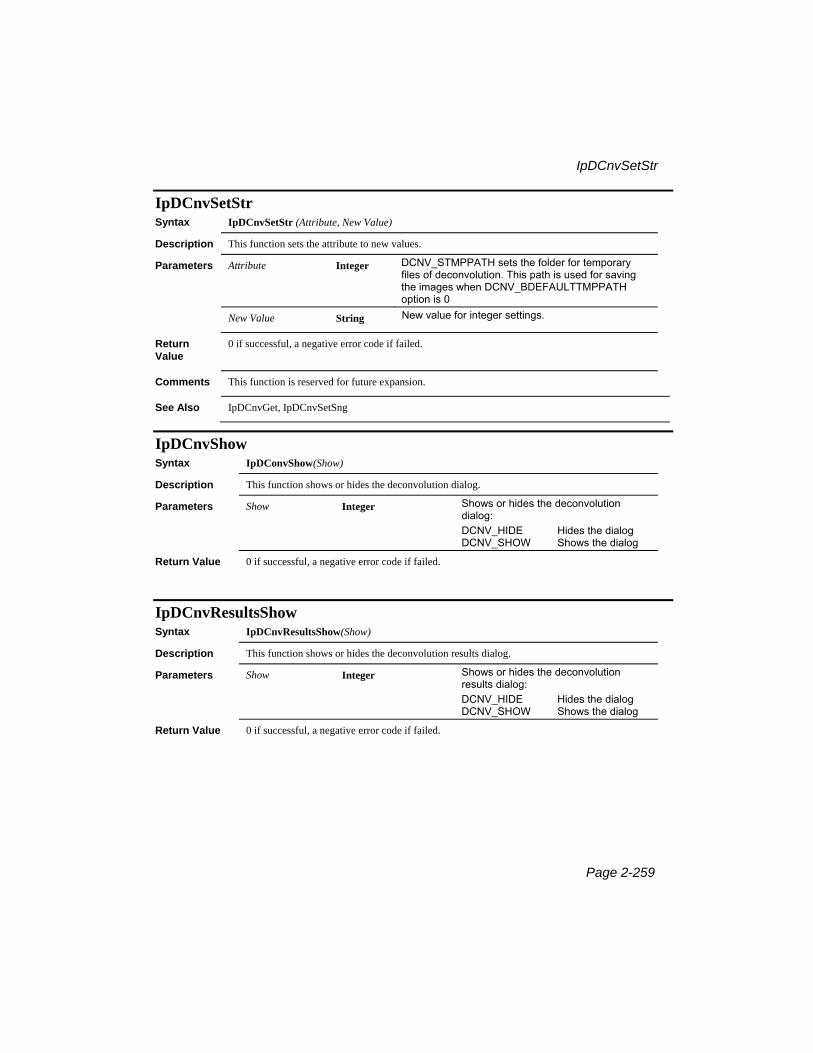
IpDCnvSetStr
Page 2-259
IpDCnvSetStr Syntax IpDCnvSetStr (Attribute, New Value)
Description This function sets the attribute to new values.
Parameters Attribute Integer DCNV_STMPPATH sets the folder for temporary files of deconvolution. This path is used for saving the images when DCNV_BDEFAULTTMPPATH option is 0
New Value String New value for integer settings.
Return Value
0 if successful, a negative error code if failed.
Comments This function is reserved for future expansion.
See Also IpDCnvGet, IpDCnvSetSng
IpDCnvShow Syntax IpDConvShow(Show)
Description This function shows or hides the deconvolution dialog.
Parameters Show Integer Shows or hides the deconvolution dialog: DCNV_HIDE Hides the dialog DCNV_SHOW Shows the dialog
Return Value 0 if successful, a negative error code if failed.
IpDCnvResultsShow Syntax IpDCnvResultsShow(Show)
Description This function shows or hides the deconvolution results dialog.
Parameters Show Integer Shows or hides the deconvolution results dialog: DCNV_HIDE Hides the dialog DCNV_SHOW Shows the dialog
Return Value 0 if successful, a negative error code if failed.
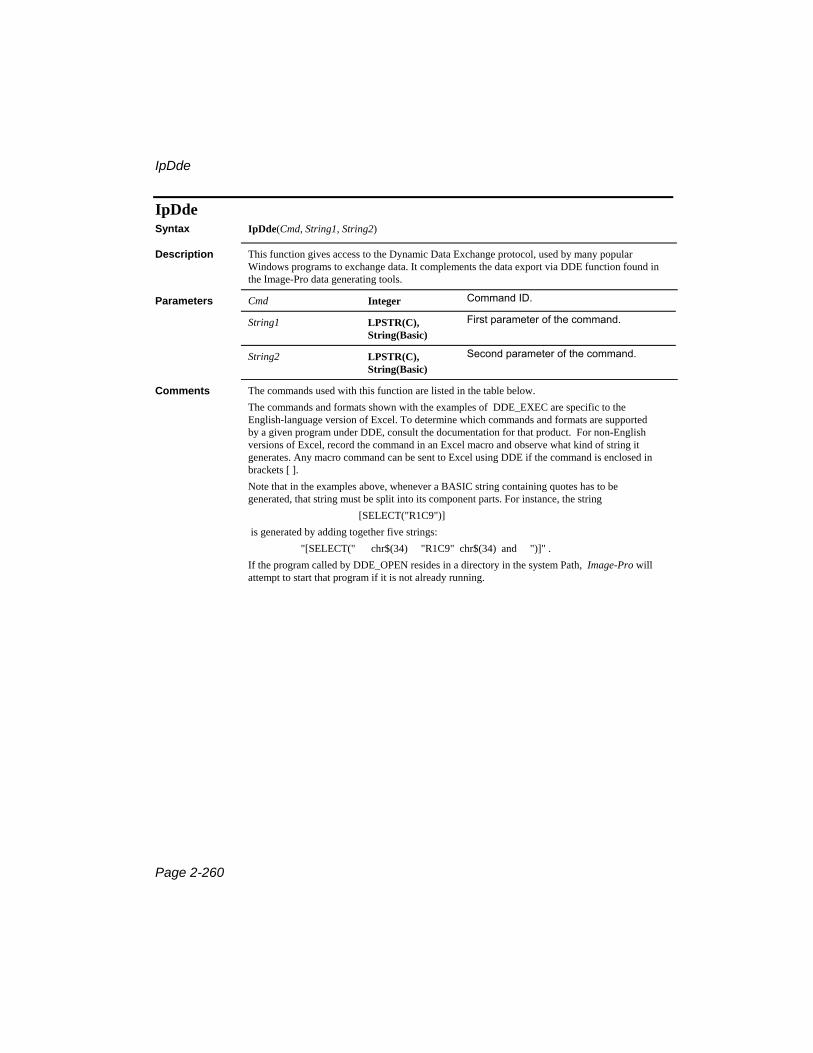
IpDde
Page 2-260
IpDde Syntax IpDde(Cmd, String1, String2)
Description This function gives access to the Dynamic Data Exchange protocol, used by many popular Windows programs to exchange data. It complements the data export via DDE function found in the Image-Pro data generating tools.
Parameters Cmd Integer Command ID.
String1 LPSTR(C), String(Basic)
First parameter of the command.
String2 LPSTR(C), String(Basic)
Second parameter of the command.
Comments The commands used with this function are listed in the table below. The commands and formats shown with the examples of DDE_EXEC are specific to the English-language version of Excel. To determine which commands and formats are supported by a given program under DDE, consult the documentation for that product. For non-English versions of Excel, record the command in an Excel macro and observe what kind of string it generates. Any macro command can be sent to Excel using DDE if the command is enclosed in brackets [ ]. Note that in the examples above, whenever a BASIC string containing quotes has to be generated, that string must be split into its component parts. For instance, the string [SELECT("R1C9")] is generated by adding together five strings: "[SELECT(" chr$(34) "R1C9" chr$(34) and ")]" . If the program called by DDE_OPEN resides in a directory in the system Path, Image-Pro will attempt to start that program if it is not already running.
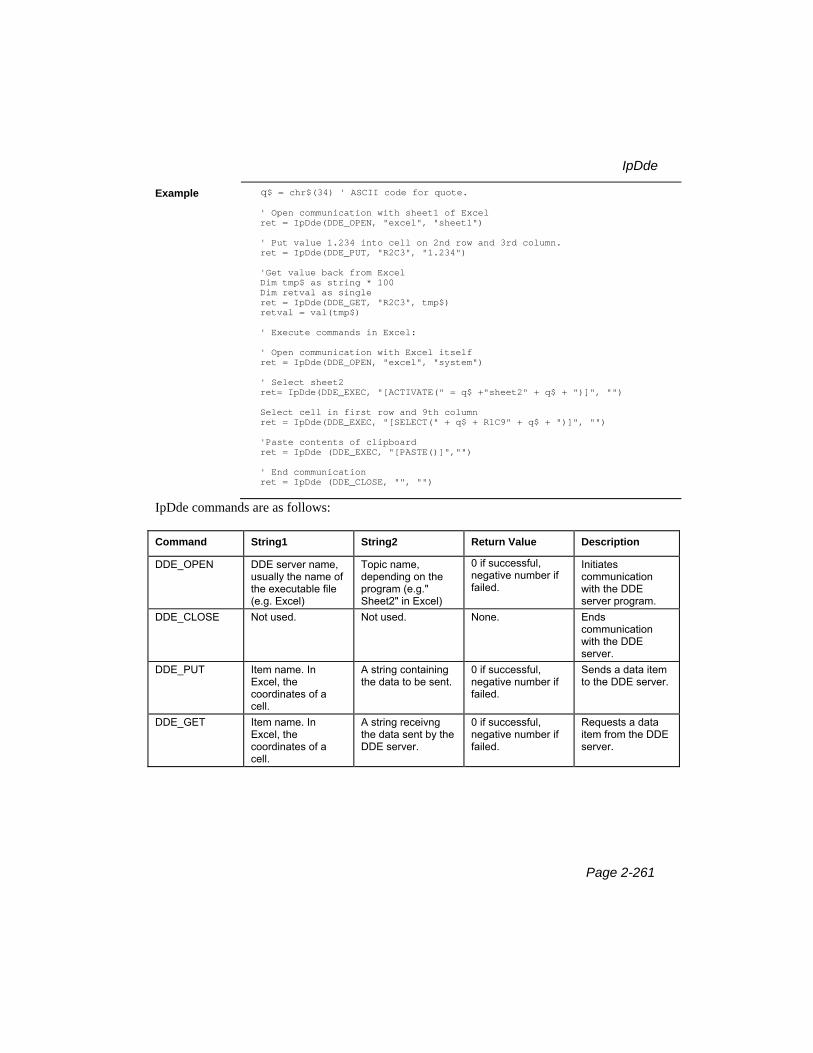
IpDde
Page 2-261
Example q$ = chr$(34) ' ASCII code for quote. ' Open communication with sheet1 of Excel ret = IpDde(DDE_OPEN, "excel", "sheet1") ' Put value 1.234 into cell on 2nd row and 3rd column. ret = IpDde(DDE_PUT, "R2C3", "1.234") 'Get value back from Excel Dim tmp$ as string * 100 Dim retval as single ret = IpDde(DDE_GET, "R2C3", tmp$) retval = val(tmp$) ' Execute commands in Excel: ' Open communication with Excel itself ret = IpDde(DDE_OPEN, "excel", "system") ' Select sheet2 ret= IpDde(DDE_EXEC, "[ACTIVATE(" = q$ +"sheet2" + q$ + ")]", "") Select cell in first row and 9th column ret = IpDde(DDE_EXEC, "[SELECT(" + q$ + R1C9" + q$ + ")]", "") 'Paste contents of clipboard ret = IpDde (DDE_EXEC, "[PASTE()]","") ' End communication ret = IpDde (DDE_CLOSE, "", "")
IpDde commands are as follows: Command String1 String2 Return Value Description
DDE_OPEN DDE server name, usually the name of the executable file (e.g. Excel)
Topic name, depending on the program (e.g." Sheet2" in Excel)
0 if successful, negative number if failed.
Initiates communication with the DDE server program.
DDE_CLOSE Not used. Not used. None. Ends communication with the DDE server.
DDE_PUT Item name. In Excel, the coordinates of a cell.
A string containing the data to be sent.
0 if successful, negative number if failed.
Sends a data item to the DDE server.
DDE_GET Item name. In Excel, the coordinates of a cell.
A string receivng the data sent by the DDE server.
0 if successful, negative number if failed.
Requests a data item from the DDE server.

IpDemoGetStr
Page 2-262
Command String1 String2 Return Value Description
DDE_SET Item name. In Excel, the coordinates of a cell
Must be one of the following: Row Col Row_Inc Col_Inc Topic
0 if successful, negative number if failed.
Sends a data item to the DDE server.
DDE_EXEC Command to be executed by the DDE server.
Not used. 0 if successful, negative number if failed.
Sends a command to be executed by the DDE server.
IpDemoGetStr Syntax IpDemoGetStr(Cmd, Param, OutVal)
Description Use this command to find the name of an IPP Demo Macro.
Parameters Cmd String See below
Param Integer An integer specifying data with which Cmd will operate.
OutVal See below The address (name) of the variable that will receive the requested data. Be sure this variable is of the type required by Cmd. See Cmd description under Comments, below.
Cmd VALUE DESCRIPTION Param VALUE OutVal TYPE
DEMO_ATTR_LISTPATH
Use this command to determine the name and location of the folder holding one or more .MPL files that define the list of macrosd disaplayed in the macro editor.
The index of the macro of interest, from 0 to the number of demo macros, -1.
STRING
Return Value The name of the available macro
IpDemoSetStr Syntax IpDemoSetStr(Cmd, Param, OutVal)
Description Use this command toset the name of an IPP Demo Macro.
Parameters Cmd String See below
Param Integer An integer specifying data with which Cmd will operate.

IpDemoShow
Page 2-263
OutVal See below The address (name) of the variable that will receive the requested data. Be sure this variable is of the type required by Cmd. See Cmd description under Comments, below.
Cmd VALUE DESCRIPTION Param VALUE OutVal TYPE
DEMO_ATTR_LISTPATH
Use this command to set the name and location of the folder holding one or more .MPL files that define the list of macrosd disaplayed in the macro editor.
The index of the macro of interest, from 0 to the number of demo macros, -1.
STRING
Return Value The name of the available macro
IpDemoShow Syntax IpDemoShow(Show )
Description This function shows or hides the macro player.
Parameters Show Integer If non-zero, show the macro player. If zero, hide the macro player
IpDocClick Syntax IpDocClick(Message, CurPos)
Description This function prompts the user to point to an image and press the left mouse button. It will write the position of the cursor to a variable that you specify.
Parameters Message String A string of text that is to be displayed in the message box.
CurPos POINTAPI The address (name) of the point-structure variable (of IPBasic type, POINTAPI) that will receive the position of the cursor when the user presses the left mouse button in the image.
Return Value This function returns the Document ID of the image that was clicked, or IPCERR_NODOC if you clicked outside of an image workspace. It will return IPCERR_CANCELLED if you clicked the Continue button on the prompt dialog.
Example The following example asks the user to select two points in an image and then measures a profile between those points.

IpDocClose
Page 2-264
dim mypt1 as pointapi, mypt2 as pointapi dim docid1 as integer, docid2 as integer docid1 = IpDocClick("Select the 1st point", mypt1) if docid1 >= 0 then docid2 = IpDocClick("Select the 2nd point", mypt2) if docid2 = docid1 then ret = IpProfCreate() ret = IpProfLineMove(mypt1.x, mypt1.y, mypt2.x, ypt2.y) end if end if
Comments The coordinates returned in CurPos are actual image coordinates. They are not affected by zoom and pan settings. If -1 is returned, the contents of CurPos is not set and, therefore, might not be valid.
See Also IpBlbGet(GETHIT), IpDocGet
IpDocClose Syntax IpDocClose( )
Description This function closes the active image window.
See Also IpAppCloseAll
IpDocCloseEx Syntax IpDocCloseEx(docID)
Description This function closes the document by document ID.
Parameters docID Integer Identifies the document to be closed.
Comments The workspace identified by the document ID does not have to be active.
See Also IpDocGet, IpDocClose, IpDocFind, IpDocMove, IpDocSize
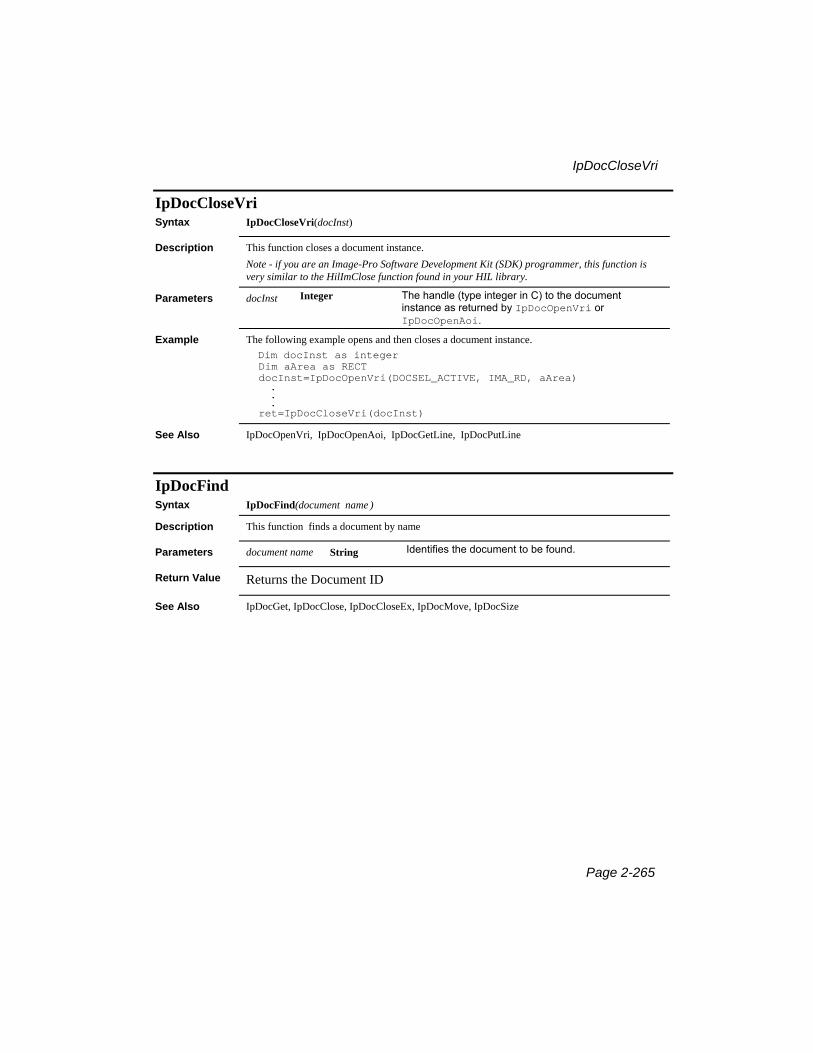
IpDocCloseVri
Page 2-265
IpDocCloseVri Syntax IpDocCloseVri(docInst)
Description This function closes a document instance. Note - if you are an Image-Pro Software Development Kit (SDK) programmer, this function is very similar to the HilImClose function found in your HIL library.
Parameters docInst Integer The handle (type integer in C) to the document instance as returned by IpDocOpenVri or IpDocOpenAoi.
Example The following example opens and then closes a document instance. Dim docInst as integer Dim aArea as RECT docInst=IpDocOpenVri(DOCSEL_ACTIVE, IMA_RD, aArea) . . .
ret=IpDocCloseVri(docInst)
See Also IpDocOpenVri, IpDocOpenAoi, IpDocGetLine, IpDocPutLine
IpDocFind Syntax IpDocFind(document name )
Description This function finds a document by name
Parameters document name String Identifies the document to be found.
Return Value Returns the Document ID
See Also IpDocGet, IpDocClose, IpDocCloseEx, IpDocMove, IpDocSize
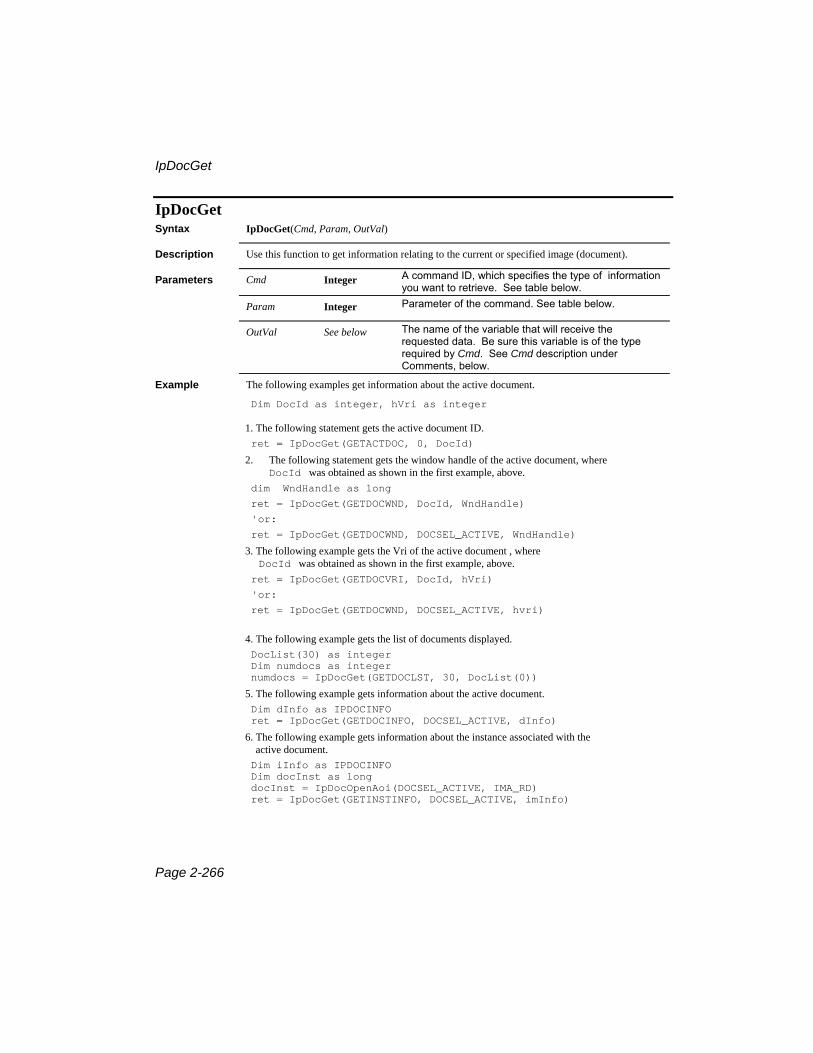
IpDocGet
Page 2-266
IpDocGet Syntax IpDocGet(Cmd, Param, OutVal)
Description Use this function to get information relating to the current or specified image (document).
Parameters Cmd Integer A command ID, which specifies the type of information you want to retrieve. See table below.
Param Integer Parameter of the command. See table below.
OutVal See below The name of the variable that will receive the requested data. Be sure this variable is of the type required by Cmd. See Cmd description under Comments, below.
Example The following examples get information about the active document. Dim DocId as integer, hVri as integer
1. The following statement gets the active document ID. ret = IpDocGet(GETACTDOC, 0, DocId)
2. The following statement gets the window handle of the active document, where DocId was obtained as shown in the first example, above.
dim WndHandle as long ret = IpDocGet(GETDOCWND, DocId, WndHandle) 'or: ret = IpDocGet(GETDOCWND, DOCSEL_ACTIVE, WndHandle)
3. The following example gets the Vri of the active document , where DocId was obtained as shown in the first example, above. ret = IpDocGet(GETDOCVRI, DocId, hVri) 'or: ret = IpDocGet(GETDOCWND, DOCSEL_ACTIVE, hvri)
4. The following example gets the list of documents displayed. DocList(30) as integer Dim numdocs as integer numdocs = IpDocGet(GETDOCLST, 30, DocList(0))
5. The following example gets information about the active document. Dim dInfo as IPDOCINFO ret = IpDocGet(GETDOCINFO, DOCSEL_ACTIVE, dInfo)
6. The following example gets information about the instance associated with the active document. Dim iInfo as IPDOCINFO Dim docInst as long docInst = IpDocOpenAoi(DOCSEL_ACTIVE, IMA_RD) ret = IpDocGet(GETINSTINFO, DOCSEL_ACTIVE, imInfo)
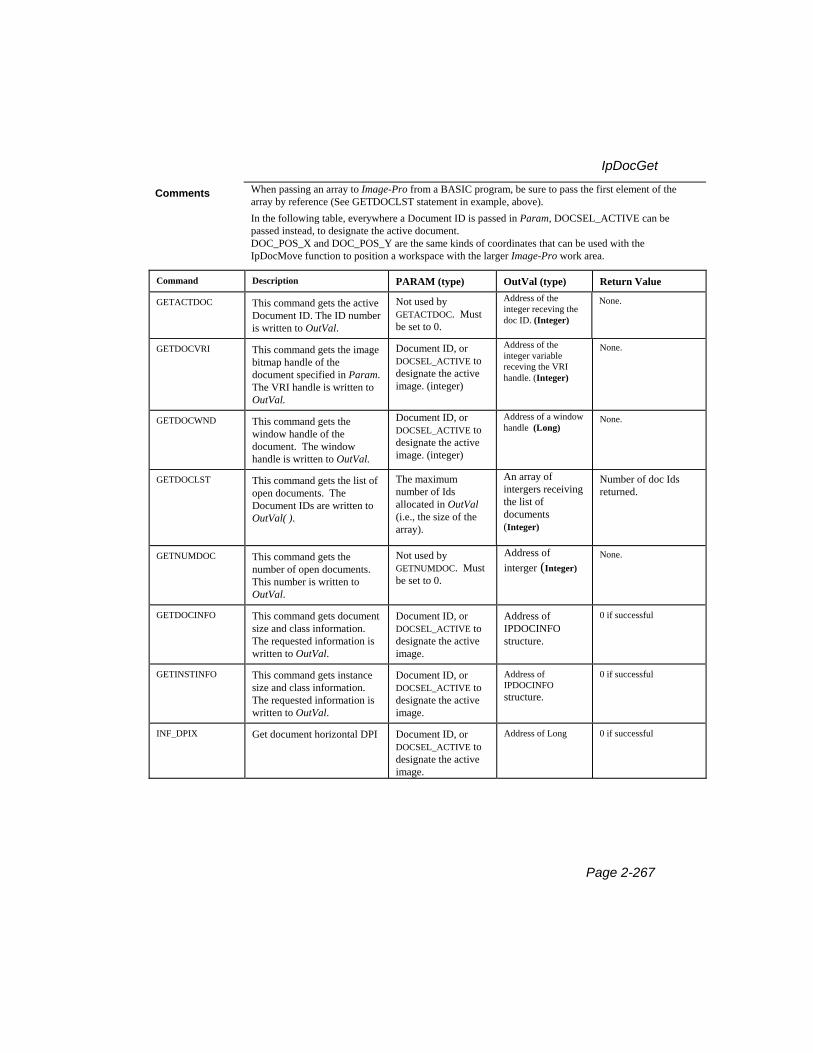
IpDocGet
Page 2-267
Comments When passing an array to Image-Pro from a BASIC program, be sure to pass the first element of the array by reference (See GETDOCLST statement in example, above). In the following table, everywhere a Document ID is passed in Param, DOCSEL_ACTIVE can be passed instead, to designate the active document. DOC_POS_X and DOC_POS_Y are the same kinds of coordinates that can be used with the IpDocMove function to position a workspace with the larger Image-Pro work area.
Command Description PARAM (type) OutVal (type) Return Value
GETACTDOC This command gets the active Document ID. The ID number is written to OutVal.
Not used by GETACTDOC. Must be set to 0.
Address of the integer receving the doc ID. (Integer)
None.
GETDOCVRI This command gets the image bitmap handle of the document specified in Param. The VRI handle is written to OutVal.
Document ID, or DOCSEL_ACTIVE to designate the active image. (integer)
Address of the integer variable receving the VRI handle. (Integer)
None.
GETDOCWND This command gets the window handle of the document. The window handle is written to OutVal.
Document ID, or DOCSEL_ACTIVE to designate the active image. (integer)
Address of a window handle (Long)
None.
GETDOCLST This command gets the list of open documents. The Document IDs are written to OutVal( ).
The maximum number of Ids allocated in OutVal (i.e., the size of the array).
An array of intergers receiving the list of documents (Integer)
Number of doc Ids returned.
GETNUMDOC This command gets the number of open documents. This number is written to OutVal.
Not used by GETNUMDOC. Must be set to 0.
Address of interger (Integer)
None.
GETDOCINFO This command gets document size and class information. The requested information is written to OutVal.
Document ID, or DOCSEL_ACTIVE to designate the active image.
Address of IPDOCINFO structure.
0 if successful
GETINSTINFO This command gets instance size and class information. The requested information is written to OutVal.
Document ID, or DOCSEL_ACTIVE to designate the active image.
Address of IPDOCINFO structure.
0 if successful
INF_DPIX Get document horizontal DPI Document ID, or DOCSEL_ACTIVE to designate the active image.
Address of Long 0 if successful

IpDocGet
Page 2-268
Command Description PARAM (type) OutVal (type) Return Value
INF_DPIY Get document vertical DPI Document ID, or DOCSEL_ACTIVE to designate the active image.
Address of Long 0 if successful
INF_DATE Get document date Document ID, or DOCSEL_ACTIVE to designate the active image.
Address of Long 0 if successful
INF_IS_MODIFIED Indicates if the specified image has been modified
Document ID, or DOCSEL_ACTIVE to designate the active image.
Address of Long 0 if successful
INF_RANGE This command gets the single-point range of the specified image workspace. It is returned for all image types, and can be useful in determining the dynamic range (range of pixel values) of the specified image.
Document ID, or DOCSEL_ACTIVE to designate the active image.
An array of 2 singles, the first being the minimum intensity value, and the second being the maximum.
0 if successful
INF_XPOSITION INF_YPOSITION INF_ZPOSITION
These commands get the image's absolute position when captured, if known. The IPDOCPOS structure indicates whether the position is known.
Document ID, or DOCSEL_ACTIVE to designate the active image.
IPDOCPOS structure to receive the position information.
0 if successful
INF_XSCROLL This command gets the current horizontal scroll position.
Document ID, or DOCSEL_ACTIVE to designate the active image.
A Long to receive the position.
0 if successful
INF_YSCROLL This command gets the current vertical scroll position.
Document ID, or DOCSEL_ACTIVE to designate the active image.
A Long to receive the position.
0 if successful
INF_ZOOMFACTOR This command gets the current Zoom factor. Zoom factors are (10), (25), (50), 100 (200), (400), (800) and (1600).
Document ID, or DOCSEL_ACTIVE to designate the active image.
A Long to receive the Zoom factor
0 if successful

IpDocGet
Page 2-269
DOC_POS_X Gets the X position of the specified image in the workspace on your screen
Document ID, or DOCSEL_ACTIVE to designate the active image
Address of Integer
0 if successful
DOC_POS_Y Gets the Y position of the specified image in the workspace on your screen
Document ID, or DOCSEL_ACTIVE to designate the active image
Address of Integer
0 if successful
The following table describes the IPDOCINFO structure:
C DEFINITION BASIC DEFINITION DESCRIPTION
short Width; Width As Integer Width of document (or document instance)
short Height; Height As Integer Height of document (or document instance)
short iClass; iClass As Integer Class of document, as follows IMC_BILEVEL - 1bpp (not supported) IMC_GRAY - 8bpp IMC_GRAY12 - 12bpp IMC_GRAY16 - 16bpp IMC_PALETTE - 8bpp IMC_RGB - 24bpp IMC_RGB36 - 36 bpp IMC_RGB48 - 48bpp IMC_SINGLE - 32bpp
short Bpp; Bpp As Integer Bits per pixel of document (bpp). See above.
RECT Extent; Extent As RECT For a document the left and top values are always 0. The right and bottom values are Width-1 and Height-1. For an instance, RECT will be the extent of the area that was opened for read/write (see IpDocOpenVri).
See Also IpDocOpenAoi, IpDocOpenVri, IpDocGetStr, IpDocGetPosition

IpDocGetArea
Page 2-270
IpDocGetArea Syntax IpDocGetArea(DocID, rArea, ImageBuffer, gMode)
Description This function reads a rectangular area from an Image-Pro image bitmap into a user-defined array. There is no Image-Pro command equivalent to this function; it is one that must be manually written with the macro editor. Currently, this function cannot be used with Bilevel images. If you want to obtain, and manipulate a block of data from a Bilevel image, convert it first to Gray Scale. Note - Because of array size limitation in IPBasic (64K), this function is intended to be used with a Visual Basic program.
Parameters DocID Integer An integer representing the document's ID, or DOCSEL_ACTIVE to designate the active image.
rArea RECT A rectangle specifying the area of the document to be read.
ImageBuffer See below The address (name) of the array variable that will receive the requested data. The type and size of this array is dependent upon the source image's class. See ImageBuffer table under Comments, below.
gMode Integer A value of 0 or CPROG specifying the manner in which the image data are to be written to the ImageBuffer. Where: 0 - writes the data in BASIC mode CPROG - writes the data in C mode See Comments, below, for more about gMode.
Return Value This function returns a 0 if successful.
Example The following example obtains a block of 8-bit Gray Scale image data and inverts its pixel values.
Dim i as integer Dim j as integer Dim Reg as RECT Reg.left = 100 Reg.top = 100 Reg.right = 200 Reg.bottom= 150 Redim ImBuf(Reg.left to Reg.right,Reg.top to Reg.bottom) as integer ret=IpDocGetArea(DOCSEL_ACTIVE,Reg,ImBuf(Reg.left,Reg.top),0) for j=Reg.top to Reg.bottom Debug.print j for i=Reg.left to Reg.right ImBuf(i,j)=255-ImBuf(i,j) next i
next j ret = IpDocPutArea(DOCSEL_ACTIVE, Reg, ImBuf(Reg.left,Reg.top), 0)

IpDocGetArea
Page 2-271
The following example reads an entire 8-bit Gray Scale image. Dim iInfo as IPDOCINFO ret=IpDocGet(GETDOCINFO, DOCSEL_ACTIVE, iInfo) Redim ImBuf(1 to iInfo.Width,1 to iInfo.Height) as integer ret=IpDocGetArea(DOCSEL_ACTIVE,iInfo.Extent,ImBuf(1,1),0) ' refresh the display of the active document. ret=IpAppUpdateDoc(DOCSEL_ACTIVE)
Comments The gMode parameter determines how IMC_GRAY, IMC_PALETTE and IMC_RGB data are written to your array. These image classes use 8 bits to represent each pixel (or color channel). BASIC, however, does not have an 8-bit data type (the 16-bit integer type is the smallest numeric data unit). So, when these image data are written in BASIC mode (i.e., gMode = 0), each pixel (or color channel) is converted to 16-bits. Pixel values do not change (0 to 255), but the storage requirement is twice that of the source image data. If you are going to manipulate the image data with a BASIC program, you must set gMode to 0. In a C program, 8-bit pixels can be directly manipulated in an array of the BYTE (8-bit) data type. Therefore, if you are extracting data to an array that will be manipulated by C, set gMode to CPROG so that the data are written without the 8- to 16-bit conversion. This will result in faster processing times and greatly reduced storage requirements. The ImageBuffer table, below, describes the data types and storage requirements of each mode.
If the Image Class is... ImageBuffer size must be
If gMode is...
ImageBuffer Data Type must be
IMC_GRAY (rArea width, rArea height) 0 Integer CPROG BYTE IMC_PALETTE (rArea width, rArea height) 0 Integer CPROG BYTE IMC_RGB (3 * rArea.width, rArea height) 0 Integer CPROG BYTE IMC_RGB36 (3 * rArea.width, rArea height) 0 Integer CPROG short IMC_RGB48 (3 * rArea.width, rArea height) 0 Integer CPROG short IMC_GRAY12 (rArea.width, rArea height) 0 Integer CPROG short IMC_GRAY16 (rArea width, rArea height) 0 Integer CPROG short IMC_SINGLE (rArea width, rArea height) 0 Single
CPROG single
IMC_BILEVEL This class is not supported by IPP 4.0 OR HIGHER.
Bilevel image files are converted to grayscale automatically.

IpDocGetAreaSize
Page 2-272
Remember, a True Color image (i.e., IMC_RGB) will require 3 times as many elements per line as a Gray Scale (IMC_GRAY) image does, because each pixel is comprised of a 3-byte “chunk” of Red, Green and Blue values. Also, BASIC arrays are different from the C arrays used in Image-Pro in that they include a header containing information about the array itself. To emulate a C array when calling an Auto-Pro function, a BASIC program should pass the address of the first element of the array (i.e. pass the first element “by reference”). See the call to IpDocGetArea in the example, above.
See Also IpDocPutArea, IpDocGetLine, IpDocPutLine, IpDocOpenVri, IpDocClose, IpAoiGet
IpDocGetAreaSize Syntax IpDocGetAreaSize(DocID, Area, Mode, Size)
Description This function returns the size required to get the specified area.
Parameters DocID Integer An integer representing the document's ID, or DOCSEL_ACTIVE to designate the active image.
Area RECT A rectangle specifying the area of the document to be read. To get the size of a line, set Area, top equal to Area, bottom.
Mode Integer A value of 0 or CPROG specifying the manner in which the image data are to be written to the ImageBuffer. Where: 0 - writes the data in BASIC mode CPROG - writes the data in C mode See Comments, below, for more about gMode.
Size Long A long variable to receive the size required.
Return Value This function returns a 0 if successful, an error code if failed.
See Also IpDocGetArea
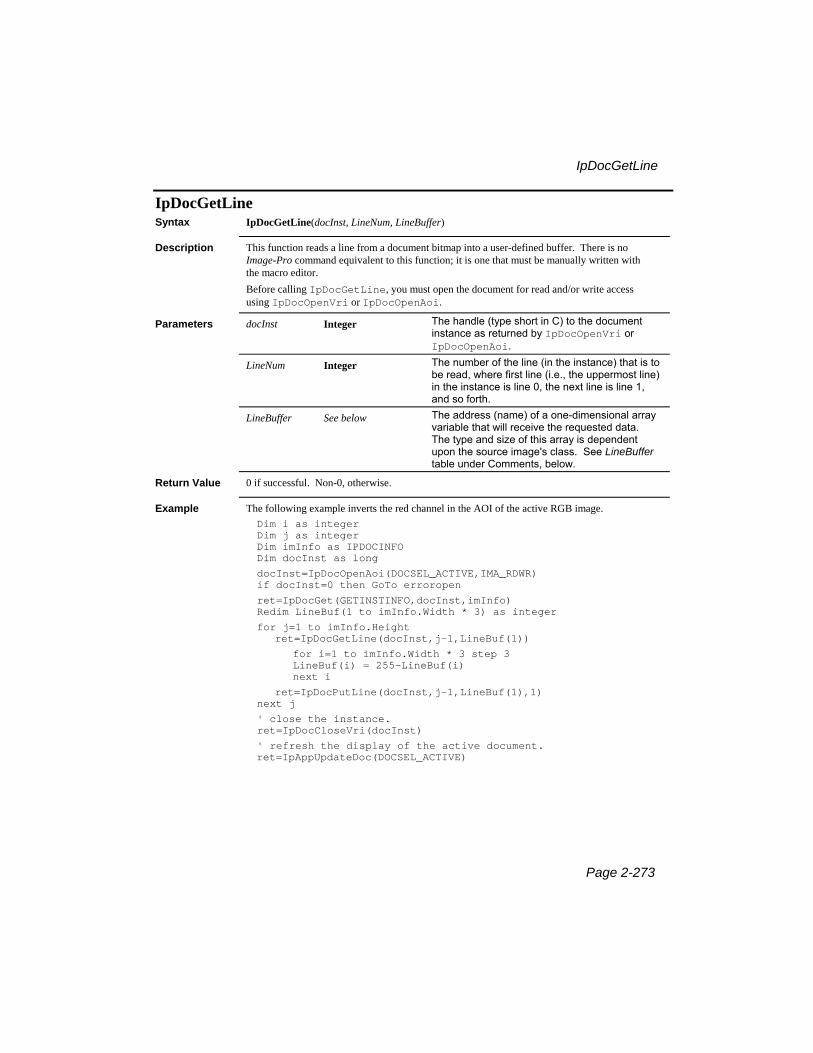
IpDocGetLine
Page 2-273
IpDocGetLine Syntax IpDocGetLine(docInst, LineNum, LineBuffer)
Description This function reads a line from a document bitmap into a user-defined buffer. There is no Image-Pro command equivalent to this function; it is one that must be manually written with the macro editor. Before calling IpDocGetLine, you must open the document for read and/or write access using IpDocOpenVri or IpDocOpenAoi.
Parameters docInst Integer
The handle (type short in C) to the document instance as returned by IpDocOpenVri or IpDocOpenAoi.
LineNum Integer The number of the line (in the instance) that is to be read, where first line (i.e., the uppermost line) in the instance is line 0, the next line is line 1, and so forth.
LineBuffer See below The address (name) of a one-dimensional array variable that will receive the requested data. The type and size of this array is dependent upon the source image's class. See LineBuffer table under Comments, below.
Return Value 0 if successful. Non-0, otherwise.
Example The following example inverts the red channel in the AOI of the active RGB image. Dim i as integer Dim j as integer Dim imInfo as IPDOCINFO Dim docInst as long
docInst=IpDocOpenAoi(DOCSEL_ACTIVE,IMA_RDWR) if docInst=0 then GoTo erroropen
ret=IpDocGet(GETINSTINFO,docInst,imInfo) Redim LineBuf(1 to imInfo.Width * 3) as integer
for j=1 to imInfo.Height ret=IpDocGetLine(docInst,j-1,LineBuf(1))
for i=1 to imInfo.Width * 3 step 3 LineBuf(i) = 255-LineBuf(i) next i
ret=IpDocPutLine(docInst,j-1,LineBuf(1),1) next j
' close the instance. ret=IpDocCloseVri(docInst)
' refresh the display of the active document. ret=IpAppUpdateDoc(DOCSEL_ACTIVE)
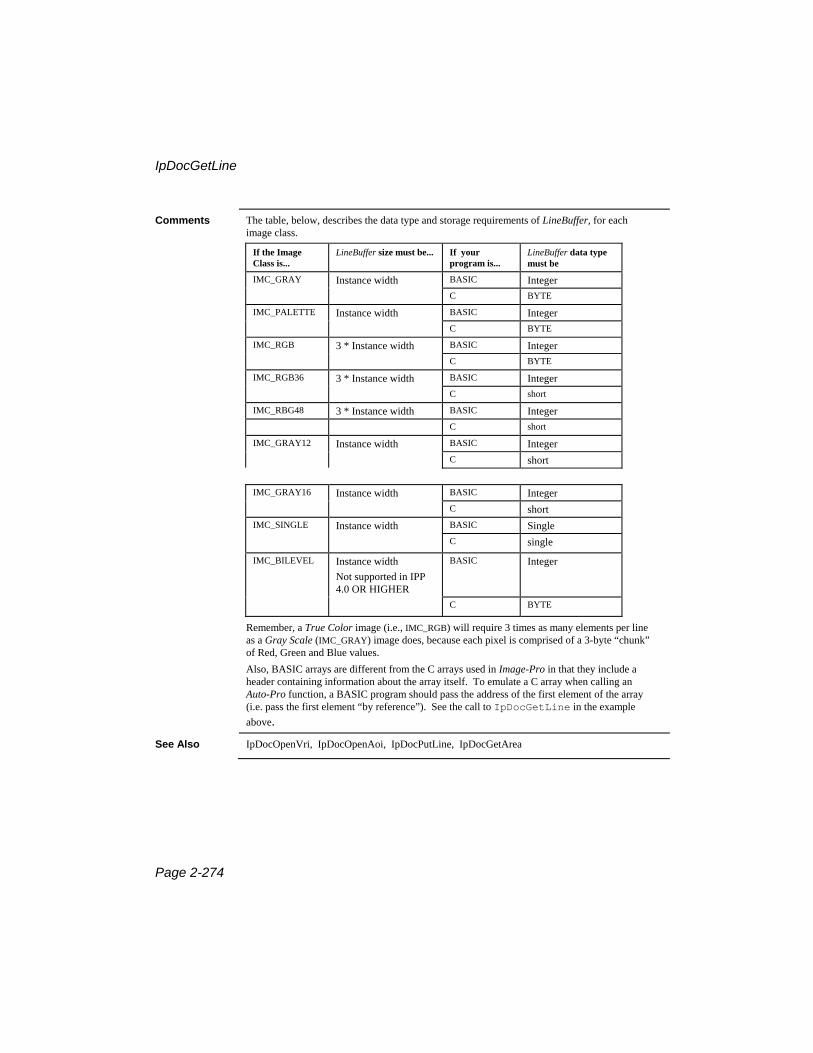
IpDocGetLine
Page 2-274
Comments The table, below, describes the data type and storage requirements of LineBuffer, for each image class.
If the Image Class is...
LineBuffer size must be... If your program is...
LineBuffer data type must be
IMC_GRAY Instance width BASIC Integer C BYTE
IMC_PALETTE Instance width BASIC Integer C BYTE
IMC_RGB 3 * Instance width BASIC Integer C BYTE
IMC_RGB36 3 * Instance width BASIC Integer C short
IMC_RBG48 3 * Instance width BASIC Integer C short
IMC_GRAY12 Instance width BASIC Integer C short
IMC_GRAY16 Instance width BASIC Integer C short IMC_SINGLE Instance width BASIC Single
C single
IMC_BILEVEL Instance width Not supported in IPP 4.0 OR HIGHER
BASIC Integer
C BYTE
Remember, a True Color image (i.e., IMC_RGB) will require 3 times as many elements per line as a Gray Scale (IMC_GRAY) image does, because each pixel is comprised of a 3-byte “chunk” of Red, Green and Blue values. Also, BASIC arrays are different from the C arrays used in Image-Pro in that they include a header containing information about the array itself. To emulate a C array when calling an Auto-Pro function, a BASIC program should pass the address of the first element of the array (i.e. pass the first element “by reference”). See the call to IpDocGetLine in the example above.
See Also IpDocOpenVri, IpDocOpenAoi, IpDocPutLine, IpDocGetArea

IpDocGetPropDate
Page 2-275
IpDocGetPropDate Syntax IpDocGetPropDate(DocID, PropertyID, Frame, DocProperty)
Description This function gets the current value of a property. Used for properties represented a date.
Parameters DocId Integer
The document ID of the image, or DOCSEL_ACTIVE to edit the active image.
PropertyID Integer The ID of the property to get, must be one of the following: DOCPROP_TIME = Capture time DOCPROP_TIMEPOINT = Time point
Frame Long The index of the frame to edit, or DOC_ACTIVEFRAME to get the property of the active (displayed) frame. For DOCPROP_TIME only, the DOC_ENTIREIMAGE property can be used to get the image time as a Date (see also the INF_DATE command to IpDocGet, which returns the image time as a string).
DocProperty Date A date variable to receive the current value of the specified property.
See Also IpDocSetPropDate

IpDocGetPropDbl
Page 2-276
IpDocGetPropDbl Syntax IpDocGetPropDbl(DocID, PropertyID, Frame, DocProperty)
Description This function gets the current value of a property. Used for properties represented by double-precision single-point values.
Parameters DocId Integer
The document ID of the image, or DOCSEL_ACTIVE to edit the active image.
PropertyID Integer The ID of the property to get, must be one of the following: DOCPROP_XPOSITION = Position of the image along the X axis, in the current calibration units. DOCPROP_YPOSITION = Position of the image along the X axis, in the current calibration units. DOCPROP_ZPOSITION = Position of the image along the Z axis, in the microns. DOCPROP_EMWAVELENGTH = The emissions wavelength in nm. DOCPROP_EXWAVELENGTH = the excitation wavelength in nm. DOCPROP_REFINDEX = Refractive index. DOCPROP_NUMAPERTURE = Numeric aperture.
DOCPROP_MAGNIFICATION = Magnification of the object in use when the image was captured.
DOCPROP_EXPOSURE = Exposure time in seconds used when the image was captured.
DOCPROP_GAIN = Digital gain setting used when the image was captured.
DOCPROP_GAMMA = Digital gamma setting used when the image was captured.
DOCPROP_OFFSET = Digital offset setting used when the image was captured.
Frame Long The index of the frame to edit, or DOC_ACTIVEFRAME to get the property of the active (displayed) frame.
DocProperty Double A double variable to receive the current value of the specified property.
See Also IpDocSetPropDbl
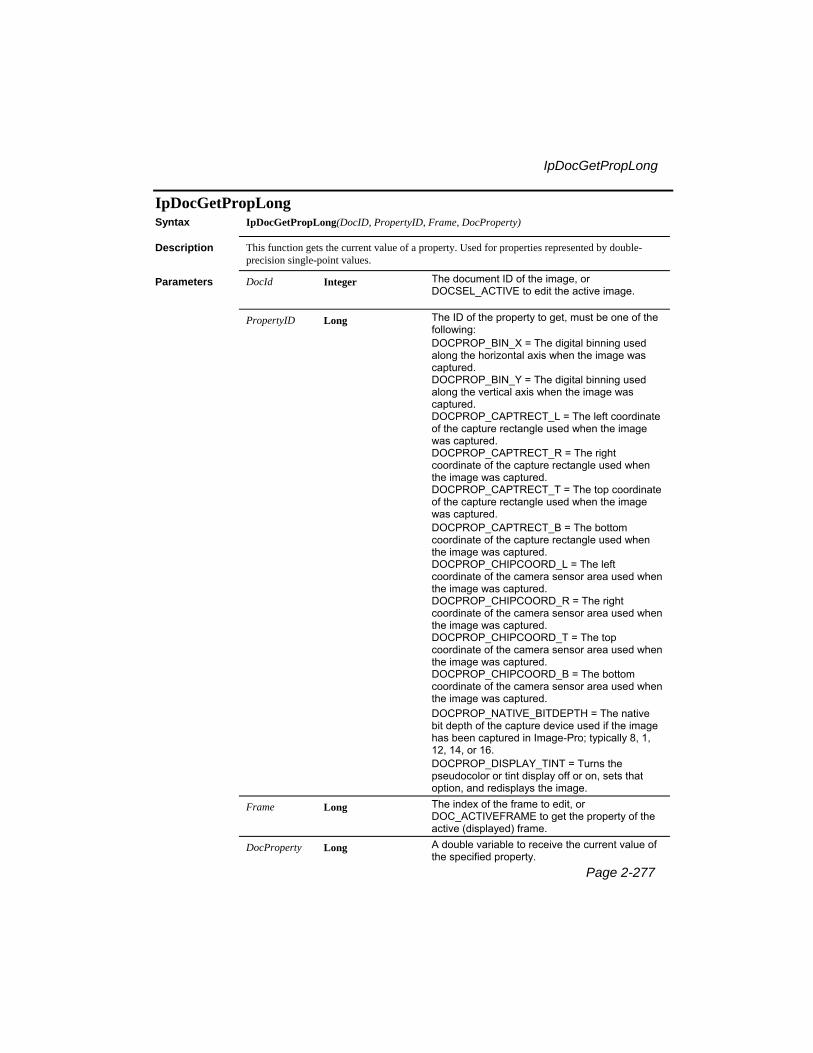
IpDocGetPropLong
Page 2-277
IpDocGetPropLong Syntax IpDocGetPropLong(DocID, PropertyID, Frame, DocProperty)
Description This function gets the current value of a property. Used for properties represented by double-precision single-point values.
Parameters DocId Integer
The document ID of the image, or DOCSEL_ACTIVE to edit the active image.
PropertyID Long The ID of the property to get, must be one of the following: DOCPROP_BIN_X = The digital binning used along the horizontal axis when the image was captured. DOCPROP_BIN_Y = The digital binning used along the vertical axis when the image was captured. DOCPROP_CAPTRECT_L = The left coordinate of the capture rectangle used when the image was captured. DOCPROP_CAPTRECT_R = The right coordinate of the capture rectangle used when the image was captured. DOCPROP_CAPTRECT_T = The top coordinate of the capture rectangle used when the image was captured.
DOCPROP_CAPTRECT_B = The bottom coordinate of the capture rectangle used when the image was captured. DOCPROP_CHIPCOORD_L = The left coordinate of the camera sensor area used when the image was captured. DOCPROP_CHIPCOORD_R = The right coordinate of the camera sensor area used when the image was captured. DOCPROP_CHIPCOORD_T = The top coordinate of the camera sensor area used when the image was captured. DOCPROP_CHIPCOORD_B = The bottom coordinate of the camera sensor area used when the image was captured.
DOCPROP_NATIVE_BITDEPTH = The native bit depth of the capture device used if the image has been captured in Image-Pro; typically 8, 1, 12, 14, or 16. DOCPROP_DISPLAY_TINT = Turns the pseudocolor or tint display off or on, sets that option, and redisplays the image.
Frame Long The index of the frame to edit, or DOC_ACTIVEFRAME to get the property of the active (displayed) frame.
DocProperty Long A double variable to receive the current value of the specified property.

IpDocGetPropStr
Page 2-278
Comments The DOCPROP_CHIPCOORD properties will only be present when the image was captured by a digital camera that uses a combination of binning and different sensor areas to support different capture resolutions. The coordinates are reported in relation to the sensor size at the current binning.
See Also IpDocSetPropLong
IpDocGetPropStr Syntax IpDocGetPropStr(DocID, PropertyID, Frame, DocProperty)
Description This function gets the current value of a property. Used for properties represented by a string.
Parameters DocId Integer
The document ID of the image, or DOCSEL_ACTIVE to edit the active image.
PropertyID Integer The ID of the property to get, must be one of the following: DOCPROP_CHANNELNAME = Channel name. DOCPROP_SITELABEL = Site label (i.e. Well Position or user-defined position). DOCPROP_CAPTDRIVERNAME = Name of the capture driver used in acquisition DOCPROP_CAPTCAMERANAME = Name of the camera used in acquisition DOCPROP_CAPTCAMERAID = Camera ID of the camera used in acquisition DOCPROP_CAPTDRIVERFEATURES = Description of camera features DOCPROP_CAPTDRIVERVERSION = Version of the capture driver used in acquisition DOCPROP_TIMEPHASELABEL = Name of the time phase in which the current time point belongs
Frame Long The index of the frame to edit, or DOC_ACTIVEFRAME to get the property of the active (displayed) frame.
DocProperty String A fixed-length string to receive the current value of the specified property.
See Also IpDocSetPropStr

IpDocGetPosition
Page 2-279
IpDocGetPosition Syntax IpDocGetPosition(DocID, PositionID, Frame, DocPosition)
Description This function gets the position of the specified frame in the specified image.
Parameters DocId Integer
Indicates the image of interest. DOCSEL_ACTIVE can be used to inquire about the active image.
PositionId Integer Indicates the axis of interest. Must be one of the following: INF_XPOSITION Absolute position along X axis in calibrated units INF_YPOSITION Absolute position along Y axis in calibrated units INF_ZPOSITION Absolute position along Z axis in microns
Frame Long Indicates the frame of interest, which must be between 0 and the number of frames in the image or composite – 1, or the value –1 which specifies the active frame.
DocPosition IPDOCPOS DocPosition is the IPDOCPOS variable that will receive the position information.
Comments The IsKnown element will indicate whether the desired position information is known for the image. The Position element will indicate the position value.
Note that the Z-axis position is always expresed in microns, regardless of the current spatial calibration.
The IPDOCPOS type is defined as follows. Note that IpDocGetPosition is the only function that uses IPDOCPOS. This function uses the structure because it needs to inidcate in the return value if the function is set, and if so, what it is set to.
IPDOCPOS Gets the image position information.
Is known as Interger If non-zerio, IsKnown indicats the positon is known. If zero, position is unknown
Position as Single Position along the specified axis.
Return Value 0 if successful. Non-0, otherwise.
Example Dim posX As IPDOCPOS, posY As IPDOCPOS ret = IpDocGetPosition( DOCSEL_ACTIVE, INF_XPOSITION, 0, posX) ret = IpDocGetPosition( DOCSEL_ACTIVE, INF_YPOSITION, 0, posY) If (posX.IsKnown = 0 Or posY.IsKnown = 0) Then MsgBox("X/Y position is not known.") Else MsgBox("Position X , Y: " & CStr(posX.Position) & ", " & CStr(posY.Position)) End If
See Also IpDocSetPosition, IPDOCPOS
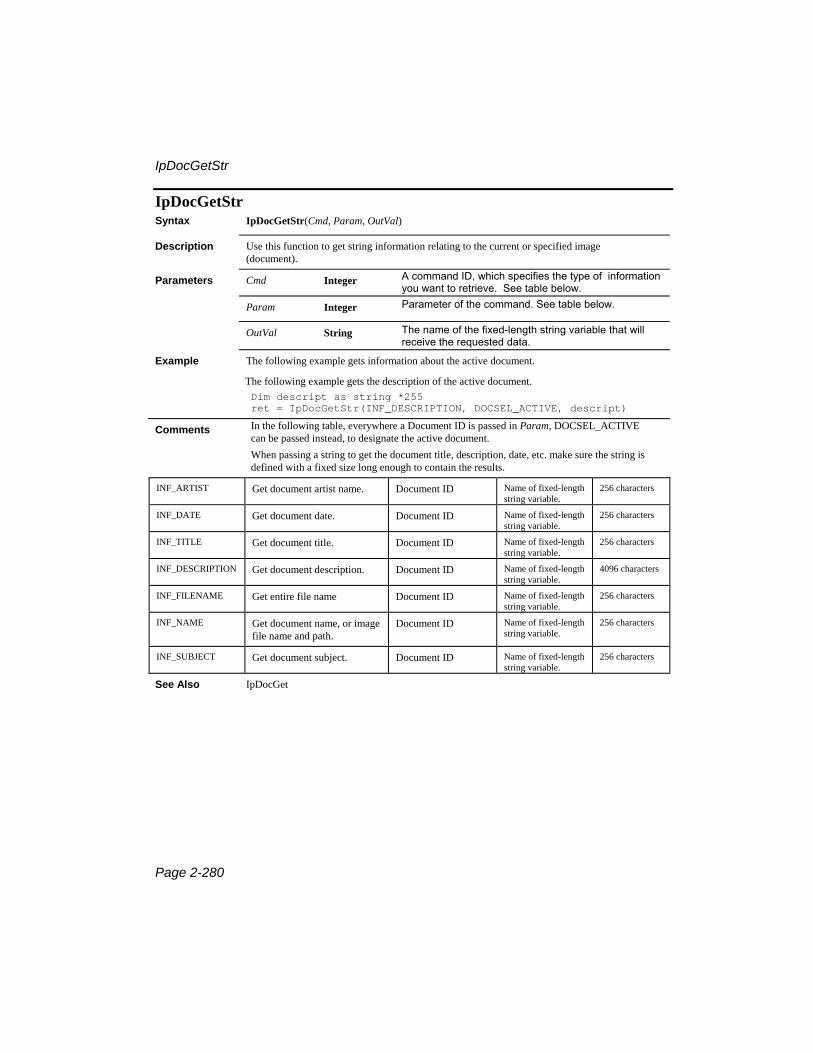
IpDocGetStr
Page 2-280
IpDocGetStr Syntax IpDocGetStr(Cmd, Param, OutVal)
Description Use this function to get string information relating to the current or specified image (document).
Parameters Cmd Integer A command ID, which specifies the type of information you want to retrieve. See table below.
Param Integer Parameter of the command. See table below.
OutVal String The name of the fixed-length string variable that will receive the requested data.
Example The following example gets information about the active document.
The following example gets the description of the active document. Dim descript as string *255 ret = IpDocGetStr(INF_DESCRIPTION, DOCSEL_ACTIVE, descript)
Comments In the following table, everywhere a Document ID is passed in Param, DOCSEL_ACTIVE can be passed instead, to designate the active document. When passing a string to get the document title, description, date, etc. make sure the string is defined with a fixed size long enough to contain the results.
INF_ARTIST Get document artist name. Document ID Name of fixed-length string variable.
256 characters
INF_DATE Get document date. Document ID Name of fixed-length string variable.
256 characters
INF_TITLE Get document title. Document ID Name of fixed-length string variable.
256 characters
INF_DESCRIPTION Get document description. Document ID Name of fixed-length string variable.
4096 characters
INF_FILENAME Get entire file name Document ID Name of fixed-length string variable.
256 characters
INF_NAME Get document name, or image file name and path.
Document ID Name of fixed-length string variable.
256 characters
INF_SUBJECT Get document subject. Document ID Name of fixed-length string variable.
256 characters
See Also IpDocGet

IpDocMaximize
Page 2-281
IpDocMaximize Syntax IpDocMaximize( )
Description This function maximizes (enlarges to maximum size) the active image window. Equivalent to clicking the Maximize button on the image window's Control bar.
See Also IpDocMinimize, IpDocRestore, IpAppMaximize
IpDocMinimize Syntax IpDocMinimize( )
Description This function minimizes (reduces to an icon) the active image window. Equivalent to clicking the Minimize button on the image window's Control bar.
See Also IpDocMaximize, IpDocRestore, IpAppMinimize
IpDocMove Syntax IpDocMove(X, Y)
Description This function moves the active image window to the specified position within the Image-Pro imaging area. Equivalent to dragging the active image to a new position with the mouse.
Parameters X Integer An integer specifying the x-coordinate of the pixel-position to which the upper-left corner of the image window is to be moved.
Y Integer An integer specifying the y-coordinate of the pixel-position to which the upper-left corner of the image window is to be moved.
Example ret = IpDocMove(0,0)
This statement will move the active image window such that it is positioned in the upper-left corner of the imaging area.

IpDocMove
Page 2-282
Comments The origin (i.e., 0, 0) of the coordinate system referenced by the x and y parameters of this function is the pixel in the upper-left corner of the imaging area, not the upper-left corner of the screen. See diagram below.
See Also IpDocMaximize, IpDocMinimize, IpDocRestore
Origin of the imaging area

IpDocOpenAoi
Page 2-283
IpDocOpenAoi Syntax IpDocOpenAoi(docID, oMode)
Description This function opens an image bitmap for direct read and/or write operations (you must Open a document before using the IpDocGetLine or IpDocPutLine functions). If the document has an active AOI, only the rectangular area bounding the AOI will be opened. Otherwise, the entire document is opened. Note - if you are an Image-Pro Software Development Kit (SDK) programmer, this function is very similar to the AOIImOpen function found in your HAIL library.
Parameters docID Integer An integer representing the document's ID, or DOCSEL_ACTIVE to designate the active image.
oMode Integer An enumerated integer specifying the mode in which the instance is to be opened. Where: IMA_RD - specifies read-only mode IMA_RDWR - specifies read/write mode Additionally, the CPROG flag can be added to this expression to signify that the calling program is written in C. See Comments, below.
Return Value An image instance (Integer in BASIC, HANDLE in C), or 0 if the open failed. Note - if you are an Image-Pro Software Development Kit (SDK) programmer, this is the same kind of value returned by the HilImOpen function in your HIL library.
Example The following example opens the active image (or AOI) in read-only mode. Dim docInst as integer
docInst = IpDocOpenAoi(DOCSEL_ACTIVE,IMA_RD) if docInst<>0 then ' Process image data w/IpDocGetLine & IpDocPutLine . . . ' Close instance ret = IpDocCloseVri(docInst) end if
Comments Use this function instead of IpDocOpenVri when the area inside an AOI must be processed. This allows you to modify the AOI with IpDocPutLine , even if it is non-rectangular. If you are calling this function from a C program, be sure to add the CPROG flag to oMode (i.e., IMA_RD+CRPOG or IMA_RDWR+CPROG). This reduces the processing and storage requirements significantly, by retaining the 8-bit structure of the IMC_GRAY, IMC_PALETTE and IMC_RGB image types. Because BASIC does not have an 8-bit data type (the 16-bit, Integer type is the smallest, numeric data unit), image data must be converted to 16-bit integers in order to be accessed directly (the pixel values do not change, but the storage requirement is twice that of the source image data). In a C program, the 8-bit pixels are directly accessible via the BYTE (8-bit) data type. Therefore, if you are calling IpDocOpenAoi from a C program, add CPROG to the oMode expression; if you calling it from a BASIC program, leave this flag off. The instance must be closed with IpDocCloseVri when it is no longer in use.
See Also IpDocOpenVri, IpDocCloseVri, IpDocGetLine, IpDocPutLine, IpAoiGet

IpDocOpenVri
Page 2-284
IpDocOpenVri Syntax IpDocOpenVri(DocID, oMode, rArea)
Description This function opens an image bitmap for direct read and/or write operations (for example, you must open the document before using the IpDocGetLine or IpDocPutLine functions). If you want to automatically open an instance based upon the active AOI, use IpDocOpenAoi instead of this function. Note - if you are an Image-Pro Software Development Kit (SDK) programmer, this function is very similar to the HilImOpen function found in your HIL library.
Parameters DocID Integer An integer representing the document's ID, or DOCSEL_ACTIVE to designate the active image.
oMode Integer An enumerated integer specifying the mode in which the instance is to be opened. Where: IMA_RD - specifies read-only mode IMA_RDWR - specifies read/write mode Additionally, the CPROG flag can be added to this expression to signify that the calling program is written in C. See Comments, below.
rArea RECT Image coordinates defining the area to be opened, which may be the entire image.
Return Value An image instance (Integer in BASIC, HANDLE in C), or 0 if the open failed. Note - if you are an Image-Pro Software Development Kit (SDK) programmer, this is the same kind of value returned by the HilImOpen function in your HIL library.
Example The following example opens the entire active image in read-only mode. Dim docInst as Long Dim iInfo as IPDOCINFO ret=IpDocGet(GETDOCINFO,DOCSEL_ACTIVE,iInfo) docInst=IpDocOpenVri(DOCSEL_ACTIVE,IMA_RD,iInfo.Extent) if docInst <> 0 then ' Process image data w/IpDocGetLine & IpDocPutLine . . . ' Close instance ret=IpDocCloseVri(docInst) end if
Comments Use IpDocOpenAoi instead of this function when the area inside an AOI must be processed. This allows you to modify the AOI with IpDocPutLine , even if it is non-rectangular. If you are calling this function from a C program, be sure to add the CPROG flag to oMode (i.e., IMA_RD+CRPOG or IMA_RDWR+CPROG). This reduces the processing
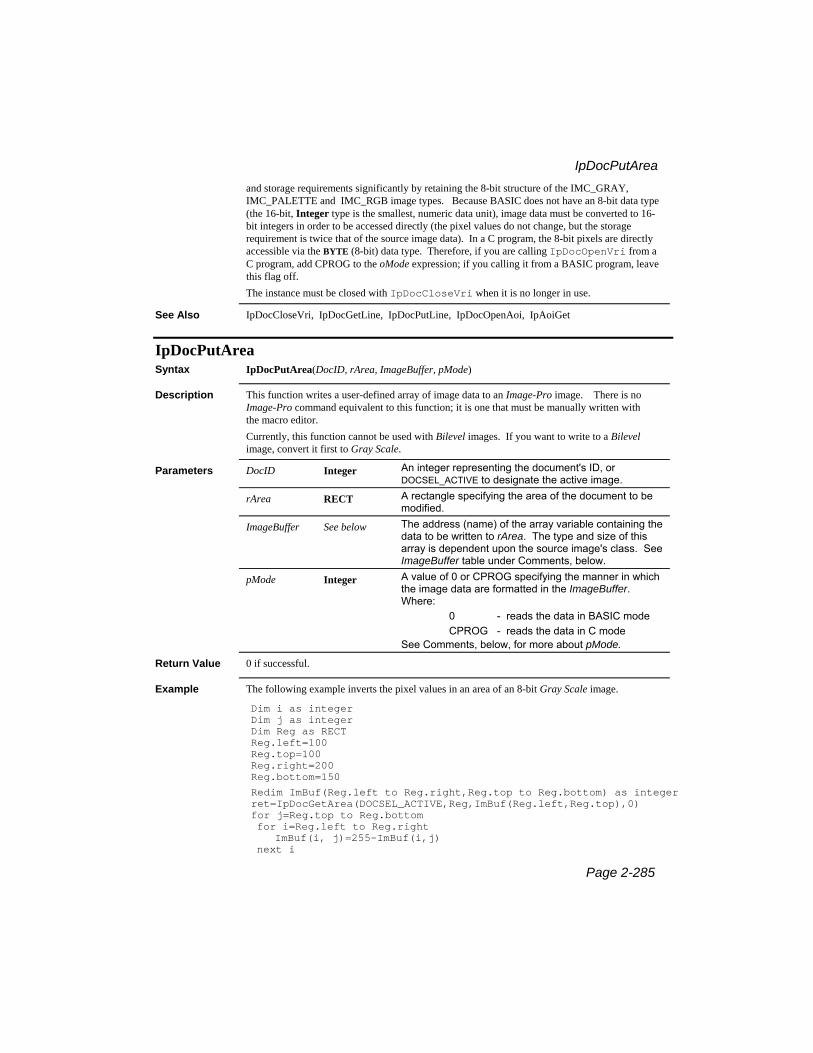
IpDocPutArea
Page 2-285
and storage requirements significantly by retaining the 8-bit structure of the IMC_GRAY, IMC_PALETTE and IMC_RGB image types. Because BASIC does not have an 8-bit data type (the 16-bit, Integer type is the smallest, numeric data unit), image data must be converted to 16-bit integers in order to be accessed directly (the pixel values do not change, but the storage requirement is twice that of the source image data). In a C program, the 8-bit pixels are directly accessible via the BYTE (8-bit) data type. Therefore, if you are calling IpDocOpenVri from a C program, add CPROG to the oMode expression; if you calling it from a BASIC program, leave this flag off. The instance must be closed with IpDocCloseVri when it is no longer in use.
See Also IpDocCloseVri, IpDocGetLine, IpDocPutLine, IpDocOpenAoi, IpAoiGet
IpDocPutArea Syntax IpDocPutArea(DocID, rArea, ImageBuffer, pMode)
Description This function writes a user-defined array of image data to an Image-Pro image. There is no Image-Pro command equivalent to this function; it is one that must be manually written with the macro editor. Currently, this function cannot be used with Bilevel images. If you want to write to a Bilevel image, convert it first to Gray Scale.
Parameters DocID Integer An integer representing the document's ID, or DOCSEL_ACTIVE to designate the active image.
rArea RECT A rectangle specifying the area of the document to be modified.
ImageBuffer See below The address (name) of the array variable containing the data to be written to rArea. The type and size of this array is dependent upon the source image's class. See ImageBuffer table under Comments, below.
pMode Integer A value of 0 or CPROG specifying the manner in which the image data are formatted in the ImageBuffer. Where: 0 - reads the data in BASIC mode CPROG - reads the data in C mode See Comments, below, for more about pMode.
Return Value 0 if successful.
Example The following example inverts the pixel values in an area of an 8-bit Gray Scale image.
Dim i as integer Dim j as integer Dim Reg as RECT Reg.left=100 Reg.top=100 Reg.right=200 Reg.bottom=150
Redim ImBuf(Reg.left to Reg.right,Reg.top to Reg.bottom) as integer ret=IpDocGetArea(DOCSEL_ACTIVE,Reg,ImBuf(Reg.left,Reg.top),0) for j=Reg.top to Reg.bottom for i=Reg.left to Reg.right ImBuf(i, j)=255-ImBuf(i,j) next i

IpDocPutArea
Page 2-286
next j ret=IpDocPutArea(DOCSEL_ACTIVE,Reg,ImBuf(Reg.left,Reg.top),0) ' refresh the display of the active document. ret = IpAppUpdateDoc(DOCSEL_ACTIVE)
Comments The pMode parameter specifies how IMC_GRAY, IMC_PALETTE and IMC_RGB data are formatted in your ImageBuffer. These image classes use 8 bits to represent each pixel (or color channel). BASIC, however, does not have an 8-bit data type. The 16-bit Integer type is its smallest, numeric data unit. So, in a BASIC program, ImageBuffer contains a 16-bit value, which must be converted to 8-bits before being written to the image (note that the pixel values, 0 - 255, are not changed; the unused, high-order bits are merely stripped away). If you are writing image data from a BASIC program, you must set pMode to 0 ensure this conversion is performed. In a C program, 8-bit image pixels can be represented by an array of the BYTE (8-bit) data type. Therefore, if you are writing data from a C program, you must set pMode to CPROG to ensure that the data are written without any 8- to 16-bit conversion (C programs are able to process images faster and with less memory because of this). The ImageBuffer table, below, describes the data types and storage requirements of each mode.
If the Image Class is... ImageBuffer size must be
If pMode is...
ImageBuffer Data Type must be
IMC_GRAY (rArea width, rArea height) 0 Integer CPROG BYTE
IMC_PALETTE (rArea width, rArea height) 0 Integer CPROG BYTE
IMC_RGB (3 * rArea.width, rArea height) 0 Integer CPROG BYTE
IMC_RGB36 (3 * rArea.width, rArea height) 0 Integer CPROG short
IMC_RGB48 (3 * rArea.width, rArea height) 0 Integer CPROG short
IMC_GRAY12 (rArea.width, rArea height) 0 Integer CPROG short IMC_GRAY16 (rArea.width, rArea height) 0 Integer CPROG short IMC_SINGLE (rArea width, rArea height) 0 Single
CPROG single
IMC_BILEVEL This class is not supported by Image-Pro Plus v. 4.0 or higher.
Bilevel image files are converted to grayscale automatically.
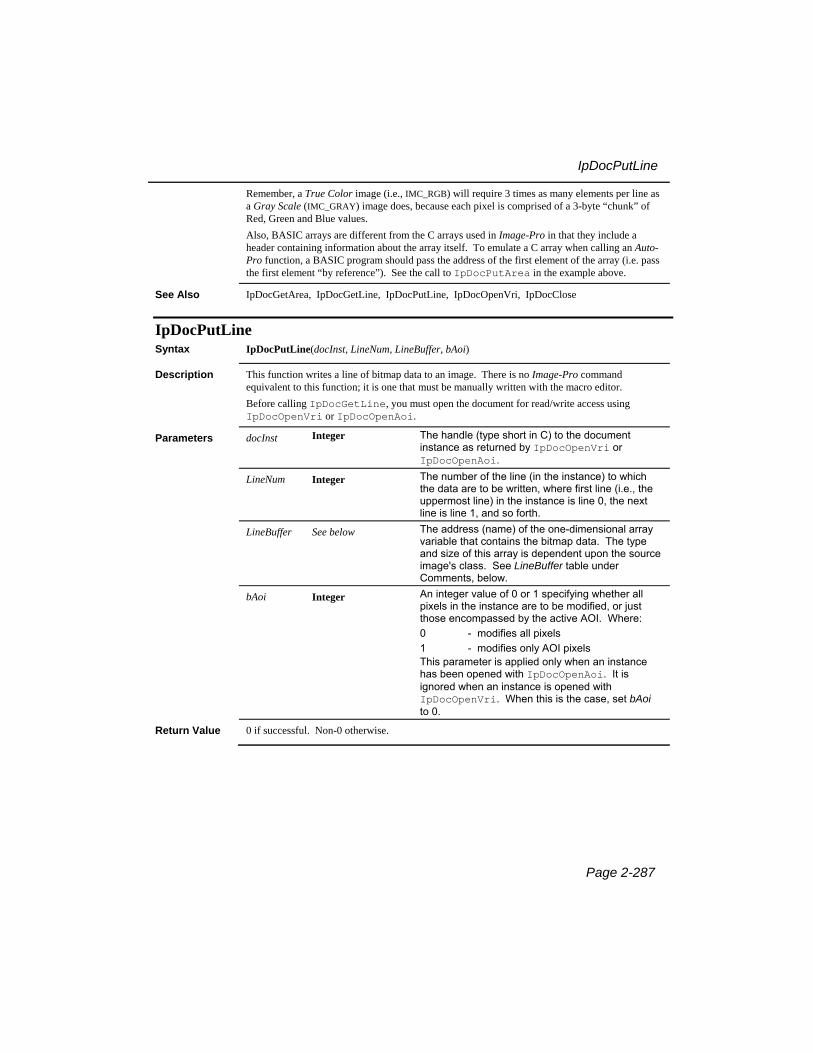
IpDocPutLine
Page 2-287
Remember, a True Color image (i.e., IMC_RGB) will require 3 times as many elements per line as a Gray Scale (IMC_GRAY) image does, because each pixel is comprised of a 3-byte “chunk” of Red, Green and Blue values. Also, BASIC arrays are different from the C arrays used in Image-Pro in that they include a header containing information about the array itself. To emulate a C array when calling an Auto-Pro function, a BASIC program should pass the address of the first element of the array (i.e. pass the first element “by reference”). See the call to IpDocPutArea in the example above.
See Also IpDocGetArea, IpDocGetLine, IpDocPutLine, IpDocOpenVri, IpDocClose
IpDocPutLine Syntax IpDocPutLine(docInst, LineNum, LineBuffer, bAoi)
Description This function writes a line of bitmap data to an image. There is no Image-Pro command equivalent to this function; it is one that must be manually written with the macro editor. Before calling IpDocGetLine, you must open the document for read/write access using IpDocOpenVri or IpDocOpenAoi.
Parameters docInst Integer The handle (type short in C) to the document instance as returned by IpDocOpenVri or IpDocOpenAoi.
LineNum Integer The number of the line (in the instance) to which the data are to be written, where first line (i.e., the uppermost line) in the instance is line 0, the next line is line 1, and so forth.
LineBuffer See below The address (name) of the one-dimensional array variable that contains the bitmap data. The type and size of this array is dependent upon the source image's class. See LineBuffer table under Comments, below.
bAoi Integer An integer value of 0 or 1 specifying whether all pixels in the instance are to be modified, or just those encompassed by the active AOI. Where: 0 - modifies all pixels 1 - modifies only AOI pixels This parameter is applied only when an instance has been opened with IpDocOpenAoi. It is ignored when an instance is opened with IpDocOpenVri. When this is the case, set bAoi to 0.
Return Value 0 if successful. Non-0 otherwise.

IpDocPutLine
Page 2-288
Example The following example inverts the red channel values within the AOI of the active RGB image.
Dim i as integer Dim j as integer Dim imInfo as IPDOCINFO Dim docInst as integer
docInst=IpDocOpenAoi(DOCSEL_ACTIVE, IMA_RDWR) if docInst=0 then GoTo erroropen
ret=IpDocGet(GETINSTINFO, docInst, imInfo) Redim LineBuf(1 to imInfo.Width * 3) as integer
for j=1 to imInfo.Height ret=IpDocGetLine(docInst,j-1,LineBuf(1))
for i=1 to imInfo.Width * 3 step 3 LineBuf(i)=255-LineBuf(i) next i
ret=IpDocPutLine(docInst,j - 1,LineBuf(1),1) next j
' close the instance. ret=IpDocCloseVri(docInst)
' refresh the display of the active document. ret=IpAppUpdateDoc(DOCSEL_ACTIVE)
Comments The table, below, describes the data type and storage requirements of LineBuffer, for each image class.
If the Image Class is...
LineBuffer size must be... If your program is...
LineBuffer data type must be
IMC_GRAY Instance width BASIC Integer C BYTE
IMC_PALETTE Instance width BASIC Integer C BYTE
IMC_RGB 3 * Instance width BASIC Integer C BYTE
IMC_RGB36 3 * Instance width BASIC Integer C short
IMC_RBG48 3 * Instance width BASIC Integer C short
IMC_GRAY12 Instance width BASIC Integer C short IMC_GRAY16 Instance width BASIC Integer C short IMC_SINGLE Instance width BASIC Single C single IMC_BILEVEL Instance width
Not supported in IPP 4.0 OR HIGHER
BASIC Integer
C BYTE
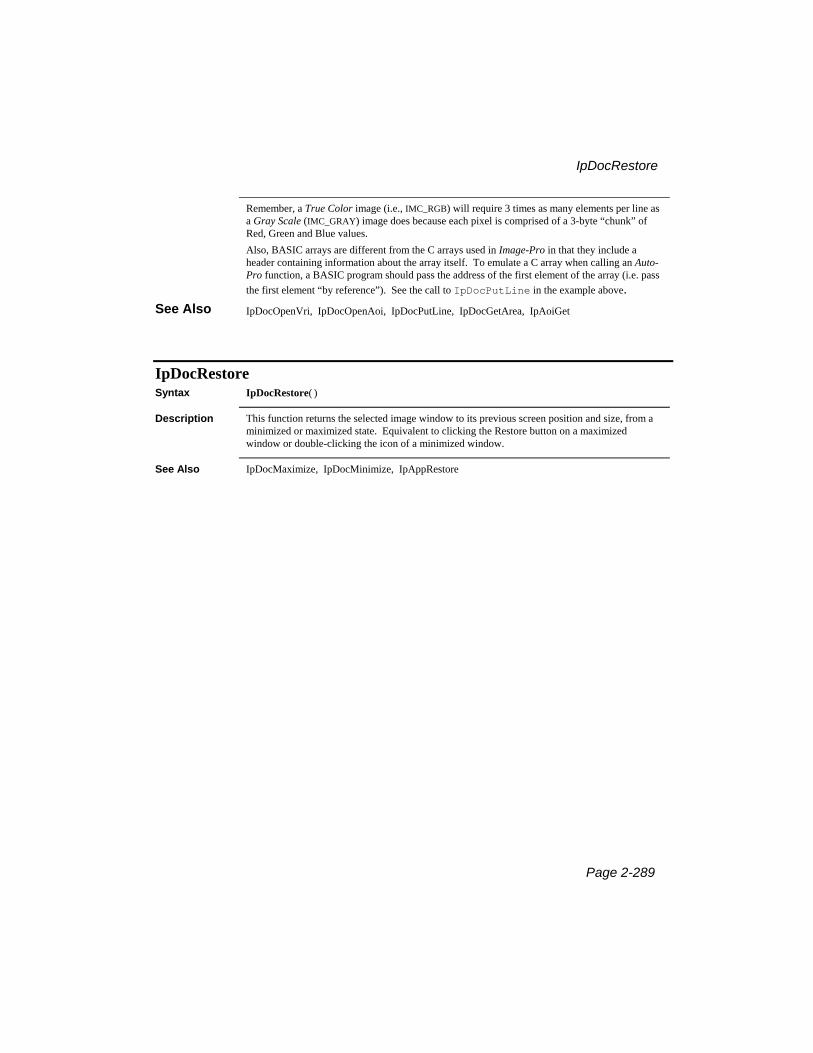
IpDocRestore
Page 2-289
Remember, a True Color image (i.e., IMC_RGB) will require 3 times as many elements per line as
a Gray Scale (IMC_GRAY) image does because each pixel is comprised of a 3-byte “chunk” of Red, Green and Blue values. Also, BASIC arrays are different from the C arrays used in Image-Pro in that they include a header containing information about the array itself. To emulate a C array when calling an Auto-Pro function, a BASIC program should pass the address of the first element of the array (i.e. pass the first element “by reference”). See the call to IpDocPutLine in the example above.
See Also IpDocOpenVri, IpDocOpenAoi, IpDocPutLine, IpDocGetArea, IpAoiGet
IpDocRestore Syntax IpDocRestore( )
Description This function returns the selected image window to its previous screen position and size, from a minimized or maximized state. Equivalent to clicking the Restore button on a maximized window or double-clicking the icon of a minimized window.
See Also IpDocMaximize, IpDocMinimize, IpAppRestore
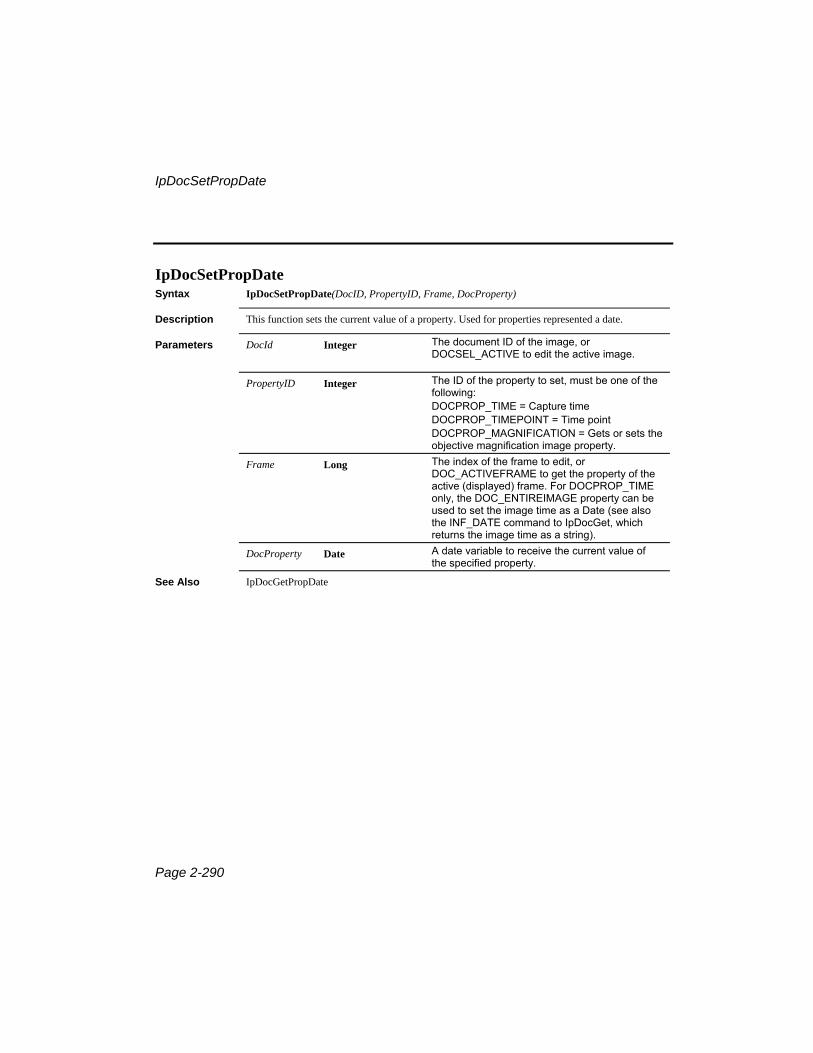
IpDocSetPropDate
Page 2-290
IpDocSetPropDate Syntax IpDocSetPropDate(DocID, PropertyID, Frame, DocProperty)
Description This function sets the current value of a property. Used for properties represented a date.
Parameters DocId Integer
The document ID of the image, or DOCSEL_ACTIVE to edit the active image.
PropertyID Integer The ID of the property to set, must be one of the following: DOCPROP_TIME = Capture time DOCPROP_TIMEPOINT = Time point DOCPROP_MAGNIFICATION = Gets or sets the objective magnification image property.
Frame Long The index of the frame to edit, or DOC_ACTIVEFRAME to get the property of the active (displayed) frame. For DOCPROP_TIME only, the DOC_ENTIREIMAGE property can be used to set the image time as a Date (see also the INF_DATE command to IpDocGet, which returns the image time as a string).
DocProperty Date A date variable to receive the current value of the specified property.
See Also IpDocGetPropDate
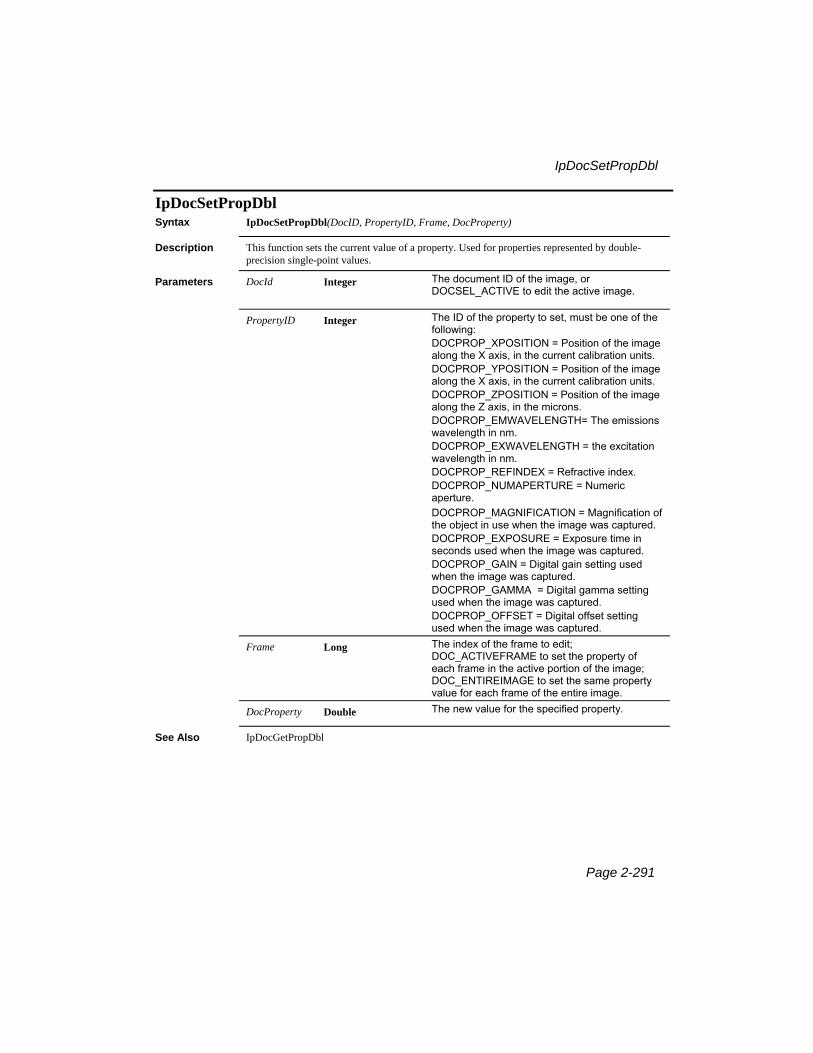
IpDocSetPropDbl
Page 2-291
IpDocSetPropDbl Syntax IpDocSetPropDbl(DocID, PropertyID, Frame, DocProperty)
Description This function sets the current value of a property. Used for properties represented by double-precision single-point values.
Parameters DocId Integer
The document ID of the image, or DOCSEL_ACTIVE to edit the active image.
PropertyID Integer The ID of the property to set, must be one of the following: DOCPROP_XPOSITION = Position of the image along the X axis, in the current calibration units. DOCPROP_YPOSITION = Position of the image along the X axis, in the current calibration units. DOCPROP_ZPOSITION = Position of the image along the Z axis, in the microns. DOCPROP_EMWAVELENGTH= The emissions wavelength in nm. DOCPROP_EXWAVELENGTH = the excitation wavelength in nm. DOCPROP_REFINDEX = Refractive index. DOCPROP_NUMAPERTURE = Numeric aperture.
DOCPROP_MAGNIFICATION = Magnification of the object in use when the image was captured. DOCPROP_EXPOSURE = Exposure time in seconds used when the image was captured. DOCPROP_GAIN = Digital gain setting used when the image was captured. DOCPROP_GAMMA = Digital gamma setting used when the image was captured. DOCPROP_OFFSET = Digital offset setting used when the image was captured.
Frame Long The index of the frame to edit; DOC_ACTIVEFRAME to set the property of each frame in the active portion of the image; DOC_ENTIREIMAGE to set the same property value for each frame of the entire image.
DocProperty Double The new value for the specified property.
See Also IpDocGetPropDbl
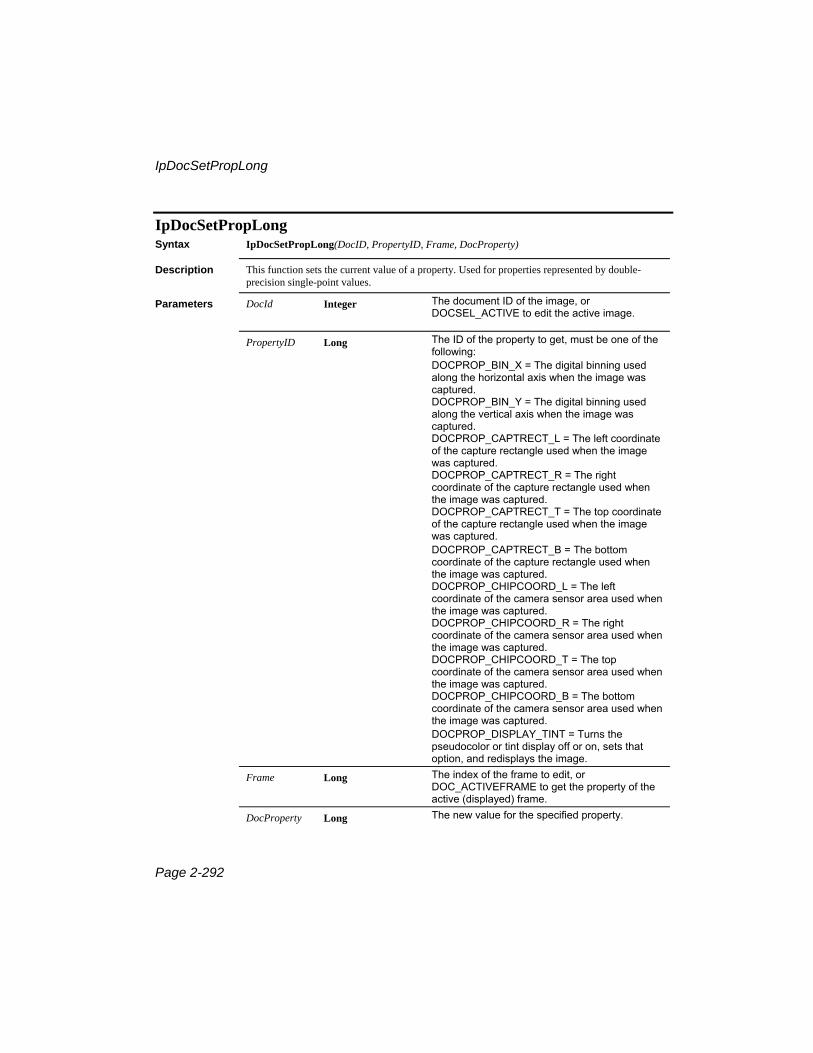
IpDocSetPropLong
Page 2-292
IpDocSetPropLong Syntax IpDocSetPropLong(DocID, PropertyID, Frame, DocProperty)
Description This function sets the current value of a property. Used for properties represented by double-precision single-point values.
Parameters DocId Integer
The document ID of the image, or DOCSEL_ACTIVE to edit the active image.
PropertyID Long The ID of the property to get, must be one of the following: DOCPROP_BIN_X = The digital binning used along the horizontal axis when the image was captured. DOCPROP_BIN_Y = The digital binning used along the vertical axis when the image was captured. DOCPROP_CAPTRECT_L = The left coordinate of the capture rectangle used when the image was captured. DOCPROP_CAPTRECT_R = The right coordinate of the capture rectangle used when the image was captured. DOCPROP_CAPTRECT_T = The top coordinate of the capture rectangle used when the image was captured.
DOCPROP_CAPTRECT_B = The bottom coordinate of the capture rectangle used when the image was captured. DOCPROP_CHIPCOORD_L = The left coordinate of the camera sensor area used when the image was captured. DOCPROP_CHIPCOORD_R = The right coordinate of the camera sensor area used when the image was captured. DOCPROP_CHIPCOORD_T = The top coordinate of the camera sensor area used when the image was captured. DOCPROP_CHIPCOORD_B = The bottom coordinate of the camera sensor area used when the image was captured. DOCPROP_DISPLAY_TINT = Turns the pseudocolor or tint display off or on, sets that option, and redisplays the image.
Frame Long The index of the frame to edit, or DOC_ACTIVEFRAME to get the property of the active (displayed) frame.
DocProperty Long The new value for the specified property.
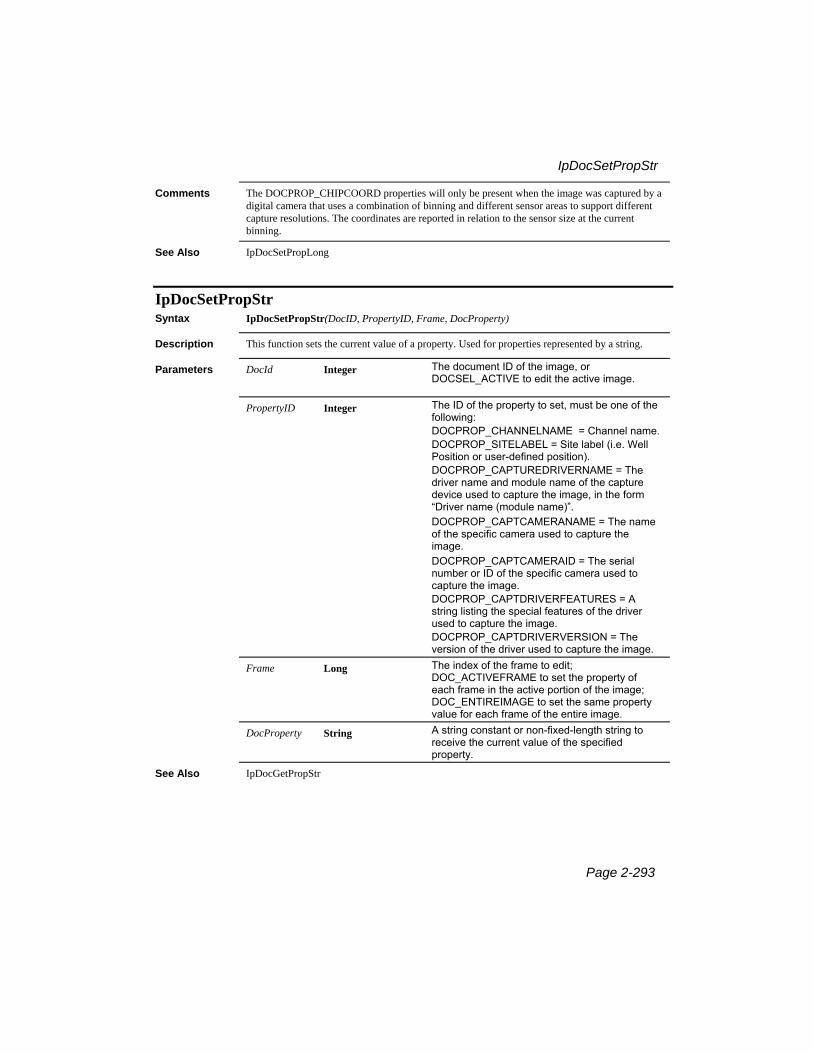
IpDocSetPropStr
Page 2-293
Comments The DOCPROP_CHIPCOORD properties will only be present when the image was captured by a digital camera that uses a combination of binning and different sensor areas to support different capture resolutions. The coordinates are reported in relation to the sensor size at the current binning.
See Also IpDocSetPropLong
IpDocSetPropStr Syntax IpDocSetPropStr(DocID, PropertyID, Frame, DocProperty)
Description This function sets the current value of a property. Used for properties represented by a string.
Parameters DocId Integer
The document ID of the image, or DOCSEL_ACTIVE to edit the active image.
PropertyID Integer The ID of the property to set, must be one of the following: DOCPROP_CHANNELNAME = Channel name. DOCPROP_SITELABEL = Site label (i.e. Well Position or user-defined position). DOCPROP_CAPTUREDRIVERNAME = The driver name and module name of the capture device used to capture the image, in the form “Driver name (module name)”. DOCPROP_CAPTCAMERANAME = The name of the specific camera used to capture the image. DOCPROP_CAPTCAMERAID = The serial number or ID of the specific camera used to capture the image. DOCPROP_CAPTDRIVERFEATURES = A string listing the special features of the driver used to capture the image. DOCPROP_CAPTDRIVERVERSION = The version of the driver used to capture the image.
Frame Long The index of the frame to edit; DOC_ACTIVEFRAME to set the property of each frame in the active portion of the image; DOC_ENTIREIMAGE to set the same property value for each frame of the entire image.
DocProperty String A string constant or non-fixed-length string to receive the current value of the specified property.
See Also IpDocGetPropStr
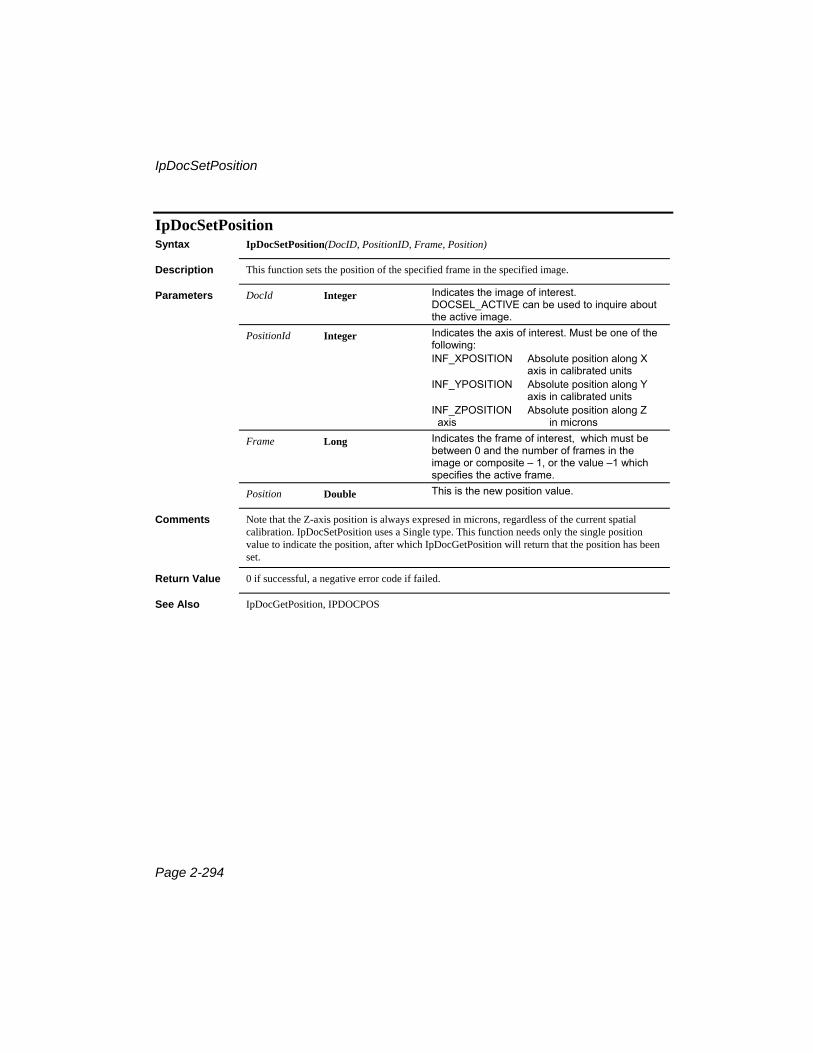
IpDocSetPosition
Page 2-294
IpDocSetPosition Syntax IpDocSetPosition(DocID, PositionID, Frame, Position)
Description This function sets the position of the specified frame in the specified image.
Parameters DocId Integer
Indicates the image of interest. DOCSEL_ACTIVE can be used to inquire about the active image.
PositionId Integer Indicates the axis of interest. Must be one of the following: INF_XPOSITION Absolute position along X axis in calibrated units INF_YPOSITION Absolute position along Y axis in calibrated units INF_ZPOSITION Absolute position along Z axis in microns
Frame Long Indicates the frame of interest, which must be between 0 and the number of frames in the image or composite – 1, or the value –1 which specifies the active frame.
Position Double This is the new position value.
Comments Note that the Z-axis position is always expresed in microns, regardless of the current spatial calibration. IpDocSetPosition uses a Single type. This function needs only the single position value to indicate the position, after which IpDocGetPosition will return that the position has been set.
Return Value 0 if successful, a negative error code if failed.
See Also IpDocGetPosition, IPDOCPOS

IpDocSize
Page 2-295
IpDocSize Syntax IpDocSize(Width, Height)
Description This function changes the size of the active image window to the specified width and height.
Parameters Width Integer An integer specifying the width, in pixels, at which you want the image window displayed.
Height Integer An integer specifying the height, in pixels, at which you want the image window displayed.
Example ret = IpDocSize(200, 300)
This statement will resize the active image window to 200 by 300 pixels.
Comments The image window must be in the “restored” or maximized state when this function is performed. Sizing a minimized image may produce unexpected results.
See Also IpAppRestore, IpAppMove
IpDrGet Syntax IpDrGet (sCmd, sParam, lpParam)
Description This functions gets the values for the display range, inverse contrast, range rest, gamma, and other display range attributes.
Parameters sCmd Integer Defines the attribute to get. See table below.
sParam Integer Depends on the value of sCmd. See table below.
lpParam Any Depends on the value of sCmd. See table below.
sCmd sParam lpParam Description
DR_RANGE 0 Array of two longs Gets the start and end of the range
DR_INV 0 integer variable: 1 = not inversed 0 = inverse
Gets the inverse flag
DR_GAMMA 0 single point variable
Gets the gamma value
DR_FRANGE 0 array of two singles
Gets the display range
DR_FRANGE 1 array of two singles
Gets the single point range

IpDrSet
Page 2-296
Comments For details about DR_FRANGE, single point images, and single point ranges, see IpDrSet.
Example ' get display range ret = IpDrGet(DR_RANGE, 0, ipLArray(0)) Debug.print "Display range: " + Str$(ipLarray(0)) + " to: " + Str$(iplArray(1)) ' get gamma dim fGamma as single ret = IpDrGet(DR_GAMMA, 0, fGamma) Debug.print "Gamma: " + Str$(fGamma) ' get inverse status dim sInverse as single ret = IpDrGet(DR_INV, 0, sInverse) If sInverse = 0 Then Debug.print "Not inversed" Else Debug.print "Inversed" dim fArray(2) as single ' get display range of single point image ' (alternate way) ret = IpDrGet(DR_FRANGE, 0, fArray(0)) Debug.print "Single display range: " + Str$(fArray(0)) + " to: " + Str$(fArray(1)) ' get single point range ret = IpDrGet(DR_FRANGE, 1, fArray(0)) Debug.print "Single point range: " + Str$(fArray(0)) + " to: " + Str$(fArray(1))
See Also IpDrSet
IpDrSet Syntax IpDrSet (sCmd, sParam, lpParam)
Description This functions sets the values for the display range, inverse contrast, range reset, gamma, and other display range attributes
Parameters sCmd Integer Defines the attribute to set. See table below.
sParam Integer Depends on the value of sCmd. See table below.
lpParam Array Depends on the value of sCmd. See table below.
sCmd sParam lpParam Description
DR_RANGE 0 Array of two longs
Sets the start and end of the range
DR_RANGE -1 Not used Resets range
DR_BEST 0 Not used. Sets optimum range

IpDrSet
Page 2-297
sCmd sParam lpParam Description
DR_INV 0 Not used. No inversion
DR_INV 1 Not used. Inverse image contrast
DR_INV 2 Not used. Toggle inversion on/off
DR_GAMMA 0 single point variable Sets the gamma value
DR_FRANGE 0 array of two singles Sets the start and end of the
range
DR_FRANGE -1 Not used Resets range
DR_FRANGE 1 array of two singles Sets the single point range
DR_RANGE_RESET -1 Not used Resets only the display range of the active image
Comments DR_FRANGE is the same as DR_RANGE for all images except single point images (see discussion on single point images below). DR_FRANGE with sParam=1 is only valid with a single point image and can be used to set the dynamic range of that image. DR_FRANGE with sParam=0 can be used to set the display range of a single point image by passing real single point intensity values instead of a fixed point index as is recorded.
Single point images: 32 bit single point images don't have fixed lowest and highest intensity. Instead, they have a user-definable "single point range" that is used to set the intensity levels of pure black and pure white. This range is equivalent to the [0, 255] range of an 8 bit gray scale image or the [0, 65535] range of a 16 bit image. The single point range of a single point image is used mainly for display, but also to calculate the bounds of intensity histograms. The display range of a single point image defines a sub-set of its single point range used for display only. The single point range of a single point image can be set via DR_FRANGE with sParam = 1 or via the interface (see Image Information dialog).
Example ' set display range ipLArray(0) = 51 ipLArray(1) = 200 ret = IpDrSet(DR_RANGE, 0, ipLArray(0)) ' set the optimal range ret = IpDrSet(DR_BEST, 0, IPNULL) ' inverse the contrast ret = IpDrSet(DR_INV, 1, IPNULL) ' reset the display range and inverse flag ret = IpDrSet(DR_RANGE, -1, IPNULL) ' set gamma dim fGamma as single fGamma = 0.4 ret = IpDrSet(DR_GAMMA, 0, fGamma)
See Also IpDrGet

IpDrShow
Page 2-298
IpDrShow Syntax IpDrShow(bShow)
Description This function displays or hides the display range tool.
Parameters bShow Integer A value of 0 or 1 specifying whether the dialog is to be displayed or suppressed. Where: 0 - hides the dialog 1 - shows the dialog
See Also IpDrGet, IpDrSet
IpDraw Syntax IpDraw(Points, Numpoints, Attrib)
Description Draws a line, polygon, or points (markers)
Parameters Points POINTAPI The name and first element of an array containing the vertices of the line.
Numpoints Integer Number of points to be drawn
Attrib Integer Specifies attributes of the object, or line: Valid values are: ATT_CONTROLS : For a polyline, highlights all verticies of the polyline. ATT_NOCOPY : Prevents the points of the line from being copied into Image-Pro’s local memory space.
Return Value Returns the new drawing ID
See Also IpAnotAttr, IpDrawText, IpDrawClear, IpGetLine, IpDrawClearDoc, IpDrawGet, IpDrawSet, IpAnotLine, IpAnotBox, IpAnotEllipse
Comments This function is no longer supported in Image-Pro Plus . Use the IpAn Auto-Pro functions instead.
IpDrawClear Syntax IpDrawClear(Objid)
Description Erases the drawing.
Parameters Objid Integer Identifies the drawing to be erased.
See Also IpDraw, IpDrawText, IpGetLine, IpDrawClearDoc, IpDrawGet, IpDrawSet, IpAnotLine, IpAnotBox, IpAnotAttr,IpAnotEllipse
Comments This function is no longer supported in Image-Pro Plus . Use the IpAn Auto-Pro functions instead.

IpDrawClearDoc
Page 2-299
IpDrawClearDoc Syntax IpAnotEllipse(Cocid)
Description Erases all drawings or object from the image docid.
Parameters Docid Integer Identifies the document containing the objects to be erased.
See Also IpDraw, IpDrawText, IpGetLine, IpDrawClear, IpDrawGet, IpDrawSet, IpAnotLine, IpAnotBox, IpAnotAttr,IpAnotEllipse
Comments This function is no longer supported in Image-Pro Plus . Use the IpAn Auto-Pro functions instead.
IpDrawGet Syntax IpDrawGet(Command, Objid, IpParam)
Description Gets status, position, and other parameters for a given drawing or object.
Parameters Command Integer Identifies data to retrieve. Valid values are: GETCURPOS: Returns the cursor position at the point where the mouse button was last down. GETNUMPTS: Returns the number of points in the object GETPOINTS: Retrieves the object’s points GETSTATUS: Returns a non-zero value if the object has been changed, and sets the object’s status to zero. GETEDITPOINT: Returns the currently selected point of the object.
Objid Integer Identifies the object
IpParam Integer Results are returned in this variable.
See Also IpDraw, IpDrawText, IpDrawClear, IpGetLine, IpDrawClearDoc, IpDrawSet, IpAnotLine, IpAnotBox, IpAnotAttr,IpAnotEllipse
Comments This function is no longer supported in Image-Pro Plus. Use the IpAn Auto-Pro functions instead.
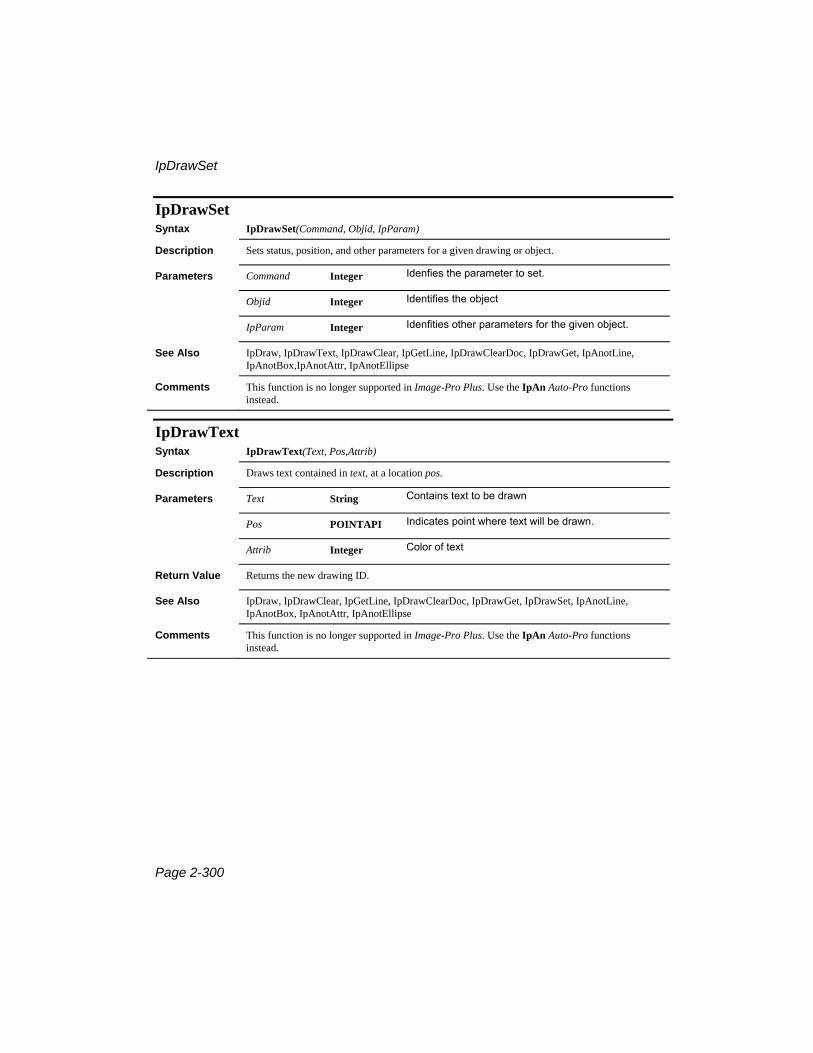
IpDrawSet
Page 2-300
IpDrawSet Syntax IpDrawSet(Command, Objid, IpParam)
Description Sets status, position, and other parameters for a given drawing or object.
Parameters Command Integer Idenfies the parameter to set.
Objid Integer Identifies the object
IpParam Integer Idenfities other parameters for the given object.
See Also IpDraw, IpDrawText, IpDrawClear, IpGetLine, IpDrawClearDoc, IpDrawGet, IpAnotLine, IpAnotBox,IpAnotAttr, IpAnotEllipse
Comments This function is no longer supported in Image-Pro Plus. Use the IpAn Auto-Pro functions instead.
IpDrawText Syntax IpDrawText(Text, Pos,Attrib)
Description Draws text contained in text, at a location pos.
Parameters Text String Contains text to be drawn
Pos POINTAPI Indicates point where text will be drawn.
Attrib Integer Color of text
Return Value Returns the new drawing ID.
See Also IpDraw, IpDrawClear, IpGetLine, IpDrawClearDoc, IpDrawGet, IpDrawSet, IpAnotLine, IpAnotBox, IpAnotAttr, IpAnotEllipse
Comments This function is no longer supported in Image-Pro Plus. Use the IpAn Auto-Pro functions instead.
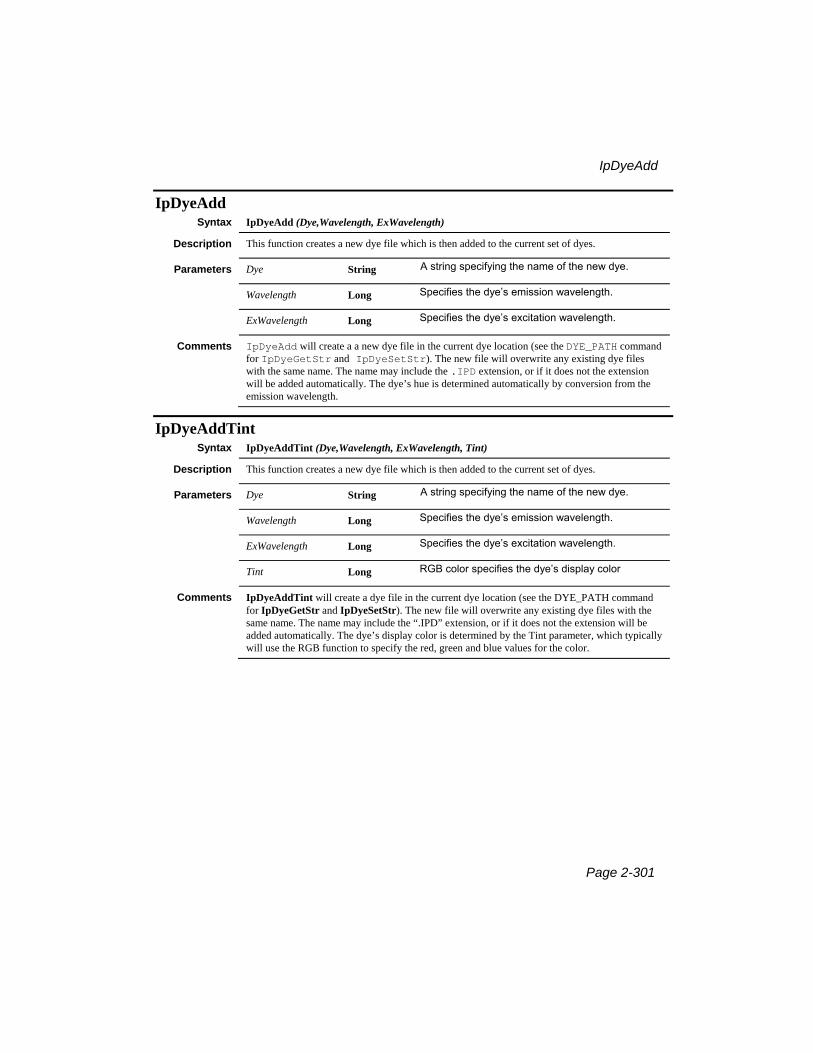
IpDyeAdd
Page 2-301
IpDyeAdd Syntax IpDyeAdd (Dye,Wavelength, ExWavelength)
Description This function creates a new dye file which is then added to the current set of dyes.
Parameters Dye String A string specifying the name of the new dye.
Wavelength Long Specifies the dye’s emission wavelength.
ExWavelength Long Specifies the dye’s excitation wavelength.
Comments IpDyeAdd will create a a new dye file in the current dye location (see the DYE_PATH command for IpDyeGetStr and IpDyeSetStr). The new file will overwrite any existing dye files with the same name. The name may include the .IPD extension, or if it does not the extension will be added automatically. The dye’s hue is determined automatically by conversion from the emission wavelength.
IpDyeAddTint Syntax IpDyeAddTint (Dye,Wavelength, ExWavelength, Tint)
Description This function creates a new dye file which is then added to the current set of dyes.
Parameters Dye String A string specifying the name of the new dye.
Wavelength Long Specifies the dye’s emission wavelength.
ExWavelength Long Specifies the dye’s excitation wavelength.
Tint Long RGB color specifies the dye’s display color
Comments IpDyeAddTint will create a dye file in the current dye location (see the DYE_PATH command for IpDyeGetStr and IpDyeSetStr). The new file will overwrite any existing dye files with the same name. The name may include the “.IPD” extension, or if it does not the extension will be added automatically. The dye’s display color is determined by the Tint parameter, which typically will use the RGB function to specify the red, green and blue values for the color.
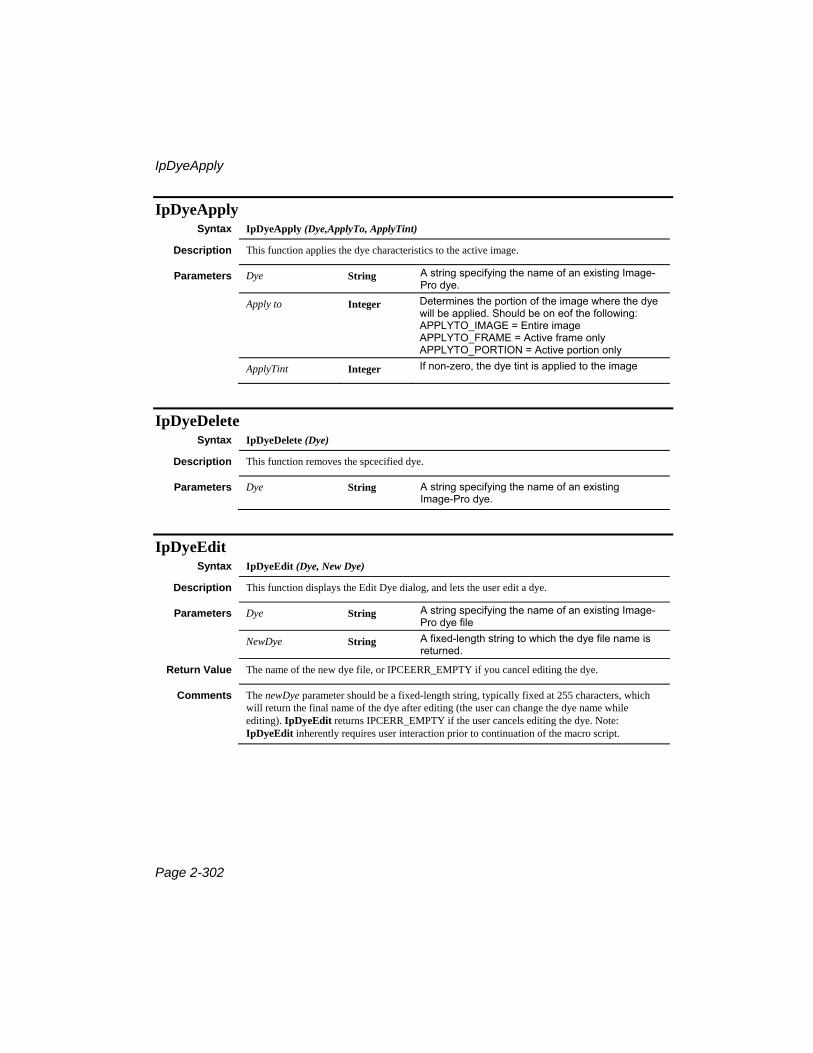
IpDyeApply
Page 2-302
IpDyeApply Syntax IpDyeApply (Dye,ApplyTo, ApplyTint)
Description This function applies the dye characteristics to the active image.
Parameters Dye String A string specifying the name of an existing Image-Pro dye.
Apply to Integer Determines the portion of the image where the dye will be applied. Should be on eof the following: APPLYTO_IMAGE = Entire image APPLYTO_FRAME = Active frame only APPLYTO_PORTION = Active portion only
ApplyTint Integer If non-zero, the dye tint is applied to the image
IpDyeDelete Syntax IpDyeDelete (Dye)
Description This function removes the spcecified dye.
Parameters Dye String A string specifying the name of an existing Image-Pro dye.
IpDyeEdit Syntax IpDyeEdit (Dye, New Dye)
Description This function displays the Edit Dye dialog, and lets the user edit a dye.
Parameters Dye String A string specifying the name of an existing Image-Pro dye file
NewDye String A fixed-length string to which the dye file name is returned.
Return Value The name of the new dye file, or IPCEERR_EMPTY if you cancel editing the dye.
Comments The newDye parameter should be a fixed-length string, typically fixed at 255 characters, which will return the final name of the dye after editing (the user can change the dye name while editing). IpDyeEdit returns IPCERR_EMPTY if the user cancels editing the dye. Note: IpDyeEdit inherently requires user interaction prior to continuation of the macro script.

IpDyeGet
Page 2-303
IpDyeGet Syntax IpDyeGet(DyeFile, Command, Value)
Description This function returns information about a specific dye.
Parameters DyeFile String A string specifying the full path for the selected dye.
Command Integer Command should be one of the following: DYE_WAVELENGTH = Return the dye emission wavelength (in nm) DYE_HUE = Return the dye hue (0 Red – 240) DYE_RGB_TINT = Return the dye tint as a color reference DYE_NUMDYES = Return the number of dyes in the current location DYE_EXWAVELENGTH = Return the dye excitation wavelength (in nm)
Value Long A long variable which will receive the specified dye parameter
See Also IpDyeGetSng, IpDyeGetStr
IpDyeGetStr Syntax IpDyeGetStr (DyeFile, Command, Index Value)
Description This function gets information about the current dye management settings.
Parameters DyeFile String Not used.
Command Integer Should be one of the following: DYE_PATH = Returns the current path for dye files DYE_LIST = return the name of the specificed Dye
Index Integer Index of the specified dye for the DYE_LIST command.
Value String A fixed-length string to receive the current dye file location or the specified dye name.
See Also IpDyeGetLong, IpDyeGetSng

IpDyeSelect
Page 2-304
IpDyeSelect Syntax IpDyeSelect(DyeFile)
Description This function displays the Edit Dye List dialog and let the user select a dye.
Parameters DyeFile String A fixed-length string to which the name of the selected dye is returned..
Return Value IpDyeSelect returns IPCERR_EMPTY if the user cancels selecting a dye. Note: IpDyeSelect inherently requires user interaction prior to continuation of the macro script.
Example This function can be used in conjunction with IpPcApplyDyeTint to let the user select a dye and apply the dye’s tint to the active workspace: Dim strDyeFile as String * 255 ret = IpDyeSelect( strDyeFile ) if (ret <> IPCERR_EMPTY) then *9IpPcApplyDyeTint ( strDyeFile ) end if
IpDyeSetStr Syntax IpDyeSetStr (DyeFile, Command,Value)
Description This function sets the dye management settings.
Parameters DyeFile String Not used.
Command Integer Should be the following: DYE_PATH = return the current dye location
Value String A string containing the new dye file location.

IpEDFAdd
Page 2-305
IpEDFAdd Syntax IpEDFAdd(DocId)
Description This function adds all the frames of the specified image to the current multi-plane focus stack.
Parameters DocId Integer Specifies the image to add to the existing EDF stack. Note that the images must be of the same image type and size. A document ID of DOCSEL_ACTIVE can be used to add the active image. A document ID of DOCSEL_ALL can be used to add all images.
Return Value 0 if successful, a negative error code if failed.
Comments This function can be used to add the first image as well as subsequent images, however using IpEDFNew for the first image will assure that the stack does not contain any unwanted images from previous stacks.
See Also IpEDFNew
IpEDFCreate Syntax IpEDFCreate(Type)
Description This function creates the extended depth of field image
Parameters Type Integer Determines the type of Extended Depth of Field image that will be created from the current stack. Must be one of the following: EDF_COMPOSITE Creates a composite image from the best-focus areas selected from multiple input frames. EDF_BEST_FOCUS Returns a new image using the single frame having the largest amount of in-focus area.
Return Value Document ID of the new image if successful, a negative error code if failed.
Comments Use IpEDFNew and IpEDFAdd to build the image list that will be used as the stack of pre-focus images. If the topographic option is selected, use the IpEDFTopoMap function to create the topographic map.The in-focus material is determined by the current analysis criteria.
See Also IpEDFNew, IpEDFGet

IpEDFGet
Page 2-306
IpEDFGet Syntax IpEDFGet(Attribute, Value, Frame)
Description This function gets an attribute of an Extended Depth of Field image.
Parameters Attribute Integer Attribute indicates the sequence gallery attribute to get, from the following: EDF_NORMALIZE Indicates whether the frame intensities should be normalized prior to focus analysis. EDF_CRITERIA Indicates the criteria used to analyze the frames for in-focus material. (See below for constants.) EDF_TOPO_MAP Indicates whether a topographic map image should be created. EDF_ TOPO_CALIBRATED Indicates whether the topographic map image should be given an intensity calibration that gives each pixel a value corresponding to the Z position of the plane that it was extracted from. EDF_ORDER Indicates whether the image list will be used from top to bottom (EDF_TOPDOWN) or bottom to top (EDF_BOTTOMUP). EDF_DEFAULT_FRAME Returns the default plane document ID (in Value) and frame number (in Frame). EDF_TS_MAP Determines whether to use the topographic map output (if non-zero) or the composite output (when zero) EDF_TS_GALLERY Determines whether to generate a sequence gallery output (if non-zero) EDF_SURFACE_PLOT Determines whether to generate a surface plot. Ignored if the topographic map option is not set.
Value Integer This is an integer variable in your script that will receive the requested attribute value.
Frame Long This is a long variable in your script that will receive the requested attribute value; used in EDF_DEFAULT_FRAME only. Can be set to IPNULL for other attributes.
Return Value 0 if successful, a negative error code if failed.

IpEDFGetConf
Page 2-307
Comments The following constants will be used with EDF_CRITERIA attribute to indicate the type of focus analysis:
EDF_MAX_LOCALCONTRAST: Pixels will be examined in a local neighborhood around the target pixel and the degree of local contrast determined for each plane. The pixel from the plane with the greatest local contrast will be selected. EDF_MAX_INTENSITY: Pixels in the same location on each plane will be examined and the pixel with the highest intensity will be selected. EDF_MIN_INTENSITY: Pixels in the same location on each plane will be examined and the pixel with the lowest intensity will be selected. EDF_MAX_DEPTHCONTRAST: Pixels in the same location on each plane will be compared to the mean intensity of all pixels at that position, and the pixel with the greatest contrast from that mean intensity will be selected. EDF_HDF_SMALL: High frequency emphasis for small edges EDF_HDF_MEDIUM: High-frequency emphasis for medium edges. EDF_HEF_LARGE:High-frequency emphasis for large edges.
See Also IpEDFSet
IpEDFGetConf Syntax IpEDFGetConf (ByRef Value)
Description This function returns the EDF confidence level for each plane.
Parameters Value Single Should be an array of Single with one element for each focus plane.
Return Value 0 if successful, a negative error code if failed.
Comments This function can be used after IpEDFCreate to inquire the confidence levels. The EDF_NUM_PLANES command can be used to get the number of planes for dimensioning the array.
See Also IpEDFCreate

IpEDFNew
Page 2-308
IpEDFNew Syntax IpEDFNew(DocId)
Description This function starts a new Extended Depth of Field stack with frames from the specified image.
Parameters DOcId Integer Specifies the first image to add to a new EDF stack. A document ID of DOCSEL_ACTIVE can be used to add the active image. A document ID of DOCSEL_ALL can be used to add all images.
Return Value 0 if successful, a negative error code if failed.
Comments This function guarantees that a new stack is started (any existing stack is discarded). Note that the first image added to the stack determines the image type and size required of all subsequent images added. Note also that all frames of the image will be added to the stack .
See Also IpEDFAdd
IpEDFRemove Syntax IpEDFRemove(DocId)
Description This function removes the specified image from the current Extended Depth of Field stack.
Parameters DocId Integer Specifies the image to remove from the existing EDF stack. A document ID of DOCSEL_ACTIVE can be used to remove the active image. A document ID of DOCSEL_ALL can be used to remove all images.
Return Value 0 if successful, a negative error code if failed.
See Also IpEDFAdd
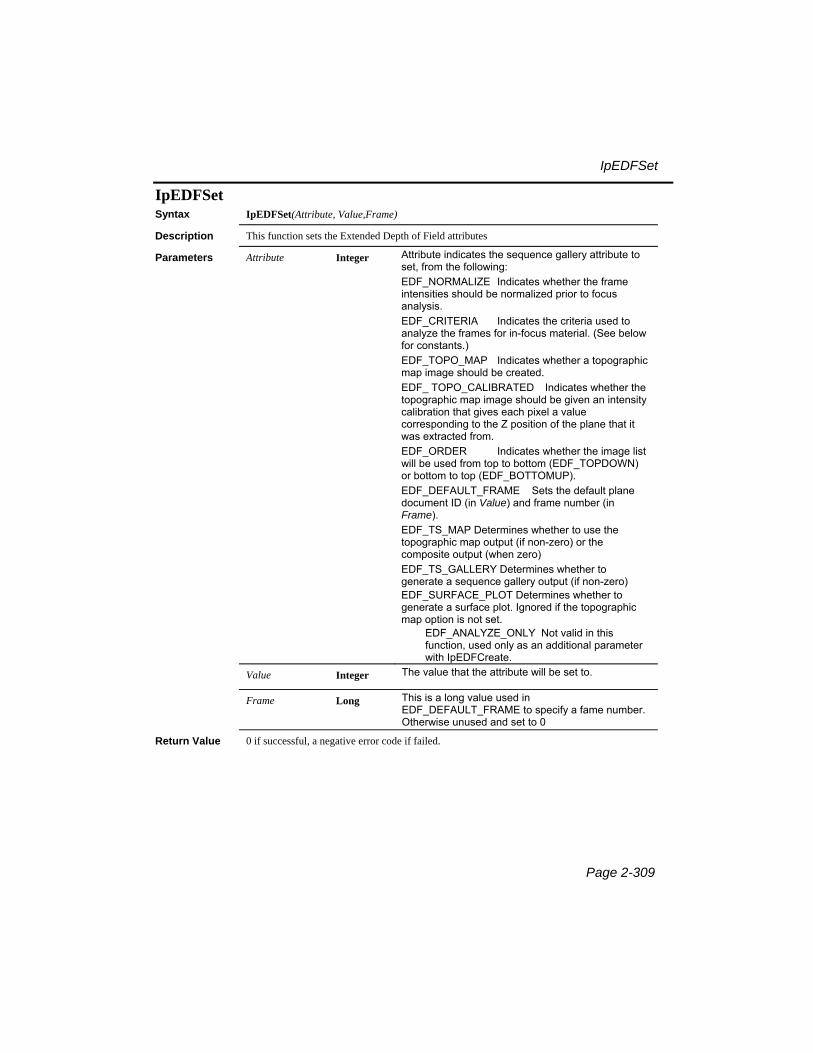
IpEDFSet
Page 2-309
IpEDFSet Syntax IpEDFSet(Attribute, Value,Frame)
Description This function sets the Extended Depth of Field attributes
Parameters Attribute Integer Attribute indicates the sequence gallery attribute to set, from the following: EDF_NORMALIZE Indicates whether the frame intensities should be normalized prior to focus analysis. EDF_CRITERIA Indicates the criteria used to analyze the frames for in-focus material. (See below for constants.) EDF_TOPO_MAP Indicates whether a topographic map image should be created. EDF_ TOPO_CALIBRATED Indicates whether the topographic map image should be given an intensity calibration that gives each pixel a value corresponding to the Z position of the plane that it was extracted from. EDF_ORDER Indicates whether the image list will be used from top to bottom (EDF_TOPDOWN) or bottom to top (EDF_BOTTOMUP). EDF_DEFAULT_FRAME Sets the default plane document ID (in Value) and frame number (in Frame). EDF_TS_MAP Determines whether to use the topographic map output (if non-zero) or the composite output (when zero) EDF_TS_GALLERY Determines whether to generate a sequence gallery output (if non-zero) EDF_SURFACE_PLOT Determines whether to generate a surface plot. Ignored if the topographic map option is not set.
EDF_ANALYZE_ONLY Not valid in this function, used only as an additional parameter with IpEDFCreate.
Value Integer The value that the attribute will be set to.
Frame Long This is a long value used in EDF_DEFAULT_FRAME to specify a fame number. Otherwise unused and set to 0
Return Value 0 if successful, a negative error code if failed.

IpEDFShow
Page 2-310
Comments The EDFTopoMap attribute will affect only the way the EDF operates from the dialog. To create a topographic map from a macro, use IpEDFTopoMap.
The following constants will be used with EDF_CRITERIA attribute to indicate the type of focus analysis: EDF_MAX_LOCALCONTRAST: Pixels will be examined in a local neighborhood around the target pixel and the degree of local contrast determined for each plane. The pixel from the plane with the greatest local contrast will be selected. EDF_MAX_INTENSITY: Pixels in the same location on each plane will be examined and the pixel with the highest intensity will be selected. EDF_MIN_INTENSITY: Pixels in the same location on each plane will be examined and the pixel with the lowest intensity will be selected. EDF_MAX_DEPTHCONTRAST: Pixels in the same location on each plane will be compared to the mean intensity of all pixels at that position, and the pixel with the greatest contrast from that mean intensity will be selected
See Also IpEDFGet, IpEDFTopoMap
IpEDFShow Syntax IpEDFShow(Show)
Description This function shows or hides the Extended Depth of Field dialog box.
Parameters Show Integer An integer value of 0 or 1 indicating whether to show or hide the Extended Depth of Field dialog 0 - Hide the Extended Depth of Field dialog. 1 - Show the Extended Depth of Field dialog
Return Value 0 if successful, a negative error code if failed.
See Also IpEDFNew,IpEDFAdd, IpEDFCreate, IpEDFTopoMap, IpEDFGet, IPEDFSet
IpEDFTestStrips Syntax IpEDFTestStips()
Description This function generates EDF test strips using the current settings.
Return Value DocId of the new test strip sequence if successful, a negative error code if failed.
Comments If the EDF_TS_GALLERY option is selected, a second workspace is generated by this function. That workspace will the active workspace after the operation, so the IpDocGet function can be used to get the document ID of the sequence gallery workspace.
See Also IpEDFAdd, IpEDFCreate, IPEDFNew
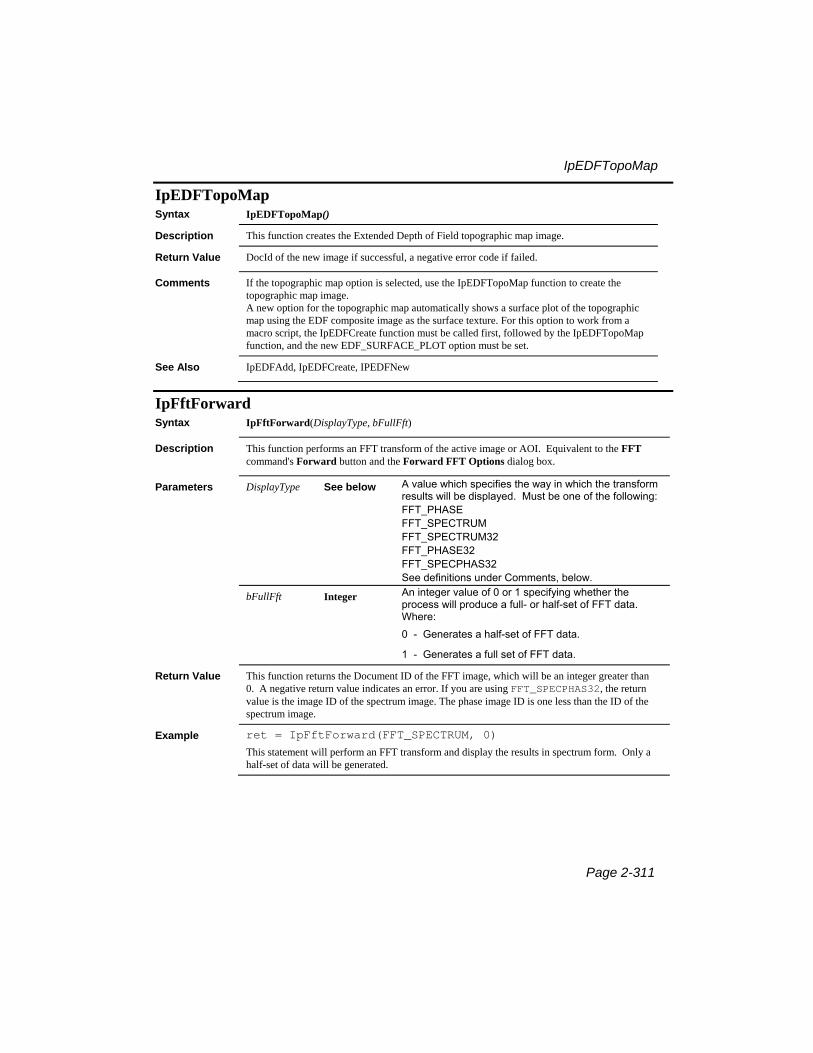
IpEDFTopoMap
Page 2-311
IpEDFTopoMap Syntax IpEDFTopoMap()
Description This function creates the Extended Depth of Field topographic map image.
Return Value DocId of the new image if successful, a negative error code if failed.
Comments If the topographic map option is selected, use the IpEDFTopoMap function to create the topographic map image. A new option for the topographic map automatically shows a surface plot of the topographic map using the EDF composite image as the surface texture. For this option to work from a macro script, the IpEDFCreate function must be called first, followed by the IpEDFTopoMap function, and the new EDF_SURFACE_PLOT option must be set.
See Also IpEDFAdd, IpEDFCreate, IPEDFNew
IpFftForward Syntax IpFftForward(DisplayType, bFullFft)
Description This function performs an FFT transform of the active image or AOI. Equivalent to the FFT command's Forward button and the Forward FFT Options dialog box.
Parameters DisplayType See below A value which specifies the way in which the transform results will be displayed. Must be one of the following: FFT_PHASE FFT_SPECTRUM FFT_SPECTRUM32 FFT_PHASE32 FFT_SPECPHAS32 See definitions under Comments, below.
bFullFft Integer An integer value of 0 or 1 specifying whether the process will produce a full- or half-set of FFT data. Where:
0 - Generates a half-set of FFT data.
1 - Generates a full set of FFT data.
Return Value This function returns the Document ID of the FFT image, which will be an integer greater than 0. A negative return value indicates an error. If you are using FFT_SPECPHAS32, the return value is the image ID of the spectrum image. The phase image ID is one less than the ID of the spectrum image.
Example ret = IpFftForward(FFT_SPECTRUM, 0) This statement will perform an FFT transform and display the results in spectrum form. Only a half-set of data will be generated.

IpFftHiPass
Page 2-312
Comments The following table describes the values allowed in the DisplayType parameter:
Display Type Value DESCRIPTION
FFT_PHASE Integer Displays the phase of the FFT.
FFT_SPECTRUM Integer Displays FFT data in the traditional “cloud of points” form.
FFT_SPECTRUM32 Single point Amplitude
FFT_PHASE32 Single point Phase
FFT_SPCPHAS32 Single point Amplitude + phase, two images.
See Also IpFftInverse
IpFftHiPass Syntax IpFftHiPass(Type, Transition, PreserveNil)
Description This function filters the FFT data to allow only the frequencies outside the specified range to remain in the image. Equivalent to applying the Hi Pass option from the Filter group box in the FFT dialog box.
Parameters Type Integer An enumerated integer specifying the way in which frequencies within the selected range will be treated. Must be one of the following: FFT_HANNING FFT_NOTCH See definitions under Comments, below.
Transition Integer An integer representing a percentage, from 0 to 50 (inclusive), specifying the rate at which the selected frequencies will be attenuated. The closer this value is to 0, the more closely the result will resemble the results of the FFT_NOTCH Type.
PreserveNil Integer An integer value of 0 or 1 specifying whether the zero frequency component is to be preserved. Where: 0 - Preserves the Zero Frequency Component 1 - Does not preserve the Zero Frequency Component
Example ipRect.left = 66 ipRect.right = 189 ipRect.top = 58 ipRect.bottom = 196 ret = IpAoiCreateBox(ipRect) ret = IpFftHiPass(FFT_HANNING, 30, 1)
This set of statements will attenuate all frequencies within the AOI defined by ipRect. A transition value of 30% will be applied during frequency attenuation. The Zero Frequency Component will not be preserved.
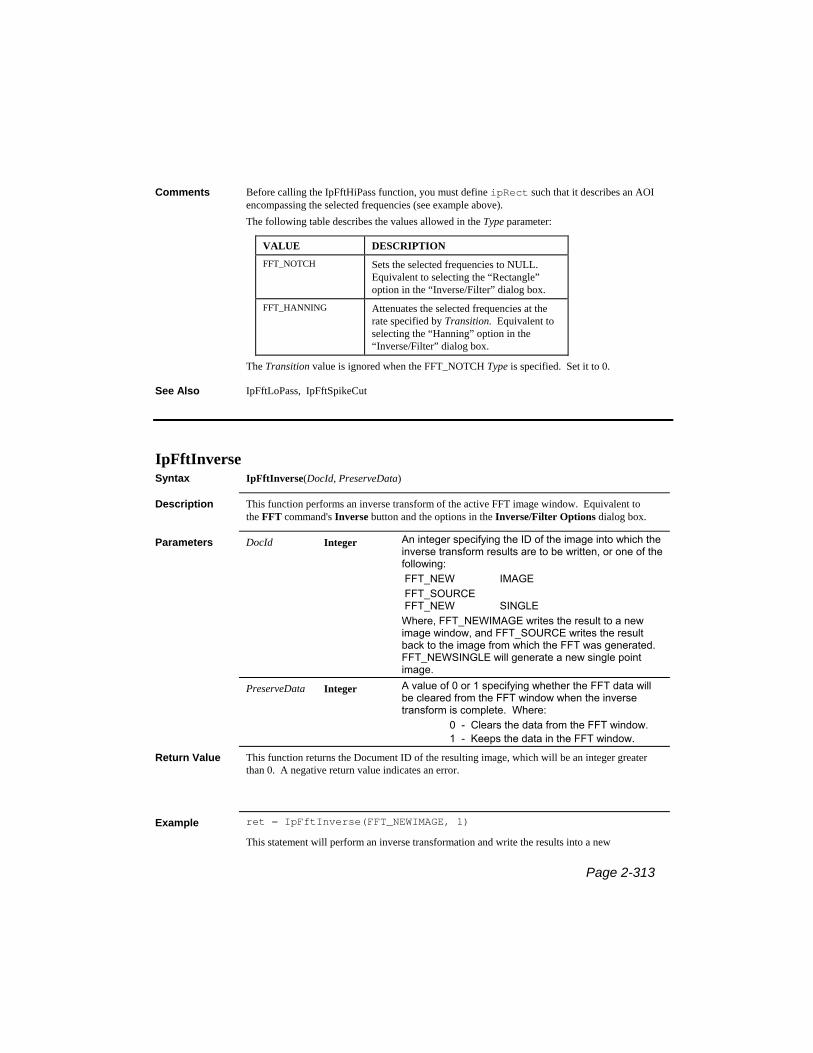
Page 2-313
Comments Before calling the IpFftHiPass function, you must define ipRect such that it describes an AOI encompassing the selected frequencies (see example above). The following table describes the values allowed in the Type parameter:
VALUE DESCRIPTION FFT_NOTCH Sets the selected frequencies to NULL.
Equivalent to selecting the “Rectangle” option in the “Inverse/Filter” dialog box.
FFT_HANNING Attenuates the selected frequencies at the rate specified by Transition. Equivalent to selecting the “Hanning” option in the “Inverse/Filter” dialog box.
The Transition value is ignored when the FFT_NOTCH Type is specified. Set it to 0.
See Also IpFftLoPass, IpFftSpikeCut
IpFftInverse Syntax IpFftInverse(DocId, PreserveData)
Description This function performs an inverse transform of the active FFT image window. Equivalent to the FFT command's Inverse button and the options in the Inverse/Filter Options dialog box.
Parameters DocId Integer An integer specifying the ID of the image into which the inverse transform results are to be written, or one of the following: FFT_NEW IMAGE FFT_SOURCE FFT_NEW SINGLE Where, FFT_NEWIMAGE writes the result to a new image window, and FFT_SOURCE writes the result back to the image from which the FFT was generated. FFT_NEWSINGLE will generate a new single point image.
PreserveData Integer A value of 0 or 1 specifying whether the FFT data will be cleared from the FFT window when the inverse transform is complete. Where: 0 - Clears the data from the FFT window. 1 - Keeps the data in the FFT window.
Return Value This function returns the Document ID of the resulting image, which will be an integer greater than 0. A negative return value indicates an error.
Example ret = IpFftInverse(FFT_NEWIMAGE, 1)
This statement will perform an inverse transformation and write the results into a new

IpFftLoad
Page 2-314
image window. Data in the FFT window will be preserved so that it can be filtered again without having to do a forward FFT.
See Also IpFftForward
IpFftLoad Syntax IpFftLoad(FileName)
Description This function loads FFT data from a file into an image window. Equivalent to the Load button in the FFT dialog box.
Parameters FileName String A string specifying the name of the file from which the FFT data will be read.
Return Value This function returns the Document ID of the FFT image, which will be an integer greater than 0. A negative return value indicates an error.
Example
ret = IpFftLoad("C:\IPWIN\DNOISE.FFT")
This statement will load the DNOISE.FFT file from the \IPWIN directory on drive C: .
See Also IpFftSave
IpFftLoPass Syntax IpFftLoPass(Type, Transition)
Description This function filters the FFT data to allow only the frequencies within the specified range to remain in the image. Equivalent to applying the Lo Pass option from the Filter group box in the FFT dialog box.
Parameters Type Integer An enumerated integer specifying the way in which frequencies outside the selected range are to be treated. Must be one of the following: FFT_HANNING FFT_NOTCH See definitions under Comments, below.
Transition Integer An integer representing a percentage, from 0 to 50 (inclusive), specifying the rate at which the selected frequencies will be attenuated. The closer this value is to 0, the more closely the result will resemble the results of the FFT_NOTCH Type.
Example ipRect.left = 66 ipRect.right = 189 ipRect.top = 58 ipRect.bottom = 196 ret = IpAoiCreateBox(ipRect) ret = IpFftLoPass(FFT_HANNING, 30)
This set of statements will attenuate all frequencies outside of the AOI defined by ipRect. A transition value of 30% will be applied during frequency attenuation.
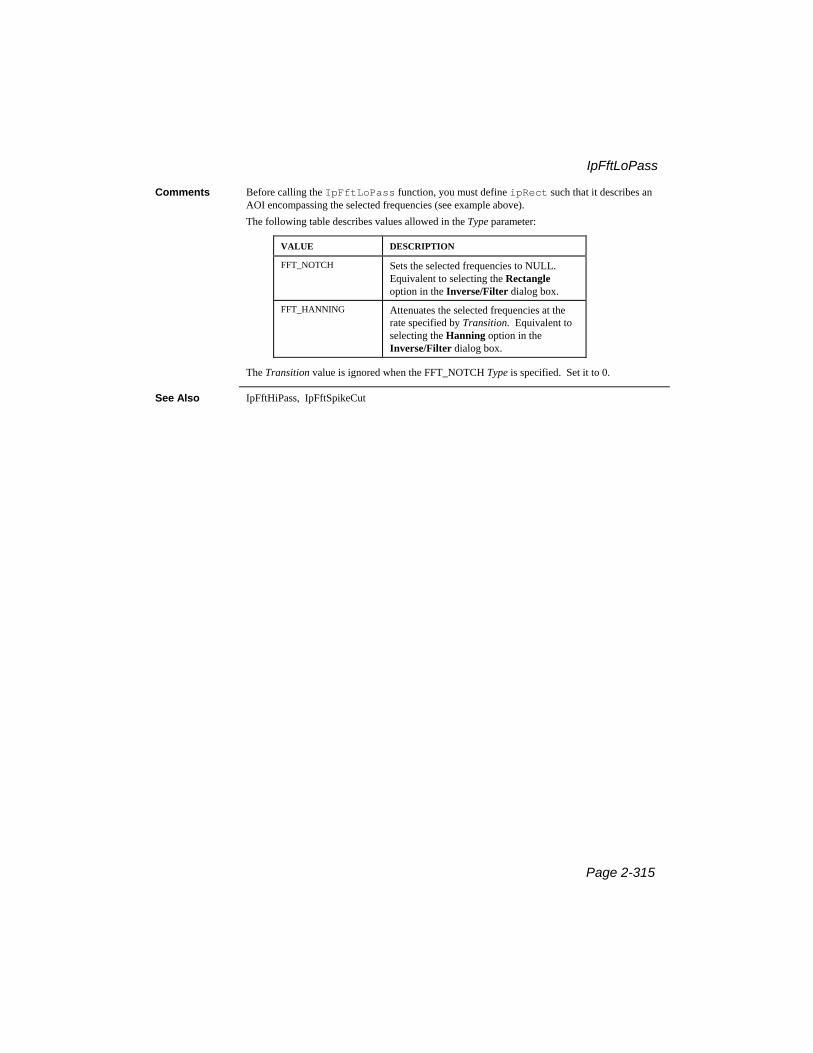
IpFftLoPass
Page 2-315
Comments Before calling the IpFftLoPass function, you must define ipRect such that it describes an AOI encompassing the selected frequencies (see example above). The following table describes values allowed in the Type parameter:
VALUE DESCRIPTION
FFT_NOTCH Sets the selected frequencies to NULL. Equivalent to selecting the Rectangle option in the Inverse/Filter dialog box.
FFT_HANNING Attenuates the selected frequencies at the rate specified by Transition. Equivalent to selecting the Hanning option in the Inverse/Filter dialog box.
The Transition value is ignored when the FFT_NOTCH Type is specified. Set it to 0.
See Also IpFftHiPass, IpFftSpikeCut

IpFftSave
Page 2-316
IpFftSave Syntax IpFftSave(FileName)
Description This function saves the current FFT data to a file. Equivalent to the Save button in the FFT dialog box.
Parameters FileName String A string specifying the name of the file to which the FFT data will be written.
Example ret = IpFftSave("C:\IPWIN7\DNOISE.FFT")
This statement will save the FFT data to the DNOISE.FFT file in the \IPWIN directory on the C: drive.
Comments If the specified file name already exists, it will be automatically overwritten. See Appendix B in the Image-Pro Reference Manual for a description of the FFT file format.
See Also IpFftLoad
IpFftShow Syntax IpFftShow(bShow)
Description This function shows or hides the FFT dialog box. Equivalent to selecting the FFT command to open the window or clicking its close button to close it.
Parameters bShow Integer An integer value of 0 or 1 specifying whether the FFT window is to be shown. Where: 0 - Closes the window if it is already open. 1 - Opens the window.
Example ret = IpFftShow(1) ret = IpFftForward(FFT_SPECTRUM, 0)
This set of statements opens the FFT window and produces an FFT spectrum.
Comments The FFT window does not have to be open during an FFT operation. Its disposition, visible or hidden, is entirely your choice. You will want to display the window if your users need to make a choice within it. But, if your objective is simply to filter a spectrum in a predefined way, you needn’t display the FFT window.

IpFftSpikeBoost
Page 2-317
IpFftSpikeBoost Syntax IpFftSpikeBoost(Type, Transition, Symmetrical)
Description This function accentuates the selected frequencies in a set of FFT data. Equivalent to applying the Spike Boost option from the Filter group box in the FFT dialog box.
Parameters Type Integer An enumerated integer specifying the way in which the selected frequencies will be treated. Must be one of the following: FFT_HANNING FFT_NOTCH See definitions under Comments, below.
Transition Integer An integer representing a percentage, from 0 to 50 (inclusive), specifying the rate at which the selected frequencies will be attenuated. The closer this value is to 0, the more closely the result will resemble the results of the FFT_NOTCH Type.
Symmetrical Integer An integer value of 0 or 1 specifying whether both halves of the FFT data set will be affected by the frequency filter. Where: 0 - Disables Symmetrical editing. 1 - Enables Symmetrical editing.
Example ipRect.left = 66 ipRect.top = 58 ipRect.right = 189 ipRect.bottom = 196 ret = IpAoiCreateBox(ipRect) ret = IpFftSpikeBoost(FFT_HANNING, 30, 0)
This set of statements will accentuate all frequencies within the AOI defined by ipRect (i.e., 66,58 and 189,196). A transition value of 30% will be applied during frequency accentuation. Symmetrical editing is disabled.
Comments Before calling the IpFftSpikeBoost function, you must define ipRect such that it describes an AOI encompassing the selected frequencies (see example above). The following table describes the values allowed in the Type parameter:
VALUE DESCRIPTION
FFT_NOTCH Sets the selected frequencies to NULL. Equivalent to selecting the “Rectangle” option in the “Inverse/Filter” dialog box.
FFT_HANNING Accentuates the selected frequencies at the rate specified by Transition. Equivalent to selecting the “Hanning” option in the “Inverse/Filter” dialog box.
The Transition value is ignored when the FFT_NOTCH Type is specified. Set it to 0.
See Also IpFftHiPass, IpFftLoPass

IpFftSpikeCut
Page 2-318
IpFftSpikeCut Syntax IpFftSpikeCut(Type, Transition, Symmetrical)
Description This function removes or attenuates the selected frequencies in a set of FFT data. Equivalent to applying the Spike Cut option from the Filter group box in the FFT dialog box.
Parameters Type Integer An enumerated integer specifying the way in which the selected frequencies will be treated. Must be one of the following: FFT_HANNING FFT_NOTCH See definitions under Comments, below.
Transition Integer An integer representing a percentage, from 0 to 50 (inclusive), specifying the rate at which the selected frequencies will be attenuated. The closer this value is to 0, the more closely the result will resemble the results of the FFT_NOTCH Type.
Symmetrical Integer An integer value of 0 or 1 specifying whether both halves of the FFT data set will be affected by the frequency filter. Where: 0 - Disables Symmetrical editing. 1 - Enables Symmetrical editing.
Example ipRect.left = 66 ipRect.top = 58 ipRect.right = 189 ipRect.bottom = 196 ret = IpAoiCreateBox(ipRect) ret = IpFftSpikeCut(FFT_HANNING, 30, 0)
This set of statements will attenuate all frequencies within the AOI defined by ipRect (i.e., 66,58 and 189,196). A transition value of 30% will be applied during frequency attenuation. Symmetrical editing is disabled.
Comments Before calling the IpFftSpikeCut function, you must define ipRect such that it describes an AOI encompassing the selected frequencies (see example above). The following table describes the values allowed in the Type parameter:
VALUE DESCRIPTION
FFT_NOTCH Sets the selected frequencies to NULL. Equivalent to selecting the “Rectangle” option in the “Inverse/Filter” dialog box.
FFT_HANNING Attenuates the selected frequencies at the rate specified by Transition. Equivalent to selecting the “Hanning” option in the “Inverse/Filter” dialog box.
The Transition value is ignored when the FFT_NOTCH Type is specified. Set it to 0.
See Also IpFftHiPass, IpFftLoPass

IpFftTag
Page 2-319
IpFftTag Syntax IpFftTag(DocID, Type, Source Class)
Description This function specifies that the active image and another image make up a pair of spectrum and phase FFT images.
Parameters Doc ID Integer Document ID of the second image.
Type Integer The component that the active image represents (FFT_SPECTRUM or FFT_PHASE).
Source Class Integer The image class of the source image that generated the FFT image.
Return Value 0 if successful, an error code if failed.
IpFlt3DApplytoBuffer Syntax IpFlt3DApplytoBuffer (ImSizeX, ImSizeY, ImSizeZ, FltBuffer, FltParams, szKernName)
Description This function applys the 3D filter to the memory buffer.
Parameters ImSizeX Long Size of the memory buffer in the X direction
ImSizeY Long Size of the memory buffer in the Y direction
ImSizeZ Long Size of the memory buffer in the Z direction
p_FltBuffer Any Pointer to a floating point buffer to be filtered
pFltParams Any Pointer to an array of doubles containing the filter parameters
szKernName String Kernel name (path and extension not required). This parameter must be specified for CONV_3D_KERNEL and MORPH_ED_XXX filter types. For other filters, this parameter must be an empty string
Return Value 0 if successful, a negative error code if failed.
Example Please see Appendix A.
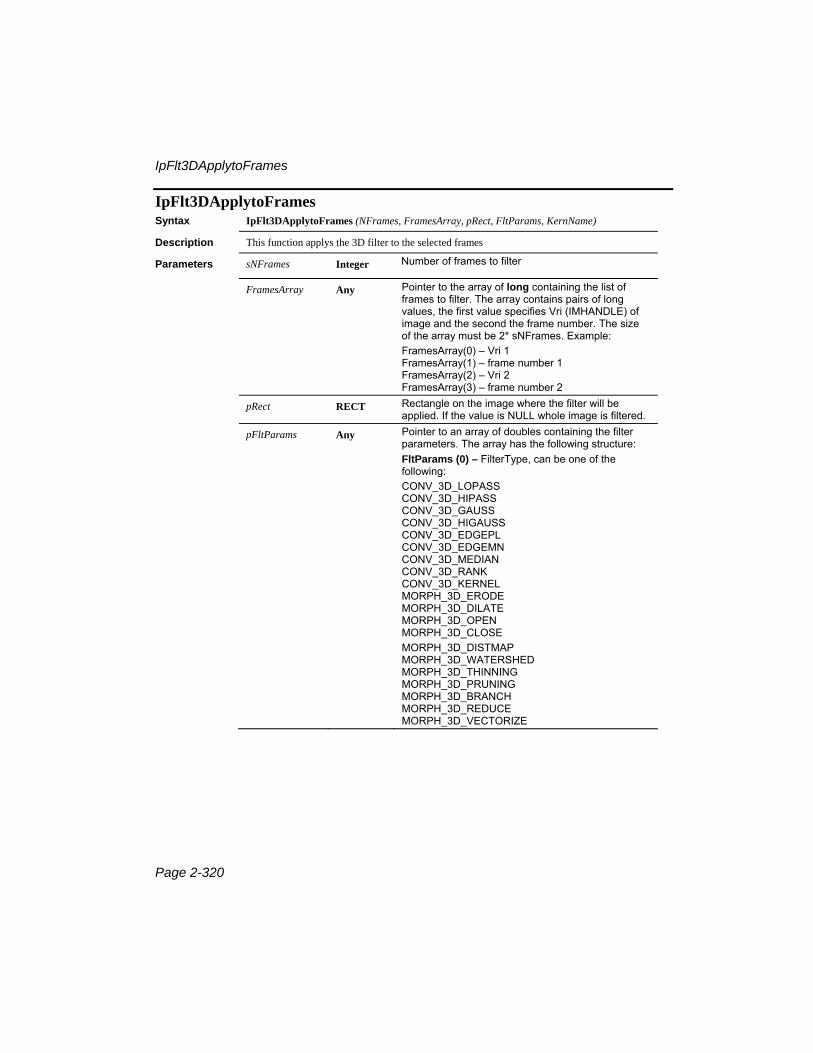
IpFlt3DApplytoFrames
Page 2-320
IpFlt3DApplytoFrames Syntax IpFlt3DApplytoFrames (NFrames, FramesArray, pRect, FltParams, KernName)
Description This function applys the 3D filter to the selected frames
Parameters sNFrames Integer Number of frames to filter
FramesArray Any Pointer to the array of long containing the list of frames to filter. The array contains pairs of long values, the first value specifies Vri (IMHANDLE) of image and the second the frame number. The size of the array must be 2* sNFrames. Example: FramesArray(0) – Vri 1 FramesArray(1) – frame number 1 FramesArray(2) – Vri 2 FramesArray(3) – frame number 2
pRect RECT Rectangle on the image where the filter will be applied. If the value is NULL whole image is filtered.
pFltParams Any Pointer to an array of doubles containing the filter parameters. The array has the following structure: FltParams (0) – FilterType, can be one of the following: CONV_3D_LOPASS CONV_3D_HIPASS CONV_3D_GAUSS CONV_3D_HIGAUSS CONV_3D_EDGEPL CONV_3D_EDGEMN CONV_3D_MEDIAN CONV_3D_RANK CONV_3D_KERNEL MORPH_3D_ERODE MORPH_3D_DILATE MORPH_3D_OPEN MORPH_3D_CLOSE
MORPH_3D_DISTMAP MORPH_3D_WATERSHED MORPH_3D_THINNING MORPH_3D_PRUNING MORPH_3D_BRANCH MORPH_3D_REDUCE MORPH_3D_VECTORIZE

IpFlt3DBranchEnd
Page 2-321
Parameters pFltParams, con’t
Any FltParams (1) – number of passes FltParams (2) – SizeX FltParams (3) – SizeY FltParams (4) – SizeZ FltParams (5) – Strength FltParams (6) – Rank (used only for CONV_3D_RANK filter) FltParams (7) – Filter Color Images in HSI space, 1= on, 0 = off FltParams (8) – use Morphological Kernel (used only with MORPH_3D_XXXX types), 1= on, 0 = off FltParams (9) – threshold absolute value (not percents) used with thinning, watershed, etc. FltParams (10) – the Stop After options. Used in Thinning, Watershed, Pruning filters (1-On, 0-Off). FltParams (11) – Iterations number, Used in Thinning, Watershed, Pruning filters. With Gray watershed the parameter defines Pre-flooding level. FltParams (12) – Gray Watershed option. Used only with Watershed (1-On, 0-Off). FltParams (13) – BranchEnd flags, can be a combination (sum) of the following constants: BR_SING LE_POINT BR_END_PO INT BR_SKELETO N BR_TRIPLE_BR BR_4_PLUS BR_ALL – is the sum of All flags
For MORPH_3D_VECTORIZE the parameter contains vectorization mode flags. See IpFlt3DVectorize for details. FltParams (14) – preserve long branches option. Used only with Pruning (1-On, 0-Off).
szKernName String Kernel name (path and extension not required). This parameter must be specified for CONV_3D_KERNEL and MORPH_ED_XXX filter types. For other filters, this parameter must be an empty string
Return Value 0 if successful, a negative error code if failed.
Example Please see Appendix A.
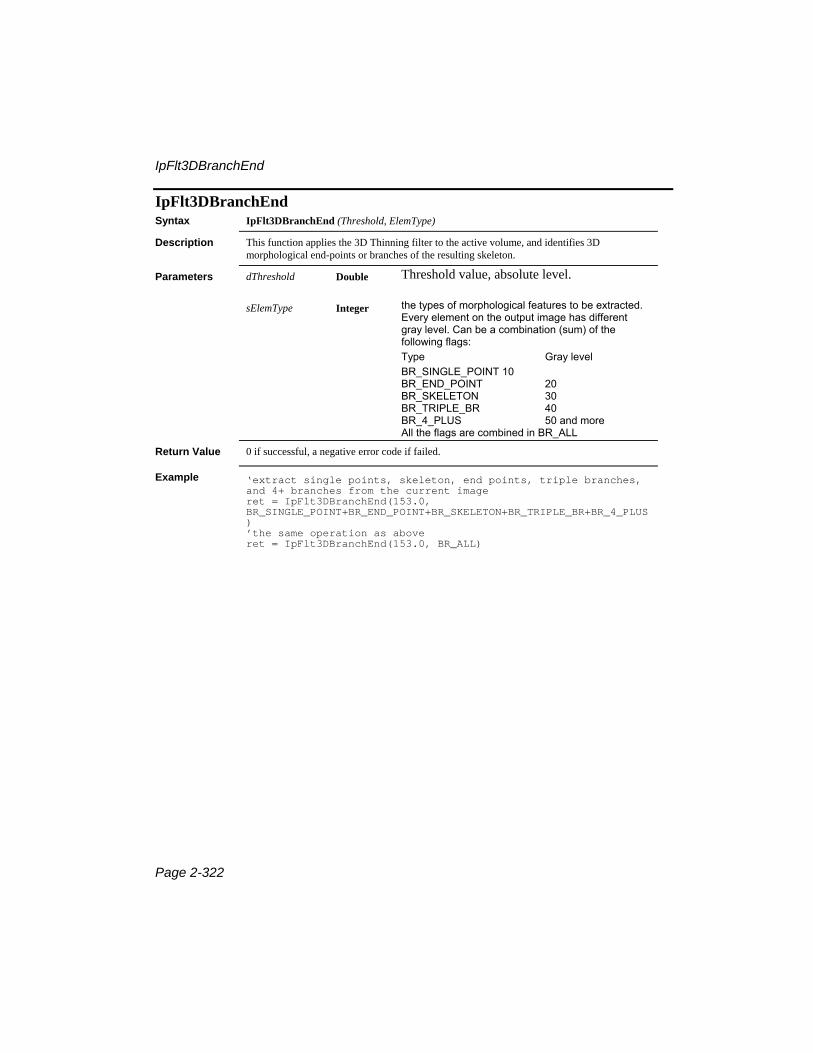
IpFlt3DBranchEnd
Page 2-322
IpFlt3DBranchEnd Syntax IpFlt3DBranchEnd (Threshold, ElemType)
Description This function applies the 3D Thinning filter to the active volume, and identifies 3D morphological end-points or branches of the resulting skeleton.
Parameters dThreshold Double Threshold value, absolute level.
sElemType Integer the types of morphological features to be extracted. Every element on the output image has different gray level. Can be a combination (sum) of the following flags:
Type Gray level BR_SINGLE_POINT 10 BR_END_POINT 20 BR_SKELETON 30 BR_TRIPLE_BR 40 BR_4_PLUS 50 and more All the flags are combined in BR_ALL
Return Value 0 if successful, a negative error code if failed.
Example ‘extract single points, skeleton, end points, triple branches, and 4+ branches from the current image ret = IpFlt3DBranchEnd(153.0, BR_SINGLE_POINT+BR_END_POINT+BR_SKELETON+BR_TRIPLE_BR+BR_4_PLUS) ’the same operation as above ret = IpFlt3DBranchEnd(153.0, BR_ALL)
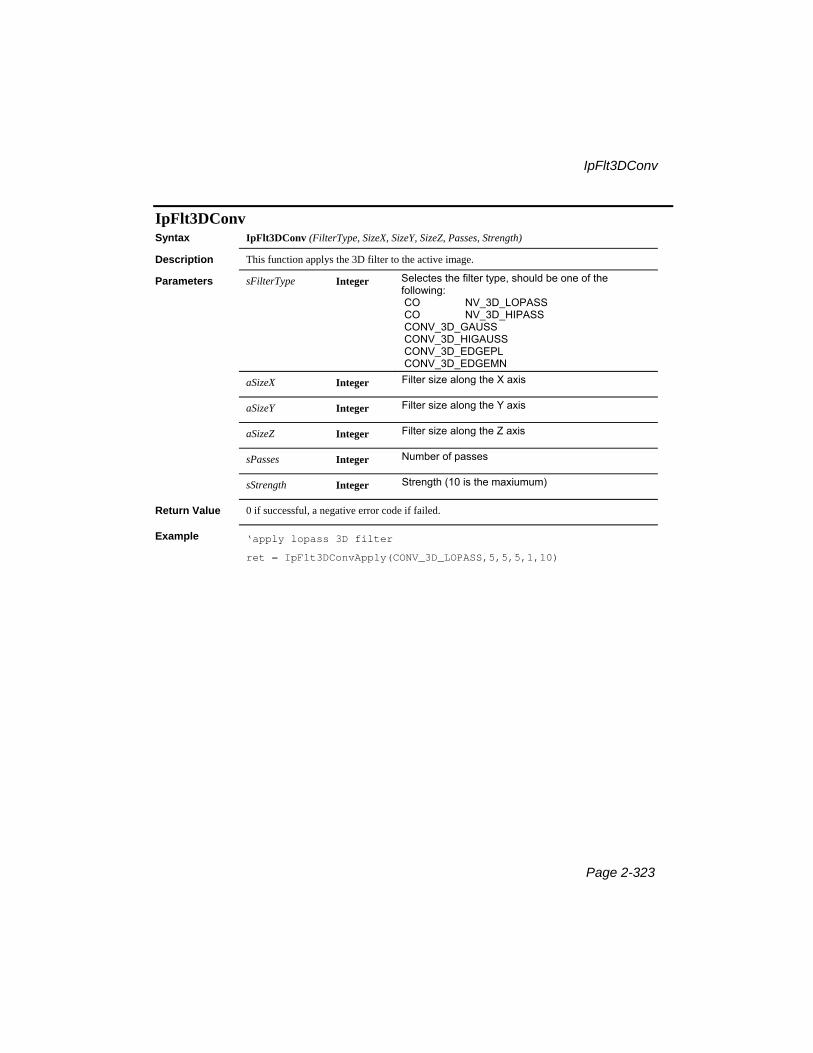
IpFlt3DConv
Page 2-323
IpFlt3DConv Syntax IpFlt3DConv (FilterType, SizeX, SizeY, SizeZ, Passes, Strength)
Description This function applys the 3D filter to the active image.
Parameters sFilterType Integer Selectes the filter type, should be one of the following: CO NV_3D_LOPASS CO NV_3D_HIPASS CONV_3D_GAUSS CONV_3D_HIGAUSS CONV_3D_EDGEPL CONV_3D_EDGEMN
aSizeX Integer Filter size along the X axis
aSizeY Integer Filter size along the Y axis
aSizeZ Integer Filter size along the Z axis
sPasses Integer Number of passes
sStrength Integer Strength (10 is the maxiumum)
Return Value 0 if successful, a negative error code if failed.
Example ‘apply lopass 3D filter
ret = IpFlt3DConvApply(CONV_3D_LOPASS,5,5,5,1,10)

IpFlt3DData
Page 2-324
IpFlt3DData Syntax IpFlt3DData (lAttr, lOption, pData)
Description This function sets or gets the data used with 3D filtering.
Parameters lAttr Long See table below
lOption Integer See table below
pData Any See table below
lAttr lOption pData Description
FLT3D_DIST_SCALE_SET Not used, should be 0 Pointer to the array of doubles[3] with scale values. pData(0) – voxel size in X direction. pData(1) – voxel size in Y direction. pData(2) – voxel size in Z direction.
Sets the distance scale (voxel size) used for distance transform and other distance map- based filters (binary watershed, thinning, reduce)
FLT3D_DIST_SCALE_GET Not used, should be 0 Pointer to the array of doubles[3] with scale values. pData(0) – voxel size in X direction. pData(1) – voxel size in Y direction. pData(2) – voxel size in Z direction.
Gets the distance scale (voxel size) used for distance transform
Example ‘set voxel size for distance transform Sub SetDist() Dim DistScale(3) As Double DistScale(0)=2 DistScale(1)=3 DistScale(2)=10 ret = IpFlt3DData(FLT3D_DIST_SCALE_SET,0,DistScale(0)) End Sub ‘get voxel size used for distance transform Sub GetDist() Dim DistScale(3) As Double ret = IpFlt3DData(FLT3D_DIST_SCALE_GET,0,DistScale(0)) Debug.Print "SizeX = " & DistScale(0) Debug.Print "SizeY = " & DistScale(1) Debug.Print "SizeZ = " & DistScale(2)
End Sub

IpFlt3DDistance
Page 2-325
IpFlt3DDistance Syntax IpFlt3DDistance (Threshold)
Description This function creates a floating-point 3D distance map on the active volume.
Parameters dThreshold Double Threshold value, absolute level.
Return Value ID of the new distance map if successful, a negative error code if failed.
Example ’create distance map with threshold 153 ret = IpFlt3DDistance(153.0)
IpFlt3DGet Syntax IpFlt3DGet (Attribute, Data)
Description This function gets the 3D filter parameters
Parameters sAttribute Integer Parameter attribute to get FLT3D_HSI_FILTRATION gets the ‘filter color images in HIS space’ option FLT3D_USEACTIVEPORTION sets the ‘use active portion’ option.
lpData Long Pointer to a long value that receives the value
Return Value 0 if successful, a negative error code if failed.
Example ‘get the HSI options Dim lHSI as Long ret=IpFlt3DGet(FLT3D_HSI_FILTRATION, lHSI)
IpFlt3DKernel Syntax IpFlt3DKernel (KernName, Passes)
Description This function applies a convolution kernel filter to the active image.
Parameters szKernName String Kernel name. An extension and/or path is not required.
sPasses Integer Number of passes
Return Value 0 if successful, a negative error code if failed.
Example ‘apply Sobel 3D filter ret=IpFlt3DKernel (Sobel 3D,1)

IpFlt3DMorph
Page 2-326
IpFlt3DMorph Syntax IpFlt3DMorph (FilterType, SizeX, SizeY, SizeZ, Passes)
Description This function applies the free size morphological filter to the active image.
Parameters sFilterType Integer Selectes the filter type, should be one of the following: MORPH_3D_ERODE MORPH_3D_DILATE MORPH_3D_OPEN MORPH_3D_CLOSE
aSizeX Integer Filter size along the X axis
aSizeY Integer Filter size along the Y axis
aSizeZ Integer Filter size along the Z axis
sPasses Integer Number of passes
Return Value 0 if successful, a negative error code if failed.
Example ‘apply Erode filter of size 7x7x7 10 times
ret = IpFlt3DMorph (MORPH_3D_ERODE,7,7,7,10)
IpFlt3DMorphKernel Syntax IpFlt3DMorphKernel (FilterType, KernName, Passes)
Description This function applies the morphological kernel filter to the active image.
Parameters sFilterType Integer Selectes the filter type, should be one of the following: MORPH_3D_ERODE MORPH_3D_DILATE MO RPH_ED_OPEN MORPH_3D_CLOSE
sKernName String Kernel name. An extension and/or path is not required
sPasses Integer Number of passes
Return Value 0 if successful, a negative error code if failed.
Example ‘apply Erode filter of size 7x7x7 10 times ret = IpFlt3DMorph (MORPH_3D_ERODE,7,7,7,10)
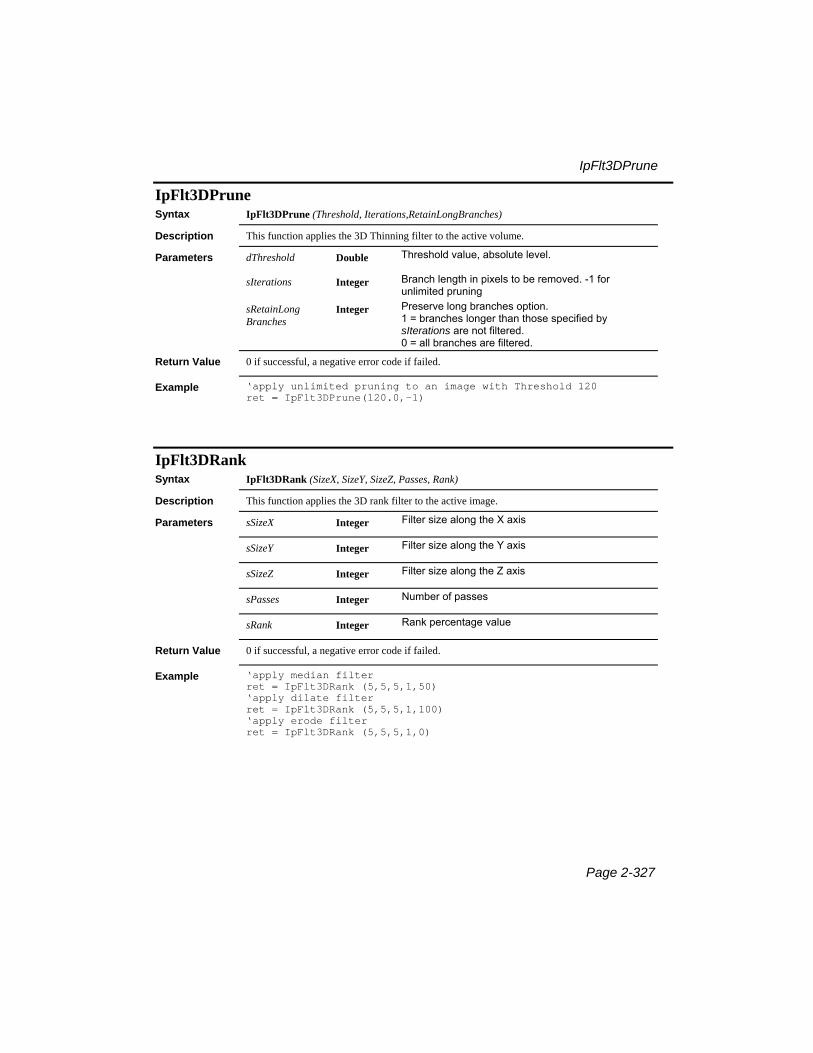
IpFlt3DPrune
Page 2-327
IpFlt3DPrune Syntax IpFlt3DPrune (Threshold, Iterations,RetainLongBranches)
Description This function applies the 3D Thinning filter to the active volume.
Parameters dThreshold Double Threshold value, absolute level.
sIterations Integer Branch length in pixels to be removed. -1 for unlimited pruning
sRetainLong Branches
Integer Preserve long branches option. 1 = branches longer than those specified by sIterations are not filtered. 0 = all branches are filtered.
Return Value 0 if successful, a negative error code if failed.
Example ‘apply unlimited pruning to an image with Threshold 120 ret = IpFlt3DPrune(120.0,-1)
IpFlt3DRank Syntax IpFlt3DRank (SizeX, SizeY, SizeZ, Passes, Rank)
Description This function applies the 3D rank filter to the active image.
Parameters sSizeX Integer Filter size along the X axis
sSizeY Integer Filter size along the Y axis
sSizeZ Integer Filter size along the Z axis
sPasses Integer Number of passes
sRank Integer Rank percentage value
Return Value 0 if successful, a negative error code if failed.
Example ‘apply median filter ret = IpFlt3DRank (5,5,5,1,50) ‘apply dilate filter ret = IpFlt3DRank (5,5,5,1,100) ‘apply erode filter ret = IpFlt3DRank (5,5,5,1,0)

IpFlt3DReduce
Page 2-328
IpFlt3DReduce Syntax IpFlt3DReduce (Threshold)
Description This function applies the 3D Reduce filter to the active volume.
Parameters dThreshold Double Threshold value, absolute level.
Return Value 0 if successful, a negative error code if failed.
Example ‘apply Reduce filter ret = IpFlt3DPrune(130.0)
IpFlt3DSet Syntax IpFlt3DSet (Attribute, lParam)
Description This function sets the 3D filter parameters
Parameters sAttribute Integer Parameter attribute to set: FLT3D_HSI_FILTRATION sets the ‘filter color images in HIS space’ option FLT3D_USEACTIVEPORTION sets the ‘use active portion’ option.
lParam Long 0 = off 1 = on
Return Value 0 if successful, a negative error code if failed.
Example ‘set the HSI options Dim lHSI as Long ret=IpFlt3DSet(FLT3D_HSI_FILTRATION, lHSI)
IpFlt3DShow Syntax IpFlt3DShow (bShow)
Description This function hides or shows the 3D filters dialog.
Parameters bShow Integer 0 = hide the dialog 1 = show the dialog
Return Value 0 if successful, a negative error code if failed.
Example ‘show dialog IpFlt3DShow (1)

IpFlt3DThin
Page 2-329
IpFlt3DThin Syntax IpFlt3DThin (Threshold, Iterations)
Description This function applies the 3D Thinning filter to the active volume.
Parameters dThreshold Double Threshold value, absolute level.
sIterations Integer The number of iteration for limited thinning. -1 for unlimited thinning.
Return Value 0 if successful, a negative error code if failed.
Example ‘apply unlimited thinning to an image with Threshold 153
ret = IpFlt3DThin(153.0,-1)
IpFlt3DVectGet Syntax IpFlt3DVectGet (lAttr, lOption)
Description This function gets the vectorization values.
Parameters lAttr Long See table below.
lOption Integer See table below.
Return Value See table below.
Comments Run this function after running IpFlt3DVectorize.
lAttr lOption Description
V3D_NUM_VECT Not used, should be 0 Returns the number of branches in the skeleton. Branches are skeleton lines where any pixel does not have more that 2 neighbors in 3x3x3 26-connected neighborhood.
V3D_NUM_BRPT Not used, should be 0 Returns the number of branch points that have 3 or more pixels in 26-connected neighborhood. The branch points usually have 3 or more branches connected to it.
V3D_NUM_SNGL Not used, should be 0 Returns the number of single pixels that do not have any neighbors in 26-connected neighborhood. The function can be used to get coordinates of points after the Reduce filter has been applied.
V3D_VECT_LEN VectID: the ID of the branch vector, should be between 0 and the value returned by the function with V3D_NUM_VECT attribute
Returns the number of pixels in a branch

IpFlt3DVectGet
Page 2-330
lAttr lOption Description
V3D_BRPT_VOLUME BranchPointID: the ID of the branch point, should be between 0 and the value returned by the function with the V3D_NUM_BRPT attribute.
Returns the number of pixels in a branch point. Branch point may include 1 or more pixels, especially if the skeleton is produced by limited thinning, so the branch point can be a blob.
V3D_VECT_START_BR_ IND
VectID: the ID of the branch vector, should be between 0 and the value returned by the function with the V3D_NUM_VECT attribute
Returns the branch point index (BranchPointID) of the start point of the vector. The value can be used to build a connection diagram of branches. The function returns -1 if there are no branch points are connected to this end of the vector (true end-point) or -2 if the branch is a closed ring.
V3D_VECT_END_BR_IND VectID: the ID of the branch vector, should be between 0 and the value returned by the function with the V3D_NUM_VECT attribute
Returns the branch point index (BranchPointID) of the end point of the vector. The value can be used to build a connection diagram of branches. The function returns -1 if there are no branch points are connected to this end of the vector (true end-point) or -2 if the branch is a closed ring.
See Also IpFlt3DVectorize, IpFlt3DVectGetData
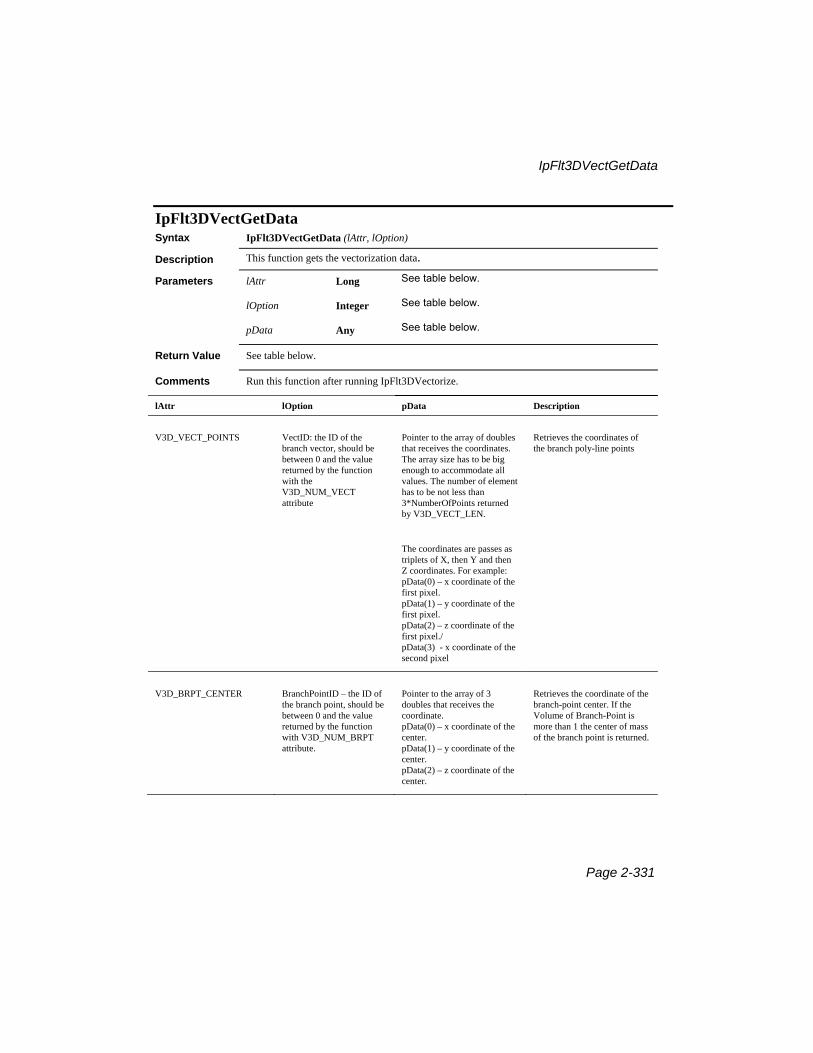
IpFlt3DVectGetData
Page 2-331
IpFlt3DVectGetData Syntax IpFlt3DVectGetData (lAttr, lOption)
Description This function gets the vectorization data.
Parameters lAttr Long See table below.
lOption Integer See table below.
pData Any See table below.
Return Value See table below.
Comments Run this function after running IpFlt3DVectorize.
lAttr lOption pData Description
V3D_VECT_POINTS VectID: the ID of the branch vector, should be between 0 and the value returned by the function with the V3D_NUM_VECT attribute
Pointer to the array of doubles that receives the coordinates. The array size has to be big enough to accommodate all values. The number of element has to be not less than 3*NumberOfPoints returned by V3D_VECT_LEN.
The coordinates are passes as triplets of X, then Y and then Z coordinates. For example: pData(0) – x coordinate of the first pixel. pData(1) – y coordinate of the first pixel. pData(2) – z coordinate of the first pixel./ pData(3) - x coordinate of the second pixel
Retrieves the coordinates of the branch poly-line points
V3D_BRPT_CENTER BranchPointID – the ID of the branch point, should be between 0 and the value returned by the function with V3D_NUM_BRPT attribute.
Pointer to the array of 3 doubles that receives the coordinate. pData(0) – x coordinate of the center. pData(1) – y coordinate of the center. pData(2) – z coordinate of the center.
Retrieves the coordinate of the branch-point center. If the Volume of Branch-Point is more than 1 the center of mass of the branch point is returned.

IpFlt3DVectGetData
Page 2-332
lAttr lOption pData Description
V3D_SNGL_CENTER SnglPointID – the ID of the single point, should be between 0 and the value returned by the function with V3D_NUM_SNGL attribute
Pointer to the array of 3 doubles that receives the coordinate. pData(0) – x coordinate of the center. pData(1) – y coordinate of the center. pData(2) – z coordinate of the center.
Retrieves the coordinate of a single point.
V3D_BRPT_DIAMETER BranchPointID – the ID of the branch point, should be between 0 and the value returned by the function with V3D_NUM_BRPT attribute
Pointer to a double that receives the diameter.
Retrieves the diameter of a 3+ branch point. The diameter is based on the value of the distance map image at the coordinate of the branch point. The last distance map created by thinning or distance map operation with active V3D_SAVE_DIST_MAP_SET option is used. (see also FLT3D_DIST_SCALE_SET to set calibrated voxel size).
V3D_SNGL_DIAMETER SnglPointID – the ID of the single point, should be between 0 and the value returned by the function with V3D_NUM_SNGL attribute
Pointer to a double that receives the diameter.
Retrieves the diameter of a single point.
V3D_VECT_DIAMETER BranchPointID – the ID of the branch point, should be between 0 and the value returned by the function with V3D_NUM_BRPT attribute
Pointer to a double that receives the diameter
Retrieves the average diameter of a vector. The branch diameter is calculated as average diameter of all points in the branch. See V3D_BRPT_DIAMETER for more info.
V3D_POINT_DIAMETER Point address, which is calculated as X + Y*Width + Z*Width*Height, where Width and Height define image size
Pointer to a double that receives the diameter.
Tetrieves the diameter of an arbitrary point defined by its linear coordinate. See V3D_BRPT_DIAMETER for more info.
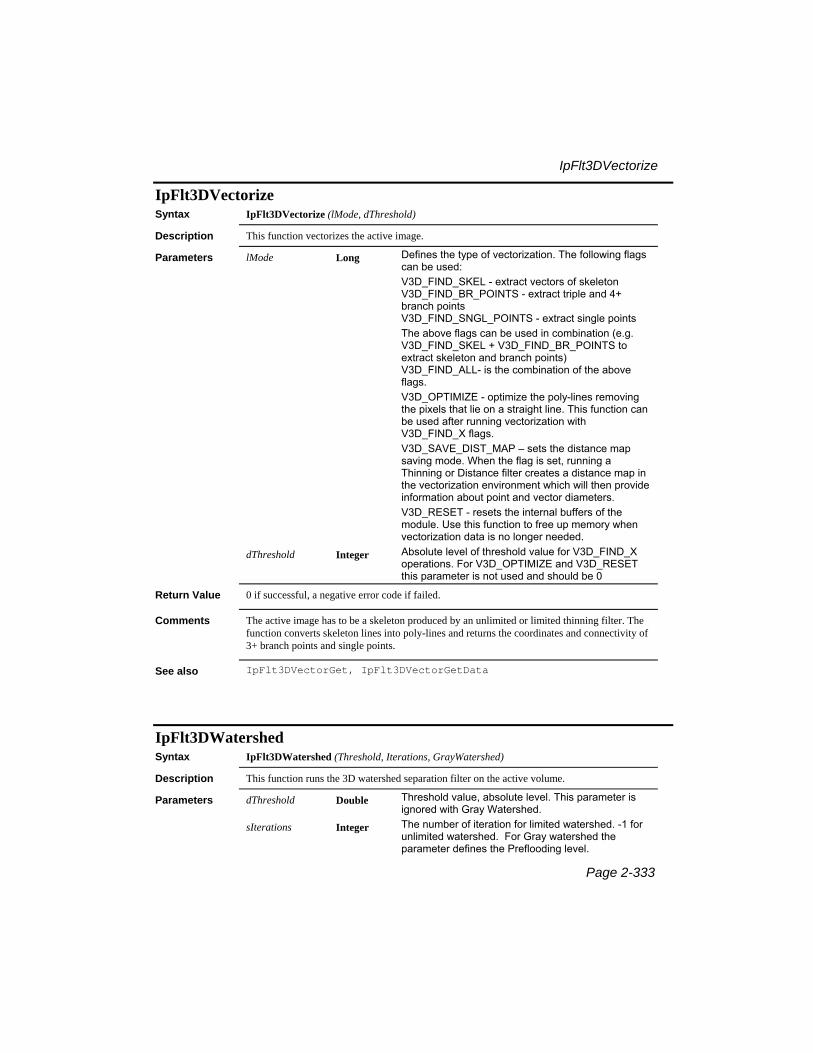
IpFlt3DVectorize
Page 2-333
IpFlt3DVectorize Syntax IpFlt3DVectorize (lMode, dThreshold)
Description This function vectorizes the active image.
Parameters lMode Long Defines the type of vectorization. The following flags can be used: V3D_FIND_SKEL - extract vectors of skeleton V3D_FIND_BR_POINTS - extract triple and 4+ branch points V3D_FIND_SNGL_POINTS - extract single points The above flags can be used in combination (e.g. V3D_FIND_SKEL + V3D_FIND_BR_POINTS to extract skeleton and branch points) V3D_FIND_ALL- is the combination of the above flags. V3D_OPTIMIZE - optimize the poly-lines removing the pixels that lie on a straight line. This function can be used after running vectorization with V3D_FIND_X flags. V3D_SAVE_DIST_MAP – sets the distance map saving mode. When the flag is set, running a Thinning or Distance filter creates a distance map in the vectorization environment which will then provide information about point and vector diameters. V3D_RESET - resets the internal buffers of the module. Use this function to free up memory when vectorization data is no longer needed.
dThreshold Integer Absolute level of threshold value for V3D_FIND_X operations. For V3D_OPTIMIZE and V3D_RESET this parameter is not used and should be 0
Return Value 0 if successful, a negative error code if failed.
Comments The active image has to be a skeleton produced by an unlimited or limited thinning filter. The function converts skeleton lines into poly-lines and returns the coordinates and connectivity of 3+ branch points and single points.
See also IpFlt3DVectorGet, IpFlt3DVectorGetData
IpFlt3DWatershed Syntax IpFlt3DWatershed (Threshold, Iterations, GrayWatershed)
Description This function runs the 3D watershed separation filter on the active volume.
Parameters dThreshold Double Threshold value, absolute level. This parameter is ignored with Gray Watershed.
sIterations Integer The number of iteration for limited watershed. -1 for unlimited watershed. For Gray watershed the parameter defines the Preflooding level.

IpFltBranchEnd
Page 2-334
sGrayWatershed Integer Turns Gray Watershed option on or off: 1 = on 0 = off
Return Value 0 if successful, a negative error code if failed.
Example ‘apply binary watershed to an image with Threshold 128 ret = IpFlt3DWatershed(128.0,-1,0) ‘apply limiter binary watershed with 6 iterations ret = IpFlt3DWatershed(128.0,6,0) ‘apply gray watershed with preflooding level of 10 ret = IpFlt3DWatershed(128.000061,10,1)
IpFltBranchEnd Syntax IpFltBranchEnd(Threshold,Classify)
Description This function applies the branch/endpoint filter with threshold and rank to the active image or AOI.
Parameters Threshold Integer Threshold (0-100) at which to binarize the image prior to skeletonization.
Classify Integer This parameter calssifies points by determining how many separate branches extend from that point. Sum of: BR_SKEL = 16;skeletal points of connectivity = 2 BR_END = 32; end points of connectivity = 1 BR_BRANCH3 = 64; branch points of connectivity = 3 BR_BRANCHN = 128; branch points of connectivity = 4 or more
Example ret = IpFltBranchEnd(22,64)
This statement uses a threshold of 10 while applying the trip branches option.
Comments The resulting image may require contrast adjustment for the results to be visible.

IpFltClose
Page 2-335
IpFltClose Syntax IpFltClose(Shape, Passes)
Description This function applies the closing filter to the active image or AOI. Equivalent to selecting the Close option within the Filter command window.
Parameters Shape Integer An enumerated integer specifying the shape and size of the filtering kernel. Must be one of the following: MORPHO_2x2SQUARE MORPHO_3x1ROW MORPHO_1x3COLUMN MORPHO_3x3CROSS MORPHO_5x5OCTAGON MORPHO_7x7OCTAGON MORPHO_11x11OCTAGON See definitions under Comments, below.
Passes Integer An integer between 1 and 100 (inclusive) specifying the number of times the filter is to be applied to the image.
Example ret = IpFltClose(MORPHO_2x2SQUARE, 3)
This statement will filter the image data using a 2 x 2 square closing filter. The filter will be applied 3 times.
Comments The following table describes the values allowed in the Shape parameter: These values are equivalent to the options presented by the Filtering window's Options group box when a morphological filter is selected.
VALUE DESCRIPTION
MORPHO_2x2SQUARE Applies a 2 x 2 square filtering kernel. MORPHO_3x1ROW Applies a 3 x 1 horizontal filtering kernel. MORPHO_1x3COLUMN Applies a 1 x 3 vertical filtering kernel. MORPHO_3x3CROSS Applies a 3 x 3 cross filtering kernel. MORPHO_5x5OCTAGON Applies a 5 x 5 octagonal filtering kernel. MORPHO_7x7OCTAGON Applies a 7 x 7 octagonal filtering kernel. MORPHO_11x11OCTAGON Applies a 11 x 11 octagonal filtering kernel.
See Also IpFltOpen, IpFltErode, IpFltDilate

IpFltConvolveKernel
Page 2-336
IpFltConvolveKernel Syntax IpFltConvolveKernel(KernelName, Strength, Passes)
Description This function filters the image data using the convolution filter contained in the specified file. Equivalent to selecting the Other option within the Filter command window.
Parameters KernelName String A string specifying the file in which the kernel coefficients are contained. Must be one of the following:
SCULPT.3X3 TOPHAT.3X3 TOPHAT.5X5 TOPHAT.7X7 WELL.3X3 WELL.5X5 WELL.7X7 HORZEDGE.3X3 HORZEDGE.5X5 HORZEDGE.7X7 VERTEDGE.3X3 VERTEDGE.5X5 VERTEDGE.7X7 HIGAUSS.7X7 HIGAUSS.9X9 LAPLACE.3X3 LAPLACE.5X5 LAPLACE.7X7
Strength Integer An integer between 1 and 10 (inclusive) specifying the amount of the filtered result that is to be applied to the image. A value of 10 indicates that the full result (100%) is to be applied. Lesser values apply the result at reduced strengths.
Passes Integer An integer between 1 and 100 (inclusive) specifying the number of times the filter is to be applied to the image.
Example ret = IpFltConvolveKernel("VERTEDGE.7x7", 10, 1)
This statement will filter the image data using the kernel contained in the file VERTEDGE.7x7. This filter will be applied one time at full strength (10).
Comments See Appendix B in the Image-Pro Reference Manual for a description of a kernel file.

IpFltDespeckle
Page 2-337
IpFltDespeckle Syntax IpFltDespeckle(Size, Strength, Passes)
Description This function applies the Despeckle filter to the active image or AOI. Equivalent to selecting the Despeckle option within the Filter command window.
Parameters Size Integer An integer value of 3, 5 or 7 specifying the size of the kernel to be applied during the filtering operation. Convolution kernels are always square, so this value specifies both length and width (e.g., 3 x 3).
Strength Integer An integer between 1 and 10 (inclusive) specifying the amount of the filtered result to be applied to the image. A value of 10 indicates that the full result (100%) is to be applied. Lesser values apply the result at reduced strengths.
Passes Integer An integer between 1 and 100 (inclusive) specifying the number of times the filter is to be applied to the image.
Example ret = IpFltDespeckle (5, 8, 2)
This statement will filter the image data using the 5 x 5 kernel. The results will be applied at reduced strength (8). The filter will be applied twice.
IpFltDilate Syntax IpFltDilate(Shape, Passes)
Description This function applies the Dilation filter to the active image or AOI. Equivalent to selecting the Dilate option within the Filter command window.
Parameters Shape Integer An enumerated integer specifying the shape and size of the filtering kernel. Must be one of the following: MORPHO_2x2SQUARE MORPHO_3x1ROW MORPHO_1x3COLUMN MORPHO_3x3CROSS MORPHO_5x5OCTAGON MORPHO_7x7OCTAGON MORPHO_11x11OCTAGON See definitions under Comments, below.
Passes Integer An integer between 1 and 100 (inclusive) specifying the number of times the filter is to be applied to the image.
Example ret = IpFltDilate(MORPHO_1x3COLUMN, 2)
This statement will filter the image data using a 1 x 3 vertical dilation filter. The filter will be applied 2 times.
Comments The following table describes the values allowed in the Shape parameter: These values are equivalent to the options presented within the Filtering window's Options group box when a morphological filter is selected.

IpFltDistance
Page 2-338
VALUE DESCRIPTION
MORPHO_2x2SQUARE Applies a 2 x 2 square filtering kernel. MORPHO_3x1ROW Applies a 3 x 1 horizontal filtering kernel. MORPHO_1x3COLUMN Applies a 1 x 3 vertical filtering kernel. MORPHO_3x3CROSS Applies a 3 x 3 cross filtering kernel. MORPHO_5x5OCTAGON Applies a 5 x 5 octagonal filtering kernel. MORPHO_7x7OCTAGON Applies a 7 x 7 octagonal filtering kernel. MORPHO_11x11OCTAGON Applies a 11 x 11 octagonal filtering kernel.
See Also IpFltOpen, IpFltErode, IpFltClose
IpFltDistance Syntax IpFltDistance (Threshold, Mode)
Description This function applies the distance filter to the active image or AOI.
Parameters Threshold Integer An integer value between 1 and 100 inclusive that indicates at what percentage of intensity to apply the filter.
Mode Integer Indicates the type of distance mapping to perform. Must be one of the following: DISTANCE_SQUARE - 0 =current square distance DISTANCE_DIAGONAL - 1 = current diagonal distanceDISTANCE_EUCLIDIAN - 2 = Euclidian distance, integer
Example ret = IpFltDistance(10,0)
This statement uses a threshold of 10 while applying the square option.
Comments All returned images will have their distances normalized, so that a white 4-connected to black background will have a distance of 1.

IpFltErode
Page 2-339
IpFltErode Syntax IpFltErode(Shape, Passes)
Description This function applies the Erosion filter to the active image or AOI. Equivalent to selecting the Erode option within the Filter command window.
Parameters Shape Integer An enumerated integer specifying the shape and size of the filtering kernel. Must be one of the following: MORPHO_2x2SQUARE MORPHO_3x1ROW MORPHO_1x3COLUMN MORPHO_3x3CROSS MORPHO_5x5OCTAGON MORPHO_7x7OCTAGON MORPHO_11x11OCTAGON See definitions under Comments, below.
Passes Integer An integer between 1 and 100 (inclusive) specifying the number of times the filter is to be applied to the image data.
Example ret = IpFltErode(MORPHO_3x1ROW, 2)
This statement will filter the image data using a 3 x 1 horizontal erosion filter. The filter will be applied 2 times.
Comments The following table describes the values allowed in the Shape parameter. These values are equivalent to the options presented within the Filtering window's Options group box when a morphological filter is selected.
VALUE DESCRIPTION
MORPHO_2x2SQUARE Applies a 2 x 2 square filtering kernel.
MORPHO_3x1ROW Applies a 3 x 1 horizontal filtering kernel.
MORPHO_1x3COLUMN Applies a 1 x 3 vertical filtering kernel.
MORPHO_3x3CROSS Applies a 3 x 3 cross filtering kernel.
MORPHO_5x5OCTAGON Applies a 5 x 5 octagonal filtering kernel.
MORPHO_7x7OCTAGON Applies a 7 x 7 octagonal filtering kernel.
MORPHO_11x11OCTAGON Applies a 11 x 11 octagonal filtering kernel.
See Also IpFltOpen, IpFltDilate, IpFltClose

IpFltExtractBkgnd
Page 2-340
IpFltExtractBkgnd Syntax IpFltExtractBkgnd(BrightOnDark, ObjectSize)
Description This function extracts the background from the active image or AOI. Equivalent to selecting the Background option within the Filter command window.
Parameters BrightOnDark Integer An integer value of 0 or 1 specifying whether the objects are dark or light. Where: 0 - Specifies dark objects on a bright background. Equivalent to the “Bright” background selection in the “Option” group box.
1 - Specifies bright objects on a dark background. Equivalent to the “Dark” background selection in the “Option” group box.
ObjectSize Integer An integer between 7 and 100 (inclusive) that describes the size of the objects in the image, in pixels.
Return Value This function returns the Document ID of the new image, which will be an integer greater than 0. A negative return value indicates an error.
Example ret = IpFltExtractBkgnd(0, 25)
This statement will extract the background from an image containing dark objects that are smaller than 25 pixels in diameter.
See Also IpFltFlatten

IpFltFlatten
Page 2-341
IpFltFlatten Syntax IpFltFlatten(BrightOnDark, ObjectSize)
Description This function flattens the background of the active image or AOI. Equivalent to selecting the Flatten option within the Filter command window.
Parameters BrightOnDark Integer An integer value of 0 or 1 specifying whether the objects are dark or light. Where: 0 - Specifies dark objects on a bright background. Equivalent to the “Bright” background selection in the “Option” group box. 1 - Specifies bright objects on a dark background. Equivalent to the “Dark” background selection in the “Option” group box.
ObjectSize Integer An integer between 7 and 100 (inclusive) that describes the size of the objects in the image, in pixels.
Example ret = IpFltFlatten(1, 40)
This statement will flatten the background of an image containing bright objects that are smaller than 40 pixels in diameter.
See Also IpFltExtractBkgnd
IpFltGauss Syntax IpFltGauss(Size, Strength, Passes)
Description This function applies the Gauss filter to the active image or AOI. Equivalent to selecting the Gauss option within the Filter command window. Use this filter to soften an image by eliminating high-frequency information using a Gauss function. This has the effect of blurring sharp edges. The operation of the Gauss filter is similar to the LoPass filter, but it degrades the image less than the LoPass filter.
Parameters Size Integer An integer value of 3, 5 or 7, which specifies the size of the kernel to be applied during the filtering operation.
Strength Integer An integer between 1 and 10 (inclusive) specifying the amount of the filtered result to be applied to the image. A value of 10 indicates that the full result (100%) is to be applied. Lesser values apply the result at reduced strengths.
Passes Integer An integer between 1 and 100 (inclusive) specifying the number of times the filter is to be applied to the image.
Example ret = IpFltGauss(5, 8, 2)
This statement will filter the image data using the 5 x 5 kernel. The results will be applied at reduced strength (8). The filter will be applied twice.
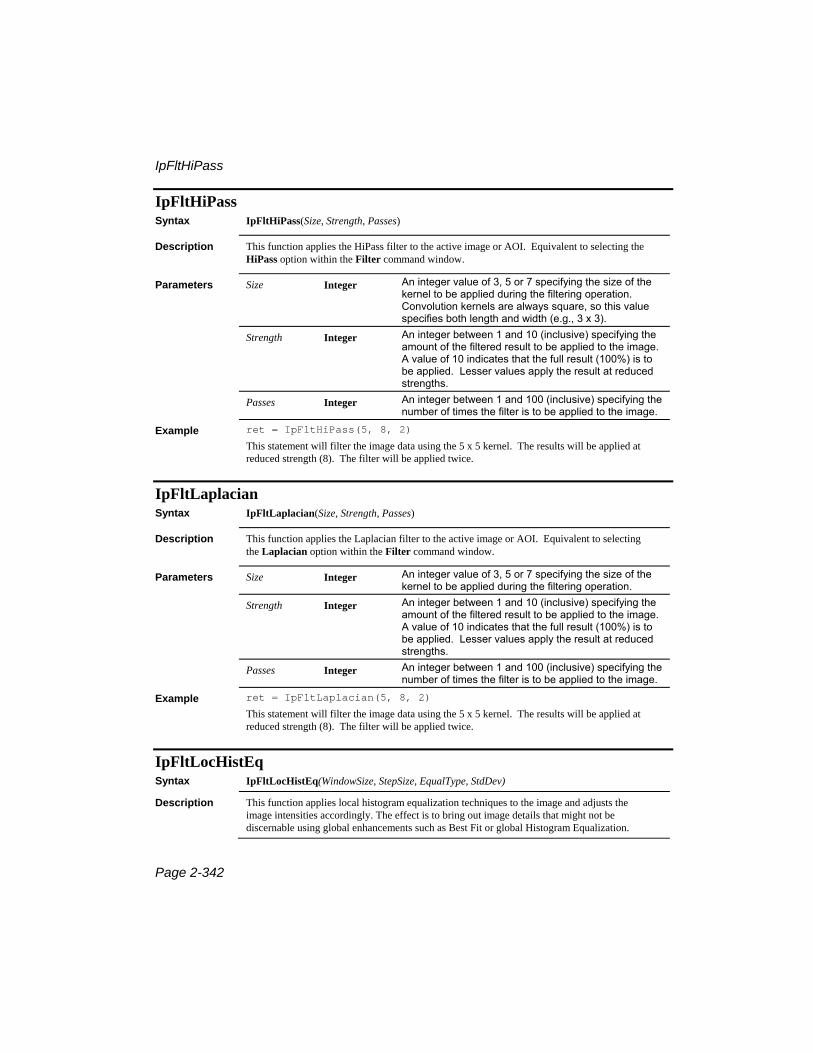
IpFltHiPass
Page 2-342
IpFltHiPass Syntax IpFltHiPass(Size, Strength, Passes)
Description This function applies the HiPass filter to the active image or AOI. Equivalent to selecting the HiPass option within the Filter command window.
Parameters Size Integer An integer value of 3, 5 or 7 specifying the size of the kernel to be applied during the filtering operation. Convolution kernels are always square, so this value specifies both length and width (e.g., 3 x 3).
Strength Integer An integer between 1 and 10 (inclusive) specifying the amount of the filtered result to be applied to the image. A value of 10 indicates that the full result (100%) is to be applied. Lesser values apply the result at reduced strengths.
Passes Integer An integer between 1 and 100 (inclusive) specifying the number of times the filter is to be applied to the image.
Example ret = IpFltHiPass(5, 8, 2)
This statement will filter the image data using the 5 x 5 kernel. The results will be applied at reduced strength (8). The filter will be applied twice.
IpFltLaplacian Syntax IpFltLaplacian(Size, Strength, Passes)
Description This function applies the Laplacian filter to the active image or AOI. Equivalent to selecting the Laplacian option within the Filter command window.
Parameters Size Integer An integer value of 3, 5 or 7 specifying the size of the kernel to be applied during the filtering operation.
Strength Integer An integer between 1 and 10 (inclusive) specifying the amount of the filtered result to be applied to the image. A value of 10 indicates that the full result (100%) is to be applied. Lesser values apply the result at reduced strengths.
Passes Integer An integer between 1 and 100 (inclusive) specifying the number of times the filter is to be applied to the image.
Example ret = IpFltLaplacian(5, 8, 2)
This statement will filter the image data using the 5 x 5 kernel. The results will be applied at reduced strength (8). The filter will be applied twice.
IpFltLocHistEq Syntax IpFltLocHistEq(WindowSize, StepSize, EqualType, StdDev)
Description This function applies local histogram equalization techniques to the image and adjusts the image intensities accordingly. The effect is to bring out image details that might not be discernable using global enhancements such as Best Fit or global Histogram Equalization.
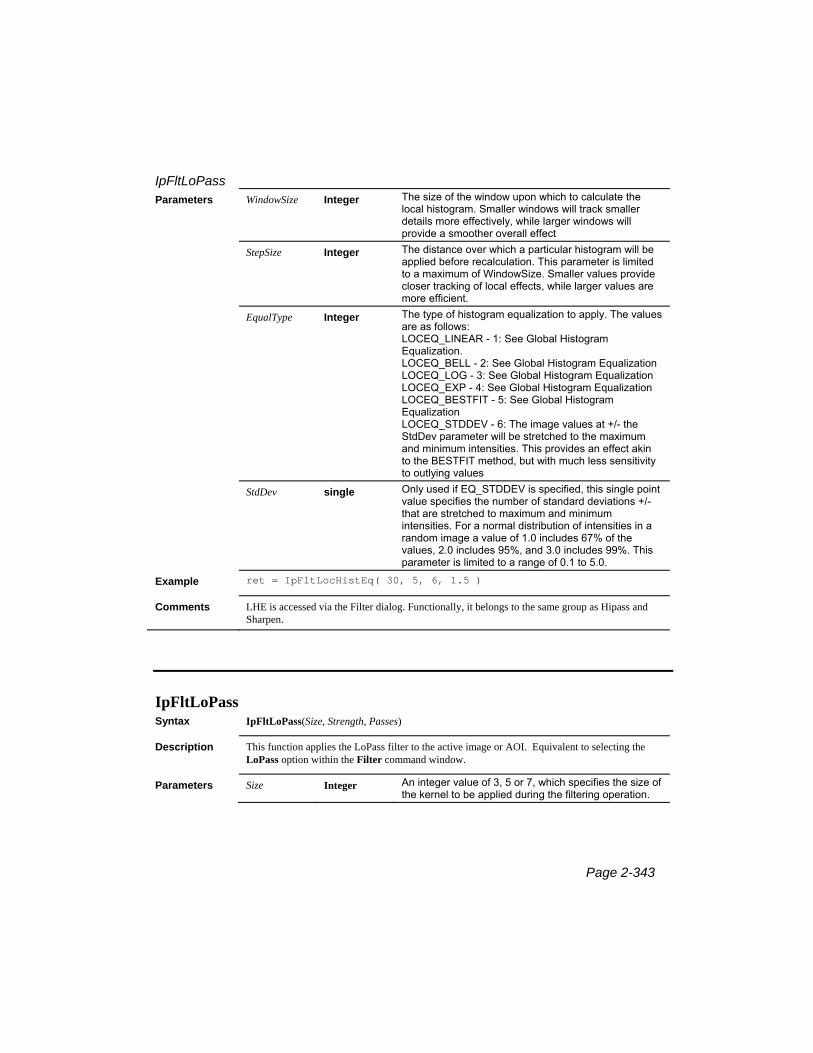
IpFltLoPass
Page 2-343
Parameters WindowSize
Integer The size of the window upon which to calculate the local histogram. Smaller windows will track smaller details more effectively, while larger windows will provide a smoother overall effect
StepSize
Integer The distance over which a particular histogram will be applied before recalculation. This parameter is limited to a maximum of WindowSize. Smaller values provide closer tracking of local effects, while larger values are more efficient.
EqualType Integer The type of histogram equalization to apply. The values are as follows: LOCEQ_LINEAR - 1: See Global Histogram Equalization. LOCEQ_BELL - 2: See Global Histogram Equalization LOCEQ_LOG - 3: See Global Histogram Equalization LOCEQ_EXP - 4: See Global Histogram Equalization LOCEQ_BESTFIT - 5: See Global Histogram Equalization LOCEQ_STDDEV - 6: The image values at +/- the StdDev parameter will be stretched to the maximum and minimum intensities. This provides an effect akin to the BESTFIT method, but with much less sensitivity to outlying values
StdDev single Only used if EQ_STDDEV is specified, this single point value specifies the number of standard deviations +/- that are stretched to maximum and minimum intensities. For a normal distribution of intensities in a random image a value of 1.0 includes 67% of the values, 2.0 includes 95%, and 3.0 includes 99%. This parameter is limited to a range of 0.1 to 5.0.
Example ret = IpFltLocHistEq( 30, 5, 6, 1.5 )
Comments LHE is accessed via the Filter dialog. Functionally, it belongs to the same group as Hipass and Sharpen.
IpFltLoPass Syntax IpFltLoPass(Size, Strength, Passes)
Description This function applies the LoPass filter to the active image or AOI. Equivalent to selecting the LoPass option within the Filter command window.
Parameters Size Integer An integer value of 3, 5 or 7, which specifies the size of the kernel to be applied during the filtering operation.

IpFltMedian
Page 2-344
Strength Integer An integer between 1 and 10 (inclusive) specifying the amount of the filtered result to be applied to the image. A value of 10 indicates that the full result (100%) is to be applied. Lesser values apply the result at reduced strengths.
Passes Integer An integer between 1 and 100 (inclusive) specifying the number of times the filter is to be applied to the image.
Example ret = IpFltLoPass(5, 8, 2)
This statement will filter the image data using the 5 x 5 kernel. The results will be applied at reduced strength (8). The filter will be applied twice.
IpFltMedian Syntax IpFltMedian(Size, Passes)
Description This function applies the Median filter to the active image or AOI. Equivalent to selecting the Median option within the Filter command window.
Parameters Size Integer An integer value of 3, 5 or 7 specifying the size of the kernel to be applied during the filtering operation.
Passes Integer An integer between 1 and 100 (inclusive) specifying the number of times the filter is to be applied to the image data.
Example ret = IpFltMedian(5, 2)
This statement will filter the image data using the 5 x 5 kernel. The filter will be applied twice.
See Also IpFltLoPass
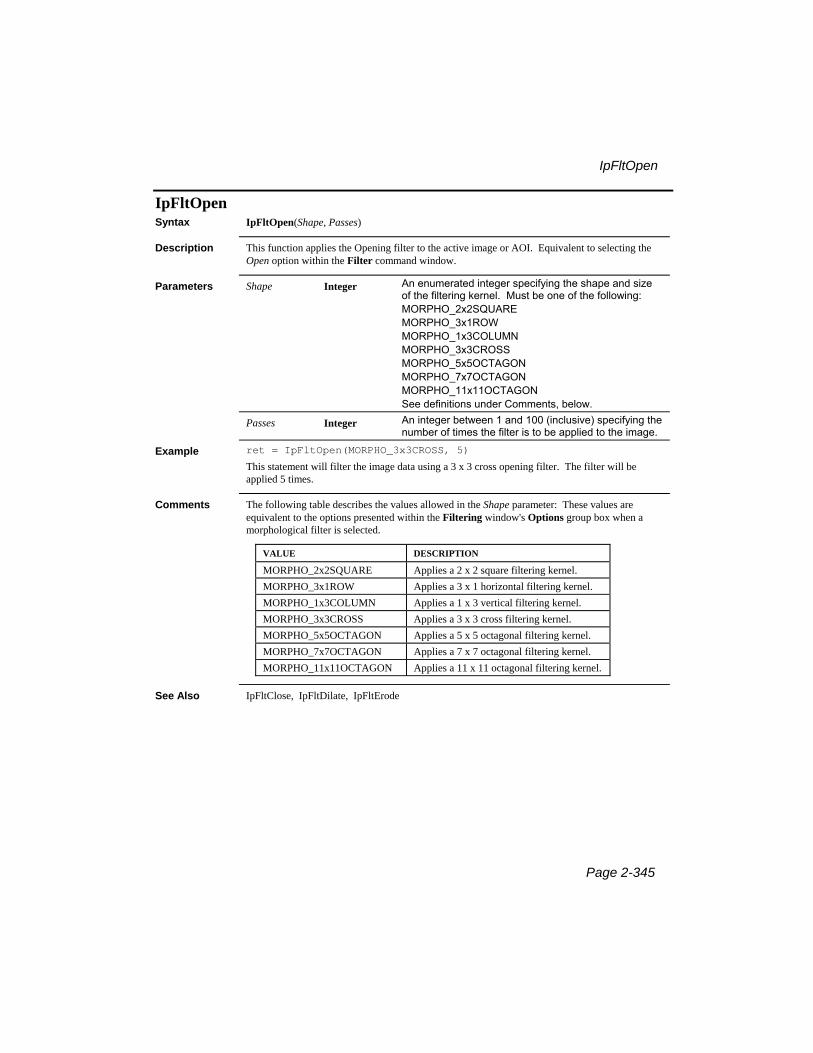
IpFltOpen
Page 2-345
IpFltOpen Syntax IpFltOpen(Shape, Passes)
Description This function applies the Opening filter to the active image or AOI. Equivalent to selecting the Open option within the Filter command window.
Parameters Shape Integer An enumerated integer specifying the shape and size of the filtering kernel. Must be one of the following: MORPHO_2x2SQUARE MORPHO_3x1ROW MORPHO_1x3COLUMN MORPHO_3x3CROSS MORPHO_5x5OCTAGON MORPHO_7x7OCTAGON MORPHO_11x11OCTAGON See definitions under Comments, below.
Passes Integer An integer between 1 and 100 (inclusive) specifying the number of times the filter is to be applied to the image.
Example ret = IpFltOpen(MORPHO_3x3CROSS, 5)
This statement will filter the image data using a 3 x 3 cross opening filter. The filter will be applied 5 times.
Comments The following table describes the values allowed in the Shape parameter: These values are equivalent to the options presented within the Filtering window's Options group box when a morphological filter is selected.
VALUE DESCRIPTION
MORPHO_2x2SQUARE Applies a 2 x 2 square filtering kernel. MORPHO_3x1ROW Applies a 3 x 1 horizontal filtering kernel. MORPHO_1x3COLUMN Applies a 1 x 3 vertical filtering kernel. MORPHO_3x3CROSS Applies a 3 x 3 cross filtering kernel. MORPHO_5x5OCTAGON Applies a 5 x 5 octagonal filtering kernel. MORPHO_7x7OCTAGON Applies a 7 x 7 octagonal filtering kernel. MORPHO_11x11OCTAGON Applies a 11 x 11 octagonal filtering kernel.
See Also IpFltClose, IpFltDilate, IpFltErode

IpFltPhase
Page 2-346
IpFltPhase Syntax IpFltPhase( )
Description This function applies the Phase filter to the active image or AOI. Equivalent to selecting the Phase option within the Filter command window.
Example ret = IpFltPhase()
IpFltPrune Syntax IpFltPrune(Threshold, Passes)
Description This function applies the pruing filter to the active image or AOI.
Parameters Threshold Integer An integer value between 1 and 100 inclusive that describes the intensity of the filter
Passes Integer An integer between 1 and 65535 (inclusive) that describes the number of passes. Enter -1 to disable the number of passes
Example ret = IpFltPrune ( 50,2)
Comments This statement applies the Prune filter with a 50% threshold. The filter is applied twice.
IpFltRank Syntax IpFltRank (Size, Threshold,Rank, Passes)
Description This function applies the rank filter with threshold and rank to the active image or AOI.
Parameters Size Integer An integer value of 3, 5 or 7 specifying the size of the kernel to be applied during the filtering operation.
Threshold Single An integer value between 0 and 100 inclusive specifying the absolute difference in values between the center pixel and the pixel replacement. This value must be multiplied by the dynamic range of the image class to get the absolute gray value.
Rank Integer An integer value between 0 and 100 (inclusive) specifying which pixel in the sorted pixel values array will be used to replace the center pixel. A value of 0 means the lowest pixel value, and a value of 100 means the highest pixel value.
Passes Integer An integer between 1 and 100 (inclusive) specifying the number of times the filter is to be applied to the image data.
Example ret = IpFltRank(3,70,50,1)
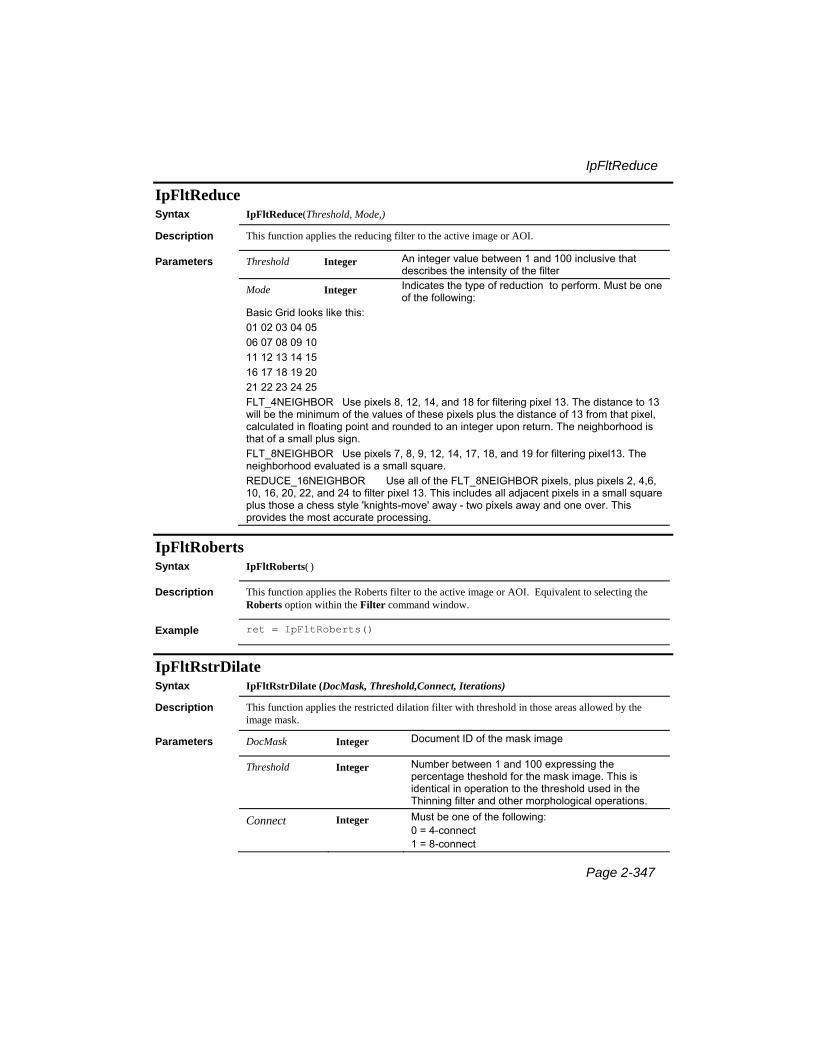
IpFltReduce
Page 2-347
IpFltReduce Syntax IpFltReduce(Threshold, Mode,)
Description This function applies the reducing filter to the active image or AOI.
Parameters Threshold Integer An integer value between 1 and 100 inclusive that describes the intensity of the filter
Mode Integer Indicates the type of reduction to perform. Must be one of the following:
Basic Grid looks like this: 01 02 03 04 05 06 07 08 09 10 11 12 13 14 15 16 17 18 19 20 21 22 23 24 25 FLT_4NEIGHBOR Use pixels 8, 12, 14, and 18 for filtering pixel 13. The distance to 13 will be the minimum of the values of these pixels plus the distance of 13 from that pixel, calculated in floating point and rounded to an integer upon return. The neighborhood is that of a small plus sign. FLT_8NEIGHBOR Use pixels 7, 8, 9, 12, 14, 17, 18, and 19 for filtering pixel13. The neighborhood evaluated is a small square. REDUCE_16NEIGHBOR Use all of the FLT_8NEIGHBOR pixels, plus pixels 2, 4,6, 10, 16, 20, 22, and 24 to filter pixel 13. This includes all adjacent pixels in a small square plus those a chess style 'knights-move' away - two pixels away and one over. This provides the most accurate processing.
IpFltRoberts Syntax IpFltRoberts( )
Description This function applies the Roberts filter to the active image or AOI. Equivalent to selecting the Roberts option within the Filter command window.
Example ret = IpFltRoberts()
IpFltRstrDilate Syntax IpFltRstrDilate (DocMask, Threshold,Connect, Iterations)
Description This function applies the restricted dilation filter with threshold in those areas allowed by the image mask.
Parameters DocMask Integer Document ID of the mask image
Threshold Integer Number between 1 and 100 expressing the percentage theshold for the mask image. This is identical in operation to the threshold used in the Thinning filter and other morphological operations.
Connect Integer Must be one of the following: 0 = 4-connect 1 = 8-connect
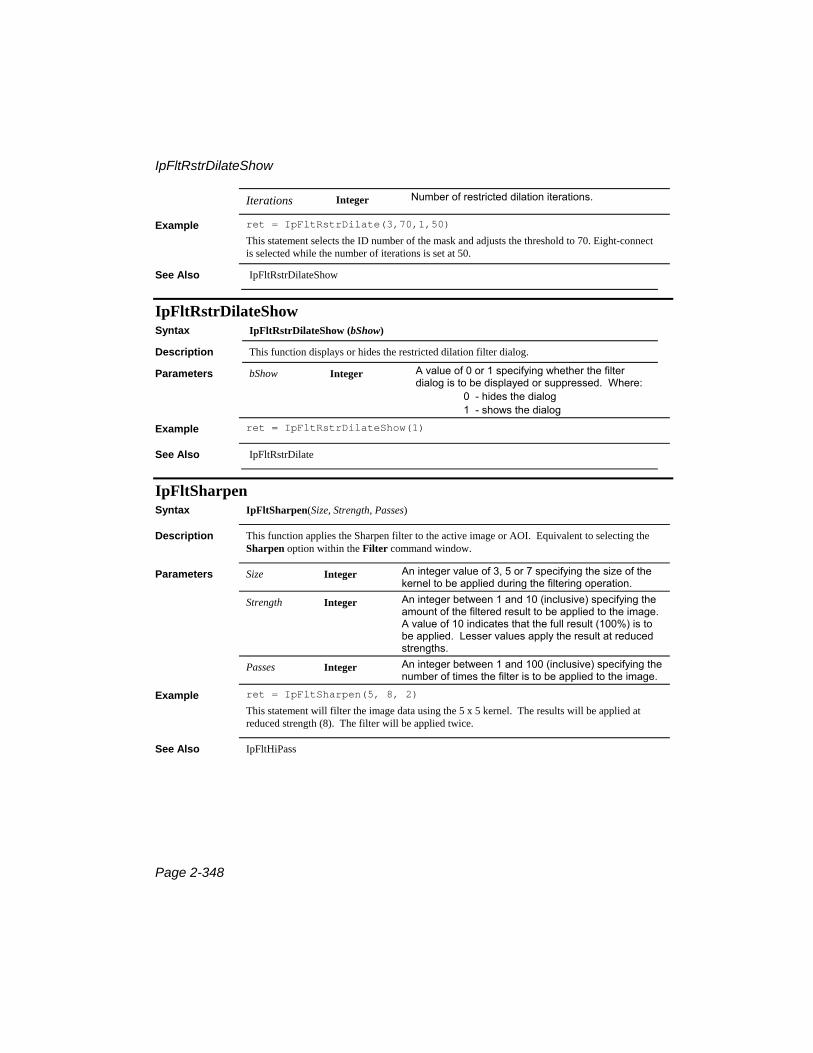
IpFltRstrDilateShow
Page 2-348
Iterations Integer Number of restricted dilation iterations.
Example ret = IpFltRstrDilate(3,70,1,50)
This statement selects the ID number of the mask and adjusts the threshold to 70. Eight-connect is selected while the number of iterations is set at 50.
See Also IpFltRstrDilateShow
IpFltRstrDilateShow Syntax IpFltRstrDilateShow (bShow)
Description This function displays or hides the restricted dilation filter dialog.
Parameters bShow Integer A value of 0 or 1 specifying whether the filter dialog is to be displayed or suppressed. Where: 0 - hides the dialog 1 - shows the dialog
Example ret = IpFltRstrDilateShow(1)
See Also IpFltRstrDilate
IpFltSharpen Syntax IpFltSharpen(Size, Strength, Passes)
Description This function applies the Sharpen filter to the active image or AOI. Equivalent to selecting the Sharpen option within the Filter command window.
Parameters Size Integer An integer value of 3, 5 or 7 specifying the size of the kernel to be applied during the filtering operation.
Strength Integer An integer between 1 and 10 (inclusive) specifying the amount of the filtered result to be applied to the image. A value of 10 indicates that the full result (100%) is to be applied. Lesser values apply the result at reduced strengths.
Passes Integer An integer between 1 and 100 (inclusive) specifying the number of times the filter is to be applied to the image.
Example ret = IpFltSharpen(5, 8, 2)
This statement will filter the image data using the 5 x 5 kernel. The results will be applied at reduced strength (8). The filter will be applied twice.
See Also IpFltHiPass

IpFltShow
Page 2-349
IpFltShow Syntax IpFltShow(bShow)
Description This function displays or hides the Filter dialog box. Equivalent to selecting the Filtering command to open the window and clicking its Close button to close it.
Parameters bShow Integer An integer value of 0 or 1 specifying whether the Filtering window is to be shown. Where: 0 - Closes the window if it is already open. 1 - Opens the window.
Example ret = IpFltShow(1)
ret = IpFltOpen(MORPHO_2x2SQUARE, 1)
ret = IpFltClose(MORPHO_7x7OCTAGON, 1)
ret = IpFltShow(0)
This set of statements will open the Filtering window, filter an image using the open and closing filters, then close the Filtering window.
Comments The Filtering window does not have to be open during a filtering operation. Its disposition, visible or hidden, is entirely your choice. You will want to display the window when your users are required to make choices within it. However, if your objective is simply to filter an image in a predefined way, you need not display the Filtering window.
IpFltSobel Syntax IpFltSobel( )
Description This function applies the Sobel filter to the active image or AOI. Equivalent to selecting the Sobel option within the Filter command window.
Example ret = IpFltSobel
IpFltThin Syntax IpFltThin(Threshold)
Description This function applies the Thinning filter to the active image or AOI. Equivalent to selecting the Thinning option within the Filter command window.
Parameters Threshold Integer An integer between 1 and 100 (inclusive) specifying the gray level at which the image should be binarized before the filter is applied. This value represents a percentage of the intensity range, e.g., a value of 50 specifies the intensity level at the 50% point in the range.
Example ret = IpFltThin(25)
This statement will apply the Thinning filter to the image data, which is first binarized at the 25% gray level.

IpFltThinEx
Page 2-350
IpFltThinEx Syntax IpFltThinEx(Threshold, Passes)
Desc ription
This function applies the Thinning filter to the active image or AOI. Equivalent to selecting the Thinning option within the Filter command window.
Parameters Threshold Integer An integer between 1 and 100 (inclusive) specifying the gray level at which the image should be binarized before the filter is applied. This value represents a percentage of the intensity range, e.g., a value of 50 specifies the intensity level at the 50% point in the range.
Passes Integer An integer between 1 and 65535 (inclusive) that describes the number of passes. Enter -1 to disable the number of passes.
Example ret = IpFltThinEx(25,2)
This statement will apply the Thinning filter to the image data, which is first binarized at the 25% gray level. The filter will be applied twice.
IpFltUserErode Syntax IpFltUserErode(KernelName,Passes)
Description This function applies a morphological erosion filter to the active image or AOI with a user-defined kernel.
Parameters KernelName String A string specifying a file name for the kernel filter.
Passes Integer An integer between 1 and 65535 (inclusive).
Example ret = IpFltUserErode ("mykernel.3x3", 2)
Comments This statement will apply the erosion function using the kernel file, "mykernel.3x3". The filter will be applied twice.
IpFltUserDilate Syntax IpFltUserDilate(KernelName, Passes)
Description This function applies a morphological dilation filter with a user-defined kernel to active image or AOI with a user-defined kernel.
Parameters KernelName String A string specifying a file name for the kernel filter.
Passes Integer An integer between 1 and 65535 (inclusive).
Example ret = IpFltUserDilate ("mykernel.3x3", 2)
Comments This statement will apply the dilation function using the kernel file, "mykernel.3x3". The filter will be applied twice.

IpFltVariance
Page 2-351
IpFltVariance Syntax IpFltVariance(SizeX, SizeY)
Description This function applies the Variance filter to the active image or AOI. Equivalent to selecting the Variance option within the Filter command window.
Parameters SizeX Integer An integer specifying the size of the kernel in the X direction.
SizeY Integer An integer specifying the size of the kernel in the Y direction.
Example ret = IpFltVariance(5, 5)
This statement will filter the image data using a 5 x 5 kernel.
IpFltWatershed Syntax IpFltWatershed(Threshold)
Description This function applies the Watershed filter to the active image or AOI. Equivalent to selecting the Watershed option within the Filter command window.
Parameters Threshold Integer An integer between 1 and 100 (inclusive) specifying the gray level at which the image should be binarized before the filter is applied. This value represents a percentage of the intensity range, e.g., a value of 50 specifies the intensity level at the 50% point in the range.
Example ret = IpFltWatershed(30)
This statement will apply the Watershed filter to the image data, which is first binarized at the 30% gray level.
IpFltWatershedEx Syntax IpFltWatershedEx(Threshold, Passes)
Description This function applies the Watershed filter to the active image or AOI. Equivalent to selecting the Watershed option within the Filter command window.
Parameters Threshold Integer An integer between 1 and 100 (inclusive) specifying the gray level at which the image should be binarized before the filter is applied. This value represents a percentage of the intensity range, e.g., a value of 50 specifies the intensity level at the 50% point in the range.
Passes Integer An integer between 1 and 65535 (inclusive) that describes the number of passes. Enter -1 to disable the number of passes.
Example ret = IpFltWatershedEx(30,1)
This statement will apply the Watershed filter to the image data, which is first binarized at the 30% gray level. The filter will be applied once.

IpFsGet
Page 2-352
IpFsGet Syntax IpFsGet (File,Attribute,Data)
Description Indicates the file signature attribute that should be returned.
Parameters File String Indicates the full path of the file name to analyze.
Attribute Integer Indicates the file signature attribute that should be returned.
Data Any Provides the user variable to receive the attribute.
Comments The Attribute parameter determines the type of data returned to the user’s variable, and can be one of the following: FS_SIGNATURE The current file signature is returned as a 128-bit number. FS_COMPARE The 128-bit number provided is compared to the current signature. If they are identical, the return code will be 1, otherwise the function returns 0.
Return Value 0 if successful, a negative error code if failed. This command does not record.
See Also IpFsGetStr
IpFsGetStr Syntax IpFsGetStr (File, Attribute, Signature)
Description Indicates the file signature attribute that should be returned.
Parameters File String Indicates the full path of the file name to analyze.
Attribute Integer Determines the type of data to be returned. Must be one of the following: FS_SIGNATURE_STR The current file signature is returned as a string FS_COMPARE_STR The provided string is compared to the current signature.
Parameters Signature String*40 Provides the user variable to receive the attribute.
Return Value When using FS_COMPARE_STR, returns 1 for identical signatures, otherwise returns 0. Will return an error code if failed. This command does not record.
See Also IpFsGet
IpFtpOpen Syntax IpFtpOpen (Server, FileName)
Description This function opens the named file.
Parameters FileName String Name of the file (including server dirrectory if any)
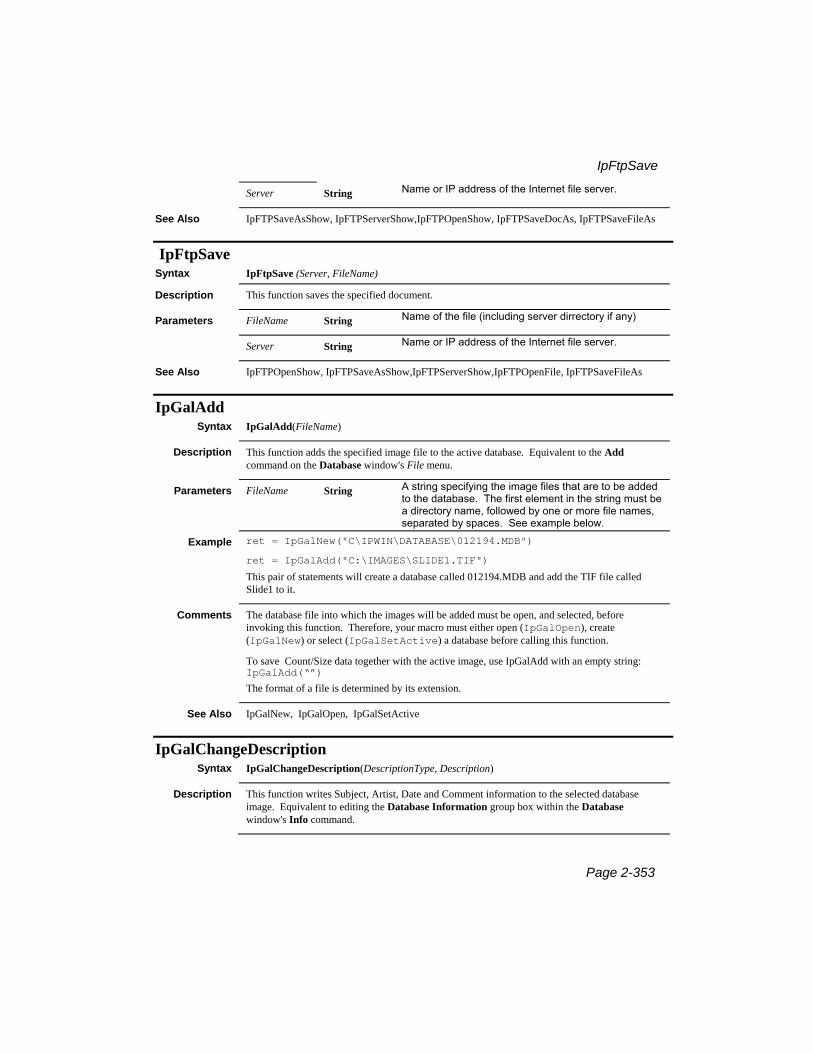
IpFtpSave
Page 2-353
Server String Name or IP address of the Internet file server.
See Also IpFTPSaveAsShow, IpFTPServerShow,IpFTPOpenShow, IpFTPSaveDocAs, IpFTPSaveFileAs
IpFtpSave Syntax IpFtpSave (Server, FileName)
Description This function saves the specified document.
Parameters FileName String Name of the file (including server dirrectory if any)
Server String Name or IP address of the Internet file server.
See Also IpFTPOpenShow, IpFTPSaveAsShow,IpFTPServerShow,IpFTPOpenFile, IpFTPSaveFileAs
IpGalAdd Syntax IpGalAdd(FileName)
Description This function adds the specified image file to the active database. Equivalent to the Add command on the Database window's File menu.
Parameters FileName String A string specifying the image files that are to be added to the database. The first element in the string must be a directory name, followed by one or more file names, separated by spaces. See example below.
Example ret = IpGalNew("C\IPWIN\DATABASE\012194.MDB")
ret = IpGalAdd("C:\IMAGES\SLIDE1.TIF")
This pair of statements will create a database called 012194.MDB and add the TIF file called Slide1 to it.
Comments The database file into which the images will be added must be open, and selected, before invoking this function. Therefore, your macro must either open (IpGalOpen), create (IpGalNew) or select (IpGalSetActive) a database before calling this function.
To save Count/Size data together with the active image, use IpGalAdd with an empty string: IpGalAdd(“”) The format of a file is determined by its extension.
See Also IpGalNew, IpGalOpen, IpGalSetActive
IpGalChangeDescription Syntax IpGalChangeDescription(DescriptionType, Description)
Description This function writes Subject, Artist, Date and Comment information to the selected database image. Equivalent to editing the Database Information group box within the Database window's Info command.
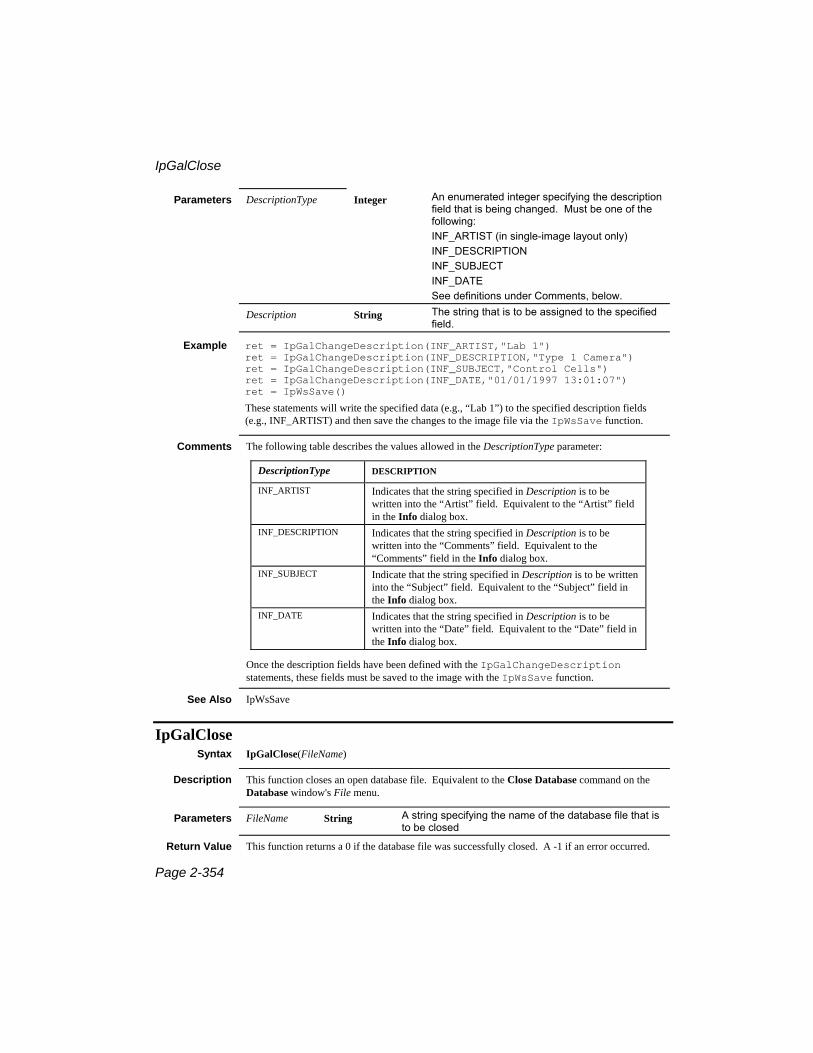
IpGalClose
Page 2-354
Parameters DescriptionType Integer An enumerated integer specifying the description field that is being changed. Must be one of the following: INF_ARTIST (in single-image layout only) INF_DESCRIPTION INF_SUBJECT INF_DATE See definitions under Comments, below.
Description String The string that is to be assigned to the specified field.
Example ret = IpGalChangeDescription(INF_ARTIST,"Lab 1") ret = IpGalChangeDescription(INF_DESCRIPTION,"Type 1 Camera") ret = IpGalChangeDescription(INF_SUBJECT,"Control Cells") ret = IpGalChangeDescription(INF_DATE,"01/01/1997 13:01:07") ret = IpWsSave()
These statements will write the specified data (e.g., “Lab 1”) to the specified description fields (e.g., INF_ARTIST) and then save the changes to the image file via the IpWsSave function.
Comments The following table describes the values allowed in the DescriptionType parameter:
DescriptionType DESCRIPTION
INF_ARTIST Indicates that the string specified in Description is to be written into the “Artist” field. Equivalent to the “Artist” field in the Info dialog box.
INF_DESCRIPTION Indicates that the string specified in Description is to be written into the “Comments” field. Equivalent to the “Comments” field in the Info dialog box.
INF_SUBJECT Indicate that the string specified in Description is to be written into the “Subject” field. Equivalent to the “Subject” field in the Info dialog box.
INF_DATE Indicates that the string specified in Description is to be written into the “Date” field. Equivalent to the “Date” field in the Info dialog box.
Once the description fields have been defined with the IpGalChangeDescription statements, these fields must be saved to the image with the IpWsSave function.
See Also IpWsSave
IpGalClose Syntax IpGalClose(FileName)
Description This function closes an open database file. Equivalent to the Close Database command on the Database window's File menu.
Parameters FileName String A string specifying the name of the database file that is to be closed
Return Value This function returns a 0 if the database file was successfully closed. A -1 if an error occurred.

IpGalDelete
Page 2-355
Example ret = IpGalClose("C:\IPWIN\RESULTS.MDB")
This statement will close the database file called RESULTS.MDB in the \IPWIN directory on the C: drive.
IpGalDelete Syntax IpGalDelete(DatabaseName)
Description This function deletes the specified database file. Equivalent to the Delete Database command on the Database window's File menu.
Parameters DatabaseName String A string specifying the name of the database file that is to be deleted.
Example ret = IpGalDelete("C:\IPWIN\RESULTS.MDB")
This statement will delete the RESULTS.MDB database file from the \IPWIN directory on the C: drive.
IpGalImageOpen Syntax IpGalImageOpen(imageId)
Description This function opens the specified image in the active database. Equivalent to double-clicking the database image with the left mouse button.
Parameters imageId Integer An integer specifying the position number of the image to be opened (where 0 represents the image in the first position in the database window — the one in the upper-left corner), or one of the following negative values:
-1 - Specifies all images. -2 - Specifies the last image.
-3 - Specifies all tagged images.
Return Value This function returns a 0 if the image file was successfully opened. A -2 if an error occurred.
Example ret = IpGalImageOpen(-1)
The statement above will open all images in the active database.
ret = IpGalImageOpen(0)
The statement above will open the first image displayed in the database.
ret = IpGalImageOpen(-2)
The statement above will open the last image displayed in the database.
See Also IpGalTag

IpGalNew
Page 2-356
IpGalNew Syntax IpGalNew(FileName)
Description This function creates a new database file. Equivalent to the New Database command on the Database window's File menu.
Parameters FileName String A string specifying the file name to be given to the new database file.
Example ret = IpGalNew("C:\IPWIN\RESULTS.MDB")
This statement will create a new database file called RESULTS.MDB in the \IPWIN directory on the C: drive.
Comments Use the IpGalAdd function to add image files to the database once it has been created with IpGalNew.
See Also IpGalAdd, IpGalOpen
IpGalOpen Syntax IpGalOpen(FileName)
Description This function opens an existing database file. Equivalent to the Open Database command on the Database window's File menu.
Parameters FileName String A string specifying the name of the database file that is to be opened.
Return Value This function returns a 0 if the database file was successfully opened. A -1 if an error occurred.
Example ret = IpGalShow(1)
ret = IpGalOpen("C:\IPWIN\RESULTS.MDB")
This pair of statements will open and display the database file called RESULTS.MDB from the \IPWIN directory on the C: drive.
Comments If you want your users to see the contents of the Database you are opening, be sure to precede this function with the IpGalShow(1) statement.
IpGalRemove Syntax IpGalRemove(FromDisk )
Description This function deletes the tagged images from a database file. Equivalent to the Delete Records command on the Database window's Database menu.
Parameters FromDisk Integer An integer value of 0 or 1 specifying whether or not to remove the image file(s) from disk in addition to removing the image(s) from the Database. Where: 0 - Does not delete the image file(s). 1 - Deletes the image file(s).

IpGalSetActive
Page 2-357
Example ret = IpGalTag(-2, 1)
ret = IpGalRemove(1)
This pair of statements will remove the last image from the database. The file associated with this image will also be deleted from disk.
See Also IpGalTag
IpGalSetActive Syntax IpGalSetActive(GalId)
Description This function makes the specified database the “active” database. It selects the database upon which all subsequent database functions will operate.
Parameters GalId Integer An integer between 10000 and 10003 (inclusive) specifying which of the open galleries is to be made active. This value selects the database based upon its position on the View menu, where: 10000 - Specifies the first database listed in the menu. 10001 - Specifies the second database listed in the menu. 10002 - Specifies the third database listed in the menu. 10003 - Specifies the fourth (last) database listed in the menu.
Example ret = IpGalSetActive(10001)
This statement will activate the second database listed in the View menu.
IpGalShow Syntax IpGalShow(bShow)
Description This function is used to open or close the Database window.
Parameters bShow Integer An integer value of 0 or 1 specifying whether the Database window is to be shown. Where: 0 - Closes the window if it is already open. 1 - Opens the window.

IpGalSort
Page 2-358
Example ret = IpGalShow(1)
ret = IpGalOpen("C:\IPWIN\CELLS.MDB")
ret = IpGalAdd("C:\IMAGES\SLIDE1.TIF")
ret = IpGalShow(0)
This set of statements will open the Database window, open and add an image to the CELLS.MDB database file, then close the Database window.
Comments The Database window does not have to be open during execution of the database functions. Its disposition, visible or hidden, is entirely your choice. You will want to display the window when your users are required to make choices within it. However, if your objective is simply to manipulate the contents of the database files, you need not display the Database window.
IpGalSort Syntax IpGalSort(bByName, bAscending)
Description This function sorts the images in the active Database by the specified order. Equivalent to the Sort command in the database Window menu.
Parameters bByName Integer An integer value of 0 or 1 specifying the characteristic by which the images are to be sorted. Where: 0 - Sorts by image name. 1 - Sorts by image size.
bAscending Integer An integer value of 0 or 1 specifying the order in which the images are to be sorted. Where: 0 - Sorts in ascending order. 1 - Sorts in descending order.
Example ret = IpGalSort(1, 1)
This statement will sort the images in the active database in descending size order.
IpGalTag Syntax IpGalTag(SlotNumber, bTag)
Description This function tags/untags the specified database image to select/de-select it as a candidate for subsequent processing by the IpGalRemove or IpGalImageOpen functions. Equivalent to clicking the database image with the <shift> key and the left mouse button.
Parameters SlotNumber Integer An integer specifying the position number of the image to be tagged/untagged (where 0 represents the image in the first position in the database window — the one in the upper-left corner), or one of the following negative values: -1 = Specifies all images. -2 = Specifies the last image.

IpGalUpdate
Page 2-359
bTag Integer An integer value of 0 or 1 specifying whether the image is to be tagged or untagged. Where: 0 = Untags. 1 = Tags.
Example ret = IpGalTag(-1,0)
The statement above will untag all images in the active database.
ret = IpGalTag(0,1)
The statement above will tag the first image displayed in the database.
ret = IpGalTag(-2,1)
The statement above will tag the last image displayed in the database.
See Also IpGalRemove, IpGalImageOpen
IpGalUpdate Syntax IpGalUpdate( )
Description This function reloads the contents of the active database with the most up-to-date versions of its image files. Equivalent to the Update Thumbnail command on the Database window's File menu.
IpGetLine Syntax IpGetLine(Message,LinePts, Numpoints, Maxpoints, Attrib)
Description Ask the user to click on a line or polygon. The line or polygon is returned in LinePts and numpoints; maxpoints indicates the maximum number of points that can be clicked in. The function returns the new object id. A different message can be displayed for each point by separating messages with ASCII character 10.
Parameters Message String (Basic)
LPSTR (C)
The message relating to a point or points.
LinePts POINTAPI Defines the line.
Numpoints Integer Defines the polygon.
Maxpoints Integer Maximum number of points that can be clicked in.
Attrib Integer Other attributes of the line or polygon

IpGetConvertColor
Page 2-360
Example Dim lineid as integer, numpts as integer Dim linePts(2) as POINTAPI Dim message as string message = "Click 1st point" + chr$(10) + "click 2nd point" lineid = IpGetLine(message, linePts(0), numpts, 2, 0)
See Also IpDraw, IpDrawText, IpDrawClear, IpDrawGet, IpDrawClearDoc, IpDrawSet, IpAnotLine, IpAnotBox, IpAnotAttr
Comments For all drawing or overlay functions, an “object” or “drawing” is a line, text, marker/point, or polygon that can be moved.
IpGetConvertColor Syntax IpGetConvertColor (RGBval, outLABval, ColMod, Class, Norm)
Description This function gets the color coordinates of RGB values
Parameters RGBval Single An array of RGB values,must be declared as Dim RGBval(3) as single
outLABval Single An array of return values,must be declared as Dim outLABval(3) as single
ColMod Integer Color Model, must be one of the following: COLM_LAB COLM_XYZ COLM_RGB COLM_YIQ COLM_CMY
Class Integer Image class, mut be IMC_RGB or IMC_RGB48
Norm Integer Normalization; if Norm = 1 the output value is normalized to the class range. For example, if the class is IMC_RGB, the range is 0 to 255.
IpGridApply Syntax IpGridApply (bApply)
Description This function applies or removes a grid to/from the active image.
Parameters bApply Integer 1 – Apply selected grid to current image 0 – Remove selected grid from current image
Return Value Returns IPCERR_NODOC if no grid is active. Returns IPCERR_NODOC if no image is present.
See Also IpGridShow, IpGridCreateMask, IpGridSelect

IpGridCreateMask
Page 2-361
IpGridCreateMask Syntax IpGridCreateMask
Description This function creates a new mask.
Return Value Returns IPCERR_NODOC if no grid is active. Returns IPCERR_NODOC if no image is present. Returns DOCID on success.
See Also IpGridApply, IpGridShow, IpGridSelect
IpGridSelect Syntax IpGridSelect(lpszFileName)
Description Selects a file of grid settings.
Parameters lpszFileName String Indicates the name of the grid file.
See Also IpGridApply, IpGridShow, IpGridCreateMask
IpGridShow Syntax IpGridShow (bShow)
Description This function displays or hides the grid mask dialog.
Parameters bShow Integer A value of 0 or 1 specifying whether the grid mask dialog is to be displayed or suppressed. Where: 0 - hides the dialog 1 - shows the dialog
See Also IpGridApply, IpGridCreateMask, IpGridSelect
IpHstCreate Syntax IpHstCreate( )
Description This function opens the Histogram window for the active image. Equivalent to selecting the Histogram command.
Return Value This function returns the Histogram ID if successful. -1 is returned if an error occurred.
Comments An image must be open before calling this function. The newly created histogram window becomes the “active” (i.e., selected) histogram as soon as it is created.
See Also IpHstMove, IpHstDestroy, IpHstSelect

IpHstDestroy
Page 2-362
IpHstDestroy Syntax IpHstDestroy( )
Description This function closes the active histogram window and clears any data associated with it. Equivalent to selecting the Close command in the Histogram window's File menu.
Comments Note that this function operates upon the “active” histogram window (i.e., the one most recently opened or selected). If the currently active histogram is not the one you want to use, you must use IpHstSelect to explicitly select (make active) the appropriate window before calling IpHstDestroy.
See Also IpHstCreate, IpHstSelect

IpHstEqualize
Page 2-363
IpHstEqualize Syntax IpHstEqualize(Method)
Description This function will redistribute the active image's histogram using the specified method. Equivalent to selecting an equalization method with the Equalize command.
Parameters Method Integer An enumerated integer specifying the equalization method to use. Must be one of the following types: EQ_BESTFIT EQ_BELL EQ_LINEAR EQ_LOGARITHMIC EQ_EXPONENTIAL See definitions under Comments, below.
Example ret = IpHstEqualize(EQ_BELL)
This statement will equalize the histogram using the “Bell” method.
Comments The following table describes the values allowed in the Method parameter:
Method DESCRIPTION
EQ_BESTFIT Assigns bottom 3% as Shadow point, upper 3% as Highlight point and distributes the remainder evenly across the scale. (Equivalent to BestLut in the Image menu.)
EQ_BELL Distributes the histogram evenly around the center of the intensity scale.
EQ_LINEAR Distributes the histogram equally across the intensity scale.
EQ_LOGARITHMIC Shifts the histogram to the lower-end of the intensity scale.
EQ_EXPONENTIAL Shifts the histogram to the upper-end of the intensity scale.
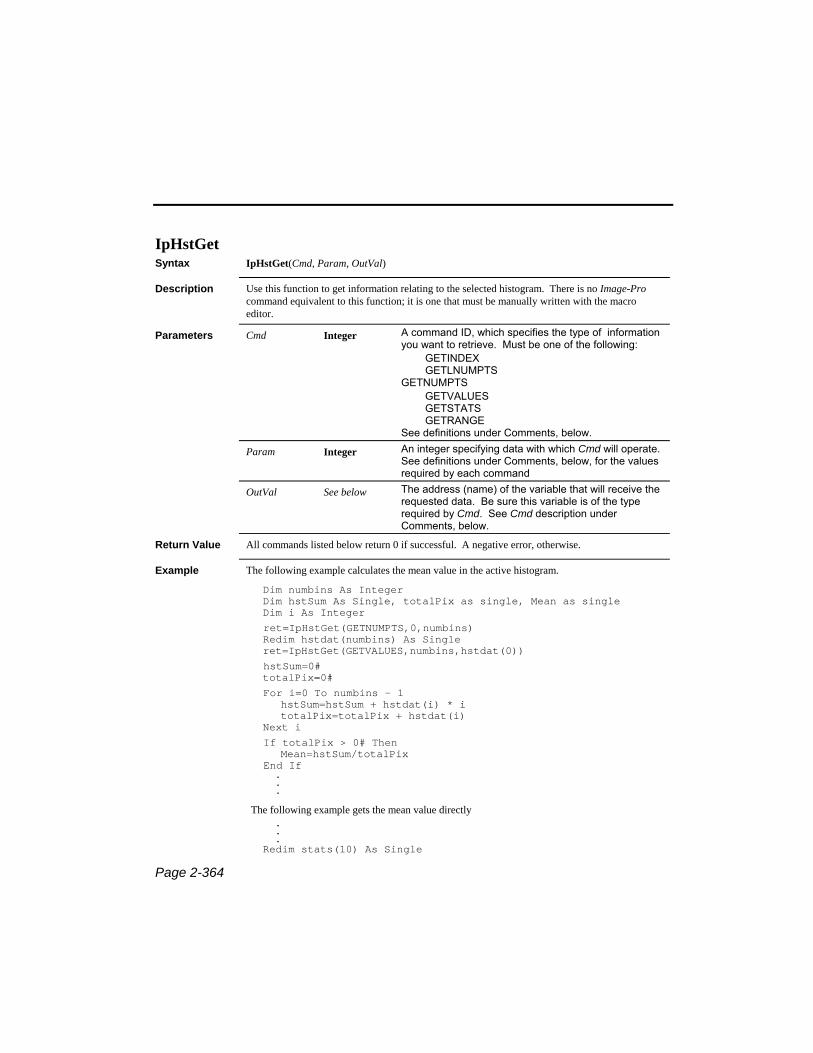
Page 2-364
IpHstGet Syntax IpHstGet(Cmd, Param, OutVal)
Description Use this function to get information relating to the selected histogram. There is no Image-Pro command equivalent to this function; it is one that must be manually written with the macro editor.
Parameters Cmd Integer A command ID, which specifies the type of information you want to retrieve. Must be one of the following:
GETINDEX GETLNUMPTS
GETNUMPTS
GETVALUES GETSTATS GETRANGE
See definitions under Comments, below.
Param Integer An integer specifying data with which Cmd will operate. See definitions under Comments, below, for the values required by each command
OutVal See below The address (name) of the variable that will receive the requested data. Be sure this variable is of the type required by Cmd. See Cmd description under Comments, below.
Return Value All commands listed below return 0 if successful. A negative error, otherwise.
Example The following example calculates the mean value in the active histogram.
Dim numbins As Integer Dim hstSum As Single, totalPix as single, Mean as single Dim i As Integer
ret=IpHstGet(GETNUMPTS,0,numbins) Redim hstdat(numbins) As Single ret=IpHstGet(GETVALUES,numbins,hstdat(0))
hstSum=0# totalPix=0#
For i=0 To numbins - 1 hstSum=hstSum + hstdat(i) * i totalPix=totalPix + hstdat(i) Next i
If totalPix > 0# Then Mean=hstSum/totalPix End If . . .
The following example gets the mean value directly . . .
Redim stats(10) As Single

IpHstGet
Page 2-365
ret = IpHstGet(GETSTATS, 0, stats(0)) Mean = stats(0) StdDev = stats(1) Sum = stats(2)
The following example illustrates the use of GETLNUMPTS: Sub HstPts() Dim NumPts As Integer Dim LNumPts As Long ret = IpHstGet(GETNUMPTS, 0, NumPts) If (ret < 0) Then MsgBox("Have to use GETLNUMPTS") ret = IpHstGet(GETLNUMPTS, 0, LNumPts) MsgBox("Ret = " + Str$(ret) + ", LNumPts = " + Str$(LNumPts)) Else MsgBox("Ret = " + Str$(ret) + ", NumPts = " + Str$(NumPts)) End If End Sub
Comments Note that this function operates upon the “active” histogram window (i.e., the one most recently opened or selected). If the currently active histogram is not the one you want to use, you must use IpHstSelect to explicitly select (make active) the appropriate window before calling IpHstGet. Histograms of RGB images contain 3 times as much data as an equivalent Gray Scale histogram. The data are organized Red channel first, then Green, then Blue. When passing an array to Image-Pro from a BASIC program, be sure to pass the first element of the array by reference (See IpHstGet(GETSTATS) statement in example, above).
For future extension, statistics and range arrays should be large enough to store at least 10 elements. GETNUMPTS will return an error when the image class is 16-bit grayscale or 48-bit true color (RGB). Therefore, use GETLNUMPTS which will return the number of points to a long variable. Cmd options are as follows:

IpHstGet
Page 2-366
Cmd VALUE DESCRIPTION
GETINDEX Use this command to determine the active histogram's ID. The ID will be written to OutVal. This value can be used later to select this histogram with IpHstSelect( ).
Param VALUE OutVal TYPE
Not used by GETINDEX. Must be set to 0. BASIC, Integer C, LPSHORT
GETNUMPTS Use this command to determine the number of bins into which the histogram is divided. This number will be written to OutVal.
Param VALUE OutVal TYPE
Not used by GETNUMPTS. Must be set to 0. BASIC, Integer C, LPSHORT
GETLNUMPTS Use this command to determine the number of bins into which the histogram is divided. This number will be written to OutVal.
Param VALUE OutVal TYPE
Not used by GETLNUMPTS. Must be set to 0. BASIC, Integer C, LONG
GETVALUES Use this command to get the selected histogram's values. These values will be written to the one-dimensional array you have specified in OutVal. For a True Color histogram the entire Red channel histogram is written into the array first, then the Green channel, then the Blue channel.
Param VALUE OutVal TYPE
An integer specifying the length of your OutVal array. If you are getting data from a True Color image, your array must be large enough to hold 3 times the number of points in the histogram. Note - you can use GETNUMPTS to determine the number of elements needed in this array.
BASIC , Single C, LPSINGLE
Note - OutVal must specify an array.

IpHstGet
Page 2-367
Cmd VALUE DESCRIPTION
GETSTATS Use this command to get the statistical data associated with the selected histogram. For True Color images, information will be obtained for the color channel you specify in Param (see below). This command writes the statistics to a 10-element array in OutVal, as follows:
OutVal (0) - Mean value OutVal (1) - Standard Deviation OutVal (2) - Sum OutVal (3) - Minimum gray level (X-MIN) OutVal (4) - Maximum gray level (X-MAX) OutVal (5) - Not Currently Used
OutVal (6) - Not Currently Used OutVal (7) - Not Currently Used OutVal (8) - Not Currently Used OutVal (9) - Not Currently Used
Param VALUE OutVal TYPE
GETSTATS An integer specifying the color channel for which statistics are to be obtained. Where:
0 - Red Channel 1 - Green Channel 2 - Blue Channel
This parameter is ignored if the image is not True Color. When this is the case, just set Param to 0.
BASIC, Single C, single Note - OutVal must specify a 10-element array.
GETRANGE Use this command to get the range information associated with the selected histogram. For True Color images, information will be obtained for the color channel you specify in Param (see below). This command will write the range information to a 10-element array in OutVal, as follows:
OutVal (0) - Start range (X1) OutVal (1) - End range (X2) OutVal (2) - Sum of histogram inside range (Area) OutVal (3) - Sum, above, as a percent of total histogram (%) OutVal (4) - Histogram value at start of range (X1) OutVal (5) - Histogram value at end of range (X2) OutVal (6) - Bin number at start of range (0-based) OutVal (7) - Bin number at end of range (0-based) OutVal (8) - Not Currently Used OutVal (9) - Not Currently Used

IpHstMaximize
Page 2-368
Cmd VALUE DESCRIPTION
Param VALUE OutVal TYPE
GETRANGE An integer specifying the color channel for which range information is to be obtained. Where:
0 - Red Channel 1 - Green Channel 2 - Blue Channel
This parameter is ignored if the image is not True Color. When this is the case, just set Param to 0.
BASIC, Single. C, single Note - OutVal must specify a 10-element array.
See Also IpHstCreate, IpHstSelect
IpHstMaximize Syntax IpHstMaximize( )
Description This function enlarges the active histogram window to full screen. Equivalent to clicking the maximize button on the Histogram window Control bar.
Comments Note that this function operates upon the “active” histogram window (i.e., the one most recently opened or selected). If the currently active histogram is not the one you want to use, you must use IpHstSelect to explicitly select (make active) the appropriate window before calling IpHstMaximize.
See Also IpHstMinimize, IpHstRestore, IpHstSelect
IpHstMinimize Syntax IpHstMinimize( )
Description This function reduces the active histogram window to an icon. Equivalent to clicking the minimize button on the Histogram window Control bar.
Comments Note that this function operates upon the “active” histogram window (i.e., the one most recently opened or selected). If the currently active histogram is not the one you want to use, you must use IpHstSelect to explicitly select (make active) the appropriate window before calling IpHstMinimize.
See Also IpHstMaximize, IpHstRestore, IpHstSelect

IpHstMove
Page 2-369
IpHstMove Syntax IpHstMove(x, y)
Description This function moves the active (i.e., selected) histogram window to the specified location. Equivalent to dragging the Histogram window with the mouse.
Parameters x Integer An integer specifying the x-coordinate of the screen position to which you want the upper-left corner of the Histogram window moved.
y Integer An integer specifying the y-coordinate of the screen position to which you want the upper-left corner of the Histogram window moved.
Example ret = IpHstMove(10, 40)
This statement will move the active histogram window 11 pixels to the right, and 41 pixels down from the upper-left corner of the screen.
Comments The origin ( 0, 0 ) for the coordinate system used by the x and y parameters is the upper-left corner of the screen. Note that this function operates upon the “active” histogram window (i.e., the one most recently opened or selected). If the currently active histogram is not the one you want to use, you must use IpHstSelect to explicitly select (make active) the appropriate window before calling IpHstMove.
See Also IpHstRestore, IpHstMaximize, IpHstMinimize, IpHstSelect
IpHstRestore Syntax IpHstRestore( )
Description This function returns the active histogram window to its previous screen position and size. Equivalent to clicking the Restore button on a maximized histogram window, or double-clicking the icon of a minimized histogram window.
Comments Note that this function operates upon the “active” histogram window (i.e., the one most recently opened or selected). If the currently active histogram is not the one you want to use, you must use IpHstSelect to explicitly select (make active) the appropriate window before calling IpHstRestore.
See Also IpHstMinimize, IpHstMaximize,

IpHstSave
Page 2-370
IpHstSave Syntax IpHstSave(FileName, SaveMode)
Description This function saves, or appends, the active histogram data or statistics to the specified file. Equivalent to the Save Histogram, Append Histogram, Save Statistics, and Append Statistics commands on the File menu in the Histogram command window.
Parameters FileName String A string specifying the name of the file to which the histogram data will be written. This parameter is ignored when data is stored to the Clipboard. When this is the case, set Filename to an empty string (i.e., "").
SaveMode Integer An enumerated integer, or an expression involving the addition of two or more enumerated integers, specifying the type of data to be stored and the place to which it is to be stored. Must contain one or more of the following: S_DATA or S_STATS S_APPEND or S_CLIPBOARD or S_PRINT_TABLE or S_PRINT_ GRAPH S_HEADER S_LEGEND S_X_AXIS S_DDE
See Comments, below, for a definition of each name. See Example below for usage.
Example ret = IpHstSave("C:\IPWIN\HISTO.HST", S_DATA)
This statement will save the current histogram data to a file called HISTO.HST in the \IPWIN directory on the C: drive. If the file already exists, it will be overwritten.
ret = IpHstSave("C:\IPWIN\HISTO.HST", S_STATS+S_APPEND)
This statement will append the current histogram statistics to a file called HISTO.HST in the \IPWIN directory on the C: drive.
ret = IpHstSave("C:\IPWIN\HISTO.HST", S_DATA+S_HEADER+S_LEGEND)
This statement will save the current histogram data to a file called HISTO.HST in the \IPWIN directory on the C: drive. The header and legend information will be stored with the data. If the file HISTO.HST already exists, it will be overwritten.
ret = IpHstSave("", S_CLIPBOARD)
This statement will save the current histogram data to the Clipboard (the function defaults to S_DATA). Note that the FileName parameter specifies a zero-length string.
ret = IpHstSave("C:\IPWIN\HISTO.HST",S_APPEND+S_DATA+S_X_AXIS)
This statement will append the current histogram data to a file called HISTO.HST in the \IPWIN directory on the C: drive. The X-axis data will be stored with the statistics.

Page 2-371
Comments Note that this function operates upon the “active” histogram window (i.e., the one most recently opened or selected). If the currently active histogram is not the one you want to use, you must use IpHstSelect to explicitly select (make active) the appropriate window before calling IpHstSave. The following options can be used in the expression comprising the SaveMode parameter.
USAGE Save Mode DESCRIPTION
Use one or none...
S_DATA Specifies that histogram data is to be stored.
S_STATS Specifies that histogram statistics are to be stored.
Note - if neither S_DATA nor S_STATS is included in the expression, S_DATA is assumed.
Use one or none...
S_APPEND Specifies that the data/statistics are to be appended to the specified file.
S_CLIPBOARD Specifies that the data/statistics are to be saved to the Clipboard. When this option is used, the FileName parameter is ignored.
S_PRINT_TABLE Specifies that the data in the table will be sent to the print.
S_PRINT_GRAPH Indicates that the graph displayed in the dialog box will be sent to the printer.
S_DDE Indicates that the graph or data will be sent to an external program, such as Excel
Note - if neither S_APPEND nor S_CLIPBOARD is included in the expression, histogram data/statistics are saved to a new file (if the file already exists, it will be overwritten).
Use any, all or none...
S_HEADER Specifies that the header is to be stored along with the data/statistics.
S_LEGEND Specifies that the legend is to be stored along with the data/statistics.
S_X_AXIS Specifies that the X-axis information is to be stored along with the data/statistics.
See Also IpHstSelect
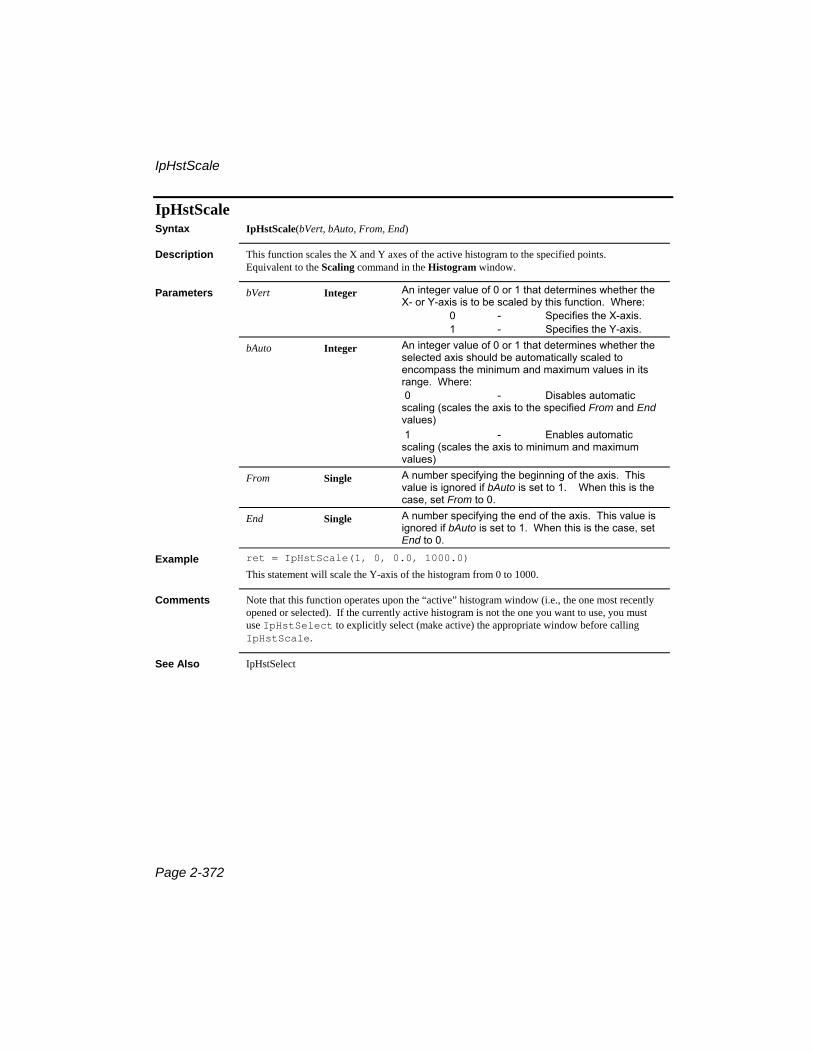
IpHstScale
Page 2-372
IpHstScale Syntax IpHstScale(bVert, bAuto, From, End)
Description This function scales the X and Y axes of the active histogram to the specified points. Equivalent to the Scaling command in the Histogram window.
Parameters bVert Integer An integer value of 0 or 1 that determines whether the X- or Y-axis is to be scaled by this function. Where: 0 - Specifies the X-axis. 1 - Specifies the Y-axis.
bAuto Integer An integer value of 0 or 1 that determines whether the selected axis should be automatically scaled to encompass the minimum and maximum values in its range. Where: 0 - Disables automatic scaling (scales the axis to the specified From and End values) 1 - Enables automatic scaling (scales the axis to minimum and maximum values)
From Single A number specifying the beginning of the axis. This value is ignored if bAuto is set to 1. When this is the case, set From to 0.
End Single A number specifying the end of the axis. This value is ignored if bAuto is set to 1. When this is the case, set End to 0.
Example ret = IpHstScale(1, 0, 0.0, 1000.0)
This statement will scale the Y-axis of the histogram from 0 to 1000.
Comments Note that this function operates upon the “active” histogram window (i.e., the one most recently opened or selected). If the currently active histogram is not the one you want to use, you must use IpHstSelect to explicitly select (make active) the appropriate window before calling IpHstScale.
See Also IpHstSelect

IpHstSelect
Page 2-373
IpHstSelect Syntax IpHstSelect(HstId)
Description This function activates the specified histogram window. It selects the histogram upon which all subsequent histogram functions will operate. Equivalent to clicking the Histogram window to activate it.
Parameters HstId Integer An integer specifying the ID of the histogram that is to be selected. See comments, below, for more information about this number.
Example ret = IpHstSelect(0)
This statement makes histogram window “0” the active histogram.
Comments A histogram “ID” (HstId) is assigned to a histogram window when it is created. The window retains this ID for the duration of its existence. A histogram window is given the lowest unused ID number available at the time it is created. If a histogram window is opened while no other histograms are open, it is assigned an ID of “0”. If another histogram is created while “0” is open, the new histogram will be assigned an ID of “1”. If “0” is closed, and another histogram is opened (while “1” is still open), the new window will get an ID of “0”, since it is the lowest, unused ID available.
IpHstSetAttr Syntax IpHstSetAttr(AttrType, AttrValue)
Description This function selects, sets or deselects options relating to the Histogram window.
Parameters AttrType Integer An enumerated integer specifying the option to be set. Must be one of the following: ACCUMULATE BIN CHANNEL1 CHANNEL2 CHANNEL3 COLORMODEL GRID ICAL LINETYPE SCAL STATISTICS See definitions under Comments, below.
AttrValue Integer An integer specifying how the AttrType option is to be set. See definitions under Comments, below, for the values allowed by each option.
Example ret = IpHstSetAttr(BIN, 100)
This statement will set the number of bins in the histogram to 100.
Comments AttrType options are as follows:

IpHstSetAttr
Page 2-374
AttrType DESCRIPTION ALLOWED VALUES
ACCUMULATE Determines whether the 0 - Normal Form histogram is displayed in 1 - Accumulated form normal or cumulative form. Equivalent to selecting Accumulate in the Histogram window Report menu. BIN Specifies the number of An integer specifying bins into which the histo- the number of bins. gram is to be divided. Equivalent to setting the Bins value in the Histogram window's Report menu. CHANNEL1 Enables or disables the 0 - Disables Channel. histogram of the Red, Hue 1 - Enables Channel. or Y channel, depending upon
the color model.
CHANNEL2 Enables or disables the 0 - Disables Channel. histogram of the Green, 1 - Enables Channel. Saturation or In-Phase
channel, depending upon the color model selected.
CHANNEL3 Enables or disables the 0 - Disables Channel. histogram of the Blue, 1 - Enables Channel. Intensity, Value or
Quadrature channel, depending upon the color model selected.
COLORMODEL Selects the color model CM_RGB in which the histogram CM_HSI is to be displayed. CM_HSV Equivalent to selecting CM_YIQ color model in the Histogram window's Color menu. GRID Determines whether the 0 - Selects Graph form. histogram is displayed in 1 - Se130lects Table
form. table or graph form. Equivalent to setting the Table option in the Histogram window's Report menu.

IpHstSize
Page 2-375
AttrType DESCRIPTION ALLOWED VALUES
ICAL Specifies whether the 0 - Disables Calibration. intensity calibration is to be 1 - Enables Calibration. applied to the histogram. Equivalent to setting the Intensity Cal option in the Histogram window Report menu. LINETYPE Determines whether the 0 - Selects Line form. histogram is to be shown 1 - Selects Bar form. in bar or line form. Equivalent to setting the Bar or Line option in the Histogram window Report menu. SCAL Specifies whether the 0 - Disables Calibration. spatial calibration is to be 1 - Enables Calibration. applied to the histogram. Equivalent to setting the Spatial Cal option in the Histogram window Report menu. STATISTICS Specifies whether statistics or
range information is to be displayed in the histo-
0 - Suppresses display of statistics and range information.
gram window. Equivalent 1 - Displays Statistics. to setting the Statistics 2 - Displays Range Info. or Range/Area option in the Histogram window's Report menu.
Note that this function operates upon the “active” histogram window (i.e., the one most recently opened or selected). If the currently active histogram is not the one you want to use, you must use IpHstSelect to explicitly select (make active) the appropriate window before calling IpHstSetAttr.
IpHstSize Syntax IpHstSize(cx, cy)
Description This function changes the size of the active histogram window to the specified width and height. Equivalent to resizing Histogram window with the mouse.
Parameters cx Integer An integer specifying the width, in pixels, at which the Histogram window is to be displayed.
cy Integer An integer specifying the height, in pixels, at which the Histogram window is to be displayed.

IpHstUpdate
Page 2-376
Example ret = IpHstSize(400, 175)
This statement will resize the Histogram window to dimensions of 400 pixels wide by 175 pixels tall.
Comments Note that this function operates upon the “active” histogram window (i.e., the one most recently opened or selected). If the currently active histogram is not the one you want to use, you must use IpHstSelect to explicitly select (make active) the appropriate window before calling IpHstSize.
See Also IpHstMove, IpHstMinimize, IpHstMaximize, IpHstRestore, IpHstSelect
IpHstUpdate Syntax IpHstUpdate( )
Description This function updates the data within the active histogram window. Equivalent to selecting the Update command within the Histogram window.
Comments Note that this function operates upon the “active” histogram window (i.e., the one most recently opened or selected). If the currently active histogram is not the one you want to use, you must use IpHstSelect to explicitly select (make active) the appropriate window before calling IpHstUpdate.
See Also IpHstSelect
IpICalCalibValues Syntax IpICalCalibValues (Calibration, NumPixels, PixelList, ValueList )
Description This function can be used to retrieve calibrated pixel intensities.
Parameters Calibration Long The ID of the calibration of interest
NumPixels Integer The number of pixels supplied in the PixelList. See comments.
PixelList Double Pixel intensities to calibrate.
ValueList Double Calibrated pixel intensities
Comments The NumPixels parameter indicates the length of the PixelList and ValueList arrays. The pixel intensities to be calibrated should be converted (e.g. using the CDbl() function) and copied into the PixelList array. The calibrated values will be returned in the ValueList array.
IpICalCreate Syntax IpICalCreate( )
Description This function creates a new intensity calibration set. Equivalent to clicking New in the Intensity Calibration dialog box.
See Also IpICalSelect, IpICalDestroy
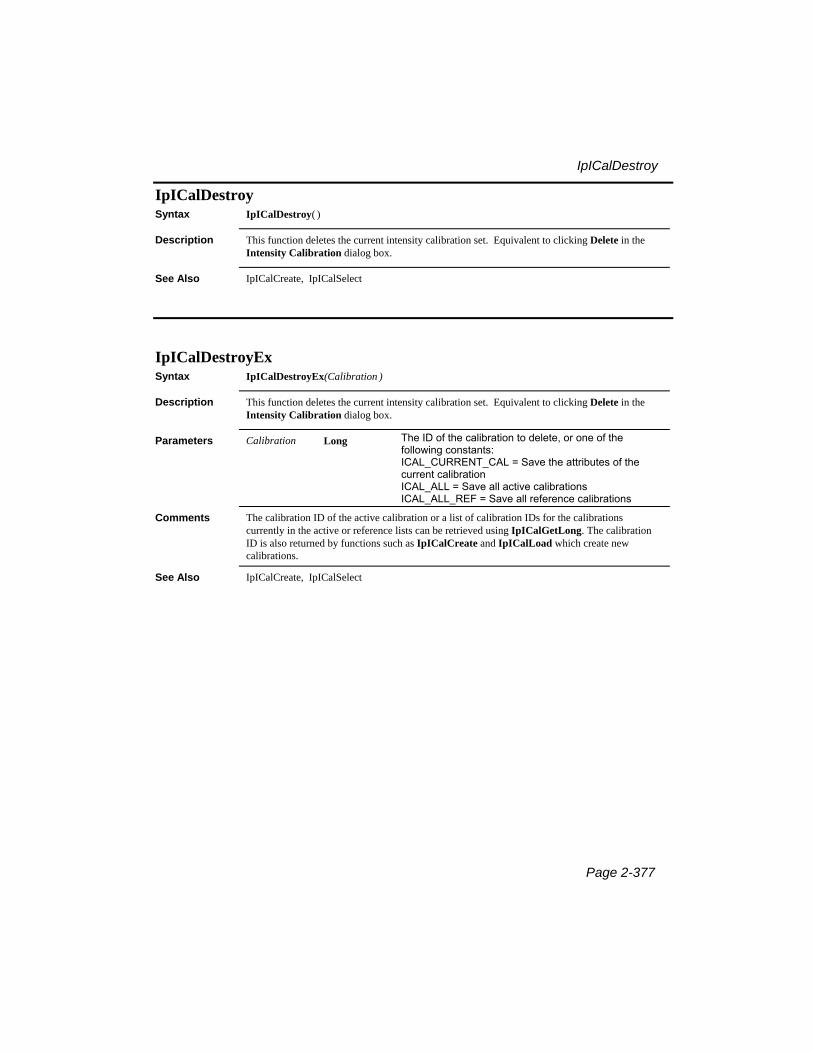
IpICalDestroy
Page 2-377
IpICalDestroy Syntax IpICalDestroy( )
Description This function deletes the current intensity calibration set. Equivalent to clicking Delete in the Intensity Calibration dialog box.
See Also IpICalCreate, IpICalSelect
IpICalDestroyEx Syntax IpICalDestroyEx(Calibration )
Description This function deletes the current intensity calibration set. Equivalent to clicking Delete in the Intensity Calibration dialog box.
Parameters Calibration Long The ID of the calibration to delete, or one of the following constants: ICAL_CURRENT_CAL = Save the attributes of the current calibration ICAL_ALL = Save all active calibrations ICAL_ALL_REF = Save all reference calibrations
Comments The calibration ID of the active calibration or a list of calibration IDs for the calibrations currently in the active or reference lists can be retrieved using IpICalGetLong. The calibration ID is also returned by functions such as IpICalCreate and IpICalLoad which create new calibrations.
See Also IpICalCreate, IpICalSelect

IpICalGetLong
Page 2-378
IpICalGetLong Syntax IpICalGetLong(Calibration, Attribute, Value)
Description This function retrieves the attributes of the specified calibration.
Parameters Calibration Long This parameter is only used by ICAL_GET_ALL and ICAL_GET_REF. For these attributes, the command is the index of the calibration of interest
Attribute Integer The attribute of interest, which must be one of the following: ICAL_NUM_ALL = The number of active calibrations ICAL_NUM_REF = The number of reference calibrations ICAL_GET_ALL = Return the calibration ID of an active calibration ICAL_GET_REF = Return the calibration ID of a reference calibration ICAL_NUM_SAMPLES = Get the number of sample points in the in the specified calibration. ICAL_CURRENT = Return the calibration ID of the current calibration ICAL_SYSTEM = Return the calibration ID of the system calibration SCAL_IS_REFERENCE = Indicates a reference calibration. SCAL_IS_SYSTEM = Indicates a system calibration.
Value Long A long variable that will receive the requested attribute’s value
Comments The calibration ID of the active calibration or a list of calibration IDs for the calibrations currently in the active or reference lists can be retrieved using IpICalGetLong. The calibration ID is also returned by functions such as IpICalCreate and IpICalLoad which create new calibrations.
Return Value 0 if successful, a negative value if failed
See Also IpICalSetLong

IpICalGetSng
Page 2-379
IpICalGetSng Syntax IpICalGetSng(Calibration, Attribute,Value)
Description This function retrieves the attributes of the specified calibration.
Parameters Calibration Long The ID of the calibration of interest. Calibration may also be set to ICAL_CURRENT_CAL to get the current calibration’s attributes.
Attribute Integer The attribute of interest, which must be one of the following: ICAL_OD_BLACK = Get the black level of an optical density calibration ICAL_OD_INCIDENT = Get the incident (white) level of an optical density calibration.
Value Single A Single (single point) variable that will receive the requested attribute’s value
Comments The calibration ID of the active calibration or a list of calibration IDs for the calibrations currently in the active or reference lists can be retrieved using IpICalGetLong. The calibration ID is also returned by functions such as IpICalCreate and IpICalLoad which create new calibrations.
Return Value 0 if successful, IPCERR_NODOC if the specified calibration does not exist, or IPCERR_EMPTY if ICAL_CURRENT_CAL was specified and there is no calibration active.
See Also IpICalSetSng

IpICalGetStr
Page 2-380
IpICalGetStr Syntax IpICalGetStr(Calibration, Attribute,Value)
Description This function retrieves the attributes of the specified calibration.
Parameters Calibration Long The ID of the calibration of interest. Calibration may also be set to ICAL_CURRENT_CAL to get the current calibration’s attributes.
Attribute Integer The attribute of interest, which must be one of the following: SCAL_NAME = The name of the calibration SCAL_UNITS = The name of the calibration units
Value String A fixed-length string variable that will receive the requested attribute’s value
Comments The calibration ID of the active calibration or a list of calibration IDs for the calibrations currently in the active or reference lists can be retrieved using IpICalGetLong. The calibration ID is also returned by functions such as IpICalCreate and IpICalLoad which create new calibrations.
Return Value 0 if successful, IPCERR_NODOC if the specified calibration does not exist, or IPCERR_EMPTY if ICAL_CURRENT_CAL was specified and there is no calibration active
See Also IpICalSetStr
IpICalGetSystem Syntax IpICalGetSystem (Class)
Description This function sets the attributes of the specified calibration.
Parameters Class Integer The image class that this calibration is designed for, which must be one of the following: IMC_GRAY 8 IMC_PALETTE IMC_RGB24 IMC_RGB36 IMC_RGB48 IMC_GRAY12 IMC_GRAY16 IMC_SINGLE
Comments There are multiple system intensity calibrations with one for each image class.
Return Value Returns the calibration ID of the system calibration for the specified image class, or IPCERR_NODOC if the specified image class’s system calibration has not been set
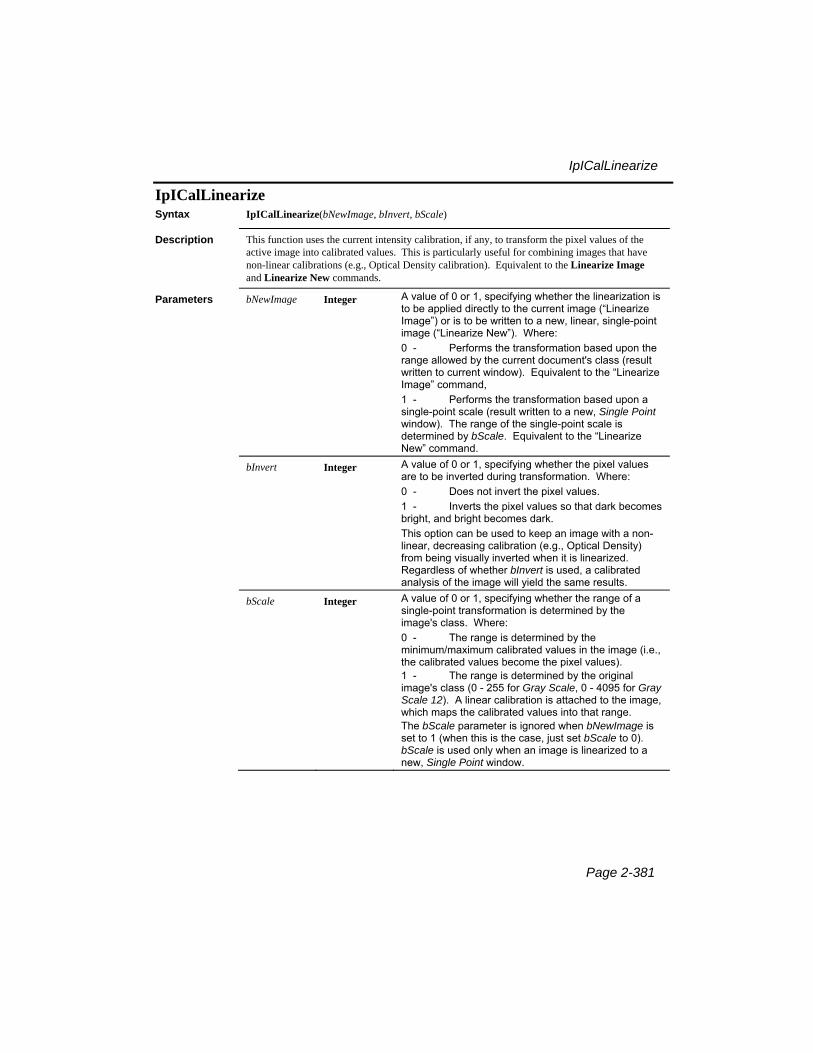
IpICalLinearize
Page 2-381
IpICalLinearize Syntax IpICalLinearize(bNewImage, bInvert, bScale)
Description This function uses the current intensity calibration, if any, to transform the pixel values of the active image into calibrated values. This is particularly useful for combining images that have non-linear calibrations (e.g., Optical Density calibration). Equivalent to the Linearize Image and Linearize New commands.
Parameters bNewImage Integer A value of 0 or 1, specifying whether the linearization is to be applied directly to the current image (“Linearize Image”) or is to be written to a new, linear, single-point image (“Linearize New”). Where: 0 - Performs the transformation based upon the range allowed by the current document's class (result written to current window). Equivalent to the “Linearize Image” command, 1 - Performs the transformation based upon a single-point scale (result written to a new, Single Point window). The range of the single-point scale is determined by bScale. Equivalent to the “Linearize New” command.
bInvert Integer A value of 0 or 1, specifying whether the pixel values are to be inverted during transformation. Where: 0 - Does not invert the pixel values. 1 - Inverts the pixel values so that dark becomes bright, and bright becomes dark. This option can be used to keep an image with a non-linear, decreasing calibration (e.g., Optical Density) from being visually inverted when it is linearized. Regardless of whether bInvert is used, a calibrated analysis of the image will yield the same results.
bScale Integer A value of 0 or 1, specifying whether the range of a single-point transformation is determined by the image's class. Where: 0 - The range is determined by the minimum/maximum calibrated values in the image (i.e., the calibrated values become the pixel values). 1 - The range is determined by the original image's class (0 - 255 for Gray Scale, 0 - 4095 for Gray Scale 12). A linear calibration is attached to the image, which maps the calibrated values into that range.
The bScale parameter is ignored when bNewImage is set to 1 (when this is the case, just set bScale to 0). bScale is used only when an image is linearized to a new, Single Point window.
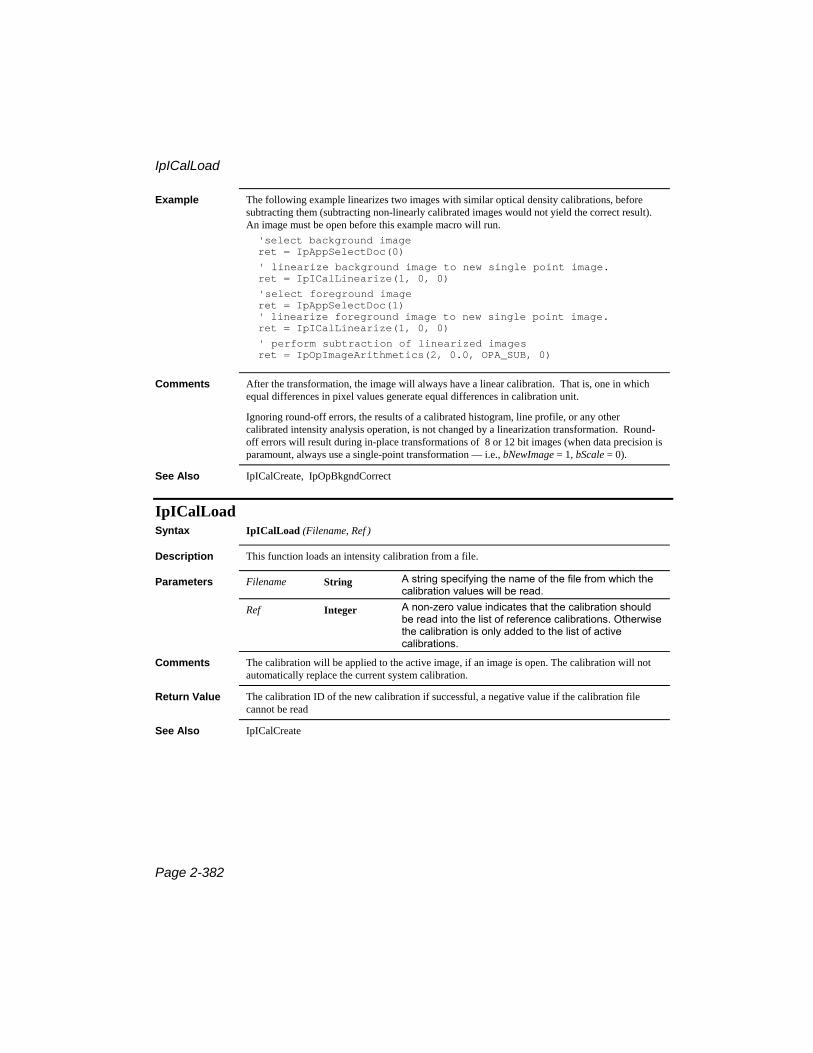
IpICalLoad
Page 2-382
Example The following example linearizes two images with similar optical density calibrations, before subtracting them (subtracting non-linearly calibrated images would not yield the correct result). An image must be open before this example macro will run. 'select background image ret = IpAppSelectDoc(0)
' linearize background image to new single point image. ret = IpICalLinearize(1, 0, 0)
'select foreground image ret = IpAppSelectDoc(1) ' linearize foreground image to new single point image. ret = IpICalLinearize(1, 0, 0)
' perform subtraction of linearized images ret = IpOpImageArithmetics(2, 0.0, OPA_SUB, 0)
Comments After the transformation, the image will always have a linear calibration. That is, one in which equal differences in pixel values generate equal differences in calibration unit.
Ignoring round-off errors, the results of a calibrated histogram, line profile, or any other calibrated intensity analysis operation, is not changed by a linearization transformation. Round-off errors will result during in-place transformations of 8 or 12 bit images (when data precision is paramount, always use a single-point transformation — i.e., bNewImage = 1, bScale = 0).
See Also IpICalCreate, IpOpBkgndCorrect
IpICalLoad Syntax IpICalLoad (Filename, Ref )
Description This function loads an intensity calibration from a file.
Parameters Filename String A string specifying the name of the file from which the calibration values will be read.
Ref Integer A non-zero value indicates that the calibration should be read into the list of reference calibrations. Otherwise the calibration is only added to the list of active calibrations.
Comments The calibration will be applied to the active image, if an image is open. The calibration will not automatically replace the current system calibration.
Return Value The calibration ID of the new calibration if successful, a negative value if the calibration file cannot be read
See Also IpICalCreate
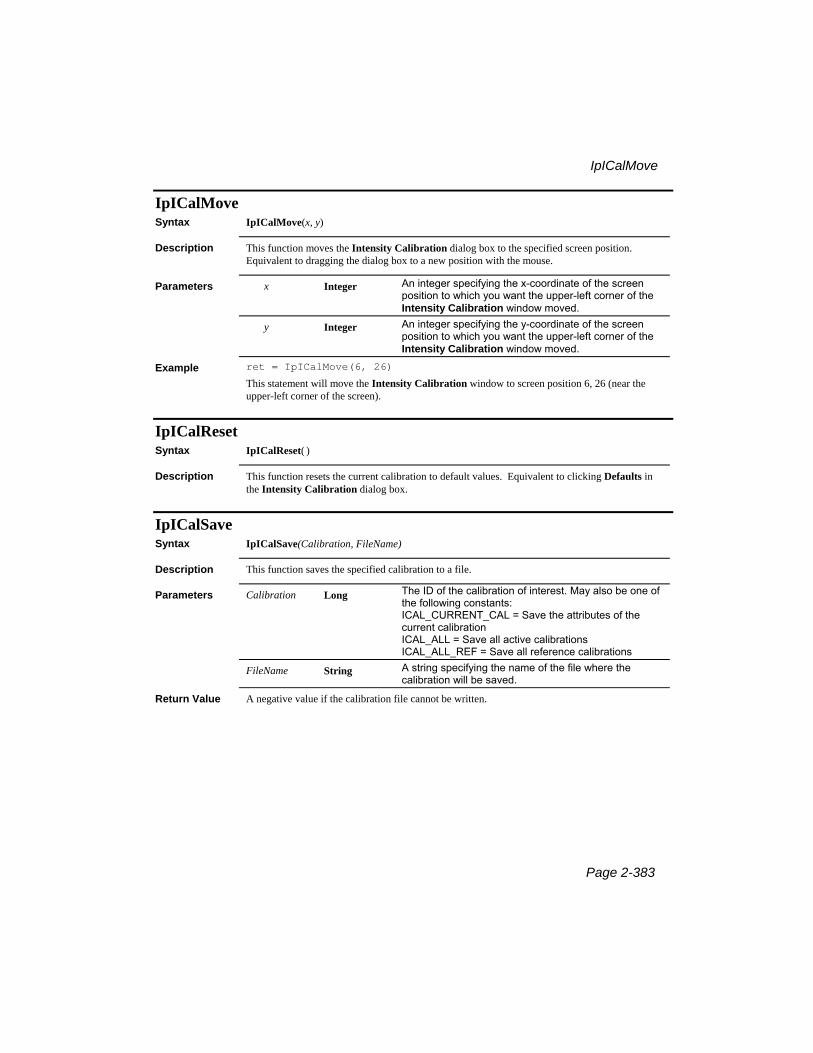
IpICalMove
Page 2-383
IpICalMove Syntax IpICalMove(x, y)
Description This function moves the Intensity Calibration dialog box to the specified screen position. Equivalent to dragging the dialog box to a new position with the mouse.
Parameters x Integer An integer specifying the x-coordinate of the screen position to which you want the upper-left corner of the Intensity Calibration window moved.
y Integer An integer specifying the y-coordinate of the screen position to which you want the upper-left corner of the Intensity Calibration window moved.
Example ret = IpICalMove(6, 26)
This statement will move the Intensity Calibration window to screen position 6, 26 (near the upper-left corner of the screen).
IpICalReset Syntax IpICalReset( )
Description This function resets the current calibration to default values. Equivalent to clicking Defaults in the Intensity Calibration dialog box.
IpICalSave Syntax IpICalSave(Calibration, FileName)
Description This function saves the specified calibration to a file.
Parameters Calibration Long The ID of the calibration of interest. May also be one of the following constants: ICAL_CURRENT_CAL = Save the attributes of the current calibration ICAL_ALL = Save all active calibrations ICAL_ALL_REF = Save all reference calibrations
FileName String A string specifying the name of the file where the calibration will be saved.
Return Value A negative value if the calibration file cannot be written.

IpICalSelect
Page 2-384
IpICalSelect Syntax IpICalSelect(szICal)
Description This function selects a calibration set to attach to an image. Equivalent to selecting a set in the Name field in the Intensity Calibration dialog box.
Parameters szICal String A string specifying the name of the calibration set that is to be made active.
Example ret = IpICalSelect("DNA Gel")
This statement will activate an intensity calibration called “DNA Gel”.
Comments The activated calibration set becomes the calibration for the active image (if there is one), and all image windows opened thereafter.
See Also IpICalCreate, IpICalSetName, IpICalDestroy
IpICalSetLong Syntax IpICalSetLong(Calibration, Attribute, Value)
Description This function sets the current or system calibration
Parameters Calibration Long The calibration ID of the calibration of interest, not used for ICAL_ONIMAGE_COLOR. Calibration may also be set to ICAL_CURRENT_CAL to get the current calibration’s attributes.
Attribute Integer The attribute of interest, which must be one of the following: ICAL_APPLY = Applies the specified calibration to the active image. ICAL_CURRENT =Set the current calibration to the specified calibration ICAL_ADD_TO_REF = Add the specified calibration to the list of reference calibrations. ICAL_REMOVE_FROM_REF = Remove the specified calibration from the list of reference calibrations.
Value Long The new value for the specified attribute.
Comments The calibration ID of the active calibration or a list of calibration IDs for the calibrations currently in the active or reference lists can be retrieved using IpICalGetLong. The calibration ID is also returned by functions such as IpICalCreate and IpICalLoad which create new calibrations. There are multiple system intensity calibrations, with one ofr each image class (such as 8-bit grayscale vs. 16-bit grayscale). The system calibratio can be set by the IpICalSetSystem or IpICalSetSystemByName functions, and queried using the IpICalGetSystem function.
Return Value 0 if successful, IPCERR_NODOC if the specified calibration does not exist, or IPCERR_EMPTY if ICAL_CURRENT_CAL was specified and there is no calibration active

IpICalSetName
Page 2-385
See Also IpICalGetLong, IpICalCreate
IpICalSetName Syntax IpICalSetName(szICal)
Description This function changes the name of the current calibration set. Equivalent to retyping the name in the Name field of the Intensity Calibration dialog box.
Parameters szICal String A string specifying the new name of the selected calibration set.
Example ret = IpICalSetName("DNA Density")
This statement will change the name of the current calibration set to “DNA Density”.
IpICalSetOptDens Syntax IpICalSetOptDens(BlackLevel, IncidentLevel)
Description This function establishes the Black level and Incident level to be applied to the optical density curve. Equivalent to completing the Optical Density Calibration dialog box.
Parameters BlackLevel Single A number (of IPBasic type, Single) specifying the value representing the pixel intensity of totally opaque material.
IncidentLevel Single A number (of IPBasic type, Single) specifying the value representing the pixel intensity of totally transparent material.
Example ret = IpICalSetOptDens(23.0, 179.5) This statement will set the Black level to 23.0 and the Incident level to 179.5.
IpICalSetPoints Syntax IpICalSetPoints(ipICalPoints, NumPoints, fitmode)
Description This function establishes the points defining a custom calibration curve. Equivalent to completing the Freeform Intensity Calibration dialog box.
Parameters ipICalPoints Single (Basic)
LPSINGLE (C)
The name and first element of an array containing the calibration points (of IPBasic type, Single). By default, this array is defined as ipICal.
NumPoints Integer An integer specifying the number of point definitions (coordinate pairs) contained in the array ipICal.
fitmode Integer An integer between 1 and 6 (inclusive) specifying the degree of fit to be applied to the custom curve.

IpICalSetSamples
Page 2-386
Comments typedef enum { ICALSETFIT_POLYNOMIAL = 1, // First order polynomial (linear) ICALSETFIT_POLYNOMIAL2 = 2, // Second order polynomial ICALSETFIT_POLYNOMIAL3 = 3, // Third order polynomial ICALSETFIT_LAGRANGE1 = 4, // First order Lagrange (linear) ICALSETFIT_LAGRANGE2 = 5, // Second order Lagrange ICALSETFIT_LAGRANGE3 = 6, // Third order Lagrange }ICALSETFIT_METHOD;
Example ipICal(0) = 0 ipICal(1) = 2.4 ipICal(2) = 100 ipICal(3) = 1.2 ipICal(4) = 170 ipICal(5) = 1.0 ipICal(6) = 255 ipICal(7) = 0.1 IpICalSetPoints(ipICal(0), 4)
This set of statements will create the custom calibration curve from the points defined in ipICalPoints (i.e., the even-odd pairs of 0,2.4 100,1.2 170,1.0 and 255,0.1). A degree-of-fit value of 4 will be applied when the curve is calculated.
IpICalSetSamples Syntax IpICalSetSamples(NumSamples)
Description This function sets the number of samples to be used to define the X-axis of the calibration curve. Equivalent to selecting a Number of Samples value in the Intensity Calibration dialog box.
Parameters NumSamples Integer An integer specifying the number of samples comprising the X-axis.
Example ret = IpICalSetSamples(100)
This statement will set the number of samples to 100.
IpICalSetSng Syntax IpICalSetSng(Calibration, Attribute,Value)
Description This function sets the attributes of the specified calibration.
Parameters Calibration Long The ID of the calibration of interest. Calibration may also be set to ICAL_CURRENT_CAL to get the current calibration’s attributes.
Attribute Integer The attribute of interest, which must be one of the following: ICAL_OD_BLACK = Set the black level of an optical density calibration ICAL_OD_INCIDENT = Set the incident (white) level of an optical density calibration.

IpICalSetStr
Page 2-387
Value Single A Single (single point) variable that will receive the requested attribute’s value
Comments The calibration ID of the active calibration or a list of calibration IDs for the calibrations currently in the active or reference lists can be retrieved using IpICalGetLong. The calibration ID is also returned by functions such as IpICalCreate and IpICalLoad which create new calibrations.
Return Value 0 if successful, IPCERR_NODOC if the specified calibration does not exist, or IPCERR_EMPTY if ICAL_CURRENT_CAL was specified and there is no calibration active.
See Also IpICalSetSng
IpICalSetStr Syntax IpICalSetStr(Calibration, Attribute,Value)
Description This function sets the attributes of the specified calibration.
Parameters Calibration Long The ID of the calibration of interest. Calibration may also be set to ICAL_CURRENT_CAL to get the current calibration’s attributes.
Attribute Integer The attribute of interest, which must be one of the following: ICAL_NAME = The name of the calibration ICAL_UNITS = The name of the calibration units
Value String The string containing the new value for the specified attribute.
Comments The calibration ID of the active calibration or a list of calibration IDs for the calibrations currently in the active or reference lists can be retrieved using IpICalGetLong. The calibration ID is also returned by functions such as IpICalCreate and IpICalLoad which create new calibrations.
Return Value 0 if successful, IPCERR_NODOC if the specified calibration does not exist, or IPCERR_EMPTY if ICAL_CURRENT_CAL was specified and there is no calibration active
See Also IpICalGetStr
IpICalSetSystem Syntax IpICalSetSystem (Calibration, Class)
Description This function sets the attributes of the specified calibration.
Parameters Calibration Long The ID of the calibration of interest.

IpICalSetSystemByName
Page 2-388
Class Integer The image class that this calibration is designed for, which must be one of the following: IMC_GRAY 8 IMC_PALETTE IMC_RGB24 IMC_RGB36 IMC_RGB48 IMC_GRAY12 IMC_GRAY16 IMC_SINGLE
Comments There are multiple system intensity calibrations with one for each image class. The calibration ID of the active calibration or a list of calibration IDs for the calibrations currently in the active or reference lists can be retrieved using IpICalGetLong. The calibration ID is also returned by functions such as IpICalCreate and IpICalLoad which create new calibrations.
Return Value 0 if successful, IPCERR_NODOC if the specified calibration does not exist, or IPCERR_EMPTY if ICAL_CURRENT_CAL was specified and there is no calibration active
IpICalSetSystemByName Syntax IpICalSetSystemByName (Calibration, Class)
Description This function sets the attributes of the specified calibration.
Parameters Calibration String The name of the calibration of interest.
Class Integer The image class that this calibration is designed for, which must be one of the following: IMC_GRAY 8 IMC_PALETTE IMC_RGB24 IMC_RGB36 IMC_RGB48 IMC_GRAY12 IMC_GRAY16 IMC_SINGLE
Comments There are multiple system intensity calibrations with one for each image class. The calibration ID of the active calibration or a list of calibration IDs for the calibrations currently in the active or reference lists can be retrieved using IpICalGetLong. The calibration ID is also returned by functions such as IpICalCreate and IpICalLoad which create new calibrations.
Return Value 0 if successful, IPCERR_NODOC if the specified calibration does not exist, or IPCERR_EMPTY if ICAL_CURRENT_CAL was specified and there is no calibration active
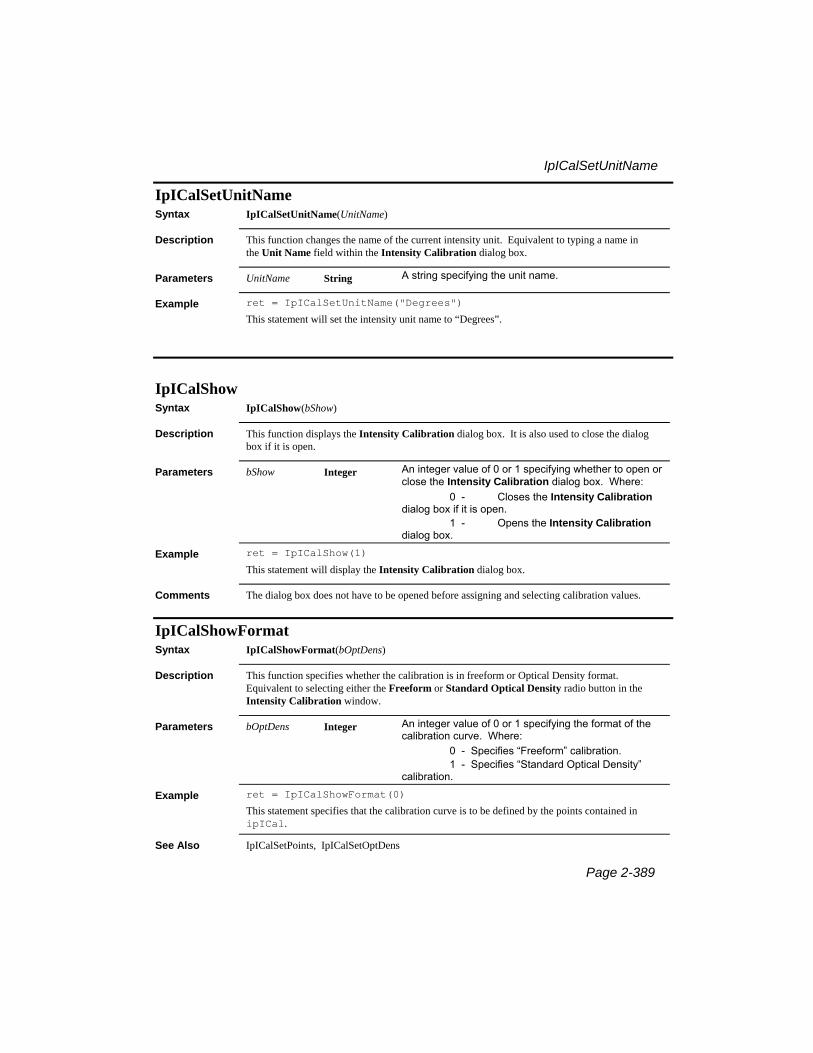
IpICalSetUnitName
Page 2-389
IpICalSetUnitName Syntax IpICalSetUnitName(UnitName)
Description This function changes the name of the current intensity unit. Equivalent to typing a name in the Unit Name field within the Intensity Calibration dialog box.
Parameters UnitName String A string specifying the unit name.
Example ret = IpICalSetUnitName("Degrees")
This statement will set the intensity unit name to “Degrees”.
IpICalShow Syntax IpICalShow(bShow)
Description This function displays the Intensity Calibration dialog box. It is also used to close the dialog box if it is open.
Parameters bShow Integer An integer value of 0 or 1 specifying whether to open or close the Intensity Calibration dialog box. Where: 0 - Closes the Intensity Calibration dialog box if it is open. 1 - Opens the Intensity Calibration dialog box.
Example ret = IpICalShow(1)
This statement will display the Intensity Calibration dialog box.
Comments The dialog box does not have to be opened before assigning and selecting calibration values.
IpICalShowFormat Syntax IpICalShowFormat(bOptDens)
Description This function specifies whether the calibration is in freeform or Optical Density format. Equivalent to selecting either the Freeform or Standard Optical Density radio button in the Intensity Calibration window.
Parameters bOptDens Integer An integer value of 0 or 1 specifying the format of the calibration curve. Where: 0 - Specifies “Freeform” calibration. 1 - Specifies “Standard Optical Density” calibration.
Example ret = IpICalShowFormat(0)
This statement specifies that the calibration curve is to be defined by the points contained in ipICal.
See Also IpICalSetPoints, IpICalSetOptDens

IpIniFile
Page 2-390
IpIniFile Syntax IpIniFile(ValType, ValName, lpValue)
Description This function is used to read and write user-defined settings from/to the IPMACRO.INI file. There is no Image-Pro command equivalent to this function; it is one that must be manually written with the macro editor.
Parameters ValType Integer An enumerated integer that specifies whether the setting is to be read or written to the IPMACRO.INI file, and identifies the setting's data type. Must be one of the following.
GETINT GETSINGLE SETINT SETSINGLE
See definitions under Comments, below.
ValName String A string specifying the name of the setting to be read or written.
lpValue See below The name of the variable that will receive the requested data when ValType is set to read (get). Or, the name of the variable that holds the setting when ValType is set to write (set). Be sure this variable is one that is compatible with the type of data written or returned by the command you have specified in ValType. See ValType description under Comments, below.
Return Value 0 if successful. Negative if the specified variable (to be read) cannot be found in the file.
Example The following example reads two settings from the IPMACRO.INI file, and writes them to variables named var1, and var2.
Dim var1 as integer Dim var2 as single . . . ret = IpIniFile(GETINT, "MyInteger", var1) ret = IpIniFile(GETSINGLE, "MySingle", var2)
The following example writes values of the two variables, var1, and var2 as settings in the IPMACRO.INI file.
Dim var1 as integer Dim var2 as single var1 = 123 var2 = 1.234 ret = IpIniFile(SETINT, "MyInteger", var1) ret = IpIniFile(SETSINGLE, "MySingle", var2) . . .
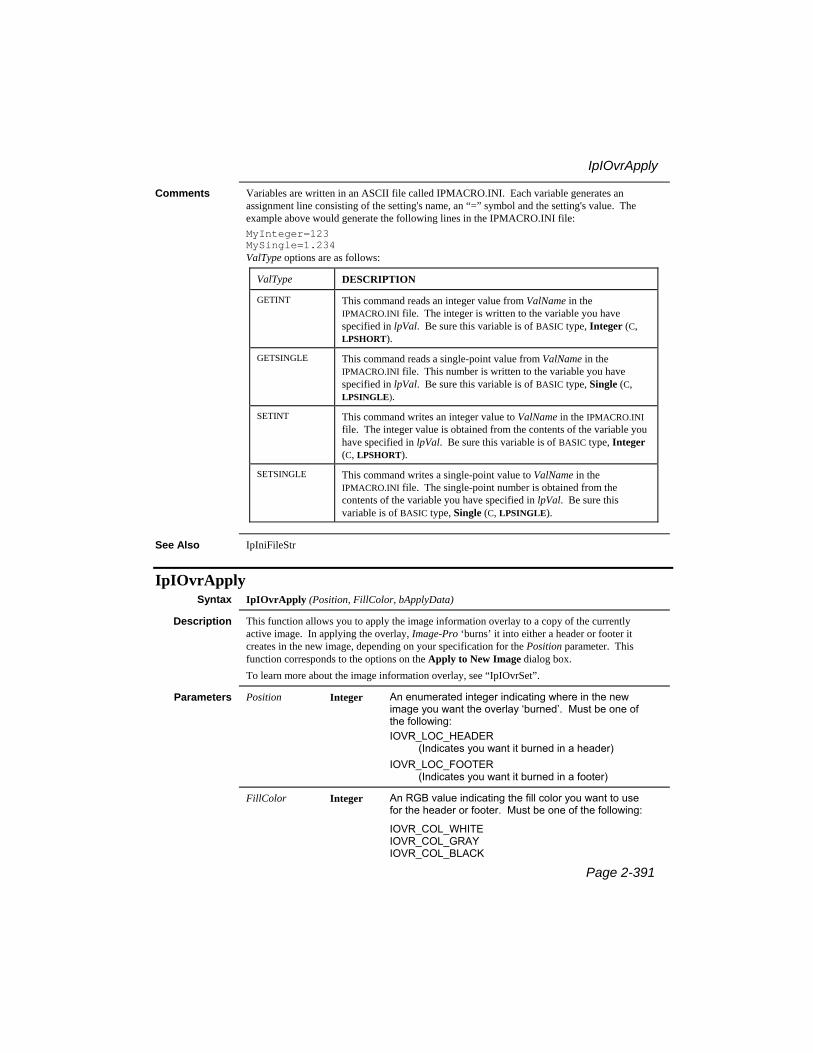
IpIOvrApply
Page 2-391
Comments Variables are written in an ASCII file called IPMACRO.INI. Each variable generates an assignment line consisting of the setting's name, an “=” symbol and the setting's value. The example above would generate the following lines in the IPMACRO.INI file: MyInteger=123 MySingle=1.234 ValType options are as follows:
ValType DESCRIPTION
GETINT This command reads an integer value from ValName in the IPMACRO.INI file. The integer is written to the variable you have specified in lpVal. Be sure this variable is of BASIC type, Integer (C, LPSHORT).
GETSINGLE This command reads a single-point value from ValName in the IPMACRO.INI file. This number is written to the variable you have specified in lpVal. Be sure this variable is of BASIC type, Single (C, LPSINGLE).
SETINT This command writes an integer value to ValName in the IPMACRO.INI file. The integer value is obtained from the contents of the variable you have specified in lpVal. Be sure this variable is of BASIC type, Integer (C, LPSHORT).
SETSINGLE This command writes a single-point value to ValName in the IPMACRO.INI file. The single-point number is obtained from the contents of the variable you have specified in lpVal. Be sure this variable is of BASIC type, Single (C, LPSINGLE).
See Also IpIniFileStr
IpIOvrApply Syntax IpIOvrApply (Position, FillColor, bApplyData)
Description This function allows you to apply the image information overlay to a copy of the currently active image. In applying the overlay, Image-Pro ‘burns’ it into either a header or footer it creates in the new image, depending on your specification for the Position parameter. This function corresponds to the options on the Apply to New Image dialog box. To learn more about the image information overlay, see “IpIOvrSet”.
Parameters Position Integer An enumerated integer indicating where in the new image you want the overlay ‘burned’. Must be one of the following: IOVR_LOC_HEADER
(Indicates you want it burned in a header) IOVR_LOC_FOOTER
(Indicates you want it burned in a footer)
FillColor Integer An RGB value indicating the fill color you want to use for the header or footer. Must be one of the following:
IOVR_COL_WHITE IOVR_COL_GRAY IOVR_COL_BLACK

IpIOvrGet
Page 2-392
bApplyData Integer Indicates whether or not to apply (‘burn’) the data overlay with the image information overlay in the new image. Must be either:
1 – True 0 – False.
This is the same as checking the Apply Data Overlay checkbox in the Apply to New Image dialog box.
See Also IpIOvrSet, IpIOvrSetStr, IpIOvrShow, IpIOvrGet
IpIOvrGet Syntax IpIOvrGet(sAttribute, sParam, lpData)
Description This function gets the currently-set attributes for the “image information overlay.” With this function, you can get the overlay’s font attributes, view and print settings, and display settings. For more information about the image information overlay, refer to “IpIOvrSet.”
Parameters sAttribute Integer An enumerated integer specifying the type of information you want to retrieve. See the list of options and their definitions under Comments, below.
sParam Integer Depends on the value of sAttribute. See table below.
lpData See table below
The name of the variable that will receive the requested data. Be sure this variable is of the type required by sAttribute, as described in the table below.
Comments The options for sAttribute are listed and described in the table below:
sAttribute VALUE DESCRIPTION
IOVR_CURRENTBCG Use this command to get the status of the Current BCG option of the Image Info Overlay dialog box. One of the following flags will be written to the variable you have specified in lpData:
0 = disabled (unchecked) 1 = enabled (checked)
sParam VALUE lpData
Not used, must be 0. Variable of type: Integer
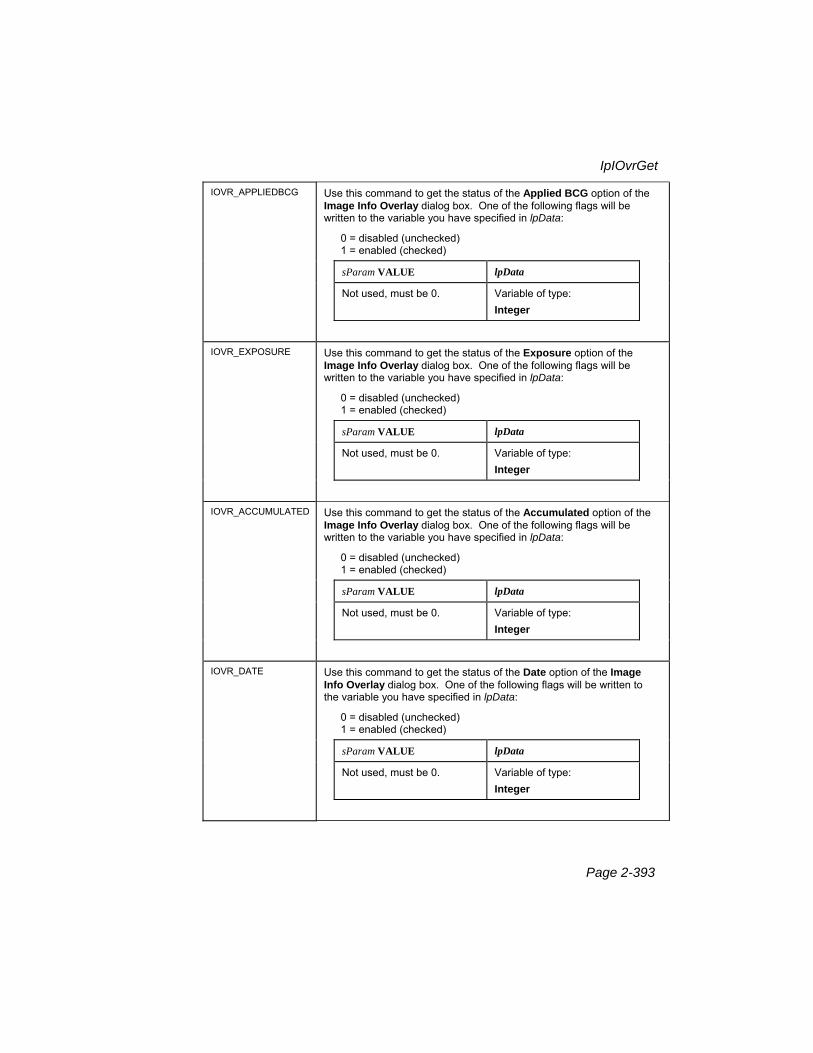
IpIOvrGet
Page 2-393
IOVR_APPLIEDBCG Use this command to get the status of the Applied BCG option of the Image Info Overlay dialog box. One of the following flags will be written to the variable you have specified in lpData:
0 = disabled (unchecked) 1 = enabled (checked)
sParam VALUE lpData
Not used, must be 0. Variable of type: Integer
IOVR_EXPOSURE Use this command to get the status of the Exposure option of the Image Info Overlay dialog box. One of the following flags will be written to the variable you have specified in lpData:
0 = disabled (unchecked) 1 = enabled (checked)
sParam VALUE lpData
Not used, must be 0. Variable of type: Integer
IOVR_ACCUMULATED Use this command to get the status of the Accumulated option of the Image Info Overlay dialog box. One of the following flags will be written to the variable you have specified in lpData:
0 = disabled (unchecked) 1 = enabled (checked)
sParam VALUE lpData
Not used, must be 0. Variable of type: Integer
IOVR_DATE Use this command to get the status of the Date option of the Image Info Overlay dialog box. One of the following flags will be written to the variable you have specified in lpData:
0 = disabled (unchecked) 1 = enabled (checked)
sParam VALUE lpData
Not used, must be 0. Variable of type: Integer
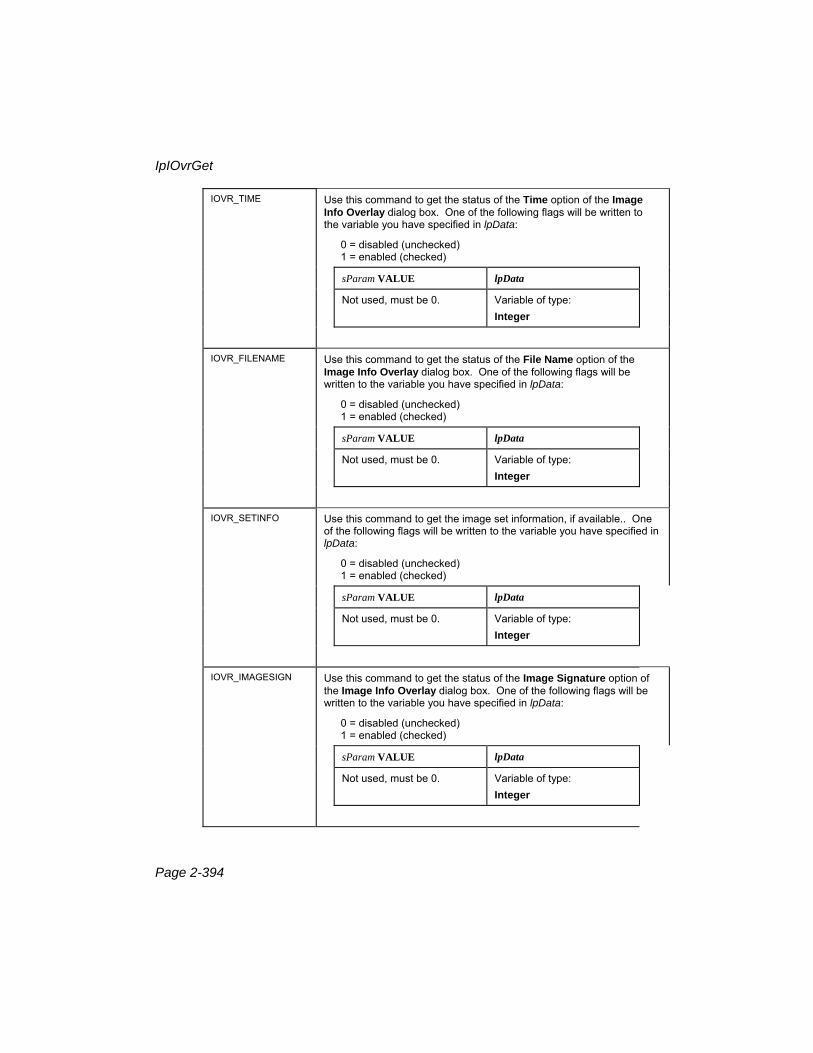
IpIOvrGet
Page 2-394
IOVR_TIME Use this command to get the status of the Time option of the Image Info Overlay dialog box. One of the following flags will be written to the variable you have specified in lpData:
0 = disabled (unchecked) 1 = enabled (checked)
sParam VALUE lpData
Not used, must be 0. Variable of type: Integer
IOVR_FILENAME Use this command to get the status of the File Name option of the Image Info Overlay dialog box. One of the following flags will be written to the variable you have specified in lpData:
0 = disabled (unchecked) 1 = enabled (checked)
sParam VALUE lpData
Not used, must be 0. Variable of type: Integer
IOVR_SETINFO Use this command to get the image set information, if available.. One of the following flags will be written to the variable you have specified in lpData:
0 = disabled (unchecked) 1 = enabled (checked)
sParam VALUE lpData
Not used, must be 0. Variable of type: Integer
IOVR_IMAGESIGN Use this command to get the status of the Image Signature option of the Image Info Overlay dialog box. One of the following flags will be written to the variable you have specified in lpData:
0 = disabled (unchecked) 1 = enabled (checked)
sParam VALUE lpData
Not used, must be 0. Variable of type: Integer
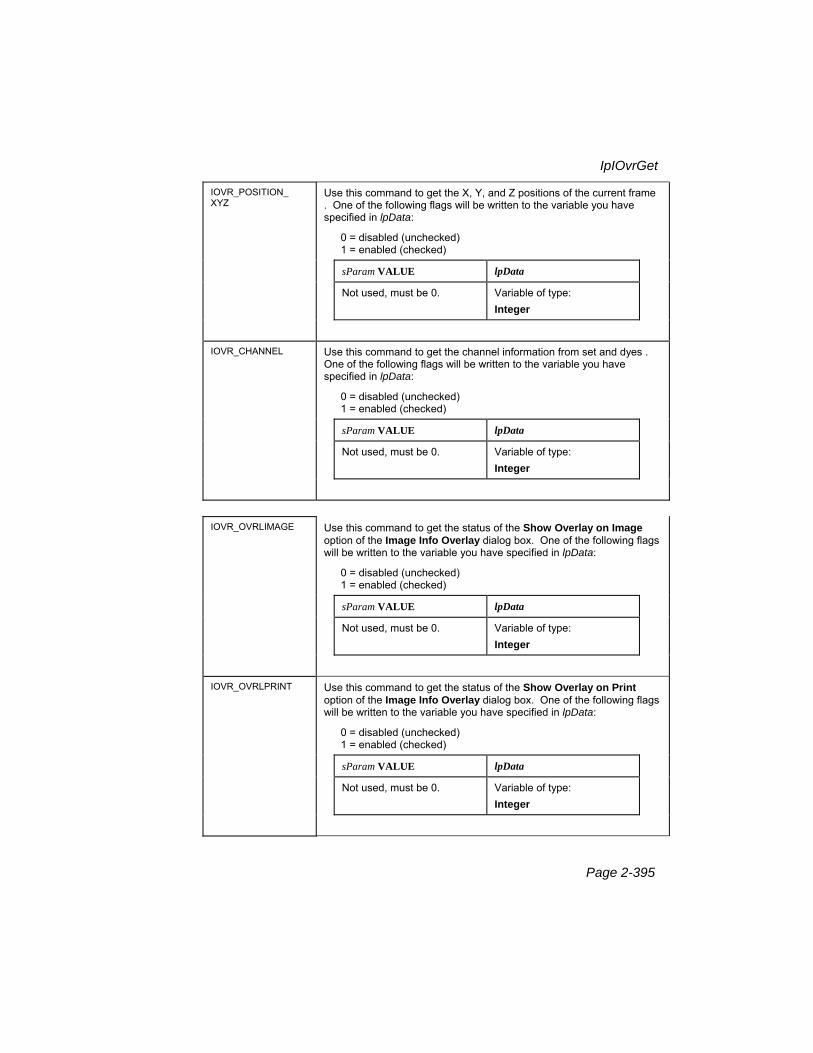
IpIOvrGet
Page 2-395
IOVR_POSITION_ XYZ
Use this command to get the X, Y, and Z positions of the current frame . One of the following flags will be written to the variable you have specified in lpData:
0 = disabled (unchecked) 1 = enabled (checked)
sParam VALUE lpData
Not used, must be 0. Variable of type: Integer
IOVR_CHANNEL Use this command to get the channel information from set and dyes . One of the following flags will be written to the variable you have specified in lpData:
0 = disabled (unchecked) 1 = enabled (checked)
sParam VALUE lpData
Not used, must be 0. Variable of type: Integer
IOVR_OVRLIMAGE Use this command to get the status of the Show Overlay on Image
option of the Image Info Overlay dialog box. One of the following flags will be written to the variable you have specified in lpData:
0 = disabled (unchecked) 1 = enabled (checked)
sParam VALUE lpData
Not used, must be 0. Variable of type: Integer
IOVR_OVRLPRINT Use this command to get the status of the Show Overlay on Print option of the Image Info Overlay dialog box. One of the following flags will be written to the variable you have specified in lpData:
0 = disabled (unchecked) 1 = enabled (checked)
sParam VALUE lpData
Not used, must be 0. Variable of type: Integer

IpIOvrGet
Page 2-396
IOVR_LOCATION Use this command to get the current setting controlling the placement of the image information overlay in new images/experiments. Values for IOVR_LOCATION are:
IOVR_LOC_UPPERLEFT IOVR_LOC_LOWERLEFT IOVR_LOC_UPPERRIGHT IOVR_LOC_LOWERRIGHT
sParam VALUE lpData
Not used, must be 0. Variable of type: Integer
IOVR_FONTFACE Use this command to get current font face setting for the image information overlay. The result will be written to the variable you have specified in lpData.
sParam VALUE lpData
Not used, must be 0. Variable of type: String
IOVR_FONTSTYLE Use this command to get current font style setting for the image information overlay. One of the following integers will be written to the variable you have specified in lpData:
0 = IOVR_FONT_STYLE (normal) 1 = IOVR_FONT_BOLD 2 = IOVR_FONT_ITALIC
sParam VALUE lpData
Not used, must be 0. Variable of type: Integer
IOVR_FONT_ EFFECTS
Use this command to get current font effects setting for the image information overlay. One of the following integers will be written to the variable you have specified in lpData:
0 = No effects 1 = IOVR_FONT_STRIKEOUT 2 = IOVER_FONT_UNDERLINE
sParam VALUE lpData
Not used, must be 0. Variable of type: Integer
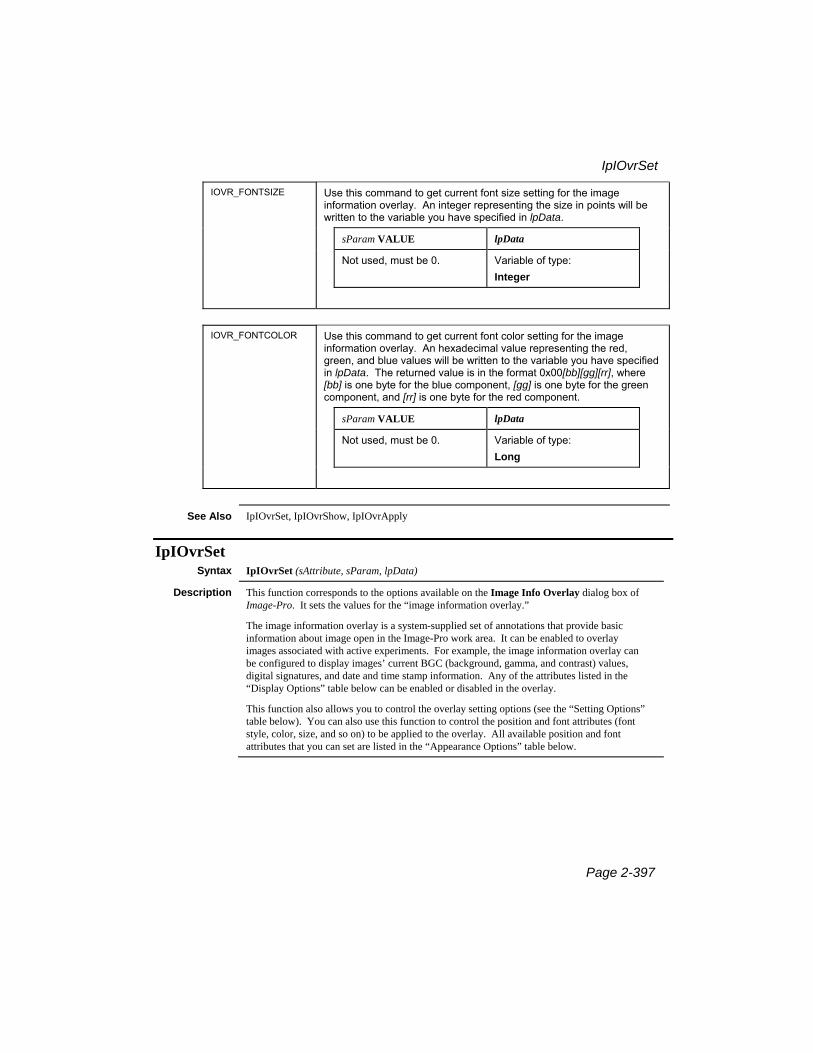
IpIOvrSet
Page 2-397
IOVR_FONTSIZE Use this command to get current font size setting for the image information overlay. An integer representing the size in points will be written to the variable you have specified in lpData.
sParam VALUE lpData
Not used, must be 0. Variable of type: Integer
IOVR_FONTCOLOR Use this command to get current font color setting for the image
information overlay. An hexadecimal value representing the red, green, and blue values will be written to the variable you have specified in lpData. The returned value is in the format 0x00[bb][gg][rr], where [bb] is one byte for the blue component, [gg] is one byte for the green component, and [rr] is one byte for the red component.
sParam VALUE lpData
Not used, must be 0. Variable of type: Long
See Also IpIOvrSet, IpIOvrShow, IpIOvrApply
IpIOvrSet Syntax IpIOvrSet (sAttribute, sParam, lpData)
Description This function corresponds to the options available on the Image Info Overlay dialog box of Image-Pro. It sets the values for the “image information overlay.”
The image information overlay is a system-supplied set of annotations that provide basic information about image open in the Image-Pro work area. It can be enabled to overlay images associated with active experiments. For example, the image information overlay can be configured to display images’ current BGC (background, gamma, and contrast) values, digital signatures, and date and time stamp information. Any of the attributes listed in the “Display Options” table below can be enabled or disabled in the overlay.
This function also allows you to control the overlay setting options (see the “Setting Options” table below). You can also use this function to control the position and font attributes (font style, color, size, and so on) to be applied to the overlay. All available position and font attributes that you can set are listed in the “Appearance Options” table below.

IpIOvrSet
Page 2-398
Parameters sAttribute Integer An enumerated integer specifying the attribute you want to set. Must be one of the following:
IOVR_CURRENTBCG IOVR_APPLIEDBCG IOVR_EXPOSURE IOVR_ACCUMULATED IOVR_DATE IOVR_TIME IOVR_FILENAME IOVR_IMAGESIGN IOVR_SETINFO IOVR_POSITION_XYZ IOVR_CHANNEL IOVR_OVRLIMAGE IOVR_OVRLPRINT IOVR_LOCATION IOVR_FONTFACE IOVR_FONTSIZE IOVR_FONTCOLOR IOVR_FONTSTYLE IOVR_FONTEFFECTS
See the definitions for these options under IpIovrGet.
sParam Integer Depends on the value of sAttribute. See tables under Comments.
lpData See table below.
Depends on the value of sAttribute. See tables under Comments.
Comments The options for sAttribute are listed and described in the tables below.
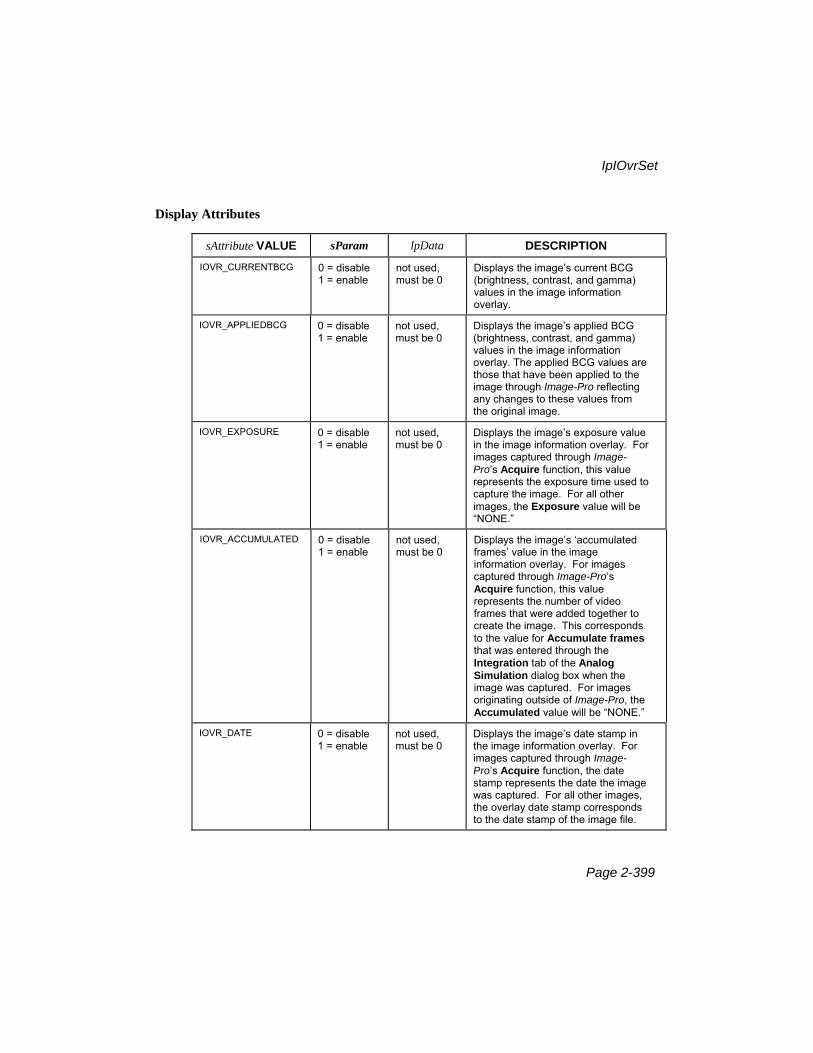
IpIOvrSet
Page 2-399
Display Attributes
sAttribute VALUE sParam lpData DESCRIPTION IOVR_CURRENTBCG 0 = disable
1 = enable not used, must be 0
Displays the image’s current BCG (brightness, contrast, and gamma) values in the image information overlay.
IOVR_APPLIEDBCG 0 = disable 1 = enable
not used, must be 0
Displays the image’s applied BCG (brightness, contrast, and gamma) values in the image information overlay. The applied BCG values are those that have been applied to the image through Image-Pro reflecting any changes to these values from the original image.
IOVR_EXPOSURE 0 = disable 1 = enable
not used, must be 0
Displays the image’s exposure value in the image information overlay. For images captured through Image-Pro’s Acquire function, this value represents the exposure time used to capture the image. For all other images, the Exposure value will be “NONE.”
IOVR_ACCUMULATED 0 = disable 1 = enable
not used, must be 0
Displays the image’s ‘accumulated frames’ value in the image information overlay. For images captured through Image-Pro’s Acquire function, this value represents the number of video frames that were added together to create the image. This corresponds to the value for Accumulate frames that was entered through the Integration tab of the Analog Simulation dialog box when the image was captured. For images originating outside of Image-Pro, the Accumulated value will be “NONE.”
IOVR_DATE 0 = disable 1 = enable
not used, must be 0
Displays the image’s date stamp in the image information overlay. For images captured through Image-Pro’s Acquire function, the date stamp represents the date the image was captured. For all other images, the overlay date stamp corresponds to the date stamp of the image file.
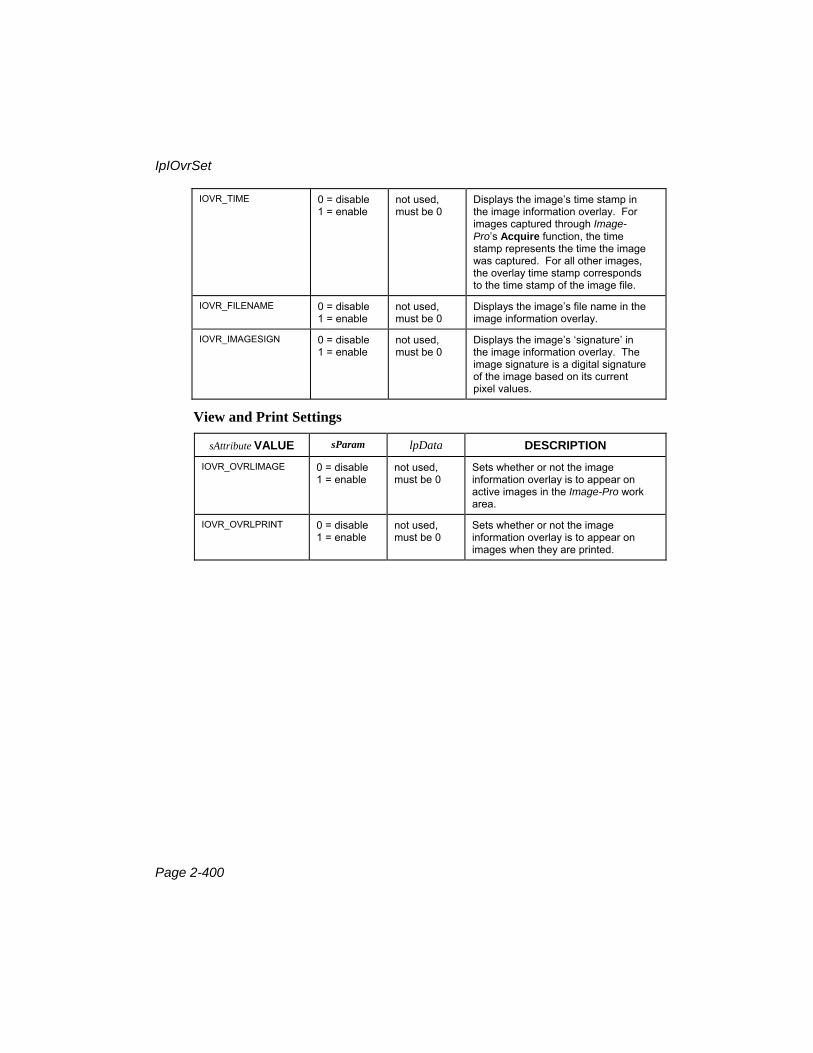
IpIOvrSet
Page 2-400
IOVR_TIME 0 = disable 1 = enable
not used, must be 0
Displays the image’s time stamp in the image information overlay. For images captured through Image-Pro’s Acquire function, the time stamp represents the time the image was captured. For all other images, the overlay time stamp corresponds to the time stamp of the image file.
IOVR_FILENAME 0 = disable 1 = enable
not used, must be 0
Displays the image’s file name in the image information overlay.
IOVR_IMAGESIGN 0 = disable 1 = enable
not used, must be 0
Displays the image’s ‘signature’ in the image information overlay. The image signature is a digital signature of the image based on its current pixel values.
View and Print Settings
sAttribute VALUE sParam lpData DESCRIPTION IOVR_OVRLIMAGE 0 = disable
1 = enable not used, must be 0
Sets whether or not the image information overlay is to appear on active images in the Image-Pro work area.
IOVR_OVRLPRINT 0 = disable 1 = enable
not used, must be 0
Sets whether or not the image information overlay is to appear on images when they are printed.

IpIOvrSet
Page 2-401
Appearance Attributes
sAttribute VALUE sParam lpData DESCRIPTION IOVR_LOCATION Must be one of the
following defined constants:
IOVR_LOC_UPPERLEFT IOVR_LOC_LOWERLEFT IOVR_LOC_UPPERRIGHTIOVR_LOC_LOWERRIGHT
not used, must be 0 Sets the default placement setting controlling where the image information overlay will be initially placed in new images. This is equivalent to the Image Overlay Initial Position setting on the “Veiw Settings” tab of the Preference Views dialog. Note: The Preference Views Dialog must be CLOSED for this macro to function properly.
IOVR_FONT_FACE not used, must be 0 Must be a string specifying the font face name.
The data type is String.
Sets the font face (Times New Roman, Courier, Helvetica, etc.) to be used in the overlay.
IOVR_FONT_STYLE Must be one of the following constants: IOVR_FONT_NORMAL IOVR_FONT_BOLD IOVR_FONT_ITALIC
not used, must be 0 Sets the font style you want to use in the overlay. You can ask Image-Pro to set the style as both bold and italics.
IOVR_FONT_SIZE An integer specifying the font size, in points.
not used, must be 0 Sets the font size to be used in the overlay. For example, a value of “12” indicates you want text to appear as 12 points.

IpIOvrSetStr
Page 2-402
IOVR_FONT_EFFECTS Must be one of the following constants: IOVR_FONT_NOEFFECTSIOVR_FONT_STRIKEOUTIOVR_FONT_UNDERLINE
not used, must be 0 Sets any font effects you want to use in the overlay.
IOVR_FONT_COLOR not used, must be 0 Must specify an RGB color. Specification must be a hexadecimal value of the format: 0x00[bb][gg][rr]
where
[bb] = one byte for the blue component
[gg] = one byte for the green component
[rr] = one byte for the red component.
The data type is Long.
Sets the color of text you want to use in the overlay. For example, a value of “0x00FFFFFF” indicates that you want the text to appear white.
See Also IpIOvrGet, IpIOvrShow, IpIOvrApply
IpIOvrSetStr Syntax IpIOvrSetStr (sAttribute, sParam, FontName)
Description This function corresponds to font face option available on the Image Info Overlay dialog box of Image-Pro. It sets the display font for the “image information overlay.”
The image information overlay is a system-supplied set of annotations that provide basic information about image open in the Image-Pro work area. It can be enabled to overlay images associated with active experiments. For example, the image information overlay can be configured to display images’ current BGC (background, gamma, and contrast) values, digital signatures, and date and time stamp information. Any of the attributes listed in the “Display Options” table below can be enabled or disabled in the overlay.
This function also allows you to control the overlay setting options (see the “Setting Options” table below). You can also use this function to control the position and font attributes (font style, color, size, and so on) to be applied to the overlay. All available position and font attributes that you can set are listed in the “Appearance Options” table below.
Parameters sAttribute Integer Must be one of the following: IOVR_FONT_FACE = 0

IpIOvrShow
Page 2-403
FontName String fontName =Verdana
Comments For more information about the image information overlay, refer to “IpIOvrSet.”
See Also IpIOvrSet, IpIOvrGet, IpIOvrApply
IpIOvrShow Syntax IpIOvrShow(bShow)
Description This function opens and closes the Image Info Overlay dialog box.
Parameters bShow Integer Must be one of the following: 0 = Close dialog 1 = Open dialog
Comments For more information about the image information overlay, refer to “IpIOvrSet.”
See Also IpIOvrSet, IpIOvrGet, IpIOvrApply

IpIniFileStr
Page 2-404
IpIniFileStr Syntax IpIniFileStr(ValType, ValName, lpValue)
Description This function is used to read and write user-defined string settings from/to the IPMACRO.INI file. There is no Image-Pro command equivalent to this function; it is one that must be manually written with the macro editor.
Parameters ValType Integer An enumerated integer that specifies whether the string setting is to be read or written to the IPMACRO.INI file, and identifies the setting's data type. Must be one of the following.
GETSTRING SETSTRING
See definitions under Comments, below.
ValName String A string specifying the name of the setting to be read or written.
lpValue See below The name of the string variable that will receive the requested data when ValType is set to read (get). Or, the name of the string variable that holds the setting when ValType is set to write (set)..
Return Value 0 if successful. Negative if the specified variable (to be read) cannot be found in the file.
Example The following example reads a string setting from the IPMACRO.INI file, and writes it to a variable named var1
Dim var1 as String * 255 . . . ret = IpIniFileStr(GETSTRING, "MySetting", var1)
The following example writes the value of the variable, var1, as a setting in the IPMACRO.INI file.
Dim var1 as String ret = IpIniFileStr(SETSTRING, "MySetting", var1) . . .
Comments Variables are written in an ASCII file called IPMACRO.INI. Each variable generates an assignment line consisting of the setting's name, an “=” symbol and the setting's value. The example above would generate the following lines in the IPMACRO.INI file: MySetting = c:\IPWIN\Images\sports.tif ValType options are as follows:

IpIsGet
Page 2-405
ValType DESCRIPTION
GETSTRING This command reads a string value from ValName in the IPMACRO.INI file. This string is written to a fixed-length string variable you have specified in lpVal. Be sure this variable is a of BASIC type, String (C, LPSTR). Important - be sure the length of your fixed-length string is large enough to accommodate the returned string.
SETSTRING
This command writes a string to ValName in the IPMACRO.INI file. The string is obtained from the contents of the variable specified in lpVal. Be sure this variable is of BASIC type, String (C, LPSTR).
See Also IpIniFile
IpIsGet Syntax IpIsGet (File, Attribute, Signature)
Description Indicates the image signature attribute that should be returned.
Parameters Attribute Integer Identifies the type of data to be returned. Must be one of the following: IS_SIGNATURE The current image signature is returned as a 128-bit number. IS_COMPARE The 128-bit number provided is compared to the current signarture.
Data Any Provides the user variable to receive the attribute.
Return Value
When using IS_COMPARE, returns 1 for identical signatures, otherwise returns 0.Will return an error code if failed. This command does not record.
See Also IpIsShow, IpIsGetStr

IpIsGetStr
Page 2-406
IpIsGetStr Syntax IpIsGetStr(Attribute, Signature)
Description Indicates the digital signature attribute that should be returned.
Parameters Attribute Integer Determines the type of data to be returned. Must be one of the following: IS_SIGNATURE_STR The current image signature is returned as a string IS_COMPARE_STR The provided string is compared to the current signature.
Signature String * 40 Provides the user variable to receive the attribute.
Return Value When using IS_COMPARE_STR, returns 1 for identical signatures, otherwise returns 0. Will return an error code if failed. This command does not record.
See Also IpIsShow, IpIsGet
IpIsShow Syntax IpIsShow (Show)
Description Shows or hides the image signature dialog.
Parameters Show Integer An integer value specifying whether to display or hide the image signature dialog. 0 = Hide Image Signature dialog 1 = Show Image Signature dialog.
Return Value Returns 0 if successful, a negative error code if failed.
See Also IpIsGet, IpIsGetStr

IpLensAdd
Page 2-407
IpLensAdd Syntax IpLensAdd (Lens, Magnification, NA, RI)
Description This function displays the Edit Lens dialog and lets the user add a new lens.
Parameters Lens String A string specifying the name of the new lens
Magnification Single The magnification of the new lens, from 0.001 to 3000.0
NA Single The numeric aperature of the new lens, from 1.0 to 2.0
RI Single The reflective index of the new lens, from 1.0 to 3.0
Comments IpLensAdd will create a lens definition file in the current lens location (see the LENS_PATH command for IpLensGetStr and IpLensSetStr). The new file will overwrite any existing dye files with the same name. The name may include the .IPD extension, or if it does not the extension will be added automatically. The dye’s hue is determined automatically by conversion from the emission wavelength.
IpLensDelete Syntax IpLensDelete (Lens)
Description This function removes the specified lens.
Parameters Lens String A string specifying the name of an existing lens
IpLensEdit Syntax IpLensEdit (Lens, New Lens)
Description This function displays the Edit Lens dialog, and lets the user edit a dye.
Parameters Lens String A string specifying the name of an existing Image-Pro Lens file
New Lens String A fixed-length string to which the lens file name is returned.
Return Value The name of the new lens file, or IPCEERR_EMPTY if you cancel editing the lens.
Comments The NewLens parameter should be a fixed-length string, typically fixed at 255 characters, which will return the final name of the lens after editing (the user can change the lens name while editing). IpLensEdit returns IPCERR_EMPTY if the user cancels editing the lens. Note: IpLensEdit inherently requires user interaction prior to continuation of the macro script.
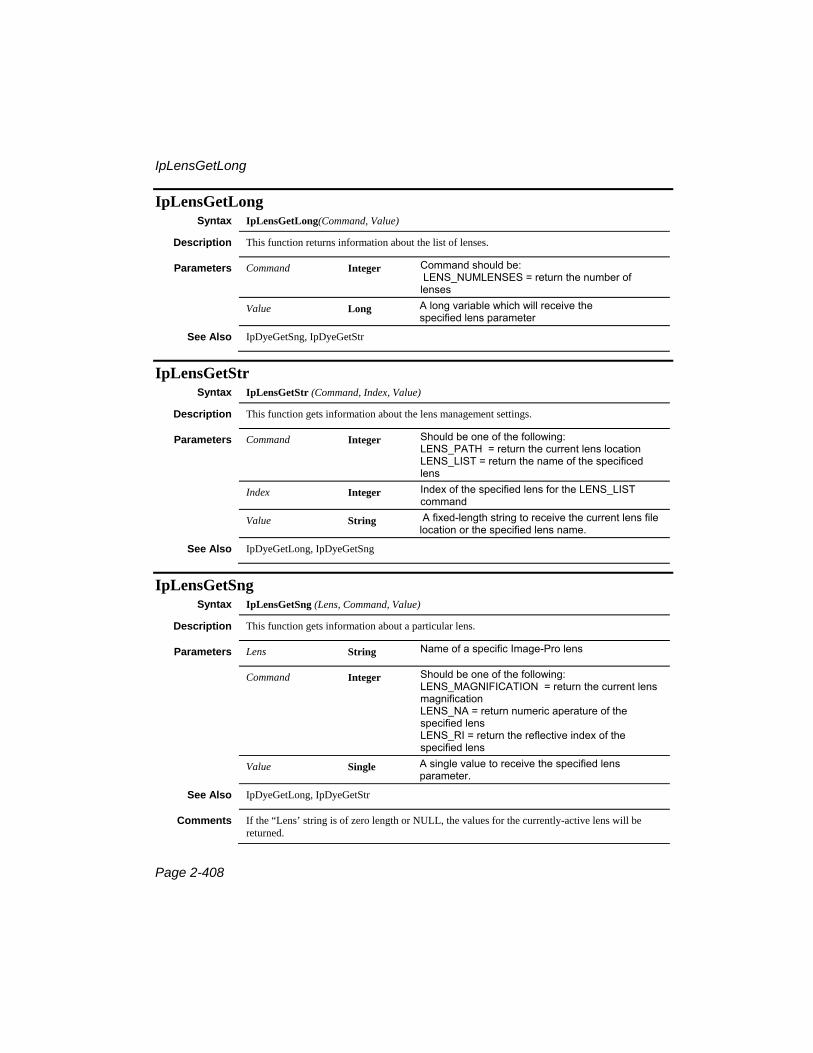
IpLensGetLong
Page 2-408
IpLensGetLong Syntax IpLensGetLong(Command, Value)
Description This function returns information about the list of lenses.
Parameters Command Integer Command should be: LENS_NUMLENSES = return the number of lenses
Value Long A long variable which will receive the specified lens parameter
See Also IpDyeGetSng, IpDyeGetStr
IpLensGetStr Syntax IpLensGetStr (Command, Index, Value)
Description This function gets information about the lens management settings.
Parameters Command Integer Should be one of the following: LENS_PATH = return the current lens location LENS_LIST = return the name of the specificed lens
Index Integer Index of the specified lens for the LENS_LIST command
Value String A fixed-length string to receive the current lens file location or the specified lens name.
See Also IpDyeGetLong, IpDyeGetSng
IpLensGetSng Syntax IpLensGetSng (Lens, Command, Value)
Description This function gets information about a particular lens.
Parameters Lens String Name of a specific Image-Pro lens
Command Integer Should be one of the following: LENS_MAGNIFICATION = return the current lens magnification LENS_NA = return numeric aperature of the specified lens LENS_RI = return the reflective index of the specified lens
Value Single A single value to receive the specified lens parameter.
See Also IpDyeGetLong, IpDyeGetStr
Comments If the “Lens’ string is of zero length or NULL, the values for the currently-active lens will be returned.

IpLensSelect
Page 2-409
IpLensSelect Syntax IpLensSelect(Lens)
Description This function displays the Edit Lens Dialog and let the user select a lens.
Parameters Lens String A fixed-length string to which the name of the selected lens is returned..
Return Value IpLensSelect returns IPCERR_EMPTY if the user cancels selecting a lens. Note: IpLensSelect inherently requires user interaction prior to continuation of the macro script. The name returned is the name of the selected lens – it is not a full path name, nor does it include the .IPL extension.
IpLensSetStr Syntax IpLensSetStr (Command,Value)
Description This function sets the lens management settings.
Parameters Command Integer Should be the following: LENS_PATH = return the current lens location
Value String A string containing the new lens file location.
IpListPts / IpMorePts Syntax IpListPts(Points, ListString)
IpMorePts(ListString) Description These functions are used to fill an array of points from a string that defines a list of pixel
coordinates. IpMorePts is used after IpListPts if more than a single image line is needed. There are no Image-Pro commands equivalent to these function; they are ones that must be manually written with the macro editor.
Parameters Points POINTAPI
The address (name) of the array of point coordinates (BASIC type, POINTAPI) that will be filled from the string specified in ListString.
ListString String A string containing a list of the point coordinates. See Comments, below, for more about the structure of this list.
Return Value IpListPts returns the number of points found in ListString.
IpMorePts returns the total number of points found in all the strings since, and including, the last IpListPts call.
Example In the following example IpListPts and IpMorePts are used to create an array defining the outline of a freeform AOI. Contrast this method with the other way of setting POINTAPI elements using individual assignment statements (also shown below). ' The new way: Dim AoiPts(10) as POINTAPI Dim numPts as integer numPts=IpListPts(AoiPts(0),"101 147 150 121 193 145 193 198 ") numPts=IpMorePts("153 221 153 222 153 221 124 216 ") numPts=IpMorePts("105 205 90 180") ret=IpAoiCreateIrregular(AoiPts(0), numPts)
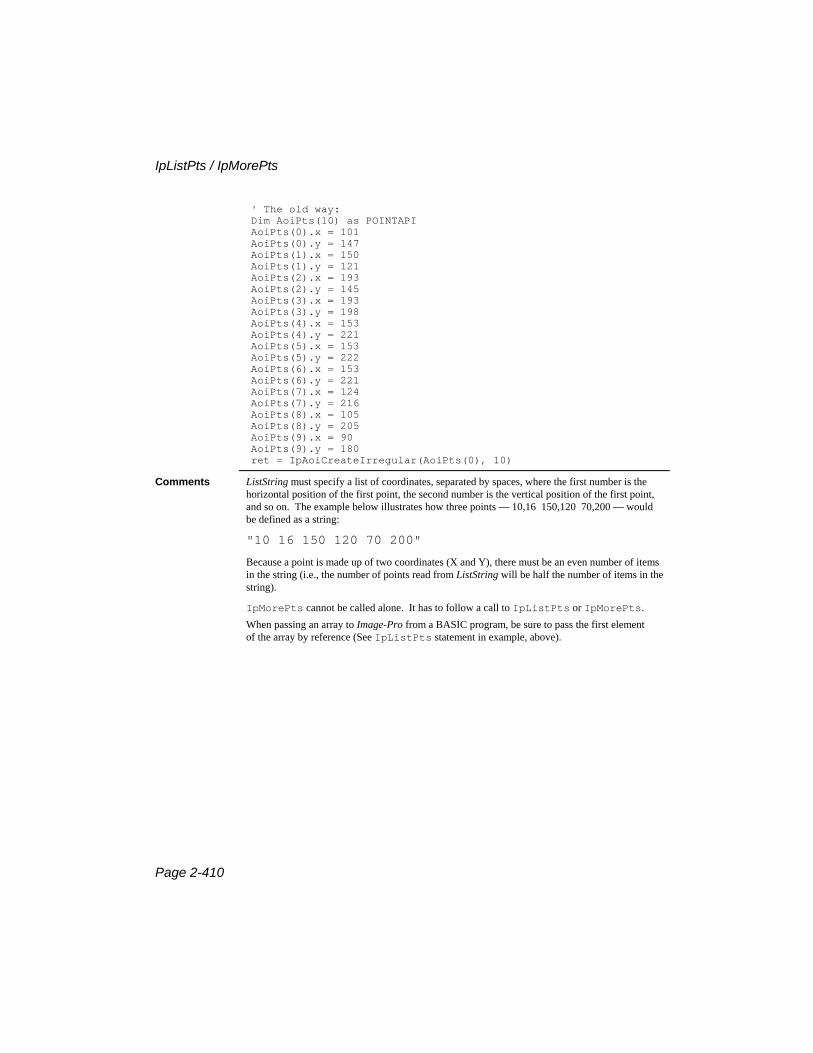
IpListPts / IpMorePts
Page 2-410
' The old way: Dim AoiPts(10) as POINTAPI AoiPts(0).x = 101 AoiPts(0).y = 147 AoiPts(1).x = 150 AoiPts(1).y = 121 AoiPts(2).x = 193 AoiPts(2).y = 145 AoiPts(3).x = 193 AoiPts(3).y = 198 AoiPts(4).x = 153 AoiPts(4).y = 221 AoiPts(5).x = 153 AoiPts(5).y = 222 AoiPts(6).x = 153 AoiPts(6).y = 221 AoiPts(7).x = 124 AoiPts(7).y = 216 AoiPts(8).x = 105 AoiPts(8).y = 205 AoiPts(9).x = 90 AoiPts(9).y = 180 ret = IpAoiCreateIrregular(AoiPts(0), 10)
Comments ListString must specify a list of coordinates, separated by spaces, where the first number is the horizontal position of the first point, the second number is the vertical position of the first point, and so on. The example below illustrates how three points — 10,16 150,120 70,200 — would be defined as a string:
"10 16 150 120 70 200" Because a point is made up of two coordinates (X and Y), there must be an even number of items in the string (i.e., the number of points read from ListString will be half the number of items in the string).
IpMorePts cannot be called alone. It has to follow a call to IpListPts or IpMorePts. When passing an array to Image-Pro from a BASIC program, be sure to pass the first element of the array by reference (See IpListPts statement in example, above).

IpLiveEDFSetInt
Page 2-411
IpLiveEDFSetInt Syntax IpLiveEDFSetInt (sAttribute, sParam, l Param
Description This function sets the various live EDF parameters and executes the functions.
Parameters sAttribute Integer
The attribute to set and execute. See table below.
sParam Integer See table below.
lParam Long See table below.
Comments Attrib options are as follows:
Attribute Description sParam lParam
LIVEEDF_ LOWER_ IMAGE
Sets base image to EDF
frame index (when live EDF is active, 0 frame is used by default)
image handle (when life EDF is active, the current frame is used as the base image)
LIVEEDF_ STEREO_ MODE
Activates stereo mode (auto-alignment)
Not used 1 = on 0 = off
LIVEDF_ DO_EDF
Perform EDF of the current image with the base image (not adding it to base, see LIVEEDF_ADD_TO_EDF)
frame index
image handle
LIVEEDF_ FILTER_SIZE
Sets the size of the variance filter
Not used Variance filter size (default is 6)
LIVEEDF_ SEARCH_SIZE_H
auto-alignment horizontal pattern size
Not used Horizontal pattern size (default is 256)
LIVEEDF_ SEARCH_SIZE_V
auto-alignment vertical pattern size
Not used Vertical pattern size (default is 64)

IpLiveEDFSetInt
Page 2-412
Attribute Description sParam lParam
LIVEEDF_ ACTIVATE
activate live EDF (image is updated on ImageChange event, fired by workspace preview)
Not used 1 = on 0 = off
LIVEEDF_ MULTIFRAME
in live mode,use accumulated EDF
Not used 1 = on 0 = off
LIVEEDF_ DUAL_VIEW
sets dual view mode
Not used must be one of the following: DUALVIEW_NONE: normal view of EDF DUALVIEW_ HORIZONTAL: horizontal views side by side DUALVIEW_LIVE: normal veiw of live image DUALVIEW_PIP_EDF: pcture in picture in the EDF corner DUALVIEW_PIP_LIVE: picture in picture live in the corner
LIVEEDF_COMP_MODE
Composition mode
Not used Live composition mode, must be one of the following: LIVECOMP_LOCAL_CONTRAST:EDF mode LIVECOMP_MAX: maximim signal LIVECOMP_MIN: miniumum signal LIVECOMP_DIFF: difference between current and base image LIVECOMP_ABS_DIFFERENCE: absolute difference
LIVEEDF_ADD_TO_EDF
perform EDF adding current image to base image
frame index (when live EDF is active, 0 frame is used by default)
image handle (when EDF is acrive the current live image is used)
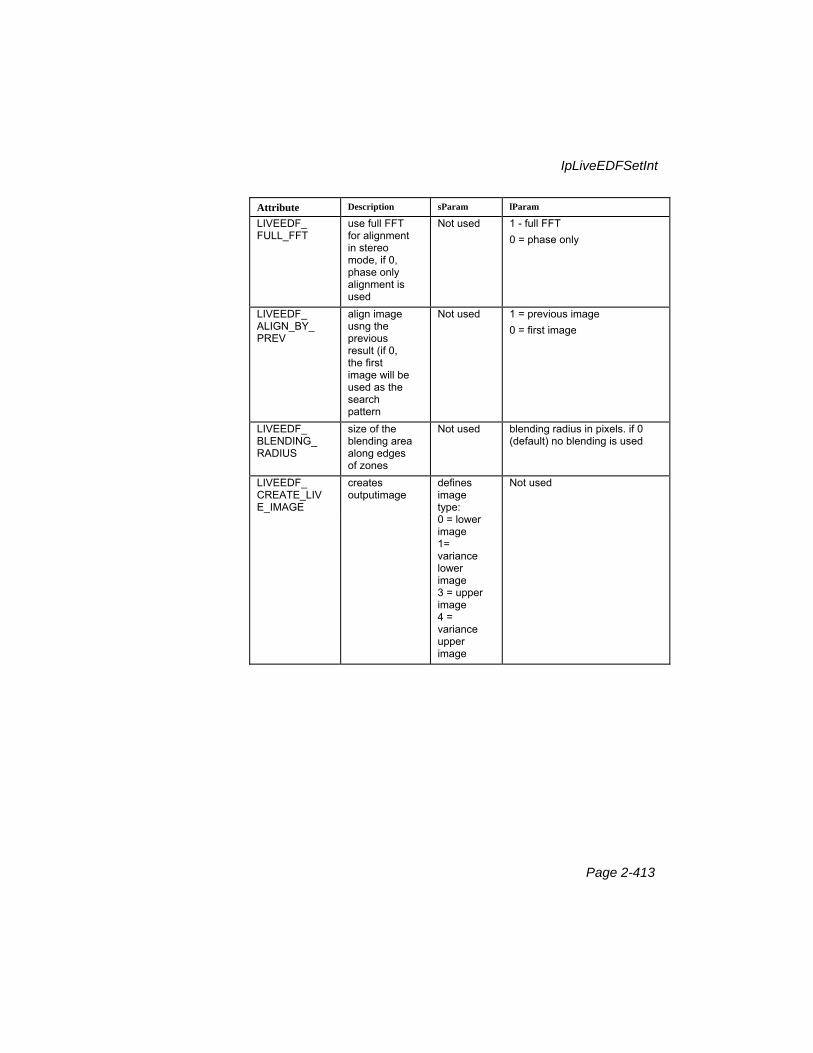
IpLiveEDFSetInt
Page 2-413
Attribute Description sParam lParam
LIVEEDF_ FULL_FFT
use full FFT for alignment in stereo mode, if 0, phase only alignment is used
Not used 1 - full FFT 0 = phase only
LIVEEDF_ ALIGN_BY_ PREV
align image usng the previous result (if 0, the first image will be used as the search pattern
Not used 1 = previous image 0 = first image
LIVEEDF_ BLENDING_ RADIUS
size of the blending area along edges of zones
Not used blending radius in pixels. if 0 (default) no blending is used
LIVEEDF_ CREATE_LIVE_IMAGE
creates outputimage
defines image type: 0 = lower image 1= variance lower image 3 = upper image 4 = variance upper image
Not used

LiveEDFGet
Page 2-414
LiveEDFGet Syntax IpLiveEDFGet (sAttribute, sParam, l Param)
Description This function gets the live EDF parameters .
Parameters sAttribute Integer
LIVEEDF_FPS: get frames per second of live EDF
sParam Integer not used
lParam Long single value receving the variable
IpLiveTileSetInt Syntax IpLiveTileSetInt (sAttribute, sParam, l Param
Description This function sets the various live tiling parameters and executes the functions.
Parameters sAttribute Integer
The attribute to set and execute. See table below.
sParam Integer See table below.
lParam Long See table below.
Comments Attrib options are as follows:
Attribute DESCRIPTION sParam lParam
LIVETILING_ ACTIVATE
activates live tiling
Not used 1 = on 0 = off
LIVETILING_ SEARCH_ IMAGE
sets search image
frame index (when live tiling is active, 0 frame is used by default)
image handle (when live tiling is active, the current image is used as the search image)
LIVETILING_ ADD_TILE
adds a tile frame index (when live tiling is active, 0 frame is used by default)
image handle (when live tiling is active, the current image is used)
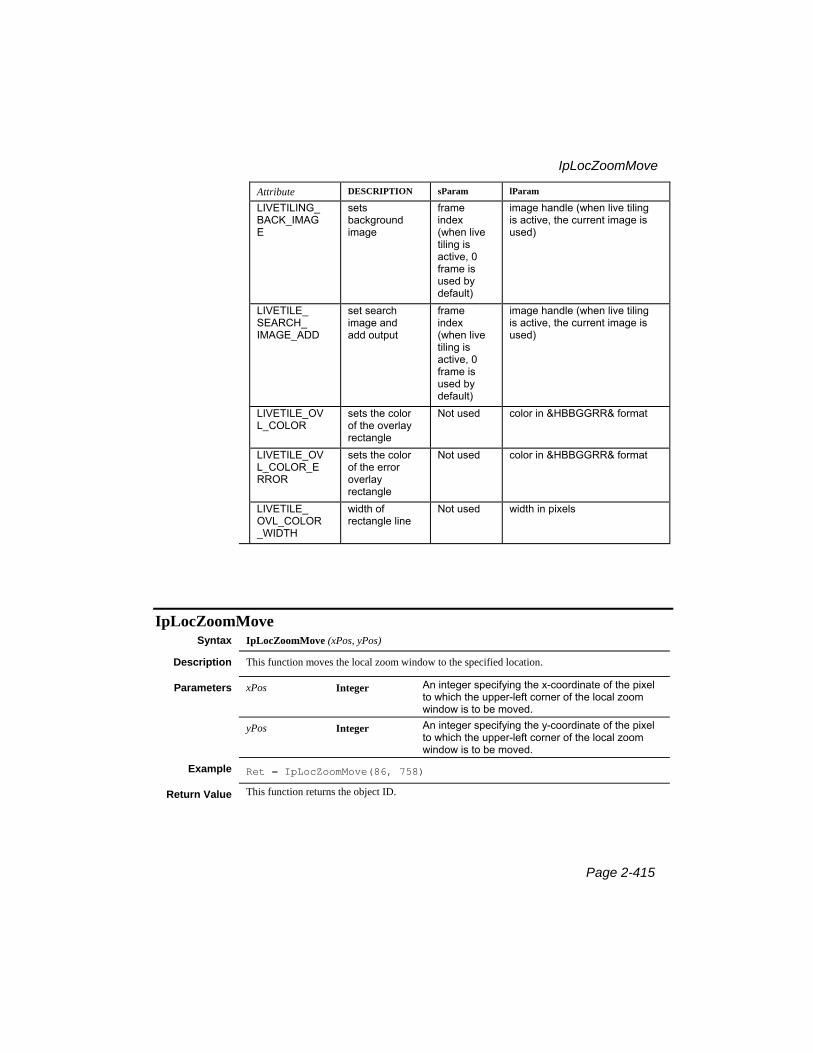
IpLocZoomMove
Page 2-415
Attribute DESCRIPTION sParam lParam
LIVETILING_ BACK_IMAGE
sets background image
frame index (when live tiling is active, 0 frame is used by default)
image handle (when live tiling is active, the current image is used)
LIVETILE_ SEARCH_ IMAGE_ADD
set search image and add output
frame index (when live tiling is active, 0 frame is used by default)
image handle (when live tiling is active, the current image is used)
LIVETILE_OVL_COLOR
sets the color of the overlay rectangle
Not used color in &HBBGGRR& format
LIVETILE_OVL_COLOR_ERROR
sets the color of the error overlay rectangle
Not used color in &HBBGGRR& format
LIVETILE_ OVL_COLOR_WIDTH
width of rectangle line
Not used width in pixels
IpLocZoomMove Syntax IpLocZoomMove (xPos, yPos)
Description This function moves the local zoom window to the specified location.
Parameters xPos Integer An integer specifying the x-coordinate of the pixel to which the upper-left corner of the local zoom window is to be moved.
yPos Integer An integer specifying the y-coordinate of the pixel
to which the upper-left corner of the local zoom window is to be moved.
Example Ret = IpLocZoomMove(86, 758)
Return Value This function returns the object ID.

IpLocZoomSet
Page 2-416
IpLocZoomSet Syntax IpLocZoomSet (sCommand, sValue)
Description This function sets the parameters of the local zoom window.
Parameters sCommand Short Should be one of the following: LP_LZ_ZOOM - sets the zoom factor for the local zoom window. IP_LZ_CROSS – shows or hides the crosshairs of the local zoom window.
sValue Integer If IP_LZ_ZOOM, indicates the zoom factor from 1 to 100. If P_LZ_CROSS, 1 = show crosshairs, 0= hide crosshairs
Example Ret = IpLocZoomSet(IP_LZ_CROSS,1) Ret = IpLocZoomSet(IP_LZ_ZOOM, 800)
IpLocZoomSetPos Syntax IpLocZoomSetPos(xPos, yPos)
Description This function sets the center of the viewing area in the active image. It has the same effect as moving the mouse to the specified position.
Parameters xPos Integer An integer specifying the x-coordinate of the pixel in the center of the active image
yPos Integer An integer specifying the y-coordinate of the pixel
in the center of the active image
Example Ret = IpLocZoomSetPos(i,i)
IpLocZoomShow Syntax IpLocZoomShow(bShow)
Description This function shows or hides the local zoom window.
Parameters bShow Short A value of 0 or 1, indicating whether to show or hide the local zoom window 0 - hides the window 1 - shows the window
Example Ret = IpLocZoomShow(1)
IpLocZoomSize Syntax IpLocZoomSize (xSize, ySize)
Description This function resizes the local zoom window.
xSize Integer The size, in pixels of the x dimension of the local zoom window.
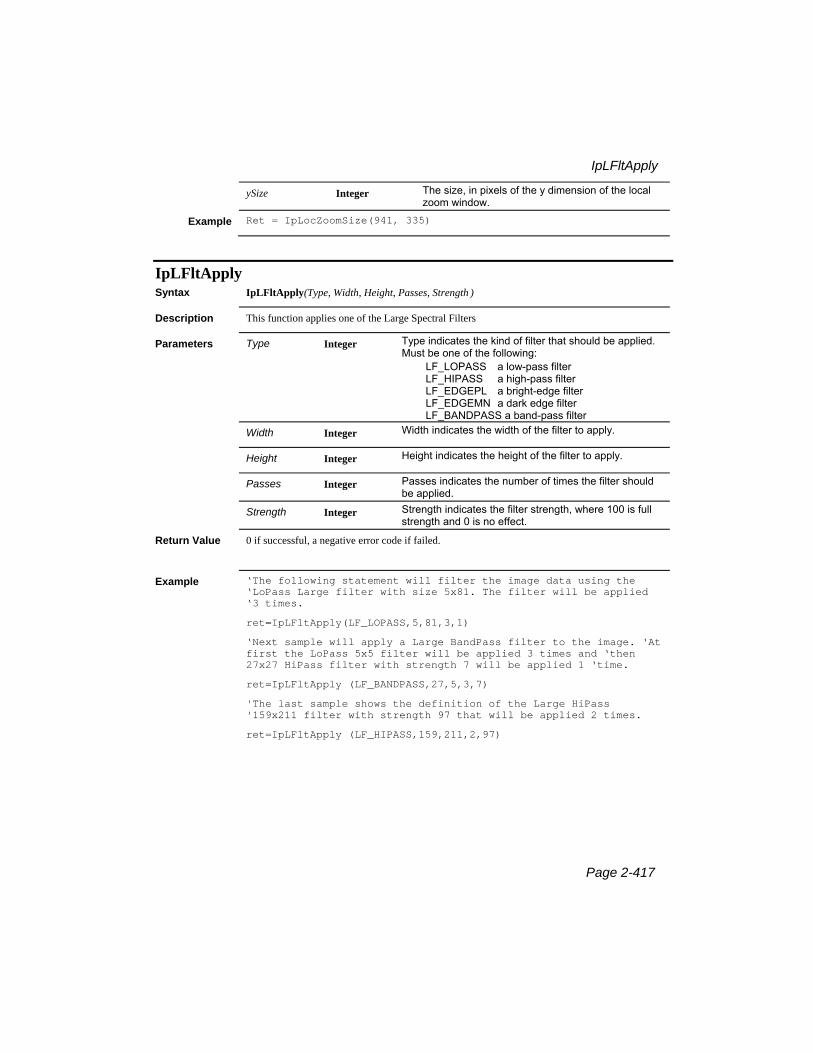
IpLFltApply
Page 2-417
ySize Integer The size, in pixels of the y dimension of the local zoom window.
Example Ret = IpLocZoomSize(941, 335)
IpLFltApply Syntax IpLFltApply(Type, Width, Height, Passes, Strength )
Description This function applies one of the Large Spectral Filters
Parameters Type Integer Type indicates the kind of filter that should be applied. Must be one of the following:
LF_LOPASS a low-pass filter LF_HIPASS a high-pass filter LF_EDGEPL a bright-edge filter LF_EDGEMN a dark edge filter LF_BANDPASS a band-pass filter
Width Integer Width indicates the width of the filter to apply.
Height Integer Height indicates the height of the filter to apply.
Passes Integer Passes indicates the number of times the filter should be applied.
Strength Integer Strength indicates the filter strength, where 100 is full strength and 0 is no effect.
Return Value 0 if successful, a negative error code if failed.
Example ‘The following statement will filter the image data using the
‘LoPass Large filter with size 5x81. The filter will be applied ‘3 times.
ret=IpLFltApply(LF_LOPASS,5,81,3,1)
‘Next sample will apply a Large BandPass filter to the image. ‘At first the LoPass 5x5 filter will be applied 3 times and ‘then 27x27 HiPass filter with strength 7 will be applied 1 ‘time.
ret=IpLFltApply (LF_BANDPASS,27,5,3,7)
'The last sample shows the definition of the Large HiPass '159x211 filter with strength 97 that will be applied 2 times.
ret=IpLFltApply (LF_HIPASS,159,211,2,97)

IpLFltShow
Page 2-418
Comments The following table describes the values allowed in the Ftype parameter: These values are equivalent to the options presented within the Large Kernel window's Filter Type group box.
VALUE DESCRIPTION
LF_LOPASS applies LoPass filter LF_HIPASS applies HiPass filter LF_BANDPASS applies BandPass filter LF_EDGEPL applies Edge + filter LF_EDGEMN applies Edge – filter
See Also IpLFltShow
IpLFltShow Syntax IpLFltShow(Show )
Description This function shows or hides the Large Spectral Filters dialog box.
Parameters Show Integer An integer value of 0 or 1 indicating whether to show or hide the Large Spectral Filters dialog 0 - Hide the Large Spectral Filters dialog. 1 - Show the Large Spectral Filters dialog
Return Value 0 if successful, a negative error code if failed.
Example Ret = IpLFltShow(1)
See Also IpLFltApply
IpLutApply Syntax IpLutApply( )
Description This function makes permanent the current Brightness, Contrast and Gamma adjustments. Equivalent to selecting Apply LUTs on the Image menu or clicking the Apply button on the Ribbon.
Comments This function clears the Lookup Table (LUT). If you want to save the LUT, you must do so before you perform this function.
See Also IpLutReset, IpLutSave

IpLutBinarize
Page 2-419
IpLutBinarize Syntax IpLutBinarize(MinRange, MaxRange, WhiteOnBlack)
Description This function reduces your image or AOI to two colors: black and white. Equivalent to selecting the Threshold command.
Parameters MinRange Integer An integer from 0 - 255 specifying the lowest value in the range to be highlighted.
MaxRange Integer An integer from 0 - 255 specifying the highest value in the range to be highlighted.
WhiteOnBlack Integer An integer value of 0 or 1 specifying whether pixels within the range are to be set to White or Black. Where:
0 - Sets the range to Black. Equivalent to the “Black on White” option in the “Binarize” dialog box. 1 - Sets the range to White. Equivalent to the “White on Black” option in the “Binarize” dialog box.
Example ret = IpLutBinarize(100, 255, 1) This statement will set pixels with values between 100 and 255 (inclusive) to white; all other pixels will be set to black.
Comments If your image is True Color or Palette, the luminance channel will be used for the conversion.
In 12-bit and single-point images, the normalized equivalents to the MaxRange and MinRange values will be used.
This function maintains the pixel depth (BPP) of the original image.

IpLutData
Page 2-420
IpLutData Syntax IpLutData (sAttrType,pData)
Description This function sets/gets the LUT (lookup table) of the active image.
Parameters sAttrType Integer An attribute, which may be one of the following: LUT_GET_LENGTH = returns length of the current LUT. pData is ignored. LUT_GET_DATA = returns LUT of the active image. pData is an array of Bytes that receives the values. The size of the array can be retrieved using LUT_GET_LENGTH. LUT_GET_BRIGHTNESS = Returns the current brightness setting using a range of 0 to 100. pData is ignored. LUT_GET_CONTRAST = Returns the current contrast setting using a range of 0 to 100. pData is ignored. LUT_GET_GAMMA = Returns the current gamma setting using a range of 0 to 970, where a gamma of 1.0 is indicated by 100. pData is ignored. These functions operate on the current channel as set through IpLutSetAttr.
LUT_SET_DATA = sets LUT to the active image. pData is an array of Bytes with values
pData Any
Return Value Returns the desired value of the function if successful, an error code if failed, i.e. Brightness = IpLutData(LUT_GET_BRIGHTNESS, IpNull)

IpLutData
Page 2-421
Example Sub LutTest() Dim LutLength As Long,i% LutLength = IpLutData(LUT_GET_LENGTH,IpNull) ReDim LutData(LutLength) As Byte ret = IpLutData(LUT_GET_DATA,LutData(0)) Debug.Print "LUT of the active image" For i=0 To LutLength-1 Debug.Print i & " : " & LutData(i) Next i IpOutputShow(1) MsgBox "The current LUT is printed in the Output window. Now we will invert image LUT." Dim dInfo As IPDOCINFO ret = IpDocGet(GETDOCINFO, DOCSEL_ACTIVE, dInfo) ReDim NewLutData(3*256) As Byte If ((dInfo.iClass=IMC_RGB) Or (dInfo.iClass=IMC_RGB36) Or (dInfo.iClass=IMC_RGB48)) Then 'color image For i=0 To 255 NewLutData(i)=255-i 'red NewLutData(256+i)=Abs(240-i) 'green NewLutData(512+i)=Abs(220-i) 'blue Next i Else 'gray image For i=0 To 255 NewLutData(i)=255-i Next i End If ret = IpLutData(LUT_SET_DATA,NewLutData(0)) End Sub
Comments The returned Lookup Table for all Gray Scale image classes is a single 256-entry lookup table.The returned Response Lookup Table for true-color image classes is arranged in RGB planar format: 256 lookup table values for red, immediately followed by... 256 lookup table values for green, immediately followed by... 256 lookup table values for blue. There is no Response Lookup Table for IMC_BILEVEL class images. This command resets the BCGM structure of a virtual image, sets the free-form advanced control to the specified response and applies it to the Response Table. For IMC_GRAY, IMC_GRAY12, IMC_GRAY16, and IMC_SINGLE class images, pParam must point to 256 Gray values. For IMC_RGB, IMC_PALETTE, IMC_RGB36, and IMC_RGB48, pParam must point to a [3] [256] array, where: 0 contains the Red channel values. 1 contains the Green channel values. 2 contains the Blue channel values

IpLutLoad
Page 2-422
IpLutLoad Syntax IpLutLoad(FileName)
Description This function loads intensity and color adjustments that have been saved. Equivalent to selecting Load LUT from the LUT command on the File menu.
Parameters FileName String A string specifying the name of the file from which the LUT values will be read.
Example ret = IpLutLoad("C:\IPWIN\HPLJ.LUT")
This statement will recall the lookup table settings from the file HPLJ.LUT in the \IPWIN directory on the C: drive.
See Also IpLutSave
IpLutReset Syntax IpLutReset(Channel, Type)
Description This function resets any BCG and/or advanced control modifications you have made but not yet applied to your image. Equivalent to Reset LUTs on the Image menu (however, it offers more functionality than this command).
Parameters Channel Integer An integer from 0 to 4 specifying the channel to be reset. Where: 0 - Luminance 1 - Red 2 - Green 3 - Blue 4 - All 4 Channels
Type Integer An enumerated integer specifying the property to be reset in the specified channel. Must be one of the following: LUT_HISHAD LUT_BRIGHTNESS LUT_CONTRAST LUT_GAMMA LUT_4TONES LUT_8TONES LUT_COMPOSIT LUT_ALL See definitions under Comments, below.
Example ret = IpLutReset(4, LUT_ALL)
This statement will reset the LUT for all properties of all channels.
ret = IpLutReset(0, LUT_8TONES)
This statement will reset the LUT for the luminance channel of the 1/8-tone curve.
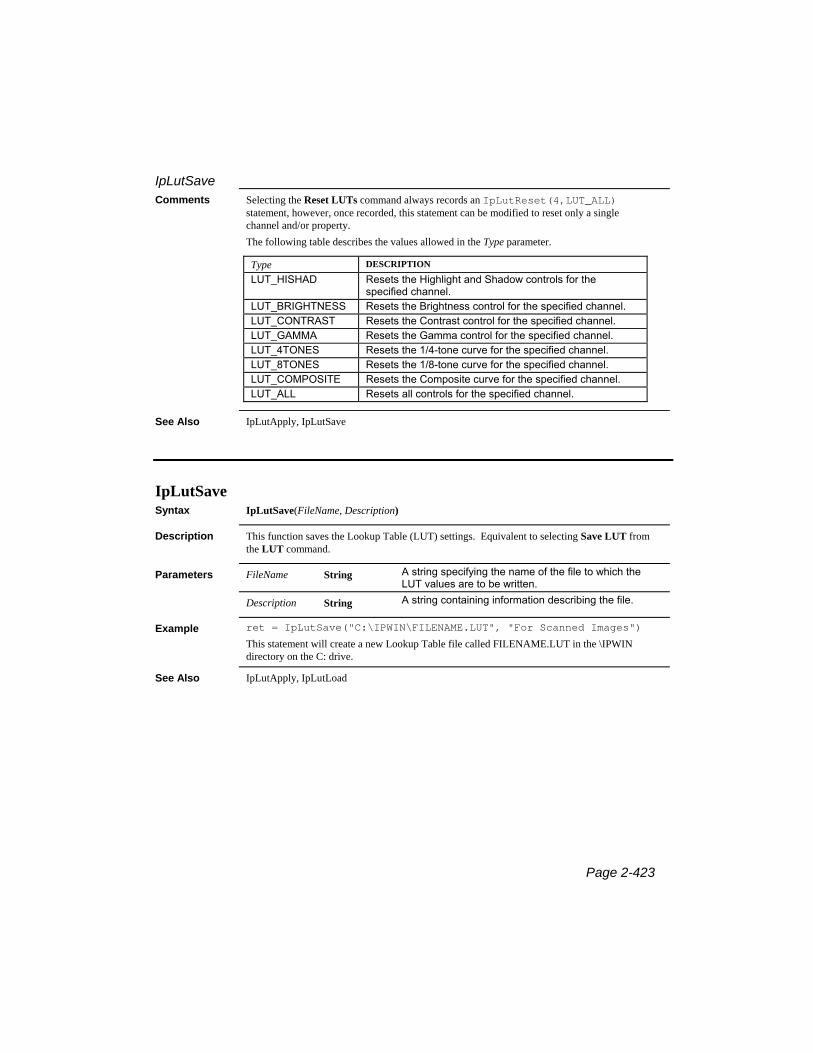
IpLutSave
Page 2-423
Comments Selecting the Reset LUTs command always records an IpLutReset(4,LUT_ALL) statement, however, once recorded, this statement can be modified to reset only a single channel and/or property. The following table describes the values allowed in the Type parameter.
Type DESCRIPTION
LUT_HISHAD Resets the Highlight and Shadow controls for the specified channel.
LUT_BRIGHTNESS Resets the Brightness control for the specified channel. LUT_CONTRAST Resets the Contrast control for the specified channel. LUT_GAMMA Resets the Gamma control for the specified channel. LUT_4TONES Resets the 1/4-tone curve for the specified channel. LUT_8TONES Resets the 1/8-tone curve for the specified channel. LUT_COMPOSITE Resets the Composite curve for the specified channel. LUT_ALL Resets all controls for the specified channel.
See Also IpLutApply, IpLutSave
IpLutSave Syntax IpLutSave(FileName, Description)
Description This function saves the Lookup Table (LUT) settings. Equivalent to selecting Save LUT from the LUT command.
Parameters FileName String A string specifying the name of the file to which the LUT values are to be written.
Description String A string containing information describing the file.
Example ret = IpLutSave("C:\IPWIN\FILENAME.LUT", "For Scanned Images")
This statement will create a new Lookup Table file called FILENAME.LUT in the \IPWIN directory on the C: drive.
See Also IpLutApply, IpLutLoad

IpLutSetAttr
Page 2-424
IpLutSetAttr Syntax IpLutSetAttr(AttrType, AttrValue)
Description This function selects, deselects or sets a Lookup Table (LUT) attribute. Equivalent to adjusting the LUT using the BCG controls or the Show Map command.
Parameters AttrType Integer An enumerated integer specifying the attribute type to be set. Must be one of the following: LUT_BRIGHTNESS LUT_CONTRAST LUT_GAMMA CHANNEL CURVE GRID See definitions under Comments, below.
AttrValue Integer An integer value specifying the setting for the attribute. See Comments, below, for the allowed settings for each AttrType.
Example ret = IpLutSetAttr(CHANNEL, 2) ret = IpLutSetAttr(LUT_BRIGHTNESS, 78)
The statements above select the Green channel and adjust its BRIGHTNESS to a value of 78. ret = IpLutSetAttr(CURVE,4) This statement selects the 1/4 Tone response curve on the “Color Map” window.
Comments The following table describes the values allowed in the AttrType parameter.

IpLutSetControl
Page 2-425
AttrType DESCRIPTION ALLOWED VALUES
LUT_BRIGHTNESS
Sets the Brightness value of the selected channel to the specified amount.
0 - 100
LUT_CONTRAST Sets the Contrast value of the selected channel to the specified amount.
0 - 100
Invert the Lookup Table Invert the image data
-1 -2
LUT_GAMMA Sets the Gamma value of the selected channel to the specified value.
10 – 970 (100 times the desired gamma setting, where a value of 10 corresponds to a gamma of .10 and a value of 970 corresponds to a gamma of 9.70.
CURVE Selects a curve of the type LUT_HISHAD specified by AttrValue. LUT_4TONES LUT_8TONES LUT_FREEFORM CHANNEL Selects the active Channel. 0 - Luminance 1 - Red or Cyan 2 - Green or Magenta 3 - Blue or Yellow GRID Selects whether or not to 0 - Suppresses the grid display the Grid. 1 - Displays the grid
See Also IpLutSetControl
IpLutSetControl Syntax IpLutSetControl(ControlType, ipLutControls, Count)
Description This function sets the values associated with the specified LUT curves. Equivalent to modifying the intensity curve in the Color Map dialog box.
Parameters ControlType Integer An enumerated integer specifying the kind of control to be activated. Must be one of the following: LUT_HISHAD LUT_4TONES LUT_8TONES LUT_COMPOSITE See definitions under Comments, below.
ipLutControls Integer (Basic)
LPSHORT (C)
The name and first element of an array containing the integer values to which the controls are to be set. By default this array is defined as Lut.
Count Integer An integer specifying the number of elements to be used in the Lut array.

IpLutShow
Page 2-426
Example Lut(0) = 0 Lut(1) = 100 Lut(2) = 169 Lut(3) = 231 Lut(4) = 255 ret = IpLutSetControl(LUT_4TONES, Lut(0), 5)
These statements set the 1/4-tone control points to 0, 100, 169, 231 and 255.
Comments The value of Count is dependent on the value of ControlType, as follows:
ControlType Count LUT_HISHAD 2
LUT_4TONES 5
LUT_8TONES 9
LUT_COMPOSITE 256
See Also IpLutSetAttr
IpLutShow Syntax IpLutShow(bShow)
Description This function is used to open or close the Contrast Map window. Equivalent to selecting the Show Map command to open the window, and double-clicking its control box to close it.
Parameters bShow Integer An integer value of 0 or 1 specifying whether the “Contrast Map” window is to be shown. Where: 0 - Closes the window if it is already open. 1 - Opens the window.
Example ret = IpLutShow(1)
This statement will open the Contrast Map window if it is not already open; if already open, it has no effect.
Comments The Contrast Map window does not have to be open during execution of any LUT function. Its disposition, visible or hidden, is entirely your choice. You will want to display the window if your users will be required to make choices within it, but if your objective is simply to adjust the LUT values, you may want to run without opening it.

IpMacroLoad
Page 2-427
IpMacroLoad Syntax IpMacroLoad(ScriptFile)
Description This function loads the specified script file and makes it the active script file. Equivalent to the Change and Reload buttons in the Macro dialog box.
Parameters ScriptFile String A string specifying the name of the script file that is to be loaded. If a zero-length string is specified (i.e., ""), the current script file is assumed.
Example ret = IpMacroLoad("C:\IPWIN\SLIDEPRC.IPM")
This statement will load the SLIDEPRC.IPM script file from \IPWIN on the C: drive.
ret = IpMacroLoad("")
This statement will refresh the active script file with the current contents of its disk file.
Comments Once a script file is loaded, it becomes the current script file.
See Also IpMacroRun
IpMacroPause Syntax IpMacroPause(Message, Mode,Delay)
Description This function pauses the macro, displays a message in a dialog box, and either waits for the specified delay period or for the user to click one of the dialog’s buttons before continuing. This function can be written into your macro using the macro editor, or it can be inserted while a macro is being recorded using the Pause/Message command on the Insert sub-menu of the Macro menu.
Parameters Message String A string specifying the message that is to be displayed in the message box.
Mode Integer An expression specifying the dialog box's mode (modal or modeless) and button configuration. Where: 0 - Issues a “modeless” message box. MS_MODAL - Issues a “modal” message box. MS_WAITFORRESPPONSE MS_RESPECTSETTING MP_PAUSEANDCONTINUE
When an MS_MODAL dialog is used, the following flags can also be set:

IpMacroPause
Page 2-428
MS_YESNO MS_OKCAN MS_YESNOCAN MS_STOP MS_EXCLAM MS_QUEST MS_DEF2 MS_DEF3 See Comments, below, for definitions.
Delay Long Specifies the number of milliseconds to show the message before continuing, or -1 to wait for the user to click one of the dialog buttons (see Comments).
Comments The Mode parameter determines the status of Image-Pro while the message box is active, where: 0 - specifies that Image-Pro is to remain active, and accessible to the user, while the
message box is displayed. This mode can be used to instruct the user to make or modify certain selections during playback.
MS_MODAL - specifies that Image-Pro is to remain inactive, and inaccessible to the user, while the message box is displayed. This mode can be used to issue an error message, or convey other “read-only” type information to your user. It can also be combined with the following flags to equip the message box with special buttons and symbols.
MP_WAITFORRESPONSE - When this mode is specified as part of the Mode parameter, IpMacroPause will display the message until the user clicks one of the dialog buttons. MP_WAITFORRESPONSE - When this mode is specified as part of the Mode parameter, IpMacroPause will display the message until the user clicks one of the dialog buttons. MP_RESPECTSETTING - When this mode is specified, IpMacroPause will respect the current setting of the IpAppGet/Set command MACRO_PAUSE_TYPE, where a non-zero value will wait for a user response and a zero value will pause and continue. Note: For functions that must wait for a user response even in free-running demo mode, a Delay of -1 can be specified, or the existing IpMacroStop function can be used.
MP_PAUSEANDCONTINUE - When this mode is specified, IpMacroPause will pause for the specified Delay, or if Delay is -1, will wait for a user response
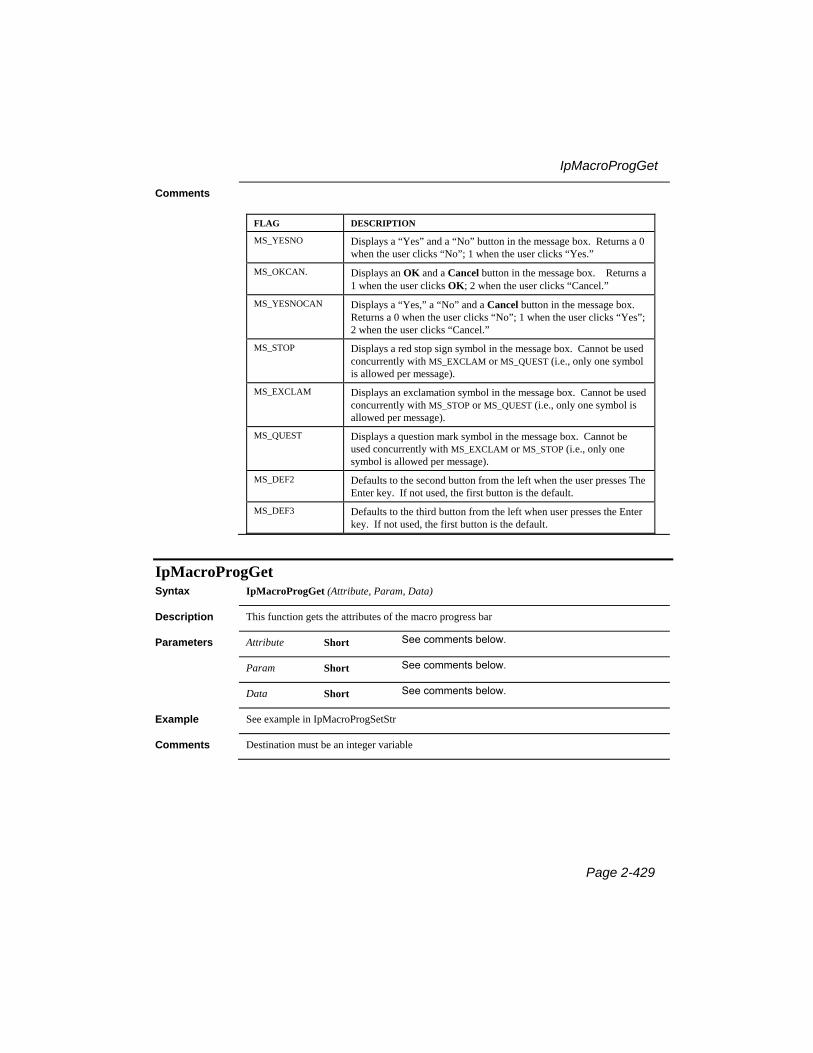
IpMacroProgGet
Page 2-429
Comments
FLAG DESCRIPTION
MS_YESNO Displays a “Yes” and a “No” button in the message box. Returns a 0 when the user clicks “No”; 1 when the user clicks “Yes.”
MS_OKCAN. Displays an OK and a Cancel button in the message box. Returns a 1 when the user clicks OK; 2 when the user clicks “Cancel.”
MS_YESNOCAN Displays a “Yes,” a “No” and a Cancel button in the message box. Returns a 0 when the user clicks “No”; 1 when the user clicks “Yes”; 2 when the user clicks “Cancel.”
MS_STOP Displays a red stop sign symbol in the message box. Cannot be used concurrently with MS_EXCLAM or MS_QUEST (i.e., only one symbol is allowed per message).
MS_EXCLAM Displays an exclamation symbol in the message box. Cannot be used concurrently with MS_STOP or MS_QUEST (i.e., only one symbol is allowed per message).
MS_QUEST Displays a question mark symbol in the message box. Cannot be used concurrently with MS_EXCLAM or MS_STOP (i.e., only one symbol is allowed per message).
MS_DEF2 Defaults to the second button from the left when the user presses The Enter key. If not used, the first button is the default.
MS_DEF3 Defaults to the third button from the left when user presses the Enter key. If not used, the first button is the default.
IpMacroProgGet Syntax IpMacroProgGet (Attribute, Param, Data)
Description This function gets the attributes of the macro progress bar
Parameters Attribute Short See comments below.
Param Short See comments below.
Data Short See comments below.
Example See example in IpMacroProgSetStr
Comments Destination must be an integer variable

IpMacroProgGetStr
Page 2-430
sAttribute sParam sData
MPROG_BUTTONTYPE Button number 1-4 Button type: MPROG_BUTTON_ CANCEL MPROG_BUTTON_STOP MPROG_BUTTON_DONE MPROG_BUTTON_USER
MPROG_BUTTONTEXT Not used, set to 0 Button text MPROG_FLAG Not used, set to 0 Gets the button state 0 = no buttons pressed MPROG_NUMBUTTONS Not used, set to 0 Button 1-4
IpMacroProgGetStr Syntax IpMacroProgGetStr (Cmd, Param, Data)
Description This function gets the string attributes of the macro progress bar
Parameters Attribute Short See comments below.
Param Short See comments below.
Data Short See comments below.
Example See example in IpMacroProgSetStr
Comments Destination must be an integer variable
sAttribute sParam sData
MPROG_TITLE Not used, set to 0 Title of the progress dialog MPROG_TEXT Not used, set to 0 Progress text MPROG_BUTTONTEXT Button number 1-4 Button text for
MPROG_BUTTON_USER butons

IpMacroProgSetInt
Page 2-431
IpMacroProgSetInt Syntax IpMacroProgSetInt (Attribute, Param, Data)
Description This function gets the attributes of the macro progress bar
Parameters Attribute Short See comments below.
Param Short See comments below.
Data Short See comments below.
Example See example in IpMacroProgSetStr
Comments Destination must be an integer variable
sAttribute sParam sData
MPROG_BUTTONTYPE Button number 1-4 Button type: MPROG_BUTTON_ CANCEL MPROG_BUTTON_STOP MPROG_BUTTON_DONE MPROG_BUTTON_USER
MPROG_BUTTONTEXT Not used, set to 0 Button text MPROG_FLAG Not used, set to 0 Sets the button state 0 = no buttons pressed MPROG_NUMBUTTONS Not used, set to 0 Button 1-4
IpMacroProgSetStr Syntax IpMacroProgSetStr (Cmd, Param, Data)
Description This function gets the string attributes of the macro progress bar
Parameters Attribute Short See comments below.
Param Short See comments below.
Data Short See comments below.
Comments Destination must be an integer variable
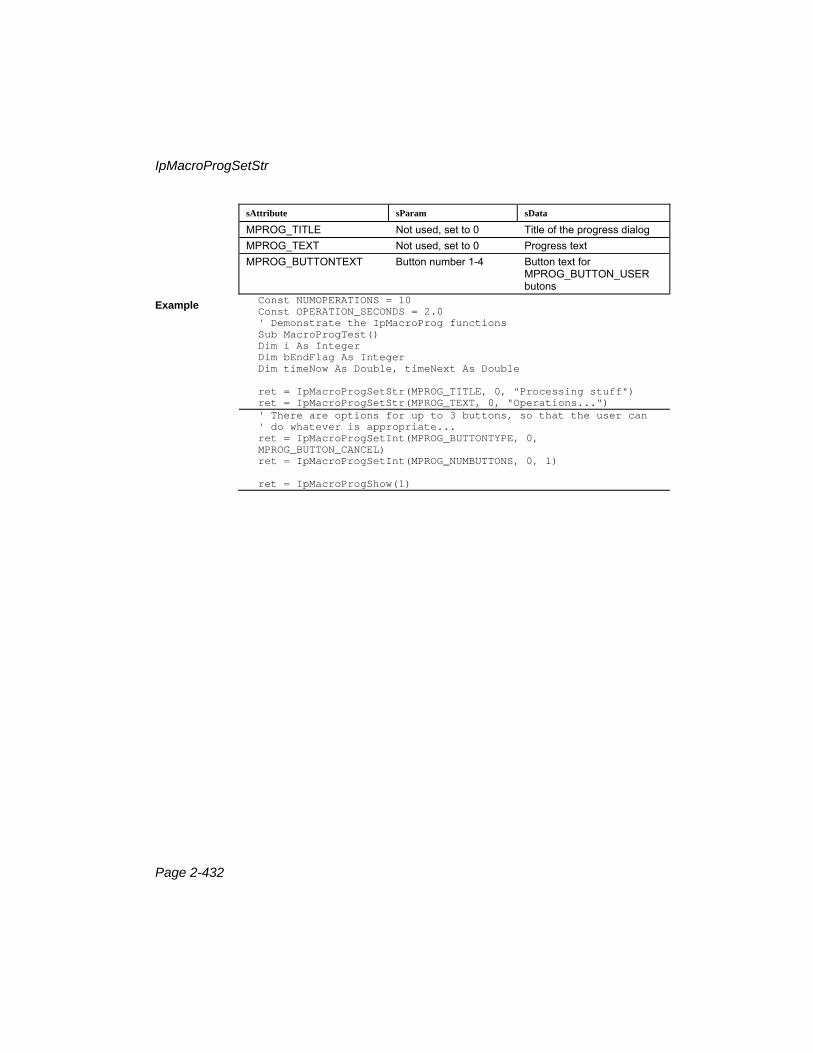
IpMacroProgSetStr
Page 2-432
sAttribute sParam sData
MPROG_TITLE Not used, set to 0 Title of the progress dialog MPROG_TEXT Not used, set to 0 Progress text MPROG_BUTTONTEXT Button number 1-4 Button text for
MPROG_BUTTON_USER butons
Example Const NUMOPERATIONS = 10 Const OPERATION_SECONDS = 2.0 ' Demonstrate the IpMacroProg functions Sub MacroProgTest() Dim i As Integer Dim bEndFlag As Integer Dim timeNow As Double, timeNext As Double ret = IpMacroProgSetStr(MPROG_TITLE, 0, "Processing stuff") ret = IpMacroProgSetStr(MPROG_TEXT, 0, "Operations...")
' There are options for up to 3 buttons, so that the user can ' do whatever is appropriate... ret = IpMacroProgSetInt(MPROG_BUTTONTYPE, 0, MPROG_BUTTON_CANCEL) ret = IpMacroProgSetInt(MPROG_NUMBUTTONS, 0, 1) ret = IpMacroProgShow(1)

IpMacroProgShow
Page 2-433
For i=1 To 10 ' Update the dialog display for progress... ret = IpMacroProgSetStr(MPROG_TEXT, 0, "Operation no." & Str(i) _ & " of" & Str(NUMOPERATIONS)) timeNext = Timer() + OPERATION_SECONDS Do timeNow = Timer DoEvents Loop Until timeNow > timeNext ' This dialog allows you to check whether the user has clicked a button ' at any appropriate time in the macro - so that you can stop when you ' want to, rather than in the middle of things... ret = IpMacroProgGet(MPROG_FLAG, 0, bEndFlag) If bEndFlag <> 0 Then ret = IpMacroStop("Processing cancelled!", 0) GoTo cleanup End If Next i ' Let the user know that we've finished ret = IpMacroStop("All operations completed.", MS_MODAL) cleanup: ret = IpMacroProgShow(0) End Sub
IpMacroProgShow Syntax IpMacroProgShow(bShow)
Description This function displays or hides the macro progress bar.
Parameters bShow Integer An integer value of 0 or 1 specifying whether the macro progress bar is to be shown or hidden. Where: 0 - hides the bar 1 - displays the bar.
Example ret = IpMacroProgShow(1)
This statement will display the macro progress bar.

IpMacroRun
Page 2-434
IpMacroRun Syntax IpMacroRun(MacroName, ScriptFile)
Description This function loads and executes the specified macro from the specified script file. It can be used to transfer control to another script file in an Auto-Pro macro. It can also be used to execute an Image-Pro macro from a Visual BASIC or Visual C++ program.
Parameters MacroName String A string specifying the name of the macro to be run.
ScriptFile String A string specifying the name of the script file containing the macro. If a zero-length string is specified (i.e., ""), the current script file is assumed.
Example ret = IpMacroRun("PREP1","C:\IPWIN\UTILTIIES.IPM")
This statement will execute the macro "PREP1" in the “UTILITIES.IPM” script file.
Comments When this function is used in an Auto-Pro macro, it differs from the IPBasic Call statement in two important ways:
1. It can be used to execute a macro that does not reside in the current script file. 2. It does not return to the calling macro after execution of the specified macro. In this
respect, it behaves like a “GoTo” operation instead of a “Call” operation. In a Visual Basic or Visual C++ program, this function must be used to invoke a macro that is defined in Image-Pro (i.e., one whose statements have not been ported into the Visual Basic or Visual C++ environment).
See Also Call, IpMacroLoad
IpMacroStop Syntax IpMacroStop(Message, Mode)
Description This function stops the macro, displays a message in a dialog box and waits for the user to click one of the dialog's buttons before continuing. This function can be written into your macro using the macro editor, or it can be inserted while the macro is being recorded, using the Stop/Message command.
Parameters Message String A string specifying the message that is to be displayed in the message box.
Mode Integer An expression specifying the dialog box's mode (modal or modeless) and button configuration. Where: 0 - Issues a “modeless” message box. MS_MODAL - Issues a “modal” message box. When an MS_MODAL dialog is used, the following flags can also be set:
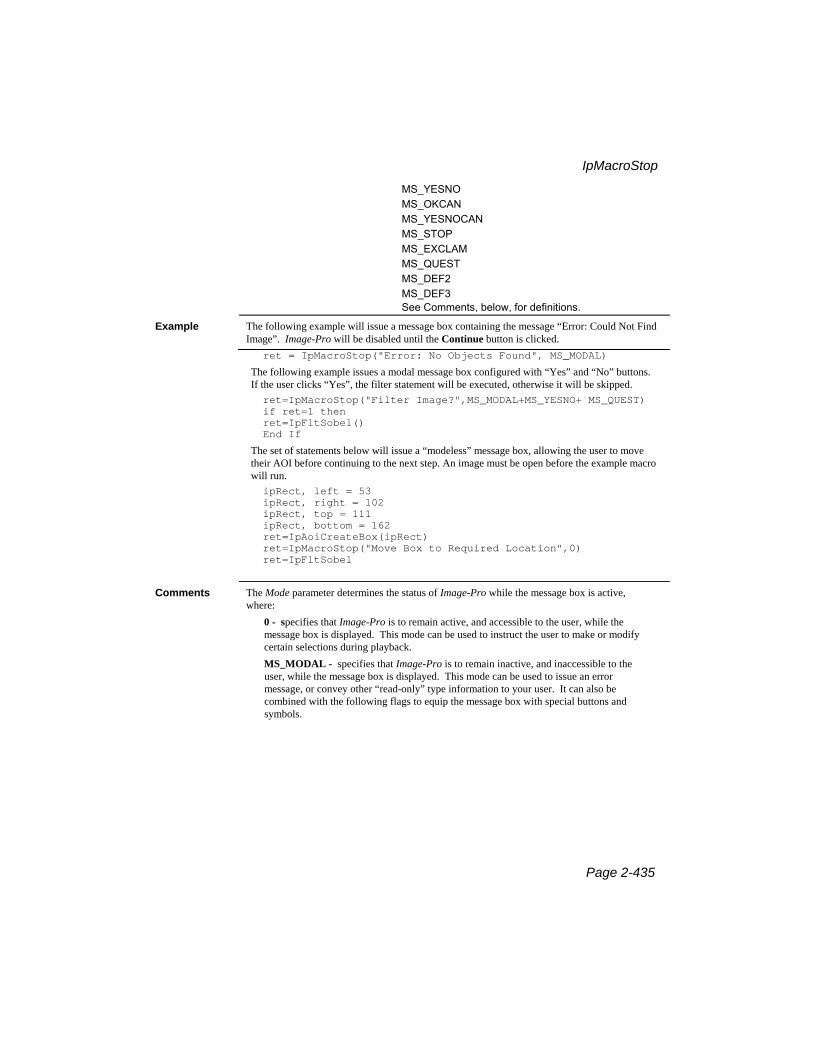
IpMacroStop
Page 2-435
MS_YESNO MS_OKCAN MS_YESNOCAN MS_STOP MS_EXCLAM MS_QUEST MS_DEF2 MS_DEF3 See Comments, below, for definitions.
Example The following example will issue a message box containing the message “Error: Could Not Find Image”. Image-Pro will be disabled until the Continue button is clicked.
ret = IpMacroStop("Error: No Objects Found", MS_MODAL)
The following example issues a modal message box configured with “Yes” and “No” buttons. If the user clicks “Yes”, the filter statement will be executed, otherwise it will be skipped. ret=IpMacroStop("Filter Image?",MS_MODAL+MS_YESNO+ MS_QUEST) if ret=1 then ret=IpFltSobel() End If
The set of statements below will issue a “modeless” message box, allowing the user to move their AOI before continuing to the next step. An image must be open before the example macro will run. ipRect, left = 53 ipRect, right = 102 ipRect, top = 111 ipRect, bottom = 162 ret=IpAoiCreateBox(ipRect) ret=IpMacroStop("Move Box to Required Location",0) ret=IpFltSobel
Comments The Mode parameter determines the status of Image-Pro while the message box is active,
where: 0 - specifies that Image-Pro is to remain active, and accessible to the user, while the
message box is displayed. This mode can be used to instruct the user to make or modify certain selections during playback.
MS_MODAL - specifies that Image-Pro is to remain inactive, and inaccessible to the user, while the message box is displayed. This mode can be used to issue an error message, or convey other “read-only” type information to your user. It can also be combined with the following flags to equip the message box with special buttons and symbols.
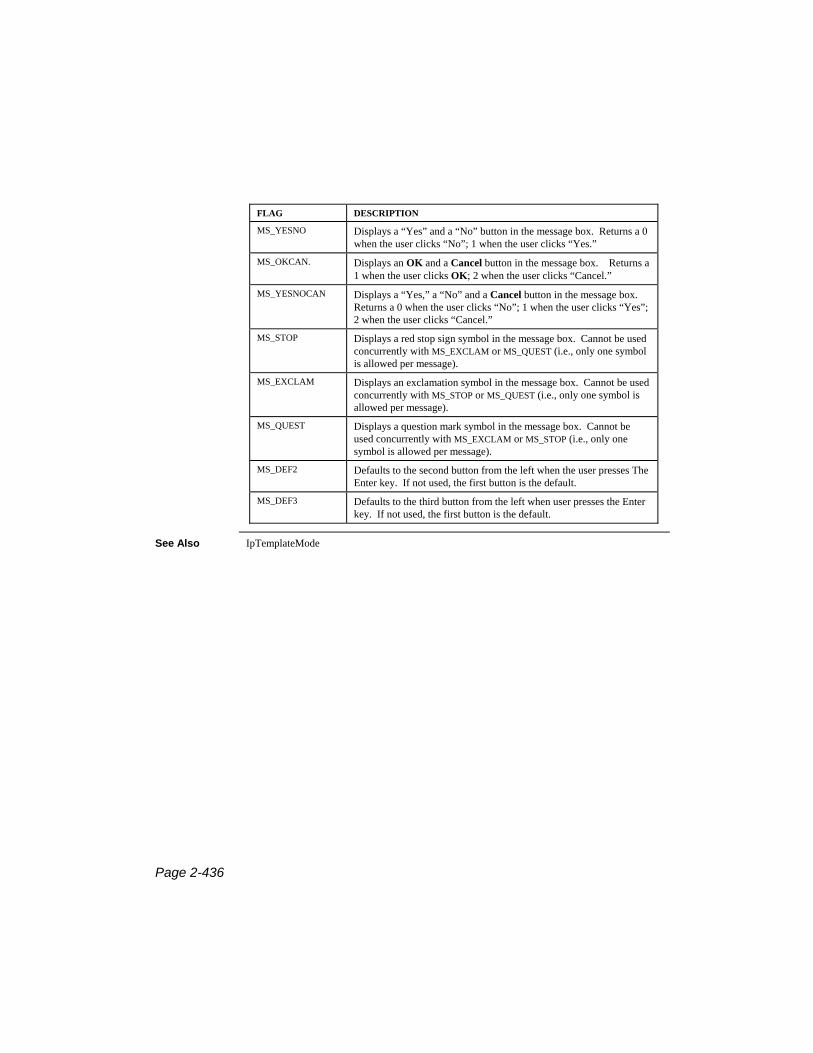
Page 2-436
FLAG DESCRIPTION
MS_YESNO Displays a “Yes” and a “No” button in the message box. Returns a 0 when the user clicks “No”; 1 when the user clicks “Yes.”
MS_OKCAN. Displays an OK and a Cancel button in the message box. Returns a 1 when the user clicks OK; 2 when the user clicks “Cancel.”
MS_YESNOCAN Displays a “Yes,” a “No” and a Cancel button in the message box. Returns a 0 when the user clicks “No”; 1 when the user clicks “Yes”; 2 when the user clicks “Cancel.”
MS_STOP Displays a red stop sign symbol in the message box. Cannot be used concurrently with MS_EXCLAM or MS_QUEST (i.e., only one symbol is allowed per message).
MS_EXCLAM Displays an exclamation symbol in the message box. Cannot be used concurrently with MS_STOP or MS_QUEST (i.e., only one symbol is allowed per message).
MS_QUEST Displays a question mark symbol in the message box. Cannot be used concurrently with MS_EXCLAM or MS_STOP (i.e., only one symbol is allowed per message).
MS_DEF2 Defaults to the second button from the left when the user presses The Enter key. If not used, the first button is the default.
MS_DEF3 Defaults to the third button from the left when user presses the Enter key. If not used, the first button is the default.
See Also IpTemplateMode

IpMacroWait
Page 2-437
IpMacroWait Syntax IpMacroWait(Delay)
Description This function pauses the macro for a specified duration. You might insert this command to “slow down” a particular step so that its results can be easily observed on the screen. Or, you might use it to allow sufficient time for an external event to occur (e.g., await a result from an external application). This function can be written into your macro using the macro editor, or it can be inserted while the macro is being recorded, using the Delay command.
Parameters Delay Integer An integer that specifies the length of the delay, in tenths (i.e., 1/10) of a second.
Example The statement below stops the macro for 5 seconds. ret = IpMacroWait(50)
Comments Image-Pro is disabled while the macro is stopped.
See Also IpMacroStop
IpMail Syntax IpMail (IpTo, IpCC, IpSubuct, IpMessage, IpAttachment)
Description This function enables you to compose and send Internet mail.
Parameters IpTo String Name of the recipient. At least one “to” recipent must be specified.
IpCC String Name of the recipient getting “carbon copy.”
IpSubject String Specifies the text for the subject line. A subject must be specified.
IpMessage String Specifies the text for the message, or a valid file name. If a file name is used, the text from the file will be inserted in the message line. Some amount of message text must be specified.
IpAttachment String Specifies an image, a valid file name, or a null string (“” ). If lpAttachment specifies “image”, there is an active image open, and if the image has been saved to disk, then the image is used as the message attachment. If lpAttachment specifies a valid file name, then the specified file is used as the message attachment. If lpAttachment specifies a null string, then the message will be sent with no attachment. Specification of “image” when none is open or when the active image has not been saved to disk, or specification of an invalid file name in lpAttachment will result in an error.
Return Value 1= success, 0 = failed. Return value should IPCERR_XXX where 0 = IPCERR_NONE. Actually, the macro will indeed return IPCERR values. Success will indeed be IPCERR_NONE, failure will be one of the others

IpMeasAdd
Page 2-438
Comments In template mode, the supplied information will be filled in and the dialog displayed. When not in template mode, the message will be sent as specified.
With internet mail, it may not be possible to return an error if invalid addresses are provided.
IpMeasAdd Syntax IpMeasAdd(Tool, NumPoints, Points)
Description This function is used to add measurement features to an image programmatically.
Parameters Tool Integer Feature to be added, specified by the feature’s tool type, from the following list: MEAS_LENGTH Adds a line feature. MEAS_AREA Adds a polygon feature. MEAS_ANGLE Adds an angle measurement between two existing features. MEAS_TRACE Adds a trace (polyliine) feature. MEAS_POINT Adds a point feature. MEAS_RECT Adds a rectangle feature. MEAS_CIRCLE Adds a circle feature. MEAS_BFLINE Adds a best-fit line feature MEAS_BFCIRCLE Adds a best-fit circle feature MEAS_BFARC Adds a best-fit arc feature MEAS_DIST Adds a distance measurement between two existing features. MEAS_NEWANGLE Adds an angle measurement between two new lines. MEAS_HTHICK Adds a horizontal thickness measurement between two line features: (MEAS_LINE, MEAS_BFLINE or MEAS_DIST). MEAS_VTHICK Adds a vertical thickness measurement between two line features: (MEAS_LINE, MEAS_BFLINE or MEAS_DIST).
MEAS_CTHICK Adds a curved thickness measurement between two existing features (all types except points).
NumPoints Integer Specifies the number of points supplied in the point array. Many features have a fixed number of points that are required. See Comments.
Points POINTAPI An array of one or more points as required by the feature. See comments.
Return Value Return value is the index of the feature created.

IpMeasAdd
Page 2-439
Comments The various types of features require different numbers and/or types of point information: MEAS_LENGTH 2 points (starting point and ending point of line) MEAS_AREA 3 or more points MEAS_ANGLE 2 points, where the X element of the first point specifies the ID of the first line feature, and the X element of the second point specifies the second line feature. MEAS_TRACE 2 or more points. MEAS_POINT 1 point. MEAS_RECT 2 points (the top-left corner point and the bottom left corner point) MEAS_CIRCLE 2 points (the top-left corner point of the square that bounds the desired circle, and the bottom-left corner point of that square) MEAS_BFLINE 2 or more points MEAS_BFCIRCLE 3 or more points MEAS_BFARC 3 or more points MEAS_DIST 2 points, where the X element of the first point specifies the ID of the first feature, and the X element of the second point specifies the second feature. MEAS_NEWANGLE 3 or 4 points. The first two points are the starting and ending point of the first line defining the angle. If 3 points are supplied, the ending point of the first line is the vertex of the angle, and is used as the starting point of the second line and the third point supplied is used as the ending point. If 4 points are supplied, the third point is the starting point of the second line, and the fourth point the ending point. MEAS_HTHICK 2 points, where the X element of the first point specifies the ID of the first line feature, and the X element of the second point specifies the second line feature. MEAS_VTHICK 2 points, where the X element of the first point specifies the ID of the first line feature, and the X element of the second point specifies the second line feature. MEAS_CTHICK 2 points, where the X element of the first point specifies the ID of the first feature, and the X element of the second point specifies the second feature.
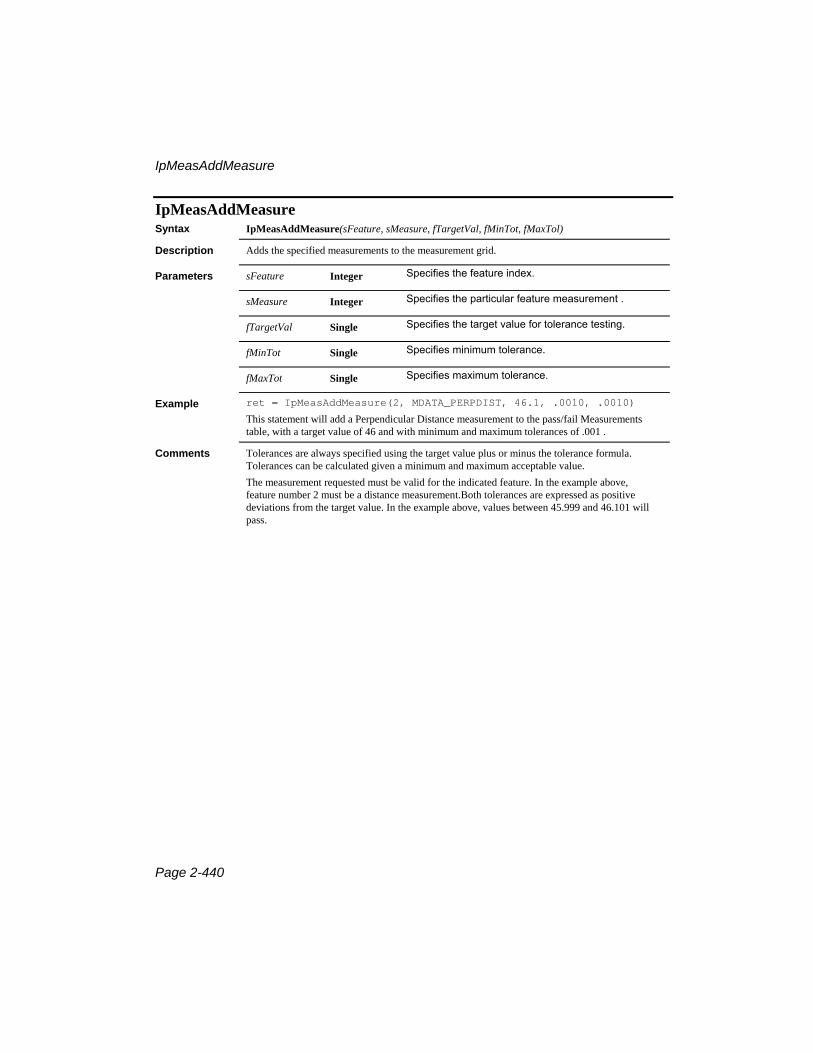
IpMeasAddMeasure
Page 2-440
IpMeasAddMeasure Syntax IpMeasAddMeasure(sFeature, sMeasure, fTargetVal, fMinTot, fMaxTol)
Description Adds the specified measurements to the measurement grid.
Parameters sFeature Integer Specifies the feature index.
sMeasure Integer Specifies the particular feature measurement .
fTargetVal Single Specifies the target value for tolerance testing.
fMinTot Single Specifies minimum tolerance.
fMaxTot Single Specifies maximum tolerance.
Example ret = IpMeasAddMeasure(2, MDATA_PERPDIST, 46.1, .0010, .0010)
This statement will add a Perpendicular Distance measurement to the pass/fail Measurements table, with a target value of 46 and with minimum and maximum tolerances of .001 .
Comments Tolerances are always specified using the target value plus or minus the tolerance formula. Tolerances can be calculated given a minimum and maximum acceptable value. The measurement requested must be valid for the indicated feature. In the example above, feature number 2 must be a distance measurement.Both tolerances are expressed as positive deviations from the target value. In the example above, values between 45.999 and 46.101 will pass.
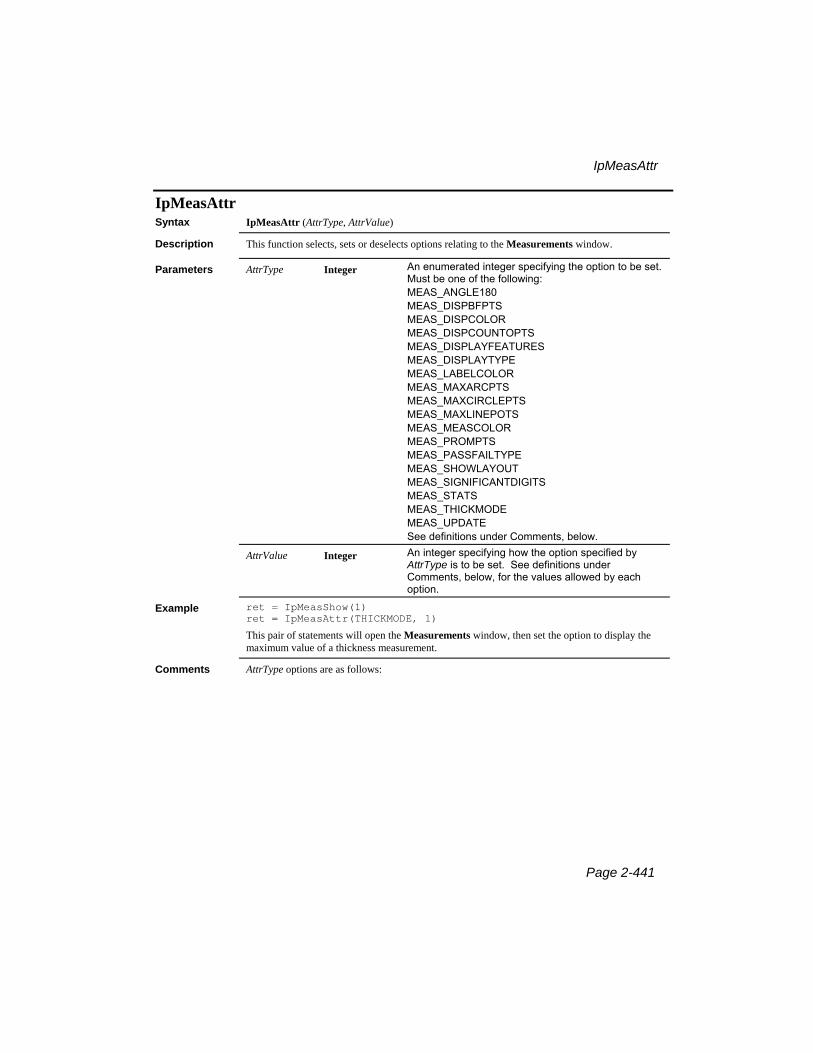
IpMeasAttr
Page 2-441
IpMeasAttr Syntax IpMeasAttr (AttrType, AttrValue)
Description This function selects, sets or deselects options relating to the Measurements window.
Parameters AttrType Integer An enumerated integer specifying the option to be set. Must be one of the following: MEAS_ANGLE180 MEAS_DISPBFPTS MEAS_DISPCOLOR MEAS_DISPCOUNTOPTS MEAS_DISPLAYFEATURES MEAS_DISPLAYTYPE MEAS_LABELCOLOR MEAS_MAXARCPTS MEAS_MAXCIRCLEPTS MEAS_MAXLINEPOTS MEAS_MEASCOLOR MEAS_PROMPTS MEAS_PASSFAILTYPE MEAS_SHOWLAYOUT MEAS_SIGNIFICANTDIGITS MEAS_STATS MEAS_THICKMODE MEAS_UPDATE See definitions under Comments, below.
AttrValue Integer An integer specifying how the option specified by AttrType is to be set. See definitions under Comments, below, for the values allowed by each option.
Example ret = IpMeasShow(1) ret = IpMeasAttr(THICKMODE, 1)
This pair of statements will open the Measurements window, then set the option to display the maximum value of a thickness measurement.
Comments AttrType options are as follows:

IpMeasAttr
Page 2-442
AttrType DESCRIPTION ALLOWED VALUES
MEAS_ANGEL180 indicates if angles are limited to 0 to 180 degrees, or may be -180 to 180 degrees
1 = constrained to 0 to 180 degrees0 = -180 to 180 degrees
MEAS_DISPBFPTS Turn display of best fit points 1 - Display best fit points on/off 0 - Hide best fit points
MEAS_DISPCOLOR Selects the color to be used 0 - Red to display the measure- 1 - Green ment outlines in the image. 2 - Blue Equivalent to selecting 3 - Yellow the outline color in the 4 - Cyan Measurement Options 5 - Magenta dialog box. 6 - White 7 - Black
MEAS_DISPCOUNTOPTS Enable or disable count options
1 - Display Count Objects dialog
dialog after selecting object intensity 0 - Do not display options dialog
MEAS_LABELCOLOR Specifies the color to be 0 - Red used to label the measure- 1 - Green ments. Equivalent to 2 - Blue selecting the label color 3 - Yellow in the Measurement 4 - Cyan Options dialog box. 5 - Magenta 6 - White 7 - Black
MEAS_MAXARCPTS Sets maximum points for best-fit arc
3 to 20
MEAS_MAXCIRCLEPTS Sets maximum points for best-fit circle
3 to 20
MEAS_MAXLINEPTS Sets maximum points for best-fit line
2 to 1000
MEAS_MEASCOLOR Selects the color to be used 0 - Red to display the measure- 1 - Green ment outlines in the image. 2 - Blue 3 - Yellow 4 - Cyan 5 - Magenta 6 - White 7 - Black
MEAS_PROMPTS turns feature prompts on/off 0 – prompts off 1 – prompts on
MEAS_PASSFAILTYPE Sets the pass/fail type MPF_NONE – no pass/fail check MPF_TOLERANCES – pass/fail based on tolerances MPF_MINMAX – pass/fail based on minimum and maximum values
MEAS_SHOWLAYOUT turn layout display on/off 0 – do not show layout 1 – show layout
MEAS_STATS Specifies whether the data- 0 - Hide Measurements sheet will display feature 1 - Display Measurements
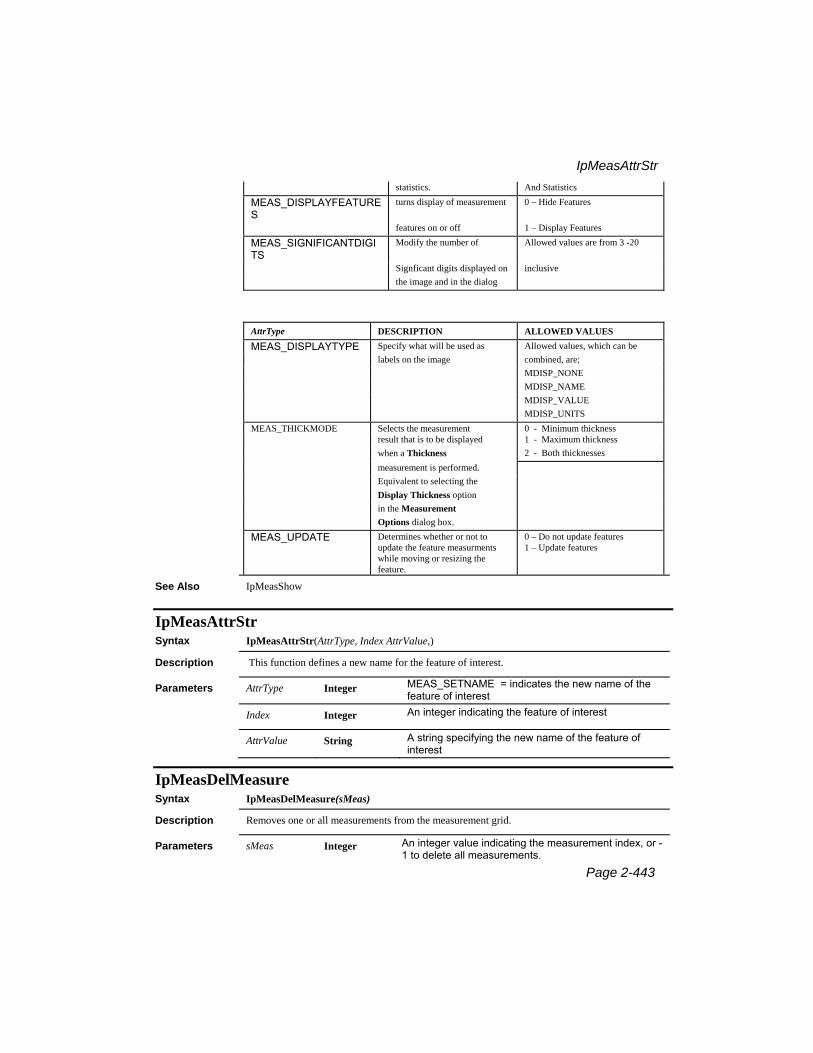
IpMeasAttrStr
Page 2-443
statistics. And Statistics
MEAS_DISPLAYFEATURES
turns display of measurement 0 – Hide Features
features on or off 1 – Display Features
MEAS_SIGNIFICANTDIGITS
Modify the number of Allowed values are from 3 -20
Signficant digits displayed on inclusive the image and in the dialog
AttrType DESCRIPTION ALLOWED VALUES
MEAS_DISPLAYTYPE Specify what will be used as Allowed values, which can be labels on the image combined, are; MDISP_NONE MDISP_NAME MDISP_VALUE MDISP_UNITS MEAS_THICKMODE Selects the measurement 0 - Minimum thickness result that is to be displayed 1 - Maximum thickness when a Thickness 2 - Both thicknesses
measurement is performed. Equivalent to selecting the Display Thickness option in the Measurement Options dialog box.
MEAS_UPDATE Determines whether or not to update the feature measurments while moving or resizing the feature.
0 – Do not update features 1 – Update features
See Also IpMeasShow
IpMeasAttrStr Syntax IpMeasAttrStr(AttrType, Index AttrValue,)
Description This function defines a new name for the feature of interest.
Parameters AttrType Integer MEAS_SETNAME = indicates the new name of the feature of interest
Index Integer An integer indicating the feature of interest
AttrValue String A string specifying the new name of the feature of interest
IpMeasDelMeasure Syntax IpMeasDelMeasure(sMeas)
Description Removes one or all measurements from the measurement grid.
Parameters sMeas Integer An integer value indicating the measurement index, or -1 to delete all measurements.

IpMeasDelMeasure
Page 2-444
Example ret = IpMeasDelMeasure(1)
Comments See IpMeasGet and IpMeasAttr for constants.

IpMeasDelete
Page 2-445
IpMeasDelete Syntax IpMeasDelete(Index)
Description This function deletes the selected (tagged) measurements, or all measurements. Equivalent to the Delete and Delete All buttons in the Measurements window.
Parameters Index Integer An enumerated integer specifying whether tagged measurements or all measurements are to be deleted. Where: MEAS_TAG - Deletes only selected records (i.e., ones tagged with IpMeasTag). MEAS_ALL - Deletes all datasheet records.
Example ret = IpMeasTag(0,1) ret = IpMeasTag(2,1) ret = IpMeasDelete(MEAS_TAG)
The set of statements above will select, then delete, the first and third measurements listed in the Measurements datasheet. ret = IpMeasDelete(MEAS_ALL)
The statement above will delete all measurements in the Measurements datasheet.
Comments The Measurements command window must be open before this function is called.
See Also IpMeasShow, IpMeasTag
IpMeasGet Syntax IpMeasGet(Cmd, Param, OutVal)
Description Use this function to get information relating to the Measurements tool associated with the current image. There is no Image-Pro command equivalent to this function; it is one that must be manually written with the macro editor.
Parameters Cmd Integer A command ID, which specifies the type of information you want to retrieve. Must be one of the following:
GETNUMOBJ GETFEATVALUES GETFEATURES GETNUMMEAS GETMEASVALUES GETVALUES
GETTYPE
GETLABEL GETINDEX GETNUMPTS GETPOINTS GETSTATS GETIPPSETTINGS
See definitions under Comments, below
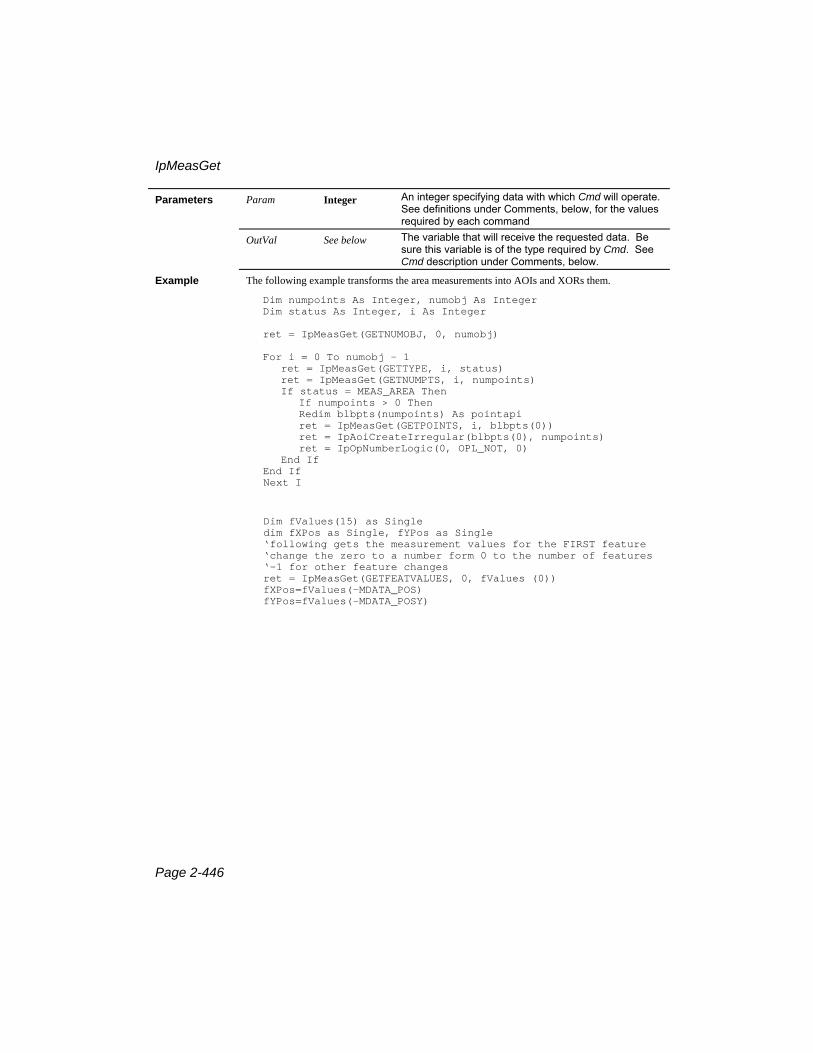
IpMeasGet
Page 2-446
Parameters Param Integer An integer specifying data with which Cmd will operate. See definitions under Comments, below, for the values required by each command
OutVal See below The variable that will receive the requested data. Be sure this variable is of the type required by Cmd. See Cmd description under Comments, below.
Example The following example transforms the area measurements into AOIs and XORs them.
Dim numpoints As Integer, numobj As Integer Dim status As Integer, i As Integer ret = IpMeasGet(GETNUMOBJ, 0, numobj) For i = 0 To numobj - 1 ret = IpMeasGet(GETTYPE, i, status) ret = IpMeasGet(GETNUMPTS, i, numpoints) If status = MEAS_AREA Then If numpoints > 0 Then Redim blbpts(numpoints) As pointapi ret = IpMeasGet(GETPOINTS, i, blbpts(0)) ret = IpAoiCreateIrregular(blbpts(0), numpoints) ret = IpOpNumberLogic(0, OPL_NOT, 0) End If End If Next I
Dim fValues(15) as Single dim fXPos as Single, fYPos as Single ‘following gets the measurement values for the FIRST feature ‘change the zero to a number form 0 to the number of features ‘–1 for other feature changes ret = IpMeasGet(GETFEATVALUES, 0, fValues (0)) fXPos=fValues(-MDATA_POS) fYPos=fValues(-MDATA_POSY)
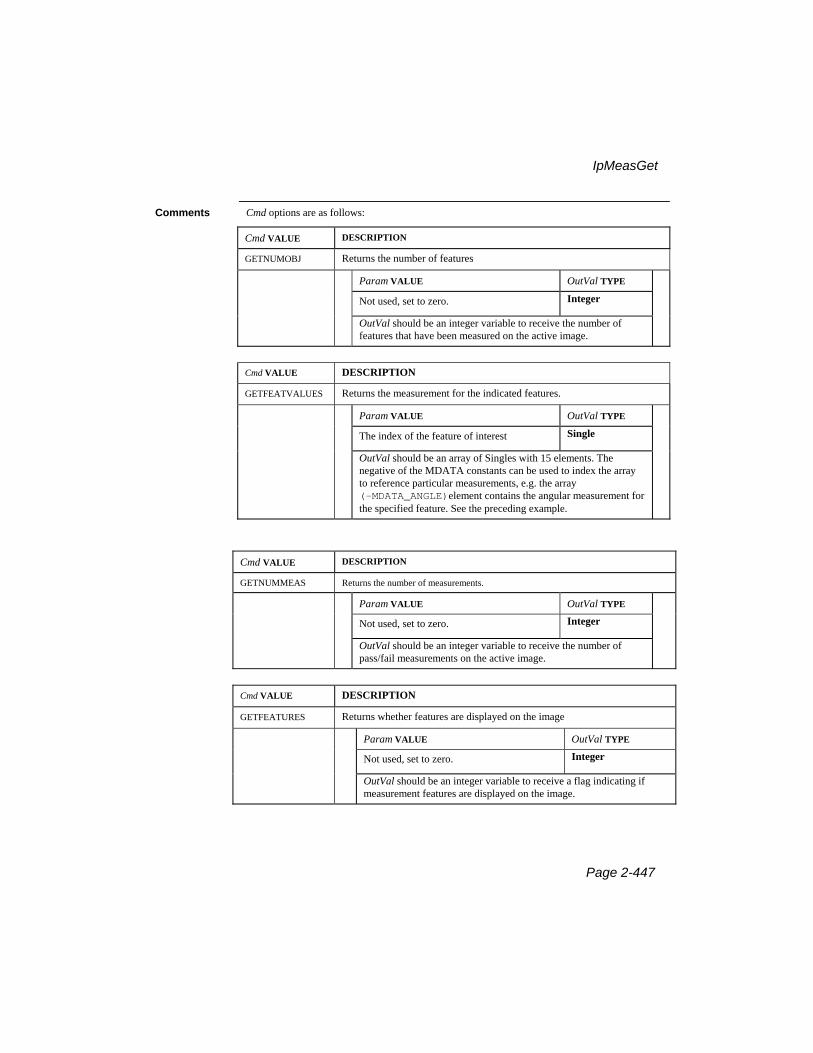
IpMeasGet
Page 2-447
Comments Cmd options are as follows:
Cmd VALUE DESCRIPTION
GETNUMOBJ Returns the number of features
Param VALUE OutVal TYPE
Not used, set to zero. Integer
OutVal should be an integer variable to receive the number of features that have been measured on the active image.
Cmd VALUE DESCRIPTION
GETFEATVALUES Returns the measurement for the indicated features.
Param VALUE OutVal TYPE
The index of the feature of interest Single
OutVal should be an array of Singles with 15 elements. The negative of the MDATA constants can be used to index the array to reference particular measurements, e.g. the array (-MDATA_ANGLE)element contains the angular measurement for the specified feature. See the preceding example.
Cmd VALUE DESCRIPTION
GETNUMMEAS Returns the number of measurements.
Param VALUE OutVal TYPE
Not used, set to zero. Integer
OutVal should be an integer variable to receive the number of pass/fail measurements on the active image.
Cmd VALUE DESCRIPTION
GETFEATURES Returns whether features are displayed on the image
Param VALUE OutVal TYPE
Not used, set to zero. Integer
OutVal should be an integer variable to receive a flag indicating if measurement features are displayed on the image.

IpMeasGet
Page 2-448
Cmd VALUE DESCRIPTION
GETIPPSETTINGS Returns the current value of the measurement attribute. Add the constant for the attribute of interest. Ex: GETIPPSETTINGS + MEAS_DISPCOLOR
Param VALUE OutVal TYPE
Not used, set to zero. Integer
OutVal should be an integer variable to receive the current value of the specified attribute.
The following are measurement constants for GETSETTINGS. Refer to IpMeasAttr for the values returned by each attribute.
AttrType DESCRIPTION
MEAS_ANGEL180 Indicates if angles are limited to 0 to 180 degrees, or may be -180 to 180 degrees
MEAS_DISPBFPTS Turn display of best fit points on/off
MEAS_DISPCOLOR Returns the color to be used to display the measure-ment outlines in the image..
MEAS_DISPCOUNTOPTS Enable or disable count options dialog.
MEAS_LABELCOLOR Returns the color to be used to label the measure ments. Equivalent to selecting the outline color in the Measurement Options dialog box.
MEAS_MAXARCPTS Returns maximum points for best-fit arc
MEAS_MAXCIRCLEPTS Returns maximum points for best-fit circle
MEAS_MAXLINEPTS Returns maximum points for best-fit line
MEAS_MEASCOLOR Returns the color to be used to display the measurement outlines in the image.
MEAS_PROMPTS Turns feature prompts on/off
MEAS_PASSFAILTYPE Returns ets the pass/fail type
MEAS_SHOWLAYOUT Turn layout display on/off
MEAS_STATS Returns whether the data sheet will display feature statistics.
MEAS_DISPLAYFEATURES Turns display of measurement features on or off
MEAS_SIGNIFICANTDIGITS Modify the number of Signficant digits displayed on the image and in the dialog
MEAS_DISPLAYTYPE Returns what will be used as labels on the image
MEAS_THICKMODE Returns the measurement result that will be displayed when a Thickness measurement is performed. Equivalent to selecting the Display Thickness option in the Measurement Options dialog box.
MEAS_UPDATE Returnswhether or not to update the feature measurments while moving or resizing the feature.
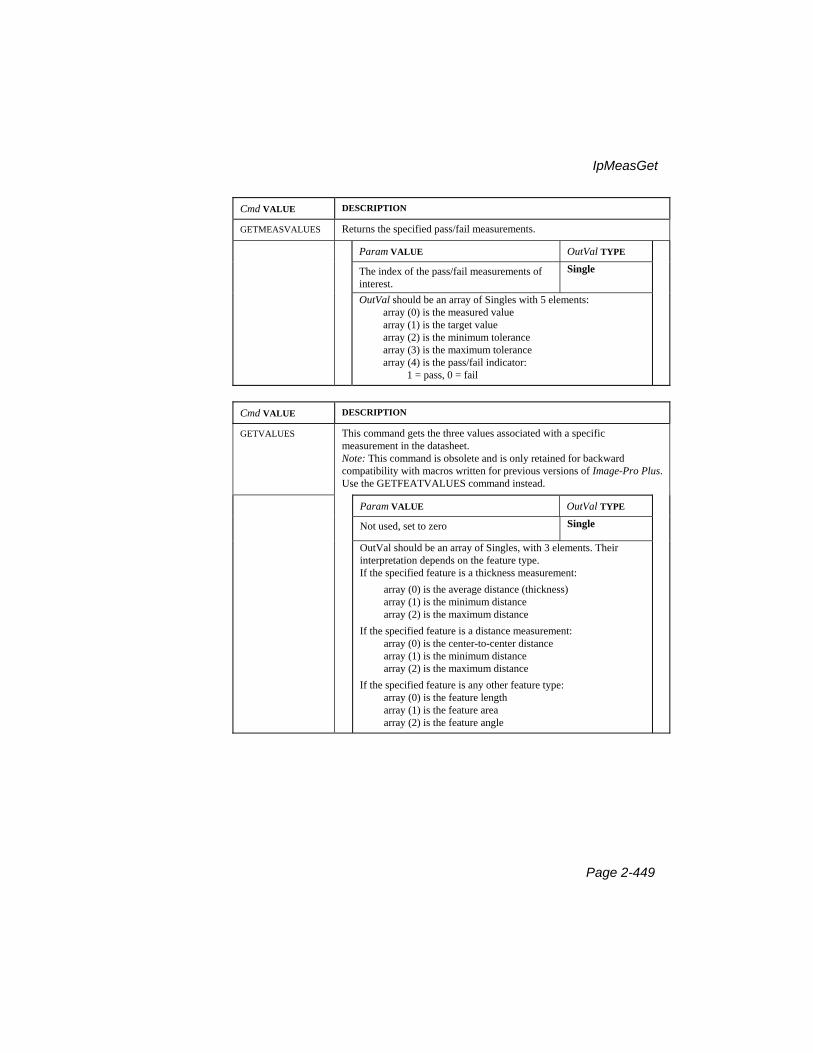
IpMeasGet
Page 2-449
Cmd VALUE DESCRIPTION
GETMEASVALUES Returns the specified pass/fail measurements.
Param VALUE OutVal TYPE
The index of the pass/fail measurements of interest.
Single
OutVal should be an array of Singles with 5 elements: array (0) is the measured value array (1) is the target value array (2) is the minimum tolerance array (3) is the maximum tolerance array (4) is the pass/fail indicator: 1 = pass, 0 = fail
Cmd VALUE DESCRIPTION
GETVALUES This command gets the three values associated with a specific measurement in the datasheet. Note: This command is obsolete and is only retained for backward compatibility with macros written for previous versions of Image-Pro Plus. Use the GETFEATVALUES command instead.
Param VALUE OutVal TYPE
Not used, set to zero Single
OutVal should be an array of Singles, with 3 elements. Their interpretation depends on the feature type. If the specified feature is a thickness measurement: array (0) is the average distance (thickness) array (1) is the minimum distance array (2) is the maximum distance If the specified feature is a distance measurement: array (0) is the center-to-center distance array (1) is the minimum distance array (2) is the maximum distance If the specified feature is any other feature type: array (0) is the feature length array (1) is the feature area array (2) is the feature angle

IpMeasGet
Page 2-450
Cmd VALUE DESCRIPTION
GETTYPE This command is used to determine the type of a specific feature.
Param VALUE OutVal TYPE
The index of the feature of interest. Integer
OutVal should be an integer variable to receive the type of the specified feature. The feature types that will be returned are defined in IpMeasTool.
Cmd VALUE DESCRIPTION
GETLABEL This command is used to get the numeric portion of a feature’s label (the label is the number displayed with the feature in the image and the datasheet; e.g., A1, L2, G3).
Param VALUE OutVal TYPE
The index of the feature of interest. Integer
OutVal should be an integer variable to receive the label number. Note: This command is obsolete and is only retained for backward compatibility with macros written for previous versions of Image-Pro Plus. New macros should use feature index numbers instead.
Cmd VALUE DESCRIPTION
GETINDEX This command is used to get a feature’s index from it label number.
Param VALUE OutVal TYPE
The label number of the feature of interest. Note that feature labels begin with 1 not zero.
Integer
OutVal should be an integer variable to receive the index number. Note: This command is obsolete and is only retained for backward compatibility with macros written for previous versions of Image-Pro Plus. New macros should use feature index numbers instead.
Cmd VALUE DESCRIPTION
GETNUMPTS This command gets the number of points defining the outline of the specified feature.
Param VALUE OutVal TYPE
The index of the feature of interest. Integer
OutVal should be an integer variable to receive the number of points used to define a feature. This number can be used to dimension an array for use with the GETPOINTS command.

IpMeasGet
Page 2-451
Cmd VALUE DESCRIPTION
GETPOINTS This command gets the coordinates defining the outline of the specified feature.
Param VALUE OutVal TYPE
The index of the feature of interest POINTAPI
OutVal should be an array of POINTAPI structures with enough elements to contain all of the points used to define the specified feature.
Cmd VALUE DESCRIPTION GETBOUNDS This command gets the bounding rectangle of the specified feature.
Param VALUE OutVal TYPE
The index of the feature of interest RECT
OutVal should be an RECT variable to receive the bounding box of the specified feature.
Cmd VALUE
GETSTATS Use this command to get the statistical data associated with a specified measurement type (e.g. length, area, thickness).
Param VALUE OutVal TYPE
The constant for the measurement of interest (see the following labels).
Single
OutVal should be an array of Singles with 9 elements. array(0) Minimum value array(1) ID of the feature with the minium value array(2) Maximum value array(3) ID of the feature with the maximum value array(4) Range of values array(5) Mean value array(6) Standard deviation array(7) Sum of values array(8) Number of measurements
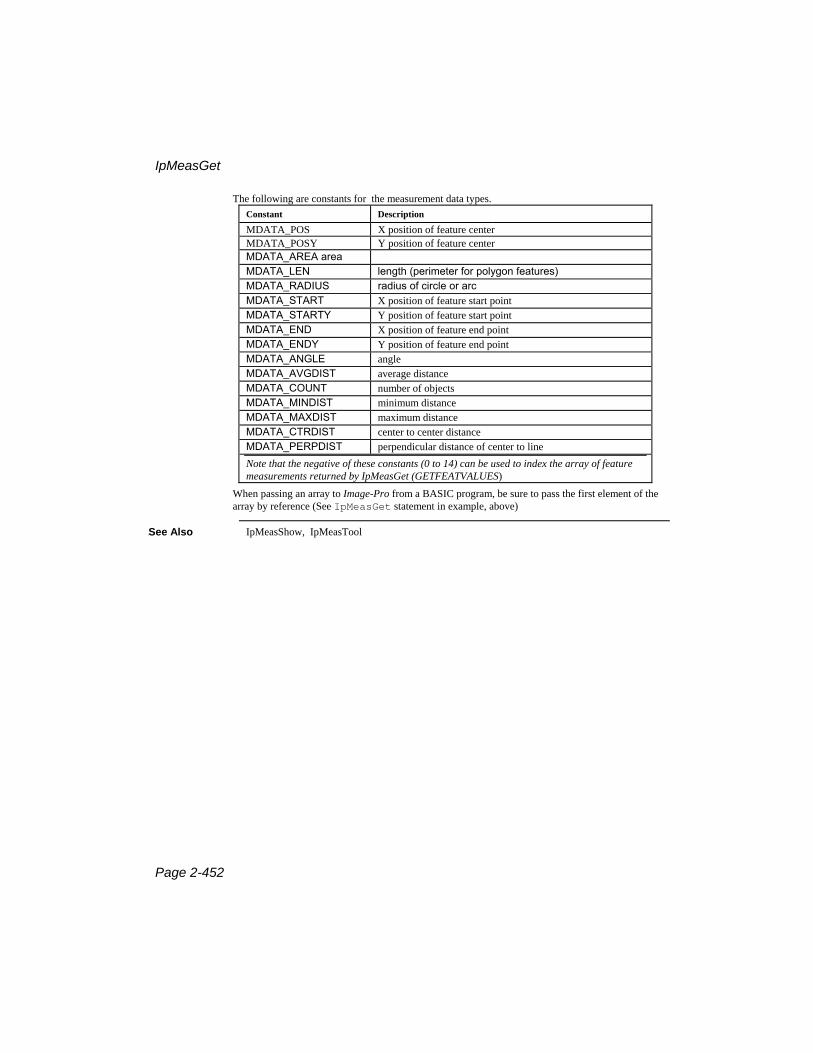
IpMeasGet
Page 2-452
The following are constants for the measurement data types. Constant Description
MDATA_POS X position of feature center MDATA_POSY Y position of feature center MDATA_AREA area MDATA_LEN length (perimeter for polygon features) MDATA_RADIUS radius of circle or arc MDATA_START X position of feature start point MDATA_STARTY Y position of feature start point MDATA_END X position of feature end point MDATA_ENDY Y position of feature end point MDATA_ANGLE angle MDATA_AVGDIST average distance MDATA_COUNT number of objects MDATA_MINDIST minimum distance MDATA_MAXDIST maximum distance MDATA_CTRDIST center to center distance MDATA_PERPDIST perpendicular distance of center to line Note that the negative of these constants (0 to 14) can be used to index the array of feature measurements returned by IpMeasGet (GETFEATVALUES)
When passing an array to Image-Pro from a BASIC program, be sure to pass the first element of the array by reference (See IpMeasGet statement in example, above)
ASee Also IpMeasShow, IpMeasTool
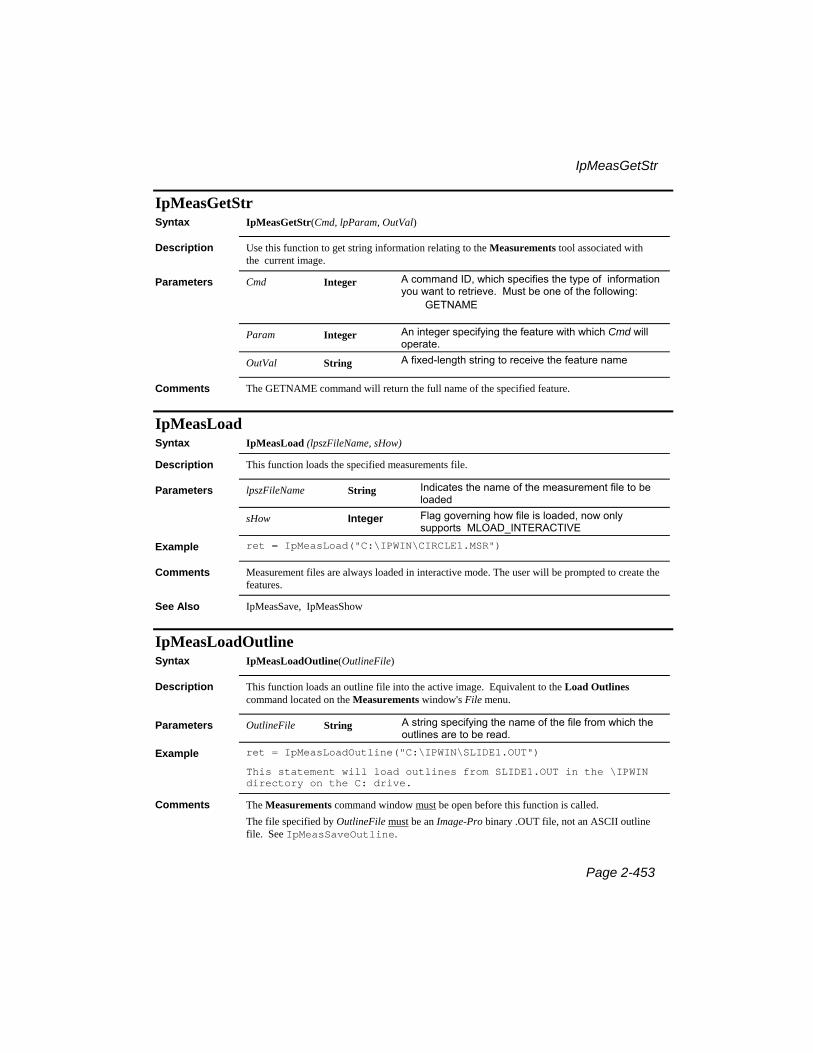
IpMeasGetStr
Page 2-453
IpMeasGetStr Syntax IpMeasGetStr(Cmd, lpParam, OutVal)
Description Use this function to get string information relating to the Measurements tool associated with the current image.
Parameters Cmd Integer A command ID, which specifies the type of information you want to retrieve. Must be one of the following:
GETNAME
Param Integer An integer specifying the feature with which Cmd will operate.
OutVal String A fixed-length string to receive the feature name
Comments The GETNAME command will return the full name of the specified feature.
IpMeasLoad Syntax IpMeasLoad (lpszFileName, sHow)
Description This function loads the specified measurements file.
Parameters lpszFileName String Indicates the name of the measurement file to be loaded
sHow Integer Flag governing how file is loaded, now only supports MLOAD_INTERACTIVE
Example ret = IpMeasLoad("C:\IPWIN\CIRCLE1.MSR")
Comments Measurement files are always loaded in interactive mode. The user will be prompted to create the features.
See Also IpMeasSave, IpMeasShow
IpMeasLoadOutline Syntax IpMeasLoadOutline(OutlineFile)
Description This function loads an outline file into the active image. Equivalent to the Load Outlines command located on the Measurements window's File menu.
Parameters OutlineFile String A string specifying the name of the file from which the outlines are to be read.
Example ret = IpMeasLoadOutline("C:\IPWIN\SLIDE1.OUT") This statement will load outlines from SLIDE1.OUT in the \IPWIN directory on the C: drive.
Comments The Measurements command window must be open before this function is called. The file specified by OutlineFile must be an Image-Pro binary .OUT file, not an ASCII outline file. See IpMeasSaveOutline.

IpMeasMove
Page 2-454
See Also IpMeasSaveOutline, IpMeasShow
IpMeasMove Syntax IpMeasMove(X, Y)
Description This function moves the Measurements window to the specified location. Equivalent to dragging the Measurements window with the mouse.
Parameters X Integer An integer specifying the x-coordinate of the screen position to which the upper-left corner of the Measurements window is to be moved.
Y Integer An integer specifying the y-coordinate of the screen position to which the upper-left corner of the Measurements window is to be moved.
Example ret = IpMeasMove(6, 26)
This statement will move the Measurements window to screen position 6, 26, a position near the upper-left corner of the screen.
Comments The origin ( 0, 0 ) for the coordinate system used by the x and y parameters is the upper-left corner of the screen.
IpMeasRestore Syntax IpMeasRestore( )
Description This function returns the Measurements window to its previous screen position and size. Equivalent to clicking the Restore button on a maximized Measurements window, or double-clicking the icon of a minimized Measurements Window.
Return Value In IPP 4.0 OR HIGHER, this macro will return IPCERR_NONE but won’t do anything.
See Also IpMeasSaveOutline, IpMeasShow, IpMeasSize
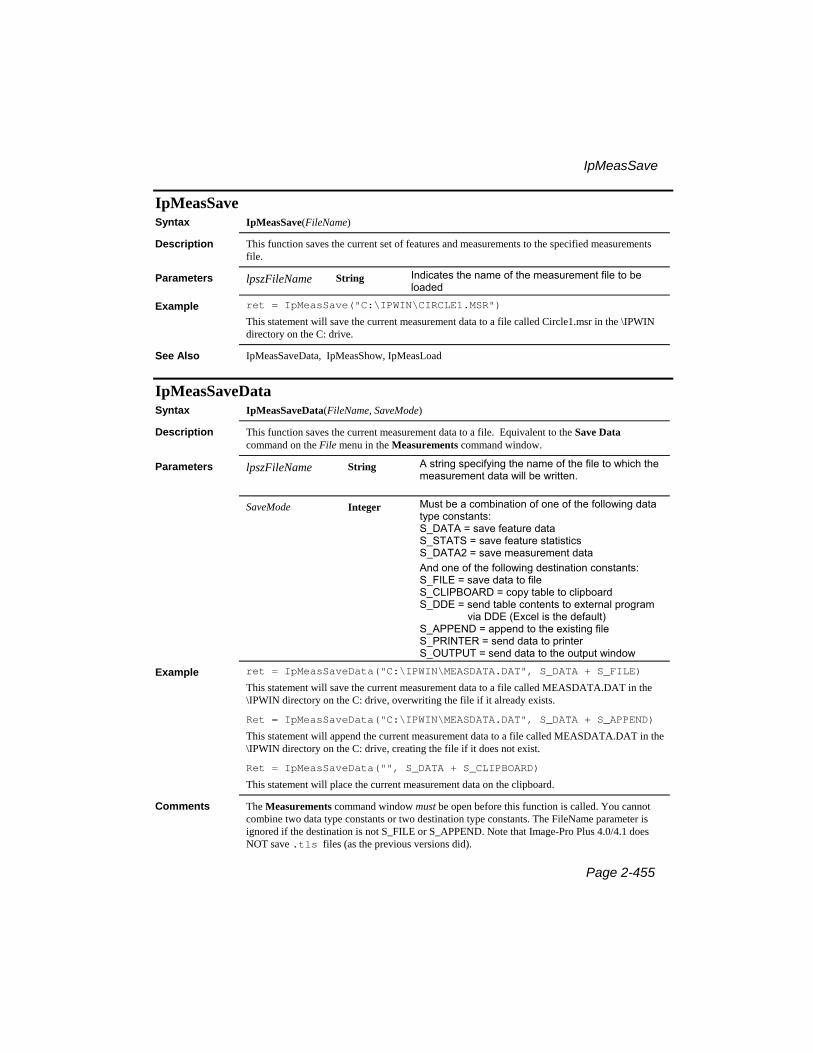
IpMeasSave
Page 2-455
IpMeasSave Syntax IpMeasSave(FileName)
Description This function saves the current set of features and measurements to the specified measurements file.
Parameters lpszFileName String Indicates the name of the measurement file to be loaded
Example ret = IpMeasSave("C:\IPWIN\CIRCLE1.MSR")
This statement will save the current measurement data to a file called Circle1.msr in the \IPWIN directory on the C: drive.
See Also IpMeasSaveData, IpMeasShow, IpMeasLoad
IpMeasSaveData Syntax IpMeasSaveData(FileName, SaveMode)
Description This function saves the current measurement data to a file. Equivalent to the Save Data command on the File menu in the Measurements command window.
Parameters lpszFileName String A string specifying the name of the file to which the measurement data will be written.
SaveMode Integer Must be a combination of one of the following data type constants: S_DATA = save feature data S_STATS = save feature statistics S_DATA2 = save measurement data And one of the following destination constants: S_FILE = save data to file S_CLIPBOARD = copy table to clipboard S_DDE = send table contents to external program via DDE (Excel is the default) S_APPEND = append to the existing file S_PRINTER = send data to printer S_OUTPUT = send data to the output window
Example ret = IpMeasSaveData("C:\IPWIN\MEASDATA.DAT", S_DATA + S_FILE)
This statement will save the current measurement data to a file called MEASDATA.DAT in the \IPWIN directory on the C: drive, overwriting the file if it already exists.
Ret = IpMeasSaveData("C:\IPWIN\MEASDATA.DAT", S_DATA + S_APPEND)
This statement will append the current measurement data to a file called MEASDATA.DAT in the \IPWIN directory on the C: drive, creating the file if it does not exist.
Ret = IpMeasSaveData("", S_DATA + S_CLIPBOARD)
This statement will place the current measurement data on the clipboard.
Comments The Measurements command window must be open before this function is called. You cannot combine two data type constants or two destination type constants. The FileName parameter is ignored if the destination is not S_FILE or S_APPEND. Note that Image-Pro Plus 4.0/4.1 does NOT save .tls files (as the previous versions did).
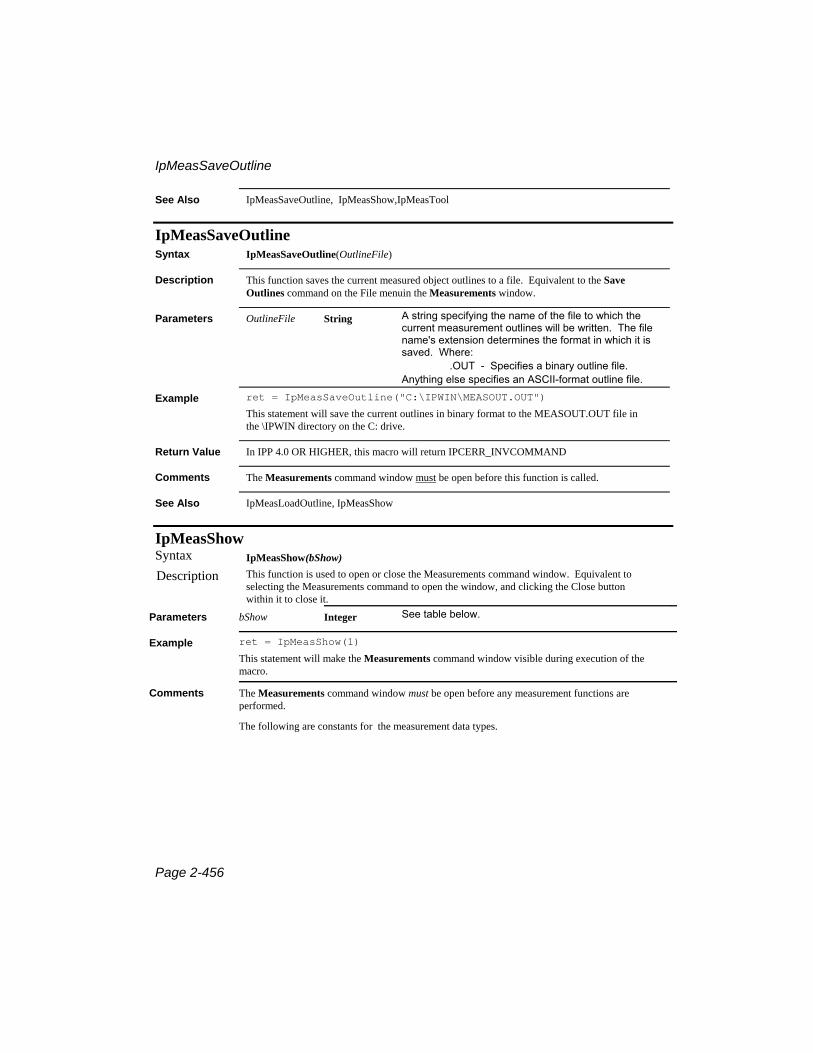
IpMeasSaveOutline
Page 2-456
See Also IpMeasSaveOutline, IpMeasShow,IpMeasTool
IpMeasSaveOutline Syntax IpMeasSaveOutline(OutlineFile)
Description This function saves the current measured object outlines to a file. Equivalent to the Save Outlines command on the File menuin the Measurements window.
Parameters OutlineFile String A string specifying the name of the file to which the current measurement outlines will be written. The file name's extension determines the format in which it is saved. Where: .OUT - Specifies a binary outline file. Anything else specifies an ASCII-format outline file.
Example ret = IpMeasSaveOutline("C:\IPWIN\MEASOUT.OUT")
This statement will save the current outlines in binary format to the MEASOUT.OUT file in the \IPWIN directory on the C: drive.
Return Value In IPP 4.0 OR HIGHER, this macro will return IPCERR_INVCOMMAND
Comments The Measurements command window must be open before this function is called.
See Also IpMeasLoadOutline, IpMeasShow
IpMeasShow Syntax IpMeasShow(bShow)
Description This function is used to open or close the Measurements command window. Equivalent to selecting the Measurements command to open the window, and clicking the Close button within it to close it.
Parameters bShow Integer See table below.
Example ret = IpMeasShow(1) This statement will make the Measurements command window visible during execution of the macro.
Comments The Measurements command window must be open before any measurement functions are performed.
The following are constants for the measurement data types.
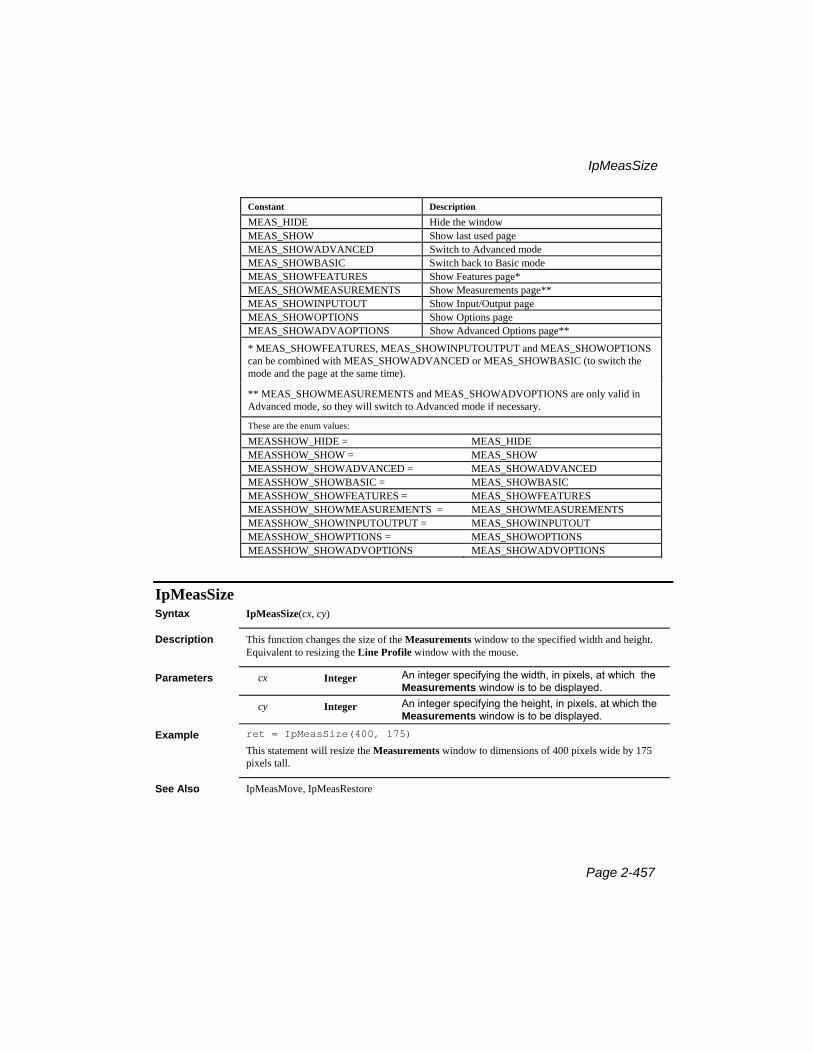
IpMeasSize
Page 2-457
Constant Description
MEAS_HIDE Hide the window MEAS_SHOW Show last used page MEAS_SHOWADVANCED Switch to Advanced mode MEAS_SHOWBASIC Switch back to Basic mode MEAS_SHOWFEATURES Show Features page* MEAS_SHOWMEASUREMENTS Show Measurements page** MEAS_SHOWINPUTOUT Show Input/Output page MEAS_SHOWOPTIONS Show Options page MEAS_SHOWADVAOPTIONS Show Advanced Options page**
* MEAS_SHOWFEATURES, MEAS_SHOWINPUTOUTPUT and MEAS_SHOWOPTIONS can be combined with MEAS_SHOWADVANCED or MEAS_SHOWBASIC (to switch the mode and the page at the same time).
** MEAS_SHOWMEASUREMENTS and MEAS_SHOWADVOPTIONS are only valid in Advanced mode, so they will switch to Advanced mode if necessary.
These are the enum values:
MEASSHOW_HIDE = MEAS_HIDE MEASSHOW_SHOW = MEAS_SHOW MEASSHOW_SHOWADVANCED = MEAS_SHOWADVANCED MEASSHOW_SHOWBASIC = MEAS_SHOWBASIC MEASSHOW_SHOWFEATURES = MEAS_SHOWFEATURES MEASSHOW_SHOWMEASUREMENTS = MEAS_SHOWMEASUREMENTS MEASSHOW_SHOWINPUTOUTPUT = MEAS_SHOWINPUTOUT MEASSHOW_SHOWPTIONS = MEAS_SHOWOPTIONS MEASSHOW_SHOWADVOPTIONS MEAS_SHOWADVOPTIONS
IpMeasSize Syntax IpMeasSize(cx, cy)
Description This function changes the size of the Measurements window to the specified width and height. Equivalent to resizing the Line Profile window with the mouse.
Parameters cx Integer An integer specifying the width, in pixels, at which the Measurements window is to be displayed.
cy Integer An integer specifying the height, in pixels, at which the Measurements window is to be displayed.
Example ret = IpMeasSize(400, 175)
This statement will resize the Measurements window to dimensions of 400 pixels wide by 175 pixels tall.
See Also IpMeasMove, IpMeasRestore

IpMeasTag
Page 2-458
IpMeasTag Syntax IpMeasTag(Index, OnOff)
Description This function selects/deselects a measurement record. Equivalent to clicking the measurement record in the Measurements datasheet.
Parameters Index Integer An integer specifying the position of the record in the datasheet (where the first record occupies position 0), or MEAS_ALL, to specify all records in the datasheet.
OnOff Integer An integer value of 0 or 1 specifying whether the record is to be selected or deselected. Where: 0 - Deselects 1 - Selects
Example ret = IpMeasTag(0, 1) ret = IpMeasTag(2, 1)
The statements above will select the first and third measurement records in the Measurements datasheet.
ret = IpMeasTag(MEAS_ALL, 0)
This statement will deselect all measurement records in the Measurements datasheet.
Comments This function is used to select individual measurements for deletion by the IpMeasDelete function. It is also used to select the pair of measurements upon which a thickness measurement with IpMeasTool(MEAS_THICK) is performed. The Measurements command window must be open before this function is called.
See Also IpMeasDelete, IpMeasTool, IpMeasShow
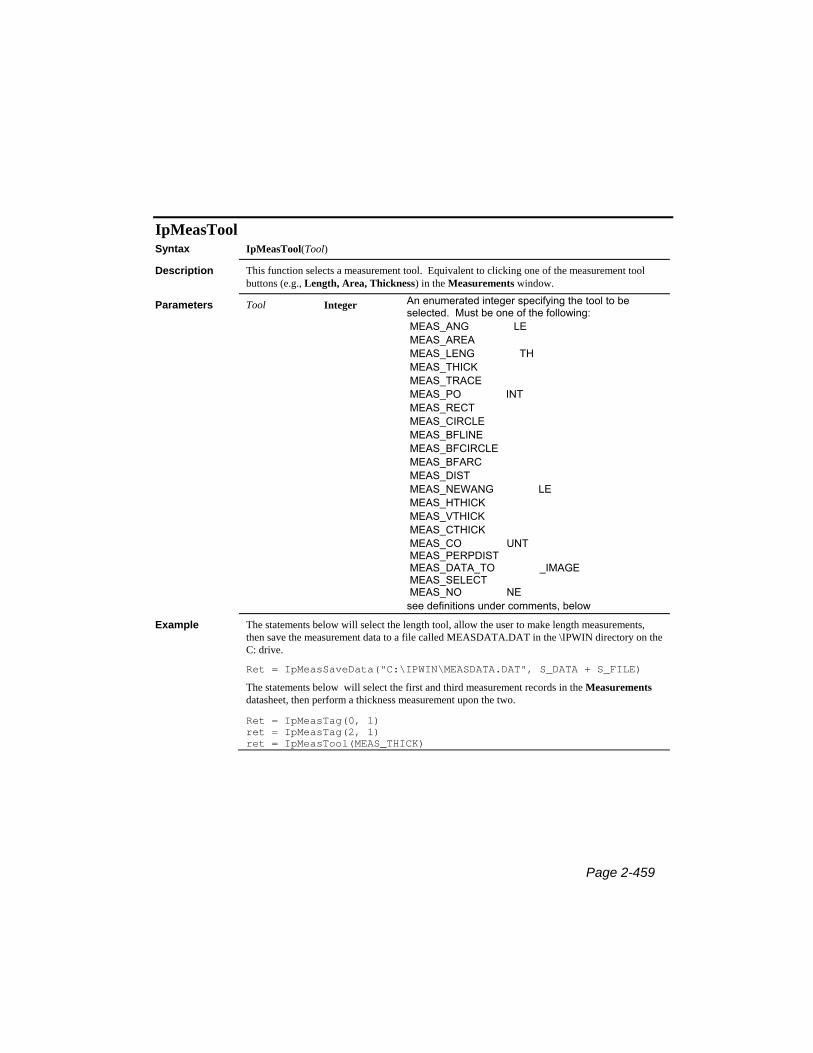
Page 2-459
IpMeasTool
Syntax IpMeasTool(Tool)
Description This function selects a measurement tool. Equivalent to clicking one of the measurement tool buttons (e.g., Length, Area, Thickness) in the Measurements window.
Parameters Tool Integer An enumerated integer specifying the tool to be selected. Must be one of the following: MEAS_ANG LE MEAS_AREA MEAS_LENG TH MEAS_THICK MEAS_TRACE MEAS_PO INT MEAS_RECT MEAS_CIRCLE MEAS_BFLINE MEAS_BFCIRCLE MEAS_BFARC MEAS_DIST MEAS_NEWANG LE MEAS_HTHICK MEAS_VTHICK MEAS_CTHICK MEAS_CO UNT MEAS_PERPDIST MEAS_DATA_TO _IMAGE MEAS_SELECT MEAS_NO NE see definitions under comments, below
Example The statements below will select the length tool, allow the user to make length measurements, then save the measurement data to a file called MEASDATA.DAT in the \IPWIN directory on the C: drive.
Ret = IpMeasSaveData("C:\IPWIN\MEASDATA.DAT", S_DATA + S_FILE)
The statements below will select the first and third measurement records in the Measurements datasheet, then perform a thickness measurement upon the two.
Ret = IpMeasTag(0, 1) ret = IpMeasTag(2, 1) ret = IpMeasTool(MEAS_THICK)

IpMeasTool
Page 2-460
Comments The Measurements command window must be open before this function is called.
TOOL DESCRIPTION MEAS_AREA Selects the Polygon tool. Equivalent to clicking the Trace or
Polygon tool in the Measurements window.
MEAS_ANGLE Selects the Click-and-Drag Angle Measurement tool. Equivalent to clicking the Click-and-Drag Angle Measurement button in the Measurements window.
MEAS_LENGTH Selects the Line tool. Equivalent to clicking the Straight Line button in the Measurements window.
MEAS_THICK Selects the Curved Thick ness tool. Equivalent to clicking the Curved Thickness button in the Measurements window.
MEAS_TRACE Selects the Trace tool. Equivalent to clicking the Trace button in the Measurements window.
MEAS_POINT Selects the Point tool.
MEAS_RECT Selects the Rectangle tool. Equivalent to clicking the Rectangle button in the Measurements window.
MEAS_CIRCLE Selects the Circle tool. Equivalent to clicking the Circle button in the Measurements window.
MEAS_BFLINE Selects the Best Fit Line tool. Equivalent to clicking the Best Fit Line button in the Measurements window.
MEAS_BFCIRCLE Selects the Best Fit Circle tool. Equivalent to clicking the Best Fit Circle button in the Measurements window.
MEAS_BEFARC Selects the Best Fit Arc tool. Equivalent to clicking the Best Fit Arc button in the Measurements window.
MEAS_DIST Selects the New Distance Measurements.
MEAS_PERPDIST Selects the Pitch tool
MEAS_COUNT Selects the Count Gray Spots tool.
MEAS_DATA_TO_ IMAGE Selects Data To Image. Equivalent to clicking the Data To
Image button on the Measurement toolbar
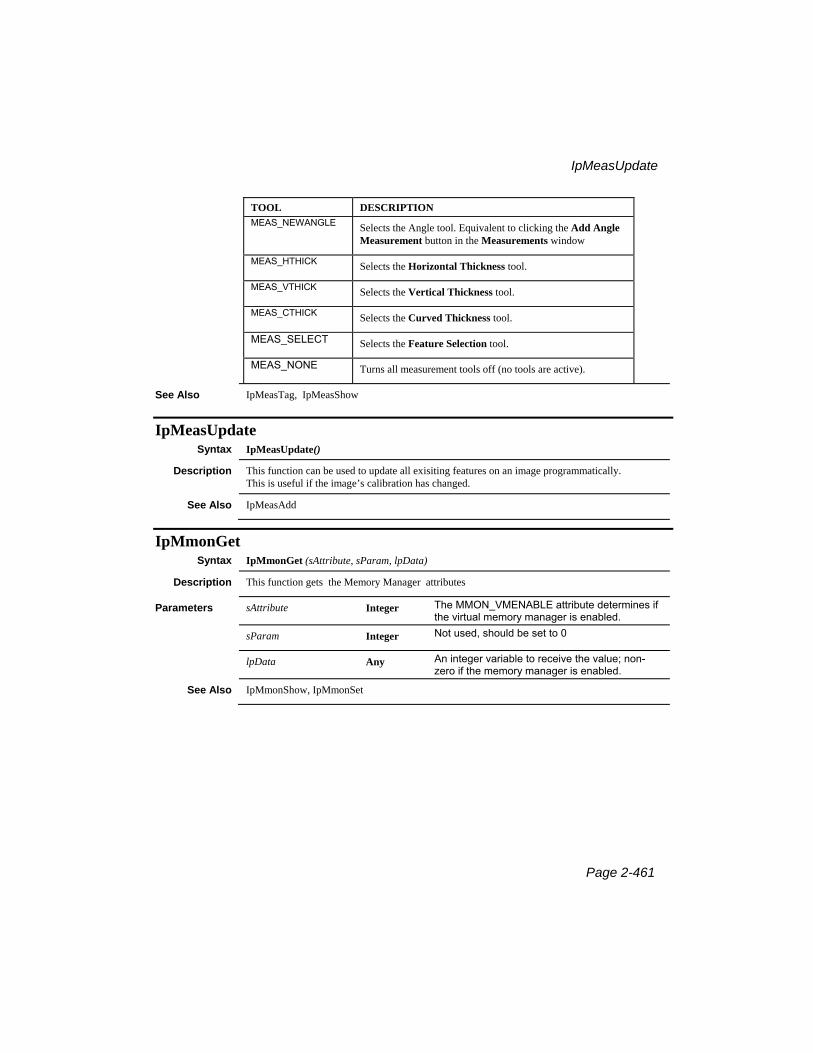
IpMeasUpdate
Page 2-461
TOOL DESCRIPTION MEAS_NEWANGLE Selects the Angle tool. Equivalent to clicking the Add Angle
Measurement button in the Measurements window
MEAS_HTHICK Selects the Horizontal Thickness tool.
MEAS_VTHICK Selects the Vertical Thickness tool.
MEAS_CTHICK Selects the Curved Thickness tool.
MEAS_SELECT Selects the Feature Selection tool.
MEAS_NONE Turns all measurement tools off (no tools are active).
See Also IpMeasTag, IpMeasShow
IpMeasUpdate Syntax IpMeasUpdate()
Description This function can be used to update all exisiting features on an image programmatically. This is useful if the image’s calibration has changed.
See Also IpMeasAdd
IpMmonGet Syntax IpMmonGet (sAttribute, sParam, lpData)
Description This function gets the Memory Manager attributes
Parameters sAttribute Integer The MMON_VMENABLE attribute determines if the virtual memory manager is enabled.
sParam Integer Not used, should be set to 0
lpData Any An integer variable to receive the value; non-zero if the memory manager is enabled.
See Also IpMmonShow, IpMmonSet

IpMmonSet
Page 2-462
IpMmonSet Syntax IpMmonSet (sAttribute, sParam, Value)
Description This function sets the Memory Manager attributes
Parameters sAttribute Integer The MMON_VMENABLE attribute enables or disables the virtual memory manager.
sParam Integer Not used, should be set to 0
Value Long A value indicating if the memory manager is on or off: zero to turn it off, a non-zero value to turn it on.
See Also IpMmonShow, IpMmonGet, IpMmonSetInt
IpMmonSetInt Syntax IpMmonSetInt (sAttribute, sParam, Value)
Description This function sets a value, rather than a variable, for the Memory Manager attributes
Parameters sAttribute Integer Attribute to modify; in this case, MMON_VMENABLE
sParam Integer Not used, should be set to 0
Value Long The new value for the attribute
See Also IpMmonShow, IpMmonGet, IpMmonSet
IpMmonShow Syntax IpMmonShow (nWindow)
Description This function shows or hides the Memory Manager window.
Parameters nWindow Short Must be one of the following: MMON_HIDE - Hide current window MMON_SHOW - Show last used window MMON_MAXIMIZE - Show large dialog MMON_MINIMIZE - Show small dialog
See Also IpMmonGet, IpMmonSet
IpMorePts See IpListPts.

IpMosaicCreate
Page 2-463
IpMosaicCreate Syntax IpMosaicCreate(ImageList, NumofImages)
Description This function creates a mosaic of the selected images.
Parameters ImageList String A semi-colon delimited string containing a list of workspace names to specify the images in the mosaic. There should not be any extraneous spaces in the string.
NumofImages Integer Specifys the number of images in the Image List. Use -1 to specify all open images in the workspace.
Return Value This function returns the Document ID of the mosaic, which will be an integer greater than 0. A negative return value indicates an error.
Example ret = IpMosaicCreate (“Test.tif;Untitled”,2)
This command creates a mosaic from the open workspaces called, “Test.tif” and “Untitled. tif.” The workspace names specified in the image list are separated with a semicolon.
Comments The ImageList parameter is ignored if the number of images less -1.

IpMosaicGet
Page 2-464
IpMosaicGet Syntax IpMosaicGet(sAttributes,Value)
Description This function queries the mosaic attributes.
Parameters Attributes Integer See list below.
Value Integer LPSHORT (C)
Pointer to a long variable to receive the attribute’s new setting.
ATTRIB Short Value
MA_AUTOGRID 0 = Autogrid on 1 = Autogrid off
MA_CAPTION 0 = none 1 = Image/Workspace name 2 = File Name 3 = Date/Time 4 = Descrption (one line only) 5 = Frame number
MA_COLUMNS number of columns (ignored if using Autogrid) MA_FONTSIZE font size in points MA_IMAGESIZE 0 = printer default paper size
1 = ¼ printer default paper size 2 = User defined
ATTRIB Short Value MA_IMAGEWIDTH Number of pixels MA_IMAGEHEIGHT Number of pixels MA_IMAGECLASS -1 = highest precision class (Best Fit)
1 = 8-bit Grayscale 2 = Palette 3 = 24-bit True Color 4 = 12-bit Grayscale 5 = Single Point 6 = 16-bit Grayscale 7 = 48-bit True Color 8 = 36-bit True Color
MA_PAGENUMBERS 0 = Page numbers off 1 = Page number on
MA_ROWS number of rows (ignored if using Autogrid) MA_SPACING Spacing in pixels between rows or columns

IpMosaicSet
Page 2-465
Return Value This function returns the Document ID of the mosaic, which will be an integer greater than 0.
A negative return value indicates an error.
Example Sub MosaicGet1() ret = IpOutputShow(1) dim parm as integer ret = IpMoasicGet(MA_ROWS,parm) Debug.print parm end sub
Sub MosaicGet2() ret = IpOutputShow(1) dim parm as string* 255 ret = IpMoasicGetStr(MA_TITLE,parm) Print parm end sub This command creates a mosaic from the currently open workspace.
See Also IpMosaicSet
IpMosaicSet Syntax IpMosaicSet(sAttributes, sValue, lpValue)
Description This function sets the mosaic attributes.
Parameters Attributes Integer Determines the mosaic attribute to set. Must be one of the following:
IMC_GRAY = 1 IMC_PALETTE = 2 IMC_RGB = 3 IMC_GRAY12 = 4 IMC_SINGLE = 5 IMC_GRAY16 = 6 IMC_RGB36 = 8 IMC_RGB48 = 9
sValue Integer New attribute value.
lpValue String New attribute string. Must be one of the following: MA_TITLE MA _FOOTER MA_FONT
Example ret = IpMosaicSet (MA_IMAGESIZE,0, IPNULL)
ret = IpMosaicSet (MA_TITLE, 0, “Mosaic#1”)
See Also IpMosaicGet

IpMosaicShow
Page 2-466
IpMosaicShow Syntax IpMosaicShow(bShow)
Description This function is used to show or hide the Mosaic Image dialog.
Parameters bShow Integer An integer value of 0 or 1 specifying whether to show or hide the Mosaic Image dialog box. Where: 0 - Hides the dialog . 1 - Shows the dialog
Example ret = IpMosaicShow(1)
This statement displays the Mosaic Image dialog box.
IpOpBkgndCorrect Syntax IpOpBkgndCorrect(WsBackId, BlackLevel, bNewImage)
Description This function corrects for uneven background lighting in the active image. Equivalent to the Background Correction option button in the Background Correction dialog box.
Parameters WsBackId Integer An integer specifying the ID of the open image to be used as the background image. See Comments, below, for more about this ID number.
BlackLevel Integer An integer between 0 and 255 specifying the black level.
bNewImage Integer An integer value of 0 or 1 specifying whether the transformed image is to be written to a new image window, or back into the active image window. Where: 0 - Writes the transformed results to the active window. 1 - Writes the transformed results to a new image window.
Return Value This function returns the Document ID of the resulting image, which will be an integer greater than 0. A negative return value indicates an error.
Example ret = IpOpBkgndCorrect(0, 50, 1)
This statement will perform a background correction on the active window, using image 0 as the characteristic background image. A value of 50 defines the black level.The corrected result will be written to a new window.
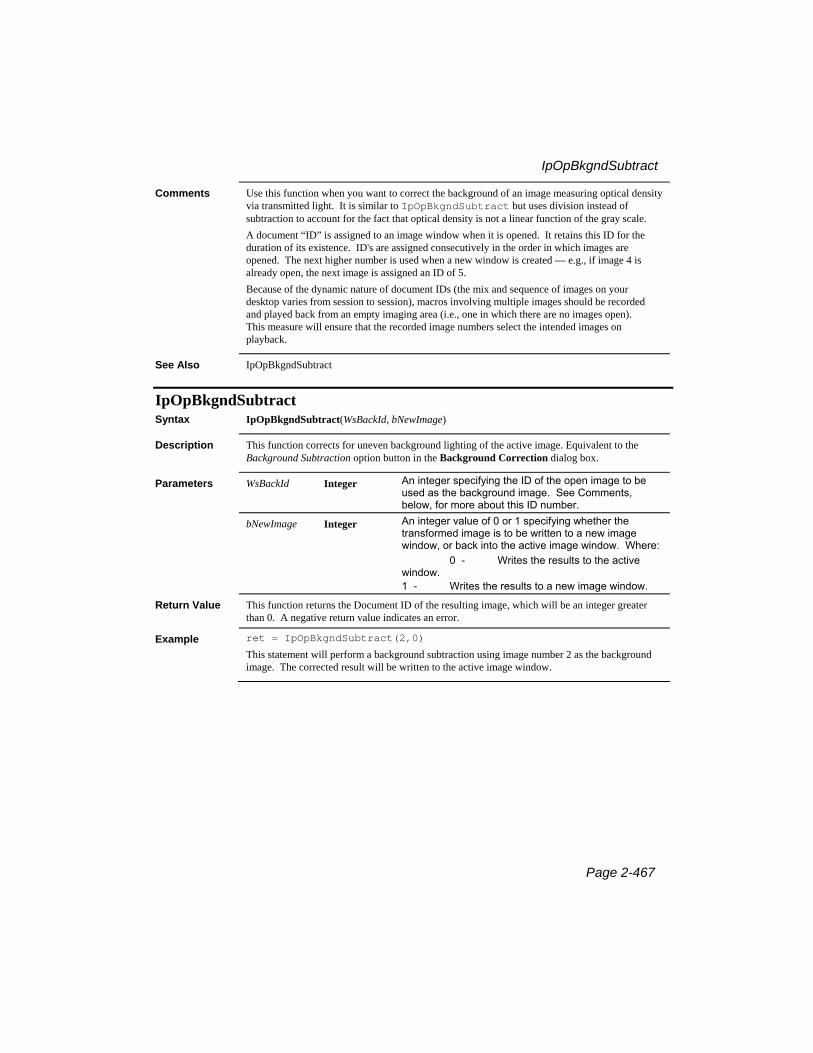
IpOpBkgndSubtract
Page 2-467
Comments Use this function when you want to correct the background of an image measuring optical density via transmitted light. It is similar to IpOpBkgndSubtract but uses division instead of subtraction to account for the fact that optical density is not a linear function of the gray scale. A document “ID” is assigned to an image window when it is opened. It retains this ID for the duration of its existence. ID's are assigned consecutively in the order in which images are opened. The next higher number is used when a new window is created — e.g., if image 4 is already open, the next image is assigned an ID of 5. Because of the dynamic nature of document IDs (the mix and sequence of images on your desktop varies from session to session), macros involving multiple images should be recorded and played back from an empty imaging area (i.e., one in which there are no images open). This measure will ensure that the recorded image numbers select the intended images on playback.
See Also IpOpBkgndSubtract
IpOpBkgndSubtract Syntax IpOpBkgndSubtract(WsBackId, bNewImage)
Description This function corrects for uneven background lighting of the active image. Equivalent to the Background Subtraction option button in the Background Correction dialog box.
Parameters WsBackId Integer An integer specifying the ID of the open image to be used as the background image. See Comments, below, for more about this ID number.
bNewImage Integer An integer value of 0 or 1 specifying whether the transformed image is to be written to a new image window, or back into the active image window. Where: 0 - Writes the results to the active window. 1 - Writes the results to a new image window.
Return Value This function returns the Document ID of the resulting image, which will be an integer greater than 0. A negative return value indicates an error.
Example ret = IpOpBkgndSubtract(2,0)
This statement will perform a background subtraction using image number 2 as the background image. The corrected result will be written to the active image window.

IpOpImageArithmetics
Page 2-468
Comments Use this function when you want to flatten the background of an image prior to counting or measuring objects. IpOpBkgndSubtract compares the active image to the background image and replaces, in the active image, pixels that are deemed to be part of the background with a value close to the mean background intensity.
A document “ID” is assigned to an image window when it is opened. It retains this ID number for the duration of its existence. ID's are assigned consecutively in the order in which images are opened. The next higher number is used when a new window is created — e.g., if image 4 is already open, the next image is assigned an ID of 5.
Because of the dynamic nature of document IDs (the mix and sequence of images on your desktop varies from session to session), macros involving multiple images should be recorded and played back from an empty imaging area (i.e., one in which there are no images open). This measure will ensure that the recorded image numbers select the intended images on playback.
See Also IpOpBkgndCorrect
IpOpImageArithmetics Syntax IpOpImageArithmetics(WsId, Number, OpaCode, bNewImage)
Description This function performs arithmetic operations upon the active image or AOI, in conjunction with a second image. Equivalent to performing an arithmetic operation using the Other Image option in the Arithmetic Operations dialog box.
Parameters WsId Integer An integer specifying the ID of the open image to be used as the operand. See Comments, below, for more about this ID number.
Number Single A single point number specifying the value to be used to offset or scale the result, as follows: If OpaCode is set to OPA_ADD, OPA_SUB or OPA_DIFF, this value will be added to the result. If OpaCode is set to OPA_MULT or OPA_DIV, the result will be multiplied by this value. For all other operations, this parameter is ignored (just set it to 0).
OpaCode Integer An enumerated integer specifying the kind of arithmetic operation to be performed. Must be one of the following: OPA_ACC OPA_ADD OPA_AVG OPA_DIFF OPA_DIV OPA_MAX OPA_MIN OPA_MULT OPA_NOT OPA_SUB See definitions under Comments, below.
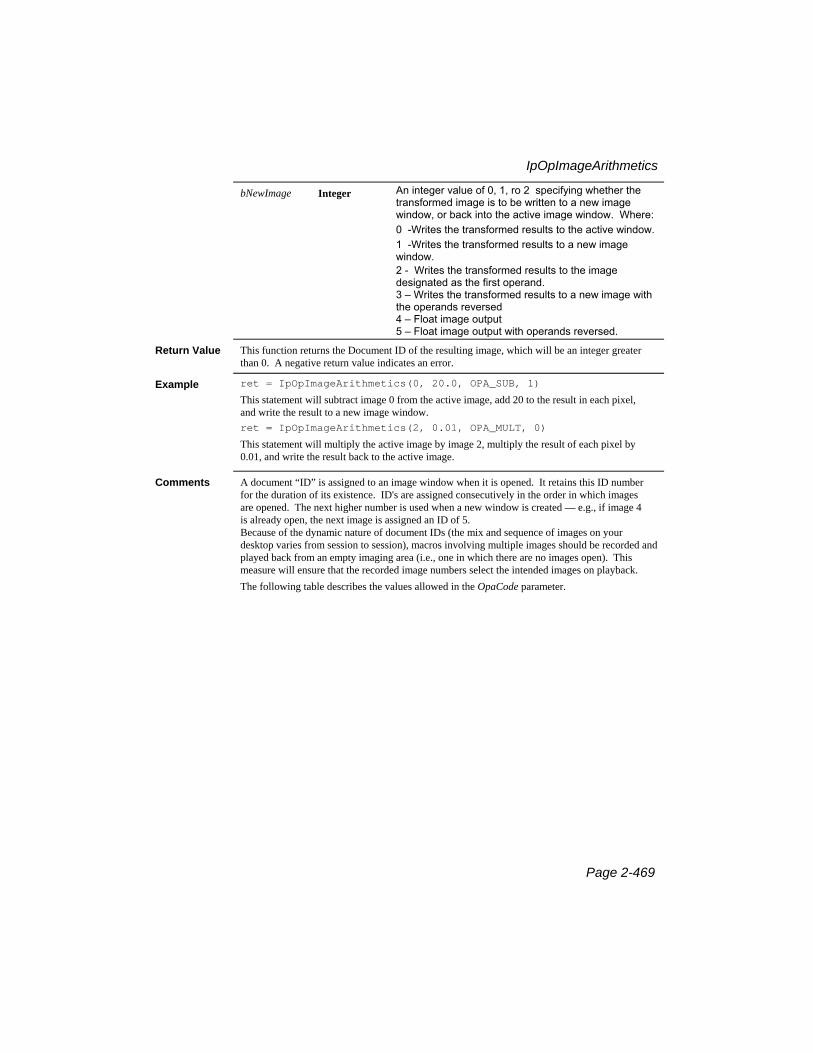
IpOpImageArithmetics
Page 2-469
bNewImage Integer An integer value of 0, 1, ro 2 specifying whether the transformed image is to be written to a new image window, or back into the active image window. Where: 0 -Writes the transformed results to the active window. 1 -Writes the transformed results to a new image window. 2 - Writes the transformed results to the image designated as the first operand. 3 – Writes the transformed results to a new image with the operands reversed 4 – Float image output 5 – Float image output with operands reversed.
Return Value This function returns the Document ID of the resulting image, which will be an integer greater than 0. A negative return value indicates an error.
Example ret = IpOpImageArithmetics(0, 20.0, OPA_SUB, 1)
This statement will subtract image 0 from the active image, add 20 to the result in each pixel, and write the result to a new image window. ret = IpOpImageArithmetics(2, 0.01, OPA_MULT, 0)
This statement will multiply the active image by image 2, multiply the result of each pixel by 0.01, and write the result back to the active image.
Comments A document “ID” is assigned to an image window when it is opened. It retains this ID number for the duration of its existence. ID's are assigned consecutively in the order in which images are opened. The next higher number is used when a new window is created — e.g., if image 4 is already open, the next image is assigned an ID of 5.
Because of the dynamic nature of document IDs (the mix and sequence of images on your desktop varies from session to session), macros involving multiple images should be recorded and played back from an empty imaging area (i.e., one in which there are no images open). This measure will ensure that the recorded image numbers select the intended images on playback. The following table describes the values allowed in the OpaCode parameter.

IpOpImageLogic
Page 2-470
OpaCode DESCRIPTION OPA_ACC Adds the active image (with the “as is” option
turned off. OPA_ADD Adds the active image and the other image. OPA_AVG Replaces each pixel with the mean value of the two
images. OPA_DIFF Obtains the absolute value of the difference
between the active image and the other image. OPA_DIV Divides the active image by the other image. OPA_MAX Replaces each pixel with the largest value of the
two images. OPA_MIN Replaces each pixel with the smallest value of the
two images. OPA_MULT Multiplies the active image by the other image. OPA_NOT Reverses the pixel values of the active image. OPA_SUB Subtracts the other image from the active image.
See Also IpOpNumberArithmetics, IpOpImageLogic, IpOpNumberLogic
IpOpImageLogic Syntax IpOpImageLogic(WsId, OplCode, bNewImage)
Description This function performs logical operations upon the active image or AOI, in conjunction with a second image. Equivalent to selecting one of the logical operations with the Other Image option in the Arithmetic Operations dialog box.
Parameters WsId Integer An integer specifying the ID of the open image to be used as the operand. See Comments, below, for more about this ID number.
OplCode Integer An enumerated integer specifying the kind of logic operation to be performed. Must be one of the following: OPL_AND OPL_OR OPL_XOR OPL_NAND OPL_NOR OPL_NOT OPL_COPY Can also be used with IMC_C_DIRECT if the “as is” checkbox is checked.
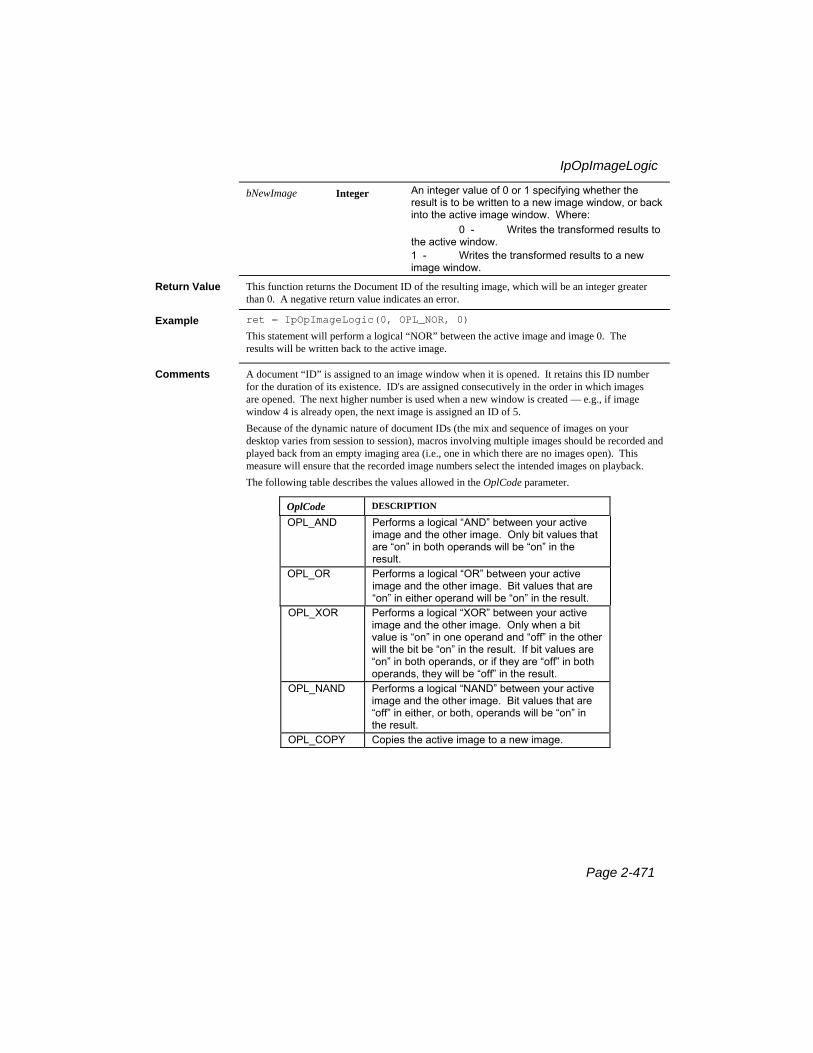
IpOpImageLogic
Page 2-471
bNewImage Integer An integer value of 0 or 1 specifying whether the result is to be written to a new image window, or back into the active image window. Where: 0 - Writes the transformed results to the active window. 1 - Writes the transformed results to a new image window.
Return Value This function returns the Document ID of the resulting image, which will be an integer greater than 0. A negative return value indicates an error.
Example ret = IpOpImageLogic(0, OPL_NOR, 0)
This statement will perform a logical “NOR” between the active image and image 0. The results will be written back to the active image.
Comments A document “ID” is assigned to an image window when it is opened. It retains this ID number for the duration of its existence. ID's are assigned consecutively in the order in which images are opened. The next higher number is used when a new window is created — e.g., if image window 4 is already open, the next image is assigned an ID of 5. Because of the dynamic nature of document IDs (the mix and sequence of images on your desktop varies from session to session), macros involving multiple images should be recorded and played back from an empty imaging area (i.e., one in which there are no images open). This measure will ensure that the recorded image numbers select the intended images on playback. The following table describes the values allowed in the OplCode parameter.
OplCode DESCRIPTION
OPL_AND Performs a logical “AND” between your active image and the other image. Only bit values that are “on” in both operands will be “on” in the result.
OPL_OR Performs a logical “OR” between your active image and the other image. Bit values that are “on” in either operand will be “on” in the result.
OPL_XOR Performs a logical “XOR” between your active image and the other image. Only when a bit value is “on” in one operand and “off” in the other will the bit be “on” in the result. If bit values are “on” in both operands, or if they are “off” in both operands, they will be “off” in the result.
OPL_NAND Performs a logical “NAND” between your active image and the other image. Bit values that are “off” in either, or both, operands will be “on” in the result.
OPL_COPY Copies the active image to a new image.

IpOpNumberArithmetics
Page 2-472
OplCode DESCRIPTION
OPL_NOR Performs a logical “NOR” between your active image and the other image. Bit values that are “off” in both images will be “on” in the result.
OPL_NOT Performs a logical “NOT” on the bit values in the active image. Every bit value that is “on” in the active image will be “off” in the result. Every bit value that is “off” in the active image will be “on” in the result.
See Also IpOpNumberLogic, IpOpNumberArithmetics, IpOpImageArithmetics
IpOpNumberArithmetics Syntax IpOpNumberArithmetics(Number, OpaCode, bNewImage)
Description This function performs arithmetic operations upon the active image or AOI, in conjunction with a numeric value. Equivalent to selecting one of the arithmetic operations and the Number option in the Arithmetic Operations dialog box. Note - if you are working with a True Color image you can use the IpOpNumberRgb function to operate upon the three color channels simultaneously.
Parameters Number Single A number (of IPBasic type, Single) representing the operand to be used with the active image.
OpaCode Integer An enumerated integer specifying the kind of arithmetic operation to be performed. Must be one of the following: OPA_ADD OPA_SUB OPA_DIFF OPA_MULT OPA_DIV OPA_AVG OPA_MAX OPA_MIN OPA_SQR OPA_X2 OPA_X2Y See definitions under Comments, below. Can also be used with IMC_C_DIRECT if the “as is” checkbox is checked.

IpOpNumberArithmetics
Page 2-473
bNewImage Integer An integer value of 0 or 1 specifying whether the transformed image is to be written to a new image window, or back into the active image window. Where: 0 -Writes the transformed results to the active window. 1 -Writes the transformed results to a new image window. 2 - Writes the transformed results to the image designated as the first operand. 3 – Writes the transformed results to a new image with the operands reversed 4 – Float image output 5 – Float image output with operands reversed.
Return Value This function returns the Document ID of the resulting image, which will be an integer greater than 0. A negative return value indicates an error.
Example ret = IpOpNumberArithmetics(120.0, OPA_MAX, 1)
This statement will compare each pixel of the active image or AOI against the value 120.0, select whichever one is higher, and write the result to a new window.
Comments The following table describes the values allowed in the OpaCode parameter.
OpaCode DESCRIPTION OPA_ADD Adds the active image and Number. OPA_SUB Subtracts Number from the active image. OPA_DIFF Obtains the absolute value of the difference
between the active image pixel and Number. OPA_MULT Multiplies the active image pixel by Number. OPA_DIV Divides the active image pixel by Number. OPA_AVG Replaces pixel with the mean value of the
active image pixel and Number. OPA_MAX Replaces pixel with the larger of the two values,
the one in the active image or Number. OPA_MIN Replaces pixel with the smaller of the two
values, the one in the active image or Number. OPA_SQR Replaces the pixel with the square root of the
active image pixel OPA_X2 Replaces the pixel with the square of the active
image pixel OPA_X2Y Replaces the pixel with the value of the active
image pixe raised to Y power
See Also IpOpNumberRgb, IpOpImageArithmetics, IpOpImageLogic, IpOpNumberLogic

IpOpNumberLogic
Page 2-474
IpOpNumberLogic Syntax IpOpNumberLogic(Number, OplCode, bNewImage)
Description This function performs logical operations upon the active image or AOI in conjunction with a numeric value. Equivalent to selecting a logic operation and the “Number” option in the Arithmetic Operations dialog box.
Parameters Number Integer An integer specifying the operand to be used with the active image. This parameter is ignored when OplCode is set to OPL_NOT (in this case, just set Number to 0).
OplCode Integer An enumerated integer specifying the kind of logic operation to be performed. Must be one of the following: OPL_AND OPL_OR OPL_XOR OPL_NAND OPL_NOR OPL_NOT See definitions under Comments, below.
bNewImage Integer An integer value of 0 or 1 specifying whether the transformed image is to be written to a new image window, or back to the active image. Where: 0 - Writes the transformed results to the active window.
1 - Writes the transformed results to a new image window.
Return Value This function returns the Document ID of the resulting image, which will be an integer greater than 0. A negative return value indicates an error.
Example ret = IpOpNumberLogic(0, OPL_NOT, 1)
This statement will produce a negative image of the active image and write the results to a new window.
ret = IpOpNumberLogic(1, OPL_NOR, 0)
This statement will perform a logical “NOR” between the active image and the number 1, then write the results to the active image.
Comments The following table describes the values allowed in the OplCode parameter.

IpOpNumberLogic
Page 2-475
OplCode DESCRIPTION OPL_AND Performs a logical “AND” between the active image
and Number. Only bit values that are “on” in both operands will be “on” in the result.
OPL_OR Performs a logical “OR” between the active image and Number. Bit values that are “on” in either operand will be “on” in the result.
OPL_XOR Performs a logical “XOR” between the active image and Number. Only when a bit value is “on” in one operand and “off” in the other will the bit be “on” in the result. If bit values are “on” in both operands, or if they are “off” in both operands, they will be “off” in the result.
OPL_NAND Performs a logical “NAND” between the active image and Number. Bit values that are “off” in either, or both, operands will be “on” in the result.
OPL_NOR Performs a logical “NOR” between the active image and Number. Bit values that are “off” in both images will be “on” in the result.
OPL_NOT Performs a logical “NOT” on the bit values in the active image. Every bit value that is “on” in the active image will be “off” in the result. Every bit value that is “off” in the active image will be “on” in the result.
See Also IpOpImageLogic, IpOpNumberArithmetics, IpOpImageArithmetics
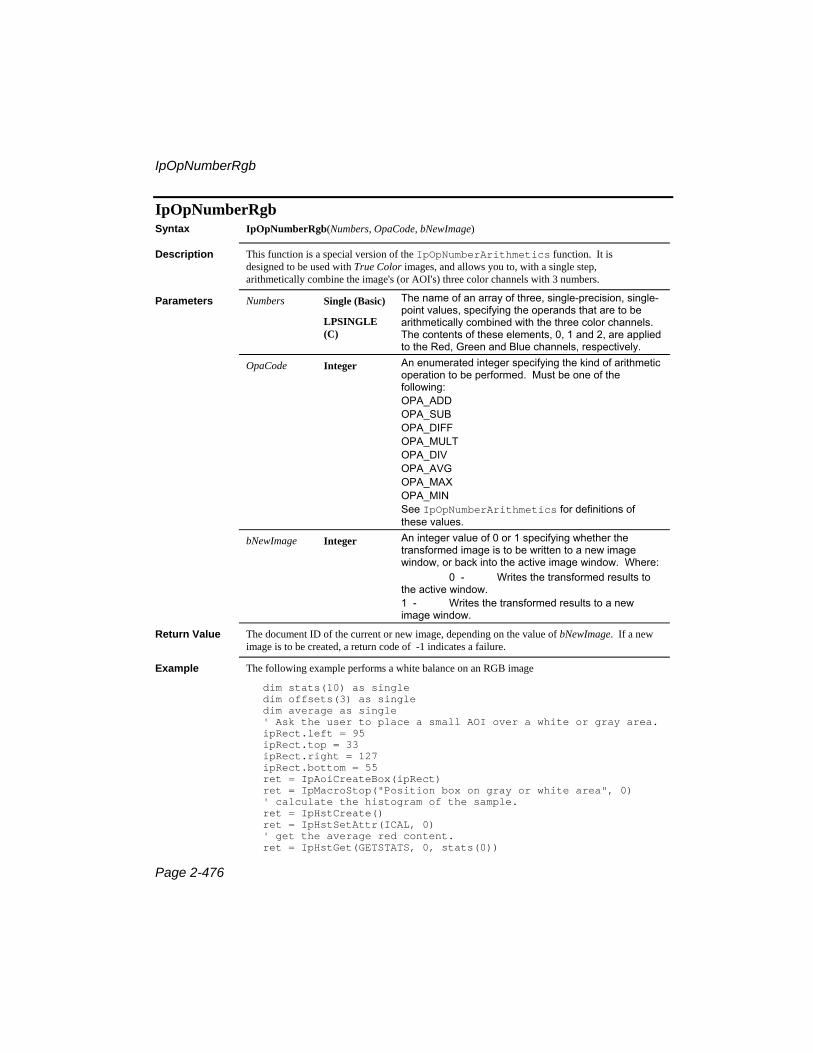
IpOpNumberRgb
Page 2-476
IpOpNumberRgb Syntax IpOpNumberRgb(Numbers, OpaCode, bNewImage)
Description This function is a special version of the IpOpNumberArithmetics function. It is designed to be used with True Color images, and allows you to, with a single step, arithmetically combine the image's (or AOI's) three color channels with 3 numbers.
Parameters Numbers Single (Basic)
LPSINGLE (C)
The name of an array of three, single-precision, single-point values, specifying the operands that are to be arithmetically combined with the three color channels. The contents of these elements, 0, 1 and 2, are applied to the Red, Green and Blue channels, respectively.
OpaCode Integer An enumerated integer specifying the kind of arithmetic operation to be performed. Must be one of the following: OPA_ADD OPA_SUB OPA_DIFF OPA_MULT OPA_DIV OPA_AVG OPA_MAX OPA_MIN See IpOpNumberArithmetics for definitions of these values.
bNewImage Integer An integer value of 0 or 1 specifying whether the transformed image is to be written to a new image window, or back into the active image window. Where: 0 - Writes the transformed results to the active window. 1 - Writes the transformed results to a new image window.
Return Value The document ID of the current or new image, depending on the value of bNewImage. If a new image is to be created, a return code of -1 indicates a failure.
Example The following example performs a white balance on an RGB image
dim stats(10) as single dim offsets(3) as single dim average as single ' Ask the user to place a small AOI over a white or gray area. ipRect.left = 95 ipRect.top = 33 ipRect.right = 127 ipRect.bottom = 55 ret = IpAoiCreateBox(ipRect) ret = IpMacroStop("Position box on gray or white area", 0) ' calculate the histogram of the sample. ret = IpHstCreate() ret = IpHstSetAttr(ICAL, 0) ' get the average red content. ret = IpHstGet(GETSTATS, 0, stats(0))

IpOpShow
Page 2-477
offsets(0) = stats(0) ' get the average green content. ret = IpHstGet(GETSTATS, 1, stats(0)) offsets(1) = stats(0) ' get the average blue content. ret = IpHstGet(GETSTATS, 2, stats(0)) offsets(2) = stats(0) ret = IpHstDestroy() ' calculate the average white content average = (offsets(0) + offsets(1) + offsets(2) ) / 3 ' Add values to each channel in the image. ret = IpAoiShow(FRAME_NONE) offsets(0) = average - offsets(0) offsets(1) = average - offsets(1) offsets(2) = average - offsets(2) ret = IpOpNumberRgb(offsets(0), OPA_ADD, 0)
Comments See Comments under IpOpNumberArithmetics.
See Also IpOpNumberArithmetics
IpOpShow Syntax IpOpShow(bShow)
Description This function is used to open or close the Image Operations dialog box. Equivalent to selecting the Operations command to open the box, and clicking its Close button to close it.
Parameters bShow Integer An integer value of 0 or 1 specifying whether to open or close the Arithmetic Operations dialog box. Where: 0 - Closes the Arithmetic Operations dialog box if it is open. 1 - Opens the Arithmetic Operations dialog box. 2 - Close the Background Correction dialog box. 3 – Opens the Background Correction dialog box.
Example ret = IpOpShow(1)
This statement displays the Image Operations dialog box.
Comments The Arithmetic Operations dialog box does not have to be open during execution of any of the arithmetic or logical operations. Its disposition, visible or hidden, is entirely your choice. You will want to display the window if your users will be required to make choices within it, but if your objective is simply to perform a predefined operation, you may want to run without opening it.

IpOutput
Page 2-478
IpOutput Syntax IpOutput(message)
Description This function prints a string to the Macro Output window. There is no Image-Pro command equivalent to this function; it is one that must be manually written with the macro editor.
Parameters message String The string that is it to be printed to the Macro Output window.
Example The following example prints the number of objects obtained from an earlier procedure. Notice that a line-ending sequence (i.e., a carriage return and a line feed) is included at the end of the string. This moves the cursor to the beginning of the next line so that is it in the proper positioned for the next IpOutput or Debug.print statement. Dim numobj as integer Dim NL as String NL = Chr$(13) + Chr$(10) ret = IpOutput("Number of objects: " + Str$(numobj)+ NL)
Comments This function is similar to the IPBasic Debug.print function, which you may want to use instead of IpOutput because of the automatic formatting it provides. Debug.print also lets you print non-string expressions, directly. The Macro Output window is limited to 25,000 characters. When this limit is reached, the oldest lines in the window are erased. To generate data files larger than 25,000 characters, save the contents of the window to a file, then append to that file in intervals. It is not necessary to show the Macro Output window to print to it. In fact, your program will execute faster if you print while the window is closed, since the display will not require any processing.
See Also Print, IpOutputShow, IpOutputClear, IpOutputSave
IpOutputClear Syntax IpOutputClear( )
Description This function clears the contents of the Macro Output window. It is equivalent to selecting the Clear Screen command on the Macro Output window's Edit menu.
Comments It is not necessary to show the Macro Output window to clear it.
See Also IpOutputShow, IpOutput, IpOutputSave
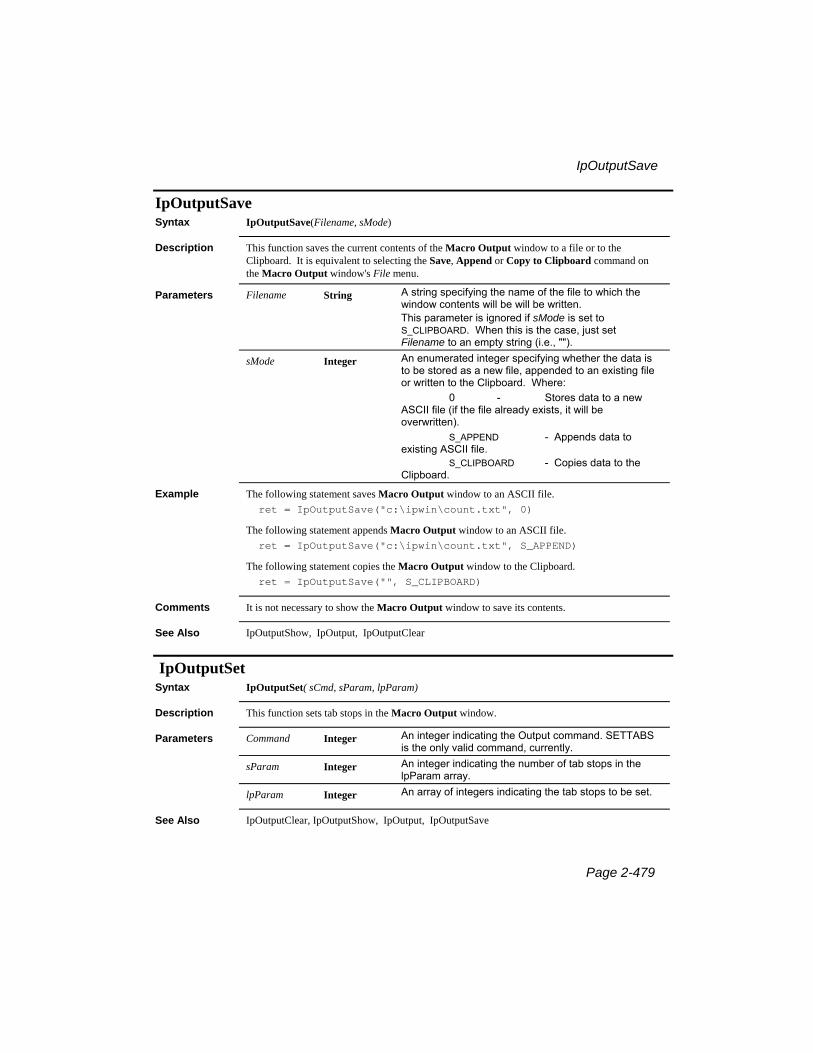
IpOutputSave
Page 2-479
IpOutputSave Syntax IpOutputSave(Filename, sMode)
Description This function saves the current contents of the Macro Output window to a file or to the Clipboard. It is equivalent to selecting the Save, Append or Copy to Clipboard command on the Macro Output window's File menu.
Parameters Filename String A string specifying the name of the file to which the window contents will be will be written. This parameter is ignored if sMode is set to S_CLIPBOARD. When this is the case, just set Filename to an empty string (i.e., "").
sMode Integer An enumerated integer specifying whether the data is to be stored as a new file, appended to an existing file or written to the Clipboard. Where: 0 - Stores data to a new ASCII file (if the file already exists, it will be overwritten). S_APPEND - Appends data to existing ASCII file. S_CLIPBOARD - Copies data to the Clipboard.
Example The following statement saves Macro Output window to an ASCII file. ret = IpOutputSave("c:\ipwin\count.txt", 0)
The following statement appends Macro Output window to an ASCII file. ret = IpOutputSave("c:\ipwin\count.txt", S_APPEND)
The following statement copies the Macro Output window to the Clipboard. ret = IpOutputSave("", S_CLIPBOARD)
Comments It is not necessary to show the Macro Output window to save its contents.
See Also IpOutputShow, IpOutput, IpOutputClear
IpOutputSet Syntax IpOutputSet( sCmd, sParam, lpParam)
Description This function sets tab stops in the Macro Output window.
Parameters Command Integer An integer indicating the Output command. SETTABS is the only valid command, currently.
sParam Integer An integer indicating the number of tab stops in the lpParam array.
lpParam Integer An array of integers indicating the tab stops to be set.
See Also IpOutputClear, IpOutputShow, IpOutput, IpOutputSave

IpOutputShow
Page 2-480
IpOutputShow Syntax IpOutputShow(bShow)
Description This function is used to open or close the Macro Output window. Equivalent to selecting the “Output Window” command to open the window, and double-clicking its control box to close it.
Parameters bShow Integer An integer value of 0 or 1 specifying whether the Macro Output window is to be shown. Where: 0 - Closes the window if it is already open. 1 - Opens the window.
Example The following statement displays the Macro Output window. ret = IpOutputShow(1)
Comments It is not necessary to show the Macro Output window to print to it, save it or clear it. In fact, your program will execute faster if you leave the window closed while working with its contents, since the display will not have to be processed.
See Also IpOutput, IpOutputClear, IpOutputSave
IpPalSetGrayBrush Syntax IpPalSetGrayBrush(bForeGround, GrayIndex)
Description This function sets the Foreground or Background color on the gray scale palette. Equivalent to clicking a color-square in the palette to assign it as the Foreground or Background color.
Parameters bForeGround Integer An integer value of 0 or 1 specifying whether the color is to be selected as the Foreground or Background color. Where: 0 - Specifies Background color. 1 - Specifies Foreground color.
GrayIndex Integer An integer between 0 and 255 (inclusive) specifying the gray level to be assigned as the Foreground or Background color.
Example ret = IpPalSetGrayBrush(0, 111) This statement will set the gray scale-palette Background color to gray level 111.
See Also IpPalSetPaletteBrush, IpPalSetRGBBrush
IpPalSetPaletteBrush Syntax IpPalSetPaletteBrush(bForeGround, PaletteIndex)
Description This function sets the Foreground or Background color for the palette-class palette. Equivalent to clicking a color-square in the palette to assign it as the Foreground or Background color.
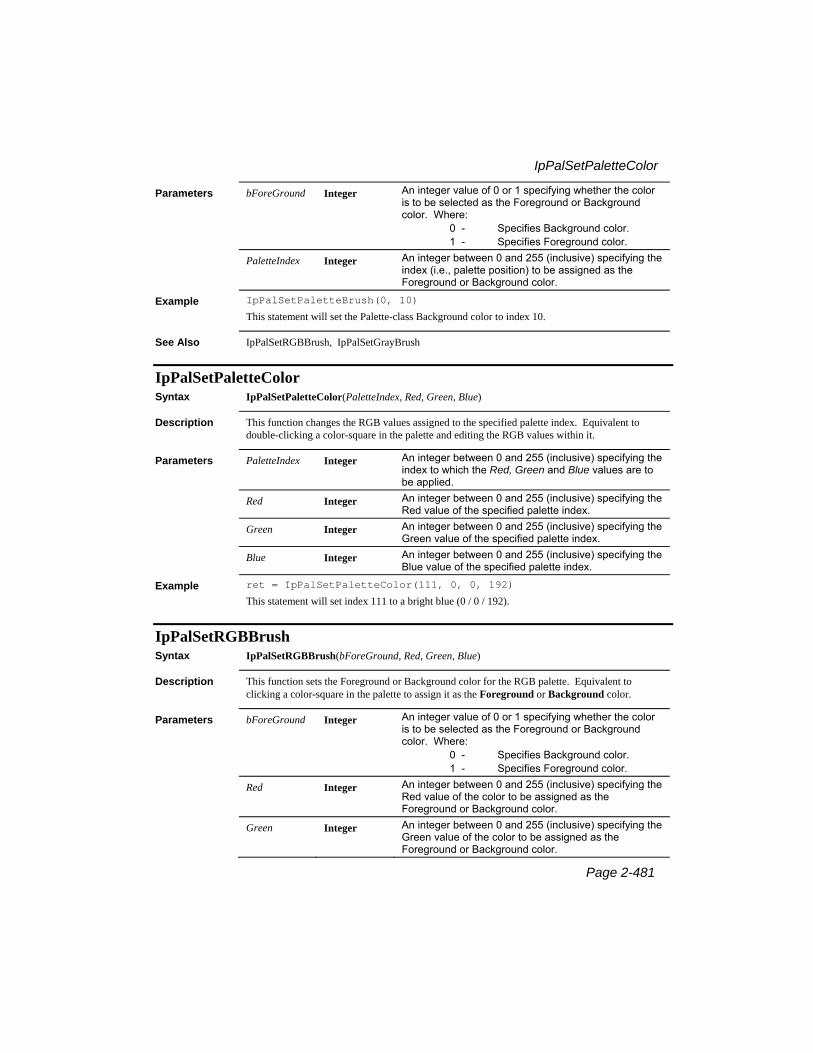
IpPalSetPaletteColor
Page 2-481
Parameters bForeGround Integer An integer value of 0 or 1 specifying whether the color is to be selected as the Foreground or Background color. Where: 0 - Specifies Background color. 1 - Specifies Foreground color.
PaletteIndex Integer An integer between 0 and 255 (inclusive) specifying the index (i.e., palette position) to be assigned as the Foreground or Background color.
Example IpPalSetPaletteBrush(0, 10)
This statement will set the Palette-class Background color to index 10.
See Also IpPalSetRGBBrush, IpPalSetGrayBrush
IpPalSetPaletteColor Syntax IpPalSetPaletteColor(PaletteIndex, Red, Green, Blue)
Description This function changes the RGB values assigned to the specified palette index. Equivalent to double-clicking a color-square in the palette and editing the RGB values within it.
Parameters PaletteIndex Integer An integer between 0 and 255 (inclusive) specifying the index to which the Red, Green and Blue values are to be applied.
Red Integer An integer between 0 and 255 (inclusive) specifying the Red value of the specified palette index.
Green Integer An integer between 0 and 255 (inclusive) specifying the Green value of the specified palette index.
Blue Integer An integer between 0 and 255 (inclusive) specifying the Blue value of the specified palette index.
Example ret = IpPalSetPaletteColor(111, 0, 0, 192)
This statement will set index 111 to a bright blue (0 / 0 / 192).
IpPalSetRGBBrush Syntax IpPalSetRGBBrush(bForeGround, Red, Green, Blue)
Description This function sets the Foreground or Background color for the RGB palette. Equivalent to clicking a color-square in the palette to assign it as the Foreground or Background color.
Parameters bForeGround Integer An integer value of 0 or 1 specifying whether the color is to be selected as the Foreground or Background color. Where: 0 - Specifies Background color. 1 - Specifies Foreground color.
Red Integer An integer between 0 and 255 (inclusive) specifying the Red value of the color to be assigned as the Foreground or Background color.
Green Integer An integer between 0 and 255 (inclusive) specifying the Green value of the color to be assigned as the Foreground or Background color.

IpPalShow
Page 2-482
Blue Integer An integer between 0 and 255 (inclusive) specifying the Blue value of the color to be assigned as the Foreground or Background color.
Example ret = IpPalSetRGBBrush(0, 255, 255, 0)
This statement will set the Background color on the RGB palette to yellow (i.e., 255 / 255 / 0).
See Also IpPalSetGrayBrush, IpPalSetPaletteBrush
IpPalShow Syntax IpPalShow(bShow)
Description This function is used to open or close the brush color selection or the image palette window. Equivalent to selecting the color patches button/window or selecting the Edit Palette command .
Parameters bShow Integer An integer value specifying whether the window is to be shown. Where: 1 - Opens the brush color selection window. 2 - Opens the image palette window (for Palette class images only).
Example ret = IpPalShow(1)
This statement will open the brush color selection window.
IpPcDefineColorSpread Syntax IpPcDefineColorSpread (ColorSpread, ClrFrom, ClrTo, Method)
Description This function loads defines a custom color spread for the pseudo-color palette.
Parameters ColorSpread Integer An integer value specifying the custom color spread to be defined, ColorSpread is greater than or equal to 8 (Custom 1) and less than or equal to 11 (Custom 4).
ClrFrom Long A long value specifying the starting color value. This color value is constructed by combining the desired red, green, and blue intensities (from 0 -255) as follows: ClrFrom = red + green * 256 + blue * 65536
ClrTo Long A long value specifying the ending color value. This color value is constructed by combining the desired red, green and blue intensities (from 0 to 255) as follows: ClrTo = red + green * 256 + blue * 65536
Method Integer An integer value specifying the method of interpolation between the starting and ending color values. Where:
0 - interpolate in RGB color space 1 - interpolate clockwise in HSI color space 2 - interpolate counter-clockwise in HSI color space

IpPcDyeTint
Page 2-483
Example ret = IpPcDefineColorSpread(8, 0, 16711680, 0)
This statement will define the Custom 1 color spread as being an RGB ramp from black to blue.
ret = IpPcDefineColorSpread(9, 255, 65280, 1)
This statement will define the Custom 2 color spread as being a clockwise HSI ramp from red to green.
Comments The custom color spread defined by this function will only be used if it is the active color spread.
See Also IpPcSetColorSpread
IpPcDyeTint Syntax IpPcDyeTint (DyeFile)
Description This function applies a dye tint to the current channel of the active workspace.
Parameters DyeFile String A string specifying the name of the dye file.
Comments The DyeFile specification can be just the name of the dye (e.g. “DAPI”), in which case the dye will be loaded from the current dye path. If the DyeFile specification includes a full path to the dye file, that will override the current dye path. The name may include the .IPD extension, or if it does not the extension will be added automatically. Tinting is applied to all of the frames of the active workspace that belong to the currently selected channel (the channel to which the active frame belongs). If the active workspace contains channel or wavelength information, the contiguous set of frames with identical information will be considered a channel set, and will be tinted. If this information is not available, the current sequence information (active portion or active frame) will be used. Tinting inherently conflicts with Pseudo-Coloring. Pseudo-coloring is applied to the image (to all frames identically), while tinting is applied to sets of frames. Applying tinting will remove any pseudo-coloring, and vice-versa.
See Also IpPcTint, IpDyeSelect
IpPcLoad Syntax IpPcLoad(PseudoColorFile)
Description This function loads a pseudo-color palette from the specified file. Equivalent to clicking File:Load in the Pseudo-Color dialog box.
Parameters PseudoColorFile String A string specifying the name of the file from which the pseudo-color palette will be read.
Example ret = IpPcLoad("C:\IPWIN\FOLIAGE.PSC")
This statement will load the pseudo-color file from a file called FOLIAGE.PSC in the \IPWIN directory on the C: drive.
See Also IpPcSave
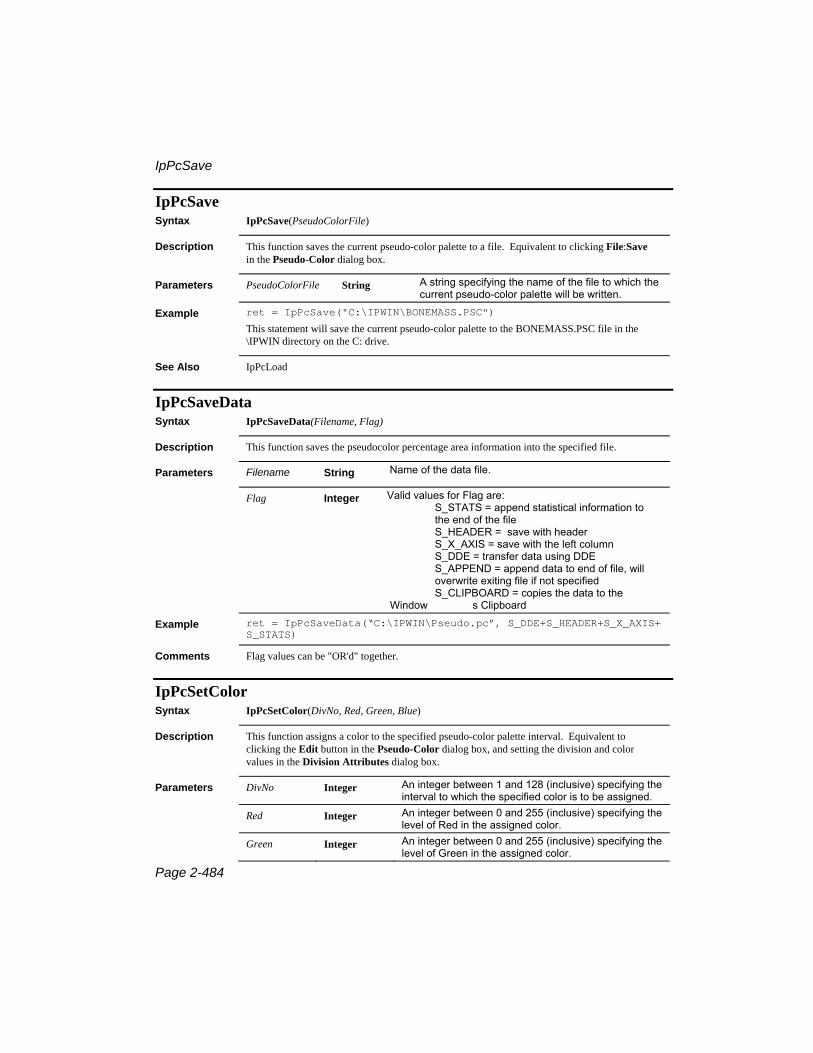
IpPcSave
Page 2-484
IpPcSave Syntax IpPcSave(PseudoColorFile)
Description This function saves the current pseudo-color palette to a file. Equivalent to clicking File:Save in the Pseudo-Color dialog box.
Parameters PseudoColorFile String A string specifying the name of the file to which the current pseudo-color palette will be written.
Example ret = IpPcSave("C:\IPWIN\BONEMASS.PSC")
This statement will save the current pseudo-color palette to the BONEMASS.PSC file in the \IPWIN directory on the C: drive.
See Also IpPcLoad
IpPcSaveData Syntax IpPcSaveData(Filename, Flag)
Description This function saves the pseudocolor percentage area information into the specified file.
Parameters Filename String Name of the data file.
Flag Integer Valid values for Flag are: S_STATS = append statistical information to the end of the file S_HEADER = save with header S_X_AXIS = save with the left column S_DDE = transfer data using DDE S_APPEND = append data to end of file, will overwrite exiting file if not specified S_CLIPBOARD = copies the data to the Window s Clipboard
Example ret = IpPcSaveData(“C:\IPWIN\Pseudo.pc”, S_DDE+S_HEADER+S_X_AXIS+ S_STATS)
Comments Flag values can be "OR'd" together.
IpPcSetColor Syntax IpPcSetColor(DivNo, Red, Green, Blue)
Description This function assigns a color to the specified pseudo-color palette interval. Equivalent to clicking the Edit button in the Pseudo-Color dialog box, and setting the division and color values in the Division Attributes dialog box.
Parameters DivNo Integer An integer between 1 and 128 (inclusive) specifying the interval to which the specified color is to be assigned.
Red Integer An integer between 0 and 255 (inclusive) specifying the level of Red in the assigned color.
Green Integer An integer between 0 and 255 (inclusive) specifying the level of Green in the assigned color.
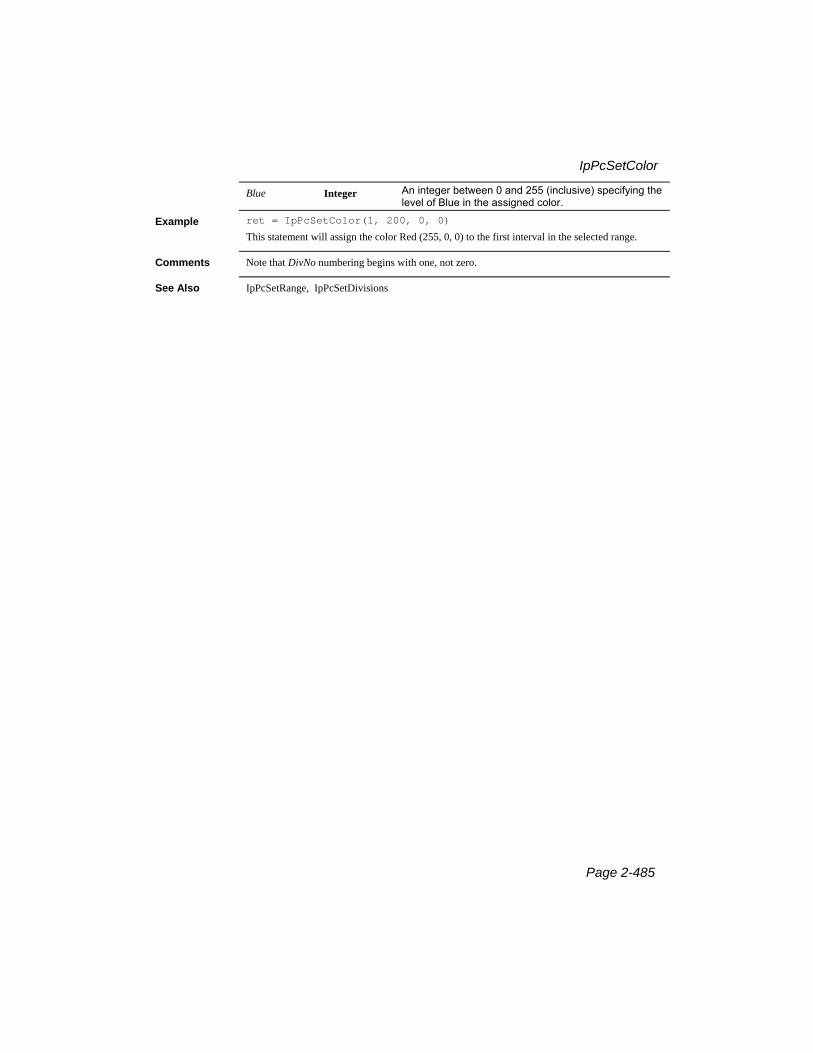
IpPcSetColor
Page 2-485
Blue Integer An integer between 0 and 255 (inclusive) specifying the level of Blue in the assigned color.
Example ret = IpPcSetColor(1, 200, 0, 0)
This statement will assign the color Red (255, 0, 0) to the first interval in the selected range.
Comments Note that DivNo numbering begins with one, not zero.
See Also IpPcSetRange, IpPcSetDivisions
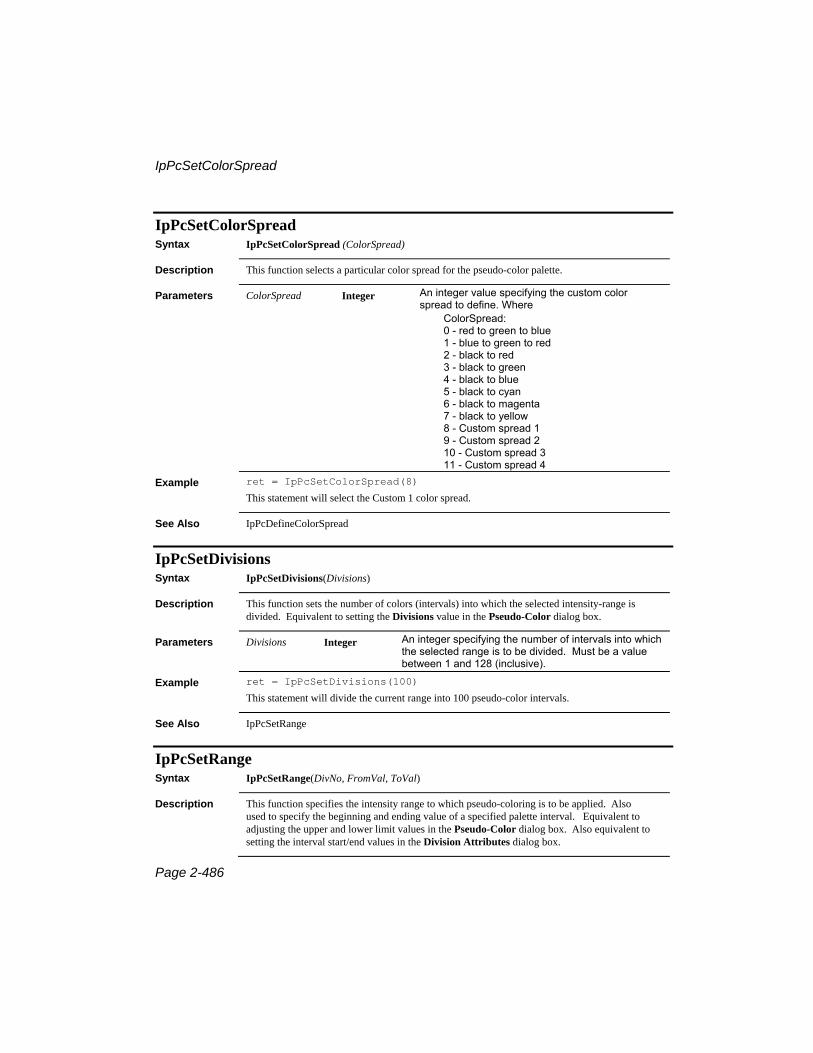
IpPcSetColorSpread
Page 2-486
IpPcSetColorSpread Syntax IpPcSetColorSpread (ColorSpread)
Description This function selects a particular color spread for the pseudo-color palette.
Parameters ColorSpread Integer An integer value specifying the custom color spread to define. Where
ColorSpread: 0 - red to green to blue 1 - blue to green to red 2 - black to red 3 - black to green 4 - black to blue 5 - black to cyan 6 - black to magenta 7 - black to yellow 8 - Custom spread 1 9 - Custom spread 2 10 - Custom spread 3 11 - Custom spread 4
Example ret = IpPcSetColorSpread(8)
This statement will select the Custom 1 color spread.
See Also IpPcDefineColorSpread
IpPcSetDivisions Syntax IpPcSetDivisions(Divisions)
Description This function sets the number of colors (intervals) into which the selected intensity-range is divided. Equivalent to setting the Divisions value in the Pseudo-Color dialog box.
Parameters Divisions Integer An integer specifying the number of intervals into which the selected range is to be divided. Must be a value between 1 and 128 (inclusive).
Example ret = IpPcSetDivisions(100)
This statement will divide the current range into 100 pseudo-color intervals.
See Also IpPcSetRange
IpPcSetRange Syntax IpPcSetRange(DivNo, FromVal, ToVal)
Description This function specifies the intensity range to which pseudo-coloring is to be applied. Also used to specify the beginning and ending value of a specified palette interval. Equivalent to adjusting the upper and lower limit values in the Pseudo-Color dialog box. Also equivalent to setting the interval start/end values in the Division Attributes dialog box.

IpPcShow
Page 2-487
Parameters DivNo Integer An integer between 1 and 128, specifying the interval for which beginning (FromVal) and endpoints (ToVal) are to be set, or -1 to specify the entire range.
FromVal Integer An integer between 0 and 255 (inclusive) specifying the first value in the specified interval or range.
ToVal Integer An integer between 0 and 255 (inclusive) specifying the last value in the specified interval or range.
Example ret = IpPcSetRange(2, 60, 100)
This statement will assign a range of 60 - 100 (inclusive) to the second interval.
ret = IpPcSetRange(-1, 0, 110)
This statement will set 0 to 110 (inclusive) as the range to which all pseudo-coloring will be applied.
Comments The FromVal and ToVal values must be expressed as an integer from 0 to 255 (inclusive). If your image is Gray Scale 12 or Single Point, the normalized equivalents of these values will be used.
When you record a macro that sets ranges, Auto-Pro may record more than one IpPcSetRange statement for each division. This occurs because one statement is posted when you set the starting value, and another is posted when you set the end value. You may edit out the unnecessary IpPcSetRange statements, and leave only the single statement that actually sets the range that is to be defined.
IpPcShow Syntax IpPcShow(bShow)
Description This function is used to apply or reset the pseudo-color palette for the active image. Equivalent to selecting the Pseudo-Color command to open the dialog box, and clicking the OK or Cancel buttons to close it.
Parameters bShow Integer An integer value of 0 or 1 specifying whether the Pseudo-Color palette is to be applied or removed from the active image. Where: 0 - Resets the pseudo-color palette, and removes pseudo-coloring from the active image. 1 - Applies the pseudo-color palette to the active image.
Example ret = IpPcShow(1)
This statement will apply the pseudo-color palette to the active image.
IpPcTint Syntax IpPcTint (Tint)
Description This function applies or removes a tint to the current channel of the active workspace.
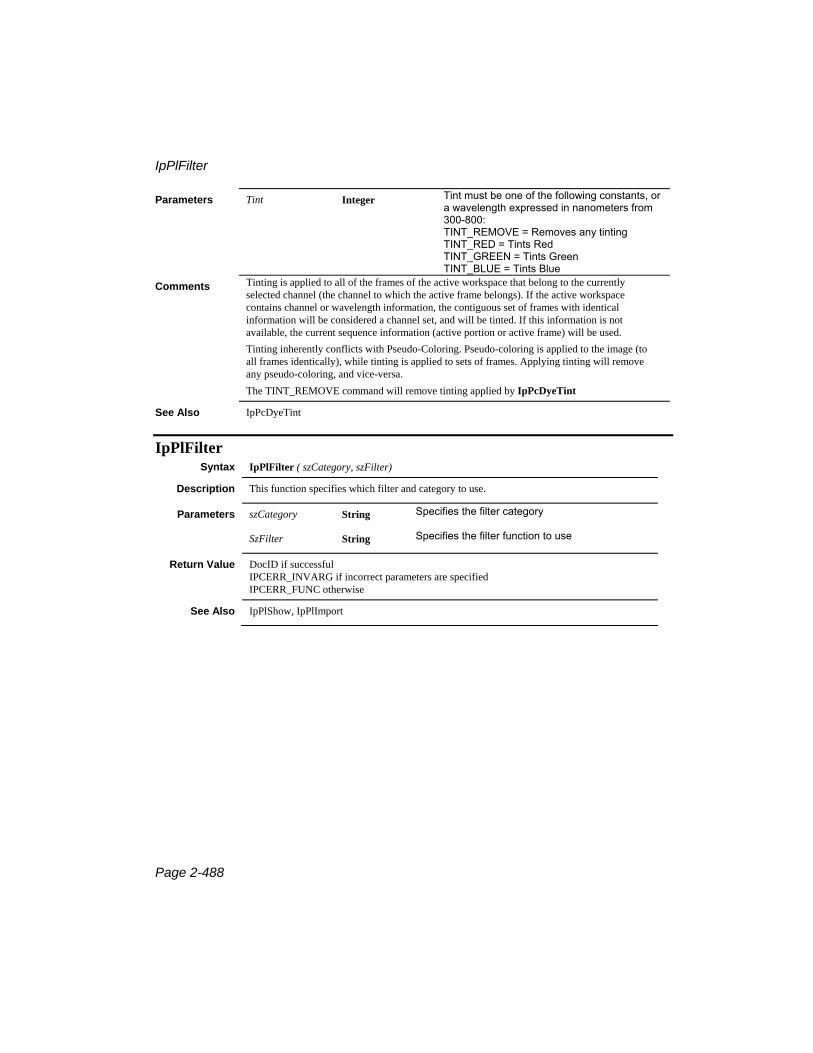
IpPlFilter
Page 2-488
Parameters Tint Integer Tint must be one of the following constants, or a wavelength expressed in nanometers from 300-800: TINT_REMOVE = Removes any tinting TINT_RED = Tints Red TINT_GREEN = Tints Green TINT_BLUE = Tints Blue
Comments Tinting is applied to all of the frames of the active workspace that belong to the currently selected channel (the channel to which the active frame belongs). If the active workspace contains channel or wavelength information, the contiguous set of frames with identical information will be considered a channel set, and will be tinted. If this information is not available, the current sequence information (active portion or active frame) will be used. Tinting inherently conflicts with Pseudo-Coloring. Pseudo-coloring is applied to the image (to all frames identically), while tinting is applied to sets of frames. Applying tinting will remove any pseudo-coloring, and vice-versa. The TINT_REMOVE command will remove tinting applied by IpPcDyeTint
See Also IpPcDyeTint
IpPlFilter Syntax IpPlFilter ( szCategory, szFilter)
Description This function specifies which filter and category to use.
Parameters szCategory String Specifies the filter category
SzFilter String Specifies the filter function to use
Return Value DocID if successful IPCERR_INVARG if incorrect parameters are specified IPCERR_FUNC otherwise
See Also IpPlShow, IpPlImport

IpPlImport
Page 2-489
IpPlImport Syntax IpPlImport (szImportName)
Description This function specifies which third-party import function to use.
Parameters szImportName String Name of the import function
Return Value DocID if successful IPCERR_INVARG if incorrect parameters are specified IPCERR_FUNC otherwise
See Also IpPlShow, IpPlFilter
IpPlShow Syntax IpPlShow (PlugWindow, bShow)
Description This function shows or hides the third-party plug-in dialogs.
Parameters PlugWindow integer 0 = selects the Import dialog. 1 = selects the Filter dialog.
bShow integer A value of 0 or 1, specifying whether the plug-in command window is to be open or closed. Where:
0 - Closes the window if it is already open. 1 - Opens the window.
Return Value IPCERR_NONE if successful IPCERR_INVARG if incorrect parameters are specified IPCERR_FUNC otherwise
See Also IpPlImport, IpPlFilter
IpPlotCreate Syntax IpPlotCreate(title)
Description Create a plot window with the given title.
Parameters title String Names the plot window
See Also IpPlotData, IpPlotRange, IpPlotSet, IpPlotShow, IpPlotUpdate, IpPlotDestroy

IpPlotData
Page 2-490
IpPlotData Syntax IpPlotData(plotId, axis, valueType, values, count)
Description Plots the data in the window referenced by plotID.
Parameters axis Integer Can be either the vertical axis (1) or the horizontal axis (0).
plotID Integer Integer value greater than zero.
valueType Integer Type of data to be plotted: PDT_INT16, PDT_INT32, PDT_SINGLE, PDT_DSINGLE
values Integer Contains the data to be plotted.
count Integer Number of elements to be plotted.
See Also IpPlotCreate, IpPlotRange, IpPlotSet, IpPlotShow, IpPlotUpdate, IpPlotDestroy
Comments For most plots, only the y-axis data needs to be set; the x-axis is incremented automatically by default.
IpPlotDestroy Syntax IpPlotUpdate (plotID)
Description Destroys the plot
Parameters plotID Integer Integer value greater than zero.
See Also IpPlotCreate, IpPlotData, IpPlotRange, IpPlotSet, IpPlotShow, IpPlotUpdate
IpPlotRange Syntax IpPlotRange(plotId, axis, valueType, rangeType, values, )
Description Sets the range for the values that will be visible on the graph for the horizontal or vertical axis.
Parameters axis Integer Can be either the vertical axis (1) or the horizontal axis (0).
plotID Integer Integer value greater than zero.
valueType Integer Type of data to be plotted: PDT_INT16, PDT_INT32, PDT_SINGLE, PDT_DSINGLE

IpPlotSet
Page 2-491
rangeType Integer Must be one of the following: RGE_FIXEDMIN values contins the lower range value. The upper range is calculated automatically from the data itself. RGE_FIXEDMAX values contains the upper range values. RGE_FIXEDvalues contains the upper and lower range values. RGE_AUTO values is not used. The lower and upper range values are calculated automatically from the data itself.
values Integer Contains one or two numbers defining the range.
See Also IpPlotData, IpPlotCreate, IpPlotSet, IpPlotShow, IpPlotUpdate, IpPlotDestroy
IpPlotSet Syntax IpPlotSet(plotId, commandString, )
Description Sets the graph parameters, legends, styles, etc.
Parameters plotID Integer Integer value greater than zero.
commandString String Can contain any number of parameters and is of the following form: [ ] indicate optional parameters.
Parameter1 [=value1], parameter2 [=value2], parameter3 = [value3]…
Parameters Values Description
histogram none bar chart without gaps between bars
line none line plot
scattergram none points plot
bars none bar chart with gaps
title string title of the graph
title on, off title of the graph on or off
axis string “on” or “off” i.e. axis is shown or hidden
x label string title of the x-axis
x label on, off title of the x-axis on or off
y label string title of the y-axis
y label on, off title of the y-axis on or off
Parameters Values Description
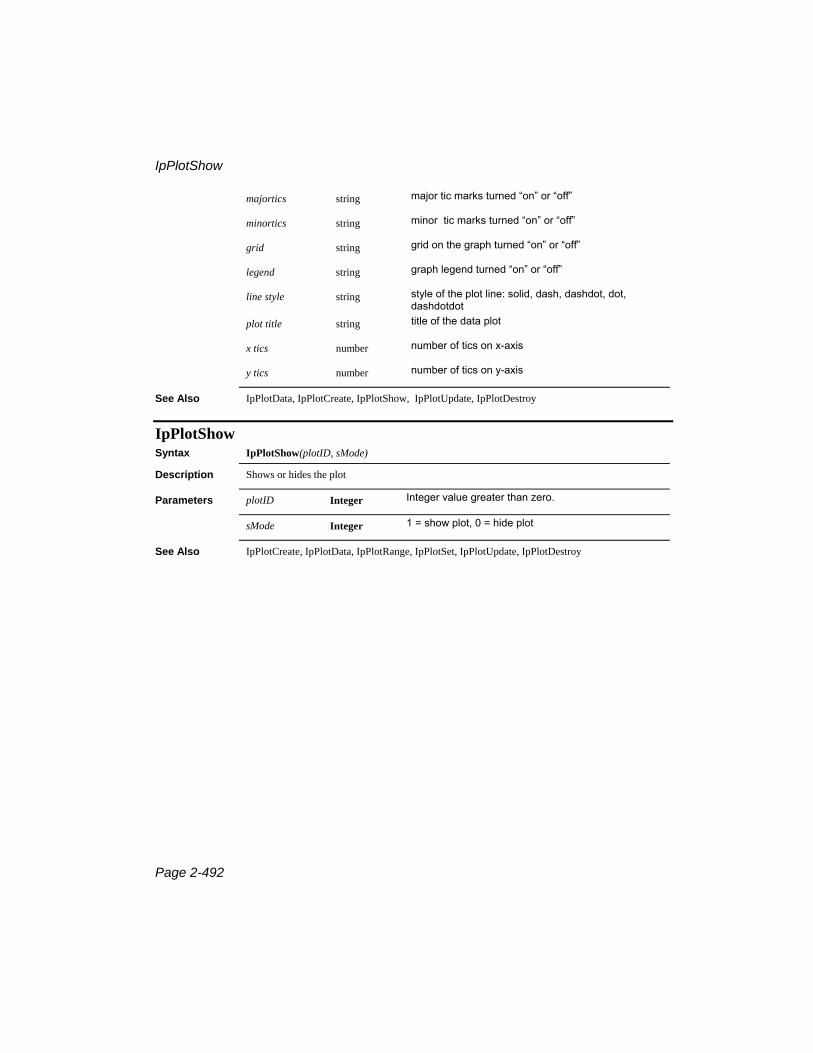
IpPlotShow
Page 2-492
majortics string major tic marks turned “on” or “off”
minortics string minor tic marks turned “on” or “off”
grid string grid on the graph turned “on” or “off”
legend string graph legend turned “on” or “off”
line style string style of the plot line: solid, dash, dashdot, dot, dashdotdot
plot title string title of the data plot
x tics number number of tics on x-axis
y tics number number of tics on y-axis
See Also IpPlotData, IpPlotCreate, IpPlotShow, IpPlotUpdate, IpPlotDestroy
IpPlotShow Syntax IpPlotShow(plotID, sMode)
Description Shows or hides the plot
Parameters plotID Integer Integer value greater than zero.
sMode Integer 1 = show plot, 0 = hide plot
See Also IpPlotCreate, IpPlotData, IpPlotRange, IpPlotSet, IpPlotUpdate, IpPlotDestroy
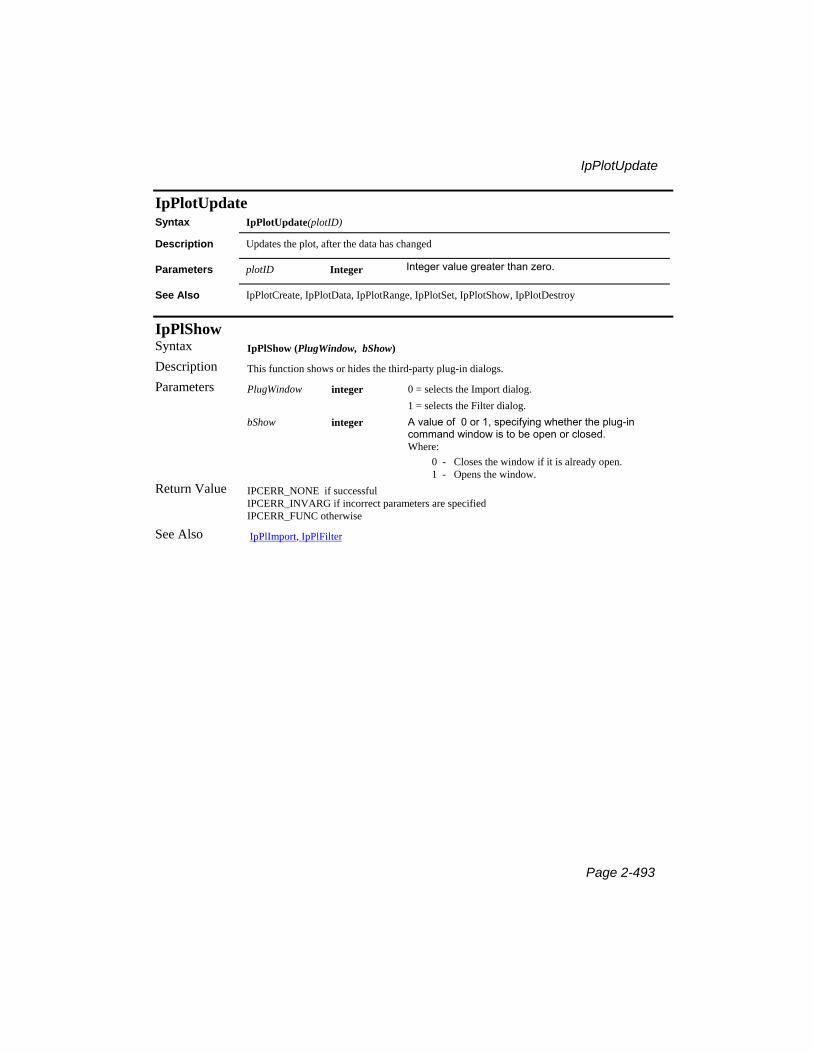
IpPlotUpdate
Page 2-493
IpPlotUpdate Syntax IpPlotUpdate(plotID)
Description Updates the plot, after the data has changed
Parameters plotID Integer Integer value greater than zero.
See Also IpPlotCreate, IpPlotData, IpPlotRange, IpPlotSet, IpPlotShow, IpPlotDestroy
IpPlShow Syntax IpPlShow (PlugWindow, bShow)
Description This function shows or hides the third-party plug-in dialogs. Parameters PlugWindow integer 0 = selects the Import dialog.
1 = selects the Filter dialog.
bShow integer A value of 0 or 1, specifying whether the plug-in command window is to be open or closed. Where:
0 - Closes the window if it is already open. 1 - Opens the window.
Return Value IPCERR_NONE if successful IPCERR_INVARG if incorrect parameters are specified IPCERR_FUNC otherwise
See Also IpPlImport, IpPlFilter

IpPortIOControl
Page 2-494
IpPortIOControl Syntax IpPortIOControl (Port, Command)
Description This function gets the current value of a specified attribute or setting.
Parameters Port Integer The serial port to control, from 1-8
Command Integer The command to apply to the serial port (see below)
Return Value 0 if the command can be completed, a negative error code if not.
Comments The following commands are supported after configuring the ports:
Command Description PORTIO_INIT Initializes the port with the current serial I/O configuration (baud rate, parity, etc.),
making the port ready for use with IpPortIORead and/or IpPortIOWrite. PORTIO_CLOSE Closes the port, releasing the port to other applications. PORTIO_UPDATE Updates the communications configuration for the port. PORTIO_CLEAR Clears the port’s input buffer, recommended prior to sending a new command
IpPortIOWrite that may result in a response string.
Example Attribute VB_Name = "Module1"
Option Explicit Private Const COM1 = 1 Private Const COM2 = 2 Private Const COM3 = 3 Private Const COM4 = 4 Sub Open_Port() ret = IpPortIOSetInt(PORTIOSET_SERIAL_BAUD, COM1, PORTIO_BAUD_115200) ret = IpPortIOSetInt(PORTIOSET_SERIAL_DATASIZE, COM1, PORTIO_DATASIZE_EIGHT) ret = IpPortIOSetInt(PORTIOSET_SERIAL_PARITY, COM1, PORTIO_PARITY_NONE) ret = IpPortIOSetInt(PORTIOSET_SERIAL_STOPBITS, COM1, PORTIO_STOP_ONE) ret = IpPortIOSetInt(PORTIOSET_SERIAL_FLOW, COM1, PORTIO_FLOW_NONE) ret = IpPortIOControl(COM1, PORTIO_INIT) End Sub Sub HelloWorld() Dim sMessage As String Dim sOut As String*255 sOut = "Hello World" ret = IpStGetString("Message to send:", sOut, 255) sMessage = IpTrim(sOut) ret = IpPortIOWrite(COM1, sMessage, 1, -1) Debug.Print ret; vbTab; Len(sMessage); vbTab; sMessage End Sub Sub ReadPort()

IpPortIOGetInt
Page 2-495
Dim sOut As String*255 Dim sMessage As String Dim count As Long Debug.Clear ret = IpOutputClear() sOut = " " count = 0 sMessage = "" Debug.Print "Begin read" Do count = count + 1 ret = IpPortIORead(COM1, sOut, 1, 255, 100) 'If sOut <> Chr(0) Then Debug.Print ret; vbTab; count; vbTab; sOut If ret > 0 And Asc(sOut) <> 10 And Asc(sOut) <> 13 Then Debug.Print ret; vbTab; count; vbTab; sOut; vbTab; GetTickCount() sMessage = sMessage + IpTrim(sOut) End If Loop Until Asc(sOut) = 13 'sOut = Chr(0) Debug.Print "Finished reading port: "; sMessage End Sub Sub Close_Port() ret = IpPortIOControl(COM1, PORTIO_CLOSE) End Sub
IpPortIOGetInt Syntax IpPortIOGetInt (Attribute, Paramter, Value)
Description This function gets the current value of a specified attribute or setting.
Parameters Attribute Integer The attribute to inquire (see Comments below)
Param Integet A value needed for some attributes (see Comments below)
Value Integer An integer to receive the current value for the specified attribute (see Comments below)
Return Value 0 if the attribute can be inquired, a negative error code if not.
See Also IpPortIOSetInt
Comments Note that only three inquiries are supported prior to configuring the ports: PORTIO_NUM_BOARDS, PORTIO_BOARD_DISABLED and PORTIO_DIGITAL_CONFIGURATION. The following attributes are supported:

IpPortIOGetInt
Page 2-496
Attribute Param value Description PORTIO_NUM_BOARDS Not used, set to 0 Returns the number of parallel
ports, each of which is treated as an independent I/O “board”.
PORTIO_NUM_D_INPUTS Not used, set to 0 Returns the total number of 8-bit digital inputs that are configured. Note that a particular board can only support a single 8-bit input or output – see also PORTIO_DIGITAL_CONFIGURATION.
This inquiry will return an error if the ports are not configured.
PORTIO_NUM_D_OUTPUTS Not used, set to 0. Returns the total number of 8-bit digital outputs that are configured. Note that a particular board can only support a single 8-bit input or output – see also PORTIO_DIGITAL_CONFIGURATION.
This inquiry will return an error if the ports are not configured.
PORTIO_NUM_D_INPUT_PINS Not used, set to 0 Returns the total number of single-bit digital input pins that are configured. Note that a particular board can support 8 1-bit inputs or outputs – see also PORTIO_DIGITAL_CONFIGURATION.
This inquiry will return an error if the ports are not configured.
PORTIO_NUM_D_OUTPUT_ PINS
Not used, set to 0 Returns the total number of single -bit digital output pins that are configured. Note that a particular board can only support 8 1-bit inputs or outputs – see also PORTIO_DIGITAL_CONFIGURATION.
This inquiry will return an error if the ports are not configured.

IpPortIOGetInt
Page 2-497
Attribute Param value Description PORTIO_D_INPUT_BRD The index of the input port
to inquire Returns the board containing the specified 8-bit input port.
PORTIO_D_OUTPUT_BRD The index of the output port to inquire
Returns the board containing the specified 8-bit output port.
PORTIO_D_INPUT_PIN_INDEX The index of the input pin to inquire
Returns the index of the pin on the port that corresponds to the specified 1-bit input pin. Note that pin indexes range from 0 to 7, which correspond to pins 2-9 of the physical connector.
PORTIO_D_INPUT_PIN_BRD The index of the input pin to inquire
Returns the board containing the specified 1-bit input pin.
PORTIO_D_OUTPUT_PIN_ INDEX
The index of the output pin to inquire
Returns the index of the pin on the port that corresponds to the specified 1-bit input pin. Note that pin indexes range from 0 to 7, which correspond to pins 2-9 of the physical connector.
PORTIO_D_OUTPUT_PIN_BRD The index of the output pin to inquire
Returns the board containing the specified 1-bit output pin.
PORTIO_D_INPUT_VALUE The index of the input port to inquire
Returns the current value on the specified 8-bit input port.
PORTIO_D_INPUT_PIN_VALUE The index of the input pin to inquire
Returns the current value on the specified single-bit input pin.
PORTIO_BOARD_DISABLED The index of the board to inquire
Returns whether the specified board is disabled in the current configuration.
PORTIO_DIGITAL_ CONFIGURATION
The index of the board to inquire
Returns the port configuration for the specified board, from the following:
PORTIO_D_8BIT_INPUT
PORTIO_D_8BIT_OUTPUT
PORTIO_D_8_INPUT_PINS
PORTIO_D_8_OUTPUT_PINS
PORTIO_SERIAL_BAUD Value of PORTIO_BAUDRATES
Should be one of the following:
PORTIO_BAUD_300 = 0,
PORTIO_BAUD_1200 = 1,
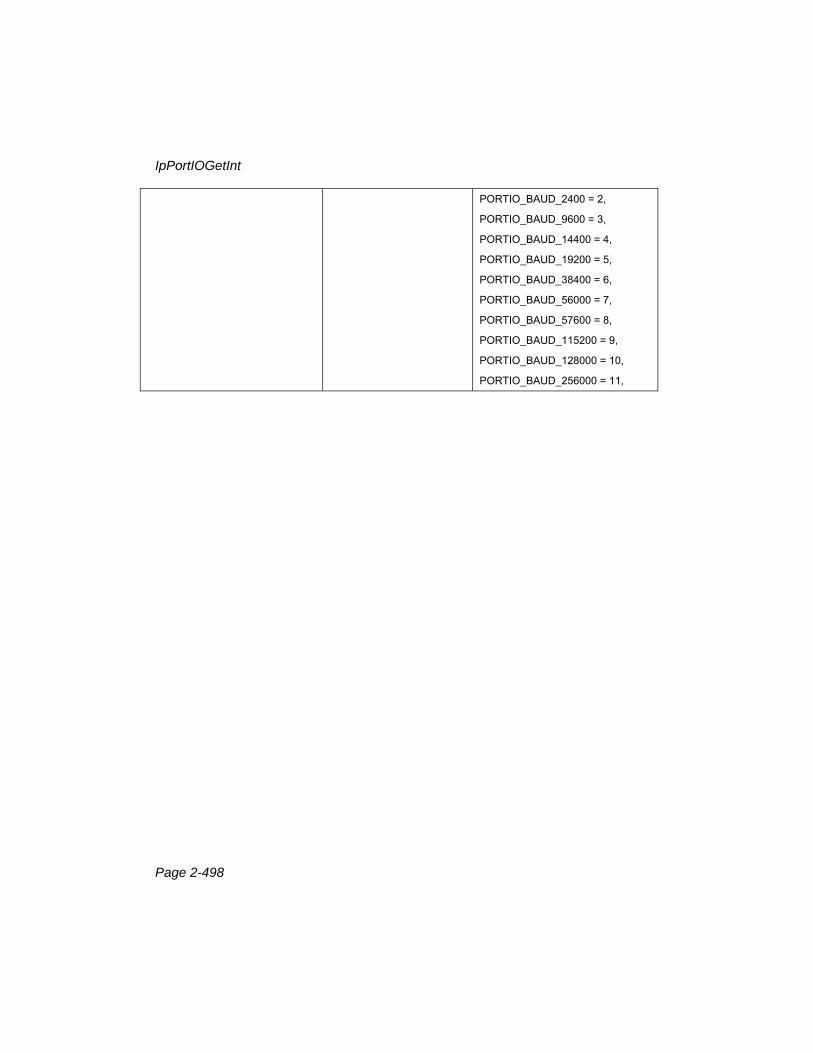
IpPortIOGetInt
Page 2-498
PORTIO_BAUD_2400 = 2,
PORTIO_BAUD_9600 = 3,
PORTIO_BAUD_14400 = 4,
PORTIO_BAUD_19200 = 5,
PORTIO_BAUD_38400 = 6,
PORTIO_BAUD_56000 = 7,
PORTIO_BAUD_57600 = 8,
PORTIO_BAUD_115200 = 9,
PORTIO_BAUD_128000 = 10,
PORTIO_BAUD_256000 = 11,

IpPortIOGetInt
Page 2-499
Attribute Param value Description PORTIO_SERIAL_DATASIZE A value between 5 and 8 Sets the byte size for the data
transfter to and from the device. Should be one of the following PORTIO_DATASIZE VALUES:
PORTIO_DATASIZE_FIVE
PORTIO_DATASIZE_SIX
PORTIO_DATASIZE_SEVEN
PORTIO_DATASIZE_EIGHT
PORTIO_SERIAL_PARITY Value of PORTIO_PARITYTYPES
Should be one of the following:
PORTIO_PARITY_NONE = 0,
PORTIO_PARITY_EVEN = 1,
PORTIO_PARITY_ODD = 2,
PORTIO_SERIAL_FLOW Serial port to inquire from 1-8
Returns the currently selected flow control for the specified port
PORTIO_SERIAL_STOPBITS Value of PORTIO_STOPBITS
Should be one of the following:
PORTIO_STOP_ONE = 0,
PORTIO_STOP_ONE_PT_FIVE = 1,
PORTIO_STOP_TWO = 2,
PORTIO_BLOCK_UPDATE Not used, set to 0 Returns whether output is currently blocked. Output may be blocked using IpPortIOSetInt in order to assure that a number of pins are set as close to simultaneously as possible.
PORTIO_OPEN_LAST_CONFIG Not used, set to 0 Returns whether the last saved configuration will automatically be opened.
PORTIO_D_OUTPUT_VALUE The index of the output port to inquire
Returns the last value that the 8-bit output port was set to.
PORTIO_D_OUTPUT_PIN_ VALUE
The index of the output pin to inquire
Returns the last value that the single-bit output pin was set to.
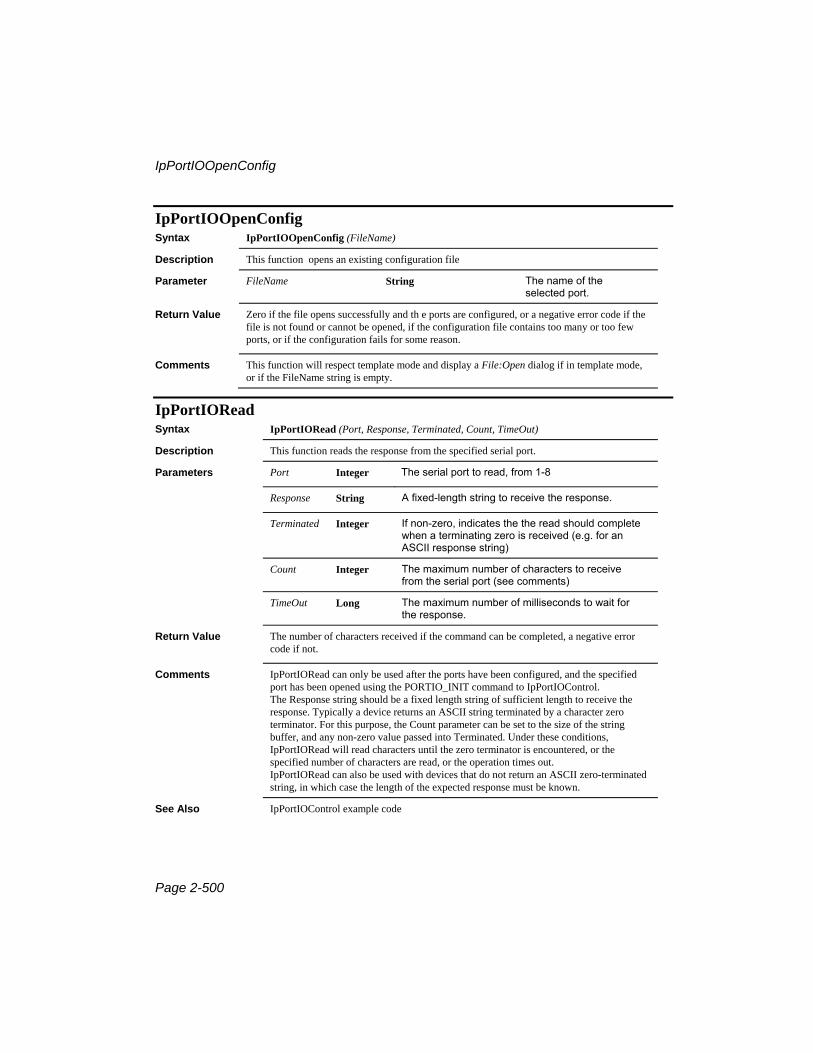
IpPortIOOpenConfig
Page 2-500
IpPortIOOpenConfig Syntax IpPortIOOpenConfig (FileName)
Description This function opens an existing configuration file
Parameter FileName String The name of the selected port.
Return Value Zero if the file opens successfully and th e ports are configured, or a negative error code if the file is not found or cannot be opened, if the configuration file contains too many or too few ports, or if the configuration fails for some reason.
Comments This function will respect template mode and display a File:Open dialog if in template mode, or if the FileName string is empty.
IpPortIORead Syntax IpPortIORead (Port, Response, Terminated, Count, TimeOut)
Description This function reads the response from the specified serial port.
Parameters Port Integer The serial port to read, from 1-8
Response String A fixed-length string to receive the response.
Terminated Integer If non-zero, indicates the the read should complete when a terminating zero is received (e.g. for an ASCII response string)
Count Integer The maximum number of characters to receive from the serial port (see comments)
TimeOut Long The maximum number of milliseconds to wait for the response.
Return Value The number of characters received if the command can be completed, a negative error code if not.
Comments IpPortIORead can only be used after the ports have been configured, and the specified port has been opened using the PORTIO_INIT command to IpPortIOControl. The Response string should be a fixed length string of sufficient length to receive the response. Typically a device returns an ASCII string terminated by a character zero terminator. For this purpose, the Count parameter can be set to the size of the string buffer, and any non-zero value passed into Terminated. Under these conditions, IpPortIORead will read characters until the zero terminator is encountered, or the specified number of characters are read, or the operation times out. IpPortIORead can also be used with devices that do not return an ASCII zero-terminated string, in which case the length of the expected response must be known.
See Also IpPortIOControl example code

IpPortIOSaveConfig
Page 2-501
IpPortIOSaveConfig Syntax IpPortIOSaveConfig (FileName)
Description This function saves an existing configuration file
Parameters FileName String The name of the selected port.
Return Value Zero if the file is successfully saved and th e ports are configured; a negative error code if the file cannot be saved, or if the configuration fails for some reason.
Comments This function will respect template mode and display a File:Save As dialog if in template mode, or if the FileName string is empty.
IpPortIOSetInt Syntax IpPortIOSetInt (Attribute, Paramter, Value)
Description This function sets the current value of a specified attribute or setting.
Parameters Attribute Integer The attribute to inquire (see Comments below)
Param Integet A value needed for some attributes (see Comments below)
Value Integer An integer to receive the current value for the specified attribute (see Comments below)
Return Value 0 if the attribute can be inquired, a negative error code if not.
See Also IpPortIOGetInt, IpPortIOControl sample code
Comments Note that only three inquiries are supported prior to configuring the ports: PORTIO_NUM_BOARDS, PORTIO_BOARD_DISABLED and PORTIO_DIGITAL_CONFIGURATION. The following attributes are supported:
Attribute Param value Description PORTIO_BOARD_DISABLED The index of the board to
inquire Set the specified board disabled (if Value is non-zero) or enabled in the current configuration.
PORTIO_DIGITAL_CONFIGURATION The index of the board to inquire
Sets the port configuration for the specified board, from the following:
PORTIO_D_8BIT_INPUT PORTIO_D_8BIT_OUTPUT PORTIO_D_8_INPUT_PINS PORTIO_D_8_OUTPUT_PINS

IpPortIOSetInt
Page 2-502
PORTIO_BLOCK_UPDATE Not used, set to 0 Sets whether output is
currently blocked. Output may be blocked in order to assure that a number of pins are set as close to simultaneously as possible.
PORTIO_OPEN_LAST_CONFIG Not used, set to 0 Sets whether the last saved configuration will automatically be opened.
PORTIO_D_OUTPUT_VALUE The index of the output port to inquire
Sets the 8-bit output port to the specified value.
PORTIO_D_OUTPUT_PIN_VALUE The index of the output pin to inquire
Sets the single-bit output pin to active (if non-zero) or inactive.
PORTIO_SERIAL_BAUD Value of
PORTIO_BAUDRATES
Should be one of the following: PORTIO_BAUD_300 = 0, PORTIO_BAUD_1200 = 1, PORTIO_BAUD_2400 = 2, PORTIO_BAUD_9600 = 3, PORTIO_BAUD_14400 = 4, PORTIO_BAUD_19200 = 5, PORTIO_BAUD_38400 = 6, PORTIO_BAUD_56000 = 7, PORTIO_BAUD_57600 = 8, PORTIO_BAUD_115200 = 9, PORTIO_BAUD_128000 = 10, PORTIO_BAUD_256000 = 11,
PORTIO_SERIAL_DATASIZE A value between 5 and 8
Sets the byte size for the data transfter to and from the device. Should be one of the following : PORTIO_DATASIZE_FIVE PORTIO_DATASIZE_SIX PORTIO_DATASIZE_SEVEN PORTIO_DATASIZE_EIGHT
PORTIO_SERIAL_FLOW Serial port to inquire from 1-8
Sets the flow control for the active port PORTIO_FLOW _NONE = 0, PORTIO_FLOW _XONXOFF = 1, PORTIO_FLOW _HARDWARE = 2,
PORTIO_SERIAL_PARITY Value of PORTIO_PARITYTYPES
Should be one of the following: PORTIO_PARITY_NONE = 0, PORTIO_PARITY_EVEN = 1, PORTIO_PARITY_ODD = 2,

IpPortIOShowConfig
Page 2-503
PORTIO_SERIAL_STOPBITS Value of
PORTIO_STOPBITS
Should be one of the following: PORTIO_STOP_ONE = 0, PORTIO_STOP_ONE_PT_FIVE = 1, PORTIO_STOP_TWO = 2,
IpPortIOShowConfig Syntax IpPortIOShowConfig ()
Description This function shows or hides the port configuration dialog
Return Value Zero if the ports are configured, a negative error code if there are no parallel ports available for configuration, if the configuration is canceled, or if the configuration fails for some reason.
Comments The function will not return until the dialog is exited by clicking OK or the close box.
IpPortIOWrite Syntax IpPortIOWrite (Port, Command, Terminated, Count)
Description This function writes a response to he specified serial port.
Parameters Port Integer The serial port to write, from 1-8
Command String The command string to send to the port
Terminated Integer If non-zero, indicates the the write should be completed by a terminating zero in the command string (e.g. for an ASCII response string)
Count Integer The maximum number of characters to write to the serial port (see comments)
Return Value The number of characters sent if the command can be completed, a negative error code if not.
Comments IpPortIOWrite can only be used after the ports have been configured, and the specified port has been opened using the PORTIO_INIT command to IpPortIOControl.
Typically a device command should be an ASCII string terminated by a character zero terminator. For this purpose, the Count parameter can be set to -1, and any non-zero value passed into Terminated. Under these conditions, IpPortIOWrite will write all characters in the Command string up to and including the zero terminator.
IpPortIOWrite can also be used with devices that do not take ASCII terminated strings, in which case Terminated should be set to zero, and the Count set to the precise number of characters to send.

IpProfCreate
Page 2-504
IpProfCreate Syntax IpProfCreate( )
Description This function opens the Line Profile window for the active image. Equivalent to selecting the Line Profile command.
Return Value This function returns the Profile ID if successful. A negative value is returned if an error occurred.
Comments An image must be open before calling this function. The newly created profile window becomes the “active” (i.e., selected) line profile as soon as it is created.
See Also IpProfMove, IpProfDestroy, IpProfSelect
IpProfDestroy Syntax IpProfDestroy( )
Description This function closes the active line profile window and clears any data associated with it. Equivalent to selecting the Close command in the Line Profile File menu.
Comments Note that this function operates upon the “active” profile window (i.e., the one most recently opened or selected). If the currently active profile is not the one you want to use, you must use IpProfSelect to explicitly select (make active) the appropriate window before calling IpProfDestroy.
See Also IpProfCreate, IpProfSelect
IpProfGet Syntax IpProfGet(Cmd, Param, OutVal)
Description Use this function to get information relating to the selected line profile. There is no Image-Pro command equivalent to this function; it is one that must be manually written with the macro editor.
Parameters Cmd Integer A command ID, which specifies the type of information you want to retrieve. Must be one of the following:
GETINDEX GETNUMPTS GETVALUES GETSTATS GETRANGE GETPOINTS
See definitions under Comments, below
Param Integer An integer specifying data with which Cmd will operate. See definitions under Comments, below, for the values required by each command
OutVal See below The address (name) of the variable that will receive the requested data. Be sure this variable is of the type required by Cmd. See Cmd description under Comments, below.
Return Value All commands listed below return 0 if successful. A negative error, otherwise.
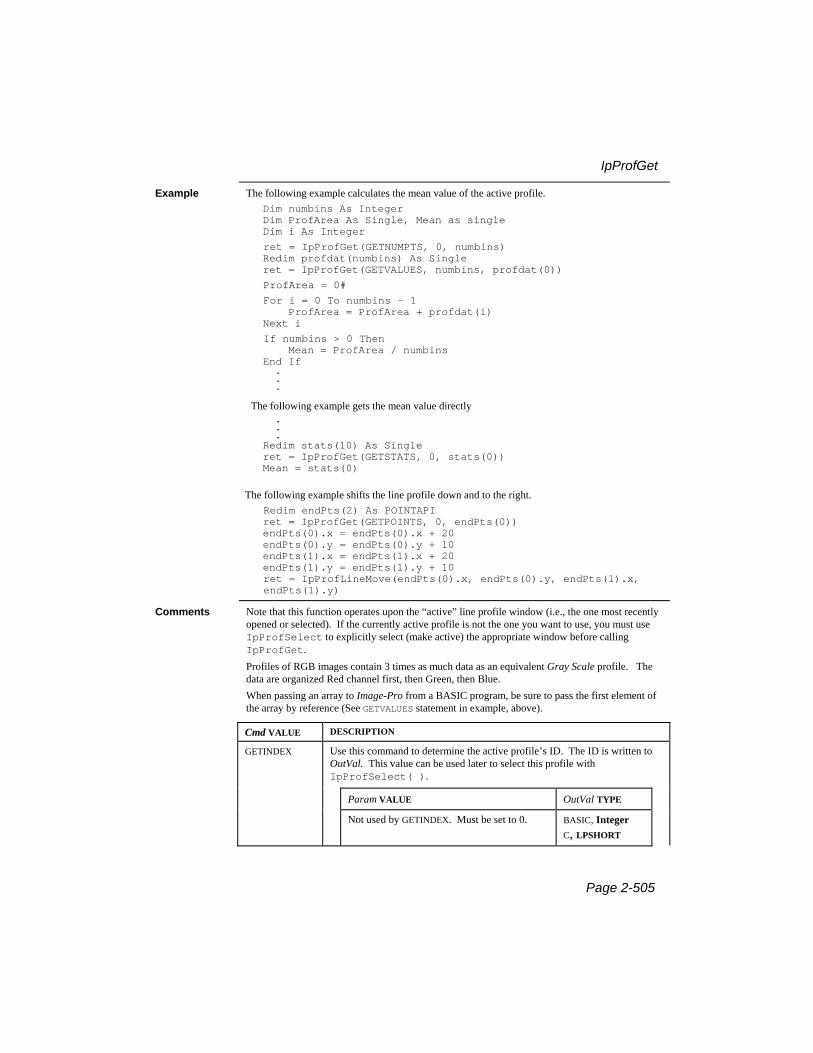
IpProfGet
Page 2-505
Example The following example calculates the mean value of the active profile. Dim numbins As Integer Dim ProfArea As Single, Mean as single Dim i As Integer
ret = IpProfGet(GETNUMPTS, 0, numbins) Redim profdat(numbins) As Single ret = IpProfGet(GETVALUES, numbins, profdat(0))
ProfArea = 0#
For i = 0 To numbins - 1 ProfArea = ProfArea + profdat(i) Next i
If numbins > 0 Then Mean = ProfArea / numbins End If . . .
The following example gets the mean value directly . . .
Redim stats(10) As Single ret = IpProfGet(GETSTATS, 0, stats(0)) Mean = stats(0)
The following example shifts the line profile down and to the right.
Redim endPts(2) As POINTAPI ret = IpProfGet(GETPOINTS, 0, endPts(0)) endPts(0).x = endPts(0).x + 20 endPts(0).y = endPts(0).y + 10 endPts(1).x = endPts(1).x + 20 endPts(1).y = endPts(1).y + 10 ret = IpProfLineMove(endPts(0).x, endPts(0).y, endPts(1).x, endPts(1).y)
Comments Note that this function operates upon the “active” line profile window (i.e., the one most recently opened or selected). If the currently active profile is not the one you want to use, you must use IpProfSelect to explicitly select (make active) the appropriate window before calling IpProfGet. Profiles of RGB images contain 3 times as much data as an equivalent Gray Scale profile. The data are organized Red channel first, then Green, then Blue. When passing an array to Image-Pro from a BASIC program, be sure to pass the first element of the array by reference (See GETVALUES statement in example, above).
Cmd VALUE DESCRIPTION
GETINDEX Use this command to determine the active profile’s ID. The ID is written to OutVal. This value can be used later to select this profile with IpProfSelect( ).
Param VALUE OutVal TYPE
Not used by GETINDEX. Must be set to 0. BASIC, Integer C, LPSHORT
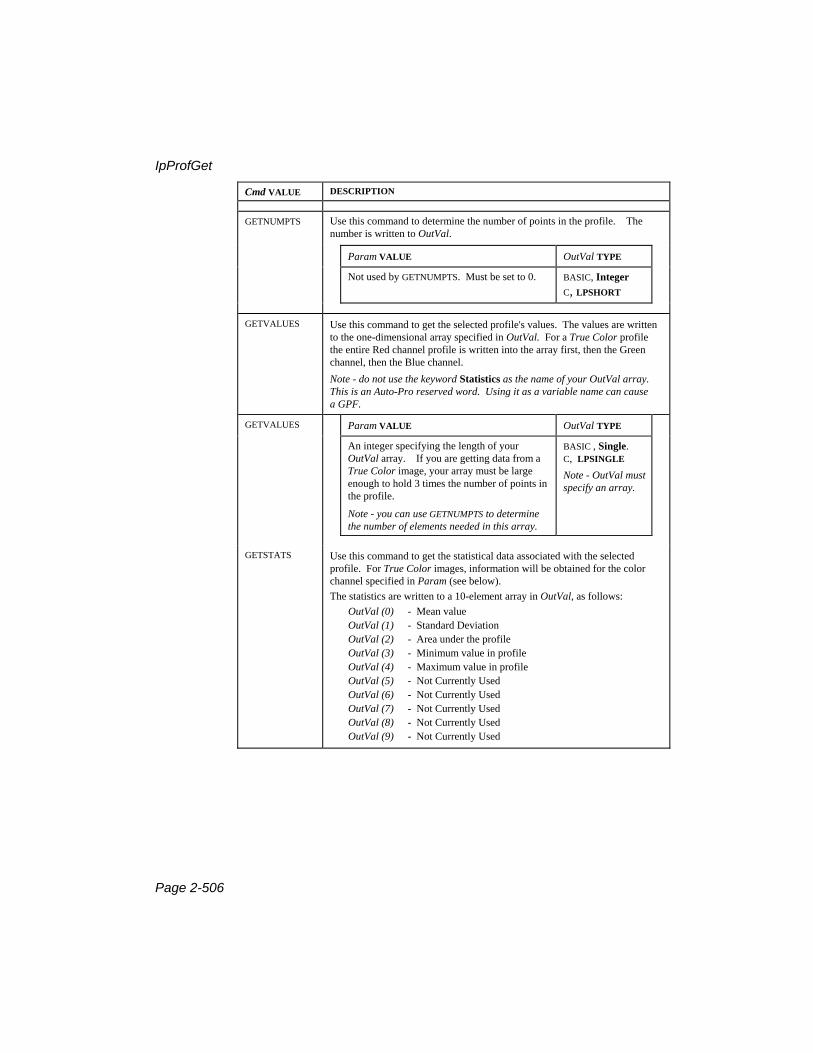
IpProfGet
Page 2-506
Cmd VALUE DESCRIPTION
GETNUMPTS Use this command to determine the number of points in the profile. The number is written to OutVal.
Param VALUE OutVal TYPE
Not used by GETNUMPTS. Must be set to 0. BASIC, Integer C, LPSHORT
GETVALUES Use this command to get the selected profile's values. The values are written to the one-dimensional array specified in OutVal. For a True Color profile the entire Red channel profile is written into the array first, then the Green channel, then the Blue channel. Note - do not use the keyword Statistics as the name of your OutVal array. This is an Auto-Pro reserved word. Using it as a variable name can cause a GPF.
GETVALUES Param VALUE OutVal TYPE
An integer specifying the length of your OutVal array. If you are getting data from a True Color image, your array must be large enough to hold 3 times the number of points in the profile.
Note - you can use GETNUMPTS to determine the number of elements needed in this array.
BASIC , Single. C, LPSINGLE
Note - OutVal must specify an array.
GETSTATS Use this command to get the statistical data associated with the selected profile. For True Color images, information will be obtained for the color channel specified in Param (see below). The statistics are written to a 10-element array in OutVal, as follows:
OutVal (0) - Mean value OutVal (1) - Standard Deviation OutVal (2) - Area under the profile OutVal (3) - Minimum value in profile OutVal (4) - Maximum value in profile OutVal (5) - Not Currently Used OutVal (6) - Not Currently Used OutVal (7) - Not Currently Used OutVal (8) - Not Currently Used OutVal (9) - Not Currently Used

IpProfGet
Page 2-507
Cmd VALUE DESCRIPTION
Param VALUE OutVal TYPE
An integer specifying the color channel for which statistics are to be obtained. Where:
0 - Red Channel 1 - Green Channel 2 - Blue Channel
This parameter is ignored if the image is not True Color. When this is the case, just set Param to 0.
BASIC, Single. C, LPSINGLE Note - OutVal must specify a 10-element array.
GETRANGE Use this command to get the range information associated with the selected profile. For True Color images, information will be obtained for the color channel you specify in Param (see below). The range information is written to a 10-element array in OutVal, as follows:
OutVal (0) - Start range (X1) OutVal (1) - End range (X2) OutVal (2) - Area under profile that is inside the range OutVal (3) - Area, above, as a percent of total area (%) OutVal (4) - Profile value at start of range (Y1) OutVal (5) - Profile value at end of range (Y2) OutVal (6) - Pixel number at start of range (0-based) OutVal (7) - Pixel number at end of range (0-based) OutVal (8) - Not Currently Used OutVal (9) - Not Currently Used
Param VALUE OutVal TYPE
An integer specifying the color channel for which range information is to be obtained. Where:
BASIC, Single. C, LPSINGLE
Param VALUE OutVal TYPE
0 - Red Channel 1 - Green Channel 2 - Blue Channel
This parameter not used when the image is not True Color. Set to 0.
BASIC, Single. C, LPSINGLE Note - OutVal must specify a 10-element array.

IpProfLineMove
Page 2-508
Cmd VALUE DESCRIPTION
GETPOINTS Use this command to get the image coordinates for the rectangle defining the start and end points of the profile. This command writes the coordinates to the 2-element array specified in OutVal.
Param VALUE OutVal TYPE
Not used by GETPOINTS. Must be 0. BASIC , POINTAPI C, LPPOINT
See Also IpProfCreate, IpProfSelect
IpProfLineMove Syntax IpProfLineMove(x1, y1, x2, y2)
Description This function defines the position of the line (or rectangle) being profiled. Equivalent to positioning the defining line with the mouse in the image window.
Parameters x1 Integer An integer specifying the x-coordinate of the first point on the line to be profiled. If a thick profile is being defined, this value specifies the x-coordinate of the upper-left corner of the rectangle to be profiled.
y1 Integer An integer specifying the y-coordinate of the first point on the line to be profiled. If a thick profile is being defined, this value specifies the y-coordinate of the upper-left corner of the rectangle to be profiled.
x2 Integer An integer specifying the x-coordinate of the last point of the line to be profiled. If a thick profile is being defined, this value specifies the x-coordinate of the lower-right corner of the rectangle to be profiled.
y2 Integer An integer specifying the y-coordinate of the last point of the line to be profiled. If a thick profile is being defined, this value specifies the y-coordinate of the lower-right corner of the rectangle to be profiled.
Example ret = IpProfLineMove(0, 0, 100, 216)
This statement will define a line that extends from pixel 0, 0 to pixel 100, 216 in the image.
Comments The parameter values must specify pixel positions in uncalibrated form. Note that this function operates upon the “active” profile window (i.e., the one most recently opened or selected). If the currently active profile is not the one you want to use, you must use IpProfSelect to explicitly select (make active) the appropriate window before calling IpProfLineMove. The position to which the profile is moved becomes the default position for the next Line Profile command.
See Also IpProfSetAttr

IpProfMaximize
Page 2-509
IpProfMaximize Syntax IpProfMaximize( )
Description This function enlarges the active line profile window to full screen. Equivalent to clicking the maximize button on the Line Profile window Control bar.
Comments Note that this function operates upon the “active” profile window (i.e., the one most recently opened or selected). If the currently active profile is not the one you want to use, you must use IpProfSelect to explicitly select (make active) the appropriate window before calling IpProfMaximize.
See Also IpProfMinimize, IpProfRestore, IpProfSelect
IpProfMinimize Syntax IpProfMinimize( )
Description This function reduces the active line profile window to an icon. Equivalent to clicking the minimize button on the Line Profile window Control bar.
Comments Note that this function operates upon the “active” profile window (i.e., the one most recently opened or selected). If the currently active profile is not the one you want to use, you must use IpProfSelect to explicitly select (make active) the appropriate window before calling IpProfMinimize.
See Also IpProfMaximize, IpProfRestore, IpProfSelect
IpProfMove Syntax IpProfMove(x, y)
Description This function moves the active (i.e., selected) line profile window to the specified location. Equivalent to dragging the Line Profile window with the mouse.
Parameters x Integer An integer specifying the x-coordinate of the screen position to which the upper-left corner of the Line Profile window is to be moved.
y Integer An integer specifying the y-coordinate of the screen position to which the upper-left corner of the Line Profile window is to be moved.
Example ret = IpProfMove(10, 40)
This statement will move the active profile window 11 pixels to the right, and 41 pixels down from the upper-left corner of the screen.
Comments The origin ( 0, 0 ) for the coordinate system used by the x and y parameters is the upper-left corner of the screen. Note that this function operates upon the “active” profile window (i.e., the one most recently opened or selected). If the currently active profile is not the one you want to use, you must use IpProfSelect to explicitly select (make active) the appropriate window before calling IpProfSize.
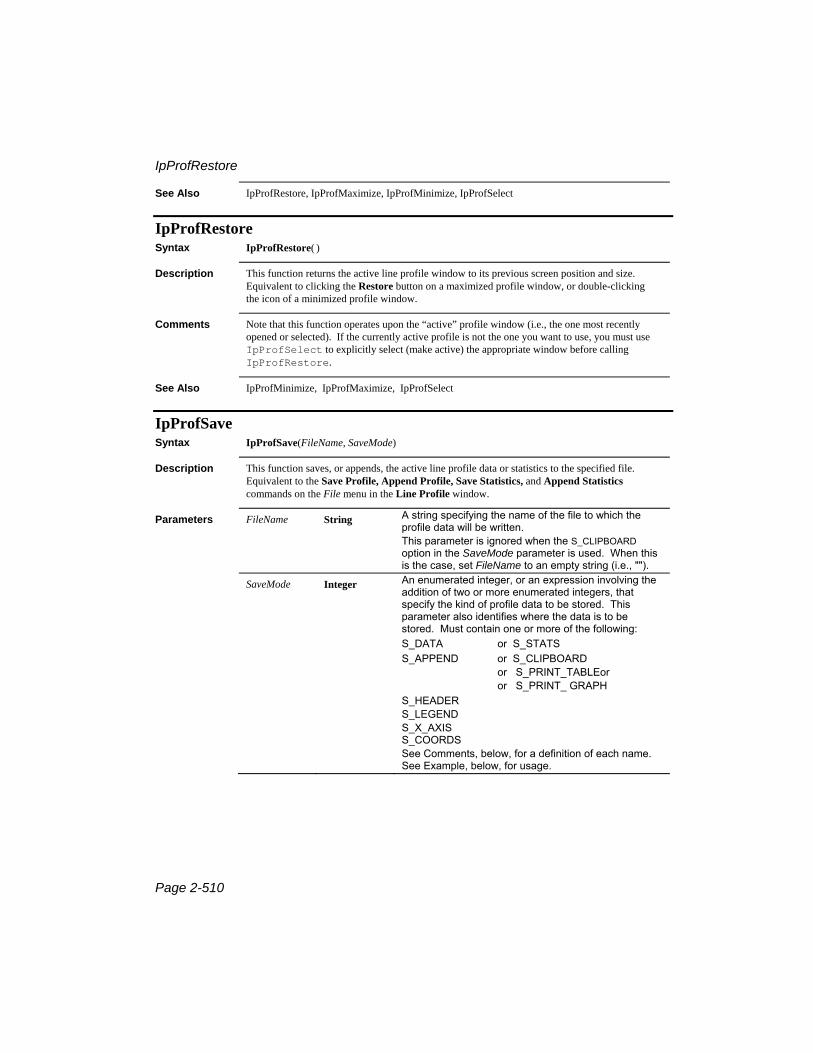
IpProfRestore
Page 2-510
See Also IpProfRestore, IpProfMaximize, IpProfMinimize, IpProfSelect
IpProfRestore Syntax IpProfRestore( )
Description This function returns the active line profile window to its previous screen position and size. Equivalent to clicking the Restore button on a maximized profile window, or double-clicking the icon of a minimized profile window.
Comments Note that this function operates upon the “active” profile window (i.e., the one most recently opened or selected). If the currently active profile is not the one you want to use, you must use IpProfSelect to explicitly select (make active) the appropriate window before calling IpProfRestore.
See Also IpProfMinimize, IpProfMaximize, IpProfSelect
IpProfSave Syntax IpProfSave(FileName, SaveMode)
Description This function saves, or appends, the active line profile data or statistics to the specified file. Equivalent to the Save Profile, Append Profile, Save Statistics, and Append Statistics commands on the File menu in the Line Profile window.
Parameters FileName String A string specifying the name of the file to which the profile data will be written. This parameter is ignored when the S_CLIPBOARD option in the SaveMode parameter is used. When this is the case, set FileName to an empty string (i.e., "").
SaveMode Integer An enumerated integer, or an expression involving the addition of two or more enumerated integers, that specify the kind of profile data to be stored. This parameter also identifies where the data is to be stored. Must contain one or more of the following:
S_DATA or S_STATS S_APPEND or S_CLIPBOARD or S_PRINT_TABLEor or S_PRINT_ GRAPH S_HEADER S_LEGEND S_X_AXIS S_COORDS See Comments, below, for a definition of each name. See Example, below, for usage.

IpProfSave
Page 2-511
Example ret = IpProfSave("C:\IPWIN\PROF.HST", S_DATA)
The statement above will save the current profile data to a file called PROF.HST in the \IPWIN directory on the C: drive. If the file already exists, it will be overwritten.
ret = IpProfSave("C:\IPWIN\PROF.HST", S_STATS+S_APPEND)
The statement above will append the current profile statistics to a file called PROF.HST in the \IPWIN directory on the C: drive.
ret = IpProfSave("C:\IPWIN\PROF.HST", S_DATA+S_HEADER+S_LEGEND)
The statement above will save the current profile data to a file called PROF.HST in the \IPWIN directory on the C: drive. The header and legend information will be stored with the data. If the file already exists, it will be overwritten.
ret = IpProfSave("", S_CLIPBOARD)
The statement above will save the current profile data to the Clipboard (the function defaults to S_DATA). Note that the FileName parameter specifies a zero-length string.
ret = IpProfSave("C:\IPWIN\PROF.HST",S_APPEND+S_DATA+S_X_AXIS)
The statement above will append the current profile data to a file called PROF.HST in the \IPWIN directory on the C: drive. The X-axis data will be stored with the statistics.
Comments Note that this function operates upon the “active” profile window (i.e., the one most recently opened or selected). If the currently active profile is not the one you want to use, you must use IpProfSelect to explicitly select (make active) the appropriate window before calling IpProfSave. The following options can be used in the expression comprising the SaveMode parameter.
USAGE Save Mode DESCRIPTION
Use one or none...
S_DATA Specifies that line profile data is to be stored.
S_STATS Specifies that line profile statistics are to be stored.
Note - if neither S_DATA nor S_STATS is included in the expression, S_DATA is assumed.
Use one or none...
S_APPEND Specifies that the data/statistics are to be appended to the specified file.
S_CLIPBOARD Specifies that the data/statistics are to be saved to the Clipboard. When this option is used, the FileName parameter is ignored.
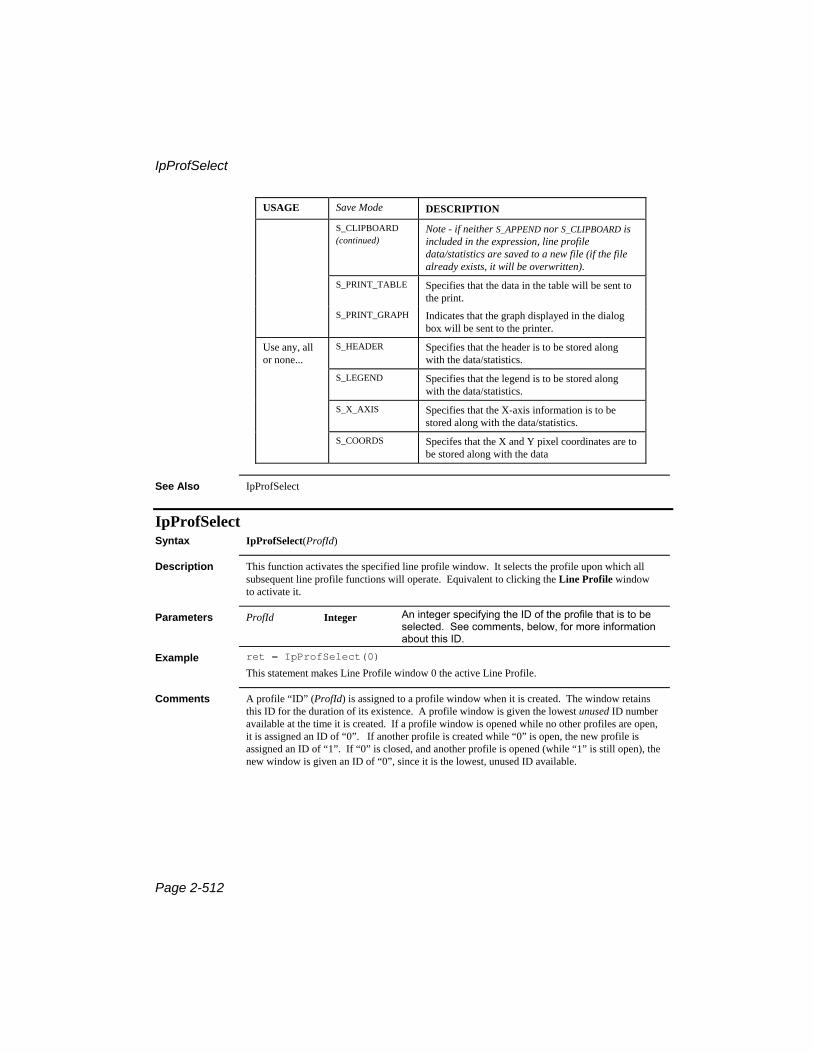
IpProfSelect
Page 2-512
USAGE Save Mode DESCRIPTION
S_CLIPBOARD (continued)
Note - if neither S_APPEND nor S_CLIPBOARD is included in the expression, line profile data/statistics are saved to a new file (if the file already exists, it will be overwritten).
S_PRINT_TABLE Specifies that the data in the table will be sent to the print.
S_PRINT_GRAPH Indicates that the graph displayed in the dialog box will be sent to the printer.
Use any, all or none...
S_HEADER Specifies that the header is to be stored along with the data/statistics.
S_LEGEND Specifies that the legend is to be stored along with the data/statistics.
S_X_AXIS Specifies that the X-axis information is to be stored along with the data/statistics.
S_COORDS Specifes that the X and Y pixel coordinates are to be stored along with the data
See Also IpProfSelect
IpProfSelect Syntax IpProfSelect(ProfId)
Description This function activates the specified line profile window. It selects the profile upon which all subsequent line profile functions will operate. Equivalent to clicking the Line Profile window to activate it.
Parameters ProfId Integer An integer specifying the ID of the profile that is to be selected. See comments, below, for more information about this ID.
Example ret = IpProfSelect(0)
This statement makes Line Profile window 0 the active Line Profile.
Comments A profile “ID” (ProfId) is assigned to a profile window when it is created. The window retains this ID for the duration of its existence. A profile window is given the lowest unused ID number available at the time it is created. If a profile window is opened while no other profiles are open, it is assigned an ID of “0”. If another profile is created while “0” is open, the new profile is assigned an ID of “1”. If “0” is closed, and another profile is opened (while “1” is still open), the new window is given an ID of “0”, since it is the lowest, unused ID available.

IpProfSetAttr
Page 2-513
IpProfSetAttr Syntax IpProfSetAttr(AttrType, AttrValue)
Description This function selects, sets or deselects options relating to the Line Profile window.
Parameters AttrType Integer An enumerated integer, which identifies the option to be set. Must be one of the following: CHANNEL1 CHANNEL2 CHANNEL3
COLORMODEL FREEZE GRID ICAL LINEGEOMETRY LINETYPE SCAL STATISTICS See definitions under Comments, below.
AttrValue Integer An integer specifying how the option specified by AttrType is to be set. See definitions under Comments, below, for the values allowed by each option.
Example ret = IpProfSetAttr(REFERENCE, 1)
This statement will set the current defining line as a “reference” line.
Comments AttrType options are as follows:
AttrType DESCRIPTION ALLOWED VALUES
CHANNEL1 Enables or disables the 0 - Disables Channel. profile of the Red, Hue 1 - Enables Channel. or Y channel, depending
upon the color model selected.
CHANNEL2 Enables or disables the 0 - Disables Channel. profile of the Green, 1 - Enables Channel. Saturation or In-Phase
channel, depending upon the color model selected.
CHANNEL3 Enables or disables the 0 - Disables Channel. profile of the Blue, 1 - Enables Channel. Intensity, Value or
Quadrature channel, depending upon the color model selected.
COLORMODEL Selects the color model CM_RGB in which the line profile CM_HSI will be displayed. CM_HSV
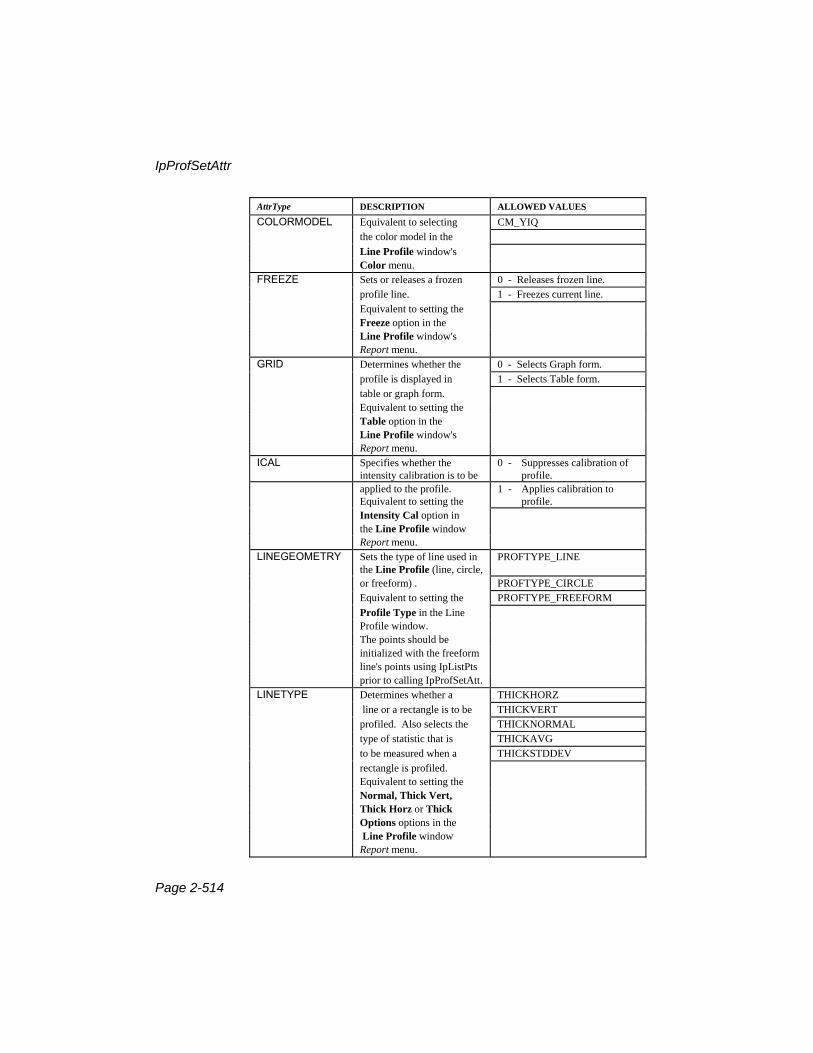
IpProfSetAttr
Page 2-514
AttrType DESCRIPTION ALLOWED VALUES
COLORMODEL Equivalent to selecting CM_YIQ the color model in the Line Profile window's Color menu. FREEZE Sets or releases a frozen 0 - Releases frozen line. profile line. 1 - Freezes current line. Equivalent to setting the Freeze option in the Line Profile window's Report menu. GRID Determines whether the 0 - Selects Graph form. profile is displayed in 1 - Selects Table form. table or graph form. Equivalent to setting the Table option in the Line Profile window's Report menu. ICAL Specifies whether the
intensity calibration is to be 0 - Suppresses calibration of
profile. applied to the profile.
Equivalent to setting the 1 - Applies calibration to
profile. Intensity Cal option in the Line Profile window Report menu. LINEGEOMETRY Sets the type of line used in
the Line Profile (line, circle, PROFTYPE_LINE
or freeform) . PROFTYPE_CIRCLE Equivalent to setting the PROFTYPE_FREEFORM Profile Type in the Line Profile window. The points should be initialized with the freeform line's points using IpListPts prior to calling IpProfSetAtt. LINETYPE Determines whether a THICKHORZ line or a rectangle is to be THICKVERT profiled. Also selects the THICKNORMAL type of statistic that is THICKAVG to be measured when a THICKSTDDEV rectangle is profiled. Equivalent to setting the Normal, Thick Vert, Thick Horz or Thick Options options in the Line Profile window Report menu.
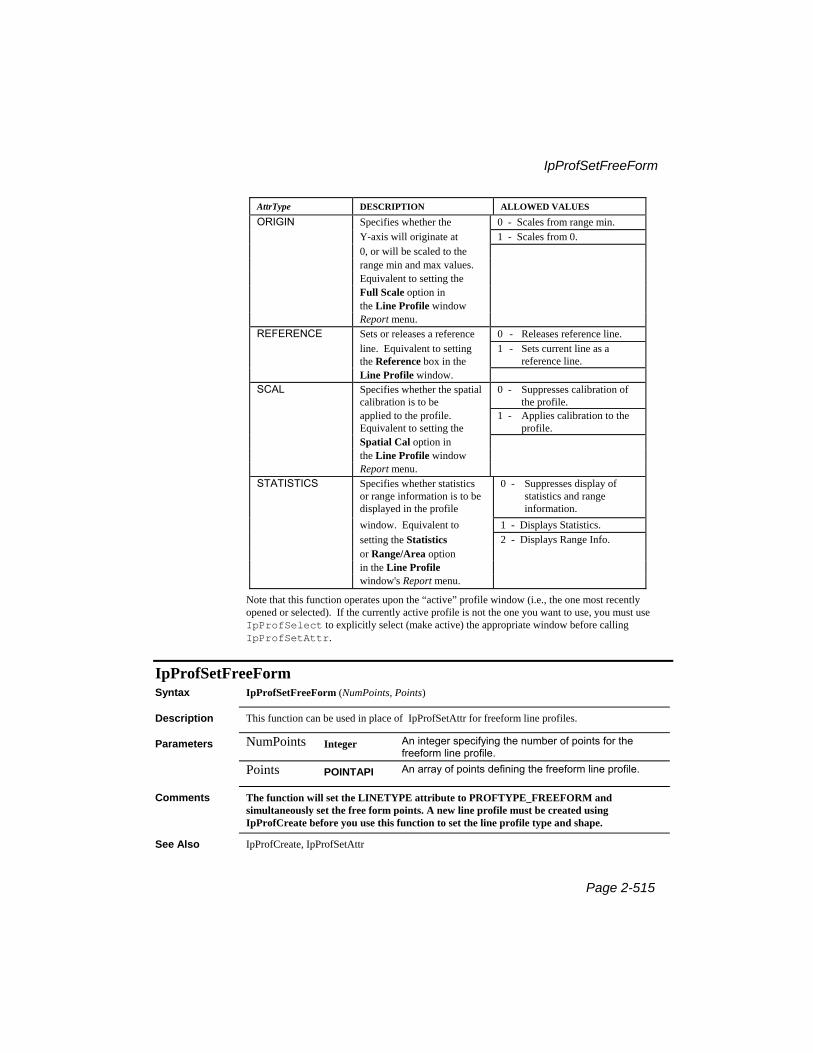
IpProfSetFreeForm
Page 2-515
AttrType DESCRIPTION ALLOWED VALUES
ORIGIN Specifies whether the 0 - Scales from range min. Y-axis will originate at 1 - Scales from 0. 0, or will be scaled to the range min and max values. Equivalent to setting the Full Scale option in the Line Profile window Report menu. REFERENCE Sets or releases a reference 0 - Releases reference line. line. Equivalent to setting
the Reference box in the 1 - Sets current line as a
reference line. Line Profile window. SCAL Specifies whether the spatial
calibration is to be 0 - Suppresses calibration of
the profile. applied to the profile.
Equivalent to setting the 1 - Applies calibration to the
profile. Spatial Cal option in the Line Profile window Report menu. STATISTICS Specifies whether statistics
or range information is to be displayed in the profile
0 - Suppresses display of statistics and range information.
window. Equivalent to 1 - Displays Statistics. setting the Statistics 2 - Displays Range Info. or Range/Area option in the Line Profile window's Report menu.
Note that this function operates upon the “active” profile window (i.e., the one most recently opened or selected). If the currently active profile is not the one you want to use, you must use IpProfSelect to explicitly select (make active) the appropriate window before calling IpProfSetAttr.
IpProfSetFreeForm Syntax IpProfSetFreeForm (NumPoints, Points)
Description This function can be used in place of IpProfSetAttr for freeform line profiles.
Parameters NumPoints Integer An integer specifying the number of points for the freeform line profile.
Points POINTAPI An array of points defining the freeform line profile.
Comments The function will set the LINETYPE attribute to PROFTYPE_FREEFORM and simultaneously set the free form points. A new line profile must be created using IpProfCreate before you use this function to set the line profile type and shape.
See Also IpProfCreate, IpProfSetAttr

IpProfSize
Page 2-516
IpProfSize Syntax IpProfSize(cx, cy)
Description This function changes the size of the active line profile window to the specified width and height.
Parameters cx Integer An integer specifying the width, in pixels, at which the Line Profile window is to be displayed.
cy Integer An integer specifying the height, in pixels, at which the Line Profile window is to be displayed.
Example ret = IpProfSize(400, 175)
This statement will resize the Line Profile window to dimensions of 400 pixels wide by 175 pixels tall.
Comments Note that this function operates upon the “active” profile window (i.e., the one most recently opened or selected). If the currently active profile is not the one you want to use, you must use IpProfSelect to explicitly select (make active) the appropriate window before calling IpProfSize.
See Also IpProfSelect
IpProfUpdate Syntax IpProfUpdate( )
Description This function updates the data within the Line Profile window. Equivalent to selecting the Updatecommand within the Line Profile window.
Comments Note that this function operates upon the “active” profile window (i.e., the one most recently opened or selected). If the currently active profile is not the one you want to use, you must use IpProfSelect to explicitly select (make active) the appropriate window before calling IpProfUpdate.
See Also IpProfSelect
IpPrtHalftone Syntax IpPrtHalftone(bUsePrtHalftone, bUsePrtScaling, HalftoneType, HaltoneOption)
Description This function sets the halftone and scaling options to be applied when the image is printed. Equivalent to setting the options within the Halftone group box in the Print dialog box.
Parameters bUsePrtHalftone Integer An integer value of 0 or 1 specifying whether the printer's halftone capability is to be utilized. Where: 0 - Image-Pro halftones the image before it is sent to the printer using the method specified by the HalftoneType and HalftoneOption parameters. 1 - the printer halftones the image at print time. When this parameter is set to 1, the HalftoneType and HalftoneOption parameters are ignored.

IpPrtPage
Page 2-517
bUsePrtScaling Integer An integer value of 0 or 1 specifying whether the printer's scaling capability is to be utilized. Where: 0 - Image-Pro scales the image before it is sent to the printer. 1 - the printer scales the image at print time.
HalftoneType Integer An integer from 0 to 6 (inclusive) specifying the halftone screen/method to be used. Where: 0 - Angle Dot Screen 1 - Flat Dot Screen 2 - Angle Line Screen 3 - Horz Line Screen 4 - Vert Line Screen 5 - Error Diffusion 6 - Threshold This parameter is ignored when bUsePrtHalftone is set to 1. When this is the case, just set HalftoneType to 0.
HaltoneOption Integer An integer from 0 to 4 (inclusive) specifying the screen resolution or halftone option to be used. Where: for HalftoneType values of 0 - 4: 0 - largest LPI value 1 - second-largest LPI value 2 - second-smallest LPI value Screen 3 - smallest LPI value
for HalftoneType values of 5: 0 - 4 Weights 1 - 12 Weights 2 - Fuzzy 3 - Random This parameter is ignored when bUsePrtHalftone is set to 1, or when HalftoneType is set to 6. When this is the case, just set HalftoneOption to 0.
Example ret = IpPrtHalftone(0, 0, 5, 3)
This statement will set the halftone type to Error Diffusion using the Random pattern.
See Also IpPrtSize, IpPrtPage
IpPrtPage Syntax IpPrtPage(PageNo, bPrintOverlay, Copies)
Description This function prints the active image (with or without an overlay). Equivalent to clicking the Print button in the Print dialog box.
Parameters PageNo Integer An integer specifying the tile number to be printed, or 0 if the entire image is to be printed on a single page. See Comments, below.

IpPrtScreen
Page 2-518
bPrintOverlay Integer An integer value of 0 or 1 specifying whether to print the image with an overlay. Equivalent to enabling the Print Overlay checkbox in the Print dialog box. Where: 0 - Print the image only. 1 - Print with image with overlay.
Copies Integer An integer specifying the number of copies to be printed of the specified tile.
Example ret = IpPrtPage(1, 0, 3)
This statement will print three copies of the second tile of the image.
Comments When an image is tiled across several pages, each tile is assigned a page number. This number is the one that you must specify in the PageNo parameter. Page numbers are assigned, beginning with “0”, from left to right, beginning with the top row and working down. The examples below illustrate the way in which tiles are numbered:
0 1
2 3
0 1
3 4
2
5
See Also IpPrtSize
IpPrtScreen Syntax IpPrtScreen(PageNo, bPintOverlay, Copies)
Description This function prints the screen capture image.
Parameters PageNo Integer An integer specifying the tile number to be printed, or 0 if the entire image is to be printed on a single page. See Comments, below.
bPrintOverlay Integer An integer value of 0 or 1 specifying whether to print the image with an overlay. Equivalent to enabling the Print Overlay checkbox in the Print dialog box. Where: 0 - Print the image only. 1 - Print with image with overlay.
Copies Integer An integer specifying the number of copies to be printed of the specified tile.
Example ret = IpPrtScreen(0, 0, 1)
This statement will print one copy of the entire image.
See Also IpPrtPage

IpPrtSize
Page 2-519
IpPrtSize Syntax IpPrtSize(Mode, bCentered, Top, Left, Width, Height, Smooth)
Description This function sets the image size and position for printing purposes. Equivalent to clicking the Position button in the Print dialog box, and setting the size and position fields.
Parameters Mode Integer An enumerated integer specifying whether the image is to be printed at actual size, page size, or the size specified by the Width and Height parameters. Must contain one of the following: PRT_ACTUAL PRT_FIT PRT_DISTO RT See definitions under Comments, below.
bCentered Integer An integer value of 0 or 1 specifying whether the image is to be centered within the print space, or is to be printed according to the margins specified by the Top and Left parameters. Where: 0 - Prints the image according to the position specified by the Top and Left parameters. 1 - Prints the image in the center of the print space. When this parameter is set to 1, the Top and Left parameters are ignored.
Top Single A single point number specifying, in inches, the position of the top edge of the image in the print space. This parameter is ignored when the bCentered parameter is set to 1. When this is the case, just set Top to 0.
Left Single A single point number specifying, in inches, the position of the left edge of the image in the print space. This parameter is ignored when the bCentered parameter is set to 1. When this is the case, just set Left to 0.
Width Single A single point number specifying the width (x-dimension), in inches, to which the printed image is to be scaled. This parameter is used only when the Mode parameter is set to PRT_DISTORT. Set it to 0, otherwise.
Height Single A single point number specifying the height (y-dimension), in inches, to which the printed image is to be scaled. This parameter is used only when the Mode parameter is set to PRT_DISTORT. Set it to 0, otherwise.
Parameters Smooth Integer An integer value of 0 or 1 specifying whether the image is to be smoothed when it is scaled for print. Where: 0 - Suppresses smoothing. 1 - Applies smoothing.

IpPrtSize
Page 2-520
Example ret = IpPrtSize(PRT_FIT, 0, 1.0, 0.0, 0.0, 0.0, 1)
This statement will print the active image to fit the page. The top edge will begin 1 inch down from the top of the print space. Smoothing will be employed. The Width and Height parameters have been set to 0 because they are not used by PRT_FIT.
Comments Mode options are as follows:
Mode DESCRIPTION
PRT_ACTUAL Sets print size to the actual image dimensions, based upon its current DPI value.
PRT_FIT Sets print size to the largest possible dimensions given the current print space.
PRT_DISTORT Sets print size to that specified by Width and Height parameters.
See Also IpPrtPage

IpRegister
Page 2-521
IpRegister Syntax IpRegister(FromPoints, ToPoints, NumPoints, AffCode)
Description This function warps the active image to a set of tiepoint, using a projective affine transformation. Equivalent to the Registration command.
Parameters FromPoints POINTAPI An array containing a list of tiepoint coordinates in the object image (the image to be warped).
ToPoints POINTAPI An array containing the list of tiepoint coordinates in the reference image. The order of these points must correspond to the order of the points in the FromPoints array.
NumPoints Integer Number of points in FromPoints or ToPoints.
AffCode Integer An expression involving the addition of one or more enumerated integers, where the operands specify the options to be used during the transformation process.
The expression may include any of the following as operands: AFF_AOI AFF_NOBILINEAR AFF_NOSCALE AFF_NOTILT AFF_SINGLE AFF_CLIP See definitions under Comments, below.
Example The following example registers one image to another using the image-clip and single-point options. Note that a single array has been used for both sets of points. 'the source points ret = IpListPts(Pts(0), "142 65 480 0 472 421 133 443 ") 'the target points ret = IpListPts(Pts(4), "133 57 472 18 479 413 153 445 ") ret = IpRegister(Pts(0), Pts(4), 4, AFF_CLIP + AFF_SINGLE)
Comments AffCode options (flags) are enabled by including them as operands in an additive expression. For example,
An AffCode of... would specify... 0 No options.
AFF_CLIP A single option (in this case, the image-clipping option).
AFF_CLIP+AFF_SINGLE
Two options (in this case, the image-clipping and single-point options).

IpRegShow
Page 2-522
The following table describes the options that can be added in AffCode:
AffCode FLAG DESCRIPTION AFF_CLIP This option determines the position of the tiepoints in the new image. When AFF_CLIP
is enabled, the tiepoints in the result are located in exactly the same spatial positions as the reference image (pixels above and to the left of the new image origin may be clipped to achieve this positioning). If the purpose of the registration is to align two images for comparative analysis, use AFF_CLIP. This produces an image that most closely resembles the reference image in terms of perspective and position.
If this option is disabled, the new image will encompass the entire transformed result.
AFF_SINGLE This option enables the single-point transformation process. This option produces the most accurate results, but will be slow if your system is not equipped with a math co-processor.
AFF_NOBILINEAR This option disables the bilinear interpolation process during transformation. Enabling this option yields faster processing time, but lower quality results.
AFF_NOSCALE This option tells the function not to correct for differences in scaling between two images.
AFF_NOTILT This option tells the function not to correct for differences in perspective or “tilt” between two images.
See Also IpRegShow
IpRegShow Syntax IpRegShow(bShow)
Description This function displays or hide the Registration dialog box. Equivalent to selecting the Registration command to open the window, or clicking its Close button to close it.
Parameters bShow Integer An integer value of 0 or 1 specifying whether the “Registration” window is to be shown. Where: 0 - Closes the window if it is already open. 1 - Opens the window.
Example This set of statements will open the “Registration” window, perform a registration, then close the “Registration” window. ret = IpRegShow(1) ret = IpListPts(Pts(0), "40 121 289 26 301 315 30 256 ") ret = IpListPts(Pts(4), "50 55 275 55 275 301 50 301 ") ret = IpRegister(Pts(0), Pts(4), 4,0 ) ret = IpRegShow(0)
See Also IpRegister

IpRendAnimation
Page 2-523
IpRendAnimation Syntax IpRendAnimation (Command, sPram, lParam)
Description This function executes various animation operations
Parameters Command Integer See comments and list below.
sParam Integer See comments and list below.
lParam Long See comments and list below.
Comments The animation functions take the following parameters:
sCmd sParam lParam Description
ANIM_GET_FRAMES not used Pointer to a long variable receving the result
Gets the total number of frames in the current animation.
ANIM_GET_CAMERAS not used Pointer to a long variable receving the result
Gets the total number of camera positions in the current animation.
ANIM_GET_CAM_ FRAMES
Camera position (0-based)
Pointer to a long variable receving the result
Gets the number of frames for the specified camera position in the current animation.
ANIM_PLAYFF Starting camera position
Pointer to a long variable that contains the value of the starting frame for the camera position. If the value is NULL the base camera position is used.
Plays animation forward
ANIM_PLAYRW Starting camera position
Pointer to a long variable that contains the value of the starting frame for the camera position. If the value is NULL the base camera position is used.
Plays animation in reverse.
sCmd sParam lParam Description

IpRendAnimationFile
Page 2-524
ANIM_STOP Ending camera position
Pointer to a long variable receving the result
Stop play
ANIM_GOTO Camera position to display
Pointer to a long variable that contains the value of the intermediate frame for the camera position. If the value is NULL the base camera position is used.
Displays the position of the defined frame in the animation.
ANIM_CREATE used as: CREATE_ANIM_ALL to create a sequence of all animation CREATE_ANIM_CURRENT to create 1-frame animation of the current view
Defines whether to create animation of whole sequence or only the current view.
Not used. Creates an animation sequence in the IPP workspace.
Return Value The ID of the animation sequence if successful, a negative error code if failed.
Example Please see Appendix A, Sample Macro Code.
See Also IpRendAnimationFile
IpRendAnimationFile Syntax IpRendAnimationFile (szFileName, bSave)
Description This function loads or saves the animation file.
Parameters szFileName String Indicates the file to load or save.
bSave Integer Indicates whether to load or save the file: 0 = load file 1 = save file
Return Value 0 if successful, a negative error code if failed.
Example Ret = IpRendAnimationFile(“FlyThrough.anm”,0)
See Also IpRendAnimation
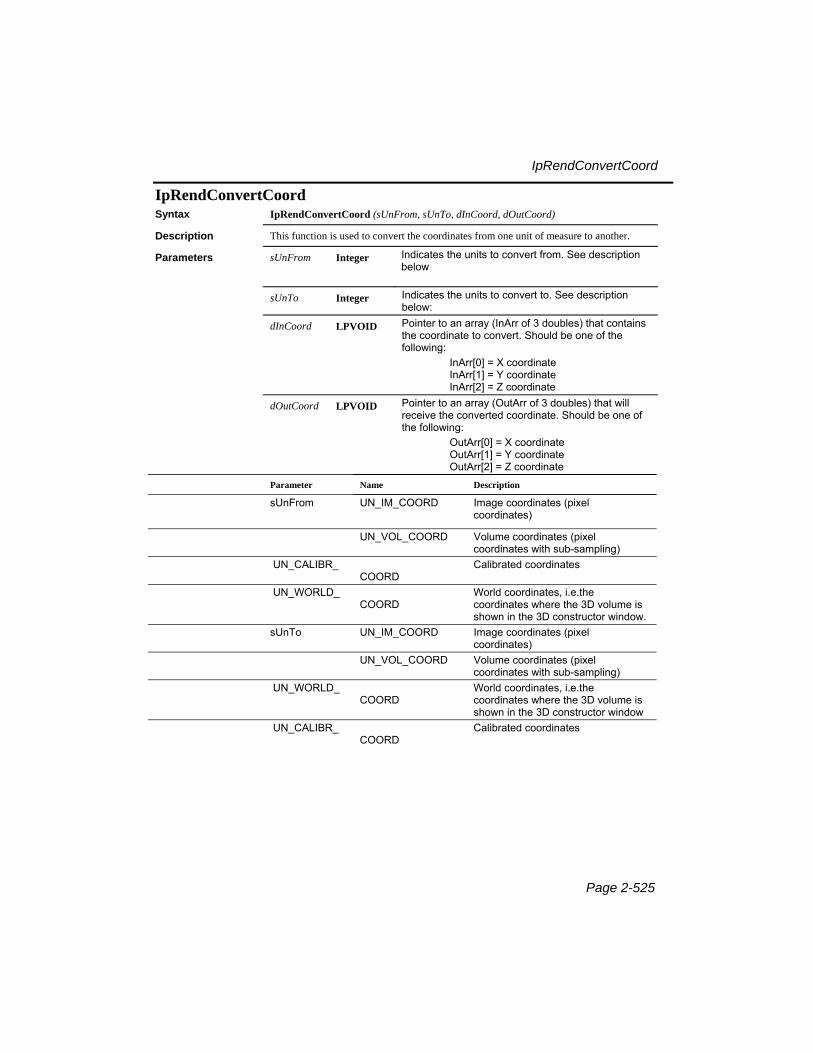
IpRendConvertCoord
Page 2-525
IpRendConvertCoord Syntax IpRendConvertCoord (sUnFrom, sUnTo, dInCoord, dOutCoord)
Description This function is used to convert the coordinates from one unit of measure to another.
Parameters sUnFrom Integer Indicates the units to convert from. See description below
sUnTo Integer Indicates the units to convert to. See description below:
dInCoord LPVOID Pointer to an array (InArr of 3 doubles) that contains the coordinate to convert. Should be one of the following: InArr[0] = X coordinate InArr[1] = Y coordinate InArr[2] = Z coordinate
dOutCoord LPVOID Pointer to an array (OutArr of 3 doubles) that will receive the converted coordinate. Should be one of the following: OutArr[0] = X coordinate OutArr[1] = Y coordinate OutArr[2] = Z coordinate
Parameter Name Description
sUnFrom UN_IM_COORD Image coordinates (pixel
coordinates)
UN_VOL_COORD Volume coordinates (pixel coordinates with sub-sampling)
UN_CALIBR_ COORD
Calibrated coordinates
UN_WORLD_ COORD
World coordinates, i.e.the coordinates where the 3D volume is shown in the 3D constructor window.
sUnTo UN_IM_COORD Image coordinates (pixel coordinates)
UN_VOL_COORD Volume coordinates (pixel coordinates with sub-sampling)
UN_WORLD_ COORD
World coordinates, i.e.the coordinates where the 3D volume is shown in the 3D constructor window
UN_CALIBR_ COORD
Calibrated coordinates
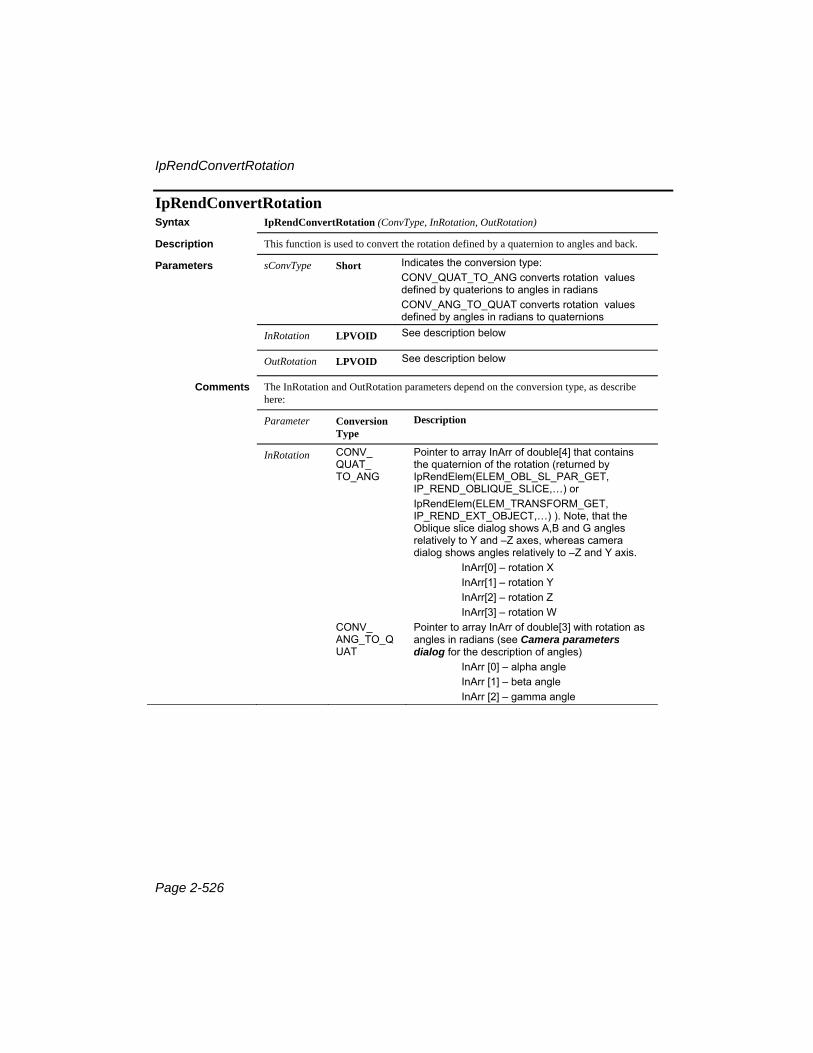
IpRendConvertRotation
Page 2-526
IpRendConvertRotation Syntax IpRendConvertRotation (ConvType, InRotation, OutRotation)
Description This function is used to convert the rotation defined by a quaternion to angles and back.
Parameters sConvType Short Indicates the conversion type: CONV_QUAT_TO_ANG converts rotation values defined by quaterions to angles in radians CONV_ANG_TO_QUAT converts rotation values defined by angles in radians to quaternions
InRotation LPVOID See description below
OutRotation LPVOID See description below
Comments The InRotation and OutRotation parameters depend on the conversion type, as describe here:
Parameter Conversion Type
Description
InRotation CONV_ QUAT_ TO_ANG
Pointer to array InArr of double[4] that contains the quaternion of the rotation (returned by IpRendElem(ELEM_OBL_SL_PAR_GET, IP_REND_OBLIQUE_SLICE,…) or IpRendElem(ELEM_TRANSFORM_GET, IP_REND_EXT_OBJECT,…) ). Note, that the Oblique slice dialog shows A,B and G angles relatively to Y and –Z axes, whereas camera dialog shows angles relatively to –Z and Y axis. InArr[0] – rotation X InArr[1] – rotation Y InArr[2] – rotation Z InArr[3] – rotation W
CONV_ ANG_TO_QUAT
Pointer to array InArr of double[3] with rotation as angles in radians (see Camera parameters dialog for the description of angles) InArr [0] – alpha angle InArr [1] – beta angle InArr [2] – gamma angle

IpRendConvertRotation
Page 2-527
Parameter Conversion
Type Description
OutRotation CONV_
QUAT_ TO_ANG
Pointer to array OutArr of double[3] that will receive the converted rotation as angles in radians (see Camera parameters dialog for the description of angles) OutArr [0] – alpha angle OutArr [1] – beta angle OutArr [2] – gamma angle
CONV_ANG_TO_QUAT
Pointer to array OutArr of double[4] that will receive the converted rotation as quaternion (can be used with IpRendElem(ELEM_OBL_SL_PAR, IP_REND_OBLIQUE_SLICE,…) or IpRendElem(ELEM_TRANSFORM, IP_REND_EXT_OBJECT,…) ) OutArr [0] – rotation X OutArr [1] – rotation Y OutArr [2] – rotation Z OutArr [3] – rotation W

IpRendElem
Page 2-528
IpRendElem Syntax IpRendElem (Command, lOpt1, lOpt2, lParam)
Description This function sets and gets various parameters of 3D rendering elements.
Parameters Command Integer See comments and list below.
lOpt1 Long See comments and list below.
lOpt2 Long See comments and list below.
lParam Any See comments and list below.
Comments The animation functions take the following parameters:
sCmd lOpt1 lOpt2 lParam Description
ELEM_GET_ NUMBER
Not used Not used Pointer to a long variable that will receive the value. Use this command to determine the number of elements and allocate the data array
Gets the total number of rendering elements in the current configuration. (The number of elements in the table of rendering lOptions dialog).
ELEM_GET_TYPE_LIST
Not used Not used. Pointer to an array of long variables that will recive the information. The list must be long enough to receive all elements
Gets the list of 3D rendering element types (see list below).
ELEM_GET_ID_ LIST
Not used. Not used. Pointer to an array of long variables that will recive the information. The list must be long enough to receive all elements
Gets list of the 3D rendering element IDs. For element types that can be multiple as Ortho-Slice, Oblique Slice or Iso-Surface this value gives the ID. The IDs for elements that can not be duplicated (Volume, Palette…) is 0.
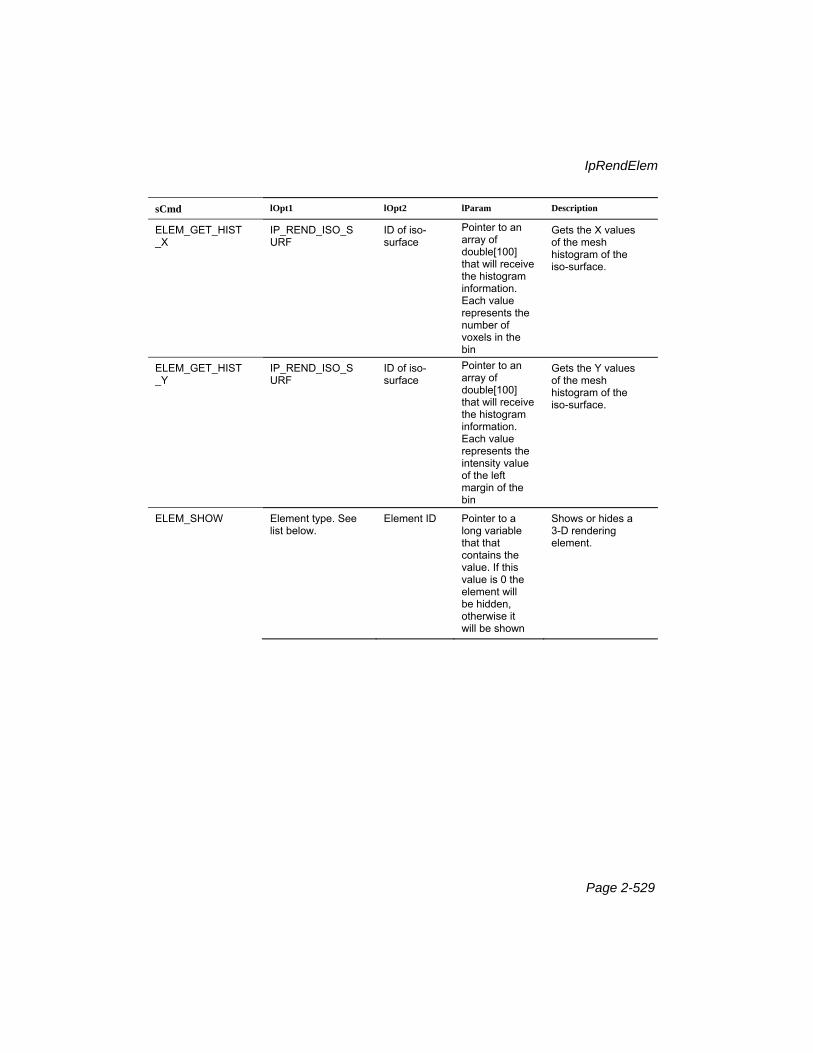
IpRendElem
Page 2-529
sCmd lOpt1 lOpt2 lParam Description
ELEM_GET_HIST_X
IP_REND_ISO_SURF
ID of iso-surface
Pointer to an array of double[100] that will receive the histogram information. Each value represents the number of voxels in the bin
Gets the X values of the mesh histogram of the iso-surface.
ELEM_GET_HIST_Y
IP_REND_ISO_SURF
ID of iso-surface
Pointer to an array of double[100] that will receive the histogram information. Each value represents the intensity value of the left margin of the bin
Gets the Y values of the mesh histogram of the iso-surface.
ELEM_SHOW Element type. See list below.
Element ID Pointer to a long variable that that contains the value. If this value is 0 the element will be hidden, otherwise it will be shown
Shows or hides a 3-D rendering element.
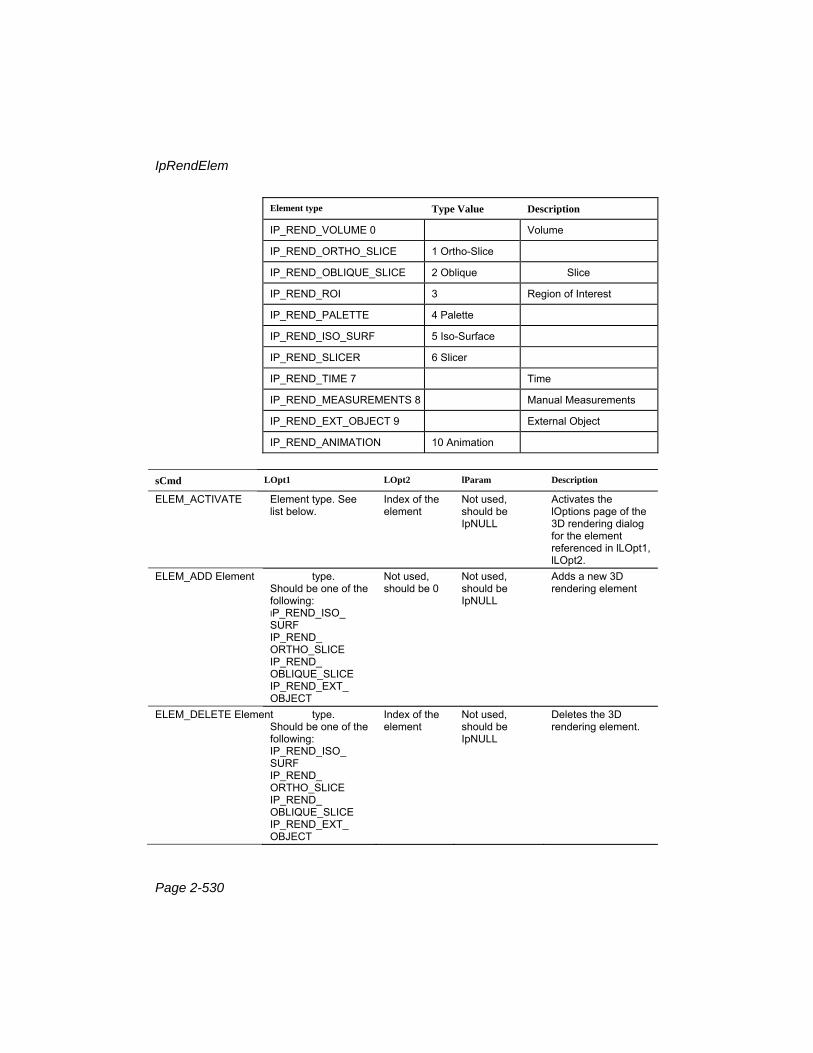
IpRendElem
Page 2-530
Element type Type Value Description
IP_REND_VOLUME 0 Volume
IP_REND_ORTHO_SLICE 1 Ortho-Slice
IP_REND_OBLIQUE_SLICE 2 Oblique Slice
IP_REND_ROI 3 Region of Interest
IP_REND_PALETTE 4 Palette
IP_REND_ISO_SURF 5 Iso-Surface
IP_REND_SLICER 6 Slicer
IP_REND_TIME 7 Time
IP_REND_MEASUREMENTS 8 Manual Measurements
IP_REND_EXT_OBJECT 9 External Object
IP_REND_ANIMATION 10 Animation
sCmd LOpt1 LOpt2 lParam Description
ELEM_ACTIVATE Element type. See list below.
Index of the element
Not used, should be IpNULL
Activates the lOptions page of the 3D rendering dialog for the element referenced in lLOpt1, lLOpt2.
ELEM_ADD Element type. Should be one of the following: IP_REND_ISO_ SURF IP_REND_ ORTHO_SLICE IP_REND_ OBLIQUE_SLICE IP_REND_EXT_ OBJECT
Not used, should be 0
Not used, should be IpNULL
Adds a new 3D rendering element
ELEM_DELETE Element type. Should be one of the following: IP_REND_ISO_ SURF IP_REND_ ORTHO_SLICE IP_REND_ OBLIQUE_SLICE IP_REND_EXT_ OBJECT
Index of the element
Not used, should be IpNULL
Deletes the 3D rendering element.
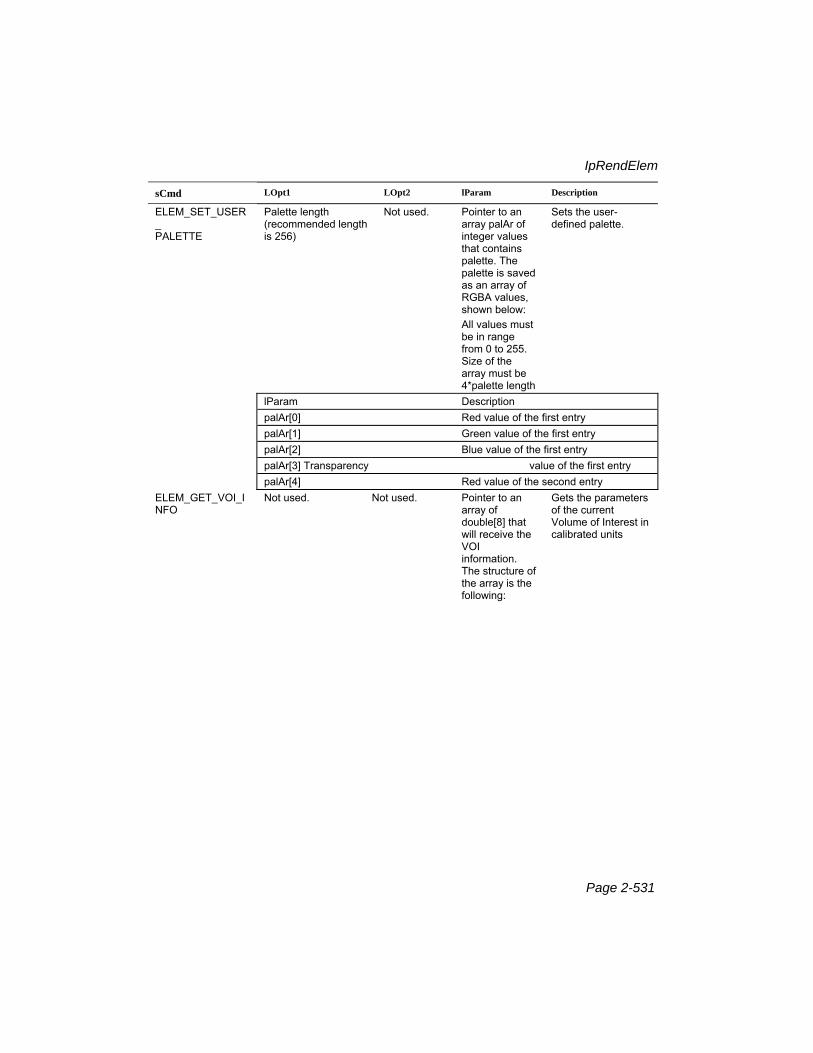
IpRendElem
Page 2-531
sCmd LOpt1 LOpt2 lParam Description
ELEM_SET_USER_ PALETTE
Palette length (recommended length is 256)
Not used. Pointer to an array palAr of integer values that contains palette. The palette is saved as an array of RGBA values, shown below: All values must be in range from 0 to 255. Size of the array must be 4*palette length
Sets the user-defined palette.
lParam Description palAr[0] Red value of the first entry palAr[1] Green value of the first entry palAr[2] Blue value of the first entry palAr[3] Transparency value of the first entry palAr[4] Red value of the second entry
ELEM_GET_VOI_INFO
Not used. Not used. Pointer to an array of double[8] that will receive the VOI information. The structure of the array is the following:
Gets the parameters of the current Volume of Interest in calibrated units

IpRendElem
Page 2-532
lParam Description
voiAr[0] Size of VOI in X direction voiAr[1] Size of VOI in Y direction voiAr[2] Size of VOI in Z direction voiAr[3] Left X coordinate of VOI voiAr[4] Left Y coordinate of VOI voiAr[5] Left Z coordinate of VOI voiAr[6] Volume of VOI voiAr[7] Volume fraction of VOI
sCmd LOpt1 LOpt2 lParam Description
ELEM_GET_ VOLUME_INFO
Not used. Not used. Pointer to an array of double[10] that will receive the volume information. The structure of the array is the following:
Gets the parameters of the current rendered volume loaded into the 3D Contructor
lParam Description
OutAr[0] sub-sampling X OutAr[1] sub-sampling Y OutAr[2] sub-sampling Z OutAr[3] voxel size X, in calibrated units OutAr[4] voxel size Y, in calibrated units OutAr[5] voxel size Z, in calibrated units OutAr[6] width, number of slices in X OutAr[7] height, number of slices in Y OutAr[8] depth, number of slices in Z OutAr[9] total volume in calibrated units
sCmd LOpt1 LOpt2 lParam Description
ELEM_VOI_PAR_ GET
IP_REND_ROI 0 Pointer to an array of double[6] that will receive the information. The structure of the array is the following:
Gets position and scale parameters of current VOI

IpRendElem
Page 2-533
lParam Description
OutAr[0] Position X of the center of VOI in world coordinates
OutAr[1] Position Y of the center of VOI in world coordinates
OutAr[2] Position Z of the center of VOI in world coordinates Range = -1 to +1
OutAr[3] Scale X Range = 0 to 1
OutAr[4] Scale Y OutAr[5] Scale Z
sCmd LOpt1 LOpt2 lParam Description
ELEM_VOI_PAR_ SET
IP_REND_ROI 0 Pointer to an array of double[6] that holds the information. The structure of the array is described in ELEM_VOI_ PAR_GET
Sets position and scale parameters of current VOI
ELEM_OBL_SL_ PAR_GET
IP_REND_OBLIQUE_SLICE
ID of oblique slice
Pointer to an array of double[10] that will receive the information. The structure of the array is described below:
Gets the oblique slice orientation parameters
lParam Description
OutAr[0] Position X of the center of slice dragger OutAr[1] Position Y of the center of slice dragger OutAr[2] Position Z of the center of slice dragger OutAr[3] Scale X OutAr[4] Scale Y OutAr[5] Scale Z OutAr[6] Rotation X OutAr[7] Rotation Y OutAr[8] Rotation Z OutAr[9] Rotation W
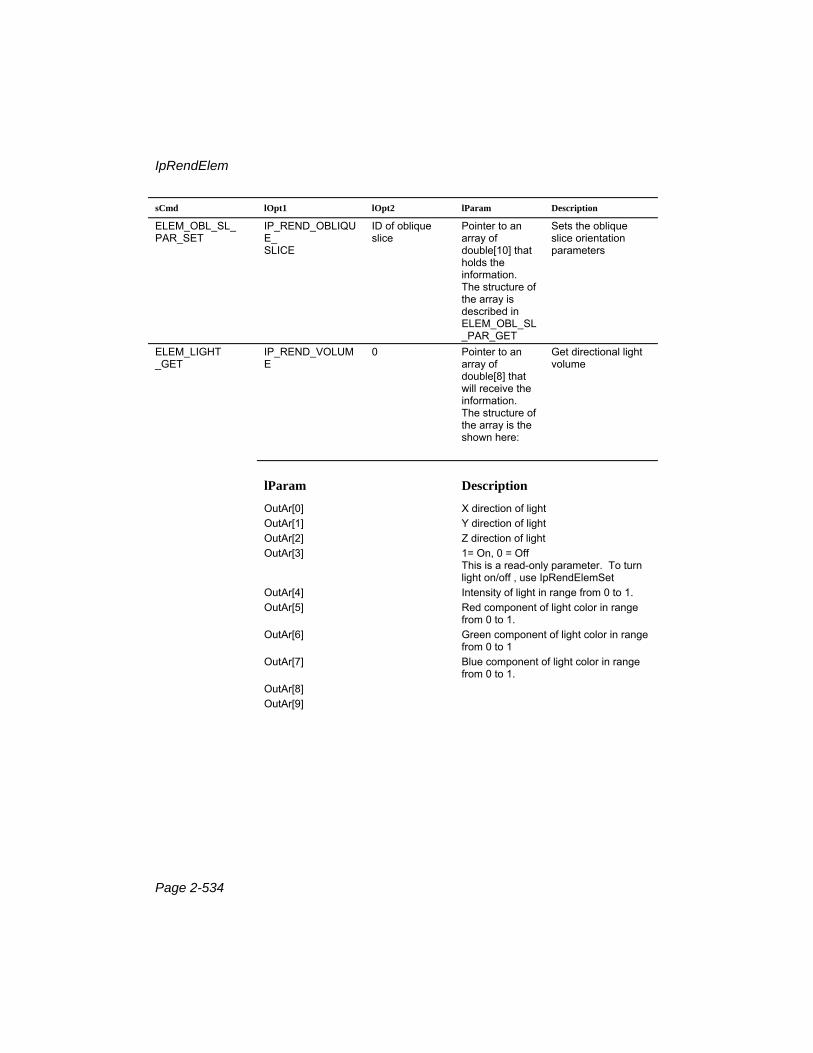
IpRendElem
Page 2-534
sCmd lOpt1 lOpt2 lParam Description
ELEM_OBL_SL_ PAR_SET
IP_REND_OBLIQUE_ SLICE
ID of oblique slice
Pointer to an array of double[10] that holds the information. The structure of the array is described in ELEM_OBL_SL_PAR_GET
Sets the oblique slice orientation parameters
ELEM_LIGHT _GET
IP_REND_VOLUME
0 Pointer to an array of double[8] that will receive the information. The structure of the array is the shown here:
Get directional light volume
lParam Description
OutAr[0] X direction of light OutAr[1] Y direction of light OutAr[2] Z direction of light OutAr[3] 1= On, 0 = Off
This is a read-only parameter. To turn light on/off , use IpRendElemSet
OutAr[4] Intensity of light in range from 0 to 1. OutAr[5] Red component of light color in range
from 0 to 1. OutAr[6] Green component of light color in range
from 0 to 1 OutAr[7] Blue component of light color in range
from 0 to 1. OutAr[8] OutAr[9]

IpRendElem
Page 2-535
sCmd lOpt1 lOpt2 lParam Description
ELEM_LIGHT _SET
IP_REND_VOLUME
0 Pointer to an array of double[8] that holds the information. The structure of the array is described in ELEM_LIGHT_GET
Set directional light volume
ELEM_COLOR_GET
IP_REND_ISO_SURF or IP_REND_VOLUME
ID of iso-surface
Pointer to an array of double[14] that will receive the information.
Gets the color of the element
lParam Description
OutAr[0] Red component of ambient color in range from 0 to 1.
OutAr[1] Green component of ambient color in range from 0 to 1
OutAr[2] Blue component of ambient color in range from 0 to 1
OutAr[3] Red component of diffuse color in range from 0 to 1.
OutAr[4] Green component of diffuse color in range from 0 to 1.
OutAr[5] Blue component of diffuse color in range from 0 to 1.
OutAr[6] Red component of specular color in range from 0 to 1.
OutAr[7] Green component of specular color in range from 0 to 1
OutAr[8] Blue component of specular color in range from 0 to 1
OutAr[9] Red component of emissive color in range from 0 to 1.
OutAr[10] Green component of emissive color in range from 0 to 1
OutAr[11] Blue component of emissive color in range from 0 to 1.
OutAr[12] Shininess in range from 0 to 1 OutAr[13] Transparency in range from 0 to 1

IpRendElem
Page 2-536
sCmd lOpt1 lOpt2 lParam Description
ELEM_COLOR_SET
IP_REND_ISO_SURF or IP_REND_VOLUME
ID of iso-surface
The structure of the array is described in ELEM_COLOR_GET
Sets color parameters
ELEM_ISO_ SUBSAMPLING
IP_REND_ISO_ SURF
ID of iso-surface
Pointer to an array of double[3] that will receive the information. The structure of the array is the following:
Sets new subsampling for iso-surface; Setting any element of the array to 0 will turn ON auto-subsampling.
lParam Description
ipDArray [0] Sub-sampling X ipDArray [1] Sub-sampling Y ipDArray [2] Sub-sampling Z
ELEM_CAM_ POSITION_GET
IP_REND_ANIMATION
0 Pointer to an array of double[9] that will receive the information. The structure of the array is shown below
Gets current camera position parametrs
lParam Description
OutAr[0] camera angle alpha (radians) OutAr[1] camera angle beta (radians) OutAr[2] camera angle gamma (radians) OutAr[3] camera type : 1 – orthographic, 0 -
perspective OutAr[4] (for orthographic), height angle, radians
(for perspective) OutAr[5] focal point X position in world
coordinates
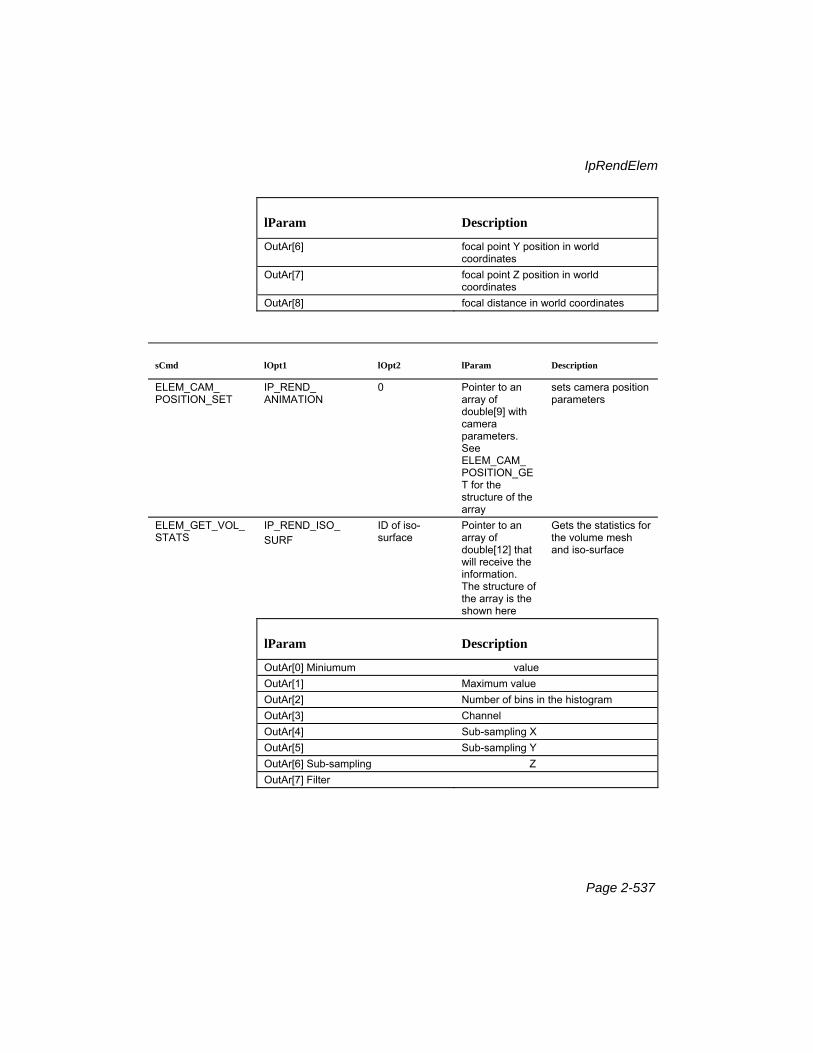
IpRendElem
Page 2-537
lParam Description
OutAr[6] focal point Y position in world coordinates
OutAr[7] focal point Z position in world coordinates
OutAr[8] focal distance in world coordinates
sCmd lOpt1 lOpt2 lParam Description
ELEM_CAM_ POSITION_SET
IP_REND_ ANIMATION
0 Pointer to an array of double[9] with camera parameters. See ELEM_CAM_ POSITION_GET for the structure of the array
sets camera position parameters
ELEM_GET_VOL_STATS
IP_REND_ISO_ SURF
ID of iso-surface
Pointer to an array of double[12] that will receive the information. The structure of the array is the shown here
Gets the statistics for the volume mesh and iso-surface
lParam Description
OutAr[0] Miniumum value OutAr[1] Maximum value OutAr[2] Number of bins in the histogram OutAr[3] Channel OutAr[4] Sub-sampling X OutAr[5] Sub-sampling Y OutAr[6] Sub-sampling Z OutAr[7] Filter

IpRendElem
Page 2-538
lParam Description
OutAr[8] Close edges OutAr[9] Simplification OutAr[10] Surface value (level) OutAr[11] Count flag
sCmd lOpt1 lOpt2 lParam Description
ELEM_TRANSFORM_ SET
IP_REND_EXT_ OBJECT
ID of external object
Pointer to an array of double[17] that holds the information. The structure of the array is described in ELEM_TRANSFORM_GET
Sets the transform parameters for the external object
ELEM_TRANSFORM_ GET
IP_REND_EXT_ OBJECT
ID of external object
Pointer to an array of double[17] that will receive the information. The structure of the array is the following:
Gets the transform parameters for the external object1
lParam Description
OutAr[0] Rotation X OutAr[1] Rotation Y OutAr[2] Rotation Z OutAr[3] Rotation W OutAr[4] Scale orientation X OutAr[5] Scale orientation Y OutAr[6] Scale orientation Z OutAr[7] Scale orientation W
1 Quaternions always obey: x^2 + y^2 + z^2 + w^2 = 1.0 See the following for more information on quaternions: - Shoemake, K., Animating Rotation With Quaternion Curves,
Computer Graphics 19, No 3 (Proc. SIGGRAPH'85), 245-254, 1985. - Pletinckx, D., Quaternion Calculus as a Basic Tool in Computer Graphics, The Visual Computer 5, 2-13, 1989

IpRendElem
Page 2-539
lParam Description
OutAr[8] Position X of the center of the object OutAr[9] Position Y of the center of the object OutAr[10] Position Z of the center of the object OutAr[11] Translation X OutAr[12] Translation Y OutAr[13] Translation Z OutAr[14] Scale X OutAr[15] Scale Y OutAr[16] Scale Z
See Also IpRendElemGet, IpRendElemSet, IpRendElemSetStr
Return Value 0 if successful, a negative error code if failed.
Example Please see Appendix A, Sample Macro Code

IpRendElemGet
Page 2-540
IpRendElemGet Syntax IpRendElemGet (Command, 1LOpt1, lLOpt2,lParam)
Description This function gets various parameters of the 3D rendering elements. This function is a version of IpRendElem used to retrieve parameters from 3D Constructor elements
Parameters Command Integer See comments and list below.
lOpt1 Long See comments and list below.
lOpt2 Long See comments and list below.
lParam Any See comments and list below.
Comments This macro takes the following commands:
Command lOpt 1 lOpt 2 lParam Description
ELEM_NUM_TIME_ POINTS
IP_REND_TIME 0 Pointer to a long variable that will receive the value.
Gets the total number of time points in the current 4D stack.
ELEM_CURR_ TIME_POINT IP_REND_TIME 0
Pointer to a long variable that will receive the value
Gets the current time point in the 4D stack
See Also IpRendElem, IpRendElemSet
Example Dim TotalTimePoints As Long Dim CurrentTimePoint As Long ret = IpRendElemGet(ELEM_NUM_TIME_POINTS,IP_REND_TIME,0,TotalTimePoints) ret = IpRendElemGet(ELEM_CUR_TIME_POINT,IP_REND_TIME,0,CurrentTimePoint) Debug.Print TotalTimePoints Debug.Print CurrentTimePoint
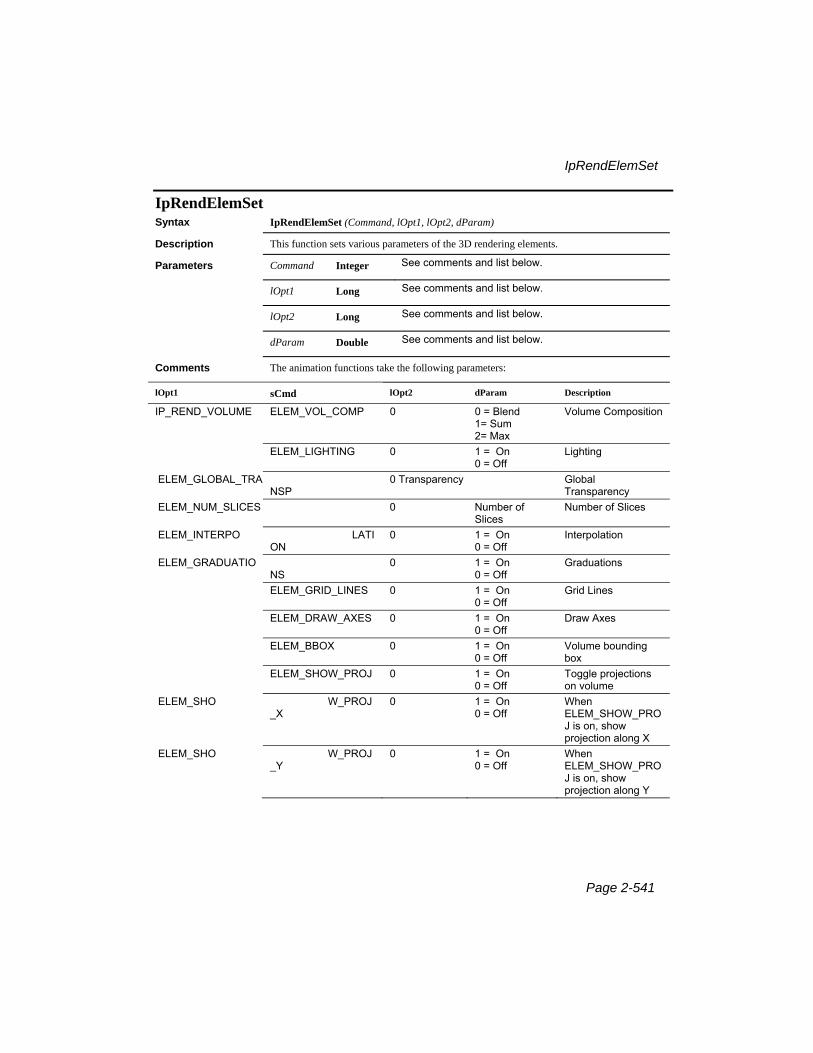
IpRendElemSet
Page 2-541
IpRendElemSet Syntax IpRendElemSet (Command, lOpt1, lOpt2, dParam)
Description This function sets various parameters of the 3D rendering elements.
Parameters Command Integer See comments and list below.
lOpt1 Long See comments and list below.
lOpt2 Long See comments and list below.
dParam Double See comments and list below.
Comments The animation functions take the following parameters:
lOpt1 sCmd lOpt2 dParam Description
IP_REND_VOLUME
ELEM_VOL_COMP 0 0 = Blend 1= Sum 2= Max
Volume Composition
ELEM_LIGHTING 0 1 = On 0 = Off
Lighting
ELEM_GLOBAL_TRANSP
0 Transparency Global Transparency
ELEM_NUM_SLICES 0 Number of Slices
Number of Slices
ELEM_INTERPO LATION
0 1 = On 0 = Off
Interpolation
ELEM_GRADUATIONS
0 1 = On 0 = Off
Graduations
ELEM_GRID_LINES 0 1 = On 0 = Off
Grid Lines
ELEM_DRAW_AXES 0 1 = On 0 = Off
Draw Axes
ELEM_BBOX 0 1 = On 0 = Off
Volume bounding box
ELEM_SHOW_PROJ 0 1 = On 0 = Off
Toggle projections on volume
ELEM_SHO W_PROJ_X
0 1 = On 0 = Off
When ELEM_SHOW_PROJ is on, show projection along X
ELEM_SHO W_PROJ_Y
0 1 = On 0 = Off
When ELEM_SHOW_PROJ is on, show projection along Y

IpRendElemSet
Page 2-542
LOpt1 sCmd lOpt2 dParam Description
IP_REND_VOLUME ELEM_SHO W_PROJ_Z
0 1 = On 0 = Off
When ELEM_SHOW_PROJ is on, show projection along Z
ELEM_PRO J_ OFFSET
0 % value Projection offset in percent of size
ELEM_SHO W_ SHADOW_ PROJ
0 1 = Shadow projection 0 = Volume projection
When ELEM_SHOW_PROJ is on, show shadow projection
ELEM_G RAD_ FONTSIZE
0 % value Graduations in font size in percent of default
ELEM_G RAD_ TICKSIZE
0 % value Graduations in tick size in percent of default
ELEM_AUTO _ RELOAD
0 1 = Auto Reload on 0 = Auto Reload off
Turns the Auto-Reload option on or off
Example ‘switch On volume projections
ret = IpRendElemSet(ELEM_SHOW_PROJ,IP_REND_VOLUME,0,1)
‘switch off Y projection
ret = IpRendElemSet(ELEM_SHOW_PROJ_Y,IP_REND_VOLUME,0,0)
‘switch on Z projection
ret = IpRendElemSet(ELEM_SHOW_PROJ_Z,IP_REND_VOLUME,0,1)
‘set projection offset to 30 %
ret = IpRendElemSet(ELEM_PROJ_OFFSET,IP_REND_VOLUME,0,30)
‘set shadow projection mode
ret=IpRendElemSet(ELEM_SHOW_SHADOW_PROJ,IP_REND_VOLUME,0,1)
See also: ELEM_COLOR_GET, ELEM-COLOR_SET, ELEM_LIGHT_GET and ELEM_LIGHT_SET in IpRendElem
Lopt1 sCmd lOpt2 dParam Description
IP_REND_PALETTE ELEM_PAL_RED 0 1 = On 0 = Off
Red channel
ELEM_PAL_GREEN 0 1 = On 0 = Off
Green channel
ELEM_PAL_BLUE 0 1 = On 0 = Off
Blue channel
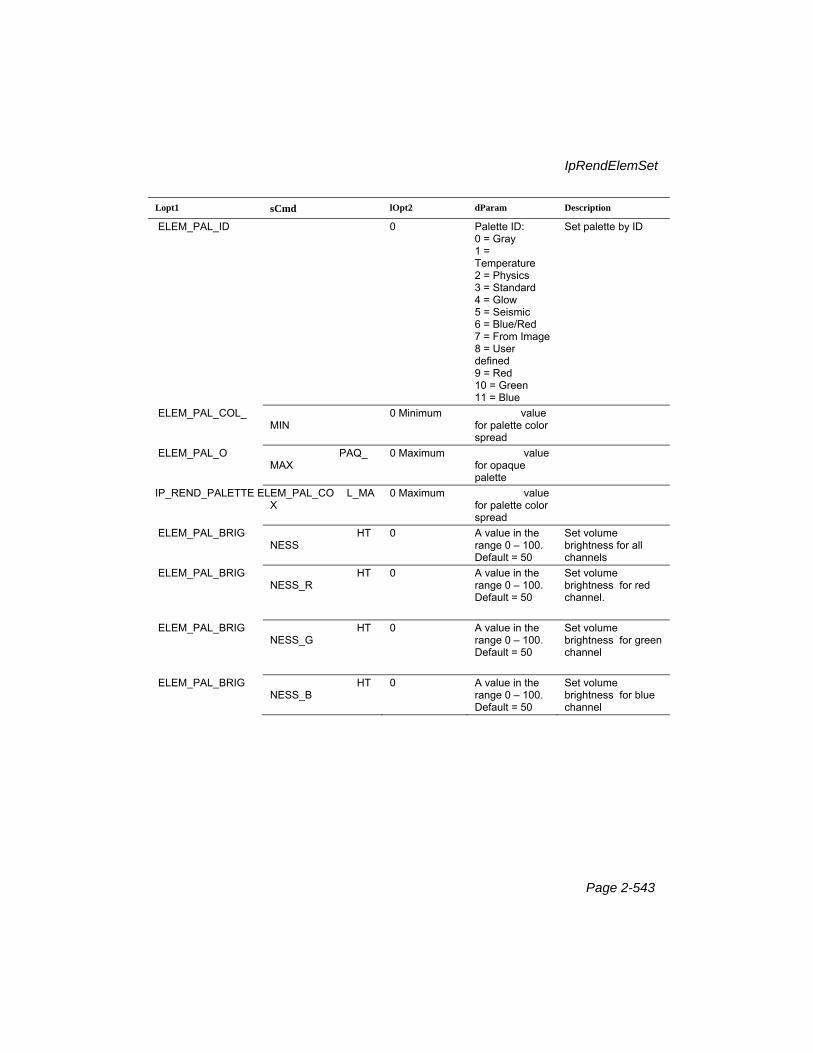
IpRendElemSet
Page 2-543
Lopt1 sCmd lOpt2 dParam Description
ELEM_PAL_ID 0 Palette ID: 0 = Gray 1 = Temperature 2 = Physics 3 = Standard 4 = Glow 5 = Seismic 6 = Blue/Red 7 = From Image8 = User defined 9 = Red 10 = Green 11 = Blue
Set palette by ID
ELEM_PAL_COL_ MIN
0 Minimum value for palette color spread
ELEM_PAL_O PAQ_MAX
0 Maximum value for opaque palette
IP_REND_PALETTE ELEM_PAL_CO L_MAX
0 Maximum value for palette color spread
ELEM_PAL_BRIG HTNESS
0 A value in the range 0 – 100. Default = 50
Set volume brightness for all channels
ELEM_PAL_BRIG HTNESS_R
0 A value in the range 0 – 100. Default = 50
Set volume brightness for red channel.
ELEM_PAL_BRIG HTNESS_G
0 A value in the range 0 – 100. Default = 50
Set volume brightness for green channel
ELEM_PAL_BRIG HTNESS_B
0 A value in the range 0 – 100. Default = 50
Set volume brightness for blue channel

IpRendElemSet
Page 2-544
lOpt1 sCmd lOpt2 dParam Description
IP_REND_ PALETTE
ELEM_PAL_ CONTRAST
0 A value in the range 0 – 100. Default = 50
Set volume contrast for all channels.
ELEM_PAL_ CONTRAST_R
0 A value in the range 0 – 100. Default = 50
Set volume contrast for red channel
ELEM_PAL_ CONTRAST_B
0 A value in the range 0 – 100. Default = 50
Set volume contrast for blue channel
ELEM_PAL_ CONTRAST_G
0 A value in the range 0 – 100. Default = 50
Set volume contrast for green channel
ELEM_PAL_GAMMA 0 A value in the range 10 – 1000. Default = 100
Set gamma for all volume channels, muliplied by 100; i.e. use 200 to set gamma = 2
ELEM_PAL_GAMMA_R 0 A value in the range 10 – 1000. Default = 100
Set volume gamma for red channel, muliplied by 100; i.e. use 200 to set gamma = 2
ELEM_PAL_GAMMA_B 0 A value in the range 10 – 1000. Default = 100
Set volume gamma for blue channel, muliplied by 100; i.e. use 200 to set gamma = 2
ELEM_PAL_GAMMA_G 0 A value in the range 10 – 1000. Default = 100
Set volume gamma for green channel, muliplied by 100; i.e. use 200 to set gamma = 2

IpRendElemSet
Page 2-545
lOpt1 sCmd lOpt2 dParam Description
IP_REND_ ANIMATION
ELEM_GO_FIRST Not Used Not Used Go to first position in Animation sequence
ELEM_PLAY_RW Not Used Start frame no. Play sequence back once
ELEM_GO_PREV Not Used Not Used Go to previous position
ELEM_GO_NEXT Not Used Not Used Go to next position ELEM_PLAY_FF Not Used Start frame no. Play sequence
forward once ELEM_GO_LAST Not Used Not Used Go to last position ELEM_GO_TO Not Used Frame no. Go to position
specified by dParam.
ELEM_CLOSE_ENDS Not Used 1 = On 0 = Off
Close start/end frames (create a loop)
ELEM_FRAMES_PER_CAM
Not Used Value No. of intermediate frames between start and end
ELEM_AUTO _ANIM_SIZE
Not Used 1 = On 0 = Off
Auto animation image size
ELEM_ ANIM_WIDTH Not Used Value Animation width in pixels
ELEM_FRAMES_CIRCULAR
Not Used Value No. of frames in circular path
ELEM_INTERVAL_MS Not Used. Value in milliseconds
Interval between frames in milliseconds
ELE_TIME_SYNC Not Used. 1 = On 0 = Off
Synchronize with time
ELEM_ ANIM_HEIGHT Not Used Value Animation height in pixels

IpRendElemSet
Page 2-546
lOpt1 sCmd lOpt2 dParam Description
IP_REND_ ANIMATION
ELEM_ANIM_ ANTIALIAS
Not Used 1 = On 0 = Off
Turns anti-aliasing of image on or off
ELEM_ANIM_ ANTIALIAS_N
Not Used Value Number of anti-aliasing passes creating animation
ELEM_REND_IN_ ANIMATION
Not Used 1 = On 0 = Off
Turns rendering settings in animation on or off
ELEM_RECO RD_ FRAME
Not Used 1 = On 0 = Off
Records current camera position to animation
ELEM_DEL_CUR_ FRAME
Not Used Not Used Delete current frame from animation
ELEM_DEL_ALL Not Used Not Used Delete all frames from animation
IP_REND_TIME ELEM_GO_FIRST Not Used Not Used Go to first position in Animation sequence
0 ELEM_PLAY_RW Not Used Start frame no. Play sequence back once
ELEM_GO_PREV Not Used Not Used Go to previous position
ELEM_GO_NEXT Not Used Not Used Go to next position ELEM_PLAY_FF Not Used Start frame no. Play sequence
forward once ELEM_GO_LAST Not Used Not Used Go to last position ELEM_GO_TO Not Used Frame no. Go to position
specified by dParam.
ELEM_INTERVAL_MS Not Used. Value in milliseconds
Interval between frames in milliseconds
ELEM_TIME_PLAY _TYPE
Not Used. 0 = Wrap around 1 = Auto reverse
Time play type
ELEM_REND_DUPL_ISO
Not Used Not Used. Creates duplicates of volume measurement for every time point.

IpRendElemSet
Page 2-547
lOpt1 sCmd lOpt2 dParam Description
ELEM_REND_REMO VE_ DUPL
Not Used Not Used. Removes duplicates of volume measurement for all time points except 0.
ELEM_REND_SHO W_CUR TIME_ISO
Not Used 1 = On 0 = Off
Sets Show Iso-Surface for current time only option
IP_REND_ROI ELEM_VOI_SHAPE Not Used 0 = Sub-Volume1 = Cross 2 = Slicer 3 = Exclusion box
VOI shape
0 ELEM_SHO W_ HANDLES
Not Used 1 = On 0 = Off
Show handles on Volume of Interest
ELEM_VOI_RESET Not Used Not Used Reset VOI IP_REND_ SLICER
ELEM_SLR_VIEW_ TYPE
Not Used. 0 = thin 1 = thick 2 = projections
Slicer view type
0 ELEM_ TRANSPARENCY
Not Used. 0 = Off 1 = On
Transparency mode
ELEM_ INTERPOLATION
Not Used. 0 = Off 1 = On
Interpolation
ELEM_SLR_CROSS Not Used. 0 = Off 1 = On
Show cross section?
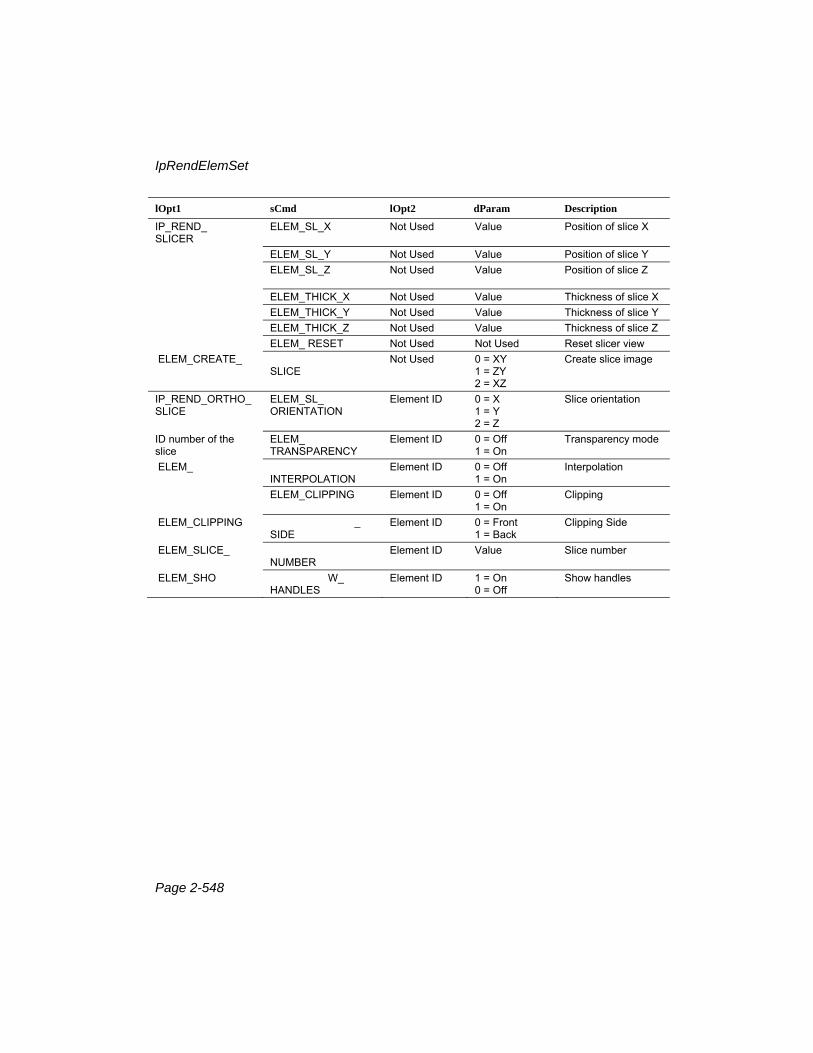
IpRendElemSet
Page 2-548
lOpt1 sCmd lOpt2 dParam Description
IP_REND_ SLICER
ELEM_SL_X Not Used Value Position of slice X
ELEM_SL_Y Not Used Value Position of slice Y ELEM_SL_Z Not Used Value Position of slice Z
ELEM_THICK_X Not Used Value Thickness of slice X ELEM_THICK_Y Not Used Value Thickness of slice Y ELEM_THICK_Z Not Used Value Thickness of slice Z ELEM_ RESET Not Used Not Used Reset slicer view ELEM_CREATE_
SLICE Not Used 0 = XY
1 = ZY 2 = XZ
Create slice image
IP_REND_ORTHO_ SLICE
ELEM_SL_ ORIENTATION
Element ID 0 = X 1 = Y 2 = Z
Slice orientation
ID number of the slice
ELEM_ TRANSPARENCY
Element ID 0 = Off 1 = On
Transparency mode
ELEM_ INTERPOLATION
Element ID 0 = Off 1 = On
Interpolation
ELEM_CLIPPING Element ID 0 = Off 1 = On
Clipping
ELEM_CLIPPING _ SIDE
Element ID 0 = Front 1 = Back
Clipping Side
ELEM_SLICE_ NUMBER
Element ID Value Slice number
ELEM_SHO W_ HANDLES
Element ID 1 = On 0 = Off
Show handles

IpRendElemSet
Page 2-549
lOpt1 sCmd lOpt2 dParam Description
IP_REND_OBLIQUE_SLICE
ELEM_TRANSPARENCY
Element ID 0 = Off 1 = On
Transparency mode
ID number of the slice
ELEM_INTERPOLATION
Element ID 0 = Off 1 = On
Interpolation
ELEM_CLIPPING Element ID 0 = Off 1 = On
Clipping
ELEM_SLICE_NUMBER
Element ID Value of the position from -1 to 1
Slice position in range from -1 to 1
ELEM_SHOW_HANDLES
Element ID 1 = On 0 = Off
Show handles
See also: ELEM_OBL_SL_PAR_GET and ELEM_OBL_SL_PAR SET in IpRendElem
IP_REND_ISO_SURF ELEM_ISO_SIMPL Element ID 0 = none 1= Med 2 = Max
Simplification level
ID number iso-surface or volume measurements
ELEM_ISO_LEVEL Element ID Value Iso-surface threshold level
ELEM_ISO_COUNT Element ID 1 = On 0 = Off
Count lOption
IP_REND_ISO_SURF ELEM_SO_CLOSE_EDGES
Element ID 1 = On 0 = Off
Close edges
ELEM_ISO_FILTER Element ID 0 = None 1 = LoPass 3x32 = LoPass 5x5x5 3 = LoPass 7x7x7 4 = LoPass 9x9x9 5 = Gauss 5x5x5 6 = Gauss 7x7x7 7 = Gauss 9x9x9
Filter type
ELEM_FREEZE Not Used 1 = On 0 = Off
Turns freeze state of iso-surface elements on or off
ELEM_DUPLICATE Not Used Not Used Duplicates iso-surfaces

IpRendElemSet
Page 2-550
lOpt1 sCmd lOpt2 dParam Description
ELEM_AUTO _HIST
_RNG Not Used 1 = On
0 = Off Describes the auto-histogram range of the iso-surface
IP_REND_MEASUREMENTS
ELEM_DECIMAL_ PL
0 Value Number of decimal places in data
0
See Also IpRendElem, IpRendElemGet, IpRendElemSetStr
Example Please see Appendix A, Sample Macro Code
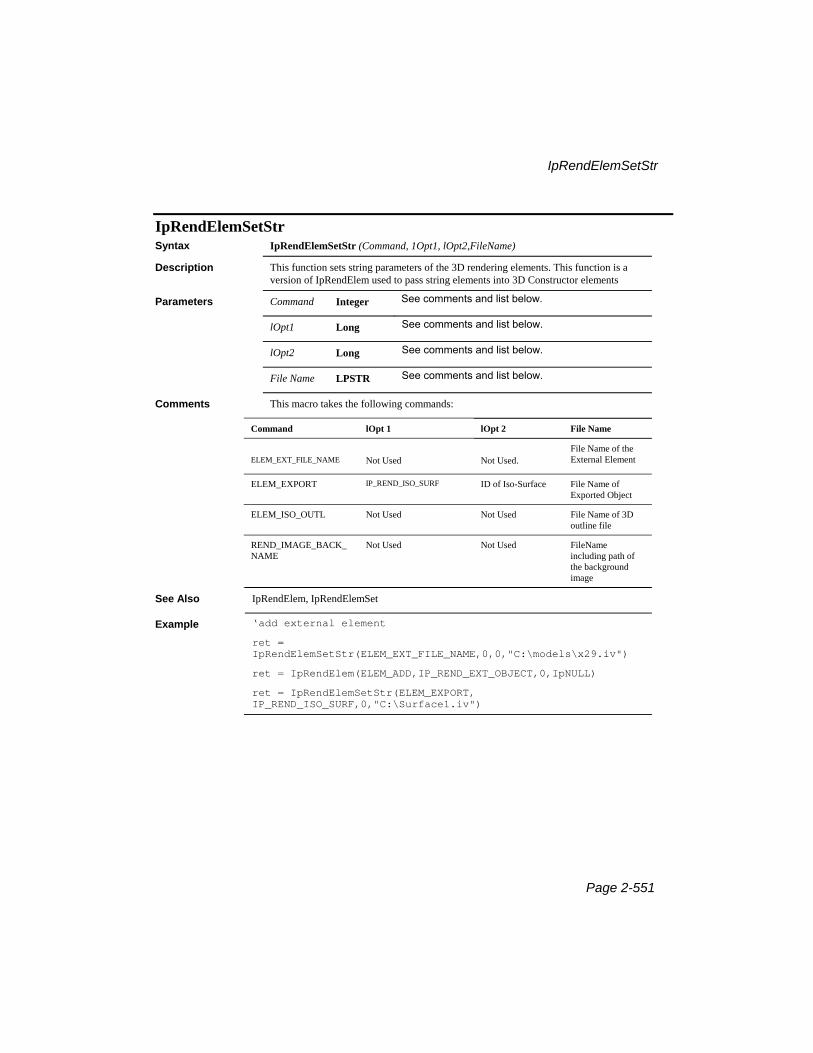
IpRendElemSetStr
Page 2-551
IpRendElemSetStr Syntax IpRendElemSetStr (Command, 1Opt1, lOpt2,FileName)
Description This function sets string parameters of the 3D rendering elements. This function is a version of IpRendElem used to pass string elements into 3D Constructor elements
Parameters Command Integer See comments and list below.
lOpt1 Long See comments and list below.
lOpt2 Long See comments and list below.
File Name LPSTR See comments and list below.
Comments This macro takes the following commands:
Command lOpt 1 lOpt 2 File Name
ELEM_EXT_FILE_NAME Not Used Not Used. File Name of the External Element
ELEM_EXPORT IP_REND_ISO_SURF ID of Iso-Surface File Name of Exported Object
ELEM_ISO_OUTL Not Used Not Used File Name of 3D outline file
REND_IMAGE_BACK_NAME
Not Used Not Used FileName including path of the background image
See Also IpRendElem, IpRendElemSet
Example ‘add external element
ret = IpRendElemSetStr(ELEM_EXT_FILE_NAME,0,0,"C:\models\x29.iv")
ret = IpRendElem(ELEM_ADD,IP_REND_EXT_OBJECT,0,IpNULL)
ret = IpRendElemSetStr(ELEM_EXPORT, IP_REND_ISO_SURF,0,"C:\Surface1.iv")

IpRendSaveData
Page 2-552
IpRendSaveData Syntax IpRendSaveData(sSrcFlags, sDstFlags, szDest)
Description This function saves the data from the 3D Constructor windows.
Parameters sSrcFlags Integer Combination of data source flags and data type flags that specify the source and type of data to be saved. See comments and list below.
sDestFlags Integer Combination of data destination flags and (lOptional) file lOption flags that specify the destination and format for the saved data. See comments and list below.
szDest LPSTR Indicates the destination file name. Used with RNDF_FILE only.
The data source, type, destination, and file lOption flags are described here:
Flag Type Name Description
Data source flags RN_MM_DATA Save manual measurements data table contents to selected destination (default if source is not supplied).
RN_MM_STATS Save manual measurements statistics contents to selected destination
RN_MM_ACTIVE Save manual measurements data and statistics if it is shown to selected destination
RN_VM_DATA Save volume measurements data table contents to selected destination
RN_DATAGRAPH Saves data graph information to the selected destination
RN_VM_STATS Save volume measurements statistics contents to selected destination
RN_VM_ACTIVE Save volume measurements data and statistics if it is shown to selected destination
RN_HISTOGRAM Saves volume histogram data to selected destination.

IpRendSaveData
Page 2-553
Flag Type Name Description
Data type flags RNTF_GRAPH Save the information as a picture. This flag is valid only for RN_HISTOGRAM with destination RNDF_CLIPBOARD
Data destination flags
RNDF_FILE
Copy data to tab-delimited file (default if destination is not supplied). Not valid with RNTF_GRAPH.
RNDF_CLIPBOARD
Copy data to clipboard. Valid only for RN_HISTOGRAM with RNTF_GRAPH.
Flag Type Name Description
Data destination flags
RNDF_OUTPUT Send contents to output file
RNDF_DDE Send contents to Excel via COM. Not valid with RNTF_GRAPH
RNDF_PRINTER Send contents of file to printer
File lOption flags RNDF_CSV The default format of the data file is a tab-delimited table of values, with one line per row. RNDF_CSV is used in conjunction with the RNDF_FILE command to modify the tab-delimited file format and save it as a comma-delimited variable file (usually compatible with import into spreadsheets and databases). Cannot be combined with RNDF_HTML
RNDF_HTML Used to specify that the data file should be written as a HTML file containing an HTML TABLE. Cannot be combined with RNDF_CSV
Return Value 0 if successful, a negative error code if failed.
Example save volume measurements data table
ret = IpRendSaveData(RN_VM_ACTIVE,RNDF_FILE +RNDF_CSV, "D:\cs.csv")
‘copy histogram graph to clipboard
ret = IpRendSaveData(RN_HISTOGRAM + RNTF_GRAPH, RNDF_CLIPBOARD,"")

IpRendLoad
Page 2-554
IpRendLoad Syntax IpRendLoad ()
Description This function loads the active sequence into the 3D Constructor volume renderer
Comments Color channel, voxel size and sub-sampling for the loaded sequence must be set prior calling this function using IpRendSet commands.
Return Value 0 if successful, a negative error code if failed.
Example ‘load active sequence into the renderer
ret = IpRendLoad()
IpRendManualMeasurementsFile Syntax IpRendManualMeasurementsFile(szFileName,bSave)
Description This function loads or saves a manual measurement file.
Parameters szFileName String Indicates the file to load or save.
bSave Integer Indicates whether to load or save the file: 0 = load file 1 = save file
Return Value 0 if successful, a negative error code if failed.
Example Ret = IpRendManualMeasurementFile (“C:\Template\TestMeas1.m3d”,0)

IpRendMeasGraphSet
Page 2-555
IpRendMeasGraphSet Syntax IpRendMeasGraphSet (sCommand, 1Opt1, dParam)
Description This function gets and sets various parameters of the 3D data graph.
Parameters sCommand Integer See comments and list below.
lOpt1 Long See comments and list below.
dParam Double See comments and list below.
Comments This macro takes the following commands:
Command 1Opt1 dParam Description
GRAPH_MEASUREMENT
Indicates the type of measurement. Should be one of the following: MANUAL_MEAS_TYPE or VOLUME_MEAS_TYPE
Measurement ID. Should be one of the following: IVM_SurfVolume = 0 IVM_SurfArea = 1 IVM_SizeX = 2 IVM_SizeY = 3 IVM_SizeZ = 4 IVM_CenterX = 5 IVM_CenterY = 6 IVM_CenterZ = 7 IVM_VolumeBox = 8 IVM_BoxRatio =9
Selects the measurments to be displayed in the data graph

IpRendMeasGraphSet
Page 2-556
Command 1Opt1 dParam Description
GRAPH_MEASUREMENT, con’t
IVM_VolumeFraction = 10 IVM_Diameter = 11 IVM_Sphericity = 12 IVM_MeanDensity = 13 IVM_IOD = 14 IVM_DensityStDev = 15 IVM_RadiusMax = 16 IVM_RadiusMin = 17 IVM_RadiusRatio = 18 IVM_Class = 19 IVM_FeretMax = 20 IVM_FeretMin = 21 IVM_FeretRatio = 22 IVM_SurfAngleA = 23 IVM_SurfAngleG = 24 IVM_SurfNormDev = 25
GRAPH_RANGE_AUTO
Not used, should be 0
0 = off 1 = on
Sets the auto-range flag for the graph
GRAPH_RANGE_MIN
Not used, should be 0
Value Sets the minimum value for the range
GRAPH_RANGE_MAX
Not used, should be 0
Value Sets the maximum value for the range
GRAPH_X_LABELS Not used, should be 0
Should be one of the following: rnxlFrameNumber rnxlRelTime rnxlAbsTime
Indicates the type of label to display on the graph
GRAPH_SHOW_TRACKS
Not used, should be 0
0 = off 1 = on
Turns the tracking mode for the graph on or off
Example ‘select SurfaceArea measurement in Data Graph
ret=IpRendMeasGraphSet(GRAPH_MEASUREMENT,VOLUME_MEAS_TYPE,IVM_SurfArea)
Return Value 0 if successful, a negative error code if failed
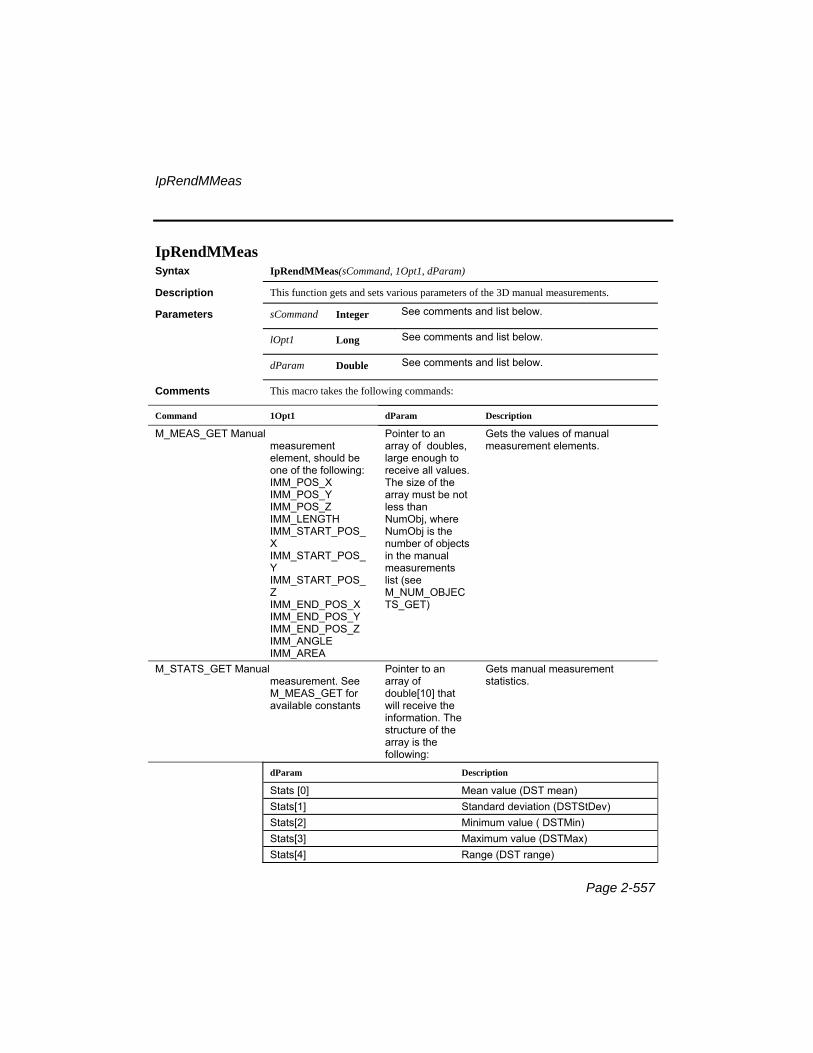
IpRendMMeas
Page 2-557
IpRendMMeas Syntax IpRendMMeas(sCommand, 1Opt1, dParam)
Description This function gets and sets various parameters of the 3D manual measurements.
Parameters sCommand Integer See comments and list below.
lOpt1 Long See comments and list below.
dParam Double See comments and list below.
Comments This macro takes the following commands:
Command 1Opt1 dParam Description
M_MEAS_GET Manual measurement element, should be one of the following: IMM_POS_X IMM_POS_Y IMM_POS_Z IMM_LENGTH IMM_START_POS_X IMM_START_POS_Y IMM_START_POS_Z IMM_END_POS_X IMM_END_POS_Y IMM_END_POS_Z IMM_ANGLE IMM_AREA
Pointer to an array of doubles, large enough to receive all values. The size of the array must be not less than NumObj, where NumObj is the number of objects in the manual measurements list (see M_NUM_OBJECTS_GET)
Gets the values of manual measurement elements.
M_STATS_GET Manual measurement. See M_MEAS_GET for available constants
Pointer to an array of double[10] that will receive the information. The structure of the array is the following:
Gets manual measurement statistics.
dParam Description
Stats [0] Mean value (DST mean) Stats[1] Standard deviation (DSTStDev) Stats[2] Minimum value ( DSTMin) Stats[3] Maximum value (DSTMax) Stats[4] Range (DST range)
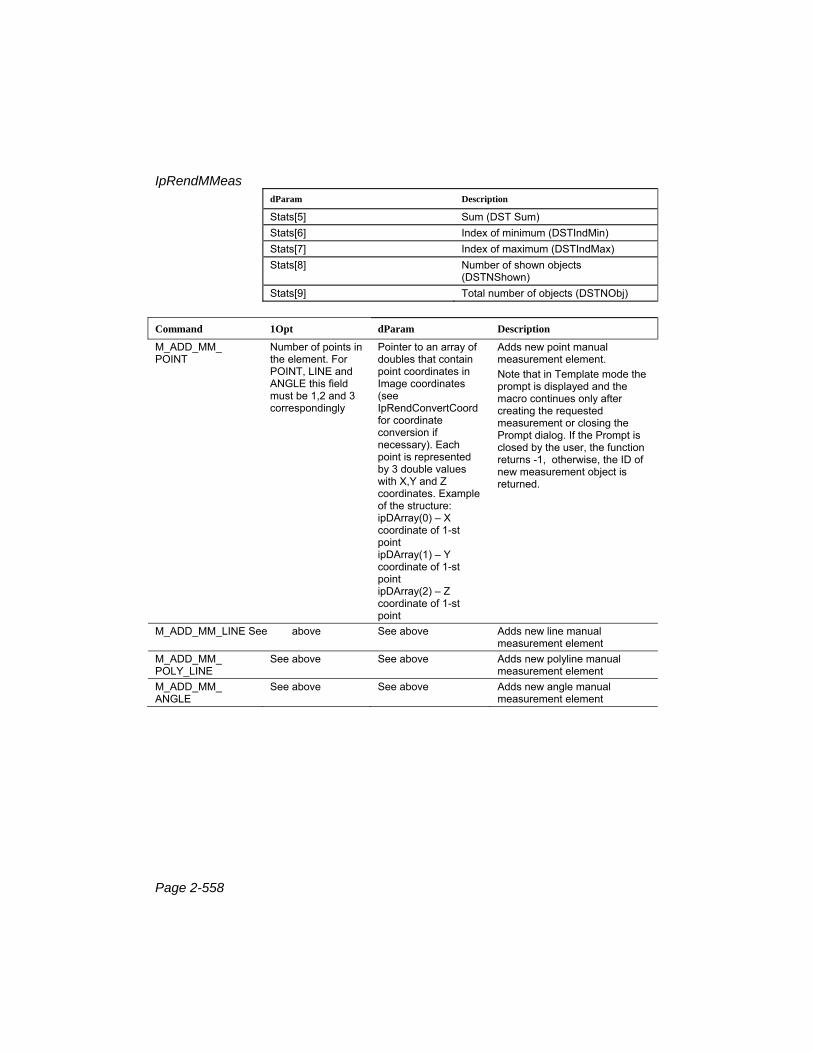
IpRendMMeas
Page 2-558
dParam Description
Stats[5] Sum (DST Sum) Stats[6] Index of minimum (DSTIndMin) Stats[7] Index of maximum (DSTIndMax) Stats[8] Number of shown objects
(DSTNShown) Stats[9] Total number of objects (DSTNObj)
Command 1Opt dParam Description
M_ADD_MM_ POINT
Number of points in the element. For POINT, LINE and ANGLE this field must be 1,2 and 3 correspondingly
Pointer to an array of doubles that contain point coordinates in Image coordinates (see IpRendConvertCoord for coordinate conversion if necessary). Each point is represented by 3 double values with X,Y and Z coordinates. Example of the structure: ipDArray(0) – X coordinate of 1-st point ipDArray(1) – Y coordinate of 1-st point ipDArray(2) – Z coordinate of 1-st point
Adds new point manual measurement element. Note that in Template mode the prompt is displayed and the macro continues only after creating the requested measurement or closing the Prompt dialog. If the Prompt is closed by the user, the function returns -1, otherwise, the ID of new measurement object is returned.
M_ADD_MM_LINE See above See above Adds new line manual measurement element
M_ADD_MM_ POLY_LINE
See above See above Adds new polyline manual measurement element
M_ADD_MM_ ANGLE
See above See above Adds new angle manual measurement element

IpRendMMeas
Page 2-559
Command 1Opt dParam Description
M_ADD_MAN_ TRACK
Number of points in the track
Pointer to an array of doubles, with object IDs and time points for the track. The structure of the array is following: ipDArray(0) – 1st volume object ID ipDArray(1) – 1st time point ipDArray(2) – 2nd volume object ID ipDArray(3) – 2nd time point ipDArray(4) – 3rd volume object ID
Adds a manual 4D track
M_ADD_AUTO_ TRACK
Number of points in the track; should be 1, because all auto-tracking starts with 1 object
Pointer to an array of doubles of size 2, with starting object ID and time point (0-based)
Adds an automatic 4D track
M_TYPE_GET Index of the measurement element (zero-based)
Pointer to a double, that will receive the value. The value can be one of the following: 0 = IP_REND_MM_POINT 1 = IP_REND_MM_LINE 2 = IP_REND_MM_POLY_LINE 3 = IP_REND_MM_ANGLE
Gets the type of manual measurement
M_NUM_OBJECTS_ GET
Not used Pointer to a double that will receive the value
Gets the number of manual measurement elements.

IpRendMMeas
Page 2-560
Command 1Opt dParam Description
M_NUM_POINTS_ GET
Index of the measurement element (zero-based)
Pointer to a double that will receive the value
Gets the number of points in the of manual measurement element
M_ POINTS_GET Index of the measurement element (zero-based)
Pointer to an array of doubles, large enough to receive to receive all coordinates. The size of the array must be not less than 3*NumPoints, where NumPoints is the number of points in the element (see M_NUM_POINTS_GET )
Gets the coordinates of the points in the manual measurement element
M_NUM_MEAS_ GET
Not used Pointer to a double that will receive the value
Gets the number of active manual measurements
M_SEL_GET Index of the measurement element (zero-based)
Pointer to a double that will receive the value
Gets the selection status of the manual measurement element.
M_SEL_SET Index of the measurement element (zero-based) Use M_ALL to select or deselect all objects
Double value: 0 = Deselect 1 = Select
Sets the selection status of the manual measurement element. Note that in Template mode the prompt is displayed and the macro continues only after selecting/deselecting a manual measurement element or closing the Prompt dialog. If the Prompt is closed by user, the function returns -1, in other case the ID of selected/unselected object is returned
M_SHOW_GET Index of the measurement element (zero-based)
Pointer to a double that will receive the value
Gets the visibility status of the manual measurement element
M_SHOW_SET Index of the measurement element (zero-based) Use M_ALL to select or deselect all objects
Double value: 0 = Deselect 1 = Select
Sets the visibility status of the manual measurement element
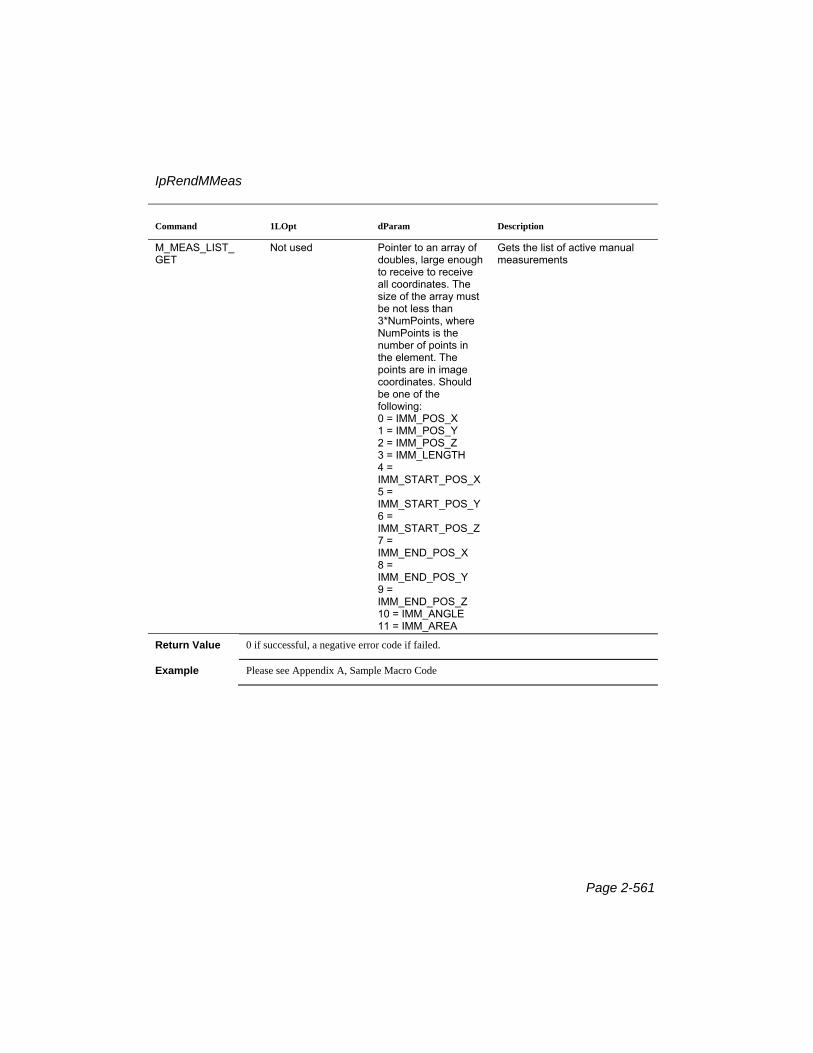
IpRendMMeas
Page 2-561
Command 1LOpt dParam Description
M_MEAS_LIST_ GET
Not used Pointer to an array of doubles, large enough to receive to receive all coordinates. The size of the array must be not less than 3*NumPoints, where NumPoints is the number of points in the element. The points are in image coordinates. Should be one of the following: 0 = IMM_POS_X 1 = IMM_POS_Y 2 = IMM_POS_Z 3 = IMM_LENGTH 4 = IMM_START_POS_X5 = IMM_START_POS_Y6 = IMM_START_POS_Z7 = IMM_END_POS_X 8 = IMM_END_POS_Y 9 = IMM_END_POS_Z 10 = IMM_ANGLE 11 = IMM_AREA
Gets the list of active manual measurements
Return Value 0 if successful, a negative error code if failed.
Example Please see Appendix A, Sample Macro Code
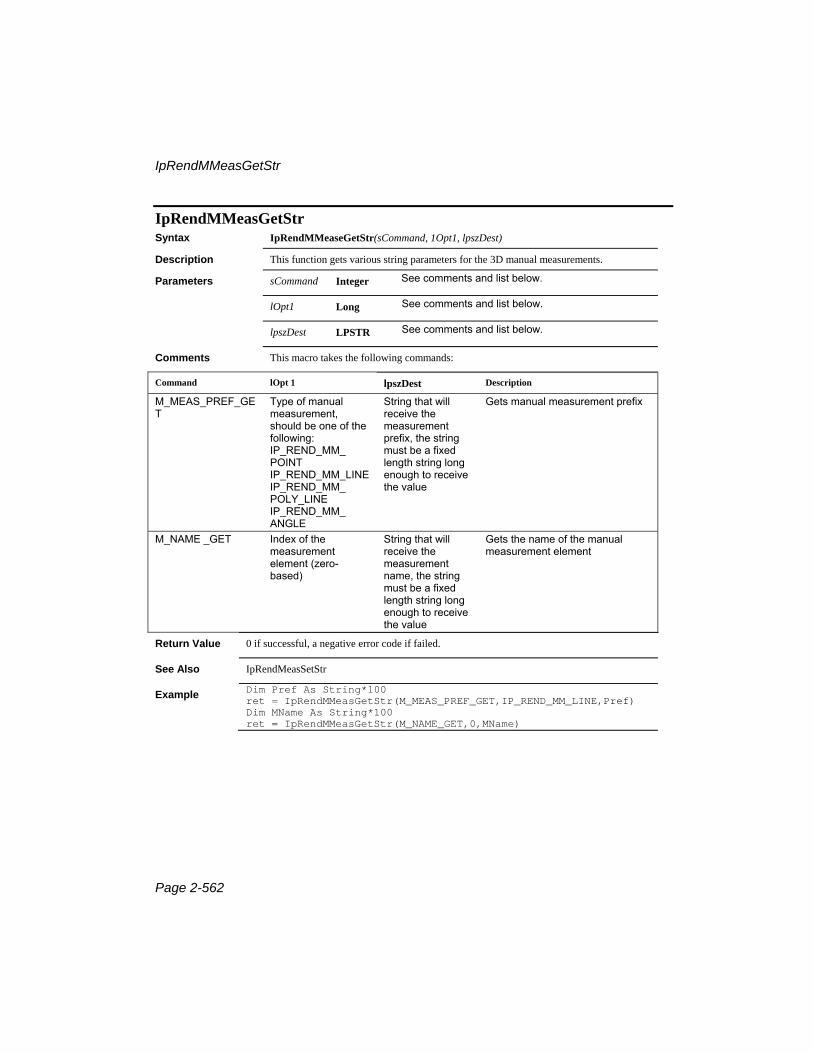
IpRendMMeasGetStr
Page 2-562
IpRendMMeasGetStr Syntax IpRendMMeaseGetStr(sCommand, 1Opt1, lpszDest)
Description This function gets various string parameters for the 3D manual measurements.
Parameters sCommand Integer See comments and list below.
lOpt1 Long See comments and list below.
lpszDest LPSTR See comments and list below.
Comments This macro takes the following commands:
Command lOpt 1 lpszDest Description
M_MEAS_PREF_GET
Type of manual measurement, should be one of the following: IP_REND_MM_ POINT IP_REND_MM_LINEIP_REND_MM_ POLY_LINE IP_REND_MM_ ANGLE
String that will receive the measurement prefix, the string must be a fixed length string long enough to receive the value
Gets manual measurement prefix
M_NAME _GET Index of the measurement element (zero-based)
String that will receive the measurement name, the string must be a fixed length string long enough to receive the value
Gets the name of the manual measurement element
Return Value 0 if successful, a negative error code if failed.
See Also IpRendMeasSetStr
Example Dim Pref As String*100 ret = IpRendMMeasGetStr(M_MEAS_PREF_GET,IP_REND_MM_LINE,Pref) Dim MName As String*100 ret = IpRendMMeasGetStr(M_NAME_GET,0,MName)

IpRendMMeasSet
Page 2-563
IpRendMMeasSet Syntax IpRendMMeaseSet(sCommand, 1Opt1, dParam)
Description This function sets various parameters of the 3D manual measurements. This function is a version of IpRendMMease used to pass parameters into the manual measurements.
Parameters sCommand Integer See comments and list below.
lOpt1 Long See comments and list below.
dParam Double See comments and list below.
Comments This macro takes the following commands:
Command lOpt 1 dParam Description
M_UPDATE Not used, should be 0
Not used, should be 0
Updates the manual measurement data tables and objects. Applies new settings, should be called after changing any manual measurement lOptions from a macro.
M_LINE_COLOR Not used, should be 0
Color in hexadecimal format as &Hrrggbb, where rr, gg,bb are Red, Green and Blue components of color.
Sets the line color for manual measurements.
M_SEL_COLOR Not used, should be 0
Color in hexadecimal format as &Hrrggbb, where rr, gg,bb are Red, Green and Blue components of color
Selects color for manual measurements
M_TEXT_COLOR Not used, should be 0
Color in hexadecimal format as &Hrrggbb, where rr, gg,bb are Red, Green and Blue components of color
Sets label color for manual measurements
M_EL_SIZE Not used, should be 0
Value Manual measurement element size (point, arrow)
M_FONT_SIZE Not used, should be 0
Value Sets font size for manual measurement labels.

IpRendMMeasSet
Page 2-564
Command LOpt 1 dParam Description
M_LABEL_TYPE Not used, should be 0 one of the following: mmLabelsShowName, mmLabelsShowMeasurement, mmLabelsShowNone
Sets label type of measurements (name,first measurement,none)
M_RESET_MEAS Not used, should be 0 Not used, should be 0
Resets the list of selected measurements
M_ADD_MEAS Should be one of the following: IMM_POS_X IMM_POS_Y IMM_POS_Z IMM_LENGTH IMM_START_POS_X IMM_START_POS_Y IMM_START_POS_Z IMM_END_POS_X IMM_END_POS_Y IMM_END_POS_Z IMM_ANGLE IMM_AREA IMM_NPOINTS
Not used, should be 1
Adds a measurement to the list of selected measurements
M_SHOW_STATS Not used, should be 0 0 = Hide statistics 1 = Show statistics
Shows or hides the statistics pane of the Manual Measurements window.
M_ACTION Not used, should be 0 Action type. Must be one of the following: mmActionSelect mmActionAddPoint mmActionAddLine mmActionAddPolyLine mmActionAddAngle mmActionSplitObjectmmActionAddOutline mmActionAddCurve
Sets measurement action
M_CREATE_MEAS Not used, should be 0 Type of new measurement, must be one of the following:
Creates a new derived measurement based on the selected objects

IpRendMMeasSet
Page 2-565
Command LOpt 1 dParam Description
IMM_ADD_PP_DIST = distance between centers of 2
objects IMM_ADD_PL_DIST = distance between point and line IMM_ADD_LL_ANGLE = angle between lines IMM_ADD_CENTER = center point of the object IMM_ADD_MIN_DIST = min distance between point and surface IMM_ADD_POLYLINE = merge object points to a poly-line IMM_SPLIT_POLYLINE = creates a new line measurement from every segment of the selected track/polyline IMM_GET_POINTS = creates a new point measurement for every coordinate of the selected track/polyline
M_SHOW_ALL Not used, should be 0
Not used, should be 0
Shows all objects
M_SHOW_SELECTED
Not used, should be 0
0 = Hide objects 1 = Show objects
Shows or hides the selected objects
M_DELETE_ALL Not used, should be 0
Not used, should be 0
Deletes all objects
M_DELETE_SELECTED
Not used, should be 0
0 = Hide objects 1 = Show objects
Deletes the selected objects
M_ALLOW_EDIT Not used, should be 0
0 = Off 1 = On
Enables point position editing
M_ENABLE_ UPDATE
Not used, should be 0
0 = Disable update 1 = Enable update
Enables/disables updating of manual and volume measurements data tables
M_SPH_SIZE Not used, should be 0
The size value Sets the size of spheres used to display manual point measurements
M_LINE_WIDTH Not used, should be 0
The width value Sets the wideth of lines connecting the manual measurement points
M_EL_COLOR Index of the manual measurement element (o-based)
The color value as long 0xrrggbb
Sets the color of a manual measurement element.
M_RESET_ALL_USR_MEAS
Not used, should be Not used, should be
Resets all added user-defined measurements

IpRendMMeasSetStr
Page 2-566
Command LOpt 1 dParam Description
M_USR_MEAS_DATA_ SET
Measurement/element index. The index is combined according to the following formula: MeasID+M_USR_MEAS_MULT*MeasElIndex, where MeasID is the measurement index returned by M_ADD_USR_MEAS and MeasElIndex is the index of the manual measurement element (line, point,…), 0-based.
The selected value
Sets the value for user-defined measurements
Return Value 0 if successful, a negative error code if failed.
See Also M_MEAS_PREF_SET in IpRendMMeasSetStr and IpRendMeasGetStr
Example Please see Appendix A, Sample Macro Code
IpRendMMeasSetStr Syntax IpRendMMeasSetStr(sCommand, 1Opt1, lpszDest)
Description This function sets various string parameters for the 3D manual measurements.
Parameters sCommand
Integer See comments and list below.
lLOpt1 Long See comments and list below.
lpszDest LPSTR See comments and list below.
Comments This macro takes the following commands:
Command lOpt 1 lpszDest Description
M_MEAS_PREF_SET Type of manual measurement, should be one of the following: IP_REND_MM_ POINT IP_REND_MM_ LINE IP_REND_MM_ POLY_LINE IP_REND_MM_ ANGLE
String with prefix Sets manual measurement prefix

IpRendMove
Page 2-567
Command lOpt 1 lpszDest Description
M_NAME _SET Index of the measurement element (zero-based)
String with new name
Sets the name of the manual measurement element
M_TEMPLATE_ PROMPT
Not used String with text Sets the user prompt for template mode
M_ADD_USR_MEAS Icon ID. The value can be from 0 to 4
Measurement name
Adds new user-defined measurement to the manual measurements list. If the measurement already exists, it is not added. The function just returns the ID of the measurement. The measurement values can be then set from macro using M_USR_MEAS_DATA_SET constant (see IpRendMMeasSet)
Comments The example macro prompts the user to select 2 manual measurement elements from within the measurements table.
Return Value Id of the measurement if successful, a negative error code if failed.
See Also IpRendMeasGetStr
Example ret = IpTemplateMode(1) ret = IpRendMMeasSetStr(M_TEMPLATE_PROMPT,0,"Please select first point") ret = IpRendMMeasSet(M_SEL_SET,1,1) ret = IpRendMMeasSetStr(M_TEMPLATE_PROMPT,0,"Please select second point") ret = IpRendMMeasSet(M_SEL_SET,2,1) ret = IpTemplateMode(0)
IpRendMove Syntax IpRendMove( Dialog, xPos, yPos)
Description This function moves windows and dialogs
Parameters sDialog Integer Indicates the dialog to move.
xPos Integer Indicates the X window position
yPos Long Indicates the Y window position
Return Value 0 if successful, a negative error code if failed.
Example ret = IpRendMove(REND_VIEWER, 632, 161)

IpRendReload
Page 2-568
IpRendReload Syntax IpRendReload()
Description This function reloads the active volume into 3D Constructor. Use this function to reload volumes after they have been modificed
IpRendPaletteFile Syntax IpRendPaletteFile (FileName,bSave)
Description This function loads or saves 3D palette files
Parameters szFileName String Indicates the name of the file
bSave Integer Indicates if the file should be loaded or saved: 0 = load file 1 = save file
Return Value 0 if successful, a negative error code if failed.
Example ‘load palette
ret = IpRendPaletteFile("C:\Mediacy\Blue-RedBl.psc", 0)
’save palette
ret = IpRendPaletteFile("C:\Mediacy\NewPal.p3d", 1)
IpRendSet Syntax IpRendSet (sCommand, dParam1, dParam2,dParam3)
Description This function sets various rendering commands
Parameters sCommand Integer See comments and list below.
dParam1 Double See comments and list below.
dParam2 Double See comments and list below.
dParam3 double See comments and list below.
Comments See list below.

IpRendSet
Page 2-569
sCommand dParam1 dParam2 dParam3 Description
REND_CHANNEL dParam1: is one of the following REND_CH_COLOR load image as color REND_CH_RED load red channel REND_CH_GREEN load green channel REND_CH_BLUE load blue channel
Not used Not used Sets the channel which will be used to load new volume into 3D Constructor volume renderer using IpRendLoad() function. Note that if the image is gray REND_CHANNEL is ignored.
REND_VOXEL_SIZE
Width of voxel in calibrated units
Height of voxel in calibrated units
Depth of voxel in calibrated units
Sets voxel size for the volume which will be used to load new volume into 3D Constructor volume renderer using IpRendLoad() function.Default values 1,1,1 will be used with IpRendLoad if voxel size is not set.
REND_SPIN XSpeed = rotation about X axis
YSpeed = rotation about Y axis
ZSpeed = rotation about Z axis
Sets the Spin animation for the volume in revolutions per second
REND_VIEWING_MODE
0 = Viewer off 1 = Viewer on
Not used. Not used. Turns 3D Viewer off or on.
REND_VIEW_ALL Not used Not used. Not Used View all actions.

IpRendSet
Page 2-570
sCommand dParam1 dParam2 dParam3 Description
REND_ACTIVE_PORTION
Defines whether to load an active portion of the sequence or the stack. 1 – to load active portion, 0 – to load stack.
Not used. Not used Sets an lOption to load an active portion of the sequence or the stack, which will be used to load new volume into 3D Constructor volume renderer using IpRendLoad() function.
REND_HI_COLOR 1 = Hi-color 2 = 256 colors
Not used. Not used. Sets the Hi-Color mode for the new image.
REND_BACK_COLOR
Color in bbggrr format where rr, gg,bb are Red, Green and Blue components of color.
Not used. Not used. Sets the background color mode for the Viewer.
REND_RESET_LOPTIONS
1 = Reset lOptions 0 = Do not reset
Not used. Not used. Resets all the rendering lOptions before loading a new volume. Removes all added elements.
REND_SUBSAMPLING
Sub-sampling in X direction
Sub-sampling in Y direction.
Sub-sampling in Z direction
Sets sub-sampling for the volume which will be used to load new volume into 3D Constructor volume renderer using IpRendLoad() function. Default values 1,1,1 will be used with IpRendLoad if sub-sampling is not set.

IpRendSet
Page 2-571
sCommand dParam1 dParam2 dParam3 Description
REND_ISO_ CHANNEL
dParam1: is one of the following REND_CH_GRAY = -1 load gray channel as weighted combinations of red, blue, and green REND_CH_RED = 1load red channel REND_CH_GREEN = 2 load green channel REND_CH_BLUE = 3 load blue channel
Not used Not used Sets the channel which will be used to create new volume measurements
REND_RED_GREEN = 4 red-green colocalization REND_BLUE_GREEN =5 blue-green colocalization REND_RED_BLUE =6 red-blue colocalization REND_RED_GREEN_ BLUE = 7 red-green-blue colocalization
Note that if the image is gray, IPRendElement ignores this parameter.
REND_ISO_SUBSAMPLING
Sub-sampling in X direction
Sub-sampling in Y direction.
Sub-sampling in Z direction
Sets sub-sampling for new volume measurements. Default values 1,1,1 will be used with IpRendLoad if sub-sampling is not set.

IpRendSet
Page 2-572
sCommand dParam1 dParam2 dParam3 Description
REND_ISO_ FILTER
FLT_3D_None FLT_3D_LoPass_3x3x3 FLT_3D_LoPass_5x5x5 FLT_3D_LoPass_7x7x7 FLT_3D_LoPass_9x9x9 FLT_3D_Gauss_5x5x5 FLT_3D_Gauss_7x7x7 FLT_3D_Gauss_9x9x9
Not used Not used Sets the filter type which will be used to create new volume measurements
REND_ISO_ SIMPL
ISO_SIMPL_NONE no simplification ISO_SIMPL_MED medium simplification ISO_SIMPL_MAX maximum simplification
Not used Not used Sets the simplification mode which will be used to create new volume measurements.
REND_ISO_ CLOSE_EDGES
0 = Close edges off 1= Close edges on
Not used Not used Sets the Close edges mode which will be used to create new volume measurements

IpRendSettingsFile
Page 2-573
sCommand dParam1 dParam2 dParam3 Description
REND_ISO_COUNT
0 = Count off 1= Count on
Not used Not used Sets the Count mode which will be used to create new volume measurements
REND_BACK_COLOR2
Color in bbggrr format where rr, gg,bb are Red, Green and Blue components of color.
Not used. Not used. Sets the gradient background color for the Viewer.
REND_GRADIENT_BACK
0 = Gradient off 1= Gradient on
Not used. Not used. Turns the gradient background color on or off.
REND_IMAGE_BACK
0 = Image off 1= Image on
Not used. Not used. Turns the image background on or off.
REND_IMAGE_BACK_ STYLE
Must be one of the following: value: 0 = None 1 = Center 2 = Lower left 3 = Upper left 4 = Upper right, 5 = Lower right 6 = Stretch 7 = Tile
Not used. Not used. Sets the position of the background image
Return Value 0 if successful, a negative error code if failed, ICERR_INVARG if out of range.
Example Please see Appendix A, Sample Macro Code
IpRendSettingsFile Syntax IpRendSettingsFile(szSettings, bSave)
Description This function loads or saves a set of 3D rendering options, including 3D Constructor files and 3D experiment sets.
Parameters szSettings String Indicates the file name. The file type is determined by the extension: *.REN = settings file *.S3D = experiment set
bSave Long Indicates whether to load or save the file: 0 = load file 1 = save file
Return Value 0 if successful, a negative error code if failed.
Example ret = IpRendSettingsFile(“def.ren”,0)
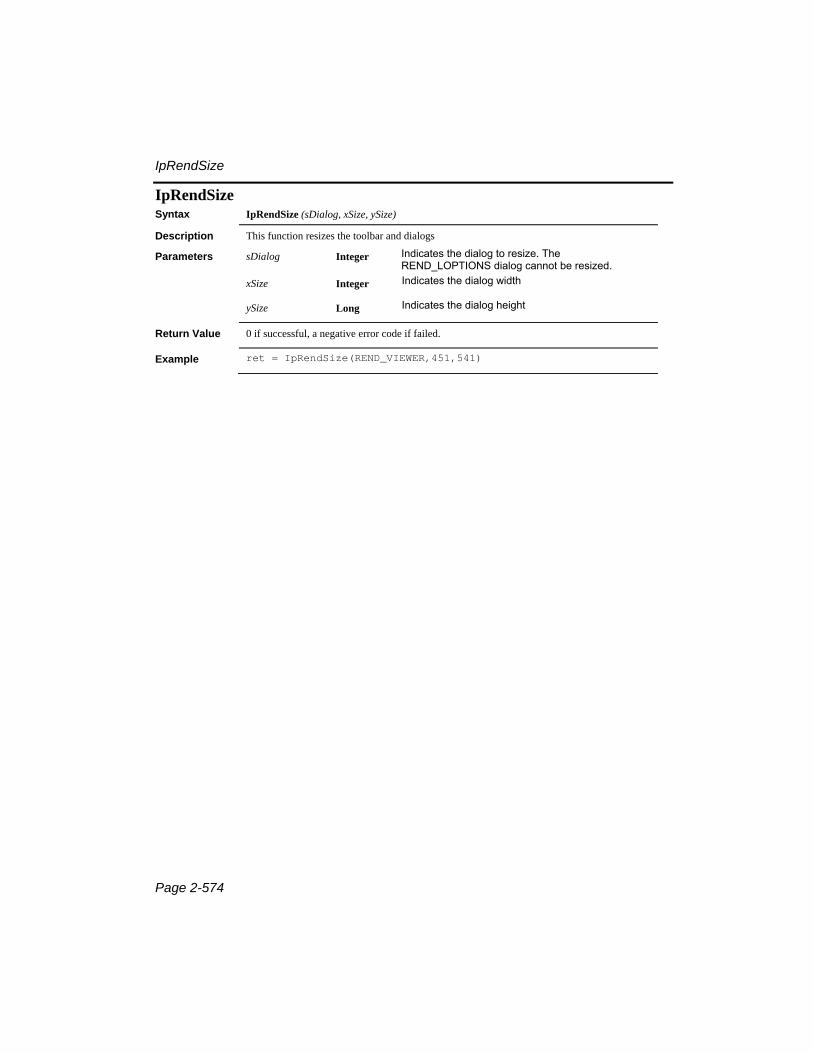
IpRendSize
Page 2-574
IpRendSize Syntax IpRendSize (sDialog, xSize, ySize)
Description This function resizes the toolbar and dialogs
Parameters sDialog Integer Indicates the dialog to resize. The REND_LOPTIONS dialog cannot be resized.
xSize Integer Indicates the dialog width
ySize Long Indicates the dialog height
Return Value 0 if successful, a negative error code if failed.
Example ret = IpRendSize(REND_VIEWER,451,541)

IpRendShow
Page 2-575
IpRendShow Syntax IpRendShow (sDialog, sShow)
Description This function hides or shows the dialog and viewer.
Parameters sDialog Integer A constant indicating what to show or hide. Must be one of the following: REND_VIEWER indicates the 3D Viewer window REND_LOPTIONS indicates the rendering lOptions dialog. REND_MEAS_DATA_TABLE indicates the manual measurements data table REND_VMEAS_DATA_TABLE indicates the volume measurements data table REND_HISTOGRAM indicates the measurements histogram REND_CAMERA_DLG indicates the camera parameters dialog REND_BCG_DLG indicates the brightness, contrast and gamma dialog.
sShow Integer A constant indicating whether to show or hide the dialog or window: REND_HIDE = hide the window or dialog REND_SHOW = show the window or dialog
Return Value 0 if successful, a negative error code if failed.
Example ret = IpRendShow(REND_VIEWER,REND_SHOW)
ret = IpRendShow(REND_LOPTIONS,REND_SHOW)

IpRendVMeas
Page 2-576
IpRendVMeas Syntax IpRendVMeas(sCommand, 1Opt1, dParam)
Description This function gets and sets various parameters of the 3D volume measurements.
Parameters sCommand Integer See comments and list below.
IOpt1 Long See comments and list below.
dParam Double See comments and list below.
Comments This macro takes the following commands:
sCommand IOpt1 dParam Description
M_MEAS_GET Manual measurement element, should be one of the following: Should be one of the following: IVM_SurfVolume IVM_SurfArea IVM_SizeX IVM_SizeY IVM_SizeZ IVM_CenterX IVM_CenterY IVM_CenterZ IVM_VolumeBox IVM_BoxRatio IVM_VolumeFraction IVM_Diameter IVM_Sphericity IVM_MeanDensity IVM_IOD IVM_DensityStDev IVM_RadiusMax IVM_RadiusMin IVM_RadiusRatio IVM_Class IVM_FeretMax IVM_FeretMin IVM_FeretRatio IVM_SurfAngleA IVM_SurfAngleG IVM_SurfNormDev
Pointer to an array of doubles, large enough to receive all values. The size of the array must be not less than NumObj, where NumObj is the number of objects in the volume measurements list see M_NUM_OBJECTS_GET
Gets the values of volume measurement elements.
M_FILTER_RANGES_ GET
Measurement ID Pointer to an array of doubles that will receive the value
Gets volume measurement filter ranges
M_FILTER_RANGES_ SET
Measurement ID Pointer to an array of a double [2] with min and max values
Sets volume measurement filter ranges

IpRendVMeas
Page 2-577
sCommand 1Opt1 dParam Description
M_ADD_SPLIT ID of the object to split Pointer to an array of doubles [9] that contain point coordinates in world coordinates (see IpRendConvertCoord for coordinate conversion if necessary). Each point is represented by 3 double values with X,Y and Z coordinates. Example of the structure: ipDArray(0) – X coordinate of 1-st point ipDArray(1) – Y coordinate of 1-st point ipDArray(2) – Z coordinate of 1-st point …
Adds split by the plane defined by 3 points (?).
Note that in Template mode the prompt is displayed and the macro continues only after splitting an object or closing the Prompt dialog. If the Prompt is closed by the user, the function returns -1, otherwise, the ID of new measurement object is returned.
M_ADD_OUT LINE Object ID Pointer to an array of doubles [9] that contain point coordinates in world coordinates
Adds an outline crossing the surface of the object in the plane defined by 3 points (?).Note that in Template mode the prompt is displayed and the macro continues only after creating an outline or closing the Prompt dialog. If the Prompt is closed by the user, the function returns -1, otherwise, the ID of new measurement object is returned.
M_ADD_CURVE Object ID Pointer to an array of doubles [9] that contain point coordinates in world coordinates
Adds a curve crossing the surface of the object the plane defined by 3 points (?).Note that in Template mode the prompt is displayed and the macro continues only after creating a curve or closing the Prompt dialog. If the Prompt is closed by the user, the function returns -1, otherwise, the ID of new measurement object is returned.
M_SHOW_GET Object ID Pointer to a double that will receive the value
Gets the visibility status of the volume measurement element
M_SHOW_SET Object ID Double value: 0 = Deselect 1 = Select
Sets the visibility status of the volume measurement element
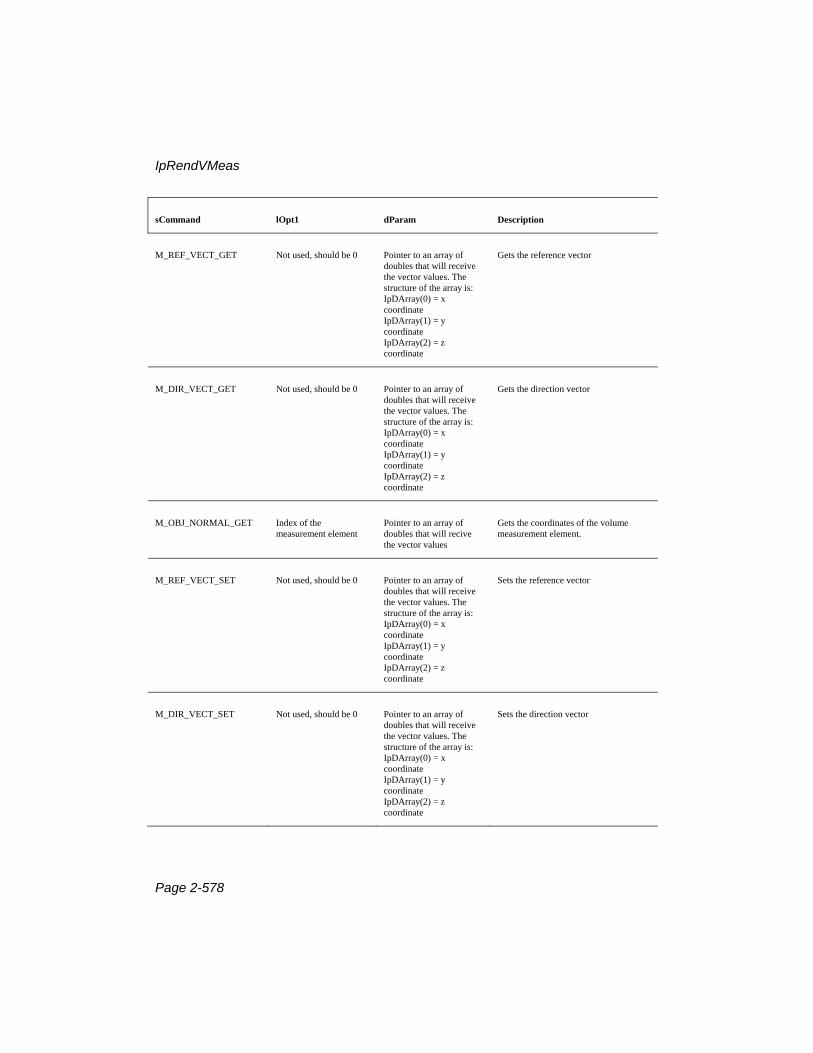
IpRendVMeas
Page 2-578
sCommand lOpt1 dParam Description
M_REF_VECT_GET Not used, should be 0 Pointer to an array of doubles that will receive the vector values. The structure of the array is: IpDArray(0) = x coordinate IpDArray(1) = y coordinate IpDArray(2) = z coordinate
Gets the reference vector
M_DIR_VECT_GET Not used, should be 0 Pointer to an array of doubles that will receive the vector values. The structure of the array is: IpDArray(0) = x coordinate IpDArray(1) = y coordinate IpDArray(2) = z coordinate
Gets the direction vector
M_OBJ_NORMAL_GET Index of the measurement element
Pointer to an array of doubles that will recive the vector values
Gets the coordinates of the volume measurement element.
M_REF_VECT_SET Not used, should be 0 Pointer to an array of doubles that will receive the vector values. The structure of the array is: IpDArray(0) = x coordinate IpDArray(1) = y coordinate IpDArray(2) = z coordinate
Sets the reference vector
M_DIR_VECT_SET Not used, should be 0 Pointer to an array of doubles that will receive the vector values. The structure of the array is: IpDArray(0) = x coordinate IpDArray(1) = y coordinate IpDArray(2) = z coordinate
Sets the direction vector
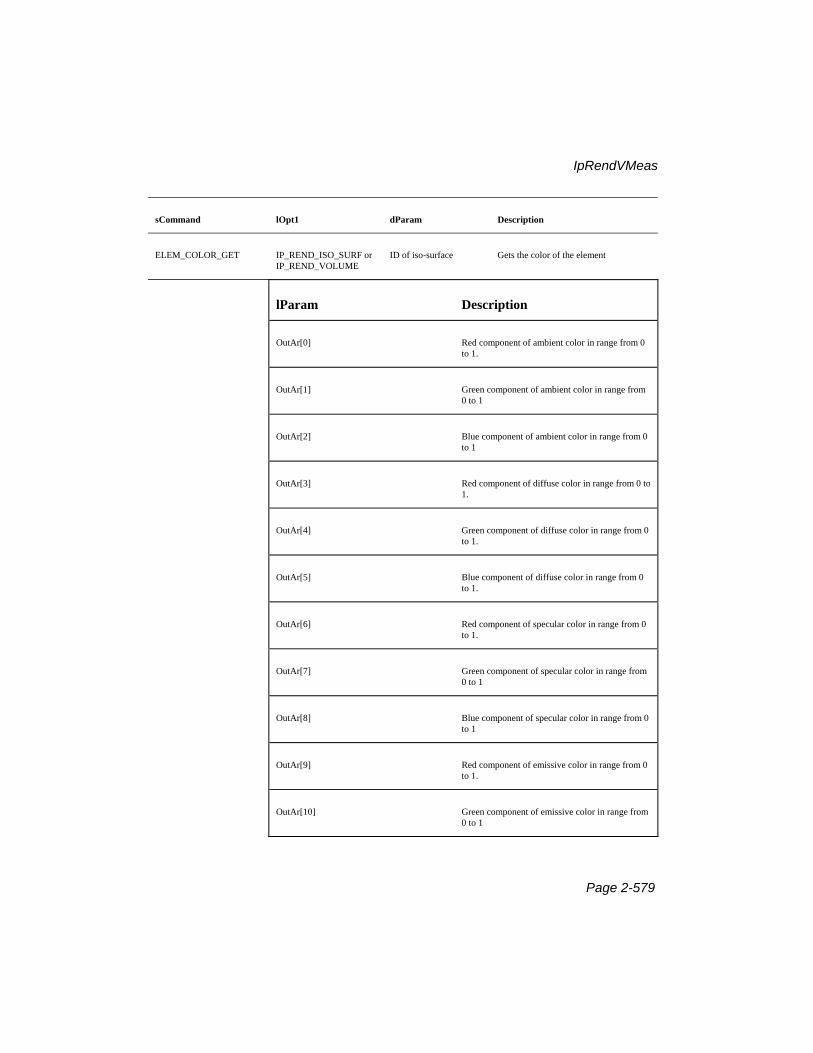
IpRendVMeas
Page 2-579
sCommand lOpt1 dParam Description
ELEM_COLOR_GET IP_REND_ISO_SURF or IP_REND_VOLUME
ID of iso-surface Gets the color of the element
lParam Description
OutAr[0] Red component of ambient color in range from 0 to 1.
OutAr[1] Green component of ambient color in range from 0 to 1
OutAr[2] Blue component of ambient color in range from 0 to 1
OutAr[3] Red component of diffuse color in range from 0 to 1.
OutAr[4] Green component of diffuse color in range from 0 to 1.
OutAr[5] Blue component of diffuse color in range from 0 to 1.
OutAr[6] Red component of specular color in range from 0 to 1.
OutAr[7] Green component of specular color in range from 0 to 1
OutAr[8] Blue component of specular color in range from 0 to 1
OutAr[9] Red component of emissive color in range from 0 to 1.
OutAr[10] Green component of emissive color in range from 0 to 1
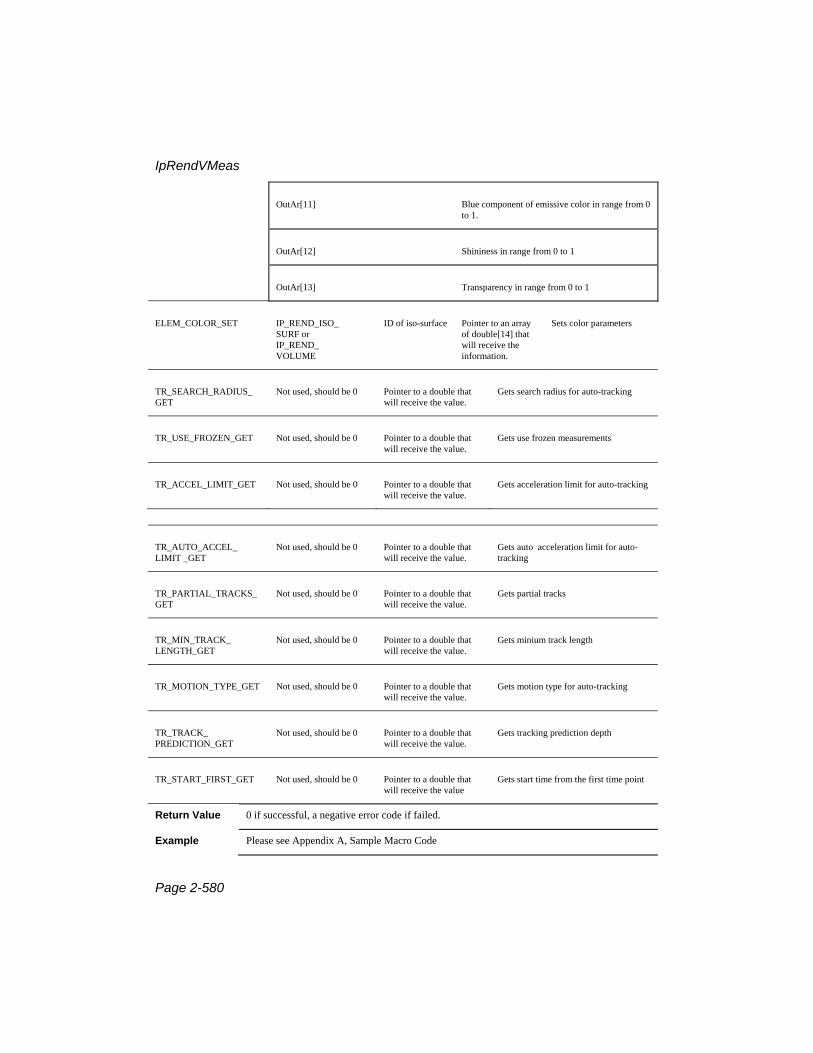
IpRendVMeas
Page 2-580
OutAr[11] Blue component of emissive color in range from 0 to 1.
OutAr[12] Shininess in range from 0 to 1
OutAr[13] Transparency in range from 0 to 1
ELEM_COLOR_SET IP_REND_ISO_ SURF or IP_REND_ VOLUME
ID of iso-surface Pointer to an array of double[14] that will receive the information.
Sets color parameters
TR_SEARCH_RADIUS_ GET
Not used, should be 0 Pointer to a double that will receive the value.
Gets search radius for auto-tracking
TR_USE_FROZEN_GET Not used, should be 0 Pointer to a double that will receive the value.
Gets use frozen measurements
TR_ACCEL_LIMIT_GET Not used, should be 0 Pointer to a double that will receive the value.
Gets acceleration limit for auto-tracking
TR_AUTO_ACCEL_ LIMIT _GET
Not used, should be 0 Pointer to a double that will receive the value.
Gets auto acceleration limit for auto-tracking
TR_PARTIAL_TRACKS_ GET
Not used, should be 0 Pointer to a double that will receive the value.
Gets partial tracks
TR_MIN_TRACK_ LENGTH_GET
Not used, should be 0 Pointer to a double that will receive the value.
Gets minium track length
TR_MOTION_TYPE_GET Not used, should be 0 Pointer to a double that will receive the value.
Gets motion type for auto-tracking
TR_TRACK_ PREDICTION_GET
Not used, should be 0 Pointer to a double that will receive the value.
Gets tracking prediction depth
TR_START_FIRST_GET Not used, should be 0 Pointer to a double that will receive the value
Gets start time from the first time point
Return Value 0 if successful, a negative error code if failed.
Example Please see Appendix A, Sample Macro Code
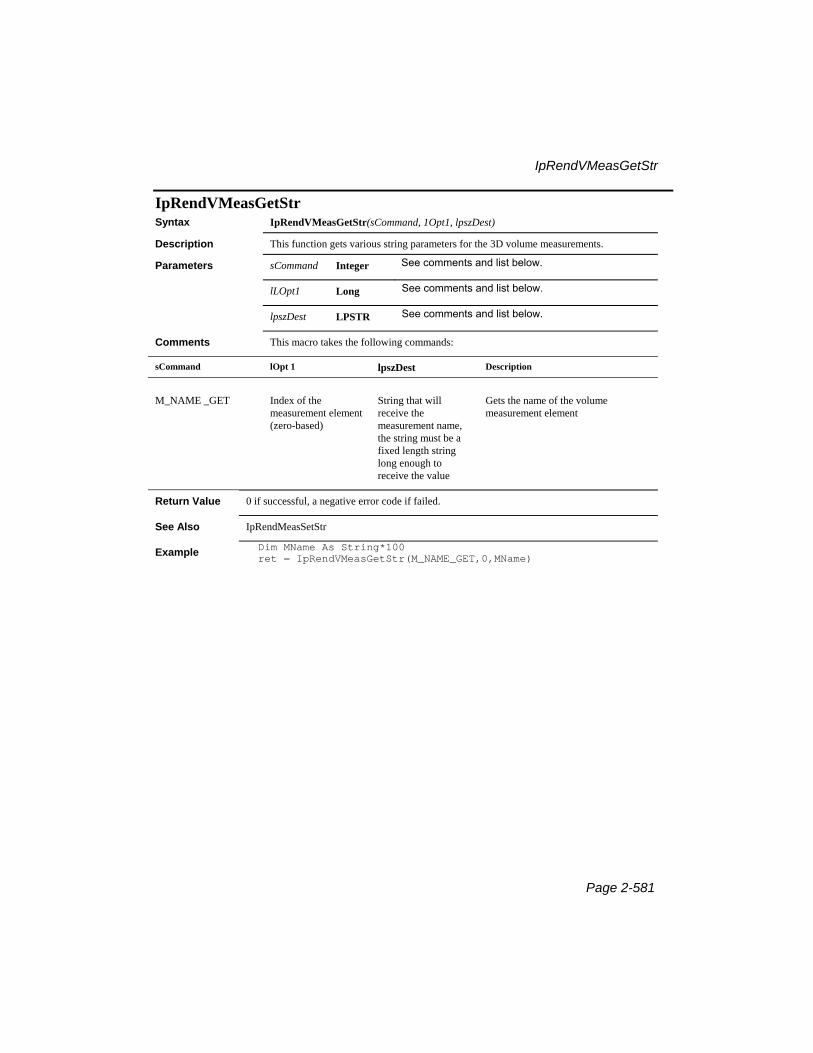
IpRendVMeasGetStr
Page 2-581
IpRendVMeasGetStr Syntax IpRendVMeasGetStr(sCommand, 1Opt1, lpszDest)
Description This function gets various string parameters for the 3D volume measurements.
Parameters sCommand Integer See comments and list below.
lLOpt1 Long See comments and list below.
lpszDest LPSTR See comments and list below.
Comments This macro takes the following commands:
sCommand lOpt 1 lpszDest Description
M_NAME _GET Index of the measurement element (zero-based)
String that will receive the measurement name, the string must be a fixed length string long enough to receive the value
Gets the name of the volume measurement element
Return Value 0 if successful, a negative error code if failed.
See Also IpRendMeasSetStr
Example Dim MName As String*100 ret = IpRendVMeasGetStr(M_NAME_GET,0,MName)
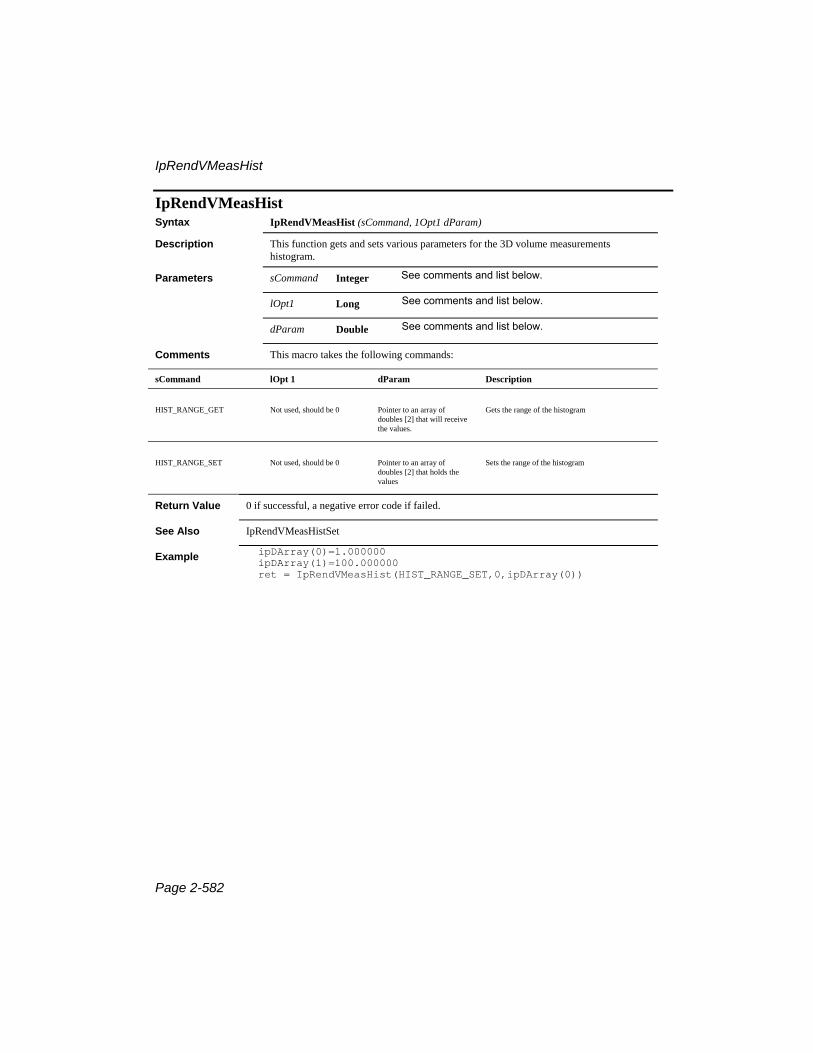
IpRendVMeasHist
Page 2-582
IpRendVMeasHist Syntax IpRendVMeasHist (sCommand, 1Opt1 dParam)
Description This function gets and sets various parameters for the 3D volume measurements histogram.
Parameters sCommand Integer See comments and list below.
lOpt1 Long See comments and list below.
dParam Double See comments and list below.
Comments This macro takes the following commands:
sCommand lOpt 1 dParam Description
HIST_RANGE_GET Not used, should be 0 Pointer to an array of doubles [2] that will receive the values.
Gets the range of the histogram
HIST_RANGE_SET Not used, should be 0 Pointer to an array of doubles [2] that holds the values
Sets the range of the histogram
Return Value 0 if successful, a negative error code if failed.
See Also IpRendVMeasHistSet
Example ipDArray(0)=1.000000 ipDArray(1)=100.000000 ret = IpRendVMeasHist(HIST_RANGE_SET,0,ipDArray(0))
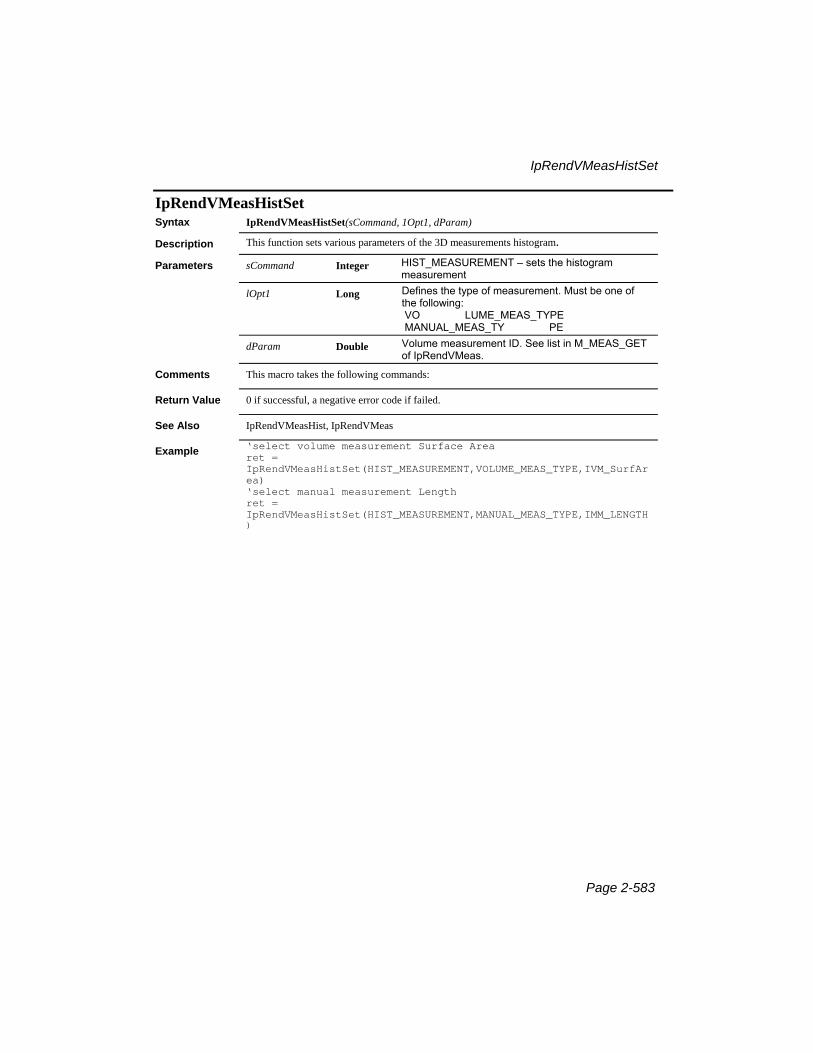
IpRendVMeasHistSet
Page 2-583
IpRendVMeasHistSet Syntax IpRendVMeasHistSet(sCommand, 1Opt1, dParam)
Description This function sets various parameters of the 3D measurements histogram.
Parameters sCommand Integer HIST_MEASUREMENT – sets the histogram measurement
lOpt1 Long Defines the type of measurement. Must be one of the following: VO LUME_MEAS_TYPE MANUAL_MEAS_TY PE
dParam Double Volume measurement ID. See list in M_MEAS_GET of IpRendVMeas.
Comments This macro takes the following commands:
Return Value 0 if successful, a negative error code if failed.
See Also IpRendVMeasHist, IpRendVMeas
Example ‘select volume measurement Surface Area ret = IpRendVMeasHistSet(HIST_MEASUREMENT,VOLUME_MEAS_TYPE,IVM_SurfArea) ‘select manual measurement Length ret = IpRendVMeasHistSet(HIST_MEASUREMENT,MANUAL_MEAS_TYPE,IMM_LENGTH)
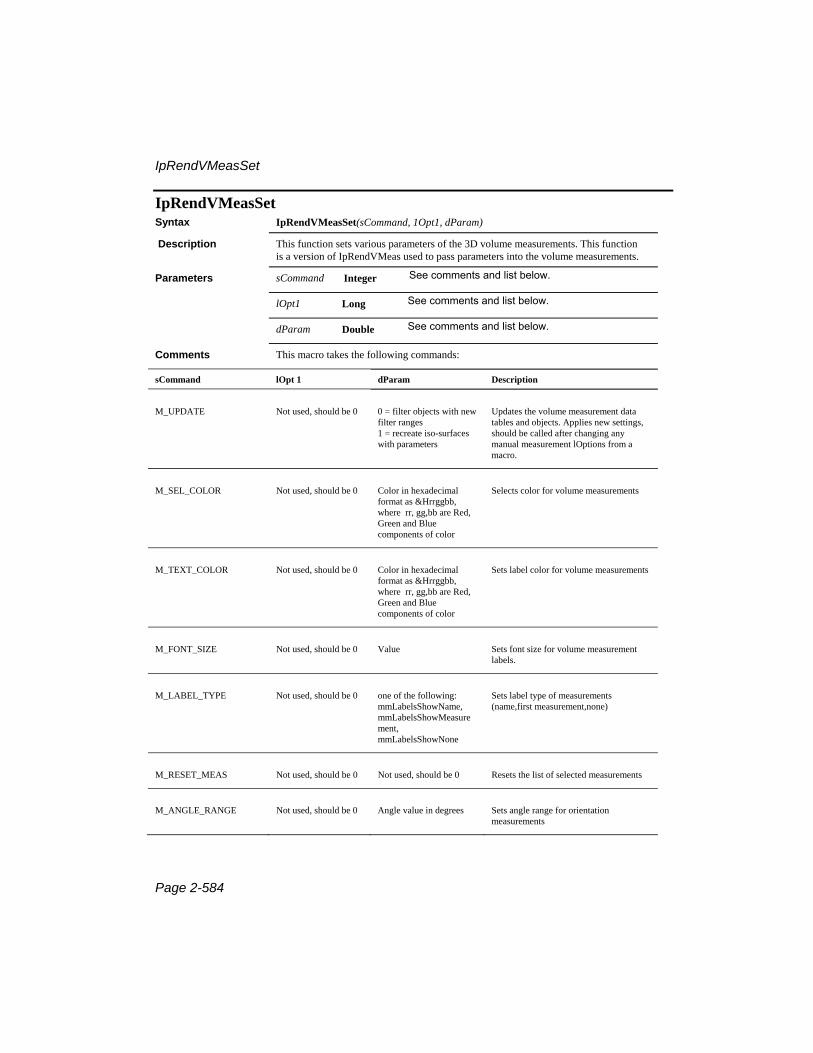
IpRendVMeasSet
Page 2-584
IpRendVMeasSet Syntax IpRendVMeasSet(sCommand, 1Opt1, dParam)
Description This function sets various parameters of the 3D volume measurements. This function is a version of IpRendVMeas used to pass parameters into the volume measurements.
Parameters sCommand Integer See comments and list below.
lOpt1 Long See comments and list below.
dParam Double See comments and list below.
Comments This macro takes the following commands:
sCommand lOpt 1 dParam Description
M_UPDATE Not used, should be 0 0 = filter objects with new filter ranges 1 = recreate iso-surfaces with parameters
Updates the volume measurement data tables and objects. Applies new settings, should be called after changing any manual measurement lOptions from a macro.
M_SEL_COLOR Not used, should be 0 Color in hexadecimal format as &Hrrggbb, where rr, gg,bb are Red, Green and Blue components of color
Selects color for volume measurements
M_TEXT_COLOR Not used, should be 0 Color in hexadecimal format as &Hrrggbb, where rr, gg,bb are Red, Green and Blue components of color
Sets label color for volume measurements
M_FONT_SIZE Not used, should be 0 Value Sets font size for volume measurement labels.
M_LABEL_TYPE Not used, should be 0 one of the following: mmLabelsShowName, mmLabelsShowMeasurement, mmLabelsShowNone
Sets label type of measurements (name,first measurement,none)
M_RESET_MEAS Not used, should be 0 Not used, should be 0 Resets the list of selected measurements
M_ANGLE_RANGE Not used, should be 0 Angle value in degrees Sets angle range for orientation measurements

IpRendVMeasSet
Page 2-585
sCommand lOpt 1 dParam Description
M_NORM_CALC_ METHOD
Not used, should be 0 0 = off 1 = on
Sets method of calculating normal surface
M_SHOW_NORMALS Not used, should be 0 0 = off 1 = on
Turns display of normal surface vectors on or off
M_ADD_MEAS Should be one of the following: IVM_SurfVolume = 0 IVM_SurfArea = 1 IVM_SizeX = 2 IVM_SizeY = 3 IVM_SizeZ = 4 IVM_CenterX = 5 IVM_CenterY = 6 IVM_CenterZ = 7 IVM_VolumeBox = 8 IVM_BoxRatio =9 IVM_VolumeFraction = 10 IVM_Diameter = 11 IVM_Sphericity = 12 IVM_MeanDensity = 13IVM_IOD = 14 IVM_DensityStDev = 15 IVM_RadiusMax =16 IVM_RadiusMin = 17 IVM_RadiusRatio = 18 IVM_Class = 19 IVM_FeretMax = 20 IVM_FeretMin = 21 IVM_FeretRatio = 22 IVM_SurfAngleA = 23 IVM_SurfAngleG = 24 IVM_SurfNormDev = 25 IVM_Surf_Angle_T =26
Not used, should be 1 Adds a volume measurement to the list of selected (or available?) measurements
M_PREV_SHOW_HIST Not used, should be 0 0 = Hide histogram 1 = Show histogram
Shows or hides volume histogram at threshold preview
M_PREV_SHOW_ PSEUDOCOL
Not used, should be 0 0 = Hide pseudocolor 1 = Show pseudocolor
Shows or hides pseudo-colored volume during threshold preview
M_VOL_PRECISION Not used, should be 0 Should be either; M_PR_SUBVOXEL or M_ORE_VOXEL
Shows or hides volume measurements precision
M_COMPL_LIMIT Not used, should be 0 Value (default = 50) Complexity limit for iso-surfaces

IpRendVMeasSet
Page 2-586
sCommand lOpt 1 dParam Description
M_OBJ_COLORING Not used, should be 0 Should be either: M_COLOR_MODE_SURF or M_COLOR_MODE_ RANDOM
Object coloring mode
M_CLEAN_BORDERS Not used, should be 0 Should be either: M_CL_BORDERS_NONE or M_CL_BORDERS_ALL
Clean borders flag
M_APPLY_FILTER_ RANGES
Not used, should be 0 0 = Filter range off 1 = Filter range on
Apply filter range flag
M_SHOW_STATS Not used, should be 0 0 = Hide statistics 1 = Show statistics
Shows or hides the statistics pane of the Volume Measurements window
M_ACTION Not used, should be 0 Action type. Must be one of the following: mmActionSelect mmActionSplitObject
Sets measurement action
M_UNDO Not used, should be 0 Not used, should be 0 Undoes last split or merge function
M_CREATE_MEAS Not used, should be 0 Type of new measurement, must be one of the following:
Creates a new derived measurement based on the selected objects
IMM_ADD_PP_DIST distance between centers of 2 objects IMM_ADD_CENTER center point of the object IMM_ADD_MIN_DIST min distance between point and surface IMM_MERGE_OBEJCTS merge selected objects
M_SHOW_ALL Not used, should be 0 Not used, should be 0 Shows all objects
M_SHOW_SELECTED Not used, should be 0 0 = Hide objects 1 = Show objects
Shows or hides the selected objects
TR_SEARCH_RADIUS Not used, should be 0 Value in calibrated units Sets search radius for auto-tracking

IpRendVMeasSet
Page 2-587
sCommand lOpt 1 dParam Description
TR_USE_FROZEN Not used, should be 0 0 = Off 1 = On
Use frozen measurements in tracking lOptions
TR_ACCEL_LIMIT Not used, should be 0 Value in calibrated units Sets acceleration limit for auto-tracking
TR_AUTO_ACCEL_ LIMIT
Not used, should be 0 0 = Off 1 = On
Sets auto acceleration limit for auto-tracking
TR_PARTIAL_TRACKS Not used, should be 0 0 = Off 1 = On
Sets partial tracks lOption
TR_MIN_TRACK_ LENGTH
Not used, should be 0 0 = Off 1 = On
Sets minium track length lOption
TR_MOTION_TYPE Not used, should be 0 0 = Chaotic 1 = Directional 2 = Straight
Sets motion type for auto-tracking
TR_TRACK_ PREDICTION
Not used, should be 0 Depth in time points Sets tracking prediction depth
TR_START_FIRST Not used, should be 0 0 = Off 1 = On
Sets start time from the first time point lOption
Return Value 0 if successful, a negative error code if failed.
Example Please see Appendix A, Sample Macro Code

IpRendVMeasSetStr
Page 2-588
IpRendVMeasSetStr Syntax IpRendVMeasSetStr(sCommand, 1Opt1, lpszDest)
Description This function sets various string parameters for the 3D volume measurements.
Parameters sCommand Integer See comments and list below.
lOpt1 Long See comments and list below.
lpszDest LPSTR See comments and list below.
Comments This macro takes the following commands:
sCommand lOpt 1 lpszDest Description
M_NAME _SET Index of the measurement element (zero-based)
String with new name Sets the name of the volume measurement element
M_TEMPLATE_PROMPT Not used String with text Sets the user prompt for template mode
Return Value 0 if successful, a negative error code if failed.
See Also IpRendMeasGetStr
Example ret = IpRendVMeasSetStr(M_NAME_SET,1,"Max distance") ret = IpTemplateMode(1) ret = IpRendVeasSetStr(M_TEMPLATE_PROMPT,0,"Please select trace object") ret = IpRendVMeasSet(M_SEL_SET,1,1)
ret = IpTemplateMode(0)
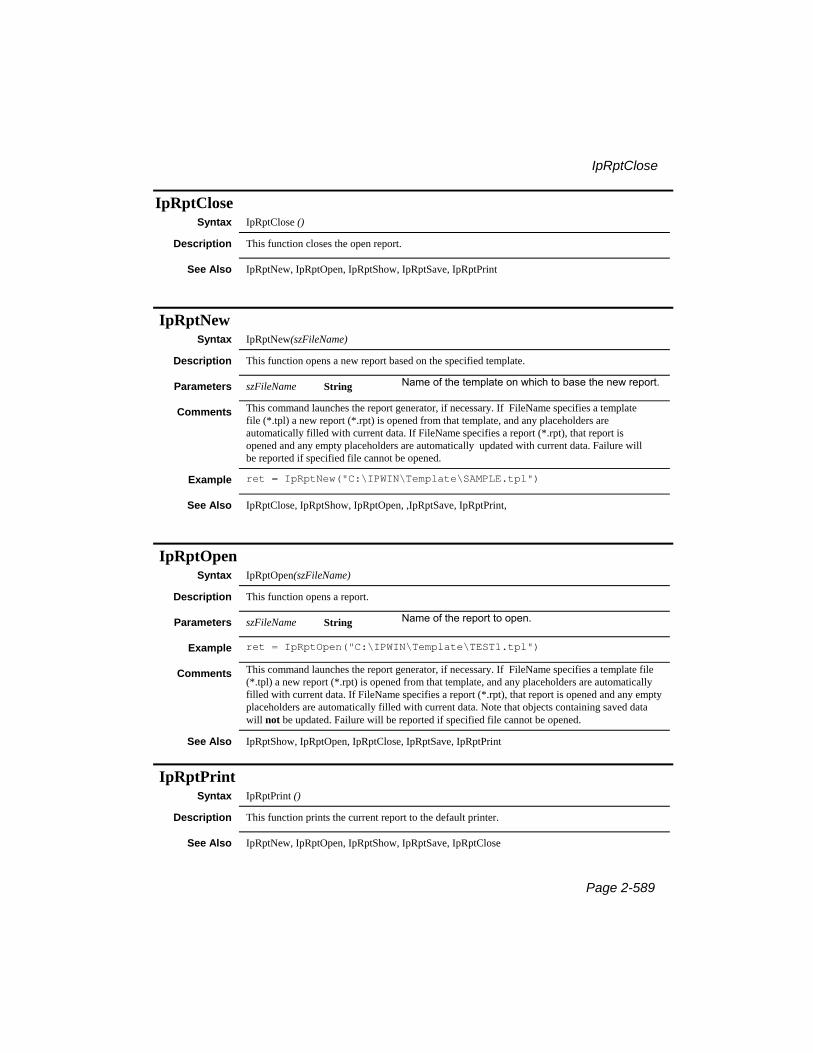
IpRptClose
Page 2-589
IpRptClose Syntax IpRptClose ()
Description This function closes the open report.
See Also IpRptNew, IpRptOpen, IpRptShow, IpRptSave, IpRptPrint
IpRptNew Syntax IpRptNew(szFileName)
Description This function opens a new report based on the specified template.
Parameters szFileName String Name of the template on which to base the new report.
Comments This command launches the report generator, if necessary. If FileName specifies a template file (*.tpl) a new report (*.rpt) is opened from that template, and any placeholders are automatically filled with current data. If FileName specifies a report (*.rpt), that report is opened and any empty placeholders are automatically updated with current data. Failure will be reported if specified file cannot be opened.
Example ret = IpRptNew("C:\IPWIN\Template\SAMPLE.tpl")
See Also IpRptClose, IpRptShow, IpRptOpen, ,IpRptSave, IpRptPrint,
IpRptOpen Syntax IpRptOpen(szFileName)
Description This function opens a report.
Parameters szFileName String Name of the report to open.
Example ret = IpRptOpen("C:\IPWIN\Template\TEST1.tpl")
Comments This command launches the report generator, if necessary. If FileName specifies a template file (*.tpl) a new report (*.rpt) is opened from that template, and any placeholders are automatically filled with current data. If FileName specifies a report (*.rpt), that report is opened and any empty placeholders are automatically filled with current data. Note that objects containing saved data will not be updated. Failure will be reported if specified file cannot be opened.
See Also IpRptShow, IpRptOpen, IpRptClose, IpRptSave, IpRptPrint
IpRptPrint Syntax IpRptPrint ()
Description This function prints the current report to the default printer.
See Also IpRptNew, IpRptOpen, IpRptShow, IpRptSave, IpRptClose
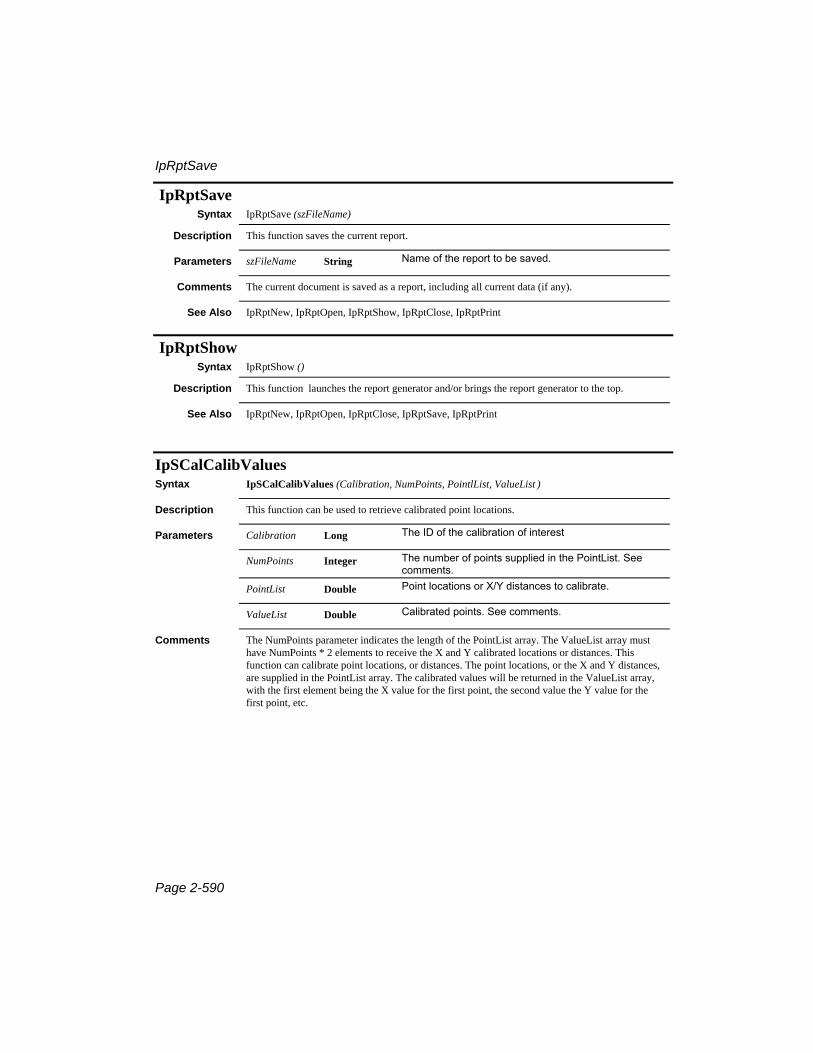
IpRptSave
Page 2-590
IpRptSave Syntax IpRptSave (szFileName)
Description This function saves the current report.
Parameters szFileName String Name of the report to be saved.
Comments The current document is saved as a report, including all current data (if any).
See Also IpRptNew, IpRptOpen, IpRptShow, IpRptClose, IpRptPrint
IpRptShow Syntax IpRptShow ()
Description This function launches the report generator and/or brings the report generator to the top.
See Also IpRptNew, IpRptOpen, IpRptClose, IpRptSave, IpRptPrint
IpSCalCalibValues Syntax IpSCalCalibValues (Calibration, NumPoints, PointlList, ValueList )
Description This function can be used to retrieve calibrated point locations.
Parameters Calibration Long The ID of the calibration of interest
NumPoints Integer The number of points supplied in the PointList. See comments.
PointList Double Point locations or X/Y distances to calibrate.
ValueList Double Calibrated points. See comments.
Comments The NumPoints parameter indicates the length of the PointList array. The ValueList array must have NumPoints * 2 elements to receive the X and Y calibrated locations or distances. This function can calibrate point locations, or distances. The point locations, or the X and Y distances, are supplied in the PointList array. The calibrated values will be returned in the ValueList array, with the first element being the X value for the first point, the second value the Y value for the first point, etc.

IpSCalCreate
Page 2-591
IpSCalCreate Syntax IpSCalCreate( )
Description This function creates a new spatial calibration set. Equivalent to clicking New in the Spatial Calibration dialog box.
Return Value The calibration ID of the new calibration if successful, a negative value if failed.
Comments The new calibration will be used as the current calibration.
See Also IpSCalSelect, IpSCalDestroy
IpSCalDestroy Syntax IpSCalDestroy()
Description This function deletes the current spatial calibration set. Equivalent to clicking Deletein the Spatial Calibration dialog box.
See Also IpSCalCreate, IpSCalSelect
IpSCalDestroyEx Syntax IpSCalDestroyEx(Calibration )
Description This function deletes the specified calibration. Equivalent to clicking Delete in the Spatial Calibration dialog box.
Parameters Calibration Long The ID of the calibration to delete, or one of the following constants: SCAL_CURRENT_CAL = Save the attributes of the current calibration SCAL_SYSTEM_CAL = Use to save theattributes of the current system calibration SCAL_ALL = Save all active calibrations SCAL_ALL_REF = Save all reference calibrations
Return Value A negative value if the calibration file cannot be written.
Comments The calibration ID of the active calibration or a list of calibration IDs for the calibrations currently in the active or reference lists can be retrieved using IpSCalGetLong. The calibration ID is also returned by functions such as IpSCalCreate and IpSCalLoad which create new calibrations.
See Also IpSCalGetLong, IpSCalCreate, IpSCalLoad

IpSCalGetLong
Page 2-592
IpSCalGetLong Syntax IpSCalGetLong(Calibration, Attribute, Value)
Description This function retrieves the attributes of the specified calibration.
Parameters Calibration Long This parameter is only used by SCAL_GET_ALL and SCAL_GET_REF. For these attributes, the command is the index of the calibration of interest
Attribute Integer The attribute of interest, which must be one of the following: SCAL_NUM_ALL = The number of active calibrations SCAL_NUM_REF = The number of reference calibrations SCAL_GET_ALL = Return the calibration ID of an active calibration SCAL_GET_REF = Return the calibration ID of a reference calibration SCAL_ONIMAGE_COLOR = Get the color used for interactive lines and non-destructive calibration markers SCAL_CURRENT = Return the calibration ID of the current calibration SCAL_SYSTEM = Return the calibration ID of the system calibration.
SCAL_IS_REFERENCE = Indicates a reference calibration. SCAL_IS_SYSTEM = Indicates a system calibration. SCAL_MARKER_STYLE = Return the selected marker style. See comments below. SCAL_UNIT_CONVERT = When non-zero, indicates that when the units are changed (see IpSCalSetUnitName and IpSCalSetStr (SCAL_UNITS...)) the scaling factors should be converted from the original absolute units to the new units. For instance, if the original units were "mm" and the new units are "cm", the scaling will be adjusted so there will be 10 times as many pixels per unit. This conversion can only be done if the units are recognized as one of the set of absolute units.
Value Long A long variable that will receive the requested attribute’s value
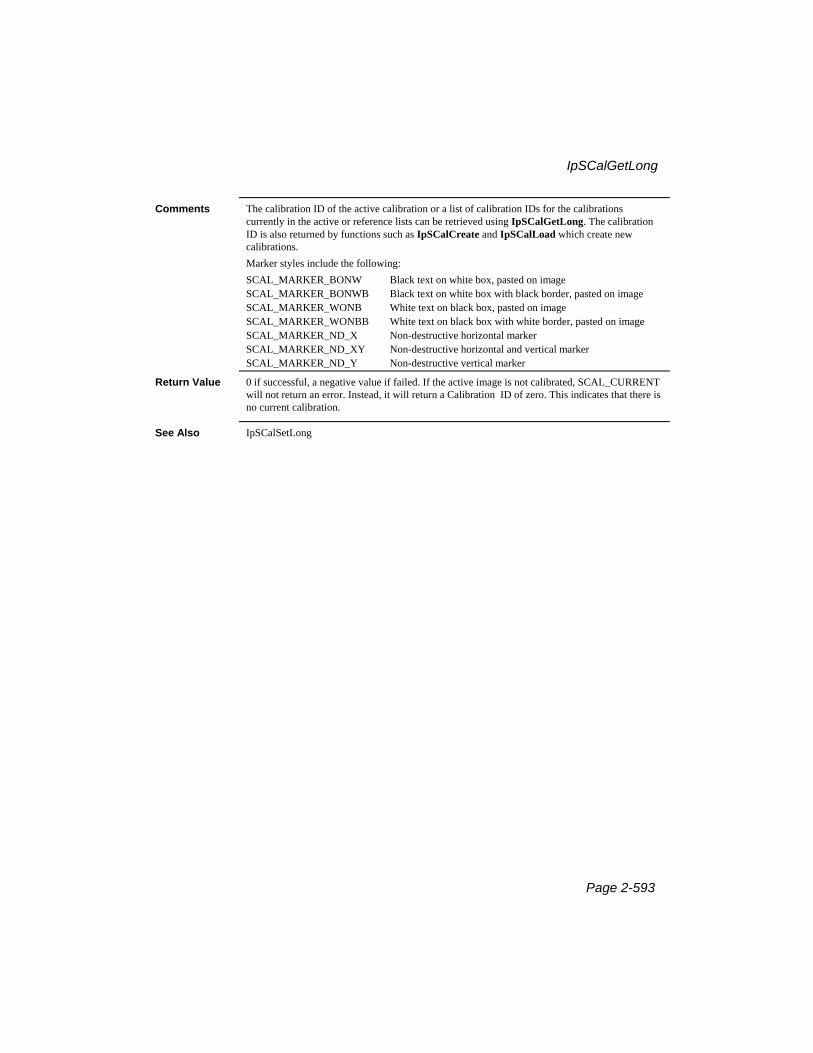
IpSCalGetLong
Page 2-593
Comments The calibration ID of the active calibration or a list of calibration IDs for the calibrations
currently in the active or reference lists can be retrieved using IpSCalGetLong. The calibration ID is also returned by functions such as IpSCalCreate and IpSCalLoad which create new calibrations.
Marker styles include the following: SCAL_MARKER_BONW Black text on white box, pasted on image SCAL_MARKER_BONWB Black text on white box with black border, pasted on image SCAL_MARKER_WONB White text on black box, pasted on image SCAL_MARKER_WONBB White text on black box with white border, pasted on image SCAL_MARKER_ND_X Non-destructive horizontal marker SCAL_MARKER_ND_XY Non-destructive horizontal and vertical marker SCAL_MARKER_ND_Y Non-destructive vertical marker
Return Value 0 if successful, a negative value if failed. If the active image is not calibrated, SCAL_CURRENT will not return an error. Instead, it will return a Calibration ID of zero. This indicates that there is no current calibration.
See Also IpSCalSetLong

IpSCalGetSng
Page 2-594
IpSCalGetSng Syntax IpSCalGetSng(Calibration, Attribute,Value)
Description This function retrieves the attributes of the specified calibration.
Parameters Calibration Long The ID of the calibration of interest. Calibration may also be set to SCAL_CURRENT_CAL to get the current calibration’s attributes.
Attribute Integer The attribute of interest, which must be one of the following: SCAL_SCALE_X - The number of horizontal pixels per calibration unit SCAL_SCALE_Y = The number of vertical pixels per calibration unit SCAL_ORIGIN_X = The horizontal coordinate of the reference origin SCAL_ORIGIN_Y = The vertical coordinate of the reference origin
SCAL_ANGLE = The angle of the reference angleSCAL_ASPECT = The aspect ratio of the scaling. This attribute is read-only - set by ratio of SCALE_X / SCALE_Y. SCAL_SYSTEM_MODIFIER = Use this to adjust the system calibration both horizontally and vertically for the effects of an optovar or anything else that affects the overall magnification of the optical system. SCAL_MARKER_WIDTH = The width of the marker in calibration units. SCAL_CONVERSION_TO_MM = Returns a value that can be used to convert values expressed in the calibration’s native units to millimeters. The native value should be multiplied by the conversion value. The IPCERR_EMPTY error code will be returned if the specified calibration is not expressed in absolute units.
Value Single A Single (single point) variable that will receive the requested attribute’s value
Comments The calibration ID of the active calibration or a list of calibration IDs for the calibrations currently in the active or reference lists can be retrieved using IpSCalGetLong. The calibration ID is also returned by functions such as IpSCalCreate and IpSCalLoad which create new calibrations.
Return Value 0 if successful, IPCERR_NODOC if the specified calibration does not exist, or IPCERR_EMPTY if SCAL_CURRENT_CAL was specified and there is no calibration active.
See Also IpSCalSetSng

IpSCalGetStr
Page 2-595
IpSCalGetStr Syntax IpSCalGetStr(Calibration, Attribute,Value)
Description This function retrieves the attributes of the specified calibration.
Parameters Calibration Long The ID of the calibration of interest. Calibration may also be set to SCAL_CURRENT_CAL to get the current calibration’s attributes, or to SCAL_SYSTEM_CAL to get the current system calibration’s attributes.
Attribute Integer The attribute of interest, which must be one of the following: SCAL_NAME = The name of the calibration SCAL_UNITS = The name of the calibration units SCAL_FIND_BY_NAME = see comments below
Value String A fixed-length string variable that will receive the requested attribute’s value
Comments The calibration ID of the active calibration or a list of calibration IDs for the calibrations currently in the active or reference lists can be retrieved using IpSCalGetLong. The calibration ID is also returned by functions such as IpSCalCreate and IpSCalLoad which create new calibrations. The SCAL_FIND_BY_NAME command is handled different from the two inquiry functions. This command can be used to locate a specific calibration from the list of reference calibrations, or from the list of all calibrations (which includes any reference calibrations). The Value string does not need to be a fixed length string and could even be a string constant. The Calibration parameter is used to specify the list to search and should be set to SCAL_ALL or SCAL_ALL_REF. The return value is the calibration ID for the first calibration of that name in the specified list, or zero if none is found.
Return Value 0 if successful, IPCERR_NODOC if the specified calibration does not exist, or IPCERR_EMPTY if SCAL_CURRENT_CAL was specified and there is no calibration active
See Also IpSCalSetStr
IpSCalLoad Syntax IpSCalLoad (Filename, Ref )
Description This function loads one or more calibration from a file to the list of available calibrations.
Parameters Filename String A string specifying the name of the file from which the calibration values will be read. The filename must include the path, such as C:\IPWIN|IpRef.cal
Ref Integer A non-zero value indicates that the calibration should be read into the list of reference calibrations. Otherwise the calibration is only added to the list of active calibrations.
Comments All of the calibrations found in the specified file will be added to the list specified by the Ref parameter. None of the calibrations will be applied to the active image, or made the active calibration. If the file contains a system calibration and is loaded into the reference calibration list, it may replace the current system calibration.
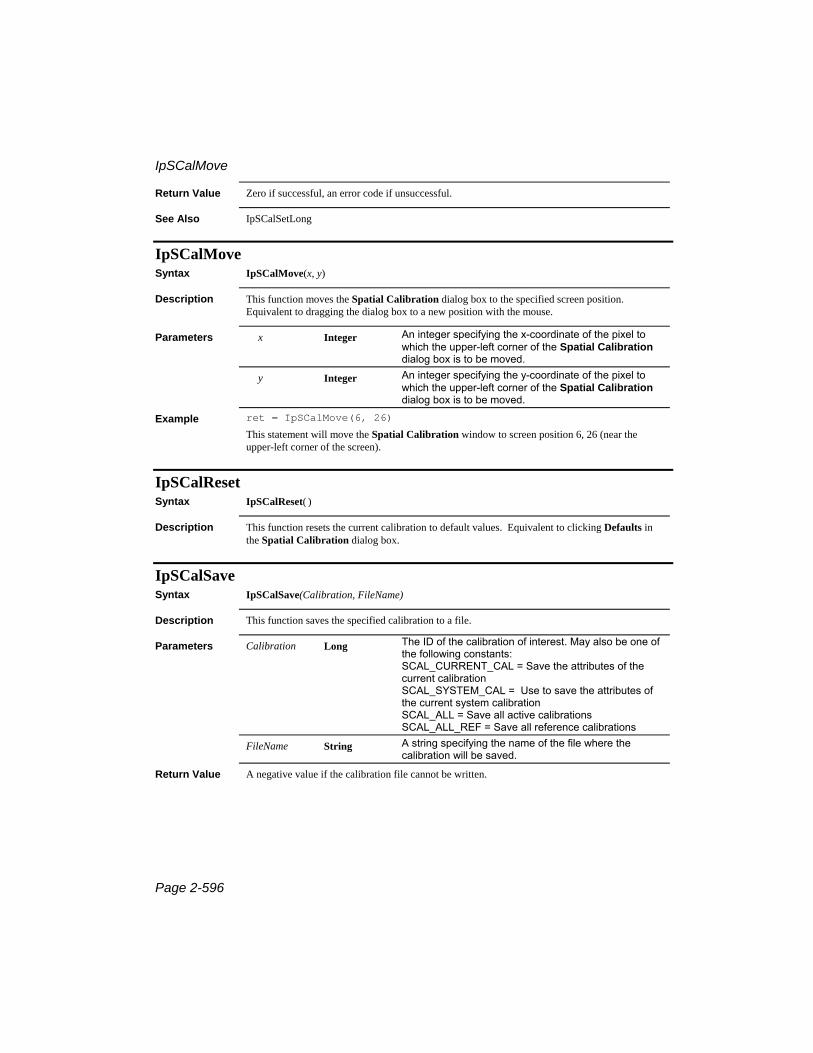
IpSCalMove
Page 2-596
Return Value Zero if successful, an error code if unsuccessful.
See Also IpSCalSetLong
IpSCalMove Syntax IpSCalMove(x, y)
Description This function moves the Spatial Calibration dialog box to the specified screen position. Equivalent to dragging the dialog box to a new position with the mouse.
Parameters x Integer An integer specifying the x-coordinate of the pixel to which the upper-left corner of the Spatial Calibration dialog box is to be moved.
y Integer An integer specifying the y-coordinate of the pixel to which the upper-left corner of the Spatial Calibration dialog box is to be moved.
Example ret = IpSCalMove(6, 26)
This statement will move the Spatial Calibration window to screen position 6, 26 (near the upper-left corner of the screen).
IpSCalReset Syntax IpSCalReset( )
Description This function resets the current calibration to default values. Equivalent to clicking Defaults in the Spatial Calibration dialog box.
IpSCalSave Syntax IpSCalSave(Calibration, FileName)
Description This function saves the specified calibration to a file.
Parameters Calibration Long The ID of the calibration of interest. May also be one of the following constants: SCAL_CURRENT_CAL = Save the attributes of the current calibration SCAL_SYSTEM_CAL = Use to save the attributes of the current system calibration SCAL_ALL = Save all active calibrations SCAL_ALL_REF = Save all reference calibrations
FileName String A string specifying the name of the file where the calibration will be saved.
Return Value A negative value if the calibration file cannot be written.

IpSCalSelect
Page 2-597
IpSCalSelect Syntax IpSCalSelect(szSCal)
Description This function activates the selected calibration set. Equivalent to selecting a set in the Name field in the Spatial Calibration dialog box.
Parameters szSCal String A string specifying the name of the calibration set that is to be made active.
Example ret = IpSCalSelect("Microns")
This statement will activate a spatial calibration set called “Microns”
Comments The activated calibration set becomes the calibration for the active image (if there is one), and all image windows opened thereafter.
IpSCalSetAngle Syntax IpSCalSetAngle(Angle)
Description This function defines the angle offset value. Equivalent to setting the Angle Offset value in the Spatial Calibration dialog box.
Parameters Angle Single A single point number specifying the offset, in degrees, from the vertical axis.
Example ret = IpSCalSetAngle(11.15466)
This statement will establish the angle offset at 11.15466 degrees from the vertical axis.
IpSCalSetAspect Syntax IpSCalSetAspect(AspectRatio)
Description This function defines the spatial relationship between the horizontal and vertical axes. Equivalent to setting the Aspect Ratio value in the Spatial Calibration dialog box.
Parameters AspectRatio Single A single point number representing the ratio between the X and Y axes (as defined by X/Y).
Example ret = IpSCalSetAspect(1.50)
This statement will set the aspect ratio to 1.5.
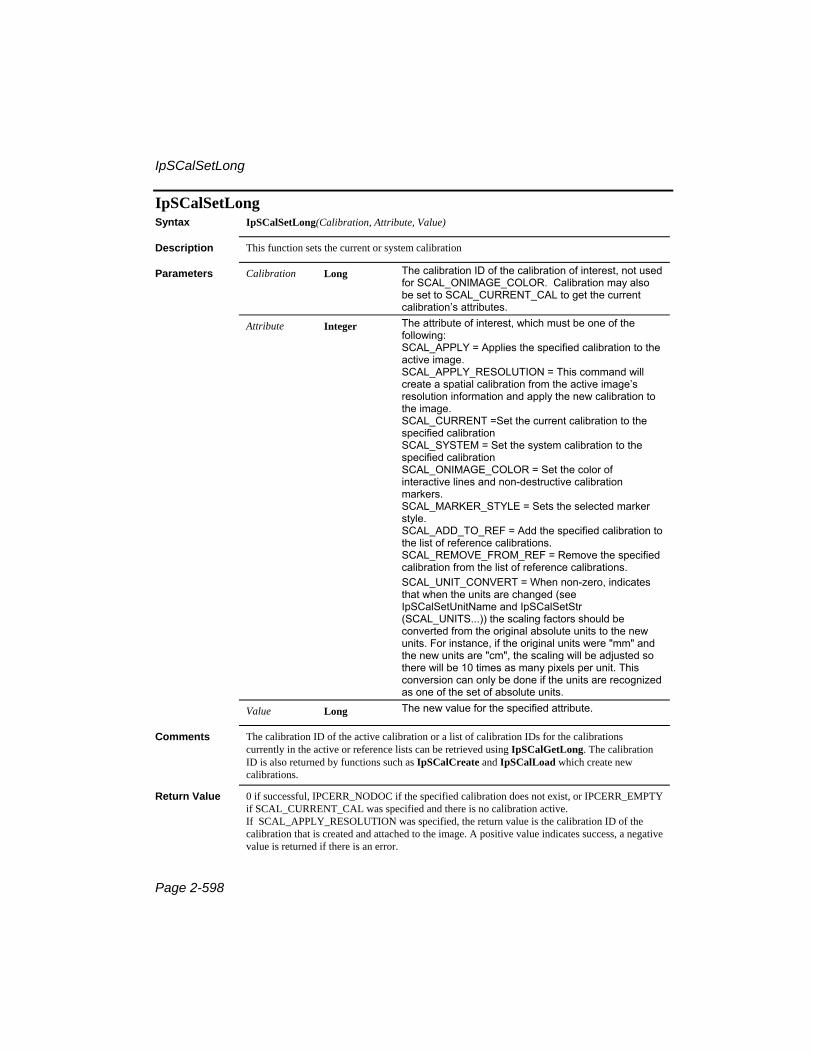
IpSCalSetLong
Page 2-598
IpSCalSetLong Syntax IpSCalSetLong(Calibration, Attribute, Value)
Description This function sets the current or system calibration
Parameters Calibration Long The calibration ID of the calibration of interest, not used for SCAL_ONIMAGE_COLOR. Calibration may also be set to SCAL_CURRENT_CAL to get the current calibration’s attributes.
Attribute Integer The attribute of interest, which must be one of the following: SCAL_APPLY = Applies the specified calibration to the active image. SCAL_APPLY_RESOLUTION = This command will create a spatial calibration from the active image’s resolution information and apply the new calibration to the image. SCAL_CURRENT =Set the current calibration to the specified calibration SCAL_SYSTEM = Set the system calibration to the specified calibration SCAL_ONIMAGE_COLOR = Set the color of interactive lines and non-destructive calibration markers. SCAL_MARKER_STYLE = Sets the selected marker style. SCAL_ADD_TO_REF = Add the specified calibration to the list of reference calibrations. SCAL_REMOVE_FROM_REF = Remove the specified calibration from the list of reference calibrations.
SCAL_UNIT_CONVERT = When non-zero, indicates that when the units are changed (see IpSCalSetUnitName and IpSCalSetStr (SCAL_UNITS...)) the scaling factors should be converted from the original absolute units to the new units. For instance, if the original units were "mm" and the new units are "cm", the scaling will be adjusted so there will be 10 times as many pixels per unit. This conversion can only be done if the units are recognized as one of the set of absolute units.
Value Long The new value for the specified attribute.
Comments The calibration ID of the active calibration or a list of calibration IDs for the calibrations currently in the active or reference lists can be retrieved using IpSCalGetLong. The calibration ID is also returned by functions such as IpSCalCreate and IpSCalLoad which create new calibrations.
Return Value 0 if successful, IPCERR_NODOC if the specified calibration does not exist, or IPCERR_EMPTY if SCAL_CURRENT_CAL was specified and there is no calibration active. If SCAL_APPLY_RESOLUTION was specified, the return value is the calibration ID of the calibration that is created and attached to the image. A positive value indicates success, a negative value is returned if there is an error.

IpSCalSetSng
Page 2-599
See Also IpSCalGetLong, IpSCalCreate
IpSCalSetSng Syntax IpSCalSetSng(Calibration, Attribute,Value)
Description This function sets the attributes of the specified calibration.
Parameters Calibration Long The ID of the calibration of interest. Calibration may also be set to SCAL_CURRENT_CAL to get the current calibration’s attributes, or to SCAL_SYSTEM_CAL to set the current system calibration’s attributes.
Attribute Integer The attribute of interest, which must be one of the following: SCAL_SCALE_X - The number of horizontal pixels per calibration unit SCAL_SCALE_Y = The number of vertical pixels per calibration unit SCAL_ORIGIN_X = The horizontal coordinate of the reference origin SCAL_ORIGIN_Y = The vertical coordinate of the reference origin SCAL_ANGLE = The angle of the reference angle SCAL_SYSTEM_MODIFIER = Use this command to adjust the system calibration either vertically or horizontally for the effects of an optovar or anything else that affects the overall magnification of the optical system. SCAL_MARKER_WIDTH = The width of the marker in calibration units.
Value Single The new value for the specified attribute
Comments The calibration ID of the active calibration or a list of calibration IDs for the calibrations currently in the active or reference lists can be retrieved using IpSCalGetLong. The calibration ID is also returned by functions such as IpSCalCreate and IpSCalLoad which create new calibrations.
Return Value 0 if successful, IPCERR_NODOC if the specified calibration does not exist, or IPCERR_EMPTY if SCAL_CURRENT_CAL was specified and there is no calibration active.
See Also IpSCalGetSng
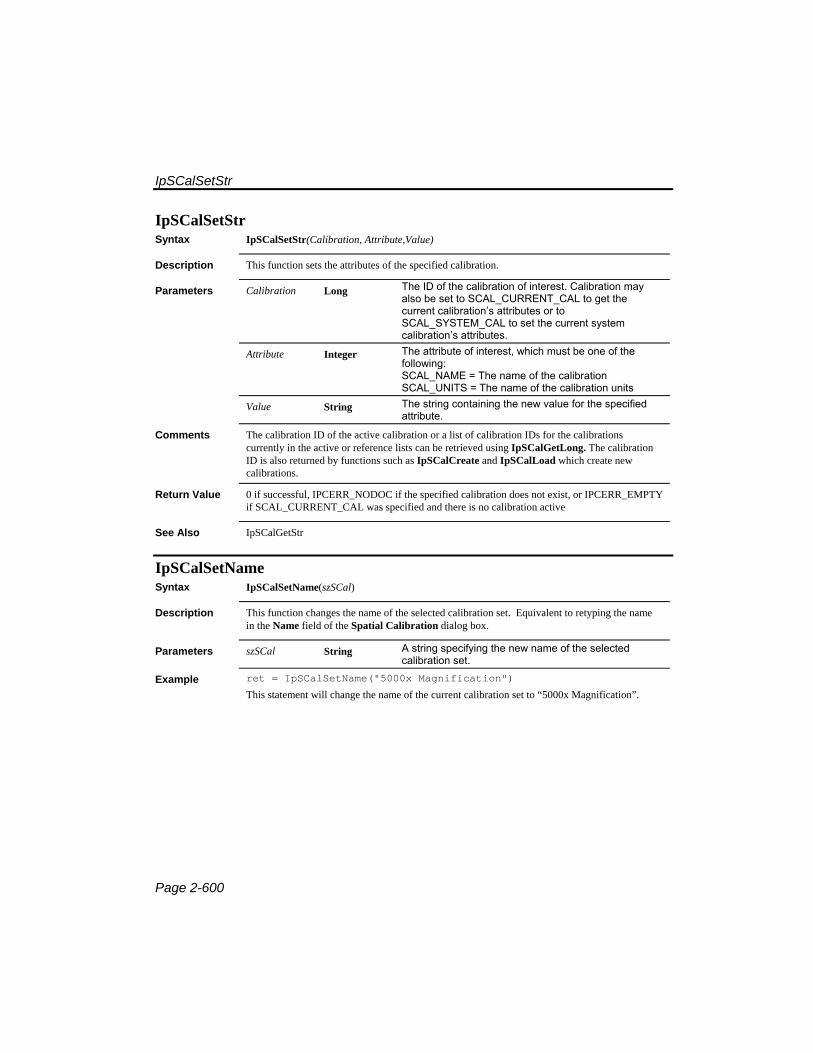
IpSCalSetStr
Page 2-600
IpSCalSetStr Syntax IpSCalSetStr(Calibration, Attribute,Value)
Description This function sets the attributes of the specified calibration.
Parameters Calibration Long The ID of the calibration of interest. Calibration may also be set to SCAL_CURRENT_CAL to get the current calibration’s attributes or to SCAL_SYSTEM_CAL to set the current system calibration’s attributes.
Attribute Integer The attribute of interest, which must be one of the following: SCAL_NAME = The name of the calibration SCAL_UNITS = The name of the calibration units
Value String The string containing the new value for the specified attribute.
Comments The calibration ID of the active calibration or a list of calibration IDs for the calibrations currently in the active or reference lists can be retrieved using IpSCalGetLong. The calibration ID is also returned by functions such as IpSCalCreate and IpSCalLoad which create new calibrations.
Return Value 0 if successful, IPCERR_NODOC if the specified calibration does not exist, or IPCERR_EMPTY if SCAL_CURRENT_CAL was specified and there is no calibration active
See Also IpSCalGetStr
IpSCalSetName Syntax IpSCalSetName(szSCal)
Description This function changes the name of the selected calibration set. Equivalent to retyping the name in the Name field of the Spatial Calibration dialog box.
Parameters szSCal String A string specifying the new name of the selected calibration set.
Example ret = IpSCalSetName("5000x Magnification")
This statement will change the name of the current calibration set to “5000x Magnification”.

IpSCalSetOrigin
Page 2-601
IpSCalSetOrigin Syntax IpSCalSetOrigin(x, y)
Description This function calibrates the horizontal and vertical origin. Equivalent to setting the Origin value in the Spatial Calibration dialog box.
Parameters x Single A single point number representing the offset to the X-axis.
y Single A single point number representing the offset to the Y-axis.
Example ret = IpSCalSetOrigin(49, 40)
This statement will set the origin at position 49,40.
IpSCalSetUnit Syntax IpSCalSetUnit(x, y)
Description This function calibrates the spatial unit in both the horizontal and vertical directions. Equivalent to setting the Pixels/Unit value in the Spatial Calibration dialog box.
Parameters x Single A single point number specifying the number of pixels representing a single unit in the horizontal direction.
y Single A single point number specifying the number of pixels representing a single unit in the vertical direction.
Example ret = IpSCalSetUnit(65.0, 75.0)
This statement will set the horizontal calibration to 65 pixels, and the vertical calibration to 75 pixels.
IpSCalSetUnitName Syntax IpSCalSetUnitName(UnitName)
Description This function changes the name of the spatial unit. Equivalent to typing a name in the Unit Name field within the Spatial Calibration dialog box.
Parameters UnitName String A string specifying the unit name.
Example ret = IpSCalSetUnitName("Microns")
This statement will set the spatial unit name to “Microns”.
IpSCalShow Syntax IpSCalShow(bShow)
Description This function displays the Spatial Calibration dialog box. It is also used to close the dialog box if it is open.

IpSCalShowEx
Page 2-602
Parameters bShow Integer An integer value of 0 or 1 specifying whether to open or close the Spatial Calibration dialog box. Where: 0 - Closes the Spatial Calibration dialog box if it is open. 1 - Opens the Spatial Calibration dialog box.
Must be one of the following: SCAL_HIDE = Hides the first visible calibration dialog SCAL_DLG_MAIN = Shows the main calibration dialogSCAL_DLG_SELECT = Shows the calibration Select dialog SCAL_ADD_MARKER = Adds a marker to the main image SCAL_MINIMIZE = Minimizes the main calibration dialog SCAL_DLG_WIZARD = Shows the calibration wizard SCAL_DLG_SYSTEM = Shows the spatial calibration system dialog.
Example ret = IpSCalShow(1)
This statement will display the Spatial Calibration dialog box.
Comments The dialog box must be opened before assigning and selecting spatial calibration values.
See Also IpSCalShowEx
IpSCalShowEx Syntax IpSCalShowEx(Dialog, Show)
Description This function shows or hides the Spatial Calibration dialog box.
Parameters Dialog Integer The calibration dialog to be shown or hidden, using one of the following constants: SCAL_DLG_MAIN = The main calibration dialog SCAL_DLG_SELECT = The spatial calibration Select dialog SCAL_DLG_WIZARD = The spatial calibration Wizard SCAL_DLG_SYSTEM = The System Settings dialog
Show Integer A value indicating how the dialog should be shown, using one of the following constants:
SCAL_SHOW = Shows the specified calibration dialogSCAL_HIDE = Hides the specified calibration dialog SCAL_HIDEALL = Hides all the calibration dialogs SCAL_MINIMIZE = Minimizes the specified calibration dialog
Comments This function is an improved version of IpSCalShow that provides more control over which dialog is to be shown, hidden, or minimized. The SCAL_HIDEALL constant will hide all open calibration dialogs, and the Dialog parameter may be zero or null for this command. The system calibration dialog cannot be minimized.

IpScanSelect
Page 2-603
IpScanSelect Syntax IpScanSelect( )
Description This function invokes the TWAIN source-selection dialog box.
See Also IpScanShow
IpScanShow Syntax IpScanShow( )
Description This function is used to open the Scan dialog box. Equivalent to selecting the Scan command.
Comments When this function is executed in a macro, the Scan dialog box is presented, and the system waits for user input. At this point the user may select scanner settings and acquire images interactively. Macro execution will resume once an image is acquired or the Cancel button is clicked.

IpScopeAcquire
Page 2-604
IpScopeAcquire Syntax IpScopeAcquire(iDest)
Description This function is used to acquire an image.
Parameters iDest Integer Indicates the snap destination (new or current image). An enumerated integer specifying the window into which the image will be captured. Must be one of the following:
ACQ_CURRENT ACQ_NEW
where, ACQ_NEW saves the captured image to a new image window and ACQ_CURRENT saves it to the active image window.
Return Value This function returns the Document ID of the new image, which will be an integer greater than or equal to 0. A negative return value indicates an error.
Example ret = IpScopeAcquire(ACQ_NEW)
Comments This function uses the ACQ_NEW and ACQ_CURRENT destinations that are also used with the IpAcqSnap function. ACQ_FILE and ACQ_SEQUENCE are not supported. (For a full discussion of IpAcqSnap, ACQ_NEW, and ACQ_CURRENT, please refer to the Auto-Pro Programming Guide.)
There is no communication between the Acquire tab page in Scope-Pro and the Acquire tab page in Stage-Pro. Using IpScopeAcquire will not affect or respect any of the settings in the Stage-Pro Acquire tab page.

IpScopeComponentPresent
Page 2-605
IpScopeComponentPresent Syntax IpScopeComponentPresent( iComponent, lpValue)
Description This function is used to specify a variety of Scope-Pro commands.
Parameters iComponent Integer An enumerated integer used to read and set Scope-Pro options. Indicates the components by ID. Must be one of the following:
SCP_ZFOCUS SCP_SLIDER1 SCP_OBJECTIVE SCP_SLIDER2 SCP_CONDENSER SCP_LAMP1 SCP_CURRSHUTTER SCP_LAMP2 SCP_SHUTTER1 SCP_FWHEEL1 SCP_SHUTTER2 SCP_FWHEEL2 SCP_SHUTTER3 SCP_FWHEEL3 SCP_SHUTTER4 SCP_FWHEEL4 SCP_SHUTTER5 SCP_FWHEEL5 SCP_SHUTTER6 SCP_FWHEEL6 SCP_SHUTTER7 SCP_FWHEEL7 SCP_SHUTTER8 SCP_FWHEEL8 SCP_SHUTTER9 SCP_FWHEEL9 SCP_SHUTTER10 SCP_FWHEEL10 SCP_SHUTTER11 SCP_FWHEEL11 SCP_SHUTTER12 SCP_FWHEEL12 SCP_SHUTTER13 SCP_FWHEEL13 SCP_SHUTTER14 SCP_FWHEEL14 SCP_SHUTTER15 SCP_FWHEEL15 SCP_APERTURE1 SCP_APERTURE2 SCP_ZOOM
lpValue LPVOID A integer value used to return 0 = not present or 1 = present
Return Value 0 if successful, a negative error code otherwise.
Comments In Scope-Pro 7.0, you may have up to 15 shutters and 15 filter wheels configured.

IpScopeControl
Page 2-606
IpScopeControl Syntax IpScopeControl( iCmd, iComponent, iPos, lpName, lpValue)
Description This function is used to specify a variety of Scope-Pro commands.
Parameters iCmd Integer The iCmd used determines the usage of the other IpScopeControl parameters. See definitions under Comments, below.
iComponent Integer An enumerated integer used to read and set Scope-Pro options. Indicates the components by ID. See definitions under Comments, below.
iPos Integer The use of this parameter with SCP_GETNAME is explained for each component above. When iPos is set to SCP_COMPONENTNAME, the name of the component will be returned. Otherwise, the name of the specified component position will be returned. This parameter is also used to define settings for the various SET commands.
lpName String String to receive the component or position name when used with SCP_GETNAME. The string should be allocated to receive SCP_MAXNAMELEN characters (currently 60). This parameter is not used with any other commands.
lpValue Any A pointer to an integer variable when used with the various GET commands. Usage is explained under iCmd.
Example Example of SCP_GETNAME command:
Dim CompName as string *60 Dim PosName as string *60
ret = IpScopeControl(SCP_GETNAME, SCP_FWHEEL1, SCP_COMPONENTNAME, CompName, IPNULL)
ret = IpScopeControl(SCP_GETNAME, SCP_FWHEEL1, 0, PosName, IPNULL)
Example of a SET command to select control of the shutter during acquisition:
ret = IpScopeControl(SCP_ACQSETSHUTTER, 0, 1, “”, IPNULL)
Example of a GET command to inquire whether Scope-Pro will auto-focus before acquisition:
Dim autofocus as integer
ret = IpScopeControl(SCP_ACQGETAUTOFOCUS, 0, 0, “”, autofocus)

IpScopeControl
Page 2-607
"The following code will set the z-travel limits for a multi-plane acquisition.
Sub SetLimits()
Dim ZTop As Single
Dim ZBot As Single
Dim iPos As Integer
Dim Str As String*256
ZTop = 0.5 'NOTE: This is in mm
ZBot = -0.5
iPos = 0
ret = IpScopeControl(SCP_ACQSETZTOP, 0, 0, Str, ZTop)
Debug.Print ret
ret = IpScopeControl(SCP_ACQSETZBOT, 0, iPos, Str, ZBot)
Debug.Print ret
End Sub
"

IpScopeControl
Page 2-608
Comments The following commands are used with the iCmd parameter:
SCP_GETNAME Return the specified component’s name (specified by iComponent), or the name of the specified position (specified by iPos). Refer to the Additional Notes section below, detailing iComponent. LpName should point to a string that is allocated to receive at least MAX_SCPNAME_LEN characters (currently 60).
SCP_AUTOFOCUS Requests Scope-Pro to auto-focus.
SCP_ACQMPFSETLIMITS Requests Scope-Pro to have the user set the limits for the extended depth of field.
SCP_ACQGETSHUTTER Inquire whether Scope-Pro will control the shutter during acquisition. LpValue must be a pointer to an integer variable to receive the current setting.
SCP_ACQSETSHUTTER Set whether Scope-Pro will control the shutter during acquisition, where iPos of 0 indicates not to control the shutter, and any non-zero value indicates to control the shutter.
SCP_ACQGETAUTOFOCUS Inquire whether Scope-Pro will hardware auto-focus during acquisition. LpValue must be a pointer to an integer variable to receive the current setting.
SCP_ACQSETAUTOFOCUS Set whether Scope-Pro will hardware auto-focus during acquisition; where iPos of 0 indicates not to auto-focus, and any non-zero value indicates to auto-focus.
SCP_ACQGETSWAUTOFOCUS Inquire whether Scope-Pro will software autofocus during acquisition. LpValue must be a pointer to an integer variable to receive the current setting.
SCP_ACQSETSWAUTOFOCUS Set whether Scope-Pro will software auto-focus during acquisition, where iPos of 0 indicates not to extended depth of field, and any non-zero value indicates to extended depth of field.
SCP_ACQGETMPFPLANES Inquire the number of planes used for extended depth of field. LpValue must be a pointer to an integer variable to receive the current setting.
SCP_ACQSETMPFPLANES Set the number of planes used for extended depth of field, where iPos indicates the number of planes, which must be between 2 and 100.
SCP_GETCURRSHUTTER Inquire which shutter is currently the active shutter. LpValue must be a pointer to an integer variable to receive the current setting.
SCP_SETCURRSHUTTER Set which shutter is currently the active shutter, where iPos indicates the shutter to become the active shutter, which must be between 0 and the number of shutters installed.

IpScopeControl
Page 2-609
iCmd, continued:
SCP_ACQGETMPFNORMAL Inquire whether Scope-Pro will normalize illumination during a multi-plane or software autofocus.
SCP_ACQSETMPFNORMAL Set whether Scope-Pro will normalize illumination during a multi-plane or software autofocus; iPos of 1 is normalized and 0 is not normalized.
SCP_ACQGETMPACQUIRE Inquire whether Scope-Pro will acquire a Z stack.
SCP_ACQSETMPACQUIRE Set whether Scope-Pro will acquire a Z stack. Use iPos = 1 for stack, iPos = 0 for no stack.
SCP_ACQGETMPSEQACQ Inquire whether Scope-Pro will acquire the Z stack as a sequence.
SCP_ACQSETMPSEQACQ Set whether Scope-Pro will acquire the Z stack as a sequence. Use iPos = 1 for sequence, iPos = 0 for no sequence. Note: This is valid only if Scope-Pro is set to acquire EDFs.
SCP_ACQGETMPFOCUS Inquire whether Scope-Pro will use the extended depth of field during acquisition. LpValue must be a pointer to an integer variable to receive the current setting.
SCP_ACQSETMPFOCUS Set whether Scope-Pro will use the extended depth of field during acquisition, where iPos of 0 indicates not to extended depth of field, and any non-zero value indicates to extended depth of field.
SCP_ACQGETMPFTYPE Inquire the type of focus analysis used for extended depth of field. LpValue must be a pointer to an integer variable to receive the current setting.
SCP_ACQSETMPFTYPE Set the type of focus analysis used for extended depth of field, where iPos indicates the type, which must be EDF_MAX_LOCALCONTRAST (maximum texture), EDF_MAX_INTENSITY, EDF_MIN_INTENSITY, or EDF_MAX_DEPTHCONTRAST.
SCP_ACQGETAFTYPE Inquire the range of auto-focus used. LpValue must be a pointer to an integer variable to receive the current setting.
SCP_ACQSETAFTYPE Set the range of auto-focus analysis used, where iPos indicates the range, which must be 0 (for low-power lenses), 1 (medium-power), or 2 (high-power).
SCP_ACQGETSLICESIZE Gets the current Z stack slice size. This is defined as (Z top - Z bottom)/(number of planes – 1)
SCP_ACQGETZTOP Gets the position of the top Z plane in mm.
SCP_ACQGETZBOT Gets the position of the bottom Z plane in mm.
SCP_GETOBJCALIB Gets the name and calibration ID of the objective calibration. iPos should be set to indicate the object that you want. LpName returns the calibration name, and LpValue returns the handle to the calibration.
SCP_DUMP_SETTINGS Gets the current Scope-Pro settings and dumps them to the output window.
SCP_SETALLSHUTTERS Opens or closes all the shutters
SCP_SAVE_IN_SETTINGS Sets the flags on the Save Settings dialog box.
SCP_ZOOM Indicates the Zoom function
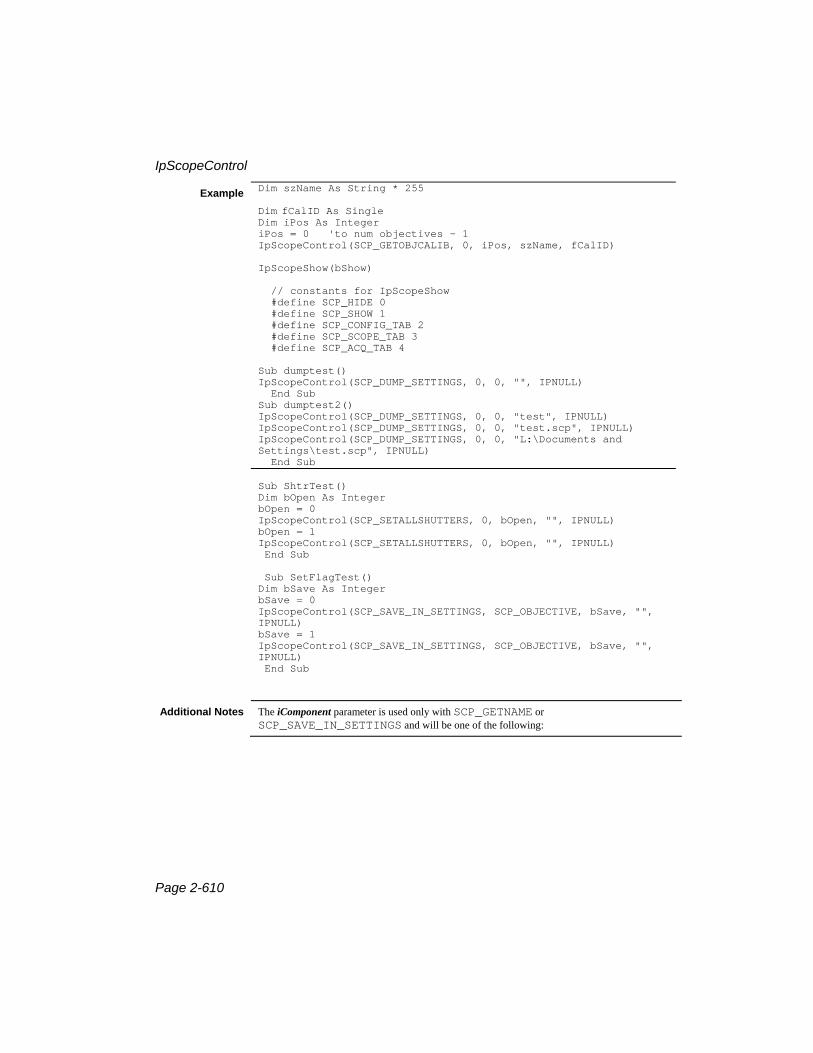
IpScopeControl
Page 2-610
Example Dim szName As String * 255 Dim fCalID As Single Dim iPos As Integer iPos = 0 'to num objectives - 1 IpScopeControl(SCP_GETOBJCALIB, 0, iPos, szName, fCalID) IpScopeShow(bShow) // constants for IpScopeShow #define SCP_HIDE 0 #define SCP_SHOW 1 #define SCP_CONFIG_TAB 2 #define SCP_SCOPE_TAB 3 #define SCP_ACQ_TAB 4 Sub dumptest() IpScopeControl(SCP_DUMP_SETTINGS, 0, 0, "", IPNULL) End Sub
Sub dumptest2() IpScopeControl(SCP_DUMP_SETTINGS, 0, 0, "test", IPNULL) IpScopeControl(SCP_DUMP_SETTINGS, 0, 0, "test.scp", IPNULL) IpScopeControl(SCP_DUMP_SETTINGS, 0, 0, "L:\Documents and Settings\test.scp", IPNULL) End Sub
Sub ShtrTest() Dim bOpen As Integer bOpen = 0 IpScopeControl(SCP_SETALLSHUTTERS, 0, bOpen, "", IPNULL) bOpen = 1 IpScopeControl(SCP_SETALLSHUTTERS, 0, bOpen, "", IPNULL) End Sub Sub SetFlagTest() Dim bSave As Integer bSave = 0 IpScopeControl(SCP_SAVE_IN_SETTINGS, SCP_OBJECTIVE, bSave, "", IPNULL) bSave = 1 IpScopeControl(SCP_SAVE_IN_SETTINGS, SCP_OBJECTIVE, bSave, "", IPNULL) End Sub
Additional Notes The iComponent parameter is used only with SCP_GETNAME or
SCP_SAVE_IN_SETTINGS and will be one of the following:

IpScopeControl
Page 2-611
SCP_ZFOCUS Indicates the name of the Focus component should be returned. iPos is not used and should be set to 0.
SCP_OBJECTIVE With an iPos of SCP_COMPONENTNAME, indicates the name of the Objective set should be returned. An iPos of between 0 and one fewer than the number of objectives will return the name of the objective in that position.
SCP_CONDENSER With an iPos of SCP_COMPONENTNAME, indicates the name of the Condenser set should be returned. An iPos of between 0 and one fewer than the number of condenser positions will return the name of the condenser in that position.
SCP_CURRSHUTTER With an iPos of SCP_COMPONENTNAME, indicates the name of the current and returns current position of shutter. An iPos of 0 or 1 will return the name of the shutter position.
SCP_SHUTTER1 See SCP_CURRSHUTTER, except that the name of shutter number 1 (or its positions) is returned.
SCP_SHUTTER2 As with SCP_SHUTTER1, but for Shutter number 2.
SCP_SHUTTER3 As with SCP_SHUTTER1, but for Shutter number 3.
SCP_SHUTTER4 As with SCP_SHUTTER1, but for Shutter number 4.
SCP_SHUTTER5 As with SCP_SHUTTER1, but for Shutter number 5.
Note that you may have up to 15 shutters….
SCP_SHUTTER15 As with SCP_SHUTTER1, but for Shutter number 15.
SCP_SLIDER1 With an iPos of SCP_COMPONENTNAME, indicates the name of Slider number 1 should be returned. An iPos of 0 or 1 will return the name of the slider position.
SCP_SLIDER2 As with SCP_SLIDER1, but for Slider number 2.
SCP_LAMP1 With an iPos of SCP_COMPONENTNAME, indicates the name of Lamp number 1 should be returned. An iPos between 0 and 1000 will return the name of that lamp intensity.
SCP_LAMP2 As with SCP_LAMP1, but for Lamp number 2.
SCP_APERTURE1 With an iPos of SCP_COMPONENTNAME, indicates the name of Aperture 1 should be returned. An iPos between 0 and 1000 will return the name of that lamp intensity
SCP_APERTURE2 As with SCP_APERTURE1, but for Aperture number 2.
SCP_FWHEEL1 With an iPos of SCP_COMPONENTNAME, indicates the name of Filter set should be returned. An iPos of between 0 and one fewer than the number of filter wheel positions will return the name of the filter in that position.
SCP_FWHEEL2 As with SCP_FWHEEL1, but for filter wheel number 2.
SCP_FWHEEL3 As with SCP_FWHEEL1, but for filter wheel number 3.
SCP_FWHEEL4 As with SCP_FWHEEL1, but for filter wheel number 4.
SCP_FWHEEL5 As with SCP_FWHEEL1, but for filter wheel number 5.
Note that you may have up to 15 filter wheels:
SCP_FWHEEL15 As with SCP_FWHEEL1, but for filter wheel number 15.

IpScopeControl
Page 2-612
The following commands have been added for Scope-Pro 7.0
SCP_CONTINUOUSFOCUS = 65
SCP_GET_CONTFOC_POS = 39
SCP_SET_CONTFOC_POS = 40
SCP_OFFSET_MEMORIZE = 1
SCP_OFFSET_RECALL = 2
GSCP_OFFSET_MOVE_MEMORIZE = 3
SCP_OFFSET_MOVE = 4
Use in macros are defined as follows: ret = IpScopeSetPosition(SCP_CONTINUOUSFOCUS, 0)
The above macro will turn the PFS off. ret = IpScopeSetPosition(SCP_CONTINUOUSFOCUS, 0)
The above macro will turn the PFS on. ret = IpScopeControl(SCP_GET_CONTFOC_POS, SCP_CONTINUOUSFOCUS, 0, "", IpStgVal)
The above macro will get the current position of the offset lens and return it in the single IpStgVal. ret = IpScopeControl(SCP_SET_CONTFOC_POS, SCP_CONTINUOUSFOCUS, SCP_OFFSET_MEMORIZE, "", IPNULL)
The above macro will “Memorize” the current offset lens position. The value will also be stored in a local array in the driver.
ret = IpScopeControl(SCP_SET_CONTFOC_POS, SCP_CONTINUOUSFOCUS, SCP_OFFSET_RECALL, "", IPNULL)
The above macro will “Recall” the currently memorized offset position. ret = IpScopeControl(SCP_SET_CONTFOC_POS, SCP_CONTINUOUSFOCUS, SCP_OFFSET_MOVE_MEMORIZE, "", IpVal)
The above macro will move the offset lens to the absolute position passed in, in the single IpStgVal. The position will then be “Memorized” and also stored in the drivers local array.
ret = IpScopeControl(SCP_SET_CONTFOC_POS, SCP_CONTINUOUSFOCUS, SCP_OFFSET_MOVE, "", IpStgVal)
The above macro will move the offset lens to the absolute position passed in, in the single IpStgVal. The position will NOT be “Memorized” and will NOT be stored in the drivers local array.
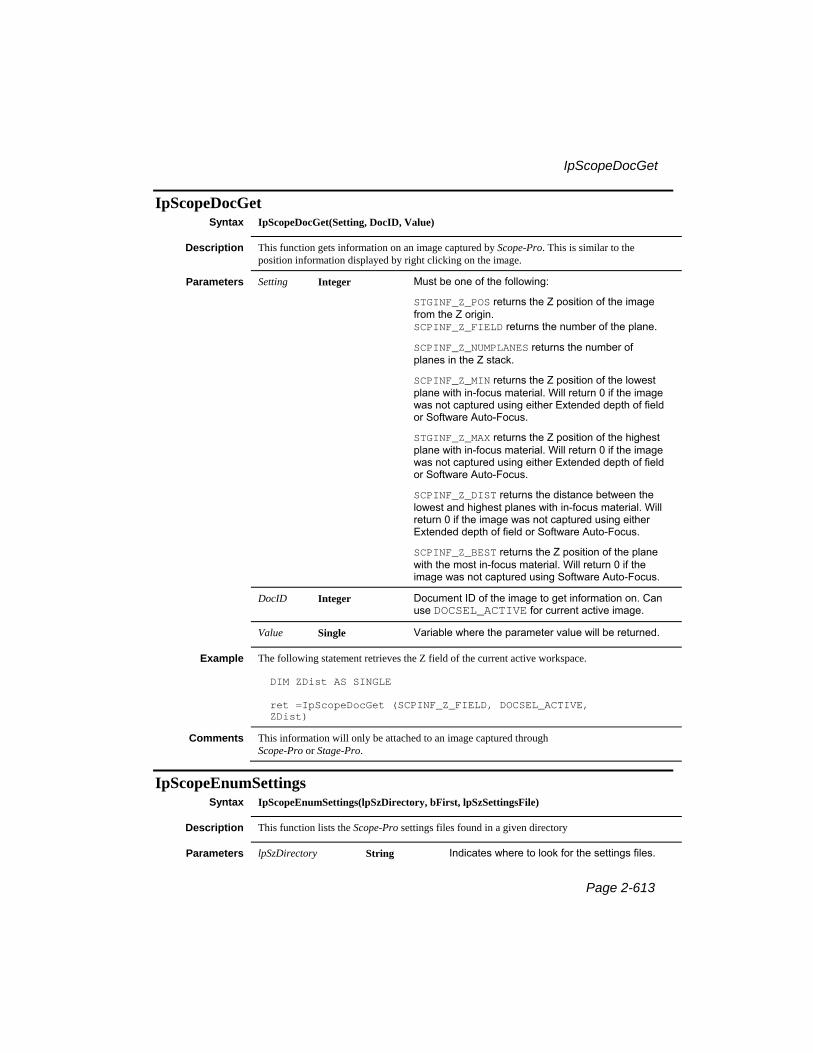
IpScopeDocGet
Page 2-613
IpScopeDocGet Syntax IpScopeDocGet(Setting, DocID, Value)
Description This function gets information on an image captured by Scope-Pro. This is similar to the position information displayed by right clicking on the image.
Parameters Setting Integer Must be one of the following:
STGINF_Z_POS returns the Z position of the image from the Z origin. SCPINF_Z_FIELD returns the number of the plane.
SCPINF_Z_NUMPLANES returns the number of planes in the Z stack.
SCPINF_Z_MIN returns the Z position of the lowest plane with in-focus material. Will return 0 if the image was not captured using either Extended depth of field or Software Auto-Focus.
STGINF_Z_MAX returns the Z position of the highest plane with in-focus material. Will return 0 if the image was not captured using either Extended depth of field or Software Auto-Focus.
SCPINF_Z_DIST returns the distance between the lowest and highest planes with in-focus material. Will return 0 if the image was not captured using either Extended depth of field or Software Auto-Focus.
SCPINF_Z_BEST returns the Z position of the plane with the most in-focus material. Will return 0 if the image was not captured using Software Auto-Focus.
DocID Integer Document ID of the image to get information on. Can use DOCSEL_ACTIVE for current active image.
Value Single Variable where the parameter value will be returned.
Example The following statement retrieves the Z field of the current active workspace.
DIM ZDist AS SINGLE
ret =IpScopeDocGet (SCPINF_Z_FIELD, DOCSEL_ACTIVE, ZDist)
Comments This information will only be attached to an image captured through Scope-Pro or Stage-Pro.
IpScopeEnumSettings Syntax IpScopeEnumSettings(lpSzDirectory, bFirst, lpSzSettingsFile)
Description This function lists the Scope-Pro settings files found in a given directory
Parameters lpSzDirectory String Indicates where to look for the settings files.
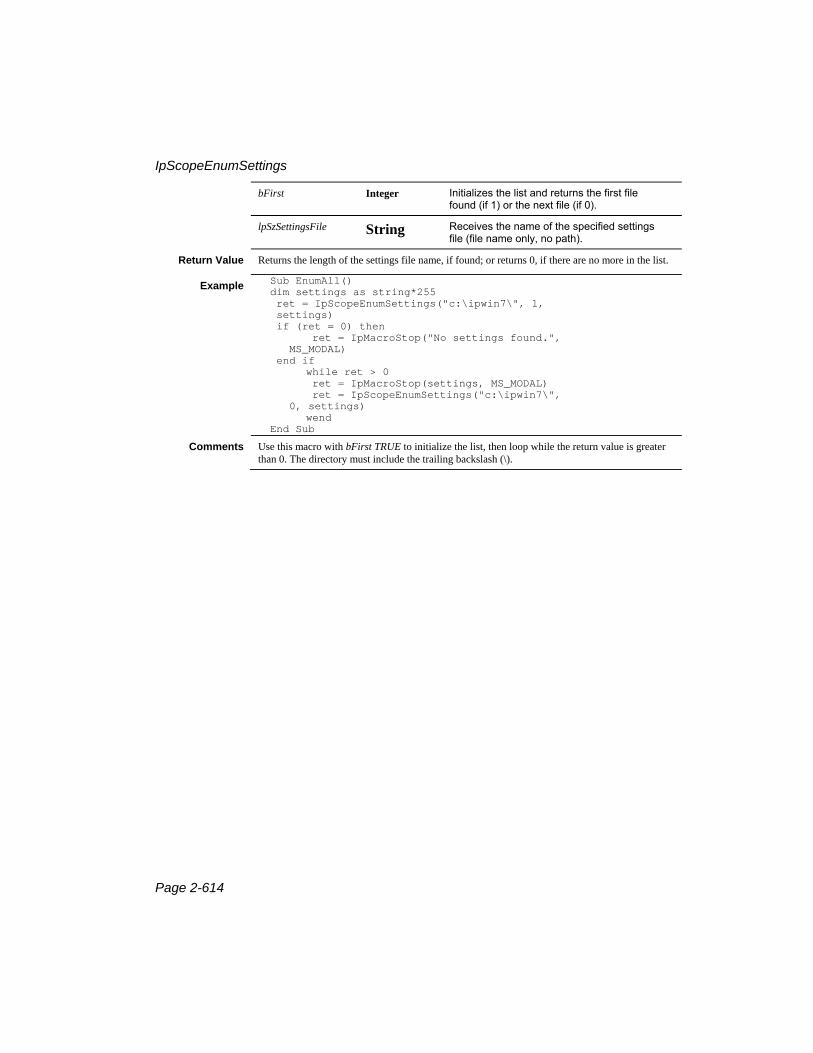
IpScopeEnumSettings
Page 2-614
bFirst Integer Initializes the list and returns the first file found (if 1) or the next file (if 0).
lpSzSettingsFile String Receives the name of the specified settings file (file name only, no path).
Return Value Returns the length of the settings file name, if found; or returns 0, if there are no more in the list.
Example Sub EnumAll() dim settings as string*255 ret = IpScopeEnumSettings("c:\ipwin7\", 1, settings) if (ret = 0) then ret = IpMacroStop("No settings found.", MS_MODAL) end if while ret > 0 ret = IpMacroStop(settings, MS_MODAL) ret = IpScopeEnumSettings("c:\ipwin7\", 0, settings) wend End Sub
Comments Use this macro with bFirst TRUE to initialize the list, then loop while the return value is greater than 0. The directory must include the trailing backslash (\).
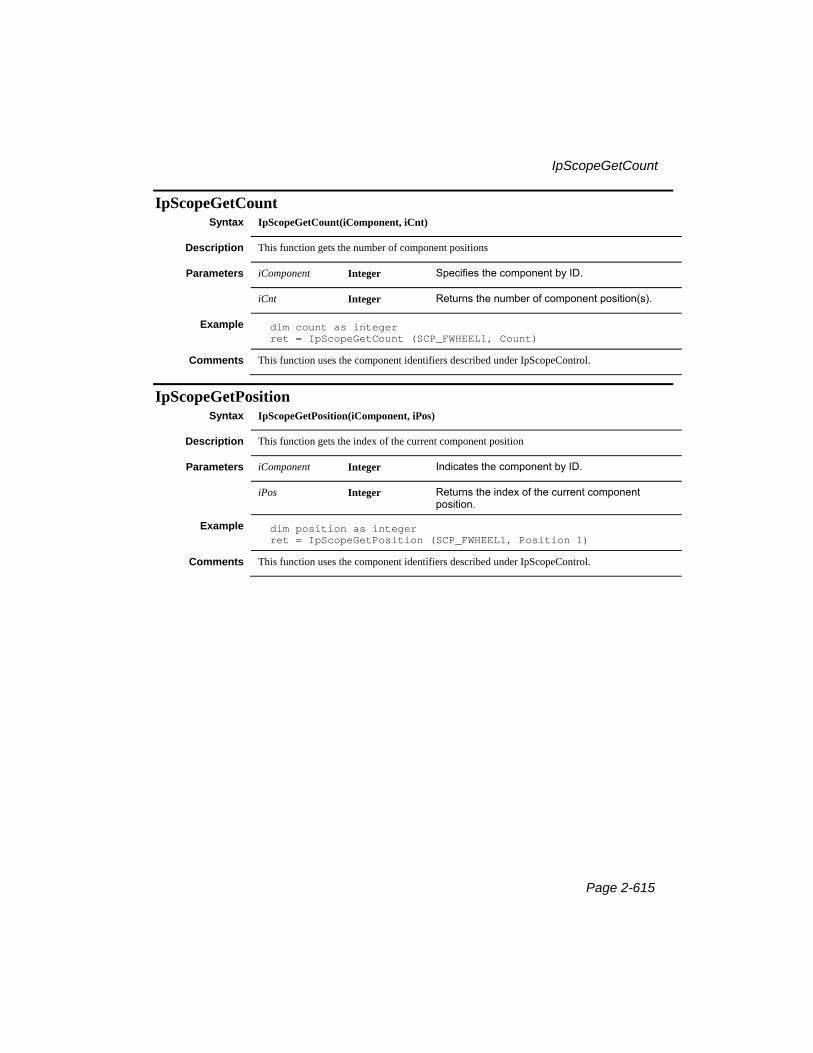
IpScopeGetCount
Page 2-615
IpScopeGetCount Syntax IpScopeGetCount(iComponent, iCnt)
Description This function gets the number of component positions
Parameters iComponent Integer Specifies the component by ID.
iCnt Integer Returns the number of component position(s).
Example dim count as integer ret = IpScopeGetCount (SCP_FWHEEL1, Count)
Comments This function uses the component identifiers described under IpScopeControl.
IpScopeGetPosition Syntax IpScopeGetPosition(iComponent, iPos)
Description This function gets the index of the current component position
Parameters iComponent Integer Indicates the component by ID.
iPos Integer Returns the index of the current component position.
Example dim position as integer ret = IpScopeGetPosition (SCP_FWHEEL1, Position 1)
Comments This function uses the component identifiers described under IpScopeControl.

IpScopeRead
Page 2-616
IpScopeRead Syntax IpScopeRead(iComponent, lpString, iNumChar, iTimeout)
Description This function allows your application to receive characters from the specified component’s controller.
Parameters iComponent Integer Indicates the component by ID.
lpString String String that receives characters from the controller.
iNumCharacters Integer The number of characters to attempt to read from the controller.
iTimeout Integer The maximum time in seconds to wait for the string to be read.
Return Value Returns the number of characters read if successful; returns a negative value if failed. A return of 0 (zero) means no characters were read.
Comments This function uses the component identifiers described under IpScopeControl. The existing XY stage function, IpStgXYWrite, will be used to access that component; and where the Stage-Pro interface is installed, the Z Focus function, IpStgZWrite, can also be used. The Z Focus component will also be identified by ID and accessible through this function as well. When the Scope-Pro interface is installed, this function must be used to access the Z Focus controller.
See Also IpScopeWrite
IpScopeSettings Syntax IpScopeSettings(lpName, iSave)
Description This loads or saves a Scope-Pro settings file (*.scp).
Parameters lpName String The name of the Scope-Pro settings file.
iSave Integer Constants will be defined for the following: SCP_LOAD SCP_SAVE
Example The following statement will save the current stage settings: ret = IpScopeSettings(“c:\Ipwin7\test.scp”, SCP_SAVE)
IpScopeSetPosition Syntax IpScopeSetPosition(iComponent, iPos)
Description This function moves the specified component to the desired position
Parameters iComponent Integer Indicates the component by ID.
iPos Integer Indicates the desired component position.

Page 2-617
Example ret = IpScopeSetPosition(SCP_FWHEEL1, 2). This will move the filter wheel to position 3.
Comments This function uses the component identifiers described under IpScopeControl.
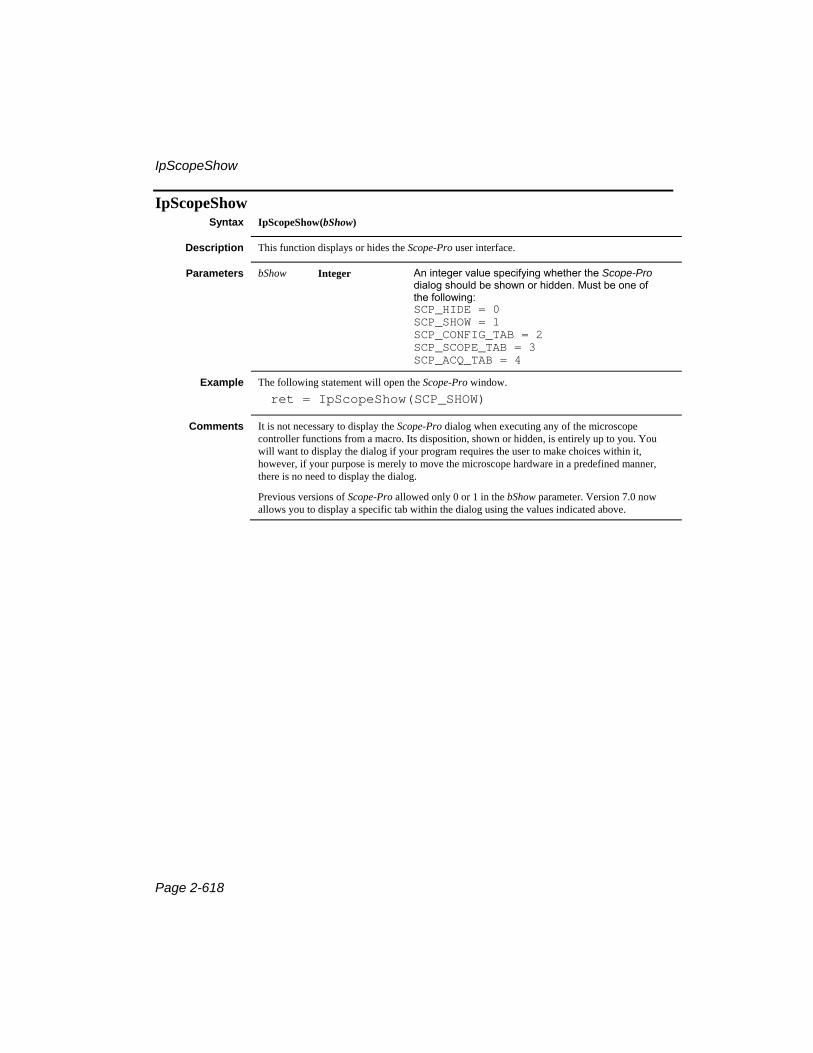
IpScopeShow
Page 2-618
IpScopeShow Syntax IpScopeShow(bShow)
Description This function displays or hides the Scope-Pro user interface.
Parameters bShow Integer An integer value specifying whether the Scope-Pro dialog should be shown or hidden. Must be one of the following: SCP_HIDE = 0 SCP_SHOW = 1 SCP_CONFIG_TAB = 2 SCP_SCOPE_TAB = 3 SCP_ACQ_TAB = 4
Example The following statement will open the Scope-Pro window. ret = IpScopeShow(SCP_SHOW)
Comments It is not necessary to display the Scope-Pro dialog when executing any of the microscope controller functions from a macro. Its disposition, shown or hidden, is entirely up to you. You will want to display the dialog if your program requires the user to make choices within it, however, if your purpose is merely to move the microscope hardware in a predefined manner, there is no need to display the dialog.
Previous versions of Scope-Pro allowed only 0 or 1 in the bShow parameter. Version 7.0 now allows you to display a specific tab within the dialog using the values indicated above.
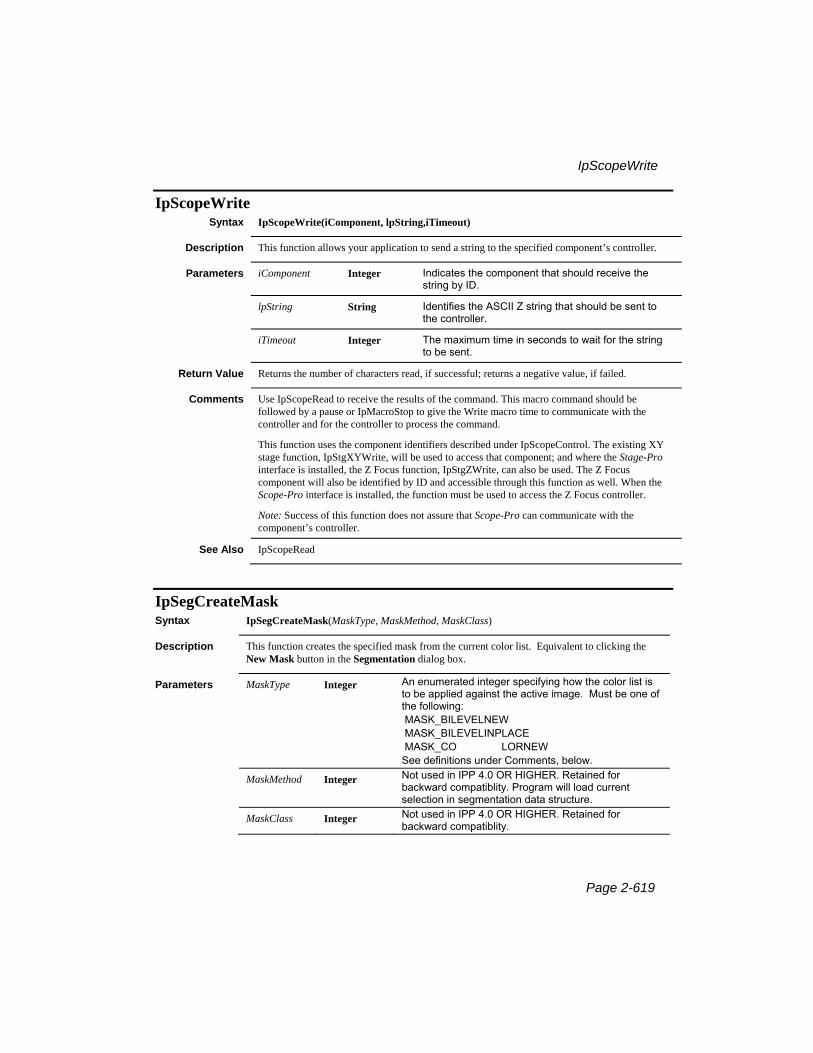
IpScopeWrite
Page 2-619
IpScopeWrite Syntax IpScopeWrite(iComponent, lpString,iTimeout)
Description This function allows your application to send a string to the specified component’s controller.
Parameters iComponent Integer Indicates the component that should receive the string by ID.
lpString String Identifies the ASCII Z string that should be sent to the controller.
iTimeout Integer The maximum time in seconds to wait for the string to be sent.
Return Value Returns the number of characters read, if successful; returns a negative value, if failed.
Comments Use IpScopeRead to receive the results of the command. This macro command should be followed by a pause or IpMacroStop to give the Write macro time to communicate with the controller and for the controller to process the command.
This function uses the component identifiers described under IpScopeControl. The existing XY stage function, IpStgXYWrite, will be used to access that component; and where the Stage-Pro interface is installed, the Z Focus function, IpStgZWrite, can also be used. The Z Focus component will also be identified by ID and accessible through this function as well. When the Scope-Pro interface is installed, the function must be used to access the Z Focus controller.
Note: Success of this function does not assure that Scope-Pro can communicate with the component’s controller.
See Also IpScopeRead
IpSegCreateMask Syntax IpSegCreateMask(MaskType, MaskMethod, MaskClass)
Description This function creates the specified mask from the current color list. Equivalent to clicking the New Mask button in the Segmentation dialog box.
Parameters MaskType Integer An enumerated integer specifying how the color list is to be applied against the active image. Must be one of the following: MASK_BILEVELNEW MASK_BILEVELINPLACE MASK_CO LORNEW See definitions under Comments, below.
MaskMethod Integer Not used in IPP 4.0 OR HIGHER. Retained for backward compatiblity. Program will load current selection in segmentation data structure.
MaskClass Integer Not used in IPP 4.0 OR HIGHER. Retained for backward compatiblity.

IpSegCreateMask
Page 2-620
Example Dim i As Integer Dim DocId As Integer For i = 0 To 2 ret = IpSegSetAttr(SETCURSEL, i) ret = IpSegSetAttr(CHANNEL, 0) ret = IpSegPreview(CURRENT_W_B) DocId = IpSegCreateMask(MASK_COLORNEW, 0, 0) ret = IpWsConvertToGray() ret = IpDocCloseEx(DocId) Next i
These statements will iterate through 3 segmentation classes, creating a mask of each class and converting the mask to grayscale. Once the gray scale conversion is complete, the RGB version of the mask is destroyed.
Comments Image-Pro 4.0 or higher does not use the MaskMethod and MaskClass paremeters. MaskType options are as follows:
VALUE DESCRIPTION
MASK_BILEVELNEW Applies the class list such that all pixels contained in a class are set to white (255) and all others are set to black (0). Writes the result to a new image window. This is the same as pressing the New Mask button.
MASK_BILEVELINPLACE Applies the color list such that all pixels contained in a classs are set to white (255) and all others are set to black (0). Writes the results to the original image window. This is the same as pressing the Apply Mask button.
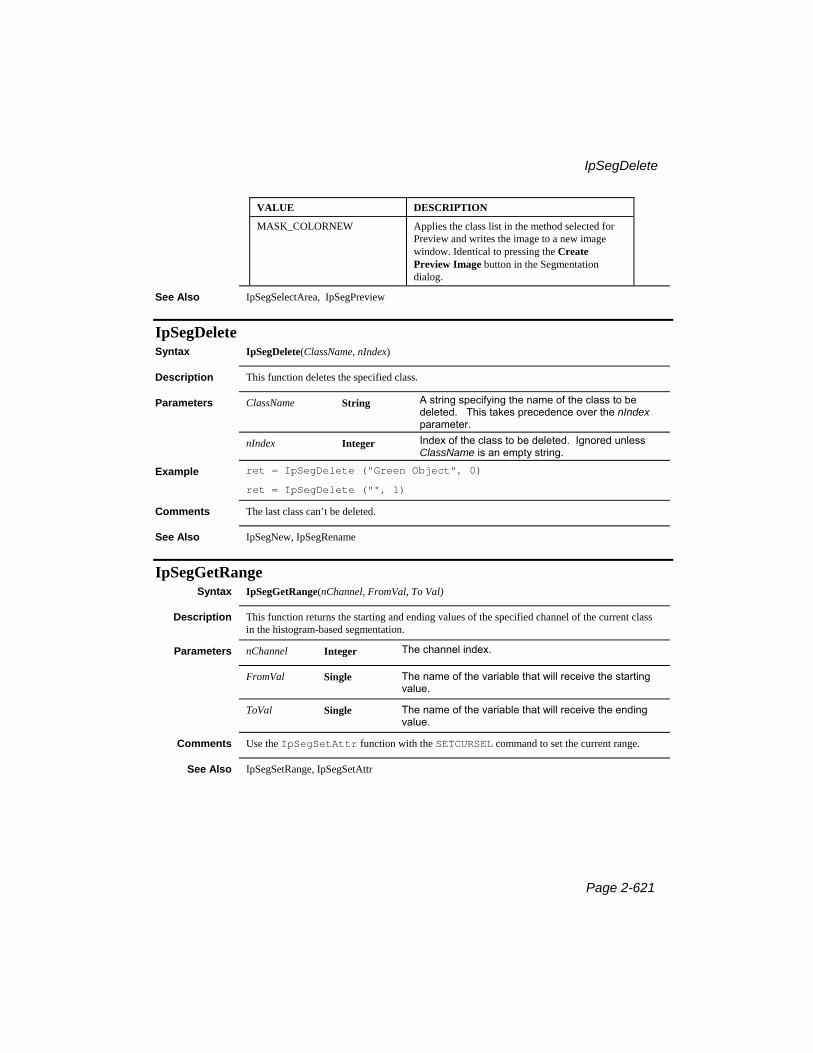
IpSegDelete
Page 2-621
VALUE DESCRIPTION
MASK_COLORNEW Applies the class list in the method selected for Preview and writes the image to a new image window. Identical to pressing the Create Preview Image button in the Segmentation dialog.
See Also IpSegSelectArea, IpSegPreview
IpSegDelete Syntax IpSegDelete(ClassName, nIndex)
Description This function deletes the specified class.
Parameters ClassName String A string specifying the name of the class to be deleted. This takes precedence over the nIndex parameter.
nIndex Integer Index of the class to be deleted. Ignored unless ClassName is an empty string.
Example ret = IpSegDelete ("Green Object", 0)
ret = IpSegDelete ("", 1)
Comments The last class can’t be deleted.
See Also IpSegNew, IpSegRename
IpSegGetRange Syntax IpSegGetRange(nChannel, FromVal, To Val)
Description This function returns the starting and ending values of the specified channel of the current class in the histogram-based segmentation.
Parameters nChannel Integer The channel index.
FromVal Single The name of the variable that will receive the starting value.
ToVal Single The name of the variable that will receive the ending value.
Comments Use the IpSegSetAttr function with the SETCURSEL command to set the current range.
See Also IpSegSetRange, IpSegSetAttr

IpSegLoad
Page 2-622
IpSegLoad Syntax IpSegLoad(ColorRangesFile)
Description This function loads a class list file to the active image. Equivalent to selecting the File: Load File button in the Segmentation window.
Parameters ColorRangesFile String A string specifying the name of the file from which the color-range list will be read.
Example ret = IpSegLoad("C:\IPWIN\HSIREDS.RGE")
This statement will load the class list list from the file HSIREDS.RGE in the \IPWIN directory on the C: drive.
Comments The loaded class list list will replace the current list. If you want to add the contents of a class list file to the current list, use the IpSegMerge function.
See Also IpSegMerge, IpSegSave
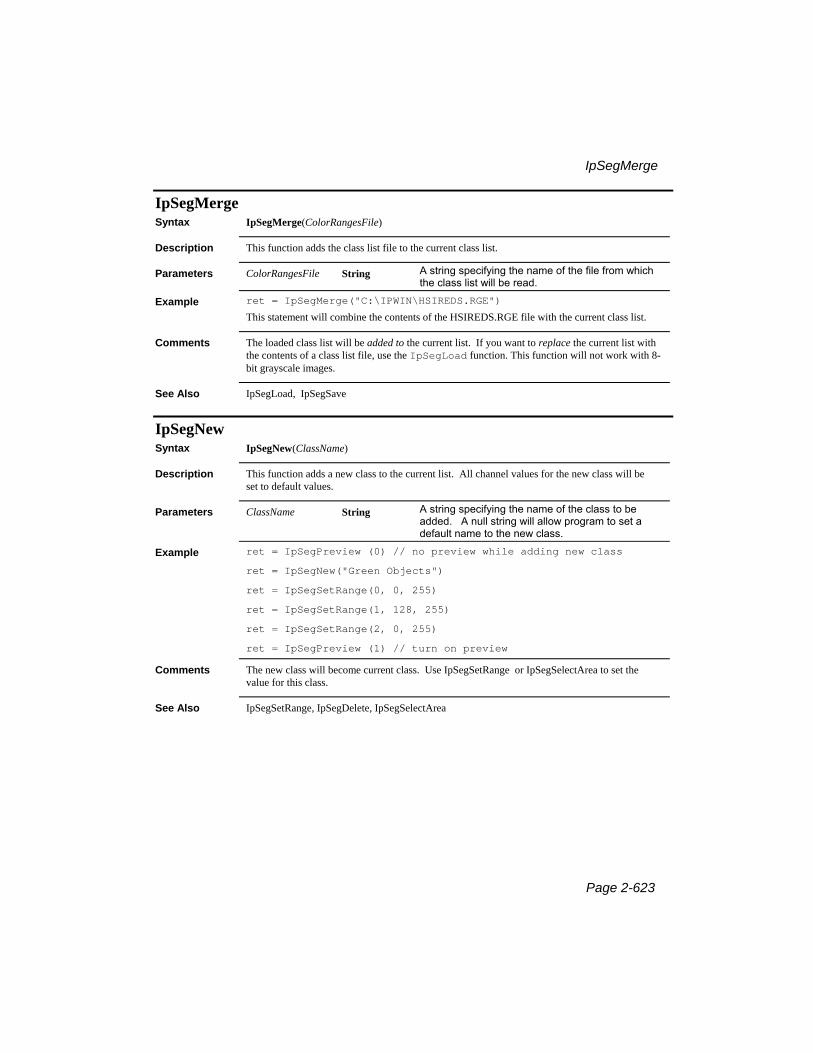
IpSegMerge
Page 2-623
IpSegMerge Syntax IpSegMerge(ColorRangesFile)
Description This function adds the class list file to the current class list.
Parameters ColorRangesFile String A string specifying the name of the file from which the class list will be read.
Example ret = IpSegMerge("C:\IPWIN\HSIREDS.RGE")
This statement will combine the contents of the HSIREDS.RGE file with the current class list.
Comments The loaded class list will be added to the current list. If you want to replace the current list with the contents of a class list file, use the IpSegLoad function. This function will not work with 8-bit grayscale images.
See Also IpSegLoad, IpSegSave
IpSegNew Syntax IpSegNew(ClassName)
Description This function adds a new class to the current list. All channel values for the new class will be set to default values.
Parameters ClassName String A string specifying the name of the class to be added. A null string will allow program to set a default name to the new class.
Example ret = IpSegPreview (0) // no preview while adding new class
ret = IpSegNew("Green Objects")
ret = IpSegSetRange(0, 0, 255)
ret = IpSegSetRange(1, 128, 255)
ret = IpSegSetRange(2, 0, 255)
ret = IpSegPreview (1) // turn on preview
Comments The new class will become current class. Use IpSegSetRange or IpSegSelectArea to set the value for this class.
See Also IpSegSetRange, IpSegDelete, IpSegSelectArea
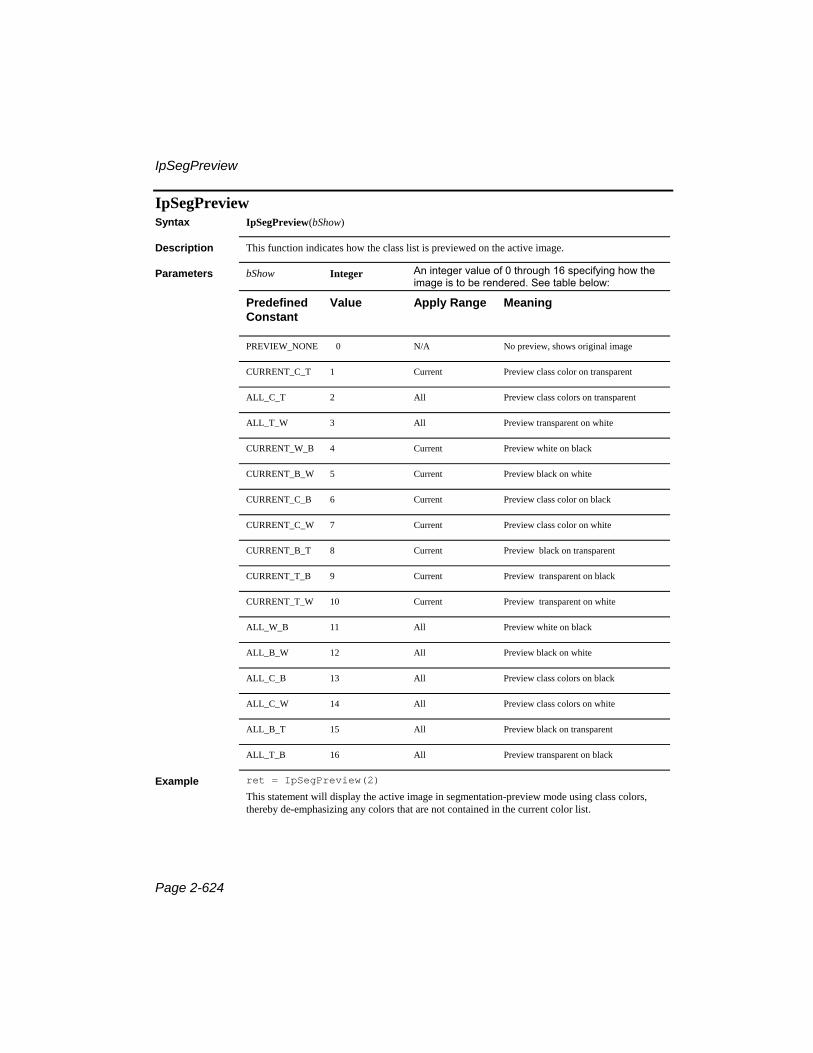
IpSegPreview
Page 2-624
IpSegPreview Syntax IpSegPreview(bShow)
Description This function indicates how the class list is previewed on the active image.
Parameters bShow Integer An integer value of 0 through 16 specifying how the image is to be rendered. See table below:
Predefined Constant
Value Apply Range Meaning
PREVIEW_NONE 0 N/A No preview, shows original image
CURRENT_C_T 1 Current Preview class color on transparent
ALL_C_T 2 All Preview class colors on transparent
ALL_T_W 3 All Preview transparent on white
CURRENT_W_B 4 Current Preview white on black
CURRENT_B_W 5 Current Preview black on white
CURRENT_C_B 6 Current Preview class color on black
CURRENT_C_W 7 Current Preview class color on white
CURRENT_B_T 8 Current Preview black on transparent
CURRENT_T_B 9 Current Preview transparent on black
CURRENT_T_W 10 Current Preview transparent on white
ALL_W_B 11 All Preview white on black
ALL_B_W 12 All Preview black on white
ALL_C_B 13 All Preview class colors on black
ALL_C_W 14 All Preview class colors on white
ALL_B_T 15 All Preview black on transparent
ALL_T_B 16 All Preview transparent on black
Example ret = IpSegPreview(2)
This statement will display the active image in segmentation-preview mode using class colors, thereby de-emphasizing any colors that are not contained in the current color list.

IpSegRename
Page 2-625
IpSegRename Syntax IpSegRename(nIndex, ClassName)
Description This function renames a class.
Parameters nIndex Integer Index of the class to be renamed.
ClassName String A string specifying the new name of the class to be renamed.
Example ret = IpSegRename (0,"Green Object").
Comments If index is incorrect, it will return IPCERR_INVARG. Class names cannot be longer than 15 characters.
See Also IpSegNew, IpSegDelete
IpSegReset Syntax IpSegReset( )
Description This function clears the current color list of current class. Equivalent to clicking the Remove Color button in the Segmentation dialog box.
See Also IpSegSelectArea, IpSegLoad
IpSegSave Syntax IpSegSave(ColorRangesFile, bUnused)
Description This function saves the current color-range list to a file. Equivalent pressing the File:Save File buttons in the Segmentation dialog.
Parameters ColorRangesFile String A string specifying the name of the file to which the color-range list will be written.
bUnused Integer Unused. Provided for backward compatibility.
Example ret = IpSegSave("C:\IPWIN\HSIREDS.RGE",0)
This statement will save the current color-range list, to a file called HSIREDS.RGE in the \IPWIN directory on the C: drive.
See Also IpSegLoad, IpSegMerge

IpSegSelect
Page 2-626
IpSegSelect Syntax IpSegSelect(SelectionType, Sensitivity)
Comments This function is not supported in IPP 4.0 OR HIGHER. Use IpSegSelectArea instead.
See Also IpSegSelectArea, IpSegPreview, IpSegCreateMask
IpSegSelectArea Syntax IpSegSelect(SelectionType, Sensitivity, xPos, yPos, nSize)
Description This function adds or deletes the colors encompassed by the area to/from the current color range list. Equivalent to clicking the Eyedropper or Eraser button in the Color Segmentation dialog box.
Parameters SelectionType Integer An enumerated integer specifying how the colors in the active AOI are to be applied to the color list. Must be one of the following: SEG _SELADD SEG _SEGSUBTRACT See definitions under Comments, below.
Sensitivity Integer An integer from 1 to 5 (inclusive) specifying how much deviation from the selected colors is to be allowed. 5 indicates that no deviation from the specified colors will be allowed, and 1 indicates that the maximum amount of deviation will be tolerated. Changing this value will reset Segmentation and reset the class list.
xPos Integer Central x coordinate of the area where colors should be selected from the image.
yPos Integer Central y coordinate of the area where colors should be selected from the image.
nSize Integer Size of rectangle from which colors are selected. Should be 1, 3, 5 or 7.
Example ret = IpSegSelectArea(SEG_SELSUBTRACT, 5, 100, 100, 5)
This set of statements will remove from the color list, just the colors contained in the image rectangle (98, 98, 102, 102). No deviation from these colors will be permitted.

IpSegSetAttr
Page 2-627
Comments SelectionType options are as follows:
VALUE DESCRIPTION SEG_SELADD Adds the colors in the specified region to the current color
list. Equivalent to using the eyedropper tool.
SEG_SEGSUBTRACT Removes the colors in the specified region from the current color list. Equivalent to using the eraser tool.
This function only works if the data structure is using the color cube model.
See Also IpSegPreview, IpSegCreateMask
IpSegSetAttr Syntax IpSegSetAttr(AttrType, AttrValue)
Description This function set the channel’s range values of current class in the histogram-based segmentation.
Parameters AttrType Integer An enumerated integer specifying the option to be set. Must be one of the following: CHANNEL COLORMODEL SEGCLR_RED SEGCLR_GREEN SEGCLR_BLUE CURSORSIZE DEGREE INVERT SETCURSEL SEGMETHOD THRESHOLD See definitions under Comments, below.
AttrValue Integer An integer specifying how the AttrType option is to be set. See definitions under Comments, below, for the values allowed by each option.
Example ret = IpSegSetAttr (COLORMODEL, CM_HSI).
This statement changes the color model used in histogram-based segmentation to HSI.

IpSegSetAttr
Page 2-628
Comments AttrType options as follows:
AttrType DESCRIPTION ALLOWED VALUES CHANNEL Select the active channel for
display purpose in the histogram-based segmentation historgram mode. This only applies to RGB image.
0 - Channel 1 (Red/Hue)
1 - Channel 2(Green/Saturation)
2 - Channel 3 (Blue/Intensity)
3 - All channels will be previewed.
4 - Only the current channel. All others will be hidden.
COLORMODEL Select the color model in which the histogram-based segmentation is based on.
CM_RGB
CM_HSI
SEGCLR_RED Records the red color level for the current channel.
0 -255
SEGCLR_GREEN Records the green color level for the current channel.
0-255
SEGCLR_BLUE Records the blue color level for the current channel.
0-255
CURSORSIZE Sets the eyedropper and eraser cursor size in pixels
1,3,5,or 7
DEGREE Sets the degree of variance for the eyedropper and eraser.
0 -1 0
INVERT Indicates if channel is inverted or not
Channel 1 - 1 = inverted 0 = not inverted
Channel 2 - 3 = inverted 2 = not inverted
Channel 3 - 5 = inverted 4 = not inverted
SETCURSEL Set the current selected class. 0-based index
(0 to NumOfClasses - 1)
SEGMETHOD Method used to do the segmentation. This only applies to RGB images.
0 - Histogram-based
1 - Color Cube-based
THRESHOLD Sets the threshold value for dropping extraneous (noise) pixels
1 -100
See Also IpSegPreview, IpSegCreateMask, IpSegGetRange, IpSegSetRange
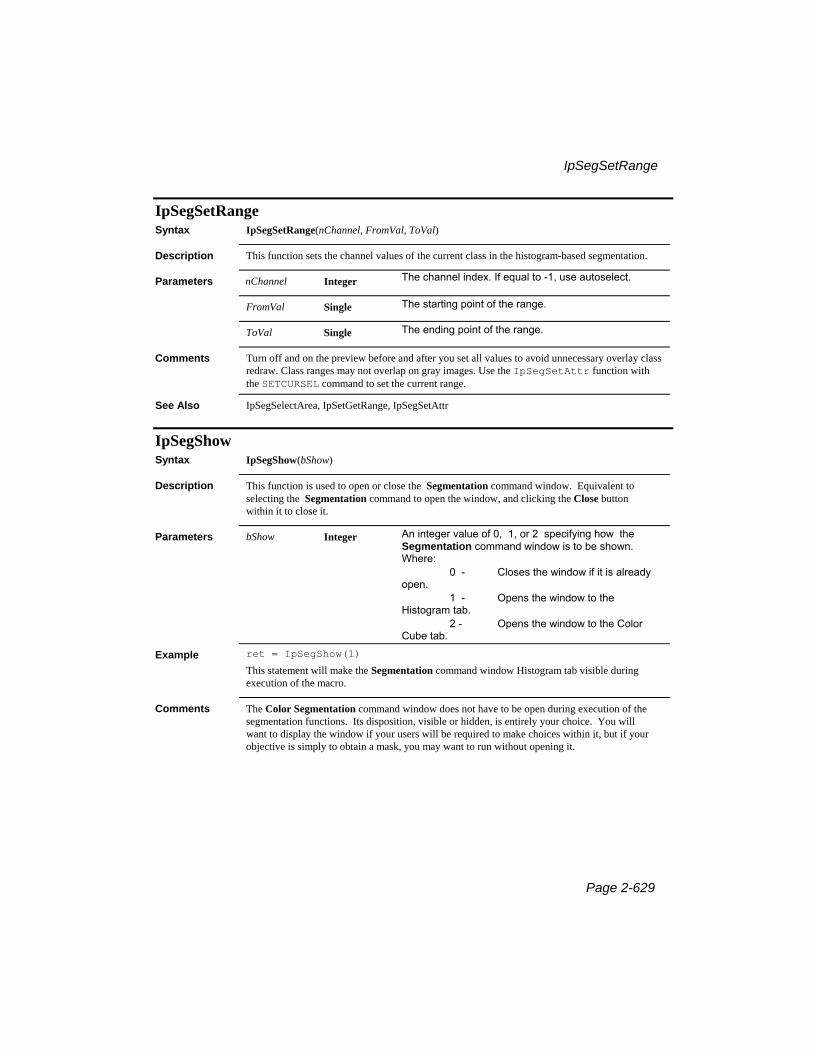
IpSegSetRange
Page 2-629
IpSegSetRange Syntax IpSegSetRange(nChannel, FromVal, ToVal)
Description This function sets the channel values of the current class in the histogram-based segmentation.
Parameters nChannel Integer The channel index. If equal to -1, use autoselect.
FromVal Single The starting point of the range.
ToVal Single The ending point of the range.
Comments Turn off and on the preview before and after you set all values to avoid unnecessary overlay class redraw. Class ranges may not overlap on gray images. Use the IpSegSetAttr function with the SETCURSEL command to set the current range.
See Also IpSegSelectArea, IpSetGetRange, IpSegSetAttr
IpSegShow Syntax IpSegShow(bShow)
Description This function is used to open or close the Segmentation command window. Equivalent to selecting the Segmentation command to open the window, and clicking the Close button within it to close it.
Parameters bShow Integer An integer value of 0, 1, or 2 specifying how the Segmentation command window is to be shown. Where: 0 - Closes the window if it is already open. 1 - Opens the window to the Histogram tab. 2 - Opens the window to the Color Cube tab.
Example ret = IpSegShow(1)
This statement will make the Segmentation command window Histogram tab visible during execution of the macro.
Comments The Color Segmentation command window does not have to be open during execution of the segmentation functions. Its disposition, visible or hidden, is entirely your choice. You will want to display the window if your users will be required to make choices within it, but if your objective is simply to obtain a mask, you may want to run without opening it.

IpSeqAverage
Page 2-630
IpSeqAverage Syntax IpSeqAverage ( lStart, lNumber)
Description This function averages the frames of a sequence into a single image.
Parameters lStart Long Indicates the first frame to average.
lNumber Long Indicates the number of frames to analyze, -1 indicates the entire sequence
Return Value This function returns the workspace Document ID if successful, -1 if failed.
Example ret = IpSeqAverage(4,7) This statement averages 7 frames in the sequence, starting with frame #4.
Comments Note that IpSeq and IpWs Auto-Pro functions number frames in a sequence starting with 0 (zero), but the workspace title bar and the sequencer tool bar start frame numbers with frame 1.
See Also IpSeqDifference, IpSeqRunning Average
IpSeqDifference Syntax IpSeqDifference( lStart, lNumber)
Description This function creates a new sequence, where each frame represents the difference between two adjacent frames.
Parameters lStart Long Indicates the first frame to analyze.
lNumber Long Indicates the number of frames to analyze, -1 indicates the entire sequence
Return Value This function returns the workspace Document ID if successful, -1 if failed.
Example ret = IpSeqDifference(4,7)
This statement analyzes 7 frames in the sequence, starting with frame #4.
Comments Note that IpSeq and IpWs Auto-Pro functions number frames in a sequence starting with 0 (zero), but the workspace title bar and the sequencer tool bar start frame numbers with frame 1.
See Also IpSeqAverage, IpSeqRunning Average
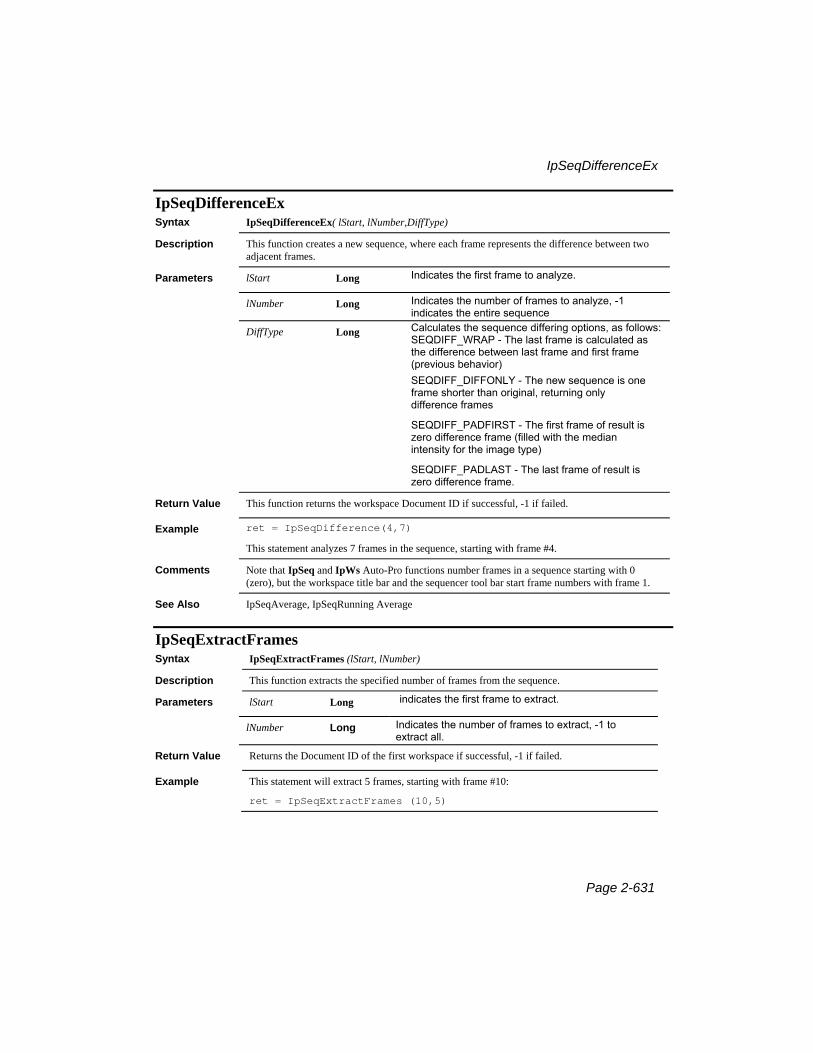
IpSeqDifferenceEx
Page 2-631
IpSeqDifferenceEx Syntax IpSeqDifferenceEx( lStart, lNumber,DiffType)
Description This function creates a new sequence, where each frame represents the difference between two adjacent frames.
Parameters lStart Long Indicates the first frame to analyze.
lNumber Long Indicates the number of frames to analyze, -1 indicates the entire sequence
DiffType Long Calculates the sequence differing options, as follows: SEQDIFF_WRAP - The last frame is calculated as the difference between last frame and first frame (previous behavior) SEQDIFF_DIFFONLY - The new sequence is one frame shorter than original, returning only difference frames
SEQDIFF_PADFIRST - The first frame of result is zero difference frame (filled with the median intensity for the image type)
SEQDIFF_PADLAST - The last frame of result is zero difference frame.
Return Value This function returns the workspace Document ID if successful, -1 if failed.
Example ret = IpSeqDifference(4,7)
This statement analyzes 7 frames in the sequence, starting with frame #4.
Comments Note that IpSeq and IpWs Auto-Pro functions number frames in a sequence starting with 0 (zero), but the workspace title bar and the sequencer tool bar start frame numbers with frame 1.
See Also IpSeqAverage, IpSeqRunning Average
IpSeqExtractFrames Syntax IpSeqExtractFrames (lStart, lNumber)
Description This function extracts the specified number of frames from the sequence.
Parameters lStart Long indicates the first frame to extract.
lNumber Long Indicates the number of frames to extract, -1 to extract all.
Return Value Returns the Document ID of the first workspace if successful, -1 if failed.
Example This statement will extract 5 frames, starting with frame #10:
ret = IpSeqExtractFrames (10,5)
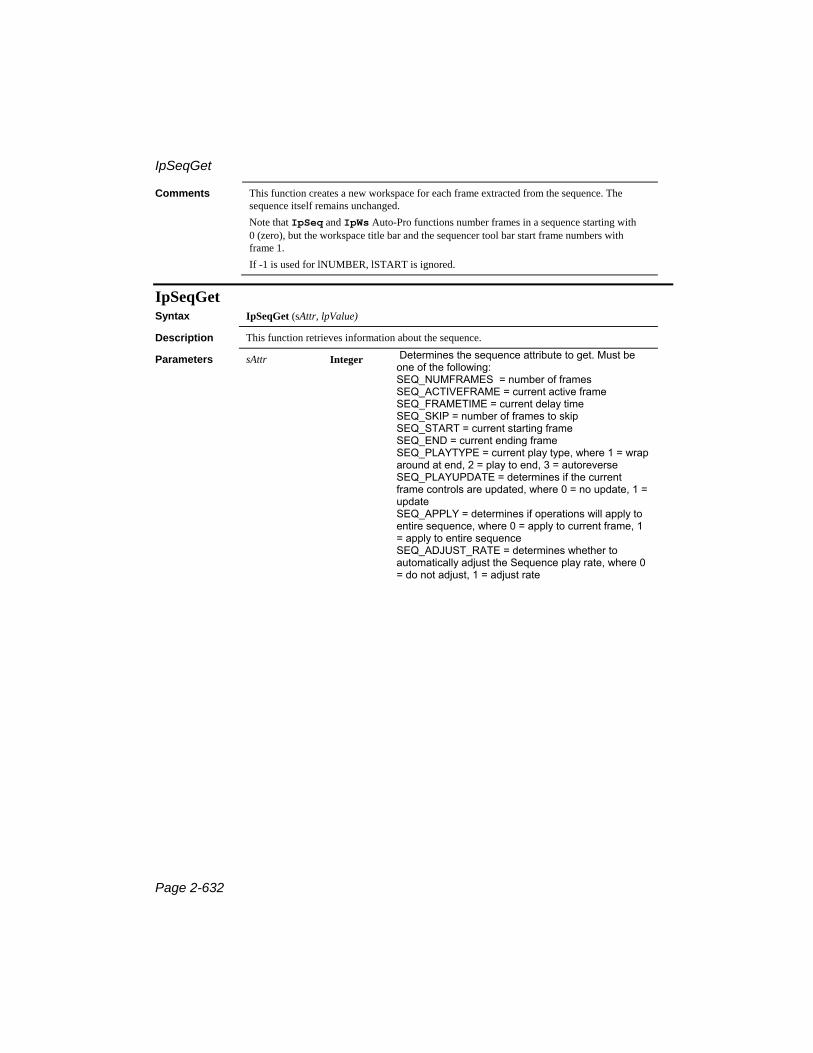
IpSeqGet
Page 2-632
Comments This function creates a new workspace for each frame extracted from the sequence. The sequence itself remains unchanged. Note that IpSeq and IpWs Auto-Pro functions number frames in a sequence starting with 0 (zero), but the workspace title bar and the sequencer tool bar start frame numbers with frame 1. If -1 is used for lNUMBER, lSTART is ignored.
IpSeqGet Syntax IpSeqGet (sAttr, lpValue)
Description This function retrieves information about the sequence.
Parameters sAttr Integer Determines the sequence attribute to get. Must be one of the following: SEQ_NUMFRAMES = number of frames SEQ_ACTIVEFRAME = current active frame SEQ_FRAMETIME = current delay time SEQ_SKIP = number of frames to skip SEQ_START = current starting frame SEQ_END = current ending frame SEQ_PLAYTYPE = current play type, where 1 = wrap around at end, 2 = play to end, 3 = autoreverse SEQ_PLAYUPDATE = determines if the current frame controls are updated, where 0 = no update, 1 = update SEQ_APPLY = determines if operations will apply to entire sequence, where 0 = apply to current frame, 1 = apply to entire sequence SEQ_ADJUST_RATE = determines whether to automatically adjust the Sequence play rate, where 0 = do not adjust, 1 = adjust rate
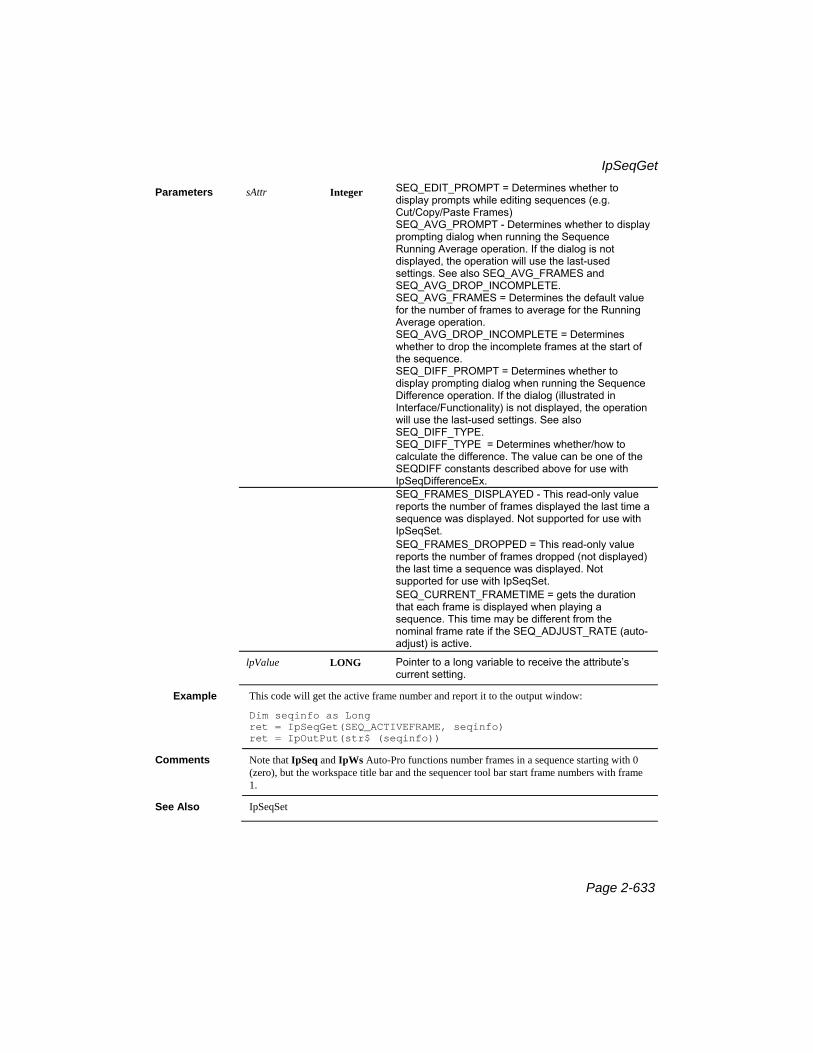
IpSeqGet
Page 2-633
Parameters sAttr Integer SEQ_EDIT_PROMPT = Determines whether to display prompts while editing sequences (e.g. Cut/Copy/Paste Frames) SEQ_AVG_PROMPT - Determines whether to display prompting dialog when running the Sequence Running Average operation. If the dialog is not displayed, the operation will use the last-used settings. See also SEQ_AVG_FRAMES and SEQ_AVG_DROP_INCOMPLETE. SEQ_AVG_FRAMES = Determines the default value for the number of frames to average for the Running Average operation. SEQ_AVG_DROP_INCOMPLETE = Determines whether to drop the incomplete frames at the start of the sequence. SEQ_DIFF_PROMPT = Determines whether to display prompting dialog when running the Sequence Difference operation. If the dialog (illustrated in Interface/Functionality) is not displayed, the operation will use the last-used settings. See also SEQ_DIFF_TYPE. SEQ_DIFF_TYPE = Determines whether/how to calculate the difference. The value can be one of the SEQDIFF constants described above for use with IpSeqDifferenceEx.
SEQ_FRAMES_DISPLAYED - This read-only value reports the number of frames displayed the last time a sequence was displayed. Not supported for use with IpSeqSet. SEQ_FRAMES_DROPPED = This read-only value reports the number of frames dropped (not displayed) the last time a sequence was displayed. Not supported for use with IpSeqSet. SEQ_CURRENT_FRAMETIME = gets the duration that each frame is displayed when playing a sequence. This time may be different from the nominal frame rate if the SEQ_ADJUST_RATE (auto-adjust) is active.
lpValue LONG Pointer to a long variable to receive the attribute’s current setting.
Example This code will get the active frame number and report it to the output window:
Dim seqinfo as Long ret = IpSeqGet(SEQ_ACTIVEFRAME, seqinfo) ret = IpOutPut(str$ (seqinfo))
Comments Note that IpSeq and IpWs Auto-Pro functions number frames in a sequence starting with 0 (zero), but the workspace title bar and the sequencer tool bar start frame numbers with frame 1.
See Also IpSeqSet

IpSeqMerge
Page 2-634
IpSeqMerge Syntax IpSeqMerge(lpszFileName, lpszLibrary, lStartNumber, lNumFrames)
Description This function appends one or more images in an image sequence into the currently active sequence.
Parameters lpszFileName String Indicates the name of the file containing the image sequence to be merged.
lpszLibrary String Specifices the file format library used to open the specified file.
lStartNumber Long An integer specifying the first frame in the sequence that will be merged i.e. 0, 1, 2, etc.
lNumFrames Long An integer specifying the total number of frames that will be merged.
Return Value This function returns the workspace Document ID if successful, -1 if failed.
Example ret = IpSeqMerge ("Heart.seq", “SEQ” 0,3)
This statement merges 3 frames from the sequence file “Heart.seq” starting with frame 0, into the current sequence. If a workspace is not open, a new one will be opened.
Comments IpSeqMerge always appends the new frames to the end of the existing sequence. Note that IpSeq and IpWs Auto-Pro functions number frames in a sequence starting with 0 (zero), but the workspace title bar and the sequencer tool bar start frame numbers with frame 1.
See Also IpSeqOpen, IpSeqPlay, IpSeqSave
IpSeqOpen Syntax IpSeqOpen (lpszFileName, lpszFileFormt, lStartFrame, lNumFrames)
Description This function opens an image sequence.
Parameters lpszFileName String Indicates the name of the file holding the image sequence to be opened.
lpszFileFormat String Specifices the file format library used to open the specified file.
lStartFrame Long An integer specifying the first frame in the sequence that will be opened i.e. 0, 1, 2, etc.
lNumFrames Long An integer specifying the total number of frames to read in.
Return Value This function returns the workspace Document ID if successful, -1 if failed.
Example ret = IpSeqOpen ("Heart.seq", "SEQ",10,10)
This statement opens 10 frames from the sequence file “Heart.seq” starting with frame 10.

IpSeqOpenEx
Page 2-635
Comments Note that IpSeq and IpWs Auto-Pro functions number frames in a sequence starting with 0 (zero), but the workspace title bar and the sequencer tool bar start frame numbers with frame 1. The file format must be either TIF or SEQ.
See Also IpSeqMerge, IpSeqPlay, IpSeqSave
IpSeqOpenEx Syntax IpSeqOpenEx(lpszFileName, lpszFileFormt, lStartFrame, lNumFrames, Interval)
Description This function opens and subsamples an image sequence.
Parameters lpszFileName String Indicates the name of the file holding the image sequence to be opened.
lpszFileFormat String Specifices the file format library used to open the specified file.
lStartFrame Long An integer specifying the first frame in the sequence that will be opened i.e. 0, 1, 2, etc.
lNumFrames Long An integer specifying the total number of frames to read in.
Interval Integer An integer indicating if the sequence should be subsampled while opening. If the interval = 1, then all frames are opened; 2 = every other frame, and so on.
Return Value This function returns the workspace Document ID if successful, -1 if failed.
Example ret = IpSeqOpen ("Heart.seq", "SEQ",10,10)
This statement opens 10 frames from the sequence file “Heart.seq” starting with frame 10.
Comments Note that IpSeq and IpWs Auto-Pro functions number frames in a sequence starting with 0 (zero), but the workspace title bar and the sequencer tool bar start frame numbers with frame 1. The file format must be either TIF or SEQ.
See Also IpSeqMerge, IpSeqPlay, IpSeqSave
IpSeqOptions Syntax IpSeqOptions ()
Description This function displays the Sequence Options dialog, which allows you to change any of the sequence settings.
Example ret = IpSeqOptions
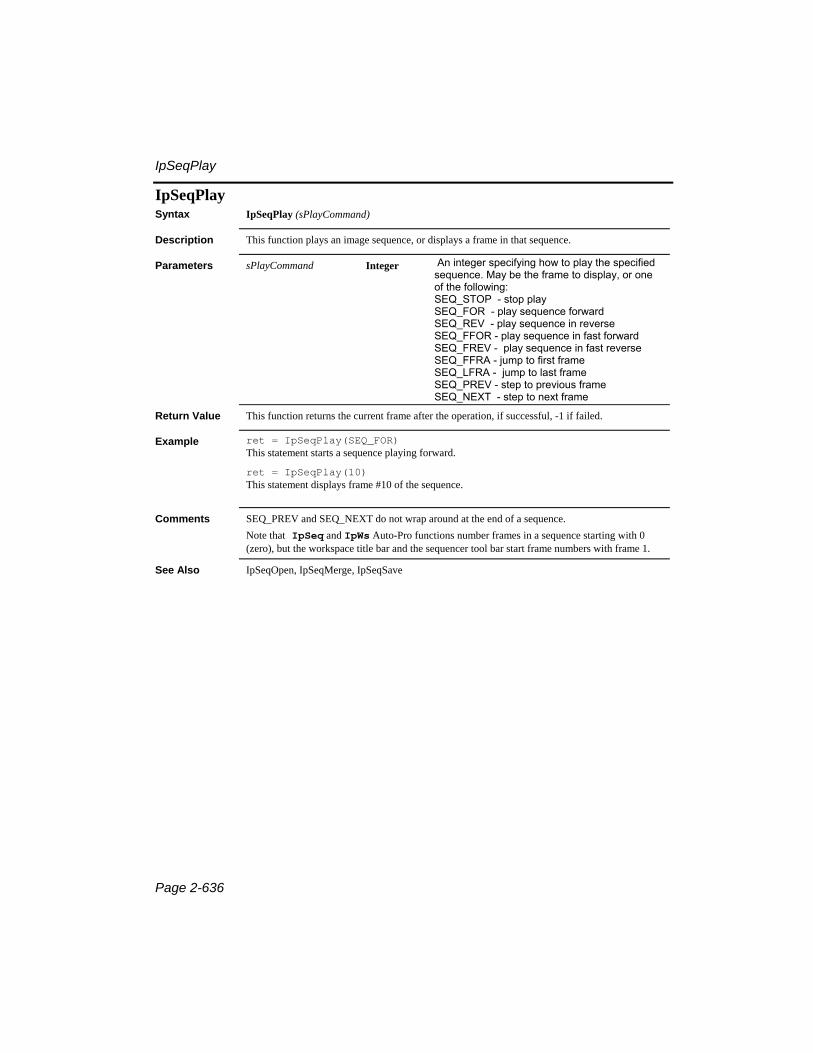
IpSeqPlay
Page 2-636
IpSeqPlay Syntax IpSeqPlay (sPlayCommand)
Description This function plays an image sequence, or displays a frame in that sequence.
Parameters sPlayCommand Integer An integer specifying how to play the specified sequence. May be the frame to display, or one of the following: SEQ_STOP - stop play SEQ_FOR - play sequence forward SEQ_REV - play sequence in reverse SEQ_FFOR - play sequence in fast forward SEQ_FREV - play sequence in fast reverse SEQ_FFRA - jump to first frame SEQ_LFRA - jump to last frame SEQ_PREV - step to previous frame SEQ_NEXT - step to next frame
Return Value This function returns the current frame after the operation, if successful, -1 if failed.
Example ret = IpSeqPlay(SEQ_FOR) This statement starts a sequence playing forward.
ret = IpSeqPlay(10) This statement displays frame #10 of the sequence.
Comments SEQ_PREV and SEQ_NEXT do not wrap around at the end of a sequence. Note that IpSeq and IpWs Auto-Pro functions number frames in a sequence starting with 0 (zero), but the workspace title bar and the sequencer tool bar start frame numbers with frame 1.
See Also IpSeqOpen, IpSeqMerge, IpSeqSave

IpSeqReslice
Page 2-637
IpSeqReslice Syntax IpSeqReslice(Start, Number, SliceType,Resample)
Description This function creates a new sequence,resampled along the X, Y, or Z axis.
Parameters Start Long Indicates the first frame to use in the resampling process, or use -1 to use the starting frame of the currently-selected portion of the sequence.
Number Long Indicates the number of frames to use for resampling,or -1 To use the number of frames in the currently-selected portion of the sequence.
SliceType Integer The type of resampling, must be one of the following:
SEQSLICE_XZ: This resampling creates an X/Z axis view of the original sequence, with the new sequence having one frame for each pixel along the Y axis.
SEQSLICE_YZ:This resampling creates a Y/Z axis view of the original sequence, with the new sequence having one frame for each pixel along the Z axis.
SEQSLICE_REVERSEZ: This resampling creates a new sequence with the same X/Y dimensions as the original sequence, but with the frame order reversed
Resample Double A scaling factor for resampling the Z axis. See comments.
Comments The Z axis is often sampled at a much lower resolution than the X/Y sampling (the pixel size along these dimensions). An X/Z or Y/Z view will end up quite thin in relation to the original sequence size, and pixels in the view will not be square. A scaling factor > 1 can be provided to resize the new view along the Z axis.
IpSeqRunningAvg Syntax IpSeqRunningAvg (lStart, lNumber, lAvgWindow, bDropFrames)
Description This function creates a new sequence where each frame represents an average of a specified number of frames from the original sequence.
Parameters lStart Long Indicates the first frame to average.
lNumber Long Indicates the number of frames to analyze, -1 indicates the entire sequence.
lAvgWindow Long Indicates the number of frames to use to calculate the running average. Must be a number greater than 1. -1 opens the sequence image selection dialog.

IpSeqSave
Page 2-638
bDropFrames Integer Indicates whether or not to include partial averages at the beginning and end of the new sequence.
Return Value This function returns the workspace Document ID if successful, -1 if failed.
Example ret = IpSeqRunningAvg (0,-1, 3, 0) This example calculates the running average of the entire sequence, averaged over 3 frames. Since the partial frames are dropped (2 at the beginning), the resulting sequence will be 2 frames shorter than the original sequence.
ret = IpSeqRunningAvg (2, 10, 2, 1) This example uses only frames 2 through 12 and retains the partial frames so the resulting sequence will be 10 frames long.
Comments Note that IpSeq and IpWs Auto-Pro functions number frames in a sequence starting with 0 (zero), but the workspace title bar and the sequencer tool bar start frame numbers with frame 1.
See Also IpSeqDifference, IpSeqAverage
IpSeqSave Syntax IpSeqSave(lpszFileName, lpszLibrary, lStartNumber, lNumFrames)
Description This function saves an image sequence to a file.
Parameters lpszFileName String Indicates the name of the file holding the image sequence to be saved
lpszLibrary String Indicates the format of the image sequence. Must be a SEQ, TIF, or IPW file.
lStartNumber LONG An integer specifying the first frame in the sequence that will be saved, i.e. 0, 1, 2, etc.
lNumFrames LONG An integer specifying the number of frames to save, -1 indicates the entire sequence.
Example ret = IpSeqSave("TestSequence.seq", "SEQ", 0,4)
This statement saves the current sequence as TestSequence.seq, starting from frame 0 and saving 4 frames.
Comments Note that IpSeq and IpWs Auto-Pro functions number frames in a sequence starting with 0 (zero), but the workspace title bar and the sequencer tool bar start frame numbers with frame 1.
See Also IpSeqOpen, IpSeqPlay, IpSeqMerge

IpSeqSet
Page 2-639
IpSeqSet Syntax IpSeqSet (sAttr, lNewAttr)
Description This function determines the sequence attribute to set.
Parameters sAttr Integer Determines the sequence attribute to set. Must be one of the following: SEQ_ACTIVEFRAME = current active frame SEQ_FRAMETIME = current delay time SEQ_SKIP = number of frames to skip SEQ_START = current starting frame SEQ_END = current ending frame SEQ_PLAYTYPE = current play type SEQ_PLAYUPDATE = determines if the current controls are updated where 0 = no update, 1 = update SEQ_APPLY = = determines if operations will apply to the active portion of the sequence, where 0 = apply to current frame, 1 = apply to active portion.
When the attribute is SEQ_PLAYTYPE, the attribute should be one of the following:
SEQ_PLAYWRAP = wraps sequence around at end
SEQ_PLAYTOEND = plays the sequence to the end
SEQ_PLAYAUTOREV = autoreverses the sequence.
SEQ_ADJUST_RATE = determines whether to automatically adjust the Sequence play rate, where 0 = do not adjust, 1 = adjust rate.
SEQ_EDIT_PROMPT = Determines whether to
display prompts while editing sequences (e.g. Cut/Copy/Paste Frames)
SEQ_AVG_PROMPT - Determines whether to display prompting dialog when running the Sequence Running Average operation. If the dialog is not displayed, the operation will use the last-used settings. See also SEQ_AVG_FRAMES and SEQ_AVG_DROP_INCOMPLETE.
SEQ_AVG_FRAMES = Determines the default value for the number of frames to average for the Running Average operation.
SEQ_AVG_DROP_INCOMPLETE = Determines whether to drop the incomplete frames at the start of the sequence.

IpSeqSet
Page 2-640
SEQ_DIFF_PROMPT = Determines whether to display prompting dialog when running the Sequence Difference operation. If the dialog (illustrated in Interface/Functionality) is not displayed, the operation will use the last-used settings. See also SEQ_DIFF_TYPE.
SEQ_DIFF_TYPE = Determines whether/how to calculate the difference. The value can be one of the SEQDIFF constants described above for use with IpSeqDifferenceEx.
SEQ_CURRENT_FRAMETIME = sets the duration that each frame is displayed when playing a sequence. This time may be different from the nominal frame rate if the SEQ_ADJUST_RATE (auto-adjust) is active.
LNewAttr Long The attribute’s new setting.
Example This statement will set the “play to end” option: ret = IpSeqSet(SEQ_PLAYTYPE, SEQ_PLAYTOEND)
This statement will turn off the “Update Frame Slider” option” ret = IpSeqSet(SEQ_PLAYUPDATE, 0)
This statement will turn on the “Update Frame Slider” option” ret = IpSeqSet(SEQ_PLAYUPDATE, 1)
Comments Note that IpSeq and IpWs Auto-Pro functions number frames in a sequence starting with 0 (zero), but the workspace title bar and the sequencer tool bar start frame numbers with frame 1. SEQ_START and SEQ_END are used to set the active portion of the sequence. When SEQ_APPLY is TRUE, the active portion determines the portion of the sequence that will be played. Many Image-Pro operations such as conversion, filtering, and image operations will alos respect the active portion of the sequence.

IpSeqShow
Page 2-641
IpSeqShow Syntax IpSeqShow(bShow)
Description This function displays or hides the sequence tool bar.
Parameters bShow Integer A value of 0 or 1 specifying whether the toolbar is to be displayed or suppressed. 0 = hide the toolbar 1 = show the toolbar
Example ret = IpSeqShow(1)
This statement opens the Sequencer tool bar.
ret = IpSeqShow(0)
This statement closes the Sequencer tool bar.
IpSeqGCreate Syntax IpSeqGCreate()
Description This function creates a sequence gallery for the active image.
Return Value Document ID of the new sequence gallery if successful, a negative error code if failed
Comments The sequence galleries themselves are Image-Pro workspaces, and can be manipulated with the normal set of IpDoc and IpWs Auto-Pro functions.
IpSeqGGet Syntax IpSeqGGet(Attribute, DocID, Value)
Description This function gets a sequence gallery attribute.
Parameters Attribute Integer Attribute indicates the sequence gallery attribute to get, from the following:
SEQG_TRACKENABLE Indicates whether the gallery will track changes in the sequence
SEQG_ISTRACKED Indicates whether the specified workspace is a sequence and is tracked by a sequence gallery
SEQG_ISGALLERY Indicates whether the specified workspace is a sequence gallery SEQG_DISPLAY_TINT Gets the tint ot be displayed using the Display Tint option.

IpSeqGSet
Page 2-642
DocID Integer DocId is ignored for SEQG_TRACKENABLE. For SEQG_ISTRACKED and S EQG_ISGALLERY,
DocId indicates the document ID of the workspace to inquire about. DOCSEL_ACTIVE can be used to inquire about the active workspace.
Value Integer Value is an integer variable in your script to receive the attribute’s value.
Return Value 0 if successful, a negative error code if failed
See Also IpSeqGUpdate
IpSeqGSet Syntax IpSeqGSet(Attribute, Value)
Description This function sets a sequence gallery attribute.
Parameters Attribute Integer Attribute indicates the sequence gallery attribute to set, from the following: SEQG_TRACKENABLE Indicates whether the gallery will track changes in the sequence.
SEQG_DISPLAY_TINT Sets the tint ot be displayed using the Display Tint option.
Value Integer Value is the value to set the attribute to, where 1 indicates to track sequences changes, and 0 indicates that the function should wait for a call to IpSeqGUpdate.
Return Value 0 if successful, a negative error code if failed
See Also IpSeqGUpdate
IpSeqGShow Syntax IpSeqGShow(Show)
Description This function displays or hides the sequence gallery dialog.
Parameters Show Integer A value of 0 or 1 specifying whether the sequence gallery dialog is to be displayed or hidden. 0 = hide the dialog 1 = show the dialog
Example ret = IpSeqGShow(1)
This statement opens the Sequence Gallery dialog
ret = IpSeqGShow(0)
This statement closes the Sequence Gallery dialog.
Return Value 0 if successful, a negative error code if failed

IpSeqGUpdate
Page 2-643
IpSeqGUpdate Syntax IpSeqGUpdate(DocId)
Description This function updates the sequence gallery to reflect any changes to the sequence itself.
Parameters DocId Integer Indicates the document ID of the sequence gallery to update.
Return Value 0 if successful, a negative error code if failed
IpSmAdd Syntax IpSmAdd (SetId, DocId,DimCount, Dim Type, PosCount, Position)
Description This function adds all the frames of the specified image to an existing set.
Parameters SetId Integer Indicates the set where the frames will be added.
DocId Integer Indicates the document to add to the set.
DimCount Integer Indicates the number of dimensions in the DimType array. DimCount may be 0 in a single-frame image. See Comments, below.
DimType Integer Array that indicates the dimensions that the image contains. New dimensions will be added to the set if necessary. See Comments, below.
PosCount Integer Indicates the number of set positions in the Position array.See Comments, below
Position Long Array that indicates the position along each dimension where the image should be added.See Comments, below
Return Value 0 if successful, a negative error code if failed.
Comments This function will respect Apply to Sequence, so the portion of the image that is added will depend on the Apply to Sequence status and either the active frame of the sequence (if Apply to Sequence is not selected) or the active portion of the sequence. The IpSMAddFrame function can be used to guarantee that a given frame is added to the set.

IpSmAdd
Page 2-644
Comments For multi-frame images, DimType must be used and DimCount must be greater than or equal to one. DimType is used to describe the matrix structure of the multi-frame image. For each dimension contained in the image, there should be two elements in the DimType array. The first is the dimension type and the second is the number of elements along that direction. The Dimension ID should be one of the following:
SMDIM_C The image contains the specified number of channels SMDIM_G The image contains the specified number sampling positions (of wells or slides in a Stage-Pro sample pattern, or user-defined positions) SMDIM_The image contains the specified number of time points SMDIM_XY The image contains the specified number of X/Y scan area positions SMDIM_Z The image contains the specified number of Z stage positions
If all of the frames will be added to a single dimension, the DimType array can specify the type from this list and a length of SMDIM_ALL (–1), but if more than one dimension is specified, the lengths along each dimension must be specified. For example, an X/Y scan area or Z stack can have one set of DimType elements indicating the XY or Z dimension ID, and the total length of the sequence. For a two-dimensional (or higher) sequence, the first set of elements indicates the dimension that is traversed first, the second the next, etc. So for a sequence that captures a Z-stack of 5 frames at each of 4 X/Y scan positions (in that order), the DimCount would be 2, and the DimType array would have four elements: SMDIM_Z, 5, SMDIM_XY, 4.
The PosCount and Position parameters are used to indicate the insertion position of the image’s frames. PosCount should be equal to the number of dimensions in the set after insertion of the frames. For each position that will be specified, there should be two elements in the Position array. The first is the dimension ID and the second is the insertion position along that dimension, which may be –1 if the frames should be inserted at the end. For the example above, if the image’s frames should be inserted at the 2nd time point for the 3rd channel, the PosCount would be 4, and the Position array would have 6 elements: SM_DIM_Z, 0, SMDIM_XY, 0, SMDIM_T, 1, SMDIM_C, 2. It will be an error to insert at a position where the previous elements are missing, e.g. in the previous example, the 1st time point and first two channels must already have been added. Note that a position of SMPOS_END (–1) should only be used for dimensions where the image will add frames at the end of the dimension – all other dimensional positions should be specified. It is also possible to specify the next position along a dimension.
Note: A given image can only be a member of a single set. This function will return an error if the specified image is part of a set and you then try to add it to another set.
See Also IpSmAddFrame, IpSmNew
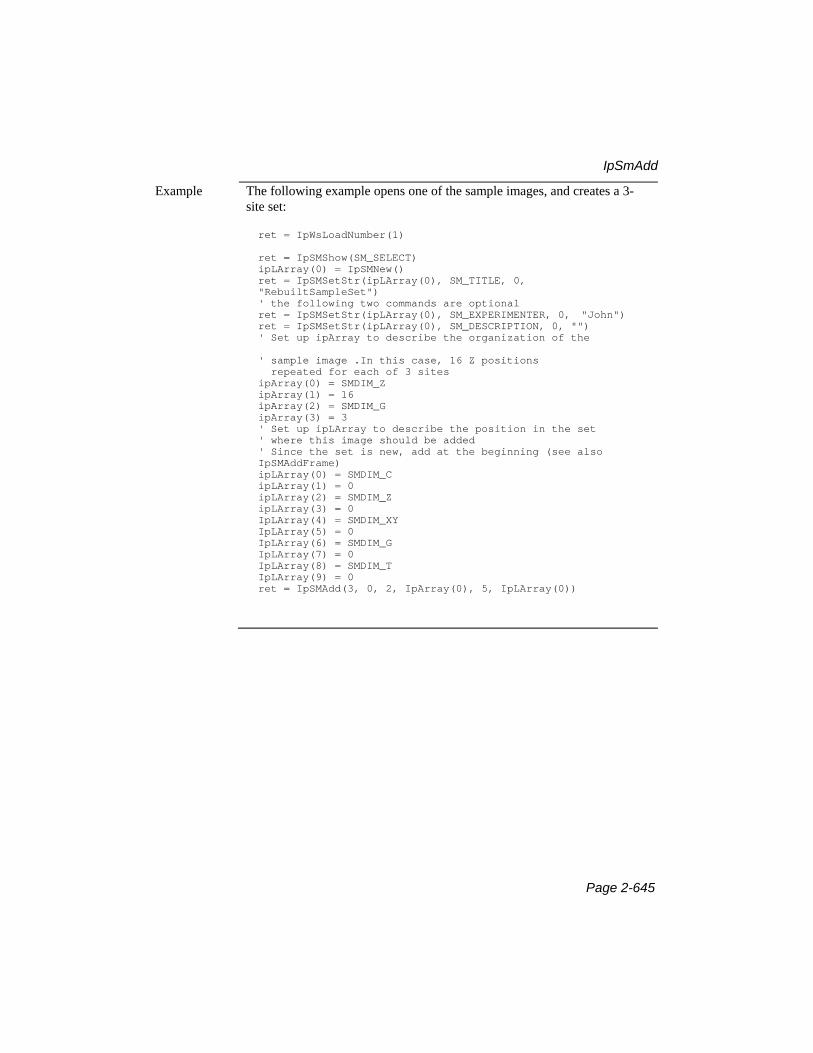
IpSmAdd
Page 2-645
Example The following example opens one of the sample images, and creates a 3-site set: ret = IpWsLoadNumber(1) ret = IpSMShow(SM_SELECT) ipLArray(0) = IpSMNew() ret = IpSMSetStr(ipLArray(0), SM_TITLE, 0, "RebuiltSampleSet") ' the following two commands are optional ret = IpSMSetStr(ipLArray(0), SM_EXPERIMENTER, 0, "John") ret = IpSMSetStr(ipLArray(0), SM_DESCRIPTION, 0, "") ' Set up ipArray to describe the organization of the ' sample image .In this case, 16 Z positions repeated for each of 3 sites ipArray(0) = SMDIM_Z ipArray(1) = 16 ipArray(2) = SMDIM_G ipArray(3) = 3 ' Set up ipLArray to describe the position in the set ' where this image should be added ' Since the set is new, add at the beginning (see also IpSMAddFrame) ipLArray(0) = SMDIM_C ipLArray(1) = 0 ipLArray(2) = SMDIM_Z ipLArray(3) = 0 IpLArray(4) = SMDIM_XY IpLArray(5) = 0 IpLArray(6) = SMDIM_G IpLArray(7) = 0 IpLArray(8) = SMDIM_T IpLArray(9) = 0 ret = IpSMAdd(3, 0, 2, IpArray(0), 5, IpLArray(0))

IpSmAddFrame
Page 2-646
IpSmAddFrame Syntax IpSmAddFrame (SetId, DocId, Frame, PosCount, Position)
Description This function adds a frame from the specified image to an existing set.
Parameters SetId Integer Indicates the set where the frames will be added.
DocId Integer Indicates the document to add to the set.
Frame Long Indicates the frame of the document that should be added to the set.
PosCount Integer Indicates the number of set positions in the Position array.
Position Long Array that indicates the position along each dimension where the image should be added.See Comments, below
Return Value 0 if successful, a negative error code if failed.
Comments The PosCount and Position parameters are used to indicate the insertion position of the frame. PosCount should be equal to the number of dimensions in the set after insertion of the frames. For each position that will be specified, there should be two elements in the Position array. The first is the dimension ID and the second is the insertion position along that dimension, which may be –1 if the frames should be inserted at the end.
For example, to add the frame as the 2nd time point for the third channel, the PosCount would be Z and the Position array would have 4 elements:
SmDim_T, 1, SmDim_C, 2.
It will be an error to insert at a position where the previous elements are missing, e.g. in the previous example, the 1st time point and first two channels must already have been added. Note that a position of SMPOS_END (–1) should only be used for dimensions where the image will add frames at the end of the dimension – all other dimensional positions should be specified. It is also possible to specify the next position along a dimension.
Note: A given image can only be a member of a single set. This function will return an error if the specified image is part of a set and you then try to add it to another set.
See Also IpSmAdd, IpSmNew

IpSmAddFrame
Page 2-647
Example Example: This example opens one of the sample images, and adds the contents of the image a frame at a time to the existing set. This example will run best after running the example for IpSMAdd. Dim lCurrSet As Long Dim lZ As Integer Dim lSite As Integer Dim lDocID As Long Dim lFrame As Long ' Get the set ID for the current set ret = IpSMGet(-1, SMGET_ACTIVE_SET, 0, 0, lCurrSet) If (lCurrSet < 0) Then MsgBox("No active set") Exit Sub End If ' load the second sample image lDocID= IpWsLoad ("C:\Ipwin71\Images\PollenRed.seq","seq") ' We know that the image is organized as 16 Z ' positions repeated for each of 3 sites, so add the ' frames accordingly ' Initialize the position array ' We are only going to specify the 2 dimensions whose ' locations are changing ' and the Channel dimension, because we are adding a ' new channel ipLArray(0) = SMDIM_Z ipLArray(1) = 0 ' this is where the Z location should go ipLArray(2) = SMDIM_G ipLArray(3) = 0 ' and this is where the site location should go ipLArray(4) = SMDIM_C ipLArray(5) = 1 ' adding channel 1 ' Start with frame 0 lFrame = 0 ' loop for the number of sites For lSite = 0 To 2 ipLArray(3) = lSite ' loop for the number of Z positions For lZ = 0 To 15 ipLArray(1) = lZ ret = IpSMAddFrame(lCurrSet, lDocID, lFrame, 3, ipLArray(0)) Next lZ lFrame = lFrame + 1 ' move to next image frame Next lSite

IpSmBackgroundCorr
Page 2-648
IpSmBackgroundCorr Syntax IpSmBackgroundCorr(DocId, Type, ActivePortion, NewImage)
Description This function applies background correction to the seleted image in your set.
Parameters DocId Integer Specifies the document to use as the background image.
Type Integer Indicates the type of correction to apply. Must be one of the following: SM_SUBTRACTION Background subtraction SM_FLATFIELD Background correction through division
ActivePortion Integer ActivePortion can be used to override the Z stack determination. If ActivePortion is non-zero, the correction will be applied to the active portion of the image. If ActivePortion is zero and the image is a member oft a set, this correction would be applied to the Z stack where the actual frame is a member.
NewImage Integer NewImage determines whether to create a new document with the corrected results (if NewImage is non-zero) or to apply the correction to the existing image.
Return Value The document ID of the corrected image if successful, a negative error code if failed.
See Also IpSmDespeckle, IpSmNormalize
IpSmBackgroundCorrShow Syntax IpSmBackgroundCorrShow(Show)
Description This function shows or hides the background correction dialog.
Parameters Show Integer SM_SHOW Show the dialog SM_HIDE Hide the dialog
Return Value The document ID of the corrected image if successful, a negative error code if failed.
Comments Any value other than SM_HIDE will show the dialog.

IpSmDelete
Page 2-649
IpSmDelete Syntax IpSmDelete(SetID)
Description This function deletes the specified set.
Parameters SetId Integer Specifies the set that will be deleted.
Return Value 0 if successful, a negative error code if failed.
See Also IpSmRemove
IpSmDespeckle Syntax IpSmDespeckle(Size, Sensitivity, ActivePortion, NewImage)
Description This function applies the despeckling filter to the seleted image in your set.
Parameters Size Integer Specifies the size of the filter kernel to use and must be 3, 5 , or 7 (3x3, 5x5, or 7x7)
Sensitivity Integer Determines how different the intensity of the center pixel in the filtering region must be before it is replaced by the region’s median value.
ActivePortion Integer ActivePortion can be used to override the Z stack determination. If ActivePortion is non-zero, the correction will be applied to the active portion of the image. If ActivePortion is zero and the image is a member of a set, this correction would be applied to the Z stack where the actual frame is a member.
NewImage Integer NewImage determines whether to create a new document with the corrected results (if NewImage is non-zero) or to apply the correction to the existing image.
Return Value The document ID of the despeckled document, if successful, a negative error code if failed.
See Also IpSmBackgroundCorr, IpSmNormalize

IpSmDespeckleShow
Page 2-650
IpSmDespeckleShow Syntax IpSmDespeckleShow(Show)
Description This function shows or hides the despeckle dialog.
Parameters Show Integer SM_SHOW Show the dialog SM_HIDE Hide the dialog
Return Value 0 if successful, a negative error code if failed.
Comments Any value other than SM_HIDE will show the dialog.
IpSmExtract Syntax IpSmExtract(Dimension, Options)
Description This function extracts a new workspace consisting of the frames along a specific dimension.
Parameters Dimension Integer Indicates the dimension along which to “play” the set. Dimension may be a dimension index or one of the dimension types used by IpSmAdd.
Options Integer Allows you to set the Z options for extraction.
Comments The frames are extracted from the current location (see IpSmSet).
Return Value The document ID of the extracted image if successful, a negative error code if failed.
See Also IpSmSet
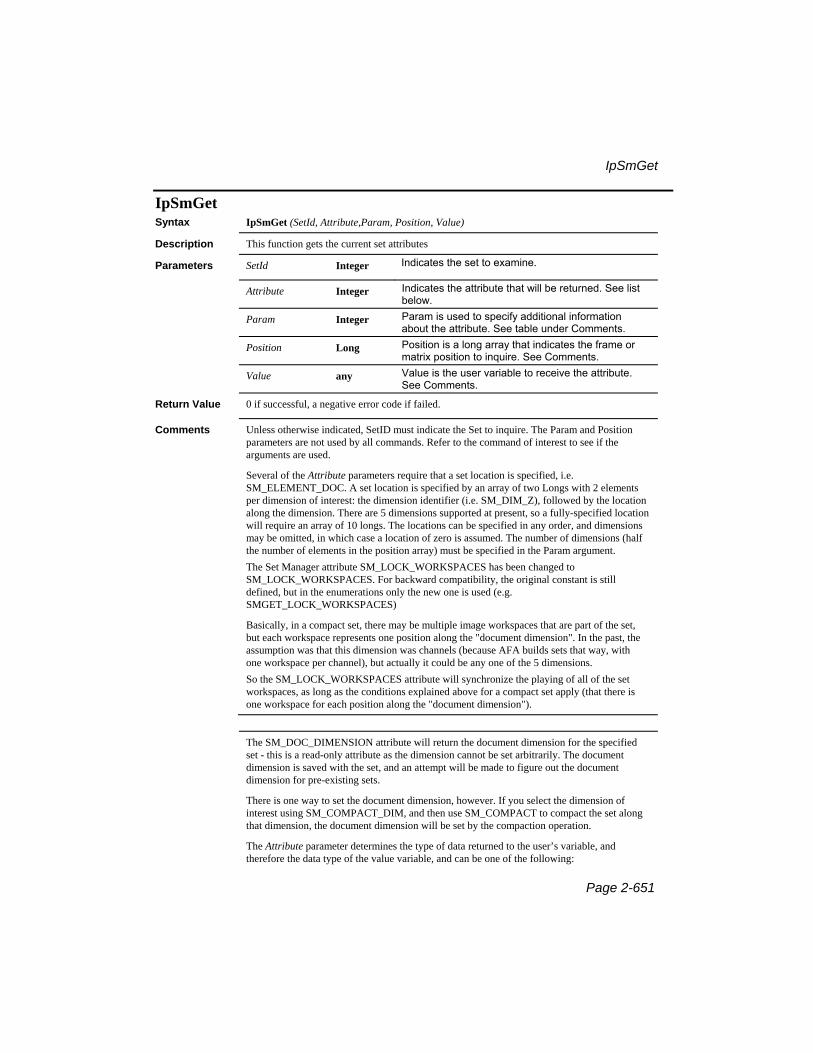
IpSmGet
Page 2-651
IpSmGet Syntax IpSmGet (SetId, Attribute,Param, Position, Value)
Description This function gets the current set attributes
Parameters SetId Integer Indicates the set to examine.
Attribute Integer Indicates the attribute that will be returned. See list below.
Param Integer Param is used to specify additional information about the attribute. See table under Comments.
Position Long Position is a long array that indicates the frame or matrix position to inquire. See Comments.
Value any Value is the user variable to receive the attribute. See Comments.
Return Value 0 if successful, a negative error code if failed.
Comments Unless otherwise indicated, SetID must indicate the Set to inquire. The Param and Position parameters are not used by all commands. Refer to the command of interest to see if the arguments are used.
Several of the Attribute parameters require that a set location is specified, i.e. SM_ELEMENT_DOC. A set location is specified by an array of two Longs with 2 elements per dimension of interest: the dimension identifier (i.e. SM_DIM_Z), followed by the location along the dimension. There are 5 dimensions supported at present, so a fully-specified location will require an array of 10 longs. The locations can be specified in any order, and dimensions may be omitted, in which case a location of zero is assumed. The number of dimensions (half the number of elements in the position array) must be specified in the Param argument. The Set Manager attribute SM_LOCK_WORKSPACES has been changed to SM_LOCK_WORKSPACES. For backward compatibility, the original constant is still defined, but in the enumerations only the new one is used (e.g. SMGET_LOCK_WORKSPACES)
Basically, in a compact set, there may be multiple image workspaces that are part of the set, but each workspace represents one position along the "document dimension". In the past, the assumption was that this dimension was channels (because AFA builds sets that way, with one workspace per channel), but actually it could be any one of the 5 dimensions. So the SM_LOCK_WORKSPACES attribute will synchronize the playing of all of the set workspaces, as long as the conditions explained above for a compact set apply (that there is one workspace for each position along the "document dimension").
The SM_DOC_DIMENSION attribute will return the document dimension for the specified
set - this is a read-only attribute as the dimension cannot be set arbitrarily. The document dimension is saved with the set, and an attempt will be made to figure out the document dimension for pre-existing sets.
There is one way to set the document dimension, however. If you select the dimension of interest using SM_COMPACT_DIM, and then use SM_COMPACT to compact the set along that dimension, the document dimension will be set by the compaction operation.
The Attribute parameter determines the type of data returned to the user’s variable, and therefore the data type of the value variable, and can be one of the following:

IpSmGet
Page 2-652
Attribute Type Descrption
SM_NUMDIMS Long Get the total number of dimensions in the set. Param and Position arrays are not used.
SM_DIMTYPE Long Get the dimension type (see IpSMAdd). Param and Position arrays are not used.
SM_DIMLENGTH Long Get the length of the dimension at the location specified by the Position array, as described above. Indicate the dimension of interest by specifing SM _DIMAOI for the location along this dimension.
SM_ELEMENT_DOC Long Get the document ID of the element specified by the location in the Position array, as described above.
SM_ELEMENT_FRAME Long Get the frame number of the element specified by the location in the Position array.
SM_AUTO_CREATE Controls whether to create new sets from N-
D images.
SM_AUTO_ADD_TO_SET Controls whether to add images to exisitng sets. Can be ond of the following; SM_AA_NONE = do not add images to exiting sets SM_AA_AS_CHANNEL = add images as new channel SM_AA_PROMPT = prompt for dimension to add
SM_ADJUST_RATE Controls whether to automatically adjust the Set play rate
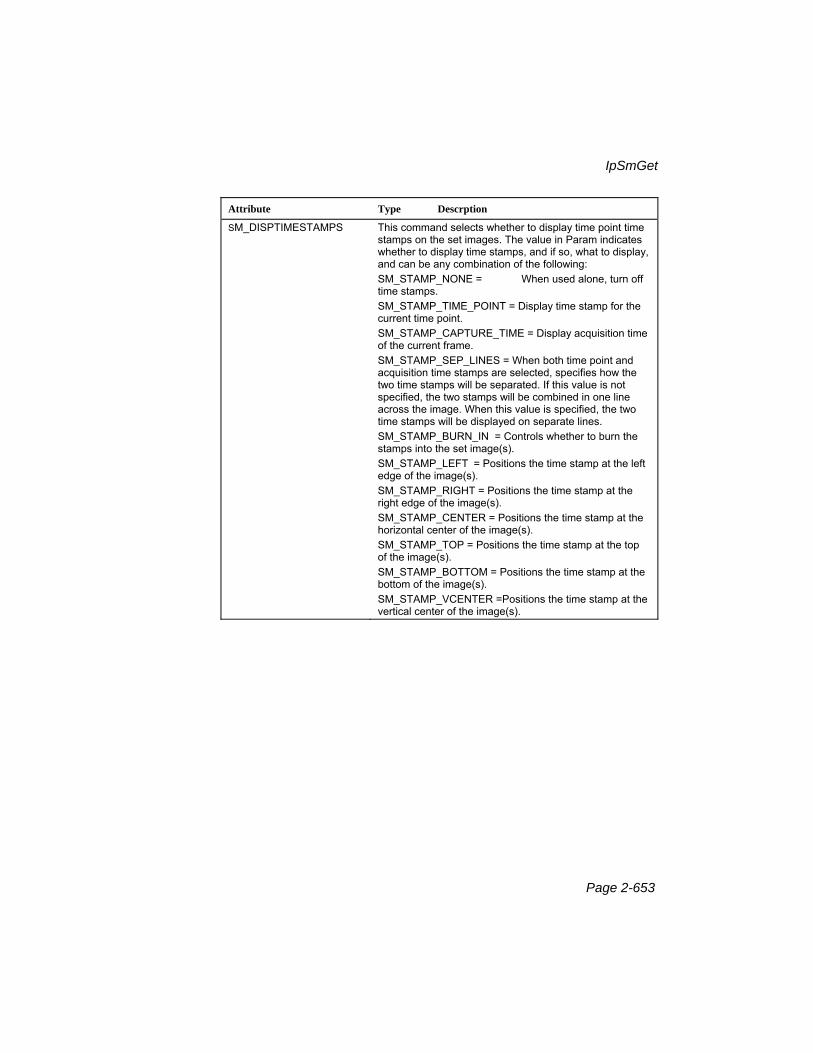
IpSmGet
Page 2-653
Attribute Type Descrption
SM_DISPTIMESTAMPS This command selects whether to display time point time stamps on the set images. The value in Param indicates whether to display time stamps, and if so, what to display, and can be any combination of the following: SM_STAMP_NONE = When used alone, turn off time stamps. SM_STAMP_TIME_POINT = Display time stamp for the current time point. SM_STAMP_CAPTURE_TIME = Display acquisition time of the current frame. SM_STAMP_SEP_LINES = When both time point and acquisition time stamps are selected, specifies how the two time stamps will be separated. If this value is not specified, the two stamps will be combined in one line across the image. When this value is specified, the two time stamps will be displayed on separate lines. SM_STAMP_BURN_IN = Controls whether to burn the stamps into the set image(s). SM_STAMP_LEFT = Positions the time stamp at the left edge of the image(s). SM_STAMP_RIGHT = Positions the time stamp at the right edge of the image(s). SM_STAMP_CENTER = Positions the time stamp at the horizontal center of the image(s). SM_STAMP_TOP = Positions the time stamp at the top of the image(s). SM_STAMP_BOTTOM = Positions the time stamp at the bottom of the image(s). SM_STAMP_VCENTER =Positions the time stamp at the vertical center of the image(s).

IpSmGet
Page 2-654
Attribute Type Descrption
SM_TIMESTAMPCOLOR Displays the time stamp color. Should be one of the following: DISPCOLOR_RED DISPCOLOR_GREEN DISPCOLOR_BLUE DISPCOLOR_YELLOW DISPCOLOR_CYAN DISPCOLOR_MAGENTA DISPCOLOR_WHITE DISPCOLOR_BLACK
SM_IS_SET_MEMBER Long SetID can be the set to search, or can be –1 to find out if the specified frame of the specified image document is a part of any active set. Param specifies a document ID of the image document. Position(0) specifies the frame of interest, which can be –1 to check whether any frame of the image is a set member. The Set ID of the set that contains the specified frame of the specified document is returned in the Value variable.
SM_GET_POSITION Array Param specifies a document ID and Position(0) the frame of interest. Value should be an array of 5 longs that will receive the location of the specified frame in its set. The Value will be arranged as follows, where any dimension’s position may be –1 if the set does not contain the dimension:
Value(0) Channel position Value(1) Position in Z stack Value(2) Position along X/Y scan area Value(3) Sampling position Value(4) Time point
SM_IS_SET_COMPLETE Long The Value variable will be set to indicate whether the set is complete (well-formed, with all dimensions filled equally). Param and Position are not used.
SM_DIMMAXLENGTH Long Get the maximum length of the dimension which is specified as described in SM_DIMLENGTH. If the set is complete (well-formed), this will be the same as the value returned by SM_DIMLENGTH. If the set is incomplete, then the maximum length found along the specified dimension will be returned.

IpSmGet
Page 2-655
Attribute Type Descrption
SM_NUMDOCUMENTS Long Get the number of documents in the set. Param and Position are not used.
SM_DOCUMENTID Long Get the document ID of the specified document in the set. Param should indicate which document to inquire, from 0 (zero) to the number of documents – 1. Position is not used.
SM_DIMSTART Long Get the start position of the specified dimension. Param should indicate the dimension to inquire, and Position is not used.
SM_DIMEND Long Get the end position of the specified dimension. Param should indicate the dimension to inquire, and Position is not used.
SM_ACTIVEDIM Long Get the active dimension. Param and Position are not used.
SM_IS_SET_LOADED Long The Value variable will be set to indicate whether all of the images of the set are currently loaded. Param and Position are not used. See also the IpSMSet command SM_RELOAD
SM_CURRENT_LOCATION Array The Value variable should be an array of 5 longs that will get the current location in the set. This is the location from which the set can be played.
SM_FRAME_RATE Long The Value variable will be set to indicate the specified set’s current frame rate. Param and Position are not used
SM_WRAP_TYPE Long The Value variable will be set to indicate the specified set’s wrap type (see IpSMSet for details). Param and Position are not used
SM_EXTRACT_Z_TYPE Long The Value variable will be set to indicate the type of Z dimension compression that will be applied when another dimension is extracted (see IpSMSet for details). Param and Position are not used.
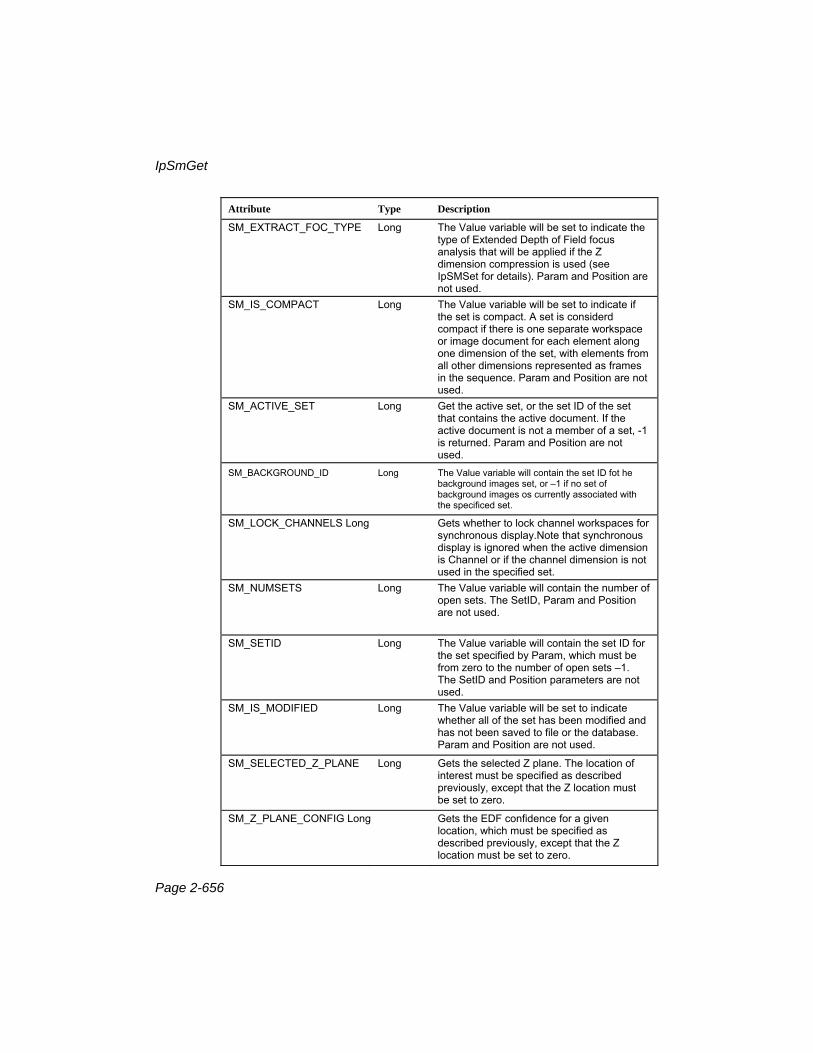
IpSmGet
Page 2-656
Attribute Type Description
SM_EXTRACT_FOC_TYPE Long The Value variable will be set to indicate the type of Extended Depth of Field focus analysis that will be applied if the Z dimension compression is used (see IpSMSet for details). Param and Position are not used.
SM_IS_COMPACT Long The Value variable will be set to indicate if the set is compact. A set is considerd compact if there is one separate workspace or image document for each element along one dimension of the set, with elements from all other dimensions represented as frames in the sequence. Param and Position are not used.
SM_ACTIVE_SET Long Get the active set, or the set ID of the set that contains the active document. If the active document is not a member of a set, -1 is returned. Param and Position are not used.
SM_BACKGROUND_ID Long The Value variable will contain the set ID fot he background images set, or –1 if no set of background images os currently associated with the specificed set.
SM_LOCK_CHANNELS Long Gets whether to lock channel workspaces for synchronous display.Note that synchronous display is ignored when the active dimension is Channel or if the channel dimension is not used in the specified set.
SM_NUMSETS Long The Value variable will contain the number of open sets. The SetID, Param and Position are not used.
SM_SETID Long The Value variable will contain the set ID for the set specified by Param, which must be from zero to the number of open sets –1. The SetID and Position parameters are not used.
SM_IS_MODIFIED Long The Value variable will be set to indicate whether all of the set has been modified and has not been saved to file or the database. Param and Position are not used.
SM_SELECTED_Z_PLANE Long Gets the selected Z plane. The location of interest must be specified as described previously, except that the Z location must be set to zero.
SM_Z_PLANE_CONFIG Long Gets the EDF confidence for a given location, which must be specified as described previously, except that the Z location must be set to zero.
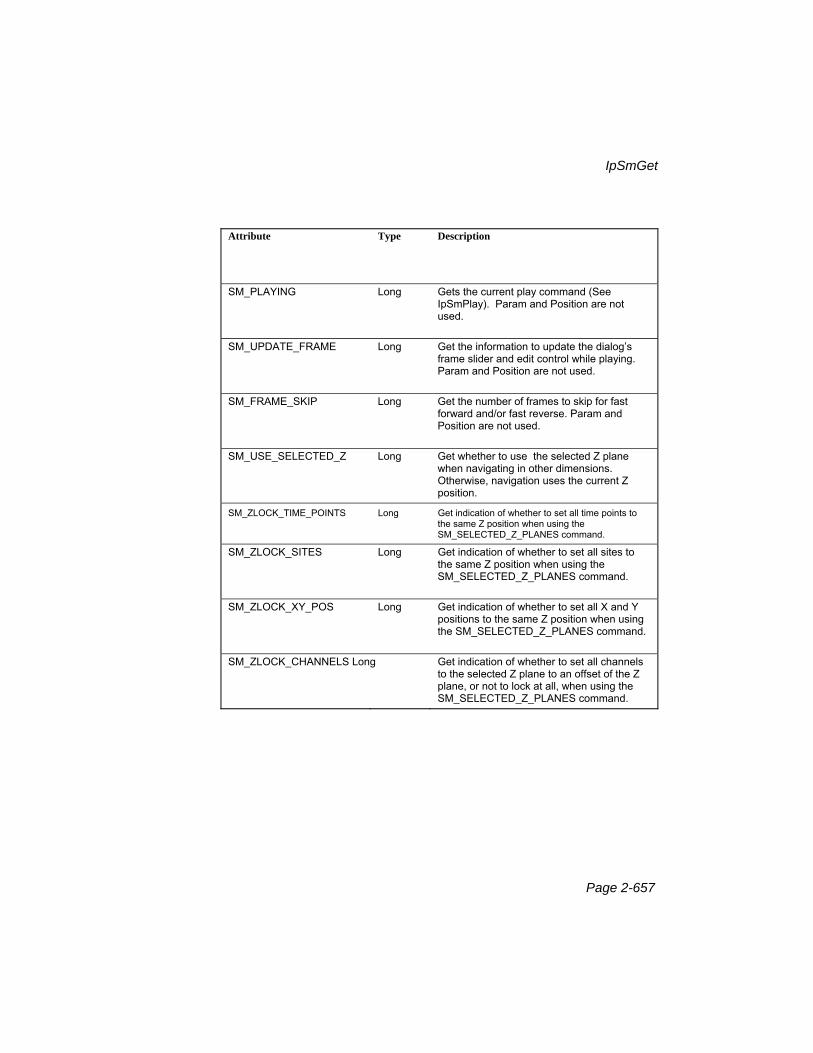
IpSmGet
Page 2-657
Attribute Type Description
SM_PLAYING Long Gets the current play command (See IpSmPlay). Param and Position are not used.
SM_UPDATE_FRAME Long Get the information to update the dialog’s frame slider and edit control while playing. Param and Position are not used.
SM_FRAME_SKIP Long Get the number of frames to skip for fast forward and/or fast reverse. Param and Position are not used.
SM_USE_SELECTED_Z Long Get whether to use the selected Z plane when navigating in other dimensions. Otherwise, navigation uses the current Z position.
SM_ZLOCK_TIME_POINTS Long Get indication of whether to set all time points to the same Z position when using the SM_SELECTED_Z_PLANES command.
SM_ZLOCK_SITES Long Get indication of whether to set all sites to the same Z position when using the SM_SELECTED_Z_PLANES command.
SM_ZLOCK_XY_POS Long Get indication of whether to set all X and Y positions to the same Z position when using the SM_SELECTED_Z_PLANES command.
SM_ZLOCK_CHANNELS Long Get indication of whether to set all channels to the selected Z plane to an offset of the Z plane, or not to lock at all, when using the SM_SELECTED_Z_PLANES command.
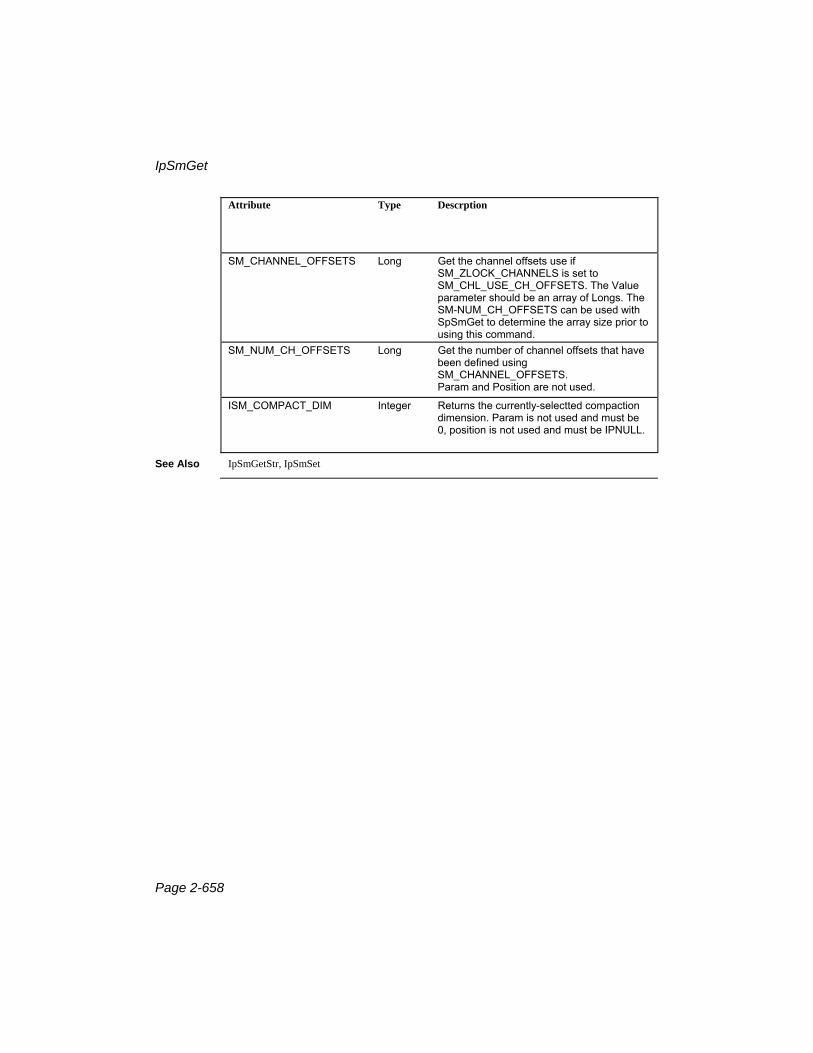
IpSmGet
Page 2-658
Attribute Type Descrption
SM_CHANNEL_OFFSETS Long Get the channel offsets use if SM_ZLOCK_CHANNELS is set to SM_CHL_USE_CH_OFFSETS. The Value parameter should be an array of Longs. The SM-NUM_CH_OFFSETS can be used with SpSmGet to determine the array size prior to using this command.
SM_NUM_CH_OFFSETS Long Get the number of channel offsets that have been defined using SM_CHANNEL_OFFSETS. Param and Position are not used.
ISM_COMPACT_DIM Integer Returns the currently-selectted compaction dimension. Param is not used and must be 0, position is not used and must be IPNULL.
See Also IpSmGetStr, IpSmSet

IpSmGetStr
Page 2-659
IpSmGetStr Syntax IpSmGetStr(SetId, Attribute, Param, Position, Value)
Description This function gets the current set string information.
Parameters SetId Integer Indicates the set to examine.
Attribute Integer Indicates the attribure that will be returned. See list below.
Param Integer Not used
Position Long For SM_CHANNELNAME, Position is a long array that indicates the channel name to inquire. See Comments.
Value String Value is the user-defined fixed-length string to receive the attribute. See Comments.
Return Value 0 or 1 if successful, a negative error code if failed.
Comments The Attribute parameter determines the type of data returned to the user’s variable, and can be one of the following:
Attribute Descrption
SM_SETNAME Get the set/file name. The set name will be the name of the set file if the set has been saved to or load from disk. Otherwise the set title is used. Param and Position are not used.
SM_TITLE Get the set title. Param and Position are not used. SM_EXPERIMENTER Get the set owner’s name. Param and Position
are not used. SM_DESCRIPTION Get the set description. Param and Position are
not used. SM_CREATIONDATE Get the date the set was created, in the format
YYYY/MM DDH:MM:S SM_MODIFIEDDATE Get the date that the set was last changed, in the
format YYYY/MM/DD/HH:MM:SS . Any modification to the set changes this date automatically. Param and Position are not used.
SM_CHANNELNAME Get the name of the specificed channel. Position should be an array of one long that indicates the channel of interest.

IpSmGetStr
Page 2-660
Attribute Descrption
SM_DOCUMENT_FILE Get the file name fo the specified document. Position should be an array of one long that indicates the document of interest (see SM_NUMDOCUMENTS to get the number of documents in the set).
SM_TIMESTAMP Set the time stamp of the specified time point. The Position parameter should be an array of one long that indicates the time point of interest.
SM_BACKGROUND_SET Get the file name of the background images set. If the specified set does not have a set of background images associated with it, or if the background images set was not save, the string will be empty. Param and Position are not used.
SM_CHANNEL_BY_NAME For this command, the name of the channel is provided in the string, and the return code indicates the channel index (if the specified name matches an existing channel), IPCERR_EMPTY if there are no channel names defined, or -1 if the specified name cannot be found among the existing channels.
SM_DISPTIMESTAMPS Displays the time stamp. Should be one of the following: SM_STAMP_BURN_IN = Controls whether to burn the stamps into the set image(s).
SM_STAMP_LEFT = Positions the time stamp at the left edge of the image(s).
SM_STAMP_RIGHT = Positions the time stamp at the right edge of the image(s).
SM_STAMP_CENTER = Positions the time stamp at the horizontal center of the image(s).
SM_STAMP_TOP = Positions the time stamp at the top of the image(s).
SM_STAMP_BOTTOM = Positions the time stamp at the bottom of the image(s).
SM_STAMP_VCENTER =Positions the time stamp at the vertical center of the image(s).

IpSmInfo
Page 2-661
Attribute Descrption
SM_TIMESTAMPCOLOR Display the time stamp color. Should be one of the following:
DISPCOLOR_RED DISPCOLOR_GREEN DISPCOLOR_BLUE DISPCOLOR_YELLOW DISPCOLOR_CYAN DISPCOLOR_MAGENTA DISPCOLOR_WHITE DISPCOLOR_BLACK
IpSmInfo Syntax IpSmInfo(Show)
Description This function displays or hides Set Information dialog.
Parameters Show Integer SM_SHOW Show the dialog. SM_HIDE Hide the dialog.
Return Value 0 if successful, a negative error code if failed.
Comments Any value other than SM_HIDE will show the dialog.
IpSmNew Syntax IpSmNew
Description This function creates a new, empty set.
Return Value A positive Set ID if successful, a negative error code if failed.
Comments A new set will have 0 dimensions initially.
IpSmNormalize Syntax IpSmNormalize(ActivePortion, NewImage)
Description This function applies illumination normalization to the specified image or frames.
Parameters ActivePortion Integer ActivePortion can be used to override the Z stack determination. If ActivePortion is non-zero, the correction will be applied to the active portion of the image.
NewImage Integer NewImage determines whether to create a new document with the corrected results (if NewImage is non-zero) or to apply the correction to the existing image.
Return Value The document ID of the normalized document, if successful, a negative error code if failed.

IpSmNormalizeShow
Page 2-662
See Also IpSmBackgroundCorr, IpSmDespeckle
IpSmNormalizeShow Syntax IpSmNormalizeShow(Show)
Description This function shows or hides the normalization dialog.
Parameters Show Integer SM_SHOW Show the dialog SM_HIDE Hide the dialog
Return Value 0 if successful, a negative error code if failed.
Comments Any value other than SM_HIDE will show the dialog.
IpSmOpen Syntax IpSmOpen(Type, FileName)
Description This function loads the specified set
Parameters Type Integer Indicates the source of the set, and the options for loading: SM_FILE = The set is loaded from the file specified by FileName. SM_DATABASE = The set is loaded from the database.
FileName String Specifies the set file name and may be empty (“ “) if loading the set from the database.
Comments Type may also include a SM_COMPACTLOAD flag to compact the set as it is loaded.
Return Value The set ID as a positive value if successful, a negative error code if failed.
See Also IpSmRemove
IpSmPlay Syntax IpSmPlay(Command)
Description This function plays the set along the specified dimension at the specified position.
Parameters Command Integer Command starts the play command, must be a location along the active dimension or one of the following: SM_STOP Stop play SM_FORWARD Play set forward SM_REVERSE Play set in reverse SM_FIRST Move to first location SM_LAST Move to last location SM_PREVIOUS Move to the previous location SM_NEXT Move to the next location
Return Value 0 if successful, a negative error code if failed.

IpSmRemoveImage
Page 2-663
Comments Use the IpSMSet SM_ACTIVEDIM command to set the dimension that will be played. Use the IpSMSet SM_CURRENT_LOCATION command to set the location along all the set’s dimensions. A particular dimension may be played by sequentially activating the appropriate workspaces and/or by activating the appropriate frame of a single workspace
See Also IpSmSet
IpSmRemoveImage Syntax IpSmRemoveImage(SetID, DocID)
Description This function removes all the frames of the specified image from an existing set.
Parameters SetID Integer Indicates the set from which the image should be removed.
DocID Integer Indicates the document to remove from the set.
Return Value 0 if successful, a negative error code if failed.
IpSmRemoveFrame Syntax IpSmRemoveFrame(SetID, DocID,Frame)
Description This function removes the specified frame of the specified document from the specified set.
Parameters SetID Integer Indicates the set from which the image should be removed.
DocID Integer Indicates the document to remove from the set.
Frame Long Indicates the frame of the document to remove.
Return Value 0 if successful, a negative error code if failed.
IpSmSave Syntax IpSmSave(SetID, Type, FileName)
Description This function saves the specified set.
Parameters SetID Integer Indicates the set that should be saved.
Type Integer Indicates the source of the set and the options for saving: SM_FILE The set in the file specified by FileName. SM_DATABASE The set is saved in the database.
FileName String Specifies the set file name if saving to a file, or the database record number if saving to the database.

IpSmSet
Page 2-664
Comments Type can also include a SM_AUTOSAVE_DOCS flag to automatically save all of the set image documents as the set is saved, and/or SM_AUTOSAVE_BKGND to automatically save the associated background images set (if there is one).
Return Value 0 if successful, a negative error code if failed.
IpSmSet Syntax IpSmSet (SetId, Attribute, Param, Value)
Description This function sets the set attributes.
Parameters SetId Integer Indicates the set to receive the data.
Attribute Integer Indicates the attribure that will be changed. See list below.
Param Integer Param is used to specify additional information about the attribute. See table under Comments.
Value Any Value is the user variable to receive the attribute. See Comments.
Return Value 0 if successful, a negative error code if failed.
Comments Several of the Attribute parameters require that a set location is specified, i.e. SM_ELEMENT_DOC. A set location is specified by an array of two Longs with 2 elements per dimension of interest: the dimension identifier (i.e. SM_DIM_Z), followed by the location along the dimension. There are 5 dimensions supported at present, so a fully-specified location will require an array of 10 longs. The locations can be specified in any order, and dimensions may be omitted, in which case a location of zero is assumed. The number of dimensions (half the number of elements in the position array) must be specified in the Param argument.
The Set Manager attribute SM_LOCK_CHANNELS has been changed to SM_LOCK_WORKSPACES. For backward compatibility, the original constant is still defined, but in the enumerations only the new one is used (e.g. SMGET_LOCK_WORKSPACES).
Basically, in a compact set, there may be multiple image workspaces that are part of the set, but each workspace represents one position along the "document dimension". In the past, the assumption was that this dimension was channels (because AFA builds sets that way, with one workspace per channel), but actually it could be any one of the 5 dimensions.
So the SM_LOCK_WORKSPACES attribute will synchronize the playing of all of the set workspaces, as long as the conditions explained above for a compact set apply (that there is one workspace for each position along the "document dimension").
The SM_DOC_DIMENSION attribute will return the document dimension for the specified set - this is a read-only attribute as the dimension cannot be set arbitrarily. The document dimension is saved with the set, and an attempt will be made to figure out the document dimension for pre-existing sets.
There is one way to set the document dimension, however. If you select the dimension of interest using SM_COMPACT_DIM, and then use SM_COMPACT to compact the set along that dimension, the document dimension will be set by the compaction operation.
The Attribute parameter determines the type of data returned to the user’s variable, and can be one of the following:

IpSmSet
Page 2-665
Attribute Descrption
SM_DIMSTART Set the starting position of the dimension in Param. Value should be a long variable to receive the location. The start position is used only for IpSmPlay.
SM_DIMEND Set the ending position of the dimension in Param. Value should be a long variable to receive the location. The end position is used only for IpSmPlay.
SM_ACTIVEDIM Set the active dimension for IpSmPlay to the dimension specified in Param. The Value parameter is not used.
SM_RELOAD Set Manager will load any of the set images that are not currently open in Image-Pro. The Param and Value parameters are not used. SM_RELOAD is not supported by IpSMGet.
SM_CURRENT_LOCATION The Value argument should be an array of 5 longs indication the new location. The SM_DIM constants can be used to index the array, i.e. IpZArray (SM_DIM_Z) = Z location.

IpSmSet
Page 2-666
Attribute Descrption
SM_FRAME_RATE Param should be set to indicate the specified set’s frame rate. Value is not used.
SM_WRAP_TYPE Param indicates the new wrap type, from one of the following values: SM_WRAP_AT_END = When playing, wrap around from the end to the beginning of the active dimension. SM_WRAP_NONE = Stop at the end of the active dimension. SM_WRAP_AUTO_REV = Auto-reverse at the end of the active dimension. Value is not used
SM_EXTRACT_Z_TYPE Param indicates the type of Z dimension compression that will be applied when another dimension is extracted: SM_EXTRACT_ONE_Z No Z compression = extract a single Z frame. SM_EXTRACT_COMPOSIT_Z = Compress Z dimension using Extended Depth of Field Composite option. SM_EXTRACT_BEST_Z = Compress Z dimension using Extended Depth of Field Best Focus option. Value is not used
SM_EXTRACT_FOC_TYPE Param indicates the type of Extended Depth of Field focus analysis that will be applied if the Z dimension compression is used: SM_FOCUS_LOCAL_CONTRAST = Local contrast SM_FOCUS_MAX_DEPTH_CONTRAST = Local depth contrast. SM_FOCUS_MAX_INTENSITY = Maximum intensity. SM_FOCUS_MIN_INTENSITY = Minimum intensity. Value is not used
SM_UPDATE_FRAME Param indicates whether to update the dialog’s frame slider and edit control while playing. Value is not used
SM_FRAME_SKIP Param indicates the number of frames to skip for fast forward and/or fast reverse. Value is not used.
SM_ADJUST_RATE Controls whether to automatically adjust the Set play rate
SM_ZLOCK_XY_POS Param indicates whether to set all X and Y positions to the same Z position when using the SM_SELECTED_Z_PLANES command. Value is not used.

IpSmSet
Page 2-667

IpSmSet
Page 2-668
Attribute Descrption
SM_DISPTIMESTAMPS This command selects whether to display time point time stamps on the set images. The value in Param indicates whether to display time stamps, and if so, what to display, and can be any combination of the following: SM_STAMP_NONE = When used alone, turn off time stamps. SM_STAMP_TIME_POINT = Display time stamp for the current time point. SM_STAMP_CAPTURE_TIME = Display acquisition time of the current frame. SM_STAMP_SEP_LINES = When both time point and acquisition time stamps are selected, specifies how the two time stamps will be separated. If this value is not specified, the two stamps will be combined in one line across the image. When this value is specified, the two time stamps will be displayed on separate lines. Value is not used.
SM_STAMP_BURN_IN = Controls whether to burn the stamps into the set image(s). SM_STAMP_LEFT = Positions the time stamp at the left edge of the image(s). SM_STAMP_RIGHT = Positions the time stamp at the right edge of the image(s). SM_STAMP_CENTER = Positions the time stamp at the horizontal center of the image(s). SM_STAMP_TOP = Positions the time stamp at the top of the image(s). SM_STAMP_BOTTOM = Positions the time stamp at the bottom of the image(s). SM_STAMP_VCENTER =Positions the time stamp at the vertical center of the image(s).
SM_USE_SELECTED_Z Param indicates whether to use the selected Z plane to use when navigating in other dimensions. Otherwise, navigation uses the current Z position. Value is not used.
SM_ZLOCK_TIME_POINTS Param indicates whether to set all time points to the same Z position when using the SM_SELECTED_Z_PLANES command. Value is not used.
Attribute Descrption
SM_ZLOCK_SITES Param indicates whether to set all sites to the same Z position when using the SM_SELECTED_Z_PLANES command. Value is not used.
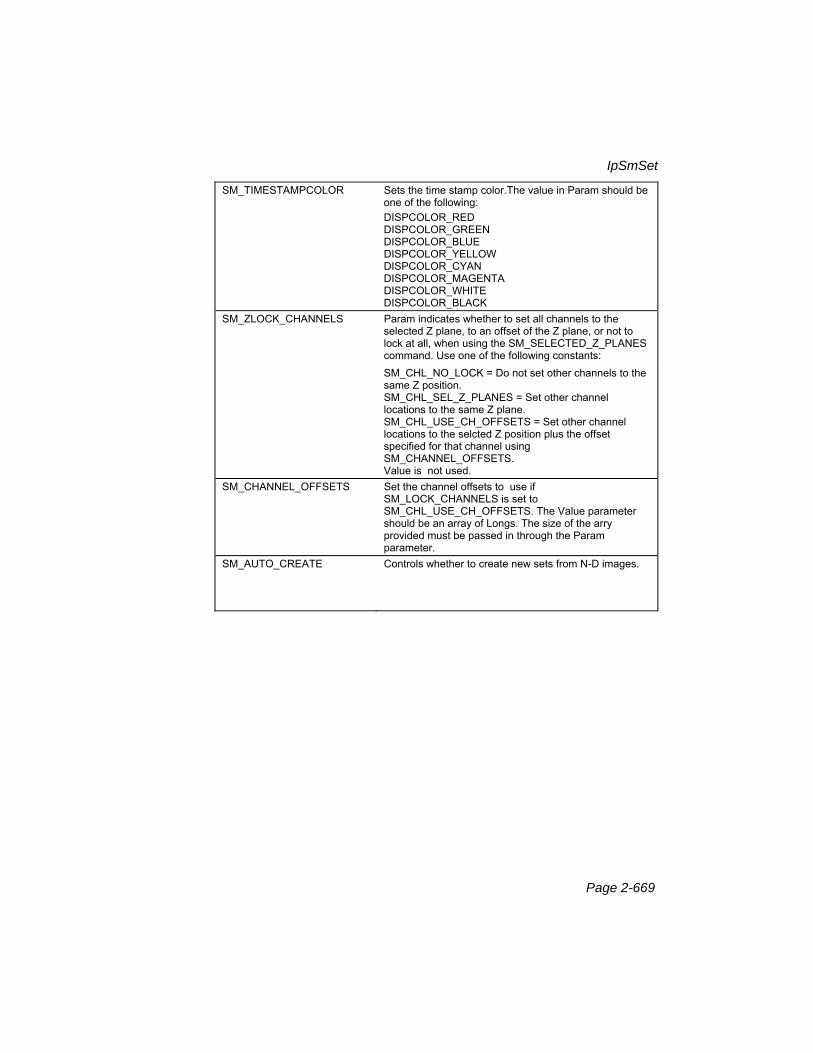
IpSmSet
Page 2-669
SM_TIMESTAMPCOLOR Sets the time stamp color.The value in Param should be one of the following: DISPCOLOR_RED DISPCOLOR_GREEN DISPCOLOR_BLUE DISPCOLOR_YELLOW DISPCOLOR_CYAN DISPCOLOR_MAGENTA DISPCOLOR_WHITE DISPCOLOR_BLACK
SM_ZLOCK_CHANNELS Param indicates whether to set all channels to the selected Z plane, to an offset of the Z plane, or not to lock at all, when using the SM_SELECTED_Z_PLANES command. Use one of the following constants:
SM_CHL_NO_LOCK = Do not set other channels to the same Z position. SM_CHL_SEL_Z_PLANES = Set other channel locations to the same Z plane. SM_CHL_USE_CH_OFFSETS = Set other channel locations to the selcted Z position plus the offset specified for that channel using SM_CHANNEL_OFFSETS. Value is not used.
SM_CHANNEL_OFFSETS Set the channel offsets to use if SM_LOCK_CHANNELS is set to SM_CHL_USE_CH_OFFSETS. The Value parameter should be an array of Longs. The size of the arry provided must be passed in through the Param parameter.
SM_AUTO_CREATE Controls whether to create new sets from N-D images.
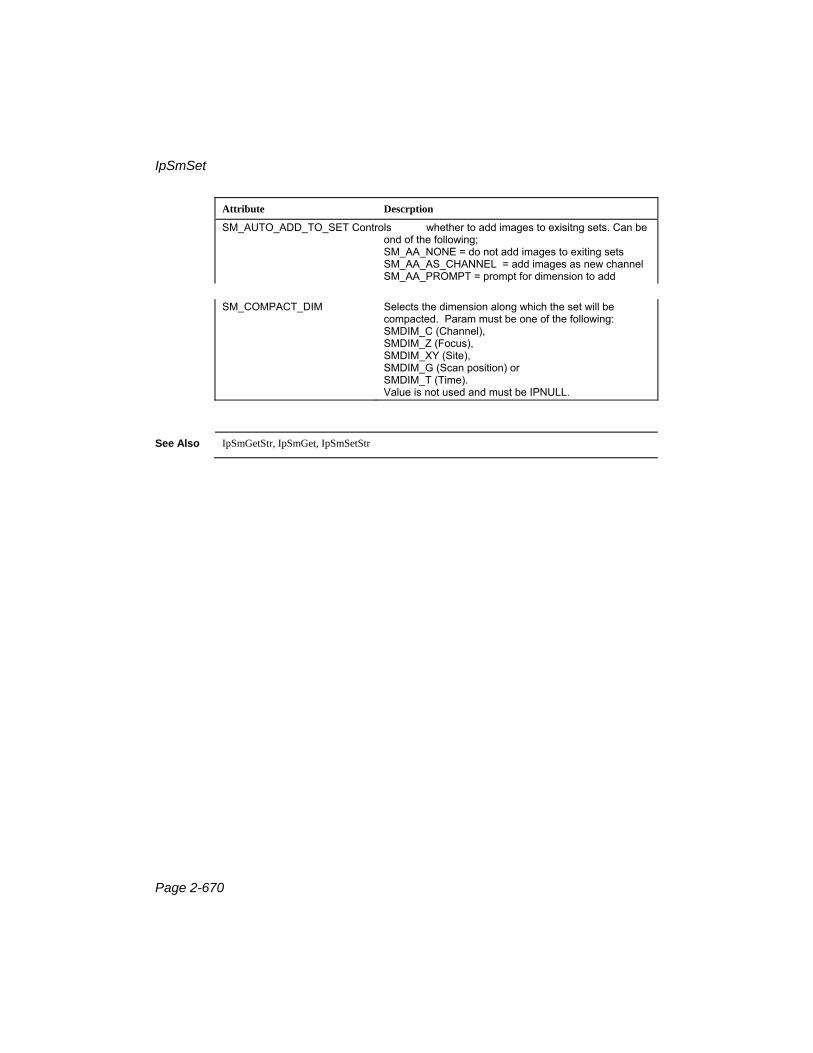
IpSmSet
Page 2-670
Attribute Descrption
SM_AUTO_ADD_TO_SET Controls whether to add images to exisitng sets. Can be ond of the following; SM_AA_NONE = do not add images to exiting sets SM_AA_AS_CHANNEL = add images as new channel SM_AA_PROMPT = prompt for dimension to add
SM_COMPACT_DIM Selects the dimension along which the set will be
compacted. Param must be one of the following: SMDIM_C (Channel), SMDIM_Z (Focus), SMDIM_XY (Site), SMDIM_G (Scan position) or SMDIM_T (Time). Value is not used and must be IPNULL.
See Also IpSmGetStr, IpSmGet, IpSmSetStr
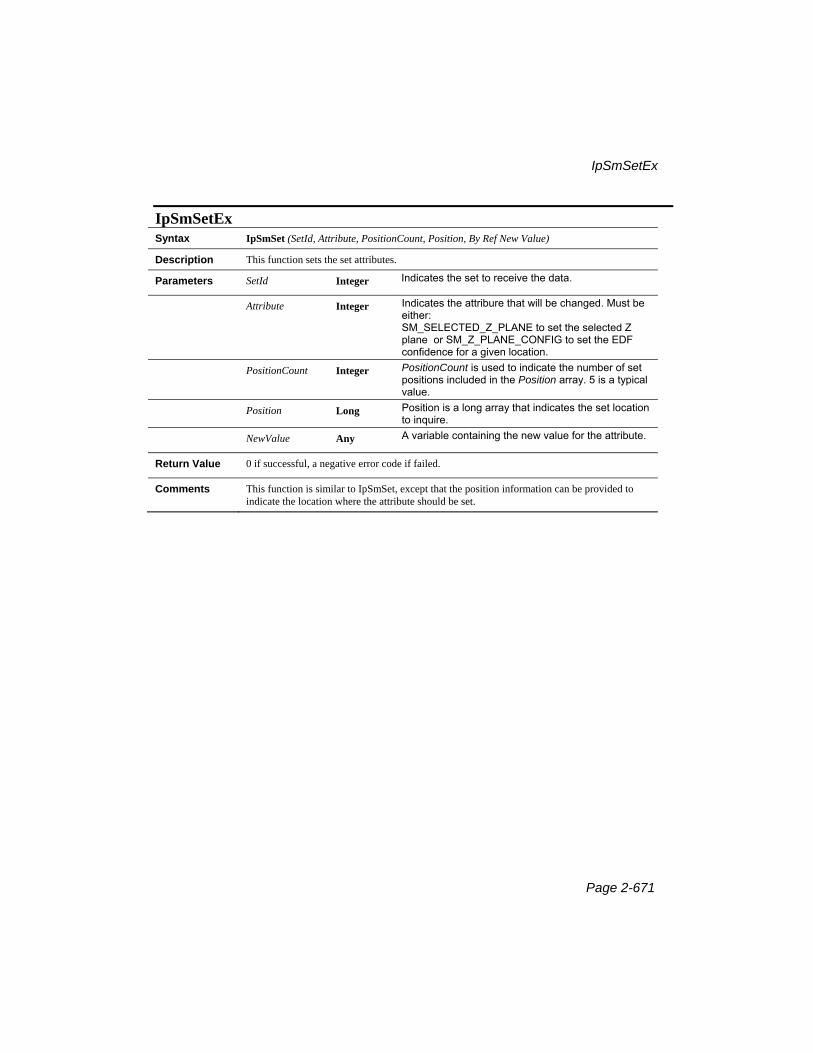
IpSmSetEx
Page 2-671
IpSmSetEx Syntax IpSmSet (SetId, Attribute, PositionCount, Position, By Ref New Value)
Description This function sets the set attributes.
Parameters SetId Integer Indicates the set to receive the data.
Attribute Integer Indicates the attribure that will be changed. Must be either: SM_SELECTED_Z_PLANE to set the selected Z plane or SM_Z_PLANE_CONFIG to set the EDF confidence for a given location.
PositionCount Integer PositionCount is used to indicate the number of set positions included in the Position array. 5 is a typical value.
Position Long Position is a long array that indicates the set location to inquire.
NewValue Any A variable containing the new value for the attribute.
Return Value 0 if successful, a negative error code if failed.
Comments This function is similar to IpSmSet, except that the position information can be provided to indicate the location where the attribute should be set.

IpSmSetStr
Page 2-672
IpSmSetStr Syntax IpSmSetStr (SetId, Attribute, Channel,,Data)
Description This function sets the attributes in the set.
Parameters SetId Integer Indicates the set to examine.
Attribute Integer Indicates the set attribure that will be changed. See list below.
Channel Long Channel is used only for SM_CHANNELNAME. Indicates the channel name to set. See comments below.
Data String Data is string to set the attribute. See Comments.
Return Value 0 or 1 if successful, a negative error code if failed.
Comments The Attribute parameter determines the type of data returned to the user’s variable, and can be one of the following. Note that not all of the attributes supported by IpSmGetStr can be set using IpSmSetStr.
Attribute Descrption
SM_TITLE Set the set title. SM_EXPERIMENTER Set the set owner’s name. SM_CHANNELNAME Set the name of the specificed channel. SM_DESCRIPTION Set the set description SM_TIMESTAMP Set the time stamp of the specified time point. The
Position parameter indicates the time point of interest.
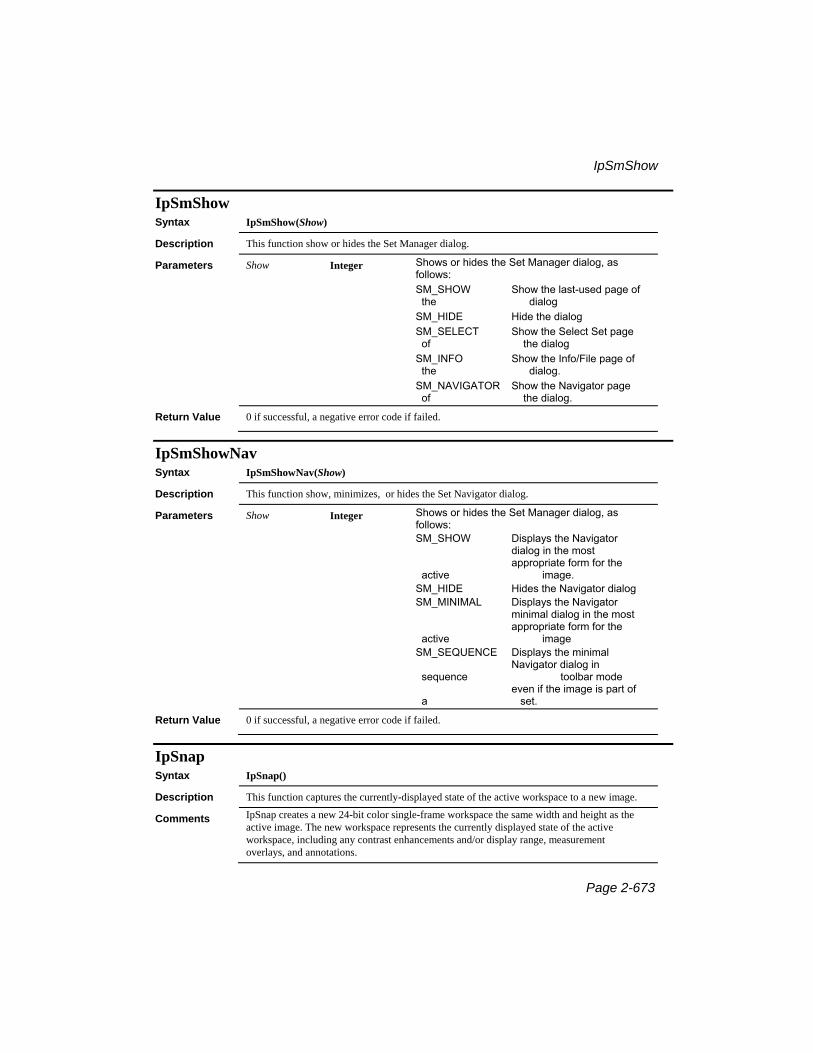
IpSmShow
Page 2-673
IpSmShow Syntax IpSmShow(Show)
Description This function show or hides the Set Manager dialog.
Parameters Show Integer Shows or hides the Set Manager dialog, as follows: SM_SHOW Show the last-used page of the dialog SM_HIDE Hide the dialog SM_SELECT Show the Select Set page of the dialog SM_INFO Show the Info/File page of the dialog. SM_NAVIGATOR Show the Navigator page of the dialog.
Return Value 0 if successful, a negative error code if failed.
IpSmShowNav Syntax IpSmShowNav(Show)
Description This function show, minimizes, or hides the Set Navigator dialog.
Parameters Show Integer Shows or hides the Set Manager dialog, as follows: SM_SHOW Displays the Navigator dialog in the most appropriate form for the active image. SM_HIDE Hides the Navigator dialog SM_MINIMAL Displays the Navigator minimal dialog in the most appropriate form for the active image SM_SEQUENCE Displays the minimal Navigator dialog in sequence toolbar mode even if the image is part of a set.
Return Value 0 if successful, a negative error code if failed.
IpSnap Syntax IpSnap()
Description This function captures the currently-displayed state of the active workspace to a new image.
Comments IpSnap creates a new 24-bit color single-frame workspace the same width and height as the active image. The new workspace represents the currently displayed state of the active workspace, including any contrast enhancements and/or display range, measurement overlays, and annotations.

IpSortAttr
Page 2-674
Return Value The document ID of the new workspace with the snapped image.
IpSortAttr Syntax IpSortAttr(sAttr, sValue)
Description Changes the various attributes of the sorted objects.
Parameters sAttr Integer Attribute to be changed. Must be one of the following: SORT_ROTATE - 0 = do not rotate, 1 = rotate SORT_MEAS - Measurements to be sorted by (i.e. BLBM_AREA, etc.) SORT_LABELS - 0 = labels off, 1 = labels on SORT_COLOR 0 = red 1 = green 2 = blue 3 = yellow SORT_INDEX - sorted image background gray level SORT_AUTO - 0 = user-defined background index 1 = automatic background index
sValue Integer
See Also IpSortShow, IpSortObjects
IpSortObjects Syntax IpSortObjects ()
Description This function sorts the objects in the Image-Pro workspace
See Also IpSortShow, IpSortAttr
IpSortShow Syntax IpSortShow(bShow)
Description This function displays or hides the object sorting dialog
Parameters bShow Integer A value of 0 or 1 specifying whether the object sorting dialog is to be displayed or suppressed. Where: 0 - hides the dialog 1 - shows the dialog
See Also IpSortObjects, IpSortAttr
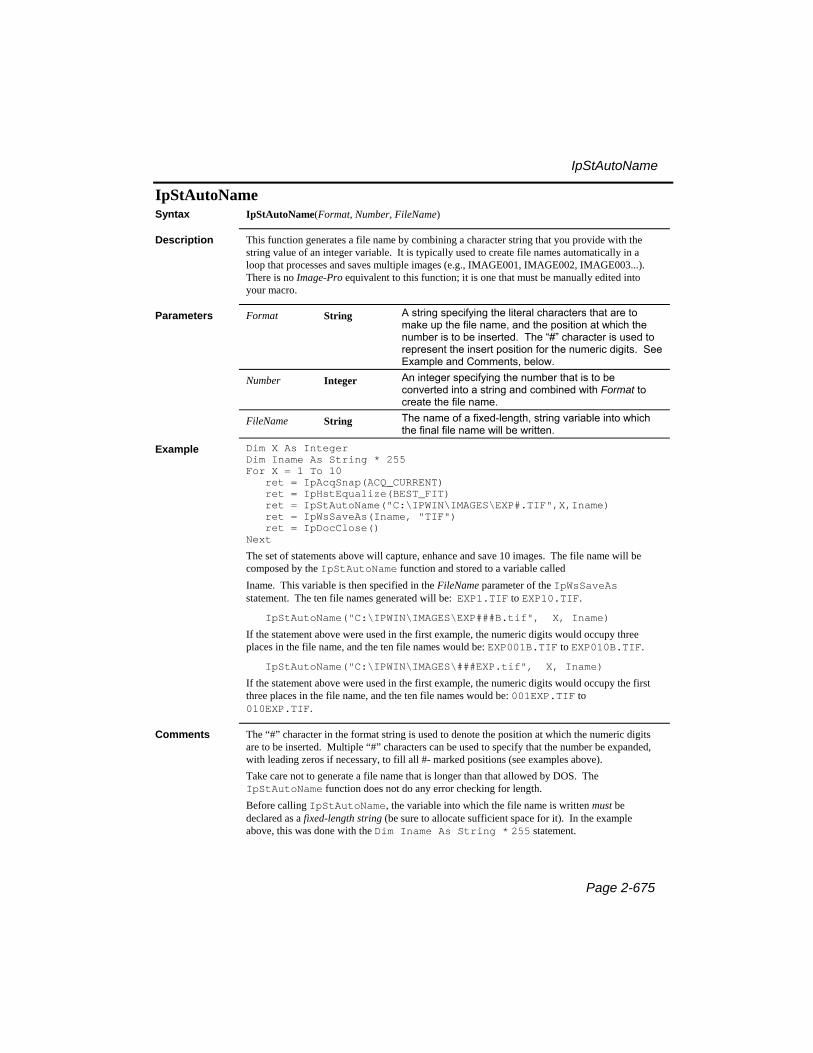
IpStAutoName
Page 2-675
IpStAutoName Syntax IpStAutoName(Format, Number, FileName)
Description This function generates a file name by combining a character string that you provide with the string value of an integer variable. It is typically used to create file names automatically in a loop that processes and saves multiple images (e.g., IMAGE001, IMAGE002, IMAGE003...). There is no Image-Pro equivalent to this function; it is one that must be manually edited into your macro.
Parameters Format String A string specifying the literal characters that are to make up the file name, and the position at which the number is to be inserted. The “#” character is used to represent the insert position for the numeric digits. See Example and Comments, below.
Number Integer An integer specifying the number that is to be converted into a string and combined with Format to create the file name.
FileName String The name of a fixed-length, string variable into which the final file name will be written.
Example Dim X As Integer Dim Iname As String * 255 For X = 1 To 10 ret = IpAcqSnap(ACQ_CURRENT) ret = IpHstEqualize(BEST_FIT) ret = IpStAutoName("C:\IPWIN\IMAGES\EXP#.TIF",X,Iname) ret = IpWsSaveAs(Iname, "TIF") ret = IpDocClose() Next
The set of statements above will capture, enhance and save 10 images. The file name will be composed by the IpStAutoName function and stored to a variable called
Iname. This variable is then specified in the FileName parameter of the IpWsSaveAs statement. The ten file names generated will be: EXP1.TIF to EXP10.TIF.
IpStAutoName("C:\IPWIN\IMAGES\EXP###B.tif", X, Iname)
If the statement above were used in the first example, the numeric digits would occupy three places in the file name, and the ten file names would be: EXP001B.TIF to EXP010B.TIF.
IpStAutoName("C:\IPWIN\IMAGES\###EXP.tif", X, Iname)
If the statement above were used in the first example, the numeric digits would occupy the first three places in the file name, and the ten file names would be: 001EXP.TIF to 010EXP.TIF.
Comments The “#” character in the format string is used to denote the position at which the numeric digits are to be inserted. Multiple “#” characters can be used to specify that the number be expanded, with leading zeros if necessary, to fill all #- marked positions (see examples above). Take care not to generate a file name that is longer than that allowed by DOS. The IpStAutoName function does not do any error checking for length. Before calling IpStAutoName, the variable into which the file name is written must be declared as a fixed-length string (be sure to allocate sufficient space for it). In the example above, this was done with the Dim Iname As String * 255 statement.

IpStGetSingle
Page 2-676
IpStGetSingle Syntax IpStGetSingle(Prompt, SingleRet, InitVal, MinVal, MaxVal, IncVal)
Description This function issues a dialog box that prompts the user for a single-point value. There is no Image-Pro equivalent to this function; it is one that must be manually edited into your macro.
Parameters Prompt String A string specifying the message to be displayed in the dialog box.
SingleRet Single (Basic)
LPSINGLE (C)
The address (name) of the single-point variable that will receive the value entered by the user.
InitVal Single (Basic)
LPSINGLE (C)
The initial (default) single-point value.
MinVal Single ((Basic)
LPSINGLE (C)
The smallest value that can be entered by the user.
MaxVal Single (Basic)
LPSINGLE (C)
The largest value that can be entered by the user.
IncVal Single (Basic)
LPSINGLE (C)
The increment by which the value will be increased or decreased by one click of the or button, respectively, in the dialog box.
Return Value This function will return a 1 if user clicks OK; a 0 if the user clicks “Cancel.”
Example The following example prompts the user for a gamma value.
Dim GValue as single ret=IpStGetSingle("Enter gamma value",GValue,1.0,0.2, 2.5, 0.1) if ret=1 Then' user pressed OK ret = IpLutSetAttr(LUT_GAMMA, GValue * 100) End If
See Also IpStGetString, IpStGetInt, IpMacroStop
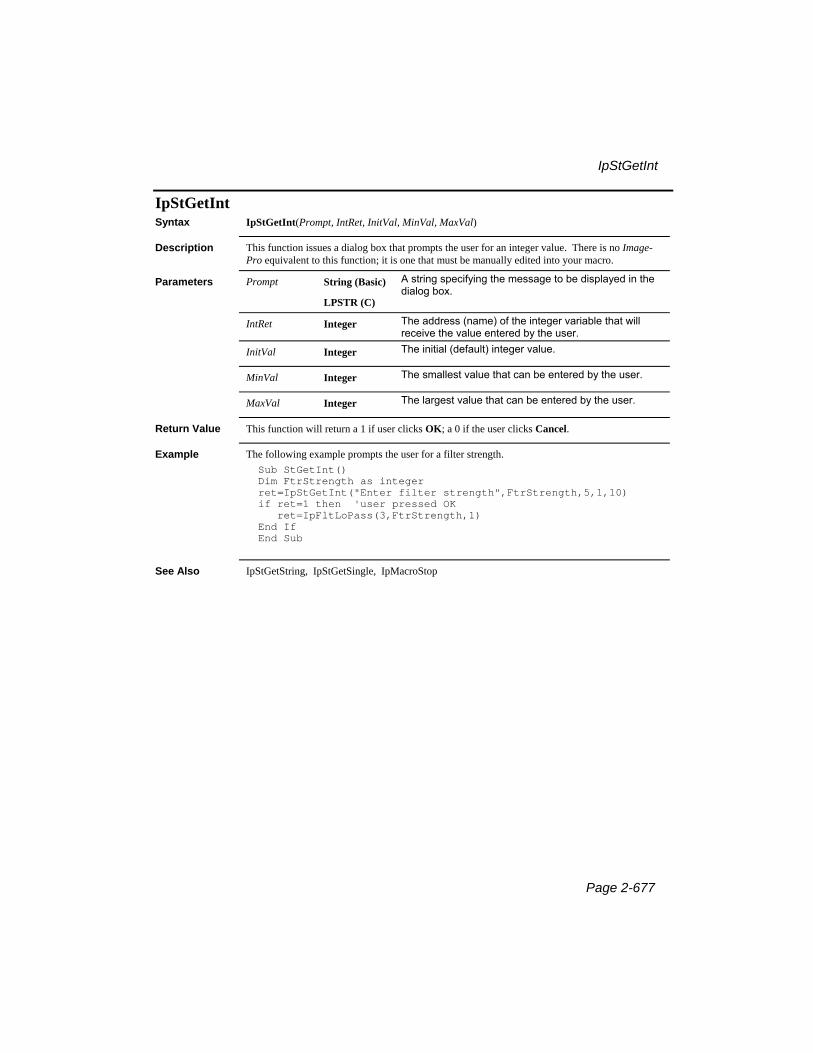
IpStGetInt
Page 2-677
IpStGetInt Syntax IpStGetInt(Prompt, IntRet, InitVal, MinVal, MaxVal)
Description This function issues a dialog box that prompts the user for an integer value. There is no Image-Pro equivalent to this function; it is one that must be manually edited into your macro.
Parameters Prompt String (Basic)
LPSTR (C)
A string specifying the message to be displayed in the dialog box.
IntRet Integer The address (name) of the integer variable that will receive the value entered by the user.
InitVal Integer The initial (default) integer value.
MinVal Integer The smallest value that can be entered by the user.
MaxVal Integer The largest value that can be entered by the user.
Return Value This function will return a 1 if user clicks OK; a 0 if the user clicks Cancel.
Example The following example prompts the user for a filter strength. Sub StGetInt() Dim FtrStrength as integer ret=IpStGetInt("Enter filter strength",FtrStrength,5,1,10) if ret=1 then 'user pressed OK ret=IpFltLoPass(3,FtrStrength,1) End If End Sub
See Also IpStGetString, IpStGetSingle, IpMacroStop
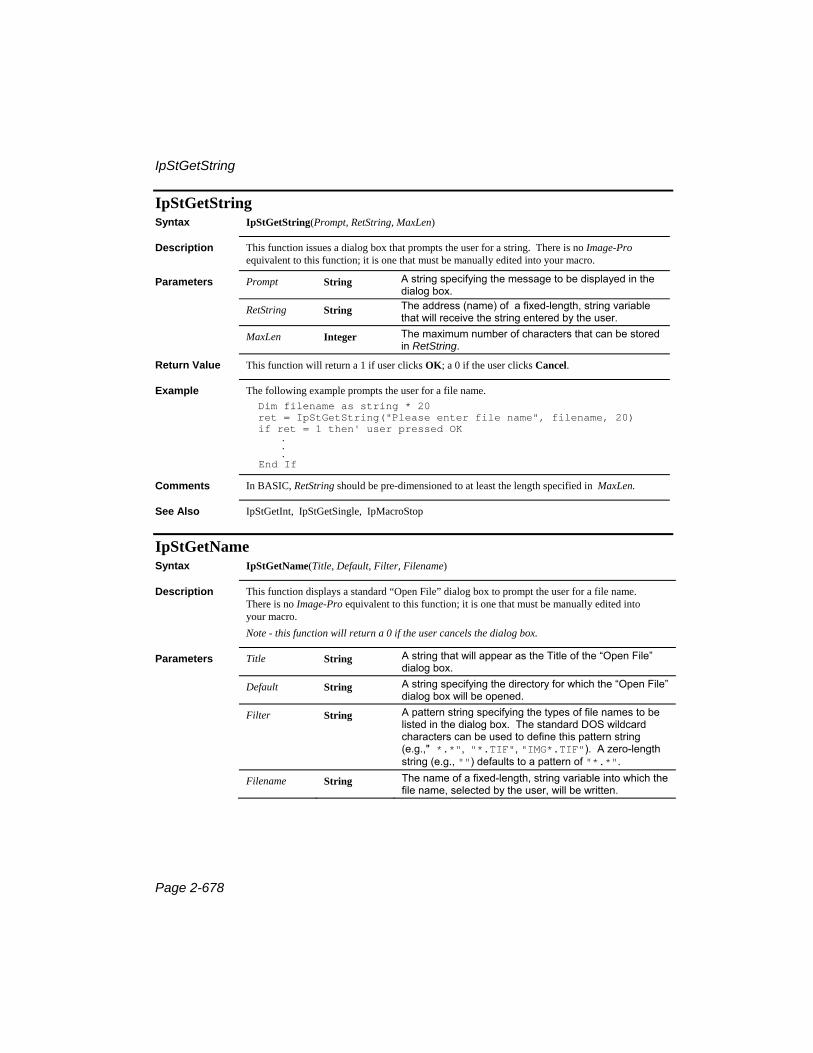
IpStGetString
Page 2-678
IpStGetString Syntax IpStGetString(Prompt, RetString, MaxLen)
Description This function issues a dialog box that prompts the user for a string. There is no Image-Pro equivalent to this function; it is one that must be manually edited into your macro.
Parameters Prompt String A string specifying the message to be displayed in the dialog box.
RetString String The address (name) of a fixed-length, string variable that will receive the string entered by the user.
MaxLen Integer The maximum number of characters that can be stored in RetString.
Return Value This function will return a 1 if user clicks OK; a 0 if the user clicks Cancel.
Example The following example prompts the user for a file name. Dim filename as string * 20 ret = IpStGetString("Please enter file name", filename, 20) if ret = 1 then' user pressed OK
.
.
. End If
Comments In BASIC, RetString should be pre-dimensioned to at least the length specified in MaxLen.
See Also IpStGetInt, IpStGetSingle, IpMacroStop
IpStGetName Syntax IpStGetName(Title, Default, Filter, Filename)
Description This function displays a standard “Open File” dialog box to prompt the user for a file name. There is no Image-Pro equivalent to this function; it is one that must be manually edited into your macro. Note - this function will return a 0 if the user cancels the dialog box.
Parameters Title String A string that will appear as the Title of the “Open File” dialog box.
Default String A string specifying the directory for which the “Open File” dialog box will be opened.
Filter String A pattern string specifying the types of file names to be listed in the dialog box. The standard DOS wildcard characters can be used to define this pattern string (e.g.," *.*", "*.TIF", "IMG*.TIF"). A zero-length string (e.g., "") defaults to a pattern of "*.*".
Filename String The name of a fixed-length, string variable into which the file name, selected by the user, will be written.
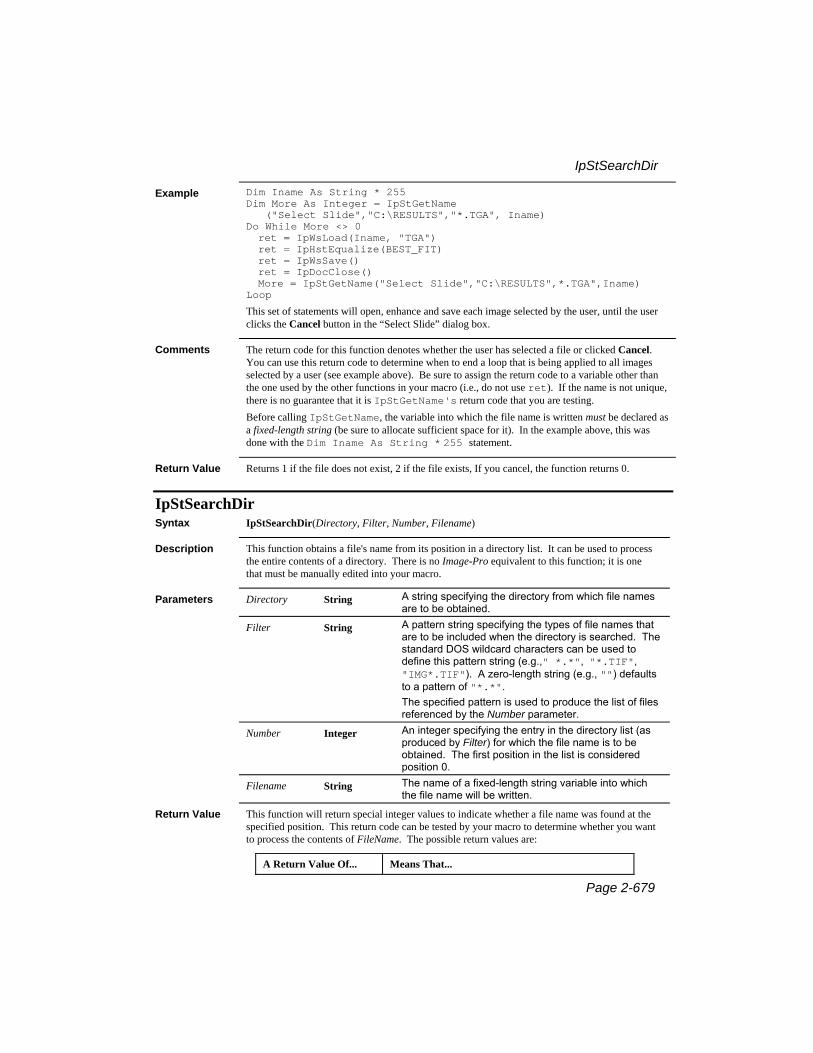
IpStSearchDir
Page 2-679
Example Dim Iname As String * 255 Dim More As Integer = IpStGetName ("Select Slide","C:\RESULTS","*.TGA", Iname) Do While More <> 0 ret = IpWsLoad(Iname, "TGA") ret = IpHstEqualize(BEST_FIT) ret = IpWsSave() ret = IpDocClose() More = IpStGetName("Select Slide","C:\RESULTS",*.TGA",Iname) Loop
This set of statements will open, enhance and save each image selected by the user, until the user clicks the Cancel button in the “Select Slide” dialog box.
Comments The return code for this function denotes whether the user has selected a file or clicked Cancel. You can use this return code to determine when to end a loop that is being applied to all images selected by a user (see example above). Be sure to assign the return code to a variable other than the one used by the other functions in your macro (i.e., do not use ret). If the name is not unique, there is no guarantee that it is IpStGetName's return code that you are testing. Before calling IpStGetName, the variable into which the file name is written must be declared as a fixed-length string (be sure to allocate sufficient space for it). In the example above, this was done with the Dim Iname As String * 255 statement.
Return Value Returns 1 if the file does not exist, 2 if the file exists, If you cancel, the function returns 0.
IpStSearchDir Syntax IpStSearchDir(Directory, Filter, Number, Filename)
Description This function obtains a file's name from its position in a directory list. It can be used to process the entire contents of a directory. There is no Image-Pro equivalent to this function; it is one that must be manually edited into your macro.
Parameters Directory String A string specifying the directory from which file names are to be obtained.
Filter String A pattern string specifying the types of file names that are to be included when the directory is searched. The standard DOS wildcard characters can be used to define this pattern string (e.g.," *.*", "*.TIF", "IMG*.TIF"). A zero-length string (e.g., "") defaults to a pattern of "*.*". The specified pattern is used to produce the list of files referenced by the Number parameter.
Number Integer An integer specifying the entry in the directory list (as produced by Filter) for which the file name is to be obtained. The first position in the list is considered position 0.
Filename String The name of a fixed-length string variable into which the file name will be written.
Return Value This function will return special integer values to indicate whether a file name was found at the specified position. This return code can be tested by your macro to determine whether you want to process the contents of FileName. The possible return values are:
A Return Value Of... Means That...

IpStSearchDir
Page 2-680
0 There is no entry at the specified position.
1 The specified position contains a file name. The name of the file will be written to the variable specified in FileName.
2 The specified position contains a subdirectory entry. The name of the subdirectory will be written to the variable specified in FileName.
3 The specified position contains a Volume Label. The Volume ID will be written to the variable specified in FileName.
Example Dim X As Integer Dim DStat As Integer Dim Iname As String * 255 X = 0 DStat = IpStSearchDir("C:\IPWIN7\IMAGES","*.TIF",X,Iname) debug.print Dstat,Iname Do While DStat = 1 ret = IpWsLoad(Iname, "TIF") ret = IpHstEqualize(BEST_FIT) ret = IpWsSave() ret = IpDocClose() X = X + 1 DStat = IpStSearchDir("C:\IPWIN7\IMAGES", "*.TIF",X,Iname) debug.print Dstat,Iname Loop
The set of statements above will open, enhance and save all TIF images in the C:\IPWIN7\IMAGES directory.
ret = IpStSearchDir("C:\IPWIN7\IMAGES","*.*",2,Iname) ret = IpWsLoad(Iname, "")
The pair of statements above will load the first file in the C:\IPWIN7\IMAGES directory.
Comments Before calling IpStSearchDir, the variable into which the file name is written must be declared as a fixed-length string (be sure to allocate sufficient space for it). In the first example above, this was done with the Dim Iname As String * 255 statement.
The first example also shows how to test the return code to determine when to end a loop that is to be applied to all images in a directory list. Be sure to assign the return code to a variable other than the one used by the other functions in your macro (i.e., do not use ret). If the name is not unique, there is no guarantee that it is IpStSearchDir's return code you are testing.
If you are using IpStSearchDir to process an entire subdirectory list (i.e., Filter specifies "*.*") consider starting your search at entry position 2, as positions 0 and 1
generally contain directory entries — 0 contains the subdirectory's entry (i.e., “.”) and 1 contains the parent directory's entry (i.e., “..”). If you choose to begin your search at position 0, be sure to include instructions that test IpStSearchDir's return code and take appropriate action if a subdirectory or volume ID is encountered.
See Also IpStSortedList

IpStSortedList
Page 2-681
IpStSortedList Syntax IpStSortedList (Directory, Filter, Attribute, List)
Description This function returns a sorted list of files from a directory. The file names for the list can be retrived using IpStSearchDir.
Parameters Directory String A string specifying the directory from which file names are to be obtained.
Filter String A pattern string specifying the types of file names that are to be included when the directory is searched. The standard DOS wildcard characters can be used to define this pattern string (e.g.," *.*", "*.TIF", "IMG*.TIF"). A zero-length string (e.g., "") defaults to a pattern of "*.*".
Attribute Integer Attribute, which can be one of the following constants, all of which will return a sorted list of image numbers to List except for SORT_GET_NFILES (see notes for that attribute). SORT_GET_NFILES = returns number of files in the Directory. pList is ignored, should be IPNULL. SORT_BY_NAME_ASC = sort by file name ascending SORT_BY_NAME_DEC = sort by file name descending SORT_BY_SUFF_ASC = sort by file name numerical suffix ascending (e.g. image1.tif, image2.tif, image10.tif) SORT_BY_SUFF_DEC = sort by file name suffix descending SORT_BY_DATE_ASC = sort by file time ascending SORT_BY_DATE_DEC = sort by file time descending
List Any The List should be an array of integers that will receive the file indexes, sorted according to the selected sAttribute. The array must be large enough to accommodate all file indexes. The number of images can be retrieved using SORT_GET_NFILES. The values from the list can be used to retrieve image names using IpStSearchDir (Directory, Filter, Number, FileName) function, where Number is an element of List.
Return Value This function returns the number of files in the folder, sorted in the order specified.

IpStSortedList
Page 2-682
Example Sub GetSortedList() Dim sDirectory As String Dim sFilter As String, NFiles%, i% Dim FileName As String*255 sDirectory="L:\Images\Sort" sFilter="*.*" ‘get number of files NFiles=IpStSortedList(sDirectory,sFilter,SORT_GET_NFILES,IpNULL) ReDim FileList(NFiles) As Integer 'get list sorted by name ret=IpStSortedList(sDirectory,sFilter,SORT_BY_NAME_ASC,FileList(0)) 'print list Debug.Print "File list sorted by name" For i=0 To NFiles-1 ‘get file name If IpStSearchDir (sDirectory,sFilter, FileList(i), Filename)=1 Then 'print only files, skip folder names Debug.Print i & " " & FileName End If Next 'get list sorted by time ret=IpStSortedList(sDirectory,sFilter,SORT_BY_TIME_ASC,FileList(0)) 'print list Debug.Print "File list sorted by time" For i=0 To NFiles-1 'get file name If IpStSearchDir(sDirectory,sFilter,FileList(i), Filename)=1 Then 'print only files, skip folder names Debug.Print i & " " & FileName End If Next
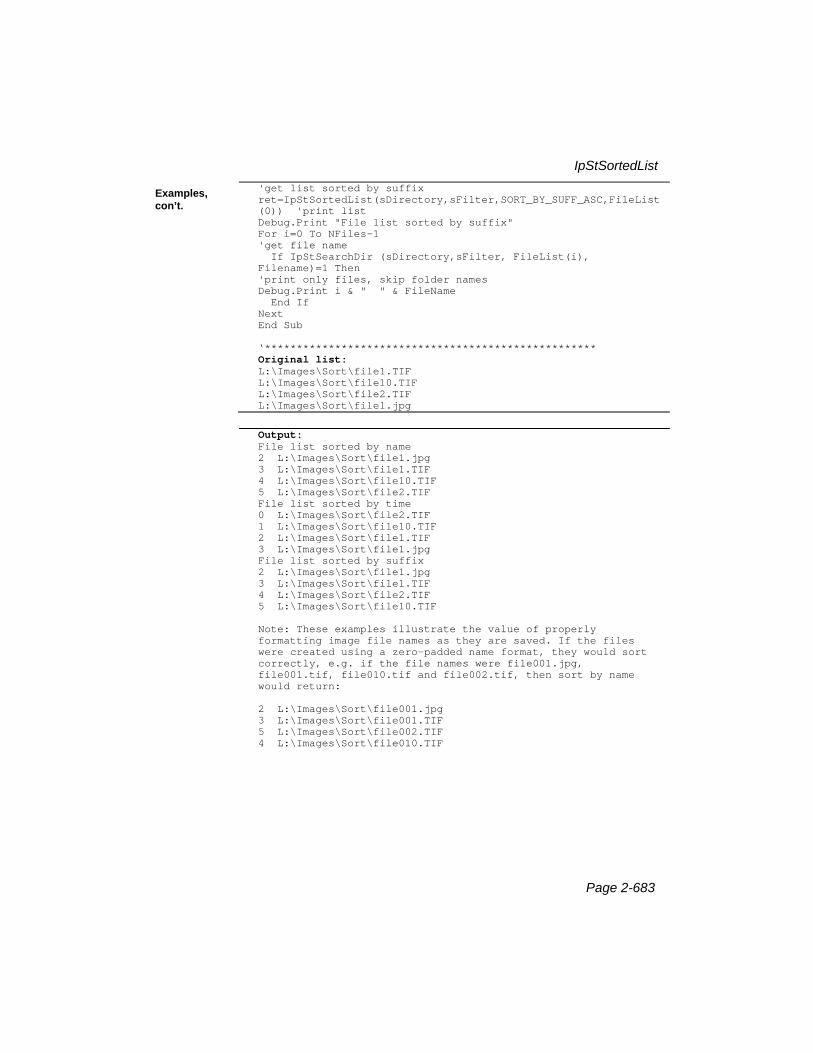
IpStSortedList
Page 2-683
Examples, con’t.
'get list sorted by suffix ret=IpStSortedList(sDirectory,sFilter,SORT_BY_SUFF_ASC,FileList(0)) 'print list Debug.Print "File list sorted by suffix" For i=0 To NFiles-1 'get file name If IpStSearchDir (sDirectory,sFilter, FileList(i), Filename)=1 Then 'print only files, skip folder names Debug.Print i & " " & FileName End If Next End Sub ‘**************************************************** Original list: L:\Images\Sort\file1.TIF L:\Images\Sort\file10.TIF L:\Images\Sort\file2.TIF L:\Images\Sort\file1.jpg
Output:
File list sorted by name 2 L:\Images\Sort\file1.jpg 3 L:\Images\Sort\file1.TIF 4 L:\Images\Sort\file10.TIF 5 L:\Images\Sort\file2.TIF File list sorted by time 0 L:\Images\Sort\file2.TIF 1 L:\Images\Sort\file10.TIF 2 L:\Images\Sort\file1.TIF 3 L:\Images\Sort\file1.jpg File list sorted by suffix 2 L:\Images\Sort\file1.jpg 3 L:\Images\Sort\file1.TIF 4 L:\Images\Sort\file2.TIF 5 L:\Images\Sort\file10.TIF Note: These examples illustrate the value of properly formatting image file names as they are saved. If the files were created using a zero-padded name format, they would sort correctly, e.g. if the file names were file001.jpg, file001.tif, file010.tif and file002.tif, then sort by name would return: 2 L:\Images\Sort\file001.jpg 3 L:\Images\Sort\file001.TIF 5 L:\Images\Sort\file002.TIF 4 L:\Images\Sort\file010.TIF

IpStageAbsZ
Page 2-684
IpStageAbsZ Syntax IpStageAbsZ(Abs ZPos)
Description This functions moves the stage to an absolute Z position, thereby changing the focus.
Parameters AbsZPos Single The position (in millimeters) from the origin of the vertical (Z) axis to which the stage is to be moved.
Example The following example moves the stage to a position 50 microns from the focus origin and away from the lens (down).
ret = IpStageAbsZ(-0.05)
See Also IpStageZ
IpStageAbsZEx Syntax IpStageAbsZEx(Z, Fine Z, uiFlags )
Description This function moves the stage to the absolute Z position.
Parameters Z Float The position (in millimeters) from the origin of the vertical (Z) axis to which the stage is to be moved.
Fine Z Float Position of the fine Z, if used.
uiFlags Integer Flags are defined as follows: STG_USE_ORIGINAL_XYZ 1 STG_USE_COARSE_XY 2 STG_USE_COARSE_Z 4 STG_USE_FINE_X 8 STG_USE_FINE_Y 16 STG_USE_FINE_Z 32 STG_USE_CONTINUOUS_FOCUS 64 STG_AFA_LIST_RESERVED_1 128 STG_AFA_LIST_RESERVED_2 256 STG_AFA_LIST_RESERVED_3 512 STG_AFA_LIST_RESERVED_4 1024 STG_AFA_LIST_RESERVED_5 2048 STG_AFA_LIST_RESERVED_6 4096 STG_AFA_LIST_RESERVED_7 8192 STG_AFA_LIST_RESERVED_8 16384 STG_AFA_LIST_RESERVED_9 32768
Example The following example moves the stage to a position 50 microns from the focus origin and away from the lens (down).
ret = IpStageAbsZEx(-0.0, 0.1, STG_USE_FINE_Z)
See Also IpStageAbsZ, IpStageZ

IpStageAcq
Page 2-685
IpStageAcq Syntax IpStageAcq(DbSpec, FileSpec, UseDb)
Description This function starts the Acquire process.
Parameters DbSpec String Indicates the database name and path
FileSpec String Indicates the file name and path
UseDb Integer Indicates whether to use a database (STG_DB) or not to use a database (STG_NO_DB).
Example The following statement will acquire to the current database:
ret = IpStageAcq(“c:\ipwin7\test.mdb”, “c:\ipwin7\test.tif”, STG_DB)
Entering “\\” in lieu of a file name will acquire image to a workspace without writing it to a file.
Comments If template mode is off, the macro will use the file and database names passed in the string. If template mode is on, the file name passed in the string is ignored, and a Windows file box is displayed; the user is forced to enter the path and name.
This command is equivalent to clicking on the Acquire button of the Acquire tab page in the Stage-Pro dialog box. All currently selected acquisition parameters on this page will be executed. All images will be tagged with the Stage-Pro location information.

IpStageAcqFrame
Page 2-686
IpStageAcqFrame Syntax IpStageAcqFrame(AcqType)
Description This function will acquire a single frame and tag that frame with the Stage-Pro properties.
Parameters AcqType Integer This can acquire to a new workspace or to the current active workspace.
ACQ_NEW
ACQ_CURRENT
Example The following statement will snap a frame into a new workspace and tag it with Stage-Pro’s property list:
ret = IpStageAcqFrame(ACQ_NEW)
Return Value This function returns the Document ID, which will be an integer greater than or equal to 0. A negative return value indicates an error.
Comments To retrieve the Stage-Pro properties use the functions IpStageDocGet() and IpStageDocGetStr(). See these functions for specific details.
If Tile Images is selected, a Stage-Pro will create a tiled image. If Multi-Plane or Software Auto-focus is selected, EDFs will be acquired in the in-focus image created.
Otherwise, a single image will be generated (as in IpAcqSnap), and the Stage-Pro location information will be added to the image.

IpStageAddListPoint
Page 2-687
IpStageAddListPoint Syntax IpStageAddListPoint (ListID, Index, Position, PointAry)
Description This function adds a point to an existing AFA point list.
Parameters ListID Integer Indicates the ID of the existing list where the point should be added.
Index Integer Indicates the position in the list where the point should be added:
-1 = add to end of list n = specific position in the list
Position Integer STG_AT_CUR_STG_POS = Use the current stage position for the position of the point
STG_AT_GIVEN_POS = Use the values in PointAry as the position of the point.
PointAry Any Can be null if Position = STG_AT_CUR_STG_POS
Must be an array of 3 single giving the X, Y, and Z position of the point (as an absolute XYZ position with respect to the defined area of travel) to add for STG_AT_GIVEN_POS .
Return Value 0 if successful, a negative error code if failed.
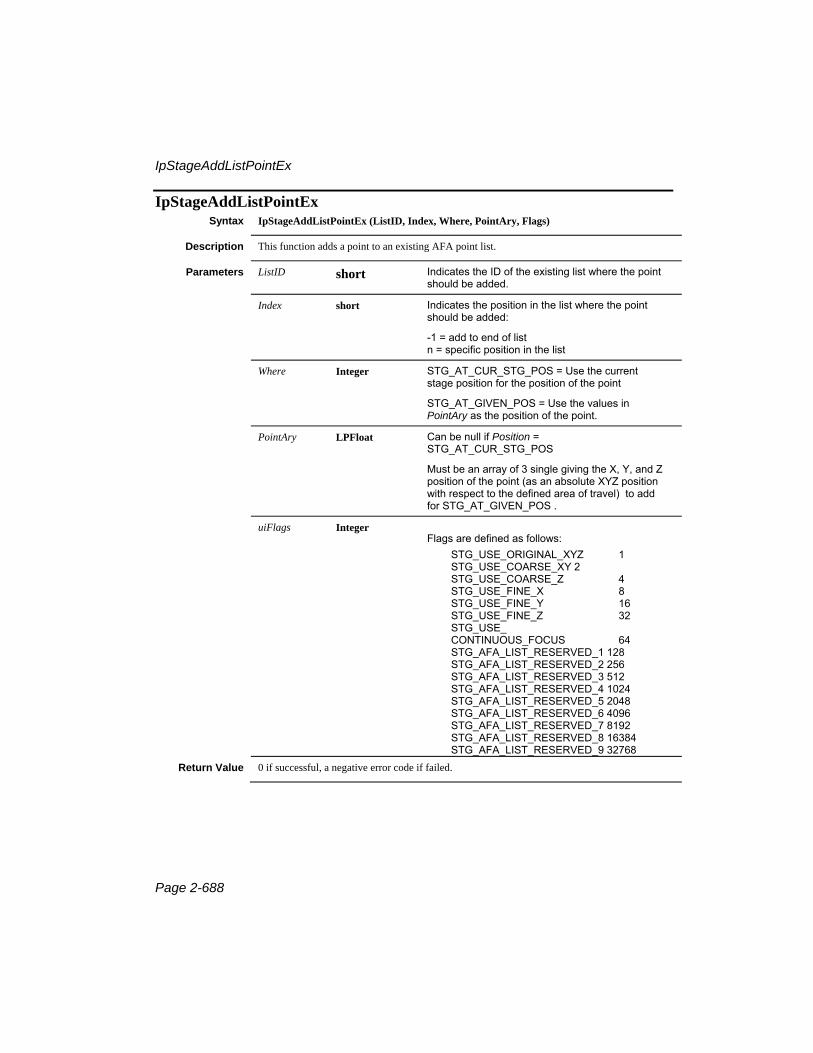
IpStageAddListPointEx
Page 2-688
IpStageAddListPointEx Syntax IpStageAddListPointEx (ListID, Index, Where, PointAry, Flags)
Description This function adds a point to an existing AFA point list.
Parameters ListID short Indicates the ID of the existing list where the point should be added.
Index short Indicates the position in the list where the point should be added:
-1 = add to end of list n = specific position in the list
Where Integer STG_AT_CUR_STG_POS = Use the current stage position for the position of the point
STG_AT_GIVEN_POS = Use the values in PointAry as the position of the point.
PointAry LPFloat Can be null if Position = STG_AT_CUR_STG_POS
Must be an array of 3 single giving the X, Y, and Z position of the point (as an absolute XYZ position with respect to the defined area of travel) to add for STG_AT_GIVEN_POS .
uiFlags Integer Flags are defined as follows:
STG_USE_ORIGINAL_XYZ 1 STG_USE_COARSE_XY 2 STG_USE_COARSE_Z 4 STG_USE_FINE_X 8 STG_USE_FINE_Y 16 STG_USE_FINE_Z 32 STG_USE_ CONTINUOUS_FOCUS 64 STG_AFA_LIST_RESERVED_1 128 STG_AFA_LIST_RESERVED_2 256 STG_AFA_LIST_RESERVED_3 512 STG_AFA_LIST_RESERVED_4 1024 STG_AFA_LIST_RESERVED_5 2048 STG_AFA_LIST_RESERVED_6 4096 STG_AFA_LIST_RESERVED_7 8192 STG_AFA_LIST_RESERVED_8 16384 STG_AFA_LIST_RESERVED_9 32768
Return Value 0 if successful, a negative error code if failed.
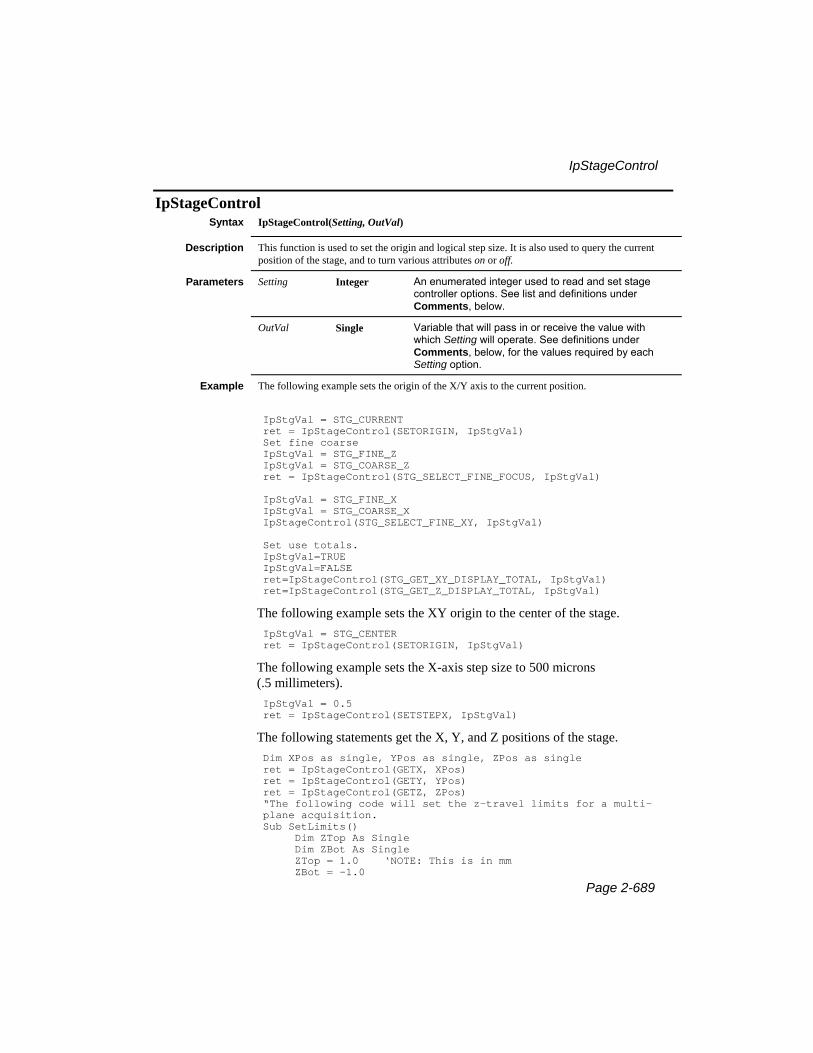
IpStageControl
Page 2-689
IpStageControl Syntax IpStageControl(Setting, OutVal)
Description This function is used to set the origin and logical step size. It is also used to query the current position of the stage, and to turn various attributes on or off.
Parameters Setting Integer An enumerated integer used to read and set stage controller options. See list and definitions under Comments, below.
OutVal Single Variable that will pass in or receive the value with which Setting will operate. See definitions under Comments, below, for the values required by each Setting option.
Example The following example sets the origin of the X/Y axis to the current position.
IpStgVal = STG_CURRENT ret = IpStageControl(SETORIGIN, IpStgVal) Set fine coarse IpStgVal = STG_FINE_Z IpStgVal = STG_COARSE_Z ret = IpStageControl(STG_SELECT_FINE_FOCUS, IpStgVal) IpStgVal = STG_FINE_X IpStgVal = STG_COARSE_X IpStageControl(STG_SELECT_FINE_XY, IpStgVal) Set use totals. IpStgVal=TRUE IpStgVal=FALSE ret=IpStageControl(STG_GET_XY_DISPLAY_TOTAL, IpStgVal) ret=IpStageControl(STG_GET_Z_DISPLAY_TOTAL, IpStgVal)
The following example sets the XY origin to the center of the stage. IpStgVal = STG_CENTER ret = IpStageControl(SETORIGIN, IpStgVal)
The following example sets the X-axis step size to 500 microns (.5 millimeters). IpStgVal = 0.5 ret = IpStageControl(SETSTEPX, IpStgVal)
The following statements get the X, Y, and Z positions of the stage. Dim XPos as single, YPos as single, ZPos as single ret = IpStageControl(GETX, XPos) ret = IpStageControl(GETY, YPos) ret = IpStageControl(GETZ, ZPos) “The following code will set the z-travel limits for a multi-plane acquisition. Sub SetLimits() Dim ZTop As Single Dim ZBot As Single ZTop = 1.0 ‘NOTE: This is in mm ZBot = -1.0

IpStageControl
Page 2-690
ret = IpStageControl(STG_SET_Z_TOP, ZTop) Debug.Print ret ret = IpStageControl(STG_SET_Z_BOT, ZBOT) Debug.Print ret End Sub” Examples: ‘Select random pattern IpStgVal = STG_RANDOM IpStageControl(STG_SET_SCAN_PATTERN, IpStgVal) ‘Use 5 frames out of current scan area IpStgVal = 5 IpStageControl(STG_NUM_RND_FRAMES, IpStgVal) ‘Recalculate the random list IpStgVal = 0 IpStageControl(STG_RECALC_RND, IpStgVal)
Comments The following table describes the values allowed in the Setting and Outval parameters.
Setting DESCRIPTION OutVal
SETSTEPX This command sets the X-axis logical step size, which is used by the IpStageStepXY function.
The logical step size, in millimeters.
SETSTEPY This command sets the Y-axis logical step size, which is used by the IpStageStepXY function.
The logical step size, in millimeters.
SETSTEPZ This command sets the Z-axis logical step size, which is used by the IpStageStepZ function.
The logical step size, in millimeters.
SETORIGIN This command sets the origin of the X, Y, and Z-axes. The X/Y origin is set as specified in the Outval parameter.
The position to which the X/Y origin is to be set. Must be one of the following: STG_UPLEFT - sets X/Y origin at the upper-left corner of the stage. STG_CENTER - sets X/Y origin at the center of the stage. STG_CURRENT - sets X/Y origin at the controller’s current X/Y position. STG_ZCURRENT - sets Z origin at the controller’s current Z position.

IpStageControl
Page 2-691
GETX This command gets the current X position of the stage, in millimeters. The value is written to the variable you specify in OutVal.
The name of the variable receiving the X location value. Be sure this variable is of BASIC type Single.
GETY This command gets the current Y position of the stage, in millimeters. This value is written to the variable you specify in OutVal.
The name of the variable receiving the Y location value. Be sure this variable is of BASIC type Single.
Setting DESCRIPTION Outval
GETZ This command gets the current Z position of the stage, in millimeters. This value is written to the variable you specify in OutVal.
The name of the variable receiving the Z location value. Be sure this variable is of BASIC type Single.
STG_GET_OFFSET_CORR
Gets the information to turn objective offset off or on
0 = off, 1 = on
STG_GET_3_POINT_PLANE
Gets the information to turn the 3 point plane off or on
0 = off, 1 = on
STG_PRESENT This command checks to see if there is a stage present.
Returns a boolean value of 1 if a stage is present, 0 if not.
STG_FOCUS_PRESENT
This command checks to see if there is a focus drive present. It may be anywhere in Stage-Pro or Scope-Pro.
Returns a boolean value of 0 if a focus drive is present anywhere in the configuration, 1 if not.
STG_SET_XY_SPEED
This command sets the speed of travel in the X and Y directions.
The speed of travel from 1 to 100 as a percentage of maximum speed. Be sure that this variable is of the BASIC type Single.
STG_SET_Z_SPEED
This command sets the speed of travel in the Z and Y direction. This function works only if your stage supports separate XY and Z speed settings
The speed of travel from 1 to 100 as a percentage of maximum speed. Be sure that this variable is of the BASIC type Single.
STG_SET_SCANAREA_X_
FRAMES
This command sets the width of the scan area in number of frames .
The scan area width in frames.

IpStageControl
Page 2-692
Setting DESCRIPTION Outval STG_SET_
SCANEARA_Y_FRAMES
This command sets the height of the scan area in number of frames
The scan area height in frames.
STG_SET_SCANAREA_X_M
M
This command sets the width of the scan area in millimeters.
The scan area width in millimeters.
STG_SET_SCANAREA_Y_M
M
This command sets the height of the scan area in millimeters.
The scan area height in millimeters.
STG_SET_Z_TOP
This command sets the top value of the Z stack in millimeters.
The top value of the Z stack in millimeters.
STG_SET_OFFSET_CORR
Sets the information to turn objective offset off or on
0 = off, 1 = on
STG_SET_Z_BOT
This command sets the bottom value of the Z stack in millimeters.
The bottom value of the Z stack in millimeters.
STG_SET_NUM_PLANES
This command sets the number of planes in the Z stack.
The number of planes in the Z stack.
STG_SELECT_BG_WS
This command is used to select the current workspace as the background.
Returns the doc ID for a valid workspace, or an error message.
STG_SELECT_BG_SUBTRACT
This command turns background subtraction on or off.
Returns a boolean value of 1 if background subtraction is on, 0 it it’s off.
STG_SELECT_BG_
FLATFIELD
This command turns background flatfield correction on or off.
Returns a boolean value of 1 if flatfield correction is on, 0 it it’s off.
STG_SELECT_TILE
This command turns image tiling on or off.
Returns a boolean value of 1 if image tiling is on, 0 it it’s off.
STG_SELECT_USE_BG_
CORRECTION
This command indicates if background correction should be used.
Returns a boolean value of 1 if background correction is on, 0 it it’s off.
STG_SELECT_USE_SAMPLE_
PATTERNS
This command indicates if pattern sampling should be used.
Returns a boolean value of 1 if pattern sampling is on, 0 it it’s off.

IpStageControl
Page 2-693
Setting DESCRIPTION Outval STG_SELECT_U
SE_ALL_GROUPS
This command indicates if all groups should be used.
Returns a boolean value of 1 if use all groups is on, 0 if it’s off.
STG_SELECT_USE_RESET_
SWAF_ORIGIN
This command will reset the Z origin after a software autofocus operation.
STG_GET_3_POINT_PLANE
Gets the information to turn the 3 point plane off or on
0 = off, 1 = on
STG_SET_XY_SEQ
This command turns the ability to save XY as a sequence.
Returns a boolean value of 1 if save XY as a sequence is on, 0 if it’s off
STG_SET_GUARD_PIX
This command sets the guard frame in pixels.
The size of the guard frame in pixels.
STG_NUM_RND_FRAMES
This command sets the number of frames to be used in the random pattern.
The number of frames to use.
STG_RECALC_RND
This command recalculates the number of frames to be used in the random pattern.
The number of frames to use.
STG_SET_SCAN_
PATTERN
This command sets the type of scan pattern
Must be one of the following: STG_SNAKE STG_SNAKE_90 STG_ONE_WAY STG_RANDOM
STG_SEELCT_FINE_XY
This command gets the fine or course X and/or Y values
0 = off, 1 = on
STG_GET_OBJ_OFFSET_CORR
Moves the stage to recent the view when an objective changes
0 = off, 1 = on
STG_SET_OBJ_OFFSET_CORR
Moves the stage to recent the view when an objective changes
0 = off, 1 = on
See Also IpStageStepXY, IpStageXY, IpStageStepZ, IpStageZ

IpStageCreateList
Page 2-694
IpStageCreateList Syntax IpStageCreateList ()
Description This function creates an empty AFA site list.
Return Value A zero-based list ID if successful, a negative error code if failed.
IpStageDeleteList Syntax IpStageDeleteList (ListID, PointsOnly)
Description This function deletes all the points in the list.
Parameters ListID Integer Indicates the ID of the existing list to be deleted
PointsOnly Integer True = Remove all the points, keep empty list. False = Remove all points, remove empty list.
Return Value 0 if successful, a negative error code if failed.
IpStageDeletePoint Syntax IpStageDeletePoint (ListID, Index)
Description This function deletes specific points in an existing list.
Parameters ListID Integer Indicates the ID of the existing list from which the points will be deleted.
Index Integer Index of the point to remove, from zero to the number of points in the list minus one.
Return Value 0 if successful, a negative error code if failed.

IpStageDocGet
Page 2-695
IpStageDocGet Syntax IpStageDocGet(Setting, DocID, Value)
Description This function gets information on an image captured by Stage-Pro. This is similar to the position information displayed by right clicking on the image.
Parameters Setting Integer Must be one of the following:
STGINF_X_POS returns the X offset of the image from the origin of the Area of Travel.
STGINF_Y_POS returns the Y offset of the image from the origin of the Area of Travel.
STGINF_Z_POS returns the Z position of the image.
STGINF_XY_FIELD returns the number of the field in the Scan Area.
STGINF_Z_FIELD returns the number of the plane.
STGINF_Z_NUMPLANES returns the number of planes in the Z stack.
STGINF_Z_MIN returns the Z position of the lowest plane with in-focus material. Will return 0 if the image was not captured using either Multi-Plane Focus or Software Auto-Focus. STGINF_Z_MAX returns the Z position of the highest plane with in-focus material. Will return 0 if the image was not captured using either Multi-Plane Focus or Software Auto-Focus. STGINF_Z_DIST returns the distance between the lowest and highest planes with in-focus material. Will return 0 if the image was not captured using either Multi-Plane Focus or Software Auto-Focus. STGINF_Z_BEST returns the Z position of the plane with the most in-focus material. Will return 0 if the image was not captured using Software Auto-Focus.

IpStageDocGet
Page 2-696
DocID Integer Document ID of the image to get information on. Can
use DOCSEL_ACTIVE for current active image.
Value Single Variable where the parameter value will be returned.
Example The following statement will get the absolute X offset of the current active workspace. Dim xPos As Single ret = IpStageDocGet (STGINF_X_POS, DOCSEL_ACTIVE, xPos)
Comments This information will only be attached to an image captured through Stage-Pro.

IpStageDocGetStr
Page 2-697
IpStageDocGetStr Syntax IpStageDocGetStr(Setting, DocID, String)
Description This function gets information on an image captured by Stage-Pro. This is similar to the position information displayed by right clicking on the image.
Parameters Setting Integer Must be one of the following:
STGINF_PATTERNNAME returns the name of the Sample Pattern that was active when the image was captured.
STGINF_GROUPNAME returns the name of the Group in Sample Pattern that was active when the image was captured.
STGINF_SAMPLENAME returns the name of the well.
DocID Integer Document ID of the image to get information on. Can use DOCSEL_ACTIVE for current active image.
String String Variable where the string will be returned.
Example The following statement will get the name of the well in which the current active image was captured: Dim MyString As String *60 ret = IpStageDocGetStr(STGINF_SAMPLENAME, DOCSEL_ACTIVE, MyString) The following statement will get the pattern name in which a given image was captured: Dim DocID As Short Dim szPtn As String *255 DocID = IpStageAcqFrame (ACQ_NEW) ret = IpStageDocGetStr (STGINF_PATTERNNAME, DocID, szPtn)
Comments This information will only be attached to an image captured through Stage-Pro.
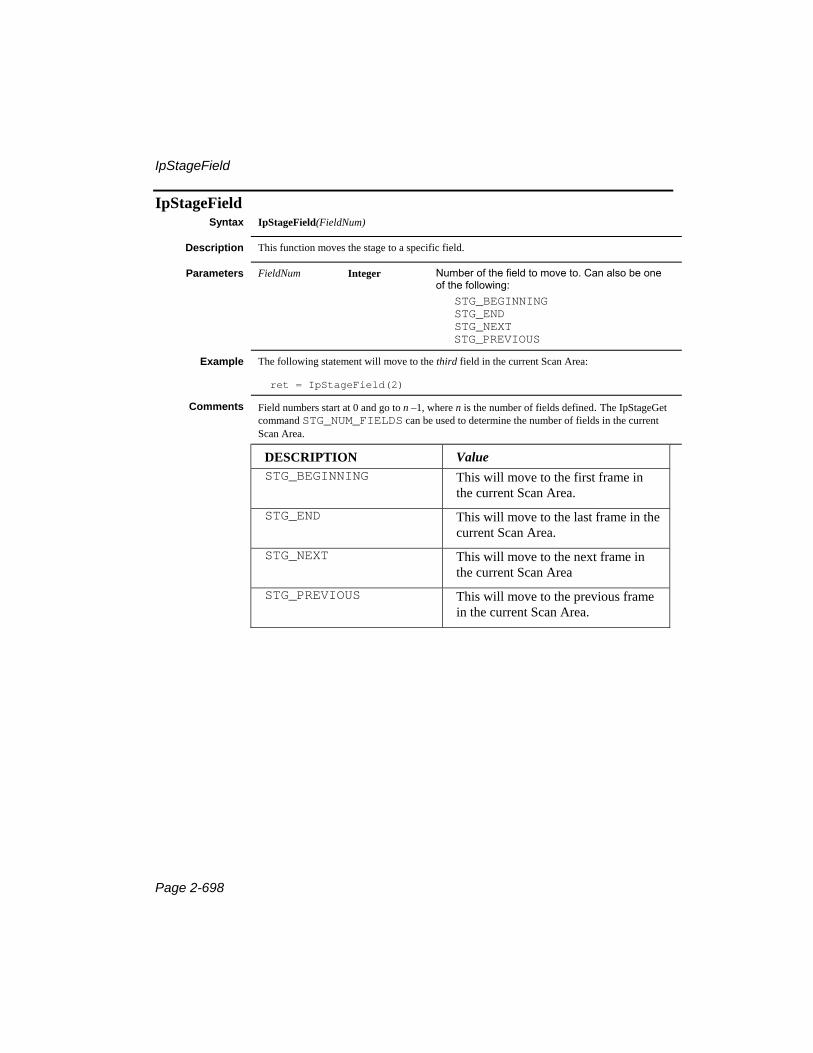
IpStageField
Page 2-698
IpStageField Syntax IpStageField(FieldNum)
Description This function moves the stage to a specific field.
Parameters FieldNum Integer Number of the field to move to. Can also be one of the following:
STG_BEGINNING STG_END STG_NEXT STG_PREVIOUS
Example The following statement will move to the third field in the current Scan Area:
ret = IpStageField(2)
Comments Field numbers start at 0 and go to n –1, where n is the number of fields defined. The IpStageGet command STG_NUM_FIELDS can be used to determine the number of fields in the current Scan Area.
DESCRIPTION Value STG_BEGINNING This will move to the first frame in
the current Scan Area.
STG_END This will move to the last frame in the current Scan Area.
STG_NEXT This will move to the next frame in the current Scan Area
STG_PREVIOUS This will move to the previous frame in the current Scan Area.
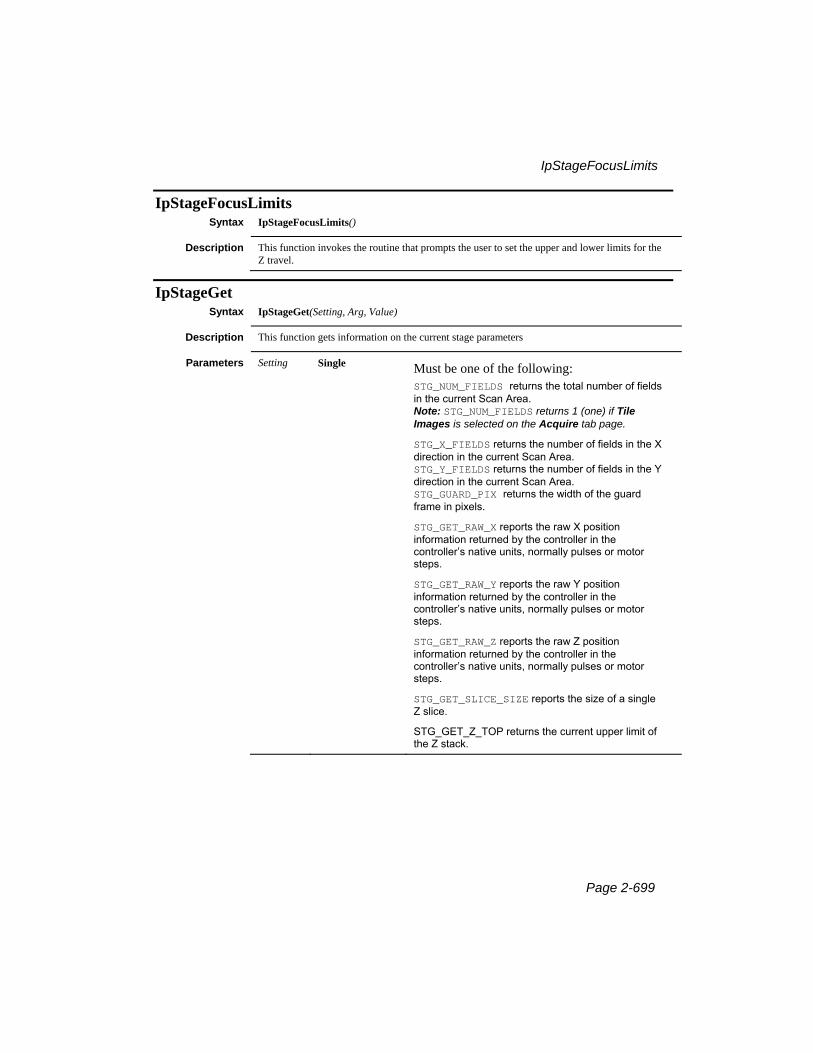
IpStageFocusLimits
Page 2-699
IpStageFocusLimits Syntax IpStageFocusLimits()
Description This function invokes the routine that prompts the user to set the upper and lower limits for the Z travel.
IpStageGet Syntax IpStageGet(Setting, Arg, Value)
Description This function gets information on the current stage parameters
Parameters Setting Single Must be one of the following: STG_NUM_FIELDS returns the total number of fields in the current Scan Area. Note: STG_NUM_FIELDS returns 1 (one) if Tile Images is selected on the Acquire tab page.
STG_X_FIELDS returns the number of fields in the X direction in the current Scan Area. STG_Y_FIELDS returns the number of fields in the Y direction in the current Scan Area. STG_GUARD_PIX returns the width of the guard frame in pixels.
STG_GET_RAW_X reports the raw X position information returned by the controller in the controller’s native units, normally pulses or motor steps.
STG_GET_RAW_Y reports the raw Y position information returned by the controller in the controller’s native units, normally pulses or motor steps.
STG_GET_RAW_Z reports the raw Z position information returned by the controller in the controller’s native units, normally pulses or motor steps.
STG_GET_SLICE_SIZE reports the size of a single Z slice.
STG_GET_Z_TOP returns the current upper limit of the Z stack.

IpStageGet
Page 2-700
Parameters Setting Single STG_GET_Z_BOT returns the current lower limit of the Z stack.
STG_GET_X_CORRECTION returns the difference between the origin of the area of travel and the origin of the scan area.
STG_GET_Y_CORRECTION returns the difference between the origin of the area of travel and the origin of the scan area. STG_TOTAL_AREA returns the total area of the Scan Area in square mm.
STG_X_MM returns the width of the frame in mm STG_Y_MM returns the height of the frame in mm STG_X_PIX returns the width of the frame in pixels STG_Y_PIX returns the height of the frame in pixels
STG_NUM_GROUPS returns the number of groups that are defined in the current Sample Pattern. Note: If Use Sample Pattern is not selected on the Acquire tab page, STG_NUM_GROUPS returns 0 (zero). If Use All Groups is not selected, STG_NUM_GROUPS returns 1 (one).
STG_CURR_GROUP returns the number (0 to n-1) of the current Group in the current Sample Pattern.
STG_NUM_WELLS returns the number of wells in the current Sample Pattern.
STG_NUM_WELLS_X returns the number of wells in X in the current Sample Pattern.
STG_NUM_WELLS_Y returns the number of wells in Y in the current Sample Pattern.
STG_CURR_WELL returns the number (0 to n-1) of the current well in the current Sample Pattern.
STG_CURR_XY_FIELD returns the number (0 to n-1) of the current frame in the current Scan Area.
STG_WELLS_IN_CURR_GROUP returns the number of wells in the current Group in the current Sample Pattern. Note: If Use Sample Pattern is not selected,
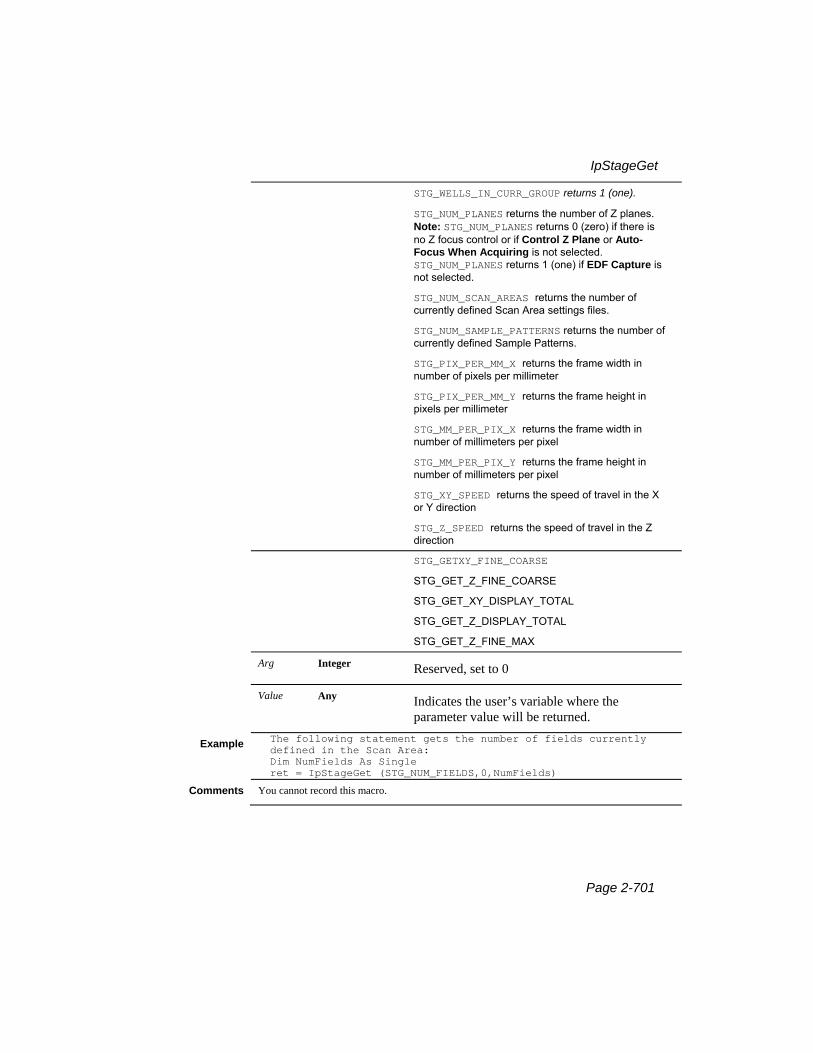
IpStageGet
Page 2-701
STG_WELLS_IN_CURR_GROUP returns 1 (one).
STG_NUM_PLANES returns the number of Z planes. Note: STG_NUM_PLANES returns 0 (zero) if there is no Z focus control or if Control Z Plane or Auto-Focus When Acquiring is not selected. STG_NUM_PLANES returns 1 (one) if EDF Capture is not selected.
STG_NUM_SCAN_AREAS returns the number of currently defined Scan Area settings files.
STG_NUM_SAMPLE_PATTERNS returns the number of currently defined Sample Patterns.
STG_PIX_PER_MM_X returns the frame width in number of pixels per millimeter
STG_PIX_PER_MM_Y returns the frame height in pixels per millimeter
STG_MM_PER_PIX_X returns the frame width in number of millimeters per pixel
STG_MM_PER_PIX_Y returns the frame height in number of millimeters per pixel
STG_XY_SPEED returns the speed of travel in the X or Y direction
STG_Z_SPEED returns the speed of travel in the Z direction
STG_GETXY_FINE_COARSE
STG_GET_Z_FINE_COARSE
STG_GET_XY_DISPLAY_TOTAL
STG_GET_Z_DISPLAY_TOTAL
STG_GET_Z_FINE_MAX
Arg Integer Reserved, set to 0
Value Any Indicates the user’s variable where the parameter value will be returned.
Example The following statement gets the number of fields currently defined in the Scan Area: Dim NumFields As Single ret = IpStageGet (STG_NUM_FIELDS,0,NumFields)
Comments You cannot record this macro.

IpStageGetAbsPoint
Page 2-702
IpStageGetAbsPoint Syntax IpStageGetAbsPoint (ListID, Index, IpfPointAry)
Description This function gets the absolute X, Y, and Z values of a specific point in an existing list.
Parameters ListID Integer Indicates the zero-based list ID.
Index Integer Indicates the zero-based point index.
IpfPointAry LPFLOAT An array of 3 floats to hold absolute x,y, and z position information with respect to the defined area of travel.
Return Value 0 if successful, a negative error code if failed.
IpStageGetAbsPointEx Syntax IpStageGetAbsPointEx(ListID, Index, IpfPointAry, uiFlags)
Description This function gets the absolute X, Y, and Z values of a specific point in an existing list.
Parameters ListID Integer Indicates the zero-based list ID.
Index Integer Indicates the zero-based point index.
IpfPointAry LPFLOAT An array of 3 floats to hold absolute x,y, and z position information with respect to the defined area of travel.
uiFlags Integer Flags are defined as follows: STG_USE_ORIGINAL_XYZ 1 STG_USE_COARSE_XY 2 STG_USE_COARSE_Z 4 STG_USE_FINE_X 8 STG_USE_FINE_Y 16 STG_USE_FINE_Z 32 STG_USE_CONTINUOUS_FOCUS 64 STG_AFA_LIST_RESERVED_1 128 STG_AFA_LIST_RESERVED_2 256 STG_AFA_LIST_RESERVED_3 512 STG_AFA_LIST_RESERVED_4 1024 STG_AFA_LIST_RESERVED_5 2048 STG_AFA_LIST_RESERVED_6 4096 STG_AFA_LIST_RESERVED_7 8192 STG_AFA_LIST_RESERVED_8 16384 STG_AFA_LIST_RESERVED_9 32768
Return Value 0 if successful, a negative error code if failed.
IpStageGetAbsPosition Syntax IpStageGetAbsPosition(IpPointAry)
Description This function gets the absolute positions of X, Y,and Z in Point (0), Point(1),and Point(2).

IpStageGetAbsPosition
Page 2-703
Parameters IpfPointAry Single An array of 3 singles to hold absolute x,y, and z position information with respect to the defined area of travel.
Comments The absolute position is the current relative position returned by the normal get functions, plus the distance from the origin of the area of travel to the origin of the scan area.
Example dim Point(3) as single
IpStageGetAbsPosition(Point)
Return Value 0 if successful, a negative error code if failed.

IpStageGetAbsPositionEx
Page 2-704
IpStageGetAbsPositionEx Syntax IpStageGetAbsPositionEx (lpPointAry,uiFlags)
Description This function gets the absolute positions of X, Y,and Z in Point (0), Point(1),and Point(2).
Parameters IpfPointAry Single An array of 3 singles to hold absolute x,y, and z position information with respect to the defined area of travel.
uiFlags Integer Flags are defined as follows: STG_USE_ORIGINAL_XYZ 1 STG_USE_COARSE_XY 2 STG_USE_COARSE_Z 4 STG_USE_FINE_X 8 STG_USE_FINE_Y 16 STG_USE_FINE_Z 32 STG_USE_CONTINUOUS_FOCUS 64 STG_AFA_LIST_RESERVED_1 128 STG_AFA_LIST_RESERVED_2 256 STG_AFA_LIST_RESERVED_3 512 STG_AFA_LIST_RESERVED_4 1024 STG_AFA_LIST_RESERVED_5 2048 STG_AFA_LIST_RESERVED_6 4096 STG_AFA_LIST_RESERVED_7 8192 STG_AFA_LIST_RESERVED_8 16384 STG_AFA_LIST_RESERVED_9 32768
IpStageGetListLength Syntax IpStageGetListLength (ListID)
Description This function gets the zero-based list length
Parameters ListID Integer Indicates the zero-based list ID.
Return Value The list length if successful, a negative error code if failed.
IpStageGetListLocked Syntax IpStageGetListLocked (ListID)
Description This function indicates if the list is locked. If so, the list cannot be modified.
Parameters ListID Integer Indicates the zero-based list ID.
Return Value The list length if successful, a negative error code if failed.
IpStageGetListModified Syntax IpStageGetListModified (ListID)

IpStageGetListModified
Page 2-705
Description This function indicates if the list has been modified.
Parameters ListID Integer Indicates the zero-based list ID.
Return Value The list length if successful, a negative error code if failed.

IpStageGetListName
Page 2-706
IpStageGetListName Syntax IpStageGetListName (ListID, szName)
Description This function gets the name of the zero-based list.
Parameters ListID Integer Indicates the zero-based list ID.
szName LPSTR Indicates the name of the list.
Return Value The list length if successful, a negative error code if failed.
IpStageGetNumLists Syntax IpStageGetNumLists ()
Description This function gets the zero-based number of lists
Return Value The number of lists if successful, -1 for none.
IpStageGoToListPos Syntax IpStageGoToListPos (ListID, Index)
Description This function moves the stage to the absolute XYZ value of a specific point in an existing list. Sets the origin of the scan area.
Parameters ListID Integer Indicates the zero-based list ID.
Index Integer Indicates the zero-based point index.
Return Value 0 if successful, a negative error code if failed.
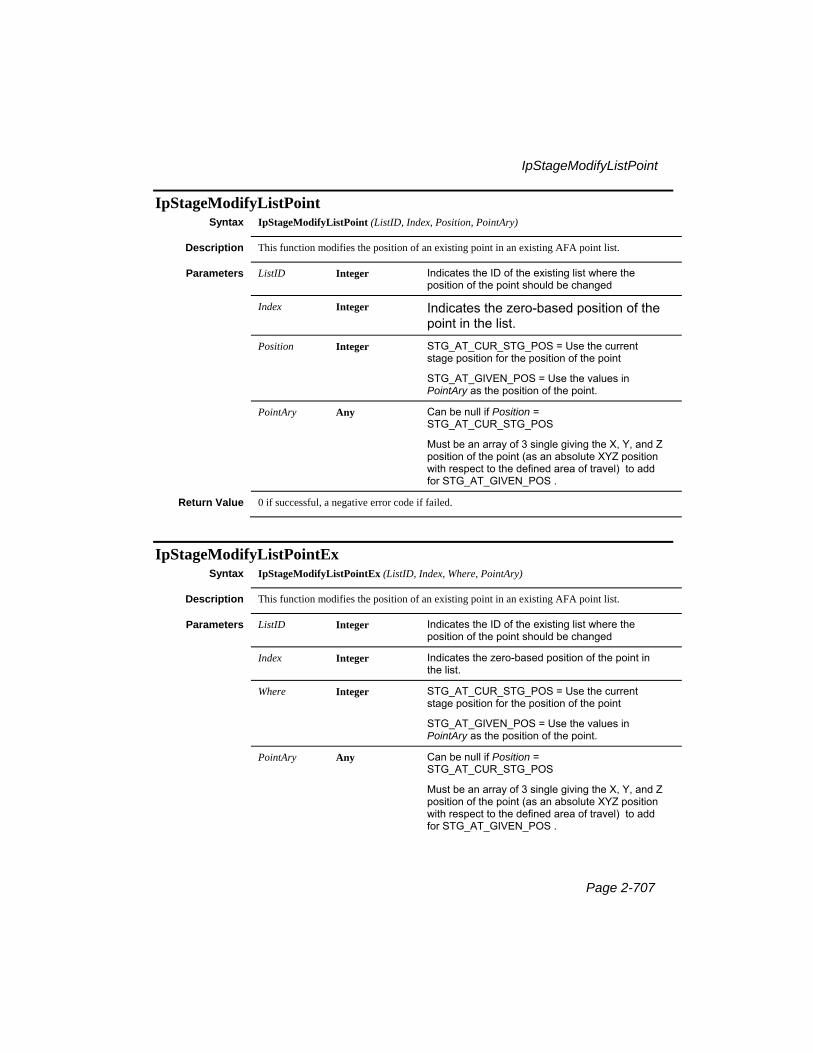
IpStageModifyListPoint
Page 2-707
IpStageModifyListPoint Syntax IpStageModifyListPoint (ListID, Index, Position, PointAry)
Description This function modifies the position of an existing point in an existing AFA point list.
Parameters ListID Integer Indicates the ID of the existing list where the position of the point should be changed
Index Integer Indicates the zero-based position of the point in the list.
Position Integer STG_AT_CUR_STG_POS = Use the current stage position for the position of the point
STG_AT_GIVEN_POS = Use the values in PointAry as the position of the point.
PointAry Any Can be null if Position = STG_AT_CUR_STG_POS
Must be an array of 3 single giving the X, Y, and Z position of the point (as an absolute XYZ position with respect to the defined area of travel) to add for STG_AT_GIVEN_POS .
Return Value 0 if successful, a negative error code if failed.
IpStageModifyListPointEx Syntax IpStageModifyListPointEx (ListID, Index, Where, PointAry)
Description This function modifies the position of an existing point in an existing AFA point list.
Parameters ListID Integer Indicates the ID of the existing list where the position of the point should be changed
Index Integer Indicates the zero-based position of the point in the list.
Where Integer STG_AT_CUR_STG_POS = Use the current stage position for the position of the point
STG_AT_GIVEN_POS = Use the values in PointAry as the position of the point.
PointAry Any Can be null if Position = STG_AT_CUR_STG_POS
Must be an array of 3 single giving the X, Y, and Z position of the point (as an absolute XYZ position with respect to the defined area of travel) to add for STG_AT_GIVEN_POS .
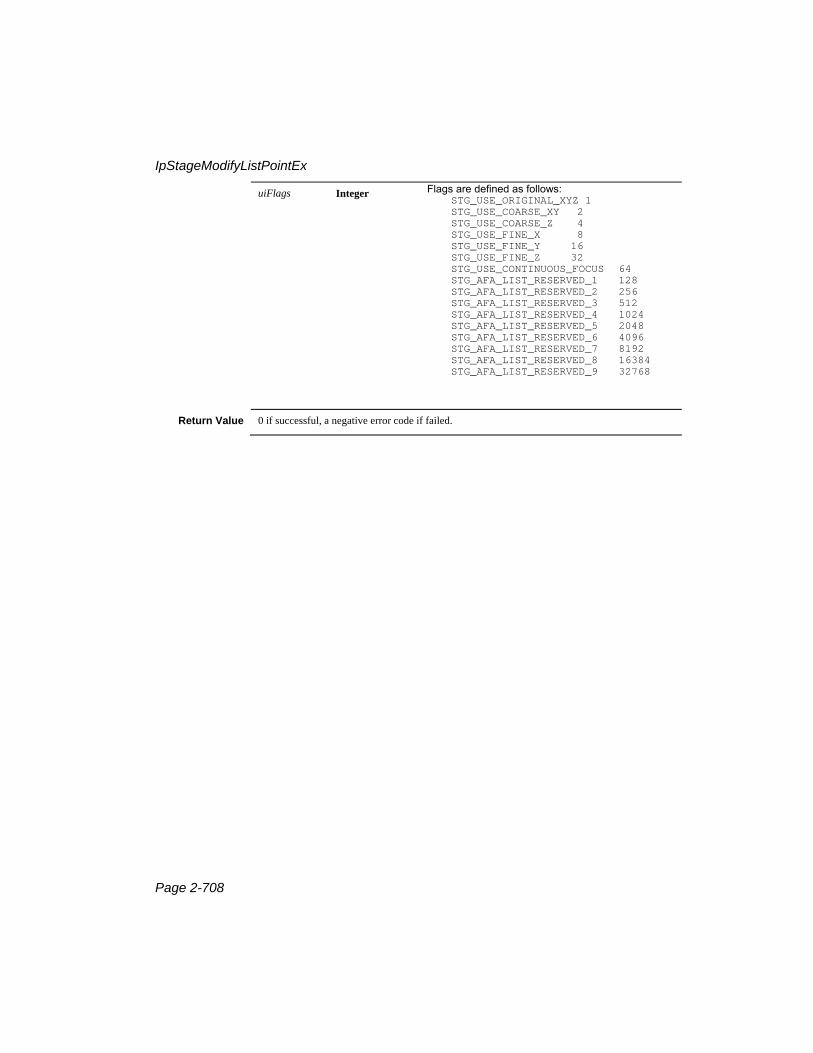
IpStageModifyListPointEx
Page 2-708
uiFlags Integer Flags are defined as follows: STG_USE_ORIGINAL_XYZ 1 STG_USE_COARSE_XY 2 STG_USE_COARSE_Z 4 STG_USE_FINE_X 8 STG_USE_FINE_Y 16 STG_USE_FINE_Z 32 STG_USE_CONTINUOUS_FOCUS 64 STG_AFA_LIST_RESERVED_1 128 STG_AFA_LIST_RESERVED_2 256 STG_AFA_LIST_RESERVED_3 512 STG_AFA_LIST_RESERVED_4 1024 STG_AFA_LIST_RESERVED_5 2048 STG_AFA_LIST_RESERVED_6 4096 STG_AFA_LIST_RESERVED_7 8192 STG_AFA_LIST_RESERVED_8 16384 STG_AFA_LIST_RESERVED_9 32768
Return Value 0 if successful, a negative error code if failed.
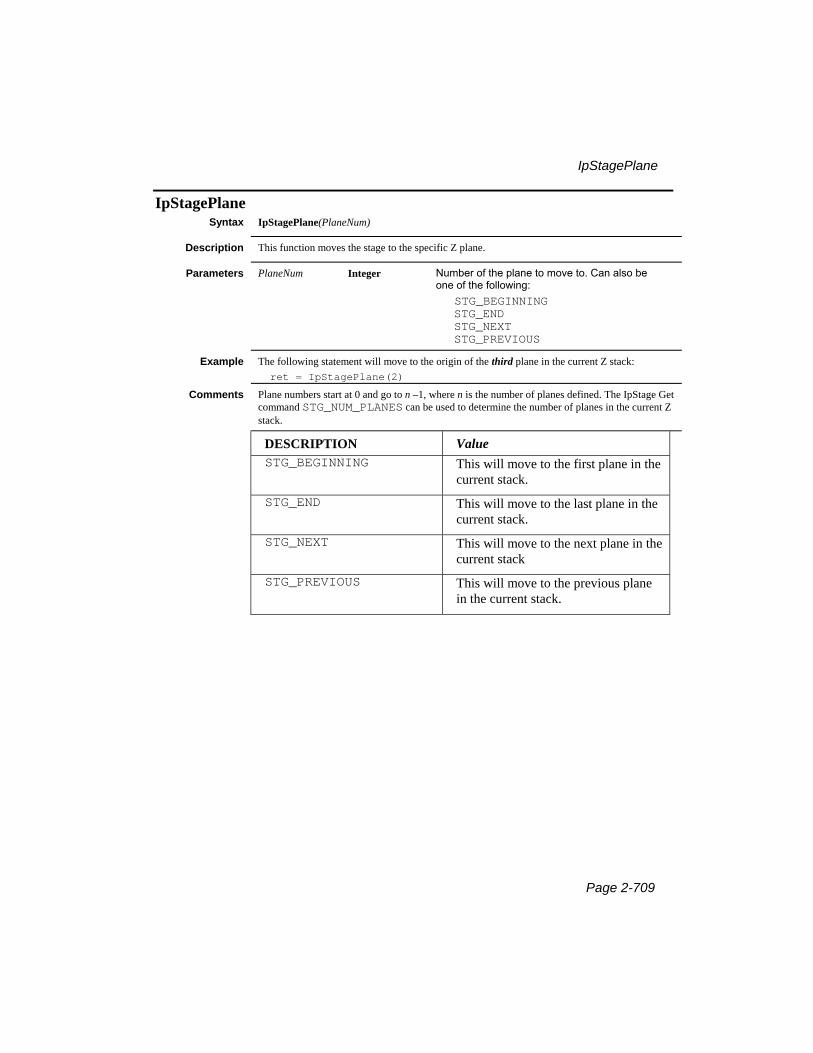
IpStagePlane
Page 2-709
IpStagePlane Syntax IpStagePlane(PlaneNum)
Description This function moves the stage to the specific Z plane.
Parameters PlaneNum Integer Number of the plane to move to. Can also be one of the following:
STG_BEGINNING STG_END STG_NEXT STG_PREVIOUS
Example The following statement will move to the origin of the third plane in the current Z stack: ret = IpStagePlane(2)
Comments Plane numbers start at 0 and go to n –1, where n is the number of planes defined. The IpStage Get command STG_NUM_PLANES can be used to determine the number of planes in the current Z stack.
DESCRIPTION Value STG_BEGINNING This will move to the first plane in the
current stack.
STG_END This will move to the last plane in the current stack.
STG_NEXT This will move to the next plane in the current stack
STG_PREVIOUS This will move to the previous plane in the current stack.

IpStageSampleGroupByName
Page 2-710
IpStageSampleGroupByName Syntax IpStageGroupByName(GroupName)
Description This function loads a Group within a Sample Pattern.
Parameters GroupName String The name of a Group as it appears in the list box on the Sample Pattern tab.
Example The following statement will load the group named “Group 1”. ret = IpStageGroupByName(“Group 1”)
Comments This function does a string compare to match the name supplied with a name in the list.
IpStageSampleGroupByNum Syntax IpStageGroupByNum(GroupNum)
Description This function loads a Group within a Sample Pattern.
Parameters GroupNum Integer The number of the position of a Group as it appears in the list box on the Sample Pattern tab.
Example The following statement will load the group that is second in the Group list. ret = IpStageGroupByNum(1)
Comments Group numbers start at 0 (zero) and continue to n-1, where n is the number of groups defined. The IpStageGet Command STG_NUM_GROUPS can be used to determine the number of groups defined.

IpStageSamplePatternByName
Page 2-711
IpStageSamplePatternByName Syntax IpStageSamplePatternByName(PatternName)
Description This function loads a Sample Pattern.
Parameters PatternName String The name of a Sample Pattern as it appears in the list box on the Sample Pattern tab.
Example The following statement will load the template for a 96-well plate. ret = IpStageSamplePatternByName(“Costar96WellPlate”)
Comments When Stage-Pro is loaded it scans the ScpPtn directory and loads all Sample Pattern names into the list box on the Sample Pattern tab. This function does a string compare to match the name supplied with a name in the list, therefore there is no path associated with the string.
IpStageSamplePatternByNum Syntax IpStageSamplePatternByNum(PatternNum)
Description This function loads a Sample Pattern.
Parameters PatternNum Integer The number of the position of a Sample Pattern as it appears in the list box on the Sample Pattern tab.
Example The following statement will load the template for the second pattern in the Sample Pattern list. ret = IpStageSamplePatternByNum(1)
Comments Sample Pattern numbers start at 0 (zero) and continue to n-1, where n is the number of patterns defined. The IpStageGet Command STG_NUM_PATTERNS can be used to determine the number of patterns defined.
IpStageSetListName Syntax IpStageSetListName (ListID, szName)
Description This function sets the name of the zero-based list.
Parameters ListID Integer Indicates the zero-based list ID.
szName LPSTR Indicates the name of the list.
Return Value The list length if successful, a negative error code if failed.

IpStageSetListLocked
Page 2-712
IpStageSetListLocked Syntax IpStageSetListLocked (ListID,bLocked)
Description This function indicates if the list is locked. If so, the list cannot be modified.
Parameters ListID Integer Indicates the zero-based list ID.
bLocked Integer Turns the lock on or off.
Comments The get / set list locked functions will allow AFA to flag a set as being locked. If a list is locked the Stage-Pro interface will not modify that list. The add point, delete point, sort list, and delete list macros will fail (and return an error code) if called for a locked list.
Return Value The list length if successful, a negative error code if failed.
IpStageSetListModified Syntax IpStageSetListModified (ListID, bModified)
Description This function indicates if the list has been modified.
Parameters ListID Integer Indicates the zero-based list ID.
bModified Integer Turns the modification on or off.
Comments The get / set modified functions add a flag to the list structure that Stage-Pro will set if Stage-Pro modifies the list. Stage-Pro will not specifically look for this flag, but will incorporate any macro/AFA changes when the tab regains focus.
Return Value The list length if successful, a negative error code if failed.
IpStageScanPatternByName Syntax IpStageScanPatternByName(ScanPatternName)
Description This function loads a Scan Area and Pattern.
Parameters ScanPatternName String The name of a Scan Area and Pattern as it appears in the list box on the Scan Area tab.
Example The following statement will load the Scan Area and Pattern named “ScanArea1”. ret = IpStageScanPatternByName(“ScanArea1”)
Comments This function does a string compare to match the name supplied with a name in the Scan Area and Pattern list box on the Scan Area tab.

IpStageScanPatternByNum
Page 2-713
IpStageScanPatternByNum Syntax IpStageScanPatternByNum(ScanPatternNum)
Description This function loads a Scan Area and Pattern.
Parameters ScanPatternNum Integer The number of the position of a Scan Area and Pattern as it appears in the list box on the Scan Area tab.
Example The following statement will load the Scan Area and Pattern that is second in the Scan Area and
Pattern list of the Scan Area tab. ret = IpStageScanPatternByNum(1)
Comments Scan Area numbers start at 0 (zero) and continue to n-1, where n is the number of Scan Areas defined. The IpStageGet Command STG_NUM_SCAN_AREAS can be used to determine the number of Scan Areas defined.
IpStageSetArea Syntax IpStageSetArea(Method)
Description This function prompts the user to set the scan area visually. Depending on the second parameter, you will be asked for the corners or the sides of the Scan Area.
Parameters Method Integer Indicates how to set the Scan Area: STG_CORNERS STG_SIDES
Example The following statement will set the upper left and lower right corners of the Scan Area: ret = IpStageSetArea (STG_CORNERS)
Comments Set the Scan Area by the corners for areas defined as rectangles. Set the Scan Area by the sides for round objects. This function has the same effect as using the Corners and Sides radio buttons, and clicking the Set Area by Stage button.

IpStageShow
Page 2-714
IpStageShow Syntax IpStageShow(bShow)
Description This function displays or hides the “Stage-Pro” user interface.
Parameters bShow Integer An integer value specifying whether the Stage-Pro window is to be shown (STG_SHOW) or hidden (STG_HIDE).
Use STG_SHOW_MID to show the minimal dialog
Example The following statement will open the Stage-Pro window. ret = IpStageShow(STG_SHOW)
Comments It is not necessary to display the Stage-Pro dialog when executing any of the stage controller functions from a macro. Its disposition, shown or hidden, is entirely up to you. You will want to display the dialog if your program requires the user to make choices within it; however, if your purpose is merely to move the stage in a predefined manner, there is no need to display the dialog.
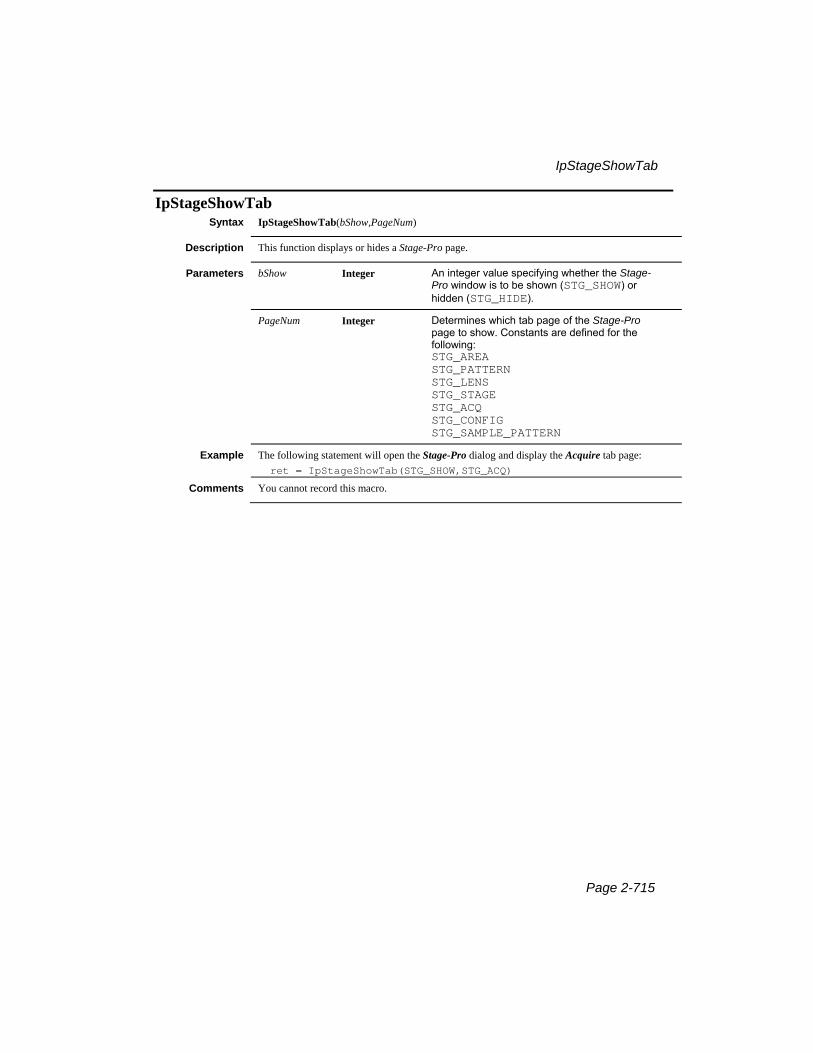
IpStageShowTab
Page 2-715
IpStageShowTab Syntax IpStageShowTab(bShow,PageNum)
Description This function displays or hides a Stage-Pro page.
Parameters bShow Integer An integer value specifying whether the Stage-Pro window is to be shown (STG_SHOW) or hidden (STG_HIDE).
PageNum Integer Determines which tab page of the Stage-Pro page to show. Constants are defined for the following: STG_AREA STG_PATTERN STG_LENS STG_STAGE STG_ACQ STG_CONFIG STG_SAMPLE_PATTERN
Example The following statement will open the Stage-Pro dialog and display the Acquire tab page: ret = IpStageShowTab(STG_SHOW,STG_ACQ)
Comments You cannot record this macro.

IpStageSettings
Page 2-716
IpStageSettings Syntax IpStageSettings(FileSpec, Save)
Description This loads or saves a Stage-Pro settings file (*.stg).
Parameters FileSpec String The path and name of the Stage-Pro settings file.
Save Integer Indicates whether to load (STG_LOAD) or save (STG_LOAD) the settings.
Example The following statement will save the current stage settings: ret = IpStageSettings(“c:\ipwin7\test.stg”, STG_SAVE)
Comments If template mode is off, the macro will use the file and database names passed in the string. If template mode is on, the file name passed in the string is ignored, and a Windows file box is displayed; the user is forced to enter the path and name.
IpStageSlideLoader Syntax IpStageSlideLoader (short Attr, short iCass, short iSlide)
Description This function controls the Prior slide loader for an automated stage.
Parameters Attr Short Controls the slide loader movement. Must be one of the following:
STG_SL_FAST_INIT: Initializes the slide loader. Parameters 2 and 3 are set to 0. STG_SL_CASS_TO_OBS: Places the selected slide from the cassette onto the stage. STG_SL_OBS_TO_CASS: Returns the selected slide from the stage to the cassette. STG_SL_SELECT_GROUP_NUM: Selects a group of slides to observe. Parameter 2 is the group number and parameter 3 is set to 0.
iCass Short Indicates the number of the selected cassette to use.
iSlide Short Indicates the number of the slide to use.

IpStageSortList
Page 2-717
IpStageSortList Syntax IpStageSortList (ListID, iByMinDist)
Description This function sorts an existing AFA point list.
Parameters ListID Integer Indicates the ID of the existing list to be sorted.
ByMinDist Integer 1 = Sort by minimum distance 0 = Sort by XY
Return Value The list length if successful, a negative error code if failed.
IpStageStepXY Syntax IpStageStepXY(Direction)
Description This function moves the stage by one logical step, relative to its current position.
Parameters Direction Integer An enumerated integer that specifies the direction in which the stage is to move. Must be one of the following:
STG_UP
STG_RIGHT
STG_DOWN
STG_LEFT
See definitions under Comments, below
Example The following example sets the X-axis logical step size to 0.7 millimeters, then moves the stage right by this amount. ret = IpStageControl(SETSTEPX, 0.7) ret = IpStageStepXY(STG_RIGHT)
Comments Use IpStageControl SETSTEPX or SETSTEPY commands to set the logical step size.
The following table describes the values allowed in Direction.
Direction DESCRIPTION STG_UP This value moves the stage one logical step to the north.
STG_RIGHT This value moves the stage one logical step to the east.
STG_DOWN
This value moves the stage one logical step to the south.
STG_LEFT This value moves the stage one logical step to the west.
See Also IpStageControl, IpStageXY, IpStageStepZ, IpStageZ

IpStageStepZ
Page 2-718
IpStageStepZ Syntax IpStageStepZ(Direction)
Description This function moves the focus by one logical step, relative to its current position.
Parameters Direction Integer An enumerated integer that specifies the direction in which the stage is to move. Must be one of the following:
STG_UP - Moves the stage one logical step closer to the lens.
STG_DOWN - Moves the stage one logical step away from the lens.
STG_AUTO - Positions the stage automatically using the hardware’s auto-focus facility.
Example The following example sets the Z-axis step size to 20 microns (if the current unit is millimeters), then moves the stage up by this amount. ret = IpStageControl(SETSTEPZ, 0.02) ret = IpStageStepZ(STG_UP)
Comments Use the IpStageControl SETSTEPZ command to set the logical step size.
Do not use the STG_AUTO option unless your motorized stage hardware is equipped with automatic focus circuitry. Using it with a controller that does not have auto-focus can cause the hardware to hang.
See Also IpStageControl, IpStageStepXY, IpStageXY, IpStageZ

IpStageWell
Page 2-719
IpStageWell Syntax IpStageWell(WellNum)
Description This function moves the stage to the specific well.
Parameters WellNum Integer Number of the well to move to. Can also be one of the following:
STG_BEGINNING STG_END STG_NEXT STG_PREVIOUS
Example The following statement will move to the origin of the third well in the currently selected group of the current sample pattern. IpStageWell(2)
Comments Well numbers start at 0 and go to n –1 (where n is the number of wells in the current group of the current sample pattern). The IpStageGet command STG_NUM_WELLS can be used to determine the number of wells in the currently selected group of the current sample pattern.
DESCRIPTION Value STG_BEGINNING This will move to the first well in the
currently selected group of the current sample pattern.
STG_END This will move to the last well in the currently selected group of the current sample pattern.
STG_NEXT This will move to the next well in the currently selected group of the current sample pattern.
STG_PREVIOUS This will move to the previous well in the currently selected group of the current sample pattern.
Wells are numbered by rows. For example, on a 96-well plate, wells 0 through 11 correspond to wells A,1 through A,12; wells 12 through 23 to well B,1 through B,12; etc.
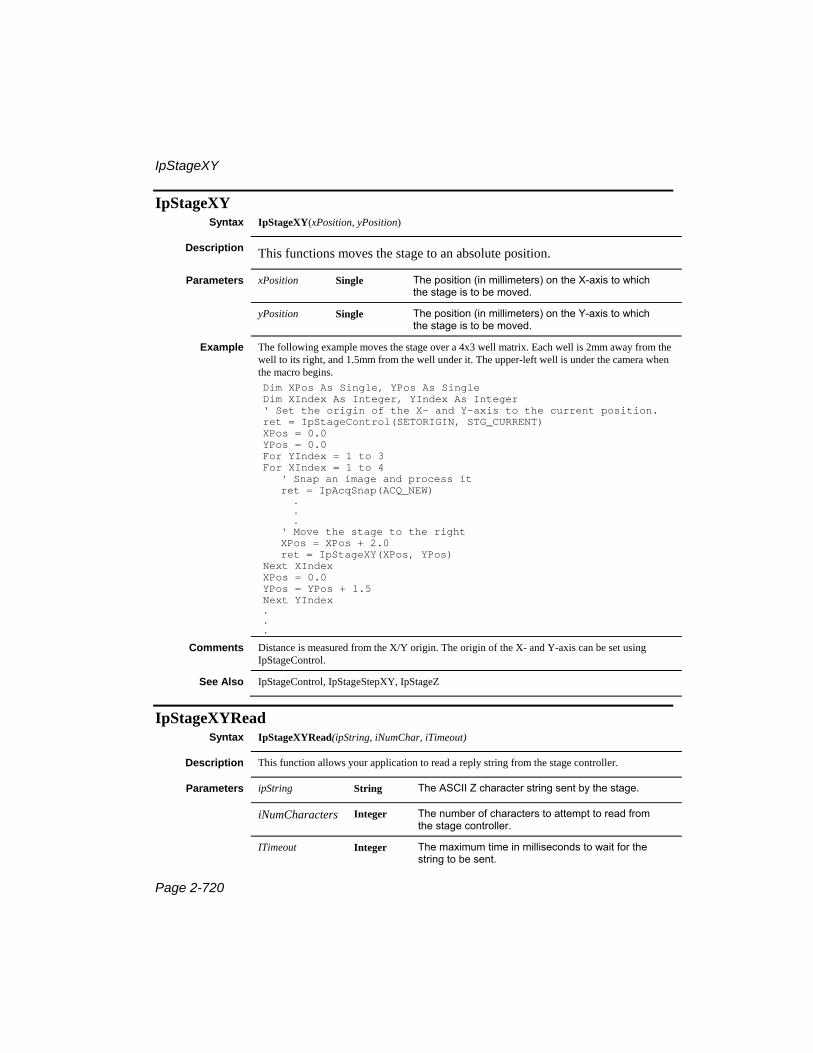
IpStageXY
Page 2-720
IpStageXY Syntax IpStageXY(xPosition, yPosition)
Description This functions moves the stage to an absolute position.
Parameters xPosition Single The position (in millimeters) on the X-axis to which the stage is to be moved.
yPosition Single The position (in millimeters) on the Y-axis to which the stage is to be moved.
Example The following example moves the stage over a 4x3 well matrix. Each well is 2mm away from the well to its right, and 1.5mm from the well under it. The upper-left well is under the camera when the macro begins. Dim XPos As Single, YPos As Single Dim XIndex As Integer, YIndex As Integer ‘ Set the origin of the X- and Y-axis to the current position. ret = IpStageControl(SETORIGIN, STG_CURRENT) XPos = 0.0 YPos = 0.0 For YIndex = 1 to 3 For XIndex = 1 to 4 ‘ Snap an image and process it ret = IpAcqSnap(ACQ_NEW) . . . ‘ Move the stage to the right XPos = XPos + 2.0 ret = IpStageXY(XPos, YPos) Next XIndex XPos = 0.0 YPos = YPos + 1.5 Next YIndex . . .
Comments Distance is measured from the X/Y origin. The origin of the X- and Y-axis can be set using IpStageControl.
See Also IpStageControl, IpStageStepXY, IpStageZ
IpStageXYRead Syntax IpStageXYRead(ipString, iNumChar, iTimeout)
Description This function allows your application to read a reply string from the stage controller.
Parameters ipString String The ASCII Z character string sent by the stage.
iNumCharacters Integer The number of characters to attempt to read from the stage controller.
ITimeout Integer The maximum time in milliseconds to wait for the string to be sent.

IpStageXYRead
Page 2-721
Return Value The number of characters read if successful; 0 (zero) if no response; or negative if failed.
Comments This function is usually used after IpStageXYWrite to receive a reply from the stage when the command is complete.
See Also IpStageXYWrite
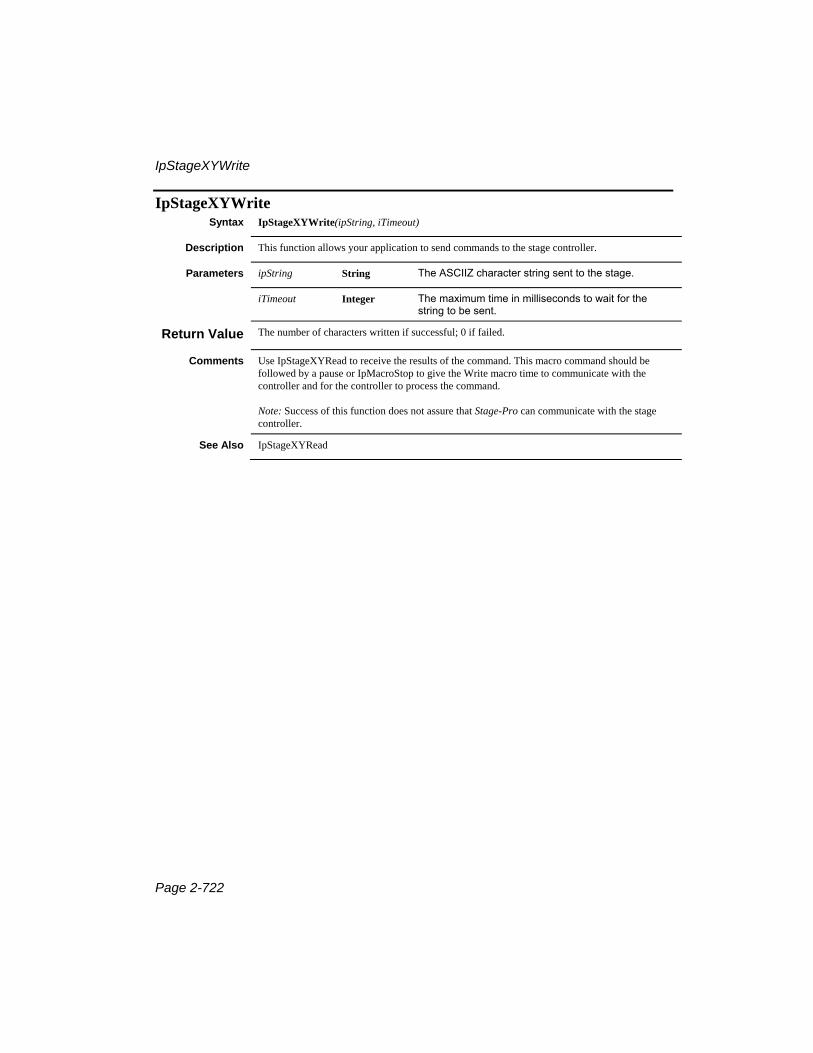
IpStageXYWrite
Page 2-722
IpStageXYWrite Syntax IpStageXYWrite(ipString, iTimeout)
Description This function allows your application to send commands to the stage controller.
Parameters ipString String The ASCIIZ character string sent to the stage.
iTimeout Integer The maximum time in milliseconds to wait for the string to be sent.
Return Value The number of characters written if successful; 0 if failed.
Comments Use IpStageXYRead to receive the results of the command. This macro command should be followed by a pause or IpMacroStop to give the Write macro time to communicate with the controller and for the controller to process the command. Note: Success of this function does not assure that Stage-Pro can communicate with the stage controller.
See Also IpStageXYRead
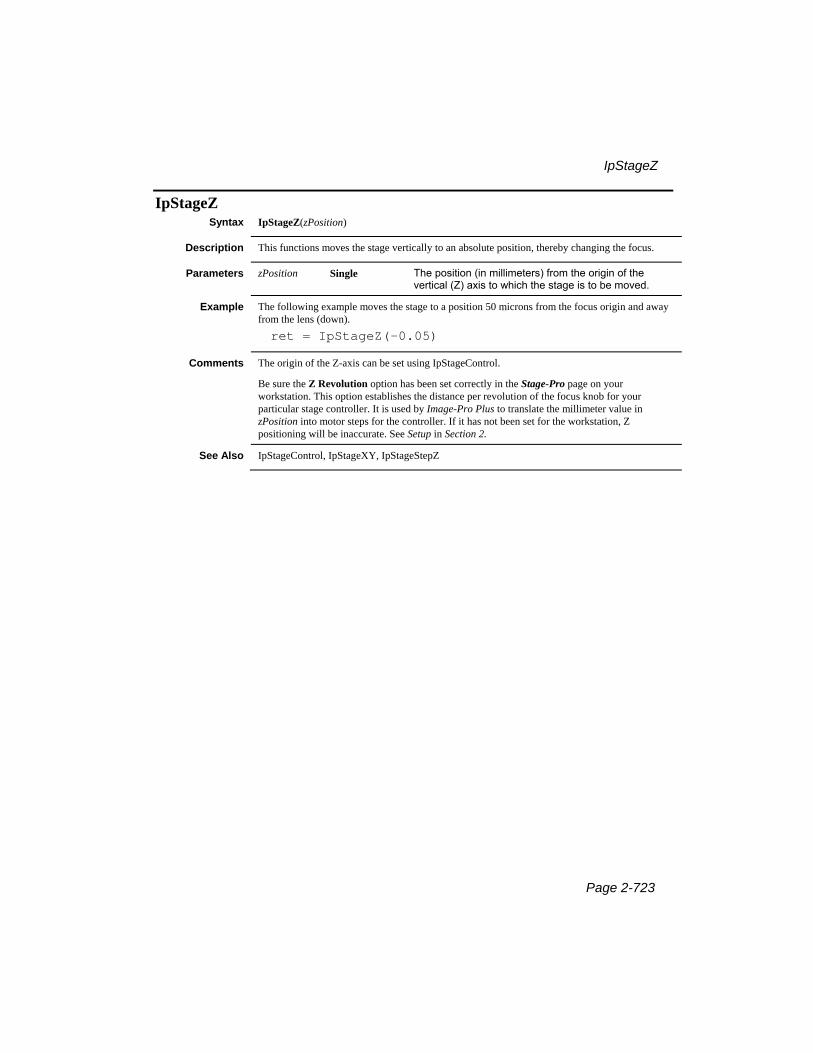
IpStageZ
Page 2-723
IpStageZ Syntax IpStageZ(zPosition)
Description This functions moves the stage vertically to an absolute position, thereby changing the focus.
Parameters zPosition Single The position (in millimeters) from the origin of the vertical (Z) axis to which the stage is to be moved.
Example The following example moves the stage to a position 50 microns from the focus origin and away from the lens (down). ret = IpStageZ(-0.05)
Comments The origin of the Z-axis can be set using IpStageControl.
Be sure the Z Revolution option has been set correctly in the Stage-Pro page on your workstation. This option establishes the distance per revolution of the focus knob for your particular stage controller. It is used by Image-Pro Plus to translate the millimeter value in zPosition into motor steps for the controller. If it has not been set for the workstation, Z positioning will be inaccurate. See Setup in Section 2.
See Also IpStageControl, IpStageXY, IpStageStepZ

IpStageZRead
Page 2-724
IpStageZRead Syntax IpStageZRead(ipString, iNumChar, iTimeout)
Description This function allows your application to receive a focus command.
Parameters ipString String The ASCIIZ character string sent by the focus hardware.
iNumCharacters Integer The number of characters to attempt to read from the stage controller.
iTimeout Integer The maximum time in milliseconds to wait for the string to be sent.
Return Value The number of characters read if successful; 0 if failed.
See Also IpStageZWrite
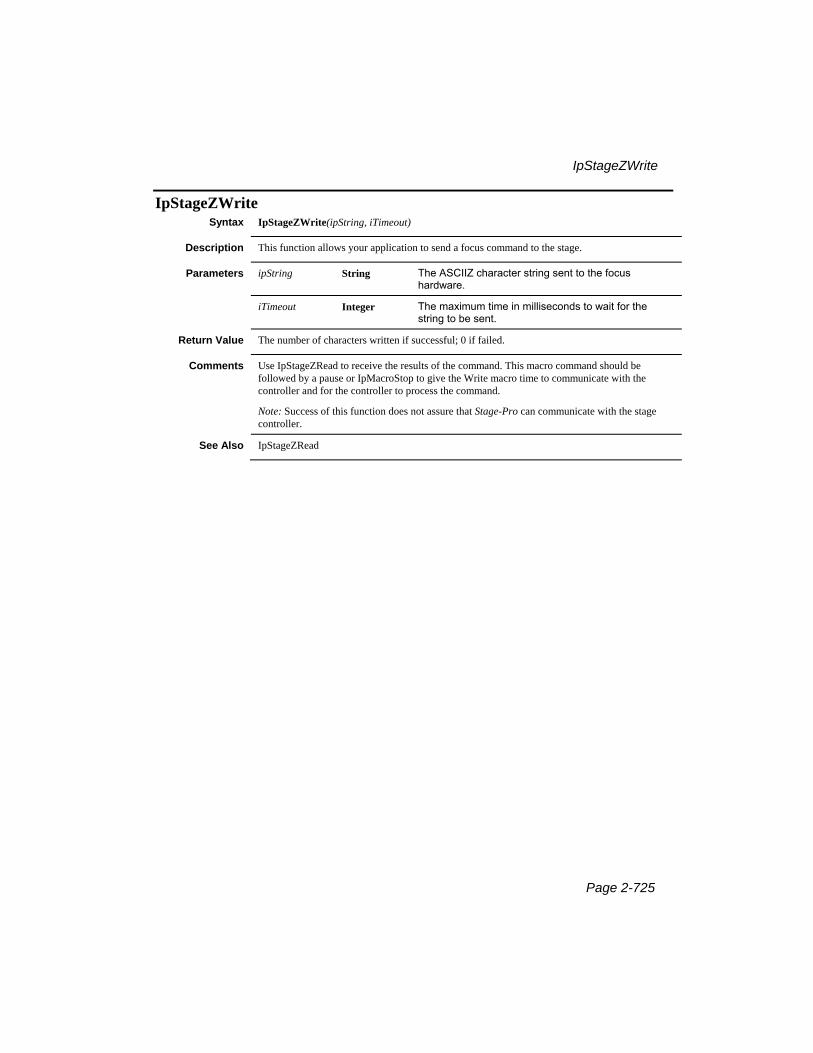
IpStageZWrite
Page 2-725
IpStageZWrite Syntax IpStageZWrite(ipString, iTimeout)
Description This function allows your application to send a focus command to the stage.
Parameters ipString String The ASCIIZ character string sent to the focus hardware.
iTimeout Integer The maximum time in milliseconds to wait for the string to be sent.
Return Value The number of characters written if successful; 0 if failed.
Comments Use IpStageZRead to receive the results of the command. This macro command should be followed by a pause or IpMacroStop to give the Write macro time to communicate with the controller and for the controller to process the command.
Note: Success of this function does not assure that Stage-Pro can communicate with the stage controller.
See Also IpStageZRead

IpSurfAutoRefresh
Page 2-726
IpSurfAutoRefresh Syntax IpSurfAutoRefresh(bAutoRefresh)
Description When AutoRefresh is on, changing the surface plot attributes using IpSurfSet will refresh the plot.
Parameters bAutoRefresh Integer A value of 0 or 1 specifying whether the auto-refresh function is on or off. Where: 0 - AutoRefresh off 1 - AutoRefresh on
Comments Leaving the AutoRefresh on and changing the attributes may slow down the process if there are more than a few attributes. A better method is to turn AutoRefresh off, change the attributes, and turn AutoRefresh back on.
See Also IpSurfOutput, IpSurfSet, IpSurfGet, IpSurfShow

IpSurfGet
Page 2-727
IpSurfGet Syntax IpSurfGet(Attr, Value)
Description Gets the various attributes of the surface plot diagram.
Parameters Attr Integer Attribute to be found. See table below:
Value Long See table below:
ATTRIB ALLOWED VALUES SP_VIEW_ELEVATION any integer 0-90 SP_VIEW_ROTATION any integer -180 - 180
SP_STYLE_TYPE SPS_WIREFRAME = wire frame (0) SPS_UNSHADED = unshaded (1) SPS_SHADED = shaded (2)
SP_STYLE_WIREFRAME_SPAN any integer 0-100
SP_STYLE_DRAWEDGES
0 - edges off 1 - edges on
SP_STYLE_DRAWAXES
0 - axes off 1 - axes on
SP_STYLE_ZSCALE any integer 0 - 400
SP_LIGHT_ELEVATION any integer 0 - 90
SP_LIGHT_ROTATION any interger -180 to 180
SP_LIGHT_COLOR color reference
SP_AMBIENT_REFLECTANCE any integer 0 - 100
SP_DIFFUSE_REFLECTANCE
any integer 0 -100
SP_SPECULAR_REFLECTANCE any integer 0 -100 SP_GLOSS any integer 0 -100 SP_COLORIZED_FROM any integer 0 - 255 SP_COLORIZED_TO any integer 0 - 255 SP_COLORIZED_FROM_COLOR color reference SP_COLORIZED_TO_COLOR
color reference
SP_SURFACE_COLOR_SPIN
any integer 0 - 5
SP_SURFACE_COLOR_SPREAD 0 - spread off 1 - spread on
Example ret = IpSurfGet(SP_VIEW_ELEVATION,45)
See Also IpSurfShow, IpSurfOutput, IpSurfAutoRefresh

IpSurfOutput
Page 2-728
IpSurfOutput Syntax IpSurfOutput(Value)
Description This function sends the surface plot diagram to the specified location.
Parameters Value Integer Indicate where the output should be sent: SPO_NEW = new image (1) SPO_NEW_WITH_ISCALE = new image with intensity scale (2) SPO_PRINTER = printer (3) SPO_CLIPBOARD - clipboard (4)
Example ret = IpSurfOutput(SPO_NEW)
See Also IpSurfShow, IpSurfSet, IpSurfGet, IpSurfAutoRefresh
IpSurfSet Syntax IpSurfSet(Attr, Value)
Description Sets the various attributes of the surface plot diagram.
Parameters Attr Integer Attribute to be set. See table below:
Value Long See table below:
ATTRIB ALLOWED VALUES SP_DEFAULT any value, sets all attributes to
default values. SP_VIEW_ELEVATION any integer 0-90 SP_VIEW_ROTATION any integer -180 - 180
SP_STYLE_TYPE SPS_WIREFRAME = wire frame (0) SPS_UNSHADED = unshaded (1) SPS_SHADED = shaded (2)
SP_STYLE_WIREFRAME_SPAN any integer 0-100
SP_STYLE_DRAWEDGES
0 - edges off 1 - edges on
SP_STYLE_DRAWAXES
0 - axes off 1 - axes on
SP_STYLE_ZSCALE any integer 0 - 400 SP_STYLE_TEXTURED 0 = texture off
1 = texture on SP_LIGHT-ELEVATION any integer 0 - 90
SP_LIGHT_ROTATION any interger -180 to 180
SP_LIGHT_COLOR color reference
SP_AMBIENT_REFLECTANCE any integer 0 - 100
SP_DIFFUSE_REFLECTANCE
any integer 0 -100
SP_SPECULAR_REFLECTANCE any integer 0 -100 SP_GLOSS any integer 0 -100 SP_COLORIZED_FROM any integer 0 - 255 SP_COLORIZED_TO any integer 0 - 255

IpSurfShow
Page 2-729
SP_COLORIZED_FROM_COLOR color reference SP_COLORIZED_TO_COLOR
color reference
ATTRIB ALLOWED VALUES SP_TEXTURE_ID Document ID of textured image SP_SHADOW_DEPTH Shadow depth, any integer 0-
255 SP_SURFACE_COLOR_SPIN
any integer 0 - 5
SP_SURFACE_COLOR_SPREAD 0 - spread off 1 - spread on
Example ret = IpSurfSet(SP_VIEW_ELEVATION,45)
See Also IpSurfShow, IpSurfOutput, IpSurfAutoRefresh
IpSurfShow Syntax IpSurfShow (bShow)
Description This function displays or hides the surface plot tool.
Parameters bShow Integer A value of 0 or 1 specifying whether the surface plot tool is to be displayed or suppressed. Where: 0 - hides the dialog 1 - shows the dialog
Example ret = IpSurfShow(1)
See Also IpSurfOutput, IpSurfSet, IpSurfGet, IpSurfAutoRefresh
IpTagAddClass Syntax IpTagAddClass(Name)
Description This function can be used to add a Manual Tag class.
Parameters Name String Name of the class to add.
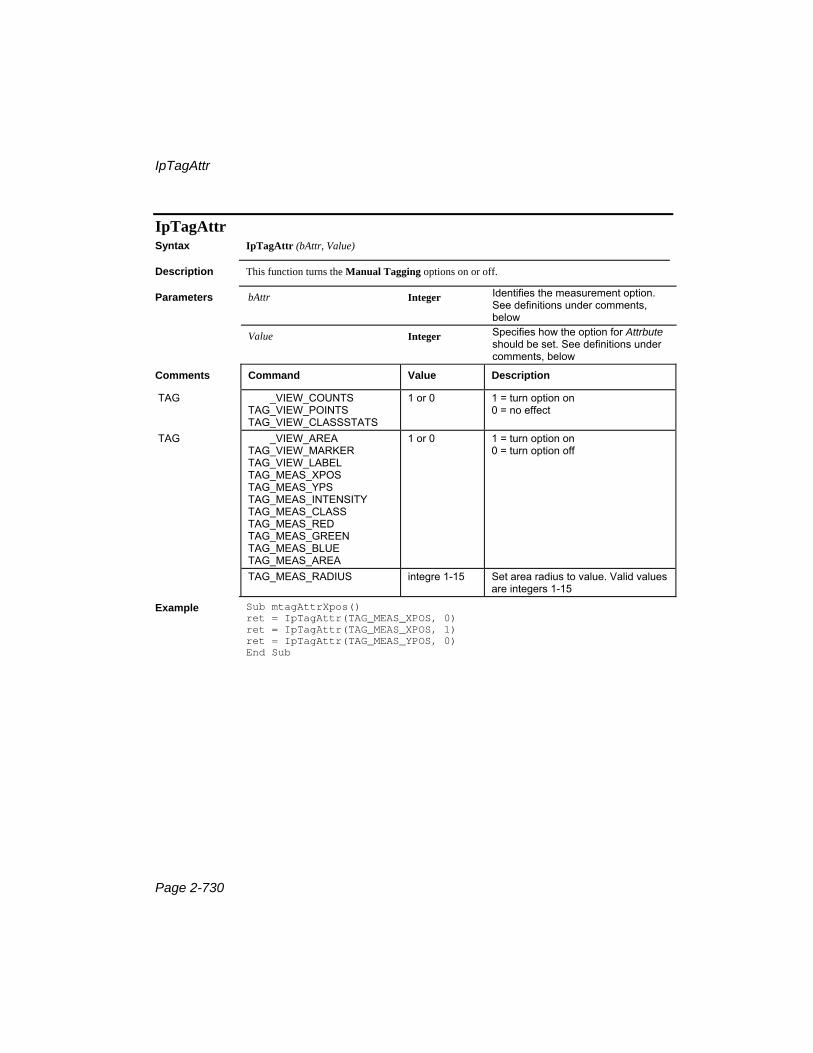
IpTagAttr
Page 2-730
IpTagAttr Syntax IpTagAttr (bAttr, Value)
Description This function turns the Manual Tagging options on or off.
Parameters bAttr Integer Identifies the measurement option. See definitions under comments, below
Value Integer Specifies how the option for Attrbute should be set. See definitions under comments, below
Comments Command Value Description
TAG _VIEW_COUNTS TAG_VIEW_POINTS TAG_VIEW_CLASSSTATS
1 or 0 1 = turn option on 0 = no effect
TAG _VIEW_AREA TAG_VIEW_MARKER TAG_VIEW_LABEL TAG_MEAS_XPOS TAG_MEAS_YPS TAG_MEAS_INTENSITY TAG_MEAS_CLASS TAG_MEAS_RED TAG_MEAS_GREEN TAG_MEAS_BLUE TAG_MEAS_AREA
1 or 0 1 = turn option on 0 = turn option off
TAG_MEAS_RADIUS integre 1-15 Set area radius to value. Valid values are integers 1-15
Example Sub mtagAttrXpos() ret = IpTagAttr(TAG_MEAS_XPOS, 0) ret = IpTagAttr(TAG_MEAS_XPOS, 1) ret = IpTagAttr(TAG_MEAS_YPOS, 0) End Sub
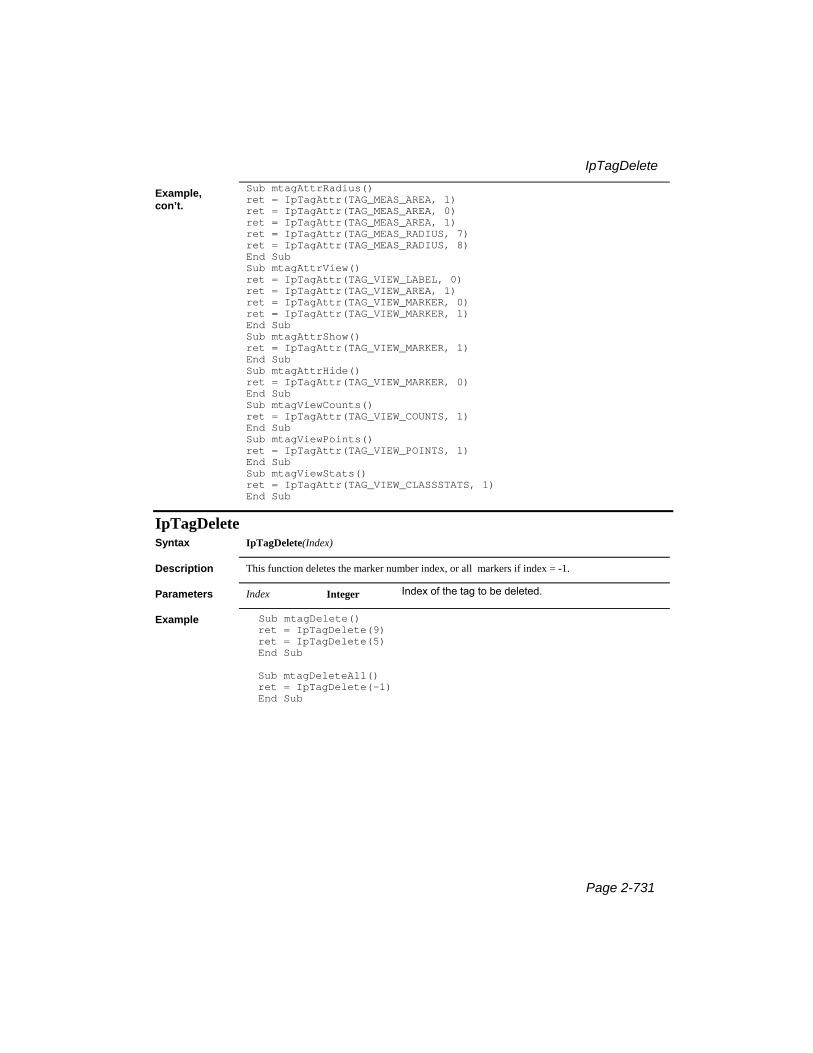
IpTagDelete
Page 2-731
Example, con’t.
Sub mtagAttrRadius() ret = IpTagAttr(TAG_MEAS_AREA, 1) ret = IpTagAttr(TAG_MEAS_AREA, 0) ret = IpTagAttr(TAG_MEAS_AREA, 1) ret = IpTagAttr(TAG_MEAS_RADIUS, 7) ret = IpTagAttr(TAG_MEAS_RADIUS, 8) End Sub Sub mtagAttrView() ret = IpTagAttr(TAG_VIEW_LABEL, 0) ret = IpTagAttr(TAG_VIEW_AREA, 1) ret = IpTagAttr(TAG_VIEW_MARKER, 0) ret = IpTagAttr(TAG_VIEW_MARKER, 1) End Sub Sub mtagAttrShow() ret = IpTagAttr(TAG_VIEW_MARKER, 1) End Sub Sub mtagAttrHide() ret = IpTagAttr(TAG_VIEW_MARKER, 0) End Sub Sub mtagViewCounts() ret = IpTagAttr(TAG_VIEW_COUNTS, 1) End Sub Sub mtagViewPoints() ret = IpTagAttr(TAG_VIEW_POINTS, 1) End Sub Sub mtagViewStats() ret = IpTagAttr(TAG_VIEW_CLASSSTATS, 1) End Sub
IpTagDelete Syntax IpTagDelete(Index)
Description This function deletes the marker number index, or all markers if index = -1.
Parameters Index Integer Index of the tag to be deleted.
Example Sub mtagDelete() ret = IpTagDelete(9) ret = IpTagDelete(5) End Sub Sub mtagDeleteAll() ret = IpTagDelete(-1) End Sub

IpTagDeleteClass
Page 2-732
IpTagDeleteClass Syntax IpTagDeleteClass(ClassId)
Description This function can be used to delete one or all of the Manual Tag classes.
Parameters ClassID Integer Index of the class to be deleted (from 0 to the number of classes -1) or -1 to delete all classes.
Comments When all classes are deleted (either using a ClassID of -1 or when the last class is deleted), the color and symbol status is reset so that the first class added thereafter gets the first color and class symbol. Various parts of the Manual Tag dialogs must disable when there are no classes defined
IpTagGet Syntax IpTagGet(Cmd, wParam, lpParam)
Description This function gets the specified markers.
Parameters Cmd Integer see comments below
wParam Integer see comments below
lpParam Any The address (name) of the variable that will receive the requested data. Be sure this variable is of the type required by Cmd. See Cmd description under Comments, below.
Comments Cmd w Param lpParam
GETNUMPTS class index pointer to a single-point variable or array
-1 returns total number of markers for a single single-point varaiable
other returns total number of markers in class wParam and their percentage of the total number for an array of single-point values. Note: lpParam must point to an array of 2 real numbers.
GETNUMCLASS not used Pointer to a single-point variable, which receives the number of classes
GETPOINTS point index starting from 0
pointer to a single-point array, return x ,y, class, intensity, red, green, blue values in lpParam (0) through lpParam (6) Note: lpParam must point to an array of 7 real numbers.

IpTagLoadEnv
Page 2-733
GETSTATS not used
pointer to a single-point array lpParam[0] = min lpParam [1] = max lpParam[2] = average number of markers lpParam[3] = standard deviation lpParam[4] = total number of markers Note: lpParam must point to an array of 5 real numbers.
Example Dim SingleNumTags As Single Dim SingleClassTags(2) As Single ‘get total number tags ret = IpTagGet(GETNUMPTS,–1, SingleNumTags) ‘now get class 0 tags ret = IpTagGet(GETNUMPTS,0, SingleClassTags(0)) ‘SingleClassTags (0) is the number
Return Value IPCERR_NOTFOUND: information not available. IPCERR_INVARG: invalid argument IPCERR_NONE: no error
IpTagLoadEnv Syntax IpTagLoadEnv(PointsFile)
Description This function loads environment setting information from the points file.
Parameters PointsFile String Name of the file where the environment setting information is stored.
Example Sub mtagLoadEnv() ret = IpTagLoadEnv("C:\IPWSRC\TEST.TAG") End Sub
IpTagLoadPoints Syntax IpTagLoadPoints(PointsFile)
Description This function loads marker information from the points file and displays the markers.
Parameters PointsFile String Name of the file where the point information is stored.
Example Sub mtagLoadPoints() ret = IpTagLoadPoints("C:\IPWSRC\JUNK.TAG") End Sub
See Also IpTagSavePoints
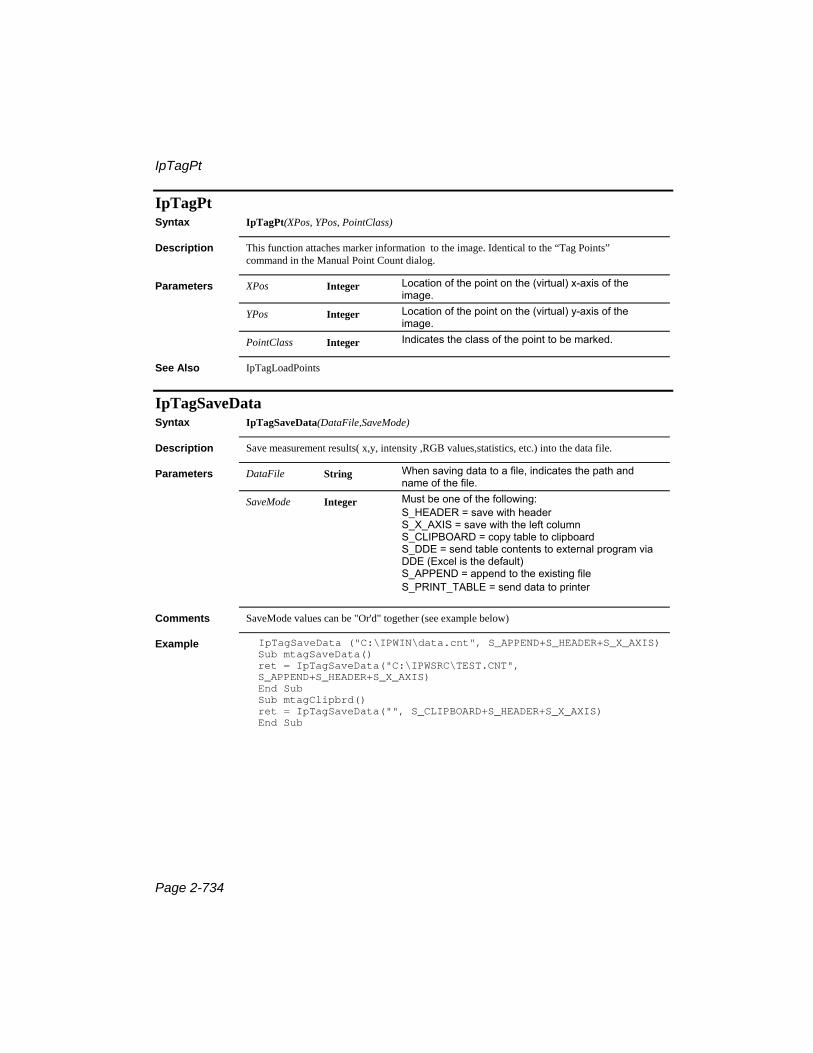
IpTagPt
Page 2-734
IpTagPt Syntax IpTagPt(XPos, YPos, PointClass)
Description This function attaches marker information to the image. Identical to the “Tag Points” command in the Manual Point Count dialog.
Parameters XPos Integer Location of the point on the (virtual) x-axis of the image.
YPos Integer Location of the point on the (virtual) y-axis of the image.
PointClass Integer Indicates the class of the point to be marked.
See Also IpTagLoadPoints
IpTagSaveData Syntax IpTagSaveData(DataFile,SaveMode)
Description Save measurement results( x,y, intensity ,RGB values,statistics, etc.) into the data file.
Parameters DataFile String When saving data to a file, indicates the path and name of the file.
SaveMode Integer Must be one of the following: S_HEADER = save with header S_X_AXIS = save with the left column S_CLIPBOARD = copy table to clipboard S_DDE = send table contents to external program via DDE (Excel is the default) S_APPEND = append to the existing file S_PRINT_TABLE = send data to printer
Comments SaveMode values can be "Or'd" together (see example below)
Example IpTagSaveData ("C:\IPWIN\data.cnt", S_APPEND+S_HEADER+S_X_AXIS) Sub mtagSaveData() ret = IpTagSaveData("C:\IPWSRC\TEST.CNT", S_APPEND+S_HEADER+S_X_AXIS) End Sub Sub mtagClipbrd() ret = IpTagSaveData("", S_CLIPBOARD+S_HEADER+S_X_AXIS) End Sub
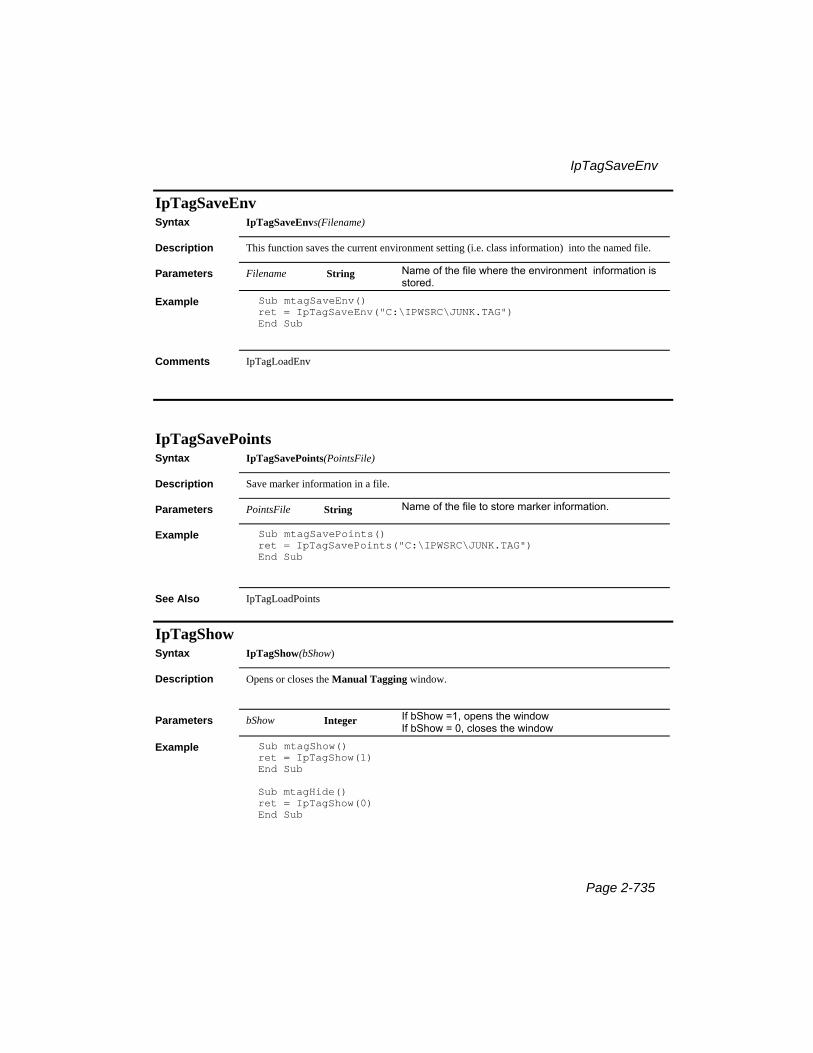
IpTagSaveEnv
Page 2-735
IpTagSaveEnv Syntax IpTagSaveEnvs(Filename)
Description This function saves the current environment setting (i.e. class information) into the named file.
Parameters Filename String Name of the file where the environment information is stored.
Example Sub mtagSaveEnv() ret = IpTagSaveEnv("C:\IPWSRC\JUNK.TAG") End Sub
Comments IpTagLoadEnv
IpTagSavePoints Syntax IpTagSavePoints(PointsFile)
Description Save marker information in a file.
Parameters PointsFile String Name of the file to store marker information.
Example Sub mtagSavePoints() ret = IpTagSavePoints("C:\IPWSRC\JUNK.TAG") End Sub
See Also IpTagLoadPoints
IpTagShow Syntax IpTagShow(bShow)
Description Opens or closes the Manual Tagging window.
Parameters bShow Integer If bShow =1, opens the window
If bShow = 0, closes the window
Example Sub mtagShow() ret = IpTagShow(1) End Sub Sub mtagHide() ret = IpTagShow(0) End Sub

IpTagUpdate
Page 2-736
IpTagUpdate Syntax IpTagUpdate( )
Description This function updates the manual tagging window display.
Example Sub mtagUpdate() ret = IpTagUpdate() End Sub
IpTemplateMode Syntax IpTemplateMode(OnOff)
Description This function turns template mode on or off. When template mode is on, the user may pass parameter values to the macro via a standard Image-Pro dialog box. If parameter values are included in the Auto-Pro function statement, they will be used as default values to the dialog box, which the user may accept or change. Macro execution will not proceed until the user has completed and closed the dialog box, or clicked “Continue” in the template-mode message box. When template mode is off, Auto-Pro functions are performed using the parameter data supplied in the macro.
Parameters OnOff Integer An integer value of 0 or 1 specifying whether subsequent Auto-Pro functions are to be performed in template mode. Where: 0 - Disables template mode. 1 - Enables template mode.
Example ret = IpTemplateMode(1) ret = IpWsLoad("C:\IPWIN\IMAGES\IMAGE1.TIF", "TIF") ret = IpTemplateMode(0) ret = IpWsScale(200, 300, 1) ret = IpHstEqualize(EQ_BESTFIT) ret = IpFltSharpen(3, 3, 2)
In this example, template mode is first enabled to allow the user to select the file upon which the rest of the macro will operate. Once the user selects an image, template mode is turned off to allow the remainder of the macro to run automatically.
See Also IpMacroStop

IpTextBurn
Page 2-737
IpTextBurn Syntax IpTextBurn(Text, Pos)
Description Burns the text into the image using the selected font name, size, text attributes, and currently selected foreground and background colors.
Parameters Text String Contains the text to burn into the image.
Pos POINTAPI Coordinate of the top left corner of the string in image coordinate.
Example Example: Sub Annotate() ret = IpTextFont("Wide Latin", 30) ret = IpTextSetAttr(TXT_BOLD, 1) ret = IpTextSetAttr(TXT_UNDERLINE, 1) ret = IpTextSetAttr(TXT_ITALIC, 0) ret = IpTextSetAttr(TXT_STRIKEOUT, 0) ret = IpTextSetAttr(TXT_ENCLOSED, 0) ret = IpTextSetAttr(TXT_DROPSHADOW, 0) ret = IpTextSetAttr(TXT_SPACING, 0) Pts(0).x = 51 Pts(0).y = 41 ret = IpTextBurn("Test Image", Pts) End Sub
Comments This function is no longer supported in Image-Pro Plus. It has been retained for compatibility with previous versions. New macros should use the IpAn Auto-Pro functions.
See Also IpTextFont, IpTextSetAttr, IpTextShow
IpTextFont Syntax IpTextFont (FontName,FontSize)
Description Sets the font name and size for the text.
Parameters FontName String Name of the font (i.e.Times New Roman)
FontSize Integer Point size of the font (i.e.12 points)
Example ret = IpTextFont("Wide Latin", 30)
Comments This function is no longer supported in Image-Pro Plus. It has been retained for compatibility with previous versions. New macros should use the IpAn Auto-Pro functions.
See Also IpTextBurn, IpTextSetAttr, IpTextShow

IpTextGetAttr
Page 2-738
IpTextGetAttr Syntax IpTextGetAttr(AttrType, AttrValue)
Description This function retrieves text attribute values.
Parameters AttrType Integer Attribute type is one of the following: TXT_BOLD Bold=1, normal=0 TXT_UNDERLINE Underline=1, normal=0 The following are no longer supported: TXT_STRIKEOUT TXT_DROPSHADOW TXT_ENCLOSED TXT_SPACING
AttrValue Integer Value for AttrType.
Example ret = IpTextGetAttr(TXT_SPACING, 1)
Comments This function is no longer supported in Image-Pro Plus. It has been retained for compatibility with previous versions. New macros should use the IpAn Auto-Pro functions.
See Also IpTextFont, IpTextBurn, IpTextShow
IpTextSetAttr Syntax IpTextSetAttr(AttrType, AttrValue)
Description This function selects text attribute value.
Parameters AttrType Integer Attribute type is one of the following: TXT_BOLD Bold=1, normal=0 TXT_UNDERLINE Underline=1, normal=0 TXT_ITALIC Italic=1, normal=0 The following are no longer supported: TXT_STRIKEOUT TXT_DROPSHADOW TXT_ENCLOSED TXT_SPACING
AttrValue Integer Value for AttrType.
Example ret = IpTextSetAttr(TXT_BOLD, 1)
Comments This function is no longer supported in Image-Pro Plus. It has been retained for compatibility with previous versions. New macros should use the IpAn Auto-Pro functions.
See Also IpTextFont, IpTextBurn, IpTextShow
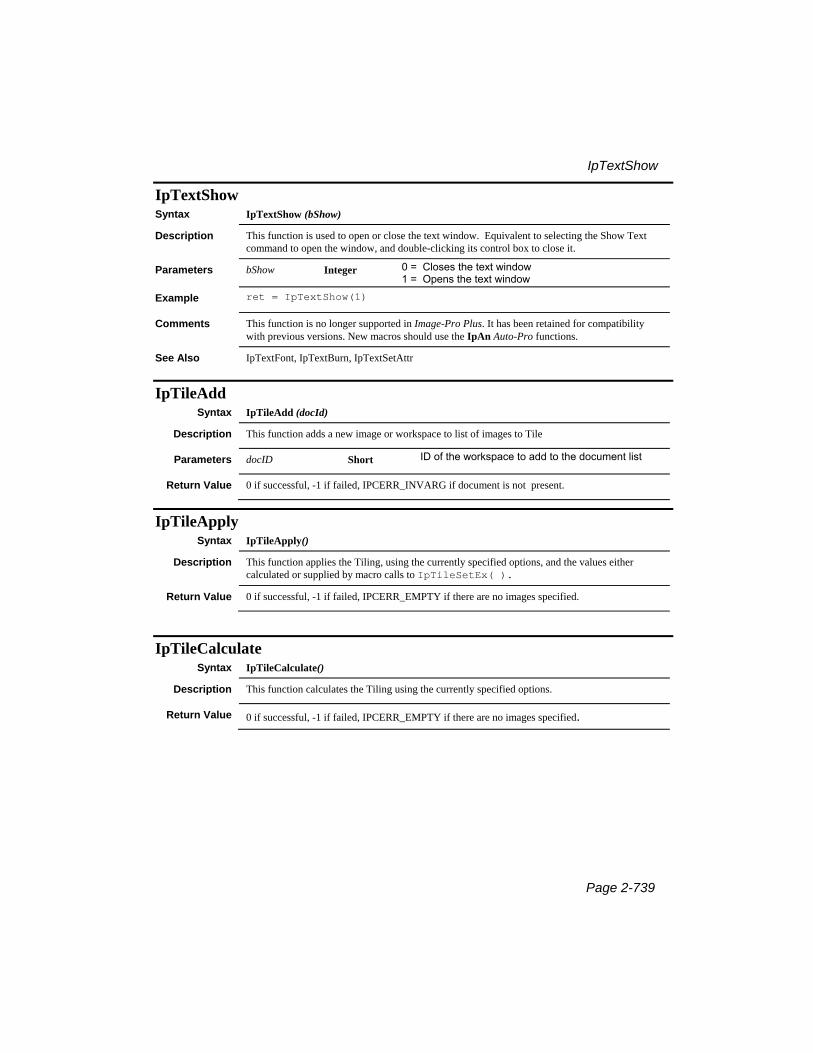
IpTextShow
Page 2-739
IpTextShow Syntax IpTextShow (bShow)
Description This function is used to open or close the text window. Equivalent to selecting the Show Text command to open the window, and double-clicking its control box to close it.
Parameters bShow Integer 0 = Closes the text window 1 = Opens the text window
Example ret = IpTextShow(1)
Comments This function is no longer supported in Image-Pro Plus. It has been retained for compatibility with previous versions. New macros should use the IpAn Auto-Pro functions.
See Also IpTextFont, IpTextBurn, IpTextSetAttr
IpTileAdd Syntax IpTileAdd (docId)
Description This function adds a new image or workspace to list of images to Tile
Parameters docID Short ID of the workspace to add to the document list
Return Value 0 if successful, -1 if failed, IPCERR_INVARG if document is not present.
IpTileApply Syntax IpTileApply()
Description This function applies the Tiling, using the currently specified options, and the values either calculated or supplied by macro calls to IpTileSetEx( ).
Return Value 0 if successful, -1 if failed, IPCERR_EMPTY if there are no images specified.
IpTileCalculate Syntax IpTileCalculate()
Description This function calculates the Tiling using the currently specified options.
Return Value 0 if successful, -1 if failed, IPCERR_EMPTY if there are no images specified.

IpTileGet
Page 2-740
IpTileGet Syntax IpTileGet(sAttribute, sParam, lpData)
Description This function gets data about the images to be tiled.
Parameters sAttribute Short Attribute to get, see list and comments below
sParam Short Number of items for the list to get, see list and comments below
lpData LPVOID Pointer to appropriate data array or value, see list and comments below
Integer Argument Description
TILE_METHOD Get the method for Tiling calculations. Should be either of the following:
ALGN_FFT Use FFT full correlation AGLN_FFTPHASE Use FT Phase correlation TILE_ANGLE_NUM Get the number of angles – must be a power of two TILE_SCALE_NUM Get the number of scales – must be a power of two TILE_OPTIONS Get Options: scale, rotate, or translate TILE_CAL_ORDER Gets the order of the images as per calibrated
positions TILE_REF_FRAME Gets the reference frame in the list TILE_ALG_OPTION Gets the algorithm specific option TILE_GETNUMFRAMES Gets the number of frames in the list TILE_GETFRAMELIST Gets the list of frames TILE_TRIMBORDERS Trim image borders down to fully-overlapping farmes GETNUMDOC Gets the number of images in the list GETDOCLST Get the list of doc IDs, maximum = sParam TILE_UPDATEUI Determine if the user interface has been updated. TILE_INTERATE Interate, setting the results to be the next input.
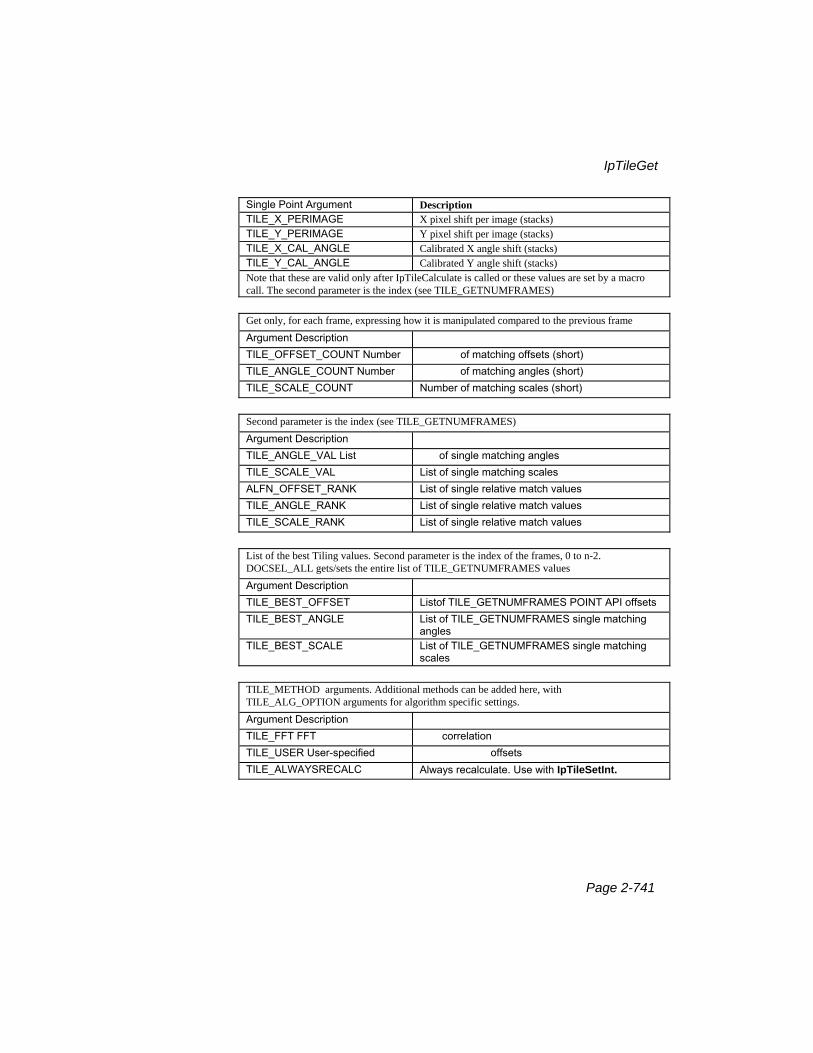
IpTileGet
Page 2-741
Single Point Argument Description TILE_X_PERIMAGE X pixel shift per image (stacks) TILE_Y_PERIMAGE Y pixel shift per image (stacks) TILE_X_CAL_ANGLE Calibrated X angle shift (stacks) TILE_Y_CAL_ANGLE Calibrated Y angle shift (stacks) Note that these are valid only after IpTileCalculate is called or these values are set by a macro call. The second parameter is the index (see TILE_GETNUMFRAMES)
Get only, for each frame, expressing how it is manipulated compared to the previous frame Argument Description TILE_OFFSET_COUNT Number of matching offsets (short) TILE_ANGLE_COUNT Number of matching angles (short) TILE_SCALE_COUNT Number of matching scales (short)
Second parameter is the index (see TILE_GETNUMFRAMES) Argument Description TILE_ANGLE_VAL List of single matching angles TILE_SCALE_VAL List of single matching scales ALFN_OFFSET_RANK List of single relative match values TILE_ANGLE_RANK List of single relative match values TILE_SCALE_RANK List of single relative match values
List of the best Tiling values. Second parameter is the index of the frames, 0 to n-2. DOCSEL_ALL gets/sets the entire list of TILE_GETNUMFRAMES values Argument Description TILE_BEST_OFFSET Listof TILE_GETNUMFRAMES POINT API offsets TILE_BEST_ANGLE List of TILE_GETNUMFRAMES single matching
angles TILE_BEST_SCALE List of TILE_GETNUMFRAMES single matching
scales
TILE_METHOD arguments. Additional methods can be added here, with TILE_ALG_OPTION arguments for algorithm specific settings. Argument Description TILE_FFT FFT correlation TILE_USER User-specified offsets TILE_ALWAYSRECALC Always recalculate. Use with IpTileSetInt.
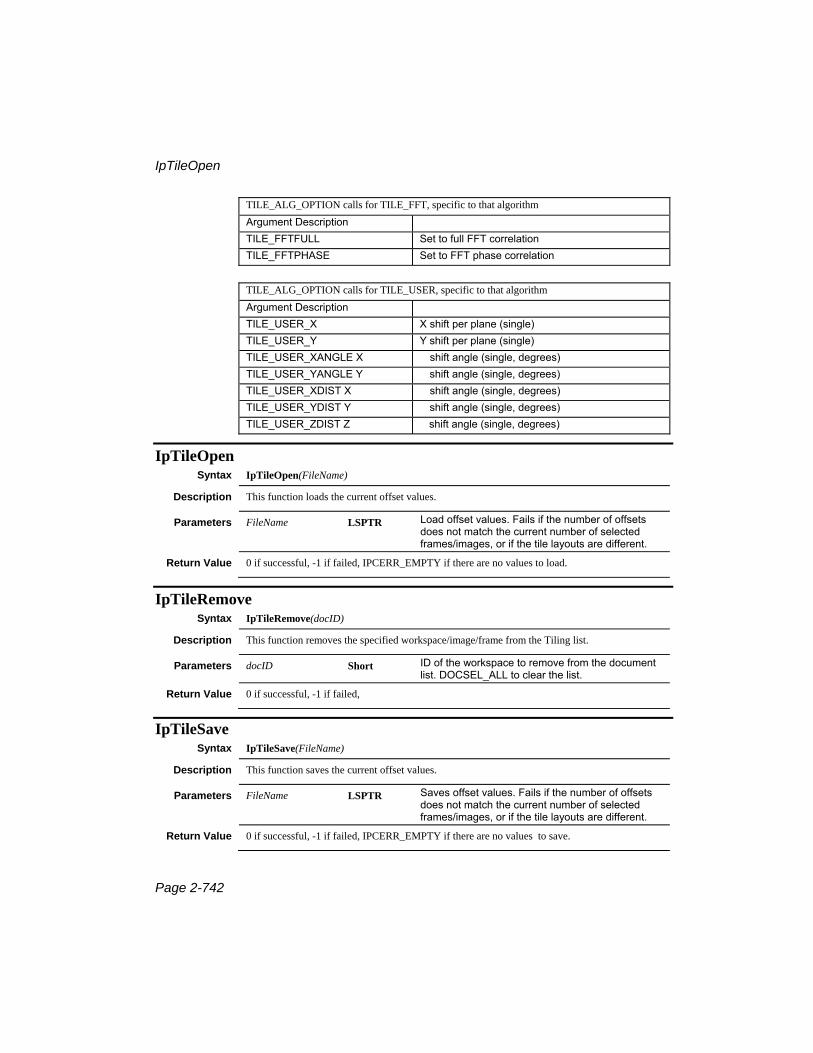
IpTileOpen
Page 2-742
TILE_ALG_OPTION calls for TILE_FFT, specific to that algorithm Argument Description TILE_FFTFULL Set to full FFT correlation TILE_FFTPHASE Set to FFT phase correlation
TILE_ALG_OPTION calls for TILE_USER, specific to that algorithm Argument Description TILE_USER_X X shift per plane (single) TILE_USER_Y Y shift per plane (single) TILE_USER_XANGLE X shift angle (single, degrees) TILE_USER_YANGLE Y shift angle (single, degrees) TILE_USER_XDIST X shift angle (single, degrees) TILE_USER_YDIST Y shift angle (single, degrees) TILE_USER_ZDIST Z shift angle (single, degrees)
IpTileOpen Syntax IpTileOpen(FileName)
Description This function loads the current offset values.
Parameters FileName LSPTR Load offset values. Fails if the number of offsets does not match the current number of selected frames/images, or if the tile layouts are different.
Return Value 0 if successful, -1 if failed, IPCERR_EMPTY if there are no values to load.
IpTileRemove Syntax IpTileRemove(docID)
Description This function removes the specified workspace/image/frame from the Tiling list.
Parameters docID Short ID of the workspace to remove from the document list. DOCSEL_ALL to clear the list.
Return Value 0 if successful, -1 if failed,
IpTileSave Syntax IpTileSave(FileName)
Description This function saves the current offset values.
Parameters FileName LSPTR Saves offset values. Fails if the number of offsets does not match the current number of selected frames/images, or if the tile layouts are different.
Return Value 0 if successful, -1 if failed, IPCERR_EMPTY if there are no values to save.

IpTileSetEx
Page 2-743
IpTileSetEx Syntax IpTileSetEx (sAttribute, sParam, lpData)
Description This function sets the tiling attributes
Parameters sAttribute Short Attribute to set, see list and comments in IpTileGet
sParam Short Number of items for the list to set, see list and comments in IpTileGet
lpData LPVOID Pointer to appropriate data array or value, see list and comments in IpTileGet
Return Value 0 if successful, IPCERR_INVCOMMAND if failed, number of values for list function.
See Also IpTileSetInt, IpTileSetSingle
IpTileSetInt Syntax IpTileSetInt (sAttribute, sParam, sData)
Description This function sets the tiling attributes
Parameters sAttribute Short Attribute to set, see list and comments in IpTileGet.
sParam Short Number of items for the list to set, see list and comments in IpTileGet
sData Short Pointer to appropriate data array or value, see list and comments in IpTileGet
Return Value 0 if successful, IPCERR_INVCOMMAND if failed, number of values for list function.
IpTileSetSingle Syntax IpTileSetSingle (sAttribute, sParam, fData)
Description This function sets thte tiling attributes
Parameters sAttribute Short Attribute to set, see list and comments in IpTileGet
sParam Short Number of items for the list to set, see list and comments in IpTileGet
fData Single Pointer to appropriate data array or value, see list and comments in IpTileGet
Return Value 0 if successful, IPCERR_INVCOMMAND if failed, number of values for list function.
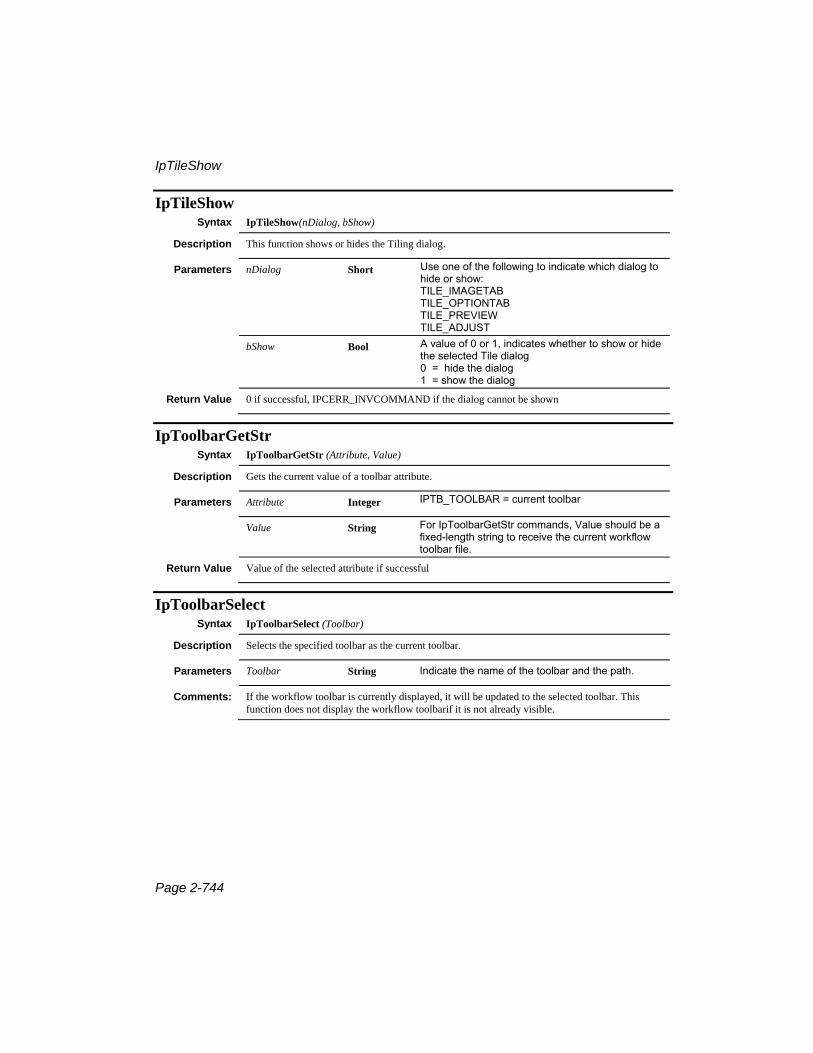
IpTileShow
Page 2-744
IpTileShow Syntax IpTileShow(nDialog, bShow)
Description This function shows or hides the Tiling dialog.
Parameters nDialog Short Use one of the following to indicate which dialog to hide or show: TILE_IMAGETAB TILE_OPTIONTAB TILE_PREVIEW TILE_ADJUST
bShow Bool A value of 0 or 1, indicates whether to show or hide the selected Tile dialog 0 = hide the dialog 1 = show the dialog
Return Value 0 if successful, IPCERR_INVCOMMAND if the dialog cannot be shown
IpToolbarGetStr Syntax IpToolbarGetStr (Attribute, Value)
Description Gets the current value of a toolbar attribute.
Parameters Attribute Integer IPTB_TOOLBAR = current toolbar
Value String For IpToolbarGetStr commands, Value should be a fixed-length string to receive the current workflow toolbar file.
Return Value Value of the selected attribute if successful
IpToolbarSelect Syntax IpToolbarSelect (Toolbar)
Description Selects the specified toolbar as the current toolbar.
Parameters Toolbar String Indicate the name of the toolbar and the path.
Comments: If the workflow toolbar is currently displayed, it will be updated to the selected toolbar. This function does not display the workflow toolbarif it is not already visible.
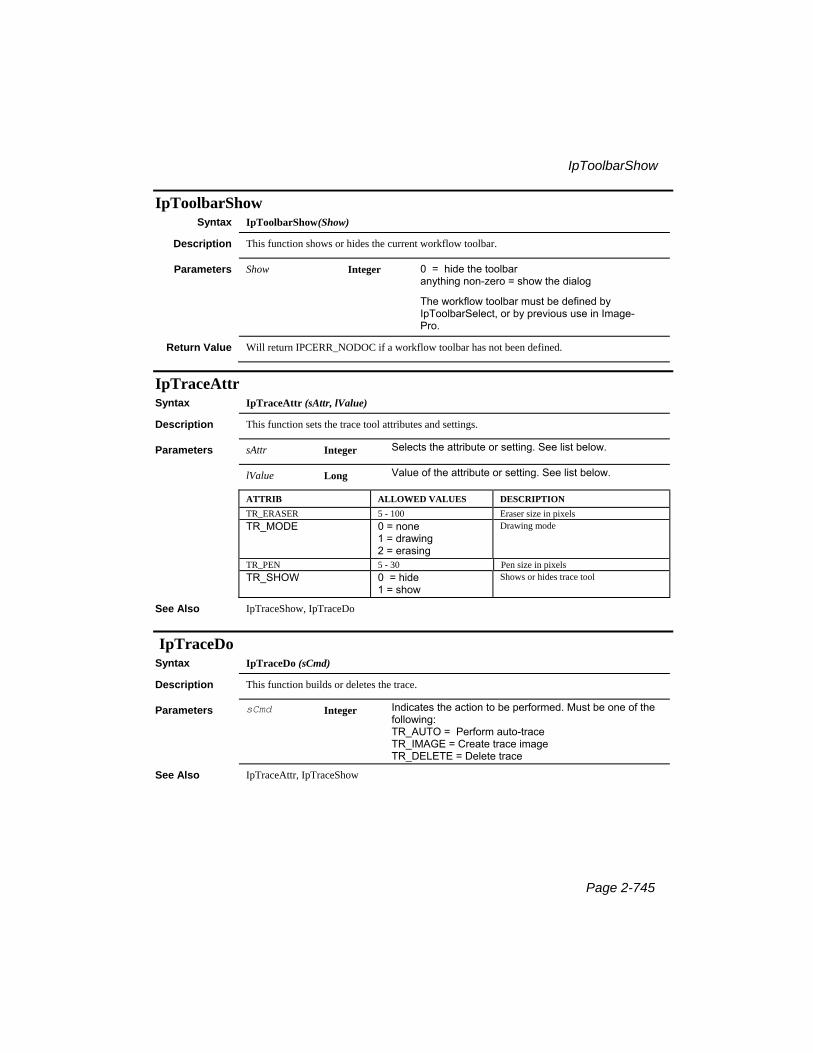
IpToolbarShow
Page 2-745
IpToolbarShow Syntax IpToolbarShow(Show)
Description This function shows or hides the current workflow toolbar.
Parameters Show Integer 0 = hide the toolbar anything non-zero = show the dialog
The workflow toolbar must be defined by IpToolbarSelect, or by previous use in Image-Pro.
Return Value Will return IPCERR_NODOC if a workflow toolbar has not been defined.
IpTraceAttr Syntax IpTraceAttr (sAttr, lValue)
Description This function sets the trace tool attributes and settings.
Parameters sAttr Integer Selects the attribute or setting. See list below.
lValue Long Value of the attribute or setting. See list below.
ATTRIB ALLOWED VALUES DESCRIPTION TR_ERASER 5 - 100 Eraser size in pixels TR_MODE 0 = none
1 = drawing 2 = erasing
Drawing mode
TR_PEN 5 - 30 Pen size in pixels TR_SHOW 0 = hide
1 = show Shows or hides trace tool
See Also IpTraceShow, IpTraceDo
IpTraceDo Syntax IpTraceDo (sCmd)
Description This function builds or deletes the trace.
Parameters sCmd Integer Indicates the action to be performed. Must be one of the following: TR_AUTO = Perform auto-trace TR_IMAGE = Create trace image TR_DELETE = Delete trace
See Also IpTraceAttr, IpTraceShow
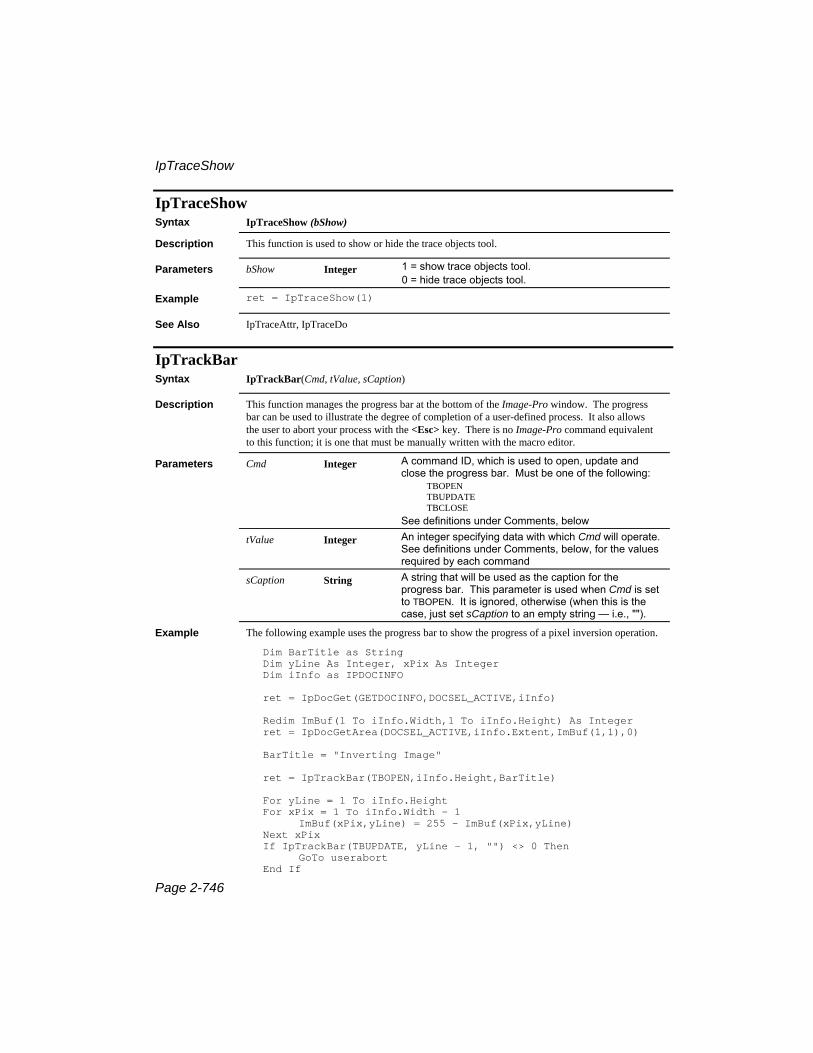
IpTraceShow
Page 2-746
IpTraceShow Syntax IpTraceShow (bShow)
Description This function is used to show or hide the trace objects tool.
Parameters bShow Integer 1 = show trace objects tool. 0 = hide trace objects tool.
Example ret = IpTraceShow(1)
See Also IpTraceAttr, IpTraceDo
IpTrackBar Syntax IpTrackBar(Cmd, tValue, sCaption)
Description This function manages the progress bar at the bottom of the Image-Pro window. The progress bar can be used to illustrate the degree of completion of a user-defined process. It also allows the user to abort your process with the <Esc> key. There is no Image-Pro command equivalent to this function; it is one that must be manually written with the macro editor.
Parameters Cmd Integer A command ID, which is used to open, update and close the progress bar. Must be one of the following:
TBOPEN TBUPDATE TBCLOSE
See definitions under Comments, below
tValue Integer An integer specifying data with which Cmd will operate. See definitions under Comments, below, for the values required by each command
sCaption String A string that will be used as the caption for the progress bar. This parameter is used when Cmd is set to TBOPEN. It is ignored, otherwise (when this is the case, just set sCaption to an empty string — i.e., "").
Example The following example uses the progress bar to show the progress of a pixel inversion operation.
Dim BarTitle as String Dim yLine As Integer, xPix As Integer Dim iInfo as IPDOCINFO ret = IpDocGet(GETDOCINFO,DOCSEL_ACTIVE,iInfo) Redim ImBuf(1 To iInfo.Width,1 To iInfo.Height) As Integer ret = IpDocGetArea(DOCSEL_ACTIVE,iInfo.Extent,ImBuf(1,1),0) BarTitle = "Inverting Image" ret = IpTrackBar(TBOPEN,iInfo.Height,BarTitle) For yLine = 1 To iInfo.Height For xPix = 1 To iInfo.Width - 1 ImBuf(xPix,yLine) = 255 - ImBuf(xPix,yLine) Next xPix If IpTrackBar(TBUPDATE, yLine - 1, "") <> 0 Then GoTo userabort End If

IpTrackFile
Page 2-747
Next yLine ret = IpDocPutArea(DOCSEL_ACTIVE,iInfo.Extent,ImBuf(1,1),0) ret = IpAppUpdateDoc(DOCSEL_ACTIVE) userabort:
ret = IpTrackBar(TBCLOSE,0,"")
Comments Cmd options are as follows:
Cmd VALUE DESCRIPTION tValue VALUE
TBOPEN Opens the progress bar indicator with the specified caption, and sets the range of possible update values
The range of possible update values.
TBUPDATE Updates the length of the progress bar based upon the value specified in tValue, relative to the range that was specified in TBOPEN.
A value between 0 and (range - 1) that represents the degree of completion at that point.
TBCLOSE Closes (removes) the progress bar. Not used by TBCLOSE. Must be 0.
IpTrackFile Syntax IpTrackFile(szFileName, bSave)
Description This function loads or saves a tracking file.
Parameters szFileName String Indicates the name of the file to load or save.
bSave Short Indicates whether to save or load the tracking file. Should be either: 0 = load the track settings from a file and append them to the existing list 1 = save the current track settings to a file
Return Value 0 if successful, a negative error code if failed.
Example ret = IpTrackFile(“AllTracks.trc, 0”)

IpTrackMeas
Page 2-748
IpTrackMeas Syntax IpTrackMeas(sCommand, 1Opt1, lParam)
Description This function gets and sets various parameters of the track measurements.
Parameters sCommand Short See comments and list below.
lOpt1 Long See comments and list below.
lParam Any See comments and list below.
Comments This macro takes the following commands:
Command 1Opt lParam Description
TM_NUM_ TRACKS_GET
Not used. Pointer to a double that will receive the value
Gets the number of manual tracks
TM_NUM_POINTS_GET
Index of the track zero-based.
Pointer to a double that will receive the value.
Gets the number of points in the track.
TM_POINTS_GET Index of the track zero-based
Pointer to an array of doubles, large enough to receive all coordinates. The size of the array must be not less than 2*NumPoints, where NumPoints is the number of points in the element (see TM_NUM_POINTS_ GET ) . The points are in image coordinates.
Gets the coordinates of the points in the track.
TM_NUM_MEAS_GET
Not used. Pointer to a double that will receive the value.
Gets the number of selected measurements.
TM_NUM_SEL_ MEAS_GET
Not used. Pointer to a double that will receive the value.
Gets the number of selected measurements

IpTrackMeas
Page 2-749
Command 1Opt lParam Description
TM_MEAS_LIST_ GET
Not used. Pointer to an array of doubles, large enough to receive the values. The size of the array must be not less than 2*NumMeas, where NumMeas is the number of active measurements (see TM_NUM_MEAS_GET) . The list is retrieved by pairs, where the first element is the measurement ID and the second element is the statistical field. If the measurement has statistical field Values, the second element will receive 1-based index of measurement multiplied by TR_VALUE.
Gets the list of active manual measurements
OutArr[0] – measurement ID of measurement 1 OutArr[1] – statistical field of measurement 1 OutArr[3] – measurement ID of measurement 2 OutArr[4] – statistical field of measurement 2
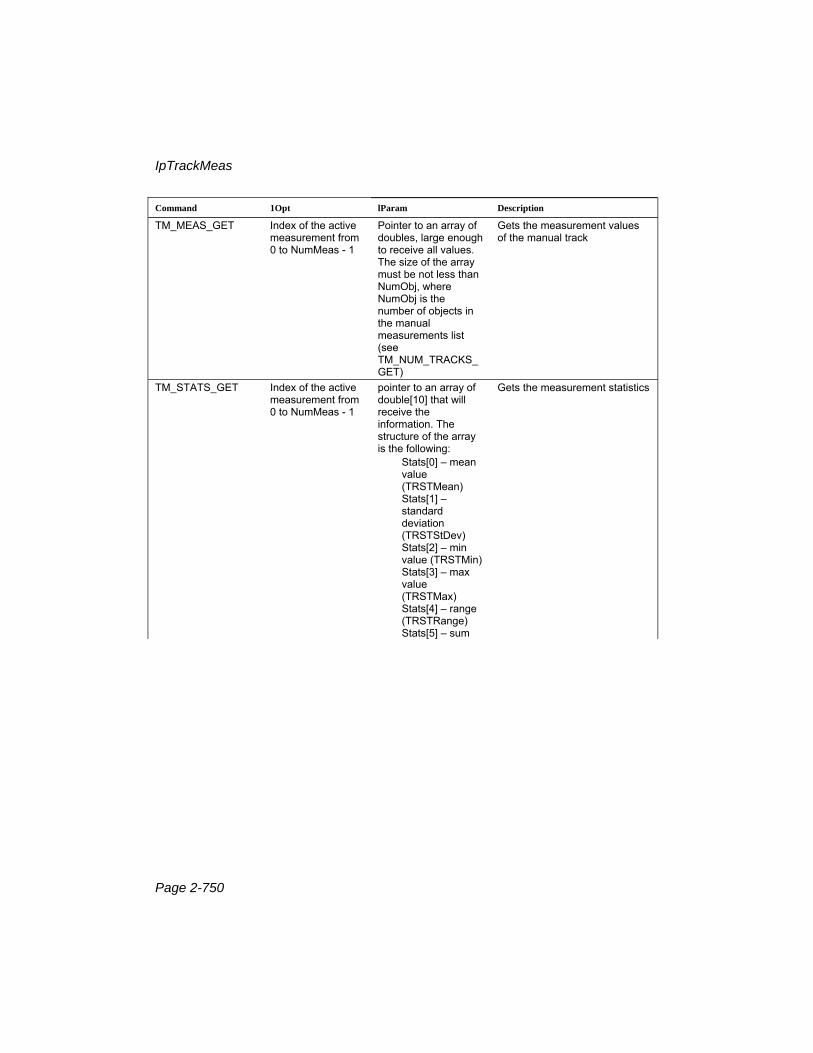
IpTrackMeas
Page 2-750
Command 1Opt lParam Description
TM_MEAS_GET Index of the active measurement from 0 to NumMeas - 1
Pointer to an array of doubles, large enough to receive all values. The size of the array must be not less than NumObj, where NumObj is the number of objects in the manual measurements list (see TM_NUM_TRACKS_GET)
Gets the measurement values of the manual track
TM_STATS_GET Index of the active measurement from 0 to NumMeas - 1
pointer to an array of double[10] that will receive the information. The structure of the array is the following:
Stats[0] – mean value (TRSTMean) Stats[1] – standard deviation (TRSTStDev) Stats[2] – min value (TRSTMin) Stats[3] – max value (TRSTMax) Stats[4] – range (TRSTRange) Stats[5] – sum
Gets the measurement statistics

IpTrackMeas
Page 2-751
(TRSTSum) Stats[6] – index of minimum (TRSTIndMin) Stats[7] – index of maximum (TRSTIndMax) Stats[8] – total number of objects (TRSTNObj) Stats[9] – number of shown objects (TRSTNShown)
Coimments: statistical parameters are calculated only from visible tracks, hidden tracks are ignored.

IpTrackMeas
Page 2-752
Command 1Opt lParam Description
TM_ADD_TRACK Number of points in the track.
Pointer to an array of POINTAPI that contains points in image coordinates
Adds a new track. In the template mode, you will be prompted to add a track manually.
TM_INIT_AUTO_ TRACK
Not used, should be 0
Not used, should be IpNull
Initiates auto-tracking using the current count/size settings to identify tracking objects. In the template mode, you will be asked to set the count/size parameters and then comfirm the correctness of the outlines
TM_ADD_AUTO_ TRACK
Number of points in the track (should be 1)
Pointer to an array of POINTAPI that contains the starting points of the track in image coordinates
Adds a new track automatically. In the template mode, you will be prompted to add the first point manually
TM_ADD_AUTO_ALL_TRACKS
Not used, should be 0
Not used, should be IpNull
Finds all tracks on the acive image automatically. In the template mode, you will be asked to set the count/size parameters and then comfirm the correctness of the outlines
TM_SEL_GET Index of the track (zero-based)
Pointer to a double that will receive the value
Gets the selection status of the track.
TM_SEL_SET Index of the track (zero-based) Use TM_ALL to select or deselect all tracks
Double value: 0 = Deselect 1 = Select
Sets the selection status of the track.
TM_SHOW_GET Index of the track (zero-based)
Pointer to a double that will receive the value
Gets the visibility status of the track
TM_SHOW_SET Index of the track (zero-based)
Double value: 0 = Hide 1 = Show
Sets the visibility status of the track.
TM_COLOR_GET Index of the track (zero-based)
Pointer to a double that will receive the value
Gets the color of the track.

IpTrackMeasGetStr
Page 2-753
Return Value 0 if successful, a negative error code if failed.
** Id of new track if successful, a negative error code if failed.
Example Sub SetTrackParameters() ret = IpTrackShow(TRACK_TABLE,TRACK_SHOW) ‘add new track ret = IpListPts(Pts(0),"84 154 164 192 255 233 402 286 512 299 519 258 459 217 349 191") ret = IpTrackMeas(TM_ADD_TRACK ,8,Pts(0)) ‘change name ret = IpTrackMeasSetStr(M_NAME_SET,1,"Base Track") ‘set yellow color ret = IpTrackMeasSet(TM_COLOR_SET,0,65535) End Sub
IpTrackMeasGetStr Syntax IpTrackMeaseGetStr(sCommand, 1Opt1, dParam)
Description This function gets various string parameters for the tracking measurments.
Parameters sCommand Short See comments and list below.
lOpt1 Long See comments and list below.
dParam Double See comments and list below.
Comments This macro takes the commands described below:
Command Opt 1 dParam Description
TM_TRACK_PREF_GET
Not used, should be 0
String that will receive the tracking prefix.
Gets the tracking preferences
TM_NAME_GET Index of the trrack, 0-based
String that will receive the name of the track.
Gets the name of the track.
Return Value 0 if successful, a negative error code if failed.
See Also IpTrackMeasSetStr, IpTrMeas
IpTrackMeasSet Syntax IpTrackMeaseSet(sCommand, lOpt, dParam)
Description This function sets various tracking parameters. This function is a version of IpTrackMeas.
Parameters sCommand Short See comments and list below.
lOpt Long See comments and list below.
dParam Double See comments and list below.

IpTrackMeasSet
Page 2-754
Comments This macro takes the following commands:
Command IOpt dParam Description
TM_UPDATE Not used, should be 0
Not used, should be 0
Updates the tracking data tables. Applies new settings, should be called after changing any tracking options from a macro.
TM_TRACK_ COLOR
Not used, should be 0
Color in hexadecimal format as &Hrrggbb, where rr, gg,bb are Red, Green and Blue components of color.
Sets the default line color for tracking.
TM_TEXT_COLOR Not used, should be 0
Color in hexadecimal format as &Hrrggbb, where rr, gg,bb are Red, Green and Blue components of color
Sets label color for tracking
TM_COLORING Not used, should be 0
0 = fixed color 1 = random color
Sets the tracking color type
TM_EL_SIZE Not used, should be 0
Value = 0, 1, or 2 Tracking arrow size
TM_FONT_SIZE Not used, should be 0
Value Sets font size for tracking labels.
TM_LABEL_TYPE Not used, should be 0
one of the following: trLabelsShowName, trLabelsShowMeasurement trLabelsShowNone
Sets label type of measurements (name,first measurement, none)
TM_SWAP_RC Not used, should be 0
0 = off 1 = on
Swaps rows/columns of data table for exporting to Excel
TM_RESET_MEAS Not used, should be 0
Not used, should be 0
Resets the list of selected measurements
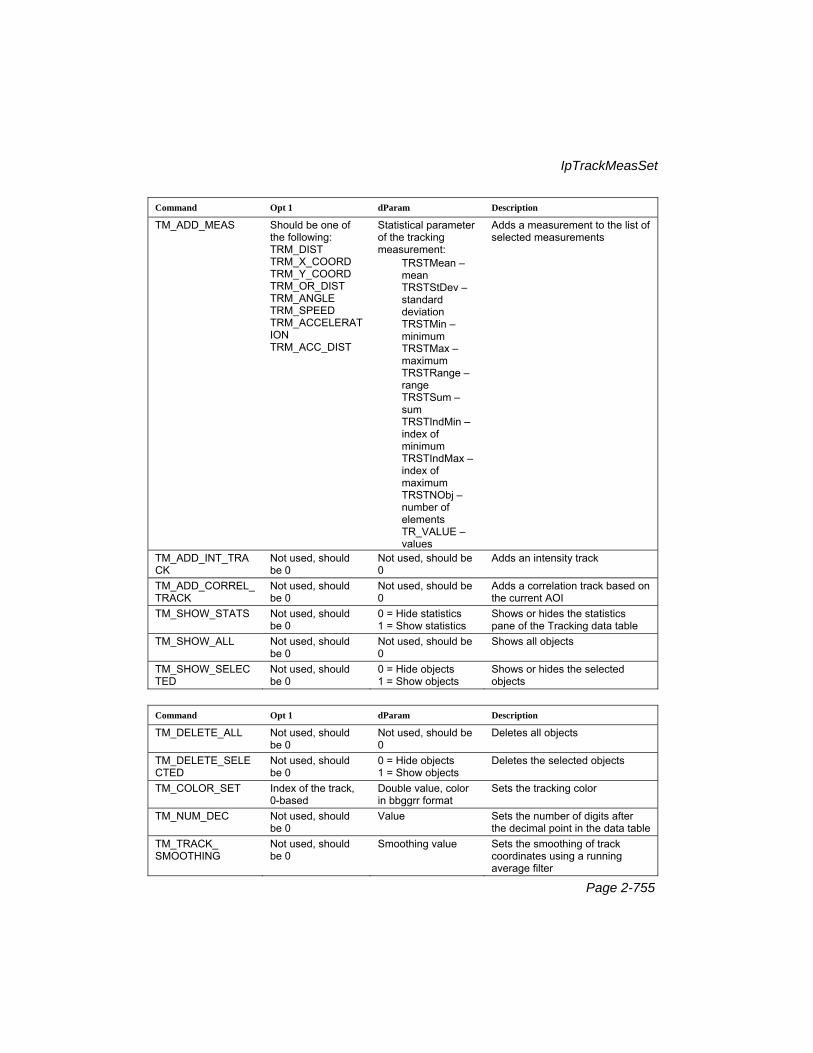
IpTrackMeasSet
Page 2-755
Command Opt 1 dParam Description
TM_ADD_MEAS Should be one of the following: TRM_DIST TRM_X_COORD TRM_Y_COORD TRM_OR_DIST TRM_ANGLE TRM_SPEED TRM_ACCELERATION TRM_ACC_DIST
Statistical parameter of the tracking measurement:
TRSTMean – mean TRSTStDev – standard deviation TRSTMin – minimum TRSTMax – maximum TRSTRange – range TRSTSum – sum TRSTIndMin – index of minimum TRSTIndMax – index of maximum TRSTNObj – number of elements TR_VALUE – values
Adds a measurement to the list of selected measurements
TM_ADD_INT_TRACK
Not used, should be 0
Not used, should be 0
Adds an intensity track
TM_ADD_CORREL_ TRACK
Not used, should be 0
Not used, should be 0
Adds a correlation track based on the current AOI
TM_SHOW_STATS Not used, should be 0
0 = Hide statistics 1 = Show statistics
Shows or hides the statistics pane of the Tracking data table
TM_SHOW_ALL Not used, should be 0
Not used, should be 0
Shows all objects
TM_SHOW_SELECTED
Not used, should be 0
0 = Hide objects 1 = Show objects
Shows or hides the selected objects
Command Opt 1 dParam Description
TM_DELETE_ALL Not used, should be 0
Not used, should be 0
Deletes all objects
TM_DELETE_SELECTED
Not used, should be 0
0 = Hide objects 1 = Show objects
Deletes the selected objects
TM_COLOR_SET Index of the track, 0-based
Double value, color in bbggrr format
Sets the tracking color
TM_NUM_DEC Not used, should be 0
Value Sets the number of digits after the decimal point in the data table
TM_TRACK_ SMOOTHING
Not used, should be 0
Smoothing value Sets the smoothing of track coordinates using a running average filter
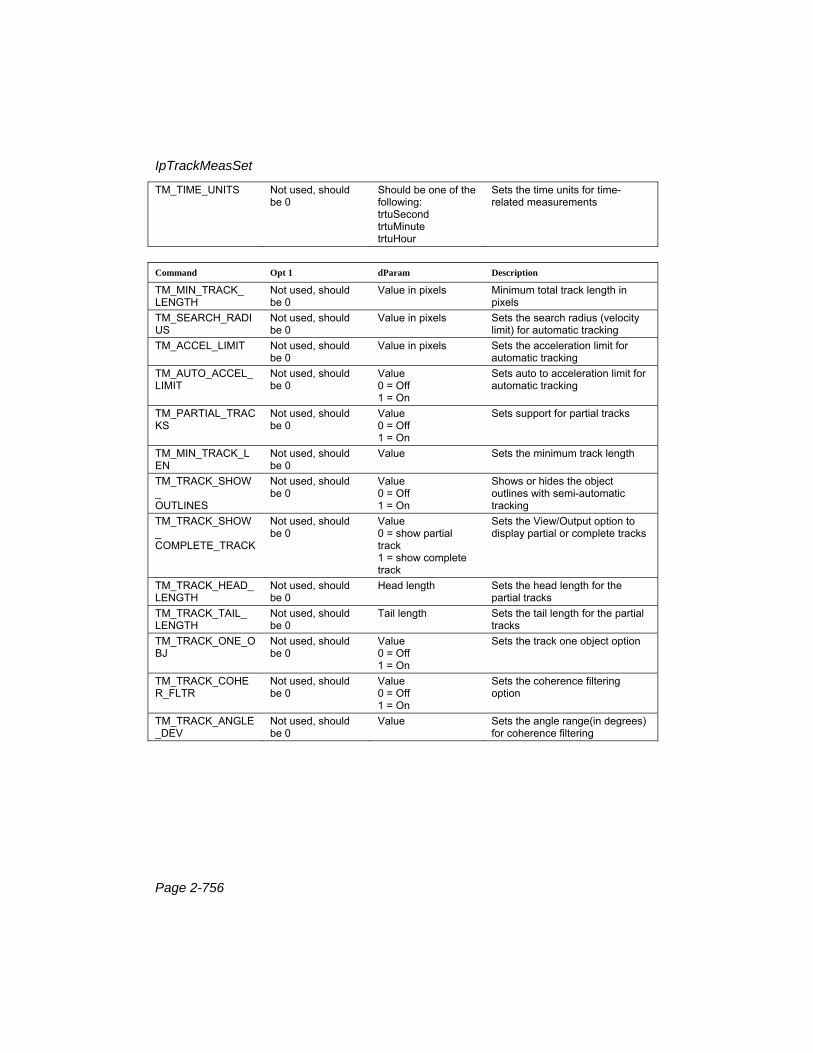
IpTrackMeasSet
Page 2-756
TM_TIME_UNITS Not used, should be 0
Should be one of the following: trtuSecond trtuMinute trtuHour
Sets the time units for time-related measurements
Command Opt 1 dParam Description
TM_MIN_TRACK_ LENGTH
Not used, should be 0
Value in pixels Minimum total track length in pixels
TM_SEARCH_RADIUS
Not used, should be 0
Value in pixels Sets the search radius (velocity limit) for automatic tracking
TM_ACCEL_LIMIT Not used, should be 0
Value in pixels Sets the acceleration limit for automatic tracking
TM_AUTO_ACCEL_LIMIT
Not used, should be 0
Value 0 = Off 1 = On
Sets auto to acceleration limit for automatic tracking
TM_PARTIAL_TRACKS
Not used, should be 0
Value 0 = Off 1 = On
Sets support for partial tracks
TM_MIN_TRACK_LEN
Not used, should be 0
Value Sets the minimum track length
TM_TRACK_SHOW_ OUTLINES
Not used, should be 0
Value 0 = Off 1 = On
Shows or hides the object outlines with semi-automatic tracking
TM_TRACK_SHOW_ COMPLETE_TRACK
Not used, should be 0
Value 0 = show partial track 1 = show complete track
Sets the View/Output option to display partial or complete tracks
TM_TRACK_HEAD_ LENGTH
Not used, should be 0
Head length Sets the head length for the partial tracks
TM_TRACK_TAIL_ LENGTH
Not used, should be 0
Tail length Sets the tail length for the partial tracks
TM_TRACK_ONE_OBJ
Not used, should be 0
Value 0 = Off 1 = On
Sets the track one object option
TM_TRACK_COHER_FLTR
Not used, should be 0
Value 0 = Off 1 = On
Sets the coherence filtering option
TM_TRACK_ANGLE_DEV
Not used, should be 0
Value Sets the angle range(in degrees) for coherence filtering
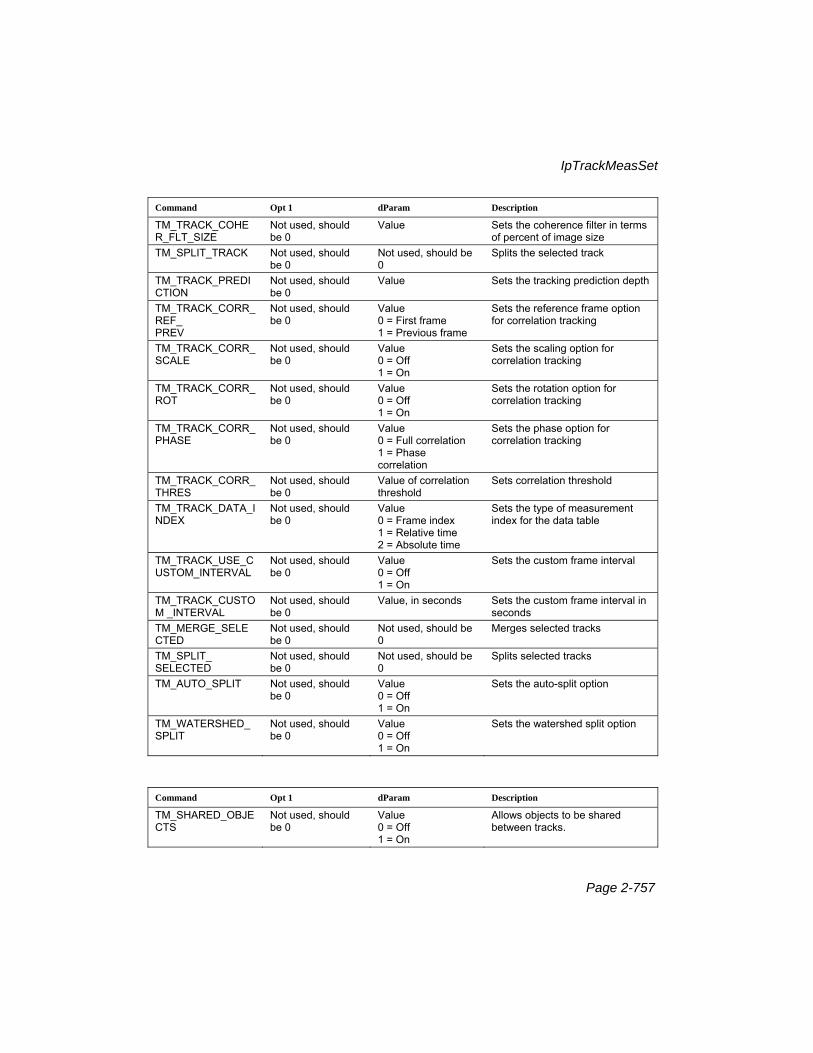
IpTrackMeasSet
Page 2-757
Command Opt 1 dParam Description
TM_TRACK_COHER_FLT_SIZE
Not used, should be 0
Value Sets the coherence filter in terms of percent of image size
TM_SPLIT_TRACK Not used, should be 0
Not used, should be 0
Splits the selected track
TM_TRACK_PREDICTION
Not used, should be 0
Value Sets the tracking prediction depth
TM_TRACK_CORR_REF_ PREV
Not used, should be 0
Value 0 = First frame 1 = Previous frame
Sets the reference frame option for correlation tracking
TM_TRACK_CORR_SCALE
Not used, should be 0
Value 0 = Off 1 = On
Sets the scaling option for correlation tracking
TM_TRACK_CORR_ROT
Not used, should be 0
Value 0 = Off 1 = On
Sets the rotation option for correlation tracking
TM_TRACK_CORR_PHASE
Not used, should be 0
Value 0 = Full correlation 1 = Phase correlation
Sets the phase option for correlation tracking
TM_TRACK_CORR_THRES
Not used, should be 0
Value of correlation threshold
Sets correlation threshold
TM_TRACK_DATA_INDEX
Not used, should be 0
Value 0 = Frame index 1 = Relative time 2 = Absolute time
Sets the type of measurement index for the data table
TM_TRACK_USE_CUSTOM_INTERVAL
Not used, should be 0
Value 0 = Off 1 = On
Sets the custom frame interval
TM_TRACK_CUSTOM _INTERVAL
Not used, should be 0
Value, in seconds Sets the custom frame interval in seconds
TM_MERGE_SELECTED
Not used, should be 0
Not used, should be 0
Merges selected tracks
TM_SPLIT_ SELECTED
Not used, should be 0
Not used, should be 0
Splits selected tracks
TM_AUTO_SPLIT Not used, should be 0
Value 0 = Off 1 = On
Sets the auto-split option
TM_WATERSHED_SPLIT
Not used, should be 0
Value 0 = Off 1 = On
Sets the watershed split option
Command Opt 1 dParam Description
TM_SHARED_OBJECTS
Not used, should be 0
Value 0 = Off 1 = On
Allows objects to be shared between tracks.

IpTrackMeasSet
Page 2-758
TM_MOTION_TYPE Not used, should be 0
Value 0 = Chaotic 1 = Directional 2 = Straight
Sets the predominant motion type for the objects
TM_GRAPH _MEAS Type of new measurement, must be one of the following:
Statistical parameter of the tracking measurement:
Sets measurements for tracking graph
TRM_DIST TRM_X_COORD TRM_Y_COORD TRM_OR_DIST TRM_ANGLE
TRSTMean - mean TRSTStDev - standard deviation TRSTMin - minimum TRSTMax - maximum TRSTRange - range TRSTSum - sum TRSTIndMin – index of minimum TRSTIndMax – index of maximum TRSTNObj – number of elements TR_VALUE - values
TM_GRAPH-RANGE_AUTO
Not used, should be 0
Value Sets auto-range for the tracking graph
TM_GRAPH_RANGE_ MIN
Not used, should be 0
Double value, color in bbggrr format
Sets the minium range for the tracking graph
TM_GRAPH_RANGE_ MAX
Not used, should be 0
Value Sets the maxiium range for the tracking graph
TM_GRAPH_X_LABELS
Not used, should be 0
Should be one of the following:trxlFrameNumber trxlRelTime trxlAbsTime
Sets X label type for graph
Return Value 0 if successful, a negative error code if failed.
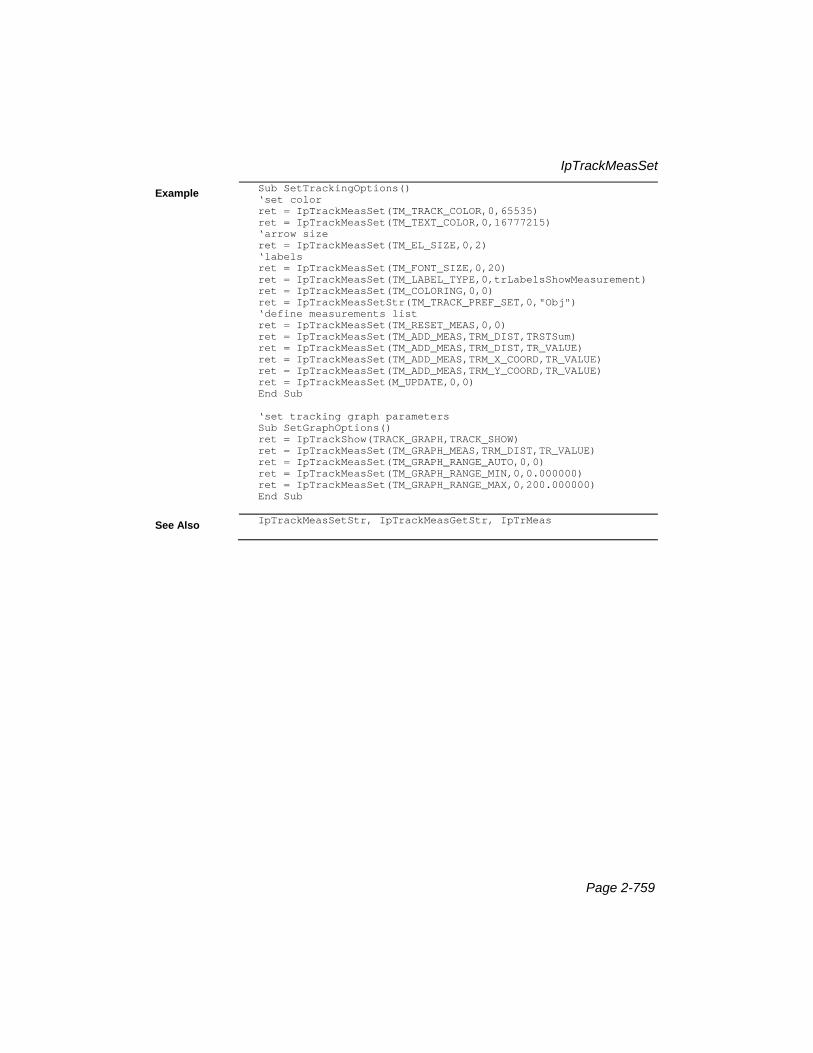
IpTrackMeasSet
Page 2-759
Example Sub SetTrackingOptions() ‘set color ret = IpTrackMeasSet(TM_TRACK_COLOR,0,65535) ret = IpTrackMeasSet(TM_TEXT_COLOR,0,16777215) ‘arrow size ret = IpTrackMeasSet(TM_EL_SIZE,0,2) ‘labels ret = IpTrackMeasSet(TM_FONT_SIZE,0,20) ret = IpTrackMeasSet(TM_LABEL_TYPE,0,trLabelsShowMeasurement) ret = IpTrackMeasSet(TM_COLORING,0,0) ret = IpTrackMeasSetStr(TM_TRACK_PREF_SET,0,"Obj") ‘define measurements list ret = IpTrackMeasSet(TM_RESET_MEAS,0,0) ret = IpTrackMeasSet(TM_ADD_MEAS,TRM_DIST,TRSTSum) ret = IpTrackMeasSet(TM_ADD_MEAS,TRM_DIST,TR_VALUE) ret = IpTrackMeasSet(TM_ADD_MEAS,TRM_X_COORD,TR_VALUE) ret = IpTrackMeasSet(TM_ADD_MEAS,TRM_Y_COORD,TR_VALUE) ret = IpTrackMeasSet(M_UPDATE,0,0) End Sub ‘set tracking graph parameters Sub SetGraphOptions() ret = IpTrackShow(TRACK_GRAPH,TRACK_SHOW) ret = IpTrackMeasSet(TM_GRAPH_MEAS,TRM_DIST,TR_VALUE) ret = IpTrackMeasSet(TM_GRAPH_RANGE_AUTO,0,0) ret = IpTrackMeasSet(TM_GRAPH_RANGE_MIN,0,0.000000) ret = IpTrackMeasSet(TM_GRAPH_RANGE_MAX,0,200.000000) End Sub
See Also IpTrackMeasSetStr, IpTrackMeasGetStr, IpTrMeas

IpTrackMeasSetStr
Page 2-760
IpTrackMeasSetStr Syntax IpTrackMeaseSetStr(sCommand, 1Opt1, dParam)
Description This function gets various string parameters for the tracking measurments.
Parameters sCommand Short See comments and list below.
lOpt1 Long See comments and list below.
dParam Double See comments and list below.
Comments This macro takes the commands described below:
Command Opt 1 dParam Description
TM_TRACK_PREF_SET
Not used, should be 0
String with tracking prefix.
Sets tracking prefix
TM_NAME_SET Index of the trrack, 0-based
String with new name.
Sets the name of the track.
Return Value 0 if successful, a negative error code if failed.
See Also IpTrackMeasSetStr, IpTrMeas
IpTrackMove Syntax IpTrackMove(sDialog,xPos, yPos)
Description This function moves the tracking windows.
Parameters Dialog Short A constant, indicating what to move. Should be one of the following: TRACK_TABLE = Tracking data table TRACK_GRAPH = Tracking graph
xPos Short Indicates the X window position
yPos Short Indicates the Y window position
Return Value 0 if successful, a negative error code if failed.
Example ret = IpTrackMOVE (TRACK_TABLE,632,18)
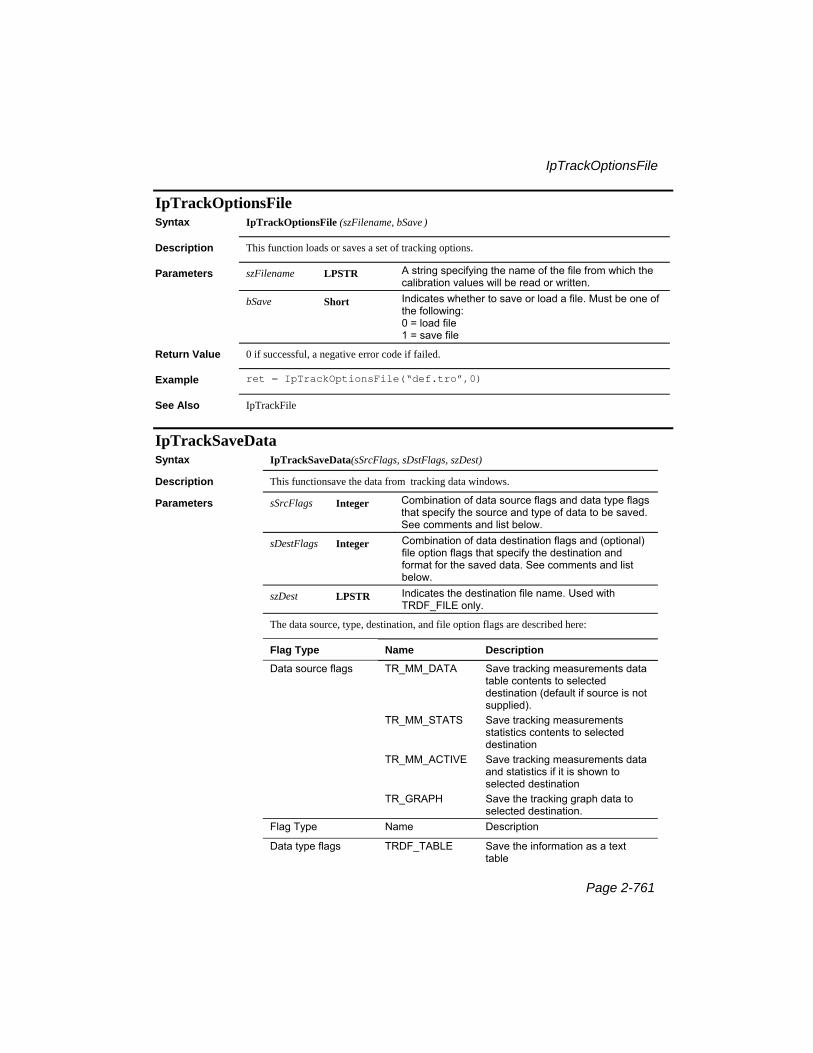
IpTrackOptionsFile
Page 2-761
IpTrackOptionsFile Syntax IpTrackOptionsFile (szFilename, bSave )
Description This function loads or saves a set of tracking options.
Parameters szFilename LPSTR A string specifying the name of the file from which the calibration values will be read or written.
bSave Short Indicates whether to save or load a file. Must be one of the following: 0 = load file 1 = save file
Return Value 0 if successful, a negative error code if failed.
Example ret = IpTrackOptionsFile(“def.tro”,0)
See Also IpTrackFile
IpTrackSaveData Syntax IpTrackSaveData(sSrcFlags, sDstFlags, szDest)
Description This functionsave the data from tracking data windows.
Parameters sSrcFlags Integer Combination of data source flags and data type flags that specify the source and type of data to be saved. See comments and list below.
sDestFlags Integer Combination of data destination flags and (optional) file option flags that specify the destination and format for the saved data. See comments and list below.
szDest LPSTR Indicates the destination file name. Used with TRDF_FILE only.
The data source, type, destination, and file option flags are described here:
Flag Type Name Description
Data source flags TR_MM_DATA Save tracking measurements data table contents to selected destination (default if source is not supplied).
TR_MM_STATS Save tracking measurements statistics contents to selected destination
TR_MM_ACTIVE Save tracking measurements data and statistics if it is shown to selected destination
TR_GRAPH Save the tracking graph data to selected destination.
Flag Type Name Description
Data type flags TRDF_TABLE Save the information as a text table

IpTrackSize
Page 2-762
TRDF_GRAPH Save the information as a graph
Data destination
flags TRDF_FILE
Copy data to tab-delimited file (default if destination is not supplied). Not valid with TRTF_GRAPH.
TRDF_CLIPBOARD
Copy data to clipboard. Valid only for TR_GRAPH with TRTF_GRAPH.
TRDF_DDE Send contents to Excel via COM. Not valid with TRTF_GRAPH
File option flags TRDF_CSV The default format of the data file is a tab-delimited table of values, with one line per row. TRDF_CSV can be used to specify that the data file should be written as a comma-delimited file (usually compatible with import into spreadsheets and databases). Cannot be combined with TRDF_HTML
TRDF_HTML Can be used to specify that the data file should be written as a HTML file containing an HTML TABLE. Cannot be combined with TRDF_CSV
Return Value 0 if successful, a negative error code if failed.
Example save tracking measurements data table ret = IpTrackSaveData(TR_MM_ACTIVE, TRDF_FILE, "C:\t1.htm")
IpTrackSize Syntax IpTrackSize(sDialog,xSize, ySize)
Description This function resizes the tracking toolbar and dialogs.
Parameters sDialog Integer A constant, indicating what to resize. Should be one of the following: TRACK_TABLE = Tracking data table TRACK_GRAPH = Tracking graph
xSize Integer Sets the dialog width.
ySize Integer Sets the dialog height.
Return Value 0 if successful, a negative error code if failed, IPCEER_INVARG if out of range or negative.
Example ret = IpTrackMOVE (TRACK_GRAPH,451,541)
IpTrackShow Syntax IpTrackShow(sDialog, sShow)

IpTrim
Page 2-763
Description This function shows or hides the tracking windows.
Parameters sDialog Integer A constant, indicating what to show or hide. Should be one of the following: TRACK_TABLE = Tracking data table TRACK_GRAPH = Tracking graph
sShow Integer A constant, indicating if the window should hidden or shown. Should be one of the following: TRACK_HIDE = Hides the window or dialog TRACK_SHOW = Shows the window or dialog
Return Value 0 if successful, a negative error code if failed.
Example ret = IpTrackShow(TRACK_TABLE, TRACK_SHOW) ret = IpTrackShow(TRACK_GRAPH, TRACK_SHOW)
IpTrim Syntax IpTrim (inString)
Description This function returns the portion of a fixed-length string that has been filled by an Auto-Pro fuction.
Parameters inString String A fixed-length string. See comments.
Return Value A string trimmed to the content returned by the Auto-Pro function.
Example Many Auto-Pro functions return strings to the caller. These Auto-Pro functions take a fixed length string, dimensioned like the following example: Dim aString as String*255
Comments The Auto-Pro function will fill the fixed length string with the requested text, but the text will in almost all cases not entirely fill the provided string (255 characters in this example), and IPBasic is not aware of the text length actually used.

IpWsChangeDescription
Page 2-764
IpWsChangeDescription Syntax IpWsChangeDescription(DescriptionType, Description)
Description This function sets or changes the descriptive information associated with the active image. Equivalent to setting the Title, Artist, Date and Comments fields with the Info command.
Parameters DescriptionType Integer An enumerated integer specifying the descriptive field to which the string in the Description parameter is to be applied. Must be one of the following: INF_TITLE INF_ARTIST INF_DATE INF_DESCRIPTION INF_NAME INF_RANGE These options correspond to the “Information” dialog box's “Title”, “Artist”, “Date”, “Comments”, “Name”, and “Display Range” fields, respectively.
Description String The string that is to be written to the field specified in DescriptionType.
Example Sub IpWsChangeDescription_example() Dim description As String description = "This demonstrates how text is placed in the" + Chr$(13) + Chr$(10) description = description + "description field. As you can see, there is" + Chr$(13) + Chr$(10) description = description + "a particular technique for inserting multi-line" + Chr$(13) + Chr$(10) description = description + "entries..." ret = IpWsChangeDescription(INF_TITLE, "My Image") ret = IpWsChangeDescription(INF_ARTIST, "Experienced Image-Pro User") ret = IpWsChangeDescription(INF_DESCRIPTION, description) description = “This line sets the display range for a single point image: Ret=IpWsChangeDescription(INF_RANGE,“1.04, 256.5”) description = “The following line determines and sets the display range automatically Ret=IpWsChangeDescription(INF_RANGE,“auto”)
End Sub
Comments INF_RANGE applies only to single point images. The description for this value may be “auto” or you may give a starting and ending value for the range, such as (1, 257).
See Also IpWsChangeInfo

IpWsChangeInfo
Page 2-765
IpWsChangeInfo Syntax IpWsChangeInfo(InfoType, Info)
Description This function assigns a logical DPI value to the active image. Equivalent to setting the Dots/Inch X and Dots/Inch Y fields with the Info command.
Parameters InfoType Integer An enumerated integer selecting the DPI field that is to be set. Must be one of the following: INF_DPIX INF_DPIY These options correspond to the Dots/Inch X and Dots/Inch Y fields, respectively.
Info Integer An integer specifying the DPI value that is to be set.
Example ret = IpWsChangeInfo(INF_DPIX, 300)
This statement will set the Dots/Inch X field to 300.
See Also IpWsChangeDescription

IpWsConvertFile
Page 2-766
IpWsConvertFile Syntax
IpWsConvertFile(DstFile, DstFormat, SrcFile, SrcFormat, Compr, imClass, HalfType, HalfOpt, Dpi)
Description This function converts the specified file to a new format. Equivalent to the Batch Conversion command.
Parameters DstFile String A string specifying the name of the file to which the converted image data will be written.
DstFormat String A string specifying the format in which the converted data will be written. See IpWsSaveAs for valid file format strings.
SrcFile String A string specifying the name of the file that is to be converted.
SrcFormat String A string specifying the format of the source file. See IpWsSaveAs for valid file format strings.
Compr Integer An enumerated integer specifying the compression method that is to be applied to the converted image. Must be one of the following: IFFCOMP_NONE IFFCOMP_DEFAULT IFFCOMP_RLE IFFCOMP_JPEG IFFCOMP_LZW IFFCOMP_LZWHPRED See definitions under Comments, below. Take care to specify a compression method that is valid for the specified FileFormat. To determine which methods are valid, select file format and class in the“Batch File Conversion dialog box, and review the options presented in the Compression list box.
imClass Integer An enumerated integer specifying the class to which the image is to be converted. Must be one of the following: IFFCL_GRAY IFFCL_PALETTE IFFCL_RGB Take care to specify a class that is valid for the specified FileFormat. To determine which classes are valid, select the file format in the Batch File
Conversion dialog box, and review the options presented in the Image Class list box.

IpWsConvertImage
Page 2-767
HalfType Integer Obsolete, set to zero
HalfOpt Integer Obsolete, set to zero
Dpi Integer An integer specifying the resolution at which the image is to be halftoned. This parameter is ignored if the imClass parameter is other than IFFCL_BILEVEL, or when HalftoneType is set to 6. When this is the case, just set Dpi to 0.
Example ret = IpWsConvertFile("abc.bmp","BMP","abc.tif","TIF",IFFCOMP_RLE,IFFCL_GRAY,0,0,0)
This statement will convert file ABC.TIF to a Gray Scale, BMP format, using RLE compression. The values in the last three parameters (i.e., 0,0,0) are ignored because the image is not being converted to IFFCL_BILEVEL.
Comments Compr values are as follows:
VALUE DESCRIPTION IFFCOMP_NONE Applies no compression. IFFCOMP_DEFAULT Applies default compression for the selected
format. IFFCOMP_RLE Applies Run Length Encoding. IFFCOMP_JPEG Applies JPEG compression IFFCOMP_LZW Applies Lempel-Zif & Welch encoding. IFFCOMP_LZWHPRED Applies Lempel-Zif & Welch encoding with
horizontal differencing.
IpWsConvertImage Syntax IpWsConvertImage (Type, Conversion, InStart, InEnd, OutStart, OutEnd)
Description This function converts the image to a type. Equivalent to selecting the Convert To command.
Parameters Type Integer Determines the image type to convert to. Valid values are:
IMC_GRAY = 1 IMC_PALETTE = 2 IMC_RGB = 3 IMC_GRAY12 = 4 IMC_SINGLE = 5 IMC_GRAY16 = 6 IMC_RGB36 = 8 IMC_RGB48 = 9
Conversion Integer Indicates the conversion style. See list of valid entries below:
Value DESCRIPTION CONV_SCALE 0: Multiplicative scaling
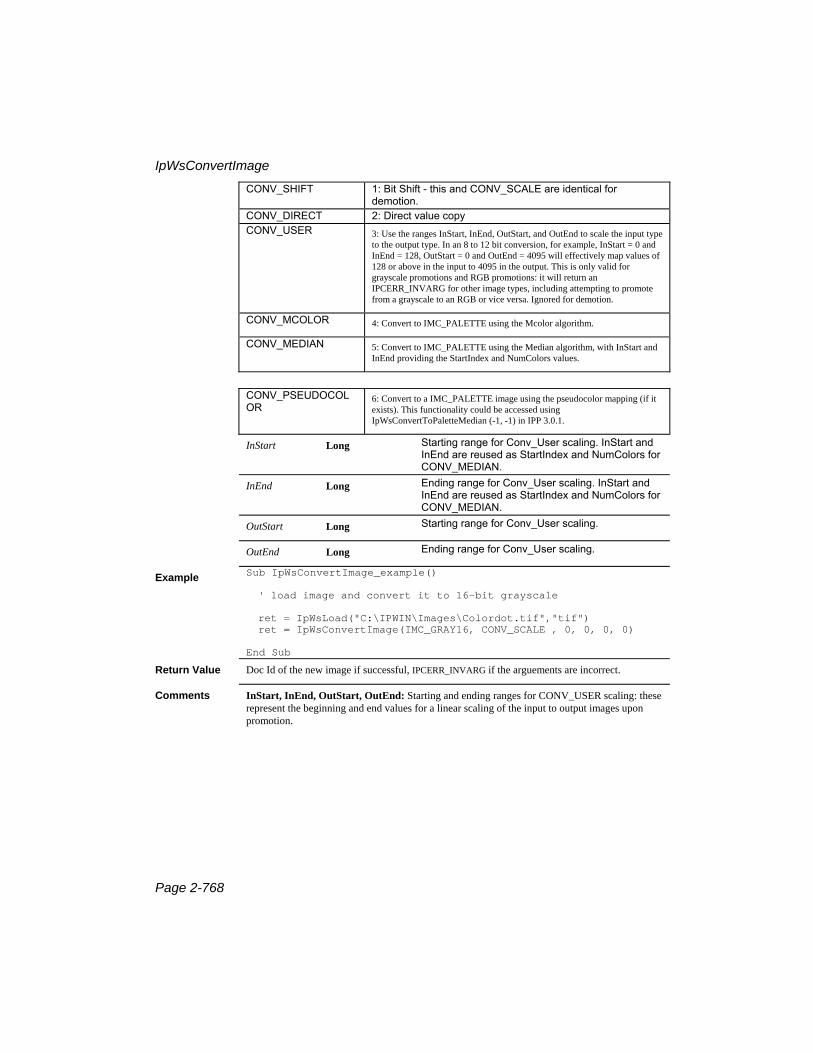
IpWsConvertImage
Page 2-768
CONV_SHIFT 1: Bit Shift - this and CONV_SCALE are identical for demotion.
CONV_DIRECT 2: Direct value copy CONV_USER 3: Use the ranges InStart, InEnd, OutStart, and OutEnd to scale the input type
to the output type. In an 8 to 12 bit conversion, for example, InStart = 0 and InEnd = 128, OutStart = 0 and OutEnd = 4095 will effectively map values of 128 or above in the input to 4095 in the output. This is only valid for grayscale promotions and RGB promotions: it will return an IPCERR_INVARG for other image types, including attempting to promote from a grayscale to an RGB or vice versa. Ignored for demotion.
CONV_MCOLOR 4: Convert to IMC_PALETTE using the Mcolor algorithm.
CONV_MEDIAN 5: Convert to IMC_PALETTE using the Median algorithm, with InStart and InEnd providing the StartIndex and NumColors values.
CONV_PSEUDOCOLOR
6: Convert to a IMC_PALETTE image using the pseudocolor mapping (if it exists). This functionality could be accessed using IpWsConvertToPaletteMedian (-1, -1) in IPP 3.0.1.
InStart Long Starting range for Conv_User scaling. InStart and InEnd are reused as StartIndex and NumColors for CONV_MEDIAN.
InEnd Long Ending range for Conv_User scaling. InStart and InEnd are reused as StartIndex and NumColors for CONV_MEDIAN.
OutStart Long Starting range for Conv_User scaling.
OutEnd Long Ending range for Conv_User scaling.
Example Sub IpWsConvertImage_example() ' load image and convert it to 16-bit grayscale ret = IpWsLoad("C:\IPWIN\Images\Colordot.tif","tif") ret = IpWsConvertImage(IMC_GRAY16, CONV_SCALE , 0, 0, 0, 0)
End Sub
Return Value Doc Id of the new image if successful, IPCERR_INVARG if the arguements are incorrect.
Comments InStart, InEnd, OutStart, OutEnd: Starting and ending ranges for CONV_USER scaling: these represent the beginning and end values for a linear scaling of the input to output images upon promotion.
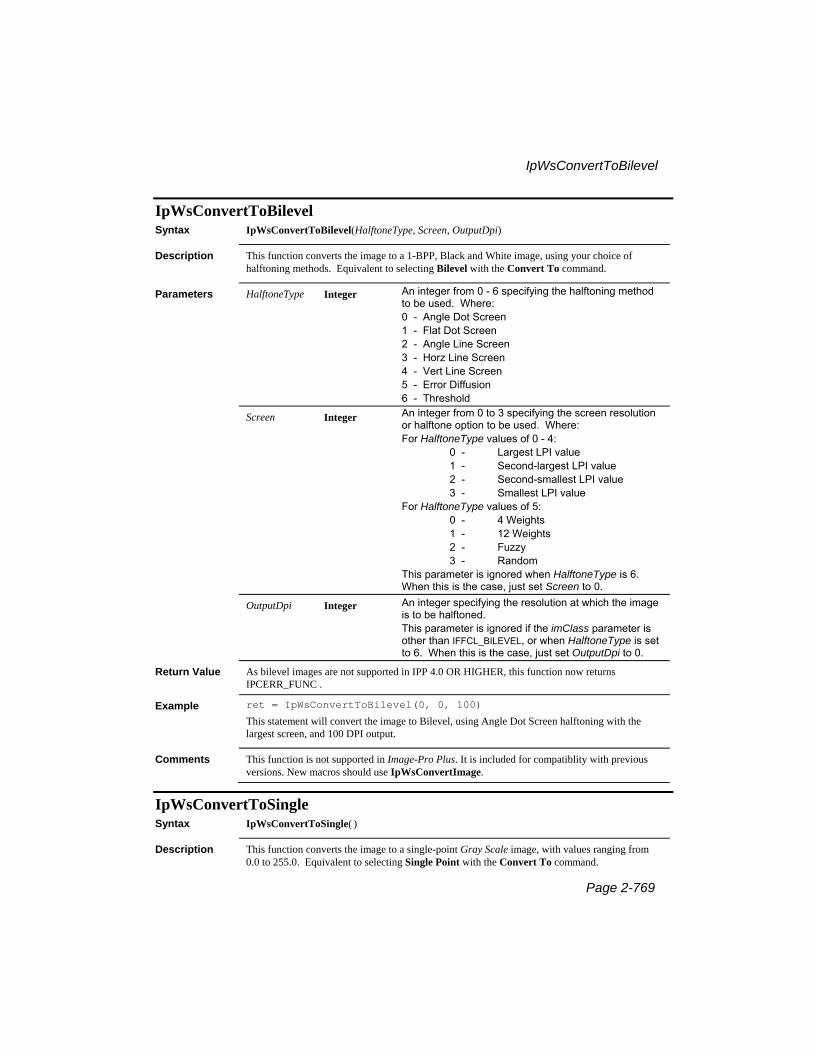
IpWsConvertToBilevel
Page 2-769
IpWsConvertToBilevel Syntax IpWsConvertToBilevel(HalftoneType, Screen, OutputDpi)
Description This function converts the image to a 1-BPP, Black and White image, using your choice of halftoning methods. Equivalent to selecting Bilevel with the Convert To command.
Parameters HalftoneType Integer An integer from 0 - 6 specifying the halftoning method to be used. Where: 0 - Angle Dot Screen 1 - Flat Dot Screen 2 - Angle Line Screen 3 - Horz Line Screen 4 - Vert Line Screen 5 - Error Diffusion 6 - Threshold
Screen Integer An integer from 0 to 3 specifying the screen resolution or halftone option to be used. Where: For HalftoneType values of 0 - 4: 0 - Largest LPI value 1 - Second-largest LPI value 2 - Second-smallest LPI value 3 - Smallest LPI value For HalftoneType values of 5: 0 - 4 Weights 1 - 12 Weights 2 - Fuzzy 3 - Random This parameter is ignored when HalftoneType is 6. When this is the case, just set Screen to 0.
OutputDpi Integer An integer specifying the resolution at which the image is to be halftoned. This parameter is ignored if the imClass parameter is other than IFFCL_BILEVEL, or when HalftoneType is set to 6. When this is the case, just set OutputDpi to 0.
Return Value As bilevel images are not supported in IPP 4.0 OR HIGHER, this function now returns IPCERR_FUNC .
Example ret = IpWsConvertToBilevel(0, 0, 100)
This statement will convert the image to Bilevel, using Angle Dot Screen halftoning with the largest screen, and 100 DPI output.
Comments This function is not supported in Image-Pro Plus. It is included for compatiblity with previous versions. New macros should use IpWsConvertImage.
IpWsConvertToSingle Syntax IpWsConvertToSingle( )
Description This function converts the image to a single-point Gray Scale image, with values ranging from 0.0 to 255.0. Equivalent to selecting Single Point with the Convert To command.
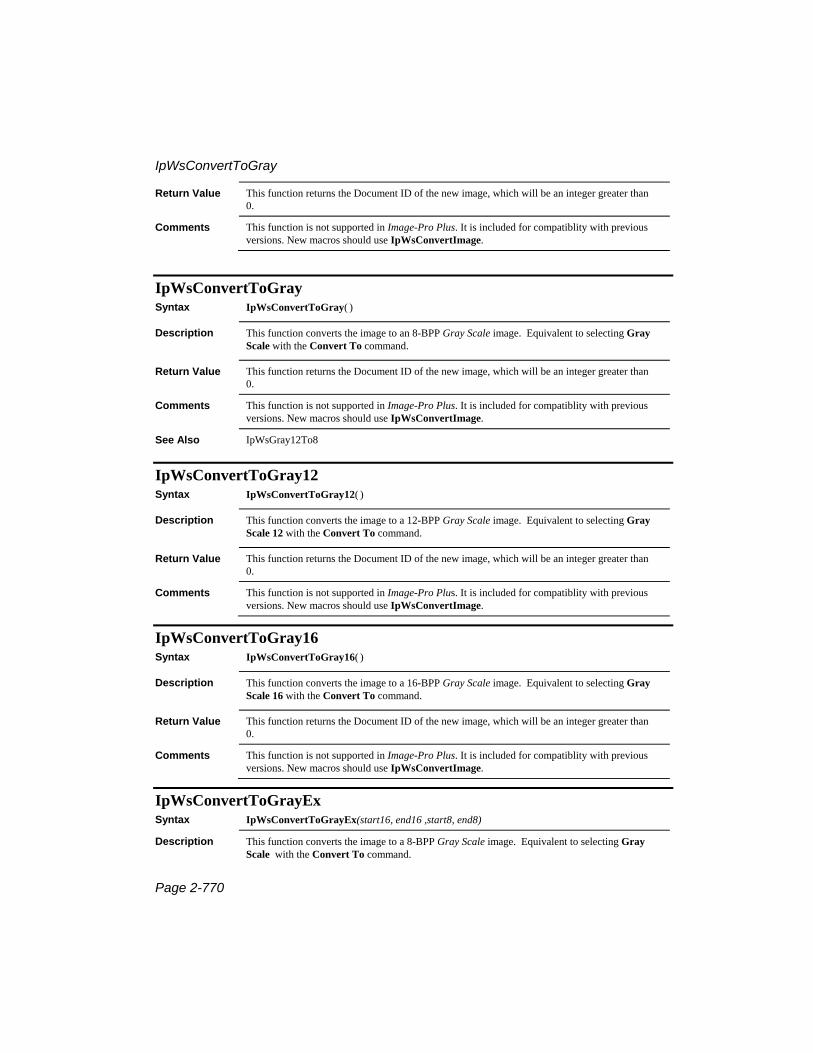
IpWsConvertToGray
Page 2-770
Return Value This function returns the Document ID of the new image, which will be an integer greater than 0.
Comments This function is not supported in Image-Pro Plus. It is included for compatiblity with previous versions. New macros should use IpWsConvertImage.
IpWsConvertToGray Syntax IpWsConvertToGray( )
Description This function converts the image to an 8-BPP Gray Scale image. Equivalent to selecting Gray Scale with the Convert To command.
Return Value This function returns the Document ID of the new image, which will be an integer greater than 0.
Comments This function is not supported in Image-Pro Plus. It is included for compatiblity with previous versions. New macros should use IpWsConvertImage.
See Also IpWsGray12To8
IpWsConvertToGray12 Syntax IpWsConvertToGray12( )
Description This function converts the image to a 12-BPP Gray Scale image. Equivalent to selecting Gray Scale 12 with the Convert To command.
Return Value This function returns the Document ID of the new image, which will be an integer greater than 0.
Comments This function is not supported in Image-Pro Plus. It is included for compatiblity with previous versions. New macros should use IpWsConvertImage.
IpWsConvertToGray16 Syntax IpWsConvertToGray16( )
Description This function converts the image to a 16-BPP Gray Scale image. Equivalent to selecting Gray Scale 16 with the Convert To command.
Return Value This function returns the Document ID of the new image, which will be an integer greater than 0.
Comments This function is not supported in Image-Pro Plus. It is included for compatiblity with previous versions. New macros should use IpWsConvertImage.
IpWsConvertToGrayEx Syntax IpWsConvertToGrayEx(start16, end16 ,start8, end8)
Description This function converts the image to a 8-BPP Gray Scale image. Equivalent to selecting Gray Scale with the Convert To command.

IpWsConvertToPaletteMColor
Page 2-771
Parameters Start16 Integer An integer between 0 and 65535 (inclusive) that identifies the beginning of the range of 16-bit values to be converted.
End16 Integer An integer between 0 and 65535 (inclusive) that identifies the end of the range of 16-bit values to be converted.
Start8 Integer An integer between 0 and 255 (inclusive) that identifies the beginning of the 8-bit range to which the 16-bit values will be converted.
End8 Integer An integer between 0 and 255 (inclusive) that identifies the end of the 8-bit range to which the 16-bit values will be converted.
Example The following statement converts the entire 16-bit range to 8 bits. ret = IpWsConvertToGrayEx(0, 65535, 0, 255)
The following statement converts bits 2 - in the 16-bit image (i.e., values 0 to 1020) to bits 0 -7 (i.e., 0 to 255) in an 8-bit image. ret = IpWsConvertToGrayEx(0, 1020, 0, 255)
Return Value This function returns the Document ID of the new image, which will be an integer greater than 0, -1 if failed.
Comments This function is not supported in Image-Pro Plus. It is included for compatiblity with previous versions. New macros should use IpWsConvertImage.
See Also IpWsConvertToGray
IpWsConvertToPaletteMColor Syntax IpWsConvertToPaletteMColor( )
Description This function converts the image to an 8-BPP Palette-class image, using Media Cybernetic's proprietary M/Color method. Equivalent to selecting Palette with the Convert To command, then choosing MColor.
Return Value This function returns the Document ID of the new image, which will be an integer greater than 0.
See Also IpWsConvertToPaletteMedian
Comments This function is not supported in Image-Pro Plus. It is included for compatiblity with previous versions. New macros should use IpWsConvertImage.
IpWsConvertToPaletteMedian Syntax IpWsConvertToPaletteMedian(StartIndex, NumColors)
Description This function converts a pseudo-colored, gray-scale image to a Palette-class image, using the pseudo-color palette definition method. Equivalent to selecting Palette with the Convert To command, then choosing Median.
Parameters StartIndex Integer An integer from 0 to 13 (inclusive), representing the palette position into which the first color will be placed.

IpWsConvertToRGB
Page 2-772
NumColors Integer An integer from 4 to 256 (inclusive), representing the number of colors in the resulting palette.
Return Value This function returns the Document ID of the new image, which will be an integer greater than 0.
Example ret = IpWsConvertToPaletteMedian(0, 256)
This statement will convert the image to an 8-BPP Palette-class image, using the Median method, with 256 colors in the palette, starting at index 0.
ret = IpWsConvertToPaletteMedian(6, 55)
This statement will convert the image to a 8-BPP Palette-class image, using the Median method, with 55 colors in the palette, starting at index 6.
Comments This function is not supported in Image-Pro Plus. It is included for compatiblity with previous versions. New macros should use IpWsConvertImage.
See Also IpWsConvertToPaletteMColor
IpWsConvertToRGB Syntax IpWsConvertToRGB( )
Description This function converts the image to a 24-BPP (chunky) True Color image. Equivalent to selecting RGB with the Convert To command.
Return Value This function returns the Document ID of the new image, which will be an integer greater than 0.
Comments This function is not supported in Image-Pro Plus. It is included for compatiblity with previous versions. New macros should use IpWsConvertImage.
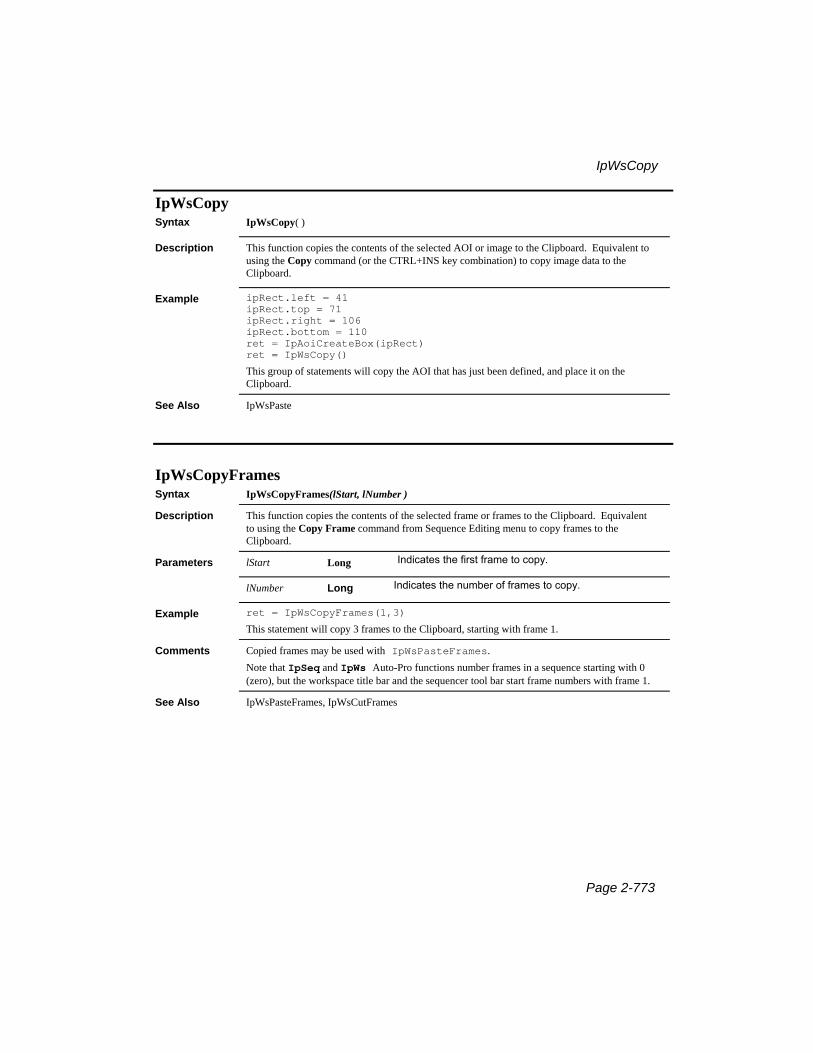
IpWsCopy
Page 2-773
IpWsCopy Syntax IpWsCopy( )
Description This function copies the contents of the selected AOI or image to the Clipboard. Equivalent to using the Copy command (or the CTRL+INS key combination) to copy image data to the Clipboard.
Example ipRect.left = 41 ipRect.top = 71 ipRect.right = 106 ipRect.bottom = 110 ret = IpAoiCreateBox(ipRect) ret = IpWsCopy()
This group of statements will copy the AOI that has just been defined, and place it on the Clipboard.
See Also IpWsPaste
IpWsCopyFrames Syntax IpWsCopyFrames(lStart, lNumber )
Description This function copies the contents of the selected frame or frames to the Clipboard. Equivalent to using the Copy Frame command from Sequence Editing menu to copy frames to the Clipboard.
Parameters lStart Long Indicates the first frame to copy.
lNumber Long Indicates the number of frames to copy.
Example ret = IpWsCopyFrames(1,3)
This statement will copy 3 frames to the Clipboard, starting with frame 1.
Comments Copied frames may be used with IpWsPasteFrames. Note that IpSeq and IpWs Auto-Pro functions number frames in a sequence starting with 0 (zero), but the workspace title bar and the sequencer tool bar start frame numbers with frame 1.
See Also IpWsPasteFrames, IpWsCutFrames
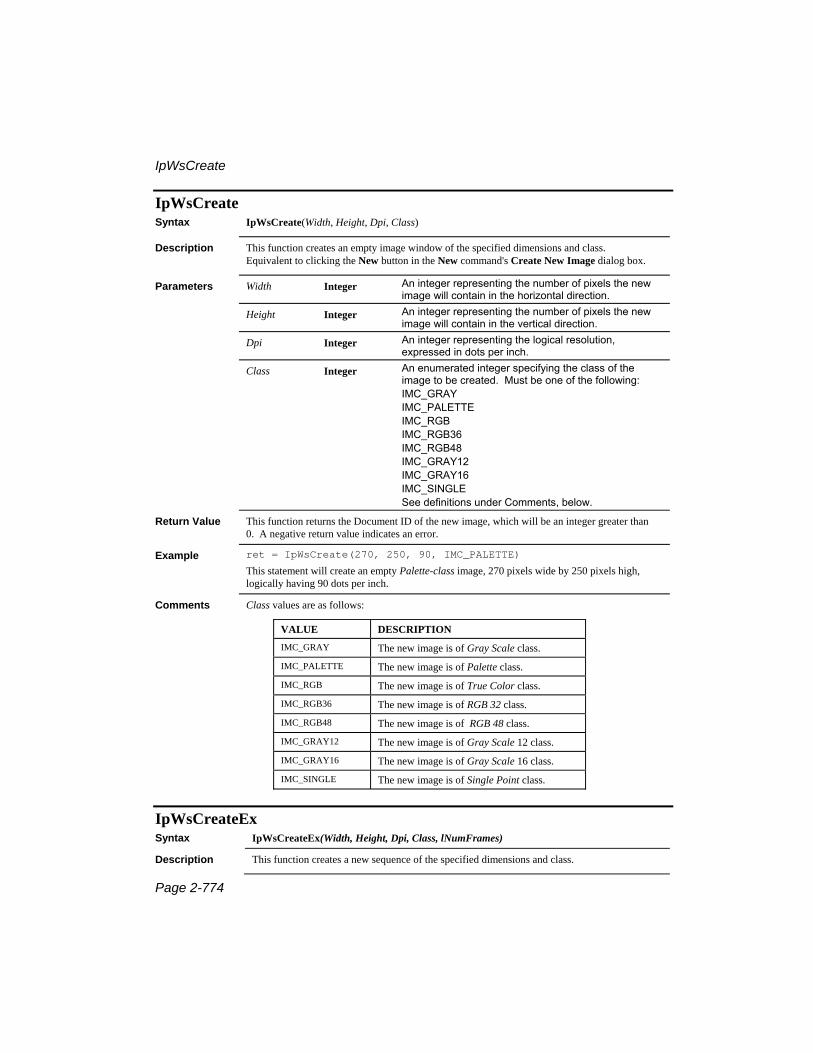
IpWsCreate
Page 2-774
IpWsCreate Syntax IpWsCreate(Width, Height, Dpi, Class)
Description This function creates an empty image window of the specified dimensions and class. Equivalent to clicking the New button in the New command's Create New Image dialog box.
Parameters Width Integer An integer representing the number of pixels the new image will contain in the horizontal direction.
Height Integer An integer representing the number of pixels the new image will contain in the vertical direction.
Dpi Integer An integer representing the logical resolution, expressed in dots per inch.
Class Integer An enumerated integer specifying the class of the image to be created. Must be one of the following: IMC_GRAY IMC_PALETTE IMC_RGB IMC_RGB36 IMC_RGB48 IMC_GRAY12 IMC_GRAY16 IMC_SINGLE See definitions under Comments, below.
Return Value This function returns the Document ID of the new image, which will be an integer greater than 0. A negative return value indicates an error.
Example ret = IpWsCreate(270, 250, 90, IMC_PALETTE)
This statement will create an empty Palette-class image, 270 pixels wide by 250 pixels high, logically having 90 dots per inch.
Comments Class values are as follows:
VALUE DESCRIPTION IMC_GRAY The new image is of Gray Scale class.
IMC_PALETTE The new image is of Palette class.
IMC_RGB The new image is of True Color class.
IMC_RGB36 The new image is of RGB 32 class.
IMC_RGB48 The new image is of RGB 48 class.
IMC_GRAY12 The new image is of Gray Scale 12 class.
IMC_GRAY16 The new image is of Gray Scale 16 class.
IMC_SINGLE The new image is of Single Point class.
IpWsCreateEx Syntax IpWsCreateEx(Width, Height, Dpi, Class, lNumFrames)
Description This function creates a new sequence of the specified dimensions and class.

IpWsCreateFromClipboard
Page 2-775
Parameters Width Integer An integer representing the number of pixels the new image will contain in the horizontal direction.
Height Integer An integer representing the number of pixels the new image will contain in the vertical direction.
Dpi Integer An integer representing the logical resolution, expressed in dots per inch.
Class Integer An enumerated integer specifying the class of the image to be created. Must be one of the following: IMC_GRAY IMC_PALETTE IMC_RGB IMC_RGB36 IMC_RGB48 IMC_GRAY12 IMC_GRAY16 IMC_SINGLE See definitions under Comments, below.
lNumFrames Long Indicates the number of frames to create.
Return Value This function returns the Document ID of the new sequence, which will be an integer greater than 0. A negative return value indicates an error.
Example ret = IpWsCreateEx(270, 250, 90, IMC_GRAY12, 3)
This statement will create an empty grayscale 12 sequence,270 pixels wide by 250 pixels high, logically having 90 dots per inch and 3 frames.
Comments Class values are as follows:
VALUE DESCRIPTION IMC_GRAY The new image is of Gray Scale class.
IMC_PALETTE The new image is of Palette class.
IMC_RGB The new image is of True Color class.
IMC_RGB36 The new image is of RGB 32 class.
IMC_RGB48 The new image is of RGB 48 class.
IMC_GRAY12 The new image is of Gray Scale 12 class.
IMC_GRAY16 The new image is of Gray Scale 16 class.
IMC_SINGLE The new image is of Single Point class.
IpWsCreateFromClipboard Syntax IpWsCreateFromClipboard( )
Description This function creates an image window from the contents of the Clipboard. Equivalent to clicking Clipboard in the New command's Create New Image dialog box.
Return Value This function returns the Document ID of the new image, which will be an integer greater than 0.

IpWsCreateFromVri
Page 2-776
Comments If there is nothing on the Clipboard, nothing will occur.
IpWsCreateFromVri Syntax IpWsCreateFromVri(Vri, Name, Mode)
Description This function creates a new image workspace (document) from a VRI handle. There is no Image-Pro command equivalent to this function; it is one that must be manually written with the macro editor. Note - if you are programming with Image-Pro's Software Development Kit (SDK), the VRI handle is the Virtual Image handle defined by your Halo Imaging Library (HIL).
Parameters Vri Integer The handle (type short in C) to the image bit map. This handle can be obtained with IpDocGet.
Name String A string specifying the name to appear in the title bar of the new workspace.
Mode Integer An enumerated integer specifying the way in which the new workspace is to be opened. Must be one of the following:
0 VRI_NODELETE VRI_COPY See definitions under Comments, below.
Return Value This function returns the Document ID of the new image, which will be an integer greater than 0. A -1 is returned when an error occurs.
Example The following example duplicates the active document without using the IpWsDuplicate function. Dim Vri as integer ret = IpDocGet(GETDOCVRI, DOCSEL_ACTIVE, Vri) If Vri >= 0 Then ret = IpWsCreateFromVri(Vri, "", VRI_COPY) End If
Comments The Vri options are described in the table below.

IpWsCutFrames
Page 2-777
VALUE DESCRIPTION 0 This option assigns the source VRI to the new workspace. If the new
workspace is subsequently closed by Image-Pro, the VRI will be destroyed. Note that this method may cause problems if the VRI is closed while it is being shared by several applications.
VRI_NODELETE This option assigns the source VRI to the new workspace. If the workspace is subsequently closed by Image-Pro, the VRI will not be destroyed.
VRI_COPY This option copies the source VRI to the new workspace. The original VRI can be destroyed by its owner without causing a problem in Image-Pro, and the workspace can be closed by Image-Pro without affecting owners of the source VRI.
See Also IpDocGet
IpWsCutFrames Syntax IpWsCutFrames(lStart, lNumber )
Description This function removes the selected frame or frames from the sequence to the Clipboard. Equivalent to using the Cut Frame command from Sequence Editing menu to place frames on the Clipboard.
Parameters lStart Long Indicates the first frame to cut.
lNumber Long Indicates the number of frames to cut.
Example ret = IpWsCutFrames(1,3)
This statement will cut 3 frames from the active sequence, starting with frame 1, and place them on the Clipboard.
Comments Cut frames may be used with IpWsPasteFrames. If the IpWsCutFrames command results in all of the frames being cut from a sequence, the sequence workspace will be closed automatically. Note that IpSeq and IpWs Auto-Pro functions number frames in a sequence starting with 0 (zero), but the workspace title bar and the sequencer tool bar start frame numbers with frame 1.
See Also IpWsPasteFrames,IpWsCopyFrames
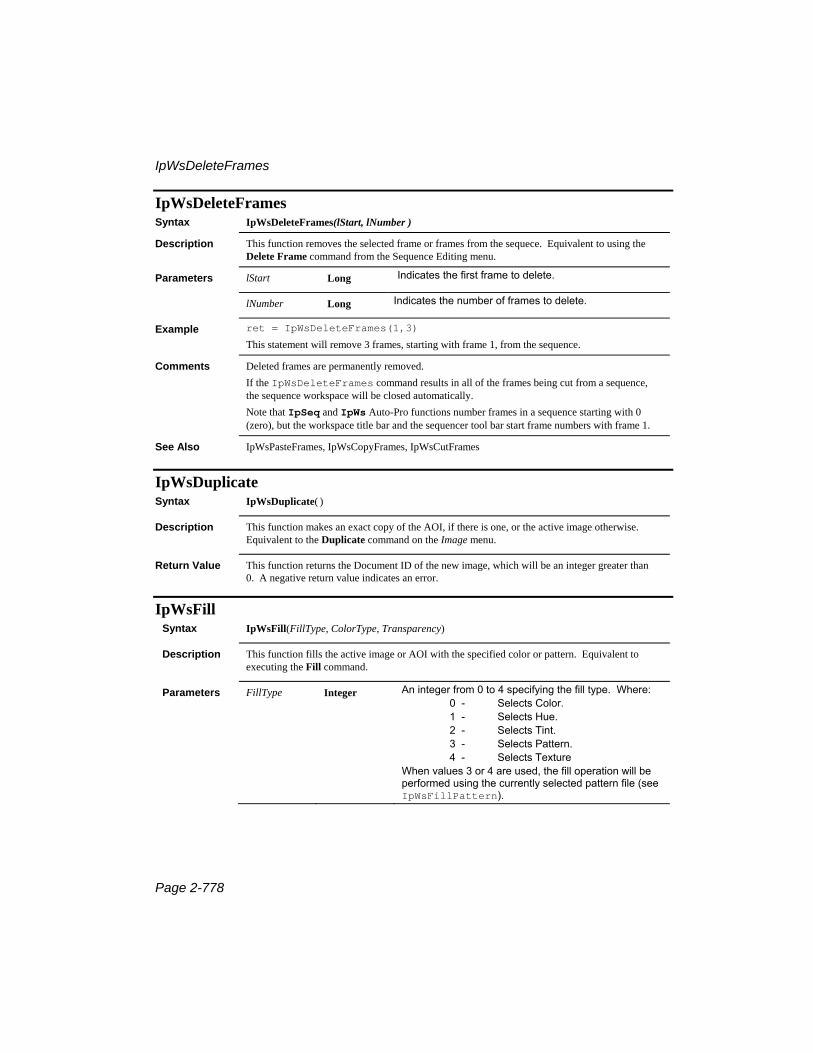
IpWsDeleteFrames
Page 2-778
IpWsDeleteFrames Syntax IpWsDeleteFrames(lStart, lNumber )
Description This function removes the selected frame or frames from the sequece. Equivalent to using the Delete Frame command from the Sequence Editing menu.
Parameters lStart Long Indicates the first frame to delete.
lNumber Long Indicates the number of frames to delete.
Example ret = IpWsDeleteFrames(1,3)
This statement will remove 3 frames, starting with frame 1, from the sequence.
Comments Deleted frames are permanently removed. If the IpWsDeleteFrames command results in all of the frames being cut from a sequence, the sequence workspace will be closed automatically. Note that IpSeq and IpWs Auto-Pro functions number frames in a sequence starting with 0 (zero), but the workspace title bar and the sequencer tool bar start frame numbers with frame 1.
See Also IpWsPasteFrames, IpWsCopyFrames, IpWsCutFrames
IpWsDuplicate Syntax IpWsDuplicate( )
Description This function makes an exact copy of the AOI, if there is one, or the active image otherwise. Equivalent to the Duplicate command on the Image menu.
Return Value This function returns the Document ID of the new image, which will be an integer greater than 0. A negative return value indicates an error.
IpWsFill Syntax IpWsFill(FillType, ColorType, Transparency)
Description This function fills the active image or AOI with the specified color or pattern. Equivalent to executing the Fill command.
Parameters FillType Integer An integer from 0 to 4 specifying the fill type. Where: 0 - Selects Color. 1 - Selects Hue. 2 - Selects Tint. 3 - Selects Pattern. 4 - Selects Texture
When values 3 or 4 are used, the fill operation will be performed using the currently selected pattern file (see IpWsFillPattern).

IpWsFillPattern
Page 2-779
Parameters ColorType Integer An integer from 0 to 4 specifying the color. Where: 0 - Selects Foreground Color. 1 - Selects Background Color. 2 - Selects White. 3 - Selects Black. This parameter is ignored if the FillType parameter is set to 3 or 4. When this is the case, set ColorType to 0.
Transparency Integer An integer from 0 to 100 (inclusive), selecting the degree to which the active image will “show through” the applied pattern or color. The higher the value, the more the active image will “show through”.
Example ret = IpWsFill(0, 1, 0)
The statement above will fill the active image or AOI with the current Background color (as set in the palette window) and apply it with a transparency value of 0. ret = IpWsFillPattern("C:\IPWIN\IMAGES\GRID.TIF") ret = IpWsFill(3, 0, 80) The set of statements above will select GRID.TIF as the pattern file, then fill the active image or AOI with it using a transparency value of 80. The ColorType parameter is ignored, as the image is being filled with a pattern file, not with color.
See Also IpWsFillPattern, IpPalShow
IpWsFillPattern Syntax IpWsFillPattern(PatternFile)
Description This function selects the file to be used as the pattern or texture for a fill operation. Equivalent to the Select button in the Fill command's Pattern/Texture group box.
Parameters PatternFile String A string specifying the name of the file from which the pattern/texture will be read.
Example ret = IpWsFillPattern("C:\IPWIN\GRID.TIF")
This statement will select the GRID.TIF file as the pattern/texture file.
Comments This function merely selects the pattern file. It must be followed by the IpWsFill command for the fill to take place.
See Also IpWsFill

IpWsGray12To8
Page 2-780
IpWsGray12To8 Syntax IpWsGray12To8(FromStart, FromEnd, ToStart, ToEnd)
Description This function converts a Gray Scale 12 image into an 8-bit Gray Scale image with the option of converting a specific intensity range. Equivalent to setting the range in the Select Range dialog box when converting a 12-bit image with the Convert To command.
Parameters FromStart Integer An integer between 0 and 4095 (inclusive) that identifies the beginning of the range of 12-bit values to be converted.
FromEnd Integer An integer between 0 and 4095 (inclusive) that identifies the end of the range of 12-bit values to be converted.
ToStart Integer An integer between 0 and 255 (inclusive) that identifies the beginning of the 8-bit range to which the 12-bit values will be converted.
ToEnd Integer An integer between 0 and 255 (inclusive) that identifies the end of the 8-bit range to which the 12-bit values will be converted.
Example The following statement converts the entire 12-bit range to 8 bits. This would produce the same result as calling IpWsConvertToGray. ret = IpWsGray12To8(0, 4095, 0, 255)
The following statement converts bits 2 - 9 in the 12-bit image (i.e., values 0 to 1020) to bits 0 -7 (i.e., 0 to 255) in an 8-bit image. In binary notation this is the same as mapping (000000000000, 001111111100) into (00000000, 11111111). ret = IpWsGray12To8(0, 1020, 0, 255)
Comments This function is not supported in Image-Pro Plus. It is included for compatiblity with previous versions. New macros should use IpWsConvertImage.
See Also IpWsConvertToGray
IpWsGray16To8 Syntax IpWsGray16To8(start16, end16 ,start8, end8)
Description This function converts a Gray Scale 16 image into an 8-bit Gray Scale image with the option of converting a specific intensity range. Equivalent to setting the range in the Select Range dialog box when converting a 16-bit image with the Convert To command.
Parameters Start16 Integer An integer between 0 and 65535 (inclusive) that identifies the beginning of the range of 16-bit values to be converted.
End16 Integer An integer between 0 and 65535 (inclusive) that identifies the end of the range of 16-bit values to be converted.
Start8 Integer An integer between 0 and 255 (inclusive) that identifies the beginning of the 8-bit range to which the 16-bit values will be converted.
End8 Integer An integer between 0 and 255 (inclusive) that identifies the end of the 8-bit range to which the 16-bit values will be converted.

IpWsLoad
Page 2-781
Example The following statement converts the entire 16-bit range to 8 bits. This would produce the same result as calling IpWsConvertToGray. ret = IpWsGray16To8(0, 65535, 0, 255)
The following statement converts bits 2 - in the 16-bit image (i.e., values 0 to 1020) to bits 0 -7 (i.e., 0 to 255) in an 8-bit image. In binary notation this is the same as mapping (0000000000000000, 0000001111111100) into (00000000, 11111111). ret = IpWsGray16To8(0, 1020, 0, 255)
Comments This function is not supported in Image-Pro Plus. It is included for compatiblity with previous versions. New macros should use IpWsConvertImage.
See Also IpWsConvertToGray
IpWsLoad Syntax IpWsLoad(FileName, FileFormat)
Description This function opens an image file. Equivalent to the Open command.
Parameters FileName String A string specifying the name of the file from which the image will be read.
FileFormat String A string specifying the format in which the image file has been written. See Comments, below, for a list of valid file format strings.
Return Value This function returns the Document ID of the new image, which will be an integer greater than or equal to 0. A negative return value indicates an error.
Example ret = IpWsLoad("c:\ipwin\images\count.tif","TIF")
This statement will open the TIF file called COUNT.TIF, which is located in the \IPWIN7\IMAGES directory on the C: drive.
This function loads the entire image file, whether it is a single-frame image, or a sequence.
Comments FileFormat strings are as follows:
FileFormat DESCRIPTION
AVI AVI File Format
BMP Windows Bitmap File Format CUT HALO Device Independent Image File Format EPS Encapsulated Postscript File Format GIF CompuServe Graphics Interface Format
HDF Park Scientific File Format
HFF HALO File Format
IPW Image-Pro Workspace File Format
JPG JPEG File Interchange Format
FileFormat DESCRIPTION
PCD Kodak Photo CD File Format

IpWsLoadNumber
Page 2-782
PCT Apple Macintosh PICT File Format PCX ZSoft Image File Format SEQ Sequence Format
TIF Tagged Image File Format
TGA Truevision Targa File Format FLF Flat File Format (user defined)
See Also IpWsSave, IpWsSaveAs, IpWsSaveAsEx
IpWsLoadNumber Syntax IpWsLoadNumber(Number)
Description This function opens a recently closed image file that is listed with an identifying number at the bottom of the File menu.
Parameters Number Integer An integer from 1 to 4 (inclusive) specifying the name of the file to be opened, or -1 to invoke the Open File dialog box so that the user may select the file.
Return Value This function returns the Document ID of the new image, which will be an integer greater than 0. A negative return value indicates an error.
Example ret = IpWsLoadNumber(2)
This statement will return the second file listed at the bottom of the File menu.
ret = IpWsLoadNumber(-1)
This statement will display the Open File dialog box, allowing the user to select a file. The macro will continue when the user closes the dialog box.
Comments The number of files listed at the bottom of the File menu may be less than four, and the order in which they are listed changes as you open and close files. In a macro, use this function with care.
See Also IpWsLoad

IpWsLoadPreview
Page 2-783
IpWsLoadPreview Syntax IpWsLoadPreview(FileName, FileFormat, Left, Top, Right, Bottom)
Description This function opens the specified portion of an image. Equivalent to clicking the Preview button in the Open File dialog box, and using the mouse to define a frame around the portion that is to be opened.
Parameters FileName String A string specifying the name of the file from which the image is to be read.
FileFormat String A string specifying the format in which the image file has been written. See IpWsLoad for a list of valid file format strings.
Left Integer An integer specifying the horizontal position, in pixels, of the left edge of the frame.
Top Integer An integer specifying the vertical position, in pixels, of the top edge of the frame.
Right Integer An integer specifying the horizontal position, in pixels, of the right edge of the frame.
Bottom Integer An integer specifying the vertical position, in pixels, of the bottom edge of the frame.
Return Value This function returns the Document ID of the new image, which will be an integer greater than 0.
Example ret = IpWsLoadPreview("C:\IMAGES\SLIDE1.BMP","BMP",0,0,50,100)
This statement will load the rectangular portion of the SLIDFE1.BMP (a BMP file), where 0,0 defines the x,y coordinates for the upper-left corner of the rectangle, and 50,100 defines the coordinates of the bottom-right corner.

IpWsLoadSetRes
Page 2-784
IpWsLoadSetRes Syntax IpWsLoadSetRes(Num)
Description This function selects the resolution of the sub-image to be loaded when a multiple-resolution image file is opened (e.g., a Photo-CD image file). Equivalent to selecting a resolution when a multiple-resolution file is opened using the Open command.
Parameters Num Integer An integer specifying the image to be loaded (where 0 represents the first image in the file), or one of the following values: LOAD_PROMPT LOAD_SMALLEST Where LOAD_PROMPT will prompt the user for the resolution, and LOAD_SMALLEST will automatically load the image with the smallest spatial resolution.
Example ret = IpWsLoadSetRes(LOAD_SMALLEST) ret = IpWsLoad("D:\image1.pcd", "PCD")
This set of statements above directs Image-Pro to open the smallest resolution image contained in the IMAGE1.PCD file.
ret = IpWsLoadSetRes(2) ret = IpWsLoad("D:\image1.pcd", "PCD")
This set of statements above directs Image-Pro to open the third image contained in the IMAGE1.PCD file.
Comments Note that the IpWsLoadSetRes function does not actually open the image, it merely identifies the sub-image that is to be opened when a multiple-image file is encountered by IpWsLoad.
See Also IpWsLoad
IpWsMove Syntax IpWsMove(X, Y)
Description This function positions the image within the current image window. Equivalent to positioning the image with the Panning Hand tool.
Parameters X Integer An integer specifying the x-coordinate of the image pixel that is to be moved to the upper-left corner (i.e., window position 0, 0) in the image window.
Y Integer An integer specifying the y-coordinate of the image pixel that is to be moved to the upper-left corner (i.e., window position 0, 0) in the image window.
Example ret = IpWsMove(9,9)
This statement will position the image such that pixel 9, 9 is located in the upper-left corner of the image window. Pixels above and to the left of pixel 9,9 will not be visible.
See Also IpWsPan

IpWsOrient
Page 2-785
IpWsOrient Syntax IpWsOrient(OrientType)
Description This function reorients or rotates the image in the specified increment. Equivalent to the “quick-step” rotation options available with the Rotate command.
Parameters OrientType Integer An enumerated integer specifying the type of rotation to be performed. Must be one of the following: OR_LEFTRIGHT OR_UPDOWN OR_TRANSPOSE OR_ROTATE90 OR_ROTATE270 OR_ROTATE180 See definitions under Comments, below.
Return Value This function returns the Document ID of the new image, which will be an integer greater than 0. A negative return value indicates an error.
Example ret = IpWsOrient(OR_UPDOWN)
This statement will flip the image from top to bottom.
Comments OrientType options are as follows:
VALUE DESCRIPTION OR_LEFTRIGHT Reorients the image from left to right. Equivalent to the Rotate
command's “Flip Left/Right” option. OR_UPDOWN Reorients the image from top to bottom. Equivalent to the
Rotate command's “Flip Up/Down” option. OR_TRANSPOSE Reorients the image from top-right to bottom-left. Equivalent
to the Rotate command's “Transpose” option. OR_ROTATE90 Rotates the image 90° counterclockwise. Equivalent to the
Rotate command's “Left 90” option. OR_ROTATE270 Rotates the image 90° clockwise. Equivalent to the Rotate
command's “Right 90” option. OR_ROTATE180 Rotates the image 180°. Equivalent to the Rotate command's
“Rotate 180” option.
See Also IpWsRotate
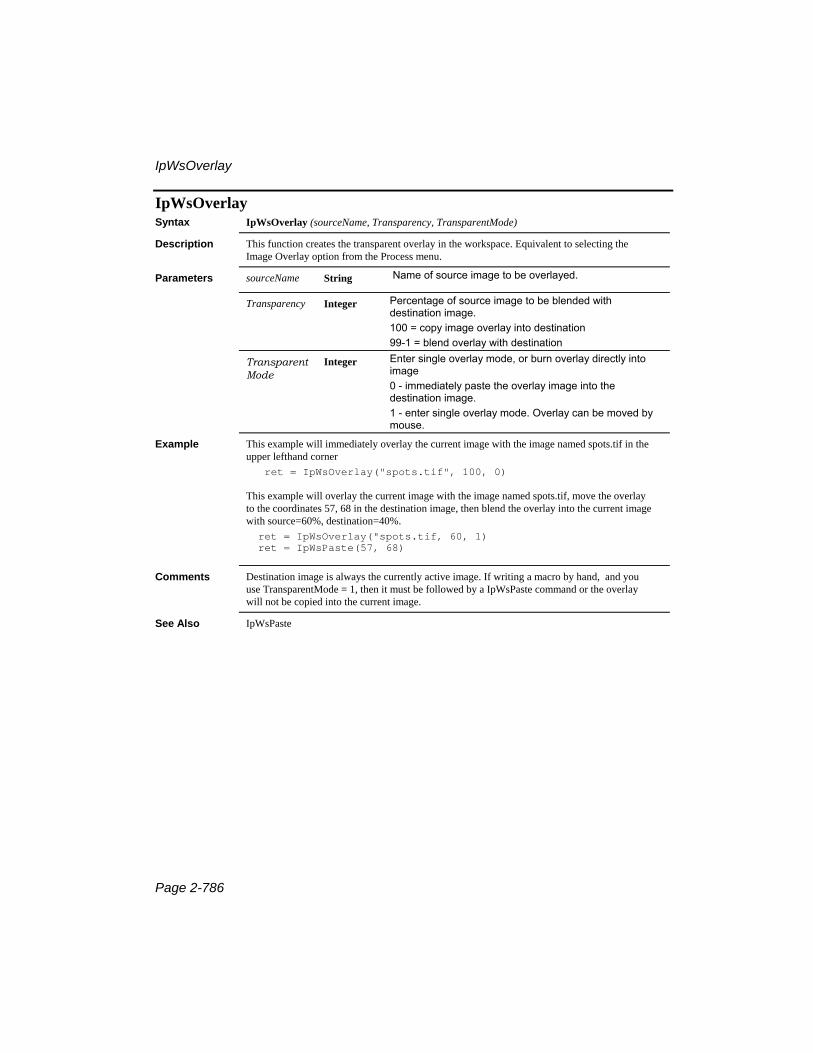
IpWsOverlay
Page 2-786
IpWsOverlay Syntax IpWsOverlay (sourceName, Transparency, TransparentMode)
Description This function creates the transparent overlay in the workspace. Equivalent to selecting the Image Overlay option from the Process menu.
Parameters sourceName String Name of source image to be overlayed.
Transparency Integer Percentage of source image to be blended with destination image. 100 = copy image overlay into destination 99-1 = blend overlay with destination
TransparentMode
Integer Enter single overlay mode, or burn overlay directly into image 0 - immediately paste the overlay image into the destination image. 1 - enter single overlay mode. Overlay can be moved by mouse.
Example This example will immediately overlay the current image with the image named spots.tif in the upper lefthand corner ret = IpWsOverlay("spots.tif", 100, 0)
This example will overlay the current image with the image named spots.tif, move the overlay to the coordinates 57, 68 in the destination image, then blend the overlay into the current image with source=60%, destination=40%. ret = IpWsOverlay("spots.tif, 60, 1) ret = IpWsPaste(57, 68)
Comments Destination image is always the currently active image. If writing a macro by hand, and you use TransparentMode = 1, then it must be followed by a IpWsPaste command or the overlay will not be copied into the current image.
See Also IpWsPaste
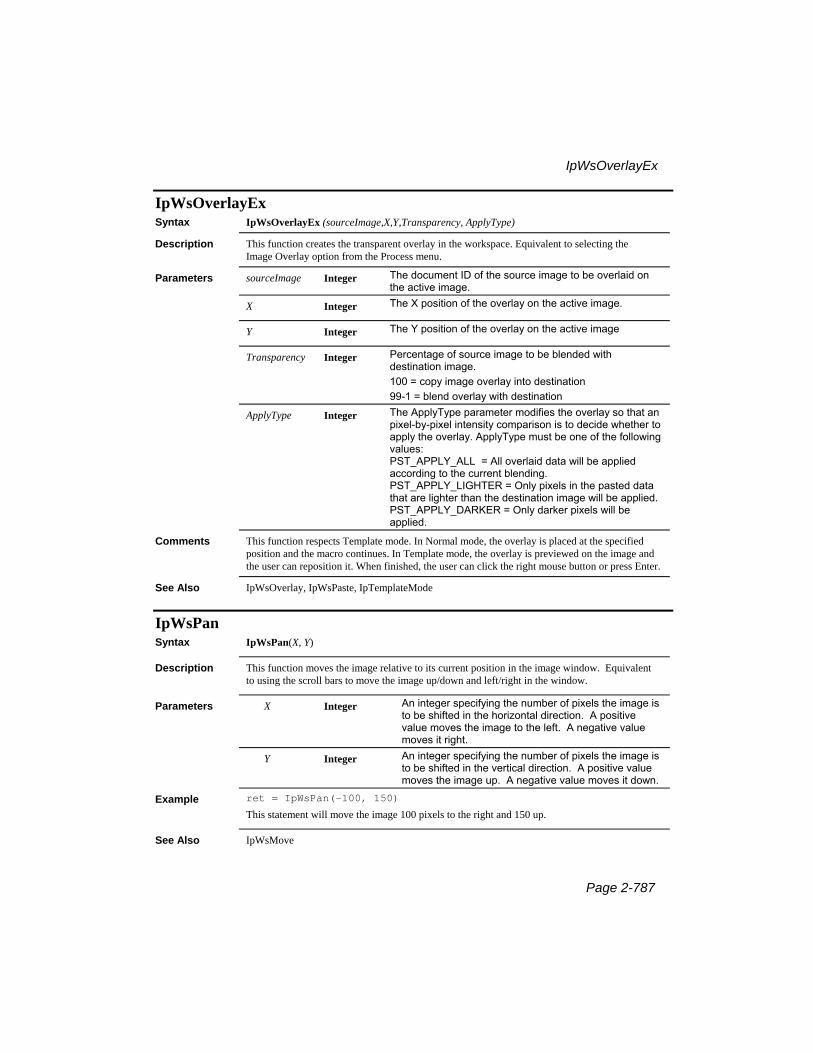
IpWsOverlayEx
Page 2-787
IpWsOverlayEx Syntax IpWsOverlayEx (sourceImage,X,Y,Transparency, ApplyType)
Description This function creates the transparent overlay in the workspace. Equivalent to selecting the Image Overlay option from the Process menu.
Parameters sourceImage Integer The document ID of the source image to be overlaid on the active image.
X Integer The X position of the overlay on the active image.
Y Integer The Y position of the overlay on the active image
Transparency Integer Percentage of source image to be blended with destination image. 100 = copy image overlay into destination 99-1 = blend overlay with destination
ApplyType Integer The ApplyType parameter modifies the overlay so that an pixel-by-pixel intensity comparison is to decide whether to apply the overlay. ApplyType must be one of the following values: PST_APPLY_ALL = All overlaid data will be applied according to the current blending. PST_APPLY_LIGHTER = Only pixels in the pasted data that are lighter than the destination image will be applied. PST_APPLY_DARKER = Only darker pixels will be applied.
Comments This function respects Template mode. In Normal mode, the overlay is placed at the specified position and the macro continues. In Template mode, the overlay is previewed on the image and the user can reposition it. When finished, the user can click the right mouse button or press Enter.
See Also IpWsOverlay, IpWsPaste, IpTemplateMode
IpWsPan Syntax IpWsPan(X, Y)
Description This function moves the image relative to its current position in the image window. Equivalent to using the scroll bars to move the image up/down and left/right in the window.
Parameters X Integer An integer specifying the number of pixels the image is to be shifted in the horizontal direction. A positive value moves the image to the left. A negative value moves it right.
Y Integer An integer specifying the number of pixels the image is to be shifted in the vertical direction. A positive value moves the image up. A negative value moves it down.
Example ret = IpWsPan(-100, 150)
This statement will move the image 100 pixels to the right and 150 up.
See Also IpWsMove

IpWsPaste
Page 2-788
IpWsPaste Syntax IpWsPaste(X, Y)
Description This function copies the contents of the Clipboard to the specified position in the active image. Equivalent to using the Paste command or the SHIFT+INS key combination.
Parameters X Integer An integer specifying the x-coordinate of the upper-left corner of the area to which the Clipboard data is to be copied.
Y Integer An integer specifying the y-coordinate of the upper-left corner of the area to which the Clipboard data is to be copied.
Example ret = IpWsPaste(65, 100)
This statement will copy the current Clipboard data into the area that originates at pixel position 65, 100 in the active image.
See Also IpWsCopy
IpWsPasteEx Syntax IpWsPasteEx(Prompt, UndoText)
Description This function allows you to paste the contents of the Windows Clipboard interactively on the active image.
Parameters Prompt String See comments.
Undo Text String See comments
Comments The Prompt parameter specifies a string that is presented to the user while the pasted contents are singleed on the image for positioning. The prompt will typically ask the user to position the contents and right-click or press Enter to paste, and then click Continue when done. The function will not return until Continue is pressed in the prompt dialog. The UndoText parameter specifies how the operation will appear in the Undo menu after the contents are applied to the image. This allows the default test ("Paste") to be replaced with Undo text that is more descriptive of the contents that were applied to the image.
Example ret = IpWsPasteEx("The watermark has been placed on the image. Position it where you want it, right-click to burn it in, and click Continue when done.", "Watermark")
See Also IpWsPaste

IpWsPasteFrames
Page 2-789
IpWsPasteFrames Syntax IpWsPasteFrames(lPosition)
Description This function places the frames from the clipboard in the sequence.
Parameters lPosition Long Indicates where to put the first pasted frame. 0 = beginning of sequence 1 = end of sequence any other value must be within the number of frames in the sequence.
Example ret = IpWsPasteFrames(1)
This statement will place the frames in the sequence after frame #1.
Comments Only valid if frames have been previously cut or copied to the clipboard. Note that IpSeq and IpWs Auto-Pro functions number frames in a sequence starting with 0 (zero), but the workspace title bar and the sequencer tool bar start frame numbers with frame 1.
See Also IpWsCutFrames, IpWsCopyFrames
IpWsRedo Syntax IpWsRedo(Number)
Description This function reverses an Undo operation. Equivalent to selecting a (Redo of) operation from the Undo pop-out menu.
Parameters Number Integer An integer from 0 to 2 specifying the operation to be reversed, as identified by its position on the “Undo” pop-out menu. Where: 0 - Redoes the most recent action (i.e., the first operation listed in the “Undo” pop-out menu). 1 - Redoes the second, most-recent action (i.e., the second operation listed in the “Undo” pop-out menu). 2 - Redoes the third, most-recent action (i.e., the third operation listed in the “Undo” pop-out menu).
Example ret = IpWsRedo(0)
This statement will redo the first operation on the “Undo” pop-out menu.
IpWsReload Syntax IpWsReload( )
Description This function reloads the active image from its disk file. Equivalent to the Reload command.
IpWsRotate Syntax IpWsRotate(Angle, bSize)
Description This function rotates the active image or AOI by the specified amount. Equivalent to the Rotate command's Any Angle option.
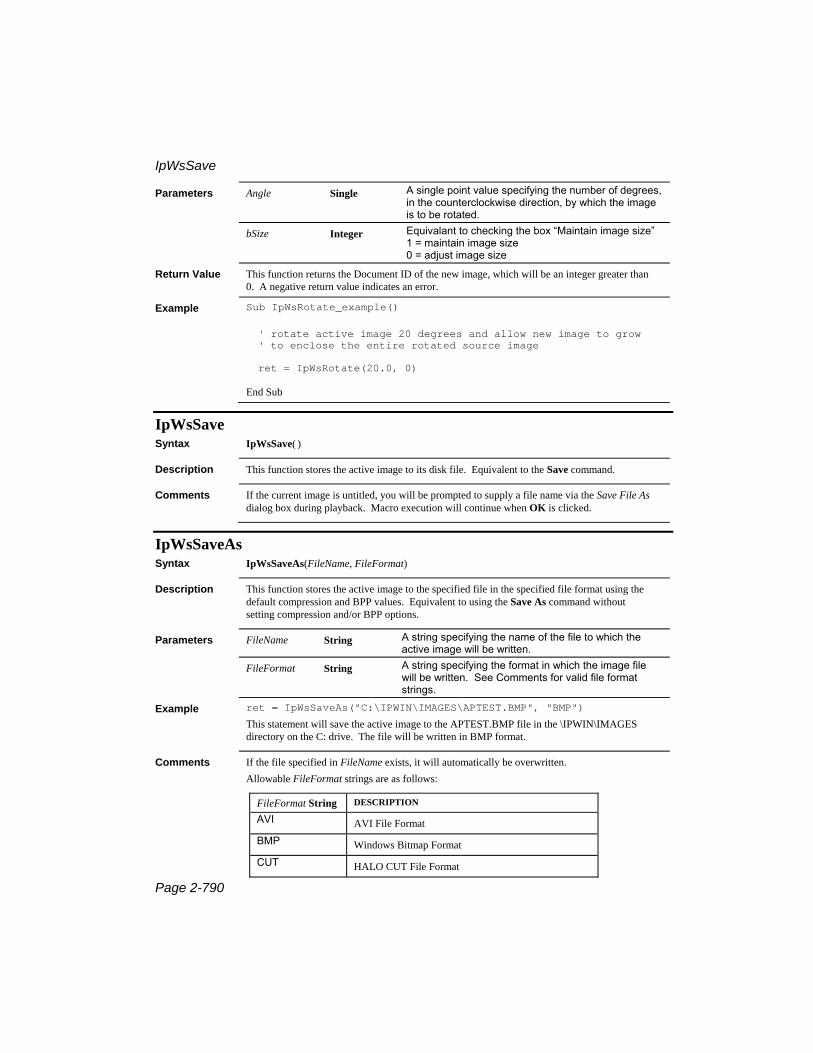
IpWsSave
Page 2-790
Parameters Angle Single A single point value specifying the number of degrees, in the counterclockwise direction, by which the image is to be rotated.
bSize Integer Equivalant to checking the box “Maintain image size” 1 = maintain image size 0 = adjust image size
Return Value This function returns the Document ID of the new image, which will be an integer greater than 0. A negative return value indicates an error.
Example Sub IpWsRotate_example()
' rotate active image 20 degrees and allow new image to grow ' to enclose the entire rotated source image ret = IpWsRotate(20.0, 0)
End Sub
IpWsSave Syntax IpWsSave( )
Description This function stores the active image to its disk file. Equivalent to the Save command.
Comments If the current image is untitled, you will be prompted to supply a file name via the Save File As dialog box during playback. Macro execution will continue when OK is clicked.
IpWsSaveAs Syntax IpWsSaveAs(FileName, FileFormat)
Description This function stores the active image to the specified file in the specified file format using the default compression and BPP values. Equivalent to using the Save As command without setting compression and/or BPP options.
Parameters FileName String A string specifying the name of the file to which the active image will be written.
FileFormat String A string specifying the format in which the image file will be written. See Comments for valid file format strings.
Example ret = IpWsSaveAs("C:\IPWIN\IMAGES\APTEST.BMP", "BMP")
This statement will save the active image to the APTEST.BMP file in the \IPWIN\IMAGES directory on the C: drive. The file will be written in BMP format.
Comments If the file specified in FileName exists, it will automatically be overwritten. Allowable FileFormat strings are as follows:
FileFormat String DESCRIPTION
AVI AVI File Format BMP Windows Bitmap Format CUT HALO CUT File Format
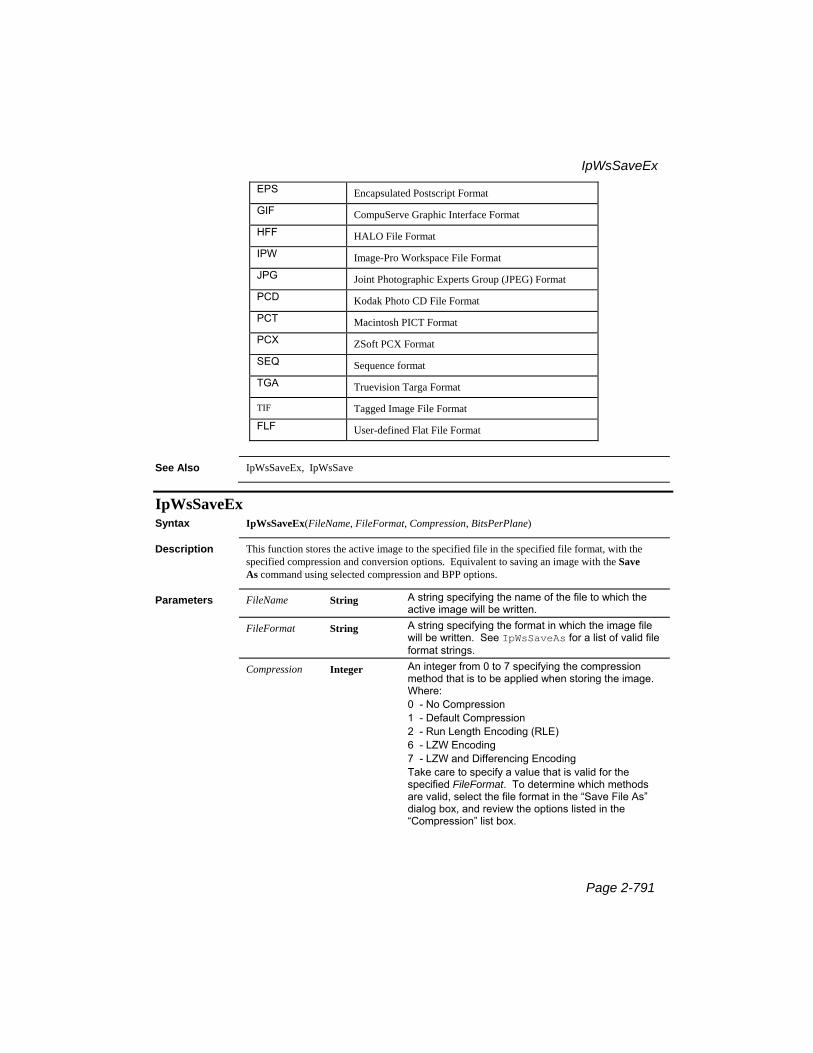
IpWsSaveEx
Page 2-791
EPS Encapsulated Postscript Format GIF CompuServe Graphic Interface Format HFF HALO File Format IPW Image-Pro Workspace File Format JPG Joint Photographic Experts Group (JPEG) Format PCD Kodak Photo CD File Format PCT Macintosh PICT Format PCX ZSoft PCX Format SEQ Sequence format TGA Truevision Targa Format
TIF Tagged Image File Format FLF User-defined Flat File Format
See Also IpWsSaveEx, IpWsSave
IpWsSaveEx Syntax IpWsSaveEx(FileName, FileFormat, Compression, BitsPerPlane)
Description This function stores the active image to the specified file in the specified file format, with the specified compression and conversion options. Equivalent to saving an image with the Save As command using selected compression and BPP options.
Parameters FileName String A string specifying the name of the file to which the active image will be written.
FileFormat String A string specifying the format in which the image file will be written. See IpWsSaveAs for a list of valid file format strings.
Compression Integer An integer from 0 to 7 specifying the compression method that is to be applied when storing the image. Where: 0 - No Compression 1 - Default Compression 2 - Run Length Encoding (RLE) 6 - LZW Encoding 7 - LZW and Differencing Encoding Take care to specify a value that is valid for the specified FileFormat. To determine which methods are valid, select the file format in the “Save File As” dialog box, and review the options listed in the “Compression” list box.

IpWsScale
Page 2-792
BitsPerPlane Integer An integer specifying the number of bits-per-pixel in a monochrome or palette-class image, or the number of bits-per-sample in an RGB image. Take care to specify a compression method that is valid for the specified FileFormat. To determine which values are allowed, select the file format in the “Save File As” dialog box, and review the options listed in the “Output BPP” list box.
Example ret = IpWsSaveEx(C:\IPWIN\IMAGES\GRAY.TIF, "TIF",6,8)
This statement will save the GRAY.TIF file in 8-BPP TIF format using LZW compression.
Comments If the file specified in FileName exists, it will automatically be overwritten.
See Also IpWsSave, IpWsSaveAs
IpWsScale Syntax IpWsScale(Width, Height, bSmooth)
Description This function resizes the active image to the specified dimensions. Equivalent to the Resize command.
Parameters Width Integer An integer specifying the width, in pixels, to which the horizontal dimension is to be scaled.
Height Integer An integer specifying the height, in pixels, to which the vertical dimension is to be scaled.
bSmooth Integer An integer value of 0 or 1 specifying whether the image is to be smoothed when it is scaled. Where: 0 - Suppresses smoothing. 1 - Applies smoothing.
Return Value This function returns the Document ID of the new image, which will be an integer greater than 0. A negative return value indicates an error.
Example ret = IpWsScale(200, 300, 1)
This statement will resize the image to dimensions of 200 pixels wide by 300 pixels tall. Smoothing will be applied during the scaling process.
Comments This function actually changes the spatial resolution of the active image. If you want to magnify or reduce the size of the image for display purposes, use the IpWsZoom function.
See Also IpWsZoom
IpWsSelectFrames Syntax IpWsSelectFrames(lStart, lNumber )
Description This function selects a frame or frames in the sequece.
Parameters lStart Long Indicates the first frame to select, -1 to select the active frame
lNumber Long Indicates the number of frames to selecte, -1 to select all.
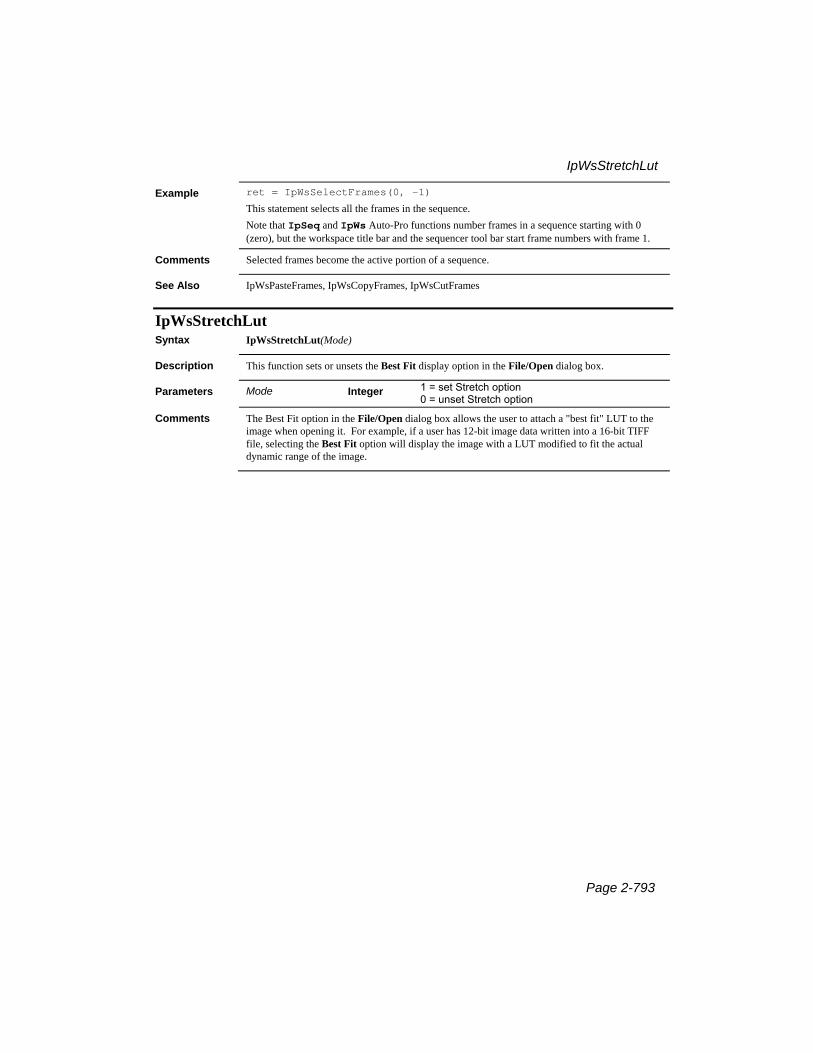
IpWsStretchLut
Page 2-793
Example ret = IpWsSelectFrames(0, -1)
This statement selects all the frames in the sequence. Note that IpSeq and IpWs Auto-Pro functions number frames in a sequence starting with 0 (zero), but the workspace title bar and the sequencer tool bar start frame numbers with frame 1.
Comments Selected frames become the active portion of a sequence.
See Also IpWsPasteFrames, IpWsCopyFrames, IpWsCutFrames
IpWsStretchLut Syntax IpWsStretchLut(Mode)
Description This function sets or unsets the Best Fit display option in the File/Open dialog box.
Parameters Mode Integer 1 = set Stretch option 0 = unset Stretch option
Comments The Best Fit option in the File/Open dialog box allows the user to attach a "best fit" LUT to the image when opening it. For example, if a user has 12-bit image data written into a 16-bit TIFF file, selecting the Best Fit option will display the image with a LUT modified to fit the actual dynamic range of the image.
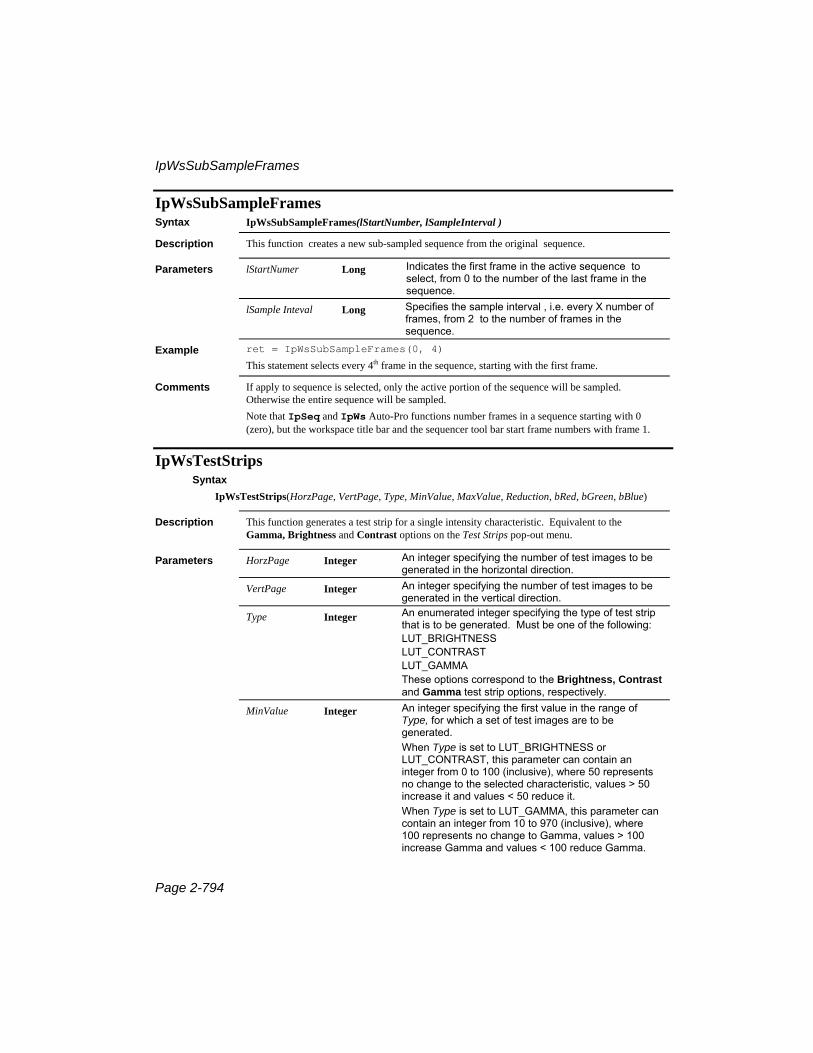
IpWsSubSampleFrames
Page 2-794
IpWsSubSampleFrames Syntax IpWsSubSampleFrames(lStartNumber, lSampleInterval )
Description This function creates a new sub-sampled sequence from the original sequence.
Parameters lStartNumer Long Indicates the first frame in the active sequence to select, from 0 to the number of the last frame in the sequence.
lSample Inteval Long Specifies the sample interval , i.e. every X number of frames, from 2 to the number of frames in the sequence.
Example ret = IpWsSubSampleFrames(0, 4)
This statement selects every 4th frame in the sequence, starting with the first frame.
Comments If apply to sequence is selected, only the active portion of the sequence will be sampled. Otherwise the entire sequence will be sampled. Note that IpSeq and IpWs Auto-Pro functions number frames in a sequence starting with 0 (zero), but the workspace title bar and the sequencer tool bar start frame numbers with frame 1.
IpWsTestStrips Syntax IpWsTestStrips(HorzPage, VertPage, Type, MinValue, MaxValue, Reduction, bRed, bGreen, bBlue)
Description This function generates a test strip for a single intensity characteristic. Equivalent to the Gamma, Brightness and Contrast options on the Test Strips pop-out menu.
Parameters HorzPage Integer An integer specifying the number of test images to be generated in the horizontal direction.
VertPage Integer An integer specifying the number of test images to be generated in the vertical direction.
Type Integer An enumerated integer specifying the type of test strip that is to be generated. Must be one of the following: LUT_BRIGHTNESS LUT_CONTRAST LUT_GAMMA
These options correspond to the Brightness, Contrast and Gamma test strip options, respectively.
MinValue Integer An integer specifying the first value in the range of Type, for which a set of test images are to be generated. When Type is set to LUT_BRIGHTNESS or LUT_CONTRAST, this parameter can contain an integer from 0 to 100 (inclusive), where 50 represents no change to the selected characteristic, values > 50 increase it and values < 50 reduce it. When Type is set to LUT_GAMMA, this parameter can contain an integer from 10 to 970 (inclusive), where 100 represents no change to Gamma, values > 100 increase Gamma and values < 100 reduce Gamma.
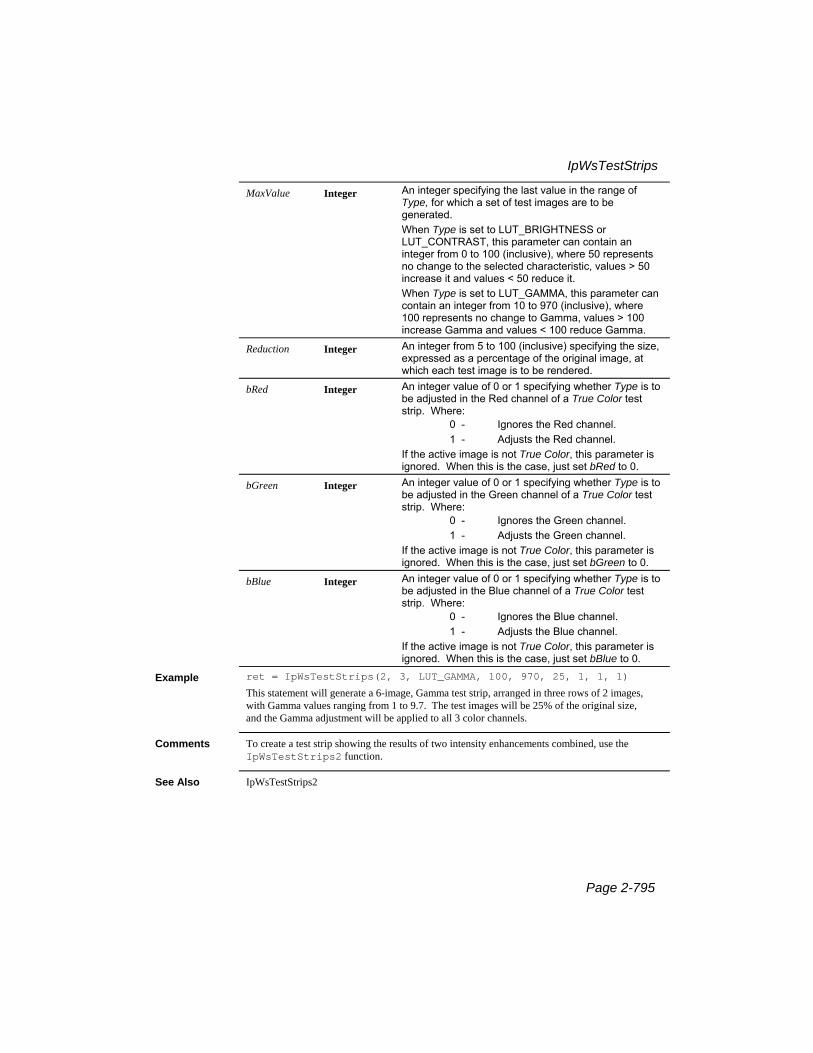
IpWsTestStrips
Page 2-795
MaxValue Integer An integer specifying the last value in the range of Type, for which a set of test images are to be generated. When Type is set to LUT_BRIGHTNESS or LUT_CONTRAST, this parameter can contain an integer from 0 to 100 (inclusive), where 50 represents no change to the selected characteristic, values > 50 increase it and values < 50 reduce it. When Type is set to LUT_GAMMA, this parameter can contain an integer from 10 to 970 (inclusive), where 100 represents no change to Gamma, values > 100 increase Gamma and values < 100 reduce Gamma.
Reduction Integer An integer from 5 to 100 (inclusive) specifying the size, expressed as a percentage of the original image, at which each test image is to be rendered.
bRed Integer An integer value of 0 or 1 specifying whether Type is to be adjusted in the Red channel of a True Color test strip. Where: 0 - Ignores the Red channel. 1 - Adjusts the Red channel. If the active image is not True Color, this parameter is ignored. When this is the case, just set bRed to 0.
bGreen Integer An integer value of 0 or 1 specifying whether Type is to be adjusted in the Green channel of a True Color test strip. Where: 0 - Ignores the Green channel. 1 - Adjusts the Green channel.
If the active image is not True Color, this parameter is ignored. When this is the case, just set bGreen to 0.
bBlue Integer An integer value of 0 or 1 specifying whether Type is to be adjusted in the Blue channel of a True Color test strip. Where: 0 - Ignores the Blue channel. 1 - Adjusts the Blue channel. If the active image is not True Color, this parameter is ignored. When this is the case, just set bBlue to 0.
Example ret = IpWsTestStrips(2, 3, LUT_GAMMA, 100, 970, 25, 1, 1, 1)
This statement will generate a 6-image, Gamma test strip, arranged in three rows of 2 images, with Gamma values ranging from 1 to 9.7. The test images will be 25% of the original size, and the Gamma adjustment will be applied to all 3 color channels.
Comments To create a test strip showing the results of two intensity enhancements combined, use the IpWsTestStrips2 function.
See Also IpWsTestStrips2
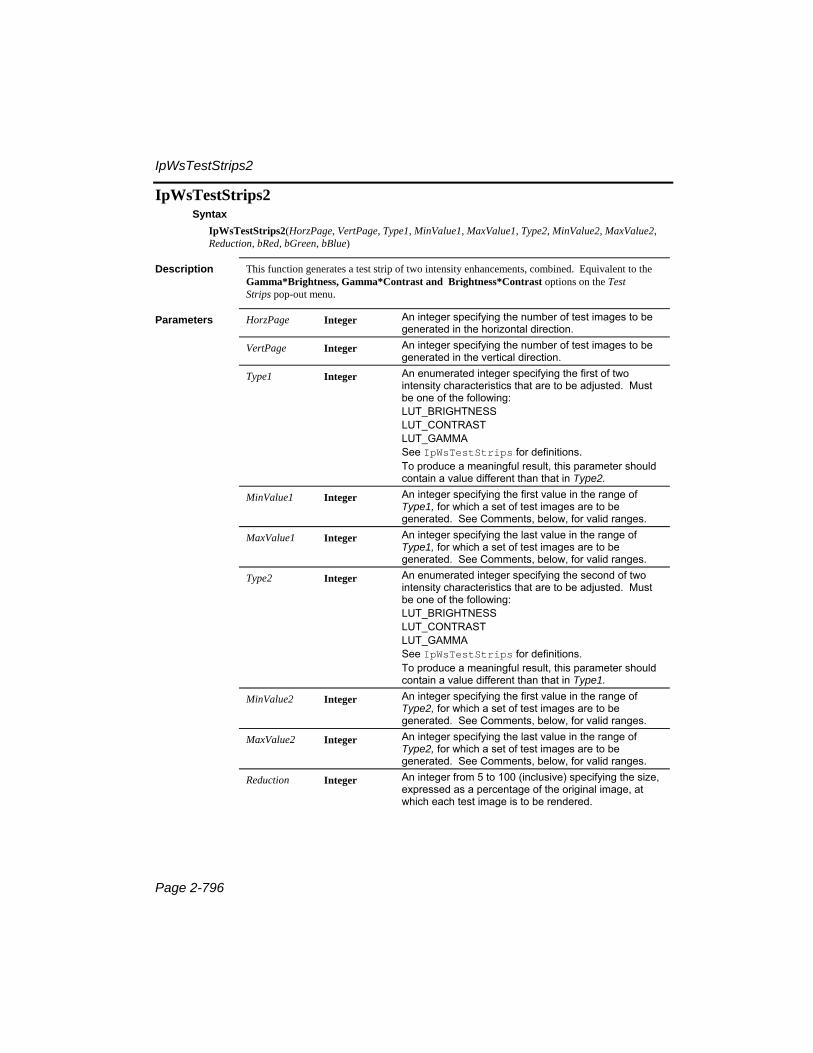
IpWsTestStrips2
Page 2-796
IpWsTestStrips2 Syntax
IpWsTestStrips2(HorzPage, VertPage, Type1, MinValue1, MaxValue1, Type2, MinValue2, MaxValue2, Reduction, bRed, bGreen, bBlue)
Description This function generates a test strip of two intensity enhancements, combined. Equivalent to the Gamma*Brightness, Gamma*Contrast and Brightness*Contrast options on the Test Strips pop-out menu.
Parameters HorzPage Integer An integer specifying the number of test images to be generated in the horizontal direction.
VertPage Integer An integer specifying the number of test images to be generated in the vertical direction.
Type1 Integer An enumerated integer specifying the first of two intensity characteristics that are to be adjusted. Must be one of the following: LUT_BRIGHTNESS LUT_CONTRAST LUT_GAMMA See IpWsTestStrips for definitions.
To produce a meaningful result, this parameter should contain a value different than that in Type2.
MinValue1 Integer An integer specifying the first value in the range of Type1, for which a set of test images are to be generated. See Comments, below, for valid ranges.
MaxValue1 Integer An integer specifying the last value in the range of Type1, for which a set of test images are to be generated. See Comments, below, for valid ranges.
Type2 Integer An enumerated integer specifying the second of two intensity characteristics that are to be adjusted. Must be one of the following: LUT_BRIGHTNESS LUT_CONTRAST LUT_GAMMA See IpWsTestStrips for definitions. To produce a meaningful result, this parameter should contain a value different than that in Type1.
MinValue2 Integer An integer specifying the first value in the range of Type2, for which a set of test images are to be generated. See Comments, below, for valid ranges.
MaxValue2 Integer An integer specifying the last value in the range of Type2, for which a set of test images are to be generated. See Comments, below, for valid ranges.
Reduction Integer An integer from 5 to 100 (inclusive) specifying the size, expressed as a percentage of the original image, at which each test image is to be rendered.

IpWsTestStrips2
Page 2-797
bRed Integer An integer value of 0 or 1 specifying whether the intensity characteristics specified in Type1 and Type2, are to be applied to the Red channel of a True Color test strip. Where: 0 - Ignores the Red channel. 1 - Adjusts the Red channel. If the active image is not True Color, this parameter is ignored. When this is the case, just set bRed to 0.
bGreen Integer An integer value of 0 or 1 specifying whether the intensity characteristics specified in Type1 and Type2 are to be applied to the Green channel of a True Color test strip. Where: 0 - Ignores the Green channel. 1 - Adjusts the Green channel. If the active image is not True Color, this parameter is ignored. When this is the case, just set bGreen to 0.
bBlue Integer An integer value of 0 or 1 specifying whether the intensity characteristics specified in Type1 and Type2 are to be applied to the Blue channel of a True Color test strip. Where: 0 - Ignores the Blue channel. 1 - Adjusts the Blue channel. If the active image is not True Color, this parameter is ignored. When this is the case, just set bBlue to 0.

IpWsTestStripsHalftone
Page 2-798
Example
ret = IpWsTestStrips2(2,3,LUT_GAMMA,100,970,LUT_CONTRAST,30,70, 25,1, 1, 1) This statement will generate a 6-image, Gamma*Contrast test strip, arranged in three rows of 2
images, with Gamma values ranging from 1 to 9.7 and Contrast values from 30 to 70. The test images will be 25% of the original size, and the Gamma/Contrast adjustments will be applied to all 3 color channels.
Comments If you want to create a test strip for a single intensity characteristic, use the IpWsTestStrips function. If a type parameter is set to LUT_BRIGHTNESS or LUT_CONTRAST, its associated min and max parameters can contain integers from 0 to 100 (inclusive), where 50 represents no change to the selected characteristic, values > 50 increase it and values < 50 reduce it. If a type parameter is set to LUT_GAMMA, its associated min and max parameters can contain integers from 10 to 970 (inclusive), where 100 represents no change to Gamma, values > 100 increase Gamma and values < 100 reduce Gamma.
See Also IpWsTestStrips
IpWsTestStripsHalftone Syntax
IpWsTestStripsHalftone(AllTypes, Color, ipHalfTypes, ipHalfScreens, OutputDpi, Reduction)
Description This function creates a test strip of the selected halftone options. Equivalent to the Halftone option on the Test Strips pop-out menu.
Parameters AllTypes Integer An integer value of 0 or 1 specifying whether the test strip is to be of a single halftone type, or of all halftone types. Where: 0 - Specifies single halftone type. 1 - Specifies all halftone types.
Color Integer An integer value of 0 or 1 specifying whether a Black & White or Color test strip is to be created. Where: 0 - Creates Black & White strip. 1 - Creates Color strip.
ipHalfTypes Integer (Basic)
LPSHORT (C)
The name and first element of an array of integers representing the halftone types for which a strip is to be generated. By default this array is defined as ipHalfTypes(0). When AllTypes is set to 0, the ipHalfTypes array must contain a single integer, which specifies the one halftone type for which a strip is to be generated. Integers 0 to 5 represent the following types: 0 - Angle Dot Screen 1 - Flat Dot Screen 2 - Angle Line Screen 3 - Horz Line Screen 4 - Vert Line Screen 5 - Error Diffusion

IpWsTestStripsHalftone
Page 2-799
When the macro is executed, Image-Pro will create a test image of this type, for each resolution specified in the ipHalfScreens array (see ipHalfScreens below). When AllTypes is set to 1, the ipHalfTypes array must contain 6 elements, each element specifying the halftone type for which a test image is to be generated. By default, the array is filled with values from 0 to 5, representing the 6 halftone types as described above. When the macro is executed, Image-Pro will create a test image for each type specified in array ipHalfTypes, using the screen specified by the corresponding element in the array, ipHalfScreens (see ipHalfScreens below).
ipHalfScreens Integer (Basic)
LPSHORT (C)
The name and first element of an array of integers representing the halftone screens to be used when creating the test strip. By default this array is defined as ipHalfScreens(0). When AllTypes is set to 0, the ipHalfScreens array must contain 4 elements, each element specifying the screen to be used with the type defined in the single-element ipHalfTypes array. Where: For ipHalftoneTypes values of 0 - 4: 0 - Largest LPI value 1 - Second-largest LPI value 2 - Second-smallest LPI value 3 - Smallest LPI value For ipHalftoneTypes value of 5: 0 - 4 Weights 1 - 12 Weights 2 - Fuzzy 3 - Random
When AllTypes is set to 1, the ipHalfScreens array must contain 6 elements, each element containing an integer specifying the screen to be used with the corresponding halftone type specified in the ipHalfTypes array (see ipHalfTypes above).
OutputDpi Integer An integer specifying the dots-per-inch value at which the image is to be halftoned.
Reduction Integer An integer from 5 to 100 (inclusive) specifying the size, expressed as a percentage of the original image, at which each test image is to be rendered.

IpWsUndo
Page 2-800
Example ipHalfScreens(0) = 0 ipHalfScreens(1) = 1 ipHalfScreens(2) = 2 ipHalfScreens(3) = 3 ipHalfTypes(0) = 2 ret = IpWsTestStripsHalftone(0, 0, ipHalfTypes(0), ipHalfScreens(0), 150, 10)
The set of statements above will create a test strip of all screen resolutions for the Angle Line halftone type.
ipHalfScreens(0) = 0 ipHalfScreens(1) = 1 ipHalfScreens(2) = 1 ipHalfScreens(3) = 0 ipHalfScreens(4) = 1 ipHalfScreens(5) = 2 ipHalfTypes(0) = 0 ipHalfTypes(1) = 1 ipHalfTypes(2) = 2 ipHalfTypes(3) = 3 ipHalfTypes(4) = 4 ipHalfTypes(5) = 5 ret = IpWsTestStripsHalftone(1, 0, ipHalfTypes(0), ipHalfScreens(0), 150, 10
The set of statements above will create a test strip of all halftone types using the screen specified in the corresponding element of array ipHalfScreens — e.g., the smallest resolution (0) for the Angle Dot type, the smallest resolution (0) for the Horz Line type, and Fuzzy screen (2) for the Error Diffusion type.
IpWsUndo Syntax IpWsUndo(Number)
Description This function reverses the specified operation. Equivalent to the Undo command.
Parameters Number Integer An integer from 0 to 2 specifying the operation to be reversed, as identified by its position on the “Undo” pop-out menu. Where: 0 - Reverses the most recent action (i.e., the first operation listed in the pop-out menu).
1 - Reverses the second-most-recent action (i.e., the second operation listed in the pop-out menu). 2 - Reverses the third-most-recent action (i.e., the third operation listed in the pop-out menu). Remember that not all Image-Pro operations are reversible.
Example ret = IpWsUndo(2)
This statement will reverse the oldest action in the “Undo” list.
See Also IpWsRedo
IpWsZoom Syntax IpWsZoom(PercentZoom)
Description This function magnifies/reduces the active image by the specified amount. Equivalent to using the Magnifying Glass tool or the Zoom command on the image window's Control menu.

IpWsZoom
Page 2-801
Parameters PercentZoom Integer An integer specifying the amount by which the image dimensions are to be increased or reduced. Must be one of the following: 10 - Displays image at 10% of image size 25 - Displays image at 25% of image size 50 - Displays image at 50% of image size 100 - Displays image at actual size 200 - Displays image at twice its actual size 400 - Displays image at 4 times its actual size 800 - Displays image at 8 times its actual size 1600 - Displays image at 16 times its actual size -1 - Displays image at the next smaller zoom factor (equivalent to clicking right mouse button when the “Magnifying Glass” tool is selected). +1 - Displays image at the next larger zoom factor (equivalent to clicking left mouse button when the “Magnifying Glass” tool is selected).
Example IpWsZoom(100) IpDocMaximize() This set of statements will return the image to its actual size and maximize the image window to ensure that the image is fully visible within the window.

IPBasic
Page 3-1
Section 3 - IPBasic Commands The IPBasic Language provides the core language definition. It is Visual Basic for Applications compatible.
Language reference by group:
• Declaration, Data Type, Assignment • Flow Control, Error Handling • Conversion, Variable Info • Constant • Math, String, Object, Time/Date • File • User Input, User Dialog, Dialog Function • DDE • Settings • Miscellaneous • Operator .
For complete definitions for the IPBasic commands, please refer to the online help.

IPBasic
Page 3-2

Appendix A - Function & Command Summary
Page 4-1
Appendix A - Function & Command Summary
Auto-Pro Functions 3D Filters Command IpFlt3DApplytoBuffer IpFlt3DApplytoFrames IpFlt3DBranchEnd IpFlt3DConv IpFlt3DData IpFlt3DDistance IpFlt3DGet IpFlt3DKernel IpFlt3DMorph IpFlt3DMorphKernel IpFlt3DPrune IpFlt3DRank IpFlt3DReduce IpFlt3DSet IpFlt3DShow IpFlt3DThin IpFlt3dVectGet IpFlt3dVectGetData IpFlt3DVectorize IpFlt3DWatershed 3D Viewer Command IpView3DCopy IpView3DCreate IpView3DCreateAnimation IpView3DLoad IpView3DMove IpView3DReload IpView3DSet IpView3DSetCamera IpView3DSize IpView3DShow Acquire Command IpAcqAverage IpAcqControl IpAcqDynIntSnap IpAcqMultiSnap IpAcqSelectDriver IpAcqSettings IpAcqShow IpAcqSnap IpAcqTimed IpAcqTimedEx
IpAcqSeqIntSnap
AFA Commands IpAFAAddChan IpAFADelChan IpAFADelChanStr IpAFAGet IpAFAGetStr IpAFALoad IpAFAMacroGet IpAFAMacroSet IpAFANew IpAFASave IpAFASaveAs IpAFASetInt IpAFASetStr IpAFASetEx IpAFASetSingle IpAFAShow IpAFASnap
Alignment Command IpAlignAdd IpAlignApply IpAlignCalculate IpAlignFindPattern IpAlignGet IpAlignOpen IpAlignRemove IpAlignSave IpAlignSetEx IpAlignSetInt IpAlignSetSearchPattern IpAlignSetSingle IpAlignShow IpAffine
AOI Operations IpAoiChangeName IpAoiCreateBox IpAoiCreateDonut IpAoiCreateEllipse IpAoiCreateIrregular IpAoiGet IpAoiGetStr IpAoiManager
IpAoiMove IpAoiMultAppend IpAoiMultShow IpAoiShow IpAoiValidate IpLstPts IpMorePts
Application Window IpAppArrange IpAppCloseAll IpAppCtl IpAppCtlText IpAppExit IpAppGet IpAppGetStr IpAppHide IpAppMaximize IpAppMenuSelect IpAppMinimize IpAppMove IpAppRestore IpAppRun IpAppSelectDoc IpAppSet IpAppSize IpSnap IpTrim IpAppUpdateDoc IpAppWindow IpAppWndPos IpAppWndState IpTrackBar
Background Correction Command IpOpBkgndCorrect IpOpBkgndSubtract
Batch Conversion Command IpWsConvertFile

Appendix A - Function & Command Summary
Page 4-2
Bayer Interpolation Command IpBayerInterpolate IpBayerGetInt IpBayerSetInt IpBayerShow BCG and Color Map IpLutApply IpLutBinarize IpLutData IpLutLoad IpLutReset IpLutSave IpLutSetAttr IpLutSetControl IpLutShow IpWsStretchLut
Bitmap Analysis IpBitAttr IpBitSaveData IpBitShow
Calibration Command IpCalGet IpCalLoad IpCalSave IpCalSaveAll IpCalSaveEx IpICalCalibValues IpICalCreate IpICalDestroy IpICalDestroyEx IpICalGetLong IpICalGetSng IpICalGetStr IpICalGetSystem IpICalLinearize IpICalLoad IpICalMove IpICalReset IpICalSave IpICalSelect IpICalSetLong IpICalSetSng IpICalSetStr IpICalSetSystem IpICalSetSystemByName IpICalSetName IpICalSetOptDens
IpICalSetPoints IpICalSetSamples IpICalSetUnitName IpICalShow IpICalShowFormat IpSCalCalibValues IpSCalCreate IpSCalDestroy IpSCalDestroyEx IpSCalGetLong IpSCalGetSng IpSCalGetStr IpSCalLoad IpSCalMove IpSCalReset IpSCalSave IpSCalSelect IpSCalSetAngle IpSCalSetAspect IpSCalSetLong IpSCalSetName IpSCalSetOrigin IpSCalSetSng IpSCalSetStr IpSCalSetUnit IpSCalSetUnitName IpSCalShow
Caliper Command IpClprClipboard IpClprCreateDerivativeEdge IpClprCreateMeas IpClprCreatePatternMatchEdge IpClprCreateSampler IpClprDeleteEdge IpClprDeleteMeas IpClprDeleteSampler IpClprDetGetInt IpClprDetGetSng IpClprEditSampler IpClprGet IpClprGetData IpClprGetDataEx IpClprGetIntEx IpClprGetStr IpClprGetSngEx IpClprSave IpClprSelectEdge IpClprSelectSampler IpClprSet IpClprSetStr
IpClprSettings IpClprShow IpClprToggleMarker IpClprTool
Chart Controls IpChrt2DCreate IpChrt2DGet IpChrt2DGraphtoClipboard IpChrt2DMove IpChrt2DSetArr IpChrt2DSet IpChrt2DSetStr IpChrt2DShow IpChrt2DSize
Clipboard Operations IpWsCopy IpWsCopyFrames IpWsCutFrames IpWsDeleteFrames IpWsPaste IpWsPasteEx IpWsPasteFrames
Color Composite Command IpCmpAdd IpCmpAddEx IpCmpAddTint IpCmpAddTintPos IpCmpDel IpCmpGet IpCmpNew IpCmpNewTint IpCmpSet IpCmpShow
Color Correction Command IpColCalAdd IpColCalConvert IpColCalCorrect IpColCalCreate IpColCalGet IpColCalGetRGB IpColCalLoad IpColCalNew IpColCalSave IpColCalSet IpColCalShow IpColExtract

Appendix A - Function & Command Summary
Page 4-3
IpColShow IpGetConvertColor
Color Segmentation Command IpSegCreateMask IpSegLoad IpSegDelete IpSegGetRange IpSegMerge IpSegNew IpSegPreview IpSegRename IpSegReset IpSegSave IpSegSelect IpSegSelectArea IpSetSetAttr IpSegSetRange IpSegShow
Color Management Command IpCmmCorrectColors IpCmmGet IpCmmSelectCamera Profile IpCmmSetInt IpCmmSetStr IpCmmShow
Color Transform Command IpCmChannelExtract IpCmChannelMerge IpCmChannelMerge3 IpCmTransform
Co-Localization Command IpCoLocForward IpCoLocGetDocument IpCoLocGetForward IpCoLocGetInverse IpCoLocInverse IpCoLocShow
Convert To Command IpWsConvertImage IpWsConvertToBilevel IpWsConvertToFloat
IpWsConvertToGray IpWsConvertToGray12 IpWsConvertToGray16 IpWsConvertToGrayEx IpWsConvertToPaletteMColor IpWsConvertToPaletteMedian IpWsConvertToRGB IpWsGray12To8 IpWsGray16To8
Count/Size Command IpBlbCount IpBlbCreateMask IpBlbData IpBlbDelete IpBlbEnableMeas IpBlbFilter IpBlbFromAOI IpBlbGet IpBlbGetStr IpBlbHideObject IpBlbHitTest IpBlbLoadOutline IpBlbLoadSetting IpBlbMeasure IpBlbMultiRanges IpBlbRange IpBlbRemoveHoles IpBlbSaveClasses IpBlbSaveData IpBlbSaveOutline IpBlbSavePopDensities IpBlbSaveSetting IpBlbSetAttr IpBlbSetFilterRange IpBlbSetRange IpBlbSetRangeEx IpBlbShow IpBlbShowAutoClass IpBlbShowCluster IpBlbShowData IpBlbShowHistogram IpBlbShowObjectWindow IpBlbShowPopDens IpBlbShowScattergram IpBlbShowSingleClass IpBlbShowStatistics IpBlbSmoothObjects IpBlbSplitObjects IpBlbUpdate
Data Collector Command IpDcAddCol IpDcAddSng IpDcAddStr IpDcCreateChart IpDcDeleteCol IpDcGet IpDcGetStr IpDcMeasList IpDcSaveData IpDcSelect IpDcSet IpDcSetStr IpDcSetVarName IpDcShow IpDcUnSelect IpDcUpdate
Deconvolution (SharpStack) Commands IpDCnvCalculateSA IpDCnvDeconvolve IpDCnvGet IpDCnvGetStr IpDCnvResultsShow IpDCnvSet IpCDnvSettings IpDCnvSetStr IpDCnvSetSng IpDCnvShow
Demo Macro Command IpDemoGetStr IpDemoSetStr IpDemoShow
Display Range Command IpDrGet IpDrSet IpDrShow
Duplicate Command IpWsDuplicate
Dye Information Command IpDyeAdd IpDyeDelete

Appendix A - Function & Command Summary
Page 4-4
IpDyeEdit IpDyeGet IpDyeGetStr IpDyeSelect IpDyeSetStr
Dynamic Data Exchange Command IpDde
Extended Depth of Field Command IpEDFAdd IpEDFCreate IpEDFGet IpEDFGetConf IpEDFNew IpEDFRemove IpEDFSet IpEDFShow IpEDFTopoMap
FFT Command IpFftForward IpFftHiPass IpFftInverse IpFftLoad IpFftLoPass IpFftSave IpFftShow IpFftSpikeBoost IpFftSpikeCut IpFftTag
File Name Operations IpStAutoName IpStGetName IpStSearchDir IpStSortedList
File Signature Command IpFsGet IpFsGetStr
Fill Command IpWsFill IpWsFillPattern
Filtering Command IpFltBranchEnd IpFltClose IpFltConvolveKernel
IpFltDespeckle IpFltDilate IpFltDistance IpFltErode IpFltExtractBkgnd IpFltFlatten IpFltGauss IpFltHiPass IpFltLaplacian IpFltLocHistEq IpFltLoPass IpFltMedian IpFltOpen IpFltPhase IpFltPrune IpFltRank IpFltReduce IpFltRoberts IpFltRstrDilate IpFltRstrDilateShow IpFltSharpen IpFltShow IpFltSobel IpFltThin IpFltThinEx IpFltUserDilate IpFltUserErode IpFltVariance IpFltWatershed IpFltWatershedEx
Grid Mask Command IpGridApply IpGridCreateMask IpGridSelect IpGridShow
Histogram Command IpHstCreate IpHstDestroy IpHstEqualize IpHstGet IpHstMaximize IpHstMinimize IpHstMove IpHstRestore IpHstSave IpHstScale IpHstSelect IpHstSetAttr IpHstSize
IpHstUpdate
Image Database Commands IpDbAddField IpDbFind IpDbGoTo IpDbLoadView IpDbOpenFolder IpDbPrint IpDbReadStr IpDbSearch IpDbSetAttr IpDbViewAll IpDbViewFolder IpDbWrite IpGalAdd IpGalChangeDescription IpGalClose IpGalDelete IpGalImageOpen IpGalOpen IpGalRemove IpGalSetActive IpGalShow IpGalSort IpGalTag IpGalUpdate
Image Overlay Command IpWsOverlay IpWsOverlayEx IpIOvrApply IpIOvrGet IpIOvrSet IpIOvrSetStr IpIOvrShow
Image Window IpAnActivateAll IpAnActivateDefaultObj IpAnActivateObjId IpAnActivateObjXY IpAnAddText IpAnBurn IpAnCreateObj IpAnDeleteAll IpAnDeleteObj IpAnGet IpAnGetFontName

Appendix A - Function & Command Summary
Page 4-5
IpAnMove IpAnPolyAddPtArray IpAnPolyAddPtString IpAnSet IpAnSetFontName IpAnShowAnnot IpAnText IpAnotAttr IpAnotBox IpAnotEllipse IpAnotLine IpDraw IpDrawClear IpDrawClearDoc IpDrawGet IpDrawSet IpDrawText IpDocClick IpDocClose IpDocCloseEx IpDocCloseVri IpDocFind IpDocGet IpDocGetArea IpDocGetAreaSize IpDocGetLine IpDocGetPropDate IpDocGetPropDbl IpDocGetPropStr IpDocGetPosition IpDocGetStr IpDocMaximize IpDocMinimize IpDocMove IpDocOpenAoi IpDocOpenVri IpDocPutArea IpDocPutLine IpDocRestore IpDocGetPropDate IpDocSetPropDbl IpDocSetPropStr IpDocSetPosition IpDocSize IpGetLine IpPlotCreate IpPlotData IpPlotDestroy IpPlotRange IpPlotSet
IpPlotShow IpPlotUpdate IpTextBurn IpTextFont IpTextGetAttr IpTextSetAttr IpTextShow IpTrim IpWsCreateFromVri
Image Signature Command IpIsGet IpIsGetStr IpIsShow
Info Command IpWsChangeDescription IpWsChangeInfo
Internet Access Commands IpFTPOpen IpFTPSave IpMail
Large Spectral Filters Command IpLFltShow IpLFltApply
Lens Information Command IpLensAdd IpLensDelete IpLensEdit IpLensGetLong IpLensGetSng IpLensGetStr IpLensSelect IpLensSetStr
Live EDF and Tiling Commands IpLiveEDFSetInt IpLiveEDFGet IpLiveTilingSetInt
Line Profile Command IpProfCreate IpProfDestroy IpProfGet
IpProfLineMove IpProfMaximize
IpProfMinimize IpProfMove IpProfRestore IpProfSave IpProfSelect IpProfSetAttr IpProfSetFreeForm IpProfSize IpProfUpdate
Local Zoom Command IpLocZoomMove IpLocZoomSet IpLocZoomSetPos IpLocZoomShow IpLocZoomSize
Macro Operations IpDemoShow IpIniFile IpIniFileStr IpMacroLoad IpMacroPause IpMacroRun IpMacroStop IpMacroWait IpMacroProgSet IpMacroProgGetStr IpMacroProgSetInt IpMacroProgSetStr IpMacroProgShow
Manual Tagging Commands IpTagAddClass IpTagAttr IpTagDelete IpTagDeleteClass IpTagGet IpTagLoadEnv IpTagLoadPoints IpTagPt IpTagSaveData IpTagSaveEnv IpTagSavePoints IpTagShow IpTagUpdate

Appendix A - Function & Command Summary
Page 4-6
Measurements Command IpMeasAdd IpMeasAddMeasure IpMeasAttr IpMeasAttrStr IpMeasDelete IpMeasDelMeasure IpMeasGet IpMeasGetHit IpMeasGetStr IpMeasLoad IpMeasLoadOutline IpMeasMove IpMeasRestore IpMeasSave IpMeasSaveData IpMeasSaveOutline IpMeasShow IpMeasSize IpMeasTag IpMeasTool IpMeasUpdate
Measure Distances Command IpDistDelete IpDistGetLong IpDistGetStr IpDistGetSng IpDistSetLong IpDistSetStr IpDistShow IpDistTag IpDistTool
Memory Monitor Command IpMmonGet IpMmonSet IpMmonShow
Mosaic Command IpMosaicCreate IpMosaicGet IpMosaicSet IpMosaicShow
New Command IpWsCreate IpWsCreateEx IpWsCreateFromClipboard
IpWsCreateFromVri
Open Command IpWsLoad IpWsLoadNumber IpWsLoadPreview IpWsLoadSetRes
Operations Command IpOpImageArithmetics IpOpImageLogic IpOpNumberArithmetics IpOpNumberLogic IpOpNumberRGB IpOpShow
Output Window Command IpOutput IpOutputClear IpOutputSave IpOutputShow IpOutputSet
Palette Window IpPalSetGrayBrush IpPalSetPaletteBrush IpPalSetPaletteColor IpPalSetRGBBrush IpPalShow
Port Configuration Command IpPortIOGetInt IpPortIOOpenConfig IpPortIORead IpPortIOSaveConfig IpPortIOSetInt IpPortIOShow IpPortIOWrite
Print Command IpPrtHalftone IpPrtPage IpPrtSize IpPrtScreen
Pseudo-Color Command IpPcDefineColorSpread IpPcDyeTint IpPcLoad
IpPcSave IpPcSaveData IpPcSetColor IpPcSetColorSpread IpPcSetDivisions IpPcSetRange IpPcShow IpPcTint
Registration Command IpRegister IpRegShow
Reload Command IpWsReload
Rendering Commands IpRendAnimation IpRendAnimationFile IpRendConvertCoord IpRendConvertRotation IpRendElem IpRendElemGet IpRendElemSet IpRendElemSetStr IpRendLoad IpRendManualMeasurementsFile IpRendMeasGraphSet IpRendMMeas IpRendMMeasGetStr IpRendMMeasSet IpRendMMeasSetStr IpRendMove IpRendReload IpRendSaveData IpRendPaletteFile IpRendSet IpRendSettingsFile IpRendSize IpRendShow IpRendVMeas IpRendVMeasGetStr IpRendVMeasHist IpRendVMeasHistSet IpRendVMeasSet IpRendVMeasSetStr

Appendix A - Function & Command Summary
Page 4-7
Report Generator Command IpRptClose IpRptNew IpRptOpen IpRptPrint IpRptSave IpRptShow
Resize Command IpWsScale
Rotate Command IpWsOrient IpWsRotate
Save/Save As Command IpWsSave IpWsSaveAs IpWsSaveEx
Scanning Command IpScanSelect IpScanShow
Screen Capture Command IpCapArea IpCapFile IpCapHotKey IpCapWindow
Scope-Pro Commands IpScopeAcquire IpScopeComponent Present IpScopeControl IpScopeDocGet IpScopeEnumSettings IpScopeGetCount IpScopeGetPosition IpScopeRead IpScopeSettings IpScopeSetPosition IpScopeShow IpScopeWrite
Scrolling/Panning Operations IpWsMove
IpWsPan
Sequencer Command IpSeqAverage IpSeqDifference IpSeqDifferenceEx IpSeqExtractFrames IpSeqGet IpSeqMerge IpSeqMergeDoc IpSeqOpen IpSeqPlay IpSeqReslice IpSeqRunningAvg IpSeqSave IpSeqSet IpSeqShow IpWsCopyFrames IpWsCutFrames IpWsDeleteFrames IpWsPasteFrames IpWsSelectFrames IpWsSubSampleFrames
Sequence Gallery Command IpSeqGGet IpSeqGCreate IpSeqGSet IpSeqGShow IpSeqGUpdate
Set Manager Command IpDocGetPropDate IpDocGetPropDbl IpDocGetPropLong IpDocGetPropStr IpDocSetPropDate IpDocSetPropDbl IpDocSetPropLong IpDocSetPropStr IpSmAdd IpSmAddFrame IpSmBackgroundCorr IpSmBackgroundCorrShow
IpSmDelete IpSmDespeckle IpSmDespeckleShow IpSmExtract IpSmGet
IpSmGetStr IpSmInfo IpSmNew IpSmNormalize IpSmNormalizeShow IpSmOpen IpSmPlay IpSmRemoveFrame IpSmRemove Image IpSmSave IpSmSet IpSmSetStr IpSmShow IpSmShowNav IpSmSetEx
Sort Objects Command IpSortAttr IpSortObjects IpSortShow
Stage-Pro Commands IpStageAbsZ IpStageAbsZEx IpStageAcq IpStageAcqFrame IpStageAddListPoint IpStageAddListPointEx IpStageControl IpStageCreateList IpStageDeleteList IpStageDeletePoint IpStageDocGet IpStageDocGetStr IpStageField IpStageFocusLimits IpStageGet IpStageGetAbsPoint IpStageGetAbsPointEx IpStageGetAbsPosition IpStageGetAbsPositionEx IpStageGetListLength IpStageGetListLocked IpStageGetListModified IpStageGetListName IpStageGetNumLists IpStageGoToListPos IpStageSlideLoader IpStageModifyListPoint

Appendix A - Function & Command Summary
Page 4-8
IpStageModifyListPointEx IpStagePlane IpStageSampleGroupbyName IpStageSampleGroupbyNum IpStageSamplePattern byName IpStageSamplePattern ByNum IpStageSetListLocked IpStageSetListModified IpStageSetListName IpStageScanPatternByName IpStageScanPatternbyNum IpStageSetArea IpStageShow IpStageShowTab IpStageSettings IpStageSortList IpStageStepXY IpStageStepZ IpStageWell IpStageXY IpStageXYRead IpStageXYWrite IpStageZ IpStageZRead IpStageZWrite
Surface Plot Command IpSurfAutoRefresh IpSurfGet IpSurfOutput IpSurfSet IpSurfShow
Template Mode IpTemplateMode
Test Strips Command IpWsTestStrips IpWsTestStrips2 IpWsTestStripsHalftone
Third-Party Plug-in Command IpPlFilter IpPlImport IpPlShow
Tiling Command IpTileAdd
IpTileApply IpTileCalculate IpTileGet IpTileOpen IpTileRemove IpTileSave IpTileSetEx IpTileSetInt IpTileSetSingle IpTileShow
Trace Objects Command IpTraceAttr IpTraceDo IpTraceShow
Tracking Command IpTrackFile IpTrackMeas IpTrackMeasGetStr IpTrackMeasSet IpTrackMeasSetStr IpTrackMove IpTrackOptionsFile IpTrackSaveData IpTrackShow IpTrackSize
Undo Command IpWsRedo IpWsUndo
User Input IpStGetFloat IpStGetInt IpStGetString IpStGetName IpStSearchDir
Workflow Toolbar Commands IpToolbarGetStr IpToolbarSelect IpToolbarShow
Zoom Operations IpWsZoom

Appendix B - Auto-Pro Keywords
Page 5-1
Appendix B - Auto-Pro Keywords This appendix contains a list of the reserved words for Auto-Pro. This list includes function names, IPBasic commands, operators, predefined variables and other key words that belong to Auto-Pro.
A Abs ACCUMULATE ACQ_AVG ACQ_CURRENT ACQ_FILE ACQ_GETCURRENT ACQ_ISLIVE ACQ_ISSHOWN ACQ_LIVE ACQ_LOAD ACQ_MULTI ACQ_NEW ACQ_SAVE ACQ_SEQUENCE ACQ_SETTINGS ACQ_SETUP ACQ_SHOWLAST ACQ_SNAP ACQ_TIMED ADVANCED AFF_AOI AFF_CLIP AFF_FLOAT AFF_NOBILINEAR AFF_NOSCALE AFF_NOTILT ALL_B_T ALL_B_W ALL_C_B ALL_C_T ALL_C_W ALL_T_B ALL_T_W ALL_W_B And AOI_AOI AOI_BOX AOI_CIRCLE AOI_ELLIPSE AOI_MULTIPLE AOI_POLYGON AOI_POWER2 AOI_SCANLIST AOI_SQUARE AOIADD AOICMD_GETAREA AOICMD_GETBOUNDS AOICMD_GETELLIPSE AOICMD_GETNUMPOINTS AOICMD_GETPOINTS AOICMD_GETTYPE
AOICMD_SETBOUNDS AOICMD_SETELLIPSE AOICMD_SETPOINTS AOIDELETE AOIHIDEDLG AOILOAD AOISAVE AOISET AOISHOWDLG APC_CLICK APC_GETCHECK APC_GETCURSEL APC_GETFOCUSID APC_GETHWND APC_GETSCROLL APC_SETCHECK APC_SETCURSEL APC_SETFOCUSID APC_SETPOSX APC_SETPOSY APC_SETSCROLL APW_ACTIVATEHWND APW_ACTIVATEID APW_ACTIVATENAME APW_GETHWND APW_GETID APW_GETNAME ARG_IN ARG_INSTR ARG_IO ARG_IOSTR ARG_OUT ARG_OUTSTR ARG_STR ARG_VAL As Asc Atn ATT_CALIPER ATT_CONTROLS ATT_FIXED ATT_FIXEDX ATT_FIXEDY ATT_NOCOPY ATTRIBUTE_1 AUTOUPDATE
B Base BCLASS_CLUSTER BCLASS_NONE BCLASS_SINGLE BIN
BIT_CALIB BIT_SAMPLE BIT_SAVEALL BLBCMD_CONNECT BLBCMD_DISABLEMEAS BLBCMD_ENABLEMEAS BLBCMD_GETBOUNDSLIST BLBCMD_GETHETRANGE BLBCMD_GETNUMANGLES BLBCMD_GETNUMCLASSES BLBCMD_GETNUMOBJECTS BLBCMD_GETOBJECTBOUNDS BLBCMD_GETOBJECTLIST BLBCMD_GETOBJECTPOS BLBCMD_GETOBJECTSTATUS BLBCMD_GETOUTLINE BLBCMD_GETRANGE BLBCMD_GETSTATISTICS BLBCMD_GETVERSION BLBCMD_INQENABLED BLBCMD_SETBORDERFLAG BLBCMD_SETEXCLUSIVERANGE BLBCMD_SETFRACTDIM BLBCMD_SETHETRANGE BLBCMD_SETINTENSCAL BLBCMD_SETINTENSITYRANGE BLBCMD_SETMINAREA BLBCMD_SETMINMAXDENS BLBCMD_SETNUMANGLES BLBCMD_SETOBJECTSTATUS BLBCMD_SETRANGE BLBCMD_SETRGBRANGE BLBCMD_SETSPATIALCAL BLBFCP_BOTTOM BLBFCP_LEFT BLBFCP_NONE BLBFCP_RIGHT BLBFCP_TOP BLBM_ALL BLBM_AREA BLBM_AREAPOLY BLBM_ASPECT BLBM_BLUE BLBM_BOX_AREA BLBM_BOX_XY BLBM_BOXX
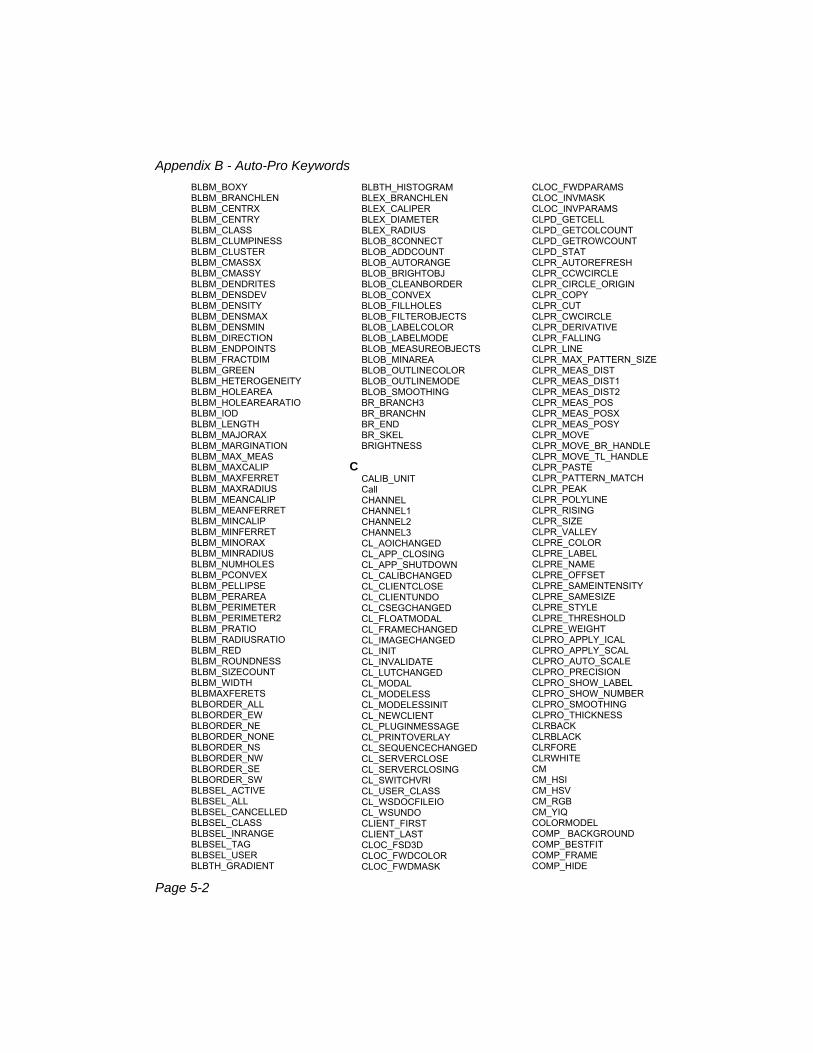
Appendix B - Auto-Pro Keywords
Page 5-2
BLBM_BOXY BLBM_BRANCHLEN BLBM_CENTRX BLBM_CENTRY BLBM_CLASS BLBM_CLUMPINESS BLBM_CLUSTER BLBM_CMASSX BLBM_CMASSY BLBM_DENDRITES BLBM_DENSDEV BLBM_DENSITY BLBM_DENSMAX BLBM_DENSMIN BLBM_DIRECTION BLBM_ENDPOINTS BLBM_FRACTDIM BLBM_GREEN BLBM_HETEROGENEITY BLBM_HOLEAREA BLBM_HOLEAREARATIO BLBM_IOD BLBM_LENGTH BLBM_MAJORAX BLBM_MARGINATION BLBM_MAX_MEAS BLBM_MAXCALIP BLBM_MAXFERRET BLBM_MAXRADIUS BLBM_MEANCALIP BLBM_MEANFERRET BLBM_MINCALIP BLBM_MINFERRET BLBM_MINORAX BLBM_MINRADIUS BLBM_NUMHOLES BLBM_PCONVEX BLBM_PELLIPSE BLBM_PERAREA BLBM_PERIMETER BLBM_PERIMETER2 BLBM_PRATIO BLBM_RADIUSRATIO BLBM_RED BLBM_ROUNDNESS BLBM_SIZECOUNT BLBM_WIDTH BLBMAXFERETS BLBORDER_ALL BLBORDER_EW BLBORDER_NE BLBORDER_NONE BLBORDER_NS BLBORDER_NW BLBORDER_SE BLBORDER_SW BLBSEL_ACTIVE BLBSEL_ALL BLBSEL_CANCELLED BLBSEL_CLASS BLBSEL_INRANGE BLBSEL_TAG BLBSEL_USER BLBTH_GRADIENT
BLBTH_HISTOGRAM BLEX_BRANCHLEN BLEX_CALIPER BLEX_DIAMETER BLEX_RADIUS BLOB_8CONNECT BLOB_ADDCOUNT BLOB_AUTORANGE BLOB_BRIGHTOBJ BLOB_CLEANBORDER BLOB_CONVEX BLOB_FILLHOLES BLOB_FILTEROBJECTS BLOB_LABELCOLOR BLOB_LABELMODE BLOB_MEASUREOBJECTS BLOB_MINAREA BLOB_OUTLINECOLOR BLOB_OUTLINEMODE BLOB_SMOOTHING BR_BRANCH3 BR_BRANCHN BR_END BR_SKEL BRIGHTNESS
C CALIB_UNIT Call CHANNEL CHANNEL1 CHANNEL2 CHANNEL3 CL_AOICHANGED CL_APP_CLOSING CL_APP_SHUTDOWN CL_CALIBCHANGED CL_CLIENTCLOSE CL_CLIENTUNDO CL_CSEGCHANGED CL_FLOATMODAL CL_FRAMECHANGED CL_IMAGECHANGED CL_INIT CL_INVALIDATE CL_LUTCHANGED CL_MODAL CL_MODELESS CL_MODELESSINIT CL_NEWCLIENT CL_PLUGINMESSAGE CL_PRINTOVERLAY CL_SEQUENCECHANGED CL_SERVERCLOSE CL_SERVERCLOSING CL_SWITCHVRI CL_USER_CLASS CL_WSDOCFILEIO CL_WSUNDO CLIENT_FIRST CLIENT_LAST CLOC_FSD3D CLOC_FWDCOLOR CLOC_FWDMASK
CLOC_FWDPARAMS CLOC_INVMASK CLOC_INVPARAMS CLPD_GETCELL CLPD_GETCOLCOUNT CLPD_GETROWCOUNT CLPD_STAT CLPR_AUTOREFRESH CLPR_CCWCIRCLE CLPR_CIRCLE_ORIGIN CLPR_COPY CLPR_CUT CLPR_CWCIRCLE CLPR_DERIVATIVE CLPR_FALLING CLPR_LINE CLPR_MAX_PATTERN_SIZE CLPR_MEAS_DIST CLPR_MEAS_DIST1 CLPR_MEAS_DIST2 CLPR_MEAS_POS CLPR_MEAS_POSX CLPR_MEAS_POSY CLPR_MOVE CLPR_MOVE_BR_HANDLE CLPR_MOVE_TL_HANDLE CLPR_PASTE CLPR_PATTERN_MATCH CLPR_PEAK CLPR_POLYLINE CLPR_RISING CLPR_SIZE CLPR_VALLEY CLPRE_COLOR CLPRE_LABEL CLPRE_NAME CLPRE_OFFSET CLPRE_SAMEINTENSITY CLPRE_SAMESIZE CLPRE_STYLE CLPRE_THRESHOLD CLPRE_WEIGHT CLPRO_APPLY_ICAL CLPRO_APPLY_SCAL CLPRO_AUTO_SCALE CLPRO_PRECISION CLPRO_SHOW_LABEL CLPRO_SHOW_NUMBER CLPRO_SMOOTHING CLPRO_THICKNESS CLRBACK CLRBLACK CLRFORE CLRWHITE CM CM_HSI CM_HSV CM_RGB CM_YIQ COLORMODEL COMP_ BACKGROUND COMP_BESTFIT COMP_FRAME COMP_HIDE

Appendix B - Auto-Pro Keywords
Page 5-3
COMP_HUE COMP_NUMFRAMES COMP_RESET COMP_SHOW COMP_UPDATE CONTRAST CONV_DIRECT CONV_MCOLOR CONV_MEDIAN CONV_PSEUDOCOLOR CONV_SCALE CONV_SHIFT CONV_USER Cos CP_BLUE_GREEN CP_BLUE_RED CP_GREEN_BLUE CP_GREEN_RED CP_RED_BLUE CP_RED_GREEN CPROG CUNDO_APPLY CUNDO_CREATE CUNDO_REDO CUNDO_RELEASE Currency CURRENT_B_T CURRENT_B_W CURRENT_C_B CURRENT_C_T CURRENT_C_W CURRENT_T_B CURRENT_T_W CURRENT_W_B CURSORSIZE CURVE
D DB_BINARY DB_CAPTION DB_COPYCUSTOM DB_FILE DB_FIRST DB_INT DB_LAST DB_LONG DB_MEMO DB_NEXT DB_PREV DB_STRING DBASE_EXITING DBASE_IMAGE_SELECTED DBASE_LOAD_IMAGE DBASE_SEARCHED_CASE DBASE_STARTING DC_AUTO DC_AUTOMODE DC_BLOCKROW1 DC_BREAK DC_CELL DC_COL DC_COLWIDTH DC_DATA DC_FETCH
DC_LEFTCOL DC_NUMBLOCK DC_NUMCOL DC_NUMROW DC_NUMVAL DC_RESET DC_RESETLAST DC_ROW DC_SIGNIF DC_STATS DC_TOPLINE DC_TYPE DDE_CLOSE DDE_EXEC DDE_GET DDE_OPEN DDE_PUT DDE_SET Declare DEGREE Dim DISTANCE_DIAGONAL DISTANCE_EUCLIDEAN DISTANCE_SQUARE DLG_MENU_COORD DLG_MENU_ID DLG_MENU_NAME Do DOCINFO_GETPMODE DOCINFO_INSTANCE DOCIO_GENERIC DOCIO_IPW DOCIO_TIFF DOCS_CASCADE DOCS_OVERLAP DOCS_TILE DOCSEL_ACTIVE DOCSEL_ALL DOCSEL_NEXTID DOCSEL_NONE DOCSEL_PREVID Double DR_BEST DR_FRANGE DR_GAMMA DR_INV DR_RANGE DRAW_ARROWCIRCLE DRAW_CIRCLEARROW DRAW_CIRCLEBOTH DRAW_DIAMONDBOTH DRAW_FILLCOLOR DRAW_LARGEARROWBOTH DRAW_LARGEARROWLEFT DRAW_LARGEARROWRIGHT DRAW_LINECOLOR DRAW_LINEWIDTH DRAW_PLAINLINE DRAW_SMALLARROWBOTH DRAW_SMALLARROWLEFT DRAW_SMALLARROWRIGHT
DRAW_THICKLINE DRAW_THINLINE DTR_ANGLEDOT DTR_ANGLELINE DTR_CUSTOM DTR_ERRDIFF DTR_FLATDOT DTR_HORZLINE DTR_THRESHOLD DTR_THRESHOLDBLACK DTR_THRESHOLDWHITE DTR_VERTLINE
E EDF_BEST_FOCUS EDF_BOTTOMUP EDF_COMPOSITE EDF_CRITERIA EDF_DEFAULT_FRAME EDF_MAX_DEPTHCONTRAST EDF_MAX_INTENSITY EDF_MAX_LOCALCONTRAST EDF_MIN_INTENSITY EDF_NORMALIZE EDF_NORMALIZE EDF_OPO_CALIBRATED EDF_ORDER EDF_TOPDOWN EDF_TOPO_MAP Else ElseIf End ENDOFMESSAGE EQ_BELL EQ_BESTFIT EQ_EXPONENTIAL EQ_LINEAR EQ_LOGARITHMIC EQ_WHITEBAL Eqv EXE-FUNC Exit Exp
F FFT_HANNING FFT_NEWFLOAT FFT_NEWIMAGE FFT_NOTCH FFT_PHASE FFT_PHASE32 FFT_SOURCE FFT_SPECPHASE32 FFT_SPECTRUM FFT_SPECTRUM32 FILE_BEGIN FILE_CURRENT FILE_END FILE_MAP_ALL_ACCESS FILE_MAP_COPY FILE_MAP_READ FILE_MAP_WRITE

Appendix B - Auto-Pro Keywords
Page 5-4
FILLCOLOR FILLHUE FILLPATTERN FILLTEXTURE FILLTINT FLT_16NEIGHBOR FLT_4NEIGHBOR FLT_8NEIGHBOR FLT_EDGE_HORZ FLT_EDGE_THICK FLT_EDGE_THIN FLT_EDGE_VERT FLT_EMBOSS_ABOVE FLT_EMBOSS_DIAG FLT_EMBOSS_LEFT FLT_LINE_BOTH FLT_LINE_HORZ FLT_LINE_VERT FLT_SCULPT_ABOVE FLT_SCULPT_DIAG FLT_SCULPT_LEFT FLT_SCULPT_METAL For FRAME_ELLIPSE FRAME_INVIEW FRAME_IRREGULAR FRAME_NONE FRAME_RECTANGLE FRAME_RESET FreeDDElParam FREEZE FS_COMPARE FS_COMPARE_STR FS_SIGNATURE FS_SIGNATURE_STR FTOA_COMMA FTOA_COMMA FTOA_FEXP FTOA_FEXP FTOA_FORCE FTOA_FORCE FTOA_INT FTOA_INT FTOA_PSIGN FTOA_PSIGN FTOA_SIGNIFMASK FTOA_SIGNIFMASK FTOA_SIZEMASK FTOA_SIZEMASK FTOAFORMAT FTOAFORMAT FTOASIGNIF FTOASIGNIF FTOASIZE FTOASIZE FTP_DUMMY Function FUT_FRAMESADDED FUT_FRAMESCUT FUT_FRAMESMOD
G GALLERY_MESSAGE GAMMA
GET_VALUE GETACTDOC GETAPPDIR GETAPPNAME GETAPPVERSION GETAPPWND GETBOUNDS GETCHANNELS GETCURPOS GETDOCINFO GETDOCLST GETDOCVRI GETDOCWND GETEDITPOINT GETFEATVALUES GETFLOAT GETGRAPH GETHBLOB GETHIT GETHWND GETINDEX GETINSTINFO GETINT GETLABEL GETLNUMPTS GETMEASVALUES GETNAME GETNUMCLASS GETNUMDOC GETNUMMEAS GETNUMOBJ GETNUMPTS GETNUMRANGES GETNUMSAMPLES GETOSVERSION GETPLUGSN GETPOINTS GETRANGE GETRANGESTATS GETSTATS GETSTATUS GETSTRING GETTHRESH GETTYPE GETVALUES GETX GETY GETZ GO_ATTR_BRUSHCOLOR GO_ATTR_CONNECT GO_ATTR_FONTBOLD GO_ATTR_FONTITALIC GO_ATTR_FONTSIZE GO_ATTR_FONTUNDERLINE GO_ATTR_LINEEND GO_ATTR_LINESTART GO_ATTR_NUMPOINTS GO_ATTR_PENCOLOR GO_ATTR_PENSTYLE GO_ATTR_PENWIDTH GO_ATTR_POINTS GO_ATTR_RECTSTYLE GO_ATTR_TEXT
GO_ATTR_TEXTAUTOSIZE GO_ATTR_TEXTCENTERED GO_ATTR_TEXTCOLOR GO_ATTR_TEXTLENGTH GO_ATTR_TEXTWORDWRAP GO_ATTR_USEASDEFAULT GO_ATTR_ZOOM GO_LINEEND_CIRCLE GO_LINEEND_LARGEARROW GO_LINEEND_LARGEDIAMOND GO_LINEEND_LARGETICKMARK GO_LINEEND_NOTHING GO_LINEEND_SMALLARROW GO_LINEEND_SMALLDIAMOND GO_LINEEND_SMALLTICKMARK GO_OBJ_ELLIPSE GO_OBJ_INDEX GO_OBJ_LINE GO_OBJ_NUMBER GO_OBJ_POLY GO_OBJ_RECT GO_OBJ_ROUNDRECT GO_OBJ_TEXT GO_PENSTYLE_DASH GO_PENSTYLE_DASHDOT GO_PENSTYLE_DASHDOTDOT GO_PENSTYLE_DOT GO_PENSTYLE_SOLID GO_RECTSTYLE_BORDER_FILL GO_RECTSTYLE_BORDER_NOFILL GO_RECTSTYLE_NOBORDER_FILL GO_SEL_INDEX GO_SEL_NUMBER GoSub GoTo GRID GRID_ATTR_BMARGIN GRID_ATTR_CHECKERED GRID_ATTR_COLOR GRID_ATTR_COUNT GRID_ATTR_DISPLAYAS GRID_ATTR_FLAGRANDSEED GRID_ATTR_FULLSIZE GRID_ATTR_HLENGTH GRID_ATTR_HSPACE GRID_ATTR_LAYOUT GRID_ATTR_LENGTH GRID_ATTR_LMARGIN GRID_ATTR_OBJECT GRID_ATTR_PENWIDTH GRID_ATTR_RMARGIN GRID_ATTR_RSPACE

Appendix B - Auto-Pro Keywords
Page 5-5
GRID_ATTR_TMARGIN GRID_ATTR_VALRANDSEED GRID_ATTR_VLENGTH GRID_ATTR_VSPACE GRID_CALIBFLAG_IMAGE GRID_CALIBFLAG_PIXEL GRID_LATICE GRID_LAYOUT_CONCENTRIC GRID_LAYOUT_ORTHOGONAL GRID_LAYOUT_RANDOM GRID_LINES GRID_OBJECT_CIRCLE GRID_OBJECT_CYCLOID GRID_OBJECT_LINE GRID_OBJECT_LINESGM GRID_OBJECT_POINT GRID_POINT_CIRCLE_LRG GRID_POINT_CIRCLE_SML GRID_POINT_CROSS_LRG45 GRID_POINT_CROSS_LRG90 GRID_POINT_CROSS_SML45 GRID_POINT_CROSS_SML90 GRID_POINT_DIAMOND_LRG GRID_POINT_DIAMOND_SML GRID_POINT_MED GRID_POINT_RECT_LRG GRID_POINT_RECT_SML GRID_POINT_STAR8 GRID_POINT_THREEDOWN GRID_POINT_THREEUP GRID_POINTS
H HAILMAXPOINTS HAILMAXSEGMENTS HAILMAXSEGMENTS HDI_DRAGINIT HDI_DRAGTOWINDOW HDI_DROPFILE HDI_RECEIVINGDRAG HIL_WINDOWS HIL_WINDOWS32 HILAPI HilGlobalAlloc HilGlobalFree HilGlobalLock HilGlobalUnlock HilImClose HilLocalAlloc HilLocalFree HilLocalLock HilLocalRealloc HilLocalUnlock HSTM_DEFAULT HSTM_RGBTOHSI
HSTM_RGBTOHSV HSTM_RGBTORGB HSTM_RGBTOYIQ HUE_BLUE HUE_CYAN HUE_DEFAULT HUE_GREEN HUE_INTERACTIVE HUE_MAGENTA HUE_QUERY HUE_RED HUE_WHITE HUE_YELLOW
I ICAL ICAL_DESTROY ICAL_GETBLACK ICAL_GETCLASS ICAL_GETCUNAME ICAL_GETFITMODE ICAL_GETFLAGS ICAL_GETHANDLE ICAL_GETINDICENT ICAL_GETINPUTMAX ICAL_GETINPUTMIN ICAL_GETNAME ICAL_GETNEXT ICAL_GETNUMPOINTS ICAL_GETNUMSAMPLES ICAL_GETPOINT ICAL_GETPOINTS ICAL_GETRESPONSE ICAL_GETRESPONSEMAX ICAL_GETRESPONSEMIN ICAL_GETSYSTEM ICAL_GETTYPE ICAL_MONOTONOUS ICAL_SETBLACK ICAL_SETCLASS ICAL_SETCUNAME ICAL_SETFITMODE ICAL_SETFLAGS ICAL_SETINCIDENT ICAL_SETINPUTMAX ICAL_SETINPUTMIN ICAL_SETNAME ICAL_SETNUMSAMPLES ICAL_SETPOINT ICAL_SETPOINTS ICAL_SETRESPONSE ICAL_SETSYSTEM ICAL_SETTYPE ICALF_POSITIVE ICALT_FREEFORM ICALT_ONE2ONE ICALT_OPTDEN ICALT_RESPONSE ICLU_DOUBLEIN ICLU_FLOATOUT IDM_INSERTFIRST IDM_INSERTLAST IDM_MACROFIRST IDM_MACROLAST
IDT_GMTFILETIME IDT_GMTSTR IDT_LOCALFILETIME IDT_LOCALSTR If IFF_MAXHANDLES IFFBV_OS2_1 IFFBV_OS2_2M IFFBV_OS2_2S IFFBV_WIN_3 IFFBV_WIN_4 IFFCL_BILEVEL IFFCL_CIELAB IFFCL_CMYK IFFCL_GRAY IFFCL_PALETTE IFFCL_RGB IFFCL_RGBA IFFCL_RGBAPLANAR IFFCL_RGBPLANAR IFFCL_YCC IFFCMD_ARTISTNAME IFFCMD_BMP IFFCMD_BMP_VERSION IFFCMD_BMPINVERTED IFFCMD_BMPVERSION IFFCMD_CMYKINFO IFFCMD_COLORIMETRY IFFCMD_DATETIME IFFCMD_DELETE IFFCMD_DESCRIPTION IFFCMD_DOCUMENTNAME IFFCMD_EPSF IFFCMD_FLAT IFFCMD_GETDATASIZE IFFCMD_GETERROR IFFCMD_GETIFFFLATD IFFCMD_GETLINESIZE IFFCMD_GETNUMIMAGES IFFCMD_GIF IFFCMD_GIFTRANSPARENT IFFCMD_HCUT IFFCMD_HFF IFFCMD_IMAGESEEK IFFCMD_IMG IFFCMD_JPEG IFFCMD_JPEGQ IFFCMD_MSP IFFCMD_PALETTE IFFCMD_PCD IFFCMD_PCDGETTRANSFORM IFFCMD_PCDISKEYED IFFCMD_PCDSETCLASS IFFCMD_PCDSETKEY IFFCMD_PCDSETTRANSFORM IFFCMD_PCX IFFCMD_RESOLUTION IFFCMD_SETIFFFLATD IFFCMD_SETPACKMODE IFFCMD_SOFTWARENAME IFFCMD_TGA IFFCMD_TIFF

Appendix B - Auto-Pro Keywords
Page 5-6
IFFCMD_TIFFFLOAT IFFCMD_TIFFOPTIONS IFFCMD_TIFFTAG IFFCMD_TIFFTAGDATA IFFCMD_TILEFORMAT IFFCMD_WPG IFFCMD_YCCINFO IFFCMD_YCCRGBCONVERT IFFCOMP_CCITT1D IFFCOMP_CCITTG3 IFFCOMP_CCITTG4 IFFCOMP_DEFAULT IFFCOMP_JPEG IFFCOMP_LZW IFFCOMP_LZWHPRED IFFCOMP_NONE IFFCOMP_RLE IFFERR_FILENOTFOUND IFFERR_HANDLELIMIT IFFERR_HEADER IFFERR_IMAGE IFFERR_INV_SIZE IFFERR_IO_CLOSE IFFERR_IO_OPEN IFFERR_IO_READ IFFERR_IO_SEEK IFFERR_IO_WRITE IFFERR_LAST_ERROR IFFERR_LZW_DISABLED IFFERR_MEMORY IFFERR_NO_DES IFFERR_NO_LIBRARY IFFERR_NONE IFFERR_NOTAVAILABLE IFFERR_NOTSUPPORTED IFFERR_PARAMETER IFFERR_UNKNOWN_FF IFFINF_BITSPERPLANE IFFINF_CLASS IFFINF_COMPRESSION IFFINF_FILEFORMAT IFFINF_HEIGHT IFFINF_RESOLUTIONX IFFINF_RESOLUTIONY IFFINF_SEQUENCE IFFINF_WIDTH IFFIT_MASK IFFIT_PRIMARY IFFIT_THUMBNAIL IFFLIB_APOLLO IFFLIB_BMP IFFLIB_EPS IFFLIB_FLAT IFFLIB_GIF IFFLIB_HALOCUT IFFLIB_HCUT IFFLIB_IMG IFFLIB_JPEG IFFLIB_MSP IFFLIB_PCD IFFLIB_PCX IFFLIB_PICT IFFLIB_RAS IFFLIB_TGA
IFFLIB_TIFF IFFM_APPEND IFFM_MEMORY IFFM_READ IFFM_READWRITE IFFM_WRITE IFFPM_LEFTJUSTIFIED IFFPM_NORMALIZED IFFPM_PACKED IFFPM_RAW IFFPM_UNPACKED IFFSEQ_BOTTOMUP IFFSEQ_INTERLACED IFFSEQ_TOPDOWN IFFTF_NONE IFFTF_STRIPS IFFTF_TILES IMA_RD IMA_RDNOCACHE IMA_RDWR IMC_BILEVEL IMC_C_DIRECT IMC_C_SCALE IMC_C_SHIFT IMC_CMYK IMC_FLOAT IMC_GRAY IMC_GRAY12 IMC_GRAY16 IMC_M_DA IMC_M_FDA IMC_M_NOINIT IMC_M_SHARED IMC_PALETTE IMC_RGB IMC_RGB36 IMC_RGB48 IMCMD_CHANGEHEIGHT IMCMD_DELETEFRAME IMCMD_GETACTIVEFRAME IMCMD_GETARTIST IMCMD_GETBPP IMCMD_GETBYTEHEIGHT IMCMD_GETBYTEHEIGHTEX IMCMD_GETBYTEWIDTH IMCMD_GETBYTEWIDTHEX IMCMD_GETCLASS IMCMD_GETDATE IMCMD_GETDESC IMCMD_GETDISPLAYRANGE IMCMD_GETDPI IMCMD_GETDPM IMCMD_GETERROR IMCMD_GETEXPRESPONSE IMCMD_GETEXPRESPONSEADDR IMCMD_GETEXTENT IMCMD_GETEXWRESPONSE IMCMD_GETFILEFORMAT IMCMD_GETFLOATRANGE IMCMD_GETFRAMEDATE
IMCMD_GETHISTCHANNEL IMCMD_GETHISTSTATUS IMCMD_GETLINEALLOCWIDTH IMCMD_GETLUTADDR IMCMD_GETLUTCOUNT IMCMD_GETMAXINTENSITY IMCMD_GETMODIFIED IMCMD_GETNAME IMCMD_GETNUMFRAMES IMCMD_GETPALETTE IMCMD_GETPSEUDOLUT IMCMD_GETRESPONSE IMCMD_GETSEQSELECTION IMCMD_GETSIZE IMCMD_GETTITLE IMCMD_I_GETACCESS IMCMD_I_GETBYTEHEIGHT IMCMD_I_GETBYTEHEIGHTEX IMCMD_I_GETBYTEWIDTH IMCMD_I_GETBYTEWIDTHEX IMCMD_I_GETEXTENT IMCMD_I_GETFRAME IMCMD_I_GETHIST IMCMD_I_GETMODIFIED IMCMD_I_GETSIZE IMCMD_I_SETACCESS IMCMD_I_SETBESTDISPLAYRANGE IMCMD_I_SETMODIFIED IMCMD_ISLILUT IMCMD_LUTRESET IMCMD_M_SIZE IMCMD_REALIZELUTS IMCMD_SETACTIVEFRAME IMCMD_SETARTIST IMCMD_SETBESTDISPLAYRANGE IMCMD_SETDATE IMCMD_SETDESC IMCMD_SETDISPLAYRANGE IMCMD_SETDPI IMCMD_SETDPM IMCMD_SETFILEFORMAT IMCMD_SETFLOATRANGE IMCMD_SETFRAMEDATE IMCMD_SETHISTCHANNEL IMCMD_SETHISTSTATUS IMCMD_SETMODIFIED IMCMD_SETNAME IMCMD_SETPALETTE IMCMD_SETPSEUDOLUT IMCMD_SETRESPONSE IMCMD_SETSEQSELECTION IMCMD_SETTITLE IME_CACHE_REALLOC IME_CANCELLED IME_CLIPPED IME_CLOSE

Appendix B - Auto-Pro Keywords
Page 5-7
IME_DISK_OPEN IME_DISK_READ IME_DISK_WRITE IME_EMPTY IME_HANDLE_LIMIT IME_HIFFL IME_INV_CLASS IME_INV_CMD IME_INV_EXTENT IME_INV_HANDLE IME_INV_LINE_NO IME_INV_PARAM IME_INV_SIZE IME_INV_TYPE IME_MEM_ACCESS IME_NO_MEMORY IME_NO_PROT_KEY IME_NONE IME_NOT_SUPPORTED IMGL_COPY IMGL_NORMAL IMM_AND IMM_COPY IMM_NAND IMM_NOR IMM_OR Imp IMPL_COPY IMPL_NORMAL IMT_DA IMT_DISK IMT_EXTMEMORY IMT_MEMORY INCHES INF_ARTIST INF_DATE INF_DESCRIPTION INF_DPIX INF_DPIY INF_FILENAME INF_MAXRANGE INF_NAME INF_RANGE INF_SUBJECT INF_TITLE INF_XPOSITION INF_YPOSITION INF_ZPOSITION InStr Int Integer INTF_FUNC INVERT IpAcqAverage IpAcqControl IpAcqDynIntSnap IpAcqMultiSnap IpAcqSelectDriver IpAcqSettings IpAcqShow IpAcqSnap IpAcqSeqIntSnap IpAcqTimed IpAcqTimedEx
IpAlignAdd IpAlignApply IpAlignCalculate IpAlignFindPattern IpAlignGet IpAlignOpen IpAlignRemove IpAlignSave IpAlignSetEx IpAlignSetInt IpAlignSetSearchPattern IpAlignSetSingle IpAlignShow IpAffine IpAFAAddChan IpAFADelChan IpAFADelChanStr IpAFAGet IpAFAGetStr IpAFALoad IpAFAMacroGet IpAFAMacroSet IpAFANew IpAFASave IpAFASaveAs IpAFASetInt IpAFASetStr IpAFASetEx IpAFASetSingle IpAFAShow IpAFASnap IpAnActivateAll IpAnActivateDefaultObj IpAnActivateObjID IpAnActivateObjXY IpAnAddText IpAnBurn IpAnCreateObj IpAnDeleteAll IpAnDeleteObj IpAnGet IpAnGetFontName IpAnGetStr IpAnMove IpAnotAttr IpAnotBox IpAnotEllipse IpAnotLine IpAnPolyAddPtArray IpAnPolyAddPtString IpAnSet IpAnSetFontName IpAnShowAnnot IpAnText IpAoiChangeName IpAoiCreateBox IpAoiCreateDonut IpAoiCreateEllipse IpAoiCreateIrregular IpAoiGet IpAoiManager IpAoiMove IpAoiMultAppend IpAoiMultShow
IpAoiShow IpAoiValidate IpAppArrange IpAppCloseAll IpAppCtl IpAppCtlText IpAppExit IpAppGet IpAppGet2 IpAppGetStr IpAppHide IpAppMaximize IpAppMenuSelect IpAppMinimize IpAppMove IpAppRestore IpAppRun IpAppSelectDoc IpAppSet IpAppSize IpAppUpdateDoc IpAppWindow IpAppWndPos IpAppWndState IpBayerInterpolate IpBayerGetInt IpBayerSetInt IpBayerShow IpBitAttr IpBitSaveData IpBitShow IpBlbCount IpBlbCreateMask IpBlbData IpBlbDelete IpBlbEnableMeas IpBlbFilter IpBlbFromAoi IpBlbGet IpBlbGetStr IpBlbHideObject IpBlbLoadOutline IpBlbLoadSetting IpBlbMeasure IpBlbMultiRanges IpBlbRange IpBlbRemoveHoles IpBlbSaveClasses IpBlbSaveData IpBlbSaveOutline IpBlbSavePopDensities IpBlbSaveSetting IpBlbSetAttr IpBlbSetFilterRange IpBlbSetRange IpBlbSetRangeEx IpBlbShow IpBlbShowAutoClass IpBlbShowCluster IpBlbShowData IpBlbShowHistogram IpBlbShowObjectWindow IpBlbShowPopDens IpBlbShowScattergram
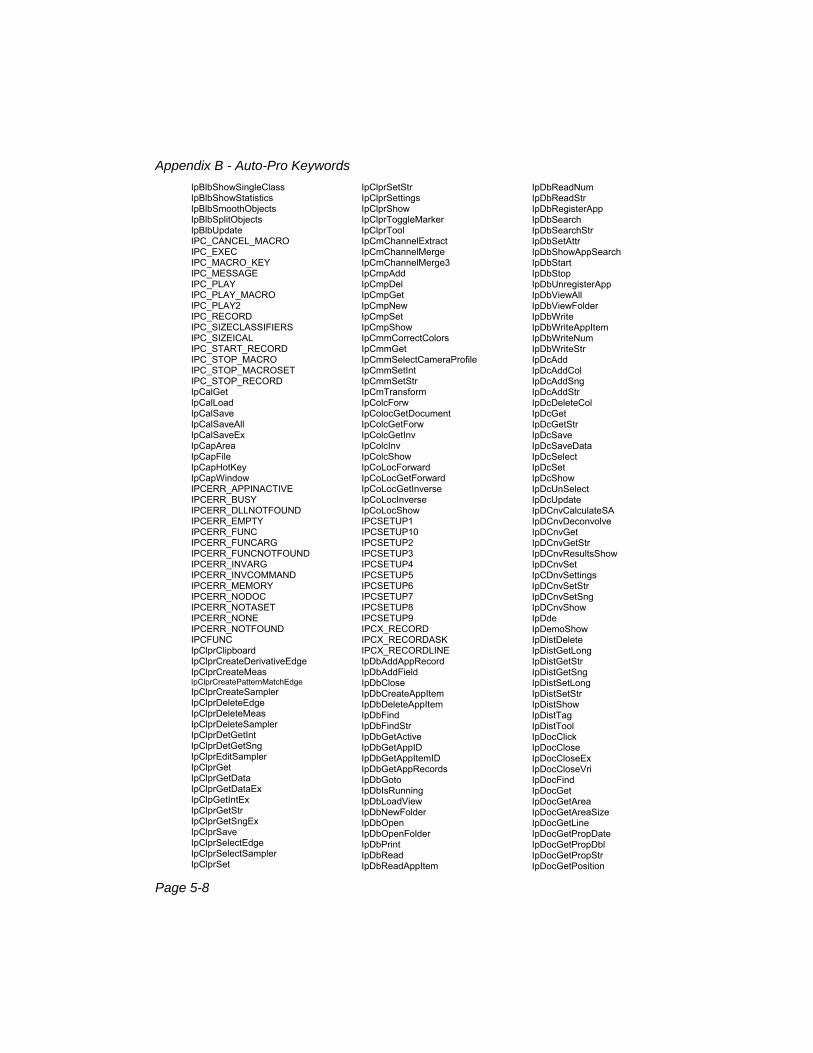
Appendix B - Auto-Pro Keywords
Page 5-8
IpBlbShowSingleClass IpBlbShowStatistics IpBlbSmoothObjects IpBlbSplitObjects IpBlbUpdate IPC_CANCEL_MACRO IPC_EXEC IPC_MACRO_KEY IPC_MESSAGE IPC_PLAY IPC_PLAY_MACRO IPC_PLAY2 IPC_RECORD IPC_SIZECLASSIFIERS IPC_SIZEICAL IPC_START_RECORD IPC_STOP_MACRO IPC_STOP_MACROSET IPC_STOP_RECORD IpCalGet IpCalLoad IpCalSave IpCalSaveAll IpCalSaveEx IpCapArea IpCapFile IpCapHotKey IpCapWindow IPCERR_APPINACTIVE IPCERR_BUSY IPCERR_DLLNOTFOUND IPCERR_EMPTY IPCERR_FUNC IPCERR_FUNCARG IPCERR_FUNCNOTFOUND IPCERR_INVARG IPCERR_INVCOMMAND IPCERR_MEMORY IPCERR_NODOC IPCERR_NOTASET IPCERR_NONE IPCERR_NOTFOUND IPCFUNC IpClprClipboard IpClprCreateDerivativeEdge IpClprCreateMeas IpClprCreatePatternMatchEdge IpClprCreateSampler IpClprDeleteEdge IpClprDeleteMeas IpClprDeleteSampler IpClprDetGetInt IpClprDetGetSng IpClprEditSampler IpClprGet IpClprGetData IpClprGetDataEx IpClpGetIntEx IpClprGetStr IpClprGetSngEx IpClprSave IpClprSelectEdge IpClprSelectSampler IpClprSet
IpClprSetStr IpClprSettings IpClprShow IpClprToggleMarker IpClprTool IpCmChannelExtract IpCmChannelMerge IpCmChannelMerge3 IpCmpAdd IpCmpDel IpCmpGet IpCmpNew IpCmpSet IpCmpShow IpCmmCorrectColors IpCmmGet IpCmmSelectCameraProfile IpCmmSetInt IpCmmSetStr IpCmTransform IpColcForw IpColocGetDocument IpColcGetForw IpColcGetInv IpColcInv IpColcShow IpCoLocForward IpCoLocGetForward IpCoLocGetInverse IpCoLocInverse IpCoLocShow IPCSETUP1 IPCSETUP10 IPCSETUP2 IPCSETUP3 IPCSETUP4 IPCSETUP5 IPCSETUP6 IPCSETUP7 IPCSETUP8 IPCSETUP9 IPCX_RECORD IPCX_RECORDASK IPCX_RECORDLINE IpDbAddAppRecord IpDbAddField IpDbClose IpDbCreateAppItem IpDbDeleteAppItem IpDbFind IpDbFindStr IpDbGetActive IpDbGetAppID IpDbGetAppItemID IpDbGetAppRecords IpDbGoto IpDbIsRunning IpDbLoadView IpDbNewFolder IpDbOpen IpDbOpenFolder IpDbPrint IpDbRead IpDbReadAppItem
IpDbReadNum IpDbReadStr IpDbRegisterApp IpDbSearch IpDbSearchStr IpDbSetAttr IpDbShowAppSearch IpDbStart IpDbStop IpDbUnregisterApp IpDbViewAll IpDbViewFolder IpDbWrite IpDbWriteAppItem IpDbWriteNum IpDbWriteStr IpDcAdd IpDcAddCol IpDcAddSng IpDcAddStr IpDcDeleteCol IpDcGet IpDcGetStr IpDcSave IpDcSaveData IpDcSelect IpDcSet IpDcShow IpDcUnSelect IpDcUpdate IpDCnvCalculateSA IpDCnvDeconvolve IpDCnvGet IpDCnvGetStr IpDCnvResultsShow IpDCnvSet IpCDnvSettings IpDCnvSetStr IpDCnvSetSng IpDCnvShow IpDde IpDemoShow IpDistDelete IpDistGetLong IpDistGetStr IpDistGetSng IpDistSetLong IpDistSetStr IpDistShow IpDistTag IpDistTool IpDocClick IpDocClose IpDocCloseEx IpDocCloseVri IpDocFind IpDocGet IpDocGetArea IpDocGetAreaSize IpDocGetLine IpDocGetPropDate IpDocGetPropDbl IpDocGetPropStr IpDocGetPosition
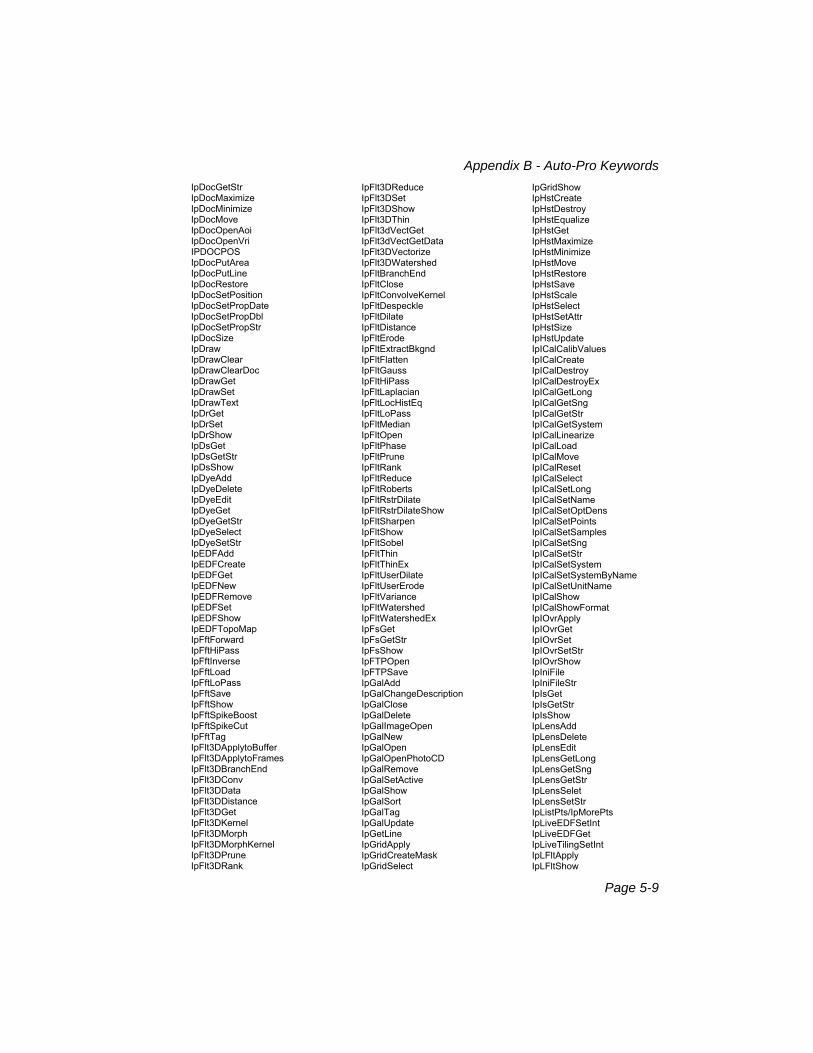
Appendix B - Auto-Pro Keywords
Page 5-9
IpDocGetStr IpDocMaximize IpDocMinimize IpDocMove IpDocOpenAoi IpDocOpenVri IPDOCPOS IpDocPutArea IpDocPutLine IpDocRestore IpDocSetPosition IpDocSetPropDate IpDocSetPropDbl IpDocSetPropStr IpDocSize IpDraw IpDrawClear IpDrawClearDoc IpDrawGet IpDrawSet IpDrawText IpDrGet IpDrSet IpDrShow IpDsGet IpDsGetStr IpDsShow IpDyeAdd IpDyeDelete IpDyeEdit IpDyeGet IpDyeGetStr IpDyeSelect IpDyeSetStr IpEDFAdd IpEDFCreate IpEDFGet IpEDFNew IpEDFRemove IpEDFSet IpEDFShow IpEDFTopoMap IpFftForward IpFftHiPass IpFftInverse IpFftLoad IpFftLoPass IpFftSave IpFftShow IpFftSpikeBoost IpFftSpikeCut IpFftTag IpFlt3DApplytoBuffer IpFlt3DApplytoFrames IpFlt3DBranchEnd IpFlt3DConv IpFlt3DData IpFlt3DDistance IpFlt3DGet IpFlt3DKernel IpFlt3DMorph IpFlt3DMorphKernel IpFlt3DPrune IpFlt3DRank
IpFlt3DReduce IpFlt3DSet IpFlt3DShow IpFlt3DThin IpFlt3dVectGet IpFlt3dVectGetData IpFlt3DVectorize IpFlt3DWatershed IpFltBranchEnd IpFltClose IpFltConvolveKernel IpFltDespeckle IpFltDilate IpFltDistance IpFltErode IpFltExtractBkgnd IpFltFlatten IpFltGauss IpFltHiPass IpFltLaplacian IpFltLocHistEq IpFltLoPass IpFltMedian IpFltOpen IpFltPhase IpFltPrune IpFltRank IpFltReduce IpFltRoberts IpFltRstrDilate IpFltRstrDilateShow IpFltSharpen IpFltShow IpFltSobel IpFltThin IpFltThinEx IpFltUserDilate IpFltUserErode IpFltVariance IpFltWatershed IpFltWatershedEx IpFsGet IpFsGetStr IpFsShow IpFTPOpen IpFTPSave IpGalAdd IpGalChangeDescription IpGalClose IpGalDelete IpGalImageOpen IpGalNew IpGalOpen IpGalOpenPhotoCD IpGalRemove IpGalSetActive IpGalShow IpGalSort IpGalTag IpGalUpdate IpGetLine IpGridApply IpGridCreateMask IpGridSelect
IpGridShow IpHstCreate IpHstDestroy IpHstEqualize IpHstGet IpHstMaximize IpHstMinimize IpHstMove IpHstRestore IpHstSave IpHstScale IpHstSelect IpHstSetAttr IpHstSize IpHstUpdate IpICalCalibValues IpICalCreate IpICalDestroy IpICalDestroyEx IpICalGetLong IpICalGetSng IpICalGetStr IpICalGetSystem IpICalLinearize IpICalLoad IpICalMove IpICalReset IpICalSelect IpICalSetLong IpICalSetName IpICalSetOptDens IpICalSetPoints IpICalSetSamples IpICalSetSng IpICalSetStr IpICalSetSystem IpICalSetSystemByName IpICalSetUnitName IpICalShow IpICalShowFormat IpIOvrApply IpIOvrGet IpIOvrSet IpIOvrSetStr IpIOvrShow IpIniFile IpIniFileStr IpIsGet IpIsGetStr IpIsShow IpLensAdd IpLensDelete IpLensEdit IpLensGetLong IpLensGetSng IpLensGetStr IpLensSelet IpLensSetStr IpListPts/IpMorePts IpLiveEDFSetInt IpLiveEDFGet IpLiveTilingSetInt IpLFltApply IpLFltShow

Appendix B - Auto-Pro Keywords
Page 5-10
IpListPts IpLFltApply IpLFltShow IpLutApply IpLutBinarize IpLutData IpLutLoad IpLutReset IpLutSave IpLutSetAttr IpLutSetControl IpLutShow IpMacroLoad IpMacroPause IpMacroRun IpMacroStop IpMacroWait IpMacroProgGet IpMacroProgGetStr IpMacroProgSetInt IpMacroProgSetStr IpMacroProgShow IpMail IpMeasAdd IpMeasAddMeasure IpMeasAttr IpMeasAttrStr IpMeasDelete IpMeasDelMeasure IpMeasGet IpMeasGetHit IpMeasGetStr IpMeasLoad IpMeasLoadOutline IpMeasMove IpMeasRestore IpMeasSave IpMeasSaveData IpMeasSaveOutline IpMeasShow IpMeasSize IpMeasTag IpMeasTool IpMeasUpdate IpMmonGet IpMmonSet IpMmonShow IpMorePts IpMosaicCreate IpMosaicGet IpMosaicSet IpOpBkgndCorrect IpOpBkgndSubtract IpOpImageArithmetics IpOpImageLogic IpOpNumberArithmetics IpOpNumberLogic IpOpNumberRgb IpOpShow IpOutput IpOutputClear IpOutputSave IpOutputSet IpOutputShow
IpPalSetGrayBrush IpPalSetPaletteBrush IpPalSetPaletteColor IpPalSetRGBBrush IpPalShow IpPcDefineColorSpread IpPcDyeTint IpPcLoad IpPcSave IpPcSaveData IpPcSetColor IpPcSetColorSpread IpPcSetDivisions IpPcSetRange IpPcShow IpPcTint IpPlFilter IpPlImport IpPlotCreate IpPlotData IpPlotDestroy IpPlotRange IpPlotSet IpPlotShow IpPlotUpdate IpPlShow IpPortIOGetInt IpPortIOOpenConfig IpPortIOSaveConfig IpPortIOSetInt IpPortIOShow IpPortIORead IpPortIOWrite IpProfCreate IpProfDestroy IpProfGet IpProfLineMove IpProfMaximize IpProfMinimize IpProfMove IpProfRestore IpProfSave IpProfSelect IpProfSetAttr IpProfSize IpProfUpdate IpPrtHalftone IpPrtPage IpPrtScreen IpPrtSize IpRegister IpRegShow IpRendAnimation IpRendAnimationFile IpRendConvertCoord IpRendConvertRotation IpRendElem IpRendElemGet IpRendElemSet IpRendElemSetStr IpRendLoad IpRendManualMeasurements File IpRendMeasGraphSet
IpRendMMeas IpRendMMeasGetStr IpRendMMeasSet IpRendMMeasSetStr IpRendMove IpRendReload IpRendSaveData IpRendPaletteFile IpRendSet IpRendSettingsFile IpRendSize IpRendShow IpRendVMeas IpRendVMeasGetStr IpRendVMeasHist IpRendVMeasHistSet IpRendVMeasSet IpRendVMeasSetStr IpRptClose IpRptNew IpRptOpen IpRptPrint IpRptSave IpRptShow IpSCalCalibValues IpSCalCreate IpSCalDestroy IpSCalDestroyEx IpSCalGetLong IpSCalGetSng IpSCalGetStr IpSCalLoad IpSCalMove IpSCalReset IpSCalSave IpSCalSelect IpSCalSetAngle IpSCalSetAspect IpSCalSetLong IpSCalSetName IpSCalSetOrigin IpSCalSetUnit IpSCalSetUnitName IpSCalShow IpScanSelect IpScanShow IpScopeAcquire IpScopeComponent Present IpScopeControl IpScopeDocGet IpScopeEnumSettings IpScopeGetCount IpScopeGetPosition IpScopeRead IpScopeSettings IpScopeSetPosition IpScopeShow IpScopeWrite IpSegCreateMask IpSegLoad IpSegDelete IpSegGetRange IpSegMerge IpSegNew

Appendix B - Auto-Pro Keywords
Page 5-11
IpSegPreview IpSegRename IpSegReset IpSegSave IpSegSelect IpSegSelectArea IpSegSetAttr IpSegSetRange IpSegShow IpSeqAverage IpSeqDifference IpSeqExtractFrames IpSeqGCreate IpSeqGet IpSeqGGet IpSeqGSet IpSeqGShow IpSeqGUpdate IpSeqMerge IpSeqMergeDoc IpSeqOpen IpSeqPlay IpSeqReslice IpSeqRunningAvg IpSeqSave IpSeqSet IpSeqShow IpSmAdd IpSmAddFrame IpSmBackgroundCorr IpSmBackgroundCorrShow IpSmDelete IpSmDespeckle IpSmDespeckleShow IpSmExtract IpSmGet IpSmGetStr IpSmInfo IpSmNavigator IpSmNew IpSmNormalize IpSmNormalizeShow IpSmOpen IpSmPlay IpSmRemoveFrame IpSmRemove Image IpSmSave IpSmSet IpSmSetStr IpSmShow IpSortAttr IpSortObjects IpSortShow IpStAutoName IpStGetFloat IpStGetInt IpStGetName IpStGetString IpStSearchDir IpStSortedList IpStageAbsZ IpStageAbsZEx IpStageAcq IpStageAcqFrame
IpStageAddListPoint IpStageAddListPointEx IpStageControl IpStageCreateList IpStageDeleteList IpStageDeletePoint IpStageDocGet IpStageDocGetStr IpStageField IpStageFocusLimits IpStageGet IpStageGetAbsPoint IpStageGetAbsPointEx IpStageGetAbsPosition IpStageGetAbsPositionEx IpStageGetListLength IpStageGetListLocked IpStageGetListModified IpStageGetListName IpStageGetNumLists IpStageGoToListPos IpStageModifyListPoint IpStageModifyListPointEx IpStagePlane IpStageSampleGroupbyName IpStageSampleGroupbyNum IpStageSamplePattern byName IpStageSamplePatternByNum IpStageSetListLocked IpStageSetListModified IpStageSetListName IpStageSlideLoader IpStageScanPatternByName IpStageScanPatternbyNum IpStageSetArea IpStageShow IpStageShowTab IpStageSettings IpStageSortList IpStageStepXY IpStageStepZ IpStageWell IpStageXY IpStageXYRead IpStageXYWrite IpStageZ IpStageZRead IpStageZWrite IpSurfAutoRefresh IpSurfGet IpSurfOutput IpSurfSet IpSurfShow IpTagAddClass IpTagAttr IpTagDelete IpTagDeleteClass IpTagGet IpTagLoadEnv IpTagLoadPoints IpTagPt IpTagSaveData IpTagSaveEnv
IpTagSavePoints IpTagShow IpTagUpdate IpTemplateMode IpTextBurn IpTextFont IpTextSetAttr IpTextShow IpTileAdd IpTileApply IpTileCalculate IpTileGet IpTileOpen IpTileRemove IpTileSave IpTileSetEx IpTileSetInt IpTileSetSingle IpTileShow IpToolbarGetStr IpToolbarSelect IpToolbarShow IpTraceAttr IpTraceDo IpTraceShow IpTrackBar IpTrackFile IpTrack Meas IpTrackMeasGetStr IpTrackMeasSet IpTrackMeasSetStr IpTrackMove IpTrackOptionsFile IpTrackSaveData IpTrackShow IpTrackSize IpWsChangeDescription IpWsChangeInfo IpWsConvertFile IpWsConvertImage IpWsConvertToBilevel IpWsConvertToFloat IpWsConvertToGray IpWsConvertToGray12 IpWsConvertToGray16 IpWsConvertToGrayEx IpWsConvertToPaletteMColor IpWsConvertToPaletteMedian IpWsConvertToRGB IpWsConvertToRGB36 IpWsConvertToRGB48 IpWsConvertToRGBEx IpWsCopy IpWsCopyFrames IpWsCreate IpWsCreateEx IpWsCreateFromClipboard IpWsCreateFromVri IpWsCutFrames IpWsDeleteFrames IpWsDuplicate IpWsFill IpWsFillPattern IpWsGray12To8

Appendix B - Auto-Pro Keywords
Page 5-12
IpWsGray16To8 IpWsLoad IpWsLoadNumber IpWsLoadPreview IpWsLoadSetRes IpWsMove IpWsOrient IpWsOverlay IpWsOverlayEx IpWsPan IpWsPaste IpWsPasteEx IpWsPasteFrames IpWsRedo IpWsReload IpWsRotate IpWsRulerShow IpWsRulerType IpWsSave IpWsSaveAs IpWsSaveEx IpWsScale IpWsSelectFrames IpWsStretchLut IpWsSubSampleFrames IpWsTestStrips IpWsTestStrips2 IpWsTestStripsHalftone IpWsUndo IpWsZoom Is IS_COMPARE IS_COMPARE_STR IS_SIGNATURE IS_SIGNATURE_STR ISMULTICHANNEL ISTRUECOLOR ISZ_STR
L Len Let LF_BANDPASS LF_EDGEMN LF_EDGEPL LF_HIPASS LF_LOPASS Like LINEGEOMETRY LINETYPE LOAD_PROMPT LOAD_SMALLEST LOCEQ_BELL LOCEQ_BESTFIT LOCEQ_EXP LOCEQ_LINEAR LOCEQ_LOG LOCEQ_STDDEV LOCH_BELL LOCH_BESTFIT LOCH_EXP LOCH_LI LOCH_LOG LOCH_STDDEV
Log Long Loop Lut LUT_4TONES LUT_8TONES LUT_ALL LUT_BRIGHTNESS LUT_CONTRAST LUT_FREEFORM LUT_GAMMA LUT_HISHAD
M MA_AUTOGRID MA_CAPTION MA_COLUMNS MA_FONT MA_FONTSIZE MA_FOOTER MA_IMAGECLASS MA_IMAGEHEIGHT MA_IMAGESIZE MA_IMAGEWIDTH MA_PAGENUMBERS MA_ROWS MA_SPACING MA_TITLE MAC_DATETIME MAC_DESCRIPTION MAC_FILENAME MAC_FRAMENUMBER MAC_IMAGENAME MAC_NONE MACRO_FUNC MACRO_NAME_LEN MAIL_DUMMY MASK_BACKGROUND MASK_BILEVELINPLACE MASK_BILEVELNEW MASK_COLORNEW MASK_FOREGROUND MAX_APP_KEY MAX_IMAGE_WIDTH MAX_MACRO_ARG MAX_MACRO_TEXT MAX_MACRO_TEXT MAX_NEWWSFILE_LEN MAX_OUTPUT_STRING MAX_RC_STRING MAX_TASKS MAXCALNAME MAXDISPPATH MCM_PLUGIN MDATA_ANGLE MDATA_AREA MDATA_AVGDIST MDATA_CTRDIST MDATA_END MDATA_ENDY MDATA_LEN MDATA_MAXDIST MDATA_MINDIST MDATA_PERPDIST
MDATA_POS MDATA_POSY MDATA_RADIUS MDATA_START MDATA_STARTY MEAS_ALL MEAS_ANGLE MEAS_ANGLE180 MEAS_AREA MEAS_BFARC MEAS_BFCIRCLE MEAS_BFLINE MEAS_CIRCLE MEAS_CLICK MEAS_CTHICK MEAS_DISPBFPTS MEAS_DISPCOLOR MEAS_DIST MEAS_HIDE MEAS_HTHICK MEAS_LABELCOLOR MEAS_LENGTH MEAS_MAXARCPTS MEAS_MAXCIRCLEPTS MEAS_MAXLINEPTS MEAS_MEASCOLOR MEAS_NEWANGLE MEAS_PASSFAILTYPE MEAS_POINT MEAS_PROMPTS MEAS_RECT MEAS_REPEAT MEAS_SHOW MEAS_SHOWADVANCED MEAS_SHOWBASIC MEAS_SHOWLAYOUT MEAS_STATS MEAS_TAG MEAS_THICK MEAS_THICKMODE MEAS_TRACE MEAS_UPDATE MEAS_VTHICK MENU_COORD MENU_DLL MENU_FUNC MENU_ID MENU_NAME MIF_BITMAP MIF_COLUMN MIF_COMNAME MIF_DLL MIF_FLAGS MIF_FUNCID MIF_HELP MIF_HELPFILE MIF_MACRO MIF_MENUID MIF_SCRIPT MIF_TYPE MIPCCALL MIPCEXIT MIS_PRINTER MIS_PRINTERQTRSIZE

Appendix B - Auto-Pro Keywords
Page 5-13
MIS_USER MLOAD_INTERACTIVE MODELESS_INIT MORPHO_11x11OCTAGON MORPHO_1x3COLUMN MORPHO_2x2SQUARE MORPHO_3x1ROW MORPHO_3x3CROSS MORPHO_5x5OCTAGON MORPHO_7x7OCTAGON MORPHO_CUSTOM MPF_MINMAX MPF_NONE MPF_TOLERANCES MS_DEF2 MS_DEF3 MS_EXCLAM MS_MODAL MS_OKCAN MS_QUEST MS_STOP MS_YESNO MS_YESNOCAN
N New Next NONAME NOSYSTEM Not Null NULLAOI
O On ON_CL_AOICHANGED ON_CL_APPCLOSING ON_CL_APPSHUTDOWN ON_CL_CLIENTCLOSE ON_CL_FRAMECHANGED ON_CL_IMAGECHANGED ON_CL_LUTCHANGED ON_CL_NEWCLIENT ON_CL_PLUGINMESSAGE ON_CL_PRINTOVERLAY ON_CL_SERVERCLOSE ON_CL_SERVERCLOSING ON_CL_WSDOCFILEIO OP_EQUAL OP_GE OP_GT OP_LE OP_LIKE OP_LT OP_NOTLIKE OPA_ACC OPA_ADD OPA_AVG OPA_DIFF OPA_DIV OPA_EXP OPA_INV OPA_LOG OPA_MAX
OPA_MIN OPA_MULT OPA_SET OPA_SQR OPA_SUB OPA_X2 OPA_X2Y OPL_AND OPL_COPY OPL_NAND OPL_NOR OPL_NOT OPL_OR OPL_XOR Option Or OR_LEFTRIGHT OR_ROTATE180 OR_ROTATE270 OR_ROTATE90 OR_TRANSPOSE OR_UPDOWN ORIGIN
P P_GRAPH P_IMAGE P_TABLE PackDDElParam PCLR_ERRDIFF PCLR_ERRDIFFFAST PCLR_LOOKUP PDT_DFLOAT PDT_FLOAT PDT_INT16 PDT_INT32 PDT_WORD16 PDT_WORD32 PIXELS PLUGM_ACTIVATEAOIBUTTON PLUGM_ALLOCPALETTEUNDO PLUGM_ALLOCUNDO PLUGM_AOIBUTTON PLUGM_AOIMOVE PLUGM_APPENDWSPOPUPMENU PLUGM_BALLOONHELP PLUGM_BCGUPDATE PLUGM_CALIBCHANGED PLUGM_CANCELPASTE PLUGM_CHECKPLUG PLUGM_CLIENTTOVIR PLUGM_CLOSEMODELESS PLUGM_CLOSETWAIN PLUGM_CLOSEUNDO PLUGM_CLOSING PLUGM_CONVERTBMPTOVRI PLUGM_CONVERTVRITOBMP PLUGM_CREATECLIENT PLUGM_CREATEWS
PLUGM_CSEGCHANGED PLUGM_DESTROYCLIENT PLUGM_DRAGFILE PLUGM_DROPEFFECT PLUGM_FILEGET PLUGM_FILEGETMULTISELECT PLUGM_FILEGETNOTRACK PLUGM_FILEIMPORT PLUGM_FILEIMPORTNOTRACK PLUGM_FILELOAD PLUGM_FILELOADNOTRACK PLUGM_FILEPUT PLUGM_FILEPUTNOTRACK PLUGM_FRAMESETTYPE PLUGM_GET332PALETTE PLUGM_GETACTIVEVRI PLUGM_GETACTIVEWND PLUGM_GETAOI PLUGM_GETAPPKEY PLUGM_GETAPPNAME PLUGM_GETAPPTRACKPROC PLUGM_GETBACKCOLOR PLUGM_GETDOCINFO PLUGM_GETEDITORTOOLBAR PLUGM_GETFORECOLOR PLUGM_GETFRAME PLUGM_GETFRAMEWINDOW PLUGM_GETHWNDFROMID PLUGM_GETHWNDVRI PLUGM_GETIDFROMDLL PLUGM_GETIDFROMHWND PLUGM_GETIDFROMNAME PLUGM_GETININAME PLUGM_GETLIBNAME PLUGM_GETMACROCOUNT PLUGM_GETMACRONAME PLUGM_GETMDITYPE PLUGM_GETMENUITEMFIELD PLUGM_GETNEWWSNAME PLUGM_GETPRINTINFO PLUGM_GETPROGRAMPATH PLUGM_GETSCRIPTNAME PLUGM_GETTIMEORFRAMEPREF PLUGM_GETTOTALFRAMES PLUGM_GETTRACKFRAME PLUGM_GETUNDOHANDLE PLUGM_GETVIEWAREA PLUGM_GETVIEWPOS PLUGM_GETWSCLIENTAREA PLUGM_GETWSLIST PLUGM_GETZOOMFACTOR PLUGM_HWNDWSNAME PLUGM_ICONIC PLUGM_IMAGECHANGED

Appendix B - Auto-Pro Keywords
Page 5-14
PLUGM_ISPLAYINGMACRO PLUGM_ISRECORDINGMACRO PLUGM_ISTEMPLATEMODE PLUGM_LOADIPCPLUGIN PLUGM_LUTCHANGED PLUGM_MCCREATEFROMVRI PLUGM_MODIFYFRAME PLUGM_PASTE PLUGM_PHYTOVIR PLUGM_PLUGINMESSAGE PLUGM_REGISTERCLIENT PLUGM_REGISTERCLIENTUNDO PLUGM_REGISTERFRAMEUNDO PLUGM_REGISTERMODELESS PLUGM_RUNMACRO PLUGM_SCANSCAL PLUGM_SCREENTOVIR PLUGM_SEQAPPLYCHANGED PLUGM_SEQFRAMECHANGED PLUGM_SEQUENCECHANGED PLUGM_SEQUENCELOAD PLUGM_SEQUENCESAVE PLUGM_SERVERMESSAGE PLUGM_SETANDGETAOI PLUGM_SETAOI PLUGM_SETAOIDIRTY PLUGM_SETBACKCOLOR PLUGM_SETFORECOLOR PLUGM_SETMULTIFRAMEEXTENTS PLUGM_SETPLAYINGMACRO PLUGM_SETPRINTINFO PLUGM_SETRECORDINGMACRO PLUGM_SETZOOMFACTOR PLUGM_SHAREVRI PLUGM_STATUSTEXT PLUGM_STATUSTEXT2 PLUGM_STATUSTEXT3 PLUGM_SWITCHVRI PLUGM_TRACKPROC PLUGM_VIRTOCLIENT PLUGM_VIRTOPHY PLUGM_VRIFROMBITMAP PLUGM_VRIFROMDIB PLUGM_VRITOCLIPBOARD PLUGM_WSCREATEFROMFILE PLUGM_WSCREATEFROMVRI PLUGRES_GETBITMAP PLUGRES_GETCHECKSUM PLUGRES_GETNAME PLUGRES_GETSERIAL PLUGSHARE_CLOSEVRI
PLUGSHARE_GETAREA PLUGSHARE_GETLINE PLUGSHARE_OPENAOIVRI PLUGSHARE_OPENVRI PLUGSHARE_PUTAREA PLUGSHARE_PUTLINE PLUGX_ACTIVEFRAME PLUGX_ACTIVEHWND PLUGX_ACTIVEHWND PLUGX_ACTIVEVRI PLUGX_ACTIVEVRI PLUGX_ACTIVEWS PLUGX_CREATEWS PLUGX_CREATEWS PREVIEW_NONE Print Private PROFTYPE_CIRCLE PROFTYPE_FREEFORM PROFTYPE_LINE PRT_ACTUAL PRT_DISTORT PRT_FIT Pts
R RA_BOTTOM RA_BOTTOMLEFT RA_BOTTOMRIGHT RA_CENTER RA_LEFT RA_RIGHT RA_TOP RA_TOPLEFT RA_TOPRIGHT RECTANGLE Redim REDUCE_16NEIGHBOR REDUCE_4NEIGHBOR REDUCE_8NEIGHBOR REFERENCE REGSAM Rem RES_FUNC ret Return RGE_AUTO RGE_FIXED RGE_FIXEDMAX RGE_FIXEDMIN RPT_DUMMY RUN_AUTOCLOSE RUN_MAXIMIZED RUN_MINIMIZED RUN_MODAL RUN_NORMAL
S S_APPEND S_CLIPBOARD S_DATA S_DATA1 S_DATA2 S_DATABASE
S_DDE S_FILE S_GRAPH S_HEADER S_LEGEND S_MEAS S_NEW S_OUTPUT S_PRINT_GRAPH S_PRINT_TABLE S_PRINTER S_RANGE S_RECORD S_STATS S_TABLE S_X_AXIS S_Y_AXIS SCAL SCAL_DESTROY SCAL_GETANGLEOFF SCAL_GETAREA SCAL_GETCUNAME SCAL_GETCUPERPIX SCAL_GETHANDLE SCAL_GETNAME SCAL_GETNEXT SCAL_GETORIGIN SCAL_GETPIXPERCU SCAL_GETSYSTEM SCAL_SETANGLEOFF SCAL_SETCUNAME SCAL_SETCUPERPIX SCAL_SETNAME SCAL_SETORIGIN SCAL_SETPIXPERCU SCAL_SETSYSTEM SECTION_ALL_ACCESS SECTION_EXTEND_SIZE SECTION_MAP_EXECUTE SECTION_MAP_READ SECTION_MAP_WRITE SECTION_QUERY SEG_COLORCUBE SEG_HISTOGRAM SEG_SELADD SEG_SELNEW SEG_SELSUBTRACT SEGCLR_BLUE SEGCLR_GREEN SEGCLR_RED SEGMETHOD SEQ_ACTIVEFRAME SEQ_APPLY SEQ_END SEQ_FFOR SEQ_FFRA SEQ_FOR SEQ_FRAMETIME SEQ_FREV SEQ_LFRA SEQ_NEXT SEQ_NUMFRAMES SEQ_PLAYAUTOREV SEQ_PLAYTOEND

Appendix B - Auto-Pro Keywords
Page 5-15
SEQ_PLAYTYPE SEQ_PLAYUPDATE SEQ_PLAYWRAP SEQ_PREV SEQ_REV SEQ_SKIP SEQ_START SEQ_STOP SEQG_ISGALLERY SEQG_ISTRACKED SEQG_TRACKENABLE SET_VALUE SETCURSEL SETFLOAT SETHWNDMESSAGE SETINT SETNOTIFY SETPARENT SETSTRING SETTABS SHIFT_X SHIFT_Y SHIFT_Z Sin Single SORT_AUTO SORT_COLOR SORT_INDEX SORT_LABELS SORT_MEAS SORT_ROTATE SP_AMBIENT_REFLECTANCE SP_COLORIZED_FROM SP_COLORIZED_FROM_COLOR SP_COLORIZED_TO SP_COLORIZED_TO_COLOR SP_DEFAULT SP_DIFFUSE_REFLECTANCE SP_GLOSS SP_LIGHT_COLOR SP_LIGHT_ELEVATION SP_LIGHT_ROTATION SP_MATERIAL SP_SHADOW_DEPTH SP_SPECULAR_REFLECTANCE SP_STYLE_DRAWAXES SP_STYLE_DRAWEDGES SP_STYLE_TEXTURED SP_STYLE_TYPE SP_STYLE_WIREFRAME_SPAN SP_STYLE_ZSCALE SP_SURFACE_COLOR_SPIN SP_SURFACE_COLOR_SPREAD SP_TEXTURE_ID SP_VIEW_ELEVATION SP_VIEW_ROTATION
SPO_CLIPBOARD SPO_NEW SPO_NEW_WITH_ISCALE SPO_PRINTER SPS_SHADED SPS_UNSHADED SPS_WIREFRAME Sqr STANDARD_RIGHTS_REQUIRED START_MDI Static STATISTICS step Stop String Sub
T TAG_ACTIVECLASS TAG_MEAS_AREA TAG_MEAS_BLUE TAG_MEAS_CLASS TAG_MEAS_GREEN TAG_MEAS_INTENSITY TAG_MEAS_RADIUS TAG_MEAS_RED TAG_MEAS_XPOS TAG_MEAS_YPOS TAG_VIEW_AREA TAG_VIEW_CLASSSTATS TAG_VIEW_COUNTS TAG_VIEW_LABEL TAG_VIEW_MARKER TAG_VIEW_POINTS Tan TBCLOSE TBOPEN TBUPDATE Then THICKAVG THICKHORZ THICKNORMAL THICKSTDDEV THICKVERT THNM_ERODEENDS THNM_NORMAL THNM_ULTIMATE THRESHOLD To TR_AUTO TR_CLOSE TR_DELETE TR_ERASER TR_IMAGE TR_MODE TR_NEXT TR_OPEN TR_PEN TR_PROC TR_SET_RANGE TR_SHOW TR_TEXT TR_UPDATE
TRACKFUNC TranslateGFlags TranslateLFlags TXT_BOLD TXT_DROPSHADOW TXT_ENCLOSED TXT_ITALIC TXT_SPACING TXT_STRIKEOUT TXT_UNDERLINE Type
U UNIT Until USEAOI
V Val Variant vbNullChar VRI_COPY VRI_NODELETE VRI_SHARE
W Wend WFX_CLEAR_EMBEDDING WFX_FRAME WFX_IMAGECHANGED WFX_INVALIDATE WFX_LOAD_FILE WFX_LUTCHANGED WFX_RUN_MACRO While WIN32_LEAN_AND_MEAN WS_MAX_COUNT WST_ENABLED WST_MAXIMIZED WST_MINIMIZED WST_NORMAL WST_VISIBLE
X XAXIS Xor
Y YAXIS
Z ZAXIS


Appendix C - ANSI Characters
Page 6-1
Appendix C - ANSI Characters 0 37 % 74 J 111 o 148 185 ¹ 1 38 & 75 K 112 p 149 186 º 2 39 ' 76 L 113 q 150 187 » 3 40 ( 77 M 114 r 151 188 ¼ 4 41 ) 78 N 115 s 152 189 ½ 5 42 * 79 O 116 t 153 190 ¾ 6 43 + 80 P 117 u 154 191 ¿ 7 44 81 Q 118 v 155 192 À 8 bksp 45 - 82 R 119 w 156 193 Á 9 tab 46 . 83 S 120 x 157 194 Â
10 LF 47 / 84 T 121 y 158 195 Ã 11 48 0 85 U 122 z 159 196 Ä 12 49 1 86 V 123 { 160 197 Å 13 CR 50 2 87 W 124 161 ¡ 198 Æ 14 51 3 88 X 125 } 162 ¢ 199 Ç 15 52 4 89 Y 126 ~ 163 £ 200 È 16 53 5 90 Z 127 164 † 201 É 17 54 6 91 [ 128 165 ¥ 202 Ê 18 55 7 92 \ 129 166 ¦ 203 Ë 19 56 8 93 ] 130 167 § 204 Ì 20 57 9 94 ^ 131 168 ¨ 205 Í 21 58 : 95 _ 132 169 © 206 Î 22 59 ; 96 ` 133 170 ª 207 Ï 23 60 < 97 a 134 171 « 208 Ð 24 61 = 98 b 135 172 ¬ 209 Ñ 25 62 > 99 c 136 173 - 210 Ò 26 63 ? 100 d 137 174 ® 211 Ó 27 64 @ 101 e 138 175 ¯ 212 Ô 28 65 A 102 f 139 176 ° 213 Õ 29 66 B 103 g 140 177 ± 214 Ö 30 67 C 104 h 141 178 ² 215 × 31 68 D 105 i 142 179 ³ 216 Ø 32 69 E 106 j 143 180 ´ 217 Ù 33 ! 70 F 107 k 144 181 µ 218 Ú 34 " 71 G 108 l 145 ‘ 182 ¶ 219 Û 35 # 72 H 109 m 146 ’ 183 · 220 Ü 36 $ 73 I 110 n 147 184 ¸ 221 Ý
Nonsupported Characters

Appendix C - ANSI Characters
Page 6-2
222 Þ 228 ä 234 ê 240 ð 246 ö 252 ü 223 ß 229 å 235 ë 241 ñ 247 ÷ 253 ý 224 à 230 æ 236 ì 242 ò 248 ø 254 þ 225 á 231 ç 237 í 243 ó 249 ù 255 ÿ 226 â 232 è 238 î 244 ô 250 ú 227 ã 233 é 239 ï 245 õ 251 û
Nonsupported Characters
Appendix D - Data Types
Page 7-1
Appendix D - Data Types
IPBasic Data Types
String The data type used to hold character data (e.g., letters, digits and punctuation). Strings may be variable or fixed length, and are defined as such during declaration.
Internally, a string's storage requirements are the length of the string plus four bytes. The four bytes are used to store the string's length. They occupy the first four bytes of the string in memory (C programmers, note that this differs from the way in which strings are stored by C).
Strings may contain up to 65,000 characters. IPBasic string data is interpreted according to the ANSI character set (see Appendix C - ANSI Characters).
Integer A data type used to hold nonfractional numeric values (integers), ranging from -32,768 to +32,767. An Integer is stored as a 16-bit number, occupying 2 bytes of storage.
Long A data type used to hold large, nonfractional numeric values (integers), ranging from -2,147,483,648 to +2,147,483,647. A Long value is stored as a 32-bit signed number, occupying 4 bytes of storage.
Single A data type used to hold numeric values that include fractional values, ranging from -3.402823E+38 to -1.401298E-45 (for negative numbers) and +1.401298E-45 to +3.402823E+38 (for positive numbers). Single data types represent single-precision, floating-point values. A Single value is stored in three parts: the sign, the exponent and the mantissa. It requires 4 bytes of storage.
Float Identical to Single
Appendix D - Data Types
Page 7-2
Auto-Pro API Data Types
RECT The RECT user-defined type is used to hold two, x,y-coordinate pairs. This data type is usually used for variables that define a rectangular area within an image. It is defined in IPBasic, as follows:
Type RECT left As Long top As Long right As Long bottom As Long End Type
POINTAPI The POINTAPI user-defined type is used to hold a pair of x,y coordinates. It
is defined in IPBasic, as follows: Type POINTAPI x As Long y As Long End Type
IPDOCINFO The IPDOCINFO user-defined type is used to hold image information
obtained by the IpDocGet function. It is defined in IPBasic, as follows: Type IPDOCINFO Width As Integer Height As Integer Class As Integer Bpp As Integer Extent As RECT End Type
IPDOCPOS The IPDOCPOS user-defined type is used to hold position information obtained by the IpDocGetPosition function. It is defined in IPBasic, as follows:
Type IPDOCPOS IsKnown As Integer Position As Single End Type
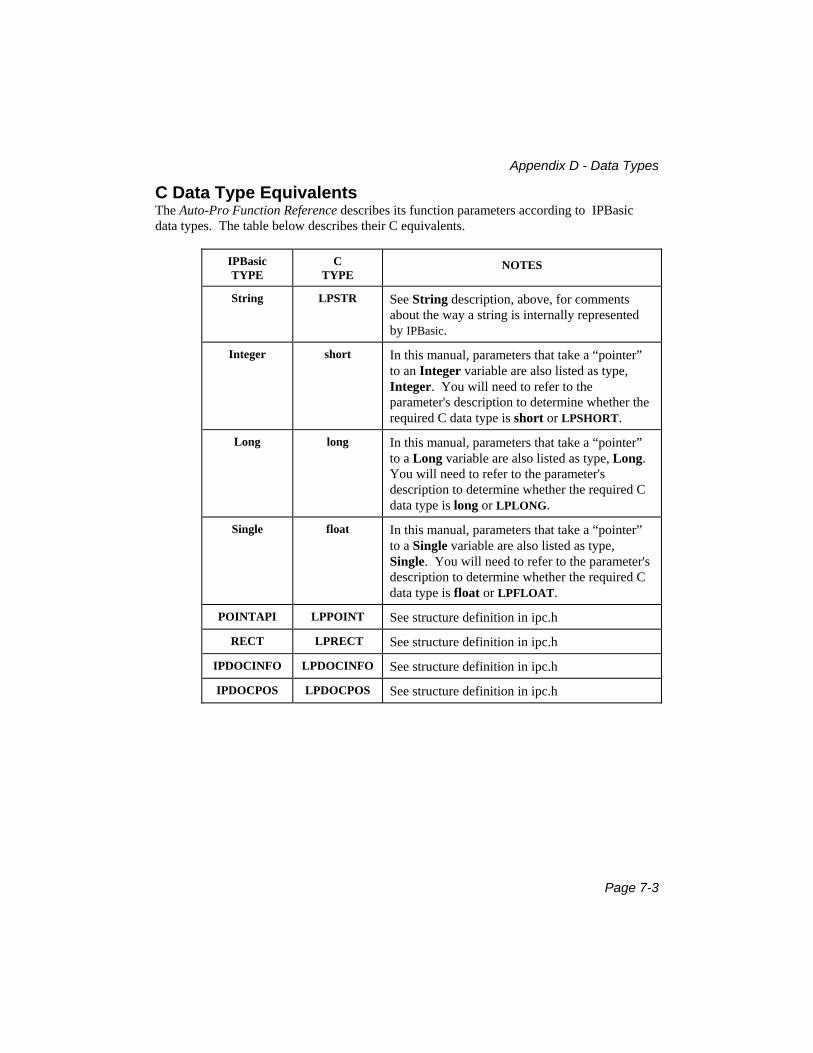
Appendix D - Data Types
Page 7-3
C Data Type Equivalents The Auto-Pro Function Reference describes its function parameters according to IPBasic data types. The table below describes their C equivalents.
IPBasic TYPE
C TYPE
NOTES
String LPSTR See String description, above, for comments about the way a string is internally represented by IPBasic.
Integer short In this manual, parameters that take a “pointer” to an Integer variable are also listed as type, Integer. You will need to refer to the parameter's description to determine whether the required C data type is short or LPSHORT.
Long long In this manual, parameters that take a “pointer” to a Long variable are also listed as type, Long. You will need to refer to the parameter's description to determine whether the required C data type is long or LPLONG.
Single float In this manual, parameters that take a “pointer” to a Single variable are also listed as type, Single. You will need to refer to the parameter's description to determine whether the required C data type is float or LPFLOAT.
POINTAPI LPPOINT See structure definition in ipc.h
RECT LPRECT See structure definition in ipc.h
IPDOCINFO LPDOCINFO See structure definition in ipc.h
IPDOCPOS LPDOCPOS See structure definition in ipc.h

Appendix D - Data Types
Page 7-4
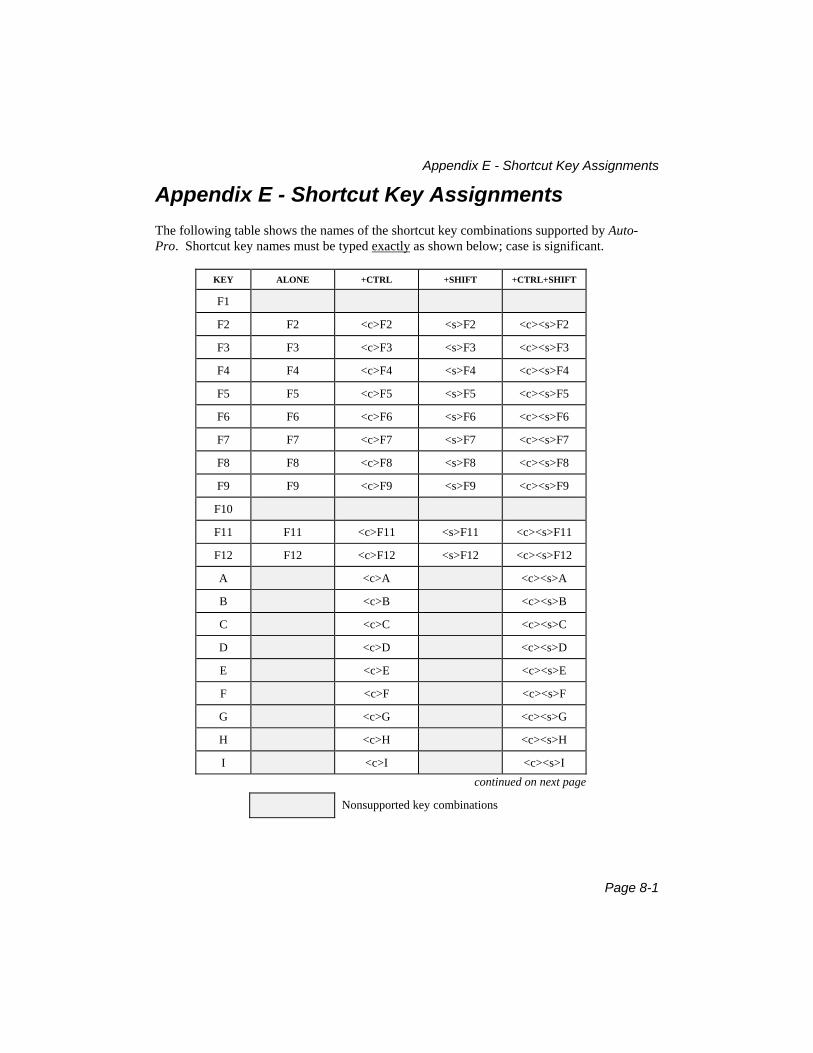
Appendix E - Shortcut Key Assignments
Page 8-1
Appendix E - Shortcut Key Assignments The following table shows the names of the shortcut key combinations supported by Auto-Pro. Shortcut key names must be typed exactly as shown below; case is significant.
KEY ALONE +CTRL +SHIFT +CTRL+SHIFT
F1
F2 F2 <c>F2 <s>F2 <c><s>F2
F3 F3 <c>F3 <s>F3 <c><s>F3
F4 F4 <c>F4 <s>F4 <c><s>F4
F5 F5 <c>F5 <s>F5 <c><s>F5
F6 F6 <c>F6 <s>F6 <c><s>F6
F7 F7 <c>F7 <s>F7 <c><s>F7
F8 F8 <c>F8 <s>F8 <c><s>F8
F9 F9 <c>F9 <s>F9 <c><s>F9
F10
F11 F11 <c>F11 <s>F11 <c><s>F11
F12 F12 <c>F12 <s>F12 <c><s>F12
A <c>A <c><s>A
B <c>B <c><s>B
C <c>C <c><s>C
D <c>D <c><s>D
E <c>E <c><s>E
F <c>F <c><s>F
G <c>G <c><s>G
H <c>H <c><s>H
I <c>I <c><s>I continued on next page
Nonsupported key combinations
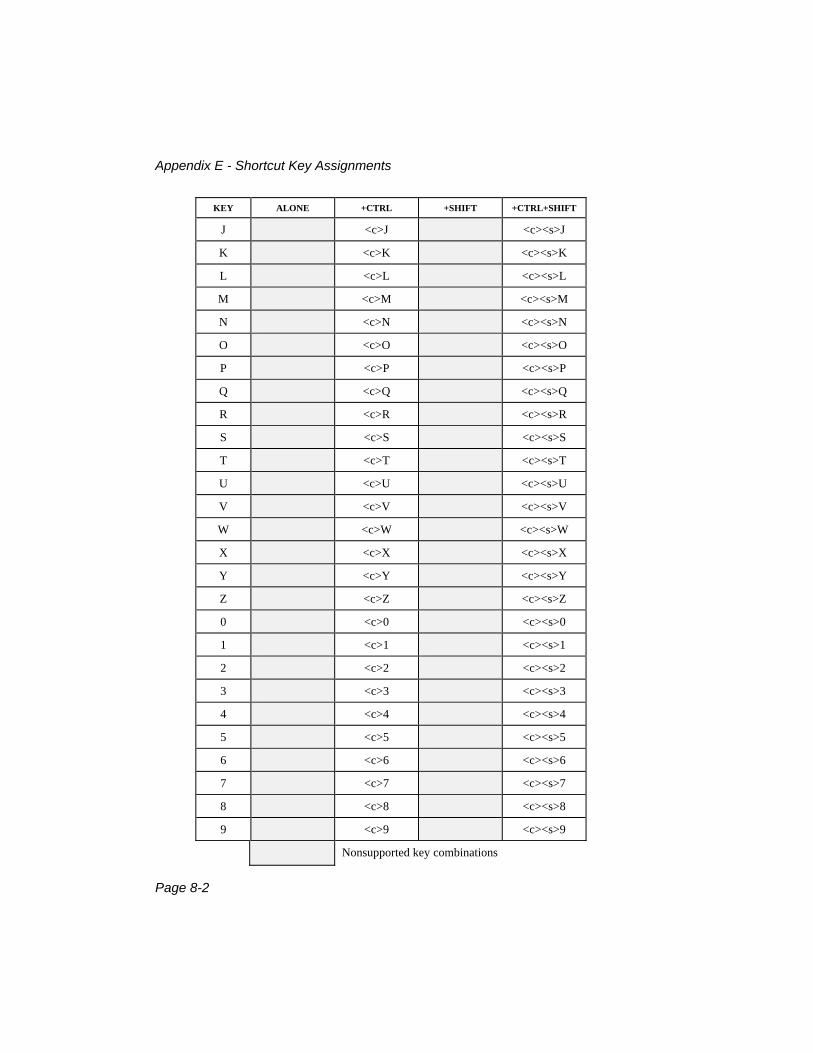
Appendix E - Shortcut Key Assignments
Page 8-2
KEY ALONE +CTRL +SHIFT +CTRL+SHIFT
J <c>J <c><s>J
K <c>K <c><s>K
L <c>L <c><s>L
M <c>M <c><s>M
N <c>N <c><s>N
O <c>O <c><s>O
P <c>P <c><s>P
Q <c>Q <c><s>Q
R <c>R <c><s>R
S <c>S <c><s>S
T <c>T <c><s>T
U <c>U <c><s>U
V <c>V <c><s>V
W <c>W <c><s>W
X <c>X <c><s>X
Y <c>Y <c><s>Y
Z <c>Z <c><s>Z
0 <c>0 <c><s>0
1 <c>1 <c><s>1
2 <c>2 <c><s>2
3 <c>3 <c><s>3
4 <c>4 <c><s>4
5 <c>5 <c><s>5
6 <c>6 <c><s>6
7 <c>7 <c><s>7
8 <c>8 <c><s>8
9 <c>9 <c><s>9
Nonsupported key combinations

Appendix F – Error Messages
Page 9-1
Appendix F – Error Messages
Error Code Error Message Description
0 IPCERR_NONE No error calling the function. A positive return value also indicates successful completion, and usually is returning a document ID or other "handle" to something the function created.
-1 IPCERR_APPINACTIVE Image-Pro is not running. This is also a default return value that is used by older code, so it may just indicate that the function failed.
-2 IPCERR_NOTFOUND Missing item, data structure, etc.
-3 IPCERR_DLLNOTFOUND The function could not be executed because Image-Pro couldn't find DLL that implements the function. This might occur if a feature uses an Auto-Pro function that is supported by an optional plug-in (e.g. Scope-Pro).
-4 IPCERR_FUNCNOTFOUND The function could not be executed because Image-Pro couldn't find the function in the DLL. This could be result of an installation error (a newer plug-in calling another plug-in that is older and not the expected version). This error code is also used sometimes to indicate that some crucial prerequisite for the function was not met, e.g. older functions that require the feature's dialog to be displayed before the Auto-Pro functions will work.
-5 IPCERR_INVCOMMAND Not applicable to the current image/situation
i.e. The requested function, command or attribute is not applicable to the current image/situation. This might be something like trying to do color channel operations on a grayscale image.
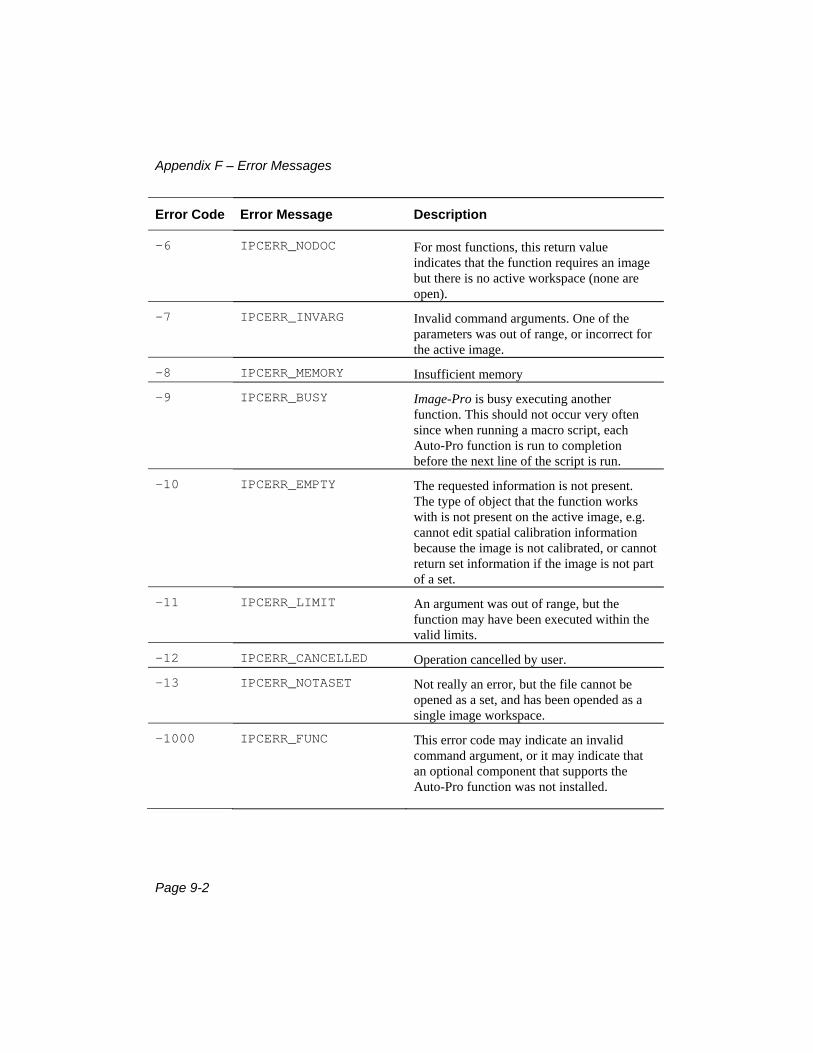
Appendix F – Error Messages
Page 9-2
Error Code Error Message Description
-6 IPCERR_NODOC For most functions, this return value indicates that the function requires an image but there is no active workspace (none are open).
-7 IPCERR_INVARG Invalid command arguments. One of the parameters was out of range, or incorrect for the active image.
-8 IPCERR_MEMORY Insufficient memory
-9 IPCERR_BUSY Image-Pro is busy executing another function. This should not occur very often since when running a macro script, each Auto-Pro function is run to completion before the next line of the script is run.
-10 IPCERR_EMPTY The requested information is not present. The type of object that the function works with is not present on the active image, e.g. cannot edit spatial calibration information because the image is not calibrated, or cannot return set information if the image is not part of a set.
-11 IPCERR_LIMIT An argument was out of range, but the function may have been executed within the valid limits.
-12 IPCERR_CANCELLED Operation cancelled by user.
-13 IPCERR_NOTASET Not really an error, but the file cannot be opened as a set, and has been opended as a single image workspace.
-1000 IPCERR_FUNC This error code may indicate an invalid command argument, or it may indicate that an optional component that supports the Auto-Pro function was not installed.
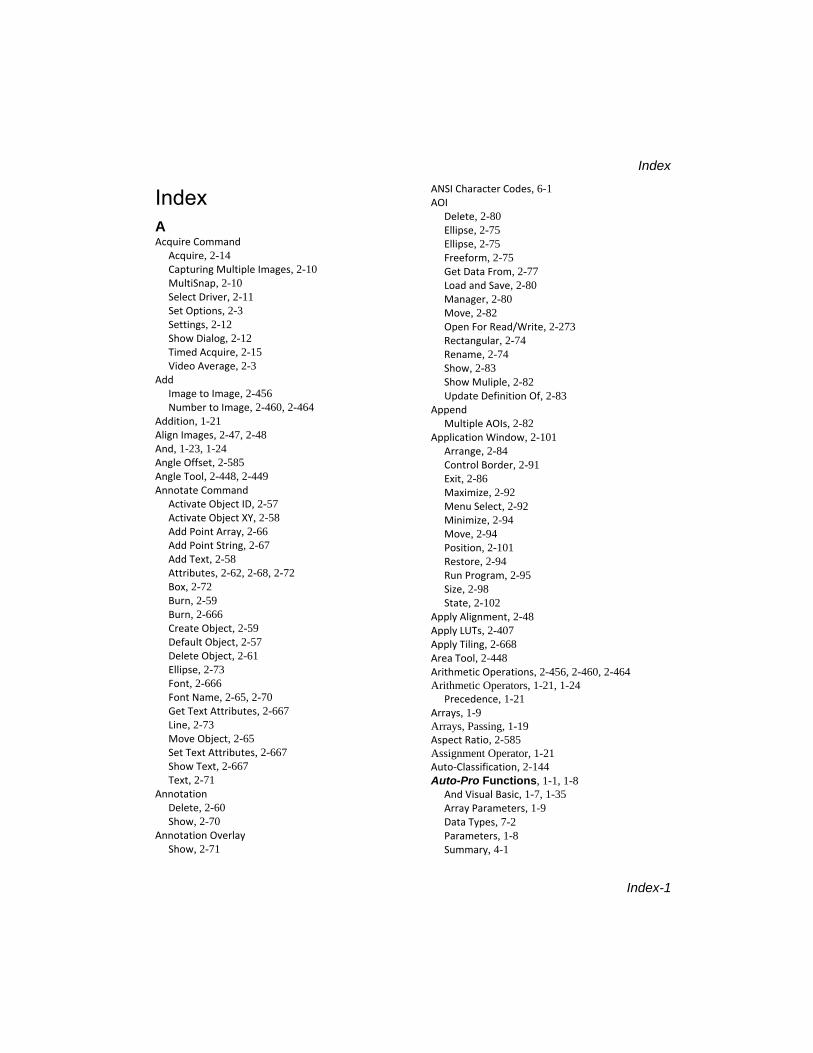
Index
Index-1
Index A Acquire Command
Acquire, 2-14 Capturing Multiple Images, 2-10 MultiSnap, 2-10 Select Driver, 2-11 Set Options, 2-3 Settings, 2-12 Show Dialog, 2-12 Timed Acquire, 2-15 Video Average, 2-3
Add Image to Image, 2-456 Number to Image, 2-460, 2-464
Addition, 1-21 Align Images, 2-47, 2-48 And, 1-23, 1-24 Angle Offset, 2-585 Angle Tool, 2-448, 2-449 Annotate Command
Activate Object ID, 2-57 Activate Object XY, 2-58 Add Point Array, 2-66 Add Point String, 2-67 Add Text, 2-58 Attributes, 2-62, 2-68, 2-72 Box, 2-72 Burn, 2-59 Burn, 2-666 Create Object, 2-59 Default Object, 2-57 Delete Object, 2-61 Ellipse, 2-73 Font, 2-666 Font Name, 2-65, 2-70 Get Text Attributes, 2-667 Line, 2-73 Move Object, 2-65 Set Text Attributes, 2-667 Show Text, 2-667 Text, 2-71
Annotation Delete, 2-60 Show, 2-70
Annotation Overlay Show, 2-71
ANSI Character Codes, 6-1 AOI
Delete, 2-80 Ellipse, 2-75 Ellipse, 2-75 Freeform, 2-75 Get Data From, 2-77 Load and Save, 2-80 Manager, 2-80 Move, 2-82 Open For Read/Write, 2-273 Rectangular, 2-74 Rename, 2-74 Show, 2-83 Show Muliple, 2-82 Update Definition Of, 2-83
Append Multiple AOIs, 2-82
Application Window, 2-101 Arrange, 2-84 Control Border, 2-91 Exit, 2-86 Maximize, 2-92 Menu Select, 2-92 Minimize, 2-94 Move, 2-94 Position, 2-101 Restore, 2-94 Run Program, 2-95 Size, 2-98 State, 2-102
Apply Alignment, 2-48 Apply LUTs, 2-407 Apply Tiling, 2-668 Area Tool, 2-448 Arithmetic Operations, 2-456, 2-460, 2-464 Arithmetic Operators, 1-21, 1-24
Precedence, 1-21 Arrays, 1-9 Arrays, Passing, 1-19 Aspect Ratio, 2-585 Assignment Operator, 1-21 Auto‐Classification, 2-144 Auto-Pro Functions, 1-1, 1-8
And Visual Basic, 1-7, 1-35 Array Parameters, 1-9 Data Types, 7-2 Parameters, 1-8 Summary, 4-1
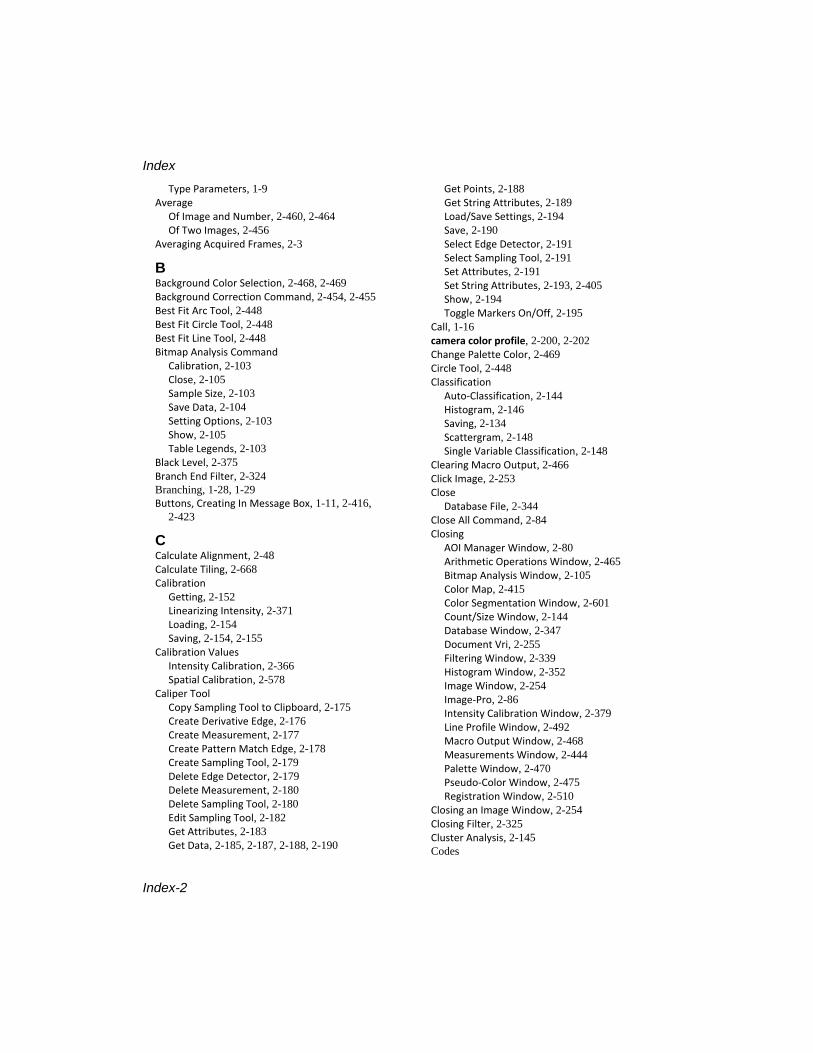
Index
Index-2
Type Parameters, 1-9 Average
Of Image and Number, 2-460, 2-464 Of Two Images, 2-456
Averaging Acquired Frames, 2-3
B Background Color Selection, 2-468, 2-469 Background Correction Command, 2-454, 2-455 Best Fit Arc Tool, 2-448 Best Fit Circle Tool, 2-448 Best Fit Line Tool, 2-448 Bitmap Analysis Command
Calibration, 2-103 Close, 2-105 Sample Size, 2-103 Save Data, 2-104 Setting Options, 2-103 Show, 2-105 Table Legends, 2-103
Black Level, 2-375 Branch End Filter, 2-324 Branching, 1-28, 1-29 Buttons, Creating In Message Box, 1-11, 2-416,
2-423
C Calculate Alignment, 2-48 Calculate Tiling, 2-668 Calibration
Getting, 2-152 Linearizing Intensity, 2-371 Loading, 2-154 Saving, 2-154, 2-155
Calibration Values Intensity Calibration, 2-366 Spatial Calibration, 2-578
Caliper Tool Copy Sampling Tool to Clipboard, 2-175 Create Derivative Edge, 2-176 Create Measurement, 2-177 Create Pattern Match Edge, 2-178 Create Sampling Tool, 2-179 Delete Edge Detector, 2-179 Delete Measurement, 2-180 Delete Sampling Tool, 2-180 Edit Sampling Tool, 2-182 Get Attributes, 2-183 Get Data, 2-185, 2-187, 2-188, 2-190
Get Points, 2-188 Get String Attributes, 2-189 Load/Save Settings, 2-194 Save, 2-190 Select Edge Detector, 2-191 Select Sampling Tool, 2-191 Set Attributes, 2-191 Set String Attributes, 2-193, 2-405 Show, 2-194 Toggle Markers On/Off, 2-195
Call, 1-16 camera color profile, 2-200, 2-202 Change Palette Color, 2-469 Circle Tool, 2-448 Classification
Auto‐Classification, 2-144 Histogram, 2-146 Saving, 2-134 Scattergram, 2-148 Single Variable Classification, 2-148
Clearing Macro Output, 2-466 Click Image, 2-253 Close
Database File, 2-344 Close All Command, 2-84 Closing
AOI Manager Window, 2-80 Arithmetic Operations Window, 2-465 Bitmap Analysis Window, 2-105 Color Map, 2-415 Color Segmentation Window, 2-601 Count/Size Window, 2-144 Database Window, 2-347 Document Vri, 2-255 Filtering Window, 2-339 Histogram Window, 2-352 Image Window, 2-254 Image‐Pro, 2-86 Intensity Calibration Window, 2-379 Line Profile Window, 2-492 Macro Output Window, 2-468 Measurements Window, 2-444 Palette Window, 2-470 Pseudo‐Color Window, 2-475 Registration Window, 2-510
Closing an Image Window, 2-254 Closing Filter, 2-325 Cluster Analysis, 2-145 Codes

Index
Index-3
For ANSI Characters, 6-1 For Shortcut Keys, 8-1
Co‐Localization, 2-218, 2-220, 2-221 Co‐Localization Command
Get Document, 2-219 Color Coordinates command
Show, 2-217 Color Calibration command
Add, 2-211 Convert, 2-212 Correct, 2-212 Create, 2-212 Get, 2-212 Get RGB values, 2-215 Load, 2-215 New, 2-215 Save, 2-215 Set, 2-216 Show, 2-217
Color Channel command Extract, 2-217
Color Composite command Add, 2-204 Add Tint, 2-205 Add Tint Position, 2-206 Get, 2-207 New, 2-209 New Tint, 2-209 Set, 2-210 Show, 2-211
Color Composite command Delete:, 2-206 Color Conversion Command, 2-350 Color Management command
Show, 2-203 Color Map, 2-413, 2-414, 2-415 Color Range File
Loading, 2-594 Saving, 2-597
Color Segmentation Command Delete Color Ranges, 2-593 Make Mask, 2-592 Merge Color Ranges, 2-595 New Color Ranges, 2-595 Preview, 2-596 Rename Color Ranges, 2-597 Reset, 2-597 Select Colors, 2-598, 2-599 Set Range, 2-601 Show Window, 2-601
Color Transform Command, 2-203 Merge 3 Channels, 2-199
Comments, 1-5, 1-15 Compatibility With Visual Basic, 1-1 Concatenation, 1-21 Configure page, 2-491 Constants, 1-17, 1-19 Convert AOI to Object, 2-116 Convert File Format, 2-694 Convert Image File Format, 2-695 Convert To Command
To Bilevel, 2-697 To Floating Point, 2-698 To Gray Scale, 2-698
From 12‐Bit, 2-708 To Gray Scale 12, 2-698 To Gray Scale 16, 2-698 To Gray Scale 8, 2-708 To Gray Scale Ex, 2-699 To MColor Palette, 2-699 To Median Palette, 2-700 To RGB, 2-700
Copy Command, 2-701 Copy Frames Command, 2-701 Correct Background, 2-454 Count Gray Spots Tool, 2-448 Count/Size Command
Auto‐Classification, 2-144 Classification, 2-148 Close, 2-144 Cluster Analysis, 2-145 Count, 2-105 Create Mask, 2-106 Delete Count, 2-113 Environment Files, 2-137 Filter Objects, 2-116 Get Count/Size Information, 2-117 Get Measurement Values, 2-106, 2-113 Measure, 2-133 Object Window, 2-147 Population Density, 2-136, 2-147 Range, 2-134 Remove Holes, 2-134 Saving Data, 2-134 Scattergram, 2-148 Select Ranges, 2-133 Setting Criteria, 2-142 Setting Intensity, 2-143 Setting Options, 2-138

Index
Index-4
Show, 2-144 Statistics, 2-150 View Data, 2-146 View Histogram, 2-146
Counting Loop Iterations, 1-25 CPROG, 2-274, 2-275 Create
Database, 2-346 Histogram, 2-351 Intensity Calibration, 2-366 Line Profile, 2-491 New Image, 2-702 New Image From Clipboard, 2-703 New Image From Vri, 2-704 New Image Sequence, 2-702 Progress Bar, 2-675 Spatial Calibration, 2-579
Create Mosaic, 2-451 Creating A Macro, 1-7 Curved Thickness Tool, 2-449 Cut Command, 2-705 Cut Frames Command, 2-705
D Data Collector Command, 2-232, 2-234 Data Collector Tool
Add Data Column, 2-230 Add Data String, 2-231 Add Single Data, 2-231 Delete Data Column, 2-232 Save Data, 2-235 Select Data Items, 2-236 Set Options, 2-236 Show, 2-237 UnSelect Data Items, 2-237 Update Data, 2-238
Data to Image Tool, 2-448 Data Types, 1-17, 7-1, 7-2
Auto‐Pro API Defined, 7-2 C Equivalents, 7-3 User Defined, 1-20
Data, Getting From User, 2-647, 2-648, 2-649 Database
Add Images, 2-343 Change Description, 2-343 Close Database File, 2-344 Create New, 2-346 Delete Image, 2-345 Load Image, 2-345
Open Database File, 2-346 Remove Image, 2-346 Select, 2-347 Show Window, 2-347 Sort, 2-348 Tagging/Untagging Images, 2-348
DDE to Excel, 2-249 Decision Structures, 1-29 Declaration of Variables, 1-18 DEFAULT.IPM, 1-3 Define Pseudo‐Color Spread, 2-470 Delaying Macro Execution, 2-426 Delete
AOIs, 2-80 Count, 2-113 Database File, 2-345 Database Image, 2-346 Intensity Calibration, 2-367 Macro Output Window, 2-466 Measurements, 2-433 Spatial Calibration, 2-579
Delete Annotation, 2-60 Delete Color Ranges, 2-593 Delete Command, 2-706 Delete Dye, 2-292 Edit Dye, 2-292 Delete Frames Command, 2-706 Delimiters, 1-14 Demostration Macros, 2-253 Description, in Macro, 1-5 Despeckle Filter, 2-327 Digital Signal Command, 2-395 Dilation Filter, 2-327 Dim, 1-18 Directory Search, 2-650, 2-652 Display Range Command, 2-285, 2-286, 2-288
Show Dialog, 2-288 Distance Filter, 2-328 Distance Measurement Tool, 2-448 Divide
Image by Image, 2-456 Image by Number, 2-460, 2-464
Division, 1-21, 1-22 Integer Division, 1-21, 1-22
Do Until, 1-26 Do While, 1-26 Do...Loop, 1-26, 1-27 Do...Loop Until, 1-26 Do...Loop While, 1-26

Index
Index-5
Donut AOI, Creating, 2-75 Drawing, 2-288, 2-289, 2-290
Text, 2-290 Duplicate Command, 2-706 Dynamic Data Exchange, 2-249
E Edit Dye List, 2-292 Edit Lens, 2-396 Edit Lens List, 2-396 Elliptical AOI, Creating, 2-75 Environment File
Loading, 2-133 Saving, 2-137
Equality, 1-22 Equalize Command, 2-353 Eqv, 1-23, 1-24 Erosion Filter, 2-329 Error Messages, 1-29, 9-1 Example Program
Visual Basic, 1-36 Exclusive Or, 1-23 Exit Image‐Pro, 2-86 Exponentiation, 1-21 Expressions, 1-20 Extended Depth of Field, 2-295, 2-296, 2-297, 2-
298, 2-299, 2-300, 2-301 Test Strips, 2-300
Extended Thinning Filter, 2-340 Extract Background Filter, 2-330 Extract Channel Command, 2-197
F F4, 2-91 FFT Command
File Load, 2-304 File Save, 2-306 File Tag, 2-309 Forward, 2-301 HiPass, 2-302 Inverse, 2-303 LoPass, 2-304 Show, 2-306 Spike Boost, 2-307 Spike Cut, 2-308
File Format Conversion, 2-694 File Name Processing, 1-12
Creating File Names, 2-646 Directory Search, 2-650
Open File Dialog Box, 2-649 Sort List, 2-652
File SignatureCommand, 2-342 Fill Command, 2-706
Pattern Selection, 2-707 Filter Command
Branch and End Points, 2-324 Close, 2-325 Despeckle, 2-327 Dilate, 2-327 Distance, 2-328 Erode, 2-329 Extract Background, 2-330 Flatten Background, 2-331 Gauss, 2-331 HiPass, 2-332 Laplacian, 2-332 Local Equalize, 2-332 LoPass, 2-333 Median, 2-334 Open, 2-335 Other, 2-326 Phase, 2-336 Prune, 2-336 Rank, 2-336 Reduce, 2-337 Restricted Dilation, 2-337 Roberts, 2-337 Sharpen, 2-338 Show Restricted Dilation, 2-338 Show Window, 2-339 Sobel, 2-339 Thinning, 2-339, 2-340 User Dilate, 2-340 User Erode, 2-340 Variance, 2-341 Watershed, 2-341
Filters Large Spectral, 2-407 Large Spectral, 2-406
Finding an Image Window, 2-255, 2-256 Flatten Background Filter, 2-331 Flip Image, 2-713 Float Data Type, 7-1, 7-3 Flow Control, 1-25 For...Next, 1-26, 1-27 Foreground Color Selection, 2-468, 2-469 Forward FFT, 2-301 Freeform AOI, Creating, 2-75
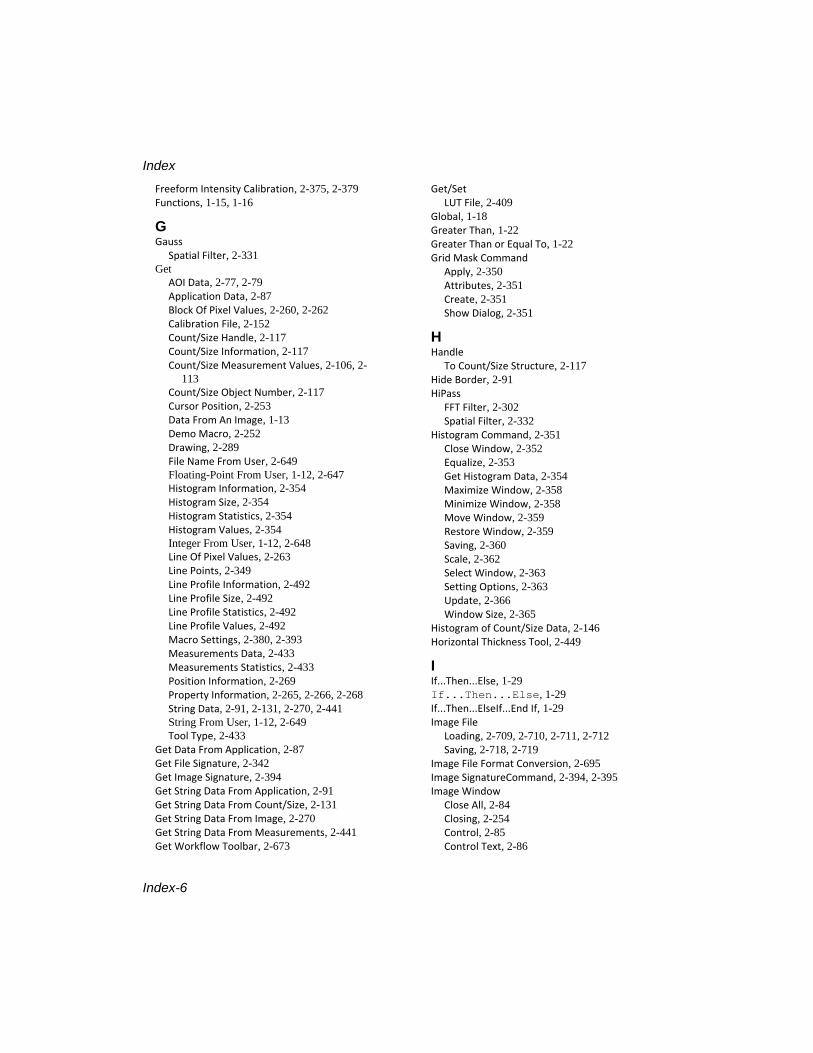
Index
Index-6
Freeform Intensity Calibration, 2-375, 2-379 Functions, 1-15, 1-16
G Gauss
Spatial Filter, 2-331 Get
AOI Data, 2-77, 2-79 Application Data, 2-87 Block Of Pixel Values, 2-260, 2-262 Calibration File, 2-152 Count/Size Handle, 2-117 Count/Size Information, 2-117 Count/Size Measurement Values, 2-106, 2-
113 Count/Size Object Number, 2-117 Cursor Position, 2-253 Data From An Image, 1-13 Demo Macro, 2-252 Drawing, 2-289 File Name From User, 2-649 Floating-Point From User, 1-12, 2-647 Histogram Information, 2-354 Histogram Size, 2-354 Histogram Statistics, 2-354 Histogram Values, 2-354 Integer From User, 1-12, 2-648 Line Of Pixel Values, 2-263 Line Points, 2-349 Line Profile Information, 2-492 Line Profile Size, 2-492 Line Profile Statistics, 2-492 Line Profile Values, 2-492 Macro Settings, 2-380, 2-393 Measurements Data, 2-433 Measurements Statistics, 2-433 Position Information, 2-269 Property Information, 2-265, 2-266, 2-268 String Data, 2-91, 2-131, 2-270, 2-441 String From User, 1-12, 2-649 Tool Type, 2-433
Get Data From Application, 2-87 Get File Signature, 2-342 Get Image Signature, 2-394 Get String Data From Application, 2-91 Get String Data From Count/Size, 2-131 Get String Data From Image, 2-270 Get String Data From Measurements, 2-441 Get Workflow Toolbar, 2-673
Get/Set LUT File, 2-409
Global, 1-18 Greater Than, 1-22 Greater Than or Equal To, 1-22 Grid Mask Command
Apply, 2-350 Attributes, 2-351 Create, 2-351 Show Dialog, 2-351
H Handle
To Count/Size Structure, 2-117 Hide Border, 2-91 HiPass
FFT Filter, 2-302 Spatial Filter, 2-332
Histogram Command, 2-351 Close Window, 2-352 Equalize, 2-353 Get Histogram Data, 2-354 Maximize Window, 2-358 Minimize Window, 2-358 Move Window, 2-359 Restore Window, 2-359 Saving, 2-360 Scale, 2-362 Select Window, 2-363 Setting Options, 2-363 Update, 2-366 Window Size, 2-365
Histogram of Count/Size Data, 2-146 Horizontal Thickness Tool, 2-449
I If...Then...Else, 1-29 If...Then...Else, 1-29 If...Then...ElseIf...End If, 1-29 Image File
Loading, 2-709, 2-710, 2-711, 2-712 Saving, 2-718, 2-719
Image File Format Conversion, 2-695 Image SignatureCommand, 2-394, 2-395 Image Window
Close All, 2-84 Closing, 2-254 Control, 2-85 Control Text, 2-86
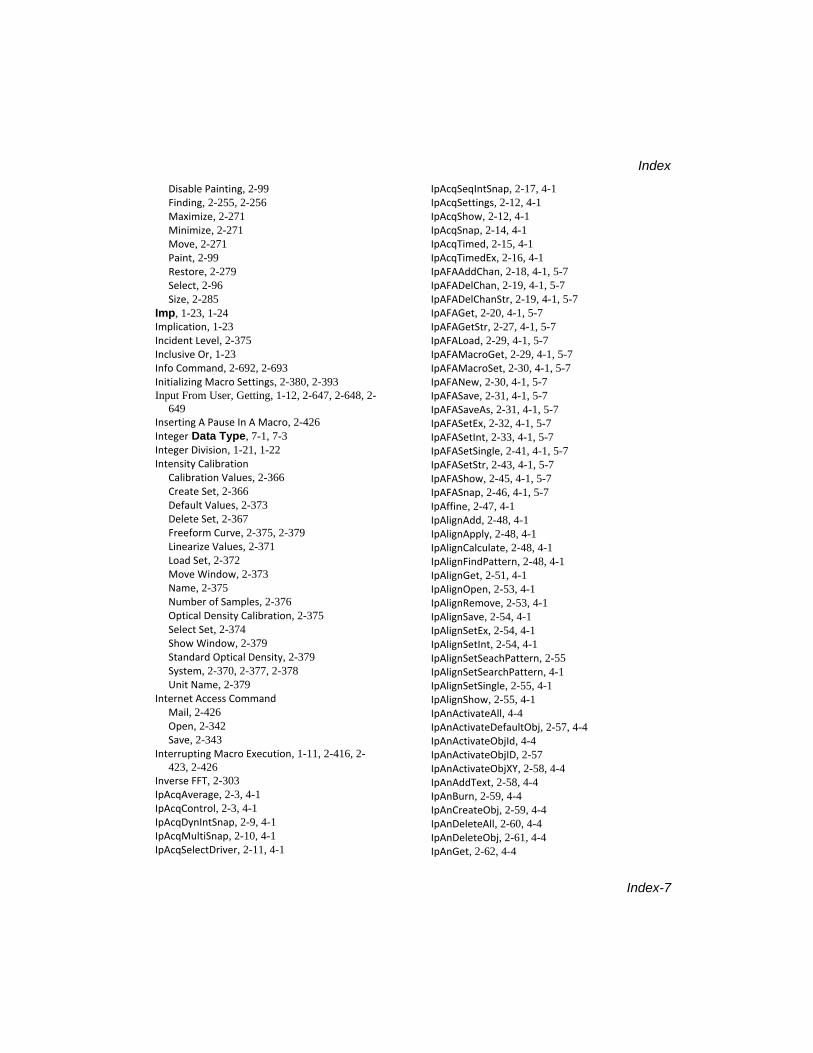
Index
Index-7
Disable Painting, 2-99 Finding, 2-255, 2-256 Maximize, 2-271 Minimize, 2-271 Move, 2-271 Paint, 2-99 Restore, 2-279 Select, 2-96 Size, 2-285
Imp, 1-23, 1-24 Implication, 1-23 Incident Level, 2-375 Inclusive Or, 1-23 Info Command, 2-692, 2-693 Initializing Macro Settings, 2-380, 2-393 Input From User, Getting, 1-12, 2-647, 2-648, 2-
649 Inserting A Pause In A Macro, 2-426 Integer Data Type, 7-1, 7-3 Integer Division, 1-21, 1-22 Intensity Calibration
Calibration Values, 2-366 Create Set, 2-366 Default Values, 2-373 Delete Set, 2-367 Freeform Curve, 2-375, 2-379 Linearize Values, 2-371 Load Set, 2-372 Move Window, 2-373 Name, 2-375 Number of Samples, 2-376 Optical Density Calibration, 2-375 Select Set, 2-374 Show Window, 2-379 Standard Optical Density, 2-379 System, 2-370, 2-377, 2-378 Unit Name, 2-379
Internet Access Command Mail, 2-426 Open, 2-342 Save, 2-343
Interrupting Macro Execution, 1-11, 2-416, 2-423, 2-426
Inverse FFT, 2-303 IpAcqAverage, 2-3, 4-1 IpAcqControl, 2-3, 4-1 IpAcqDynIntSnap, 2-9, 4-1 IpAcqMultiSnap, 2-10, 4-1 IpAcqSelectDriver, 2-11, 4-1
IpAcqSeqIntSnap, 2-17, 4-1 IpAcqSettings, 2-12, 4-1 IpAcqShow, 2-12, 4-1 IpAcqSnap, 2-14, 4-1 IpAcqTimed, 2-15, 4-1 IpAcqTimedEx, 2-16, 4-1 IpAFAAddChan, 2-18, 4-1, 5-7 IpAFADelChan, 2-19, 4-1, 5-7 IpAFADelChanStr, 2-19, 4-1, 5-7 IpAFAGet, 2-20, 4-1, 5-7 IpAFAGetStr, 2-27, 4-1, 5-7 IpAFALoad, 2-29, 4-1, 5-7 IpAFAMacroGet, 2-29, 4-1, 5-7 IpAFAMacroSet, 2-30, 4-1, 5-7 IpAFANew, 2-30, 4-1, 5-7 IpAFASave, 2-31, 4-1, 5-7 IpAFASaveAs, 2-31, 4-1, 5-7 IpAFASetEx, 2-32, 4-1, 5-7 IpAFASetInt, 2-33, 4-1, 5-7 IpAFASetSingle, 2-41, 4-1, 5-7 IpAFASetStr, 2-43, 4-1, 5-7 IpAFAShow, 2-45, 4-1, 5-7 IpAFASnap, 2-46, 4-1, 5-7 IpAffine, 2-47, 4-1 IpAlignAdd, 2-48, 4-1 IpAlignApply, 2-48, 4-1 IpAlignCalculate, 2-48, 4-1 IpAlignFindPattern, 2-48, 4-1 IpAlignGet, 2-51, 4-1 IpAlignOpen, 2-53, 4-1 IpAlignRemove, 2-53, 4-1 IpAlignSave, 2-54, 4-1 IpAlignSetEx, 2-54, 4-1 IpAlignSetInt, 2-54, 4-1 IpAlignSetSeachPattern, 2-55 IpAlignSetSearchPattern, 4-1 IpAlignSetSingle, 2-55, 4-1 IpAlignShow, 2-55, 4-1 IpAnActivateAll, 4-4 IpAnActivateDefaultObj, 2-57, 4-4 IpAnActivateObjId, 4-4 IpAnActivateObjID, 2-57 IpAnActivateObjXY, 2-58, 4-4 IpAnAddText, 2-58, 4-4 IpAnBurn, 2-59, 4-4 IpAnCreateObj, 2-59, 4-4 IpAnDeleteAll, 2-60, 4-4 IpAnDeleteObj, 2-61, 4-4 IpAnGet, 2-62, 4-4

Index
Index-8
IpAnGetFontName, 2-65, 4-4 IpAnMove, 2-65, 4-4 IpAnotAttr, 2-72, 4-4 IpAnotBox, 2-72, 4-4 IpAnotEllipse, 2-73, 4-4 IpAnotLine, 2-73, 4-5 IpAnPolyAddPtArray, 2-66, 4-4 IpAnPolyAddPtString, 2-67, 4-4 IpAnSet, 2-68, 4-4 IpAnSetFontName, 2-70, 4-4 IpAnShow, 2-70 IpAnShowAnnot, 2-71, 4-4 IpAnText, 2-71, 4-4 IpAoiChangeName, 2-74, 4-1 IpAoiCreateBox, 2-74, 4-1 IpAoiCreateDonut, 2-75, 4-1 IpAoiCreateEllipse, 2-75 IpAoiCreateIrregular, 2-75, 4-1 IpAoiGet, 2-77, 4-1 IpAoiGetStr, 2-79, 4-1 IpAoiManager, 2-80, 4-1 IpAoiMove, 2-82, 4-1 IpAoiMultAppend, 2-82, 4-1 IpAoiMultShow, 2-82, 4-1 ipAoiPoints, 2-76 IpAoiShow, 2-83, 4-1 IpAoiValidate, 2-83, 4-1 IpAppArrange, 2-84, 4-1 IpAppCloseAll, 2-84, 4-1 IpAppCtl, 2-85, 4-1 IpAppCtlText, 2-86, 4-1 IpAppExit, 2-86, 4-1 IpAppGet, 2-87, 4-1 IpAppGetStr, 2-91, 4-1 IpAppHide, 2-91, 4-1 IpAppMaximize, 2-92, 4-1 IpAppMenuSelect, 2-92, 4-1 IpAppMinimize, 2-94, 4-1 IpAppMove, 2-94, 4-1 IpAppRestore, 2-94, 4-1 IpAppRun, 2-95, 4-1 IpAppSelectDoc, 2-96, 4-1 IpAppSet, 2-97, 4-1 IpAppSize, 2-98, 4-1 IpAppUpdateDoc, 2-99, 4-1 IpAppWindow, 2-101, 4-1 IpAppWndPos, 2-101, 4-1 IpAppWndState, 2-102, 4-1 IPBasic, 1-1, 1-3, 1-14
And Visual Basic, 1-1, 1-14, 1-37 Branching, 1-28 Comments, 1-15 Compatibility Issues, 1-31 Constants, 1-17, 1-19 Data Types, 1-17, 7-1 Decision Structures, 1-29 DimFunction, 1-33 Expressions, 1-20 Functions, 1-15 Image Updates, 1-34 IpAppGet, 1-33 IpDocGet, 1-33 Loop Structures, 1-25 Operators, 1-20 Option Explicit, 1-34 Print Function, 1-31 RTrim$ Function, 1-31 Statements, 1-14 Str$ Function, 1-32 Subroutines, 1-15 User-Defined Data Types, 1-20 Variables, 1-17
IPBasic Editor, 1-30 IpBitAttr, 2-103, 4-2 IpBitSaveData, 2-104, 4-2 IpBitShow, 2-105, 4-2 IpBlbCount, 2-105, 4-3 IpBlbCreatemask, 2-106 IpBlbCreateMask, 4-3 IpBlbData, 2-106, 4-3 IpBlbData (alternative version), 2-113 IpBlbDelete, 2-113, 4-3 IpBlbEnableMeas, 4-3 IpBlbFilter, 2-116, 4-3 IpBlbFromAOI, 2-116, 4-3 IpBlbGet, 1-13, 2-117, 4-3 IpBlbGetStr, 4-3 IpBlbHideObject, 2-131, 4-3 IpBlbHitTest, 2-132, 4-3 IpBlbLoadOutline, 2-132, 4-3 IpBlbLoadSetting, 2-133, 4-3 IpBlbMeasure, 2-133, 4-3 IpBlbMultiRanges, 2-133, 4-3 IpBlbRange, 2-134, 4-3 IpBlbRemoveHoles, 2-134, 4-3 IpBlbSaveClasses, 2-134, 4-3 IpBlbSaveData, 2-134, 4-3 IpBlbSaveOutline, 2-136, 4-3

Index
Index-9
IpBlbSavePopDensities, 2-136, 4-3 IpBlbSaveSetting, 2-137, 4-3 IpBlbSaveStatistics, 4-3 IpBlbSetAttr, 2-138, 4-3 IpBlbSetFilterRange, 2-142, 4-3 IpBlbSetRange, 2-143, 4-3 IpBlbSetRangeEx, 2-143, 4-3 IpBlbShow, 2-144, 4-3 IpBlbShowAutoClass, 2-144, 4-3 IpBlbShowCluster, 2-145, 4-3 IpBlbShowData, 2-146, 4-3 IpBlbShowHistogram, 2-146, 4-3 IpBlbShowObjectWindow, 2-147, 4-3 IpBlbShowPopDens, 2-147, 4-3 IpBlbShowScattergram, 2-148, 4-3 IpBlbShowSingleClass, 2-148, 4-3 IpBlbShowStatistics, 2-150, 4-3 IpBlbSmoothObjects, 2-150, 4-3 IpBlbSplitObjects, 2-151, 4-3 IpBlbUpdate, 2-151, 4-3 IpCalGet, 2-152, 4-2 IpCalLoad, 2-154, 4-2 IpCalSave, 2-154, 4-2 IpCalSaveAll, 2-154, 4-2 IpCalSaveEx, 2-155, 4-2 IpCapArea, 2-155, 4-7 IpCapFile, 2-156, 4-7 IpCapHotKey, 2-157, 4-7 IpCapWindow, 2-159, 4-7 IpCDnvSettings, 4-3, 5-8 IPCERR_APPINACTIVE, 9-1 IPCERR_BUSY, 9-2 IPCERR_CANCELLED, 9-2 IPCERR_DLLNOTFOUND, 9-1 IPCERR_EMPTY, 9-2 IPCERR_FUNCNOTFOUND, 9-1 IPCERR_INVARG, 9-2 IPCERR_INVCOMMAND, 5-8, 9-1 IPCERR_LIMIT, 9-2 IPCERR_MEMORY, 9-2 IPCERR_NODOC, 9-2 IPCERR_NONE, 9-1 IPCERR_NOTFOUND, 9-1 IpChrt2DCreate, 2-159, 4-2 IpChrt2DGet, 2-160, 4-2 IpChrt2DGraphtoClipboard, 4-2 IpChrt2DGraphToClipboard, 2-161 IpChrt2DMove, 2-161, 4-2 IpChrt2DSet, 2-162, 4-2
IpChrt2DSetArr, 2-172, 4-2 IpChrt2DSetStr, 2-172, 4-2 IpChrt2DShow, 2-174, 4-2 IpChrt2DSize, 2-175, 4-2 IpChrt2DUpdate, 2-175 IpClprClipboard, 2-175, 4-2 IpClprCreateDerivativeEdge, 2-176, 4-2 IpClprCreateMeas, 2-177, 4-2 IpClprCreatePatternMatchEdge, 2-178, 4-2 IpClprCreateSampler, 2-179, 4-2 IpClprDeleteEdge, 2-179, 4-2 IpClprDeleteMeas, 2-180, 4-2 IpClprDeleteSampler, 2-180, 4-2 IpClprDetGetInt, 2-180, 4-2 IpClprDetGetSng, 2-181, 4-2 IpClprEditSampler, 2-182, 4-2 IpClprGet, 2-183, 4-2 IpClprGetData, 2-185, 4-2 IpClprGetDataEx, 4-2 IpClprGetIntEx, 2-187, 4-2 IpClprGetPoints, 2-188 IpClprGetSngEx, 2-188, 4-2 IpClprGetStr, 2-189, 4-2 IpClprGetStrEx, 2-190 IpClprSave, 2-190, 4-2 IpClprSelectEdge, 2-191, 4-2 IpClprSelectSampler, 2-191, 4-2 IpClprSet, 2-191, 4-2 IpClprSetIntEx, 2-193 IpClprSetStr, 2-193, 4-2 IpClprSettings, 2-194, 4-2 IpClprShow, 2-194, 4-2 IpClprToggleMarker, 2-195, 4-2 IpClprTool, 4-2 IpCmChannelExtract, 2-197, 4-3 IpCmChannelMerge, 2-198, 4-3 IpCmChannelMerge3, 2-199, 4-3 IpCmmCorrectColors, 2-199, 4-3 IpCmmGet, 2-200, 4-3 IpCmmSelectCamera, 4-3 IpCmmSetInt, 2-201, 4-3 IpCmmSetStr, 2-202, 4-3 IpCmmShow, 2-203, 4-3 IpCmpAdd, 2-204, 4-2 IpCmpAddEx, 2-204, 4-2 IpCmpAddTint, 2-205, 4-2 IpCmpAddTintPos, 2-206, 4-2 IpCmpDel, 2-206, 4-2 IpCmpGet, 2-207, 4-2
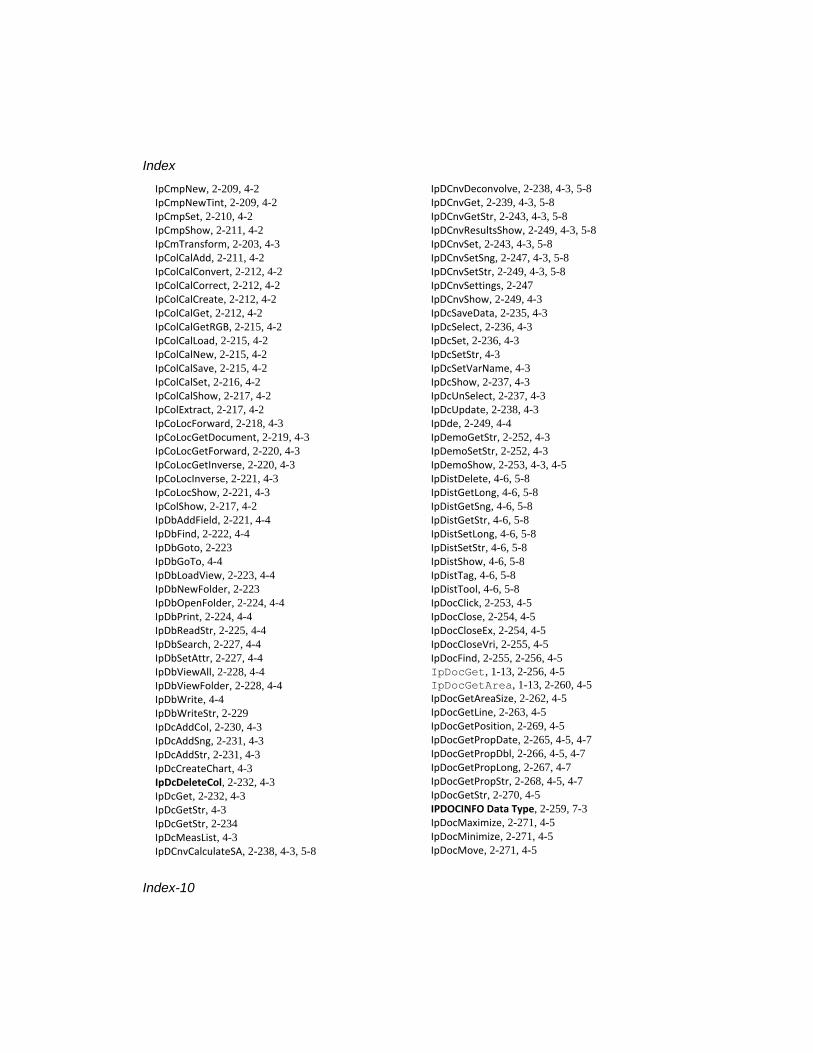
Index
Index-10
IpCmpNew, 2-209, 4-2 IpCmpNewTint, 2-209, 4-2 IpCmpSet, 2-210, 4-2 IpCmpShow, 2-211, 4-2 IpCmTransform, 2-203, 4-3 IpColCalAdd, 2-211, 4-2 IpColCalConvert, 2-212, 4-2 IpColCalCorrect, 2-212, 4-2 IpColCalCreate, 2-212, 4-2 IpColCalGet, 2-212, 4-2 IpColCalGetRGB, 2-215, 4-2 IpColCalLoad, 2-215, 4-2 IpColCalNew, 2-215, 4-2 IpColCalSave, 2-215, 4-2 IpColCalSet, 2-216, 4-2 IpColCalShow, 2-217, 4-2 IpColExtract, 2-217, 4-2 IpCoLocForward, 2-218, 4-3 IpCoLocGetDocument, 2-219, 4-3 IpCoLocGetForward, 2-220, 4-3 IpCoLocGetInverse, 2-220, 4-3 IpCoLocInverse, 2-221, 4-3 IpCoLocShow, 2-221, 4-3 IpColShow, 2-217, 4-2 IpDbAddField, 2-221, 4-4 IpDbFind, 2-222, 4-4 IpDbGoto, 2-223 IpDbGoTo, 4-4 IpDbLoadView, 2-223, 4-4 IpDbNewFolder, 2-223 IpDbOpenFolder, 2-224, 4-4 IpDbPrint, 2-224, 4-4 IpDbReadStr, 2-225, 4-4 IpDbSearch, 2-227, 4-4 IpDbSetAttr, 2-227, 4-4 IpDbViewAll, 2-228, 4-4 IpDbViewFolder, 2-228, 4-4 IpDbWrite, 4-4 IpDbWriteStr, 2-229 IpDcAddCol, 2-230, 4-3 IpDcAddSng, 2-231, 4-3 IpDcAddStr, 2-231, 4-3 IpDcCreateChart, 4-3 IpDcDeleteCol, 2-232, 4-3 IpDcGet, 2-232, 4-3 IpDcGetStr, 4-3 IpDcGetStr, 2-234 IpDcMeasList, 4-3 IpDCnvCalculateSA, 2-238, 4-3, 5-8
IpDCnvDeconvolve, 2-238, 4-3, 5-8 IpDCnvGet, 2-239, 4-3, 5-8 IpDCnvGetStr, 2-243, 4-3, 5-8 IpDCnvResultsShow, 2-249, 4-3, 5-8 IpDCnvSet, 2-243, 4-3, 5-8 IpDCnvSetSng, 2-247, 4-3, 5-8 IpDCnvSetStr, 2-249, 4-3, 5-8 IpDCnvSettings, 2-247 IpDCnvShow, 2-249, 4-3 IpDcSaveData, 2-235, 4-3 IpDcSelect, 2-236, 4-3 IpDcSet, 2-236, 4-3 IpDcSetStr, 4-3 IpDcSetVarName, 4-3 IpDcShow, 2-237, 4-3 IpDcUnSelect, 2-237, 4-3 IpDcUpdate, 2-238, 4-3 IpDde, 2-249, 4-4 IpDemoGetStr, 2-252, 4-3 IpDemoSetStr, 2-252, 4-3 IpDemoShow, 2-253, 4-3, 4-5 IpDistDelete, 4-6, 5-8 IpDistGetLong, 4-6, 5-8 IpDistGetSng, 4-6, 5-8 IpDistGetStr, 4-6, 5-8 IpDistSetLong, 4-6, 5-8 IpDistSetStr, 4-6, 5-8 IpDistShow, 4-6, 5-8 IpDistTag, 4-6, 5-8 IpDistTool, 4-6, 5-8 IpDocClick, 2-253, 4-5 IpDocClose, 2-254, 4-5 IpDocCloseEx, 2-254, 4-5 IpDocCloseVri, 2-255, 4-5 IpDocFind, 2-255, 2-256, 4-5 IpDocGet, 1-13, 2-256, 4-5 IpDocGetArea, 1-13, 2-260, 4-5 IpDocGetAreaSize, 2-262, 4-5 IpDocGetLine, 2-263, 4-5 IpDocGetPosition, 2-269, 4-5 IpDocGetPropDate, 2-265, 4-5, 4-7 IpDocGetPropDbl, 2-266, 4-5, 4-7 IpDocGetPropLong, 2-267, 4-7 IpDocGetPropStr, 2-268, 4-5, 4-7 IpDocGetStr, 2-270, 4-5 IPDOCINFO Data Type, 2-259, 7-3 IpDocMaximize, 2-271, 4-5 IpDocMinimize, 2-271, 4-5 IpDocMove, 2-271, 4-5

Index
Index-11
IpDocOpenAoi, 2-273, 4-5 IpDocOpenVri, 2-274, 4-5 IpDocPutArea, 2-275, 4-5 IpDocPutLine, 2-277, 4-5 IpDocRestore, 2-279, 4-5 IpDocSetPosition, 2-283, 4-5 IpDocSetPropDate, 2-280, 4-5, 4-7 IpDocSetPropDbl, 2-281, 4-5, 4-7 IpDocSetPropLong, 2-281, 4-7 IpDocSetPropStr, 2-283, 4-5, 4-7 IpDocSize, 2-285, 4-5 IpDraw, 2-288, 4-5 IpDrawClear, 2-288, 4-5 IpDrawClearDoc, 2-289, 4-5 IpDrawGet, 2-289, 4-5 IpDrawSet, 2-290, 4-5 IpDrawText, 2-290, 4-5 IpDrGet, 4-3 IpDrGet, 2-285 IpDrSet, 2-286, 4-3 IpDrShow, 2-288, 4-3 IpDyeAdd, 2-291, 4-3 IpDyeAddTint, 2-291 IpDyeApply, 2-292 IpDyeDelete, 2-292, 4-3 IpDyeEdit, 2-292 IpDyeEdit, 4-3 IpDyeGet, 2-293, 4-3 IpDyeGetStr, 2-293, 4-3 IpDyeSelect, 2-294, 4-3 IpDyeSetStr, 2-294, 4-3 IpEDFAdd, 2-295, 4-4 IpEDFCreate, 2-295, 4-4 IpEDFGet, 2-296, 4-4 IpEDFGetConf, 2-297, 4-4 IpEDFNew, 2-297, 2-298, 4-4 IpEDFRemove, 2-298, 4-4 IpEDFSet, 2-299, 4-4 IpEDFShow, 2-300, 4-4 IpEDFTestStrips, 2-300 IpEDFTopoMap, 2-301, 4-4 IpFftForward, 2-301, 4-4 IpFftHiPass, 2-302, 4-4 IpFftInverse, 2-303, 4-4 IpFftLoad, 2-304, 4-4 IpFftLoPass, 2-304, 4-4 IpFftSave, 2-306, 4-4 IpFftShow, 2-306, 4-4 IpFftSpikeBoost, 2-307, 4-4
IpFftSpikeCut, 2-308, 4-4 IpFftTag, 2-309, 4-4 IpFlt3DApplytoBuffer, 2-309, 4-1, 5-9 IpFlt3DApplytoFrames, 2-310, 4-1, 5-9 IpFlt3DBranchEnd, 2-312, 4-1, 5-9 IpFlt3DConv, 2-313, 4-1, 5-9 IpFlt3DData, 4-1, 5-9 IpFlt3DDistance, 2-315, 4-1, 5-9 IpFlt3DGet, 2-315, 4-1, 5-9 IpFlt3DKernel, 2-315, 4-1, 5-9 IpFlt3DMorph, 2-316, 4-1, 5-9 IpFlt3DMorphKernel, 2-316, 4-1, 5-9 IpFlt3DPrune, 2-317, 4-1, 5-9 IpFlt3DRank, 2-317, 4-1, 5-9 IpFlt3DReduce, 2-318, 4-1, 5-9 IpFlt3DSet, 2-318, 4-1, 5-9 IpFlt3DShow, 2-318, 4-1, 5-9 IpFlt3DThin, 2-319, 4-1, 5-9 IpFlt3dVectGet, 4-1, 5-9 IpFlt3DVectGet, 2-319 IpFlt3dVectGetData, 4-1, 5-9 IpFlt3DVectGetData, 2-321 IpFlt3DVectorize, 2-323, 4-1, 5-9 IpFlt3DWatershed, 2-323, 4-1, 5-9 IpFltBranchEnd, 2-324, 4-4 IpFltClose, 2-325, 4-4 IpFltConvolveKernel, 2-326, 4-4 IpFltDespeckle, 2-327, 4-4 IpFltDilate, 2-327, 4-4 IpFltDistance, 2-328, 4-4 IpFltErode, 2-329, 4-4 IpFltExtractBkgnd, 2-330, 4-4 IpFltFlatten, 2-331, 4-4 IpFltGauss, 2-331, 4-4 IpFltHiPass, 2-332, 4-4 IpFltLaplacian, 2-332, 4-4 IpFltLocHistEq, 2-332, 4-4 IpFltLoPass, 2-333, 4-4 IpFltMedian, 2-334, 4-4 IpFltOpen, 2-335, 4-4 IpFltPhase, 2-336, 4-4 IpFltPrune, 2-336, 4-4 IpFltRank, 2-336, 4-4 IpFltReduce, 2-337, 4-4 IpFltRoberts, 2-337, 4-4 IpFltRstrDilate, 2-337, 4-4 IpFltRstrDilateShow, 2-338, 4-4 IpFltSharpen, 2-338, 4-4 IpFltShow, 2-339, 4-4

Index
Index-12
IpFltSobel, 2-339, 4-4 IpFltThin, 2-339, 4-4 IpFltThinEx, 2-340, 4-4 IpFltUserDilate, 2-340, 4-4 IpFltUserErode, 2-340, 4-4 IpFltVariance, 2-341, 4-4 IpFltWatershed, 2-341, 4-4 IpFltWatershedEx, 2-341, 4-4 IpFsGet, 2-342, 4-4 IpFsGetStr, 2-342, 4-4 IpFTPOpen, 2-342, 4-5 IpFTPSave, 2-343, 4-5 IpGalAdd, 2-343, 4-4 IpGalChangeDescription, 2-343, 4-4 IpGalClose, 2-344, 4-4 IpGalDelete, 2-345, 4-4 IpGalImageOpen, 2-345, 4-4 IpGalNew, 2-346 IpGalOpen, 2-346, 4-4 IpGalRemove, 2-346, 4-4 IpGalSetActive, 2-347, 4-4 IpGalShow, 2-347, 4-4 IpGalSort, 2-348, 4-4 IpGalTag, 2-348, 4-4 IpGalUpdate, 2-349, 4-4 IpGetConvertColor, 2-350, 4-2 IpGetLine, 2-349, 4-5 IpGridApply, 2-350, 4-4 IpGridCreateMask, 2-351, 4-4 IpGridSelect, 2-351, 4-4 IpGridShow, 2-351, 4-4 IpHstCreate, 2-351, 4-4 IpHstDestroy, 2-352, 4-4 IpHstEqualize, 2-353, 4-4 IpHstGet, 1-13, 2-354, 4-4 IpHstMaximize, 2-358, 4-4 IpHstMinimize, 2-358, 4-4 IpHstMove, 2-359, 4-4 IpHstRestore, 2-359, 4-4 IpHstSave, 2-360, 4-4 IpHstScale, 2-362, 4-4 IpHstSelect, 2-363, 4-4 IpHstSetAttr, 2-363, 4-4 IpHstSize, 2-365, 4-4 IpHstUpdate, 2-366, 4-4 IpICalCalibValues, 2-366, 4-2 IpICalCreate, 2-366, 4-2 IpICalDestroy, 2-367, 4-2 IpICalDestroyEx, 2-367, 4-2
IpICalGetLong, 2-368, 4-2 IpICalGetSng, 2-369, 4-2 IpICalGetStr, 2-370, 4-2 IpICalGetSystem, 4-2 IpICalGetSytem, 2-370 IpICalLinearize, 2-371, 4-2 IpICalLoad, 2-372, 4-2 IpICalMove, 2-373, 4-2 IpICalReset, 2-373, 4-2 IpICalSave, 2-373, 4-2 IpICalSelect, 2-374, 4-2 IpICalSetLong, 2-374, 4-2 IpICalSetName, 2-375, 4-2 IpICalSetOptDens, 2-375, 4-2 IpICalSetPoints, 2-375, 4-2 IpICalSetSamples, 2-376, 4-2 IpICalSetSng, 2-376, 4-2 IpICalSetStr, 2-377, 4-2 IpICalSetSystem, 4-2 IpICalSetSystemByName, 4-2 IpICalSetSytem, 2-377 IpICalSetSytemByName, 2-378 IpICalSetUnitName, 2-379, 4-2 IpICalShow, 2-379, 4-2 IpICalShowFormat, 2-379, 4-2 IpIniFile, 2-380, 4-5 IpIniFileStr, 2-393, 4-5 IpIOvrApply, 2-381 IpIOvrGet, 2-382 IpIOvrSet, 2-387 IpIOvrShow, 2-392 IpIsGet, 2-394, 4-5 IpIsGetStr, 2-394, 2-395, 4-5 IpIsShow, 2-395, 4-5 IpLensAdd, 2-396, 4-5 IpLensDelete, 2-396, 4-5 IpLensEdit, 2-396, 4-5 IpLensGetLong, 2-397, 4-5 IpLensGetSng, 2-397, 4-5 IpLensGetStr, 2-397, 4-5 IpLensSelect, 2-398, 4-5 IpLensSetStr, 2-398, 4-5 IpLFltApply, 4-5 IpLFltShow, 4-5 IpListPts, 2-398 IpLiveEDFGet, 4-5 IpLiveEDFSetInt, 2-400, 4-5 IpLiveTileSetInt, 2-403 IpLiveTilingSetInt, 4-5

Index
Index-13
IpLocalZoomSetPos, 2-405 IpLocZoomMove, 2-404, 4-5 IpLocZoomSet, 4-5 IpLocZoomSetPos, 4-5 IpLocZoomSetStr, 2-405 IpLocZoomShow, 2-405, 4-5 IpLocZoomSize, 2-405, 4-5 IpLFltApply, 2-406 IpLFltShow, 2-407 IpLstPts, 4-1 IpLutApply, 2-407, 4-1 IpLutBinarize, 2-408, 4-1 IpLutData, 2-409, 4-2 IpLutLoad, 2-411, 4-2 IpLutReset, 2-411, 4-2 IpLutSave, 2-412, 4-2 IpLutSetAttr, 2-413, 4-2 IpLutSetControl, 2-414, 4-2 IpLutShow, 2-415, 4-2 IPMACRO.INI File, 2-380, 2-393 IpMacroLoad, 2-416, 4-5 IpMacroPause, 2-416, 4-5 IpMacroProgGet, 2-418 IpMacroProgGetStr, 2-419, 4-5 IpMacroProgSet, 4-5 IpMacroProgSetInt, 2-420, 4-5 IpMacroProgSetStr, 2-420, 4-5 IpMacroProgShow, 2-422, 4-5 IpMacroRun, 2-423, 4-5 IpMacroStop, 1-11, 2-423, 4-5 IpMacroWait, 2-426, 4-5 IpMail, 2-426, 4-5 IpMeasAdd, 2-427, 4-5 IpMeasAddMeasure, 2-429, 4-5 IpMeasAttr, 2-430, 4-5 IpMeasAttrStr, 2-432, 4-5 IpMeasDelete, 2-433, 4-5 IpMeasDelMeasure, 2-432, 4-5 IpMeasGet, 2-433, 4-5 IpMeasGetHit, 4-6 IpMeasGetStr, 2-441, 4-6 IpMeasLoad, 2-441, 4-6 IpMeasLoadOutline, 2-441, 4-6 IpMeasMove, 2-442, 4-6 IpMeasRestore, 2-442, 4-6 IpMeasSave, 2-443, 4-6 IpMeasSaveData, 2-443, 4-6 IpMeasSaveOutline, 2-444, 4-6 IpMeasShow, 2-444, 4-6
IpMeasSize, 4-6 IpMeasTag, 2-446, 4-6 IpMeasTool, 2-447, 4-6 IpMeasUpdate, 2-449, 4-6 IpMmonGet, 2-449, 4-6 IpMmonSet, 2-450, 4-6 IpMmonSetInt, 2-450 IpMmonShow, 2-450, 4-6 IpMorePts, 2-398, 2-450, 4-1 IpMosaicCreate, 2-451, 4-6 IpMosaicGet, 2-452, 4-6 IpMosaicSet, 2-453, 4-6 IpMosaicShow, 2-454, 4-6 IpOpBkgndCorrect, 2-454, 4-1 IpOpBkgndSubtract, 2-455, 4-1 IpOpImageArithmetics, 2-456, 4-6 IpOpImageLogic, 2-458, 4-6 IpOpNumberArithmetics, 2-460, 4-6 IpOpNumberLogic, 2-462, 4-6 IpOpNumberRgb, 2-464, 4-6 IpOpShow, 2-465, 4-6 IpOutput, 1-14, 2-466, 4-6 IpOutputClear, 2-466, 4-6 IpOutputSave, 2-467, 4-6 IpOutputSet, 2-467, 4-6 IpOutputShow, 2-468, 4-6 IpPalSetGrayBrush, 2-468, 4-6 IpPalSetPaletteBrush, 2-468, 4-6 IpPalSetPaletteColor, 2-469, 4-6 IpPalSetRGBBrush, 2-469, 4-6 IpPalShow, 2-470, 4-6 IpPcDefineColorSpread, 2-470, 4-6 IpPcDyeTint, 2-471, 4-6 IpPcLoad, 2-471, 4-6 IpPcSave, 2-472, 4-6 IpPcSaveData, 2-472, 4-6 IpPcSetColor, 2-472, 4-6 IpPcSetColorSpread, 2-474, 4-6 IpPcSetDivisions, 2-474, 4-6 IpPcSetRange, 2-474, 4-6 IpPcShow, 2-475, 4-6 IpPcTint, 2-475, 4-6 IpPlFilter, 2-476, 4-7 IpPlImport, 2-477, 4-7 IpPlotCreate, 2-477, 4-5 IpPlotData, 2-478, 4-5 IpPlotDestroy, 2-478, 4-5 IpPlotRange, 2-478, 4-5 IpPlotSet, 2-479, 4-5
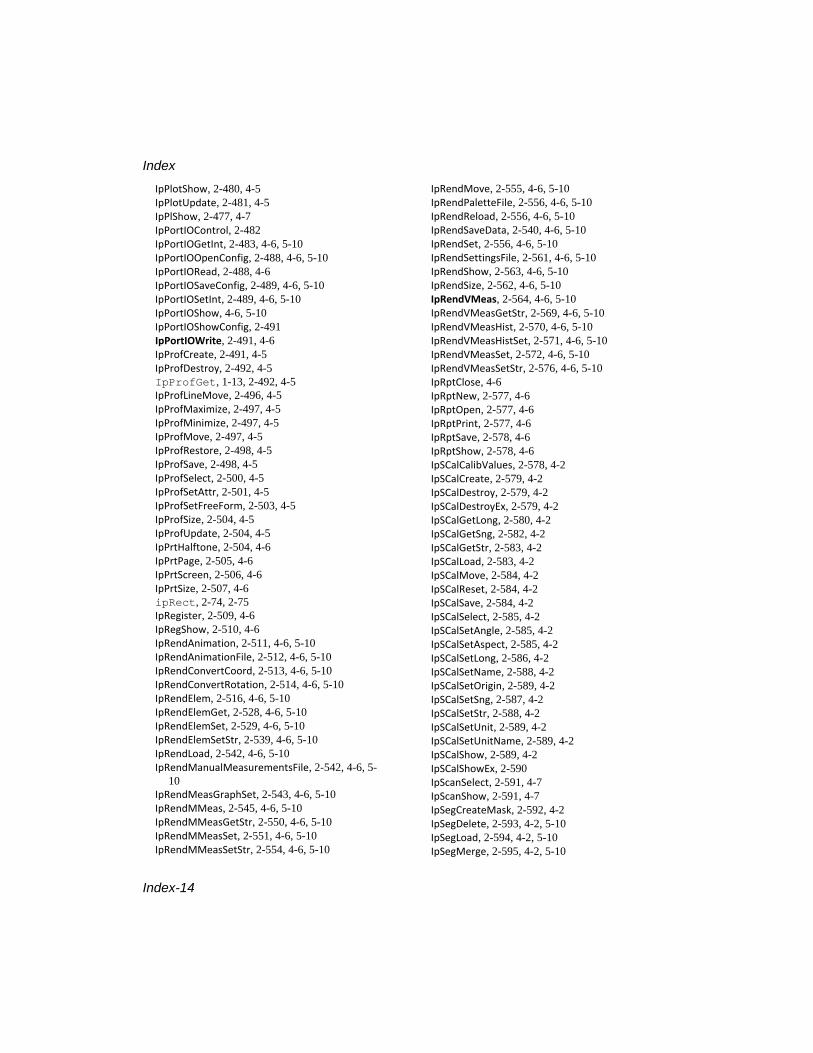
Index
Index-14
IpPlotShow, 2-480, 4-5 IpPlotUpdate, 2-481, 4-5 IpPlShow, 2-477, 4-7 IpPortIOControl, 2-482 IpPortIOGetInt, 2-483, 4-6, 5-10 IpPortIOOpenConfig, 2-488, 4-6, 5-10 IpPortIORead, 2-488, 4-6 IpPortIOSaveConfig, 2-489, 4-6, 5-10 IpPortIOSetInt, 2-489, 4-6, 5-10 IpPortIOShow, 4-6, 5-10 IpPortIOShowConfig, 2-491 IpPortIOWrite, 2-491, 4-6 IpProfCreate, 2-491, 4-5 IpProfDestroy, 2-492, 4-5 IpProfGet, 1-13, 2-492, 4-5 IpProfLineMove, 2-496, 4-5 IpProfMaximize, 2-497, 4-5 IpProfMinimize, 2-497, 4-5 IpProfMove, 2-497, 4-5 IpProfRestore, 2-498, 4-5 IpProfSave, 2-498, 4-5 IpProfSelect, 2-500, 4-5 IpProfSetAttr, 2-501, 4-5 IpProfSetFreeForm, 2-503, 4-5 IpProfSize, 2-504, 4-5 IpProfUpdate, 2-504, 4-5 IpPrtHalftone, 2-504, 4-6 IpPrtPage, 2-505, 4-6 IpPrtScreen, 2-506, 4-6 IpPrtSize, 2-507, 4-6 ipRect, 2-74, 2-75 IpRegister, 2-509, 4-6 IpRegShow, 2-510, 4-6 IpRendAnimation, 2-511, 4-6, 5-10 IpRendAnimationFile, 2-512, 4-6, 5-10 IpRendConvertCoord, 2-513, 4-6, 5-10 IpRendConvertRotation, 2-514, 4-6, 5-10 IpRendElem, 2-516, 4-6, 5-10 IpRendElemGet, 2-528, 4-6, 5-10 IpRendElemSet, 2-529, 4-6, 5-10 IpRendElemSetStr, 2-539, 4-6, 5-10 IpRendLoad, 2-542, 4-6, 5-10 IpRendManualMeasurementsFile, 2-542, 4-6, 5-
10 IpRendMeasGraphSet, 2-543, 4-6, 5-10 IpRendMMeas, 2-545, 4-6, 5-10 IpRendMMeasGetStr, 2-550, 4-6, 5-10 IpRendMMeasSet, 2-551, 4-6, 5-10 IpRendMMeasSetStr, 2-554, 4-6, 5-10
IpRendMove, 2-555, 4-6, 5-10 IpRendPaletteFile, 2-556, 4-6, 5-10 IpRendReload, 2-556, 4-6, 5-10 IpRendSaveData, 2-540, 4-6, 5-10 IpRendSet, 2-556, 4-6, 5-10 IpRendSettingsFile, 2-561, 4-6, 5-10 IpRendShow, 2-563, 4-6, 5-10 IpRendSize, 2-562, 4-6, 5-10 IpRendVMeas, 2-564, 4-6, 5-10 IpRendVMeasGetStr, 2-569, 4-6, 5-10 IpRendVMeasHist, 2-570, 4-6, 5-10 IpRendVMeasHistSet, 2-571, 4-6, 5-10 IpRendVMeasSet, 2-572, 4-6, 5-10 IpRendVMeasSetStr, 2-576, 4-6, 5-10 IpRptClose, 4-6 IpRptNew, 2-577, 4-6 IpRptOpen, 2-577, 4-6 IpRptPrint, 2-577, 4-6 IpRptSave, 2-578, 4-6 IpRptShow, 2-578, 4-6 IpSCalCalibValues, 2-578, 4-2 IpSCalCreate, 2-579, 4-2 IpSCalDestroy, 2-579, 4-2 IpSCalDestroyEx, 2-579, 4-2 IpSCalGetLong, 2-580, 4-2 IpSCalGetSng, 2-582, 4-2 IpSCalGetStr, 2-583, 4-2 IpSCalLoad, 2-583, 4-2 IpSCalMove, 2-584, 4-2 IpSCalReset, 2-584, 4-2 IpSCalSave, 2-584, 4-2 IpSCalSelect, 2-585, 4-2 IpSCalSetAngle, 2-585, 4-2 IpSCalSetAspect, 2-585, 4-2 IpSCalSetLong, 2-586, 4-2 IpSCalSetName, 2-588, 4-2 IpSCalSetOrigin, 2-589, 4-2 IpSCalSetSng, 2-587, 4-2 IpSCalSetStr, 2-588, 4-2 IpSCalSetUnit, 2-589, 4-2 IpSCalSetUnitName, 2-589, 4-2 IpSCalShow, 2-589, 4-2 IpSCalShowEx, 2-590 IpScanSelect, 2-591, 4-7 IpScanShow, 2-591, 4-7 IpSegCreateMask, 2-592, 4-2 IpSegDelete, 2-593, 4-2, 5-10 IpSegLoad, 2-594, 4-2, 5-10 IpSegMerge, 2-595, 4-2, 5-10
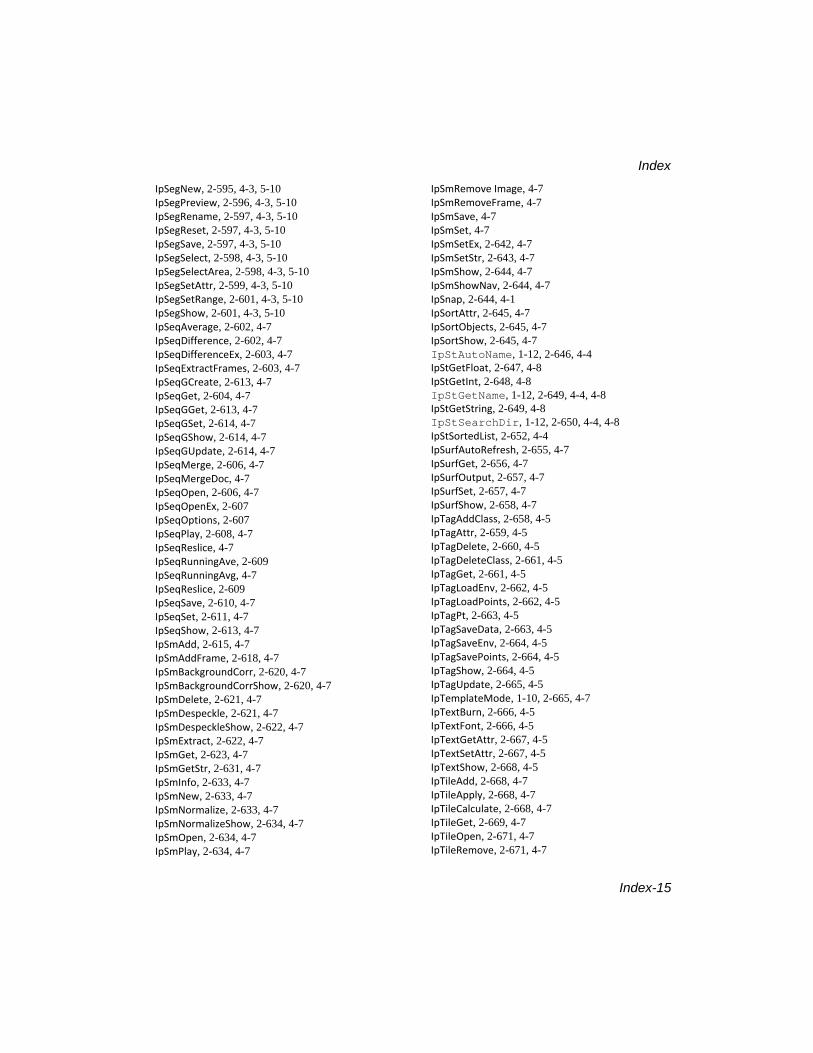
Index
Index-15
IpSegNew, 2-595, 4-3, 5-10 IpSegPreview, 2-596, 4-3, 5-10 IpSegRename, 2-597, 4-3, 5-10 IpSegReset, 2-597, 4-3, 5-10 IpSegSave, 2-597, 4-3, 5-10 IpSegSelect, 2-598, 4-3, 5-10 IpSegSelectArea, 2-598, 4-3, 5-10 IpSegSetAttr, 2-599, 4-3, 5-10 IpSegSetRange, 2-601, 4-3, 5-10 IpSegShow, 2-601, 4-3, 5-10 IpSeqAverage, 2-602, 4-7 IpSeqDifference, 2-602, 4-7 IpSeqDifferenceEx, 2-603, 4-7 IpSeqExtractFrames, 2-603, 4-7 IpSeqGCreate, 2-613, 4-7 IpSeqGet, 2-604, 4-7 IpSeqGGet, 2-613, 4-7 IpSeqGSet, 2-614, 4-7 IpSeqGShow, 2-614, 4-7 IpSeqGUpdate, 2-614, 4-7 IpSeqMerge, 2-606, 4-7 IpSeqMergeDoc, 4-7 IpSeqOpen, 2-606, 4-7 IpSeqOpenEx, 2-607 IpSeqOptions, 2-607 IpSeqPlay, 2-608, 4-7 IpSeqReslice, 4-7 IpSeqRunningAve, 2-609 IpSeqRunningAvg, 4-7 IpSeqReslice, 2-609 IpSeqSave, 2-610, 4-7 IpSeqSet, 2-611, 4-7 IpSeqShow, 2-613, 4-7 IpSmAdd, 2-615, 4-7 IpSmAddFrame, 2-618, 4-7 IpSmBackgroundCorr, 2-620, 4-7 IpSmBackgroundCorrShow, 2-620, 4-7 IpSmDelete, 2-621, 4-7 IpSmDespeckle, 2-621, 4-7 IpSmDespeckleShow, 2-622, 4-7 IpSmExtract, 2-622, 4-7 IpSmGet, 2-623, 4-7 IpSmGetStr, 2-631, 4-7 IpSmInfo, 2-633, 4-7 IpSmNew, 2-633, 4-7 IpSmNormalize, 2-633, 4-7 IpSmNormalizeShow, 2-634, 4-7 IpSmOpen, 2-634, 4-7 IpSmPlay, 2-634, 4-7
IpSmRemove Image, 4-7 IpSmRemoveFrame, 4-7 IpSmSave, 4-7 IpSmSet, 4-7 IpSmSetEx, 2-642, 4-7 IpSmSetStr, 2-643, 4-7 IpSmShow, 2-644, 4-7 IpSmShowNav, 2-644, 4-7 IpSnap, 2-644, 4-1 IpSortAttr, 2-645, 4-7 IpSortObjects, 2-645, 4-7 IpSortShow, 2-645, 4-7 IpStAutoName, 1-12, 2-646, 4-4 IpStGetFloat, 2-647, 4-8 IpStGetInt, 2-648, 4-8 IpStGetName, 1-12, 2-649, 4-4, 4-8 IpStGetString, 2-649, 4-8 IpStSearchDir, 1-12, 2-650, 4-4, 4-8 IpStSortedList, 2-652, 4-4 IpSurfAutoRefresh, 2-655, 4-7 IpSurfGet, 2-656, 4-7 IpSurfOutput, 2-657, 4-7 IpSurfSet, 2-657, 4-7 IpSurfShow, 2-658, 4-7 IpTagAddClass, 2-658, 4-5 IpTagAttr, 2-659, 4-5 IpTagDelete, 2-660, 4-5 IpTagDeleteClass, 2-661, 4-5 IpTagGet, 2-661, 4-5 IpTagLoadEnv, 2-662, 4-5 IpTagLoadPoints, 2-662, 4-5 IpTagPt, 2-663, 4-5 IpTagSaveData, 2-663, 4-5 IpTagSaveEnv, 2-664, 4-5 IpTagSavePoints, 2-664, 4-5 IpTagShow, 2-664, 4-5 IpTagUpdate, 2-665, 4-5 IpTemplateMode, 1-10, 2-665, 4-7 IpTextBurn, 2-666, 4-5 IpTextFont, 2-666, 4-5 IpTextGetAttr, 2-667, 4-5 IpTextSetAttr, 2-667, 4-5 IpTextShow, 2-668, 4-5 IpTileAdd, 2-668, 4-7 IpTileApply, 2-668, 4-7 IpTileCalculate, 2-668, 4-7 IpTileGet, 2-669, 4-7 IpTileOpen, 2-671, 4-7 IpTileRemove, 2-671, 4-7

Index
Index-16
IpTileSave, 2-671, 4-7 IpTileSetEx, 2-672, 4-7 IpTileSetInt, 2-672, 4-7 IpTileSetSingle, 2-672, 4-7 IpTileShow, 2-673 IpToolbarGetStr, 2-673, 4-8 IpToolbarSelect, 2-673, 4-8 IpToolbarShow, 2-674, 4-8 IpTraceAttr, 2-674, 4-7 IpTraceDo, 2-674, 4-7 IpTraceShow, 2-675, 4-7 IpTrackBar, 2-675, 4-1 IpTrackFile, 2-676, 4-7 IpTrackMeas, 2-677, 4-7 IpTrackMeasGetStr, 2-681 IpTrackMeasSet, 2-681, 4-7 IpTrackMeasSetStr, 2-688, 4-7 IpTrackMove, 2-688, 4-7 IpTrackOptionsFile, 2-689, 4-7 IpTrackSaveData, 2-689, 4-7 IpTrackShow, 2-690, 4-7 IpTrackSize, 2-690, 4-7 IpTrim, 2-691, 4-1, 4-5 IpView3DCopy, 4-1 IpView3DCreate, 4-1 IpView3DCreateAnimation, 4-1 IpView3DLoad, 4-1 IpView3DMove, 4-1 IpView3DReload, 4-1 IpView3DSet, 4-1 IpView3DSetCamera, 4-1 IpView3DShow, 4-1 IpView3DSize, 4-1 IPWIN32.MNU, 2-93 IpWsChangeDescription, 2-692, 4-5 IpWsChangeInfo, 2-693, 4-5 IpWsConvertFile, 2-694, 4-1 IpWsConvertImage, 2-695, 4-3 IpWsConvertToBilevel, 2-697, 4-3 IpWsConvertToFloat, 2-698, 4-3 IpWsConvertToGray, 2-698, 4-3 IpWsConvertToGray12, 2-698, 4-3 IpWsConvertToGray16, 2-698 IpWsConvertToGrayEx, 2-699, 4-3 IpWsConvertToPaletteMColor, 2-699, 4-3 IpWsConvertToPaletteMedian, 2-700, 4-3 IpWsConvertToRGB, 2-700, 4-3 IpWsCopy, 2-701, 4-2 IpWsCopyFrames, 2-701, 4-2, 4-7
IpWsCreate, 2-702, 4-6 IpWsCreateEx, 2-702, 4-6 IpWsCreateFromClipboard, 2-703, 4-6 IpWsCreateFromVri, 2-704, 4-5, 4-6 IpWsCutFrames, 2-705, 4-2, 4-7 IpWsDeleteFrames, 2-706, 4-2, 4-7 IpWsDuplicate, 2-706, 4-3 IpWsFill, 2-706, 4-4 IpWsFillPattern, 2-707, 4-4 IpWsGray12To8, 2-708, 4-3 IpWsGray16To8, 2-708 IpWsLoad, 2-709, 4-6 IpWsLoadNumber, 2-710, 4-6 IpWsLoadPreview, 2-711, 4-6 IpWsLoadSetRes, 2-712, 4-6 IpWsMove, 2-712, 4-7 IpWsOrient, 2-713, 4-7 IpWsOverlay, 2-714, 4-4 IpWsOverlayEx, 2-715, 4-4 IpWsPan, 2-715, 4-7 IpWsPaste, 2-716, 4-2 IpWsPasteEx, 2-716, 4-2 IpWsPasteFrames, 2-717, 4-2, 4-7 IpWsRedo, 2-717, 4-8 IpWsReload, 2-717, 4-6 IpWsRotate, 2-717, 4-7 IpWsSave, 2-718, 4-7 IpWsSaveAs, 2-718, 4-7 IpWsSaveEx, 2-719, 4-7 IpWsScale, 2-720, 4-7 IpWsSelectFrames, 2-720, 4-7 IpWsStretchLut, 2-721 IpWsSubSampleFrames, 2-722, 4-7 IpWsTestStrips, 2-722, 4-7 IpWsTestStrips2, 2-724, 4-7 IpWsTestStripsHalftone, 2-726, 4-7 IpWsUndo, 2-728, 4-8 IpWsZoom, 2-728, 4-8 item, 2-94
K Keywords, 5-1 Kodak Photo CD
Opening Image From, 2-709
L Laplacian Filter, 2-332 Large Spectral Filters, 2-406 Large Spectral Filters, 2-407

Index
Index-17
Length Tool, 2-448 Less Than, 1-22 Less Than or Equal To, 1-22 Line Profile Command, 2-491
Close Window, 2-492 Get Profile Data, 2-492 Maximize Window, 2-497 Minimize Window, 2-497 Move Window, 2-497 Positioning The Line, 2-496 Restore Window, 2-498 Saving, 2-498 Select Options, 2-501, 2-503, 2-504 Select Window, 2-500 Update, 2-504 Window Size, 2-503, 2-504
Linearize Intensity Calibration, 2-371 Live EDF and Tiling Commands, 4-5 LiveEDFGet, 2-403 Load
AOIs, 2-80 Calibration File, 2-154 Color Range File, 2-594 Database Image, 2-345 Environment File, 2-133 FFT File, 2-304 Image File, 2-709, 2-712 Intensity Calibration, 2-372 LUT File, 2-411 Outline File, 2-132, 2-441 Pseudo‐Color File, 2-471 Script File, 2-416 Spatial Calibration, 2-583
Load Measurements File, 2-441 Local Equalization Filter, 2-332 Logic Operations, 2-458, 2-462 Logical Equivalence, 1-23 Logical Operators, 1-23, 1-24, 1-25
Precedence, 1-24 Long Data Type, 7-1, 7-3 Look‐Up Table
Apply, 2-407 Get, 2-409 Load, 2-411 Reset, 2-411 Save, 2-412
Loops, 1-25 Nesting, 1-28
LoPass
FFT Filter, 2-304 Spatial Filter, 2-333
LPPOINT Data Type, 7-3 LPRECT Data Type, 7-3 LPSTR Data Type, 7-3 LUT
Apply, 2-407 Changing, 2-413, 2-414 Loading, 2-411 Reset, 2-411 Saving, 2-412 Set/Get, 2-409
M Macro Command, 1-3, 1-7 Macro Output Window
Clearing, 2-466 Printing To, 2-466 Saving Data From, 2-467 Setting, 2-467
Macro Progress Bar, 2-418, 2-419, 2-420, 2-422 Macros, 1-3
Add Channel, 2-18 And Subroutines, 1-15 Calling from Outside Program, 2-423 Create New Settings File, 2-30 Creating, 1-7 Delete Channel, 2-19 Delete Channel by name, 2-19 Description Comment, 1-5 Error Messages, 1-29 Example Of, 1-5 File Name Processing, 1-12 Get, 2-29 Get String Value of Attribute, 2-27 Get Value of Attribute, 2-20 Getting Data From, 1-13 How to Playback, 1-3, 1-7 How to Record, 1-3 Initialization File, 2-380, 2-393 Interrupting, 1-11, 2-416, 2-423 Issuing Messages, 1-11, 1-12, 2-416, 2-423 Load settings file, 2-29 Loading, 2-416 Naming, 1-5 Pausing Temporarily, 2-426 Printing Data From, 1-14, 2-466 Running, 2-423 Save Settings File, 2-31

Index
Index-18
Save Settings UnderNew Name, 2-31 Set, 2-30 Set Floating Point Values, 2-41 Set Integer Values, 2-33 Set String Values, 2-43 Set Values, 2-32 Shortcut Key, 1-5 Show or Hide Dialog Tabs, 2-45 Snap Images, 2-46 Template Mode, 1-10, 2-665 Unrecordable Actions, 1-13
Make Mask, 2-592 Manual Overview, 1-2 Manual Tagging, 2-659
Add Class, 2-658 Delete Class, 2-661 Delete Markers, 2-660 Get Market Information, 2-661 Load Settings, 2-662 Mark Points, 2-663 Save Data, 2-663 Save Markers, 2-664 Save Settings, 2-664 Show Markers, 2-662 Show Window, 2-664 Update, 2-665
Maximize Histogram Window, 2-358 Image Window, 2-271 Image‐Pro Window, 2-92 Line Profile Window, 2-497
Maximum Between Two Images, 2-456 Of Image and Number, 2-460, 2-464
Measurement Tool Update Data, 2-449
Measurements Command Add, 2-427, 2-429 Delete, 2-432 Get Data, 2-433 Move Window, 2-442 Restore Window, 2-442 Save, 2-443 Save Data, 2-443 Save Outlines, 2-444 Selecting Measurements, 2-446 Selecting Tools, 2-447 Setting Options, 2-430, 2-432 Show Window, 2-444
Median Filter, 2-334 Memory Manager, 2-449, 2-450 Menu Select, 2-92 Merge Channel Command, 2-198 Merge Color Ranges, 2-595 Minimize
Histogram Window, 2-358 Image Window, 2-271 Image‐Pro Window, 2-94 Line Profile Window, 2-497
Minimum Between Two Images, 2-456 Of Image and Number, 2-460, 2-464
Mod, 1-21 Modal Messages, 1-11, 2-416, 2-423 Modeless Messages, 1-11, 2-416, 2-423 Modulo Arithmetic, 1-21, 1-22 Mosaic Command
Attributes, 2-452, 2-453 Create, 2-451
Move AOI, 2-81 Histogram Window, 2-359 Image Window, 2-271 Image‐Pro Window, 2-94 Intensity Calibration Window, 2-373 Line Profile Window, 2-497 Measurements Window, 2-442 Spatial Calibration Window, 2-584
Multiple File Processing, 1-12 Multiple Image Files, 2-712 Multiplication, 1-21 Multiply
Image by Image, 2-456 Number by Image, 2-460, 2-464
N Name
Intensity Calibration, 2-375 Spatial Calibration, 2-588
Negation, 1-21, 1-22 Nested Loops, 1-28 New Command, 2-702, 2-703 New in version 4.0, 1-30 New in version 6.2, 1-2 New Sequence Command, 2-702 Nonequality, 1-22 Not, 1-23, 1-24

Index
Index-19
O Object Window, 2-147 On...Error…GoTo, 1-29 On…Errror…GoTo, 1-29 On…Errror…Resume…Next, 1-29, 1-30 Open
Database File, 2-346 Database Image, 2-345 Image File, 2-649, 2-709, 2-710, 2-711 Vri, 2-274
Opening Filter, 2-335 Operations Command, 2-456, 2-458, 2-460, 2-
462 For RGB Images, 2-464 Show Window, 2-465
Operators Arithmetic, 1-21 Assignment, 1-21 Logical, 1-23, 1-24 Precedence, 1-24 Relational, 1-22 String Concatenation, 1-21
Or, 1-23, 1-24 Origin, Of Spatial Scale, 2-589 Other, Filtering Command, 2-326 Outlines, Object
Loading, 2-132, 2-441 Saving, 2-136, 2-444
Output Window Command Clearing Data, 2-466 Printing To, 1-14, 2-466 Saving Data From, 2-467 Setting Data, 2-467 Show Window, 2-468
Overlay Command Erase, 2-288, 2-289 IpDraw, 2-288 IpDrawClearDoc, 2-289 IpDrawGet, 2-289 IpDrawSet, 2-290 IpDrawText, 2-290 IpGetLine, 2-349 IpPlotCreate, 2-477 IpPlotData, 2-478 IpPlotDestroy, 2-478 IpPlotRange, 2-478 IpPlotSet, 2-479 IpPlotShow, 2-480 IpPlotUpdate, 2-481
Overlay Image, 2-714, 2-715
P Paint Image Window
Disabling, 2-99 Palette
Change Color, 2-469 Select Color, 2-468, 2-469 Show Window, 2-470
Panning Image, 2-712 Parameters, 1-8
And Template Mode, 1-10 Passed As Variables, 1-9
Passing an Array to Auto-Pro, 1-19 Paste Command, 2-716 Paste Frames Command, 2-717 Pausing Macro Execution, 2-426 Phase Filter, 2-336 Pitch Tool, 2-448 Playing Back a Macro, 1-3, 1-7 POINT Data Type, 7-3 Point Tool, 2-448 POINTAPI Data Type, 7-2, 7-3
Converting From String, 2-398, 2-450 Population Density, 2-147
Saving, 2-136 Precedence of Operators, 1-21, 1-22, 1-24 Preview
Color Segmentation, 2-596 Image File, 2-711
Preview tab, 2-45 Print, 1-14 Print Command, 2-505
Halftone Options, 2-504 Scaling, 2-504 Size And Position, 2-507
Print Screen Command, 2-506 Printing To The Macro Output Window, 1-14, 2-
466 progbutton, 2-93 progitem, 2-93 Progress Bar, Creating & Updating, 2-675 Prompting User For Cursor Position, 2-253 Prompting User For Data, 2-647, 2-648, 2-649 Prompting User For File Name, 2-649 Prune Filter, 2-336 Pseudo‐Color
Apply Palette, 2-475 Color Assignment, 2-472

Index
Index-20
Defining the Color Spread, 2-470 Intensity Range Selection, 2-474 Interval Division, 2-474 Loading, 2-471 Reset Palette, 2-475 Saving, 2-472 Saving Data, 2-472 Set Color Spread, 2-474
Put Block of Data To Image, 2-275 Line of Data To Image, 2-277
R Rank Filter, 2-336 Reading
Directly From An AOI, 2-273 Directly From An Image, 2-265, 2-266, 2-268,
2-269, 2-274, 2-280, 2-281, 2-283 Record Macro Command, 1-3 Recording a Macro, 1-3 RECT Data Type, 7-2, 7-3 Rectangle Tool, 2-448 Rectangular AOI, Creating, 2-74 Redo Command, 2-717 Reduce Filter, 2-337 Refresh
AOI Definition, 2-83 Bitmap Analysis Window, 2-105 Count/Size Environment, 2-151 Database File, 2-349 Histogram Window, 2-366 Line Profile, 2-504
Registration Command, 2-509 Show Window, 2-510
Relational Operators, 1-22, 1-25 Precedence, 1-22
Reload Command, 2-717 Reload Macro Command, 1-7 Rem, 1-15 Remove Alignment, 2-53 Remove Database Image, 2-346 Remove Tiling, 2-671 Rename Color Ranges, 2-597 Report Generator Command
IpRptNew, 2-577 IpRptOpen, 2-577 IpRptPrint, 2-577 IpRptSave, 2-578 IpRptShow, 2-578
Reserved Words, 5-1 Reset
Color List, 2-597 Intensity Calibration, 2-373 LUT, 2-411 Pseudo‐Color Palette, 2-475 Spatial Calibration, 2-584
Resize Command, 2-720 Restore
Histogram Window, 2-359 Image Window, 2-279 Image‐Pro Window, 2-94 Line Profile Window, 2-498 Measurements Window, 2-442
Restricted Dilation Filter, 2-337, 2-338 Return Code, 1-36 Roberts Filter, 2-337 Rotate Command
Fixed Angle Rotations, 2-713 Free Angle Rotation, 2-717
Run External Program, 2-95 Run Macro Command, 1-3, 1-7 Run-Time Errors, 1-29
S Save
AOIs, 2-80 Bitmap Analysis Data, 2-104 Calibration Files, 2-154, 2-155 Classification Data, 2-134 Color Range File, 2-597 Count/Size Data, 2-134 Environment Files, 2-137 FFT Files, 2-306 Histogram Data, 2-360 Image File
Save, 2-718 Save As, 2-718, 2-719
Line Profile, 2-498 LUT Files, 2-412 Macro Output, 2-467 Macro Settings To IPMACRO.INI, 2-380, 2-393 Measurements, 2-443 Outline Files, 2-136, 2-444 Population Density, 2-136 Pseudo‐Color Datat, 2-472 Pseudo‐Color File, 2-472
Save Measurements File, 2-443 Scanning, 2-591

Index
Index-21
Selecting A TWAIN Source, 2-591 Scattergram, 2-148 Scope, Of Variables, 1-17 Screen Capture, 2-155, 2-159
Setting Options, 2-156, 2-157 Script Files, 1-3
Allowed Contents, 1-15 Example Of, 1-4 Loading, 2-416
Scrolling Image, 2-715 Select Dye, 2-398 Select Dye, 2-294 Select Workflow Toolbar, 2-673 Selecting
A TWAIN Source Device, 2-591 Database, 2-347 Database Images, 2-348 Histogram Window, 2-363 Image Window, 2-96 Intensity Calibration, 2-374 Line Profile Window, 2-500 Measurement Tools, 2-447 Measurements, 2-446 Spatial Calibration, 2-585
Sequence Command Average of Frames, 2-602 Difference of Frames, 2-602, 2-603 Extract Frames, 2-603 Get, 2-604 Merge, 2-606 Open, 2-606, 2-607 Options, 2-607 Play, 2-608 Save, 2-610 Set, 2-611 Show/Hide, 2-613
Sequence Gallery Command Create, 2-613 Set, 2-613, 2-614 Show/Hide, 2-614 Update, 2-614
Set Demo Macro, 2-252 Position Information, 2-283 Property Information, 2-280, 2-281, 2-283
Setting the Macro Output, 2-467 SetWindowPos, 1-38 Sharpening Filter, 2-338 Short Data Type, 7-3
Shortcut Key, 1-5, 1-7, 8-1 Show
Annotation, 2-70 Annotation Overlay, 2-71 AOI, 2-83 AOI Manager Window, 2-80 Arithmetic Operations Window, 2-465 Bitmap Analysis Window, 2-105 Border, 2-91 Color Map Window, 2-415 Color Segmentation Window, 2-601 Count/Size Data, 2-146 Count/Size Window, 2-144 Database Window, 2-347 Filtering Window, 2-339 Intensity Calibration Window, 2-379 Macro Output Window, 2-468 Macro Progress Bar, 2-422 Measurements Window, 2-444 Multiple AOIs, 2-82 Object Window, 2-147 Palette Window, 2-470 Registration Window, 2-510 Scan Window, 2-591 Spatial Calibration Window, 2-589, 2-590
Show FFT, 2-306 Show Map Command, 2-413, 2-414 Show/Hide Object
Count/Size Window, 2-131 Show/Hide Workflow Toolbar, 2-674 Single Data Type, 7-1, 7-3 Single Variable Classification, 2-148 Size
Histogram Window, 2-365 Image Window, 2-285 Image‐Pro Window, 2-98 Line Profile Window, 2-503, 2-504
Slowing Macro Execution, 2-426 Smooth Objects, 2-150 Sobel Filter, 2-339 Sort Database Images, 2-348 Sort List, 2-652 Sort Objects Command, 2-645
Attributes, 2-645 Show Dialog, 2-645
Spatial Calibration Angle Offset, 2-585 Aspect Ratio, 2-585 Calibration Values, 2-578

Index
Index-22
Create Set, 2-579 Default Values, 2-584 Delete Set, 2-579 Load Set, 2-583 Move Window, 2-584 Name, 2-588 Origin, 2-589 Select Set, 2-585 Unit Name, 2-589
Spike Boost, 2-307 Spike Cut, 2-308 Split Objects, 2-151 Standard Optical Density, 2-379 Static, 1-18 Statistics
Count/Size, 2-117, 2-134, 2-150 Histogram, 2-354, 2-360, 2-363 Line Profile, 2-492, 2-498, 2-501 Measurements, 2-430, 2-432, 2-433
String Data Type, 7-1, 7-3 String Variables
Saving To IPMACRO.INI, 2-393 Strings
Concatenation, 1-21 Converting To A List Of Points, 2-398, 2-450
Subroutines, 1-15 Subtract
Background, 2-455 Image, 2-456 Image from Image, 2-456 Number from Image, 2-460, 2-464
Subtraction, 1-21, 1-22 Summary of Auto‐Pro Functions, 4-1 Surface Plot Command
Attributes, 2-656, 2-657 AutoRefresh, 2-655 Output, 2-657 Show Dialog, 2-658
SW_SHOWMINIMIZED, 1-38 SW_SHOWNORMAL, 1-38 Syntax
Auto‐Pro Functions, 2-1 IPBasic Commands, 3-1
System Intensity Calibration, 2-370, 2-377, 2-378
T Tag
FFT Files, 2-309
Tagging Database Images, 2-348 Measurements, 2-446
Template Mode, 1-10, 2-665 Test Strips Command
Creating BCG Strips, 2-722, 2-724 Creating Halftone Strips, 2-726
Testing a Condition, 1-25 Thickness Tool, 2-448 Thinning Filter, 2-339 Third‐Party Plug‐ins
Filters, 2-476 Import, 2-477 Show, 2-477
Threshhold Command, 2-408 Tile Images, 2-668 time points, 2-23, 2-24, 2-37 Timed Acquire Command, 2-15 Trace Objects Command
Show Trace Tool, 2-675 Trace, 2-674 Trace Atributes, 2-674
Trace Tool, 2-448 Tracking Bar, 2-675 Transpose Image, 2-713 TWAIN Source, Selecting, 2-591 Type Parameters, 1-9
U Unconditional Branching, 1-29 Undo Command, 2-728 Unit Name
Intensity Calibration, 2-379 Spatial Calibration, 2-589
Untagging Database Images, 2-348 Measurements, 2-446
Update AOI Definition, 2-83 Bitmap Analysis Window, 2-105 Count/Size Environment, 2-151 Database File, 2-349 Histogram Window, 2-366 Image Window, 2-99 Line Profile, 2-504 Progress Bar, 2-675
User Dilate Filter, 2-340 User Erode Filter, 2-340 User Input

Index
Index-23
Cursor Position, 2-253 Data Values, 1-12, 2-647, 2-648, 2-649 File Names, 2-649 Via Message Box, 1-11 Via Message Box, 2-416 Via Message Box, 2-423 Via Template Mode, 1-10, 2-665
User-Defined Data Types, 1-20, 7-2
V Validate AOI, 2-83 Variables, 1-17
Declaring, 1-18 Naming, 1-17 Saving To IPMACRO.INI, 2-380 Scope, 1-17 Types, 1-17
Variance Filter, 2-341 Vertical Thickness Tool, 2-449 Video Average, 2-3 Visual Basic, 1-1, 1-7
Example Program, 1-36 Using With Auto-Pro, 1-35
Visual C++ Data Types, 7-3
Vri Closing, 2-255 Create Image From, 2-704 Opening, 2-274
W Watershed Filter, 2-341 Watershed Filter ‐ Extended, 2-341 While...Wend, 1-26, 1-27 Windows API, 1-38 WinExec, 1-38 Writing
Directly To An AOI, 2-273 Directly To An Image, 2-274, 2-275, 2-277
X Xor, 1-23, 1-24
Z Zoom Command, 2-728