IBM WebSphere Portal for Multiplatforms V5 Handbook
810
ibm.com/redbooks IBM WebSphere Portal here Portal for Multiplatforms V5 V5 Handbook Rufus Credle Faheem Altaf Serena Chan Fernanda Gomes Sunil Hiranniah Pralhad Khatri Shun Zhong Li Vikrant Mastoli A better installation process and enhanced management capabilities Step-by-step installation instructions for multiplatforms Implementation of powerful clustering and collaboration capabilities
-
Upload
khangminh22 -
Category
Documents
-
view
2 -
download
0
Transcript of IBM WebSphere Portal for Multiplatforms V5 Handbook

ibm.com/redbooks
IBM WebSphere Portalhere Portalfor Multiplatforms V5 V5 Handbook
Rufus CredleFaheem AltafSerena Chan
Fernanda GomesSunil HiranniahPralhad KhatriShun Zhong Li
Vikrant Mastoli
A better installation process and enhanced management capabilities
Step-by-step installation instructions for multiplatforms
Implementation of powerful clustering and collaboration capabilities
Front cover


IBM WebSphere Portal for Multiplatforms V5 Handbook
March 2004
International Technical Support Organization
SG24-6098-00

© Copyright International Business Machines Corporation 2004. All rights reserved.Note to U.S. Government Users Restricted Rights -- Use, duplication or disclosure restricted by GSA ADPSchedule Contract with IBM Corp.
First Edition (March 2004)
This edition applies to IBM WebSphere Application Server Enterprise V5.0, IBM HTTP Server 1.3.26.1, IBM DB2 Universal Database Enterprise Server Edition 8.1, IBM Directory Server V5.1, IBM Lotus Domino Enterprise Server 5.0.12, Lotus Sametime 3.0, Lotus QuickPlace for Windows 3.01and IBM WebSphere Portal for Multiplatforms, V5.0.
Note: Before using this information and the product it supports, read the information in “Notices” on page xv.

Contents
Notices . . . . . . . . . . . . . . . . . . . . . . . . . . . . . . . . . . . . . . . . . . . . . . . . . . . . . . xvTrademarks . . . . . . . . . . . . . . . . . . . . . . . . . . . . . . . . . . . . . . . . . . . . . . . . . . . xvi
Preface . . . . . . . . . . . . . . . . . . . . . . . . . . . . . . . . . . . . . . . . . . . . . . . . . . . . . xviiThe team that wrote this redbook. . . . . . . . . . . . . . . . . . . . . . . . . . . . . . . . . . xviiiBecome a published author . . . . . . . . . . . . . . . . . . . . . . . . . . . . . . . . . . . . . . . xxComments welcome. . . . . . . . . . . . . . . . . . . . . . . . . . . . . . . . . . . . . . . . . . . . . xxi
Chapter 1. Introduction: WebSphere Portal for Multiplatforms V5 . . . . . . . 11.1 IBM WebSphere Portal Enable for Multiplatforms. . . . . . . . . . . . . . . . . . . . 21.2 IBM WebSphere Portal Extend for Multiplatforms. . . . . . . . . . . . . . . . . . . . 41.3 Tools and components . . . . . . . . . . . . . . . . . . . . . . . . . . . . . . . . . . . . . . . . 5
Chapter 2. Portal technology . . . . . . . . . . . . . . . . . . . . . . . . . . . . . . . . . . . . . 92.1 Portal evolution . . . . . . . . . . . . . . . . . . . . . . . . . . . . . . . . . . . . . . . . . . . . . 10
2.1.1 The generations of portal technology . . . . . . . . . . . . . . . . . . . . . . . . 112.2 Overview . . . . . . . . . . . . . . . . . . . . . . . . . . . . . . . . . . . . . . . . . . . . . . . . . . 12
2.2.1 WebSphere Portal architecture . . . . . . . . . . . . . . . . . . . . . . . . . . . . . 152.2.2 WebSphere Portal tooling . . . . . . . . . . . . . . . . . . . . . . . . . . . . . . . . . 22
2.3 WebSphere Portal . . . . . . . . . . . . . . . . . . . . . . . . . . . . . . . . . . . . . . . . . . . 232.3.1 Portal concepts . . . . . . . . . . . . . . . . . . . . . . . . . . . . . . . . . . . . . . . . . 232.3.2 Portlets . . . . . . . . . . . . . . . . . . . . . . . . . . . . . . . . . . . . . . . . . . . . . . . 26
2.4 Highlights of WebSphere Portal V5. . . . . . . . . . . . . . . . . . . . . . . . . . . . . . 262.4.1 Portal install. . . . . . . . . . . . . . . . . . . . . . . . . . . . . . . . . . . . . . . . . . . . 262.4.2 General infrastructure . . . . . . . . . . . . . . . . . . . . . . . . . . . . . . . . . . . . 272.4.3 Event broker . . . . . . . . . . . . . . . . . . . . . . . . . . . . . . . . . . . . . . . . . . . 282.4.4 Member subsystem. . . . . . . . . . . . . . . . . . . . . . . . . . . . . . . . . . . . . . 282.4.5 Authentication . . . . . . . . . . . . . . . . . . . . . . . . . . . . . . . . . . . . . . . . . . 292.4.6 Authorization . . . . . . . . . . . . . . . . . . . . . . . . . . . . . . . . . . . . . . . . . . . 292.4.7 Search. . . . . . . . . . . . . . . . . . . . . . . . . . . . . . . . . . . . . . . . . . . . . . . . 302.4.8 Content management . . . . . . . . . . . . . . . . . . . . . . . . . . . . . . . . . . . . 312.4.9 Content publishing . . . . . . . . . . . . . . . . . . . . . . . . . . . . . . . . . . . . . . 332.4.10 Transcoding . . . . . . . . . . . . . . . . . . . . . . . . . . . . . . . . . . . . . . . . . . 332.4.11 Struts portlet framework . . . . . . . . . . . . . . . . . . . . . . . . . . . . . . . . . 342.4.12 Click-to-Action . . . . . . . . . . . . . . . . . . . . . . . . . . . . . . . . . . . . . . . . . 342.4.13 Portal Toolkit . . . . . . . . . . . . . . . . . . . . . . . . . . . . . . . . . . . . . . . . . . 35
Chapter 3. WebSphere Portal V5 prerequisites and planning. . . . . . . . . . 373.1 Overview . . . . . . . . . . . . . . . . . . . . . . . . . . . . . . . . . . . . . . . . . . . . . . . . . . 39
© Copyright IBM Corp. 2004. All rights reserved. iii

3.2 Architecture review . . . . . . . . . . . . . . . . . . . . . . . . . . . . . . . . . . . . . . . . . . 403.2.1 HTTP server separation . . . . . . . . . . . . . . . . . . . . . . . . . . . . . . . . . . 403.2.2 Simple-machine . . . . . . . . . . . . . . . . . . . . . . . . . . . . . . . . . . . . . . . . 403.2.3 Multiple-machine . . . . . . . . . . . . . . . . . . . . . . . . . . . . . . . . . . . . . . . . 403.2.4 Multiple-tier . . . . . . . . . . . . . . . . . . . . . . . . . . . . . . . . . . . . . . . . . . . . 413.2.5 Vertical scaling . . . . . . . . . . . . . . . . . . . . . . . . . . . . . . . . . . . . . . . . . 413.2.6 Horizontal scaling . . . . . . . . . . . . . . . . . . . . . . . . . . . . . . . . . . . . . . . 41
3.3 Hardware and software prerequisites . . . . . . . . . . . . . . . . . . . . . . . . . . . . 423.3.1 Microsoft Windows 2000 . . . . . . . . . . . . . . . . . . . . . . . . . . . . . . . . . . 423.3.2 SUSE SLES 8 . . . . . . . . . . . . . . . . . . . . . . . . . . . . . . . . . . . . . . . . . . 473.3.3 IBM AIX 5.2 . . . . . . . . . . . . . . . . . . . . . . . . . . . . . . . . . . . . . . . . . . . . 483.3.4 Sun Solaris 8.0 . . . . . . . . . . . . . . . . . . . . . . . . . . . . . . . . . . . . . . . . . 503.3.5 zLinux . . . . . . . . . . . . . . . . . . . . . . . . . . . . . . . . . . . . . . . . . . . . . . . . 52
3.4 Planning for the database . . . . . . . . . . . . . . . . . . . . . . . . . . . . . . . . . . . . . 533.4.1 Using Cloudscape or another robust database. . . . . . . . . . . . . . . . . 543.4.2 Local or remote database server . . . . . . . . . . . . . . . . . . . . . . . . . . . 543.4.3 Database preparation . . . . . . . . . . . . . . . . . . . . . . . . . . . . . . . . . . . . 543.4.4 Database migration . . . . . . . . . . . . . . . . . . . . . . . . . . . . . . . . . . . . . . 553.4.5 Database prerequisites . . . . . . . . . . . . . . . . . . . . . . . . . . . . . . . . . . . 56
3.5 Planning for the LDAP. . . . . . . . . . . . . . . . . . . . . . . . . . . . . . . . . . . . . . . . 583.6 Planning for Web servers . . . . . . . . . . . . . . . . . . . . . . . . . . . . . . . . . . . . . 60
3.6.1 Existing Web server . . . . . . . . . . . . . . . . . . . . . . . . . . . . . . . . . . . . . 603.6.2 Local or remote Web server . . . . . . . . . . . . . . . . . . . . . . . . . . . . . . . 603.6.3 Web server product choice . . . . . . . . . . . . . . . . . . . . . . . . . . . . . . . . 603.6.4 Port conflict avoidance . . . . . . . . . . . . . . . . . . . . . . . . . . . . . . . . . . . 613.6.5 Web server prerequisites . . . . . . . . . . . . . . . . . . . . . . . . . . . . . . . . . 61
3.7 Planning for WebSphere Application Server and WebSphere Portal . . . . 623.7.1 An existing WebSphere Application Server. . . . . . . . . . . . . . . . . . . . 623.7.2 Coexisting WebSphere Application Servers . . . . . . . . . . . . . . . . . . . 633.7.3 Multiple instances of WebSphere Portal on the same machine . . . . 633.7.4 Installation without a configuration . . . . . . . . . . . . . . . . . . . . . . . . . . 633.7.5 Default virtual host consideration . . . . . . . . . . . . . . . . . . . . . . . . . . . 643.7.6 Installing an empty Portal . . . . . . . . . . . . . . . . . . . . . . . . . . . . . . . . . 643.7.7 Context root planning . . . . . . . . . . . . . . . . . . . . . . . . . . . . . . . . . . . . 643.7.8 If a firewall exists . . . . . . . . . . . . . . . . . . . . . . . . . . . . . . . . . . . . . . . . 653.7.9 WebSphere Application Server Enterprise Edition prerequisites . . . 65
3.8 Planning for WebSphere Portal security . . . . . . . . . . . . . . . . . . . . . . . . . . 663.8.1 Authentication and the user registry . . . . . . . . . . . . . . . . . . . . . . . . . 663.8.2 External authentication . . . . . . . . . . . . . . . . . . . . . . . . . . . . . . . . . . . 673.8.3 External authorization . . . . . . . . . . . . . . . . . . . . . . . . . . . . . . . . . . . . 683.8.4 Supported external security software . . . . . . . . . . . . . . . . . . . . . . . . 683.8.5 Secure Sockets Layer (SSL) . . . . . . . . . . . . . . . . . . . . . . . . . . . . . . . 683.8.6 Certificate consideration . . . . . . . . . . . . . . . . . . . . . . . . . . . . . . . . . . 69
iv IBM WebSphere Portal for Multiplatforms V5 Handbook

3.8.7 Deleting passwords . . . . . . . . . . . . . . . . . . . . . . . . . . . . . . . . . . . . . . 693.8.8 Tivoli Access Manager . . . . . . . . . . . . . . . . . . . . . . . . . . . . . . . . . . . 69
3.9 Planning for the clustering . . . . . . . . . . . . . . . . . . . . . . . . . . . . . . . . . . . . . 703.9.1 Vertical clustering . . . . . . . . . . . . . . . . . . . . . . . . . . . . . . . . . . . . . . . 703.9.2 Horizontal clustering . . . . . . . . . . . . . . . . . . . . . . . . . . . . . . . . . . . . . 703.9.3 Cross-platform clustering . . . . . . . . . . . . . . . . . . . . . . . . . . . . . . . . . 71
3.10 Planning for content publishing . . . . . . . . . . . . . . . . . . . . . . . . . . . . . . . . 713.11 Planning Lotus Collaborative Components . . . . . . . . . . . . . . . . . . . . . . . 72
3.11.1 Sametime and QuickPlace . . . . . . . . . . . . . . . . . . . . . . . . . . . . . . . 723.11.2 IBM WebSphere Portal Collaboration Center . . . . . . . . . . . . . . . . . 74
3.12 Translation server and transcoding . . . . . . . . . . . . . . . . . . . . . . . . . . . . . 763.13 Typical scenarios . . . . . . . . . . . . . . . . . . . . . . . . . . . . . . . . . . . . . . . . . . . 77
3.13.1 Quick install . . . . . . . . . . . . . . . . . . . . . . . . . . . . . . . . . . . . . . . . . . . 783.13.2 WebSphere Portal install with existing WebSphere environment . . 793.13.3 WebSphere Portal install with existing WebSphere environment and
security enabled . . . . . . . . . . . . . . . . . . . . . . . . . . . . . . . . . . . . . . . . 793.13.4 WebSphere Portal install with remote robust database . . . . . . . . . 803.13.5 WebSphere Portal with remote robust database and extended security
using an LDAP directory . . . . . . . . . . . . . . . . . . . . . . . . . . . . . . . . . . 803.13.6 WebSphere Portal with Lotus Collaborative Components. . . . . . . . 803.13.7 WebSphere Portal with WebSphere Portal content publishing . . . . 813.13.8 WebSphere Portal with extended security using an external security
manager . . . . . . . . . . . . . . . . . . . . . . . . . . . . . . . . . . . . . . . . . . . . . . 813.13.9 WebSphere Portal in a cluster environment . . . . . . . . . . . . . . . . . . 813.13.10 Remote server attach portlet development environment. . . . . . . . 813.13.11 Upgrading from WebSphere Portal V4 to V5 . . . . . . . . . . . . . . . . 823.13.12 Additional components to add to WebSphere Portal. . . . . . . . . . . 82
3.14 Web browser considerations . . . . . . . . . . . . . . . . . . . . . . . . . . . . . . . . . . 823.15 Install and uninstall method considerations. . . . . . . . . . . . . . . . . . . . . . . 84
3.15.1 Uninstall considerations . . . . . . . . . . . . . . . . . . . . . . . . . . . . . . . . . 853.15.2 Database considerations. . . . . . . . . . . . . . . . . . . . . . . . . . . . . . . . . 85
Chapter 4. WebSphere Portal: Microsoft Windows 2000 installation . . . . 874.1 Using install logs . . . . . . . . . . . . . . . . . . . . . . . . . . . . . . . . . . . . . . . . . . . . 92
4.1.1 Using WebSphere Portal log files . . . . . . . . . . . . . . . . . . . . . . . . . . . 924.2 Base installation . . . . . . . . . . . . . . . . . . . . . . . . . . . . . . . . . . . . . . . . . . . . 944.3 Migrating the database from Cloudscape to DB2 . . . . . . . . . . . . . . . . . . 1114.4 Installing IBM DB2 Enterprise Server Edition V8.1.1.94 . . . . . . . . . . . . . 1134.5 Configuring WebSphere Portal for DB2 . . . . . . . . . . . . . . . . . . . . . . . . . 1164.6 Adding an LDAP to the portal . . . . . . . . . . . . . . . . . . . . . . . . . . . . . . . . . 119
4.6.1 Installing Domino Enterprise Server Release 5.0.12 . . . . . . . . . . . 1204.6.2 Configuring Domino server settings . . . . . . . . . . . . . . . . . . . . . . . . 1214.6.3 Installing Domino Administrator Release 5.0.12 . . . . . . . . . . . . . . . 125
Contents v

4.6.4 Configuring Domino Administrator Release 5.0.12 . . . . . . . . . . . . . 1254.6.5 Setting up Domino LDAP . . . . . . . . . . . . . . . . . . . . . . . . . . . . . . . . 1274.6.6 Updating the Access Control List of the Domino Directory . . . . . . . 1294.6.7 Specifying Domino LDAP configuration settings. . . . . . . . . . . . . . . 130
4.7 Creating the Web SSO configuration . . . . . . . . . . . . . . . . . . . . . . . . . . . 1344.8 Installing Lotus QuickPlace Release 3.0.1 . . . . . . . . . . . . . . . . . . . . . . . 1364.9 Specifying QuickPlace 3.0.1 server settings . . . . . . . . . . . . . . . . . . . . . . 138
4.9.1 Adding QuickPlaceServlet. . . . . . . . . . . . . . . . . . . . . . . . . . . . . . . . 1424.10 Installing Lotus Sametime Release 3.0 . . . . . . . . . . . . . . . . . . . . . . . . . 1454.11 Configuring QuickPlace to use Sametime awareness . . . . . . . . . . . . . 1514.12 Applying Domino Fix Pack 5.0.12 . . . . . . . . . . . . . . . . . . . . . . . . . . . . . 152
4.12.1 Editing the Sametime.ini file to set the security level . . . . . . . . . . 1534.13 Configuring WebSphere Portal for Domino Directory . . . . . . . . . . . . . . 1544.14 Deploying Lotus Collaborative Components . . . . . . . . . . . . . . . . . . . . . 163
4.14.1 Enabling Lotus Collaborative Components . . . . . . . . . . . . . . . . . . 1634.14.2 Deploying collaborative portlets . . . . . . . . . . . . . . . . . . . . . . . . . . 165
4.15 Installing IBM WebSphere Portal Collaboration Center . . . . . . . . . . . . 1694.16 Configuring the Collaboration Center portlet . . . . . . . . . . . . . . . . . . . . . 172
4.16.1 Configuring the Web Conferencing portlet . . . . . . . . . . . . . . . . . . 1734.16.2 Configuring People Finder 5.0 . . . . . . . . . . . . . . . . . . . . . . . . . . . 174
Chapter 5. WebSphere Portal: SUSE SLES 8 Linux installation . . . . . . . 1795.1 Overview of WebSphere Portal installation on Linux . . . . . . . . . . . . . . . 1815.2 Preparing the machines for installation . . . . . . . . . . . . . . . . . . . . . . . . . . 1835.3 WebSphere Portal installation . . . . . . . . . . . . . . . . . . . . . . . . . . . . . . . . . 185
5.3.1 Installing WebSphere Portal V5.0 . . . . . . . . . . . . . . . . . . . . . . . . . . 1855.3.2 Installing manual fixes for WebSphere Application Server V5.0 . . . 200
5.4 IBM HTTP Server installation . . . . . . . . . . . . . . . . . . . . . . . . . . . . . . . . . 2055.4.1 IBM HTTP Server installation . . . . . . . . . . . . . . . . . . . . . . . . . . . . . 2065.4.2 Installing WebSphere Plug-in Cumulative Fix for versions 5.0.0, 5.0.1,
and 5.0.22. . . . . . . . . . . . . . . . . . . . . . . . . . . . . . . . . . . . . . . . . . . . 2105.4.3 Verifying the installation . . . . . . . . . . . . . . . . . . . . . . . . . . . . . . . . . 2115.4.4 Configuring WebSphere Portal with a remote IBM HTTP Server . . 213
5.5 Installing IBM DB2 V8.1 for WebSphere Portal . . . . . . . . . . . . . . . . . . . . 2165.5.1 Installation of IBM DB2 Server V8.1 . . . . . . . . . . . . . . . . . . . . . . . . 2165.5.2 Installing IBM DB2 administration client V8.1 . . . . . . . . . . . . . . . . . 2205.5.3 Installing IBM DB2 V8.1 FP1. . . . . . . . . . . . . . . . . . . . . . . . . . . . . . 2205.5.4 Migrating databases from Cloudscape to IBM DB2 . . . . . . . . . . . . 2215.5.5 Configuring WebSphere Portal for IBM DB2. . . . . . . . . . . . . . . . . . 225
5.6 Lotus Domino V5.0.12 installation. . . . . . . . . . . . . . . . . . . . . . . . . . . . . . 2285.6.1 Installing Lotus Domino Enterprise Server V5.0.12 . . . . . . . . . . . . 2285.6.2 Configuring Domino Server settings . . . . . . . . . . . . . . . . . . . . . . . . 2365.6.3 Installing Domino Administrator . . . . . . . . . . . . . . . . . . . . . . . . . . . 243
vi IBM WebSphere Portal for Multiplatforms V5 Handbook

5.6.4 Configuring Domino Administrator . . . . . . . . . . . . . . . . . . . . . . . . . 2445.6.5 Setting up Domino Directory . . . . . . . . . . . . . . . . . . . . . . . . . . . . . . 2475.6.6 Configuring WebSphere Portal for Domino Directory . . . . . . . . . . . 2515.6.7 Verifying the LDAP configuration . . . . . . . . . . . . . . . . . . . . . . . . . . 254
Chapter 6. WebSphere Portal: IBM AIX V5.2 installation . . . . . . . . . . . . . 2556.1 Installing Portal in a multi-tier environment . . . . . . . . . . . . . . . . . . . . . . . 2576.2 The WebSphere Portal installation . . . . . . . . . . . . . . . . . . . . . . . . . . . . . 2576.3 Install a remote HTTP server . . . . . . . . . . . . . . . . . . . . . . . . . . . . . . . . . 2676.4 Configure the remote HTTP server . . . . . . . . . . . . . . . . . . . . . . . . . . . . . 270
6.4.1 The plugin configuration . . . . . . . . . . . . . . . . . . . . . . . . . . . . . . . . . 2706.4.2 Add a new host alias . . . . . . . . . . . . . . . . . . . . . . . . . . . . . . . . . . . . 2716.4.3 Update and copy the Web server plugin configuration . . . . . . . . . . 2726.4.4 Disable access to port 9081 - optional . . . . . . . . . . . . . . . . . . . . . . 273
6.5 Install and configure DB2 Server. . . . . . . . . . . . . . . . . . . . . . . . . . . . . . . 2746.5.1 IBM DB2 Server installation . . . . . . . . . . . . . . . . . . . . . . . . . . . . . . 2756.5.2 IBM DB2 Fix pack installation . . . . . . . . . . . . . . . . . . . . . . . . . . . . . 2806.5.3 IBM DB2 Administration Client installation . . . . . . . . . . . . . . . . . . . 2826.5.4 Create remote databases . . . . . . . . . . . . . . . . . . . . . . . . . . . . . . . . 2836.5.5 Configure connection to remote databases . . . . . . . . . . . . . . . . . . 2846.5.6 Transfer data to DB2 database . . . . . . . . . . . . . . . . . . . . . . . . . . . . 287
6.6 Install and configure LDAP . . . . . . . . . . . . . . . . . . . . . . . . . . . . . . . . . . . 2906.6.1 Install IBM Directory Server . . . . . . . . . . . . . . . . . . . . . . . . . . . . . . 2906.6.2 Configure the Administrator DN . . . . . . . . . . . . . . . . . . . . . . . . . . . 2926.6.3 Configure the LDAP database . . . . . . . . . . . . . . . . . . . . . . . . . . . . 2936.6.4 Configure the Web Administration Tool . . . . . . . . . . . . . . . . . . . . . 3016.6.5 Configure servers into Web Administrator Tool . . . . . . . . . . . . . . . 3036.6.6 Install IBM Directory Server V5.1 Client . . . . . . . . . . . . . . . . . . . . . 3066.6.7 Prepare LDAP server for WebSphere Portal . . . . . . . . . . . . . . . . . 3076.6.8 Configure Portal with LDAP settings . . . . . . . . . . . . . . . . . . . . . . . . 309
6.7 Validate the overall configuration . . . . . . . . . . . . . . . . . . . . . . . . . . . . . . 3126.7.1 Validate database configuration . . . . . . . . . . . . . . . . . . . . . . . . . . . 3126.7.2 Validate LDAP configuration . . . . . . . . . . . . . . . . . . . . . . . . . . . . . . 316
Chapter 7. WebSphere Portal: clustering . . . . . . . . . . . . . . . . . . . . . . . . . 3197.1 WebSphere Application Server Network Deployment. . . . . . . . . . . . . . . 322
7.1.1 Installing Network Deployment machine . . . . . . . . . . . . . . . . . . . . . 3227.1.2 Installing the Enterprise extensions on Network Deployment . . . . . 3247.1.3 Installing Network Deployment Fix Pack 1 . . . . . . . . . . . . . . . . . . . 3267.1.4 Installing WebSphere Enterprise Fix Pack 1. . . . . . . . . . . . . . . . . . 3297.1.5 Validating the Network Deployment installation . . . . . . . . . . . . . . . 3307.1.6 Enabling global security on Network Deployment. . . . . . . . . . . . . . 3317.1.7 Setting the required authority for wpsadmin . . . . . . . . . . . . . . . . . . 334
Contents vii

7.2 Installing and configuring WebSphere Portal on node 1 . . . . . . . . . . . . . . . . . . . . . . . . . . . . . . . . . . . . . . . . . . . . . . . . 334
7.3 Installing and configuring WebSphere Portalon node 2 . . . . . . . . . . . . . . . . . . . . . . . . . . . . . . . . . . . . . . . . . . . . . . . . 335
7.3.1 The Portal02 configuration . . . . . . . . . . . . . . . . . . . . . . . . . . . . . . . 3367.4 Adding portal nodes to the cell . . . . . . . . . . . . . . . . . . . . . . . . . . . . . . . . 338
7.4.1 Adding Portal01 to the cell . . . . . . . . . . . . . . . . . . . . . . . . . . . . . . . 3397.4.2 Adding Portal02 to the cell . . . . . . . . . . . . . . . . . . . . . . . . . . . . . . . 340
7.5 Creating the cluster . . . . . . . . . . . . . . . . . . . . . . . . . . . . . . . . . . . . . . . . . 3417.5.1 Starting the cluster . . . . . . . . . . . . . . . . . . . . . . . . . . . . . . . . . . . . . 3447.5.2 Updating the Web Server plugin . . . . . . . . . . . . . . . . . . . . . . . . . . . 3457.5.3 Validating the cluster configuration . . . . . . . . . . . . . . . . . . . . . . . . . 347
7.6 Deploying portlets . . . . . . . . . . . . . . . . . . . . . . . . . . . . . . . . . . . . . . . . . . 3487.7 Deploying themes and skins . . . . . . . . . . . . . . . . . . . . . . . . . . . . . . . . . . 3507.8 Enabling dynamic caching. . . . . . . . . . . . . . . . . . . . . . . . . . . . . . . . . . . . 3517.9 Removing the Portal node from Deployment Manager . . . . . . . . . . . . . . 352
7.9.1 Removing the node from the cell . . . . . . . . . . . . . . . . . . . . . . . . . . 3537.9.2 Removing all Enterprise Application instances from DM01 . . . . . . 353
Chapter 8. WebSphere Portal: Sun Solaris 8.0 installation . . . . . . . . . . . 3578.1 Scenario overview . . . . . . . . . . . . . . . . . . . . . . . . . . . . . . . . . . . . . . . . . . 358
8.1.1 The architecture . . . . . . . . . . . . . . . . . . . . . . . . . . . . . . . . . . . . . . . 3588.1.2 Installation and configuration sequence . . . . . . . . . . . . . . . . . . . . . 3598.1.3 Skill requirements . . . . . . . . . . . . . . . . . . . . . . . . . . . . . . . . . . . . . . 359
8.2 Hardware and software used for multi-tier configuration. . . . . . . . . . . . . 3608.2.1 Hardware used in our test environment . . . . . . . . . . . . . . . . . . . . . 3608.2.2 Software used within our test environment . . . . . . . . . . . . . . . . . . . 3618.2.3 Hardware and software prerequisites . . . . . . . . . . . . . . . . . . . . . . . 3628.2.4 File system planning . . . . . . . . . . . . . . . . . . . . . . . . . . . . . . . . . . . . 3628.2.5 Network information . . . . . . . . . . . . . . . . . . . . . . . . . . . . . . . . . . . . 363
8.3 Installing Netscape Communicator . . . . . . . . . . . . . . . . . . . . . . . . . . . . . 3638.3.1 Removing the old Netscape Communicator . . . . . . . . . . . . . . . . . . 3648.3.2 Installing Netscape Communicator . . . . . . . . . . . . . . . . . . . . . . . . . 3648.3.3 Checking the result of the installation . . . . . . . . . . . . . . . . . . . . . . . 364
8.4 WebSphere Portal 5.0 installation . . . . . . . . . . . . . . . . . . . . . . . . . . . . . . 3658.4.1 WebSphere components. . . . . . . . . . . . . . . . . . . . . . . . . . . . . . . . . 3658.4.2 Preparation for the installation . . . . . . . . . . . . . . . . . . . . . . . . . . . . 3658.4.3 Installing WebSphere Portal . . . . . . . . . . . . . . . . . . . . . . . . . . . . . . 3668.4.4 Manually installation of the interim fixes of WebSphere Application
Server . . . . . . . . . . . . . . . . . . . . . . . . . . . . . . . . . . . . . . . . . . . . . . . 3718.4.5 Verifying the installation . . . . . . . . . . . . . . . . . . . . . . . . . . . . . . . . . 3758.4.6 Uninstalling WebSphere Portal (optional) . . . . . . . . . . . . . . . . . . . . 379
8.5 Installing the Oracle Enterprise Server . . . . . . . . . . . . . . . . . . . . . . . . . . 381
viii IBM WebSphere Portal for Multiplatforms V5 Handbook

8.5.1 Solaris preparation for Oracle 9i . . . . . . . . . . . . . . . . . . . . . . . . . . . 3818.5.2 Preparing the database for WebSphere Portal . . . . . . . . . . . . . . . . 3908.5.3 Post-install configuration . . . . . . . . . . . . . . . . . . . . . . . . . . . . . . . . . 402
8.6 Installing the Oracle client . . . . . . . . . . . . . . . . . . . . . . . . . . . . . . . . . . . . 4048.6.1 Pre-installation for the Oracle client . . . . . . . . . . . . . . . . . . . . . . . . 4048.6.2 Installing the Oracle 9i client . . . . . . . . . . . . . . . . . . . . . . . . . . . . . . 4048.6.3 Verifying the Oracle 9i Client installation. . . . . . . . . . . . . . . . . . . . . 409
8.7 Installing the Sun ONE Directory Server . . . . . . . . . . . . . . . . . . . . . . . . . 4108.7.1 Preparing for the installation . . . . . . . . . . . . . . . . . . . . . . . . . . . . . . 4108.7.2 Preparing the installation images . . . . . . . . . . . . . . . . . . . . . . . . . . 4118.7.3 LDAP structure planning . . . . . . . . . . . . . . . . . . . . . . . . . . . . . . . . . 4118.7.4 Installing the Sun ONE Directory Server. . . . . . . . . . . . . . . . . . . . . 4128.7.5 Configuring the LDAP structure . . . . . . . . . . . . . . . . . . . . . . . . . . . 4158.7.6 Verifying the installation and configuration . . . . . . . . . . . . . . . . . . . 427
8.8 Sun ONE Web Server and WebSphere Application Server plugin install 4298.8.1 Pre-installation steps. . . . . . . . . . . . . . . . . . . . . . . . . . . . . . . . . . . . 4298.8.2 Installing the Sun ONE Web Server . . . . . . . . . . . . . . . . . . . . . . . . 4308.8.3 Starting and verifying the installation of the Sun ONE Web Server 4318.8.4 Installing the WebSphere Application Server plugin for iPlanet . . . 4338.8.5 Installing WebSphere Application Server Fix Pack 1
on machine 1 . . . . . . . . . . . . . . . . . . . . . . . . . . . . . . . . . . . . . . . . . 4368.8.6 Installing WebSphere Application Server manual install interim fix on
machine 1 . . . . . . . . . . . . . . . . . . . . . . . . . . . . . . . . . . . . . . . . . . . . 4378.8.7 Adding an alias to the virtual host and regenerating
the plugin file. . . . . . . . . . . . . . . . . . . . . . . . . . . . . . . . . . . . . . . . . . 4398.8.8 Copying the plugin configuration file to the Web server . . . . . . . . . 4468.8.9 Updating the Web server and running the verification . . . . . . . . . . 447
8.9 WebSphere Portal configuration . . . . . . . . . . . . . . . . . . . . . . . . . . . . . . . 4508.9.1 Configuring WebSphere Portal for Oracle. . . . . . . . . . . . . . . . . . . . 4518.9.2 Configuring WebSphere Portal for Sun ONE Directory Server . . . . 4608.9.3 Enabling security. . . . . . . . . . . . . . . . . . . . . . . . . . . . . . . . . . . . . . . 4628.9.4 Configuring WebSphere Portal Server for Sun ONE Web Server . 4648.9.5 Deleting passwords in the configuration file (optional) . . . . . . . . . . 468
8.10 Verifying WebSphere Portal in the three-tier environment . . . . . . . . . . 469
Chapter 9. WebSphere Portal: zLinux (SUSE SLES Linux 7) installation4719.1 Introduction . . . . . . . . . . . . . . . . . . . . . . . . . . . . . . . . . . . . . . . . . . . . . . . 4729.2 WebSphere Portal installation overview . . . . . . . . . . . . . . . . . . . . . . . . . 4729.3 Sample single-tier installation with Setup Manager. . . . . . . . . . . . . . . . . 4739.4 Preparation steps for the installation . . . . . . . . . . . . . . . . . . . . . . . . . . . . 4759.5 WebSphere Portal installation . . . . . . . . . . . . . . . . . . . . . . . . . . . . . . . . . 4779.6 Validation task for WebSphere Portal . . . . . . . . . . . . . . . . . . . . . . . . . . . 4939.7 Running the validation task . . . . . . . . . . . . . . . . . . . . . . . . . . . . . . . . . . . 494
Contents ix

9.8 Configuring your Web server. . . . . . . . . . . . . . . . . . . . . . . . . . . . . . . . . . 4949.9 Configuring DB2 into WebSphere Portal . . . . . . . . . . . . . . . . . . . . . . . . . 4959.10 Exporting the database from Cloudspace . . . . . . . . . . . . . . . . . . . . . . . 4969.11 Configuring DB2 properties . . . . . . . . . . . . . . . . . . . . . . . . . . . . . . . . . . 4979.12 Creating local databases for DB2 . . . . . . . . . . . . . . . . . . . . . . . . . . . . . 5009.13 Exporting the db2instance environment in your root profile . . . . . . . . . 5009.14 Importing the Cloudscape database into DB2. . . . . . . . . . . . . . . . . . . . 5019.15 Performance improvement for imported databases . . . . . . . . . . . . . . . 5019.16 Verifying the connection from a command prompt . . . . . . . . . . . . . . . . 5029.17 Configuring IBM Directory Server in WebSphere Portal . . . . . . . . . . . . 5029.18 Configuring LDAP properties. . . . . . . . . . . . . . . . . . . . . . . . . . . . . . . . . 5039.19 Validating LDAP . . . . . . . . . . . . . . . . . . . . . . . . . . . . . . . . . . . . . . . . . . 5059.20 Enabling security . . . . . . . . . . . . . . . . . . . . . . . . . . . . . . . . . . . . . . . . . . 5059.21 Conclusion. . . . . . . . . . . . . . . . . . . . . . . . . . . . . . . . . . . . . . . . . . . . . . . 506
Chapter 10. WebSphere Portal administration . . . . . . . . . . . . . . . . . . . . . 50710.1 Introduction . . . . . . . . . . . . . . . . . . . . . . . . . . . . . . . . . . . . . . . . . . . . . . 508
10.1.1 Definitions . . . . . . . . . . . . . . . . . . . . . . . . . . . . . . . . . . . . . . . . . . . 50810.1.2 Organization . . . . . . . . . . . . . . . . . . . . . . . . . . . . . . . . . . . . . . . . . 509
10.2 Getting started with Portal navigation . . . . . . . . . . . . . . . . . . . . . . . . . . 51210.2.1 Portal states . . . . . . . . . . . . . . . . . . . . . . . . . . . . . . . . . . . . . . . . . 51210.2.2 New features in WebSphere Portal V5 administration . . . . . . . . . 51310.2.3 Launching the Portal user interface . . . . . . . . . . . . . . . . . . . . . . . 514
10.3 Portal User Interface . . . . . . . . . . . . . . . . . . . . . . . . . . . . . . . . . . . . . . . 52010.3.1 Manage Pages . . . . . . . . . . . . . . . . . . . . . . . . . . . . . . . . . . . . . . . 52110.3.2 Themes and skins . . . . . . . . . . . . . . . . . . . . . . . . . . . . . . . . . . . . . 537
10.4 Portlets . . . . . . . . . . . . . . . . . . . . . . . . . . . . . . . . . . . . . . . . . . . . . . . . . 54710.4.1 Install . . . . . . . . . . . . . . . . . . . . . . . . . . . . . . . . . . . . . . . . . . . . . . . 54810.4.2 Manage Portlet Applications . . . . . . . . . . . . . . . . . . . . . . . . . . . . . 55110.4.3 Manage Portlets . . . . . . . . . . . . . . . . . . . . . . . . . . . . . . . . . . . . . . 55810.4.4 Web Clipping. . . . . . . . . . . . . . . . . . . . . . . . . . . . . . . . . . . . . . . . . 562
10.5 Access. . . . . . . . . . . . . . . . . . . . . . . . . . . . . . . . . . . . . . . . . . . . . . . . . . 56910.5.1 Users and groups . . . . . . . . . . . . . . . . . . . . . . . . . . . . . . . . . . . . . 57010.5.2 Resource permissions. . . . . . . . . . . . . . . . . . . . . . . . . . . . . . . . . . 58210.5.3 Users and Group Permissions portlet . . . . . . . . . . . . . . . . . . . . . . 59610.5.4 Credential Vault. . . . . . . . . . . . . . . . . . . . . . . . . . . . . . . . . . . . . . . 606
10.6 Portal Settings . . . . . . . . . . . . . . . . . . . . . . . . . . . . . . . . . . . . . . . . . . . . 61510.6.1 Global Settings . . . . . . . . . . . . . . . . . . . . . . . . . . . . . . . . . . . . . . . 61510.6.2 URL Mapping . . . . . . . . . . . . . . . . . . . . . . . . . . . . . . . . . . . . . . . . 61710.6.3 Custom Unique Names . . . . . . . . . . . . . . . . . . . . . . . . . . . . . . . . . 62510.6.4 Supported Markups. . . . . . . . . . . . . . . . . . . . . . . . . . . . . . . . . . . . 62910.6.5 Supported Client . . . . . . . . . . . . . . . . . . . . . . . . . . . . . . . . . . . . . . 63110.6.6 Searching the administration. . . . . . . . . . . . . . . . . . . . . . . . . . . . . 633
x IBM WebSphere Portal for Multiplatforms V5 Handbook

10.7 Portal Analysis. . . . . . . . . . . . . . . . . . . . . . . . . . . . . . . . . . . . . . . . . . . . 64610.7.1 Frequent Users . . . . . . . . . . . . . . . . . . . . . . . . . . . . . . . . . . . . . . . 64710.7.2 Enable Tracing . . . . . . . . . . . . . . . . . . . . . . . . . . . . . . . . . . . . . . . 647
Chapter 11. WebSphere Portal customization . . . . . . . . . . . . . . . . . . . . . 64911.1 General customization. . . . . . . . . . . . . . . . . . . . . . . . . . . . . . . . . . . . . . 650
11.1.1 Customization roles. . . . . . . . . . . . . . . . . . . . . . . . . . . . . . . . . . . . 65011.2 Portal navigation and customization options . . . . . . . . . . . . . . . . . . . . . 652
11.2.1 Anonymous login. . . . . . . . . . . . . . . . . . . . . . . . . . . . . . . . . . . . . . 65211.2.2 Authenticated login and options . . . . . . . . . . . . . . . . . . . . . . . . . . 65411.2.3 Page customization. . . . . . . . . . . . . . . . . . . . . . . . . . . . . . . . . . . . 656
Chapter 12. Migration from WebSphere Portal V4.2 to V5. . . . . . . . . . . . 66112.1 WebSphere Portal V5.0 migration overview . . . . . . . . . . . . . . . . . . . . . 662
12.1.1 General recommendations for migration. . . . . . . . . . . . . . . . . . . . 66412.2 Migration process overview. . . . . . . . . . . . . . . . . . . . . . . . . . . . . . . . . . 66412.3 Prerequisites and preparing for migration . . . . . . . . . . . . . . . . . . . . . . . 66512.4 Portal migration process . . . . . . . . . . . . . . . . . . . . . . . . . . . . . . . . . . . . 674
12.4.1 Running the migration steps . . . . . . . . . . . . . . . . . . . . . . . . . . . . . 674
Appendix A. Identity management . . . . . . . . . . . . . . . . . . . . . . . . . . . . . . 695A.1 WebSphere Member Manager . . . . . . . . . . . . . . . . . . . . . . . . . . . . . . . . 696A.2 WebSphere Member Manager supported configuration . . . . . . . . . . . . . 697
Appendix B. Preparing the AIX machine. . . . . . . . . . . . . . . . . . . . . . . . . . 701B.1 Increasing the size of an existing file system . . . . . . . . . . . . . . . . . . . . . 702B.2 Creating a new file system . . . . . . . . . . . . . . . . . . . . . . . . . . . . . . . . . . . 702B.3 Creating a CDROM file system. . . . . . . . . . . . . . . . . . . . . . . . . . . . . . . . 703
Appendix C. Creating users on AIX . . . . . . . . . . . . . . . . . . . . . . . . . . . . . . 705C.1 Creating DB2 groups . . . . . . . . . . . . . . . . . . . . . . . . . . . . . . . . . . . . . . . 706C.2 Creating DB2 users . . . . . . . . . . . . . . . . . . . . . . . . . . . . . . . . . . . . . . . . 706C.3 Setting user’s password . . . . . . . . . . . . . . . . . . . . . . . . . . . . . . . . . . . . . 706
Appendix D. Installing fixes . . . . . . . . . . . . . . . . . . . . . . . . . . . . . . . . . . . . 707
Appendix E. Text-based Portal installation on Solaris . . . . . . . . . . . . . . 713E.1 Installing and configuring WebSphere Application Server and WebSphere
Portal in text mode . . . . . . . . . . . . . . . . . . . . . . . . . . . . . . . . . . . . . . . . . 715E.2 Applying the WebSphere Application Server interim fix in silent mode . 723E.3 Installing the WebSphere Application Server fix pack in text mode . . . . 724E.4 Uninstalling WebSphere Application Server and WebSphere Portal in text
mode. . . . . . . . . . . . . . . . . . . . . . . . . . . . . . . . . . . . . . . . . . . . . . . . . . . . 724E.5 WebSphere Application Server and WebSphere Portal automatic install
(non-interactive mode) . . . . . . . . . . . . . . . . . . . . . . . . . . . . . . . . . . . . . . 727
Contents xi

E.5.1 The response file for the installation . . . . . . . . . . . . . . . . . . . . . . . . 727E.5.2 The response file for the uninstallation . . . . . . . . . . . . . . . . . . . . . . 730E.5.3 Adding the alias to the virtual host using the wsadmin command . 731E.5.4 Regenerating the plugin using the wsadmin command . . . . . . . . . 731E.5.5 Preparing the batch file (.jacl) to run the wsadmin file . . . . . . . . . . 732E.5.6 Shell script to automatically reinstall WebSphere Portal . . . . . . . . 732E.5.7 Copying the plugin configuration file to the Web server . . . . . . . . . 735
Appendix F. Hints to set up the Solaris environment . . . . . . . . . . . . . . . 737F.1 Setting up the networking environment. . . . . . . . . . . . . . . . . . . . . . . . . . 738
F.1.1 Defining the /etc/hosts file . . . . . . . . . . . . . . . . . . . . . . . . . . . . . . . . 738F.1.2 Changing the default host name and the default IP address . . . . . 739F.1.3 Enabling telnet and ftp . . . . . . . . . . . . . . . . . . . . . . . . . . . . . . . . . . 740F.1.4 Adding a second IP address to the network adapter for
machine 2 . . . . . . . . . . . . . . . . . . . . . . . . . . . . . . . . . . . . . . . . . . . . 74112.4.2 Set ting up NFS on machine 3 . . . . . . . . . . . . . . . . . . . . . . . . . . . 742
F.2 Setting up the file system environment . . . . . . . . . . . . . . . . . . . . . . . . . . 743F.2.1 Defining the file system size . . . . . . . . . . . . . . . . . . . . . . . . . . . . . . 743F.2.2 Creating the file sysetm . . . . . . . . . . . . . . . . . . . . . . . . . . . . . . . . . 745F.2.3 Mounting the file system . . . . . . . . . . . . . . . . . . . . . . . . . . . . . . . . . 745
Appendix G. Creating users and groups in SUSE SLES V8.0 . . . . . . . . . 747G.1 Creating users on SUSE SLES V8.0 using YaST . . . . . . . . . . . . . . . . . 748G.2 Creating groups on SUSE SLES V8.0 using YaST . . . . . . . . . . . . . . . . 749G.3 Adding an existing user to a group using YaST . . . . . . . . . . . . . . . . . . . 751
Appendix H. UNIX commands on SUSE SLES V8.0 . . . . . . . . . . . . . . . . . 753H.1 Mounting a CD . . . . . . . . . . . . . . . . . . . . . . . . . . . . . . . . . . . . . . . . . . . . 754H.2 Unmounting a CD . . . . . . . . . . . . . . . . . . . . . . . . . . . . . . . . . . . . . . . . . . 754
Appendix I. Implementing the Portal V5 environment for migration from Portal V4.x . . . . . . . . . . . . . . . . . . . . . . . . . . . . . . . . . . . . . . . 755
I.1 WebSphere Portal V5.0 installation . . . . . . . . . . . . . . . . . . . . . . . . . . . . . 756I.2 Configuring WebSphere Portal V5.0 for remote IBM DB2 V8.1 . . . . . . . . 756
I.2.1 Configuring WebSphere Portal V5.0 for remote DB2. . . . . . . . . . . . 756I.3 Configuring WebSphere Portal V5.0 for a remote LDAP directory. . . . . . 757
I.3.1 Installation of IBM Directory Server V5.1 . . . . . . . . . . . . . . . . . . . . . 757I.3.2 Configuring IBM Directory server . . . . . . . . . . . . . . . . . . . . . . . . . . . 760I.3.3 Installation of IBM Directory client V5.1 . . . . . . . . . . . . . . . . . . . . . . 761I.3.4 Configuring WebSphere Portal V5.0 for remote IBM Directory Server
V5.1 . . . . . . . . . . . . . . . . . . . . . . . . . . . . . . . . . . . . . . . . . . . . . . . . 762
Appendix J. Setting portlet column width . . . . . . . . . . . . . . . . . . . . . . . . 763
xii IBM WebSphere Portal for Multiplatforms V5 Handbook

Abbreviations and acronyms . . . . . . . . . . . . . . . . . . . . . . . . . . . . . . . . . . . 765
Related publications . . . . . . . . . . . . . . . . . . . . . . . . . . . . . . . . . . . . . . . . . . 767IBM Redbooks . . . . . . . . . . . . . . . . . . . . . . . . . . . . . . . . . . . . . . . . . . . . . . . . 767Other publications . . . . . . . . . . . . . . . . . . . . . . . . . . . . . . . . . . . . . . . . . . . . . 767Online resources . . . . . . . . . . . . . . . . . . . . . . . . . . . . . . . . . . . . . . . . . . . . . . 768How to get IBM Redbooks . . . . . . . . . . . . . . . . . . . . . . . . . . . . . . . . . . . . . . . 769Help from IBM . . . . . . . . . . . . . . . . . . . . . . . . . . . . . . . . . . . . . . . . . . . . . . . . 769
Index . . . . . . . . . . . . . . . . . . . . . . . . . . . . . . . . . . . . . . . . . . . . . . . . . . . . . . . 771
Contents xiii

xiv IBM WebSphere Portal for Multiplatforms V5 Handbook

Notices
This information was developed for products and services offered in the U.S.A.
IBM may not offer the products, services, or features discussed in this document in other countries. Consult your local IBM representative for information on the products and services currently available in your area. Any reference to an IBM product, program, or service is not intended to state or imply that only that IBM product, program, or service may be used. Any functionally equivalent product, program, or service that does not infringe any IBM intellectual property right may be used instead. However, it is the user's responsibility to evaluate and verify the operation of any non-IBM product, program, or service.
IBM may have patents or pending patent applications covering subject matter described in this document. The furnishing of this document does not give you any license to these patents. You can send license inquiries, in writing, to: IBM Director of Licensing, IBM Corporation, North Castle Drive Armonk, NY 10504-1785 U.S.A.
The following paragraph does not apply to the United Kingdom or any other country where such provisions are inconsistent with local law: INTERNATIONAL BUSINESS MACHINES CORPORATION PROVIDES THIS PUBLICATION "AS IS" WITHOUT WARRANTY OF ANY KIND, EITHER EXPRESS OR IMPLIED, INCLUDING, BUT NOT LIMITED TO, THE IMPLIED WARRANTIES OF NON-INFRINGEMENT, MERCHANTABILITY OR FITNESS FOR A PARTICULAR PURPOSE. Some states do not allow disclaimer of express or implied warranties in certain transactions, therefore, this statement may not apply to you.
This information could include technical inaccuracies or typographical errors. Changes are periodically made to the information herein; these changes will be incorporated in new editions of the publication. IBM may make improvements and/or changes in the product(s) and/or the program(s) described in this publication at any time without notice.
Any references in this information to non-IBM Web sites are provided for convenience only and do not in any manner serve as an endorsement of those Web sites. The materials at those Web sites are not part of the materials for this IBM product and use of those Web sites is at your own risk.
IBM may use or distribute any of the information you supply in any way it believes appropriate without incurring any obligation to you.
Information concerning non-IBM products was obtained from the suppliers of those products, their published announcements or other publicly available sources. IBM has not tested those products and cannot confirm the accuracy of performance, compatibility or any other claims related to non-IBM products. Questions on the capabilities of non-IBM products should be addressed to the suppliers of those products.
This information contains examples of data and reports used in daily business operations. To illustrate them as completely as possible, the examples include the names of individuals, companies, brands, and products. All of these names are fictitious and any similarity to the names and addresses used by an actual business enterprise is entirely coincidental.
COPYRIGHT LICENSE: This information contains sample application programs in source language, which illustrates programming techniques on various operating platforms. You may copy, modify, and distribute these sample programs in any form without payment to IBM, for the purposes of developing, using, marketing or distributing application programs conforming to the application programming interface for the operating platform for which the sample programs are written. These examples have not been thoroughly tested under all conditions. IBM, therefore, cannot guarantee or imply reliability, serviceability, or function of these programs. You may copy, modify, and distribute these sample programs in any form without payment to IBM for the purposes of developing, using, marketing, or distributing application programs conforming to IBM's application programming interfaces.
© Copyright IBM Corp. 2004. All rights reserved. xv

TrademarksThe following terms are trademarks of the International Business Machines Corporation in the United States, other countries, or both:
Eserver®Eserver®Redbooks (logo) ™ibm.com®iNotes™iSeries™pSeries®xSeries®z/OS®z/VM®zSeries®AIX®ClearCase®Cloudscape™Domino®Dynamic Workplaces™DB2 Connect™
DB2 Universal Database™DB2®DPI®Hummingbird®HACMP™Illustra™Informix®IBM®Lotus Discovery Server™Lotus Notes®Lotus Workflow™Lotus®Netfinity®Notes®OS/390®Perform™POWER™
POWER3™QuickPlace®Redbooks™RDN™RS/6000®S/390 Parallel Enterprise Server™S/390®Sametime®SecureWay®SP1®SP2®ThinkPad®Tivoli®WebSphere®
The following terms are trademarks of other companies:
Intel, Intel Inside (logos), MMX, and Pentium are trademarks of Intel Corporation in the United States, other countries, or both.
Microsoft, Windows, Windows NT, and the Windows logo are trademarks of Microsoft Corporation in the United States, other countries, or both.
Java and all Java-based trademarks and logos are trademarks or registered trademarks of Sun Microsystems, Inc. in the United States, other countries, or both.
UNIX is a registered trademark of The Open Group in the United States and other countries.
Other company, product, and service names may be trademarks or service marks of others.
xvi IBM WebSphere Portal for Multiplatforms V5 Handbook

Preface
This IBM® Redbook positions the IBM WebSphere® Portal for Multiplatforms as the solution to best address the process of building scalable and reliable business-to-employee (B2E), business-to-business (B2B) and business-to-consumer (B2C) portals.
The IBM WebSphere Portal for Multiplatforms V5 Handbook will help you to understand the WebSphere Portal architecture, how to install, tailor and configure WebSphere Portal, and how to administer and customize portal pages using WebSphere Portal.
In this redbook, we discuss the installation of IBM WebSphere Portal for Multiplatforms within the Microsoft® Windows® 2000 Server, IBM AIX, SuSE SLE8 Linux, Solaris 8, and zLinux environments using Setup Manager. The ability to set up a clustered environment is covered, as well as a demonstration of migrating from WebSphere Portal V4.2 to V5.0.
In this redbook, we illustrate the implementation and the use of the following directory services: IBM Directory Server, Lotus® Domino® Enterprise Server, and Sun ONE Directory Server.
In the IBM WebSphere Portal for Multiplatforms V5 Handbook, you will find step-by-step examples and scenarios showing ways to rapidly integrate your enterprise applications into an IBM WebSphere Portal environment using state-of-the-art technologies, such as portlets. You will be able to implement new and enhanced capabilities incorporated in the current releases of IBM WebSphere Portal offerings, which provide powerful collaboration applications such as Lotus QuickPlace®, Lotus Sametime®, and Lotus Collaborative components.
Some knowledge of WebSphere Portal and Java™ technologies such as servlets, JavaBeans, EJBs, JavaServer Pages (JSPs), as well as XML applications and Lotus collaboration software, is assumed.
© Copyright IBM Corp. 2004. All rights reserved. xvii

The team that wrote this redbookThis redbook was produced by a team of specialists from around the world working at the International Technical Support Organization, Raleigh Center.
Rufus Credle is a Senior I/T Specialist and certified Professional Server Specialist at the International Technical Support Organization, Raleigh Center. He conducts residencies and develops Redbooks™ about network operating systems, ERP solutions, voice technology, high availability and clustering solutions, Web application servers, pervasive computing, and IBM and OEM e-business applications, all running IBM Eserver®xSeries systems. Rufus’s various positions during his IBM career have included assignments in administration and asset management, systems engineering, sales and marketing, and IT services. He holds a BS degree in business management from Saint Augustine’s College. Rufus has been employed at IBM for 23 years.
Faheem Altaf is an IT professional with IBM's Linux Integration Center in Austin, TX, working as a sales engagement specialist on the pre-sales support initiative. The Linux Integration Center is a world-wide team dedicated to assisting the IBM Sales team with technical issues concerning IBM middleware, and ultimately driving Linux solutions into the marketplace. Recently, Faheem has been focused on single sign-on solutions in Linux that include WebSphere Portal, WebSphere Application Server, DB2®, Tivoli® Access Manager and IBM Directory Server as well as open source components such as OpenLDAP and Samba. Faheem has previously contributed to the Redpaper WebSphere Portal Installation for Linux on zSeries, REDP3699.
Serena Chan is an Advisory IT Specialist in the Portal and Content Management Practice with IBM Global Services in Toronto, Canada. Serena has over eight years of IT and Management Consulting experience. In addition, she has in-depth industry experience in investment banking and has extensive Enterprise portal design and architecture experience in various products including Plumtree, Vignette/Epicentric, Oracle portal, Top Tier/SAP Portals and IBM WebSphere Portal. Serena holds an Honors Degree in Bachelor of Commerce (H.BCom.) from the University of Toronto and is pursing her Master of Science in Computer Information Technology (M.Sc.) at the Regis University. Serena is an IBM Certified e-Business Solution Designer and an IBM Certified Solution Developer - WebSphere Portal for Multiplatforms V4.1 Implementation.
Fernanda Gomes is an IT Specialist with ITS Software Support in IBM Brazil. She has five years of experience in the application server field. Her areas of expertise include support for WebSphere Application Server on Multiplatforms, and WebSphere Portal and its components, such as HTTP Server, IBM DB2 Server, IBM Directory Server and Lotus Collaborative products. Her experience with WebSphere Portal started with the very first version of the product; she is
xviii IBM WebSphere Portal for Multiplatforms V5 Handbook

very familiar with Portal on Windows and AIX® platforms. She is IBM Certified for WebSphere Application Server Advanced V4.0 Administration.
Sunil Hiranniah is a Software Engineer and works for IBM Developer Relations Technical Support Center in Dallas, TX. He has over five years of experience in the software industry, working within various commercial projects. He has extensive experience with WebSphere Portal, WebSphere Application Server, J2EE and databases. He has written and published extensively on the WebSphere family of products.
Pralhad Khatri is an Advisory Software Engineer with the IBM WebSphere Portal Development team in RTP, NC. He has worked in the Information Technology sector for over 13 years and holds a Masters degree in Computer Science from Southern Illinois University, Carbondale. He is the architect and the development lead for migration support for WebSphere Portal 5.
Shun Zhong Li is an Advisory IT Specialist in the Technical Support Center for IBM China. He holds a B.S. in Computer Science from the NanJing University of China. He has many years of experience in the information technology field. His areas of expertise include AIX, WebSphere Application Server, WebSphere Portal, e-business solution, etc. He is an IBM Certified Specialist for pSeries® AIX System Admin, IBM Certified Systems Expert-pSeries HACMP™ for AIX, IBM Certified System Expert - Administration for IBM WebSphere Application Server, Advanced Edition 4.0, IBM Certified Specialist - DB2 v 7.1 user, IBM Certified Specialist - IBM WebSphere Studio Application Developer for Windows 4.0.3, IBM Certified Solution Developer - IBM WebSphere Portal for Multiplatforms V4.1, IBM Certified system Administrator - WebSphere Application Server V5.0, and IBM Certified Advanced System Administrator - WebSphere Application Server V5.0.
Vikrant Mastoli is a Software Engineer in Portal Practice with Miracle Software Systems, Inc. in Southfield, MI. He has approximately four years of IT experience in the areas of Web applications and Portal development. His areas of expertise include WebSphere Portal development, installation and administration since WebSphere Portal V4.1, WebSphere Application Server and J2EE. His key areas of work include Portal development, deployment, administration and integration of Web applications using IBM WebSphere Portal on Windows and Linux platforms.
Thanks to the following people for their contributions to this project:
Tamakia Barrow, Linda Robinson, Diane O’Shea, Cecilia BardyInternational Technical Support Organization, Raleigh Center
Alan Beaubien, WebSphere SWAT TeamIBM Austin
Preface xix

Cristiane M. Ferreira, WebSphere Support and ServicesIBM Brazil
Mike Fitzgerald, Central Region WebSphere Portal POC teamIBM Pittsburgh
Marshall Lamb, Chief Programmer, WebSphere PortalIBM Research Triangle Park
Lori Phelps Brown, Manager, WebSphere Portal IDIBM Research Triangle Park
Thomas Boehme, Software EngineerIBM Germany
William H. Tworek, Consulting IT Architect, Lotus/Portal TechnologiesIBM ITSO Cambridge
James Stroud, Executive ConsultantIBM New York
Andrew Hatzikyriacos, Business Acquisition Services South Africa CentreIBM South Africa
Axel Buecker, ITSO Project LeaderIBM Austin
Become a published authorJoin us for a two- to six-week residency program! Help write an IBM Redbook dealing with specific products or solutions, while getting hands-on experience with leading-edge technologies. You'll team with IBM technical professionals, Business Partners and/or customers.
Your efforts will help increase product acceptance and customer satisfaction. As a bonus, you'll develop a network of contacts in IBM development labs, and increase your productivity and marketability.
Find out more about the residency program, browse the residency index, and apply online at:
ibm.com/redbooks/residencies.html
xx IBM WebSphere Portal for Multiplatforms V5 Handbook
Comments welcomeYour comments are important to us!
We want our Redbooks to be as helpful as possible. Send us your comments about this or other Redbooks in one of the following ways:
� Use the online Contact us review redbook form found at:
ibm.com/redbooks
� Send your comments in an Internet note to:
� Mail your comments to:
IBM Corporation, International Technical Support OrganizationDept. HQ7 Building 662P.O. Box 12195Research Triangle Park, NC 27709-2195
Preface xxi

xxii IBM WebSphere Portal for Multiplatforms V5 Handbook

Chapter 1. Introduction: WebSphere Portal for Multiplatforms V5
IBM WebSphere® Portal V5 helps a business become truly responsive. Employees, customers and trading partners can interact with a company's e-business through a secure, single point of entry to key applications, content, people, and business processes.
IBM WebSphere Portal allows people to interact with the on demand world in a personalized way. They can automatically get the dynamic information they need. They can quickly execute business processes across critical applications. They can collaborate with portal users inside and outside your e-business. By providing these industry-leading portal solutions for your e-business, IBM will help you improve employee productivity, cut costs and strengthen relationships with your customers and trading partners.
Portal V5 has significant improvements, including added programming interfaces, a better installation process and enhanced management capabilities.
By improving the portal ease of use, WebSphere Portal V5 helps improve employee productivity and customer satisfaction while speeding the return on your investment.
With WebSphere Portal 5, portal users can see content and applications translated into eighteen different languages by WebSphere Translation Server.
1
© Copyright IBM Corp. 2004. All rights reserved. 1

By combining these industry-leading portal and machine translation solutions for your e-business, IBM helps you improve employee productivity and strengthen relationships with your customers and trading partners around the world.
The WebSphere Portal family include the following products:
� WebSphere Portal for Multiplatforms
� WebSphere Portal - Express
� WebSphere Portal Express for iSeries™
� WebSphere Portal Express Plus for iSeries
� WebSphere Portal for z/OS® and OS/390®
� WebSphere Commerce Portal
In this redbook, we will focus our discussion on IBM WebSphere Portal for Multiplatforms. With IBM WebSphere Portal for Multiplatforms V5.0, you will be prepared to the following:
� Help build scalable and reliable business-to-employee (B2E), business-to-business (B2B) and business-to-consumer (B2C) portals
� Deliver a single, point of personalized interaction with applications, content, processes, and people for a unified user experience
� Allow users to view, search, create, convert, and edit basic documents, spreadsheets, and presentations from within the portal
� Provide powerful collaboration capabilities such as instant messaging, team workplaces, people finder and e-meetings
� Enables quick portal integration with back-end systems via portlet builders
WebSphere Portal for Multiplatforms V5 includes two offerings:
� Portal Enable
� Portal Extend
More information is provided on these two offerings in the upcoming sections. The platforms discussed in this redbook are: Microsoft Windows, SUSE Linux, IBM AIX, and Sun Solaris.
1.1 IBM WebSphere Portal Enable for MultiplatformsThe IBM WebSphere Portal Enable for Multiplatforms offering is the basic edition of WebSphere Portal for Multiplatforms. It helps you quickly build scalable portals to simplify and accelerate access to personalized information and applications.
2 IBM WebSphere Portal for Multiplatforms V5 Handbook

New capabilities in WebSphere Portal Enable, V5 include the following:
� Portal Document Manager provides a way for portal users to share, view, and organize files of all types ranging from documents to spreadsheets within the portal community. This communication enhancer offers category subscription services, simple approval processes for file contribution, automatic dialog boxes for contributing portal search, versioning so that users can track the evolution of a piece of content, and access control for managing viewing privileges of different content items.
� Productivity components allow users to view, create, convert, and edit basic documents, spreadsheets, and presentation files from the portal interface. Therefore, they can execute an ad-hoc business process from the same place they access their applications, search for information and collaborate with other employees and partners. The productivity components are integrated with the document management feature so files can be indexed, categorized, and searched by other portal users.
� Portal Application Integrator allows business users to quickly create portlets for interacting with relational databases, Domino databases, and enterprise applications from Oracle, SAP, Siebel, and PeopleSoft.
� A redesigned installation procedure and improved administration portlets allow you to quickly get a return on your investment while using fewer IT resources.
� Improved scalability and reliability of WebSphere Application Server V5 provide mission-critical portal services to users.
WebSphere Portal Enable continues to provide the following functions which help to improve employee productivity and customer loyalty:
� Click-to-Action (C2A) technology for portlet-to-portlet communication and action, ensuring accuracy of information passed and delivering it on demand.
� Integration services which give you access to enterprise data, applications, newsfeeds and Web services.
� Ability to publish local portlets as remote Web services or subscribe to Web services to make them available to portal users via portlets.
� Presentation services which allow for the customization of the computing desktop to match individual work patterns and roles.
� Browser-based content publishing and personalization technology so portal users get a unique experience with the latest information.
� WebSphere Translation Server functionality, which helps you to translate the contents of portlets from English to French, Italian, German, Spanish, Portuguese, Taiwanese, Japanese, Simplified Chinese and Traditional Chinese, or to translate your portlet content from those languages to English.
Chapter 1. Introduction: WebSphere Portal for Multiplatforms V5 3

1.2 IBM WebSphere Portal Extend for MultiplatformsWebSphere Portal Extend for Multiplatforms V5 includes all the robust features of WebSphere Portal Enable and introduces collaboration capabilities, enterprise search functions and portal usage analysis. These functions help you improve employee productivity and continually strengthen relationships with your customers and trading partners. WebSphere Portal Extend also includes the following:
� IBM WebSphere Portal Collaboration Center (formerly Lotus Collaboration Center)- A set of ready-to-use collaborative portlets that can be used right out of the box, providing instant value for your portal users. The Collaboration Center integrates portlets for finding, connecting, and working with people inside and outside your organization. It is fully integrated in WebSphere Portal and includes the following new collaboration portlets:
– People Finder portlet - An online company directory and organizational navigator. People Finder lets you find any employee by name and see the employee's contact information, background, areas of expertise, and context within the company's organizational chart (manager and peers).
– My Lotus Team Workspaces (QuickPlace) portlet - Lists your workplaces, which are provided by Lotus QuickPlace right on the portal page. You can search across all of the team workspaces to which you belong, or you can quickly see what's new in a workplace, join a workplace, or create a new workplace.
– Web Conferencing (Sametime) portlet - Provides integrated tools for managing online meetings. From within the portlet, people can join existing online conferences, see active meetings they need to join, or schedule new meetings. All these portlets are integrated and enabled with presence awareness, which indicates whether a portal user is available for an instant messaging session. This allows you to start a chat session with someone you found through the People Finder and then turn it into a Web conference without switching between applications. You never have to leave the portal to access applications and work with your associates, which helps you make faster and better business decisions.
� WebSphere Portal Extend continues to provide the following functions, which help to improve the return on investment (ROI) of your portal deployment.
– Robust Web analysis technology provides vital business intelligence about customers using your portal so you can continually improve their satisfaction.
– Extended search capabilities are provided across relational databases such as DB2® Universal Database and Oracle®, Lotus® Notes and Lotus Domino databases, Web search engines, and text or HTML documents.
4 IBM WebSphere Portal for Multiplatforms V5 Handbook

1.3 Tools and componentsIBM WebSphere Portal V5 includes the following tools and components for use.
Portal catalog The WebSphere portlet catalog describes portlets created by numerous companies for use with WebSphere Portal. You can find portlets for your specific needs by searching or browsing by category. Visit the following URL for details.
https://www-3.ibm.com/services/cwi/portal/_pagr/105/
WebSphere Studio IBM WebSphere® Studio offers the best solution for accelerating team application development. Whether you need to build on demand applications or are just getting started, WebSphere Studio provides an open, comprehensive development environment that tightly integrates with Ready for WebSphere Studio Partner plugins and third-party Eclipse-based offerings. Founded on open technologies and built on Eclipse, WebSphere Studio provides a flexible, portal-like integration of multi-language, multi-platform and multi-device application development tools for building, testing and deploying dynamic applications.
For more information, visit the following URL:
http://www-3.ibm.com/software/info1/websphere/index.jsp?tab=products/studio
WebSphere Portal content publishing WebSphere Portal content publishing browser-based Web content management tools make it easier for non-technical users to manage the content within WebSphere Portal, alleviating the traditionally heavy reliance on IT departments.
WebSphere Portal content publishing helps content owners manage large volumes of static and dynamic content, allowing them to deliver Web sites that are accurate, updated and relevant to each user who visits the site. This feature ships in all bundles of the WebSphere Portal enterprise offerings.
Content publishing maintains a consistent repository and various site management tools to allow dual management of WebSphere Portal and other company Web sites, ultimately simplifying the migration to a complete portal environment for an organization.
Personalization Provides rules-based filtering to match content to the unique needs and interests of each visitor by determining which content to display. The recommendation engine within personalization uses collaborative filtering and item
Chapter 1. Introduction: WebSphere Portal for Multiplatforms V5 5

affinity analysis to offer content and product recommendations to site visitors.
Templates Provide structure to unstructured content such as images and Microsoft Word documents. IBM offers out of the box integration with the WebSphere Studio products to develop templates for separating content authoring from content presentation.
Preview Lets you view content as it would appear on the Web site before publishing it, to allow for additional changes. The integrated personalization features offer a preview of content from the perspective of different targeted users.
Workspaces Ensure that site contributors can work in isolation, reducing potential confusion with other users. Only the person working on the content can see the changes they have made until they promote the content in the workflow process.
Workflow Lets you route content through a series of people and processes to gain appropriate approvals and to apply defined business principles before publishing. Customers can choose from Lotus Workflow™, a simple internal approval process, or the IBM DB2 Content Manager workflow.
Versioning Allows the user to store content for reuse at a later time.
Access control Manages privileges and access to content within the content publishing environment. Access control makes it easy for business users to manage users, roles and groups through a simple UI.
Syndication Provides the ability to import feeds from syndicators into the workflow to publish to Web sites in a controlled fashion.
Reports Log the activity of site viewers to determine the effectiveness of personalization rules.
For more information, visit the URL:
http://www-3.ibm.com/software/genservers/portal/webcontentpublisher/index.html
Portal toolkit Portals provide a mechanism for aggregating information and accessing enterprise services via a single consolidated view for Web usage. A portlet
6 IBM WebSphere Portal for Multiplatforms V5 Handbook

(similar to a servlet) provides access to a specific application or function being made available to the user via the portal.
The IBM Portal Toolkit V5.0 provides the capabilities to customize and manage the enterprise portal and create, test, debug, and deploy individual portlets and Web content. Templates enable developers to quickly and easily create their own portlets. Debugging and deployment tools shorten the development cycle. Sample portlets that demonstrate best programming practices are also provided.
The Portal Toolkit plugs into the IBM WebSphere Studio Workbench, which provides a comprehensive framework for the development of e-business applications.
In general the Portal Toolkit provides:
� Portlet development and debugging support for WebSphere Portal V5
� Portlet Wizard enhancements to support action handling, message handling, using Portlet Data, single sign-on function, and multi-portlet applications development
� Portlet preview to preview a portlet during development
� Sample portlet code that demonstrates best programming practices
� Cooperative portlet example using the Click-to-Action feature
� Windows XP professional support
� IBM DB2 V8.1 and Oracle V8.1 and V9.2 support
Chapter 1. Introduction: WebSphere Portal for Multiplatforms V5 7

8 IBM WebSphere Portal for Multiplatforms V5 Handbook

Chapter 2. Portal technology
Investment in portal technology will remain high amidst economic adjustments. The reason for the sustained growth is that enterprise portals deliver immediate tangible cost savings, enhance productivity, increase efficiency and generate revenue for clients. Most companies have developed business-to-consumer (B2C) and business-to-business (B2B) strategies. Many times, the challenge is to tie the two together via a comprehensive strategy that is extendable to business partners and customers. Customers are often faced with issues of integrating with legacy systems. Companies are often faced with the decision of whether to build or to buy. Portal solutions such as IBM WebSphere Portal are proven and shorten development time. Pre-built adapters and connectors are available so that customers can leverage the company's existing investment by integrating with the existing legacy systems without re-inventing the wheel.
WebSphere Portal provides a flexible framework based on open standards with the capability to integrate with a best of breed solution. IBM is one of the few vendors to provide an end-to-end portal solution in the solution space.
This chapter provides an overview of the WebSphere Portal technology, IBM’s portal tooling, and its use in developing integrated portal applications. A high-level overview of the WebSphere Portal concepts integral to development is presented here.
In this chapter, we explore the evolution of portals and some fundamental Portal concepts and definitions.
2
© Copyright IBM Corp. 2004. All rights reserved. 9

2.1 Portal evolutionAs J2EE technology has evolved, much emphasis has been placed on the challenges of building enterprise applications and bringing those applications to the Web. At the core of the challenges currently being faced by Web developers is the integration of disparate user content into a seamless Web application and well-designed user interface. Portal technology provides a framework to build such applications for the Web.
If we take a step back in time to the original PC days when each application took up the entire screen and used all the computer’s resources, the advent of Windows from Microsoft revolutionized the way we interact with our desktop. A user no longer has to close one application to interact with another. Each application’s content is aggregated to the desktop. This same evolution is taking place on the Web with portal technology.
Taking a shorter step back in time to the advent of the Web, initially interaction with the Web involved entering a single URL to access a single Web site much like the single application model of the early PCs. As the Web quickly evolved, so did the associated browser technology such as applets and browser plugins for technologies like Java. Unfortunately, these technologies never standardized and made the job of the Web developer very difficult when trying to provide cross-browser implementations. In parallel with these technologies, the desire for dynamic content on the Web drove the development of Web servers into application servers that could serve dynamic content and technologies such as JSPs.
Support for portals evolved from this application server evolution along with the need to render multiple streams of dynamic content. The early portals fall in the category of roll your own. These are proprietary and specific to each implementation. As these portals grew, so did tooling and frameworks to support the building of new Portals. The main job of a portal is to aggregate content and functionality. Portal provides:
� A server to aggregate content
� A scalable infrastructure
� A framework to build portal components and extensions
Additionally, most portals require personalization and customization. Personalization enables the portal to deliver user specific information targeting a user based on their unique information. Customization allows the user to organize the look and feel of the portal to suit their individual needs and tastes.
10 IBM WebSphere Portal for Multiplatforms V5 Handbook

WebSphere Portal provides a framework for addressing all these issues along with an open flexible infrastructure for creating many types or portals accessible from a wide variety of devices.
2.1.1 The generations of portal technologyPortals have gone through an evolution process of their own.
First generation portalsThe first portals, known as first generation portals, were focused on providing static Web content, Web documents and live feeds. They were mostly an aggregation of content. In a corporate environment, they had a similar objective, providing a single interface to corporate information distributed throughout the enterprise. They typically contained information such as company news, employee contact information, company policy documents and other key Web links.
Second generation portalsSecond generation portals were first generation portals plus added features such as personalized, customized content and search capability but were often a manual roll your own process.
Third generation portalsThird generation portals focus on specific information and applications. Integration at the data level has been added. They incorporate the notion of providing services along with the first generation idea of providing content. Another key feature of third generation portals is collaboration.
Collaboration portals provide the ability for teams to work in a virtual office. They provide content management services, the mining and organization of related information, along with collaborative services that allow users to chat, e-mail, share calendars and define user communities. Collaborative portals are typically internal corporate portal installations.
Fourth generation portalsFourth generation portals are intended to address full-function e-business (Figure 2-1 on page 12). This involves integration with legacy applications at the component level. Enterprise portals have evolved from the provision of traditional employee self-service (such as an HR policy) to providing employees a complete set of comprehensive tools to enhance their productivity.
Fourth generation portals take portals beyond the corporate boundaries for use by employees, suppliers and customers. They also provide access from multiple
Chapter 2. Portal technology 11

types of devices to address the diverse user communities in need of services. They offer the richest set of content and application choice via a single user interface to a diverse community, including browsers and pervasive devices. They also provide automated personalization based on business rules. The key to their further evolution is their open framework for common services.
IBM WebSphere Portal is a fourth generation portal providing organizations with a portal framework that connects a wide range of enterprise content and applications. It provides a high degree of integration technologies based on the J2EE platform. Its extensible architecture provides a scalable framework allowing adaptation to the changing needs of business.
Figure 2-1 e-business needs
2.2 OverviewPortals are the next-generation desktop, delivering e-business applications over the Web to all kinds of client devices. Portals provide site users with a single point of access to multiple types of information and applications. Regardless of
Discussion Groups/Chat Rooms
KnowledgeManagement
Virtual Project Teams
Job Information &Opportunities
CorporateCommunications
Portal
User
HR & Finance Applications
Cross-Functional Integration of Transactions & Information
IT Support
Real-TimeCollaboration &Feedback
CompetetiveIntelligence
Learning & Development
Personal Information
Strategic Business Teams
Corporate Yellow Pages
Corporate Programs
Enterprise
12 IBM WebSphere Portal for Multiplatforms V5 Handbook

where the information resides or the format it uses, a portal aggregates all of the information in a way that is pleasing and relevant to the user. A complete portal solution should provide users with convenient access to everything they need to get their tasks done.
WebSphere Portal's extensible framework allows the end user to interact with enterprise applications, people, content, and processes. Users can personalize and organize their own view of the portal, manage their own profiles, and publish and share documents. WebSphere Portal provides additional services (see Figure 2-2 on page 14) such as single sign-on, security, directory services, content management, collaboration, search and taxonomy, support for mobile devices, accessibility support, internationalization, and site analytics. Clients can further extend the portal solution to provide host integration and e-Commerce.
Chapter 2. Portal technology 13

Figure 2-2 Portal context diagram
WebSphere Portal is a framework that lets you plug in new features or extensions called portlets. In the same way that a servlet is an application within a Web server, a portlet is an application within WebSphere Portal. Developing portlets is the most important task in providing a portal that functions as the user’s window to information and tasks. Portlets are an encapsulation of content and functionality. They are reusable components that combine Web-based content, application functionality and access to resources. Portlets are assembled onto portal pages which, in turn, make up a portal implementation. Portlets are similar to Windows applications in that they present their content in a window-like display on a portal page. Like a Windows application, the portlet window has a title bar that contains controls, allowing the users to expand
Portal
DirectoryServices
Authorization/Authentication
Collaboration
Internationalization
Search
ContentManagement
Personalization
Site Usage
Host Integration
PervasiveComputing
E-Commerce
14 IBM WebSphere Portal for Multiplatforms V5 Handbook

(maximize) and shrink (minimize) the application. Portlets function within the Portal framework where Windows applications function in the Windows framework. From the portal user’s perspective, a portlet is a window on a portal site that provides access to a specific service or resource.
A portal also provides the runtime environment for the portlets that make up the portal implementation. This runtime environment is the portlet container. The portlet container, in the J2EE sense of a container, is responsible for instantiating, invoking and destroying portlets. The portlet container provides the life cycle infrastructure for the portlets. Portlets rely on their container to provide the necessary infrastructure to support a portal environment. The portal infrastructure provides the core sets of services required by the portlets, including:
� Access to user profile information
� A framework for portlets to participate in events
� A framework to communicate with other portlets
� Access to remote content
� Access to credentials
� A framework for storing persistent data
2.2.1 WebSphere Portal architectureThe WebSphere Portal platform is positioned to enhance the WebSphere family of products, providing tooling for aggregating and personalizing Web-based content and making that content available via multiple devices. WebSphere Portal takes advantage of the strong platform provided by WebSphere Applications Server.
WebSphere Portal finds its roots in Apache Jetspeed. Jetspeed is an Open Source implementation of an Enterprise Information Portal, using Java and XML. Jetspeed was created to deliver an Open Source Portal which individuals or companies could use and contribute to in an Open (Source) manner.
Soon after creation, it became apparent that Jetspeed was going to become an engine for Web applications. That, however, was far beyond the scope of the original project. Around that time, there were many discussions on the mailing list which spawned the Turbine project based on technology donated by Jon Stevens of Clear Ink. Turbine is now the Web application framework that Jetspeed shares with many other Web applications.
Building on the Jetspeed implementation, WebSphere Portal provides an architecture for building and running portal applications. The overall WebSphere Portal architecture can be seen in Figure 2-5 on page 19. WebSphere Portal
Chapter 2. Portal technology 15

provides services for Authentication and Authorization though WebSphere Member Services. The core of the WebSphere Portal architecture is composed of the Presentation Services, the portal infrastructure, and the portal services.
Figure 2-3 Distributed Portal system
Figure 2-4 on page 18 depicts a sample architecture of deploying Portal in a multi-tier Demilitarized Zone (DMZ) configuration with high availability. This configuration can be used for an Internet/Extranet portal solution.
As shown in this configuration, Tivoli WebSEAL is used to shield the Web server from unauthorized requests for external facing users. This approach is desirable when the Web server contains sensitive data and direct access to it is not desirable. WebSEAL is a Reverse Proxy Security Server (RPSS) which uses Tivoli Access Manager (TAM) to perform coarse-grained access control to filter out unauthorized requests before they reach the domain firewall. WebSEAL uses Tivoli Access Manager (TAM) to perform access control as illustrated in our
IntranetClients
WAPGateway
VoiceGateway
Internet Intranet
Outbound Proxy
AuthorizationServer
ContentProviders
WebServices
Authent./ReverseProxy
PortalCluster
UserRegistry
Portal Database
SearchServer
ContentManagementServer
BackendSystems
Public UDDIRegistry Corporate
UDDI
FirewallFirewall Firewall
16 IBM WebSphere Portal for Multiplatforms V5 Handbook
figure. In the particular example of integrating with WebSEAL, you can configure WebSphere Application Server to use the LDAP user registry, which can be shared with WebSEAL and TAM. Replicated front-end WebSEAL provides the portal site with load balancing during periods of heavy traffic, as well as a fail-over capability. The load balancing mechanism is handled by a Network Dispatcher such as an IBM WebSphere Edge Server. If the Network Dispatcher fails for some reason, the standby Network Dispatcher will continue to provide access to the portal. In our sample configuration, HTTP servers and Portal are clustered to provide additional redundancy. The Directory Server can be replicated to one or more replica LDAP servers to provide redundancy. WebSphere Application Server uses LDAP to perform authentication. The client ID and password are passed from WebSphere Application Server to the LDAP server. Replication can be turned on in the database server which is used by the portal. In this configuration, it is optional to use a separate WebSEAL for the internal users to achieve better performance.
Chapter 2. Portal technology 17

Figure 2-4 High availability portal solution
WebServer
WebServer
Internet Production DMZ IntranetInternet DMZ
NetworkDispatcher
NetworkDispatcher
(Standby)
80/443389/636
80/443
81/1443389/63681/1443 80/443
389/63681/1443
LotusSametime
UncontrolledZone
ControlledZone
RestrictedZone
TrustedZone
DBDB
WebSEAL/TAM
IBMHTTPServer
LotusQuickPlace
PortalPortalPortalServer
WebSEAL/TAM
NetworkDispatcher
NetworkDispatcher(Standby)
BrowserBrowser
LDAPLDAP
WebSEAL/TAM
WebSEAL/TAM
Cluster
Cluster
Replicate
ReplicateFirewall FirewallFirewall
HeartbeatHeartbeat
Port closedPort open
18 IBM WebSphere Portal for Multiplatforms V5 Handbook
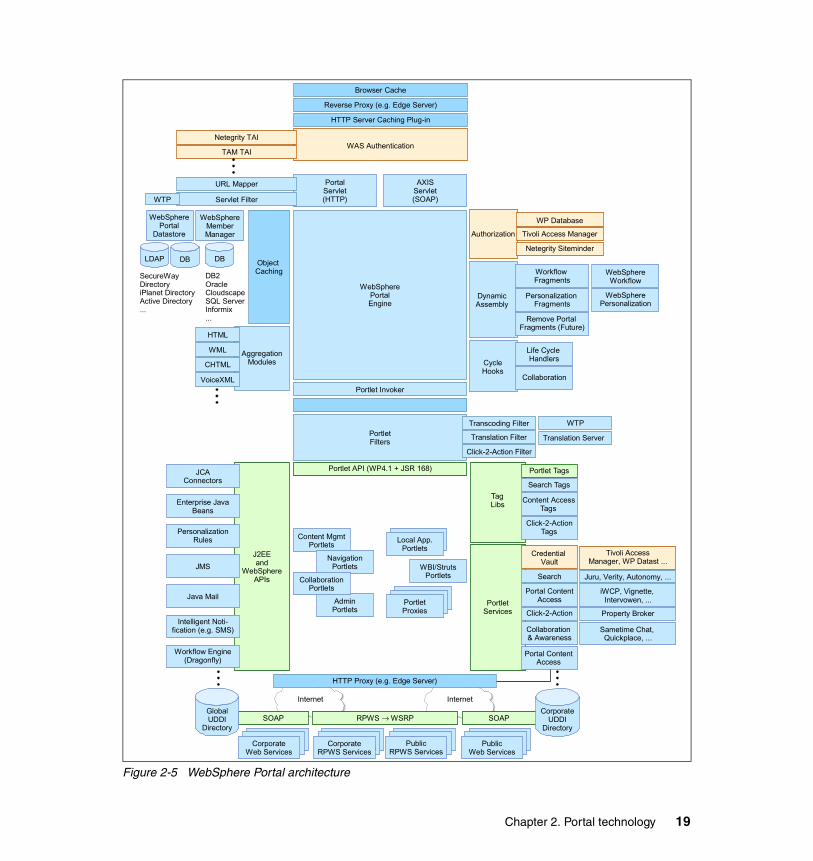
Figure 2-5 WebSphere Portal architecture
Content MgmtPortlets
NavigationPortlets
AdminPortlets
CollaborationPortlets
WBI/StrutsPortlets
Local App.PortletsLocal App.
Portlets
PortletProxiesPortlet
ProxiesPortletProxies
J2EEand
WebSphereAPIs
Portlet API (WP4.1 + JSR 168)
HTTP Proxy (e.g. Edge Server)
Internet
CorporateWeb ServicesCorporate
Web ServicesCorporateWeb Services
CorporateRPWS ServicesCorporate
RPWS ServicesCorporateRPWS Services
PublicRPWS ServicesPublic
RPWS ServicesPublicRPWS Services
PublicWeb ServicesPublic
Web ServicesPublicWeb Services
SOAP RPWS → WSRP SOAPGlobalUDDI
Directory
CorporateUDDI
Directory
Internet
PortletServices
TagLibs
Click-2-ActionTags
Content AccessTags
Search Tags
Portlet Tags
Credential Vault
Search
Portal ContentAccess
Click-2-Action
Collaboration & Awareness
Portal ContentAccess
Tivoli AccessManager, WP Datast ...
Juru, Verity, Autonomy, ...
iWCP, Vignette, Intervowen, ...
Property Broker
Sametime Chat, Quickplace, ...
JCAConnectors
Enterprise JavaBeans
PersonalizationRules
JMS
Java Mail
Workflow Engine(Dragonfly)
Intelligent Noti-fication (e.g. SMS)
Transcoding Filter
Translation Filter
Click-2-Action Filter
WTP
Translation ServerPortletFilters
Portlet Invoker
HTML
WML
CHTML
VoiceXML
AggregationModules
Object Caching
WebSpherePortal
Datastore
WebSphereMemberManager
LDAP DB DB
SecureWayDirectoryiPlanet DirectoryActive Directory...
DB2OracleCloudscapeSQL ServerInformix...
Authorization
Netegrity Siteminder
Tivoli Access Manager
WP Database
Workflow Fragments
Remove Portal Fragments (Future)
Personalization Fragments
DynamicAssembly
Life Cycle Handlers
Collaboration
CycleHooks
WebSpherePersonalization
WebSphereWorkflow
WebSpherePortalEngine
WAS AuthenticationNetegrity TAI
TAM TAI
URL Mapper
Servlet FilterWTP
PortalServlet(HTTP)
AXISServlet(SOAP)
HTTP Server Caching Plug-in
Reverse Proxy (e.g. Edge Server)
Browser Cache
Chapter 2. Portal technology 19

Presentation ServicesWebSphere Portal Presentation Services provide customized and personalized pages for users though aggregation. Page content is aggregated from a variety of sources via content and applications. The portal presentation framework simplifies the development and maintenance of the portal by defining the page structure independent of the portlet definition. Portlets can be changed without impact to the overall portal page structure.
The portal engine WebSphere Portal provides a pure Java engine whose main responsibility is to aggregate content from different sources and serve the aggregated content to multiple devices. The Portal engine also provides a framework that allows the presentation layer of the portal to be decoupled from the portlet implementation details. This allows the portlets to be maintained as discrete components. Figure 2-6 shows the WebSphere Portal engine components.
Figure 2-6 WebSphere Portal engine
The Authentication Server is a third party authentication proxy server that sits in front of the Portal engine. Access to portlets is controlled by checking access rights during page aggregation, page customization, and other access points.
The Portal Servlet is the main component of the Portal engine. The Portal Servlet handles the requests made to the portal. The portal requests are handled in two phases. The first phase allows portals to send event messages between themselves. In the second phase, the appropriate Aggregation Module for the requesting device renders the overall portal page by collecting information from all the portlets on the page and adding standard decorations such as title bars, edit buttons, etc.
Portal Servlet
Aggregation Modules
User Bean
LDAP Directory
Relational Database
Management System
Portal Registry
portlets
ser vices
Access ControlTrust Association interceptor
Authentication Server
Portal Engine Full Page View
20 IBM WebSphere Portal for Multiplatforms V5 Handbook

Portlet containerPortal Services are components WebSphere Portal uses to extend the portal functionality. Key functionality is provided with WebSphere Portal for personalization, search, content management, site analysis, enterprise application integration collaboration and Web services. Portlets can access these services via their container.
Portal infrastructureThe WebSphere Portal infrastructure is the framework that provides the internal features of the portal. Functionality such as user and group management via self-registration, as well as portal administration, is provided by the Portal infrastructure.
User and group managementThe WebSphere Portal infrastructure provides facilities to allow user self-management along with enterprise integration with user directories such as LDAP or database structures.
Security servicesSince WebSphere Portal runs within the WebSphere Application Server platform, it makes use of the standard Java Security APIs to provide authentication. The WebSphere Portal is configured so that incoming requests pass through an authentication component such as WebSphere Application Server, WebSEAL or other proxy servers. A user’s authorization for a particular resource such as a page or a portlet is handled by the portal engine.
User Beans are provided to allow programmatic access to the User information for use within portlets.
Page transformationWebSphere Transcoding Technology is integrated with WebSphere Portal to transform the portal markup produced by WebSphere Portal to mark up for additional devices such as mobile phones and personal digital assistants (PDAs).
Portal ServicesPortal Services are built-in features which WebSphere Portal provides to extend and enhance the full portal solution. These services are provided via the Portlet container as seen in Figure 2-5 on page 19. Among the services are the following:
� Personalization
The IBM WebSphere Personalization functionality enables advanced personalization capabilities. Base customization, such as choosing which
Chapter 2. Portal technology 21

portlets are desired on a page, is accomplished by the user via administration functionality. Advanced personalization via rules engines, user preferences and profiles is accomplished by the provided personalization services.
� Content management
WebSphere Portal provides services to facilitate connections to content management sources. Built-in support is provided for several common content types such as Rich Site Summary (RSS), News Markup Language (NewsML) and Open Content Syndication (OCS) along with most XML and Web browser markups.
� Search
WebSphere Portal offers a simple search service. The Portal Search capability enables searches across distributed HTML and text data sources. The search can crawl a Web site and is configured so as to force it to follow several layers in a site or to extend beyond several links in a site. Furthermore, IBM Extended Search and Enterprise Information Portal can be fully incorporated into the Portal environment. These search engines are industrial-strength tools that provide federated searches across numerous data sources.
� Site analysis
You can take advantage of the underlying WebSphere Application Server technology and Site Analyzer to provide information about Web site visitor trends, usage and content. This detailed information can then be used to improve the overall effectiveness of the site.
� Collaboration
Collaboration services are provided by WebSphere Portal through a set of pre-defined portlets. These portlets allow for team-room function, chat, e-mail, calendering and many other collaborative technologies.
� Web Services
WebSphere Portal provides services for exposing and integrating portlets as remote portlets hosted on another portal platform via Web Services technology. The entire process of packaging and responding to a Simple Object Access Protocol (SOAP) request is hidden from the developer and the administrator.
2.2.2 WebSphere Portal toolingWebSphere Portal and WebSphere Portal Toolkit, along with their prerequisite products, provide the basic tooling for developing and deploying portals and their associated portlets.
22 IBM WebSphere Portal for Multiplatforms V5 Handbook

WebSphere PortalWebSphere Portal contains built-in support for portlet deployment, configuration, administration and communication between portlets.
WebSphere Portal provides the framework for building and deploying portals and the portal components, portlets. Portlet content is aggregated by the WebSphere Portal to provide the desired portal implementation.
WebSphere Portal makes use of the WebSphere Application Server technology to provide a portal platform.
WebSphere Portal ToolkitThe WebSphere Portal Toolkit is included with WebSphere Portal and provides an environment for developing portal using WebSphere Portal. The WebSphere Portal Toolkit is a plugin for WebSphere Studio Application Developer (WSAD) or WebSphere Studio Site Developer (WSSD), which adds the portal development environment.
The WebSphere Portal Toolkit provides the ability to quickly create complete, MVC-compliant portlet applications. It also provides intuitive editors for working with the deployment descriptors required by your portlet applications. Furthermore, it allows you to dynamically debug your portlet applications.
The WebSphere Portal Toolkit is explored in detail in the redbook Portlet Application Development with IBM WebSphere Portal Toolkit V5, SG24-6076.
2.3 WebSphere PortalWebSphere Portal takes advantage of the WebSphere Application Server, making use of its J2EE services. WebSphere Portal itself installs as an Enterprise application in WebSphere Application Server.
2.3.1 Portal conceptsFollowing is a discussion of some concepts of WebSphere Portal.
PortletA portlet is an application that displays page content.
Portlet applicationPortlet applications are collections of related portlets and resources that are packaged together. All portlets packaged together share the same context which
Chapter 2. Portal technology 23

contains all resources such as images, properties files and classes. Important also is the fact that portlets within a portlet application can exchange messages.
Page A portal page displays content. A page can contain one or more portlets. For example, a World Market page might contain two portlets which display stock tickers for popular stock exchanges and a third portlet which displays the current exchange rates for world currencies. To view a page in the portal, you select its page.
Layout The page layout defines the number of content areas within the page and the portlets displayed within each content area. In many cases, the portal administrator defines the page layout. The administrator can permit specified users or user groups to change the page layout in order to reflect individual preferences. If you have authority to change a page, use the configure icon (wrench icon) to alter the page layout.
Roles Each portal page is subdivided into one or more content areas. Each content area can contain one or more portlets. The Portal administrator or a user who has authority to manage a page can control whether others who have authority to edit the page can move, edit or delete the content areas and the portlets on the page. Portal V5 permission is role based. A role is a set of permissions. Roles can be assigned (or mapped) to individual principals granting those principals the corresponding permissions. If you have the authority to make changes to a portal page, use the Resource Permissions page in Access under Administration to set the permissions for the page. By default, there are seven roles:
� Administrators are allowed to have unrestricted access on all portal resources
� Security Administrators are allowed to grant access on a resource.
� Delegators are allowed to grant access to other principals
� Managers are allowed to create, edit, and delete shared resources
� Editors are allowed to create and edit shared resources
� Privileged Users are allowed to create private resources
� Users are allowed to view portal resources
Note: WebSphere Portal V4.x uses the concept of place for grouping pages. In WebSphere Portal V5, the concept of place does not exist. Places are treated as top-level pages in WebSphere Portal V5.
24 IBM WebSphere Portal for Multiplatforms V5 Handbook

Comparison of V4.x permission and V5.x rolesPermissions that a principal (a user or group) had in WebSphere Portal V4.x are mapped to the appropriate roles in WebSphere Portal V5.0. The following table illustrates this role mapping.
Table 2-1 Role mapping
ThemesThemes represent the overall look and feel of the portal, including colors, images and fonts. There are several default themes provided with the standard
V4.x Permissions V5.0 Roles
View User
Edit Privileged User
Manage Manager
Delegate Security Administrator
View + Edit Privileged User
View + Manage Manager
View + Delegate Security Administrator + User
Edit + Manage Manager
Edit + Delegate Security Administrator + Privileged User (Migration option: Security Administrator + Editor)
Manage + Delegate Administrator
View + Edit + Manage Manager
View + Edit + Delegate Security Administrator + Privileged User (Migration option: Security Administrator + Editor)
View + Manage + Delegate Administrator
View + Edit + Manage + Delegate Administrator
Create No longer necessary. In WebSphere Portal V5.0, principals with the Administrator, Manager, Editor, or Privileged User roles on a resource are automatically allowed to create new resources underneath that resource in the resource hierarchy.
Chapter 2. Portal technology 25

installation of WebSphere Portal. Each page in the portal may have a different theme associated with it, thereby creating the appearance of virtual portals. Use Themes and Skins under Portal User Interface to manage themes.
Skins The term skin refers to the visual appearance of the area surrounding an individual portlet. Each portlet can have its own skin. The skins that are available for use with a portlet are defined by the portal theme that is associated with the place. The Portal administrator or the designer determines the theme for places and the available skins for the theme. The administrator can permit specified users to change the skins to reflect individual preferences. If you have authority to make changes to a portal page, use the Themes and Skins under Portal User Interface to manage themes.
2.3.2 PortletsThe base building blocks of a portal are the portlets. Portlets are complete applications following the Model-View-Controller design pattern. Portlets are developed, deployed, managed and displayed independent of all other portlets.
Portlets may have multiple states and view modes along with event and messaging capabilities. Based on the J2EE container model, portlets run inside the Portlet Container of WebSphere Portal analogous to the way servlets run inside the Servlet Container of WebSphere Application Server. Portlets are a special subclass of HTTPServlet that includes properties and functionality which allows them to run inside the Portlet Container. Though portlets actually run as servlets under the WebSphere Application Server, they cannot send redirects or errors to the browser directly, forward requests or write arbitrary markup to the output stream. All communication back to the end user from a portlet is via the aggregation modules.
For more information on portlets and portlet development, you should read the redbook Portlet Application Development with IBM WebSphere Portal Toolkit V5, SG24--6076.
2.4 Highlights of WebSphere Portal V5In the following sections, we discuss the highlights of WebSphere Portal V5.
2.4.1 Portal installWhile WebSphere 4.x’s install procedure tried to address all needs and adapt virtually all portal settings to the specific customer environment, which required
26 IBM WebSphere Portal for Multiplatforms V5 Handbook

systems administrators to know and specify many things at install time, WebSphere Portal 5.0 has a redesigned install that follows a more modular approach, consisting of the following steps.
� Installation - This step lays down the required files and only asks for some basic configuration settings. By default, the portal installation installs WebSphere Application Server 5.0.1 EE and the Cloudscape™ database, plus the portal software on top of those. Alternatively, the install can be done on a pre-existing installation of WebSphere Application Server 5.0.1 EE, optionally using a pre-existing database (for example, Cloudscape, DB2, Oracle, SQL Server, Informix®). Installation of the portal is quick and simple, using common defaults.
� Configuration - This step allows tailoring a portal installation to fit the specific customer environment by running configuration scripts to change the database being used by the portal, switching from using the WebSphere Member Manager database as a user registry to using one of the supported LDAP directories, enabling the use of a proxy for access of remote content through the portal, etc.
2.4.2 General infrastructureThe following sections cover the general infrastructure of WebSphere Portal V5.
Support for WebSphere Application Server EnterpriseWebSphere Portal V5.0 runs on WebSphere Application Server V5.01 Enterprise to take advantage of better performance and scalability.
Property broker incorporating C2A and cooperative portletdata sharing
The property broker is intended to support brokering of properties between independently developed portlets. It is intended to support the collaborative requirements of both the Click-to-Action and Dynamic Workplaces™ features. The main runtime pieces are as follows:
� A property broker service (an instance of PortletService), which provides public and private APIs for using or implementing the property brokering function.
� A property match broker, which maintains a repository of property matching rules and carries out matches as required.
� Portlets, which use the public APIs on the property broker service to enable the sharing of properties and inform it of changes in shared properties. Portlets may use the existing action mechanism to receive notification of
Chapter 2. Portal technology 27

changes to shared properties, or may implement a new property provider interface, through which such notifications are delivered.
� A property broker portlet filter (an instance of PortletFilter), which filters all calls to portlets.
� The portlet container, which invokes callbacks on the portlets to indicate the start and end of the event processing phase, and which provides an API to the portlet service to invoke selected methods on portlets.
Enabling for communitiesWebSphere Portal 5.0, through its WebSphere Member Manager component, provides support for communities as special groups with additional meta-information.
2.4.3 Event brokerWebSphere Portal 5.0 has a portal event broker to which Portal components can fire typed events for which the broker dispatched to the listeners previously registered. The portal event broker is used to deliver Portal internal events across portal components and to produce events for event listeners for BEI and Site Analyzer integration.
Figure 2-7 Event broker
2.4.4 Member subsystemWebSphere Portal 5.0 uses WebSphere Member Manager instead of WMS.
WebSphere Member Manager can access user information in different types of repositories using WebSphere Member Manager Repository Adapters which implement the WebSphere Member Manager Member Repository Interface. WebSphere Member Manager provides repository adapters for LDAP user profile repositories and the WebSphere Member Manager Database user profile
28 IBM WebSphere Portal for Multiplatforms V5 Handbook

repository (supporting the same set of databases as WebSphere Portal). It is also possible to connect custom repositories by implementing a custom profile repository adapter, for example, in service projects.
2.4.5 Authentication
J2EE securityThe authentication function in WebSphere Portal 5.x uses the J2EE security calls to authenticate users instead of the SSO Authenticator calls which had been used in WebSphere Portal 4.x.
Deprecating old SSO functionalityIn WebSphere Portal 5.x, the old JAAS-based SSO functionality allowing portlets to take the user ID and password from the JAAS Subject for the special case that no authentication proxy is used is not supported anymore. Instead, portlets have to use the Credential Vault, which also works in the general case.
2.4.6 AuthorizationThe following sections discuss the various facets of authorization within WebSphere Portal V5.
Enhancing access control for roles and inheritanceWebSphere Portal uses a role-based approach to manage user authorization for accessing Portal resources such as portlets and pages. Access control administration can be performed using corresponding portlets within the running Portal or via the XML Access scripting interface.
Portal access control (PAC) is the single access control decision point within the portal. It controls access to all sensitive portal resources, for example, pages and portlets. PAC is used by various components including the customizer, the different aggregation modules, and the SOAP RPI router that allows for remote invocation of portlets. All these components will allow actions on particular portal resources only if these actions are allowed by PAC.
PAC directly supports access control configuration of hierarchical resource topologies through the concept of permission inheritance. This concept reduces the administration overhead for an administrator when controlling access to a large number of Portal resources. Inherited permissions are automatically assembled into roles that can be assigned to individual users and user groups, granting them access to whole sets of logically related Portal resources. The “user-to-role-assignments” can be managed within Portal or within external authorization systems (for example, Tivoli Access Manager).
Chapter 2. Portal technology 29

To allow for pluggable implementations, the authorization component defines a Service Provider Interface (SPI). WebSphere Portal 5.x has a built-in authorization component implementation that plugs into the SPI so that it can easily be replaced by other implementations.
The summarized access control facilities provided by PAC include:
� Instance-level access control for the complete set of portal resources
� Granting/revoking of permissions based on roles
� Support for predefined action sets for convenient creation of roles based on the intrinsic portal resource topology
� Flexible blocking of permission inheritance on a per resource/per action set basis
� Notion of Private Resources to reduce the number of defined roles within Portal for high volume personalized resources
� Delegated administration concept supporting an unlimited number of delegation levels
� Leveraging a sophisticated caching infrastructure for high performance access control decisions
� SPI plug-point for external access control components, for example, Tivoli Access Manager
� First alignment towards upcoming JSR 115 based authorization facilities that will be provided by WebSphere in the future
2.4.7 SearchWebSphere Portal 5.0 introduces major improvements in its search functionality, adding categorization, summarization and support of more than 225 document formats through document filters.
Document categories and summariesWebSphere Portal 5.0 provides function for automatic categorization of documents as well as automatic generation of document summaries.
Eureka! categorizerThe Eureka! categorizer is a high-accuracy system for categorizing text documents, including those from highly heterogeneous sources such as the Web. Currently, it is used by ibm.com® to categorize the IBM Web pages with 80% accuracy (relative to humans categorizing to the same taxonomy) and 80% coverage. The system consists of two major components, a taxonomy creation
30 IBM WebSphere Portal for Multiplatforms V5 Handbook

system and a categorizer. It is the use of the categorization system which produces the high accuracy of Eureka!.
The Eureka! categorizer and associated data can be viewed as a black box that accepts text in either HTML, XML, or flat text, and outputs a list of one or more categories into which the text has been categorized, as well as a score for each. Optionally, it may also detect the presence of one or more phrases or terms that are then mapped to a specific category. The categorizer is available in multiple languages; however, each language requires a separate invocation of the categorizer. The categorizer requires that the calling application fetch the text to be categorized and handle the resulting output of categories from the categorizer. In a multilingual application, it may also be necessary for the calling application to determine the language of the text in order to dispatch it to the appropriate categorizer. The categorizer will operate as a server within the UIM Architecture framework.
The Eureka! data consists of a language-specific dictionary of words (stemmed words in English), a language-specific hierarchy of categories, and a set of definitions for each category. The category definitions are produced by the Eureka! “back-end” system, which will remain at HAW. However, the Eureka! system currently consists only of categories in the following areas: computers (excluding computer science), financial markets, and telecommunications. Additional effort is included in the scope of work to expand this set of category definitions to other areas.
SummarizerThe Summarizer is configurable to run in three client-selectable modes:
� For certain types of news articles, it will return the initial 255 characters of the text document.
� For documents which have a certain narrative quality, it will return the most salient sentences (client-settable). Additionally, the computation of salience can be made sensitive to a query or to a user profile, presented as a parameter to Summarizer, thus enabling query-biased and profile-biased summaries.
� For applications where it makes sense to define/assume a “domain” and where a domain dictionary/glossary is provided, it will 'highlight' occurrences of domain-specific terms in documents. This mode may also produce “keyword summaries” which list important domain terms in the documents.
2.4.8 Content managementThe following sections discuss content management.
Chapter 2. Portal technology 31

Portal Document ManagerPortal Document Manager (PDM) is a portlet application that provides a simple, real-time document viewing and contribution solution for Portal users. It is built according to the WebSphere Portal 5.0 portlet style and architecture guidelines and uses the new WebSphere Portal Content Publishing Portal Content Management (PCM) API to provide the necessary folder, document and user management functions needed for the PDM solution. PDM will be shipped in all versions of WebSphere Portal V5.0 (including Express). One of PDM's major usability objectives is to provide a simple interface, one that can be used without training, often referred to as a “walk up and use” interface. PDM's target audience includes business professionals, and content contributors who demand a non-technical interface.
This release of PDM provides the following function:
� Document Management:
– Navigate a hierarchy of documents organized into user-defined folders
– Authorized users can add, view, modify and delete folders and documents
– Access Control: Portal users/user groups used for access control
– Assign access control rights for folders and documents using Portal access control interface
� Search:
– PDM documents and folders are searchable using Portal search engine
– PDM search toolbar is used to search folder hierarchy
– Search on metadata or body of document
� Workflow Process:
– Using built-in workflow, assign approvers for workflow process during PDM configuration
– Approvers must approve new and changed documents before they are made public
– Work items show up in Tasks folder
– Ability to use configure PDM to use customized workflow process instead of the built-in workflow process
� Subscription:
– Allow subscription to documents and folders
– Subscription folder shows subscribed documents
� Integration with On Demand Client (ODC) components:
32 IBM WebSphere Portal for Multiplatforms V5 Handbook

– ODC editors (RichTextEditor, Presentation Editor and Spreadsheet Editor) can be used to edit PDM documents
– ODC Mailbox portlet can save attachments as PDM documents or attach PDM documents to e-mail
– ODC document conversion services used when it is necessary to change PDM document formats
� Versioning:
– User can create new versions of documents
– The user can view and retrieve document versions
– PDM provides built-in versioning support but can be configured to support CVS, IBM CM, and ClearCase®
2.4.9 Content publishingWebSphere Portal content publishing (WPCP) provides a Web content management solution which gives non-technical users greater control over content published to portals and other Web sites. Users benefit from the combined power of having one place to manage content for their Portal environment or other Web sites and an easy-to-use Web interface. This interface puts content management back into the hands of non-technical business users and provides them with tools such as personalization rules, templates, workflow, and versioning, which make the content creation process simple, yet controlled. WebSphere Portal Content Publishing decreases Web maintenance and administration costs, increases sales and profits by deploying timely and personalized content, and improves efficiency by getting all content produced in an enterprise to the Web.
2.4.10 TranscodingTranscoding technology was incorporated into WebSphere Portal 4.1. Since transcoding technology serves different markets through various IBM offerings, including WebSphere Portal, a number of markup language transformation were not enabled in WebSphere Portal. Starting with WebSphere Portal V5, plugins for WML and cHTML markup transformation are enabled. WebSphere Transcoding Publisher will be bundled as part of the Portal core install package. This will alleviate the need to have a separate installation for WebSphere Transcoding Publisher and Portal. Simplifying the installation process and reducing the chance of an error during the installation of Portal and later, during migration. In an effort to do this, transcoding is now installed inside the Portal directory; this includes moving transcoding classes to the shared app directory. Configuration steps are also simplified by pre-configuring Portal property files with transcoding information.
Chapter 2. Portal technology 33

2.4.11 Struts portlet frameworkStruts is a very popular framework for Web applications using a Model-View-Controller design pattern. The Struts framework can be used to effectively design Web applications and support development teams of different sizes and organizations.
For WebSphere Portal 4.2, the Struts Portlet framework was updated to include the Struts 1.1 Beta 3 release and support for tiles and file upload was added.
The Struts Portlet framework in the WebSphere Portal 4.2 implementation is closely tied to Portal Core API, so changes there will affect the Struts Portlet framework and require changes to function in the WebSphere Portal V5 product. There are also WebSphere Application Server 5 dependencies that need to be addressed. The new function which end users will see again are supported for newer releases of Struts. The Struts Portlet framework will also be updated to use the new roles feature being developed in WebSphere Portal V5 and kept current with the JSR 127 (Java Server Face).
2.4.12 Click-to-ActionOne of the most significant advantages of the portlet architecture is the portlets’ ability to communicate with each other to create dynamic, interactive applications. Portlets can use messages to share information, notify each other of a user’s actions or simply help better manage screen real estate.
Messages can be sent to all portlets on a page, to a specific named portlet or to all portlets in a single portlet application. To send a message to all portlets on a page, you must send an instance of the DefaultPortletMessage.
User-Driven Process Integration extensions to C2AEnhancements to C2A which would contribute to the realization of the User-Driven Process Integration (UDPI) idea would be remembering the user choice for each step (so that only that choice is presented or automatically executed during subsequent interactions), supporting cross-page data transfer, so that the next step in the task is automatically surfaced to the user, supporting the notion of “sticky notes” which the user can attach to chosen sources (as reminders in a partially completed process of what he/she intends to do next), etc. Also, a user with special privileges should be able to save his/her choices (which, in effect, will define a particular process connecting a set of diverse applications) for import and use by other users or all users in a group or organization.
34 IBM WebSphere Portal for Multiplatforms V5 Handbook

Property wiring tool to be integrated with admin portletsThe wiring tool may is invoked as part of editing a page. It provides the capability to view sharable properties on each portlet instance and create wirings between them. It will also provide the capability to view the existing set of wiring rules for the current page. In order to obtain information about the sharable properties, the tool will invoke listProperties on the property broker. In order to obtain information about the existing rules, it will invoke getMatchRules on the PropertyBrokerServiceInternal interface. It will allow the user to pairwise choose compatible properties on two portlet instances and wire them up, or to specify that type-based matching be used for a specified property on a portlet. After the user has created the matching rules using the tool, the tool will invoke setMatchRules on the PropertyBrokerServiceInternal interface. The property broker service will store the rules persistently and cause the property match broker to update its in-memory data structures to add the new rules.
The Portlet Wiring Tool is not provided with the WebSphere Portal product package. It can be downloaded from the Portlet Catalog at http://www.ibm.com/websphere/portal/portlet/catalog by searching for IBM Portlet Wiring Tool V5.0. The Navigation code is 1WP10004E. This portlet should be placed on a page called Wires under the Page Customizer.
2.4.13 Portal Toolkit The Portal Toolkit for WebSphere Portal is an add-on component that installs into WebSphere Studio Site Developer and adds portlet development and debug functionality. The Toolkit includes two primary components and a set of example portlets which demonstrate portlet programming techniques.
The Portlet Wizard components allows a developer to begin development of a new portlet application. The developer specifies the portlet application name, portlet name, Java class name for the portlet, and the markups to be supported by the portlet. The wizard then generates a skeleton portlet application as a project in WebSphere Studio Site Developer. This project includes a Java source file that represents the portlet controller, a Java class that implements a Java bean to transfer display data from the controller class to the display JSPs, and sample display JSPs for all supported portlet modes and display markups. The project also includes properly completed web.xml and portlet.xml documents.
The portlet application debug components allows the developer to source debug a portlet. The developer defines a server instance for local debug, with WebSphere Portal running inside WebSphere Studio Site Developer, remote debug, with WebSphere Portal running on a remote instance of WebSphere Application Server, and remote attach, which allows the developer to debug a portal within a full portal production runtime stack.
Chapter 2. Portal technology 35

The Toolkit also includes interactive, dialog-driven editors for the portlet.xml and web.xml documents. As the developer changes Java files or JSPs, these resources are automatically recompiled and validated.
A portlet application project may be packaged as a standard portal WAR file and exported to a portal any time.
In Portal Toolkit V5.0, the following enhancements are included:
� WebSphere Portal 5.0 Currency / Portlet API support
� Updated portlet wizard
� Additional portlet examples
36 IBM WebSphere Portal for Multiplatforms V5 Handbook

Chapter 3. WebSphere Portal V5 prerequisites and planning
WebSphere Portal for Multiplatforms is an integrated solution. Multiple software components are shipped within the package. In order to design, build or implement the solution, one must at least understand the function of these components and, in general, know how they work together.
In this chapter, we will provide high-level technical information about the installation and configuration of WebSphere Portal V5. The high-level information presented here will set the foundation for the specific instructions for implementing WebSphere Portal in the following chapters.
We hope this information will prove to be helpful for people in the following roles:
� IBM Client Representatives and Sales teams and IBM Business Partners who need high level knowledge about the WebSphere Portal V5 technology.
� IT Architects and Technical Sales specialists who are designing solutions based on IBM WebSphere Portal to address customer needs.
� IT Specialists who are planning to implement the WebSphere Portal V5 technology.
� IBM customers planning to build a solution based on WebSphere Portal.
3
© Copyright IBM Corp. 2004. All rights reserved. 37

This chapter will cover the following:
� Architecture review
� Hardware and software prerequisites
� Planning for the database
� Planning for the LDAP
� Planning for the Web servers
� Planning for WebSphere Application Server and WebSphere Portal
� Planning for security
� Planning for clustering
� Planning for content publishing
� Planning Lotus Collaborative components
� Translation server and transcoding
� Typical scenarios
� Web browser consideration
� Installation method consideration
38 IBM WebSphere Portal for Multiplatforms V5 Handbook

3.1 Overview WebSphere Portal for Multiplatforms provides the runtime and development environment for running and developing portlets. It is based on WebSphere Portal V5 and other software components running on different hardware platforms.
In Table 3-3 on page 44, we list the software components found in the package and their major functions.
With these software components and based on the various requirements, you can build the Portal solution for the following environments:
Development The developers can use the development environment to create their software unit and test it.
This environment basically uses WebSphere Portal, the WebSphere Studio Site Developer or WebSphere Studio Application Developer, and WebSphere Portal Toolkit. Other components could also be added for development.
Test This environment can emulate the production environment to test the workload, scalability, etc.
This environment basically uses WebSphere Portal, the database, and the LDAP. Other components could also be added for the testing.
Production This is the runtime environment. This solution provides the daily service for the end user.
This environment uses all components which are necessary and it should be use for a clustered environment.
The major task of the planning is based on satisfying the following criteria:
� Clarifying the requirements
� Selecting the software components
� Checking and verifying the prerequisites
� Preparing the architecture
� Outlining the implementation steps
� Executing the installation and configuration process
In the following sections, we will provide high-level information about the planning and preparation of these components.
Chapter 3. WebSphere Portal V5 prerequisites and planning 39

3.2 Architecture reviewWhen designing or implementing a solution, it is very important to define the architecture first. With the architecture, one can clarify the hardware and software components. With a good architectural definition, one can also consider security, scalability, high availability, etc.
In this section, we will review the use of architecture. More detailed information can be found in Chapter 2, “Portal technology” on page 9.
3.2.1 HTTP server separationIn this architecture, the Web server is installed on another machine. The WebSphere Application Server Plugin components are installed on the same machine as the Web server. With the function of the plugin, the request received by the Web server is sent to the WebSphere Application Server.
The purpose of this architecture is scalability and load balancing. The plugin installed in the Web server could act as a dispatcher to pass the requests from the Web server to many application servers based on the routing method set in the plugin configuration file. Therefore, the plugin helps to provide scalability, high availability and work load balancing for the application server and WebSphere Portal.
3.2.2 Simple-machineA simple-machine architecture is considered to be a small workload environment. Therefore, all components are installed on one machine.
3.2.3 Multiple-machine A multiple-machine architecture includes the use of multiple machines but within one domain. The software components are installed on different machines based on the requirement. For example, we can install WebSphere Portal on one machine, install the database on another, and use a third machine for the LDAP server.
Here are some recommendations for the multiple-machine architecture:
� Use a dedicated machine for the Network Deployment.
� It is suggested that you install the Domino and Lotus collaborative components on separate machines.
� Install WebSphere Portal content publishing on a dedicated machine.
40 IBM WebSphere Portal for Multiplatforms V5 Handbook

3.2.4 Multiple-tier This architecture is based on the multiple-machine architecture, but the different machines can be in a different network area. In general, these different networks are separated by the firewalls and use different network domains.
With the multiple-tier architecture, one can put machines with critical information behind the firewall and put the interface machines, such as the Edge Server, in the front.
The database is the most important component. In addition to the database, the Domino server, Sametime, QuickPlace, etc. need to be available to users on the back end, so they are placed at the back end of the architecture. Sometimes, the LDAP directory is also put at the back end.
At the front of the architecture is the Edge Server. Behind the Edge Server, there is the firewall to the WebSphere Application Server and WebSphere Portal.
In general, the Web server, WebSphere Application Server, WebSphere Portal, etc. are placed in the network before a second firewall where the database exists.
3.2.5 Vertical scaling The vertical scaling is for WebSphere Application Server and WebSphere Portal. In the multiple-process architecture, we can configure more than one WebSphere Application Server on the same physical machine, thereby allowing us to take advantage of multiple processors.
3.2.6 Horizontal scaling In the WebSphere Portal solution, the horizontal scaling could be addressed at two levels.
1. Web server horizontal scaling
In this environment, more than one Web server machine can be used. These can provide the scalability and the high availability functions. The Web servers can work in parallel or back each other up.
This architecture would require the use of the Edge component in WebSphere Application Server Network Deployment. The Edge Server acts as a dispatcher to forward the requests from the Web browsers to different Web servers, then the Web servers can forward the requests to the application servers.
Chapter 3. WebSphere Portal V5 prerequisites and planning 41

2. WebSphere Application Server and WebSphere Portal horizontal scaling
In this architecture, we use more than one machine for the WebSphere Application Server and Portal machines. These machines handle the requests from the Web server(s). The plugin installed in the Web server dispatches the requests to the Portal machines.
3.3 Hardware and software prerequisites In this chapter, we will provide the hardware and related software prerequisites based on the different supported platforms.
3.3.1 Microsoft Windows 2000This topic provides hardware requirements and software product levels that are supported for WebSphere Portal.
Hardware requirements Listed in Table 3-1 are the hard requirements for WebSphere Portal running on Windows 2000.
Table 3-1 Hardware requirements
Listed in Table 3-2 are the disk space requirements per component.
Table 3-2 Disk space requirements
Hardware Minimum Recommendation
Processor Pentium® 800 MHz or equivalent
Pentium IV 1.4 GHz or higher
Memory 1024 MB or more per processor
2 GB or more
Component /tmp
WebSphere Portal 50 MB
WebSphere Application Server, extensions (includes Embedded Messaging), and fixes
245 MB
IBM HTTP Server N/A
Total 295 MB minimum
42 IBM WebSphere Portal for Multiplatforms V5 Handbook

Virtual memory/swap space: It is recommended that your virtual memory double your physical memory. At a minimum, this should be at least equal to your physical memory.
File system: An NTFS file system is recommended.
Network connectivity: To use Portal across a network, a network adapter and a connection to a physical network that can carry IP packets are required for the Portal machine, for example, Ethernet, Token Ring, asynchronous transfer mode (ATM), and so on.
Static IP address: A configured fully qualified host name. The Portal system must be able to resolve an IP address from its fully qualified host name. To ensure that this is configured correctly, you can issue the ping command from a command line.
An example command is:
ping hostname.yourco.com
where hostname.yourco.com is the fully qualified host name.
Note: Because the installation program does not check cluster sizes on a file system, install on an NTFS file system to ensure that you have enough disk space. If you intend to install on a FAT file system, make sure that you have enough disk space prior to installation. For more information, refer to the Microsoft support Web site, http://support.microsoft.com, and search for content about default cluster sizes for FAT file systems.
Chapter 3. WebSphere Portal V5 prerequisites and planning 43

Software requirementsThis section (Table 3-3) provides the minimum product levels that you should install for WebSphere Portal on the Windows 2000 platform.
Table 3-3 Software requirement
Components Supported software
Operating system
� Windows 2000 Advanced Server SP2 � Windows 2000 Advanced Server SP3 � Windows 2000 Server SP2 � Windows 2000 Server SP3
IBM WebSphere Application Server Enterprise V5.0 Fix Pack 1
All of the following fixes are required: + PQ73644_fix-temp.jar1 +WAS_Dynacache_05-08-2003_5.0.1_cumulative_fix.jar1 + PQ76567.jar1 + WAS_CM_08-12-2003_5.0.2-5.0.1_cumulative_Fix.jar1 + WebSphere Plug-in Cumulative Fix for 5.0.0, 5.0.1, and 5.0.22 + PQ72597-efix.jar2 + PQ72196_fix.jar2 + PQ77008.jar2 + PQ77142.jar2 + WAS_Security_07-07-2003_JSSE_cumulative_Fix.jar2
1. If you install WebSphere Application Server with the WebSphere Portal installation program, these fixes are installed for you. If you are installing on an existing WebSphere Application Server, these fixes must be applied before installing WebSphere Portal. Required fixes are located in the /fixes directory on the WebSphere Application Server Fix Pack and Fixes disc for your operating system.
2. These fixes must be installed manually. Fixes that must be installed manually are located in the /manualfixes directory on the WebSphere Application Server Fix Pack and Fixes disc.
Refer to the README files associated with the interim fixes for instructions on how to apply them. Refer to the WebSphere Portal Release Notes for the latest information on fixes.
Web server � Apache Web Server 1.3.26 � IBM HTTP Server 1.3.26.1 � IBM HTTP Server 2.0.42.1 � Microsoft Internet Information Server 4.0 supported on Windows NT 4.0 SP6. � Microsoft Internet Information Server 5.0 supported on Windows 2000 Advanced
Server SP2 and Windows 2000 Server SP2. � Lotus Domino Enterprise Server (as Web server) 5.0.9a or later � Sun ONE Web Server, Enterprise Edition 6.0 SP4
44 IBM WebSphere Portal for Multiplatforms V5 Handbook

Pre-installation checklistBefore you install WebSphere Portal, there are several tasks you should perform to ensure that your machine is ready for installation.
� Make sure that the servers meet the hardware and software requirements.
� Review release notes for each component before the install.
� If you are installing WebSphere Portal and already have the Microsoft Internet Information Server (IIS) Web server running, avoid Web server port conflict by
Database � Cloudscape V5.1.26 � IBM DB2 Universal Database Enterprise Server Edition 8.1 FP1 � IBM DB2 Universal Database Enterprise Edition 7.2 FP7 IBM DB2 Universal
Database Enterprise Edition 7.2 FP8 � IBM DB2 Universal Database Express 8.1 FP1 � IBM DB2 Universal Database Workgroup Server Edition 8.1 FP1 � IBM DB2 Universal Database Workgroup Edition 7.2 FP8 Informix Dynamic
Server 9.4 � Informix Dynamic Server 9.3 � Oracle Enterprise Edition 8i Release 3 (8.1.7) � Oracle Enterprise Edition 9i Release 2 (9.2.0.1) � SQL Server Enterprise SP3
LDAP � IBM Directory Server V5.1 � IBM Directory Server V4.1 � IBM Lotus Domino Enterprise Server 5.0.11 � IBM Lotus Domino Enterprise Server 5.0.12 � IBM Lotus Domino Enterprise Server 6.0� NDS eDirectory 8.6 � Windows 2000 Active Directory
Browser � Microsoft Internet Explorer 5.5 � Microsoft Internet Explorer 5.5 SP2 � Microsoft Internet Explorer 6.0 SP1 � Mozilla 1.0.2 � Mozilla 1.2.1 � Mozilla 1.3 � Netscape Communicator 6.2 � Netscape Communicator 7.0 � Opera Web Browser 7.11 and above
Components Supported software
Note: Although this is not listed under the supported items, Portal has run successfully on Windows 2000 SP4.
We have also run Mozilla 1.5 successfully with Portal.
Chapter 3. WebSphere Portal V5 prerequisites and planning 45

disabling IIS. IIS service can be disabled by clicking Control Panel -> Services.
� Make sure that all the servers have static IP addresses.
� Make sure that all the servers have a fully qualified host name.
� Install appropriate service packs for your operating system.
� Disable anti-virus software running on the servers.
� Disable any firewall application running on the servers.
� Gather all the software required for the installation.
For the purpose of the installation of WebSphere Portal MP on Windows 2000 in our lab environment, the following WebSphere Portal V5.0 CDs (Table 3-4) are required to implement the sample scenario described in Chapter 4, “WebSphere Portal: Microsoft Windows 2000 installation” on page 87.
Table 3-4 CD- components
CD Portal component Version
Documentation WebSphere Portal Documentation
V5.0
Setup Portal Installer Portal InfoCenter WebSphere Portal Toolkit
Current Build Build 08181037 V5.0 Build 20030816.1
1-1 WebSphere Application Server Enterprise for Windows
V5.0
1-6 WebSphere Application Server Fixpack and eFixesfor Windows and Linux
Fixpack 1
2 WebSphere PortalWebSphere Portal Content Publishing
Build 500_144_20030818 Build 20030815_1955
5-1 DB2 Enterprise Edition (Windows)
V8.1
5-7 DB2 Enterprise Edition Fixpack 1 (Windows, Linux, Linux390)
V8.1
8-1 Lotus Domino Extended Search for Windows and LinuxLotus Collaboration Center
Release 4.0GM - 8/14/2003
9-1 Lotus QuickPlace for Windows (Group 1)
Release 3.0.1
46 IBM WebSphere Portal for Multiplatforms V5 Handbook

3.3.2 SUSE SLES 8 This topic provides hardware requirements and software product levels supported for a WebSphere Portal Linux installation.
Hardware requirements Listed in Table 3-5 are the hardware requirements for WebSphere Portal running in a Linux environment.
Table 3-5 Hardware requirements
Software requirementsThe following WebSphere Portal V5.0 CDs are required to implement the sample scenario described in Chapter 5, “WebSphere Portal: SUSE SLES 8 Linux installation” on page 179.
Table 3-6 WebSphere Portal CDs for SuSE installation
10-1 Lotus Sametime (English and French)
Release 3.0
11-1 Lotus Domino Application Server (Windows - ENU, JPN, KOR)
Release 5.0.12
11-6 Lotus Notes Client, Domino Admin Domino and Sametime Hot Fixes
Release 5.0.12
CD Portal component Version
Hardware Minimum Recommended
Processor 800 MHz Pentium 4 at 1.4 GHz or higher
Physical memory 1024 MB 1024 MB or more
Virtual memory Equal to physical memory Double to the physical memory
CD Portal component Version
Documentation WebSphere Portal Documentation V5.0
Setup Portal Installer Portal InfoCenter WebSphere Portal Toolkit
Current Build Build 08181037 V5.0 Build 20030816.1
Chapter 3. WebSphere Portal V5 prerequisites and planning 47

3.3.3 IBM AIX 5.2This topic provides hardware requirements for WebSphere Portal on AIX.
Hardware requirementsIt is not recommended that you install WebSphere Portal on a machine with less than 1 GB RAM.
It is recommended that the virtual memory be double your physical memory. At a minimum, ensure that your virtual memory is equal to your physical memory.
1-1 WebSphere Application Server Enterprise for Windows,to install the IBM HTTP Server
IBM HTTP Server V1.3.26.1
1-2 WebSphere Application Server Enterprise for Linux, to install the WebSphere Application Server V5.0.
V5.0
1-6 WebSphere Application Server Fixpack and eFixes for Windows and Linux, to install the Fixpack, fixes and manual fixes for WebSphere Application Server V5.0
V5.0
2 WebSphere Portal and WebSphere Portal Content Publishing to install the WebSphere Portal V5.0. and WebSphere Portal Runtime Server.
V5.0
5-2 DB2 Enterprise Edition (Linux), to install IBM DB2 Server and Administration Client
V8.1
5-7 DB2 Enterprise Edition Fixpack 1 (Windows, Linux, Linux 390) to install the fixpack for IBM DB2
V8.1
11-3 Lotus Domino Application Server (AIX, Solaris, Linux), to install the Lotus Domino Enterprise Server
V5.0.12
11-6 Lotus Notes Client, Domino Admin, Domino and Sametime Hot Fixes, to install the Lotus Administrator on Windows 2000 SP3.
CD Portal component Version
48 IBM WebSphere Portal for Multiplatforms V5 Handbook

Disk space necessary on AIXBefore installing WebSphere Portal 5.0 on AIX, you must ensure the AIX box has enough disk space.
Figure 3-7 shows the required disk space by component.
Please refer to product documentation for more information about DB2 and Directory server requirements.
If you need help to create and increase file systems, please refer to Appendix B, “Preparing the AIX machine” on page 701.
Table 3-7 Disk space required on AIX
Software requirementsYou can find all supported products for WebSphere Portal V5 on the Internet at http://publib.boulder.ibm.com/pvc/wp/500/ent/en/InfoCenter/wpf/inst_req.html.
Product Installation directory Space required Temporary space /tmp
WebSphere Application Server 5.0
/usr/WebSphere/AppServer 968 MB 295 MB
WebSphere Portal 5.0 /usr/WebSphere/PortalServer 1150 MB 50 MB
WebSphere Network Deployment 5.0
/usr/WebSphere/DeploymentManager
900 MB 234MB
IBM HTTP Server 1.3.26 /usr/HTTPServer 30 MB
DB2 UDB Server 8.1 //home/db2inst1/usr
50 MB300 MB500 MB
IBM Directory Server 5.1 /usr/ldap 160 MB
Chapter 3. WebSphere Portal V5 prerequisites and planning 49

The following WebSphere Portal V5 CDs are required to implement the sample scenario shown in Chapter 6, “WebSphere Portal: IBM AIX V5.2 installation” on page 255.
Table 3-8 WebSphere Portal CDs for AIX installation
3.3.4 Sun Solaris 8.0This topic provides hardware requirements and software product levels that are supported for WebSphere Portal on Sun Solaris 8.0.
Hardware requirements Listed in Table 3-10 on page 51 are the hardware requirements for WebSphere Portal running on Sun Solaris.
CD Portal component Version
Documentation WebSphere Portal Documentation
V5.0
Setup Portal Installer Portal InfoCenter WebSphere Portal Toolkit
Current Build Build 08181037 V5.0 Build 20030816.1
1-3 WebSphere Application Server Enterprise for Windows
V5.0
1-7 WebSphere Application Server Fixpack and eFixesfor Windows and Linux
Fixpack 1
2 WebSphere PortalWebSphere Portal Content Publishing
Build 500_144_20030818 Build 20030815_1955
5-3 DB2 Enterprise Edition (Windows)
V8.1
5-8 DB2 Enterprise Edition Fixpack 1 (Windows, Linux, Linux390)
V8.1
3-2 IBM Directory Server for AIX V5.1
50 IBM WebSphere Portal for Multiplatforms V5 Handbook

Table 3-9 Hardware requirements
Listed in Table 3-10 are the disk space requirements per component.
Table 3-10 Disk space requirement on Solaris
Network connectivity requirements are as follows:
� A network adapter and a connection to a physical network which can use the TCP/IP protocol.
� A static IP address and a fully qualified host name.
Software requirementsPrior to installing WebSphere Application Server and WebSphere Portal, ensure that you install the Solaris 8.0 operating system and its patches (July 29, 2002 or later). You must log in as root or su to root to install the WebSphere Portal 5, otherwise the installation will fail.
Hardware Minimum Recommended
Processor Ultra 60 at 450 MHz Sun Blade 2000 workstation at 1 GHz or higher is recommended
Physical memory 1024 MB 1024 MB or more per processor
Virtual memory Equal to Physical memory Double to the physical memory
Component /opt /tmp
WebSphere Portal 1124 MB 50 MB
WebSphere Application Server, extensions (includes Embedded Messaging), and fixes
1002 MB 245 MB
IBM HTTP Server 30 MB n/a
Total 2422 MB 295 MB
Important: After installing Solaris 8.0, you will need to install the package SUNWnamos (system SUNWnamos Northern America OS Support) and change variables LANG=en_US and LC_ALL=en_US to ensure that all of your scripts run successfully.
Chapter 3. WebSphere Portal V5 prerequisites and planning 51

The following WebSphere Portal V5 CDs are required to implement the sample scenario described in Chapter 8, “WebSphere Portal: Sun Solaris 8.0 installation” on page 357.
Table 3-11 CDs required for Solaris
3.3.5 zLinux In this section, we list the hardware and software requirements for zLinux.
Hardware requirements:� IBM zSeries® or IBM S/390® Parallel Enterprise Server capable of running
SUSE Linux Enterprise Server, V7 (31-bit)
� Disk space: 2 GB or higher; Memory: 1024 MB or higher
CD name Components
Setup Portal InstallerPortal InfoCenterWebSphere Portal Toolkit
1-4 WebSphere Application Server Enterprise for Solaris
1-7 WebSphere Application Server Fixpack and eFixesfor AIX and Solaris
1-12 WebSphere Application Server Network Deployment for Solaris
2 WebSphere Portal WebSphere Portal Content Publishing
3-3 IBM Directory Server for Solaris
5-5 DB2 Enterprise Edition (Solaris)
5-9 DB2 Enterprise Edition Fixpack 1 (Solaris)
6-1 WebSphere Translation Server (SBCS)
6-2 WebSphere Translation Server (DBCS)
7 Tivoli Site Analyzer
8-2 Lotus Domino Extended Search for AIX and Solaris Lotus Collaboration Center
9-3 Lotus QuickPlace for AIX and Solaris
10-7 Lotus Sametime (Solaris)
11-3 Lotus Domino Application Server (AIX, Solaris, Linux)
52 IBM WebSphere Portal for Multiplatforms V5 Handbook

Software requirements� SUSE SLES for s/390 7 or 8 Kernel 2.4
� IBM HTTP Server V1.3.26
� IBM DB2 Universal Database™ V8.1 + Fix Pack 1
� IBM WebSphere Application Server V5.0 + Fix Pack 1
� IBM WebSphere Portal Enable 5.0
� IBM Directory Server V5.1
3.4 Planning for the databaseIn WebSphere Portal, the database is used to store information. During the installation, Cloudscape is used as the default database. But this database is for testing and demonstration only. In the production environment, for example, where a clustering environment exist, a robust database must be used.
Following are some robust databases which WebSphere Portal supports:
� IBM DB2
� DB2 for OS/390 and z/OS
� Informix
� Oracle
� SQL Server
So, for the production environment after the installation, some migration must be performed. The following are the major steps for the migration:
1. Export the configuration information from Cloudscape.
2. Install the database server and client.
3. Create the database for WebSphere Portal and create the users needed to access the databases. These tasks need to be performed manually if the database used is not DB2. However, for DB2, there is a task command available.
4. Run the WebSphere Portal database migration task to import the configuration information to the database server.
For database planning and configuration, you need to consider the following sections.
Chapter 3. WebSphere Portal V5 prerequisites and planning 53

3.4.1 Using Cloudscape or another robust databaseIf the installation is only for the purposes of demonstration and testing, and with no clustering, you can use the Cloudscape database. For other situations, you should migrate the database.
When you use Cloudscape, it must be run on the same machine as the Portal.
3.4.2 Local or remote database server Based on your architecture, you can install and configure the database either locally or remotely. However, you need to come up with a plan if you decide to install the database client on the machine running the WebSphere Portal.
WebSphere Portal uses JDBC to connect the database. If the database provided the type 3 or 4 JDBC driver and it is supported by WebSphere Portal V5, you do not need to install the database client. Otherwise, you need to install the database client first and make sure it can connect to the database server.
When you use the remote database, the platforms for the server and client may be different.
3.4.3 Database preparationIf you plan to migrate to a robust database, you need to pay attention to the database preparation, as detailed below:
1. Install the database server and client separately.
2. Create the database used by WebSphere Portal if the database is not DB2 (in DB2, there is a task command available).
3. Create the users and grant the privileges manually.
4. If you use a remote database, you must verify the connection first with a method used by database (such as the connect command in Oracle).
Important: Cloudscape does not support vertical cloning or a clustering environment. It also does not support the custom user registry for authentication.
Important: For different kinds of databases, the number of instance databases and users could be different. You can make the decision as to whether you need to use more than one database or put all the information in one database.
54 IBM WebSphere Portal for Multiplatforms V5 Handbook

Table 3-12 shows a brief summary of the databases and users.
Table 3-12 The databases and users
For more information, see the InfoCenter or the examples in the following chapters.
3.4.4 Database migrationIn order to migrate from Cloudscape to a robust database, some parameters need to be modified in the configuration file named wpconfig.properties, located in the directory <wp_root>/config. The modification is different based on the type of database server. There are samples in the directory <wp_root>/config/helpers.
For the database migration, you need to review and perform the following steps:
1. Export the configuration before making any modifications.
2. During the configuration, for the file path, always use / even in the Windows operating system.
3. Do not change parameters if it is not suggested.
4. Make a back-up of the configuration file before making changes.
Database name
Database Type
DB2 DB2 for z/OS and OS/390
Informix Oracle SQL Server
wps50 wpsdbusr wpsdbusr wpsdbusr wpsdbusrwmmdbusr
WPSDBUSRWMMDBUSR
wpcp50 pznadminEJBwcmdbadm
PZNADMINEJBWCMDBADM
fdbk50 feedback FEEDBACK
Note: After installing WebSphere Portal, the sample files are copied to the file system running the WebSphere Portal under the directory <wp_root>/config. The file names are:
� transfer_db2.properties
� transfer_informix.properties
� transfer_oracle.properties
� transfer_sqlserver.properties
Chapter 3. WebSphere Portal V5 prerequisites and planning 55

5. In order to make sure the database migration is correct, you can check the JDBC provider used before and after the migration.
3.4.5 Database prerequisites Shown in Table 3-13 are the supported databases for WebSphere Portal.
Table 3-13 Supported database prerequisites
Database Platform Notes
Windows AIX Solaris Linux Intel®
Linux zSeries
Cloudscape V5.1.26 (required for initial WebSphere Portal installation)
Yes Yes Yes Yes Yes � It is required on the initial installation
� After the installation, it can be transferred to other robust database
� It is included in the Portal CD
IBM DB2 Universal Database Enterprise Server Edition 8.1 FP1
Yes Yes Yes Yes Yes It is included in the WebSphere Portal CDs
IBM DB2 Universal Database Enterprise Edition 7.2 FP7
Yes Yes Yes Yes Yes 32-bit support only
IBM DB2 Universal Database Enterprise Edition 7.2 FP8
Yes Yes Yes Yes Yes 32-bit support only
IBM DB2 for z/OS and OS/390 7.1
For z/OS and OS/390 system only. To connect it, DB2 Connect™ V7 is required. Db2 Connect is part of the Enterprise Edition of DB2.
56 IBM WebSphere Portal for Multiplatforms V5 Handbook

IBM DB2 Universal Database Express 8.1 FP1
Yes Yes Yes Yes Yes
IBM DB2 Universal Database Workgroup Server Edition 8.1 FP1
Yes Yes Yes Yes Yes
IBM DB2 Universal Database Workgroup Edition 7.2 FP8
Yes Yes Yes Yes Yes 32-bit support only.
Informix Dynamic Server 9.4
Yes Yes Yes Yes Yes The following fixes are required and can be obtained from Informix
� TC3
Informix Dynamic Server 9.3
Yes Yes Yes Yes Yes The following fixes are required and can be obtained from Informix:
� TC6
Oracle Enterprise Edition 8i Release 3 (8.1.7)
Yes Yes Yes Yes Yes
Oracle Enterprise Edition 9i Release 2 (9.2.0.1)
Yes Yes Yes Yes Yes For WebSphere Compensation support, the Oracle OCI driver is required
SQL Server Enterprise SP3
Yes Required Microsoft SQL Server 2000 or Data Directory (formerly Meant) JDBC drivers
Database Platform Notes
Windows AIX Solaris Linux Intel®
Linux zSeries
Chapter 3. WebSphere Portal V5 prerequisites and planning 57

3.5 Planning for the LDAPTo incorporate security, we can use the LDAP as the user registry for authentication. LDAP is optional for WebSphere Portal and you must define the user registry method before enabling security. Because the LDAP is an industrial standard, there are some selections that need to be made.
The LDAPs supported by WebSphere Portal are the following:
� IBM Directory Server
� Domino (Lotus Domino Enterprise Server)
� Window 2000 Active Directory
� Novell eDirectory
� Sun ONE Directory Server
In order to set up the LDAP and configure it for WebSphere Portal, you must address the following items:
1. Use a new LDAP or an existing one if it is supported by WebSphere Portal.
You need to check the prerequisites for the supported LDAP and the versions first.
2. Where will the LDAP directory be installed?
You can install the LDAP on the same machine as the Portal or on another machine. You need to determine whether the LDAP client is necessary.
In general, installing the LDAP remotely will increase the performance.
3. Do you need to secure the data flow between the LDAP server, WebSphere Portal, and WebSphere Application?
If so, there are some special steps to follow to enable SSL among these servers.
4. You need to be aware of the difference in directory structure between LDAPs; whereas some LDAPs use cn, others use ou, etc.
5. It is recommended that you define the directory structure as soon as possible.
6. After defining the directory structure in the LDAP for the users and groups, determine whether the users/groups could be searched from the LDAP before you start the configuration of the WebSphere Portal. Use one of the following methods:
58 IBM WebSphere Portal for Multiplatforms V5 Handbook

– Use the Web browser
Some Web browsers support the LDAP protocol; in this case, you can use the following URL to do the search:
ldap://<hostname>/uid=wpsadmin,ou=People,o=itso.ral.ibm.com
– Use the LDAP search command
You can always use this command for testing. An example of this command can be found in 8.7.6, “Verifying the installation and configuration” on page 427.
After you have installed and configured the LDAP, you can configure the Portal security based on the LDAP. You can change the Portal configuration to add the LDAP information, validate it, then enable the security which is based on the LDAP.
Shown in Table 3-14 are the supported LDAPs.
Table 3-14 Supported LDAP directories
LDAP Platform Notes
Windows AIX Solaris Linux Intel
Linux series
IBM Directory Server V5.1 Yes Yes Yes Yes Yes it is included in the WebSphere Portal CD
IBM Directory Server V4.1 Yes Yes Yes Yes Yes
Lotus Domino Enterprise Server 5.0.11
Yes Yes Yes Yes Yes
IBM Lotus Domino Enterprise Server 5.0.12
Yes Yes Yes Yes Yes It is included in the WebSphere Portal CDs.
Lotus Domino Enterprise Server 6.0
Yes Yes Yes Yes Yes
Novell e-Directory Yes Yes Yes Yes Yes
Sun ONE Directory Server (formerly iPlanet) V5 FP2
Yes Yes AIX 4.3.3 and Solaris 8 only.
Windows 2000 Active Directory
Yes
Chapter 3. WebSphere Portal V5 prerequisites and planning 59

3.6 Planning for Web serversThe Web server is the front end of the WebSphere Portal solution.
Although there is an integrated Web server in the WebSphere Application Server, it is mainly for administrative and test purposes. In the runtime environment, it is strongly suggested that you use a Web server.
To plan for the Web servers, you need to consider the following sections.
3.6.1 Existing Web server If there is an existing Web server, we must make sure it is supported by WebSphere Portal. The installer will not automatically detect the Web server during the installation but it will provide the option to install the plugin to the Web server, if required.
3.6.2 Local or remote Web serverIf you use a remote Web server, do not forget to install the WebSphere plugin and do not forget to install the fix pack and the e-fix for the plugin.
In the case of a remote Web server, you can use a different platform. For example, you can run the WebSphere Portal on AIX and install the remote Web server on Windows. In this situation, when you copy the plugin configuration file, you need to make sure to modify the path in the configuration file.
3.6.3 Web server product choiceThe WebSphere Portal supports the following Web servers:
� IBM HTTP Server
� Apache Web Server
� Microsoft IIS
� Sun ONE Web Server
� Lotus Domino Enterprise Server (as Web server)
If you choose the IBM HTTP Server and plan to install it on the same machine as WebSphere Portal, keep in mind that it could be installed by the installer. Otherwise, for the other situations, such as when using the IBM HTTP Server remotely, or using other Web servers, both locally or remotely, you must install the Web server separately.
60 IBM WebSphere Portal for Multiplatforms V5 Handbook

The WebSphere plugin needs to be installed to the Web server. If the Web server is installed on the same machine as WebSphere Portal, the installer could help to install it. If the Web server is installed remotely, the plugin, fix pack and e-fix must be installed separately.
3.6.4 Port conflict avoidanceIn some environments and platforms, a Web server may already exist. As a default, the Web server uses port 80. If using SSL, it uses port 443. Therefore, you must ensure the port is not being used in the machine where the Web server is to be installed.
3.6.5 Web server prerequisitesShown in Table 3-15 are the supported Web servers for WebSphere Portal V5.0.
Table 3-15 Supported Web servers
Web server Platform Notes
Windows AIX Solaris Linux Intel
Linux zSeries
Apache Server 1.3.26
Yes Yes Yes Yes Yes Includes CERT Advisory CA-2002-17
IBM HTTP Server 1.3.26.1
Yes Yes Yes Yes Yes It is included in the WebSphere Application Server CD.
IBM HTTP Server 2.0.42.1
Yes Yes Yes Yes Yes
Microsoft Internet Information Server 4.0
Yes Supported on Windows NT® 4.0 SP6.
Microsoft Internet Information Server 5.0
Yes Supported on Windows 2000Advanced Server SP2® and Windows2000 Server SP2.
Lotus Domino Enterprise Server (as Web server) 5.0.9a or later
Yes Yes Yes Yes 5.0.9a supports AIX 5.x.
Chapter 3. WebSphere Portal V5 prerequisites and planning 61

3.7 Planning for WebSphere Application Server and WebSphere Portal
The WebSphere Portal operates on top of the WebSphere Application Server as an application. When planning for WebSphere Portal, you should consider the information included in the following sections.
3.7.1 An existing WebSphere Application ServerIf there is an existing version of WebSphere Application Server, WebSphere Portal will detect the existing version and will verify it. If it is not at the supported level, the installer will be launched to perform the required migration.
If the existing version of the WebSphere Application Server is V5.0, you need to pay more attention to the security. For example, you must check if the existing WebSphere Application Server has already enabled security. The configuration is different between the versions depending on whether or not security is enabled.
If security in the existing WebSphere Application Server V5 is enabled during the configuration, IBM recommends that the security be set to disable and then set back to enable after the configuration.
Another important issue is that the WebSphere Portal does not support the Java 2 security in the WebSphere Application Server V5.0. This choice must be disabled. You must avoid the situation where there is an application which needs to enable the Java 2 security and must run on the same WebSphere Application Server V5.0.
Sun ONE Web Server, Enterprise Edition 6.0 SP4
Yes Yes Support for AIX was dropped with 6.x editions.
Web server Platform Notes
Windows AIX Solaris Linux Intel
Linux zSeries
62 IBM WebSphere Portal for Multiplatforms V5 Handbook

3.7.2 Coexisting WebSphere Application ServersSometimes, because of other applications and the limitation of resources, you may need to install WebSphere Portal on another WebSphere Application Server. Note that the other server will be WebSphere Application Server V4. In such a situation, you should consider one of the following items:
� Upgrading WebSphere Application Server V4 to V5,
� Allowing the coexistence of WebSphere Portal V5 with WebSphere Application Server V4
There are some special steps involved for the above configuration. However, you should refer to the WebSphere Portal V5 InfoCenter for detailed steps.
3.7.3 Multiple instances of WebSphere Portal on the same machine
You can install more than one copy of WebSphere Portal on the same machine, where each WebSphere Portal operates independently. In such a situation, each copy of the WebSphere Portal must be installed on a separate installation of the WebSphere Application Server.
Running multiple instances of WebSphere Portal on the same installation of WebSphere Application Server is not supported. Visit the WebSphere Portal V5 InfoCenter for more detailed information.
3.7.4 Installation without a configurationIn general, the WebSphere Portal Installer will install the necessary programs and then automatically perform the necessary configuration tasks to get the WebSphere Portal up and running. However, it is possible to have the installer perform only the installation and basic configuration. The configuration can then be performed manually.
This function is provided by an option of the installer. You can use the option during the installation in the following method when starting the Portal installer:
� In UNIX®: ./install.sh -W basicConfig.choice=”no”
� In Windows: install.abt -W basicConfig.choice=”no”
Then, after the installation, you can use the configuration task to continue the configuration.
Chapter 3. WebSphere Portal V5 prerequisites and planning 63

3.7.5 Default virtual host consideration By default, the Portal Installer will deploy the Portal application on the default virtual host of the WebSphere Application Server. But, in some cases and especially during coexistence, it might need to use another virtual host for the Portal application.
You can use the following method:
1. Install the WebSphere Portal without configuring, for example, use the -W basicConfig.choice=”no” option.
2. Edit the configuration file, change the parameters and save the file.
3. Run the configuration task, basic-config, for the configuration.
For more information, visit the WebSphere Portal V5.0 InfoCenter.
http://publib.boulder.ibm.com/pvc/wp/500/ent/en/InfoCenter/index.html
3.7.6 Installing an empty PortalThe installer can also provide a choice where no portlet is installed during the installation and only an empty Portal is installed.
For instance, you can use the option:
-W installPortaletsSequence.active=”false”,
After the installation, you must continue with the manual configuration.
3.7.7 Context root planningBy default, the WebSphere Portal uses the /wps/portal as the context root.
In some situations, you may prefer to change the context root to another location.
In V4, it is difficult to change this because Portal will need to modify the context root of the WebSphere Portal application, then re-install it. However, in V5, an easier method is provided to make the change.
If you plan to change the default context root, pay special attention to the following section.
About using / as the context rootIf you plan to change the context root to root, you must make sure there is no other application using it within the same virtual host. There is a sample
64 IBM WebSphere Portal for Multiplatforms V5 Handbook

application preinstalled which uses / as the context root, and by default, uses the same virtual host with WebSphere Portal.
About the name of the context rootIf you need to provide another name for the context root, you must avoid the names in the directory where the portlet WAR directory exists.
3.7.8 If a firewall existsIf there is a firewall running on the machine where you plan to install the Portal, you need to disable it first. Otherwise, the installer will detect it and will display warning messages.
3.7.9 WebSphere Application Server Enterprise Edition prerequisitesWebSphere Portal can run on the WebSphere Application Server Enterprise Edition and the supported platforms:
� Windows
� AIX
� Solaris
� Linux Intel
� Linux zSeries
In addition, the following e-fixes are required:
1. The e-fixes can be installed by the installer, but if you use an existing WebSphere Application Server Enterprise Edition, you must install them manually:
– PQ73644_fix-temp.jar
– WAS_Dynacache_05-08-2003_5.0.1_cumulative_fix.jar
– PQ76567.jar
– WAS_CM_08-12-2003_5.0.2-5.0.1_cumulative_Fix.jar
2. The e-fixes which must be installed manually, even if you use the installer, are:
– WebSphere Plug-in Cumulative Fix for 5.0.0, 5.0.1,and 5.0.2
– PQ72597-efix.jar
– PQ72196_fix.jar
– PQ77008.jar
Chapter 3. WebSphere Portal V5 prerequisites and planning 65

– PQ77142.jar
– WAS_Security_07-07-2003_JSSE_cumulative_Fix.jar
3.8 Planning for WebSphere Portal securityAfter you have installed WebSphere Portal, you must configure security for it.
Unlike the WebSphere Portal V4, the security configuration is not included in the installation program. It must be performed separately.
The following sections discuss some aspects of the security configuration.
3.8.1 Authentication and the user registry The security configuration will perform some security setup in WebSphere Application Server V5, including authentication. However, before you get started, you must define which security registry will be used.
Generally speaking, there are three types of registries that could be accessed by WebSphere Application Server and WebSphere Portal:
� Lightweight Directory Access Protocol (LDAP) directory
� Custom User Registry (CUR)
� Member repository (for WebSphere Portal/WebSphere Member Manager)
By default and after the installation, WebSphere Portal uses a Cloudscape database as a Custom User Registry (CUR) for authentication.
You can perform your configuration so as to use the LDAP or the CUR. The WebSphere Application Server needs the definition for the global security to be enabled. Based on the security registry that is defined, you can modify the configuration file, then enable the security.
If using the LDAP If you use the LDAP as the security repository, in general, you will follow these steps:
1. Install and configure the LDAP server, and client if necessary.
2. Configure the user and the group needed by the Portal.
3. Use the following command to check the LDAP setup:
– In UNIX:
./WPSconfig.sh. validate-ldap
66 IBM WebSphere Portal for Multiplatforms V5 Handbook

– In Windows
WPSconfig.sh validate-ldap
4. Use the following command to enable the security:
– In UNIX:
./WPSconfig.sh. enable-security-ldap
– In Windows:
WPSconfig.sh enable-security-ldap
If using the Custom User Registry If you use the Custom User Registry as the security repository, in general, you will follow these steps:
1. Ready the custom user registry.
2. Change some parameters in the configuration file, for example, <wp_root>/config/wpconfig.properties
3. Enable the security using the following command:
– UNIX
./WPSconfig.sh enable-security-cur
– Windows
WPSconfig.bat enable-security-cur
3.8.2 External authentication By default, WebSphere Portal relies on WebSphere Application Server for authentication.
You can configure a third-party authentication proxy server to perform authentication for WebSphere Portal.
WebSphere Application Server typically uses a Trust Association Interceptor (TAI) for the external authentication proxy. The TAI must be activated via the WebSphere Application Server Admin console.
Note: If the WebSphere application exists and security is already enabled before executing your security configuration, there will be some special steps needed. This information is available from WebSphere Portal V5 InfoCenter.
Note: If you use the pre-existing WebSphere Application Server, the method might be different.
Chapter 3. WebSphere Portal V5 prerequisites and planning 67

The TAI can be used with Tivoli Access Manager and SiteMinder.
If the third-party authentication proxy provides native WebSphere Application Server identity tokens, such as the Lightweight Third Party Authentication (LTPA) tokens, a TAI is not necessary. Currently, only Tivoli Access Manager WebSEAL can provide native WebSphere Application Server identity tokens.
3.8.3 External authorization When portal resources are created, their access control is administered internally by WebSphere Portal. Alternatively, you can configure an external manager to control access to Portal resources. Currently, WebSphere Portal supports Tivoli Access Manager and Netegrity SiteMinder as external security managers.
For the external authorization, there are some differences between WebSphere Portal V4 and V5. In V4, resources are externalized and ACLs are used to control permissions. In V5, role-based access control is used, so the externalization process is changed. From the perspective of the external security manager, the externalized roles contain only one permission: membership in the role. WebSphere Portal always determines the permissions the portal associates with each role.
3.8.4 Supported external security softwareThe software for an external security manager for WebSphere Portal is as follows:
� IBM Tivoli Access Manager for e-business 4.1 with fix pack 2 installed
� Netegrity SiteMinder 5.0 or 5.5
3.8.5 Secure Sockets Layer (SSL)The Secure Sockets Layer (SSL) could help to ensure the secure data transfer through the network. In the WebSphere Application Server, you can set SSL for the following:
� Web browser to Web server
� Web server to WebSphere Application Server
� WebSphere Application Server to LDAP
� WebSphere Portal to LDAP
� WebSphere Portal to back-end system
68 IBM WebSphere Portal for Multiplatforms V5 Handbook

You can find more detailed information in the documentation CD for WebSphere Application Server, WebSphere Portal and other related products, such as the LDAP you have chosen.
When setting up LDAP for SSL, you can finish the setup without the SSL and later enabled SSL. For more information on how to set up the SSL for different LDAP servers, consult the WebSphere Portal V5 Infocenter.
3.8.6 Certificate consideration In order to configure the SSL, you need a certificate. You can get the certificate from the vendor or use a tool to create it. For example, you can use iKeyman, which is included in the IBM HTTP Server.
Another important item to keep in mind is that for any certificates required to establish full certificates, the signing of a trust chain must be available to WebSphere Application Server and WebSphere Portal. For the self-signed certificate, only one level is needed. However, for the single certificate by CA, the certificate chain confirming the identification and validity of the signing CA must be included.
You must also pay attention to the expired time of the certificate.
3.8.7 Deleting passwordsIn order to configure the security and the LDAP, you must include information in the configuration file, including the password. After the configuration is done, you can remove the passwords in the configuration file.
1. Log in as root.
2. Change the working directory to <wp_root>/config.
3. Enter the appropriate command to run the configuration task:
UNIX: ./WPSconfig.sh delete-passwords
Windows: WPSconfig.bat delete-passwords
4. Restart the Portal.
3.8.8 Tivoli Access ManagerPortals provide a personalized single point of access to applications, content, people and processes through a Web interface. They also provide underlying services for these applications, such as security, search, collaboration and workflow.
Chapter 3. WebSphere Portal V5 prerequisites and planning 69
The redbook A Secure Portal using WebSphere Portal V5 and Tivoli Access Manager, SG24-6077, focuses on the security aspect of WebSphere Portal’s single access point. This solution is built on WebSphere Portal V5.0.1 and Tivoli Access Manager V4.1. The secure portal is designed to be a Portal application integrated with a centralized security access manager. Both client authentication and page/portlet authorization is managed in this one central repository. For more information, visit http://www.ibm.com/redbooks.
3.9 Planning for the clusteringClustering uses the concept of distributing the workload across multiple application servers. These application servers could be on the same physical machine (we call this a vertical cluster), or on different machines (we call this a horizontal cluster).
With the support of WebSphere Application Server V5, WebSphere Portal can provide the clustering across different platform machines.
3.9.1 Vertical clusteringIf there are multiple-processor machines, such as SMP, it is suitable to install the WebSphere Application Server in vertical clustering. In this environment, we can take full advantage of the resources of a multi-processor system.
3.9.2 Horizontal clusteringAs defined earlier, we can allow WebSphere Portal to run on multiple machines; these machine run the same task and provide the same service.
With this kind of clustering, we are allowed more scalability because some machines are performing the same task. So, if one machine is busy, the next request could be forwarded to another available machine and provide a quick response.
This kind of clustering also provides high availability. If one machine has a problem or is unavailable, the other machine is available to conduct the work. As a whole, the service is still available. People utilize this method to perform machine maintenance and other activity based on a schedule, while service is provided around the clock.
Important: If using clustering, the WebSphere Application Server Network Deployment Manager must be used.
70 IBM WebSphere Portal for Multiplatforms V5 Handbook

Furthermore, in order to maximize security, horizontal clustering could reside in different geographic locations to guard against natural disasters or site outages.
3.9.3 Cross-platform clusteringAn advantage of WebSphere Application Server V5.0 is that it provides clustering across different platforms. WebSphere Portal takes advantage of this feature. When an organization plans for horizontal clustering, they are restricted to the same platform. They can install the cluster on another platform and increase the capability of the services.
3.10 Planning for content publishingWebSphere Portal content publishing (WPCP) is a browser-based interface easily managed by non-technical users. This feature provides you with tools to create, manage and control the workflow of the content for WebSphere Portal.
WebSphere Portal content publishing will be automatically installed and configured during the WebSphere Portal installation.
You can refer to the WebSphere Portal InfoCenter for additional detailed installation and configuration steps.
http://publib.boulder.ibm.com/pvc/wp/500/ent/en/InfoCenter/index.html
WebSphere Portal content publishing uses Cloudscape as a database, similar to WebSphere Portal. If you want to move the data to a more robust database, such as DB2 Server, you should follow the instructions to transfer the data from Cloudscape to DB2 Server as shown in 4.3, “Migrating the database from Cloudscape to DB2” on page 111. If you are installing the runtime component in a stand-alone machine, you can use the database server of your choice, such as Cloudscape, DB2 Server, Oracle, Informix or MS SQL.
Important: The Authoring component of WebSphere Portal content publishing can be installed on Windows only. You will be able to run the Runtime component of WebSphere Portal Content Publishing on Windows, AIX, Solaris, Linux-Intel and Linux zSeries operation systems. This feature is included in CD#2 of WebSphere Portal.
Chapter 3. WebSphere Portal V5 prerequisites and planning 71

3.11 Planning Lotus Collaborative Components Lotus Collaborative Components provide the building blocks for integrating the functionality of Lotus Domino, Lotus Sametime, Lotus QuickPlace, and the Lotus Discovery server into portals and portlets. In order to use the Lotus Collaborative Components, you must install the related products (for example, Lotus Sametime, Lotus QuickPlace, Lotus Discovery, etc.).
Here are the general steps for the installation and configuration:
1. Install and configure the WebSphere Portal. Because you will use Domino for the collaborative components, it is suggested that you use Domino as the LDAP.
2. Define the components you require. Here are the general rules:
– If you will use the Notes and Domino portlet, or Domino Web Access (iNotes™) portlet, you must install Domino and configure WebSphere Portal for it later.
– If you will be using the Sametime Connect portlet, you must install Sametime and configure WebSphere Portal for it later.
– If you will be using the QuickPlace portlet, you must install QuickPlace and configure WebSphere Portal for it later.
– If you will be using the Lotus Discovery portlet, you must install the Lotus Discovery Server™ and configure WebSphere Portal for it later.
3. Install the following products based on the function defined.
– Lotus Domino
– Lotus Sametime
– Lotus QuickPlace
– Lotus Discovery Server
4. Configure Lotus Collaborative Components to use Domino Directory or to configure WebSphere Portal to use the Lotus companion products.
5. Deploy the portlets.
3.11.1 Sametime and QuickPlaceSet up Lotus Sametime to work with WebSphere Portal users. The complete set of people awareness features are available in collaborative portlets. Also set up Lotus QuickPlace to work with WebSphere Portal users. This allows you to use instances of the QuickPlace portlet.
72 IBM WebSphere Portal for Multiplatforms V5 Handbook

Domino is a prerequisites for SameTime and QuickPlace. You must install and configure Domino before setting up other servers.
The following are some points for your consideration:
� If possible, you should install Sametime and QuickPlace on different machines to achieve a better performance.
� If Sametime and QuickPlace are to work together, both must use the same LDAP directory. Domino LDAP is recommended.
� You should set up SSO authentication on both the Sametime server and QuickPlace server.
Shown in Table 3-16 is the supported software for Lotus Collaborative Components.
Table 3-16 Supported Lotus Collaborative Components
Lotus Companion products
Platform Notes
Windows AIX Solaris Linux Intel
Linux zSeries
IBM Lotus Domino Enterprise Server 5.0.12
Yes Yes Yes � It is included in the WebSphere Portal V5.0 CDs.
Instant messaging and online awareness, based on Lotus Sametime 3.0 technology
Yes Yes Yes � It is included in the WebSphere Portal V5.0 CDs
� Lotus Domino 5.0.12 is a prerequisite.
� An LDAP directory is required, and Domino Directory is recommended. Also, fixes are required
Virtual teamrooms based on Lotus QuickPlace 3.0.1 technology
Yes Yes Yes � It is included in the WebSphere Portal V5.0 CDs
� Lotus Domino 5.0.12 is a prerequisite.
� An LDAP directory is required, and Domino Directory is recommended.
Chapter 3. WebSphere Portal V5 prerequisites and planning 73

The installation of Domino, Sametime and the required fixes have its order. Please check WebSPhere Portal InfoCenter for the detail steps.
3.11.2 IBM WebSphere Portal Collaboration Center The IBM WebSphere Portal Collaboration Center, with Lotus software at its core, provides an integrated framework of e-workplace components for finding, connecting and working with people:
� People Finder portlet
– Directory Connector application
– Sample directory configuration
� My Lotus Team Workplace (QuickPlace) portlet
� Lotus Web Conferencing (Sametime) portlet
� Sametime Contact List portlet
� Sametime Who Is Here portlet
Before you install and configure the Collaboration Center, you should consider the following factors:
� Principally, user roles and responsibilities
The user type and the role with the responsibilities must be defined.
� Directory strategy
The directory for the people finder should also be defined.
� Installation readiness
Lotus Collaboration Center V5.0
Yes Yes Yes � It is included in the WebSphere Portal V5.0 CDs
Lotus Discovery Server V2.0
Yes Yes Yes
Lotus Companion products
Platform Notes
Windows AIX Solaris Linux Intel
Linux zSeries
Note: The ORB JDK Interim Fix is required for Collaboration Center.
74 IBM WebSphere Portal for Multiplatforms V5 Handbook

Shown in Table 3-17 are the supported operating systems for Collaboration Center.
Table 3-17 Supported operating system for Collaboration Center
Shown in Table 3-18 are the supported databases for the Collaboration Center.
Table 3-18 Support database for the Collaboration Center
Platform Notes
Windows AIX Solaris Linux Intel
Linux zSeries
Operating System for Lotus Collaboration Center
Yes Yes Yes Yes Yes Please see the Notes below
Note:
1. The following operating systems are not supported at this time:
– Red Hat Enterprise Linux AS for Intel (x86) 2.1
– SuSE SLES for Intel (x86) 7 2.4 kernel
– SuSE SLES for Intel (x86) 8 2.4 kernel
2. For the following operating systems, please refer to the Release Notes before installing Collaboration Center:
– AIX 5.2
– Windows 2000 Advanced Server SP2
– Windows 2000 Advanced Server SP3
Platform Notes
Cloudscape DB2 Informix Oracle MS SQL
Database for Lotus Collaboration Center
Yes Yes Yes Yes Please see the Notes below
Chapter 3. WebSphere Portal V5 prerequisites and planning 75

Shown in Table 3-19 is the supported LDAP for Collaboration Center.
Table 3-19 Supported LDAP for the Collaboration Center
3.12 Translation server and transcoding Machine translation is a natural addition to handle content that is not in a user’s desired language. Machine translation is an automatic translation of human language by computers.
WebSphere Translation Server provides machine translation through two paradigms:
� Viewer initiated (referred to as on demand translation in the WebSphere Translation Server InfoCenter)
� Viewer automated (referred to as on-the-fly translation in the WebSphere Translation Server InfoCenter)
Note:
1. DB2 for z/OS and OS/390 is not supported at this time.
2. When using the following databases, please refer to the Release Notes before installing the Collaboration Center.
– DB2 Workgroup Edition 7.2 FP7
– DB2 Workgroup Edition 7.2 FP8
– DB2 Workgroup Edition 8.1 FP1
– MS SQL Server 2000 SP3 l
Platform Notes
IBM Directory Server
Domino Novell eDirectory
Sun ONE
MS Active Directory
LDAP for Lotus Collaboration Center
Yes Yes Yes Yes Lotus Collaboration Center Supports most of the directories that WebSphere Portal supports.
76 IBM WebSphere Portal for Multiplatforms V5 Handbook

In order to use machine translation with WebSphere Portal, the administrator must:
� Configure the Transcoding Technology of the WebSphere Portal with Translation Server(s) information.
� Provide the Machine Translation Plugin, which acts as a bridge between WebSphere Portal and Translation Server, passing the portlet's content to Translation Server for translation.
� Configure individual portlets to specify the translation paradigm, either viewer initiated or viewer automated.
You need to install the Translation Server separately. Refer to the product documentation for details.
The general steps of the installation and the configuration are:
1. Install the Translation Server.
2. Configure Transcoding Technology.
3. Confirm successful installation and configuration.
4. Enable portlets for machine translation.
You can refer to the WebSphere Portal InfoCenter for details.
3.13 Typical scenariosBased on the features and functions of the WebSphere software components, in this section, we will discuss some typical installation and configuration scenarios.
In order to implement the scenarios and gain an understanding of the solution, you will need to install, configure and customize them individually, or combine some scenarios so as to address their business requirements.
Note: We recommend that users install Translation Server on a separate machine from WebSphere Portal, so that WebSphere Portal can run at its peak performance. Users can also install Translation Server on multiple machines, with each machine providing a different pair of language translations. This configuration may further improve the translation performance.
Chapter 3. WebSphere Portal V5 prerequisites and planning 77

3.13.1 Quick install This is the simplest scenario. This install includes WebSphere Portal with WebSphere Application Server, IBM HTTP Server and the Cloudscape database on one machine. The focus is on the WebSphere Portal only, with no options. The scenario uses the WebSphere Portal installer and puts all the components on one machine.
The components to be installed are:
� WebSphere Application Server Enterprise Edition
� WebSphere Application Server Base, Fixpack
� WebSphere Application Server Enterprise Edition Fix Pack
� WebSphere Portal V5
� WebSphere Portal Content Publisher Runtime
� Cloudscape database
The steps for the quick install are very simple:
1. Determine the platform you will use and check that the hardware meets the prerequisites. For example, ensure you have enough memory, hard disk space, etc.
2. Make sure to use the static IP address and the fully qualified host name.
3. In the UNIX platform, make sure the installer uses the account with root privileges.
4. In the Windows platform, make sure the installer has administrative privileges for the following services:
– Acting as part of the operating system
– Logging on as a service
5. Find the CD named Setup; you can either copy the installation image to your hard disk, insert the CD in the driver, or access the CD remotely.
6. In the UNIX system, start the installer with the following command:
# ./install.sh
7. In the Windows system, start the installer with the command:
> install.bat
8. Follow the instructions to install WebSphere Portal with WebSphere Application Server, IBM HTTP Server and a Cloudscape database (with existing or remote components).
78 IBM WebSphere Portal for Multiplatforms V5 Handbook
3.13.2 WebSphere Portal install with existing WebSphere environment
In some environments, people may wish to install the WebSphere Portal in an existing WebSphere environment. The existing components might include the WebSphere Application Server, the Web server, etc.
In the WebSphere Portal installer, if you choose the Custom method, you can choose to use the existing WebSphere Application Server. On the other hand, in order to use the existing Web server, you must install the plugin to the existing Web server or manually edit the plugin configuration file so it can connect to the WebSphere Application Server where the Portal is running. Refer to the WebSphere Application Server InfoCenter for more details.
3.13.3 WebSphere Portal install with existing WebSphere environment and security enabled
In this environment, you can choose to use the existing WebSphere environment where security is already enabled.
This scenario also focuses on the installation and configuration of the WebSphere Portal. In order to add WebSphere Portal to this environment, we need to perform the following steps:
1. Install the WebSphere Portal in the existing WebSphere environment.
2. Disable security temporarily.
3. Configure the WebSphere Portal for the database, LDAP, Web server, etc. if necessary.
4. Enable security again.
You can get more detailed information about this scenario from the WebSphere Portal InfoCenter.
Important: This quick install scenario is basically for demonstration and testing purposes. It is not recommended for the production environment. For the production environment and especially the clustering environment, you need to at least migrate the database from the Cloudscape to other databases such as IBM DB2.
Chapter 3. WebSphere Portal V5 prerequisites and planning 79

3.13.4 WebSphere Portal install with remote robust databaseFor performance and security considerations, many people use one dedicated machine as the database server and some high availability software, such IBM High Availability Cluster Multiprocessing (HACMP) for high availability for the database server. In WebSphere Portal, this style is supported.
This scenario focuses on the use of a robust database to replace the CloudScape database (for example, IBM DB2). The remote database can be in the same network domain with WebSphere Portal or in another domain, such as behind the firewall.
3.13.5 WebSphere Portal with remote robust database and extended security using an LDAP directory
In addition to the remote database, WebSphere Portal provides the security functions for authentication and authorization. The user registry information can be stored in the LDAP. The LDAP server can be local or remote.
This scenario focuses on installing and configuring the LDAP with the robust database. The major software components to consider in this scenario are:
� WebSphere Portal
� Database
� LDAP
3.13.6 WebSphere Portal with Lotus Collaborative Components
In WebSphere Portal Extend Edition, Portal works closely with the Lotus Collaborative Components.
The major software components to consider are:
� WebSphere Portal
� Domino
� QuickPlace
� Sametime
� Lotus Collaborative Components
80 IBM WebSphere Portal for Multiplatforms V5 Handbook

3.13.7 WebSphere Portal with WebSphere Portal content publishing The major software components you need to consider in this scenario are:
� WebSphere Portal
� Database
� LDAP
� WebSphere Portal content publishing
3.13.8 WebSphere Portal with extended security using an external security manager
The major software components you need to consider in this scenario are:
� WebSphere Portal
� Database
� LDAP
� External Security Managers (such as Tivoli Access Manager or SiteMinder)
3.13.9 WebSphere Portal in a cluster environment The major software component to be considered in this scenario is WebSphere Portal.
3.13.10 Remote server attach portlet development environmentTo help with the development and debugging of an application, WebSphere Studio provides many functions, such as local and remote modes for debugging. With the support of the WebSphere Portal Toolkit, WebSphere Studio can not only help develop the portlet, but also provide the facility to debug it. For example, the debugging function can use the local and remote modes.
In the local mode, it can use the WebSphere test environment in WebSphere Studio. In the remote mode, it uses Portal from WebSphere Studio, and with the configuration of the WebSphere Portal Remote Server Attach, WebSphere Studio can connect to Portal and perform the debug for the portlet.
It is important to notice that:
� In the local debug mode, authentication is not provided.
� Some interim fixes need to be applied
Chapter 3. WebSphere Portal V5 prerequisites and planning 81

The major software components you need to pay attention to in this scenario are:
� WebSphere Portal
� WebSphere Studio
� WebSphere Portal Toolkit
3.13.11 Upgrading from WebSphere Portal V4 to V5WebSphere Studio provides a good method to migrate a portlet running on WebSphere V4 to V5.
In order to build an environment for the migration, one can use the dedicated machine for WebSphere Portal V4 and V5 separately, or install the two versions on a same machine but start the different versions one at a time.
The major software components you need to pay attention to in this scenario are:
� WebSphere Portal
� WebSphere Studio
� WebSphere Portal Toolkit
3.13.12 Additional components to add to WebSphere PortalBased on the components you have, and your environment, you can perform more customization and configuration to extend the functions.
3.14 Web browser considerationsEnd users can use the Web browser to access WebSphere Portal.
For the Web browser usage, please note the following:
1. There are some limitations to the Web browser. You will need to check the prerequisites for detailed information.
2. Some portlets have defined the browsers they support. Check the documentation about the portlet. If you are using an unsupported browser, the Web browser may exhibit some odd behavior.
3. Table 3-20 on page 83 shows some of the supported Web browsers that have been tested by IBM.
82 IBM WebSphere Portal for Multiplatforms V5 Handbook

Table 3-20 Supported Web browses
Web browser platform Notes
Windows AIX Solaris Linux Intel
Linux zSeries
Microsoft Internet Explorer 5.5
Yes
Microsoft Internet Explorer 5.5 SP2
Yes
Microsoft Internet Explorer 6.0 SP1®
Yes
Mozilla 1.0.2 Yes Yes The Java script option must be enabled. If the Mozilla browser is automatically installed along with the operating system, the Java script option is enabled by default.
Mozilla 1.2.1 Yes Yes The Java script option must be enabled. If the Mozilla browser is automatically installed along with the operating system, the Java script option is enabled by default.
Mozilla 1.3 Yes Yes The Java script option must be enabled. If the Mozilla browser is automatically installed along with the operating system, the Java script option is enabled by default.
Netscape Communicator 6.2
Yes Yes Yes Yes Yes
Netscape Communicator 7.0
Yes Yes Yes Yes Yes
Opera Web Browser 7.11 and above
Yes
Chapter 3. WebSphere Portal V5 prerequisites and planning 83
These Web browsers are required to access the Portal from either a remote client or from the Portal machine.
The productivity components support Microsoft Internet Explorer 5.5 and 6.0, and Mozilla 1.3 only.
3.15 Install and uninstall method considerations
WebSphere Portal has an installer for the installation task. This installer could install both the WebSphere Application Server and the WebSphere Portal. In general, the installer will do the following:
1. Install the product files to the file system.
2. Set up the appropriate operating system information, such as the software repository information, etc.
3. Perform a series of configuration tasks for the WebSphere Portal.
The WebSphere Portal provides three installation methods for different environments.
Graphical User InterfaceThis mode requires a graphics adapter and display for the system. The installation is interactive with the user via the use of a graphic display to channel information.
This is a commonly used method and it is very simple. You can run the following commands to begin this method:
� In UNIX: ./install.sh
� In Windows: install.bat
Text mode (console mode) This mode does not require a graphic display; an interactive installation can be achieved via a text terminal.
The startup of the installer needs to add a parameter to run the following commands:
� In UNIX: ./install.sh -console
� In Windows: install.bat -console
Important: Keep in mind that, because WebSphere Portal is an integrated solution, it includes other software components.
84 IBM WebSphere Portal for Multiplatforms V5 Handbook

Silent with response file If you plan to install the WebSphere Portal on many machines, or do not want to perform the install using an interactive method, the WebSphere Portal installer provides a silent method. The information needed by the installer can be put into a file, then the installer will base itself on the information in the file to install the product automatically. This file is called a response file.
To start the installation in the silent mode, the command will be similar to the following:
� In UNIX: ./install.sh -options <path_to_file>/responsefile_name
� In Windows: install.bat -options <path_to_file>\responsefile_name
3.15.1 Uninstall considerationsDepending on the platform, the uninstallation method could be different. But in general, each platform has its own installed software repository management facility. You cannot simply remove the directory of the software without risking problems during reinstallation.
WebSphere Portal has provided an uninstallation program which can remove WebSphere Portal and can also remove the WebSphere Application Server at the same time. This uninstallation program has the following three modes:
� Graphic User Interface
� Text (console) mode
� Silent method with the response file.
3.15.2 Database considerationsYou can choose to keep the database used by WebSphere Portal or remove the database.
If the database you used is not Cloudscape, you can use the following method to remove the database. Cloudscape will be removed automatically during the uninstallation of the Portal.
1. If security is enabled, disable it first with the task disable-security.
2. Remove the database tables using the following tasks:
– drop-tables-database-wps
– drop-tables-database-wmm
– drop-table-database-wpcp
3. Remove the databases by performing the following commands:
Chapter 3. WebSphere Portal V5 prerequisites and planning 85

– drop-database-wps
– drop-wmm-db
– remove-wpcp-databases-db2
4. Then run the uninstallation program.
86 IBM WebSphere Portal for Multiplatforms V5 Handbook

Chapter 4. WebSphere Portal: Microsoft Windows 2000 installation
This chapter describes the installation and configuration of WebSphere Portal for Multiplatforms V5.0 for Microsoft Windows 2000 in a single-tier environment.
The installation configuration includes the following (as shown in Figure 4-1 on page 88):
� Server 1:
– IBM HTTP Server V1.3.26
– WebSphere Application Server V5.0
– WebSphere Portal V5.0
– Migrates the datastore from IBM Cloudscape to IBM DB2 V8.1.1.94
– WebSphere Portal content publishing V5.0 (Runtime and Authoring)
– Collaboration Center
� Server 2:
– Lotus Domino as LDAP Release 5.0.12
– Lotus QuickPlace Release 3.0.1
– Lotus Sametime V3.0
4
© Copyright IBM Corp. 2004. All rights reserved. 87

Figure 4-1 Lab configuration for Windows 2000 install
The following section depicts the lab configuration of the WebSphere Portal Extend offering in V5. WebSphere Portal is shipped with multiple software components. It provides the clients with an open architecture framework and the flexibility to integrate with other software components.
WebSphere Portal provides additional services such as single sign-on, security, directory services, content management, collaboration, search and taxonomy, support for mobile devices, accessibility support, internationalization, and site analytics. Clients can further extend the portal solution to provide host integration and e-commerce (see the context diagram in Figure 4-2 on page 89).
Note: If your portal configuration includes QuickPlace and Sametime, it is highly recommended that you install Sametime and QuickPlace on separate machines for acceptable performance and troubleshooting purposes, as in the simple portal architecture diagram in Figure 4-3 on page 90. The Sametime and Quickplace servers can reside in the same Domino domain. However, if Sametime and Quickplace share the same domain as Domino LDAP, then Web authentication with Sametime and Quickplace might fail because the Sametime server might find duplicate person documents in the directory within the Domino domain.
88 IBM WebSphere Portal for Multiplatforms V5 Handbook

Figure 4-2 Context diagram
We conducted a proof of concept in the ITSO Raleigh lab environment. We depicted a distributed architecture in the Windows environment and a Demilitarized Zone architecture for the Linux, Solaris and AIX environments. For demonstration purposes, integration to an external Directory Services, WPCP and Collaboration Center is depicted in the Windows environment only. Clustering will be demonstrated in the AIX configuration only.
Portal
DirectoryServices
Authorization/Authentication
Collaboration
Internationalization
Search
ContentManagement
Personalization
Site Usage
Host Integration
PervasiveComputing
E-Commerce
Chapter 4. WebSphere Portal: Microsoft Windows 2000 installation 89

Figure 4-3 Distributed multi-tier portal architecture
WebSphere Portal V4.x addresses most portal requirements in a client environment and results in a relatively complex install. WebSphere Portal V5.0 is based on a modular approach. The base configuration installs WebSphere Application Server V5, WebSphere Application Server V5 Enterprise Edition, the Cloudscape database and Portal software. The client can then tailor the portal solution that best fit the requirements by changing the database used by the portal, switching to a custom user registry, using one of the supported LDAP, integration to host systems, enabling a proxy for access of remote content through the portal, etc. IBM is one of the few vendors which provides not only an open architecture but also an end-to-end solution in the portal solution space. IBM provides Access Manager and Identity Manager from the Tivoli family to handle advanced authentication and authorization, Application Server ND from the WebSphere family to provide an application server and clustering, messaging queue service from the MQ Series family, Host-on-Demand for host integration, Commerce for e-commerce, Directory Services such as IBM Directory Server, a database such as DB2, Site Analyzer for site usage, etc. This gives the client the flexibility and options to integrate with the best of breed
IntranetClients
WAPGateway
VoiceGateway
Internet Intranet
Outbound Proxy
AuthorizationServer
ContentProviders
WebServices
Authent./ReverseProxy
PortalCluster
UserRegistry
Portal Database
SearchServer
ContentManagementServer
BackendSystems
Public UDDIRegistry Corporate
UDDI
FirewallFirewall Firewall
90 IBM WebSphere Portal for Multiplatforms V5 Handbook

software to create the end-to-end portal solution. Please refer to Figure 4-3 on page 90 when planning for client implementation.
A base configuration installs Cloudscape as the database repository. Clients planning to pursue a better database performance should upgrade to a more robust database. The steps of migrating the database repository from Cloudscape to DB2 is demonstrated in the proof of concept.
Figure 4-4 Example Portal architecture with high availability
In Figure 4-4, we depicted a sample architecture of deploying portal in a multi-tier Demilitarized Zone (DMZ) configuration with high availability. This configuration can be used for an Internet/extranet portal solution.
In this configuration, Tivoli WebSEAL is used to shield the Web server from unauthorized requests for external facing users. This approach is desirable when
WebServer
WebServer
Internet Production DMZ IntranetInternet DMZ
NetworkDispatcher
NetworkDispatcher
(Standby)
80/443389/636
80/443
81/1443389/63681/1443 80/443
389/63681/1443
LotusSametime
UncontrolledZone
ControlledZone
RestrictedZone
TrustedZone
DBDB
WebSEAL/TAM
IBMHTTPServer
LotusQuickPlace
PortalPortalPortalServer
WebSEAL/TAM
NetworkDispatcher
NetworkDispatcher(Standby)
BrowserBrowser
LDAPLDAP
WebSEAL/TAM
WebSEAL/TAM
Cluster
Cluster
Replicate
ReplicateFirewall FirewallFirewall
HeartbeatHeartbeat
Port closedPort open
Chapter 4. WebSphere Portal: Microsoft Windows 2000 installation 91

the Web server may contain sensitive data and direct access to it is not desirable.
WebSEAL is a Reverse Proxy Security Server (RPSS) that uses Tivoli Access Manager (TAM) to perform coarse-grained access control to filter out unauthorized requests before they reach the domain firewall. WebSEAL uses Tivoli Access Manager (TAM) to perform access control as illustrated in Figure 4-4 on page 91. In the particular example of integrating with WebSEAL, you can configure WebSphere Application Server to use the LDAP user registry, which can be shared with WebSEAL and TAM. Replicated front-end WebSEAL provides the portal site with load balancing during periods of heavy traffic and failover capability. The load balancing mechanism is handled by a Network Dispatcher such as IBM WebSphere Edge Server. If the Network Dispatcher fails for some reason, the standby Network Dispatcher will continue to provide access to the portal. In our sample configuration, HTTP servers and Portal are clustered to provide additional redundancy.
The Directory Server can be replicated to one or more replica LDAP servers to provide redundancy. WebSphere Application Server uses LDAP to perform authentication. The client ID and password are passed from WebSphere Application Server to the LDAP server. Replication can be turned on in the database server which is used by the portal.
In this configuration, it is optional to use a separate WebSEAL for the internal users for better performance.
4.1 Using install logs
This section contains information to assist an administrator in preventing, identifying, and correcting problems with WebSphere Portal.
4.1.1 Using WebSphere Portal log filesWebSphere Portal has log files that are created during installation and runtime. This section describes the content of the log files and includes recommendations as to when to check the log files.
Important: For information pertaining to the hardware and software prerequisites for a WebSphere Portal Windows installation, refer to 3.3.1, “Microsoft Windows 2000” on page 42.
92 IBM WebSphere Portal for Multiplatforms V5 Handbook

Installation log filesThe installation log files (Table 4-1) are in the directory <wp_root>/log, where wp_root is the directory where WebSphere Portal is installed. The table lists each file, describes the file content and recommends when to check the file for information that might assist in troubleshooting installation problems.
Table 4-1 Log files under <wp_root>/log directory
Log file name Description Problem symptoms
wpinstalllog.txt Contains trace information generated by the installation program.
Check this log if the WebSphere Portal installation stops before successful completion.
installmessages.txt Contains messages generated during installation. The messages in this file are translated for the language specified during installation.
Check this log for errors generated during installation.
wpcpInstallLog.txt Contains trace information generated by the WebSphere Portal component during installation.
Check this log for errors related to the WebSphere Portal component.
portletinstall.txt Contains messages generated during portlet installation.
Check this log if problems occur with portlets being deployed during installation.
wpwasfp1.txt Contains trace information generated during the installation of WebSphere Application Server Fix Pack 1.
Check this log if you have problems with the installation of WebSphere Application Server Fix Pack 1.
wppmefp1.txt Contains trace information generated during the installation of WebSphere Application Server Enterprise Edition Fix Pack 1.
Check this log if you have problems with the installation of WebSphere Application Server Enterprise Edition Fix Pack 1.
Chapter 4. WebSphere Portal: Microsoft Windows 2000 installation 93

The following log files (Table 4-2) are located in the <temp> directory and are used during installation. Note that the wpinstalllog.txt and wpsinstalllog.txt log files described above begin in the <temp> directory and are moved to <wp_root>/log early in the installation
Table 4-2 Log files under <temp> directory
4.2 Base installationThis scenario takes you through a basic installation of WebSphere Portal, with an emphasis on getting it up and running quickly. At the end of the scenario, you can follow links to information describing additional functions you can add to your
log.txt Contains trace information generated during the installation of WebSphere Application Server.Note: Located in <was_root>/logs directory.
Check this log if you have problems with the installation of WebSphere Application Server.
WAS.PME.install.log Contains trace information generated during the installation of WebSphere Application Server Enterprise Edition.Note: Located in <was_root>/logs directory.
Check this log if you have problems with the installation of WebSphere Application Server Enterprise Edition.
Log file name Description Problem symptoms
installtraces1.txtinstalltraces2.txtinstalltraces3.txt
Contain trace information generated by the dependency checking function. Output is added to installtraces1.txt until it reaches a predefined size, at which point output goes into installtraces2.txt and then into installtraces3.txt. When installtraces3.txt is full, output reverts to installtraces1.txt and overwrites previous trace information.
Check these files if there are problems with component discovery and dependency checking.
Log file name Description Problem symptoms
94 IBM WebSphere Portal for Multiplatforms V5 Handbook

WebSphere Portal environment, such as the use of an LDAP directory for user authentication or a collaboration function such as Sametime instant messaging.
Installation requires you to log in with an ID with sufficient user privileges on the system. The user account must be part of the local Administrators group and has the following user rights assigned to it:
� Act as part of the operating system
� Log on as a service
You can change user privileges by going to Control Panel -> Administrative Tools -> Local Security Policy -> Security Settings -> Local Policies -> User Rights Assignment.
1. Run install.bat from the setup folder in the setup CD.
2. Choose your preferred language and click OK.
3. Click Next and you will have the option to launch Infocenter.
4. Read and accept the licence agreement and click Next.
Figure 4-5 Warning message for detecting firewall application
5. Select a Full installation as shown in Figure 4-6 on page 96 and proceed to the next window.
Note: After assigning user privileges, you might be required to logoff from the Windows and log in again for the changes to become effective.
Note: If you have firewall applications running on the server, a warning message similar to the one shown in Figure 4-5 will be presented. Disable any firewall applications before you proceed.
Chapter 4. WebSphere Portal: Microsoft Windows 2000 installation 95

Figure 4-6 Select full installation
6. Enter your choice of WebSphere Application Server installation directory (Figure 4-7 on page 97) and click Next. For example, C:\WebSphere\AppServer.
96 IBM WebSphere Portal for Multiplatforms V5 Handbook

Figure 4-7 WebSPhere Application Server install directory
7. Enter your choice of the install directory for IBM HTTP Server (Figure 4-8 on page 98), for example, C:\IBM\HttpServer.
Chapter 4. WebSphere Portal: Microsoft Windows 2000 installation 97

Figure 4-8 Install directory for HTTP server
8. Enter the system Administrator ID and password (Figure 4-9 on page 99) and accept the default values for the other fields. Click Next.
98 IBM WebSphere Portal for Multiplatforms V5 Handbook

Figure 4-9 Run as a service on Windows
9. Enter or accept the Node name (for example, top440) and fully qualified host name (for example, top440.itso.ral.ibm.com). See Figure 4-10 on page 100. Click Next to proceed to the next window.
Chapter 4. WebSphere Portal: Microsoft Windows 2000 installation 99

Figure 4-10 Confirm node name and fully qualified host name
10.Confirm your choice of the install directory for Portal (Figure 4-11 on page 101). For example, C:\WebSphere\PortalServer.
100 IBM WebSphere Portal for Multiplatforms V5 Handbook
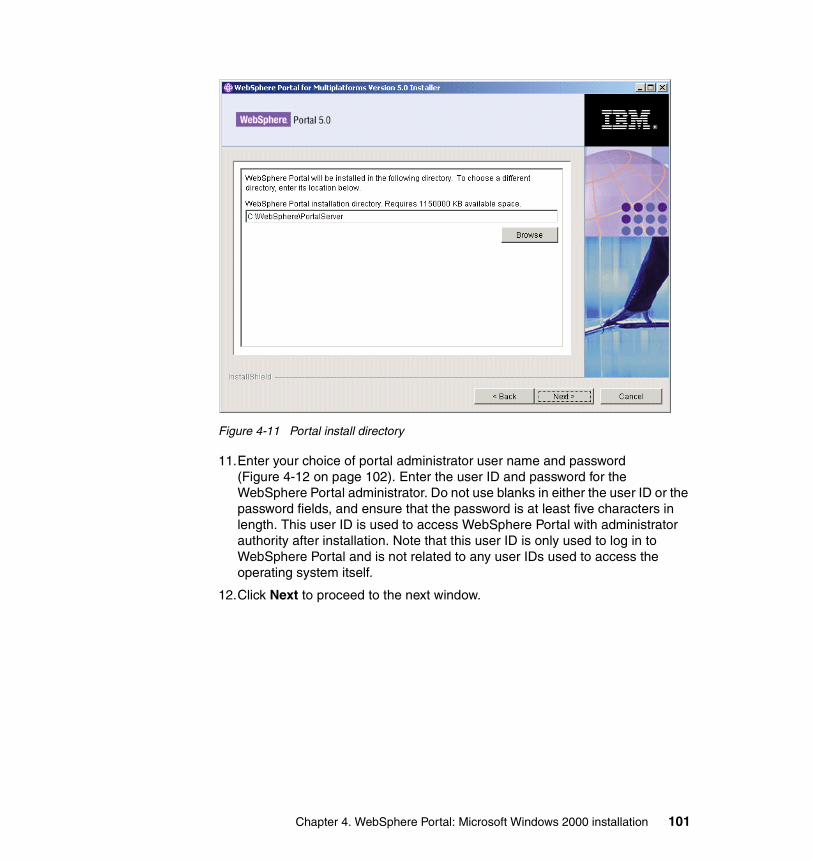
Figure 4-11 Portal install directory
11.Enter your choice of portal administrator user name and password (Figure 4-12 on page 102). Enter the user ID and password for the WebSphere Portal administrator. Do not use blanks in either the user ID or the password fields, and ensure that the password is at least five characters in length. This user ID is used to access WebSphere Portal with administrator authority after installation. Note that this user ID is only used to log in to WebSphere Portal and is not related to any user IDs used to access the operating system itself.
12.Click Next to proceed to the next window.
Chapter 4. WebSphere Portal: Microsoft Windows 2000 installation 101

Figure 4-12 Portal Administrator username and password
13.Click Next on the summary information window for the installation (Figure 4-13 on page 103).
102 IBM WebSphere Portal for Multiplatforms V5 Handbook

Figure 4-13 Summary information for the install
14.When prompted, browse to the location of Disk 1-1 (WebSphere Application Server Enterprise for Windows) to continue the installation (Figure 4-14 on page 104).
Chapter 4. WebSphere Portal: Microsoft Windows 2000 installation 103
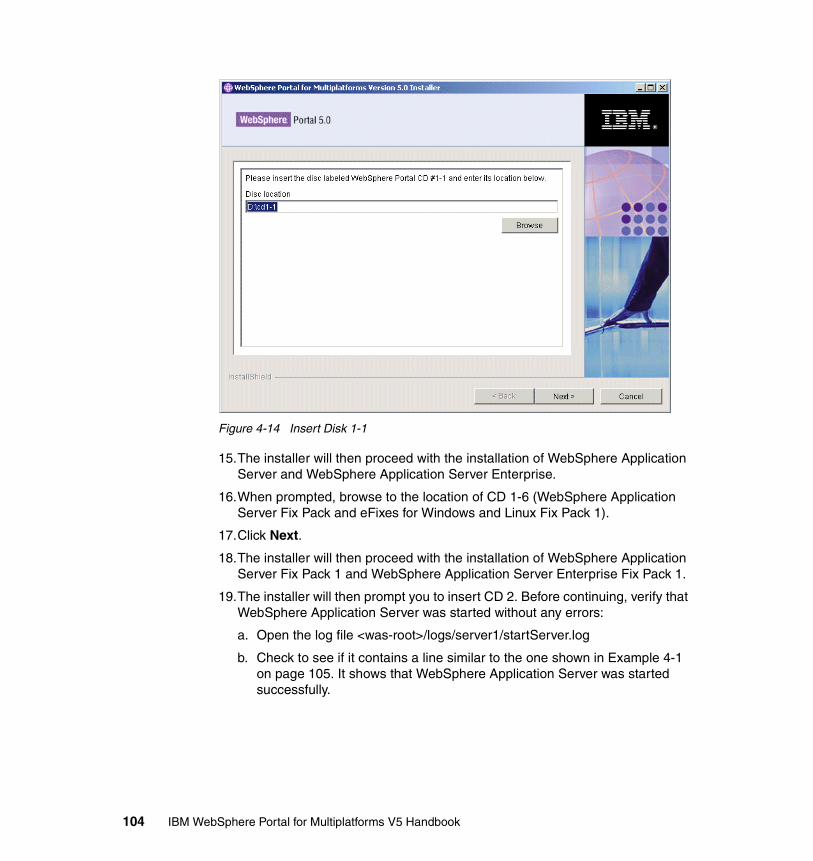
Figure 4-14 Insert Disk 1-1
15.The installer will then proceed with the installation of WebSphere Application Server and WebSphere Application Server Enterprise.
16.When prompted, browse to the location of CD 1-6 (WebSphere Application Server Fix Pack and eFixes for Windows and Linux Fix Pack 1).
17.Click Next.
18.The installer will then proceed with the installation of WebSphere Application Server Fix Pack 1 and WebSphere Application Server Enterprise Fix Pack 1.
19.The installer will then prompt you to insert CD 2. Before continuing, verify that WebSphere Application Server was started without any errors:
a. Open the log file <was-root>/logs/server1/startServer.log
b. Check to see if it contains a line similar to the one shown in Example 4-1 on page 105. It shows that WebSphere Application Server was started successfully.
104 IBM WebSphere Portal for Multiplatforms V5 Handbook

Example 4-1 server 1 was started successfully
[10/21/03 9:06:24:594 EDT] 6535c63c AdminTool A ADMU3100I: Reading configuration for server: server1[10/21/03 9:06:36:938 EDT] 6535c63c AdminTool A ADMU3200I: Server launched. Waiting for initialization status.[10/21/03 9:08:34:672 EDT] 6535c63c AdminTool A ADMU3000I: Server server1 open for e-business; process id is 1776
20.Browse to the location of CD 2 WebSphere Portal (Figure 4-15). Click Next.
Figure 4-15 Insert CD 2 - WebSphere Portal
21.The installer will then install WebSphere Portal and WebSphere Portal content publishing.
22.Click Finish to complete the installation (Figure 4-16 on page 106).
23.Deselect Launch First Steps.
Chapter 4. WebSphere Portal: Microsoft Windows 2000 installation 105

Figure 4-16 Installation finish
Note: Checkpoint for Portal:
To verify the installation is successful, go to a browser and type in the URL:
http://<fully_qualified_host_name>:9081/wps/portal
For example, in our scenario, the URL of the portal will be http://top440.itso.ral.ibm.com/wps/portal. You should see the Welcome to WebSphere Portal V5 portlet as shown in Figure 4-18 on page 108.
106 IBM WebSphere Portal for Multiplatforms V5 Handbook

Figure 4-17 Checkpoint for servlet
The portal is now up and running.
Note: Checkpoint for the servlet:
To verify the servlet engine is up and running, go to a browser and type in the URL:
http://<fully_qualified_hostname>:9080/snoop
where <fully_qualified_host_name> in the example is top440.itso.ral.ibm.com.
You should see a window similar to Figure 4-17 on page 107.
Chapter 4. WebSphere Portal: Microsoft Windows 2000 installation 107

Figure 4-18 Welcome to WebSphere Portal V5
24.Click Sign in and enter the portal administrator ID and password (Figure 4-19 on page 109).
108 IBM WebSphere Portal for Multiplatforms V5 Handbook

Figure 4-19 Signing in using portal administrator ID
25.You are now logged on to the portal, as shown in Figure 4-20 on page 110.
Chapter 4. WebSphere Portal: Microsoft Windows 2000 installation 109

Figure 4-20 WebSphere Portal
The base installation is now complete.
26.Apply WebSphere Application Server manual fixes. The fixes are located in the /manualfixes directory on the WebSphere Application Server Fix Pack and Fixes CD. Please refer to Appendix D, “Installing fixes” on page 707 for information about applying WebSphere Application Server manual fixes.
Note: In our install configuration, where we have the HTTP server running on the same box as Portal, include the Cumulative Plug-in fix in the manual fixes when running the wizard.
110 IBM WebSphere Portal for Multiplatforms V5 Handbook

Figure 4-21 Content Publishing tab
4.3 Migrating the database from Cloudscape to DB2 By default, WebSphere Portal installs and uses a Cloudscape database to store information about user identities, credentials, and permissions for accessing
Troubleshooting notes for content publishing:
Problem: Internet Explorer browser hangs intermittently when using WebSphere Portal content publishing. Sometimes the Internet Explorer browser will hang when using WebSphere Portal content publishing.
Solution: This can be fixed by adding the following keys to the registry.
[HKEY_CURRENT_USER\Software\Microsoft\Windows\CurrentVersion\Internet Settings]"MaxConnectionsPerServer"=dword:00000020"MaxConnectionsPer1_0Server"=dword:00000020
Chapter 4. WebSphere Portal: Microsoft Windows 2000 installation 111

portal resources. Cloudscape is a built-in Java database that is well suited to basic portal environments. However, if the demands of your portal environment include database software with greater capability and scalability, you can also configure WebSphere Portal to use a more robust database, such as DB2. For example, Cloudscape does not support vertical cloning or a cluster environment, nor does it support enabling security in a database only mode. Performance gains may also be possible by moving to a more robust database. If you want to use another database, you must transfer data from the Cloudscape database to your preferred database.
For the purpose of the proof of concept, the migration of Cloudscape to a local DB2 database will be illustrated here.
1. Create a database user on the Windows operating system. The user should be defined locally and belongs to part of the local Administrators group.
2. The user ID should have the following user rights:
– Act as part of the operating system– Create a token object– Increase quotas– Replace a process level token
The limitations of the choice of the database ID are as follows:
– User names in Windows can contain 1 to 30 characters. The Windows NT and Windows 2000 operating systems currently have a limit of 20 characters.
– Group and instance names can contain 1 to 8 characters.
– Names cannot be any of the following:
• users
• admins
• guests
• public
• local
– Names cannot begin with:
• IBM
• SQL
• SYS
– Names cannot include accented characters.
You can assign or change user privileges by going to Control Panel -> Administrative Tools -> Local Security Policy.
112 IBM WebSphere Portal for Multiplatforms V5 Handbook

4.4 Installing IBM DB2 Enterprise Server Edition V8.1.1.94
1. Insert CD 5-1 (DB2 Enterprise Edition for Windows V8.1) and run setup to start the DB2 on Windows installation.
2. Click Install Products.
3. Select DB2 UDB Enterprise Server Edition to install. Click Next.
4. Click Next in the welcome window.
5. Read and accept the licence agreement and click Next.
6. Select Typical as the installation type. Click Next.
7. If you receive a warning message for APPC support similar to that shown in Figure 4-22, click OK.
Figure 4-22 APPC warning message
Note: If an earlier version of WebSphere Portal coexists on the same server, the database user ID for WebSphere Portal V5 must be different from the one in the earlier version to avoid conflicts during installation.
The database user wpsdbusr, with administrative rights, is recommended.
Chapter 4. WebSphere Portal: Microsoft Windows 2000 installation 113

8. Select Install DB2 UDB Enterprise Server Edition on this computer. Click Next.
9. Confirm the install directory. Click Next.
10.Make sure that you enter a valid SMTP server name and valid e-mail address. Otherwise, you will receive a warning message.
11.Enter the user information of the DB2 Administrator Server (Figure 4-23). For example, the user name is wpsdbusr and the password is password. If you are installing DB2 in a Domain environment, enter the Domain name.
Figure 4-23 Database user ID and password
12.Accept the default and click Next until you reach the Start copying files window (Figure 4-24 on page 115).
114 IBM WebSphere Portal for Multiplatforms V5 Handbook

Figure 4-24 Start copying files
13.Click Install.
Chapter 4. WebSphere Portal: Microsoft Windows 2000 installation 115
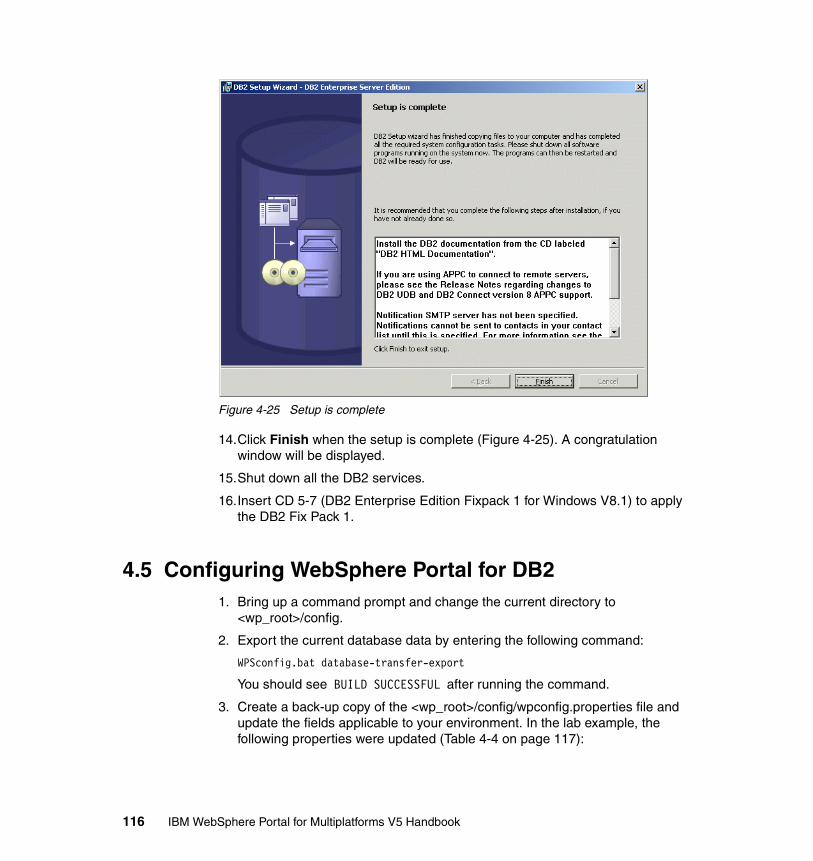
Figure 4-25 Setup is complete
14.Click Finish when the setup is complete (Figure 4-25). A congratulation window will be displayed.
15.Shut down all the DB2 services.
16.Insert CD 5-7 (DB2 Enterprise Edition Fixpack 1 for Windows V8.1) to apply the DB2 Fix Pack 1.
4.5 Configuring WebSphere Portal for DB21. Bring up a command prompt and change the current directory to
<wp_root>/config.
2. Export the current database data by entering the following command:
WPSconfig.bat database-transfer-export
You should see BUILD SUCCESSFUL after running the command.
3. Create a back-up copy of the <wp_root>/config/wpconfig.properties file and update the fields applicable to your environment. In the lab example, the following properties were updated (Table 4-4 on page 117):
116 IBM WebSphere Portal for Multiplatforms V5 Handbook

Table 4-3 Database functions
Table 4-4 Value used in database configuration
Note: The following databases are recommended; please refer to Table 4-3 on page 117 for database functions.
� wps50: to be shared by WebSphere Portal and Member Manager
� wpcp50: to be shared by WebSphere Portal content publishing components, such as Document Manager
� fdbk50: feedback database used by WebSphere Portal content publishing
Database Database function
wps50 Stores information about user customizations, such as Pages, as well as user and login information.
wpcp50 Contains the campaign and personalization information in addition to authoring and configuration.
fdbk50 Contains the information logged by your Web site for generating reports for analysis of site activity, including information about campaigns and personalized resources.
Property Value used
DbType db2
wpsDbName wps50
DbDriver COM.ibm.db2.jdbc.app.DB2Driver
DbDriverDs COM.ibm.db2.jdbc.DB2ConnectionPoolDataSource
JdbcProvider wps50JDBC
DbUrl jdbc:db2:wps50
DbUser wpsdbusr
DbPassword password
Chapter 4. WebSphere Portal: Microsoft Windows 2000 installation 117

4. Save the file.
5. From a command prompt, type WPSconfig.bat create-local-database-db2 from the <wp_root>/config directory.
You should see the message BUILD SUCCESSFUL after successfully running the command.
6. From a command prompt, type WPSconfig.bat validate-database-connection-wps from the <wp_root>/config directory.
You should see the message BUILD SUCCESSFUL after successfully running the command.
7. From a command prompt, type WPSconfig.bat validate-database-connection-wmm from the <wp_root>/config directory.
You should see the message BUILD SUCCESSFUL after successfully running the command.
8. From a command prompt type WPSconfig.bat validate-database-connection-wpcp from the <wp_root>/config directory.
You should see the message BUILD SUCCESSFUL after successfully running the command.
DbLibrary C:/Program Files/ibm/SQLLIB/java/db2java.zip
WpcpDbName wpcp50
WpcpDbUser wpsdbusr
WpcpDbPassword password
WpcpDbUrl jdbc:db2:wpcp50
FeedbackDbName fdbk50
FeedbackDbUser wpsdbusr
FeedbackDbPassword password
FeedbackDbUrl jdbc:db2:fdbk50
WmmDbUser wpsdbusr
WmmDbPassword password
WmmDbUrl jdbc:db2:wps50
Property Value used
118 IBM WebSphere Portal for Multiplatforms V5 Handbook

9. From a command prompt type WPSconfig.bat database-transfer-import from the <wp_root>/config directory. This command takes a while to run. If the command runs successfully, you should see the message BUILD SUCCESSFUL.
10.It is recommended that you perform a reorg check to improve performance. Bring up a db2 command prompt. Connect to each database (wps50, wpcp50 and fdbk50) and run the following commands:
db2=>reorgchk update statistics on table alldb2=>terminate
Go to a command prompt and type c:\> db2rbind <database_name> -l db2rbind.out -u <db2_admin> -p <password>.
11.Start the WebSphere Portal by clicking Start -> Programs -> IBM WebSphere Application Server -> Portal Server v5.0 -> Start the Server.
12.Verify the portal by typing in the URL of portal. For example, http://<fully_qualified_hostname_name>:9081/wps/portal.
You have now completed the task of migrating the portal database from Cloudscape to DB2.
4.6 Adding an LDAP to the portalWebSphere Portal and WebSphere Application Server require some form of user registry. There are several possible ways to provide WebSphere Application Server and WebSphere Portal with access to a user registry:
� Lightweight Directory Access Protocol (LDAP) directory
� Custom User Registry
� MemberRepository (for WebSphere Portal/WebSphere Member Manager)
By default, WebSphere Portal installs a Cloudscape database and uses it as a Custom User Registry (CUR) for authentication.
WebSphere Portal can be configured to use an LDAP directory to store user information and to authenticate users. This section discusses the issues to consider and the procedures to follow if you plan to use an LDAP directory with WebSphere Portal.
Note: Checkpoint for database migration
Refer to 6.7.1, “Validate database configuration” on page 312 for the steps necessary to verify the database configuration.
Chapter 4. WebSphere Portal: Microsoft Windows 2000 installation 119

In the lab proof of concept, a Domino server is configured as an LDAP for the portal. It is recommended that Domino be used as the LDAP server if no existing directory is already in place. Also, if you intend to make use of Lotus Collaborative Components, it is recommended that you use Domino as the LDAP server. If there is already a non-Domino directory server in place, you may want to use Domino's Directory Assistance feature to incorporate the existing directory with Domino. If you intend to use Domino as the LDAP server for WebSphere Portal, you should configure Domino Directory in Domino Administrator or the Notes client before you install WebSphere Portal.
4.6.1 Installing Domino Enterprise Server Release 5.0.12You can install and configure Lotus Domino as an LDAP directory (Domino Directory) for WebSphere Portal (including Lotus Collaborative Components), Sametime, and QuickPlace, and as prerequisite software for Sametime and QuickPlace. The following information is specific to installing Domino 5.0.12, which is included with some editions of WebSphere Portal. Usage restrictions apply when installing Domino. You are authorized to install and use Domino solely and exclusively in connection with your use of Sametime and QuickPlace. Consult the product license for details.
1. Insert CD 11-1 (Lotus Domino Application Server for Windows - ENU, JPN, KOR Release 5.0.12) and run the Setup.exe program in the \domino\win\English directory.
2. At the welcome window, click Next.
3. Read and accept the licence agreement.
4. Enter the name and company name. Click Next.
5. Confirm the installation folder. Click Next.
6. Select Domino Enterprise Server as the install type.
7. Click the Customize button and deselect the following components, then click Next:
– DECS
– Domino Directory NT Sync Services
– Domino Server Planner
8. Accept the default installation folder and click Next.
9. Click Finish to complete the installation.
120 IBM WebSphere Portal for Multiplatforms V5 Handbook

4.6.2 Configuring Domino server settingsThe following steps provide installation and configuration information for setting up Domino. These steps are provided to help guide you through the installation and configuration. Some steps might vary depending on the operating system on which you are installing Domino. These steps assume that you are installing Domino server for use with WebSphere Portal, and that the LDAP service provided with Domino will be configured.
1. Start Domino server by going to Start -> Programs -> Lotus Applications -> Lotus Domino Server.
2. Click First Domino Server.
3. Proceed to the next window by clicking the > button.
4. Click Advanced Configuration. Proceed to the next window by clicking the > button.
5. Ensure that the following settings are selected:
– Under Web Browser, select HTTP, IIOP and Both Mail and Applications. Select Domino as the HTTP engine to use (Figure 4-26 on page 122).
– Under Internet Mail Packages, select POP3 and SMTP.
– Under Internet Directory Services, select LDAP.
Chapter 4. WebSphere Portal: Microsoft Windows 2000 installation 121

Figure 4-26 Advanced settings
6. Click the > button to continue to the Administration Settings panel.
7. Under Organization Identity, enter the same value for the domain name and the certifier name. Make sure that Allow Setup to create new certifier ID is selected.
Save & Quit
122 IBM WebSphere Portal for Multiplatforms V5 Handbook

Figure 4-27 Administration settings
8. Enter an administrator’s name and password. In our example, the last name of the Administrator is portaladmin and the password is password. Make sure that Allow Setup to create new administrator ID is selected (Figure 4-27).
9. Click Finish.
Finish
Chapter 4. WebSphere Portal: Microsoft Windows 2000 installation 123

Figure 4-28 Congratulations window
10.In the Congratulations window (Figure 4-28), take notes of all the information. Click the Set Access Control List Entry button.
Figure 4-29 Add a group
11.Select Add a group and enter Administrators. Click OK.
12.Click the Exit Configuration button.
124 IBM WebSphere Portal for Multiplatforms V5 Handbook

13.Start Lotus Domino Server by clicking Start -> Programs -> Lotus Applications -> Lotus Domino Server.
4.6.3 Installing Domino Administrator Release 5.0.12Domino Administrator is required in order to administer Domino.
1. Insert CD 11-6 (Lotus Notes® Client, Domino Admin, Domino and Sametime Hot Fixes Release 5.0.12) and start the Setup.exe program in the lotusnotes\win\English directory.
2. Click Next in the welcome window.
3. Read and accept the licence agreement.
4. Enter the name and company name.
5. Confirm the install folder.
6. Select Domino Administrator for the setup type.
7. Click the Customize button and deselect the following components, then click Next:
– DECS
– Domino Directory NT Sync Services
8. Confirm the program folders and click Next.
9. Click Finish to complete the installation.
4.6.4 Configuring Domino Administrator Release 5.0.12The Notes client software provides a wizard to step you through configuration. The following steps provide general information for setting up Domino Administrator.
1. Start Domino Server is it is not already started by going to Start -> Programs -> Lotus Applications -> Lotus Domino Server.
2. Start Domino Administrator by going to Start -> Programs -> Lotus Applications -> Lotus Domino Administrator.
3. Click Next to continue.
4. Select I want to connect to a Domino server and click Next.
5. Select Set up a connection to a local area network (LAN) and click Next.
6. Enter the Domino Server name, for example m23d5062/portal in the format <hostname>/<domain>.
7. Click Next.
Chapter 4. WebSphere Portal: Microsoft Windows 2000 installation 125

Figure 4-30 Use the name as identification
8. Select Use my name as identification and enter the user name (portaladmin); see Figure 4-30. Click Next.
9. Click Next to proceed to the next window.
10.Respond to the options for Internet mail account, news server connection, directory server (LDAP) connection, proxy server connection. Do not choose the Connect through a proxy server option if you are not connecting via a proxy server. Proceed to the next window.
11.Select Connect over a local area network (or cable modem) and click Next.
12.Click Finish to complete the installation.
13.At the prompt, enter the password and click OK.
14.Click OK on the Notes setup is complete dialog box.
15.If a popup message (as show in Figure 4-31) displays, ignore the message and click OK.
Figure 4-31 Notes error
16.The Domino Administrator interface displays.
126 IBM WebSphere Portal for Multiplatforms V5 Handbook

4.6.5 Setting up Domino LDAPThe following section shows how to set up the Domino LDAP.
Adding portal administrators to the Domino DirectoryIf you do not have a user to administer your portal or you do not have an existing LDAP, you should create a new user: wpsbind.
1. Open Domino Administrator by going to Start -> Programs -> Lotus Applications -> Lotus Domino Server.
2. Select the People and Group tab.
3. Go to the People view of the Domino Directory and click Register.
4. Enter the certifier password and click OK.
5. Click the Advanced checkbox.
6. Enter the following for in the Register Person - New Entry form (Figure 4-32 on page 128.
7. Click Close.
Field Value
Last Name wpsbind
Short Name/UserID wpsbind
Internet address [email protected]
Internet domain itso.ral.ibm.com
Chapter 4. WebSphere Portal: Microsoft Windows 2000 installation 127

Figure 4-32 Register person form
8. Click Add Person.
9. Click Register All.
10.Click Save and Close to save the entries for the administrators and return to the People view of the Domino Directory.
11.Go to the Groups view and click Add Group.
12.In the New Group form, create a new group called wpsadmins. Select Multi-purpose for the Group type.
13.Add wpsbind and the portal administrator user as members from the portal’s address book. wpsbind is the user ID for LDAP Bind authentication.
14.Click Save and Close to save the wpsadmins group.
128 IBM WebSphere Portal for Multiplatforms V5 Handbook

Figure 4-33 Checkpoint for LDAP
4.6.6 Updating the Access Control List of the Domino Directory1. From the Domino Administrator, open the server’s Domino Directory. Go to
File -> Database -> Access Control to open up names.nsf.
2. Click Add group. Fill in wpsadmins as the group name and use the button next to the members field to select wpsadmin and wpsbind.
3. In the Basic panel, make sure that the portal administrator group wpsadmins has either Author access or Editor access for all roles available by selecting wpsadmins, changing the access to Manager and selecting the Delete documents check box.
Note: Checkpoint for LDAP
1. Bring up a browser.
2. Enter the following to the URL:
ldap://<fully_qualified_hostname>/cn=wpsbind,o=portal
For example:
ldap://m23d5062.itso.ral.ibm.com/cn=wpsbind,o=portal
3. You should see a window similar to Figure 4-33.
Chapter 4. WebSphere Portal: Microsoft Windows 2000 installation 129

4. Assign the following Role types to the wpsadmins group:
– GroupCreator
– GroupModifier
– UserCreator
– UserModifier
5. Click OK to save the settings.
4.6.7 Specifying Domino LDAP configuration settings1. Go to the server’s Domino Directory and open up names.nsf.
2. Click the Configurations tab.
3. Click Server -> Configurations.
4. Open the global configuration Configuration Settings document to edit the server configuration document.
5. On the Basics tab, select Yes for Use these settings as the default settings for all servers (Figure 4-34).
The LDAP tab appears.
Figure 4-34 Change default settings for all servers
CONFIGURATION SETTINGSm23d5062.itso.ral.ibm.com/portal
130 IBM WebSphere Portal for Multiplatforms V5 Handbook

6. On the LDAP tab, click the <<>> button to choose fields that anonymous users can query via LDAP.
Figure 4-35 LDAP field list
7. In the Form pull-down list box, select Person and click Show Fields (Figure 4-35).
8. From the Fields in Form: Person list box, select MailFile, Mail Server and SametimeServer and click Add.
9. Change the From pull-down list box to Server\Server and click Show Fields.
10.In the Fields in Form: Server\Server listbox, add HTTP_HostName and NetAddresses (Figure 4-36).
Figure 4-36 Server\Server form
11.Click OK.
12.Make sure that the Anonymous users can query the following fields (Figure 4-37 on page 133):
– AltFullName
– Certificate
– FirstName
Chapter 4. WebSphere Portal: Microsoft Windows 2000 installation 131

– FullName
– HTTP_HostName
– InternetAddress
– LastName
– ListName
– Location
– MailAddress
– MailDomain
– MailFile
– MailServer
– Members
– NetAddresses
– PublicKey
– SametimeServer
– ShortName
– userCertificate
132 IBM WebSphere Portal for Multiplatforms V5 Handbook

Figure 4-37 Anonymous users can query
13.Select Yes for Allow LDAP users write access. This will allow self registration for portal users.
14.Click Save and Close.
15.Select Current Server Document from the left-hand side of the window under Server and click Edit Server.
16.Select the Security tab and add an asterisk (*) to the following fields:
– Run restricted LotusScript/Java agents
– Run unrestricted LotusScript/Java agents
– Run restricted Java/JavaScript/COM agents
– Run unrestricted Java/JavaScript/COM agents
17.Go to Internet Protocols -> HTTP. In Host name(s), enter the fully qualified host name of the server. Select Yes for Change Allow HTTP clients to browse databases.
Chapter 4. WebSphere Portal: Microsoft Windows 2000 installation 133

18.Click Save and Close.
4.7 Creating the Web SSO configurationThe Web SSO configuration document is a domain-wide configuration document stored in the Domino Directory. You must create the Web SSO configuration document prior to enabling multi-server single-signon.
1. Start Domino Administrator by clicking Start -> Programs -> Lotus Applications -> Lotus Domino Server.
2. Open Domino Directory.
3. Select Server -> All Server Documents.
4. Select the server and click Web -> Create Web SSO Configuration (Figure 4-38).
Figure 4-38 Create Web SSO configuration
134 IBM WebSphere Portal for Multiplatforms V5 Handbook

Figure 4-39 Create Web SSO key
5. Enter the domain suffix for the token domain and select the server name in Domino Server Names (Figure 4-39).
6. From the Keys menu, select Create Domino SSO Key (Figure 4-40 on page 136).
Web SSO Configuration for:
Chapter 4. WebSphere Portal: Microsoft Windows 2000 installation 135

Figure 4-40 Create the Domino SSO key
7. Click OK.
8. Click Save and Close.
9. Close the Domino Administrator interface.
10.Restart the Domino Server.
4.8 Installing Lotus QuickPlace Release 3.0.1Setting up Lotus QuickPlace to work with the WebSphere Portal offers portal users the ability to use instances of the QuickPlace portlet.
1. Stop the Domino Server.
Note: Checkpoint for Domino
You should be able to bring up Domino homepage using a browser by typing in http://<fully_qualified_domino_server>:80 in the URL. Port 80 is the default port number for Domino Web server. For example, in our lab configuration, the URL of the Domino home page is http://m23d5062.itso.ral.ibm.com:80.
136 IBM WebSphere Portal for Multiplatforms V5 Handbook

2. Run Setup.exe in the quickplace\win\English\server directory from CD 9-1 (Lotus QuickPlace for Windows Group 1 Release 3.0.1).
3. Read and accept the licence agreement.
4. Accept the default until you reach the window prompting for the administrator ID for QuickPlace server. For example, the ID used for the lab configuration is qpadmin. Make sure the ID (qpadmin) does not already exist in the Domino Directory.
Figure 4-41 Administrator ID for QuickPlace server
5. Click Finish to complete the installation.
Note: If your portal configuration includes QuickPlace and Sametime, it is highly recommended that you install Sametime and QuickPlace on separate machines for acceptable performance and troubleshooting purposes.The Sametime and Quickplace servers can reside in the same Domino domain. However, if Sametime and Quickplace share the same domain as Domino LDAP, then Web authentication with Sametime and Quickplace might fail because the Sametime server might duplicate documents in the directory within the Domino domain.
Chapter 4. WebSphere Portal: Microsoft Windows 2000 installation 137

4.9 Specifying QuickPlace 3.0.1 server settingsTo set up the QuickPlace server for use with WebSphere Portal, follow these general steps:
1. Start the Domino Server by clicking Start -> Programs -> Lotus Applications -> Lotus Domino Server.
2. Bring up a browser and enter http://domino_server/QuickPlace where domino_server is the fully qualified host name. For example, in our case, this would be http://m23d5062.itso.ral.ibm.com/QuickPlace/.
3. Click Sign in.
4. Enter the administrator ID and password that you specified during the installation. For example, in our lab configuration, we used qpadmin.
5. Select Server Settings.
6. Select User Directory.
7. Click the Change Directory button.
138 IBM WebSphere Portal for Multiplatforms V5 Handbook

Figure 4-42 Change User Directory
8. Select LDAP Server as the server type.
9. Enter the fully qualified host name of the Domino LDAP Server (Figure 4-42).
10.Select Disallow new users in the bottom part of the window.
Chapter 4. WebSphere Portal: Microsoft Windows 2000 installation 139

Figure 4-43 Confirm configuration of user directory
11.Confirm your choices by clicking Next. (Figure 4-43)
12.Select Security.
13.Click the Add button under Who can administer this server?.
14.Click the Directory button.
15.Select Group and enter an asterisk (*) to search.
16.Add the portal administrator group (wpsadmins) and then click the Add button.
17.Click Close.
18.Click Next.
19.Start Domino Administrator by going to Start -> Programs -> Lotus Applications -> Lotus Domino Administrator.
140 IBM WebSphere Portal for Multiplatforms V5 Handbook

20.Select the portal domain and choose your server.
21.Select the Configuration tab.
22.Expand Server.
23.Select Current Server Document.
24.Click Edit Server.
25.Go to Internet Protocols -> Domino Web Engine. Change the Session authentication to Multiserver (Figure 4-44). Domino is a prerequisite for the QuickPlace and Sametime servers, and if you plan to use those servers, multi-server single sign-on must be enabled. Enabling single sign-on allows Web users who log on once to a server to automatically access any other server in the DNS domain that is enabled for single sign-on.
26.Change the Java servlet support to Domino Servlet Manager.
Figure 4-44 Change session authentication settings
27.Click Save and Close.
28.Close the Domino Administrator.
29.Create an empty servlet directory folder if it does not exist in <QuickPlace_Server>:\Lotus\Domino\Data\domino\Servlet.
30.Restart the Domino Server.
You should see messages as shown in Example 4-2:
Example 4-2 Web SSO configuration messages
10/21/2003 05:51:42 PM HTTP Web Server restarting10/21/2003 05:51:46 PM HTTP: Successfully loaded Web SSO Configuration.10/21/2003 05:51:46 PM Java Servlet Manager initialized10/21/2003 05:51:48 PM QuickPlace: Successfully loaded Web SSO Configuration.10/21/2003 05:51:57 PM QuickPlace Server started. 301076.0010/21/2003 05:52:03 PM HTTP Web Server restarted
Chapter 4. WebSphere Portal: Microsoft Windows 2000 installation 141

4.9.1 Adding QuickPlaceServletTo enable QuickPlace to work in your collaborative portal, you need to add the QuickPlaceServlet (stored in the Collaborative Components Java archive file cs.jar) to your QuickPlace server. The QuickPlaceServlet ensures that the records of portal users who are registered in portal are synchronized with QuickPlace membership records.
1. Go to Windows Explorer and create the servlets.properties file in the Domino data directory. In our example, it is the <installation_drive>:\Lotus\Domino\Data\ directory.
Figure 4-45 The servlet.properties file
2. Add the following line (Figure 4-45) to the file using a text editor:
servlet.QPServlet.code=com.lotus.cs.util.QPServlet
3. Locate the cs.ear file from the <wps_root>/installableApps/ directory.
4. Extract cs.war from the ear file and then extract cs.jar from the war file.
5. Place the cs.jar file in the Domino java default directory. In our example, this is <installation_drive>:\Lotus\Domino\Data\domino\java\.
6. Edit the Domino\notes.ini file and append java\cs.jar to the JavaUserClasses entry.
Note: Checkpoint for the notes.ini update
Make sure that after making the entry, the JavaUserClasses does not exceed 256 characters.
For example, in our configuration:
JavaUserClasses=C:\Lotus\Domino\java;dsig.zip;xalan.jar;xercesImpl.jar;stcore.jar;stmtgmanagement.jar;STNotesCalendar.jar;log4j-118compat.jar;ibmjsse.jar;xml-apis.jar;mail.jar;activation.jar;C:\Lotus\Domino\Data;C:\Lotus\Domino\Data\domino\java\cs.jar;C:\LOTUS\DOMINO\quickplace.jar;C:\LOTUS\DOMINO\xercesImpl.jar;C:\LOTUS\DOMINO\xalan.jar;C:\LOTUS\DOMINO\xml-apis.jar;C:\LOTUS\DOMINO\log4j-118compat.jar;
142 IBM WebSphere Portal for Multiplatforms V5 Handbook

Note: Checkpoint for Lotus QuickPlace
1. Bring up a browser.
1. Log in to QuickPlace by typing in http://<server_name>/quickplace in the URL as wpsadmin.
2. Create a place.
3. Log in to the place you created.
4. You should see the place you created as shown in Figure 4-48 on page 145.
Note: Checkpoint for QPServlet
1. Bring up a browser.
Enter the following as the URL:
http://<fully_qualified_domino_server_host_name>/servlet/QPServlet?actionType=69
In our example, this is:
http://m23d5062.itso.ral.ibm.com/servlet/QPServlet?actionType=69
2. You should see the return message as shown in Figure 4-46.
3. Enter the following in the URL:
http://<fully_qualified_domino_server_host_name>/servlet/QPServlet?actionType=68
In our example, this is:
http://m23d5062.itso.ral.ibm.com/servlet/QPServlet?actionType=68
4. You should see the return message as shown in Figure 4-47 on page 144.
Chapter 4. WebSphere Portal: Microsoft Windows 2000 installation 143

Figure 4-46 Checkpoint for QPServlet
Figure 4-47 whoami
144 IBM WebSphere Portal for Multiplatforms V5 Handbook

Figure 4-48 Checkpoint to QuickPlace
4.10 Installing Lotus Sametime Release 3.0Setting up Lotus Sametime to work with the WebSphere Portal offers portal users the complete set of people awareness features available in collaborative portlets.
1. Shut down the Domino Server.
1. Run setup from CD 10-1 (Lotus Sametime English and French Release 3.0).
2. Read and accept the licence agreement.
3. Click Next until the install is finished.
4. Click Finish to complete the installation.
5. Browse to the server.id file in the Domino\Data directory and click Next (Figure 4-49 and Figure 4-50 on page 146).
Chapter 4. WebSphere Portal: Microsoft Windows 2000 installation 145
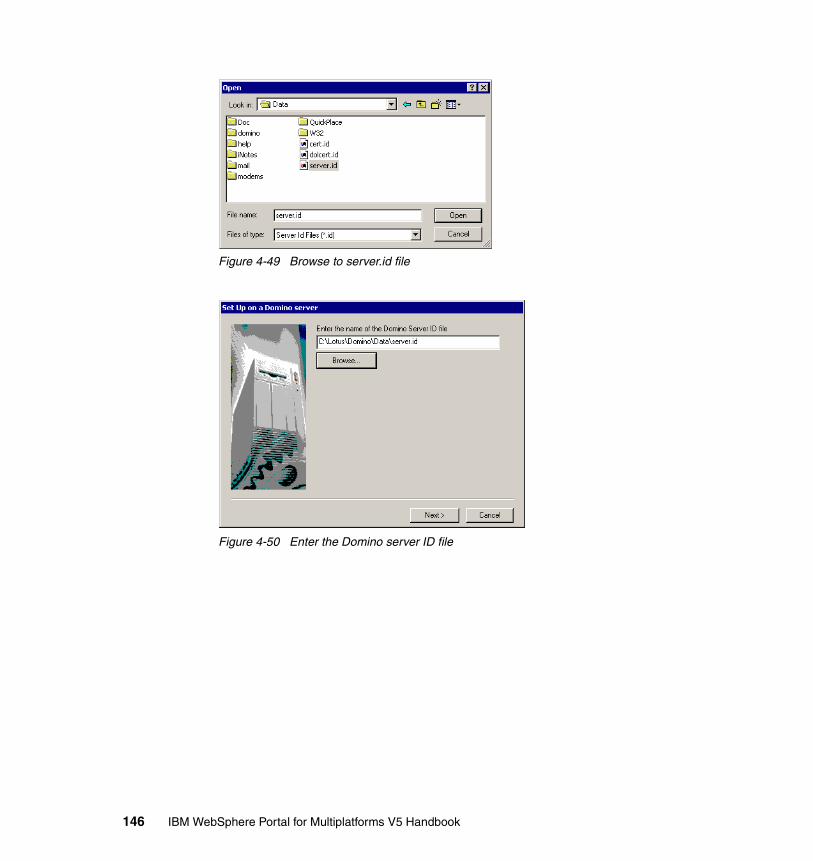
Figure 4-49 Browse to server.id file
Figure 4-50 Enter the Domino server ID file
146 IBM WebSphere Portal for Multiplatforms V5 Handbook

Figure 4-51 Select the directory type
6. Select LDAP directory for the Directory Type (Figure 4-51).
7. Enter the host name (For example, in our case, m23d5062.itso.ral.ibm.com) for the LDAP Server Name. Accept the default Port number for LDAP (for example, in our case, 389). Click Next.
8. Click Next again and the install completes.
9. Click OK.
10.Obtain Sametime 3.0 Service Pack 1 (SP1). The Fix Pack is located at:
http://www-1.ibm.com/support/docview.wss?rs=477&context=SSKTXQ&q=&uid=swg24004607&loc=en_US&cs=utf-8&lang=en+en
11.Run \SametimeServerSP1\setup.exe to install the service pack.
12.The Sametime toolkit is recommended to be installed for Sametime development. This developer toolkits give organizations a way to embed real-time collaboration into Web- and Windows-based applications, thus encouraging collaboration related to the application, or contextual collaboration. The toolkit can be installed by running the setup.exe from the Toolkit directory in the SP1 package.
13.Click Next and install all toolkits.
14.Apply STlinks-switch and UTF8_hotfix Sametime fixes from the Domino_ST_Fixes directory from CD 11-6 (Lotus Notes Client, Domino Admin, Domino and Sametime Hot Fixes Release 5.0.12).
a. Install STlinks-switch by extracting the STlinks-switch.zip file to the \Lotus\Domino\Data\domino\html\sametime\stlinks\ directory
Chapter 4. WebSphere Portal: Microsoft Windows 2000 installation 147

b. Install UTF8_hotfix by following the instructions in the utf8_STLInks_hotfix_readme.txt file from the Domino_ST_Fixes directory.
15.Go to Domino Administrator by clicking Start -> Programs -> Lotus Applications -> Lotus Domino Administrator.
16.Enter the password.
17.Select File -> Database -> Open.
18.Browse to c:\domdata\names.nsf.
19.Close the About window.
20.Expand the server twisty and select Servers.
21.Open the server document.
22.Edit the server and under Basics, remove da.nsf as the directory assistance database name.
23.Save and close the document, then close the administrator.
24.Start the Domino Server by going to Start -> Programs -> Lotus Applications -> Lotus Domino Server.
25.Sametime services will be started by the Domino Server. The Sametime Services take a while to start. The status of the Sametime services can be monitored from Control Panel -> Services.
26.Below is a list of Sametime services:
– Sametime Server
– ST Admin Service
Note: Checkpoint for Sametime online awareness
a. Bring up a browser and enter http://<sametime_server_name>/sametime/toolkits/st30linkstk/samples/links/form.html. For example, in our configuration, the URL is:
http://m23d5062.itso.ral.ibm.com/sametime/toolkits/st30linkstk/samples/links/form.html
b. Log on to the page and add names (for example, in our case, portaladmin) to be displayed, as shown in Figure 4-52 on page 150, then click View Page.
c. The sample page with online awareness displays as shown in Figure 4-53 on page 151. You should see an online awareness indicator in green besides the ID you entered in the previous window.
148 IBM WebSphere Portal for Multiplatforms V5 Handbook

– ST BuddyList
– ST Chat Logging
– ST Community
– ST Community Launch
– ST Conference
– ST Configuration
– ST Directory
– ST Links
– ST Logger
– ST Mux
– ST OnlineDir
– ST Places
– ST Polling
– ST Privacy
– ST Resolve
– ST SIP Gateway
– ST User Storage
– ST Users
Chapter 4. WebSphere Portal: Microsoft Windows 2000 installation 149

Figure 4-52 Sametime links sample form
150 IBM WebSphere Portal for Multiplatforms V5 Handbook

Figure 4-53 Online Awareness icons
4.11 Configuring QuickPlace to use Sametime awareness
In this section, we will configure Lotus QuickPlace to use Lotus Sametime awareness:
1. Go to Windows Explorer.
2. Create a QuickPlace directory under C:\Lotus\Domino\Data\domino\html\.
3. Create a peopleonline directory under C:\Lotus\Domino\Data\domino\html\QuickPlace.
Chapter 4. WebSphere Portal: Microsoft Windows 2000 installation 151

4. Copy the STComm.jar and CommRes.jar from the C:\Lotus\Domino\Data\domino\html\sametime\toolkits\st30javatk\bin directory to the newly created peopleonline directory.
5. Copy the PeopleOnline30.jar file from the C:\Lotus\Domino\Data\QuickPlace directory to the peopleonline directory.
6. Bring up a browser and enter http://<server_name>/QuickPlace as the URL.
7. Click Sign in. Use the Quickplace admin user, qpadmin.
8. Select Server Settings -> Other Options and click Edit Options.
9. Enter http://<host_name> in the Sametime Community Server field.
10.Click Next.
11.Sign out.
12.Restart the Domino Server.
4.12 Applying Domino Fix Pack 5.0.12The following steps provide information about accessing and installing a Domino fix that is required for Sametime. You should install this fix after you install Sametime and QuickPlace. Note that the fix is sometimes referred to as a HotFix.
1. Shut down the Domino Server.
2. Execute upnotes.exe from the Domino_ST_Fixes directory from CD 11-6 (Lotus Notes Client, Domino Admin, Domino and Sametime Hot Fixes Release 5.0.12).
3. Read and accept the licence agreement (Figure 4-54 on page 153).
4. Accept the defaults (Figure 4-55 on page 153).
Note: Make sure that Domino, QuickPlace and Sametime are all working properly before you apply the Domino Fix Pack.
152 IBM WebSphere Portal for Multiplatforms V5 Handbook

Figure 4-54 Install Domino Fix Pack
Figure 4-55 Install Domino Fix Pack
5. Click Close to complete the installation.
4.12.1 Editing the Sametime.ini file to set the security levelBefore you perform the configuration task, set the security level. WebSphere Portal uses a Lotus Sametime server application to enable Lotus Sametime
Chapter 4. WebSphere Portal: Microsoft Windows 2000 installation 153

connectivity or People Awareness. To allow this connectivity to work, you must set a security level by editing the Sametime.ini file.
1. Go to the Sametime server.
2. Locate the C:\Lotus\Domino\sametime.ini file to grant portal access to the Sametime server.
3. Back up a copy of the file.
4. Add the following line to the top of the file using a text editor. This is to configure the Lotus Sametime server to accept all IPs as trusted. Add the following line to the Debug section:
[Debug]VPS_BYPASS_TRUSTED_IPS=1
5. Change VPS_IGNORE_UNKNOWN_CLIENT_IP to equal 0.
6. Save and close the file.
4.13 Configuring WebSphere Portal for Domino Directory
Follow the steps below to edit the wpconfig.properties file and run the appropriate configuration tasks so that WebSphere Portal can work with the Domino LDAP server.
1. Locate the <wp_root>/config/wpconfig.properties file and create a back-up copy.
2. Update the file property values under the WebSphere Application Server and Domino sections applicable to your environment.
3. For the purpose of the proof of concept, the following fields were updated.
Table 4-5 Value used in the lab
Properties Value used
WasUserId cn=wpsbind,o=portal
WasPassword wpsbind
PortalAdminId cn=portaladmin,o=portal
PortalAdminIdShort portaladmin
PortalAdminPwd password
PortalAdminGroupId cn=wpsadmins
154 IBM WebSphere Portal for Multiplatforms V5 Handbook

4. Start Domino server by clicking Start -> Programs -> Lotus Applications -> Lotus Domino Server.
5. Bring up a command prompt and change the current working directory to <was_root>/bin.
6. Enter the following commands:
startServer server1stopServer WebSphere_Portal
7. Change the current working directory to <wp_root>/config.
PortalAdminGroupIdShort wpsadmins
LTPAPassword password
SSOEnabled true
SSORequiresSSL false
SSODomainName .itso.ral.ibm.com
LDAPHostName m23d5062.itso.ral.ibm.com
LDAPPort 389
LDAPAdminUId cn=portaladmin,o=portal
LDAPAdminPwd password
LDAPServerType DOMINO502
LDAPBindID cn=wpsbind,o=portal
LDAPBindPassword wpsbind
LDAPSuffix <blank>
LDAPUserPrefix cn
LDAPUserSuffix o=portal
LDAPGroupPrefix cn
LDAPGroupSuffix <blank>
LDAPUserObjectClass inetOrgPerson
LDAPGroupObjectClass groupOfNames
LDAPGroupMember member
Properties Value used
Chapter 4. WebSphere Portal: Microsoft Windows 2000 installation 155

8. Enter the following command:
WPSconfig.bat validate-ldap
9. Make sure a BUILD SUCCESSFUL message returns.
10.Enter WPSconfig.bat enable-security-ldap at the command prompt. Wait for the BUILD SUCCESSFUL message.
11.Check the output for any error messages before proceeding with any additional tasks. If the configuration task fails, verify the values in the wpconfig.properties file. Before running the task again, be sure to stop the WebSphere Portal application server by entering the following command from the <was_root>/bin directory and specify the WebSphere Application Server user ID and password (as defined by the WasUserid and WasPassword properties).
stopServer WebSphere_Portal -user was_admin_userid -password was_admin_password
At this point, when using Domino, users cannot log in to WebSphere Portal using a shortname. Users must use a full first and last name to log in. In order to allow users to log in using a shortname, you must reconfigure a filter in WebSphere Application Server. Use the following steps as a guide to configure a filter.
12.Stop the WebSphere Application Server by going to Start -> Programs -> IBM WebSphere Application Server -> Application Server v5.0 -> Stop the Server.
13.Start the WebSphere Application Server by going to Start -> Programs -> IBM WebSphere Application Server -> Application Server v5.0 -> Start the Server.
14.Select WebSphere Application Server Admin Console by going to Start -> Programs -> IBM WebSphere Application Server -> Application Server v5.0 -> Administrative Console.
Note: If the configuration task fails, validate the values in the wpconfig.properties file.
Note: Once you have enabled security with your LDAP directory, you will need to provide the user ID and password required for security authentication on WebSphere Application Server when you perform certain administrative tasks with WebSphere Application Server.
In our configuration, the command will read as follows:
stopServer WebSphere_Portal -user wpsbind -password wpsbind
156 IBM WebSphere Portal for Multiplatforms V5 Handbook

15.Select Security -> User Registries -> LDAP -> Advanced LDAP Settings.
16.In order to allows users to log in using the shortname, you need to change the user filter from (&(cn=%v) to (&(uid=%v) as shown in Figure 4-56.
Figure 4-56 Change user filter
17.Click OK.
18.Save the changes to the master configuration.
The SSO mechanism requires the use of a token. This token, referred to as a Light-Weight Third Party Authentication (LTPA) token, contains data that uniquely identifies the user, such as the user’s ID and a digital signature used to authenticate the token by the application server.
If you have already configured SSO between Domino LDAP and WebSphere Application Server, then use the same LTPA token that was created by WebSphere Application Server and imported by Domino LDAP.
19.Select Security -> Authentication Mechanism -> LTPA.
Chapter 4. WebSphere Portal: Microsoft Windows 2000 installation 157

20.Enter a name for the key file, for example, C:\domwas.key.
21.Click Export Keys (Figure 4-57).
22.Click Save (Figure 4-58 on page 159).
Figure 4-57 Export LTPA token from portal
158 IBM WebSphere Portal for Multiplatforms V5 Handbook

Figure 4-58 Click save
23.Bring up the Domino Administrator.
24.Select the portal domain (as opposed to local).
25.Click the Configuration tab.
26.Expand Web.
27.Click Web Server Configuration.
28.Expand *- All Servers -.
29.Open the Web SSO Configuration for the LTPA token (Figure 4-59 on page 160).
Chapter 4. WebSphere Portal: Microsoft Windows 2000 installation 159

Figure 4-59 Import LTPA token on Domino Server
Figure 4-60 Import LTPA token
30.Edit the document.
31.Click Keys -> Import WebSphere LTPA Keys (Figure 4-60).
32.Ignore the warning message that SSO configuration has already been initialized.
33.Click OK.
160 IBM WebSphere Portal for Multiplatforms V5 Handbook

34.Enter the path of the key (Figure 4-61). For example, in the lab the key was copied to C:\itpa\domwas.key.
35.Click OK.
Figure 4-61 Path to LTPA token
Figure 4-62 Enter LTPA password
36.Type in the LTPA password, for example, password (Figure 4-62).
Click OK.
37.You will see the message Successfully imported WebSphere LTPA keys. Click OK.
Chapter 4. WebSphere Portal: Microsoft Windows 2000 installation 161

Figure 4-63 Finish Importing LTPA token
38.Enter <server_name>\:389 as the LDAP realm (Figure 4-63). It is important to enter the slash and colon (\:) before the port number.
39.Click Save and Close.
40.Restart the Domino Server.
41.Stop the WebSphere Application Server by going to Start -> Programs -> IBM WebSphere Application Server -> Application Server v5.0 -> Stop the Server.
42.Start the WebSphere Application Server by going to Start -> Programs -> IBM WebSphere Application Server -> Application Server v5.0 -> Start the Server.
43.Stop the WebSphere Portal by going to Start -> Programs -> IBM WebSphere Application Server -> Portal Server v5.0 -> Stop the Server.
44.Start the WebSphere Portal by going to Start -> Programs -> IBM WebSphere Application Server -> Portal Server v5.0 -> Start the Server.
Web SSO Configuration for: LtpaToken
162 IBM WebSphere Portal for Multiplatforms V5 Handbook

4.14 Deploying Lotus Collaborative ComponentsLotus Collaborative Components (LCC) provide the building blocks for integrating the functionality of Lotus Domino, Lotus Sametime, Lotus QuickPlace, and Lotus Discovery Server into portals and portlets. To use Lotus Collaborative Components, you must use the Lotus companion products (Lotus Sametime, Lotus QuickPlace, and Lotus Discovery Server). In addition, you can configure Lotus Collaborative Components to use Domino Directory as the LDAP server.
4.14.1 Enabling Lotus Collaborative Components1. Stop the WebSphere Application Server by going to Start -> Programs ->
IBM WebSphere Application Server -> Application Server v5.0 -> Stop the Server.
2. Stop WebSphere Portal by going to Start -> Programs -> IBM WebSphere Application Server -> Portal Server v5.0 -> Stop the Server.
3. Locate the <wp_root>/config/wpconfig.properties file.
4. Back up the file.
5. Update the values of the fields applicable to your environment. For the purpose of the proof of concept, the following fields are updated:
Table 4-6 LCC Domino values
6. Save the file.
7. Bring up a command prompt.
Note: Checkpoint for Single Sign-On:
1. Log in to the portal by entering the URL:
http://<server_name>:9081/wps/portal
2. Point the same browser to http://<domino_server>/names.nsf.
3. You should see the Domino address book without being challenged for an user name and password if Single Sign-On is working properly.
Property Value Used
LCC.DominoDirectory.Enabled true
LCC.DominoDirectory.Server m23d5062.itso.ral.ibm.com
LCC.DominoDirectory.SSL false
Chapter 4. WebSphere Portal: Microsoft Windows 2000 installation 163

8. Change the current working directory to C:\WebSphere\PortalServer\config.
9. Run wpsconfig lcc-configure-dominodirectory and wait for the BUILD SUCCESSFUL message.
10.Start the WebSphere Portal by going to Start -> Programs -> IBM WebSphere Application Server -> Portal Server v5.0 -> Start the Server.
11.Stop WebSphere Portal by going to Start -> Programs -> IBM WebSphere Application Server -> Portal Server v5.0 -> Stop the Server.
12..Locate the <wp_root>/config/wpconfig.properties file.
13.Back up the file.
14.Update the values of the fields applicable to your environment. For the purpose of the proof of concept, the following fields are updated, as shown in Table 4-7.
Table 4-7 Values used in LCC
15.Save the file.
16.Bring up a command prompt.
17.Change the current working directory to C:\WebSphere\PortalServer\config.
18.Run wpsconfig lcc-configure-sametime and wait for the BUILD SUCCESSFUL message.
19.Start the WebSphere Portal by going to Start -> Programs -> IBM WebSphere Application Server -> Portal Server v5.0 -> Start the Server.
20.Stop WebSphere Portal by going to Start -> Programs -> IBM WebSphere Application Server -> Portal Server v5.0 -> Stop the Server.
21.Locate the <wp_root>/config/wpconfig.properties file and update the values of the fields applicable to your environment. For the purpose of the proof of concept, the following fields werer updated (Table 4-8).
Table 4-8 Valuesused for enabling QuickPlace
22.Save the file.
Property Value Used
LCC.Sametime.Enabled true
LCC.Sametime.Server m23d5062.itso.ral.ibm.com
Property Value used
LCC.QuickPlace.Enabled true
LCC.QuickPlace.Server m23d5062.itso.tal.ibm.com
164 IBM WebSphere Portal for Multiplatforms V5 Handbook

23.Bring up a command prompt.
24.Change the current working directory to C:\WebSphere\PortalServer\config.
25.Run wpsconfig lcc-configure-quickplace and wait for the BUILD SUCCESSFUL message.
26.Restart WebSphere Portal Server.
4.14.2 Deploying collaborative portletsFollow the instructions provided to deploy the Lotus collaborative portlets.
1. Start Server1 by going to Start -> Programs -> IBM WebSphere Application Server -> Application Server v5.0 -> Start the Server.
2. Start WebSphere Portal by going to Start -> Programs -> IBM WebSphere Application Server -> Portal Server v5.0 -> Start the Server.
3. Bring up a command prompt.
4. Change the current working directory to C:\WebSphere\PortalServer\bin.
5. Execute the following command:
xmlaccess -in ..\config\work\lccportlets.xml -user <adminID> -pwd <password> -url <server_name>:9081/wps/config
where
<adminID> is a portal administrator user name, for example, wpsadmin
<password> is the administrator password
<server_name> is the name of your Portal server
6. Make sure the status for the result of all elements is ok, as shown in Figure 4-64 on page 166.
Chapter 4. WebSphere Portal: Microsoft Windows 2000 installation 165

Figure 4-64 Deploy collaborative portlets
7. Stop WebSphere Portal by going to Start -> Programs -> IBM WebSphere Application Server -> Portal Server v5.0 -> Stop the Server.
8. Stop WebSphere Portal by going to Start -> Programs -> IBM WebSphere Application Server -> Application Server v5.0 -> Stop the Server.
9. Locate the CSEnvironment.properties file in the C:\WebSphere\PortalServer\shared\app\config\ directory.
10.Back up a copy of the file.
11.Use a text editor to edit the CSEnvironment.properties file.
12.Uncomment the line CS_SERVER_SAMETIME_1.dnNameSeparator=.
13.Set its value to CS_SERVER_SAMETIME_1.dnNameSeparator=/
14.Change the value for CS_PERF_PROP_USEWMM.enabled=true to false.
15.Save the file.
16.Start the PortalServer by going to Start -> Programs -> IBM WebSphere -> Portal Server v5.0 -> Start the Server.
166 IBM WebSphere Portal for Multiplatforms V5 Handbook

Figure 4-65 Test QuickPlace portlet
Note: Checkpoint for collaborative portlets
1. Log on to the portal.
2. Add the QuickPlace portlet to any page of the portal.
3. Click the Edit icon of the QuickPlace Portlet.
4. Enter a name and the URI for the QuickPlace and click OK.
You should see the QuickPlace portlet as shown in Figure 4-65.
5. Click the My Work tab and the e-mail sub-tab.
6. You should see the Lotus Notes View portlet with Sametime online awareness working properly, as in Figure 4-66, Figure 4-67 and Figure 4-68.
Chapter 4. WebSphere Portal: Microsoft Windows 2000 installation 167

Figure 4-66 Test Lotus Notes view portlet
Figure 4-67 Test chat
168 IBM WebSphere Portal for Multiplatforms V5 Handbook

Figure 4-68 Sametime chat
4.15 Installing IBM WebSphere Portal Collaboration Center
WebSphere Portal featuring Collaboration Center capabilities provide a People Finder portlet that is integrated with the My Lotus Team Workplaces (QuickPlace) portlet, the Web Conferencing (Sametime) portlet, the Sametime Contact List portlet and the Sametime Who Is Here portlet.
1. Execute installcollabctr c:\websphere\appserver from \collabcenter\install\auto from CD 8-1 (Lotus Domino Extended Search for Windows and Linux, Lotus Collaboration Center) as shown in Figure 4-69.
Figure 4-69 Install Collaboration Center
Chapter 4. WebSphere Portal: Microsoft Windows 2000 installation 169

2. Click Next.
3. Confirm the WebSphere Application Server install directory.
4. Confirm the WebSphere Portal install directory.
Figure 4-70 Database type to create
5. Confirm the type of database to create (Figure 4-70).
170 IBM WebSphere Portal for Multiplatforms V5 Handbook

Figure 4-71 Database access information
6. Enter the database access information (Figure 4-71).
Chapter 4. WebSphere Portal: Microsoft Windows 2000 installation 171

Figure 4-72 Update JDBC driver library information
7. Update the path to JDBC driver library, for example, C:\Program Files\ibm\SQLLIB\Java\db2java.zip as shown in Figure 4-72.
8. Confirm the Application Server name.
9. Select Yes to deploy the Collaboration Center sample page.
10.Click Next.
11.Click Finish to complete the installation.
12.Stop WebSphere Portal by clicking Start -> Programs -> IBM WebSphere Application Server -> Portal Server v5.0 -> Stop the Server.
13.Copy ibmorb.jar from \collaborationcenter\fixes on CD 8-1 (Lotus Domino Extended Search for Windows and Linux, Lotus Collaboration Center) to the \websphere\appserver\java\jre\lib\ext directory.
14.Start WebSphere Portal by clicking Start -> Programs -> IBM WebSphere Application Server -> Portal Server v5.0 -> Start the Server.
4.16 Configuring the Collaboration Center portletAfter you have installed the Collaboration Center components of WebSphere Portal, you must set them up to work with each other and with the portal. The
172 IBM WebSphere Portal for Multiplatforms V5 Handbook

central component of the Collaboration Center is the People Finder portlet, which requires the preparation of an LDAP directory and server connection. A sample directory configuration, PFSampleConnection.xml, is provided for directory administrators with LDAP expertise to modify and import as a new directory connection. A directory configuration defines both the directory data model and the connection settings to the LDAP server. After you specify a directory configuration in an XML file, you can manage it using the Directory Connector application. The Directory Connector application allows configurations to be imported, validated, activated, exported and deleted as needed.
4.16.1 Configuring the Web Conferencing portletThe Lotus Web Conferencing portlet that comes with WebSphere Portal featuring Collaboration Center lets users find, attend, and schedule e-meetings, as well as view meeting details. The Web Conferencing portlet is provided by the portlet application, LotusWebConferencing.war. This portlet complements the People Finder portlet and the My Lotus Team Workplaces portlet. As with the other Collaboration Center portlets, people links are visible in the Web Conferencing portlet to make employee interaction fast and easy, improving personal and organizational productivity.
1. Log on to the portal.
2. Click Administration.
3. Click Manage portlets.
4. Select Lotus Web Conferencing.
5. Modify the parameters (Figure 4-73 on page 174).
6. Set SametimePassword1 to <password>.
7. Set SametimeUsername1 to <username>.
8. Set SametimeServer1 to <server_name>.
9. Click Save.
Chapter 4. WebSphere Portal: Microsoft Windows 2000 installation 173

Figure 4-73 Modify Lotus Web Conferencing portlet parameters
4.16.2 Configuring People Finder 5.0The People Finder portlet is the primary application of Collaboration Center. It provides both quick search and advanced search options for locating people and information about them.
1. Go to the WebSphere Application Server Admin Console by clicking Start -> Programs -> IBM WebSphere Application Server -> Application Server v5.0 -> Administrative Console.
2. Enter a user name and password, for example, in our case, wpsbind.
3. Select Applications -> Enterprise applications from the main menu on the left.
174 IBM WebSphere Portal for Multiplatforms V5 Handbook

4. Select the LdapConnector application check box and click Stop.
5. Click the LdapConnector link.
6. Scroll down and click Map security roles to users/groups at the bottom of the window (Figure 4-74).
7. Check Everyone for AdminRole and click OK.
8. Click OK.
9. Click Save.
10.Click the Save button.
Figure 4-74 LDAP connector
11.Click Enterprise applications again from the main menu on the left, select the LdapConnector checkbox and click Start.
12.Locate the \WebSphere\PortalServer\CollabCenter\PFSampleConnection.xml file.
13.Back up a copy.
14.Use a text editor to enter ldap://<server_name>:389 as the hostURI element.
15.Enter o=portal for the baseDN element <baseDN>o=portal</baseDN>.
Chapter 4. WebSphere Portal: Microsoft Windows 2000 installation 175

16.Bring up a browser and enter:
http://<server_name>:9081/PFDirectoryConnector/ConfigCenterView.action
17.Browse to and select C:\WebSphere\PortalServer\CollabCenter\PFSampleConnection.xml as shown in Figure 4-75.
Figure 4-75 Import connection
18.Click Import New Connection.
19.Select the PFSampleConnection radio button, click the Skip field mapping validation check box and click Activate.
20.Return to the portal. You should see the Collaboration Center portlets as shown in Figure 4-76 on page 177.
176 IBM WebSphere Portal for Multiplatforms V5 Handbook

Figure 4-76 Collaboration Center
You have now completed the WebSphere Portal for Multiplatforms 5.0 install with Collaboration Center on Windows 2000 using IBM DB2, Lotus QuickPlace and Sametime using Domino as LDAP.
Chapter 4. WebSphere Portal: Microsoft Windows 2000 installation 177

178 IBM WebSphere Portal for Multiplatforms V5 Handbook

Chapter 5. WebSphere Portal: SUSE SLES 8 Linux installation
This chapter describes the installation and configuration of WebSphere Portal V5 Extend for SUSE SLES V8.0 in a multi-tier environment.
The installation includes three machines, where:
� Machine one with Windows 2000 SP3 has:
– IBM HTTP Server V1.3.26.1
– Lotus Domino Administrator R5
� Machine two with SUSE SLES 8.0 has:
– WebSphere Application Server V5.0
– WebSphere Portal V5.0
– Cloudscape V5.1.26
– IBM DB2 Client V8.1
� Machine three with SUSE SLES 8.0 has:
– IBM DB2 Server V8.1
– Lotus Domino Application Server 5.0.12
5
© Copyright IBM Corp. 2004. All rights reserved. 179

This chapter is organized as follows:
� Overview of WebSphere Portal installation on Linux
� Preparing the machines for installation
� WebSphere Portal V5.0 installation
� IBM HTTP Server V1.3.26.1 installation
� IBM DB2 V8.1 installation
� Lotus Domino V5.0.12 installation
180 IBM WebSphere Portal for Multiplatforms V5 Handbook

5.1 Overview of WebSphere Portal installation on LinuxWebSphere Portal V5.0 installation supports the following distributions of Linux:
� Linux Intel:
– SUSE Linux for Intel (x86) 7.3 2.4 Kernel
– SUSE SLES for Intel (x86) 7 2.4 Kernel, IA32 only
– SUSE SLES for Intel (x86) 8 2.4 Kernel.
– Red Hat Enterprise Linux AS for Intel (x86) 2.1
– Red Hat Linux for Intel (x86) 8.0 2.4 Kernel, 32-bit mode support only
� Linux zSeries:
– SUSE SLES for s/390 7 2.4 Kernel, supported by WebSphere Portal Enable only
Figure 5-1 on page 182 illustrates the possible software candidates for the browser, Web server, application server, LDAP and database for installation and configuration of WebSphere Portal V5.0 on Linux Intel systems.
The other components, such as the IBM WebSphere Portal Collaboration Center, do not support the following operating systems at this time:
� Red Hat Enterprise Linux AS for Intel (x86) 2.1
� SUSE SLES for Intel (x86) 7 2.4 Kernel
� SUSE SLES for Intel (x86) 8 2.4 Kernel
and only the WebSphere Portal content publishing runtime server is installed during the installation of the base WebSphere portal on a Linux Intel system.
Chapter 5. WebSphere Portal: SUSE SLES 8 Linux installation 181

Figure 5-1 Possible software candidates for WebSphere Portal V5 on Linux
The sample scenario described in this chapter is more appropriate for a production environment where you would like to have the Web server in tier 1, the WebSphere Application Server in tier 2 and a robust LDAP directory and database for WebSphere Portal authentication through the WebSphere Application Server in tier 3. The architecture of the sample scenario is shown in Figure 5-2 on page 183.
The sample scenario has been implemented on clean machines, having no previous versions of WebSphere Portal or its component products, such as WebSphere Application Server or a Web server.
INTERNET
Browser
1. Mozilla 1.0.2 2. Mozilla 1.2.1 3. Mozilla 1.3 4. Netscape
Communicator 6.2
5. Netscape Communicator
7.0
Internet Demilitarized Zone Internal network
Web Server
1. Apache Server 1.3.26 2. IBM HTTP Server
1.3.26.1 3. IBM HTTP Server
2.0.42.14. Lotus Domino
Enterprise Server 5.0.9a or later
ApplicationServer
Websphere Application Server
Enterprise 5.0 Fix Pack 1
LDAP
1. IBM Directory Server V5.1 2. IBM Directory Server V4.1
3. Lotus Domino Enterprise Server 5.0.11 4. IBM Lotus Domino Enterprise Server 5.0.12
5. Lotus Domino Enterprise Server 6.0
Database
1.Cloudscape V5.1.26 2. IBM DB2 Universal Database
Enterprise Server Edition 8.1 FP1 3. IBM DB2 Universal Database
Enterprise Edition 7.2 FP7 4. IBM DB2 Universal Database
Enterprise Edition 7.2 FP8 5. IBM DB2 Universal Database
Express 8.1 FP1 6. IBM DB2 Universal Database
Workgroup Server Edition 8.1 FP1 7. IBM DB2 Universal Database
Workgroup Edition 7.2 FP8 8. Informix Dynamic Server 9.4 - Fix
TC3 9 .Informix Dynamic Server 9.3 - Fix
TC6 10. Oracle Enterprise Edition 8i
Release 3 (8.1.7) 11. Oracle Enterprise Edition 9i
Release 2 (9.2.0.1)
182 IBM WebSphere Portal for Multiplatforms V5 Handbook

Figure 5-2 Architecture of the sample scenario for WebSphere Portal V5 on SUSE SLES V8.0
5.2 Preparing the machines for installation� Refer to 3.3.2, “SUSE SLES 8” on page 47 for information on the hardware
requirements that should be fulfilled by the three machines and the software CDs required to implement this sample scenario.
� IBM HTTP Server can be run as a service on the Windows operating system. To enable this feature, you need to have an existing user with sufficient privileges on machine 1. Refer to Appendix G, “Creating users and groups in SUSE SLES V8.0” on page 747.
� You should create the following users and groups on the SUSE SLES V8.0 machines:
– A user on machine 2 for WebSphere Portal administration
– A user on machine 3 for Lotus Domino Enterprise Server V5.0.12 administration
– A group on machine 3 for Lotus Domino Enterprise Server V5.0.12 administrators
Http Server
LDAPWeb Server
ApplicationServer
Database
Windows 2000 SP3IBM Http Server
V1.23.26Lotus Domino
Administrator R5Webserver Plugins
SuSE SLES V8.0 Websphere Portal
Server V5.0Websphere Application
Server V5.0IBM DB2 Client V8.2
SuSE SLES V8.0Domino Application
Server V5.0.12IBM DB2 V8.1 FP1
INTERNET
Internal Network
Machine 1 Machine 2 Machine 3
Edge ofNetwork
Chapter 5. WebSphere Portal: SUSE SLES 8 Linux installation 183

Refer to Appendix G, “Creating users and groups in SUSE SLES V8.0” on page 747 for information on creating users and groups and adding a user to a group on SUSE SLES V8.0. The user and group information for the users used for administration of the components in this scenario is as shown in Table 5-1. Create a similar table of user or group information for assistance during the installation.
Table 5-1 User ang group information
� Any firewall products running on the machines have been disabled.
� Every machine has a static IP address.
� Each machine has a fully qualified host name; this is because after WebSphere Portal is configured to work with the Domino Directory, the WebSphere Application Server global security is enabled and you must then type the fully qualified host name when accessing WebSphere Portal and the WebSphere Application Server administrative console. Table 5-2 on page 185 specifies the fully qualified host name of the three machines used in this sample scenario.
Role Username Password
WebSphere Portal Administrator
wpsadmin wpsadmin
IBM DB2 Server Administrator
db2usr1 password
Instance owner on DB2 server and client
db2inst1 password
Domino Enterprise Server Administrator
ldapadmin password
IBM HTTP Server Administrator
ihsadmin password
WebSphere Portal Administrators group
wpsadms password
IBM DB2 Server Administrators group
db2adm1 password
Instance owners group on DB2 server and client
db2iadm1 password
Domino Enterprise Server Administrators group
ldapadm password
184 IBM WebSphere Portal for Multiplatforms V5 Handbook

Table 5-2 Fully qualified host names of the machines
� Any anti-virus products running on the machines have been disabled.
� You can refer to Appendix H, “UNIX commands on SUSE SLES V8.0” on page 753 for commands in UNIX to perform tasks such as mounting and unmounting a CD.
� Network connectivity to the Internet is available.
5.3 WebSphere Portal installationThis section describes the steps to perform the WebSphere Portal installation.
� Installation of WebSphere Portal V5.0 on machine 2. The installation program for WebSphere Portal V5.0 installs the following components:
– WebSphere Portal V5.0
– WebSphere Application Server V5.0
– Cloudscape 5.1.26
– IBM HTTP Server 1.3.26.1
under its full installation type. In this scenario, we are using a remote Web server. However, the IBM HTTP Server will not be installed here. After installing, we will verify the installation of each component.
� Installation of the manual fixes for WebSphere Application Server V5.0.
5.3.1 Installing WebSphere Portal V5.0Complete the following steps:
1. On machine 2, log in as the root user and start a terminal session.
2. Mount the setup CD and start the WebSphere Portal Installation wizard by running the following command:
#./media/cdrom/install.sh
3. Select the language you would like to have for the installation and click OK. For our example, we selected English.
Machine Fully qualified host name
1 webserver.itso.ral.ibm.com
2 wpslinux.itso.ral.ibm.com
3 ldaplinux.itso.ral.ibm.com
Chapter 5. WebSphere Portal: SUSE SLES 8 Linux installation 185

Figure 5-3 Language for Installation
4. Click Next in the WebSphere Portal V5 welcome window.
5. Read the license agreement, click I accept the terms in the License Agreement to accept the WebSphere Portal V5 software license agreement and click Next.
Figure 5-4 WebSphere Portal V5.0 license agreement
6. The installer now checks for the required operating system and software prerequisites. The warning window shown in Figure 5-5 on page 187 appears if any firewall product is still running on machine 2. Disable the firewall product and click OK.
186 IBM WebSphere Portal for Multiplatforms V5 Handbook

Figure 5-5 Firewall warning
7. Installation type: WebSphere Portal V5 includes two different types of setup, as shown in Figure 5-6:
Full: this setup type installs all the basic components needed for WebSphere Portal V5 to be up and running, which include WebSphere Application Server V5, WebSphere Portal V5 and Cloudscape V5.1.26 and IBM HTTP Server V1.3.26.1, on a single machine. This setup type is recommended in cases where you would like to implement a proof of concept environment.
Custom: this setup type allows you to select the features that you would like to install. This setup type is recommended in cases where would like to implement a development or production environment.
Select Custom and click Next.
Figure 5-6 Installation type
Chapter 5. WebSphere Portal: SUSE SLES 8 Linux installation 187

8. WebSphere Application Server installation type
The installation wizard provides you with several types of WebSphere Application Server installations (shown in Figure 5-7).
Select Install a new instance of WebSphere Application Server and click Next.
Figure 5-7 WebSphere Application Server installation type
9. WebSphere Application Server installation directory
Select the default directory (see Figure 5-8 on page 189) for the installation of WebSphere Application Server and click Next.
188 IBM WebSphere Portal for Multiplatforms V5 Handbook

Figure 5-8 WebSphere Application Server installation directory
10.IIBM HTTP Server installation type
The installation wizard provides you with several options for an HTTP server installation (shown in Figure 5-9 on page 190). Select Do not install a plugin at this time and click Next.
Chapter 5. WebSphere Portal: SUSE SLES 8 Linux installation 189

Figure 5-9 IBM HTTP Server installation type
11.WebSphere Application Server node name and host name
Enter the node name for the instance of WebSphere Application Server and the host name; here it is the fully qualified host name of machine 2. Click Next.
Note:
� To avoid conflict with other instances of WebSphere Application Server on the network, it is best to have the node name as the host name of the machine on which WebSphere Application Server is being installed.
� Not entering the fully qualified host name may create problems if you would like to enable Single Sign-On (SSO) in the future.
190 IBM WebSphere Portal for Multiplatforms V5 Handbook

Figure 5-10 Nodename and Hostname for WebSphere Application Server
12.WebSphere Portal installation directory
Select the default directory as shown in Figure 5-11 on page 192 for the installation of WebSphere Portal. Click Next.
Chapter 5. WebSphere Portal: SUSE SLES 8 Linux installation 191

Figure 5-11 WebSphere Portal installation directory
13.WebSphere Portal administrator
Enter the user name and password of the WebSphere Portal administrator and click Next.
192 IBM WebSphere Portal for Multiplatforms V5 Handbook
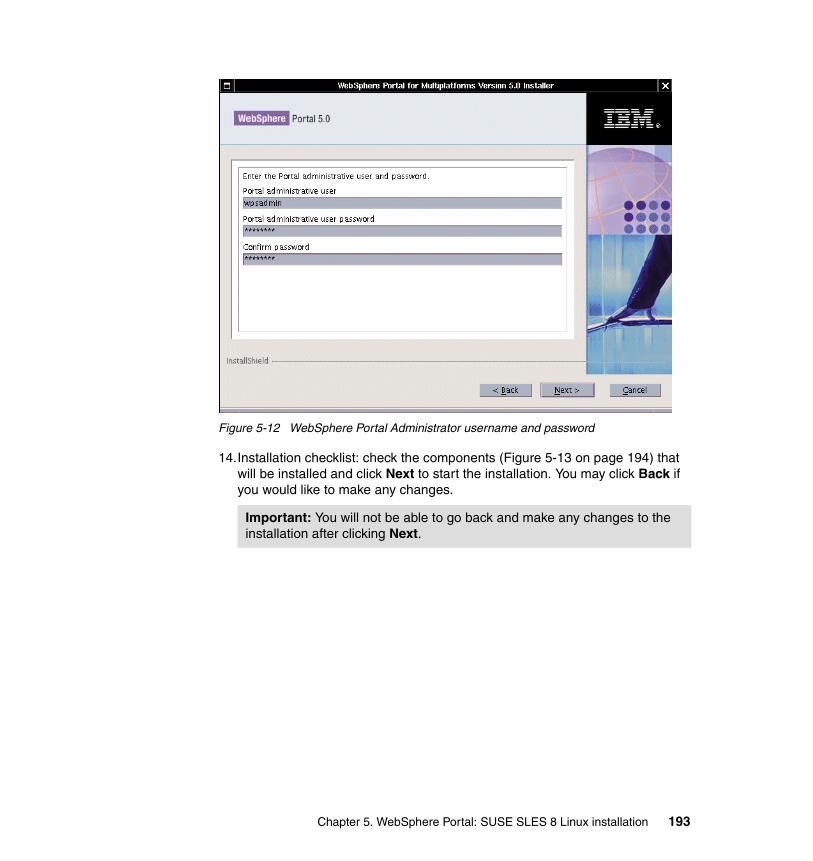
Figure 5-12 WebSphere Portal Administrator username and password
14.Installation checklist: check the components (Figure 5-13 on page 194) that will be installed and click Next to start the installation. You may click Back if you would like to make any changes.
Important: You will not be able to go back and make any changes to the installation after clicking Next.
Chapter 5. WebSphere Portal: SUSE SLES 8 Linux installation 193

Figure 5-13 List of components selected for installation
15.iOn reaching the window shown in Figure 5-14 on page 195, unmount the Setup CD and mount the CD 1-2. Click Next to start the WebSphere Application Server installation.
194 IBM WebSphere Portal for Multiplatforms V5 Handbook

Figure 5-14 Insert CD 1-2 for WebSphere Application Server V5 installation
16.Upon reaching the window shown in Figure 5-15 on page 196, unmount CD 1-2 and mount CD 1-6. Click Next to install the WebSphere Application Server Fix Pack 1 and some eFixes.
Chapter 5. WebSphere Portal: SUSE SLES 8 Linux installation 195

Figure 5-15 Insert CD 1-6 for WebSphere Application Server Fix Pack and eFixes
17.Verify WebSphere Application Server installation.
Upon reaching the window shown in Figure 5-17 on page 198, verify the installation of WebSphere Application Server with the following steps.
a. Open the WebSphere Application administrative console from a browser by entering the URL:
http://<hostname>:9090/admin
where hostname is the fully qualified host name of machine 2
and 9090 is the port on which WebSphere Application administrative server listens.
b. Enter any user ID (for example admin) and click OK; you will see a window similar to Figure 5-16 on page 197. This verifies the successful installation of WebSphere Application Server V5.0.
196 IBM WebSphere Portal for Multiplatforms V5 Handbook

Figure 5-16 WebSphere Application administrative console
c. You can double-check the installation of WebSphere Application Server by accessing a Web application running on WebSphere Application Server; enter the following URL in a browser:
http://<hostname>:9080/snoop
where hostname is the fully qualified host name of machine 2
and 9080 is the port on which the Web applications running on WebSphere Application Server are presently listening.
18.Back to the installation: unmount CD 1-6 and mount CD 2. Click Next to start the installation of WebSphere Portal V5.0 and WebSphere Portal content publishing runtime server.
Chapter 5. WebSphere Portal: SUSE SLES 8 Linux installation 197

Figure 5-17 Mount CD 2 for WebSphere Portal and WPCP installation
19.Installation result
The final window (Figure 5-18 on page 199) tells you the result of the installation (successful or unsuccessful), the list of components installed on the machine and the URL to access WebSphere Portal. Click Finish to stop and close the installation wizard.
198 IBM WebSphere Portal for Multiplatforms V5 Handbook

Figure 5-18 List of components installed successfully
20.Verify WebSphere Portal installation
Verify the installation of the WebSphere Portal with the following steps:
a. Access the following URL from a browser:
http://<hostname>:9081/wps/portal
where, <hostname> is the fully qualified host name of machine 2,
and 9081 is the port on which WebSphere Portal is presently listening.
b. Log in to the WebSphere Portal administrative window by clicking Log in in the top right-hand corner of the page and entering the user ID and password for the WebSphere Portal Administrator. You created this user ID in step 13 on page 192. Click Login. You will see a window similar to Figure 5-19 on page 200.
Chapter 5. WebSphere Portal: SUSE SLES 8 Linux installation 199

Figure 5-19 WebSphere Portal Welcome page for the Portal Administrator
This completes the installation and verification of WebSphere Portal V5.0 on machine 2.
5.3.2 Installing manual fixes for WebSphere Application Server V5.0WebSphere Portal V5 requires you to install the following fixes manually for WebSphere Application Server V5.0:
� PQ72597-efix.jar2.
� PQ72196_fix.jar2.
� PQ77008.jar2.
� PQ77142.jar2.
� WAS_Security_07-07-2003_JSSE_cumulative_Fix.jar2.
� WebSphere Plug-in Cumulative Fix for 5.0.0, 5.0.1, and 5.0.22.
200 IBM WebSphere Portal for Multiplatforms V5 Handbook

The first five fixes should be installed on the WebSphere Application Server machine and the last one on the Web server machine. The installation can be done by using a Update Installation Wizard.
This section describes the steps to install the first five fixes on machine 2. Perform the steps listed below:
1. Check the status of WebSphere Application administration server and WebSphere Portal by running the following from the <was_root>/bin directory:
#./serverStatus -all
If they are started, stop them by using the commands:
#./stopServer server1#./stopServer WebSphere_Portal
2. Mount CD 1-6 and extract the files present in linuxUpdateInstaller.zip, in the /media/cdrom/manualfixes/linux directory.
3. Start the Update Installation Wizard by running the updateWizard.sh file, extracted from the zip file.
4. Select English as the language for the installation and click OK.
5. Click Next in the Welcome window.
6. The wizard lists the version of the WebSphere Application Server installed on your machine. Click Next to go to the window shown in Figure 5-20 on page 202.
7. Select Install Fixes and click Next.
Chapter 5. WebSphere Portal: SUSE SLES 8 Linux installation 201

Figure 5-20 Fixes or Fix Packs product selection
8. The fixes are present in the /media/cdrom/manualfixes/linux directory on CD 1-6. Browse to this directory or any other directory where the fixes are present and click Next.
9. The wizard lists all the fixes available for installation from the directory provided in the previous step. Select all fixes except for the fix named WebSphere Plug-in Cumulative Fix for 5.0.0, 5.0.1, and 5.0.22 and click Next.
10.Check the fixes that will be installed and also the directory and then click Next to start the installation.
11.Once the installation is over, you will see a window similar to the one in Figure 5-21 on page 203. Check that all the selected fixes have installed successfully and then click Finish to close the wizard.
Note: If the Web server is installed locally then the WebSphere Plug-in Cumulative Fix for 5.0.0, 5.0.1, and 5.0.22 fix should also be selected for installation.
202 IBM WebSphere Portal for Multiplatforms V5 Handbook

Figure 5-21 Installation result
Verifying the installation of the manual fixesThis section describes the steps to verify the successful installation of WebSphere Application Server manual fixes.
1. Start the first steps for WebSphere Application Server by entering the following in a console from the <was_root>/bin/ directory:
./firststeps.sh
You will see a window similar to Figure 5-22 on page 204.
2. Click Start the Server to start the WebSphere Application Server.
Note: If the installation of any of the fixes was unsuccessful, do not click Finish. Check the log files in the <was_root>/logs/update directory for errors that might have ocurred during the installation. You can rerun the wizard by clicking Run Wizard Again.
Chapter 5. WebSphere Portal: SUSE SLES 8 Linux installation 203

Figure 5-22 WebSphere Application Server 5.0 first steps
3. Once the server is started, click Verify Installation to start the verification. You should see a window similar to Figure 5-23 on page 205, stating that the verification of the installation of the manual fixes was successful.
204 IBM WebSphere Portal for Multiplatforms V5 Handbook

Figure 5-23 Results of running the verification
5.4 IBM HTTP Server installationThis section describes the steps to perform the following tasks:
� Installation of IBM HTTP Server V1.3.26 on machine 1. This is done by using the WebSphere Application Server installation program in CD 1-1.
� Manual installation of WebSphere Plug-in Cumulative Fix for 5.0.0, 5.0.1, and 5.0.22.
� Verification of the installation of the IBM HTTP Server and the WebSphere Application Server plugin.
� Configuration of the WebSphere Portal to use the remote IBM HTTP Server as a Web server.
Chapter 5. WebSphere Portal: SUSE SLES 8 Linux installation 205

5.4.1 IBM HTTP Server installationTo begin the installation of the IBM HTTP Server, perform the following steps:
1. Insert CD 1-1 in machine 1 and start the installation wizard by running the file Install.exe from the directory <cd drive>/cd 1-1/was/win/WAS50.
2. Select the language you would like to use during the installation and click OK. For our example, we chose English.
Figure 5-24 Select language for the installation
3. Click Next in the IBM HTTP Server welcome window.
4. Click I accept the terms in the License Agreement (Figure 5-25) to accept the IBM HTTP Server software license agreement and click Next.
Figure 5-25 Licence Agreement for IBM HTTP Server
5. Select Custom type to install only the IBM HTTP Server V1.3.26 and the plugins for the Web server. Click Next.
206 IBM WebSphere Portal for Multiplatforms V5 Handbook

Figure 5-26 Installation type
6. Select the following features for installation (Figure 5-27).
– IBM HTTP Server V1.3.26
– Web Server plugins
• IBM HTTP Server
Figure 5-27 Components to be selected for installation
Chapter 5. WebSphere Portal: SUSE SLES 8 Linux installation 207

7. Enter the directory where you want to install the components or select the default (Figure 5-28) and click Next.
Figure 5-28 Installation directories
8. Run as Service
If you would want the IBM HTTP Server to run as a service on your machine then select Run IBM HTTP Server as a service, enter the user ID and password of the IBM HTTP Server Administrator and click Next.
208 IBM WebSphere Portal for Multiplatforms V5 Handbook

Figure 5-29 Run IBM HTTP Server as a service
Figure 5-30 User rights set by the installation wizard
9. Check the next window (Figure 5-31 on page 210) to verify the features being installed and click Next.
Note: The window, shown in Figure 5-30 comes up only when the privileges required by the user have not been set before the installation started. Click OK if you get this window.
Chapter 5. WebSphere Portal: SUSE SLES 8 Linux installation 209
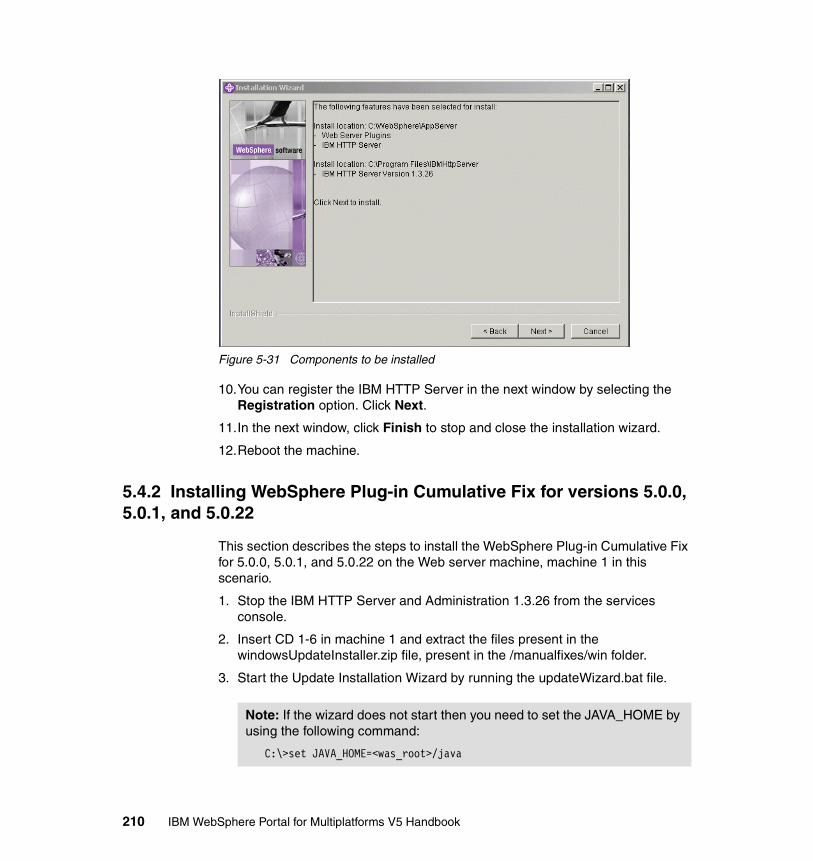
Figure 5-31 Components to be installed
10.You can register the IBM HTTP Server in the next window by selecting the Registration option. Click Next.
11.In the next window, click Finish to stop and close the installation wizard.
12.Reboot the machine.
5.4.2 Installing WebSphere Plug-in Cumulative Fix for versions 5.0.0, 5.0.1, and 5.0.22
This section describes the steps to install the WebSphere Plug-in Cumulative Fix for 5.0.0, 5.0.1, and 5.0.22 on the Web server machine, machine 1 in this scenario.
1. Stop the IBM HTTP Server and Administration 1.3.26 from the services console.
2. Insert CD 1-6 in machine 1 and extract the files present in the windowsUpdateInstaller.zip file, present in the /manualfixes/win folder.
3. Start the Update Installation Wizard by running the updateWizard.bat file.
Note: If the wizard does not start then you need to set the JAVA_HOME by using the following command:
C:\>set JAVA_HOME=<was_root>/java
210 IBM WebSphere Portal for Multiplatforms V5 Handbook

4. Select English and click Next.
5. Click Next twice and select Install fixes. Click Next.
6. Browse to the manualfixes/win directory on the CD and click Next.
7. Select WAS_Plugin_07-01-2003_5.0.X_cumulative and click Next.
8. Click Next to start the installation.
9. Once the installation is complete, you will see a window similar to Figure 5-32, Click Finish to close the wizard.
10.Start the IBM HTTP Server.
Figure 5-32 Successful installation of fix
5.4.3 Verifying the installationThis section describes the steps to verify the installation of the IBM HTTP Server and the WebSphere Application Server plugin on machine 1.
Note: If the installation of any of the fixes was unsuccessful, do not click Finish but check the log files in <was_root>/logs/update directory for errors during the installation. You can rerun the wizard by clicking Run Wizard Again.
Chapter 5. WebSphere Portal: SUSE SLES 8 Linux installation 211

Verifying the installation of the IBM HTTP ServerComplete the following steps to verify the IBM HTTP Server installation:
1. Open the Services window from Administrative Tools in Control Panel.
2. Check that the IBM HTTP Server 1.3.26 is started. If not, start it.
3. Access the IBM HTTP Server 1.3.26 home page from a browser by entering the following URL:
http://localhost
You will see a page similar to Figure 5-33.
Figure 5-33 IBM HTTP Server welcome window
Verifying the installation of WebSphere Application Server plugin
This is done by checking the Web server configuration; for example, if you install the IBM HTTP Server plugin on a machine running the Windows operating system, the plugin installation updates the <ihs_root>/conf/httpd.conf file with the following lines:
LoadModule ibm_app_server_http_module "C:\WebSphere\AppServer/bin/mod_ibm_app_server_http.dll"WebSpherePluginConfig "C:\WebSphere\AppServer/config/cells/plugin-cfg.xml"
212 IBM WebSphere Portal for Multiplatforms V5 Handbook

where ihs_root is the root directory of the IBM HTTP Server installation.
5.4.4 Configuring WebSphere Portal with a remote IBM HTTP Server
This section describes the steps to configure WebSphere Portal V5.0 on machine 2 with the IBM HTTP Server on machine 1.
On the WebSphere Portal V5.0 machine1. Create a new default host alias.
a. Check the status of the WebSphere Application administrative server by using the following command from the <was_root>/bin directory:
#./serverStatus server1
If it is stopped, start it by using the command:
./startServer server1
b. Open the WebSphere Application administrative console by entering the following URL in a browser:
http://<host_name>:9090/admin
where host_name is the fully qualified host name of the machine on which WebSphere Application Server was installed.
c. Log in to the administrative console, click Environment -> Virtual Hosts and then click default_host in the list of Virtual Hosts.
d. Click Host Aliases under Additional Properties on the default_host page.
e. Click New on the Host Aliases page.
f. In the New page, under General Properties, Figure 5-34 on page 214, enter the following:
• Host Name: the fully qualified host name of the machine where the HTTP server has been installed.
• Port: 80 or the port for which you would like to configure the HTTP server to accept client requests.
Note: If you have installed the IBM HTTP Server V2.0.42.1instead of the V1.3.26.1, then the httpd.conf file should be manually edited by replacing the above mentioned lines with the following lines:
LoadModule was_ap20_module "C:\WebSphere\AppServer/bin/mod_was_ap20_http.dll"WebSpherePluginConfig C:\WebSphere\AppServer/config/cells/plugin-cfg.xml"
Chapter 5. WebSphere Portal: SUSE SLES 8 Linux installation 213

Figure 5-34 Adding the default host alias
g. Click OK and then Save to save the changes to the configuration file.
2. Regenerate the Web server plugin.
a. Update the Web server plugin configuration by regenerating the plugin for the Web server. You do this by clicking Environment -> Update Web Server Plugin.
b. Click OK.
c. Click Logout and then close the administrative console.
3. Configure the WebSphere Portal.
a. Run the following command from <wps_root>/config/ directory:
#./WPSConfig.bat httpserver-config
214 IBM WebSphere Portal for Multiplatforms V5 Handbook
b. Restart WebSphere Application administration server by running the following command sequence from <was_root>/bin directory:
#./stopServer server1#./startServer server1
c. Check the status of WebSphere Portal by using the command:
#./serverStatus WebSphere_Portal
If it is stopped, start it by using the command:
#./startServer WebSphere_Portal
On the IBM HTTP Server machine1. Update the plugin file, plugin-cfg.xml
a. Copy the plugin file from the directory <was_root>/config/cells/ on the WebSphere Portal machine to the same directory in the HTTP server machine.
b. In the plugin file, check the directory path for the logs and etc files.
For this scenario, since the Web server is on Windows and the WebSphere Portal on Linux, the following changes have to be made:
/opt/WebSphere/AppServer/logs/ to <was_root>\AppServer\logs\/opt/WebSphere/AppServer/etc/ to <was_root>\AppServer\etc\
2. Verify the plugin configuration.
a. Restart the HTTP server.
b. Access the following URLs from a browser:
http://<hostname>/snoophttp://<hostname>/wps/portal
where <hostname> is the fully qualified host name of the machine on which the Web server is installed.
Note: In any scenario where the Web server and WebSphere Portal are on machines with different operating systems, the above mentioned directory paths should be checked and edited to match the directory structure of the Web server’s machine operating system.
Note: If the port entered in Figure 5-34 on page 214 is not 80 then the port should be entered after the host name in the above URLs.
Chapter 5. WebSphere Portal: SUSE SLES 8 Linux installation 215
5.5 Installing IBM DB2 V8.1 for WebSphere PortalBy default, WebSphere Portal V5.0 uses Cloudscape, a built-in Java database installed automatically during the WebSphere Portal installation. Cloudscape is well suited for basic portal environments but it does not support a clustering environment or enabling of security in a database-only mode. Also, by default WebSphere Portal uses the Cloudscape database as a Custom User Registry (CUR) for authentication under the database-only mode. There is always a gain in performance by moving to a database with greater scalability and capability.
In this scenario, we choose to use IBM DB2 V8.1 FP1 as the database for WebSphere Portal V5.0. The IBM DB2 server will be installed on a remote machine, which would require us to install the IBM DB2 administration client on the WebSphere Portal machine so that WebSphere Portal can communicate with the IBM DB2 server.
The process of implementing IBM DB2 V8.1 as the database for WebSphere Portal consists of the following steps:
� Installation of IBM DB2 server V8.1
� Installation of IBM DB2 administration client V8.1
� IBM DB2 Fix Pack 1 installation for IBM DB2 server and client
� Migration of databases from Cloudscape to IBM DB2
� Configuring WebSphere Portal for IBM DB2
� Verifying that WebSphere Portal is using IBM DB2
5.5.1 Installation of IBM DB2 Server V8.1Complete the following instructions to install IBM DB2:
1. On machine 3, log in as the root user and start a terminal session.
2. Mount CD 5-2 and start the installation wizard for IBM DB2 V8.1 by running the following command from the /media/cdrom directory:
#./db2setup
3. Click Install Products in the IBM DB2 Setup Launchpad.
4. Select DB2 UDB Enterprise Server Edition in the list of products available for installation, Figure 5-35 on page 217, and click Next.
216 IBM WebSphere Portal for Multiplatforms V5 Handbook

Figure 5-35 Choosing the product to be installed
5. Click Next in the DB2 Setup wizard welcome window.
6. Read the license agreement, select Accept and click Next.
7. Select the Typical installation type and click Next.
8. Select Install DB2 UDB Enterprise Server Edition on this computer and click Next.
9. Administrative user information
Select New user to create a new user to administer the DB2 Administration Server (DAS). Retain the default values of:
– User name: dasusr1
– Group name: dasadm1
– Home directory: /home/db2inst1
Enter values for Password, Confirm password and then click Next.
10.Select Create a DB2 instance to create a new DB2 instance and click Next.
Note: The name of the instance created here is the user name of the instance owner you create or provide under Instance owner information.
Chapter 5. WebSphere Portal: SUSE SLES 8 Linux installation 217

11.Select Single-partition instance and click Next.
12.Instance owner information
Select New user to create a new user to administer the instance created in step 10. Retain the default values (Figure 5-36):
– User name: db2inst1
– Group name: db2iadm1
– Home directory: /home/db2inst1
Enter values for Password, Confirm password and then click Next.
Figure 5-36 DB2 Instance owner user information
218 IBM WebSphere Portal for Multiplatforms V5 Handbook

13.Fenced user information
Select New user to create a new fenced user. Retain the default values shown in Figure 5-37. For example, we retained:
– User name: db2fenc1
– Group name: db2fgrp1
– Home directory: /home/db2fenc1
Enter values for Password, Confirm password and then click Next.
Figure 5-37 DB2 fenced user information
14.Click Do not prepare the DB2 tools catalog on this computer and click Next.
15.Enter the administration contact list Information and click Next.
Note: Not selecting Enable Notification brings up a warning window. Ignore the warning and click OK to carry on with the installation.
Chapter 5. WebSphere Portal: SUSE SLES 8 Linux installation 219

16.Select Defer this task until after installation is complete and click Next.
17.Review the settings for the installation and click Finish to start the installation.
18.Wait for the installation to be finished and then click the tab Status report to confirm that all the installed features have a status of Success. Click Finish to close the installation wizard.
5.5.2 Installing IBM DB2 administration client V8.1This section describes the steps to install IBM DB2 administration client on machine 2.
1. Log in as the root user and start a terminal session.
2. Mount CD 5-2 and start the installation wizard by running the following command from /media/cdrom directory:
#./db2setup
3. Click Install Products and in the next window, select DB2 Administration Client, then click Next.
4. Click Next in the Welcome window.
5. Read the Software license agreement, select Accept and click Next.
6. Select the Typical installation type and click Next.
7. Select Create a DB2 instance and click Next.
8. Retain the default values for DB2 instance owner, enter values for the Password and Confirm password fields and click Next.
9. Review the settings for installation and click Finish to start the installation.
10.Wait for the installation to be done and then click the Status report tab to confirm that all the installed features have a status of Success. Click Finish to close the installation wizard.
5.5.3 Installing IBM DB2 V8.1 FP1 This sections describes the steps to install Fix Pack 1 for IBM DB2 on the DB2 server and client machines.
On the DB2 server machine1. Log in as the root user and start a terminal session.
2. Stop the DB2 instance by entering the following commands:
#su - db2inst1#db2stop#exit
220 IBM WebSphere Portal for Multiplatforms V5 Handbook

3. Stop the DB2 administrative server by entering the following commands:
#su - dasusr1#db2admin stop#exit
4. Mount CD 5-7 and run the script file installFixPack from the directory media/cdrom/db2fp/Linux/.
5. Check for a status of Success for the filesets being installed.
6. Start the DB2 instance server by entering the following commands:
#su - db2inst1#db2start
You should get the message: SQL1063N DB2START processing was successful.
On the DB2 client machine1. Log in as the root user and start a terminal session.
2. Mount CD 5-7 and run the script file installFixPack from the directory /media/cdrom/db2fp/Linux/.
3. Check for a status of Success for the filesets being installed.
5.5.4 Migrating databases from Cloudscape to IBM DB2In this section, we provide the steps to prepare for the migration of databases.
On the DB2 Server machine1. Log in as db2inst1.
2. Create the remote databases.
The recommended databases for WebSphere Portal V5.0 are as follows:
Chapter 5. WebSphere Portal: SUSE SLES 8 Linux installation 221

a. Enter the following commands for the WebSphere Portal Database.
#db2 create database wps50 using codeset UTF-8 territory us#db2 update database configuration for wps50 using applheapsz 16384 app_ctl_heap_sz 8192#db2 update database configuration for wps50 using stmtheap 60000#db2 update database configuration for wps50 using locklist 400#db2 update database configuration for wps50 using indexrec RESTART#db2 update database configuration for wps50 using logfilsiz 1000#db2 update database configuration for wps50 using logprimary 12#db2 update database configuration for wps50 using logsecond 10#db2set DB2_RR_TO_RS=yes
b. Enter the following commands for the content publishing databases.
#db2 create database wpcp50 using codeset UTF-8 territory us collate using identity#db2 create database fdbk50 using codeset UTF-8 territory us collate using identity#db2 update database configuration for wpcp50 using applheapsz 4096#db2 update database configuration for fdbk50 using applheapsz 4096
Recommended databases
� wps50: to be shared by WebSphere Portal and Member Manager. The amount of database space required depends on the number of WebSphere Portal users and the number of portal objects, such as pages and portlets. This database stores information about user customizations, such as pages, as well as user and login information.
� wpcp50: to be shared by WebSphere Portal content publishing components, such as Document Manager. The amount of database space required for logging depends on the amount of traffic to the site. The amount of data logged per login-enabled page can vary. This database contains the campaign and personalization information in addition to authoring and configuration.
� fdbk50: feedback database used by WebSphere Portal content publishing. The amount of database space required depends on the size and number of documents that will be published in Document Manager. This database contains the information logged by your Web site for generating reports for analysis of site activity, including information about campaigns and personalized resources.
Note: Here, we are creating only one database for both WebSphere Portal and Member manager. You can also create different databases for each.
222 IBM WebSphere Portal for Multiplatforms V5 Handbook

#db2 update database configuration for wpcp50 using logfilsiz 4096#db2 update database configuration for fdbk50 using logfilsiz 4096#db2 update database configuration for wpcp50 using logprimary 4#db2 update database configuration for fdbk50 using logprimary 4#db2 update database configuration for wpcp50 using logsecond 25#db2 update database configuration for fdbk50 using logsecond 25
3. Specify the DB2 connection and interrupt service ports.
Open the /etc/services file and check for the lines below; if they do not exist, add them:
DB2c_db2inst1 50000/tcp # DB2 connection service portDB2i_db2inst1 50001/tcp # DB2 interrupt service port
where db2inst1 is the name of the DB2 instance created during the IBM DB2 server and client installation.
4. Set DB2COMM to TCP/IP by using the following command.
#db2set DB2COMM=TCPIP
5. Set the service name by entering the following command.
#db2 UPDATE DBM CFG USING svcename DB2c_db2inst1
where DB2c_db2inst1 is the service name specified in step 2.
On the DB2 client machine1. Log in as IBM DB2 client administrator.
2. Specify the DB2 connection service port
Open the /etc/services file and check for the line below, if it does not exist, add it:
#DB2c_db2inst1 50000/tcp # DB2 connection service port
3. Set DB2COMM to TCP/IP by using the following command:
#db2set DB2COMM=TCPIP
4. Catalog the TCP/IP node with the IP address of the remote database server:
#db2 catalog tcpip node was_node remote database_server_node server connection_service_port
where was_node is the value you are defining for the DB2 server remote, database_server_node is the fully qualified host name of your database server machine, and connection_service_port is the name of the DB2 connection service port you specified in step 2.
Note: The DB2 connection service port must match the connection port entered in the same file on the DB2 server machine.
Chapter 5. WebSphere Portal: SUSE SLES 8 Linux installation 223

For example:
#db2 catalog tcpip node wpsnode5 remote ldaplinux.itso.ral.ibm.com server DB2c_db2inst1
5. Catalog the WebSphere Portal and content publishing databases by entering the following commands:
#db2 catalog db remote_db_name_wps50 as wps50_alias_name at node was_node#db2 catalog db remote_db_name_wpcp50 as wpcp50_alias_name at node was_node#db2 catalog db remote_db_name_fdbk50 as fdbk50_alias_name at node was_node
where remote_db_name_wps50, remote_db_name_wpcp50, remote_db_name_fdbk50 are the catalogued names of the WebSphere Portal and content publishing databases on the server machine, wpcp50_alias_name, fdbk50_alias_name, wps50_alias_name are the database alias names that you are defining, and was_node is the name used in the previous step.
Example 5-1 Cataloguing the databases
#db2 catalog db wps50 as wps50db at node wpslinux#db2 catalog db wpcp50 as wpcp50db at node wpslinux#db2 catalog db fdbk50 as fdbk50db at node wpslinux
#db2 connect to <alias_name> user <username> using <password>
where
alias_name is the alias name for the database defined in the above step.
username is the username of IBM DB2 server administrator.
password is the password for IBM DB2 server administrator.
Example 5-2 Testing the remote connections
#db2 connect to wps50db user db2inst1 using password#db2 connect to wpcp50db user db2inst1 using password#db2 connect to fdbk50db user db2inst1 using password
Note:
� The database alias name should not exceed eight characters and should only contain letters and numbers.
� If a separate database was created for Member Manager, it should also be catalogued in the above step.
224 IBM WebSphere Portal for Multiplatforms V5 Handbook
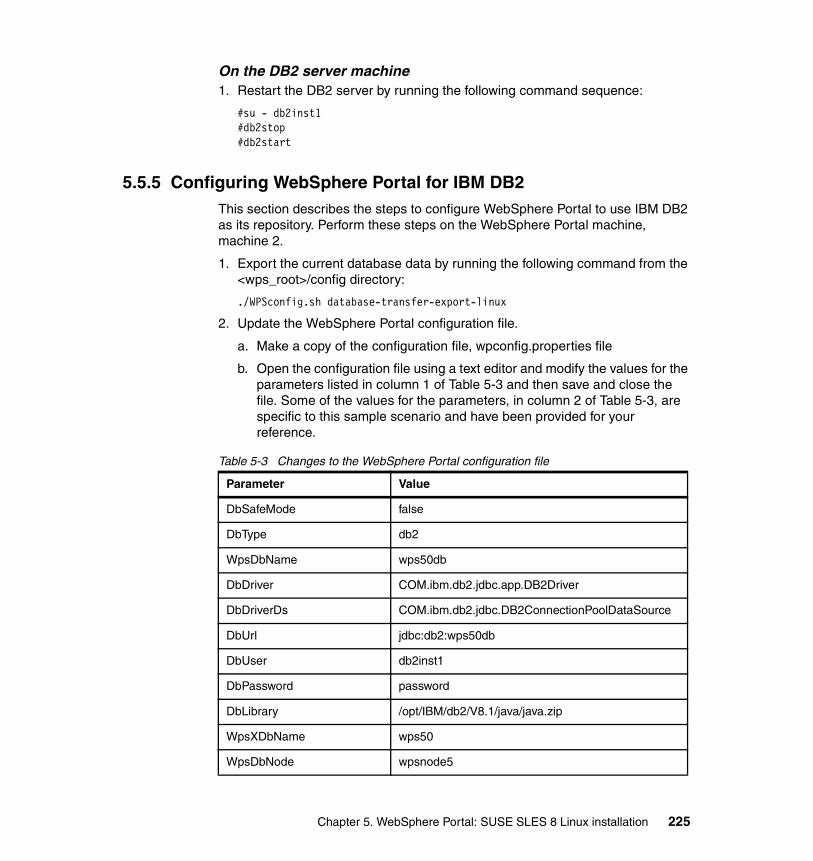
On the DB2 server machine1. Restart the DB2 server by running the following command sequence:
#su - db2inst1#db2stop#db2start
5.5.5 Configuring WebSphere Portal for IBM DB2This section describes the steps to configure WebSphere Portal to use IBM DB2 as its repository. Perform these steps on the WebSphere Portal machine, machine 2.
1. Export the current database data by running the following command from the <wps_root>/config directory:
./WPSconfig.sh database-transfer-export-linux
2. Update the WebSphere Portal configuration file.
a. Make a copy of the configuration file, wpconfig.properties file
b. Open the configuration file using a text editor and modify the values for the parameters listed in column 1 of Table 5-3 and then save and close the file. Some of the values for the parameters, in column 2 of Table 5-3, are specific to this sample scenario and have been provided for your reference.
Table 5-3 Changes to the WebSphere Portal configuration file
Parameter Value
DbSafeMode false
DbType db2
WpsDbName wps50db
DbDriver COM.ibm.db2.jdbc.app.DB2Driver
DbDriverDs COM.ibm.db2.jdbc.DB2ConnectionPoolDataSource
DbUrl jdbc:db2:wps50db
DbUser db2inst1
DbPassword password
DbLibrary /opt/IBM/db2/V8.1/java/java.zip
WpsXDbName wps50
WpsDbNode wpsnode5
Chapter 5. WebSphere Portal: SUSE SLES 8 Linux installation 225

3. Export the db2instance environment.
a. Log in the root by using the following command and entering the root password
#su
b. Open one of the files .bachrc, .dshrc, or .profile and add the following lines to it
if [ -f /home/db2inst1/sqllib/db2profile ]; then . /home/db2inst1/sqllib/db2profile fi
where db2inst1 is the database instance name.
c. Reopen all the currently open shells.
d. Run the env command to validate that the root environment has set the DB2 profile environment variable, such as DB2INSTANCE=db2inst1, where db2inst1 is the database instance name.
4. Import the current database data.
WpcpDbNode wpsnode5
WpcpXDbName wpcp50
FeedbackXDbName fdbk50
WpcpDbName wpcp50db
WpcpDbUser db2inst1
WpcpDbPassword password
WpcpDbUrl jdbc:db2:wpcp50db
FeedbackDbName fdbk50db
FeedbackDbUser db2inst1
FeedbackDbPassword password
FeedbackDbUrl jdbc:db2:fdbk50db
WmmDbName wps50db
WmmDbUser db2inst1
WmmDbPassword password
WmmDbUrl jdbc:db2:wps50db
Parameter Value
226 IBM WebSphere Portal for Multiplatforms V5 Handbook

From the directory <wps_root>/config/, run the following command:
./WPSconfig.sh database-transfer-import
5. Perform a reorg check.
This step is to improve the performance. Run the following command sequence on the WebSphere Portal and content publishing databases:
#db2db2 => connect to <database_name> user <username> using <password>db2 => reorgchk update statistics on table alldb2 => terminate#db2rbind <database_name> -l db2rbind.out -u <username> -p <password>
Example 5-3 Performing the reorg check on WebSphere Portal database wps50
#db2db2 => connect to wps50db user db2inst1 using passworddb2 => reorgchk update statistics on table alldb2 => terminate#db2rbind wps50db -l db2rbind.out -u db2inst1 -p password
6. Verify the configuration.
a. Log in to WebSphere Portal by accessing the following URL from a browser:
http://<hostname>:9081/wps/portal
where hostname is the fully qualified host name of machine 2.
7. Verify the database connections using WebSphere Application Server.
a. Check the status of WebSphere Application Server by using the following command from the <was_root>/bin directory:
#./serverStatus server1
If it is stopped, start it by using the command:
#./startServer server1
b. Verify that the IBM DB2 server is up and running on the DB2 server machine.
c. Access the WebSphere Application Administrative console from a browser by entering the URL:
http://<hostname.yourco.com>:9090/admin
d. Log in to the Administrative console.
Note: If the configuration fails on the above command, verify the values entered in the configuration file and repeat the above step.
Chapter 5. WebSphere Portal: SUSE SLES 8 Linux installation 227

e. Click Resources -> JDBC Providers -> wps50jdbc.
f. In Additional Properties, click Data Sources.
g. Do the following with each data source present:
i. Select a data source and click Test Connection.
ii. Wait for a success message at the top of the page.
5.6 Lotus Domino V5.0.12 installationAt this stage of the implementation of the sample scenario, WebSphere Portal is using IBM DB2 V8.1 as the Custom User Registry (CUR) for authentication. However, it can be configured to use an LDAP directory to store user information and to authenticate users and do the authentication in database and LDAP mode.
This section describes the following:
� “Installing Lotus Domino Enterprise Server V5.0.12” on page 228
� “Configuring Domino Server settings” on page 236
� “Installing Domino Administrator” on page 243
� “Configuring Domino Administrator” on page 244
� “Setting up Domino Directory” on page 247
� “Configuring WebSphere Portal for Domino Directory” on page 251
� “Verifying the LDAP configuration” on page 254
5.6.1 Installing Lotus Domino Enterprise Server V5.0.12In this section, you will install Lotus Domino Enterprise Server. Complete the following steps:
1. On machine 3, log in as the root user and start a terminal session.
2. Mount CD 11-3 and start the text-based installation wizard by running the following command:
#./media/cdrom/linux/install
You will see a window similar to the one in Figure 5-38 on page 229; press Tab.
228 IBM WebSphere Portal for Multiplatforms V5 Handbook

Figure 5-38 Welcome window for installation of Lotus Domino Server
3. The Lotus Domino/Notes software agreement comes up; press Enter to go through the agreement until you see the window in Figure 5-39. Press Tab.
Figure 5-39 Lotus Domino/Notes software agreement
Chapter 5. WebSphere Portal: SUSE SLES 8 Linux installation 229

4. License Agreement
If the setting for the license agreement is not Yes, press the spacebar and then press Tab, otherwise just press Tab.
Figure 5-40 License Software Agreement
5. Installation type
Press the spacebar until you see Domino Enterprise Server as the setup type and then press Tab.
230 IBM WebSphere Portal for Multiplatforms V5 Handbook

Figure 5-41 Installation Type
6. Domino program files installation directory
Press Tab to select the default settings for Domino program files installation directory and continue, otherwise press Enter to change the directory path.
Figure 5-42 Domino Server Installation Directory
Chapter 5. WebSphere Portal: SUSE SLES 8 Linux installation 231

7. Press Tab in the next window.
8. Domino Server partitioning
The partitioning of Domino Server can be performed on Linux but we will not select this option now. Press the spacebar to state No in the settings and press Tab.
Figure 5-43 Domino Partitioned Servers
9. Domino data files installation directory
Press Tab to select the default settings for Domino data files installation directory and continue, otherwise press Enter to change the directory path.
232 IBM WebSphere Portal for Multiplatforms V5 Handbook

Figure 5-44 Domino data files installation directory
10.Domino Server administrator
In the next window, press Enter to get the window shown in Figure 5-45. Enter the user name of the Domino Enterprise server administrator and press Enter to return to the previous window; view the changes and press Tab.
Figure 5-45 Changing the Domino Server administrator user name
Chapter 5. WebSphere Portal: SUSE SLES 8 Linux installation 233

11.Domino Server administrator groupname
In the next window, press Enter; you will see a window similar to Figure 5-46. Enter the name of the Domino Enterprise server administrator group and press Enter to return to the previous window, then view the changes and press Tab.
Figure 5-46 Changing the Domino Server administrator group name
12.Press Tab in the next window.
13.installation settings
Check the settings for your installation and press Tab to start the installation. Your installation settings will be similar to those shown in Figure 5-47 on page 235.
234 IBM WebSphere Portal for Multiplatforms V5 Handbook

Figure 5-47 Domino Server installation settings
14.Once the installation is comlete, you will see a window similar to Figure 5-48. It provides you with the information on the installation settings and the status of the installation.
Figure 5-48 Successful completion of the installation
Chapter 5. WebSphere Portal: SUSE SLES 8 Linux installation 235

5.6.2 Configuring Domino Server settingsThe configuration of the Domino server is done using the Lotus Domino Web Server; this is because there is no Notes client for Linux and the configuration requires local access.
1. On machine 3, log in as the root user and start a terminal session.
2. Open the startup file from the directory /opt/lotus/notes/latest/linux/ using an editor such as vi and find the following snippet:
# Set variable to work around issue with memory stack in # glibc 2.2 # which Java cannot handle - once it can, then disable# this export LD_ASSUME_KERNEL=2.2.5 ;;
Comment the export statement to make the snippet look like this:
# Set variable to work around issue with memory stack in # glibc 2.2 # which Java cannot handle - once it can, then disable# this # export LD_ASSUME_KERNEL=2.2.5 ;;
Save and close the file. This step is to avoid the error, shown in Figure 5-49 on page 237, which you would get upon starting the Web server for Lotus Domino. This problem involves the dynamical linker and an environment variable used in the Domino startup script.
236 IBM WebSphere Portal for Multiplatforms V5 Handbook

Figure 5-49 Error upon starting the Web server for Lotus Domino
3. Launch the Web server for Lotus Domino by using the following command sequence:
cd /lotus/notesdata/opt/lotus/bin/http httpsetup
The second command will launch the Web Server and use the setupweb.nsf database in the /local/notesdata directory to complete the configuration. You can see a HTTP Web Server started message in the console once the Web server is started.
4. The launched Web server listens on port 8081 and serves the setup configuration database, accessed by entering the following URL in a browser:
http://<hostname>:8081
where hostname is the fully qualified host name of machine 3. You will now see a window similar to Figure 5-50 on page 238.
5. Select First Domino Server and Click >>.
Chapter 5. WebSphere Portal: SUSE SLES 8 Linux installation 237

Figure 5-50 Create a Domino Server
6. Domino services
Select:
– Under Web Browsers:
• HTTP
• IIOP
• Both Mail and Applications
– Under Internet Mail Packages:
• POP3
• SMTP
– Under Directory Services:
• LDAP
238 IBM WebSphere Portal for Multiplatforms V5 Handbook

These are the services that you want Domino to start for you. Next, click >>. The resulting window should look like the one shown in Figure 5-51 on page 239.
Figure 5-51 Domino Server audience settings
7. The next window requires you to specify the following administrative settings:
– Organization identity:
• Enter the domain name and the same value for the certifier name. The domain name entered will be the organizational name in Domino Directory.
• Make sure the Allow Setup to create new certifier ID option is selected.
• Enter a certifier password.
Chapter 5. WebSphere Portal: SUSE SLES 8 Linux installation 239

– New Server Identity:
• Make sure that the values for the Server name and the Server’s host name are correct. The Server’s host name is the fully qualified host name of machine 3.
• Make sure the Allow Setup to create new server ID option is selected.
– Administrator’s Identity:
• Enter the Administrator’s name.
• Make sure the Allow Setup to create new administrator ID option is selected
• Enter the Password for the administrator.
Click >>.
For reference, you can view the window in Figure 5-52 on page 241.
240 IBM WebSphere Portal for Multiplatforms V5 Handbook

Figure 5-52 Domino domain, certifier, server and administrator settings
8. No changes are required in the window for Network and Communications settings. Click Finish to begin the configuration.
Chapter 5. WebSphere Portal: SUSE SLES 8 Linux installation 241

Figure 5-53 Network and modem settings
9. The next window indicates the progress in the configuration.
10.The window shown in Figure 5-54 on page 243 provides a summary of the configuration. Note all the information in the Names section and the Identification and Passwords section. Click Exit to complete the installation and stop the Domino Web server.
11.The next window provides a message similar to the one in Figure 5-55 on page 243.
Note: If you do not see a configuration progress window, your setup might have failed. You can find the reasons for possible errors logged in the server’s notes.ini file, which is in the Domino Data directory (/local/notesdata in this scenario).
242 IBM WebSphere Portal for Multiplatforms V5 Handbook

Figure 5-54 Congratulations window
Figure 5-55 Configuration complete
5.6.3 Installing Domino AdministratorSince the Domino clients do not support the Linux platform at this point, you need to install Domino Administrator on machine 1. This section describes the steps to do so.
1. Insert CD 11-6 into machine 1 and start the setup program (setup.exe file) from the lotusnotes/win/English directory.
Chapter 5. WebSphere Portal: SUSE SLES 8 Linux installation 243

2. Click Next in the Welcome window. Read and accept the License Agreement by clicking Yes.
3. Enter the Name and Company name. Click Next.
4. Browse to the folders where you want to install the Notes program files and data files or choose the default folders and click Next.
5. Select Domino Administrator and click Next.
6. Click Next to start the installation and Finish once the installation is over.
You have now installed the Domino Administrator on machine 1.
5.6.4 Configuring Domino AdministratorThis section describes the steps to configure the Domino Administrator.
1. Start the Domino Server by entering the following command from the directory /local/notesdata on machine 3:
/opt/lotus/bin/server
The server is started when you see a window similar to Figure 5-56 on page 245.
Note: You can stop the Domino server by entering exit or quit and pressing Enter in the same console.
244 IBM WebSphere Portal for Multiplatforms V5 Handbook

Figure 5-56 Starting Domino Server for the first time
2. On machine 1, start Domino Administrator by clicking Lotus Domino Administrator from Start -> Programs -> Lotus Applications. Perform the following steps in the Lotus Domino Administrator interface:
a. Click Next on the Lotus Notes Client Configuration wizard until you reach the Domino Server Name window.
Chapter 5. WebSphere Portal: SUSE SLES 8 Linux installation 245

b. Enter the Domino Server name (ldaplinux in this scenario) and click Next.
c. In the next window, Figure 5-57, select Use my name as identification and enter the Administrator’s name, the name you entered for Administrator in Figure 5-52 on page 241. Click Next.
Figure 5-57 Identity the user of the Domino Server
d. You should see a window similar to Figure 5-58 on page 247; you are now connected to the remote Domino Server. Click Next until you reach the Congratulations! window and then click Finish to start the configuration.
246 IBM WebSphere Portal for Multiplatforms V5 Handbook
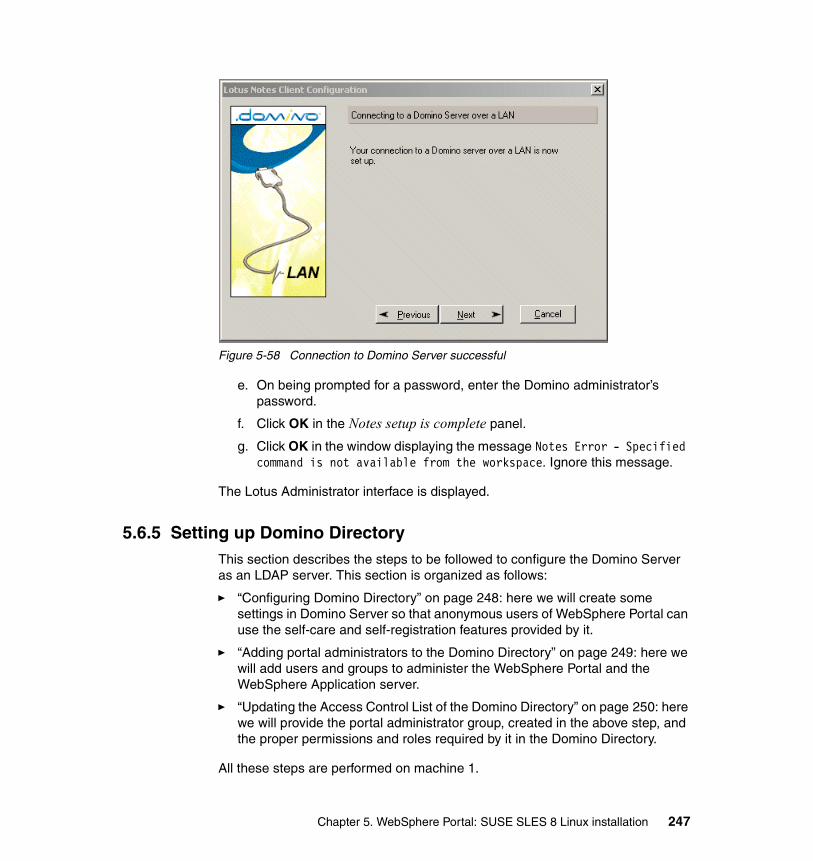
Figure 5-58 Connection to Domino Server successful
e. On being prompted for a password, enter the Domino administrator’s password.
f. Click OK in the Notes setup is complete panel.
g. Click OK in the window displaying the message Notes Error - Specified command is not available from the workspace. Ignore this message.
The Lotus Administrator interface is displayed.
5.6.5 Setting up Domino DirectoryThis section describes the steps to be followed to configure the Domino Server as an LDAP server. This section is organized as follows:
� “Configuring Domino Directory” on page 248: here we will create some settings in Domino Server so that anonymous users of WebSphere Portal can use the self-care and self-registration features provided by it.
� “Adding portal administrators to the Domino Directory” on page 249: here we will add users and groups to administer the WebSphere Portal and the WebSphere Application server.
� “Updating the Access Control List of the Domino Directory” on page 250: here we will provide the portal administrator group, created in the above step, and the proper permissions and roles required by it in the Domino Directory.
All these steps are performed on machine 1.
Chapter 5. WebSphere Portal: SUSE SLES 8 Linux installation 247

Configuring Domino DirectoryOpen the Lotus Domino Administrator interface and perform the following steps:
1. Click the Administration tab.
2. Check that the server is the Domino server which you are configuring (ldaplinux/Itsoraleigh in this scenario) and click the Configuration tab.
3. Expand the Server twisty and click Configurations.
4. Select the server you are configuring and click Edit Configuration.
5. On the Basics tab, under Configuration Settings, click Yes for the option Use these settings as the default settings for all servers.
6. Click the LDAP tab and then click <<>> in the option Choose fields that anonymous users can query via LDAP. The LDAP Field List dialog box appears; here you will specify the Person and Server fields.
7. With the Form field as Person, click Show Fields and select the following fields from Fields in form: Person. This will add the fields selected to the Person form:
– MailFile
– Mail Server
8. Select Server/Server from the Form field and click Show Fields.
9. Select the following fields from Fields in form: Server/Server. This will add the fields selected to the Server/Server form:
– HTTP_HostName
– NetAddresses
10.Click OK to close the LDAP Field List dialog box. You will be brought back to the LDAP tab in Configuration Settings.
11.Select Yes in the option Allow LDAP users write access. Your LDAP Configuration should look like the one in Figure 5-59 on page 249.
Note: This will cause the LDAP tab to appear beside the Basics tab.
Note: Select SametimeServer from Fields in form: Person if you are or will be configuring Sametime Server to work with WebSphere Portal.
248 IBM WebSphere Portal for Multiplatforms V5 Handbook

Figure 5-59 LDAP configuration for Domino Server
12.Click Save and Close to close the Configuration Settings.
Adding portal administrators to the Domino DirectoryOpen the Lotus Domino Administrator Interface and perform the following steps:
1. Click the People & Groups tab and navigate to the People view in Domino Directories. You should have the Domino Administrator (wpsadmin in this scenario) as one of the people.
2. Click Add Person; this will open the New Person form.
3. Under the Basics tab, enter the values in Table 5-4 for the respective fields.
Table 5-4 Values for the fields in New Person form
Field Value
Last name wpsbind
User name wpsbind/<DominoDomain>wpsbind
Short name/User ID wpsbind
Internet password wpsbind
Chapter 5. WebSphere Portal: SUSE SLES 8 Linux installation 249

Click Save and Close to save the new person record. You will return to the People view; wpsbind should be in the people list now.
4. Click Groups in Domino Directories; you will now see the Groups view.
5. Click Add Group; this will open the New Group form, where you will create a new group for portal administrators and add the users to administer the WebSphere Portal to the group.
6. Under the Basics tab, do the following:
– Enter wpsadmins as the Group name.
– Add wpsadmin and wpsbind to the Members field.
7. Click Save and Close to save the wpsadmins group.
Updating the Access Control List of the Domino DirectoryOpen the Lotus Domino Administrator Interface and perform the following steps:
1. Click the Files tab and open your server’s Address Book (file name: names.nsf). The Address Book form will open.
2. From the main menu, click File -> Database -> Access Control. This will open the Access Control List dialog box.
3. Under Basics, click Add and then the person icon beside the person, server, or group textbox.
4. From your server’s Address Book (Itsoraleigh’s Address Book in this scenario), select wpsadmins and click Add and then OK.
5. For wpsadmins, check all the options (such as Create Documents) available above Roles, and under Roles, select the following Role Types:
– GroupCreator
– GroupModifier
– UserCreator
– UserModifier
6. Click OK. The changes made are now added to the Access Control List of the Domino Directory.
7. Click File -> Exit Administrator to close the Domino Administrator.
Note: <DominoDomain> is the Domain Name you entered in Figure 5-52 on page 241; make sure that you enter two values for the User name field.
Note: You can add other users to the group if you so desire.
250 IBM WebSphere Portal for Multiplatforms V5 Handbook

5.6.6 Configuring WebSphere Portal for Domino DirectoryThis section describes the steps to configure the WebSphere Portal to work with Domino Enterprise Server as the LDAP server. Perform these steps on machine 2.
1. Update the WebSphere Portal configuration file.
a. Make a copy of the configuration file, wpconfig.properties.
b. Open the configuration file using a text editor and modify the values for the parameters listed in column 1 of Table 5-5. Some of the values for the parameters, in column 2 of Table 5-5, are specific to this sample scenario and have been provided for your reference.
Table 5-5 Changes made to the WebSphere Configuration file
Parameter Value
WasUserId cn=wpsbind,o=Itsoraleigh
WasPassword wpsbind
PortalAdminId cn=wpsadmin,o=Itsoraleigh
PortalAdminIdShort wpsadmin
PortalAdminPwd wpsadmin
PortalAdminGroupId wpsadmins
PortalAdminGroupIdShort wpsadmins
LTPAPassword wpsadmin
LTPATimeout 120
SSODomainName itso.ral.ibm.com
LookAside false
LDAPHostName ldaplinux.itso.ral.ibm.com
LDAPPort 389
LDAPAdminUid cn=wpsadmin
LDAPAdminPwd wpsadmin
LDAPServerType DOMINO502
LDAPBindID cn=wpsbind,o=Itsoraleigh
LDAPBindPassword wpsbind
Chapter 5. WebSphere Portal: SUSE SLES 8 Linux installation 251

c. Save the file and close it.
2. Check the status of the WebSphere Application Server and WebSphere Portal by using the following command from <was_root>/bin directory:
#./serverStatus -all
If WebSphere Application administrative server is stopped, start it using the command:
#./startServer server1
If WebSphere Portal is started, stop it using the command:
#./stopServer WebSphere_Portal
3. Validate the configuration of WebSphere Portal for Domino Directory by running the configuration task, using the following command from the <wps_root>/config directory:
#./WPSconfig.sh validate-ldap
Wait for the configuration task to finish. You should get a Build Successful message in the end.
4. Enable the security for WebSphere Application server and WebSphere Portal through the Domino Directory by running the following command form the <wps_root>/config directory:
#./WPSconfig.sh enable-security-ldap
LDAPSuffix <none>
LDAPUserPrefix cn
LDAPUserSuffix o=Itsoraleigh
LDAPGroupSuffix <none>
LDAPUserObjectClass inetOrgPerson
LDAPGroupObjectClass groupOfNames
LDAPGroupMember member
LDAPsslEnabled false
Note: If the configuration task ends with a Build Unsuccessful message, verify the values you entered in the wpconfig.properties file and run this configuration task again.
Parameter Value
252 IBM WebSphere Portal for Multiplatforms V5 Handbook

Wait for the configuration task to finish. You should get a Build Successful message in the end.
5. At this point, the users in Domino Directory must use their first name and last name to log in to WebSphere Portal. In order to allow these users to log in using their shortname, you must reconfigure the User Filter in the WebSphere Application server. The steps to do that are as follows:
a. With the WebSphere Application administrator started, open the WebSphere administrator console from a browser using the URL:
http://<hostname>:9090/admin
where <hostname> is the fully qualified host name of machine 2.
b. Enter the WebSphere Application administrator’s user ID and password (wpsbind and wpsbind in this scenario) and click OK to log in to the console.
c. Click Security -> User Registries -> LDAP and then under Additional Properties, click Advanced LDAP Settings.
d. Change the value of User Filter field from (&(cn=%v)(objectclass=inetOrgPerson)) to (&(uid=%v)(objectclass=inetOrgPerson))
Important: From this point, you should use the following command formats respectively, from the <was_root>/bin directory, to stop WebSphere Application administration server, WebSphere Portal and to check the status of both these servers or one of them:
#./stopServer server1-user <was_admin_id> -password <was_admin_password>
#./stopServer WebSphere_Portal -user <was_admin_id> -password <was_admin_password>
#./serverStatus <server name | -all> -user <was_admin_id> -password <was_admin_password>
where <was_admin_id> and <was_admin_password> are the values you entered for the properties WasUserId and WasPassword, respectively, in the wpconfig.properties file.
Note: If the configuration task ends with a Build Unsuccessful message, verify the values you entered in the wpconfig.properties file. This configuration starts the WebSphere_Portal, so before running the task once again, you should stop this server.
Chapter 5. WebSphere Portal: SUSE SLES 8 Linux installation 253

e. Click OK and then Save to save the changes made to the configuration file.
f. Log out and close the WebSphere administrator console.
6. Restart the WebSphere Application administrator server and WebSphere Portal.
Example 5-4 Restart the administrator server and WebSphere Portal
#./stopServer server1 -user wpsbind -password wpsbind#./stopServer WebSphere_Portal -user wpsbind -password wpsbind#./startServer server1#./startServer WebSphere_Portal
7. Log in to WebSphere Portal and verify that you can log in.
5.6.7 Verifying the LDAP configurationThis section describes the steps to verify that Domino Enterprise Server V5.0.12 for WebSphere Portal has been properly configured.
1. Open WebSphere Portal and create a new user by clicking Sign-up in the upper right-hand corner.
2. Log in to WebSphere Portal as the user you just created.
If the login is successful then the configuration is successful and your Domino Enterprise server is working normally.
Note: Once WebSphere Portal is configured to work with the Domino Directory, the WebSphere Application Server Global Security is enabled and you must type the fully qualified host name when accessing WebSphere Portal and the WebSphere Application Server Administrative Console.
254 IBM WebSphere Portal for Multiplatforms V5 Handbook

Chapter 6. WebSphere Portal: IBM AIX V5.2 installation
This chapter describes the installation and configuration of WebSphere Portal V5 for IBM AIX V5.2 in a multi-tier environment.
This installation will include:
� Server one:
IBM HTTP Server 1.3.26.1
� Server two:
– WebSphere Application Server Enterprise V5.0.1
– WebSphere Portal 5.0
– WebSphere Portal content publishing Runtime
– Cloudscape
Hardware supporting this server:
– IBM eServer pSeries (RS/6000®) 44p Model 170
• 1x 450 MHz POWER3™-II processor
• 2 GB RAM
• 2x 18 GB hard disk
6
© Copyright IBM Corp. 2004. All rights reserved. 255
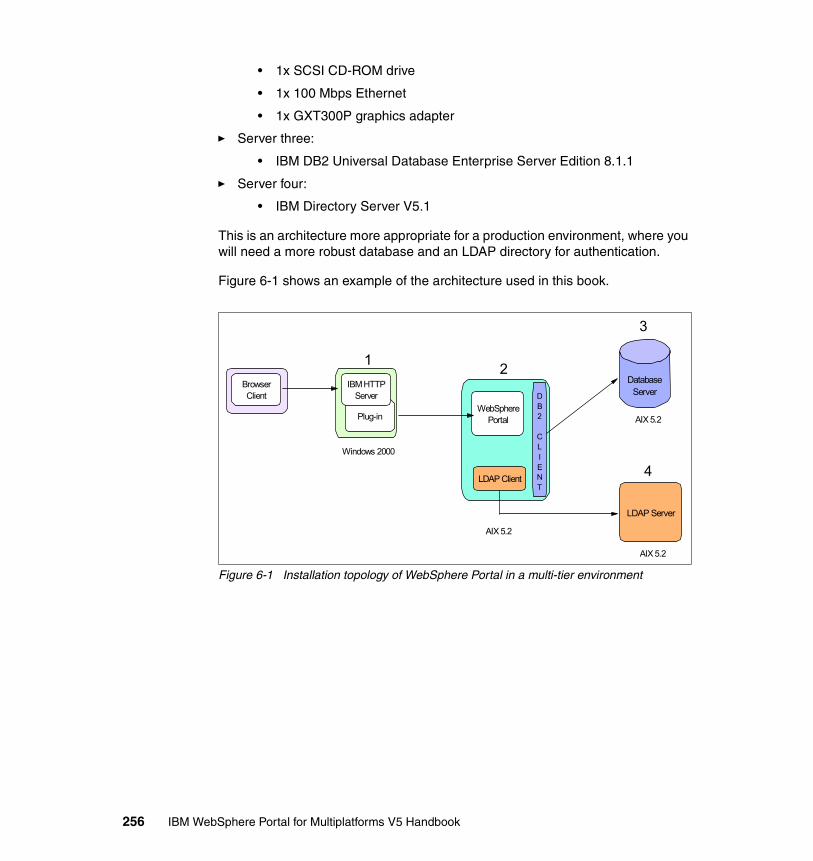
• 1x SCSI CD-ROM drive
• 1x 100 Mbps Ethernet
• 1x GXT300P graphics adapter
� Server three:
• IBM DB2 Universal Database Enterprise Server Edition 8.1.1
� Server four:
• IBM Directory Server V5.1
This is an architecture more appropriate for a production environment, where you will need a more robust database and an LDAP directory for authentication.
Figure 6-1 shows an example of the architecture used in this book.
Figure 6-1 Installation topology of WebSphere Portal in a multi-tier environment
2
WebSpherePortal
LDAP Client
DB2
CLIENT
4
LDAP Server
3
DatabaseServer
1
Plug-in
IBM HTTPServer
BrowserClient
Windows 2000
AIX 5.2
AIX 5.2
AIX 5.2
256 IBM WebSphere Portal for Multiplatforms V5 Handbook

6.1 Installing Portal in a multi-tier environmentIn WebSphere Portal V5.0, you will have to install WebSphere Portal using Cloudscape; at this point, Portal will not have security enabled. At a later time, you will be configuring WebSphere Portal to use DB2 Server and IBM Directory Server as the LDAP. This is what you need to do:
1. Install a base WebSphere Portal environment; this include WebSphere Application Server Enterprise, WebSphere Portal, WebSphere Portal content publishing and portlets.
2. Install and configure IBM HTTP Server and WebSphere Application Server plugin.
3. Install DB2 Server and configure databases.
4. Move the data from Cloudscape to DB2 Server database.
5. Install LDAP and setting up users and groups.
6. Configure WebSphere Portal for LDAP.
6.2 The WebSphere Portal installationThis section describes the procedure for the WebSphere Portal installation on AIX.
Important: Avoid a potential port conflict between the administrative console and the AIX WebSM system management console. The AIX WebSM system management server listens on port 9090 by default.
Before starting WebSphere Portal installation, verify that the port 9090 is already in use by running the following command:
netstat -an |grep 9090
If you find an existing connection to this port, WebSM process might be using it. We strongly recommend that you disable the service during the WebSphere Portal installation. To disable the WebSM server, issue the following command:
usr/websm/bin/wsmserver -disable
If you want the WebSM server to coexist with WebSphere Application Server, you must change the Administrative port number when the installation of Portal is completed. Refer to the WebSphere Application Server 5.0 InfoCenter for more information.
Chapter 6. WebSphere Portal: IBM AIX V5.2 installation 257

It is assumed that you do not have WebSphere Application Server or a Web server such as IBM HTTP Server installed on this machine. The Portal Installation Wizard will install and configure all the required components in order to have a base Portal environment up and running.
Cloudscape will be used as a database repository until we move the data to a robust database server such as IBM DB2 UDB Server.
Follow the instructions below to install WebSphere Portal:
1. Check to see if you have met all hardware and software requirements for Portal. Refer to Chapter 3, “WebSphere Portal V5 prerequisites and planning” on page 37.
2. Insert the Setup disc and mount the CD-ROM file system. If you need more information about mounting a CD-ROM file system, refer to B.3, “Creating a CDROM file system” on page 703.
3. Run the Installation script file by running the following command:
./install.sh
4. Choose the language you want to use for the install. Click OK.
5. Press the Next button on the Welcome window.
6. To continue, select I accept the terms in the license agreement and click Next.
7. We will not install all WebSphere Portal components; for that reason, you must select the Custom setup type as it appears in Figure 6-2 on page 259 and click Next.
Important: If you already have WebSphere Application Server installed, there are some steps you need to take before installing WebSphere Portal. Refer to the WebSphere Portal 5.0 InfoCenter at:
http://publib.boulder.ibm.com/pvc/wp/500/index.html
258 IBM WebSphere Portal for Multiplatforms V5 Handbook

Figure 6-2 Selecting Custom installation type
8. Select Install a new instance of WebSphere Application Server (Figure 6-3 on page 260) and click Next.
Chapter 6. WebSphere Portal: IBM AIX V5.2 installation 259

Figure 6-3 A new instance of WebSphere Application Server will be installed
9. Accept the default for WebSphere Application Server directory or type in a desired one. Click Next.
10.If you chose to have a remote HTTP server as in this example, select Do not install a plugin at this time as it appears in Figure 6-4 on page 261 and click Next.
Note: The HTTP server and plugin will be installed on a different machine.
260 IBM WebSphere Portal for Multiplatforms V5 Handbook

Figure 6-4 The plugin will not be installed on Portal machine
11.Type the node name and the fully qualified host name for the WebSphere Application Server as defined in Figure 6-5 on page 262 and click Next.
Important: When a host name is required, enter the fully qualified host name, that is, hostname.domain.com.
Chapter 6. WebSphere Portal: IBM AIX V5.2 installation 261

Figure 6-5 Enter a node name and the fully qualified host name
12.Accept the default for WebSphere Portal directory or type a desired one. Click Next.
13.Enter wpsadmin for the Portal administrative user and the password; by default, the password value for this user is also wpsadmin (Figure 6-6 on page 263). Click Next.
262 IBM WebSphere Portal for Multiplatforms V5 Handbook

Figure 6-6 Portal Administrative user and password
14.Verify the components that will be installed (Figure 6-7 on page 264) and click Next.
Chapter 6. WebSphere Portal: IBM AIX V5.2 installation 263

Figure 6-7 Components that will be installed
15.Insert CD #1-3 when required. Click Next. This will install WebSphere Application Server Enterprise Edition. This process might take several minutes to complete.
16.Insert CD #1-7 and click Next. This will install the WebSphere Application Server Fix Packs and the required interim fixes for Portal.
17.The installation wizard will require you to insert CD #2. Before continuing, verify that WebSphere Application Server was started without errors:
a. Open the log file <was-root>/logs/server1/startServer.log
b. Check that this file contains a line similar to the one given in Example 6-1. If so, WebSphere Application Server was started successfully.
Example 6-1 Server 1 was started successfully
[10/3/03 15:06:38:452 EDT] 20a550b2 AdminTool A ADMU3000I: Server server1 open for e-business; process id is 17212
18.Insert CD #2 and click Next. This will install WebSphere Portal and WebSphere Portal content publishing and deploy the productivity portlets.
19.Click Finish when you see the window shown in Figure 6-8 on page 265.
264 IBM WebSphere Portal for Multiplatforms V5 Handbook

Figure 6-8 The installation is complete
20.You can validate the installation by entering the URL below in a browser. You will see the WebSphere Portal welcome page (Figure 6-9 on page 266).
http://<wps_hostname>:9081/wps/portal
where <wps_hostname> is the fully qualified host name for WebSphere Portal machine.
Chapter 6. WebSphere Portal: IBM AIX V5.2 installation 265

Figure 6-9 The WebSphere Portal Welcome page
21.Now you will have to manually install the interim fixes required for WebSphere Portal. You can find them on CD #1-7. If you need more information about the installation of fixes and Fix Packs on WebSphere Application Server 5.0, refer to Appendix D, “Installing fixes” on page 707.
/cdrom/manualfixes/aix/PQ72597-efix.jar
/cdrom/manualfixes/aix/PQ77008.jar
/cdrom/manualfixes/aix/PQ77142.jar
/cdrom/manualfixes/aix/WAS_Plugin_cumulative_Fix.jar
/cdrom/manualfixes/aix/WAS_Security_cumulative_Fix.jar
Important: The Cumulative Plugin fix must be installed on the machine where the Web server resides. If you are configuring WebSphere Portal with a remote Web server do not install the Cumulative Plugin fix on the Portal Machine. You have to install the fix on the machine where you installed a Web server such as HTTP server.
266 IBM WebSphere Portal for Multiplatforms V5 Handbook

6.3 Install a remote HTTP serverInstalling the Web server on a separate machine can improve performance, security and maintainability.
Performance: The Web server and application server might require different machine sizes. The Application Server machine for example, requires a more robust machine than the HTTP server one.
Security: You can create a secure demilitarized zone (DMZ) by putting a Firewall between the Web server and the application server. This will protect your application from non-authorized accesses.
Maintainability: The Web server can be re-configured and/or replaced without effecting the application server machine and vice-versa.
In our scenario we have installed and configured the IBM HTTP Server on a Windows machine. This procedure can also be helpful for other platforms.
1. Insert WebSphere Portal CD #1-1.
2. Run Install.exe from X:\cd1-1\was\win\WAS50 directory.
3. When the installation Wizard window appears, choose the language of your preference and click OK button.
4. A Welcome Window is displayed. Click Next.
5. The window that follows will be the Software License Agreement. Select Accept and click Next.
6. Select Custom on the Setup Type window. Click Next button.
7. Select IBM HTTP Server and IBM HTTP Server Plug-in only, as shown on Figure 6-10 on page 268, click Next.
Chapter 6. WebSphere Portal: IBM AIX V5.2 installation 267

Figure 6-10 Selecting HTTP server components
8. Enter the path for the WebSphere Application Server plugin and HTTP server or accept the default (Figure 6-11). Click Next.
Figure 6-11 Enter the path for HTTP and plugin
9. Click Run IBM HTTP Server as a service checkbox and type the user ID and password of the user account that will start the service. Click Next.
268 IBM WebSphere Portal for Multiplatforms V5 Handbook

Figure 6-12 The installation wizard will set the user rights for the user account.
10.Verify the components that will be installed. Click Next.
The installation process starts. Wait for this process to finish.
11.Select the check box for the Registration if you desire. Click Next.
12.The installation is completed. Click Finish.
13.Reboot your machine.
14.Test if the HTTP server is working properly by typing the following URL:
http://localhost
You will see the Welcome page of HTTP server similar to Figure 6-13 on page 270.
Note: If you chose to install IBM HTTP Server on Windows, you will probably get a warning window similar to the one in Figure 6-12. The installation will set the privileges for you, but you can also prevent this message by setting the required user rights before starting the installation.
You can assign or change user privileges by going to Control Panel | Administrative Tools | Local Security Policy. The HTTP user must have the following privileges:
� Act as part of the operating system
� Log on as a service
Chapter 6. WebSphere Portal: IBM AIX V5.2 installation 269

Figure 6-13 The HTTP server Welcome page
6.4 Configure the remote HTTP serverAfter installing Portal and IBM HTTP Server it is required to configure the plugin configuration file located on the HTTP server machine.
In order to have WebSphere Application Server handle the requests that comes from the remote HTTP server, you need to follow the instructions below:
6.4.1 The plugin configurationCheck if the plugin was successfully installed on the remote Web server.
1. Open the file <http_dir>/conf/httpd.conf.
270 IBM WebSphere Portal for Multiplatforms V5 Handbook

a. The following 2 lines must be present in the configuration file:
LoadModule ibm_app_server_http_module "C:\WebSphere\AppServer/bin/mod_ibm_app_server_http.dll"
WebSpherePluginConfig "C:\WebSphere\AppServer/config/cells/plugin-cfg.xml"
2. Start IBM HTTP Server.
6.4.2 Add a new host aliasFor testing purposes, you can work on WPS application without a Web server, this is possible because WebSphere Application Server has an embedded HTTP transport that takes care of that.
The default transport port for WebSphere Portal is 9081, as soon you install WebSphere Portal, you will be able to reach Portal Welcome page by entering the following URL:
http://<wps_hostname.com>:9081/wps/config
The request is handled by the embedded HTTP server installed with WebSphere Application Server 5.0.
However, if you want your Portal application to be accessible from the internet, you have to configure Portal to receive incoming requests from a Web server generally, listening on port 80. This can be done by adding the Web server fully qualified host name and the Web server port number to the virtual host that Portal is using.
Add a new host alias to the default virtual host.
1. Go to the WebSphere Portal machine, start the WebSphere Application Server and WebSphere Portal application:
#cd /usr/WebSphere/AppServer/bin
#./startServer.sh server1
#./startServer.sh WebSphere_Portal
2. Open the WS Administrative Console by typing the following URL in a browser:
http://<wps_hostname>:9090/admin
Where <wps_hostname> is the fully qualified host name of WebSphere Portal machine.
3. After logging in, expand Environment and select Virtual Hosts.
Chapter 6. WebSphere Portal: IBM AIX V5.2 installation 271

4. Click default_host.
5. On the Additional Properties table, click Host Aliases link.
6. Click New to add a Host Name and a Port number.
7. Enter the fully qualified host name of the HTTP server machine and Port 80 similar to Figure 6-14.
Figure 6-14 Add a new Host Alias
8. Click OK.
9. Click Save link to save your configuration.
10.Click Save button to save the changes to the master configuration.
6.4.3 Update and copy the Web server plugin configurationThe plugin configuration file is a XML file located in each WebSphere Application Server machine. In a single machine installation, the Web server and WebSphere Application Server have access to the same plugin file. However, for a remote Web server, you need to manually copy the plugin file from the WebSphere Application Server machine to the HTTP server machine.
272 IBM WebSphere Portal for Multiplatforms V5 Handbook

This section gives you instructions to update, copy and correct the plugin file.
Follow the steps below to regenerate and copy the plugin configuration file:
1. Open the Administrative Console, expand Environment and select Update Web Server Plugin.
2. Click OK to regenerate the plugin.
3. Copy the plug-in-cfg.xml file from the machine where you install Portal to the Web server machine. This file is located in the <was_root>/config/cells directory.
4. Restart the IBM HTTP Server service.
5. Test if the plugin is functional by entering the following URLs in a browser:
http://<http_server.com>/snoop
http://<http_server.com>/wps/portal
This means that WebSphere Application Server is handling the requests that are coming from the remote HTTP server machine through the plugin
6.4.4 Disable access to port 9081 - optionalAs mentioned earlier, WebSphere Portal uses port 9081 by default. If you followed the steps in 6.4, “Configure the remote HTTP server” on page 270, you already have WebSphere Portal application receiving incoming requests from a Web server.
Therefore, you might want to disable the access to port 9081. If so, follow the instructions below:
Important: If your Web server is on Windows and WebSphere Portal on Unix, as in this example, there is an extra step that you have to take before restarting the Web server.
On the Web server machine, open the <was_root>/config/cells/plugin-cfg.xml file and change all the lines that contain a UNIX formatted path to a Windows format. Otherwise, you will get an error when trying to start HTTP server service.
Example:
From /usr/WebSphere/AppServer/logs/http_plugin.log
To X:\WebSphere\AppServer\logs\http_plugin.log
Chapter 6. WebSphere Portal: IBM AIX V5.2 installation 273
1. On the Portal machine, make a backup of the file /usr/WebSphere/PortalServer/config/wpconfig.properties and open it.
2. Locate and change the following line:
WpsHostPort=9081 to
WpsHostPort=80
3. Save the properties file.
4. The above change will take effect after running the following command:
#./WPSconfig.sh httpserver-config
5. Open the WebSphere Administrative Console, select Environment and click Virtual Hosts.
6. Select default_host.
7. On the Additional Properties table, click Host Aliases view.
8. Select the line that contains the port 9081.
9. Click Delete.
10.Click Save on the top of the window.
11.Click Save button to save to the Master Configuration.
12.Follow the steps to 6.4.3, “Update and copy the Web server plugin configuration” on page 272.
13.Restart serverq1.
14.Restart WebSphere Portal application.
6.5 Install and configure DB2 ServerThis section will describe the procedure of exporting the data from Cloudscape database and importing it to a more powerful database server.
Separating the database server from the Application Server can improve performance, provides high-availability and maintainability.
Performance: Keeping the database server in a different machine than the Application Server provides less competition for the machine resources and allows appropriate tuning configuration for each product.
Important: You must install the Cumulative Plugin fix on the HTTP server machine. Refer to Appendix D, “Installing fixes” on page 707 for help.
274 IBM WebSphere Portal for Multiplatforms V5 Handbook

High-Availability: Multiple Database servers with common access to the application data. Reduces the chance of a single-point of failure.
Maintainability: Components can be re-configured and/or replaced without affecting the Application Server.
As described before, we are running IBM DB2 UDB Server as the database server. The instructions will help you to install and configure it as well. If you are intending to use a database server other than DB2, please, refer to WebSphere Portal 5.0 InfoCenter.
6.5.1 IBM DB2 Server installationThis section will guide you trough the installation of IBM DB2 UDB Server 8.1.1 on AIX 5.2.
Refer to hardware and software requirements section for more information about what is supported on WebSphere Portal 5.0.
Follow the instructions below to start the DB2 installation:
1. Insert the CD #5-3 - DB2 Enterprise Edition - AIX. Mount the /cdrom filesystem.
2. Run the DB2 Setup Installation file
./db2setup.sh
3. The IBM DB2 Setup window appears. Select Install Products.
4. Select the product DB2 UDB Enterprise Server Edition. Click Next.
5. The Welcome Setup Wizard window shows up. Click Next.
6. Select Accept if you agree to the license terms. Click Next.
7. Select Typical as the installation type (Figure 6-15 on page 276). Click Next.
Chapter 6. WebSphere Portal: IBM AIX V5.2 installation 275

Figure 6-15 Choose the installation type
8. Select Install DB2 UDB Enterprise Server Edition on this computer. Click Next.
9. The installation wizard will create a user and a group that will run the DB2 Administration Server - DAS. The default values are:
user name: db2as
group name: db2iadm1
You can use the same values or choose your own. Click Next.
10.Accept the default Create a DB2 instance - 32 bit (Figure 6-16 on page 277). Click Next.
276 IBM WebSphere Portal for Multiplatforms V5 Handbook

Figure 6-16 Creating the db2 administrative user
11.Select Single-partition instance. Press Next button.
12.The installation wizard will create a user and a group that will be the DB2 instance owner. Use the default values as in Figure 6-17 on page 278 or use your own. Click Next.
Note: If you do not want the installation wizard to create a new user and group, you can create them before installation, then select Existing user in the Installation Wizard window.
You can find more information about creating users manually in the DB2 Documentation.
Chapter 6. WebSphere Portal: IBM AIX V5.2 installation 277

Figure 6-17 Creating the DB2 instance owner
13.You can accept the default for the DB2 fence user or enter the user name and group name you desire. Type the password and click Next.
14.Select Do not prepare the DB2 tools catalog on this computer. Click Next.
15.Accept the default for the contact list information and enter the SMTP Server name if you are using this feature. Click Next.
Important: For the purpose of this redbook, we do not enable the SMTP Server notification similar to Figure 6-18. If the SMTP Server field is not enabled, you will get a warning dialog-box. Just click OK to proceed.
278 IBM WebSphere Portal for Multiplatforms V5 Handbook

Figure 6-18 The administration contact list
16.Select the desired option for the health monitor notification. Click Next.
17.Verify the information displayed in the summary. Click Finish to complete the installation.
18.A window will show up and display the Overall Progress. Wait for this process to finish.
19.To confirm the success of the installation, a Status report window shows up. Confirm that you have all tasks with a SUCCESS status (Figure 6-19 on page 280) and click Finish button.
Chapter 6. WebSphere Portal: IBM AIX V5.2 installation 279

Figure 6-19 Status report window
6.5.2 IBM DB2 Fix pack installationWebSphere Portal 5.0 requires IBM DB2 Universal Database Enterprise Server Edition 8.1 Fix pack 1. After installing DB2 UDB Server 8.1, you will have to follow the steps below for the IBM DB2 Fix pack 1 installation on IBM DB2 UDB Server:
1. Stop DB2 Server by running the following command:
#su - db2inst1
#db2 force applications all
#db2 terminate
#db2stop
#exit
2. Stop the DB2 Administrative instance:
#su - db2as
#db2admin stop
#exit
280 IBM WebSphere Portal for Multiplatforms V5 Handbook
3. On AIX, you should run the slibclean command to unload unused shared libraries from memory:
#su - root
#/usr/sbin/slibclean
4. Insert CD #5.8 - DB2 Enterprise Edition Fixpack 1 for AIX
5. Run /cdrom/db2fp/aix/installFixPak using root user
When completed, check if all filesets have the SUCCESS status.
6. Update the DB2 instances to use the new fix level:
a. Logon as root
b. Run <inst_home>/instance/db2iupdt <instance_name>
Where inst_home is the location of your DB2 installation and instance_name is your DB2 instance name.
Example:
/usr/opt/db2_08_01/instance/db2iupdt db2inst1
7. Update the Database Administration Server instance:
a. Logon as root
b. Run <inst_home>/instance/dasupdt <das_instance_name>
Where inst_home is the location of your DB2 installation and das_instance_name is your Database Administration Server instance name.
Example:
/usr/opt/db2_08_01/instance/dasupdt db2as
8. Start DB2 Server
#su - db2inst1
#db2start
9. You must wait for the following successful message:
SQL1063N DB2START processing was successful.
10.Enter the command db2level. It will give you the complete version of DB2. After Fixpack 1 installation, this is the output you will see:
Note: If you have more than one DB2 instance, run the command below for each instance.
Chapter 6. WebSphere Portal: IBM AIX V5.2 installation 281

DB21085I Instance “ db2inst1” uses “32” bits and DB2 code release “ SQL08010” with level identifier “01010106”
Information tokens are “DB2 v8.1.1.8”, “s030130”, “ U486246”, and FixPak “1”.
6.5.3 IBM DB2 Administration Client installationThis architecture requires you to install the DB2 Administration Client on the same machine where WebSphere Portal was installed.
This section describes the instructions of a IBM DB2 Administration Client installation:
1. Create a user named db2inst1 and group db2iadm1. Refer to Appendix C, “Creating users on AIX” on page 705.
2. Go to /cdrom/ese.sbcs/ directory
3. Run the command line installation script
./db2_install
4. Enter DB2.ADMCL to install DB2 Administration Client
Wait for the process to finish.
5. Check if the installation has SUCCESS status
6. Go to /usr/opt/db2_08_01/instance
7. Run the command:
./db2icrt -u db2inst1 db2inst1
8. Check if the instance was created successfully by entering the following command:
#su - db2inst1
$db2level
Install Fixpack 1 on DB2 clientThe DB2 Administration Client must be at the same level as the DB2 Server machine. In this example, the version of DB2 Server is 8.1 +Fixpack 1. This requires you to install Fixpack 1 on the Client machine as well.
Important: When creating the client instance, be sure that you are using the same name used in the server instance. Example: db2inst1.
282 IBM WebSphere Portal for Multiplatforms V5 Handbook

1. Stop all products that might be using DB2 database
2. Insert CD #5.8 - DB2 Enterprise Edition Fixpack 1 for AIX
3. Run /cdrom/db2fp/aix/installFixPak using root user
When completed, check if all filesets have a SUCCESS status.
4. Update the DB2 Client instance to use the new fix level:
a. Logon as root
b. Run <inst_home>/instance/db2iupdt <instance_name>
Where inst_home is the location of your DB2 Client installation and instance_name is your DB2 instance name.
Example:
/usr/opt/db2_08_01/instance/db2iupdt db2inst1
5. You can check the DB2 instance by entering the db2level command. The output below came from a DB2 Client on a AIX machine.
DB21085I Instance “ db2inst1” uses “32” bits and DB2 code release “ SQL08010” with level identifier “01010106”
Information tokens are “DB2 v8.1.1.8”, “s030130”, “ U486246”, and FixPak “1”.
6.5.4 Create remote databasesThis section describes the instructions to create the required databases for Portal on a remote DB2 server machine. This example creates three databases:
Table 6-1 Database functionality
As you see in Table 6-1, WebSphere Portal and Member Manager information will be stored in the same database. You can create a different database for Member Manager as an option.
Database Its function is
WPS50 Stores the Pages, Places and Portlets information, as well as login and user information (for Member Manager)
WPCP50 Stores the campaign, personalization information and the Content Publishing projects information as well.
FDBK50 Stores information about the Web site activity
Chapter 6. WebSphere Portal: IBM AIX V5.2 installation 283

To create the databases, follow the steps below:
1. Log in as DB2 Instance owner and run the appropriate db2 commands to create and update databases configurations:
#su - db2inst1
$db2 create database wps50 using codeset UTF-8 territory us
$db2 update database configuration for wps50 using applheapsz 16384 app_ctl_heap_sz 8192
$db2 update database configuration for wps50 using stmtheap 60000
$db2 update database configuration for wps50 using locklist 400
$db2 update database configuration for wps50 using indexrec RESTART
$db2 update database configuration for wps50 using logfilsiz 1000
$db2 update database configuration for wps50 using logprimary 12
$db2 update database configuration for wps50 using logsecond 10
$db2set DB2_RR_TO_RS=yes
$db2 create database wpcp50 using codeset UTF-8 territory us collate using identity
$db2 create database fdbk50 using codeset UTF-8 territory us collate using identity
$db2 update database configuration for wpcp50 using applheapsz 4096
$db2 update database configuration for wpcp50 using logfilsiz 4096
$db2 update database configuration for wpcp50 using logprimary 4
$db2 update database configuration for wpcp50 using logsecond 25
$db2 update database configuration for fdbk50 using applheapsz 4096
$db2 update database configuration for fdbk50 using logfilsiz 4096
$db2 update database configuration for fdbk50 using logprimary 4
$db2 update database configuration for fdbk50 using logsecond 25
6.5.5 Configure connection to remote databasesIn order to WebSphere Portal be able to connect to the databases, you need to perform the configurations provided in this section.
Changes to perform on the DB2 Server machine1. Edit the /etc/services file, check if the DB2 service port numbers were
included to this file, if they were not, add them:
284 IBM WebSphere Portal for Multiplatforms V5 Handbook

DB2_db2inst1 60000/tcp # DB2 connection service port
DB2i_db2inst1 60001/tcp # DB2 interrupt service port
2. Save and close the file
3. Log in as the DB2 instance owner and update the Service Name configuration:
#su - db2inst1
$db2 UPDATE DBM CFG USING svcename DB2_db2inst1
Where DB2_db2inst1 is the service name added into services file above.
4. Set the DB2COMM variable to use TCP/IP:
$db2set DB2COMM=TCPIP
Changes to perform on the DB2 Client machine:1. Edit the /etc/services file and add the DB2 connection service port.
DB2_db2inst1 60000/tcp # DB2 connection service port
2. Save and close the file
3. Set the DB2COMM variable to use TCP/IP:
#su - db2inst1
$db2set DB2COMM=TCPIP
4. Catalog the node name with the DB2 Server IP Address and service name:
#su - db2inst1
$db2 catalog tcpip node node_name remote db2_srv_hn server svce_name
Where node_name is the value you define for the DB2 Server machine remote information, db2_srv_hn is the fully qualified host name or IP Address of the DB2 Server machine and svce_name is the value you specified in step 1, as you see in the Example 6-2.
Example 6-2 Catalog node
$db2 catalog tcpip node WPSNODE remote db2.itso.ral.ibm.com server DB2_db2inst1
5. Catalog the remote databases created on DB2 Server machine using the node name that was created on step 4:
#su - db2inst1
Note: You must use the same service name and port number on the DB2 Server machine.
Chapter 6. WebSphere Portal: IBM AIX V5.2 installation 285

$db2 catalog database wps_db_name as wps_db_name_alias at node node_name
$db2 catalog database wpcp_db_name as wpcp_db_name_alias at node node_name
$db2 catalog database fdbk_db_name as fdbk_db_name_alias at node node_name
Where wps_db_name, wpcp_db_name and fdbk_db_name are the WebSphere Portal and WebSphere content publishing database names you used when you created them on the database Server machine, wps_db_name_alias, wpcp_db_name_alias and fdbk_db_name_alias are the value that you are defining for database names on the Client machine. Follow the Example 6-3.
Example 6-3 Catalog database
db2 catalog database WPS50 as WPS5TCP at node WPSNODEdb2 catalog database WPCP50 as WPCP5TCP at node WPSNODEdb2 catalog database FDBK50 as FDBK5TCP at node WPSNODE
6. Test connection to the databases:
#su - db2inst1
$db2 connect to wps_db_name_alias user db2_user using db2_password
$db2 connect to wpcp_db_name_alias user db2_user using db2_password
$db2 connect to fdbk_db_name_alias user db2_user using db2_password
Where wps_db_name_alias, wpcp_db_name_alias and fdbk_db_name_alias are the values you used on step 5 on page 285, db2_user is the user name that have rights to connect to this database and db2_password is the password for the user name you are defining. See Example 6-4.
Example 6-4 Connecting to database
db2 connect to WPS5TCP user db2inst1 using passworddb2 connect to WPCP5TCP user db2inst1 using passworddb2 connect to FDBK5TCP user db2inst1 using password
Note: If you have created a database for Member Manager separate from Portal, you will also have to catalog the Member Manager database.
286 IBM WebSphere Portal for Multiplatforms V5 Handbook

6.5.6 Transfer data to DB2 databaseWebSphere Portal 5.0 uses Cloudscape as a database, so, it does not require you do have DB2 Server, Oracle, Informix nor SQL Server up and running at this time.
For a production architecture, we strongly recommend moving this data to a powerful database server such as DB2 Server.
In WebSphere Portal 5.0 all configuration information is stored in the wpconfig.properties file. In order to have the database transferred, we need to change the appropriate values into this file and use the WPSconfig script to execute the changes. Follow the steps below to start to move the data from Cloudscape to DB2 Server database:
1. Export the data from Cloudscape, go to <wp-root>/config and execute the following command:
#./WPSconfig.sh database-transfer-export
2. Wait for the process above to finish successfully and then go to <wps-root>/config/helpers
Where <wps-root> is the root directory for WebSphere Portal. Example: On AIX is /usr/WebSphere/PortalServer.
3. Edit the template configuration transfer_db2.properties and change the parameters following the example below:
Table 6-2 Values for the DB2 template properties
Properties Name Value
DbLibrary /home/db2inst1/sqllib/java12/db2java.zip
WpsDbName wps50
DbUrl jdbc:db2:wps50
DbUser db2inst1
DbPassword <type_db2inst1_password>
WpsXDbName wps5TCP
WpsDbNode WPSNODE
WmmDbName wps50
WmmDbUrl jdbc:db2:wps50
WmmDbUser db2inst1
Chapter 6. WebSphere Portal: IBM AIX V5.2 installation 287

4. Save and close the transfer_db2.properties file.
5. Run the command below to update the wpconfig.properties file:
#cd /usr/WebSphere/PortalServer/config
#./WPSconfig.sh -DparentProperties=config/helpers/transfer_db2.properties -DSaveParentProperties=true
6. Give the user root the privilege to run db2 commands:
a. Edit the root .profile file
#cd /
#vi .profile
b. Add the following lines:
#!/bin/ksh
if [ -f /home/db2inst1/sqllib/db2profile ]; then
. /home/db2inst1/sqllib/db2profile;
fi
WmmDbPassword <type_db2inst1_password>
WpcpDbName wpcp50
WpcpDbUrl jdbc:db2:wpcp50
WpcpDbUser db2inst1
WpcpDbPassword <type_db2inst1_password>
WpcpXDbName wpcp5TCP
WpcpDbNode WPSNODE
FeedbackDbName fdbk50
FeedbackDbURL jdbc:db2:fdbk50
FeedbackDbUser db2inst1
FeedbackDbPassword <type_db2inst1_password>
FeedbackXDbName fdbk5TCP
Important: The command above should be typed on just one line.
Properties Name Value
288 IBM WebSphere Portal for Multiplatforms V5 Handbook

c. Save and close the file.
d. Close all shells and open a new one.
e. Check if now you can perform db2 commands by running db2levelat the command line.
7. You can test the connections to Portal databases using the following commands:
#./WPSconfig.sh validate-database-connection-wps
#./WPSconfig.sh validate-database-connection-wmm
#./WPSconfig.sh validate-database-connection-wpcp
Wait for the BUILD SUCCESSFUL message.
8. Import the data you have exported in step 1 on page 287 by running the command below:
#./WPSconfig.sh database-transfer-import
This task will take several minutes to complete, you will see a BUILD SUCCESSFUL message when it finishes.
9. Perform reorg check to improve performance:
#db2 connect to <db_name> user <user_name> using <password>
#db2 reorgchk update statistics on table all
#db2 terminate
#db2rbind <db_name> -l db2rbind.out -u <user_name> -p <password>
Where <db_name> is your Portal database name, <user_name> is the user you chose to be the owner of this database and <password> is the db2 user name password.
10.Restart WebSphere Application Server - server1
11.Start WebSphere Portal
12.Test the Portal configuration by typing the following URL in a browser. You can log in as wpsadmin:
http://<wps_hostname>:9081/wps/myportal
Note: You must perform the above steps to each Portal database. For example, WPS50, WPCP50 and FDBK50.
Chapter 6. WebSphere Portal: IBM AIX V5.2 installation 289

Where <wps_hostname> is the fully qualified host name for WebSphere Portal and <ihs_hostname> is the fully qualified host name for the IBM HTTP Server machine.
6.6 Install and configure LDAPA basic installation of WebSphere Portal will use Cloudscape as a Custom User Registry for authentication. It is strongly recommended that you configure a LDAP Server to be used as the user repository. The LDAP Server will store all user information and provide user authentication to Portal application.
This section provides instructions to install and configure IBM Directory Server 5.1 on AIX. We assume that you already have a DB2 Server installed on this machine.
For detailed information, read the IBM Directory Server Installation Guide and IBM Directory Server Administration Guide. These guides can be found in the config directory on the installation CD.
6.6.1 Install IBM Directory ServerFor hardware and software requirements, read the documentation provided by IBM Directory Server Installation Guide.
In a AIX environment, the product will be installed in the following directories:
IBM Directory Server: /usr/ldap
GSKIT: /usr/opt/ibm/gskak
WebSphere Application Server Express 5.0: /usr/ldap/appsrv
Follow the instructions below to install IDS:
1. Go to /cdrom/ids_ismp directory
2. Run the installation wizard file:
./setup
Important: If you disabled port 9081 and enabled the remote HTTP port number as in “Disable access to port 9081 - optional” on page 273, you must enter the following URL:
http://<ihs_hostname>/wps/myportal
290 IBM WebSphere Portal for Multiplatforms V5 Handbook

3. Select the desired language for the installation then click OK.
4. The Welcome window will be displayed. Click Next.
5. The installation wizard gives a warning about the existent DB2 Server (Figure 6-20). Click Next to continue.
Figure 6-20 Warning about the existent DB2 Server
6. Select the desired language in which you want IBM Directory Server to be installed. Click Next.
7. Select Custom installation type. Click Next.
8. Select the features you want to install. For this example, we installed everything but DB2 Server as appears in Figure 6-21 on page 292.
You must install an embedded WebSphere Application Server - Express 5.0 for the Web Administration Tool. You can have more information about those features in the IBM Directory Server documentation.
Chapter 6. WebSphere Portal: IBM AIX V5.2 installation 291

Figure 6-21 Available features for Directory Server
9. If you need to change the settings, just click Back, if you are satisfied with what you have chose, proceed by clicking Next.
10.Read the Client Readme information and click Next.
11.The Server Readme information will be displayed. Click Next after reading it.
12.Click Finish to complete the installation. The IBM Directory Configuration Tool will automatically be displayed.
Follow the steps below to complete the installation.
6.6.2 Configure the Administrator DNThe Administrator DN is required for LDAP Management and Portal configuration. Follow the steps below to create it:
1. In the IBM Directory Configuration window, select Administrator DN/password on the left-hand side.
2. On the right-hand side, enter the Administrator DN name and its password (Figure 6-22 on page 293).
292 IBM WebSphere Portal for Multiplatforms V5 Handbook

Figure 6-22 Configuring the Administrator DN name
3. Wait for the message Administrator DN and password successfully updated. Click OK.
Figure 6-23 The Administrator DN was created
6.6.3 Configure the LDAP databaseYou must now configure the LDAP database. In this example, we are using an existing DB2 instance, named db2inst1. The Configuration Tool will create and configure the database.
Chapter 6. WebSphere Portal: IBM AIX V5.2 installation 293

Before configuring the database, you must be aware of the following requirements:
� Assure that the DB2COMM variable is not set. You can set the variable to a blank value, as appears in the following example:
#su - db2inst1
db2set DB2COMM=
� The root user must be a member of the DB2 user’s primary group.
You can find more requirements for the DB2 user in the IBM Directory Server Installation Guide.
Step through the following procedure to configure the LDAP database:
1. If you closed the Configuration Tool, open it again by running the following command:
#./ldapxcfg
2. Select the Configure database in the left-hand side of the window.
3. Check Create a new database (Figure 6-24 on page 295). Click Next.
294 IBM WebSphere Portal for Multiplatforms V5 Handbook

Figure 6-24 Create a new LDAP database
4. Enter the DB2 user name and password for the instance. In the example shown in Figure 6-25 on page 296, we are using an existing DB2 instance. If you would like to create a different instance, follow the steps in the Installation Guide. Click Next.
Chapter 6. WebSphere Portal: IBM AIX V5.2 installation 295

Figure 6-25 Enter the DB2 user and password
5. Enter the database name for the LDAP Directory, LDAPDB2 is the default value similar to Figure 6-26 on page 297. Click Next.
296 IBM WebSphere Portal for Multiplatforms V5 Handbook

Figure 6-26 Enter the database name
6. Select Create a universal DB2 database (UTF-8/UCS-2) as appears in Figure 6-27 on page 298. Click Next.
Chapter 6. WebSphere Portal: IBM AIX V5.2 installation 297

Figure 6-27 Select UTF-8 database
7. Enter the database location, for example, /home/db2inst1 as the Figure 6-28 on page 299 demonstrates. This is the location where the installation wizard will create the database. Click Next.
298 IBM WebSphere Portal for Multiplatforms V5 Handbook

Figure 6-28 Enter the database location
8. If you are satisfied with the settings, just click Finish.
9. Read the messages and check if the database was created and configured successfully. You will see a window similar to Figure 6-29 on page 300.
Chapter 6. WebSphere Portal: IBM AIX V5.2 installation 299

Figure 6-29 The database was created successfully
10.Start the LDAP server by running the command below on just one line:
#ibmdirctl -h ldap_svr_hostname -D admin_DN -w admin_DN_pwd -p ldap_admin_port_number start
Where ldap_svr_hostname is the fully qualified host name of your LDAP server, admin_DN and admin_DN_pwd are the one you created on “Configure the Administrator DN” on page 292 and ldap_admin_port_number is the LDAP Administration port number, it can be 3538 for non-SSL or 3539 for SSL accesses. See Example 6-5
Example 6-5 Starting LDAP server
#ibmdirctl -h m10df5ff.itso.ibm.com -D cn=root -w abc123 -p 3538 start
11.Validate the LDAP configuration:
300 IBM WebSphere Portal for Multiplatforms V5 Handbook

ldapsearch -h ldap_svr_hostname -s base objectclass=*
Where ldap_svr_hostname is the fully qualified host name of your LDAP server.
6.6.4 Configure the Web Administration ToolThis section explains how to configure the Web Administration Tool that is installed to administer the IBM Directory Server.
As soon you finish the installation and configuration of IBM Directory Server, you must follow the steps below to be able to use the Web Administration Tool:
1. Start the Administrator daemon:
./ibmdiradm
2. Start the embedded version of Application Server Express
#cd /usr/ldap/appsrv/bin
./startServer.sh server1
3. Open the Console by typing the URL:
http://<ldap_hostname>:9080/IDSWebApp/IDSjsp/Login.jsp
4. Select Console Admin for the LDAP Hostname
5. Enter superadmin in the Username field and secret as Password (Figure 6-30). Click Login.
Figure 6-30 Console Admin login
Chapter 6. WebSphere Portal: IBM AIX V5.2 installation 301

The Web Administration Tool is displayed.
6. For security purposes, change the user name and password of the Console Administrator:
a. Expand Console Administration on the left-hand side of the window
b. Select Change console administration login
c. Enter a new user name and secret as password as Figure 6-31 demonstrates. Click OK.
Figure 6-31 Changing the user name for Web Administration Tool
d. Select Change console administrator password
e. Enter the old password and type a new one (Figure 6-32 on page 303).
302 IBM WebSphere Portal for Multiplatforms V5 Handbook

Figure 6-32 Changing the password for Web Administrator Tool user
6.6.5 Configure servers into Web Administrator ToolThis section provides the instructions to configure the LDAP server you want to administer using Web Administrator Tool.
1. Open the Web Administration Tool
2. Select Manage console server link.
3. Click Add.
4. Enter the fully qualified host name of the LDAP server, accept the default for ldap port and administration port number similar to Figure 6-33 on page 304. Click OK.
Chapter 6. WebSphere Portal: IBM AIX V5.2 installation 303

Figure 6-33 Adding the LDAP server host name
The Server you just added is displayed on the list as illustrated in Figure 6-34 on page 305.
304 IBM WebSphere Portal for Multiplatforms V5 Handbook

Figure 6-34 The LDAP host name appears on the list
5. Click Logout.
Now that you have added the LDAP server name, you will be able to administer the server using the Web Administration Tool. The procedure above adds the LDAP server host name in the LDAP Hostname list on the Login page.
The Login procedure for the LDAP Server requires a different Administrator name. You must use the Administrator DN and its password as shown in Figure 6-35 on page 306.
Chapter 6. WebSphere Portal: IBM AIX V5.2 installation 305

Figure 6-35 The LDAP Server login
6.6.6 Install IBM Directory Server V5.1 ClientThe architecture in use in this Chapter requires you to install LDAP client on the machine where WebSphere Portal was installed.
Follow the steps below:
1. Run the installation wizard file /cdrom/ids_ismp/setup
2. Select the desired language for the installation. Click Next.
3. Click Next on the Welcome Window.
4. In this case we already had DB2 Server 8.1 installed, if you do not have DB2 Server on this machine, let the installation wizard install it for you. Click Next.
5. Select the language for the Directory Server. Click Next.
6. Select Custom installation. Click Next.
7. Select Client SDK 5.1 and GSKit only, unselect everything else. Click Next.
8. Click Next to start copying the files.
9. Read the Client Readme information and click Next.
10.Click Finish. The installation is completed.
306 IBM WebSphere Portal for Multiplatforms V5 Handbook

6.6.7 Prepare LDAP server for WebSphere PortalThis section will provide you guidance on configuring the LDAP server to work with WebSphere Portal. It will guide you through the follow steps:
� Add the Suffix for Portal
� Create the required users and group
� Configure Portal settings
Add the suffix for PortalFollow the procedure below to add a new suffix into LDAP structure:
1. Open Web Administration Tool page.
2. Select the LDAP host name server from the LDAP Hostname list.
3. Enter the Administrator DN name and password (Figure 6-35 on page 306). Click Login.
4. Expand Server administration link.
5. Select Manage server properties.
6. Select Suffixes on the Manage Server properties window.
7. Enter the suffix value (Figure 6-36 on page 308). Click Add.
Chapter 6. WebSphere Portal: IBM AIX V5.2 installation 307

Figure 6-36 Adding the suffix
8. Click OK to save the changes.
9. Stop and Start LDAP server.
a. Expand Server administration.
a. Select Start/stop/restart Server on the left-hand side of the Web Administration Tool window.
b. Click Stop then Start. Look for the Server started message on the bottom of the window.
Create the required users and groupThe WebSphere Portal requires an administrator user, a bind user and an administrator group. The PortalUsers.ldif file contains the required users and group for a basic Portal environment. This file can be found on the Portal Setup CD.
308 IBM WebSphere Portal for Multiplatforms V5 Handbook

Follow the steps below to import the ldif file into LDAP directory structure:
1. Copy the PortalUsers.ldif file to your hard disk and edit it.
2. Replace all entries of dc=yourco,dc=com with the suffix you have created in “Add the suffix for Portal” on page 307. You might want to enter a different password for wpsadmin and wpsbind users, it is easier than changing them later.
3. You must stop the LDAP Server before importing the ldif file.
4. Import the file by running the following command:
ldif2db -i ldif_file_name
Where ldif_file_name is the location and file name of the LDIF file. For example:
ldif2db -i /tmp/PortalUsers.ldif
The message below indicates that the ldif file was successfully imported:
ldif2db: 6 entries have been successfully added out of 6 attempted.
5. Start the LDAP Server.
6. Validate the LDIF import by executing the ldapsearch command below, in just one line. Replace all occurrences of “dc=ibm,dc=com” with your suffix:
ldapsearch -b “dc=ibm,dc=com” -h <ldap_hostname> -D “uid=wpsbind,cn=users,dc=ibm,dc=com” -w “wpsbind_password” “(&(uid=wpsadmin)(objectclass=inetOrgPerson))”
6.6.8 Configure Portal with LDAP settingsThis section provides instructions on how to configure the WebSphere Portal settings for an external LDAP directory.
The use of configuration templates is recommended. The configuration template that supports this task is already created. The templates are located into <wps-root>/config/helpers directory.
To configure WebSphere Portal, follow the steps:
1. Create a backup of the security_ibm_dir_server.properties configuration template.
2. Edit the original security_ibm_dir_server.properties file.
Tip: Use configuration templates instead of editing the wpconfig.properties directly. For more information about configuration templates, check the WebSphere Portal 5.0 InfoCenter.,
Chapter 6. WebSphere Portal: IBM AIX V5.2 installation 309

3. Change the required properties values as shown on Table 6-3:
Table 6-3 Changing the configuration security template
Property Value
WasUserId uid=wpsbind,cn=users,dc=yourco,dc=com
WasPassword <wpsbind_password>
WpsHostName <wps_full_qualified_hostname>
PortalAdminId uid=wpsadmin,cn=users,dc=ibm,dc=com
PortalAdminIdShort wpsadmin
PortalAdminPwd <wpsadmin_password>
PortalAdminGroupId cn=wpsadmins,cn=groups,dc=ibm,dc=com
PortalAdminGroupIdShort wpsadmins
LTPAPassword <ltpa_password>
LTPATimeout 120
SSOEnable true
SSODomainName <Single Sign-on Domain>Example: .itso.ral.ibm.com
LDAPHostName <The fully qualified LDAP host name>
LDAPPort 389
LDAPAdminUId <LDAP Administrator DN> Example: cn=root
LDAPAdminPwd <LDAP Administrator DN password>
LDAPServerType IBM_DIRECTORY_SERVER
LDAPBindID uid=wpsbind,cn=users,dc=yourco,dc=com
LDAPBindPassword <wpsbind_password>
LDAPSuffix <Your LDAP suffix>Example: dc=ibm,dc=com
LDAPUserPrefix uid
LDAPUserSuffix cn=users
LDAPGroupPrefix cn
310 IBM WebSphere Portal for Multiplatforms V5 Handbook

4. Start server1
5. Stop WebSphere_Portal
6. Import the content of the configuration template to the wpconfig.properties file by running the command below on just one line:
#cd /usr/WebSphere/PortalServer/config
#./WPSconfig.sh -DparentProperties=config/helpers/security_ibm_dir_server.properties -DSaveParentProperties=true
The BUILD SUCCESSFUL message indicates that the template was successful imported into wpconfig.properties file.
7. Test the connection to LDAP Server:
#cd /usr/WebSphere/PortalServer/config
#./WPSconfig.sh validate-ldap
8. Execute the following task, according to your environment:
a. If Security is not enable, run the command below, otherwise go to step b:
./WPSconfig.sh enable-security-ldap
b. If the Security is already enabled, you must run the command:
./WPSconfig.sh secure-portal-ldap
LDAPGroupSuffix cn=groups
LDAPUserObjectClass inetOrgPerson
LDAPGroupObjectClass groupOfUniqueNames
LDAPGroupMember uniqueMember
LDAPsslEnable false
Note: If you get errors during this process, verify the values into wpconfig.properties file. You can find more details about the error in the <wps-root>/log/ConfigTrace.log file.
Before running this command again, stop WebSphere_Portal. You might have to include the WebSphere Administrator user and password to complete this task. Example:
stopServer.sh WebSphere_Portal -user wpsbind -password <wpsbind_pwd>
Property Value
Chapter 6. WebSphere Portal: IBM AIX V5.2 installation 311

9. Stop server1:
./stopServer.sh server1 -user wpsbind -password <wpsbind_pwd>
10.Start server1:
./startServer.sh server1
11.Start WebSphere_Portal:
./startServer.sh WebSphere_Portal
6.7 Validate the overall configurationThis section will guide you through the validation of the database and LDAP configuration on WebSphere Portal.
As mentioned before in this chapter, by default, the WebSphere Portal uses Cloudscape as a database and also as a Custom User Registry for authentication.
We assume that you already have installed and configured the following:
� Remote IBM HTTP Server
� Remote DB2 UDB Server
� Remote IDS - IBM Directory Server (LDAP)
� Configured Portal to use a remote Web server
� WebSphere Portal using a remote DB2 as a database and remote IBM Directory Server as a LDAP
6.7.1 Validate database configurationYou might want to check if WebSphere Portal data is being written into DB2 database. Follow the steps below:
1. Open the WebSphere Portal page by typing the following URL:
http://<http_server_hostname>/wps/myportal
Where http_server_hostname is your Web server fully qualified host name. For example: portal02.itso.ral.ibm.com.
2. Login as the Portal Administrator user, in this example we use wpsadmin (Figure 6-37 on page 313). Click Login.
312 IBM WebSphere Portal for Multiplatforms V5 Handbook

Figure 6-37 Login as Portal Administrator user
3. Click Administration link on the top-right side of the window.
4. Click Portal User Interface, then Manage Pages.
5. You will see a window similar to Figure 6-38 on page 314.
Chapter 6. WebSphere Portal: IBM AIX V5.2 installation 313

Figure 6-38 Manage Pages window
6. Click New Page button.
7. Enter the Title of the page.
8. Select the desired theme.
9. Expand the Advanced link.
10.Choose the layout you want in this page by selecting one of the frames in the A content page with these properties section (Figure 6-39 on page 315). Click OK.
314 IBM WebSphere Portal for Multiplatforms V5 Handbook

Figure 6-39 Page properties window
11.Click OK when you see the message APPR0010I: <page_title> page has been created successfully.
The Manage Page window is displayed. The page you just created appears in the list.
Now, you need to check if the page you have created was stored into WPS database. Follow the instructions below:
1. In the WebSphere Portal machine, open a terminal window.
2. Login as the database owner user and start the DB2 command line:
Note: You have created a blank page. You can continue and add portlets to this page, but for the purpose of this chapter, this is enough to validate the database configuration.
Chapter 6. WebSphere Portal: IBM AIX V5.2 installation 315

su - db2inst1
db2
3. Enter the SQL statement below, the result will bring the information of the page you have created before. See Example 6-6.
select * from <schema>.PAGE_INST_LOD where TITLE=’<page_name>’
Example 6-6 Validating the DB2 configuration
select * from db2inst1.PAGE_INST_LOD where TITLE=’NewPage’
The validation is successful if you get at least one entry into the PAGE_INST_LOD table.
6.7.2 Validate LDAP configurationThis section will help you through the steps to validate the LDAP configuration you have completed in “Install and configure LDAP” on page 290.
The following steps will help you to create a new user using Portal web page and check if the user was added to IBM Directory Server:
1. Enter the following URL:
http://<wps_hostname>:9081/wps/portal
Where <wps_hostname> is the fully qualified host name for the WebSphere Portal machine.
2. Click Sign up link on top-right side of the window.
3. Fill out the form with the required user information. Click Continue.
4. Review the user information and click Continue to proceed.
5. You will see the message Your enrollment was successful. Click Continue.
6. Validate the successful enrollment by logging in to Portal using the user name and password you have just created.
7. After a successful login, check if the user was added to the LDAP directory structure:
a. In the WebSphere Portal machine, enter the following command:
ldapsearch -b “<your_suffix>” -h <ldap_hostname> -D “uid=wpsbind,cn=users,dc=ibm,dc=com” -w “<wpsbind_password>” “(&(uid=<new_user>)(objectclass=inetOrgPerson))”
Where <your_suffix> is the suffix you have created on step “Add the suffix for Portal” on page 307, <ldap_hostname> is the fully qualified host name for the LDAP server, <wpsbind_password> is the bind userand
316 IBM WebSphere Portal for Multiplatforms V5 Handbook

<new_user> is the user ID name you have created using Portal application. See Example 6-7, type the command on just one line.
Example 6-7 Validating LDAP configuration
ldapsearch -b “dc=ibm,dc=com” -h m10df5ff.itso.ral.ibm.com -D “uid=wpsbind,cn=users,dc=ibm,dc=com” -w “wpsbind” “(&(uid=daiane)(objectclass=inetOrgPerson))”
Chapter 6. WebSphere Portal: IBM AIX V5.2 installation 317

318 IBM WebSphere Portal for Multiplatforms V5 Handbook

Chapter 7. WebSphere Portal: clustering
This chapter will guide you through the configuration of WebSphere Portal in a clustered environment.
Our example is based on the topology shown in Figure 7-1 on page 320, but we will not cover the installation and configuration of the Reverse Proxy and Dispatcher components. Those components are already included in the WebSphere Network Deployment 5.0 product. You can find information about installing and configuring the Edge Components in IBM WebSphere V5.0 Performance, Scalability and High Availability, SG24-6198.
The topology shown in Figure 7-1 on page 320 includes:
� Machine 1: This chapter will only cover the configuration of one Web server machine, but we recommend the use of two remote Web servers, such as IBM HTTP Server. The WebSphere plugin is installed on each machin; the plugin configuration is responsible for the workload manager and failover.
� Machine 2: The Deployment Manager machine is responsible for managing all WebSphere Application Server nodes in the cell. This machine runs WebSphere Network Deployment 5.0.
7
© Copyright IBM Corp. 2004. All rights reserved. 319

� Machine 3: In this topology, we have two WebSphere Portal machines. Each machine has the following products installed:
– IBM Directory Server client 5.1– DB2 8.1 client– WebSphere Application Server 5.0.1– WebSphere Portal 5.0
The Portal nodes are members of the cluster managed by Deployment Manager.
� Machine 4: This is the database server machine. In this chapter, we are using IBM DB2 UDB Server 8.1.1.
� Machine 5: A dedicated LDAP Server machine, such asIBM Directory Server 5.1.
Figure 7-1 Clustering topology
DMZ Network
INTERNET
Plug-in
IBM HTTPServer
Plug-in
IBM HTTPServer
Node Agent
WebSpherePortal01
LDAP Client
Deployment Manager
WPS Cluster
Application Network
LDAP Server
DatabaseServer
DB2
CLIENT
WebSpherePortal02
Node Agent
LDAP Client
DB2
CLIENT
Reverse Proxy
www.ibmportal.com
1
2
3a
3b
4
5
320 IBM WebSphere Portal for Multiplatforms V5 Handbook

The WebSphere Application Server Network Deployment 5.0 allows you to run applications on multiple servers and on multiple physical nodes.
You will be using terms that are only used by WebSphere Application Server Network Deployment. This is a brief description of a few of them:
� Cell
A cell is a group of nodes in a single administrative domain. The Deployment Manager manages the cell master configuration repository. This repository stores the configuration for all nodes included in the cell.
� Deployment Manager
The Deployment Manager process provides a single point of administration for all nodes of the cell. The Deployment Manager manages the communication with the node agent process presented on each node added to the cell.
� Master configuration repository
The master configuration repository contains the configuration data of the cell. The Deployment Manager is responsible for the updates to the configuration repository. Only the Deployment Manager can update the node repository.
� Node Agent
The Node Agent resides in each node. It is responsible for the communication with the Deployment Manager, file transfer services, configuration synchronization and performance monitoring.
� Cluster
A cluster is a logical collection of application server processes. It provides the load balance, fail-over and scalability between application servers that are part of the cluster.
For a detailed description of Network Deployment components, read IBM WebSphere Application Server V5.0 System Management and Configuration - WebSphere Handbook Series, SG24-6195.
Chapter 7. WebSphere Portal: clustering 321

7.1 WebSphere Application Server Network DeploymentThis section explains how to install and configure WebSphere Application Server Network Deployment on AIX 5.2 to work with WebSphere Portal 5.0.
7.1.1 Installing Network Deployment machineThis section gives you instructions on how to install a base installation of WebSphere Application Server Network Deployment 5.0.
We will refer to this machine as DM01.
Before installing WebSphere Application Server Network Deployment, you must follow the steps below:
1. Create a group named mqm.
2. Create a group named mqbrkrs.
3. Create a user mqm.
4. Make the user mqm a member of group mqm.
5. Make the user root a member of groups mqm and mqbrkrs.
6. Log off and log on to AIX again.
Follow the steps below for the installation:
1. Insert CD #1-11. It contains the WebSphere Application Server Network Deployment product.
2. Launch the Installation wizard with the command:
/cdrom/wasnd/aix/aix/LaunchPad.sh
3. Select the desired language. Click OK.
4. The Installation Wizard window appears. Click Install the product.
5. Select the language that will be used during installation. Click OK.
6. Click Next on the Welcome page.
7. Accept the license terms. Click Next.
8. Select the components to be installed. You will see a window similar to Figure 7-2 on page 323. Click Next.
322 IBM WebSphere Portal for Multiplatforms V5 Handbook

Figure 7-2 Select the components to be installed
9. Enter the Network Deployment installation directory. We suggest that you use the default /usr/WebSphere/DeploymentManager. Click Next.
10.Enter the Network Deployment node name, host name and cell name or accept the defaults. You will see a window similar to Figure 7-3 on page 324.
Important: We recommend that you use the default values on this window. If you enter a node name that is already in use, you will have problems when trying to add a node to the cell.
Chapter 7. WebSphere Portal: clustering 323

Figure 7-3 Accept the default for the node name and cell name
11.The Summary window is displayed. Verify that the features to be installed are correct and click Next to continue.
Wait for the process to finish.
12.You have the option to register now or later. Choose the desired option. Click Next.
13.Click Finish. The installation is complete.
14.Click Exit to close the WebSphere Application Server LaunchPad.
15.The WebSphere Application Server - First Steps window may launch automatically. We will not start the server at this moment. Click Exit to close the window.
7.1.2 Installing the Enterprise extensions on Network DeploymentThis section describes how to upgrade WebSphere Network Deployment to Enterprise level. It is required that Network Deployment and all WebSphere Application Server nodes be on the same level.
324 IBM WebSphere Portal for Multiplatforms V5 Handbook

Table 7-1 shows the required levels of WebSphere products in this Portal solution:
Table 7-1 Required version for a clustering solution on Portal
If you have completed the section “Installing Network Deployment machine” on page 322, this is the actual level of Network Deployment:
WebSphere Network Deployment 5.0.0
Now you have to install WebSphere Enterprise on the WebSphere Network Deployment machine:
1. Insert CD #1-3, which contains WebSphere Application Server 5.0 Enterprise.
2. Start the installation wizard by running:
#<cdrom>/was/aix/#./install
3. Select the language. Click OK.
4. The Welcome page will be displayed. Click Next.
5. Accept the License terms and click Next.
6. Select Add to the existent copy of WebSphere Application Server Network Deployment, V5.0. You will see a window similar to Figure 7-4 on page 326. Click Next.
This process might take a while. Please wait.
Product Required Version
WebSphere Portal node WebSphere Application Server 5.0.1 + Enterprise 5.0.1
WebSphere Network Deployment WebSphere Network Deployment 5.0.1 + Enterprise 5.0.1
Chapter 7. WebSphere Portal: clustering 325

Figure 7-4 Upgrading Network Deployment to Enterprise level
7. Verify the features that will be installed. Click Next.
The installation starts. Wait for the process to finish.
8. You have the option to register now or later; choose the desired option. Click Next.
9. Click Finish to complete the installation.
You have now upgraded WebSphere Network Deployment with Enterprise extensions.
7.1.3 Installing Network Deployment Fix Pack 1Table 7-1 on page 325 shows the required version for WebSphere Portal nodes and WebSphere Application Server Network Deployment. After completing the steps given in “Installing the Enterprise extensions on Network Deployment” on page 324, this is the actual version of WebSphere Application Server Network Deployment:
WebSphere Network Deployment 5.0.0 + Enterprise 5.0.0
326 IBM WebSphere Portal for Multiplatforms V5 Handbook

The steps below will help you to upgrade the Network Deployment to V5.0.1:
1. Create the directory update under the /usr/WebSphere/DeploymentManager directory.
2. Insert CD #1-11. It contains the Network Deployment Fix Pack for AIX.
3. Copy the files from <cdrom>/ndfp1/aix/ to <nd-root>/update/.
4. The Update Installation Wizard tool will create a java_tmp folder in the update directory and then copy the WebSphere JDK to this folder. You must give root privilege to write to all the files in the update directory. Run the commands below:
#cd <nd-root>/update#chmod 755 *
5. Export the Java variable; it is required for the Update Installation Wizard tool:
export JAVA_HOME=/usr/WebSphere/DeploymentManager/java
6. Run the Update Installation Wizard tool on the same window where you ran the export command above:
#cd <nd-root>/update#./updateWizard.sh
7. The Update Installation Wizard Welcome window is displayed. Click Next.
8. Select IBM WebSphere Application Server Network Deployment 5.0.0 as shown in Figure 7-5 on page 328. Click Next.
Chapter 7. WebSphere Portal: clustering 327

Figure 7-5 Select product Network Deployment
9. Select Install fix packs. Click Next.
10.Enter the path where the fix pack is located. Click Next. You will see a window similar to Figure 7-6 on page 329.
11.Select the fix pack name and click Next.
328 IBM WebSphere Portal for Multiplatforms V5 Handbook

Figure 7-6 Select the fix pack name
12.We recommend that you upgrade the Embedded Messaging to the same level as Network Deployment. Select the Embedded Messaging check box. Click Next.
13.The Summary window is displayed. At this moment, the Update Installation Wizard will remove any interim fixes that you might have applied earlier and install the new fix pack. Click Next.
14.Verify that the fix pack was installed successfully. Click Finish.
The version of WebSphere Network Deployment has changed to 5.0.1.
7.1.4 Installing WebSphere Enterprise Fix Pack 1This section give you instructions to install WebSphere Application Server 5.0 Fix Pack 1 for WebSphere Network Deployment. You have already applied the Network Deployment Fix Pack 1; the same procedure must be followed for the Enterprise extensions.
1. Create the directory pme under the /usr/WebSphere/DeploymentManager/update directory.
Chapter 7. WebSphere Portal: clustering 329

2. Insert CD #1-7. It contains the Fix Pack 1 for Enterprise.
3. Copy all files from <cdrom>/pmefp1/aix/ to <nd-root>/update/pme.
4. If you have not done so yet: the Update Installation Wizard tool will create a java_tmp folder in the update directory and then copy the WebSphere JDK to this folder. You must give root privilege to write to all files in the update directory. Run the commands below:
#cd <nd-root>/update#chmod 755 *
5. Export the Java variable; it is required for the Update Installation Wizard tool:
export JAVA_HOME=/usr/WebSphere/DeploymentManager/java
6. Run the Update Installation Wizard tool in the same window where you ran the export command above:
#cd <nd-root>/update#./updateWizard.sh
7. The Welcome window is displayed. Click Next.
8. Select IBM WebSphere Network Deployment v5.0.1 + Enterprise v5.0.0. Click Next.
9. Select Install fix packs. Click Next.
10.Enter the directory where the fix pack is located. In this example, it is <nd-root>/update/pme/fixpacks. Click Next.
11.Select the fix pack name and click Next.
12.The Summary window shows the features that will be installed. Click Next.
13.Verify that the fix pack was installed successfully. Click Finish.
7.1.5 Validating the Network Deployment installationVerify that the WebSphere Network Deployment is working properly.
1. Start the Deployment Manager
#cd /usr/WebSphere/DeploymentManager/bin/#./startManager.sh
2. Open the startServer.log file in /usr/WebSphere/DeploymentManager/logs/dmgr directory. If the server was started successfully, you should see the following message:
Server dmgr open for e-business.
330 IBM WebSphere Portal for Multiplatforms V5 Handbook

3. Open the Deployment Manager Administrative Console. Enter the URL in your browser window:
http://<nd_hostname>:9090/admin
where <nd_hostname> is the Network Deployment fully qualified host name.
7.1.6 Enabling global security on Network DeploymentIt is required that you enable security on Network Deployment before adding the Portal nodes to the cell.
1. Start the Deployment Manager server:
#cd /usr/WebSphere/DeploymentManager/bin#./startManager.sh
2. Open the Deployment Manager Admin Console:
http://<nd_hostname>:9090/admin
3. Enter any user ID name. Click OK.
4. Expand the Security link on the Navigation menu on the left.
5. Expand Authentication Mechanisms. Click the LTPA link.
6. The LTPA properties are displayed on the right side. Enter the LTPA password and confirm it. Enter the same password that you used to configure security on WebSphere Portal nodes.
7. Keep the Timeout property default value, 120 minutes.
8. Click Apply.
9. In the Additional Properties section, select Single Sign-On (SSO).
10.Click the Enable flag if it is not already checked.
11.Enter the domain names of the Network Deployment machine and Portal machine. They must be the same (see Example 7-1). Click Apply.
Example 7-1 SSO Domain name
Domain Name = .itso.ral.ibm.com
12.Expand Security, then User Registries on the Navigator menu.
13.Select the LDAP link. The LDAP user registry properties are displayed on the right.
14.Enter the values according to Table 7-2 on page 332.
Chapter 7. WebSphere Portal: clustering 331
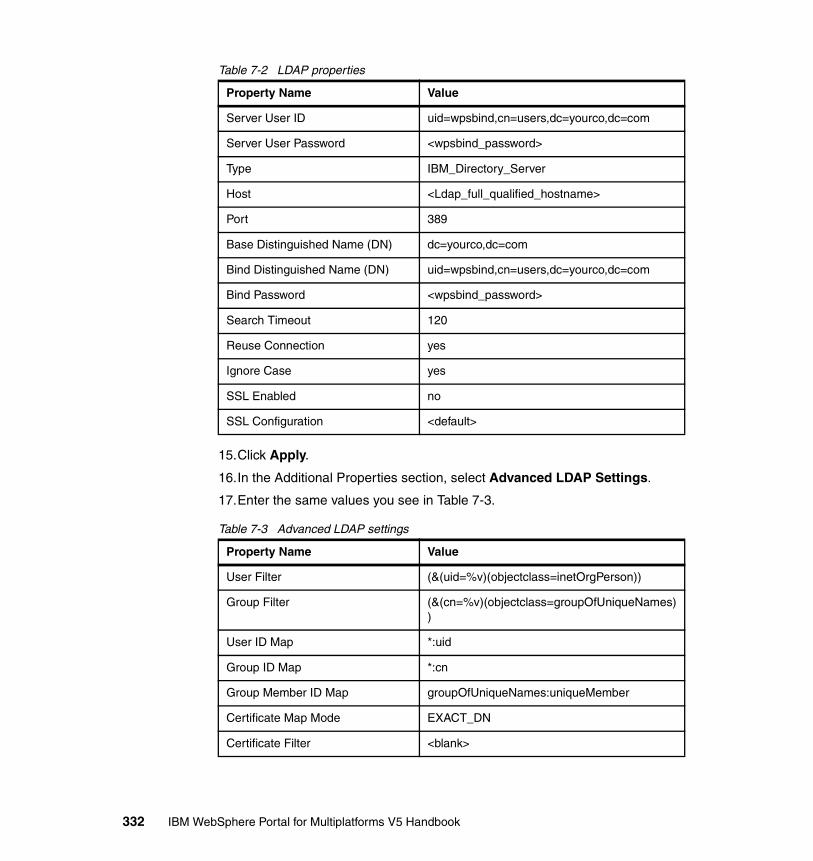
Table 7-2 LDAP properties
15.Click Apply.
16.In the Additional Properties section, select Advanced LDAP Settings.
17.Enter the same values you see in Table 7-3.
Table 7-3 Advanced LDAP settings
Property Name Value
Server User ID uid=wpsbind,cn=users,dc=yourco,dc=com
Server User Password <wpsbind_password>
Type IBM_Directory_Server
Host <Ldap_full_qualified_hostname>
Port 389
Base Distinguished Name (DN) dc=yourco,dc=com
Bind Distinguished Name (DN) uid=wpsbind,cn=users,dc=yourco,dc=com
Bind Password <wpsbind_password>
Search Timeout 120
Reuse Connection yes
Ignore Case yes
SSL Enabled no
SSL Configuration <default>
Property Name Value
User Filter (&(uid=%v)(objectclass=inetOrgPerson))
Group Filter (&(cn=%v)(objectclass=groupOfUniqueNames))
User ID Map *:uid
Group ID Map *:cn
Group Member ID Map groupOfUniqueNames:uniqueMember
Certificate Map Mode EXACT_DN
Certificate Filter <blank>
332 IBM WebSphere Portal for Multiplatforms V5 Handbook

18.Click OK.
19.Expand Security. Select Global Security.
20.The Global Security properties are displayed on the right. Fill out the fields according to Table 7-4.
Table 7-4 Global security properties
21.Click OK.
22.Click the Save link at the top of the window.
23.Click the Save button to save the changes to the master configuration.
24.Log out from the Administration Console.
25.Stop the Deployment Manager server.
#cd /usr/WebSphere/DeploymentManager/bin#./stopManager.sh
26.Start the Deployment Manager server.
#cd /usr/WebSphere/DeploymentManager/bin#./startManager.sh
27.Validate the Security configuration by doing the following:
a. Open the Network Deployment Admin Console:
http://<nd_hostname>:9090/admin
You will be redirected to a secure Admin Console.
Property Name Value
Enabled true
Enforce Java 2 Security false
Use Domain Qualified User IDs false
Cache Timeout 600
Issue Permission Warning true
Active Protocol CSI and SAS
Active Authentication Mechanism LTPA
Active User Registry LDAP
Important: The Java 2 Security is automatically enabled when you enabled security. You must uncheck it, ensuring that Java 2 Security is disabled.
Chapter 7. WebSphere Portal: clustering 333

b. Enter the user ID and password you used during the security configuration, for example: wpsbind. Click OK.
A successful login means that your security configuration is working properly.
From now on, when you stop the Deployment Manager Server, use the command below:
./stopManager.sh -user wpsbind - password <wpsbind_password>
7.1.7 Setting the required authority for wpsadminAfter enabling security, you have to give the Portal Administrator user the authority to deploy portlets in a clustered environment. This privilege can also be set for other users besides the Portal Administrator.
In this chapter, we use wpsadmin as the Portal Administrator user; follow these steps to set the privilege to this user:
1. Open the Deployment Manager Admin Console. Log in as wpsbind.
http://<dm01_hostname>:9090/admin
2. Expand System Administration. Select Console Users. The console user properties are displayed on the right.
3. Click Add to add a new user.
4. Enter wpsadmin in the User field.
5. Select Administrator role. Click OK.
6. Save changes to the master configuration.
7.2 Installing and configuring WebSphere Portal on node 1
This section is described in detail in Chapter 6, “WebSphere Portal: IBM AIX V5.2 installation” on page 255.
In this chapter, we will refer to this machine as Portal01.
To complete the installation and configuration of Portal01, follow the steps:
1. Install a base Portal using Cloudscape. For details, see 6.2, “The WebSphere Portal installation” on page 257.
2. Install an IBM HTTP Server in a machine other than Portal. For details, see 6.3, “Install a remote HTTP server” on page 267.
334 IBM WebSphere Portal for Multiplatforms V5 Handbook

3. Configure Portal to use the remote Web server. For details, see 6.4, “Configure the remote HTTP server” on page 270.
4. Install DB2 Server and export the data from Cloudscape to DB2 Server. For details, see 6.5, “Install and configure DB2 Server” on page 274.
5. Install IBM Directory Server and configure Portal to use it. For details, see 6.6, “Install and configure LDAP” on page 290.
6. Validating the database and LDAP configurations. For details, see 6.7, “Validate the overall configuration” on page 312.
7.3 Installing and configuring WebSphere Portalon node 2
This section will guide you through the installation and configuration of the second Portal node that will be part of the cluster.
In this chapter, we will refer to this machine as Portal02.
The configuration procedure for the second node, Portal02, is different from what was used for Portal01. At this point, we expect that you have installed and configured Portal01.
If you are planning on adding more than two machines to a cluster, that is, Portal03 and Portal04, you can follow the same steps as for Portal02.
Preparing Portal02This section will guide you through the installation of a base WebSphere Portal and its prerequisites.
Follow the steps provided in this section for every node you want to add in the cluster:
1. Install a base Portal using Cloudscape on Portal02. For details, see 6.2, “The WebSphere Portal installation” on page 257.
2. Configure Portal to use the remote Web server. At this point, we have already installed the remote HTTP server. All we need to do is configure Portal02 to receive the incoming requests from the remote Web server. For details, see 6.4, “Configure the remote HTTP server” on page 270.
Important: Use the same directory structure you used for Portal01, that is, if you install Portal on /usr/WebSphere/Portal, do the same for subsequent Portal machines.
Chapter 7. WebSphere Portal: clustering 335

3. Install DB2 Administrative Client and Fix Pack. For details, see 6.5.3, “IBM DB2 Administration Client installation” on page 282
4. Install the LDAP Client on Portal02. For details, see 6.6.6, “Install IBM Directory Server V5.1 Client” on page 306.
5. Configure Portal to use the remote LDAP server. For details, see 6.6.8, “Configure Portal with LDAP settings” on page 309.
7.3.1 The Portal02 configurationThis section provides instructions to configure the second node of WebSphere Portal.
The DB2 configuration:Configure Portal02 to use the same datasource as Portal01:
1. Catalog the WPSNODE and databases in use by Portal01. You can follow the same instructions given in 6.5.5, “Configure connection to remote databases” on page 284.
1. Edit the transfer_db2.properties configuration template located in the <wps-root>/config/helpers/ directory.
2. Change the values according to Table 7-5.
Table 7-5 Values for the DB2 template properties
Important: The DBSafeMode=true property will protect the database from updates. This property is required when the database is already populated.
Properties Name Value
DBSafeMode true
DbLibrary /home/db2inst1/sqllib/java12/db2java.zip
WpsDbName wps50
DbUrl jdbc:db2:wps50
DbUser db2inst1
DbPassword <type_db2inst1_password>
WpsXDbName wps5TCP
WpsDbNode WPSNODE
WmmDbName wps50
336 IBM WebSphere Portal for Multiplatforms V5 Handbook

3. Save and close the file.
4. Run the command below to update the wpconfig.properties file:
#cd /usr/WebSphere/PortalServer/config#./WPSconfig.sh -DparentProperties=config/helpers/transfer_db2.properties -DSaveParentProperties=true
5. Give the user root the privilege to run db2 commands:
a. Edit the root .profile file
#cd /#vi .profile
b. Add the following lines:
#!/bin/kshif [ -f /home/db2inst1/sqllib/db2profile ]; then. /home/db2inst1/sqllib/db2profile;fi
c. Save and close the file.
d. Close all shells and open a new one.
WmmDbUrl jdbc:db2:wps50
WmmDbUser db2inst1
WmmDbPassword <type_db2inst1_password>
WpcpDbName wpcp50
WpcpDbUrl jdbc:db2:wpcp50
WpcpDbUser db2inst1
WpcpDbPassword <type_db2inst1_password>
WpcpXDbName wpcp5TCP
WpcpDbNode WPSNODE
FeedbackDbName fdbk50
FeedbackDbURL jdbc:db2:fdbk50
FeedbackDbUser db2inst1
FeedbackDbPassword <type_db2inst1_password>
FeedbackXDbName fdbk5TCP
Properties Name Value
Chapter 7. WebSphere Portal: clustering 337

e. Check to see if you can now execute db2 commands by running db2level at the command line.
6. Configure Portal02 to use the same datasources and JDBC provider as Portal01 by running the following commands:
#cd /usr/WebSphere/PortalServer#./WPSconfig.sh connect-database
7. You can test the connections to Portal databases using the following commands:
#./WPSconfig.sh validate-database-connection-wps#./WPSconfig.sh validate-database-connection-wmm#./WPSconfig.sh validate-database-connection-wpcp
Wait for the BUILD SUCCESSFUL message.
8. Stop server1.
9. Start server1.
10.Start WebSphere_Portal.
7.4 Adding portal nodes to the cellBefore adding a Portal node to a cell, verify the following:
� The cell must already exist, that is, you have to install and validate WebSphere Network Deployment before adding nodes to a cell.
� The date/time between the Deployment Manager machine and the nodes must be the same or within five minutes. All machines must be set using the same time zone.
� Cloudscape cannot be used in a clustered environment. You must transfer the data to a more robust database, such as DB2 Server before adding the node to a cell.
� You cannot install WebSphere Portal into an existing cluster environment.
� All WebSphere Portal configurations must be done outside the cell. This means that if you need to change the configuration of a Portal node that was added to a cell, you have to remove it from the cell, configure it and then add it back into the cell.
� On all nodes, install a sample portlet to validate the Deployment Portlet configuration and avoid problems after creating the cluster.
� Deployment Manager must be running.
� The node name must be unique in the cell.
� Both server1 and WebSphere Portal must be running on each node.
338 IBM WebSphere Portal for Multiplatforms V5 Handbook

� WebSphere Portal is a large application, so we strongly recommend that you increase the maximum heap size of addNode.sh and removeNode.sh files, otherwise, you might get an java.lang.OutOfMemoryError during the process:
a. Go to <was_root>/bin directory.
b. Edit the addNode.sh file.
c. In the Java command, include an additional line with the option:
-Xmx512 \
d. Save and close the file.
e. Do the same for the removeNode.sh file.
7.4.1 Adding Portal01 to the cellThis section explains how to add the first WebSphere Portal node to a cell managed by WebSphere Network Deployment. When a node is added to a cell, all administration must be done through the Deployment Manager Administration Console.
Follow the steps below to add Portal01 node to a cell:
1. On Portal01 machine, go to the <was-root>/bin directory.
2. Start server1.
3. Start WebSphere Portal.
4. Execute the following command:
./addNode.sh <dmgr_host> <dmgr_port> -username <username> -password <username_pwd> -includeapps
Where:
<dmgr_host> is the Deployment Manager host name
<dmgr_port> is the Deployment Manager’s SOUP port. The default is 8879.
<username> is the user name for authentication
<username_pwd> is the password used for authentication
Important: You must include the -includeapps option for the first node added to the cell. This option will install the applications from Portal01 into the Deployment Manager cell.
Chapter 7. WebSphere Portal: clustering 339

5. This process will take a while to complete. The node is successfully added to the cell when you see the message Node <node_name> has been successful federated.
6. During WebSphere Portal base installation, a Portal Admin Console enterprise application is installed. You have to remove it from the cell configuration; otherwise, you might have problems with the plugin configuration:
a. Open the Admin Console of Deployment Manager.
b. Log in as wpsbind; this is the Administrator user we have configured on Global Security.
c. Expand Applications on the Navigation menu.
d. Select Enterprise Applications.
e. Select the WpsAdminconsole Enterprise application. Click Uninstall.
f. Save the changes to the master configuration.
7.4.2 Adding Portal02 to the cellThis section explains how to add the second WebSphere Portal node to a cell managed by WebSphere Network Deployment. You can also use this section to add other Portal nodes.
Follow the instruction below to add the second Portal node:
1. On Portal02 machine, go to <was-root>/bin directory.
2. Start server1.
3. Start WebSphere Portal.
4. Execute the following command:
./addNode.sh <dmgr_host> <dmgr_port> -username <username> -password <username_pwd>
Where:
<dmgr_host> is the Deployment Manager host name
<dmgr_port> is the Deployment Manager’s SOUP port. The default is 8879.
<username> is the user name for authentication
<username_pwd> is the password used for authentication
Note: After adding a node to a cell, you cannot administer Portal01 using the local Admin Console any longer. You need to do this through the Deployment Manager Admin Console.
340 IBM WebSphere Portal for Multiplatforms V5 Handbook

5. This process will take a while to complete. The node is successfully added to the cell when you see the message Node <node_name> has been successful federated.
7.5 Creating the clusterThis section provides instructions on how to create a cluster and include members into a WebSphere Application Server Network Deployment cell.
This example describes how to create a cluster using horizontal scaling; the WebSphere_Portal application existing on Portal01 machine will be the clone template which will be used to create a new cluster member on the Portal02 node.
You can find detailed information about clustering, horizontal and vertical scaling in IBM WebSphere V5.0: Performance, Scalability, and High Availability, SG24-6198.
Follow the steps below to create a cluster:
1. Open the DM01 Administration Console:
http://<dm01_hostname>:9090/admin
2. Expand Servers. Select Clusters. The Create a new Cluster window is displayed on the right side.
3. Enter the value for the Cluster name. In this example, we use WPS_Cluster.
4. Check Prefer local enabled.
5. Check Create Replication Domain for this cluster.
6. Select Select an existing server to add to this cluster.
7. Choose the server WebSphere_Portal from node Portal01. You will see a window similar to Figure 7-7 on page 342.
Important: You should not include -includeapps for the second node. All applications required for Portal02 were already included by Portal01.
Chapter 7. WebSphere Portal: clustering 341
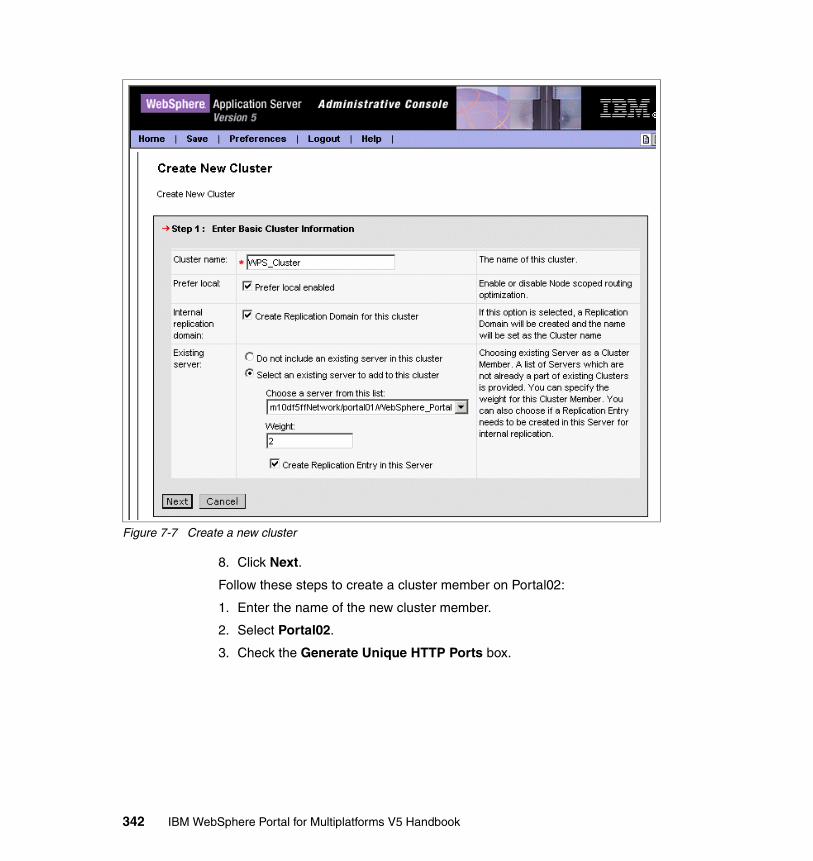
Figure 7-7 Create a new cluster
8. Click Next.
Follow these steps to create a cluster member on Portal02:
1. Enter the name of the new cluster member.
2. Select Portal02.
3. Check the Generate Unique HTTP Ports box.
342 IBM WebSphere Portal for Multiplatforms V5 Handbook

4. Check Create Replication Domain for this cluster. You will see a window similar to Figure 7-8.
Figure 7-8 Create a cluster member
5. Click Apply.
Note: This option will create a unique port number for the next cluster members. For example, the WebSphere Portal application uses port 9081 by default; if you select the above option, the second clustered server will be using a different port than 9081. This is not really required for a horizontal scaling with clusters, unless you are creating a vertical clustered environment, that is, multiple clustered servers on a single Portal machine.
For more information about horizontal and vertical scaling with clusters, see IBM WebSphere Application Server V5.0 System Management and Configuration, SG24-6195.
Chapter 7. WebSphere Portal: clustering 343
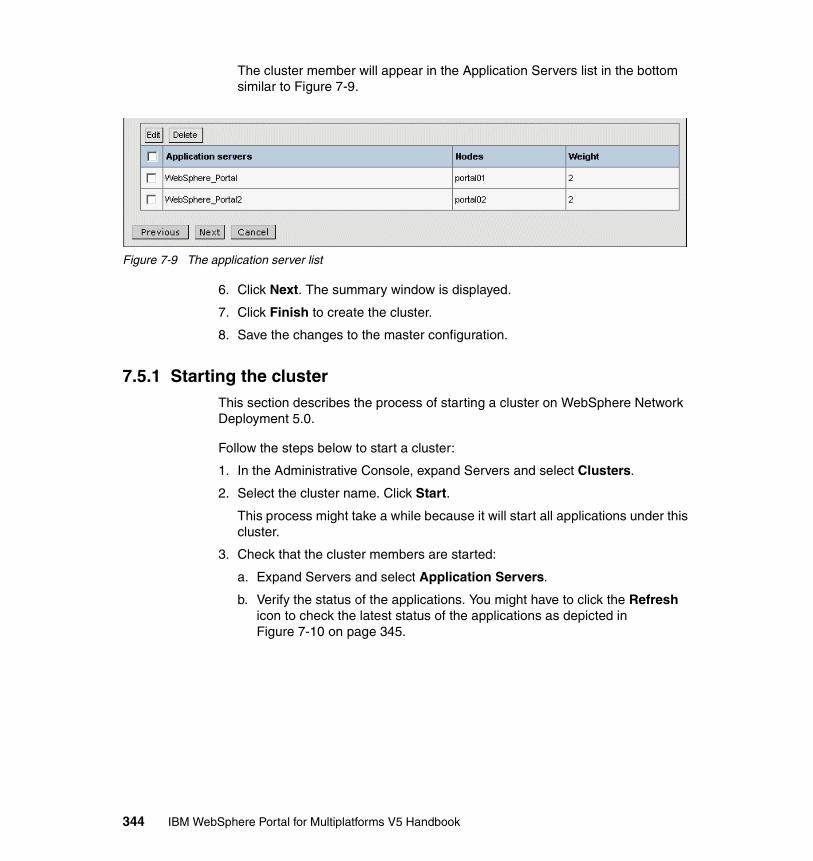
The cluster member will appear in the Application Servers list in the bottom similar to Figure 7-9.
Figure 7-9 The application server list
6. Click Next. The summary window is displayed.
7. Click Finish to create the cluster.
8. Save the changes to the master configuration.
7.5.1 Starting the clusterThis section describes the process of starting a cluster on WebSphere Network Deployment 5.0.
Follow the steps below to start a cluster:
1. In the Administrative Console, expand Servers and select Clusters.
2. Select the cluster name. Click Start.
This process might take a while because it will start all applications under this cluster.
3. Check that the cluster members are started:
a. Expand Servers and select Application Servers.
b. Verify the status of the applications. You might have to click the Refresh icon to check the latest status of the applications as depicted in Figure 7-10 on page 345.
344 IBM WebSphere Portal for Multiplatforms V5 Handbook

Figure 7-10 Click the refresh view
4. You must change the Application Server name to the cluster name on each Portal node in order for portlet deployment to work properly:
a. Edit DeploymentService.properties.
#<wp-root>/shared/app/config/services/#vi DeploymentService.properties
b. Change the wps.appserver.name parameter to the cluster name you have created previously, instead of the default value, WebSphere_Portal. See Example 7-2.
Example 7-2 Changing the application server name
wps.appserver.name=WPS_Cluster
c. Save and close the file.
d. Restart the cluster.
7.5.2 Updating the Web Server pluginThis section describes the procedure of updating the plugin configuration on the Deployment Manager machine and transferring it to the remote HTTP server.
When you add a node to a Deployment Manager cell, you no longer use the plugin configuration residing on the node machine. You have to work on the plugin configuration located in the Network Deployment machine. For this reason, all ports in use by the node applications must be added to the virtual host on the Deployment Manager machine, in this example what we call the DM01 machine.
The procedure that follows will add the remote HTTP server host name and port to the Host Alias list. This action will allow the user to access the clustered portal application.
1. Open the Administrative Console on DM01.
2. Authenticate using wpsbind and its password.
Chapter 7. WebSphere Portal: clustering 345

3. Expand Environment and click Virtual Hosts.
4. Select default_host.
5. On the Additional Properties table, click the Host Aliases link.
6. Click New to add a Host Name and a Port number. Add the Host Alias as in Table 7-6.
Table 7-6 Host aliases
7. Save the configuration.
8. Regenerate the plugin.
a. In the Administrative Console of Deployment Manager, expand Environment and select Update Web Server Plugin.
a. Click OK to regenerate the plugin.
9. Copy the plugin-cfg.xml file located in the /usr/WebSphere/DeploymentManager/config/cells directory to the remote Web server machine:
a. The file should be copied to the <was-root>/config/cells directory in the Web server machine.
b. After copying it, you will have to modify all occurrences of paths in the plugin-key.kdb and plugin-key.sth files. See Example 7-3.
Example 7-3 Changing paths in plugin-cfg.xml
from /usr/WebSphere/DeploymentManager/etcto /usr/WebSphere/AppServer/etc
Alias Port
<http_server_full_hostname> 80
346 IBM WebSphere Portal for Multiplatforms V5 Handbook

7.5.3 Validating the cluster configurationThis section explains the validation of a cluster configuration on WebSphere Network Deployment 5.0.1.
You can validate a cluster configuration by testing the failover functionality.
In this example, the WebSphere_Portal application is a cluster member residing in Portal01 node, while WebSphere_Portal2 is the second cluster member and resides on node Portal02.
If the application WebSphere_Portal fails, all the incoming requests will be automatically handled by the application on Portal02 without errors or re-login. Follow the steps below to validate the cluster configuration:
1. Start the cluster. Follow the steps of “Starting the cluster” on page 344.
When you start the cluster, all application members of this cluster will be automatically started. Make sure that all applications are started before you continue.
2. Stop the clustered application on Portal02:
a. Open the ND01 Administration Console.
b. Log in using wpsbind and its password.
c. Expand Servers, select Application Servers.
d. Check the box for the WebSphere_Portal2 application. Click Stop.
3. Log in to the WebSphere Portal application using wpsadmin and its password:
http://<webserver_hostname>/wps/myportal
Important: If your Web server is on Windows and WebSphere Portal on Unix, as in this example, there is an extra step that you have to take before restarting the Web server.
On the Web server machine, open the <was_root>/config/cells/plugin-cfg.xml file and change all the lines that contain a path in a Unix format to a Windows format. Otherwise, you will get an error when trying to start HTTP server service.
Example:
From /usr/WebSphere/AppServer/logs/http_plugin.log
To X:\WebSphere\AppServer\logs\http_plugin.log
Chapter 7. WebSphere Portal: clustering 347

At this moment, the remote HTTP server receives and uses the plugin to send the incoming requests to the available clustered application; since we have stopped the application on node Portal02, we ensure that the application receiving and processing requests is the one residing on node Portal01.
4. Do not logoff to the Portal Application. Do not close the browser window.
5. Start the clustered application on Portal02, that is, WebSphere_Portal2.
6. Stop the application previously running, WebSphere_Portal on the Portal01 node.
7. Go back to the Portal browser window you opened in step 3 on page 347.
8. Select the Administration link.
If the Administration page shows up without interruption, the failover validation was successful completed.
7.6 Deploying portletsThis section will explain the deployment of portlets in a clustered environment.
When you install a new portlet on WebSphere Portal application, the portlet information is stored into the Portal database. In a cluster environment, the database is shared across the cluster members, meaning that all portlets installed on the Portal01 application will also be available on Portal02 and vice-versa. The Deployment Manager is responsible for keeping all cluster members synchronized.
Ensure that you have made the following changes before deploying a portlet:
� Change the application name in the DeploymentService.properties file. Refer to 7.5.1, “Starting the cluster” on page 344, step 4 on page 345.
� Add the Portal Administrator user to the Console Users list. Refer to 7.1.7, “Setting the required authority for wpsadmin” on page 334.
The following procedure will help you to install a new portlet and synchronize the change across all Portal nodes:
1. Open the Portal Web page.
2. Log in as the Portal Administrator, in this example wpsadmin.
3. Click the Administration page.
4. Click the Portlets icon on the left. Select Install.
5. Browse for the portlet WAR file. Click Next.
6. You will be shown the portlets included in the WAR file. Click Next.
348 IBM WebSphere Portal for Multiplatforms V5 Handbook

7. Click Install. Wait for the installation process to finish.
As soon as the portlet installation process is over, you will see a message similar to the one shown in Figure 7-11.
Figure 7-11 Could not activate the portlet
The auto-synchronization might not occur as soon as you install a new portlet; this will depend on how the auto-synchronization is configured on Deployment Manager. We recommend that you manually synchronize all nodes just after installing or removing portlets.
When you install a portlet, an Enterprise Application is created under the Deployment Manager topology. This Enterprise Application must be started manually in order to be able to activate the portlet.
The following steps will guide you through this configuration:
1. Open the Administrative Console of Deployment Manager:
http://<dm_hostname>:9090/admin
2. Expand System Administration and select Nodes.
3. Select all nodes that are members of the cluster. Click the Synchronize button. Check that you see a successful synchronization message for each node.
4. Expand Applications and select Enterprise Applications.
5. Select the enterprise application of your portlet. You can use the Filter to search applications. Click the Start button.
6. Open the Portal Administration page and log in as wpsadmin:
http://<portal_hostname>/wps/myportal
7. Click Administration at the top right of the window.
8. Click the Portlets icon on the left. Select Manage Applications.
Chapter 7. WebSphere Portal: clustering 349

9. Select the portlet application under the web modules box, then select the portlet name you have just installed and click Activate/Deactivate to activate the portlet.
7.7 Deploying themes and skinsThis section give you instructions to deploy a new theme and skin into the cluster. Themes and skins are stored in the WebSphere Portal enterprise application; in a cluster environment, you must export the Portal EAR file from Deployment Manager, update the EAR file with the new theme and skin directories and import the Enterprise Application file back to the Deployment Manager cell.
Follow the instructions below:
1. Export the WebSphere Portal EAR file from the Deployment Manager:
a. On the Deployment Manager machine, go to the <nd-root>/bin directory.
b. Enter the following command:
#./wsadmin.sh -user <was_user> -password <password>$AdminApp export wps /tmp/wps_orig.ear
where <was_user> is the administrator’s id, such as wpsbind and <password> is the administrator’s password.
c. Enter quit to exit the wpsadmin command line.
A wps_orig.ear file will be created in /tmp directory.
2. Expand the wps_orig.ear file:
a. Create the directory /tmp/wps_files.
b. Go to the <nd-root>/bin directory.
c. Expand the wps_orig.ear file using the command below (make sure you type the command on just one line):
#./EARExpander.sh -ear /tmp/wps_orig.ear -operationDir /tmp/wps_files/ -operation expand
3. Copy the new theme and skin JSP files to the following locations:
Theme: /tmp/wps_files/wps.war/themes/<markup>/
Skin: /tmp/wps_files/wps.war/skins/<markup>/
4. Collapse the files back to an EAR file; enter the following command:
#./EARExpander.sh -ear /tmp/wps.ear -operationDir /tmp/wps_files/ -operation collapse
5. Import the new wps.ear to the Deployment Manager:
350 IBM WebSphere Portal for Multiplatforms V5 Handbook

a. Use wsadmin to import an EAR file:
#./wsadmin.sh -user <was_user> -password <password>wsadmin>$AdminApp install /tmp/wps.ear {-update -appname wps}
Wait for the message Application wps installed successfully.
b. Save the changes to the master configuration, then quit the wsadmin command line:
wsadmin>$AdminConfig savewsadmin>quit
6. Add the new skin and theme to the Portal Administration page:
a. Log in to the Portal page using the Portal Administrator user, such as wpsadmin:
http://<hostname.com>/wps/myportal
b. Click Administration and select Portal User Interface.
c. Select the Themes and Skins view.
d. Click the Add new skin button.
e. Enter the skin name and default locale title.
f. Enter the skin directory name. The directory name must match the one you have created in step 3 on page 350. Click OK.
g. Click the Add new theme button.
h. Enter the theme name in the Theme name and default locale title field.
i. Enter the theme directory name. The directory name must match the one you have created in step 3 on page 350.
j. Select the desired skins to be used in this theme. Click OK.
You are now ready to use the new theme and skin in Portal.
7.8 Enabling dynamic cachingDynamic caching improves the application’s performance by caching the output of dynamic servlets and JavaServer Pages (JSP) files. The dynamic caching is required for a clustered Portal application, because all nodes in a cluster must share the same cache information.
You must follow the steps below for each cluster member application:
1. Open the Deployment Manager Admin Console:
http://<dm_hostname>:9090/admin
2. Expand Servers and select Application Servers.
Chapter 7. WebSphere Portal: clustering 351

3. Select the desired application server name.
4. The application configuration properties is displayed. Select Dynamic Cache Service in the Additional Properties section.
5. Select Enable service at server startup to enable dynamic cache at the time of server startup.
6. Select Enable cache replication box and click its link to open the Internal Messaging properties.
7. Select the Portal cluster name for the domain name and the desired application server name as the replicator (this might be configured by default).
The runtime mode must be push only.
8. Click OK.
9. Save the changes to the DM01 master configuration.
10.Repeat the above steps for each application member of the Portal cluster.
7.9 Removing the Portal node from Deployment Manager
This section will give you instructions for removing a Portal node from a Deployment Manager cell.
You might have to remove a Portal node from a cell when:
� Upgrading the product level of Portal components
� Installing an interim fix or fix pack on Portal components, such as WebSphere Application Server
� You need to add any configuration to the Portal node
� You need to change any existent configuration, such as LDAP or database properties
We strongly recommend that you increase the maximum heap size of the removeNode script. If you do not increase this value, you might run into a java.lang.OutOfMemoryError error message during the remove process and this will cause you problems when restoring the original configuration of the node.
To increase the maximum heap size of removeNode.sh:
1. In the machine where the node you want to remove resides, go to the <was_root>/bin directory.
352 IBM WebSphere Portal for Multiplatforms V5 Handbook

2. Edit the removeNode.sh file.
3. In the java command, include an additional line with the option:
-Xmx512 \
4. Save and close the file.
7.9.1 Removing the node from the cellYou can choose to remove a node using the Administration Console from the Deployment Manager or by using the removeNode script on the Portal node machine.
To remove a node using the Administration Console, follow these steps:
1. Open the Deployment Manager Admin Console
http://<nd_hostname>:9090/admin
2. Stop the cluster member
a. Expand Servers and select the Clusters link.
b. Select the cluster name. The cluster properties window is displayed.
c. In the Additional Properties, select Cluster members.
d. Select the cluster member you want to remove. Click Stop.
3. Remove the node from the cell:
a. Expand System Administration and select the Nodes view.
b. Select the node name you want to remove. Click Remove Node.
This task will take several minutes to finish. Wait until the task is completed.
7.9.2 Removing all Enterprise Application instances from DM01When you added the first Portal node to the cell, you had to include the -includeapps option. This option also adds all Portal Enterprise Applications and associated resources, such as datasources, JDBC providers, variables, to the cell master configurations.
When you remove a node from the cell, the task will also remove the resources, but not the Enterprise Applications. You have to remove them manually, otherwise, if that node is added back to the cell, you will get configuration conflict errors.
Chapter 7. WebSphere Portal: clustering 353

Complete the steps that follow to remove the Enterprise Application from the cell master configuration:
1. Open the Deployment Manager Administrative Console.
2. Expand Applications and select Enterprise Applications.
3. Use the Filter to search all portlet applications:
a. Enter the value *_PA_* as the search string and click Go. The result will be all portlet applications.
b. Select them all and click Uninstall.
4. Remove the remaining Portal Enterprise Applications:
– Presentation.war
– RichTextEditor.war
– WPCP_Authoring
– WPCP_Runtime
– Pdmauthor
– wmmApp
– wps
5. You also will have to remove any customized Enterprise Application you have deployed.
The following steps are only required if you had problems adding or removing a node to a cell:
1. Remove the Portal JDBC providers.
a. Expand Resources and select JDBC Providers. Select the following JDBC provider names and click Delete:
• wpcp50JDBC
• wps50JDBC
2. Remove the WebSphere Portal shared libraries.
a. Expand Environment and select Shared Libraries.
b. Click the Browse Nodes button and select the Portal node name.
c. Click Apply.
d. Click Delete for each shared library below:
• CloudScapeLib
• WPSlib
354 IBM WebSphere Portal for Multiplatforms V5 Handbook

• WpcpAuthorLib
• WpcpRuntimeLib
3. Remove the WebSphere Portal variables:
a. Expand Environment and select Manage WebSphere Variables.
b. Click the Browse Nodes button and select the Portal node name.
c. Click Apply.
d. Select all variables under this node and click Delete.
e. Save the changes to the master configuration.
Chapter 7. WebSphere Portal: clustering 355

356 IBM WebSphere Portal for Multiplatforms V5 Handbook

Chapter 8. WebSphere Portal: Sun Solaris 8.0 installation
This chapter describes the installation and configuration of WebSphere Portal V5 for Sun Solaris 8.0 in a multi-tier environment.
This installation will include:
� Machine 1:
– Sun ONE Web Server, V6.0
– Netscape Communicator V7.0
� Machine 2:
– WebSphere Application Server V5.0.1
– WebSphere Portal V5.0
– WebSphere Portal Content Publisher V5.0 Runtime
– + Cloudscape
– Oracle 9i client
� Machine 3:
– Oracle 9i Enterprise Server (9.2.0.1)
8
© Copyright IBM Corp. 2004. All rights reserved. 357

8.1 Scenario overviewIn this section, we discuss the building of our Solaris and Sun ONE environment.
8.1.1 The architectureFigure 8-1 depicts the runtime product mapping for the multi-tier runtime environment.
Figure 8-1 WebSphere Portal multi-tier runtime environment product mapping for Solaris
In our test environment (Figure 8-1), we use three machines to emulate our multi-tier environment. Behind the first firewall starting from the left is a protocol firewall where an Edge Server or Tivoli Access Manager can exist. These could receive external requests for the Portal via the external IP or external domain host name, and forward the request to the internal Web server and the Portal.
The Web server and WebSphere Portal are behind the second firewall, which is a domain firewall. The servers behind this firewall are more secure. So, we put
WPS 5.0 with Solaris/SunOne/Oracle
Oracle9i
Dom
ain
Fire
wal
l
machine1machine2
machine3
WebSphere plug-in
Oracle 9i
clientWebSphere
Portal
LDAP Dom
ain
Fire
wal
l
Prot
ocol
Fire
wal
l Edge of Network
TAM
Softwareinstalled
Edge server (Based on requirement)Tivoli Access Manger(based on requirement)
SUN ONE Web ServerWebSphere plug-inNetscape
WebSphere PortalWebSphere Application ServerSUN ONE Directory ServerNetscapeOracle 9i Client
Oracle 9i Database Server
Full-qualified hostname
User defined sun1.itso.ral.ibm.com sun2.itso.ral.ibm.com machine2.itso.ora.ibm.com machine3.itso.ora.ibm.com
IP External IP 9.24.105.46 9.24.106.47 9.25.100.101 9.25.101.102
Web server
WebSphere Application
Server
JDBC
358 IBM WebSphere Portal for Multiplatforms V5 Handbook

the Web server, WebSphere Application Server, WebSphere Portal and the LDAP server here. The WebSphere Portal database information is very critical, so we put the database server behind another firewall. This firewall could be a protocol firewall or domain firewall. For our example, this is a domain firewall, which means that the domain of the database is different from the domain of WebSphere Portal.
Because the focus of this redbook is WebSphere Portal, we focus on the installation and configuration on the machines behind the first domain firewall. These are machines 1 and 2.
If you need more details about the setup and configuration of the Edge Server or Tivoli Access Manager, you can visit the following URL and search for related Redbooks: http://www.ibm.com/redbooks.
8.1.2 Installation and configuration sequence In this section, we begin installing and configuring our Solaris Sun ONE and WebSphere Portal environment. You will follow the outline provided, but note that some of the steps can be done concurrently on different machines:
1. Install Solaris and perform some configuration on each machine
2. Install Netscape on each machine
3. Install WebSphere Portal on machine 2
4. Install and configure Oracle 9i Enterprise Server on machine 3
5. Install and configure Oracle 9i Client on machine 2
6. Install and configure Sun ONE Directory Server on machine 2
7. Install Sun ONE Web Server on machine 1
8. Configure WebSphere Portal for the related components on machine 1, machine 2 and machine 3
9. Verify the whole environment
8.1.3 Skill requirements As we stated above, there are many software components working together in this environment. In order to install, configure, and maintain the system, skills in the following areas are strongly desired:
� Solaris operating system
� Oracle database installation and administration
� WebSphere Application Server V5
Chapter 8. WebSphere Portal: Sun Solaris 8.0 installation 359

� WebSphere Portal
� Knowledge of the LDAP
8.2 Hardware and software used for multi-tier configuration
The sections below describe the hardware and software used to develop our multi-tier configuration.
8.2.1 Hardware used in our test environmentThe following is the hardware configuration for each machine we used:
Machine 1� Hostname: Sun 1
� IP address 2: 9.24.105.46 (sun1.itso.ral.ibm.com)
� Sun SPARC Ultra 60
– 450 MHZ UltraSPARC II CPU
– 512 MB RAM
– 17 GB hard disk X 2
– 1 Ethernet adapter
Machine 2� Hostname: Sun 2
� IP address 1: 9.24.105.47 (sun2.itso.ral.ibm.com)
� IP address 2: 9.25.100.101 (machine2.itso.ora.ibm.com)
� Sun SPARC Ultra 60
– 450 MHZ UltraSPARC II CPU
– 1 GB RAM
– 17 GB hard disk X 2
– 1 Ethernet adapter
Machine 3 � Hostname: machine 3
� IP address 1: 9.25.100.102 (machine3.itso.ora.ibm.com)
360 IBM WebSphere Portal for Multiplatforms V5 Handbook

� Sun SPARC Ultra 60
– 450 MHZ UltraSPARC II CPU
– 512 MB RAM
– 17 GB hard disk X 2
– 1 Ethernet adapter
8.2.2 Software used within our test environmentIn order to build the multi-tier runtime environment, we used the following software:
� Sun Solaris 8 (5.8) + Solaris maintenance update 5 (MU5)
� Netscape Communicator V7.0
� Sun ONE Web Server V6.0
� Oracle 9i (9.2.0.1) Enterprise Edition
� Oracle 9i client
� IBM WebSphere Application Server V5.0.1
� Sun ONE Directory Server V5.1
� IBM WebSphere Portal V5.0
Product installation directories Table 8-1 show the components used in each machine and their home directories.
Table 8-1 Product installation directories
Machine Component Directory
machine 1 netscape /usr/netscape
Sun ONE Web Server /usr/iplanet/servers
machine 2 netscape /usr/netscape
WebSphere Portal /opt/WebSphere/Portal
Sun ONE Directory Server /opt/iplanet/servers
Oracle client /opt/oracle
machine 3 Oracle Enterprise Server /opt/oracle
netscape /usr/netscape
Chapter 8. WebSphere Portal: Sun Solaris 8.0 installation 361
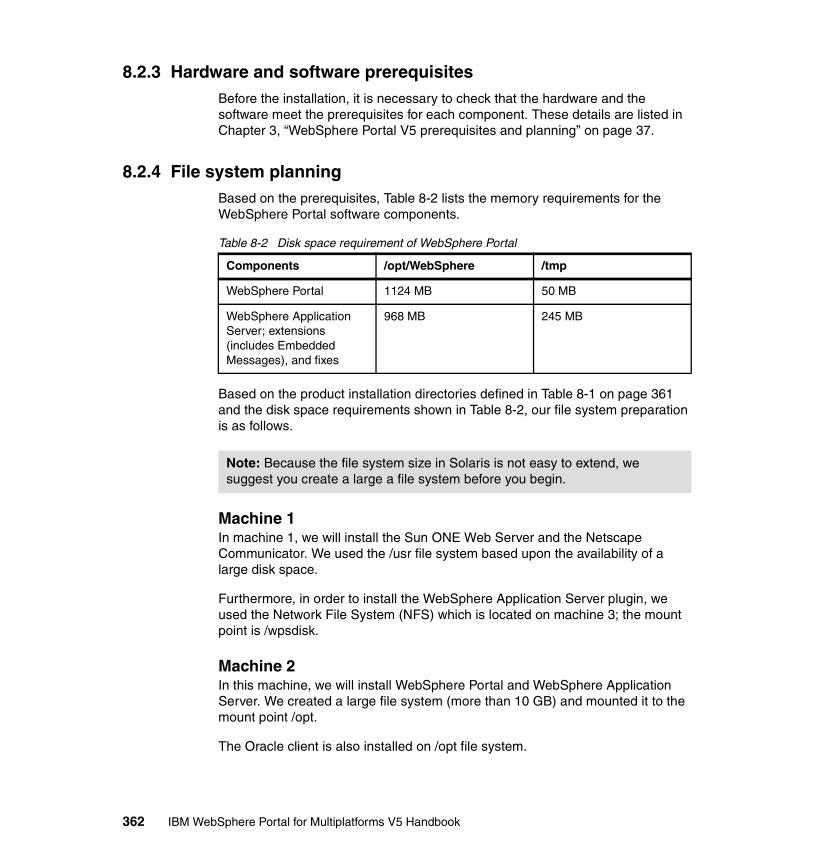
8.2.3 Hardware and software prerequisites Before the installation, it is necessary to check that the hardware and the software meet the prerequisites for each component. These details are listed in Chapter 3, “WebSphere Portal V5 prerequisites and planning” on page 37.
8.2.4 File system planningBased on the prerequisites, Table 8-2 lists the memory requirements for the WebSphere Portal software components.
Table 8-2 Disk space requirement of WebSphere Portal
Based on the product installation directories defined in Table 8-1 on page 361 and the disk space requirements shown in Table 8-2, our file system preparation is as follows.
Machine 1 In machine 1, we will install the Sun ONE Web Server and the Netscape Communicator. We used the /usr file system based upon the availability of a large disk space.
Furthermore, in order to install the WebSphere Application Server plugin, we used the Network File System (NFS) which is located on machine 3; the mount point is /wpsdisk.
Machine 2 In this machine, we will install WebSphere Portal and WebSphere Application Server. We created a large file system (more than 10 GB) and mounted it to the mount point /opt.
The Oracle client is also installed on /opt file system.
Components /opt/WebSphere /tmp
WebSphere Portal 1124 MB 50 MB
WebSphere Application Server; extensions (includes Embedded Messages), and fixes
968 MB 245 MB
Note: Because the file system size in Solaris is not easy to extend, we suggest you create a large a file system before you begin.
362 IBM WebSphere Portal for Multiplatforms V5 Handbook

For Sun ONE Directory Server and Netscape, we used the /usr file system, which was large enough for our installation because the disk space requirement is relatively small.
For the installation images as in machine 1, we used the NFS file system which is from machine 3. The mount point is also /wpsdisk.
Machine 3 In this machine, we will install the Oracle 9i database server. We used a file system of more than 8 GB. The mount point is /opt.
8.2.5 Network information In order to emulate the multi-tier environment, we defined the IP address for each machine as in Table 8-3.
Table 8-3 Networking information
Based on the networking definition, we used two domains and two different subnets. The purpose is to emulate the multi-tier environment.
8.3 Installing Netscape CommunicatorBased on the WebSphere Portal prerequisites, Netscape Communicator V7.0 is required. Sometimes, there is an old version installed in Solaris, but that version does not meet the prerequisites. Therefore, we need to remove the old version and install the new version, in our case, V7.0.
Note: For hints about file system preparation, please refer to F.2, “Setting up the file system environment” on page 743 for more detailed information.
machine Hostname IP Fully qualified name
machine1 sun1 9.24.105.46 sun1.itso.ral.ibm.com
machine 2 sun2 9.24.105.47 sun2.itso.ral.ibm.com
9.25.100.101 machine2.itso.ora.ibm.com
machine 3 machine3 9.25.100.102 machine3.itso.ora.ibm.com
Note: You can refer to F.1, “Setting up the networking environment” on page 738 for network preparation information.
Chapter 8. WebSphere Portal: Sun Solaris 8.0 installation 363

8.3.1 Removing the old Netscape Communicator We use the following command to find the Netscape package:
# pkginfo |grep Netscape
Then, we use the following command to remove the package we found:
# pkgrm <package name>
8.3.2 Installing Netscape CommunicatorComplete the following steps to install the new Netscape Communicator version.
1. Start a Solaris Console, and enter the following command:
# cd /usr# mkdir netscape
2. Get the Netscape Communicator package and unzip it. We download the V7 from the Web and got the package named n7-patches-s8-sparc.zip, then we ran the following command:
# cd /opt1# mkdir netscape_img# cd netscape_img
3. Copy the installation image to this directory.
4. Unpack the images:
# unzip ../n7-patches-s8-sparc.zip
5. Start the installation program to install:
# ./nsinstall
The installation will start, it will check the current package, add some files to the directories, and then finish successfully.
8.3.3 Checking the result of the installation Start Netscape to check the installation:
# cd /usr/netscape # ./netscape &
The Netscape Communicator browser will display. At this time, you can add the /usr/netscape to the PATH environment.
Our next step is to install the WebSphere Portal 5.0 on machine 2.
364 IBM WebSphere Portal for Multiplatforms V5 Handbook

8.4 WebSphere Portal 5.0 installationIn this section, we will describe the steps used to install the WebSphere Portal on machine 2.
8.4.1 WebSphere components As planned in 8.1, “Scenario overview” on page 358, we will install the WebSphere Portal on machine 2. This installation will include the following components:
� WebSphere Application Server Enterprise Edition V 5.0.1
� WebSphere Application Server Base, Fix Pack 5.0.1
� WebSphere Application Server Enterprise Edition Fix Pack 5.0.11.
� WebSphere Portal V5.0
� WebSphere Portal Content Publisher Runtime
� Cloudscape database 5.0
The above components are installed by the Portal installation program.
The other components required by WebSphere Portal are:
� On machine 1:
Web server: Sun ONE Web Server 6.0
� On machine 2:
– LDAP server: Sun ONE Directory Server 5.1
– Database client: Oracle client 9.2.0.1
� On machine 3:
Database server: Oracle database server 9.2.0.1
8.4.2 Preparation for the installation Before the installation, we need to perform the following checks:
1. Make sure the installation media is available
In our environment, we copied the installation media in the directory /wpsdisk. As shown in Table 8-4 on page 366, the following CDs will be used which is copied to the subdirectory as the label marked.
Chapter 8. WebSphere Portal: Sun Solaris 8.0 installation 365

Table 8-4 WebSphere Portal installation images
2. Define the home directory for each application as shown in Table 8-5.
Table 8-5 WebSphere Portal components home directories
3. Make sure another WebSphere Application Server has not been previously installed on machine 2, so we can use the install new instance option during the installation.
8.4.3 Installing WebSphere PortalListed are the steps we used to install the WebSphere Portal:
1. Log in as root user account on machine 2.
2. Change the current working directory to
# cd /wpsdisk/setup
3. Start the installation command:
# ./install.sh
4. As shown in Figure 8-2 on page 367, a window is displayed asking for the language to be used for the installation. Choose English and click OK to continue.
CD number Directory contents
Setup /wpsdisk/setup Portal InstallerPortal InfoCenterWebSphere Portal Toolkit
1-4 /wpsdisk/1-4 WebSphere Application Enterprise Edition for Solaris
1-7 /wpsdisk/1-7 WebSphere Application Fix Pack and eFixes for AIX and Solaris
2 /wpsdisk/cd2 WebSphere PortalWPCP
Software components Home directory
WebSphere Application Server
/opt/WebSphere/Application
WebSphere Portal /opt/WebSphere/PortalServer
Cloudscape database /opt/WebSphere/PortalServer/Cloudscape
366 IBM WebSphere Portal for Multiplatforms V5 Handbook

Figure 8-2 Choose the language window
5. In the next window, there is a button available to visit the InfoCenter. Skip it and click Next to continue.
6. In the Software License Agreement Page, click I accept the terms in the license agreement and then click Next to continue.
7. The installer will check the operating and software prerequisites. If successful, you will see a page asking for the Setup type. Click Custom and then click Next.
8. In the next window, as in Figure 8-3 on page 368, there are three options for installation. Since this is a new installation and no WebSphere Application Server has been previously installed, select Install a new instance of WebSphere Application Server, then click Next to continue.
Chapter 8. WebSphere Portal: Sun Solaris 8.0 installation 367

Figure 8-3 WebSphere Application Server installation, options
9. The next window asks for the WebSphere Application Server installation directory. Keep the default /opt/WebSphere/AppServer, then click Next to continue.
10.In Figure 8-4 on page 369, you are asked about the Web server and plugin installation. Because our Web server is in another machine, we select Do not install a plugin at this time, then click Next to continue.
368 IBM WebSphere Portal for Multiplatforms V5 Handbook

Figure 8-4 Web Server and plugin choice
11.You are now asked for the Node name and the WebSphere Application Server host name. For our example, we used sun2 as the node name and sun2.itso.ral.ibm.com as the host name (as shown in Figure 8-5 on page 370).
Note: You must use the fully qualified host name here, otherwise, you may encounter problems later, especially if you use the SSO.
Chapter 8. WebSphere Portal: Sun Solaris 8.0 installation 369

Figure 8-5 Hostname selection window
12.Next, you are asked the home location for WebSphere Portal. Keep the default /opt/WebSphere/PortalServer. Then click Next to continue.
13.Provide the Portal administrative user name and password. For our example, we used wpsadmin as the user name and the password. Click Next to continue.
14.Next, the components to be installed are displayed. Review these and click Next to continue.
15.The installation starts, then a window is displayed requesting the location of the installation images for the following CDs:
– CD 1-4 WebSphere Application Server Enterprise Edition
– CD 1-7 Fix Pack of the WebSphere Application Server
– CD 2 WebSphere Portal
370 IBM WebSphere Portal for Multiplatforms V5 Handbook

16.The installation program will display a window indicating the installation was successful and will provide the location of the log for checking. Review it and then click Finish.
8.4.4 Manually installation of the interim fixes of WebSphere Application Server
Although the Portal install program will install Fix Pack 5.0.1 of the WebSphere Application Server and the Enterprise edition, there are some other interim fixes which need to be installed manually. These interim fixes are located in CD 1-7.
In CD 1-7, there are four subdirectories:
� fixes
The WebSphere Application Server interim fixes needed by WebSphere Portal are here. These interim fixes have been applied by the Portal Installer; you can see the history in the directory /opt/WebSphere/AppServer/properties/version/history.
Important: When prompted for CD2, before you input the location it is better to open another window as root. Use the following command to check if the WebSphere Application Server, named server1 is started:
# cd /opt/WebSphere/AppServer/bin# ./serverStatus.sh -all
If the Application Server server1 is started, you can continue the installation. Otherwise, use the command ./startServer server1 to start the Application Server. If it cannot be started, check the following logs:
� The installation logs of the WebSphere Application Server, which is located in the /opt/WebSphere/AppServer/log
� The log for the start of the Applications Server, which is located at /opt/WebSphere/AppServer/logs/server1
If the problem could not be solved, it may be necessary to restart the installation from the beginning.
Note: You can check the installation log for the WebSphere Portal which is located in /opt/WebSphere/PortalServer/log.
Chapter 8. WebSphere Portal: Sun Solaris 8.0 installation 371

� manualfixes
The interim fixes needed by the Portal are here; these interim fixes must be applied manually.
� pmefp1
The Fix Pack 1 of the WebSphere Application Server Enterprise Edition 5.0 is here. It has been applied by the Portal installer, you can check it in the directory /opt/WebSphere/AppServer/properties/version/history.
� wasfp1
The Fix Pack 1 of the WebSphere Application Server Edition 5.0 is here. It has been applied by the Portal installer; you can check it in the directory /opt/WebSphere/AppServer/properties/version/history.
In this section, we introduce how to apply the manualf ixes via the GUI; for the console mode or called text mode, you can refer to E.2, “Applying the WebSphere Application Server interim fix in silent mode” on page 723 for more details.
Listed are the steps to manually install the interim fixes via the GUI:
1. Log in as root on machine 2.
2. Change the directory:
# cd /wpsdisk/1-7/manualfixes/solaris# ls
Example 8-1 List of files
PQ72597-efix.jarPQ77008.jarPQ77142.jarREADME_PQ72597.txtREADME_PQ77008.txtREADME_PQ77142.txtREADME_WAS_Plugin.txtREADME_WAS_Security_07-07-2003_JSSE_cumulative_Fix.txtsunUpdateInstaller.zipWAS_Plugin_07-01-2003_5.0.X_cumulative_Fix_Sun.jarWAS_Security_07-07-2003_JSSE_cumulative_Fix.jar
Important: You must log in as root or su to root to install the WebSphere Portal 5, otherwise the installation will fail.
372 IBM WebSphere Portal for Multiplatforms V5 Handbook

3. Change the directory, make a subdirectory, and copy the interim fix files to the new created directory:
# cd /opt/WebSphere/AppServer# mkdir update # cd update# cp /wpsdisk/1-7/manualfixes/solaris/*
4. Unpack the sunUpdateInstaller.
# mkdir installer# cd installer # unzip ../sunUpdateInstaller.zip # ls -l
Example 8-2 List of files
total 15072drwxr-xr-x 2 root other 523 Oct 5 13:44 docsdrwxr-xr-x 2 root other 186 Oct 5 13:44 earLauncher-rw-rw-rw- 1 root other 7636897 Jun 23 02:57 installer.jardrwxr-xr-x 3 root other 249 Oct 5 13:44 lib-rwxr-xr-x 1 root other 10433 Jun 23 02:57 updateSilent.sh-rwxr-xr-x 1 root other 15944 Jun 23 02:57 updateWizard.shdrwxr-xr-x 2 root other 192 Oct 5 13:44 utils-rw-rw-rw- 1 root other 97 Jun 23 02:57 version.properties
5. Start the installation wizard.
# ./updateWizard.sh
6. You will be asked to select a language. Choose English then click OK to continue.
7. The Welcome page appears, click Next to continue.
8. Found installed are WebSphere Application Server v5.0.1 and Enterprise V5.0.1. Click Next to continue.
9. For the installation of the fix pack or interim fix (Figure 8-6 on page 374), click Install fixes. Click Next to continue.
Chapter 8. WebSphere Portal: Sun Solaris 8.0 installation 373

Figure 8-6 Choose to apply the interim fix
10.Specify the location of the fixes then click Next to continue.
11.The fixes are displayed. Select all fixes except the fix for the plugin (for example, deselect the interim fix for the plugin), because the plugin is installed on another machine, as shown in Figure 8-7 on page 375. Click Next to continue.
374 IBM WebSphere Portal for Multiplatforms V5 Handbook

Figure 8-7 Choose the interim fixes, except the interim fix for plugin
12.A window will display the fixes to be applied, click Next to start the installation.
13.You will see a window stating that the update was successful. Click Finish to exit.
8.4.5 Verifying the installation After the installation, you can use the following steps to verify that the installations for the WebSphere Application Server and WebSphere Portal were successful separately.
Note: You can check the log for the interim fix installation. The logs are located in the directory /opt/WebSphere/AppServer/logs/update.
Chapter 8. WebSphere Portal: Sun Solaris 8.0 installation 375

Verification for the WebSphere Application Server Complete the following steps to verify the WebSphere Application Server installation:
1. Log in as root on machine 2.
2. Change the current working directory:
# cd /opt/WebSphere/Application/bin
3. Run the following command to check the status of the application server:
# ./serverStatus.sh -all
You can see there will be two application servers. One is called server1, another is called WebSphere_Portal.
4. If the status of the application server1 is not in the START state, use the following command to start it.
# ./startServer.sh server1
5. After the server has started, run the following command to open a Netscape browser:
# /usr/netscape/netscape &
6. In the browser, type the following URL: http://9.24.105.47:9090/admin/. This will start the WebSphere Application Server administrative console login page, as shown in Figure 8-8 on page 377.
Note: If there is a problem starting the WebSphere Application Server, you can check the log named startserver.log. The log is located in /opt/WebSphere/Application/logs/server1.
376 IBM WebSphere Portal for Multiplatforms V5 Handbook

Figure 8-8 WebSphere Application Administrative Login
7. You can key in a user ID to continue the configuration. However, the installation verification for WebSphere Application Server is finished.
Verification of WebSphere Portal Complete the following steps to verify the installation of WebSphere Portal:
1. Log in as root on machine 2.
2. Change the current working directory:
# cd /opt/WebSphere/Application/bin
3. Run the following command to check the status of the application server:
# ./serverStatus.sh -all
You can see there are two application servers. One server is called server1 and the other server is called WebSphere_Portal.
4. If the status of the application server server1 is not START, use the following command to start server1:
# ./startServer.sh server1
Chapter 8. WebSphere Portal: Sun Solaris 8.0 installation 377

5. If the application server named WebSphere_Portal is not started, use the following command to start it:
# ./startsServer.sh WebSphere_Portal
6. After the tow applications started, run the following command to open a Netscape browser:
# /usr/netscape/netscape &
7. In the browser, type in the following URL: http://9.24.105.47:9081/wps/portal, you will see the WebSphere Portal Welcome page as shown in Figure 8-9.
Figure 8-9 WebSphere Portal welcome page
8. The verification of the WebSphere Portal installation is finished.
The base installation has been completed. If your purpose is to demonstrate the basic function of the Portal, you are done at this point. If your purpose is to establish a secure runtime environment, you must continue to install the database and LDAP, enable the security, etc.
378 IBM WebSphere Portal for Multiplatforms V5 Handbook

Go to 8.5, “Installing the Oracle Enterprise Server” on page 381 to continue the steps to install the Oracle database server.
8.4.6 Uninstalling WebSphere Portal (optional)In order to remove WebSphere Portal and the WebSphere Application Server, you should not use Solaris’s pkgrm command. You must use the uninstall command provided by WebSphere Portal.
Complete the following steps to uninstall WebSphere Portal and WebSphere Application Server:
1. Log in as root on machine 2.
2. Change the working directory:
# cd /opt/WebSphere/PortalServer/uninstall
3. Execute the following command to start the uninstall program:
# ./uninstall.sh
4. A window will display asking you the language you want to use during the uninstall. Select English, then click OK to continue.
5. The Welcome page will appear. Click Next to continue.
6. You will see a window as shown in Figure 8-10 on page 380. Select Uninstall WebSphere Portal and uninstall WebSphere Application Server. Click Next to continue.
Note: If there is a problem starting or using Portal, you can check the logs to determine the cause of the problem. The logs are located in the following two places:
� To determine a problem pertaining to the application server named WebSphere_Portal (where Portal is running), you can view the log file in /opt/WebSphere/AppServer/logs/WebSphere_Portal.
� To determine a problem pertaining to Portal, you can view the log file in /opt/WebSphere/PortalServer/log.
Note: You can also remove WebSphere Portal in console mode. You can refer to E.4, “Uninstalling WebSphere Application Server and WebSphere Portal in text mode” on page 724 for more detailed information.
Chapter 8. WebSphere Portal: Sun Solaris 8.0 installation 379

Figure 8-10 Uninstallation selection
Figure 8-11 Uninstallation summary
380 IBM WebSphere Portal for Multiplatforms V5 Handbook

7. In Figure 8-11 on page 380, a summary page is shown. Review it and click Next to continue. The uninstall will begin.
8. After uninstall is complete, run the following commands to remove the two packages which could not be removed by the uninstall program.
# pkgrm -n gsk4bas# pkgrm -n gsk5bas
9. Afterwards, you must reboot the machine.
8.5 Installing the Oracle Enterprise Server As we planned our environment in 8.1, “Scenario overview” on page 358, we discussed the installation of the Oracle 9i Enterprise Server to be placed at the back end in the domain itso.ora.ibm.com. We installed an Oracle 9i client on the machine running WebSphere Portal; this machine is located in the domain itso.ral.ibm.com.
This section will provide detailed information regarding the installation and configuration of the database server. The detailed information for the Oracle client can be found in the 8.6, “Installing the Oracle client” on page 404.
8.5.1 Solaris preparation for Oracle 9i Before the installation of Oracle 9i, the following tasks must be performed:
� Install Solaris 8 required packages for Oracle
� Configure the Solaris UNIX Kernel for Oracle 9i
� Create the groups for Oracle 9i
� Create the user accounts for Oracle 9i
� Set environment variables in the user .profile
Note: Here, we introduced the installation method using the GUI. There are two other methods: the console method and the silent method. Please refer to E.1, “Installing and configuring WebSphere Application Server and WebSphere Portal in text mode” on page 715, and E.5, “WebSphere Application Server and WebSphere Portal automatic install (non-interactive mode)” on page 727 for more details.
Note: This section covers how to install the Oracle database we used for WebSphere Portal. For detailed information about the Oracle database server, please refer to the documentation provided on the Oracle CD.
Chapter 8. WebSphere Portal: Sun Solaris 8.0 installation 381

Solaris 8 required packages for Oracle 9i When installing Solaris 8, we chose the developer’s distribution, which includes the following packages required by Oracle 9i:
� SUNWarc� SUNWbtool� SUNWhea� SUNWlibm� SUNWlibms� SUNWsprot� SUNWtoo
Use the following operating system commands to check if the packages are installed:
# pkginfo <packagename>
for example
#pkginfo SUNWarc system SUNWarc Archive Libraries
Configuring the Solaris UNIX Kernel for Oracle 9iTo run Oracle 9i properly, some UNIX Kernel parameters need to be modified.
To update the UNIX Kernel parameter for Oracle 9i, do the following:
1. Start the Solaris console using root on machine 3.
2. Change the directory to /etc and make a copy of the original file named system:
# cd /etc# cp system system.org
3. In our scenario, we added the following Kernel parameters to the end of the /etc/system file to configure the Solaris Kernel for the Oracle 9i.
set msgsys:msginfo_msgmax=65535set msgsys:msginfo_msgmnb=65535set msgsys:msginfo_msgmap=258set msgsys:msginfo_msgmni=256set msgsys:msginfo_msgssz=16set msgsys:msginfo_msgtql=1024set msgsys:msginfo_msgseg=32767set semsys:seminfo_semmni=300set semsys:seminfo_semmsl=300set semsys:seminfo_semmns=2048set semsys:seminfo_semopm=200set semsys:seminfo_semvmx=32767set shmsys:shminfo_shmmax=4294967295
382 IBM WebSphere Portal for Multiplatforms V5 Handbook

set shmsys:shminfo_shmmin=1set shmsys:shminfo_shmseg=16set shmsys:shminfo_shmmni=256set semsys:seminfo_semume=200set eri:adv_autoneg_cap=0set eri:adv_100T4_cap=0set eri:adv_100fdx_cap=1set eri:adv_100hdx_cap=0set eri:adv_10fdx_cap=0set eri:adv_10hdx_cap=0
4. The Solaris system needs to be restarted to allow the parameter changes to take effect:
# reboot
Creating the groups for Oracle 9i In our environment, we created the following groups for the database administrative tasks:
� dba
� oinstall
Perform the following steps:
1. Start a Solaris console using root on machine 3.
2. Create the groups as:
# groupadd dba# groupadd oinstall
Creating user accounts for Oracle 9iWe created a user called oracle and made it a member of the groups dba and oinstall. Perform the following steps:
1. Start a Solaris console using root on machine 3.
2. Execute the following command:
# useradd -g oinstall -G dba -d /opt/oracle -m -s /usr/bin/ksh oracle
3. Set the password for the new created user
# passwd oracle
This will prompt you to set the new password. We used oracle as the password.
Chapter 8. WebSphere Portal: Sun Solaris 8.0 installation 383

4. Change the current user account to the newly created user account and check its home directory:
# su - oracle$ su - oracle $ pwd/opt/oracle $ exit$ exit #
Setting environment variables in the user .profileTo set the environment variables as part of the .profile for the Oracle user shell; perform the following steps.
1. Log in as the user oracle on machine 3, or change to the oracle user account:
# su - oracle $
2. Add the following environment variables to the oracle user .profile:
umask 022export ORACLE_BASE=/opt/oracle/u0/app/oracleexport ORACLE_HOME=$ORACLE_BASE/product/9.2.0.1export ORACLE_SID=wps50export PATH=$PATH:$ORACLE_HOME/bin:/usr/ccs/bin:/usr/openwin/binexport LD_LIBRARY_PATH=$LD_LIBRARY_PATH:$ORACLE_HOME/libexport CLASSPATH=$CLASSPATH:$ORACLE_HOME/jdbc/lib/classes12.zip
Preparing the installation images We copied the installation images on the CDs to the directory /opt1/images/oracle. There are a total of three CDs, so we create three subdirectories, called disk1, disk2 and disk3, respectively. The installation steps are as follows:
1. Start the Solaris Console logged in using the user root account on machine 3.
Because the Oracle installation program uses the graphic interface, the login window needs to use the Solaris CDE or an X11 environment.
2. Change the directory location to the /opt1/images/oracle/disk1.
# cd /opt1/images/oracle/disk1
3. Enable the XWindows GUI for other applications.
a. Set the variable DISPLAY.
# export DISPLAY=:0.0
b. Enable the XServer for display.
# xhost +
384 IBM WebSphere Portal for Multiplatforms V5 Handbook

c. Test if the XWindows will work properly.
# xclock
A graphic clock will be displayed.
d. Close the xclock application.
4. Run the Oracle installer.
# pwd /opt1/images/oracle/disk1# ./runInstaller &
5. When the Oracle Universal Installer Welcome window opens, click Next.
6. The File Locations window appears as shown in Figure 8-12. In the Destination field, keep the default path setting and enter the name as wps50oracle. Click Next.
Figure 8-12 Oracle database server installation file location
Chapter 8. WebSphere Portal: Sun Solaris 8.0 installation 385

7. In the Available Product window, select Oracle 9i Database to install. Click Next.
8. In the Installation Type page, select Custom. Click Next.
9. In the Available Product Components window, select the following components ,
– Oracle 9i database 9.2.0.1.0
– Oracle 9i 9.2.1.0
– Oracle net Service 9.2.0.1.0
– Oracle Net Listener 9.2.0.1.0
Then click Next.
10.In the Component Locations window, accept the default and click Next.
11.In the Privileged Operating System Groups window, accept the defaults and click Next.
12.In the Create Database window, click No and then click Next.
13.The Summary window appears, review it and then click Next.
14.The installer starts the installation and will display the prompt for disk 2 and disk 3. Enter the location path of the disk and click OK to continue the installation.
15.Near the end of the installation, the installer will display a window as shown in Figure 8-13.
Figure 8-13 Setup Privilege for Oracle 9i Enterprise server install
Run and respond to the following commands:
# cd /opt/oracle/u0/app/oracle/product/9.0.1# ./root.sh
386 IBM WebSphere Portal for Multiplatforms V5 Handbook

Example 8-3 root.sh script
Running Oracle9 root.sh script...
The following environment variables are set as: ORACLE_OWNER= oracle ORACLE_HOME= /opt/oracle/u0/app/oracle/product/9.0.1
Enter the full pathname of the local bin directory: [/usr/local/bin]: The file "dbhome" already exists in /usr/local/bin. Overwrite it? (y/n) [n]: y Copying dbhome to /usr/local/bin ...The file "oraenv" already exists in /usr/local/bin. Overwrite it? (y/n) [n]: y Copying oraenv to /usr/local/bin ...The file "coraenv" already exists in /usr/local/bin. Overwrite it? (y/n) [n]: y Copying coraenv to /usr/local/bin ...
Adding entry to /var/opt/oracle/oratab file...Entries will be added to the /var/opt/oracle/oratab file as needed byDatabase Configuration Assistant when a database is createdFinished running generic part of root.sh script.Now product-specific root actions will be performed.
16.After the commands execute successfully, click OK to continue.
17.The installation completes and the Configuration Tools window appears. Continue and click Next in the Oracle Net Configuration Assistant Welcome page.
18.The installer asks if you will complete the configuration now (shown in Figure 8-14 on page 388). Click No, I want to defer this configuration to another time. Then click Next to continue.
Chapter 8. WebSphere Portal: Sun Solaris 8.0 installation 387

Figure 8-14 Oracle Directory usage configuration
19.You will see a window for the Listener name as shown in Figure 8-15 on page 389. Keep the default setting LISTENER and click Next.
388 IBM WebSphere Portal for Multiplatforms V5 Handbook

Figure 8-15 Oracle Listener name definition
Figure 8-16 Oracle Listen Configuration, Select Protocol
Chapter 8. WebSphere Portal: Sun Solaris 8.0 installation 389

20.In the Select Protocol window (Figure 8-16 on page 389), select TCP and click Next.
21.In the TCP/IP Protocol setup window, keep the standard port number, 1521. Click Next.
22.The installer asks if you need to configure another Listener. Click No then click Next.
23.You will see that the Listener configuration is complete. Click Next to continue.
24.In the Naming Method configuration window, click No, I don't want to change the naming methods configured. Then click Next to continue.
25.You will see that the Oracle Net configuration is complete. Click Next to continue.
26.You will see the End of the installation window. Click Exit to finish.
8.5.2 Preparing the database for WebSphere PortalWebSphere Portal requires a database to store information. Portal must have pre-defined users and database names. These users and databases need to be added and configured manually.
Database and user planThe requirements for WebSphere Portal are shown in Table 8-6.
Table 8-6 WebSphere Portal required Oracle databases and users
Note: At the time of the writing of this redbook, Oracle 9.2.0.1 met the requirements based on the prerequisites for WebSphere Portal. No other patch for Oracle was required. However, check the WebSphere Portal Infocenter to determine if other patches are now required.
Database name User
wps50 wpsdbusr
wmmdbusr
wpcp50 pznadmin
EJB
wcmdbadm
fdbk50 feedback
390 IBM WebSphere Portal for Multiplatforms V5 Handbook

In the next section, we will create the databases and grant privileges to them.
Adding a database We use the Oracle tool, dbca, to create the databases. Because the steps are similar, we will only demonstrate the creation of the wps50 database. However, you should ensure all databases listed in Table 8-6 on page 390 are created. Complete the following steps:
1. Log in as root from the XWindow environment on machine 3.
2. Run the following command:
# xhost +
3. Login to the oracle account.
# su - oracle $
4. Run the command:
$ export DISPLAY=:0.0
5. Run the following command to check if the GUI is working:
$ xclock
6. If a clock is displayed, close it. Then run the following command:
$ dbca &
7. The Database Configuration Assistant window appears. Click Next. Click Next again to bypass the Welcome window.
8. In window 1 of 8, click Create a database, then click Next to continue.
9. In window 2 of 8, click New Database, then click Next to continue.
10.in window 3 of 8, enter the Global Database Name as wps50.itso.ora.ibm.com, and the Field of the SID will show wps50. Click Next to continue.
11.In window 4 of 8 (Figure 8-17 on page 392), deselect Oracle Ultra Search and Example Schemas. If asked to delete the tablespace, click Yes.
Chapter 8. WebSphere Portal: Sun Solaris 8.0 installation 391

Figure 8-17 Create oracle database, 4 of 8
12.In window 4 of 8 shown in Figure 8-17, click Standard database features; another window will be displayed (Figure 8-18 on page 393). Deselect all the choices except the Oracle text (if asked to delete the tablespace, click Yes.). Click OK to continue.
392 IBM WebSphere Portal for Multiplatforms V5 Handbook

Figure 8-18 Oracle Standard database feature
13.In window 5 of 8, select Dedicated Server Mode, then click Next to continue.
14.In window 6 of 8 (Figure 8-19), in the Memory tab, set the parameter Shared Pool to 200. Click the Character Sets tab.
Figure 8-19 Oracle database creating, initialization parameters
Chapter 8. WebSphere Portal: Sun Solaris 8.0 installation 393

15.In the Character Sets tab (Figure 8-20), select Choose from the list of character sets and select the character set UTF8, then set the field National Character Set to UTF8. Click Next to continue.
Figure 8-20 Database character set
16.In Step 7 of 8 (Figure 8-21 on page 395), click Next to continue.
Important: Here, the Database Character Set and the National Character Set must be the same, otherwise, you will get an error when you do the Database-transfer-import.
394 IBM WebSphere Portal for Multiplatforms V5 Handbook

Figure 8-21 7 of 8 database creation
Figure 8-22 8 of 8, creating the database
Chapter 8. WebSphere Portal: Sun Solaris 8.0 installation 395

17.In Step 8 of 8 (Figure 8-22 on page 395), click Create Database and click Finish to continue.
18.At the summary page, click OK.
19.Oracle starts to create the database.
20.At the end of the creation, you will see a page asking for the password of the default user, SYSTEM and SYS, as shown in Figure 8-23.
Figure 8-23 Enter the password for the default user
21.Type in the password. For our example, we used manager1 for both accounts. Click Exit to finish.
Database initialization For each database created, Oracle requires an initialization file located in the directory /opt/oracle/u01/app/oracle/product/9.2.0.1/dbs. In the initialization file, some parameters need to added and modified.
396 IBM WebSphere Portal for Multiplatforms V5 Handbook

For each of the databases, we use the sample initialization file named init.ora to create the file for our database. The file name has the format init<the SID>.ora. The file is located in the directory /opt/oracle/u01/app/oracle/product/9.2.0.1/dbs.
Complete the following steps to modify its parameters:
1. Log in as oracle on machine 3.
# su - oracle$
2. Change the working directory.
$ cd /opt/oracle/u01/app/oracle/product/9.2.0.1/dbs
3. Using the values specified in Table 8-7, modify the parameters in the initialization file. If the item does not exist, add it.
Table 8-7 Database initialization parameters
4. Stop and start the Oracle database server:
# su - oracle# dbshut# dbstart
Verifying the database creation We should check that the database was created properly and can be accessed.
Complete the following steps to verify the database wps50 (these steps should be used for the other databases as well):
1. Log in using the oracle account on machine 3.
# su - oracle $
parameter recommended value for production
db_block_buffers 20000
shared_pool_size 67108864
log_checkpoint_interval 10000
processes 150
log_buffer 163840
db_block_size 8192
open_cursors 300
cursor_sharing force
Chapter 8. WebSphere Portal: Sun Solaris 8.0 installation 397

2. Run the command sqlplus:
# sqlplus system/manager1@wps50
Example 8-4 Results of sqlplus
SQL*Plus: Release 9.2.0.1.0 - Production on Mon Oct 13 09:45:39 2003
Copyright (c) 1982, 2002, Oracle Corporation. All rights reserved.
Connected to:
Oracle9i Enterprise Edition Release 9.2.0.1.0 - Production
JServer Release 9.2.0.1.0 - Production
SQL>
3. Run the following command to exit sqlplus.
SQL > exit
Adding the users and granting privileges to the databaseAfter creating the database, we need to add the users and grant them privileges to access the database.
Adding users and privileges for the wps50 database Complete the following steps:
1. Log in to the oracle account on machine 3.
# su - oracle $
2. Run the command:
SQL> sqlplus system/manager1@wps50
3. Run the following command to create the user WPSDBUSR with the password WPSDBUSR.
Note: In our test environment, we used Oracle’s default tablespace, for example, USERS and TEMP; if required, you can define your own tablespaces, then continue to add the users.
398 IBM WebSphere Portal for Multiplatforms V5 Handbook

SQL> create user WPSDBUSR > identified by WPSDBUSR> default tablespace USERS> temporary tablespace TEMP > ;
4. Run the following command to create the user WMMDBUSR with the password WMMDBUSR.
SQL> create user WMMDBUSR > identified by WMMDBUSR> default tablespace USERS> temporary tablespace TEMP > ;
5. Run the command:
SQL > connect
Type in the user name as SYSTEM with password manager1.
6. Run the following command to grant privileges:
SQL > grant connect, resource to WPSDBUSR SQL > grant connect, resource to WMMDBUSR
7. Quit sqlplus by executing the command:
SQL > exit
Adding users and privileges to the wpcp50 database Perform the following steps:
1. Log in to the oracle account on machine 3
# su - oracle $
2. Run the command
# sqlplus system/manager1@wpcp50
3. Run the following command to create the user PZNADMIN with password PZNADMIN:
SQL> create user PZNADMIN> identified by PZNADMIN> default tablespace USERS> temporary tablespace TEMP > ;
Chapter 8. WebSphere Portal: Sun Solaris 8.0 installation 399

4. Run the following command to create the user EJB with password EJB:
SQL> create user EJB > identified by EJB > default tablespace USERS> temporary tablespace TEMP > ;
5. Run the following command to create the user WCMDBADM with password WCMDBADM:
SQL> create user WCMDBADM> identified by WCMDBADM> default tablespace USERS> temporary tablespace TEMP > ;
6. Run the command:
SQL > connect
Type in the user name SYSTEM and password manager1.
7. Run the following command to grant privileges:
SQL > grant connect, resource to PZNADMINSQL > grant connect, resource to EJBSQL > grant connect, resource to WCMDBADM SQL > grant insert any table to WCMDBADM
8. Quit sqlplus by executing the command:
SQL > exit
Adding the users and the privileges to the fdbk50 database Perform the following steps:
1. Login to the oracle account
# su - oracle $
2. Run the command:
# sqlplus system/manager1@fdbk50
3. Run the following command to create the user FEEDBACK with password FEEDBACK:
SQL> create user FEEDBACK> identified by FEEDBACK> default tablespace USERS> temporary tablespace TEMP > ;
400 IBM WebSphere Portal for Multiplatforms V5 Handbook

4. Run the command:
SQL > connect
Type in the user name SYSTEM and password manager1.
5. Run the following commands to grant privileges:
SQL > grant connect, resource to WPSDBUSR SQL > grant connect, resource to WMMDBUSR
6. Quit sqlplus by executing the command:
SQL > exit
Verifying that the privileges are grantedIt is very important to check that the privileges have been granted to the user. Imagine that we come across an error only to find the cause of the error was based on privileges not being granted correctly; this is a good time to eliminate that possibility.
1. Check the privileges for connect and resource.
Complete the next steps to check that privileges were granted to wpsdbusr in the database wps50.
a. Log in using the oracle user account.
# su - oracle $
b. Run the following commands:
$ sqlplus /nolog
Example 8-5 Result of sqlplus command
SQL*Plus: Release 9.2.0.1.0 - Production on Wed Oct 8 16:20:48 2003
Copyright (c) 1982, 2002, Oracle Corporation. All rights reserved.
SQL> connect system/[email protected]> select * from sys.dba_role_privs where grantee='WPSDBUSR'> ;
Chapter 8. WebSphere Portal: Sun Solaris 8.0 installation 401

Example 8-6 Result of Select syntax command
GRANTEE GRANTED_ROLE ADM DEF
------------------------------ ------------------------------ --- ---
WPSDBUSR CONNECT NO YES
WPSDBUSR RESOURCE NO YES
SQL>
2. Check that the privileges of the insert any table is granted to the user.
Here is the method to check if the privilege insert any table is granted to wcmdbadm in the database wpcp50.
a. Log in using the oracle user account on machine 3.
# su - oracle $
b. Run the following commands:
$ sqlplus /nolog
Example 8-7 Result of sqlplus command
SQL*Plus: Release 9.2.0.1.0 - Production on Wed Oct 8 16:27:15 2003
Copyright (c) 1982, 2002, Oracle Corporation. All rights reserved.
SQL> connect system/[email protected]> select * from sys.dba_sys_privs where grantee='WCMDBADM' 2 ;
Example 8-8 Result of Select syntax command
GRANTEE PRIVILEGE ADM
------------------------------ ---------------------------------------- ---
WCMDBADM INSERT ANY TABLE NO
WCMDBADM UNLIMITED TABLESPACE NO
SQL>
8.5.3 Post-install configurationBased on the situation, there is some post-installation configuration that may be performed for Oracle.
402 IBM WebSphere Portal for Multiplatforms V5 Handbook

Autostarting database startup and shutdown Basically, log in as the oracle user account and then use the command dbstart to start the database. Use the command dbshut to stop the database. If, after the reboot, you find the database not started, you can use these commands.
Start Oracle Listener
You can use the following method to start the Oracle Listener:
# su - oracle# lsnrctl LSNRCTL > start
Verifying the Oracle 9i Enterprise Edition installation We can use the following commands to verify the installation for databases.
1. Start a console as oracle and start sqlplus.
# su - oracle $ sqlplus system
2. You can see all database users by executing the following command:
SQL > select * from all_users ;
3. You can see all SIDs by executing the following command:
SQL > select * from v$instance ;
4. You can also see all tablespaces by executing the following command:
SQL> select * from v$tablespace
5. Exit sqlplus with the command:
SQL > exit
Now the installation and the configuration for the Oracle database server is finished. We will continue to install and configure the Oracle client in the next section.
Note: When we ran the Portal configuration on machine 2 to import the data to the Oracle database, we met the following error:
ORA-12541 TNS:no listener
After we enabled the Oracle Listener, the error disappeared.
Chapter 8. WebSphere Portal: Sun Solaris 8.0 installation 403

8.6 Installing the Oracle client As discussed in 8.1, “Scenario overview” on page 358, the Oracle client is installed on machine 2 where WebSphere Portal is installed. WebSphere Portal accesses the database server which is on machine 3 via the Oracle client. This section describe the methods we used for the Oracle client installation and configuration. For detailed information about the Oracle client, please refer to the documentation from Oracle 9i CD for more detail.
8.6.1 Pre-installation for the Oracle client Before the installation, the following tasks must be completed:
1. Installing Solaris 8 required packages for Oracle 9i, as shown in “Solaris 8 required packages for Oracle 9i” on page 382.
2. Configuring the Solaris Kernel parameters for the Oracle 9i, as shown in “Configuring the Solaris UNIX Kernel for Oracle 9i” on page 382.
3. Creating groups, as shown in “Creating the groups for Oracle 9i” on page 383.
4. Creating a user account for Oracle 9i, as shown in “Creating user accounts for Oracle 9i” on page 383.
5. Setting environment variables in the user .profile, as shown in “Setting environment variables in the user .profile” on page 384.
6. Defining the Server name, the domain name, the IP address, etc. of the Oracle database server. These are defined in Table 8-3 on page 363.
8.6.2 Installing the Oracle 9i client The following are the necessary steps for the Oracle 9i client installation:
1. Log in using the root account in the XWindow environment on machine 2, and execute the following command:
# xhost +
2. Change to the Oracle account
# su - oracle $
3. Set the variable DISPLAY:
$export DISPLAY=:0.0
4. Run the following command to check that the GUI is working:
$ xclock
After the clock displayed, close it.
404 IBM WebSphere Portal for Multiplatforms V5 Handbook

5. Change the current working directory to the place where the installation images are located:
$ cd /wpsdisk/images/oracle/disk1
6. Start the installation program:
$ ./runInstaller &
7. A window displays Oracle Universal Installer 2.2, then the Welcome window appears. Click Next to continue.
8. In the File Locations window (shown in Figure 8-24), accept the default path and type in the Oracle Home name as orawps50client, then click Next to continue.
Figure 8-24 Oracle client installation file location
9. In the Available Products window (shown in Figure 8-25 on page 406), select Oracle9i client 9.2.0.1.0. Click Next to continue.
Chapter 8. WebSphere Portal: Sun Solaris 8.0 installation 405

Figure 8-25 Oracle installation products selection
10.In the Installation Types window, select Custom. Click Next to continue.
11.In the Available Product Components window, select the following components:
– Oracle9i Client 9.2.0.1.0
– Oracle database utilities 9.2.0.1.0
– Oracle Java utilities 9.2.0.1.0
– SQL*Plus 9.2.0.1.0
– Oracle JDBC/OCI Interface 9.2.0.1.0
– Oracle JDBC/THIN Interface 9.2.0.1.0
– Oracle Call interface 9.2.0.1.0
Then click Next to continue.
12.In the Component Locations window, click Next to continue.
406 IBM WebSphere Portal for Multiplatforms V5 Handbook

13.Review the Summary window. Click Install to start the installation
14.During the installation, you will see a window called Disk Location and prompt you for the next CD (Figure 8-26). Type in the location and click OK to continue.
Figure 8-26 Oracle installation media directory
15.Before the installation is finished, you will see window as shown in Figure 8-13 on page 386. Give the following response:
a. Open another window as root and change the directory:
# cd /opt/oracle/u01/app/oracle/product9.2.0.1
b. Run the following command:
# ./root.Sh
After the command is finished, click OK to continue.
16.The Oracle Net Configuration Assistance: Welcome page is displayed. Click Next to continue.
17.In the Oracle Net Configuration Assistance: Directory Usage Configuration page, click No, I want to defer this configuration to another time. Click Next to continue.
18.In the Oracle Net Configuration Assistant: Naming Methods configuration window, select Host name and Local. Click Next to continue.
19.In the Oracle Net Configuration Assistance: Net Service name configuration window, select Oracle8i or later database or service. Click Next to continue.
20.In the next window, you must enter a Service name for a database. Type in the database name wps50.itso.ora.ibm.com, then click Next to continue.
21.In the next window, select TCP as the protocol. Click Next to continue.
22.In the next window, fill in the Host name field with machine3.itso.ora.ibm.com and keep the selection Use the standard port number 1521. Click Next to continue.
Chapter 8. WebSphere Portal: Sun Solaris 8.0 installation 407

23.In the next window, click Yes, perform a test to test the connection to the remote database.
24.If the password for the user SYSTEM is not the default, you will see that the connection did not succeed (Figure 8-27). Click Change login.
Figure 8-27 Test the connection
25.You will see another window that lets you key in the password for the user SYSTEM, key in the password and then click OK to continue.
Note: If, after changing the password, the ORA-12541 error is still displayed, it is perhaps because the Oracle Listener on the server is not started. Use the following method to start the Listener on machine 3:
# su - oracle# lsnrctlLSNRCTL > start
The method to stop the Oracle is:
# su - oracle# lsnrctlLSNRCTL > stop
408 IBM WebSphere Portal for Multiplatforms V5 Handbook

26.After passing the connection test, you will see a window that asks for the net service name. Type wps50 and click Next to continue.
27.In the next window, you are asked if you would like to configure another net service name. Click Yes and then click Next to continue.
28.Repeat the steps listed above (from 18 on page 407 to 28) to create the other two net services for wpcp50 and fdbk50. When asked if you like to configure another net service name, click No and click Next to continue.
29.The Net Service name configuration is complete. Click Next to continue.
30.The next window will explain the host name methods; read it and click Next to continue.
31.The Naming Methods configuration complete window appears. Click Next to continue.
32.In the window Oracle Net Configuration Complete, click Finish.
33.At last, the End of Installation window appears. Click Exit and the installation is finished.
8.6.3 Verifying the Oracle 9i Client installation After the installation is complete, test the Oracle 9i Client installation. Perform the following steps:
1. Log in as a oracle user account
# su - oracle $
2. Run the sqlplus command:
$ sqlplus system/manager1@wps50
3. You can see the database users with the following command:
SQL > select * from all_users ;
4. You can see the all SIDs by executing the command:
SQL> select * from v$instance ;
5. You can also see all tablespace by executing the command:
SQL > select * from v$tablespace SQL > exit
Note: You can create the other two net services here, or you can do so later by executing the Oracle command netca.
Chapter 8. WebSphere Portal: Sun Solaris 8.0 installation 409

6. Execute the following commands to make sure the database can be connected remotely from the client:
# sqlplus /nologSQL> connect wpsdbusr/wpsdbusr@wps50connectedSQL> connect wmmdbusr/wmmdbusr@wps50connectedSQL> connect pznadmin/pznadmin@wpcp50connectedSQL> connect ejb/ejb@wpcp50connectedSQL> connect wcmdbadm/wcmdbadm@wpcp50connectedSQL>connect feedback/feedback@fdbk50connectedSQL> exit
Now the installation and the configuration of the Oracle client is finished. We will continue to install and configure the Sun ONE Directory Server.
8.7 Installing the Sun ONE Directory Server As shown in Figure 8-1 on page 358, we use the Sun ONE Directory Server as the LDAP server for WebSphere Portal. This machine is installed on the same machine as WebSphere Portal.
In this section, we will introduce the steps to install and configure the Sun ONE Directory Server. For more detailed information about the Sun ONE Directory Server, please refer to the documentation from SUN.
8.7.1 Preparing for the installationBefore the installation, we need to perform the following preparation steps:
1. Prepare the group and the user account
2. Prepare the installation images
3. Prepare the application home
Note: If you did not create the net service, you cannot connect to the database in the server. You must create the net service first. To do so, use the command netca.
410 IBM WebSphere Portal for Multiplatforms V5 Handbook

Preparing the group and user account Complete the following steps to create the group and user account for the Sun ONE Directory Server.
1. Log in as root.
2. Run the following command:
# groupad iplanet
3. Run the following command to create a user account:
# useradd -g iplanet -d /usr/iplanet -m -s /usr/bin/ksh iplanet
4. Change the password:
# passwd iplanet
8.7.2 Preparing the installation images The Sun ONE Directory Server is part of Solaris 9, but not Solaris 8, so we download it from the Internet. We received the package and unpacked it in the directory /export/home/sunone.
8.7.3 LDAP structure planning The LDAP structure must be defined before starting the installation and configuration. Based on the requirements of WebSphere Portal, we defined the LDAP structure as shown in Figure 8-28.
Figure 8-28 LDAP structure
Note: The group wpsadmins will include the member wpsadmin.
o=itso.ral.ibm.com
ou=People ou=Groups
uid=wpsadmin uid=wpsbind cn=wpsadmins
Chapter 8. WebSphere Portal: Sun Solaris 8.0 installation 411

8.7.4 Installing the Sun ONE Directory ServerComplete the following installation steps:
1. Log in as root on machine 2.
2. Change the current working directory:
# cd /export/home/sunone
3. Run the following command to start the installation program:
# ./setup
4. A Welcome page will appear and ask you if wish to continue. Press Enter to continue.
5. In the License Terms page, select Yes and then press Enter to continue .
6. The next page asks you which items need to be installed; select 1, which is the iplanet Servers, then press Enter to continue. See Example 8-9.
Example 8-9 installation items
Select the items you would like to install:
1. iPlanet Servers
Installs iPlanet Servers with the integrated iPlanet Console
onto your computer.
2. iPlanet Console
Installs iPlanet Console
as a stand-alone Java application on your computer.
To accept the default shown in brackets, press the Enter key.
Select the component you want to install [1]: 1
7. In the Choose an installation type page, select 3. Custom installation, then press Enter to continue. See Example 8-10.
Example 8-10 Installation type
Choose an installation type:
1. Express installation
Allows you to quickly install the servers using the most
common options and pre-defined defaults. Useful for quick
evaluation of the products.
2. Typical installation
Allows you to specify common defaults and options.
3. Custom installation
Allows you to specify more advanced options. This is
recommended for experienced server administrators only.
412 IBM WebSphere Portal for Multiplatforms V5 Handbook

To accept the default shown in brackets, press the Enter key.
Choose an installation type [2]: 3
8. The next page ask you for the installation location. Keep the default as /usr/iplanet/servers. Press Enter to continue.
9. The next page, shown in Example 8-11, allows you to choose the iPlanet Server Products components. Keep the default choice, All. Then press Enter to continue.
Example 8-11 iPlanet Server Products components
iPlanet Server Products components:
Components with a number in () contain additional subcomponents
which you can select using subsequent screens.
1. Server Core Components (3)
2. iPlanet Directory Suite (2)
3. Administration Services (2)
Specify the components you wish to install [All]:
10.In the next page, as shown in Example 8-12, you can choose the Server Core components. Keep the default selection, 1,2,3. Press Enter to continue.
Example 8-12 Server Core Components
Server Core Components components:
Components with a number in () contain additional subcomponents
which you can select using subsequent screens.
1. Server Core Components
2. Core Java classes
3. Java Runtime Environment
Specify the components you wish to install [1, 2, 3]: 1,2,3
11.In the next page, as shown in Example 8-13 on page 414, you can choose the iPlanet Directory Suite components. Keep the default selection, 1,2. Press Enter to continue.
Chapter 8. WebSphere Portal: Sun Solaris 8.0 installation 413

Example 8-13 iPlanet Directory Suite Components
iPlanet Directory Suite components:
Components with a number in () contain additional subcomponents
which you can select using subsequent screens.
1. iPlanet Directory Server
2. iPlanet Directory Server Console
Specify the components you wish to install [1, 2]: 1,2
12.In the next page, as shown in Example 8-14, you can choose the Administration Servers components. Keep the default selection, 1,2. Press Enter to continue.
Example 8-14 Administration Servers components
Administration Services components:
Components with a number in () contain additional subcomponents
which you can select using subsequent screens.
1. iPlanet Administration Server
2. Administration Server Console
Specify the components you wish to install [1, 2]: 1,2
13.In the next page, you are asked for the computer’s fully qualified name. Keep the default, that is, sun2.itso.ral.ibm.com and then press Enter to continue.
14.In the next page, you will assign a user and group to represent the iPlanet server. For our example, we used root for both. Press Enter to continue.
15.In the next page, you are asked if you want to register this software. Since we use it temporarily, we chose the default, No. Press Enter to continue.
16.In the next page, you are asked if you want to use another directory to store your data. Keep the default, which is No. Press Enter to continue.
17.Next, you will define the Directory server network port. Keep the default, 389. Press Enter to continue.
18.Next, you will select the Directory server identifier. For our example, we kept the default, sun2. Press Enter to continue.
19.Next, you are asked for the ID and password for the iPlanet configuration server administrator. We used admin as the ID and used iplanet as the password. Then press Enter to continue.
20.Next, you will define the suffix for the root of the directory tree. As shown in Figure 8-28 on page 411, we enter the suffix o=itso.ral.ibm.com. Press Enter to continue.
414 IBM WebSphere Portal for Multiplatforms V5 Handbook

21.Next, you are asked the Directory Manager’s user ID and password. Keep the default name as cn=Directory manager, and type in the password, ral1eigh. Press Enter to continue.
22.Next, you are asked for the administration domain. Keep the default, which is itso.ral.ibm.com. Press Enter to continue.
23.Next, you are asked to install the sample entries. Keep the default as No, then press Enter to continue.
24.Then you are asked to populate the newly created directory. We did not; just press Enter to continue.
25.Next, you are asked if you need to disable the schema checking. Accept the the default, No. Press Enter to continue.
26.Next, you are asked the administration port number. Keep the default, that is, 5966. Press Enter to continue.
27.Next, you are asked to bind the Administration Server to a specific IP address. Accept the default and press Enter to continue.
28.Then, you are asked to run the Administration Server as root. Keep the default and press Enter to continue.
29.The installation program starts to extract the file and perform the installation. A URL as shown here will be displayed:
http://sun2.itso.ral.ibm.com, port 5966 ready to accept requests
Remember the port number, identified in our example as 5966. Press Enter to continue.
30.Finally, you are asked to go to ./usr/iplanet/servers and type startconsole to begin managing the servers.
8.7.5 Configuring the LDAP structureAfter installing the Sun ONE Directory Server, we must configure the LDAP suffix tree as defined in Figure 8-28 on page 411.
Complete the following steps:
1. Log in as root on machine 2.
Important: You must remember the port number. Otherwise, if you start the admin console later and you have forgotten the port number, you might not be able to enter the admin console. The startup program does not help you to remember the port as it does in the Windows 2000 environment.
Chapter 8. WebSphere Portal: Sun Solaris 8.0 installation 415

2. Change the working directory to the /usr/iplanet/server.
# cd /usr/iplanet/server
3. Start the console with the command startconsole.
# ./startconsole
4. The iPlanet Console Login, shown in Figure 8-29, will prompt for the user ID and password.
Figure 8-29 Iplanet Console Login
We used cn=Directory Manager as the user ID and typed in the password ral1eigh.
5. Click OK to start the admin console.
6. The iPlanet Console appears as shown in Figure 8-30 on page 417.
Note: In the administration URL, you must check that the port number is correct. If the port number is not correct, the admin console will not start.
416 IBM WebSphere Portal for Multiplatforms V5 Handbook

Figure 8-30 iPlanet Console
7. Click the Users and Groups tab, and you will see a window as shown in Figure 8-31 on page 418.
Chapter 8. WebSphere Portal: Sun Solaris 8.0 installation 417

Figure 8-31 iPlanet Console, Users and Groups
8. Click Create -> User as shown in Figure 8-32.
Figure 8-32 Select create the User in the LDAP
9. Then, click People -> OK (Figure 8-33 on page 419).
418 IBM WebSphere Portal for Multiplatforms V5 Handbook

Figure 8-33 Select organizational unit window
10.In the Create user window, fill out the information as shown in Figure 8-34; the password is wpsadmin. Click OK.
Figure 8-34 Fill in the user information for wpsadmin
Chapter 8. WebSphere Portal: Sun Solaris 8.0 installation 419

11.Perform the same step as above to create the user wpsbind as shown in Figure 8-35; here we use the wpsbind as the password.
Figure 8-35 Fill in user information for the wpsbind
12.In the Selection Organization Unit window (Figure 8-36 on page 421), select Groups and click OK.
420 IBM WebSphere Portal for Multiplatforms V5 Handbook

Figure 8-36 Select for create a group in LDAP
13.In the Create Group window, as shown in Figure 8-37, type in the group name wpsadmins.
Figure 8-37 Input group name
14.Click members in the left panel as shown in Figure 8-38 on page 422.
Chapter 8. WebSphere Portal: Sun Solaris 8.0 installation 421

Figure 8-38 Create group, member
15.Click Add (Figure 8-38).
16.In Figure 8-39 on page 423, type in wpsadmin as the search keyword and click Search.
422 IBM WebSphere Portal for Multiplatforms V5 Handbook

Figure 8-39 Search the user for the group
17.In the window shown in Figure 8-40, click OK.
Figure 8-40 Select the user for the group
Chapter 8. WebSphere Portal: Sun Solaris 8.0 installation 423

18.At the Create Group window, the member is shown (Figure 8-41 on page 424).
Figure 8-41 Group member selected
19.Click OK in the window shown in Figure 8-41. You will see a window as shown in Figure 8-42 on page 425.
424 IBM WebSphere Portal for Multiplatforms V5 Handbook

Figure 8-42 iPlanet console again
20.Click Servers and Applications and you will be back in the iPlanet Console Directory Server page, shown in Figure 8-30 on page 417.
21.On the left pane, expand the tree from itso.ral.ibm.com -> sun2.itso.ibm.com -> Server Group and click Directory Server (sun2) as shown in Figure 8-43 on page 426.
Chapter 8. WebSphere Portal: Sun Solaris 8.0 installation 425

Figure 8-43 Select the Directory Server (sun2)
22.In the right panel, click Open; the admin console for the Directory Server displays (see Figure 8-44 on page 427).
426 IBM WebSphere Portal for Multiplatforms V5 Handbook

Figure 8-44 Admin Console for the Directory Server
23.Click Restart Directory Server. Click OK to restart the Directory Server and continue.
24.When Directory Server has restarted, click OK to continue.
25.Close the admin console.
8.7.6 Verifying the installation and configurationAs Netscape Communicator does not support the LDAP protocol, we will use the command ldapsearch to perform the verification. Perform the following steps:
1. Log in as the root user.
2. Change the working directory.
# cd /usr/iplanet/servers/shared/bin #
Chapter 8. WebSphere Portal: Sun Solaris 8.0 installation 427

3. Use the following command to check the user wpsadmin,
# ./ldapsearch -b "o=itso.ral.ibm.com" "uid=wpsadmin"
Example 8-15 Result from executing ldapsearch
version: 1
dn: uid=wpsadmin,ou=People, o=itso.ral.ibm.com
uid: wpsadmin
givenName: wps
objectClass: top
objectClass: person
objectClass: organizationalPerson
objectClass: inetorgperson
sn: admin
cn: wps admin
4. Use the following command to check the user wpsbind,
# ./ldapsearch -b "o=itso.ral.ibm.com" "uid=wpsbind"
Example 8-16 Result from executing ldapsearch
version: 1
dn: uid=wpsbind,ou=People, o=itso.ral.ibm.com
uid: wpsbind
givenName: wps
objectClass: top
objectClass: person
objectClass: organizationalPerson
objectClass: inetorgperson
sn: bind
cn: wps bind
5. Use the following command to check the group wpsadmins,
# ldapsearch -b "o=itso.ral.ibm.com" "cn=wpsadmins"
428 IBM WebSphere Portal for Multiplatforms V5 Handbook

Example 8-17 Result from executing ldapsearch
version: 1
dn: cn=wpsadmins,ou=Groups, o=itso.ral.ibm.com
objectClass: top
objectClass: groupofuniquenames
uniqueMember: uid=wpsadmin,ou=People, o=itso.ral.ibm.com
cn: wpsadmins
6. For now, the verification work is finished.
The installation and the configuration of the LDAP for the Sun ONE Directory Server is finished. We will continue our work to install the remote Web server on machine 1.
8.8 Sun ONE Web Server and WebSphere Application Server plugin install
At this time, we have installed Sun ONE in machine 1 as a remote Web server for WebSphere Portal. The Web server communicates with WebSphere Application Server and WebSphere Portal via the plugin of the WebSphere Application Server. In this section, we describe the steps to install and configure those.
8.8.1 Pre-installation steps Complete the following steps before starting the installation program:
1. Ensure the server Hostname and IP address are configured. In our environment:
Hostname: sun1
IP address_2: 9.24.105.46 (sun1.itso.ral.ibm.com)
2. Ensure that port 80 is not used.
# netstat -an |grep 80
There should be no items using port 80.
3. Create a UNIX group and a user account:
# groupadd iplanet# useradd -g iplanet -d /usr/iplanet -m -s /usr/bin/ksh iplanet# passwd iplanet
Enter the password we defined, iplanet.
Chapter 8. WebSphere Portal: Sun Solaris 8.0 installation 429

4. Acquire the installation images and prepare for the installation.
We acquired the following package from the Internet:
enterprise-6[1].0SP6-domestic-us.sparc-sun-solaris2.6.tar
Then we performed the following steps:
a. Log in as root on machine 1.
b. Make a directory called /export/home/sunone.
c. Change to /export/home/sunone
# cd /export/home/sunone
d. Copy the package to this directory.
e. Make a subdirectory called 2.8.
# mkdir 2.8# cd 2.8
f. Run the command:
# tar xvf ../enterprise-6[1].0SP6-domestic-us.sparc-sun-solaris2.6.tar
5. The installation files will be unpacked and ready for installation.
8.8.2 Installing the Sun ONE Web ServerTo install the Sun ONE Web Server, do the following:
1. Log in as root and change the current working directory:
# cd /export/home/sunone/2.8
2. Start the installation program,
# ./setup iPlanet Web Server Installation/Uninstallation
The Welcome page is displayed. You are asked if you need to continue the installation, type Yes to continue.
3. The License Agreement is displayed in the next window. Type Yes to continue.
4. In the next page, you are asked the installation type. Type 3 for the custom installation.
5. In the next page, you are asked for the installation location. Accept the default location (/usr/iplanet/servers) and press Enter to continue.
6. Select All components and press Enter to continue.
7. In the Choose user/group page, use root as the system user and group. Then press Enter to continue.
430 IBM WebSphere Portal for Multiplatforms V5 Handbook

8. In the iWS Admin Server User Name page, accept the default name admin. Press Enter to continue.
9. Type in the password. For our example, we used iplanet as a password. Press Enter to start the installation.
10.The installation process starts; it extracts the files and performs the installation.
11.You are notified when the installation is successful. It suggested that you could go to the /usr/iplanet/servers to start the command startconsole for managing the server. Press Enter to finish.
8.8.3 Starting and verifying the installation of the Sun ONE Web Server
After successfully installing the Web server, you can follow these steps to start and verify the installation
1. Log in as root and change the working directory to /usr/iplanet/servers.
2. Run the following command to start the console:
# ./startconsole
3. You will see a window to log in the admin console, as shown in Figure 8-45.
Figure 8-45 Login to the Sun ONE admin console
4. Type in the user name (admin) and the password (iplanet), then click OK to continue.
Chapter 8. WebSphere Portal: Sun Solaris 8.0 installation 431

Figure 8-46 Sun ONE Web Server adminconsole started
5. The Sun ONE Web Server admin console appears (Figure 8-46), click Manage to continue.
6. In the next window, shown in Figure 8-47 on page 433, the Web server is off. Click Server On to start the server.
432 IBM WebSphere Portal for Multiplatforms V5 Handbook

Figure 8-47 Preference tab window
7. A security warning will appear. Click Continue.
8. You should see an indication that the startup was successful. Click OK to continue.
9. The Web server should now be on.
10.Use a browser, for example Netscape to access the Web page at, http://sun1.itso.ral.ibm.com and see it work.
8.8.4 Installing the WebSphere Application Server plugin for iPlanetIn order to communicate with the WebSphere Application Server, the Web server needs to install a plugin. The install image of the plugin is on CD 1-4 of WebSphere Application Server 5.0.
We use the following steps to install the plugin:
1. Log in as root on machine 1.
Chapter 8. WebSphere Portal: Sun Solaris 8.0 installation 433

2. Change the working directory:
# cd /usr/iplanet/servers
3. Start the admin console
# ./startconsole
4. Enter the user name and the password, as shown in Figure 8-45 on page 431.
5. Click Manage.
6. From the console, click Server Off to turn off the Web server.
7. Change the working directory for the installation images:
# cd /wpsdisk/1-4/was/sun/WAS50
8. Run the following command to start:
# ./LaunchPad.sh
9. You are asked for the language to be used during the installation. Select English and then click OK to continue.
10.The WebSphere Application Server LaunchPad appears. Click Install the product to continue.
11.Once again, you are asked for the language to use for the installation wizard. Select English and click OK to continue.
12.The Welcome page of the Installation Wizard appears. Click Next to continue.
13.At the Software License Agreement page, click I accept the terms in the license agreement, and click Next to continue.
14.In next window, you are asked for the Setup type. Because it is necessary to install the plugin, click Custom. Click Next to continue.
15.In the next window, shown in Figure 8-48 on page 435, deselect everything except IBM Server Plugins and iPlanet(TM) Web Server, then click Next to continue.
Important: Your system may experience a slow response time. You may need to wait a while for the installation wizard to appear. If you continue to click Install the Product several times, you may launch many installation wizard windows.
434 IBM WebSphere Portal for Multiplatforms V5 Handbook

Figure 8-48 Plug-in installation selection
16.The installation wizard will ask for the installation location. Keep the default directory /opt/WebSphere/AppServer as the install location. Click Next to continue.
17.In the next page, you are asked for the iPlanet Web Server configuration file (obj.conf). Type in or use the browser to find the location /usr/iplanet/servers/https-sun1.itso.ral.ibm.com/config/obj.conf. Click Next to continue.
18.The summary is displayed. Review it and click Next to continue.
19.The installation starts. Before the installation completes, your are asked to register the software. Because we are only using it for our test environment, we click Next to continue.
20.Once the software has installed successfully, click Finish to exit the installation.
21.Click Exit.
Chapter 8. WebSphere Portal: Sun Solaris 8.0 installation 435

22.Then change the working directory:
# cd /usr/iplanet/servers
23.Start the admin console and then start the Web server. as shown in 8.8.3, “Starting and verifying the installation of the Sun ONE Web Server” on page 431.
8.8.5 Installing WebSphere Application Server Fix Pack 1 on machine 1
We need to install WebSphere Application Server Fix Pack 1 on machine 1 after installing the plugin.
The plugin was only installed on machine 1, so we cannot follow the general steps to apply the Fix Pack 1.
Complete the following steps:
1. Download the updated installer named sunUpdateInstaller.zip from the following Web site:
http://www-1.ibm.com/support/docview.wss?rs=180&context=SSEQTP&q=updateInstaller&uid=swg24001908&loc=en_US&cs=utf-8&lang=en+en
Copy the file to the /tmp directory.
2. Access the following Web site:
http://www-1.ibm.com/support/docview.wss?rs=180&context=SSEQTP&q=&uid=swg24004576&loc=en_US&cs=utf-8&lang=en
then click Solaris Base to download Fix Pack 1, named was50_fp1_solaris.zip.
Copy the file to the /tmp directory.
3. Change the working directory.
# cd /opt/WebSphere/AppServer
4. Make a new directory.
# mkdir update
5. Copy the file we downloaded previously to the new directory.
# cd update# cp /tmp/was50_fp1_solaris.zip # cp /tmp/sunUpdateInstaller.zip
6. Unpack the Fix Pack package first.
# unzip was50_fp1_solaris.zip
436 IBM WebSphere Portal for Multiplatforms V5 Handbook

7. Unpack the new installer.
# unzip sunUpdateInstaller.zip
8. Run the following commands to install the Fix Pack:
# ./updateSilent.sh -fixpack \> -installDir "/opt/WebSphere/AppServer" \> -skipIHS \> -skipMQ \> -fixpackDir "/opt/WebSphere/AppServer/update/fixpacks" \> -install \> -fixpackID was50_fp1_solaris
It will start to install until the following message appears:
Task 16 out of 16; Begin Completing fix pack 'was50_fp1_solaris'Fix pack installation completed successfully.End of [ ./updateSilent.sh ]
9. We can continue to install the interim fix which needs to be installed manually from CD 1-7.
8.8.6 Installing WebSphere Application Server manual install interim fix on machine 1
The interim fix in CD 1-7 must be installed manually. Perform the following steps to install this interim fix:
1. Log in as root account on machine 1
2. Change the working directory.
# cd /opt/WebSphere/AppServer/update
3. Make another directory called efix.
# mkdir efix
# cd efix
4. Copy the manual interim fixes from CD-7.
cp /wpsdisk/1-7/manualfixes/solaris/*
Important: At the time of the writing this redbook, there was a problem installing Fix Pack 5.0.1 to a Solaris machine, where it only installed the plugin and used the Sun ONE Web Server. You can refer to the Web link http://www-1.ibm.com/support/docview.wss?rs=180&context=SSEQTP&q=PQ75169&uid=swg1PQ75169&loc=en_US&cs=utf-8&lang=en for more detailed information.
Chapter 8. WebSphere Portal: Sun Solaris 8.0 installation 437

5. Make a subdirectory.
# mkdir installer # cd installer
6. Unpack the installer program.
# unzip ../sunUpdateInstall.zip
7. Start the installer program.
# ./updateWizard.sh
8. Select the default, English. Click OK to continue.
9. The installation Welcome page is displayed. Click Next to continue.
10.The WebSphere version is detected. Click Next to continue. You will see a window as shown in Figure 8-49.
11.Select Install fixes. Click Next to continue.
Figure 8-49 Select apply the interim fix
12.In the next window, you are asked for the fix directory. Input the directory as /opt/WebSphere/AppServer/update/efix. Click Next to continue.
13.In the next window, you are asked which interim fix is to be installed. Because we only have the plugin in this machine, click WAS_Plugin_07-01-2003_5.X_cumulative_fix_Sun. Click Next to continue.
438 IBM WebSphere Portal for Multiplatforms V5 Handbook

14.The next window will display the interim fix to be applied. Click Next to start the installation.
15.Click Finish to exit.
8.8.7 Adding an alias to the virtual host and regenerating the plugin file
In this section, you will add the alias to the virtual host and regenerate the plugin file on machine 2. We need to add the IP name of the Web server as the alias to the virtual host of the WebSphere Application Server.
Complete the following steps to add the aliases and regenerate the plugin of the WebSphere Application Server:
1. On machine 2 where the WebSphere Application Server is installed, log in as root.
2. Change the working directory.
# cd /opt/WebSphere/Application/bin
3. Check the Application Server’s status by executing the following command:
# ./serverStatus.sh -all
4. If server1 is in the START status, continue to the next step. Otherwise, run the following command to start server1:
# ./startServer.sh server1
5. Use your Netscape browser to access the following URL:
http://9.24.105.47:9090/admin
The WebSphere Admin Console Welcome page appears. Click OK to enter the console. In the left pane, click Environment -> Virtual Hosts and then click default_host as shown in Figure 8-50 on page 440.
Chapter 8. WebSphere Portal: Sun Solaris 8.0 installation 439

Figure 8-50 Find the virtual host for the application server
440 IBM WebSphere Portal for Multiplatforms V5 Handbook

Figure 8-51 Host Alias from the Additional Properties
6. In the Additional Properties section of the default_host, click Host Aliases (Figure 8-51).
7. Click New to create a new host alias as shown in Figure 8-52 on page 442.
Chapter 8. WebSphere Portal: Sun Solaris 8.0 installation 441

Figure 8-52 Create new host alias
442 IBM WebSphere Portal for Multiplatforms V5 Handbook

Figure 8-53 General properties of the host alias
8. In the General Properties page of the host alias, fill in the host name sun1.itso.ibm.com and the port number 80 for the Web server as shown in Figure 8-53. Click OK.
9. You can see the new host alias appear in the list (see Figure 8-54 on page 444).
Chapter 8. WebSphere Portal: Sun Solaris 8.0 installation 443
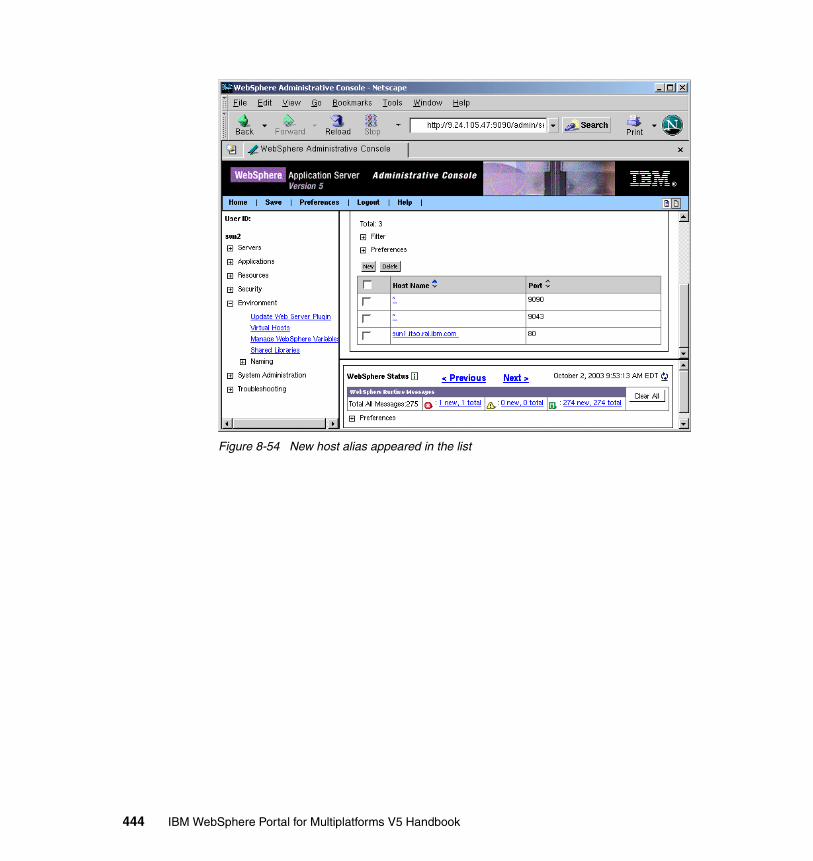
Figure 8-54 New host alias appeared in the list
444 IBM WebSphere Portal for Multiplatforms V5 Handbook

Figure 8-55 Update the Web server plugin configuration
10.From the left pane of the admin console, click Environment -> Update Web Server Plugin. You will see a window as shown in Figure 8-55.
11.Click OK. You will see a window as shown in Figure 8-56 on page 446. The Web server plugin configuration was upgraded successfully.
Chapter 8. WebSphere Portal: Sun Solaris 8.0 installation 445

Figure 8-56 Plugin is updated successfully
12.Click Save in the menu.
8.8.8 Copying the plugin configuration file to the Web serverThe configuration file regenerated on the WebSphere Application Server needs to be copied to the remote Web server manually. Because the application server and the plugin use the same installation location, for example, /opt/WebSphere/AppServer, we just copy it and do not need to modify it.
Complete the following steps:
1. Log in as root in machine 2.
2. Change the working directory.
# cd /opt/WebSphere/AppServer/config/cells
Note: You can also use wsadmin for this. You can refer to E.5.3, “Adding the alias to the virtual host using the wsadmin command” on page 731 and E.5.4, “Regenerating the plugin using the wsadmin command” on page 731 for details.
446 IBM WebSphere Portal for Multiplatforms V5 Handbook
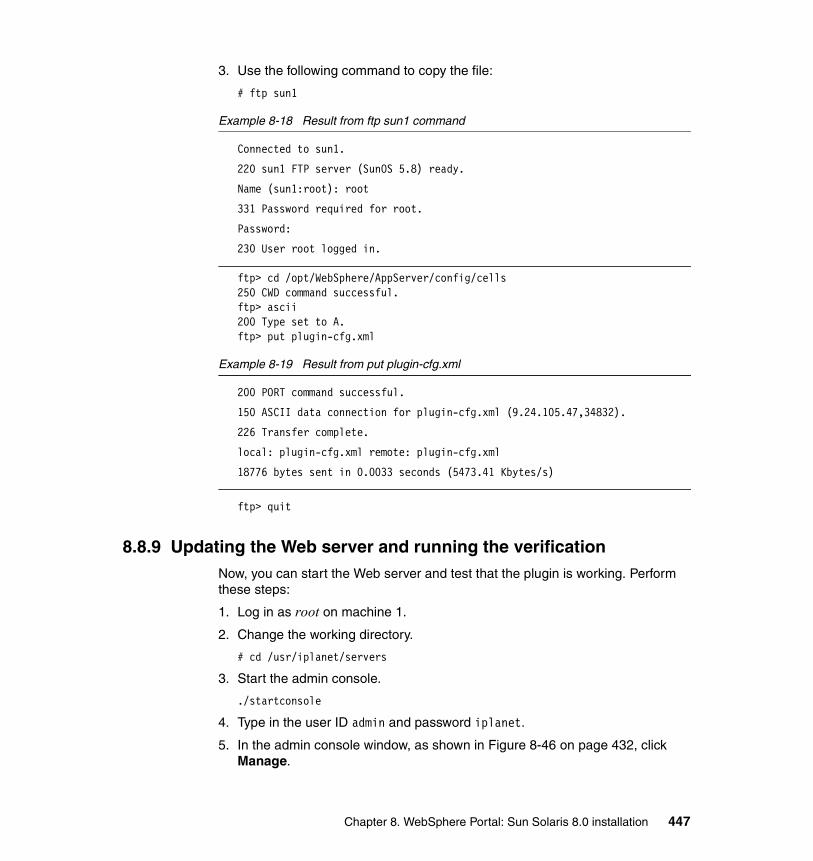
3. Use the following command to copy the file:
# ftp sun1
Example 8-18 Result from ftp sun1 command
Connected to sun1.
220 sun1 FTP server (SunOS 5.8) ready.
Name (sun1:root): root
331 Password required for root.
Password:
230 User root logged in.
ftp> cd /opt/WebSphere/AppServer/config/cells250 CWD command successful.ftp> ascii200 Type set to A.ftp> put plugin-cfg.xml
Example 8-19 Result from put plugin-cfg.xml
200 PORT command successful.
150 ASCII data connection for plugin-cfg.xml (9.24.105.47,34832).
226 Transfer complete.
local: plugin-cfg.xml remote: plugin-cfg.xml
18776 bytes sent in 0.0033 seconds (5473.41 Kbytes/s)
ftp> quit
8.8.9 Updating the Web server and running the verificationNow, you can start the Web server and test that the plugin is working. Perform these steps:
1. Log in as root on machine 1.
2. Change the working directory.
# cd /usr/iplanet/servers
3. Start the admin console.
./startconsole
4. Type in the user ID admin and password iplanet.
5. In the admin console window, as shown in Figure 8-46 on page 432, click Manage.
Chapter 8. WebSphere Portal: Sun Solaris 8.0 installation 447

6. A warning is displayed (Figure 8-57). Click OK.
Figure 8-57 Warning to update the Web server
7. In the admin console window (as shown in Figure 8-58), click Apply in the upper-right corner.
Figure 8-58 Click the Apply for the Web server configuration update
8. In the next window (Figure 8-59 on page 449), click Apply Changes.
448 IBM WebSphere Portal for Multiplatforms V5 Handbook

Figure 8-59 Click Apply Change
9. The update is successful. Click OK to continue.
10.Now the Web Server is on. From your Netscape browser, type in the following URL: http://sun1.itso.ral.ibm.com/snoop. Your result should look as shown in Figure 8-60 on page 450.
Chapter 8. WebSphere Portal: Sun Solaris 8.0 installation 449

Figure 8-60 Test the result after regenerated the plugin
Now the installation and configuration for the remote Web server have been satisfied. We can access the application running on WebSphere Application Server on machine 2 by accessing the Web server on machine 1. Our next task is to configure WebSphere Portal to migrate the database, and to enable security.
8.9 WebSphere Portal configurationIn WebSphere Portal V5.0, a new tool is available for the configuration, called WPSconfig.sh. Based on this tool, there are many tasks that can be performed. In this section, we will use this tool to perform some basic configuration tasks, for example:
� Transfer the database from Cloudscape to Oracle
� Enable the security for WebSphere Portal
� Configure WebSphere Portal to connect to the remote Web server
450 IBM WebSphere Portal for Multiplatforms V5 Handbook

8.9.1 Configuring WebSphere Portal for Oracle During the installation of WebSphere Portal, the default database Cloudscape is installed. This database, by default, stores the information needed by WebSphere Portal. But, in general, this database is for testing and development, not for the runtime environment. So, in order to build a runtime environment or a cluster environment, you must transfer this database to another relational database. In our scenarios, we used Oracle.
The database transfer could be divided into the following steps:
1. Check whether WebSphere Portal is actually using Cloudscape (optional)
2. Export the configuration information
3. Change the configuration setup and the parameters
4. Import the data based on the modified configuration information
5. Verify that WebSphere Portal accesses the Oracle database (optional)
Checking whether WebSphere Portal uses Cloudscape (optional)
WebSphere Portal information is stored in Oracle, not in Cloudscape, after the transfer. Let’s verify that Cloudscape is available prior to initiating the transfer, by performing the following steps:
1. Start a Web browser and use the following URL:
http://sun2.itso.ral.ibm.com:9090/admin
2. In the WebSphere admin console, click Resources -> JDBC Providers on the left pane. You should see two JDBC Providers created by the Portal install program (Figure 8-61 on page 452). These JDBC drivers are used to connect to the database using WebSphere Portal.
Chapter 8. WebSphere Portal: Sun Solaris 8.0 installation 451

Figure 8-61 Find the JDBC Providers
3. In order to check which database is being accessed, you can check the JDBC provider to see which JDBC driver is used. For example, click WPCP50JDBC.
4. A window as shown in Figure 8-62 on page 453 will display the detailed information of the JDBC Provider, wpcp50jdbc. In the field of Classpath, you can see that the JDBC driver classes path is pointed to the Cloudscape directory.
452 IBM WebSphere Portal for Multiplatforms V5 Handbook

Figure 8-62 Classpath for the JDBC provider wpcp50jdbc to database Cloudscape
5. Scroll down; you can see the window shown in Figure 8-63 on page 454 which shows the JDBC implementation classes that are used. This is the Cloudscape JDBC driver.
Chapter 8. WebSphere Portal: Sun Solaris 8.0 installation 453

Figure 8-63 JDBC driver classpath to Cloudscape
6. You can use the same method to check the access for the JDBC Provider WPS50JDBC.
7. Click Logout in the menu of the WebSphere Application Server to exit the admin console.
Exporting the configuration The first step of the transfer is to export the configuration from the Cloudscape database to a file which will be used to import the configuration information to the Oracle database.
Perform the following steps:
1. Log in as root on machine 2.
2. Change the current working directory.
# cd /opt/WebSphere/Portal/config
454 IBM WebSphere Portal for Multiplatforms V5 Handbook

3. Start the following command for the export.
# ./WPSconfig.sh database-transfer-export
Changing the configurationAfter the configuration data is exported, we can modify the configuration file for WebSphere Portal, named wpconfig.properties. Perform the following steps:
1. Log in as root on machine 2.
2. Change the current working directory.
# cd /opt/WebSphere/PortalServer/config
3. Use an editor, such as vi, to edit the file named wpconfig.properties and modify the parameters listed in Table 8-8. After modifying, save and exit.
Table 8-8 Modify the parameter for the database transfer
Note: At this point, please be patient. It may take more than 30 minutes for the export to finish.
Note: It is strongly recommended that you make a copy of the file wpconfig.properties before you begin to modify it.
Section Parameters Value we used
Database properties
DbSafeMode false
DbType oracle
WpsDbName wps50
DbDriver oracle.jdbc.driver.OracleDriver
DbDriverDs oracle.jdbc.pool.OracleConnectionPoolDataSource
DbUrl jdbc:oracle:thin:@machine3.itso.ora.ibm.com:1521:wps50
DbUser wpsdbusr
DbPassword wpsdbusr
DbLibrary /opt/oracle/u01/app/oracle/product/9.2.0.1/jdbc/lib/classes12.zip
WpsDsName wps50DS
Chapter 8. WebSphere Portal: Sun Solaris 8.0 installation 455

Importing the configurationAfter correctly modifying the parameters, we can import the data to the Oracle database based on the files exported from Cloudscape and the configuration file we just modified. Complete the following steps:
1. Log in as root on machine 2.
2. Change the working directory.
# cd /opt/WebSphere/PortalServer/config
3. Run the following command:
# ./WPSconfig.sh database-transfer-import
The transfer will be started and will run for a very long time. The end result will look as shown in Example 8-20 on page 457.
WebSphere Portal content publishing database properties
WpcpDbName wpcp50
WpcpDbUser wcmdbadm
WpcpDbPassword wcmdbadm
WpcpDbUrl jdbc:oracle:thin:@machine3.itso.ora.ibm.com:1521:wpcp50
WpcpDbEjbPassword ejb
WpcpDbPznadminPassword
pznadmin
FeedbackDbName fdbk50
FeedbackDbUser feedback
FeedbackDbPassword feedback
FeedbackDbUrl jdbc:oracle:thin:@machine3.itso.ora.ibm.com:1521:fdbk50
Member manager properties
WmmDsName wmmDS
WmmDbName wps50
WmmDbUsr wmmdbusr
WmmDbPassword wmmdbusr
WmmDbUrl jdbc:0racle:thin:@machine3.itso.ora.ibm.com:1521:wps50
Section Parameters Value we used
456 IBM WebSphere Portal for Multiplatforms V5 Handbook

Example 8-20 Result of the ./WPSconfig.sh command
action-finalize-config:action-propogate-properties:BUILD SUCCESSFULTotal time: 89 minutes 12 seconds
4. After the task finishes successfully, start WebSphere Portal using the following command which is located in /opt/WebSphere/AppServer/bin:
# startServer.sh WebSphere_Portal
5. After WebSphere Portal is started, use the URL http://sun2.itso.ral.ibm.com/wps/portal to start the WebSphere Portal Welcome window from the Web browser. After login, you will see the Portal application, as shown in Figure 8-64 on page 458.
Note: The success of running the ./WPSconfig.sh command depends on the accuracy of the steps performed prior to this step. If an error is present, this command can run successfully. If you encounter an error, check the log named ConfigTrace.log located in /opt/WebSphere/PortalServer/log for detailed information. You can correct the error(s) and re-start the command.
Chapter 8. WebSphere Portal: Sun Solaris 8.0 installation 457

Figure 8-64 Portal after the database transfer import
Verifying that WebSphere Portal accesses the Oracle database (optional)
WebSphere Portal accesses the database via the datasource defined in the WebSphere Application Server. You can use the following method to check whether the access has been changed to Oracle.
1. Start a Web browser using the following URL:
http://sun2.itso.ral.ibm.com:9090/admin
2. In the WebSphere Application Server admin console, click Resources -> JDBC Providers on the left pane. You will see two JDBC Providers created by the WebSphere Portal install program as shown in Figure 8-61 on page 452. These JDBC drivers are used by WebSphere Portal to connect to the database.
3. In order to check that the connection is changed from Cloudscape to the Oracle, check the JDBC Provider to see which JDBC driver it is using. Click WPCP50JDBC.
458 IBM WebSphere Portal for Multiplatforms V5 Handbook

4. A window (as shown in Figure 8-65) displays the detailed information of the JDBC Provider wpcp50jdbc. In the field of the ClassPath, you can see that the JDBC driver class path is pointed to Oracle’s directory.
Figure 8-65 JDBC Provider wpcp50
5. Scroll down; you will see a window as shown in Figure 8-66 on page 460 which shows the JDBC implementation classes that are used. This is the Oracle JDBC driver.
Chapter 8. WebSphere Portal: Sun Solaris 8.0 installation 459

Figure 8-66 Check the JDBC implementation classes for the wpcp50 jdbc provider
6. You can use the same method to check the WPS50JDBC.
7. Click Logout in the admin console menu to exit.
8.9.2 Configuring WebSphere Portal for Sun ONE Directory Server
In our scenarios, we used the Sun ONE Directory Server as our LDAP server. In WebSphere Application Server V5.0, you must configure the authentication method before enabling security. Therefore, we need to perform the configuration for the LDAP and then enable security.
The configuration information is defined in the WebSphere Portal configuration file. Perform the following steps to modify this configuration file:
1. Log in as root on machine 2.
2. Change the working directory.
# cd /opt/WebSphere/PortalServer/config
3. Use an editor, such as vi, to modify the parameters shown in Table 8-9 on page 461. After the modification is complete, save the file and exit.
460 IBM WebSphere Portal for Multiplatforms V5 Handbook

Table 8-9 Modify the properties for Sun ONE Directory Server
Section Property Value we used
WebSphere Application Server properties
WasUserId uid=wpsbind,ou=People,o=itso.ral.ibm.com
WasPassword wpsbind
PortalAdminId uid=wpsadmin,ou=People,o=itso.ral.ibm.com
PortalAdminIdShort wpsadmin
PortalAdminPwd wpsadmin
PortalAdminGroupId uid=wpsadmins,ou=Groups,o=itso.ral.ibm.com
PortalAdminGroupIdShort wpsadmins
WebSphere Portal Security LTPA and SSO configuration
SSODomainName itso.ral.ibm.com
LTPAPassword wpsbind
LTPATimeout 120
LDAP properties configurations
LookAside false
LDAPHostName sun2.itso.ral.ibm.com
LDAPPort 389
LDAPAdminUid cn=Directory Manager
LDAPAdminPwd ral1eigh
LDAPServerType IPLANET
LDAPBindID uid=wpsbind,ou=People,o=itso.ral.ibm.com
LDAPBindPassword wpsbind
Chapter 8. WebSphere Portal: Sun Solaris 8.0 installation 461

Running the configuration taskComplete the following steps to run the configuration task:
1. Log in as root on machine 2.
2. Change the working directory.
# cd /opt/WebSphere/PortalServer/config
3. Run the following command:
./WPSconfig.sh validate-ldap
Results should be as follows:
action-propogate-properties:BUILD SUCCESSFULTotal time: 10 seconds
Checking the result and correcting any errorsIf there is an error and the configuration task cannot finish successfully, you should check the log, ConfigTrace.log. which is located in /opt/WebSphere/PortalServer/log. You can correct the error and then run the configuration task again until you are successful.
8.9.3 Enabling security Now that we have configured the LDAP, we can enable security for the WebSphere Application Server and Portal.
Advanced LDAP configuration
LDAPSuffix o=itao.ral.ibm.com
LDAPUserPrefix uid
LDAPUserSuffix ou=People
LDAPGroupPrefix cn
LDAPGroupSuffix ou=Group
LDAPUserObjectClass inetOrgPerson
LDAPGroupObjectClass groupOfUniqueNames
LDAPGroupMember uniqueMember
LDAPsslEnabled false
Section Property Value we used
462 IBM WebSphere Portal for Multiplatforms V5 Handbook

Perform the following steps:
1. Log in as root on machine 2.
2. Change the working directory.
# cd /opt/WebSphere/PortalServer/config
3. Run the following command to enable security:
# ./WPSconfig.sh enable-security-ldap
Results should be as follows:
action-finalize-config:action-propogate-properties:BUILD SUCCESSFULTotal time: 10 minutes 3 seconds
Again, if there is an error and the configuration task does not finish successfully, you can check the log, ConfigTrace.log located in /opt/WebSphere/PortalServer/log. You can correct the error and then run the configuration task again until it is successful.
4. Change the working directory to check the status of the application servers.
# cd /opt/WebSphere/AppServer/bin# ./serverStatus.sh -all
You will find the status of WebSphere Portal cannot be displayed because it requires a password; run the following command.
# ./serverStatus.sh -all -username wpsbind -password wpsbind
This time, the two application servers are displayed and started.
5. Restart the application servers.
# ./stopServer.sh WebSphere_Portal -username wpsbind -password wpsbind # ./stopServer.sh server1 -username wpsbind -password wpsbind # ./startServer.sh server1 -username wpsbind -password wpsbind # ./startServer.sh WebSphere_Portal -username wpsbind -password wpsbind
6. Start a Web browser and access the admin console of the WebSphere Application by using the URL http://sun2.itso.ral.ibm.com:9090/admin/. This time, we need to key in the user ID and password to log in to the admin console of the WebSphere Application Server (Figure 8-67 on page 464). We used wpsbind as the user ID and password to log in.
Chapter 8. WebSphere Portal: Sun Solaris 8.0 installation 463

Figure 8-67 Login to the WebSphere Application Server with ID/Password
7. Also, you can use the URL http://sun2.itso.ral.ibm.com:9081/wps/portal to test. The Welcome page of WebSphere Portal will be displayed.
8.9.4 Configuring WebSphere Portal Server for Sun ONE Web Server In our multi-tier environment, the Web server and WebSphere Portal are located on different machines. Therefore, we need to perform some configuration to support this environment.
Because we installed the WebSphere Application Server plugin component on the Web server (as shown in the 8.8.4, “Installing the WebSphere Application Server plugin for iPlanet” on page 433), we must now configure WebSphere Portal and WebSphere Application Server to connect to the Web server.
Basically, this task could be divided into the following parts:
1. Change the parameters in the configuration file
2. Run the configuration task
3. Regenerate the plugin configuration file
4. Copy the plugin configuration file to the remote machine
5. Run your verification
464 IBM WebSphere Portal for Multiplatforms V5 Handbook

Changing the parameters in the configuration filePerform the following steps:
1. Log in as root on machine 2.
2. Change the current working directory.
# cd /opt/WebSphere/PortalServer/config
3. Make a copy of the configuration file.
# cp wpconfig.properties wpconfig_properties.bak
4. Use one of the editors, such as vi, to modify the file named wpconfig.properties. Use the parameters shown in Table 8-10.
Table 8-10 Change the parameters for the remote Web server
4. After the modification is finished, save the file and exit.
Running the configuration task To run the configuration task, complete the following steps:
1. Log in as root.
2. Change the working directory.
# cd /opt/WebSphere/PortalServer/config
3. Run the following command:
# ./WPSconfig.sh httpserver-config
The command will start to run until the procedure is finished. Results should be as follows:
action-propogate-properties:BUILD SUCCESSFULTotal time: 3 minutes 7 seconds
Copying the plugin-cfg.xml file to machine 1Because the configuration task changed the plugin configuration, we need to copy the newly created plugin file to the Web server machine.
Section Property value we used
WebSphere Application Server properties
WpsHostName sun2.itso.ral.ibm.com
WpsHostPort 80
Note: The value of the WpsHostName must be a fully qualified name.
Chapter 8. WebSphere Portal: Sun Solaris 8.0 installation 465
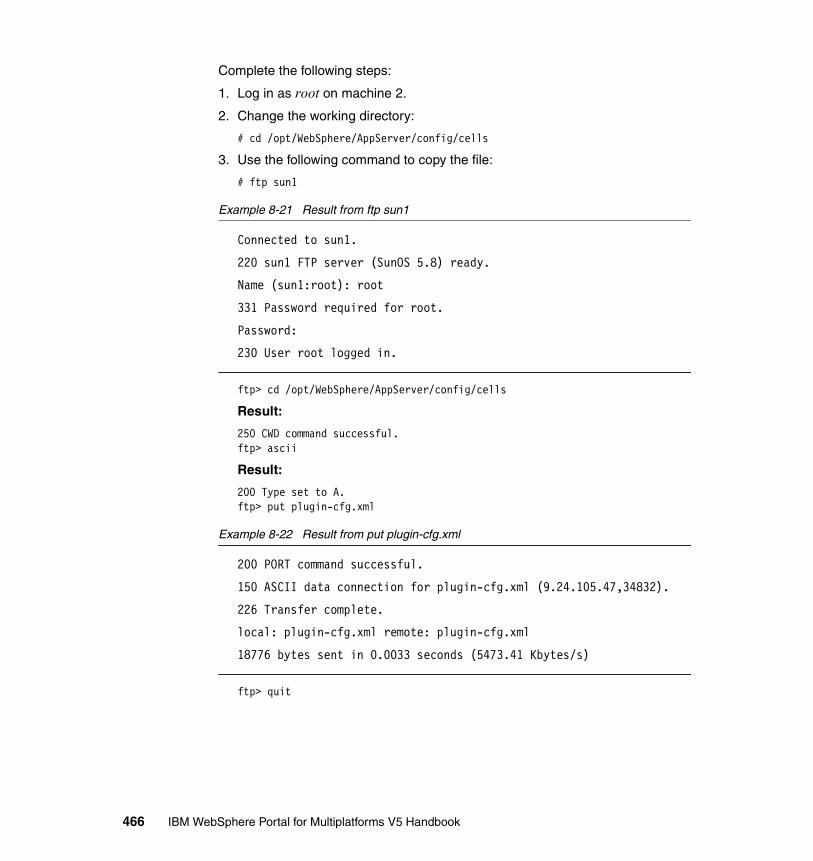
Complete the following steps:
1. Log in as root on machine 2.
2. Change the working directory:
# cd /opt/WebSphere/AppServer/config/cells
3. Use the following command to copy the file:
# ftp sun1
Example 8-21 Result from ftp sun1
Connected to sun1.
220 sun1 FTP server (SunOS 5.8) ready.
Name (sun1:root): root
331 Password required for root.
Password:
230 User root logged in.
ftp> cd /opt/WebSphere/AppServer/config/cells
Result:
250 CWD command successful.ftp> ascii
Result:
200 Type set to A.ftp> put plugin-cfg.xml
Example 8-22 Result from put plugin-cfg.xml
200 PORT command successful.
150 ASCII data connection for plugin-cfg.xml (9.24.105.47,34832).
226 Transfer complete.
local: plugin-cfg.xml remote: plugin-cfg.xml
18776 bytes sent in 0.0033 seconds (5473.41 Kbytes/s)
ftp> quit
466 IBM WebSphere Portal for Multiplatforms V5 Handbook

Verification In this section, we will verify our previous procedures. Use the following command to restart the application servers:
1. Log in as root on machine 1.
2. Change the working directory.
cd /usr/iplanet/servers
3. Use startconsole to start the Web server.
4. Log in as root on machine 2.
5. Change the working directory.
# cd /opt/WebSphere/AppServer/bin
6. Run these commands to stop the application server:
# ./stopServer.sh WebSphere_Portal# ./StopServer.sh server1
7. Run the following commands to start the application server:
# ./startServer.sh server1# ./startSever.sh WebSphere_Portal
Now, you can open a browser and enter the following URL to access the Web server to access the Portal application (Figure 8-68 on page 468):
http://sun1.itso.ral.ibm.com/wps/portal
Chapter 8. WebSphere Portal: Sun Solaris 8.0 installation 467

Figure 8-68 Access Portal from the Web server
8.9.5 Deleting passwords in the configuration file (optional) After the configuration, you can remove all passwords from the wpconfig.properties file. To do so, perform the following steps:
1. Log in as root on machine 2.
2. Change the working directory.
# cd /opt/WebSphere/PortalServer/config
3. Execute the following command:
# ./WPSconfig.sh. delete-passwords
468 IBM WebSphere Portal for Multiplatforms V5 Handbook

8.10 Verifying WebSphere Portal in the three-tier environment
Now we can verify our test runtime environment as a whole.
Start by powering on the machine, and then complete these steps:
1. Power on all three machines.
2. Log in as root in machine 3, and check that the Oracle server is started. If not, use the dbstart command to start it.
3. Log in as root in machine 2, and do the following:
a. Change the working directory to /opt/iplanet/servers.
b. Use the command startconsole to start the Sun ONE Directory Server.
c. Change the working directory to /opt/WebSphere/AppServer/bin and use startServer.sh to start the following two application servers.
• server1
• PortalServer
4. Log in as root in machine. Change the working directory to /usr/iplanet/servers and use the command startconsole to start the Web server.
5. Using a Web browser, such as Netscape, type in the URL http:\\sun1.itso.ral.ibm.com/wps/portal; the WebSphere Portal Welcome page will appear.
At this time, the installation and configuration task is finished.
Important: You must start the Database Server first before starting WebSphere Portal. Furthermore, if you enabled security, you must also start the LDAP server before starting the WebSphere Application Server and WebSphere Portal.
Note: Because we have enabled security, the application server startup must use the -username and -password options.
Chapter 8. WebSphere Portal: Sun Solaris 8.0 installation 469

470 IBM WebSphere Portal for Multiplatforms V5 Handbook

Chapter 9. WebSphere Portal: zLinux (SUSE SLES Linux 7) installation
This chapter describes the installation and configuration of WebSphere Portal V5 for zLinux (SUSE SLES Linux 7) in a single-tier environment.
9
© Copyright IBM Corp. 2004. All rights reserved. 471
9.1 IntroductionThis chapter provides guidelines and recommendations for installing WebSphere Portal V5.0 software components in a Linux for zSeries environment with Setup Manager, the software installer provided with WebSphere Portal and supported by IBM.
9.2 WebSphere Portal installation overview Linux distributions for zSeries are currently available from three major Linux distributors: SUSE, Turbolinux and Red Hat.
Current Linux distributions are based on Linux kernel 2.4. These distributions include basic services like DHCP, DNS, NFS, Apache Web servers, SMTP mail server, and Samba server. The benefit of using Linux on zSeries is the total cost of ownership (TOC) with zLinux. The TOC did not increase as the IFL or load of the applications increased on the machine. The time to administrate the mainframe is far less than when maintaining a server farm. Scalability with a mainframe lets you have thousands of Linux guests to run on one machine. zLinux server supports large workloads.
WebSphere Portal V5.0 is currently supported on SUSE SLES 7, Linux Kernel 2.4. The zSeries server is widely recognized as an integrated business server which scales both vertically and horizontally. It is reliable, scalable, and recognized as one of the most flexible, easy to use systems in the industry. It can run multiple environments and help to quickly deploy applications. These attributes position zSeries as one of the best platforms to manage the complexity and cost of e-business enablement. Key characteristics of Linux on zSeries, such as a new generation of applications, integration, and consolidation, strongly support the IBM initiatives. They can result in measurable customer benefits for the deployment of e-business solutions.
WebSphere Portal provides multiple software components that you can install, and each component has various requirements and prerequisites. You are strongly urged to use the Setup Manager to install these components.
Prior to installing, you should review the release notes document in the InfoCenter. This contains information related to workarounds for known defects and supplemental information on topics that might also be covered in the WebSphere Portal
You can access the release notes at the following URL:
http://publib.boulder.ibm.com/pvc/wp/500/ent/en/InfoCenter/index.html
472 IBM WebSphere Portal for Multiplatforms V5 Handbook

Lastly, the Hints & Tips and Technotes available in WebSphere Portal Support contains late-breaking news and information related to workarounds for known defects and supplemental information on topics that might not be covered in the WebSphere Portal InfoCenter.
You can access the release notes at the following URL:
http://www-3.ibm.com/software/webservers/portal/support/
However, as a starting point in an initial sample scenario, the basic components are installed:
� IBM WebSphere Portal
� IBM WebSphere Application Server
� DB2 Universal Database
� IBM Directory Server in a SUSE Linux environment
9.3 Sample single-tier installation with Setup Manager
This section provides guidelines to install WebSphere Portal in a single-tier environment. As illustrated in Figure 9-1 on page 474, the standard WebSphere Portal components are all installed on the same server. Although this is not a recommended scenario for a production server, this configuration can be very useful for development platforms, testing, and proof of concept scenarios.
Note: Before you begin the WebSphere Portal installation, it is important to gather enough information about the specific components you want to install. To help you collect this information into a single document, you may want to use the planning worksheet provided in the planning section of the WebSphere Portal InfoCenter. Fill out the table entries with appropriate values for your configuration and keep the worksheet for future reference.
Chapter 9. WebSphere Portal: zLinux (SUSE SLES Linux 7) installation 473

Figure 9-1 WebSphere Portal sample scenario
Software used in this sample scenario
The following software will be installed:� 2.4.7 SUSE-SMP Linux
� z/VM® 4.3
� SUSE SLES 7
� IBM HTTP Server V1.3.26
� IBM DB2 Universal Database V8.1 + Fix Pack 1
� IBM WebSphere Application Server V5.0 + Fix Pack 1
� IBM WebSphere Portal Enable 5.0
� IBM Directory Server V5.1
Hardware used in this sample scenarioFor our hardware setup, we used the IBM z800 with the following configuration:
� 16 CPUs and 36 GB of memory.
� Allocations for z/VM are:
– Four shared CPUs
– 36 GB of main memory
474 IBM WebSphere Portal for Multiplatforms V5 Handbook

� Linux for zSeries guest on the z/VM
– Two shared CPUs
– 2 GB of main memory
– 2276 MB DASD for /
– 2347 MB DASD for /opt
– 446 MB SwapDesktop browser
Supported operating systemsThe following operating systems are required on zSeries.
� Linux Distribution: SUSE SLES 7 s390
� Linux zSeriesIntel: X
9.4 Preparation steps for the installationThe Database server and the LDAP Server must be installed before you start the WebSphere Portal installation. You will use DB2 and LDAP on Setup Manager to install and configure. Then use Setup Manager of WebSphere Portal to start the install after you have verified that the LDAP server and DB2 have been installed correctly. There are other dependencies that must be met before setup is started.
Setup Manager scripts require the Public Domain Korn Shell to execute; thus, pdksh needs to be installed before the install script can run. The Linux for zSeries systems programmer needs to install pdksh so that the install script can run. For SUSE, you can find the package with the following commands and selections:
1. Click YaST -> Package Management -> Change or create configuration -> ap -> pdksh
2. Prepare the CDs that come with WebSphere Portal (WP)
We used eight CDs for WebSphere Portal. These CDs should be NFS-mounted and made available to your Linux for zSeries system. Issue the following commands after the CDs have been NFS-mounted somewhere:
cd /mnt mkdir WPScd WPSmkdir cdnmkdir setup mount nfsserver:/nfslocation/cdn cdn
Note: Linux on zSeries is supported by WebSphere Portal Enable only.
Chapter 9. WebSphere Portal: zLinux (SUSE SLES Linux 7) installation 475

The CDs you will require (and the exact naming for the CD, using lowercase characters) for Linux for zSeries are:
– cd5-6: DB2 Enterprise Edition (Linux 390) V8.1
– cd5-7: DB2 Enterprise Edition Fix Pack 1 (Windows, Linux, Linux390)
– cd1-5: WebSphere Application Server Enterprise for zLinux V5.0
– cd1-8: WebSphere Application Server Fix Pack and eFixes for zLinux - Fixpack1
– cd3-5: IBM Directory Server for zLinux V5.1
– cd2: WebSphere Portal WPCP
– Setup: Portal Installer, Portal InfoCenter, and WebSphere Portal Toolkit
3. Setup Manager
Setup Manager requires an X11 window to execute, because it has a GUI interface. For our Linux for zSeries installation, we exported our Linux for zSeries DISPLAY variable to our ThinkPad®’s IP address with the export DISPLAY=9.117.77.9:0.0 command, then started KDE with the startkde & command from Linux for zSeries. On our ThinkPad, we then started an X11 window software program called Exceed, made by Hummingbird®, with the communications setting at PASSIVE. After Exceed started with our Linux for zSeries settings, we opened a terminal window within Exceed and started the Setup Manager installer program.
Note: The name of the directory where you mount the CD matters! If the name of the directory is cdn (or cdn-n), where n is the CD number, Setup Manager finds the directory and continues without intervention. However, if you name the directory anything else, Setup Manager takes a while searching for the directory, then prompts you for the directory name.
This has both positive and negative aspects:
� If the directories are called cdn (or cdn-n), you cannot intervene with the installation to verify or alter anything between product installs.
� If the directories are not called cdn (or cdn-n), you will be prompted for each CD directory name before each product install. Setup Manager cannot continue until you enter the directory name, and will spin cycles while waiting for input.
476 IBM WebSphere Portal for Multiplatforms V5 Handbook

9.5 WebSphere Portal installationOnce the software is available to install, we will unzip and untar the files to a directory on a remote machine. Then, we will export the directory from that remote machine so that the Linux guest on mainframe can mount that exported share and begin the install.
The remote machine we used was a system running Red Hat 7.3 with 512 MB. In order to export the directory, update the /etc/exports file and restart the NFS server.
From any Linux machine, ssh to zLinux guest and make sure that the guest has mounted the install media via NFS. Once the NFS share is mounted, you can go to the /wps directory (this is the directory where we unzip and untar all the files) and start the install as shown in Figure 9-2.
Figure 9-2 InstallShield Wizard window
1. At a command prompt (Figure 9-2), run the following commands:
su - rootmkdir /wpscd /wps./install.sh
You will see a window similar to Figure 9-3 on page 478.
Chapter 9. WebSphere Portal: zLinux (SUSE SLES Linux 7) installation 477

Figure 9-3 Language selection window
2. Select English as the language and click OK.
3. The Welcome window appears. Click Next.
4. At the Software License Agreement window, select I accept the terms in the license agreement and click Next. You will see a window similar to Figure 9-4.
Figure 9-4 Prerequisites window
5. Click Next. You will see a window similar to Figure 9-5 on page 479.
478 IBM WebSphere Portal for Multiplatforms V5 Handbook

Figure 9-5 Setup selection window
6. Choose the type of setup. Select Custom and click Next. You will see a window similar to Figure 9-6 on page 480.
Chapter 9. WebSphere Portal: zLinux (SUSE SLES Linux 7) installation 479

Figure 9-6 WebSphere Application Server install options window
7. Choose Install a new instance of WebSphere Application Server and click Next. You will see a window similar to Figure 9-7 on page 481.
480 IBM WebSphere Portal for Multiplatforms V5 Handbook

Figure 9-7 WebSphere Application Server install directory window
8. Enter the directory where you want to install WebSphere Application Server. Ensure you have the requirement amount of disk space available for the install. If the directory you specify does not exist, it will be created. Click Next. You will see a window similar to Figure 9-8 on page 482.
Chapter 9. WebSphere Portal: zLinux (SUSE SLES Linux 7) installation 481

Figure 9-8 IBM HTTP Server install options window
9. Choose Install IBM HTTP Server. Click Next. You will see a window similar to Figure 9-9 on page 483.
482 IBM WebSphere Portal for Multiplatforms V5 Handbook

Figure 9-9 IBM HTTP Server install directory window
10.Enter the directory where you want to install IBM HTTP Server. Ensure you have the requirement amount of disk space available for the install. If the directory you specify does not exist, it will be created. Click Next. You will see a window similar to Figure 9-10 on page 484.
Chapter 9. WebSphere Portal: zLinux (SUSE SLES Linux 7) installation 483

Figure 9-10 Node name and host name entry window
11.In the window shown in Figure 9-10, you will specify a node name for the WebSphere Application Server instance as well as a host name. For our example, we input the following:
Node name: linux048
WebSphere Application Server host name: linux048.austin.ibm.com
The node within the WebSphere Application Server cell is where you want the WebSphere Portal application server to be installed. This value must be unique among other node names in the same cell. Typically, this value is the same as the host name for the computer.
The fully qualified host name or IP address is the computer running WebSphere Application Server.
Click Next. You will see a window similar to Figure 9-11 on page 485.
484 IBM WebSphere Portal for Multiplatforms V5 Handbook

Figure 9-11 WebSphere Portal install directory window
12.Enter the directory where you want to install WebSphere Portal. Ensure you have the requirement amount of disk space available for the install. If the directory you specify does not exist, it will be created. If you are installing on Windows, do not include periods (.) in the install path. For our example, we used the path /opt/WebSphere/PortalServer. Click Next. You will see a window similar to Figure 9-12 on page 486.
Chapter 9. WebSphere Portal: zLinux (SUSE SLES Linux 7) installation 485

Figure 9-12 WebSphere Portal administrative user window
13.Enter the user ID and password for the WebSphere Portal administrator. Do not use blanks in either the user ID or the password field, and ensure that the password is at least five characters in length. This user ID is used to access WebSphere Portal with administrator authority after installation. Note that this user ID is only used to log into WebSphere Portal and is not related to any user IDs used to access the operating system itself. If you intend to use a Lightweight Directory Access Protocol (LDAP) directory to manage your users, ensure that the administrator user ID you specify here conforms to the recommendations. In our example, we made the following entries:
– Portal administrative user: wpsadmin
– Portal administrative user password: wpsadmin
– Confirm password: wpsadmin
Click Next. You will see a window similar to Figure 9-13 on page 487.
486 IBM WebSphere Portal for Multiplatforms V5 Handbook

Figure 9-13 WebSphere Portal product install window
14.Verify the components to be installed. Based on our example, you should see the following components:
– WebSphere Application Server, extensions, and required interim fixes
– IBM HTTP Server
– WebSphere Portal
– WebSphere Portal content publishing
Click Next. The installation program begins installing the selected components. Throughout the installation and configuration process, the installation program displays progress indicators for the different components.
Note that a full installation including WebSphere Application Server can take some time to complete. Use the progress indicators and your platform's process monitoring facilities to monitor the overall progress of the installation.
Chapter 9. WebSphere Portal: zLinux (SUSE SLES Linux 7) installation 487

Figure 9-14 WebSphere Application Server start window
During the installation and configuration process, you will see the Starting WebSphere Application Server window (Figure 9-14).
488 IBM WebSphere Portal for Multiplatforms V5 Handbook

Figure 9-15 Prerequisites window
Again, the system will check for the required prerequisites.
Chapter 9. WebSphere Portal: zLinux (SUSE SLES Linux 7) installation 489

Figure 9-16 Successful installation window
15.You will see a window similar to Figure 9-16 if your installation completed successfully. Click Finish. Now, let us verify our installation.
490 IBM WebSphere Portal for Multiplatforms V5 Handbook

Figure 9-17 WebSphere Portal Welcome window
16.To verify that WebSphere Portal is running, open the following URL in a browser: http://<hostname.yourco.com>:<port_number>/wps/portal, where hostname.yourco.com is the fully qualified host name of the machine running WebSphere Portal and port_number is the port number displayed on the confirmation panel.
For example, this could be http://www.ibm.com:9081/wps/portal.
17.Log in to WebSphere Portal. In the window shown in Figure 9-17, click Login at the top right-hand corner of the page. You will see a window similar to Figure 9-18 on page 492.
Chapter 9. WebSphere Portal: zLinux (SUSE SLES Linux 7) installation 491

Figure 9-18 WebSphere Portal login window
18.Enter your user ID and password. For our example, we used the following:
User ID: wpsadmin
Password: wpsadmin
Click Login. You will see a window similar to Figure 9-19 on page 493.
492 IBM WebSphere Portal for Multiplatforms V5 Handbook

Figure 9-19 WebSphere Portal V5 page
This page is similar to what the user will see after logging in.
9.6 Validation task for WebSphere PortalThe best way to verify that WebSphere Portal has been installed and is working properly is to launch WebSphere Portal.
1. To launch WebSphere Portal, you must have all required servers running. If you are using a database other than Cloudscape, an LDAP server, or an external Web server, ensure that those servers are running. Also ensure that WebSphere Application Server is running and that the WebSphere_Portal enterprise application has been started.
Chapter 9. WebSphere Portal: zLinux (SUSE SLES Linux 7) installation 493

2. Once the servers are all running, open a Web browser and enter the WebSphere Portal page URL:
http://<hostname>:9081/wps/portal
9.7 Running the validation taskThere is also a configuration task you can use to verify the operation of WebSphere Portal. This task can be a useful aid when attempting to determine the status of WebSphere Portal.
To run the task, do the following:
1. On the machine where WebSphere Portal is installed, open a command prompt and change to the directory cd /opt/WebSphere/PortalServer/config.
2. Type vi wpconfig.properties.
3. Change the value of PortalAdminPwd to wpsadmin.
4. Enter the following command:
UNIX: ./WPSconfig.sh validate-wps-admin-login
9.8 Configuring your Web serverThe instructions in this section assume that you have installed WebSphere Portal with the Full installation type, which also installs IBM HTTP Server.
Examine the httpd.conf file for the following lines:
LoadModule ibm_app_server_http_module/opt/WebSphere/AppServer/bin/mod_ibm_app_server_http.soWebSpherePluginConfig /opt/WebSphere/AppServer/config/cells/plugin-cfg.xml "
To run the task, perform the following steps:
1. On the machine where WebSphere Portal is installed, open a command prompt and change to the directory cd /opt/WebSphere/PortalServer/config.
2. Type: vi wpconfig.properties
3. Change the value of WpsHostPort to 80.
4. Change the value of WpsHostName to faltaf1.austin.ibm.com.
5. Enter the following command:
UNIX: ./WPSconfig.sh httpserver-config
494 IBM WebSphere Portal for Multiplatforms V5 Handbook

6. Change directory: cd /opt/IBMHttpServer/conf
7. Type: vi httpd.conf
ServerName <hostname of your machine>.austin.ibm.com
8. Restart the Web server.
9. Restart WebSphere Portal by entering the following commands from the /opt/WebSphere/AppServer/bin directory:
stopServer WebSphere_PortalstartServer WebSphere_Portal
ValidationOnce Portal starts, bring up the Web browser and enter http://<hostname.domain>/wps/portal without any port to make sure that Portal is running on port 80.
Example:
http://linux048.austin.ibm.com/wps/portal
9.9 Configuring DB2 into WebSphere PortalThe Cloudscape database may be sufficient in a development environment or in a production environment. If your production environment requires a more robust database with greater capability and scalability, you should not use Cloudscape as your database software.
In our case, we are going to use DB2 as our database for WebSphere Portal. During configuration, you must export information from the Cloudscape database and import it into the new database.
Creating a wpsdbusr instanceA wpsdbusr database user with administrative rights is recommended.
Note: We encountered an error while loading shared libraries:
libdb.so.3: cannot open shared object file: cd /usr/libln -s libdb1.so.2 libdb.so.3
Chapter 9. WebSphere Portal: zLinux (SUSE SLES Linux 7) installation 495

Example 9-1 wpsdbusr creation
su - rootecho "db2c_wpsdbusr 50005/tcp # Connection port for DB2 instance wpsdbusr" >> /etc/services/usr/sbin/groupadd wpsdbgrp/usr/sbin/useradd -g wpsdbgrp -d /home/wpsdbusr -m -k /etc/skel wpsdbusr/opt/IBM/db2/V8.1/instance/db2icrt -a SERVER -u wpsdbusr wpsdbusrpasswd wpsdbusr ( password = password )
su - wpsdbusrsource /home/wpsdbusr/sqllib/db2profiledb2 update dbm cfg using SVCENAME db2c_wpsdbusrdb2set DB2COMM=TCPIPdb2set DB2AUTOSTART=TRUEdb2 force application alldb2 terminatedb2stopdb2start
VerificationThe steps in Example 9-2 will make sure that the SVCENAME value for the wpsdbusr instance was configured correctly, that the wpsdbusr instance is set to autostart on reboot and that the communication type for the instance is set to TCPIP.
Example 9-2 Verification step
su - wpsdbusrdb2 get dbm cfg ( make sure it says db2c_wpsdbusr as TCP/IP Service name )db2set ( make sure it says DB2COMM=TCPIP and DB2AUTOSTART=TRUE)
9.10 Exporting the database from CloudspaceWebSphere Portal stores user and configuration information in a database. Although WebSphere Portal installs and uses a Cloudscape database, we are going to use a DB2 database with greater capability and scalability.
To run the task, do the following:
1. On the machine where WebSphere Portal is installed, open a command prompt and change to the directory cd /opt/WebSphere/PortalServer/config.
2. Enter the following command:
UNIX: ./WPSconfig.sh database-transfer-export-linux
496 IBM WebSphere Portal for Multiplatforms V5 Handbook

9.11 Configuring DB2 propertiesWebSphere Portal stores user and configuration information in a database. Again, although WebSphere Portal installs and uses a Cloudscape database, we are going to user a DB2 database with greater capability and scalability.
We are assuming that DB2 V8.1 is installed on the same machine. Now we are going to create databases which are used by WebSphere Portal.
The recommended db2 instance is wpsdbusr, which we created earlier.
Database architecture and functionalityListed are the following databases:
wps50:
� Shared by WebSphere Portal and Member Manager.
� Stores information about user customizations, such as pages, as well as user and login information.
wpcp50:
� Shared by WebSphere Portal content publishing components, such as Document Manager.
� Contains the campaign and personalization information in addition to authoring and configuration.
fdbk50:
� Feedback database is used by WebSphere Portal content publishing.
� Contains the information logged by your Web site for generating reports for analysis of site activity, including information about campaigns and personalized resources.
Scenario:
Database DB2 and WebSphere Portal are both installed on the same machine.
To update the wpconfig.properties files, do the following:
1. On the machine where WebSphere Portal is installed, open a command prompt and change to the directory cd /opt/WebSphere/PortalServer/config.
2. Type: vi wpconfig.properties
3. Change values to agree with those given in Table 9-1 on page 498.
Chapter 9. WebSphere Portal: zLinux (SUSE SLES Linux 7) installation 497

Table 9-1 wpconfig.properties file
# Variables Values
1 DbType Description: The type of database used to store information for WebSphere.
db2
2 DbDriver Description: This is the name of the JDBC provider used to import SQL files.
COM.ibm.db2.jdbc.app.DB2Driver
3 DbDriverDs Description: The data source for the JDBC provider that WebSphere Portal uses to communicate with its databases.
COM.ibm.db2.jdbc.DB2ConnectionPoolDataSource
4 DbUrl Description: The database URL used to access the WebSphere Portal database with JDBC, where <hostname> is the name of the remote server and <port> is the port where the appropriate database instance is listening. The value must conform to standard JDBC URL syntax. Note that the database element of this value should match the value of WpsDbName.
jdbc:db2:wps50
5 DbUser Description: This value should be an administrative user in the database. The admin is only necessary if WebSphere Portal is creating the database. A user is necessary to connect to WpsDbName.
wpsdbusr
6 DbLibrary Description: DbLibrary is machine specific. You must locate the db2java.zip file on your machine. For example, C:/Program Files/SQLLIB/db2java.zip, C:/Program Files/SQLLIB/java12/db2java.zip, or /home/db2admin/sqllib/java/db2java.zip
/home/wpsdbusr/sqllib/java12/db2java.zip
7 WpcpDbNode Description: This value is the node for the WebSphere Portal content publishing database and is needed only in non-Windows environments. If you created your databases manually, this is the was_node value that you identified when you catalogued the TCP/IP node in the Creating database section. If you plan to use the configuration task to automatically create the databases, use this value. Note: Required only for non-Windows platforms.
wpcpNode
498 IBM WebSphere Portal for Multiplatforms V5 Handbook

8 WpcpDbName Description: This value represents the database name (or alias name if remote) where you want the WebSphere Portal content publishing objects created. Note: This value is also the database element in the WpcpDbUrl property.
wpcp50
9 WpcpDbUser Description: This value should be an administrative user in the database. If WebSphere Portal is creating the database, the user must be an administrative user. If you choose to use one database to store all WebSphere Portal, Member Manager, and WebSphere Portal content publishing information, this user must be different from DbUser.
wpsdbusr
10 WpcpDbUrl Description: The database URL used to access the WebSphere Portal content publishing database with JDBC, where <hostname> is the name of the remote server and <port> is the port where the appropriate database instance is listening. The value must conform to standard JDBC URL syntax. Note: The database element of this value should match the value of WpcpDbName.
jdbc:db2:wpcp50
11 FeedbackDbName Description: This value represents the database name (or alias name if remote) where you want the feedback objects created. Note: This value is also the database element in the FeedbackDbUrl property.
fdbk50
12 FeedbackDbUser Description: This value should be an administrative user in the database. If WebSphere Portal is creating the database, the user must be an administrative user.
wpsdbusr
13 FeedbackDbUrl Description: The database URL used to access the feedback database with JDBC, where <hostname> is the name of the remote server and <port> is the port where the appropriate database instance is listening. The value must conform to standard JDBC URL syntax. If you are installing WebSphere Portal content publishing under one database, this value will be the same as the value for the WpcpDbUrl property. Note: The database element of this value should match the value of FeedbackDbName.
jdbc:db2:fdbk50
# Variables Values
Chapter 9. WebSphere Portal: zLinux (SUSE SLES Linux 7) installation 499

9.12 Creating local databases for DB2Since we are using a local DB2, WebSphere can create the required databases for us.
To run the task, do the following:
1. On the machine where WebSphere Portal is installed, open a command prompt and change to the directory cd /opt/WebSphere/PortalServer/config.
2. Enter the following command:
UNIX: ./WPSconfig.sh create-local-database-db2
9.13 Exporting the db2instance environment in your root profile
We are using root id to install WebSphere Portal, which must have administrative privileges to create or update databases for the wpsdbusr instance.
1. Use the following steps to export the db2instance environment in your profile:
a. In your .bashrc, .dshrc, or .profile file, add
if [ -f /home/wpsdbusr/sqllib/db2profile ]; then . /home/wpsdbusr/sqllib/db2profile; fi
where wpsdbusr represents your database instance.
b. Reopen all the shells.
14 WmmDbUsr Description: This value should be an administrative user in the database.
wpsdbusr
15 WmmDbUrl Description: The database URL used to access the Member Manager database with JDBC. The value must conform to standard JDBC URL syntax. If WebSphere Portal and Member Manager are sharing a database, you will use the same database value entered for WpsDbName. Note: The database element of this value should match the value of WmmDbName.
jdbc:db2:wps50
# Variables Values
500 IBM WebSphere Portal for Multiplatforms V5 Handbook

c. Validate that your environment has set the DB2 profile environment variables, such as DB2INSTANCE=wpsdbusr where wpsdbusr represents your database instance by running the env command.
9.14 Importing the Cloudscape database into DB2WebSphere Portal is going to use the WebSphere Portal and Member Manager databases on DB2 by issuing the following command.
1. On the machine where WebSphere Portal is installed, open a command prompt and change to the directory cd /opt/WebSphere/PortalServer/config.
2. Enter the following command:
UNIX: ./WPSconfig.sh database-transfer-import
9.15 Performance improvement for imported databasesAfter importing the database tables, perform a reorg check to improve performance. Connect to each database and run the commands in Example 9-3 from the DB2 prompt.
Example 9-3 Reorg check
reorgchk update statistics on table all terminatedb2rbind <database_name> -l db2rbind.out -u <db2_admin> -p <password>
su - wpsdbusr
db2 connect to FDBK5TCP user wpsdbusr using passworddb2 reorgchk update statistics on table alldb2 terminatedb2rbind FDBK5TCP -l FDBK5TCP.out -u wpsdbusr -p password
db2 connect to WPCP50 user wpsdbusr using passworddb2 reorgchk update statistics on table alldb2 terminatedb2rbind WPCP50 -l WPCP50.out -u wpsdbusr -p password
db2 connect to WPS5TCP user wpsdbusr using passworddb2 reorgchk update statistics on table alldb2 terminatedb2rbind WPS5TCP -l WPS5TCP.out -u wpsdbusr -p password
db2 connect to FDBK50 user wpsdbusr using password
Chapter 9. WebSphere Portal: zLinux (SUSE SLES Linux 7) installation 501

db2 reorgchk update statistics on table alldb2 terminatedb2rbind FDBK50 -l FDBK50.out -u wpsdbusr -p password
db2 connect to WPS50 user wpsdbusr using passworddb2 reorgchk update statistics on table alldb2 terminatedb2rbind WPS50 -l WPS50.out -u wpsdbusr -p password
db2 connect to WPCP5TCP user wpsdbusr using passworddb2 reorgchk update statistics on table alldb2 terminatedb2rbind WPCP5TCP -l WPCP5TCP.out -u wpsdbusr -p password
9.16 Verifying the connection from a command promptYou can also verify the database connection from a command prompt by performing the following steps:
1. On the machine where WebSphere Portal is installed, open a command prompt and change to the WebSphere Portal Configuration directory.
2. At the command prompt, type su - root01
3. Enter the following command:
UNIX:
./WPSconfig.sh validate-database-connection-wps
./WPSconfig.sh validate-database-connection-wmm
./WPSconfig.sh validate-database-connection-wpcp
9.17 Configuring IBM Directory Server in WebSphere Portal
WebSphere Portal can be configured to use an LDAP directory to store user information and to authenticate users. This section discusses the issues to consider when you use an LDAP directory with WebSphere Portal.
We created a Base DN for this scenario: dc=portal,dc=com
We also created users wpsadmin and wpsbind and the group wpsadmins. We made the wpsadmin user a member of the wpsadmins group.
502 IBM WebSphere Portal for Multiplatforms V5 Handbook

Run the following command to make sure LDAP is up and running and has the users and groups defined.
Command:
ldapsearch -b 'dc=portal,dc=com' '(objectclass=*)' namingContexts
Result:
dc=portal,dc=comcn=users,dc=portal,dc=comcn=groups,dc=portal,dc=comuid=wpsadmin,cn=users,dc=portal,dc=comuid=wpsbind,cn=users,dc=portal,dc=comcn=wpsadmins,cn=groups,dc=portal,dc=com
9.18 Configuring LDAP propertiesBy default, WebSphere Portal installs a Cloudscape database and uses it as a Custom User Registry (CUR) for authentication.
WebSphere Portal can be configured to use an LDAP directory to store user information and to authenticate users. This section discusses procedures to use an LDAP directory with WebSphere Portal.
To run the task, do the following:
1. On the machine where WebSphere Portal is installed, open a command prompt and change to the directory /opt/WebSphere/PortalServer/config.
2. Type: vi wpconfig.properties
3. Change the following values using Table 9-2 on page 504.
Chapter 9. WebSphere Portal: zLinux (SUSE SLES Linux 7) installation 503

Table 9-2 wpconfig.properties file
# Variables Value
1 WasUserId Description: The user ID for WebSphere Application Server security authentication. This should be the fully qualified distinguished name (DN). Note: If a value is specified for WasUserId, a value must also be specified for WasPassword. If WasUserId is left blank, WasPassword must also be left blank. Note: For LDAP configuration this value should not contain spaces.
uid=wpsbind,cn=users,dc=portal,dc=com
2 WasPassword Description: The password for WebSphere Application Server security authentication. Note: If a value is specified for WasPassword, a value must also be specified for WasUserId. If WasPassword is left blank, WasUserId must also be left blank.
wpsbind
3 PortalAdminId Description: The fully-qualifed name of the WebSphere Portal administrator. This should be the fully qualified distinguished name (DN). Note: For LDAP configuration this value should not contain spaces.
uid=wpsadmin,cn=users,dc=portal,dc=com
4 PortalAdminGroupId Description: The group ID for the group to which the WebSphere Portal administrator belongs.
cn=wpsadmins,cn=groups,dc=portal,dc=com
5 LTPAPassword Description: The password for the LTPA bind.
password
6 SSODomainName Description: Single signon domain; for example, SSODomainName=yourcompany.com
.austin.ibm.com
7 LDAPHostName Description: The host information for the LDAP server that WebSphere Portal will use; for example, yourserver.yourcompany.com.
linux048.austin.ibm.com
8 LDAPAdminPwd Description: The LDAP access password.
root01
504 IBM WebSphere Portal for Multiplatforms V5 Handbook

Stopping and starting WebSphere Application ServerTo perform a stop and start of the WebSphere Application Server, perform the following steps:
cd /opt/WebSphere/AppServer/bin./stopServer.sh server1./startServer.sh server1
9.19 Validating LDAPYou can also verify the database connection from a command prompt by performing the following steps:
1. On the machine where WebSphere Portal is installed, open a command prompt and change to the directory cd /opt/WebSphere/PortalServer/config.
2. Enter the following command:
UNIX: ./WPSconfig.sh validate-ldap
9.20 Enabling securityOnce you have installed WebSphere Portal, you must configure security for the portal. Before you can configure Portal security, you must decide whether to use a custom user registry or an LDAP directory for authentication. In our case, we are using IBM Directory Server for LDAP authentication.
1. On the machine where WebSphere Portal is installed, open a command prompt and change to the directory cd /opt/WebSphere/PortalServer/config.
2. Enter the following command:
UNIX: ./WPSconfig.sh enable-security-ldap
9 LDAPBindID Description: User ID for LDAP Bind authentication.
cn=root
10 LDAPBindPassword Description: Password for LDAP Bind authentication.
root01
11 LDAPSuffix Description: LDAP Suffix.
dc=portal,dc=com
# Variables Value
Chapter 9. WebSphere Portal: zLinux (SUSE SLES Linux 7) installation 505

Stopping WebSphere PortalUse the following commands to stop WebSphere Portal.
cd /opt/WebSphere/AppServer/bin./stopServer.sh WebSphere_Portal -user uid=wpsbind,cn=users,dc=portal,dc=com -password wpsbind
Stopping WebSphere Application ServerUse the following commands to stop WebSphere Application Server.
cd /opt/WebSphere/AppServer/bin./stopServer.sh server1 -user uid=wpsbind,cn=users,dc=portal,dc=com -password wpsbind
Start WebSphere Application ServerUse the following commands to start WebSphere Application Server.
cd /opt/WebSphere/AppServer/bin./startServer.sh server1 -user uid=wpsbind,cn=users,dc=portal,dc=com -password wpsbind
Start WebSphere PortalUse the following commands to start WebSphere Portal.
cd /opt/WebSphere/AppServer/bin./startServer.sh WebSphere_Portal -user uid=wpsbind,cn=users,dc=portal,dc=com -password wpsbind
Validation of LDAPGo to WebSphere Portal and create a new user by clicking Sign-up in the upper right-hand corner.
1. Log in to WebSphere Portal as the user you have just created.
2. If the login is successful, your LDAP server should be working correctly.
9.21 ConclusionAt this point, WebSphere Portal Server is successfully configured using DB2 for a data repository and LDAP for security.
506 IBM WebSphere Portal for Multiplatforms V5 Handbook

Chapter 10. WebSphere Portal administration
This chapter describes how to use the administration portlets provided by WebSphere Portal. Information regarding security is mentioned in this chapter, but you may also want to refer to the IBM Redbook A Secure Portal using WebSphere Portal V5 and Tivoli Access Manager, SG24-6077.
10
© Copyright IBM Corp. 2004. All rights reserved. 507

10.1 IntroductionIn WebSphere Portal V5, the administration of Portal is done through Portal itself, either in a centralized or delegated fashion. The administration interface for Portal enables quick access to the administration portlets and greatly simplifies the task of administering the portal. Administrators can deliver a new service to users simply by adding new portlets to the pages of the portal. Since these are portlets, just like bookmarks, reminders, news or any other portlets, administrators can control access to them, place them on portal pages, and perform any of the usual steps.
10.1.1 DefinitionsYou will need to know some of the basic definitions before you start working with Portal administration pages.
PortletFrom a portal administrator's view, a portlet is a content container to which users can subscribe. WebSphere Portal administration functionality is delivered via portlets. The following are some of the portlet features:
� A portlet is a pluggable component that represents an application.
� From a developer’s perspective, a portlet is a Java client which runs on the server.
� A portlet provides output to the user by generating markup output that is assembled into a portal page by the Portal.
� A portlet manages the user's preferences for the associated application.
Portlet applicationA portlet application is a set of portlets grouped together in an execution context.
� The portlet application provides no code, per se; the application is just a vehicle for grouping portlets.
� Portlets within the same application package share the same context, for example, images, properties files, and classes.
� The set of portlets is packaged into a Web archive file, called a WAR file.
� Portlets in a portlet application may communicate with other portlets in the portlet application using custom messages.
508 IBM WebSphere Portal for Multiplatforms V5 Handbook

PageThe following points cover the definition of a page.
� A page is a collection of portlets and containers.
� A page contains one or more portlets and containers. Containers hold the portlets as a row or a column.
� Pages can contain child pages (also referred as child nodes in this chapter) with portlets deployed for delivering content.
Label A label is a collection of nodes or, in other words, a collection of pages.
URL A URL helps to launch any URL-addressable resource within the Portal site, which can include external Web sites.
NodePortal navigation is like a tree structure. A node is an element in the Portal navigation tree, which can be a page, label or URL. Nodes are located in a level of the navigation hierarchy relative to the parent node in which they are created.
Content rootThe topmost node in the tree is the content root. This content root can have nodes which can be represented in a parent-child relationship.
10.1.2 Organization The default WebSphere Portal installation will create the following nodes under the content root.
My PortalThis is the first page displayed by Portal after login. It is a label containing business and productive out-of-the-box portlets.
Note: In WebSphere Portal V4.x, we used the term “place” (used for grouping pages). In WebSphere Portal V5, “place” has been replaced with “label”. You should use a label to group/hold pages. A label does not include any content, so when a label is selected, the first page under it is displayed.
Chapter 10. WebSphere Portal administration 509

AdministrationThis is a label containing pages with administrative portlets. Administrators use these portlets for portal administration.
Page customizerThis is a label containing pages for managing page content and layout. You cannot see this node directly because it is hidden. Access to the portlets in the page customizer is through context-sensitive links in the portal toolbar.
Page propertiesThis is a page containing the properties portlet. This page is hidden from navigation and is used for editing the properties of a page.
Organize FavoritesThis is a page containing the Organize Favorites portlet, which allows users to create, edit, activate, order and delete labels and URLs. You can reach this page through the My Favorites drop-down list.
Figure 10-1 on page 511 shows the different default nodes that a user can see when logging on to WebSphere Portal as a user with administrative privileges.
510 IBM WebSphere Portal for Multiplatforms V5 Handbook

Figure 10-1 Default Portal nodes for an user logged in with administrative privilege
WebSphere Portal V5 provides a node called Portal Administration, which, for instance, allows the portal administrator to install portlets, create themes and skins, work with users and groups and secure portlets. The Portal Administration node contains the following portlet pages, which will be discussed in this chapter:
� Portal User Interface
� Portlets
� Access
� Portal Settings
� Portal Analysis
The administrative functions included with these individual portlets are discussed in the following sections.
Chapter 10. WebSphere Portal administration 511

10.2 Getting started with Portal navigation
The user interface in WebSphere Portal V5 has significantly changed compared to WebSphere Portal V4.x. In this section, we will learn how to navigate and prepare for WebSphere Portal administration.
10.2.1 Portal states The behavior of the portal is explained using a model with three states.
Model stateModel state displays what is available for viewing when you access the portal via a browser. Portlets within a page can be an example of a model state.
View stateView state defines how the model state is viewed, for example, as a maximized or minimized size in a portlet window. View state is not persisted when a session expires or a session logout occurs. However, you can persist this information (optionally) so that view state can resume at the same state with a new session.
Navigational stateNavigational state provides information as to where in the portal a user has navigated using a browser. An example of the navigational state can be given using the welcome page. A user can open multiple browser windows with the same view state and different navigational states in the same Portal session.
Note: Portal administration can also be performed using XML Access. In this chapter, we will focus only on using administrative portlets for portal adminis-tration.
Important: Before you start work on portal navigation, make sure that you have successfully installed WebSphere Portal.
512 IBM WebSphere Portal for Multiplatforms V5 Handbook
10.2.2 New features in WebSphere Portal V5 administrationHere we discuss some new features in WebSphere Portal V5 administration.
Redesigned administrative interfaceThe administrative interface in V5 has been redesigned with additional features. Enhancements include:
� New administrative portlets
� Navigation improvements
� New themes and skins
� Updates to existing administrative and customizer themes and skins
� Context sensitive links
Ability to arrange content in a tree structurePortal pages are laid in tree structure, which makes portal administration on these pages easier. Portal access control is sensitive to this structure and any permissions that you apply on the parent page are inherited by the child page.
Transcoding WebSphere Portal allows administrators to adapt portal content for diverse situations through transcoding technology. Administrators can now use transcoding at the portlet level.
Web Clipping portletIt is now easy to create Web Clipping portlets; performance of these portlets has been enhanced with changes made to the code.
Tip: the behavior of the Back button in your browser
Check the value for uri.requestid in the file WebSphere/PortalServer/shared/app/confi/services/ConfigServices.properties.
If the value is set to on, using the Back button of the browser will not change the navigational state of the portal. If you click the Back button repeatedly, you will be taken back to the login page for the portal. By default, this setting is off.
Chapter 10. WebSphere Portal administration 513

Improved logging abilityLogging in WebSphere Portal V5 has improved based on WebSphere Application Server V5.
Portlet menus for improved navigation Portlet menus are an extension to the Portlet API that allows portlets to contribute menu items to the portal navigation. In this release of WebSphere Portal, helper classes have been provided which simplify the development of portlet menu items. Portlet menu items can be created using a static XML file, or dynamically generated and updated with each request.
Improved XML AccessWith WebSphere Portal V5, you can use XML Access to completely export your portal configuration and to recreate your portal structure using this file.
10.2.3 Launching the Portal user interfaceIn this section, we will discuss how to log in to WebSphere Portal and access the administration node.
WebSphere Portal V5 uses WebSphere Application Server V5 administration server. This has to be started before we use WebSphere Portal.
Starting and stopping the administrative serverIn this section, we illustrate the starting and stopping of the administrative server.
1. Verify whether you have started server1, which is the default WebSphere Application Server administrative server.
a. To do this, open a command prompt window and change the directory to WebSphere/AppServe/bin.
b. Enter the command serverStatus server1.
c. If the server is stopped, make sure you start the server before you proceed.
2. To start the server, enter the following command:
startServer server1
If you are running with security enabled in WebSphere Application Server, you need to specify a user ID and password for security authentication. In this case, enter the following command (in the following command, the user ID can be wpsadmin, which is the admin_userid):
startServer server1 -user admin_userid -password admin_userid
514 IBM WebSphere Portal for Multiplatforms V5 Handbook

To stop the server, use stopServer in place of startServer in the above commands. You can test the above command, by accessing the administrative console of WebSphere Application Server by issuing the following URL in your browser.
http://fullyqualifiedhostname:9090/admin
Starting and stopping WebSphere PortalBefore starting WebSphere Portal, make sure that you have other servers up and running. This includes the administrative server of WebSphere Application Server, any database, LDAP server and external Web servers.
1. Open a command prompt window and run:
startServer WebSphere_Portal
If the start is successful, you should see a message in the command console: Server WebSphere_Portal open for e-business: process id is . You can also confirm whether your WebSphere_Portal has started by issuing the following URL to a browser:
http://fullyqualifiedhostname/wps/portal
You should see the Portal welcome page if Portal has started.
2. To stop WebSphere Portal, replace the startServer command with stopServer. If you are running with security enabled on WebSphere Application Server, you must specify a user ID and password for security authentication. In this case, enter the following command:
stopServer WebSphere_Portal -user admin_userid -password admin_useridj
WebSphere Portal loginIn this section, we show the steps for logging in to WebSphere Portal:
� The default WebSphere Portal page will be displayed to all anonymous portal users as shown in Figure 10-2 on page 516.
Tip: If you try the following URL and if you get page not found error, stop and start your Web browser. This should rectify the problem.
Tip: If you are having problems either starting or stopping WebSphere Portal, make sure that the words WebSphere_Portal are properly capitalized.
Chapter 10. WebSphere Portal administration 515

Figure 10-2 Portal page for an anonymous user
� When you click the Log in option, you will see page as shown in Figure 10-3 on page 517. The Cancel option will take you to the welcome page.
516 IBM WebSphere Portal for Multiplatforms V5 Handbook

Figure 10-3 Login page for Portal user authentication
� If you have successfully logged in, you should see the WebSphere Portal Welcome Page as shown in Figure 10-4 on page 518.
Note:
� The default user with administrative privilege is generally wpsadmin.
� In our example, we will log in as user wpsadmin and with the password wpsadmin.
Chapter 10. WebSphere Portal administration 517

Figure 10-4 Portal page for an authenticated user
Base don Figure 10-4:
� When you click the Administration node, it will take you to the Administrative portlets page which we will cover in this chapter.
� A question mark (?) is the help option. The Help menu icon (?), is provided on all the portal administration pages. When you click this icon, a window pops up as shown in Figure 10-5 on page 519 with the product documentation information, also known as the InfoCenter. There is also a Help icon (?) on individual administration portlets and clicking this icon will get you the product information specific to that particular portlet.
518 IBM WebSphere Portal for Multiplatforms V5 Handbook

Figure 10-5 Product documentation is displayed when you click help option
� Log out will take you back to the login window as shown in Figure 10-3 on page 517.
When there is no activity in your portal or when your session expires, you get the message shown in Figure 10-6 on page 520. At this stage, you will have to log back in to WebSphere Portal using the steps described above.
Chapter 10. WebSphere Portal administration 519

Figure 10-6 Portal session time-out message display
10.3 Portal User InterfacePortal User Interface includes two portlets:
� Manage Pages portlet
� Themes and Skins portlet
You can use the Portal User Interface page to manage the portal look and feel with the option to create pages, edit pages, and add a new theme or skin or modify any existing theme or skin.
When you select the Portal User Interface page, you will see the window shown in Figure 10-7 on page 521.
520 IBM WebSphere Portal for Multiplatforms V5 Handbook

Figure 10-7 Portal User Interface page under Portal Administration node
10.3.1 Manage Pages The Manage Pages portlet will help you to:
� Create a new page or label, and edit, delete, activate/deactivate, and re-order a page, label or URL.
� Edit properties of pages, URLs and labels.
� Assign access to pages, URLs and labels.
When you open the Manage Pages portlet, you will see the window shown in Figure 10-8 on page 522.
Note: Pages can be in a tree structure within Portal. One page can have multiple pages underneath.
Note: In WebSphere Portal V4.x, Manage Places and Pages provided the same functionality as Manage Pages in WebSphere Portal V5. With additional functionalities offered by Manage Pages portlet in WebSphere Portal V5, it can be considered a new or enhanced administrative portlet.
Chapter 10. WebSphere Portal administration 521

Figure 10-8 Manage Pages portlet
The Manage Pages portlet displays existing portal pages, labels and URLs which are available. It will also provide information as to whether these portal resources are active or not. It will also allow you to edit the properties of these resources and have access assigned on them.
In Figure 10-8, you can see the page My Portal as a node when you click it. It will have child pages. Icons that are displayed corresponding to the resources indicate the permissions you have on that particular resource. These icons and links are dependent upon the permissions you have on the resource. Once you complete the task, you will be returned to the Manage Pages portlet.
All the labels, pages and URLs are associated underneath the Content Root.
Search Pages, Labels and URLs You can search for pages, labels and URLs using this option.
1. Under the Manage Pages portlet, select the option that you want to search. You can choose from the drop-down list. In our example, we have used for our search criteria: Title Contains, with Welcome as the keyword as shown in Figure 10-9 on page 523. Examples of other options include description contains, markup contains, all available, unique name, and last modified.
522 IBM WebSphere Portal for Multiplatforms V5 Handbook

Figure 10-9 Search Label, Pages and URLs
2. Click Search to begin the search process and you will see the results in the table.
Once you have the portal resource, you can perform any functionality using the icons corresponding to that resource.
In Figure 10-9, highlighted numbers 1 and 2 correspond to the following:
Option 1: This is a new feature available in the WebSphere Portal V5 administrative portlet. You have a provision for listing all the available portal resources pertaining to the selected portlet as a table. When you click the Configure mode (which is indicated by the number 1 in the figure), you will see a window similar to Figure 10-10 on page 524.
1. You will be able to control the number of resources displayed and also the total number of resources per page. Enter the value you need.
2. Select the Show search expanded option to have the search feature enabled.
3. Click OK to confirm changes or Cancel to return.
Chapter 10. WebSphere Portal administration 523

Figure 10-10 List available portal resources for the selected portlet
Option 2: This will allow you to specify a number of resources and a number of resources per page that will be displayed on a selected administrative portlet.
Icon functionalities on a page, label or URLYou can observe from Figure 10-11 on page 525 the different functionalities you can execute from the icons associated with the resource.
524 IBM WebSphere Portal for Multiplatforms V5 Handbook

Figure 10-11 Functionalities associated with the icons
Option 1: Edit Page Properties
You will be performing the same steps for editing properties on any existing Label, URL or page.
1. Click the Edit Page Properties icon. You will see a window open as shown in Figure 10-12 on page 526. For our example, we used the My Portal label. However, if you have any nested portal resources under My Portal, you will click My Portal and select the child page for which you need to edit page properties.
2. Make the changes you need. You can select a different theme; preview the theme by opening the Preview icon.
3. When you expand Advanced options, you will have the choice to choose different markups that are available in the portal.
4. Click OK to save changes.
Chapter 10. WebSphere Portal administration 525

Figure 10-12 Edit Page Properties
5. You will see a confirmation message, as shown in Figure 10-13, about the changes you made.
Figure 10-13 Confirmation message on the changes made to the portal resource
As an example, we changed the theme for My Portal. You can compare the changes in Themes between Figure 10-1 on page 511 and Figure 10-14.
526 IBM WebSphere Portal for Multiplatforms V5 Handbook

Figure 10-14 New Theme applied using Edit Page Properties option
Option 2: Set Page Permission
You can set access permissions by navigating to the page, label or URL to which you want to assign or modify access.
1. Click the Set Page Permission icon to set or edit permissions on a particular portal resource (in our example, My Portal). You will see a window open as shown in Figure 10-15 on page 528.
2. You can refer to 10.5.2, “Resource permissions” on page 582 for instructions on using this portlet.
Chapter 10. WebSphere Portal administration 527
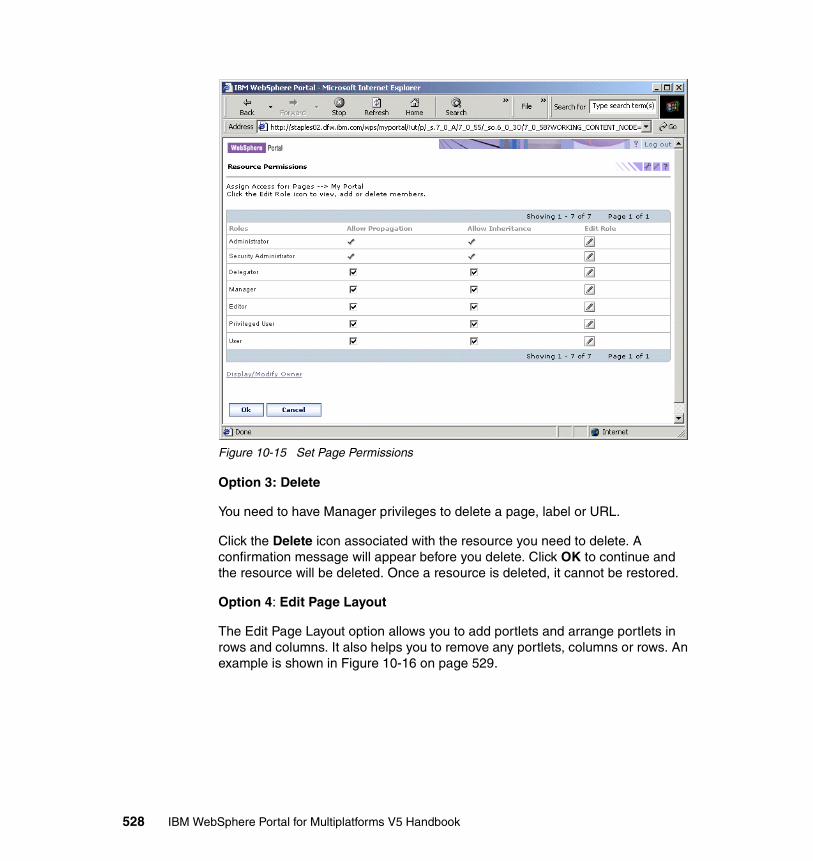
Figure 10-15 Set Page Permissions
Option 3: Delete
You need to have Manager privileges to delete a page, label or URL.
Click the Delete icon associated with the resource you need to delete. A confirmation message will appear before you delete. Click OK to continue and the resource will be deleted. Once a resource is deleted, it cannot be restored.
Option 4: Edit Page Layout
The Edit Page Layout option allows you to add portlets and arrange portlets in rows and columns. It also helps you to remove any portlets, columns or rows. An example is shown in Figure 10-16 on page 529.
528 IBM WebSphere Portal for Multiplatforms V5 Handbook
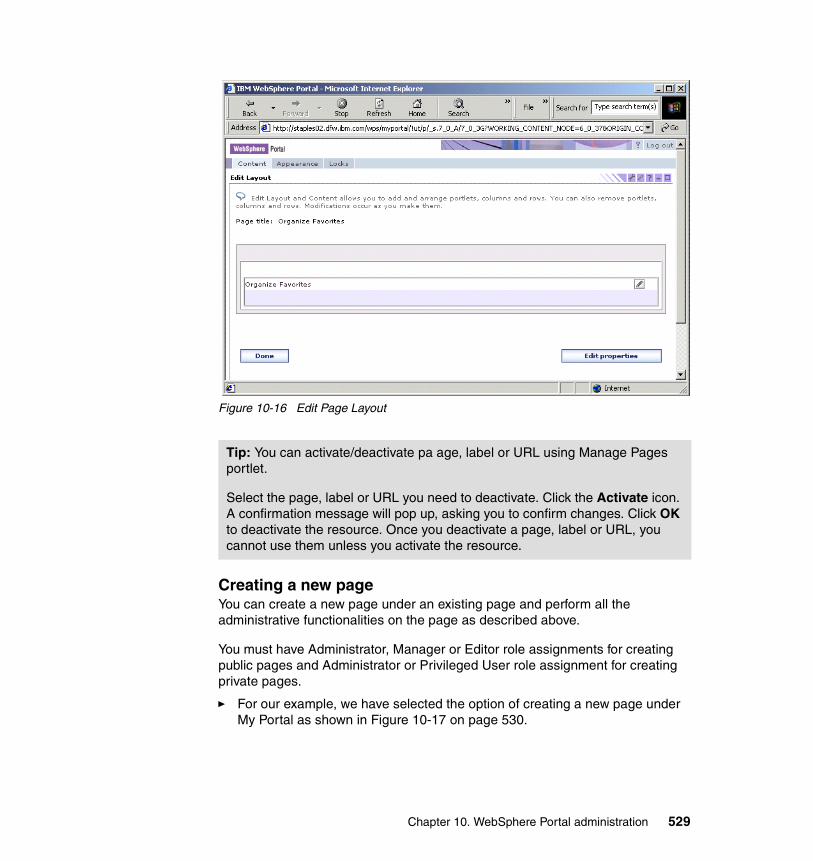
Figure 10-16 Edit Page Layout
Creating a new pageYou can create a new page under an existing page and perform all the administrative functionalities on the page as described above.
You must have Administrator, Manager or Editor role assignments for creating public pages and Administrator or Privileged User role assignment for creating private pages.
� For our example, we have selected the option of creating a new page under My Portal as shown in Figure 10-17 on page 530.
Tip: You can activate/deactivate pa age, label or URL using Manage Pages portlet.
Select the page, label or URL you need to deactivate. Click the Activate icon. A confirmation message will pop up, asking you to confirm changes. Click OK to deactivate the resource. Once you deactivate a page, label or URL, you cannot use them unless you activate the resource.
Chapter 10. WebSphere Portal administration 529

Figure 10-17 Reordering pages and choosing the option to create a new page
� You can reorder pages as shown in the figure above (up arrow and down arrow circled in the figure), labels and URLs. You must have the Privileged User, Manager, Security Administrator, Editor or Administrator role assignment on the parent page to reorder items. A message will display as to whether you have successfully swapped when you reorder pages, labels or URLs.
1. Click the New Page icon on the Manage Pages portlet. You will see a new window open as shown in Figure 10-18 on page 531.
a. In our example, for the Page Title option, we have named the new page ITSOPage.
b. Select the theme for your page. You can preview the theme before you finalize.
c. Select Advanced Options to have additional features or click OK if you need to add the new page with default settings.
d. When you select Advanced Options, you can add the page to the My Favorites list. When this feature is opted, users can bookmark this page and it will be available from My Favorites in the banner. If you want this
530 IBM WebSphere Portal for Multiplatforms V5 Handbook

page to be share by others, select The contents of this page can be shared by other pages.
e. Select the type of layout you need for the page, for example, two columns or three columns.
f. Select A Page which uses content from a shared page if you want the new page to reference an existing page. Initial content and layout properties are inherited in this scenario. Changes made to the parent page are inherited to the child page.
g. Click OK to save changes.
Figure 10-18 Creating a new page
2. You will see a confirmation message when a new page is created, as shown in Figure 10-19 on page 532.
Chapter 10. WebSphere Portal administration 531

Figure 10-19 Confirmation message for the new page
3. The new page ITSOPage that we created will be listed under the titles for My Portal as shown in Figure 10-20 on page 533.
– You can edit the layout on this page, add portlets and assign permissions for the page.
– You can also add child pages to ITSOPage using the same steps as described above for creating a new page.
532 IBM WebSphere Portal for Multiplatforms V5 Handbook

Figure 10-20 New Page added successfully
4. You can confirm ITSOPage creation by opening My Portal as shown in Figure 10-21.
Figure 10-21 ITSOPage(New Page that we created) added to My Portal
Chapter 10. WebSphere Portal administration 533

Creating a new labelLabels are used to group pages or URLs. To create a new label:
1. Select the New Label option from the Manage Pages portlet. You will see a window open as shown in Figure 10-22.
Figure 10-22 Create a New Label
a. In our example, we have the Title for the new label as TestLabel.
b. Select a Theme for the label. You can preview the theme you select before you confirm. This option is available only when you create a root page.
c. Advanced option will let you choose the markup that the page supports. By default, html is selected.
d. Click OK to save the settings and create a new label or Cancel to return to Manage Pages portlet without creating a new label.
2. By clicking option 1 as shown in Figure 10-22, you can edit the properties for the Create New Label portlet. For example, when you open the Create New Label portlet, you can have WML and HTML as the markups supported by default under the advanced options. This is done by editing the properties as shown in Figure 10-23 on page 535 and clicking OK to save changes.
534 IBM WebSphere Portal for Multiplatforms V5 Handbook

Figure 10-23 Edit Properties for Creating New Label Portlet
Creating a new URLThe main advantage of this option is that you can add external URLs to your Portal navigation. To create a new URL:
1. Select the New URL option under a page or a label. For this example, we chose to create a new URL under My Portal. You will see a window open as shown in Figure 10-24 on page 536.
Chapter 10. WebSphere Portal administration 535

Figure 10-24 Create a new URL
2. Type the title of the new URL. For our example, we have named it TestUrl.
3. You can create an internal or external URL. If you select an internal URL, you must select a bookmarkable page, as shown in Figure 10-24.
4. If you select an external URL, you need to specify the markup and provide appropriate URL information.
5. Click OK to create a new URL or Cancel to return without creating a new URL.
If you click OK, you will see this new URL, TestUrl, added under the titles for My Portal.
6. To verify whether you have created TestUrl successfully, open My Portal and TestUrl. You will see a window similar to Figure 10-25 on page 537.
536 IBM WebSphere Portal for Multiplatforms V5 Handbook

Figure 10-25 A New URL called TestUrl successfully created
10.3.2 Themes and skinsThemes and skins are templates that provide a page group's look and feel. They provide specific control for branding, navigation, and decoration.
Branding is the general scheme of the page. It usually encompasses logos, color schemes, decorations, fonts, artistic layout, etc.
Navigation refers to the way in which the user gets around on the site. There are several themes that demonstrate some of the different navigation models.
Decorations are the icons and images that are used to provide function and content links as well as general look-and-feel enhancement.
Each place has a theme associated with it, and each theme has a set of skins associated with it.
ThemesA theme is an attribute of a page group, meaning you create page groups and then apply a theme to it. Themes are not user-specific. All users see the same theme that is applied to the page group. This means that a user could be
Tip: What if you add a new page or a label under the context root and you do not see this new page or a label when you log in to Portal? You can see this new page or label by performing some additional steps.
� Make sure you have added the new label or page using the Manage Pages portlet as explained above under the Creating a new page and Creating a new label sections.
� Add a Custom Unique Name for your link by clicking Administration -> Portal Settings -> Custom Unique Names Portlet. You do this because you set up the link to the page by this name.
� Modify the ToolbarInclude.jsp to add your link.
Chapter 10. WebSphere Portal administration 537

presented with a completely different site experience when navigating from one page group to the next.
Themes contain various components:
� Cascading Style Sheets (CSS) files provide a mechanism to apply look and feel to specific HTML tags. This can be done on a broad scale by specifying the attributes of the specific HTML tag. Or you can create classes and apply specific classes to the HTML attributes as desired. For example, you can specify a font size to be used on the <P> (paragraph) tag or you can create a class that specifies a font size, and then point to the class when you use the <P> tag. This second method provides the ability to apply different attributes to the same tag and achieve a variety of effects. CSS files can be found in the product install directory.
� Images provide specific brand, logos, and decorations. The image components of the theme's supported skins that are sensitive to theme settings are kept with the theme's images.
� Each theme contains its own set of JSPs to render the page groups and pages. This allows a completely different layout and brand experience from one page group to the next.
� Assets (images, JSPs, etc.) that are used in themes and skins are resolved by using WebSphere Portal supplied custom tags. There are several points within the directory structure where assets can be located. When the <wps:urlFindInxxx> tag is used, a search for the asset begins deep in the directory structure where the asset may be deployed for a specific country within a locale. If the assets is not found or the directory structure does not exist, the search continues by traversing “up” the directory tree. It is important to deploy default assets in the theme (or skin) root in order to avoid a “not found” situation.
During portal aggregation, the portal determines the theme for display as follows:
� If there is a theme associated with the displayed page group, the portal uses this theme.
� If there is no theme specified for the page group, the portal-wide default theme is used.
� If no portal default theme is set, the portal uses the theme settings given in the theme main directory, such as /theme/French for HTML.
Theme: A theme determines the global appearance of all pages in a place. This will ensure visual consistency. Themes affect the navigational structure, the banner, colors and fonts and other visual elements of a page.
538 IBM WebSphere Portal for Multiplatforms V5 Handbook

A default theme is not required for the portal.
Here is a search order example:
<...background='<wps:urlFindInTheme file="banner.jpg">'>\themes\html\science\ie5\en_US\default.jsp\themes\html\science\ie5\en\default.jsp\themes\html\science\ie5\default.jsp\themes\html\science\en_US\default.jsp\themes\html\science\en\default.jsp\themes\html\science\default.jsp\themes\html\en_US\default.jsp\themes\html\en\default.jsp\themes\html\default.jsp\themes\default.jsp
In WebSphere Portal V5, themes are located under was_root/installedApps/hostname/wps.ear/wps.war/themes/. The themes folder contains a subdirectory for each markup type.
Creating a new themeTo create a new theme:
1. Create a new directory for your theme: <was_root>/installedApps/hostname/wps.ear/wps.war/themes/html/NewTheme
2. Choose a current theme closest to the layout you want:
/themes/html/Science
Note: Theme or skin aggregation takes place in the following order:
1. /locale_region
2. /locale
3. client
4. /theme_name (for Theme) or /skin_name (for Skin)
5. /markup
Note: In WebSphere Portal V4.x, themes were located under the
was_root/PortalServer/app/wps.ear/wps.war/themes directory
Chapter 10. WebSphere Portal administration 539

3. Copy the resources into the appropriate directories
– JSPs: Default.jsp, Banner.jsp, Navigation.jsp, ... – Images: banner.jpg, navfade.jpg, ... – Style Sheet: Styles.css
4. Customize to get the look and feel you are seeking.
5. Add this new theme using the Themes and Skins portlet under Portal Administration and Portal User Interface.
SkinsSkins are used to apply specific decorations to portlets. They are used in conjunction with the theme in order to accomplish this. For instance, the theme's Cascading Style Sheet is used to specify the color of the portlet’s title bar. Some skins use images to produce rounded corners on the title bar. The rounded corner images are stored with the different themes that support the skin. This is done so that the colors match across all of the components of the portlet’s title bar. The rest of the skin assets are generic and apply to all theme uses, so they are kept in the skins folder.
Skins contain images that are used to create the visual effects of the portlet. The visual portlet container (lines, shadows, backgrounds, etc.) and the portlet navigation icons (edit, help, back, etc.) are the main components of a skin.
Skins are applied to the portlet via a JSP known as Control.jsp. Each skin has its own version of Control.jsp. It is used to specify the exact implementation of the skin.
The search for skin assets works the same way as the themes search. Using the <wps:urlFindInSkin> tag, the file system is traversed starting with a specific country within a locale and working up to the skin default.
Note: You may modify the tag definitions and the class definitions.
Tip: Before you deploy this new theme for general use, it is recommended that you deploy this new theme to a test page and test this new theme.
Note: Skins are installed independent of themes, but a skin can be associated with a theme.
540 IBM WebSphere Portal for Multiplatforms V5 Handbook

The portal determines the skin for display as follows:
1. If there is a skin specified for the portlet, the portal displays the component in that skin.
2. If there is no skin specified for the component, the portal looks for a skin at page level and uses it.
3. If no skin has been set for the page, the portal checks the page group for a skin setting.
4. If the page group has no skin specified, the portal uses the default skin of the page group.
5. If no skin has been found so far, the portal default skin is used.
To create a new skin, make a copy of one of the existing ones and modify the images and the JSP in order to get the desired look and feel. Once you finish, you will be able to choose it from the administration portlets.
In WebSphere Portal V5, skins are located under was_root/installedApps/hostname/wps.ear/wps.war/skins/. The Skins folder contains a subdirectory for each markup type.
Creating a new skinTo create a new skin, execute the following steps:
1. Create a new directory for your skin. Let us name it to NewSkin (was_root/installedApps/hostname/wps.ear/wps.war/skins/).
2. Choose a current skin closest to the layout you want (/skins/html/Science).
3. Copy the resources into the appropriate directories:
– JSPs: Control.jsp, RowContainer.jsp, ColumnContainer.jsp, etc.– Images: title_edit.gif, etc.
4. Customize to get the look and feel you are looking for.
Control.jsp is the only JSP that you would want to modify. Images may be modified or new ones created.
Skin: A skin defines the frame around a portlet, thus determining the look of the portlet. It affects only portlets. You can select a skin for each portlet in a page if the theme has skins associated with it.
Note: In WebSphere Portal V4.x, themes were located under the was_root/PortalServer/app/wps.ear/wps.war/skins directory.
Chapter 10. WebSphere Portal administration 541

5. Add this new skin using the Themes and Skins portlet under Portal Administration and Portal User Interface
Administering the Themes and Skins portletAt this time, you will administer the Themes and Skins portlet:
1. From the Portal User Interface page, select the Themes and Skins portlet. You should see the Themes and Skins portlet as shown in Figure 10-26.
Figure 10-26 Themes and Skins portlet
Tip:
Before you deploy this new skin for general use, it is recommended that you deploy this new theme to a test page and test it.
If you have a faulty theme or skin, remove it from the theme or skin folder and then remove it from WebSphere Portal using the Themes and Skins administrative portlet.
Note: In WebSphere Portal V4.x, the Themes and Skins portlet was called Manage Themes and Skins portlet.
542 IBM WebSphere Portal for Multiplatforms V5 Handbook

2. In the Themes and Skins portlet, you can see that we have WebSphere as the portal default theme and Outline as the portal default skin.
3. The Themes and Skins portlet has four administrative capabilities:
– Add New Theme/Skin
– Edit Theme/Skin
– Delete Theme/Skin
– Set Default Theme or Skin
Add new themeAdd new theme will allow you to add a new theme.
1. Click the Add New theme option.
2. You will see a window open as shown in Figure 10-27.
Figure 10-27 Add a new theme
3. Enter the name for the theme (default locale title). In our example, we have specified New Theme.
4. Enter the directory location of your theme. You can specify a relative path.
5. You will have All Skins to your left-hand side and you can use the arrow button and choose the skin that you want for the theme.
Chapter 10. WebSphere Portal administration 543

6. You can confirm with the message at the bottom of your default skin. In our example, we have chosen Diamonds as the default skin for our theme.
7. You can change the language and the theme title (locale-specific theme titles) by selecting the Set locale specific titles option.
8. Click the Set locale specific-titles option. You will see a window similar to Figure 10-28.
Figure 10-28 Change theme title and language using set locale-specific titles option
9. Once finished, click OK to add the new theme or Cancel to return.
10.You will see New Theme being added to the list of available portlet themes.
Edit ThemeThe Edit Theme option will help you modify which skin your theme uses.
1. Select the theme for which you need to modify the skin, as shown in Figure 10-29 on page 545.
Note: If only one skin is chosen, it is selected as the default. However, you can choose multiple skins and click Set as Default to make it the default skin. In WebSphere Portal V5.0, you have additional default skins and themes as compared with WebSphere Portal V4.x.
544 IBM WebSphere Portal for Multiplatforms V5 Handbook

Figure 10-29 Edit Theme
2. Select Edit theme.
3. Make the necessary changes. You can also edit local specific titles here.
4. Click OK to confirm the changes or Cancel to return.
Delete ThemeComplete the following instructions to remove a theme:
1. Select the theme you want to delete and click Delete.
2. A pop-up window will ask you to confirm your deletion.
3. Select OK to confirm or Cancel to return.
Set as default portal themeComplete the following instructions to set the portal theme as the default:
� To set a portal-wide default theme, select a theme from the themes list, then click Set as default portal theme.
If no theme is set for a place, the Portal default theme is used.
Tip: The files that compose the theme are not deleted from the system.
Chapter 10. WebSphere Portal administration 545

Add new skinYou can add a new skin using the Add New Skin option.
1. Select Add New Skin.
2. You will see a window similar to Figure 10-30.
Figure 10-30 Add a new skin
3. Specify a skin name (New Skin), a default locale and the directory location where this skin is stored. You can specify a relative path for the skin directory name.
4. The Set locale specific titles option will help you change the locale-specific titles.
5. Click OK to add the new skin or Cancel to return.
6. You should now see New Skin added to the list of available skins.
Delete skinExecute the following steps to delete a skin.
1. Select the skin you want to delete.
2. A hint window will pop up asking you to confirm the deletion. Click OK if you are sure or Cancel to return.
Tip: You should not apply the Admin theme to the portal. This theme is intended for administrative portlets and renders the portlets without a title bar.
546 IBM WebSphere Portal for Multiplatforms V5 Handbook

Set as default portal skinThis option will help you to set a portal-wide default skin for portlets:
1. Select a skin from the available skins list.
2. Click Set as default portal skin. If no default skin is set for a theme, the portal default skin is used.
The changes will be reflected when the page refreshes.
10.4 PortletsPortlets page in Portal Administration includes four portlets:
� Install
� Manage Applications
� Manage Portlets
� Web Clipping
You can use these portlets available under the Portlets section of Portal Administration to install portlets, manage Web modules and portlet applications, copy, configure, activate/deactivate and delete portlets using Manage Portlets and build a portlet from clipped contents using the Web Clipping portlet. In this section of the chapter, we will explore these portlets and its functionalities individually.
When you click the Portlets section under Portal Administration, you will see a window similar to Figure 10-31 on page 548.
Important: You should not apply the skin with the name NoSkin to a portlet. This skin is intended for administrative portlets and renders the portlet without a title bar.
Definition:
Web module: A Web module is nothing but a Web application comprised of servlets, JSPs and static content such as HTML pages. A Web module can contain more than one portlet application, JSP, servlet and static HTML file. The Web module is packaged in the Web archive (.war) file.
Chapter 10. WebSphere Portal administration 547

Figure 10-31 Portlets page in Portal Administration
10.4.1 InstallIn WebSphere Portal V4.x, this portlet was named Install Portlets. This feature will help you install a portlet application. Portlet application is installed through a Web archive (WAR) file or install remote portlets via UDDI directory (Web Services portlet). The WAR file, which is used to install portlet application can contain multiple portlets. The install process uploads the WAR file to the server, installs portlets, adds them to the list of available portlets and activates the portlets. Once you install a portlet, it is automatically activated but with no permissions. A new rule is added to Access Control making the user who installed the portlet the owner. The user can then go to the Resource Permissions portlet and assign roles to users and groups for gaining access to this portlet.
Tip: Before you install a portlet, make sure you have not installed the same portlet earlier. If you try installing twice, you will get an error message.
The portlet name should not exceed 25 characters and the portlet path length should not exceed 260 characters.
548 IBM WebSphere Portal for Multiplatforms V5 Handbook

1. Select Install portlet. Browse for the WAR file as shown in Figure 10-32. Click Next.
Figure 10-32 Browse the WAR file for installing portlet
2. Check for the list of Portlets included in the WAR file as shown in Figure 10-33 on page 550. Click Install to proceed with the installation. You can click Cancel anytime to stop the installation process.
3. At the end of the portlet installation, if it was successful, you should see a message, Portlets Successfully Installed as shown in Figure 10-34 on page 550. You can click Next if you want to install more portlets.
Important: An administrator should have manager role on the portal to install portlets.
Tip: If portlet installation fails, check for the Portal logs directory and check the latest log file located under \WebSphere\PortalServer\logs\. The name of the log file can be determined with the append of the latest time and date stamp on it (for example, wps_2003.10.27-11.00.47.log).
Chapter 10. WebSphere Portal administration 549

Figure 10-33 Check for the portlets that will be installed
Figure 10-34 Portlet successfully installed
550 IBM WebSphere Portal for Multiplatforms V5 Handbook

10.4.2 Manage Portlet ApplicationsManage Portlet Applications helps you to identify and manage existing installed Web modules (WAR file). It also displays the concrete portlet application corresponding to the selected Web module. Using this portlet, you can uninstall the portlet application and modify dynamically configured parameters or portlet application settings.
Select the Manage Portlet Applications portlet and you should see a window open as shown in Figure 10-35 on page 552. Using the Manage Applications portlet, you will be able to:
� Show Info
� Update
� Un-install
Web modules can contain one or more portlet applications, servlets JSP files and other files and are defined in the Web descriptor file (web.xml).
With the portlet applications belonging to the selected module, you can:
� Activate/Deactivate
� Rename
� Copy
� Modify Parameters
� Show Info
� Delete
Portal applications can contain one or more portlets. They are created implicitly when the WAR file is deployed and they are packaged as an enterprise application (ear file). You will see the default Web modules in Figure 10-35 on page 552. This is installed during the WebSphere Portal installation.
Note: You need to select the portlet application belonging to the selected Web module in order to see the icons for Activate/Deactivate, Copy, Modify Parameters, Show Info and Delete.
Chapter 10. WebSphere Portal administration 551

Figure 10-35 Manage Applications portlet
Show InfoShow Info describes the content of the WAR file (Web module), abstract portlet application and the abstract portlet (complete portlet application).
1. Select a WAR file and click Show Info.
2. You will be shown the selected Web module, portlet application name, concrete portlet applications belonging to the Web module, and portlets as shown in Figure 10-36 on page 553.
3. Click Done to come back to Manage Portlet.
552 IBM WebSphere Portal for Multiplatforms V5 Handbook

Figure 10-36 Manage Portlet Applications
UpdateThe Update option helps you to modify your existing portlet application without the need to uninstall your existing portlet application.
1. Select any WAR file that you need to update. Click Update and it will take you to a window similar to Figure 10-37 on page 554.
Note: Update functionality includes updating configuration parameters in your portlet and replacing the portlet code with new code, incorporating all the changes.
Chapter 10. WebSphere Portal administration 553

Figure 10-37 Update existing Web module
2. Enter or browse for the updated WAR file.
3. Click Next. You can also click Cancel to return without updating the WAR file.
4. You will get a window highlighting the portlets that will be installed during the update. Check for accuracy and click the Install option. You can select Cancel to return.
5. If the WAR file is successfully updated, you should see The web module was updated successfully.
UninstallUninstall helps to uninstall your existing portlet application.
1. Highlight the Web module to uninstall.
2. A confirmation window will prompt for confirmation. Click OK if you want to uninstall or click Cancel to return to the Manage Portlet Application portlet without uninstalling the Web module.
Tip: It is not required for you to add the portlet to the page again after doing an update. Changes are incorporated to the page where the portlet was installed automatically.
554 IBM WebSphere Portal for Multiplatforms V5 Handbook

3. If you click OK, you will get the message The web module was uninstalled successfully in the Manage Portlet Applications portlet and this Web module will be removed from the Web module section and also from the page where the portlet is deployed.
Portlet applications belonging to the selected Web moduleWhen you select a Web module, you will find the list of portlet applications corresponding to the selected Web module. When you select any of these portlet applications, you will see the options to Activate/Deactivate, Copy, Modify Parameters, Show Info and Delete as shown in Figure 10-38.
Figure 10-38 Select Portlet application belonging to the Web module
Activate/DeactivateThe Deactivate feature helps to temporarily suspend access to your selected portlet application and then with activating, provide access to the portlet application.
1. Highlight the portlet application to activate or deactivate. By default, the portlet application will be in Active state.
2. Click Activate/Deactivate to deactivate the portlet application and vice versa.
Tip: Once you deactivate your portlet application, all the portlets that are part of the deactivated application will disappear from your customized portal page.
Chapter 10. WebSphere Portal administration 555

Copy (Cloning)This option helps to copy your concrete portlet application.
You can activate or deactivate based upon your requirements. When you copy a Portal application, the newly created application is Active by default. However, portlets that are part of the newly created Portal application are Inactive. To customize this Portal application, you will have to activate it, using the Activate/Deactivate option.
1. Highlight the portlet application corresponding to WAR file of your choice.
2. Select Copy. A window will prompt you to enter the name for the copy.
3. Click OK. You can hit Cancel to avoid copying.
Once it is copied, you should see the new portlet application under the portlet applications belonging to the selected Web module.
Modify ParametersModify Parameters allows you to modify the configuration parameters of the portlet application. Parameters are originally set by portlet.xml for that instance.
1. Highlight the portlet application you want to modify. Select Modify parameters.
2. You will see a window similar to Figure 10-39 on page 557 with the portlet application name and the existing parameter values.
Note: This is useful when different portlet configuration parameters are required for different instances of a portlet.
Note: Prior to the release of this redbook, we were informed of a possible error in the use of the copy feature. This has been corrected and the fix will be included in the release of WebSphere Portal 5.0.2.
556 IBM WebSphere Portal for Multiplatforms V5 Handbook

Figure 10-39 Select Portlet Application for modifying parameters
3. To add a new parameter and value, enter the new values.
4. Click Add and Save. The parameter and value are saved and you will be taken back to the Manage Applications portlet.
5. Click Cancel to stop modifying any parameters and you will be taken back to the Manage Applications Portlet.
6. To test, select the page which contains the portlet for which you modified the parameters. You should see the new modified parameters in your portlet.
7. You can also rename a portlet application. When you clone a portlet application, you may wish to rename one of the portlet application to avoid duplicate names. Renaming helps with this functionality.
a. To change the title of the portlet, select the portlet and click Modify Parameters.
b. Under Edit Locale Specific Titles, as shown in Figure 10-40 on page 558, select the locale for which you want to change the title.
c. Click Set title for selected locale.
d. Enter the name of the file.
e. Click OK to make changes or Cancel to return.
f. If you test it, the portlet will have a new title for the locale you selected.
Chapter 10. WebSphere Portal administration 557

Figure 10-40 Set locale specific title
Show InfoThis option shows information for each concrete portlet application. It displays the names of the concrete portlets that are part of the selected portlet application.
1. Select the concrete portlet application corresponding to the Web module and click Show Info.
2. You should see a window open with information which includes the portlet application name and the corresponding portlets.
3. Click Done to return to the Manage Applications portlet.
DeleteThis deletes the portlet application.
1. Select the portlet application that you wish to delete. Click Delete.
2. A prompt window will appear to confirm. Click OK to delete the portlet application or Cancel to avoid deleting, depending on your requirement.
3. If the deletion was successful, you will not see the portlet application.
10.4.3 Manage PortletsManage Portlets allows you to selectively activate, deactivate, rename, copy, delete portlets and modify portlet parameters instead of portlet applications as we did in the previous section.
� Manage Portlets will display the list of all available portlets in the portal as shown in Figure 10-41 on page 559.
558 IBM WebSphere Portal for Multiplatforms V5 Handbook

� You can also search for portlets by specifying the search criteria (Active/Inactive state) and clicking Go.
Figure 10-41 Manage Portlets
Activate/DeactivateThis option helps to activate/deactivate portlets.
1. You can select the portlet you want to activate/deactivate and click Activate/Deactivate.
2. Once you select Activate/Deactivate option, the page will refresh and you should see the current status in the portlet.
Users who have active references to the inactive portlets on a portal page will see a message stating that the portlet is temporarily disabled.
CopyIn this section, we will copy a portlet. We will use the Hello World portlet and the following steps:
1. Create a copy of the Hello World portlet. The copy will be named HelloWorld2. Navigate to the link Administration -> Portlets -> Manage Portlets.
Note: When you take the default of displaying all portlets, the other selection options are greyed out.
You need to select a portlet to see the options Activate/Deactivate, Copy, Modify Parameters, Show Info, Delete.
Chapter 10. WebSphere Portal administration 559

2. Select the HelloWorld portlet from the list of available portlets.
3. Click Copy. You will see the new portlet just before the portlet is cloned. Please note the Inactive state of the new portlet. Additionally, the Portal shows a message stating that the portlet was cloned successfully.
4. Select the new HelloWorld portlet in the results list. Click Modify parameters and modify the title.
5. Select English and click Set title for selected locale.
6. Change to HelloWorld2.
7. Click OK. Click Save and click Cancel.
8. Select HelloWorld2 and click Activate/deactivate to activate the portlet.
9. Add the HelloWorld2 portlet to My Page -> My label -> New Page as described in step 5 of this exercise. Put HelloWorld2 in the other column.
10.Navigate to My Page -> My label -> New Page and verify that HelloWorld2 exists.
Modify parametersPortlets have configuration parameters which need to be changed after deployment. Changing these parameters through the code is a time consuming option. The Modify parameters option will allow you to modify the parameter values of your portlet.
1. Select the portlet for which you need to modify parameters.
2. Click Modify parameters.
3. You will see a window as shown in Figure 10-42 on page 561 with portlet configuration parameters and titles. Select the parameter that requires editing. Enter the new parameter or value.
4. You can also add a new parameter when you click Add.
5. The Edit Locale Specific Titles option will help you change the Portlet Title. Select the locale and click Set title for selected locale.
6. A new window will open. Make changes and then click OK. You will return to the portlet Configure parameter and title page.
Note: To copy a portlet, the user must have an Administrator, Manager, or Editor role for public pages and an Administrator or Privileged User role for private pages for both portlets and portlet applications.
Note: The Change title option is not mandatory. It can be used based on indi-vidual requirements.
560 IBM WebSphere Portal for Multiplatforms V5 Handbook

7. Click Save and then Close.
You will be taken back to the Manage Portlets page.
Figure 10-42 Modify Portlet Parameters
Show infoThis shows the portlet name, portlet title, and portlet description.
1. Highlight the portlet for which you need information.
2. Click Show info.
You should see a window as shown in Figure 10-43 on page 562 with the portlet information for the selected portlet.
3. Click Done to return to the Manage Portlets page.
Chapter 10. WebSphere Portal administration 561

Figure 10-43 Show Portlet Info
DeleteYou can delete any portlet.
1. Select the Portlet you need to delete.
2. Click Delete.
3. You will get a pop-up window for confirmation. Click OK to confirm deletion and Cancel to return.
4. The Manage Portlets page will refresh and the portlet will be deleted.
10.4.4 Web ClippingThe Web Clipping portlet allows Web content from other sites to be clipped and displayed within the portlet on a portal page. You have the option to choose an entire document by referencing a URL tag or to select only key sections from the URL.
Web Clipping Portlet Administration:� Displays sections of existing Web pages, visually or between tags.
� Links can be displayed without leaving the portal.
� Each clip creates a new portlet.
Tip: Make sure you do not delete any administrative portlets.
562 IBM WebSphere Portal for Multiplatforms V5 Handbook

� Retrieves the current version of the Web page.
� Credentials are supplied by user or administrator.
The Web Clipping portlet uses Transcoding Technology, which allows the administrator to use the front-end user interface to create new portlets with the ability to wrap contents by specifying URL information. It allows you to identify and extract specific portions of an HTML document as desired by the administrator. Links have been rewritten to go through the Portal.
When you select Administration -> Portlets -> Web Clipping, you will see a window open as shown in Figure 10-44.
Figure 10-44 Web Clipping portlet
Let us explore how to use this Web Clipping portlet by creating a new clipper.
To enable users to clip and tailor contents from the Web site, WebSphere Portal provides you with a portlet called Web Clipper.
1. From Figure 10-44, click New Portlet. You will see a window similar to Figure 10-45 on page 564.
Chapter 10. WebSphere Portal administration 563

Figure 10-45 Create a New Web Clipper portlet
2. Enter a name and default locale title for the new Web clipper. In our example, we have named the new Web clipper Test Clip. This will be the default locale setting. However, you can click Set locale-specific titles and descriptions for other languages to set locale-specific titles.
3. Specify the URL from which you intend to clip the contents. We have chosen to clip from the IBM Web site. This needs to be a fully qualified URL. The Web Clipper portlet will not allow you to navigate further if the URL link is not working.
4. Provide a description about this Web clipper.
5. You can click Next to keep the default configuration or click Advanced Options to make changes.
6. When you click Advanced Options, you will see the various Modify Web Clipper options. What options you will be using depends on your architecture scenario.
a. To modify the clipping type (replacing the default value), click Modify clipping type. You will see a window similar to Figure 10-46 on page 565.
Tip: Unlike WebSphere Portal V4.x, if you keep the default options, you will have the default setting of Keep all content from the base URL. This will clip the entire contents from the URL.
564 IBM WebSphere Portal for Multiplatforms V5 Handbook

Figure 10-46 Modify Clipping Type
b. For our example, we have used HTML Clipping, which allows you to manually select the elements from the URL to clip.
c. Keeping all content options will keep all the content in the URL.
d. Text clipping will allow you to clip content between specified text.
• You can specify the content after this text string with the option Start clipping after text.
• You can specify at what content text string clipping should stop using the option End clipping before text.
• You can also include the start and the end text string in the output by selecting that option.
• Click OK to confirm changes or Cancel to return while keeping the default.
e. If you use a proxy server to access the content (URL), then modify these changes by selecting Modify firewall options.
i. Click Use a Proxy Server.
ii. Provide details regarding the hostname and port for communicating with the proxy server.
iii. Specify user ID and password information for accessing this proxy server.
iv. Click OK to make the changes or Cancel to return.
Chapter 10. WebSphere Portal administration 565

f. Some Web sites which you choose for clipping content require user ID and password information. To specify this information, select Modify authentication options.
i. By default, when you select this option, you will have No authentication required selected. Select Authentication required if you need to select an authentication method for accessing the HTML document.
ii. Enter whether you would like to use HTTP Basic Authentication or a Form-based authentication. You will need to provide realm or user ID and password information for authentication. Then click Set Credentials.
iii. Select the type of vault slot you would like to associate with the Web clipper. If a private slot is used, then user ID and password information must be specified.
iv. Click OK to confirm changes.
g. If the URL from which you will clip the content requires special handling, select Modify rules for URL rewriting.
i. When you open this option, by default it will be set to Use standard URL rewriting. If you select the option Use rules to exclude URLs from rewriting, you will have to specify the new rule by clicking Add. You can delete the rule by clicking Delete.
ii. Click OK to continue or Cancel to return.
h. If you need to remove JavaScript from the clipped content, select the option Modify security options.
You can also select the option Remove JavaScript from clipped content.
7. After specifying the Advanced Options, click Next.
8. You will see a window as shown in Figure 10-47 on page 567. Since we have used http://www.ibm.com as our URL, you can see this Web site. We will clip contents from this site.
– By default, the Follow links option is set to Never. The Web clipper will not follow links that are within the content you select to clip. If you set to Ask, you will be prompted with a message from the Web clipper as to whether you want to follow the link. In our example, we have set this to Never.
– Select the content to clip by moving over the content and clicking it. You will see a yellow color indicating the selected clipped content. Clicking twice will deselect the clipped content.
– You can preview the clipped contents that you selected as shown in Figure 10-47 on page 567.
566 IBM WebSphere Portal for Multiplatforms V5 Handbook

Figure 10-47 Select the contents to be clipped
9. Click Next and you will be taken to a window to preview the content you selected for clipping, as shown in Figure 10-48 on page 568. This will be the content that will appear in the portlet based on your current settings.
10.Click Finish to save and create this portlet or Cancel to modify the content. Before you click Finish, at any time you can click Back to modify changes.
Chapter 10. WebSphere Portal administration 567

Figure 10-48 Clipped content preview
11.When you click Finish, you will see this new Web clipped portlet added to the list, as shown in Figure 10-49.
Figure 10-49 New Web Clipper portlet
12.To test this new Web clipper portlet, we deployed it to a page and the results are shown in Figure 10-50 on page 569.
568 IBM WebSphere Portal for Multiplatforms V5 Handbook

Figure 10-50 Web Clipper portlet deployed to a page
10.5 AccessThe Access part of the Portal administration will help you control your Portal resources. You can create users, groups, associate users to groups, create child groups and also store credential information in the credential vault.
When you click Administration -> Access, you will see a window similar to Figure 10-51 on page 570.
Note:
You can copy specific cookies from the client-portal conversation to the original portal conversation. If you have cookies like uid (user ID) and password that you need to preserve through the clipping portlet, locate your Web clipper portlet and modify parameters with the value: ClientCookies =uid.password (this is done through Portal Administration -> Portlets -> Manage Portlets -> Modify Parameters after you select the Web Clipping portlet under Manage Portlets).
Similarly, you can specify the CacheTimeout value.
Chapter 10. WebSphere Portal administration 569

Figure 10-51 Access section of Portal administration
Access has four portlets:
� Users and groups
� Resource permissions
� User and group permissions
� Credential vault
We will explore each of these portlets individually.
10.5.1 Users and groupsThe Users and Groups portlet in WebSphere Portal V4.x was split into two portlets, Manage Users and Manage Groups.
Centralized administration of users and user groups is provided through the Member manager component of Portal. Users can register and manage their own account information, or an administrator can provision and manage users. Administrators can also create groups and maintain group membership. A user group (sometimes called member group) is an arbitrary collection of members. The members of the group are users or other groups.
570 IBM WebSphere Portal for Multiplatforms V5 Handbook

The Member Services component:
� Manages user profile information
� Manages user group information
� Provides a user repository containing user profiles, group definitions, and organizational entities. The physical implementation of the registry can be a database or a directory server.
Users can be generic or registered users. Generic users are basically anonymous users; registered users have an associated user profile and a user ID and password kept in the authentication registry. An authenticated user, upon successful login (successful authentication), becomes an authenticated user who is considered to be part of a group. You can assign roles to this group, which will establish the permissions this particular user group has on portal resources. Groups can contain groups and this can be managed in the same administration window. In other words, WebSphere Portal supports nested groups. Group memberships give the required permissions to access an object or perform a request. Member Services accesses the user authentication registry to update user ID and password information.
The user registration page included with WebSphere Portal exposes a limited set of user attributes. You can add or delete attributes as required for your portal implementation, either by exposing additional attributes from the underlying user repository (LDAP) that are not currently exposed, or by extending the user profile to include new attributes.
� Portal will recognize an existing user/group in an existing repository (for example an LDAP).
� A user can modify his profile (except the user ID).
� Users may belong to multiple groups.
� User membership can also be managed externally.
� Typically, a portal administrator will separate its users in groups. Separating smaller groups from bigger groups will enable sophisticated structuring of the users in the system.
Read attributes for users and groups are stored in the WebSphere/PortalServer/shared/app/config/services/PumaService.properties file.
Note that you need to have at least one user with the Administrator@Role..
Chapter 10. WebSphere Portal administration 571

Users and Groups portletThe Users and Groups portlet will help you create a new user or a group, search for a user or group, edit user, group membership information and delete a user or a group.
When you click Administration -> Access -> Users and Groups, you will see a window open as shown in Figure 10-52.
Figure 10-52 Users and Groups Portlet
� You can search for user or user group information. Click Search as in Figure 10-52. Select the options for searching for users or user groups from the drop-down list. You can also run a search on specific search conditions such as uid. For our example, we ran a search for user Test. The results were similar to those shown in Figure 10-53 on page 573.
572 IBM WebSphere Portal for Multiplatforms V5 Handbook

Figure 10-53 Search for users or user groups
� In the Manage Users and Groups portlet, you will also be able to configure or edit the Manage Users and Groups portlet page by clicking the Configure option or Edit option. You can specify a maximum number of items and also a maximum number of items per page.
Tip:
� You can control how many users or groups you will see when you perform a search. This can be done by specifying the limits on these parameters in the wmm.xml file.
maximumSearchResults= (specify maximum number of search results)
searchTimeOut= (specify timeout for searches)
� Search results will contain only users and user groups that you are authorized to modify.
Chapter 10. WebSphere Portal administration 573

Creating a new user or user groupThis section describes the creation of a new user or user group.
As in Figure 10-52 on page 572, select a group from the ID list for which you wish to create a new user. When a new user is created, they are added as a member of the group that is currently selected and as a member of the all authenticated users group.
1. You can select the option New Group to create a new group. You will see a window similar to Figure 10-54.
Figure 10-54 Create a new group
Specify the new group name and when you click OK, you will see this new group added to the list of groups that Portal will display, as shown in the Figure 10-55 on page 575.
574 IBM WebSphere Portal for Multiplatforms V5 Handbook

Figure 10-55 New group added
2. In our example, we selected all authenticated portal users. We wanted to create a new user under this group. When you select this option, you will see a window as shown in Figure 10-56 on page 576. You will see a list of users existing under this user group. You can add, edit and delete users or user groups.
Chapter 10. WebSphere Portal administration 575

Figure 10-56 Creating a new user
3. Click New User. You will see a window as shown in Figure 10-57 on page 577.
576 IBM WebSphere Portal for Multiplatforms V5 Handbook

Figure 10-57 Provide information for creating a new user
You need to provide information for creating a new user as shown in the figure above.
a. Specify User ID information. The (*) represents values that are required for registering the new user.
b. Provide password information for the user and confirm the password.
c. Type the first and last name for the user.
d. Specify an e-mail address.
e. You can select the preferred language for the user from the drop-down menu list. If no language is selected, Portal will assume that the user will use the default language.
f. Click OK to register the new user or Cancel to return.
Note: The User ID must be 3-60 characters in length. It can contain alphanumeric characters and the hyphen "-", period ".", and underscore "_" characters. No other characters are permitted in this field.
Chapter 10. WebSphere Portal administration 577

4. When a new user is created successfully, you will see the message User created successfully as shown in Figure 10-58. Also, you can see that the new user we created (testuser1) was successfully added to the list of available users under the All authenticated portal users group.
Figure 10-58 New user successfully created
In Figure 10-58, you will see five options that you can perform on a user or user group.
� Option 1 - View Membership
� Option 2 - Duplicate group assignments
� Option 3 - Duplicate role assignments
� Option 4 - Edit user information
� Option 5 - Delete users or user groups from WebSphere Portal
Note: You get a confirmation message when you create a new group. The steps involved and the icon functionalities which will be explained in this chapter are similar for both users and groups. As an example, a user is used to explain these functionalities.
578 IBM WebSphere Portal for Multiplatforms V5 Handbook

Option 1: View Membership
� This option will display a list of all the groups of which the selected user or user group is a member.
� When you select this option, you can remove a membership information when the results are displayed or click Cancel to return to the previous window.
Option 2 : Duplicate Group Assignments
1. Select the user or user group and click Duplicate group assignments option. This user or user group will inherit the group assignments.
2. Select the user or user group from where this user or user group will inherit assignments.
3. Click OK to confirm changes or Cancel to return to the previous window.
4. If you click OK, you will get the message User or user group membership duplicated successfully.
Option 3: Duplicate Role Assignments
1. Select the user or user group and click Duplicate role assignments.
2. Select the user or user group that will serve as the model, as shown in Figure 10-59 on page 580.The role assignments for this user or user group will be added to the user or user group selected earlier.
3. Click OK to confirm changes or Cancel to return to the previous window.
Chapter 10. WebSphere Portal administration 579
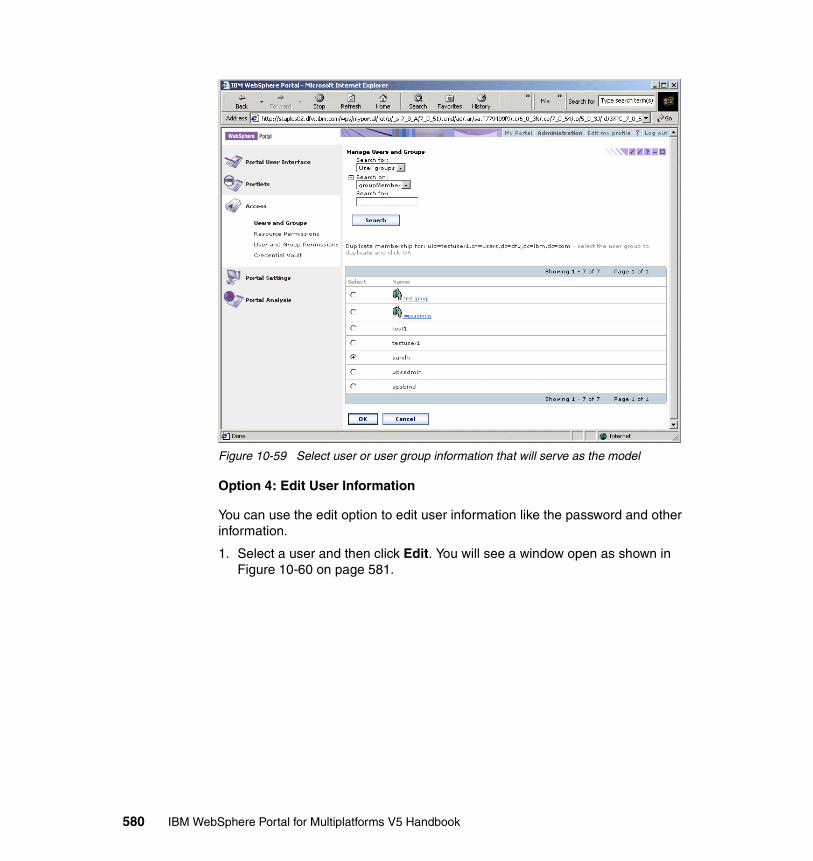
Figure 10-59 Select user or user group information that will serve as the model
Option 4: Edit User Information
You can use the edit option to edit user information like the password and other information.
1. Select a user and then click Edit. You will see a window open as shown in Figure 10-60 on page 581.
580 IBM WebSphere Portal for Multiplatforms V5 Handbook

Figure 10-60 Edit user information
2. Make the necessary changes and click OK to save these changes or Cancel to return to previous page.
Option 5: Delete users and user groups from WebSphere Portal
Deleting a user group from the portal does not delete the members of the group. To delete an user:
1. Select the user or user group that you wish to delete. Deleting a user from the All authenticated users group is the only way to delete an user from WebSphere Portal.
2. Click Delete.
3. Click OK to confirm the deletion or Cancel to return. If you click OK, you will notice that the user or user group has been deleted.
Adding a member to a user group A member can be a user or a user group.
1. Select the user group to which you want to add members.
2. Click the Add Member icon as shown in Figure 10-61 on page 582.
Chapter 10. WebSphere Portal administration 581

Figure 10-61 Add member to a group
3. Search for the user that you wish to add to the user group and click OK.
4. You can also remove this user from the user group by selecting the user and clicking the Remove icon.
10.5.2 Resource permissionsBefore we proceed with this portlet, we will need to have an understanding of some terminologies associated with WebSphere Portal security.
AuthenticationThe authentication component is responsible for authenticating users at login. That is, it checks whether a user is who he claims to be. Typically, this is done by requesting information from the user about identity and credentials, such as a password to prove identity. The authentication component checks whether the
Tip:
� User name and user group names must be unique.
� When your search results are large and displayed in multiple pages, you can use Jump to page option to specify a page number.
582 IBM WebSphere Portal for Multiplatforms V5 Handbook

credentials that a user provided match the assumed identity. If the credentials are verified successfully, the user is logged in and a session is established.
There are different authentication mechanisms. The most important ones from a server perspective are form-based or basic authentication based on user ID and password. SSL client authentication is based on digital signatures.
By default, WebSphere Portal uses form-based authentication. Form-based authentication means that a user is prompted through an HTML form for the user ID and password for authentication when trying to access the portal. In a database-only installation, WebSphere Portal validates the user against its own database. However, in a default database with LDAP installation, WebSphere Portal requests that the WebSphere Application Server validate the authentication information against a Lightweight Directory Access Protocol (LDAP) user registry.
WebSphere Application Server uses LTPA as the authentication mechanism. A Common Object Request Broker Architecture (CORBA) credential is used to represent authenticated users and their group memberships. When a user tries to access a protected resource, the application server intercepts the request and redirects the request to the login form. This form posts the user ID and password to the portal that requests the application server to authenticate the user. If the user can be authenticated, a valid CORBA credential is created and an LTPA cookie is stored on the user's machine.
The authentication registry is specified during the WebSphere Portal V5 installation and is recorded in <wp_root>/shared/app/wmm/wmm.xml.
Single sign-onSingle sign-on is often used in conjunction with security. It is also a frequent requirement for a portal, especially an Enterprise Portal. Indeed, one of the base requirements of a portal is single sign-on.
With single sign-on (SSO), after a first successful authentication, the client will not be asked for further authentication. He is automatically authenticated for the applications participating in the single sign-on domain.
WebSphere Portal uses a double-realm SSO concept (see Figure 10-62 on page 584).
The Client-Web App SSO is a well-known concept from other WebSphere products. A flat implementation of such an SSO leads to parallel operating application servers, such as WebSphere Application Server or a Domino Application Server, where both can generate and validate unique credential tokens of users. A scenario as shown in Figure 10-62 on page 584 demonstrates the use of an Authentication Proxy prior to accessing applications within an SSO
Chapter 10. WebSphere Portal administration 583

domain. The Authentication Proxy would then pass proper information to the applications of the SSO domain to make them aware which client it is and that the client was successfully authenticated. With WebSphere Application Servers such as WebSphere Portal in that layer, this is usually done by an implementation of the Trust Association Interceptor (TAI). Applications that do not need to know the identity of the client might assume that all requests are correctly authenticated.
The Portal-Back End SSO is conceptually similar and typical for a portal that acts as an aggregation engine. WebSphere Portal uses the Credential Vault concept to give the portlets the ability to store and retrieve credentials specific to users and applications. Portlets can also leverage ready-to-use or self-made credential object implementations to authenticate the user for the back-end applications.
The double-realm SSO concept illustrates that the client (shown in Figure 10-62) will authenticate only once to the Authentication Proxy or to the Application Server layer. Portal administrators and the portlet developers must ensure that the client authenticates to the back-end applications as well.
Therefore, the client itself does not need to be aware of the existence of the back-end application even if he uses a user identifier and password for it.
Figure 10-62 Single sign-on of aggregation components and back-end components
Back-endApplication
Back-endApplication
Back-endApplication
584 IBM WebSphere Portal for Multiplatforms V5 Handbook
User registryUser registry is a datastore that contains user account information, such as user ID and password. This information is accessed during authentication. WebSphere Portal support three types of user registries:
� LDAP
� Custom User registry
� Third-party authentication using Trust Association Interceptors (TAIs)
Member ManagerThis was called Member Services in WebSphere Portal V4.x. Member Manager is a component of WebSphere Portal that manages data for users and groups (called members). User information needs to be available in the member database for authentication to succeed. Member Manager will hold attributes associated with each user or user groups. Features of Member Manager include:
� Managing user profile information and data
� Managing the group memberships of users in WebSphere Portal
AuthorizationAuthorization controls access to all sensitive portal resources, for example pages or portlet instances. Authorization is also called access control. Actions on particular portal resources should only be possible after receiving authorization from the access control component.
Users must successfully authenticate before they can be authorized to use Portal resources. An authenticated user will be able to view portal resources that he has access to. WebSphere Portal in the background verifies that the logged in user has the proper privileges for accessing a particular resource. Access rights are administered through the User Group Permissions and Resource Permissions portlets and stored in the WebSphere Portal database by default.
You can also use an external security manager, such as Netegrity SiteMinder and Tivoli Access Manager for authentication and authorizing portal resources.
In WebSphere Portal V5.0, access control is based on roles.
RolesA role is a set of permissions. Roles can be assigned (or mapped) to individual principals granting those principals the corresponding permissions.
A permission is a privilege that allows a principal to perform a specific action on a specific resource, for example, to view the Sales Page. Roles are denoted by RoleType@Resource.
Chapter 10. WebSphere Portal administration 585

For example, let’s say that there is a role called User@SalesPage containing the permissions (View, SalesPage) and (View, SalesPortletInstance). If this role is assigned to the user group SalesForce, all members of this group (including nested groups) are allowed the perform the action View on the Sales page and the Sales portlet, for example, see the contents of the Sales Page and use the Sales Portlet. Users with roles on resources that exist towards the bottom of the resource hierarchy can always navigate to these resources.
Roles are assigned to users and groups contained in the user registry. Roles can be assigned explicitly by someone like the portal administrator or implicitly through group membership. They can also be inherited from a parent resource.
You must make sure that there is at least one user with the Administrator@Portal role. Otherwise, you will not be able to use WebSphere Portal.
Inheritance and role blocksRoles are created within the portal by applying an action set to a specific resource within the resource topology. The resulting set of permissions is determined by combining the set of actions contained in the action set with the resource and all descendant resources (as long as no inheritance blocks are encountered). An action set is a named set of actions that provides a grouping of individual actions (for example, {View, Edit}). The portal provides a set of predefined action sets, each of which contains a set of actions that is typically needed to fulfill specific tasks within the portal (for example, adjust and modify the layout of shared resources).
The concept of propagating permissions from a root node to all the descendants of this node is called permission inheritance. Inheritance from a resource hierarchy can be blocked. There are two types of role blocks: inheritance blocks and propagation blocks.
Inheritance blocks prevent role assignments from being transferred from a parent resource. Propagation blocks prevent a resource from distributing to child resources.
Shared resource and private resourcesShared resources are portal resources which can be accessed by all portal users.
Private resources are resources that are personalized by a specific user for their own use. A private page can be accessed only by its owner. Any user who creates a portal page becomes the owner for that particular page.
586 IBM WebSphere Portal for Multiplatforms V5 Handbook

ResourcesProtected resources are resources that can be accessed by a restricted set of users only. In order to be allowed to access a protected resource in a specific way, the user needs a corresponding permission on this resource. The following types of resources are protected within the portal:
� Web modules
� Portlet application definitions
� Portlet definitions
� Portlet entities
� Content nodes (pages)
� User groups
� Users
� URL mapping segments/URL mappings
� WebSphere Portal Content Publishing projects
� WebSphere Portal Content Publishing resource collections
� WebSphere Portal Content Publishing directories
� WebSphere Portal Content Publishing resource
� WebSphere Portal Content Publishing editions
You can assign roles on portal resources. Users and groups can have multiple roles on the same resource.
Portal security defines the following roles and the associated permissions:
� Administrators are allowed to have unrestricted access on all portal resources
� Security Administrators are allowed to grant access on a resource.
� Delegators are allowed to grant access to other principals
� Managers are allowed to create, edit, and delete shared resources
� Editors are allowed to create and edit shared resources
� Privileged Users are allowed to create private resources
� Users are allowed to view portal resources
Delegated administrationWebSphere Portal installation uses a dedicated administrative user. This user is a member of the group wpsadmins by default. WebSphere Portal supports
Chapter 10. WebSphere Portal administration 587
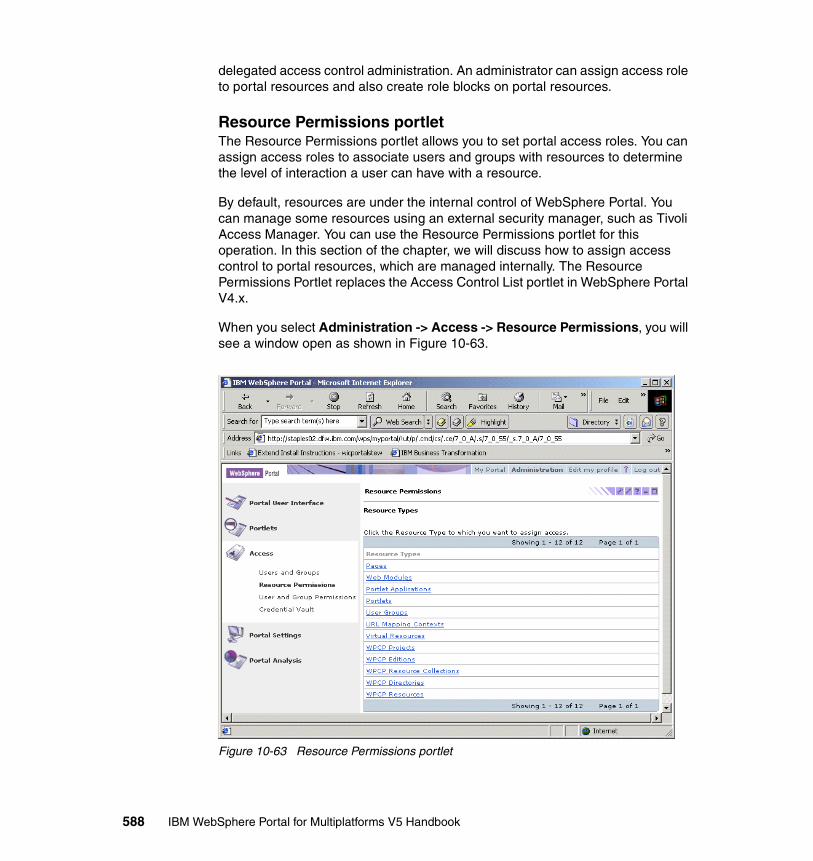
delegated access control administration. An administrator can assign access role to portal resources and also create role blocks on portal resources.
Resource Permissions portletThe Resource Permissions portlet allows you to set portal access roles. You can assign access roles to associate users and groups with resources to determine the level of interaction a user can have with a resource.
By default, resources are under the internal control of WebSphere Portal. You can manage some resources using an external security manager, such as Tivoli Access Manager. You can use the Resource Permissions portlet for this operation. In this section of the chapter, we will discuss how to assign access control to portal resources, which are managed internally. The Resource Permissions Portlet replaces the Access Control List portlet in WebSphere Portal V4.x.
When you select Administration -> Access -> Resource Permissions, you will see a window open as shown in Figure 10-63.
Figure 10-63 Resource Permissions portlet
588 IBM WebSphere Portal for Multiplatforms V5 Handbook

Assign roles1. Click the resource for which you want to assign access. For our example, we
have selected Pages as our resource. You will see a window similar to Figure 10-64.
You can configure the settings for Resource Permissions portlet by clicking the Configure option. You can set the number of items that a search will retrieve and the number of items displayed on a page.
Figure 10-64 Assign Roles to a resource
2. Click the Assign Access icon associated with the Page Title. By default, this will be Content Root. When you click the Assign Access option, you will see a window open as shown in Figure 10-65 on page 590. You will see the roles, inheritance, propagation information on these roles and also the ability to view, add or delete roles when you select the Edit role option.
You can display or modify owner information of the resource by clicking the option Display/Modify Owner.
Chapter 10. WebSphere Portal administration 589

Figure 10-65 Assign Access
3. When you expand Content root as in Figure 10-64 on page 589, you will see a window open as shown in Figure 10-66 on page 591.
The search results include only users, user groups, and resources that you are authorized to modify.
590 IBM WebSphere Portal for Multiplatforms V5 Handbook

Figure 10-66 Assign Access for Content Root
4. Select the Assign Access option for the Administration page. You will see a window open as shown in Figure 10-67 on page 592.
Chapter 10. WebSphere Portal administration 591

Figure 10-67 Assign access for Administration page
5. Click Edit Role for the Administrator role. You will see a window open as shown in the Figure 10-68 on page 593.
6. You can add members to the admin role by selecting the option Add Role. You will see the Delete option only when the member has an explicit role assignment. A check mark in the inherited column indicates that the role is inherited from the resource hierarchy. To remove a user from an explicit role, click the Delete icon corresponding to the role member. Confirm when prompted for deletion. This option will remove the user from that particular role and not from WebSphere Portal. To remove the user completely, you can remove the role from the group to which the member belongs. To remove inherited role assignment, change the role of the member on the parent resource.
592 IBM WebSphere Portal for Multiplatforms V5 Handbook

Figure 10-68 Add/Delete members to the role
7. When you click the Add icon, you will see a window open as shown in Figure 10-69 on page 594.
a. Browse or search for the appropriate user or user group.
b. Select the appropriate user or user group from the search results.
c. Click OK; this user or user group will have explicit assigned roles.
d. You will see the message Members successfully added to the role as shown in Figure 10-70 on page 595.
e. In our example, the user testuser1 will have administrative privilege. To test this role, log in to WebSphere Portal as the user testuser1. You will see all the administrative portlets indicating that this user has administrative authority due to the administrator role.
This confirms that you have successfully added (explicitly assigned) a role to a user or a member.
Chapter 10. WebSphere Portal administration 593

Figure 10-69 Add member to the role
594 IBM WebSphere Portal for Multiplatforms V5 Handbook

Figure 10-70 Member successfully added to the role.
Creating role blocks1. Select the appropriate resource and click the Assign Access icon.
2. To create a propagation block, remove the check mark from the appropriate Allow Propagation check box. Child resources of this particular resource will no longer inherit any assignments for this role type.
Restoring the check mark option will remove the role block.
3. To create an inheritance block, remove the check mark from the appropriate Allow Inheritance check box. This resource will not inherit from the parent resource.
Restoring the check mark option will remove the role block.
Chapter 10. WebSphere Portal administration 595

10.5.3 Users and Group Permissions portletThe User and Group Permissions portlet allows you to view and modify the roles that users and groups have on WebSphere Portal resources. The User and Group Permissions portlet indicates whether a role is:
� Explicitly assigned
� Implicitly acquired through group membership
� Inherited via the resource hierarchy
When you select Administration -> Access -> User and Group Permissions portlet, you will see a window open as shown in Figure 10-71. You will see the available users and user groups listed. You can also configure the number of items that a search will retrieve and the number of items displayed on a page by clicking the Configure option.
Figure 10-71 User and Group Permissions portlet
1. You can select either Users or User Groups. For our example, we have selected the option Users.
2. You will be presented with a list of users.
You can search for users, user groups, and resources. Specify the search criteria and select the option Search. You will see a display of your search results. You can run a wildcard search with (*). This will display all the available users or user groups available in the portal based on your selection.
596 IBM WebSphere Portal for Multiplatforms V5 Handbook

3. In the next window, click the Select Resource Type option for users (anonymous portal user). You will see the pages available for this type of user, as shown in Figure 10-72.
Figure 10-72 Pages available for an user
Assigning explicit roles to users and user groupsIn this section, we show how to assign explicit roles to users and user groups. Complete the following steps:
1. Select the type of resource from Figure 10-72. For our example, this is the Administration page.
2. Click the Assign Access icon to assign access for this resource page. You will see a window open as shown in Figure 10-73 on page 598.
A check mark in the Inherited/Group Member column can indicate any of the following:
– The role is inherited through the resource hierarchy
– The role is implicitly assigned through the group membership.
Chapter 10. WebSphere Portal administration 597

– The role is both implicitly assigned and inherited through the resource hierarchy.
Figure 10-73 Assign Explicit Persmissions
3. To explicitly assign a role to the user or user group, place a check mark in the assigned roles check box. For our example, we have placed the check mark on all the roles.
4. Click OK to provide these permissions or Cancel to return to the previous window.
5. Click Done when finished, as shown in Figure 10-74 on page 599.
598 IBM WebSphere Portal for Multiplatforms V5 Handbook

Figure 10-74 Assign Permissions
As you read in the previous section under Resource Permissions, since we explicitly specified permissions, you have the option to delete a member from the role, as shown in Figure 10-75 on page 600. Note that this is checked through the Resource Permissions portlet.
Chapter 10. WebSphere Portal administration 599

Figure 10-75 Delete Member from Role
Exercise: how to set permissions on a resourceIn this section, we will set permissions on a resource. The objective is to provide Edit privilege on portlets for users from one group and deny this privilege on portlets when users from any other group log in.
1. Earlier in this chapter, we created a group called TestGroup. Create a user called “test1” and add this user to the group TestGroup. You can refer to “Users and Groups portlet” on page 572 for information regarding creating a new user and adding a user to a group.
2. Open the Welcome page under MyPortal. You will see a window as shown in Figure 10-76 on page 601. Example: the My Stocks portlet has the options for Edit (pencil icon).
By default, all the authenticated portal users can see the pencil icons, because they inherit PrevilegedUser@ThePage and PrivilegedUser@ThePortal roles, which allow the right to create private resources.
600 IBM WebSphere Portal for Multiplatforms V5 Handbook

Figure 10-76 Observe My Stocks Portlet
3. Click Administration -> Access -> Resource Permissions.
4. Select Pages as the type of resource. Click Content Root -> My Portal -> Welcome -> My Page as shown in Figure 10-77 on page 602.
Chapter 10. WebSphere Portal administration 601

Figure 10-77 Assign Access for My Page
5. You will see the list of roles along with the propagation, inheritance and option to edit role. When you click Edit Role for the Privileged User role, you will notice that all authenticated portal users are members of this role as they inherit this role. Remove the check mark for Allow Inheritance for the Privileged User as shown in Figure 10-78 on page 603. This will remove inheritance.
602 IBM WebSphere Portal for Multiplatforms V5 Handbook

Figure 10-78 Remove Inheritance to Privileged User
6. Click OK for the changes to take effect.
7. Go to Access -> Resource Permissions -> Pages -> Content Root -> My Portal -> Welcome -- > My Page. Click Assign Access.
8. Add TestGroup as a member of this role, as shown in Figure 10-79 on page 604.
Chapter 10. WebSphere Portal administration 603

Figure 10-79 Add user as member in the role
9. Click OK and Done.
TestGroup has been assigned the role PrevilegedUser@My Page.
10.Click Edit Role for the role User and add All authenticated portal users as the user group which can access these portlets.
11.Click OK.
12.We have removed all users from the role PrevilegedUser@My Page. We want the default user (all authenticated portal users) to have only a User@ My Page role assignment and not PrivilegedUser@My Page role assignment.
To test whether we have set the role assignments properly, log in to WebSphere Portal as user test1. You will see a window open as shown in Figure 10-80 on page 605. Since this user is a member of group TestGroup, this user will have the right to edit all the portlets.
604 IBM WebSphere Portal for Multiplatforms V5 Handbook

Figure 10-80 User logged in as Test1
13.Log in to WebSphere Portal, as a different user, abc1, who is not a part of TestGroup; you will see a window open as shown in Figure 10-81 on page 606.
Notice that the portlets in My Page do not have the edit icon (pencil icon). We have blocked the inheritance on the role Privileged User for all authenticated users to My Page. My Page will not inherit the access rights from its parent. All authenticated users will not automatically get the PriviligedUser action set on this resource. Only members of the group TestGroup will have the right to edit the portlets.
This was the privilege all authenticated users used to have before we completed this exercise.
14.This concludes our exercise, where we were successfully in setting permissions on a resource.
Chapter 10. WebSphere Portal administration 605

Figure 10-81 Login as user abc1
10.5.4 Credential VaultWebSphere offers a Credential Vault as a PortletService. The PortletService interface of the portlet API enables portlets to use pluggable services like Credential Vault via dynamic discovery. It provides portlets with a mechanism for mapping from a user identity to a credential, such as a secret. Therefore, portlets do not need to store user credentials as part of the user-specific portlet data.
In WebSphere Portal V5, the portal authenticates users using the credentials stored in vaults.
Back-end single sign-onEspecially by using WebSphere Portal as an enterprise portal, WebSphere Portal can often be used as an aggregation and consolidation engine, integrating various enterprise information systems and presenting them through the portal user interface. Because of their design and of various security aspects, it is often not possible or not reasonable for them to relinquish control of their application security, even if they are accessed through the WebSphere Portal and not directly by the user’s Web browser.
606 IBM WebSphere Portal for Multiplatforms V5 Handbook

Those back-end systems should therefore still be able to use their own authentication and authorization mechanisms. The users, however, should not be forced to authenticate repeatedly. Permitting the user to authenticate just once is called a single sign-on solution.
Single sign-on from the portal to the back-end applications allows a client (a user with a Web browser), having once logged in to the portal, to access a number of back-end applications through respective portlets without having to authenticate at each of these back-end applications.
Leveraging the WebSphere Portal Credential Vault system, portlets, usually specific to the back-end system, can log in to those systems on behalf of the user. See Figure 10-82 for a schematic description of the single sign-on procedure. A user performs a standard login to WebSphere Portal. The portlets leverage the Credential Vault (CV) through the WebSphere Portal Java APIs to retrieve valid credentials. Using these credentials, the portlet is able to perform a login at the back-end application.
Figure 10-82 Schematic description of the single sign-on procedure
Credential Vault segments and slotsThe Credential Vault system can store and manage Principals and Credentials for various back-end resources and various users.
� A Principal is usually a user ID. It is always a unique identifier for the user on that particular back-end system.
� A Credential is usually a password string used by the back-end system to authenticate the Principal.
Chapter 10. WebSphere Portal administration 607

Figure 10-83 Illustration of the WebSphere Portal Credential Vault structure
Vault segmentsIn the Credential Vault system, the vault is partitioned into vault segments and the vault segments again can have various vault slots. The slots are specific to the back-end application for the shared slots and specific to user and back-end applications for slots that are not shared.
The vault segments map onto a specific vault implementation through corresponding vault adapters (see Figure 10-83). By default, the WebSphere Portal internal implementation will be used. It saves its data in the WebSphere Portal database tables. Tivoli Access Manager’s repository could be used as an external implementation of the vault.
The Credential Vault system distinguishes between two different types of vault segments:
� Administrator-managed
Only Administrators can create credential slots in such a vault segment. Portlets (that is, users) can set and retrieve credentials from a slot in such a segment if they are authorized. They cannot create slots.
608 IBM WebSphere Portal for Multiplatforms V5 Handbook

� User-managed
Portlets, acting on behalf of a portal user, are allowed to create credential slots in this vault segment.
An internal flag marks whether the segment is to be managed by the administrator or by the user.
� Examples of administrator-managed vault segments are corporate resources such as Lotus Notes databases or intranet passwords.
� An example of a user-managed vault segment is a personal POP3 mail box for a user.
Administering the Credential Vault portletWhen you select the option Administration -> Access -> Credential Vault, you should see a window open as shown in Figure 10-84.
Figure 10-84 Credential Vault Portlet
� If you select Add a vault segment, you will be able to create a new vault segment.
a. When you select this option, you will see a window open as shown in Figure 10-85 on page 610.
Chapter 10. WebSphere Portal administration 609

Figure 10-85 Create a new Vault Segment
b. In the Add a vault segment window, you will select a vault where you want to add a new segment. In the Vaults drop-down field, choose the Default vault implementation based on the WebSphere Portal database. This is the only vault available by default, even though using the Tivoli Access Manager vault repository is also supported. The number in brackets shows how many administrator-managed segments were already defined for this vault.
c. The Resources within selected vault field shows a comma-separated list of the names of the resources located in the vault.
d. In the vault segment name field, insert a name. You may also optionally insert a name in the vault segment description field.
e. Click OK.
f. You will be returned to the Credential Vault portlet. A message will tell you whether or not the vault segment was successfully added, as shown in Figure 10-86 on page 611.
610 IBM WebSphere Portal for Multiplatforms V5 Handbook

Figure 10-86 Vault segment added successfully
� The Manage vault segments option will help you to view or delete a vault segment.
When you select this option, you will see a window open as shown in Figure 10-87 on page 612.
Chapter 10. WebSphere Portal administration 611

Figure 10-87 Manage vault segments
a. If you want to delete a vault segment, click the appropriate radio button to do so. You will be prompted with a JavaScript pop-up window and asked to confirm.
b. Leave the window by clicking the Done option.
Vault segment slotsEach vault segment can contain one or more Credential Vault slots, which are logical containers where portlets store and retrieve a user's credentials. A Credential Vault slot contains only one credential per user and is the place where the credential secrets are logically located.
From a physical implementation point of view, the credentials of a user are held in a vault, which could be a database table, with the user identifier and the resource name as a unique key.
A Credential Vault slot is logically linked to a vault resource.
The WebSphere Portal Credential Vault distinguishes between three different types of credential slots:
� A system credential slot stores system credentials. These are credentials where the secret is shared among all users and portlets. This type of credential slot is created in administrator-managed vault segments.
612 IBM WebSphere Portal for Multiplatforms V5 Handbook
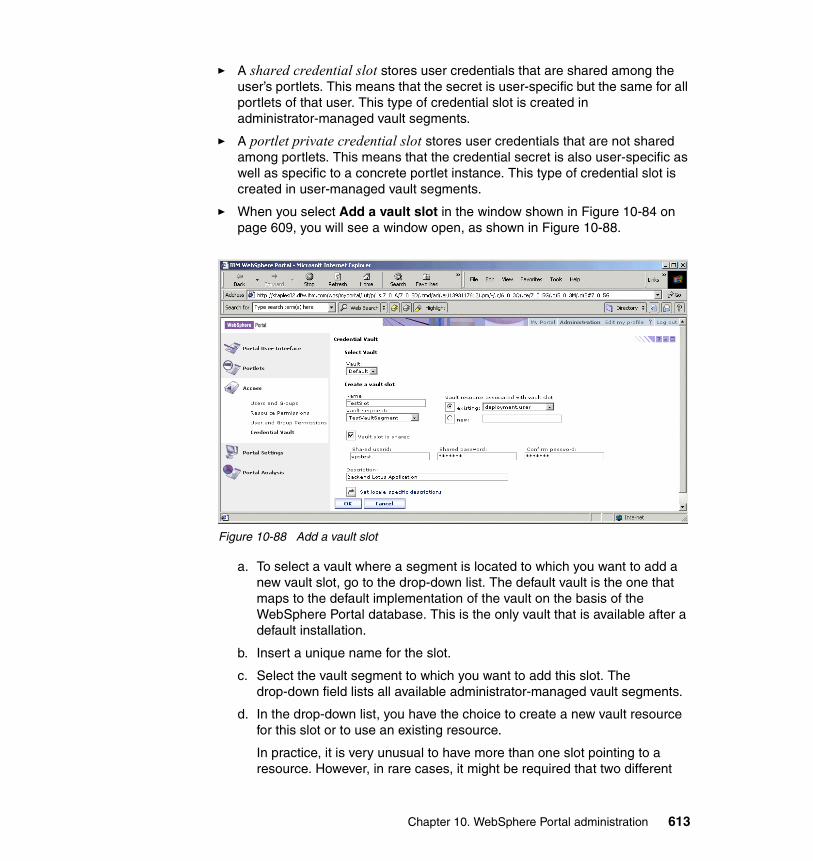
� A shared credential slot stores user credentials that are shared among the user’s portlets. This means that the secret is user-specific but the same for all portlets of that user. This type of credential slot is created in administrator-managed vault segments.
� A portlet private credential slot stores user credentials that are not shared among portlets. This means that the credential secret is also user-specific as well as specific to a concrete portlet instance. This type of credential slot is created in user-managed vault segments.
� When you select Add a vault slot in the window shown in Figure 10-84 on page 609, you will see a window open, as shown in Figure 10-88.
Figure 10-88 Add a vault slot
a. To select a vault where a segment is located to which you want to add a new vault slot, go to the drop-down list. The default vault is the one that maps to the default implementation of the vault on the basis of the WebSphere Portal database. This is the only vault that is available after a default installation.
b. Insert a unique name for the slot.
c. Select the vault segment to which you want to add this slot. The drop-down field lists all available administrator-managed vault segments.
d. In the drop-down list, you have the choice to create a new vault resource for this slot or to use an existing resource.
In practice, it is very unusual to have more than one slot pointing to a resource. However, in rare cases, it might be required that two different
Chapter 10. WebSphere Portal administration 613

portlets cannot share the logical vault slot with each other, but must share its physical implementation, the vault resource.
e. You can check the box to share the slot and therefore the user ID and password for all users.
• If you check this box, you will create a system credential slot. You will be able to provide the user ID and password that will be used for all users in the fields below the check box.
• If you do not check this box, you will create a shared credential slot. The info fields below will not be enabled, since the user ID and password will not be shared among users.
f. Optionally, add a description in the input field.
g. You can specify and change locale information by clicking Set locale-specific descriptions.
h. Click OK to create a new vault slot or Cancel to return to the Credential vault portlet.
� When you click Manage system vault slots in the window shown in Figure 10-84 on page 609, you will see a window, as shown in Figure 10-89.
Using this option, you can view or delete a system vault slot, or change the credential for system shared slots.
Perform the operation (Delete or Modify Shared Slot) and click Done. You will return to Credential Vault portlet.
Figure 10-89 Manage system vault slots
614 IBM WebSphere Portal for Multiplatforms V5 Handbook

10.6 Portal SettingsYour overall settings for the portal can be managed using the Portal Settings part of Portal Administration. The Portal Settings section includes six portlets:
� Global Settings
� URL Mapping
� Custom Unique Names
� Supported Markups
� Supported Clients
� Search Administration
Portal Settings will allow you to specify a default portal language, create custom URLs and custom unique names, specify markups and clients and build and search indexes.
10.6.1 Global SettingsThe Global Settings portlet is used to configure settings that apply throughout the portal. With the Global Settings portlet, you can:
� Specify a default portal language
� Provide a search engine URL when a user selects the Find option
� Specify the Transcoding option
� Provide information to returning users
– Taking them to the default page, or
– Taking them to the state of the page at the user’s last visit
1. When you select the Global Settings portlet, you will see a window open as shown in Figure 10-90 on page 616.
Chapter 10. WebSphere Portal administration 615

Figure 10-90 Global Settings Portlet
2. Specify the default portal language that portal users will see after login. In the case where users browser language preference is not supported by WebSphere Portal, WebSphere Portal opens using the default language. In our example, we have kept this to English.
3. After the user logs in, you can select what would be the first portal page by selecting the options provided by the Global Settings portlet. By default, this is set to Will always be the user’s default page (the portal session will not resume).
– If you choose the option Will be the page the user most recently visited (portal session will resume), users will return to the page from their last visit. This option is helpful when users lose their portal session in the middle of a task and need to log in a second time.
– Users can determine what they can see if you choose the option Will be dependant upon the choice the user makes at log in.
4. Specify a search engine URL. This URL is triggered when the user selects the Find option. This option is available only if supported in a theme.
5. By default, the Enable transcoding of portlet content option is selected. Selecting this option will enable Portal to use transcoding technology, which helps rendering portlets as WML.
6. Click Save if you need to commit any changes or click Reset to restore to system defaults.
616 IBM WebSphere Portal for Multiplatforms V5 Handbook

10.6.2 URL MappingThis is a new administrative portlet in WebSphere Portal V5.0.
The URL Mapping portlet helps to create friendly URLs and maps them to portal pages. WebSphere Portal, by default, associates URLs with names which are hard to interpret. Using the URL Mapping portlet, administrators create these friendly URLs and hence can associate them with human readable names. These URLs can be published externally and made available to portal users.
Let us say we have a group of users who need specific information available on a page. Instead of navigating the portal and locating that particular page, it would be advantageous to provide these users with a mapped URL which takes them straight to that particular page outside the portal. Even though you may provide a mapped URL, you will be required to provide login credentials as required.
When you select the URL Mapping portlet, you will see a window as shown in Figure 10-91 on page 618.
URLs are arranged in a hierarchal tree of contexts. Users can map these contexts to pages, labels or child contexts. In this way, the URLs can be mapped to portal pages in any way and the access rights for users to individual contexts can be administrated. If there are any changes in the name of a URL, Portal applies that name change to all mapping URLs affected by the change.
1. In the Figure 10-91 on page 618, click New context. A new window will open as shown in Figure 10-92 on page 618.
Chapter 10. WebSphere Portal administration 617

Figure 10-91 URL Mapping portlet
Figure 10-92 Create New Context
618 IBM WebSphere Portal for Multiplatforms V5 Handbook
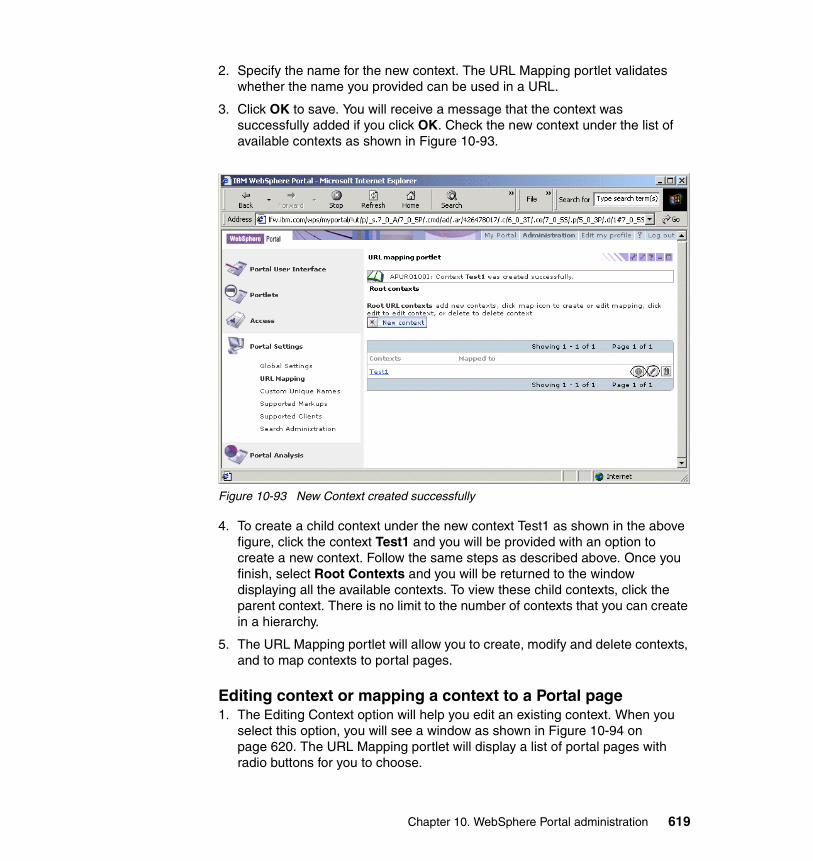
2. Specify the name for the new context. The URL Mapping portlet validates whether the name you provided can be used in a URL.
3. Click OK to save. You will receive a message that the context was successfully added if you click OK. Check the new context under the list of available contexts as shown in Figure 10-93.
Figure 10-93 New Context created successfully
4. To create a child context under the new context Test1 as shown in the above figure, click the context Test1 and you will be provided with an option to create a new context. Follow the same steps as described above. Once you finish, select Root Contexts and you will be returned to the window displaying all the available contexts. To view these child contexts, click the parent context. There is no limit to the number of contexts that you can create in a hierarchy.
5. The URL Mapping portlet will allow you to create, modify and delete contexts, and to map contexts to portal pages.
Editing context or mapping a context to a Portal page1. The Editing Context option will help you edit an existing context. When you
select this option, you will see a window as shown in Figure 10-94 on page 620. The URL Mapping portlet will display a list of portal pages with radio buttons for you to choose.
Chapter 10. WebSphere Portal administration 619
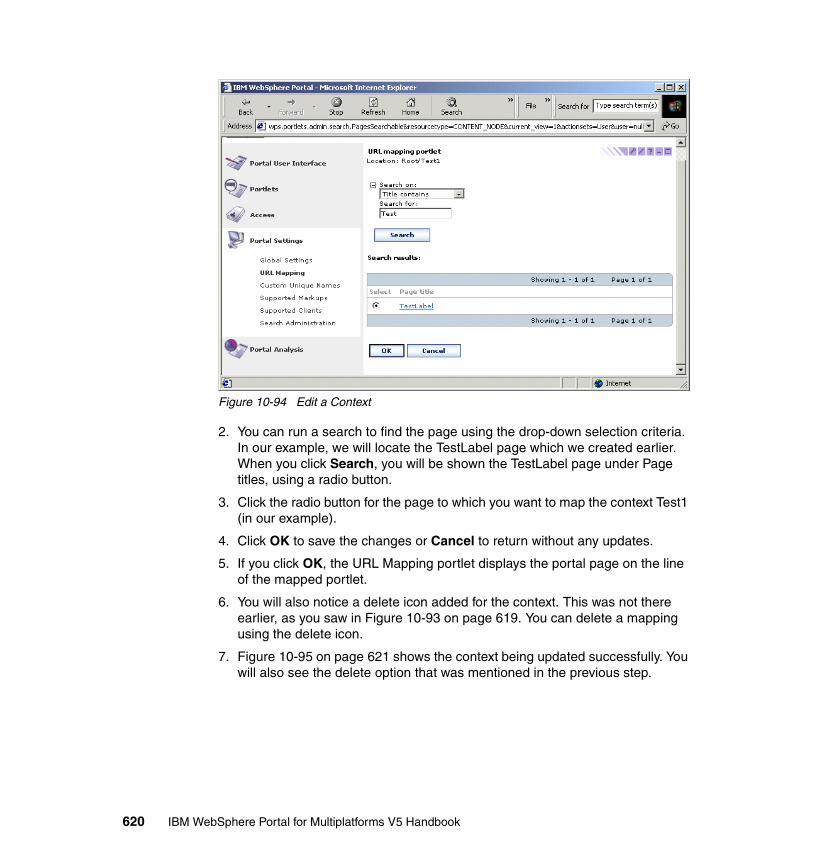
Figure 10-94 Edit a Context
2. You can run a search to find the page using the drop-down selection criteria. In our example, we will locate the TestLabel page which we created earlier. When you click Search, you will be shown the TestLabel page under Page titles, using a radio button.
3. Click the radio button for the page to which you want to map the context Test1 (in our example).
4. Click OK to save the changes or Cancel to return without any updates.
5. If you click OK, the URL Mapping portlet displays the portal page on the line of the mapped portlet.
6. You will also notice a delete icon added for the context. This was not there earlier, as you saw in Figure 10-93 on page 619. You can delete a mapping using the delete icon.
7. Figure 10-95 on page 621 shows the context being updated successfully. You will also see the delete option that was mentioned in the previous step.
620 IBM WebSphere Portal for Multiplatforms V5 Handbook

Figure 10-95 Context mapping updated successfully
There are two options:
Option 1: Delete Context Mapping. This option will delete the context mapping; using the Edit Mapping option, you can reset the mappings. If you use the Edit Mapping option, click OK to save the changes and Cancel to return to the previous panel without saving.
Option 2 : Delete Context. This option will delete the context from the list of available contexts. You will get a confirmation message to confirm the deletion. Click OK to confirm the deletion or click Cancel to return to the previous panel.
� To test whether or not the new context works, use the URL that you mapped as shown in Figure 10-96 on page 622.
� In our example, we had mapped the context Test1 to TestLabel; notice the URL used to access this page:
http://staples02.dfw.ibm.com/wps/myportal/Test1
1 2
Chapter 10. WebSphere Portal administration 621

Figure 10-96 Test for the new context that was created
Adding labels for a contextThis option will allow to create additional labels for a context. The advantage of this feature is that you can have different human readable names for the same portal pages. To create additional labels, follow these steps:
1. Click the Edit Labels option of the context for which you need to create additional labels.
2. Type the name of the new label in the Create New Label option. In our example, we have created a new label called TestChild as shown in Figure 10-97 on page 623. URL Mapping will validate whether the label you type can be used in a URL. You can create any number of additional labels in this manner.
3. Click OK to add the new labels or Cancel to return to the previous window.
622 IBM WebSphere Portal for Multiplatforms V5 Handbook

Figure 10-97 Adding lables to a context
4. To test whether this new label or child label works, you can test the mapped URL. In our example, we have named the child label TestChild; it is mapped to TestLabel. Figure 10-98 on page 624 shows that new label was mapped successfully for our example.
5. In our example, we have also mapped the context TestChild, which was the child label for the context Test1, to the TestLabel page; notice the URL used to access this page:
http://staples02.dfw.ibm.com/wps/myportal/TestChild
Chapter 10. WebSphere Portal administration 623

Figure 10-98 Child Label mapped successfully
624 IBM WebSphere Portal for Multiplatforms V5 Handbook

10.6.3 Custom Unique NamesThis is a new administrative portlet in WebSphere Portal V5.
Open a Portal resource and observe the alphanumeric strings (6_0_0.1020...) attached to that resource. Portal internally generates object IDs, which consist of these strings to identify portal resources. These are hard to understand and are associated with another portal resource.
The Custom Unique Names portlet allows you to give names to portal resources and assign them unique or human readable names, which are easy to remember. They make identification of portal resources easier, for example when porting resources from one portal to another, when portal developers need to link a resource from their portlet or when security is managed by external access control.
Note:
� The following restrictions apply to the names you can give to contexts.
– The length of the label cannot exceed 255 characters.
– Users can map contexts to all portal pages for which they have the User role.
– The label should contain characters listed in the unreserved character list.
– Child contexts should not have the same name.
� Administrators can provide users access roles to perform their tasks with contexts. The roles determine the access rights assigned to the users to perform their tasks. Child contexts inherit all the roles given to a parent context by default.
� Users can map contexts and URLs to all portal pages for which they have the Editor role and for all portal pages; users need to have User role permission.
� Administrators perform the following tasks with regard to access control roles for URL Mapping:
– Assign access roles to users for a context – Remove access roles
� You can disable URL Mapping functionality by setting the value for wps.mappingurl.enabled in ConfigServices.properties file to false. By default, this value is set to true.
Chapter 10. WebSphere Portal administration 625

To open the Custom Unique Names portlet, select Administration -> Portal Settings -> Custom Unique Names. When you select Custom Unique Names, you should see a window open, as shown in Figure 10-99.
Figure 10-99 Custom Unique Names Portlet
The Custom Unique Names portlet will allow you to:
� Define custom unique names to a portal resource and map them to that particular resource.
� Search/look up the custom unique names for a resource.
� Modify or delete a custom unique name, or modify a mapping.
� Display the mapping between the resources and the assigned unique names in the resource list.
� View portal resources.
In the window shown in Figure 10-99, select a portal resource for which you need to specify a human readable unique name. For our example, we have selected the resource type to be Portlets.
1. When you select Portlets, you will be provided with an option to search for a specific portlet for which you have decided to provide a custom unique name. You can search by specific criteria using the options from the drop-down menu. By default, the Custom Unique Names portlet will display all the
626 IBM WebSphere Portal for Multiplatforms V5 Handbook

resources available for the selected portal resource (in our case, this is Portlets). All the portlets available in your portal will be displayed.
As you see in Figure 10-100, we have run a search to display all portlets with a “Welcome” word in the Portlet Title.
Figure 10-100 Identify a portal resource for providing custom unique name
– You will see a list of portlets displayed with the title containing the word “Welcome” under Portlet title.
– Associated with the portlet title, you will see a Unique Identifier. This is the identifier which Portal generates internally. If a custom name is provided to the portlet, you will see this under the Custom name option.
– You will also see the portlet description along with the option to edit. (pencil icon).
As you see in the figure, we have selected the option to edit the Welcome to WebSphere portlet. We will provide a custom unique name for this portlet.
2. The Edit option will take you to a window similar to Figure 10-101 on page 628.
Note: Using the Configure option available in the portlet, you can restrict the number of portlets displayed per page by specifying the number of rows per page. Using this option, you can also change the default search behavior.
Chapter 10. WebSphere Portal administration 627
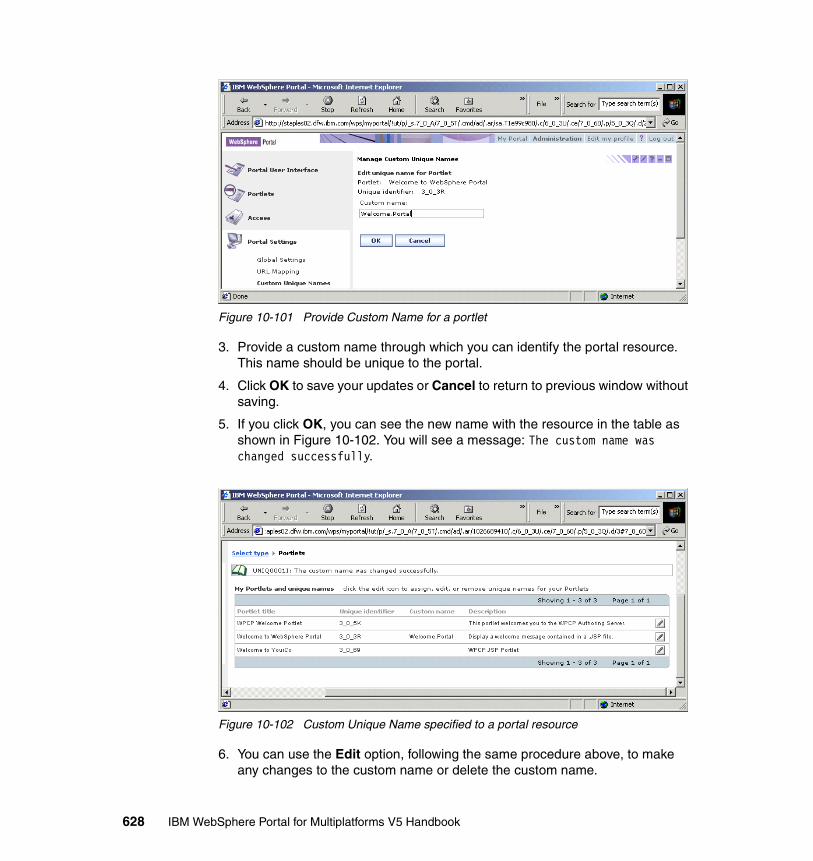
Figure 10-101 Provide Custom Name for a portlet
3. Provide a custom name through which you can identify the portal resource. This name should be unique to the portal.
4. Click OK to save your updates or Cancel to return to previous window without saving.
5. If you click OK, you can see the new name with the resource in the table as shown in Figure 10-102. You will see a message: The custom name was changed successfully.
Figure 10-102 Custom Unique Name specified to a portal resource
6. You can use the Edit option, following the same procedure above, to make any changes to the custom name or delete the custom name.
628 IBM WebSphere Portal for Multiplatforms V5 Handbook

10.6.4 Supported MarkupsThe Supported Markups portlet will help you define the markup language that will be supported by the portal.
� By default, WebSphere Portal comes with three markups: chtml, wml and html, as shown in Figure 10-103.
� You can add, edit, activate or deactivate, show information of a markup and delete a markup.
Figure 10-103 When you select Supported Markups Portlet
Edit Selected MarkupYou can edit markups.
1. Select the markup that you wish to edit and click Edit Selected Markup.
2. Make the necessary changes. You can select the Set locale-specific settings option and change the markup settings for different languages.
3. Click OK to confirm the changes or Cancel to return.
Note: Supported Markups was called Manage Markups portlet in WebSphere Portal V4.x.
Chapter 10. WebSphere Portal administration 629

Add new markup1. To add a new markup, click Add new markup.
2. You will be required to specify a markup name. This is a required field.
– Directories of this name need to be created to support the aggregation of the portal for clients that support this markup.
– Avoid characters in the markup name that might cause conflicts inside file or path names, such as /, \ , . , or & . The markup name also acts as a default title for those languages where no locale-specific title has been set.
3. Specify the MIME type associated with this markup.
4. UTF-8 is used as the default character set if the Default character option is left blank.
5. You can use Set locale-specific settings for specifying/changing markup settings for different languages. The default markup title is displayed, which you can change. Click OK to confirm.
6. Click OK to add the new markup. When you click OK, you should see the new markup added to the available markup list for your portal.
Activating/deactivating a selected markupBy default, all available markups to WebSphere Portal are in the Active state.
1. Select the markup you want to deactivate and click the Activate/Deactivate option.
2. The page will refresh and you can see the message Inactive next to the selected markup.
3. You cannot render the markup to any portlet until you change the status of the markup to Active.
4. Click the Activate/Deactivate option again to activate the markup.
Showing informationAt this time, you can display your information:
1. Select Markup Info and you can get complete details about available markups in your Portal along with the date created and last modified information.
2. Click OK to return to the Supported Markups portlet.
Deleting the selected markupYou can delete any markup by selecting the Delete option.
1. A pop-up window will appear asking you to confirm for deletion.
630 IBM WebSphere Portal for Multiplatforms V5 Handbook

2. Click OK to delete or Cancel to return.
If you choose Delete, this markup will not be available in the list of available markups for your portal.
10.6.5 Supported ClientPortlets can be accessed across a Web browser, mobile devices, personal digital assistants, etc. The Supported Client portlet, also called the Manage Client portlet, will help you to define these devices for accessing portal information. To optimize the data which Portal sends to the client and to handle the limitations and deviations of each individual client browser, Portal maintains information about all supported client devices in a client registry.
When you select the Supported Client portlet, you will see a window as shown in Figure 10-104.
Figure 10-104 Supported Clients Portlet
You can perform the following tasks using the Supported Client portlet.
Adding a new clientComplete the following instructions to add a new client:
1. Click Add new client.
Chapter 10. WebSphere Portal administration 631

– User Agent is a required field. Make sure that the user agent string that the client sends in its request header matches the value you specify. If you are not sure, enter * and the Portal will search for the closest match to this string.
– Select the markup which the client supports. This is a required field.
– Specify Markup Version, Manufacturer information, Model and Version. These are optional values.
– List the capabilities for the client you have specified. For example, you could specify specific attributes it supports in HTML, like JavaScript, etc. You can use the Add or Delete options for adding and removing the capabilities.
– Specify the position where you would want this new client information stored in the client registry. Portal matches the user agent string in the client's request header to patterns in the client registry. If the default user agent pattern (*), is used then it should be placed in the last position. Check on the drop-down option and you can position the client information according to your requirements.
2. Click OK to add the new client or Cancel to return.
You will see the new added client under the available clients list.
Editing the selected clientIf you notice that a certain browser requires different browser-specific processing, you can change the client registry information by editing the existing client registry entry.
1. Select the client which require editing.
2. Click Edit selected client.
3. Make the required modifications. Click OK to approve changes or Cancel to return.
Order client before/Order client afterTo send the most exact markup to the client, it is very important that you make sure your client is properly positioned in the client registry.
Note: If the user agent sends Microsoft Internet Explorer 5.5 and the Portal finds *Internet Explorer 5*, then that registry entry is used to determine the markup sent to the client. For this reason, it is recommended that you place the most specific user agent patterns at the top of the list.
632 IBM WebSphere Portal for Multiplatforms V5 Handbook

1. Select the client from the list on the Manage Clients tab.
2. Click Order client before to move the client up in the registry, as shown in Figure 10-105.
Figure 10-105 Select Order Client before or after
3. Click Order client after to move the client down in the registry.
Showing information 1. Click Select Info and the complete client information for all the clients defined
to your Portal is displayed.
2. Click OK to return to the client listing.
10.6.6 Searching the administrationSearch capabilities form an integral part of a Web portal. The ability to find relevant documents based on a set of keywords is a lifeline for an informational portal.
Most portals deploy intelligent and heuristic search engines that work on search indexes spanning millions of Web pages. These indexes can be comprehensive or may be updated based on popular searches. Some sites also provide speciality searches, which essentially means that the search engine searches
Chapter 10. WebSphere Portal administration 633

through an index that points to documents pertaining to a specific domain of interest.
WebSphere Portal V5 provides a portal search engine to facilitate indexing and searching for information. The search engine that is integrated into the Portal is Juru. More information on Juru search engine can be obtained from the following Web site:
http://www.haifa.il.ibm.com/km/ir/juru/
Major components of the search engine are the indexer, crawler and search. The indexer goes through a Web site and its different links. The Search portlet then goes through the index via the crawler, returning the results from the search criteria.
WebSphere Portal V5 has additional search functionality when compared to WebSphere Portal V4.x. Some of the key features of Portal Search engine are as follows:
� Enhanced search capabilities
– Crawl multiple Web sites: This feature will enable you to collect information from multiple Web sites.
– Free Text and Internet style symbol search capability: You can explicitly search for phrases by enclosing keywords in double-quotes (“‘). For example, you could search “WebSphere Portal” in Google.
– Enable browsing of collections: Not only can you collect information, but you can also browse this collection.
– Option to approve documents before they are added to the collection and the index: This option will enable you to control what documents are put in the collection.
– Allow categorization of incoming documents: During the indexing process, you can categorize incoming documents into either a predefined static taxonomy or a user-defined taxonomy. Documents are classified into categories by rules applied to a document. Rules can be a set of keywords describing the content or can have additional information for a category.
– IBM WebSphere Portal V5 includes a new facility for categorizing Web pages and other documents, either as part of its search facility or stand-alone. The WebSphere Portal categorization facility allows high accuracy categorization of documents in any of over 2 300 subjects. Using the categorization facility, WebSphere Portal can build applications which automatically determine the subject of documents that fall within any of these areas. You can customize the categorizer using product names (using a word or a phrase) or synonyms. You can assign any number of
634 IBM WebSphere Portal for Multiplatforms V5 Handbook

synonyms to the standard set of categories shipped with WebSphere Portal or your product name categories.
– Enhanced language support: You can now search plurals and inflections.
� Summarizer: A new summarization facility can summarize Web pages and other documents, either as part of its search facility, or stand-alone. The default type of summary that WebSphere Summarizer produces is the most salient sentences type of summary. WebSphere Summarizer allows the creation of three different types of summaries, selectable by the calling program:
• For certain types of news articles, it can return the initial characters of the text document.
• For documents which have certain narrative quality, it will return most salient sentences.
• For applications which assume a domain and where a domain dictionary is provided, it will produce keyword summaries, which list important domain terms in the documentation.
In order to enable the search services in the portal, you need to perform administrative tasks, such as the following:
� Define the context that you want to make available for search.
� Define the properties of the full text index; this allows for fast and efficient searches.
Searching the Administration portletWhen you select Administration -> Portal Settings -> Search Administration, you will see a window similar to Figure 10-106 on page 636.
Chapter 10. WebSphere Portal administration 635

Figure 10-106 Search Administration portlet
The Manage Document Collections administrative portlet provides a list of all document collections in the portal. We can use this portlet to collect documents that will be used by the Search User portlet or any other related indexes. During the document collection build process, documents are retrieved for indexing through a Web crawler. The search index stores keywords and maps them to their source documents.
In this section, we will show how to collect documents and use this as an index to perform searches. We will install the out-of-box search portlet (SearchPortlets.war file available under WebSphere/PortalServer/installableApps) for our testing. However, you can test the search functionality using your own portlet.
As you see in Figure 10-106, the Manage Document Collections portlet has two parts:
� Document Collections: Lists the document collections and allows you to delete, refresh, import/export, work on pending documents and browse documents.
� Sites in Collection: Lists sites for the selected document collection and shows its related information.
636 IBM WebSphere Portal for Multiplatforms V5 Handbook

Document collections1. Click the Create Collection icon in the window shown in Figure 10-106 on
page 636. You will see a window open as shown in the Figure 10-107.
Figure 10-107 Create Collection
a. Specify the location of collection information. This is the name and location of the document collection in the file system. For our example, we have named it ITSOCollection.
b. Specify the collection language. The index uses this language to analyze the documents when indexing. For our example, we have kept the defaults.
c. Specify your choice in the Select Categorizer drop-down list. For our example, we have selected the option Pre-defined. The default option is None.
d. Select Summarizer: the default is None and we have retained that for our example.
e. You can select the option to remove common words from queries (like in, of, an, etc.)
f. Click OK to create a location or Cancel to return to the Manage Document Collections portlet.
2. You should see the new collection that we created (ITSOCollection) added to the list of document collections, as shown in Figure 10-108 on page 638.
Chapter 10. WebSphere Portal administration 637

Figure 10-108 New Document Collection created
3. The Delete option will delete the selected document collection.
4. The Refresh option will manually refresh the document collection by re-crawling all the sites of the document collection.
5. The Import or Export option is used to import or export the selected document collection by using the portal search XML interface.
6. The Pending Documents option will approve or reject the documents returned by a crawl of the selected document collection.
7. As shown in Figure 10-108, you can see one more option called Collection Status. By default, this option is expanded. However, you can minimize this option.
– Last Update completed: Shows the date when a site defined for the document collection was last updated by a scheduled update.
– Number of Active documents: Lists documents that are available for search by users.
Note: We will use the Pending Documents option later for our example, once a Web site is defined for a collection and after some documents are collected.
638 IBM WebSphere Portal for Multiplatforms V5 Handbook

– Number of deleted documents: Lists number of documents that are to be deleted.
– Collection name and location: Shows the collection name and its location in the file system.
– Collection language: Shows the language for which the document collection and its index are optimized.
– Categorizer used and Summarizer used: Provide details on the categorizer and summarizer used for the document collection.
Sites in CollectionSites in Collection will helps us to define sites for document collection. A document collection can be configured to cover more than one site.
1. Select ITSO Collection and click Add Site under Sites in Collection. You will see a window open as shown in Figure 10-109.
Figure 10-109 Add Site for Document collection
2. Under General Parameters, provide information for the following:
– Collect Documents linked from this URL: this is where you will specify the URL link from where the documents will be collected. For our example, we have specified the link as http://www.ibm.com.
Chapter 10. WebSphere Portal administration 639

– Levels of linked documents to collect: this indicates the maximum number of levels of nested links which the crawler will follow from the root URL. We have kept the default setting (five levels).
– Number of linked documents to collect; this indicates the maximum number of documents which will be indexed by the crawler during each crawling session. We have kept the default setting as 1000.
– Stop collecting after: this indicates the maximum number of minutes the crawler may run in a single session. We have kept the default setting of 60 min.
– Stop fetching a document after: this sets the maximum time limit, in seconds, for receiving the initial HTTP headers. We have kept the default of 5 seconds.
– Life Expires after: this indicates the maximum time the document will be kept in the document collection after the last time it was found by the crawler. We have kept the default of 7 days.
– Remove broken links after: determines the number of days document will be kept in the document collection after the links are determined to be broken. We have kept the default of 10 days.
– Number of parallel processes: this determines the number of threads the crawler uses in a crawling session. We have kept the default of 5.
– Default character encoding: this sets the default character set that the crawler uses.We have kept the default of ISO-8859-1.
– Always use default character encoding: this option is not checked by default. If it is checked, the crawler uses the default character set, regardless of the document character set.
– Add all documents to collection automatically: if this option is checked, the crawler puts all documents directly in their destination folder and indexes them. We have used the default setting and this option is not checked.
– Obey Robot.txt: when this option is checked, the crawler observes the restrictions specified in the robot.txt file when accessing URLs for documents.
– Proxy server and Port: this specifies the HTTP proxy server and port used by the crawler. We have not specified any values.
– Socks server and Port: this specifies the socks server and port used by the crawler. We have not specified any values.
3. Click Create to specify this link for the document collection or Cancel to return to the previous window.
640 IBM WebSphere Portal for Multiplatforms V5 Handbook

4. If the link works correctly, you should see the message Site is ok, as shown in Figure 10-110.
Figure 10-110 Message indicating that the site selected for document collection is ok
5. In Figure 10-110, click Edit Site to create or define a schedule for document collection. When you click Edit Site, you will be taken back to the window shown in Figure 10-109 on page 639. In this window, click Create under Collection update schedule. You will see a window open as shown in Figure 10-111 on page 642.
Note: In Figure 10-110, if you click Verify Address, you will be provided with the same capability. This option will also confirm whether the link is suitable for document collection.
Chapter 10. WebSphere Portal administration 641

Figure 10-111 Define Collection Schedule
To create a schedule:
a. Under Define Schedule, specify the date and time for the first execution of the crawler.
b. Click OK to create the schedule or Cancel to return to the previous window without creating a schedule.
c. To delete a schedule, select the schedule you want to delete and click Delete. You will receive a confirmation message and clicking OK will delete the schedule.
6. You can also create filtering rules to use while collecting documents or while adding documents to index.
a. Click Create under Filtering rules as shown in Figure 10-109 on page 639. You will be provided with various options for creating filtering rules which can be used while collecting documents and while adding documents to the index.
b. Click OK to confirm filter rule creation or Cancel to return to the previous window without creating a filtering rule.
c. For our example, we did not create any filtering rules.
7. Manage Document Collections displays the Categorizer box only for document collections that you created with the rule-based categorizer. You can add destination categories (which you created under the Taxonomy panel) to a site. To add a category to the site, perform the following steps:
642 IBM WebSphere Portal for Multiplatforms V5 Handbook

a. Click Add. The Categorizer displays the Destination Categories panel.
b. From the taxonomy tree view, select the category which you want to add. Categorizer highlights that category.
c. Click Add and continue with other destination categories if you wish.
d. After you have added all desired categories, click OK on the action bar or Cancel to return to the previous window.
8. Return to the window as shown in Figure 10-108 on page 638 by clicking OK in the window, as shown by Figure 10-109 on page 639.
9. Select Start Collecting under Sites in Collection. This option will start a new run of the crawler on the specified site. In our example, it will be the www.ibm.com site.
10.Manage Site Update Schedules allows you to select one of several schedules according to which a site is updated. You can also activate or deactivate that schedule.
11.When you click Start Collecting, you can view the status and configuration information.
– Site Status Running shows whether or not the crawler for the site is running. It will also display the number of documents collected and the runtime information.
– Clicking Stop Collecting will stop the collection of documents from the site.
12.Clicking Delete Site will delete the site collection.
13.Click Pending Documents under Document Collections after the crawler has run for the specified time. You will see a window open as shown in Figure 10-112 on page 644. An index crawl on a document collection returns documents to Manage Document Collections. Before these documents are made available for search by users, they will be moved to the Pending Documents panel for acceptance or rejection.
a. The Pending Documents panel will contain a list of all documents that the index crawler collected from all sites defined for the selected document collection, except for those sites for which the option Add all documents to collection automatically was selected.
b. In the figure, for our example you will see one document listed. You can either accept or reject the document.
c. The Edit option will enable you to edit document information for the URL.
d. The Accept option will allow search users to access this document.
e. The Reject option will not allow search users to access this document during a search.
Chapter 10. WebSphere Portal administration 643

Figure 10-112 Pending Documents
f. For our example, we have accepted the document listed in the document collection.
g. You can click Show Details to get details about the collected document. You need to select a document before you choose the Show Details option.
h. Click Reset to cancel your updates and return to the previous panel.
i. Click Apply to save changes.
j. Click Cancel to return without saving any changes.
k. For our example, we clicked Apply; you will be taken back to the previous window, as shown in Figure 10-108 on page 638.
14.In the window shown in Figure 10-108 on page 638, select Browse Documents. You will be taken to a window similar to Figure 10-113 on page 645.
644 IBM WebSphere Portal for Multiplatforms V5 Handbook

Figure 10-113 Browse Documents
a. Under Collection Name -ITSOCollection (this will be your collection name), specify the search option and click Search.
b. Results will be displayed as shown in the figure above. You can edit or delete the search result. You also have the ability to modify search results based on the Sort by date and Hide details options.
15.To test search functionality outside of the Search Administration portlet, you can install the Search out-of-box portlet and deploy this portlet to a page. For our example, we deployed this portlet to a page called ITSOPage and when a search was made for documents containing IBM, we got results as shown in Figure 10-114 on page 646.
Chapter 10. WebSphere Portal administration 645

Figure 10-114 Results from Document Search portlet
10.7 Portal AnalysisPortal Analysis provides information about your portal by assisting you in gathering all the required information. Portal Analysis includes two portlets:
� Frequent Users� Enable Tracing
Tip:
To make the Document Search portlet work, you need to modify the parameters of this portlet by specifying your document collection name.
To do this, go to Administration -> Portlets -> Manage Portlets. Select the Document Search portlet and under the Modify Parameters option, specify your document collection name. To have multiple collections, add a new parameter to the document search portlet.
646 IBM WebSphere Portal for Multiplatforms V5 Handbook

10.7.1 Frequent UsersThe Frequent Users portlet will provide information on how many users are currently logged in. When you select the Frequent Users portlet under Portal Analysis, you will see a window as shown in Figure 10-115.
Figure 10-115 Frequent Users portlet
10.7.2 Enable TracingThe Enable Tracing portlet will allow you to enable or disable tracing logs.
When you select Portal Analysis -> Enable Tracing, you will see a window open as shown in Figure 10-116 on page 648.
Chapter 10. WebSphere Portal administration 647

Figure 10-116 Enable Tracing Portlet
� When you open this portlet, by default it lists all currently running trace loggers on the current portal. This list is pre-populated with the trace values from the WebSphere/PortalServer/shared/app/config/log.properties file.
� The advantage of this portlet is that you can enable the trace logger using a portlet without needing to modify the log.properties file.
� Specify the trace logger that you need under the Append these trace settings option. Click the Add (+) symbol. This new trace logger will be added to the current trace settings. Any changes that you make to these trace settings apply only to the current running portal and are not persisted when restarting of the portal.
� Once you enable trace settings and start to analyze trace information, you can check the wps log file with the latest time stamp under the WebSphere/PortalServer/log directory.
This concludes our discussion of the available WebSphere Portal V5 administration portlets. In the next chapter, we will discuss some of the different options available for WebSphere Portal customization.
Tip: Traces can set for more than one session by manually switching them on in the log configuration file of WebSphere Portal, which is available under WebSphere/PortalServer/shared/app/config/log.properties.
648 IBM WebSphere Portal for Multiplatforms V5 Handbook

Chapter 11. WebSphere Portal customization
This chapter describes some of the WebSphere Portal customization features. Most of the concepts covered in this chapter are an extension to the topics covered in Chapter 10, “WebSphere Portal administration” on page 507.
11
© Copyright IBM Corp. 2004. All rights reserved. 649

11.1 General customization
Users can have one or more personalized pages, navigating to each one from the home page. Pages can be arranged within a tree structure. Each label can have its own choice of color themes, skins and page layouts. Themes are used to define the fonts, colors, spacing, and other visual elements; themes consist of cascading style sheets, JSP files, and images. Skins are decorations and controls placed around portlets, such as title bars, borders, shadows, etc. Since the look and feel of each label can be completely different, labels can be used to create multiple virtual portals running on one Portal.
Within a label, each personalized page can have a different set of portlets. The portlets on a page can be selected by end users or by administrators, depending on their access rights for the page. Administrators can specify that certain portlets be required, so that end users cannot remove them or re-arrange them. Pages can also be re-arranged to achieve a different navigation order.
All of the functions related to customizing page layouts, page contents, color themes and skins are found in the pages of the Work with Pages page group. Using these tools, users can see the arrangement of the page and can easily move portlets around.
11.1.1 Customization rolesCustomization is one of WebSphere Portal’s main strengths. Portal administrators, Web designers and end users each have specific roles that contribute to the end users’ experience.
Web designers are responsible for building the look and feel of the portal. They design the graphics and the layouts that will be used in the portal.
Portal administrators are responsible for controlling user access to the portal. They can make decisions about which applications and designs are available to users. They are also responsible for selecting what designs will be applied to the portal.
Definitions:
Customization is presenting tailored content and layouts based on explicit user specifications.
Personalization is presenting content to a user based on a user profile.
650 IBM WebSphere Portal for Multiplatforms V5 Handbook

Portal administrators can also assign specific applications and portal pages that are mandatory for users. They can specify where applications reside and what capabilities these applications have.
Users are able to add applications to their portal, as well as create new portal pages. They can modify the default layout of the portal page, assuming the portal administrators have given them the proper permissions to do so.
Portal layout
Portal layout is organized into pages, labels and URLs.
� Portal layout is made up of and controlled by Row containers and Column containers, which contain either more containers or controls.
� Containers and container content can be locked, but keep the following points in mind.
– Manage rights are required.
– Locked containers cannot be deleted.
– Locked container content cannot be moved or deleted.
– Containers can be container content of other containers.
� Portals may have multiple labels.
� Labels may contain multiple pages and these pages can have child pages associated with it.
� Pages may contain multiple portlets.
Portlets are laid out on pages. All WebSphere Portal functionality (administration, customization, etc.) is delivered via portlets. The Portal Administration pages use a Portlet Selector portlet to provide menu-like access to portlets on the page. When combined with the NoSkin skin, these functions appear to be single windows served to the user. This technique can be used for any type of page.
Portlets have customization options, based on access permissions; see Figure 11-1 on page 652.
Note: A container is a row or column on the page. A row container stacks content horizontally. A column container stacks content vertically.
Chapter 11. WebSphere Portal customization 651

Figure 11-1 World Clock Portlet: an example of a portlet
World Clock is a portlet with Edit, Help, Minimize and Maximize options. On your portlet, the options are as follows. A user will see these options based on the access permissions on the Welcome portlet.
11.2 Portal navigation and customization optionsIn this section, we will discuss how to navigate WebSphere Portal and the various features available for portal customization
11.2.1 Anonymous loginAn anonymous user is a user who has not logged in to WebSphere Portal. Roles assigned to this user will help in establishing pages, which contain portlets. These pages can be accessed without logging in to Portal. Once a user logs in to WebSphere Portal, the authentication process begins. An anonymous user is not part of any group within the portal.
When the Anonymous user opens WebSphere Portal, he will see a window similar to the one shown in Figure 11-2 on page 653.
652 IBM WebSphere Portal for Multiplatforms V5 Handbook

Figure 11-2 Anonymous portal user
1. The user can click the Log in option to authenticate himself for WebSphere Portal. When the Log in option is clicked, you will see a window similar to Figure 11-3 on page 654.
Chapter 11. WebSphere Portal customization 653

Figure 11-3 Login for an anonymous user
2. In the window shown in Figure 11-3, users can click the Sign up option to register a new user.
Once this new user is created, you can log in to Portal using this new user. Portal resources which will be displayed upon successful login depend on the access permissions the new user will have on the portal resource. Refer to 10.5.1, “Users and groups” on page 570 for information on creating a new user.
11.2.2 Authenticated login and optionsWhen a user provides user ID and password information, WebSphere Portal authenticates this user and you will see a window similar to Figure 11-4 on page 655. You can see default labels or administrator-defined labels in your Welcome page.
WebSphere Portal provides the ability to customize these pages. You do not need to be an administrator to re-arrange your portlets or to perform minimize and maximize operations, as long as you have the associated permissions.
654 IBM WebSphere Portal for Multiplatforms V5 Handbook

Figure 11-4 Welcome Page for an authenticated user
In Figure 11-4:
� Option 1 allows you to move across labels
You can move backward or forward to locate your labels. This option provides the ability to navigate across labels and pages. When you use this option, you will see a window open, as shown in Figure 11-5 on page 656.
� Option 2 allows you to configure pages
This option will help you customize the portal page layout by adding new portlets and rearranging portlets.
Chapter 11. WebSphere Portal customization 655

Figure 11-5 Moving across labels
11.2.3 Page customizationYou can customize a page layout by adding new portlets, re-arranging existing portlets, etc. When you click Option 2 in the window shown in Figure 11-4 on page 655, you will see a window open as shown in Figure 11-6 on page 657. Notice the difference in options between Figure 11-4 on page 655 and Figure 11-6 on page 657.
656 IBM WebSphere Portal for Multiplatforms V5 Handbook

Figure 11-6 Customize portal page layout
In Figure 11-6:
� Option 1 allows you to edit the layout
� Option 2 allows you to re-arrange portlets
Edit layoutWhen you select this option, you will see a window open as shown in Figure 11-7 on page 658.
Edit layout allows you to add portlets, arrange portlets, columns and rows. You can also remove portlets, columns and rows. Modifications occur as you make them.
In the Edit layout portlet, you can see the different types of layouts you can use for deploying portlets. Compared to WebSphere Portal V4.x, the choice of layouts has increased with WebSphere Portal V5.
Chapter 11. WebSphere Portal customization 657

You can also move portlets to the column or row that you desire.
Figure 11-7 Edit layout
Add PortletThis option will help you deploy portlets to a desired location in a page. When you click the Add Portlets option, you will see a window open as shown in Figure 11-8 on page 659.
You can select portlets available in Portal using different search criteria, as shown in Figure 11-8 on page 659. Once you determine which portlet needs to be added, select that portlet and click OK. You can also click Cancel, which will not add any portlet. Clicking OK will take you back to the Edit layout page.
658 IBM WebSphere Portal for Multiplatforms V5 Handbook

Figure 11-8 Add Portlet
Select the Appearance option in Figure 11-7 on page 658.
Chapter 11. WebSphere Portal customization 659

660 IBM WebSphere Portal for Multiplatforms V5 Handbook

Chapter 12. Migration from WebSphere Portal V4.2 to V5
This chapter describes the steps to migrate from an existing WebSphere Portal V4.2.1 environment to a new WebSphere Portal V5.0 environment.
This chapter is organized as follows:
� In “WebSphere Portal V5.0 migration overview” on page 662, we talk about the migration to WebSphere Portal V5.0, supported migration paths, changes in WebSphere Portal V5.0, automated migration tasks and manual migration steps. We also introduce the sample migration scenario (migration from WebSphere Portal V4.2.1 to WebSphere Portal V5.0 (ITSO migration example, Figure 12-1 on page 662)), which we implement by providing the architectural diagram, sections and appendixes you can refer to to plan, prepare and build the environment for the sample scenario.
� In “Migration process overview” on page 664, we perform the steps to migrate from WebSphere Portal V4.2.1 to WebSphere Portal V5.0.
� In “Prerequisites and preparing for migration” on page 665, we talk about the prerequisites to be fulfilled before starting the migration process and also provide steps to complete the prerequisites related to WebSphere Portal V5.0 environment, thereby preparing the two WebSphere Portal environments for migration.
12
© Copyright IBM Corp. 2004. All rights reserved. 661

Figure 12-1 Architectural diagram for Portal migration
12.1 WebSphere Portal V5.0 migration overviewIn this section, we discuss WebSphere Portal V5.0 and some items you should understand about V5.0 prior to migrating to this platform.
� Supported migration paths and resources
Figure 12-2 on page 663 provides the information on the WebSphere Portal versions and the path supported in migration to WebSphere Portal V5.0. Some other important points to consider while planning for migration to WebSphere Portal V5.0 are as follows:
WebSphere Portal V4.2.1 Environment
WebSphere Portal V5.0 Environment
IBM HTTP Server 1.3.26.1
(Machine 2)
WebSphere Portal V5.0
IBM DB2 Client V8.1 FP1
IBM Directory Client V4.1 (Machine 3)
IBM DB2 Server V8.1 FP1
IBM Directory ServerV5.1 (Machine 4)
IBM HTTP Server
1.3.19.1 WebSphere Portal
V4.2.1 IBM DB2 Server
V7.1 FP8 IBM Directory
Server V4.1 (Machine 1)
662 IBM WebSphere Portal for Multiplatforms V5 Handbook

– You can migrate to WebSphere Portal V5.0 only from WebSphere Portal V4.1.2 and higher.
– Migration between WebSphere Portal environments running on different operating systems is not supported. For example, migrating from WebSphere Portal V4.x running on SUSE SLES to WebSphere Portal V5.0 running on Windows 2000 is possible, but we have not performed this activity.
– Migration across database servers is also not supported. For example, WebSphere Portal data cannot be migrated from Oracle to DB2 or vice versa.
– The migration of bookmarks or internal URLs is currently not supported and will be made available as a separate utility from the WebSphere Portal support site in the future.
Figure 12-2 Supported versions for migration to WebSphere Portal V5.0
� Migration in cluster environments
To migrate from WebSphere Portal V4.x in a cluster environment, you need to perform the following steps:
a. Install a stand-alone WebSphere Portal V5.0. This will serve as the new main node for WebSphere Portal V5.0 in a clustering environment.
Note: In Figure 12-2, you should note that the transition between different WebSphere Portal V5.0 offerings is treated as an upgrade and not a migration. So, if one wanted to move from WebSphere Portal V4.x Enable to WebSphere Portal V5.0 Extend, one would have to first migrate to WebSphere Portal V5.0 Enable and then upgrade to WebSphere Portal V5.0 Extend.
Chapter 12. Migration from WebSphere Portal V4.2 to V5 663

b. Migrate data from the WebSphere Portal V4.x cluster main node to the WebSphere Portal V5.0 cluster main node.
c. Verify the successful migration to the WebSphere Portal V5.0 cluster main node.
d. Create new clone nodes from the WebSphere Portal V5.0 main node.
� Changes introduced in WebSphere Portal V5.0 affecting migration (there are many more changes in V5, but in this section, we only talk about changes affecting migration):
– XML configuration schema changes
– Change from permissions-based access control to role-based access control
– Change from using navigation model APIs for themes and skins to using object-based API
– Portlet API changes, deprecations and enhancements
12.1.1 General recommendations for migrationWhen planning to migrate, you should take a moment to understand the scope of your migration and the specific tasks that may be required. Consider the following:
� Read through the migration documentation available with the Web-only version of the Infocenter (http://pvcid.raleigh.ibm.com/wpf/ic/wpo502/ent/en/InfoCenter/wpf/migrationv5.html) before starting any migration procedure.
� Develop a plan for migration: identify tasks, resources needed, testing methodology, etc.
� Limit pre-migration customizations to a minimum.
� Test migration using a development machine.
� Use WebSphere Studio and Portal toolkit 5.0 when possible to debug WP4x custom portlets
� Thoroughly verify all aspects of your portal after migration, especially the access control.
12.2 Migration process overviewPrior to getting started, you should understand the typical migration process. Consider the following five-step migration process:
664 IBM WebSphere Portal for Multiplatforms V5 Handbook

1. Install and configure WebSphere Portal 5.0 and the migration i-fix.
2. Apply xmlaccess e-fixes on WebSphere Portal V4.
3. Complete some manual migration steps.
4. Run migration tasks supplied with WebSphere Portal V5.
5. Migrate small portion of access control information not covered by migration tasks involving manual steps.
For more detailed information regarding the WebSphere Portal migration process, we recommend you review the following Infocenter URL:
http://pvcid.raleigh.ibm.com/wpf/ic/wpo502/ent/en/InfoCenter/wpf/migrationv5.html
12.3 Prerequisites and preparing for migrationThis section discusses the prerequisites that we address before starting the migration process.
� Installation and configuration of all components of WebSphere Portal V5.0, which includes:
– Setting up and configuring WebSphere Portal for the database you plan to use.
– Setting up and configuring WebSphere Portal for the LDAP you plan to use.
– Verification of the above-mentioned configurations.
� An operational WebSphere Portal V4.x environment.
� The Content Organizer portlet in WebSphere Portal V4 has been replaced by the Document Manager portlet in WebSphere Portal V5.0 and there is no migration path from the Portal Content Organizer portlet to the Document Manager portlet. If you have Portal Content Organizer portlets included on a page in your WebSphere Portal V4 environment, remove them from the page.
� In your WebSphere Portal V4.x system, go to the Manage Pages portlet, open Properties for each page and select a speaking title for the page. The reason for doing this is basically to distinguish the explicitly created pages as the migration of explicitly created page hierarchies from WebSphere Portal
Note: As you prepare and plan for the WebSphere Portal migration, you should consider the time and effort that will be required to perform this activity in your environment. Planning is key and allows you to address most questions or concerns before you start the migration process.
Chapter 12. Migration from WebSphere Portal V4.2 to V5 665

V4.x to WebSphere Portal V5.0. WebSphere Portal V5.0 does not migrate the administrative name assigned to the pages in WebSphere Portal V4.x. Therefore, all pages in the page hierarchy appear to have the same name in the Manage Pages portlet.
� Catalog the WebSphere Member Service and WebSphere Portal content publishing databases used in WebSphere Portal V4.2.1. Perform the following steps to catalog the databases:
� Migrate the LDAP database of the WebSphere Portal V4.2.1 system to the LDAP server of the WebSphere Portal V5.0 system. Perform the following steps to migrate the LDAP database:
On the WebSphere Portal V4.2.1 system, machine 1:
a. Access the LDAP directory from a browser using the URL:
http://<host_name>/ldap, where host_name is the fully qualified host name of machine 1.
b. Log in to the IBM Directory server, expand the Database twisty and click Export LDAP.
c. Provide path and file name, then click Export.
d. Wait for a success message in the Task messages textbox, click Log off and close the browser.
e. Copy the exported ldif file to WebSphere Portal V5.0 machine.
You have successfully exported the LDAP database information on machine 1.
On the WebSphere Portal V5.0 system, machine 3:
a. Stop IBM Directory server from the service console.
b. Start the IBM Directory Configuration tool.
c. Click Import LDIF Data, browse to the ldif file copied from machine 1 and click Import.
d. Wait for a success message and then click Close.
e. Close the IBM Directory Configuration tool.
You have successfully migrated the database of IBM Directory server V4.1 on machine 1 to the IBM Directory server V5.1 on machine 3.
Note: You need not migrate the LDAP database if you are using the same LDAP server for both environments.
666 IBM WebSphere Portal for Multiplatforms V5 Handbook

� Apply the migration interim fix to both environments.
To the WebSphere Portal V4.2.1 environment:
Perform the following steps to apply the interim fix to your WebSphere Portal V4.2.1 system.
a. Stop WebSphere Portal and open a command prompt.
b. Copy the interim fix 42_421_Multiplatform_Cumulative_Fixes.jar from the wps/migration/efixes/MultiPlatform directory on the WebSphere Portal V5.0 Product CD (CD 2) to a temporary directory and extract the files in it by entering the following command:
jar -xvf 42_421_Multiplatform_Cumulative_Fixes.jar
This will extract the following files:
• 42X_MP_fix.jar.
• ReadMe.txt
c. In the command prompt, change to the <was_root>/lib/app directory.
d. Copy the 42X_MP_fix.jar file to the <was_root>/lib/app directory and extract the files in it by using the following command:
jar -xvf 42X_MP_fix.jar
Note:
� The above mentioned jar file is for WebSphere Portal V4.2 and V4.2.1, for WebSphere Portal versions below 4.2 the files are:
– 412_Multiplatform_Cumulative_Fixes.jar - for V4.1.2– 413_413a_Multiplatform_Cumulative_Fixes.jar - for V4.1.3a– 414_Multiplatform_Cumulative_Fixes.jar - for V4.1.4– 415_Multiplatform_Cumulative_Fixes.jar - for V4.1.5
� For WebSphere Portal V4.1.x, the files extracted are:
– x_MP_fix.jar– ReadMe.txt, and– an XmlAccess.jar.
Perform the following steps for the XMLAccess.jar file:
a. Make a back-up of the existing XmlAccess.jar file in the <wp_root>/bin directory.
b. Copy the updated XmlAccess.jar file to <wp_root>/bin directory.
where <wp_root> is the root directory of WebSphere Portal V4.1.x.
Chapter 12. Migration from WebSphere Portal V4.2 to V5 667

e. Remove the 42X_Mp_fix.jar file from the <was_root>/lib/app directory as it is no longer required.
f. Add the following line to the XmlAccessService.properties file in <was_root>/lib/app/config/ services/ directory and then save and close the file:
com.ibm.wps.command.xml.groupexport.GroupExportEngine= -//IBM//DTD GroupExport//EN, /com/ibm/wps/command/xml/groupexport/GroupExport.dtd
g. Restart WebSphere Portal.
To the WebSphere Portal V5.0 environment:
To install the interim fix on WebSphere Portal V5.0 the WebSphere Portal update installer application is used.
a. If you have customized any of the XML files located in the <wp_root>/config directory or its subdirectories, back up all these files.
b. Stop WebSphere Application administrative server and WebSphere Portal by using the following commands from <was_root>/bin directory:
stopServer server1 -user wpsbind -password wpsbindstopServer WebSphere_Portal -user wpsbind -password wpsbind
c. Stop all WebSphere Application Server-related Java processes by using the task manager.
d. Create a directory called update in <wp_root> and download the WebSphere Portal V5.0 Update Installer application PortalUpdateInstaller.zip file to the <wp_root>/update directory from the IBM support page:
http://www-3.ibm.com/software/genservers/portal/support/
e. Extract the contents of the zip file to the <wp_root>/update directory.
f. Create a directory called fixes in <wp_root>/update and download the following zip files for the interim fixes:
• PQ77682_WP50_Migration_iFix.zip
• PQ77683_WP50_iFix.zip
from the IBM support page to the fixes directory.
Note: The above line should be added in a single line, maintaining all the capitalization.
Note: If you are migrating WPCP then you should download the PQ78841_WPCP50_iFix.zip also.
668 IBM WebSphere Portal for Multiplatforms V5 Handbook

g. Extract the contents of the two zip files to the <wp_root>/update/fixes directory.
h. Apply the two interim fixes by using the following command:
<wp_root>\update> updatePortal -fix -installDir "<wp_root>"-fixDir "<wp_root>\update\fixes" -install -fixes <fix_name>
for example,
C:\WebSphere\PortalServer\update>updatePortal -fix -installDir “C:\WebSphere\PortalServer” -fixDir “C:\WebSphere\PortalServer\update\fixes” -install -fixes PQ77682_WP50_Migration_iFix PQ77683_WP50_iFix
i. If you had customized the configuration files in the <wp_root>/config directory or its subdirectories, refer to the files you backed up in step a on page 668 and perform the same customization on the new version of each file.
j. Restart WebSphere Application administrative server and WebSphere Portal by using the following commands from <was_root>/bin directory:
startServer server1startServer WebSphere_Portal
k. Verify that the interim fix was successfully applied by checking the following:
i. In the <wp_root>/version directory there are PQ77683_WP50_iFix.efix and PQ77682_WP50_Migration_iFix.efix files and in the <wp_root>/version/history directory there are PQ77683_WP50_iFix.efixApplied and PQ77682_WP50_Migration_iFix.efixDriver files.
Note: The pkunzip utility might not decompress the download image correctly, so we suggest using another utility (such as WinZip) to unzip the interim fix zip files.
Note:
� The above command should be entered on one line.
� Do not type .jar after the fix_name in the above command.
� If you are migrating WPCP then you should enter PQ78841_WPCP50_iFix after PQ77683_WP50_iFix in the above example.
Chapter 12. Migration from WebSphere Portal V4.2 to V5 669

ii. You should be able to access WebSphere_Portal from a browser using the URL:
http://<hostname.yourco.com>/wps/portal
where hostname.yourco.com is the fully qualified host name of the machine where WebSphere Portal is running.
� Apply the update to the migration interim fix applied to WebSphere Portal V4.2.1 environment.
After applying the migration interim fix to the WebSphere Portal V5.0 environment, an update to the previously applied fixes for WebSphere Portal V4.2.1 is located in the <wp5_root>/migration/efixes directory on the machine running WebSphere Portal V5.0, where wp5_root is the root directory of WebSphere Portal. Perform the following steps to apply this update to your WebSphere Portal V4.2.1 environment:
a. Stop your WebSphere Portal V4.2.1 and open a command prompt.
b. Copy the WP42X_MP_Express_Patch.jar file, update to the interim fix, from <wp5_root>/migration/efixes directory to a temporary directory on your WebSphere Portal V4.2.1 system.
c. Extract the update to the interim fix by entering the following command:
jar -xvf WP42X_MP_Express_Patch.jar
This extracts the update file 42X_fix.jar.
d. In the command prompt, change to the <was_root>/lib/app directory.
e. Copy the update file 42X_fix.jar to <was_root>/lib/app directory and extract it by entering the following command:
jar -xvf 42X_fix.jar
f. Remove 42X_fix.jar from the <was_root>/lib/app directory and restart WebSphere Portal.
Note: If you are migrating WPCP, there should be PQ78841_WPCP50_iFix.efix and PQ78841_WPCP50_iFix.efixDriver files in the above directories.
Note: Copy WP41X_MP_Express_Patch.jar file if you have WebSphere Portal V4.1.x system.
Note: The files extracted in steps c and e above for WebSphere Portal V4.1.x are WP41X_MP_Express_Patch.jar and 41X_fix.jar respectively.
670 IBM WebSphere Portal for Multiplatforms V5 Handbook

� Make portlet applications available to migration tasks for deployment.
Before making your custom portlets available for migration, you should update the portlet source code so that the portlets can work on WebSphere Portal V5.0. Refer to the section “Migrating custom portlet code” in” Manual migration steps” under Migrating in the InfoCenter for WebSphere Portal V5.0. Once you are finished updating, there are two methods in which you can make the portlet applications available for migration:
a. Create war files of each portlet application you want to migrate and copy them to <wp5_root>/installableApps directory.
b. Create war files of each portlet application and then enter as value of the parameter appsPath in Mig_core.properties file the path of the directory on WebSphere Portal V4.2.1 system, where the war files are present.
� Specify values in the properties files.
Providing values to the parameters in the property files allows you to invoke various migration tasks without supplying individual parameters on the command line. There are, in all, four property files for migration:
– mig_core.properties, where you specify the core migration properties. Column 2 in Table 12-1 indicates the values you need to enter for this sample scenario for the parameters in column 1. Column 3 provides a brief description of each parameter.
Table 12-1 Values for parameters in mig_core.properties file
Note: The path entered as the value of the parameter appsPath above should be accessible from the WebSphere Portal V5.0 system.
Property Value Description
WpsHostName4x m23a1049.itso.ral.ibm.com Fully qualified host name of the WebSphere Portal V4.x machine
WpsPort4x 80 Port number to which WebSphere Portal V4.x has been configured
WpsContextRoot4x wps Base URI for WebSphere Portal V4.x
WpsDefaultHome4x portal Default home for WebSphere Portal V4.x
PortalAdminId4x wpsadmin WebSphere Portal V4.x administrator
Chapter 12. Migration from WebSphere Portal V4.2 to V5 671

– mig_wmm.properties, where you specify values related to Member Manager. You need not edit this file and nor run the migrate-wmm task, if you configured WebSphere Portal V5.0 not to use a Look Aside database. However, you must not change the value of the parameter LookAside in wpconfig.properties from false to true while configuring WebSphere Portal V5.0 for a LDAP Directory. For this sample scenario, a LookAside database is not being used and so this file need not be edited. Only users with WebSphere Portal V5.0 configured to use a LookAside database and having environments similar to this sample scenario can reference Table 12-2 for values for the parameters in this file. This table also provides a description for each parameter. These users should run the migrate-wmm task.
Table 12-2 Values for parameters in mig_wmm.properties
PortalAdminPwd4x wpsadmin WebSphere Portal V4.x administrator password
wpsinstallLocation4x C:/WebSphere/PortalServer Root directory of WebSphere Portal V4.x
includePlaces TestPlace Comma-seperated names of the custom places you want to migrate
includePages TestPage Comma-separated names of the custom pages you want to migrate
includeApps Newsgroups, Images, Concrete iFrame Portlet (author - change it to uid)
Comma-separated names of the portlet applications you want to migrate
Property Value Description
WmsDbName wps42db alias name of WebSphere Portal database on WebSphere Portal V4.x.
WmsDbUrl jdbc:dbc:wps42db WebSphere Portal database JDBC URL
WmsDbUser db2admin db2 administrator
WmsDbPassword db2admin db2 administrator password
Property Value Description
672 IBM WebSphere Portal for Multiplatforms V5 Handbook

– mig_wpcp.properties, where you specify values for properties related to migration of WebSphere Portal content publishing. In this sample scenario, we did not migrate WPCP and do not need to edit this file. Related to this file are two other files called mig_wpcp_author.properties in which you specify values related to WPCP authoring and feedback, respectively.
� Copy the wps.properties file from the <wp4_root> directory of your WebSphere Portal V4.2.1 system to the <wp5_root>/migration directory of the WebSphere Portal V5.0 system.
� Ensure that all groups in IBM Directory Server V4.1 on WebSphere Portal V4.2.1 have at least one member. Otherwise, some of the migration tasks will fail.
WmmConfigType 2 LDAP + Look Aside Database configuration
WmmUuid value of the element UUID under the node databaseRepository in the file wmm.xml in directory <wp5_root>/shared/app/wmm
Db2Home C:/ibm/SQLLIB root installation directory of DB2 on machine 3
WmmHasUuid true
LdapUuidName ibm-appUUID
LdYesapAuxiliaryClassName
ibm-appUUIDAux
Property Value Description
Chapter 12. Migration from WebSphere Portal V4.2 to V5 673

12.4 Portal migration processIn this section, we will continue with our example of migrating from Portal 4.2.1 to Portal 5.
12.4.1 Running the migration stepsBefore running the migration tasks, do the following:
1. On machine 1, make sure WebSphere Portal V4.2.1 is up and running.
2. On machine 3, make sure WebSphere Portal V5.0 is up and running.
3. On machine 3, open a command prompt and change to the migration directory (C:\WebSphere\PortalServer).
Migrating access controls on user groupsIn this section, we will migrate the access controls of the user groups.
1. From the command prompt, run the following command:
WPmigrate.bat migrate-user-groups-ac
2. Wait for the task to end; it should end with a Build Successful message.
3. Verify that the migration was a success by doing the following:
a. Log in to the WebSphere Portal V5.0 administrative interface.
b. Click Access -> Users and Group Permissions and under Users and User Groups, click Users.
c. Under the Search on option box, select givenName and in the Search for text box, enter the user name of a user having access controls on user groups in WebSphere Portal V4.2.1. Click Search.
Note: The values in Table 12-1 and Table 12-2 are provided to help you document the parameters correctly based on our migration.
The includePlaces, includePages, includeApps are all optional parameters. By default, the migration tasks migrate all places (migrate-places task), all pages (migrate-pages task) and deploy all portlet apps (migrate-apps task). These parameters are used to limit what gets migrated.
For more information regarding these parameters, please see the Migration Task referenced in the WP502 Infocenter (click Migrating... on the first page) at the following URL:
http://wpid.raleigh.ibm.com/ic/wpo502/ent/en/InfoCenter/index.html
674 IBM WebSphere Portal for Multiplatforms V5 Handbook

d. Click the Select Resource Type icon beside the user name of the user you just searched for and then under Resource Types, click User Groups.
e. You will see a window with a list of user groups; click the Access icon for the user group for which the user has access controls.
f. You should see a window similar to Figure 12-3. Verify the permissions with the permissions the user has for the selected group on WebSphere Portal V4.2.1, as shown in Figure 12-4 on page 676. For this scenario, the Manage permission and the Delegate permission equal an Administrator role.
Figure 12-3 Permission-based Access Control on a group on WebSphere Portal V4.2.1
Chapter 12. Migration from WebSphere Portal V4.2 to V5 675

Figure 12-4 Role-based Access Control on a group on WebSphere Portal V5.0
g. Perform the same type of verification for other users having access controls on user groups on WebSphere Portal V5.0.
Migrating portlet applicationsIn this section, we will perform the migration of the portlet applications.
1. From the command prompt, run the following command:
WPmigrate.bat export-apps
2. Wait for a task to end; it should end with a Build Successful message.
3. Verify that the migration was a success by doing the following:
a. Log in to the WebSphere Portal V5.0 administrative interface.
b. Click Portlets -> Manage Applications on the left navigation pane.
c. Verify that all the portlet applications listed as migrated are present under Web modules. For this scenario, the blue-colored arrows in Figure 12-5 on page 677 indicate the portlet applications migrated from WebSphere Portal V4.2.1 to WebSphere Portal V5.0; this is also indicated by the blue-colored arrows in Figure 12-6 on page 678.
676 IBM WebSphere Portal for Multiplatforms V5 Handbook

Figure 12-5 Portlet Applications listed for migration from WebSphere Portal V4.2.1
Chapter 12. Migration from WebSphere Portal V4.2 to V5 677

Figure 12-6 Portlet Applications migrated to WebSphere Portal V5.0
d. For each Web module migrated, verify that all portlet applications related to the Web module are also display in the Portlet Applications list. See Figure 12-5 on page 677 and Figure 12-6 for reference.
e. Select each portlet application migrated and click Modify parameters to verify that the parameters that were set up for the portlet applications have also been migrated correctly. and indicate the migration of the Author parameter for Concrete iFrame Portlet from WebSphere Portal V4.2.1 to WebSphere Portal V5.0.
678 IBM WebSphere Portal for Multiplatforms V5 Handbook

Figure 12-7 Author parameter for Concrete iFrame Portlet application on WebSphere Portal V4.2.1
Chapter 12. Migration from WebSphere Portal V4.2 to V5 679

Figure 12-8 Author parameter for Concrete iFrame Portlet application on WebSphere Portal V5.0
4. Verify the migration of access control for the migrated Portlet Applications and portlets:
In the Administrative interface, click Access -> Resource Permissions and then under Resource Types, click Portlet Applications.
Migrating placesIn this section, we will migrate places:
1. From the command prompt, run the following command:
>WPmigrate.bat migrate-places -DdeployPages=false -DdeployApps=false -DconfigThemesSkins=false
2. Wait for a task to end; it should end with a Build Successful message.
3. Verify that the migration was a success by doing the following:
a. Log in to the WebSphere Portal V5.0 administrative interface.
b. Click Portal user interface -> Manage pages on the left navigation pane.
680 IBM WebSphere Portal for Multiplatforms V5 Handbook

c. Under Content Root, click My Portal, you will see a window similar to the one shown in Figure 12-9. You should see the places you migrated in the list of pages under Pages in My Portal.
Figure 12-9 TestPlace migrated from WebSphere Portal V4.2.1 to WebSphere Portal V5.0
d. Click the Edit page properties icon for one of the pages just migrated to verify the title of the page and ensure that it uses the same theme as WebSphere Portal V4.2.1. Click Advanced Options and verify that supported markup settings and the titles and descriptions for other languages were migrated successfully. For this scenario, the properties of the TestPlace in WebSphere Portal V4.2.1 are as shown in Figure 12-10
Note: The concept of place does not exist in WebSphere Portal V5.0. WebSphere Portal V4.x places are treated like top-level pages in WebSphere Portal V5.0. The same will be done in this chapter from now on.
Chapter 12. Migration from WebSphere Portal V4.2 to V5 681

on page 682 and the same properties after migration to WebSphere Portal V5.0 are as shown in Figure 12-11 on page 683.
Figure 12-10 Properties of TestPlace in WebSphere Portal V4.2.1
682 IBM WebSphere Portal for Multiplatforms V5 Handbook

Figure 12-11 Properties of TestPlace in WebSphere Portal V5.0
e. Perform the above step to verify the successful migration of other places.
Migrating pagesIn this section, we will migrate pages:
1. From the command prompt, run the following command:
WPmigrate.bat migrate-pages -DconfigThemesSkins=false
2. Wait for the task to end; it should end with a Build Successful message.
3. Verify that the migration was a success by doing the following:
a. Log in to the WebSphere Portal V5.0 administrative interface.
b. Click Portal user interface -> Manage pages in the left navigation pane.
c. Under Content Root, click My Portal and under the list of pages for My Portal, click TestPlace. You should see a window similar to Figure 12-12 on page 684, indicating the migrating of TestPage.
Chapter 12. Migration from WebSphere Portal V4.2 to V5 683

Figure 12-12 Migration of TestPage from WebSphere Portal V4.2.1 to WebSPhere Portal V5.0
d. Click the Edit Page Properties icon for TestPage to verify that the title was migrated successfully. Click Advanced Options to verify successful migration of other options like Bookmarkable and Supported markups. Figure 12-13 on page 685 indicates the properties of TestPage in WebSphere Portal V4.2.1 and Figure 12-14 on page 686 indicates the properties of TestPage in WebSphere Portal V5.0.
684 IBM WebSphere Portal for Multiplatforms V5 Handbook

Figure 12-13 Properties of TestPage in WebSphere Portal V4.2.1
Chapter 12. Migration from WebSphere Portal V4.2 to V5 685

Figure 12-14 Properties of TestPage in WebSphere Portal V5.0
e. Perform the above step to verify successful migration of other pages.
Migrating all user customizationsIn this section, we will migrate all user customizations:
1. From the command prompt, run the following command:
WPmigrate.bat migrate-user-customizations
2. Wait for the task to end; it should end with a Build Successful message.
3. Verify that the migration was a success by doing the following:
a. Log in to the WebSphere Portal V5.0 with credentials of a user who has customizations in WebSphere Portal V4.2.1.
b. Browse to the migrated page in which the user has customized portlet(s). For this scenario, go to TestPage in TestPlace page under MyPortal. Verify that all customizations from WebSphere Portal V4.2.1 are present in WebSphere Portal V5.0. For this scenario, Figure 12-15 on page 687 and
686 IBM WebSphere Portal for Multiplatforms V5 Handbook

Figure 12-16 on page 688 indicate the migration of customizations on TestPage from WebSphere Portal V4.2.1 to WebSphere Portal V5.0, respectively.
Figure 12-15 User Customization for TestPage in WebSphere Portal V4.2.1
Chapter 12. Migration from WebSphere Portal V4.2 to V5 687

Figure 12-16 User Customization for TestPage in WebSphere Portal V5.0
c. Perform the verification for other users having customizations on WebSphere Portal V4.2.1.
Migrating Credential Vault slots and segmentsIn this section, we will migrate the Credential Vault slots and segments:
1. From the command prompt, run the following command:
WPmigrate.bat migrate-credential-slots-segments
2. Wait for the task to end; it should end with a Build Successful message.
3. Verify the MigrationReport.xml file for any error for this task.
4. Verify that the migration was a success by doing the following:
a. Log in to the WebSphere Portal V5.0 Administrative Interface.
b. Click Access -> Credential Vault on the left navigation pane.
688 IBM WebSphere Portal for Multiplatforms V5 Handbook

c. Click the Manage vault segments option to verify that the segments in WebSphere Portal V4.2.1 are now present in WebSphere Portal V5.0. For this scenario, you should see a window similar to Figure 12-17 and Figure 12-18 on page 690 in WebSphere Portal V4.2.1 and WebSphere Portal V5.0, respectively.
Figure 12-17 List of Credential Segments in WebSphere Portal V4.2.1
Chapter 12. Migration from WebSphere Portal V4.2 to V5 689

Figure 12-18 List of Credential Segments in WebSphere Portal V5.0
d. Click Done to go back and then click the Manage system vault slots option to verify that the vault slots in WebSphere Portal V4.2.1 are now present in WebSphere Portal V5.0. For this scenario, you should see a window similar to Figure 12-19 on page 691 and Figure 12-20 on page 692 in WebSphere Portal V4.2.1 and WebSphere Portal V5.0, respectively.
690 IBM WebSphere Portal for Multiplatforms V5 Handbook

Figure 12-19 List of Credential Slots in WebSphere Portal V4.2.1
Chapter 12. Migration from WebSphere Portal V4.2 to V5 691

Figure 12-20 List of Credential Slots in WebSphere Portal V5.0
Migrating Credential Vault dataMigrating the Credential Vault data involves moving the data from two tables, VAULT_DATA and VAULT_RESOURCES from the WebSphere Portal V4.2.1 database to the WebSphere Portal V5.0 database.
1. Perform the following steps on machine 1 to export these tables from the WebSphere Portal V4.2.1 database:
a. Start the DB2 Command Line Processor (CLP).
b. Connect to the WebSphere Portal database:
db2 connect <wps42db> using <db2user> password <db2userpwd>
c. Run the following commands:
db2 export to c:/temp/vault.data.wp4.ixf of ixf messages c:/temp/vault.data. wp4.msgtxt select * from VAULT_DATAdb2 export to c:/temp/vault.res.wp4.ixf of messages c:/temp/vault.res.wp4.msgtxt select * from VAULT_RESOURCES
692 IBM WebSphere Portal for Multiplatforms V5 Handbook

d. Disconnect from the WebSphere Portal database:
db2 disconnect <wps42db>
where <wps42db> is name of WebSphere Portal V4.2.1 database, <db2user> is the user ID of the database administrator and <db2userpwd> is the password of this user ID.
2. Perform the following steps on machine 3 to import the data into the same tables of WebSphere Portal V5.0 database:
a. Copy the vault.data.wp4.ixf and vault.res.wp4.ixf files from machine 1 to the same directory in machine 3.
b. Start the DB2 Command Line Processor (CLP).
c. Connect to the WebSphere Portal database:
db2 connect <wps5db> using <db2user> password <db2userpwd>
d. Run the following commands:
db2 import from c:/temp/vault.data.wp4.ixf of ixf modified by indexschema=<db2user> messages c:/temp/vault.data. wp5.msgtxt insert into VAULT_DATAdb2 import from c:/temp/vault.res.wp4.ixf of ixf modified by indexschema=<db2user> messages c:/temp/vault.res. wp5.msgtxt insert into VAULT_RESOURCES
e. Disconnect from the WebSphere Portal database:
db2 disconnect <wps5db>
where <wps5db> is name of WebSphere Portal V5.0 database, <db2user> is the user ID of the database administrator and <db2userpwd> is the password of this user ID.
3. Verify that the migration was successful by doing the following:
a. Log in to the WebSphere Portal V5.0 Administrative Interface.
b. Click Access -> Credential Vault on the left navigation pane.
c. Click Manage system vault slots and click Modify shared slot radio button for TestVaultSlot02.
d. The value of the Shared userid field should be the one TestVaultSlot02 had in the WebSphere Portal V4.2.1 environment.
Note: The import into the VAULT_RESOURCES table may generate some errors. If the error indicates that a row with the same resource name already exists, this is fine. This table only defines resource names for use in the vault. If they already exist, there is no need to redefine them and this will not cause a problem in the subsequent import.
Chapter 12. Migration from WebSphere Portal V4.2 to V5 693

694 IBM WebSphere Portal for Multiplatforms V5 Handbook

Appendix A. Identity management
This appendix provides an overview of Member Manager for IBM WebSphere Application Server, or simply WebSphere Member Manager (WMM), formerly known as WebSphere Member Services (WMS).
A
© Copyright IBM Corp. 2004. All rights reserved. 695

A.1 WebSphere Member ManagerWebSphere Member Manager (WMM) empowers WebSphere Portal with advanced capabilities to handle member data and profiles. A member in WebSphere Member Manager is one of the following: a person, organization, organizational unit, or group. This is one of the key differentiators from WebSphere Portal.
Member Manager provides the following to the portal:
� A common profile management mechanism for WebSphere products to access and manage member profiles using attributes regardless of where and how the data of member profiles is stored. By default, WebSphere Portal uses seven attributes, namely, a unique identifier, a user password, a group, a first name, a last name, an e-mail address and a preferred language.
� A set of services to act upon and manage profiles such as create, read, update, remove, search members, manage groups in profile repository.
� A hierarchical structuring of members.
� Database profile repository adapters to interact with supported database profile repository.
� Lightweight Directory Access Protocol (LDAP) profile repository adapters to interact with supported LDAP servers.
� Not all attributes can be stored in LDAP. A look-aside profile can be used to some those profiles such as a composite attribute. WebSphere Member Manager provides a look-aside profile repository adapter to interact with a look-aside repository.
� A programmatic way to define new attributes and various member-related tasks in the profile repositories. Tasks can be performed programmatically by calling methods on the Member Manager API. The Member Manager API is contained in the following packages:
– com.ibm.websphere.wmm, which contains the MemberService interface, the main interface of the Member Manager API. The methods in the MemberService interface allow you to perform member management operations.
– com.ibm.websphere.wmm.objects, which contains enterprise bean home and remote interfaces for the stateless session bean used to implement the Member Manager API.
– com.ibm.websphere.wmm.datatype, which contains interfaces and classes for parameters used by the methods of the Member Manager API.
– com.ibm.websphere.wmm.exception, which contains classes for exceptions thrown by the Member Manager API.
696 IBM WebSphere Portal for Multiplatforms V5 Handbook

– com.ibm.websphere.wmm.adapter, which contains classes interfaces for developing profile repository adapters to connect profile repositories to Member Manager. The two adapters provided by Member Manager are developed according to the interfaces in this package.
� Tools and utilities such as WebSphere Member Manager Attributes Loader to assist developers to test, develop, and integrate WebSphere Member Manager.
A.2 WebSphere Member Manager supported configuration
In general, information within a member profile for a person can be divided into the following three main categories:
� Profile information, such as name, title, address, e-mail, and demographical information.
� Authentication information, such as a logon ID and password used for security and identification when logging onto a system.
� Privilege information, such as roles for the person and the access control groups to which the member belongs.
The information for a person may or may not be stored in the same storage location. For example, a client might have an existing LDAP profile repository whose schema cannot be changed to accommodate additional attributes required by an application. It could be for business or technical reasons that the new attributes cannot be accommodated. A look-aside repository can be used for the additional attributes and applications, by using Member Manager, which will not be aware that two repositories are being used.
Another scenario is that the look-aside repository supports composite attributes that are typically not supported by LDAP profile repositories. For instance, address is an example of composite attribute. If a customer wants to use composite attributes, the customer can use the look-aside repository together with his LDAP profile repository and the look-aside repository can supplement the capability of the LDAP repository.
Member Manager supports the following configurations:
1. Profile repository – a repository where user profiles are stored. A profile repository can be either a database profile repository (such as wmmDB), an LDAP profile repository (such as wmmLDAP), or a custom profile repository. The custom repository can be of any nature including being a database or an LDAP server.
Appendix A. Identity management 697

2. Look-Aside repository - a repository provided with the Member Manager as a storage location for additional attributes that cannot be accommodated in the main profile repositories. For example, composite attributes are not supported in LDAP, and these types of attributes can be stored in LA.
Member Manager can be configured in the following ways:
Figure A-1 Single Profile Repository
� DB Only
Database Repository only (Figure A-1). Database Repository is the only main repository. All profile data is stored in the WebSphere Member Manager database. By default, the base portal install configures WebSphere Member Manager to use DB only.
� LDAP Only
LDAP Repository only (Figure A-1). LDAP Repository is the only main repository. All profile data is stored on an LDAP server. By executing the command enable-security-ldap during the portal configuration tasks enables WebSphere Portal to work with an LDAP server.
MemberServiceInterface
MemberRepositoryInterface
ProfileRepository
Adapter
MemberManagerDataClient or
Caller
Data
Data
ProfileRepository
698 IBM WebSphere Portal for Multiplatforms V5 Handbook

Figure A-2 A Profile Repository plus a Look-aside Repository
� LDAP + LA
LDAP Repository plus Look Aside Repository (Figure A-2). The LDAP Repository is the main repository. It stores attributes specified in WebSphere Member Manager LDAP Attributes XML file. The rest of the attributes are stored in the Look Aside Repository. Look Aside repository usually stores attributes which cannot be stored on LDAP server, such as composite attribute. If all attributes you are using are supported by LDAP server, then there is no need to use LDAP + LA configuration. You can use LDAP only configuration instead.
WebSphere Member Manager is installed and configured by the portal during the installation and configuration. The WebSphere Member Manager properties are supplied by the wpsconfig.properties file.
MemberServiceInterface
MemberRepositoryInterface
+
Look-asideRepository(Optional)
ProfileRepositoryProfile
RepositoryProfileRepository
Adapter
Look-asideAdapter
MemberManagerDataClient or
Caller
Data
Data
Appendix A. Identity management 699

700 IBM WebSphere Portal for Multiplatforms V5 Handbook

Appendix B. Preparing the AIX machine
Before installing WebSphere Portal 5.0 on AIX, you have to prepare the AIX box with enough disk space. This appendix will guide you through this process.
B
© Copyright IBM Corp. 2004. All rights reserved. 701

B.1 Increasing the size of an existing file systemWebSphere Portal installation requires 350 MB of free space on the /tmp file system; you might want to use the following calculation for increasing space on this specific file system and on any other you might need.
� Find the new size value:
new_size=current_size + (required_space - free_space)
You can have the values below using the command df on AIX.
File system current_size= 131072 bytes
File system free space = 126872
File system required space = 716800 bytes
New size = 721000
� Increase the file system size:
#chfs -a size='<new_size>' /<file_system_mount_point>
Example:
#chfs -a size=’721000’ /tmp
B.2 Creating a new file systemWe recommend that you create a file system dedicated for WebSphere Portal and WebSphere Application Server installation.
These instructions already include the required disk space for both products:
1. Type the following command:
#smitty fs
2. Select Add/Change/Show/Delete File Systems.
3. Select Journaled File Systems.
4. Select Add a Journaled File System.
5. Select Add a Standard Journaled File System.
6. Select the desired Volume Group.
7. Select Megabytes in the Unit Size field.
8. Enter the value 2200 for the Number of unit.
9. Enter /usr/WebSphere for the Mount Point value.
10.Select yes for the question Mount AUTOMATICALLY at system restart?.
702 IBM WebSphere Portal for Multiplatforms V5 Handbook

11.Accept the default for the remaining fields and press Enter.
12.Press F10 to exit.
13.Mount the file system entering the following command:
mount /usr/WebSphere
B.3 Creating a CDROM file systemYou can use the following instructions if you do not have a CDROM file system already created:
1. Type the following command:
#smitty fs
2. Select Add/Change/Show/Delete File Systems.
3. Select Add/Change/Show/Delete File Systems.
4. Select CDROM File Systems.
5. Select Add a CDROM File System.
6. Press F4 to select the available CDROM Device Name.
7. Enter /cdrom in the Mount Point field.
8. Select no for the question Mount AUTOMATICALLY at system restart?.
9. Press Enter.
10.Press F10 to exit.
11.Mount the file system using the command:
mount /cdrom
12.To eject the CD, you need to umount the file system:
#unmount /cdrom
Appendix B. Preparing the AIX machine 703

704 IBM WebSphere Portal for Multiplatforms V5 Handbook

Appendix C. Creating users on AIX
This appendix provides instructions for creating users and groups on AIX.
Three users and groups are required to operate DB2. The user and group names used in the following instructions are documented in Table C-1.
Table C-1 Required user and groups
There are some limitations for the DB2 user name and group name:
� User names on Unix can contain 1 to 8 characters.
� Group and instance names can contain 1 to 8 characters.
� Names cannot be any of the following:
– users
– admins
– guests
– public
C
Required User User name Group name
Instance Owner db2inst1 db2iadm1
Fenced user db2fenc1 db2fadm1
Administrator server db2as dasadm1
© Copyright IBM Corp. 2004. All rights reserved. 705

– local
� Names cannot begin with:
– IBM
– SQL
– SYS
� Names cannot include accented characters.
� We recommend that you use lowercase for user and group names in Unix.
C.1 Creating DB2 groupsCreate a group for the instance owner, one for the user that will execute UDFs or stored procedures and one for the DB2 Administrator user.
Log on as root and execute the following commands:
mkgroup db2iadm1mkgroup db2fadm1mkgroup dasadm1
C.2 Creating DB2 usersCreate a user that will belong to each group you have created previously.
Log on as root and execute the following commands:
mkuser pgrp=db2iadm1 groups=db2iadm1 home=/home/db2inst1 core=-1 data=491519 stack=32767 rss=-1 fsize=-1 db2inst1mkuser pgrp=db2fadm1 groups=db2fadm1 home=/home/db2fenc1 db2fenc1mkuser pgrp=dasadm1 groups=dasadm1 home=/home/db2as db2as
C.3 Setting user’s passwordSet an initial password for each user you have created.
Enter the following commands:
passwd db2inst1passwd db2fenc1passwd db2as
706 IBM WebSphere Portal for Multiplatforms V5 Handbook

Appendix D. Installing fixes
This appendix provide assistance when applying the manual fixes required for WebSphere Portal.
WebSphere Portal requires you to manually apply the following fixes:
� PQ72196_fix.jar
� PQ72597-efix.jar
� PQ77008.jar
� PQ77142.jar
� WAS_Plugin_07-01-2003_5.0.X_cumulative_Fix.jar
� WAS_Security_07-07-2003_JSSE_cumulative_Fix.jar
Follow the steps below to apply the fixes using the Update Wizard tool:
1. Stop server1.
AIX: ./stopServer.sh server1
WIN: stopServer.bat server1
2. Stop WebSphere Portal.
AIX: ./stopServer.sh WebSphere_Portal
WIN: stopServer.bat WebSphere_Portal
D
© Copyright IBM Corp. 2004. All rights reserved. 707

3. Stop the Web server.
4. Create a directory named update in the WebSphere Application Server root directory:
AIX: /usr/WebSphere/AppServer/update
WIN: X:\WebSphere\AppServer\update
5. Copy the manualfixes folder to the <was-root>/update directory. The directory can be found in the WebSphere Application Server FixPacks and eFixes CD:
AIX: /cdrom/cd1-7/manualfixes/
WIN: X:\cd1-6\manualfixes\
6. Unzip windowsUpdateInstaller.zip.
7. Export the JAVA_HOME variable.
AIX: export JAVA_HOME=/usr/WebSphere/AppServer/java
WIN: set JAVA_HOME=X:\WebSphere\AppServer\java
8. On the same command line window where you exported the JAVA_HOME variable, go to the <was-root>/update directory.
9. Run the updateWizard tool:
AIX: ./updateWizard.sh
WIN: updateWizard.bat
10.The updateWizard tool starts, select the desired language. Click OK.
11.Click Next in the Welcome window.
12.You will see a window similar to Figure D-1 on page 709. Click Next.
708 IBM WebSphere Portal for Multiplatforms V5 Handbook

Figure D-1 Update Wizard tool
13.Select Install fixes. Click Next.
Appendix D. Installing fixes 709

Figure D-2 Select install fixes
14.Enter the location of the interim fixes. Click Next.
15.Select the fixes you want to install. Click Next.
Important: If your WebSphere Portal Installation does not include a Web server such as IBM HTTP Server on the same machine, do not install the Cumulative Plug-in fix. This is required for machines that have a Web server installed.
If you have a remote Web server such as an HTTP server, you must install the Cumulative plugin fix on this machine.
710 IBM WebSphere Portal for Multiplatforms V5 Handbook

Figure D-3 Select the fixes you want to install
16.Select Next to confirm the installation.
Wait for the process to finish.
17.Check that all fixes were successfully installed. Click Finish.
18.Start the Web server.
19.Start server1.
20.Start WebSphere Portal.
Appendix D. Installing fixes 711

712 IBM WebSphere Portal for Multiplatforms V5 Handbook

Appendix E. Text-based Portal installation on Solaris
We have introduced the installation and configuration for WebSphere Application Server and WebSphere Portal in the previous chapters. Basically, those introductions were based on the GUI (Graphical User Interface) environment. But sometimes, especially in the UNIX environment, people use the UNIX machine as a server. Therefore, they have no graphical terminal for the server in their environment; they only have a text terminal.
In this appendix, we will briefly discuss how to use the text mode of Solaris to perform the following tasks:
� Install and configure the WebSphere Application Server
� Install and configure the WebSphere Portal
� Uninstall the WebSphere Application Server and Portal
� Install and uninstall the interim fixes of the WebSphere Application Server
� Use the batch file to perform the following tasks automatically:
– Install the WebSphere Application Server
– Install the WebSphere Portal
– Apply the interim fix of the WebSphere Application Server
– Add the host alias for the virtual host
E
© Copyright IBM Corp. 2004. All rights reserved. 713

– Configure the database for WebSphere Portal
– Enable the security for WebSphere Portal
Of course, the method for the text mode can also be used in the Graphical User Interface.
Note: The introduction in this appendix is based on the Solaris environment. There might be some differences between other UNIX platforms but you can use this section as a reference.
Important: This appendix only discusses how to install and configure the WebSphere Application Server and WebSphere Portal in text mode. For other related products, you can refer to the product documentation for detailed information.
714 IBM WebSphere Portal for Multiplatforms V5 Handbook
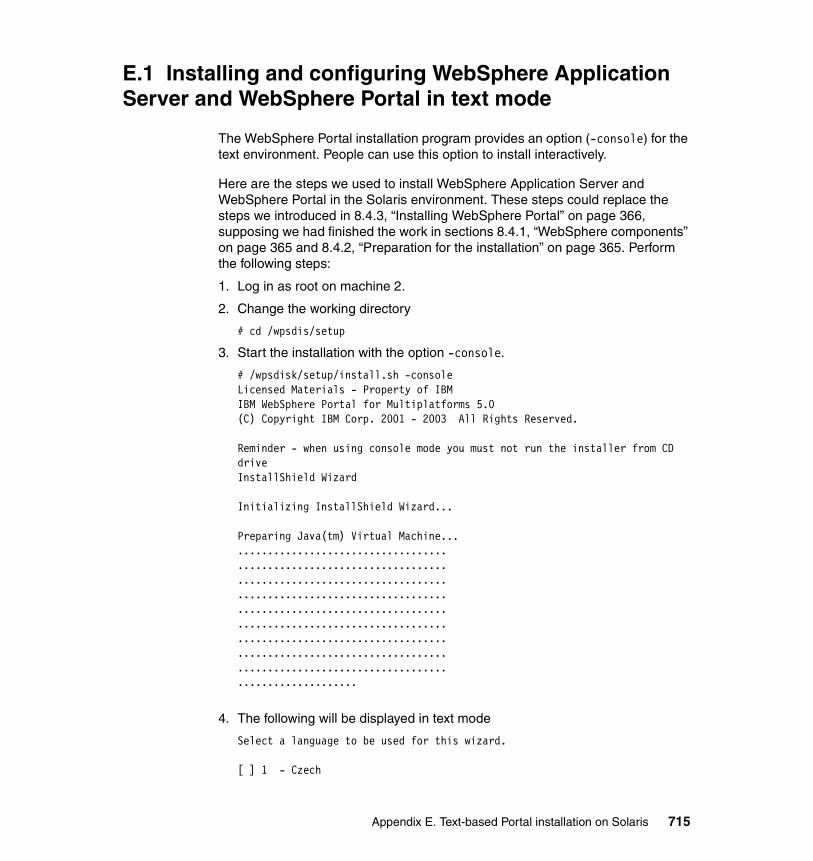
E.1 Installing and configuring WebSphere Application Server and WebSphere Portal in text mode
The WebSphere Portal installation program provides an option (-console) for the text environment. People can use this option to install interactively.
Here are the steps we used to install WebSphere Application Server and WebSphere Portal in the Solaris environment. These steps could replace the steps we introduced in 8.4.3, “Installing WebSphere Portal” on page 366, supposing we had finished the work in sections 8.4.1, “WebSphere components” on page 365 and 8.4.2, “Preparation for the installation” on page 365. Perform the following steps:
1. Log in as root on machine 2.
2. Change the working directory
# cd /wpsdis/setup
3. Start the installation with the option -console.
# /wpsdisk/setup/install.sh -consoleLicensed Materials - Property of IBMIBM WebSphere Portal for Multiplatforms 5.0(C) Copyright IBM Corp. 2001 - 2003 All Rights Reserved.
Reminder - when using console mode you must not run the installer from CD driveInstallShield Wizard
Initializing InstallShield Wizard...
Preparing Java(tm) Virtual Machine..................................................................................................................................................................................................................................................................................................................................................
4. The following will be displayed in text mode
Select a language to be used for this wizard.
[ ] 1 - Czech
Appendix E. Text-based Portal installation on Solaris 715

[X] 2 - English[ ] 3 - French[ ] 4 - German[ ] 5 - Greek[ ] 6 - Hungarian[ ] 7 - Italian[ ] 8 - Japanese[ ] 9 - Korean[ ] 10 - Polish[ ] 11 - Portuguese[ ] 12 - Portuguese (Brazil)[ ] 13 - Russian[ ] 14 - Simplified Chinese[ ] 15 - Spanish[ ] 16 - Traditional Chinese[ ] 17 - Turkish
To select an item enter its number, or 0 when you are finished: [0]
5. Select 0 then press Enter to continue.
6. The following license information will display.
Welcome to the InstallShield Wizard for WebSphere Portal for MultiplatformsVersion 5.0. The InstallShield Wizard will install WebSphere Portal forMultiplatforms Version 5.0 on your computer.
Press 1 for Next, 3 to Cancel or 4 to Redisplay [1] 1
Press 1 and then press Enter to continue
7. The License Agreement will display, along with the following
Press 1 for Next, 2 for Previous, 3 to Cancel or 4 to Redisplay [1] 1
8. Press 1 and press Enter to continue. The following information will display:
Choose the setup type that best suits your needs.
[X] 1 - Full Installs everything you need for WebSphere Portal, including WebSphere Application Server and IBM HTTP Server. [ ] 2 - Custom Select the features you want to install. Choose this option to install WebSphere Portal to use an existing WebSphere Application Server or an existing HTTP server.
To select an item enter its number, or 0 when you are finished: [0] 2
716 IBM WebSphere Portal for Multiplatforms V5 Handbook

9. Because we use the custom method, type 2 and then press Enter to continue. A new window is shown:
[ ] 1 - Full Installs everything you need for WebSphere Portal, including WebSphere Application Server and IBM HTTP Server. [X] 2 - Custom Select the features you want to install. Choose this option to install WebSphere Portal to use an existing WebSphere Application Server or an existing HTTP server.
To select an item enter its number, or 0 when you are finished: [0]
10.Press 0 and the following information displays:
Press 1 for Next, 2 for Previous, 3 to Cancel or 4 to Redisplay [1] 1
11.Press 1 then press the Enter to continue.
You will see the following response:
WebSphere Portal requires WebSphere Application Server. Choose one of thefollowing options to continue.
[X] 1 - Install a new instance of WebSphere Application Server[ ] 2 - Use an existing instance of WebSphere Application Server[ ] 3 - Upgrade a WebSphere Application Server to the supported level.
To select an item enter its number, or 0 when you are finished: [0]
12.Since this is a new installation, press Enter to access the default (0) and continue. You will see the following response:
Press 1 for Next, 2 for Previous, 3 to Cancel or 4 to Redisplay [1] 1
13.Press 1 then press Enter to continue.
You will see the following response:
WebSphere Application Server will be installed in the following directory. Tochoose a different directory, enter its location below.
WebSphere Application Server installation directory. Requires 900000 KBavailable space.
Enter a directory: [/opt/WebSphere/AppServer]
Press 1 for Next, 2 for Previous, 3 to Cancel or 4 to Redisplay [1] 1
Appendix E. Text-based Portal installation on Solaris 717

14.Access the default and press 1 then press Enter to continue.
You will see the following response:
Do you wish to install IBM HTTP Server for use with WebSphere ApplicationServer, or do you wish to configure WebSphere Application Server to use anexisting HTTP server?
[X] 1 - Install IBM HTTP Server.[ ] 2 - Install the plugin for an existing HTTP server.[ ] 3 - Do not install a plugin at this time.
To select an item enter its number, or 0 when you are finished: [0] 3
15.Input 3 and then press Enter to continue.
You will see the following response:
[ ] 1 - Install IBM HTTP Server.[ ] 2 - Install the plugin for an existing HTTP server.[X] 3 - Do not install a plugin at this time.
To select an item enter its number, or 0 when you are finished: [0]
16.Press 0 and press Enter to continue
You will see the following response:
Press 1 for Next, 2 for Previous, 3 to Cancel or 4 to Redisplay [1] 1
17.Input 1 and then press Enter to continue.
You will see the following response:
Enter a node name for this instance of WebSphere Application Server. The nodename is used for administration and must be unique within its group of nodes(cell).
Node name
Enter a value: [sun2] sun2
18.Type in our node name, sun2 then press Enter to continue.
You will see the following response requesting the host name:
Enter the hostname for this installation of WebSphere Application Server. Usethe fully qualified DNS name, short DNS name, or the IP address for thiscomputer.
WebSphere Application Server hostname
Enter a value: [sun2] sun2.itso.ral.ibm.com
718 IBM WebSphere Portal for Multiplatforms V5 Handbook

19.Enter our host name, sun2.itso.ral.ibm.com then press Enter to continue.
You will see the following response:
Press 1 for Next, 2 for Previous, 3 to Cancel or 4 to Redisplay [1] 1
20.Press 1 then press Enter to continue.
It will display the following message and ask for the directory to install the WebSphere Portal:
WebSphere Portal will be installed in the following directory. To choose adifferent directory, enter its location below.
WebSphere Portal installation directory. Requires 1150000 KB available space.
Enter a directory: [/opt/WebSphere/PortalServer]
21.Use the default directory and press Enter to continue
You will see the following response:
Press 1 for Next, 2 for Previous, 3 to Cancel or 4 to Redisplay [1] 1
Input 1 and press Enter to continue.
22.It will ask you for the administrative user ID.
Enter the Portal administrative user and password.
Portal administrative user
Enter a value: [] wpsadmin
23.Use the default and press Enter to continue.
24.It will ask for the password,
Portal administrative user password
Enter a password:
Confirm password
Enter a password:
We use wpsadmin as the password; input the password and press Enter to continue.
You will see the following response:
Press 1 for Next, 2 for Previous, 3 to Cancel or 4 to Redisplay [1] 1
25.Input 1 and press Enter to continue.
The summary page will be displayed as follows:
Appendix E. Text-based Portal installation on Solaris 719

WebSphere Portal is ready to install.
The following components will be installed:
WebSphere Application Server, extensions, and required Fixes
WebSphere Portal
WebSphere Portal content publishing
Press 1 for Next, 2 for Previous, 3 to Cancel or 4 to Redisplay [1] 1
Input 1 and press Enter to start the installation.
26.The installation is started and you will see the following response:
Preparing installation
|-----------|-----------|-----------|------------|0% 25% 50% 75% 100%||||||||||||||||||||||||||||||||||||||||||||||||||-------------------------------------------------------------------------------Please insert the disc labeled WebSphere Portal CD #1-4 and enter its locationbelow.
Disc location
Enter a directory: [/wpsdisk/setup] /wpsdisk/1-4
27.Input the image location, /wpsdisk/1-4 then press Enter to continue.
It will display the following information to confirm.
Press 1 for Next, 3 to Cancel or 4 to Redisplay [1] 1
28.Input 1 and press Enter to continue.
The installation of the WebSphere Application Server starts and displays the following:
Installing WebSphere Application Server
|-----------|-----------|-----------|------------|0% 25% 50% 75% 100%||||||||||||||||||||||||||||||||||||||||||||||||||Installing WebSphere Application Server Enterprise
|-----------|-----------|-----------|------------|0% 25% 50% 75% 100%||||||||||||||||||||||||||||||||||||||||||||||||||
720 IBM WebSphere Portal for Multiplatforms V5 Handbook

-------------------------------------------------------------------------------Please insert the disc labeled WebSphere Portal CD #1-7 and enter its locationbelow.
Disc location
Enter a directory: [/wpsdisk/1-4] /wpsdisk/1-7
Input the image directory, /wpsdisk/1-7 and press Enter to continue
29.It will display the following information to confirm.
Press 1 for Next, 3 to Cancel or 4 to Redisplay [1] 1
Input 1 and press Enter to continue.
30.The fix pack and the interim fixes install starts and displays the following:
Preparing Fix Pack files.
Installing WebSphere Application Server Fix Pack 1
|-----------|-----------|-----------|------------|0% 25% 50% 75% 100%||||||||||||||||||||||||||||||||||||||||||||||||||
Preparing Fix Pack files.
Installing WebSphere Application Server Enterprise Fix Pack 1
|-----------|-----------|-----------|------------|0% 25% 50% 75% 100%||||||||||||||||||||||||||||||||||||||||||||||||||Installing WebSphere Application Server Fixes
|-----------|-----------|-----------|------------|0% 25% 50% 75% 100%||||||||||||||||||||||||||||||||||||||||||||||||||
Starting WebSphere Application Server
Checking for required operating system and software prerequisites. Please wait.
-------------------------------------------------------------------------------Please insert the disc labeled WebSphere Portal CD #2 and enter its locationbelow.
Appendix E. Text-based Portal installation on Solaris 721

Disc location
Enter a directory: [/wpsdisk/1-7] /wpsdisk/cd2
31.Input the location /wpsdisk/cd2, then press Enter to continue.
It will display the following information to confirm.
Press 1 for Next, 3 to Cancel or 4 to Redisplay [1] 1
32.Input 1 and press Enter to continue.WebSphere Portal install starts and the following is displayed:
Installing WebSphere Portal
|-----------|-----------|-----------|------------|0% 25% 50% 75% 100%||||||||||||||||||||||||||||||||||||||||||||||||||
Installing InfoCenter
Starting WebSphere Portal
Validating installation of the Portal. Please wait.
|-----------|-----------|-----------|------------|0% 25% 50% 75% 100%||||||||||||||||||||||||||||||||||||||||||||||||||Installing Portlets
|-----------|-----------|-----------|------------|0% 25% 50% 75% 100%||||||||||||||||||||||||||||||||||||||||||||||||||Installing WebSphere Portal content publishing
|-----------|-----------|-----------|------------|0% 25% 50% 75% 100%||||||||||||||||||||||||||||||||||||||||||||||||||-------------------------------------------------------------------------------Installation is successful. Please review the message log/opt/WebSphere/PortalServer/log/installmessages.txt for any install warnings.
The following components are now installed on your computer:
WebSphere Application Server, extensions, and required Fixes
WebSphere Portal
722 IBM WebSphere Portal for Multiplatforms V5 Handbook

WebSphere Portal content publishing
WebSphere Portal is listening on port 9081.
The WebSphere Portal is now available at http://localhost:9081/wps/portal.
Press 3 to Finish or 4 to Redisplay [3] 3
33.Input 3 to finish the installation.
E.2 Applying the WebSphere Application Server interim fix in silent mode
As we stated in 8.4.4, “Manually installation of the interim fixes of WebSphere Application Server” on page 371, after the installation of WebSphere Application Server and WebSphere Portal, we need to manually install a fix pack.
Following is the method we used to install the interim fix in silent mode. Because it is not in active mode, it could work in text mode.
Here are the steps:
1. Log in as root on machine 2.
2. Change to a temporary directory (we use the /export/home/screen).
# cd /export/home/screen
3. Make a working directory for the installation.
# mkdir installfix # cd installfix
4. Copy the installation images:
# cp /wpsdisk/1-7/manualfixes/solaris/* .
5. In the installation images, there is a file called sunUpdateInstaller.zip. We will use this tool to install the interim fixes, so make a directory for the new installation program:
# mkdir wizard # cd wizard
6. Unpack the installation program package.
Important: Because the installation program will create the JDK environment for the installation, we must copy the images to a working directory. We cannot start the installation program from a CD.
Appendix E. Text-based Portal installation on Solaris 723

# unzip ../sunUpdateInstaller.zip
The installation program is ready.
7. Use the following command to apply the interim fixes:
# ./updateSilent.sh -fix \-installDir "/opt/WebSphere/AppServer" \-fixDir "/export/home/screen/installfix" \-install \-fixJars PQ72597-efix.jar PQ77008.jar PQ77142.jar \ WAS_Security_07-07-2003_JSSE_cumulative_Fix.jar
8. After the command has finished, you can restart the WebSphere Application Server and WebSphere Portal as shown in Chapter 8, “WebSphere Portal: Sun Solaris 8.0 installation” on page 357.
E.3 Installing the WebSphere Application Server fix pack in text mode
We have already use this method during the fix pack installation on machine 1, which is shown in 8.8.5, “Installing WebSphere Application Server Fix Pack 1 on machine 1” on page 436. The command we used is as follows:
# ./updateSilent.sh -fixpack \> -installDir "/opt/WebSphere/AppServer" \> -skipIHS \> -skipMQ \> -fixpackDir "/opt/WebSphere/AppServer/update/fixpacks" \> -install \> -fixpackID was50_fp1_solaris
E.4 Uninstalling WebSphere Application Server and WebSphere Portal in text mode
As we stated in 8.4.6, “Uninstalling WebSphere Portal (optional)” on page 379, sometimes we may need to remove the WebSphere Application Server and the WebSphere Portal from the operating system. The uninstall text mode method is explained in the following steps.
1. Log in as root on machine 2.
Note: The symbol “\” in the command means that the line is changed for one command.
724 IBM WebSphere Portal for Multiplatforms V5 Handbook

2. Change the working directory:
# cd /opt/WebSphere/PortalServer/uninstall
3. Start the uninstall program in text mode:
# ./uninstall.sh -console
4. The following response is displayed:
Licensed Materials - Property of IBMIBM WebSphere Portal for Multiplatforms 5.0(C) Copyright IBM Corp. 2001 - 2003 All Rights Reserved.
-------------------------------------------------------------------------------Select a language to be used for this wizard.
[ ] 1 - Czech[X] 2 - English[ ] 3 - French[ ] 4 - German[ ] 5 - Greek[ ] 6 - Hungarian[ ] 7 - Italian[ ] 8 - Japanese[ ] 9 - Korean[ ] 10 - Polish[ ] 11 - Portuguese[ ] 12 - Portuguese (Brazil)[ ] 13 - Russian[ ] 14 - Simplified Chinese[ ] 15 - Spanish[ ] 16 - Traditional Chinese[ ] 17 - Turkish
To select an item enter its number, or 0 when you are finished: [0]
5. Make your selection and press Enter to continue
The following response is displayed:
Welcome to the Uninstall Wizard for WebSphere Portal for Multiplatforms Version5.0
Press 1 for Next, 3 to Cancel or 4 to Redisplay [1]
6. Press Enter to continue. You will be asked about the components to be removed:
Choose an uninstallation option
[X] 1 - Uninstall WebSphere Portal only
Appendix E. Text-based Portal installation on Solaris 725

[ ] 2 - Uninstall WebSphere Portal and uninstall WebSphere Application Server
To select an item enter its number, or 0 when you are finished: [0]
7. Because we wish to remove both, we select 2 and press Enter to continue.
It will display the following:
[ ] 1 - Uninstall WebSphere Portal only[X] 2 - Uninstall WebSphere Portal and uninstall WebSphere Application Server
To select an item enter its number, or 0 when you are finished: [0]
8. Press Enter to continue.
It will display the following information to confirm.
Press 1 for Next, 3 to Cancel or 4 to Redisplay [1] 1
9. Input 1and press Enter to continue.
The summary window will display:
WebSphere Portal is ready to uninstall.
The following products will be uninstalled:
WebSphere Application Server, extensions, and required Fixes
WebSphere Portal
WebSphere Portal content publishing
Press 1 for Next, 2 for Previous, 3 to Cancel or 4 to Redisplay [1] 1
10.Input 1 and press Enter; the uninstallation will run.
11.As we stated in 8.4.6, “Uninstalling WebSphere Portal (optional)” on page 379, there are two other packages that need to be removed via Solaris’s tool. Perform the following steps:
#pkgrm -n gsk4bas #pkgrm -n gsk5bas
The option -n here indicates the non-interactive mode.
726 IBM WebSphere Portal for Multiplatforms V5 Handbook

E.5 WebSphere Application Server and WebSphere Portal automatic install (non-interactive mode)
Because of the time each product takes to install and configure, we sometimes need to re-install products. So, for the installation and configuration of WebSphere Application Server and WebSphere Portal, we have developed a shell script and some files so that we can install and configure both products automatically on the Solaris platform. With this method, we can just start the shell script and get the results the next day.
Before we detail our steps, first we need to introduce the response file. Our response file will be used in our automatic uninstallation and installation.
E.5.1 The response file for the installation In addition to the text mode (or console mode), the installation program from the WebSphere Portal also provides a silent method. You should first create the response file and then input the installation and configuration information. After the installation starts, you are not asked for any new information. The response file will provide all the necessary information.
In the installation media (setup CD), there is a sample response file named installresponse.txt; we can check it for the definition and content of the response file.
Furthermore, if we perform the installation in GUI or text mode, after the installation has finished there is also a response log file under the directory /opt/WebSphere/PortalServer/log. The response log file is called responselog.txt. This file can be modified and installed in silent mode next time.
The following is the response file we used. In order to save space, we have removed some comments and explanations.
# Response File for WebSphere Portal Version 5.0 Silent Installation## SILENT INSTALL CHOICE#-silent## INSTALL WEBSPHERE APPLICATION SERVER#
Note: We cannot directly use this file. We must modify it, for example, by adding a password, etc.
Appendix E. Text-based Portal installation on Solaris 727

-W installWas.choice="install"## WEBSPHERE APPLICATION SERVER INSTALLATION LOCATION#-W was.location="/opt/WebSphere/AppServer"## INSTALL WEB SERVER (IBM HTTP SERVER)#-W installIhs.choice="none"## IBM HTTP SERVER INSTALLATION LOCATION#-W ihs.location="/opt/IBMHttpServer"## HTTP SERVER TYPE#-W httpServerType.choice="ihs"## LOTUS DOMINO(TM) WEB SERVER -- NOTES.JAR AND NAMES.NSF FILE LOCATIONS#-W dominoPlugin.notes=""-W dominoPlugin.names=""## WEB SERVER CONFIGURATION FILE LOCATIONS##=============================================## IBM HTTP Server Configuration File Location ##=============================================#
-W ihsPlugin.file=""
#===================================================## Apache(TM) Web Server Configuration File Location ##===================================================#
-W apachePlugin.file=""
#====================================================## iPlanet(TM) Web Server Configuration File Location ##====================================================#
-W iplanetPlugin.file=""
################################################################################## End of Web Server Configuration File Locations#
728 IBM WebSphere Portal for Multiplatforms V5 Handbook

################################################################################
################################################################################## WEBSPHERE APPLICATION SERVER NODE NAME#-W node.name="sun2"## WEBSPHERE APPLICATION SERVER HOST NAME#-W node.hostName="sun2.itso.ral.ibm.com"## Begin Installing Services ## # INSTALL THE IBM HTTP SERVER SERVICE (Windows 2000 only)#-W wasService.ihs="true"# # INSTALL THE WEBSPHERE APPLICATION SERVER SERVICE (Windows 2000 only)#-W wasService.was="true"# # USER NAME AND PASSWORD FOR SERVICE INSTALLATION (Windows 2000 only)#-W wasService.user="root"-W wasService.password="YOUR_PASSWORD"## WEBSPHERE PORTAL INSTALLATION LOCATION#-W portal.location="/opt/WebSphere/PortalServer"## WEBSPHERE PORTAL ADMINISTRATIVE USER AND PASSWORD#-W portalAdmin.user="wpsadmin"-W portalAdmin.password="wpsadmin"## SETUP CD LOCATION#-W cdSetup.cdPath="/wpsdisk/setup"## WEBSPHERE APPLICATION SERVER CD LOCATION#-W userInputCDLoc2.cdPath="/wpsdisk/1-4"## WEBSPHERE APPLICATION SERVER FIXPACK AND EFIXES CD LOCATION#
Appendix E. Text-based Portal installation on Solaris 729

-W wasfix1MediaLocation.cdPath="/wpsdisk/1-7"## WEBSPHERE PORTAL CD LOCATION#-W WPSCDLoc.cdPath="/wpsdisk/cd2"## PORTAL BASIC CONFIGURATION OPTION## -W basicConfig.choice="yes"## The options above make this a custom install#-W setupTypePanel.selectedSetupTypeId="custom"
When the response file is ready, it is stored in the directory /export/home/screen/ and its name is responsefile.txt; we can then start the following command to perform the silent installation.
# /wpsdisk/setup/install.sh -options /export/home/screen/responsefile.txt
E.5.2 The response file for the uninstallation Just as for the installation, there is a silent mode to uninstall the WebSphere Application Server and the WebSphere Portal. The uninstallation will also remove the interim fixes and the fix packs installed.
In the installation images (setup CD), there is also a sample response file called uninstallresponse.txt. You can modify this file.
The following is the response information we used for the uninstallation. With this response file, we remove both the WebSphere Application Server and the WebSphere Portal. Some comments and explanations have been removed from this file for the sake of clarity.
# Uninstall response file for IBM WebSphere Portal for Multiplatforms 5.0## UNINSTALLATION CHOICE#-silent## UNINSTALL WEBSPHERE APPLICATION CHOICE#-W uninstallWas.choice="uninstall"
We put the file in the directory /export/home/screen, where it is accessed and used by the following command (for the uninstall of WebSphere Portal and WebSphere Application Server):
730 IBM WebSphere Portal for Multiplatforms V5 Handbook

# /opt/WebSphere/PortalServer/uninstall/uninstall.sh -options \ /export/home/screen/uninstallwps.txt
As we explained before, the symbol “\” means that a line is changed in the same command.
E.5.3 Adding the alias to the virtual host using the wsadmin command
Because we use the remote Web server, we need to add the host name of the remote Web server as the alias to the virtual host. We showed how to do this in 8.8.7, “Adding an alias to the virtual host and regenerating the plugin file” on page 439. We can also do it using the wsadmin command.
1. Log in as root on machine 2.
2. Change the directory
# cd /opt/WebSphere/AppServer/bin
3. Run the following command:
# ./wsadmin.sh wsadmin> set vh [$AdminConfig getid /VirtualHost:default_host/]wsadmin > $AdminConfig modify $vh { {aliases { {{ hostname sun1.itso.ral.ibm.com } {port 80}}}} }wsadmin> $AdminConfig save
If you log in to the WebSphere Application Server console (similar to Figure 8-54 on page 444), you will find the aliases added.
E.5.4 Regenerating the plugin using the wsadmin commandAs we introduced in 8.8.7, “Adding an alias to the virtual host and regenerating the plugin file” on page 439 and after adding the aliases, we must regenerate the plugin configuration. This can be done by using the wsadmin command:
1. Log in as root on machine 2.
2. Change the directory
# cd /opt/WebSphere/AppServer/bin
3. Run the following command:
# ./wsadmin.sh wsadmin> set generator [$AdminControl completeObjectName type=PluginCfgGenerator,node=sun2,*] wsadmin > $AdminControl invoke $generator generate "/opt/WebSphere/AppServer /opt/WebSphere/AppServer/config sun2 sun2 null plugin-cfg.xml"
Appendix E. Text-based Portal installation on Solaris 731

E.5.5 Preparing the batch file (.jacl) to run the wsadmin file In order to run the command automatically and not interactively, we create one file called prepare.jacl which includes the wsadmin command discussed in E.5.4, “Regenerating the plugin using the wsadmin command” on page 731.
The file prepare.jacl is located in the /export/home/screen directory and its content is as follows:
set vh [$AdminConfig getid /VirtualHost:default_host/]$AdminConfig modify $vh { {aliases { {{ hostname sun1.itso.ral.ibm.com } {port 80}}}} }$AdminConfig saveset generator [$AdminControl completeObjectName type=PluginCfgGenerator,node=sun2,*] $AdminControl invoke $generator generate "/opt/WebSphere/AppServer /opt/WebSphere/AppServer/config sun2 sun2 null plugin-cfg.xml"
E.5.6 Shell script to automatically reinstall WebSphere PortalIn this section, the shell script will automatically re-install the WebSphere Portal, re-configure the database, and enable security.
We wrote one shell script for the following tasks:
� Uninstall the WebSphere Portal and the WebSphere Application Server
� Remove the two packages:
– gsk4bas
– gsk5bas
� Remove the directory of the following:
– /opt/WebSphere
– /tmp/*
� Install the WebSphere Application Server and the WebSphere Portal
� Install the interim fixes that need to be installed manually
� Add the Aliases to the virtual host
� Regenerate the plugin configuration
� Transfer the database from the CloudScape to the Oracle
� Validate the LDAP
� Enable the security based on the LDAP
� Configure WebSphere Portal for the Web server
� Start the WebSphere Application server and the WebSphere Portal
732 IBM WebSphere Portal for Multiplatforms V5 Handbook

The shell script file is as follows (the file name is reinstallwps.sh):
cd /opt/WebSphere/PortalServer/uninstall/opt/WebSphere/PortalServer/uninstall/uninstall.sh -options /export/home/screen/uninstallwps.txt
cd /pkgrm -n gsk4baspkgrm -n gsk5bas
rm -r /opt/WebSphererm -r /tmp/*
cd /wpsdisk/setup/wpsdisk/setup/install.sh -options /export/home/screen/responsefile.txt
/opt/WebSphere/AppServer/bin/stopServer.sh WebSphere_Portal/opt/WebSphere/AppServer/bin/stopServer.sh server1
/export/home/screen/installfix/wizard/updateSilent.sh -fix \-installDir "/opt/WebSphere/AppServer" \-fixDir "/export/home/screen/installfix" \-install \-fixJars PQ72597-efix.jar PQ77008.jar PQ77142.jar \WAS_Security_07-07-2003_JSSE_cumulative_Fix.jar
/opt/WebSphere/AppServer/bin/startServer.sh server1/opt/WebSphere/AppServer/bin/startServer.sh WebSphere_Portal/opt/WebSphere/AppServer/bin/wsadmin.sh -f /export/home/screen/prepare.jacl
cd /opt/WebSphere/PortalServer/config
/opt/WebSphere/PortalServer/config/WPSconfig.sh database-transfer-export
cp /opt/WebSphere/PortalServer/config/wpconfig.properties /opt/WebSphere/PortalServer/config/wpconfig_pro_orginal
Important: Before running the following script, you must make sure you have performed the following verifications:
� Verification for the database connection as shown in 8.6.3, “Verifying the Oracle 9i Client installation” on page 409.
� The LDAP verification as shown in 8.7.5, “Configuring the LDAP structure” on page 415.
Appendix E. Text-based Portal installation on Solaris 733

cp /export/home/screen/wpconfig_pro_after_import /opt/WebSphere/PortalServer/config/wpconfig.properties/opt/WebSphere/PortalServer/config/WPSconfig.sh database-transfer-import
cp /export/home/screen/wpconfig_pro_sunone /opt/WebSphere/PortalServer/config/wpconfig.properties/opt/WebSphere/PortalServer/config/WPSconfig.sh validate-ldap
/opt/WebSphere/PortalServer/config/WPSconfig.sh enable-security-ldap
/opt/WebSphere/AppServer/bin/stopServer.sh WebSphere_Portal -username wpsbind -password wpsbind /opt/WebSphere/AppServer/bin/stopServer.sh server1 -username wpsbind -password wpsbind /opt/WebSphere/AppServer/bin/startServer.sh server1 -username wpsbind -password wpsbind /opt/WebSphere/AppServer/bin/startServer.sh WebSphere_Portal -username wpsbind -password wpsbind
cp /export/home/screen/wpconfig_pro_webserver /opt/WebSphere/PortalServer/config/wpconfig.properties/opt/WebSphere/PortalServer/config/WPSconfig.sh httpserver-config/opt/WebSphere/AppServer/bin/stopServer.sh WebSphere_Portal -username wpsbind -password wpsbind /opt/WebSphere/AppServer/bin/stopServer.sh server1 -username wpsbind -password wpsbind /opt/WebSphere/AppServer/bin/startServer.sh server1 -username wpsbind -password wpsbind /opt/WebSphere/AppServer/bin/startServer.sh WebSphere_Portal -username wpsbind -password wpsbind
We use the following method to start this command.
1. Log in as root on machine 2.
2. Change the directory.
# cd /export/home/screen
3. Change the file mode.
# chmod +x reinstallsh.wps
4. Run the following command:
# ./reinstallwps.sh
The installation will start and several hours later it will finish and the portal can be accessed.
734 IBM WebSphere Portal for Multiplatforms V5 Handbook

E.5.7 Copying the plugin configuration file to the Web serverAfter the installation has completed, do not forget to copy the new generated plugin configuration file to the Web server, as follows:
1. Log in as a root on machine 2.
2. Change the working directory.
# cd /opt/WebSphere/AppServer/config/cells
3. Run the following command to copy the file.
# ftp sun1Connected to sun1.220 sun1 FTP server (SunOS 5.8) ready.Name (sun1:root): root331 Password required for root.Password:230 User root logged in.ftp> cd /opt/WebSphere/AppServer/config/cells250 CWD command successful.ftp> ascii200 Type set to A.ftp> put plugin-cfg.xml200 PORT command successful.150 ASCII data connection for plugin-cfg.xml (9.24.105.47,34832).226 Transfer complete.local: plugin-cfg.xml remote: plugin-cfg.xml18776 bytes sent in 0.0033 seconds (5473.41 Kbytes/s)ftp> quit
Appendix E. Text-based Portal installation on Solaris 735

736 IBM WebSphere Portal for Multiplatforms V5 Handbook

Appendix F. Hints to set up the Solaris environment
After the installation of the Solaris operating system, and before the installation of the software components, we need to perform some setup and configuration for Solaris.
This section introduce some methods we used to set up the networking and file sytem environment.
F
Important: The purpose of this section is to provide some hints to make Solaris work for WebSphere Portal. It does not intent to introduce the configuration of Solaris in detail. The method provided here is just “as is” but for more detailed information, and other good methods, please refer to the documentation for Solaris.
© Copyright IBM Corp. 2004. All rights reserved. 737

F.1 Setting up the networking environmentThe following sections illustrate how to set up your networking environment.
F.1.1 Defining the /etc/hosts file In order to emulate the multiple-tier environment, we disabled the DNS and used /etc/hosts for the resolution.
Based on the architecture described in Figure 8-1 on page 358, we have the following etc/hosts file for each machine.
Machine 1 The file /etc/hosts in machine 1 is as follows:
127.0.0.1 localhost9.24.105.46 sun1 sun1.itso.ral.ibm.com9.24.105.47 sun2 sun2.itso.ral.ibm.com# 9.24.105.48 sun3 sun3.itso.ral.ibm.com
Machine 2The file /etc/hosts in machine 2 is as follows:
127.0.0.1 localhost9.24.105.46 sun1 sun1.itso.ral.ibm.com9.24.105.47 sun2 sun2.itso.ral.ibm.com# 9.24.105.48 sun3 sun3.itso.ral.ibm.com9.25.100.101 machine2 machine2.itso.ora.ibm.com9.25.100.102 machine3 machine3.itso.ora.ibm.com
Machine 3The file /etc/hosts in machine 3 is as follows:
127.0.0.1 localhost9.24.105.46 sun1 sun1.itso.ral.ibm.com9.24.105.47 sun2 sun2.itso.ral.ibm.com# 9.24.105.48 sun3 sun3.itso.ral.ibm.com9.25.100.101 machine2 machine2.itso.ora.ibm.com9.25.100.102 machine3 machine3.itso.ora.ibm.com
Note: In order to use NFS sharing, we also added another item in the file named hosts, 9.24.105.48, which is commented after the installation and configuration, as shown above.
738 IBM WebSphere Portal for Multiplatforms V5 Handbook

F.1.2 Changing the default host name and the default IP addressIn our test environment, we have redefined the default host name and the IP address for the machine.
We will take machine 3 as an example and show how to change the host name and the default IP address
Suppose our requirement for machine 3 is as follows:
� Hostname: machine3� IP : 9.25.100.102
Defining/changing the configuration We performed the following steps for the configuration:
1. Log in as root on machine 3.
2. Change the working directory
# cd /etc
3. Edit the file named nodename, and replace the content with machine3.
4. Make sure that the /etc/hosts file includes the definition for machine3.
5. Edit the file named hostname.hme0 and replace the content with machine3. This is the default name for the network adapter.
6. Edit the file named resolv.conf, and replace the content as follows:
domain itso.ora.ibm.com
7. Edit the file name defaultrouter and comment out any line. The result is that we do not use the default router.
8. Change the work directory:
# cd /etc/net/ticots
9. Edit the file named hosts and put the following information in the file.
machine3 machine3
10.Reboot the system:
# reboot
Verifying the configurationAfter the reboot, you can check the results as follows.
1. Check the host name
a. Log in as root.
b. Use the command host name; it will display the current host name.
Appendix F. Hints to set up the Solaris environment 739

# hostnamemachine3
2. Check the IP address:
a. Log in as root.
b. Use the following command to see the IP address.
# ifconfig -a # ifconfig -alo0: flags=1000849<UP,LOOPBACK,RUNNING,MULTICAST,IPv4> mtu 8232 index 1 inet 127.0.0.1 netmask ff000000 hme0: flags=1000843<UP,BROADCAST,RUNNING,MULTICAST,IPv4> mtu 1500 index 2 inet 9.25.100.102 netmask ff000000 broadcast 9.255.255.255 ether 8:0:20:cb:34:9a
Here the hme0 is the Ethernet adapter.
F.1.3 Enabling telnet and ftp Sometimes, after the installation, we cannot use telnet or ftp from another machine to Solaris; we need to perform some setup to enable telnet and the ftp.
Enabling telnet To enable the telnet, do the folllowing:
1. Log in as root.
2. Change the working directory.
# cd /etc/default
3. Edit the file login, and comment the following statement (add the symble “#” at the appropriate line)
# CONSOLE=/dev/console
4. Save the file.
This machine can now serve telnet requests from other machines.
Enabling ftpHere are the steps to enable ftp to use the root account:
1. Log in as root.
2. Change the working directory.
# cd /etc
3. Edit the file ftpusers and comment the line having the word “root” (add the symbol “#” at the begining of the line which has the word “root”).
740 IBM WebSphere Portal for Multiplatforms V5 Handbook

4. Save the file.
You can now use ftp via the root account.
F.1.4 Adding a second IP address to the network adapter formachine 2
In our test environment, we have three machines. Each machine has only one Ethernet adapter. In order to emulate the multi-tier environment and without the firewall for the IP translation, for machine 2, we added another IP address.
Here is the method to add the second IP in machine 2.
In machine 1, we’ve already configured the IP for the Ethernet as follows:
� Fully qualified host name : sun2.itso.ral.ibm.com � IP : 9.24.105.47
We use the following method to add the another IP:
� Fully qualified host name : machine2.itso.ora.ibm.com � IP: 9.25.100.101
1. Log in as root.
2. Check the current IP status:
# ifconfig -a lo0: flags=1000849<UP,LOOPBACK,RUNNING,MULTICAST,IPv4> mtu 8232 index 1 inet 127.0.0.1 netmask ff000000 hme0: flags=1000843<UP,BROADCAST,RUNNING,MULTICAST,IPv4> mtu 1500 index 2 inet 9.24.105.47 netmask ff000000 broadcast 9.255.255.255 ether 8:0:20:e5:be:ae
3. Add another IP as follows:
# ipconfig hem0:1 plumb 9.25.100.101 up
We also put this command in the /etc/profile so it could be active automatically.
4. Check the result:
# ifconfig -a lo0: flags=1000849<UP,LOOPBACK,RUNNING,MULTICAST,IPv4> mtu 8232 index 1 inet 127.0.0.1 netmask ff000000 hme0: flags=1000843<UP,BROADCAST,RUNNING,MULTICAST,IPv4> mtu 1500 index 2 inet 9.24.105.47 netmask ff000000 broadcast 9.255.255.255 ether 8:0:20:e5:be:ae hme0:1: flags=1000843<UP,BROADCAST,RUNNING,MULTICAST,IPv4> mtu 1500 index 2 inet 9.25.100.101 netmask ffff0000 broadcast 9.255.255.255
Appendix F. Hints to set up the Solaris environment 741

5. Add Name machine2.itso.ora.ibm.com to the /etc/hosts:
# cd /etc# echo “9.25.100.101 machine2 machine2.itso.ora.ibm.com“ >> hosts# ping machine2.itso.ora.ibm.commachine2.itso.ora.ibm.com is alive
12.4.2 Set ting up NFS on machine 3 In our setup environment, in order to share the files, we created an NFS file system on machine 3. The other two machines can access this file system via NFS. Here is the method we used.
Setting up the NFS file system and sharing it on machine 3On machine 3, we created one file sysetm , /opt1 , then we used the following command to share it so the other machine could mount it; the command is as follows:
1. Log in as root on machine 3.
2. Run the command:
# share -F nfs -o ro /opt1
Now the other machines mount this file and can access it remotely.
Mounting NFS on machines 1 and 2After machine 3 shares the file system, we can do the following to access this NFS file system in machine 1 and machine 2.
1. Log in as root.
2. Make a mount point.
# cd /# mkdir wpsdisk Mount the NFS file system# mount -F nfs -o ro sun3:/opt1 /wpsdisk # cd /wpsdisk
You can now see the contents in the file system.
Note: We also used the same method to add another IP (9.24.105.48 sun3) on machine 3 for NFS sharing. This IP is disabled after installation and configuration.
742 IBM WebSphere Portal for Multiplatforms V5 Handbook

Unmounting the NFS file systemAfter the installation, we need to unmount the NFS file system. Here is the method we used.
1. Log in as root from machine 1 or machine 2.
2. Make sure no applications are working or are under the /wpsdisk and its sub-directory.
3. Run the command:
# umount /wpsdisk
4. If it could not unmount, you can try the following command:
# umount -f /wpsdisk
F.2 Setting up the file system environment Based on the prerequisites, WebSphere Application Server and WebSphere Portal have their requirements for the disk space. So, we need to make sure the file system we assigned to the software has enough space.
In this section, we briefly introduce the method we used to prepare the file system.
F.2.1 Defining the file system size In order to create a file system, the first step is to define the size.
1. Log in as root.
2. Run the following command:
# format In our machine, the following will display:Searching for disks...done
AVAILABLE DISK SELECTIONS: 0. c0t0d0 <SUN18G cyl 7506 alt 2 hd 19 sec 248> /pci@1f,4000/scsi@3/sd@0,0 1. c0t1d0 <SUN18G cyl 7506 alt 2 hd 19 sec 248> /pci@1f,4000/scsi@3/sd@1,0Specify disk (enter its number):
Important: You need be very careful when preparing the file system. If you make some mistable, it will damage the contents of the disk, so it is best to consult your system administrator.
Appendix F. Hints to set up the Solaris environment 743

3. Select 1 because we need to create a file system in disk 1.
The following is displayed:
selecting c0t1d0[disk formatted]
FORMAT MENU: disk - select a disk type - select (define) a disk type partition - select (define) a partition table current - describe the current disk format - format and analyze the disk repair - repair a defective sector label - write label to the disk analyze - surface analysis defect - defect list management backup - search for backup labels verify - read and display labels save - save new disk/partition definitions inquiry - show vendor, product and revision volname - set 8-character volume name !<cmd> - execute <cmd>, then return quitformat>
4. Key in the partition and press Enter.
The following is displayed:
format> partitionPARTITION MENU: 0 - change `0' partition 1 - change `1' partition 2 - change `2' partition 3 - change `3' partition 4 - change `4' partition 5 - change `5' partition 6 - change `6' partition 7 - change `7' partition select - select a predefined table modify - modify a predefined partition table name - name the current table print - display the current table label - write partition map and label to the disk
Important: You must remeber the device name of the disk here, such as c0t0d0 for disk1 , and c0t1d0 for disk 2, because the file system creation process must use the device name.
744 IBM WebSphere Portal for Multiplatforms V5 Handbook

!<cmd> - execute <cmd>, then return
5. Use the modify command to define the size for the partition.
6. Use the print command to check the result:
Current partition table (original):Total disk cylinders available: 7506 + 2 (reserved cylinders)
Part Tag Flag Cylinders Size Blocks 0 root wm 0 0 (0/0/0) 0 1 swap wu 0 0 (0/0/0) 0 2 backup wu 0 - 7505 16.86GB (7506/0/0) 35368272 3 unassigned wm 0 0 (0/0/0) 0 4 unassigned wm 0 0 (0/0/0) 0 5 unassigned wm 0 - 6230 14.00GB (6231/0/0) 29360472 6 usr wm 6231 - 7505 2.86GB (1275/0/0) 6007800 7 alternates wm 0 0 (0/0/0) 0
7. After modifying the size, you can use label to update the partition information.
8. Then use quit to exit.
F.2.2 Creating the file sysetm After assigning the size of the partition, you can create a file system.
As in the example above, in order to create a file system on partition 5 on hard disk 1, we use the following steps.
1. Log in as root.
2. Run the followign comand
# newfs -v /dev/rdsk/c0t1d0s5
3. Check the new created file system.
# fsck /dev/rdsk/c0t1d0s5
F.2.3 Mounting the file systemHere are the steps to mount the newly created file system.
1. Log in as root.
Important: You must remember the part number; for example, we created a part 5, and it is in disk 1, so the device name for this partition is c0t1d0s5. We will use this device name later.
Appendix F. Hints to set up the Solaris environment 745

2. Run the following to command to check the file system.
# fsck /dev/rdsk/c0t1d0s5
3. Create a mount point, for example /opt.
# mkdir /opt
4. Mount the file system.
# mount /dev/dsk/c0t1d0s5 /opt
746 IBM WebSphere Portal for Multiplatforms V5 Handbook

Appendix G. Creating users and groups in SUSE SLES V8.0
This appendix describes the procedures to perform the following tasks:
� Creating users on SUSE SLES V8.0 using YaST
� Creating groups on SUSE SLES V8.0 using YaST
� Adding a user to a group on SUSE SLES V8.0 using YaST
G
© Copyright IBM Corp. 2004. All rights reserved. 747

G.1 Creating users on SUSE SLES V8.0 using YaSTThis section describes the steps to create a user on SUSE SLES V8.0 using YaST. Complete the following instructions:
1. Log in as root and start the Yast2 Control Center by running the following command:
#yast
You will see a window similar to Figure G-1.
Figure G-1 Yast2 Control Center
2. Select Security and Users -> Edit and create users and press Enter.
3. Press Tab until you reach the option Add and then press Enter. You will see a window similar to Figure G-2 on page 749.
748 IBM WebSphere Portal for Multiplatforms V5 Handbook

Figure G-2 Add new user window
4. Enter information for the user you want to create, as shown in Figure G-2, then press Tab until you reach the option Create; then press Enter. If a user with the entered User login already exists, you will get an error message. Otherwise, a user with the information provided is created.
5. Move focus to the Finish option and press Enter.
6. Press Enter to save the modified settings to the system.
7. Press Shift+Q and then Enter to close the Yast2 Control Center.
You have successfully created a user on SUSE SLES V8.0.
G.2 Creating groups on SUSE SLES V8.0 using YaST1. Log in as root and start the Yast2 Control Center by running the following
command:
#yast
Note:
� The User login should be between 2 and 32 characters in length.
� The password should be between 5 and 8 characters in length.
First Name Last Name
password
Appendix G. Creating users and groups in SUSE SLES V8.0 749

You will see a window similar to Figure G-1 on page 748.
2. Select Security and Users -> Edit and create groups and press Enter.
3. Press Tab until focus moves to the option Groups administration and then press Enter.
4. Press Tab until focus moves to the option Add and then press Enter. You will see a screen similar to Figure G-3.
Figure G-3 Add new group screen
5. Enter information for the group you want to create (Figure G-3). Press Tab until the focus moves to the option Create and press Enter.
6. With the focus on the option Finish, press Enter.
7. Press Enter to save the modified settings to the system.
8. Press Shift+Q and then Enter to close the Yast2 Control Center.
You have successfully created a group on SUSE SLES V8.0.
Note:
� The Group name should be between 2 and 8 characters in length.
� The password should be between 5 and 8 characters in length.
Group Name:
Group ID (gid):
750 IBM WebSphere Portal for Multiplatforms V5 Handbook

G.3 Adding an existing user to a group using YaSTComplete the following instructions to add an existing user to a group:
1. Log in as root and start the Yast2 Control Center by running the following command:
#yast
You will see a screen similar to Figure G-1 on page 748.
2. Move down to Security and Users -> Edit and create groups and press Enter.
3. Press Tab until focus moves to the option Groups administration and then press Enter.
4. In the Group list box, select the group to which you want to add a user, press Tab until the focus moves the option Edit and press Enter. You will see a screen similar to Figure G-4.
Figure G-4 Edit existing group window
5. Press Tab until the focus moves to the Members of this box.
6. Move down to the user whom you want to add to this group and press Enter.
7. Press Tab until focus moves to the option Next and press Enter.
8. With the focus on the option Finish, press Enter.
9. Press Enter to save the modified setttings to the system.
x
Appendix G. Creating users and groups in SUSE SLES V8.0 751
10.Press Shift+Q and then Enter to close the Yast2 Control Center.
You have successfully added an existing user to an existing group.
752 IBM WebSphere Portal for Multiplatforms V5 Handbook

Appendix H. UNIX commands on SUSE SLES V8.0
This appendix describes the commands to do the following on SUSE SLES V8.0:
� Mounting a CD
� Unmounting a CD
H
© Copyright IBM Corp. 2004. All rights reserved. 753

H.1 Mounting a CDPerform the following steps to mount a CD:
1. Insert the CD into the CD-ROM drive.
2. From a terminal, run the following command:
#mount /media/cdrom
H.2 Unmounting a CDPerform the following steps to unmount a CD:
1. From a terminal, run the following command:
#unmount /media/cdrom
2. You can now remove the CD from the CD-ROM drive.
Note: You should not be in a directory within the CD while unmounting a CD.
754 IBM WebSphere Portal for Multiplatforms V5 Handbook

Appendix I. Implementing the Portal V5 environment for migration from Portal V4.x
This appendix describes the steps and sections in the book to be referred to in order to implement a WebSphere Portal V5.0 environment with remote IBM DB2 V8.1 as its database and remote IBM Directory Server V5.1 as its LDAP directory. The appendix is organized as follows:
� WebSphere Portal V5.0 installation, where references are provided to sections in the book where steps to install WebSphere Application Server V5.0 and WebSphere Portal V5.0 and configuring WebSphere Portal to use IBM HTTP Server V1.3.26.1 as a remote HTTP server are present.
� Configuring WebSphere Portal for remote IBM DB2 V8.1, where we provide steps to install IBM DB2 client on a Windows 2000 server machine and to configure WebSphere Portal V5.0 to a remote IBM DB2 server on Windows 2000.
� Configuring WebSphere Portal for remote IBM Directory Server V5.1, where we provide steps to install IBM Directory server and client V5.1 on Windows 2000 and configure WebSphere Portal V5.0 to use a remote IBM Directory Server as an LDAP directory.
I
© Copyright IBM Corp. 2004. All rights reserved. 755

I.1 WebSphere Portal V5.0 installationFor the steps to install WebSphere Portal V5.0, visit the following Web site:
http://publib.boulder.ibm.com/pvc/wp/500/index.html
I.2 Configuring WebSphere Portal V5.0 for remote IBM DB2 V8.1
When installing WebSphere Portal V5.0 out of the box, it comes standard with the Cloudscape database. During the installation, you will need to run configuration tasks to configure Portal to use DB2. For information on installing the IBM DB2 V8.1 client, please see the following URL for more information:
http://publib.boulder.ibm.com/pvc/wp/500/ent/en/InfoCenter/index.html
I.2.1 Configuring WebSphere Portal V5.0 for remote DB2In this section, we used the following parameters for configuring our migration of DB2 in our lab.
Table I-1 Changes to WebSphere Portal configuration file
Property Value
DbType db2
WpsDbName wps50db
DbDriver COM.ibm.db2.jdbc.app.DB2Driver
DbDriverDs COM.ibm.db2.jdbc.DB2ConnectionPoolDataSource
DbUrl jdbc:db2:wps50db
DbUser db2admin
DbPassword password
DbLibrary C:/Program Files/ibm/SQLLIB/java/db2java.zip
WpsDbNode wpsnode5
WpcpDbName wpcp50db
WpcpDbUser db2admin
756 IBM WebSphere Portal for Multiplatforms V5 Handbook

I.3 Configuring WebSphere Portal V5.0 for a remote LDAP directory
In this section, we discuss the installation of the IBM Directory Server as our LDAP directory.
I.3.1 Installation of IBM Directory Server V5.1This section provides the steps to install IBM Directory Server V5.1 on a Windows 2000 machine:
1. Insert CD 5- 1 into machine 4 and start the installation wizard by running setup.exe from the ids_ismp directory.
2. Select the language and click Next.
3. Click Next in the Welcome window.
4. Select I accept the terms in the license agreement and click Next.
5. You should see a window similar to Figure I-1 on page 758 indicating the existence of DB2 V8.1 on the machine. Click Next.
WpcpDbPassword password
WpcpDbUrl jdbc:db2:wpcp50db
FeedbackDbName fdbk50db
FeedbackDbUser db2admin
FeedbackDbPassword password
FeedbackDbUrl jdbc:db2:fdbk50db
WmmDbName wps50db
WmmDbUser db2admin
WmmDbPassword password
WmmDbUrl jdbc:db2:wps50db
Property Value
Appendix I. Implementing the Portal V5 environment for migration from Portal V4.x 757

Figure I-1 Existence of IBM DB2 V8.1 for installation of IDS V5.1
6. Select the installation directory and click Next.
7. Select the language for IBM Directory Server and click Next.
8. Select the Custom setup type and click Next.
9. Select the features shown in Figure I-2 on page 759 and click Next.
758 IBM WebSphere Portal for Multiplatforms V5 Handbook

Figure I-2 Selected features for installation
10.Check the settings for installation and click Next to start the installation.
11.Once the installation of IBM Directory server is over, you will see a window similar to Figure I-3; click OK to start the installation of WebSphere Application Server - Express.
Figure I-3 Installation of WebSphere Application Server - Express
12.Read the readme file for IBM Directory server V5.1 and click Next, and again Next.
13.Select Yes, restart the system and click Next.
14.Click Finish to exit the wizard. You will get the IBM Directory Server Configuration Tool after the system reboots.
Appendix I. Implementing the Portal V5 environment for migration from Portal V4.x 759

I.3.2 Configuring IBM Directory server1. Set the Administrator DN and password.
2. Enter values for the Administrator DN, Administrator password, Confirm password fields and click OK.
Figure I-4 Setting the IBM Directory server administrator DN and password
3. Configure the database; this is to create the database that will be used to store directory data to the configuration file (ibmslapd.conf).
a. In the IBM Directory Server configuration tool, click Configure database.
b. Select Create a new database and click Next.
c. Enter the user ID and password of a user having IBM DB2 administrative privileges and click Next.
d. Enter a name for the database and click Next.
e. Select Create a universal DB2 database (UTF-8/UCS-2) and click Next.
f. Select a drive for the database location and click Next.
760 IBM WebSphere Portal for Multiplatforms V5 Handbook

g. Review the settings for configuration and click Finish to start the database configuration.
h. The configuration is successfully complete when you get the message IBM Directory Server Configuration complete in the Task messages, as shown in Figure I-5.
Figure I-5 Database configuration complete
i. Click Close to end the configuration.
I.3.3 Installation of IBM Directory client V5.1In this section, you may include the installation of the IBM Directory client. Refer to the following Infocenter URL for additional information:
http://publib.boulder.ibm.com/pvc/wp/500/ent/en/InfoCenter/index.html
Appendix I. Implementing the Portal V5 environment for migration from Portal V4.x 761

I.3.4 Configuring WebSphere Portal V5.0 for remote IBM Directory Server V5.1
Use the parameters in this section to configure WebSphere Portal.
Table I-2 Changes to WebSphere Portal configuration file
Property Value
WasUserId uid=wpsbind,cn=users,dc=ibm,dc=com
WasPassword wpsbind
PortalAdminId uid=wpsadmin,cn=users,dc=ibm,dc=com
PortalAdminIdShort wpsadmin
PortalAdminPwd wpsadmin
PortalAdminGroupId n=wpsadmins,cn=groups,dc=ibm,dc=com
PortalAdminGroupIdShort wpsadmins
LTPAPassword password
SSODomainName .itso.ral.ibm.com
LDAPHostName top440.itso.ral.ibm.com
LDAPAdminUId cn=root
LDAPAdminPwd password
LDAPServerType IBM_DIRECTORY_SERVER
LDAPBindID uid=wpsbind,cn=users,dc=ibm,dc=com
LDAPBindPassword wpsbind
LDAPSuffix dc=ibm,dc=com
LDAPUserPrefix uid
LDAPUserSuffix cn=users
LDAPGroupPrefix cn
LDAPGroupSuffix cn=groups
LDAPUserObjectClass inetOrgPerson
LDAPGroupObjectClass groupOfUniqueNames
LDAPGroupMember uniqueMember
762 IBM WebSphere Portal for Multiplatforms V5 Handbook

Appendix J. Setting portlet column width
This appendix provides instructions for setting the width of the column for the portlets.
To set the column width, please perform the following steps to add Show Layout Control Links:
1. Select the page you want to modify.
2. Select Edit Page.
3. Select the configure icon.
4. Enable the check box Show toggle link for "Show layout tools/hide layout tools" (upper right corner).
5. Click OK.
6. Click + and add the column container (left corner).
7. Click Done.
The above steps will display the Show layout tools; follow the steps below to set the column width.
1. Go to the page you want to edit.
2. Select Edit Page.
3. Select Show layout tools.
J
© Copyright IBM Corp. 2004. All rights reserved. 763

You will now see a double arrow <-> with the words not set, for example, <->Not Set in each column.
4. Click the <-> Not Set link.
A Javascript pop-up box appears and the width of the column can be set using a percentage or pixels. To set the width using a percentage, be sure to use the percent sign, for example, 25%.
764 IBM WebSphere Portal for Multiplatforms V5 Handbook

acronyms
ATM Asynchronous Transfer Mode
B2B Business-to-Business
B2C Business-to-Customer
B2E Business-to-Employee
C2A Click-to-Action
CHTML Compact HTML
CORBA Common Object Request Broker Architecture
CRM Customer Relationship Management
CSS Cascading Style Sheet
CUR Custom User Registry
CV Credential Vault
DMT Directory Management Tool
DN Distinguished Name
DNS Directory Name Service
DNS Domain Name Server
EJB Enterprise JavaBeans
ERP Enterprise Resource Planning
GNOME GNU Network Object Model Environment
GNU UNIX-like operating system
HACMP High Availability Cluster Multiprocessing
HTML Hypertext Markup Language
IBM International Business Machines Corporation
IHS IBM HTTP Server
IIOP Internet Inter-ORB Protocol
IIS Microsoft Internet Information Services
ITSO International Technical Support Organization
Abbreviations and
© Copyright IBM Corp. 2004. All rights reserved.
J2EE Java 2 Platform, Enterprise Edition
JDBC Java Database Connectivity
JDK Java Development Kit
JRE Java Runtime Environment
JSP Java Server Pages
JVM Java Virtual Machine
KDE K Desktop Environment
LCC Lotus Collaborative Components
LDAP Lightweight Directory Access Protocol
LTPA Lightweight Third Party Authentication
LUM License Use Management
NFS Network File System
NewsML News Markup Language
OCS Open Content Syndication
ODC On-Demand Client
PAC Portal Access Control
PDA Personal Digital Assistant
RDN™ Relative Distinguish Name
RPM Red Hat Package Manager
RSS Rich Site Summary
SASL Simple Authentication and Security Layer
SCM Supply Chain Management
SMIT System Management Interface Tool
SOAP Simple Object Access Protocol
SSL Secure Socket Layer
SSO Single sign-on
765

TAI Trust Association Interceptors
TOC Total cost of ownership
UDPI User-Driven Process Integration
UID User ID
URI Uniform Resource Identifier
URL Uniform Resource Locator
WAP Wireless Access Point
WCM WebSphere Content Manager
WCP Web Content Publisher
WML Wireless Markup Language
WMM WebSphere Member Manager
WMS WebSphere Member Services
WPCP WebSphere Portal Content Publishing
WPS WebSphere Portal Server
WSAD WebSphere Studio Application Developer
WSSD WebSphere Studio Site Developer
XHTML Extensible Hypertext Markup Language
XML Extensible Markup Language
XSLT Extensible Stylesheet Language Transformation
766 IBM WebSphere Portal for Multiplatforms V5 Handbook

Related publications
The publications listed in this section are considered particularly suitable for a more detailed discussion of the topics covered in this redbook.
IBM RedbooksFor information on ordering these publications, see “How to get IBM Redbooks” on page 769. Note that some of the documents referenced here may be available in softcopy only.
� IBM WebSphere Portal V4.1 Handbook Volume 1, SG24-6883
� IBM WebSphere Portal V4.1 Handbook Volume 2, SG24-6920
� IBM WebSphere Portal V4.1 Handbook Volume 3, SG24-6921
� WebSphere Portal, SG24-6992
� A Secure Portal Using WebSphere Portal V5 and Tivoli Access Manager, SG24-6077
� Portalizing Domino Applications for WebSphere Portal, SG24-7004
� A Portal Composite Pattern Using WebSphere V4.1, SG24-6869
� WebSphere Commerce Portal V5.4 Solutions Guide, SG24-6890
� Patterns: Pervasive Portals Patterns for e-business Series, SG24-6876
� IBM WebSphere Portal V5 A Guide for Portlet Application Development, SG24-6076
Other publicationsThese publications are also relevant as further information sources:
� WebSphere Studio Application Developer 5.0, ISBN: 1590591208
� WebSphere Portal Primer, ISBN: 1-931182-13-2
� Mastering IBM WebSphere Portal Server: Expert Guidance to Build and Deploy Portal Applications, ISBN: 0764539914
© Copyright IBM Corp. 2004. All rights reserved. 767

Online resourcesThese Web sites and URLs are also relevant as further information sources:
� Information Center for IBM WebSphere Portal for Multiplatforms V5.0
http://publib.boulder.ibm.com/pvc/wp/500/ent/en/InfoCenter/index.html
� Access to the InfoCenter for WebSphere Portal language documentation
http://publib.boulder.ibm.com/pvc/wp/500/index.html
� Information Center for IBM WebSphere Portal for Multiplatforms V5.02
http://wpid.raleigh.ibm.com/ic/wpo502/ent/en/InfoCenter/index.html
� WebSphere Portal for Multiplatforms Support
http://www-3.ibm.com/software/genservers/portal/support/
� Migrating to WebSphere Portal V5.0 and 5.0.2
http://pvcid.raleigh.ibm.com/wpf/ic/wpo502/ent/en/InfoCenter/wpf/migrationv5.html
� JURU a full text search library
http://www.haifa.il.ibm.com/km/ir/juru/
� IBM Corporation
http://www.ibm.com
� PQ75169: WAS50 FP1
http://www-1.ibm.com/support/docview.wss?rs=180&context=SSEQTP&q=P Q75169&uid=swg1PQ75169&loc=en_US&cs=utf-8&lang=en
� WebSphere Application Server V5.0 Fix Pack 2 (V5.0.2)
http://www-1.ibm.com/support/docview.wss?rs=0&uid=swg24005012
� WebSphere Application Server V5.0 Fix Pack 1 (V5.0.1)
http://www-1.ibm.com/support/docview.wss?rs=180&context=SSEQTP&q=&uid=swg24004576&loc=en_US&cs=utf-8&lang=en
� UpdateInstaller for WebSphere Application Server 5.0.x
http://www-1.ibm.com/support/docview.wss?rs=180&context=SSEQTP&q=up dateInstaller&uid=swg24001908&loc=en_US&cs=utf-8&lang=en+en
� Sametime 3.0 Service Pack 1 (SP1) for Windows Platforms
http://www-1.ibm.com/support/docview.wss?rs=477&context=SSKTXQ&q=&uid=swg24004607&loc=en_US&cs=utf-&lang=en+en
� Microsoft Help and Support
http://support.microsoft.com
768 IBM WebSphere Portal for Multiplatforms V5 Handbook

� WebSphere Portal Catalog
http://www.ibm.com/websphere/portal/portlet/catalog
� WebSphere Studio
http://www-3.ibm.com/software/info1/websphere/index.jsp?tab=products/studio
� WebSphere Portal content publishing
http://www-306.ibm.com/software/genservers/portal/webcontentpublisher/index.html
How to get IBM RedbooksYou can search for, view, or download Redbooks, Redpapers, Hints and Tips, draft publications and Additional materials, as well as order hardcopy Redbooks or CD-ROMs, at this Web site:
ibm.com/redbooks
Help from IBMIBM Support and downloads
ibm.com/support
IBM Global Services
ibm.com/services
Related publications 769

770 IBM WebSphere Portal for Multiplatforms V5 Handbook

Index
Aaccess control 6, 548Access page 511accessibility 13action handling 7Active Authentication Mechanism 333active meetings 4Active Protocol 333Active User Registry 333ad-hoc business process 3administration portlets 3, 507administrative rights 495administrative server 514Administrator DN 292administrators 24, 587aggregate content 10Aggregation Module 20AIX 65anonymous user 652anti-virus product 185Apache Jetspeed 15Apache Web Server 44, 60, 472appsPath 671architecture 15assets 538assign access 589asynchronous transfer mode (ATM) 43authentication 16authentication proxy 583–584Authentication Server 20authorization 16, 29automatic dialog boxes 3
Bback-end single sign-on 606back-end system 31, 68back-end systems 2Base Distinguished Name (DN) 332basic definitions 508basic documents 2–3Bind Distinguished Name (DN) 332Bind Password 332blocking 30
© Copyright IBM Corp. 2004. All rights reserved.
branding 537browser-based content publishing and personaliza-tion technology 3business intelligence 4business processes 1business-to-business (B2B) 2, 9business-to-consumer (B2C) 2, 9business-to-employee (B2E) 2
CCache Timeout 333calendering 22Cascading Style Sheet (CSS) 538, 540categorization 30cell 321centralized administration 570Certificate Filter 332Certificate Map Mode 332character sets 393chat 22chat session 4child nodes 509child page 513classes 508, 538Clear Ink 15Click-to-Action (C2A) 3, 27, 34client registry 631Client-Web App SSO 583cloning 556Cloudscape 27, 45, 54–55, 179, 185, 257, 357, 365–366, 450–451, 454, 456, 495Cloudscape JDBC driver 453cluster 321clustering 54collaboration 11, 13, 22collaborative portals 11colors 25ColumnContainer.jsp 541common object request broker architecture (COR-BA) 583communication enhancer 3communities 28component locations 406
771

concrete portlet application 558configuration 27configuration scripts 27container 651Content Management 31content management 13, 22content nodes 587content root 509context root 64Control.jsp 540–541cooperative portlet 7cooperative portletdata sharing 27Credential Vault (CV) 29, 584, 606–607Credential Vault portlet 610credentials 15critical applications 1cross platform clustering 71cursor_sharing 397custom portlets 671custom profile repository adapter 29custom repositories 29custom unique names 625Custom User Registry (CUR) 66–67, 119, 228, 503, 585customization 3, 10, 650
Ddata source 498database character set 394Database Configuration Assistant 391database connection verification 733database consideration 85database migration 55database structures 21datastore 585db_block_buffers 397db_block_size 397DB2 Enterprise Edition 46, 48, 50DB2 Enterprise Edition (Linux 390) V8.1 476DB2 Enterprise Edition Fix Pack 1 476DB2 Enterprise Edition Fixpack 48, 50DB2 Universal Database 4, 473DB2 Universal Database Enterprise Server Edition 45DB2 Universal Database Express 45DB2 Universal Database Workgroup Edition 45DB2 Universal Database Workgroup Server Edition 45
db2adm1 184Db2Home 673db2iadm1 184db2inst1 184db2instance 500db2usr1 184dbca 391DbDriver 225, 455, 498, 756DbDriverDs 225, 455, 498, 756DbLibrary 118, 225, 287, 336, 455, 498, 756DbPassword 225, 287, 336, 455, 756DBSafeMode 336DbSafeMode 225, 455dbshut 397dbstart 397DbType 225, 455, 498, 756DbUrl 225, 287, 336, 455, 498, 756DbUser 225, 287, 336, 455, 498, 756debugging tools 7decorations 537dedicated server mode 393default portal skin 547default themes 25default virtual host 64DefaultPortletMessage 34delegated administration 587delegators 24, 587Demilitarized Zone 16deployment manager 321Deployment Manager Admin Console 331deployment tools 7development environment 39DHCP 472dialog driven editors 36Directory Connector application 74, 173Directory Server 45directory services 13disk space 49dispatcher 319DNS 472document filters 30document management 3, 32documentation 50Domino database 3Domino Enterprise Server administrator 184Domino Enterprise Server administrators group 184Domino LDAP 73Domino Web Access (iNotes) portlet 72
772 IBM WebSphere Portal for Multiplatforms V5 Handbook

double-realm SSO concept 584DparentProperties 288DSaveParentProperties 288dynamic caching 351Dynamic Workplaces 27
Ee-business 1e-business needs 12Eclipse 5e-Commerce 13editors 24, 587EJB 390, 400, 456e-mail 22e-meetings 2Enforce Java 2 Security 333enterprise data 3environment variables 384Ethernet 43Eureka! Categorizer 30event broker 28event listeners 28events 15evolution process 11Example schemas 391external authentication proxy 67external security manager 68externalization process 68externalize resources 68externalized roles 68Extranet 16
Ffailover 319fdbk50 390, 456feedback 390, 456FeedbackDbName 118, 226, 288, 337, 456, 499, 757FeedbackDbPassword 118, 226, 288, 337, 456, 757FeedbackDbURL 288, 337FeedbackDbUrl 118, 226, 456, 499, 757FeedbackDbUser 118, 226, 288, 337, 456, 499, 757FeedbackXDbName 226, 288, 337file contribution 3file system 43financial markets 31
firewall 65, 184first generation portals 11fix pack 68flat text 31follow links option 566fonts 25fourth generation portals 11framework 14framework for the development of e-business appli-cations 7fully-qualified host name 43, 184, 369
Ggenerations of portal technology 11getMatchRules 35global database name 391global security 184Global Settings portlet 616Graphical User Interface (GUI) 713Group Filter 332Group ID Map 332Group Member ID Map 332GroupCreator 130, 250GroupModifier 130, 250groups 383gsk4bas 732gsk5bas 732
Hhardware requirements 42, 47–48, 50helper classes 514hierarchical resource topologies 29high availability 16High Availability Cluster Multiprocessing (HACMP) 80horizontal clustering 71horizontal scaling 41HTML 31HTML documents 4HTML tags 538HTTPServlet 26Hummingbird 476
IIBM AIX 2IBM Business Partners 37IBM Client Representatives 37
Index 773

IBM DB2 Client V8.1 179IBM DB2 Content Manager workflow 6IBM DB2 Server administrator 184IBM DB2 Server administrators group 184IBM DB2 Universal Database Enterprise Edition 45IBM DB2 V8.1 755IBM Directory Server 45, 49, 58, 502IBM Directory Server for AIX 50IBM Directory Server for Solaris 52IBM Directory Server for zLinux V5.1 476IBM Directory Server V5.1 755IBM Extended Search and Enterprise Information Portal 22IBM HACMP 80IBM HTTP Server 42, 44, 49, 51, 60, 69, 179, 185, 487, 494, 755IBM HTTP Server administrator 184IBM Lotus Domino Enterprise Server 45IBM Portal Toolkit 7IBM Portlet Wiring Tool V5.0 35IBM S/390 Parallel Enterprise Server 52IBM Sales teams 37IBM SecureWay Directory 473IBM Tivoli Access Manager for e-business 68IBM WebSphere Portal Collaboration Center 169IBM zSeries 52Ignore Case 332ihsadmin 184iKeyman 69images 25, 508, 538includeApps 672includePages 672includePlaces 672indexing process 634Informix 27Informix Dynamic Server 45infrastructure 21in-memory data structures 35install portlets 547installation 27installation log files 93installmessages.txt 93installresponse.txt 727installtraces1.txt 94installtraces2.txt 94installtraces3.txt 94instance-level access control 30instant messaging 2integration services 3
interim fixes 65, 371, 723internationalization 13Internet 16intrinsic portal resource topology 30iPlanet 433iPlanet console 416iPlanet Web Server 435Issue Permission Warning 333IT Architects 37IT Specialists 37
JJ2EE container model 26J2EE platform 12J2EE security 29J2EE technology 10JAAS Subject 29JAAS-based SSO functionality 29Java 15Java bean 35Java class 35Java client 508Java engine 20Java Security APIs 21Java source file 35JavaScript 566JavaServer Pages (JSP) 351JDBC 54JDBC drivers 458JDBC implementation classes 453JDBC Provider 454, 458JDBC provider 498Jetspeed implementation 15
Kkeyword summaries 635
Llabel 509–510, 522languages 1layout 24LDAP 17, 21, 79, 410–411LDAP authentication 505LDAP directory 41LDAP properties configuration 461LDAP server 515ldapadm 184
774 IBM WebSphere Portal for Multiplatforms V5 Handbook

ldapadmin 184LDAPAdminPwd 155, 251, 310, 461, 504, 762LDAPAdminUId 155, 310, 762LDAPAdminUid 251, 461LDAPBindID 155, 251, 310, 461, 505, 762LDAPBindPassword 155, 251, 310, 461, 505, 762LDAPGroupMember 155, 252, 311, 462, 762LDAPGroupObjectClass 155, 252, 311, 462, 762LDAPGroupPrefix 155, 310, 462, 762LDAPGroupSuffix 155, 252, 311, 462, 762LDAPHostName 155, 251, 310, 461, 504, 762LDAPPort 155, 251, 310, 461ldapsearch 427, 503LDAPServerType 155, 251, 310, 461, 762LDAPsslEnable 311LDAPsslEnabled 252, 462LDAPSuffix 155, 252, 310, 462, 505, 762LDAPUserObjectClass 155, 252, 311, 462, 762LDAPUserPrefix 155, 252, 310, 462, 762LdapUserPrefix 252LDAPUserSuffix 155, 252, 310, 462, 762LdapUuidName 673LdYesapAuxiliaryClassName 673Lightweight Directory Access Protocol (LDAP) 66, 119, 486Lightweight Third Party Authentication (LTPA) 68Linux Intel 65Linux kernel 2.4 472Linux zSeries 65, 181listener 28listProperties 35load balance 321local databases 500local portlets 3log.txt 94log_buffer 397log_checkpoint_interval 397logging 514LookAside 251, 461LookAside database 672Lotus Collaboration Center 4Lotus Collaborative Components (LCC) 72, 80, 163Lotus Discovery 72Lotus Discovery Server 72Lotus Domino 4, 41, 72Lotus Domino Administrator Interface 250Lotus Domino Administrator R5 179Lotus Domino Application Server 47Lotus Domino Application Server for AIX, Solaris,
and Linux 48, 52Lotus Domino Enterprise Server 45, 58, 60Lotus Domino Enterprise Server administrators 183Lotus Domino Extended Search 169Lotus Domino Extended Search for AIX and Solaris 52Lotus Domino Extended Search for Windows and Linux 46Lotus Domino Web Server 236Lotus Notes 4Lotus Notes Client 47–48Lotus QuickPlace 4, 41, 46, 72, 136Lotus QuickPlace for AIX and Solaris 52Lotus Sametime 41, 47, 72, 145Lotus Workflow 6LTPAPassword 155, 251, 310, 461, 504, 762LTPATimeout 251, 310, 461
Mmachine translation 2machine translation plugin 77manage applications portlets 547Manage Pages portlet 520–521manage portlets 547, 558managers 24, 587manual fixes 200manual migration 671master configuration repository 321member manager 585, 672member repository 66member repository interface 28member services 571member subsystem 28memory 42memory tab 393message handling 7Microsoft IIS 60Microsoft Internet Explorer 45Microsoft Internet Information Server (IIS) 44–45Microsoft Windows 2Microsoft Windows 2000 42Microsoft Word 6mig_core.properties 671mig_wmm.properties 672mig_wpcp.properties 673mobile devices 13, 631mobile phones 21
Index 775

model state 512Model-View-Controller design pattern 26, 34modify parameters option 556, 560Mozilla 45multiple devices 15multiple-machine architecture 40multiple-process machine 41multiple-processors 41multi-portlet applications development 7multi-tier architecture 41multi-tier runtime environment 358MVC-compliant portlet applications 23My Favorites drop-down list 510My Lotus Team Workplace (QuickPlace) portlet 74My Lotus Team Workspaces (QuickPlace) portlet 4My Portal 509
Nnaming method 390national character set 394navigation 537navigational state 512NDS eDirectory 45Netegrity SiteMinder 68, 585Netscape 359Netscape Communicator 45, 357, 361–364network adapter 43, 51network connectivity 43, 51, 185Network Deployment 40, 49Network Dispatcher 17Network File System (NFS) 362, 472News Markup Language (NewsML) 22newsfeeds 3next-generation desktop 12node 509node agent 321node name 369Notes and Domino portlet 72notion of private resources 30Novell eDirectory 58NTFS file system 43
OODC Mailbox portlet 33On Demand Client (ODC) 32on demand translation 76online conferences 4on-the-fly translation 76
Open Content Syndication (OCS) 22Open Source 15Open Source Portal 15open_cursors 397Opera Web Browser 45operating system 44Oracle 3–4, 27, 390, 407Oracle 9i 357Oracle 9i Client 359, 406, 409Oracle 9i Enterprise Edition 361, 403Oracle 9i Enterprise Server 357, 359, 381Oracle Call interface 9.2.0.1.0 406Oracle database utilities 9.2.0.1.0 406Oracle Enterprise Edition 45Oracle Java utilities 9.2.0.1.0 406Oracle JDBC/OCI Interface 9.2.0.1.0 406Oracle JDBC/THIN Interface 9.2.0.1.0 406Oracle Listener 403Oracle Net configuration 390Oracle Net Configuration Assistance 407Oracle text 392Oracle Ultra Search 391ORB JDK Interim Fix 74Organize Favorites portlet 510
PP packets 43page 24, 509, 522page content 20Page Customizer 35, 510page properties 510page structure 20parent page 513patterns 3People Finder 174People Finder portlet 4, 74PeopleSoft 3permission inheritance 29–30permissions 24–25personal digital assistants 21, 631Personalization 5, 10, 21, 650personalized interaction 2physical machine 41physical memory 47, 51pkgrm 379pkunzip utility 669place 509Planet Server Products 413
776 IBM WebSphere Portal for Multiplatforms V5 Handbook

plugin configuration file 735Portal 9Portal access control (PAC) 29, 513portal administration 21Portal Administration node 511Portal administrative user name 370Portal administrator 24Portal aggregation 538Portal Analysis page 511Portal Application Integrator 3Portal applications 551Portal catalog 5portal components 10portal concepts 23Portal Content Management (PCM) 32Portal Core API 34Portal default theme 545Portal Document Manager 3, 32Portal EAR file 350Portal Enable 2portal engine 20Portal Extend 2portal extensions 10Portal Framework 15Portal InfoCenter 46–47, 50, 52, 366, 476Portal install 26Portal Installer 46–47, 50, 52, 366, 476portal integration 2Portal internal events 28Portal layout 651Portal navigation 509, 512Portal navigation tree 509portal page 4, 24portal presentation framework 20Portal security 505Portal Servlet 20Portal session 512Portal Settings page 511Portal states 512Portal technology 9–10portal tooling 9Portal Toolkit 7, 35Portal Toolkit for WebSphere Portal 35portal translation 2Portal user authentication 517Portal User Interface 511, 520portal users 1, 3PortalAdminGroupId 154, 251, 310, 461, 504, 762PortalAdminGroupIdShort 155, 251, 310, 461, 762
PortalAdminId 154, 251, 310, 461, 504, 762PortalAdminId4x 671PortalAdminIdShort 154, 251, 310, 461, 762PortalAdminPwd 154, 251, 310, 461, 762PortalAdminPwd4x 672Portal-Back End SSO 584portals 9portlet 23, 508portlet API 514, 606portlet application 23, 508, 671portlet application debug components 35portlet application definitions 587portlet applications 23portlet builders 2portlet catalog 35portlet container 21, 28Portlet Container of WebSphere Portal analogous 26portlet content 23portlet definitions 20, 587portlet entities 587portlet menu items 514portlet menus 514portlet preview 7Portlet Selector portlet 651Portlet Wiring Tool 35Portlet Wizard 7, 35portlet wizard 36portlet.xml 35–36portlet’s title bar 540PortletFilter 28portletinstall.txt 93portlets 3, 15, 20, 26–27, 34Portlets page 511portlets page 547PortletService 27portlet-to-portlet communication 3PQ72196_fix.jar 65PQ72597-efix.jar 65PQ73644_fix-temp.jar 65PQ76567.jar 65PQ77008.jar 65PQ77142.jar 66prepare.jacl 732presentation 3Presentation Editor 33presentation services 3, 16, 20presentations 2preview 6
Index 777

privileged users 24, 587processes 397processor 42, 47, 51production environment 39Productivity Components 3profile information 15programming interfaces 1properties files 508property broker 27property broker portlet filter 28property broker service 27property match broker 27PropertyBrokerServiceInternal 35PropertyBrokerServiceInternal interface 35public APIs 27Public Domain Korn Shell 475pznadmin 390, 399, 456
QQuickPlace portlet 72
RReady for WebSphere Studio Partner plugins 5Red Hat Enterprise Linux AS 181Red Hat Linux 473Red Hat Linux for Intel 181Redbooks Web site 769
Contact us xxiregistry 571reinstallwps.sh 733relational database 3–4remote content 15remote Web server 60remote Web services 3reports 6repository adapters 28Resource Permissions page 24resource permissions portlet 588response file 730return on investment (ROI) 4Reuse Connection 332reverse proxy 319Reverse Proxy Security Server 16Rich Site Summary (RSS) 22RichTextEditor 33role mapping 25roles 3, 24, 585–586RowContainer.jsp 541
rules 634
SSametime Connect portlet 72Sametime Contact List 169Sametime Contact List portlet 74Sametime Who Is Here portlet 74sample directory configuration 74sample portlet code 7sample portlets 7SAP 3scalability 472scalable infrastructure 10search 22, 30, 32search and taxonomy 13search capabilities 4, 633search engine 634search functionality 30Search Timeout 332second generation portals 11secure data transfer 68Secure Sockets Layer (SSL) 68security 13security administrators 24, 587security services 21self-signed certificate 69server core components 413Server User ID 332Server User Password 332Service Provider Interface 30services 21Servlet Container 26setMatchRules 35Setup Manager 472Setup Manager scripts 475shared pool 393shared_pool_size 397shell script file 733show info 551, 558Siebel 3silent mode 723Simple Object Access Protocol (SOAP) 22simple-machine architecture 40single sign-on (SSO) 7, 13, 583single-tier installation 473Site Analysis 22site analytics 13Site Analyzer integration 28
778 IBM WebSphere Portal for Multiplatforms V5 Handbook

SiteMinder 68skeleton portlet application 35skins 26, 540small workload environment 40SMTP 472SOAP RPI router 29software requirements 44, 47, 49, 51Solaris CDE 384Solaris console 383Solaris Kernel parameters 404Solaris maintenance update 361Solaris UNIX kernel 381Spreadsheet Editor 33spreadsheets 2–3SQL Server 27SQL Server Enterprise 45SQL*Plus 9.2.0.1.0 406sqlplus 398, 400SSL 61SSL Configuration 332SSL Enabled 332SSO Authenticator 29SSO functionality 29SSODomainName 155, 251, 310, 461, 504, 762SSOEnable 310SSOEnabled 155SSORequiresSSL 155static IP address 43, 51static XML file 514stock exchanges 24stock tickers 24Struts 34Struts Portlet Framework 34subscription 32Summarizer 31Sun Blade 2000 workstation 51Sun ONE 357Sun ONE Directory Server 58, 359, 361, 363, 365, 410, 415Sun ONE Web Server 60, 357, 359, 361–362, 365, 429, 464Sun ONE Web Server, Enterprise Edition 44Sun Solaris 2, 50–51, 65, 357, 381Sun SPARC Ultra 60 360SUNWarc 382SUNWbtool 382SUNWhea 382SUNWlibm 382SUNWlibms 382
SUNWsprot 382SUNWtoo 382Supported Client portlet 631SUSE Linux 2SUSE Linux Enterprise Server 52SUSE SLES 53SUSE SLES for Intel 181SUSE SLES V8.0 179SuSE SLES V8.0 753swap space 43syndication 6
Ttaxonomy 13, 634taxonomy creation system 30team workplaces 2team workspaces 4team-room function 22Technical Sales specialists 37Technotes 473telecommunications 31templates 6test environment 39text mode 714–715The Portlet Wiring Tool 35themes 25, 537Themes and Skins 537Themes and Skins portlet 520, 542third generation portals 11third-party authentication 585third-party authentication proxy server 67Tivoli Access Manager (TAM) 16, 29, 68, 358–359, 585, 608Tivoli Access Manager WebSEAL 68Tivoli Site Analyzer 52Tivoli WebSEAL 16Token Ring 43ToolbarInclude.jsp 537Tooling 22toolkit 23total cost of ownership (TOC) 472trading partners 2transcoding 33transcoding technology 21, 33, 77, 513transfer_db2.properties 288Trust Association Interceptor (TAI) 67, 584–585Turbine project 15types of registries
Index 779
Custom User Registry (CUR) 66Lightweight Directory Access Protocol (LDAP) 66Member repository 66
Uuid (user ID) 569UIM Architecture framework 31UltraSPARC II CPU 360uninstall 379, 551uninstall text mode method 724uninstallresponse.txt 730UNIX Kernel parameter 382UNIX platform 78untar 477unzip 477update 551URL 509URL Mapping portlet 617URL mapping segments 587Use Domain Qualified User IDs 333user .profile 381, 384, 404user accounts 383User and Group Management 21User Beans 21User Filter 332user groups 587User ID Map 332user registration 571user registry 585UserCreator 130, 250User-Driven Process Integration (UDPI) 34, 766UserModifier 130, 250users 24, 587Users and Groups portlet 570, 572
Vvalidation task 493vault segments 608versioning 3, 6, 33vertical cloning 54vertical clustering 70vertical scaling 41view state 512virtual memory 43, 47, 51virtual portals 26
WWAR file 36, 508warning messages 65WAS.PME.install.log 94WAS_CM_08-12-2003_5.0.2-5.0.1_cumulative_Fix.jar 65WAS_Dynacache_05-08-2003_5.0.1_cumulative_fix.jar 65WAS_Security_07-07-2003_JSSE_cumulative_Fix.jar 66WasPassword 154, 251, 253, 310, 461, 504, 762WasUserId 154, 251, 253, 310, 461, 504, 762WCMDBADM 400wcmdbadm 390, 456Web analysis technology 4Web archive 547Web archive file 508Web browser 68, 631Web clipper 566Web Clipping portlet 513, 547, 562Web conference 4Web Conferencing (Sametime) portlet 4, 74, 169, 173Web content management tools 5Web crawler 636Web descriptor file 551Web developers 10Web modules 547, 551, 587Web search engines 4Web server 60, 79, 358, 368Web server horizontal scaling 41Web servers 515Web Services 22Web services 3Web Services portlet 548Web SSO configuration 134web.xml 35–36, 551Web-based content 14WebSphere Application Enterprise Edition for So-laris 366WebSphere Application Fixpack and eFixes for AIX and Solaris 366WebSphere Application Server 3, 17, 22–23, 41, 49, 51, 68, 357, 361, 365, 713WebSphere Application Server base fixpack 365WebSphere Application Server cell 484WebSphere Application Server Enterprise Edition 365WebSphere Application Server Enterprise Edition
780 IBM WebSphere Portal for Multiplatforms V5 Handbook

fixpack 365WebSphere Application Server Enterprise for Linux 48WebSphere Application Server Enterprise for So-laris 52WebSphere Application Server Enterprise for Win-dows 46, 48, 50WebSphere Application Server Enterprise for zLinux V5.0 476WebSphere Application Server Fix Pack and eFixes for zLinux - Fixpack1 476WebSphere Application Server Fixpack 46, 48, 50, 52WebSphere Application Server host name 369WebSphere Application Server Network Deploy-ment 41, 321, 331, 341WebSphere Application Server Network Deploy-ment for Solaris 52WebSphere Application Server plugin 429, 433WebSphere Application Server Plugin compo-nents 40WebSphere Application Server V5.0 179, 185WebSphere Commerce Portal 2WebSphere Content Management 22WebSphere Edge Server 17, 41, 358–359WebSphere Member Manager (WMM) 28WebSphere Personalization 473WebSphere Plug-in Cumulative Fix for 5.0.0, 5.0.1,and 5.0.2 65WebSphere Portal 1, 12, 15, 21, 23, 28, 41, 49, 51, 62, 68, 79, 179, 185, 257, 357, 359, 361, 363–365, 390, 450, 473, 487, 508, 671, 713, 755
Linux 472WebSphere Portal - Express 2WebSphere Portal administration 183WebSphere Portal administrator 184WebSphere Portal administrators group 184WebSphere Portal Collaboration Center 4, 74WebSphere Portal Content Publisher 357WebSphere Portal Content Publisher Runtime 365WebSphere Portal content publishing (WPCP) 5, 33, 71, 487, 673WebSphere Portal Credential Vault system 607WebSphere Portal Documentation 50WebSphere Portal Enable 3WebSphere Portal Engine Components 20WebSphere Portal Express for iSeries 2WebSphere Portal Express Plus for iSeries 2WebSphere Portal Extend 4
WebSphere Portal for Domino Directory 252WebSphere Portal for Multiplatforms 2, 37WebSphere Portal for z/OS and OS/390 2WebSphere Portal InfoCenter 472–473WebSphere Portal Installer 63WebSphere Portal Java APIs 607WebSphere Portal Security LTPA 461WebSphere Portal Server 464WebSphere Portal Toolkit 22–23, 39, 46–47, 50, 52, 366, 476WebSphere Portal V5 for zLinux 471WebSphere Portal WPCP 46, 48, 50, 52, 476WebSphere portlet catalog 5WebSphere Studio 5WebSphere Studio Application Developer (WSAD) 23, 39WebSphere Studio Site Developer (WSSD) 23, 35, 39WebSphere Studio Workbench 7WebSphere Summarizer 635WebSphere Transcoding Publisher 33WebSphere Translation Server 1, 3, 52, 76
languagesEnglish 3French 3German 3Italian 3Japanese 3Portuguese 3Simplified Chinese 3Spanish 3Taiwanese 3Traditional Chinese 3
WebSphere Translation Server (DBCS) 52WebSphere Translation Server InfoCenter 76Window 2000 Active Directory 58Windows 65Windows 2000 179, 755Windows 2000 Active Directory 45Windows 2000 Advanced Server 44Windows 2000 Server 44Windows XP Professional 7WinZip 669wiring tool 35WMM database 27WmmConfigType 673WmmDbName 226, 287, 336, 456, 757WmmDbPassword 118, 226, 288, 337, 456, 757WmmDbUrl 118, 226, 287, 337, 456, 500, 757
Index 781

WmmDbUser 118, 226, 287, 337, 500, 757WmmDbUsr 390, 399, 456, 500wmmDS 456WmmDsName 456WmmHasUuid 673WmmUuid 673WmsDbName 672WmsDbPassword 672WmsDbUrl 672WmsDbUser 672workflow 6workflow process 32workload manager 319workplace 4workspaces 6World Clock 652world currencies 24wpconfig.properties 55, 288, 455, 465, 468, 494, 672WPCP 366, 670WPCP directories 587WPCP editions 587WPCP projects 587WPCP resource 587WPCP resource collections 587wpcp50 390, 456WpcpDbEjbPassword 456WpcpDbName 118, 226, 288, 337, 456, 499, 756WpcpDbNode 226, 288, 337, 498WpcpDbPassword 118, 226, 288, 337, 456, 757WpcpDbPznadminPassword 456WpcpDbUrl 118, 226, 288, 337, 456, 499, 757WpcpDbUser 118, 226, 288, 337, 456, 499, 756wpcpInstallLog.txt 93WpcpXDbName 226, 288, 337wpinstalllog.txt 93wppmefp1.txt 93wps50 390–391, 398, 456wpsadmin 184wpsadms 184WpsContextRoot4x 671WpsDbName 225, 287, 336, 455, 756WpsDbNode 225, 287, 336, 756WpsDbUsr 390, 398WpsDefaultHome4x 671WpsDsName 455WpsHostName 310, 465WpsHostName4x 671WpsHostPort 465
wpsinstallLocation4x 672WpsPort4x 671WpsXDbName 225, 287, 336wpwasfp1.txt 93wsadmin command 731wsadmin file 732
XX11 environment 384XML 15, 31XML Access 512, 514XML Access scripting interface 29XML file 173XWindow 384XWindow environment 391, 404
ZzLinux 472zLinux guest 477zSeries 475
782 IBM WebSphere Portal for Multiplatforms V5 Handbook

(1.0” spine)0.875”<->
1.498”460 <->
788 pages
IBM W
ebSphere Portalfor M
ultiplatforms V5 Handbook


®
SG24-6098-00 ISBN 073849882
INTERNATIONAL TECHNICALSUPPORTORGANIZATION
BUILDING TECHNICALINFORMATION BASED ONPRACTICAL EXPERIENCE
IBM Redbooks are developed by the IBM International Technical Support Organization. Experts from IBM, Customers and Partners from around the world create timely technical information based on realistic scenarios. Specific recommendations are provided to help you implement IT solutions more effectively in your environment.
For more information:ibm.com/redbooks
IBM WebSphere Portalfor Multiplatforms V5 HandbookA better installation process and enhanced management capabilities
Step-by-step installation instructions for multiplatforms
Implementation of powerful clustering and collaboration capabilities
This IBM Redbook positions the IBM WebSphere Portal for Multiplatforms as the solution to best address the process of building scalable and reliable business-to-employee (B2E), business-to-business (B2B) and business-to-consumer (B2C) portals.
The IBM WebSphere Portal for Multiplatforms V5 Handbook will help you to understand the WebSphere Portal architecture, how to install, tailor and configure WebSphere Portal, and how to administer and customize portal pages using WebSphere Portal.
In this redbook, we discuss the installation of IBM WebSphere Portal for Multiplatforms within the Microsoft Windows 2000 Server, IBM AIX, SuSE SLE8 Linux, Solaris 8, and zLinux environments using Setup Manager. The ability to set up a clustered environment is covered, as well as a demonstration of migrating from WebSphere Portal V4.2 to V5.0.
In this redbook, we illustrate the implementation and the use of the following directory services: IBM Directory Server, Lotus Domino Enterprise Server, and Sun ONE Directory Server.
In the IBM WebSphere Portal for Multiplatforms V5 Handbook, you will find step-by-step examples and scenarios showing ways to rapidly integrate your enterprise applications into an IBM WebSphere Portal environment using state-of-the-art technologies such as portlets. You will be able to implement new and enhanced capabilities incorporated in current releases of IBM WebSphere Portal offerings, which provide powerful collaboration applications such as Lotus QuickPlace, Lotus Sametime, and Lotus Collaborative components.
Back cover