IBM WebSphere Portal: Applying Cumulative Fixes to Multi-Profile Installation
41
Applying Cumulative Fixes to Multi-Profile Installation IBM WebSphere Portal 8 Author: Omar Siliceo 10/18/2013
-
Upload
vanderbilt -
Category
Documents
-
view
2 -
download
0
Transcript of IBM WebSphere Portal: Applying Cumulative Fixes to Multi-Profile Installation

Applying Cumulative Fixes to Multi-Profile Installation
IBM WebSphere Portal 8
Author: Omar Siliceo
10/18/2013

IBM WebSphere Portal 8 ▪ Applying Cumulative Fixes to Multi-Profile Installation
Release 2013-10-18_01 Page 2 10/18/2013
Version Notice
All revisions of this document are listed in chronological order. There is no relationship between the
document number and the software release number
Document Release
Date Description Author
2013-10-18_01 10/18/2013 Prolifics/Omar Siliceo
This White Paper was created by Prolifics. Prolifics has made every effort to ensure that this
document is accurate at the time of delivery. This White Paper was created based on the installation of
CF07 to a WebSphere Portal 8.0.0.1 environment.

IBM WebSphere Portal 8 ▪ Applying Cumulative Fixes to Multi-Profile Installation
Release 2013-10-18_01 Page 3 10/18/2013
1. Table of Contents
Table of Contents
1. TABLE OF CONTENTS 3
2. INTRODUCTION—OVERVIEW 5
3. ROAD MAP 5
4. ACCESS REFERENCE DOCUMENT 6
5. CUMULATIVE FIX ID DETERMINATION 7
5.1. PROCEDURE 7
6. CUMULATIVE FIX SYSTEM REQUIREMENTS 8
6.1. DISCOVERY PROCESS 8 6.2. VERIFICATION PROCESS 10
7. CUMULATIVE FIX DISTRIBUTION ACQUISITION 13
7.1. PREREQUISITES 13 7.2. NAVIGATING FIX CENTRAL 13
8. CUMULATIVE FIX CONTENT EXTRACTION 18
8.1. PREREQUISITES 18 8.2. PROCEDURE 18
9. CUMULATIVE FIX PRE-INSTALLATION TASKS 20
9.1. EXISTING CONFIGENGINE ATTRIBUTES 20 9.2. SETUP THE PWORDDELETE PROPERTY 21 9.3. VERIFYING THE DEFINED MASTER PROFILE 23 9.4. DISABLING AUTO-SYNCHRONIZATION FOR ALL NODES 24
10. CUMULATIVE FIX INSTALLATION—PRIMARY NODE 27
10.1. INSTALLING A CF TO PORTAL BINARIES AND MPP 27 10.2. UPDATING PORTAL PROFILES TO UPGRADED BINARIES 30
11. CUMULATIVE FIX INSTALLATION—SECONDARY NODES 31
11.1. INSTALLING A CF TO PORTAL BINARIES 31 11.2. UPDATING PORTAL PROFILES TO UPGRADED BINARIES 34
12. POST CUMULATIVE FIX INSTALLATION TASKS 36
12.1. PROCEDURE 36 12.2. WHAT’S NEXT 37
IBM WebSphere Portal 8 ▪ Applying Cumulative Fixes to Multi-Profile Installation
Release 2013-10-18_01 Page 4 10/18/2013
APPENDICES 38
APPENDIX I. DETAILED TABLE OF CONTENTS 38
APPENDIX II. TABLE OF FIGURES 40
APPENDIX III. BIBLIOGRAPHY 41

IBM WebSphere Portal 8 ▪ Applying Cumulative Fixes to Multi-Profile Installation
Release 2013-10-18_01 Page 5 10/18/2013
2. Introduction—Overview
Purpose The objective of this document is to illustrate a generic method to apply WebSphere Portal Cumulative Fixes on installations with multiple IBM WebSphere Portal Profiles. This method is valid for WebSphere Portal 8.0.x, unless IBM documentation states otherwise.
In general, for an environment that uses more than the master WebSphere Portal Profile, the
installation of a cumulative fix is carried out in two major stages. During the first stage, the actual code
for the Cumulative Fix is deployed on the Portal nodes and the master Portal Profile. Once the code is in
place, the second stage can initiate. During the latter, each of the additional WebSphere Profiles is
upgraded to the Cumulative Fix by using the ConfigEngine tool.
NOTE: For those readers either familiar with this document or wanting only to review the procedural sections, go to all of the subsections Procedure , in the order provided, to perform an installation of a Cumulative Fix.
3. Road map
The remainder of this document is organized as follows:
1. Access Reference Document 2. Cumulative Fix ID 3. Cumulative Fix System Requirements 4. Cumulative Fix Distribution Acquisition 5. Cumulative Fix Content Extraction 6. Cumulative Fix Pre-Installation Tasks 7. Cumulative Fix Installation
NOTE: The Portal Wiki article (IBM-WP-8.0.0.1-CF07) was used in the writing of this section
IBM WebSphere Portal 8 ▪ Applying Cumulative Fixes to Multi-Profile Installation
Release 2013-10-18_01 Page 6 10/18/2013
4. Access Reference Document
Using a web browser go to wiki article. [ (IBM-WP-8.0.0.1-CF07)]
The wiki article, at the time this white paper was being written, described applying of the
Cumulative Fix 07 for WebSphere Portal 8.0.0.1 in multiple deployment scenarios. The work presented
in this document is based in such article, but it is customized for a deployment scenario that uses
multiple (non-master) Portal Profiles.
The wiki article can serve as a reference in case that there are questions about this document. The
following list includes sections in the wiki article that can be of use in the deployment of future
Portal/WCM Cumulative fixes.
Cluster upgrade planning
Before you begin
Ensure wkplc properties files are correct
Unix, Linux, Windows, and IBM i only
Special considerations for a binary installation
Multiple profile considerations
Non-root considerations
Disabling automatic synchronization
Upgrading the primary node
Use a command line
Additional configuration steps
Linux, Unix, Windows or IBM i only
Upgrading additional nodes
Use a command line on additional nodes
Additional configuration steps on additional nodes
Linux, Unix, Windows or IBM i only
Finalizing the upgrade

IBM WebSphere Portal 8 ▪ Applying Cumulative Fixes to Multi-Profile Installation
Release 2013-10-18_01 Page 7 10/18/2013
5. Cumulative Fix ID Determination
An integral part of applying a Cumulative Fix is figuring out its identifier. This section helps with this
task.
5.1. Procedure
1. Using a browser go to recommended page for WP-WCM [ (IBM-WP-WCM-RecUpd)]
Figure 1. Recommended Updates page
2. Locate and select installed version
Figure 2. Installed version selection

IBM WebSphere Portal 8 ▪ Applying Cumulative Fixes to Multi-Profile Installation
Release 2013-10-18_01 Page 8 10/18/2013
3. Locate and identify the desired Cumulative Fix
Figure 3. Desired CF identification
Make a note of the CF ID, in this case, PM91269
NOTE: The CF ID will help you finding documentation and the actual CF download.
6. Cumulative Fix System Requirements
The steps described in the “Discovery Process” section, below, were used to determine the system
requirements for the particular Cumulative Fix. The section can be skipped during the actual deployment
of the current CF, but will have to be carried out for future CF’s.
6.1. Discovery Process
1. Using a web browser go to wiki article [ (IBM-WP-8.0.0.1-CF07)] 2. Look for the section “software requirements”
Figure 4. Software requirements section
3. In a new browser tab or window, open the link to hardware/software requirements Insure that the selected tab matches the version of your Portal installation.
Figure 5. WP version matching
4. On resulting page, identify and click on the link for the version and OS

IBM WebSphere Portal 8 ▪ Applying Cumulative Fixes to Multi-Profile Installation
Release 2013-10-18_01 Page 9 10/18/2013
Figure 6. Product version and OS for cumulative fix
Review the generated report’s sections as indicated below
5. Go to the Operating systems tab Review the version and level of the OS. If uncertain as to the version of the OS, run the script /usr/local/custom/bin/whichLinux.ksh on the target Primary Portal host. On the report, for a Redhat 6.4, you should see, under the Required Fix Packs section of the report, an entry similar to the screenshot below.
Figure 7. Required OS level for Linux Redhat 6
6. Go to the Prerequisites tab On the top of the report, look for the Prerequisites tab (third from the left in the figure) and click on it.
The updated report looks similar to
Figure 8. Prerequisites tab selection
7. Locate the “Application Servers (Mandatory)” capability Once you do, click on the “Only supported with additional fix packs” link.

IBM WebSphere Portal 8 ▪ Applying Cumulative Fixes to Multi-Profile Installation
Release 2013-10-18_01 Page 10 10/18/2013
Figure 9. Application Servers (Mandatory) section
8. Identify additional fixes for the installed Portal/WCM version If there is a need to identify the WAS version and fix pack level, use the command /opt/IBM/WebSphere/AppServer/bin/versionInfo.sh
If there is a need to identify the WP version and fix pack level, use the command /opt/IBM/WebSphere/PortalServer/bin/WPVersionInfo.sh Base on the version findings, locate and identify any additional required interim fixes. The next figure highlights the additional required interim fixers for a Portal/WCM environment version 8.0.0.1
Figure 10. Additional required fixes
Make note of the interim fixes IDs.
9. Identify the Java SDK required version Go to the top of the report (same page, as in 7) and scroll down
Figure 11. Required Java SDK version
Make a note of the required version. For the CF07 case, the version is JRE 6.0 and VM J9 2.6.
6.2. Verification Process
There are two aspects that need to be verified in terms of the Systems Requirements. These aspects
are:
Verifying the interim fixes captured in step 8.

IBM WebSphere Portal 8 ▪ Applying Cumulative Fixes to Multi-Profile Installation
Release 2013-10-18_01 Page 11 10/18/2013
Verifying the JDK version identified in step 9.
6.2.1. Required Interim fixes
A custom script will be used for this endeavor. The name of the script is
wp_verifyIfixSysReqForCF.ksh. Its location is under the /usr/local/custom/bin/cf-aux directory. The
script is intended to be generic in the sense that it can be used with future CF’s. With this in mind, it
uses two mandatory configuration files:
wp_verifyIfixSysReqForCF.cfg
<CF_ID>.cfg
NOTE: Configuration files must be located under the /usr/local/custom/etc directory
The first configuration file (wp_verifyIfixSysReqForCF.cfg) stores installation parameters such as
location of the installation, etc. This configuration file should not be modified unless a change in the
installation parameters takes place. The current wp_verifyIfixSysReqForCF.cfg is shown in the next
figure.
Figure 12. Site-wide configuration example
The second configuration file contains the list of required interim fixes, and therefore, there should
be one configuration file per new cumulative fix. It is recommended to use the CF ID as the name for the
second configuration file. For instance, the CF ID for CF07 is CFPM91269, so the corresponding
configuration file name would be CFPM91269.cfg. This file must define two variables:
IF_LIST Coma-separated list of required interim fixes
REPO_PATH Location of the cumulative fix extracted content
The corresponding configuration file for CF07 is shown in the next screenshot.
Figure 13. CF07 configuration file

IBM WebSphere Portal 8 ▪ Applying Cumulative Fixes to Multi-Profile Installation
Release 2013-10-18_01 Page 12 10/18/2013
6.2.1.1. Script execution
The syntax for executing the script is: CFID=<CF_ID> /usr/local/custom/bin/cf-aux/wp_verifyIfixSysReqForCF.ksh
Where <CF_ID> must match the name of the CF, as already stated.
6.2.1.2. Procedure
For CF07:
1. Execute wp_verifyIfixSysReqForCF.ksh as follows CFID=CFPM91269 /usr/local/custom/bin/cf-aux/wp_verifyIfixSysReqForCF.ksh
2. Verify output The output of the command should be similar to the one shown below.
Figure 14. Command wp_verifyIfixSysReqForCF.ksh sample output
6.2.2. Required JDK Version
Verifying the JDK version is done visually after running a WAS command.
6.2.2.1. Procedure
Using the information captured in step 9, do the following
1. Use the WAS java executable Execute the WAS java command as shown below. /opt/IBM/WebSphere/AppServer/java/bin/java -version
2. Perform visual verification The command output is similar to
Figure 15. java -version sample output
According to the mentioned step, the requirement is JRE 6.0 and VM J9 2.6. The fourth line in the output above matches our requirement.
NOTE: If your WAS installation meets both requirements, you may proceed to the next chapter. Otherwise, update to the required version.

IBM WebSphere Portal 8 ▪ Applying Cumulative Fixes to Multi-Profile Installation
Release 2013-10-18_01 Page 13 10/18/2013
7. Cumulative Fix Distribution Acquisition
7.1. Prerequisites
Use the following table to search for the desired fix using IBM’s Fix Central web site.
Table 1. Parameters for finding a Cumulative Fix
Requirement Value
Website http://www-933.ibm.com/support/fixcentral/options
Product WebSphere Portal
Installed Version 8.0.0.1
Desired Fix CF07 (APAR PM91269)
Platform Linux
7.2. Navigating Fix Central
1. Use a web browser Open a browser and go the address indicated by the Website value in Table 1.
2. Provide product and version information Using Table 1, select the value for “Product” on the page’s Product selector and the value for “Installed Version” on the page’s Installed Version pop-up menu.

IBM WebSphere Portal 8 ▪ Applying Cumulative Fixes to Multi-Profile Installation
Release 2013-10-18_01 Page 14 10/18/2013
Figure 16. Providing product and version
Then click “Continue”
3. Provide cumulative fix information On the resulting page, enter the value for Desired Fix from Table 1.

IBM WebSphere Portal 8 ▪ Applying Cumulative Fixes to Multi-Profile Installation
Release 2013-10-18_01 Page 15 10/18/2013
Figure 17. Providing CF ID
Then click the “Continue” button.
4. Select desired CF Several matches may appear in the results page. Insure that you select the one made for the “Server” edition, as opposed to “Express” or “zOS” editions.
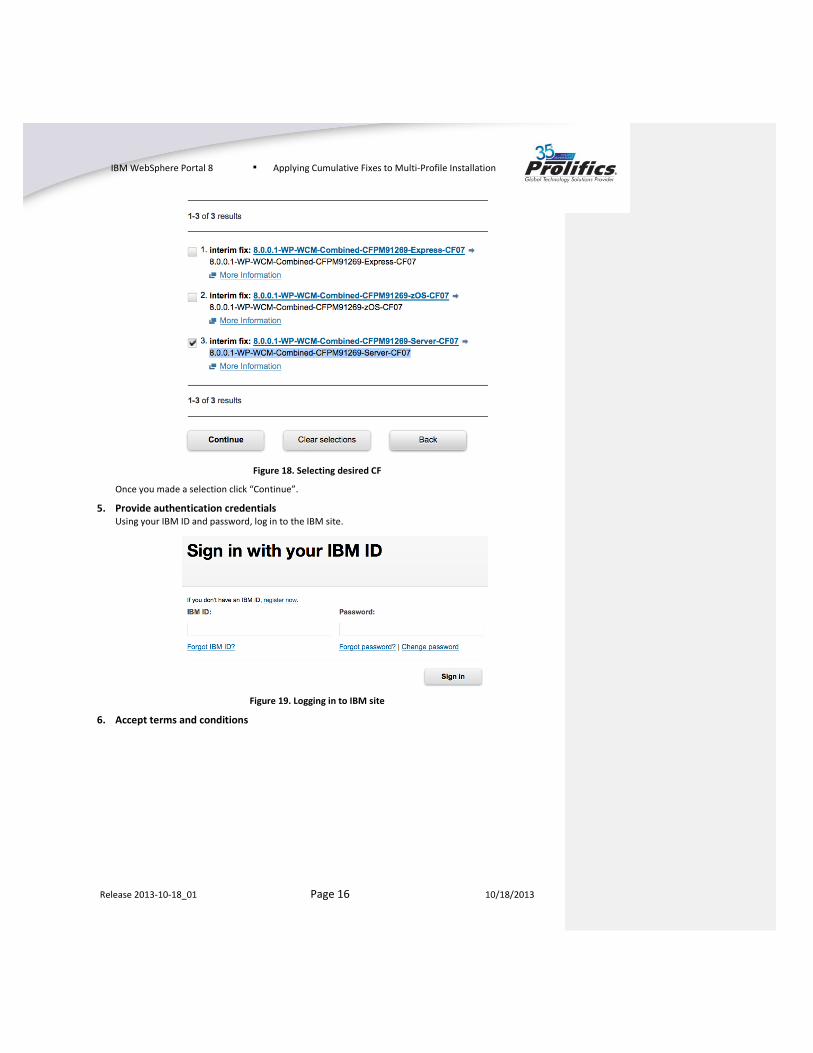
IBM WebSphere Portal 8 ▪ Applying Cumulative Fixes to Multi-Profile Installation
Release 2013-10-18_01 Page 16 10/18/2013
Figure 18. Selecting desired CF
Once you made a selection click “Continue”.
5. Provide authentication credentials Using your IBM ID and password, log in to the IBM site.
Figure 19. Logging in to IBM site
6. Accept terms and conditions

IBM WebSphere Portal 8 ▪ Applying Cumulative Fixes to Multi-Profile Installation
Release 2013-10-18_01 Page 17 10/18/2013
Figure 20. Accepting terms and conditions
7. Download CF
Figure 21. Downloading CF
8. Save the CF media to a temporary location The name of the downloaded file, for CF07 is 8.0.0.1-WP-WCM-Combined-CFPM91269-Server-CF07.zip

IBM WebSphere Portal 8 ▪ Applying Cumulative Fixes to Multi-Profile Installation
Release 2013-10-18_01 Page 18 10/18/2013
8. Cumulative Fix Content Extraction
NOTE: It is assumed that the location of the CF07 is /opt/local/media/WP-cumulative-fix-07/8.0.0.1-WP-WCM-Combined-CFPM91269-Server-CF07.zip
8.1. Prerequisites
There are basic two content prerequisites for this task. The CF downloaded file and the target
location for extracting the CF archive. In addition, the location of the WAS jar utility is also required.
The downloaded file is /opt/local/media/WP-cumulative-fix-07/8.0.0.1-WP-WCM-Combined-CFPM91269-
Server-CF07.zip.
The target directory is /opt/local/media/installFiles/wp-wcm8001cf07.
Finally, the location of the jar WAS utility is /opt/IBM/WebSphere/AppServer/java/bin/jar
8.2. Procedure
1. Insure that source file exists Use the command file /opt/local/media/WP-cumulative-fix-07/8.0.0.1-WP-WCM-Combined-CFPM91269-Server-
CF07.zip
2. Insure that target directory exists Use the command file /opt/local/media/installFiles/wp-wcm8001cf07
If the command fails, create the directory using the command mkdir -p /opt/local/media/installFiles/wp-wcm8001cf07
3. Change your working location to the target directory 4. Use the jar utility to test the source file
Use the command /opt/IBM/WebSphere/AppServer/java/bin/jar tf /opt/local/media/WP-cumulative-fix-
07/8.0.0.1-WP-WCM-Combined-CFPM91269-Server-CF07.zip >/dev/null
If the command produces no output, it indicates that the ZIP archive is OK.
5. Extract the CF distribution Use the command /opt/IBM/WebSphere/AppServer/java/bin/jar xf /opt/local/media/WP-cumulative-fix-
07/8.0.0.1-WP-WCM-Combined-CFPM91269-Server-CF07.zip
6. Verify the result Use the command ls. The output should be match the following screenshot
Figure 22. Files list of original CF zip file
The last part of the extraction is to unzip the CF archived data (PM91269_Server.zip)

IBM WebSphere Portal 8 ▪ Applying Cumulative Fixes to Multi-Profile Installation
Release 2013-10-18_01 Page 19 10/18/2013
7. Create a CF subdirectory In order not to mix content of the CF actual data with content of the CF distribution, create a subdirectory named PM91269 mkdir -p /opt/local/media/installFiles/wp-wcm8001cf07/PM91269
8. Change your working location to the PM91269 directory 9. Extract the actual CF data
Using the jar command, extract the CF data /opt/IBM/WebSphere/AppServer/java/bin/jar xf PM91269_Server.zip
10. Verify the result Using the ls command, the output should be match the following screenshot
Figure 23. CF content

IBM WebSphere Portal 8 ▪ Applying Cumulative Fixes to Multi-Profile Installation
Release 2013-10-18_01 Page 20 10/18/2013
9. Cumulative Fix Pre-Installation Tasks
NOTE: Unless otherwise noticed, this section applies to each WebSphere Portal Profile. This means that any set of commands will have to be performed on each Portal Profile on all Portal nodes.
9.1. Existing ConfigEngine Attributes
In order to apply a Cumulative Fix, there are certain configuration areas that need to be verified.
Attributes in wkplc.properties file
Attributes in wkplc_dbdomain.properties file
Attributes in wkplc_comp.properties file
9.1.1. Attributes to verify
In this section a list of the attributes that need to be verified will be presented for each of the areas
mentioned above.
9.1.1.1. wkplc.properties file
The list of attributes that need verification is:
WasSoapPort
WasRemoteHostName
WasUserid
WasPassword
WpsHostName
WpsHostPort
PortalAdminId
PortalAdminPwd
WpsContextRoot
9.1.1.2. wkplc_dbdomain.properties file
The list of attributes that need verification is:
feedback.DbPassword
likeminds.DbPassword
release.DbPassword
community.DbPassword
customization.DbPassword
jcr.DbPassword
9.1.1.3. wkplc_comp.properties file
The list of attributes that need verification is:
XmlAccessHost
XmlAccessPort

IBM WebSphere Portal 8 ▪ Applying Cumulative Fixes to Multi-Profile Installation
Release 2013-10-18_01 Page 21 10/18/2013
9.1.2. Using wp_verfyWkplcForCF.ksh to verify attributes
In order to simplify the verification process of the aforementioned attributes, the script
wp_verfyWkplcForCF.ksh was created.
The syntax to use it is: PROF=<WP_Profile_Name> /usr/local/custom/bin/cf-aux/wp_verfyWkplcForCF.ksh
Where WP_Profile_Name is the WebSphere Portal Profile name, such as wp_profile3.
An example of running this command for the wp_profile1 is shown in the figures below.
Figure 24. wp_verfyWkplcForCF.ksh command execution
This command produces an output that allows one to verify the required parameters. A sample
output is given in the following screen shot.
Figure 25. wp_verfyWkplcForCF.ksh command sample output
Once that you are confident that the values are correct and up to date, proceed to the next section.
Otherwise, using helper files, make the required modifications.
9.2. Setup the PWordDelete Property
During the installation of various types of fixes, including Cumulative Fixes, the default behavior is
for the installer to remove passwords from the ConfigEngine properties files. It is a best practice not to
have this default behavior and only when a profile will not be subject to frequent modifications that
these passwords should be removed.

IBM WebSphere Portal 8 ▪ Applying Cumulative Fixes to Multi-Profile Installation
Release 2013-10-18_01 Page 22 10/18/2013
In order to prevent the installer to remove said passwords, the attribute PWordDelete must be
defined and set to false.
9.2.1. Creating a helper file
A helper file to set this attribute has been created. This helper file can be used with any existing
profiles. Its location is /usr/local/custom/ConfigEngine. Its file name is wkplc.set-
PWordDelete.all_profiles.primary_nodes.properties. The screenshot below shows the content of this file.
Figure 26. PWordDelete attribute helper file
9.2.2. Procedure
Once the helper file has been created, carry out the following steps to define PWordDelete.
NOTE: This procedure is provided in a way that PWordDelete is defined in all Portal Profiles.
1. Define the location of the helper file Issue the command NEW_CFGENG_PROP=/usr/local/custom/ConfigEngine/wkplc.set-
PWordDelete.all_profiles.primary_nodes.properties
2. Use a shell loop (for) to carry out the attribute definition Enter the following text at the command prompt for PIDX in 1 2 3 4; do wrap+
/opt/IBM/WebSphere/wp_profile${PIDX}/ConfigEngine/ConfigEngine.sh -
DparentProperties=${NEW_CFGENG_PROP} -DSaveParentProperties=true; printf
"\n\n***\n"; sleep 5; done
At the end of each cycle, you should see a "BUILD SUCCESSFUL" a few lines above the "***" string output by the printf command.
Figure 27. sample partial output
3. Verify results Use the grep command as follows: grep PWordDelete /opt/IBM/WebSphere/wp_profile?/ConfigEngine/properties/wkplc.properties
NOTE: Observe the use of the ? wildcard in the Portal Profile name

IBM WebSphere Portal 8 ▪ Applying Cumulative Fixes to Multi-Profile Installation
Release 2013-10-18_01 Page 23 10/18/2013
The result of the command should be similar to the content of the next screenshot.
Figure 28. Verifying PWordDelete value
9.3. Verifying the defined master profile
The Cumulative Fix installation process only effects the fix modifications to the Master Portal Profile.
It is therefore very important to insure that the correct Profile is defined as the MPP. For THP, such
profile is wp_profile1_thp for primary nodes and wp_profile1 for secondary nodes . The definition takes
place in the WebSphere Portal binaries root directory.
A script has been created, namely wp_vfyDefaultProfileForCF.ksh, that generates a short report
indicating if three main parameters of the Portal installation:
Existence of the wps.properties file (under the binary root)
Correct definition of the master profile
Existence of the master profile directory
9.3.1. Secondary nodes exception
Since secondary nodes were created as binary installations, there is not a master profile defined. We
will use wp_profile1 as the master profile. The procedure for making this definition will be part of
chapter 11.
9.3.2. Procedure
Perform the following.
1. Use the wp_vfyDefaultProfileForCF.ksh script Issue the command /usr/local/custom/bin/cf-aux/wp_vfyDefaultProfileForCF.ksh
2. Review its output The output of the previous command should be similar to the one shown below.

IBM WebSphere Portal 8 ▪ Applying Cumulative Fixes to Multi-Profile Installation
Release 2013-10-18_01 Page 24 10/18/2013
Figure 29. wp_vfyDefaultProfileForCF.ksh command sample output
In the screenshot, it is shown that [1] wps.properties exists and it is accessible by the user running the command; [2] the name of the MPP is wp_profile1_thp, the desired value; and [3] the directory containing the MPP is available and accessible.
9.4. Disabling Auto-Synchronization for all Nodes
During the installation process of a Cumulative Fix it is not desired that every time a node is started
to kick off a synchronization cycle with the deployment manager. Therefore, this feature must be
temporarily disabled on all nodes where the fix is being installed. Once the installation of the fix is
completed, the auto-synchronization must be reverted to its previous state.
9.4.1. Procedure
Perform the steps described below to disable the file synchronization service on the nodeagents.
1. Using a browser log in to the ISC for a Portal Profile
NOTE: Do steps 2 through 5 for each defined nodeagent
2. Go to the first or next nodeagent configuration page Follow the System administration Node agents File synchronization service breadcrumb
Comment [OPS1]: Scripting tip: AdminConfig.modify('(cells/wp_cell2/nodes/wpprof2_node1/servers/nodeagent|server.xml#ConfigSynchronizationService_1371680780265)', '[[synchInterval "1"] [exclusions ""] [enable "true"] [synchOnServerStartup "false"] [autoSynchEnabled "true"]]')

IBM WebSphere Portal 8 ▪ Applying Cumulative Fixes to Multi-Profile Installation
Release 2013-10-18_01 Page 25 10/18/2013
Figure 30. Start (1)
Figure 31. Cont'd (2)
Figure 32. End (3)
3. Go to the File synchronization service configuration page 4. Disable automatic synchronization
Click the Automatic synchronization box to disable the feature

IBM WebSphere Portal 8 ▪ Applying Cumulative Fixes to Multi-Profile Installation
Release 2013-10-18_01 Page 26 10/18/2013
Figure 33. Disabling automatic authentication
5. Apply and save Click the OK button. Then save the new configuration, click on the Save link.
6. Repeat steps 2 through 5 for the remaining nodeagents
Once all steps are completed, proceed to the next section to apply the cumulative fix.

IBM WebSphere Portal 8 ▪ Applying Cumulative Fixes to Multi-Profile Installation
Release 2013-10-18_01 Page 27 10/18/2013
10. Cumulative Fix Installation—Primary Node
The installation of a Cumulative Fix for the THP environment is carried out in two major stages.
Installation into the Portal binaries and Master Portal Profile
Installation into the non-Master Portal Profiles
NOTE: The installation of a CF affects all profiles on the host, therefore, the procedure described in this section must be performed on all profiles as indicated.
10.1. Installing a CF to Portal Binaries and MPP
A script has been created, namely wp_ApplyCF.ksh, which performs the installation of a Cumulative
Fix. The way is implemented is very similar to other custom scripts mentioned above, such as
wp_verifyIfixSysReqForCF.ksh (cf. Required Interim fixes—section 6.2.1).
10.1.1. Prerequisites
This script uses a single configuration file, <CF_ID>.cfg. This configuration file should already exist
since it is also needed by wp_verifyIfixSysReqForCF.ksh (cf. section 6.2.1 for further details.)
10.1.2. Custom script syntax
The syntax for wp_ApplyCF.ksh is as follows. CFID=<CF_ID> /usr/local/custom/bin/cf-aux/wp_verifyIfixSysReqForCF.ksh
10.1.3. Procedure
NOTE: This procedure applies to the binary installation and the MPP.
In order to be able to verify that the fix has been successful, it is important to have a reference point
to compare results. The Portal command WPVersionInfo.sh can be of assistance in this matter. Issue the
command /opt/IBM/WebSphere/PortalServer/bin/WPVersionInfo.sh -fixDetail
The next figure shows the last portion of the output generated by the command.

IBM WebSphere Portal 8 ▪ Applying Cumulative Fixes to Multi-Profile Installation
Release 2013-10-18_01 Page 28 10/18/2013
Figure 34. Command WPVersionInfo.sh sample output (initial)
For the purposes of this document, the sections of interest are “IBM WebSphere Portal
MultiPlatform” (first section) and “IBM Web Content Manager” (second section). In particular, make
note of the build level for both sections.
Product Build Level
IBM WebSphere Portal MultiPlatform wp8001_194_01
IBM Web Content Manager wp8001_194_01
NOTE: Stop all JVMs in the primary node (see step 1, below)
1. Stop all JVMs belonging to the Portal Profile cell In the host where the CF is being installed stop all WebSphere_Portal and nodeagent processes
2. Insure that the Deployment Manager is running 3. Use the wp_ApplyCF.ksh custom script
Issue the command

IBM WebSphere Portal 8 ▪ Applying Cumulative Fixes to Multi-Profile Installation
Release 2013-10-18_01 Page 29 10/18/2013
CFID=CFPM91269 /usr/local/custom/bin/cf-aux/wp_ApplyCF.ksh
4. Insure that script ends successfully 5. Verify the reported version of Portal (binaries)
Execute the command /opt/IBM/WebSphere/PortalServer/bin/WPVersionInfo.sh -fixDetail
Figure 35. Command WPVersionInfo.sh sample output (target)
The new build level reported after installing the CF is
Product Build Level
IBM WebSphere Portal MultiPlatform wp8001CF07_001_20
IBM Web Content Manager wp8001CF07_001_20
Which is the desired build level.
6. Stop the WebSphere_Portal process for the MPP The CF installer leaves executing the WebSphere_Portal process of the MPP. Issue the command /opt/IBM/WebSphere/wp_profile1_thp/bin/stopServer.sh WebSphere_Portal
Provide the authentication credentials, if any.

IBM WebSphere Portal 8 ▪ Applying Cumulative Fixes to Multi-Profile Installation
Release 2013-10-18_01 Page 30 10/18/2013
10.2. Updating Portal Profiles to Upgraded Binaries
Up to this point, among the Portal profiles, only the Master Portal Profile has been updated to the
CF. This section describes the procedure to update all of the remaining profiles to the new CF.
For each non-master profile there are three configuration tasks that must be carried out.
Clearing of the ConfigEngine Registry
Repopulate the ConfigEngine Registry with updated values
Update the profile to the CF level
10.2.1. Procedure
NOTE: This procedure must be performed on each non-master profiles.
A custom script has been created to perform all of these tasks, namely wp_updateProfileForCF.ksh.
1. Insure all JVMs are stopped 2. Insure that the Deployment Manager is running 3. Use the wp_updateProfileForCF.ksh script
Issue the command PIDX=1 /usr/local/custom/bin/cf-aux/wp_updateProfileForCF.ksh
Where PIDX indicates the number associated to the non-master profiles (e.g., 1-4)
4. Insure that script ends successfully In the event of potential issues, most likely will have to do with misconfiguration of the ConfigEngine properties files. Re-run the wp_verfyWkplcForCF.ksh script and carefully review the values reported.
5. Verify the reported version of Portal for the Profile has been updated The file wps.properties contains the WP version and level. To verify that the Profile has been updated to the desired version and level use the command egrep 'buildnumber|fixlevel' /opt/IBM/WebSphere/wp_profile3/PortalServer/wps.properties
The output should look like the one shown below.
Figure 36. Verifying success using wps.properties
If the output of the egrep command looks like Figure 37, the update has not been successful. Review logs and re-run the script wp_verfyWkplcForCF.ksh and insure the values reported are correct.
Figure 37. wps.properties w/o CF07 applied
For environments with only one node you can now proceed to chapter 12, Post Cumulative Fix
Installation Tasks. However, for environments with two or more nodes, proceed to the next chapter.

IBM WebSphere Portal 8 ▪ Applying Cumulative Fixes to Multi-Profile Installation
Release 2013-10-18_01 Page 31 10/18/2013
11. Cumulative Fix Installation—Secondary Nodes
The installation of a Cumulative Fix for the THP environment on secondary nodes is carried out in
two major stages. One main difference with the procedure for a Primary Node is that on the Secondary
Nodes there is no MPP.
Installation into the Portal binaries
Installation into the non-Master Portal Profiles
NOTE: The installation of a CF affects all profiles on the host, therefore, the procedure described in this section must be performed on all profiles of a host as indicated.
11.1. Installing a CF to Portal Binaries
A script has been created, namely wp_ApplyCF.ksh, which performs the installation of a Cumulative
Fix. This section describes how to use it.
11.1.1. Prerequisites
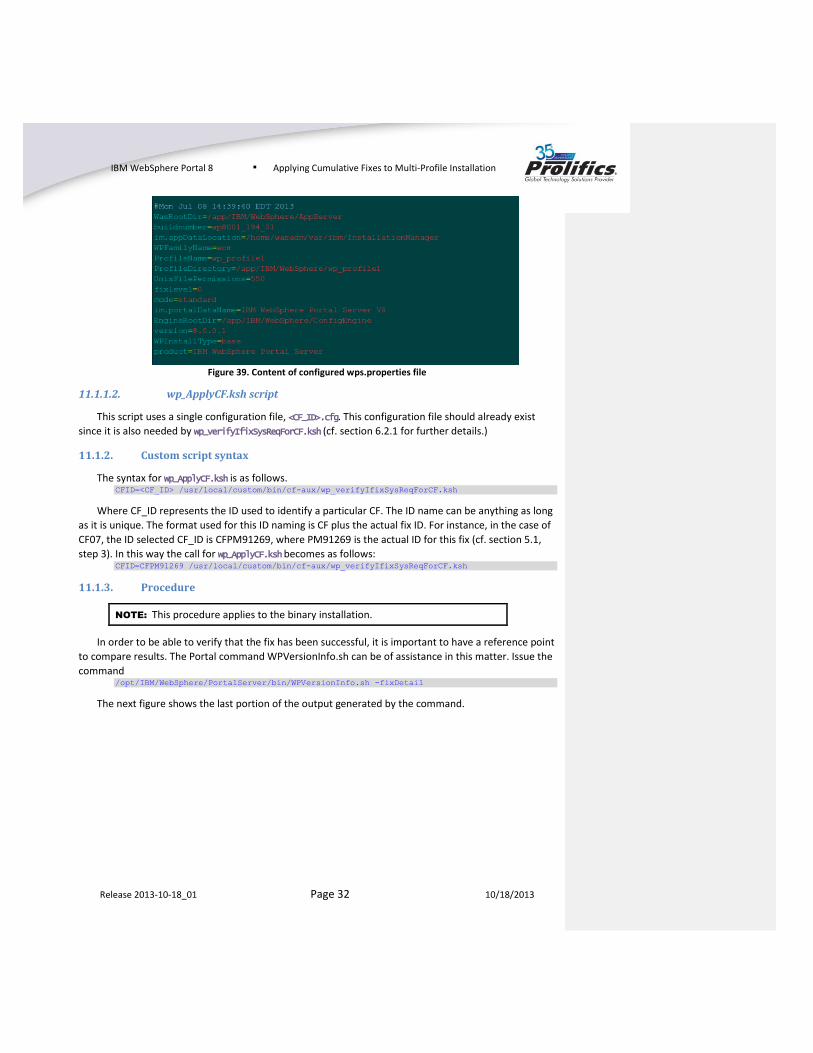
11.1.1.1. wps.properties
As mentioned in section 9.3.1 [Secondary nodes exception], the master profile needs to be defined
before proceeding. The file wps.properties located in the PortalServer binary directory
(/opt/IBM/WebSphere/PortalServer) on secondary nodes look similar to Figure 38.
Figure 38. Default wps.properties file
The file requires two additional entries (ProfileName and ProfileDirectory) and needs to update the
value of WPInstallType. The final content of the wps.properties file is shown in Figure 39.
IBM WebSphere Portal 8 ▪ Applying Cumulative Fixes to Multi-Profile Installation
Release 2013-10-18_01 Page 32 10/18/2013
Figure 39. Content of configured wps.properties file
11.1.1.2. wp_ApplyCF.ksh script
This script uses a single configuration file, <CF_ID>.cfg. This configuration file should already exist
since it is also needed by wp_verifyIfixSysReqForCF.ksh (cf. section 6.2.1 for further details.)
11.1.2. Custom script syntax
The syntax for wp_ApplyCF.ksh is as follows. CFID=<CF_ID> /usr/local/custom/bin/cf-aux/wp_verifyIfixSysReqForCF.ksh
Where CF_ID represents the ID used to identify a particular CF. The ID name can be anything as long
as it is unique. The format used for this ID naming is CF plus the actual fix ID. For instance, in the case of
CF07, the ID selected CF_ID is CFPM91269, where PM91269 is the actual ID for this fix (cf. section 5.1,
step 3). In this way the call for wp_ApplyCF.ksh becomes as follows: CFID=CFPM91269 /usr/local/custom/bin/cf-aux/wp_verifyIfixSysReqForCF.ksh
11.1.3. Procedure
NOTE: This procedure applies to the binary installation.
In order to be able to verify that the fix has been successful, it is important to have a reference point
to compare results. The Portal command WPVersionInfo.sh can be of assistance in this matter. Issue the
command /opt/IBM/WebSphere/PortalServer/bin/WPVersionInfo.sh -fixDetail
The next figure shows the last portion of the output generated by the command.

IBM WebSphere Portal 8 ▪ Applying Cumulative Fixes to Multi-Profile Installation
Release 2013-10-18_01 Page 33 10/18/2013
Figure 40. Command WPVersionInfo.sh sample output (initial-secondary)
For the purposes of this document, the sections of interest are “IBM WebSphere Portal
MultiPlatform” (first section) and “IBM Web Content Manager” (second section). In particular, make
note of the build level for both sections.
Product Build Level
IBM WebSphere Portal MultiPlatform wp8001_194_01
IBM Web Content Manager wp8001_194_01
NOTE: Stop all JVMs in the primary node (see step 1, below)
1. Stop all JVMs belonging to the Portal Profile cell In the host where the CF is being installed stop all WebSphere_Portal and nodeagent processes
2. Insure that the Deployment Manager is running 3. Use the wp_ApplyCF.ksh custom script
Issue the command

IBM WebSphere Portal 8 ▪ Applying Cumulative Fixes to Multi-Profile Installation
Release 2013-10-18_01 Page 34 10/18/2013
wrap+ CFID=CFPM91269 /usr/local/custom/bin/cf-aux/wp_ApplyCF.ksh
4. Insure that script ends successfully 5. Verify the reported version of Portal (binaries)
Execute the command /opt/IBM/WebSphere/PortalServer/bin/WPVersionInfo.sh -fixDetail
Figure 41. Command WPVersionInfo.sh sample output (target-secondary)
The new build level reported after installing the CF is
Product Build Level
IBM WebSphere Portal MultiPlatform wp8001CF07_001_20
IBM Web Content Manager wp8001CF07_001_20
Which is the desired build level.
11.2. Updating Portal Profiles to Upgraded Binaries
Up to this point, only the binaries and wp_profile1 have been updated to the CF. This section
describes the procedure to update the remaining profiles to the new CF build level.

IBM WebSphere Portal 8 ▪ Applying Cumulative Fixes to Multi-Profile Installation
Release 2013-10-18_01 Page 35 10/18/2013
For each profile in a secondary node other than wp_profile1 there are three configuration tasks that
must be carried out.
Clearing of the ConfigEngine Registry
Repopulate the ConfigEngine Registry with updated values
Update the profile to the CF level
11.2.1. Procedure
NOTE: This procedure must be performed on all secondary node profiles other that wp_profile1.
A custom script has been created to perform all of these tasks, namely wp_updateProfileForCF.ksh.
1. Insure all JVMs are stopped 2. Insure that the Deployment Manager is running 3. Use the wp_updateProfileForCF.ksh script
Issue the command PIDX=1 /usr/local/custom/bin/cf-aux/wp_updateProfileForCF.ksh
Where PIDX indicates the number associated with the profile (e.g., 1-4)
4. Insure that script ends successfully In the event of potential issues, most likely will have to do with misconfiguration of the ConfigEngine properties files. Re-run the wp_verfyWkplcForCF.ksh script and carefully review the values reported. Update any property that requires modification. Repeat the previous step.
5. Verify the reported version of Portal for the Profile being updated The file wps.properties contains the WP version and level. To verify that the Profile has been updated to the desired version and level use the command egrep 'buildnumber|fixlevel' /opt/IBM/WebSphere/wp_profile3/PortalServer/wps.properties
The output should look like the one shown below.
Figure 42. Verifying success using wps.properties
If the output of the egrep command looks like Figure 43, the update has not been successful. Review logs and re-run the script wp_verfyWkplcForCF.ksh and insure the values reported are correct.
Figure 43. wps.properties w/o CF07 applied
Once this procedure has been applied to all the secondary nodes of all profiles, one can proceed to
the next chapter.

IBM WebSphere Portal 8 ▪ Applying Cumulative Fixes to Multi-Profile Installation
Release 2013-10-18_01 Page 36 10/18/2013
12. Post Cumulative Fix Installation Tasks
The final step to have the Portal ready for use is to restore the auto-synchronization for the node
agents which was disabled in section 9.4.
12.1. Procedure
1. Using a browser log in to the ISC for a Portal Profile
NOTE: Do steps 2 through 5 for each defined nodeagent
2. Go to the first or next nodeagent configuration page Follow the System administration Node agents File synchronization service breadcrumb.
3. Go to the File synchronization service configuration page 4. Enable automatic synchronization
Click the Automatic synchronization box to enable the feature
Figure 44. Re-enabling node automatic synchronization
5. Apply and save Click the OK button. Then save the new configuration, click on the Save link.

IBM WebSphere Portal 8 ▪ Applying Cumulative Fixes to Multi-Profile Installation
Release 2013-10-18_01 Page 37 10/18/2013
6. Repeat steps 2 through 5 for the remaining nodeagents
12.2. What’s next
Insure that all Portal processes are running. Testing of the functionality of the Portal application can
start.

IBM WebSphere Portal 8 ▪ Applying Cumulative Fixes to Multi-Profile Installation
Release 2013-10-18_01 Page 38 10/18/2013
Appendices
Appendix I. Detailed Table of Contents
1. TABLE OF CONTENTS 3
2. INTRODUCTION—OVERVIEW 5
3. ROAD MAP 5
4. ACCESS REFERENCE DOCUMENT 6
5. CUMULATIVE FIX ID DETERMINATION 7
5.1. PROCEDURE 7
6. CUMULATIVE FIX SYSTEM REQUIREMENTS 8
6.1. DISCOVERY PROCESS 8 6.2. VERIFICATION PROCESS 10 6.2.1. REQUIRED INTERIM FIXES 11 6.2.1.1. Script execution 12 6.2.1.2. Procedure 12 6.2.2. REQUIRED JDK VERSION 12 6.2.2.1. Procedure 12
7. CUMULATIVE FIX DISTRIBUTION ACQUISITION 13
7.1. PREREQUISITES 13 7.2. NAVIGATING FIX CENTRAL 13
8. CUMULATIVE FIX CONTENT EXTRACTION 18
8.1. PREREQUISITES 18 8.2. PROCEDURE 18
9. CUMULATIVE FIX PRE-INSTALLATION TASKS 20
9.1. EXISTING CONFIGENGINE ATTRIBUTES 20 9.1.1. ATTRIBUTES TO VERIFY 20 9.1.1.1. wkplc.properties file 20 9.1.1.2. wkplc_dbdomain.properties file 20 9.1.1.3. wkplc_comp.properties file 20 9.1.2. USING WP_VERFYWKPLCFORCF.KSH TO VERIFY ATTRIBUTES 21 9.2. SETUP THE PWORDDELETE PROPERTY 21 9.2.1. CREATING A HELPER FILE 22 9.2.2. PROCEDURE 22 9.3. VERIFYING THE DEFINED MASTER PROFILE 23
IBM WebSphere Portal 8 ▪ Applying Cumulative Fixes to Multi-Profile Installation
Release 2013-10-18_01 Page 39 10/18/2013
9.3.1. SECONDARY NODES EXCEPTION 23 9.3.2. PROCEDURE 23 9.4. DISABLING AUTO-SYNCHRONIZATION FOR ALL NODES 24 9.4.1. PROCEDURE 24
10. CUMULATIVE FIX INSTALLATION—PRIMARY NODE 27
10.1. INSTALLING A CF TO PORTAL BINARIES AND MPP 27 10.1.1. PREREQUISITES 27 10.1.2. CUSTOM SCRIPT SYNTAX 27 10.1.3. PROCEDURE 27 10.2. UPDATING PORTAL PROFILES TO UPGRADED BINARIES 30 10.2.1. PROCEDURE 30
11. CUMULATIVE FIX INSTALLATION—SECONDARY NODES 31
11.1. INSTALLING A CF TO PORTAL BINARIES 31 11.1.1. PREREQUISITES 31 11.1.1.1. wps.properties 31 11.1.1.2. wp_ApplyCF.ksh script 32 11.1.2. CUSTOM SCRIPT SYNTAX 32 11.1.3. PROCEDURE 32 11.2. UPDATING PORTAL PROFILES TO UPGRADED BINARIES 34 11.2.1. PROCEDURE 35
12. POST CUMULATIVE FIX INSTALLATION TASKS 36
12.1. PROCEDURE 36 12.2. WHAT’S NEXT 37
APPENDICES 38
APPENDIX I. DETAILED TABLE OF CONTENTS 38
APPENDIX II. TABLE OF FIGURES 40
APPENDIX III. BIBLIOGRAPHY 41

IBM WebSphere Portal 8 ▪ Applying Cumulative Fixes to Multi-Profile Installation
Release 2013-10-18_01 Page 40 10/18/2013
Appendix II. Table of Figures Figure 1. Recommended Updates page ........................................................................................................ 7 Figure 2. Installed version selection.............................................................................................................. 7 Figure 3. Desired CF identification ................................................................................................................ 8 Figure 4. Software requirements section ..................................................................................................... 8 Figure 5. WP version matching ..................................................................................................................... 8 Figure 6. Product version and OS for cumulative fix .................................................................................... 9 Figure 7. Required OS level for Linux Redhat 6............................................................................................. 9 Figure 8. Prerequisites tab selection ............................................................................................................. 9 Figure 9. Application Servers (Mandatory) section .................................................................................... 10 Figure 10. Additional required fixes ............................................................................................................ 10 Figure 11. Required Java SDK version ......................................................................................................... 10 Figure 12. Site-wide configuration example ............................................................................................... 11 Figure 13. CF07 configuration file ............................................................................................................... 11 Figure 14. Command wp_verifyIfixSysReqForCF.ksh sample output ......................................................... 12 Figure 15. java -version sample output ...................................................................................................... 12 Figure 16. Providing product and version ................................................................................................... 14 Figure 17. Providing CF ID ........................................................................................................................... 15 Figure 18. Selecting desired CF ................................................................................................................... 16 Figure 19. Logging in to IBM site ................................................................................................................. 16 Figure 20. Accepting terms and conditions ................................................................................................ 17 Figure 21. Downloading CF ......................................................................................................................... 17 Figure 22. Files list of original CF zip file ..................................................................................................... 18 Figure 23. CF content .................................................................................................................................. 19 Figure 24. wp_verfyWkplcForCF.ksh command execution ........................................................................ 21 Figure 25. wp_verfyWkplcForCF.ksh command sample output ................................................................ 21 Figure 26. PWordDelete attribute helper file ............................................................................................ 22 Figure 27. sample partial output................................................................................................................. 22 Figure 28. Verifying PWordDelete value ..................................................................................................... 23 Figure 29. wp_vfyDefaultProfileForCF.ksh command sample output ....................................................... 24 Figure 30. Start (1) ...................................................................................................................................... 25 Figure 31. Cont'd (2).................................................................................................................................... 25 Figure 32. End (3) ........................................................................................................................................ 25 Figure 33. Disabling automatic authentication ........................................................................................... 26 Figure 34. Command WPVersionInfo.sh sample output (initial) ................................................................ 28 Figure 35. Command WPVersionInfo.sh sample output (target) ............................................................... 29 Figure 36. Verifying success using wps.properties ..................................................................................... 30 Figure 37. wps.properties w/o CF07 applied .............................................................................................. 30 Figure 38. Default wps.properties file ........................................................................................................ 31 Figure 39. Content of configured wps.properties file ................................................................................. 32 Figure 40. Command WPVersionInfo.sh sample output (initial-secondary) .............................................. 33 Figure 41. Command WPVersionInfo.sh sample output (target-secondary) ............................................. 34 Figure 42. Verifying success using wps.properties ..................................................................................... 35 Figure 43. wps.properties w/o CF07 applied .............................................................................................. 35 Figure 44. Re-enabling node automatic synchronization ........................................................................... 36

IBM WebSphere Portal 8 ▪ Applying Cumulative Fixes to Multi-Profile Installation
Release 2013-10-18_01 Page 41 10/18/2013
Appendix III. Bibliography IBM-WP-8.0.0.1-CF07. "IBM WebSphere Portal V8.0.0.1 Combined Cumulative Fix Instructions: cluster." Vers. 8.0.0.1-07. WebSphere Portal Family Wiki. 24 October 2013 <http://www-10.lotus.com/ldd/portalwiki.nsf/xpDocViewer.xsp?lookupName=Cumulative+fix+readme+8.0.0.1#action=openDocument&res_title=IBM_WebSphere_Portal_V8.0.0.1_Combined_Cumulative_Fix_Instructions_cluster_cf8001&content=pdcontent>.
IBM-WP-WCM-RecUpd. "Recommended Updates for WebSphere Portal and IBM Web Content Manager V8.0." IBM Support. IBM. 11 9 2013 <http://www-01.ibm.com/support/docview.wss?uid=swg24031246#8001>.