The Influence of Professional Skepticism, Professional Ethics ...
Upload
khangminh22Category
view
4download
0
How to Build
Professional Web Forms
by Prasanth Janardanan

1
How to Build Professional Web Forms
by Prasanth Janardanan
©2013 by Simfatic Solutions PVT Ltd.
This is a Free Ebook. You have permission to share this and pass it along for free to anyone
you like, as long as you make no changes or edits to its contents or digital format. The right
to sell it, however, is strictly reserved.

2
Dedication:
To All Simfatic Forms Users.
You made this book possible.
3
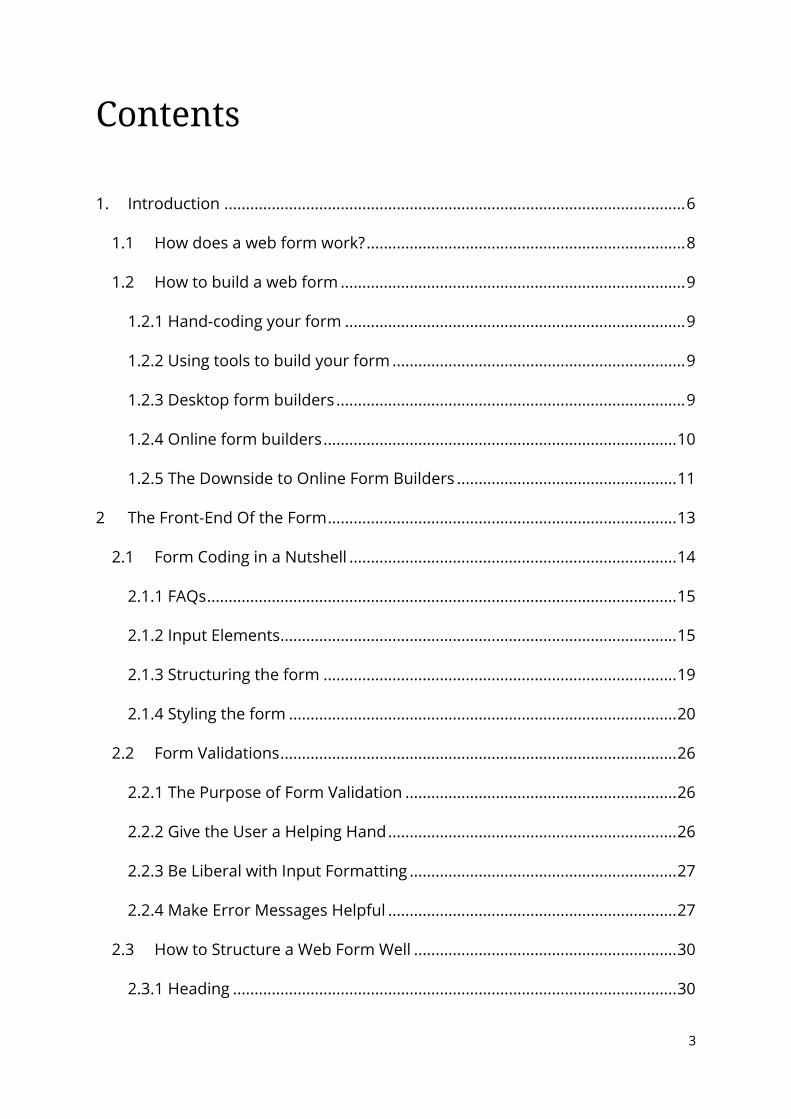
Contents
1. Introduction ........................................................................................................... 6
1.1 How does a web form work? .......................................................................... 8
1.2 How to build a web form ................................................................................ 9
1.2.1 Hand-coding your form ............................................................................... 9
1.2.2 Using tools to build your form .................................................................... 9
1.2.3 Desktop form builders ................................................................................. 9
1.2.4 Online form builders .................................................................................. 10
1.2.5 The Downside to Online Form Builders ................................................... 11
2 The Front-End Of the Form ................................................................................. 13
2.1 Form Coding in a Nutshell ............................................................................ 14
2.1.1 FAQs ............................................................................................................. 15
2.1.2 Input Elements............................................................................................ 15
2.1.3 Structuring the form .................................................................................. 19
2.1.4 Styling the form .......................................................................................... 20
2.2 Form Validations ............................................................................................ 26
2.2.1 The Purpose of Form Validation ............................................................... 26
2.2.2 Give the User a Helping Hand ................................................................... 26
2.2.3 Be Liberal with Input Formatting .............................................................. 27
2.2.4 Make Error Messages Helpful ................................................................... 27
2.3 How to Structure a Web Form Well ............................................................. 30
2.3.1 Heading ....................................................................................................... 30

4
2.3.2 Additional Information .............................................................................. 30
2.3.3 Pre-requisites .............................................................................................. 31
2.3.4 Images versus Text ..................................................................................... 31
2.3.5 Grouping ..................................................................................................... 32
2.3.6 The Great Scroll .......................................................................................... 32
2.4 How to Get More Form Submissions .......................................................... 34
2.4.1 Ask a Few but Relevant Questions ............................................................ 34
2.4.2 Ask the most important question first ..................................................... 35
2.4.3 Explain why you are asking certain questions ........................................ 35
2.4.4 Assure security and privacy of the information submitted ................... 36
2.4.5 Provide Helpful Validation Messages ....................................................... 36
2.4.6 Avoid the Reset Button ! ............................................................................ 37
2.4.7 Avoid CAPTCHA ........................................................................................... 37
2.5 Creating Large Forms .................................................................................... 39
2.5.1 Making your web forms more usable: ..................................................... 39
2.5.2 Design strategy for very large forms ........................................................ 40
3 The Back-End of the Form .................................................................................. 43
3.1 Server-side Validations ................................................................................. 43
3.2 Emailing .......................................................................................................... 45
3.2.1 Simple Emailing .......................................................................................... 45
3.2.2 Advanced Emailing ..................................................................................... 45
3.3 Saving to database ........................................................................................ 47
3.4 Handling File Uploads ................................................................................... 49
3.4.1 Advanced File Upload Widgets .................................................................. 50

5
3.5 Web Form Security & Security Threats ........................................................ 52
3.5.1 Spam and CAPTCHA ................................................................................... 52
3.5.2 SQL Injection ............................................................................................... 53
3.5.3 Cross Site Scripting (XSS) ........................................................................... 55
3.5.4 Cross Site Request Forgery (CSRF) ............................................................ 57
3.5.5 Email Header Injection ............................................................................... 58
3.5.6 Other Preventative Techniques ................................................................ 60
3.5.7 Security and Usability Balancing ............................................................... 61
4 References ............................................................................................................ 63

6
6 How to Build Professional Web Forms
1. Introduction
Web forms are a critical part of your website's success or failure. You may
have spent a fortune on an attention-grabbing headline, compelling text,
great illustrations, a pleasing layout, perhaps some fast-loading video - but if
your forms fail, so does your site!
Failure can mean a lot more than just code failure and error messages; it can
also mean forms that don't get filled in, or are filled incorrectly. Keep an eye
on your email inbox, as I'll be sending you some free bonus design tips to
address such issues.
Talking of free ...
THIS GUIDE IS FREE OF CHARGE!
Please note I created this guide to help my friends and visitors to
www.Simfatic.com. It is given to the community for free. If you paid money
for it then you should demand a refund!
Also, feel free to pass this guide to anyone you think might need it, as long as
this introduction is left intact.
This guide takes you through the essentials of building professional quality
web forms for websites (web forms).

7
7 How to Build Professional Web Forms
Follow the examples and soon you will be able to manually build contact
forms, appointment forms, surveys, lead capture forms and more. Of course
you can cheat and use Simfatic Forms software instead:
www.simfatic.com
Sometimes though, even if you can automate things, it helps to know HOW
and WHY it works!
OK, let's get started...

8
8 How to Build Professional Web Forms
1.1 How does a web form work? A web form as two essential parts:
I. A client side HTML form
and
II. a server side script that processes the form submission
The client side of the form handles the 'look & feel' of the form (aligned
labels, fonts, colors etc.) . You can also add a bit of helpful validation in this
part of the form.
The server side processing script does all the back-end core functionality like
sending emails, saving the submissions to a database and so on.
The client side of the form runs in your visitor's browser. It can't do the
heavier stuff like emailing or saving to database.
So, to run a complete form, you need a web server where you can run your
server side processing script.

9
9 How to Build Professional Web Forms
1.2 How to build a web form You can either hand-code the form or use software tools such as Simfatic
Forms to generate the code for the form.
1.2.1 Hand-coding your form Hand-coding your forms give you total control and flexibility, though that
also means you're totally responsible for how it looks and if it works properly
or not!
You have to code the following to make a complete form:
The HTML code for the form
CSS to style the form
Javascript to validate the form and to do any additional dynamic
features
Server side script to process the form submissions
1.2.2 Using tools to build your form Using tools to build your form makes it quicker and easier and you don't
have to learn any coding to build your own forms.
There are two types of form builder tools:
1. Desktop based Form builders
2. Online form builders
Let's look at both…
1.2.3 Desktop form builders A desktop form builder runs on your computer, as normal Windows®
software.
10
10 How to Build Professional Web Forms
You can design your form, choose the options and the software generates
the code for you. Then you can just upload the generated code to your
website and you have an online form online ready to accept submissions.
This is the easiest method and how the Simfatic Forms software works. Here
are some of the advantages:
Your forms run on your own webserver
Lots of customization options.
You can build any number of forms for any number of websites
No monthly subscription fee.
1.2.4 Online form builders Using online form builders, you can build forms from your browser. Just go
to their website and start designing your form. A couple of examples are:
wufoo.com
jotform.com
formstack.com
Online form builders both build and then host your form.
That means the server side processing remains on their website and you just
have to embed the client side of the form in your web pages. You can later
log-in to their website to view your form submissions.
Since the form is hosted on their website you don't have to worry about the
server-side configuration such as creating a database and giving it
permissions. That makes them very easy for short-term forms such as
surveys or planning a one-time event like a wedding.
11
11 How to Build Professional Web Forms
1.2.5 The Downside to Online Form Builders The downside of such form builders is that you have no control over what
the price will be next month or if the company (and your form) will even
exist. If it does exist for month after month that is also a kind of downside,
because you have to keep paying them month after month!
There are usually limits too, such as the number of form submissions or how
many fields you're allowed to have etc.
It gets worse - if a 3rd party online form builder is processing the form for
you then they are also getting access to the data, which as well as being
insecure can actually an offense under privacy laws, especially in Europe. You
cannot make claims in your privacy policy and then hand your visitor's data
to a 3rd party!
Here's an overview of reasons to avoid online form builders for anything
other than short-term and trivial tasks:
Hosted forms offer much less control
The service provider's servers may go down and your forms will no
longer work, making your site 'broken'
Lack of privacy - your visitor's form submission data is on their servers!
The service itself may shut down
Since the form is hosted, you have to keep paying monthly
subscription charges
The charges may suddenly rise
The company may change their terms and conditions
There will be limits to the number of form submissions

12
12 How to Build Professional Web Forms
All of those downsides magically turn into benefits when you host your own
form processing script on your own server.

13
13 How to Build Professional Web Forms
2 The Front-End Of the Form
The front end of the form is what you see in your browser. The display,
structuring , styling all are handled in the front-end.
Coding web forms requires understanding of the following languages.
HTML
CSS
Javascript
For tutorials and introductions to these languages, see the reference section.

14
14 How to Build Professional Web Forms
2.1 Form Coding in a Nutshell In an HTML page the form and the form elements are enclosed within the
<form> and </form> tags
For example, here is a simple form:
<form method='post' action='/handle-form.php'>
<p>
<label for='name'>Name:</label>
<input type='text' name='name'/>
</p>
<p>
<label for='email'>Email:</label>
<input type='text' name='email'/>
</p>
<p>
<input type='submit' name='submit' value='Submit'/>
</p>
</form>
The form above has a name field, an email field and a submit button.
method='post' means the form submission data is not sent as part of the
URL. For most forms, it should be good enough to keep the method='post'
action='/handle-form.php' means the form submission should be send to a
script in the URL: /handle-form.php
<input type='text' name='name'/>
Creates a single line text field. (Notice the type='text' attribute) . Every field in
the form should have a name. That name is used to identify the field in the
server side script.

15
15 How to Build Professional Web Forms
<input type='submit' name='submit' value='Submit'/>
Creates a submit button. Pressing the submit button sends the form
submission to the server side processing script.
2.1.1 FAQs Some Frequently Asked Questions on basic HTML Form:
1. How can I create sub forms?
or
How can Create Nested forms?
There is no sub forms or nested forms. One form can't contain another form.
What you need to do is a visual representation of sections in a single form
(this is explained in later chapters )
2. How can I make the form send an email to me?
The only reliable way is to code the server side processing script (handle-
form.php in the example above) to collect the form submission and send the
email.
2.1.2 Input Elements When you are creating an HTML form, there are several different options for
input elements to use. If you can efficiently use the non-textbox components
as much as possible, you will make your form easier on your users.

16
16 How to Build Professional Web Forms
The ‘textbox’ form input type
The most common input method on an HTML form is the text box. To add
one of these to your form, use the code in this way:
<input name="name" size="15" type="text" />
This creates a single-line box that is 15 characters wide, and allows the user
to enter as much text as he wants. When you refer to this box from a form
mail script, you will use its “NAME” value.
Multiline textbox
For a text box with multiple lines, use the following code:
<textarea name='Address' rows='3' cols='30' > </textarea>.
Instead of having just a single line to input on, the user can perform carriage
returns to make better formatting of the text. This is also easier if the user
will be inputting a large amount of text – address or ‘comments’ for example.
It’s much easier to have it all in a large text area, and be able to scroll
through it.
Drop-down List

17
17 How to Build Professional Web Forms
For dropdown list, the user can choose only one option from a number of
available options.
<select name="colors">
<option> Red </option>
<option> Green </option>
<option> Yellow </option>
<option> Blue </option>
<option> Orange </option>
</select>
Create a drop-down list when the user is to select from a big set of values.
When the number of options is less than 5, consider using radio buttons
instead.
Check box
A toggle switch that user can select or deselect.(example: subscribe, 'Agree'
etc)
<input type="checkbox" name="subscribe" value="yes" />Send
me email notifications
When you have a number of options to select from a set, create a checkbox
group.

18
18 How to Build Professional Web Forms
<input name="color[]" type="checkbox" value="green"/>green
<input name="color[]" type="checkbox" value="red" />red
<input name="color[]" type="checkbox" value="blue" />blue
Radio buttons
Use radio buttons when the user can choose only one option from a number
of options.
<input checked="checked" name="answer" type="radio"
value="true" />True
<input name="answer" type="radio" value="false" />False
Any of the radio buttons with the same name will fall into the same group,
and only allow one at a time to be checked.
File Upload
When you want to let your users upload a file along with the form
submission, use a file upload widget.
Upload your profile photo:
<input type="file" name="photo" />

19
19 How to Build Professional Web Forms
2.1.3 Structuring the form Well organized, structured forms get more submissions than forms that are
not well organized. We will see some of the elements in structuring a form
better.
Labelling the elements
Use the <label> tag to label input elements.
Example: <label for='name'>Name:</label>
<input type='text' name='name' id='name'/>
The 'for' attribute of the label tells the id of the input to bind to.
For radio buttons and check boxes, you can bind the elements like this as
well: <label><input type="checkbox" name="subscribe"
value="yes" />Send me email notifications</label>
Grouping
Groups related elements together. Grouping helps in organizing the
elements better.
Here is the code: <fieldset >
<legend>Personal Information</legend>
<label for='name'>Name:</label>
<input type='text' name='name' id='name'/>
</p>
<p>
<label for='email'>Email:</label>
<input type='text' name='email'/>
</fieldset>
20
20 How to Build Professional Web Forms
Notice the <fieldset> and <legend> tags and how it is used.
2.1.4 Styling the form Using a bit of CSS code, you can make the form look better.
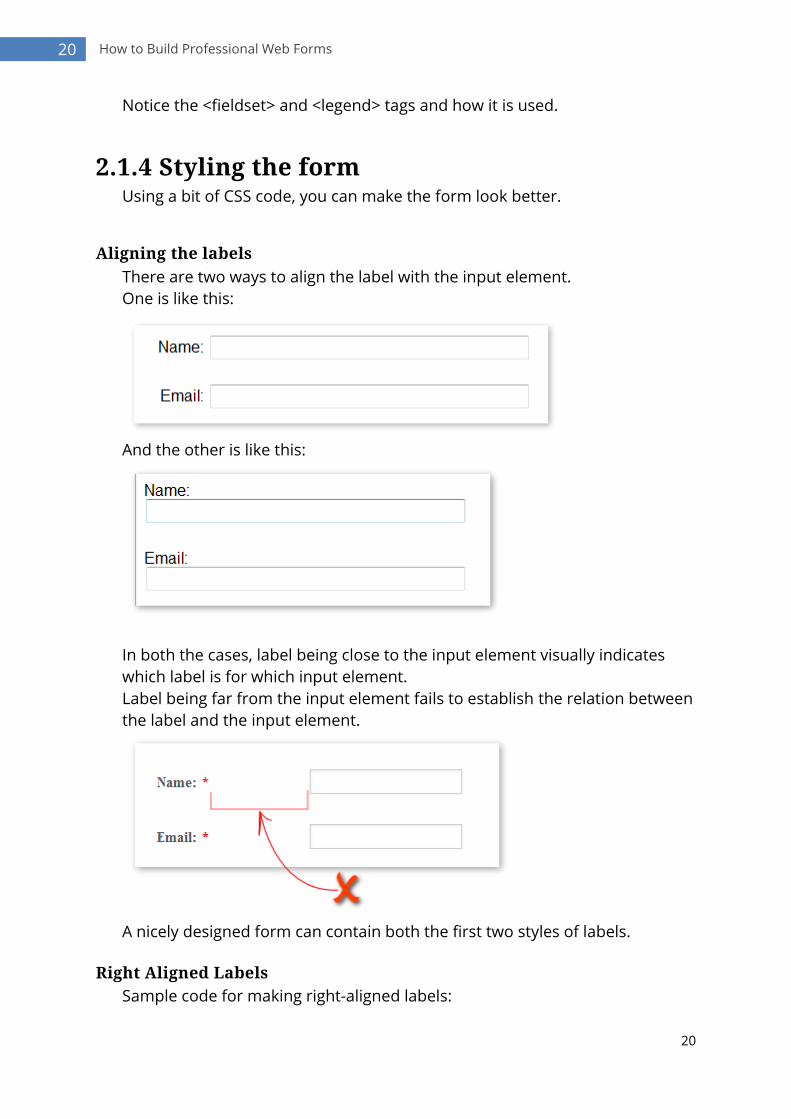
Aligning the labels
There are two ways to align the label with the input element.
One is like this:
And the other is like this:
In both the cases, label being close to the input element visually indicates
which label is for which input element.
Label being far from the input element fails to establish the relation between
the label and the input element.
A nicely designed form can contain both the first two styles of labels.
Right Aligned Labels
Sample code for making right-aligned labels:

21
21 How to Build Professional Web Forms
HTML <div class='container_2_col'>
<label for='name' >Name:</label>
<input type='text' name='name' id='name'/>
</div>
<div class='container_2_col'>
<label for='email' >Email:</label>
<input type='text' name='email'/>
</div>
CSS
.container_2_col label {
text-align:right;
width:30%;
display:inline-block;
vertical-align:top;
}
.container_2_col {
margin:25px 0px;
}
The container_2_col class sets a vertical margin and right aligned label having
some width.
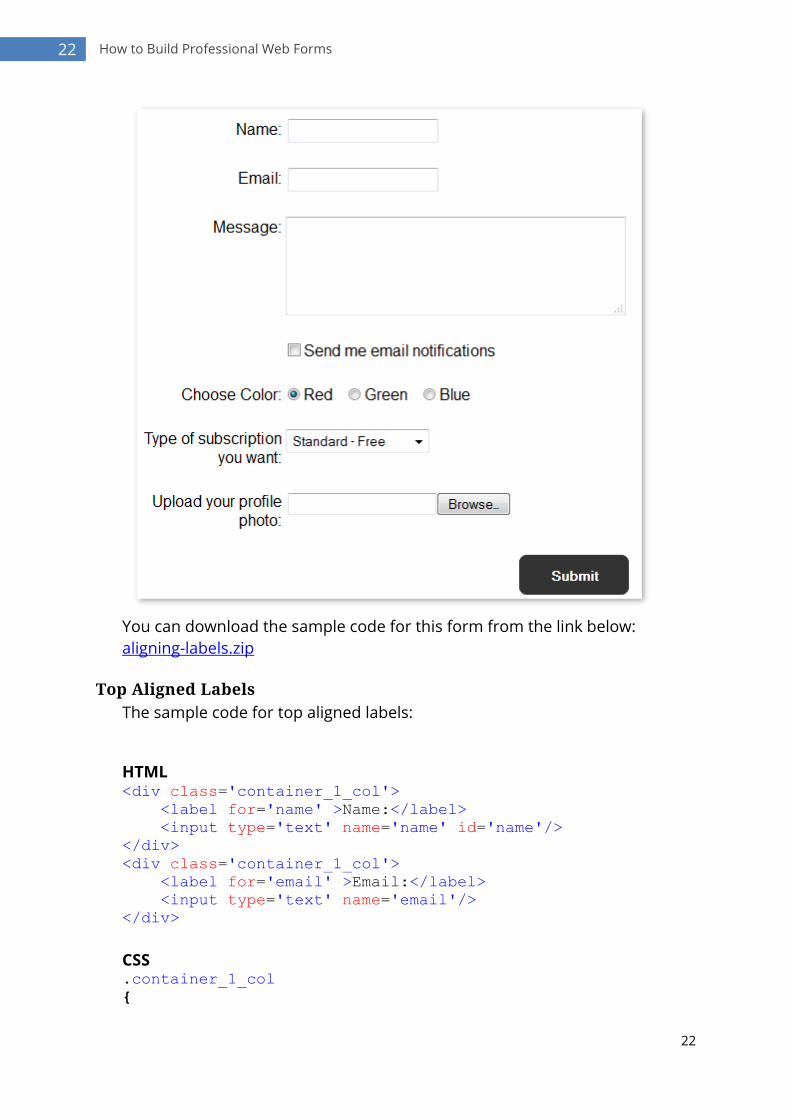
Here is the sample form in this style:
22
22 How to Build Professional Web Forms
You can download the sample code for this form from the link below:
aligning-labels.zip
Top Aligned Labels
The sample code for top aligned labels:
HTML <div class='container_1_col'>
<label for='name' >Name:</label>
<input type='text' name='name' id='name'/>
</div>
<div class='container_1_col'>
<label for='email' >Email:</label>
<input type='text' name='email'/>
</div>
CSS .container_1_col {
23
23 How to Build Professional Web Forms
margin:25px 0px;
}
.container_1_col label {
text-align:left;
display:block;
}
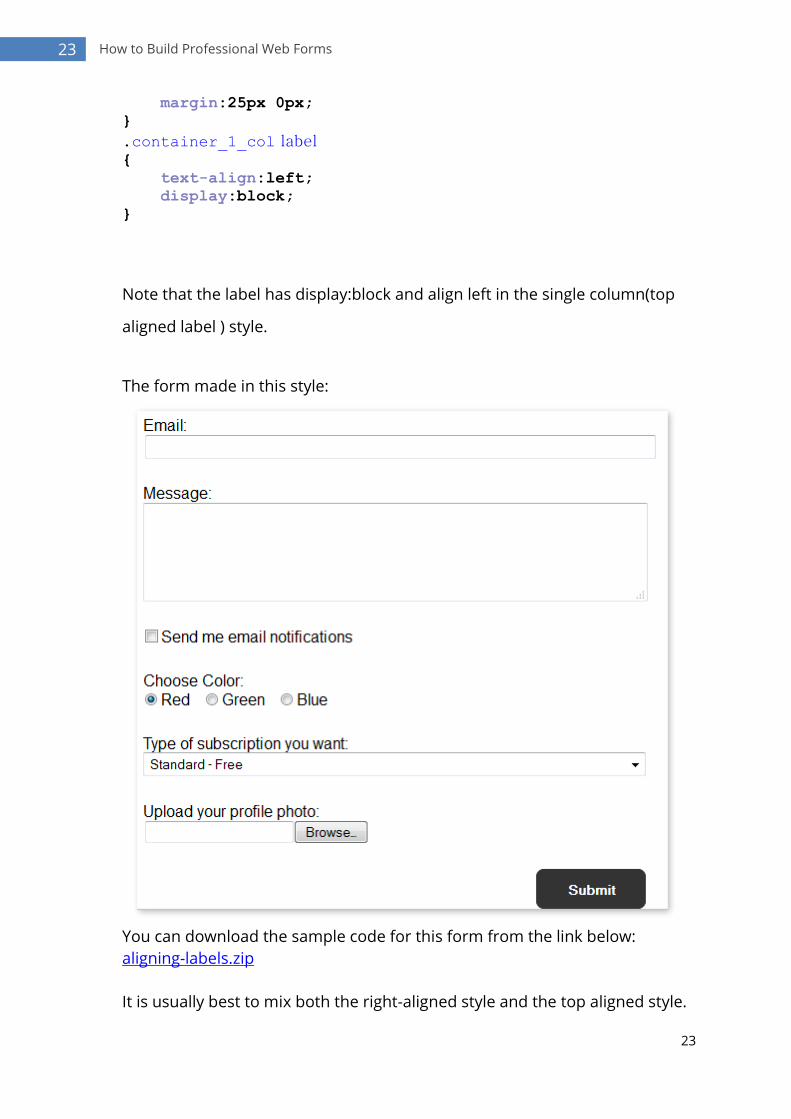
Note that the label has display:block and align left in the single column(top
aligned label ) style.
The form made in this style:
You can download the sample code for this form from the link below:
aligning-labels.zip
It is usually best to mix both the right-aligned style and the top aligned style.

24
24 How to Build Professional Web Forms
When the input field is smaller, make it right-aligned. When it is large, align
the label on top.
Example:
Reusing the form style
You can reuse the master-form-style.css in the sample code above while
making your forms. Follow these steps:
1. Include/link to the master-form-style.css in your HTML form page:
<link rel="stylesheet" href="master-form-style.css"
type="text/css" />

25
25 How to Build Professional Web Forms
2. If you want right aligned label, just wrap the input elements in a <div> with
container_2_col class
<div class='container_2_col'>
<label for='email' >Email:</label>
<input type='text' name='email'/>
</div>
3. If you want top-aligned label, use the container_1_col class instead:
<div class='container_1_col'>
<label for='name' >Name:</label>
<input type='text' name='name' id='name'/>
</div>
Using labels with Checkboxes and radio buttons
You can wrap the label tag around the check box element or radio box
element like this:
<label class='wrapper'>
<input type="checkbox" name="subscribe" value="yes" />
Send me email notifications</label>
<label class='wrapper'>
<input type="radio" name="color" value="green" />Green
</label>
The advantage of using the label this way is that clicking on the label
checks/unchecks the checkbox/radio button
26
26 How to Build Professional Web Forms
2.2 Form Validations The misconception is that form validation is to make sure the data entered is
correct. The truth is that you can’t verify that. For example, you can just verify
the format of the email. Whether there is an @ in the email etc. But Joe can
enter [email protected] and you will never know that the email address does
not belong to joe.
The point is that if the user does not intend to give you the correct details, no
validation can help you!
2.2.1 The Purpose of Form Validation So, the purpose of form validation is not to verify the correctness of the
information entered in the form; but to make sure a genuine user does not
make a typo or does not skip a field. The right form validation helps a
genuine user to complete the form.
Some amount of validation can sure keep tyre kickers out. But, don’t focus
just on the tyre-kickers! Keeping the key fields ‘required’ with a liberal format
checking should keep a large set of tyre-kickers out.
Now, focus on the genuine user. If you are asking the email address, explain
why you need the email address. Tell them what useful information you will
send them. Ensure you will not spam them with offers and that you will keep
the email securely.
Validating the email address for existence of the domain and doing DNS
checks are all just nonsense!
With the proper assurances and a clear value proposition, your user will give
you her email address. Otherwise they won’t; with any number of high-tech
validation!
Same goes with any personal information like phone number, date of birth,
SSN mailing address etc.
2.2.2 Give the User a Helping Hand

27
27 How to Build Professional Web Forms
If you want your visitors to take full responsibility for the accuracy of their
entries, the offer of some how-to hints can help.
Provide correct and easily visible formatting tips up front.
Supply uncommon fields with a clickable link to additional information
Offer dynamic tips like "this field must be numeric" when the user
types invalid data.
Demonstrate the formatting like "mm/dd/yyyy" or"###-##-####"
2.2.3 Be Liberal with Input Formatting The worst kinds of validations are those that insist on a very specific format.
Common examples are phone number, URL, email, postal code or Zip code .
Remember that our aim is to enable the user to complete the form and not
to create hurdles.
For URL allow:
http://www.domain.com or
www.domain.com or
domain.com.
Then handle the different cases in the server side.
Similarly for phone number, allow
(541) 754-3010 or
541 754 3010 or
5417543010
In General:
Keep the size limits liberal. For example, if you have a comment field in
your form. Allow enough maximum size so that your users can enter
longer or shorter comments.
Do not insist on the character sets (only alphabetic, for example) in
the Name field.
As far as possible, do not insist on the exact format to follow
2.2.4 Make Error Messages Helpful
28
28 How to Build Professional Web Forms
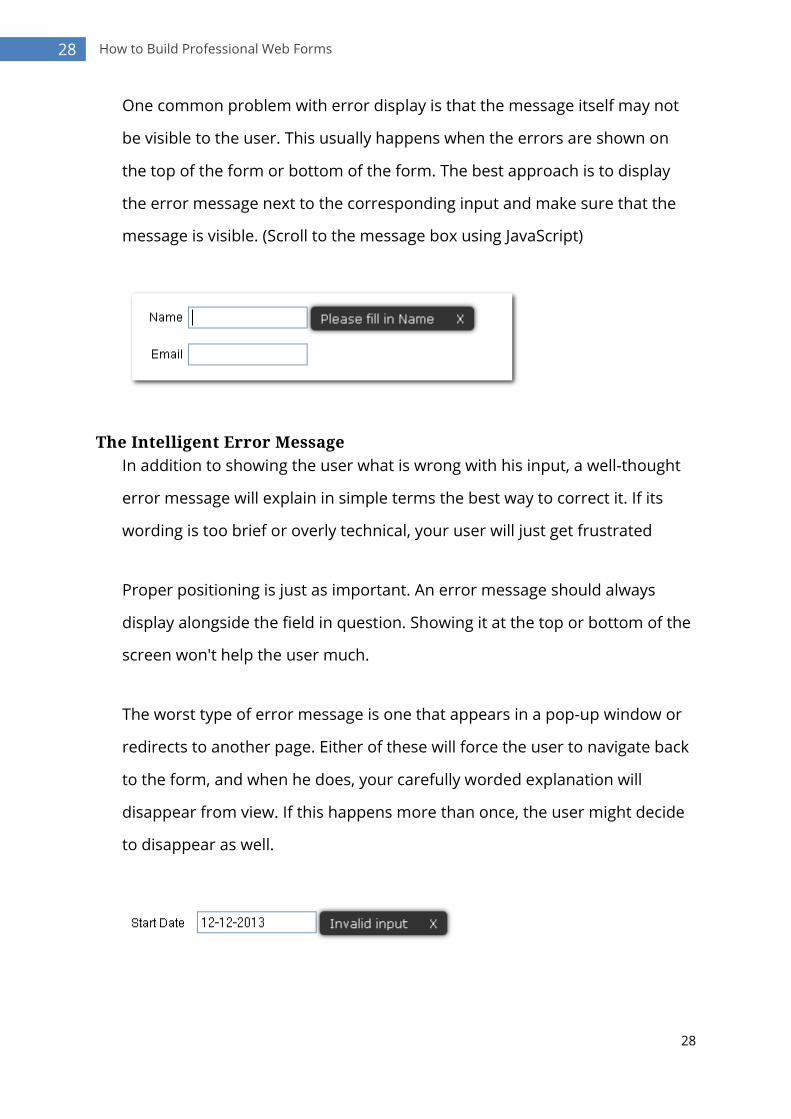
One common problem with error display is that the message itself may not
be visible to the user. This usually happens when the errors are shown on
the top of the form or bottom of the form. The best approach is to display
the error message next to the corresponding input and make sure that the
message is visible. (Scroll to the message box using JavaScript)
The Intelligent Error Message
In addition to showing the user what is wrong with his input, a well-thought
error message will explain in simple terms the best way to correct it. If its
wording is too brief or overly technical, your user will just get frustrated
Proper positioning is just as important. An error message should always
display alongside the field in question. Showing it at the top or bottom of the
screen won't help the user much.
The worst type of error message is one that appears in a pop-up window or
redirects to another page. Either of these will force the user to navigate back
to the form, and when he does, your carefully worded explanation will
disappear from view. If this happens more than once, the user might decide
to disappear as well.

29
29 How to Build Professional Web Forms

30
30 How to Build Professional Web Forms
2.3 How to Structure a Web Form Well A web form may not be the most glamorous or compelling part of a site’s
presentation, but it often serves a critical purpose. The web form is the
gateway to visitor interaction or, for sites with a commercial purpose,
conversion, but sites that devote enormous resources to attracting those
visitors may pay less attention to the structure and design of the web forms
they use, despite the fact that the form is the element that turns a mere
visitor into something more.
2.3.1 Heading Why are we here? In general, a web form does not have a complex purpose,
but it does have a purpose. Once you’ve lured your visitor to the form, that
purpose should be made plain in the form’s heading. Simplicity is best
Google may not be known for the aesthetics of its offerings, but it frequently
gets the user experience right, especially in its most popular products. In
Gmail, for example, new users are offered the chance to “Sign up for Gmail”
on a page that highlights three features that, in Google’s eyes, set the service
apart from the competition. A click on the sign-up link leads to a page that
simply says “Create an Account.” Those three words tell you everything you
need to know
Subheads also work well if they adhere to the same principles. If you present
users with a long form, help them to navigate by inserting short, simple and
clear subheads at intervals. Otherwise, people will be lost in the midst of
what feels like an endless chore.
2.3.2 Additional Information

31
31 How to Build Professional Web Forms
Not all forms are created equal, and there are situations in which it’s
appropriate to introduce the form by providing the user with additional
information. Having brought your visitor this far, though, you want to make it
as easy as possible for him or her to continue.
Again, brevity is best. Users will avoid large blocks of text, skipping directly to
the form. Keep introductory information to a minimum. Edit ruthlessly,
breaking text into digestible paragraphs of short, declarative sentences, and
you’ve maximized the chance that users will pay attention.
2.3.3 Pre-requisites If a form requires certain information, advise users in advance, especially if
it’s the kind of information that may not be instantly available to the average
user. There’s no need to warn users that they’ll be asked for names,
addresses and phone numbers, but it is worth alerting them to the need for
certain less obvious pieces of information, including:
Driver’s license numbers
Social security numbers
Insurance policy numbers
Model numbers for devices
Giving that kind of notice is, for one thing, a sign of consideration for your
visitors. For another, it can help to avoid the situation in which users
abandon a half-completed form when they’re confronted with questions that
they can’t answer immediately. Instead, you’ve captured the momentum they
generated when starting the form.
2.3.4 Images versus Text

32
32 How to Build Professional Web Forms
It bears repeating that large blocks of text are not user-friendly. At best,
users may skim them. At worst, they avoid them altogether.
This problem occurs in many contexts, not just in the design of forms, and
the solution often involves images. Images are not purely decorative,
although they can certainly add variety and visual appeal.
Use images to explain, when possible.
2.3.5 Grouping People thrive on patterns. We see them when they’re there and we impose
them on the world when we can. Grouping fields into related sections, a
process also called “chunking”, makes it easier for people to process the
information that’s in front of them. Presenting users with a page of 25
undifferentiated questions gives those users nothing to hang on to.
Grouping those questions into related subjects and setting them apart with
appropriate sub-headings helps users to understand what’s happening. The
entire process is easier.
For the best experience, groups can be numbered, and the form can be
accompanied by an indication of the user’s progress through the form.
Instead of leaving people in limbo, tell them the stage they’ve reached. Show
them that questions are part of a logical progression and that there’s an end
in sight. Those small courtesies will make for a happier audience.
2.3.6 The Great Scroll Consistency is as important to form design as it is to other aspects of
building a site, and it is especially important to a form’s flow. Inconsistent
choices, with some elements flowing horizontally and others vertically, are

33
33 How to Build Professional Web Forms
confusing and difficult to navigate. Horizontal flow, even if applied
consistently, feels awkward and unnatural. If you scroll through a page, we
assume that you are moving vertically. If your mouse has a scroll button, its
default configuration is on the vertical axis.
So make your form flow vertically. A consistent vertical flow is what feels
natural to users, and it’s what they have come to expect.

34
34 How to Build Professional Web Forms
2.4 How to Get More Form Submissions Web forms are an amazing way of getting information from your users. With
one form, you can be able to gather data from several thousand people at
the same time. So, how exactly do you measure the extent to which a form is
successful? Well, the main indicator of this is the number of complete form
submissions you are able to get. More precisely, the number of visitors vs
the number of visitors who submitted the form. For example, if your form
page is visited by 1000 unique visitors and only 10 of them decided to submit
the form, then the conversion ratio is 1% . If you build a better form and if
you start getting 20 submissions per 1000 visits, then that is 100% increase in
conversion. The fact is that certain seemingly silly but important changes in
your form can bring 300 or 400% increase in the conversions.
You will have to design your form with the following points in mind. These
act just as a guideline to help you avoid some common mistakes.
2.4.1 Ask a Few but Relevant Questions Keeping your form simple is one of its greatest strength. Filling a web form
should never feel like a chore to your users and this is what a long form may
feel like. Cut down your form to the essential questions and you will start
getting more submissions.
Another reason for keeping the form simple is the attention span of users.
Usually, the user will only dedicate a portion of their time to filling in the
form. A short form will ensure that you get straight and honest answers. It is
better to get a few true answers rather than having a load of irrelevant
details that the user entered on a painfully long form.

35
35 How to Build Professional Web Forms
2.4.2 Ask the most important question first When the user has just started to fill the form, they are most attentive. They
will therefore tend to give more concise answers. With the most important
questions posed first, you will be able to get much clear results from the
form.
For example, in a feedback form, ask the feedback first! It is common to see
feedback forms that ask for name, email phone number, what type of
feedback and more before he gets to give the feedback. That just turns down
genuine users.
2.4.3 Explain why you are asking certain
questions Some questions on your form may be personal or even sensitive for the
user. In these situations, it is always good to inform the user why you need
that information. For example, asking them for their phone number should
come with a note that you will only use the number when you need to
recover their lost passwords. This way, the user will be more willing to give
out such information without hesitation. When you ask the user to give their
date of birth, gender or even their location, you can always explain to them
that these details will be used to personalize the information they get to see
so as to ensure that it is tailored to their needs. A user will always be happy
to see information that fits their preferences. They will therefore offer up this
information more readily and honestly.
Another important piece of information that the user may be hesitant to
offer up is their email. In order to get them to share their email addresses
with you, you need to assure them that you will be sending them an email
with information that is important to them. This may be the results of a

36
36 How to Build Professional Web Forms
survey if the form is for survey. You should also assure them of the
confidentiality of the information they provide and reassure them that you
will not share this information with any other person.
Information is very sensitive in this modern age and people are not always
willing to give their details easily. You therefore need to explain why you
need such information in order to get more form submissions.
2.4.4 Assure security and privacy of the
information submitted When you have asked for sensitive data from the user, you need to keep
their trust and confidence in you. You will need to assure them that the
information they have offered up will be kept safe and secure. You should
also have a privacy policy that outlines the steps you take to ensure the
privacy of your users. For example you can have a message that says, "We
value your privacy. All the information you provide will be held with the highest
confidentiality and will only be used in accordance with the terms of our privacy
policy." You can then go ahead and provide a link to your privacy policy.
2.4.5 Provide Helpful Validation Messages Users sometimes make errors when filling in web forms. This may happen
when they enter numbers in place of text, email addresses without the '@'
symbol and a myriad of other input errors. In such cases, show error
messages that offer helpful details.
For example, instead of having an error message like, "Invalid Input!" you can
have a message that says, "seems like your email address is missing this: @."
This way, the user can easily correct the error message and the extra
interactivity will go a long way to improve the overall user experience.

37
37 How to Build Professional Web Forms
Validation messages that are conversational in nature are better than bland
error messages.
2.4.6 Avoid the Reset Button ! The reset button has only one purpose: to clear every input field and reset
the form to the way it was before being filled. While this may be convenient
for other places such as data entry applications, it is never a good idea to
have it on a web form. The user has dedicated their time to fill out your form
and all this goes away at the single click of the mouse. A tiny mistake can
erase their work of several minutes. Very frustrating!
Suppose the form was to get the comments of the attendees at an event.
The user enthusiastically enters their feelings and experiences into the form.
Unfortunately, the user clicks in reset instead of the submit button and the
form goes blank.
In some situations, the user might even think that their details have been
submitted and may just go on with their work.
So, avoid the Reset button!
2.4.7 Avoid CAPTCHA

38
38 How to Build Professional Web Forms
CAPTCHA Validation tests are a way of confirming that the user filling in the
web form is actually a human being. This involves something that may be
possible for a human being to accomplish but not a robot. However,
CAPTCHA tests are frustrating to most users. They are usually very confusing
and the user may get it wrong several times thus giving up.
Also note that CAPTCHA tests are only to avoid automated submissions of
the form. CAPTCHA does not add any other ‘security’ to the form!
There are other, non-intrusive ways to avoid CAPTCHAs. Consider CAPTCHA
only when none of the alternatives work and you start getting too many
spam submissions.
Getting more form submission starts with the right design and a plan. With
the points highlighted above, you can be able to design a proper form the
user will fill to completion and submit successfully. You will also get more
honest answers and your users will have a better experience with forms.

39
39 How to Build Professional Web Forms
2.5 Creating Large Forms It is usually tough to design web forms that the visitors will be willing to fill in.
If the form in question is very long, then the problem is compounded. In this
case, there is the added problem of keeping the interest of the user until the
form is completed. Long forms are unavoidable in certain situations like
collecting information for a survey, collecting information to give a quote for
an insurance policy or for accepting details for a real estate listing, etc. With
some creativity and by following some tried and tested design principles, you
can create a large web form that keeps the interest of your visitors and
succeeds in collecting the information that you need.
2.5.1 Making your web forms more usable: Even a fairly large form can be made to look simple if you do the following:
Break the form into sections:
This not only groups related information and fields, it also makes the form
appear much simpler to your visitor. This is similar to how a staircase when
broken up into sections, makes the climb seem easier. You also have the
opportunity to validate as you go without the user having to scroll all the way
to the top to correct errors, which is bound to happen with a long form that
has a single validation at the end.
You can use the group box or a background color to make the groups stand
out. Group boxes are better in that they don't depend on the color setting of
the browser. They also allow people with color perception difficulties to see
the groups. Many users are also put off with some background colors.
Finally, it all depends on the design, so the choice is yours.
Make sure that the field and tab order is right:

40
40 How to Build Professional Web Forms
Fields should be presented logically, so that it makes sense to the visitor. For
example, there is no point in asking for marital status after making the visitor
input the spouse's name. Correct order also makes it easier for you to
validate inputs as the form is filled.
It is easier and faster to tab through fields than using the mouse to click each
one before entering it. Pay attention to the tab order so that the control
moves logically from field to field. If you get this wrong and the control keeps
jumping randomly, visitors are likely to abandon the form.
Use white space properly:
If you are keeping all the fields on a single page, don't try to cramp all of
them together to accommodate everything without scrolling. Most visitors
are fine with vertical scrolling. So use white space wisely.
Hide what is not required:
Long web forms often collect information that fit a wide group of people. As
the form is filled, some of the fields may become irrelevant to the visitor.
Hide irrelevant fields so that the visitor does not have to read them and
waste time. Take care with validation so that you don't make any of the
irrelevant fields mandatory. Though this may seem fundamental, this is one
aspect that usually goes wrong with long forms. Example is when the use has
been forced to enter a dummy zip code even though he is not living in the
US.
2.5.2 Design strategy for very large forms So far we have seen how to make a large form more usable. However, our
focus has been on forms that can still be accommodated on one page. There
are times when we have to present the form in bite-sized chunks rather than
throwing all the questions at the user on one page. What do you do if the

41
41 How to Build Professional Web Forms
form is so large that it becomes necessary to break it up into multiple pages?
Here are three popular strategies:
Using the Wizard Design:
A wizard is nothing but a way of presenting the form in steps. You show only
a small logical section in each step. We are all familiar with this approach, as
the windows installer uses this approach when we install new software.
The user moves back and forth from page to page using the 'Back' and 'Next'
buttons. This also allows us to hide irrelevant pages from the visitor. The
inputs can be validated on each page making things easier for the visitor. We
can also save the inputs after each section so that nothing is lost. Show a
page count or progress bar so that the user knows how many pages are left.
Show/Hide Sections
Hiding/showing a section is useful when there are mutually exclusive set of
input fields. For example, you can have a check box that says “Billing address
is same as shipping address”. If enabled, that check box hides the section of
Billing address fields
Other Tips for Large Forms
Keep unnecessary distractions like links, ads and special offers away.
Don't tempt the user to leave the form and move to something else.
Give helpful information for filling out the form on one side.
Give explanatory text near the fields in case they are confusing.
Provide default values, drop down lists and radio buttons whenever
possible.

42
42 How to Build Professional Web Forms
Use icons or symbols, if they make sense, to make things more clear
and attractive
As you can see, a lot of planning is required for designing long web forms.
Better planning will result in a better design and more form submissions. If
you take the time to do the planning and put some thought into the design
elements, your visitors will enjoy filling your form even if it is a little long.
Whatever you do, don't make the form look like an add-on to your website,
let it blend in with the design and be a part of it.

43
43 How to Build Professional Web Forms
3 The Back-End of the Form
The client side of the form handles the visual aspects. The server side script
should handle the actual functionality of the form- collect subscribers, save
the submissions, send emails and so on.
This section gives examples and sample codes for most common form
features. The samples are in PHP. PHP is most common and is available on
most platforms and webservers.
3.1 Server-side Validations Even though you are doing complete validations in the client-side using
JavaScript, it is necessary to do the validations on the server side as well. This
is because it is possible to submit the form completely bypassing the
Javascript validations.
Here is some PHP form validation sample code:
First, some PHP validation functions: function checkMandatory($fieldname)
{
if(empty($_REQUEST[$fieldname]))
{
return FALSE;
}
$trimval = trim($_REQUEST[$fieldname]);
if(empty($trimval))
{
return FALSE;
}
return TRUE;
}
function checkMaxLength($fieldname,$length)
{
if(empty($_REQUEST[$fieldname]))
{

44
44 How to Build Professional Web Forms
return TRUE;
}
if(strlen($_REQUEST[$fieldname]) > $length)
{
return FALSE;
}
return TRUE;
}
function checkEmail($fieldname)
{
return filter_var($_REQUEST[$fieldname],
FILTER_VALIDATE_EMAIL) ? TRUE: FALSE;
}
Using those validation functions : if(!empty($_POST['submit']))
{
if(!checkMandatory('name'))
{
$errors[] = "Please enter your Name";
}
elseif(!checkMaxLength('name',10))
{
$errors[] = "The name is too long!";
}
if(!checkMandatory('email'))
{
$errors[] = "Please enter your Email address";
}
elseif(!checkEmail('email'))
{
$errors[] = "Enter the correct email address";
}
if(empty($errors))
{
/*Successful validation*/
header("Location: thankyou.html");
exit();
}
}
You can download the sample validation code here:
form-validation.zip

45
45 How to Build Professional Web Forms
3.2 Emailing The common need for any form processing script is to send a notification
email that the form was submitted by a visitor.
3.2.1 Simple Emailing The simplest method is to use the mail() function in PHP . Here is the sample
code that sends the form submission by email:
$myemail = '[email protected]';//<----- Replace Your
email address here.
/*
do validations here
*/
/*Send the form submission by email*/
$email_subject = "A new form submission";
$email_body = "You have received a new form submission \n";
foreach($_POST as $key => $value)
{
$email_body .= "$key : $value \n";
}
$headers = "From: $myemail\n";
mail(/*to*/$myemail,$email_subject,$email_body,$headers);
You can download email sample code from the link below:
email-form.zip
3.2.2 Advanced Emailing If you want emailing that's a bit more advanced, PHP Mailer is a nice library
to use.
With PHPMailer,
you can use an SMTP server with SSL support
attach files
send HTML emails

46
46 How to Build Professional Web Forms
has security features
Here is some sample code that uses PHPMailer:
require_once("class.phpmailer.php");
$myemail = '[email protected]';//<<---Replace your
email address here
$mailer = new PHPMailer();
$mailer->CharSet = 'utf-8';
$mailer->AddAddress($myemail,'YourName');
$mailer->Subject = "New form submission";
$mailer->From = $myemail;
$email_body = "You have received a new form submission
<br/>\n";
foreach($_POST as $key => $value)
{
$email_body .= "$key : $value <br/>\n";
}
$mailer->MsgHTML($email_body);
$mailer->Send();
For more information on PHPMailer see the PHP mailer documentation
47
47 How to Build Professional Web Forms
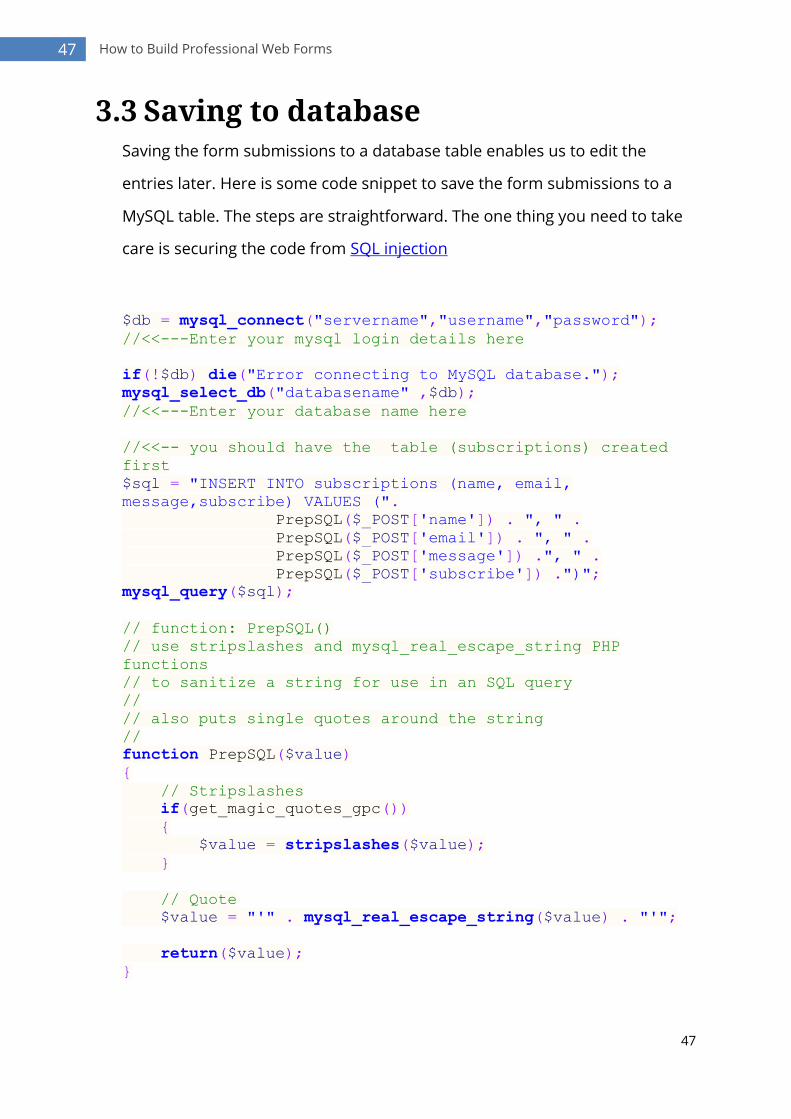
3.3 Saving to database Saving the form submissions to a database table enables us to edit the
entries later. Here is some code snippet to save the form submissions to a
MySQL table. The steps are straightforward. The one thing you need to take
care is securing the code from SQL injection
$db = mysql_connect("servername","username","password");
//<<---Enter your mysql login details here
if(!$db) die("Error connecting to MySQL database.");
mysql_select_db("databasename" ,$db);
//<<---Enter your database name here
//<<-- you should have the table (subscriptions) created
first
$sql = "INSERT INTO subscriptions (name, email,
message,subscribe) VALUES (".
PrepSQL($_POST['name']) . ", " .
PrepSQL($_POST['email']) . ", " .
PrepSQL($_POST['message']) .", " .
PrepSQL($_POST['subscribe']) .")";
mysql_query($sql);
// function: PrepSQL()
// use stripslashes and mysql_real_escape_string PHP
functions
// to sanitize a string for use in an SQL query
//
// also puts single quotes around the string
//
function PrepSQL($value)
{
// Stripslashes
if(get_magic_quotes_gpc())
{
$value = stripslashes($value);
}
// Quote
$value = "'" . mysql_real_escape_string($value) . "'";
return($value);
}

48
48 How to Build Professional Web Forms
The code above connects to the MySQL server, selects the database and
inserts the form submission data. (Please note that the form validations
should already be done before this part of the code)
You can download the full code from the link below:
database-form.zip

49
49 How to Build Professional Web Forms
3.4 Handling File Uploads If you have a file uploadbox in your form, add enctype="multipart/form-data"
in the form tag.
<form method="POST"
action="upload-handler.php" enctype="multipart/form-data">
<label for='name'>Name: </label>
<input type="text" name="name" >
<label for='email'>Email: </label>
<input type="text" name="email" >
<label for='uploaded_file'>Select A File To Upload:</label>
<input type="file" name="uploaded_file">
<input type="submit" value="Submit" name='submit'>
</form>
The file upload box is created using the input tag with type="file"
<input type="file" name="uploaded_file">
Now, on the server side, we can access the uploaded file's information from
the $_FILES array.
$_FILES['uploaded_file']['name'] contains the file's name and
$_FILES["uploaded_file"]["tmp_name"] contains the temporary file
path of the uploaded file.
Here is the PHP code to copy the uploaded file to a file uploads folder:
$upload_folder ='../../uploads/';
//<<-- This folder must exist and should be writeable

50
50 How to Build Professional Web Forms
$name_of_uploaded_file =
basename($_FILES['uploaded_file']['name']);
$path_of_uploaded_file = $upload_folder .
$name_of_uploaded_file;
$tmp_path = $_FILES["uploaded_file"]["tmp_name"];
if(!move_uploaded_file($tmp_path,$path_of_uploaded_file))
{
$errors .= '\n error while copying the uploaded file';
}
You can download the full code from the link below:
file-upload.zip
3.4.1 Advanced File Upload Widgets You may have noticed that the native file upload is very limited in features.
There are enhanced file upload widgets available that you can just plug-in to
your form. Here are a selected few.
jQuery File Upload
http://blueimp.github.io/jQuery-File-Upload/
Plupload
http://www.plupload.com/

51
51 How to Build Professional Web Forms

52
52 How to Build Professional Web Forms
3.5 Web Form Security & Security
Threats As the number of hack attempts increases, so do the number of security
measures developed to block them. To a hacker, Web Form is a great way to
access the server to plant their malicious code or snippet.
There is a very famous saying in the security world that says "Thou shalt
never trust user input". Simply put, this means that a user can be just
about anyone, from a man using a computer for the first time or someone
who has extensive experience as a hacker. There is no way to tell.
In this section, we are going to take a serious look at the more common
security vulnerabilities associated with web forms and how we can best
overcome them. The following 5 are the more common forms of web form
hacking:
- Spam
- SQL Injection
- XSS
- CSRF
- Email header Injection
3.5.1 Spam and CAPTCHA While spam may not compromise your entire website it will certainly cause
you headaches. You will start to receive large numbers of junk emails.
Spammers use automatic bots to search the websites that have web forms
and then start sending spam to those forms. One way to prevent this is to
require the input of a CAPTCHA, but this can be annoying to your genuine
users. The other way is to automatically detect Spam submission
characteristics and automatically ignore them. For example, disallow too
frequent form submissions from the same IP address as it is not natural.

53
53 How to Build Professional Web Forms
3.5.2 SQL Injection SQL Injection is perhaps the most common technique malicious users and
hackers use to compromise a website, and sometimes the entire server also.
Bad coding by the web developer leaves loop holes for hackers to gain
unauthorized access to the server.
In a normal dynamic website that includes a database, the user is able to
access specific portions of the server. SQl Queries built-in to the script are
used so a user cannot create their own query. But, with SQL Injection the
user is able to create their own queries and gain access to any part of the
database they wish, which is very dangerous as they then have access to
sensitive information within the database.
Let's look at an example of SQL Injection. For the purpose of this exercise,
imagine that we have created a login form that requests the user to input a
user name and password. In a normal circumstance the user will input his
user name and password in the respective fields.
Now let's take a look at the back end code:
"SELECT * from users WHERE name='$name' AND
password='$password'"
In this example the user inputs their information like this:
Username=smith
Password=smith123

54
54 How to Build Professional Web Forms
The query then searches the table of users for instances where the username
is "smith" and the password is "smith123".
Now here is what a hacker will do. A hacker will use the following user name
and password to gain unauthorized access.
Username=smith
Password=' OR 'x'='x
Now let us take a look at just what such a query will do. When we insert
these values into a query it will look like this:
SELECT * from users WHERE name='smith' AND password='' OR
'x'='x';
The form of query will search for the name "smith" in the database, just as it
did in the previous example, but instead of searching that string for the
password it will see the query as 'x'='x'.
The server reads this query as a true statement so if the username "smith"
exists in the database and is true according to the query, then the password
will be bypassed as a true statement. That string x'='x is commonly referred
to as the magic string.
To prevent such SQL Injection, there is a built-in function in PHP called
mysql_real_escape_string() , which escapes certain characters so that the SQL
query is not modified. Here is the PHP function to sanitize form input before
using in an SQL query:

55
55 How to Build Professional Web Forms
// function: PrepSQL()
// use stripslashes and mysql_real_escape_string PHP
functions
// to sanitize a string for use in an SQL query
//
// also puts single quotes around the string
//
function PrepSQL($value)
{
// Stripslashes
if(get_magic_quotes_gpc())
{
$value = stripslashes($value);
}
// Quote
$value = "'" . mysql_real_escape_string($value) . "'";
return($value);
}
Look at how the SQL statement look like, after this update:
SELECT * from users WHERE name='smith' AND password='\' OR
\'x\'=\'x'
Note that the quote characters are escaped with a slash \ making SQL query
compare password with the entered value (' OR 'x'='x). The SQL query can
not be modified any more.
3.5.3 Cross Site Scripting (XSS) Cross Site Scripting (XSS) is an Application-Layer attack. It consists of an
embedded code that runs on the client's browser rather than on the server.
The malicious user or hacker locates an XSS bug within the client's coding
and then adds their own html or JavaScript into the infected website. Using
that code the hacker is then able to steal the cookies from the client's

56
56 How to Build Professional Web Forms
browser and adds them to their own browser, so that whenever the hacker
opens that site in their own browser it will him them a logged in account of
the infected client.
Let's assume that you have a guest book form on your website where clients
are able to leave you feedback. The user feedback is displayed on the
guestbook entries page like this:
<h1>Feedback from: <?php echo $name ?> </h1>
A normal user will input his name and will get response like this:
Feedback from Smith Johns
Now let's take a look at what a malicious user will input. Let's assume the
malicious user inputs their name as:
<script>alert("Whoopey! I could run a script");</script>
Now the HTML code in the guestbook entries page looks like this:
<h1>Feedback from: <script>alert("Whoopey! I could run a
script");</script></h1>
And it throws a message box:

57
57 How to Build Professional Web Forms
When the ‘guest book entries’ page loads.
This is seemingly harmless. However, the harm occurs when the hacker
steals cookies from the user’s computer and posts it to his own server:
<script>post_to_myserver(getcookie('sessionid'));</script>
To avoid this problem, always use the PHP function htmlentities() to
display any user entered data on a web page.
So the corrected code is :
<h1>Feedback from: <?php echo htmlentities($name) ?> </h1>
Now, if the hacker enters script code, it will be converted like this:
<script>alert("Whoopey! I could run a
script");</script>
The browser will display it exactly as the HTML code entered.
3.5.4 Cross Site Request Forgery (CSRF)

58
58 How to Build Professional Web Forms
Cross Site Request Forgery (CSRF) is a one click attack. This attack is used in
websites that has signup and login. Most of those websites use cookies to
remember the user and the user does not have to login every time.
The malicious user embeds a hidden form that contains "ACTION" onto the
target website and then sends the link to the victim. When the user clicks on
the link the hidden form is submitted and the form then uses the session of
the active user (in this case the victim). Since the website ‘remembers’ the
user, the changes are made in to his account. In this way the attacker has the
ability to remotely make changes to the victim's account information.
Let's look at an example of how this form of malicious attack works. The
malicious user can use this technique to update an email address with his
own email and then gain access to reset passwords. Once the attacker has
reset the passwords of the victim's emails he can then take control of the
victim's account.
In order to avoid this problem,
Check and make sure that the user had initiated the account update
process by loading the form.
Request the user to login again before making changes to his account.
Send a confirmation link to the user to complete account update the
process
3.5.5 Email Header Injection Email Header Injection is also used by spammers. The spammer or attacker
finds a flaw in your mail script and uses it to send a spam message to a large
number of users. Your form mail script is turned into a spam relay. When
59
59 How to Build Professional Web Forms
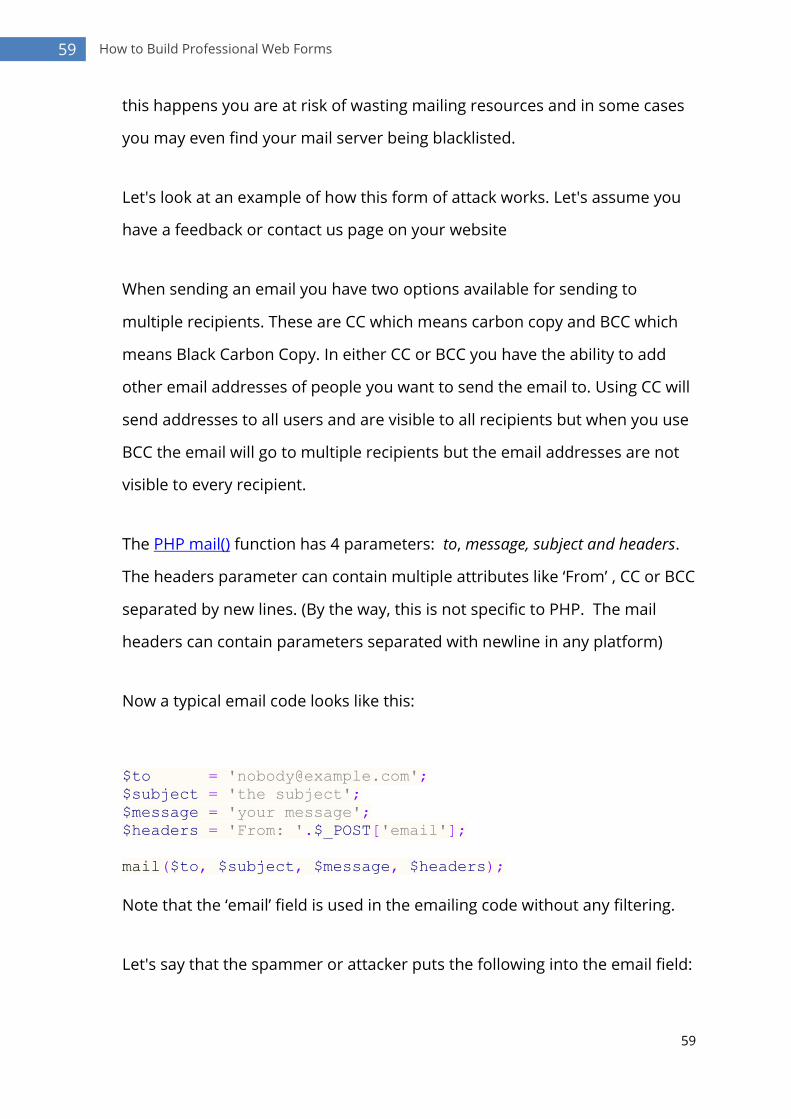
this happens you are at risk of wasting mailing resources and in some cases
you may even find your mail server being blacklisted.
Let's look at an example of how this form of attack works. Let's assume you
have a feedback or contact us page on your website
When sending an email you have two options available for sending to
multiple recipients. These are CC which means carbon copy and BCC which
means Black Carbon Copy. In either CC or BCC you have the ability to add
other email addresses of people you want to send the email to. Using CC will
send addresses to all users and are visible to all recipients but when you use
BCC the email will go to multiple recipients but the email addresses are not
visible to every recipient.
The PHP mail() function has 4 parameters: to, message, subject and headers.
The headers parameter can contain multiple attributes like ‘From’ , CC or BCC
separated by new lines. (By the way, this is not specific to PHP. The mail
headers can contain parameters separated with newline in any platform)
Now a typical email code looks like this:
$to = '[email protected]';
$subject = 'the subject';
$message = 'your message';
$headers = 'From: '.$_POST['email'];
mail($to, $subject, $message, $headers);
Note that the ‘email’ field is used in the emailing code without any filtering.
Let's say that the spammer or attacker puts the following into the email field:

60
60 How to Build Professional Web Forms
[email protected]\r\n CC: [email protected]
In this example \r\n indicates the end of one email header and the beginning
of the next. We can also add multiple emails with this technique. Here we
have the issue of "\r\n". We need to block the user from inputting this or find
a way to filter the user's input in this way:
/*
Sanitize() function removes any potential threat from
the data submitted. Prevents email injections or any other
hacker attempts. if $remove_nl is true, newline chracters
are removed from the input.
*/
function Sanitize($str,$remove_nl=true)
{
if($remove_nl)
{
$injections = array('/(\n+)/i',
'/(\r+)/i',
'/(\t+)/i',
'/(%0A+)/i',
'/(%0D+)/i',
'/(%08+)/i',
'/(%09+)/i'
);
$str = preg_replace($injections,'',$str);
}
return $str;
}
Any data from the form should be filtered with such a sanitize function first
$headers = 'From: '.Sanitize($_POST['email']);
3.5.6 Other Preventative Techniques

61
61 How to Build Professional Web Forms
There are other techniques we can use to prevent spammer attacks. As we
have already discussed it is imperative to never trust anything a user inputs.
If some of the value is going to the database we must ensure that all input is
properly filtered before it reaches the database server. It is the same in the
case of a mail server.
Security checks must be implemented on the server side coding (PHP or
other). For example, in a form we must not limit ourselves to JavaScript
validations. Validate on the server side as well.
By putting security measures into play before spammers have the
opportunity to infiltrate your website through web forms you can prevent a
lot of damage from occurring. Your web form security should be a priority
and not something that is addressed after an attack. Remember that you
owe users of your web forms the security their private information deserves,
and if you lose that trust through not implementing adequate security
measures you will lose respect, credibility and your business will suffer as a
result.
3.5.7 Security and Usability Balancing One common observation about security is that people have a number of
misconceptions about implementing security. Here are a few points in this
regard:
Misconception 1: “CAPTCHA ensures security”
CAPTCHA is only a mechanism to prevent automated form submission. It
makes it difficult to write a script or program to submit your form
programmatically. Apart from this one use, CAPTCHA does not add any

62
62 How to Build Professional Web Forms
security to your form or website. CAPTCHA just adds frustration to your
users and will cause your form submissions to drop.
Misconception 2: “Very tight Form Validation Increases Security”
Some forms validate with very tight input patterns.
For example,
not allowing non alphabetic characters in names,
allowing only numbers in phone number field,
restricting punctuation characters in feedback/message fields etc
This usually originates from the misconception that such validations will
increase security and will close vulnerabilities. The fact is, it will not . Too
much of validations will just cause more trouble to your users.
People’s names can contain non-alphabetic Characters (o'connor ).Some
people prefer entering phone numbers separated with space or hyphen. As
explained in the Form Validation Section, being liberal on input field patterns
makes it easy to complete the form.
Handle it in the server-side
Handling security is the server-side coder’s job. The server side programmer
should properly filter convert the user input before saving to database,
sending emails or before displaying on a web page.
Do not trouble your website users in the name of security.

63
63 How to Build Professional Web Forms
4 References
Books
Designing with the Mind in Mind: Simple Guide to Understanding User
Interface Design Rules
by Jeff Johnson
Don't Make Me Think: A Common Sense Approach to Web Usability
by Steve Krug
Web Form Design: Filling in the Blanks
by Luke Wroblewski
Forms that Work: Designing Web Forms for Usability
Caroline Jarrett & Gerry Gaffney
HTML and CSS: Design and Build Websites
by Jon Duckett
JavaScript & jQuery: The Missing Manual
by David Sawyer McFarland
JavaScript: The Good Parts
by Douglas Crockford
Learning PHP, MySQL, JavaScript, and CSS: A Step-by-Step Guide to
Creating Dynamic Websites
by Robin Nixon
Programming PHP
by Kevin Tatroe, Peter MacIntyre and Rasmus Lerdorf
Websites
HTML-Form-Guide.com
Javascript-Coder.com
w3schools.com
sitepoint.com

64
64 How to Build Professional Web Forms
End I hope you have found this book helpful and informative. If you
have spotted any errors or omissions, do please let me know!
Simfatic.com Home of Simfatic Forms, form creation software
Copyright © 2022 FDOKUMEN