Protoss Build Orders - FreeBSD
150
All information contained in this thread is the product of a project I started a long time ago. I wanted a fairly complete set of basic Starcraft Information that could be provided on demand to a fairly new player wanting to get into competitive play. While this does not contain everything it contains *A LOT* Credit is due were it is deserved. Information gleaned from other sites is categorized as such with the authors name/the site it was derived from. All posted as used are copied in their entirety. This was put compiled by Iruian @ sc2gg.com Written by Salv Guide for fast improvement Introduction Improving your matchups and your overall game can be difficult. Many don’t know where to begin, or the best way to go about it. Sadly, I see people in SC101 that aren’t going about this the correct way. You can call this just my opinion, and Dees or Iruian may disagree, but what I am about to outline are what I think are the best ways to improve yourself at a fast pace. Firstly, you must recognize the resources that are available to you. Your most important resource is your teacher. Your teacher is a race specific wealth of knowledge, a question you have about a certain build order, or how to counter a specific unit combination can all be answered by your teacher. I don’t think many realize what an opportunity this is. You have the ability to ask and receive answers for any concerns you may possibly encounter. I think many of you realize the knowledge of your teacher, but do not take advantage. I will talk about that point in a moment. The other important resource is iCCup ladder. I haven’t checked all the players so far, but for the ones I have checked, I have yet to see a person who has played twenty of more games; this is a problem. I can easily say that if I was trying to improve, I would play at least twenty games a week. I realize this is not possible for everyone, but one of the requirements for SC101 was to have a couple hours every day to play; this is the equivalent of four to five games at least. There is no excuse. Everyone needs to understand the important of the three sessions we have a week. These weekly sessions should not be the only time you gain knowledge or play an abundance of games. If you find that this statement rings true to you, I feel you are going about SC101 all wrong. Back to iCCup; you have the opportunity to play a one on one-- versus another player whose goal is to win. In other words, a competitive game. These iCCup games will test you as a player and expose your strengths and weaknesses; please take advantage of
-
Upload
khangminh22 -
Category
Documents
-
view
1 -
download
0
Transcript of Protoss Build Orders - FreeBSD

All information contained in this thread is the product of a project I started a long time ago. I wanted a fairly complete set of basic Starcraft Information that could be provided on demand to a fairly new player wanting to get into competitive play. While this does not contain everything it contains *A LOT*
Credit is due were it is deserved. Information gleaned from other sites is categorized as such with the authors name/the site it was derived from. All posted as used are copied in their entirety.
This was put compiled by Iruian @ sc2gg.com
Written by Salv
Guide for fast improvementIntroduction
Improving your matchups and your overall game can be difficult. Many don’t know where to begin, or the best way to go about it. Sadly, I see people in SC101 that aren’t going about this the correct way. You can call this just my opinion, and Dees or Iruian may disagree, but what I am about to outline are what I think are the best ways to improve yourself at a fast pace.
Firstly, you must recognize the resources that are available to you. Your most important resource is your teacher. Your teacher is a race specific wealth of knowledge, a question you have about a certain build order, or how to counter a specific unit combination can all be answered by your teacher. I don’t think many realize what an opportunity this is. You have the ability to ask and receive answers for any concerns you may possibly encounter. I think many of you realize the knowledge of your teacher, but do not take advantage. I will talk about that point in a moment.
The other important resource is iCCup ladder. I haven’t checked all the players so far, but for the ones I have checked, I have yet to see a person who has played twenty of more games; this is a problem. I can easily say that if I was trying to improve, I would play at least twenty games a week. I realize this is not possible for everyone, but one of the requirements for SC101 was to have a couple hours every day to play; this is the equivalent of four to five games at least. There is no excuse. Everyone needs to understand the important of the three sessions we have a week. These weekly sessions should not be the only time you gain knowledge or play an abundance of games. If you find that this statement rings true to you, I feel you are going about SC101 all wrong. Back to iCCup; you have the opportunity to play a one on one-- versus another player whose goal is to win. In other words, a competitive game. These iCCup games will test you as a player and expose your strengths and weaknesses; please take advantage of

iCCup, it is there to help you.
The weekly sessions serve a purpose that I don’t see many players taking advantage of. During the week, you should be playing competitive games, generally iCCup is best-- but please do not play players that you train with all the time; they know you too well. You want to play random players, people you have never met. You play games and you will get to see what your strong suits are and your weak areas. You can tell your best matchup and your worst matchup. Do you have problems with certain builds? Why is that? What can you do to change this? These are the questions you should bring with yourself to each session. The player who can do this is the one who will leave SC101 a better player. Think of SC101 sessions as pit-stops where you can refuel, clear up some things that are puzzling you and learn some new tricks before heading back out to face the competition. If this seems like too much you, you are most likely in the wrong program.
What You Need to do as a Player
As a Starcraft player that is aiming to improve themselves, you must have an open mind to your games. When you lose, there was a reason. Was it your build order? Did you macro slip? Could better micro have saved you? Was your strategy sufficient? Did you properly scout? Questions like these are the ones you can ask you teacher if you are stumped, but usually you can tell by yourself what the problem was. Whenever you lose a game, make the replay right after and watch it on fastest or fastest times two. You want to catch what the turning points in the game were. Did you lose a lot to harass? Did he proxy build you? Could better scouting have solved the problem? Did you have a hard time killing his combination of units? Were you building at all times? You can narrow down the problem to a few situations usually and then address what happened. For example:
You push out with templars and zealots PvZ.You engage an army of hydralisks(1) or lurkers(2)You lose the battle and are counteredYou lose the game
These are very basic, but let’s go over this. You move out with templars and zealots. First question, was this the correct choice? Yes? Than continue. No? Why not? Let’s say you attack and he has lurkers. You can contribute your choice of units to failure to scout. Do you know what you should have looked for? If not, use your resource; ask your teacher. Once you know what you should have looked for, do that next game and adjust accordingly. This is how you improve, making mistakes, but learning from them. On the flip side, did you move out and engage an amount of hydralisk? Than your unit combination was correct. Did he have too many units? This is scouting and macro. Next time, focus on making a couple more gateways and scouting before attacks, than this problem will be easier to deal with next time.
Our Responsibilities as a Teacher

This is very general and not directed at any one, but I like to speak for Iruian and Dees when I say that we can only help you as much as you let us. If you consistently post replays, ask for advice and ask questions, your fulfilling your obligation and we can do what we signed up to do – help out and teach. The players who are simply waiting for good advice to be thrown at them are not going to improve. They may improve a slight bit, but you’re not taking advantage of the program, and that’s what I would like to see.
Conclusion
In conclusion, I want to see more replays posted by the students, more games played on iCCup, have questions ready when you come to the weekly sessions, let yourself be open to learning and most importantly, let us help you. We signed up as teachers because we enjoy helping other players and want give back to the community, but SC101 is a two way street, so it’s about time every one learned how to play ball.
Dear reader,
Here's a compilation of tips for beginners who are interested in learning basic principles behind Starcraft. The post is long but you don't need to read every part to get started. Just look at whichever sections are relevant to what you want to learn; e.g. the latter half of the post is mostly just explanation of theory that you may or may not be interested in. As a general caveat, there are exceptions to every rule, so I'm not claiming these are always the right thing to do. They are just good principles to follow absent any compelling reason not to; as you get better, you'll start recognizing when to deviate from certain rules.
THE "BIG FIVE" BASIC PRINCIPLES
Here are the five basic skills that I think every new player should start out trying to get decently good at.
1) Always be building peons (SCV/drone/probe) from your town hall (town hall (CC/hatchery/Nexus) and put the peons to use on minerals/gas. Don't ever stop. Your CC/Nexus should always be flashing, your main hatchery should always have at least one drone building from larva. If you need to queue up peons, do it, but try to avoid having to do that since it ties up resources. When you get gas, typically put a maximum of 4 peons on it if unless it's far away from your hall.
2) Never be held back by your supply limit. Always build supply early enough in advance so that you're not waiting for your next depot/overlord/pylon. E.G. Generally you should start building your first depot/overlord/pylon when your supply reads 8. In later game, build it much earlier if you're pumping units faster.
3) Try to keep your resources as close to zero as possible by spending whatever income you're getting. If you have a barraks, make sure it's always making marines. If it's making marines and you have leftover money in the bank, build another barraks or tech, expand, etc. Just don't let your money sit in the bank.
4) Dont make too much static defense (cannons/bunkers/turrets/sunkens/etc.). Build those minimally. E.G. 2-3 cannons is about enough for each base you have, use mobiles for the rest of your defense. If you follow steps 1-3 well, you should not have to build any static defense early. In recreational play, never incorporate an early sunken/cannon/bunker into your regular build, you do not need it. So, do not start off building a forge and cannons with Toss, make a gateway and zealots instead. If you're losing because of following this advice, ask on the forum and we'll help you figure out what you're doing wrong.
5) Scout early. You'll want to use either a peon or an overlord if you're Zerg. When your supply reads 10, take a peon off your resources and send him around the map. Just hold down shift and click on various spots on the minimap.
LEARNING THE GAME
I would recommend the following steps to actually getting better at the game, working your way up from first computer opponents to real ones.
1) Go through the single player campaigns, at least the Terran one, they're fun and they teach you various basics. Make sure you log onto b.net at least once so you can get patched to the latest version. Don't worry too much about strategy when going through this; e.g. you may not be able to practice the Big Five in some missions if resources are limited or you're forced to build a lot of static defense to survive.
2) Next, try playing some 1on1's against the computer. I would pick simple maps like ladder/LostTemple or Challenger. Play until you can beat the computer consistently. Stick with one race, I recommend Protoss because they have the simplest build/economy structure but any race is fine.
3) Then try playing 1on1 against the computer without building any static defense until you can consistently beat it. Try to beat the computer as fast as possible, play aggressively and send your first units to attack when you get them, don't let any units sit in your base doing nothing but instead be constantly on the offensive.
4) Get online and play against real opponents. Start by creating "1on1 newbies only" games and kick out anyone who has an appreciable record, or not if you don't mind getting slaughtered. If you lose, save the replay, watch it, and figure out what your opponent did that beat you. Then try doing what he did against your next opponent. This way you're always copying people who are better than you. If you need practice, you can always play against the comp and get good at executing your learned strategy until you're comfortable with it.

5) If you can't get online and are creaming the computer regularly, try adding more computers. 1on2 should be manageable without having to build any static defense. If you can't do 1on2, do 2on3 where you ally yourself with one computer.
6) If you have specific questions about strats or things you've seen, post them in this forum. Do not post very generic questions like "How do I get better at Terran?", but rather stuff like, "My opponent made a bunch of wraiths in my last TvT game, I have no idea why but he did beat me, can you explain that strat?" Do not post those kinds of questions in this thread; this post's intention is to give a broad overview of general strats versus race-specific help such as counters and build orders.
THEORY OF ECONOMICS
Let me explain some of the rationale behind the Big Five now. For basics, my philosophy is that economic management is the key to any RTS and thus should be the first thing you learn how to get good at. If you can get money in as fast as possible, and spend it as fast as possible, then you'll do pretty well, and that's what the Big Five focuses on. If on the other hand, your opponent attacks you and you die with 1000 minerals in the bank, that's wasted money that could have e.g. been another 10 zealots or what not and you may have survived the attack. Making peons constantly means that you are getting resources as fast as possible. Peons make up for their cost very quickly. There is a limit to the number of useful peons you can have especially on smaller maps since only one peon can mine minerals at once, but I wouldn't worry about that for now. Most newer players forget to make peons and thus never come anywhere close to reaching that point. If you are oversaturated, it's no big deal at the recreational level.
At recreational level, I also believe it is more important to make sure you're spending your money on SOMETHING, versus fretting about the best unit or tactic to use. We can talk about specific tactics for race matchups, but that's more advanced and is likely to cause you to focus more on advanced stuff versus making sure you have the basics. I could e.g. teach you one tactic that can win you most of your newbie games with little effort, but that doesn't buy you much in the long run. Instead, for now, just make sure you build anything with your money so that it doesn't sit around in your bank account. Good things to spend your money on include: 1) more units 2) more unit-producing buildings like rax/gateway/hatcheries 3) upgrades 4) expansions (building a CC/Nexus/hatchery near another group of minerals).
For Protoss, for example, you'll start off making probes and probably build your first gateway. When that gateway is done, start making zealots out of it while you're still making probes and pylons. At some point, you'll have enough money to build another gateway, an assimilator for gas, or a cybernetics core for tech. Doesn't matter what you make, just choose one of those and build it. In later game, the principle is usually:
1) Look at your production buildings, make sure they're all making something (zealot, goon, carrier, whatever).

2) If they are all making units and you still have enough money for another production building, start on one.
It's not uncommon in later game for you to have 10 gateways by this principle, especially if you're playing on large maps with lots of resources.
As a general principle, try to avoid queueing for creating units as Terran/Toss, because this ties up resources. If you queue up 5 SCVs in your CC, that means there is 4 SCV's worth of minerals that's waiting to be used but is not actively being used, this is 200/0 worth of resources that could be going towards your next barraks or supply depot immediately. For a more extreme example, suppose you have one starport with 5 battlecruisers queued up. Four of those battlecruisers aren't actually being built so the queue is just tying up resources. You should instead have 3 starports building 1 battlecruiser each.
Queues are a convenience but have their drawbacks. In late game, you can't be producing at 100% efficiency such that you start a new unit everytime the previous is finished, and you'll probably have some surplus of resources so queueing may not tie up your resources significantly. But at least in early game, try to never have more than 2 units, even if that, in your production queue.
SCOUTING
As you do get better and start figuring out what to build, that's when scouting becomes important. You send an early scout out for two reasons. One is to start getting to know the map, even from basics such as whether you're on a land or island. The second is to find your opponent's base and get some idea of what he's doing, such as what race he is. In advanced play, recon is very important, as most decisions are not made blindly. Heavy emphasis is placed on figuring out some way to take a peek at what your opponent is doing and then to adjust what you're doing based on that.
STATIC DEFENSE
Static defense is all structures that have an attack. A common question is, "Why not build a lot of cannons and static defense? Cannons are great units -- they detect, fire at land and air, have awesome range, and straight up will kill units better than most other Toss units for the same cost." Cannons are deliberately made better than mobile units where the tradeoff is that they DON'T MOVE. You cannot beat your opponent by having a well defended base. A good opponent will see this and just leave you alone while taking expansion spots around the rest of the map. Remember that at your level of play, economics has a huge impact on winning or losing. If your opponent has 2 bases and you have 1, it doesn't matter how well defended your base is, you're going to lose in the long run.
Sadly, playing single player missions tends to encourage mass static defense. Building cannons works great against the computer because it'll just mindlessly throw forces at

your cannons and get them slaughtered. Some single player missions are in fact very hard to beat without building static defense. This encourages very bad habits for multiplayer. The computer isn't smart enough to figure out that it should just ignore your cannons. You can build a bunch of tanks and bunkers and then go out to lunch, and when you come back the computer will have no units and no resources because it wasted them all against your defenses. Players will not do this, though.
Getting more concrete, suppose you start out building 3 cannons early. That's great defense and your opponent will see this when he scouts you. This is good news for him though because he knows you've been spending money on defense versus mobile units so he's safe from being attacked by you. 3 cannons is a bit more cost than a Nexus, so this means that if you both are getting resources at the same rate, he can for that same money plop down a Nexus at the nearest resource node for free. Now you're essentially going to be fighting one base against two, and you will lose unless out of some miracle.
MAPS
I will now address the issue of map choice, as an addendum in response to comments below. My intention is not to make a strong statement that will cause controversy, but to share some knowledge that can help you make informed decisions.
There are generally two broad classifications of maps, so-called normal maps versus money maps. Money maps have overwhelming resources, enough that you will never have to worry about expanding or running dry. This includes zero clutter map, big game hunters, and fastest maps. Money maps simplify the game in many ways because you can focus just on one base strategies. And it makes some parts of basic skills more challenging because, for example, it's much hardeer to keep your resources near zero and it's not atypical to max out on 200 supply and still have near infinite amount of resources. On the other hand, money maps tend to reward strategies that are typically not feasible in other games, such as turtling (building a lot of static defense) and teching to capital units such as carriers, i.e. "turtle & tech".
If you folow the Big Five principle on those maps, you should still have an advantage over someone who does not because e.g. he builds many cannons. But, it is far easier at a beginner level to win by turtle & tech than to play conventionally, so money maps tend to favor these kinds of tactics at that level.
The type of map and experience you choose for yourself is up to you, and e.g. the vast majority of recreational Starcraft players prefer money maps because those simply the game to an extent that they don't have to learn some aspects of the Big Five. My only strong recommendation is that you start with land maps, since island maps add a whole new level of complexity and at beginner level usually involve memorizing some canned build order and attack regardless of the situation.
RUSHING

One of the frustrating parts about Starcraft is learning to defend against rushes. Even new players can learn some build order that will work against most players since some attacks are easier to execute than defend against. A common one is a zergling rush where you don't make any drones and just build an early spawning pool, this is a "do or die" attack but it often works against recreational players. If you follow the Big Five, you should be well equipped to deal with any early game attack. If you are attacked before you have many units, use your workers for defense. If you are attacked and have units but don't have enough, the solution is NEVER to build static defense. Watch the replay and see how he got so many units, it's likely that he either has better economy management, or more unit producing structures. For example, if you build a cybernetics core and gas for tech and he builds 2 gateways, then you will probably get run over by superior forces. Just modify your build order next time so that you don't tech as fast, but instead make early units. Just remember, there is NEVER a need a to build static defense to stop early rushes in recreational level. You should always be able to adjust your build or use workers.
ADVANCED PLAY
If you want to learn more about advanced tactics, I would recommend watching replays on sites such as WGTour ( http://www.wgtour.com/rep.php?datab=broodwar ). Just click on the replays and save them to your "maps" directory. Watch how the pros play, and ask questions here about things you don't understand and we'll be happy to explain.
CONCLUSIONS
Overall, pay attention to your resources and learn by watching your opponent's replays when you get beat. Ask questions here for anything you're confused about. Check out the Starcraft Compendium ( http://www.battle.net/scc/ ) since it overall has pretty good advice. Get good at the Big Five. Watch your replays afterward to make sure you are actually building peons nonstop and that you're not letting money stockpile. Good luck.
Shockwave[xpow] made that got stickied in the B.net forums, copied from www.teamliquid.net reposted by EvilTeletubby
I see a lot of threads lately that are "Why did I suck in this game?", and then the game is so bad that you can't give a specific reason because there are too many. I'm going to give tl.net the advice I give everyone who asks me to watch replays, and hopefully it will do some help to someone.
In order of decending important, you should be thinking about the following things:
1. Always be Doing Something.
As I see it, there's only ever three things to be done: Attacking, expanding, and teching. If you're not doing one of the three, you're doing nothing. I see this a lot in low level replays; people tech quick to Lurkers and then sit at home with them. They don't go Hive,

they don't expand and they don't try to break their opponents expansion - they do nothing.
By the same logic, a containment is doing you no good if nothing is going on beyond that containment. If you're not holding up for more expansions or more tech, that containment is pointless.
You should note that Teching means teching NOW, not in 5 minutes. If you're "going to be" teching, you're still not doing anything.
There are two times that I can think of when this wouldn't apply. Those are the time when you are building up for an attack, and once the late game kicks in and resources are getting low.
Try to think about this during the game. Make sure you're always doing something.
2. What's your underlying game plan?
It's ZvT. Instead of powering Drones off of 3 Hatcheries, you got Lurkers quickly off 2 Hatcheries. Now what? Why would you use this build? Either to break his natural, or secure more expansions for yourself. It doesn't make sense now to add many Hatcheries and get many Zerglings. If that was your plan you should have added the Hatcheries before Lair.
This happens all the time to one of my friends. He's good, but whenever I watch a replay he needs help with, I ask him "Why'd you do that?" and "What's your gameplan?". He can never answer. You should be able to watch your own replays and be able to explain your plan to yourself.
3. Adapt
Now that you stole build orders from replays to satisfy #2, it's time to adapt. In ZvT, it's 3 base (2 gas) Zerg versus 2 base (2 gas) Terran. You were planning on going Hydralurk until you scouted Terran with 6 Barracks and 2 Factories. You're going to make life easier if you switch to Lurkerling.
Sometimes you have to use Ultras. Sometimes it makes more sense to use Defilers. Sometimes it makes more sense to use both. Sometimes you don't need Hive tech (rare). If you feel Terran is going fast Tanks and you just stick with your 3 Sunkens and Spire, you deserve to lose because you didn't adapt.
So, have your general cookie cutter builds, but you have to stray from them when you see Terran went 1 Vulture into 2 Port Wraith, or basically an unorthodox build.
Sorry all my examples are ZvT just because I have that on my mind for some reason.
4. Macro & Micro

Now that you've done 1-3, you should start worrying about macro and micro. I see a lot of people starting with macro when people ask for help. I think it's much more important to be "always doing something" than having good macro, that's why I put these so far down the list.
So, if you watch your replay and you think you did all 1-4, then ask for help. I can pretty much guarentee that if you are always doing something, following a game plan, and adapting your build to counter his, you won't have a replay that you still need help with.Protoss Build Orders
Posted by Chill www.teamliquid.net
StarcraftBW Macro Guide Originally Posted by TwoTimer www.blizzforums.com
This is for you guy’s to practice! Especially if your new!
The way to the exercise without a computer is to do it a single player game. Type in “there is no cow level” after you start it then continue.
Essay 1:
The game of StarCraft has been around since 1998, and there have been dozens and dozens of bugs that have been fixed. Maps have evolved, and evolved again. Great players have come and gone, and each added something to the game. Play styles have come and gone with each patch that changed balance. However, there is quite a bit of common ground to be reached among all three races - Protoss, Terran, and Zerg, and this guide will reveal to you the common ground and principles upon which this and most real-time strategy (RTS) games are built. APM is not the key to the game as many may think, its using and even abusing all the shortcuts the game offers that increases speed. Your recorded APM will increase accordingly as you take advantage of the shortcuts. Exercises will be either geared toward one of the three races, or will take advantage of all three races at the same time. Whether you're a one-race player, or play two or three of the races, all exercises must be completed. Use the training map provided to complete your exercises. Objectives will be listed at the bottom of each exercise. Read each exercise completely before you begin. You may not move on to the next exercise without completing each objective in the previous one. Be warned, some of this might be boring, but nobody said getting better at anything, whether sport or academic, is always fun. So you know, press Ctrl+X (where X is a number) to assign a numeric hotkey to any unit or building.
Exercise 1 - Worker Race A:
Send your workers to mine, make a fifth worker, hotkey your production building (nexus should be on 0, CC or hatch on 0 or 1), and set a rally point for it between the building and the crystals. Using your favorite race (P/T/Z), build workers constantly until you

have near 100 crystal. Use your newly created hotkeys to save time making workers. You can now make workers without your screen being on the nex/hatch/cc if you use the keyboard shortcuts for workers (p for probe, d for drone, s for SCV). Add to your supply limit by making a pylon/overlord/depot, then max out your supply. This is the first and last time you will hit the supply limit for this exercise. Scout with a worker at this point by using the minimap, go to all the other bases so you know where to expand to. Expand to the nearest expansion, working your way away from your main base.Once ur supply building finishes, continue making workers until you have nearly enough money to make another worker building. You will figure out from trial and error what this number is. Send a worker to your natural and start another production building. Hotkey that building now. When that building finishes, send half your workers to the new building to mine and set rally points accordingly. Continue making workers at both buildings. Watch your supply, make pylons/overlords/depots as needed. Remember, nexuses give 9 supply, CC's 10, and hatches 1. Once you have roughly 20 workers in each base, send each additional worker built from that base to one that's lacking enough workers. The base you sent it from is now saturated, you wont gain money faster from sending more workers to mine at that particular base.Continue making workers, supply buildings, and nex/hatch/cc's at new expos as money allows until you reach 200/200 supply (all workers). At this point, stop, save the replay if you wish, and note how long you took to max out on the timer.
Objectives for Exercise 1:
1. You set a hotkey for every nex/cc/hatch you built, including the original one that was given to you.2. You set a rally point for every nex/cc/hatch you built, including the original one that was given to you.3. You sent workers from your nearest base to each newly completed base, a process called maynarding.4. You used the hotkeyed production building(s) to continue worker production (hotkeys do not do anything for you unless you use them). The nexus or CC light never went off, you never had an idle larva for more then a few seconds.
Essay 2:
You have just learned the basic underpinnings of quickly creating economy for your favorite race. You should have noticed how you always had money once you got the 2nd and 3rd production building online, and therefore had no excuse for hitting the supply limit. I hope you started to learn how to manage base saturation, by spreading your economy out equally among several bases. Congratulations, you have just learned with professional accuracy, most of the double nex/cc/hatch build order if you completed all the objectives. Of course the build order continues from there to include unit production buildings, but you learned the basics of it. The next exercise will add a little complexity, by taking gas into the equation. Again, read the entire exercise before you begin.
Exercise 2 - Worker Race B:
Go back and complete exercise 1 with the other two races. Now, just like exercise 1, complete exercise 2 with your favorite race in the same way with only one difference. After you start your second nex/hat/cc, throw in a refinery/extract/assim as money allows. Once the gas building finishes, pull 3 workers off your nearby mining and send them to collect gas. The reason for making the 2nd worker production building first is because you will not hit the supply limit a second time this way. If you went the gas building first route, you would have to add an extra pylon/ovy/depot before getting the 2nd nex/hat/cc down, which would slow down your worker production. Otherwise, use all the techniques learned in exercise 1 for this exercise as well. Its virtually the same exercise only with the addition of workers collecting gas.
Objectives for Exercise 2:
1. Successfully complete Exercise 1 and its objectives for the two other races you did not choose (This will add a measure of versatility to your game by allowing you to learn and use hotkeys/shortcuts all over the keyboard. p for probe is not near d for drone or s for SCV).2. You placed 3 workers in each gas expansion you started up.
Essay 3:
Well now that you've added gas to your worker production, its time to begin focusing on scouting a bit. Until now, you have just only scouted the map, saw the expansions and where they are on the map by using the minimap. Now we will start doing something with the scout unit, as you will begin how to really scout in the beginning of the game, to gain more information as to what your opponent is doing, and eventually learning harassment techniques. Before that, and you guessed it, you have to complete exercise 2 with the other two races you didn't complete it with yet. Once again, completely read through the exercise before attempting it.
Exercise 3 - Waypoint Scout:
Complete Exercise 2 with the two races you did not complete it with as of yet. Now do exercise 2 again with all three races, with this stipulation. Hotkey your scout worker (for protoss, 1 is a good number to use for it, go with what your comfortable with however for the other races) For protoss, build a pylon near every mineral line you scout except your own main, nat, and min only (in such a way that they do not block the creation of a nexus in that base). For terran, build a depot near every mineral line you scout. For zerg, simply float an overlord over each mineral line, scout the islands last. Disregard the islands for now (p and t only), only zerg can scout them at the moment. For your information, thats 9 pylons/depots in a base other then your own, and 11 mineral locations to float an overlord to. Once you have sight of every ground expansion, with your scout worker selected, hold shift and right-click every expansion on the map.
Congratulations, you have just learned how to set waypoints, the first step to advanced

worker scouting. Waypoints are exactly how players keep their scout alive until after their opponent started teching (i know you have seen replays with early marine(s), lings, or even zeals chasing workers around the base). If you really become good with scout worker waypoints, you can keep it alive until your opponent makes his first speedy range unit (tank for terran, goon for toss, speedlings for zerg)
Objectives for Exercise 3:
1. Successfully complete all objectives in Exercise 2 for all three races.2. Successfully hotkey your scout worker (probe/drone/SCV).3. Build a pylon/depot, or float an overlord to every mineral line in the game.4. Successfully set waypoints with your scout worker.
Essay 4p:
You have completed the basic tier of exercises, which focuses on 1-supply worker units. You can't expect to keep up with more expensive 1 or 2-supply units if your worker game is not up to par. From here the guide will split up into the three different races, to focus more on tasks and units associated with each race. At first will be making basic tier units out of one base, with increasing complexity, followed by more high-tech and multi-base exercises. Read through your race's section of each exercise before attempting it; the exercises will be broken down into P, T, and Z, representing the Protoss, Terran, and Zerg respectively. You will not utilize vaspene gas in this exercise.
Exercise 4p - One-base Zealot Pump:
Warm up by completing exercises 1-3 with the protoss. Open normally as you would with protoss, making probes (one at a time) until you can afford a pylon. Waypoint scout and do whatever you have to do as if it was a normal 1v1. Continue with probe production until you are able to compile enough minerals for a gateway (which should be very soon after the pylon finishes).
Warp in a gateway, then when you have enough money for another, start another. Hotkey the gates to 1 and 2 (or 2 and 3 if you assigned a hotkey to the scout) as soon as they start warping in. In case you did not know, you can hotkey or set rally points for protoss buildings as soon as they start, you do not want to be caught assigning a rally location or a hotkey for a building that is finished. One of the common macro errors that is made with protoss is setting a rally or a hotkey to a building that either should be pumping out something, or a probe that should be making a pylon if it is pumping out something. Make a zealot out of your finished gate, the quick way is 1z/2z/3z depending on what hotkeys you set for your gateways. Don't forget to watch your supply and slap down a pylon somewhere around or just before your first gate finishes, otherwise there will be a lapse in either your probe or zealot production. Watch your probe production, when you have 20 probes or so, stop making them, you will not expand in this game.
Once you have navigated that tricky situation with the pylon in between the gateway

timing, and once you can pump zealots simultaneously out of both gateways, the key to the exercise and the protoss zeal rush comes. You must make a pylon every round of units. Many players know 2 zealots only take up half your supply (which its true), but they forget you can build two more probes while you make another set of zealots, which takes up 6 supply. You cannot pump another round of zealots once these finish unless you added supply for them, and since a pylon takes the same amount of time as a zealot, you lose a round of zeals every time you mess up, which basically can kill your rush. Even if your zealots die rushing, and you see you have plenty of supply leftover from the rush, just having the supply out there can speed your tech, since you will not have to make a pylon most likely until after your tech buildings have finished.
Anyway, continue pumping round after round of zeals + pylons + probes (until 20 or so), once you have enough money to add a 3rd gate (roughly 200 minerals leftover after a round of units), add a 3rd gate and a pylon. You will need the pylon so you can actually utilize the gate as soon as its finished. Hotkey it to 3 or 4, depending on your configuration. Pump zealots (and pylons) out of increasing gates (you will not be able to support more then 4 gates off of 8 mineral patches) until you have maxed out.
Objectives for Exercise 4p:
1. You properly warmed up before attempting the exercise.2. You did not hit the supply limit after both gateways finished warping in.3. You hotkeyed and rallied all gateways and your nexus and used keyboard shortcuts to make your zealots and probes.4. You made at least 20 probes and 4 gateways by exercise's end.
Essay 4t:
You have completed the basic tier of exercises, which focuses on 1-supply worker units. You can't expect to keep up with more expensive 1 or 2-supply units if your worker game is not up to par. From here the guide will split up into the three different races, to focus more on tasks and units associated with each race. At first will be making basic tier units out of one base, with increasing complexity, followed by more high-tech and multi-base exercises. Read through your race's section of each exercise before attempting it; the exercises will be broken down into P, T, and Z, representing the Protoss, Terran, and Zerg respectively. You will not utilize your vaspene geyser in this exercise.
Exercise 4t - One base Marine Pump:
Warm up by completing exercises 1-3 with the terran. Open normally as you would with terran, making SCV (one at a time) until you can afford a supply depot. Waypoint scout as if it was a normal 1v1. Continue with SCV production until you have enough for a barracks (which should be right after the depot finishes.
Build a barracks, and when you have enough money for another, start a second (assign both barracks a numeric hotkey along the way). When the first finishes, make another

depot with that SCV and start pumping marines out the barracks. Assign an SCV to continuously make depots until you reach 200 supply. Add an extra barrack if you have 200 mineral or more leftover after each round of SCV and marines. You may stop making marines once you have at least 20 mining SCV (do not include the ones building depots or barracks). Continue pumping marines and SCV until you max out. You should be able to house at least 5 barracks by exercise's end.
Objectives for Exercise 4t:
1. You properly warmed up before attempting the exercise.2. You did not hit the supply limit after you started your first barrack.3. You hotkeyed and assigned rally points for all of your barracks and your command center.4. You built at least 22 SCV and 5 barracks by exercise's end.
Essay 4z:
You have completed the basic tier of exercises, which focuses on 1-supply worker units. You can't expect to keep up with more expensive 1 or 2-supply units if your worker game is not up to par. From here the guide will split up into the three different races, to focus more on tasks and units associated with each race. At first will be making basic tier units out of one base, with increasing complexity, followed by more high-tech and multi-base exercises. Read through your race's section of each exercise before attempting it; the exercises will be broken down into P, T, and Z, representing the Protoss, Terran, and Zerg respectively. A quick reminder about the zerg exercises from this point on... they are not designed to follow a designated real build order unless indicated, they are exercises designed to help speed your unit pump, not teach you a build order. Unlike the more rigid terran and protoss exercises, these will be more liquid, allowing you to do what's comfortable for you, with established goals by the end of the exercise. Here you will pump zerglings (with the speed upgrade) until you reach the supply limit, with a minimum drone number.
Exercise 4z - One base Zergling Pump:
Warm up by completing exercises 1-3 with the zerg. Open normally and scout with your overlord, making drones until you hit the limit then adding an overlord with your next larva. Pump more drones until you have enough for a hatchery. Start a hatchery next to the original, pumping more drones until you have enough mineral for a pool. Afterwards, once you obtain enough for an extractor, make an extractor and put 3 drones to collect gas from it (Once you reach 100 gas, pull the drones and send them to mine again). Make sure you do not hit the supply limit anymore with drones or zerglings, time your overlords accordingly. Once you have your 2 hatcheries and empty extractor (~100 gas mined), pump zerglings until you max out. Make sure you mix in drones, as you do have a 20 drone minimum. Add hatcheries as necessary, and don't forget to rally and hotkey your hatcheries. With your overlords, they must all have a purpose. Have an overlord over every expansion in the game by time you max out.

Objectives for Exercise 4z:
1. You properly warmed up before attempting the exercise.2. You did not hit the supply limit after building your second overlord.3. You hotkeyed and assigned rally points for your hatcheries.4. You changed rally points for hatcheries as the exercise wore on based upon what you were building (drones should be rallied to the patches, zerglings to the ramp or wherever you choose)5. You collected enough gas for the speedling upgrade then send those drones back to mine.6. You had 20 drones mining by exercise's end, and an overlord over every set of mineral patch on the map, including islands.
www.teamliquid.net Posted by Myrmidon
There's a somewhat accepted Zerg build order triangle: 12 pool -> 9 pool -> 12 hatch -> 12 pool, but that's a simplification, of course. Other builds you see are 4-5 pool, 7 pool (which beat 12 pool if scouted late), some kind of fast gas after overlord to 12 pool, and gas right before pool. 12 pool can continue on with gas or hatch afterwards, with 12 pool -> 12 hatch expo being fairly common. 12 hatch is usually 12 hatch expo. And 9 pool often is 9 pool 9 gas 8 lord speedlings. Uh, check the recommended threads for an idea of how to play 12 pool against 12 hatch or vice versa.
Anyway, 12 pool's the build you probably want to learn first.
edit: General theorycraft premise of the build order triangle:
12 pool wins over 9 pool because of the economic advantage--that is, unless the 9 pool forces the 12 pooler to make a sunken, in which case the advantage is mostly negated. 12 pool gets a second hatchery much faster than 9 pool, so that also translates into a larvae count advantage. 9 pool has the opportunity to lair faster, but if earlier spire tech doesn't do damage fast (which it often doesn't, considering flying time between bases), and initial zerglings don't slow the 12 pooler down, the 9 pooler should be in for a very rough game. Traveling distance > 9 pool usually.
12 hatch wins over 12 pool for much the same reason as 12 pool beats 9 pool above. The 12 hatcher's larvae count lead translates into a quick (before lair tech shows) zergling count lead, which can be lethal. By forcing the 12 pooler into a mineral-based game, the 12 hatcher can abuse his build's strength. Spending money on scourge rather than muta should be especially common in such a situation. If the 12 hatch is at an expansion (on a larger map), however, then the 12 pooler has some harassment options--a couple sneaky lings can offset the economic advantage. It's not like the 12 hatch expo player gains any economic advantage from extra minerals, though...at least until he survives to midgame and can slowly start tapping that extra gas to catch back up and surpass, helped by the pressure of zerglings, the 12 pooler's initial gas lead.

9 pool beats 12 hatch obviously because the 12 hatcher has no lings to defend. Sucks. A 12 hatch expo usually cancels the expo hatch, tries to rebuild a hatch in main, and generally defends, his economic advantage nulled and with slower gas, until he ultimately gets raped.
Super Tips by Dees!
Rant
I'll start something similar to Salv's thread (sue me for copyrights) - but with more complaining. Anyways, post general questions here that you figure might help other Terran players too, and I'll add some stuff that comes to mind also.
I'll also use this thread to pass some information to those that haven't been in the loop regarding my current SC101 presence - or the lack there of. I broke my ankle the other day, and because I play with my feet to give people a fighting chance, I'm unable to play for a while.
Anyways - I'll try to keep this thread up to date and if you have some replays that need to be analyzed, you're always free to post them to the replay section and I'll check them out providing there aren't in huge numbers. Don't post wins.
I'll start with some building placements like Salv did (I can hear the MPAA on my doorsteps already) - tomorrow that is, when I get Starcraft installed on the computer I'm currently on. Post questions and requests as to what you'd like to see and I'll see what I can do about it.
-Dees 2.4.2008
First update done.
-Dees 3.4.2008
Tutorials
TvP
Some building placement tips
The general idea: You want to have as many production facilities on screen at one time as humanly possible. This makes it easy to macro as you don't need to scroll your screen about, and can just click through all of them after focusing on them with F-keys. At the same time you want your units to move as fast as possible towards your ramp, not get stuck on buildings or other slower units.

I won't go into details about every possible way to block a Zealot, or how to wall-in in every map possible, there are plenty of guides for those already. I'll cover the first one slightly, and then move to often ignored area of smart factory placement. My examples are in Python but can be easilly converted to work on other maps too. I chose Python because all 4 bases favour slighly different style of placement to get maximum effect, the bases are small enough that you can't place stuff just anywhere, and it's a well known and much played map.
Exhibit A:
Python starting place at 12.
We assume that you build the bottom 2 supply depots and the rax first. In this situation the lines marked in the picture apply. Even though the gap between the two supplys looks huge, Zealot can't pass through it. After these 3 buildings are in place, there's still room for zealots to move from north, but you should be able to hold them off with scv's and marines with relative ease.
After third supply (next to gas) and two factories with machine shops have been added, Zealots can no longer pass to your scv-line from anywhere else but gaps in the minerals. When the game has progressed so far you're rarely afraid of zealots anyways, and the buildings are already blocking your scv's free movement to go build stuff, move to expansion or to escape from reavers. When zealot threath has passed, simply lift the rax, and your scv's have a good moving path to rest of your base.
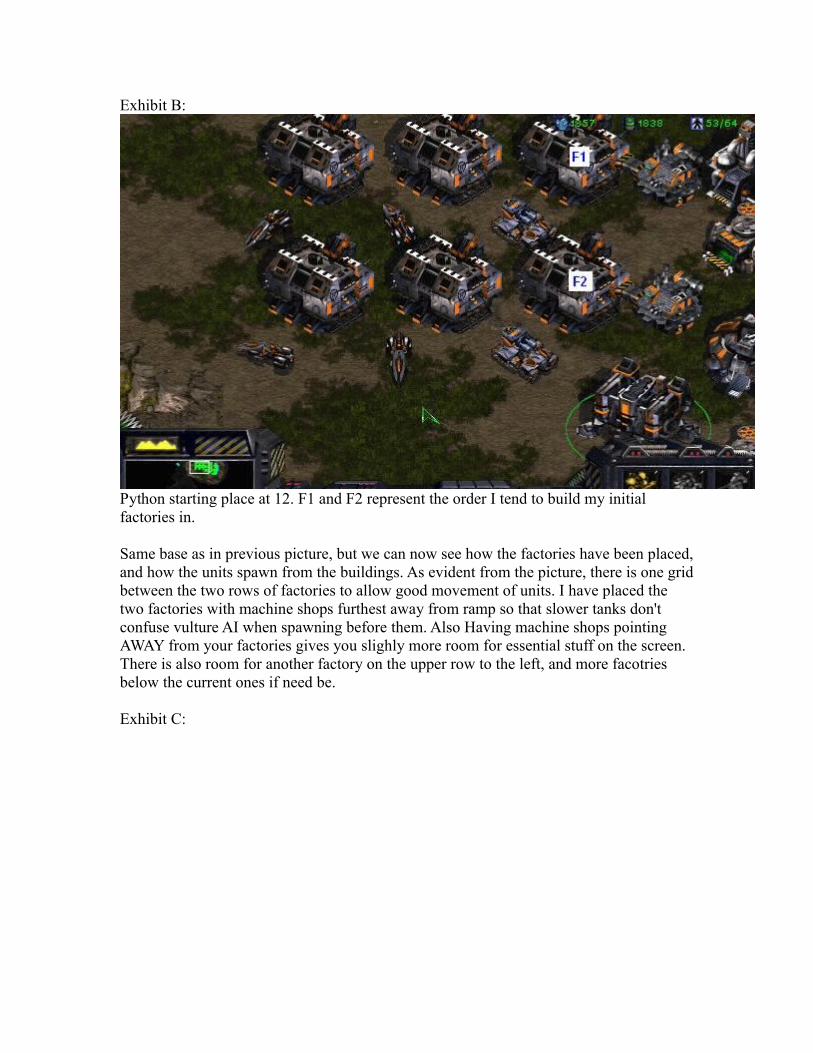
Exhibit B:
Python starting place at 12. F1 and F2 represent the order I tend to build my initial factories in.
Same base as in previous picture, but we can now see how the factories have been placed, and how the units spawn from the buildings. As evident from the picture, there is one grid between the two rows of factories to allow good movement of units. I have placed the two factories with machine shops furthest away from ramp so that slower tanks don't confuse vulture AI when spawning before them. Also Having machine shops pointing AWAY from your factories gives you slighly more room for essential stuff on the screen. There is also room for another factory on the upper row to the left, and more facotries below the current ones if need be.
Exhibit C:

Python starting place at 9. F1 and F2 represent the order I tend to build my initial factories in.
Quite similar buildup as in the previous starting place, but with a twist. If you place the F2 factory too much to the left, you either end up blocking unit movement by that closeby gas, or just can't make as many factories in a row. Yet again there's plenty of room to add more facts below the current ones and moving patterns are clear. Vults first tanks last.
Exhibit D:

Python starting place at 6.
In this starting place we can use some advanced trickery to our advantage. We know that units want to spawn at the bottom left corner of the building, and if that is blocked, they will rotate counterclockwise untill they find a free spot. This we put together with the bottom of the map and we can force the units to another (better) place. As Evident from the picture, factories F1, F2 and F3 have puked their insides on top. Notice the vulture spawn of F4 in the corner. Yet again pathways are clear, Tanks are in the back and vultures in the front. Also F5 and F6 could easily house a machine shop without it affecting the unit flow. Also notice there is room for scanner.
Exhibit E:

Python starting place at 3.
In my opinion the hardest starting position on Python to place factories nicely. You'd want the first factories to have machine shops and nearby to the ramp and CC, so I usually place them in this fashion. This slighly gimps the moving patters of factories 8 and above, but that's an endgame problem. You could use similar way to the other places here to counter it, but I personally rahter place my bets on early/midgame and build in this fashion. This is also sometimes the only way to build facotires when the map provides virtually no room in horizontal dimension. Notice that I could have built my two topmost factories next to each other, but then my SCV's couldn't run away from reavers if need be.
I'm being 2 gate zealot rushed, what should I do?
There's quite a few variables that affect to the perfect response: how early you scouted it, are they proxy, the distance in overal, have you walled in, can you even wall in, what buiild order wre you doing, has he found you, etc.... The most important two are however:a) How early you spot it.b) Are you already walling? (we presume the map allows a wall if this is the case)With different variations we end up with four (4) different situations, we'll go over all of these from best to worse.
This may be a good place to talk a bit about the dilemma of TvP early resource management. You'd ideally want to have 200 minerals, 100 gas, 1 supply depot ready and one building plus constant SCV-production when the Barracks finishes. This takes a bit of practice to achieve, but even then you can always alter it a bit. That second supply at 15

or 16 (depending if you need or think you need an early marine) should never be sacrificed. Constant SCV-production is also something you definatelly want. So in the case of early rush, you can make the first factory a bit later, in favour of getting one Marine before it. It may very well save your hide in a tight spot. But after that first Marine, you really need the factory up ASAP or Dragoons will be quite annoying. Back to fact-tracks:
1) I spotted it early - no zealots are out yet - and I'm already walling in.Peace of cake: You'll just complete the wall (presuming his probe doesn't get in to block it, in which case look at situation 4) and post one marine on hold position behind it. If he's stubborn and tried to break it, just repair with couple of scv's, but don't start panicing with going early vulture instead of tank, or massing marines. You have the advanatege if he wasted momentum on 2gate start.
2) I spotted it a bit late, zealots are already on their way, but I was walling in.Time to panic. In the worst case your Barracks isn't ready and you're completely missing the 3rd supply from the wall. Select the SCV which is building the Rax, hit ESC and start building the 3rd supply with that while bringing a new SCV in to complete the Rax. If the zealots are especially close, you may need to sacrifice constant scv production to get that 3rd supply, and might be a bit late with first Factory. But yet again, you should be able to get one marine out to shoot at the zealots, and SCV's repairing if he's bull-headed.
Next two are micro battles: no building placement will save you if your marine micro is very bad, but there is always things you can do to tilt the tables a bit.
3) I spotted it early - no zealots inc yet - but I haven't walled.If you think you have gosu marine micro, skip to part 4.Otherwise, don't lose a game being too cocky, and just make a bunker in the middle of your mineral line. Force your SCV's to other end of the mineral path by clicking them there to clean some room for a moment, and place a bunker. Now your only problem is microing marines in and out of this stronghold as you can't place factory so close that it too would be protected. This is however quite safe, and a lot easier form of micro than the last option. Don't forget the 3rd supply depot if you keep making marines and scv's constantly, many a people get supply blocked in this situation because of the intense micro - and can't make the vulture when factory finally completes.
4) I spotted it late - zealots are closeby, and I haven't walled.This is where good building placement comes along. You should delay the first Factory in favour of getting the first marine out as soon as the Rax finishes. Rarely there is a map where you couldn't build decently defendable position with one rax and two supply depots. This is what you need to have, and it's just dull practice on maps to test them out until you know how to get one. Some positions are far from perfect thou, and you are forced to micro the SCV's as meatwall between the zealot and the first marine. Remember that clicking on minerals when you have SCV's selected, will make them slide through units, and in the case of zealots, mess up their moving for a while. Also ~5 SCV's surrounding a single zealot will hurt it a lot. Use your short supply line to your advantage,

and make a vulture instead of machine shop + tank if situation looks dire.
The absolute worst case scenario is him blocking your wall-in with a pylon, in such a way you can't rebuild the wall (by eg. lifting Rax to a new position and placing more supply depots) AND you didn't spot the early rush. If this happens, the pylon blocking your wall should ring all the alarm bells of pending rush even if you hadn't seen it yet. He may even try to get shield battery and/or cannons to supprt this. Now it's an all out micro war, and he has the advantage. It's essential to bring 6 or more SCV's to fight this threath (block the ramp if you can and get the probe down before it places down anything else). You still don't want to sacrifice SCV-production, but you're going to need constant marine pumping (dont' forget 3rd supply) and place the factory near the CC, but opposite side of ramp for easier protection. You don't want him cannon pushing your factory before you get that tank+siegemode out if things go from bad to worse.
ps. I might add pictures to this section the next time someone zealot rushes me.www.teamliquid.net Posted by DaZe
Carnac asked me to write a TvT guide here on tl.net since there wasnt any, and I agreed to do so, I even made a TvZ and TvP guide for those who are interested :o
Unfortunately I just wrote around half of it but by a mistake I pressed some shit which made me lose everything (fuck, should have wrote it in word), so I typed it really fast now (probably are some typos!)
TerranVsTerran: This is probably my worst matchup, even though Ive won most progamers and semipros in this matchup.
Keep in mind that as all other mirror matchups it depends A LOT on map and experience. So my gameplay in TvT might not work at all for you guys. I wont write everything to do in all situations coz we all know many games of terran vs terran are long games with drops which differs sooo much its not even worth mentioning. However, I remember when I was new to tvt and I always thought the beginning was the hard part, and not lategame when its all about droptiming.
In TvT (on maps such as Luna/Longinus/Tau Cross/Rush Hour etc) I mostly stick to 3 basic openings. Most tvt games are decided after the first 10 minutes, depending on adapting to your opponent and getting earlier expansions / containment
1. 1 Fact, 1 Port:
When I make 1 fact+port I always try to use the 11gas/11rax build. I make supply at 9, wait to around 230 or so then move out with 1 scv to build rax, the other one to build gas.
When your next scv drops out, I recommend to scout with it directly. Some of you may wonder why I wanna make a 11 gas / 11 rax build. Thats coz I want my factory to be

finished as early as possible. There are 2 main reasons for this. 1. You wont have a hard time vs a 3-4 rines + 1 vulture rush2. You will be able to do a 3-4 rines + 1 vulture rush (depending on your opponents bo of course)
If you scout and see your opponent doing a late first factory, and you're not too far from each other, you can try a rush. I often just make 2 rines unless I scout him early and take notice of the late factory, then I might land my rax somewhere and build another rine.
However if you dont wanna rush and see a 2 fact build, with or without armory. I would recommend setting up shop on your starport before making your first wraith. Some people wouldnt agree but trust me that its way better to surprise your opponent with a little later wraith and have cloak then it is to get 1 singularly wraith fast and get spanked on by a goliath or two. You should be able to hold off a rush with 1 or 2 tanks, or 1 tank 1 vulture. If not, you should have made some more rines or picked a stupid opening on a map with big choke.
If you hold off his attack he will probably back off and put down some mines outside of you, just so you cant build your cc there. At this point (when you feel secure), start making your expansion. If you by any chance saw him doing something else than a 2 fact opening (a 2 fact rush opening) you should make your expansion even earlier. Lets just say, build your cc as soon as possible, but dont build it unless you know you can handle an attack from him. Remember to make academy as fast as possible once you start your cc to scan either mines or what he is doing.
When your first wraith arrives, go with it to his base, preferably build another one. Your rax by this time is hopefully floating either above his base, or somewhere where you see him move out. By this time he has with 90% certainty started making his own expansion, hopefully yours will be ahead, at least if he made a 2 fact opening. He will always have made scanner or turrets. With your first wraith just scout a little, if he doesnt have anything against it, start hitting a scv. But he will. Either he has ebay so he will start making a few turrets (bad timing judgement from him) or goliath + scanner. If he has scanner and goliath, try cloaking and making him scan, then move back to base asap. When you get about 2-4 wraiths (depending on if you keep producing them or wanting to make earlier and more factories (I strongly prefer factories), I have this little trick which can be devastating for your opponent. Scan his main or maybe natural and see if he has turrets or scanner. If bad turret placement try sneak some of your wraiths behind mineral line and press hold, often people dont really care where their 2 turrets are (a lot of supply's in their way or too stressed to care).
If this is the case, let them be there for some time, until he scans. If he didnt build turrets and just scanner, try to make him scan your wraiths, then back them off and come back a few seconds later (he will probably not have built more than 2-3 goliaths so you will survive after their first hit, assuming he hasnt uploaded goliath range but he wont that early vs just 1 starport.

By this time your factories should be done, I prefer 3 or 4 of them with shop on all. mass tank (unless he is making 2-3 starports hidden wraith, then you make 5 factories with goliaths and shit)
You should also be able to move out with a few wraiths, or you just have 1 left but it doesnt really matter. Hopefully he wont have any rax / ebay near your base coz of your wraiths earlier, and his scouting scv will be searching for an additional expansion from your side.
At this point you can either try to contain him or get another expansion going. If you feel you can survive it, do both. He shouldnt be able to have a contain on you yet, but if he by any chance do, try to range-micro his turr + units with your tanks. (use wraith to see further than he does).
You must also remember that scanning is probably the most important thing in TvT. Just keep scanning his main and natural (sometimes some expansion if your scouting scv cant reach there coz he got units blocking). But I would recommend scanning main + natural at constant bases. This way you will have a easy time to adapt to his strat. If you see dropships, just set up turrets + a few sieged tanks at some places and you should be fine (while expanding more). Most terrans dont try to drop this early coz their second expansion will be late and its risky coz you cant possibly have so many dropships to make a huge difference, unless you have an advantage from the beginning.
I normally start making dropships after my second expansion. I try to hide them until I get at least 4 coz this late in the game 2 or 3 dropships wont do much dmg and if you lose 4-6 tanks it can hurt you alot after just doing a 1 fact build.
When you get your dropships ready, try to make as much dmg as possible with your first drop attack. I know you always want to make as much dmg as possible but really, try to scan as much as possible before showing them (if you by any chance have been able to hide your dropships, or he made bad scans, it should be relatively easy to make a good drop). Most people, especielly inexperienced one's, will believe you are going to drop one of their expansions, assuming that they have more than 1. Thats why I like to drop the main, in tvt all players build most buildings in their main, so its pretty certain to say, he wont have defense at all places in the main. If he has good placement on tanks it can be enough to just drop at the range of some supplys, just to keep him busy and afraid.
Be careful though so you dont make what I call a "desperation-drop" and loses everything, coz then it will be very hard to turn the game around. If you feel he is blocking all possible drop-opportunities (I doubt he will, not even progamers do that), but theoretically, if he does, just drop off some units at another expansion (if this is a 3 player map I strongly suggest you expand that other main).
The 3 player map Ive played most tvt on is rush hour and if the game is longer than 14 minutes, It always turn into a fight over the other main. If you secure that exp with defense and dont lose your main, it shouldnt be a problem for you. Your opponent will have to drop or attack somewhere and he will in 80% of the cases, try to attack the "new main" or your real main.
When it comes to upgrades I always just upgrade weapons at first, +1 pretty early after your factories are up, and then a science facitily when my other expansion is up. Remember that +2 tanks can be a huge advantage! Now to my next opening
2. 2 fact rush:
When I wanna make a 2 fact rush opening I also do a 11rax/11 gas build. Mostly coz if I get my first factory up at least as fast as him, I will be able to make a shop instead of 1 fast vulture. (Should be able to do that if your factories finishes simultaneously, but if he by any chance is ahead of you, again he shouldnt!, then go for a vulture before shop)
When your shop is done, make 1 tank, upgrade mines and 1 vulture in your other factory. Your scouting scv (or floating rax) should by now have seen what he is doing. If he is fast expanding try to put a pressure on as soon as possible. If you see him doing a 2 fact build and DIDNT make shop before vulture on his first factory you should be in favour. I dunno if any you people saw my games vs mireille on dreamhack a few months back, but 2 of the games were decided exactly because of him doing a vulture before shop, which made my first tank to pop out earlier and my mine upgrade.
Once your first tank is out, head for his base with the rine/rines you have, 1 or 2 vulture + tank. If he is fast expanding I strongly recommend you get siegemode and ebay fast. siegemode so that you can attack his cc in exp from distance (first attack with vulture + tank, he wont have siege yet I promise!, put down as many mines as possible and let the tank hit his, remember to NOT die this tank, if he has 2 or 3 tanks and you cant get him to pull back completely, back off and put up a close containment.
You should be able to have put a few mines so he cant reach your tanks without going into them when his siege grade is complete, however he will probably have siegeupgrade before you do. so DONT have your units in range of his!I also said build ebay fast as well, this is because you should put up 1 or 2 turrets very fast at your containment if he by any chance went 1 or 2 starports really fast.
If you succeed with this containment or rush, the game should be over, I make shop on my other factory as soon as I see I have an advantage after my rush. You should also start your expansions when you feel secured.
I hope I dont have to explain what to do when your containment is in order, just keep massing tanks from 2 factories, build turrets around his base at all possible ways and get scanner. Once you get scanner try to find out what he is doing, he has mainly 3

oppurtinities at this point.
1. Mass units and try to break the containment with scv + units. Against this you wont have any problem if you just keep up your tankmacro.2. Making drops and either dropping off on another main and expandning there + dropping your expansion/expansions + main. Against this you should be fine if you just scout and defend properly (+ building turrets around his base)3. Mass hidden wraiths. If you dont see so many units or factories but still cant find those starports, just make some defense against that coz it can be a bitch if they show up from nowhere.Also keep in mind that this containment, whether it reaches his CC or not, should work the same. Of course it will be a lot easier if your containment is so close that you can kill his cc but its not always the case. Just set up the same containment a few paces back and it should work the same way!
3. 1 fact FE
This build order I use more and more rarely. Only on pretty big maps (for example Gaia).
Either you make a 12rax/12gas at the same time or you make a 11rax/11gas build. It doesnt really matter, your first factory should just be up so that you can either build 1 vulture and expand, or get shop and expand at the same time. If you are afraid by his rush / you scouted a rush. Be sure to make a vulture before shop and have some scv ready to repair.
Once you start your cc (as soon as you feel secured from rush, at most times when vulture / tank is building), its time to decide what to do next. If you see a 2 fact build and he didnt succeed or didnt even try to rush, you can expect an early containment on your ass. I often make 2 starports when my cc is building and stop building tanks for a while. Just make sure he doesnt see this or that he cant contain outside your base coz the twilight blocks turrets. (There is almost always some place where to build turrets though...)
Your biggest shot with this strat is to catch him off guard with his few tanks, maybe some vulture and some rine with your own 2 wraiths.Now he will either start making turrets if he hasnt already, if he has just hit scvs with wraiths. Or he will unsiege and back off. Once he backs off, you continue making wraiths but also add some factories, I would say add 2 or 3 and start making tanks as well.
If the game turns out like Ive explained your opponent will be defensive for quite some time. Now you should start another expansions and continue making tank + wraith in order to either put up a containment outside him or just mass units and eventually start making dropships. (A containment would be great in this situation since your opponent will have to stay in base for a little while)
Remember at this point your wraiths will most likely stop his drops as well but build a couple of turrets around the map just to get some mapvision.

Its most likely that your opponent will mass goliath/tank and eventually move out to try and break the containment. He shouldnt be able to do that if your factories turned up in time... just remember to keep expanding when you feel you are secured and he cant catch off guard.
If now by any chance your opponent had goliath or turrets when he contained you after the fast expansion, you have to get more tanks and factories so that you can break the containment. Hopefully you can use your range-micro with siegetanks to break out pretty early, assuming your wraiths kill off his ebay or rax (if he even has one there).
These kind of strats with tankrange can be a little difficult in the beginning but the key is to just move as little as possible while you see his units. dont try to be boxer and get it right on your first try, just coz you want to break out as soon as possible. Remember your tanks should be placed parallell to eachother so they all (at least 4 out of 5 or so) can hit the same lengths. If you do this correctly and good and break out, just play the same way I wrote about above, you will have more units and just contain him.
But be careful of some random tanks in the middle of the map when you are heading for his base to contain, as well as tanks which are hurt. Repair this early is mandatory!
If you decide to not make 2 starports, go for another factory while your cc is being built, and an armory so he doesnt surprise you with wraiths. I would strongly recommend a academy as well, so he cant use his tanks + sight of floating rax to pick off your tanks one by one!
If he doesnt contain you, just add more factories and move out to make another expansion and starport. Mass units and scan alot. Defend your units wel!
Most players will however try to contain vs a fast exp, and if they get it up just make 5-6 factories with tank/vulture (goliath if he by any chance have wraiths as well). Then move out with 8 scvs (DONT STACK THEM THEN ALL DIE ON 1 SIEGESHOT!), and all your units. Hopefully you will break through his containment.
Some people tries to drop if they get contained, and on some maps like longinus (where you cant really cut off the map with turrets + tanks as containment early), it can be really good. If you decide to drop, I would strongly recommend to expand another gas with your first dropships (a few tanks and some scvs in the exp). So that your opponent wont think you are doing an all in drop in his main.
Conclusion of TvT:I know I probably didnt cover a lot of scenarios, I just took the once I usually see on players, especielly non koreans. If you have any other situations you have questions about just write them in comments and I will try to answer them as good as possible
I must add that the fast exp strat can be really inconsistent and I rarely use it.

I also have to repeat that this mu is very experience-based and most people find it boring until they get pretty good / decent at it. I know that I kept writing about "when you feel secured", but I cant describe it any other way. Most of you people know the feeling Im talking about, and I dont mean it like "fully secured with 1000 turrets everywhere and 100 tanks"...
TerransVsProtoss:
I consider my TvP really good (lol no flame plz ;o). There arent many Protoss users outside of korea which I fear since Ive beaten all of them several times. My TvP is mostly based on macro, and I can honestly say there arent any good concrete ways to improve your macro. Its just to try to time your supply's and building units constantly. Practise gogo!
I mostly just use 2 main builds when it comes to TvP.
1. Fast exp:
I love to use the classic 12rax/12gas (at same time of couse, just like midas,boxer,oov does). Then when rax is done you put up factory and start making rines + another supply. I remove 2 scvs from gas a little while, when I have about 100 gas, and then put them on a few seconds later.Most players build different amount of marines when they wanna move out with 1 tank + 1 vulture (mine grade) + rines. On a map with a ramp, I mostly just make 4, sometimes 5. But on a map like azalea or longinus, I do everything from 5-8 rines depending on my opponents build.
I dunno if Im supposed to say this (plz dont kill me tt), but I rely on my read of the opponent and what I see with my scouting scv very much.
1 or 2 gates without range running on his cyb, you can pretty much assume he is doing some kind of dt build, maybe hidden templar archives and shit. Or he is just very late with range but most players now adays upgrade that really fast if they are doing a 2 gate build.
If you see just 1 gate without range he is definitly up to something, it can also be a dt build where he adds his second gateway later, or he is going for a reaver build. In both these cases you can move pretty far with your units and fake some kind of rush while expanding (but dont move too far so you dont have your units at home when reaver arrives!).
However, if you see a 2 gate build with range goons you can assume he will be going for the offensive strat and expand himself. Just be careful and lay down a few mines and try to sneak 1 vulture around his units so you can put up mines on some expansions or just wait for his probe to expand again. Or you just move with that vulture to his natural to

see if he is expanding, doesnt really matter.
Almost every game I fast exp I choose to make 2 vultures with mines, then I start making a tank again, so that if he has fast observers you will have something to defend yourself with. Siegemode can be good to upgrade as well, especielly if you dont see an expansion or you think he is making reaver.
Your ebay can be built at so many different times, but trust your instincts and if you feel something is wrong play safe and dont take anything for granted. At the same time dont kill off your economy just coz he might be a "known player" and you are scared, a 2 gate double expansion is very common.
I often make my second factory pretty fast, so that I will have enough units if he does a 3 gate +1 shuttle build or something weird. After that factory is being built, or at the same time, add more factories and additionally you should have 6 of them. I prefer 1 or 2 with shop.
If you wanna go for the strat with 1 shop, you must be really careful with your tanks and make constant tanks at that factory. When macroing this early, its really important you keep making supplys, if you by any chance get a supply drop, dont just make a supply with 1 or 2 scvs, make them with 3 or 4, just like oov does. After that you should have 2 scvs making supplys constantly. I really doubt you will do this perfect all the time coz not even the best progamers are flawless, so when you get a supply drop again, bring 3 scvs again and gogo.
If you do a 1 shop build (and 5 facts without shop) you dont need gas on your natural at first. If you go for a 2 shop build (and 4 facts without), you should build your gas pretty early after your expansion is up.
Now, some people love to harass with vultures. Personally I just move out with a few, perhaps 5-7 to scout and get some mapvision (of course if I see an oppurtinity I will take it).
If his goons are blocking the possibilty to move out with vultures and you dont see a shuttle nor zealots, siege up and move out with the tanks just so that they can reach the first 3 goons in sight or so. Now he will definitly move back, unless he was hiding his shuttle or zelots, but even if thats the case you should have a really good chance of winning the fight since your units are sieged and he is attacking, if not, you had poor macro :o.
Your scanner should be built so its done when you start massing units in your facts. Thats coz you will then have enough time and scans to look where his units / expansions are and your vultures will know where to move when harassing.
Now, when you move out with your units, its really important that you know where he is with his and what he has. If not you will be suprised with his attack coz he has observers

and will time his attack when you are unsieged, if this happens --> gg in most cases.
If you see his units are in the middle somewhere, for example on luna and you are about to move out. Go first with your vultures (not too far) but like half of the way where he is and put down a couple of mines. Now you should see if his units are heading towards the vultures, then you just siege. Go back to base and macro really quick then back to units. If he has observer he will mostly move back and just hit a couple of mines. Now trust your instincts again and if you feel that his units are pretty close, just unsiege a couple of them and move forward, also put down mines (not where your tanks are heading!!).
Also remember to bring reinforcements which is very easy in TvP, take advantage of it!
By now your second expansion should have been started (I usually start it at the same time I move out). I often add another 2 factories when my second expansion is done, and also 2 armorys.
Depending on my 1 shop or 2 shop build, I add some more shops. If you did a 2 fact build you can either add another shop or just keep 2 shops. But if I do a 1 shop build on my factories, I always add gas (at my natural) at the same time I expand mineral only (or the other closest expansion), and add another 2 shops making it 3 factories which are producing tanks.
Remember to keep scanning his units and if you feel he has too few of them, start looking for carriers (I often look for arbiters at this point as well since it doesnt take that good eco to have 1 or 2 of those). You should have/had 1 vulture on each main, at least the closest to protoss so that you see approximately WHEN he expands again. Mines at all expansions are really good as well.
He will most likely have 1 more expansion than you do, assuming he is a good player. But dont get freaked out even if he has 2 more. All those of you who play PvT (as P) knows it doesnt really matter coz if terran have 2-3 incomes they can roll over a toss with 5-6 bases if terran kills the opponents army.
Back to your attack in the middle, while you build more units at home and expand, keep "pushing" in the middle. When armorys are done build 1-3 goliaths or so and scan the middle from time to time and kill off observers. Note that this can really help you alot. Protoss biggest advantage when terran is in the middle or trying to push are those damn observers, we all hate them since it makes protoss attacks SO easy to time well. Even so, try to push a little with your units and keep laying down mines + sending reinforcements.
Remember you want the protoss to make the first move, especielly if your tanks are sieged! Once he make his move, move back the vultures to the middle of the tanks (I hope they are not TOO spread out).
If you hotkey your tanks in this situation, at least 12 of them and they are in somewhat of
the same range as the others. Try to select and attack some goon in the middle and then press down shift while spam on all goons you can see. This has really helped me alot in tvp, especielly when its pretty small fights like 15 goons + a couple of zealots vs 6 tanks or so, and a lot of vultures. Now your tanks wont kill each other and the vultures will most definitly kill off zelots since they are not even in the range of goons.
This shift + attack thing will probably take you some time to get used to but it can really help you, trust me ^^ As a terran you will almost ALWAYS win if your first attack / push succeeds pretty well. If the protoss dont attack you, dont be eager and make some desperate attack, just expand yourself and look out for recall + eventually carriers!
Lets move on to my other opening!
2. 2 Fact rush
I dont open with this build order as much as the previous one, but if there is a probe in my base, I start off the same way as 1 fact fast exp with 12 / 12. Then I might add another factory to trick my opponent so his probe see's it, and when its killed, I cancel my other fact and go for regular fast expansion (he will most likely make 2 gate goons + obs here so be careful and dont move out too far with 1 tank + 1 vulture + rines, UNLESS you are sure what he is doing).
If his probe gets killed around the time my first factory is done (or just before hopefully), I pretty often add another one coz now he will think Im doing an early expansion and probably expand himself!If I rush in TvP, I usually make 2 fact, both with shop. Either I go for 2 tanks then vultures (speed + mine upgrade) or if Im really sure he will go for an half fast expansion or fast expansion, I wait til 3 tanks, then vultures and same upgrades!
As soon as your mine + speed grades are done, move out with 3-4 rines, your tanks + vultures. DONT MAKE YOUR UNITS MOVE IN A LINE!
When you are out at your natural, try to hide the vulture so he still thinks you are just expanding (kill his probe if he has one outside). Then regroup and make your units stay close to eachother so they cant be picked off one by one by those ranged goons.
There are 2 main scenarios at this point. 1. He has his goons outside your base really close so he can pick off your units when you are expanding (when he thinks you are expanding that is)2. He has his goons at home coz he might fear a rush and dont want you to run ahead with vults.
If his units are close to your main, attack with tanks + rines while spreading out vultures to lay mines, TRY LAYING THOSE MINES BEHIND HIS GOONS so he cant back, if

he backs off at once coz he realizes he will get pwned. Run ahead with vultures quite a bit and lay mines there, same here, dont let your vultures get too far from each other so he can pick them off one by one when they are trying to get pass his goons.
Set your rally point somewhere outside his main and then just keep making vultures. I recommend to bring 2 scvs in case they hit some tanks and you wanna repair them!
If his units wasnt outside your base, they are probably at his choke / natural. If he didnt see your vults when you killed his probe (if there is one, which it should, unless he has his units close). Then he might not even think you will rush. But most players will think of it so they might send a probe which you will meet up half the way.
Now when you get close to his natural, bring your units together, you should have gotten at least another 2 vultures from home since they build fast and move alot faster than tanks (remember to time your supplys!).
As Ive said so many times before, your units must be close to eachother before entering into battle at this point, dont feel to stressed and eager to kill off his expansion if he has one, a few seconds wont make a difference, your micro is much more important.
When its time to attack you want to get your vultures at good places so you can put down a few mines and then back them off. Be careful so he dont drag one of those mines close to your tanks. I strongly recommend you have your tanks + vultures hotkeyed on different hotkeys!
If you dont see an expansion or if he cancels it while moving up his ramp (if there is one), you dont necessarily have to move up the ramp. If he has 4 goons or more I would most likely just put down mines at his natural and start my expansion at home asap. Bring some vultures around and put mines on all expansions, maybe even leave 1 or 2 vultures there to pick off his probe which will turn up sooner or later.
Unless he hadnt started building his expansion when you rushed, he will with most certainty have either obs by now, or a reaver heading for your base. Go back and set up some turret in exp so he cant attack with goons + obs, and turret in main if you suspect he might be going reaver. You should also make more tanks when you've started your new cc and upgrade siege mode, especielly if you suspect reaver or goon/obs, then siege is really important!
Sometimes I upgrade siege before expanding If I realize my rush will be pretty successful but I might have to pull off and do an early containment.
If the rush just delays his expansion and you back off to secure your own while building more units, just get another 4 factories (always 6 factories with incomes!) and keep macroing while keeping mapvision. If your vultures nor mines can see another expansion for him I should be really careful

with my first attack and push. He might just go alot of gates and 2 incomes just so that he can kill your first attack. This is where your scanner comes into play again. Scan main and natural to see what he is doing, he might be going storm on 2 bases or shuttle or even both!
If he doesnt expand again, I would expand again and wait for his move. Since the next play is his, wheather he likes it or not.
Conclusion of TvP:I think my 2 fact rush build will help you more than my fast exp. Mostly coz fast exp is so based upon macro. And Im sorry but I find it really hard to learn how to macro better in TvP. At least in writing However my tip about shift-attacking with siege tanks will help you alot (assuming you dont use it already) if you do it correctly and your vultures are placed close to your tanks!
TerranVsZerg:
Most people would probably consider this my best matchup and recordwise vs the non korean scene, they are definitly correct. I can say if thats the case, its only coz Ive had the privileged to train with the best.Ive played alot with players like Mondragon, SEn, Hullah, SquaLL, MidiaN, ogogo, Nal_keke, Testie. When it comes to TvZ I will only talk about what everyone does and what you should be doing, fast exp. I use it 90% of the time and if I dont its just coz I do a 3 rax build or fast tank push. Those 2 Ive read at least 5 guides on and most people know how to do that properly (even though some players do it better than others! froz > all ;D)
There are 3 ways I fast expand. I'll go through each one in the same order I prefer and use them.
1. The regular 2 rax expansion:
You start off with 11 / 13 rax, adding another supply at 14. Your scv scout should come when supply is done or so. You have two choices this early, either you want to make a really fast expansion with just 3-4 rines then CC, or you want to do like the Chinese gamer Super, who makes another supply after your second one, and keep making rines, so that he can put a pressure on zerg early and maybe even kill them with rush before he put up a sunk. Or just kill off some lings so that he will make more of them or put up more sunks.
These 2 depends so much about what you see with your scouting scv. If he makes 3 hatch (most zergs do now adays), try to look for how many lings he is making, if 4 lings or less, you should be able to expand really fast with just a few rines (around 22/23 in supply), or try the more offensive strat like super. Remember you dont have to go to his base with the rines, just scare him a little!

If you see the zerg making 6 lings or more I wouldnt move out that early with just rines, in fact if my scouting scv isnt alive when my cc is done I wouldnt even move out with rines except to kill off that 1 ling (or maybe 2) at your natural, which he is using as scout. If he doesnt have hold on this ling, and you can spot if it has speed or not, you can move out with marines (if it doesnt have speed that is).
After that if you are afraid he might be doing like 14-18 lings speed (which many zergs do and wont get them that far behind), just stand in your ramp with rines. If he attacks your exp with alot of lings, just back off with scvs or if you think you can kill them with rines only + scvs. Do so. Also if he just attacks with 1 ling you will probably see if has speed or not, if it does, you are free to move out!
Now your academy is done and you should upgrade stim + get medic/bats and scanner. Once the scanners are done you scan once in main and once in exp, or his third hatch or whatever you like ;pThe main purpose is just too see what he has. If you still dont know or have a feeling he might have a lot of speedlings, be careful. Even if he only have 2-3 sunkens and nothing else but he did see you move out, he will most likely have those lings somewhere. Of course you can attack 2-3 sunks with the right amount of units but try to micro your bats as good as possible, put them close to your medic + rines so most lings will get killed by rines before they get close to the bats!
Now lets say you moved out and he built a few sunks (he has 4 or so) you also saw a spire when you scanned. Its time to move back home and your ebay should be ready. Once you moved out with units you should have added 1 or 2 more barracks. 'Put up 4 turrets around your main and 3 or so at your natural.
I almost always put 8 or 9 rines in my main with 2 medics, just to be close if the mutas start hitting on supplys / raxes. You should be careful though of a ling/muta attack in your expansion, if you scan and see a lot of lings this can be the case! then put up 1 bunker in expansion where you put at least 1 bat, preferably 2. They will rape, no doubt!
Your first factory should start building when you got cash and have units in your main preventing the mutas to harass very much. Most muta users wanna find that scvs who are building raxes/factories to try and kill them while building. This can be a real bitch but you should be able to defend it pretty well with units in main.
Just keep producing, perhaps send out of a scv to scout. He will most likely kill it off before it can search for many expansions. I mostly send out a scv at the same time I move out with my first army to make him build sunkens (just when my expansion has started running and medics + bats arrived!) This scv should just be going from expansion to expansion (priority to the one's with gas, another mineral only is so risky for z and wont work in most cases.
While Im building up my army I scan both his main + his natural pretty often to see what he is doing. Many people like to scan all the expansions coz they are so afraid but we all

know they are coming. Just dont let him make any sneak expansions. If you by any chance feel that you can move out with a pretty big army of m&ms before he's got lurks. Do so, but I must warn you it can really destroy you if you're not careful. I only do this when I see a pretty fast expansion (expoing before his lurks arrive). When you do this, stay alert for a stab if he doesnt try to kill off your army, or some heavy muta harass in main.
When you scan his main + natural while building factory or so, try to read your opponent if he will be going for a really fast hive or is he doing the regular ling / maaaaaany lurk / scourge strat and then getting hive around ~12-13 minutes.
If you see him as a lurkman, I recommend a second factory when your first is done, so that you can move out with 26-30 rines, 4-6 tanks and 1 vessel. This attack is so timingbased its ridiculous. It will probably take a lot of practise before you get it right but you should be able to be out quite some time before he has hive (unless he made really fast hive then I would suggest only 1 fact into 1 starport, early attack and eventually a second starport with mass vessel + mass drops)
If you moved out with that army consisting of 26-30 rines, 4-6 tanks + vessel, and your scans shows that he soon has hive, you should start making vultures with mines + speed. Just to buy some time later on.
This attack of yours should make some dmg (the big army consisting of m&ms + tanks + vessel). A good advice is too build a dropship as soon as your first vessel is out so that you can drop while attacking in middle. This is something I see a lot terrans doing wrong. You should never start making a dropship before your vessel and hoping to be lucky and drop into zergs main or one of their expansions so that you kill their eco a little before going out. A good zerg, or even a pretty bad one to be honest, will definitly be waiting for a move like this and he will have no problem with preventing it. But if you drop his expansions or his main while you move out with your big army, he will have to decide what to do, save exp, and maybe lose some units or try to rape your army, either way you can take advantage of his decision. If he saves his exp, you should be able to pretty much steamroll over the rest of his units in the middle (and if he went with all units you can either trap him where he went or kill his main).
If he by any chance sacrifices his expansion and kills most of your army, or the entire army you still got something out of it if your drop worked. Just be careful and look out for scourge while dropping!!!
I also often see terran players moving out with this army but not paying enough attention to where zerg is. I always try to scout and scan where zerg has his or her units. When you know where they are, try to get a battle going which you started. Dont die your first vessel for fuck sake. That totally blows, but it happens to everyone from time to time!

You should have at least 4 barracks by now. I usually get around 6-8 on 2 incomes... If you didnt make your fourth rax at the same time as your third, make it while you are building your first factory.
Upgrades in TvZ are crucual. I always do +1 as soon as my ebay is done (weapon ofc). When to add your second ebay is very personal and differs alot for me. I guess the most common is to have the other one ready as soon as your +1 is done, so that you will start +2 and +1 on armor at the same time...
When you engage in a battle vs zerg, you wanna be the one who starts it or provoces him into it. If you by any chance are macroing in base while your units are unsieged and placed all together (plz ffs dont put all units in 1 big mass), just press your hotkeys to stim and back off on the minimap asap. You wont have a chance if you just press "o" on tanks and stim late when you get back to the middle. If thats the case its way better to back off and maybe lose some units then zerg might lose control over a few lurks or lings and when you get back to your army you can micro, but back off at first!
How to kill expansions then?
Well I go by this rule, which I apply to in most cases, but not all. If your opponent has hive or close to hive, I always go for his expansions. If he has just started with hive or just lair with hyd/lurk or many ling/lurk, I move to his main. Im of course talking about the times when Ive either won the battle in the middle, or he is dodging me really good to get more units. If he is dodging you, just put up sieged units outside his natural and spread out your m&ms.
If I attack his main I always send reinforcements to take out his expansions. Most zergs dont even have more than some sunk and maybe 1 lurk, so 10 rines + 2 medics will do, though Im sure I mostly bring more than that.
Back to when I fast expand.
If I see a hydra den I almost always put up at least 2 bunkers. If I scan and see him doing ALOT of lings and lurkers, and my factory isnt that fast. Build a third one, a bunker is very cheap and can help you alot. Especielly on maps with big choke!
Many terrans have a really hard time vs zerg drops in mid game. I used to be one of those who hated it and didnt really know when to defend against it or not.
I basicly play by 2 rules when it comes to dropping:
1. Did he start with mutas and then switched in to lurk/ling. Most likely he wont drop, if he does you will feel something is wrong when he doesnt expand as much or his timing of expansions is off. At those rare occasions you can put some units in main and be afraid of drops. 2. If he starts with hydra den (which most ppl who drop does), I keep scanning from time

to time at his natural and main to see if he added a spire and evo/evo's. If he doesnt add his spire pretty quickly he will be going for a drop, you cant really afford making lurks + drop + spire + evo. At those situations I stay a little longer in base, have some units in main, preferably 1 tank as well (some turrets close to the edges) and try to see when he expands.
In some of these cases he dont make a spire that early but goes for a queen nest instead, but you should be able to see this with your scans looking for spire.
2. The second way I FE:
This strat I only use on players who do a 2 hatch fast lair build, or on a map like rush hour where I can put a good and early pressure on zerg (sometimes even kill off extractor... I'll get back to that!)
Many of you might even know what Im talking about, its the classic 2 rax into academy, then fast exp build order.You start the same way you did with the previous strat, 11 / 13 rax, supply on 9 and 14. Then around 18 you get gas and later on academy + supply. I mostly start my CC when Im building medic / bats. And then move out with around 8-10 rines, 2 bats and 2 medics. Watch for a lingstab and put 1 bat 1 medic in ramp if you fear one! (trust your instincts ;D)
Now, if it was rush hour I would probably put an early pressure on Z so that he would at least 4 sunkens, and once my range is done (upgrade directly after stim, keep making rines and scvs at home), you should be able to make some dmg to his extractor. So many zergs build their 1 sunken which is supposed to cover that, wrong. Dont stick around too long with those units coz you dont wanna lose them to many ling/lurk or many ling/muta. Killing the extractor once is enough to delay the zerg. You got your advantage dont be greedy, go home! From here on I basicly play the fast exp scenario the same as I wrote of before.
If your opponent does a 2 hatch fast lair strat, I start the same and put some pressure on Z. This time its another map than rush hour so I just stand outside. Most players who make 2 hatch fast lair goes for ling / lurk.
Look out for maps where he can go around your little "containment" such as gaia, I often put a scv where his other way out is, making sure he doesnt sneak out. If he pushes your little containment, and you have to stim and back off all the time. Make 2 bunkers at your natural and just play safe. If its necessary build another one if he keeps massing out his units in the middle and dont expand.
The basic play vs a 2 hatch build is just to play safe. Even if he makes mutas just have an early ebay and defend well against it. You will be so ahead eco-wise it wont even be a game if he doesnt make a lot of dmg with his mutas or his lurks. Look out for the drop follow up if he makes lurks! keep scanning main + nat, dont really care about the

expansions coz he is still so low on eco it wont make much difference (unless he starts making 16 drones all of a sudden but then he wont have units enough when you go out).
3. The third way I FE:
This strat is based on the so famous and hated 8 rax build. I rarely do this but its a good way to kill off some zergs from time to time. If you by any chance dont make your bunkerrush (bring 3 or 4 scvs, less than that and its not even a little hard to kill off a 8 rax, a zerg can do it with drones only). You should fast expand with 1 rax, then build gas and another 2 raxes and add your academy. Once again you should be careful of the lings. Dont move out rines unless you know he doesnt have speed! After that. play on like you do when you fast exp. But remember the timing and balance of the game might be somewhat weird after that rush depending on how much dmg you did or he did.
Conclusions on TvZ:My TvZ is a lot of timing, massgaming will help you. Though you might be able to improve some of my tips about your own drops while attacking, and to prevent drops and read your opponent based on buildings.
For those who want some reps I have this half-old replaypackage from last year where you can check out some of my replays if you wanna see how I apply them. My style might have changed a little in since those games were played But I'm too lazy to make a newer replaypack just for this, sry! Download --> http://personal.gamingeye.com/daze/dazereplaypack/dazereplaypack.rarPS. I know its a lot of context and somewhat blurry, but if you have any questions what so ever just ask and I'll try and answer them better than I did in this post. -_-Basic Build Orders
Suggested Build Orders for New Players.
There are MANY MANY different ways to open each game. For a new player your better of sticking to some of your standard safty builds in order to extend the game and learn from the midgame.Recommeded Openings for Beginners.
Terran
TvT Stick to 2 fac --> port builds don't try and expand in this matchup unless you have a clear advantage.TvP Again two fac builds are fairly safe. Leave expanding out of this till you have experiance dealing with 1 base vs 1 base. It really makes it alot less complicated.TvZ I'd open with a 10/10 rax depending on map distance to be extremely safe against 9 pool even 8 rax if you feel like you need to. Go twin rax into expand then slowly tech adding turrets at the right time. Slowly get tanks and then vessels. going to 5 rax onace

your expand is up. 5x rax 1 fac 1 port. Is a good solid start. Don't tech to quickly. Stick with tanks for a while to counter the early lurks Z's like to pull against slow expanding Terran.Another note a good time to add an academy is around 25 supply. Turrents around 45-50 against a three hatch Z. 40-45 against a two hatch Z that's going muta. Against Lurks skimp on rines and add a second fac when you scan it. Feel free to sit in your base untill your confortable. Their is a rush in this matchup but its against when they get defilers. You must push before they get them.
Zerg
ZvZ 12 pool 1 sunk tech adding a second hatch during tech at base. Teching straight to muta's (one base build)
ZvT 12 pool (its not worth the risk of almost automatically losing 25% of your ZvT games to try and 12 hatch) into 11 hatch into 14 hatch. (3 hatch build) into muta harass into midgame lurks will serve you well.
ZvP Very difficult to open with a 12 hatch in this match or a 12 pool. Your better off either 10 hatch 9 pooling (this will stop everything but a 9/9 fairly well) or hydra rushing by 12 hatch in base 11 pool gas at 14 hatch at 15 in base. and push with your hydra's. (go range first and hope that the P player put their forge out front.
Another option against a FE toss is to go into a 3 hatch build taking another expand. I like to take a natrual main pair with my third hatch and try and sunk up. 3 expands+main against a FE toss is good for you if you can hold their initial push. Go straight from sunkens into lurks and then sit and tech to ultra/ling
Protoss
PvP Open with either a two gate or a 1 gate shield battery build. I personally like 1 gate into obs. Its very safe. or 1 gate cannon into expand.
PvT A very comlicated matchup. But stick with one base when your starting. 2 gate goon obs. Is very safe. 1 gate obs if you are really paronoid. Stick with goons untill you get speed for your Z's.
PvZ Either two gate Z's or FE are your two choices. Get used to FE it will expand your options. Go pylon forge two cannons nexus third cannon. One gate sair tech. into 5-7 gate ground (9 if you don't intend to tech). (As you play more this will change) Remember to add obs in a timely manner.
These are some of the safest openings for a new player. The idea here is to get you into the midgame and allow you to grow. You don't learn much when 50% of your games end in the first 5-8 minutes. These opening will help extend game length and help you into becoming a more effective SC player.

I know that their are tons of other openings that people would recommend. These just suit me as being some of the safest. At higher level play realize that these openings while safe. Sacrifice much in order to be as reliable as they are and can be exploited with careful timing.
Toss Notes by Salv
Protoss FAQWhat is the Protoss FAQ? The Protoss FAQ by Salv is going to be a compedium of questions from users/students/myself that I answer in depth. The purpose will be, a student/P user later on, can come check this compedium, find the answer here. As of now, it will consist of only a few questions, but it will grow over time, and thus will become a handy document indeed!
LegendItalics = QuestionBold = Answer
General Protoss Questions
How do your hotkeys progress?
Pretty general question, but i'l explain how I usually hotkey.
Beginning of the game: I put 1-0 to my first nexus. I don't spam those keys, it's just because during early-mid game, I can spam a key and get my main screen up.
Early game: I hotkey my scout probe to 2. Why 2? I have no idea, at this point every other key I just double tap to get my nexus again, and 2 to bring up my probe.
Late early game: This is when my gateway and maybe a unit is up. At this point, I hotkey my first gateway to 4/5/6, in preperation for using those. My first three gateways are always 4, 5 and 6.
Mid game: This is where I would have some units and maybe another nexus or two. My Nexii (Nexus', Nexusii? W/e) are 0, 9 and 8. The reason is because I can hit

0p9p8p really fast and make probes at all of them. 4,5,6 are still gateways, but not so i can hit 4d5d6z or something for units, it's so that i can just spam one of those keys and bring up my gates, I hotkey them to 4/5/6 so I have a larger margin of error ^^, i can mean to hit four and hit five twice and still get my nexus.
Conclusion. 1-4 are my units usually. I rarely make it to five except in midgame. Late game; and I would consider this important, seven is the hotkey for the most used unit at that point in time. If i am reaver dropping, 7 is the shuttle, otherwise it's usually an observer, since you never know when you'll need one of those buggers.
How do you do nexus first builds?
The only one I am familar with is in PvT and I don't find it very good except on select maps. First thing you want to do is do it on a map where A ) There is some good space between youB ) You have an advantage when being attacked
You put a pylon @ 8Nexus @ 13
than you basically tech to three gate dragoons while making zealots meanwhile ASAP. The standard counter is either a bunker rush or some two gate push. You should be able to kill the push, but the bunker one is difficult to beat, that's what you want a lot of space between you so that it takes him awhile to get to you.
I'd go on, but I never really do this build since I think it's inferior except on like... Katrina where it's standard, or Monty Hall where your basically safe.
When are some good times to cheese?
The most common times to cheese are when you are in a best of series and want to catch him offguard in game two or three maybe; or perhaps in a game versus a player you _KNOW_ is much better than you. Otherwise, you just do it if you want to try to get an easy win. I would _RECOMMEND_ that you cheese on iCCup a little bit. WTH you may ask? Why would you do that? Cheesing will help your micro and multitask. When you cheese, it's always a battle of micro and multitask, macro gets almost completely thrown out the window, it's about how well you use what you have, and that is key. Don't use it everygame obviously, but it has it's uses.
How do I do effective high templar drops?
The reason I put effective because if you simply click unload near his SCVs/Probes/Drones, a few things can and most likely will happen. A ) He'll have enough time to run away his SCV/Probe/Drone B ) Your shuttle will get in the way

of you clicking the HT, further wasting time, allowing (A) to happen. C ) Your templar will drop and a mine or tank kills it. Now to my glorious illustration (I know it's crude, shutup.):
First of all, look at A, this is the order you load your units up in. The last zealot you put in is up to you, I put it in because those two zeals often can drag mines, kill a tank or just kill some SCV, so I think it's worth it. You put them in that order becase... look above the mineral line. The first unit drops, if a tank is there, it hits the zealot, that's fine. Now the templar drops, now another, than another zealot (optional). So the templar won't die, that's good. To deal with the shuttle getting stuck over the HT, you simple move to B, than click to move to C. Whilst in motion, hit U on the keyboard and than left click on the shuttle. That's it, no other move commands or anything. The shuttle will than unload in the in the order you picked up earlier at A _AND_ keep moving. So when the templar drops, the shuttle gets right out of the way. So you can click, hit T, target poor SCV and than let joy ensue.
Protip: I wouldn't too much about picking up the HT. Do it if you can, but if they die it's alright, as long as they kill SCV you did your job.
Tips for reaver micro?
PvT: In PvT, reavers can be of great help, but can also put you _WAY_ behind if you muff it up. Hence, if you can't multitask too well, work on it before trying this, because it will just lose you games. You ideally want to have a reaver, a speedshuttle and two zealots. You drop the zealot to absorb any time fire or mines, than the reaver now that the coast is clear, target w/e it is you want to hit and once the scarab

goes, pick it up the reaver and fly away. Now if you want to be fancy, you can do a micro trick which results in picking up the reaver faster, but it's hard as hell to do. The way I do it is, I hotkey the shuttle to 2 and the reaver to 1. I drop the zealot, than the reaver, whilst moving (you cannot stop while doing this otherwise the shuttle loses acceleration. Than hit 1, select a target. Than hit 2, which brings the shuttle, which is moving, click directly behind it, it will turn around and not lose acceleration, when you click behind the shuttle, you have to click _BEHIND_ the reaver as well, as the shuttle moves overtop of the reaver (which is on a move command to _BEHIND_ the reaver) you hit 1 and right click the shuttle, it will go into the shuttle instantly and than you hit 2 and move to where you want to go next. That micro is ridiculous and I never find it game altering, only slightly more effective. If you want to be a god damn gosu, go ahead an do it, otherwise, just do it
like mortal men please .
PvZ: Nothing to it in this matchup, no mines or tanks to watch out for, just drop it, fire away and get the hell out of there. Although when following behind your army with reavers in shuttles, I like to use unload instead of the unload trick you can do because if the zerg flanks you, it's good to have your reavers right below your shuttle.
PvP: Perhaps where most of your reaver micro will lie. Microing in this matchup is
easy to do, but you have to manage a base whilst doing it... making it not so easy . You attack with the your goons, drop the reavers behind the goons and attack move them. Now what you want to look for are dragoon clumps (usually four or five) that he manually moves forward, hes trying to move forward to be in range of the reaver, than snipe it. When he moves foward, pick it up. Usually he will fire at it, than you pick it up, his attack hits nothing, only difference being, that was five of his goons not attacking, but all of yours still are. Than you just drop it again or move it to a slightly less hostile part of the battle (where there aren't goons moved up) and continue as usual. This seems really easy, but macroing, building gateways, rallying units, placing pylons and putting probes on minerals/gas makes this a little more
complicated . Practice makes perfect here.
How to maximize the room of your base to ensure maximum gateway placement and no trapped units?
(I made an illustration that I will refer to for this question.)
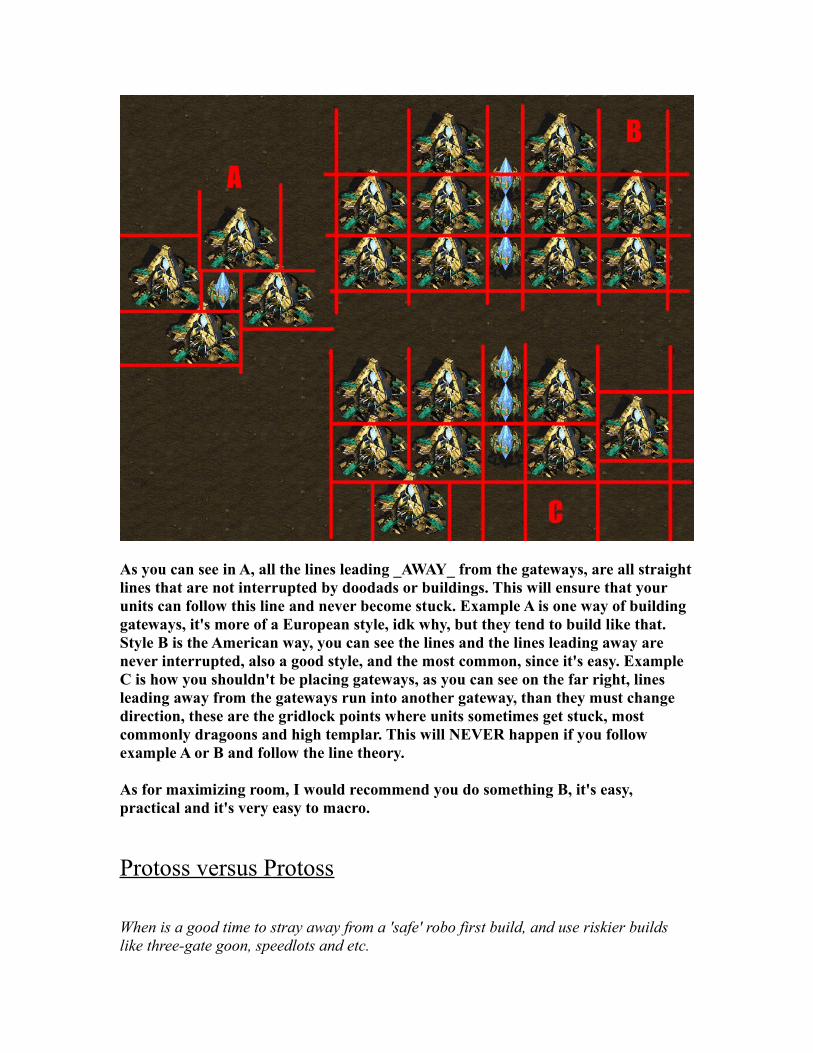
As you can see in A, all the lines leading _AWAY_ from the gateways, are all straight lines that are not interrupted by doodads or buildings. This will ensure that your units can follow this line and never become stuck. Example A is one way of building gateways, it's more of a European style, idk why, but they tend to build like that. Style B is the American way, you can see the lines and the lines leading away are never interrupted, also a good style, and the most common, since it's easy. Example C is how you shouldn't be placing gateways, as you can see on the far right, lines leading away from the gateways run into another gateway, than they must change direction, these are the gridlock points where units sometimes get stuck, most commonly dragoons and high templar. This will NEVER happen if you follow example A or B and follow the line theory.
As for maximizing room, I would recommend you do something B, it's easy, practical and it's very easy to macro.
Protoss versus Protoss
When is a good time to stray away from a 'safe' robo first build, and use riskier builds like three-gate goon, speedlots and etc.

The best time to stray away from the robo first build depends on the map. For example, on Blue Storm, making a Nexus around 30 or so supply is standard because dragoons take so long to make their way to the opponents base, as deal zealots when that small choke is blocked. Therefore, you can expand early and rely on your early reinforcements to make your army equal to his. Because of this though, you will be getting a forge + cannons in case he made fast dark templar, because at that point observers wouldn't be out in time. That is one example.
Another example is Longinus. Often on Longinus, you can expand and make cannons to defend yourself. Because of the way the map is, the opponents army has to go through a small choke to get to your nexus, so essentially your funneling his larger group of units through a space where only six or so units can attack at once, out of his army of twelve, but every units of your army of nine + a cannon or two can fire back. Essentially meaning you can win with a smaller army, so in that situation, you can make a nexus quicker than usual, because even if he amassed a larger army, due to the nature of the map, you'll be safe until you decide to push out, in which case your nexus will have given you a boost to economy.
On the flip side to that, if you build reavers Longinus, you obviously don't want to attack him right away because of what I mentioned above, however, you can harass him instead, than expand slightly later and than depending on your harass, your either: still behind, equal or slightly ahead.
A build like three-gate goons are a matter of preference really. Two gate goons versus three gate goons is really a battle of micro and positioning. The guy who went three gate goons wants to try to either A ) Pick off the shuttle with the reavers in it if the reaver guy is being careless B ) set up a good flank and spread goons out more to reduce splash andC ) try to target the reavers when possible.
Such battles are a bit of luck, such as: If the three gate goon guy moves forward six goons, it's obviously he is trying to snipe the reaver there, so let's say you pick it up with the shuttle so the goon fire will hit nothing. What if he actually anticipated you would do that and instead targeted the shuttle? Now both are dead, it's things like that are often unavoidable and can sometimes come to bit you in the ass.
If you want advice on certain maps, just post what maps and i'l post a reply.
Protoss versus Terran
How to deal with mines before observers?
Dealing with mines before you have observers is kind of tricky. There is a form of

micro where you move forward a half step of a goon at a time and press hold and than the mine will usually die to goon fire before it explodes. This is tricky like I said, and it really only works if you know where the mines are. So if your just blind to where mines are, your out of lucky. What you can do however is weigh your options. If there is a CC being built behind a small minefield and a siege tank & you have five goons, you may want to suicide a goon to take the mines, than rush in with the rest to cleanup. This is usally the best way early on. Also, if you can contain the Terran with goons early on, his vultures can't run rampant all about the map, placing unsuspecting mines.
Is a 10/12 gate build viable against T? I've seen a few progamers do it.
Not really, for a few reasons. 10/12 build will just ensure that your sending a constant stream of zealots to him, which is useless. A good terran will do one of two things.A ) They will block their choke, rendering the build uselessB ) They will place supply depots/barracks in a way that zealots cannot reach.
It's unfortunate, but 10/12 is never a good idea. The best way to do a zealot build versus Terran is when you proxy two gateways, and they must be 9/10 to ensure that the Terran only has one marine or so when your first zealot arrives.
The best maps to do a build like this is any map where you can place the gateways in middle. Python & Longinus are examples of this.
What is a good Dark Temp. build to do?
The best Dark Templar build is the DT drop, it's effective and rarely fails, you just need good multitask to make sure you slow them down as much as possible. You start of with a standard PvT BO:8pylon (don't scout)10gateway (still no scout)11Assimilator (still no scout)13cybercore (go scout now)14pylon
You basically DON'T get range and just make a goon, than you add a robotics, the second the SCV from them dies, put up a citadel and another gateway. Than you basically just make your shuttle and make sure your two gateways are free for when the templar archives comes. Your two DT pop and you send them in the shuttle to his base. You also must make sure you rally your two gates to somewhere outside his base so your next two DT can be picked up, carried over the wall/cliff/block and than you have four DTs in his base.
Things to go for:

1 ) Turrets, aim for these the second you drop the templar, once they are down, it's easy.2 ) New Turrets being built.3 ) Scanner being built. 4 ) Supply depots
That's the order in which you should go for targets. I'l try to make a replay of it in action and post it for you Turbo.
How does PvT work in regards to Protoss to Terran bases? It's generally accepted that a Protoss wants one more base, what if this isn't possible?
This is a lot of map preference too. First off, there are some maps where it's not advantageous for you to try to take a third base right away, or it's in a position that would fuck you over, I assume this is what you mean when you say that it isn't possible to take. For example, a lot of Protoss find Longinus hard because their mineral only is right near that long cliff where terrans and siege and essentially contain you.
The first thing you must know is that two base play isn't a death kneel, it's just a different style. To play three base versus their two is just macro and positioning, very methodical, but requires a lot of knowledge. Basically, you have to keep delaying them as best you can, because if you take a third base and they mass up to 110 and push and you let them get to you and setup, your dead, no matter how good your macro is.
In regards to two base, it generally goes like this. Two base is a fine build, but your putting yourself mildly behind, so you hope to use those monies you saved from not expanding and waiting instead to inflict enough damage to A ) even it up and B ) hopefully put you ahead. Reaver is an example of this. Two base->Reaver requires that you do damage with the reaver(s). Take out SCVs, stray vultures, supply depots (which are key) and force him to make turrets, thus evening you up and putting you ahead. Enough so that you can THEN expand, THEN kill any push he tried to make. The options for two base are pretty muchA ) ReaverB ) Dark templar (really hard, you need a lot of knowledge in order to use these effectively imo)C ) Pure mass.
The way C ) works is you just mass of seven gateways or so and the second he pushes, you can fuck him up due to mass. The terran knows this though and if they just crawl and take a third, your just behind with a massive army that can't do anything-- which is bad. So C ) is a little luck based, but can work well on a map like python where the Terran has to spread themselves really thin in order to cover everything.

Lastly, let's say the Terran expands, than turtles a third and your left waiting. You don't want to attack him, you pretty much just have to wait for him to try to expand again or for him to attack, and generally he WILL eventually attack. All you need is A ) Some air to even out the fact that his ground army with upgrades will most likely crush yoursB ) Upgrades on your units, preferably armor and weapons only. Shields are unncessary.C ) Many gateways and bases to support it.
C ) Is the key one, you just want a lot of gateways to replenish your army.
What is a good PvT cheese?
I really only have one good PvT cheese, but it's really nice. You have to have a knowledge of the map first of all to do this, I like to do it on python, actually besides python, I don't use this build at all. The build is this- At six, send a probe to the middle of the map and at 8/9 supply, build a pylon. - Build another probe so your 9/9- When the pylon finishes and you have 150, build a gateway at 9/17. Go scout with that probe now. Send a probe from your base to the middle of the map again.- at 10/17, build another gateway, scout with that probe. Build a probe so your 11/17.
This is where it's gets tricky and a bit risky. Hopefully he didn't block in which case this is almost an instant win. If he is blocking, you should get to it while it's building. Build a pylon so it fucks up his block. (put a pylon where the supply depot would go. Rally your gates to his base. Build _NO MORE_ probes until your first two zealots are being built. You will have to use your judgement on when to build probes and zealots, since you won't have enough for each. The cheesy part of the build comes in now:
A ) If you built a pylon to block his wall, make a forge there. Use your zealots to harass, but if he builds a bunker don't attack it, just keep your zealots around to not allow him to kill the forge. When your forge finishes, start creeping towards his CC with more pylons cannons, you can stop zealots at this point since your cannons are stronger. Once a cannon can hit his depots or CC, he has to make a move and most likely die, or lose the building and be crippled, his choice.
B ) He didn't wall, keep your probe alive when you scout him and when your zealots are harassing him, build a pylon. Close enough so when your forge is done, you'll be able to build a cannon that is in range of his CC. It's not very difficult.
That's about all there is to it. Send me a PM with a replay if your having trouble with it. I might do this to a Terran on iCCups so I can post the rep of it in action.

When do you gas steal?
Gas steal whenever it's possible. If you scout a double rax obviously don't do it, but I don't think i've ever seen that. Otherwise, if he has his rax building and you scouted him early enough, just take it. The problem is what he responds with. If he puts four to five SCV to attack the warping assimilator, you can assume hes not going to cheese you, if he seems like he doesn't give a shit that you just took it, watch out since a second or even third barracks is going down and hes going to try to bunker rush you or just kill you with mass SCV and marine. If you scout that he looks perfectly content with you stealing the gas, make a zealot instead of a goon, a shield battery and another gateway. You want to make zealots for the first little bit and than switch slowly to dragoons. The shield battery is nice since you will keep your zealots alive about 50% longer, which is huge. When he actually attacks, try to probe drill if you can, which means get vision of your natural minerals, select 12probe, click the natural mineral patch and the probes will slide right through all his units to get to those minerals. When the probes are on top or near the marines, attack move. You want to kill the marines, not the SCV. It's really just a micro battle, but I wouldn't expect him to counter with a cheese like this often. Just make sure your prepared, being unprepared would be continuing to tech range goons as normal. Check my first game versus Renchak in the SC2GG Starleague Round of 4 series to see what I did versus a two rax cheese.
What is the best way to defend against vulture raids? (Vultures moving in and manually targetting your probes, even in the prescence of units or cannons)
Vulture raids are a pain in the ass for many reasons. Probes are so frail that you can't afford for them to be killed by cost effective units, such as the vulture. The solution to this problem isn't as clear as one would think. Having two or three cannons deter the Terran from rushing in with few vultures, but at a certain number-- usually ~10 or so, it becomes managable, as they will rush in, kill your probes and than be ahead, or even manage to salvage a few.Pylon walls + cannons are the key here. Whenever building on a ramp, try to pylon wall it off with a cannon behind that, or if not building on a ramp, see if you just hinder movement by connecting pylons to walls, or placing buildings that will be needed there so they further act as a wall. For example: A pylon, cannon, than second forge for upgrades is seven matrix's wide, that's quite a length and you will likely be able to slightly wall with that.
How do you deal with turtle Terrans?
Turtle Terrans are T's that mass up and take more expansions whilst setting up a lot of turrets & spidermines, ensuring you cannot attack them without losing way, way more than them. I'l answer this question specifically, but in cases with any strategy really, you have to ask yourself, "What's their goal?" What are they trying to

accomplish? When you know this, than you think of ways to avoid them getting to their goal, or delaying.
With that in mind, what's the goal of the Terran in this situation? The Terran knows that upgraded Terran ground owns unupgraded Protoss ground and still decisively beats Protoss upgraded ground. So their goal is to become upgraded and than crush you. What you need to do than is do something that makes your ground equal to theirs, and adding air is the solution. If a Terran turtles, you want a third gas immediately and than two stargates making arbiters and two forges upgrading. You will be 2-0-2 at least when he pushes out and with any luck, two arbiters with stasis. You just want to start expanding after that and killing his expansions whenever you can. If you can kill his expo and he kills one of yours, consider it a win. He needs his expos more than you, you can take more easily and should always have more.
The key is to just let him be when he turtles, don't try to own him somehow, if hes any good, you'll lose. So just let him be, don't let him take more than his third base and just play as normal, but teching towards arbiters ASAP. It's hard to be more specific than that without seeing replays from people, which I will gladly do.
Protoss versus Zerg
How do you defeat a Zerg going hydra/lurker? Lurkers counter zealots and hydras counter goons.
That is true. If you had an army of goon/zealot versus lurker/hydra, it would get mauled. The lurkers simply own the zealots and the hydras simply own the goons, however zealots do not own hydras or lurkers and goons do not own hydras or lurkers, they can simply do well versus one of those. What you need is storm, but the key is positioning. I should maybe make this it's own question, but this is how you beat lurker armys: (Note, skip the last paragraph if you want a short answer)
Storm counters hydras.. HARD, that is known. Zealot/Goon/Storm beats on Hydra fine enough, so you don't have a problem with them, you have a problem with the lurkers. The problem with lurkers is only apparent when they are burrowed properly. Burrowing them spread apart increases their effectiveness 10fold. Not only do they not die to storms easily, but since they are spread, their splash covers a greater area. It takes time to spread them though, this is what you do.
Think of lurkers as Siege tanks. You want to attack siege tanks when they are are unsieged and moving because than when they siege, they are in shitty position. This is even more apparent in PvZ because when he unburrows and is moving about, if you attack and he it's his hotkey for them and "u" for burrow and four or five of them are clumped (which will happen I guarantee it) two storms own those and than you can move back. So in short, this is how you beat it:

You have your goon/zealot/templar army, archons are not needed since hydras beat their asses with focus fire. Do not attack him. If hes turtling, than you can just expand and get upgrades and work towards arbiters/reavers or something high tech. The key is to not attack him, because hes spread his lurkers. When he unburrows to attack you, or move somewhere, _THAT'S_ when you attack. You will be able to get off some storms on his army before he burrows and that's when you look to see how they burrowed. If you unlucky, they burrowed kind of spread apart, so you move back and if the hydras follow and they are away from the burrowed lurks, you can reattack move the hydra until he brings his lurkers. _HOWEVER_ (this will most likely happen) if four or five of his lurkers are in the same spot or quite near eachother (basically, if one storm will hit them all) then storm those lurks, kill em and than you can decide to continue with the attack or move back, when hydras follow, re-attack move etc. This is the same way you can kill lurker ling easy. When he moves, you attack, when he burrows, storm quickly on the clumped lurkers, move back, lings follow, they get raped until he realises.
How do I beat/defend four pool/five pool?
(Protip: The first replay uploaded to this thread is called SC101 5pool EX. It's an example of a player 5pooling me on iCCup@Longinus and how I dealt with it.)
This is actually a lot easier than you think. The key here is to get in the habit of sending your probe _EARLY_ in anticipating to making the buildings you need. What this means is, send your probe just when your eigth probe is about to pop out, thus when you have 100 minerals, your in position to make the pylon. A big mistake is when people have 100 minerals, _THAN_ send the probe, than they get there and they have 160 minerals, that's seconds wasted, and in a rush like this, you cannot afford that. Likewise, send a probe just when the pylon is about to warp in, so it arrives just as your 150th mineral rolls in for the forge. That's the first thing, good timing. It takes practice to know when to send it, but too early is still better than too late.
Now onto the actual rush. Let me say there _ARE_ sometimes when you can be killed by a fourpool and there is nothing you could have done. An example is let's say on python he 4pools you and hes at six and your at nine. You scout 12, than 3, than 6. Well you won't be able to see the four pool until they are already to your base, in which case it's too late to pull probes and your pretty much a goner. (Note that this would be luck on his part, since if he didn't scout you and just guessed he wouldn't be able to do that all the time) Likewise you can also look to see if he sent a drone to scout fairly early. If he did, you can pretty much assume he wants to know where you are QUICKLY, and that's because hes rushing, so you can pull probes. Let's assume you see it however at your second scouting. You should see the zerglings come out of his choke usually just as you get there. At this time either your cannon is just started or your about to start it, get the cannon going, cancel any probes being built and if you have 150, build a gateway to tighten the choke, build a pylon if you have only 100, you want that choke as small as possible. Pull _EVERY
SINGLE PROBE_, don't leave any behind. He has four drones at this point, it's okay for you to pull all of them. The goal is to just stall those zerglings long enough for that cannon to warp in, once it has, keep some probes there to block, since he is most likely going to try one last time to kill you with ten or so zerglings. After that, try to scout him to see what he has and enjoy your sizable lead... that is if he doesn't quit, which 90% of them should.
What to do against 9pool speedlings?
I think 9pool speedlings is the best build a zerg has. They can do so much off this and how to counter it depends a lot on scouting. The fact is, once your probe is dead, your most likely going to have a hard fucking time scouting them again. That's why you have to be sneaky and maybe even a tad bit lucky. What hes going to do is, make a 9pool, than get 100 gas for speedlings. Than he will kill your probe, and either mass more zerglings and try to break you, double expand, or expand once and tech to something like lurkers or muta. Either one of these sucks for you. Zergling break sucks because you can't see it coming, he'll show you 6 lings, but whether he has 20 more 10feet behind those is a mystery. So if you prepare for that by adding cannons and than he double expanded, now your behind. At the time same if you don't and he does have it your dead. Or maybe he techs to mutalisk? The bitch about mutalisk here is that if he is a good zerg (which all these questions assume to be true) his mutas WILL be up before your corsair has time to scout. You will be halfway to his base, see them, say fuck and than your in real shit.
So what to do? Scouting here is key, absolutely key. Key Key Key Key Key. I cannot stress it enough. _KEY_. If you scout poorly, your literally guessing and you have a 33% chance you guessed correctly. What you do is this. When his zerglings pop, there is still a good 20-30 seconds before speed finishes. When speed is done, that probe is dead, it has no chance of survival. So the longer it's alive the better. The things you look for are this.
A ) Has he kept drones on gas or putting some back on?B ) Are those eggs hatching into drone or zerglings?
If he puts drones on gas, you can bet hes going to get a lair soon, which should make you think mutalisk. If he doesn't, than it's still up in the air, but your corsair should most likely be able to get there in time to scout than. If he hatches his fourth pair of zerglings (for a total of eight) I'd lean towards zergling rush, in which case you add a cannon and get a zealot asap. Until that Zealot finishes, block (which a proper block, which I answered how to do in this section as well) with two probes and you should be ok as long as you pull probes when he comes to attack. If they hatch into drones, than it's up in the air still, but not going to be zergling rush most likely.
So you may be thinking that what I just said doesn't sound too good. That's only a slight possibilty you can make a good guess what hes doing. That is where two tricks

come in handy. A ) When you scout a 9pool. Just send a probe somewhere out in the map, and keep it there, it will come in handy in a minute or two. B ) Hotkey a probe in your base to something, just remember what it is! (_REMEMBER_, if you forget than it sucks!) When your original probe in his base is about to die, bring it near his mineral patches in his main, hit the hotkey for one of your probes and click the mineral patch. Than that probe will go through everything to get to that patch, so it has a good chance of getting in the base since it can go right through zerglings. Than send your other probe that is at a random spot on the map. He can't kill both probes, he might get one, but not two. That's when you check for the same things. More zerglings coming? Drones on gas? Double expansions up? That's when you can see what hes doing and than go ok hes teching or massing lings or double expanding. Than you play normally. PM me or post if anything is still unclear.
What is the best way to do the forge/cannon fast expansion on popular maps? (Python, Tau Cross, Longinus, Blue Storm etc..)
I couldn't answer this any better than the Teamliquid thread that is already made. They are all correct and this is actually where I learned the best ways. As a matter of fact, I printed them off and I have five to six sheets that I can rifle through to see it,
since my memory is bad
Link: http://www.teamliquid.net/forum/viewmessag...?topic_id=62652
How do deal with Sunk/Lurk/Spore defense?
Depending on what level your playing at, your going to come across these Zergs who make expansions, defend the hell out of them and than get ultra-ling with maximum upgrades, like I stated before, let's ask ourselves what their goal is. The goal of the Zerg is close to that of a turtling Terran, they want to buy themselves time to get to hive tech, full upgrades and their ultimate combination, which is ultra-ling. Ultra-ling is so good because it's cost effective, can crush your bases easily, especially with dark swarm, and is damn fast to boot. Throw in the fact that they can drop 2-3 ultras and a dozen lings and there goes an expansion of yours, it's hard to defend.
The goal for you than is to be prepared when they finally do decide to go on the offensive. Upgrades are important here, in PvZ you should always have a second forge upgrading, I usually add it with my citadel and stargate after a fast expansion. So by the time they have 3-3, you should have 3-0-3 and starting on shields. Next you want to take as many expansions as you can. This is hard because you cannot play like this normally, but what you do is, you play normal until you see he is just defending his expansions with sunks/lurkers and spore colonies. Than that's your cue to start expanding yourself. He has few units because A ) hes spending money on defense B ) all his larvae go towards drones.
Protip: DO NOT ATTACK SUNK/LURK/SPORE, it's so cost effective it's

ridiculous, stay away, unless it hasn't fully formed yet, in which case you can try to take it out, but be prepared to retreat.
Your goal is to basically have 2-3 running expansions _AND_-- this is very important, adequate defense. What is good defense? At least one gateway at your gas expansions and a robotics facility, and than mass cannons surrounding that. Why the gateway/robo? Robo for reavers, gateway for templar. Cannons/Reaver/Templar are cost effective as all hell and he will have a hard time breaking that. Usually he won't even try, but if he does, hes going to die. I usually get two reavers are expansions I crucially need, like the double gas on longinus, and always try to put one high templar at mining expansions. This takes care of defending yourself.
Fighting his ultra-ling. With full upgrades or even 3-0-3, your still a match for the ultra-ling, it's when he gets swarm that your now at the disadvantage. The best weapon to add are speedshuttles with reavers in them, do this for two reasons. A ) They own ultra/ling B ) They own static defense C ) dropping four or so at a hatchery can kill it in about eight or so seconds. Your basically more effective than them once you get reavers. Zealot/Archon/Reaver is the ideal counter, don't get goons, they aren't better than a 3-3-3 or 3-0-3 zealot at this point. Just don't let yourself be surrounded. Like a lot of strategies, if your still have problems, PM the problem + a replay and i'l PM you back with your specific mistakes and etc.
Zerg Guide By Ahzz
========================= Introduction ============================
(Note: Macro means managing your resources, building units etc in general, while micro means controlling your units in battles in general. Secondly, for those doubting this guide, I can play zerg, aside from zvz, at A- or A level if I put effort to my game.)
First off, for those better players around there. This is mostly meant to teach stuff for less experienced players, though experienced players can get something out of it too but.. Well, what I'm trying to say is, that if I say that you shouldn't concentrate on cool micro, it means that you should ONLY concentrate on better micro etc if you have enough speed and multitasking, which most of the people who read this do not.
There are several ways to start the game. Some are better at something else than others etc. Well, let's skip that crap and move to business shall we?
General Tips

-A good amount of drones is usually 1½ times the amount of mineral patches +3 for gas. So for example, if an expansion spot has 8 mineral patches and a vespene gas, then a nice amount of drones would be 12 at minerals and 3 at gas. This is, of course, in general. If you're making a power build or something, you can have several more drones on minerals.
-Keep your overlords around the map. Especially if you have speed. If you dont have speed, it might be too dangerous to send them around, so in that case just keep them at safe-ish positions and around your expansions and bases. This way you can still spot any harassment and attack attempts and somehow defend against them. One could say that this brings great danger to the overlords and shouldnt be done. However, if you ask me, it brings much greater danger to them if you keep them clumped at one place, you wont be able to spot harassment attempts (for eample, shuttles with dark templars to kill your expansion, or instead of dark templars, high templars to kill all your workers in matter of seconds), and they will be in great danger against units like corsairs. Besides, it's easy to bring a few hydralisks in case of an early harassment attempt. Also, if you keep your overlords around, you will have quicker detection for cloaked units such as dark templars. And if you have speed, just send your overlords to any strategic positions such as expansions, choke points, places he might attack you from etc. They are fast, you can escape with them from almost anything, and they have 200 hp. And even if you lose one, you will win much more as you know EXACTLY where he is, where he's attacking from, and usually his army size too, so you will know wether its worth to attack his army just yet or not. Trust me, every good player does this, and its totally worth it. watch any high level replays, you wont find a single game where this isn't the case.
-Zerg needs more expansions than terran or protoss to be able to fight them in general. In theory, "to win for sure" you need two times the expansions he has, and to be able to fight him rather well you need one more expansion. Of course, it's not always like this, but Zerg players should keep this as an guideline to really understand the importance of having more expansions. Also remember that gas is more important to zerg than other races, as the zerg is the most gas consuming. You got to weigh the options when expanding, either taking a safe mineral only expansion, or perhaps a bit more risky expansion that is worth more. Also, since gas expansions are much more valuable, your opponent will scout them more often.Remember, even if you have the correct amount of expansions the very moment, the least you should still expand is another expansion when your previous one has decent amount of workers. The Zerg can never have too many expansions.
-Atleast against terran and protoss, Zerg needs to keep his army around the map (also called MAP CONTROL) for various reasons. That way you get faster defense for any harassment attempts at your exapansions for example, you will have you army ready for flank the very moment he moves out, and its harder for your opponent to know your army's size. The Zerg has weak units in general and they rely on their quantities, therefore A flank and some general and simple micro such as burrow lurkers, dark swarm, or

moving your units just a bit to prevent your opponents escape is in general all you will need. except hydras against psionic storms for example. That is pretty intense stuff, since you have to predict perfectly where and when your opponent is going to throw a psi storm, how many storms he has, where to dodge, etc etc. Such knowledge can be acquired through experience and practise. However, for lower skilled people just spreading out your hydras is enough.
-Hotkey your hatcheries. The zerg has least amount of production buildings, so it's well possible for them. Also, the larvas piling up is another advantage. Personally, I prefer 0,9,8,7,6,5 etc for hatcheries. In the late game as I have even 6+ groups of units, I choose units before production buildings, since both of us will be battling with such large armies a single battle can change the course of the entire game.
Guidelines for using Hatcheries
-Even while you're only doing macro at your main, I, atleast, still prefer using hotkeys to build drones and units. It's faster than using your mouse. The only thing I have to do is 0sd9sd8sd or something along the lines, and the hatcheries I want to are building drones.
-One could say that these hotkeys suck as they're hard to reach. However, personally I think that using units at easy reach is much more important, if I want to macro, I can do whatever 0sh9sh8sz7sz6sz in an second if I release my hold of my mouse. Right after that I bring my hand back to my mouse. With experience you will start doing this automatically without thinking and disturbing ANYTHING you will know the exact moments..
-Always keep building your units. Dont forget it for an second. While your units are moving to the location you wish to, go and do your 0sz9sz8sh7sh whatsoever again. Also, since bigger battles do take quite a while, you should do this hatcery hotkey stuff every time before a battle, during a battle unless its very intense, and right after the battle. If you have too many groups of units, it's a bit more tricky. However, in that case you should usually have ultralisk tech ready already, and really, it's the fastest way to spend huge amounts of money. Choose a good time and go back to your base and build ultralisks from as many hatcheries as you can. poof, all your money was spent in seconds.
-Remember, once an expansion has good amount of drones, it becomes a unit production building. Sometimes its good to leave the rally point close to the expansion, You can then take it any time you wish, and it will provide better defense for the expansion.
-The more you have extra money, the more expansions you make, unless you already have alot of them already or something. It's hard to give a guideline for this, but one could be... 2 expansions = 5 hatcheries, 3 expansions = 6-7 hatcheries, 4 expansions = ... even more. If you have plenty of expansions and plenty of money, of course you make more expansions, but what's more important is to get alot of units and fast. You do nothing with expansions if they get destroyed before they can be used, and you cant defend them unless you have units. But you could say that if you have enough expansions

to fight him, you could spend most of your extra money for extra unit production hatcheries. Depends, but yeah. Also do not forget that usually once an expansion has the appropriate amount of drones, it becomes an unit production hatchery.
-In early game, especially in zvp, a zerg will be able to fend off a protoss attack without huge trouble even if the zerg ONLY starts to prepare once the protoss is about to move out. If you have 1 sunken colony and 6 lings, and protoss is starting to move out and you place 1-2 extra sunks and spend all larva on lings, you will be able fend off almost any attack especially if you pull your drones to help as well. Unless they specifically target the drones, they will just try to attack lings/sunkens so it might give you several free hits plus other bonuses which is why its quite powerful as a defense.
-When playing zerg, you just about always scout with your ninth drone. If your opponent plays random, you MAY scout at seventh or eighth drone. Unless you know what your opponents race is, you have to start off with a pool build. Otherwise its too risky.
Build Orders
Note: The build orders I give are just something to lead you to the correct timing. It could be an ideal situation, so you gotta see how you act if the situation does not happen to be ideal. In general, I don't really follow all build orders that closely. Personally, I just make the buildings when I got the money for it. Of course I send the worker a bit beforehand, so I can build it the instant I receive 300 minerals for example. In most of the cases anyway.
========================= ZvP ============================
9 Poolpros: May catch opponent off guard, forces him to make more and faster defense, you have defense for any kind of rush, pretty much.cons: not too great early economy (not THAT bad either, but still)(Another variation of this build would be to keep the extractor and make zergling speed early on, making it even more powerful of a rush, or if it fails, you can use zergling speed to stop any scouting units with ease. However, this takes a lot more money, and it might not be quite as good in some cases for that reason)9/9 drones9/9 spawning pool9/9 drones9/9 overlord10/9 extractor trick (take a drone, morph it to extractor, build another drone, and then cancel the extractor and you have 10/9 drones13/17 zerglingspressure with lings unless he already has defense you cant easily break up. If he has 2 zealots at ramp (2 gate build by protoss), dont attack. Leave them at his choke point so you can see the moment he moves out, and kill and scouts they might send. Same goes if they make fast expo and have 2 cannons up, or probes blocking the way and 1 cannon. if

its only 1 cannon, then attack with the zerglings. you should still have 3-4 lings left after finishing off the cannon. If you're confident with your multitasking and micro, you might want to keep sending zerglings and finish the game right there and then, or atleast gain a huge advantage, or just settle with dealing some damage to gain a small advantage while pumping drones yourself, gaining superior economy. This is what I usually prefer to do. Instead of taking a huge risk of just keeping on, why not leave it at that and take a huge lead? Of course I dont give up the very moment im about to gain the advantage, you keep going on for a moment, but remember to not get too greedy.
now there are different ways of continuing after making the lings etc... You can possibly make an ultra fast spire to completely catch him off guard, especially if you dealt some damage with your lings, or perhaps 3 hatchery zerglings to simply mass over him, though it pretty much only works if he made an fast expansion. Another option is to just continue safe and normal, making an expansion after you make your lings, keep making drones, and after you have enough money, make a third hatchery. If he made an fast expansion, make the third hatchery to a new expansion spot in most cases.
9 overpoolpros: better economy than 9 pool, able to defend against rushes pretty well.Cons: a bit slow hatcheries, 5-10 seconds slower than 9 pool(just like in 9 pool, in overpool you can build a gas at 10 supply as well to make ling speed.)9/9 drones (ninth drone to scout)9/9 overlord11/17 dronesexpand when you have the money, send a drone beforehand,14or15/17 lings (thats 8 or 10 lings). You will make lings appropriately depending on his build order and army size when needed, of course. You will use these lings to either shut him down if he's going 14 nexus fast expand, or if he's playing safe just kill his scouting probe and bring lings to choke to see when he moves out etc.17/17 dronesmake a third hatchery somewhat over here. If you dont have the money yet, just make it when you do. If he fast expanded place it to your second expansion.17or18/18 overlord (im supposing that your second hatch already popped out)18/18 dronesmake a sunken colony now, it will kill scouting probes and since you're 18/18 anyway you will have to wait a while for the overlord to finish. This way you will be able to build another drone and no larva is wastedMake a fourth hatchery when you have spare money while keeping on making drones and doing w/e tech you wish
6 Poolpros: VERY fast lings, kills almost any protoss fast expansion unless they're aware of it early on or map distances are large, gives a rather good economy even though you wouldnt expect it, you can also laugh your ass off at idiots who whine after the game for being stupid enough not to realize its potential

Cons: If it fails miserably you will have hard time, if he makes gateways instead of normal fast expand you will have very hard time, or if he finds out about it almost instantly you will have a hard time.This build order is extremely underestimated, however, it only works on maps which you'd expect the toss to fast expand.6/9 spawning pool6/9 drones, send 1 to scout.9/9 lingsdo the extractor trick and morph 2 more lingsattack with the lings and make an overlord when you have the money.Once your ovie pops out you make a few more drones and after that expo when you have the money. More drones and third hatch to second expo if he fe'd. Even more drones and do w/e you wish. I'd recommend 4 hatch start with this build tho. Make lings and sunks when needed.
The micro with lings:vs fe:when your lings arrive his cannons most likely will not be up yet, but they should be up rather soon. If they're not up and you're pretty sure you could kill them, go for it. If he has pulled several probes to block/kill your lings, see if there's a path which you could use to run to his main before cannons pop out. If there is no such path, use right click to make your lings attack 1 probe at a time. This is the thing, really, his cannons will most likely pop out before you could kill them or run past if this is the case, which it will be in most cases, but with this build you will kill like, at least 6 probes of his before the cannons actually come out. That will slow him down so much that you wont even be behind. Since you did a fast rush like this he will be completely paranoid and playing extra safe making his economy even worse, while you're just making drones. Even if you dont do well at all with this build, you should be able to do well enough that you wont be behind, but very few actually understand this.
Vs 1/2 gateway:in the case that protoss went 1/2 gateway build and you went 6 pool, you wont be having any instant win moments like you might have when fighting against fast expansion. However, your goal is to deal as much damage as possible.Your lings should arrive around the same time that his first zealot pops out. If he knows a bit what he's doing, he should have pulled around 7 probes or so to help that zealot while building a new one. Now, you CANNOT fight this army head on. You got to wait till they're in some sort of a line and scattered around, and then pick off lone probes one at a time. If he gets careless at any moment and his zealot gets separated, surround it and kill it. If you're able to do this, it might be gg already. Vs 1 gateway you will have far easier time than 2 gateway because if he went 1 gateway you wont have to fight a big counterattack after the rush, and he wont have that many zealots to chase your lings. In any case, try to kill off as many probes as possible. Possibly destroy the pylon that powers the gateway if you feel like it would be good and you have the chance to do so. 12 pool:pros: quite safe against rushes, just overall good economy, most likely able to kill
scouting probe before it sees anything bigcons: your lings most likely wont be able to deal any sort of damage, not quite as good economy as 12 hat, balancing drones and lings might get troublesome against rush builds your enemy makes.(like in 9 pool or overpool, you can make an extractor after your spawning pool, but in that case you wont have quite as good economy etc.)9/9 drones, send ninth drone to scout9/9 overlord12/17 drones12 pool(either gas here or gas later)12 drone12 hatchery at expansion (unless he's doing proxy gates or some weird stuff)14/17 6 lings (you can make a few more if you wish/need)17/17 dronesthird hatch around here unless you're going very fast tech to spire or lurkersoverlord around here toomore drones, possibly place a sunken colonyw/e you wish now. (of course not random shit)
12 Hatchpros: just about best possible economy for early game zerg, quite safe if you save larva for lings, very standard build (perhaps most popular too)cons: your opponent can play a bit risky and doesn't have to watch out for anything, can have trouble fighting against proxy gates or really fast gates9 drones9 overlord12 drones2nd hat at expansions11 pool12 droneseither you make a gas here if you're going for fast tech, or later. If you make gas here, your third hatchery wont be yet.13/14 third hat to second expo if he fe'dmake 6-10 lingsdrones till 17/18a new overlord at 17/18you can build sunken colony here if you wishcontinue with w/e tech/unit build
9 Hatchpros: You get to fast expand, you're VERY safe from almost anything, even fast gateways, you will get extremely fast 10 lings which will kill your opponent if he's careless. Cons: not quite as good economy, have to think more about things, and balancing your economy out may be troublesome.

10/9 drones (extractor trick)send 2 drones to your expansion after your tenth drone pops out, build an hatchery and send the other one to scout (doing it this way makes it easier to build the hatchery if his worker comes on the way)10/9 spawning pool (yes, extractor trick again)9/9 overlord10/9 extractor trick againsave larva for lings when your pool pops out. You will be able to bring 10 lings at a time, and if your opponent went 14 nexus fast expand you might be able to kill him off if he's careless. After this you just keep making drones and overlord when you cant make more drones, also make third hatch when you have the money (to second exp if he fe'd) Keep making more drones and tech when you wish etc. (ofc not too late)
I will skip 3 and 4 hatchery before pool builds against protoss fast expo since it's really difficult to balance out the drones and lings well enough for it to work. Once you're better you can find out yourself, or if you're already better you know of it already and know how to do it)
9 Pool into fast SpireBasically, you make gas around same time you start your lings or around the time you do the 10/9 trick, except that instead of doing the trick, you make it to the end. Start mining gas from the geyser, around the time you make your first lings, you should also have around 100/100 extra... make ling speed with those. Now keep making a few lings so that you can add a bit more pressure, and once you have enough money, make a lair. Also make some more drones at this point. If he has a good defense up (3 cannons or so, or zealots blocking the ramp) don't try to get in and waste your units. If he has less defense, feel free to try and run in and kill whatever stuff you can. After that, it depends if he expects mutalisks or not. Now, it's ESPECIALLY important that he cant scout you at ANY point of the game. Very important. If he does, it's obvious you're making a fast lair, and its over. You cant deal damage anymore after that. Keeping it secret is hard, and if you're too secretive and seem to be missing something, he will become suspicious, so this is hard to pull off. depends how much extra money you have, but make your second hatchery to the expansion, after your mutas the LATEST (you should have money for it earlier too, anyway). This build is very risky and its basically all-in. If you deal a lot of damage, good for you, if you dont, you've lost the game.
3 Hatch ZerglingsSecond hatchery to your expansion, and third to second expansion. Basically you keep making zerglings with speed, and after you have around 24+, depending of his defense, you attack. Now, it's also very important that he doesn't know about this. If he does, it's over. It's easy for him to make 4-5 cannons an a few zealots and probes, and there's nothing you can do. And again, this only might work against fast expand. or atleast, then it has highest chance of working. Otherwise it's quite easy to block the ramp and build a cannon or two and its hard to get through unless he becomes careless.
2/3 Hatch Hydra all in

Basically this build is making a very fast hydralisk den with 2 or 3 hatcheries and having rather few drones and spending all of the money on hydralisks and their upgrades. This works best against fast expand. Basically if your opponent is able to scout this, you will most likely lose since he will just canno up and you will have far inferior of an economy. However, if he cant predict in time you might be able to just run over him.
The 'safe' builds:Instead of going for a fast cheese build, you can just play it safe, stop ling production after first 6-10 unless he's adding a huge load of pressure with zealots, take an expansion pretty soon afterwards, and maybe throw in another hatchery while making drones. If he started off with a 2 gate build or so and you feel like he's making a lot of zealots or something along the lines, you may want to place a sunken colony early on, and maybe make a creep colony or two beforehand if you're quite sure he will be attacking soon. Just making an creep colony saves money and they morph to sunken colonies extremely fast, so you will be safe this way. However, don't forget that each sunken colony costs you 175 minerals (you lose a drone) and if we take to account how much money that drone could gather, it means you lose about 200 minerals for each sunken colony you make, so you should be aware of this and weigh the options.
Basically you have 4 decent options along with a few less common builds which you can figure out later yourself. You probably wont need em for a while.
The zerg, unlike the protoss, can make a million different variations of each build, and its the same over here. They can for example either make a quick lair straight after second hatch and maybe even add drop ugprade coming as well, or they can just start lair a bit after their thitd hatch in which case they will have good economy, able to fight fast pressure builds without things getting complicated, spare money for additional things like upgrades, lings, and maybe even another epxansion, and so on. Once again you have to weigh the options and look at whats happened so far in the game. If you think it will work out, then you can go for it, but going for it when its just been a basic game so far and both are playing safe is usually not worth it. Thats why I'd recommend safe builds for you now.
The lurker tech:Let us suppose we're playing safe. First off, think what your opponent has done, did he fast expand or is he still in his base, doing either 1 or 2 gate build or something. If he fast expanded you gain a huge load if you can make a quicker carapace than your opponent can make an +1 weapons, since if the protoss only has +1 he will kill zerglings with 2 hits, but if the zerg has a carapace upgrade it will take three hits. You may have noticed that progamers rarely rush to quite quick evolution chambers, but I recommend that you still try to get a quicker upgrade than your opponent because you don't have progamer gaming sense, micro, macro, or timings, and thus not making the upgrade will punish you a lot more. Okay, you KNOW he's getting a quicker upgrade, that's fine, you just have to play a bit different. For example now making slow tech and making a lot of lings could be bad since his zealots are like, twice stronger than before against your lings. So either you make fast tech or you go hydra. That's what I usually do anyway.

In this case we're talking about lurker tech. In any case, you should start your lair pretty quickly after your third hatch, either with the upgrade before or after the lair, however you fancy and feel. It also depends on how much spare money and gas you have. Your scouting ovies or lings/drones should have seen if they're making a stargate or just templar tech. If he did a stargate first, you might want to place your hydralisk den a bit beforehand, for example right after you start your lair so you can save as many overlords as possible. Otherwise you will be fine with starting it when your lair is about 50% done. Also start your second gas around the same time you start your lurker aspect upgrade. Since you most likely have been just making drones till now, you should be having somewhat nice number of them around already. You should start ling production at this point. Remember to also add your fourth hatch when you have the money. If you dont have a second expansion yet, you could add it there. Keep making lings and make a bit of hydralisks beforehand so that the instant you get lurker aspect you can morph around 6 lurkers or so. Now, you should be watching out for a few things. First off, if he's making some sort of a zealot rush, you should be defending your expansions and making sure that you know where his army is and when. Bring your lurkers to help if needed, and sunken up, but dont overdo it. If your army can already beat his army as it is, no point wasting money on sunken colonies. You only add them if you believe you cannot beat his army otherwise or you'd have trouble defending your expansions. I recommend starting a spire after your first lurkers pop out too. Also make overlord speed when you have the money. Now, he SHOULD be in his base, and he most likely has his natural.There are a few things you need to look out for. First off, could he have observers yet, and second, how many cannons does he have and at what locations. If you think you will be able to destroy his cannons and he doesnt have observers, go for it. If you're able to do this, its pretty much gg since there's not much he can do against your lurkers when he has no detection. However, you shouldn't do this uselessly. If you think you might not be able to pull it off, dont try. If you lose your army at this point, especially if you started off with lurkers, you will also lose your map control, he might be free to take another expansion, and your army will most likely be inferior overall.Let's suppose you did NOT attack. You should spread your lurkers at his choke point so that he wont get more than 1-2 with a storm. Also bring some overlords close by so no dark templars will sneak by, and you will be able to see if he has observers and so on. If you're making a spire like I recommended, using scourges to kill off harassing shuttles and killing observers will slow him down a lot. Also, make double evolution chamber, if you haven't already. Upgrade carapace and melee attack, since thats what you will need in late game and probably the best now too. Expand and make more unit production hatcheries with your spare money. Also keep making more units and bringing more and more lurkers to the choke point, making it harder for him to pass by every moment. Also make a queens nest for hive.Now, since you're making a lurker block you have to be extra careful not to suddenly lose everything for free because you're putting a huge part of your game on this build. Basically the goal is to keep him in base long enough for you to get hive tech and even ultralisks if possible. Adrenal glands for zerglings improve them two fold, so its important not to make too late hive in ZvP. Also, once he breaks out you also have to make sure that he will lose a large portion of his army too, because if he doesnt he can just run over you. Usually at this point every zerg has to sunken up his main and exps

appropriately. Also, if you've kept him in his main a decent time, his mineral will be close to running out, so its especially important to stop him for getting new expansions without trouble.
My most common lurker build: (only vs protoss fe)starting off with either pool build or 12 hatchery fast expand, it doesnt really matter. Also fast third hatchery to second expo. Keep making drones and make a fourth hatchery when you have the money, also start a gas the moment you start your fourth hatchery. If you made a pool build, start it a bit before your fourth. Also make some lings when spawning pool pops out. Keep making drones and start to gather gas. Make an evolution chamber when you start gathering ags as well, and as fast carapace as possible. With this build your opponent most likely will NOT have faster upgrade than you. Keep gathering gas and making more drones, also make lair and ling speed when you have the gas. Start a second gas after ling speed. Make a hydralisk den when lair is at 50%. You should now dedicate around 3 hatcheries for ling production, while one hatchery makes drones. You can also make ovie speed, second evolution chamber, and spire when you have spare money. With this build you will have faster upgrade, and you will have enough lings to kill off ANY rush he makes, even if its something like 6 gateways mass speed zealot rush. You can also expand again once you have a decent amount of lings. Especially once you fend off his attack. Once your lurkers come, set a lurker block and use lings as well to keep him away and check for any exps. Keep adding units and make hive as well. Possibly expand once again after a while.
4 hatch hydra:This is basically making 4 hatcheries and a gas a bit after the fourth hatchery. Of course making drones all the time before this besides for the few lings. And if he fast expanded, you place third hatch to second expo. Once you have the gas you make a hydralisk den, start hydra speed and start making hydralisks. Also start a second gas. Keep making hydras for a while... You most likely will not end the game with this, but thats possible too if he's careless. Start a lair when you have spare gas, and if you have plenty of spare gas make hydra range and double evolution chambers for ugprades (even tho you make hydras for now, you will still upgrade melee attack instead of missile). Also, this would be a good time to make more drones if some of your expansions do not have enough and expo again.Once your lair pops out make ovie speed, lurker aspect, and if not already, zergling speed. Keep making units, and keep him contained for now. Watch out for high templars though.
If you're not able to keep him contained, at least make sure he doesnt get expansions for free, or if you don't think you can stop him, take an expansion or two yourself. Let's suppose he didn't break out of your hydra contain. Once your lurker aspect finishes, morph as many hydras to lurkers as possible. Start a lurker contain, and have some overlords close by. This is a bit different from the previous lurker contain because this time you may not be using scourges at all. Instead, the moment your overlord spots an observer, you move in with your hydras and focusfire on it and instantly run away, while brining more units and teching up, upgrading, etc. remember to make a lot of lurkers. You can also bring scourges but its semi-optional.

3 or 4 hat muta build:Basically you start off the same as if you're going the lurker build I explained before (4 hatch and gas instantly after fourth hatch) except that instead of evolution chamber, you will be making a a lair. (you can also start gas after third hatchery, but you will have slightly worse economy then) Also make a speed after that, and start your second gas. If you wish, you can make an evolution chamber for carapace now as well. If you do it now, It MIGHT get in time.The good thing about this build is that you will be able to get a good amount of drones, a good economy, and its rather safe and basic build overall. Another good thing is that they might not predict this build as mutalisks since this will be so late. However, because this IS so late, they will have archon(s) and high templars with storm, and POSSIBLY 1-2 cannons, and thus it might not deal a huge load of damage. That won't necessarily make your situation worse though, since you have good economy. Meanwhile you have two options: Either you make mass hydra and use mutas to kill off his high templars, or you go with the 'safe' thing which would be lurker tech. Remember to add a second evo and possibly tech up while taking a new expansion while doing this build. The danger of going mass hydra after this build is that if you're actually not able to take his high templars or if your macro screwed up, he will just be able to run over you unless you have good micro. That's why its risky.So most of the time I'd just make lurker/ling/muta/scourge at this point, and using overlords with speed to pick off any observers with both muta and scourge. Try and set a lurker contain if possible using mutas/scourges to pick off observers as long as possible.
5 hatchery mass: (only vs protoss fe)Basically you can do this when you start off with almost anything, but personally I'd recommend that you start off with a pool build, either 9, 9 overpool, or 12 pool. This way you can kill his scouting probe so he will be wondering a bit what you're doing, you will be safe from rushes, and you will force him to cannon up a bit and delaying his nexus and gateways and so on. After your first lings expand, and then just keep making drones and adding hatcheries. Add your third hatchery to your second expansion. Once you have 5 hatcheries you take both of your gasses. While making more drones. This build is very strong for several reasons; You can make a huge amount of lings any time since you will have so many hatcheries so you wont have trouble with early attacks. You will also have so many hatcheries that in just a few moments all your expansions will be running at full speed. In any case, with this build you have two good options:Either you go mass hydra, which gives you a strong mid game but weaker late game, or just go mass ling/lurker to fast ultra which is sort of weak mid game but strong late game. The ling/lurker to fast hive/ultra also requires more gaming sense, while the hydra is something almost anyone can do.If you decided to go with hydra:make a hydra den when you have the gas, once it pops out you do hydralisk speed and start full hydralisk pump from 5 hatcheries. By this point all your expansions will have plenty of drones and you will just be able to pump hydras from 5 hatcheries. Just keep pumping hydras, also get range once speed finishes. The reason this is so strong is that even if the toss went 6 gateway mass speed zealots he cant do a thing about it. You will

have 3 times the hydras and they will just die. They can't expand either, but if they do you can just run over the expansions with pure mass. If he gets careless at all, you can just run over his whole base if he doesnt have enough cannons/storm. Basically the only good thing he can do is cannon up, make high templars rather quick, and gather up his army, and then burst out. Which really isn't a bad thing for him since at that point he can cast storm so many times that hydras wont do much, therefore if that DOES happen the zerg has to stop making hydras for a while, tech up, and get dual evo upgrades while taking an expansion or two and maybe a few more drones before continuing unit pump again. Naturally they have to make lurkers as well and all. Then it becomes gaming sense/macro battle. The reason why this build isnt so strong at this point is that the zerg wont have as good upgrades, and thus toss doesnt even need that many units. Secondly, zerg wont have hive tech, and he wont have cracklings or ultras whatsoever, he only has to beat tosses army with pure mass pretty much, which can be hard. Especially if zerg wasnt able to contain the toss.
If you decided to go with ling/lurker -> fast ultraBasically with this ling build as well you will have extremely strong economy, and a huge amount of lings. Even if toss makes a zealot rush, it shouldnt be a big problem because there will be 4 lings to each zealot, unless the toss did some 5/6 gateway mass zealot thing, in which case you have to sunken up.Basically it goes like this;5 hatcheriesdual gasdual evolution chamber and hydra denlair, also ling speed and dual carapace/meleemake a few hydras so you can kill off corsair harassalso at this point or a bit before you need to start making lings. Besides, all your expansions should have plenty of drones. Also make ovie speed/lurker aspect upgrade when possible.also make a queens nest for hive/crackling/ultras. Keep making lings. He will probably either try to take an expo, or attack with his stuff, which you shouldn't have any problem stopping. After you've got some lings up you can expo pretty freely I'd say. Also, since you will be doing so heavy ling build and only quite few lurkers, you will have a lot of money and that means a lot of unit production hatcheries. You will have so many lings that you shouldnt have any problems if you sacrifice even 20 lings to stop his expansions from time to time. But basically, you cant let him expo now. You wont have enough lurkers and your ultras wont be up yet, so you need to make sure he doesnt get many expoes when the game gets to late game. Once you start to get more ultra/ling you should be quite safe.
The mass ling/hydra/lurker/defilerThis isn't a very common build mainly because it needs very good macro to work well and not bad micro so that your hydras and lurkers wont be wasted to few psionic storms. Basically you can do this even if you started with anything, you just need to start 3 evolution chambers rather early and getting all ling/hydra upgrades. That includes getting cracklings as well. You need defilers later on, but they're not in as big of a hurry. You're basically gonna be making a huge load of hydra/ling and lurkers with any spare gas that
you have, having total map control and superior upgrades over your opponent, totally swarming him.Later on with defilers you will plague his army and use dark swarm and lings/lurkers to your advantage against expansion cannons, dragoons, and archons. Later on you should switch to ultra ling hydra though.
That's pretty much it for the ZvP part. I'll still list the goals for each time of the game.
Early game:The goal is to survive, keep your tech hidden as well as possible, get an expansion (or against fast expansion 2 exps) up, and get as good economy as possible.
Mid game:The goal is to not let your opponent take any free hidden expansions. You need to make sure his probes didnt sneak to cannon up a ramp or choke and so on. This is quite important. You also need to get your tech up and running, make sure you're not too inferior upgrade-wise, have good economy, and start massing units.
Late game:The goal is to outexpand your opponent and take down his expansions while protecting your own. You want to have ultras, lings, defilers and so on and several hatcheries pumping units non stop. You need to keep map control, and you cannot let your opponent to get any expansions for free. You also got to be aware of his late game tech, which could be arbiters, corsair/dt, or reavers. Or possibly just mass archons which is extremely deadly.
======================= ZvT =========================
if in ZvP it is important to have good macro, then in ZvT aside from macro its important to have good timings/gaming senses.Basically most of the opening build orders are same for terran and protoss, but there are a few changes and exceptions. For example 6 pool is pretty much out of the question, and making a quick speed on ZvT is almost like making all in zerglings. It's far more risky, because if he blocks it, and why wouldnt he if he has firebats, stimpacks, medics, or scvs blocking, the game is just about over. Making ling speed is fine, but not on the early game unless you plan on really swarming his first M&m attack, destroying his fast expo build, or something along the lines. But basically thats almost all in, so you shouldn't do it too often unless you have a reason to do so.Also, unlike ZvP, in ZvT you need faster tech, and you dont need as fast upgrades in general. If your lurkers for example are too late against a decent terran, you wont be able to even move out properly, and not even expand once without it being taken out pretty quickly. And if your mutas are too late, you wont deal any damage at all and his science vessel will be up pretty soon so the damage will be even smaller.That being said, there are two ways to start an average ZvT game, either go lurkers, or go mutas. However, there are very many variations of these. Let's go through them.

1 base build:
Basically this is all in build, you start off with a 9 pool speedlings, make very quick lair and very quick lurkers. You try to deal as much damage as possible with the lings until your lurkers come out. When they do come out you try to end the game. If you're not quite able to, take an expansion up while making drones/keeping adding more lurkers. You might get a chance to break him once you have enough lurkers. Against decent players you dont have too big of a chance of winning with this one unless you're lucky
2 hatchery muta rush:You either start off with a fast pool or 12 hat, make a very fast lair and speed for lings shortly after. You also make a few drones meanwhile. After a while you start making lings. Start a spire when lair pops out, and when spire is 50% start your second gas. Otherwise you will have too few minerals that it will be useless to have extra gas. With the speedlings that you have been making you try to deal as much damage as possible, killing his marines, destroying missile turrets that he might be making, and overall just slowing him down. Remember to save a bit of money and larva for mutas when spire pops out. When spire DOES pop out, you make your mutas and try to deal as much damage as possible with the harass. Just make mutas and drones when you can. You have to deal quite a bit of damage, because your own economy will be quite bad meanwhile that unless you can do the equivalent amount of damage or end the game, things will be bad. Basically you either make fast guardians, or you continue with lurker build. If you've already dealed a lot of damage with mutas, and if you have several mutas left, it will be rather cheap and effective to actually just morph them to guardians. In that case you need to bring scourges too to fight off wraiths/vessels though.
If this doesn't end the game, you just have to hope you can continue the game with lurker/defiler/ling/scourge.
2 hatchery lurker build:(first building timings almost same as 2 hat muta build)Used in maybe 1/100 games or something. This doesn't give you a good economy, it might be hard to keep control of the game, and things might get otherwise complicated as well. In this case you need to make drop as well, otherwise it will be too difficult to deal real damage. But basically you use speedlings to slow him down, destroy marines, bunkers and so on, while making your hydralisks beforehand and possibly even bringing them to the middle of the map before the lurker upgrade finishes for faster lurkers. If he doesn't have bunkers ready by the time your lurkers arrive, you might win the game with that since your economy wont be downright horrible. If he does have bunkers etc, your hope is that your drops will be succesful. If that fails too, you might as well type gg but if you insist, you just have to keep making only drones and lurkers and expanding twice and hoping to outplay him.
3 hatchery mutas:Works best if you start off with a 12 hatch fast expo, but it works with 12 pool/9 pool as well.

Basically, make your expansion after whatever you've been doing, either lings, pool, or just drones. Whatever you began with. Make a few drones and make your third hatchery. The same time you start your third hatch you also start your first gas. Make lings if you havent already so you can kill his scout and see when he's moving out etc. Make some more drones and possibly place a sunken colony so you'll make sure he doesn't sneak an scv scout behind your back. Make your lair as quickly as possible, and keep making drones. When your lair is about 50% done, start your second gas. You may also start ling speed around this time if you have not already. Just keep making drones for now. You may place an hydralisk den somewhere to mislead him, and then place you spire to another spot. This might buy you quite a bit of time.Around the time you start your spire you should be having enough drones at both of your bases, so you can start ling production. Once your spire is about 1/3 done make a few overlords so you will have around 20 or more free supply by the time your spire pops out. At this point you also need to save larva. If you didn't have to sunken up, you should have enough money for a fourth hatchery, which you should place at another gas expansion. If he's been moving out with M&m, you might want to sneak the drone beforehand so you wont delay it. Once you start your first 9 mutas you should also start a hydralisk den for lurker aspect. Your lurkers cannot be too late. You have to contain him before he can move out when your mutas cannot keep him in his base anymore. Anyway, once your you've started your hydra den, start 2 more mutas so you will have 11 alltogether. Go and harass with your 9 mutas and add 2 mutas to that group when they pop Pick off any lone marines, scvs building missile turrets, scvs in general, lone missile turrets, and so on. One thing you need to remember that if he has huge clumps of marines, do not attack. Wait for them to be in a disadvantageous position or in a line or just scattered. This is when the pros attack as well (sometimes they get greedy, and if you look closely, thats EXACTLY when they lose a lot of mutas). If you see a flaw in his defense you may bring your lings to deal some extra damage. Also, remember to make hydras in time so you can start lurkers the moment your upgrade finishes. Also remember to make a third expansion when you have the money, as well as a fourth unit production hatchery. Also send 2 lurkers to your expansions choke points so m&m alone cannot take them down. Start an evolution chamber or two while making lurkers and lings and contain him in his base till he gets science vessels. If you have several mutas left from your harass, you can place an queen nest already for hive. That way when you get a greater spire you can make guardians very cheaply. It's almost free. Also, unless you have all your 3 expansions left and map control, you will need defilers before ultras. However, if your attacks and/or pressure has been succesful, you may be able to go ultras first. Use scourge on dropships and science vessels though to delay him even further. Remember, do NOT waste your units. He's attacking your lurkers with siege tanks? Retreat, unless you know you will overwhelm him. In ZvT especially its very important to keep absolute map control. You will need to know where your opponent is and when, how big of an army he has, and if your army could beat him, and even more, at what place your army can fight his army. You will have to look for the correct timing when to fight his army.In any case, just keep gathering up your army, protecting your expoes and looking for the correct time to attack while getting hive tech. Usually defilers first and then ulra.

3 hatch lurkers:Kind of same stuff as in 3 hatch muta except that you make lurkers in stead of mutas first, and you probably can't expo before you move out.Basically, make your three hatcheries and so on while making a few lings and drones. Once your supply is around 16/17 take one gas. Make a few more drones and start an overlord. You may also start a sunken over here. Make a lair when you have enough gas and keep making drones. When your lair is about 50% done make hydralisk den, also make zergling speed. Now, you have two options. Either you make lurker drop, in which case you have to take a new gas right now, or you can just make normal lurkers and possibly add a carapace sooner, in which case you will take the gas around same time your lair finishes. In the case of lurker drop I recommend making hydralisk den instantly after you start lair so you can make a few hydra beforehand and sneak them around the map before the terran m&m contain comes so your drop wont be slowed down. It's sort of optional, but it works sometimes.Anyway, once you start your lurker aspect you should be having quite a few drones already, so you need to start producing lings. Remember to make several hydra beforehand so your lurkers wont be slowed down.You might be able to swarm your opponents m&m army before your lurkers even come, but if he has a larger than average army or firebats, I wouldn't take the risk. In any case, once you get your lurkers , take your army and move out, drive the terran out of your way and back to his base. He can't really do much else. Also expand once or twice now, however you fancy and have money for. Keep making lurkers while you make a few more drones what your main/natural may have been missing. Also make a spire for scourge so dropships and vessels wont be a trouble. If you haven't started upgrades yet, make a double evolution chamber now. You have two choices now. Either you depend more on your superior macro, add a new hatchery and just mass out your opponent for first 1-2 attacks, or you add a queens nest for quick hive and defilers. Either way you need to expand again if you haven't already. And even if you did go for macro style, you still need to make queens nest pretty soon for defilers and/or ultralisks. Basically try to keep your expoes while taking more of them, massing up more if possible and getting defilers. Once you get defilers defending against him will become easier though you have multitask twice as much as before. Try to drive him to his base. Later on just go ultra/ling/defiler/scourge
double expo vs 14 or 18 CC terran FE:Ok this zerg build I thought of myself, though some other people may have used before me. It's sort of tricky, so if you have trouble balancing your drones/army in general, I don't recommend it.Start off with 12 hatchery fe, make 11 pool, and 14 hatchery to SECOND EXPANSION. Make a few lings and then make a gas. Try to hide your second expo as well as possible, make a sunken colony early if you need to, because if he finds out about it before he even starts his CC, he can just not do it, but instead add 2-3 more barrackses and run over you. The good thing about this build is that it wont give terran any sort of economical advantage, the bad thing is that it's very macro heavy and needs a bit of experience to pull off well. Anyway, start a fourth hatchery once you have the spare money, keep making drones and make a lair first and then ling speed when you have the money/gas. Also start
a hydralisk den when lair is at 50%. Remember to make a sunken colony or two to your second expo, and start making lings. All of your expoes CANNOT have enough drones yet, but you still have to know the correct time to start massing speedlings, which is why this build is tricky. Either you start making them when he moves out which could be before, or you start making them now. I recommend something like 1 hatchery for drones, and the rest for speedlings. Once he moves out, prepare your lings for a flank and absolutely rape his army. Remember to make hydras for lurkers before hand. Once you get your first lurkers, start a second gas (and third in some maps) and an evolution chamber for carapace. Contain him inside his base with lurkers, take another expansion yourself, start making another evolution chamber, tech up, make a spire, maybe add another hatchery for units and maybe a few more drones if some of your epxansions dont have enough. The just continue to mass lurkers and lings. It's all about your macro and flanking and attack timings right now, and its pretty much the same as with 3 hat lurkers, so gl.
Early game goals:Survive, find out what he's doing, get up as good economy as your build allows, not too late tech, hide your tech as well as possible.
Mid game goals:Get another working expansion or two, survive his first 1-2 attack while being able to keep your expansions, tech up and start upgrades now the latest.
Late game goals:Do not let him expand for free, get a lot of your own expansions and protect them, and stop his attacks. Also get ultraling.
================== ZvZ ====================
I haven't played serious ZvZ for a while so I won't tell you the specifics like I have in ZvT/ZvP so I don't tell anything wrong. Besides, every ZvZ is different and by watching ZvZ replays you only get the vague idea. True ZvZ knowledge and gaming sense comes through experience. Also remember one thing, ZvZ is all about who makes the first mistake. That mistake will change the whole game.
Also, you pretty much always have to make gas after your spawning pool either for ling speed or just quick lair. The general goal is to get quicker spire than your opponent, but even if you do get quicker spire it doesn't necessarily mean that you will win the game, because your opponent can go mass hydra or just place a spore colony or two while having TWO HATCHERIES against your ONE, and/or simply far better economy. Every single drone counts in zvz. If your opponent has 1-2 more drones for a few minutes, you will probably kiss good bye to your victory since he will have quite a few more zerglings. ZvZ is also largely about having more lings than your opponent and copying his moves. He keeps making drones? You keep making drones, He starts making lings? You make 1 more drone and then make lings because it will take time before he arrives at your base. These guidelines are, of course, not working if you're going a ling heavy build yourself, but in that case I would expect your opponent to react somehow. Also, though making

muta upgrades doesn't help you for a while, but once the game gets longer and there will be bigger mutalisk vs mutalisk battles, the winner will most likely be the one with superior upgrades.Also, until your opponent gets antiair, keep overlords all around his bases and paths to your base.
Let's look at some general builds:
risky:
12 expand:12 hatchery at expansion, 11 pool, 10 gas, drones till 12 then save larva for lings and be ready to make a sunken colony at your expansion if needed. If your enemy does mass ling build, you will be in trouble. If he does 9 pool or even 9 overpool, you will be in trouble. If the distances are short and he makes 12 pool and triple sunken colony at your natural, you will be in trouble. However the latter can usually be stopped with proper caution. If you scout your enemy and he's not 9 pooling or 9 overpooling, you might have chance for this build. The advantage is that you will get a bit better economy and more gas than your opponent which will count when you get mutas. (unless, of course, your enemy did the same build)
12 hatch at main, 11 pool, 10 gas. Drones till 12 and save larva for ling etc. Not too risky if you're prepared to make a sunken colony if needed, but if he 9 pools you might lose several drones
12 hatch at main, 11 gas, 12 pool, drones till 14, save larva for lings and MAKE an sunken colonyThis build gives you VERY good economy, you will have rather quick lair and ling speed because you've been gathering gas so much beforehand, and you will have so many more drones that it will be no problem if you even have to make a spore colony. Once your spire pops you wont be behind in mutas. You can also easily overpower your opponent with lings if he gets careless. However, this build will most likely lose to 9 pool, 9 overpool, and possibly 12 hatch at expo (but not necessarily).
3 hat ling:Start with w/e pool or hatchery build, making one to an expansion is optional. Make three hatcheries, also remember ling speed. Your goal is to destroy your opponent with mass lings before he gets a spire, however the game is not over if he gets a spire if you deal enough damage, it just means you got to make 1-2 more spore colonies and start making hydra while droning up.
9 pool/9 overpool fast spireskip ling speed usually, just make spire with the first 100 gas you get, sunken up as needed while making first 8 lings. Make as quick spire as simply possible while making more sunken colonies if you need to and more drones. Your opponent will either rush to spire as well, in which case its competition of faster spire, or go 2 hatchery lings with

slower spire in which case he might try to run over you with zerglings before your spire completes and winner stays undetermined if you survive, or he goes mass ling and if you are able to defend well, you've won pretty much.
ling/scourge:Doesn't happen often anymore, but its basically 2 or 3 hatchery lings with rather quick lair, and just massing lings and scourges. Scourges take very few minerals, and thus by making them the zerg can just mass ling and use scourges to counter his opponents mutalisks. Doesn't work too well IMO.
3 hat hydras:This is actually semi-risky. Basically you add your second or third hatchery to your expansion, make lings as needed, defend, and drone up. Dont mind his spire, just make spore colonies as needed while droning up and making a hydralisk den as well as hydralisk attack upgrade. Your hope is to mass hydra and run over his stuff. If you're not capable to do this, you've most likely lost
Safe:well, actually there aren't any safe build in ZvZ as it all depends on your opponents build order, but I mean safe start off.
9 pool9 pool8 extractor7 overlord9 drone
Basically make 8 zerglings or so as well as zergling speed. Stop gathering gas for a moment. Possibly make 1-2 more drones, and also make a second hatchery. Start gathering gas and make as fast lair as possible while constantly making lings and getting as fast spire as you can. If your opponent has inferior amount of lings, try to run over him. If he's going some super fast spire build, you might need to make a spore colony while possibly trying to run over him with lings.
9 overlord9 spawning pool10 drone10 extractor10 dronestart gathering gas, and do same thing as in the previous ones
In my opinion these two are quite safe and you will usually have faster or fast spire as your opponent, you wont be behind in hatcheries since you have two, and you most likely will not be behind in drones unless you wish to make lings when he's making drones. Just remember to save money for mutas.

Watch some ZvZ replays. You will get the general idea faster than me explaining every specific thing you can think of.
Early game goals:Get faster spire than your opponent, destroy him if you see a weakness
Mid game goals:Destroy him if you get a weakness while having better muta upgrades, not letting him expo while expoing yourself, having more mutas
Late game goals:Get creative here. Destroy his exps, tech to hive, have better upgrades, get devourers, defilers etc.
=============Scouting&Counters=============
--------ZvT--------•you see 1 barracks and quick refinery with your overlord or drone:
-he might be doing fast academy to fast expansion while rushing with 1 medic, few firebats and marines,-he might be doing 1 barracks fast drop. -he might be doing some sort of a 2-4 vulture fast rush through your defense and kill your main to some sort of wraith rush or drop to an expansion (possibly expo without air)-he might be going for just fast 2 starport wraiths-he might be going fast metal -> expansion-he might be doing a fast tank push at your expansion
COUNTER:Mutalisks, either 2 or 3 hatcheries, but it got to be rather fast.(if he made fast academy rush to fast expo, lurkers are fine as well)If it's too slow, his wraiths will kill too many overlords and drones. If its too slow he might already drop your main and destroy it (however, if you predict a drop, make sunken colony and zerglings with speed to your main beforehand). If it's too slow his tanks will be able to destroy your expansion hatchery.If you think your enemy is doing really quick wraiths, far faster than your spire, I recommend placing a spore colony at both of your mineral lines.If you think your enemy is making vulture rush through your defense, Make 2-3 sunken colonies and place them so that he has to go through as long course before he can run through as possible Be ready to pull drones to block to slow him down even more.If you think your enemy is tank pushing or there's the risk, place sunken colonies, at least 4 of them, as far apart from the hatchery and a bit apart from themselves as well so tank splash wont kill them. Keep making more sunken colonies before your spire finishes.

•you see he's making tank push and you started with a lurker build:you need to stop drone production and start making a lot of speedlings beforehand. Once he starts attacking your sunken colonies, which you should have at least 2-3 of, measure his and your own army. Can your lings destroy his? If so, go for it. If not, wait for your lurkers, then destroy his army.
•You saw some other of these options and started with lurkersJust play safe, but make as quick spire as possible so you may fend him off. You might need hydras against wraiths etc tho.
•He fast expandsYou either go the risky way and try to mass speedling him, or you play it safe and go 3 hat muta (best, probably) or 3 hat lurker build. 2 hat muta may work well as well. My double expo build works as well, but if you cant pull it off, I don't recommend it. In any case, just tech up while making drones and expo when you have money for it.
•He makes proxy barrackses either middle of the map, at his choke, or just really fast barrackses at his main.-did you go 9 pool or overpool? If you did, just keep making lings and also make ling speed. Expand when you have money for it. You're safe. This is the perfect counter.-did you go 12 pool? Make ling speed and keep making lings, however, only expand after your lings pop out-did you go 12 hatchery? This is a tricky one, first off, you need to see if he's bunker rushing you or not too. If he is, pull off 6 drones or so and try to destroy his scv that builds the bunker and/or marines before they enter the bunker. Build as quick double sunken colony as possible and save larva for lings. Once a sunken colony pops up, send your lings with the help of the sunk to destroy his attack. You should be fine in most the cases unless your micro failed.Did you go 10/9 hatch? If so, you should be fine. Just place a sunken colony beforehand.
•He goes fast expo or without fast expo metal-At first you need mutalisks to kill of wraiths, vultures, and such if he made them. If you made mutas you might also be able to destroy quite a bit of his stuff before his goliaths with range arrive. Keep making mutas with +1 attack or carapace. Also start a hydralisk den for hydralisk speed/range and evolution chamber for +1 carapace/missile. Now, if he's making 100% goliaths, make almost 100% hydra (just keep around 1 group of mutas around). If he goes metal he will try to expand a huge lot, so keep the map scouted. Just have 1-2 more expansions than him and concentrate on out-massing him. Also try to have superior upgrades. The more he makes tanks, the more you make mutas. Just use muta/ling/hydra with good upgrades to kill him off. Make 2-3 sunken colonies per expansion so no drops or vulture harasses can disturb them much. Also tech to hive, but it is NOT in a hurry. The best possible combo to fight his metal build is ultralisk, hydralisk defiler (and maybe mutas). Just flank him well, and use the terrain to your advantage while not letting him expo.
•He's making a lot of tanks, m&m, and some vessels (most common tvz mid/lategame

build)if you have mutalisks left from your previous build, go to guardian tech fast. If not, try to get quick defilers and use lurker/ling/defiler/scourge to drive him away. HYDRA/LURKER ARE NOT AN OPTION AGAINST THIS BUILD UNLIKE SOME ZERGS SEEM TO THINK! The tanks simply slaughter the hydras, you get almost 4 lings for the cost of 1 hydra, and you get more lurkers that way too If something owns a terran army its 1-2 groups of lurkers that flanks the terran army.
•He is making mass vessles and a huge lot of m&m (skterran, he might also be making tanks from 1 factory)If you notice this early on, before mid/late game, go mass hydra with double evo upgrades and lurkers. The thing is, now there aren't that many tanks at all to shoot down your hydras like flies, and thus they're very strong with the help of lurkers. Also, once lurkers get a few damage upgrades, they just utterly rape m&m. It's a fact. Besides, if he has good micro scourges might have trouble killing the vessels, but hydra focus fire still works. Later on you may tech to hive and get defilers/ultralisks. It's especially important to keep your expansions vs this build.
If you, however, realize this a bit late, aka your hive is coming etc etc, you got to play a bit different. You have to rush to defilers, and use lurker/ling/scourge for now to fend him off at all costs. Once you get defilers use dark swarm to delay him a bit more. Upgrade plague as soon as possible. Keep making defilers, because he will irradiate them a lot. Once you get the chance, plague all of his science vessels and marines. At this point, make a few mutalisks. When you get the chances, use these mutalisks to attack on the 2-3 hp vessels. They will die pretty quickly...But basically from this point on just keep fighting his army with defiler/ling/lurker/scourge/muta, maybe get ultras once you start to have more gas.
•It's early game, and I don't know anything what he's doing!You may sacrifice an overlord to see his tech, but its semi-optional. Make rather quick mutalisks though, because they counter so many weird ass cheese builds and even if they don't cheese, mutas are still fine since you gain map control so quickly.
•Mass wraith at endgamespore colony or two to every exp, a lot of hydra, and scourge/muta
•Battlecruisersdevourers, plague, and hydra
----------ZvP----------
•He's making 1 gateway and assimilatorthis means fast tech for protoss in 80% of the cases they will be making fast stargate and try to pick off as many overlords from you as simply possible before you get hydras or spore colonies. Calculate in your head, how long will it be till that corsair/scout (yes, scout. They kill overlords 3x quicker and can even attack drones) will be finished? What

are you doing? Lurkers? Mutas? Hydras? If you're going hydras, you might as well just place the hydralisk den a bit beforehand and make a few hydras and then continue drone production. If you went for a spire, place a spore colony at your NATURAL ONLY. And bring your overlords thereIf you went lurkers you might want to build the hydralisk den about same time you start your lair so you can move your ovies around sooner, but also place a spore colony at your natural. However, if you're quite sure that he's making fast templar tech instead of stargate, then you dont need to place spore colonies. Though, if they go 1 gateway and make a corsair tech, you better watch out because once he takes out your overlords from his choke point etc, you wont have any detection. Once he makes dark templars after that and expands, there's not much you can do to help it but accept it. So either you accept it, or take precautions.
•He's making 2 gateways with assimilatorabout 50% of the time he will be making corsairs and other 50% just mass zealot with fast speed and fast templars. This time the corsairs are slower though, so you might want to add that your calculations. If he's not going corsair, he also wont have anything to kill your overlord at his choke, so dark templars to defend his expo wont be a problem. However, you most likely wont have anything that can take his army out so you could destroy his expo before psionic storm/cannons warp in, so don't get greedy. You just got to finish up what you were doing and expo again etc. Remember, if he's not fast expanding he wont have as quick +1 upgrade.
•He's making 2 gateways without assimilator, either at his choke or main.It means that he will be doing the 2 gateway pressure build. This is basically rushing your fast expansion if you made one with zealots and a few probes, and rallying his zealots to your base, or your choke all the time. The thing is, he will be making zealots non stop AND probes non stop, so in the end he will be gaining better and better economy. When he has the money he will make a nexus at his expansions and cannon it up and start playing normal. Personally I hate this build. You just got to watch out for a few things, if you FE'd, you need to make 1-2 sunkens so you wont die. You also need to make lings almost all the time so that his zealots will not run over you. His zealot army will keep growing at your choke, so its kind of tricky.
This is what you can do;9 pool speed or 9 overpool and force him to stay in his main/natural. If he ignores this, make a sunken colony to your main and run in his base with your lings or destroy his pylon. If he stays in his base, take an expansion while keeping on making lings. Once your expo pops up, he will have quite a few zealots and might be attacking any moment, so I'd make 1-2 more sunken colonies. After they are done, and if you have a decent number of lings, you can make drones for a while. You just got to make sure that you make sunken colonies appropriately while he keeps brining more zealots. UNLESS you decided to go with a mass 3 hatch ling build and run over his zealots AND him. Its a bit risky if he survives though. If you decided NOT TO go that build, you can go fast mutas, just remember to sunken up enough. Going mutas is neat because by the time your mutas pop out, his cybernetics core probably hasnt even finished, so you might be able to either

end the whole game, or at least drive his zealots away and slow his tech quite a bit. You can also go hydras, but then you cannot go very low economy hydras because he will have cannons and like 12 zealots without speed. Hydras would be All-in. Lastly, there is lurker tech, which is quite safe economy wise, and since you make lings you wont need as many sunkens. You will be able to contain him fine and keep your own expoes.12 pool is bad against this build because you have to make lings 24/7 and he will have zealots before your lings come, so its not strong. You will have to make lings all the time till your expo finishes and then sunken up, while he can just make probes meanwhile. This is maybe weakest build against 2 gate pressure build. However, you continue same as in 9 poo/overpool start.12 hat at main works fine as well since you will have good economy, a lot of lings, and you dont hae to get tricky with sunks. However, you need to watch out that he cannot cannon up your choke while walling in with zealots. Third hatchery to exp and continue normal while making lings from 2 hatches and trying to break him.12 hat fast expo works as well but you just have to survive the first rush and sunken up appropriately.
•He goes 3-4 gateway mass zealotYou need to survive his attacks while you get mutas or lurkers. Sunken up a lot.
•He goes 1 base dragoon/reaver-I started with muta build:Good, this is the best thing you can do. Muta ling whereas the lings flank them well is the best thing you can do. Dragoons deal very little damage to mutas and lings, so you will do good. Also, his reavers cannot harass your mineral line this way. You just got to watch out a bit. Be ready to switch to muta/hydra later on-I started with 3 hat hydraThat's fine. Just make spire as quickly as possible while making mass hydra and slowing him down/flanking him well.-I started with lurker buildThis is the worst build you can start off, and if you did, you're very unlucky . But. You just need to make spire as quickly as possible. Try to save as many lurkers as possible, and slow him down however you can. Once your mutas pop out, flank and swarm him with muta lurker ling and stop his escape with lings so lurkers deal extra damage. This is the best you can do with this startoff. Once you fend their first attack, they should be trying to expand. Stop it if you can, but even if you can't, expand again yourself.
•He does some weird-ass build (aka I don't know what he's doing, or he's doing something like reaver drop or smthing)Make a sunken colony at your mineral line(not needed if he's not making a drop, but you need spore colony if you think dt drop is possible. They always corsair harass your main before dt drop), and make as quick spire as possible. Be careful with your lings, but try to delay his harass if possible.
•He fast expoes (most common pvz build nowadays)

You can go risky and go super fast mutas or 3 hatchery lings or 6 pool or w/e. I explained this before in the ZvP part of the guide.Or you can play standard, aka expand twice and play normal
•He fast expoes and does 2 stargatesThis means he will most likely be doing corsair/reaver, at least at first. Especially if you see his cyber core upgrading. The counter is to make a fast lair for spire while making mass hydras otherwise. Also upgrade hydra speed, range, and +1 attack. Don't forget ovie speed. You will also need a spore colony at both of your expansions to help protect against corsairs. Just keep making hydras, but make sure he cannot expo more. This is important. (on some maps they can anyway, in which case you will take two expoes) Once your spire pops out morph like, 12 scourges. Pick a good time to attack his corsairs (unless he already has a huge lot. If he does, don't make scourge. Use hydra/muta/scourges to destroy his shuttles at all costs and corsairs too if you simply can. Don't make very many mutas though. You can make mutas at first when he still has 6 or less sairs. After that it's just a waste. If he does reaver sair, you also won't need many unit production hatcheries. Just expand a huge lot. And I mean, A LOT. Tech to hive, and keep upgrading shit and stopping his exps. Once your hive pops out, get a greater spire and make devourers. Devourers are the best possible counter for corsairs. Keep making hydras though, and if you have plenty of spare money make ultras/defilers. However, he might stop making reaver/sair any moment and instead just attack with reaver sair twice and then switch to normal zealot/high templar/dark templar/corsair/reaver or whatever, in which case you might need lurkers and fast ultras with your army.
•He goes fast expo and doesn't corsair harassThis means he will most likely be making just fast templar tech or mass zealots. Either way, you need to prepare with enough zerglings and sunken colonies. Don't prepare too much beforehand though. The lurker build that I like to use that I explained before can counter their attack while having good economy yourself quite nicely. (TT1 did 6 gateway mass zealot against it and I had no trouble beating him). However, you can do pretty much what you want. I explained this stuff before already. In this case it's a bit more important to have +1 carapace same time as he has +1 attack
•He makes fast expo and does corsair harass from 1 stargateThis is very basic fast expo build. The most important goal for the toss when he does this is to just know what his opponent is doing. Killing overlords is secondary, BUT. If he does do this, take precautions, because he will most likely kill all your overlords that are nearby his base, and that means that fast hydra push to kill him might not work since he will have dark templars. You either prepare, or don't attack or just add pressure but not even try to break him etc. You may need a spore colony at your expansions for this.
•He double expoes cuz of weird mapEither try and take advantage of it and mass over him, or simply triple or quadrouple expand yourself. In the latter you need to be a bit careful though. And also, if he double
expands, or expands really quickly again, you need to watch out for his army because he will be getting a LOT of units. Your macro cannot fail in this one.
•Some other weird shit/don't know what he's doing in early/mid gameIn most cases if you don't know what he's doing, the best choise is to either go hydras or mutas. Mutas may be a little more risky if he counters them well. When you don't think that either of them would work because the situation is so special, use your head and experience.
•He does corsair/dtYou need quick devourers. Otherwise you just need to manage with ultra/hydra/plague as well as making a spore colony to every expo and main as well as sunkenking up the expoes. You need a lot of hydras for now. Till you counter them.
•He does reavers along with his main army which is very powerfulThis is very powerful and the reason why is because it has no direct counter. You will just have to try and overpower him you know? But in any case, you should use plague, mass ultras, and hydras. Some zerglings to the bunch as money allows and all as well.
•He goes arbiters with his main armyYou will be needing scourges to take them out, and ultra/hydra/ling otherwise. Possibly throw in defilers.
•He goes mass archon (and maybe some Dark Archons)This is another combo that has no ultimate counter. It's one of the strongest thing the toss can do.You will have to use dark swarm, ultra, and ling in general. Under dark swarm archons only deal around 5 damage instead of 30 or 39 or whatever, so it's basically a must against this combo. Also sunken up.
•He goes carrier corsair or smthingDevourer hydra plague dark swarm, pretty much.
•He just does his normal zealot/dragoon/archon/high templarGo ultra ling, maybe defiler, get expoes, defend them with sunken colonies if needed, dont let him expo
•He turtles or you're not sure how to attack him so that it's worth it-Drop him. A few ultras to take the damage and 20 lings can destroy quite a bit in a short time, plus it might drive his army back to his base which allows you to take his exps.
--------ZvZ-------•He has more lings than yousunken up as needed
•He has more mutasmake a spore colony or two
•He gets faster spire by farget a spore colony or two
•He expandsYou expand
•He has more dronesYou either destroy him, find a way to kill his drones, or make more drones yourself
•He's rushing to spiretry to destroy him before spire completes, if not possible, spore colonies up.
•He's mass linging meMake a lot of sunken colonies and zerglings yourself. Make sure that he doesnt destroy your spire
•He's expanding around the mapStop him, if you're able to, you must get an expansion yourself
•He's getting mass hydraGet mutas for a while, but start lurker tech. A few sunken colonies and lurkers or just lurkers at his choke can stop any number of hydras. Once you have lurkers you resume muta production.
==========MICRO & TRICKS============First for the tricks:-You can stack your flying units easily by using a resource patch.-You can stack your mutas really well (which is needed for muta micro) by using the magic box. The magic box is having one unit apart from the bigger group and when you tell the whole group to move to a specific location, they start to stack by themselves and stay stacked. The best unit to use as the stacker is the overlord because its slow.-When you micro your mutas and you have lan latency, use hold position. Let me explain a bit; You close up to your enemy, when you're somewhat in firing range, press hold position, and after maybe 0.3 second delay you right click back so you wont get killed. This way they will not only pick one target, but several, which is very powerful in for example vs marines when you have 9 or more mutas. Against static defense, however, right click is the best. (or when you have very few mutas)-If you select a group of lurkers and add an overlord to the group, burrow the lurkers, and press hold position, they will not attack even if they're in firing range. It always feels good when a group of marines and medics walks atop my lurkers and then they just die. (this is allowed even in proleagues, because it's the TERRANS flaw and carelessness if he falls for it.)

-If you select your larvas and any other unit and press stop, the larvas will move to the left side of the hatchery-If you burrow your drones, the science vessels that irradiate one another cannot damage your units, nor reavers that dont have detection can shoot your drones.-Overlord unload while moving can be done by selecting one overlord at a time and pressing unload on it while its still moving to the specific location. This is especially useful if they're closing up on a cannon line for example because then the cannons will target units, not overlords.
MICRO/control:
Always, ALWAYS flank your opponent. Except maybe zvz. Zerg micro at even quite high level could possibly only be good flanking, burrow with lurkers, and dark swarm and cloning with scourges to effectively kill vessels or corsair etc.However, there are some stuff where more micro can be good.
Hydras vs zealots/high templars:Now this is very tricky. Against zealots alone you will move the first line of hydra which is targeted by the zealots almost instantly after the zealots close up to the back of the line and start shooting again. Against high templars too the most important thing is just effectively dodging the storms, which you will learn through practise and experience. You will just feel in your head that THIS group of hydras will be stormed soon, in which case you move them, and poof, just out of the storms way, pretty much. The thing is, you first have to see how many high templars he has. You could count that he has 1 storm per templar, but still be wary once each templar has cast a storm once. They almost always try to attack the place which have most hydras. If you have two clumps that have a lot of hydras among your other 'clumps, you might want to move the two the same time. You dont lose much if you move a group back for 1-2 seconds useless and then move back
Lings stopping the enemy from escaping:Sometimes once you've flanked your enemy well your army is actually stronger (especially if you're burrowing about 6-12 lurkers), and the difference in power at that situation is so great that they will want to escape or look for a better position. To stop this, you might take a group or two of zerglings and run in the way to block the escape. This micro happens from early to late game.
Overlords follow:Sometimes it might be annoying to control a group of overlords even if you need detection, so why not try making overlords follow the strongest units, for example ultras or lurkers by right clicking on the specific unit
Quick overlord load:Its slow to simply load 1 overlord at a time, so you got to learn how to be faster. First, you have your normal units grouped up and all. Now you bring your overlords near those units. Just select group 1, right click on 1 ovie, group 2 right click on another, group 3 on a third and so on. It doesn't actually make that much of a difference if 1 spot of the

overlord is left unused. Later on if you have more overlords than you have groups, you can just use the heaps of the groups to full the rest.
Muta vs scourge;The best possible way would be to first run away, then when scourges close up, press patrol behind the scourges and instantly right click away again. The scourges will slow down just a bit before hitting the mutas and this is possible without taking hits. However, this requires a lot of practise to do in a real match when you need it, so I personally prefer just running, right click or hold position trick on the scourges, and running again. This way a lot more scourges than mutas will die and its safer.
Mutas vs archons:Mutas actually have a bit longer range than archons, so if you use your terrain to your advantage mutas can shoot archons without taking hit themselves, however, its so risky that I would avoid it at all costs.
=========HOW TO IMPROVE FASTEST==========
Several people I've met seem to think that you simply playing a lot of games makes you better. This is true, yes, but if you REALLY want to improve, you must reflect on your mistakes. You must really think of to do, and what you did wrong. This is the most important thing and you learn fastest that way. But basically, you watch pro replays, see the genral idea, you practise it, and reflect on your mistakes. Asking better players for help helps the most.
PHEW !! That was it, and almost 23 pages.
Some of you may be wondering that this guide was actually very vague at times, but thats simply how zerg is, that is how STARCRAFT is. Anyone who can reach even D+ at iccup should understand this guide quite well at all times. This game is not warcraft3, so I cannot tell everything EXACTLY like it is. A fact is, that nobody of you has probably played many games where exactly the same stuff happened, which is why I cannot be very accurate all the time.
Also, I apologise if the way this guide was laid out annoyed you or is hard to browse, understand or something.
Build Order Archive
Protoss 9/10 Gate Zeal Rush

Matchups: Pvz, Pvp, Short distance locations.
Theory: This is the fastest way to rush zerg with zealots, while maintaining a decent economy. The build is all about cutting corners to get those zeals out as fast as possible. Against builds where zerg elected to make a hatchery before a pool, the zealots will arrive at latest by time the hatch finishes. This build is the strongest against the fast-expo, given the travel distance is not too great for the zeals. Scouting and harassing is important here, and probes at the attack site are just as valuable as the zealots.
Build:8/9 – Pylon (near choke)9/17 – Gateway (scout, leave probe near enemy base)10/17 – Gateway11/17 – Zealot (hotkey, then rally gate to enemy choke, no probes)13/17 – Pylon, Zealot (hotkey, then rally other gate to enemy choke, no probes)15/25 – Zealot*, send 2nd probe to enemy choke
For pvz, make sure the scout probe stayed alive, it is needed to assist the zealots in killing the lings. Also make sure that if it is a fast expo situation, harass the drone(s) that comes out so it cannot place what will be a sunken. With the probe attacking with the zeals, lings die in 2 hits instead of 3. Setting hotkeys for the gates is important so you can focus on necessary micro at the enemy choke, instead of going back to the gates to queue more units. After the second pair of zealots, you can gas up and tech as normal (stargate or temp archive), or you can continue the pressure with zealots, looking to force more ling production and delaying economy and tech for the zerg.
In pvp, 9/10 will own a 1 gate-goon tech, even if he sticks a zealot in while the cyber core is warping. However, all you will have gained is an inferior economy if the enemy toss went double gate zealots as well.
* If you are brave, you can make the 2nd pylon in the enemy choke so you can build a battery to reinforce the rush. If the battery finishes warping and there are zeals left to heal (not always the case), it should spell the end for zerg.^ If you want, you can rally the nexus to the choke as well so other probes can get in on the action in case the original pair died. You have enough economy mining to execute this rush, however, once zerg solidifies his position, these probes should be sent back to mine.
__________________________________________________ __________________
Protoss 10/12 Gate Zeal Build
Matchups: Pvz, Pvp, Multiplayer
Theory: This is the most popular and simple zeal build for protoss, because it sacrifices no economy besides the standard scout probe. While not as fast as the 9/10 rush, it is serviceable for a variety of situations, including multiplayer games. Room to solidify
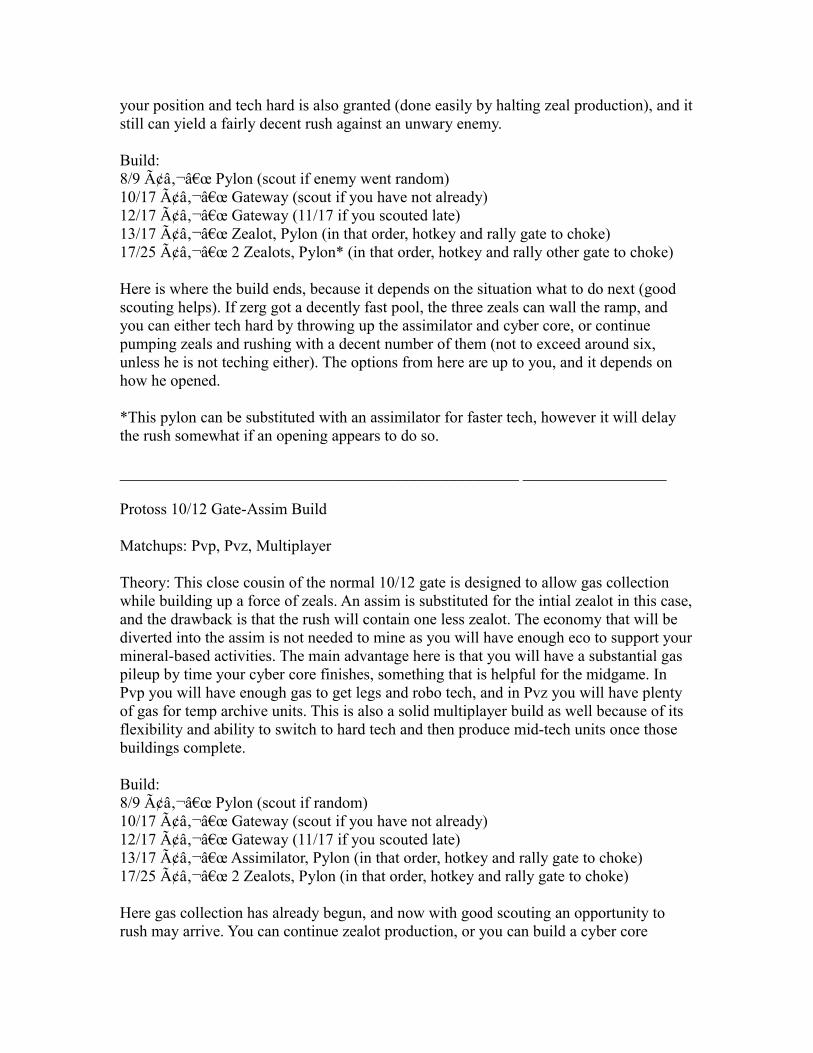
your position and tech hard is also granted (done easily by halting zeal production), and it still can yield a fairly decent rush against an unwary enemy.
Build:8/9 – Pylon (scout if enemy went random)10/17 – Gateway (scout if you have not already)12/17 – Gateway (11/17 if you scouted late)13/17 – Zealot, Pylon (in that order, hotkey and rally gate to choke)17/25 – 2 Zealots, Pylon* (in that order, hotkey and rally other gate to choke)
Here is where the build ends, because it depends on the situation what to do next (good scouting helps). If zerg got a decently fast pool, the three zeals can wall the ramp, and you can either tech hard by throwing up the assimilator and cyber core, or continue pumping zeals and rushing with a decent number of them (not to exceed around six, unless he is not teching either). The options from here are up to you, and it depends on how he opened.
*This pylon can be substituted with an assimilator for faster tech, however it will delay the rush somewhat if an opening appears to do so.
__________________________________________________ __________________
Protoss 10/12 Gate-Assim Build
Matchups: Pvp, Pvz, Multiplayer
Theory: This close cousin of the normal 10/12 gate is designed to allow gas collection while building up a force of zeals. An assim is substituted for the intial zealot in this case, and the drawback is that the rush will contain one less zealot. The economy that will be diverted into the assim is not needed to mine as you will have enough eco to support your mineral-based activities. The main advantage here is that you will have a substantial gas pileup by time your cyber core finishes, something that is helpful for the midgame. In Pvp you will have enough gas to get legs and robo tech, and in Pvz you will have plenty of gas for temp archive units. This is also a solid multiplayer build as well because of its flexibility and ability to switch to hard tech and then produce mid-tech units once those buildings complete.
Build:8/9 – Pylon (scout if random)10/17 – Gateway (scout if you have not already)12/17 – Gateway (11/17 if you scouted late)13/17 – Assimilator, Pylon (in that order, hotkey and rally gate to choke)17/25 – 2 Zealots, Pylon (in that order, hotkey and rally gate to choke)
Here gas collection has already begun, and now with good scouting an opportunity to rush may arrive. You can continue zealot production, or you can build a cyber core

instead of a 2nd pair of zeals and tech as normal. You will find you will have at least 300 gas (usually a lot more) by time that core finishes, which really broadens your options compared to your normal gas amount when your cyber core warps in (200 at most).
__________________________________________________ __________________
Protoss Proxy-Gate Zeal Rush
Matchups: Pvz
Theory: This build is a do or die option, based on making medium distance trips much shorter by making the gateways halfway toward the base. This build works well when there is a large middle from which paths emerge going to each starting position (e.g. Lost Temple), as well as on two-player maps (e.g. Bifrost). Gates in both cases would be made in the middle of the map cutting the walking distance for zealots in half. However, if the zerg defends it, those gates are nearly impossible to hold with the threat of the lings running by it and into the undefended economy.
Build:6/9 – Send pylon to middle of map or near enemy base8/9 – Pylon near midmap9/17 – Gateway10/17 – Gateway (scout)11/17 – Zealot (hotkey and rally gate to enemy choke, no probes)13/17 – 2 Zealots (hotkey and rally other gate to enemy choke, no probes)17/17 – Pylon near nexus, send 2nd probe to enemy choke.17/25 – 2 Zealots
If zerg went fast expo, that expo is as good as dead since this build is basically 9/10 gate on steroids. Make sure that you take some drones with the scout and zealot and harass plenty. If zerg went 9-pool, then this build dies. If things get hairy hold position at his ramp until reinforcements arrive. This is an all-out rush, and if it fails the game is just about lost for you.
__________________________________________________ __________________
Protoss Tech Build 1
Matchups: Pvp, Pvt, Pvz (no fast pool), Long distance between mains.
Theory:This build introduces fast tech on ground maps (assuming there is a ramp). It includes a fast zealot while the cyber core warps for rush defense (hold position with a couple probes on ramp). It is an introductory build that will allow you to go up any tree. It can be done in any matchup, however you will have trouble with fast pool zergs.

Build:8/9 - Pylon (Scout, preferably at choke in case of random zerg)10/17 - Gateway12/17 - Assimilator14/17 - Cyber Core15/17 - Pylon, Zealot^ (hold probe production momentarily so you can get a pylon in there first)17/25 - Dragoon, Gateway^ Necessary to hold quick lings in Pvz and 2 gate zeals in Pvp.
From here you can add a gate and begin amassing goons, or you can add citadel tech (then gate), or you may elect to go robo or stargate right away. This is a very flexible starting build, and if the zealot lacks a purpose after a while (assuming he did not rush) then it will make an excellent scout.
__________________________________________________ __________________
Protoss Tech Build 2
Matchups: Air, Hybrid, Pvp, Pvt
Theory:This build introduces fast tech on air and hybrid maps. It can also be done in Pvp and Pvt ground games. It is an introductory build that will allow you to go up any tree.
Build:8/9 - Pylon (Scout, preferably at choke in case of random zerg)10/17 - Gateway12/17 - Assimilator14/17 - Cyber Core15/17 - Pylon17/25 - Dragoon^ (ground maps)
From here you can add a gate and start massing goons (for ground maps), or you can continue up the robo or stargate trees on air/hybrid games. On non-ground, robo is preferred and is good for random. Stargate is exclusive for zerg.
^Against zerg a second zealot is better. If you are going to do a furnace (pvt strategy for fast backdoor drops) start a robo right away.
__________________________________________________ __________________
Protoss Tech Build 3
Matchups: Air, Hybrid

Theory:This build introduces fast tech on air and hybrid maps. It varies from tech builds 1 and 2 since here the assimilator is made first and then the gateway after. It has features that will allow for more aggressive teching once the slightly slower cyber core finishes.
Build:8/9 - Pylon9/9 - Assimilator11/17 - Gateway13/17 - Cyber Core15/17 - Pylon
In this build when the core finishes, you have the added choices among the normal plans to go double robotics (Pvp, Pvt) and double stargates (Pvz). The extra gas will also allow a fast +1 air that will finish long before goon range is needed.
__________________________________________________ __________________
Protoss Fast Expo Build
Matchups: Pvp, Pvt, Pvz (no fast pool), FFA, Average/long distance between mains
Theory: This build allows for a fast second nexus at your expansion. Depending on what the enemy is doing the build will differ after the nexus has begun warping in. However it does supply protoss with a tremendous economy after five minutes, however watch out for hard tech by the enemy.
Build:7/9 – Send probe to expansion8/9 – Pylon in choke (make sure not to block where the nexus will go)12/17 – Nexus (scout)
The build now diverges.
Pvt (mech build):13/17 – Gateway, Assimilator^14/17 – Pylon in main15/17 – Cyber Core18/25 – Robo Facility, Dragoon
Continuously scout the terran. You might need a forge to stop a vulture sneak. This build is risky when you have a cliff above the natural, since even though you will get your shuttle out early enough, he will have too many harass or push options. When you nexus finishes, do not Maynard too many probes (six at the most) so in case that expo comes under fire your economy does not suffer. You can always send extra later on when it

becomes secure. Make sure you get warp pylons earlier than in other builds since you will have two nexuses pumping probes.
^If a SCV gets in the base before the gateway is laid down, run to your geyser and warp an assimilator before he can build a refinery on it.
Pvp:13/17 – Gateway, Gateway*14/17 – Pylon15/17 – Zealot, Assimilator (if not built already)
Watch out once again for fast robo and either reaver drop or a turbonewbie if there is a cliff over your natural. You should have fast archive covered nicely since you have the pylon to make cannons down there. Make sure you get warp pylons earlier than in other builds since you will have two nexuses pumping probes.
*If the enemy toss went straight for goons, then make that second gateway an assimilator and rush up to goons as well. If he went zeal rush, then throw up a battery as soon as the first gateway finish next to your choke pylon, and gather some probes ready to defend with the zealot.
Pvz:13/17 – Forge14/17 – Cannon, Gateway#15/17 – Assimilator$, Pylon (in main)16/25 – Zealot17/25 – Cyber Core, Assimilator (in natural)21/25 – Stargate, Pylon (near main nexus)
You will need the stargate for the muta. Two stargates may be needed even. You will have the gas to get +1 air if you want. You will also ave the gas to go double robo or fast to archive, slapping down another 3 gates before the archives finishes. Make sure you get legs before starting the archive. You can do anything you want really (zeal-sair-reav or zeal-temp or dragoon-reav) just scout well to make cannons as necessary. Make sure you get warp pylons earlier than in other builds since you will have two nexuses pumping probes.
#Make a 2nd cannon if you scouted a mass ling attempt, you will need it. Make sure to space out both cannons and place them behind buildings so the lings do not have easy access to them. Hold your ramp so the lings do not try to sneak by and run into the main.
$Gateway goes here followed by assimilator and pylon if you made a 2nd cannon.
DefaultTerran Build Orders

Terran Double Rax MnM
Matchups: Tvz, Multi.
Theory:This is a simple and common build done in most Tvz games, and it is fine for multiplayer. The build can be done with or without a wall. You may also make a makeshift wall with the pair of rax. This build is not suggested for 1v1 vs a protoss other than a suprise, since protoss tech owns mnm hard.
Build:9/10 Depot (Scout when done)11/18 Barracks13/18 Barracks15/18 DepotRefineryAcademy+Depot
Pump marines out of both barracks as soon as they finish as supply allows. With your first bit of gas get a pair of medics or medic+firebat and upgrade stim, and get a scanner for detection. Then you may start teching either straight for vessel or for tanks. If you choose tanks, make sure you add an ebay for detection when you push.
__________________________________________________ __________________
Terran Tri-Rax MnM Rush
Matchups: Tvz, Tvp (Deep 6), Multi
Theory:This build order is a specific extension of the Double Rax build. Here medics are delayed in favor of a third rax. Detection for cloaked rushes is supplied by an ebay built so a fast +1 attack can be ungraded. This is an attacking opening that allows terran to attack, while the double rax is more of a flexible build order where one can tech or expand quicker, and contain while they do so.
Build:9/10 Depot (Scout when done)11/18 Barracks13/18 Barracks15/18 DepotBarracksRefineryEngineering Bay+Academy+1 Attack

From here even though your medics were delayed a bit, your +1 attack is well on its way, you many attack even before medics arrive since you have extra marines. In Tvz normal is quick tech to vessel, if zerg holds the rush, fall back to vessels and expansion (bunker here and there is nice), with tanks getting into the game after the first vessel pops out, unless you did significant damage and perhaps want to try and finish him off right there. Multiplayer normally static detection is made and tanks are slowly mixed in, but vessels is another viable option (assumed is that you are attacking with teammates that can cover the weakneses of Mnm). For Tvp, Deep 6 has its risks, and several other Barracks must be added while you expand. Remember, Reavers and Psi Storm can own terran infantry, beware of reavers and high templars.
__________________________________________________ __________________
Terran Proxy-Rax Marine Rush
Matchups: Tvp, Tvz
Theory:This is a suprise build meant to rush a protoss or zerg before enough defense to hold it. If it fails, then usually it's game over for terran.
Build:8/10 - Send two SCV to the middle of the map. Make sure they are not in any of the normal path scouting workers usually take.10/10 - Two barracks in middle of map. Depot when money allows in the main.10/18 - Pump rines from both barracks, SCV from the CC. Use the 2 scv that made the barracks to scout, and rush with them as well.
Against zerg who went fast expo (manyof them will against a chosen terran) its GG for that expo with any micro at all. Against protoss without perfect micro by the toss it will do decent damage, if not win the game outright. Dont forget to use offensive bunkers as necessary.
__________________________________________________ __________________
Terran 3 Factory Vulture Rush
Matchups: Tvp, Multi
Theory:This build, especially custom built for Tvp has some multiplayer implications as well. Here the terran quickly builds up three factories with a pair of add-ons, get both vulture upgrades in a timely fashion, and rushes the protoss. In multiplayer this build can be used in conjunction with a partner going melee units (beware of muta however). The use of

marines is optional, but factored into this build is use of a three-marine defense. Once again no wall is needed for this opening.
Build:9/10 - Depot11/18 - Barracks12/18 - Refinery (Scout with SCV)15/18 - Depot16/18 - Marine (Rally barracks to choke)18/26 - Factory, Marine20/26 - Factory, Marine22/26 - Machine Shop, Depot25/34 - Vulture, Speed upgrade (From this point build vultures as money allows from this factory, rally factory to choke)27/34 - Machine Shop30/34 - Depot32/34 - Factory, Mines upgrade (From this build build vultures as money allows from this factory, rally factory to choke)
From here rush and harass the protoss with the speed vults, mines will be finished momentarilly to aid you. You may invert the two upgrades to upgrade mines first, it will aid your fight against goons, however it will cut down on your harassment ability since the vultures will not be quite as fast. After the rush upgrade siege, pump a couple tanks and add an ebay then turrets while you expand.
__________________________________________________ __________________
Terran Gundam Rush
Matchups: Tvp
Theory:This is a build designed to rush the protoss with marines and mines, with siege soon to come. Even though dragoons do well against marines and vultures, their damage type (explosive) allows this rush to occur. The marines are used as distract fire giving vultures time to plant mines around and behind the goons. SCV's are brought along to make a bunker for early tank protection and later on turrets. The barracks floating towards the enemy main is for upland scouting, and from time to time extra marine production on-site. Scouting is a little later than normal to allow cash for timely production of at least four marines. Below is a build order that allows for 5 marines in the rush (copied from V-Gundam himself).
Build:9/10 - Depot11/18 - Barracks12/18 - Refinery

15/18 - Depot16/18 - Marine (Scout with SCV, rally barracks to choke)18/26 - Factory19/26 - Marine21/26 - Marine22/26 - Factory, Marine23/26 - Machine Shop, Depot, Marine25/34 - Tank, Vulture, Mines Upgrade (Float Barracks toward enemy main, rally factories to choke)30/34 - Depot, Siege Mode Upgrade when mines complete
In this build, the later you scout, the more marines you can fit in before tha tank and vulture emerge. You can fit up to 6 marines actually.
As soon as your tank and vulture appear, rush with that force and 2-3 SCV toward the protoss choke, using focus fire on any goons. Rally your two factories to his choke, and continue making tanks out of one and vultures out of the other. As soon as you get there, make a bunker for your marines to set up a contain. If goons try to break it before the bunker is complete, use the marines and focus fire, while sending the vults to plant mines next to the goons, thus driving them back. Siege mode will finish momentarily, and the barracks will arrive for high ground and advanced vision. If no high ground, you could land it and continue marine porduction. Back in your main, continue sending the units from the facts, leave ur 3rd tank behind and make an ebay, then turrets for defense. Too many times a gundam rusher gets carried away and loses their eco to reavers. Once the ebay is up, you can commence pushing in, with each tank that arrives from the main. Last but not least, be sure to expand in a timely fashion.
__________________________________________________ __________________
Terran 1 Fact Expo
Matchups: Tvp, Tvt
Theory:This build can be done with or without marine defense. Marine defense will slow the command center, but those marines will serve well, especially in Tvp games. Anyway, this is an opening that allows for a quick capture of the natural, and the few tanks that are pumped while the CC builds in conjunction with turrets and siege mode are sufficient defense to allow expansion. A wall is very helpful with this build in Tvp, but within the marine defense sub-opening, walling is not necessary. In Tvt this build is playable but risky on some maps.
Build:9/10 - Depot (Scout if random)11/18 - Barracks12/18 - Refinery (Scout if you haven't already)

15/18 - Depot16/18 - Marine18/26 - Factory
The build now diverges...
With Marine Defense:19/26 - Marine21/26 - Marine23/26 - Machine Shop, Marine*24/26 - Depot26/34 - Tank28/34 - Siege Mode Upgrade, Command Center
*4th marine is optional
From here as money allows continue pumping tank from the 1 factory, add an engineering bay then a 2nd factory. Secure your expansion with well placed turrets and even a bunker, then you can add 2-4 facts and continue on with standard massing with Tvp (adding mines and speed upgrade) or Tvt (armory and starport). If you have a ledge above your natural, make sure to float the rax over so siege tanks below can have vision. To finish up, get your academy up and get a pair of scanners.
Without Marine Defense:21/26 - Machine Shop23/26 - Command Center24/26 - Tank26/26 - Depot, Siege Mode Upgrade27/34 - Tank29/34 - Engineering Bay
From here add a fact as soon as money allows, and continue pumping tanks from the one factory. Secure your expansion with well placed turrets, then you can add 2-4 facts and continue on with standard massing with Tvp (adding mines and speed upgrade) or Tvt (armory and starport) If you have a ledge above your natural, make sure to float the rax over to siege tanks below can have vision. To finish up, get an academy and add on a pair of scanners.
__________________________________________________ __________________
Terran 2 Fact Mech Build
Matchups: Tvp, Tvt, Hybrid, Air, Multi
Theory:

This is a general, flexible metal build that opens with two factories. You can make vultures or tanks to start, leaves room for marines and can be done in Tvp, Tvt, Air, Hybrid, and in Multiplayer games as well (no marines for air or hybrid maps of course). It is so flexible that economy can be sacrificed to have the second factory start sooner. You can go with one, two or no machine shops, and can easily add an armory for goliaths in Tvt. This is the foundation build for terran mech, most other specialized builds started from this point and were then tweaked to maximize their effectiveness.
Build:9/10 - Depot11/18 - Barracks (Scout with SCV)12/18 - Refinery15/18 - Depot16/18 - Marine*18/26 - Factory20/26 - Factory^
*Optional, you can fit in this marine anywhere during the build as long as supply allows for it. If you make this marine, keep it behind the wall.^You can hold SCV production until you have another 100 gas for the 2nd fact (and be sure you have 200 mins for it)
There are many little variations to this build. The marine can be build before, during, or after the first factory. You can temporarilly halt SCV production so you can fit in the 2nd factory just a bit sooner. After the first factory is completed, you will have money to continue teching to starport (common in Tvt, mandatory for air and hybrid maps), armory (also common in Tvt), or you can just attach a shop or two and go tanks and vultures. To micro the marine in Tvp against a goon rush, address the goon, then move back and watch the glorious goon dance that will result, buying precious seconds for your tank. In close locations, make sure you make more than one marine just to be safe. More specific builds for fast goliaths and 2 fact starport can be found elsewhere in this archive.
__________________________________________________ __________________
Terran Goliath Build / Goliath Drop
Matchups: Tvt, Air, Hybrid
Theory:This build utilizes the anti-air powers of the versatile goliath for opening on air and hybrid maps. Arguably, the only reason these pair of openings are viable is because four goliaths can fit in a shuttle.
Build:9/10 - Depot11/18 - Barracks (Scout if ground map)
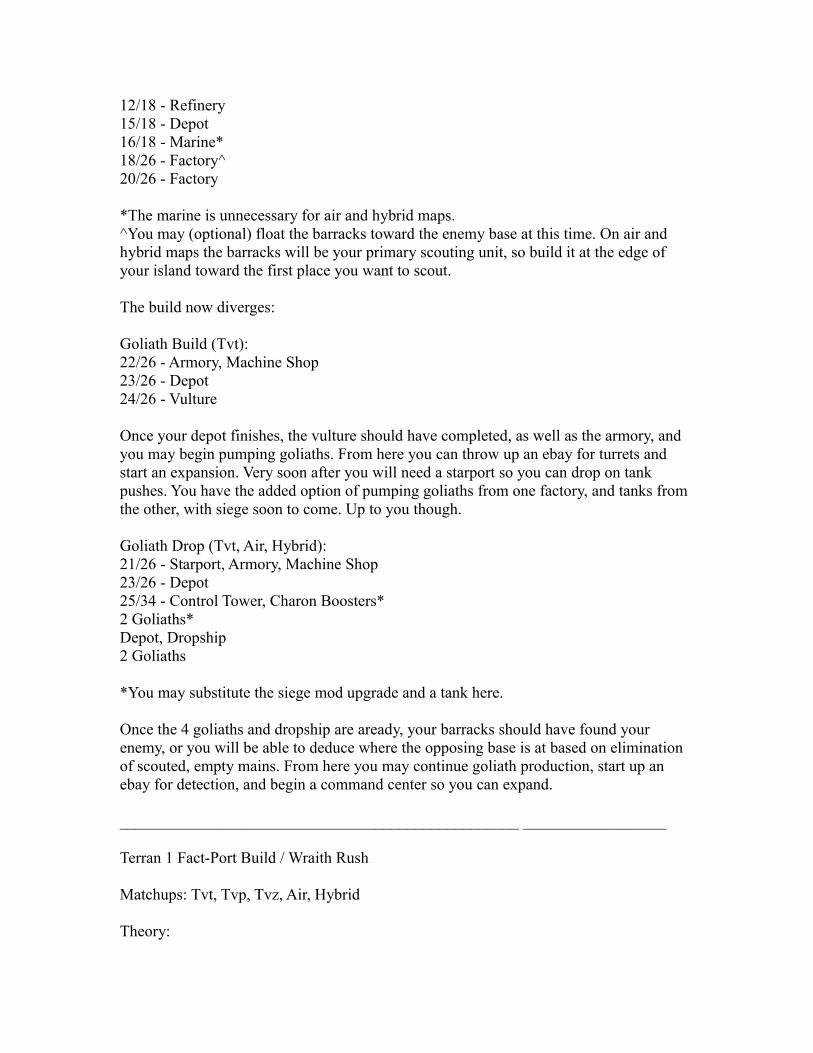
12/18 - Refinery15/18 - Depot16/18 - Marine*18/26 - Factory^20/26 - Factory
*The marine is unnecessary for air and hybrid maps.^You may (optional) float the barracks toward the enemy base at this time. On air and hybrid maps the barracks will be your primary scouting unit, so build it at the edge of your island toward the first place you want to scout.
The build now diverges:
Goliath Build (Tvt):22/26 - Armory, Machine Shop23/26 - Depot24/26 - Vulture
Once your depot finishes, the vulture should have completed, as well as the armory, and you may begin pumping goliaths. From here you can throw up an ebay for turrets and start an expansion. Very soon after you will need a starport so you can drop on tank pushes. You have the added option of pumping goliaths from one factory, and tanks from the other, with siege soon to come. Up to you though.
Goliath Drop (Tvt, Air, Hybrid):21/26 - Starport, Armory, Machine Shop23/26 - Depot25/34 - Control Tower, Charon Boosters*2 Goliaths*Depot, Dropship2 Goliaths
*You may substitute the siege mod upgrade and a tank here.
Once the 4 goliaths and dropship are aready, your barracks should have found your enemy, or you will be able to deduce where the opposing base is at based on elimination of scouted, empty mains. From here you may continue goliath production, start up an ebay for detection, and begin a command center so you can expand.
__________________________________________________ __________________
Terran 1 Fact-Port Build / Wraith Rush
Matchups: Tvt, Tvp, Tvz, Air, Hybrid
Theory:

This is a fine, versatile build that can be done on almost any map with a choke. It has great usefulness, taking the form of a wraith rush (with or without 2nd Starport) in Tvz, and alternating as a double tank drop (with siege mode) for harassment in Tvt, Tvp, as well as on air or hybrid maps.
Build:9/10 - Depot11/18 - Barracks (Scout if ground map)12/18 - Refinery15/18 - Depot16/18 - Marine (exclude on air/hybrid maps)18/26 - Factory
The build now diverges:
Fast Drop Build (Tvt, Tvp, Air, Hybrid):19/26 - Marine*21/26 - Marine*23/26 - Starport, Machine Shop, Marine*24/26 - Depot26/34 - Tank28/34 - Siege Mode Upgrade, Control TowerTank, Engineering BayDropship
*These marines are needed for defense in Tvp. If there is a ramp, rally the barracks to the ramp.
Once your dropship comes out, you may harass his economy. From here you can set up for expansion (most common) by starting a command center, or add an extra factory. Either way begin to secure yourself with detecting turrets. You may drop a second time if you got good eco rape in the first time.
1 Port Wraith Rush (Tvz):19/26 - Marine21/26 - Marine23/26 - Starport, Marine24/26 - Depot25/26 - Marine, AcademyWraith, BarracksControl Tower, Science Facility
Continue making marines from your one rax as money and supply allows throughout the build. Harass his overlords with your wraith while adding a control tower to enable dropships. If you spot spire morphing, get an engineering bay and turrets. Be sure to repair your damaged wraiths to prolong their life and harassment opportunities. From

here add barracks and get a science facility for vessels and expand. Do not forget to make depots as needed.
2 Port Wraith Rush (Tvz):19/26 - Marine21/26 - Marine23/26 - 2 Starports24/26 - Depot, MarineControl Tower, Wraith, AcademyWraith, Wraith, Cloak UpgradeBarracks, Engineering BayScience Facility
Continue to make marines from your one rax as money and supply allows throughout the build. Harass his overlords with wraith while you build your academy. You can slow a lurker push or hydra counter with cloak. The cloak will come in handy if he goes spire for scourge and/or muta. Add extra barracks and engineering bay while you prepare vessels and expansion with the facility.
2 Port Wraith Rush (Tvt):21/26 - 2 Starports, Vulture23/26 - Vulture, Depot26/34 - Wraith, Control Tower, Engineering BayCloak Upgrade
Harass with your wraiths in places where your opponent does not have turrets, only cloak when anti-air arrives. After this harass stage prepare expansion by adding your command center and machine shop for tanks. Armory will be soon to follow.
Old 07-12-2006 #3
Sweden NaAaniNice bugJoin Date: Jun 2006Posts: 4,081 NaAani is a splendid one to beholdNaAani is a splendid one to beholdNaAani is a splendid one to beholdNaAani is a splendid one to beholdNaAani is a splendid one to beholdNaAani is a splendid one to beholdNaAani is a splendid one to behold
DefaultZerg Build Orders
Zerg 7 Pool Rush
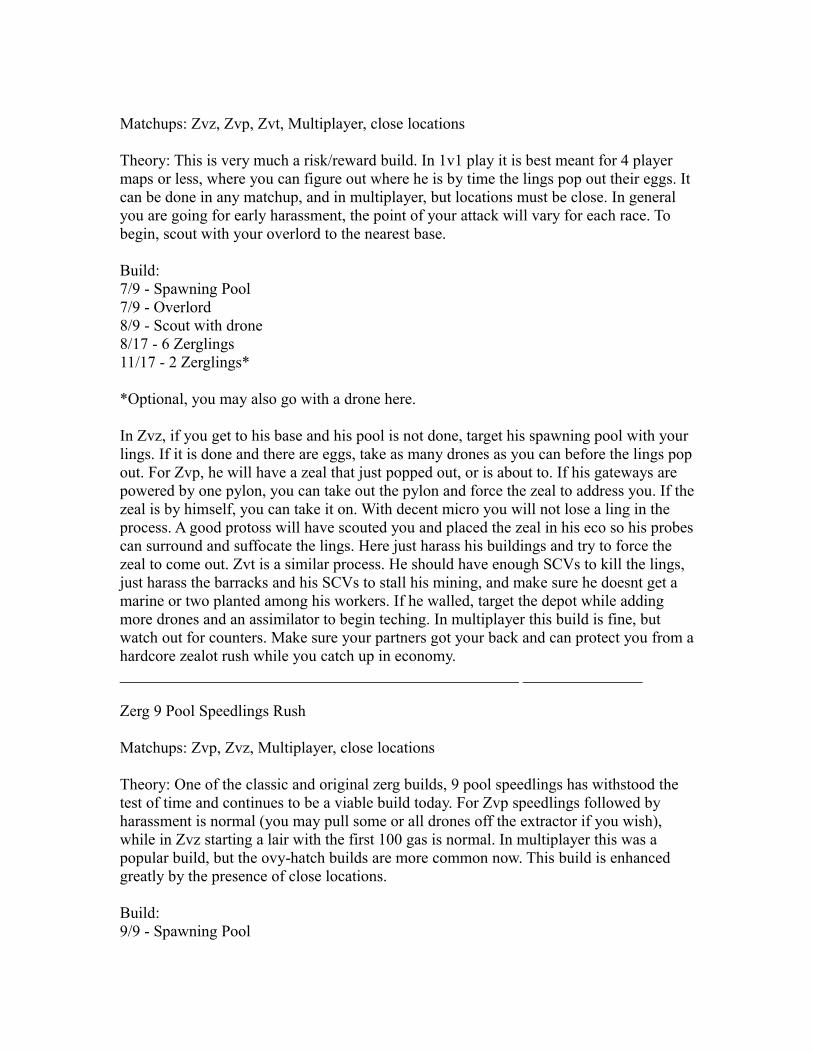
Matchups: Zvz, Zvp, Zvt, Multiplayer, close locations
Theory: This is very much a risk/reward build. In 1v1 play it is best meant for 4 player maps or less, where you can figure out where he is by time the lings pop out their eggs. It can be done in any matchup, and in multiplayer, but locations must be close. In general you are going for early harassment, the point of your attack will vary for each race. To begin, scout with your overlord to the nearest base.
Build:7/9 - Spawning Pool7/9 - Overlord8/9 - Scout with drone8/17 - 6 Zerglings11/17 - 2 Zerglings*
*Optional, you may also go with a drone here.
In Zvz, if you get to his base and his pool is not done, target his spawning pool with your lings. If it is done and there are eggs, take as many drones as you can before the lings pop out. For Zvp, he will have a zeal that just popped out, or is about to. If his gateways are powered by one pylon, you can take out the pylon and force the zeal to address you. If the zeal is by himself, you can take it on. With decent micro you will not lose a ling in the process. A good protoss will have scouted you and placed the zeal in his eco so his probes can surround and suffocate the lings. Here just harass his buildings and try to force the zeal to come out. Zvt is a similar process. He should have enough SCVs to kill the lings, just harass the barracks and his SCVs to stall his mining, and make sure he doesnt get a marine or two planted among his workers. If he walled, target the depot while adding more drones and an assimilator to begin teching. In multiplayer this build is fine, but watch out for counters. Make sure your partners got your back and can protect you from a hardcore zealot rush while you catch up in economy.__________________________________________________ _______________
Zerg 9 Pool Speedlings Rush
Matchups: Zvp, Zvz, Multiplayer, close locations
Theory: One of the classic and original zerg builds, 9 pool speedlings has withstood the test of time and continues to be a viable build today. For Zvp speedlings followed by harassment is normal (you may pull some or all drones off the extractor if you wish), while in Zvz starting a lair with the first 100 gas is normal. In multiplayer this was a popular build, but the ovy-hatch builds are more common now. This build is enhanced greatly by the presence of close locations.
Build:9/9 - Spawning Pool

8/9 - Overlord9/9 - Extractor9/17 - 6 Zerglings (Scout with drone when pool finishes if you have not found the enemy as of yet)
When the extractor finishes, pluck three drones off the minerals and get some gas. When you get 100 vaspene in Zvp, upgrade speed for your lings while you harass and add a second hatchery. You may transfer some or all the drones back to minerals for a spell while your mineral-based economy rebounds. For Zvz, lair tech is fashionable since you can survive for a while with that few drones and catch up later once you have all rushes guarded.__________________________________________________ __________________
Zerg 9 Pool Hatch
Matchups: Zvp, Multiplayer
Theory: This is a newer build tailor made for Zvp, although it has some uses in multiplayer as well. Here the pool is delayed for a spell in favor of an overlord so extra drones can be made to support a faster 2nd hatch.
Build:9/9 - Overlord9/9 - Spawning Pool11/17 - Hatchery10/17 - 6 Zerglings (Scout with a drone here if you wish)
These lings are more of the harass and defensive type, with the second hatchery at the ramp or in an expo even. From here you can immediately go for gas and begin to tech, or you can continue to amass lings and drones while your hatchery warps. The exact build of course varies now that you have lings.__________________________________________________ __________________
Zerg Muta Rush
Matchups: Air, Hybrid
Theory: This is one of the standard builds for zerg on air and hybrid maps. It leaves enough gas for a muta pump, while getting the drop/speed upgrades one at a time.
Build:9/9 - Overlord (Scout with this overlord as well if the other one did not find him as of yet, retreat or hide either overlord when you find him so they cannot be found and killed as easily)9/9 - Extractor12/17 - Spawning Pool

14/17 - Lair15/17 - Hatchery16/17 - Overlord*18/25 - Spire18/26 - Drop Upgrade21/26 - Overlord
*For Zvp an evo chamber and a creep colony will be needed here to defend against corsairs (spore), this can be done at a later time in the other two matchups.
When you reach this part of the build, start saving larva so you can make six mutas (may add in some scourges if Zvz) when the spire finishes. The thrid overlord came early so you can have enough supply to fit in all of the mutas. When the first upgrade is finished, on hybrids you can slow drop a drone to expand (if the expo is close on pure air you can do it here as well). Against protoss it is wise to get two pairs of scourge so you can pop their stronger corsairs. Use a mix of muta and scourge to control double stargate corsairs until you have ovy speed as well.__________________________________________________ __________________
Zerg 12 Pool Build
Matchups: Zvp, Zvz
Theory: This is a simple ovy-pool build that has a great range of flexibility. You can gas up at any time after the pool is down, hold larva for lings, or power drones until the pool completes for a good economy.
Build: (Larvae save for lings)9/9 - Overlord12/17 - Spawning Pool (scout with one of the drones)12/17 - Extractor (optional, but recommended)11/17 - Hatchery10/17 - 6 Zerglings
This is a nifty build to rush/harass while acquiring reasonably fast tech.
Build: (Power drone variation)9/9 - Overlord12/17 - Spawning Pool (scout with one of the drones)12/17 - Extractor (optional)13/17 - Hatchery
When the pool finishes, you may make lings in pairs if need be. The pool will be done fast enough to hold whatever any other race can throw out at you.

There are so many variations for Zvp and Zvz that it is really fruitless to talk about each. This is a very general guide in this case.__________________________________________________ __________________
Zerg 9 Hatch 9 Pool Fast Expo
Matchups: Zvp, Zvz
Theory: This build from the theoretical standpoint differs for each of the matchups, especially when it comes to what follows the opening. It allows a very fast expo hatch in such a fashion that creep should be there before enemy troops arrive with a sacrifice of economy. You could do this build in a Zvt, but there are expo builds that are more effective econ-wise for that matchup. For Zvp this is the safest fast expo build, but of course there are other, more aggressive ones.
Build:9/9 - Overlord* (When ovy is half done send drone to expo)9/17 - Hatchery in expo9/17 - Spawning Pool11/17 - Begin saving larvae^10/18 - 8 Zerglings
*If you can fit in a quick extractor trick where you lose only a few crystals maximum, then you can and it wont affect the build at all. If you can't, then do not try and just follow the above build. If you do try it, it will be a 10/17 hatch as a result.
^You can think about adding an extractor here. You do not have to put drones in it as soon as it is done, however. In Zvp you can quickly collect 100 gas for speed upgrade than send them back to minerals to bring back up the economy.
From here you shouldnt need a sunken colony right away since the 8 lings that pop out should be good enough. If you find that he is not rushing, do not make the lings. Options that are available is to add a sunken, quick extractor at expo, and tech hard, while scouting to determine how many extra lings you have to fit in to hold any rush attempt. In Zvz fast tech is necessary so your spire is not later than his, or you will have serious harassment problems with muta and/or lings.__________________________________________________ __________________
Zerg 9 Hatch 11 Pool Fast Expo
Matchups: Zvp, Zvt
Theory: This is the "safe" Zvt fast expo build where offensive bunker is more easily defended, but beware that amassing of tech units will take slightly longer because of the sacrifice in economy if he tries to test that expo with a rush(you will need to spend

money for at least one sunken). Scout well to make sure you do not make sunkens you do not need. In Zvp this is another decent fast expo build that is safer than the 12 hatch - 11 pool version.
Build:9/9 - Overlord* (send drone to expo when overlord is half done, scout with this ovyerlord as well)9/9 - Hatchery11/17 - Spawning Pool12/17 - Hold Larvae for zerglings^12/17 - 8 Zerglings
*Here you may do a extractor trick for the 10th drone. If you are not well versed at doing it fast enough to make it worth the slight cost in minerals (if any if you are really fast), do not do it. In this case the extractor trick will make it a 10/17 Hatchery.
^You may include an extractor at this point, you may wait until the expo is up, then make a pair of them simultaneously.
Again you will have 4 larvae ready to morph when the pool is finished. If he decided to tech, then do not make any lings, and begin teching hard while continously scouting.__________________________________________________ __________________
Zerg 12 Hatch 11 Pool Build
Matchups: Zvp, Zvt, Zvz, Multiplayer
Theory: This is arguably the most popular zerg opening in Brood War right now. In Zvz it can be done if the enemy does not find you right away, you can expo with this build in Zvt (much more riskier in Zvp) and its perfectly fine for multiplayer. This yeilds both a good eco, and larva for lings.
Build:9/9 - Overlord (Scout with overlord when it completes)12/17 - Hatchery11/17 - Spawning Pool13/17 - Extractor*12/17 - 6 Zerglings15/18 - 2 ZerglingsOverlord
*In Zvt if you expo make sure you have a drone at the expo ready to make a sunken. Rally both hatches at that moment to the expo as well. You should send this drone now, since it is around here where most offensive bunker rushes begin. Should you be a victim of this, send a couple other drones to kill the scv, it is the most important part of the rush, and make sure the hatches are rallied to the area.

From here you can harass with the lings in Zvp, and think about expanding and teching with your gas. You can even go 3 hatch ling into a sauron-style zerg. It is best to get a sunken and try to push out as many drones as possible in Zvt along with hard tech; the lings are indeed optional. Make sure to go lurks if he tries to rush, and if he techs go muta should there be a cliff above the expo. What you do from here is really up to you, and rather flexible.__________________________________________________ __________________
Zerg 3 Hatch Pool
Matchups: Multiplayer, FFA
Theory: This is an aggressive, risky build that if successful will give you an excellent economy that can support a heavy speedling rush. This build is best suited for multiplayer games or FFA. A double toss or zerg rush can put this build in serious jeopardy in you are paired with a terran. It is best to be paired with a quick rusher in order for this build to work. Now if they scout you late, then most likely you will be able to pull off this opening.
Build:9/9 - Overlord (scout with this ovy)13/17 - Hatchery14/17 - Hatchery14/17 - Spawning Pool (scout with drone)14/17 - Extractor13/18 - Overlord (begin saving larvae from this point)13/18 - Creep Colony (near mineral line)13/26 - 10 Zerglings, Sunken
Use defensive techniques such as blocking off the sunken if you are rushed and waiting for the lings to come out. From here upgrade speed, lair with the 2nd set of 100 gas, and you should not need any more drones and can pump pure ling until its time to expand (this is the beauty of this build order). With three hatches pumping ling, the lings will add up quickly and you can deal what can be a fatal strike on unwary opponents.__________________________________________________ __________________
Zerg 3 Hatch Ling Rush
Matchups: Zvp, Multiplayer
Theory: This build has lost some popularity in Zvp in favor of tech builds, but its still thrives in multiplayer games. It is not the power build that 3 hatch pool is, but it is a much safer way to have three hatches pumping ling. However, the ling pump will not be as strong as in the other 3 hatch build.

Build:9/9 - Overlord (scout with this overlord when it completes)[b]12/17 - Hatchery12/17 - Spawning Pool13/17 - Extractor13/17 - Hatchery (Save larvae)12/18 - 8 Zerglings* (scout with drone)Overlord
*You will not have 200 ready to morph them all, you will have to make them as money allows.
From here once you have 100 gas, upgrade speed, then put the drones back on minerals so you can support lings from the 3rd hatch when it completes (you may mine another 100 gas for lair, but then it will sacrifice your pump somewhat). A sunken is not included in this build because you will not have the cash for it. Pump lings from the three hatches, but make sure to tech in a timely fashion so your lings won't get owned by tech combinations (MnM, Zeal/Goon, or Zeal/Arch). Usually sauron-style zerg emerges from this type of opening from 4 or 5 hatches.
Posted by NaAani on www.blizzforums.com
Default StarCraft Spell ArchiveWelcome to the Spell Archive.
While there are many special abilites in the game, only those that are actual spells with an impact are covered. Here's how the information is organized...
Spell name.(shorthand name).
Vital statistics about the spell.
Spell definition and basic information.
Basic information on strengths.
Basic information on weaknesses.
ZvZ applications: How the spell is used in the ZvZ matchup.ZvT applications: How the spell is used in the ZvT matchup, from Z's point of view.ZvP applications: How the spell is used in the ZvP matchup, from Z's point of view.PvP applications: How the spell is used in the PvP matchup.PvZ applications: How the spell is used in the PvZ matchup, from P's point of view.

PvT applications: How the spell is used in the PvT matchup, from P's point of view.TvT applications: How the spell is used in the TvT matchup.TvZ applications: How the spell is used in the TvZ matchup, from T's point of view.TvP applications: How the spell is used in the TvP matchup, from T's point of view.
Commonly used counter strats from each race. Burrow.
100/100.
Burrow allows all zerg ground units (except ultralisks) to hide underground, rendering them cloaked to the enemy. They do not attack unless attacked. Zerglings take best advantage of this spell. Lurkers can burrow by themselves, they do not need this upgrade to burrow.
Strengths: Can upgrade it early. Decent for scouting purposes, harassment and expansion denial.
Weaknesses: Units that can use it do not have great sight range, overlords scout better and are cheaper.
ZvZ applications: Many say the 100 gas is better put into an upgrade, tech, or an extra mutalisk (all three attractive options). The vast presence of overlords render this spell nearly useless and a waste of money. You can use burrowed ling or two; however, to keep an eye on faraway expos with gas if overlords are killed or chased away by enemy muta.
ZvP applications: This spell hurts the protoss the most since mobile detection is the fairly far up the tree in the early going. Speedlings that mange to get into a main can burrow, and harass probes once zeals go away, and can jump out the ground and attempt to kill a nearby cannon or two trying to warp in if needed. Another burrow idea is burrowing a ling in the nat where the nexus goes, denying the nat until the ling dies (it can force an extra cannon usually). You can scout for when protoss tries to expo again (usually a faraway expo or another main) in this same way.
ZvT applications: Burrow allows lings to flank early marine/medic attacks; however, a firebat or two does counter this type of flank decently. Since terran gets early scan in this matchup, expo denial in general does not work. You can try and use that burrowed flank to counter the terran main if you can hold your nat with what's left, but usually there will be more freshly built medrines there to handle that. This is really only a stop gap measure until you get your lurkling or mutaling pump going.
Counters: For terran, scan does the trick nicely. For protoss, observers do well if you have them, if you're trapped behind that burrow in the nat trick and don't want to build a cannon, you can attempt to put a zealot on top of the ling, and attack it with an archon or

reaver, and allow the splash damage to kill the burrowed unit underneath. For zerg, use an overlord (duh). Consume.
1 Range.
This natural defiler spell adds 50 mana each time it is used. It does not matter what's consumed: big, expensive 400hp ultralisks will obtain no more mana then a 1hp ling. Keep track of where your defiler is, and keep lings nearby. You cannot consume larva, but you can eat eggs.
Strengths: Makes use of weakened zerg units.
Weaknesses: When you don't have any cheap units nearby.
ZvP applications: Consume liberally to plague units or swarm. Plague really hurts protoss since usually their shield upgrades are lacking at mid to late stages of the game (they usually upgrade armor first).
ZvT applications: Consume liberally to swarm. Dark swarm negates the attack of most terran units completely, and the rest partially.
ZvZ applications: Defilers are usually not built in this matchup.
Counters: For terran, irridiate defilers as soon as you see them. For protoss, feedback will often kill a defiler unless it just cast something, that's if you have any dark archons on the map at that time. It is unwise to make a DA just to feedback a defiler unless you have other ideas for investment (maelstrom). Dark Swarm.(swarm, cloud, ds).
100 mana, 9 range, 6x6 area.
This natural defiler spell creates a large orange cloud up to 9 tiles away. The swarm protects any units - not buildings - under it (friend or foe) from ranged attacks (all air-to-ground attacks are ranged attacks). Ranged units can shoot out at things not protected by the cloud (including anything in the air). If both friendly and enemy units are under the swarm, their attacks against each other will be negated, even though they will continue to shoot. Zerg can move the defiler under the swarm with the rest of their army, and cast again (after using consume a couple times most likely), creating what is called a "swarm push". Melee units are unaffected by the spell (only protected from range when under it), making it an ideal aid to melee-based armies (ultraling, lurkling). All spells work normally under dark swarm, including those that are ranged attacks in themselves (like yamato).

Stengths: Amazing when used with melee units and/or lurkers. It allows hydra to hang in there well against capital ships.
Weaknesses: When the enemy gets their melee units under your swarm.
ZvZ applications: Defilers are not commonly built in ZvZ, but when they are, it's for plague.
ZvT applications: Swarms away! The only terran units that can attack anything under dark swarm are firebats, spider mines (a special ability), and siege mode tanks (only their splash damage). Terran has bascially no counter to swarm pushing with ultraling (or lurkling for that matter) except for irridiate.
ZvP applications: Protoss is better equipped to handle dark swarm then the terran. The main use for swarm in zvp is to take out cannons without a significant loss of lings (or ultraling). Still, swarm reduces some of the attack from archons (in the same fashion as siege mode tanks) renders dragoons harmless (if lings weren't enough) and as mentioned, allows lings to attack cannons head-on.
Counters: Terran can, and will irridiate any defiler their vessels can get in range of, even if it just cast swarm of plague (because of consume). Note that I said vessels, once you start building them don't stop, that's the only way terran can really stop a swarm push once zerg reaches hive tech is to have many vessels. All the protoss spells work fine under it, storm, stasis, maelstrom, d-web has its uses even for those occasional sair-reaver style games. Zeals, DT, reavs still attack normally under it, archons still pack a decent punch. Defensive Matrix(d-matrix, matrix)
100 mana, 10 range, 250hp shield
This natural science vessel spell places a 250hp shield around the unit for about 60 seconds. While being attacked, a few hp may be lost, this is only the matrix working normally, it is not fullproof in the same way protoss plasma shields protect hit points. Casting it again only replaces the old matrix with a fresh one, the spell is not stackable. A vessel cannot matrix itself.
Strengths: Prolongs the life of key units in battles or harassment situations.
Weaknesses: A timed spell (60 secs.), plague will still run its course, if the unit has less then 3hp, it will most likely die before the matrix wears down, it can be hard to find a unit to cast it on during the normal course of a battle. A single unit spell, no area affect.

TvZ applications: The matrix is highly successful when used in combination with marine/medic micro against lurkers. Simply matrix a marine, send him out, draw the spines, and allow other m&m to focus fire with stim. It is a quick series of actions, but it works well when facing multiple lurkers and you don't want to wait for enough siege mode to arrive. You can throw it on your few siege tanks as well to get a couple extra blasts in.
TvP applications: It can be hard to find units to matrix here since so much of your time is used in micro with your push (and macro to make sure you have units at the end of a battle since it takes time for a terran to set up), and often vessels do not show up until the toss has arbiters. But every now and again you may find a key tank group that you want to keep alive, even through storm (matrix will eat the storm for the tank). Often in the middle of a medium-sized battle is a perfect time to cast (at a point where siege mode is hammering away at zealots hacking away at the matrix), but it may better making sure you can crank out another set of units then trying to protect those last few. If the outcome of the battle is still in doubt, it will help. If you have the skill to macro and matrix, then more power to you, but the fresh set of units will take precedence here. Protoss has no counter to a matrixed unit other then to use mind control or focus fire on it.
TvT applications: Similar to the wars against protoss, a key tank being able to go into siege fire, siege up and shoot can turn the tide of these often very timely battles. Just like psi storm, matrix also can eat a few siege blasts before expiring. It can also turn the tide in battles involving BC if it gets that far (the matrix will eat most of the yamato). Terrans usually does not want to spend too much gas on vessels, however, needing every bit of gas they can find.
Counters: In general, all status spells work normally, spells that attack get absorbed. For zerg, broodlings still work, plague still runs its course. For protoss, mind control takes control of the unit and its matrix, feedback still works if its a spellcaster, everything else is normal. For terran (if you see it), siege mode usually makes short work of a matrix, but beware if what's going on around the matrixed unit (is it a decoy to allow other stuff to set up). All other spells work normally. Focus fire with high-powered units is usually the best way to go for any race. Sometimes in the heat of a battle it may be best to leave the matrixed unit(s) there and go for everything else around it, it's usually what is around that unit that will kill you, not what's protected itself.
Disruption Web(d-web, web).
125 mana, 9 range, 4x3 area, 200/200.
This corsair spell casts a 4x3 web that disables ground attacks of all units and buildings under it (no effect on air units). Units under its influence cannot shoot out of it (both

friend or foe). It lasts shorter then it used to, but it still lasts long enough to get its job done.
Strengths: Great against static defense (including siege mode tanks) and units trying to focus fire.
Weaknesses: Short spell duration needs fast action before it wears off, 125 manna is an expensive cast.
PvT applications: The goon-sair anti-metal strategy (web tanks in siege mode) got nerfed by the duration decrease in patch 1.08. Web can still be used to good effect when going carrier vs. gols. Keep carriers over water or high ground, and use web to desired effect. With its shorter duration, you will need more corsairs then you used to need.
PvZ applications: You will mostly need web for the sair-reav style of play. The gist of the build order is that hydras seek to focus fire on dropped reavs (the best zerg answer for the build is to spam hydras and make sunkens near mineral lines) and sunks kill reavs quickly if they get into its slightly shorter range. Web works well against both the focus fire and sunks, allowing that critical extra rab to get off and create decisive damage to the hydras.
PvP applications: PvP on land is a ground-based game, the only time you will see yourself needing web is to get onto a heavily defended island; however, there are other, cheaper options if you do not have the money to build carriers (hall then recall utilizes two units you will most likely already have in the game, temps and arbs).
Counters: There isn't much terran can do to get corsairs off the map, just got to minimize their damage by being aggressive, and moving units (not attack-move, btw) quickly out of webs so they can continue attacking. Zerg has basically the same idea, spreading out sunks sometimes forces more then one web, otherwise move hydras out of the web and continue focus firing. Scourges can be handy in taking out the shuttle if they can get near it. Protoss has basically no answer, but you will not see web in 99% of your pvp's. Melee units work if it is dragoons working with the web, otherwise reavs will just go back in the shuttle and move to another location while the web remains.
EMP Shockwave(emp)
200/200, 8 range, 100 mana, 3x3 circular radius (6x6 diameter).

This science vessel spell resets all shield and mana to 0 within a 3 matrix radius of its target. While it has the potential to cripple the shield-based protoss race and mana-based juggernauts HT's, DA's, and arbs, it's actually quite difficult to get a decent EMP off, giving it a very concentrated if not overrated set of uses. It is very slow to fire, with an emp missle speed similar to the ghost's lockdown bullet. Fast units can usually avoid the spell. Also, it's lackluster 8 range makes it a difficult cast even against slow HT's (irridiate is a better option against zerg spellcasters). The only unit that seems to have trouble escaping is the slow-accelerating protoss arbiter. Its use has increased in late-gate TvP as a counter to stasis. Even against archons, there are cheaper options even though the spell takes away over 90% of its HP.
Strengths: Decent for targetted use against arbiters in TvP.
Weaknesses: Irridiate bests it in everything zerg, need the mana for d-matrix in TvT, hard to cripple protoss spellcasters with the exception of arbs (siege mode does a much better job at shield draining).
TvP applications: Arbiters have a difficult time avoiding this spell due to its slow acceleration, however you must get it off before the arbiter gets its stasis off. Good timing is needed. Every now and again you may get one in on carriers, but a good protoss can see it coming and move away, keeping most of their carriers away from its effect. D-matrix on your own stuff is often a better option against ground units unless you are sneaky about it (for example, toss units clumped outside of the LT nat, you come from the ledge above them with the EMP and catch them off guard).
TvZ applications: Use irridiate.
TvT applications: You will not have several vessels in this matchup, often the one you may have would be better off casting d-matrix, obviously in a BCvBC battle, its nice to stop their yamato cannon before they can use it, and its hard for BC's to dodge it either. Dont bother on spend the money on it unless BC's are on the map and you have BC's of your own. However, it is much easier and better to just bring gols or wraiths along with your BC's to kill his.
Counters: Zerg won't need to counter this spell, irridiate is their nemesis from this unit. Set up scourge ambushes if you can, timely execution can usually net you a few vessels. Protoss can easily start moving (not necessarily away either, side to side will do) to avoid it, arbs are best to try and get their stasis off before it casts, more difficult to do if you have more then one, and they're travelling together. Storm will almost always get off before a vessel gets close enough to hit a templar with it. Gols can simply chase and often kill a vessel before it gets away for terran. Don't even worry about this spell unless the endgame comes down to BCvBC. Even then, its best to get a secondary anti-air unit (wraith or gol) for his BC's rather then try and stop his yamato. Ensnare(snare)

100/100, 4x4 area, 9 range, 75 mana.
This queen spell cuts movement speed in half and reveals cloaked units in a 4x4 area (no effect on burrowed units). It does not cut attack rate (cooldown) and is mostly a spell to decrease the efficiency of enemy units (while snared they usually cannot achieve good attacking formations). Its usefulness has been questioned over the years, especially if it cannot slow fire rates of units.
Strengths: Good against medrine using focus fire tactics. Decent with ultraling when looking for a small edge against protoss units. The spellcaster itself (queen) is difficult to kill.
Weaknesses: Generally too expensive for the ZvZ matchup, plague or dark swarm are better choices against terran or protoss.
ZvZ applications: Ensare on packs of muta looks promising being that they stack, but the financial investment is better put into upgrades or a couple extra muta.
ZvT applications: Used against mnm, snare effectively counters the speed portion of stim, allowing your units to better surround them, but dark swarm is a better and cheaper mnm counter, and plague is more of a threat then ensnare will ever be.
ZvP applications: Best against protoss melee (or clumped toss units) before they attack if you wish to throw the timing of the fight off to your advantage. It is difficult to see a clear use or advantage here though. It has been seen in spots against sairs (real hard to get it in on shuttles) in sair-reav games, allowing hydras to better pop a few sairs before they get away.
Counters: For terran, just irridiate away. Protoss doesn't have too much to fear from this spell, feedback's nice range can catch a queen even from afar if you happen to have a DA on the map at that time. Zerg always have scourge on the map in ZvZ's, it is unlikely that you will see a queen even built in this MU. Last edited by TwoTimer : 07-20-2007 at 02:05 PM.
Feedback(fb)
10 range, 50 mana.

This natural dark archon spell damages individual units with mana. The damage done in hit points is equal to the amount of mana the unit had at that time. It also resets their mana count to 0. Obviously the more mana the unit has, the more deadly feedback can be. Its 10 range, 50 mana and instant effect equals or outranges most other spellcasters, and can allow multicasting from a single da.
Strengths: Often an instant kill of low-hp spellcasters (HT, defiler, ghost), can cripple units with mana (BC's most infamously), 50 mana gives great value to the spell, it allows you to cast something else before or after. Its range and speed can often get the feedback in before the enemy casts. You can cast a feedback instantly after a dark archon merge.
Weaknesses: Little or no value to spellcasters who have just cast, no area effect.
PvP applications: While feedback slightly outranges psi storm and will often kill the temp, bulky dragoons often keep da's too far away to get the feedback in before he storms. Its use is very limited since outside of ht's, spellcasters are not generally built in PvP with the exception of the occasional arb.
PvT applications: Having 2 dt's is better then a dark archon in almost every situation, EMP or matrix is not a big enough threat to justify making a da to feedback a vessel.
PvZ applications: Feedback is often an instant kill of a defiler (they usually have energy either from building it up or consuming), it can usually catch an elusive queen if you see one, and you automatically have it when you merge with the idea of maelstrom.
Counters: Zerg has no real counter to a da or feedback due to its high shield, but feedback is not especially damaging to the race. It is rare for feedback to catch a filer before it has done anything. Terran doesn't have much to fear from feedback either, since ghosts, wraiths or vessels are not often seen in the TvP matchup in number. Beware if a terran dare uses BC's (a foolhardy move) against a toss, however. Protoss players can usually get their storm or storms off before an enemy da comes into range to cast a feedback. Hallucination(hall)
150/150, 7 range, 100 mana.
This "highly" specialized high templar spell creates two identical images of a target unit. Their phantom attacks do no damage, and unless destroyed by enemy fire, will disappear by itself after 180 seconds. Any spell used on it will make the phantom unit pop. The spell can be used on any unit, and is often used to get into heavily defended areas, distract fire, or absorb damage and extend real units' life. The hallucination can move in the same way as the unit it was cast on.
Strengths: Use on big-hp units to absorb damage and get into heavily defended areas, casting it on the enemy can distract background fire.

Weaknesses: A nice spell, but storm is so good, it's hard for hall to find its place in the game other then a few very isolated situations, hallucinated carriers cannot attack with fake interceptors, its 7 range limits its ability to create distract fire against terran pushes.
PvP applications: The main use here is to get onto heavily cannoned islands when you cannot afford carriers or corsairs (d-web). Halling some shuttles to get a few real ones onto the island works, same idea with arbiters and recall. You can hall some of your own units to absorb some fire, but it's useless if your opponent has storm, and the mana is better used on storming his units then hall'ing your own. A halled reaver does not shoot scarabs.
PvZ applications: Being that plague and ensnare is rare in a PvZ, hall works to completion here, but storm is so good against zerg, it is foolhardy not to put every mana point on a ht into storming something. Of course it can be used to get onto a heavily spored island.
PvT applications: Storm can be spotty here because of slow pushing (tanks are spread apart), but hall can be used to clear minefields or (if you can get close enough) hall a siege tank, making tanks behind shoot the halls instead of you, not to mention damaging the tank in the process. Zeal bombs are better in most cases, but hall is an option if the pushing terran is a turret whore (which on today's maps, is difficult to be) and you dont have shuttle speed. Interestingly enough, you cannot unsiege (or move) a halled siege tank in siege mode. Lastly, you can get onto a heavily turreted island with shuttles or arbs by using this spell.
Counter: Not much for zerg to counter here, ensnare or plague does makes them disappear, good luck ever finding a hall'ed unit in a ZvP. Same deal with terran, there's not much to do against the spell, you can try and send in focus fire vults when a protoss attacks to snipe temps, but usually they're trying to storm you, not hall you. For the protoss, feedback does fine, but again, the temp is trying to storm you, not use hall.
Heal
1 mana, 2 range
This medic spell takes effect automatically, it adds 2hp of health for every mana pt used. This spell only works on biological ground units (terran barrack units, SCV, all zerg ground units, zeals, dt's, ht's as well).

Strengths: The game's only autocast spell, can heal friendly biological units as well as your own in 2v2s, creating potent matchup problems, the unit is low on the attack priority scale, making a medic slide in there to do its magic often without getting hurt, medics can heal each other.
Weaknesses: Useless against protoss once you go mech, useless against another terran.
TvP applications: You won't often see medics in the game unless you do one of those newer builds that makes marines and a medic while going mech (attacking with a tank and the mnm instead of a couple vults). It allows a bit more aggression with your early marines against a protoss once their goon count is more then three.
TvT applications: Won't need any medics against another terran.
TvZ applications: Obviously you will make many medics during a typical TvZ. Try to make medics in pairs so they can heal each other. Keep them behind your marines if your force consists entirely of rines and meds. If you can, you can try and get one in front if you have a firebat or two early on so it can lend the bat a hand. Usually, the bat can fend just fine for itself. Don't let medics get too far away from your medrines.
Counters: For zerg, single medics can be the subject of focus fire early on, otherwise make sure all your units are attacking marines. Often zerg attacking can overwhelm medic healing, maintaining an edge. You won't really have to think about medics once you reach hive tech and the units that come with it. Protoss' psi storm owns everything that comes out of a barracks. You won't see medics as a terran. Last edited by TwoTimer : 07-20-2007 at 04:35 PM.
Irridiate
75 mana, 9 range, 200/200, 1x1 circular area.
This science vessel spell causes severe damage to any affected biological unit, and damages anything within 1 range of the unit up to 250hp. Overlapping irridiates increase the rate of damage, not the size of the area effect field. Irridiate is used mostly against the zerg.
Strengths: Great against zerg, the splash owns clumped zerg.
Weaknesses: Nothing doing in TvT, not cost-effective against toss, area effect is very limited.

TvZ applications: This is the spell of choice against the zerg. The most common units to irridiate are are lurkers, ultralisks and guardians, but other units can be irridiated as well. It is often difficult to separate clumped mutas in the harassment stage of the game. Watch out for ultralisks attacking mnm (sharing the pain) after irridiating them.
TvT applications: None.
TvP applications: While temps can be irridiated (along with zeals and dt), there are better ways to deal with ht's then with irridiate.
Counters: Opposing terrans will not even see this spell researched. Protoss can just feedback a vessel if needed, or merge the temps (irridiated temps will not die if merged into an archon). For zerg, burrow lurkers to negate the area effect, ultralisks should just attack medrines and let the radiation splash off while they attack. Likewise, try and spread guardians out while attacking so one or two irridiates doesn't kill them all. If a mutalisk clump is irridiated, try and spread them asap so you can find the targetted muta.
Lockdown(ld)
75 mana, 5 range, 200/200.
This special ghost missle disables any mechanical unit for 60 secs. It cannot move or fire during this time, and can be attacked and destroyed. It is a nice spell for high-end mechanical units, but its inhibited greatly by the fragility of the ghost itself (45hp). Very few players have made great use of this spell.
Strengths: Nice late endgame spell for TvT, if you get a chance.
Weaknesses: Dfficult to use in TvP, useless in TvZ, range too short for a unit so fragile, even when cloaked.
TvT applications: While you can use lockdown on BC's, if there is anything else of lesser value in the area (gols, tanks, etc), the ghost is likely to be killed unless he happens to be cloaked, and even still scan will give him up.
TvZ applications: None, all zerg units are biological.
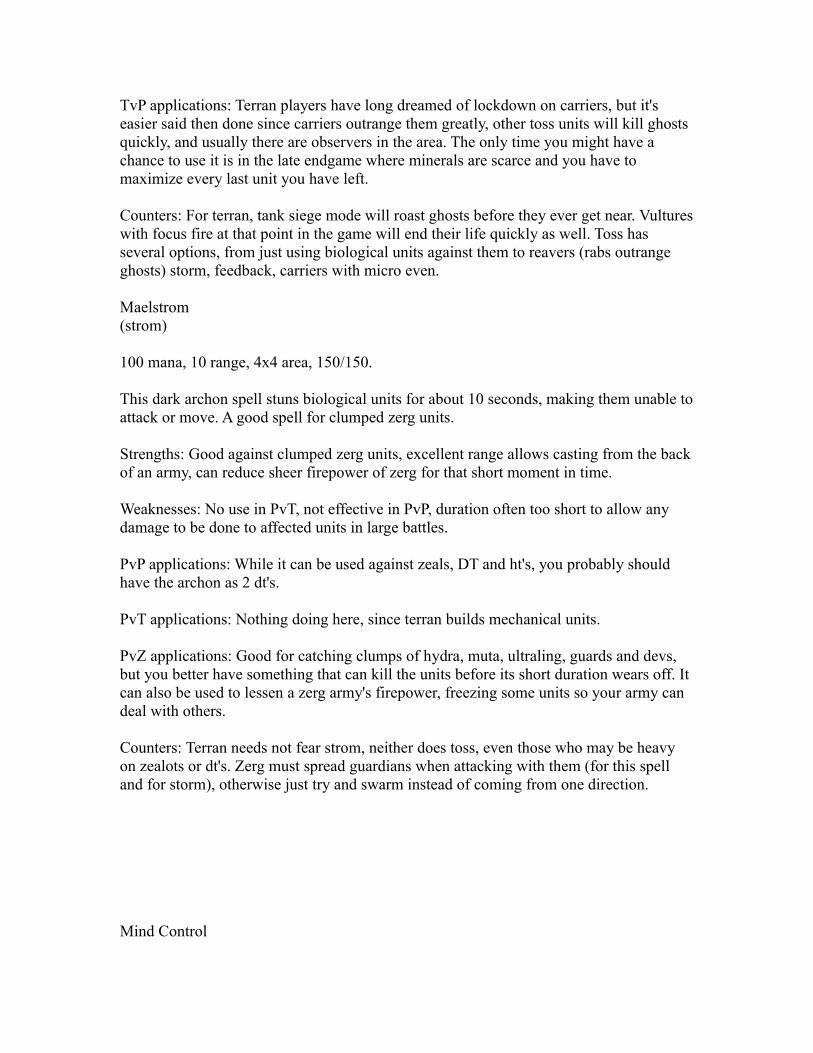
TvP applications: Terran players have long dreamed of lockdown on carriers, but it's easier said then done since carriers outrange them greatly, other toss units will kill ghosts quickly, and usually there are observers in the area. The only time you might have a chance to use it is in the late endgame where minerals are scarce and you have to maximize every last unit you have left.
Counters: For terran, tank siege mode will roast ghosts before they ever get near. Vultures with focus fire at that point in the game will end their life quickly as well. Toss has several options, from just using biological units against them to reavers (rabs outrange ghosts) storm, feedback, carriers with micro even. Maelstrom(strom)
100 mana, 10 range, 4x4 area, 150/150.
This dark archon spell stuns biological units for about 10 seconds, making them unable to attack or move. A good spell for clumped zerg units.
Strengths: Good against clumped zerg units, excellent range allows casting from the back of an army, can reduce sheer firepower of zerg for that short moment in time.
Weaknesses: No use in PvT, not effective in PvP, duration often too short to allow any damage to be done to affected units in large battles.
PvP applications: While it can be used against zeals, DT and ht's, you probably should have the archon as 2 dt's.
PvT applications: Nothing doing here, since terran builds mechanical units.
PvZ applications: Good for catching clumps of hydra, muta, ultraling, guards and devs, but you better have something that can kill the units before its short duration wears off. It can also be used to lessen a zerg army's firepower, freezing some units so your army can deal with others.
Counters: Terran needs not fear strom, neither does toss, even those who may be heavy on zealots or dt's. Zerg must spread guardians when attacking with them (for this spell and for storm), otherwise just try and swarm instead of coming from one direction.
Mind Control

(mc)
200/200, 8 range, 150 mana.
This dark archon spell allows you to take full control of the targetted unit, with any unit-specific upgrades and special abilities it had at the time. You do not assume the regular upgrades (like attack, armor, carapace, etc) just the ones meant only for that unit. The spell takes up 150 mana and also drains the shields. You can start up a second race with a separate set of supply if you mc a drone or SCV, but this is very rare and extremely expensive to do. This spell shows up mostly in the very late game.
Strengths: Using MC on a shuttle will allow you to also capture anything it carried, can also capture expensive units from your own or other races, unit speed is good enough for the da to get away after stealing a unit.
Weaknesses: 150 mana means you won't get a chance to cast too often, useless if no expensive or high-tech units are around.
PvP applications: The only units worth controlling are carriers and arbs. Stealing an arb and it will most likely die right away if there were goons underneath. Taking some carriers can change the tide of the game, but most PvP's don't go that far.
PvT applications: Not too much of a strategy here, BC's are rarely built against toss since they counter them so well, very late game (low mineral count) might be able to steal a dropship or two and hope you get lucky with 2 tanks.
PvZ applications: There is some practical uses here even though most of the zerg units are cheap. While in those tight late games you can seek out ultralisks to take. Also, when you need spot detection for spread lurks and your ob just got popped or there's none nearby, players have been known to mc a nearby overlord for detection. The one thing toss does not have in its arsenal is a high-hp detector.
Counters: Avoidance and scouting are the keys here. Best way to not be a victim is to scout to see if and/or why a toss has da's on the map in the first place, especially if you're terran or protoss. For toss, feedback outranges mind control if you can see a da coming and can select it. Toss can also keep expensive units tucked over their army where a da can't get close (8 range is not 10 like the other two spells it has). Terran doesn't have too much to worry about because da's are not typically built in the matchup unless terran went bc's (a foolhardy move). In the late endgame, watch your drops however if you try to harass.
Nuclear Strike(nuke)
200/200 per missle, 8-10 range, 500hp or 2/3 total hp, 8x8 area.

This ghost spell does 500hp or damage or 2/3 of total maximum hp (including shield) to everything near the center, whichever is more. The damage is somewhat less the farther out from the target you go. Nuke's casting range is 8, 10 when ghost sight is upgraded. Cancelling the nuke or the death of the ghost will make you lose the cost of the missle. It is hard to do much damage with a nuke unless the opponent didn't hear the missle go off or see that message on the screen.
Strengths: Easily the most powerful spell in the game, all units except for a full-health BC will die from it.
Weaknesses: Slow to land, hard to catch units or workers in a strike, expensive at 200/200 each, need two nukes to take out most buildings and three for a hive, the ghost unit itself is weak, hard to get the ghost in the game in the first place, need scan for your first two or three cc's and games don't usually go farther then that.
TvT applications: The only reason you might see ghosts in the game are for lockdown. It is hard to get a nuke off on units or workers, even tanks in siege mode have enough time to unsiege and move. If you're playing a red terran, the dot is the same color as parts of his CC, but any smart player will move his units and workers quickly to areas that do not have a dot nearby. However, you can nuke a set of depots and they'll explode shortly thereafter, for what that's worth.
TvP applications: Because obs are cloaked, it is even harder to get a nuke off on a toss unless it's not in a place he expects. Most toss units are fast and can get out the way. Need two nukes to take out any toss buildings, unless EMP is used on them first (EMP just before a single nuke can destroy a nexus).
TvZ applications: Oddly enough with all the overlords around, this is probably the best race to get a nuke off of. Problem is, zergs know if they ever see a ghost on the map, they are immediately wary of a possible nuke attempt (lockdown does not apply to them). The presence of blood can make a dot hard to find, and with zerg usually having pockets of units not in bases and several expos, even with the heavy detecting presence, it can be difficult to stop a nuke if done well. Again not easy to get units, but you can get a hold of tech buildings built together (usually in the main, good zergs spread them out among two or three bases).
Counters: For all races, two things can be done, find the nuking ghost, he must be within 10 spaces of the dot if you know where that. The wiser thing to do is to just move all your units to a different spot and quickly check your econ for the dot, acting as necessary to protect it.

Optic Flare(flare)
75 mana, 100/100, 9 range.
This medic spell simply cuts the sight range of a unit to 1 (permanently). Flared detectors lose their ability to detect. Only the medic's restoration can reverse a flare. The spell is useless on units that do not detect if they have units with normal sight nearby.
Strengths: Good for individual units.
Weaknesses: No area effect, spellcaster is not typically built against anything not zerg.
TvT applications: None basically, terran units seldom travel alone.
TvZ applications: Basically impossible to utilize since overlords are plentiful, and zerg is not a race to travel alone. The lack of area effect shows greatly here.
TvP applications: Protoss units do not travel alone, either, but it can be used on early shuttle harass, therefore limiting drop options; but thats outside of a typical terran tech tree at that point in the game. Also units inside of the shuttle can give the shut some sight.
Counters: No need to counter this spell, all three races won't ever see it used.
Parasite(bug)
75 mana, 12 range.
This natural queen spell places a irremovable (except for terran) bug on an enemy unit. The parasite can see whatever that unit sees, including cloaked units if the affected unit can detect. Its 12 range outranges everything else in the game, only tanks' siege mode can shoot as far. Only a medic's restore can remove a parasite, or morphing a drone if its cast on a drone.
Strengths: Gives good recon when placed on expensive units, spell comes with the queen, don't have to invest any extra money to have the spell, its excellent 12 range outranges all other spells, hard to find when cast randomly amongst a large set of enemy units.

Weaknesses: Not great against cheap units (enemy can suicide them), overlord scouts are cheaper in all cases, better in most.
ZvZ applications: While the queen can be better used as an extra upgrade or an extra muta, a parasite in the middle of clumped muta will give good recon as to muta location (giving you better opportunities to attempt attacking) unless your opponent is willing to give you a free muta.
ZvT applications: While the medic can restore, the ideal units to parasite in this matchup is a dropship or vessel. Both often fly over areas ols can't scout, vessels cannot be suicide since terrans need all the irridiate they can get, and it might even force terran to spend the money on restore if its used continually. Many terrans do not upgrade restore, and even forget it exists, even though they have medics throughout the game.
ZvP applications: Parasite is nice on those expensive toss units, especially arbiters.
Counters: If parasite is cast on a cheap unit, suicide it or send it to do recon itself. Terran can restore bugs if placed on expensive units, zerg or protoss can't. It is a spell rarely seen (a good FFA spell), but it does have its uses.
Plague
9 range, 3x3 area, 150 mana, 200/200, 300 damage or 1hp.
This defiler spell does up to 300hp of damage over time, leaving the unit with 1hp. It also splashes off on cloaked units, making them visible until the spell's effect finishes. It has no effect on protoss shields. This spell is great on terran buildings, many of them will burn down and explode if damaged below 1/3 health.
Strengths: Good for weaking high-hp units, good for taking out protoss units and cannon walls, does well on terran bio, draining medic energy, it can detect cloaked units for a short time with its splash, it works well on buildings.
Weaknesses: Does not actually kill anything, weak against archons.
ZvZ applications: You will be hard pressed to spend significant money to get defilers in the game (the cost of hive + defier mound + defilers + upgrade + lings to consume is very expensive for this mu), but plague owns other zerg. There is nothing zerg can do about it, either.

ZvP applications: Plague does well against toss units, even though they have shields. Often, toss players upgrade armor to +3 before starting shields, plague takes advantage of their usually weak shields in the late midgame or early endgame, disregarding their armor upgrades and forcing them to survive on just shield. Plague does well against carriers, but shield-based archons are mostly immune to it. You can use plague to good effect when the toss army is mostly zeals and dt, dark swarm when it is comprised of goons and archs.
ZvT applications: Plague will make medics use all their energy healing nearby medrines (and each other), and they will run out of mana long before the spell is done. Plague on vessels make them better to chase down with hydra after winning a battle. The spell does not own terran as well as dark swarm, but it's not too far behind, either. If BC's ever show up in the mu, plague will force massive repairs or restore (if terran thinks of getting it at all).
Counters: The best thing protoss can do is start shield upgrades earlier in the game. Current builds get +3 attack faster then before (off fast expo +1 openings), allowing shield upgrades to start a few minutes earlier. Terran players can quickly use restore on BC's as they are often too slow to retreat unless there's ground units to hide behind. Even d-matrix can fail if a few hp leaks through the shield. There is really no counter for zerg, either attack with the affected units or hide them for awhile.
Psionic Storm(storm, psi storm)
150/150, 75 mana, 9 range, 112 damage, 3x3 area.
The trademark spell of the protoss is cast by the high templar. Its area effect hits both air and ground to a tune of 112 damage over the duration of the spell. It does not affect buildings, it cannot be stacked, and its uses covers all three matchups and attacking possibilities, making it an almost mandatory spell to have each game. It does very well against low-hp and slow units, and spent temps can be merged into archons, extending their usefullness and life.
Strengths: Versatile spell, good damage, decent range and area effect, good against low-hp units, great against slow units, spent temps can be merged into archons, the best harassing spell in the game.
Weaknesses: Fast units.

PvP applications: Storm is a staple spell in the dragoon wars, often gotten right away or after a short stint with reavs. You can storm reavs (it is best to storm the reavs to get them out the game before storming enemy goons), and the shuttle takes good damage when it tries to protect them. If you can get a storm on an enemy ht, do not discount the value of taking out enemy temps, especially if they did not storm yet. It is a bit more difficult to storm zeal-goon-ht combos, but storming the path zeals are about to run through can deplete shields enough to allow your goons to finish them off easily. Storm does decently against carriers, good carrier micro can minimize its effects, however. Harassing storm drops are always an option.
PvT applications: Storm is good against fast pushes if the ht's can get close enough (it is best to flank or drop with ht's in this matchup). Storm is one of the many BC counters, you won't see terran making them most likely. Dropping temps in mineral lines and storming is also a common harassment strategy in PvT, being that storm is a more dependable SCV killer then scarabs, with morphing an option after all storms are exhausted.
PvZ applications: Storm works well against most zerg units. Guardians are too slow to avoid it, lurkers are stationary while attacking, hydra have been long a storm target since the beginnings of PvZ, storm does not do that much against ultras (mass archons or reavers are generally better options), but it can kill the lings running in those small cracks between ultra. Storming muta and ultraling takes good timing, but it does do some decent damage there as well. Storm is good against mass zerg drops since ovies usually are stationary while dropping. Using maelstrom before storm will make sure most if not all of storm's damage is taken. Need more then one storm to kill most lair tech or higher units entirely with storm, keep that in mind.
Counters: Terrans should spread out their pushes as best as they can. That will often slow the speed of the push, but better terrans can create pushes that are a bit more storm resistant. Vulture raids (use focus fire) can run in and kill temps without giving up much. Irridiate can kill temps, but they will usually morph or get rid of their storms before dying, therefore making it usually an ill-fated option. For protoss, feedback slightly outranges storm, it is hard to get it in behind goons since they're so bulky, but it might have some use in more melee-based armies. Best bet is to get your own storm, and make yours do more damage then his, or switch a bit to a more melee-range combo and put pressure on his micro. For zerg, hydra dodging is a good skill to learn, spreading lurks forces more storms to be used to create an opening. Use your speedier units to minimize storm's effects. Zerg can also raid with their speedier units (hydra, muta, lings), taking advantage of the fact that temps can storm themselves.

Recall
150 mana, 150/150, 5x5 area.
This arbiter spell quickly moves units from anywhere on the map under the arbiter (cloaked as long they stay under the arbiter). It only works on your own units, not allied units. It is good to clump your units together so they can fit in the 5x5 box of the recall.
Strengths: Works on both air and ground units (can recall an observer or two with your force to take detection to the area as well), does well with small units, the arb itself has enough hp to recall in decently defended areas, you can transport units without a shuttle on the map in emergency situations.
Weaknesses: It can work with air units, spell doesn't work nearly as well, however; hard to get before the endgame.
PvP applications: It will be mostly zeal-goon recalls here if you in fact reach arbiter tech, as games in this matchup usually end fairly quickly before both sides go completely up the tree.
PvT applications: The generally slow-moving terran forces and expensive factories make mains an ideal place to recall. The cloaked nature of the recalled units helps too if detection is razed before the terran army returns. On ramped maps, if you have enough mana leftover to stasis, you can block the ramp for awhile with a stasis units allowing you enough time to finish off the base. Recall can used to great effect anywhere the terran army is not. While more rare, it can also be used right on top of the terran army.
PvZ applications: Recall can be used where the zerg army is not, since their army is usually away from any of their bases. It is easier said then done getting arbs in the matchup with lots of gas spent on ht's, archs and da's even, but recall can work almost as well as it does against terran.
Counters: Staying aggressive is key here, as recalls typically happen when your army is away from your base but not attacking anything. Attacking a protoss (if it is wise to do so) will often make a toss use the units it wanted to recall. It is hard to stop the recall itself really, but zerg does have scourge if he can put four scourge into an arb before it uses recall.
Restoration(restore)

6 range, 100/100, 50 mana.
Medic's restoration removes spell effects such as lockdown, optic flare, irridiate, plague, ensnare, and parasite (it cannot counter stasis). Because half of these are terran spells, restore is not needed in most games. It does have some use in the rare case of BC's vs zerg.
Strengths: The only way to rid a unit of parasite, restore cures plague without having to run back to repair if cast quickly, mana requirement is not much.
Weaknesses: Does nothing against stasis (long a terran nemesis), does not restore hp from plague (or anything else), it's best to just wait out ensnare, most spells it can cure are cast by terran in the first place.
TvT applications: None.
TvZ applications: You can restore plagued BC's, undercutting the spell and possibly preventing having to retreat to repair. However, hp is not restored, just the status. You can also remove parasites on expensive units (vessels).
TvP applications: You cannot restore stasis, therefore it has no use.
Counters: The spell isn't really damaging to anything, you probably won't see it ever in competitive games.
Scanner Sweep(scan)
50 mana, 50/50, 20x20 area.
Scan reveals a 20x20 area for 15 seconds, with detection. It uses 50 mana, it is necessary to have at least two scanners to have enough mobile detection to get through the game without a vessel.
Strengths: Scanner detects, can reveal any part of the map, whether it has been revealed or not, best counter to units under arbs, the best scouting spell in the game.
Weaknesses: Need more than one, and often more than two to have enough scan on hand for a constant cloaked threat.

TvT applications: Scan gas expos for possible expo attempts. Otherwise, use as needed, and scan every now and then to find the tech tree: for covert ops expect ghosts (lockdown), for physics lab expect BC's, for multiple starports expect wraiths.
TvZ applications: Since you have vessels for detection after you tech to them, scan around to search for flanks, swarm setups, and for expos. Every expo is important to zerg, especially the gas ones, needing the gas to fund ultraling and those tech switches. Scan their tech hatch (the one that zerg chose to morph) to find out when he goes hive tech. Scan other tech buildings (easy since everything is on the creep): for spire means scourge and muta, for greater spire means guardians, for ultralisk cavern expect ultraling, a defiler mound means swarm/plague is coming. Irridiate anything zerg needs those tech buildings to build.
TvP applications: Scan clear disturbances in the screen for dt. Scan uncovers everything under an arb, repeat until whatever's under the arb is dead, best bet is to use a vessel for detection against arbiter tosses. Scan for tech tree: for fleet beacon expect carriers unless you already seen sairs flying around, templar archives expect dt and eventually storm, arbiter tribunal means arbs are coming.
Counters: Having your stuff in areas not commonly scanned is a decent way to counteract scan, especially if you are trying to hide something that takes time to build up (such as a carrier fleet). Spreading your tech buildings around your bases will force terran to use multiple scans to get a complete picture of your game. Last edited by TwoTimer : 07-23-2007 at 05:56 AM.
Spawn Broodling(broodling)
150 mana, 9 range, 100/100.
A broodling instantly kills any non-robotic unit, leaving a pair of 30hp broodlings in its wake. A potentially powerful spell, it has been hindered by the pacing of the zerg game, most zergs only building a queen's nest so they can reach hive tech. 150 mana, 100/100 for the queen, and 200/200 for the upgrade also is a significant investment for a spell that can only work on one unit at a time. Broodlings will die by themsleves after 120 seconds, they do not have a timer like hallucinations.
Strengths: Good against tanks (more for the background firepower decrease) and temps (toss loses a couple storms usually).

Weaknesses: Expensive to get and effectively utilize, defiler spells overshadow queen spells by far.
ZvT applications: Zergs from time to time have experimented with queens and broodling/ensnare, always coming to the conclusion that getting defilers that much faster is the much more prudent (and correct) choice. Broodling is one of those spells that can pay dividends once money on the map dries up and you have to come up with creative ways to kill leftover enemy units or win.
ZvP applications: While broodling works on temps, zerg cannot pump out queens and broodling at the rate toss can pump out ht's and storm. One queen for parasite in games involving sairs usually won't hurt. Most zergs do not build queens at all against toss, and can win a game just fine without them.
ZvZ applications: Broodling has no use in this matchup, the best two units to use it on are not even built in this MU (ultralisk and lurker).
Counter: Terran can catch a queen with irridiate, and a toss can feedback a queen if he has a da on the map, otherwise there's no major need to really build anything just to counteract the spell. Zergs need not worry at all. Stasis Field(stasis)
100 mana, 150/150, 9 range, 3x3 area.
This arbiter spell freezes any unit in place for roughly 40 seconds. It cannot do anything, and nothing can be done to it (not even restore). This spell takes priority over all others. It has a variety of uses (offensive and defensive), and it is especially damaging to the terran. Stasis basically splits armies in two, the portion under stasis and the portion not. The short-term firepower decrease can turn the tide of battle. A stasis used properly on a ramp can block the ramp temporarily.
Strengths: Spell priority above all others, good range and decent area effect, good duration, good variety of uses.
Weaknesses: Cannot attack enemy units caught in a stasis.
PvP applications: Stasis can be used in several ways in this MU. Its main use can decrease firepower decisively in a battle, winning the battle and waiting for the small contingent of enemy units under stasis to finish them off. You can stasis enemy carriers again and again, each stasis buying you 40 seconds until you have enough to take them out.

PvT applications: Stasis on clumped tanks (easier to do then getting two storms on them) takes a big chunk of firepower out of the terran push, with major effects. Not only is the direct attacks gone for 40 seconds, all the possible splash those tanks would have done is also gone, increasing the lifespan of your army. Similar to carriers, you can stasis BC's until you can get a counter for them. When using recall in a ramped main, if you have enough energy left with a nearby arb to use stasis on a unit (yours or theirs), you can effectively lock out retreating terran units while you finish off the base.
PvZ applications: Stasis is a good postponement spell in this MU, allowing you time to get storm (or any other counter) into the area. It can be used on anything of decent size (zerglings do not make good stasis targets). You can stasis when zerg tries to get up a ramp protected by cannons after using dark swarm as a delay tactic as well.
Counter: It is very difficult to counter this spell, terran can try and emp arbs before they use stasis, sometimes it works, other times the arb gets the stasis off before the missle explodes. For protoss, feedback is decent to use on arbs, mind control if you have the energy for it, remember to have obs to detect whatever is under it. Zerg has difficulty countering arbiter spells, stasis is no different. Arbs do less damage against zerg then it does the other races, however.
Stim Pack(stim)
-10 health, 100/100.
Stim pack doubles movement speed and attack rate for marines and firebats at a cost of 10 health. It is curiously absent for ghosts. Works well with medics, which will heal the small amount of damage if they are nearby.
Strengths: Raises efficiency of medrines and increases their ability to focus fire.
Weaknesses: Makes them more prone to lurker fire.
TvZ applications: Matrix a rine, stim your army and send the matrixed rine out there to draw lurker fire. Send the rest out there and focus fire to take out a small amount of lurks.
TvP applications: Stim and focus fire will do a decent job against toss melee. Still no help against range or reavs, whose rabs will target the unmatrixed rines.
TvT applications: None.

Counters: Use units that can shred terran bio to counter stim. Toss has reavers or storm, Zerg has ultraling, lurkers in number, or guards, terran vultures own bio as well (as well as all other mech).
Yamato Cannon(yamato)
150 mana, 100/100, 10 range.
This battlecruiser attack is worth 260hp of explosive damage (50% to small units, 75% to medium). Its range is 1 more then its sight, so advanced scouting and sight is needed to use its 10 range. It is usually seen against carriers, other BC's or arbs. Used with EMP, it can spell near doom for carriers.
Strengths: Good power, good range.
Weaknesses: Hard to build up a fleet of BC's, toss has too many counters for the spellcaster, takes time to charge up a blast.
TvT applications: Yamato is used mostly to target other BC's, wraiths are better for chasing down vessels. You can also use it to unlock the deadlock when both sides have several tank lines as well.
TvZ applications: While yamato does go through swarm, and you can yamato a defiler or ultralisk (after asking yourself why you have BC's for zerg in the first place), terran is much better off using irridiate (which you obviously got on your way to physics lab tech). Zerg can pump ultras much faster then terran can get yamato.
TvP applications: Carriers and arbs are the main targets for yamato, but toss has many options for countering BC's.
Counters: Feedback owns BC that haven't used yamato yet, mind control or stasis on a BC charging up a yamato will cancel the blast. Zergs have plague and swarm, devs in number with hydra also work well. A matrix can absorb a yamato without too much difficulty, wraiths are good for taking out BC's.
Originally Posted by TwoTimer from www.blizzforums.com
Default Shorthand DictionaryStarCraft Shorthand Dictionary Posted by TwoTimer www.blizzforums.com
A

ac - (set messaging to) allied chat.air map - island map without ground paths between starting locations and without connected expansions.air unit - any flying unit.APM - actions per minute.arb - arbiter.arch - archon.archives - templar archives.assim - assimilator.
B
bat - firebat.bay - robotics support bay.bc - battlecruiser.bf - blizzforums.beacon - fleet beaconbgh - big game hunters.bio - terran (biological) barracks units (marine, firebat, medic, ghost).biometal - unit combination of barracks units (marine, firebat, medic) with tanks.blimp - carrier.block - blocking a path or choke with buildings.bm - bad manner.bo - build order.boa - build order archive.broodling - spawn broodling.bug - parasite.bunk - bunker.bw - brood war.
C
cannon - photon cannon.carapace - zerg armor (usually ground armor, could be air as well).cars - carriers.cavern - ultralisk cavern.cc - command center.ceptors - interceptors.choke - anywhere on the map where a path is narrow.cloud - dark swarm.combo - combination (of units).concussive - damage type, 100% to small, 50% to medium, 25% to large.core - cybernetics core.cit - citadel of adun.citadel - citadel of adun.

cracklings - zerglings with both the metabolic boost (speed) and adrenal gland (attack) upgrades.cyber core - cybernetics core.
D
da - dark archon.deep six - terran strategy that uses multiple barracks against protoss.den - hydralisk den.depot - supply depot.dev - devourer.disc - disconnect.dmatrix - defensive matrix.double (attack) - an attack that is split in two, or two attacks at the same time (zealot, goliath air attack, etc), attack modifiers for these units are doubled when upgraded.dra - hydralisk.drop - attacking or harassing by transport(s) (shuttle/overlord/dropship).ds - dark swarm.dship - dropship.dt - dark templar.dweb - disruption web.
E
ebay - engineering bay.econ - economy.emp - emp shockwave.evo - evolution chamber.explosive - damage type, 50% to small, 75% to medium, 100% to large.expo - any mining base, or to expand (to an expansion).
F
facility - science facility.fac - factory.fact - factory.fast expo - expanding to a second base before developing an army.fastest - Fastest Possible Map (money map, stacked minerals in melee).fb - feedback.fe - fast expo.feed - to give units away to the enemy, whether intentional or not.ffa - free for all.filer - defiler.flare - optical flare.fmp - fastest possible map (money map, stacked minerals in melee).
G
gas - vespene gas (or geyser).gate - gateway.geyser - vespene geyser.gg - good game.gl - good luck.gm - good manner.gol - goliath.gollie - goliath.goon - dragoon.ground - damage type, range attack that travels along or under the ground.ground map - a map with land paths to any starting location.ground unit - any unit that moves along the ground.guard - guardian.gundam rush - old terran build strategy against protoss that calls for early marines with scvs, few vultures (with mines), a tank and a barracks (floating to proxy position) looking to rush a protoss tech build from close starting positions.
H
hall - hallucination.harass - to bother the enemy economy, typically with air units or drops.hat - hatchery.hatch - hatchery.heavy metal - any combination of terran factory units (tanks, vultures, goliaths) built exclusively.hf - have fun.ht - high templar.hybrid map - a map without land paths between starting locations, but most (or all) expansions are connected by land.hydra - hydralisk.hydralurk - unit combination of hydralisks and lurkers.
I
infested - infested terran.infested cc - infested command center.
J
juke - to outmicro or micro around something (usually a unit).
K
kc - kill count.

L
lab - physics lab.land map - a map with direct paths on land to any starting location.ld - lockdown.leapfrog - to push by bringing tanks from the back to the front as the enemy retreats.legs - leg enhancements (zealot speed upgrade).limited map - a map with normally set resource amounts (1500 per mineral patch, 5000 per vespene geyser).ling - zergling.ling rush - zerg build order where a spawning pool is started before an overlord is built.linglurk - unit combination of zerglings and lurkers.lon - pylon.lord - overlord.lot - zealot.lt - lost temple (map).lurk - lurker.lurkling - unit combination of lurkers and zerglings.
M
main - a mining base that is also a starting location.mana - the number that represents the amount of energy spellcasters have (from 0-250).maynard - to transfer workers from base to base.mael - maelstrom.matrix - defensive matrix.mc - mind control.melee (map) - a map with normal resources (~1500 minerals per patch, ~5000 gas per vespene geyser).melee (unit) - a unit with a ground-only physical attack (zealot, zergling, etc).mech - referring to the factory (can be a build order or units).med - medicmetal - any combination of terran factory units (tanks, vultures, goliaths).macro - anything that has to do with army production.micro (map) - a UMS map based upon a micro competition.micro (units) - increasing individual or small group unit efficiency in battles.min only - a mining base without a nearby vespene geyser.mine - spider mine, to lay spider mines.mins - minerals.m&m - marines and medics.mmf - marines, firebats, and medics.mnm - marines and medics.money map - a map that does not run out of resources (normal-length game).mound - defiler mound.muta - mutalisk.

mutadev - unit combination of mutalisks and devourers.mutaling - unit combination of mutalisks and zerglings.mutalurk - unit combination of mutalisks and lurkers.
N
nat - natural expansion, the closest mining base to your starting location.natural - natural expansion, the closest mining base to your starting location.nest - queens nest.newb(ie) - a new player at starcraft.nex - nexus.nilla - vanilla starcraft (regular, without brood war expansion).noob - a weak (in melee games) player at starcraft.normal map - a map with normally set resource amounts (1500 per mineral patch, 5000 per vespene geyser).nost - nostalgia (map).nr - no rush.nuke - a nuclear strike, or to launch a nuclear strike.nydus - nydus canal (or to build one on enemy creep).
O
ob (player) - someone who watches the play, has vision of all players.ob (unit) - observer.ol - overlord.ovie - overlord.ovy - overlord.
P
peon - worker units (probes, drones, SCVs).pool - spawning pool.(X)-pool - a rush build order that tells the number of drones to have before starting a pool (4-pool, 6 pool, etc).port - starport.power - to amass units within your town limit.proxy (rush) - placing basic production buildings close to their target to sharply reduce travel time.psi storm - psionic stormpubbie - public (game or player).pvp - protoss vs protoss matchup.pvt - protoss vs terran matchup, from a protoss point of view.pvz - protoss vs zerg matchup, from a protoss point of view.
Q

R
rab - scarab.range unit - a unit that can an attack from afar.rax - barracks.reav - reaver.restore - restoration.rine - marine.rj - rejoin.rm - remake.robo - robotics facility.rov - ride of valkryies (map).rush (tech units) - a strategy where you quickly tech with little or no defense to attack as soon as possible with advanced units.rush (basic units) - a strategy where you quickly build basic units to attack as soon as possible.
S
sair - corsair.sair rush - protoss quick tech to corsairs for scouting and harassment against zerg.sauron zerg - old zerg strategy that calls for slow-teching, aggressive expanding, and an all-out low tech unit (zerglings, hydralisks) assault against protoss.scan - to use a comsat station over an area.scanner - comsat station.sgate - stargate.shop - machine shop.shut - shuttle.snare - ensnare.speed (upgrade) - refers to any unit with a speed upgrade (zergling, hydralisk, overlord, ultralisk, zealot, shuttle, observer, scout, vulture).speedlings - zerglings with the metabolic boost upgrade.speedvult - terran rush strategy against protoss that calls for pure vulture harassment and attacking.spellcaster - any unit with a spell and mana.splash - an attack that can damage multiple units at once.split - sending your four starting workers to different mineral patches to mine at the start of a game.spore - spore colony.stasis - stasis field.static defense - buildings that attack and cannot move (bunker, photon cannon, sunken colony, spore colony).stim - stim pack.storm - psionic storm.stove - old protoss strategy against terran that calls for harassment (first by scout, then by dts), leading to quick arbiters.

strom - maelstrom.sunk - sunken colony.suv - scv (typo).sv - science vessel.swarm - dark swarm.swarm push - to attack (usually with melee units) by repeatedly casting dark swarm from under a previously cast swarm.
T
tank - siege tank.tech - referring to advanced units, build orders or buildings.tma - team micro arena (created by old member cygnus).tmt - tanks, mines, turrets.tower - control tower.turtle - a defensive posture where defense (often static defense) is setup before offensive units are built.turbonewbie - a harassment strategy where the enemy drops land units on a cliff above any of your mining bases.turret - missle turret.tvb - top vs bottom.tvp - terran vs protoss matchup, from a terran point of view.tvt - terran vs terran matchup.tvz - terran vs zerg matchup, from a terran point of view.
U
ultra - ultralisk.ultraling - unit combination of ultralisks and zerglings.
V
valk - valkyrie.vessel - science vessel.vult - vulture.
W
wall - blocking a ramp or choke with units.wall-in - blocking a ramp with buildings (usually done by terran).web - disruption web.
X
Y

yamato - yamato gun.
Z
zeal - zealot.zeal bomb - protoss tactic that utilizes a zealot drop on sieged tanks.zeal rush - protoss strategy that rushes with zealots, often at a small economic sacrifice.zvp - zerg vs protoss matchup, from a zerg point of view.zvt - zerg vs terran matchup, from a zerg point of view.zvz - zerg vs zerg matchup.
Advanced Tactics
Magical Boxes www.teamliquid.net
Hihi due to Gatsu giving his super duper tip (THANK YOU!!!!!!!! :D) about these magical boxes in the "Did you know" thread, I decided to do some research so that I can give concrete ways of how to spread your spells, like storm and mines. Alot of the time we get frustrated with 12 vults clumping together and laying only 1 mine, or 3 storms stacking onto each other. Here's what to do:
Gatsu's tip is that you need to keep all the units you are selecting in your group constrained to an imaginary box, and when you do, a move command to anywhere outside of this box causes the units to move together and stay in formation, and also if you give a command for a spell, like storm, the units will storm in the formation that they are in, so you get spread out storm which is good.
[EDIT: As pointed out correctly by Locked there is a box size for all ground units, and one for all air units]
To find out the sizes, I figured that the lenght of the sides of the square must equal the maximum distance that 2 units in a line perpendicular the the horizontal such that these units will stay in formation. To test the staying in formation a move command (from Gatsu) or spell can be used.
Here's a few units showing the box size:

The sides of the boxes are around these in pixels:Ground units: 195 [EDIT: Revised to be 195 from more tests]Air units: 255
So what does all these boxes mean? Well if you keep your units within those sized boxes, then you'll be able to stay formation and cast spreaded spells, for example if you're in a battle and you need to lay alot of mines:

This application of the magical box idea can be used alot in TvP for example. The key idea behind vult mine laying is to select 3-4 vults to use the mine command, rather than using the mine command for 12 vults. 3-4 vults are far more likely to be in the megical box than all 12, which is why selecting the vults in groups of 3-4 to mine is far more effective. If you wanted to do what I did in this picture, you'd have to make the 12 vults "hug" each other very tightly before they would fit into the box, which is obviously a time waster in a real game.
Or if you want to keep your science vessels in a TvZ spread out in a group for easy selection for irradiate and d matrix:
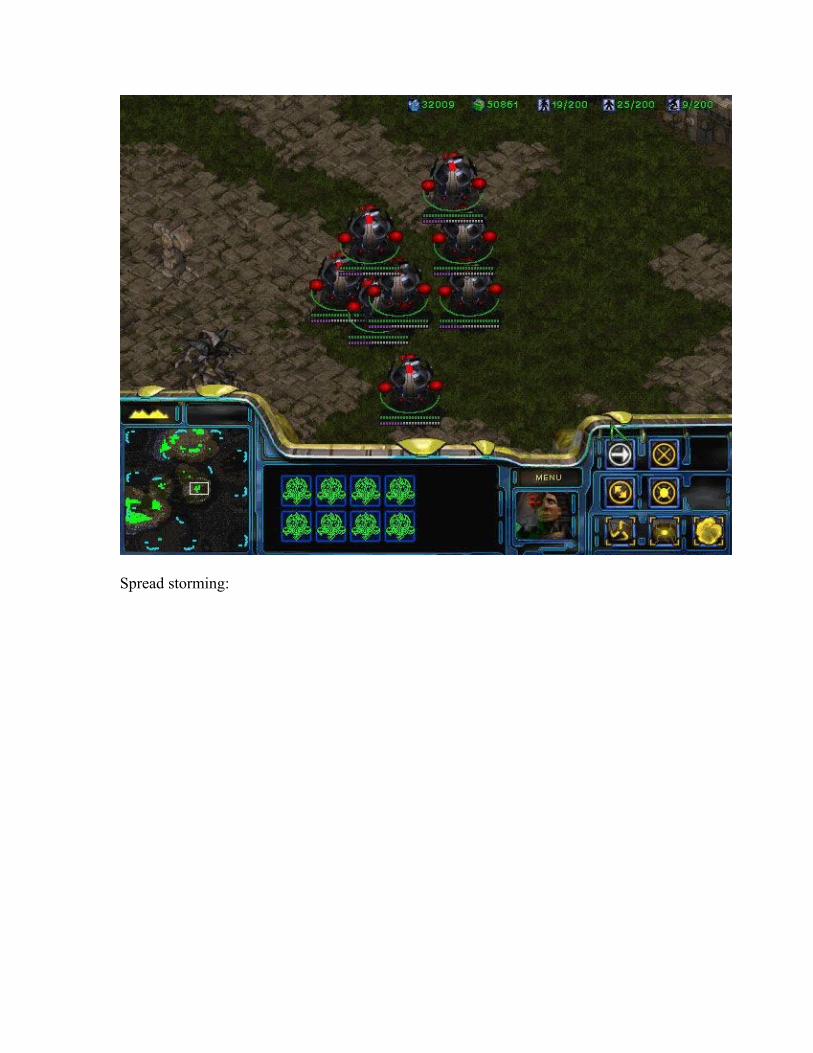
Spread storming:

Notice in the spread storming the storms are spread out because all 4 templars are within the size of the 195 by 195 pixel box.
So, if you want your units to be within the confines of the magical box, say 6 vultures selected, right click a couple of times on a spot of ground that is towards the middle of the group. This makes the clump in tighter and ensures that they are within the 195x195 box. Any move command to somewhere outside of the box will also test if your selected units are within the box because they will move while keeping their formation (and if they aren't in the box then they'll move clumsily and get in each others way). For other units where you want them to be in the box, but not to be completely clumped up, you have to use your judgement to ensure all the units are within the box without too much clumping. Again you can test if they are using a move command. For example you might want to have your science vessels like in that picture before, then you have to use your judgement to get the science vessels within the 255x255 box without having them too close to each other (for easy individual selection).
While trying these experiments out, I also found that if you have a speed shuttle or normal shuttle dropping a nat or main mineral line with 2 temps, the 2 templars dropped are well within the area of the box, so clicking approximately in the middle of the mineral field will give a good spreaded double simultaneous storm so it will own the scvs (where the cursor is placed in the image is where you would click for aiming your storm to give

that effect):
What if your units are inside the box, but you need to clump them together rather than staying in formation? Just use a move command to somewhere near the middle of your box, and the units will move inside. Also if you're units aren't in the box and you try to cast a spell or do an ability, it will clump around where you clicked, and thats no good for stuff like storm :

Notice how the 2 templars are well beyond the confines of the 195 by 195 box as they are too far apart, so the storm clumps. Furthermore, if you do a move command on a unit or some other command like a spell or ability on a unit rather than an area of ground or air, it will clump up rather than spread.
Sometimes you want your units to clump, and magical boxes can explain why you hotkey an overlord or larva or trapped ling with your 11 mutas to clump them. Because your mutas are so far away from your last unit that you have in your selection, your selection is constantly larger than the 255 by 255 air box, and hence every move command means your units will clump, which is usually good for muta harass. If for example you wanted them to be spread out (maybe fighting corsairs, but I dunno anything about pvz), just spread them out but not too far, and they will stay in that spread out formation as long as they don't drift too far apart.
[EDIT]If the units are outside the confines of the box, it seems that using the minimap for the command does not help, and the spell or ability still clumps. I'm not sure where this notion comes from, but I believe its untrue. A possible reason is that any command that is issued by you but is focused on an enemy unit, for example 4 storms targeted on 1 unit, will cause the units who are given that command to clump. Using the minimap bypasses this because on the minimap you cant target 1 unit, however it does not ensure your units

are within the box and as a result they might still clump up.
This "magical box" concept is not center of gravity technique nor does it have any relation to that technique (apart from the similarity in appearance between the spreaded storms and spreaded units which leads many people to link these 2 ideas together, when in reality they are not linked). Furthermore, many people will say to get your storms spread out like in the picture, just use the "center of gravity". This doesn't even make sense: what is the center of gravity in relation to 2 templars? The midpoint of the line that connects them? Storm at that point and kill your own templars? This concept of magical boxes ensures that the storm is always spread (if you do it correctly of course) without any "mumbo-jumbo".[/EDIT]
Hoped that helped ^^ And again big thanks to Gatsu for this tip.
Posted by skyglow1 on www.teamliquid.net
Unit Size Armor HP GroundAttack
AirAttack Cool Range
Attack Mod Sight Notes
BuildTime
Battlecruiser L 6 400 300 3 500 25 25 30 6 3 11 SA 160
Dropship L 2 100 100 1 150 0 0 - 0 0 8 T 50
Firebat S 1 50 25 1 50 16cs 022/11 Stim
2 2 7 B 24
Ghost S 1 25 75 0 45 10c 10c 22 7 19/11 upg
B,SA 50
Goliath L 2 100 50 1 125 12 20e 225/8 Air upg
1Gnd/4Air
8 40
Marine S 1 50 0 0 40 6 615/7.5Stim
4/5 upg.
1 7 B 24
Missile Turret
L 0 75 0 0 200 0 20e 15 7 0 11 D 30
Science Vessel
L 2 100 225 1 200 0 0 - 0 0 10 D,SA 80
SCV S 1 50 0 0 60 5 0 15 1 0 7 B,W 20Siege Tank - Siege
L 2 150 100 1 150 70es 0 75 12 5 10 50

Siege Tank - Tank
L 2 150 100 1 150 30e 0 37 7 3 10 50
Vulture M 2 75 0 0 80 20c 0 30 5 2 8 SA 30
Wraith L 2 150 100 0 120 8 20e30Gnd/22Air
51Gnd/2Air
7 SA 60
Medic S 1 50 25 1 60 0 0 0 0 9 B,SA 30Valkyrie L 3 250 125 2 200 0 6es 64 6 1 8 60
Cool is the time between the ending of the attack and the beginning of another.Attack Mod is the Damage modifier for each level of upgrade.Gnd is Ground attack for units with split Air/Ground Weapon SystemsAir is Air attack for units with split Air/Ground Weapon SystemsUpg is a stat change after getting an upgrade
Red indicates that the information is specific to StarCraft Brood War.
Towers such as the Missile Turret have a detection range of 7. Mobile detectors such as the Science Vessel have a detection range of 11. This is independent of sight range.
Attacks: E indicates Explosive Attack (50% damage to Small Units 75% damage to Medium Units, full damage to Large Units).C indicates Concussive/Plasma damage Attack (50% damage to Medium Units 25% dam to Large Units).S indicates Splash damage, which affects all units in the blast area.
Notes: B = BiologicalD = Unit can Detect cloaked/burrowed unitsSA = Unit has one or more Special Abilities (is a spell-caster)T = TransportW = Worker
[ See Terran Stats and Zerg Stats ]
Unit Size Armor HP Shield GroundAttack
AirAttack Cool Range
AttackMod Sight Notes
BuildTime
Arbiter L 4 100 350 1 200 150 10e 10e 45 5 1 9 SA 160
Archon L 4 100 300 0 10 350 30s 30s 20 2 3 8 20
Carrier L 6 350 250 4 300 150 6 6 8 1 11 140

Dragoon L 2 125 50 1 100 80 20e 20e 304/6upg.
2 8 40
High Templar
S 2 50 150 0 40 40 0 0 0 0 7 B,SA 50
ObserverS 1 25 75 0 40 20 0 0 0 09/11upg.
D 40
Photon Cannon
L 0 150 0 0 100 100 20 20 22 7 0 11 D 50
Probe S 1 50 0 0 20 20 5 0 22 1 0 8 W 20
Reaver L 4 200 100 0 100 80100s/125supg.
0 60 8 0 10 70
Scout L 3 275 125 0 150 100 8 28e30Gnd/22Air
41Gnd/2Air
8/10upg.
80
Shuttle L 2 200 0 1 80 60 0 0 0 0 8 T 60
Zealot S 2 100 0 1 100 60 16 0 22 1 2 7 B 40
Corsair M 2 150 100 1 100 80 0 5es 8 5 1 9 SA 40
Dark Archon
L 4 250 200 1 25 200 0 0 0 0 10 SA 20
Dark Templar
S 2 125 100 1 80 40 40 0 30 1 3 7 B 50
Cool is the time between the ending of the attack and the beginning of another.Attack Mod is the Damage modifier for each level of upgrade.Gnd is Ground attack for units with split Air/Ground Weapon SystemsAir is Air attack for units with split Air/Ground Weapon SystemsUpg is a stat change after getting an upgradeRed indicates that the information is specific to StarCraft Brood War.
Towers such as the Photon Cannon have a detection range of 7. Mobile detectors such as the Observer have a detection range of 11. This is independent of sight range. Attacks: E indicates Explosive Attack (50% damage to Small Units 75% damage to Medium Units, full damage to Large Units).C indicates Concussive/Plasma damage Attack (50% damage to Medium Units 25% dam to Large Units).S indicates Splash damage, which affects all units in the blast area. Notes: B indicates BiologicalD = Unit can Detect Cloaked/Burrowed unitsSA = Unit has one or more Special Abilities (is a spell-caster)T = Transport

W = Worker
[ Also See Terran Stats and Protoss Stats ]
Unit Size Armor HP
GroundAttack
AirAttack Cool
Range
Attack Mod
Sight Notes
BuildTime
Broodling
S 0 0 0 0 30 4 0 15 1 1 5 B 0
Defiler M 2 50 150 1 80 0 0 0 0 10 B,SA 50
Drone S 1 50 0 0 40 5 0 22 1 0 7 B,W 20
Egg L 0 0 0 10 200 0 0 0 0 4 0
Guardian L 2 150 200 2 150 20 0 30 8 2 11 B 40
Hydralisk M 1 75 25 0 80 10e 10e 154/5 upg.
1 6 B 28
Infested Terran
S 1 100 50 0 60 500es 0 1 0 5 B 40
Larva S 0 0 0 10 25 0 0 0 0 4 0
Mutalisk S 2 100 100 0 120 9 9 30 3 1 7 B 40
Overlord L 0 100 0 0 200 0 0 0 09/11 upg.
D,B,T 40
Queen M 2 100 100 0 120 0 0 0 0 10 B,SA 50
Scourge S0.5
12 38 0 25 0 110 1 0 5 B 30
Spore Colony
L 0 175 0 0 400 0 15 15 7 0 10 D 20
Sunken Colony
L 0 175 0 2 300 40e 0 32 7 0 10 20
Ultralisk L 4 200 2001/3 upg.
400 20 0 15 1 3 7 B 60
Zergling S0.5
25 0 0 35 5 08/6 upg.
1 1 5 B 28
Devourer L 2 250 150 2 250 0 25e 100 6 2 10 B 40
Lurker M 2 200 200 1 125 20s 0 37 6 2 8 B 40
Cool is the time between the ending of the attack and the beginning of another.

Attack Mod is the Damage modifier for each level of upgrade.Gnd is Ground attack for units with split Air/Ground Weapon SystemsAir is Air attack for units with split Air/Ground Weapon SystemsUpg is a stat change after getting an upgrade
Red indicates that the information is specific to StarCraft: Brood War.
Towers such as the Spore Colony have a detection range of 7. Mobile detectors such as the Overlord have a detection range of 11. This is independent of sight range.
Attacks: E indicates Explosive Attack (50% damage to Small Units 75% damage to Medium Units, full damage to Large Units).C indicates Concussive/Plasma damage Attack (50% damage to Medium Units 25% dam to Large Units).S indicates Splash damage, which affects all units in the blast area. Notes: B = BiologicalD = Unit can Detect cloaked/burrowed unitsSA = Unit has one or more Special Abilities (is a spell-caster)T = TransportW = Worker