Hitachi Virtual Storage Platform
350
Product Version Contents Getting Help FASTFIND LINKS Hitachi Virtual Storage Platform Hitachi Storage Navigator User Guide MK-90RD7027-15
-
Upload
khangminh22 -
Category
Documents
-
view
1 -
download
0
Transcript of Hitachi Virtual Storage Platform

Product Version
Contents
Getting Help
FASTFIND LINKS
Hitachi Virtual Storage PlatformHitachi Storage Navigator User Guide
MK-90RD7027-15
Hitachi Virtual Storage Platform Hitachi Storage Navigator User Guide
ii
© 2010 - 2014 Hitachi, Ltd. All rights reserved.
No part of this publication may be reproduced or transmitted in any form or by any means, electronic or mechanical, including photocopying and recording, or stored in a database or retrieval system for any purpose without the express written permission of Hitachi, Ltd.
Hitachi, Ltd., reserves the right to make changes to this document at any time without notice and assumes no responsibility for its use. This document contains the most current information available at the time of publication. When new or revised information becomes available, this entire document will be updated and distributed to all registered users.
Some of the features described in this document might not be currently available. Refer to the most recent product announcement for information about feature and product availability, or contact Hitachi Data Systems Corporation at https://portal.hds.com.
Notice: Hitachi, Ltd., products and services can be ordered only under the terms and conditions of the applicable Hitachi Data Systems Corporation agreements. The use of Hitachi, Ltd., products is governed by the terms of your agreements with Hitachi Data Systems Corporation.
Notice on Export Controls. The technical data and technology inherent in this Document may be subject to U.S. export control laws, including the U.S. Export Administration Act and its associated regulations, and may be subject to export or import regulations in other countries. Reader agrees to comply strictly with all such regulations and acknowledges that Reader has the responsibility to obtain licenses to export, re-export, or import the Document and any Compliant Products.
Hitachi is a registered trademark of Hitachi, Ltd., in the United States and other countries. Hitachi Data Systems is a registered trademark and service mark of Hitachi, Ltd., in the United States and other countries.
Archivas, Essential NAS Platform, HiCommand, Hi-Track, ShadowImage, Tagmaserve, Tagmasoft, Tagmasolve, Tagmastore, TrueCopy, Universal Star Network, and Universal Storage Platform are registered trademarks of Hitachi Data Systems Corporation.
AIX, AS/400, DB2, Domino, DS6000, DS8000, Enterprise Storage Server, ESCON, FICON, FlashCopy, IBM, Lotus, MVS, OS/390, RS/6000, S/390, System z9, System z10, Tivoli, VM/ESA, z/OS, z9, z10, zSeries, z/VM, and z/VSE are registered trademarks or trademarks of International Business Machines Corporation.
All other trademarks, service marks, and company names in this document or website are properties of their respective owners.
Microsoft product screen shots are reprinted with permission from Microsoft Corporation.

Contents iiiHitachi Virtual Storage Platform Hitachi Storage Navigator User Guide
Contents
Preface . . . . . . . . . . . . . . . . . . . . . . . . . . . . . . . . . . . . . . . . . . . xiiiIntended audience. . . . . . . . . . . . . . . . . . . . . . . . . . . . . . . . . . . . . . . . . . . . .xivProduct version . . . . . . . . . . . . . . . . . . . . . . . . . . . . . . . . . . . . . . . . . . . . . . .xivDocument revision level . . . . . . . . . . . . . . . . . . . . . . . . . . . . . . . . . . . . . . . . .xivChanges in this revision . . . . . . . . . . . . . . . . . . . . . . . . . . . . . . . . . . . . . . . . . xvReferenced documents. . . . . . . . . . . . . . . . . . . . . . . . . . . . . . . . . . . . . . . . . . xvDocument organization . . . . . . . . . . . . . . . . . . . . . . . . . . . . . . . . . . . . . . . . . xvDocument conventions. . . . . . . . . . . . . . . . . . . . . . . . . . . . . . . . . . . . . . . . . .xviConvention for storage capacity values . . . . . . . . . . . . . . . . . . . . . . . . . . . . . xviiAccessing product documentation . . . . . . . . . . . . . . . . . . . . . . . . . . . . . . . . . xviiiGetting help . . . . . . . . . . . . . . . . . . . . . . . . . . . . . . . . . . . . . . . . . . . . . . . . xviiiComments . . . . . . . . . . . . . . . . . . . . . . . . . . . . . . . . . . . . . . . . . . . . . . . . . xviii
1 Storage Navigator overview . . . . . . . . . . . . . . . . . . . . . . . . . . . . 1-1Manage the storage system . . . . . . . . . . . . . . . . . . . . . . . . . . . . . . . . . . . . . 1-2GUI feature highlights . . . . . . . . . . . . . . . . . . . . . . . . . . . . . . . . . . . . . . . . . 1-2
Emphasis on performance . . . . . . . . . . . . . . . . . . . . . . . . . . . . . . . . . . . 1-2Wizards and task management . . . . . . . . . . . . . . . . . . . . . . . . . . . . . . . . 1-3Reporting . . . . . . . . . . . . . . . . . . . . . . . . . . . . . . . . . . . . . . . . . . . . . . . 1-3Help . . . . . . . . . . . . . . . . . . . . . . . . . . . . . . . . . . . . . . . . . . . . . . . . . . . 1-3
Storage Navigator CLI . . . . . . . . . . . . . . . . . . . . . . . . . . . . . . . . . . . . . . . . . 1-3Storage Navigator components . . . . . . . . . . . . . . . . . . . . . . . . . . . . . . . . . . . 1-3
2 Setting up Storage Navigator . . . . . . . . . . . . . . . . . . . . . . . . . . . 2-1Setup workflow . . . . . . . . . . . . . . . . . . . . . . . . . . . . . . . . . . . . . . . . . . . . . . 2-2Cable connection requirements . . . . . . . . . . . . . . . . . . . . . . . . . . . . . . . . . . . 2-2
Enabling IPv6 communication . . . . . . . . . . . . . . . . . . . . . . . . . . . . . . . . . 2-2Configuring IPv6 communication in Windows 7. . . . . . . . . . . . . . . . . . . . . 2-3Configuring IPv6 communication in Solaris 10 . . . . . . . . . . . . . . . . . . . . . 2-3
Setting up SSL encryption . . . . . . . . . . . . . . . . . . . . . . . . . . . . . . . . . . . . . . 2-3Flow of SSL communication settings . . . . . . . . . . . . . . . . . . . . . . . . . . . . 2-4
Hitachi Virtual Storage Platform Hitachi Storage Navigator User Guide
iv Contents
Notes on updating the signed certificate to the SVP . . . . . . . . . . . . . . . . . 2-4Creating a keypair . . . . . . . . . . . . . . . . . . . . . . . . . . . . . . . . . . . . . . . . . 2-5
Creating a private key (.key file) . . . . . . . . . . . . . . . . . . . . . . . . . . . . 2-5Creating a public key (.csr file) . . . . . . . . . . . . . . . . . . . . . . . . . . . . . 2-5Acquiring a self-signed certificate . . . . . . . . . . . . . . . . . . . . . . . . . . . . 2-6
Creating a signed and trusted certificate . . . . . . . . . . . . . . . . . . . . . . . . . 2-7Uploading the signed SSL certificate . . . . . . . . . . . . . . . . . . . . . . . . . . 2-7Returning a certificate to default . . . . . . . . . . . . . . . . . . . . . . . . . . . . . 2-8Importing the certificate to the SVP. . . . . . . . . . . . . . . . . . . . . . . . . . 2-10
Blocking HTTP communication to the storage system . . . . . . . . . . . . . . . 2-14Releasing HTTP communication blocking . . . . . . . . . . . . . . . . . . . . . . . 2-15
Setting up a client computer . . . . . . . . . . . . . . . . . . . . . . . . . . . . . . . . . . . 2-16Requirements for client computers . . . . . . . . . . . . . . . . . . . . . . . . . . . . 2-17
Requirements for Windows-based computers . . . . . . . . . . . . . . . . . . . 2-17Requirements for UNIX/Linux-based computers . . . . . . . . . . . . . . . . . 2-19
Configuring a Windows 2003/2008 Server . . . . . . . . . . . . . . . . . . . . . . . 2-20Setting up TCP/IP for a firewall . . . . . . . . . . . . . . . . . . . . . . . . . . . . . . . 2-20Configuring the web browser . . . . . . . . . . . . . . . . . . . . . . . . . . . . . . . . 2-20Installing Adobe Flash Player . . . . . . . . . . . . . . . . . . . . . . . . . . . . . . . . 2-21Installing and configuring the JRE . . . . . . . . . . . . . . . . . . . . . . . . . . . . . 2-21
Configuring JRE. . . . . . . . . . . . . . . . . . . . . . . . . . . . . . . . . . . . . . . . 2-21Using the SMI-S function with a Storage Navigator user account . . . . . . . . . . 2-22
Using the SMI-S function . . . . . . . . . . . . . . . . . . . . . . . . . . . . . . . . . . . 2-22Prerequisites . . . . . . . . . . . . . . . . . . . . . . . . . . . . . . . . . . . . . . . . . . 2-22Procedure . . . . . . . . . . . . . . . . . . . . . . . . . . . . . . . . . . . . . . . . . . . . 2-22Troubleshooting. . . . . . . . . . . . . . . . . . . . . . . . . . . . . . . . . . . . . . . . 2-22
Uploading a signed certificate to the SMI-S provider . . . . . . . . . . . . . . . . 2-22Prerequisites . . . . . . . . . . . . . . . . . . . . . . . . . . . . . . . . . . . . . . . . . . 2-23Procedure . . . . . . . . . . . . . . . . . . . . . . . . . . . . . . . . . . . . . . . . . . . . 2-23
Returning an SMI-S provider certificate to default . . . . . . . . . . . . . . . . . . 2-24Uploading an SMI-S provider configuration file . . . . . . . . . . . . . . . . . . . . 2-25
Prerequisites . . . . . . . . . . . . . . . . . . . . . . . . . . . . . . . . . . . . . . . . . . 2-25Procedure . . . . . . . . . . . . . . . . . . . . . . . . . . . . . . . . . . . . . . . . . . . . 2-25
Returning an SMI-S provider configuration file to default . . . . . . . . . . . . . 2-27Installing the report configuration tool. . . . . . . . . . . . . . . . . . . . . . . . . . . . . 2-28
Prerequisites . . . . . . . . . . . . . . . . . . . . . . . . . . . . . . . . . . . . . . . . . . . . 2-28Installation procedure . . . . . . . . . . . . . . . . . . . . . . . . . . . . . . . . . . . . . 2-28
Using the report configuration tool . . . . . . . . . . . . . . . . . . . . . . . . . . . . . . . 2-29
3 Getting started using Storage Navigator . . . . . . . . . . . . . . . . . . . . 3-1Logging in to Storage Navigator . . . . . . . . . . . . . . . . . . . . . . . . . . . . . . . . . . 3-2
Initial super-user login . . . . . . . . . . . . . . . . . . . . . . . . . . . . . . . . . . . . . . 3-2Normal login . . . . . . . . . . . . . . . . . . . . . . . . . . . . . . . . . . . . . . . . . . . . . 3-2Changing your password . . . . . . . . . . . . . . . . . . . . . . . . . . . . . . . . . . . . 3-3Adding your SVP to the trusted sites zone—for Windows server . . . . . . . . . 3-3
Storage Navigator restrictions. . . . . . . . . . . . . . . . . . . . . . . . . . . . . . . . . . . . 3-4

Contents vHitachi Virtual Storage Platform Hitachi Storage Navigator User Guide
General restrictions . . . . . . . . . . . . . . . . . . . . . . . . . . . . . . . . . . . . . . . . 3-5Web browser restrictions while using Storage Navigator . . . . . . . . . . . . . . 3-5Unsupported actions in Windows version of Storage Navigator. . . . . . . . . . 3-6Unsupported actions in UNIX version of Storage Navigator . . . . . . . . . . . . 3-6Applying changes made in Storage Navigator . . . . . . . . . . . . . . . . . . . . . . 3-6Refreshing data after a Volume Migration or Quick Restore operation . . . . . 3-7LUN ID displayed in Storage Navigator. . . . . . . . . . . . . . . . . . . . . . . . . . . 3-7Refreshing data after operations performed with another application . . . . . 3-7
Refreshing your user view . . . . . . . . . . . . . . . . . . . . . . . . . . . . . . . . . . . . . . 3-8Setting your view back to default . . . . . . . . . . . . . . . . . . . . . . . . . . . . . . . . . 3-8For more information about Storage Navigator . . . . . . . . . . . . . . . . . . . . . . . . 3-8
4 Setting up and managing user accounts . . . . . . . . . . . . . . . . . . . . 4-1Workflow for creating and managing user accounts . . . . . . . . . . . . . . . . . . . . 4-2Using an authentication server and authorization server . . . . . . . . . . . . . . . . . 4-2
Authentication server protocols . . . . . . . . . . . . . . . . . . . . . . . . . . . . . . . . 4-3Authorization server requirements . . . . . . . . . . . . . . . . . . . . . . . . . . . . . . 4-3Connecting two authentication servers. . . . . . . . . . . . . . . . . . . . . . . . . . . 4-4Connecting authentication and authorization servers . . . . . . . . . . . . . . . . . 4-4Enabling the cooperation with the authorization server . . . . . . . . . . . . . . . 4-5
User Groups . . . . . . . . . . . . . . . . . . . . . . . . . . . . . . . . . . . . . . . . . . . . . . . . 4-6Roles . . . . . . . . . . . . . . . . . . . . . . . . . . . . . . . . . . . . . . . . . . . . . . . . . . 4-7Built-in groups, roles, and resource groups. . . . . . . . . . . . . . . . . . . . . . . . 4-9Creating a new user group . . . . . . . . . . . . . . . . . . . . . . . . . . . . . . . . . . 4-11
Managing user accounts. . . . . . . . . . . . . . . . . . . . . . . . . . . . . . . . . . . . . . . 4-12Creating user accounts. . . . . . . . . . . . . . . . . . . . . . . . . . . . . . . . . . . . . 4-12Changing user passwords . . . . . . . . . . . . . . . . . . . . . . . . . . . . . . . . . . . 4-14Changing user permissions . . . . . . . . . . . . . . . . . . . . . . . . . . . . . . . . . . 4-15Disabling user accounts . . . . . . . . . . . . . . . . . . . . . . . . . . . . . . . . . . . . 4-15Deleting user accounts . . . . . . . . . . . . . . . . . . . . . . . . . . . . . . . . . . . . . 4-16
Changing the user group configuration . . . . . . . . . . . . . . . . . . . . . . . . . . . . 4-16Changing a user group name . . . . . . . . . . . . . . . . . . . . . . . . . . . . . . . . 4-16Changing user group permissions . . . . . . . . . . . . . . . . . . . . . . . . . . . . . 4-17Changing resource groups assigned to a user group . . . . . . . . . . . . . . . . 4-17Deleting a user group . . . . . . . . . . . . . . . . . . . . . . . . . . . . . . . . . . . . . 4-18
Account lock policy . . . . . . . . . . . . . . . . . . . . . . . . . . . . . . . . . . . . . . . . . . 4-18Session timeout. . . . . . . . . . . . . . . . . . . . . . . . . . . . . . . . . . . . . . . . . . . . . 4-18
5 Configuring the Storage Navigator environment . . . . . . . . . . . . . . 5-1Configuration overview . . . . . . . . . . . . . . . . . . . . . . . . . . . . . . . . . . . . . . . . 5-2Creating a login message . . . . . . . . . . . . . . . . . . . . . . . . . . . . . . . . . . . . . . . 5-2Setting email notification for SIMs or SNMP traps . . . . . . . . . . . . . . . . . . . . . . 5-3
Configuring email notification . . . . . . . . . . . . . . . . . . . . . . . . . . . . . . . . . 5-3Sending a test email . . . . . . . . . . . . . . . . . . . . . . . . . . . . . . . . . . . . . . . 5-4
Setting time periods. . . . . . . . . . . . . . . . . . . . . . . . . . . . . . . . . . . . . . . . . . . 5-5
Hitachi Virtual Storage Platform Hitachi Storage Navigator User Guide
vi Contents
Backing up and restoring Storage Navigator configuration files . . . . . . . . . . . . 5-8Setting syslog notification for SIMs . . . . . . . . . . . . . . . . . . . . . . . . . . . . . . . 5-10
Setting and configuring syslog notification for SIMs . . . . . . . . . . . . . . . . 5-10Sending a test syslog. . . . . . . . . . . . . . . . . . . . . . . . . . . . . . . . . . . . . . 5-10
6 License keys . . . . . . . . . . . . . . . . . . . . . . . . . . . . . . . . . . . . . . . 6-1License keys overview . . . . . . . . . . . . . . . . . . . . . . . . . . . . . . . . . . . . . . . . . 6-2License key types . . . . . . . . . . . . . . . . . . . . . . . . . . . . . . . . . . . . . . . . . . . . 6-2Using the permanent key . . . . . . . . . . . . . . . . . . . . . . . . . . . . . . . . . . . . . . . 6-3Using the term key . . . . . . . . . . . . . . . . . . . . . . . . . . . . . . . . . . . . . . . . . . . 6-3Using the temporary key . . . . . . . . . . . . . . . . . . . . . . . . . . . . . . . . . . . . . . . 6-3Using the emergency key. . . . . . . . . . . . . . . . . . . . . . . . . . . . . . . . . . . . . . . 6-4Estimating licensed capacity . . . . . . . . . . . . . . . . . . . . . . . . . . . . . . . . . . . . . 6-4
Software and licensed capacity . . . . . . . . . . . . . . . . . . . . . . . . . . . . . . . . 6-4Calculating licensed capacity for a normal volume. . . . . . . . . . . . . . . . . . . 6-7Calculating licensed capacity for an external volume . . . . . . . . . . . . . . . . . 6-8Calculating pool capacity . . . . . . . . . . . . . . . . . . . . . . . . . . . . . . . . . . . . 6-8
Installing and removing software . . . . . . . . . . . . . . . . . . . . . . . . . . . . . . . . . 6-8Installing software using a license key code . . . . . . . . . . . . . . . . . . . . . . . 6-9Installing software using a license key file . . . . . . . . . . . . . . . . . . . . . . . . 6-9When the status is Installed (Disabled) . . . . . . . . . . . . . . . . . . . . . . . . . 6-10Enabling or disabling a license . . . . . . . . . . . . . . . . . . . . . . . . . . . . . . . 6-10Removing software . . . . . . . . . . . . . . . . . . . . . . . . . . . . . . . . . . . . . . . 6-11Removing Data Retention Utility . . . . . . . . . . . . . . . . . . . . . . . . . . . . . . 6-11
Insufficient license capacity . . . . . . . . . . . . . . . . . . . . . . . . . . . . . . . . . . . . 6-11Exceeded capacity . . . . . . . . . . . . . . . . . . . . . . . . . . . . . . . . . . . . . . . . 6-12
License key expiration . . . . . . . . . . . . . . . . . . . . . . . . . . . . . . . . . . . . . . . . 6-12Expired temporary key . . . . . . . . . . . . . . . . . . . . . . . . . . . . . . . . . . . . . 6-13Expired term key . . . . . . . . . . . . . . . . . . . . . . . . . . . . . . . . . . . . . . . . . 6-13
7 Viewing and managing the storage system . . . . . . . . . . . . . . . . . . 7-1Viewing and managing overview. . . . . . . . . . . . . . . . . . . . . . . . . . . . . . . . . . 7-2Viewing storage system information . . . . . . . . . . . . . . . . . . . . . . . . . . . . . . . 7-2
Viewing basic information. . . . . . . . . . . . . . . . . . . . . . . . . . . . . . . . . . . . 7-2Viewing specific information . . . . . . . . . . . . . . . . . . . . . . . . . . . . . . . . . . 7-3Viewing other system information . . . . . . . . . . . . . . . . . . . . . . . . . . . . . . 7-3Viewing port locations . . . . . . . . . . . . . . . . . . . . . . . . . . . . . . . . . . . . . . 7-3Status icons for certain resources . . . . . . . . . . . . . . . . . . . . . . . . . . . . . . 7-4
Using reports to verify system changes . . . . . . . . . . . . . . . . . . . . . . . . . . . . . 7-5Viewing a Storage Navigator report. . . . . . . . . . . . . . . . . . . . . . . . . . . . . . . . 7-5
Creating a configuration report . . . . . . . . . . . . . . . . . . . . . . . . . . . . . . . . 7-6Deleting a configuration report . . . . . . . . . . . . . . . . . . . . . . . . . . . . . . . . 7-6
Managing tasks. . . . . . . . . . . . . . . . . . . . . . . . . . . . . . . . . . . . . . . . . . . . . . 7-6Tasks window . . . . . . . . . . . . . . . . . . . . . . . . . . . . . . . . . . . . . . . . . . . . 7-7Managing your tasks . . . . . . . . . . . . . . . . . . . . . . . . . . . . . . . . . . . . . . . 7-7
Contents viiHitachi Virtual Storage Platform Hitachi Storage Navigator User Guide
Stalled tasks . . . . . . . . . . . . . . . . . . . . . . . . . . . . . . . . . . . . . . . . . . . . . 7-8Setting the status refresh interval of the Tasks window . . . . . . . . . . . . . . . 7-8
Creating a configuration report with the Report Configuration Tool . . . . . . . . . . 7-8Preparing a script file . . . . . . . . . . . . . . . . . . . . . . . . . . . . . . . . . . . . . . . 7-9Executing a regularly scheduled script file . . . . . . . . . . . . . . . . . . . . . . . 7-12Example execution and explanation of script files . . . . . . . . . . . . . . . . . . 7-13Error in executing Report Configuration Tool. . . . . . . . . . . . . . . . . . . . . . 7-13
8 Troubleshooting . . . . . . . . . . . . . . . . . . . . . . . . . . . . . . . . . . . . . 8-1Getting help . . . . . . . . . . . . . . . . . . . . . . . . . . . . . . . . . . . . . . . . . . . . . . . . 8-2General troubleshooting . . . . . . . . . . . . . . . . . . . . . . . . . . . . . . . . . . . . . . . . 8-2Checking alerts . . . . . . . . . . . . . . . . . . . . . . . . . . . . . . . . . . . . . . . . . . . . . . 8-3Login errors . . . . . . . . . . . . . . . . . . . . . . . . . . . . . . . . . . . . . . . . . . . . . . . . 8-4Java application errors . . . . . . . . . . . . . . . . . . . . . . . . . . . . . . . . . . . . . . . . . 8-4No-response errors . . . . . . . . . . . . . . . . . . . . . . . . . . . . . . . . . . . . . . . . . . . 8-7Incorrect display errors . . . . . . . . . . . . . . . . . . . . . . . . . . . . . . . . . . . . . . . 8-10UNIX operation errors . . . . . . . . . . . . . . . . . . . . . . . . . . . . . . . . . . . . . . . . 8-12Other errors . . . . . . . . . . . . . . . . . . . . . . . . . . . . . . . . . . . . . . . . . . . . . . . 8-13Clearing Java and web browser caches . . . . . . . . . . . . . . . . . . . . . . . . . . . . 8-14Firefox web browser problems on UNIX . . . . . . . . . . . . . . . . . . . . . . . . . . . . 8-14Downloading dump files using the FD Dump tool . . . . . . . . . . . . . . . . . . . . . 8-15Saving Java log and trace files . . . . . . . . . . . . . . . . . . . . . . . . . . . . . . . . . . 8-17
A Storage configuration reports . . . . . . . . . . . . . . . . . . . . . . . . . . . A-1Reports in table view . . . . . . . . . . . . . . . . . . . . . . . . . . . . . . . . . . . . . . . . . A-2
Disk Adapters report . . . . . . . . . . . . . . . . . . . . . . . . . . . . . . . . . . . . . . . A-2Host Groups report . . . . . . . . . . . . . . . . . . . . . . . . . . . . . . . . . . . . . . . . A-3Hosts report . . . . . . . . . . . . . . . . . . . . . . . . . . . . . . . . . . . . . . . . . . . . . A-4Logical Device Expansions report . . . . . . . . . . . . . . . . . . . . . . . . . . . . . . A-4Logical Devices report . . . . . . . . . . . . . . . . . . . . . . . . . . . . . . . . . . . . . . A-5LUNs report . . . . . . . . . . . . . . . . . . . . . . . . . . . . . . . . . . . . . . . . . . . . . A-6MP Blades report . . . . . . . . . . . . . . . . . . . . . . . . . . . . . . . . . . . . . . . . . . A-7MP Blade Details report . . . . . . . . . . . . . . . . . . . . . . . . . . . . . . . . . . . . . A-7Parity Groups report. . . . . . . . . . . . . . . . . . . . . . . . . . . . . . . . . . . . . . . . A-8Ports report. . . . . . . . . . . . . . . . . . . . . . . . . . . . . . . . . . . . . . . . . . . . . . A-9Spare Drives report . . . . . . . . . . . . . . . . . . . . . . . . . . . . . . . . . . . . . . . A-10SSD Endurance report . . . . . . . . . . . . . . . . . . . . . . . . . . . . . . . . . . . . . A-10Storage System Summary report . . . . . . . . . . . . . . . . . . . . . . . . . . . . . . A-11
Reports in graphical view . . . . . . . . . . . . . . . . . . . . . . . . . . . . . . . . . . . . . A-12Cache Memories report . . . . . . . . . . . . . . . . . . . . . . . . . . . . . . . . . . . . A-12Channel Adapters report. . . . . . . . . . . . . . . . . . . . . . . . . . . . . . . . . . . . A-13Physical View report. . . . . . . . . . . . . . . . . . . . . . . . . . . . . . . . . . . . . . . A-14
CSV files . . . . . . . . . . . . . . . . . . . . . . . . . . . . . . . . . . . . . . . . . . . . . . . . . . A-16AllConf.csv . . . . . . . . . . . . . . . . . . . . . . . . . . . . . . . . . . . . . . . . . . . . . A-16CacheInfo.csv . . . . . . . . . . . . . . . . . . . . . . . . . . . . . . . . . . . . . . . . . . . A-17
Hitachi Virtual Storage Platform Hitachi Storage Navigator User Guide
viii Contents
ChaStatus.csv . . . . . . . . . . . . . . . . . . . . . . . . . . . . . . . . . . . . . . . . . . . A-17DcrInfo.csv . . . . . . . . . . . . . . . . . . . . . . . . . . . . . . . . . . . . . . . . . . . . . A-17DeviceEquipInfo.csv . . . . . . . . . . . . . . . . . . . . . . . . . . . . . . . . . . . . . . A-18DkaInfo.csv . . . . . . . . . . . . . . . . . . . . . . . . . . . . . . . . . . . . . . . . . . . . A-18DkaStatus.csv . . . . . . . . . . . . . . . . . . . . . . . . . . . . . . . . . . . . . . . . . . . A-19DkcInfo.csv. . . . . . . . . . . . . . . . . . . . . . . . . . . . . . . . . . . . . . . . . . . . . A-19ELunInfo.csv. . . . . . . . . . . . . . . . . . . . . . . . . . . . . . . . . . . . . . . . . . . . A-20FcSpNameInfo.csv. . . . . . . . . . . . . . . . . . . . . . . . . . . . . . . . . . . . . . . . A-21FcSpPortInfo.csv . . . . . . . . . . . . . . . . . . . . . . . . . . . . . . . . . . . . . . . . . A-22HduInfo.csv . . . . . . . . . . . . . . . . . . . . . . . . . . . . . . . . . . . . . . . . . . . . A-23JnlInfo.csv . . . . . . . . . . . . . . . . . . . . . . . . . . . . . . . . . . . . . . . . . . . . . A-23LdevCapaInfo.csv . . . . . . . . . . . . . . . . . . . . . . . . . . . . . . . . . . . . . . . . A-23LdevCountInfo.csv. . . . . . . . . . . . . . . . . . . . . . . . . . . . . . . . . . . . . . . . A-24LdevInfo.csv . . . . . . . . . . . . . . . . . . . . . . . . . . . . . . . . . . . . . . . . . . . . A-25LdevStatus.csv . . . . . . . . . . . . . . . . . . . . . . . . . . . . . . . . . . . . . . . . . . A-27LogPathStatus.csv . . . . . . . . . . . . . . . . . . . . . . . . . . . . . . . . . . . . . . . . A-27LPartition.csv . . . . . . . . . . . . . . . . . . . . . . . . . . . . . . . . . . . . . . . . . . . A-27LunInfo.csv. . . . . . . . . . . . . . . . . . . . . . . . . . . . . . . . . . . . . . . . . . . . . A-28LunPortInfo.csv . . . . . . . . . . . . . . . . . . . . . . . . . . . . . . . . . . . . . . . . . . A-29LuseInfo.csv . . . . . . . . . . . . . . . . . . . . . . . . . . . . . . . . . . . . . . . . . . . . A-30MfDMInfo.csv . . . . . . . . . . . . . . . . . . . . . . . . . . . . . . . . . . . . . . . . . . . A-30MicroVersion.csv . . . . . . . . . . . . . . . . . . . . . . . . . . . . . . . . . . . . . . . . . A-30MlcEnduranceInfo.csv . . . . . . . . . . . . . . . . . . . . . . . . . . . . . . . . . . . . . A-31ModePerLpr.csv . . . . . . . . . . . . . . . . . . . . . . . . . . . . . . . . . . . . . . . . . . A-32MpPathStatus.csv . . . . . . . . . . . . . . . . . . . . . . . . . . . . . . . . . . . . . . . . A-32MpPcbStatus.csv . . . . . . . . . . . . . . . . . . . . . . . . . . . . . . . . . . . . . . . . . A-33PcbRevInfo.csv . . . . . . . . . . . . . . . . . . . . . . . . . . . . . . . . . . . . . . . . . . A-34PdevCapaInfo.csv . . . . . . . . . . . . . . . . . . . . . . . . . . . . . . . . . . . . . . . . A-34PdevInfo.csv . . . . . . . . . . . . . . . . . . . . . . . . . . . . . . . . . . . . . . . . . . . . A-34PdevStatus.csv . . . . . . . . . . . . . . . . . . . . . . . . . . . . . . . . . . . . . . . . . . A-36PhyPathStatus.csv . . . . . . . . . . . . . . . . . . . . . . . . . . . . . . . . . . . . . . . . A-36PkInfo.csv. . . . . . . . . . . . . . . . . . . . . . . . . . . . . . . . . . . . . . . . . . . . . . A-37PpInfo.csv . . . . . . . . . . . . . . . . . . . . . . . . . . . . . . . . . . . . . . . . . . . . . A-38SMfundat.csv . . . . . . . . . . . . . . . . . . . . . . . . . . . . . . . . . . . . . . . . . . . A-39SsdDriveInfo.csv . . . . . . . . . . . . . . . . . . . . . . . . . . . . . . . . . . . . . . . . . A-39SsidInfo.csv . . . . . . . . . . . . . . . . . . . . . . . . . . . . . . . . . . . . . . . . . . . . A-40SysoptInfo.csv . . . . . . . . . . . . . . . . . . . . . . . . . . . . . . . . . . . . . . . . . . A-40WwnInfo.csv. . . . . . . . . . . . . . . . . . . . . . . . . . . . . . . . . . . . . . . . . . . . A-41
B Report Configuration Tool command reference (raidinf commands) B-1raidinf command list and command description . . . . . . . . . . . . . . . . . . . . . . . B-2raidinf command syntax. . . . . . . . . . . . . . . . . . . . . . . . . . . . . . . . . . . . . . . . B-2raidinf add report . . . . . . . . . . . . . . . . . . . . . . . . . . . . . . . . . . . . . . . . . . . . B-4raidinf delete report. . . . . . . . . . . . . . . . . . . . . . . . . . . . . . . . . . . . . . . . . . . B-5raidinf download report . . . . . . . . . . . . . . . . . . . . . . . . . . . . . . . . . . . . . . . . B-6raidinf get reportinfo . . . . . . . . . . . . . . . . . . . . . . . . . . . . . . . . . . . . . . . . . . B-7

Contents ixHitachi Virtual Storage Platform Hitachi Storage Navigator User Guide
C SMI-S provider configuration file . . . . . . . . . . . . . . . . . . . . . . . . . C-1User-defined.properties file. . . . . . . . . . . . . . . . . . . . . . . . . . . . . . . . . . . . . . C-2
File description format . . . . . . . . . . . . . . . . . . . . . . . . . . . . . . . . . . . . . . C-2File organization format . . . . . . . . . . . . . . . . . . . . . . . . . . . . . . . . . . . . . C-2Parameters defined in user configuration files. . . . . . . . . . . . . . . . . . . . . . C-2
CipherSuites parameter . . . . . . . . . . . . . . . . . . . . . . . . . . . . . . . . . . . C-3VVolForSnapshot parameter . . . . . . . . . . . . . . . . . . . . . . . . . . . . . . . . C-3PoolIDForSnapshot parameter. . . . . . . . . . . . . . . . . . . . . . . . . . . . . . . C-4DefaultSnapshotFunction parameter . . . . . . . . . . . . . . . . . . . . . . . . . . C-5
D Storage Navigator GUI reference (main window) . . . . . . . . . . . . . D-1Storage Navigator main window . . . . . . . . . . . . . . . . . . . . . . . . . . . . . . . . . . D-2
Using the main window and wizard . . . . . . . . . . . . . . . . . . . . . . . . . . . . . D-5Main window controls . . . . . . . . . . . . . . . . . . . . . . . . . . . . . . . . . . . . . . D-6
Buttons. . . . . . . . . . . . . . . . . . . . . . . . . . . . . . . . . . . . . . . . . . . . . . . D-6Table . . . . . . . . . . . . . . . . . . . . . . . . . . . . . . . . . . . . . . . . . . . . . . . . D-7Filtering . . . . . . . . . . . . . . . . . . . . . . . . . . . . . . . . . . . . . . . . . . . . . . D-8Tooltip . . . . . . . . . . . . . . . . . . . . . . . . . . . . . . . . . . . . . . . . . . . . . . . D-8
Reset View Settings . . . . . . . . . . . . . . . . . . . . . . . . . . . . . . . . . . . . . . . . D-9Column Settings window . . . . . . . . . . . . . . . . . . . . . . . . . . . . . . . . . . . . . . . D-9Storage Systems window . . . . . . . . . . . . . . . . . . . . . . . . . . . . . . . . . . . . . . D-10Edit Storage System window. . . . . . . . . . . . . . . . . . . . . . . . . . . . . . . . . . . . D-14Confirm window (Edit Storage System) . . . . . . . . . . . . . . . . . . . . . . . . . . . . D-15Edit Information Display Settings window . . . . . . . . . . . . . . . . . . . . . . . . . . D-16Resource Lock Properties window . . . . . . . . . . . . . . . . . . . . . . . . . . . . . . . . D-17Tasks window . . . . . . . . . . . . . . . . . . . . . . . . . . . . . . . . . . . . . . . . . . . . . . D-18Task Properties window . . . . . . . . . . . . . . . . . . . . . . . . . . . . . . . . . . . . . . . D-21Suspend Tasks window . . . . . . . . . . . . . . . . . . . . . . . . . . . . . . . . . . . . . . . D-22Resume Tasks window . . . . . . . . . . . . . . . . . . . . . . . . . . . . . . . . . . . . . . . . D-23Delete Tasks window . . . . . . . . . . . . . . . . . . . . . . . . . . . . . . . . . . . . . . . . . D-24Disable Auto Delete window . . . . . . . . . . . . . . . . . . . . . . . . . . . . . . . . . . . . D-25Enable Auto Delete window . . . . . . . . . . . . . . . . . . . . . . . . . . . . . . . . . . . . D-26Reports window . . . . . . . . . . . . . . . . . . . . . . . . . . . . . . . . . . . . . . . . . . . . D-27Create Configuration Report window . . . . . . . . . . . . . . . . . . . . . . . . . . . . . . D-28Delete Reports window . . . . . . . . . . . . . . . . . . . . . . . . . . . . . . . . . . . . . . . D-29User Groups window . . . . . . . . . . . . . . . . . . . . . . . . . . . . . . . . . . . . . . . . . D-30Window when User Group is selected . . . . . . . . . . . . . . . . . . . . . . . . . . . . . D-32Create User window. . . . . . . . . . . . . . . . . . . . . . . . . . . . . . . . . . . . . . . . . . D-35Confirm window (Create User) . . . . . . . . . . . . . . . . . . . . . . . . . . . . . . . . . . D-36Change Password window . . . . . . . . . . . . . . . . . . . . . . . . . . . . . . . . . . . . . D-37Confirm window (Change Password) . . . . . . . . . . . . . . . . . . . . . . . . . . . . . D-38Edit User window . . . . . . . . . . . . . . . . . . . . . . . . . . . . . . . . . . . . . . . . . . . D-39Confirm window (Edit User) . . . . . . . . . . . . . . . . . . . . . . . . . . . . . . . . . . . . D-40Add Users window. . . . . . . . . . . . . . . . . . . . . . . . . . . . . . . . . . . . . . . . . . . D-41Confirm window (Add Users) . . . . . . . . . . . . . . . . . . . . . . . . . . . . . . . . . . . D-43
Hitachi Virtual Storage Platform Hitachi Storage Navigator User Guide
x Contents
Remove Users window. . . . . . . . . . . . . . . . . . . . . . . . . . . . . . . . . . . . . . . . D-44Delete Users window . . . . . . . . . . . . . . . . . . . . . . . . . . . . . . . . . . . . . . . . . D-45Create User Group wizard . . . . . . . . . . . . . . . . . . . . . . . . . . . . . . . . . . . . . D-45
Create User Group window. . . . . . . . . . . . . . . . . . . . . . . . . . . . . . . . . . D-45Confirm window (Create User Group) . . . . . . . . . . . . . . . . . . . . . . . . . . D-47
Edit User Group wizard . . . . . . . . . . . . . . . . . . . . . . . . . . . . . . . . . . . . . . . D-49Edit User Group window. . . . . . . . . . . . . . . . . . . . . . . . . . . . . . . . . . . . D-49Confirm window (Edit User Group) . . . . . . . . . . . . . . . . . . . . . . . . . . . . D-50
Delete User Groups window . . . . . . . . . . . . . . . . . . . . . . . . . . . . . . . . . . . . D-51Edit Resource Group Assignment wizard . . . . . . . . . . . . . . . . . . . . . . . . . . . D-52
Edit Resource Group Assignment window. . . . . . . . . . . . . . . . . . . . . . . . D-52Confirm window for Edit Resource Group Assignment . . . . . . . . . . . . . . . D-55
Edit Role Assignment wizard. . . . . . . . . . . . . . . . . . . . . . . . . . . . . . . . . . . . D-56Edit Role Assignment window . . . . . . . . . . . . . . . . . . . . . . . . . . . . . . . . D-56Confirm window for Edit Role Assignment . . . . . . . . . . . . . . . . . . . . . . . D-59
Alerts window . . . . . . . . . . . . . . . . . . . . . . . . . . . . . . . . . . . . . . . . . . . . . . D-60Alert Properties window . . . . . . . . . . . . . . . . . . . . . . . . . . . . . . . . . . . . . . . D-62Setup Server wizard . . . . . . . . . . . . . . . . . . . . . . . . . . . . . . . . . . . . . . . . . D-64
Select Authentication Server window. . . . . . . . . . . . . . . . . . . . . . . . . . . D-64Disable authentication server setup window . . . . . . . . . . . . . . . . . . . . . D-66
LDAP Properties window . . . . . . . . . . . . . . . . . . . . . . . . . . . . . . . . . . . . . . D-67RADIUS Properties . . . . . . . . . . . . . . . . . . . . . . . . . . . . . . . . . . . . . . . . . . D-69Kerberos Properties . . . . . . . . . . . . . . . . . . . . . . . . . . . . . . . . . . . . . . . . . . D-72Setup Server for LDAP . . . . . . . . . . . . . . . . . . . . . . . . . . . . . . . . . . . . . . . . D-75
Setup Server for LDAP window . . . . . . . . . . . . . . . . . . . . . . . . . . . . . . . D-75Confirm window for LDAP Setup Server . . . . . . . . . . . . . . . . . . . . . . . . . D-79
Setup Server for RADIUS . . . . . . . . . . . . . . . . . . . . . . . . . . . . . . . . . . . . . D-82Setup Server RADIUS window. . . . . . . . . . . . . . . . . . . . . . . . . . . . . . . . D-82Confirm window for RADIUS Setup Server . . . . . . . . . . . . . . . . . . . . . . D-87
Setup Server for Kerberos . . . . . . . . . . . . . . . . . . . . . . . . . . . . . . . . . . . . . D-91Setup Server Kerberos window . . . . . . . . . . . . . . . . . . . . . . . . . . . . . . . D-91Confirm window for Kerberos Setup Server . . . . . . . . . . . . . . . . . . . . . . D-96
Edit SIM Syslog Server Settings wizard . . . . . . . . . . . . . . . . . . . . . . . . . . . . D-99Edit SIM Syslog Server Settings window . . . . . . . . . . . . . . . . . . . . . . . . D-99Confirm window (Edit SIM Syslog Server Settings) . . . . . . . . . . . . . . . . D-101
E Storage Navigator GUI reference (secondary windows) . . . . . . . . . E-1Storage Navigator secondary window . . . . . . . . . . . . . . . . . . . . . . . . . . . . . . E-2
Opening Storage Navigator secondary windows . . . . . . . . . . . . . . . . . . . . E-4Storage Navigator secondary windows and Modify mode. . . . . . . . . . . . . . E-5
About window. . . . . . . . . . . . . . . . . . . . . . . . . . . . . . . . . . . . . . . . . . . . . . . E-6License Key window . . . . . . . . . . . . . . . . . . . . . . . . . . . . . . . . . . . . . . . . . . E-7
License Key list . . . . . . . . . . . . . . . . . . . . . . . . . . . . . . . . . . . . . . . . . . . E-8Status and icons . . . . . . . . . . . . . . . . . . . . . . . . . . . . . . . . . . . . . . . . . E-10
Alerts window . . . . . . . . . . . . . . . . . . . . . . . . . . . . . . . . . . . . . . . . . . . . . . E-11Login Message window . . . . . . . . . . . . . . . . . . . . . . . . . . . . . . . . . . . . . . . E-14
Contents xiHitachi Virtual Storage Platform Hitachi Storage Navigator User Guide
E-mail Information window. . . . . . . . . . . . . . . . . . . . . . . . . . . . . . . . . . . . . E-15Basic Information Display dialog box . . . . . . . . . . . . . . . . . . . . . . . . . . . . . . E-16
Common elements. . . . . . . . . . . . . . . . . . . . . . . . . . . . . . . . . . . . . . . . E-17Port dialog box . . . . . . . . . . . . . . . . . . . . . . . . . . . . . . . . . . . . . . . . . . E-18LUN dialog box . . . . . . . . . . . . . . . . . . . . . . . . . . . . . . . . . . . . . . . . . . E-20LDEV dialog box . . . . . . . . . . . . . . . . . . . . . . . . . . . . . . . . . . . . . . . . . E-21LDEV Status dialog box . . . . . . . . . . . . . . . . . . . . . . . . . . . . . . . . . . . . E-23
F Tool Panel GUI Reference . . . . . . . . . . . . . . . . . . . . . . . . . . . . . . F-1Control Panel . . . . . . . . . . . . . . . . . . . . . . . . . . . . . . . . . . . . . . . . . . . . . . . F-2
Environment Parameter window . . . . . . . . . . . . . . . . . . . . . . . . . . . . . . . F-2Download File window . . . . . . . . . . . . . . . . . . . . . . . . . . . . . . . . . . . . . . F-3Restore File window. . . . . . . . . . . . . . . . . . . . . . . . . . . . . . . . . . . . . . . . F-3Download Dump Files window . . . . . . . . . . . . . . . . . . . . . . . . . . . . . . . . F-4Update Certificate Files window . . . . . . . . . . . . . . . . . . . . . . . . . . . . . . . F-5Update Certificate Files for SMI-S window . . . . . . . . . . . . . . . . . . . . . . . . F-6Upload Configuration Files for SMI-S window . . . . . . . . . . . . . . . . . . . . . . F-7

Hitachi Virtual Storage Platform Hitachi Storage Navigator User Guide
xii Contents
Preface xiiiHitachi Virtual Storage Platform Hitachi Storage Navigator User Guide
Preface
This document provides information to help you set up Hitachi Storage Navigator for the Hitachi Virtual Storage Platform, set up end-user computers and web browsers, and establish user accounts and permissions. It explains the GUI features and provides basic navigation information.
Complete information for performing specific tasks in Storage Navigator is contained in the Virtual Storage Platform software user guides.
Please read this document carefully to understand how to use this product, and keep a copy for reference.
□ Intended audience
□ Product version
□ Document revision level
□ Changes in this revision
□ Referenced documents
□ Document organization
□ Document conventions
□ Convention for storage capacity values
□ Accessing product documentation
□ Getting help
□ Comments
Hitachi Virtual Storage Platform Hitachi Storage Navigator User Guide
xiv Preface
Intended audienceThis document is intended for system administrators, Hitachi Data Systems representatives, and authorized service providers who are involved in installing, configuring, and operating the Hitachi Virtual Storage Platform storage system.
Readers of this document should have at least the following knowledge and experience:
• A background in data processing and an understanding of RAID storage systems and their basic functions.
• Familiarity with the Hitachi Virtual Storage Platform, the Storage Navigator software that runs on it, and the Hitachi Storage Navigator User Guide.
• Familiarity with the operating system and web browser software on the system hosting the Storage Navigator software.
Product versionThis document revision applies to Hitachi Virtual Storage Platform microcode 70-06-2x or later.
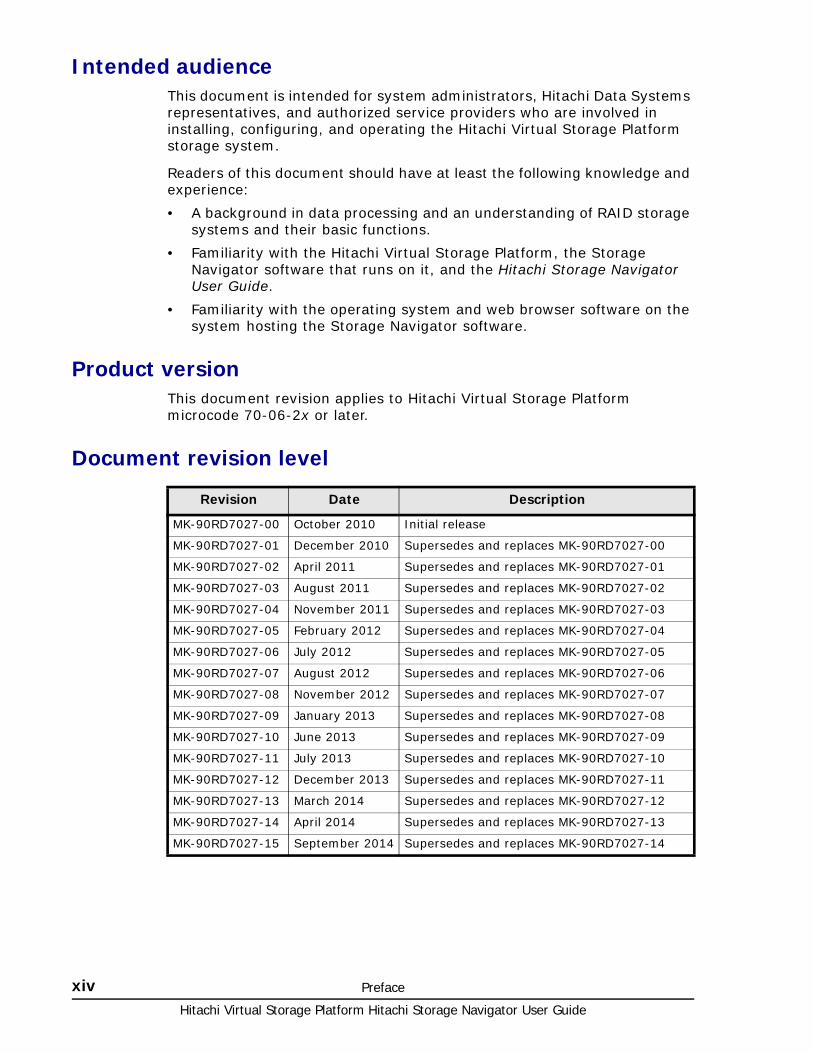
Document revision level
Revision Date Description
MK-90RD7027-00 October 2010 Initial release
MK-90RD7027-01 December 2010 Supersedes and replaces MK-90RD7027-00
MK-90RD7027-02 April 2011 Supersedes and replaces MK-90RD7027-01
MK-90RD7027-03 August 2011 Supersedes and replaces MK-90RD7027-02
MK-90RD7027-04 November 2011 Supersedes and replaces MK-90RD7027-03
MK-90RD7027-05 February 2012 Supersedes and replaces MK-90RD7027-04
MK-90RD7027-06 July 2012 Supersedes and replaces MK-90RD7027-05
MK-90RD7027-07 August 2012 Supersedes and replaces MK-90RD7027-06
MK-90RD7027-08 November 2012 Supersedes and replaces MK-90RD7027-07
MK-90RD7027-09 January 2013 Supersedes and replaces MK-90RD7027-08
MK-90RD7027-10 June 2013 Supersedes and replaces MK-90RD7027-09
MK-90RD7027-11 July 2013 Supersedes and replaces MK-90RD7027-10
MK-90RD7027-12 December 2013 Supersedes and replaces MK-90RD7027-11
MK-90RD7027-13 March 2014 Supersedes and replaces MK-90RD7027-12
MK-90RD7027-14 April 2014 Supersedes and replaces MK-90RD7027-13
MK-90RD7027-15 September 2014 Supersedes and replaces MK-90RD7027-14
Preface xvHitachi Virtual Storage Platform Hitachi Storage Navigator User Guide
Changes in this revisionThis revision of the manual contains the following updates:
• Updated protocol information in Chapter 2, Setting up Storage Navigator.
Referenced documents• Hitachi Audit Log User Guide, MK-90RD7007
• Hitachi Compatible XRC User Guide, MK-90RD7011
• Hitachi Compatible PAV User Guide, MK-90RD7012
• Hitachi Copy-on-Write Snapshot User Guide, MK-90RD7013
• Encryption License Key User Guide, MK-90RD7015
• Hitachi Compatible FlashCopy® User Guide, MK-90RD7017
• Hitachi Virtual Storage PlatformPerformance Guide, MK-90RD7020
• Hitachi ShadowImage® for Mainframe User Guide, MK-90RD7023
• Hitachi ShadowImage® User Guide, MK-90RD7024
• Hitachi SNMP Agent User Guide, MK-90RD7025
• Hitachi Storage Navigator Messages, MK-90RD7028
• Hitachi TrueCopy® User Guide, MK-90RD7029
• Hitachi TrueCopy® for Mainframe User Guide, MK-90RD7030
• Hitachi Universal Replicator for Mainframe User Guide, MK-90RD7031
• Hitachi Universal Replicator User Guide, MK-90RD7032
• Hitachi Universal Volume Manager User Guide, MK-90RD7033
Document organizationThe following table provides an overview of the contents and organization of this document. Click the chapter title in the left column to go to that chapter. The first page of each chapter provides links to the sections in that chapter.
Chapter Description
Chapter 1, Storage Navigator overview
Provides an overview of Storage Navigator features and components
Chapter 2, Setting up Storage Navigator
Provides instructions for setting up Storage Navigator
Chapter 3, Getting started using Storage Navigator
Provides basic information for using Storage Navigator
Chapter 4, Setting up and managing user accounts
Provides instructions for setting up user accounts
Chapter 5, Configuring the Storage Navigator environment
Provides instructions for configuring the Storage Navigator environment
Hitachi Virtual Storage Platform Hitachi Storage Navigator User Guide
xvi Preface
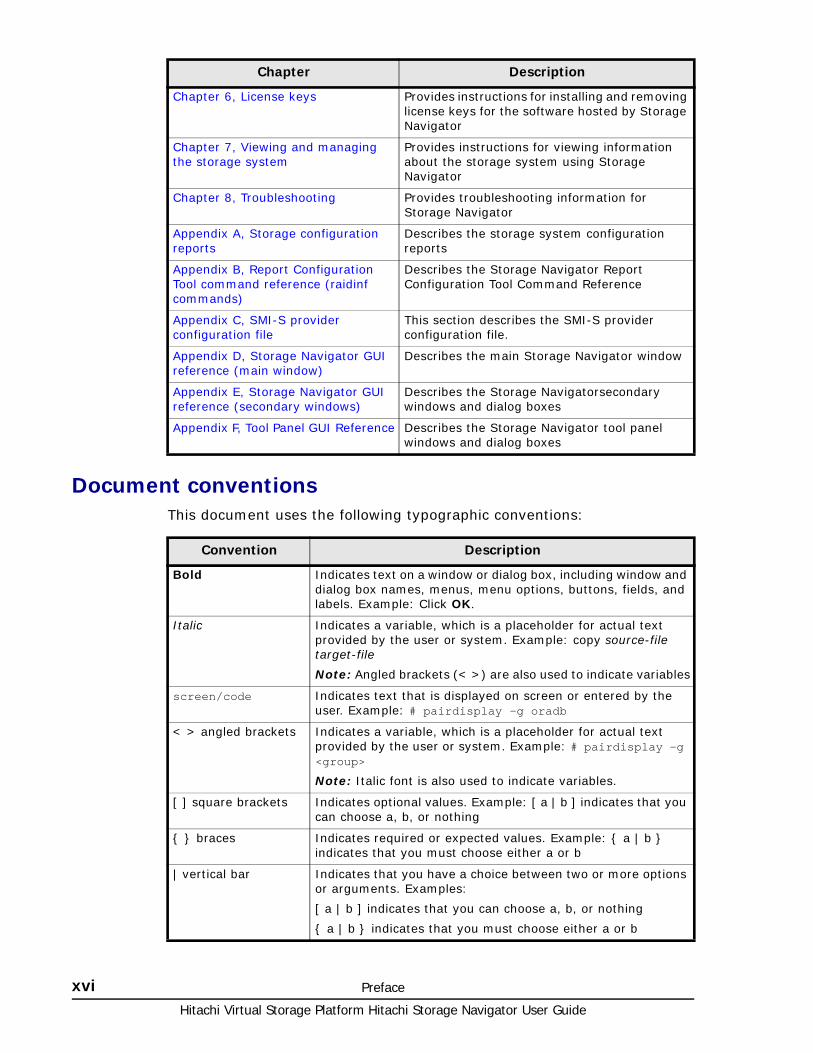
Document conventionsThis document uses the following typographic conventions:
Chapter 6, License keys Provides instructions for installing and removing license keys for the software hosted by Storage Navigator
Chapter 7, Viewing and managing the storage system
Provides instructions for viewing information about the storage system using Storage Navigator
Chapter 8, Troubleshooting Provides troubleshooting information for Storage Navigator
Appendix A, Storage configuration reports
Describes the storage system configuration reports
Appendix B, Report Configuration Tool command reference (raidinf commands)
Describes the Storage Navigator Report Configuration Tool Command Reference
Appendix C, SMI-S provider configuration file
This section describes the SMI-S provider configuration file.
Appendix D, Storage Navigator GUI reference (main window)
Describes the main Storage Navigator window
Appendix E, Storage Navigator GUI reference (secondary windows)
Describes the Storage Navigatorsecondary windows and dialog boxes
Appendix F, Tool Panel GUI Reference Describes the Storage Navigator tool panel windows and dialog boxes
Chapter Description
Convention Description
Bold Indicates text on a window or dialog box, including window and dialog box names, menus, menu options, buttons, fields, and labels. Example: Click OK.
Italic Indicates a variable, which is a placeholder for actual text provided by the user or system. Example: copy source-file target-file
Note: Angled brackets (< >) are also used to indicate variables
screen/code Indicates text that is displayed on screen or entered by the user. Example: # pairdisplay -g oradb
< > angled brackets Indicates a variable, which is a placeholder for actual text provided by the user or system. Example: # pairdisplay -g <group>
Note: Italic font is also used to indicate variables.
[ ] square brackets Indicates optional values. Example: [ a | b ] indicates that you can choose a, b, or nothing
{ } braces Indicates required or expected values. Example: { a | b } indicates that you must choose either a or b
| vertical bar Indicates that you have a choice between two or more options or arguments. Examples:
[ a | b ] indicates that you can choose a, b, or nothing
{ a | b } indicates that you must choose either a or b
Preface xviiHitachi Virtual Storage Platform Hitachi Storage Navigator User Guide
This document uses the following icons to draw attention to information:
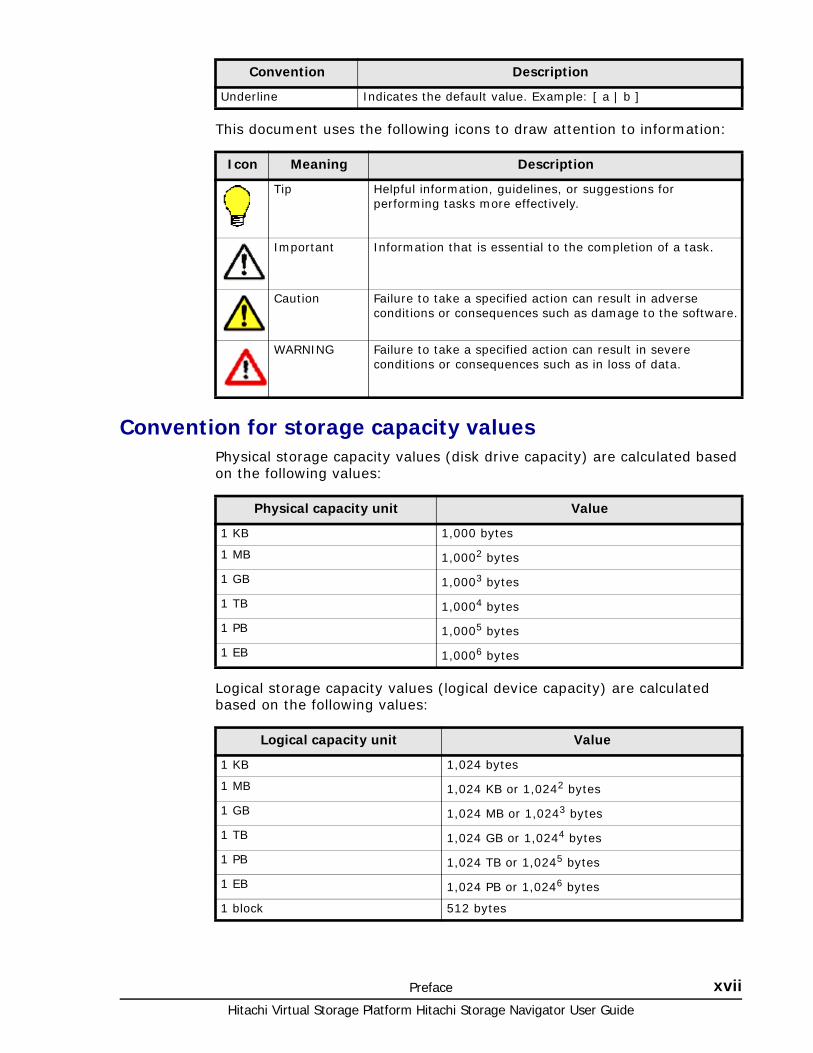
Convention for storage capacity valuesPhysical storage capacity values (disk drive capacity) are calculated based on the following values:
Logical storage capacity values (logical device capacity) are calculated based on the following values:
Underline Indicates the default value. Example: [ a | b ]
Convention Description
Icon Meaning Description
Tip Helpful information, guidelines, or suggestions for performing tasks more effectively.
Important Information that is essential to the completion of a task.
Caution Failure to take a specified action can result in adverse conditions or consequences such as damage to the software.
WARNING Failure to take a specified action can result in severe conditions or consequences such as in loss of data.
Physical capacity unit Value
1 KB 1,000 bytes
1 MB 1,0002 bytes
1 GB 1,0003 bytes
1 TB 1,0004 bytes
1 PB 1,0005 bytes
1 EB 1,0006 bytes
Logical capacity unit Value
1 KB 1,024 bytes
1 MB 1,024 KB or 1,0242 bytes
1 GB 1,024 MB or 1,0243 bytes
1 TB 1,024 GB or 1,0244 bytes
1 PB 1,024 TB or 1,0245 bytes
1 EB 1,024 PB or 1,0246 bytes
1 block 512 bytes
Hitachi Virtual Storage Platform Hitachi Storage Navigator User Guide
xviii Preface
Accessing product documentationHitachi Virtual Storage Platform user documentation is available on the Hitachi Support Portal: https://Portal.HDS.com. Please check this site for the most current documentation, including important updates that may have been made after the release of the product.
Getting helpThe Hitachi Data Systems customer support staff is available 24 hours a day, seven days a week. If you need technical support, log on to the Hitachi Data Systems Support Portal for contact information: https://Portal.HDS.com
CommentsPlease send us your comments on this document: [email protected] Comments. Include the document title, number, and revision. Please refer to specific sections and paragraphs whenever possible.
Thank you! (All comments become the property of Hitachi Data Systems.)
1
Storage Navigator overview 1–1Hitachi Virtual Storage Platform Hitachi Storage Navigator User Guide
Storage Navigator overview
Hitachi Storage Navigator provides a unified GUI for managing and optimizing the VSP storage system. You access the system in Storage Navigator from any computer with a web browser. Besides the GUI, Storage Navigator provides a CLI to allow scheduling of storage system events.
Storage Navigator can be set up in either Windows or UNIX environments.
This topic provides an overview of Storage Navigator features and components.
□ Manage the storage system
□ GUI feature highlights
□ Storage Navigator CLI
□ Storage Navigator components

Hitachi Virtual Storage Platform Hitachi Storage Navigator User Guide
1–2 Storage Navigator overview
Manage the storage systemWith Storage Navigator, you can perform the following tasks:
• Provision storage.
• Set up data replication for restoring lost data.
• View and manage the configuration of the storage system.
• Monitor and tune performance.
• Acquire logs for actions and commands performed on the storage system.
GUI feature highlightsStorage Navigator allows you to set up and manage more than one storage system with a use-case in mind. Whether creating LDEVs or pools, adding host groups or LUN paths, enabling performance monitoring, or creating pairs for replication—these and all storage system tasks are made simpler because the GUI seamlessly crosses the underlying Hitachi Virtual Storage Platform software functionality. The use of wizards for major use-case tasks makes it possible to complete the set of tasks in one procedural flow, with a minimum of steps and a minimum of clicks.
The following illustration shows an example of the GUI main window.
Emphasis on performanceOperations you perform are executed in the background. This means you can start the next operation without waiting for the previous one to complete.
Figure 1-1 Storage Navigator GUI
Storage Navigator overview 1–3Hitachi Virtual Storage Platform Hitachi Storage Navigator User Guide
Wizards and task managementWizards are provided for each main task. The wizard guides you through all the subtasks that you ordinarily perform one at a time. For example, the Create V-VOLs wizard guides you through a series of screens in which you create the LDEVs for the V-VOLs and add LUN paths by selecting LDEVs, selecting host groups, and mapping LUNs.
Storage Navigator also provides a window checking on the tasks you have committed to the system. The Task window provides detailed information about each task and shows the priority and status of each task you are tracking.
ReportingStorage Navigator provides views of various aspects of your storage system. In addition to these views, you can generate a report for specific areas of the system. Reports can be generated for a summary of the system data, ports, Channel Adapters, and disk adapters. A total of 20 configuration reports can be generated. Reports are formatted in either CSV or HTML. Use these reports to determine if the storage system configurations have changed properly.
The Report Configuration Tool allows you to create a configuration report by using a command prompt. You can automate the creation or deletion of configuration reports by writing.bat script files. Use the Windows Task Scheduler to execute the script files at regular intervals.
HelpStorage Navigator online help provides procedural information for setting up and managing the storage system. Links to the major storage system tasks, search functions, and glossary are included.
Storage Navigator CLIThe Storage Navigator CLI allows you to perform commands on the storage system using the command prompt. To use the CLI, you need to install certain files on the Storage Navigator computer.
The CLI can be used to perform only specific operations for specific software. For details on the Storage Navigator CLI, see the System Operations Using Spreadsheets.
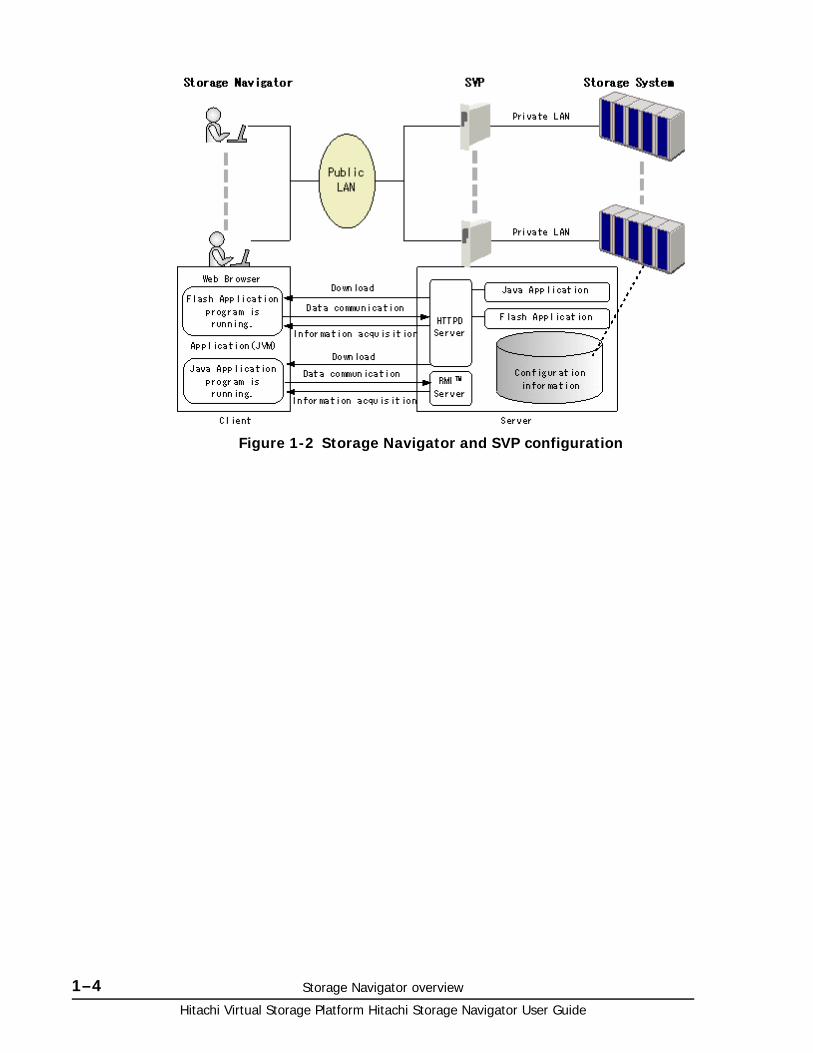
Storage Navigator componentsThe following figure shows an example of the Storage Navigator computer and SVP configuration.
Hitachi Virtual Storage Platform Hitachi Storage Navigator User Guide
1–4 Storage Navigator overview
Figure 1-2 Storage Navigator and SVP configuration
2
Setting up Storage Navigator 2–1Hitachi Virtual Storage Platform Hitachi Storage Navigator User Guide
Setting up Storage Navigator
This topic provides Storage Navigator requirements and set up procedures.
□ Setup workflow
□ Cable connection requirements
□ Setting up SSL encryption
□ Setting up a client computer
□ Using the SMI-S function with a Storage Navigator user account
□ Installing the report configuration tool
□ Using the report configuration tool
Hitachi Virtual Storage Platform Hitachi Storage Navigator User Guide
2–2 Setting up Storage Navigator
Setup workflowThe following workflow describes the set up tasks for Storage Navigator:
• The HDS representative attaches the SVP in your storage system to the LAN. Storage Navigator is already set up on the SVP and is therefore ready for access by client computers.
• Ensure the correct LAN cabling and connections are in place. See Cable connection requirements on page 2-2.
• Set up network connections. See Enabling IPv6 communication on page 2-2, as needed. Also, you can set up additional communications security for remote operations with Secure Sockets Layer (SSL). See Setting up SSL encryption on page 2-3
• Set up the Storage Navigator computer(s). See Setting up a client computer on page 2-16.
• Set up user accounts. See Setting up and managing user accounts on page 4-1.
• Configure Storage Navigator environment. See Configuring the Storage Navigator environment on page 5-1.
• Install license keys forany software applications that are installed on the system. See License keys on page 6-1.
Requirements for the various elements are included in the following topics.
Cable connection requirementsEnsure that the following LAN cable and connection requirements are met:
• Thinnet coaxial cable. For twisted-pair connections, contact the Hitachi Data Systems Support Center for assistance.
• The total length of the LAN cables must not be greater than 185 meters (607 feet).
Enabling IPv6 communicationIf Internet Protocol Version 6 (IPv6) addresses are used in the storage system LAN, you may need to enable IPv6 communication on the SVP. For Windows 7 and Solaris 10, you can enable IPv4 (standard) communication, IPv6 communication, or both. You determine which protocol to use based on the IP addresses that are used within the LAN. Use the same communication options for or both the Storage Navigator computer and the SVP.
If you use IPv6 to display the Storage Navigator main window when both IPv4 and IPv6 are available, IPv6 addresses are displayed in the Storage Navigator secondary window but actually IPv4 communication is used.
For information on how to configure IP communication from an SVP, contact the Hitachi Data Systems Support Center. The following topics give brief instructions on configuring IPv6 communication in Windows 7 and Solaris 10 environments.
Setting up Storage Navigator 2–3Hitachi Virtual Storage Platform Hitachi Storage Navigator User Guide
Configuring IPv6 communication in Windows 7To configure a Storage Navigator computer to use IPv6 for communication with an SVP:
1. Select Control Panel > Network and Sharing Center > Manage network connections.
2. Select and right-click the network where the SVP resides, and then click Properties in the pop-up menu.
Click Continue if the User Account Control dialog box appears. Otherwise, the Networking dialog box appears.
3. Select the Internet Protocol Version 6 (TCP/IPv6) check box.
Optionally, clear the Internet Protocol Version 4 (TCP/IPv4) check box.
4. Click OK to close the dialog box.
Configuring IPv6 communication in Solaris 10To configure a Storage Navigator computer to use IPv6 for communication with an SVP:
1. Start the console.
2. Execute the following command:
ipconfig network-interface-name inet down
Setting up SSL encryptionTo improve security of remote operations from a Storage Navigator SVP to a storage system, you can set up Secure Sockets Layer (SSL) encrypted communication. By setting SSL encryption, the Storage Navigator User ID and Password are encrypted.
Note the following SSL terms:
• Secure Sockets Layer: SSL is a protocol first developed by Netscape to securely transmit data over the Internet. Two SSL-enabled peers use their private and public keys to establish a secure communication session, with each peer encrypting transmitted data with a randomly generated and agreed-upon symmetric key.
• Keypair: A keypair is two mathematically-related cryptographic keys consisting of a private key and its associated public key.
• Server Certificate: A Server Certificate (also called a Digital Certificate) forms an association between an identity (in this case the SVP server) and a specific keypair. A Server Certificate is used to identify the SVP server to a client so that the server and client can communicate using SSL. Server Certificates come in two basic types:
• Self-signed: You generate your owned self-signed certificate and the subject of the certificate is the same as the issuer of the certificate. If the Storage Navigator computers and the SVP are on an internal LAN behind a firewall, you may find that this option provides sufficient security.
Hitachi Virtual Storage Platform Hitachi Storage Navigator User Guide
2–4 Setting up Storage Navigator
• Signed and Trusted: For a Signed and Trusted Server Certificate, a Certificate Signing Request (CSR) is sent to and certified by a trusted Certificate Authority (CA) such as VeriSign (http://www.verisign.com/)
If you enable SSL, you must make sure that the key pair and associated server certificate do not expire. If either the key pair or the server certificate expires, users will be unable to connect to the SVP. Server certificates require the use of a host name instead of an IP address.
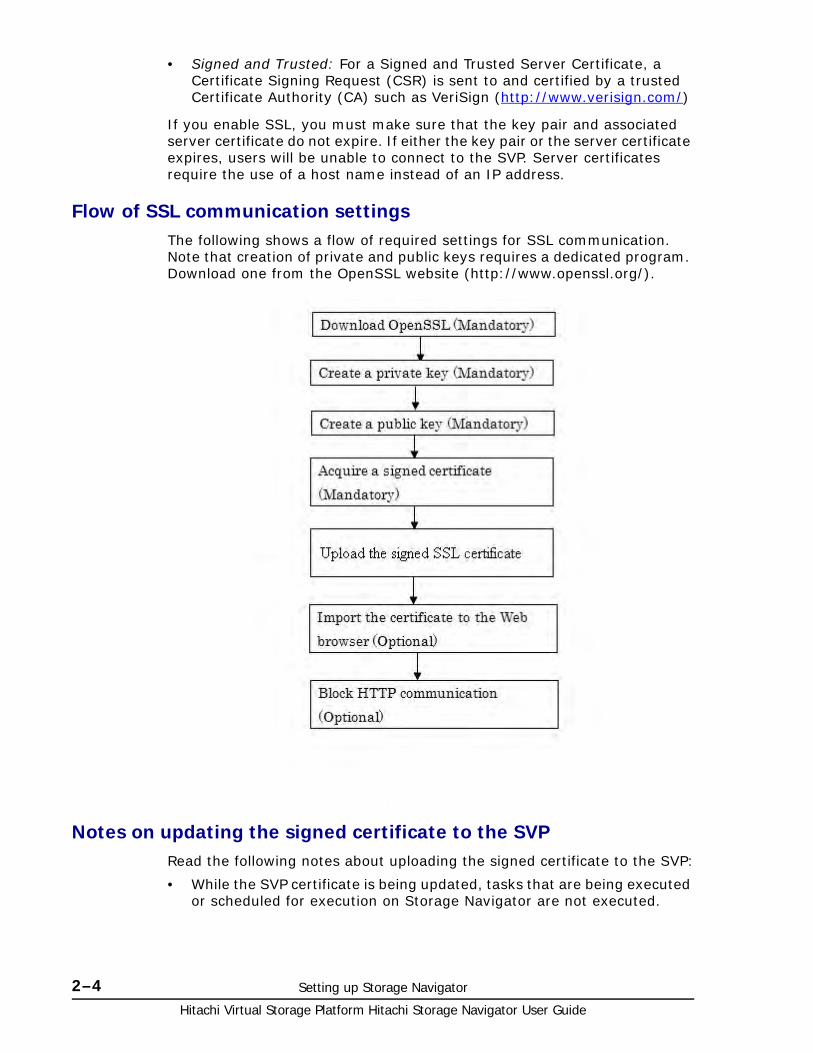
Flow of SSL communication settingsThe following shows a flow of required settings for SSL communication. Note that creation of private and public keys requires a dedicated program. Download one from the OpenSSL website (http://www.openssl.org/).
Notes on updating the signed certificate to the SVPRead the following notes about uploading the signed certificate to the SVP:
• While the SVP certificate is being updated, tasks that are being executed or scheduled for execution on Storage Navigator are not executed.

Setting up Storage Navigator 2–5Hitachi Virtual Storage Platform Hitachi Storage Navigator User Guide
• Certificates for RMI communication are updated asynchronously (within approximately two minutes).
• If an SVP certificate is updated during Command Suite setup operation, the Command Suite setup operation will result in an error
• Update of the SSL certificate gives a great influence to the system and may lead to SVP failure. Therefore take sufficient care about the content of the certificate and private key to be set.
• Depending on the environment, the SVP web server restart may require 30 to 60 minutes after update of the certificate is completed. In that case, an internal server error occurs, and even after completion of the restart, the update completion dialog box for Update Certificate Files does not display, but the update of the certificate is complete.
Creating a keypairTo enable SSL, you must create a keypair consisting of a public and a private key. The instructions use Windows XP as an example.
If you are using Solaris™, download software for creating an OpenSSL keypair (http://www.openssl.org/) and follow the manufacturer's instructions.
Creating a private key (.key file)
A private key is required to create an SSL keypair. The following procedure is for the Windows Vista operating system.
Before you begin, download openssl.exe from the OpenSSL website.
To create a private key (.key file) in a Windows Vista environment:
1. If the read-only attribute is set, release it from the c:\key folder.
2. Open a command prompt.
3. Move the current directory to the folder to which the key file is output (such as c:\keyl) , and execute the following command:
c:\key > c:\openssl\bin\openssl genrsa -out server.key 1024
This procedure creates a file called server.key in the c:\key folder. This file becomes the private Key.
Creating a public key (.csr file)
A public key is required to create an SSL keypair. The following procedure is for the Windows Vista operating system.
Before you begin, download openssl.exe from the OpenSSL website.
To create a public key in a Windows Vista environment:
1. Open a command prompt.
2. Move the current directory to the folder to which the key file is output (such as c:\key). Execute the following command:
Hitachi Virtual Storage Platform Hitachi Storage Navigator User Guide
2–6 Setting up Storage Navigator
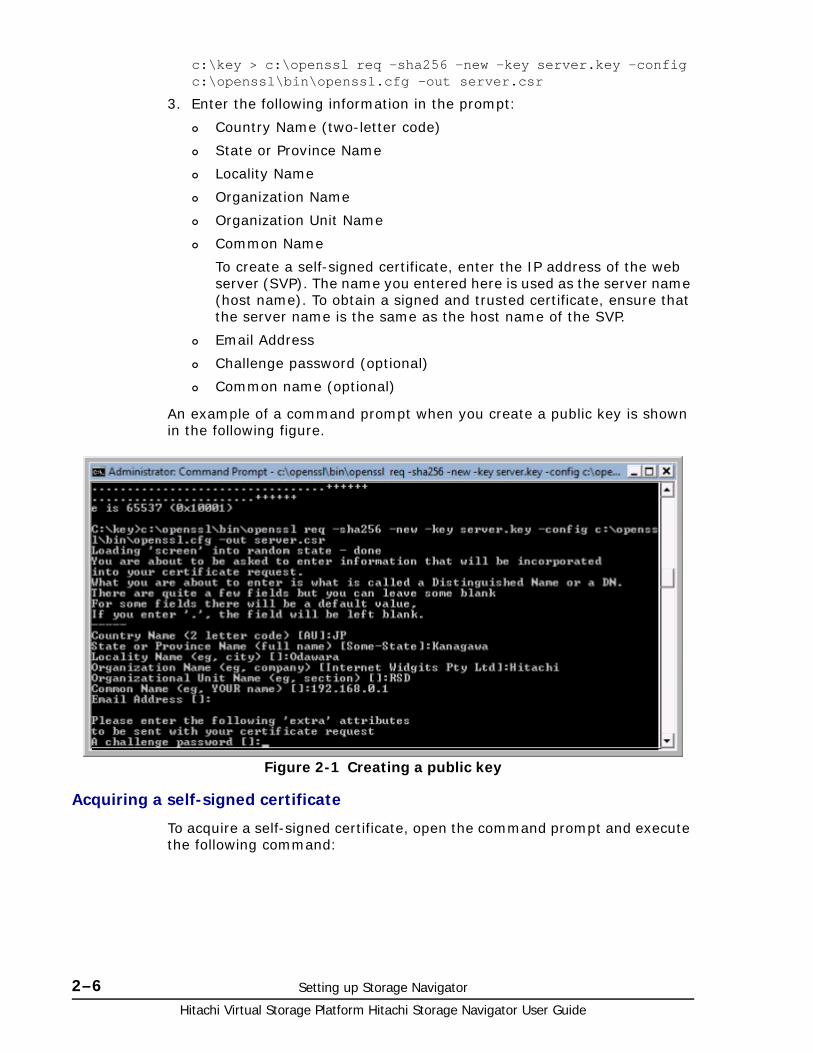
c:\key > c:\openssl req -sha256 -new -key server.key -config c:\openssl\bin\openssl.cfg -out server.csr
3. Enter the following information in the prompt:
Country Name (two-letter code)
State or Province Name
Locality Name
Organization Name
Organization Unit Name
Common Name
To create a self-signed certificate, enter the IP address of the web server (SVP). The name you entered here is used as the server name (host name). To obtain a signed and trusted certificate, ensure that the server name is the same as the host name of the SVP.
Email Address
Challenge password (optional)
Common name (optional)
An example of a command prompt when you create a public key is shown in the following figure.
Acquiring a self-signed certificate
To acquire a self-signed certificate, open the command prompt and execute the following command:
Figure 2-1 Creating a public key
Setting up Storage Navigator 2–7Hitachi Virtual Storage Platform Hitachi Storage Navigator User Guide
c:\key>c:\openssl\bin\openssl x509 -req -sha256 -days 10000 -in server.csr -signkey server.key -out server.crt
This creates a server.crt file in the c:\key folder, which is valid for 10,000 days. This is the signed private key, which is also referred to as a self-signed certificate.
Creating a signed and trusted certificateIf you want to create a signed and trusted certificate, you must create a certificate signing request (CSR) , send that file to a Certificate Authority (CA) , and request that the CA issue a signed and trusted certificate. Each certificate authority has its own procedures and requirements, and there is generally a cost for doing so. The signed and trusted certificate is the signed Public Key.
Uploading the signed SSL certificate
To use SSL-encrypted communication, you must update and upload the private key and the signed Server Certificate (Public Key) to the SVP.
Prerequisites• A private key (.key file) has been created. Change the file name to
server.key unless the file is already named that.
• A signed public key certificate (.crt file) has been acquired. Change the file name to server.crt unless the file is already named that.
• The private key (server.key file) and the signed public key certificate (server.crt file) are in Base 64 encoded X509 format.
Related information• Notes on updating the signed certificate to the SVP on page 2-4
Procedure
To upload the signed SSL certificate:
1. Log off all Storage Navigator web client sessions on the SVP.
2. In the browser of your Storage Navigator computer, specify the following URL:
http://IP-address-or-host-name-of-SVP/cgi-bin/utility/toolpanel.cgi
Note: This command uses SHA-256 as a hash algorithm. MD5 or SHA-1 is not recommended for a hash algorithm due to its low security level.
Hitachi Virtual Storage Platform Hitachi Storage Navigator User Guide
2–8 Setting up Storage Navigator
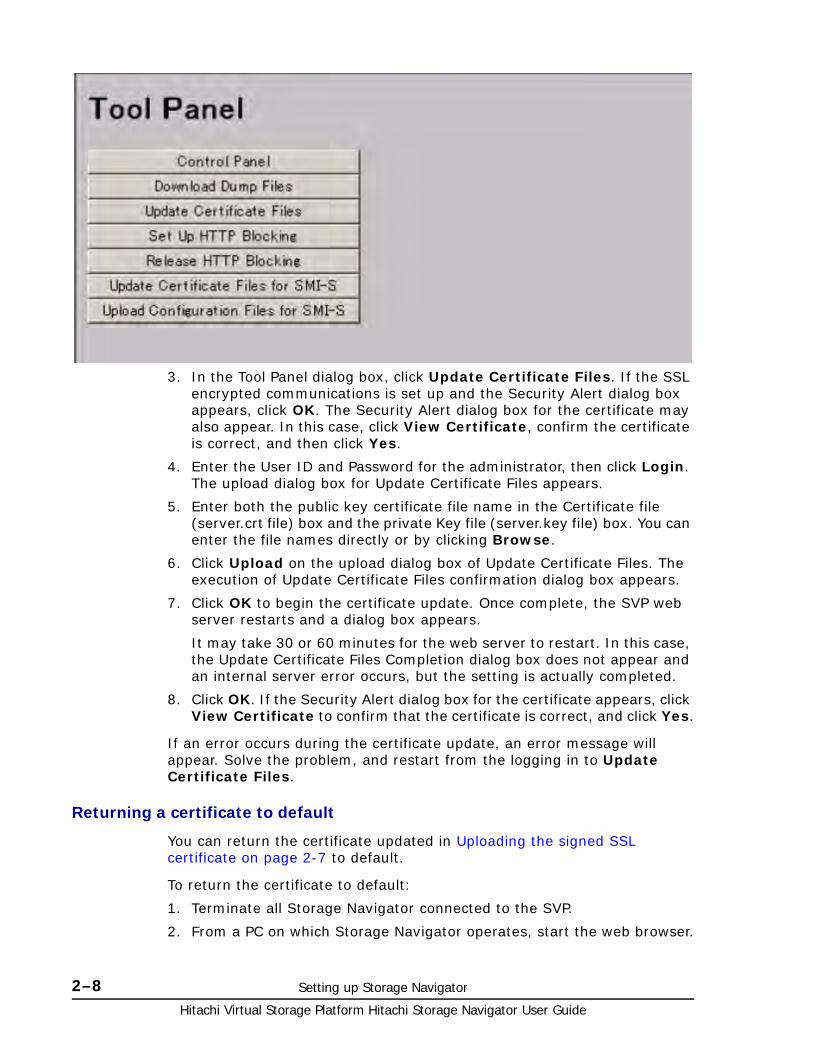
3. In the Tool Panel dialog box, click Update Certificate Files. If the SSL encrypted communications is set up and the Security Alert dialog box appears, click OK. The Security Alert dialog box for the certificate may also appear. In this case, click View Certificate, confirm the certificate is correct, and then click Yes.
4. Enter the User ID and Password for the administrator, then click Login. The upload dialog box for Update Certificate Files appears.
5. Enter both the public key certificate file name in the Certificate file (server.crt file) box and the private Key file (server.key file) box. You can enter the file names directly or by clicking Browse.
6. Click Upload on the upload dialog box of Update Certificate Files. The execution of Update Certificate Files confirmation dialog box appears.
7. Click OK to begin the certificate update. Once complete, the SVP web server restarts and a dialog box appears.
It may take 30 or 60 minutes for the web server to restart. In this case, the Update Certificate Files Completion dialog box does not appear and an internal server error occurs, but the setting is actually completed.
8. Click OK. If the Security Alert dialog box for the certificate appears, click View Certificate to confirm that the certificate is correct, and click Yes.
If an error occurs during the certificate update, an error message will appear. Solve the problem, and restart from the logging in to Update Certificate Files.
Returning a certificate to default
You can return the certificate updated in Uploading the signed SSL certificate on page 2-7 to default.
To return the certificate to default:
1. Terminate all Storage Navigator connected to the SVP.
2. From a PC on which Storage Navigator operates, start the web browser.

Setting up Storage Navigator 2–9Hitachi Virtual Storage Platform Hitachi Storage Navigator User Guide
3. Specify the following URL to open the Tool Panel dialog box:
https://SVP-IP-address-or-host-name/cgi-bin/utility/toolpanel.cgi
4. From the Tool Panel dialog box, click Update Certificate Files. A login dialog box for Update Certificate Files opens.
If SSL communication has been established, the Security Alert dialog box opens before the login dialog box. In that case, click OK. If the Security Alert dialog box regarding the certificate opens at other times, ensure that the certificate is correct and then click Yes.
5. From the Update Certificate Files login dialog box, enter the administrator's user ID and password, and click login. The upload dialog box for Update Certificate Files opens.
6. In the upload dialog box for Update Certificate Files, click Return to Default. The confirmation dialog box for Update Certificate Files opens. From the upload dialog box for Update Certificate Files, click Return to Default. The confirmation dialog box for Update Certificate Files opens.
Upon completion of the certificate update, the SVP web server restarts to reflect the update. When the restart of the SVP web server is complete, the update completion dialog box for Update Certificate Files opens.
7. From the update completion dialog box for Update Certificate Files, click OK. The display returns to the login dialog box.
8. In some cases, the Security Alert dialog box regarding the certificate may display before the login dialog box. If so, check that the certificate is correct and click Yes.
Note: If an error occurs during update of the certificate, an error message displays. If so, resolve the problem and then reexecute from login to Update Certificate Files.
Hitachi Virtual Storage Platform Hitachi Storage Navigator User Guide
2–10 Setting up Storage Navigator
Importing the certificate to the SVP
If you use a self-signed certificate, the web browser displays a warning message when it connects to an SSL-enabled SVP. You can disable this message using the following sample procedure, which assumes the use of Internet Explorer® 8.0.
To import the certificate to the browser:
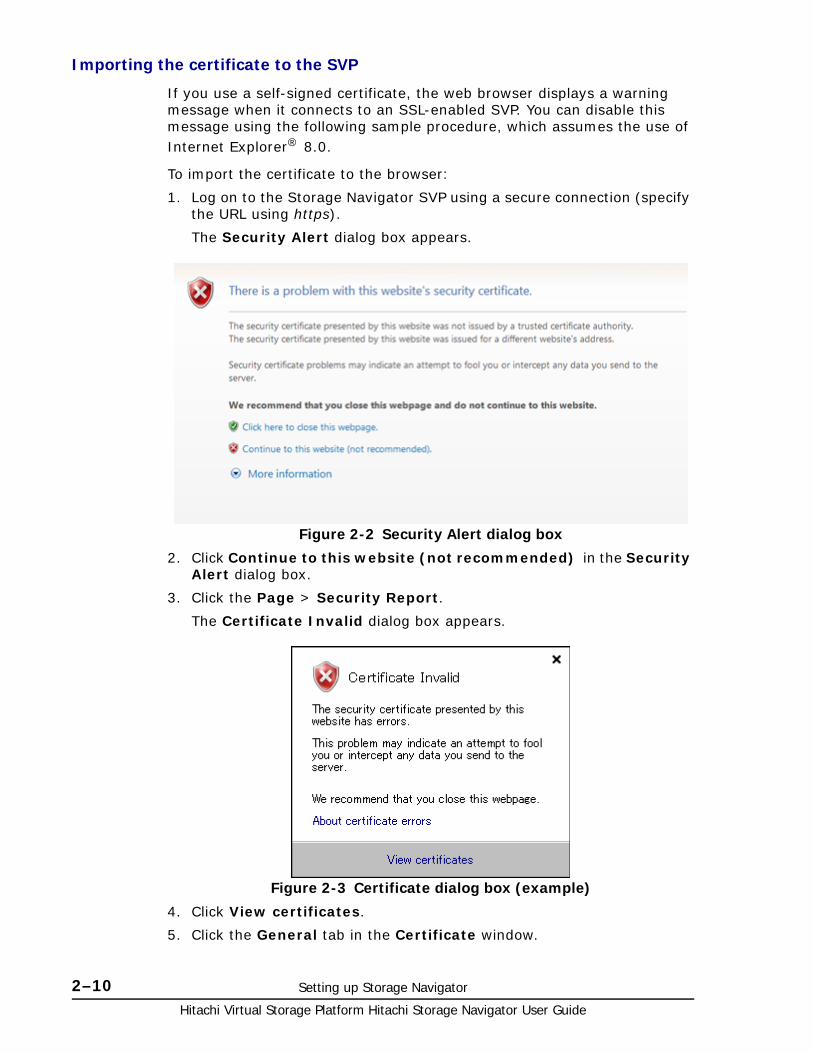
1. Log on to the Storage Navigator SVP using a secure connection (specify the URL using https).
The Security Alert dialog box appears.
2. Click Continue to this website (not recommended) in the Security Alert dialog box.
3. Click the Page > Security Report.
The Certificate Invalid dialog box appears.
4. Click View certificates.
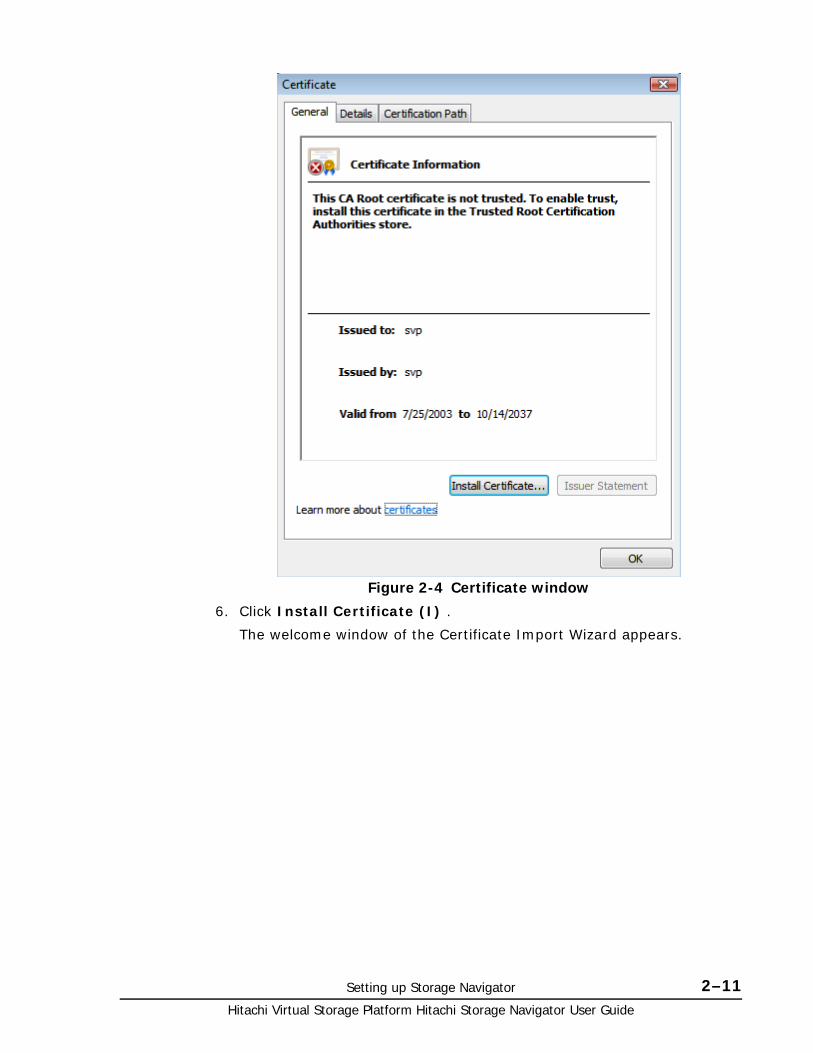
5. Click the General tab in the Certificate window.
Figure 2-2 Security Alert dialog box
Figure 2-3 Certificate dialog box (example)
Setting up Storage Navigator 2–11Hitachi Virtual Storage Platform Hitachi Storage Navigator User Guide
6. Click Install Certificate (I) .
The welcome window of the Certificate Import Wizard appears.
Figure 2-4 Certificate window
Hitachi Virtual Storage Platform Hitachi Storage Navigator User Guide
2–12 Setting up Storage Navigator
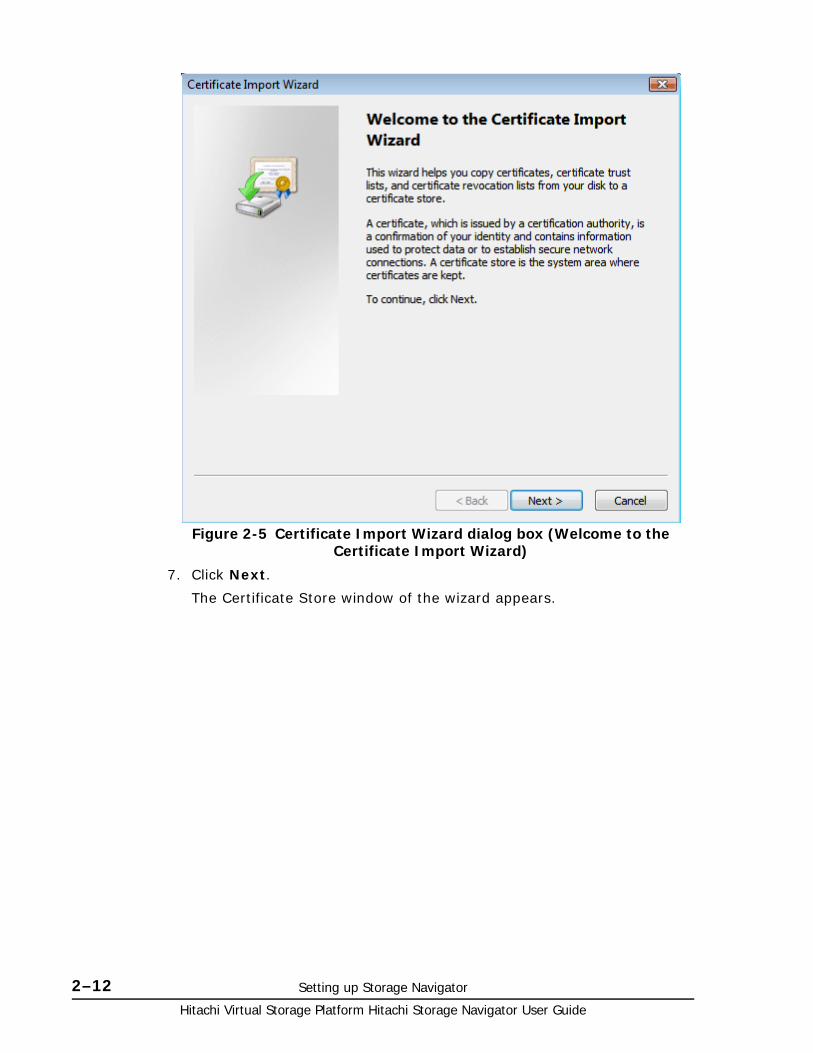
7. Click Next.
The Certificate Store window of the wizard appears.
Figure 2-5 Certificate Import Wizard dialog box (Welcome to the Certificate Import Wizard)
Setting up Storage Navigator 2–13Hitachi Virtual Storage Platform Hitachi Storage Navigator User Guide
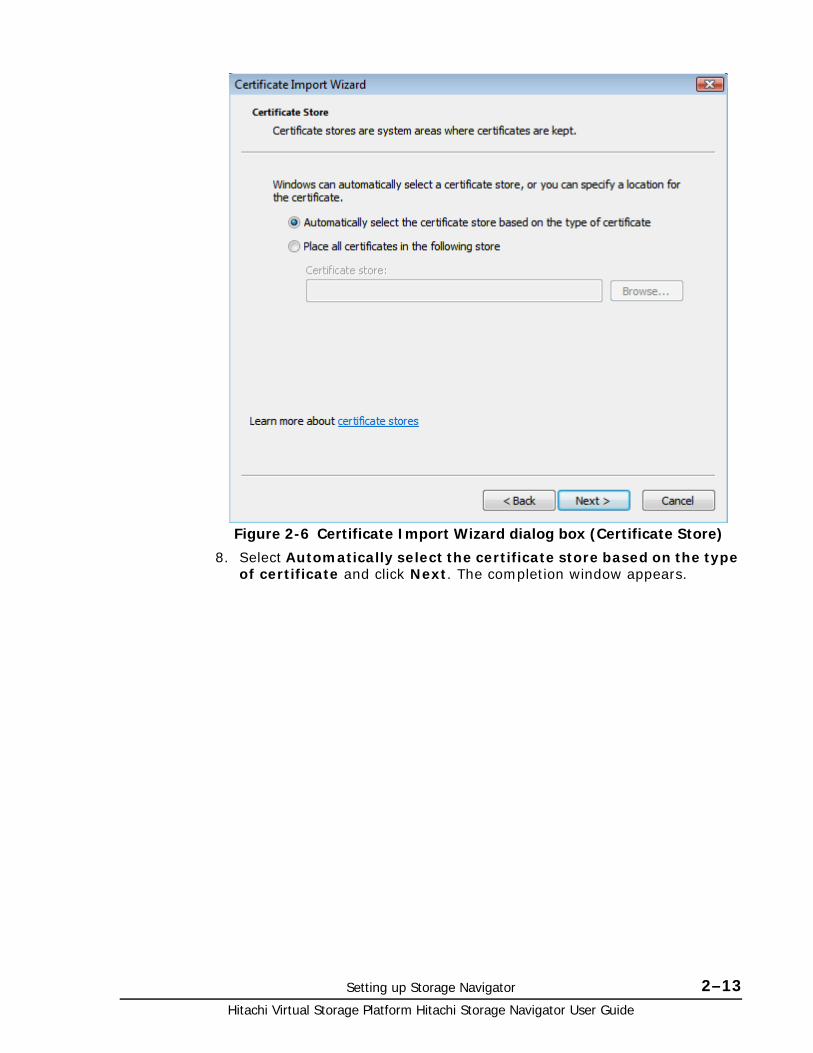
8. Select Automatically select the certificate store based on the type of certificate and click Next. The completion window appears.
Figure 2-6 Certificate Import Wizard dialog box (Certificate Store)
Hitachi Virtual Storage Platform Hitachi Storage Navigator User Guide
2–14 Setting up Storage Navigator
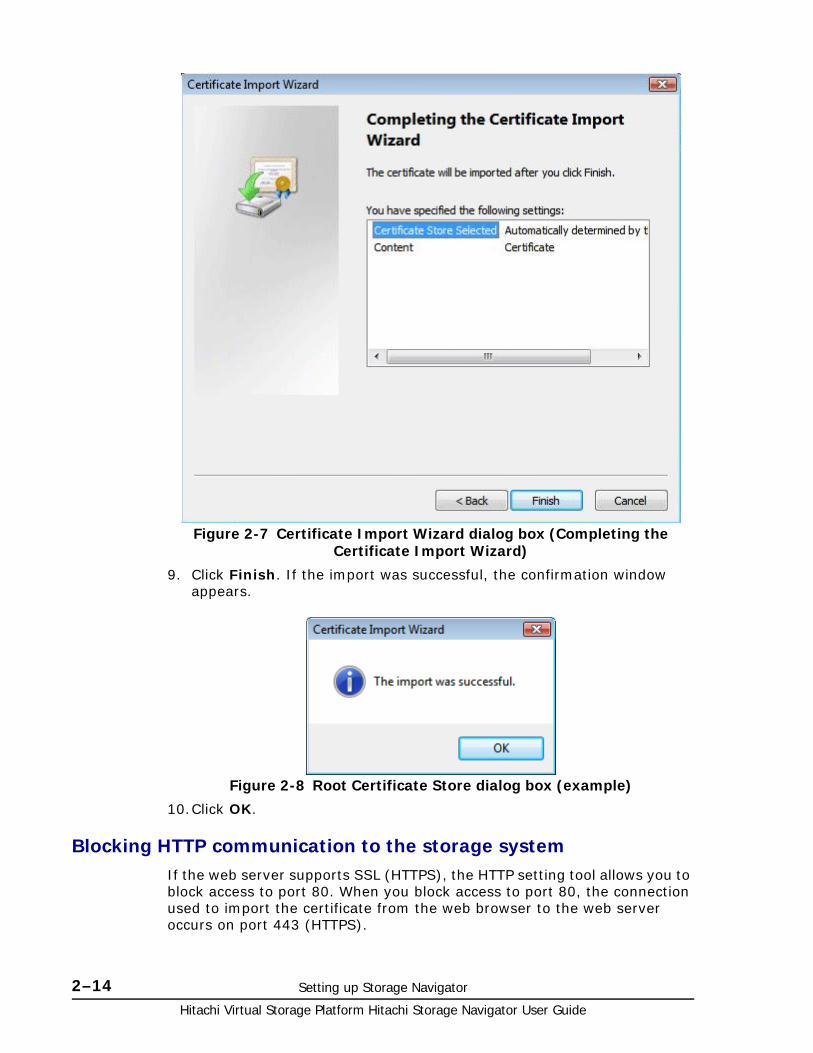
9. Click Finish. If the import was successful, the confirmation window appears.
10.Click OK.
Blocking HTTP communication to the storage systemIf the web server supports SSL (HTTPS), the HTTP setting tool allows you to block access to port 80. When you block access to port 80, the connection used to import the certificate from the web browser to the web server occurs on port 443 (HTTPS).
Figure 2-7 Certificate Import Wizard dialog box (Completing the Certificate Import Wizard)
Figure 2-8 Root Certificate Store dialog box (example)
Setting up Storage Navigator 2–15Hitachi Virtual Storage Platform Hitachi Storage Navigator User Guide
If you are using Command Suite to access Storage Navigator, blocking HTTP communication might interfere with that access. Make sure the Command Suite can use SSL communication to access Storage Navigator.
To block HTTP communication:
1. Log off all Storage Navigator web clients attached to the SVP.
2. Start both the Storage Navigator web client and web browser.
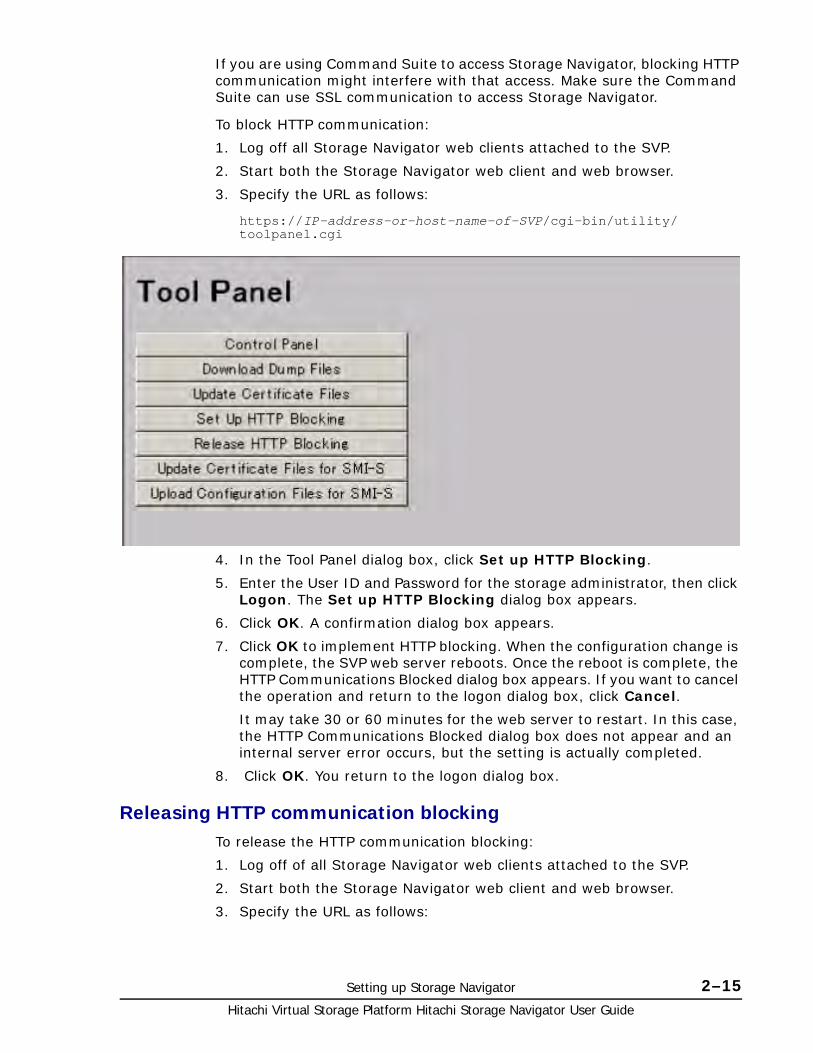
3. Specify the URL as follows:
https://IP-address-or-host-name-of-SVP/cgi-bin/utility/toolpanel.cgi
4. In the Tool Panel dialog box, click Set up HTTP Blocking.
5. Enter the User ID and Password for the storage administrator, then click Logon. The Set up HTTP Blocking dialog box appears.
6. Click OK. A confirmation dialog box appears.
7. Click OK to implement HTTP blocking. When the configuration change is complete, the SVP web server reboots. Once the reboot is complete, the HTTP Communications Blocked dialog box appears. If you want to cancel the operation and return to the logon dialog box, click Cancel.
It may take 30 or 60 minutes for the web server to restart. In this case, the HTTP Communications Blocked dialog box does not appear and an internal server error occurs, but the setting is actually completed.
8. Click OK. You return to the logon dialog box.
Releasing HTTP communication blocking To release the HTTP communication blocking:
1. Log off of all Storage Navigator web clients attached to the SVP.
2. Start both the Storage Navigator web client and web browser.
3. Specify the URL as follows:
Hitachi Virtual Storage Platform Hitachi Storage Navigator User Guide
2–16 Setting up Storage Navigator
https://IP-address-or-host-name-of-SVP/cgi-bin/utility/toolpanel.cgi
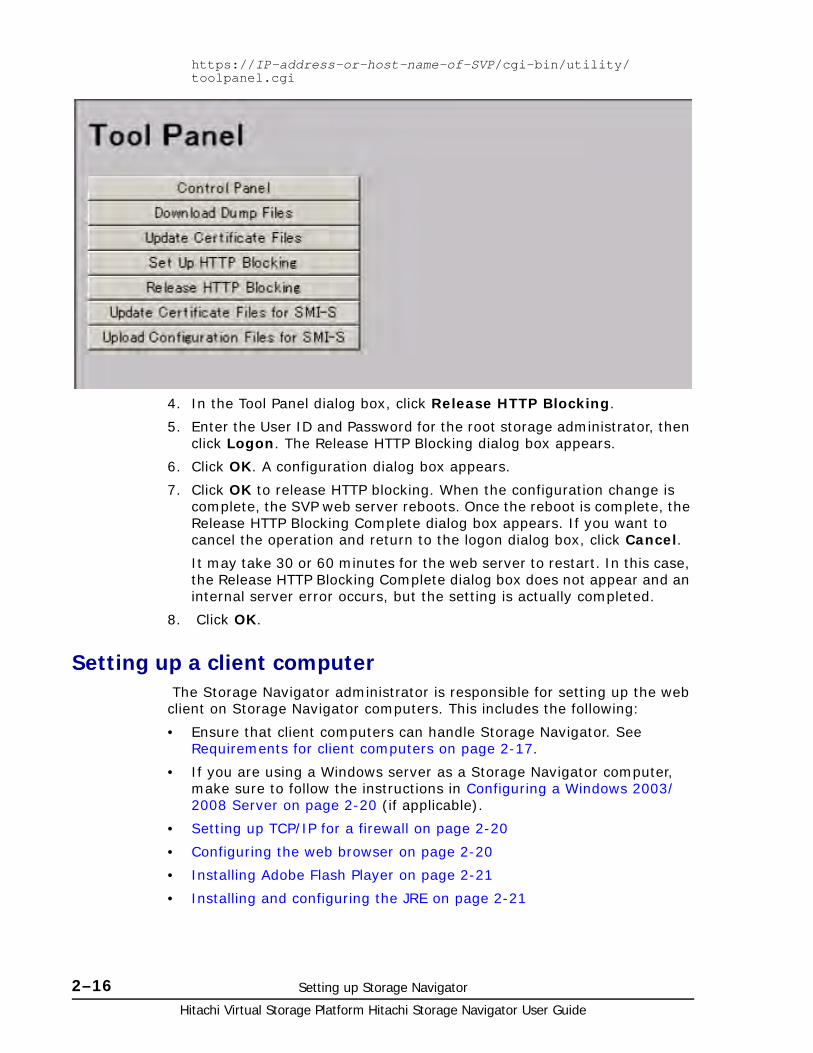
4. In the Tool Panel dialog box, click Release HTTP Blocking.
5. Enter the User ID and Password for the root storage administrator, then click Logon. The Release HTTP Blocking dialog box appears.
6. Click OK. A configuration dialog box appears.
7. Click OK to release HTTP blocking. When the configuration change is complete, the SVP web server reboots. Once the reboot is complete, the Release HTTP Blocking Complete dialog box appears. If you want to cancel the operation and return to the logon dialog box, click Cancel.
It may take 30 or 60 minutes for the web server to restart. In this case, the Release HTTP Blocking Complete dialog box does not appear and an internal server error occurs, but the setting is actually completed.
8. Click OK.
Setting up a client computer The Storage Navigator administrator is responsible for setting up the web client on Storage Navigator computers. This includes the following:
• Ensure that client computers can handle Storage Navigator. See Requirements for client computers on page 2-17.
• If you are using a Windows server as a Storage Navigator computer, make sure to follow the instructions in Configuring a Windows 2003/2008 Server on page 2-20 (if applicable).
• Setting up TCP/IP for a firewall on page 2-20
• Configuring the web browser on page 2-20
• Installing Adobe Flash Player on page 2-21
• Installing and configuring the JRE on page 2-21
Setting up Storage Navigator 2–17Hitachi Virtual Storage Platform Hitachi Storage Navigator User Guide
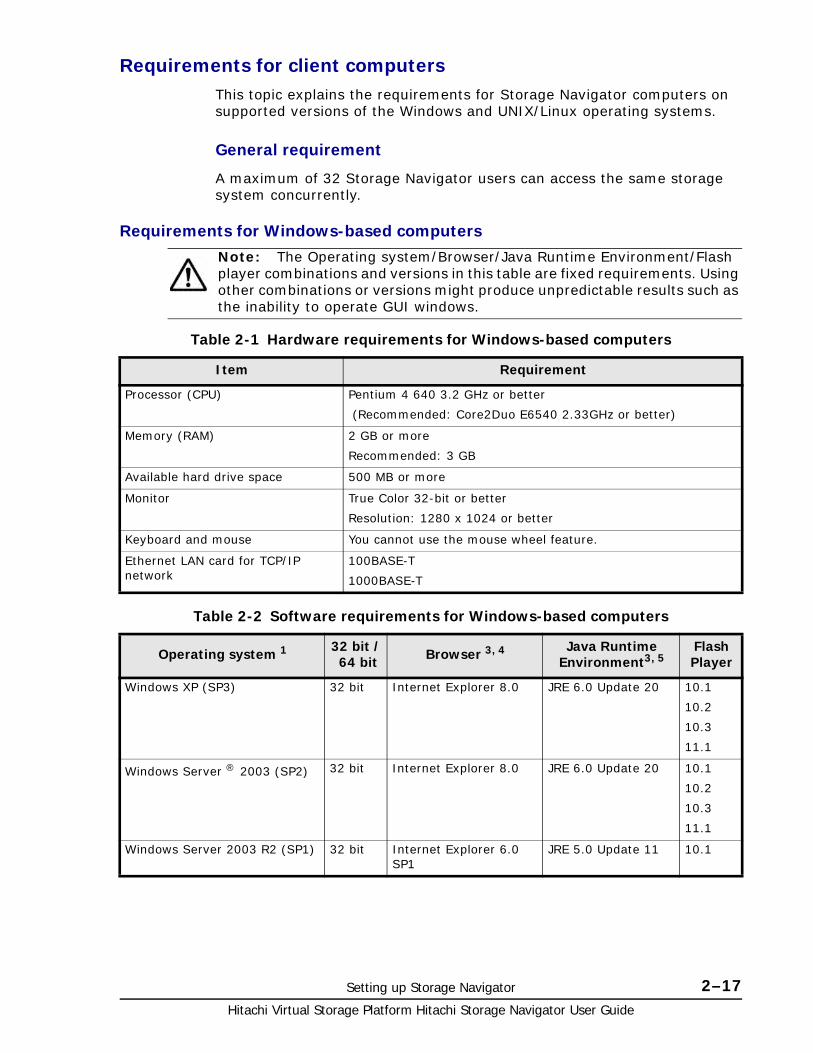
Requirements for client computersThis topic explains the requirements for Storage Navigator computers on supported versions of the Windows and UNIX/Linux operating systems.
General requirement
A maximum of 32 Storage Navigator users can access the same storage system concurrently.
Requirements for Windows-based computers
Table 2-1 Hardware requirements for Windows-based computers
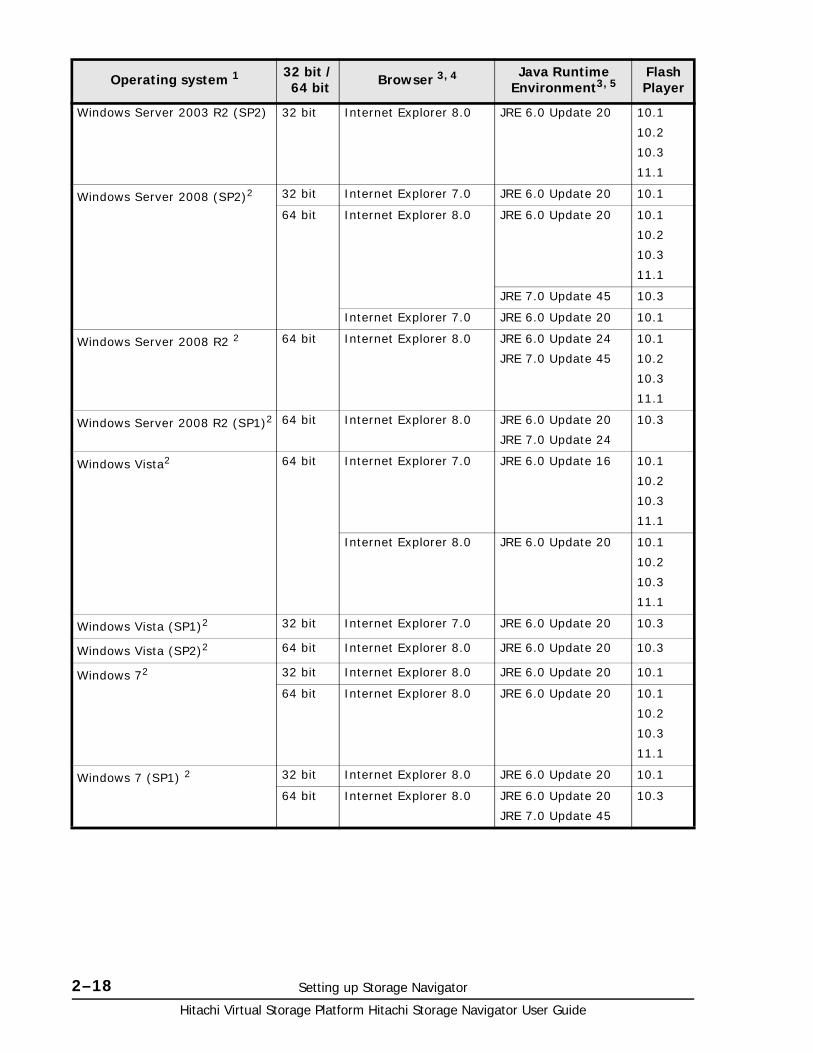
Table 2-2 Software requirements for Windows-based computers
Note: The Operating system/Browser/Java Runtime Environment/Flash player combinations and versions in this table are fixed requirements. Using other combinations or versions might produce unpredictable results such as the inability to operate GUI windows.
Item Requirement
Processor (CPU) Pentium 4 640 3.2 GHz or better
(Recommended: Core2Duo E6540 2.33GHz or better)
Memory (RAM) 2 GB or more
Recommended: 3 GB
Available hard drive space 500 MB or more
Monitor True Color 32-bit or better
Resolution: 1280 x 1024 or better
Keyboard and mouse You cannot use the mouse wheel feature.
Ethernet LAN card for TCP/IP network
100BASE-T
1000BASE-T
Operating system 1 32 bit / 64 bit Browser 3, 4 Java Runtime
Environment3, 5Flash Player
Windows XP (SP3) 32 bit Internet Explorer 8.0 JRE 6.0 Update 20 10.1
10.2
10.3
11.1
Windows Server ® 2003 (SP2) 32 bit Internet Explorer 8.0 JRE 6.0 Update 20 10.1
10.2
10.3
11.1
Windows Server 2003 R2 (SP1) 32 bit Internet Explorer 6.0 SP1
JRE 5.0 Update 11 10.1
Hitachi Virtual Storage Platform Hitachi Storage Navigator User Guide
2–18 Setting up Storage Navigator
Windows Server 2003 R2 (SP2) 32 bit Internet Explorer 8.0 JRE 6.0 Update 20 10.1
10.2
10.3
11.1
Windows Server 2008 (SP2)2 32 bit Internet Explorer 7.0 JRE 6.0 Update 20 10.1
64 bit Internet Explorer 8.0 JRE 6.0 Update 20 10.1
10.2
10.3
11.1
JRE 7.0 Update 45 10.3
Internet Explorer 7.0 JRE 6.0 Update 20 10.1
Windows Server 2008 R2 2 64 bit Internet Explorer 8.0 JRE 6.0 Update 24
JRE 7.0 Update 45
10.1
10.2
10.3
11.1
Windows Server 2008 R2 (SP1)2 64 bit Internet Explorer 8.0 JRE 6.0 Update 20
JRE 7.0 Update 24
10.3
Windows Vista2 64 bit Internet Explorer 7.0 JRE 6.0 Update 16 10.1
10.2
10.3
11.1
Internet Explorer 8.0 JRE 6.0 Update 20 10.1
10.2
10.3
11.1
Windows Vista (SP1)2 32 bit Internet Explorer 7.0 JRE 6.0 Update 20 10.3
Windows Vista (SP2)2 64 bit Internet Explorer 8.0 JRE 6.0 Update 20 10.3
Windows 72 32 bit Internet Explorer 8.0 JRE 6.0 Update 20 10.1
64 bit Internet Explorer 8.0 JRE 6.0 Update 20 10.1
10.2
10.3
11.1
Windows 7 (SP1) 2 32 bit Internet Explorer 8.0 JRE 6.0 Update 20 10.1
64 bit Internet Explorer 8.0 JRE 6.0 Update 20
JRE 7.0 Update 45
10.3
Operating system 1 32 bit / 64 bit Browser 3, 4 Java Runtime
Environment3, 5Flash Player
Setting up Storage Navigator 2–19Hitachi Virtual Storage Platform Hitachi Storage Navigator User Guide
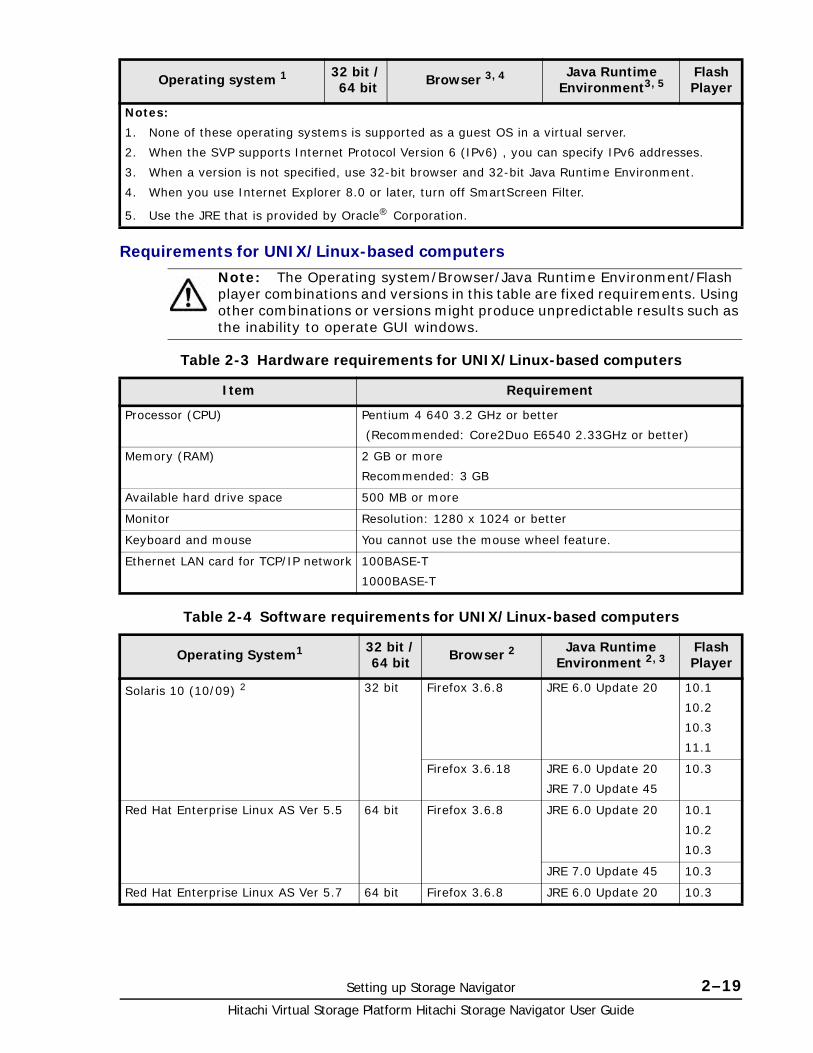
Requirements for UNIX/Linux-based computers
Table 2-3 Hardware requirements for UNIX/Linux-based computers
Table 2-4 Software requirements for UNIX/Linux-based computers
Notes:
1. None of these operating systems is supported as a guest OS in a virtual server.
2. When the SVP supports Internet Protocol Version 6 (IPv6) , you can specify IPv6 addresses.
3. When a version is not specified, use 32-bit browser and 32-bit Java Runtime Environment.
4. When you use Internet Explorer 8.0 or later, turn off SmartScreen Filter.
5. Use the JRE that is provided by Oracle® Corporation.
Note: The Operating system/Browser/Java Runtime Environment/Flash player combinations and versions in this table are fixed requirements. Using other combinations or versions might produce unpredictable results such as the inability to operate GUI windows.
Item Requirement
Processor (CPU) Pentium 4 640 3.2 GHz or better
(Recommended: Core2Duo E6540 2.33GHz or better)
Memory (RAM) 2 GB or more
Recommended: 3 GB
Available hard drive space 500 MB or more
Monitor Resolution: 1280 x 1024 or better
Keyboard and mouse You cannot use the mouse wheel feature.
Ethernet LAN card for TCP/IP network 100BASE-T
1000BASE-T
Operating System1 32 bit /64 bit Browser 2 Java Runtime
Environment 2, 3FlashPlayer
Solaris 10 (10/09) 2 32 bit Firefox 3.6.8 JRE 6.0 Update 20 10.1
10.2
10.3
11.1
Firefox 3.6.18 JRE 6.0 Update 20
JRE 7.0 Update 45
10.3
Red Hat Enterprise Linux AS Ver 5.5 64 bit Firefox 3.6.8 JRE 6.0 Update 20 10.1
10.2
10.3
JRE 7.0 Update 45 10.3
Red Hat Enterprise Linux AS Ver 5.7 64 bit Firefox 3.6.8 JRE 6.0 Update 20 10.3
Operating system 1 32 bit / 64 bit Browser 3, 4 Java Runtime
Environment3, 5Flash Player

Hitachi Virtual Storage Platform Hitachi Storage Navigator User Guide
2–20 Setting up Storage Navigator
Configuring a Windows 2003/2008 ServerIf you are using a Windows Server 2003/2008 and Internet Explorer, set the following options before logging in to an SVP:
• Navigate to Tools > Internet Options, click Advanced, and click the Do not save encrypted pages to disk checkbox to enable it.
• Navigate to Tools > Internet Options, click Security and register the URL of the SVP.
For more information on configuring these settings, see the Internet Explorer help documentation.
Setting up TCP/IP for a firewallTo connect the Storage Navigator computer and the SVP through a firewall, configure the firewall so that the TCP/IP port for the protocol you use becomes available.
Table 2-5 Firewall configuration
Configuring the web browserTo configure the client web browser, note the following:
• The browser must allow first-party, third-party, and session cookies.
Notes:
1. None of these operating systems is supported as a guest OS in a virtual server.
2. When a version is not specified, use 32-bit browser and 32-bit Java Runtime Environment.
3. Use the JRE that is provided by Oracle® Corporation.
Operating System1 32 bit /64 bit Browser 2 Java Runtime
Environment 2, 3FlashPlayer
Protocol Port number Direction of communication
HTTP 80 From the Storage Navigator web client to the SVP
HTTPS 443
RMI 1099
RMI 51099
RMI 51100
SMI-S 427
SMI-S 5989
SNMP* 161
SNMP Trap* 162 From the SVP to the Storage Navigator web client
Command Control Interface
31001 From a host to the SVP
Command Control Interface
34001 From the SVP to a host
* Required if you use a Storage Navigator web client as an SNMP manager.
Setting up Storage Navigator 2–21Hitachi Virtual Storage Platform Hitachi Storage Navigator User Guide
• Pop-up blocker and plug-ins must be disabled.
Consult your browser's documentation for instructions.
Installing Adobe Flash Player
To install the latest Adobe® Flash® Player, go to http://get.adobe.com/flashplayer/ download the installer to your system, and run the installer.
To install a previous version of Adobe Flash Player:
1. Launch the web browser that you normally use and go to the Adobe website http://www.adobe.com.
2. Scroll upward as needed to display the top of the Adobe web page.
3. In the Adobe search box in the upper right corner of the web page (not the browser search box) enter archived flash player and click Search.
4. In the search results, select Archived Flash Player versions. The Archived Flash Player version web page on the Adobe website opens.
5. Scroll down to the list of archived Flash player versions, select the archived version you want, download the installer, and then install it
Installing and configuring the JREYou can download and install the JRE from the Java website at http://www.oracle.com/technetwork/java/archive-139210.html.
In a Windows environment, you can verify that JRE was successfully installed if you are able to view the Java icon in the Control Panel. You should be able to launch the Java Control Panel by double-clicking the Java icon.
In a UNIX or Linux environment, you can verify that JRE was successfully installed if you are able to open the ControlPanel.html file, which is located in the JRE root directory.
On the JRE of each Storage Navigator computer, Java log file trace and logging must be enabled and caching must be disabled. The Java log file can help you troubleshoot a problem when an application error occurs in the Storage Navigator web client. Disabling the caching feature can help prevent complications when the microcode is updated. See the http://java.sun.com website for more information on configuring JRE through the Java Control Panel.
Configuring JRE
After installing the JRE file on UNIX workstations, you must set the file path for the installation directory.
In a B Shell, issue the following command:
PATH=$PATH:[JRE installation directory path]/jre/bin export PATH
In a C Shell, issue the following command:
setenv PATH ${PATH}:[JRE installation directory path]/jre/bin
Hitachi Virtual Storage Platform Hitachi Storage Navigator User Guide
2–22 Setting up Storage Navigator
Using the SMI-S function with a Storage Navigator user account
VSP storage systems support the SMI-S function developed by SNIA. Storage administrators can use the SMI-S function by using SMI-S compliant management software.
Information and details about SMI-S are located at http://www.snia.org.
Using the SMI-S functionTo use the SMI-S function, create a Storage Navigator user account and specify a storage system as the access destination from the management software.
Prerequisites• SMI-S Provider software application must be installed.
Procedure1. Create a Storage Navigator user account in the management software.
The user account must belong to one of the following built-in user groups:
Storage Administrator (View & Modify) User Group. Users have full permissions to access the SMI-S function from the management software.
Storage Administrator (View Only) User Group. Users have read- only permissions to access the SMI-S function from the management software.
2. In the management software program, enter the following storage system information:
IP Address of the storage system
Protocol: specify HTTPS
Port: 5989
Namespace:root/hitachi/smis or interop
Troubleshooting
If you cannot access the SMI-S function, check the network environment and access destination. If access cannot be made even though there is no problem with the network environment and access destination, contact Hitachi Data Systems Support Centerr.
Uploading a signed certificate to the SMI-S providerTo use certificates in SSL communication with the SMI-S provider, you must update and upload the private key and the signed server certificate (public key) to the SMI-S provider to update the certificate. Use the following procedure to upload and update certificates using a certificate update tool.

Setting up Storage Navigator 2–23Hitachi Virtual Storage Platform Hitachi Storage Navigator User Guide
Prerequisites
Ensure that the following items have been completed:
• A private key (.key file) has been created. Change the file name to server.key unless the file is already named that.
• A signed public key certificate (.crt file) has been acquired. Change the file name to server.crt unless the file is already named that.
• The private key (server.key file) and the signed public key certificate (server.crt file) are in Base 64 encoded X509 format.
Procedure1. Terminate all Storage Navigators connected to the SMI-S provider.
2. From a PC on which Storage Navigator operates, start the Web browser.
3. Specify the following URL to open the Tool Panel dialog box.
https://IP-address-or-host-name-of-SVP/cgi-bin/utility/toolpanel.cgi
4. In the Tool Panel dialog box, click Update Certificate Files for SMI-S. The login dialog box for Update Certificate Files for SMI-S opens.
If SSL communication has been established, the Security Alert dialog box opens before the login dialog box. Click OK. If the Security Alert dialog box regarding the certificate opens at other times, ensure that the certificate is correct and then click Yes.
5. In the login dialog box for Update Certificate Files for SMI-S, enter the administrator's user ID and password, and click Login. The upload dialog box for Update Certificate Files for SMI-S opens.
6. In the upload dialog box for Update Certificate Files for SMI-S, enter both the public key certificate file name in the Certificate file (server.crt file) box and the Private Key file (server.key file) box. You can enter the file names directly or by clicking Browse.
7. Click Upload. The execution confirmation dialog box for Update Certificate Files for SMI-S opens.
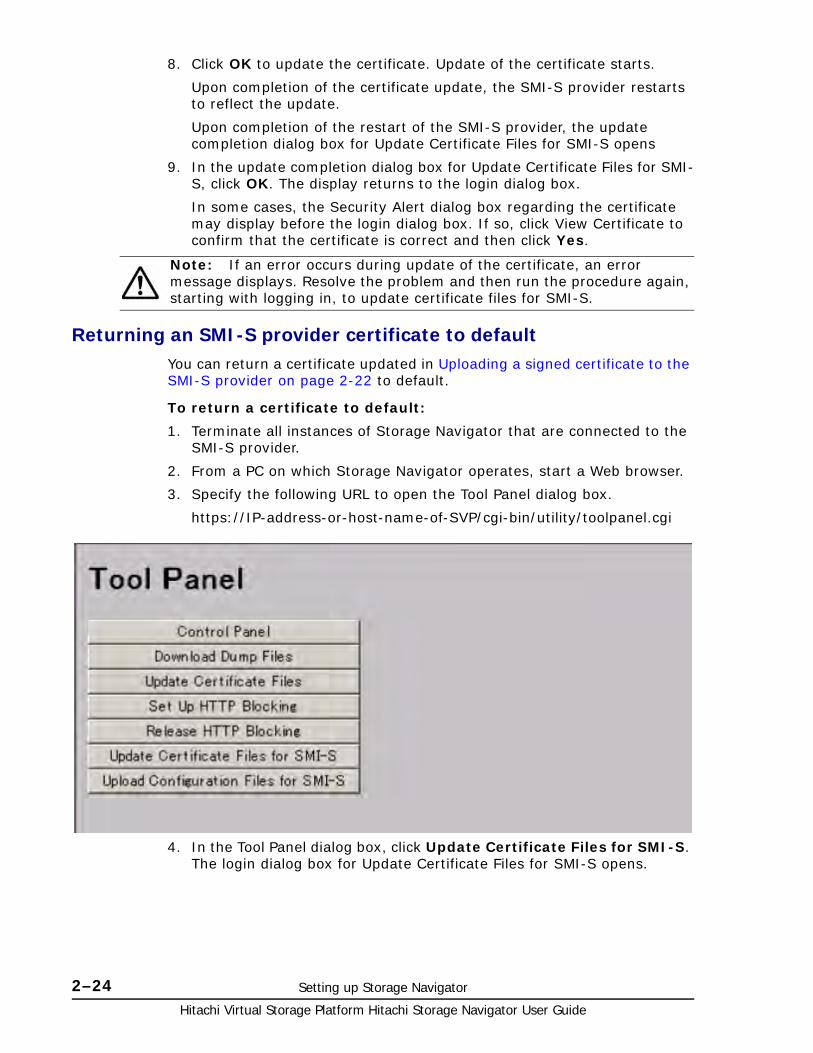
Hitachi Virtual Storage Platform Hitachi Storage Navigator User Guide
2–24 Setting up Storage Navigator
8. Click OK to update the certificate. Update of the certificate starts.
Upon completion of the certificate update, the SMI-S provider restarts to reflect the update.
Upon completion of the restart of the SMI-S provider, the update completion dialog box for Update Certificate Files for SMI-S opens
9. In the update completion dialog box for Update Certificate Files for SMI-S, click OK. The display returns to the login dialog box.
In some cases, the Security Alert dialog box regarding the certificate may display before the login dialog box. If so, click View Certificate to confirm that the certificate is correct and then click Yes.
Returning an SMI-S provider certificate to defaultYou can return a certificate updated in Uploading a signed certificate to the SMI-S provider on page 2-22 to default.
To return a certificate to default:
1. Terminate all instances of Storage Navigator that are connected to the SMI-S provider.
2. From a PC on which Storage Navigator operates, start a Web browser.
3. Specify the following URL to open the Tool Panel dialog box.
https://IP-address-or-host-name-of-SVP/cgi-bin/utility/toolpanel.cgi
4. In the Tool Panel dialog box, click Update Certificate Files for SMI-S. The login dialog box for Update Certificate Files for SMI-S opens.
Note: If an error occurs during update of the certificate, an error message displays. Resolve the problem and then run the procedure again, starting with logging in, to update certificate files for SMI-S.
Setting up Storage Navigator 2–25Hitachi Virtual Storage Platform Hitachi Storage Navigator User Guide
If SSL communication has been established, the Security Alert dialog box opens before the login dialog box. If so, click OK. If the Security Alert dialog box regarding the certificate opens at other times, click View Certificate to confirm that the certificate is correct and then click Yes.
5. In the login dialog box for Update Certificate Files for SMI-S, enter the administrator's user ID and password, and click Login. The upload dialog box for Update Certificate Files for SMI-S opens.
6. In the upload dialog box for Update Certificate Files for SMI-S, click Return to the default configuration. The execution confirmation dialog box for Update Certificate Files for SMI-S opens.
7. Click OK to update the certificate. Update of the certificate starts.
Upon completion of the certificate update, the SMI-S provider restarts to reflect the update. Upon completion of the restart of the SMI-S provider, the update completion dialog box for Update Certificate Files for SMI-S opens.
8. In the update completion dialog box for Update Certificate Files for SMI-S, click OK. The display returns to the login dialog box.
In some cases, the Security Alert dialog box regarding the certificate may display before the login dialog box. If so, click View Certificate to confirm that the certificate is correct and then click Yes.
Uploading an SMI-S provider configuration fileYou can control the SMI-S function using the SMI-S provider configuration file that you create.
Prerequisites• Ensure that the SMI-S provider configuration file (user-
defined.properties) has already been created. Change the file name to user-defined.properties unless the file is already named that.
Procedure
To upload the SMI-S provider configuration file:
1. Terminate all Storage Navigators connected to the SMI-S provider.
2. From a PC on which Storage Navigator operates, start the Web browser.
3. Specify the following URL to open the Tool Panel dialog box.
http://IP-address-or-host-name-of-SVP/cgi-bin/utility/toolpanel.cgi
Note: If an error occurs during update of the certificate, an error message displays. Resolve the problem and then run the procedure again, starting with logging in, to update certificate files for SMI-S.
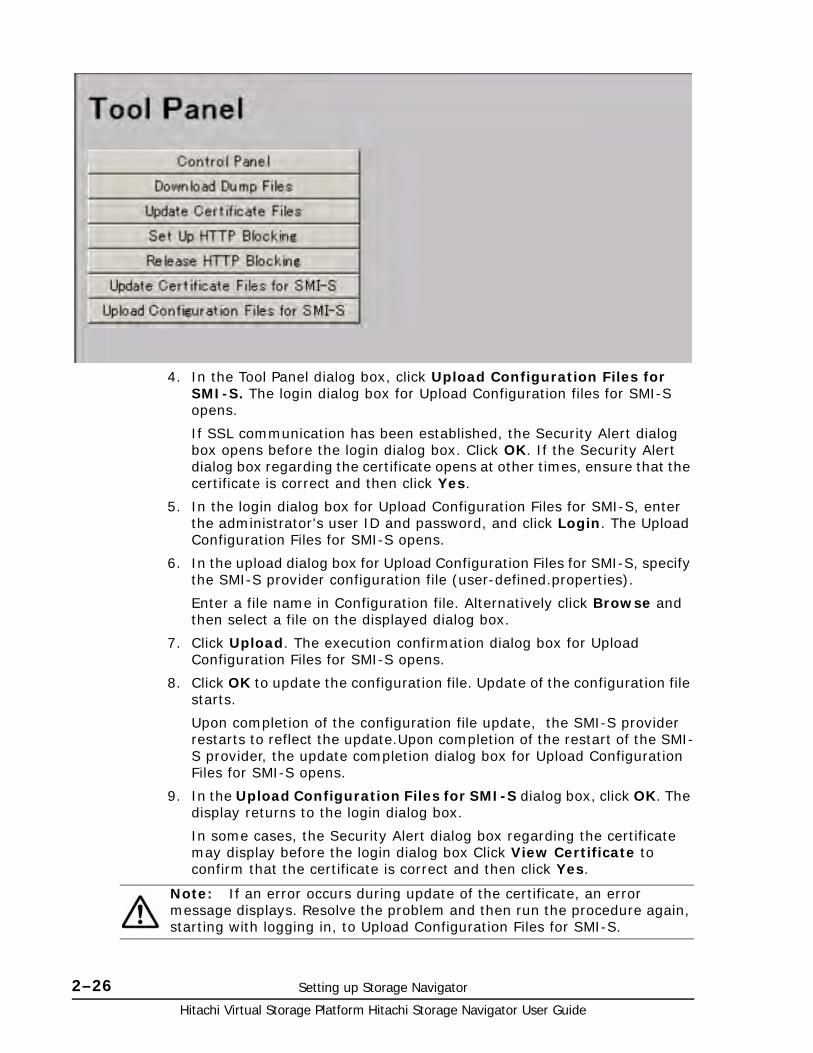
Hitachi Virtual Storage Platform Hitachi Storage Navigator User Guide
2–26 Setting up Storage Navigator
4. In the Tool Panel dialog box, click Upload Configuration Files for SMI-S. The login dialog box for Upload Configuration files for SMI-S opens.
If SSL communication has been established, the Security Alert dialog box opens before the login dialog box. Click OK. If the Security Alert dialog box regarding the certificate opens at other times, ensure that the certificate is correct and then click Yes.
5. In the login dialog box for Upload Configuration Files for SMI-S, enter the administrator's user ID and password, and click Login. The Upload Configuration Files for SMI-S opens.
6. In the upload dialog box for Upload Configuration Files for SMI-S, specify the SMI-S provider configuration file (user-defined.properties).
Enter a file name in Configuration file. Alternatively click Browse and then select a file on the displayed dialog box.
7. Click Upload. The execution confirmation dialog box for Upload Configuration Files for SMI-S opens.
8. Click OK to update the configuration file. Update of the configuration file starts.
Upon completion of the configuration file update, the SMI-S provider restarts to reflect the update.Upon completion of the restart of the SMI-S provider, the update completion dialog box for Upload Configuration Files for SMI-S opens.
9. In the Upload Configuration Files for SMI-S dialog box, click OK. The display returns to the login dialog box.
In some cases, the Security Alert dialog box regarding the certificate may display before the login dialog box Click View Certificate to confirm that the certificate is correct and then click Yes.
Note: If an error occurs during update of the certificate, an error message displays. Resolve the problem and then run the procedure again, starting with logging in, to Upload Configuration Files for SMI-S.
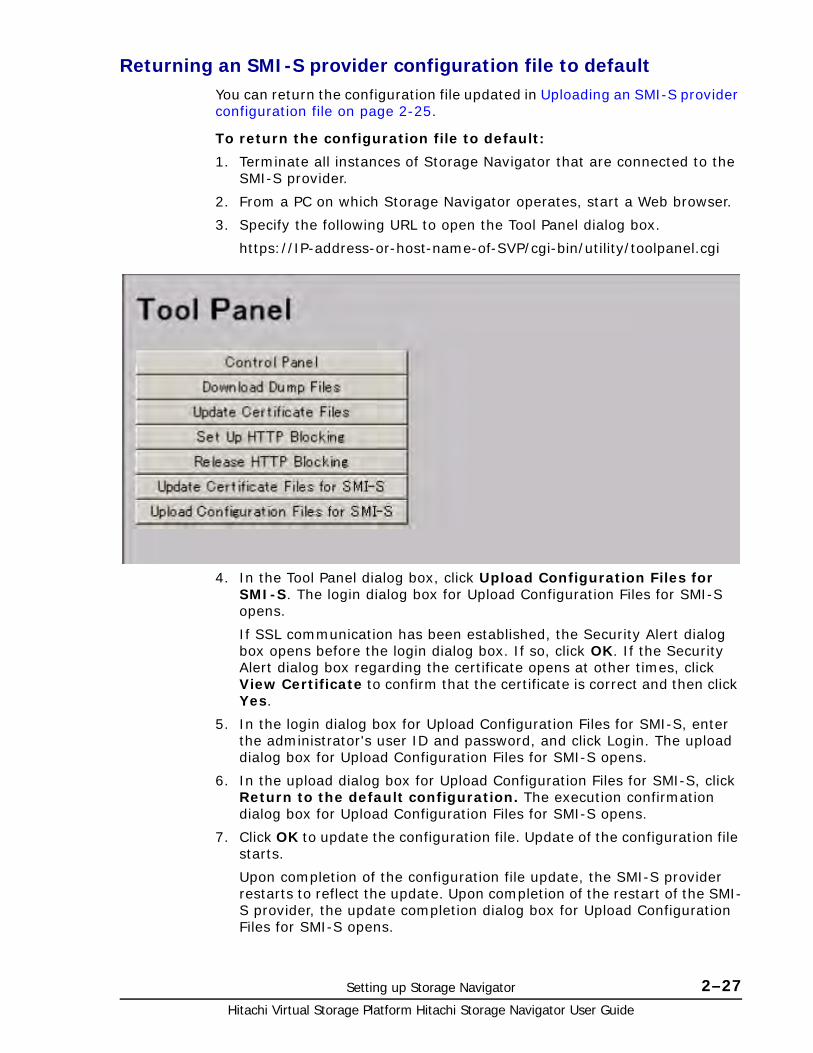
Setting up Storage Navigator 2–27Hitachi Virtual Storage Platform Hitachi Storage Navigator User Guide
Returning an SMI-S provider configuration file to defaultYou can return the configuration file updated in Uploading an SMI-S provider configuration file on page 2-25.
To return the configuration file to default:
1. Terminate all instances of Storage Navigator that are connected to the SMI-S provider.
2. From a PC on which Storage Navigator operates, start a Web browser.
3. Specify the following URL to open the Tool Panel dialog box.
https://IP-address-or-host-name-of-SVP/cgi-bin/utility/toolpanel.cgi
4. In the Tool Panel dialog box, click Upload Configuration Files for SMI-S. The login dialog box for Upload Configuration Files for SMI-S opens.
If SSL communication has been established, the Security Alert dialog box opens before the login dialog box. If so, click OK. If the Security Alert dialog box regarding the certificate opens at other times, click View Certificate to confirm that the certificate is correct and then click Yes.
5. In the login dialog box for Upload Configuration Files for SMI-S, enter the administrator's user ID and password, and click Login. The upload dialog box for Upload Configuration Files for SMI-S opens.
6. In the upload dialog box for Upload Configuration Files for SMI-S, click Return to the default configuration. The execution confirmation dialog box for Upload Configuration Files for SMI-S opens.
7. Click OK to update the configuration file. Update of the configuration file starts.
Upon completion of the configuration file update, the SMI-S provider restarts to reflect the update. Upon completion of the restart of the SMI-S provider, the update completion dialog box for Upload Configuration Files for SMI-S opens.
Hitachi Virtual Storage Platform Hitachi Storage Navigator User Guide
2–28 Setting up Storage Navigator
8. In the update completion dialog box for Upload Configuration Files for SMI-S, click OK. The display returns to the login dialog box.
In some cases, the Security Alert dialog box regarding the certificate may open before the login dialog box. If so, click View Certificate to confirm that the certificate is correct and then click Yes.
Installing the report configuration toolComplete the following instructions to install the report configuration tool.
PrerequisitesYou need the following items to install the report configuration tool:
• A Windows computer running Windows 2000, Windows Server 2003, or Windows Server 2008.
You can use either an IPv4 address or an IPv6 address to connect the SVP to the windows computer. You can also connect the computer to the SVP over an IPv4 proxy server. When you use the proxy server, specify a name and a port number of the proxy server as the HTTP_PROXY environment variable on the Windows computer. For example:
SET HTTP_PROXY=http://proxy.xx.co.jp:8080
• A user account for exclusive use of the report configuration tool.
To use the report configuration tool, you must create a user account that is used exclusively for the report configuration tool. Assign the storage administrator role (initial configuration) to this user account.
For information on user accounts, see Creating user accounts on page 4-12.
• The report configuration tool installation software
The Report Configuration Tool is located on the CD-ROM Disc 2, which is named Host PP.
Installation procedureTo install the report configuration tool:
1. Insert the Report Configuration Tool installation CD into the CD-ROM drive.
2. On the CD, navigate to the /program/Config_Report_CLI/Win32 folder and double-click setup.exe. Follow the instructions on the screen.
Note: If an error occurs during update of the SMI-S provider configuration file, an error message displays. Resolve the problem and then run the procedure again, starting with logging in, to upload configuration files for SMI-S.
Setting up Storage Navigator 2–29Hitachi Virtual Storage Platform Hitachi Storage Navigator User Guide
3. When prompted, enter the name of the directory in which to install the report configuration tool. The installer continues until the tool is installed.
Using the report configuration tool You can use the report configuration tool to create up to 20 configuration reports and then view or download them.
Creating a configuration report on page 7-6 describes how to create a configuration report. The list of commands for creating reports is located in Report Configuration Tool command reference (raidinf commands) on page B-1 .
Note: The directory where the report configuration tool is installed is not specified as an application path. When necessary, specify the directory as the application path

Hitachi Virtual Storage Platform Hitachi Storage Navigator User Guide
2–30 Setting up Storage Navigator
3
Getting started using Storage Navigator 3–1Hitachi Virtual Storage Platform Hitachi Storage Navigator User Guide
Getting started using StorageNavigator
This chapter describes login and restrictions when using Storage Navigator.
For instructions on navigating to storage system information, see Viewing and managing the storage system on page 7-1.
□ Logging in to Storage Navigator
□ Storage Navigator restrictions
□ Refreshing your user view
□ Setting your view back to default
□ For more information about Storage Navigator
Hitachi Virtual Storage Platform Hitachi Storage Navigator User Guide
3–2 Getting started using Storage Navigator
Logging in to Storage NavigatorThere are two kinds of login for Storage Navigator:
• One-time only initial login by the administrator or super-user who logs in first to create other user accounts
• Normal login for all other Storage Navigator and storage system administrators
Initial super-user loginThis topic describes the login procedure for the super-user who sets up Storage Navigator and logs in to it for the first time. This super-user has a built-in ID and password, which is set up with all permissions.
Once logged in, the super-user must change the super-user password to prevent unwarranted login.
To log in using the super-user ID and password:
1. In your web browser, specify the URL for your SVP:
https://IP-address-or-host-name-of-SVP/.
2. Log in with the super-user ID maintenance and password raid-mainte.
3. Change the password for this account by clicking Settings > User Management > Change Password.
Normal loginThis login procedure is for all users other than the super-user.
To log in to a storage system with Storage Navigator:
1. In your web browser, specify the following URL:
https://IP-address-or-host-name-of-SVP/
2. The following actions might be required to open the login dialog box, depending on your environment:
If a message indicates that the enhanced security configuration is enabled on the computer, select In the future, do not show this message and click OK.
If the SVP is set to support SSL-encrypted communication and security messages appear, make sure the certificate is correct and follow the instructions on the dialog box.
If a message indicates that certain web sites are blocked, follow instructions in Adding your SVP to the trusted sites zone—for Windows server on page 3-3.
3. Type the user ID and password.
4. Click Login.
5. If the Security Information dialog box appears, click Yes.
Note: When connecting to a second storage system, you must start a new web browser instance and log in to the system's URL.
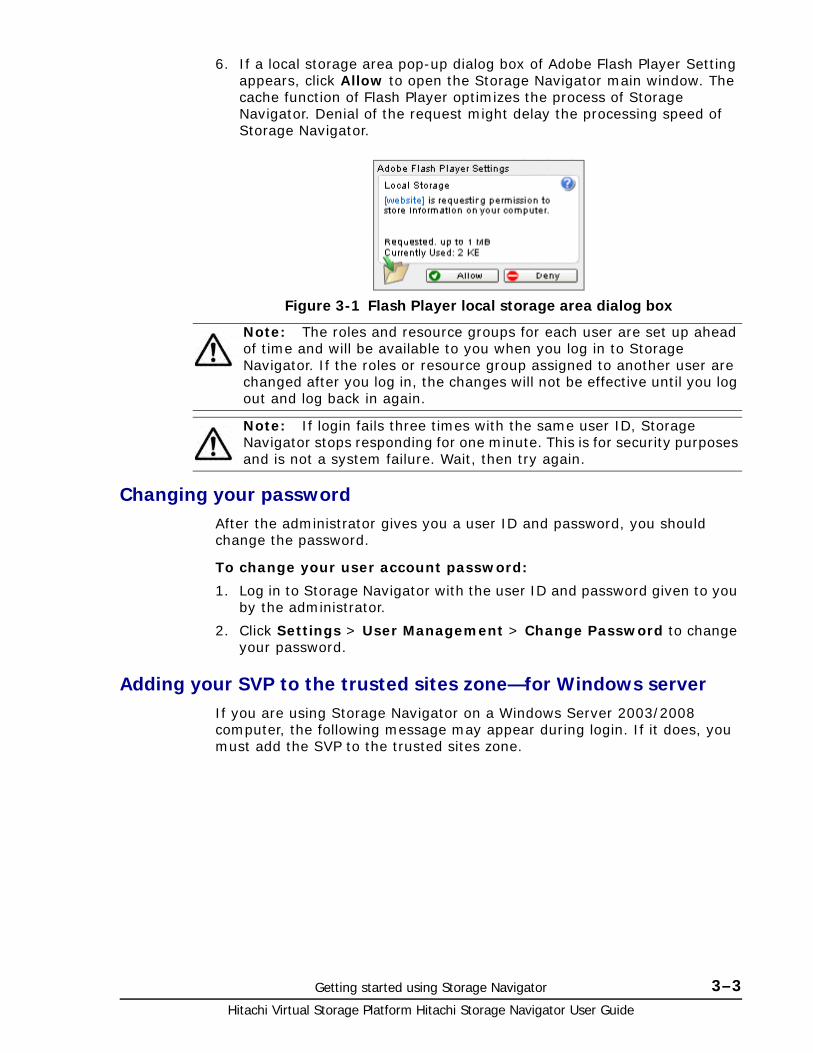
Getting started using Storage Navigator 3–3Hitachi Virtual Storage Platform Hitachi Storage Navigator User Guide
6. If a local storage area pop-up dialog box of Adobe Flash Player Setting appears, click Allow to open the Storage Navigator main window. The cache function of Flash Player optimizes the process of Storage Navigator. Denial of the request might delay the processing speed of Storage Navigator.
Changing your passwordAfter the administrator gives you a user ID and password, you should change the password.
To change your user account password:
1. Log in to Storage Navigator with the user ID and password given to you by the administrator.
2. Click Settings > User Management > Change Password to change your password.
Adding your SVP to the trusted sites zone—for Windows serverIf you are using Storage Navigator on a Windows Server 2003/2008 computer, the following message may appear during login. If it does, you must add the SVP to the trusted sites zone.
Figure 3-1 Flash Player local storage area dialog box
Note: The roles and resource groups for each user are set up ahead of time and will be available to you when you log in to Storage Navigator. If the roles or resource group assigned to another user are changed after you log in, the changes will not be effective until you log out and log back in again.
Note: If login fails three times with the same user ID, Storage Navigator stops responding for one minute. This is for security purposes and is not a system failure. Wait, then try again.
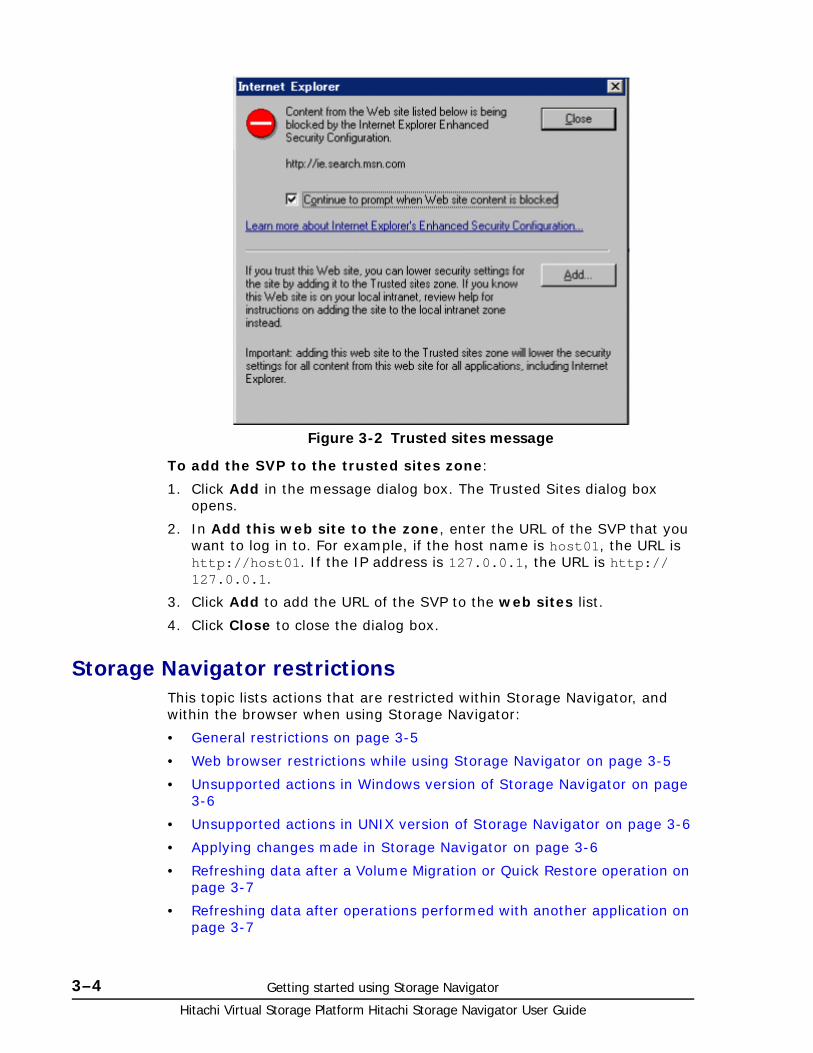
Hitachi Virtual Storage Platform Hitachi Storage Navigator User Guide
3–4 Getting started using Storage Navigator
To add the SVP to the trusted sites zone:
1. Click Add in the message dialog box. The Trusted Sites dialog box opens.
2. In Add this web site to the zone, enter the URL of the SVP that you want to log in to. For example, if the host name is host01, the URL is http://host01. If the IP address is 127.0.0.1, the URL is http://127.0.0.1.
3. Click Add to add the URL of the SVP to the web sites list.
4. Click Close to close the dialog box.
Storage Navigator restrictionsThis topic lists actions that are restricted within Storage Navigator, and within the browser when using Storage Navigator:
• General restrictions on page 3-5
• Web browser restrictions while using Storage Navigator on page 3-5
• Unsupported actions in Windows version of Storage Navigator on page 3-6
• Unsupported actions in UNIX version of Storage Navigator on page 3-6
• Applying changes made in Storage Navigator on page 3-6
• Refreshing data after a Volume Migration or Quick Restore operation on page 3-7
• Refreshing data after operations performed with another application on page 3-7
Figure 3-2 Trusted sites message
Getting started using Storage Navigator 3–5Hitachi Virtual Storage Platform Hitachi Storage Navigator User Guide
General restrictionsTo avoid an error, do not perform any of the following actions while using Storage Navigator:
• Do not change the local storage area value in Adobe Flash Player.
• Do not change the clock time of the Storage Navigator computer while you are logged in to the SVP.
• Do not adjust your computer display while using Storage Navigator. For example, do not change the screen resolution or use the Remote Desktop feature of Microsoft.
• Do not use screen savers that change the screen resolution automatically.
• Do not allow the computer to enter standby or hibernate mode when using Storage Navigator. If you do so, you must restart Storage Navigator.
• If applicable, disable the auto-login function of any web-based software or web site.
• You cannot use the Home, End, or Delete key for Storage Navigator operations.
• You cannot use function keys.
Web browser restrictions while using Storage NavigatorDo not use the web browser menus, shortcuts, or other browser options when logged in to Storage Navigator:
• If you use Back, Next, or web browser shortcut keys such as F5 and Esc, you will be logged out of Storage Navigator and any settings will be canceled.
• Do not close the web browser window using the button, the Close option in the File menu, or the Alt + F4 shortcut. To close Storage Navigator, click Logout or File > Close in the Storage Navigator menu.
• Do not change the web browser settings such as Tools > Folder options of Internet Explorer. If you do so and see unexpected results, close the web browser and log in to Storage Navigator again.
• Do not disable Flash Player because Flash Player is necessary for Storage Navigator and works as an add-on to a web browser. If you use Internet Explorer, do not change the settings in Tools > Manage Add-ons.
• Do not use the following web browser functions: character encoding, text size, the zoom function, the Ctrl + F (search), Ctrl + A (select all).
• Use the Tab shortcut only to move the focus to Flash Player; do not use the Shift + Tab.
• If you use Shift + Tab shortcut to move the focus in reverse, the focus may not move from web browser to the Flash Player. Use only Tab to move the focus to the Flash Player.
Hitachi Virtual Storage Platform Hitachi Storage Navigator User Guide
3–6 Getting started using Storage Navigator
Unsupported actions in Windows version of Storage NavigatorThe following actions are not supported in any version of Storage Navigator.
• You cannot use the right-click action in the Storage Navigator main window to open a pop-up menu. If you right-click, the Flash Player pop-up menu opens instead.
• You cannot use the copy (Ctrl+C) and paste (Ctrl+V) shortcuts to copy and paste text to a text box in Storage Navigator.
• No drag-and-drop operation is available in Storage Navigator.
• The mouse wheel may not function in the Storage Navigator secondary window.
• The zoom in and zoom out function of the web browser cannot be used in the Storage Navigator window. When you hold down on the Ctrl key and use the mouse wheel, a part of the Storage Navigator window may not be displayed because of the zoom in and zoom out function of the web browser.
Unsupported actions in UNIX version of Storage NavigatorThe following actions are not supported in the UNIX version of Storage Navigator:
• You cannot change the Storage Navigator window size.
• You cannot drag-and-drop objects in the Volume Migration or LUN Manager windows.
• If you click the Storage Navigator secondary window when you are using Volume Migration, the Volume Migration window may be fully or partially hidden behind the Storage Navigator window. However you cannot use the front Storage Navigator window.
Before you use the Storage Navigator secondary window, close the Volume Migration window. If the Volume Migration window is hidden behind the Storage Navigator window, click the Volume Migration window to bring it to the foreground.
• The Close button on the Volume Migration window remains active even if you click Apply while the Volume Migration process is running. If you click Close after clicking Apply, the Volume Migration window closes but the Volume Migration process continues.
• The word "Loading..." only appears in the Volume Migration window message dialog box for the first operation. This message does not re-appear after the first operation.
Applying changes made in Storage NavigatorWhen applying changes in Storage Navigator, be aware of the following behavior:
• When an internal process is running on the SVP (for example, a configuration change, option check, or an operational information acquisition), Storage Navigator processing might be temporarily delayed.
Getting started using Storage Navigator 3–7Hitachi Virtual Storage Platform Hitachi Storage Navigator User Guide
• If you request a change to the storage system configuration in the secondary window while another change is being made, an error message appears.
If the error occurs while you are logging in or clicking Apply to implement changes, wait a few minutes, then retry the operation.
If the error occurs while you are either switching between Modify and View mode, or switching tabs, wait a few minutes, click Refresh on the File menu, and then retry the operation.
• When the microcode is being updated on the SVP, you must exit and restart all web client sessions on the Storage Navigator computer.
• When you use Storage Navigator on Windows, the Add or Remove Programs window in the Windows' Control Panel might or might not display Storage Navigator. Storage Navigator works in both cases.
Refreshing data after a Volume Migration or Quick Restore operation
During a Volume Migration operation or ShadowImage Quick Restore operation, a Storage Navigator window may display old information (data from before the operation) on logical volume (LDEV) configurations. Wait until the operation completes, and then click File > Refresh > or File > Refresh All to update the Storage Navigator window.
LUN ID displayed in Storage NavigatorThe default LUN ID format used in the Storage Navigator main window in the HUS VM and VSP G1000 systems is decimal. You can change this format to hexadecimal when needed. The format of LUN IDs in the Storage Navigator secondary window is always decimal. You cannot change this format.
In comparison, the LUN ID format used in Storage Navigator in both USP V/VM and Virtual Storage Platform is hexadecimal. If the hexadecimal format is selected in the HUS VM or VSP G1000 systems, you can enter the USP V/VM or VSP LUN IDs as is.
However, if the decimal format for LUN IDs is set in HUS VM or VSP G1000, convert the LUN IDs to decimal format before entering them in Storage Navigator.
To switch the LUN ID notation of the Storage Navigator main window between decimal and hexadecimal, use the Edit Information Display Settings window. See Edit Information Display Settings window on page D-16.
Refreshing data after operations performed with another application
Be aware that it may take time to refresh the information in Storage Navigator after you have performed an operation on the storage system using another application, such as CCI.

Hitachi Virtual Storage Platform Hitachi Storage Navigator User Guide
3–8 Getting started using Storage Navigator
Refreshing your user viewWhen you remain in the same Storage Navigator view while other users change the configuration of the system, the changes that others make do not appear in your view. You can tell how long it has been since your screen was refreshed by checking the clock on the title bar to the left of the Refresh View button. The clock displays server time, not the time on your local workstation. When you rest your mouse cursor over the clock, the system displays the number of minutes that have passed since the screen was refreshed.
To see changes that others might have made, click Refresh View on the far right title bar in the top right corner of the screen.
Setting your view back to defaultYou can adjust Storage Navigator settings for column width and order, table options, filter conditions, and similar parameters. Storage Navigator saves these settings after you logout. When you login again, your settings appear as you left them in your last session.
You can also return your settings to default.
To return your settings to default, select Settings > Environmental Settings > Reset User's View Settings.
The parts and items that are recorded as user settings are shown in Reset View Settings on page D-9.
For more information about Storage NavigatorAfter you log in, the Storage Navigator main window opens. You can navigate using the menu, tree, or General Tasks. Precise instructions for performing an operation can be found in the software user guides. Also, see Storage Navigator GUI reference (main window) on page D-1 and Storage Navigator GUI reference (secondary windows) on page E-1.
4
Setting up and managing user accounts 4–1Hitachi Virtual Storage Platform Hitachi Storage Navigator User Guide
Setting up and managing useraccounts
When Storage Navigator has been set up on the SVP, and the client computers are set up, you create user accounts for Storage Navigator users and define their roles. This chapter provides information for setting up and managing user accounts.
□ Workflow for creating and managing user accounts
□ Using an authentication server and authorization server
□ User Groups
□ Managing user accounts
□ Changing the user group configuration
□ Account lock policy
□ Session timeout
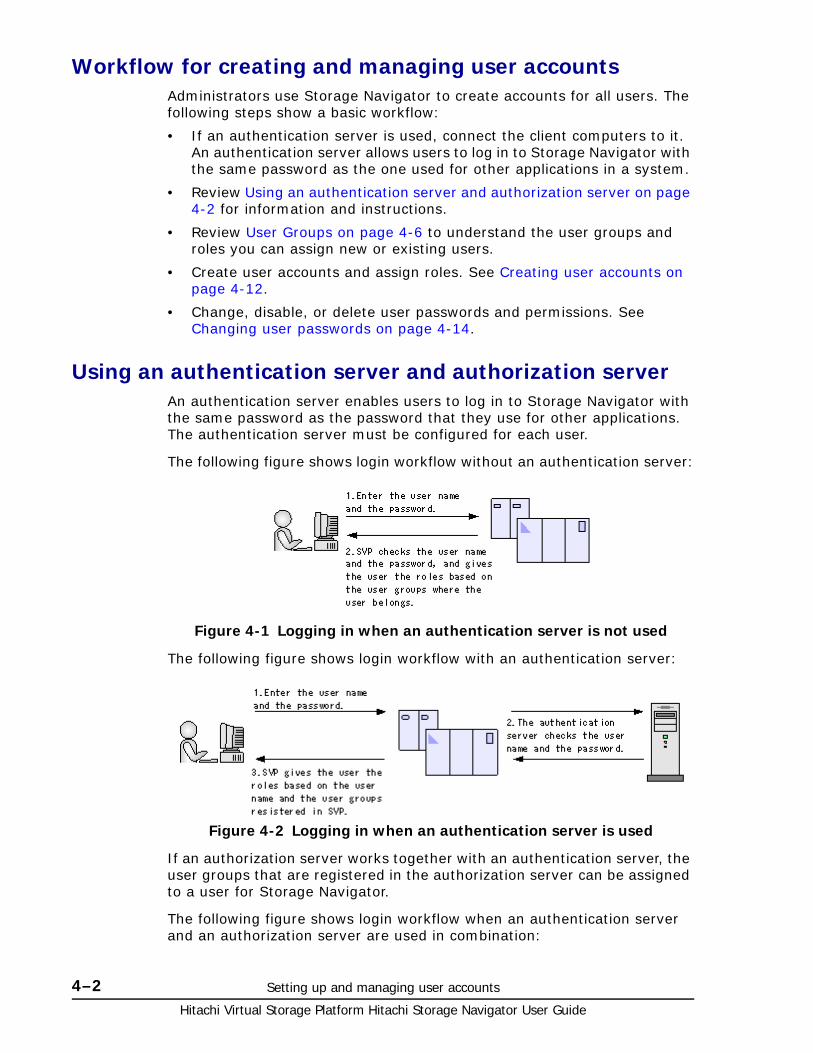
Hitachi Virtual Storage Platform Hitachi Storage Navigator User Guide
4–2 Setting up and managing user accounts
Workflow for creating and managing user accountsAdministrators use Storage Navigator to create accounts for all users. The following steps show a basic workflow:
• If an authentication server is used, connect the client computers to it. An authentication server allows users to log in to Storage Navigator with the same password as the one used for other applications in a system.
• Review Using an authentication server and authorization server on page 4-2 for information and instructions.
• Review User Groups on page 4-6 to understand the user groups and roles you can assign new or existing users.
• Create user accounts and assign roles. See Creating user accounts on page 4-12.
• Change, disable, or delete user passwords and permissions. See Changing user passwords on page 4-14.
Using an authentication server and authorization serverAn authentication server enables users to log in to Storage Navigator with the same password as the password that they use for other applications. The authentication server must be configured for each user.
The following figure shows login workflow without an authentication server:
The following figure shows login workflow with an authentication server:
If an authorization server works together with an authentication server, the user groups that are registered in the authorization server can be assigned to a user for Storage Navigator.
The following figure shows login workflow when an authentication server and an authorization server are used in combination:
Figure 4-1 Logging in when an authentication server is not used
Figure 4-2 Logging in when an authentication server is used
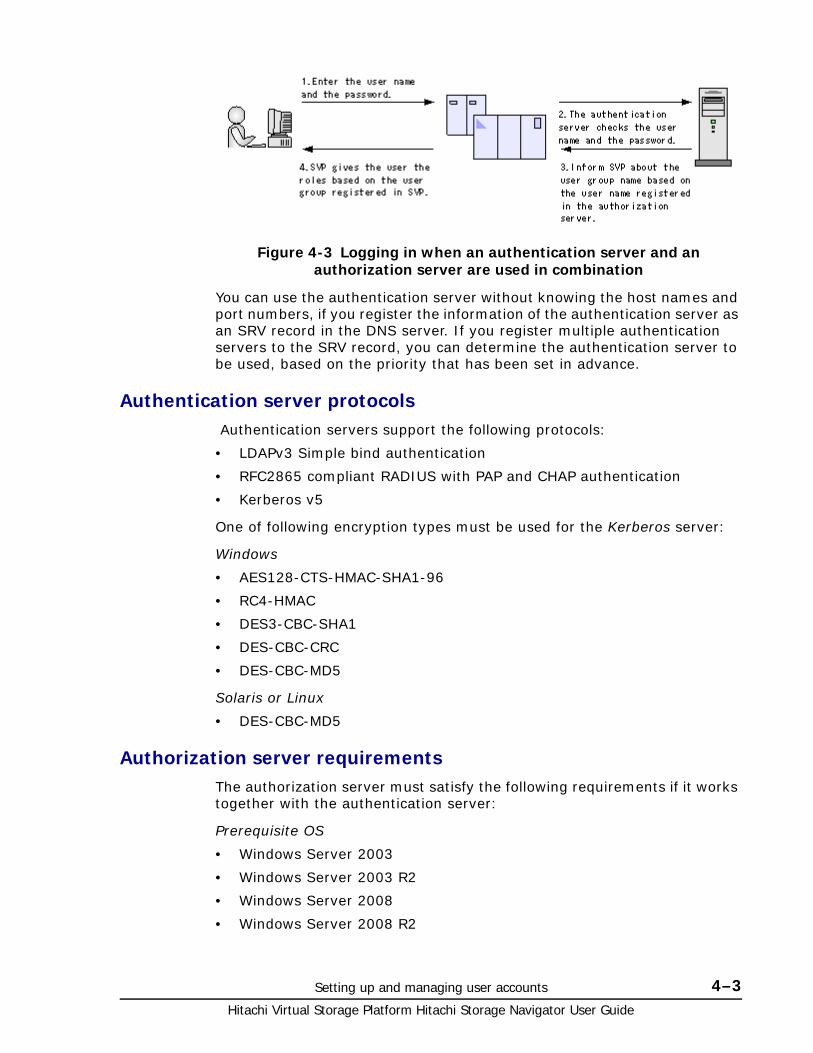
Setting up and managing user accounts 4–3Hitachi Virtual Storage Platform Hitachi Storage Navigator User Guide
You can use the authentication server without knowing the host names and port numbers, if you register the information of the authentication server as an SRV record in the DNS server. If you register multiple authentication servers to the SRV record, you can determine the authentication server to be used, based on the priority that has been set in advance.
Authentication server protocols Authentication servers support the following protocols:
• LDAPv3 Simple bind authentication
• RFC2865 compliant RADIUS with PAP and CHAP authentication
• Kerberos v5
One of following encryption types must be used for the Kerberos server:
Windows
• AES128-CTS-HMAC-SHA1-96
• RC4-HMAC
• DES3-CBC-SHA1
• DES-CBC-CRC
• DES-CBC-MD5
Solaris or Linux
• DES-CBC-MD5
Authorization server requirementsThe authorization server must satisfy the following requirements if it works together with the authentication server:
Prerequisite OS
• Windows Server 2003
• Windows Server 2003 R2
• Windows Server 2008
• Windows Server 2008 R2
Figure 4-3 Logging in when an authentication server and an authorization server are used in combination
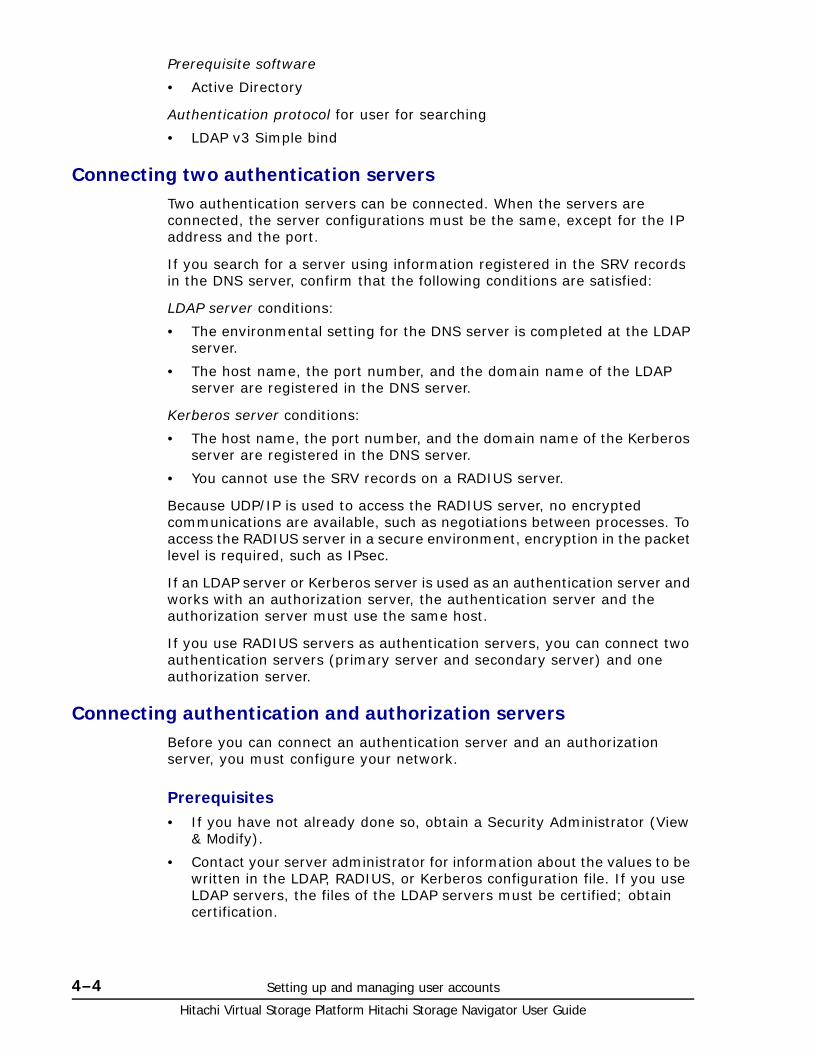
Hitachi Virtual Storage Platform Hitachi Storage Navigator User Guide
4–4 Setting up and managing user accounts
Prerequisite software
• Active Directory
Authentication protocol for user for searching
• LDAP v3 Simple bind
Connecting two authentication serversTwo authentication servers can be connected. When the servers are connected, the server configurations must be the same, except for the IP address and the port.
If you search for a server using information registered in the SRV records in the DNS server, confirm that the following conditions are satisfied:
LDAP server conditions:
• The environmental setting for the DNS server is completed at the LDAP server.
• The host name, the port number, and the domain name of the LDAP server are registered in the DNS server.
Kerberos server conditions:
• The host name, the port number, and the domain name of the Kerberos server are registered in the DNS server.
• You cannot use the SRV records on a RADIUS server.
Because UDP/IP is used to access the RADIUS server, no encrypted communications are available, such as negotiations between processes. To access the RADIUS server in a secure environment, encryption in the packet level is required, such as IPsec.
If an LDAP server or Kerberos server is used as an authentication server and works with an authorization server, the authentication server and the authorization server must use the same host.
If you use RADIUS servers as authentication servers, you can connect two authentication servers (primary server and secondary server) and one authorization server.
Connecting authentication and authorization serversBefore you can connect an authentication server and an authorization server, you must configure your network.
Prerequisites• If you have not already done so, obtain a Security Administrator (View
& Modify).
• Contact your server administrator for information about the values to be written in the LDAP, RADIUS, or Kerberos configuration file. If you use LDAP servers, the files of the LDAP servers must be certified; obtain certification.
Setting up and managing user accounts 4–5Hitachi Virtual Storage Platform Hitachi Storage Navigator User Guide
• Contact your network administrator for information about the network settings.
• Give your service representative the IP address of the DNS server and ask that representative to configure the SVP.
To connect authentication and authorization servers:
1. Click Settings > Environmental Setting > View External Authentication Server Properties.
2. Click Setup Server to open the Setup Server window
3. Select the type of the authentication server.
4. Specify options to connect to the authentication server. If you use more than one authentication server or an authorization server, specify an option for each server.
5. To test the connection, in the Server Configuration Test field, click Check.
6. Click Finish.
7. Enter a task name and then click Apply.
When the authentication server and the authorization server cannot be used even if you execute the settings, a problem might exist in the server connections or the network. Contact the server administrator or the network administrator.
After you finish setting up the authentication and authorization servers and confirm that you can use the servers, save a copy of the configuration files for connecting the authentication server. For details on saving a copy, see Backing up and restoring Storage Navigator configuration files on page 5-8.
Enabling the cooperation with the authorization server
Using a user group of authorization server in Storage Navigator
Create a user group of the same name as the user group set in the value of the memberOf attribute value for each user in Active Directory. After entering the user group name, click Check and verify that the user group name that you entered is registered in the authorization server.
For details on how to create a user group, see Creating a new user group on page 4-11.
Register the Storage Navigator user group to the authorization server
To register the user group created using Storage Navigator to the authorization server, set the DN of the user group of the same name as the user group of Storage Navigator to the value of memberOf attribute value for each user.
Note: The domain name (DN) of the user group to be set to Active Directory must be between 1 and 250 characters. The number of user groups that can be registered at one time is 20 at maximum.
Hitachi Virtual Storage Platform Hitachi Storage Navigator User Guide
4–6 Setting up and managing user accounts
User GroupsThe administrator creates Storage Navigator user accounts and adds each user to a built-in group. Registered user are able to use Storage Navigator privileges allowed to them as determined by the user groups to which each user belongs. A user can belong to one or more groups.
Roles and user groups
The operations allowed to users depends on the roles of users. The roles are not set in each user but in each user group. There are two ways to change the operations that are allowed to users.
• Moving the users to another user group.
See Changing user permissions on page 4-15 for more information.
• Changing the roles assigned to the user group where the user belongs.
See Changing user group permissions on page 4-17 for more information.
Resource group and user groups
The resources that users can manipulate depend on the resource groups. The resource groups are not assigned to users but to user groups. There are two ways to change the resources that are allowed to users.
• Moving users to another user group.
See Changing user permissions on page 4-15 for more information.
• Changing the resource groups assigned to the user group where the user belongs.
See Changing resource groups assigned to a user group on page 4-17 for more information.
For details about resource groups, see the Provisioning Guide for Open Systems.
User registering example• The setting operations that affect the security of the whole system must
be done by the administrator.
• The setting operations on the resource group 10 must be done by user A.
• The setting operations on the resource group 20 must be done by user B.
To implement the above configuration, assign the users to the user groups as shown below.
Caution: If a user needs to use different user groups for different purposes, create local user accounts on Storage Navigator. Do not use the authorization server.

Setting up and managing user accounts 4–7Hitachi Virtual Storage Platform Hitachi Storage Navigator User Guide
Table 4-1 User registration example
RolesThe following table shows all the roles that are available for use and the permissions that each role provides to the users. You cannot create a custom role.
Table 4-2 Roles, Permissions, and Capabilities
User User group to be registered
Roles to be assigned to the user group
Resource group to be assigned to user
group
Administrator
user group 1 Security Administrator (View & Modify)
All Resource Groups Assigned1
User A user group 10 Storage Administrator2 Resource group 10
User B user group 20 Storage Administrator2 Resource group 20
Notes:
1. For the user group that is assigned the Security Administrator role, All Resource Groups Assigned is automatically set to Yes.
2. There are a few types of storage administrators. See Table 4-2 Roles, Permissions, and Capabilities on page 4-7 for more information.
Caution: When multiple user groups are assigned to a user, the user has the permissions of all the roles in each user group that are enabled on the resource groups assigned to each user group.
Role Permissions Capabilities
Security Administrator View Only • Viewing information about user accounts and encryption settings
• Viewing information about encryption key in the key management server
Security Administrator View & Modify • Configuring user accounts
• Creating encryption keys and configuring encryption settings
• Viewing and switching where encryption keys are generated
• Backing up and restoring encryption keys
• Deleting encryption keys backed up in the key management server
• Viewing and changing the password policy for backing up encryption keys on the Storage Navigator computer
• Connection to the external server
• Backing up and restoring connection configuration to the external server
• Configuring the certificate used for the SSL communication
• Configuring the fibre channel authentication (FC-SP)
• Configuring resource groups
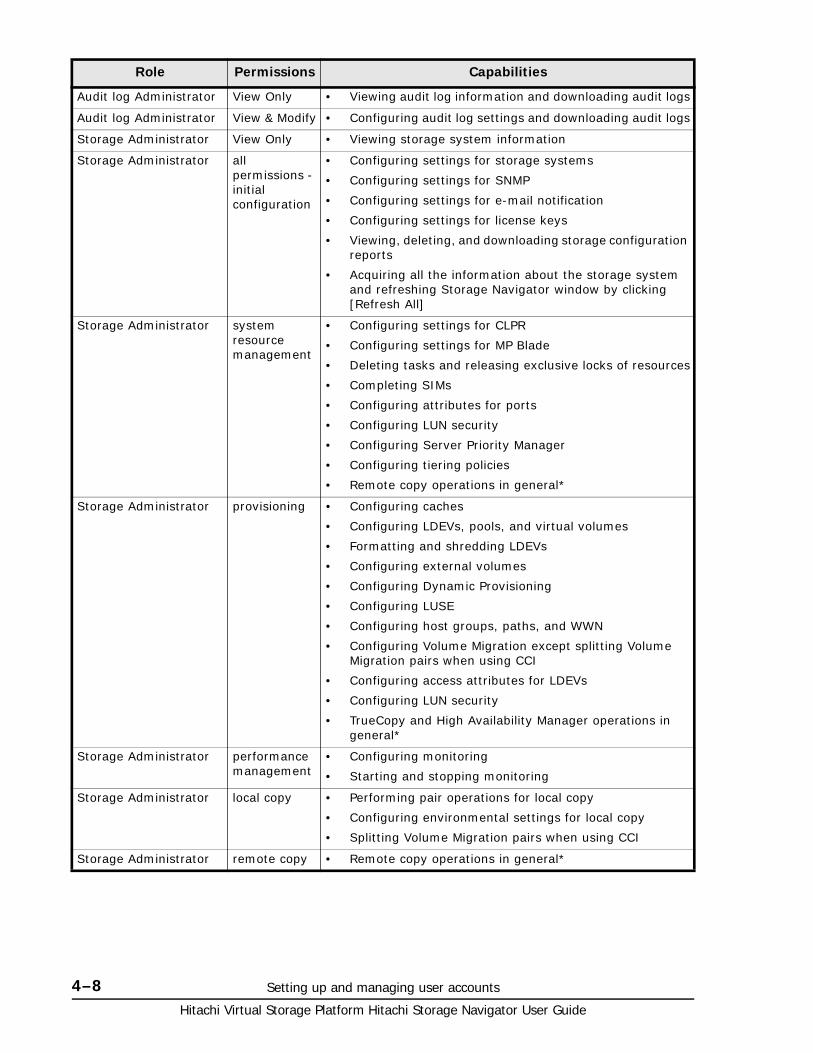
Hitachi Virtual Storage Platform Hitachi Storage Navigator User Guide
4–8 Setting up and managing user accounts
Audit log Administrator View Only • Viewing audit log information and downloading audit logs
Audit log Administrator View & Modify • Configuring audit log settings and downloading audit logs
Storage Administrator View Only • Viewing storage system information
Storage Administrator all permissions - initial configuration
• Configuring settings for storage systems
• Configuring settings for SNMP
• Configuring settings for e-mail notification
• Configuring settings for license keys
• Viewing, deleting, and downloading storage configuration reports
• Acquiring all the information about the storage system and refreshing Storage Navigator window by clicking [Refresh All]
Storage Administrator system resource management
• Configuring settings for CLPR
• Configuring settings for MP Blade
• Deleting tasks and releasing exclusive locks of resources
• Completing SIMs
• Configuring attributes for ports
• Configuring LUN security
• Configuring Server Priority Manager
• Configuring tiering policies
• Remote copy operations in general*
Storage Administrator provisioning • Configuring caches
• Configuring LDEVs, pools, and virtual volumes
• Formatting and shredding LDEVs
• Configuring external volumes
• Configuring Dynamic Provisioning
• Configuring LUSE
• Configuring host groups, paths, and WWN
• Configuring Volume Migration except splitting Volume Migration pairs when using CCI
• Configuring access attributes for LDEVs
• Configuring LUN security
• TrueCopy and High Availability Manager operations in general*
Storage Administrator performance management
• Configuring monitoring
• Starting and stopping monitoring
Storage Administrator local copy • Performing pair operations for local copy
• Configuring environmental settings for local copy
• Splitting Volume Migration pairs when using CCI
Storage Administrator remote copy • Remote copy operations in general*
Role Permissions Capabilities
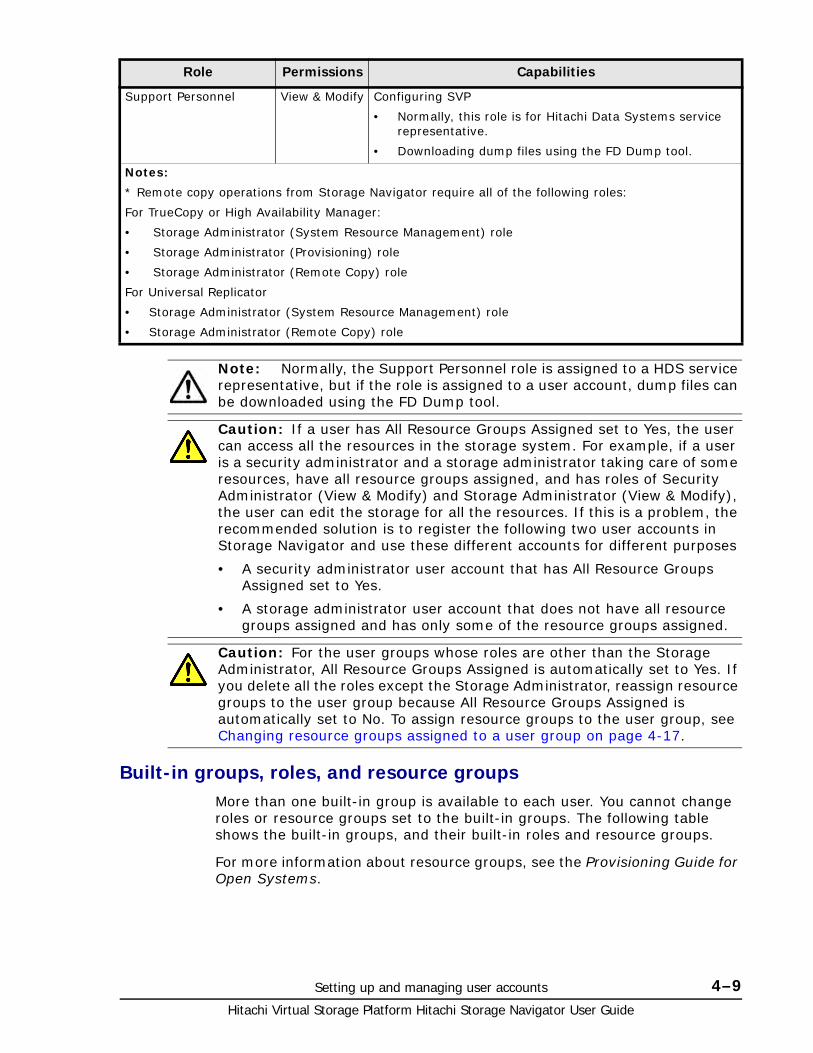
Setting up and managing user accounts 4–9Hitachi Virtual Storage Platform Hitachi Storage Navigator User Guide
Built-in groups, roles, and resource groupsMore than one built-in group is available to each user. You cannot change roles or resource groups set to the built-in groups. The following table shows the built-in groups, and their built-in roles and resource groups.
For more information about resource groups, see the Provisioning Guide for Open Systems.
Support Personnel View & Modify Configuring SVP
• Normally, this role is for Hitachi Data Systems service representative.
• Downloading dump files using the FD Dump tool.
Notes:
* Remote copy operations from Storage Navigator require all of the following roles:
For TrueCopy or High Availability Manager:
• Storage Administrator (System Resource Management) role
• Storage Administrator (Provisioning) role
• Storage Administrator (Remote Copy) role
For Universal Replicator
• Storage Administrator (System Resource Management) role
• Storage Administrator (Remote Copy) role
Note: Normally, the Support Personnel role is assigned to a HDS service representative, but if the role is assigned to a user account, dump files can be downloaded using the FD Dump tool.
Caution: If a user has All Resource Groups Assigned set to Yes, the user can access all the resources in the storage system. For example, if a user is a security administrator and a storage administrator taking care of some resources, have all resource groups assigned, and has roles of Security Administrator (View & Modify) and Storage Administrator (View & Modify), the user can edit the storage for all the resources. If this is a problem, the recommended solution is to register the following two user accounts in Storage Navigator and use these different accounts for different purposes
• A security administrator user account that has All Resource Groups Assigned set to Yes.
• A storage administrator user account that does not have all resource groups assigned and has only some of the resource groups assigned.
Caution: For the user groups whose roles are other than the Storage Administrator, All Resource Groups Assigned is automatically set to Yes. If you delete all the roles except the Storage Administrator, reassign resource groups to the user group because All Resource Groups Assigned is automatically set to No. To assign resource groups to the user group, see Changing resource groups assigned to a user group on page 4-17.
Role Permissions Capabilities
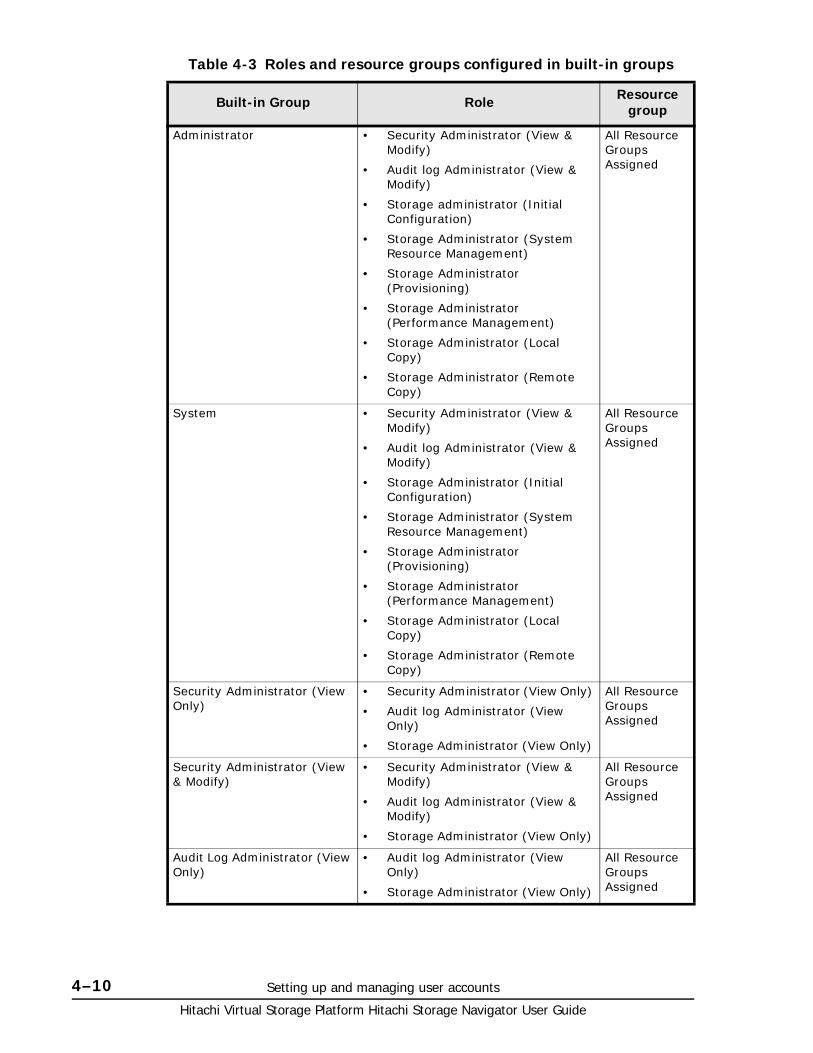
Hitachi Virtual Storage Platform Hitachi Storage Navigator User Guide
4–10 Setting up and managing user accounts
Table 4-3 Roles and resource groups configured in built-in groups
Built-in Group Role Resource group
Administrator • Security Administrator (View & Modify)
• Audit log Administrator (View & Modify)
• Storage administrator (Initial Configuration)
• Storage Administrator (System Resource Management)
• Storage Administrator (Provisioning)
• Storage Administrator (Performance Management)
• Storage Administrator (Local Copy)
• Storage Administrator (Remote Copy)
All Resource Groups Assigned
System • Security Administrator (View & Modify)
• Audit log Administrator (View & Modify)
• Storage Administrator (Initial Configuration)
• Storage Administrator (System Resource Management)
• Storage Administrator (Provisioning)
• Storage Administrator (Performance Management)
• Storage Administrator (Local Copy)
• Storage Administrator (Remote Copy)
All Resource Groups Assigned
Security Administrator (View Only)
• Security Administrator (View Only)
• Audit log Administrator (View Only)
• Storage Administrator (View Only)
All Resource Groups Assigned
Security Administrator (View & Modify)
• Security Administrator (View & Modify)
• Audit log Administrator (View & Modify)
• Storage Administrator (View Only)
All Resource Groups Assigned
Audit Log Administrator (View Only)
• Audit log Administrator (View Only)
• Storage Administrator (View Only)
All Resource Groups Assigned

Setting up and managing user accounts 4–11Hitachi Virtual Storage Platform Hitachi Storage Navigator User Guide
Creating a new user groupThis topic explains how administrators can create a user group.
Prerequisites• You must have Security Administrator (View & Modify) role to perform
this task.
• A user group name consists of 1 to 64 characters including alphanumeric characters (ASCII), spaces and the following symbols: ! # $ % & ' ( ) + - . = @ [ ] ^ _ ` { } ~
• You can create up to 256 user groups including the built-in groups.
Audit Log Administrator (View & Modify)
• Audit log Administrator (View & Modify)
• Storage Administrator (View Only)
All Resource Groups Assigned
Storage Administrator (View Only)
• Storage Administrator (View Only) meta_resource
Storage Administrator (View & Modify)
• Storage Administrator (Initial Configuration)
• Storage Administrator (System Resource Management)
• Storage Administrator (Provisioning)
• Storage Administrator (Performance Management)
• Storage Administrator (Local Copy)
• Storage Administrator (Remote Copy)
meta_resource
Support Personnel • Storage Administrator (Initial Configuration)
• Storage Administrator (System Resource Management)
• Storage Administrator (Provisioning)
• Storage Administrator (Performance Management)
• Storage Administrator (Local Copy)
• Storage Administrator (Remote Copy)
• Support Personnel
• User Maintenance
All Resource Groups Assigned
Maintenance User • Storage Administrator (View Only)
• User Maintenance
All Resource Groups Assigned
Built-in Group Role Resource group
Hitachi Virtual Storage Platform Hitachi Storage Navigator User Guide
4–12 Setting up and managing user accounts
To create a new user group
1. In the tree, click Administration > User Groups.
2. In the User Groups tab, click Create User Group to open the Create User Group window.
3. Enter a user group name.
4. If you use an authorization server, click Check and verify that the entered user group name is registered in the authorization server.
5. Click Next to open the Assign Roles window.
6. Select the roles to assign to the user group, and click Add.
7. Click Next to open the Assign Resource Groups window.
8. Select the resource groups to assign to the user group, and click Add.
9. Click Finish.
Clicking Next allows you to add a user.
10.Specify a task name and click Apply.
Managing user accountsThis topic provides instructions for the following tasks:
• Creating user accounts on page 4-12
• Changing user passwords on page 4-14
• Changing user permissions on page 4-15
• Disabling user accounts on page 4-15
• Deleting user accounts on page 4-16
Creating user accountsThis topic explains how to create a user account and register the account to a user group with appropriate roles.
Prerequisites• You must have Security Administrator (View & Modify) role to perform
this task.
• You can create up to 512 users including the built-in user.
• You can log in to SVP and CCI with user accounts that are created by Storage Navigator. You must have Support Personnel role to log in to the SVP.
• The allowable characters and length of user names and passwords depend on the applications (Storage Navigator, SVP, and/or CCI) that the user uses. The user names and the passwords must satisfy the requirements of all the applications when the user uses multiple applications.
Note: If you select a role other than the storage administrator in the Assign Roles window, you do not need to select resource groups because all the resource groups are assigned automatically.
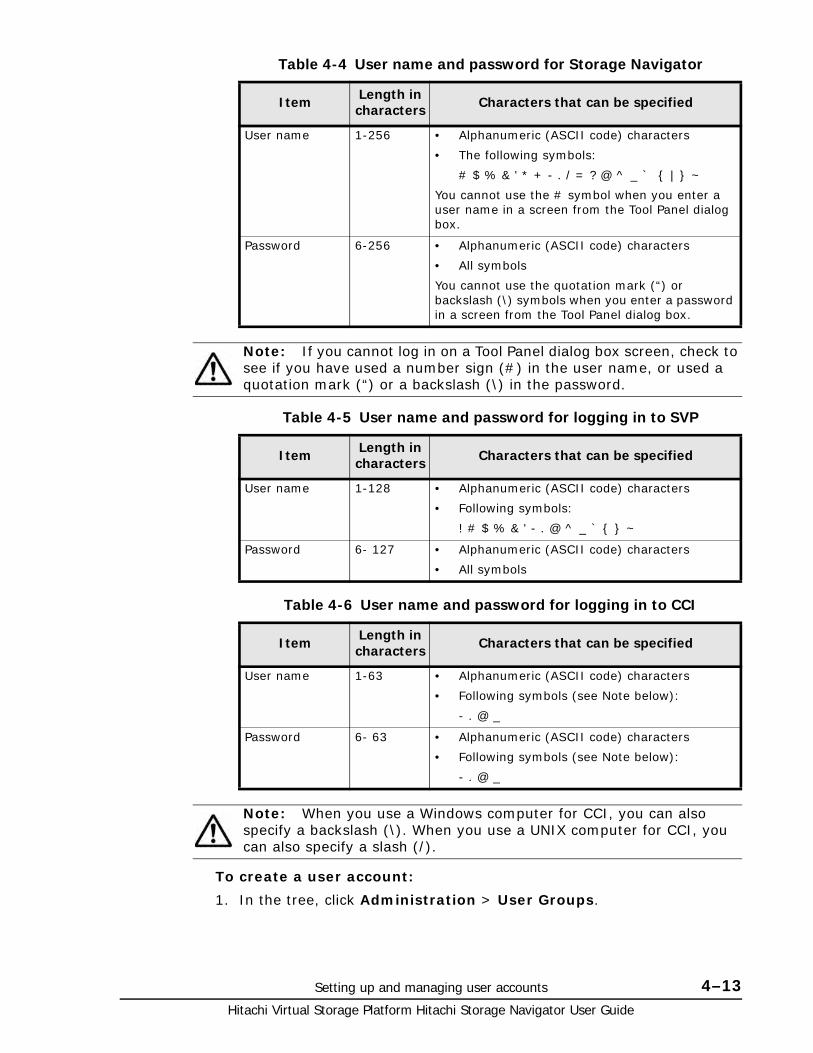
Setting up and managing user accounts 4–13Hitachi Virtual Storage Platform Hitachi Storage Navigator User Guide
Table 4-4 User name and password for Storage Navigator
Table 4-5 User name and password for logging in to SVP
Table 4-6 User name and password for logging in to CCI
To create a user account:
1. In the tree, click Administration > User Groups.
Item Length in characters Characters that can be specified
User name 1-256 • Alphanumeric (ASCII code) characters
• The following symbols:
# $ % & ' * + - . / = ? @ ^ _ ` { | } ~
You cannot use the # symbol when you enter a user name in a screen from the Tool Panel dialog box.
Password 6-256 • Alphanumeric (ASCII code) characters
• All symbols
You cannot use the quotation mark (“) or backslash (\) symbols when you enter a password in a screen from the Tool Panel dialog box.
Note: If you cannot log in on a Tool Panel dialog box screen, check to see if you have used a number sign (#) in the user name, or used a quotation mark (“) or a backslash (\) in the password.
Item Length in characters Characters that can be specified
User name 1-128 • Alphanumeric (ASCII code) characters
• Following symbols:
! # $ % & ' - . @ ^ _ ` { } ~
Password 6- 127 • Alphanumeric (ASCII code) characters
• All symbols
Item Length in characters Characters that can be specified
User name 1-63 • Alphanumeric (ASCII code) characters
• Following symbols (see Note below):
- . @ _
Password 6- 63 • Alphanumeric (ASCII code) characters
• Following symbols (see Note below):
- . @ _
Note: When you use a Windows computer for CCI, you can also specify a backslash (\). When you use a UNIX computer for CCI, you can also specify a slash (/).
Hitachi Virtual Storage Platform Hitachi Storage Navigator User Guide
4–14 Setting up and managing user accounts
2. In the User Groups tab, select a user group to which to add a user. This is dependent on which roles you want to give to the user.
3. In the Roles tab, confirm that the displayed roles are appropriate for the user.
4. Click the Users tab and then Create User to open the Create User window.
5. Enter a name.
6. Select Enable or Disable for the account. If you select Disable, the user of this account is disabled and cannot log in to Storage Navigator.
7. To use an authentication server, select External. To authenticate users with only Storage Navigator, select Local.
8. If you select Local, enter the password of this user account in two places.
9. Click Finish.
10.Specify a task name and click Apply.
Changing user passwordsThis topic explains how to change or re-issue passwords for other users on Storage Navigator.
Prerequisites• Security Administrator (View & Modify) role can change user passwords
on Storage Navigator.
• If the target user has a local user account for Storage Navigator, the security administrator can use Storage Navigator to change the target user's password.
• If the target user has a local user account for the authentication server, the security administrator can use the authentication server to change the target user's password. After the password is changed, the target user can use the new password on both the authentication server and Storage Navigator.
To change the password of a user on Storage Navigator:
1. In the resource tree, click Administration > User Groups.
2. On the User Groups tab, select the user group to which the user belongs.
3. Click the Users tab, select the user, and then click Change Password. The Change Password dialog box opens.
4. Specify a new password for the user in the two password fields.
5. Click Finish.
6. Specify a task name and click Apply.

Setting up and managing user accounts 4–15Hitachi Virtual Storage Platform Hitachi Storage Navigator User Guide
Changing user permissionsUser permissions are determined by the groups to which the user belongs. You change these permissions by changing membership in the user group. A user can belong to multiple user groups.
For example, if you want to change the role of the user who manages security to the performance management role, add this user to the Storage Administrator (Performance Management) role group and then remove the user from the Security Administrator (View & Modify) role group. The change takes effect the next time the user logs in.
Prerequisites• You must have Security Administrator (View & Modify) role to perform
this task.
• The user whose permissions you want to change must belong to at least one user group.
• A user can belong to up to 8 user groups.
• 512 users can belong to a user group including the built-in user.
To change the permission of a user:
1. In the resource tree, click Administration > User Groups.
2. In the User Groups tab, select a user group to add the user to and then click Add Users.
3. In the Add User dialog box, select the user and click Add.
4. Click Finish.
5. Specify a task name and click Apply.
6. In the resource tree, click Administration > User Groups.
7. In the User Groups tab, click the user group to remove the user from.
8. Click the Users tab, select the user to remove from this user group, and then click More Actions > Remove Users.
9. Click Finish.
10.Specify a task name and click Apply.
Disabling user accountsSecurity Administrators can disable a user account to temporarily prevent the user from logging in to Storage Navigator.
Prerequisites• Log into an account that is different from the user whose account that
you want to disable.
• You must have Security Administrator (View & Modify) role to perform this task.
To disable a user account:
1. In the resource tree, click Administration > User Groups.
Hitachi Virtual Storage Platform Hitachi Storage Navigator User Guide
4–16 Setting up and managing user accounts
2. In the User Groups tab, click a user group which the user belongs to.
3. Click the Users tab, select the user and then click Edit User.
4. Click the Account Status check box and click Disable.
5. Click Finish.
6. Specify a task name and click Apply.
To allow the user to log in to Storage Navigator, perform the operation above and click Enable instead of Disable in the Edit User window.
Deleting user accountsSecurity Administrators can delete a user account when the account is no longer in use. Built-in user accounts cannot be deleted.
Prerequisites
You must have Security Administrator (View & Modify) role to perform this task.
To delete a user account:
1. In the resource tree, click Administration > User Groups.
2. In the User Groups tab, click the user group.
3. Click the Users tab, select the users and then click More Actions > Delete Users to open the Delete User dialog box.
4. Specify a task name and click Apply.
Changing the user group configuration
Changing a user group nameThis topic explains how to change the name of a user group.
Prerequisites• You must have Security Administrator (View & Modify) role to perform
this task.
• The names of built-in groups cannot be changed.
• A user group name consists of 1 to 64 characters including alphanumeric characters (ASCII), spaces and the following symbols: ! # $ % & ' ( ) + - . = @ [ ] ^ _ ` { } ~
To change the user group name:
1. In the tree, click Administration > User Groups.
2. In the User Groups tab, select the user group and then click More Actions > Edit User Group to open the Edit User Group window.
3. In the Edit User Group window, enter a new user group name.
4. If you use an authorization server, click Check and verify that the entered user group name is registered in the authorization server.
Setting up and managing user accounts 4–17Hitachi Virtual Storage Platform Hitachi Storage Navigator User Guide
5. Click Finish.
6. Specify a task name and click Apply.
Changing user group permissionsThis topic explains how to change the permissions that are assigned to user groups.
Prerequisites• You must have Security Administrator (View & Modify) role to perform
this task.
• The permissions of a built-in group cannot be changed.
To change the permissions of a user group:
1. In the tree, click Administration > User Groups.
2. In the User Groups tab, select the user group and then click More Actions > Edit Role Assignment.
3. In the Edit Role Assignment window, change roles to be assigned to the user group.
Select roles to add, and then click Add.
Select a role to remove, and then click Remove.
4. Click Finish.
5. Specify a task name and click Apply.
Changing resource groups assigned to a user groupThis topic explains how to change the resource groups that are assigned to the user group.
Prerequisites• You must have Security Administrator (View & Modify) role to perform
this task.
• Create a resource group to be assigned to the user group in advance.
• You cannot change the resource groups of the user group that has All Resource Groups Assigned set to Yes.
• You cannot change resource groups of the built-in group.
To change a resource group that is assigned to a user group:
1. In the tree, click Administration > User Groups.
Caution: For the user groups whose roles are other than the Storage Administrator, All Resource Groups Assigned is automatically set to Yes. If you delete all the roles except the Storage Administrator, reassign resource groups to the user group because All Resource Groups Assigned is automatically set to No. To assign resource groups to the user group, see Changing resource groups assigned to a user group on page 4-17.

Hitachi Virtual Storage Platform Hitachi Storage Navigator User Guide
4–18 Setting up and managing user accounts
2. In the User Groups tab, select a user group to change the resource group, and click Edit Resource Group Assignment.
3. In the Edit Resource Group Assignment window, change resource groups to be assigned to the user group.
Select the resource group to add, and click Add.
Select the resource group to remove, and click Remove.
4. Click Finish.
5. Specify a task name and click Apply.
Deleting a user groupDelete a user group when the user group is no longer needed.
Prerequisites• You must have Security Administrator (View & Modify) role to perform
this task.
• You cannot delete built-in groups.
• A user group cannot be deleted if there are users that belong to only the user group to delete.
To delete a user group:
1. In the tree, click Administration > User Groups.
2. In the User Groups tab, select user groups that you want to delete, and click More Actions > Delete User Groups.
3. Specify a task name in the Delete User Groups window, and click Apply.
Account lock policyA user account is automatically locked after three unsuccessful logins to Storage Navigator or Command Control Interface. The account is locked for 60 seconds.
Session timeoutA session timeout occurs if the system receives no user operation for one minute due to a network error.

5
Configuring the Storage Navigator environment 5–1Hitachi Virtual Storage Platform Hitachi Storage Navigator User Guide
Configuring the Storage Navigatorenvironment
This chapter provides instructions for setting customized behaviors on Storage Navigator, including timeout and polling periods, email notifications, and so on. Also, instructions are included for saving your Storage Navigator configuration settings and restoring them as needed.
□ Configuration overview
□ Creating a login message
□ Setting email notification for SIMs or SNMP traps
□ Setting time periods
□ Backing up and restoring Storage Navigator configuration files
□ Setting syslog notification for SIMs

Hitachi Virtual Storage Platform Hitachi Storage Navigator User Guide
5–2 Configuring the Storage Navigator environment
Configuration overviewYou can set up the following Storage Navigator behaviors:
• Create a message to display on the Storage Navigator login screen. See Creating a login message on page 5-2.
• Configure email notification when certain system failures occur. See Configuring email notification on page 5-3.
• Establish times for timeouts and polling limits. You can also hide the Alerts tab. See Setting time periods on page 5-5.
• Save Storage Navigator configuration settings, which are used if it becomes necessary to restore the settings. See Backing up and restoring Storage Navigator configuration files on page 5-8.
• Restore configuration settings. See Backing up and restoring Storage Navigator configuration files on page 5-8.
• Configure syslog notifications for system failures See Setting and configuring syslog notification for SIMs on page 5-10
Creating a login messageA login message is displayed in the Storage Navigator login window. You can use a login message to broadcast system messages and warnings. The following figure shows an example of a warning message in the login window.
Prerequisite
Figure 5-1 Warning banner on the login window
Configuring the Storage Navigator environment 5–3Hitachi Virtual Storage Platform Hitachi Storage Navigator User Guide
You must have Security Administrator (View & Modify) role to perform this task.
To create a login message:
1. Click Settings > Security > Login Message. The Storage Navigator secondary window opens.
2. Click to change to Modify mode.
3. Enter the message in the window.
Alphanumeric characters and symbols can be used in the message. The maximum length of the message is 2,048 characters.
4. Click Apply.
Setting email notification for SIMs or SNMP trapsYou can specify notification by email to key users when system failures occur. Failures reported in the email are the same as the SIMs displayed in the Alerts window or reported by SNMP traps.
• You can configure emails for any SIMs caused by software licensing events or Dynamic Provisioning threshold events.
• With SNMP traps, email notification eliminates the need for checking for failures in SNMP manager.
You can also send a test email.
SIMs failures reported by email typically require user action. These SIMs are caused either by reaching the threshold levels configured by the user, or by a software license needing user attention.
Configuring email notificationPrerequisites
• You must have the Storage Administrator (Initial Configuration) role to perform this task.
• You must have a mail server that supports the Simple Mail Transfer Protocol (SMTP).
• If a firewall is used, port 25 must be used.
To configure settings for email notice:
1. Click Settings > Environmental Setting > E-mail Information. The E-mail Information window opens.
2. Click to change to Modify mode.
3. Select Enable in Mail Notice.
4. Select IPv4, IPv6, or Host Name, and enter the IP address or host name of the mail server.
5. In SMTP-AUTH, select Enable to use SMTP authentication. Enter the account and password for SMTP authentication
Hitachi Virtual Storage Platform Hitachi Storage Navigator User Guide
5–4 Configuring the Storage Navigator environment
Select Disable not to use SMTP authentication.
6. Enter addresses in the From Address (required) and Return Address (optional).
7. In To Address, add an email address:a. Select a blank row in the list.b. Enter an email address in the text box.c. Select To, Cc, or Bcc for the attribute.d. Click Update.
8. Repeat the previous step for all email addresses.
To delete an email address, select the target address in the list and click Delete. You can select multiple addresses and delete all of them at once.
To change an email address, select the target address in the list and perform the same operation for adding an address.
9. Click Apply to apply the settings to the storage system.
Sending a test emailAfter configuring email notification, you can send a test email to confirm your settings.
Prerequisites
• You must have the Storage Administrator (Initial Configuration) role to perform this task.
• The mail server must be completely configured before you begin.
To send a test email:
1. Click Settings > Environmental Setting > E-mail Information. The E-mail Information window opens.
2. Click to change to Modify mode.
3. Make sure that Mail Notice is set to Enable and that the settings in the window are correct.
4. Click Test Send. A confirmation message appears.
5. Click OK.
6. Confirm that mail clients received the email with the reference code 7FFFFF.
An example of a test email follows:
Date: FRI 03 AUG 2012 10:10:10 +9000 (JST)To: [email protected]: [email protected]: [email protected]: HUS VM Report
Date : 03/10/2009Time : 10:09:30
Configuring the Storage Navigator environment 5–5Hitachi Virtual Storage Platform Hitachi Storage Navigator User Guide
Machine : HUS VM (Serial# 265307)RefCode : 7FFFFFDetail: This is Test Report.
The field definitions in the test email are listed in the following table:
Table 5-1 Email details for system failures notice
See the Hitachi SNMP Agent User Guide for reference codes and failure details.
Setting time periodsYou can set the following Storage Navigator time periods:
• Polling period for monitoring who is changing information while others are viewing
• Time interval for monitoring disk controller and drive box status
• Time period that a user is logged out of the SVP because of a network error
• Time period when no changes are made that access the RMI server and the user is released from Modify mode as a result
You can also specify whether to show or hide the Alerts tab.
Prerequisite
You must have the Storage Administrator (Initial Configuration) role to perform this task. See Table 4-2 Roles, Permissions, and Capabilities on page 4-7.
To set time periods:
1. Start a web browser and enter the following URL to open the tool panel.
http://IP-address-or-host-name-of-SVP/cgi-bin/utility/toolpanel.cgi
# Item Description
1 Date Date and time when the email was sent. This time stamp is set by the mail server.
2 To Email address of the receiver.
3 From Email address of the sender.
4 Reply-To Email address to which replies from the receivers will be sent. Optional.
5 Subject email title. (Name of the storage system) + (Report)
6 Date Date when a system failure occurred.
7 Time Time when a system failure occurred.
8 Machine Name and serial number of the storage system.
9 RefCode Reference code. The same code as the one reported by SNMP traps.
10 Detail Failure details. The same information as the one reported by SNMP traps.
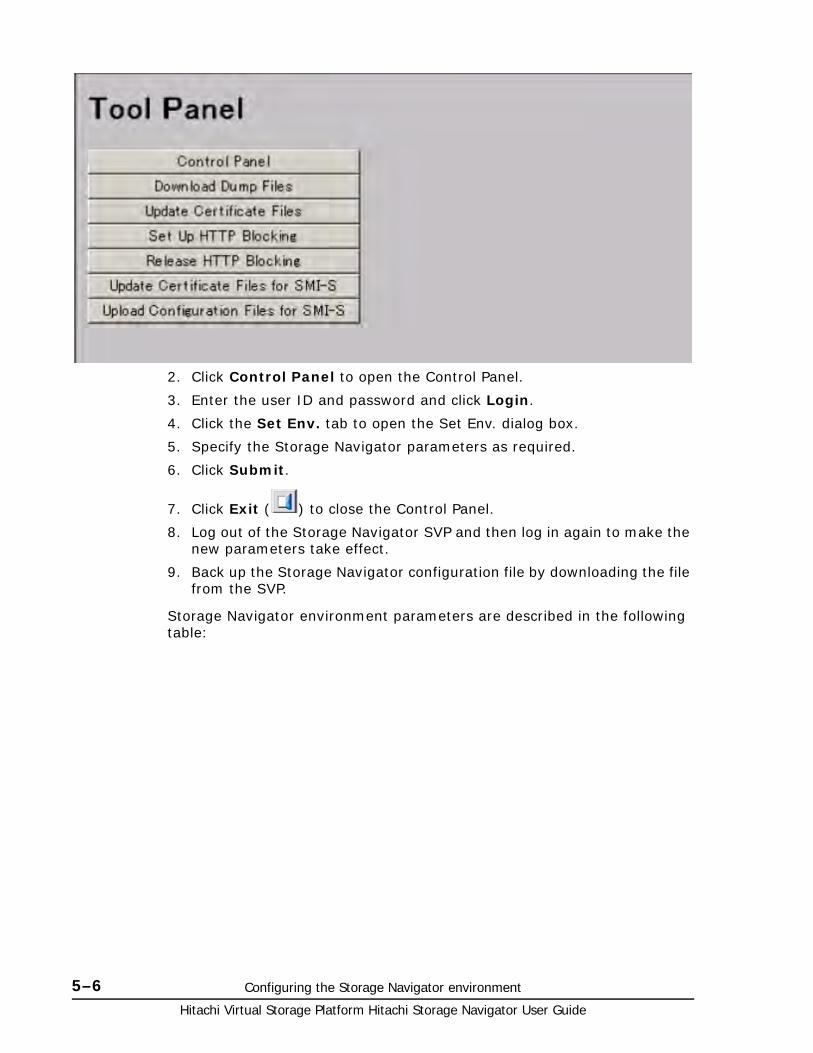
Hitachi Virtual Storage Platform Hitachi Storage Navigator User Guide
5–6 Configuring the Storage Navigator environment
2. Click Control Panel to open the Control Panel.
3. Enter the user ID and password and click Login.
4. Click the Set Env. tab to open the Set Env. dialog box.
5. Specify the Storage Navigator parameters as required.
6. Click Submit.
7. Click Exit ( ) to close the Control Panel.
8. Log out of the Storage Navigator SVP and then log in again to make the new parameters take effect.
9. Back up the Storage Navigator configuration file by downloading the file from the SVP.
Storage Navigator environment parameters are described in the following table:
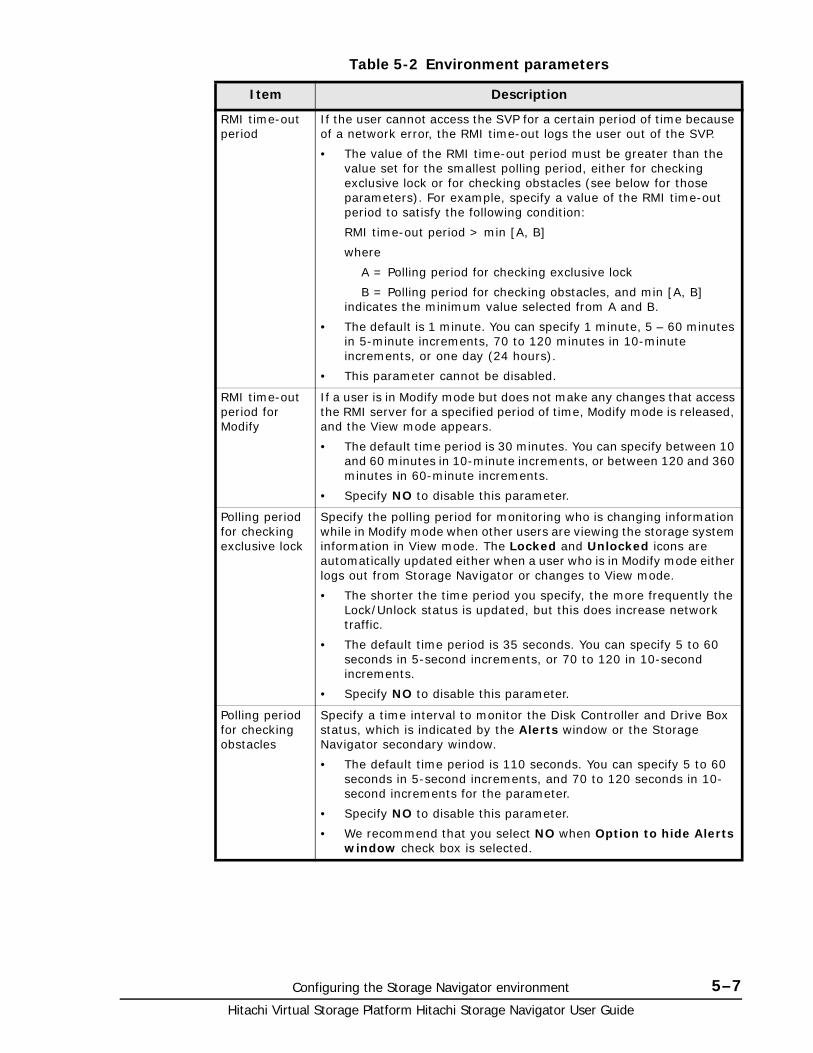
Configuring the Storage Navigator environment 5–7Hitachi Virtual Storage Platform Hitachi Storage Navigator User Guide
Table 5-2 Environment parameters
Item Description
RMI time-out period
If the user cannot access the SVP for a certain period of time because of a network error, the RMI time-out logs the user out of the SVP.
• The value of the RMI time-out period must be greater than the value set for the smallest polling period, either for checking exclusive lock or for checking obstacles (see below for those parameters). For example, specify a value of the RMI time-out period to satisfy the following condition:
RMI time-out period > min [A, B]
where
A = Polling period for checking exclusive lock
B = Polling period for checking obstacles, and min [A, B] indicates the minimum value selected from A and B.
• The default is 1 minute. You can specify 1 minute, 5 – 60 minutes in 5-minute increments, 70 to 120 minutes in 10-minute increments, or one day (24 hours).
• This parameter cannot be disabled.
RMI time-out period for Modify
If a user is in Modify mode but does not make any changes that access the RMI server for a specified period of time, Modify mode is released, and the View mode appears.
• The default time period is 30 minutes. You can specify between 10 and 60 minutes in 10-minute increments, or between 120 and 360 minutes in 60-minute increments.
• Specify NO to disable this parameter.
Polling period for checking exclusive lock
Specify the polling period for monitoring who is changing information while in Modify mode when other users are viewing the storage system information in View mode. The Locked and Unlocked icons are automatically updated either when a user who is in Modify mode either logs out from Storage Navigator or changes to View mode.
• The shorter the time period you specify, the more frequently the Lock/Unlock status is updated, but this does increase network traffic.
• The default time period is 35 seconds. You can specify 5 to 60 seconds in 5-second increments, or 70 to 120 in 10-second increments.
• Specify NO to disable this parameter.
Polling period for checking obstacles
Specify a time interval to monitor the Disk Controller and Drive Box status, which is indicated by the Alerts window or the Storage Navigator secondary window.
• The default time period is 110 seconds. You can specify 5 to 60 seconds in 5-second increments, and 70 to 120 seconds in 10-second increments for the parameter.
• Specify NO to disable this parameter.
• We recommend that you select NO when Option to hide Alerts window check box is selected.

Hitachi Virtual Storage Platform Hitachi Storage Navigator User Guide
5–8 Configuring the Storage Navigator environment
Backing up and restoring Storage Navigator configuration files
You can make backup copies of the various Storage Navigator configuration files by downloading them to a folder that you specify. You can then use the backup copies to restore one or more configuration files if it becomes necessary.
Prerequisites
You must have one of the following roles, depending on the configuration you are backing up or restoring.
Table 5-3 Roles required to back up and restore configuration files
To back up configuration files:
1. Start a web browser and enter the following URL to open the tool panel:
https://IP-address-or-host-name-of-SVP/cgi-bin/utility/toolpanel.cgi
Option to hide Alerts Window
Specify whether to display the Alerts window. If the Hide Alerts Window check box is selected, the Alerts tab does not appear.
• By default, the check box is cleared.
• We recommend that you select NO for Polling period for checking obstacles when the Option to hide Alerts Window check box is selected.
Item Description
Configuration file Description Required role to
back up a fileRequired role to
restore a file
User Account Information
User account information registered to the Storage Navigator.
Security Administrator (View Only)
Security Administrator (View & Modify)
Environment Parameter List
The parameters settings in the Set Env. window.
Storage Administrator (Initial Configuration)
Storage Administrator (Initial Configuration)
Log Transfer Information
Settings made in the Syslog, Audit Log Transfer windows, and the Edit SIM Syslog Server Settings window.
Audit log Administrator (View Only)
Audit log Administrator (View & Modify)
External Authentication
Connection to the authentication server.
Security Administrator (View & Modify)
Security Administrator (View & Modify)
Key Management Server
Connection to the key management server*
Security Administrator (View & Modify)
Security Administrator (View & Modify)
Password Policy Password policy for backing up encryption keys on the Storage Navigator computer
Security Administrator (View & Modify)
Security Administrator (View & Modify)
* The client certificate in use when the key management (KMIP) server is connected cannot be backed up or restored by Storage Navigator. Consult the administrator of the key management server to determine the best way to use the server to manage and back up the certificate.

Configuring the Storage Navigator environment 5–9Hitachi Virtual Storage Platform Hitachi Storage Navigator User Guide
2. Click Control Panel to open the Control Panel.
3. Enter the user ID and password and click Login.
4. Click the Download tab to open the Download File Window.
5. Click the files to be downloaded. You can download only the files for which you have permission.
6. Click Submit. The Download File dialog box shows the list of the files to be downloaded.
7. Click Download. The File Download dialog box opens.
8. Click Save. The Save As dialog box opens.
9. Specify the name of a folder to save the compressed file, and then click Save to start downloading.
10.Decompress the downloaded *.tgz file as required. To decompress the *.tgz file, use the tool supporting tar and gzip.
To restore the configuration files:
1. Start a web browser and enter the following URL to open the tool panel:
http://IP-address-or-host-name-of-SVP/cgi-bin/utility/toolpanel.cgi
2. Click Control Panel to open the Control Panel.
3. Enter the user ID and password and click Login.
4. Click the Restore tab to open the Restore File window.
5. Click the files and click Browse to specify the directory of the file. You can restore only the files for which you have permission.
6. Click Next.
7. Click the configuration files to restore.
8. Click Submit.
Hitachi Virtual Storage Platform Hitachi Storage Navigator User Guide
5–10 Configuring the Storage Navigator environment
9. If the Password check dialog box opens, enter User ID, Password, and Re-enter Password of the storage administrator on the backup user list, and click Submit on the Password check dialog box.
The Restore File dialog box opens.
10.Confirm the restoring process has been completed successfully.
11.Click Close to close the dialog box.
Setting syslog notification for SIMs
Setting and configuring syslog notification for SIMsYou can be notified in syslog format when storage system failures occur. Failures notified in syslog format are the same as failures reported by SIMs displayed in the Alerts window or failures reported by SNMP traps.
Prerequisites• You must have the Storage Administrator (Initial Configuration) role to
perform this task. See Table 4-2 Roles, Permissions, and Capabilities on page 4-7.
• You must have a server that supports syslogs.
• If a firewall is used, a port must be opened to transfer syslogs.
To configure settings for syslog notification:
1. Click Settings >Environmental Setting> Edit SIM Syslog Server Settings.
2. Select Enable, and enter the IP Address and Port Number to transfer syslogs to a primary server.
3. Select Enable, and enter the IP Address and Port Number to transfer syslogs to a secondary server.
4. Specify any name in the Location Identification Name field to identify the storage system.
5. Click Finish
6. Specify a task name and click Apply
Sending a test syslogAfter configuring the syslog notification, send a test syslog to verify your settings.
Prerequisites• You must have the Storage Administrator (Initial Configuration) role to
perform this task. See Table 4-2 Roles, Permissions, and Capabilities on page 4-7.
• Complete the configuration of the syslog server.
Configuring the Storage Navigator environment 5–11Hitachi Virtual Storage Platform Hitachi Storage Navigator User Guide
To send a test syslog:
1. Click Settings > Environmental Setting > Edit SIM Syslog Server Settings.
2. Make sure that the servers are set to Enable and that the settings in the window are correct.
3. Check Send a test message.
4. Enter a name in the Location Identification Name field to identify the storage system.
5. Click Finish
6. Specify a task name and click Apply.
7. Confirm that the syslog servers received the following log: RefCode:7FFFFF, This is Test Report.

Hitachi Virtual Storage Platform Hitachi Storage Navigator User Guide
5–12 Configuring the Storage Navigator environment
6
License keys 6–1Hitachi Virtual Storage Platform Hitachi Storage Navigator User Guide
License keys
Accessing software functionality requires a license key. This topic provides information on license keys and instructions for installing, disabling, enabling, and uninstalling license keys.
□ License keys overview
□ License key types
□ Using the permanent key
□ Using the term key
□ Using the temporary key
□ Using the emergency key
□ Estimating licensed capacity
□ Installing and removing software
□ Insufficient license capacity
□ License key expiration
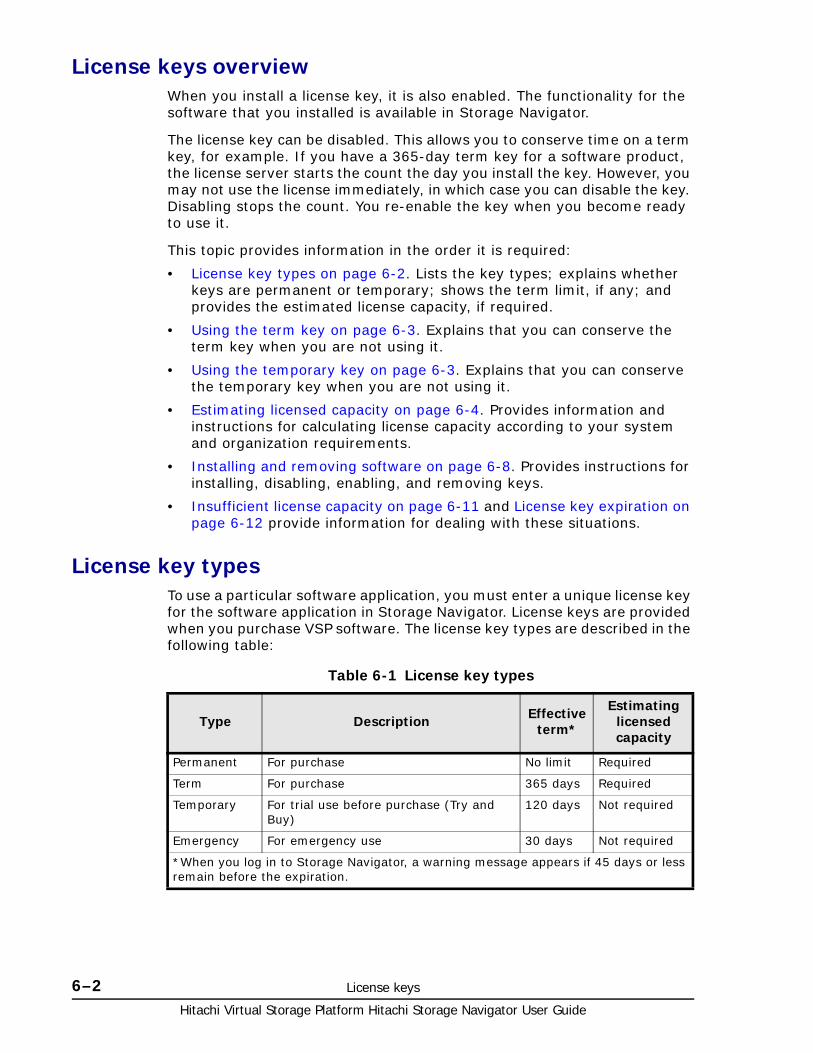
Hitachi Virtual Storage Platform Hitachi Storage Navigator User Guide
6–2 License keys
License keys overviewWhen you install a license key, it is also enabled. The functionality for the software that you installed is available in Storage Navigator.
The license key can be disabled. This allows you to conserve time on a term key, for example. If you have a 365-day term key for a software product, the license server starts the count the day you install the key. However, you may not use the license immediately, in which case you can disable the key. Disabling stops the count. You re-enable the key when you become ready to use it.
This topic provides information in the order it is required:
• License key types on page 6-2. Lists the key types; explains whether keys are permanent or temporary; shows the term limit, if any; and provides the estimated license capacity, if required.
• Using the term key on page 6-3. Explains that you can conserve the term key when you are not using it.
• Using the temporary key on page 6-3. Explains that you can conserve the temporary key when you are not using it.
• Estimating licensed capacity on page 6-4. Provides information and instructions for calculating license capacity according to your system and organization requirements.
• Installing and removing software on page 6-8. Provides instructions for installing, disabling, enabling, and removing keys.
• Insufficient license capacity on page 6-11 and License key expiration on page 6-12 provide information for dealing with these situations.
License key typesTo use a particular software application, you must enter a unique license key for the software application in Storage Navigator. License keys are provided when you purchase VSP software. The license key types are described in the following table:
Table 6-1 License key types
Type Description Effective term*
Estimating licensed capacity
Permanent For purchase No limit Required
Term For purchase 365 days Required
Temporary For trial use before purchase (Try and Buy)
120 days Not required
Emergency For emergency use 30 days Not required
*When you log in to Storage Navigator, a warning message appears if 45 days or less remain before the expiration.

License keys 6–3Hitachi Virtual Storage Platform Hitachi Storage Navigator User Guide
Using the permanent keyYou can purchase the permanent key to use a software application indefinitely. You must estimate a licensed capacity required for using the software application and purchase a license key for the amount of the required capacity.
• If insufficient licence capacity is installed, Not Enough License displays in the status field of the License Key window, and the software application is not enabled.
• If the capacity of the usable volume exceeds the licensed capacity while the storage system is running, for example, an LDEV was additionally installed, Grace Period displays in the status field of the License Key window. You can continue to perform the same operations, but the deficient amount of license must be purchased within 30 days.
Using the term keyYou can purchase the term key to use the software application for a specific number of days. You must estimate a licensed capacity required for using the software application and purchase a license key for the amount of the required capacity.
• Not Enough License or Grace Period displays in the status field of the License Key window if there is insufficient license capacity.
• You can enable or disable the term key for each software application. Unlike the temporary key and the emergency key, the number of days the term key is enabled is counted as the number of effective days of the term key rather than the number of elapsed days from the date of installation.
• The number of effective days is decremented by one day when the date is changed.
For example, if the term key is set to be enabled for 150 days at the time of installation and the term key is disabled for 100 days and a total of 250 days have elapsed since the installation, the number of remaining effective days of the term key is 215 days. This is determined by subtracting 150 days from 365 days. By disabling the term key on the days when the software application is not used, you can prevent the unnecessary decrease of the period in which the term key can be used.
• If the term key is expired, Not Installed displays in the status field of the License key window, and the software application is disabled.
Using the temporary keyYou can use the temporary key for trial purposes. The effective term is 120 days from the time of installation of the temporary key. The effective term is not increased even if the temporary key is reinstalled during the effective term.
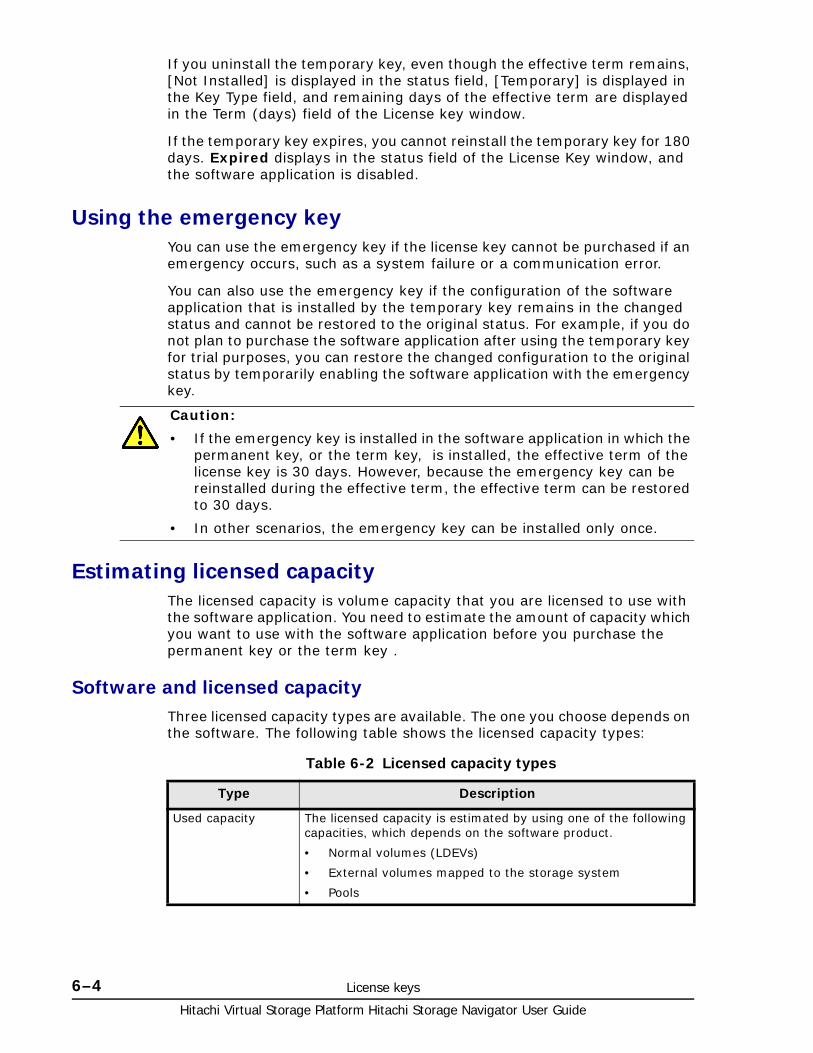
Hitachi Virtual Storage Platform Hitachi Storage Navigator User Guide
6–4 License keys
If you uninstall the temporary key, even though the effective term remains, [Not Installed] is displayed in the status field, [Temporary] is displayed in the Key Type field, and remaining days of the effective term are displayed in the Term (days) field of the License key window.
If the temporary key expires, you cannot reinstall the temporary key for 180 days. Expired displays in the status field of the License Key window, and the software application is disabled.
Using the emergency keyYou can use the emergency key if the license key cannot be purchased if an emergency occurs, such as a system failure or a communication error.
You can also use the emergency key if the configuration of the software application that is installed by the temporary key remains in the changed status and cannot be restored to the original status. For example, if you do not plan to purchase the software application after using the temporary key for trial purposes, you can restore the changed configuration to the original status by temporarily enabling the software application with the emergency key.
Estimating licensed capacityThe licensed capacity is volume capacity that you are licensed to use with the software application. You need to estimate the amount of capacity which you want to use with the software application before you purchase the permanent key or the term key .
Software and licensed capacityThree licensed capacity types are available. The one you choose depends on the software. The following table shows the licensed capacity types:
Table 6-2 Licensed capacity types
Caution:
• If the emergency key is installed in the software application in which the permanent key, or the term key, is installed, the effective term of the license key is 30 days. However, because the emergency key can be reinstalled during the effective term, the effective term can be restored to 30 days.
• In other scenarios, the emergency key can be installed only once.
Type Description
Used capacity The licensed capacity is estimated by using one of the following capacities, which depends on the software product.
• Normal volumes (LDEVs)
• External volumes mapped to the storage system
• Pools
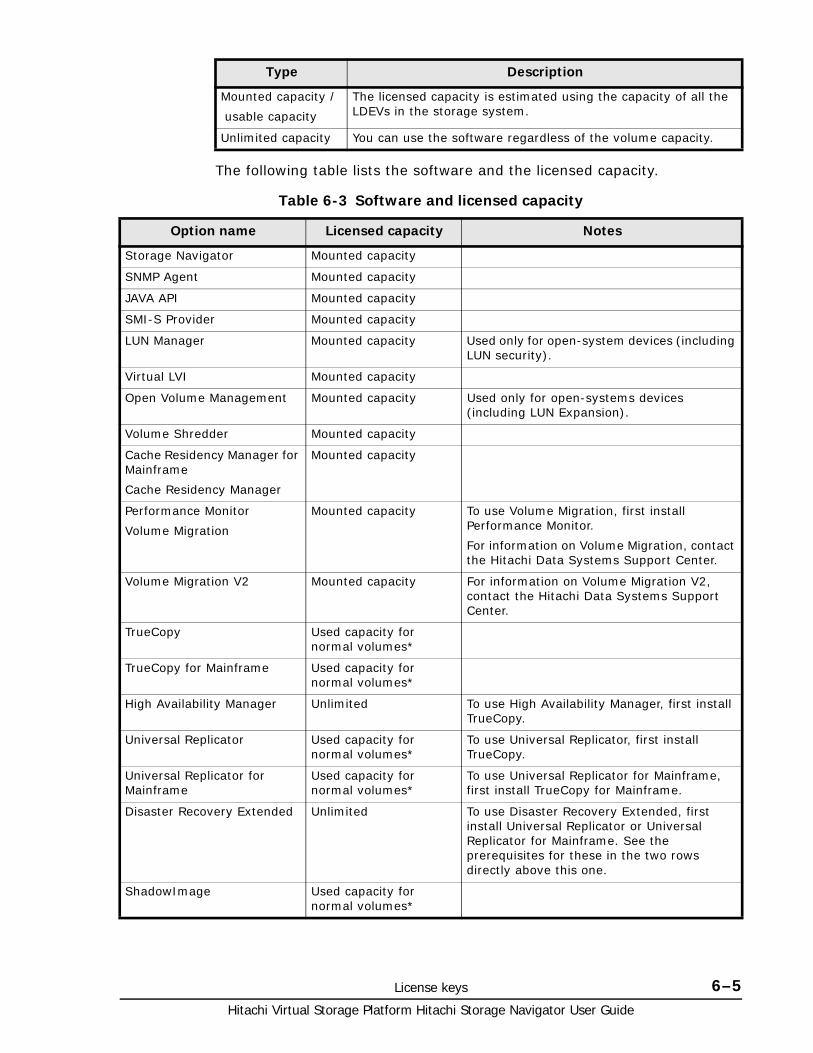
License keys 6–5Hitachi Virtual Storage Platform Hitachi Storage Navigator User Guide
The following table lists the software and the licensed capacity.
Table 6-3 Software and licensed capacity
Mounted capacity /
usable capacity
The licensed capacity is estimated using the capacity of all the LDEVs in the storage system.
Unlimited capacity You can use the software regardless of the volume capacity.
Type Description
Option name Licensed capacity Notes
Storage Navigator Mounted capacity
SNMP Agent Mounted capacity
JAVA API Mounted capacity
SMI-S Provider Mounted capacity
LUN Manager Mounted capacity Used only for open-system devices (including LUN security).
Virtual LVI Mounted capacity
Open Volume Management Mounted capacity Used only for open-systems devices (including LUN Expansion).
Volume Shredder Mounted capacity
Cache Residency Manager for Mainframe
Cache Residency Manager
Mounted capacity
Performance Monitor
Volume Migration
Mounted capacity To use Volume Migration, first install Performance Monitor.
For information on Volume Migration, contact the Hitachi Data Systems Support Center.
Volume Migration V2 Mounted capacity For information on Volume Migration V2, contact the Hitachi Data Systems Support Center.
TrueCopy Used capacity for normal volumes*
TrueCopy for Mainframe Used capacity for normal volumes*
High Availability Manager Unlimited To use High Availability Manager, first install TrueCopy.
Universal Replicator Used capacity for normal volumes*
To use Universal Replicator, first install TrueCopy.
Universal Replicator for Mainframe
Used capacity for normal volumes*
To use Universal Replicator for Mainframe, first install TrueCopy for Mainframe.
Disaster Recovery Extended Unlimited To use Disaster Recovery Extended, first install Universal Replicator or Universal Replicator for Mainframe. See the prerequisites for these in the two rows directly above this one.
ShadowImage Used capacity for normal volumes*
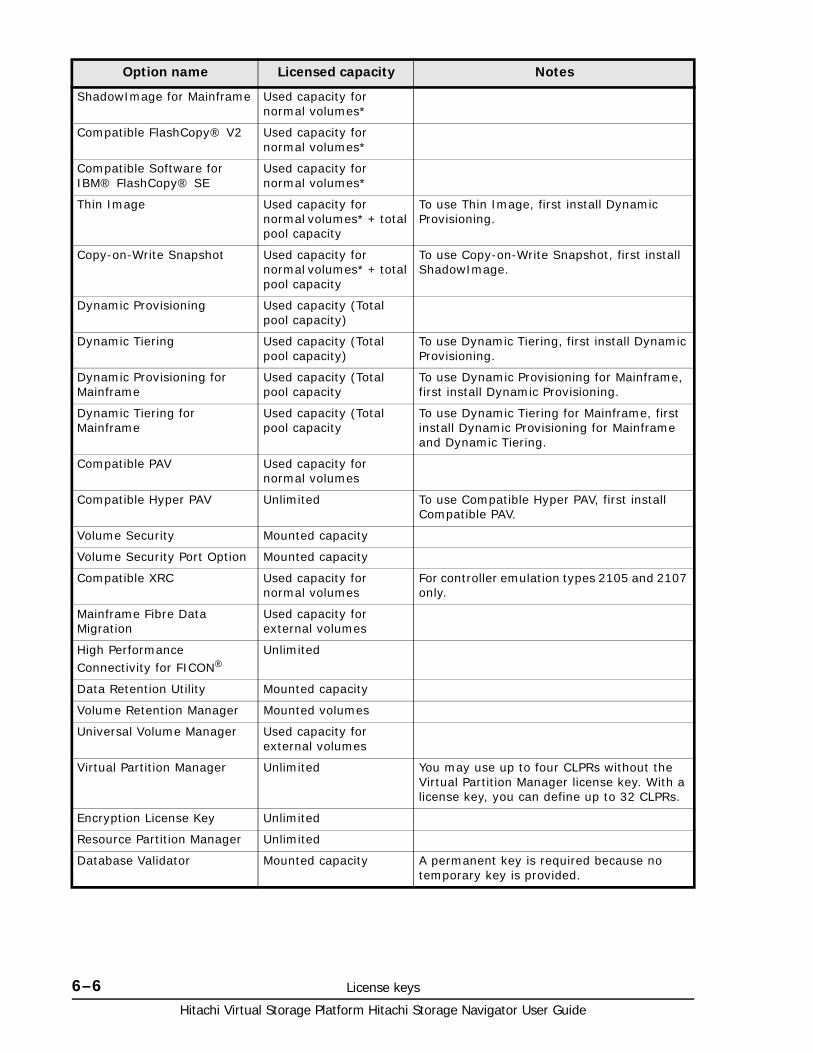
Hitachi Virtual Storage Platform Hitachi Storage Navigator User Guide
6–6 License keys
ShadowImage for Mainframe Used capacity for normal volumes*
Compatible FlashCopy® V2 Used capacity for normal volumes*
Compatible Software for IBM® FlashCopy® SE
Used capacity for normal volumes*
Thin Image Used capacity for normal volumes* + total pool capacity
To use Thin Image, first install Dynamic Provisioning.
Copy-on-Write Snapshot Used capacity for normal volumes* + total pool capacity
To use Copy-on-Write Snapshot, first install ShadowImage.
Dynamic Provisioning Used capacity (Total pool capacity)
Dynamic Tiering Used capacity (Total pool capacity)
To use Dynamic Tiering, first install Dynamic Provisioning.
Dynamic Provisioning for Mainframe
Used capacity (Total pool capacity
To use Dynamic Provisioning for Mainframe, first install Dynamic Provisioning.
Dynamic Tiering for Mainframe
Used capacity (Total pool capacity
To use Dynamic Tiering for Mainframe, first install Dynamic Provisioning for Mainframe and Dynamic Tiering.
Compatible PAV Used capacity for normal volumes
Compatible Hyper PAV Unlimited To use Compatible Hyper PAV, first install Compatible PAV.
Volume Security Mounted capacity
Volume Security Port Option Mounted capacity
Compatible XRC Used capacity for normal volumes
For controller emulation types 2105 and 2107 only.
Mainframe Fibre Data Migration
Used capacity for external volumes
High Performance Connectivity for FICON®
Unlimited
Data Retention Utility Mounted capacity
Volume Retention Manager Mounted volumes
Universal Volume Manager Used capacity for external volumes
Virtual Partition Manager Unlimited You may use up to four CLPRs without the Virtual Partition Manager license key. With a license key, you can define up to 32 CLPRs.
Encryption License Key Unlimited
Resource Partition Manager Unlimited
Database Validator Mounted capacity A permanent key is required because no temporary key is provided.
Option name Licensed capacity Notes
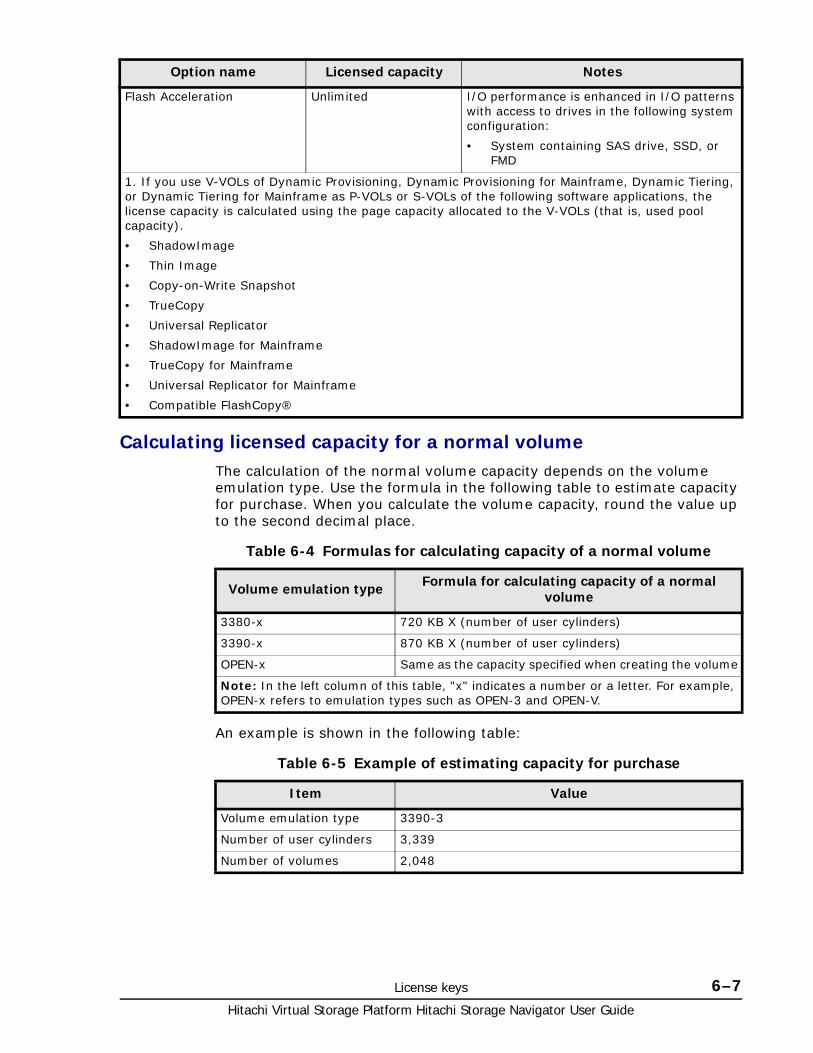
License keys 6–7Hitachi Virtual Storage Platform Hitachi Storage Navigator User Guide
Calculating licensed capacity for a normal volumeThe calculation of the normal volume capacity depends on the volume emulation type. Use the formula in the following table to estimate capacity for purchase. When you calculate the volume capacity, round the value up to the second decimal place.
Table 6-4 Formulas for calculating capacity of a normal volume
An example is shown in the following table:
Table 6-5 Example of estimating capacity for purchase
Flash Acceleration Unlimited I/O performance is enhanced in I/O patterns with access to drives in the following system configuration:
• System containing SAS drive, SSD, or FMD
1. If you use V-VOLs of Dynamic Provisioning, Dynamic Provisioning for Mainframe, Dynamic Tiering, or Dynamic Tiering for Mainframe as P-VOLs or S-VOLs of the following software applications, the license capacity is calculated using the page capacity allocated to the V-VOLs (that is, used pool capacity).
• ShadowImage
• Thin Image
• Copy-on-Write Snapshot
• TrueCopy
• Universal Replicator
• ShadowImage for Mainframe
• TrueCopy for Mainframe
• Universal Replicator for Mainframe
• Compatible FlashCopy®
Option name Licensed capacity Notes
Volume emulation type Formula for calculating capacity of a normal volume
3380-x 720 KB X (number of user cylinders)
3390-x 870 KB X (number of user cylinders)
OPEN-x Same as the capacity specified when creating the volume
Note: In the left column of this table, "x" indicates a number or a letter. For example, OPEN-x refers to emulation types such as OPEN-3 and OPEN-V.
Item Value
Volume emulation type 3390-3
Number of user cylinders 3,339
Number of volumes 2,048
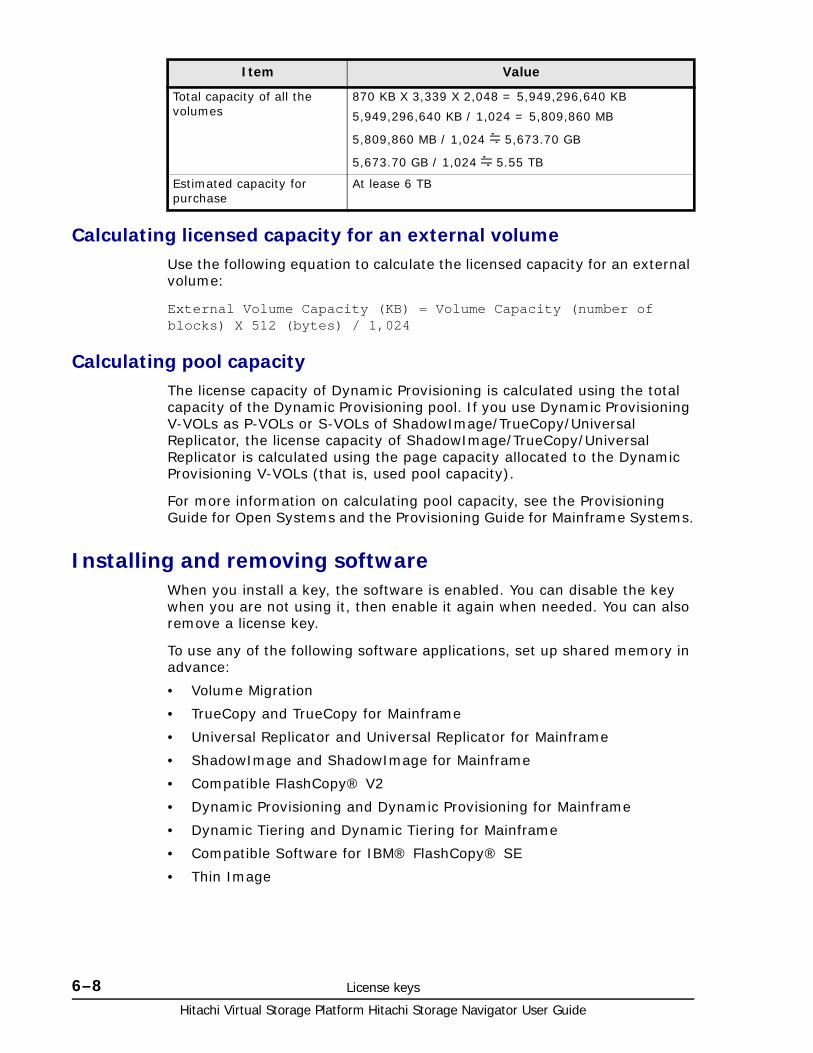
Hitachi Virtual Storage Platform Hitachi Storage Navigator User Guide
6–8 License keys
Calculating licensed capacity for an external volumeUse the following equation to calculate the licensed capacity for an external volume:
External Volume Capacity (KB) = Volume Capacity (number of blocks) X 512 (bytes) / 1,024
Calculating pool capacity The license capacity of Dynamic Provisioning is calculated using the total capacity of the Dynamic Provisioning pool. If you use Dynamic Provisioning V-VOLs as P-VOLs or S-VOLs of ShadowImage/TrueCopy/Universal Replicator, the license capacity of ShadowImage/TrueCopy/Universal Replicator is calculated using the page capacity allocated to the Dynamic Provisioning V-VOLs (that is, used pool capacity).
For more information on calculating pool capacity, see the Provisioning Guide for Open Systems and the Provisioning Guide for Mainframe Systems.
Installing and removing softwareWhen you install a key, the software is enabled. You can disable the key when you are not using it, then enable it again when needed. You can also remove a license key.
To use any of the following software applications, set up shared memory in advance:
• Volume Migration
• TrueCopy and TrueCopy for Mainframe
• Universal Replicator and Universal Replicator for Mainframe
• ShadowImage and ShadowImage for Mainframe
• Compatible FlashCopy® V2
• Dynamic Provisioning and Dynamic Provisioning for Mainframe
• Dynamic Tiering and Dynamic Tiering for Mainframe
• Compatible Software for IBM® FlashCopy® SE
• Thin Image
Total capacity of all the volumes
870 KB X 3,339 X 2,048 = 5,949,296,640 KB
5,949,296,640 KB / 1,024 = 5,809,860 MB
5,809,860 MB / 1,024 5,673.70 GB
5,673.70 GB / 1,024 5.55 TB
Estimated capacity for purchase
At lease 6 TB
Item Value

License keys 6–9Hitachi Virtual Storage Platform Hitachi Storage Navigator User Guide
Installing software using a license key codeA Storage Administrator with modify permission can install license keys.
To install software by using the license key code:
1. Click Settings > Environmental Setting > License Key. The License Key window opens.
2. Click to change to Modify mode.
3. Select Key Code in Mode.
4. In Key Code, enter the license key code.
5. Click Install. The Status column changes to Install.
6. Click Apply. The status changes to Installed.
If installation fails, an error message window appears. Display error details by selecting the failed option and clicking Detail.
Installing software using a license key fileYou can install multiple software in a single procedure using a license key file. The license key files are provided by HDS.
The required time for installing a license key file depends on the number of license keys included in the file. A file with 30 license keys can take about 3 minutes to install. A file with 1,000 license keys can take about 60 minutes to install.
Prerequisite
The license key file name can be up to 200 alphanumeric characters but cannot include the following symbols: " \ ; : , * ? < > | / .
To install software using the license key file:
1. Click Settings > Environmental Setting > License Key. The License Key window opens.
2. Click to change to Modify mode.
3. From Mode, click File. The Browse button becomes available.
4. Click Browse to display the dialog box, and select the license key file (the file extension is plk) to be used for installing options on the displayed window. The selected file name appears in the File Name text box.
5. Click Install.
6. Click Apply. The status changes to Installed.
7. If installation fails or an error occurs during the installation, a message appears listing the failed options. To display the error details in the dialog box, select the failed option and then click Detail.

Hitachi Virtual Storage Platform Hitachi Storage Navigator User Guide
6–10 License keys
When the status is Installed (Disabled)If you do not install the prerequisite software or set up shared memory before you install the license key software, the software will install correctly but will be disabled after you install it. To enable the license key, install the prerequisite software and/or set up the shared memory. Then enable the license key. See the following table for details.
Enabling or disabling a licenseThe term key can be enabled or disabled. You can also enable a license when you install more than one software product. However, some software may not be available because the requirements for these products are not satisfied. When this is the case, satisfy the requirements first, then enable the license.
To enable or disable the license:
1. Click Settings > Environmental Settings > License Key. The License Key window opens.
2. Click to change to Modify mode.
3. Select the software from the list.
4. In License Status, select Enable or Disable.
5. Click Set. The Status column changes to Install or Install (Disabled) .
6. Click Apply. The status changes.
Causes Recommended Actions
The prerequisite software was not installed before the license key software was installed.
Install the required prerequisite software. See Software and licensed capacity on page 6-4.
The shared memory was not set up before the following license key software was installed.
• Volume Migration
• TrueCopy and TrueCopy for Mainframe
• Universal Replicator and Universal Replicator for Mainframe
• Compatible FlashCopy® V2
• Compatible Software for IBM® FlashCopy® SE
• ShadowImage and ShadowImage for Mainframe
• Dynamic Tiering and Dynamic Tiering for Mainframe
Set up the shared memory, and then enable the license. See the following section, Enabling or disabling a license on page 6-10.

License keys 6–11Hitachi Virtual Storage Platform Hitachi Storage Navigator User Guide
Removing softwareTo remove software:
1. Click Settings > Environmental Settings > License Key. The License Key window opens.
2. Click to change to Modify mode.
3. Select the desired option that you want to remove from the list.
4. From Mode, click Key Code.
5. Click Uninstall. The status changes to Remove.
6. Click Apply. The status changes from Installed to Not Installed.
7. On rare occasions, a software option that is listed as Not Installed but still has available licensed capacity (shown as XX TB) might remain in the list. In this case, select that option and select Uninstall to reset the information.
Removing Data Retention Utility When you remove Data Retention Utility, an error might occur even if the Permitted Volumes column of the License Key window indicates that the licensed capacity is 0TB.
To resolve the error and continue removal:
1. Click Actions > Other Function > Data Retention to open the Data Retention window.
2. In the Data Retention window, find logical volumes that are unusable as S-VOLs (secondary volumes).
3. Change the settings so that the logical volumes are usable as S-VOLs.
4. Click Settings > Environmental Settings > License Key to open the License Key window, and then remove Data Retention Utility.
Insufficient license capacityIf license capacity becomes insufficient, a message appears when you log in to Storage Navigator.
If you add LDEVs and the available amount of volume capacity exceeds the licensed capacity, Grace Period appears under the Status column in the License Key window. If this occurs, you must purchase an additional license within 30 days to cover the capacity shortage.
If you use Dynamic Provisioning, the licensed capacity might become insufficient because the used capacity of Dynamic Provisioning pools could increase even if you do not add any volumes. If this occurs, you must purchase an additional license within 30 days to cover the capacity shortage. For details on how to calculate pool capacity, see the Provisioning Guide for Open Systems.
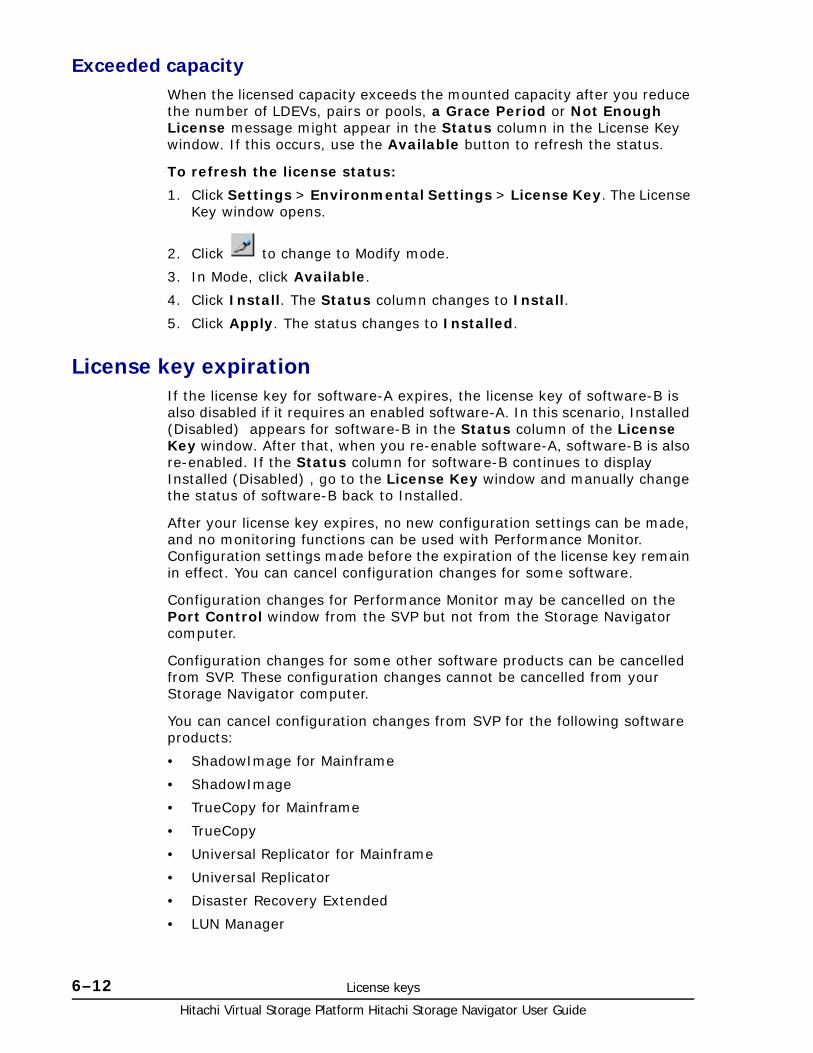
Hitachi Virtual Storage Platform Hitachi Storage Navigator User Guide
6–12 License keys
Exceeded capacityWhen the licensed capacity exceeds the mounted capacity after you reduce the number of LDEVs, pairs or pools, a Grace Period or Not Enough License message might appear in the Status column in the License Key window. If this occurs, use the Available button to refresh the status.
To refresh the license status:
1. Click Settings > Environmental Settings > License Key. The License Key window opens.
2. Click to change to Modify mode.
3. In Mode, click Available.
4. Click Install. The Status column changes to Install.
5. Click Apply. The status changes to Installed.
License key expirationIf the license key for software-A expires, the license key of software-B is also disabled if it requires an enabled software-A. In this scenario, Installed (Disabled) appears for software-B in the Status column of the License Key window. After that, when you re-enable software-A, software-B is also re-enabled. If the Status column for software-B continues to display Installed (Disabled) , go to the License Key window and manually change the status of software-B back to Installed.
After your license key expires, no new configuration settings can be made, and no monitoring functions can be used with Performance Monitor. Configuration settings made before the expiration of the license key remain in effect. You can cancel configuration changes for some software.
Configuration changes for Performance Monitor may be cancelled on the Port Control window from the SVP but not from the Storage Navigator computer.
Configuration changes for some other software products can be cancelled from SVP. These configuration changes cannot be cancelled from your Storage Navigator computer.
You can cancel configuration changes from SVP for the following software products:
• ShadowImage for Mainframe
• ShadowImage
• TrueCopy for Mainframe
• TrueCopy
• Universal Replicator for Mainframe
• Universal Replicator
• Disaster Recovery Extended
• LUN Manager
License keys 6–13Hitachi Virtual Storage Platform Hitachi Storage Navigator User Guide
• Volume Migration
• Data Retention Utility
• High Availability Manager
Configuration changes for the following software products cannot be deleted:
• Virtual LVI
• Open Volume Management
• Cache Residency Manager for Mainframe
• Cache Residency Manager
• Compatible PAV
• Compatible Hyper PAV
Expired temporary keyThe temporary key expires on the 120th day from the day when you install it. Once the temporary key expires, you cannot reinstall the temporary key for 180 days.
Expired term keyIf the term key expires, you can install the software with another license key.
When a term key expires, Not Installed appears in the Status column in the License Key window. When the status is Not Installed, you can install the temporary key, the term key, the emergency key, or the permanent key for the software.

Hitachi Virtual Storage Platform Hitachi Storage Navigator User Guide
6–14 License keys
7
Viewing and managing the storage system 7–1Hitachi Virtual Storage Platform Hitachi Storage Navigator User Guide
Viewing and managing the storagesystem
This topic describes how to navigate to storage system information, create and download system configuration reports, and manage Storage Navigator tasks.
□ Viewing and managing overview
□ Viewing storage system information
□ Using reports to verify system changes
□ Viewing a Storage Navigator report
□ Managing tasks
□ Creating a configuration report with the Report Configuration Tool
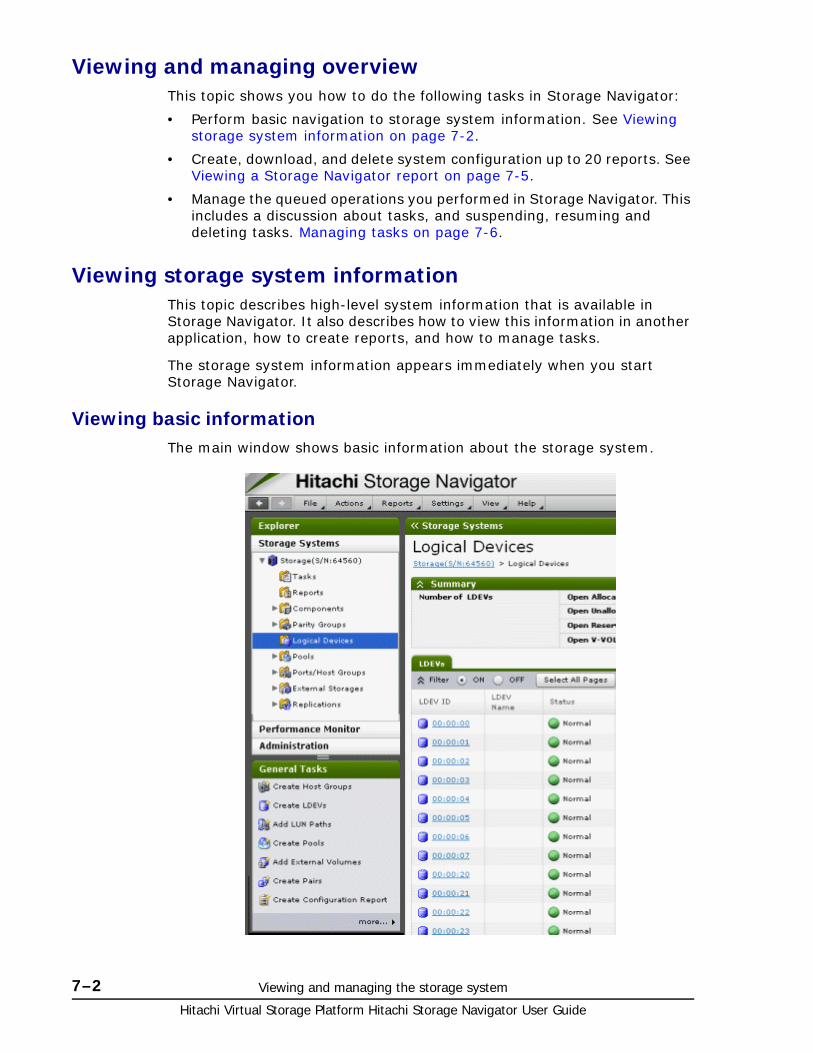
Hitachi Virtual Storage Platform Hitachi Storage Navigator User Guide
7–2 Viewing and managing the storage system
Viewing and managing overviewThis topic shows you how to do the following tasks in Storage Navigator:
• Perform basic navigation to storage system information. See Viewing storage system information on page 7-2.
• Create, download, and delete system configuration up to 20 reports. See Viewing a Storage Navigator report on page 7-5.
• Manage the queued operations you performed in Storage Navigator. This includes a discussion about tasks, and suspending, resuming and deleting tasks. Managing tasks on page 7-6.
Viewing storage system informationThis topic describes high-level system information that is available in Storage Navigator. It also describes how to view this information in another application, how to create reports, and how to manage tasks.
The storage system information appears immediately when you start Storage Navigator.
Viewing basic informationThe main window shows basic information about the storage system.
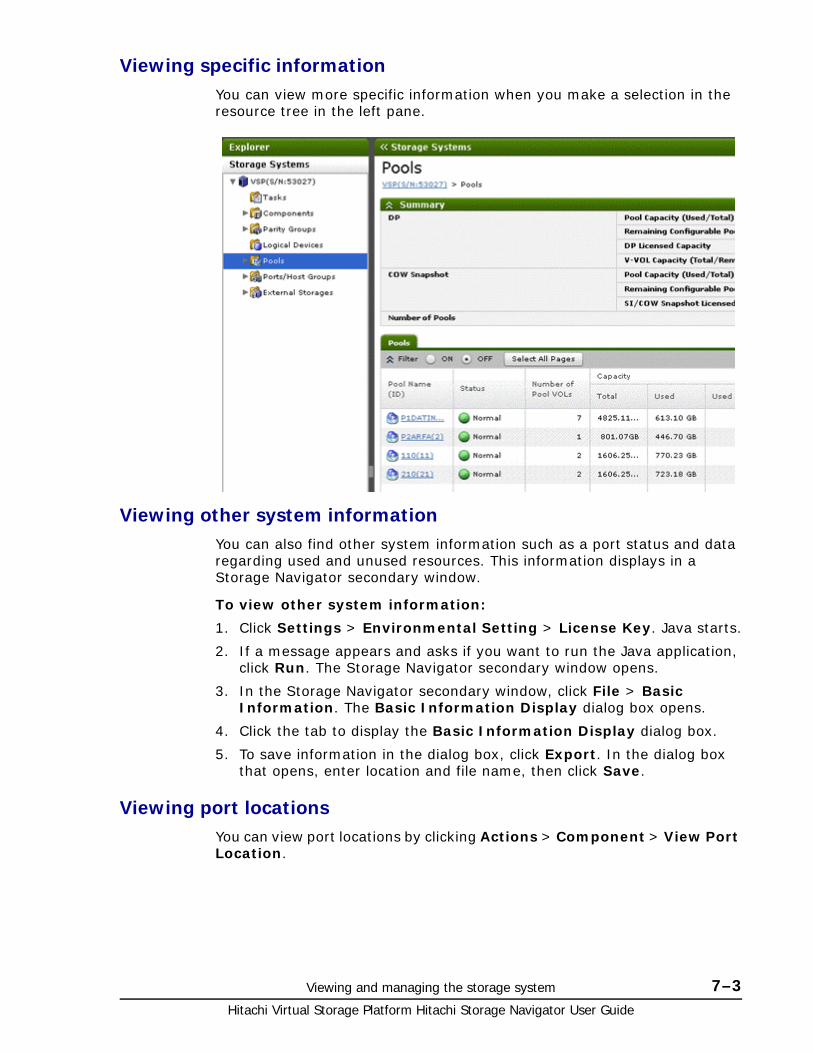
Viewing and managing the storage system 7–3Hitachi Virtual Storage Platform Hitachi Storage Navigator User Guide
Viewing specific informationYou can view more specific information when you make a selection in the resource tree in the left pane.
Viewing other system informationYou can also find other system information such as a port status and data regarding used and unused resources. This information displays in a Storage Navigator secondary window.
To view other system information:
1. Click Settings > Environmental Setting > License Key. Java starts.
2. If a message appears and asks if you want to run the Java application, click Run. The Storage Navigator secondary window opens.
3. In the Storage Navigator secondary window, click File > Basic Information. The Basic Information Display dialog box opens.
4. Click the tab to display the Basic Information Display dialog box.
5. To save information in the dialog box, click Export. In the dialog box that opens, enter location and file name, then click Save.
Viewing port locationsYou can view port locations by clicking Actions > Component > View Port Location.

Hitachi Virtual Storage Platform Hitachi Storage Navigator User Guide
7–4 Viewing and managing the storage system
Each cluster has up to 16 printed circuit boards (PCBs) and the name of each PCB appears on the header of the port list. The icons show the port name, port LED status, and equipment information of port.
• : This port is equipped and is currently in use. The cable is properly set. This port is available for the operation.
• : This port is equipped and available for the operation.
• : This port is not equipped or not available.
Status icons for certain resourcesThe status of certain resources is indicated by the following icons:
Figure 7-1 Port location window
Status Description
The resource can be used normally.
The resource has the following status:
• The resource can be used, but has a limit on I/O performance and so on.
• The status of the resource is changing.
• The status of the resource is being confirmed.
• The resource has subresources of different status.
For example, parity groups are in this status if the statuses of logical volumes in the parity groups are not the same.
In this case, the subresources might be blocked. Confirm the status of subresources.
Viewing and managing the storage system 7–5Hitachi Virtual Storage Platform Hitachi Storage Navigator User Guide
Using reports to verify system changesThis topic explains Storage Navigator reports and provides instructions for creating, viewing, and deleting them.
You can create reports of your storage system’s physical configurations and logical settings. Doing this provides a copy of the settings when you intend to make changes. If you make a similar report after the changes, then you can compare the reports to verify that new settings were made as intended.
Storage Navigator reports can be saved in a CSV or HTML file. Tables in the HTML version of the configuration report are sortable.
Viewing a Storage Navigator reportAdobe Flash Player is necessary to view reports. For details on Flash Player, see General restrictions on page 3-5 and Installing Adobe Flash Player on page 2-21.
Prerequisite• Users that create the report or users with Storage Administrator (Initial
Configuration) role can view the report.
To download and view a report:1. In the Storage Navigator tree, click Storage Systems > Reports.
2. Specify the report to download.
3. Click Download Reports.
4. Specify a folder in which to save a .tgz file.
5. Extract the downloaded .tgz file.
6. Display the report in the following ways:
For an HTML format report:
Open html\index.html file in the extracted folder.
For a CSV format report:
Open a csv file in csv folder in the extracted folder.
To display a report in the Reports window
You can view only HTML format reports in the Reports window. You can view CSV format reports in the previous procedure.
The resource has the following status:
• The resource cannot be used because it is blocked due to a failure or maintenance operations.
• The status of the resource is unknown.
Restore the resource to the normal status.
Status Description

Hitachi Virtual Storage Platform Hitachi Storage Navigator User Guide
7–6 Viewing and managing the storage system
1. Click Storage Systems > Reports.
2. Click the report name to display in the Reports window.
The report is displayed in the Reports window.
In the Reports window, click the reports name in the list at the left, and you can view the report at the right.
For details about each report, see Storage configuration reports on page A-1.
Creating a configuration reportYou can use the report configuration tool to create up to 20 configuration reports and then view or download them.
Prerequisite
You must have Storage View permission to perform this task.
To create a configuration report:
1. From General Tasks, click Create Configuration Report.
2. Specify a task name and click Apply. This task name is used as the report name in the Reports window. This process takes approximately 10 minutes to complete.
3. Click Refresh View to update the Reports window. The created report appears in the list.
Deleting a configuration reportYou can delete a report when you no longer need it, or to make room in the Reports window when the report limit is about to be reached.
Prerequisite
Users that create the report or users with Storage Administrator (Initial Configuration) role can delete a configuration report.
To delete a report:
1. In the tree, click Storage Systems > Reports.
2. Specify the report to delete.
3. Click Delete Reports.
4. Click Apply.
Managing tasksThis topic describes tasks and the Tasks window, and provides instructions for managing tasks.
Because Storage Navigator operations are executed in the background, you start the next task immediately after performing the previous one. You keep track of your tasks' progress is by entering a task name during each Storage Navigator procedure and then tracking its status and other information using the Task window.
Viewing and managing the storage system 7–7Hitachi Virtual Storage Platform Hitachi Storage Navigator User Guide
• Each procedure you perform requires a task name. For example, when you provision or configure the system, create a pair, or any other procedure, you must assign a name for the task.
• Each task is queued and then processed by the storage system in the order of its arrival.
Only one task is executed at the same time, except for the following. In the case of the following operations, the next task may be executed before the current task completes or fails.
• Create LDEVs
• Format LDEVs
• Shred LDEVs
• Shrink Pool
• Edit Encryption
Tasks windowThe Tasks window can display 384 tasks, including up to 128 tasks with a status of In Progress, Waiting, and Suspended, and up to 256 tasks with a status of Completed and Failed. If the number exceeds these limits, the oldest completed tasks are automatically removed from the window.
Managing your tasksStorage Navigator allows you to suspend, resume, cancel, and prevent tasks from being automatically deleted.
Prerequisites
• Users that execute the task or users with Storage Administrator (System Resource Management) role can view the details of tasks.
• Users with the Storage Administrator (System Resource Management) role can delete, suspend, resume tasks, and enable or disable auto-deletion of tasks.
To modify a task:
1. In the tree, click Storage Systems > Tasks. The list of tasks appears.
2. In the list, click the task or tasks that you want to modify.
3. In the bottom right corner of the window, click the corresponding button for the task you want to perform:
Click Delete Tasks to delete or cancel a task.
Click Suspend Tasks to suspend a queued task.
Click Resume Tasks to resume a suspended task.
Click More Actions > Enable Auto Delete to delete tasks from the Task list when they have completed and the task list is full. This allows you to check for completed tasks and to clear the list when the limit (384) is reached.
Click More Actions > Disable Auto Delete to keep tasks in the task list after the tasks are completed.

Hitachi Virtual Storage Platform Hitachi Storage Navigator User Guide
7–8 Viewing and managing the storage system
4. Verify the displayed settings and click Apply.
Stalled tasksIf a queued task is not performed over a reasonable period, check the following:
• Did the task fail? Click failed to view the reason. then delete the task, correct the problem, and try the task again.
• Are too many tasks in the task list because Auto Delete is disabled? Click Enable Auto Delete to remove tasks from the window.
• Is another program changing the storage system configuration? Check this by observing whether Resource Lock is displayed for too long a time. If so, verify that another program is running and then wait until its changes are completed.
• The percentage of progress of an ongoing task may not change if another operation is in progress.
Setting the status refresh interval of the Tasks windowThe Tasks window automatically updates every 60 seconds by default. This interval can be changed using the following procedure.
To change the refresh interval:
1. Click Settings > Environmental Setting > Edit Information Display Settings.
2. Specify the interval for Task Screen Refresh Interval. If No Update is specified, the Tasks window will not be automatically updated. In this case, to refresh the window, you must use Refresh View or Refresh All.
3. Click Apply
Creating a configuration report with the Report Configuration Tool
You can use the command prompt in the Report Configuration Tool to create a configuration report. You can automate the creation and the deletion of a configuration report by preparing a script file that contains a series of commands and scheduling a tasks in Windows to execute the script at regular intervals. See the following sections for details.
• Preparing a script file on page 7-9
• Executing a regularly scheduled script file on page 7-12
• Example execution and explanation of script files on page 7-13
• Error in executing Report Configuration Tool on page 7-13
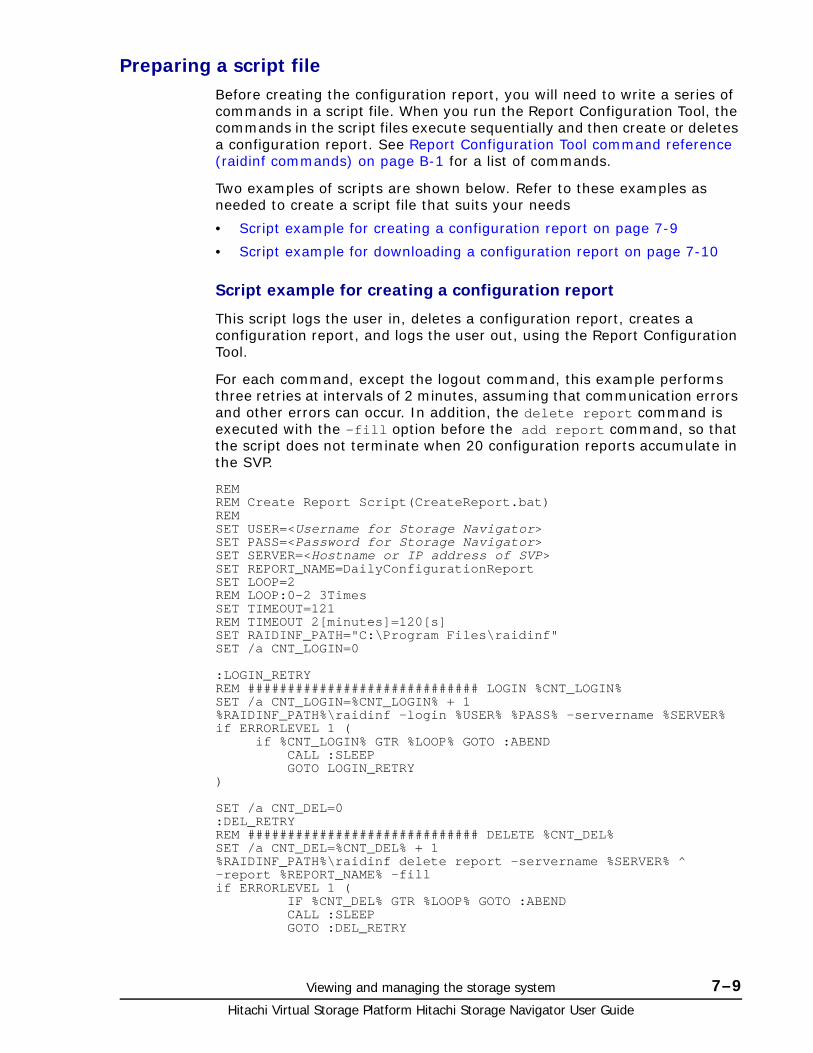
Viewing and managing the storage system 7–9Hitachi Virtual Storage Platform Hitachi Storage Navigator User Guide
Preparing a script fileBefore creating the configuration report, you will need to write a series of commands in a script file. When you run the Report Configuration Tool, the commands in the script files execute sequentially and then create or deletes a configuration report. See Report Configuration Tool command reference (raidinf commands) on page B-1 for a list of commands.
Two examples of scripts are shown below. Refer to these examples as needed to create a script file that suits your needs
• Script example for creating a configuration report on page 7-9
• Script example for downloading a configuration report on page 7-10
Script example for creating a configuration report
This script logs the user in, deletes a configuration report, creates a configuration report, and logs the user out, using the Report Configuration Tool.
For each command, except the logout command, this example performs three retries at intervals of 2 minutes, assuming that communication errors and other errors can occur. In addition, the delete report command is executed with the -fill option before the add report command, so that the script does not terminate when 20 configuration reports accumulate in the SVP.
REMREM Create Report Script(CreateReport.bat) REMSET USER=<Username for Storage Navigator>SET PASS=<Password for Storage Navigator>SET SERVER=<Hostname or IP address of SVP>SET REPORT_NAME=DailyConfigurationReportSET LOOP=2REM LOOP:0-2 3TimesSET TIMEOUT=121REM TIMEOUT 2[minutes]=120[s]SET RAIDINF_PATH="C:\Program Files\raidinf"SET /a CNT_LOGIN=0
:LOGIN_RETRYREM ############################# LOGIN %CNT_LOGIN%SET /a CNT_LOGIN=%CNT_LOGIN% + 1%RAIDINF_PATH%\raidinf -login %USER% %PASS% -servername %SERVER%if ERRORLEVEL 1 ( if %CNT_LOGIN% GTR %LOOP% GOTO :ABEND CALL :SLEEP GOTO LOGIN_RETRY)
SET /a CNT_DEL=0:DEL_RETRYREM ############################# DELETE %CNT_DEL%SET /a CNT_DEL=%CNT_DEL% + 1%RAIDINF_PATH%\raidinf delete report -servername %SERVER% ^-report %REPORT_NAME% -fillif ERRORLEVEL 1 ( IF %CNT_DEL% GTR %LOOP% GOTO :ABEND CALL :SLEEP GOTO :DEL_RETRY
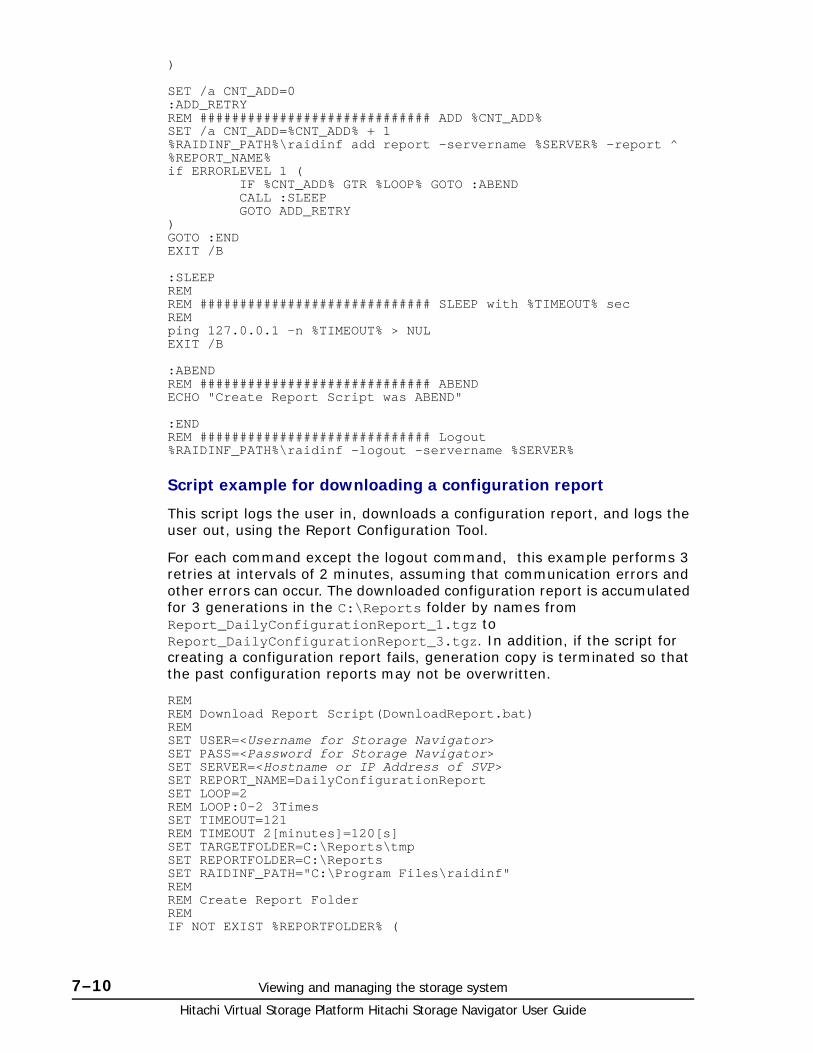
Hitachi Virtual Storage Platform Hitachi Storage Navigator User Guide
7–10 Viewing and managing the storage system
)
SET /a CNT_ADD=0:ADD_RETRYREM ############################# ADD %CNT_ADD%SET /a CNT_ADD=%CNT_ADD% + 1%RAIDINF_PATH%\raidinf add report -servername %SERVER% -report ^%REPORT_NAME%if ERRORLEVEL 1 ( IF %CNT_ADD% GTR %LOOP% GOTO :ABEND CALL :SLEEP GOTO ADD_RETRY) GOTO :ENDEXIT /B
:SLEEPREMREM ############################# SLEEP with %TIMEOUT% secREMping 127.0.0.1 -n %TIMEOUT% > NULEXIT /B
:ABENDREM ############################# ABENDECHO "Create Report Script was ABEND"
:ENDREM ############################# Logout%RAIDINF_PATH%\raidinf -logout -servername %SERVER%
Script example for downloading a configuration report
This script logs the user in, downloads a configuration report, and logs the user out, using the Report Configuration Tool.
For each command except the logout command, this example performs 3 retries at intervals of 2 minutes, assuming that communication errors and other errors can occur. The downloaded configuration report is accumulated for 3 generations in the C:\Reports folder by names from Report_DailyConfigurationReport_1.tgz to Report_DailyConfigurationReport_3.tgz. In addition, if the script for creating a configuration report fails, generation copy is terminated so that the past configuration reports may not be overwritten.
REMREM Download Report Script(DownloadReport.bat) REMSET USER=<Username for Storage Navigator>SET PASS=<Password for Storage Navigator>SET SERVER=<Hostname or IP Address of SVP>SET REPORT_NAME=DailyConfigurationReportSET LOOP=2REM LOOP:0-2 3TimesSET TIMEOUT=121REM TIMEOUT 2[minutes]=120[s]SET TARGETFOLDER=C:\Reports\tmpSET REPORTFOLDER=C:\ReportsSET RAIDINF_PATH="C:\Program Files\raidinf"REMREM Create Report FolderREMIF NOT EXIST %REPORTFOLDER% (
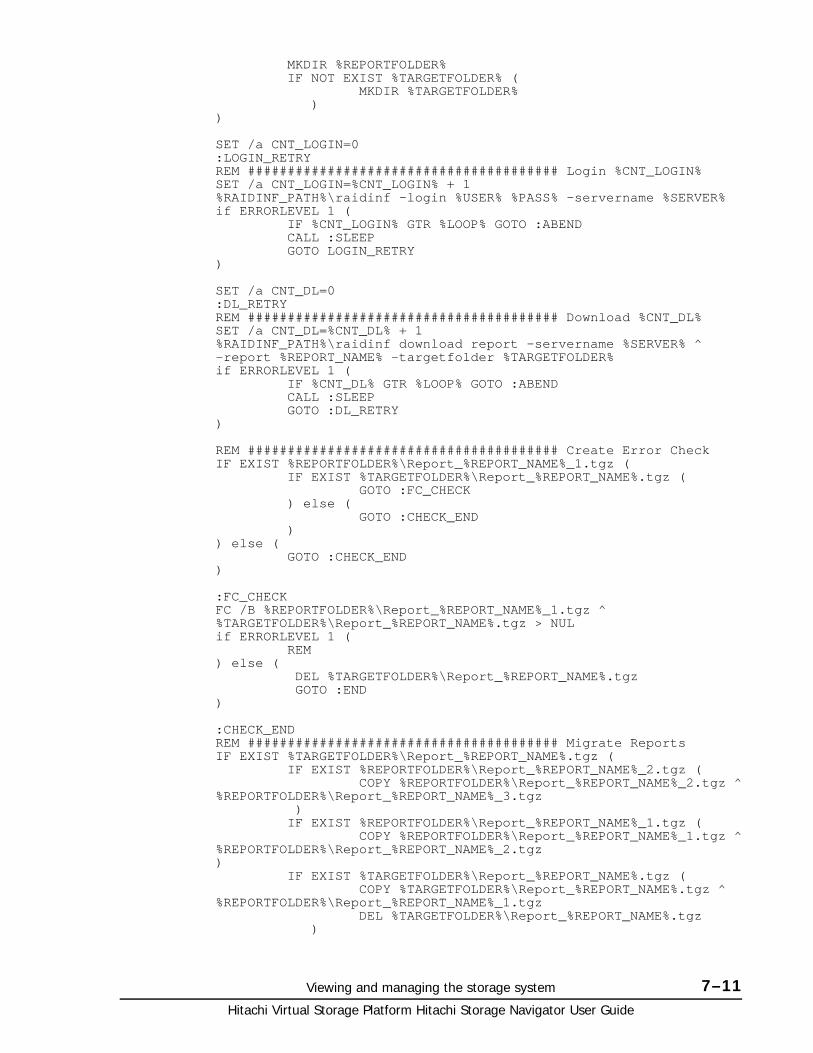
Viewing and managing the storage system 7–11Hitachi Virtual Storage Platform Hitachi Storage Navigator User Guide
MKDIR %REPORTFOLDER% IF NOT EXIST %TARGETFOLDER% ( MKDIR %TARGETFOLDER% ) )
SET /a CNT_LOGIN=0:LOGIN_RETRYREM ####################################### Login %CNT_LOGIN%SET /a CNT_LOGIN=%CNT_LOGIN% + 1%RAIDINF_PATH%\raidinf -login %USER% %PASS% -servername %SERVER%if ERRORLEVEL 1 ( IF %CNT_LOGIN% GTR %LOOP% GOTO :ABEND CALL :SLEEP GOTO LOGIN_RETRY)
SET /a CNT_DL=0:DL_RETRYREM ####################################### Download %CNT_DL%SET /a CNT_DL=%CNT_DL% + 1%RAIDINF_PATH%\raidinf download report -servername %SERVER% ^-report %REPORT_NAME% -targetfolder %TARGETFOLDER%if ERRORLEVEL 1 ( IF %CNT_DL% GTR %LOOP% GOTO :ABEND CALL :SLEEP GOTO :DL_RETRY)
REM ####################################### Create Error CheckIF EXIST %REPORTFOLDER%\Report_%REPORT_NAME%_1.tgz ( IF EXIST %TARGETFOLDER%\Report_%REPORT_NAME%.tgz ( GOTO :FC_CHECK ) else ( GOTO :CHECK_END ) ) else ( GOTO :CHECK_END)
:FC_CHECKFC /B %REPORTFOLDER%\Report_%REPORT_NAME%_1.tgz ^%TARGETFOLDER%\Report_%REPORT_NAME%.tgz > NULif ERRORLEVEL 1 ( REM) else ( DEL %TARGETFOLDER%\Report_%REPORT_NAME%.tgz GOTO :END)
:CHECK_ENDREM ####################################### Migrate ReportsIF EXIST %TARGETFOLDER%\Report_%REPORT_NAME%.tgz ( IF EXIST %REPORTFOLDER%\Report_%REPORT_NAME%_2.tgz ( COPY %REPORTFOLDER%\Report_%REPORT_NAME%_2.tgz ^%REPORTFOLDER%\Report_%REPORT_NAME%_3.tgz ) IF EXIST %REPORTFOLDER%\Report_%REPORT_NAME%_1.tgz ( COPY %REPORTFOLDER%\Report_%REPORT_NAME%_1.tgz ^%REPORTFOLDER%\Report_%REPORT_NAME%_2.tgz) IF EXIST %TARGETFOLDER%\Report_%REPORT_NAME%.tgz ( COPY %TARGETFOLDER%\Report_%REPORT_NAME%.tgz ^%REPORTFOLDER%\Report_%REPORT_NAME%_1.tgz DEL %TARGETFOLDER%\Report_%REPORT_NAME%.tgz )
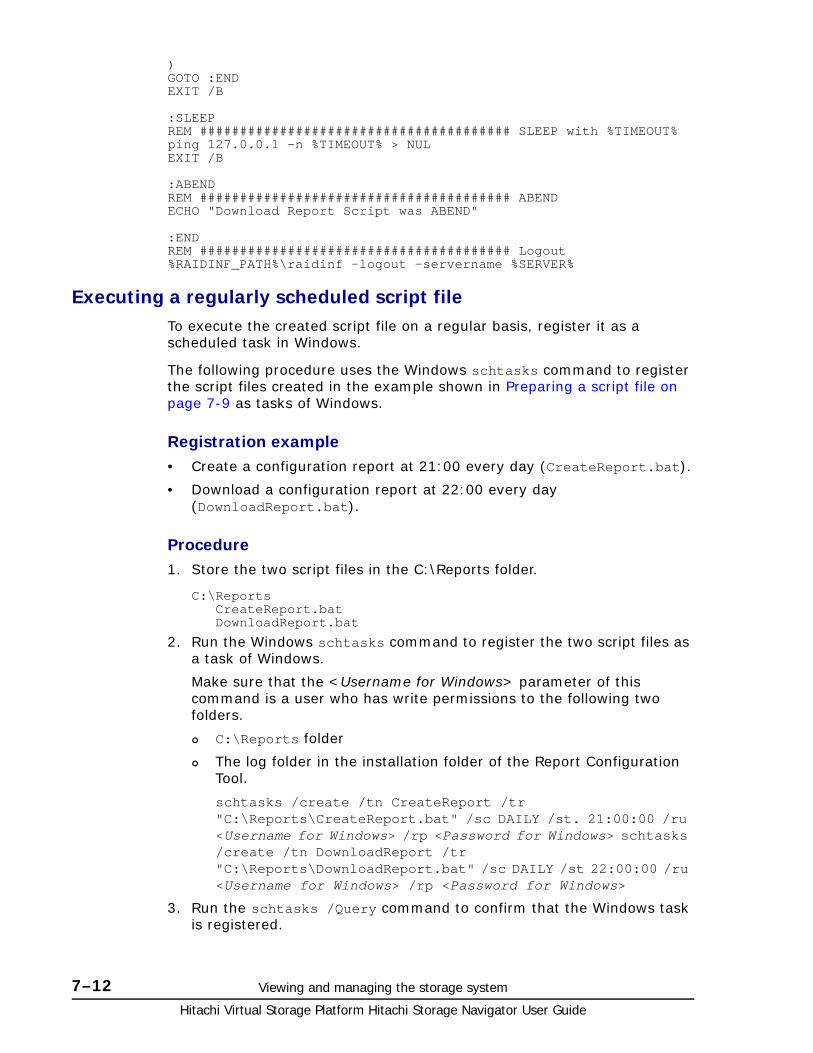
Hitachi Virtual Storage Platform Hitachi Storage Navigator User Guide
7–12 Viewing and managing the storage system
) GOTO :ENDEXIT /B
:SLEEPREM ####################################### SLEEP with %TIMEOUT%ping 127.0.0.1 -n %TIMEOUT% > NULEXIT /B
:ABENDREM ####################################### ABENDECHO "Download Report Script was ABEND"
:ENDREM ####################################### Logout%RAIDINF_PATH%\raidinf -logout -servername %SERVER%
Executing a regularly scheduled script fileTo execute the created script file on a regular basis, register it as a scheduled task in Windows.
The following procedure uses the Windows schtasks command to register the script files created in the example shown in Preparing a script file on page 7-9 as tasks of Windows.
Registration example• Create a configuration report at 21:00 every day (CreateReport.bat).
• Download a configuration report at 22:00 every day (DownloadReport.bat).
Procedure1. Store the two script files in the C:\Reports folder.
C:\Reports CreateReport.bat DownloadReport.bat
2. Run the Windows schtasks command to register the two script files as a task of Windows.
Make sure that the <Username for Windows> parameter of this command is a user who has write permissions to the following two folders.
C:\Reports folder
The log folder in the installation folder of the Report Configuration Tool.
schtasks /create /tn CreateReport /tr "C:\Reports\CreateReport.bat" /sc DAILY /st. 21:00:00 /ru <Username for Windows> /rp <Password for Windows> schtasks /create /tn DownloadReport /tr "C:\Reports\DownloadReport.bat" /sc DAILY /st 22:00:00 /ru <Username for Windows> /rp <Password for Windows>
3. Run the schtasks /Query command to confirm that the Windows task is registered.
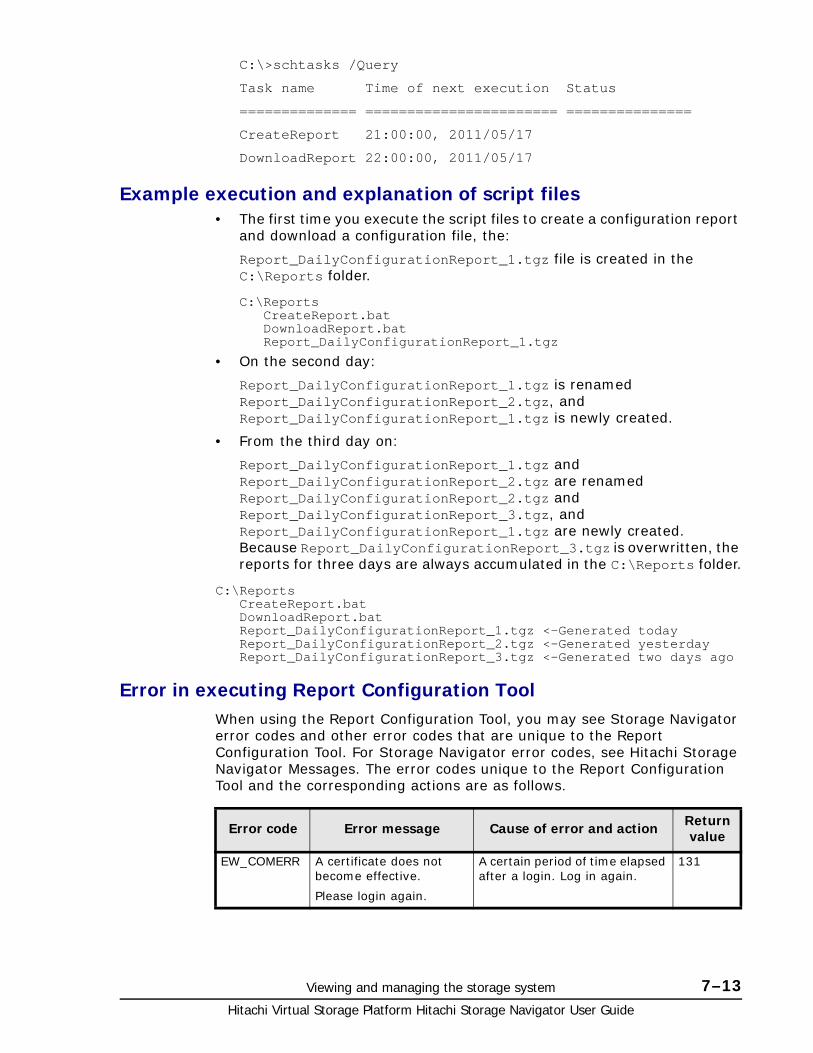
Viewing and managing the storage system 7–13Hitachi Virtual Storage Platform Hitachi Storage Navigator User Guide
C:\>schtasks /Query
Task name Time of next execution Status
============== ======================= ===============
CreateReport 21:00:00, 2011/05/17
DownloadReport 22:00:00, 2011/05/17
Example execution and explanation of script files• The first time you execute the script files to create a configuration report
and download a configuration file, the:
Report_DailyConfigurationReport_1.tgz file is created in the C:\Reports folder.
C:\Reports CreateReport.bat DownloadReport.bat Report_DailyConfigurationReport_1.tgz
• On the second day:
Report_DailyConfigurationReport_1.tgz is renamed Report_DailyConfigurationReport_2.tgz, and Report_DailyConfigurationReport_1.tgz is newly created.
• From the third day on:
Report_DailyConfigurationReport_1.tgz and Report_DailyConfigurationReport_2.tgz are renamed Report_DailyConfigurationReport_2.tgz and Report_DailyConfigurationReport_3.tgz, and Report_DailyConfigurationReport_1.tgz are newly created. Because Report_DailyConfigurationReport_3.tgz is overwritten, the reports for three days are always accumulated in the C:\Reports folder.
C:\Reports CreateReport.bat DownloadReport.bat
Report_DailyConfigurationReport_1.tgz <-Generated today Report_DailyConfigurationReport_2.tgz <-Generated yesterday Report_DailyConfigurationReport_3.tgz <-Generated two days ago
Error in executing Report Configuration ToolWhen using the Report Configuration Tool, you may see Storage Navigator error codes and other error codes that are unique to the Report Configuration Tool. For Storage Navigator error codes, see Hitachi Storage Navigator Messages. The error codes unique to the Report Configuration Tool and the corresponding actions are as follows.
Error code Error message Cause of error and action Return value
EW_COMERR A certificate does not become effective.
Please login again.
A certain period of time elapsed after a login. Log in again.
131
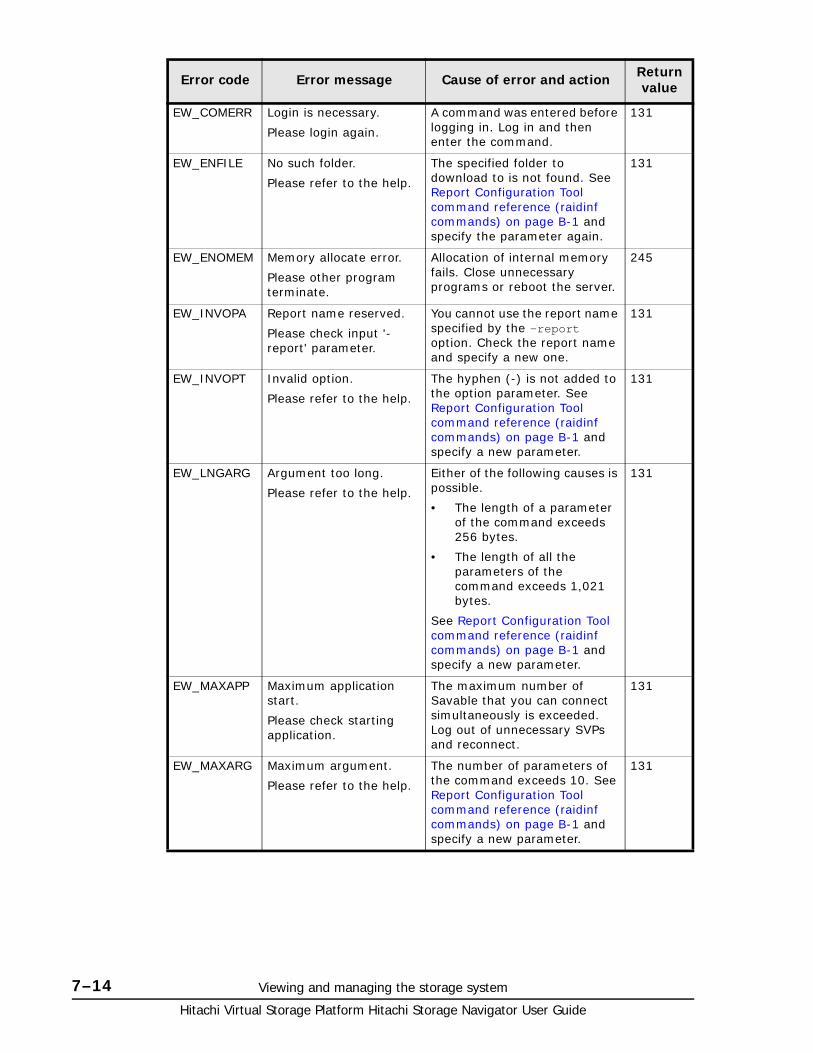
Hitachi Virtual Storage Platform Hitachi Storage Navigator User Guide
7–14 Viewing and managing the storage system
EW_COMERR Login is necessary.
Please login again.
A command was entered before logging in. Log in and then enter the command.
131
EW_ENFILE No such folder.
Please refer to the help.
The specified folder to download to is not found. See Report Configuration Tool command reference (raidinf commands) on page B-1 and specify the parameter again.
131
EW_ENOMEM Memory allocate error.
Please other program terminate.
Allocation of internal memory fails. Close unnecessary programs or reboot the server.
245
EW_INVOPA Report name reserved.
Please check input '-report' parameter.
You cannot use the report name specified by the -report option. Check the report name and specify a new one.
131
EW_INVOPT Invalid option.
Please refer to the help.
The hyphen (-) is not added to the option parameter. See Report Configuration Tool command reference (raidinf commands) on page B-1 and specify a new parameter.
131
EW_LNGARG Argument too long.
Please refer to the help.
Either of the following causes is possible.
• The length of a parameter of the command exceeds 256 bytes.
• The length of all the parameters of the command exceeds 1,021 bytes.
See Report Configuration Tool command reference (raidinf commands) on page B-1 and specify a new parameter.
131
EW_MAXAPP Maximum application start.
Please check starting application.
The maximum number of Savable that you can connect simultaneously is exceeded. Log out of unnecessary SVPs and reconnect.
131
EW_MAXARG Maximum argument.
Please refer to the help.
The number of parameters of the command exceeds 10. See Report Configuration Tool command reference (raidinf commands) on page B-1 and specify a new parameter.
131
Error code Error message Cause of error and action Return value

Viewing and managing the storage system 7–15Hitachi Virtual Storage Platform Hitachi Storage Navigator User Guide
EW_REQOPT Required option list.
Please refer to the help.
The required option and parameters were not entered. See Report Configuration Tool command reference (raidinf commands) on page B-1 and specify a valid option and parameters.
131
EW_SYSERR System error.
Please call to service center.
An internal error occurred. Contact Hitachi Data Systems Support Center.
131
EW_SYSERR Install path is too long.
Specify the install path with up to 240 bytes.
The installation path exceeds 240 bytes. Specify no more than 240 bytes.
131
EW_SYSERR Certificate file invalid.
Please call to service center.
Updating certificate file fails. Contact Hitachi Data Systems Support Center.
131
EW_SYSERR The file is illegal.
Please move 'raidinfcer' file from the installation directory.
The installation directory includes a file that will overlap with another file to be created by the Report Configuration Tool and the Report Configuration Tool cannot start.
Remove the overlapping file from the installation directory.
131
EW_SYSERR Log file invalid.
Please call to service center.
The log file cannot be accessed. Contact Hitachi Data Systems Support Center.
131
EW_UNWCMD Unknown command.
Please refer to the help.
The syntax of the command is not valid. See Report Configuration Tool command reference (raidinf commands) on page B-1 and enter a valid parameter.
230
EW_UNWOPT Unknown option.
Please refer to the help.
The option and paramenter are not valid. See Report Configuration Tool command reference (raidinf commands) on page B-1 and input a new option and parameter.
252
EW_UNWOPT Invalid environment value.
Please confirm the setting of HTTP_PROXY.
Unable to connect to the proxy server specified by the environment variable. Check the proxy server name.
252
EW_WEBERR Web access error.
Please confirm the setting of server.
An internal error occurred while connecting to the server. Check the setting of the server.
131
Error code Error message Cause of error and action Return value
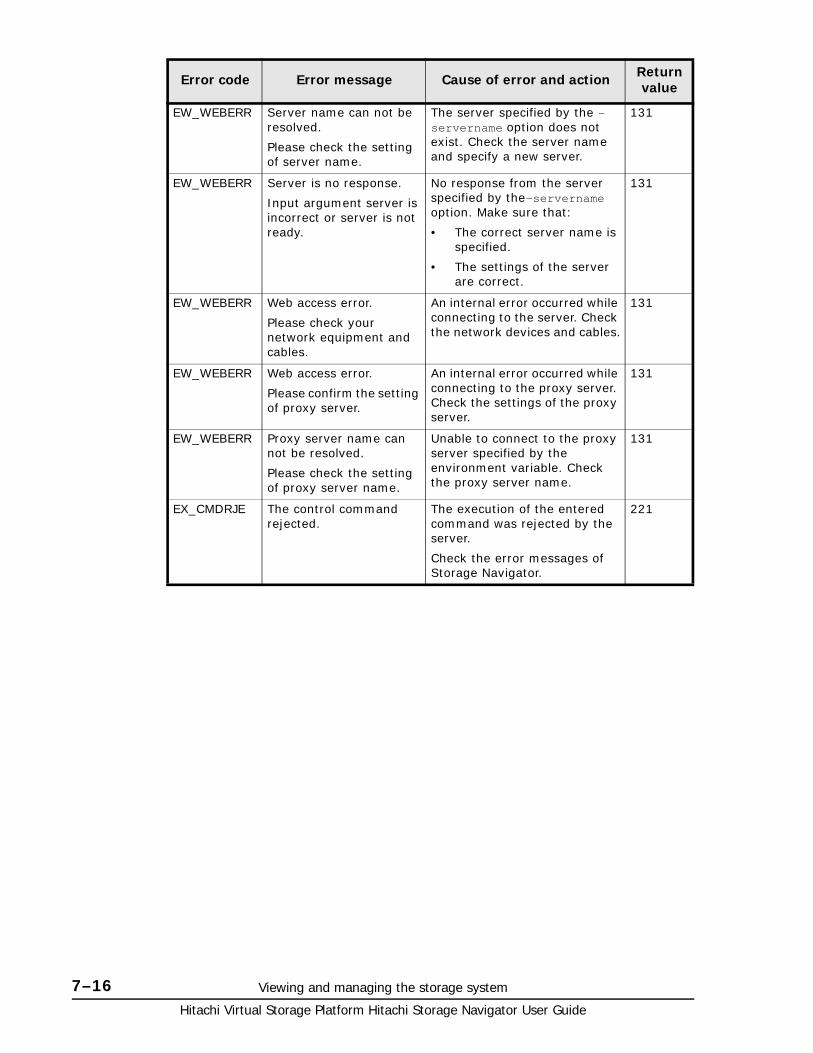
Hitachi Virtual Storage Platform Hitachi Storage Navigator User Guide
7–16 Viewing and managing the storage system
EW_WEBERR Server name can not be resolved.
Please check the setting of server name.
The server specified by the -servername option does not exist. Check the server name and specify a new server.
131
EW_WEBERR Server is no response.
Input argument server is incorrect or server is not ready.
No response from the server specified by the-servername option. Make sure that:
• The correct server name is specified.
• The settings of the server are correct.
131
EW_WEBERR Web access error.
Please check your network equipment and cables.
An internal error occurred while connecting to the server. Check the network devices and cables.
131
EW_WEBERR Web access error.
Please confirm the setting of proxy server.
An internal error occurred while connecting to the proxy server. Check the settings of the proxy server.
131
EW_WEBERR Proxy server name can not be resolved.
Please check the setting of proxy server name.
Unable to connect to the proxy server specified by the environment variable. Check the proxy server name.
131
EX_CMDRJE The control command rejected.
The execution of the entered command was rejected by the server.
Check the error messages of Storage Navigator.
221
Error code Error message Cause of error and action Return value
8
Troubleshooting 8–1Hitachi Virtual Storage Platform Hitachi Storage Navigator User Guide
Troubleshooting
This topic provides information for identifying and correcting problems with Storage Navigator.
□ Getting help
□ General troubleshooting
□ Checking alerts
□ Login errors
□ Java application errors
□ No-response errors
□ Incorrect display errors
□ UNIX operation errors
□ Other errors
□ Clearing Java and web browser caches
□ Firefox web browser problems on UNIX
□ Downloading dump files using the FD Dump tool
□ Saving Java log and trace files
Hitachi Virtual Storage Platform Hitachi Storage Navigator User Guide
8–2 Troubleshooting
Getting helpIf you have difficulty with any of the procedures included in this chapter, or if a procedure does not provide the answer or results you expect, contact Hitachi Data Systems support. See Getting help on page Preface-xviii in the preface of this manual.
General troubleshootingA system administrator is responsible for the operation and normal maintenance of the Storage Navigator web client. The following are guidelines for troubleshooting the Storage Navigator web client:
• Check the cabling and the LAN. Verify that both the computer and LAN cabling are firmly attached, and that the LAN is operating properly.
• Reboot the computer. Close any programs that are not responding. If necessary, reboot the Storage Navigator computer and restart a Storage Navigator web client session.
• Check for any general error conditions. For a complete list of Storage Navigator error codes, see the Hitachi Storage Navigator Messages.
• Check the alert icon. Confirm the severity level of the storage system alert by clicking Alert on the Storage Navigator main window. If you cannot resolve an error condition, contact Hitachi Data Systems Support Center.
The following figure shows the workflow for troubleshooting:

Troubleshooting 8–3Hitachi Virtual Storage Platform Hitachi Storage Navigator User Guide
Checking alertsThe Storage Navigator main window displays an icon indicating whether service information messages (SIMs) occurred in the storage system.
To check details of a SIM:
1. In the Storage Navigator main window, click Alert. The Alerts window opens.
2. To check the details of each alert, select and right-click one row, and then click Detail in the pop-up menu. The detail dialog box opens.
3. If the following SIM reference codes appear, you must resolve the error (XXX indicates the pool ID):
601XXX, 602XXX, 602FFE, and 624000 (for Thin Image)
601XXX, 602XXX, and 602FFF (for Copy-on-Write Snapshot)
Figure 8-1 Troubleshooting workflow
Figure 8-2 Alert icon on Storage Navigator main window
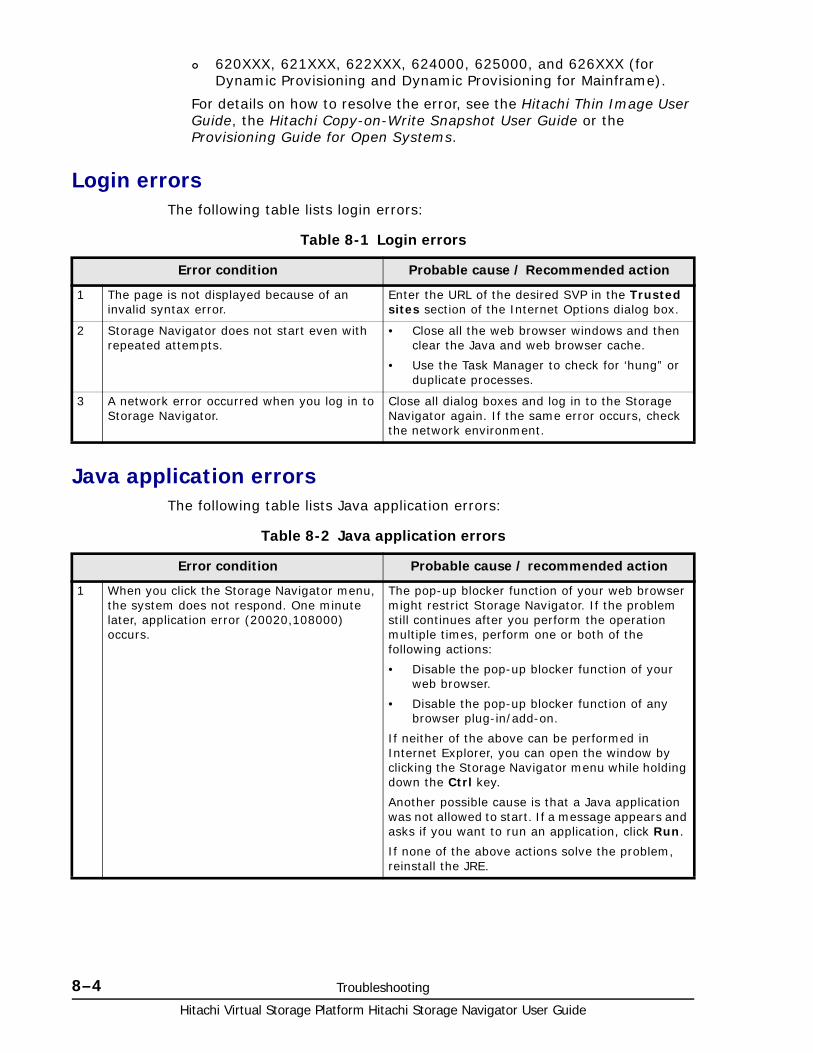
Hitachi Virtual Storage Platform Hitachi Storage Navigator User Guide
8–4 Troubleshooting
620XXX, 621XXX, 622XXX, 624000, 625000, and 626XXX (for Dynamic Provisioning and Dynamic Provisioning for Mainframe).
For details on how to resolve the error, see the Hitachi Thin Image User Guide, the Hitachi Copy-on-Write Snapshot User Guide or the Provisioning Guide for Open Systems.
Login errorsThe following table lists login errors:
Table 8-1 Login errors
Java application errorsThe following table lists Java application errors:
Table 8-2 Java application errors
Error condition Probable cause / Recommended action
1 The page is not displayed because of an invalid syntax error.
Enter the URL of the desired SVP in the Trusted sites section of the Internet Options dialog box.
2 Storage Navigator does not start even with repeated attempts.
• Close all the web browser windows and then clear the Java and web browser cache.
• Use the Task Manager to check for ‘hung” or duplicate processes.
3 A network error occurred when you log in to Storage Navigator.
Close all dialog boxes and log in to the Storage Navigator again. If the same error occurs, check the network environment.
Error condition Probable cause / recommended action
1 When you click the Storage Navigator menu, the system does not respond. One minute later, application error (20020,108000) occurs.
The pop-up blocker function of your web browser might restrict Storage Navigator. If the problem still continues after you perform the operation multiple times, perform one or both of the following actions:
• Disable the pop-up blocker function of your web browser.
• Disable the pop-up blocker function of any browser plug-in/add-on.
If neither of the above can be performed in Internet Explorer, you can open the window by clicking the Storage Navigator menu while holding down the Ctrl key.
Another possible cause is that a Java application was not allowed to start. If a message appears and asks if you want to run an application, click Run.
If none of the above actions solve the problem, reinstall the JRE.
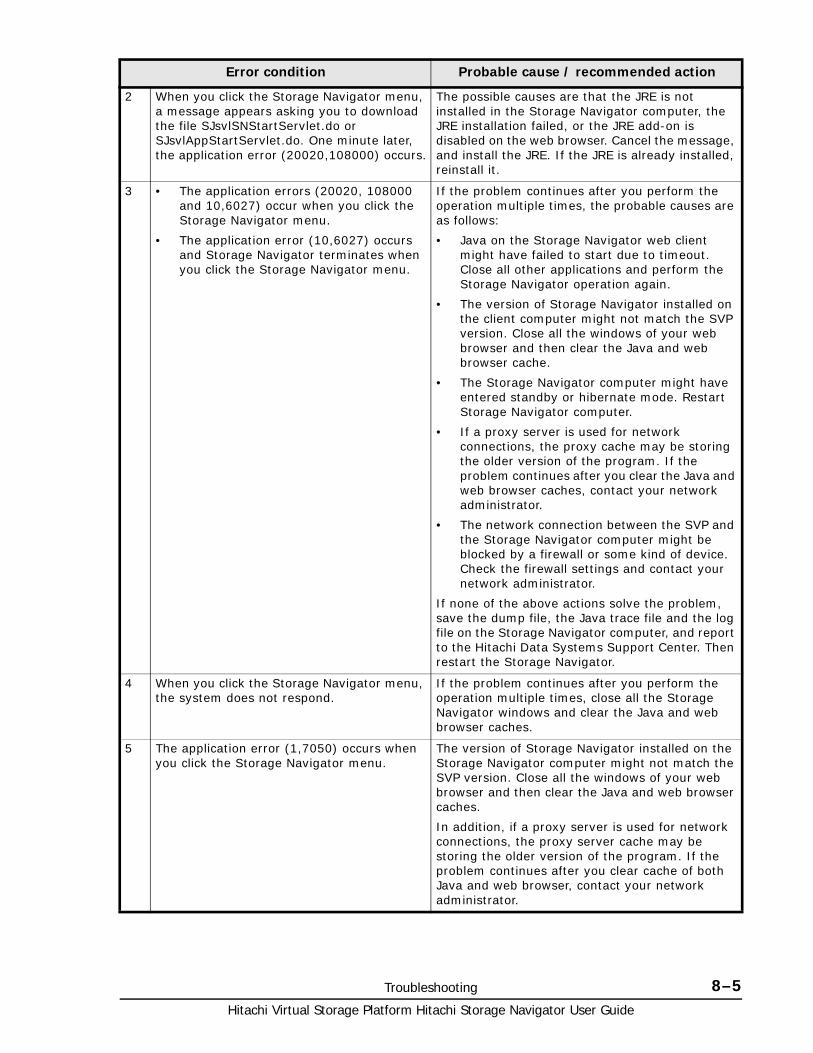
Troubleshooting 8–5Hitachi Virtual Storage Platform Hitachi Storage Navigator User Guide
2 When you click the Storage Navigator menu, a message appears asking you to download the file SJsvlSNStartServlet.do or SJsvlAppStartServlet.do. One minute later, the application error (20020,108000) occurs.
The possible causes are that the JRE is not installed in the Storage Navigator computer, the JRE installation failed, or the JRE add-on is disabled on the web browser. Cancel the message, and install the JRE. If the JRE is already installed, reinstall it.
3 • The application errors (20020, 108000 and 10,6027) occur when you click the Storage Navigator menu.
• The application error (10,6027) occurs and Storage Navigator terminates when you click the Storage Navigator menu.
If the problem continues after you perform the operation multiple times, the probable causes are as follows:
• Java on the Storage Navigator web client might have failed to start due to timeout. Close all other applications and perform the Storage Navigator operation again.
• The version of Storage Navigator installed on the client computer might not match the SVP version. Close all the windows of your web browser and then clear the Java and web browser cache.
• The Storage Navigator computer might have entered standby or hibernate mode. Restart Storage Navigator computer.
• If a proxy server is used for network connections, the proxy cache may be storing the older version of the program. If the problem continues after you clear the Java and web browser caches, contact your network administrator.
• The network connection between the SVP and the Storage Navigator computer might be blocked by a firewall or some kind of device. Check the firewall settings and contact your network administrator.
If none of the above actions solve the problem, save the dump file, the Java trace file and the log file on the Storage Navigator computer, and report to the Hitachi Data Systems Support Center. Then restart the Storage Navigator.
4 When you click the Storage Navigator menu, the system does not respond.
If the problem continues after you perform the operation multiple times, close all the Storage Navigator windows and clear the Java and web browser caches.
5 The application error (1,7050) occurs when you click the Storage Navigator menu.
The version of Storage Navigator installed on the Storage Navigator computer might not match the SVP version. Close all the windows of your web browser and then clear the Java and web browser caches.
In addition, if a proxy server is used for network connections, the proxy server cache may be storing the older version of the program. If the problem continues after you clear cache of both Java and web browser, contact your network administrator.
Error condition Probable cause / recommended action

Hitachi Virtual Storage Platform Hitachi Storage Navigator User Guide
8–6 Troubleshooting
6 Java console is grayed out and does not start when you try to open the Storage Navigator secondary window (Java application).
Restart the Storage Navigator computer, or terminate the Storage Navigator process with the following method.
• For Windows:
Exit all applications using Java, and then terminate the javaw.exe and javaws.exe applications through Task Manager.
• For UNIX:
Exit all applications using Java, and then terminate javaw and javaws with the kill command.
7 A message box remains displayed when opening the Storage Navigator secondary window (Java application). The Storage Navigator secondary window does not appear for a long time.
Restart the Storage Navigator computer, or terminate the Storage Navigator process with the following method.
• For Windows:
Exit all applications using Java, and then terminate the javaw.exe and javaws.exe applications through the Task Manager.
• For UNIX:
Exit all applications using Java, and then terminate javaw and javaws with the kill command.
8 A message remains displayed when the Storage Navigator secondary window opens and the system does not respond.
The SVP may be set as an exception on the proxy setting of the web browser. Make the settings the same on the Network Configuration dialog box, which is located in the Java Control Panel’s General dialog box.
9 If you open the Java console dialog box by selecting the Java icon on the system tray while opening the Storage Navigator secondary window (Java application) , the browser and Java console may stop responding.
Do not open the Java console dialog box while opening the Storage Navigator secondary window. If the browser and Java console stop responding, restart the Storage Navigator computer.
10 When you click the Storage Navigator menu.The application error (20020, 108000) occurs.
If the problem continues after you repeat the operation several times, you might have cancelled the display of the secondary window.
For example:
• You might have clicked Exit on the Security Warning window.
• You might have clicked Cancel on the Warning - Security window.
Close all the Storage Navigator windows and clear the Java and web browser caches.
If the problem continues after you clear both Java and web browser caches, save the Storage Navigator dump file and the Java trace file, and send them to Hitachi Data Systems Support Center.
Error condition Probable cause / recommended action
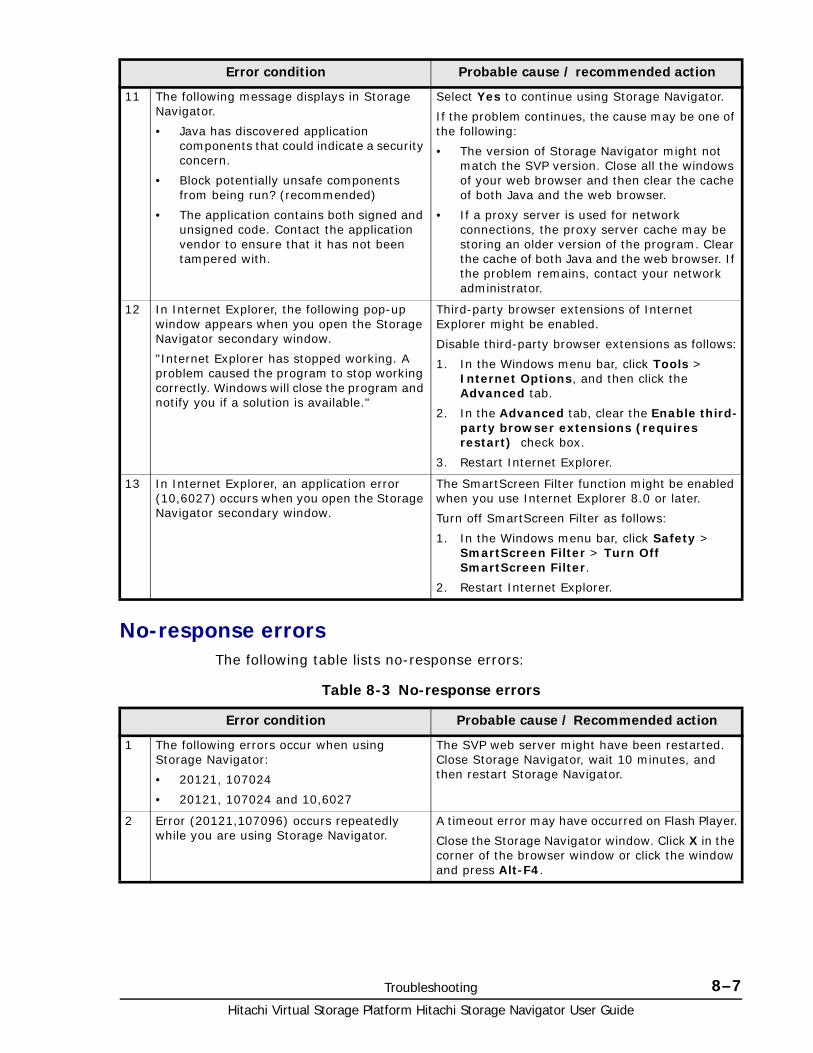
Troubleshooting 8–7Hitachi Virtual Storage Platform Hitachi Storage Navigator User Guide
No-response errorsThe following table lists no-response errors:
Table 8-3 No-response errors
11 The following message displays in Storage Navigator.
• Java has discovered application components that could indicate a security concern.
• Block potentially unsafe components from being run? (recommended)
• The application contains both signed and unsigned code. Contact the application vendor to ensure that it has not been tampered with.
Select Yes to continue using Storage Navigator.
If the problem continues, the cause may be one of the following:
• The version of Storage Navigator might not match the SVP version. Close all the windows of your web browser and then clear the cache of both Java and the web browser.
• If a proxy server is used for network connections, the proxy server cache may be storing an older version of the program. Clear the cache of both Java and the web browser. If the problem remains, contact your network administrator.
12 In Internet Explorer, the following pop-up window appears when you open the Storage Navigator secondary window.
"Internet Explorer has stopped working. A problem caused the program to stop working correctly. Windows will close the program and notify you if a solution is available."
Third-party browser extensions of Internet Explorer might be enabled.
Disable third-party browser extensions as follows:
1. In the Windows menu bar, click Tools > Internet Options, and then click the Advanced tab.
2. In the Advanced tab, clear the Enable third-party browser extensions (requires restart) check box.
3. Restart Internet Explorer.
13 In Internet Explorer, an application error (10,6027) occurs when you open the Storage Navigator secondary window.
The SmartScreen Filter function might be enabled when you use Internet Explorer 8.0 or later.
Turn off SmartScreen Filter as follows:
1. In the Windows menu bar, click Safety > SmartScreen Filter > Turn Off SmartScreen Filter.
2. Restart Internet Explorer.
Error condition Probable cause / recommended action
Error condition Probable cause / Recommended action
1 The following errors occur when using Storage Navigator:
• 20121, 107024
• 20121, 107024 and 10,6027
The SVP web server might have been restarted. Close Storage Navigator, wait 10 minutes, and then restart Storage Navigator.
2 Error (20121,107096) occurs repeatedly while you are using Storage Navigator.
A timeout error may have occurred on Flash Player.
Close the Storage Navigator window. Click X in the corner of the browser window or click the window and press Alt-F4.
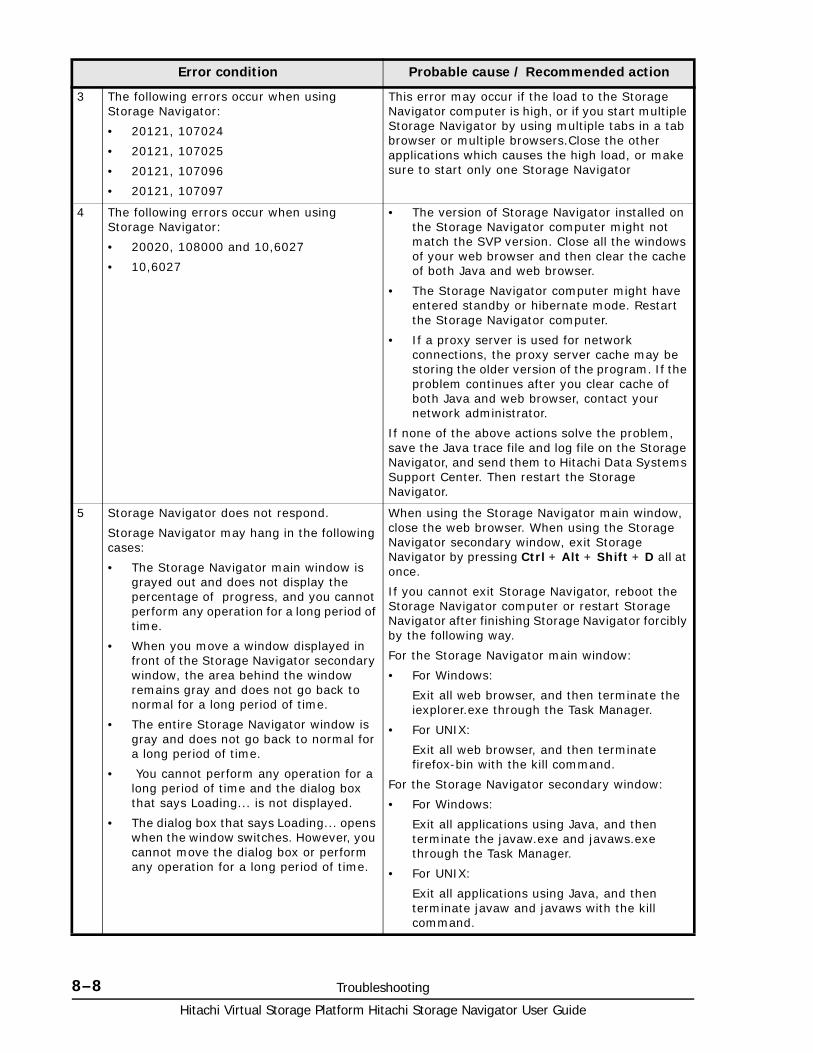
Hitachi Virtual Storage Platform Hitachi Storage Navigator User Guide
8–8 Troubleshooting
3 The following errors occur when using Storage Navigator:
• 20121, 107024
• 20121, 107025
• 20121, 107096
• 20121, 107097
This error may occur if the load to the Storage Navigator computer is high, or if you start multiple Storage Navigator by using multiple tabs in a tab browser or multiple browsers.Close the other applications which causes the high load, or make sure to start only one Storage Navigator
4 The following errors occur when using Storage Navigator:
• 20020, 108000 and 10,6027
• 10,6027
• The version of Storage Navigator installed on the Storage Navigator computer might not match the SVP version. Close all the windows of your web browser and then clear the cache of both Java and web browser.
• The Storage Navigator computer might have entered standby or hibernate mode. Restart the Storage Navigator computer.
• If a proxy server is used for network connections, the proxy server cache may be storing the older version of the program. If the problem continues after you clear cache of both Java and web browser, contact your network administrator.
If none of the above actions solve the problem, save the Java trace file and log file on the Storage Navigator, and send them to Hitachi Data Systems Support Center. Then restart the Storage Navigator.
5 Storage Navigator does not respond.
Storage Navigator may hang in the following cases:
• The Storage Navigator main window is grayed out and does not display the percentage of progress, and you cannot perform any operation for a long period of time.
• When you move a window displayed in front of the Storage Navigator secondary window, the area behind the window remains gray and does not go back to normal for a long period of time.
• The entire Storage Navigator window is gray and does not go back to normal for a long period of time.
• You cannot perform any operation for a long period of time and the dialog box that says Loading... is not displayed.
• The dialog box that says Loading... opens when the window switches. However, you cannot move the dialog box or perform any operation for a long period of time.
When using the Storage Navigator main window, close the web browser. When using the Storage Navigator secondary window, exit Storage Navigator by pressing Ctrl + Alt + Shift + D all at once.
If you cannot exit Storage Navigator, reboot the Storage Navigator computer or restart Storage Navigator after finishing Storage Navigator forcibly by the following way.
For the Storage Navigator main window:
• For Windows:
Exit all web browser, and then terminate the iexplorer.exe through the Task Manager.
• For UNIX:
Exit all web browser, and then terminate firefox-bin with the kill command.
For the Storage Navigator secondary window:
• For Windows:
Exit all applications using Java, and then terminate the javaw.exe and javaws.exe through the Task Manager.
• For UNIX:
Exit all applications using Java, and then terminate javaw and javaws with the kill command.
Error condition Probable cause / Recommended action
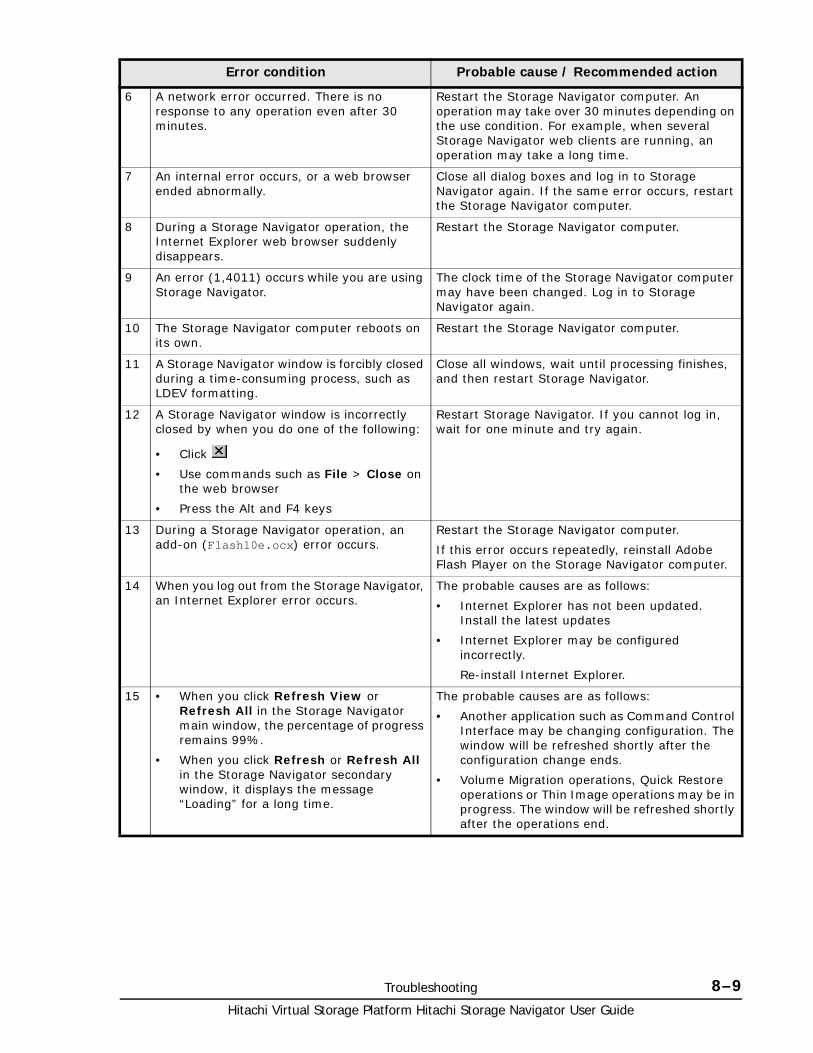
Troubleshooting 8–9Hitachi Virtual Storage Platform Hitachi Storage Navigator User Guide
6 A network error occurred. There is no response to any operation even after 30 minutes.
Restart the Storage Navigator computer. An operation may take over 30 minutes depending on the use condition. For example, when several Storage Navigator web clients are running, an operation may take a long time.
7 An internal error occurs, or a web browser ended abnormally.
Close all dialog boxes and log in to Storage Navigator again. If the same error occurs, restart the Storage Navigator computer.
8 During a Storage Navigator operation, the Internet Explorer web browser suddenly disappears.
Restart the Storage Navigator computer.
9 An error (1,4011) occurs while you are using Storage Navigator.
The clock time of the Storage Navigator computer may have been changed. Log in to Storage Navigator again.
10 The Storage Navigator computer reboots on its own.
Restart the Storage Navigator computer.
11 A Storage Navigator window is forcibly closed during a time-consuming process, such as LDEV formatting.
Close all windows, wait until processing finishes, and then restart Storage Navigator.
12 A Storage Navigator window is incorrectly closed by when you do one of the following:
• Click
• Use commands such as File > Close on the web browser
• Press the Alt and F4 keys
Restart Storage Navigator. If you cannot log in, wait for one minute and try again.
13 During a Storage Navigator operation, an add-on (Flash10e.ocx) error occurs.
Restart the Storage Navigator computer.
If this error occurs repeatedly, reinstall Adobe Flash Player on the Storage Navigator computer.
14 When you log out from the Storage Navigator, an Internet Explorer error occurs.
The probable causes are as follows:
• Internet Explorer has not been updated. Install the latest updates
• Internet Explorer may be configured incorrectly.
Re-install Internet Explorer.
15 • When you click Refresh View or Refresh All in the Storage Navigator main window, the percentage of progress remains 99%.
• When you click Refresh or Refresh All in the Storage Navigator secondary window, it displays the message “Loading” for a long time.
The probable causes are as follows:
• Another application such as Command Control Interface may be changing configuration. The window will be refreshed shortly after the configuration change ends.
• Volume Migration operations, Quick Restore operations or Thin Image operations may be in progress. The window will be refreshed shortly after the operations end.
Error condition Probable cause / Recommended action
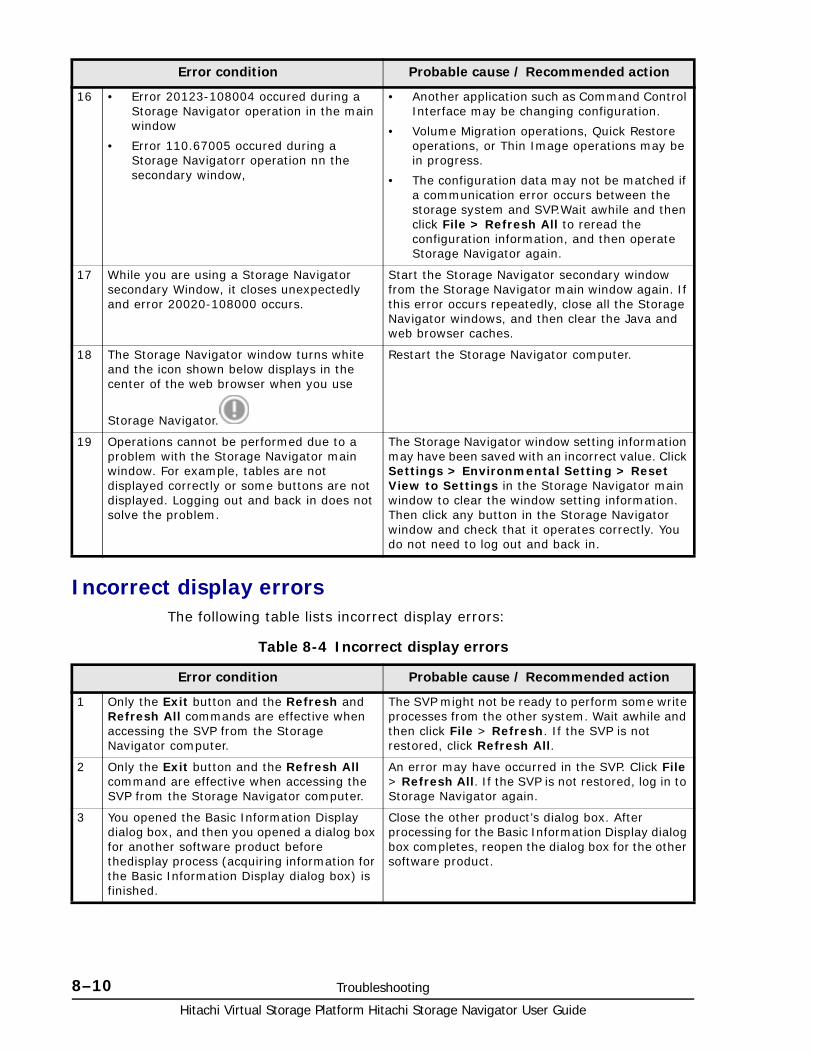
Hitachi Virtual Storage Platform Hitachi Storage Navigator User Guide
8–10 Troubleshooting
Incorrect display errorsThe following table lists incorrect display errors:
Table 8-4 Incorrect display errors
16 • Error 20123-108004 occured during a Storage Navigator operation in the main window
• Error 110.67005 occured during a Storage Navigatorr operation nn the secondary window,
• Another application such as Command Control Interface may be changing configuration.
• Volume Migration operations, Quick Restore operations, or Thin Image operations may be in progress.
• The configuration data may not be matched if a communication error occurs between the storage system and SVP.Wait awhile and then click File > Refresh All to reread the configuration information, and then operate Storage Navigator again.
17 While you are using a Storage Navigator secondary Window, it closes unexpectedly and error 20020-108000 occurs.
Start the Storage Navigator secondary window from the Storage Navigator main window again. If this error occurs repeatedly, close all the Storage Navigator windows, and then clear the Java and web browser caches.
18 The Storage Navigator window turns white and the icon shown below displays in the center of the web browser when you use
Storage Navigator.
Restart the Storage Navigator computer.
19 Operations cannot be performed due to a problem with the Storage Navigator main window. For example, tables are not displayed correctly or some buttons are not displayed. Logging out and back in does not solve the problem.
The Storage Navigator window setting information may have been saved with an incorrect value. Click Settings > Environmental Setting > Reset View to Settings in the Storage Navigator main window to clear the window setting information. Then click any button in the Storage Navigator window and check that it operates correctly. You do not need to log out and back in.
Error condition Probable cause / Recommended action
Error condition Probable cause / Recommended action
1 Only the Exit button and the Refresh and Refresh All commands are effective when accessing the SVP from the Storage Navigator computer.
The SVP might not be ready to perform some write processes from the other system. Wait awhile and then click File > Refresh. If the SVP is not restored, click Refresh All.
2 Only the Exit button and the Refresh All command are effective when accessing the SVP from the Storage Navigator computer.
An error may have occurred in the SVP. Click File > Refresh All. If the SVP is not restored, log in to Storage Navigator again.
3 You opened the Basic Information Display dialog box, and then you opened a dialog box for another software product before thedisplay process (acquiring information for the Basic Information Display dialog box) is finished.
Close the other product’s dialog box. After processing for the Basic Information Display dialog box completes, reopen the dialog box for the other software product.
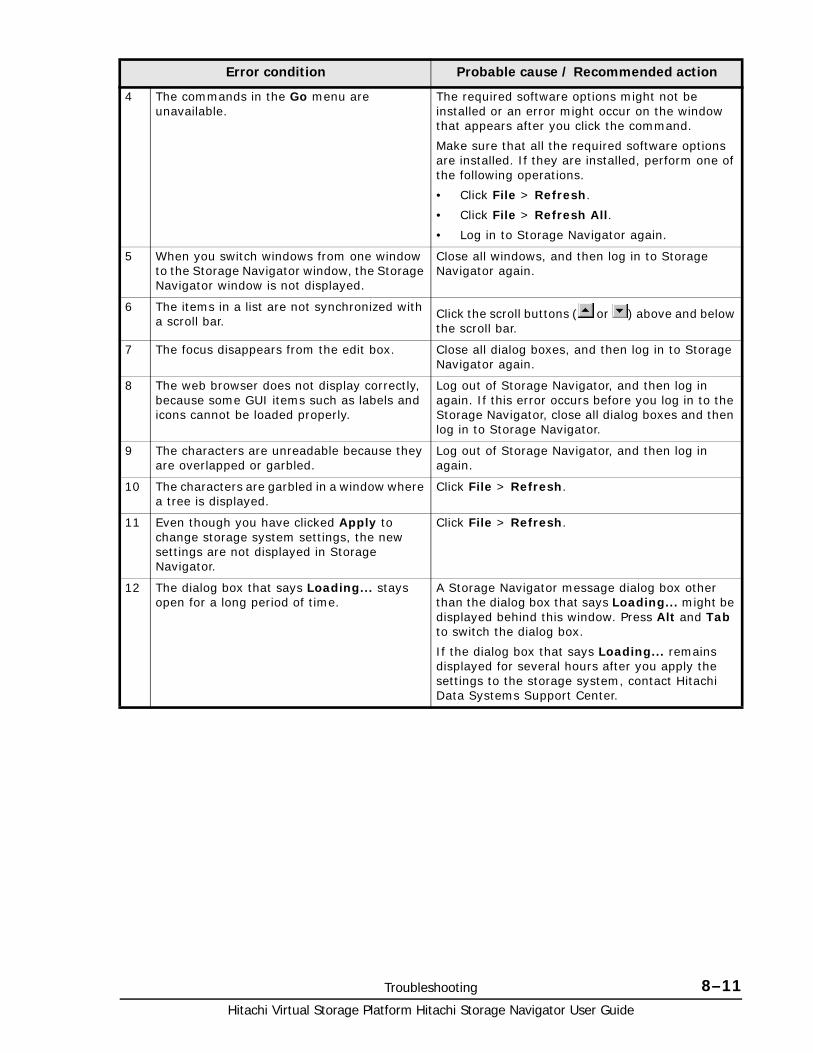
Troubleshooting 8–11Hitachi Virtual Storage Platform Hitachi Storage Navigator User Guide
4 The commands in the Go menu are unavailable.
The required software options might not be installed or an error might occur on the window that appears after you click the command.
Make sure that all the required software options are installed. If they are installed, perform one of the following operations.
• Click File > Refresh.
• Click File > Refresh All.
• Log in to Storage Navigator again.
5 When you switch windows from one window to the Storage Navigator window, the Storage Navigator window is not displayed.
Close all windows, and then log in to Storage Navigator again.
6 The items in a list are not synchronized with a scroll bar.
Click the scroll buttons ( or ) above and below the scroll bar.
7 The focus disappears from the edit box. Close all dialog boxes, and then log in to Storage Navigator again.
8 The web browser does not display correctly, because some GUI items such as labels and icons cannot be loaded properly.
Log out of Storage Navigator, and then log in again. If this error occurs before you log in to the Storage Navigator, close all dialog boxes and then log in to Storage Navigator.
9 The characters are unreadable because they are overlapped or garbled.
Log out of Storage Navigator, and then log in again.
10 The characters are garbled in a window where a tree is displayed.
Click File > Refresh.
11 Even though you have clicked Apply to change storage system settings, the new settings are not displayed in Storage Navigator.
Click File > Refresh.
12 The dialog box that says Loading... stays open for a long period of time.
A Storage Navigator message dialog box other than the dialog box that says Loading... might be displayed behind this window. Press Alt and Tab to switch the dialog box.
If the dialog box that says Loading... remains displayed for several hours after you apply the settings to the storage system, contact Hitachi Data Systems Support Center.
Error condition Probable cause / Recommended action
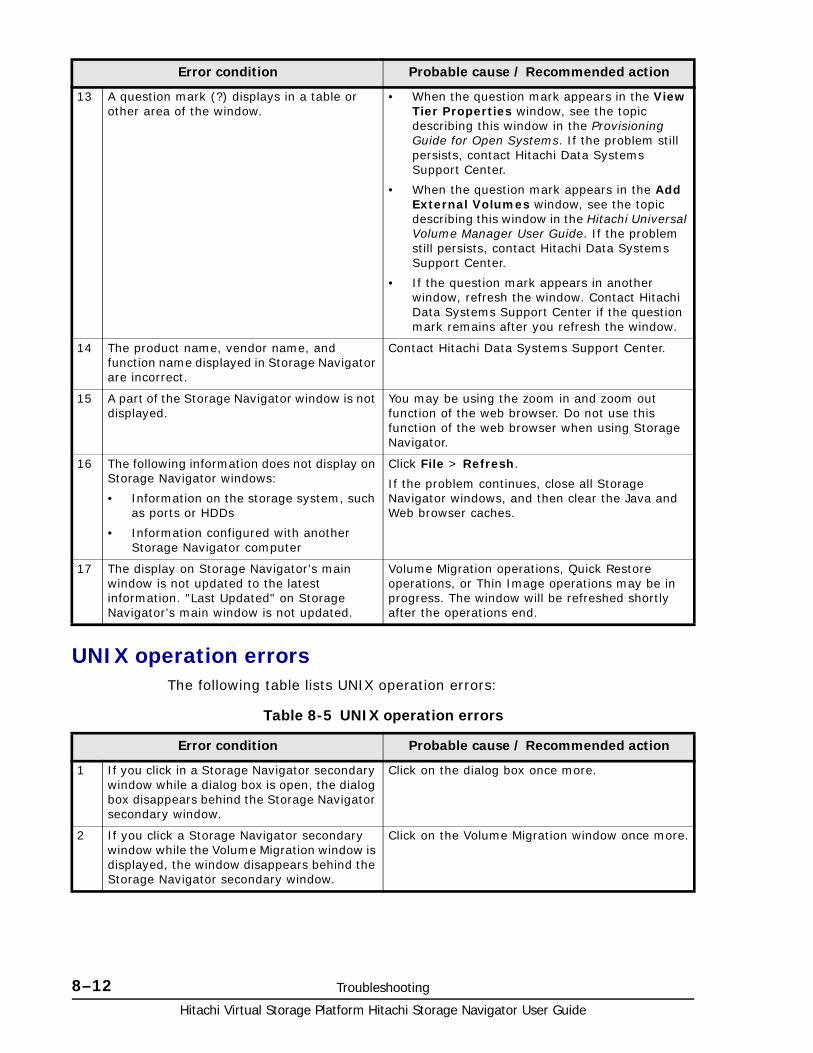
Hitachi Virtual Storage Platform Hitachi Storage Navigator User Guide
8–12 Troubleshooting
UNIX operation errorsThe following table lists UNIX operation errors:
Table 8-5 UNIX operation errors
13 A question mark (?) displays in a table or other area of the window.
• When the question mark appears in the View Tier Properties window, see the topic describing this window in the Provisioning Guide for Open Systems. If the problem still persists, contact Hitachi Data Systems Support Center.
• When the question mark appears in the Add External Volumes window, see the topic describing this window in the Hitachi Universal Volume Manager User Guide. If the problem still persists, contact Hitachi Data Systems Support Center.
• If the question mark appears in another window, refresh the window. Contact Hitachi Data Systems Support Center if the question mark remains after you refresh the window.
14 The product name, vendor name, and function name displayed in Storage Navigator are incorrect.
Contact Hitachi Data Systems Support Center.
15 A part of the Storage Navigator window is not displayed.
You may be using the zoom in and zoom out function of the web browser. Do not use this function of the web browser when using Storage Navigator.
16 The following information does not display on Storage Navigator windows:
• Information on the storage system, such as ports or HDDs
• Information configured with another Storage Navigator computer
Click File > Refresh.
If the problem continues, close all Storage Navigator windows, and then clear the Java and Web browser caches.
17 The display on Storage Navigator's main window is not updated to the latest information. "Last Updated" on Storage Navigator's main window is not updated.
Volume Migration operations, Quick Restore operations, or Thin Image operations may be in progress. The window will be refreshed shortly after the operations end.
Error condition Probable cause / Recommended action
Error condition Probable cause / Recommended action
1 If you click in a Storage Navigator secondary window while a dialog box is open, the dialog box disappears behind the Storage Navigator secondary window.
Click on the dialog box once more.
2 If you click a Storage Navigator secondary window while the Volume Migration window is displayed, the window disappears behind the Storage Navigator secondary window.
Click on the Volume Migration window once more.
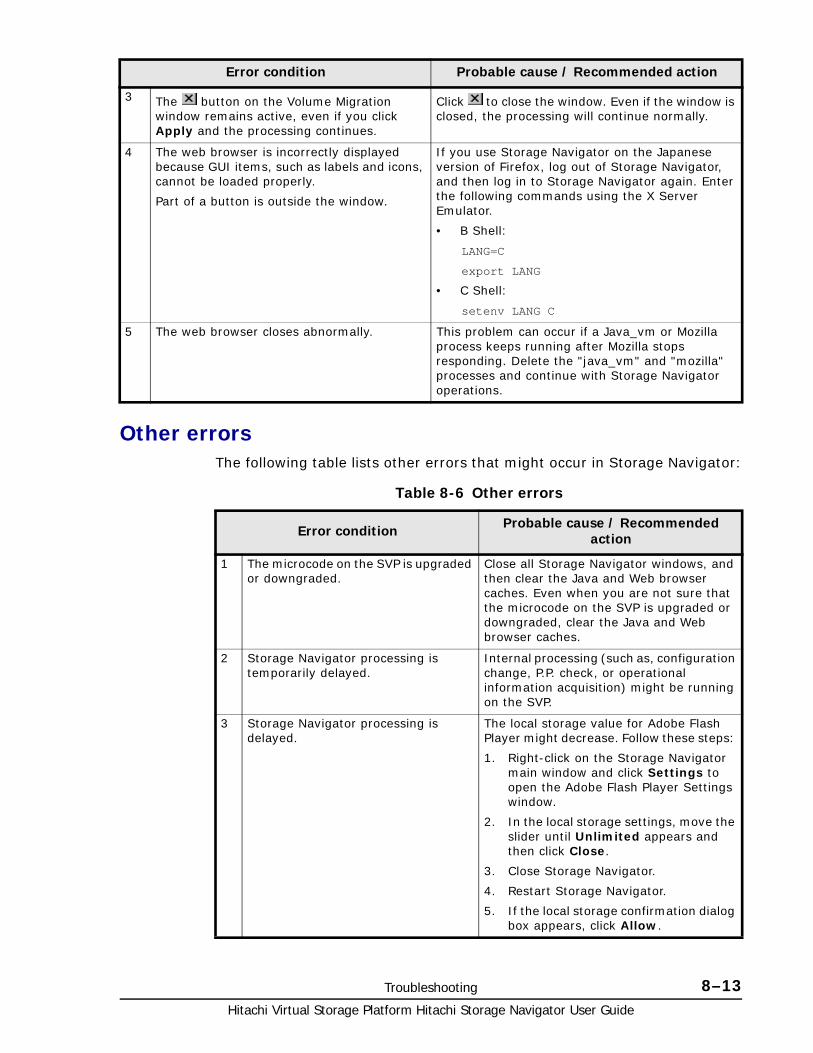
Troubleshooting 8–13Hitachi Virtual Storage Platform Hitachi Storage Navigator User Guide
Other errorsThe following table lists other errors that might occur in Storage Navigator:
Table 8-6 Other errors
3 The button on the Volume Migration window remains active, even if you click Apply and the processing continues.
Click to close the window. Even if the window is closed, the processing will continue normally.
4 The web browser is incorrectly displayed because GUI items, such as labels and icons, cannot be loaded properly.
Part of a button is outside the window.
If you use Storage Navigator on the Japanese version of Firefox, log out of Storage Navigator, and then log in to Storage Navigator again. Enter the following commands using the X Server Emulator.
• B Shell:
LANG=C
export LANG
• C Shell:
setenv LANG C
5 The web browser closes abnormally. This problem can occur if a Java_vm or Mozilla process keeps running after Mozilla stops responding. Delete the "java_vm" and "mozilla" processes and continue with Storage Navigator operations.
Error condition Probable cause / Recommended action
Error condition Probable cause / Recommended action
1 The microcode on the SVP is upgraded or downgraded.
Close all Storage Navigator windows, and then clear the Java and Web browser caches. Even when you are not sure that the microcode on the SVP is upgraded or downgraded, clear the Java and Web browser caches.
2 Storage Navigator processing is temporarily delayed.
Internal processing (such as, configuration change, P.P. check, or operational information acquisition) might be running on the SVP.
3 Storage Navigator processing is delayed.
The local storage value for Adobe Flash Player might decrease. Follow these steps:
1. Right-click on the Storage Navigator main window and click Settings to open the Adobe Flash Player Settings window.
2. In the local storage settings, move the slider until Unlimited appears and then click Close.
3. Close Storage Navigator.
4. Restart Storage Navigator.
5. If the local storage confirmation dialog box appears, click Allow.
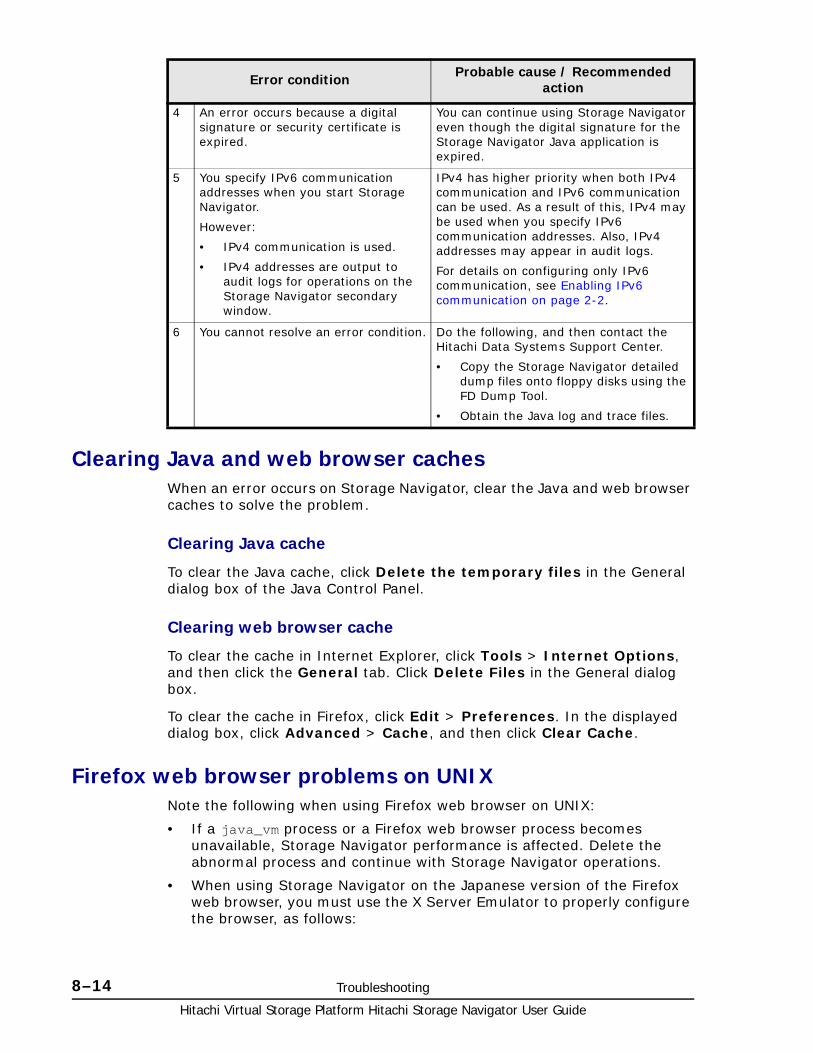
Hitachi Virtual Storage Platform Hitachi Storage Navigator User Guide
8–14 Troubleshooting
Clearing Java and web browser cachesWhen an error occurs on Storage Navigator, clear the Java and web browser caches to solve the problem.
Clearing Java cache
To clear the Java cache, click Delete the temporary files in the General dialog box of the Java Control Panel.
Clearing web browser cache
To clear the cache in Internet Explorer, click Tools > Internet Options, and then click the General tab. Click Delete Files in the General dialog box.
To clear the cache in Firefox, click Edit > Preferences. In the displayed dialog box, click Advanced > Cache, and then click Clear Cache.
Firefox web browser problems on UNIXNote the following when using Firefox web browser on UNIX:
• If a java_vm process or a Firefox web browser process becomes unavailable, Storage Navigator performance is affected. Delete the abnormal process and continue with Storage Navigator operations.
• When using Storage Navigator on the Japanese version of the Firefox web browser, you must use the X Server Emulator to properly configure the browser, as follows:
4 An error occurs because a digital signature or security certificate is expired.
You can continue using Storage Navigator even though the digital signature for the Storage Navigator Java application is expired.
5 You specify IPv6 communication addresses when you start Storage Navigator.
However:
• IPv4 communication is used.
• IPv4 addresses are output to audit logs for operations on the Storage Navigator secondary window.
IPv4 has higher priority when both IPv4 communication and IPv6 communication can be used. As a result of this, IPv4 may be used when you specify IPv6 communication addresses. Also, IPv4 addresses may appear in audit logs.
For details on configuring only IPv6 communication, see Enabling IPv6 communication on page 2-2.
6 You cannot resolve an error condition. Do the following, and then contact the Hitachi Data Systems Support Center.
• Copy the Storage Navigator detailed dump files onto floppy disks using the FD Dump Tool.
• Obtain the Java log and trace files.
Error condition Probable cause / Recommended action
Troubleshooting 8–15Hitachi Virtual Storage Platform Hitachi Storage Navigator User Guide
In a B Shell, enter the following command:
LANG=C export LANG
In a C Shell, enter the following command:
setenv LANG C
When you use Storage Navigator with Firefox, movements of the focus may differ from movements of the focus in Internet Explorer. For example:
• When the Storage Navigator login window appears, the focus is not on the User Name box. Even is the User Name box is emphasized, you cannot enter any characters in it.
• When you move the focus by using the Tab key, the destination browser window does not become active.
When you click Logout at the upper right in the Storage Navigator main window on Firefox, the Storage Navigator login window appears after you logout. (With Internet Explorer, the window closes after the logout.
Downloading dump files using the FD Dump toolUse the FD Dump tool to download dump files onto a hard disk drive. The downloaded dump files can be used for the following reasons:
• For troubleshooting purposes. Use the FD Dump tool to download dump files from SVP and give it to the HDS service personnel.
• For checking configuration. First click Refresh All command to refresh the configuration information, and then use the FD Dump tool to download dump files.
Prerequisites
• No other user (including SVP user) should be using the FD Dump tool.
• No maintenance operation is being performed.
• You must have Support Personnel role to log in.
To download dump files from the SVP:
1. Start a web browser and specify the following URL to open the Tool Panel:
https://IP-address-or-host-name-of-SVP/cgi-bin/utility/toolpanel.cgi

Hitachi Virtual Storage Platform Hitachi Storage Navigator User Guide
8–16 Troubleshooting
2. Click Download Dump Files. The Login dialog box opens.
3. Enter the user ID and password and click Login. The Download Dump Files dialog box opens.
4. Select a file that you want to download.
Existing Dump Files indicates the dump file for the last time you downloaded. Select this when you want to re-download a previously downloaded dump file. If you have not downloaded any dump files from Tool Panel, this item does not display even if you have acquired a dump file via SVP.
Normal Dump includes all information about the SVP and the minimum information about the storage system. Select this when you have a less serious problem such as incorrect display.
Detail Dump includes all information about the SVP and the storage system. Select this when Storage Navigator has a serious problem (for example, Storage Navigator does not start) or when you need to determine if the storage system has a problem.
Detail Dump (for DKC Performance) contains the I/O-performance-related information. This includes performance monitor collection information, in addition to information applicable to Detail Dump. Choose Detail Dump (for DKC Performance) to check for I/O performance problems.
Note that while processing takes place, DKC I/O performance may be affected. During processing, Storage Navigator apply operations and SVP maintenance opertions are not allowed.
5. Click Next >>. A message appears confirming the execution of compression of the dump files.
6. Click OK. File compression processing starts. When the file is compressed, the Download Dump Files dialog box opens for the download.
7. Click Download. The File Download dialog box opens.
Troubleshooting 8–17Hitachi Virtual Storage Platform Hitachi Storage Navigator User Guide
8. On the File Download dialog box, click Save this file to disk, and then click OK. The Save As dialog box opens.
9. Specify the download destination, and then click Save. When the file is downloaded successfully, the Download complete dialog box opens.
Saving Java log and trace filesBefore you contact your service representative, save the detail dump files collected using the FD dump tool, and the Java log and trace file on your Storage Navigator computer, and then restart the web browser.
Examples of the Windows trace and log file locations are shown below:
• C:\Users\logon user ID\AppData\LocalLow\Sun\Java\Deployment\log\*.trace
• C:\Users\logon user ID\AppData\LocalLow\Sun\Java\Deployment\log\*.log
Examples of the UNIX trace and log file locations follow:
• user home directory\.java\deployment\log\*.trace
• user home directory\.java\deployment\log\*.log

Hitachi Virtual Storage Platform Hitachi Storage Navigator User Guide
8–18 Troubleshooting
A
Storage configuration reports A–1Hitachi Virtual Storage Platform Hitachi Storage Navigator User Guide
Storage configuration reports
This section describes the configuration reports you can generate. They are shown here according to the way they display: in tables, graphs, or CSV files.
To create, download, and delete reports, see Viewing a Storage Navigator report on page 7-5.
□ Reports in table view
□ Reports in graphical view
□ CSV files
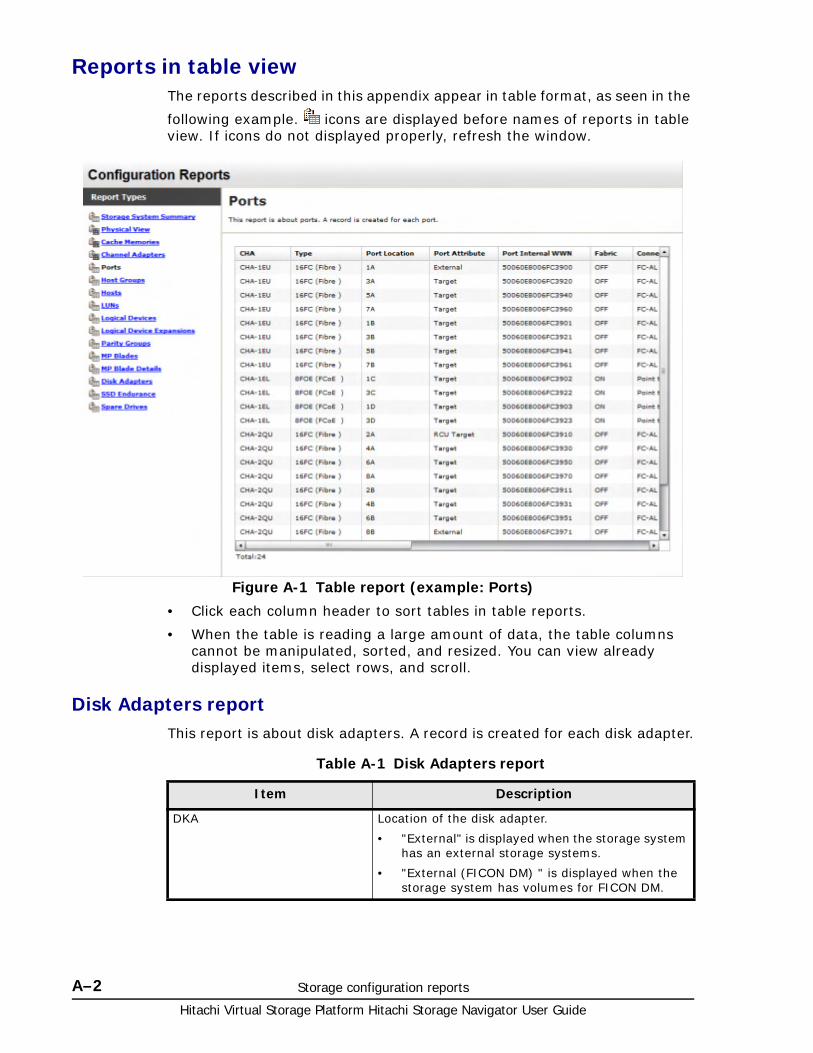
Hitachi Virtual Storage Platform Hitachi Storage Navigator User Guide
A–2 Storage configuration reports
Reports in table view The reports described in this appendix appear in table format, as seen in the
following example. icons are displayed before names of reports in table view. If icons do not displayed properly, refresh the window.
• Click each column header to sort tables in table reports.
• When the table is reading a large amount of data, the table columns cannot be manipulated, sorted, and resized. You can view already displayed items, select rows, and scroll.
Disk Adapters reportThis report is about disk adapters. A record is created for each disk adapter.
Table A-1 Disk Adapters report
Figure A-1 Table report (example: Ports)
Item Description
DKA Location of the disk adapter.
• "External" is displayed when the storage system has an external storage systems.
• "External (FICON DM) " is displayed when the storage system has volumes for FICON DM.
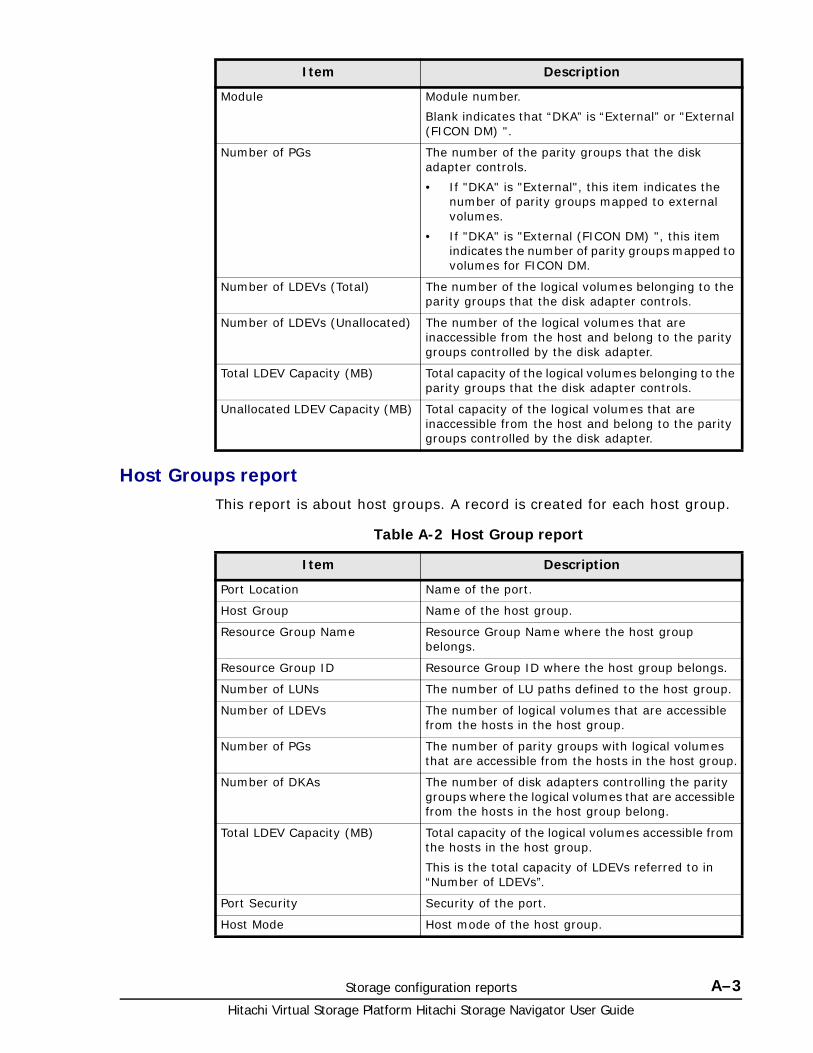
Storage configuration reports A–3Hitachi Virtual Storage Platform Hitachi Storage Navigator User Guide
Host Groups reportThis report is about host groups. A record is created for each host group.
Table A-2 Host Group report
Module Module number.
Blank indicates that “DKA” is “External” or "External (FICON DM) ".
Number of PGs The number of the parity groups that the disk adapter controls.
• If "DKA" is "External", this item indicates the number of parity groups mapped to external volumes.
• If "DKA" is "External (FICON DM) ", this item indicates the number of parity groups mapped to volumes for FICON DM.
Number of LDEVs (Total) The number of the logical volumes belonging to the parity groups that the disk adapter controls.
Number of LDEVs (Unallocated) The number of the logical volumes that are inaccessible from the host and belong to the parity groups controlled by the disk adapter.
Total LDEV Capacity (MB) Total capacity of the logical volumes belonging to the parity groups that the disk adapter controls.
Unallocated LDEV Capacity (MB) Total capacity of the logical volumes that are inaccessible from the host and belong to the parity groups controlled by the disk adapter.
Item Description
Item Description
Port Location Name of the port.
Host Group Name of the host group.
Resource Group Name Resource Group Name where the host group belongs.
Resource Group ID Resource Group ID where the host group belongs.
Number of LUNs The number of LU paths defined to the host group.
Number of LDEVs The number of logical volumes that are accessible from the hosts in the host group.
Number of PGs The number of parity groups with logical volumes that are accessible from the hosts in the host group.
Number of DKAs The number of disk adapters controlling the parity groups where the logical volumes that are accessible from the hosts in the host group belong.
Total LDEV Capacity (MB) Total capacity of the logical volumes accessible from the hosts in the host group.
This is the total capacity of LDEVs referred to in “Number of LDEVs”.
Port Security Security of the port.
Host Mode Host mode of the host group.
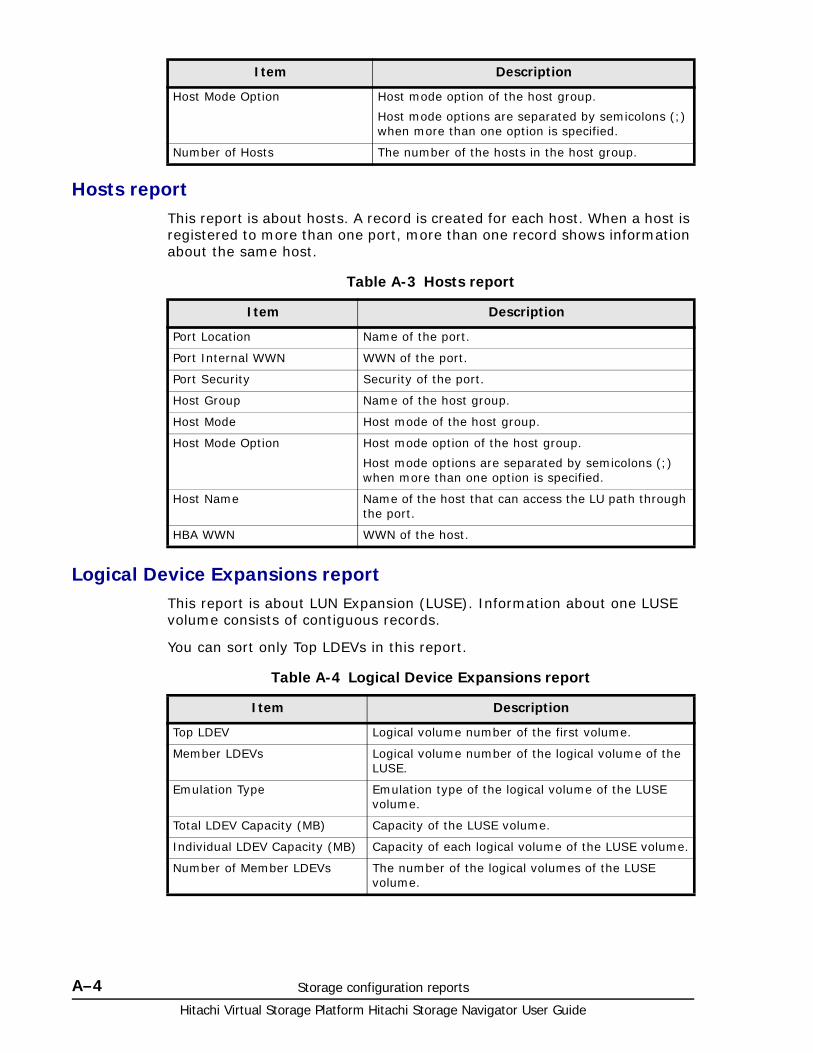
Hitachi Virtual Storage Platform Hitachi Storage Navigator User Guide
A–4 Storage configuration reports
Hosts reportThis report is about hosts. A record is created for each host. When a host is registered to more than one port, more than one record shows information about the same host.
Table A-3 Hosts report
Logical Device Expansions reportThis report is about LUN Expansion (LUSE). Information about one LUSE volume consists of contiguous records.
You can sort only Top LDEVs in this report.
Table A-4 Logical Device Expansions report
Host Mode Option Host mode option of the host group.
Host mode options are separated by semicolons (;) when more than one option is specified.
Number of Hosts The number of the hosts in the host group.
Item Description
Item Description
Port Location Name of the port.
Port Internal WWN WWN of the port.
Port Security Security of the port.
Host Group Name of the host group.
Host Mode Host mode of the host group.
Host Mode Option Host mode option of the host group.
Host mode options are separated by semicolons (;) when more than one option is specified.
Host Name Name of the host that can access the LU path through the port.
HBA WWN WWN of the host.
Item Description
Top LDEV Logical volume number of the first volume.
Member LDEVs Logical volume number of the logical volume of the LUSE.
Emulation Type Emulation type of the logical volume of the LUSE volume.
Total LDEV Capacity (MB) Capacity of the LUSE volume.
Individual LDEV Capacity (MB) Capacity of each logical volume of the LUSE volume.
Number of Member LDEVs The number of the logical volumes of the LUSE volume.

Storage configuration reports A–5Hitachi Virtual Storage Platform Hitachi Storage Navigator User Guide
Logical Devices reportThis report is about logical volumes. A record is created for each logical volume.
Table A-5 Logical Devices report
PG Parity group number of the parity group to which the logical volumes of the LUSE volume belong.
If the number starts with “E” (for example, E1) , the parity group contains external volumes.
RAID Level RAID level of the parity group where the logical volumes comprising the LUSE volume belong.
Drive Type-Code Type code of the drive of the parity group where the logical volumes comprising the LUSE volume belong.
Drive Capacity Capacity of the drives of the parity group where the logical volumes comprising the LUSE volume belong.
SSID SSID of the logical volume of the LUSE volume.
CMD Dev Information about whether the LUSE volume is a command device.
Item Description
Item Description
LDEV ID The logical volume number.
LDEV Name The logical volume name.
Capacity (MB) Capacity of the logical volume.
Emulation Type Emulation type of the logical volume.
Resource Group Name Resource group name where LDEV belongs.
Resource Group ID Resource group ID where LDEV belongs.
PG The parity group number.
• If the number starts with "E" (for example, E1-1) , the parity group contains external volumes.
• If the number starts with "M" (for example, M1-1) , the parity group contains FICON DM volumes.
RAID Level RAID level of the parity group where the logical volume belongs.
Drive Type/RPM Drive type and round-per-minute (RPM) of the drive of the parity group where the logical volume belongs.
A hyphen (-) is displayed as RPM when the drive is SSD.
Drive Type-Code Type code of the drive of the parity group where the logical volume belongs.
Drive Capacity Capacity of the drive of the parity group where the logical volume belongs.
PG Members List of the drive locations of the parity group where the logical volume belongs.
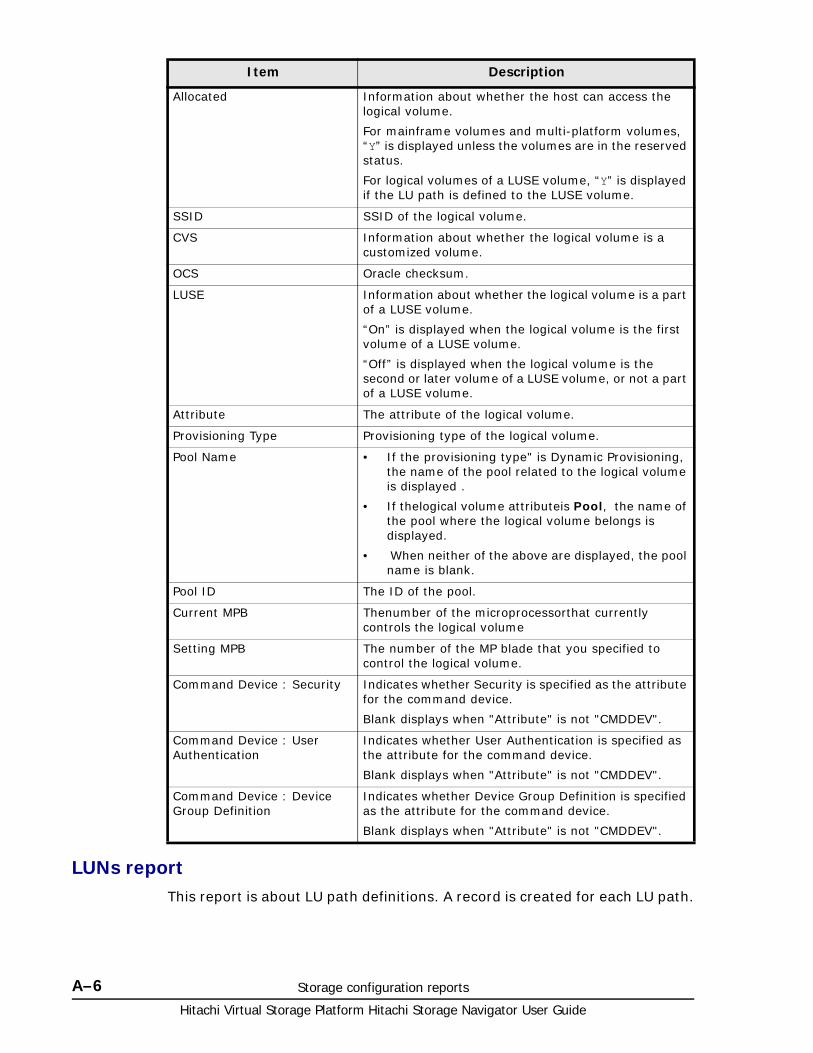
Hitachi Virtual Storage Platform Hitachi Storage Navigator User Guide
A–6 Storage configuration reports
LUNs reportThis report is about LU path definitions. A record is created for each LU path.
Allocated Information about whether the host can access the logical volume.
For mainframe volumes and multi-platform volumes, “Y” is displayed unless the volumes are in the reserved status.
For logical volumes of a LUSE volume, “Y” is displayed if the LU path is defined to the LUSE volume.
SSID SSID of the logical volume.
CVS Information about whether the logical volume is a customized volume.
OCS Oracle checksum.
LUSE Information about whether the logical volume is a part of a LUSE volume.
“On” is displayed when the logical volume is the first volume of a LUSE volume.
“Off” is displayed when the logical volume is the second or later volume of a LUSE volume, or not a part of a LUSE volume.
Attribute The attribute of the logical volume.
Provisioning Type Provisioning type of the logical volume.
Pool Name • If the provisioning type" is Dynamic Provisioning, the name of the pool related to the logical volume is displayed .
• If thelogical volume attributeis Pool, the name of the pool where the logical volume belongs is displayed.
• When neither of the above are displayed, the pool name is blank.
Pool ID The ID of the pool.
Current MPB Thenumber of the microprocessorthat currently controls the logical volume
Setting MPB The number of the MP blade that you specified to control the logical volume.
Command Device : Security Indicates whether Security is specified as the attribute for the command device.
Blank displays when "Attribute" is not "CMDDEV".
Command Device : User Authentication
Indicates whether User Authentication is specified as the attribute for the command device.
Blank displays when "Attribute" is not "CMDDEV".
Command Device : Device Group Definition
Indicates whether Device Group Definition is specified as the attribute for the command device.
Blank displays when "Attribute" is not "CMDDEV".
Item Description
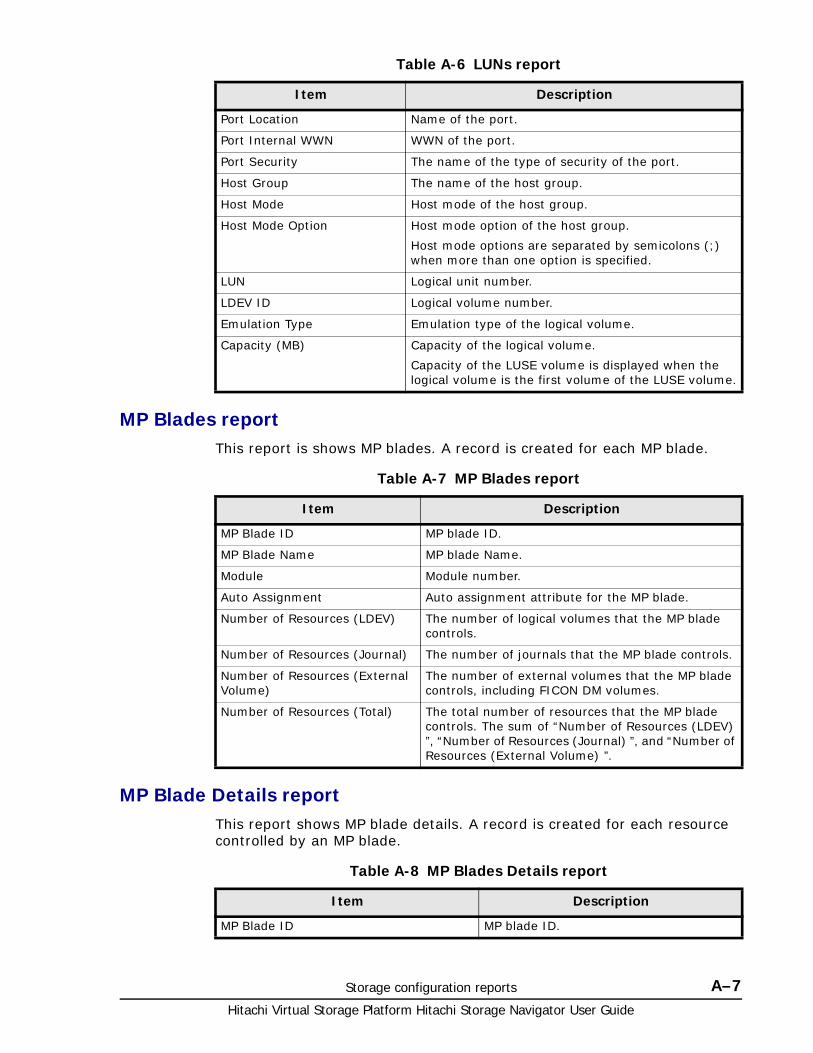
Storage configuration reports A–7Hitachi Virtual Storage Platform Hitachi Storage Navigator User Guide
Table A-6 LUNs report
MP Blades reportThis report is shows MP blades. A record is created for each MP blade.
Table A-7 MP Blades report
MP Blade Details reportThis report shows MP blade details. A record is created for each resource controlled by an MP blade.
Table A-8 MP Blades Details report
Item Description
Port Location Name of the port.
Port Internal WWN WWN of the port.
Port Security The name of the type of security of the port.
Host Group The name of the host group.
Host Mode Host mode of the host group.
Host Mode Option Host mode option of the host group.
Host mode options are separated by semicolons (;) when more than one option is specified.
LUN Logical unit number.
LDEV ID Logical volume number.
Emulation Type Emulation type of the logical volume.
Capacity (MB) Capacity of the logical volume.
Capacity of the LUSE volume is displayed when the logical volume is the first volume of the LUSE volume.
Item Description
MP Blade ID MP blade ID.
MP Blade Name MP blade Name.
Module Module number.
Auto Assignment Auto assignment attribute for the MP blade.
Number of Resources (LDEV) The number of logical volumes that the MP blade controls.
Number of Resources (Journal) The number of journals that the MP blade controls.
Number of Resources (External Volume)
The number of external volumes that the MP blade controls, including FICON DM volumes.
Number of Resources (Total) The total number of resources that the MP blade controls. The sum of “Number of Resources (LDEV) ”, “Number of Resources (Journal) ”, and “Number of Resources (External Volume) ”.
Item Description
MP Blade ID MP blade ID.

Hitachi Virtual Storage Platform Hitachi Storage Navigator User Guide
A–8 Storage configuration reports
Parity Groups reportThis report is about parity groups. A record is created for each parity group.
Table A-9 Parity Groups report
MP Blade Name MP blade Name.
Auto Assignment Auto assignment attribute for the MP blade.
Resource ID ID of this resource that the MP blade controls.
Resource Name The name of the resource that the MP blade controls. If "Type" is LDEV, the LDEV name that is set is displayed.
Type The type of the resource that the MP blade controls.
Item Description
Item Description
PG Parity group number.
• If the number starts with "E" (for example, E1-1) , the parity group contains external volumes (Universal Volume Manager).
• If the number starts with "M" (for example, M1-1) , the parity group contains volumes for FICON DM.
Module Module number 1
DKA Name of the disk adapter that controls the parity group 1.
RAID Level RAID level of the parity group 1.
Resource Group Name Name of the resource group in which the parity group belongs.
Resource Group ID ID for the resource group in which the parity group belongs.
Emulation Type Emulation type of the parity group 1.
Number of LDEVs (Total) The number of the logical volumes in the parity group.
Number of LDEVs (Unallocated) The number of the logical volumes in the parity group that the host cannot access.
Total LDEV Capacity (MB) Capacity of the logical volumes in the parity group.
Unallocated LDEV Capacity (MB) Capacity of the logical volumes in the parity group that the host cannot access.
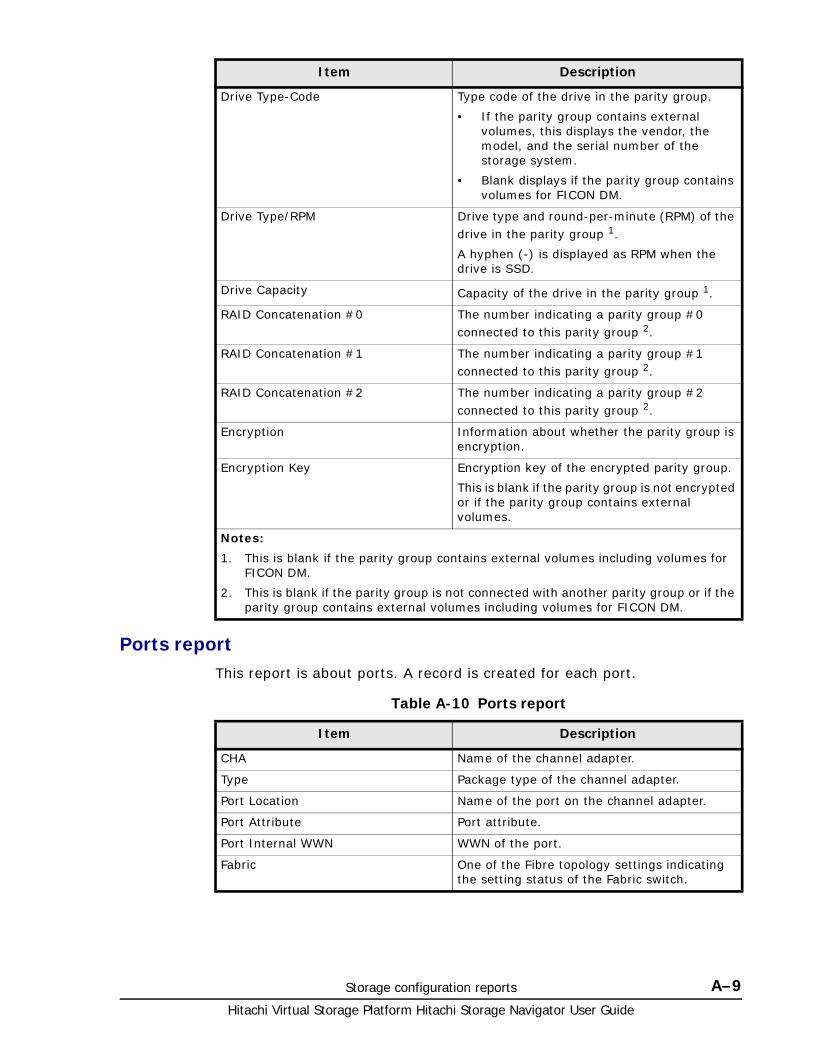
Storage configuration reports A–9Hitachi Virtual Storage Platform Hitachi Storage Navigator User Guide
Ports reportThis report is about ports. A record is created for each port.
Table A-10 Ports report
Drive Type-Code Type code of the drive in the parity group.
• If the parity group contains external volumes, this displays the vendor, the model, and the serial number of the storage system.
• Blank displays if the parity group contains volumes for FICON DM.
Drive Type/RPM Drive type and round-per-minute (RPM) of the drive in the parity group 1.
A hyphen (-) is displayed as RPM when the drive is SSD.
Drive Capacity Capacity of the drive in the parity group 1.
RAID Concatenation #0 The number indicating a parity group #0 connected to this parity group 2.
RAID Concatenation #1 The number indicating a parity group #1 connected to this parity group 2.
RAID Concatenation #2 The number indicating a parity group #2 connected to this parity group 2.
Encryption Information about whether the parity group is encryption.
Encryption Key Encryption key of the encrypted parity group.
This is blank if the parity group is not encrypted or if the parity group contains external volumes.
Notes:
1. This is blank if the parity group contains external volumes including volumes for FICON DM.
2. This is blank if the parity group is not connected with another parity group or if the parity group contains external volumes including volumes for FICON DM.
Item Description
Item Description
CHA Name of the channel adapter.
Type Package type of the channel adapter.
Port Location Name of the port on the channel adapter.
Port Attribute Port attribute.
Port Internal WWN WWN of the port.
Fabric One of the Fibre topology settings indicating the setting status of the Fabric switch.
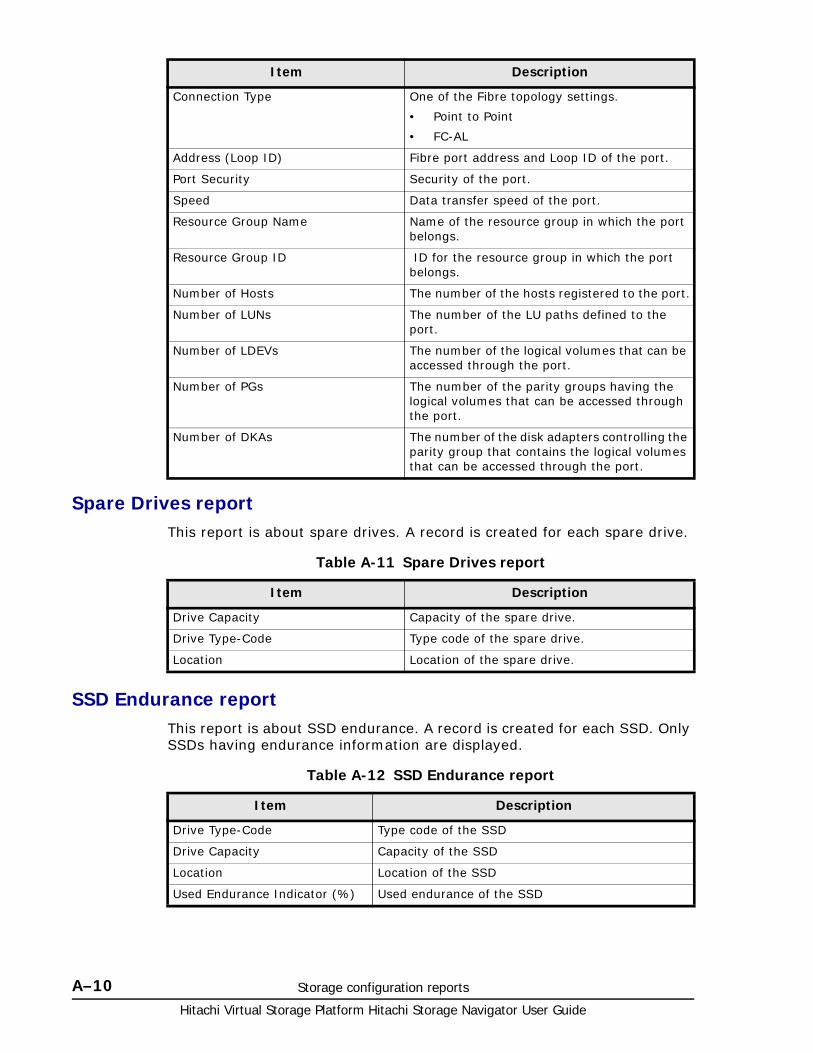
Hitachi Virtual Storage Platform Hitachi Storage Navigator User Guide
A–10 Storage configuration reports
Spare Drives reportThis report is about spare drives. A record is created for each spare drive.
Table A-11 Spare Drives report
SSD Endurance reportThis report is about SSD endurance. A record is created for each SSD. Only SSDs having endurance information are displayed.
Table A-12 SSD Endurance report
Connection Type One of the Fibre topology settings.
• Point to Point
• FC-AL
Address (Loop ID) Fibre port address and Loop ID of the port.
Port Security Security of the port.
Speed Data transfer speed of the port.
Resource Group Name Name of the resource group in which the port belongs.
Resource Group ID ID for the resource group in which the port belongs.
Number of Hosts The number of the hosts registered to the port.
Number of LUNs The number of the LU paths defined to the port.
Number of LDEVs The number of the logical volumes that can be accessed through the port.
Number of PGs The number of the parity groups having the logical volumes that can be accessed through the port.
Number of DKAs The number of the disk adapters controlling the parity group that contains the logical volumes that can be accessed through the port.
Item Description
Item Description
Drive Capacity Capacity of the spare drive.
Drive Type-Code Type code of the spare drive.
Location Location of the spare drive.
Item Description
Drive Type-Code Type code of the SSD
Drive Capacity Capacity of the SSD
Location Location of the SSD
Used Endurance Indicator (%) Used endurance of the SSD
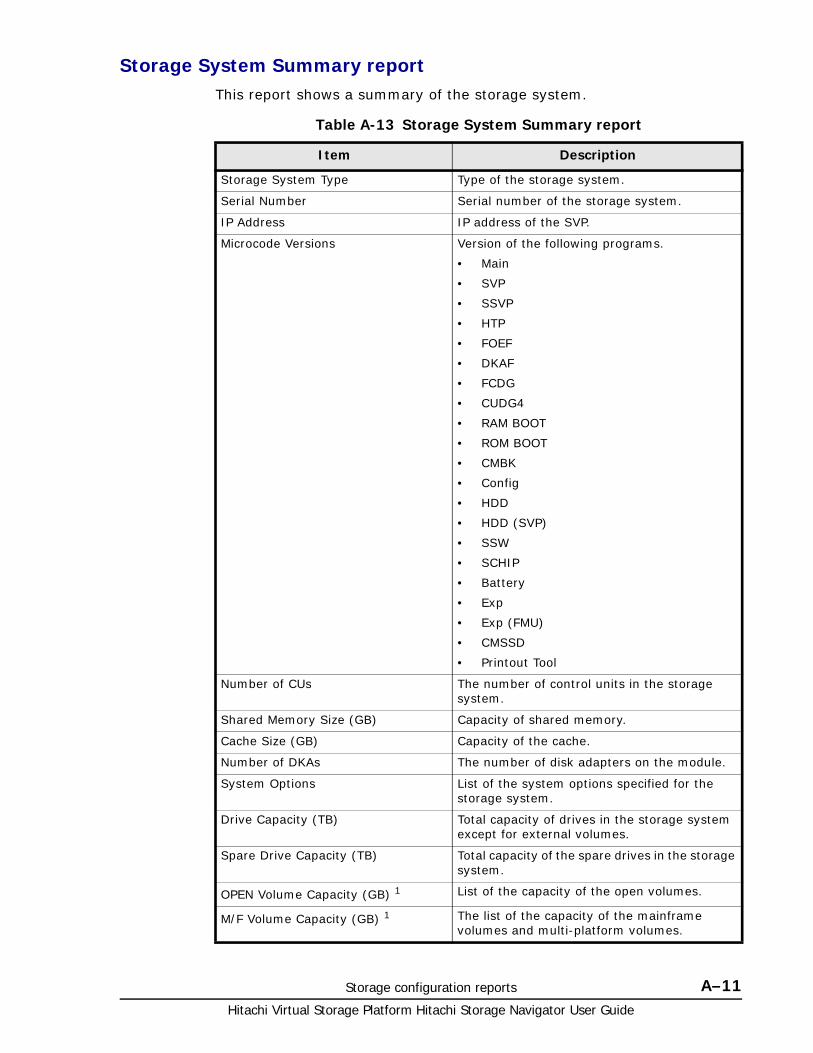
Storage configuration reports A–11Hitachi Virtual Storage Platform Hitachi Storage Navigator User Guide
Storage System Summary reportThis report shows a summary of the storage system.
Table A-13 Storage System Summary report
Item Description
Storage System Type Type of the storage system.
Serial Number Serial number of the storage system.
IP Address IP address of the SVP.
Microcode Versions Version of the following programs.
• Main
• SVP
• SSVP
• HTP
• FOEF
• DKAF
• FCDG
• CUDG4
• RAM BOOT
• ROM BOOT
• CMBK
• Config
• HDD
• HDD (SVP)
• SSW
• SCHIP
• Battery
• Exp
• Exp (FMU)
• CMSSD
• Printout Tool
Number of CUs The number of control units in the storage system.
Shared Memory Size (GB) Capacity of shared memory.
Cache Size (GB) Capacity of the cache.
Number of DKAs The number of disk adapters on the module.
System Options List of the system options specified for the storage system.
Drive Capacity (TB) Total capacity of drives in the storage system except for external volumes.
Spare Drive Capacity (TB) Total capacity of the spare drives in the storage system.
OPEN Volume Capacity (GB) 1 List of the capacity of the open volumes.
M/F Volume Capacity (GB) 1 The list of the capacity of the mainframe volumes and multi-platform volumes.
Hitachi Virtual Storage Platform Hitachi Storage Navigator User Guide
A–12 Storage configuration reports
Reports in graphical view The reports described in this topic display as graphics. icons are displayed before names of reports in graphical view. If the icons or graphics do not displayed properly, refresh the window
Cache Memories reportThis report shows cache memory data, including shared memory capacity and PCB and DIMM cache.
Number of LDEVs1 List of the numbers of the volumes in the following status.
• allocated
• unallocated
• reserved
• free
The list for open-systems and the list for mainframe-systems are separate.
1You cannot sort the llist.
Item Description

Storage configuration reports A–13Hitachi Virtual Storage Platform Hitachi Storage Navigator User Guide
Total capacity of the cache memory and shared memory is displayed separately for each module.
Channel Adapters reportThis report is about channel adapters.
Figure A-2 Cache Memories report
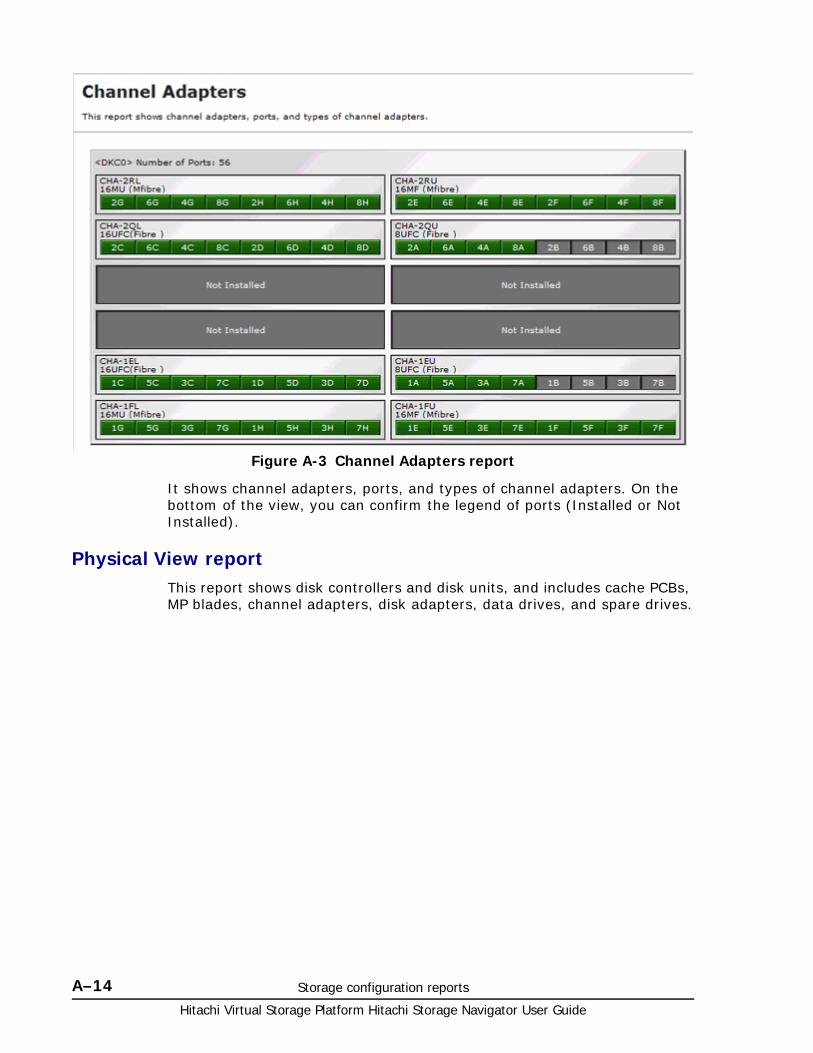
Hitachi Virtual Storage Platform Hitachi Storage Navigator User Guide
A–14 Storage configuration reports
It shows channel adapters, ports, and types of channel adapters. On the bottom of the view, you can confirm the legend of ports (Installed or Not Installed).
Physical View reportThis report shows disk controllers and disk units, and includes cache PCBs, MP blades, channel adapters, disk adapters, data drives, and spare drives.
Figure A-3 Channel Adapters report
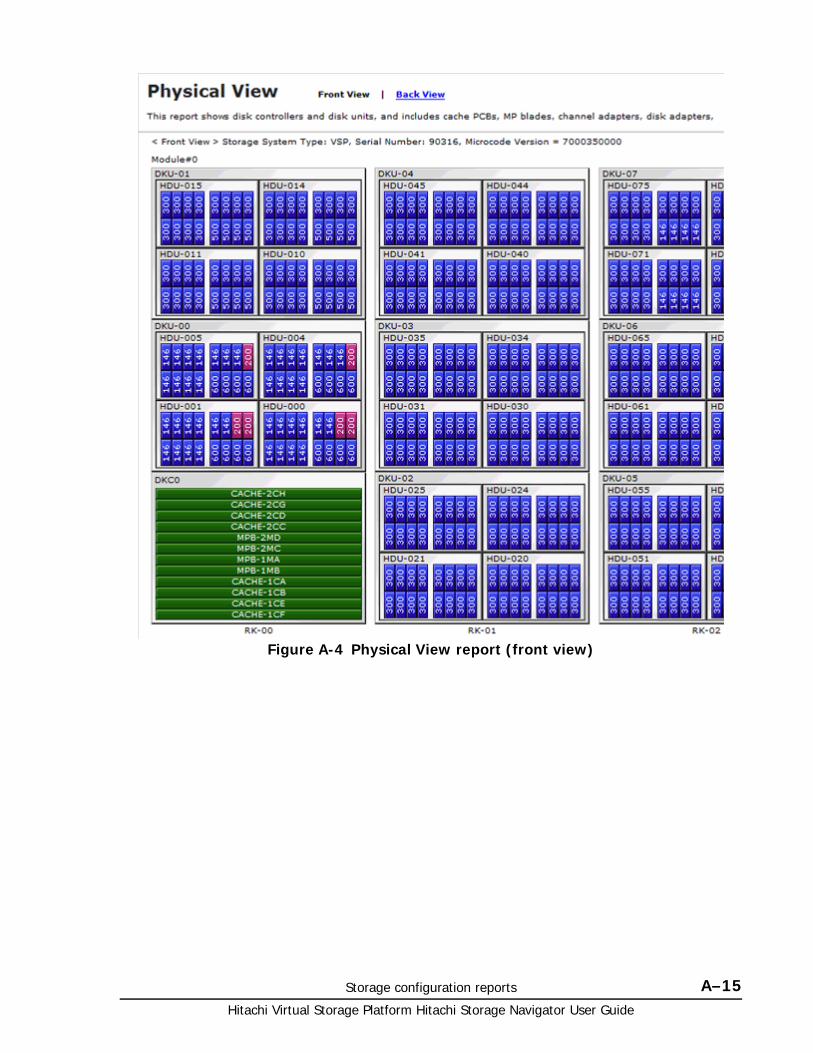
Storage configuration reports A–15Hitachi Virtual Storage Platform Hitachi Storage Navigator User Guide
Figure A-4 Physical View report (front view)
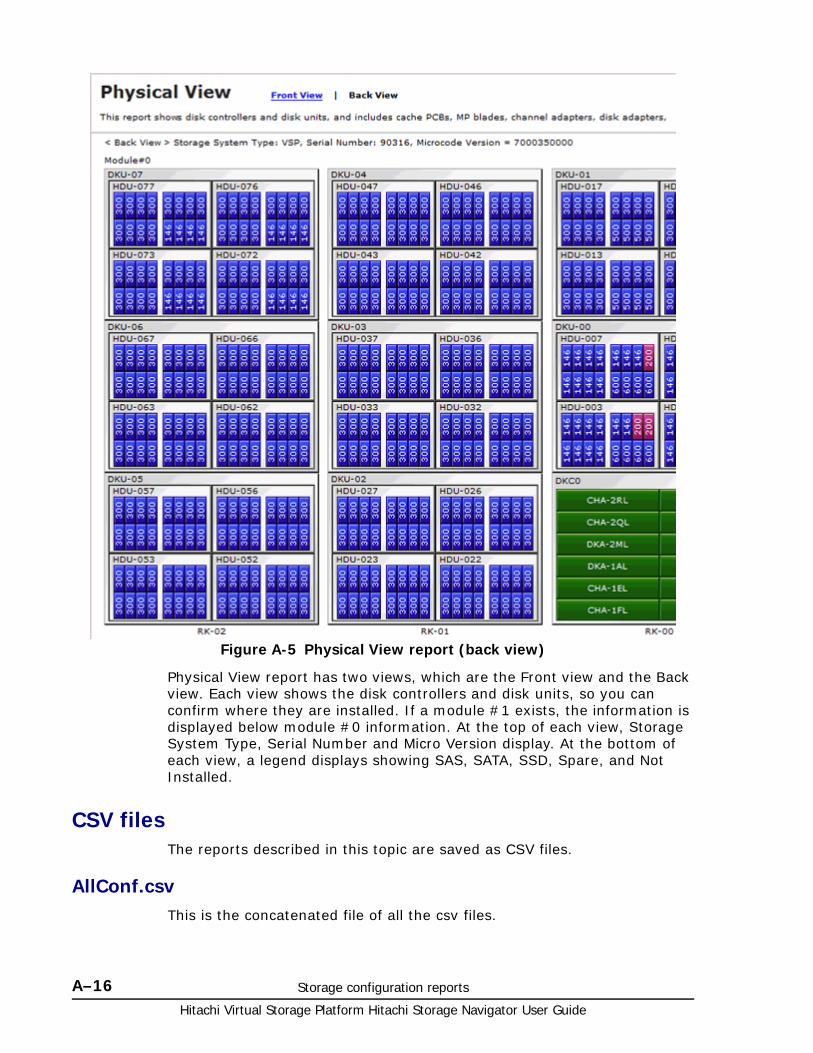
Hitachi Virtual Storage Platform Hitachi Storage Navigator User Guide
A–16 Storage configuration reports
Physical View report has two views, which are the Front view and the Back view. Each view shows the disk controllers and disk units, so you can confirm where they are installed. If a module #1 exists, the information is displayed below module #0 information. At the top of each view, Storage System Type, Serial Number and Micro Version display. At the bottom of each view, a legend displays showing SAS, SATA, SSD, Spare, and Not Installed.
CSV filesThe reports described in this topic are saved as CSV files.
AllConf.csvThis is the concatenated file of all the csv files.
Figure A-5 Physical View report (back view)

Storage configuration reports A–17Hitachi Virtual Storage Platform Hitachi Storage Navigator User Guide
CacheInfo.csvThis CSV file contains information about cache packages. A record is created for each cache package.
Table A-14 CacheInfo.csv file (Title: <<Cache>>)
ChaStatus.csvThis CSV file contains information about the status of channel adapters (CHAs). A record is created for each CHA.
Table A-15 ChaStatus.csv file (Title: <<Cha Status>>)
DcrInfo.csvThis CSV file contains information about Cache Residency Manager. A record is created for each logical volume for which Cache Residency Manager is set.
Item Content
Module# Module number.
Label Cache memory package label.
Output example
• Cache Memory A Basic
• Cache Memory A Option1
CMG Size(GB) CMG size per cache package (in GB). This is half the value of the CMG size because this is the size for one package.
Cache Size(GB) Total cache capacity of this package (in GB).
SM Size(GB) Shared memory capacity (in GB).
Output only for Basic package in Module #0. Blank in other cases.
Cache Residency Size(MB)
Capacity allocated to the cache package for Cache Residency Manager(in MB).
Item Content
Module# Module number.
CHA Location CHA name.
PCB Status Status of this CHA 1.
LCP/FCP#00, #01, …, #07 Status of ports on this CHA 2.
DRR#00, #01 Status of DRR on this CHA 2.
DMA#00, #01, …, #03 Status of DMA on this CHA 2.
MFDMA#00, #01, …, #0f Status of MFDMA on this CHA. 2.
SYNCDMA#00 Status of SYNCDMA#00 on this CHA 2.
Notes:
1. 1: Normal, 0: Abnormal
2. 1: Normal, 0: Abnormal, Blank: Not installed
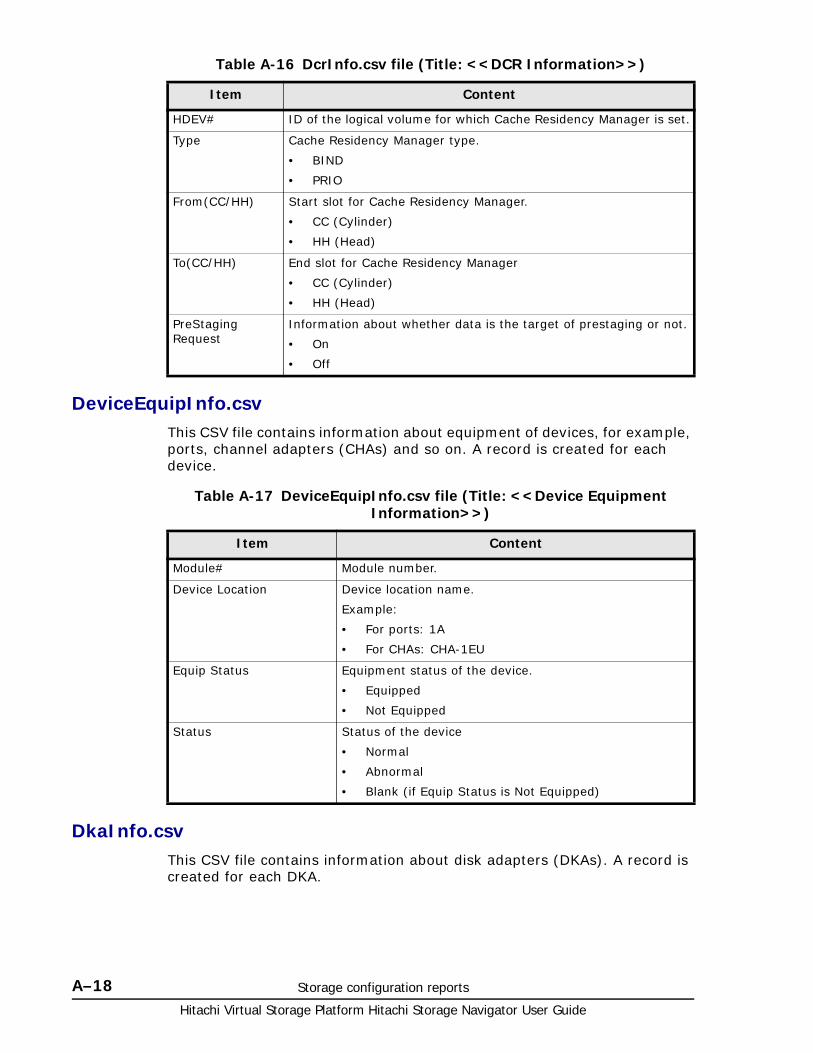
Hitachi Virtual Storage Platform Hitachi Storage Navigator User Guide
A–18 Storage configuration reports
Table A-16 DcrInfo.csv file (Title: <<DCR Information>>)
DeviceEquipInfo.csvThis CSV file contains information about equipment of devices, for example, ports, channel adapters (CHAs) and so on. A record is created for each device.
Table A-17 DeviceEquipInfo.csv file (Title: <<Device Equipment Information>>)
DkaInfo.csvThis CSV file contains information about disk adapters (DKAs). A record is created for each DKA.
Item Content
HDEV# ID of the logical volume for which Cache Residency Manager is set.
Type Cache Residency Manager type.
• BIND
• PRIO
From(CC/HH) Start slot for Cache Residency Manager.
• CC (Cylinder)
• HH (Head)
To(CC/HH) End slot for Cache Residency Manager
• CC (Cylinder)
• HH (Head)
PreStaging Request
Information about whether data is the target of prestaging or not.
• On
• Off
Item Content
Module# Module number.
Device Location Device location name.
Example:
• For ports: 1A
• For CHAs: CHA-1EU
Equip Status Equipment status of the device.
• Equipped
• Not Equipped
Status Status of the device
• Normal
• Abnormal
• Blank (if Equip Status is Not Equipped)
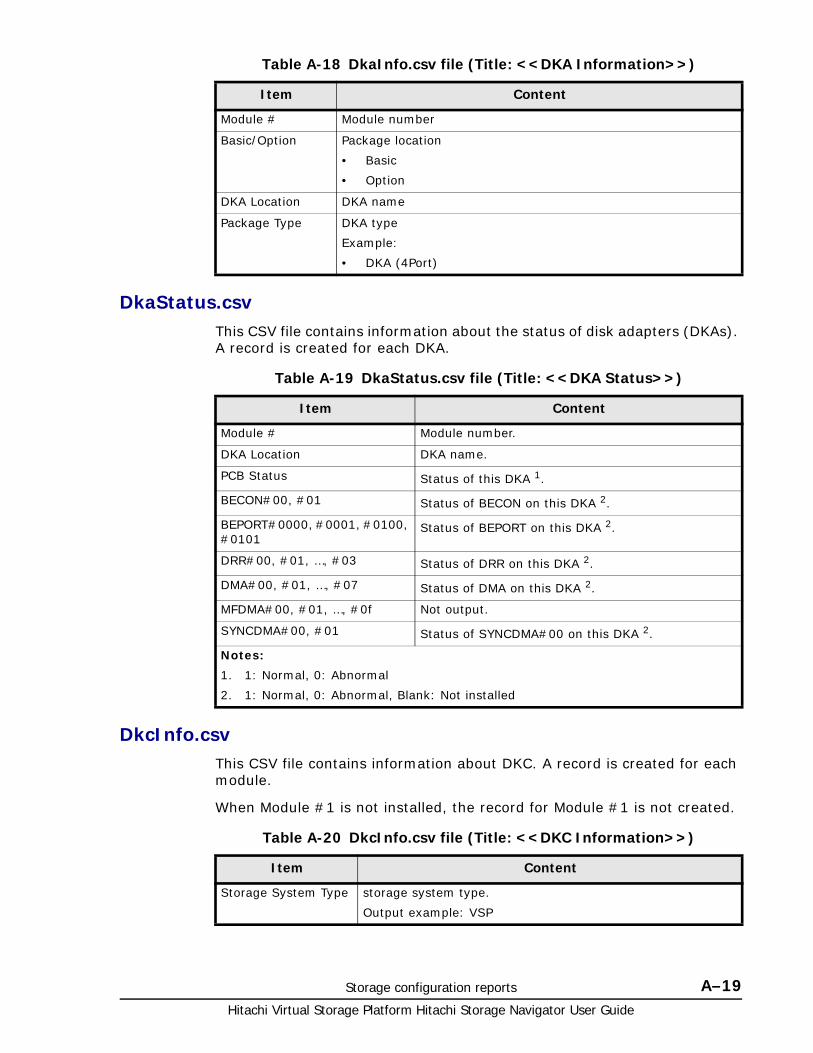
Storage configuration reports A–19Hitachi Virtual Storage Platform Hitachi Storage Navigator User Guide
Table A-18 DkaInfo.csv file (Title: <<DKA Information>>)
DkaStatus.csvThis CSV file contains information about the status of disk adapters (DKAs). A record is created for each DKA.
Table A-19 DkaStatus.csv file (Title: <<DKA Status>>)
DkcInfo.csvThis CSV file contains information about DKC. A record is created for each module.
When Module #1 is not installed, the record for Module #1 is not created.
Table A-20 DkcInfo.csv file (Title: <<DKC Information>>)
Item Content
Module # Module number
Basic/Option Package location
• Basic
• Option
DKA Location DKA name
Package Type DKA type
Example:
• DKA (4Port)
Item Content
Module # Module number.
DKA Location DKA name.
PCB Status Status of this DKA 1.
BECON#00, #01 Status of BECON on this DKA 2.
BEPORT#0000, #0001, #0100, #0101
Status of BEPORT on this DKA 2.
DRR#00, #01, …, #03 Status of DRR on this DKA 2.
DMA#00, #01, …, #07 Status of DMA on this DKA 2.
MFDMA#00, #01, …, #0f Not output.
SYNCDMA#00, #01 Status of SYNCDMA#00 on this DKA 2.
Notes:
1. 1: Normal, 0: Abnormal
2. 1: Normal, 0: Abnormal, Blank: Not installed
Item Content
Storage System Type storage system type.
Output example: VSP
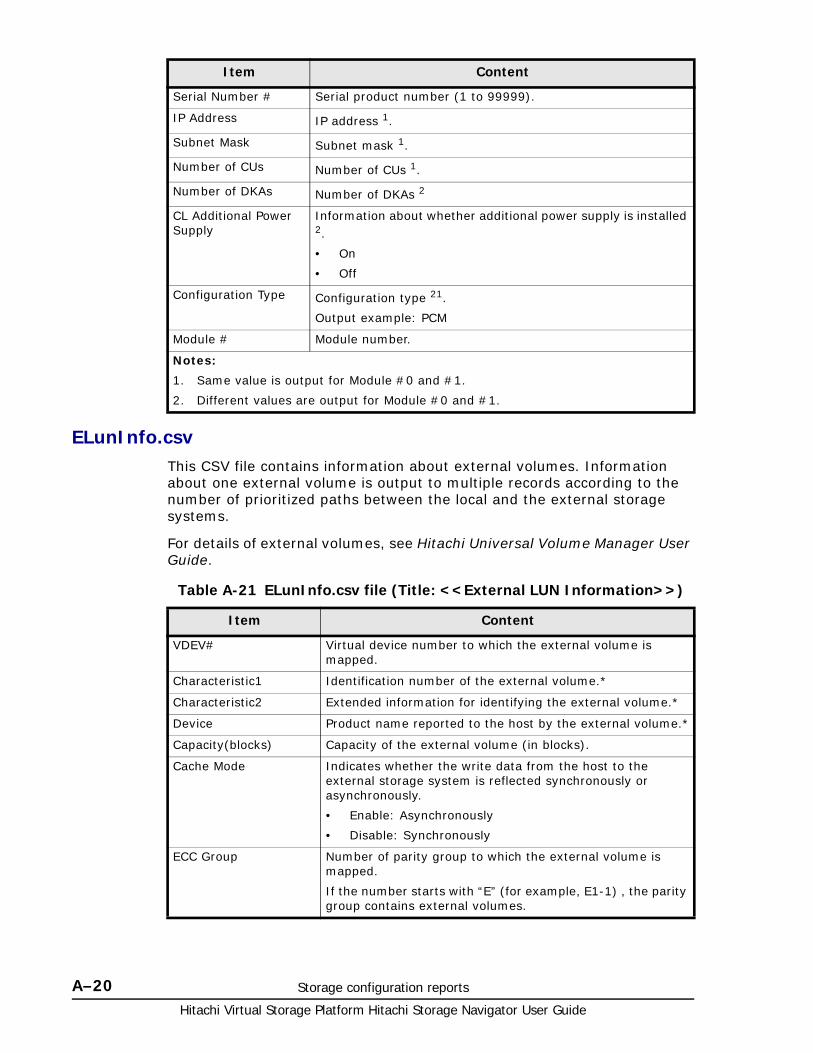
Hitachi Virtual Storage Platform Hitachi Storage Navigator User Guide
A–20 Storage configuration reports
ELunInfo.csvThis CSV file contains information about external volumes. Information about one external volume is output to multiple records according to the number of prioritized paths between the local and the external storage systems.
For details of external volumes, see Hitachi Universal Volume Manager User Guide.
Table A-21 ELunInfo.csv file (Title: <<External LUN Information>>)
Serial Number # Serial product number (1 to 99999).
IP Address IP address 1.
Subnet Mask Subnet mask 1.
Number of CUs Number of CUs 1.
Number of DKAs Number of DKAs 2
CL Additional Power Supply
Information about whether additional power supply is installed 2.
• On
• Off
Configuration Type Configuration type 21.
Output example: PCM
Module # Module number.
Notes:
1. Same value is output for Module #0 and #1.
2. Different values are output for Module #0 and #1.
Item Content
Item Content
VDEV# Virtual device number to which the external volume is mapped.
Characteristic1 Identification number of the external volume.*
Characteristic2 Extended information for identifying the external volume.*
Device Product name reported to the host by the external volume.*
Capacity(blocks) Capacity of the external volume (in blocks).
Cache Mode Indicates whether the write data from the host to the external storage system is reflected synchronously or asynchronously.
• Enable: Asynchronously
• Disable: Synchronously
ECC Group Number of parity group to which the external volume is mapped.
If the number starts with “E” (for example, E1-1) , the parity group contains external volumes.

Storage configuration reports A–21Hitachi Virtual Storage Platform Hitachi Storage Navigator User Guide
FcSpNameInfo.csvThis CSV file contains information about Fibre Channel Security Protocols (FCSPs). A record is created for each initiator (host).
For details of port setting, see the Provisioning Guide for Open Systems.
Current MP Blade Number and name of a current MP blade controlling the parity group to which the external volume is mapped.
Setting MP Blade Number and name of an MP blade configured to control the external volume indicated by the ECC Group.
Vendor Vendor name of the external storage system.
Product Name Product name of the external storage system.
Serial Number# Serial product number of the external storage system.
Path Mode Mode which indicates how the paths between local and external storage systems operate.
• Multi
• Single
• APLB
Port Name of a local port from which the external path is connected to the external storage system.
WWN Port identifier number of the external storage system.
LUN LU number set for the external volume.
Priority Priority of the paths between the storage systems to be used for connection with the external volume.
“1” indicates the path of the highest priority.
Status Status of the path between storage systems.
• Normal
• Blocked
IO TOV IO timeout value for the external volume.
QDepth The number of Read/Write commands that can be issued to the external volume at a time.
Resource Group Name (FCC Group)
Resource group name of the parity group that is mapping external volumes.
Resource Group ID (FCC Group)
Resource group ID for the parity group that is mapping external volumes.
Load Balance Mode I/O load balance distribution logic specified for external volume
• Normal Round-robin
• Extended Round-robin
• Disable
A hyphen (-) displays when Single is specified in Path Mode.
* Note: If the character string contains a comma, the comma is converted to a tab.
Item Content
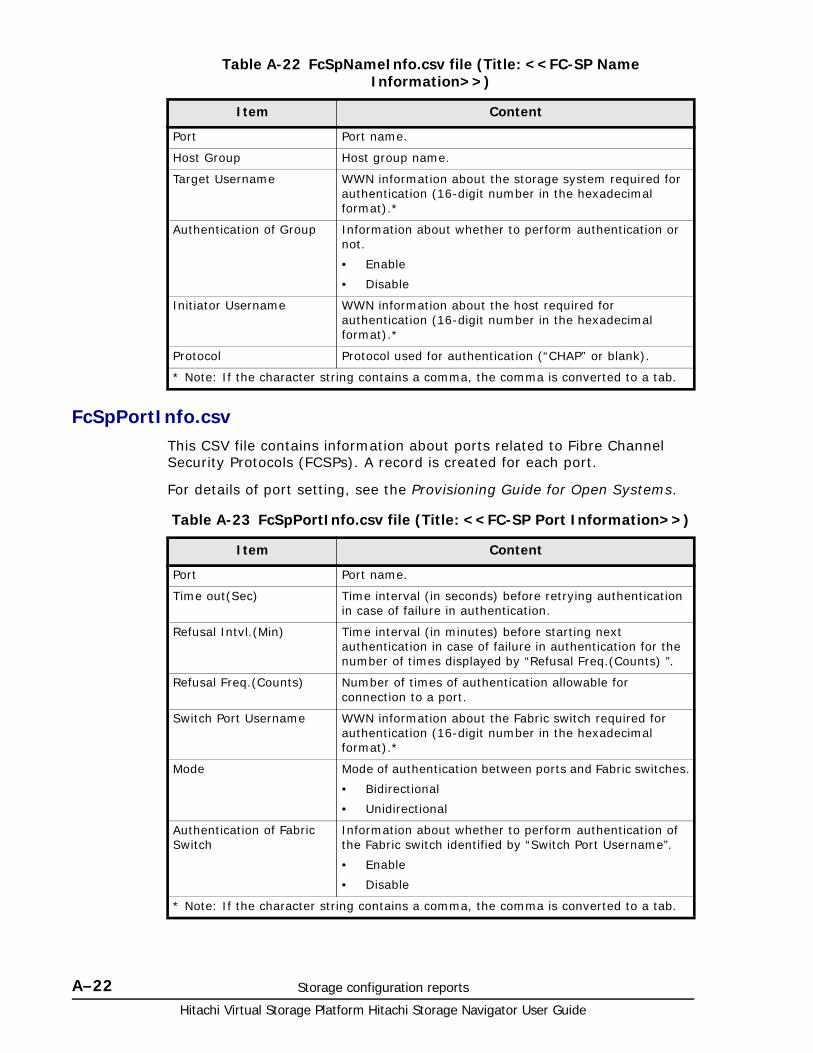
Hitachi Virtual Storage Platform Hitachi Storage Navigator User Guide
A–22 Storage configuration reports
Table A-22 FcSpNameInfo.csv file (Title: <<FC-SP Name Information>>)
FcSpPortInfo.csvThis CSV file contains information about ports related to Fibre Channel Security Protocols (FCSPs). A record is created for each port.
For details of port setting, see the Provisioning Guide for Open Systems.
Table A-23 FcSpPortInfo.csv file (Title: <<FC-SP Port Information>>)
Item Content
Port Port name.
Host Group Host group name.
Target Username WWN information about the storage system required for authentication (16-digit number in the hexadecimal format).*
Authentication of Group Information about whether to perform authentication or not.
• Enable
• Disable
Initiator Username WWN information about the host required for authentication (16-digit number in the hexadecimal format).*
Protocol Protocol used for authentication (“CHAP” or blank).
* Note: If the character string contains a comma, the comma is converted to a tab.
Item Content
Port Port name.
Time out(Sec) Time interval (in seconds) before retrying authentication in case of failure in authentication.
Refusal Intvl.(Min) Time interval (in minutes) before starting next authentication in case of failure in authentication for the number of times displayed by “Refusal Freq.(Counts) ”.
Refusal Freq.(Counts) Number of times of authentication allowable for connection to a port.
Switch Port Username WWN information about the Fabric switch required for authentication (16-digit number in the hexadecimal format).*
Mode Mode of authentication between ports and Fabric switches.
• Bidirectional
• Unidirectional
Authentication of Fabric Switch
Information about whether to perform authentication of the Fabric switch identified by “Switch Port Username”.
• Enable
• Disable
* Note: If the character string contains a comma, the comma is converted to a tab.
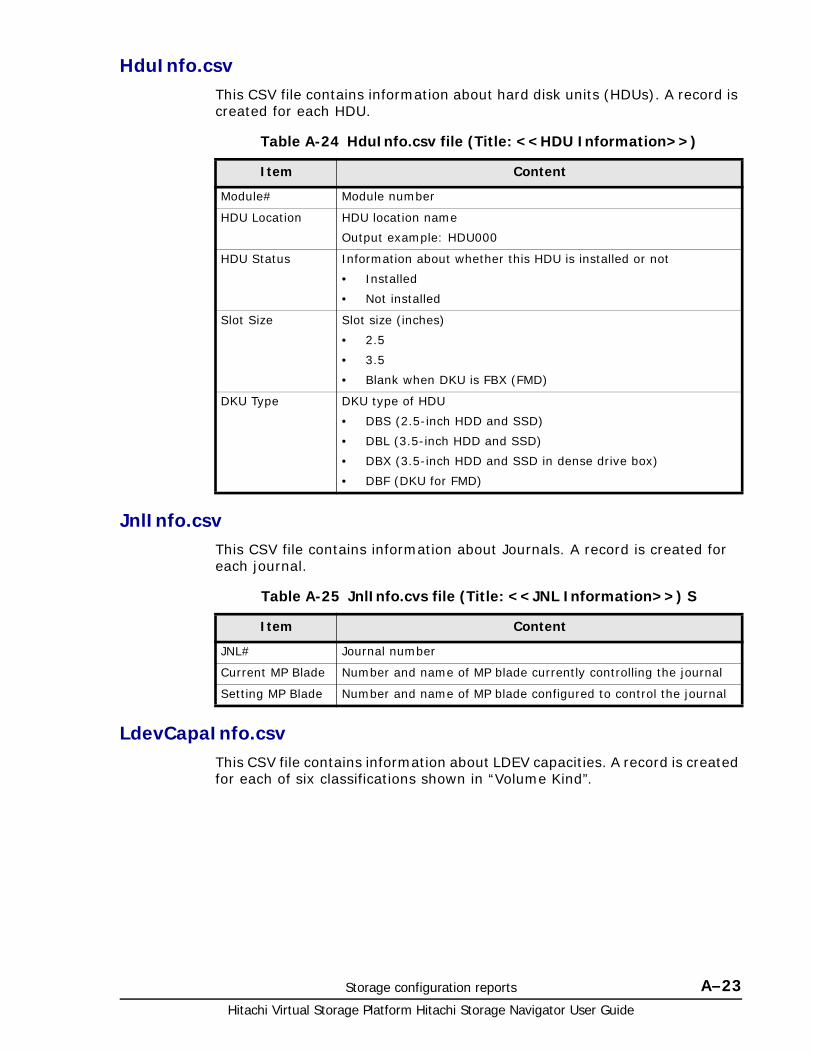
Storage configuration reports A–23Hitachi Virtual Storage Platform Hitachi Storage Navigator User Guide
HduInfo.csvThis CSV file contains information about hard disk units (HDUs). A record is created for each HDU.
Table A-24 HduInfo.csv file (Title: <<HDU Information>>)
JnlInfo.csvThis CSV file contains information about Journals. A record is created for each journal.
Table A-25 JnlInfo.cvs file (Title: <<JNL Information>>) S
LdevCapaInfo.csvThis CSV file contains information about LDEV capacities. A record is created for each of six classifications shown in “Volume Kind”.
Item Content
Module# Module number
HDU Location HDU location name
Output example: HDU000
HDU Status Information about whether this HDU is installed or not
• Installed
• Not installed
Slot Size Slot size (inches)
• 2.5
• 3.5
• Blank when DKU is FBX (FMD)
DKU Type DKU type of HDU
• DBS (2.5-inch HDD and SSD)
• DBL (3.5-inch HDD and SSD)
• DBX (3.5-inch HDD and SSD in dense drive box)
• DBF (DKU for FMD)
Item Content
JNL# Journal number
Current MP Blade Number and name of MP blade currently controlling the journal
Setting MP Blade Number and name of MP blade configured to control the journal

Hitachi Virtual Storage Platform Hitachi Storage Navigator User Guide
A–24 Storage configuration reports
Table A-26 LdevCapaInfo.csv file (Title: <<LDEV Capacity Information>>)
LdevCountInfo.csvThis CSV file contains information about the number of logical devices (LDEVs). A record is created for each of three classifications shown in “Volume Kind”.
Table A-27 LdevCountInfo.csv file (Title: <<LDEV Count Information>>)
Item Content
Volume Kind The following six classifications are output.
• Internal OPEN Volumes
• Internal Mainframe Volumes
• External OPEN Volumes
• External Mainframe Volumes
• Total OPEN Volumes
• Total Mainframe Volumes
Allocated LDEV Capacity (GB)
Allocated LDEV capacity (in GB).
Unallocated LDEV Capacity (GB)
Unallocated LDEV capacity (in GB).
Reserved Capacity (GB) Reserved LDEV capacity (in GB).
Total Volume Capacity (GB)
Total capacity (in GB) of “Allocated LDEV Capacity (GB) ”, “Unallocated LDEV Capacity (GB) ” and “Reserved Capacity (GB) ”.
Free Space (GB) Free Space (in GB).
Total Capacity (GB) Total Capacity (GB).
The sum of “Total Volume Capacity (GB) ” and “FreeSpace (GB) ”.
Item Content
Volume Kind The following three classifications are output.
• Internal Volumes
• External Volumes
• Total Volumes
Allocated OPEN LDEVs The number of allocated open-system volumes (LDEVs).
Unallocated OPEN LDEVs
The number of unallocated open-system volumes (LDEVs).
Reserved OPEN LDEVs The number of reserved open-system volumes (LDEVs).
Allocated Mainframe LDEVs
The number of allocated mainframe and multi-platform volumes (LDEVs).
Reserved Mainframe LDEVs
The number of reserved mainframe and multi-platform volumes (LDEVs).
V-VOL The number of virtual volumes.
Output only when “Volume Kind” is Total Volumes.
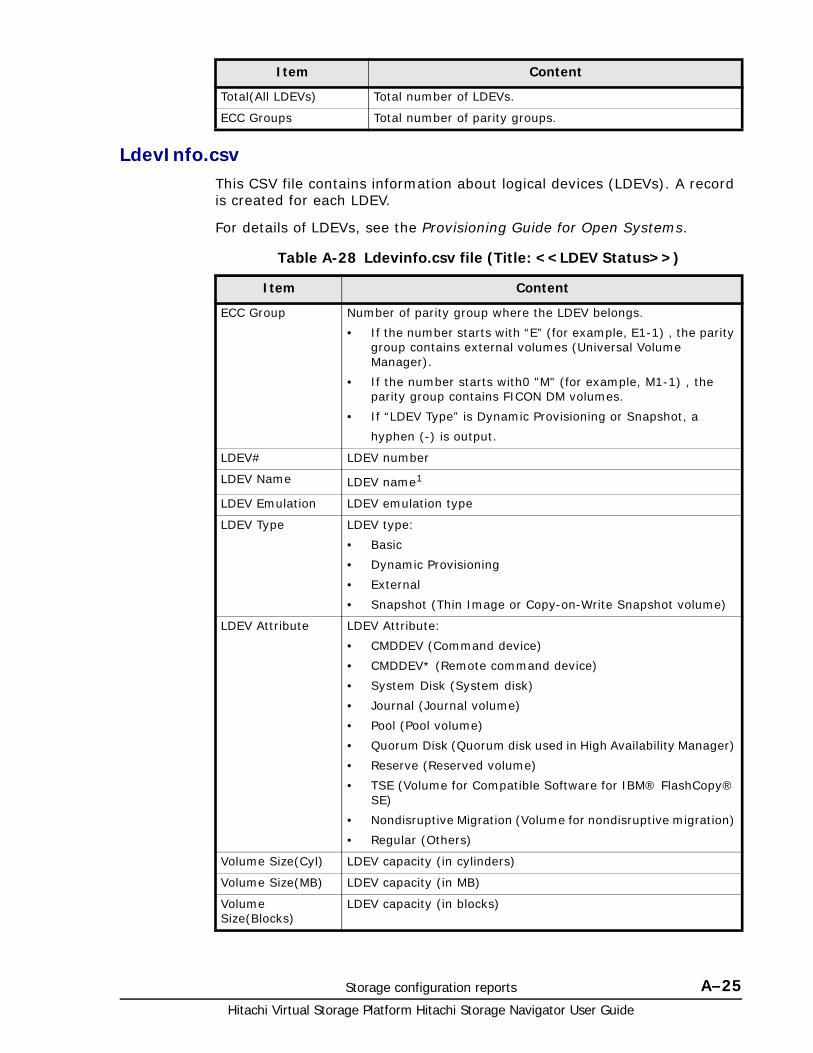
Storage configuration reports A–25Hitachi Virtual Storage Platform Hitachi Storage Navigator User Guide
LdevInfo.csvThis CSV file contains information about logical devices (LDEVs). A record is created for each LDEV.
For details of LDEVs, see the Provisioning Guide for Open Systems.
Table A-28 Ldevinfo.csv file (Title: <<LDEV Status>>)
Total(All LDEVs) Total number of LDEVs.
ECC Groups Total number of parity groups.
Item Content
Item Content
ECC Group Number of parity group where the LDEV belongs.
• If the number starts with “E” (for example, E1-1) , the parity group contains external volumes (Universal Volume Manager).
• If the number starts with0 "M" (for example, M1-1) , the parity group contains FICON DM volumes.
• If “LDEV Type” is Dynamic Provisioning or Snapshot, a
hyphen (-) is output.
LDEV# LDEV number
LDEV Name LDEV name1
LDEV Emulation LDEV emulation type
LDEV Type LDEV type:
• Basic
• Dynamic Provisioning
• External
• Snapshot (Thin Image or Copy-on-Write Snapshot volume)
LDEV Attribute LDEV Attribute:
• CMDDEV (Command device)
• CMDDEV* (Remote command device)
• System Disk (System disk)
• Journal (Journal volume)
• Pool (Pool volume)
• Quorum Disk (Quorum disk used in High Availability Manager)
• Reserve (Reserved volume)
• TSE (Volume for Compatible Software for IBM® FlashCopy® SE)
• Nondisruptive Migration (Volume for nondisruptive migration)
• Regular (Others)
Volume Size(Cyl) LDEV capacity (in cylinders)
Volume Size(MB) LDEV capacity (in MB)
Volume Size(Blocks)
LDEV capacity (in blocks)

Hitachi Virtual Storage Platform Hitachi Storage Navigator User Guide
A–26 Storage configuration reports
CVS Information about whether the LDEV is a custom-sized volume or not:
• On: Custom-sized volume
• Off: Others
LUSE Information about whether this LDEV is the top volume of LUSE or not:
• On
• Off
Pool ID Pool number. This is blank except for the following cases:
• If “LDEV Type” is Dynamic Provisioning
• If LDEV Attribute is Pool
RAID Concatenation#0
Number of parity group to be concatenated to parity group (#0) identified by ECC Group.2
RAID Concatenation#1
Number of parity group to be concatenated to parity group (#1) identified by ECC Group.2
RAID Concatenation#2
Number of parity group to be concatenated to parity group (#2) identified by ECC Group.2
ORACLE CHECK SUM
Information about whether this LDEV is Oracle check sum target or not.
• For open-system or multi-platform volumes: On or Off
• For other volumes: blank
Current MP Blade Number and name of MP blade currently controlling the LDEV.
Setting MP Blade Number and name of MP blade configured to control LDEV.
Encryption Information about whether the parity group identified by ECC Group is encrypted or not.
• For Internal volumes:
Enable (encrypted) or Disable
• For other volumes: blank
Encryption Key • If “Encryption” is Enable:
Encryption key number
• Blank if “Encryption” is Disable or blank.
Allocated Information about whether this LDEV is allocated to a host or not.
• In case of mainframe or multi-platform volumes, “Y” is output for all except Reserved.
• In case of open-system volumes, “Y” is output for volumes accessible to host.
Pool Name The pool's name1
The name of the pool shown in "Pool ID" is displayed.
CmdDevSecurity Indicates whether Security is specified as the attribute for the command device.
CmdDevUserAuth Indicates whether User Authentication is specified as the attribute for the command device.
CmdDevDevGrpDef Indicates whether Device Group Definition is specified as the attribute for the command device.
Item Content
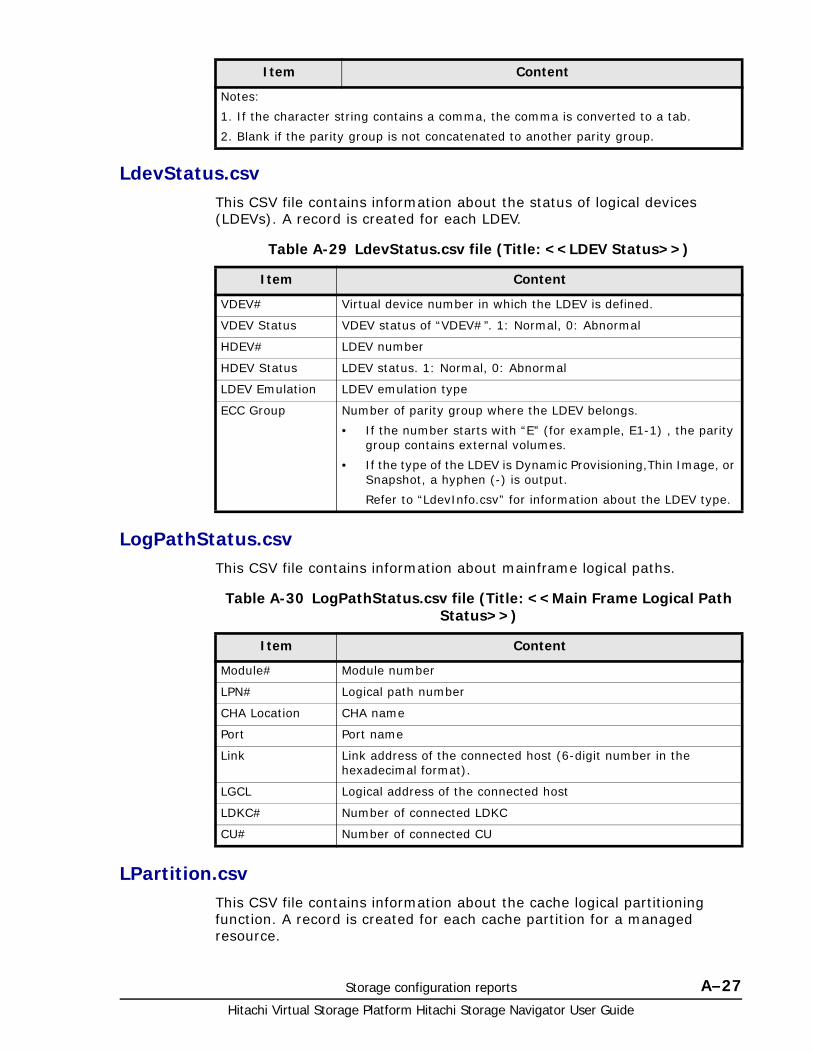
Storage configuration reports A–27Hitachi Virtual Storage Platform Hitachi Storage Navigator User Guide
LdevStatus.csvThis CSV file contains information about the status of logical devices (LDEVs). A record is created for each LDEV.
Table A-29 LdevStatus.csv file (Title: <<LDEV Status>>)
LogPathStatus.csvThis CSV file contains information about mainframe logical paths.
Table A-30 LogPathStatus.csv file (Title: <<Main Frame Logical Path Status>>)
LPartition.csvThis CSV file contains information about the cache logical partitioning function. A record is created for each cache partition for a managed resource.
Notes:
1. If the character string contains a comma, the comma is converted to a tab.
2. Blank if the parity group is not concatenated to another parity group.
Item Content
Item Content
VDEV# Virtual device number in which the LDEV is defined.
VDEV Status VDEV status of “VDEV#”. 1: Normal, 0: Abnormal
HDEV# LDEV number
HDEV Status LDEV status. 1: Normal, 0: Abnormal
LDEV Emulation LDEV emulation type
ECC Group Number of parity group where the LDEV belongs.
• If the number starts with “E” (for example, E1-1) , the parity group contains external volumes.
• If the type of the LDEV is Dynamic Provisioning,Thin Image, or Snapshot, a hyphen (-) is output.
Refer to “LdevInfo.csv” for information about the LDEV type.
Item Content
Module# Module number
LPN# Logical path number
CHA Location CHA name
Port Port name
Link Link address of the connected host (6-digit number in the hexadecimal format).
LGCL Logical address of the connected host
LDKC# Number of connected LDKC
CU# Number of connected CU
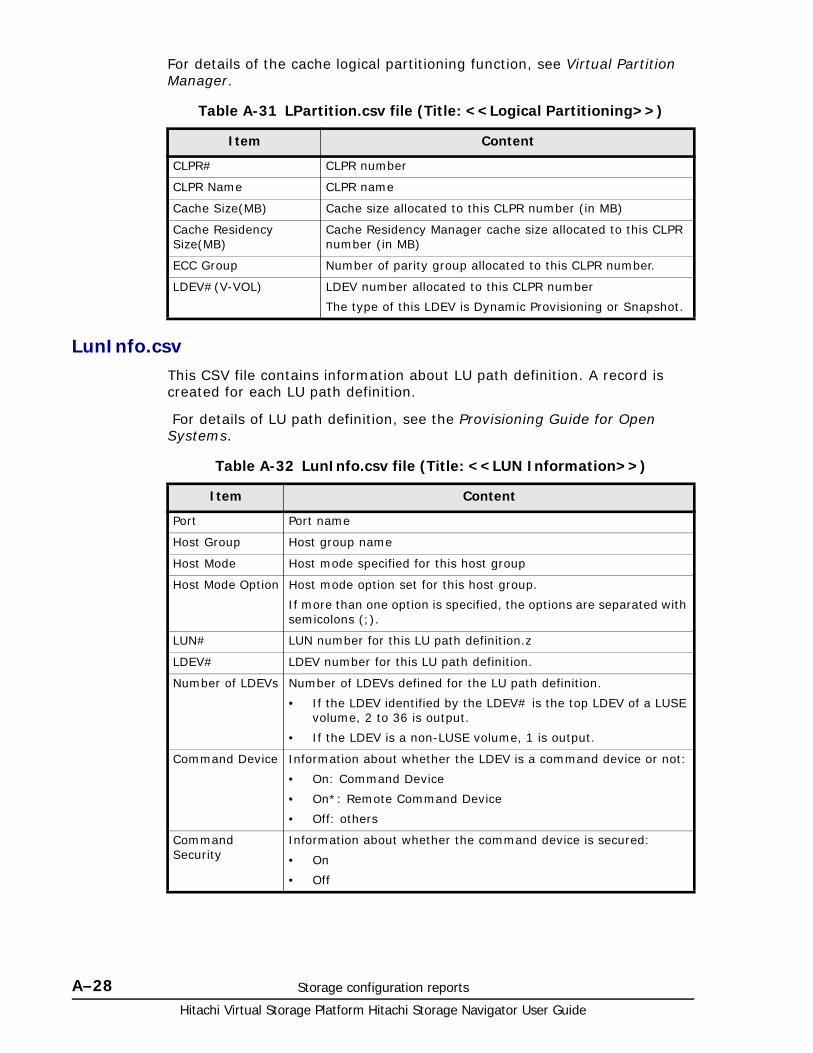
Hitachi Virtual Storage Platform Hitachi Storage Navigator User Guide
A–28 Storage configuration reports
For details of the cache logical partitioning function, see Virtual Partition Manager.
Table A-31 LPartition.csv file (Title: <<Logical Partitioning>>)
LunInfo.csvThis CSV file contains information about LU path definition. A record is created for each LU path definition.
For details of LU path definition, see the Provisioning Guide for Open Systems.
Table A-32 LunInfo.csv file (Title: <<LUN Information>>)
Item Content
CLPR# CLPR number
CLPR Name CLPR name
Cache Size(MB) Cache size allocated to this CLPR number (in MB)
Cache Residency Size(MB)
Cache Residency Manager cache size allocated to this CLPR number (in MB)
ECC Group Number of parity group allocated to this CLPR number.
LDEV#(V-VOL) LDEV number allocated to this CLPR number
The type of this LDEV is Dynamic Provisioning or Snapshot.
Item Content
Port Port name
Host Group Host group name
Host Mode Host mode specified for this host group
Host Mode Option Host mode option set for this host group.
If more than one option is specified, the options are separated with semicolons (;).
LUN# LUN number for this LU path definition.z
LDEV# LDEV number for this LU path definition.
Number of LDEVs Number of LDEVs defined for the LU path definition.
• If the LDEV identified by the LDEV# is the top LDEV of a LUSE volume, 2 to 36 is output.
• If the LDEV is a non-LUSE volume, 1 is output.
Command Device Information about whether the LDEV is a command device or not:
• On: Command Device
• On*: Remote Command Device
• Off: others
Command Security
Information about whether the command device is secured:
• On
• Off
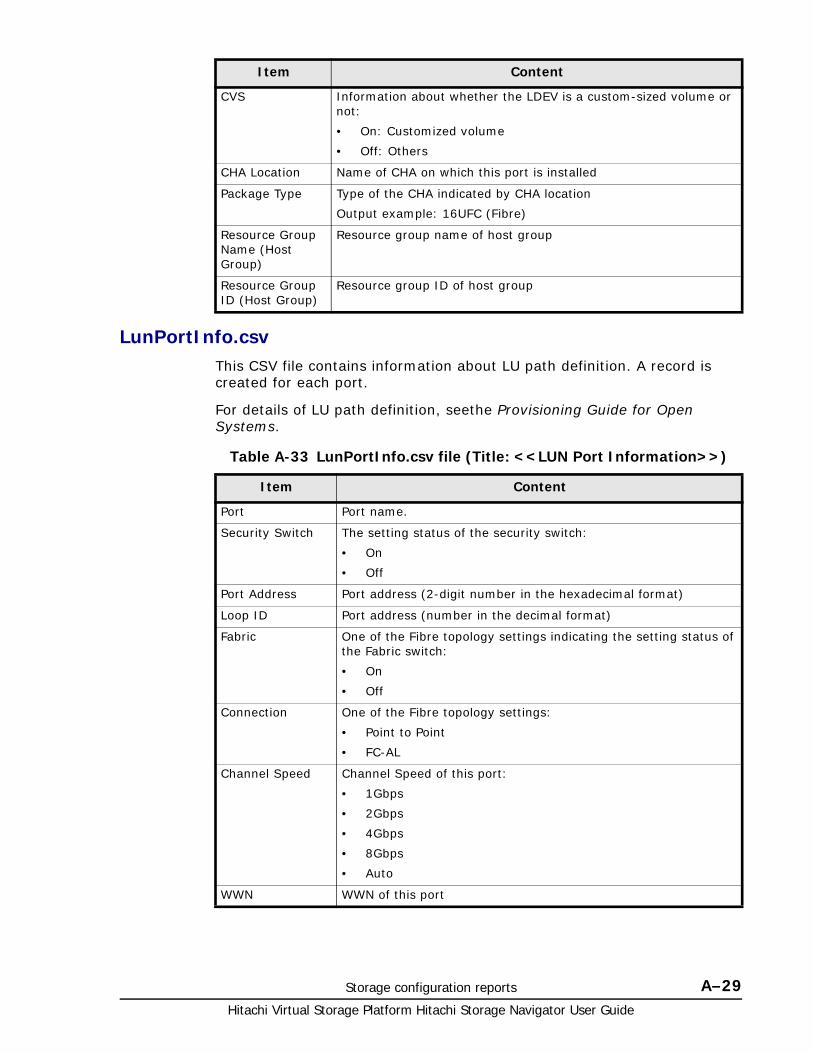
Storage configuration reports A–29Hitachi Virtual Storage Platform Hitachi Storage Navigator User Guide
LunPortInfo.csvThis CSV file contains information about LU path definition. A record is created for each port.
For details of LU path definition, seethe Provisioning Guide for Open Systems.
Table A-33 LunPortInfo.csv file (Title: <<LUN Port Information>>)
CVS Information about whether the LDEV is a custom-sized volume or not:
• On: Customized volume
• Off: Others
CHA Location Name of CHA on which this port is installed
Package Type Type of the CHA indicated by CHA location
Output example: 16UFC (Fibre)
Resource Group Name (Host Group)
Resource group name of host group
Resource Group ID (Host Group)
Resource group ID of host group
Item Content
Item Content
Port Port name.
Security Switch The setting status of the security switch:
• On
• Off
Port Address Port address (2-digit number in the hexadecimal format)
Loop ID Port address (number in the decimal format)
Fabric One of the Fibre topology settings indicating the setting status of the Fabric switch:
• On
• Off
Connection One of the Fibre topology settings:
• Point to Point
• FC-AL
Channel Speed Channel Speed of this port:
• 1Gbps
• 2Gbps
• 4Gbps
• 8Gbps
• Auto
WWN WWN of this port
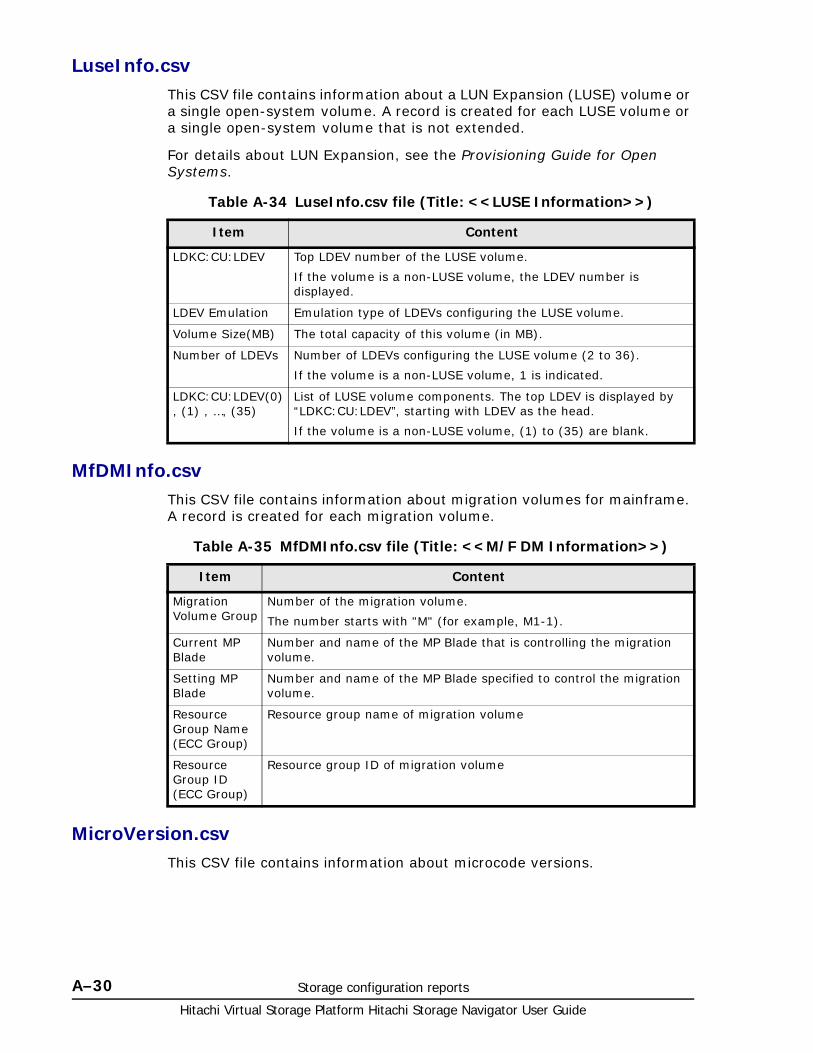
Hitachi Virtual Storage Platform Hitachi Storage Navigator User Guide
A–30 Storage configuration reports
LuseInfo.csvThis CSV file contains information about a LUN Expansion (LUSE) volume or a single open-system volume. A record is created for each LUSE volume or a single open-system volume that is not extended.
For details about LUN Expansion, see the Provisioning Guide for Open Systems.
Table A-34 LuseInfo.csv file (Title: <<LUSE Information>>)
MfDMInfo.csvThis CSV file contains information about migration volumes for mainframe. A record is created for each migration volume.
Table A-35 MfDMInfo.csv file (Title: <<M/F DM Information>>)
MicroVersion.csvThis CSV file contains information about microcode versions.
Item Content
LDKC:CU:LDEV Top LDEV number of the LUSE volume.
If the volume is a non-LUSE volume, the LDEV number is displayed.
LDEV Emulation Emulation type of LDEVs configuring the LUSE volume.
Volume Size(MB) The total capacity of this volume (in MB).
Number of LDEVs Number of LDEVs configuring the LUSE volume (2 to 36).
If the volume is a non-LUSE volume, 1 is indicated.
LDKC:CU:LDEV(0) , (1) , …, (35)
List of LUSE volume components. The top LDEV is displayed by “LDKC:CU:LDEV”, starting with LDEV as the head.
If the volume is a non-LUSE volume, (1) to (35) are blank.
Item Content
Migration Volume Group
Number of the migration volume.
The number starts with "M" (for example, M1-1).
Current MP Blade
Number and name of the MP Blade that is controlling the migration volume.
Setting MP Blade
Number and name of the MP Blade specified to control the migration volume.
Resource Group Name (ECC Group)
Resource group name of migration volume
Resource Group ID (ECC Group)
Resource group ID of migration volume
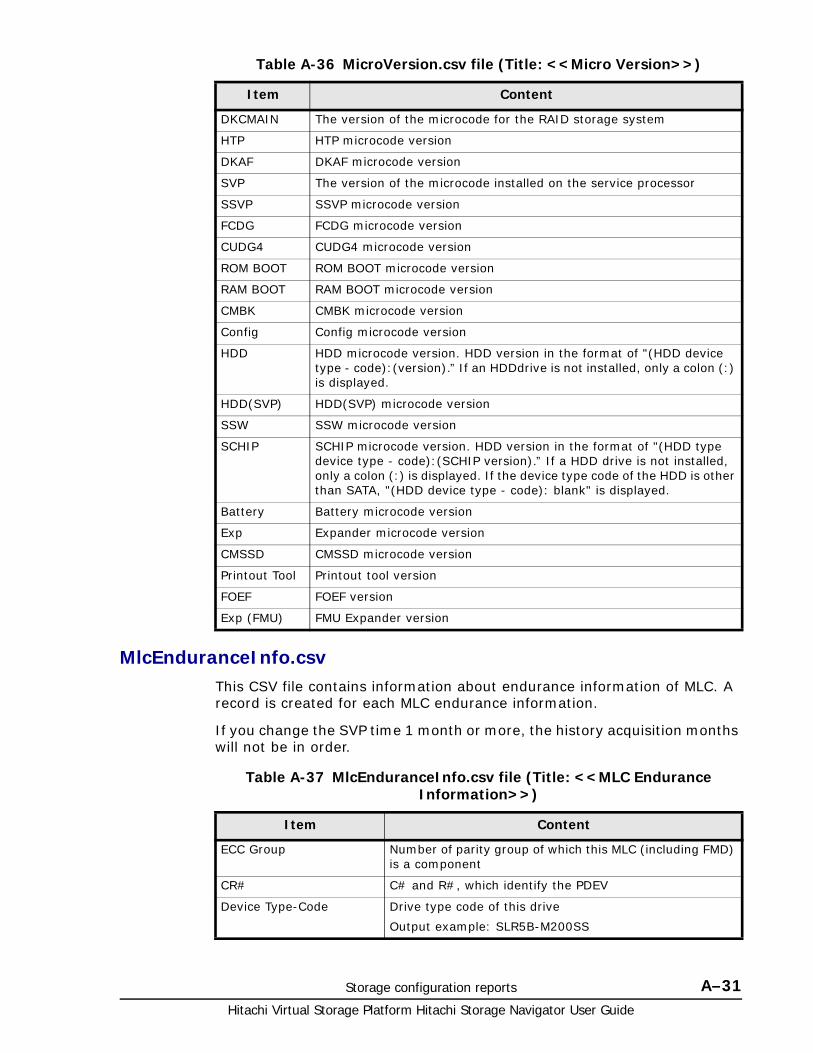
Storage configuration reports A–31Hitachi Virtual Storage Platform Hitachi Storage Navigator User Guide
Table A-36 MicroVersion.csv file (Title: <<Micro Version>>)
MlcEnduranceInfo.csvThis CSV file contains information about endurance information of MLC. A record is created for each MLC endurance information.
If you change the SVP time 1 month or more, the history acquisition months will not be in order.
Table A-37 MlcEnduranceInfo.csv file (Title: <<MLC Endurance Information>>)
Item Content
DKCMAIN The version of the microcode for the RAID storage system
HTP HTP microcode version
DKAF DKAF microcode version
SVP The version of the microcode installed on the service processor
SSVP SSVP microcode version
FCDG FCDG microcode version
CUDG4 CUDG4 microcode version
ROM BOOT ROM BOOT microcode version
RAM BOOT RAM BOOT microcode version
CMBK CMBK microcode version
Config Config microcode version
HDD HDD microcode version. HDD version in the format of "(HDD device type - code):(version).” If an HDDdrive is not installed, only a colon (:) is displayed.
HDD(SVP) HDD(SVP) microcode version
SSW SSW microcode version
SCHIP SCHIP microcode version. HDD version in the format of "(HDD type device type - code):(SCHIP version).” If a HDD drive is not installed, only a colon (:) is displayed. If the device type code of the HDD is other than SATA, "(HDD device type - code): blank" is displayed.
Battery Battery microcode version
Exp Expander microcode version
CMSSD CMSSD microcode version
Printout Tool Printout tool version
FOEF FOEF version
Exp (FMU) FMU Expander version
Item Content
ECC Group Number of parity group of which this MLC (including FMD) is a component
CR# C# and R#, which identify the PDEV
Device Type-Code Drive type code of this drive
Output example: SLR5B-M200SS
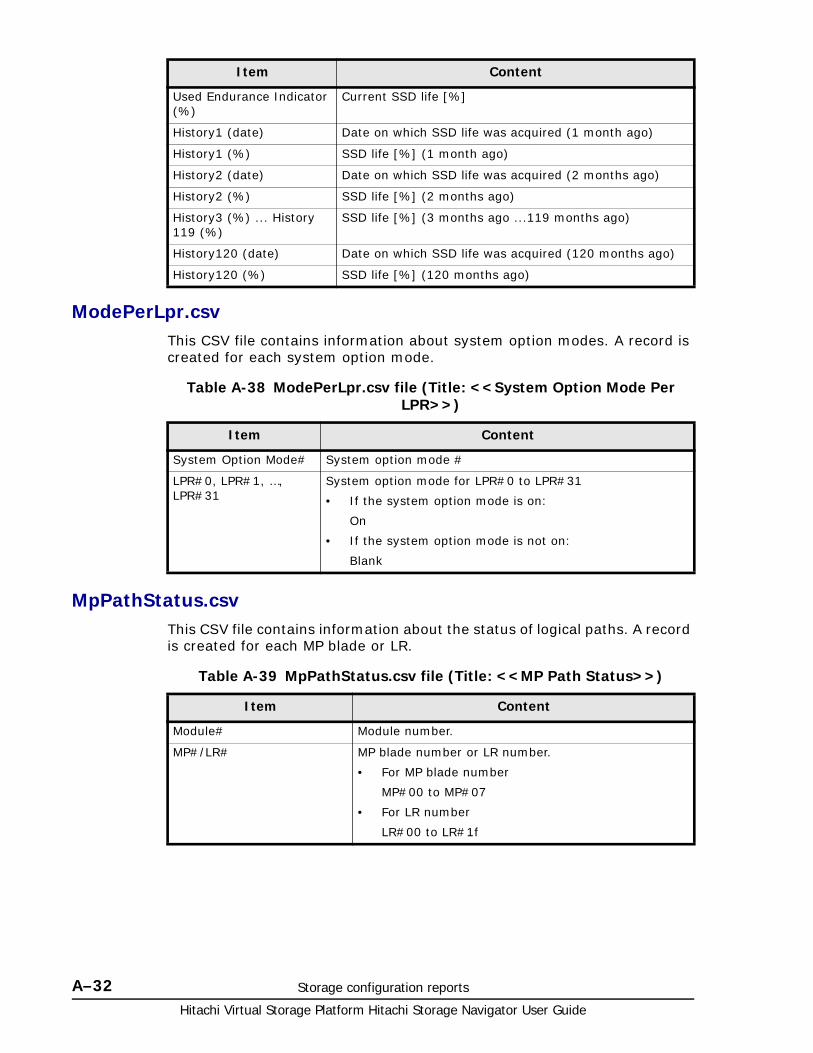
Hitachi Virtual Storage Platform Hitachi Storage Navigator User Guide
A–32 Storage configuration reports
ModePerLpr.csvThis CSV file contains information about system option modes. A record is created for each system option mode.
Table A-38 ModePerLpr.csv file (Title: <<System Option Mode Per LPR>>)
MpPathStatus.csvThis CSV file contains information about the status of logical paths. A record is created for each MP blade or LR.
Table A-39 MpPathStatus.csv file (Title: <<MP Path Status>>)
Used Endurance Indicator (%)
Current SSD life [%]
History1 (date) Date on which SSD life was acquired (1 month ago)
History1 (%) SSD life [%] (1 month ago)
History2 (date) Date on which SSD life was acquired (2 months ago)
History2 (%) SSD life [%] (2 months ago)
History3 (%) ... History 119 (%)
SSD life [%] (3 months ago ...119 months ago)
History120 (date) Date on which SSD life was acquired (120 months ago)
History120 (%) SSD life [%] (120 months ago)
Item Content
Item Content
System Option Mode# System option mode #
LPR#0, LPR#1, …, LPR#31
System option mode for LPR#0 to LPR#31
• If the system option mode is on:
On
• If the system option mode is not on:
Blank
Item Content
Module# Module number.
MP#/LR# MP blade number or LR number.
• For MP blade number
MP#00 to MP#07
• For LR number
LR#00 to LR#1f

Storage configuration reports A–33Hitachi Virtual Storage Platform Hitachi Storage Navigator User Guide
MpPcbStatus.csvThis CSV file contains information about the status of MP Blades. A record is created for each MP blade.
Table A-40 MpPcbStatus.csv file (Title: <<MP PCB Status>>)
CMPK#00-00, …, CMPK#00-0f,
CMPK#01-00, …, CMPK#01-0f,
CMPK#02-00, …, CMPK#02-0f,
CMPK#03-00, …, CMPK#03-0f
Cache package path status for MP blade number in the format of “CMPK#XX-YY”. See *.
XX: ESW number in one module.
YY: Cache package number.
MPPCB#00-00, …, MPPCB#00-07,
MPPCB#01-00, …, MPPCB#01-07,
MPPCB#02-00, …, MPPCB#02-07,
MPPCB#03-00, …, MPPCB#03-07
MP blade path status for MP blade number in the format of “MPPCB#XX-YY”. See *.
XX: ESW number in one module.
YY: Cache package number.
LR#00-00, …, LR#00-1f,
LR#01-00, …, LR#01-1f
LR path status for MP blade number in the format of “LR#XX-YY”. See *.
XX: P path number.
YY: LR number.
CMPK#00-00, CMPK#00-0f,
CMPK#01-00, CMPK#01-0f
Cache package path status for LR number in the format of “CMPK#XX-YY”. See *.
XX: P path number.
YY: Cache package number.
* 1: Normal, 0: Abnormal
Item Content
Item Content
Module# Module number.
MP PCB Location MP blade name.
MP PCB ID MP blade ID.
Auto Assignment Information about whether this MP blade is set to be automatically assigned to each resource or not.
• Enabled
Set to be automatically assigned.
• Disabled
Not set to be automatically assigned.
PCB Status MP blade status. See *.
MP#00, #01, #02, #03
MP status on this MP blade. See *.
* 1: Normal, 0: Abnormal
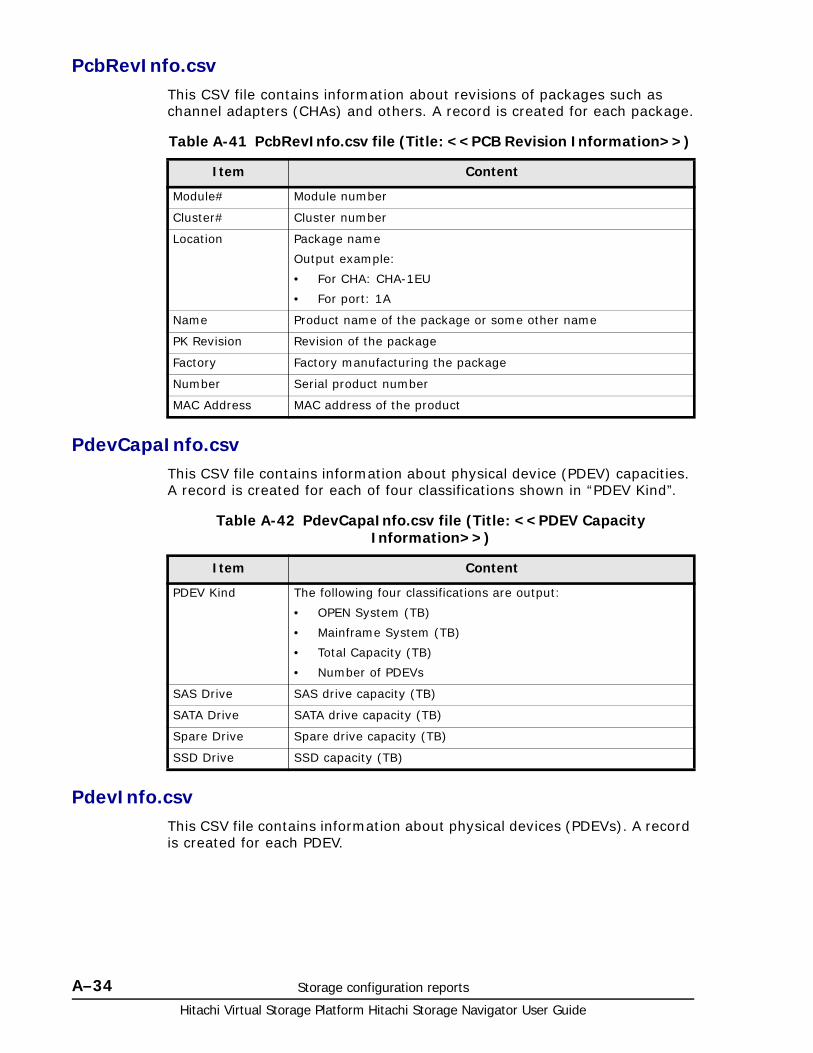
Hitachi Virtual Storage Platform Hitachi Storage Navigator User Guide
A–34 Storage configuration reports
PcbRevInfo.csvThis CSV file contains information about revisions of packages such as channel adapters (CHAs) and others. A record is created for each package.
Table A-41 PcbRevInfo.csv file (Title: <<PCB Revision Information>>)
PdevCapaInfo.csvThis CSV file contains information about physical device (PDEV) capacities. A record is created for each of four classifications shown in “PDEV Kind”.
Table A-42 PdevCapaInfo.csv file (Title: <<PDEV Capacity Information>>)
PdevInfo.csvThis CSV file contains information about physical devices (PDEVs). A record is created for each PDEV.
Item Content
Module# Module number
Cluster# Cluster number
Location Package name
Output example:
• For CHA: CHA-1EU
• For port: 1A
Name Product name of the package or some other name
PK Revision Revision of the package
Factory Factory manufacturing the package
Number Serial product number
MAC Address MAC address of the product
Item Content
PDEV Kind The following four classifications are output:
• OPEN System (TB)
• Mainframe System (TB)
• Total Capacity (TB)
• Number of PDEVs
SAS Drive SAS drive capacity (TB)
SATA Drive SATA drive capacity (TB)
Spare Drive Spare drive capacity (TB)
SSD Drive SSD capacity (TB)
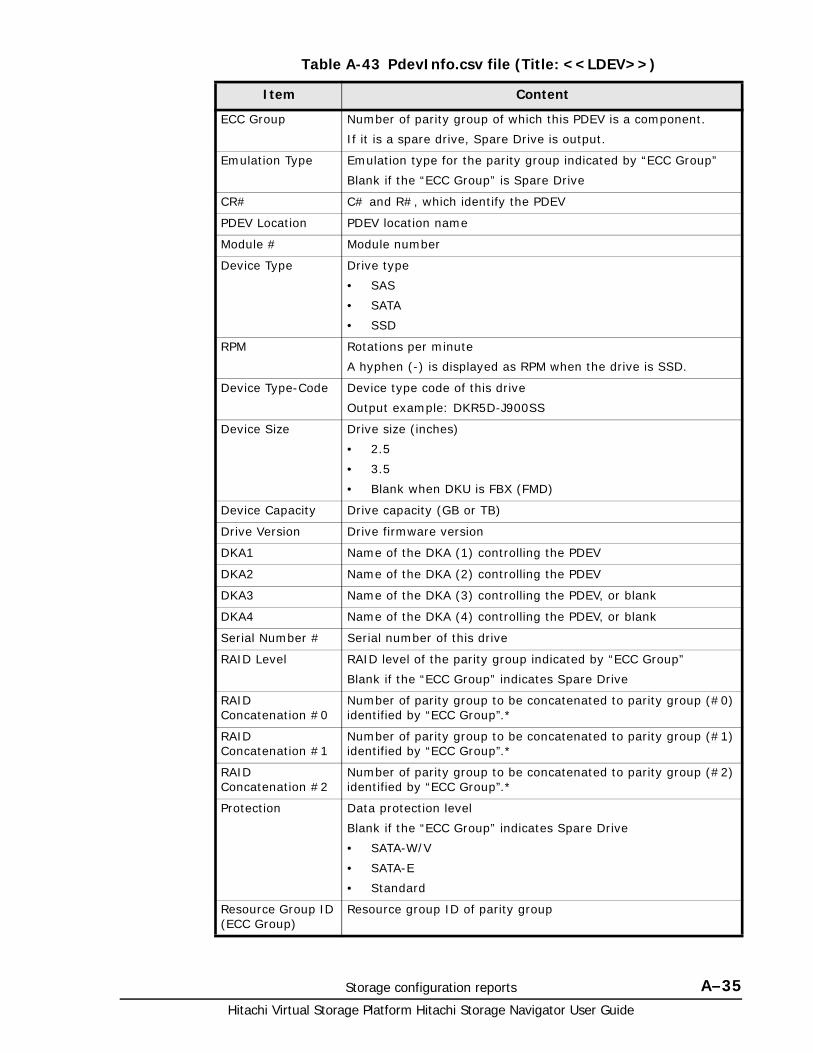
Storage configuration reports A–35Hitachi Virtual Storage Platform Hitachi Storage Navigator User Guide
Table A-43 PdevInfo.csv file (Title: <<LDEV>>)
Item Content
ECC Group Number of parity group of which this PDEV is a component.
If it is a spare drive, Spare Drive is output.
Emulation Type Emulation type for the parity group indicated by “ECC Group”
Blank if the “ECC Group” is Spare Drive
CR# C# and R#, which identify the PDEV
PDEV Location PDEV location name
Module # Module number
Device Type Drive type
• SAS
• SATA
• SSD
RPM Rotations per minute
A hyphen (-) is displayed as RPM when the drive is SSD.
Device Type-Code Device type code of this drive
Output example: DKR5D-J900SS
Device Size Drive size (inches)
• 2.5
• 3.5
• Blank when DKU is FBX (FMD)
Device Capacity Drive capacity (GB or TB)
Drive Version Drive firmware version
DKA1 Name of the DKA (1) controlling the PDEV
DKA2 Name of the DKA (2) controlling the PDEV
DKA3 Name of the DKA (3) controlling the PDEV, or blank
DKA4 Name of the DKA (4) controlling the PDEV, or blank
Serial Number # Serial number of this drive
RAID Level RAID level of the parity group indicated by “ECC Group”
Blank if the “ECC Group” indicates Spare Drive
RAID Concatenation #0
Number of parity group to be concatenated to parity group (#0) identified by “ECC Group”.*
RAID Concatenation #1
Number of parity group to be concatenated to parity group (#1) identified by “ECC Group”.*
RAID Concatenation #2
Number of parity group to be concatenated to parity group (#2) identified by “ECC Group”.*
Protection Data protection level
Blank if the “ECC Group” indicates Spare Drive
• SATA-W/V
• SATA-E
• Standard
Resource Group ID (ECC Group)
Resource group ID of parity group
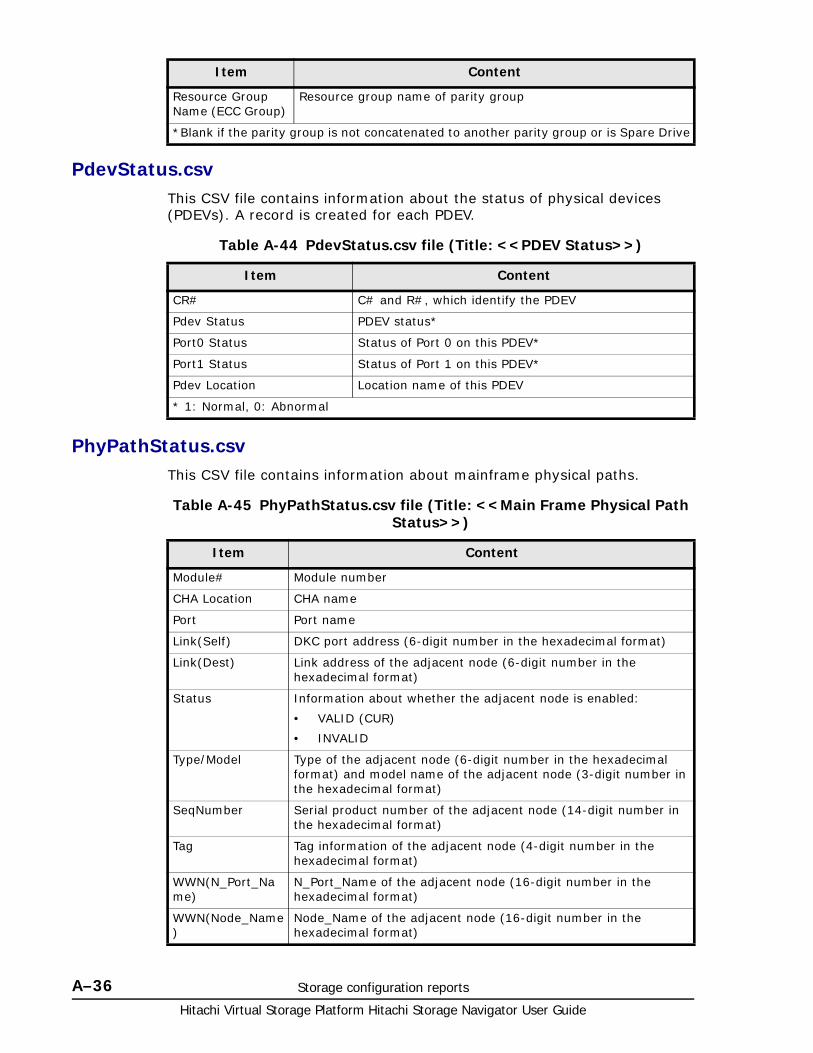
Hitachi Virtual Storage Platform Hitachi Storage Navigator User Guide
A–36 Storage configuration reports
PdevStatus.csvThis CSV file contains information about the status of physical devices (PDEVs). A record is created for each PDEV.
Table A-44 PdevStatus.csv file (Title: <<PDEV Status>>)
PhyPathStatus.csvThis CSV file contains information about mainframe physical paths.
Table A-45 PhyPathStatus.csv file (Title: <<Main Frame Physical Path Status>>)
Resource Group Name (ECC Group)
Resource group name of parity group
*Blank if the parity group is not concatenated to another parity group or is Spare Drive
Item Content
Item Content
CR# C# and R#, which identify the PDEV
Pdev Status PDEV status*
Port0 Status Status of Port 0 on this PDEV*
Port1 Status Status of Port 1 on this PDEV*
Pdev Location Location name of this PDEV
* 1: Normal, 0: Abnormal
Item Content
Module# Module number
CHA Location CHA name
Port Port name
Link(Self) DKC port address (6-digit number in the hexadecimal format)
Link(Dest) Link address of the adjacent node (6-digit number in the hexadecimal format)
Status Information about whether the adjacent node is enabled:
• VALID (CUR)
• INVALID
Type/Model Type of the adjacent node (6-digit number in the hexadecimal format) and model name of the adjacent node (3-digit number in the hexadecimal format)
SeqNumber Serial product number of the adjacent node (14-digit number in the hexadecimal format)
Tag Tag information of the adjacent node (4-digit number in the hexadecimal format)
WWN(N_Port_Name)
N_Port_Name of the adjacent node (16-digit number in the hexadecimal format)
WWN(Node_Name)
Node_Name of the adjacent node (16-digit number in the hexadecimal format)
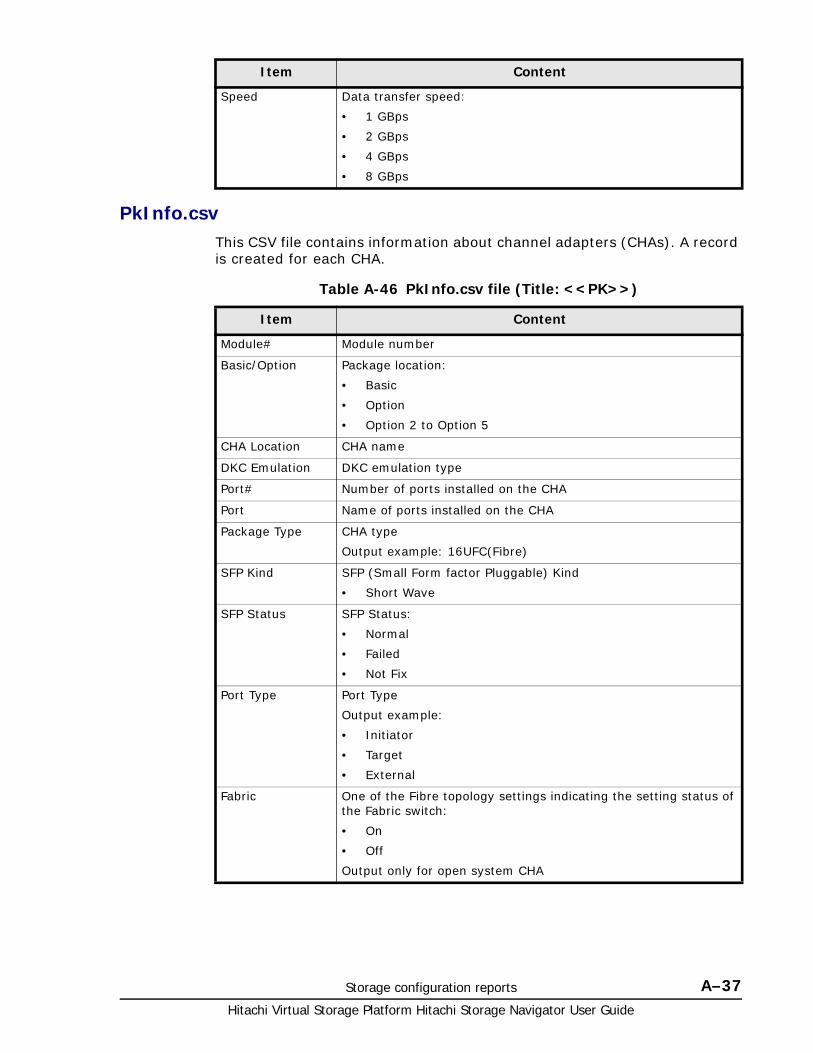
Storage configuration reports A–37Hitachi Virtual Storage Platform Hitachi Storage Navigator User Guide
PkInfo.csvThis CSV file contains information about channel adapters (CHAs). A record is created for each CHA.
Table A-46 PkInfo.csv file (Title: <<PK>>)
Speed Data transfer speed:
• 1 GBps
• 2 GBps
• 4 GBps
• 8 GBps
Item Content
Item Content
Module# Module number
Basic/Option Package location:
• Basic
• Option
• Option 2 to Option 5
CHA Location CHA name
DKC Emulation DKC emulation type
Port# Number of ports installed on the CHA
Port Name of ports installed on the CHA
Package Type CHA type
Output example: 16UFC(Fibre)
SFP Kind SFP (Small Form factor Pluggable) Kind
• Short Wave
SFP Status SFP Status:
• Normal
• Failed
• Not Fix
Port Type Port Type
Output example:
• Initiator
• Target
• External
Fabric One of the Fibre topology settings indicating the setting status of the Fabric switch:
• On
• Off
Output only for open system CHA
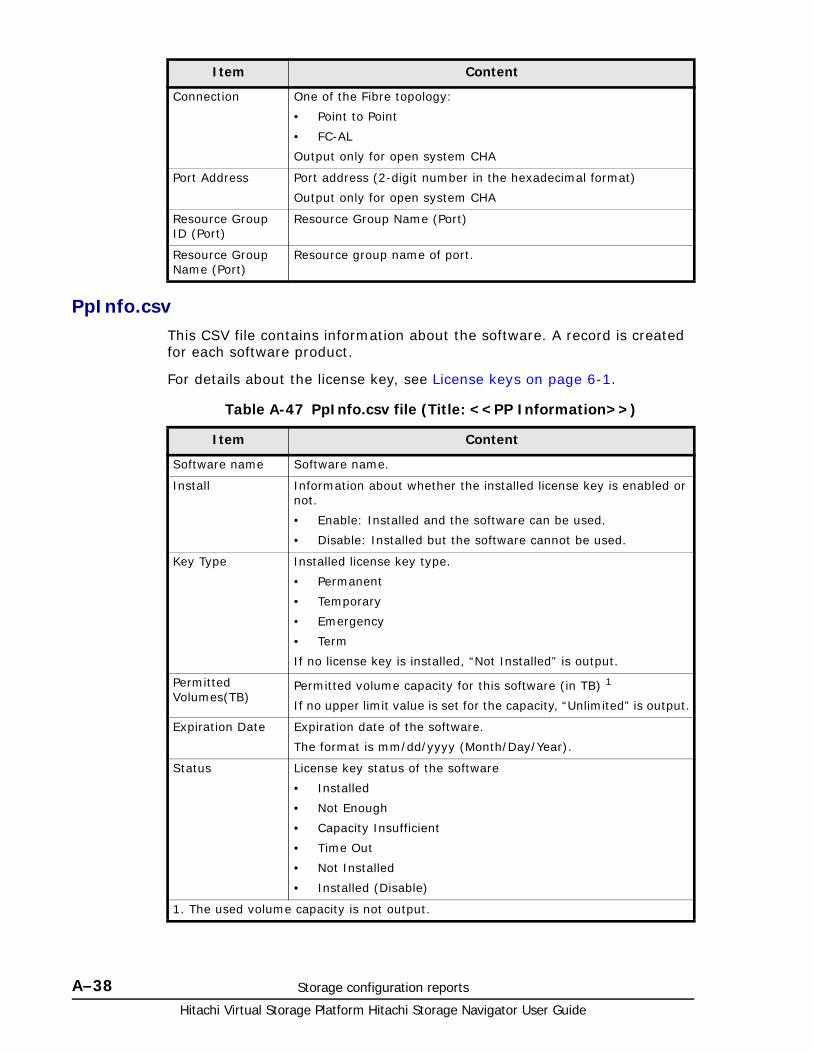
Hitachi Virtual Storage Platform Hitachi Storage Navigator User Guide
A–38 Storage configuration reports
PpInfo.csvThis CSV file contains information about the software. A record is created for each software product.
For details about the license key, see License keys on page 6-1.
Table A-47 PpInfo.csv file (Title: <<PP Information>>)
Connection One of the Fibre topology:
• Point to Point
• FC-AL
Output only for open system CHA
Port Address Port address (2-digit number in the hexadecimal format)
Output only for open system CHA
Resource Group ID (Port)
Resource Group Name (Port)
Resource Group Name (Port)
Resource group name of port.
Item Content
Item Content
Software name Software name.
Install Information about whether the installed license key is enabled or not.
• Enable: Installed and the software can be used.
• Disable: Installed but the software cannot be used.
Key Type Installed license key type.
• Permanent
• Temporary
• Emergency
• Term
If no license key is installed, “Not Installed” is output.
Permitted Volumes(TB)
Permitted volume capacity for this software (in TB) 1
If no upper limit value is set for the capacity, “Unlimited” is output.
Expiration Date Expiration date of the software.
The format is mm/dd/yyyy (Month/Day/Year).
Status License key status of the software
• Installed
• Not Enough
• Capacity Insufficient
• Time Out
• Not Installed
• Installed (Disable)
1. The used volume capacity is not output.
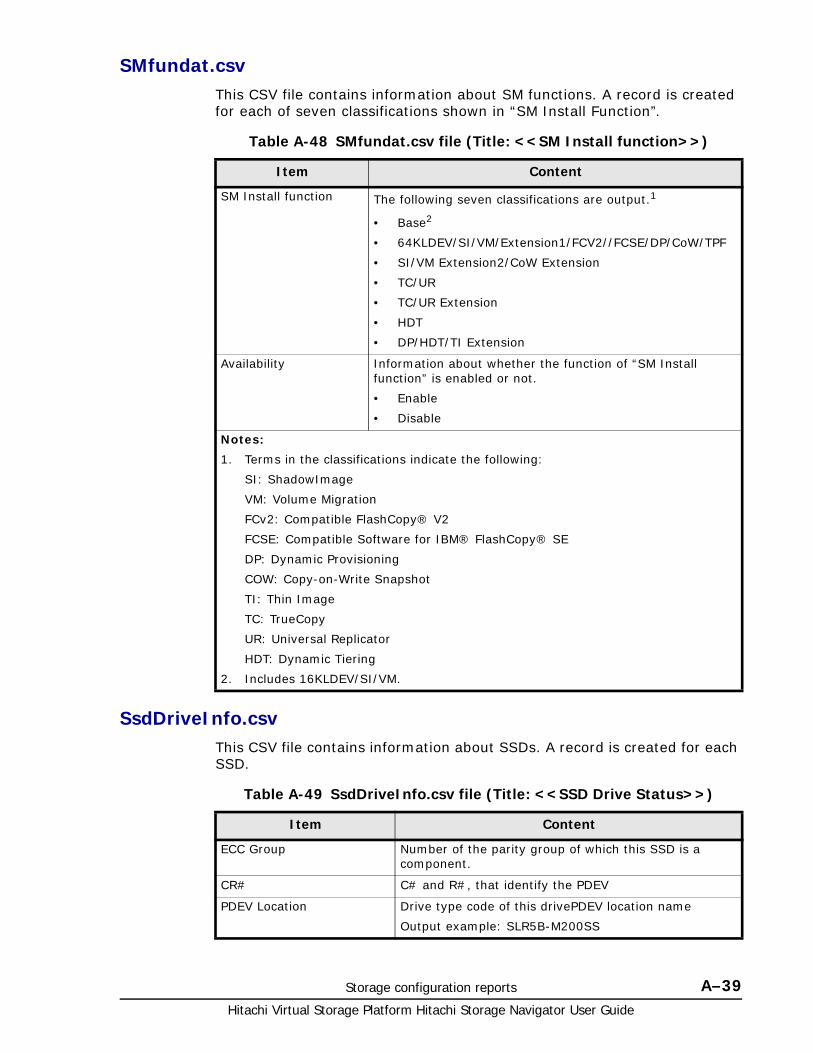
Storage configuration reports A–39Hitachi Virtual Storage Platform Hitachi Storage Navigator User Guide
SMfundat.csvThis CSV file contains information about SM functions. A record is created for each of seven classifications shown in “SM Install Function”.
Table A-48 SMfundat.csv file (Title: <<SM Install function>>)
SsdDriveInfo.csvThis CSV file contains information about SSDs. A record is created for each SSD.
Table A-49 SsdDriveInfo.csv file (Title: <<SSD Drive Status>>)
Item Content
SM Install function The following seven classifications are output.1
• Base2
• 64KLDEV/SI/VM/Extension1/FCV2//FCSE/DP/CoW/TPF
• SI/VM Extension2/CoW Extension
• TC/UR
• TC/UR Extension
• HDT
• DP/HDT/TI Extension
Availability Information about whether the function of “SM Install function” is enabled or not.
• Enable
• Disable
Notes:
1. Terms in the classifications indicate the following:
SI: ShadowImage
VM: Volume Migration
FCv2: Compatible FlashCopy® V2
FCSE: Compatible Software for IBM® FlashCopy® SE
DP: Dynamic Provisioning
COW: Copy-on-Write Snapshot
TI: Thin Image
TC: TrueCopy
UR: Universal Replicator
HDT: Dynamic Tiering
2. Includes 16KLDEV/SI/VM.
Item Content
ECC Group Number of the parity group of which this SSD is a component.
CR# C# and R#, that identify the PDEV
PDEV Location Drive type code of this drivePDEV location name
Output example: SLR5B-M200SS
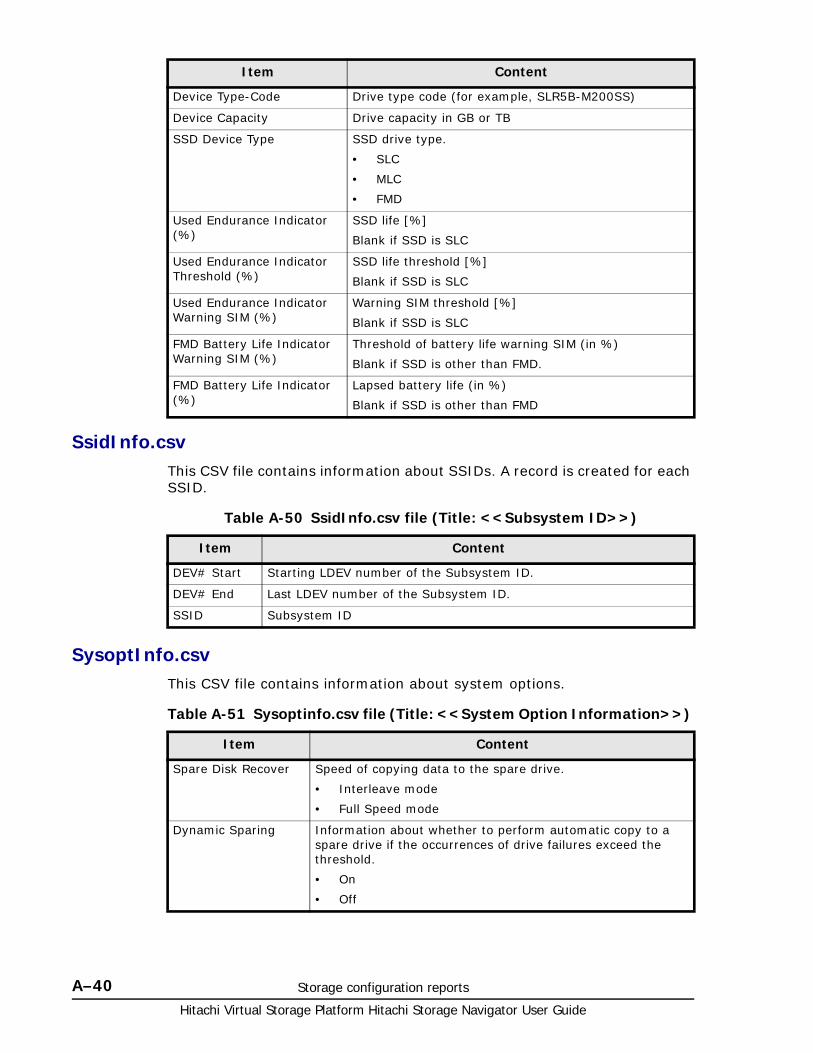
Hitachi Virtual Storage Platform Hitachi Storage Navigator User Guide
A–40 Storage configuration reports
SsidInfo.csvThis CSV file contains information about SSIDs. A record is created for each SSID.
Table A-50 SsidInfo.csv file (Title: <<Subsystem ID>>)
SysoptInfo.csvThis CSV file contains information about system options.
Table A-51 Sysoptinfo.csv file (Title: <<System Option Information>>)
Device Type-Code Drive type code (for example, SLR5B-M200SS)
Device Capacity Drive capacity in GB or TB
SSD Device Type SSD drive type.
• SLC
• MLC
• FMD
Used Endurance Indicator (%)
SSD life [%]
Blank if SSD is SLC
Used Endurance Indicator Threshold (%)
SSD life threshold [%]
Blank if SSD is SLC
Used Endurance Indicator Warning SIM (%)
Warning SIM threshold [%]
Blank if SSD is SLC
FMD Battery Life Indicator Warning SIM (%)
Threshold of battery life warning SIM (in %)
Blank if SSD is other than FMD.
FMD Battery Life Indicator (%)
Lapsed battery life (in %)
Blank if SSD is other than FMD
Item Content
Item Content
DEV# Start Starting LDEV number of the Subsystem ID.
DEV# End Last LDEV number of the Subsystem ID.
SSID Subsystem ID
Item Content
Spare Disk Recover Speed of copying data to the spare drive.
• Interleave mode
• Full Speed mode
Dynamic Sparing Information about whether to perform automatic copy to a spare drive if the occurrences of drive failures exceed the threshold.
• On
• Off
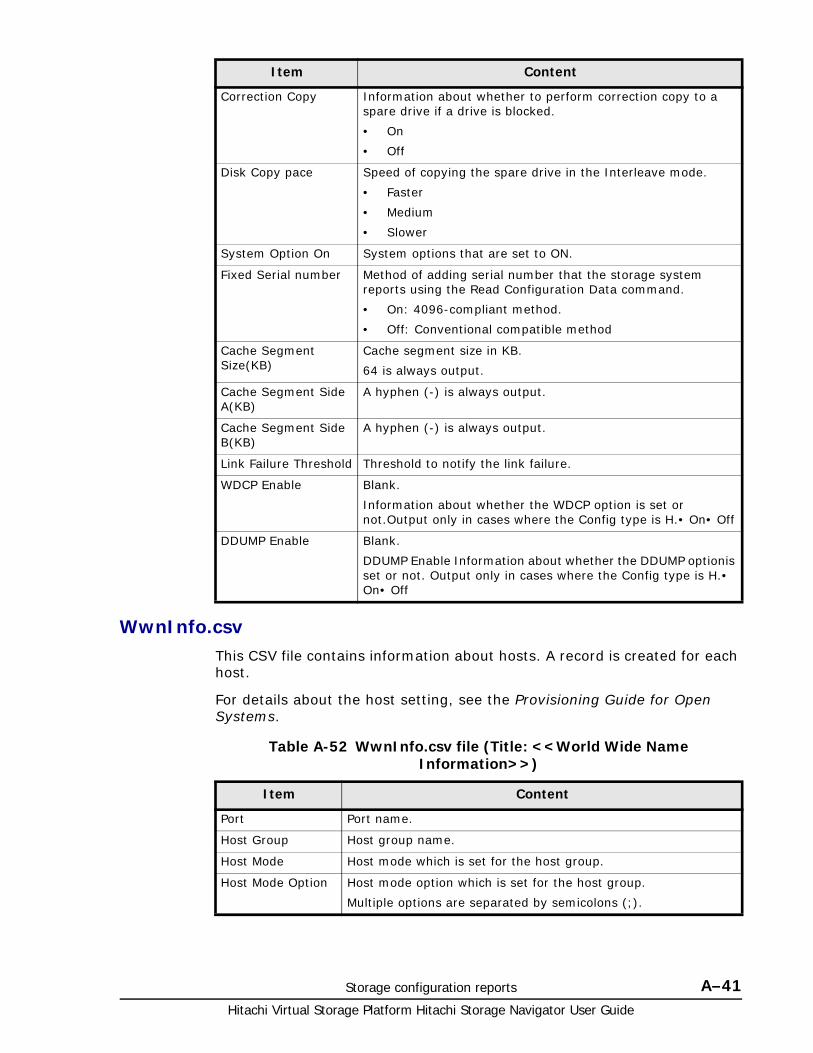
Storage configuration reports A–41Hitachi Virtual Storage Platform Hitachi Storage Navigator User Guide
WwnInfo.csvThis CSV file contains information about hosts. A record is created for each host.
For details about the host setting, see the Provisioning Guide for Open Systems.
Table A-52 WwnInfo.csv file (Title: <<World Wide Name Information>>)
Correction Copy Information about whether to perform correction copy to a spare drive if a drive is blocked.
• On
• Off
Disk Copy pace Speed of copying the spare drive in the Interleave mode.
• Faster
• Medium
• Slower
System Option On System options that are set to ON.
Fixed Serial number Method of adding serial number that the storage system reports using the Read Configuration Data command.
• On: 4096-compliant method.
• Off: Conventional compatible method
Cache Segment Size(KB)
Cache segment size in KB.
64 is always output.
Cache Segment Side A(KB)
A hyphen (-) is always output.
Cache Segment Side B(KB)
A hyphen (-) is always output.
Link Failure Threshold Threshold to notify the link failure.
WDCP Enable Blank.
Information about whether the WDCP option is set or not.Output only in cases where the Config type is H.• On• Off
DDUMP Enable Blank.
DDUMP Enable Information about whether the DDUMP optionis set or not. Output only in cases where the Config type is H.• On• Off
Item Content
Item Content
Port Port name.
Host Group Host group name.
Host Mode Host mode which is set for the host group.
Host Mode Option Host mode option which is set for the host group.
Multiple options are separated by semicolons (;).

Hitachi Virtual Storage Platform Hitachi Storage Navigator User Guide
A–42 Storage configuration reports
WWN World Wide Name of the host bus adapter registered to the host group.
Nickname Nickname of the host.
Host Group# Host group number (hexadecimal)
Item Content
B
Report Configuration Tool command reference (raidinf commands) B–1Hitachi Virtual Storage Platform Hitachi Storage Navigator User Guide
Report Configuration Tool commandreference (raidinf commands)
This section describes the raidinf commands, symbols, and reports.
□ raidinf command list and command description
□ raidinf command syntax
□ raidinf add report
□ raidinf delete report
□ raidinf download report
□ raidinf get reportinfo
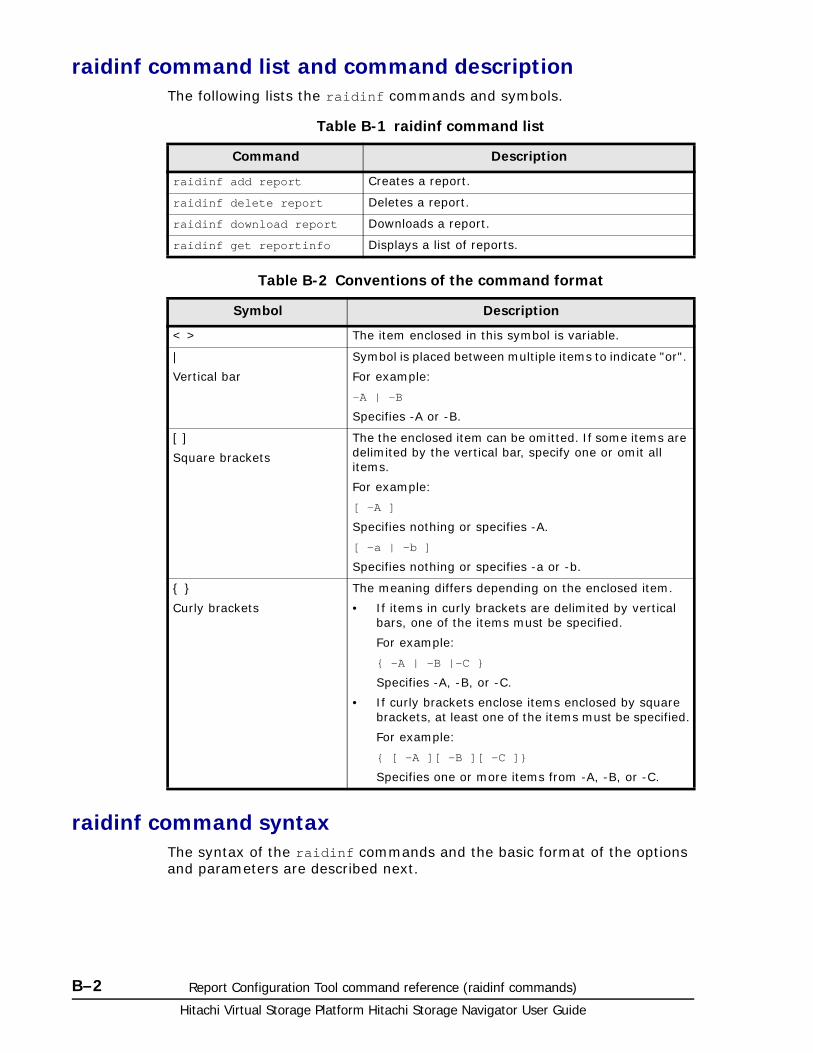
Hitachi Virtual Storage Platform Hitachi Storage Navigator User Guide
B–2 Report Configuration Tool command reference (raidinf commands)
raidinf command list and command description The following lists the raidinf commands and symbols.
Table B-1 raidinf command list
Table B-2 Conventions of the command format
raidinf command syntaxThe syntax of the raidinf commands and the basic format of the options and parameters are described next.
Command Description
raidinf add report Creates a report.
raidinf delete report Deletes a report.
raidinf download report Downloads a report.
raidinf get reportinfo Displays a list of reports.
Symbol Description
< > The item enclosed in this symbol is variable.
|
Vertical bar
Symbol is placed between multiple items to indicate "or".
For example:
-A | -B
Specifies -A or -B.
[ ]
Square brackets
The the enclosed item can be omitted. If some items are delimited by the vertical bar, specify one or omit all items.
For example:
[ -A ]
Specifies nothing or specifies -A.
[ -a | -b ]
Specifies nothing or specifies -a or -b.
{ }
Curly brackets
The meaning differs depending on the enclosed item.
• If items in curly brackets are delimited by vertical bars, one of the items must be specified.
For example:
{ -A | -B |-C }
Specifies -A, -B, or -C.
• If curly brackets enclose items enclosed by square brackets, at least one of the items must be specified.
For example:
{ [ -A ][ -B ][ -C ]}
Specifies one or more items from -A, -B, or -C.
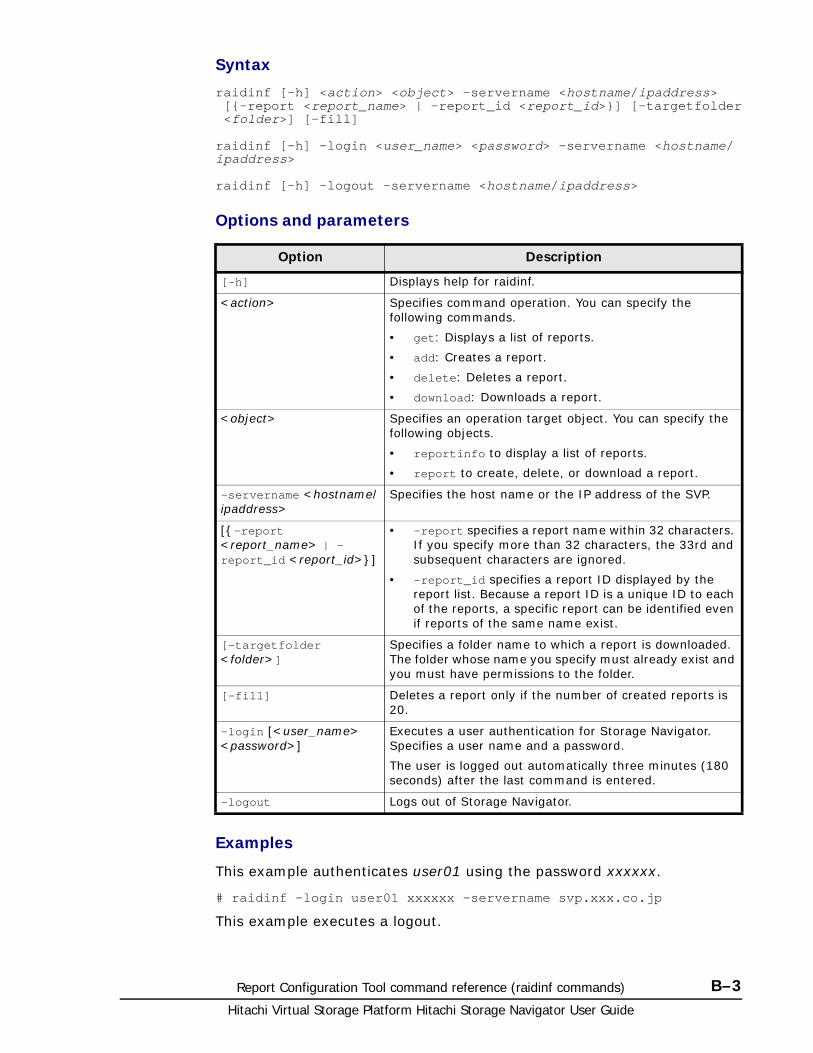
Report Configuration Tool command reference (raidinf commands) B–3Hitachi Virtual Storage Platform Hitachi Storage Navigator User Guide
Syntax
raidinf [-h] <action> <object> –servername <hostname/ipaddress> [{-report <report_name> | -report_id <report_id>}] [-targetfolder <folder>] [-fill]
raidinf [-h] –login <user_name> <password> –servername <hostname/ipaddress>
raidinf [-h] –logout –servername <hostname/ipaddress>
Options and parameters
Examples
This example authenticates user01 using the password xxxxxx.
# raidinf -login user01 xxxxxx -servername svp.xxx.co.jp
This example executes a logout.
Option Description
[-h] Displays help for raidinf.
<action> Specifies command operation. You can specify the following commands.
• get: Displays a list of reports.
• add: Creates a report.
• delete: Deletes a report.
• download: Downloads a report.
<object> Specifies an operation target object. You can specify the following objects.
• reportinfo to display a list of reports.
• report to create, delete, or download a report.
-servername <hostname/ipaddress>
Specifies the host name or the IP address of the SVP.
[{-report <report_name> | -report_id <report_id>}]
• -report specifies a report name within 32 characters. If you specify more than 32 characters, the 33rd and subsequent characters are ignored.
• -report_id specifies a report ID displayed by the report list. Because a report ID is a unique ID to each of the reports, a specific report can be identified even if reports of the same name exist.
[-targetfolder <folder>]
Specifies a folder name to which a report is downloaded. The folder whose name you specify must already exist and you must have permissions to the folder.
[-fill] Deletes a report only if the number of created reports is 20.
-login [<user_name> <password>]
Executes a user authentication for Storage Navigator. Specifies a user name and a password.
The user is logged out automatically three minutes (180 seconds) after the last command is entered.
-logout Logs out of Storage Navigator.
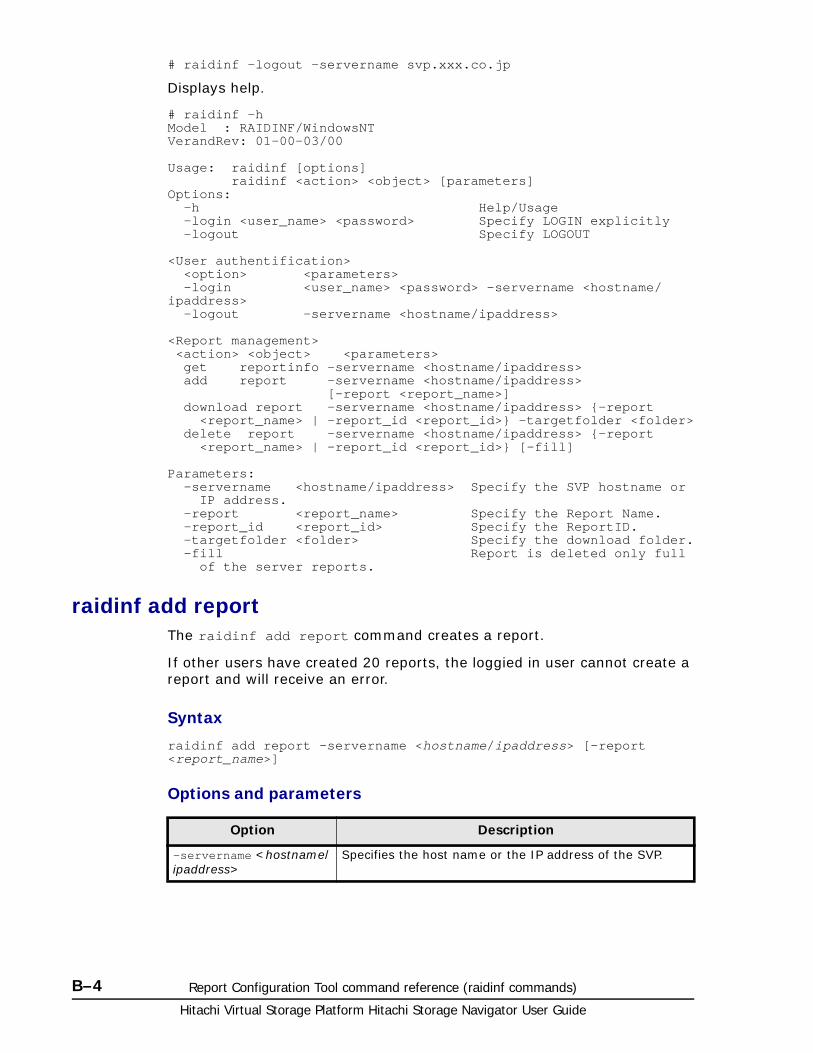
Hitachi Virtual Storage Platform Hitachi Storage Navigator User Guide
B–4 Report Configuration Tool command reference (raidinf commands)
# raidinf -logout -servername svp.xxx.co.jp
Displays help.
# raidinf -hModel : RAIDINF/WindowsNTVerandRev: 01-00-03/00
Usage: raidinf [options] raidinf <action> <object> [parameters]Options: -h Help/Usage -login <user_name> <password> Specify LOGIN explicitly -logout Specify LOGOUT
<User authentification> <option> <parameters> -login <user_name> <password> -servername <hostname/ipaddress> -logout -servername <hostname/ipaddress>
<Report management> <action> <object> <parameters> get reportinfo -servername <hostname/ipaddress> add report -servername <hostname/ipaddress> [-report <report_name>] download report -servername <hostname/ipaddress> {-report <report_name> | -report_id <report_id>} -targetfolder <folder> delete report -servername <hostname/ipaddress> {-report <report_name> | -report_id <report_id>} [-fill]
Parameters: -servername <hostname/ipaddress> Specify the SVP hostname or IP address. -report <report_name> Specify the Report Name. -report_id <report_id> Specify the ReportID. -targetfolder <folder> Specify the download folder. -fill Report is deleted only full of the server reports.
raidinf add reportThe raidinf add report command creates a report.
If other users have created 20 reports, the loggied in user cannot create a report and will receive an error.
Syntax
raidinf add report –servername <hostname/ipaddress> [-report <report_name>]
Options and parameters
Option Description
-servername <hostname/ipaddress>
Specifies the host name or the IP address of the SVP.
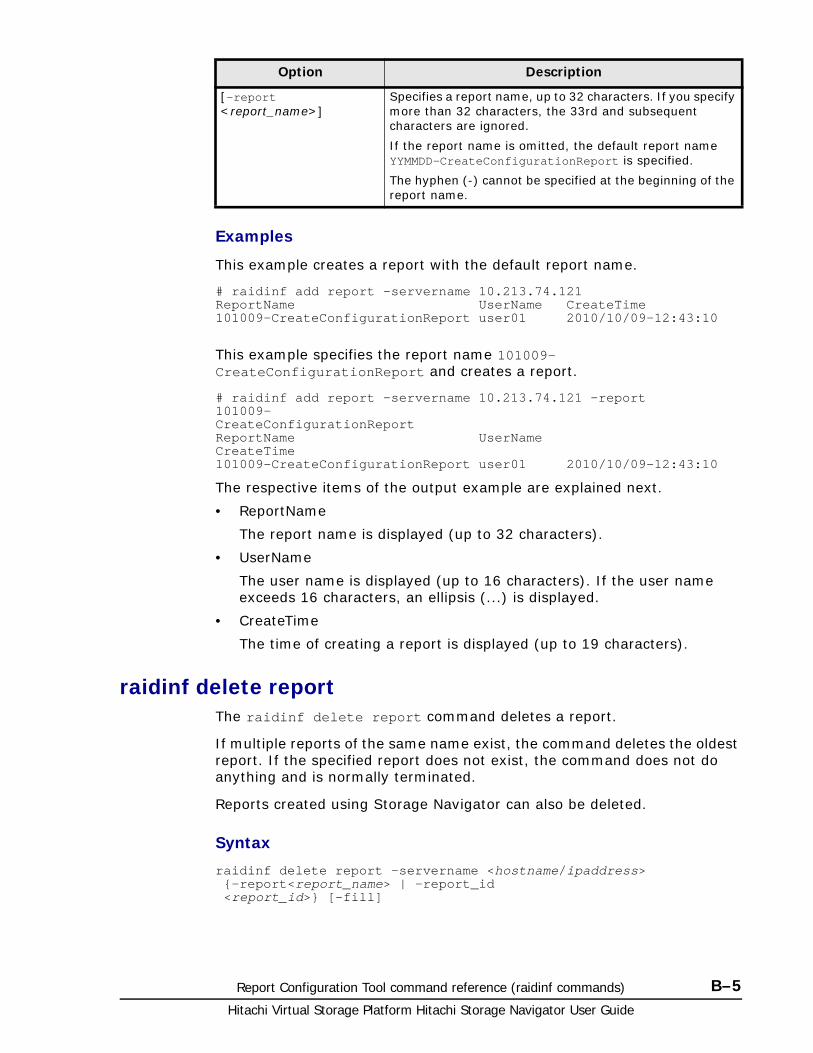
Report Configuration Tool command reference (raidinf commands) B–5Hitachi Virtual Storage Platform Hitachi Storage Navigator User Guide
Examples
This example creates a report with the default report name.
# raidinf add report -servername 10.213.74.121ReportName UserName CreateTime101009-CreateConfigurationReport user01 2010/10/09-12:43:10
This example specifies the report name 101009-CreateConfigurationReport and creates a report.
# raidinf add report -servername 10.213.74.121 -report101009-CreateConfigurationReportReportName UserNameCreateTime101009-CreateConfigurationReport user01 2010/10/09-12:43:10
The respective items of the output example are explained next.
• ReportName
The report name is displayed (up to 32 characters).
• UserName
The user name is displayed (up to 16 characters). If the user name exceeds 16 characters, an ellipsis (...) is displayed.
• CreateTime
The time of creating a report is displayed (up to 19 characters).
raidinf delete reportThe raidinf delete report command deletes a report.
If multiple reports of the same name exist, the command deletes the oldest report. If the specified report does not exist, the command does not do anything and is normally terminated.
Reports created using Storage Navigator can also be deleted.
Syntax
raidinf delete report -servername <hostname/ipaddress> {-report<report_name> | -report_id <report_id>} [-fill]
[-report <report_name>]
Specifies a report name, up to 32 characters. If you specify more than 32 characters, the 33rd and subsequent characters are ignored.
If the report name is omitted, the default report name YYMMDD-CreateConfigurationReport is specified.
The hyphen (-) cannot be specified at the beginning of the report name.
Option Description
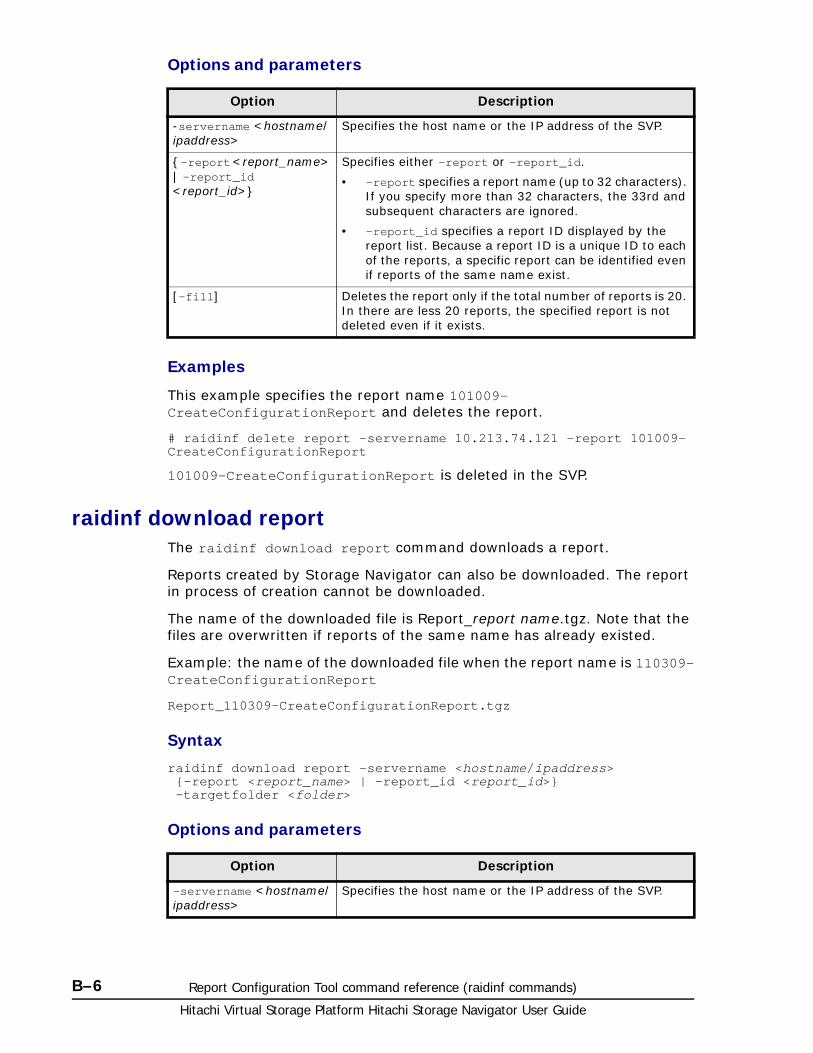
Hitachi Virtual Storage Platform Hitachi Storage Navigator User Guide
B–6 Report Configuration Tool command reference (raidinf commands)
Options and parameters
Examples
This example specifies the report name 101009-CreateConfigurationReport and deletes the report.
# raidinf delete report -servername 10.213.74.121 -report 101009-CreateConfigurationReport
101009-CreateConfigurationReport is deleted in the SVP.
raidinf download reportThe raidinf download report command downloads a report.
Reports created by Storage Navigator can also be downloaded. The report in process of creation cannot be downloaded.
The name of the downloaded file is Report_report name.tgz. Note that the files are overwritten if reports of the same name has already existed.
Example: the name of the downloaded file when the report name is 110309-CreateConfigurationReport
Report_110309-CreateConfigurationReport.tgz
Syntax
raidinf download report -servername <hostname/ipaddress> {-report <report_name> | -report_id <report_id>} -targetfolder <folder>
Options and parameters
Option Description
-servername <hostname/ipaddress>
Specifies the host name or the IP address of the SVP.
{-report <report_name> | -report_id <report_id>}
Specifies either -report or -report_id.
• -report specifies a report name (up to 32 characters). If you specify more than 32 characters, the 33rd and subsequent characters are ignored.
• -report_id specifies a report ID displayed by the report list. Because a report ID is a unique ID to each of the reports, a specific report can be identified even if reports of the same name exist.
[-fill] Deletes the report only if the total number of reports is 20. In there are less 20 reports, the specified report is not deleted even if it exists.
Option Description
-servername <hostname/ipaddress>
Specifies the host name or the IP address of the SVP.

Report Configuration Tool command reference (raidinf commands) B–7Hitachi Virtual Storage Platform Hitachi Storage Navigator User Guide
Examples
Downloads the most recently created report.
# raidinf download report -servername 10.213.74.121 -report LatestReport -targetfolder C:\tmp
Report_101009-CreateConfigurationReport.tgz is downloaded to C:\tmp.
This example specifies the report name 101009-CreateConfigurationReport and downloads the report.
# raidinf download report -servername 10.213.74.121 -report 101009-CreateConfigurationReport -targetfolder C:\tmp
Report_101009-CreateConfigurationReport.tgz is downloaded to C:\tmp.
raidinf get reportinfoThe raidinf get reportinfo command displays a list of reports.
Reports created using Storage Navigator are also displayed. A report currently being created cannot be downloaded
Syntax
raidinf get reportinfo –servername <hostname/ipaddress>
{-report <report_name> | -report_id <report_id>}
Specifies either -report or -report_id.
• -report: specifies a report name within 32 characters. If you specify more than 32 characters, the 33rd and subsequent characters are ignored.
If a special name LatestReport is specified as a report name, the report created on the newest date is downloaded.
To download another report having the same name as the special name "LatestReport", specify the relevant report ID in -report_id. If multiple reports of the same name exist, the report of the newest date is the target of download.
• -report_id: specifies a report ID displayed by the report list. As a report ID is a unique ID to each of the reports, a specific report can be identified even if reports of the same name exist.
-targetfolder <folder> Specifies a folder name to which a report is downloaded. The folder whose name you specify must already exist and you have permissions to the folder.
Option Description
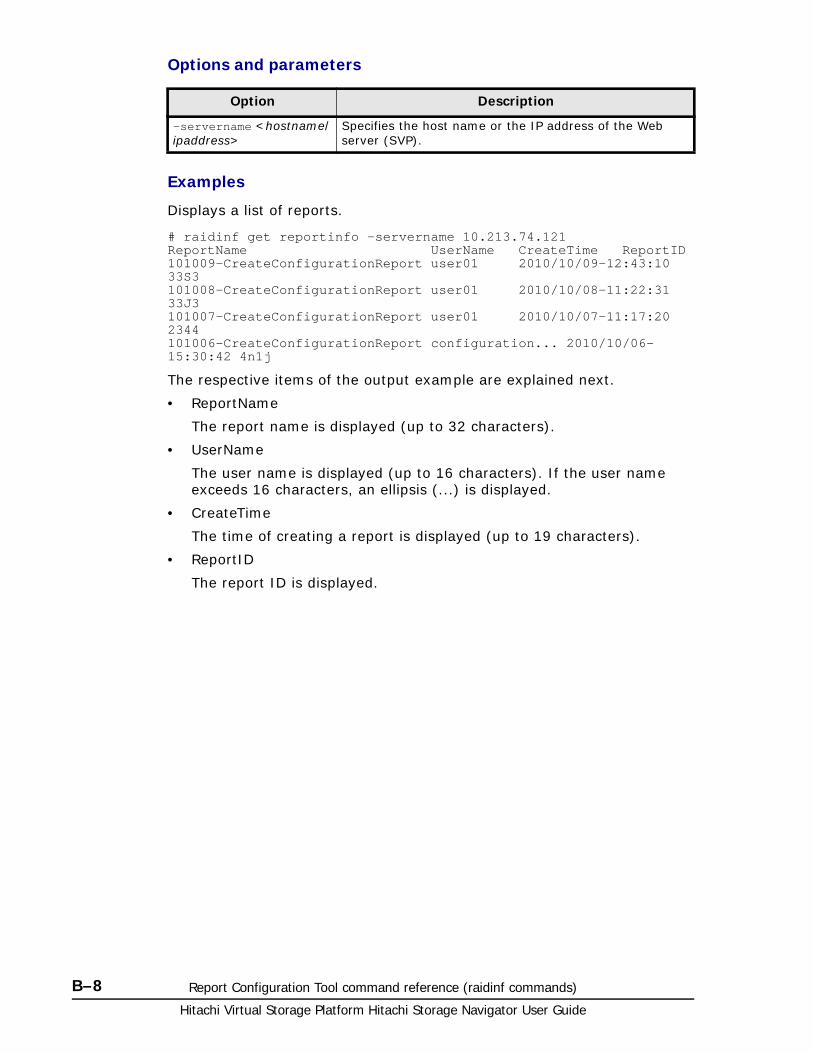
Hitachi Virtual Storage Platform Hitachi Storage Navigator User Guide
B–8 Report Configuration Tool command reference (raidinf commands)
Options and parameters
Examples
Displays a list of reports.
# raidinf get reportinfo -servername 10.213.74.121ReportName UserName CreateTime ReportID101009-CreateConfigurationReport user01 2010/10/09-12:43:10 33S3101008-CreateConfigurationReport user01 2010/10/08-11:22:31 33J3101007-CreateConfigurationReport user01 2010/10/07-11:17:20 2344101006-CreateConfigurationReport configuration... 2010/10/06-15:30:42 4n1j
The respective items of the output example are explained next.
• ReportName
The report name is displayed (up to 32 characters).
• UserName
The user name is displayed (up to 16 characters). If the user name exceeds 16 characters, an ellipsis (...) is displayed.
• CreateTime
The time of creating a report is displayed (up to 19 characters).
• ReportID
The report ID is displayed.
Option Description
-servername <hostname/ipaddress>
Specifies the host name or the IP address of the Web server (SVP).
C
SMI-S provider configuration file C–1Hitachi Virtual Storage Platform Hitachi Storage Navigator User Guide
SMI-S provider configuration file
This section describes the SMI-S provider configuration files.
□ User-defined.properties file
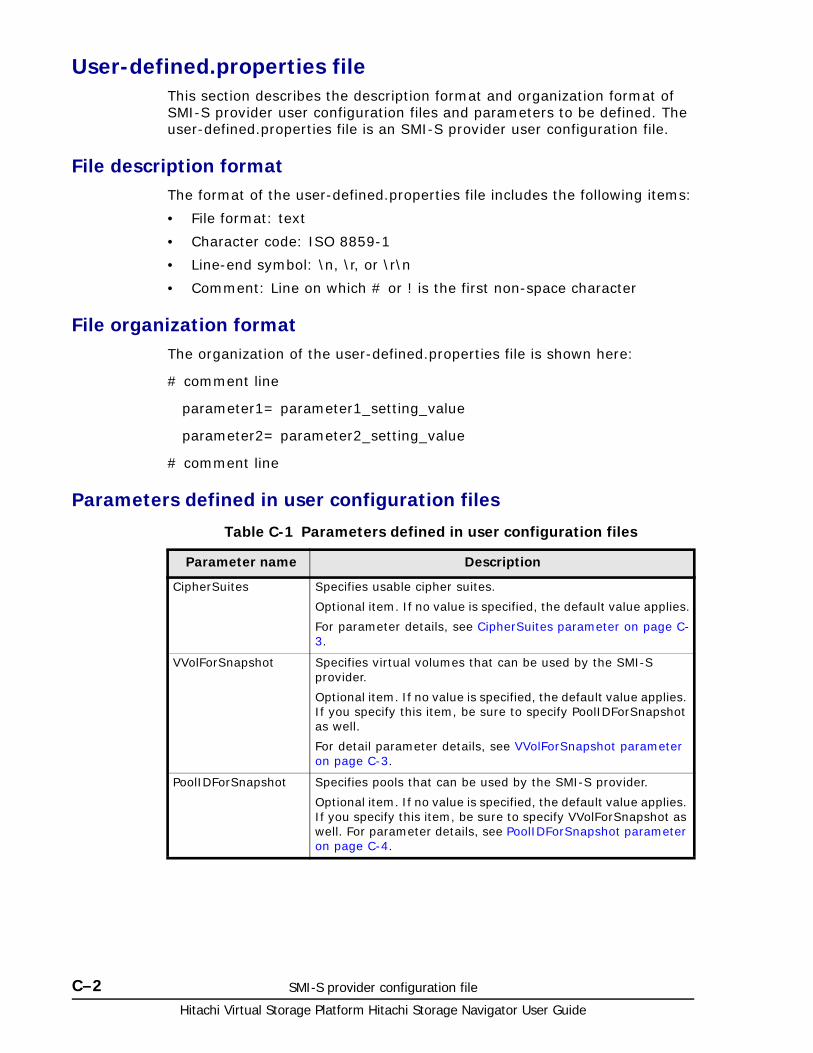
Hitachi Virtual Storage Platform Hitachi Storage Navigator User Guide
C–2 SMI-S provider configuration file
User-defined.properties fileThis section describes the description format and organization format of SMI-S provider user configuration files and parameters to be defined. The user-defined.properties file is an SMI-S provider user configuration file.
File description formatThe format of the user-defined.properties file includes the following items:
• File format: text
• Character code: ISO 8859-1
• Line-end symbol: \n, \r, or \r\n
• Comment: Line on which # or ! is the first non-space character
File organization formatThe organization of the user-defined.properties file is shown here:
# comment line
parameter1= parameter1_setting_value
parameter2= parameter2_setting_value
# comment line
Parameters defined in user configuration files
Table C-1 Parameters defined in user configuration files
Parameter name Description
CipherSuites Specifies usable cipher suites.
Optional item. If no value is specified, the default value applies.
For parameter details, see CipherSuites parameter on page C-3.
VVolForSnapshot Specifies virtual volumes that can be used by the SMI-S provider.
Optional item. If no value is specified, the default value applies. If you specify this item, be sure to specify PoolIDForSnapshot as well.
For detail parameter details, see VVolForSnapshot parameter on page C-3.
PoolIDForSnapshot Specifies pools that can be used by the SMI-S provider.
Optional item. If no value is specified, the default value applies. If you specify this item, be sure to specify VVolForSnapshot as well. For parameter details, see PoolIDForSnapshot parameter on page C-4.
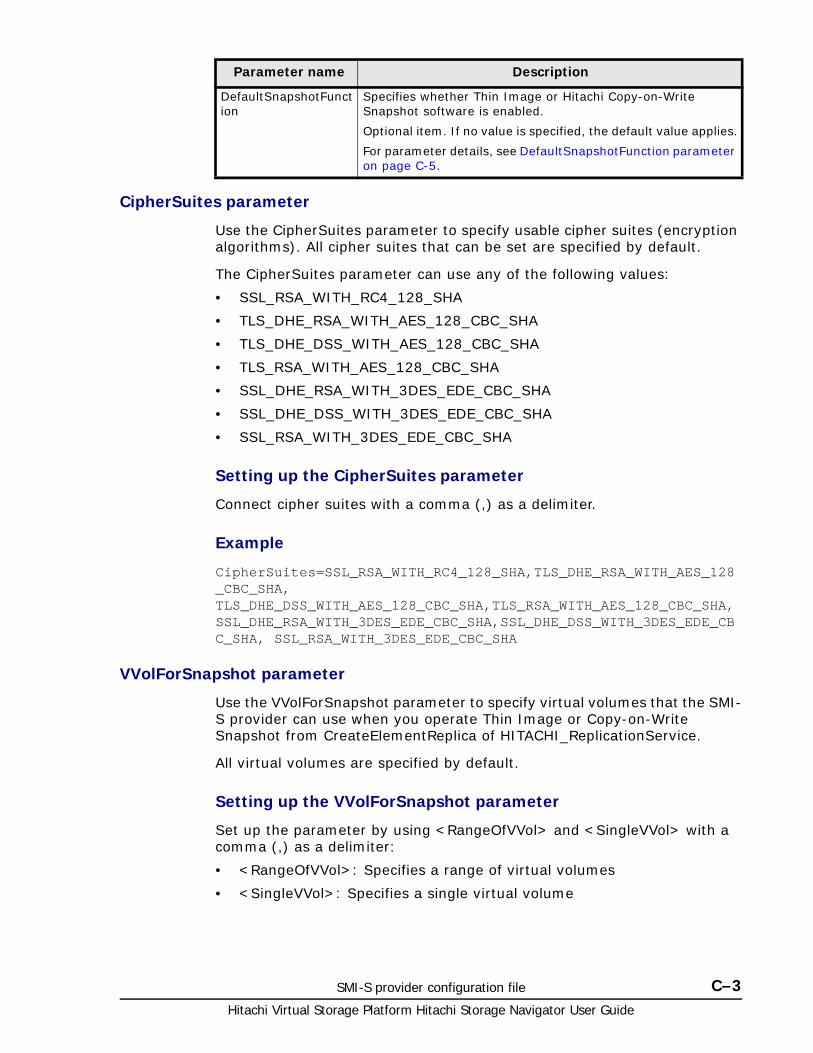
SMI-S provider configuration file C–3Hitachi Virtual Storage Platform Hitachi Storage Navigator User Guide
CipherSuites parameter
Use the CipherSuites parameter to specify usable cipher suites (encryption algorithms). All cipher suites that can be set are specified by default.
The CipherSuites parameter can use any of the following values:
• SSL_RSA_WITH_RC4_128_SHA
• TLS_DHE_RSA_WITH_AES_128_CBC_SHA
• TLS_DHE_DSS_WITH_AES_128_CBC_SHA
• TLS_RSA_WITH_AES_128_CBC_SHA
• SSL_DHE_RSA_WITH_3DES_EDE_CBC_SHA
• SSL_DHE_DSS_WITH_3DES_EDE_CBC_SHA
• SSL_RSA_WITH_3DES_EDE_CBC_SHA
Setting up the CipherSuites parameter
Connect cipher suites with a comma (,) as a delimiter.
Example
CipherSuites=SSL_RSA_WITH_RC4_128_SHA,TLS_DHE_RSA_WITH_AES_128_CBC_SHA, TLS_DHE_DSS_WITH_AES_128_CBC_SHA,TLS_RSA_WITH_AES_128_CBC_SHA, SSL_DHE_RSA_WITH_3DES_EDE_CBC_SHA,SSL_DHE_DSS_WITH_3DES_EDE_CBC_SHA, SSL_RSA_WITH_3DES_EDE_CBC_SHA
VVolForSnapshot parameter
Use the VVolForSnapshot parameter to specify virtual volumes that the SMI-S provider can use when you operate Thin Image or Copy-on-Write Snapshot from CreateElementReplica of HITACHI_ReplicationService.
All virtual volumes are specified by default.
Setting up the VVolForSnapshot parameter
Set up the parameter by using <RangeOfVVol> and <SingleVVol> with a comma (,) as a delimiter:
• <RangeOfVVol>: Specifies a range of virtual volumes
• <SingleVVol>: Specifies a single virtual volume
DefaultSnapshotFunction
Specifies whether Thin Image or Hitachi Copy-on-Write Snapshot software is enabled.
Optional item. If no value is specified, the default value applies.
For parameter details, see DefaultSnapshotFunction parameter on page C-5.
Parameter name Description
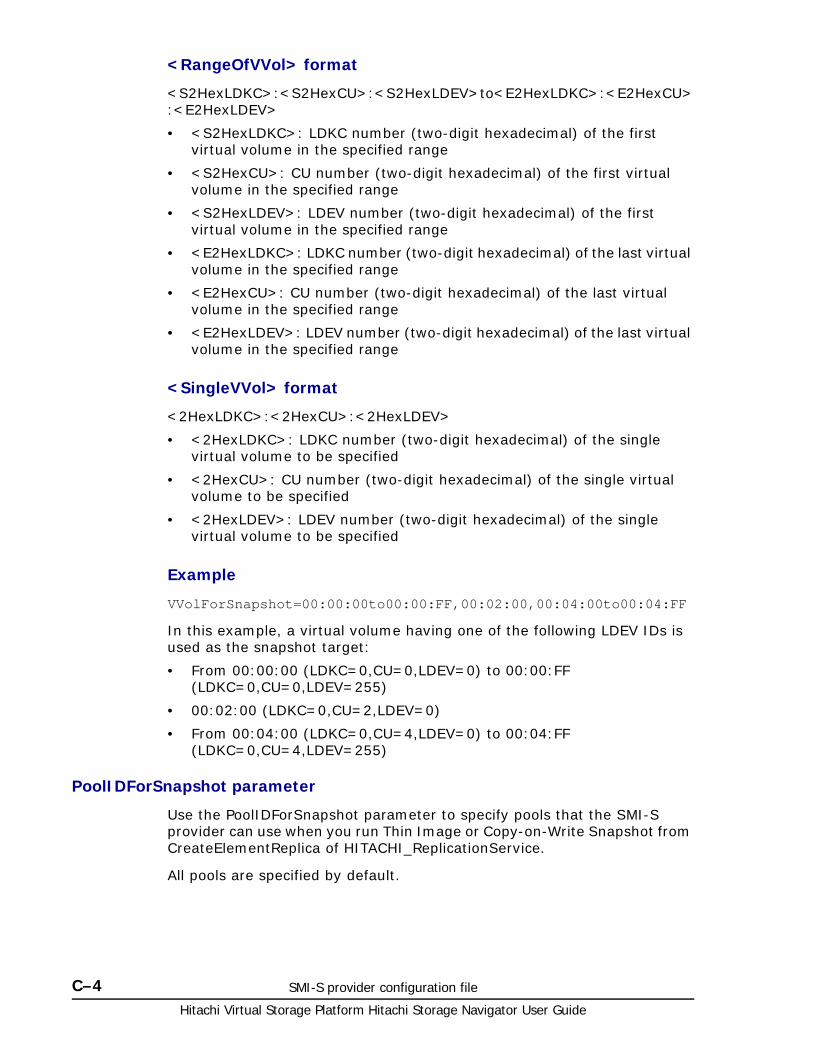
Hitachi Virtual Storage Platform Hitachi Storage Navigator User Guide
C–4 SMI-S provider configuration file
<RangeOfVVol> format
<S2HexLDKC>:<S2HexCU>:<S2HexLDEV>to<E2HexLDKC>:<E2HexCU>:<E2HexLDEV>
• <S2HexLDKC>: LDKC number (two-digit hexadecimal) of the first virtual volume in the specified range
• <S2HexCU>: CU number (two-digit hexadecimal) of the first virtual volume in the specified range
• <S2HexLDEV>: LDEV number (two-digit hexadecimal) of the first virtual volume in the specified range
• <E2HexLDKC>: LDKC number (two-digit hexadecimal) of the last virtual volume in the specified range
• <E2HexCU>: CU number (two-digit hexadecimal) of the last virtual volume in the specified range
• <E2HexLDEV>: LDEV number (two-digit hexadecimal) of the last virtual volume in the specified range
<SingleVVol> format
<2HexLDKC>:<2HexCU>:<2HexLDEV>
• <2HexLDKC>: LDKC number (two-digit hexadecimal) of the single virtual volume to be specified
• <2HexCU>: CU number (two-digit hexadecimal) of the single virtual volume to be specified
• <2HexLDEV>: LDEV number (two-digit hexadecimal) of the single virtual volume to be specified
Example
VVolForSnapshot=00:00:00to00:00:FF,00:02:00,00:04:00to00:04:FF
In this example, a virtual volume having one of the following LDEV IDs is used as the snapshot target:
• From 00:00:00 (LDKC=0,CU=0,LDEV=0) to 00:00:FF (LDKC=0,CU=0,LDEV=255)
• 00:02:00 (LDKC=0,CU=2,LDEV=0)
• From 00:04:00 (LDKC=0,CU=4,LDEV=0) to 00:04:FF (LDKC=0,CU=4,LDEV=255)
PoolIDForSnapshot parameter
Use the PoolIDForSnapshot parameter to specify pools that the SMI-S provider can use when you run Thin Image or Copy-on-Write Snapshot from CreateElementReplica of HITACHI_ReplicationService.
All pools are specified by default.
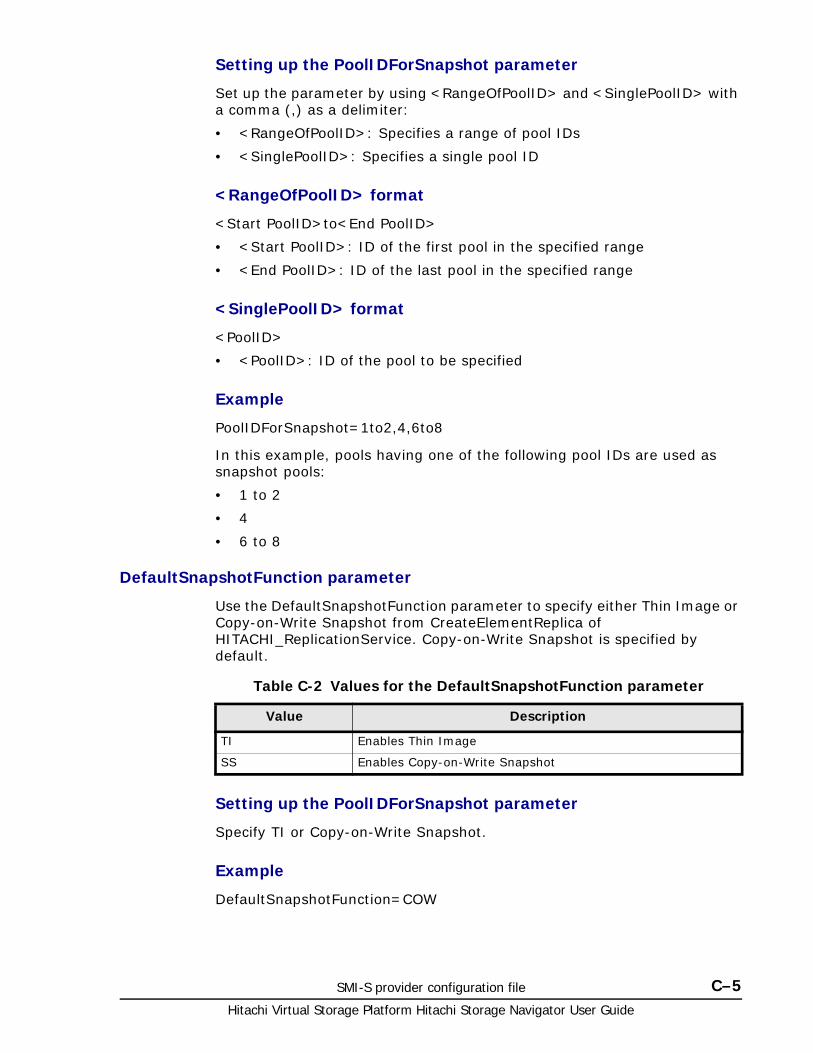
SMI-S provider configuration file C–5Hitachi Virtual Storage Platform Hitachi Storage Navigator User Guide
Setting up the PoolIDForSnapshot parameter
Set up the parameter by using <RangeOfPoolID> and <SinglePoolID> with a comma (,) as a delimiter:
• <RangeOfPoolID>: Specifies a range of pool IDs
• <SinglePoolID>: Specifies a single pool ID
<RangeOfPoolID> format
<Start PoolID>to<End PoolID>
• <Start PoolID>: ID of the first pool in the specified range
• <End PoolID>: ID of the last pool in the specified range
<SinglePoolID> format
<PoolID>
• <PoolID>: ID of the pool to be specified
Example
PoolIDForSnapshot=1to2,4,6to8
In this example, pools having one of the following pool IDs are used as snapshot pools:
• 1 to 2
• 4
• 6 to 8
DefaultSnapshotFunction parameter
Use the DefaultSnapshotFunction parameter to specify either Thin Image or Copy-on-Write Snapshot from CreateElementReplica of HITACHI_ReplicationService. Copy-on-Write Snapshot is specified by default.
Table C-2 Values for the DefaultSnapshotFunction parameter
Setting up the PoolIDForSnapshot parameter
Specify TI or Copy-on-Write Snapshot.
Example
DefaultSnapshotFunction=COW
Value Description
TI Enables Thin Image
SS Enables Copy-on-Write Snapshot

Hitachi Virtual Storage Platform Hitachi Storage Navigator User Guide
C–6 SMI-S provider configuration file
D
Storage Navigator GUI reference (main window) D–1Hitachi Virtual Storage Platform Hitachi Storage Navigator User Guide
Storage Navigator GUI reference(main window)
□ Storage Navigator main window
□ Column Settings window
□ Storage Systems window
□ Edit Storage System window
□ Confirm window (Edit Storage System)
□ Edit Information Display Settings window
□ Resource Lock Properties window
□ Tasks window
□ Task Properties window
□ Suspend Tasks window
□ Resume Tasks window
□ Delete Tasks window
□ Disable Auto Delete window
□ Enable Auto Delete window
□ Reports window
□ Create Configuration Report window
□ Delete Reports window
□ User Groups window
□ Window when User Group is selected
□ Create User window
□ Confirm window (Create User)
□ Change Password window
□ Confirm window (Change Password)
□ Edit User window
□ Confirm window (Edit User)
□ Add Users window
□ Confirm window (Add Users)
□ Remove Users window
□ Delete Users window
□ Create User Group wizard
□ Edit User Group wizard
□ Delete User Groups window
□ Edit Resource Group Assignment wizard
□ Edit Role Assignment wizard
□ Alerts window
□ Alert Properties window
□ Setup Server wizard
□ LDAP Properties window
□ RADIUS Properties
□ Kerberos Properties
□ Setup Server for LDAP
□ Setup Server for RADIUS
□ Setup Server for Kerberos
□ Edit SIM Syslog Server Settings wizard
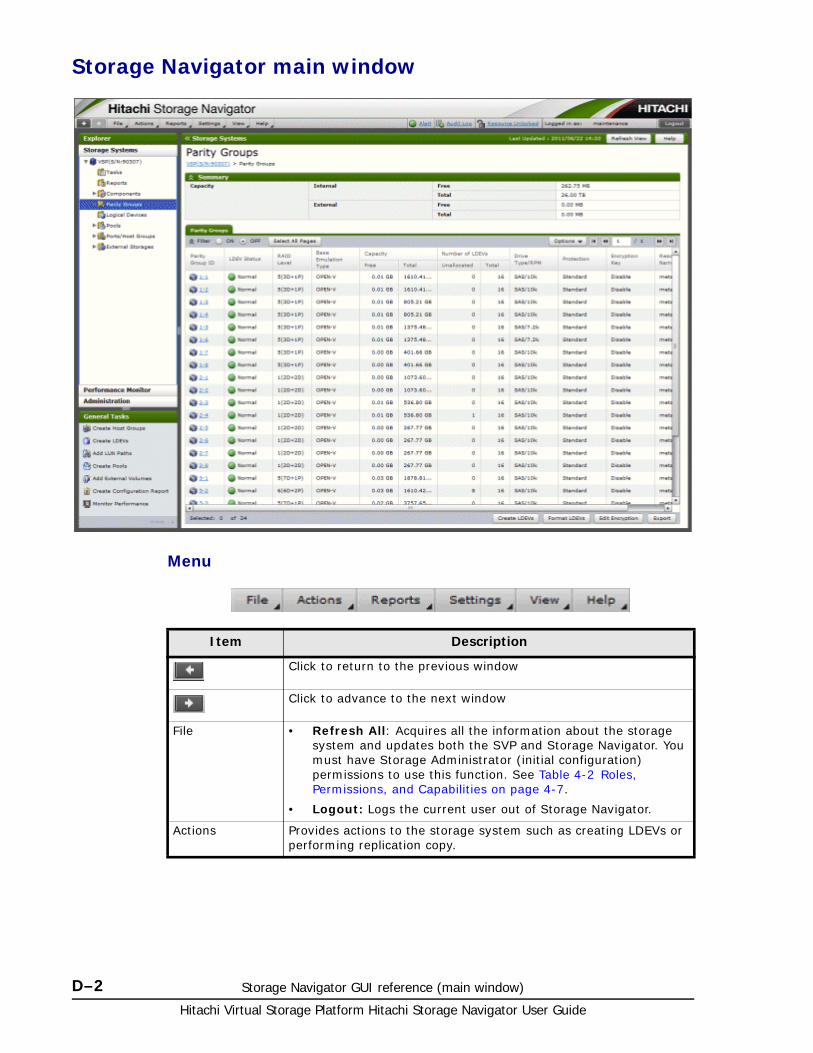
Hitachi Virtual Storage Platform Hitachi Storage Navigator User Guide
D–2 Storage Navigator GUI reference (main window)
Storage Navigator main window
Menu
Item Description
Click to return to the previous window
Click to advance to the next window
File • Refresh All: Acquires all the information about the storage system and updates both the SVP and Storage Navigator. You must have Storage Administrator (initial configuration) permissions to use this function. See Table 4-2 Roles, Permissions, and Capabilities on page 4-7.
• Logout: Logs the current user out of Storage Navigator.
Actions Provides actions to the storage system such as creating LDEVs or performing replication copy.
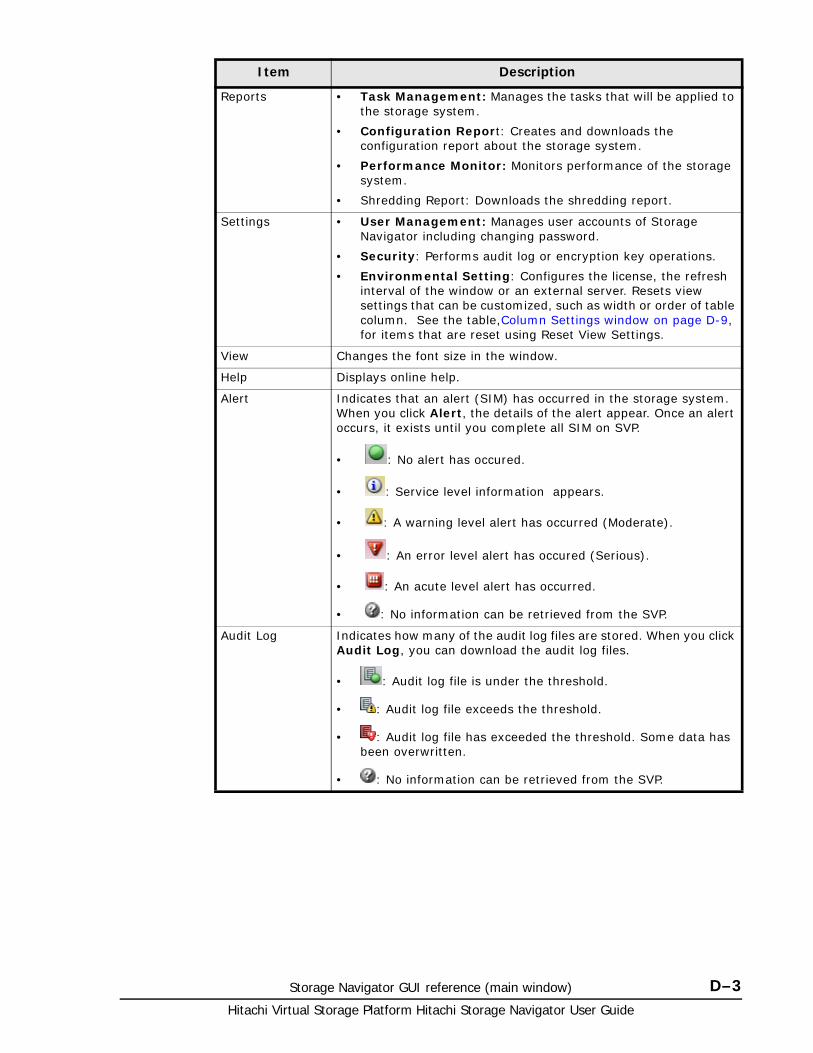
Storage Navigator GUI reference (main window) D–3Hitachi Virtual Storage Platform Hitachi Storage Navigator User Guide
Reports • Task Management: Manages the tasks that will be applied to the storage system.
• Configuration Report: Creates and downloads the configuration report about the storage system.
• Performance Monitor: Monitors performance of the storage system.
• Shredding Report: Downloads the shredding report.
Settings • User Management: Manages user accounts of Storage Navigator including changing password.
• Security: Performs audit log or encryption key operations.
• Environmental Setting: Configures the license, the refresh interval of the window or an external server. Resets view settings that can be customized, such as width or order of table column. See the table,Column Settings window on page D-9, for items that are reset using Reset View Settings.
View Changes the font size in the window.
Help Displays online help.
Alert Indicates that an alert (SIM) has occurred in the storage system. When you click Alert, the details of the alert appear. Once an alert occurs, it exists until you complete all SIM on SVP.
• : No alert has occured.
• : Service level information appears.
• : A warning level alert has occurred (Moderate).
• : An error level alert has occured (Serious).
• : An acute level alert has occurred.
• : No information can be retrieved from the SVP.
Audit Log Indicates how many of the audit log files are stored. When you click Audit Log, you can download the audit log files.
• : Audit log file is under the threshold.
• : Audit log file exceeds the threshold.
• : Audit log file has exceeded the threshold. Some data has been overwritten.
• : No information can be retrieved from the SVP.
Item Description
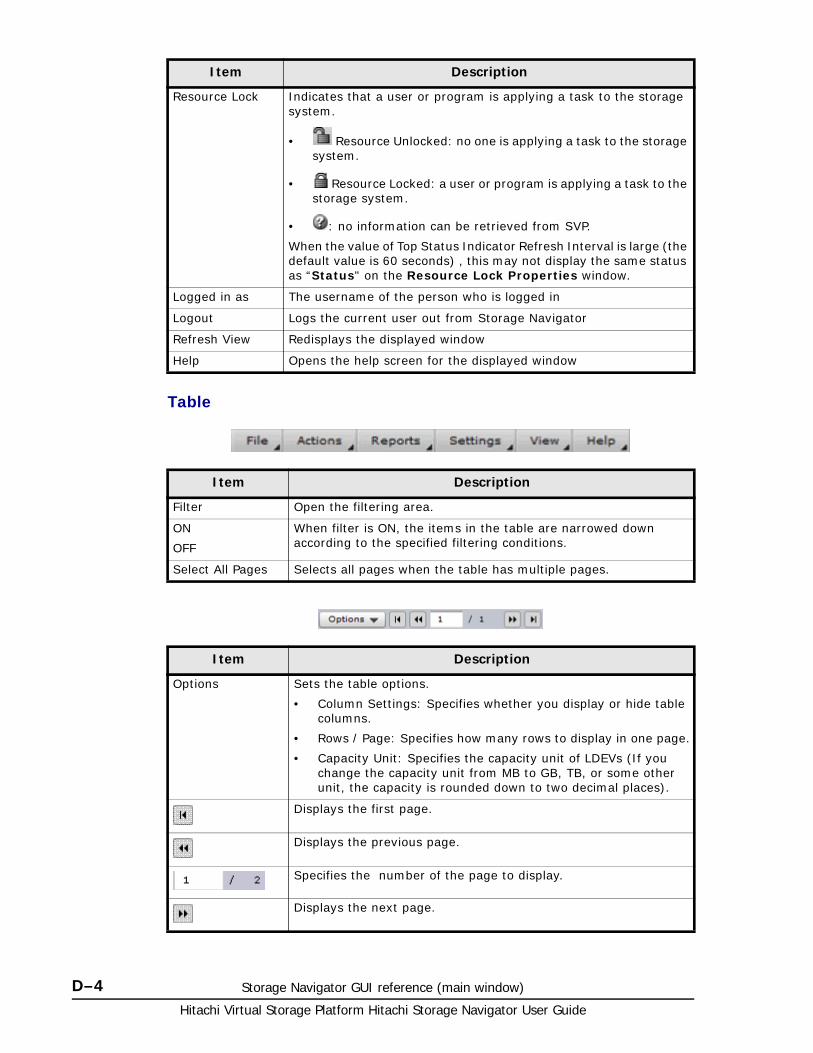
Hitachi Virtual Storage Platform Hitachi Storage Navigator User Guide
D–4 Storage Navigator GUI reference (main window)
Table
Resource Lock Indicates that a user or program is applying a task to the storage system.
• Resource Unlocked: no one is applying a task to the storage system.
• Resource Locked: a user or program is applying a task to the storage system.
• : no information can be retrieved from SVP.
When the value of Top Status Indicator Refresh Interval is large (the default value is 60 seconds) , this may not display the same status as “Status" on the Resource Lock Properties window.
Logged in as The username of the person who is logged in
Logout Logs the current user out from Storage Navigator
Refresh View Redisplays the displayed window
Help Opens the help screen for the displayed window
Item Description
Item Description
Filter Open the filtering area.
ON
OFF
When filter is ON, the items in the table are narrowed down according to the specified filtering conditions.
Select All Pages Selects all pages when the table has multiple pages.
Item Description
Options Sets the table options.
• Column Settings: Specifies whether you display or hide table columns.
• Rows / Page: Specifies how many rows to display in one page.
• Capacity Unit: Specifies the capacity unit of LDEVs (If you change the capacity unit from MB to GB, TB, or some other unit, the capacity is rounded down to two decimal places).
Displays the first page.
Displays the previous page.
Specifies the number of the page to display.
Displays the next page.
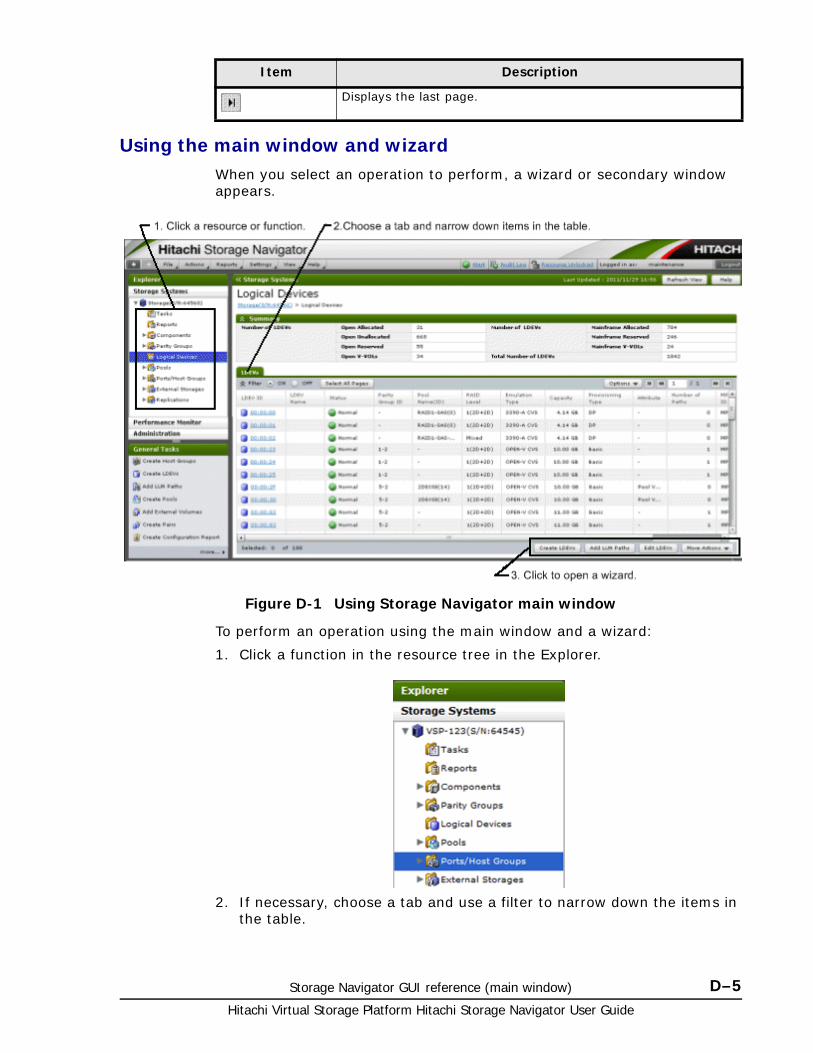
Storage Navigator GUI reference (main window) D–5Hitachi Virtual Storage Platform Hitachi Storage Navigator User Guide
Using the main window and wizardWhen you select an operation to perform, a wizard or secondary window appears.
To perform an operation using the main window and a wizard:
1. Click a function in the resource tree in the Explorer.
2. If necessary, choose a tab and use a filter to narrow down the items in the table.
Displays the last page.
Item Description
Figure D-1 Using Storage Navigator main window

Hitachi Virtual Storage Platform Hitachi Storage Navigator User Guide
D–6 Storage Navigator GUI reference (main window)
3. Select an item in the table and click a button to open a wizard.
4. Set options in the wizard and click Finish to confirm the setting.
5. Enter a task name and click Apply to apply the setting to the storage system. The setting is queued as a task and performed in order.
6. Open the task window to verify the result of the operation. A task can be suspended or canceled if the processing of the task is not started.
Main window controls
Buttons
The following figure shows the Back and Next buttons that appear at upper left of the main window:
The Back button displays the previous window; the Next button displays the next window. Storage Navigator tracks up to 10 operations and the windows that display depends the selection from the navigation tree.
The following figure shows the buttons that appear at upper right of the main window:
Tip: To open the task window after closing the wizard, select Go to tasks window for status and click Apply in the wizard.
Figure D-2 Using wizard buttons
Figure D-3 Back and Next buttons in main window
Figure D-4 Buttons at upper right of main window
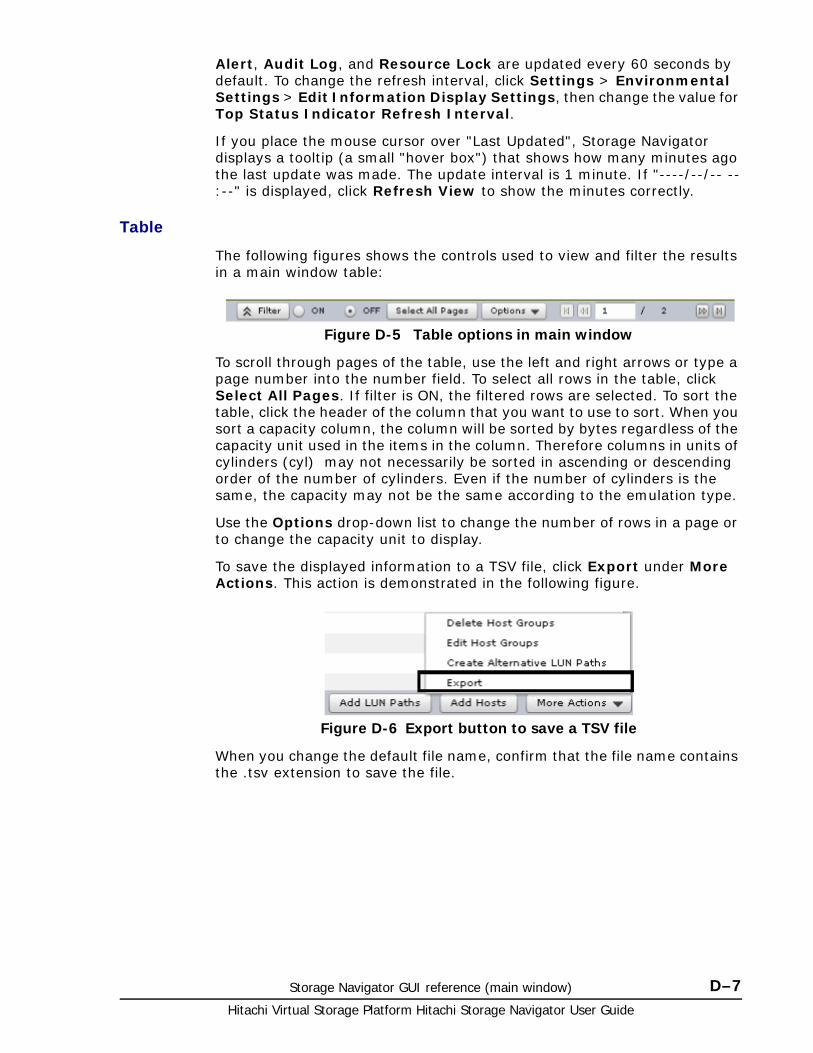
Storage Navigator GUI reference (main window) D–7Hitachi Virtual Storage Platform Hitachi Storage Navigator User Guide
Alert, Audit Log, and Resource Lock are updated every 60 seconds by default. To change the refresh interval, click Settings > Environmental Settings > Edit Information Display Settings, then change the value for Top Status Indicator Refresh Interval.
If you place the mouse cursor over "Last Updated", Storage Navigator displays a tooltip (a small "hover box") that shows how many minutes ago the last update was made. The update interval is 1 minute. If "----/--/-- --:--" is displayed, click Refresh View to show the minutes correctly.
Table
The following figures shows the controls used to view and filter the results in a main window table:
To scroll through pages of the table, use the left and right arrows or type a page number into the number field. To select all rows in the table, click Select All Pages. If filter is ON, the filtered rows are selected. To sort the table, click the header of the column that you want to use to sort. When you sort a capacity column, the column will be sorted by bytes regardless of the capacity unit used in the items in the column. Therefore columns in units of cylinders (cyl) may not necessarily be sorted in ascending or descending order of the number of cylinders. Even if the number of cylinders is the same, the capacity may not be the same according to the emulation type.
Use the Options drop-down list to change the number of rows in a page or to change the capacity unit to display.
To save the displayed information to a TSV file, click Export under More Actions. This action is demonstrated in the following figure.
When you change the default file name, confirm that the file name contains the .tsv extension to save the file.
Figure D-5 Table options in main window
Figure D-6 Export button to save a TSV file
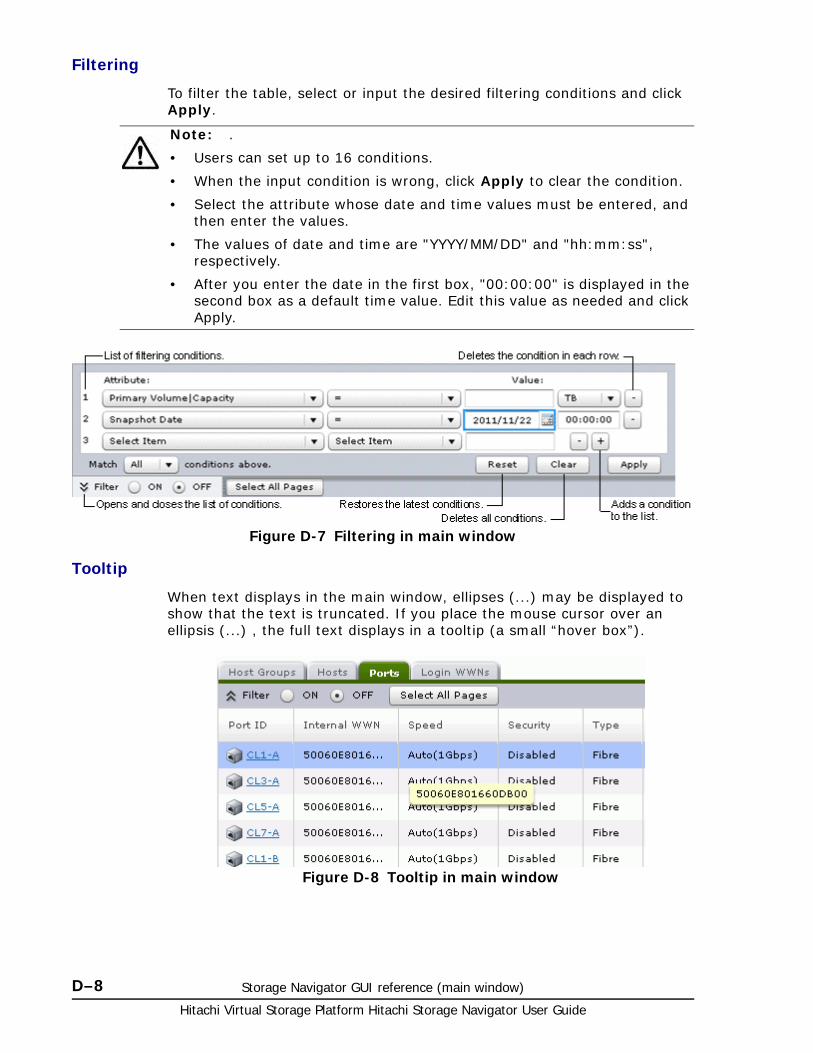
Hitachi Virtual Storage Platform Hitachi Storage Navigator User Guide
D–8 Storage Navigator GUI reference (main window)
Filtering
To filter the table, select or input the desired filtering conditions and click Apply.
Tooltip
When text displays in the main window, ellipses (...) may be displayed to show that the text is truncated. If you place the mouse cursor over an ellipsis (...) , the full text displays in a tooltip (a small “hover box”).
Note: .
• Users can set up to 16 conditions.
• When the input condition is wrong, click Apply to clear the condition.
• Select the attribute whose date and time values must be entered, and then enter the values.
• The values of date and time are "YYYY/MM/DD" and "hh:mm:ss", respectively.
• After you enter the date in the first box, "00:00:00" is displayed in the second box as a default time value. Edit this value as needed and click Apply.
Figure D-7 Filtering in main window
Figure D-8 Tooltip in main window
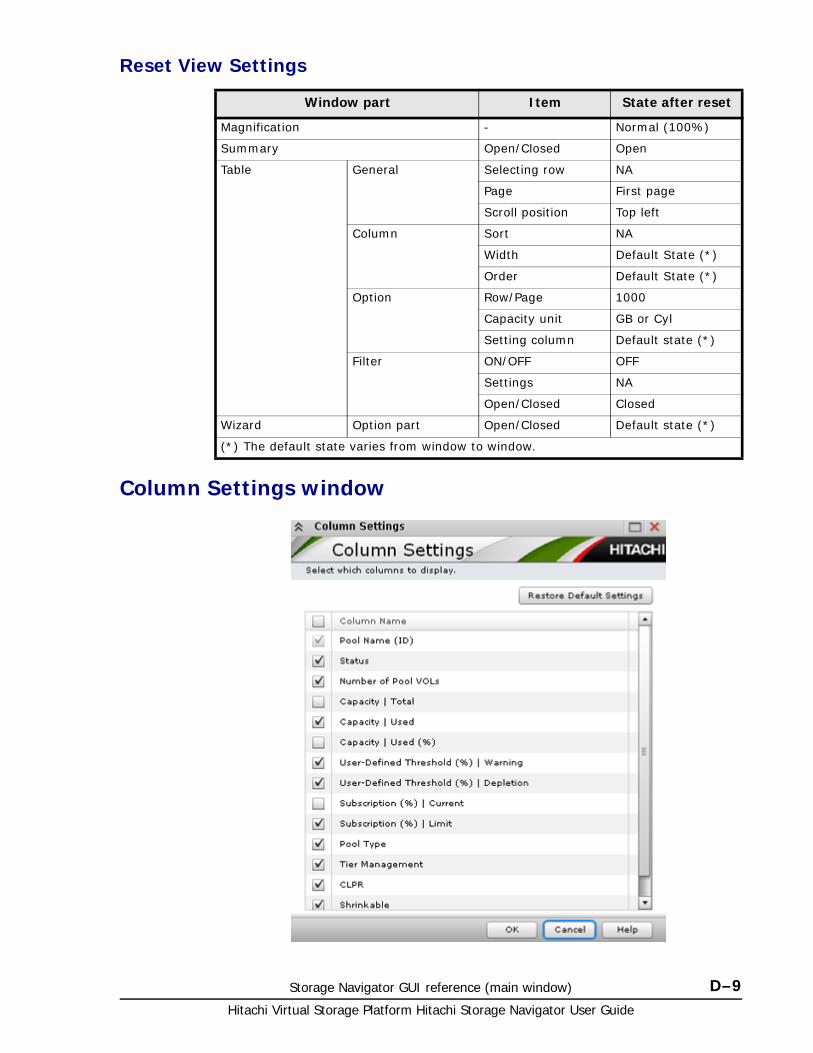
Storage Navigator GUI reference (main window) D–9Hitachi Virtual Storage Platform Hitachi Storage Navigator User Guide
Reset View Settings
Column Settings window
Window part Item State after reset
Magnification - Normal (100%)
Summary Open/Closed Open
Table General Selecting row NA
Page First page
Scroll position Top left
Column Sort NA
Width Default State (*)
Order Default State (*)
Option Row/Page 1000
Capacity unit GB or Cyl
Setting column Default state (*)
Filter ON/OFF OFF
Settings NA
Open/Closed Closed
Wizard Option part Open/Closed Default state (*)
(*) The default state varies from window to window.
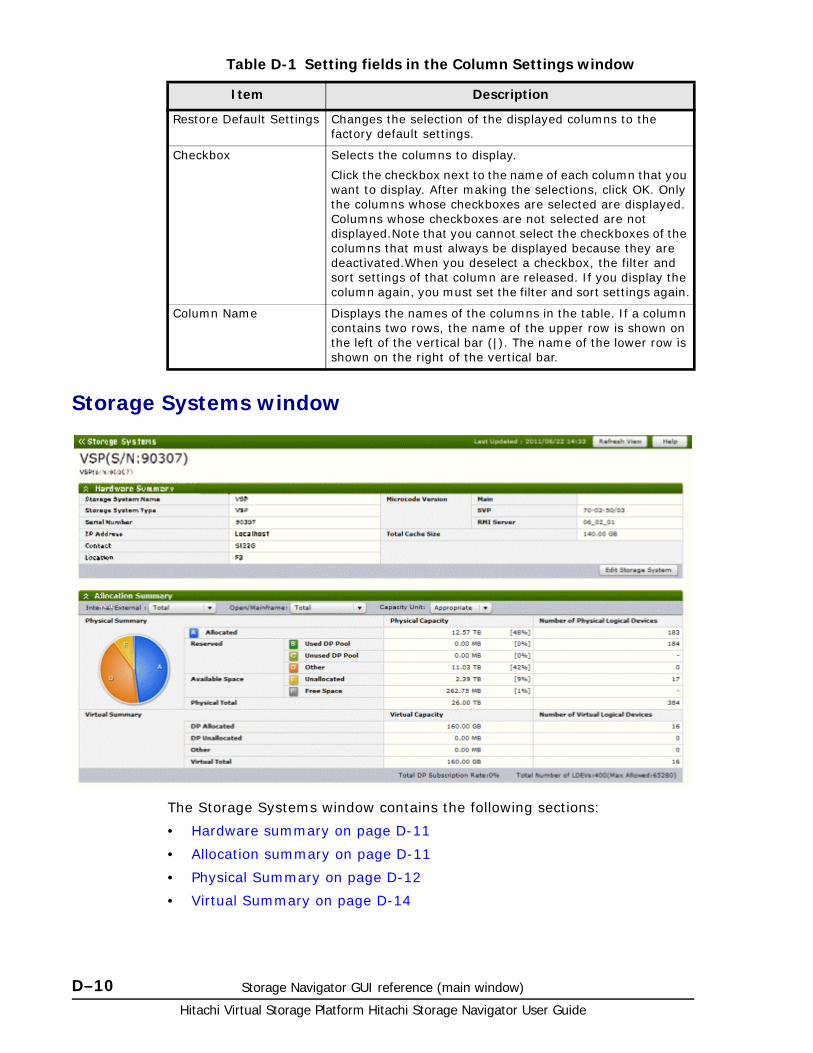
Hitachi Virtual Storage Platform Hitachi Storage Navigator User Guide
D–10 Storage Navigator GUI reference (main window)
Table D-1 Setting fields in the Column Settings window
Storage Systems window
The Storage Systems window contains the following sections:
• Hardware summary on page D-11
• Allocation summary on page D-11
• Physical Summary on page D-12
• Virtual Summary on page D-14
Item Description
Restore Default Settings Changes the selection of the displayed columns to the factory default settings.
Checkbox Selects the columns to display.
Click the checkbox next to the name of each column that you want to display. After making the selections, click OK. Only the columns whose checkboxes are selected are displayed. Columns whose checkboxes are not selected are not displayed.Note that you cannot select the checkboxes of the columns that must always be displayed because they are deactivated.When you deselect a checkbox, the filter and sort settings of that column are released. If you display the column again, you must set the filter and sort settings again.
Column Name Displays the names of the columns in the table. If a column contains two rows, the name of the upper row is shown on the left of the vertical bar (|). The name of the lower row is shown on the right of the vertical bar.
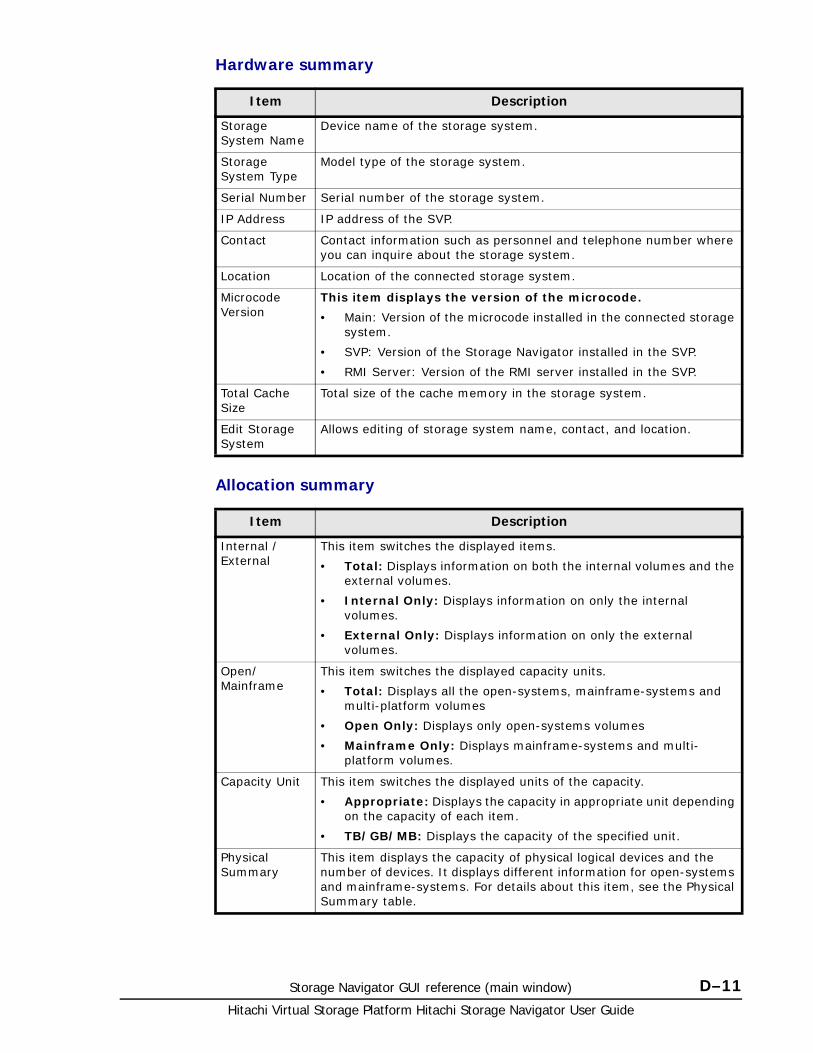
Storage Navigator GUI reference (main window) D–11Hitachi Virtual Storage Platform Hitachi Storage Navigator User Guide
Hardware summary
Allocation summary
Item Description
Storage System Name
Device name of the storage system.
Storage System Type
Model type of the storage system.
Serial Number Serial number of the storage system.
IP Address IP address of the SVP.
Contact Contact information such as personnel and telephone number where you can inquire about the storage system.
Location Location of the connected storage system.
Microcode Version
This item displays the version of the microcode.
• Main: Version of the microcode installed in the connected storage system.
• SVP: Version of the Storage Navigator installed in the SVP.
• RMI Server: Version of the RMI server installed in the SVP.
Total Cache Size
Total size of the cache memory in the storage system.
Edit Storage System
Allows editing of storage system name, contact, and location.
Item Description
Internal / External
This item switches the displayed items.
• Total: Displays information on both the internal volumes and the external volumes.
• Internal Only: Displays information on only the internal volumes.
• External Only: Displays information on only the external volumes.
Open/Mainframe
This item switches the displayed capacity units.
• Total: Displays all the open-systems, mainframe-systems and multi-platform volumes
• Open Only: Displays only open-systems volumes
• Mainframe Only: Displays mainframe-systems and multi-platform volumes.
Capacity Unit This item switches the displayed units of the capacity.
• Appropriate: Displays the capacity in appropriate unit depending on the capacity of each item.
• TB/GB/MB: Displays the capacity of the specified unit.
Physical Summary
This item displays the capacity of physical logical devices and the number of devices. It displays different information for open-systems and mainframe-systems. For details about this item, see the Physical Summary table.
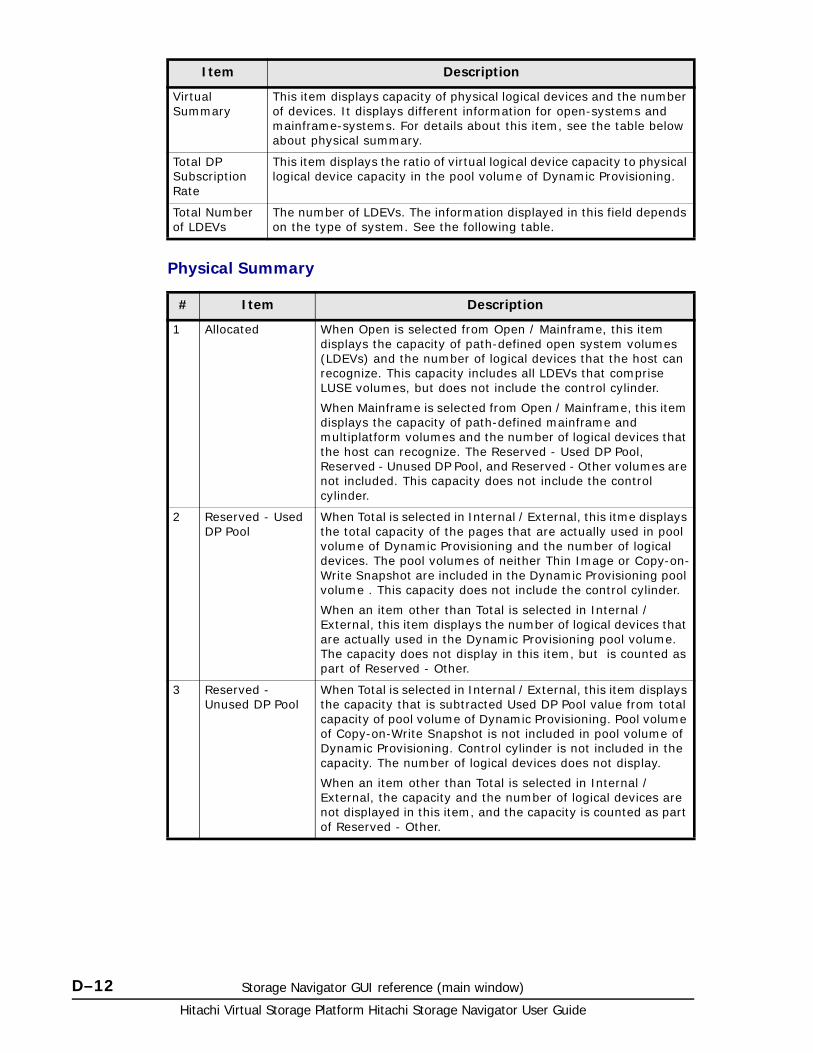
Hitachi Virtual Storage Platform Hitachi Storage Navigator User Guide
D–12 Storage Navigator GUI reference (main window)
Physical Summary
Virtual Summary
This item displays capacity of physical logical devices and the number of devices. It displays different information for open-systems and mainframe-systems. For details about this item, see the table below about physical summary.
Total DP Subscription Rate
This item displays the ratio of virtual logical device capacity to physical logical device capacity in the pool volume of Dynamic Provisioning.
Total Number of LDEVs
The number of LDEVs. The information displayed in this field depends on the type of system. See the following table.
Item Description
# Item Description
1 Allocated When Open is selected from Open / Mainframe, this item displays the capacity of path-defined open system volumes (LDEVs) and the number of logical devices that the host can recognize. This capacity includes all LDEVs that comprise LUSE volumes, but does not include the control cylinder.
When Mainframe is selected from Open / Mainframe, this item displays the capacity of path-defined mainframe and multiplatform volumes and the number of logical devices that the host can recognize. The Reserved - Used DP Pool, Reserved - Unused DP Pool, and Reserved - Other volumes are not included. This capacity does not include the control cylinder.
2 Reserved - Used DP Pool
When Total is selected in Internal / External, this itme displays the total capacity of the pages that are actually used in pool volume of Dynamic Provisioning and the number of logical devices. The pool volumes of neither Thin Image or Copy-on-Write Snapshot are included in the Dynamic Provisioning pool volume . This capacity does not include the control cylinder.
When an item other than Total is selected in Internal / External, this item displays the number of logical devices that are actually used in the Dynamic Provisioning pool volume. The capacity does not display in this item, but is counted as part of Reserved - Other.
3 Reserved - Unused DP Pool
When Total is selected in Internal / External, this item displays the capacity that is subtracted Used DP Pool value from total capacity of pool volume of Dynamic Provisioning. Pool volume of Copy-on-Write Snapshot is not included in pool volume of Dynamic Provisioning. Control cylinder is not included in the capacity. The number of logical devices does not display.
When an item other than Total is selected in Internal / External, the capacity and the number of logical devices are not displayed in this item, and the capacity is counted as part of Reserved - Other.

Storage Navigator GUI reference (main window) D–13Hitachi Virtual Storage Platform Hitachi Storage Navigator User Guide
4 Reserved - Other When Open is selected from Open / Mainframe, this item displays the total capacity and the number of logical devices of the following volumes:
• Volume Migration Reserved volumes
• Journal volumes
• System disk
• Thin Image Pool volumes
• Quorum disk used in High Availability Manager
The total capacity includes:
• The pool-VOL capacity that is not used as pool capacity
• The capacity of the system pool-VOL management area (approx. 4.1 GB per pool)
The reserved volumes of ShadowImage for Mainframe and Volume Migration that are defined paths are not included. The control cylinder is not included in the capacity.
When Mainframe is selected from Open / Mainframe, this item displays the total capacity and the number of logical devices of the following Mainframe and multi-platform volumes:
• Reserved volumes of Volume Migration
• Journal volumes
• System disk
The total capacity includes:
• The pool-VOL capacity that is not used as pool capacity
• The capacity of the system pool-VOL management area (approx. 3.7 GB per pool)
The reserved volumes of ShadowImage for Mainframe are not included. The control cylinder is not included in the capacity.
For both open and mainframe, when an item other than Total is selected in Internal / External, the capacities for Reserved - Used DP Pool and Reserved - Unused DP Pool are also counted as part of this item.
5 Available Space - Unallocated
When Open or Total is selected from Open / Mainframe, this item displays the volume capacity and the number of logical devices from the open volumes that are not defined paths. The Reserved - Used DP Pool, Reserved - Unused DP Pool, and Reserved - Other volumes are not included. The control cylinder is also not included in the capacity.
When Mainframe is selected from Open / Mainframe, the capacity and the number of logical devices do not display.
6 Available Space - Free Space
When Open is selected from Open / Mainframe, this item displays the free space in which users can create Open volumes.
When Mainframe is selected from Open / Mainframe, this item displays the free space in which users can create Mainframe-systems and multi-platform volumes.
In both Open and Mainframe, the control cylinder is not included in the capacity. and the number of logical devices does not display.
# Item Description
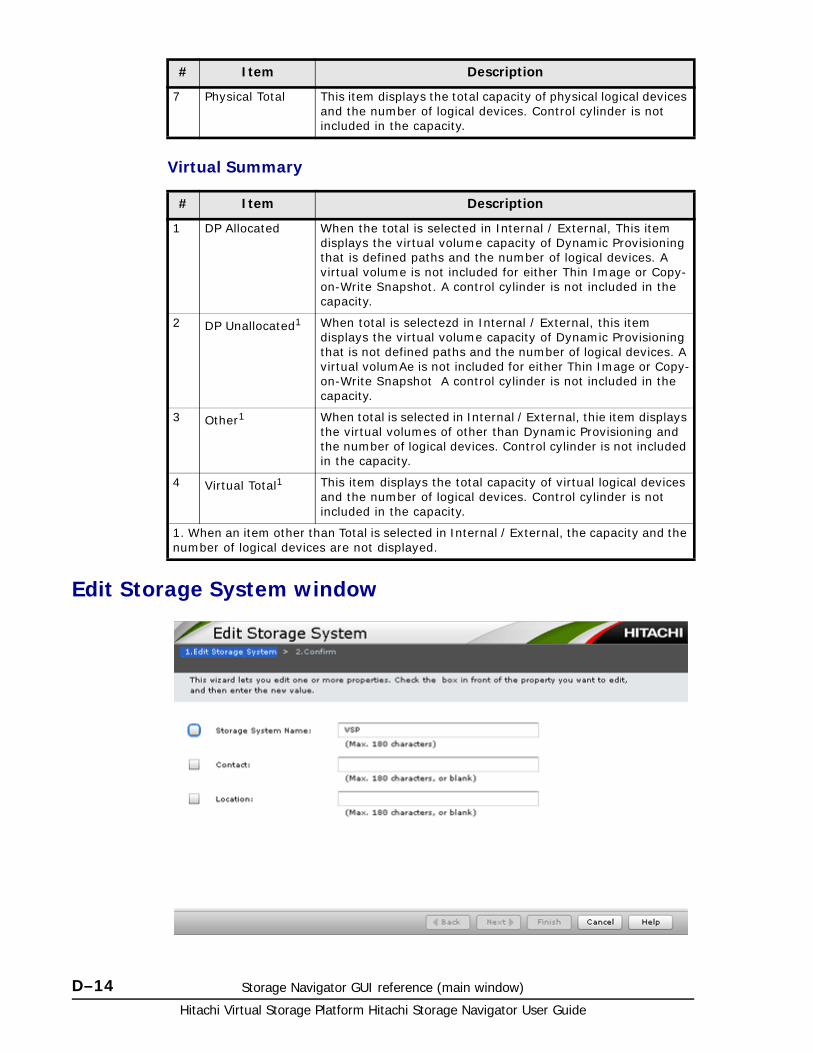
Hitachi Virtual Storage Platform Hitachi Storage Navigator User Guide
D–14 Storage Navigator GUI reference (main window)
Virtual Summary
Edit Storage System window
7 Physical Total This item displays the total capacity of physical logical devices and the number of logical devices. Control cylinder is not included in the capacity.
# Item Description
# Item Description
1 DP Allocated When the total is selected in Internal / External, This item displays the virtual volume capacity of Dynamic Provisioning that is defined paths and the number of logical devices. A virtual volume is not included for either Thin Image or Copy-on-Write Snapshot. A control cylinder is not included in the capacity.
2 DP Unallocated1 When total is selectezd in Internal / External, this item displays the virtual volume capacity of Dynamic Provisioning that is not defined paths and the number of logical devices. A virtual volumAe is not included for either Thin Image or Copy-on-Write Snapshot A control cylinder is not included in the capacity.
3 Other1 When total is selected in Internal / External, thie item displays the virtual volumes of other than Dynamic Provisioning and the number of logical devices. Control cylinder is not included in the capacity.
4 Virtual Total1 This item displays the total capacity of virtual logical devices and the number of logical devices. Control cylinder is not included in the capacity.
1. When an item other than Total is selected in Internal / External, the capacity and the number of logical devices are not displayed.

Storage Navigator GUI reference (main window) D–15Hitachi Virtual Storage Platform Hitachi Storage Navigator User Guide
This window lets you set storage system values. The configured values are required to use SNMP agents. Make sure to document the information, because the settings will be cleared when the SVP is replaced.
• Enter a device name using up to 180 alphanumeric characters (ASCII codes) , except for some symbols, such as ", \, ;, :, ,, *, ?, <, >, |, /, ^, and, and %.
• You can also use a space, except for before and after the settings.
Setting fields
Confirm window (Edit Storage System)
Caution: You can change more than one parameter, multiple times. But to do so, wait until the current task finishes.
If you apply a setting (a new task) before the current task finishes, only the new task will be applied, so the result might be different from what you expected.
Item Description
Storage System Name
Device name of the storage system.
Contact Contact information such as personnel and telephone number where you can inquire about the storage system.
Location Location of the connected storage system.
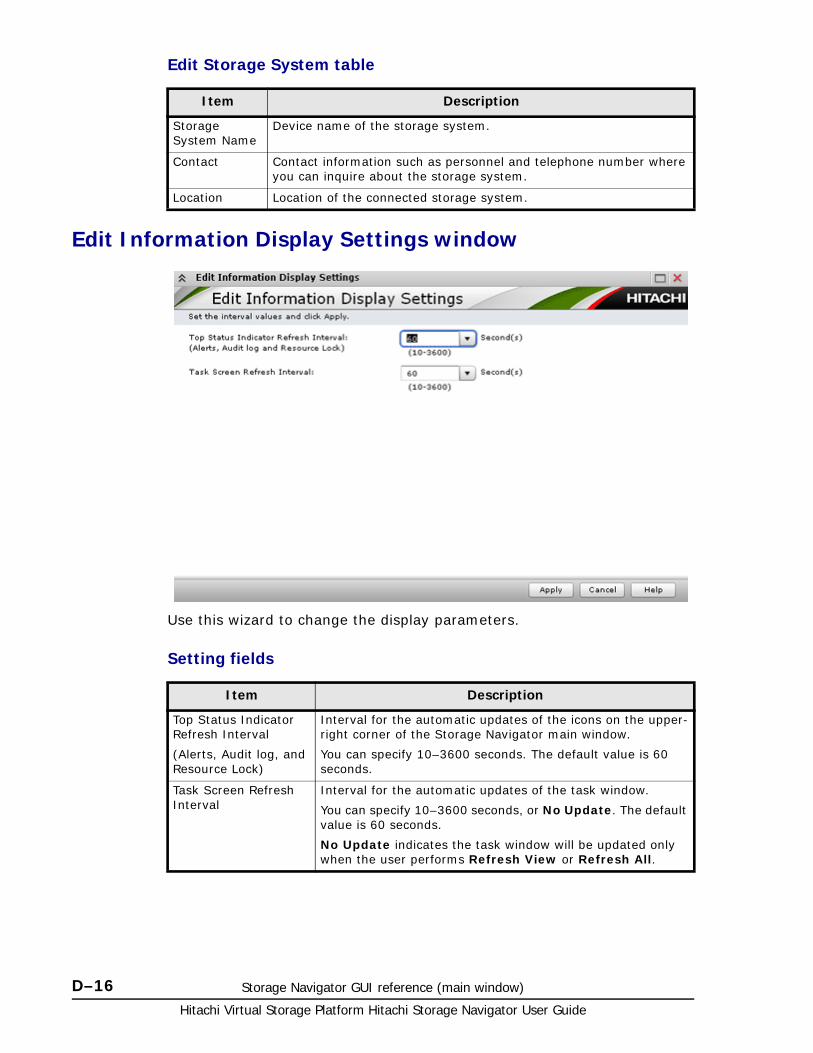
Hitachi Virtual Storage Platform Hitachi Storage Navigator User Guide
D–16 Storage Navigator GUI reference (main window)
Edit Storage System table
Edit Information Display Settings window
Use this wizard to change the display parameters.
Setting fields
Item Description
Storage System Name
Device name of the storage system.
Contact Contact information such as personnel and telephone number where you can inquire about the storage system.
Location Location of the connected storage system.
Item Description
Top Status Indicator Refresh Interval
(Alerts, Audit log, and Resource Lock)
Interval for the automatic updates of the icons on the upper-right corner of the Storage Navigator main window.
You can specify 10–3600 seconds. The default value is 60 seconds.
Task Screen Refresh Interval
Interval for the automatic updates of the task window.
You can specify 10–3600 seconds, or No Update. The default value is 60 seconds.
No Update indicates the task window will be updated only when the user performs Refresh View or Refresh All.
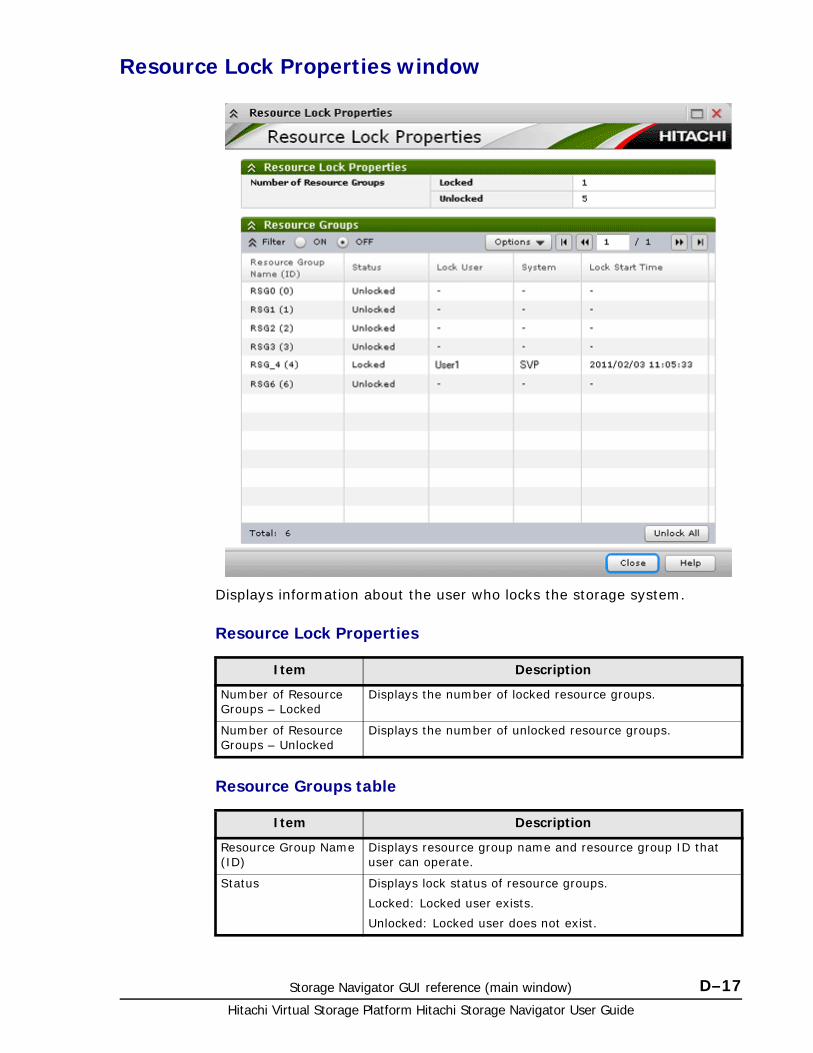
Storage Navigator GUI reference (main window) D–17Hitachi Virtual Storage Platform Hitachi Storage Navigator User Guide
Resource Lock Properties window
Displays information about the user who locks the storage system.
Resource Lock Properties
Resource Groups table
Item Description
Number of Resource Groups – Locked
Displays the number of locked resource groups.
Number of Resource Groups – Unlocked
Displays the number of unlocked resource groups.
Item Description
Resource Group Name (ID)
Displays resource group name and resource group ID that user can operate.
Status Displays lock status of resource groups.
Locked: Locked user exists.
Unlocked: Locked user does not exist.
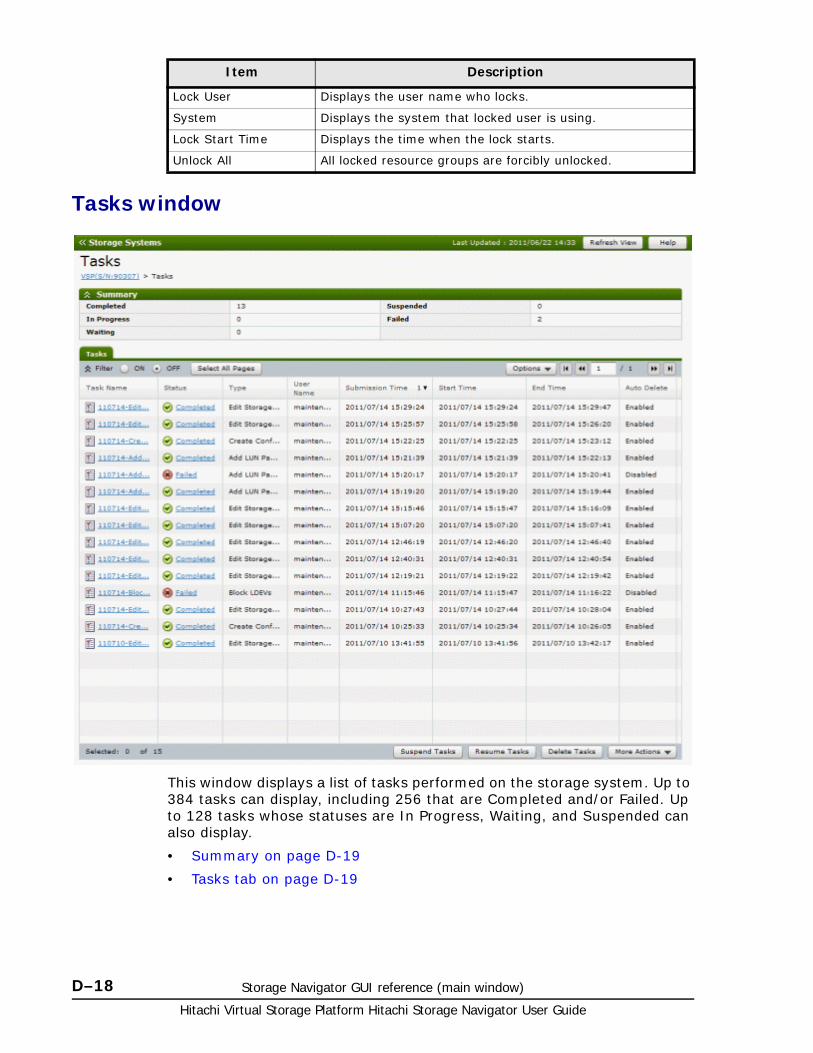
Hitachi Virtual Storage Platform Hitachi Storage Navigator User Guide
D–18 Storage Navigator GUI reference (main window)
Tasks window
This window displays a list of tasks performed on the storage system. Up to 384 tasks can display, including 256 that are Completed and/or Failed. Up to 128 tasks whose statuses are In Progress, Waiting, and Suspended can also display.
• Summary on page D-19
• Tasks tab on page D-19
Lock User Displays the user name who locks.
System Displays the system that locked user is using.
Lock Start Time Displays the time when the lock starts.
Unlock All All locked resource groups are forcibly unlocked.
Item Description
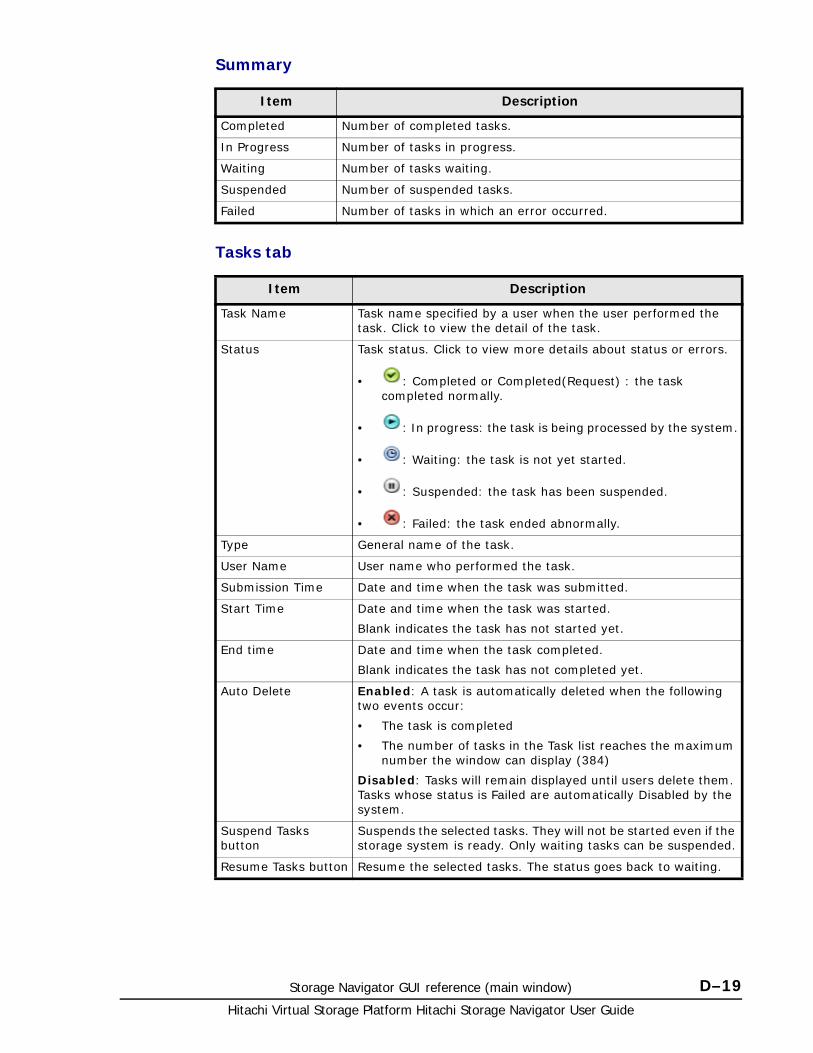
Storage Navigator GUI reference (main window) D–19Hitachi Virtual Storage Platform Hitachi Storage Navigator User Guide
Summary
Tasks tab
Item Description
Completed Number of completed tasks.
In Progress Number of tasks in progress.
Waiting Number of tasks waiting.
Suspended Number of suspended tasks.
Failed Number of tasks in which an error occurred.
Item Description
Task Name Task name specified by a user when the user performed the task. Click to view the detail of the task.
Status Task status. Click to view more details about status or errors.
• : Completed or Completed(Request) : the task completed normally.
• : In progress: the task is being processed by the system.
• : Waiting: the task is not yet started.
• : Suspended: the task has been suspended.
• : Failed: the task ended abnormally.
Type General name of the task.
User Name User name who performed the task.
Submission Time Date and time when the task was submitted.
Start Time Date and time when the task was started.
Blank indicates the task has not started yet.
End time Date and time when the task completed.
Blank indicates the task has not completed yet.
Auto Delete Enabled: A task is automatically deleted when the following two events occur:
• The task is completed
• The number of tasks in the Task list reaches the maximum number the window can display (384)
Disabled: Tasks will remain displayed until users delete them. Tasks whose status is Failed are automatically Disabled by the system.
Suspend Tasks button
Suspends the selected tasks. They will not be started even if the storage system is ready. Only waiting tasks can be suspended.
Resume Tasks button Resume the selected tasks. The status goes back to waiting.
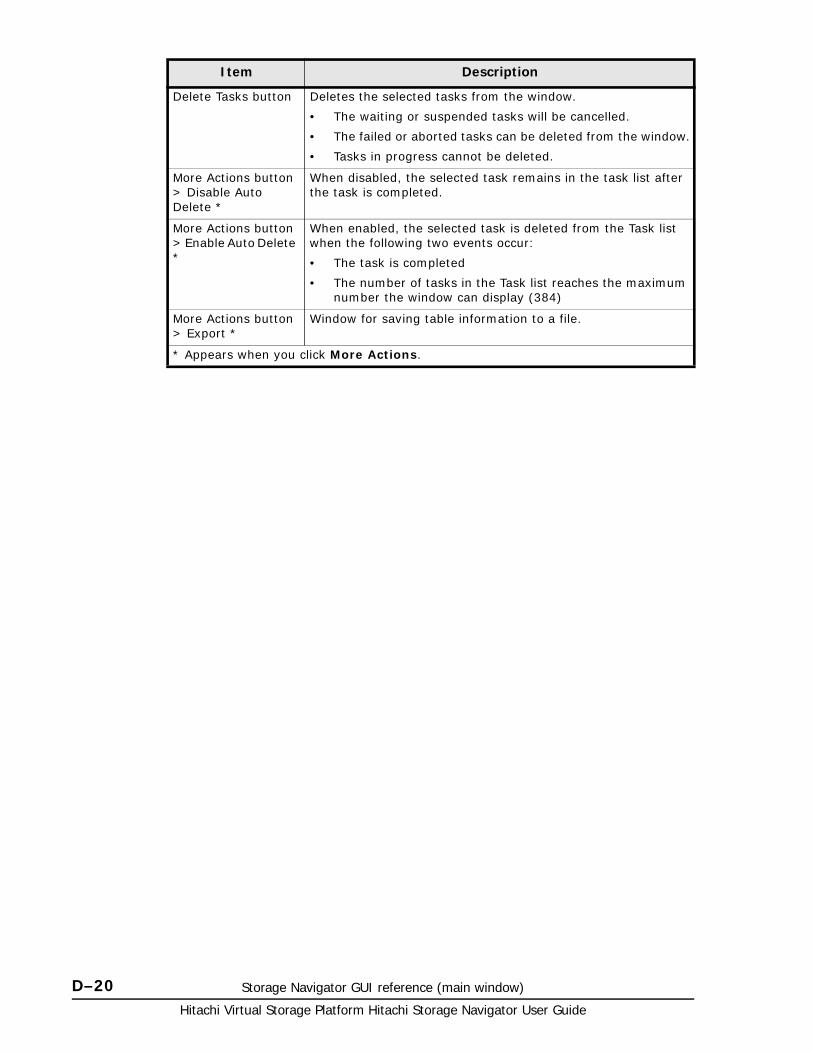
Hitachi Virtual Storage Platform Hitachi Storage Navigator User Guide
D–20 Storage Navigator GUI reference (main window)
Delete Tasks button Deletes the selected tasks from the window.
• The waiting or suspended tasks will be cancelled.
• The failed or aborted tasks can be deleted from the window.
• Tasks in progress cannot be deleted.
More Actions button > Disable Auto Delete *
When disabled, the selected task remains in the task list after the task is completed.
More Actions button > Enable Auto Delete *
When enabled, the selected task is deleted from the Task list when the following two events occur:
• The task is completed
• The number of tasks in the Task list reaches the maximum number the window can display (384)
More Actions button > Export *
Window for saving table information to a file.
* Appears when you click More Actions.
Item Description
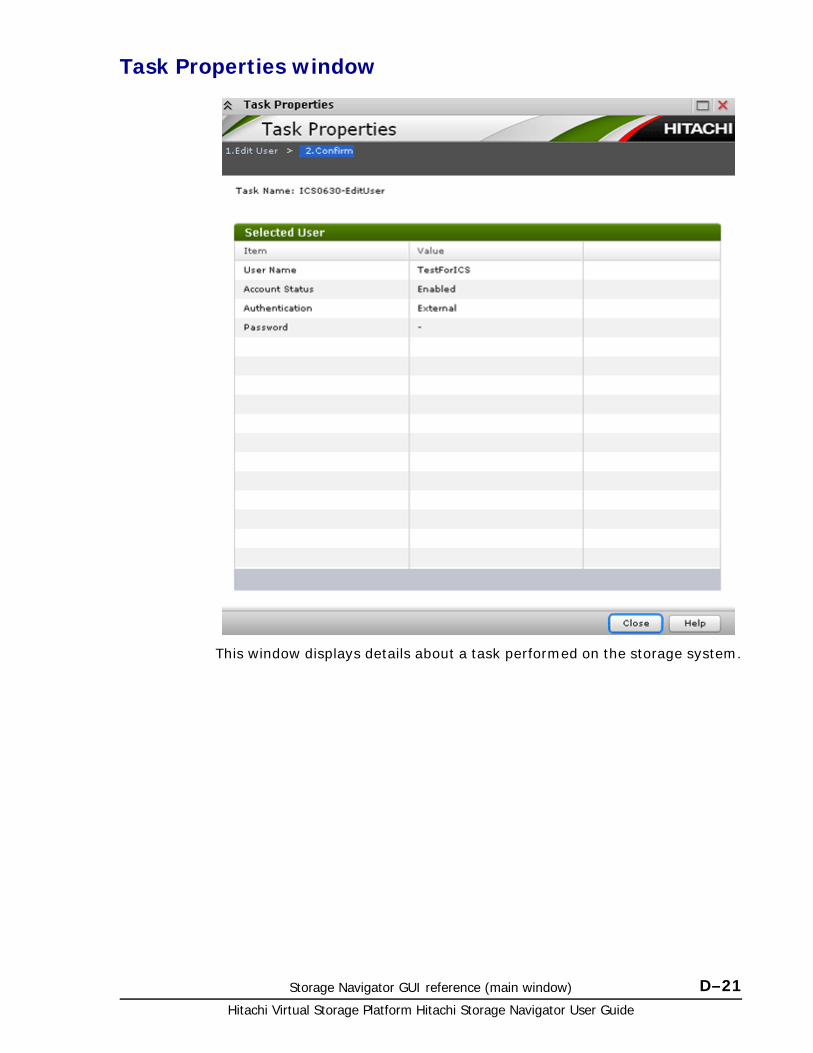
Storage Navigator GUI reference (main window) D–21Hitachi Virtual Storage Platform Hitachi Storage Navigator User Guide
Task Properties window
This window displays details about a task performed on the storage system.

Hitachi Virtual Storage Platform Hitachi Storage Navigator User Guide
D–22 Storage Navigator GUI reference (main window)
Suspend Tasks window
Use this window to suspend waiting tasks.
Selected Tasks table
Item Description
Task Name Task name specified by a user when the user performed the task.
Status Task status.
Type General name of the task.
User Name User name who performed the task.
Submission Time Date and time when the task was submitted.
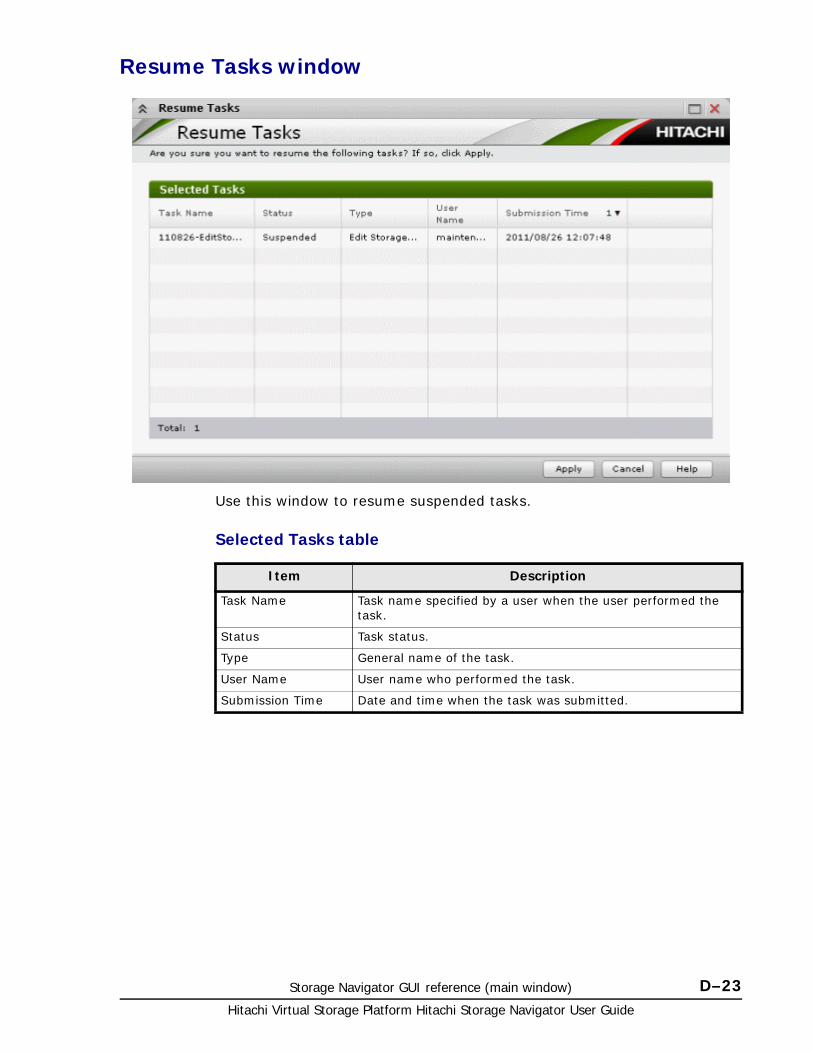
Storage Navigator GUI reference (main window) D–23Hitachi Virtual Storage Platform Hitachi Storage Navigator User Guide
Resume Tasks window
Use this window to resume suspended tasks.
Selected Tasks table
Item Description
Task Name Task name specified by a user when the user performed the task.
Status Task status.
Type General name of the task.
User Name User name who performed the task.
Submission Time Date and time when the task was submitted.
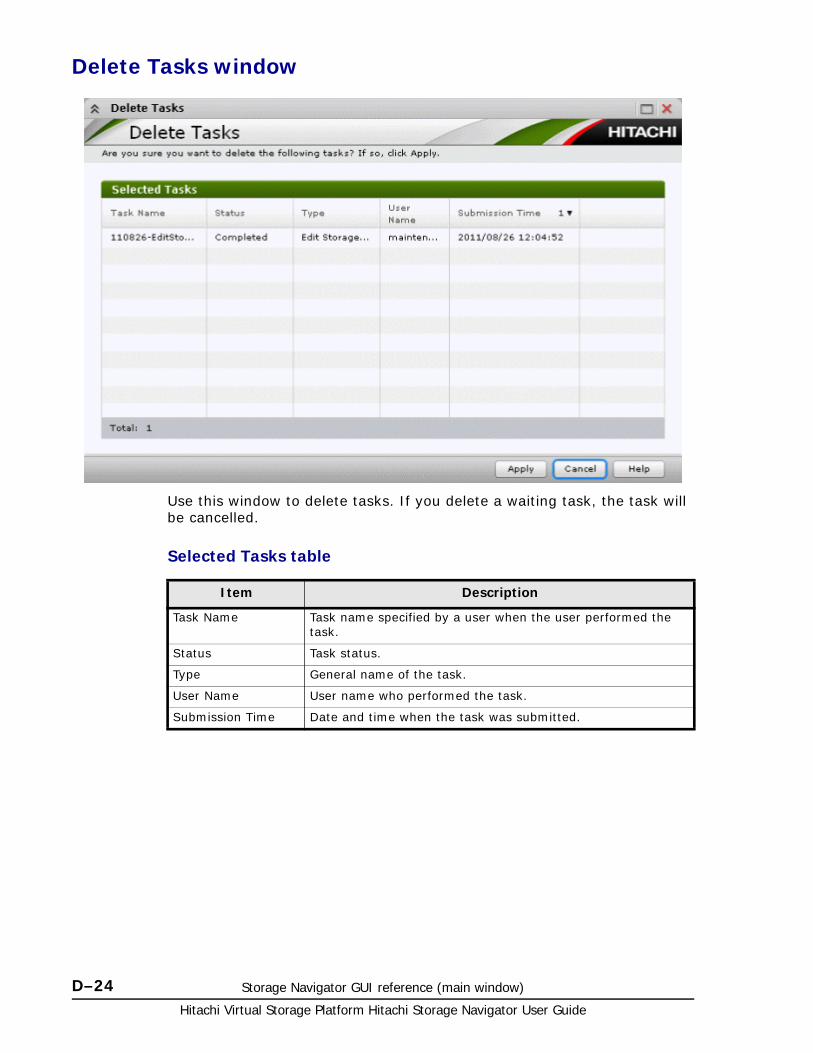
Hitachi Virtual Storage Platform Hitachi Storage Navigator User Guide
D–24 Storage Navigator GUI reference (main window)
Delete Tasks window
Use this window to delete tasks. If you delete a waiting task, the task will be cancelled.
Selected Tasks table
Item Description
Task Name Task name specified by a user when the user performed the task.
Status Task status.
Type General name of the task.
User Name User name who performed the task.
Submission Time Date and time when the task was submitted.
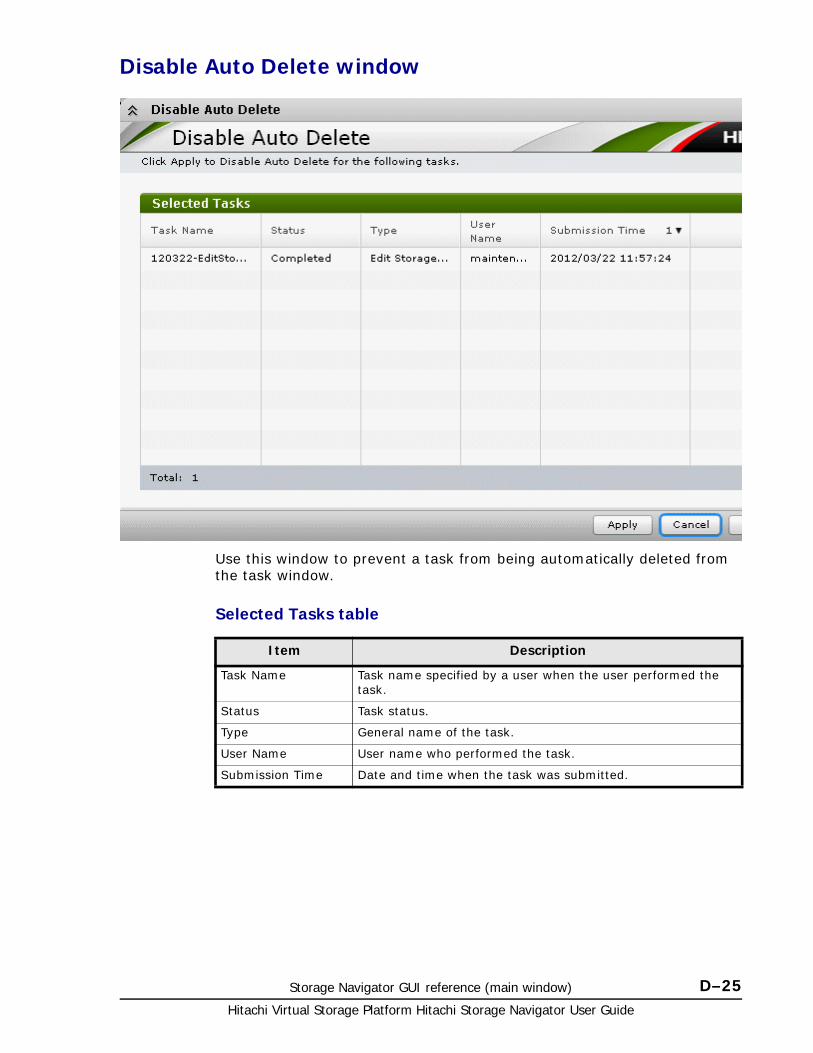
Storage Navigator GUI reference (main window) D–25Hitachi Virtual Storage Platform Hitachi Storage Navigator User Guide
Disable Auto Delete window
Use this window to prevent a task from being automatically deleted from the task window.
Selected Tasks table
Item Description
Task Name Task name specified by a user when the user performed the task.
Status Task status.
Type General name of the task.
User Name User name who performed the task.
Submission Time Date and time when the task was submitted.
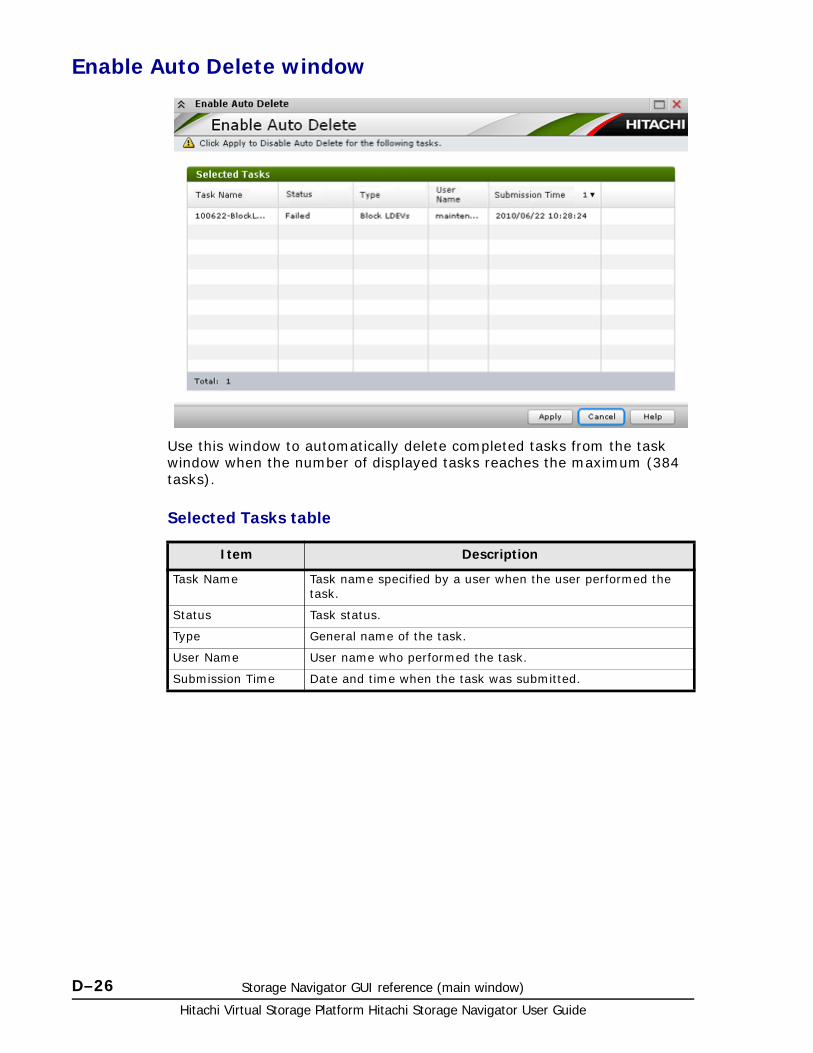
Hitachi Virtual Storage Platform Hitachi Storage Navigator User Guide
D–26 Storage Navigator GUI reference (main window)
Enable Auto Delete window
Use this window to automatically delete completed tasks from the task window when the number of displayed tasks reaches the maximum (384 tasks).
Selected Tasks table
Item Description
Task Name Task name specified by a user when the user performed the task.
Status Task status.
Type General name of the task.
User Name User name who performed the task.
Submission Time Date and time when the task was submitted.
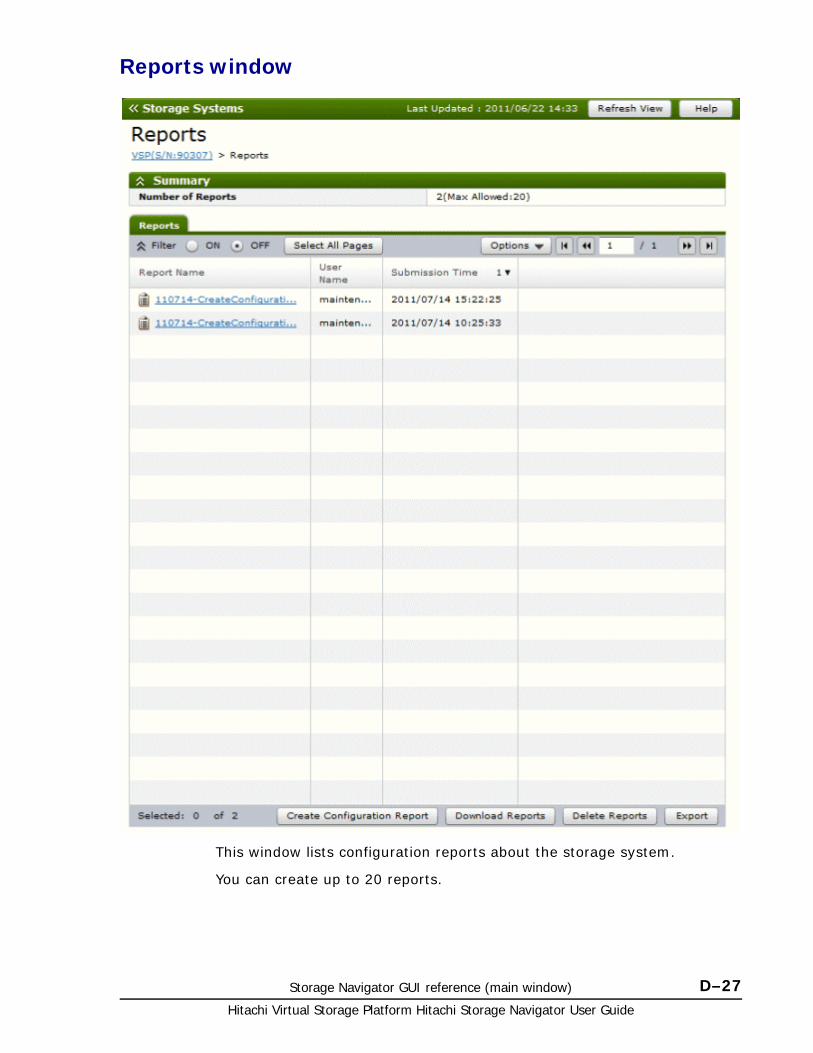
Storage Navigator GUI reference (main window) D–27Hitachi Virtual Storage Platform Hitachi Storage Navigator User Guide
Reports window
This window lists configuration reports about the storage system.
You can create up to 20 reports.
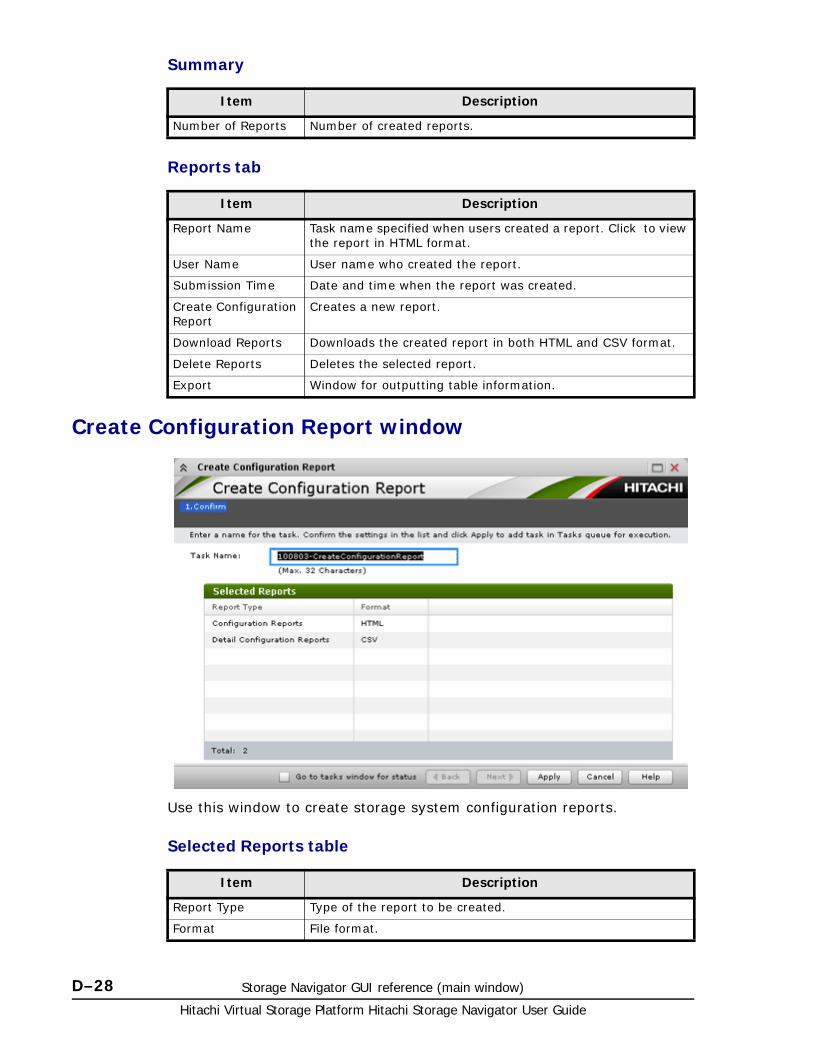
Hitachi Virtual Storage Platform Hitachi Storage Navigator User Guide
D–28 Storage Navigator GUI reference (main window)
Summary
Reports tab
Create Configuration Report window
Use this window to create storage system configuration reports.
Selected Reports table
Item Description
Number of Reports Number of created reports.
Item Description
Report Name Task name specified when users created a report. Click to view the report in HTML format.
User Name User name who created the report.
Submission Time Date and time when the report was created.
Create Configuration Report
Creates a new report.
Download Reports Downloads the created report in both HTML and CSV format.
Delete Reports Deletes the selected report.
Export Window for outputting table information.
Item Description
Report Type Type of the report to be created.
Format File format.
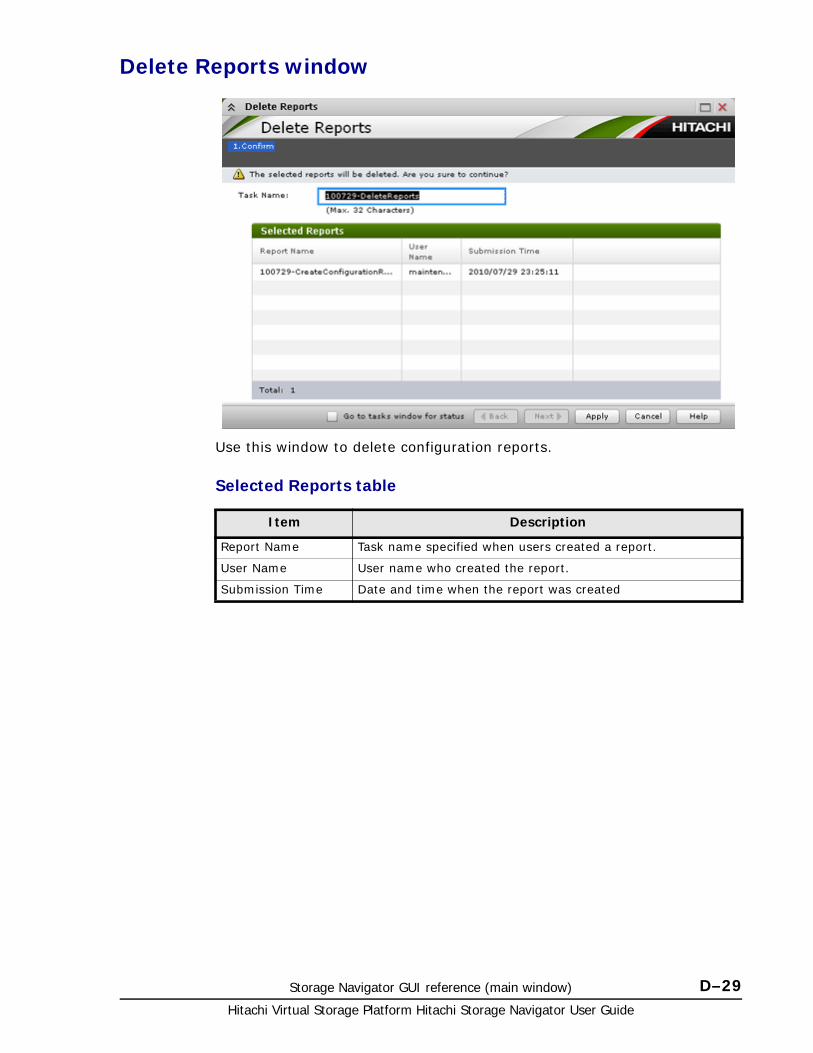
Storage Navigator GUI reference (main window) D–29Hitachi Virtual Storage Platform Hitachi Storage Navigator User Guide
Delete Reports window
Use this window to delete configuration reports.
Selected Reports table
Item Description
Report Name Task name specified when users created a report.
User Name User name who created the report.
Submission Time Date and time when the report was created

Hitachi Virtual Storage Platform Hitachi Storage Navigator User Guide
D–30 Storage Navigator GUI reference (main window)
User Groups window
This window lists all user groups created in Storage Navigator.
Summary
User Groups tab
Item Description
Number of User Groups
Number of user groups created in Storage Navigator.
Item Description
User Group Name Displays user group name.
User Group Type Displays the user group type.
Built-in: Indicates a built-in user group.
User-created: Indicates a user group that users created.
Number of Roles Displays the number of the roles that are assigned to the user group.
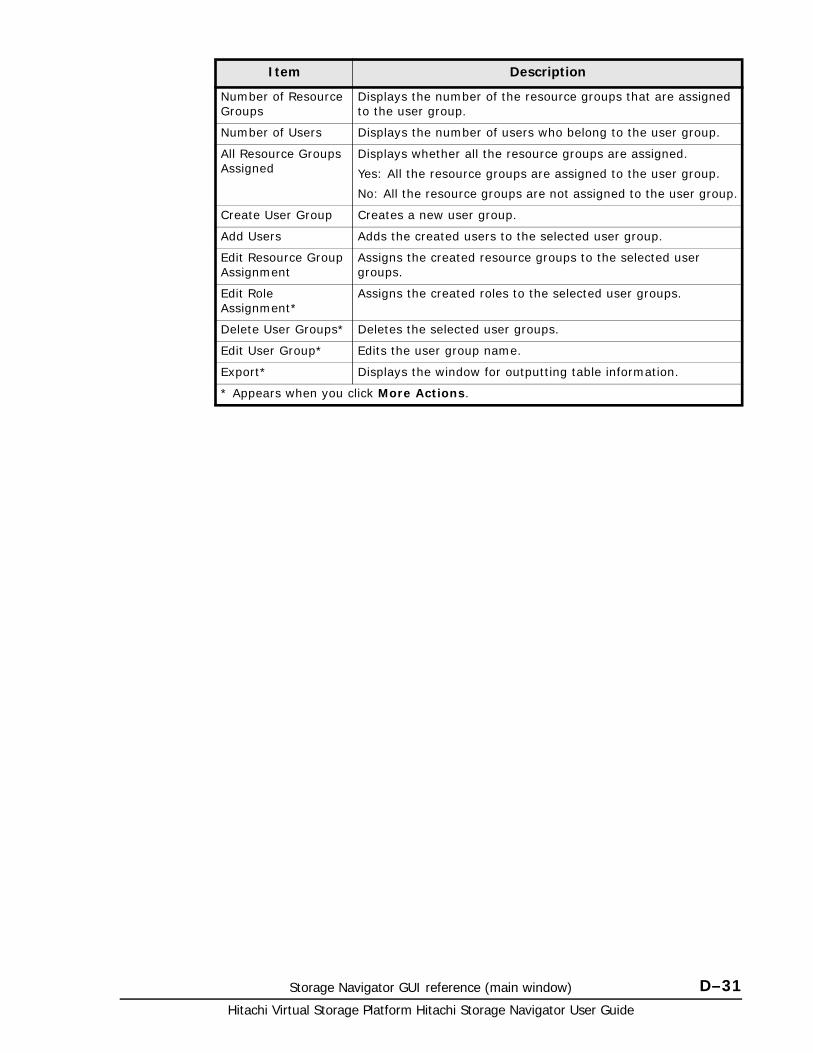
Storage Navigator GUI reference (main window) D–31Hitachi Virtual Storage Platform Hitachi Storage Navigator User Guide
Number of Resource Groups
Displays the number of the resource groups that are assigned to the user group.
Number of Users Displays the number of users who belong to the user group.
All Resource Groups Assigned
Displays whether all the resource groups are assigned.
Yes: All the resource groups are assigned to the user group.
No: All the resource groups are not assigned to the user group.
Create User Group Creates a new user group.
Add Users Adds the created users to the selected user group.
Edit Resource Group Assignment
Assigns the created resource groups to the selected user groups.
Edit Role Assignment*
Assigns the created roles to the selected user groups.
Delete User Groups* Deletes the selected user groups.
Edit User Group* Edits the user group name.
Export* Displays the window for outputting table information.
* Appears when you click More Actions.
Item Description
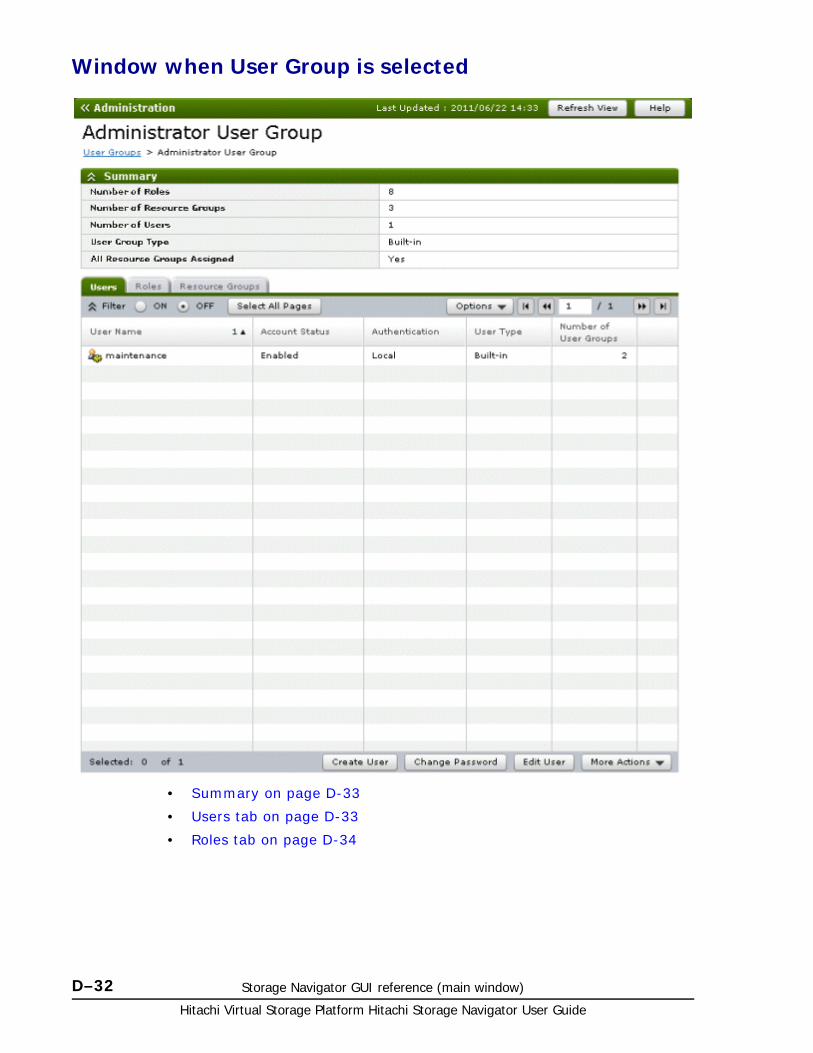
Hitachi Virtual Storage Platform Hitachi Storage Navigator User Guide
D–32 Storage Navigator GUI reference (main window)
Window when User Group is selected
• Summary on page D-33
• Users tab on page D-33
• Roles tab on page D-34
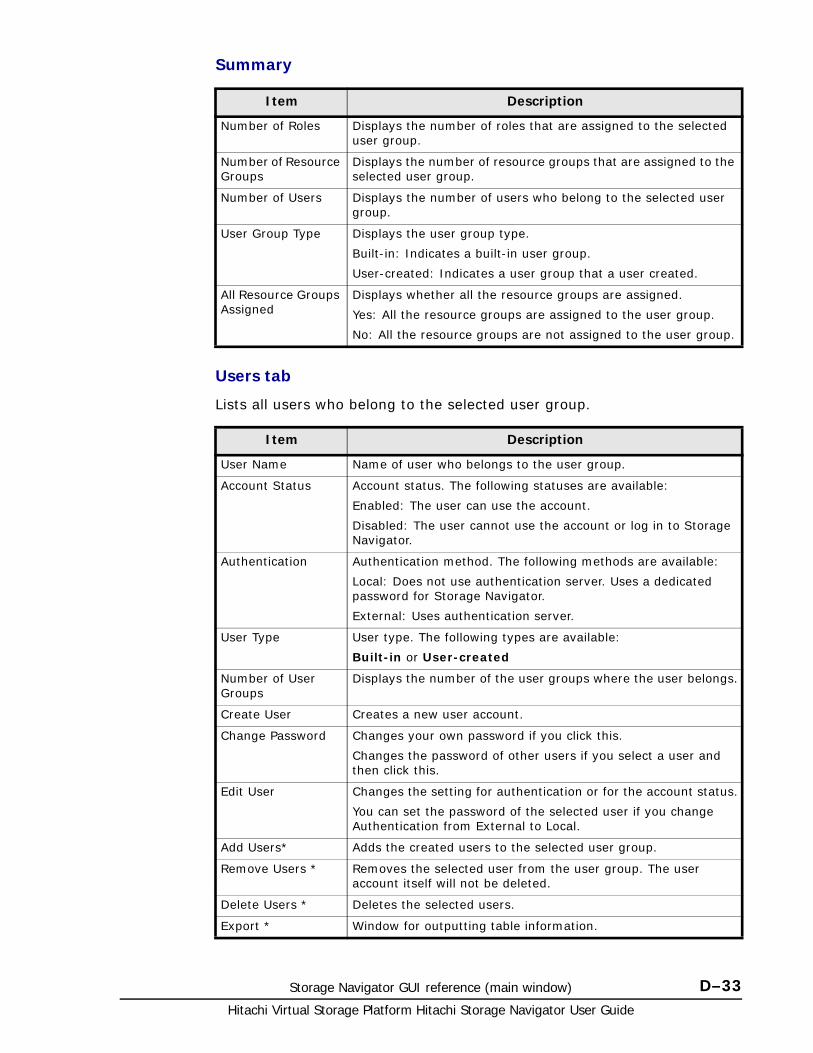
Storage Navigator GUI reference (main window) D–33Hitachi Virtual Storage Platform Hitachi Storage Navigator User Guide
Summary
Users tab
Lists all users who belong to the selected user group.
Item Description
Number of Roles Displays the number of roles that are assigned to the selected user group.
Number of Resource Groups
Displays the number of resource groups that are assigned to the selected user group.
Number of Users Displays the number of users who belong to the selected user group.
User Group Type Displays the user group type.
Built-in: Indicates a built-in user group.
User-created: Indicates a user group that a user created.
All Resource Groups Assigned
Displays whether all the resource groups are assigned.
Yes: All the resource groups are assigned to the user group.
No: All the resource groups are not assigned to the user group.
Item Description
User Name Name of user who belongs to the user group.
Account Status Account status. The following statuses are available:
Enabled: The user can use the account.
Disabled: The user cannot use the account or log in to Storage Navigator.
Authentication Authentication method. The following methods are available:
Local: Does not use authentication server. Uses a dedicated password for Storage Navigator.
External: Uses authentication server.
User Type User type. The following types are available:
Built-in or User-created
Number of User Groups
Displays the number of the user groups where the user belongs.
Create User Creates a new user account.
Change Password Changes your own password if you click this.
Changes the password of other users if you select a user and then click this.
Edit User Changes the setting for authentication or for the account status.
You can set the password of the selected user if you change Authentication from External to Local.
Add Users* Adds the created users to the selected user group.
Remove Users * Removes the selected user from the user group. The user account itself will not be deleted.
Delete Users * Deletes the selected users.
Export * Window for outputting table information.
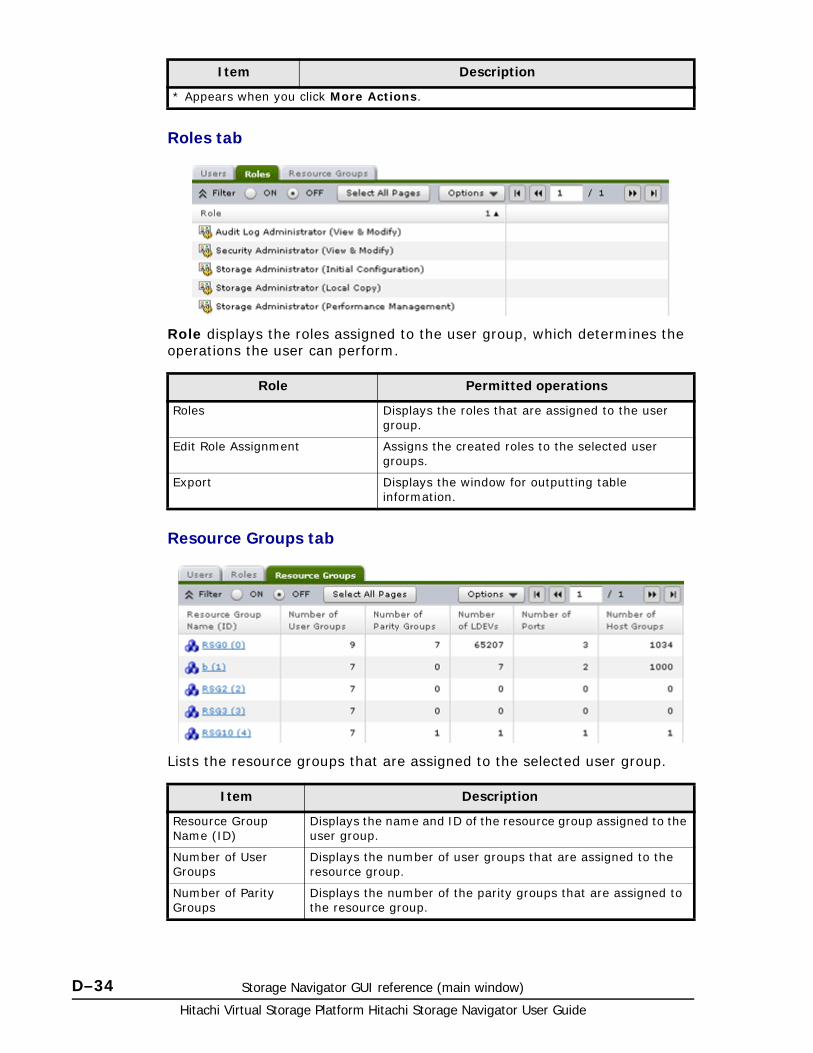
Hitachi Virtual Storage Platform Hitachi Storage Navigator User Guide
D–34 Storage Navigator GUI reference (main window)
Roles tab
Role displays the roles assigned to the user group, which determines the operations the user can perform.
Resource Groups tab
Lists the resource groups that are assigned to the selected user group.
* Appears when you click More Actions.
Item Description
Role Permitted operations
Roles Displays the roles that are assigned to the user group.
Edit Role Assignment Assigns the created roles to the selected user groups.
Export Displays the window for outputting table information.
Item Description
Resource Group Name (ID)
Displays the name and ID of the resource group assigned to the user group.
Number of User Groups
Displays the number of user groups that are assigned to the resource group.
Number of Parity Groups
Displays the number of the parity groups that are assigned to the resource group.
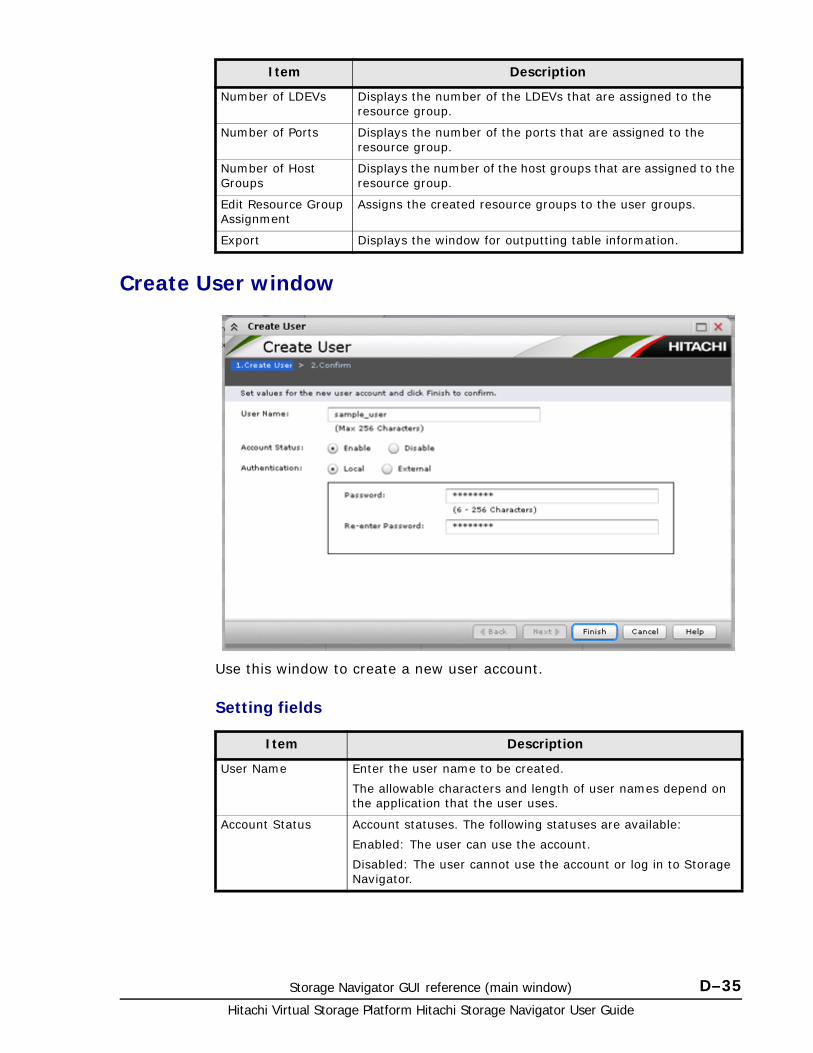
Storage Navigator GUI reference (main window) D–35Hitachi Virtual Storage Platform Hitachi Storage Navigator User Guide
Create User window
Use this window to create a new user account.
Setting fields
Number of LDEVs Displays the number of the LDEVs that are assigned to the resource group.
Number of Ports Displays the number of the ports that are assigned to the resource group.
Number of Host Groups
Displays the number of the host groups that are assigned to the resource group.
Edit Resource Group Assignment
Assigns the created resource groups to the user groups.
Export Displays the window for outputting table information.
Item Description
Item Description
User Name Enter the user name to be created.
The allowable characters and length of user names depend on the application that the user uses.
Account Status Account statuses. The following statuses are available:
Enabled: The user can use the account.
Disabled: The user cannot use the account or log in to Storage Navigator.
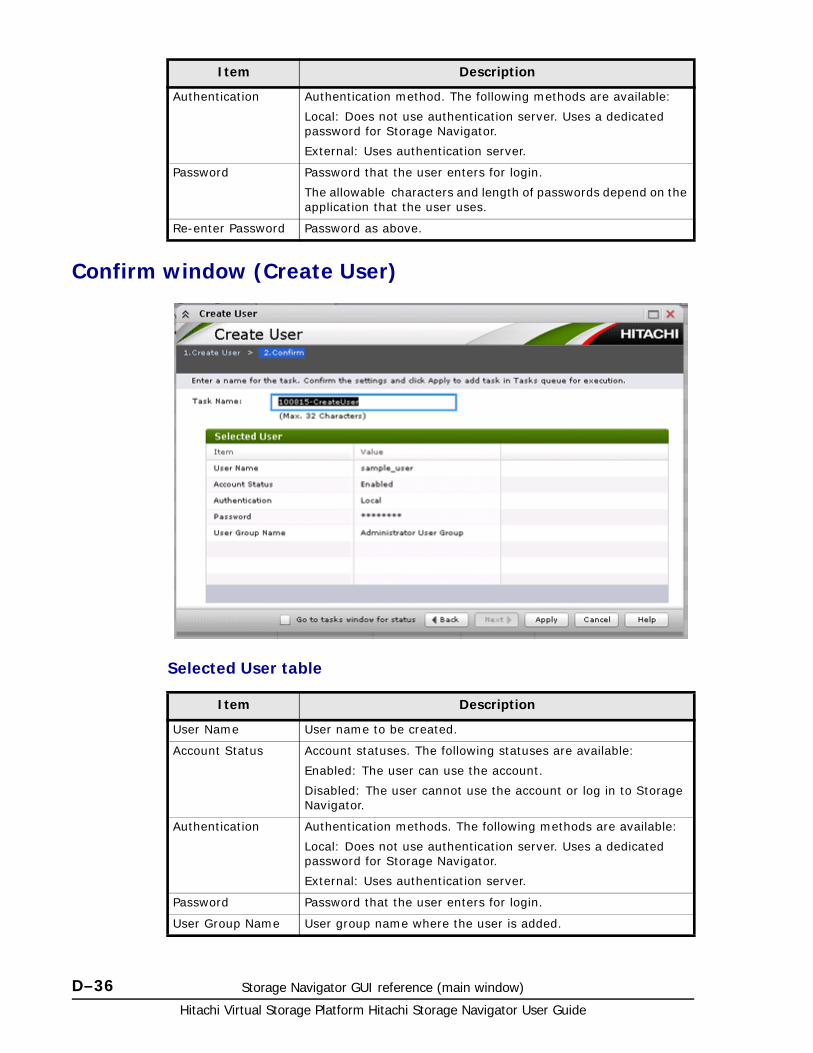
Hitachi Virtual Storage Platform Hitachi Storage Navigator User Guide
D–36 Storage Navigator GUI reference (main window)
Confirm window (Create User)
Selected User table
Authentication Authentication method. The following methods are available:
Local: Does not use authentication server. Uses a dedicated password for Storage Navigator.
External: Uses authentication server.
Password Password that the user enters for login.
The allowable characters and length of passwords depend on the application that the user uses.
Re-enter Password Password as above.
Item Description
Item Description
User Name User name to be created.
Account Status Account statuses. The following statuses are available:
Enabled: The user can use the account.
Disabled: The user cannot use the account or log in to Storage Navigator.
Authentication Authentication methods. The following methods are available:
Local: Does not use authentication server. Uses a dedicated password for Storage Navigator.
External: Uses authentication server.
Password Password that the user enters for login.
User Group Name User group name where the user is added.
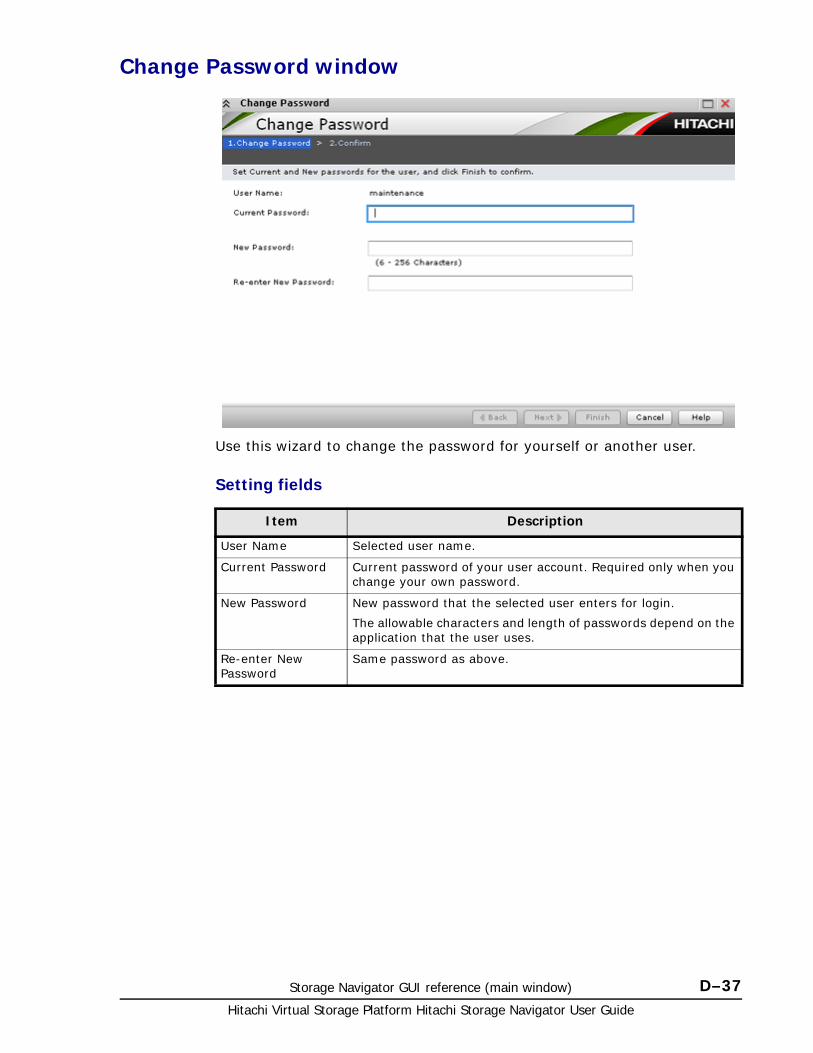
Storage Navigator GUI reference (main window) D–37Hitachi Virtual Storage Platform Hitachi Storage Navigator User Guide
Change Password window
Use this wizard to change the password for yourself or another user.
Setting fields
Item Description
User Name Selected user name.
Current Password Current password of your user account. Required only when you change your own password.
New Password New password that the selected user enters for login.
The allowable characters and length of passwords depend on the application that the user uses.
Re-enter New Password
Same password as above.
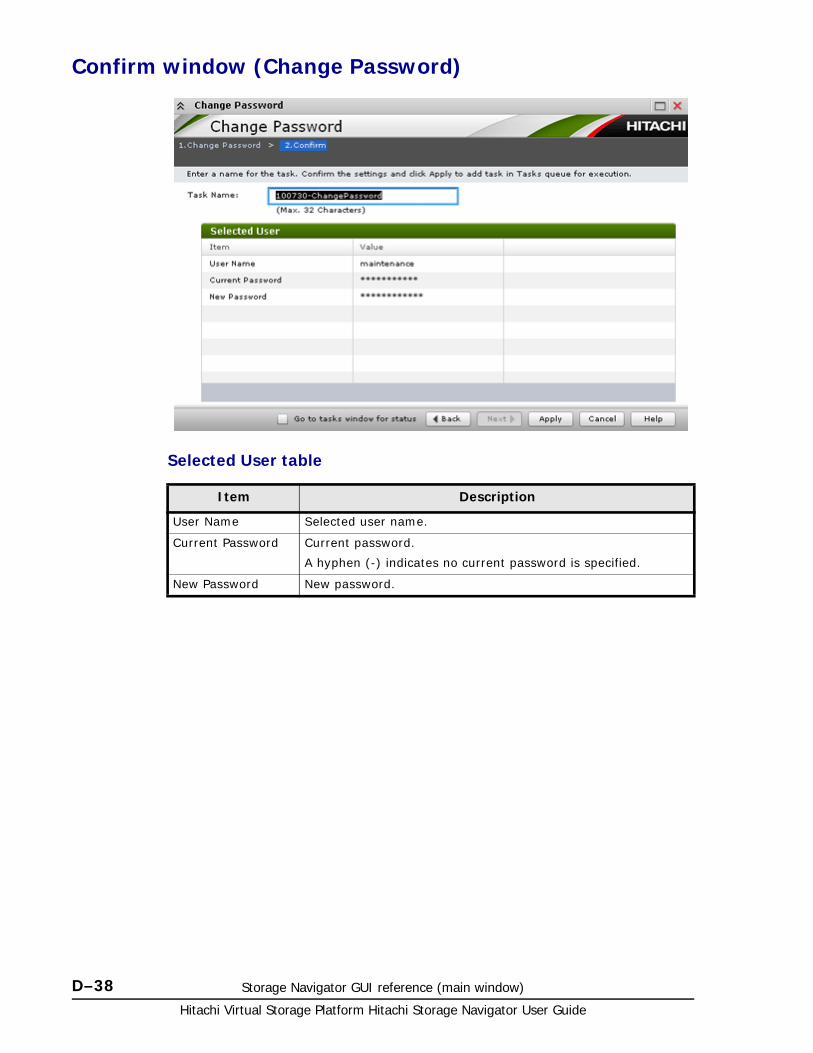
Hitachi Virtual Storage Platform Hitachi Storage Navigator User Guide
D–38 Storage Navigator GUI reference (main window)
Confirm window (Change Password)
Selected User table
Item Description
User Name Selected user name.
Current Password Current password.
A hyphen (-) indicates no current password is specified.
New Password New password.

Storage Navigator GUI reference (main window) D–39Hitachi Virtual Storage Platform Hitachi Storage Navigator User Guide
Edit User window
Use this wizard to change the setting for authentication or for the account status.
Setting fields
Item Description
User Name Selected user name.
Account Status Account statuses. The following statuses are available:
Enabled: The user can use the account.
Disabled: The user cannot use the account or log in to Storage Navigator.
Authentication Authentication method. The following methods are available:
Local: Does not use authentication server. Uses a dedicated password for Storage Navigator.
External: Uses authentication server.
Password Password that the user enters for login.
You can specify ASCII code characters and the following symbols:
! # $ % and ' ( ) * + , -. / : ; < = > ? @ [ \ ] ^ _` { | } ~
Re-enter Password Password that the user enters for login.
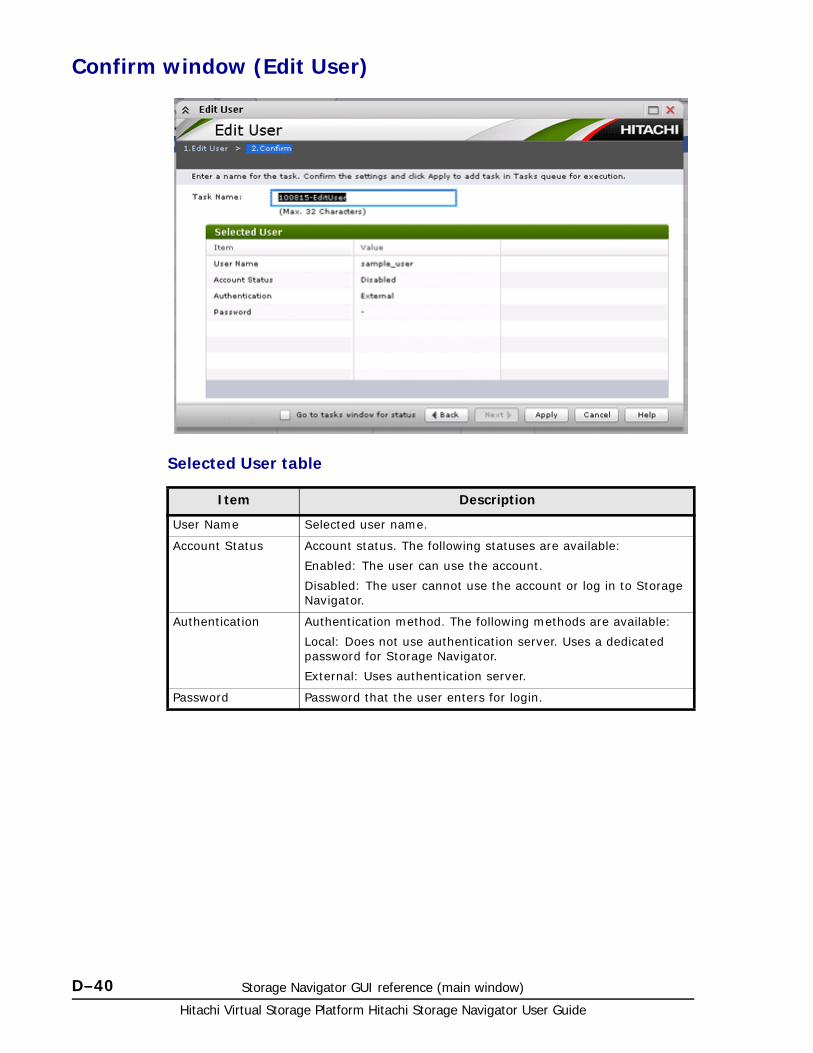
Hitachi Virtual Storage Platform Hitachi Storage Navigator User Guide
D–40 Storage Navigator GUI reference (main window)
Confirm window (Edit User)
Selected User table
Item Description
User Name Selected user name.
Account Status Account status. The following statuses are available:
Enabled: The user can use the account.
Disabled: The user cannot use the account or log in to Storage Navigator.
Authentication Authentication method. The following methods are available:
Local: Does not use authentication server. Uses a dedicated password for Storage Navigator.
External: Uses authentication server.
Password Password that the user enters for login.
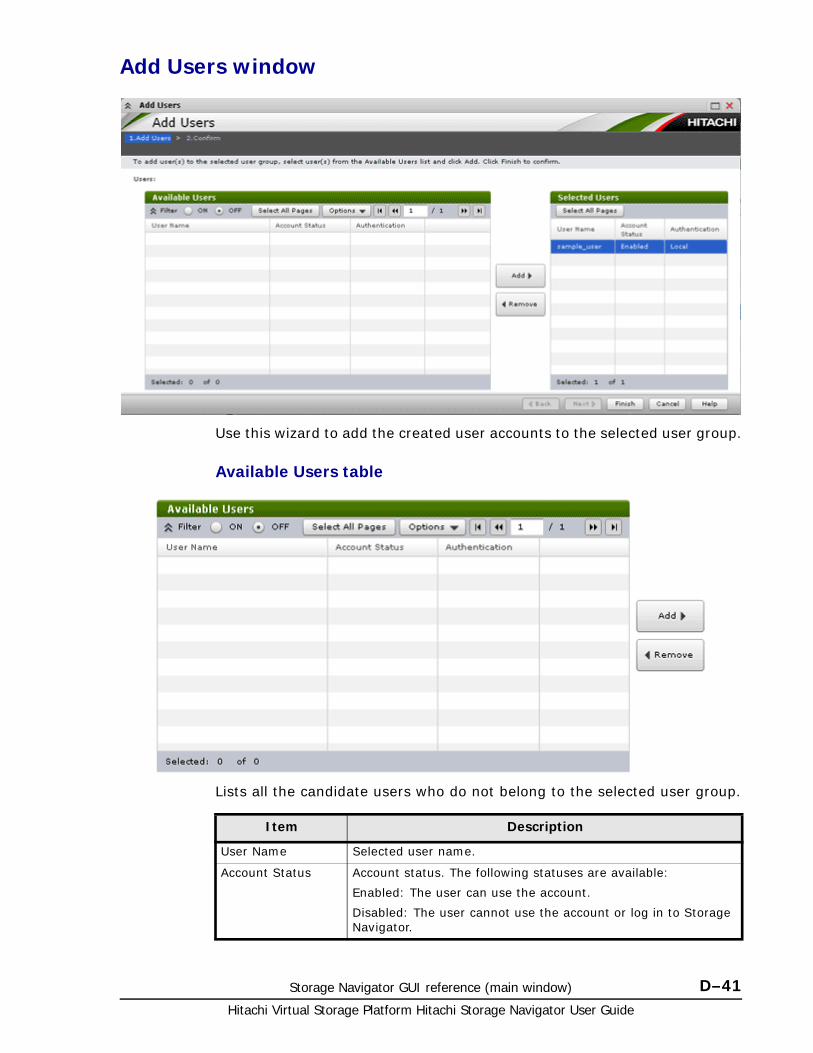
Storage Navigator GUI reference (main window) D–41Hitachi Virtual Storage Platform Hitachi Storage Navigator User Guide
Add Users window
Use this wizard to add the created user accounts to the selected user group.
Available Users table
Lists all the candidate users who do not belong to the selected user group.
Item Description
User Name Selected user name.
Account Status Account status. The following statuses are available:
Enabled: The user can use the account.
Disabled: The user cannot use the account or log in to Storage Navigator.

Hitachi Virtual Storage Platform Hitachi Storage Navigator User Guide
D–42 Storage Navigator GUI reference (main window)
Add button
Adds the selected users in the Available Users list to the Selected Users list.
Remove button
Removes the selected users from the Selected Users list and relocates the selected users to the Available User list.
Selected Users table
Lists users to be added to the user group.
Authentication Authentication method. The following methods are available:
Local: Does not use authentication server. Uses a dedicated password for Storage Navigator.
External: Uses authentication server.
Item Description
Item Description
User Name Selected user name.
Account Status Account status. The following statuses are available:
Enabled: The user can use the account.
Disabled: The user cannot use the account or log in to Storage Navigator.
Authentication Authentication method. The following methods are available:
Local: Does not use authentication server. Uses a dedicated password for Storage Navigator.
External: Uses authentication server.
User Group Name Name of user group to which user is added.
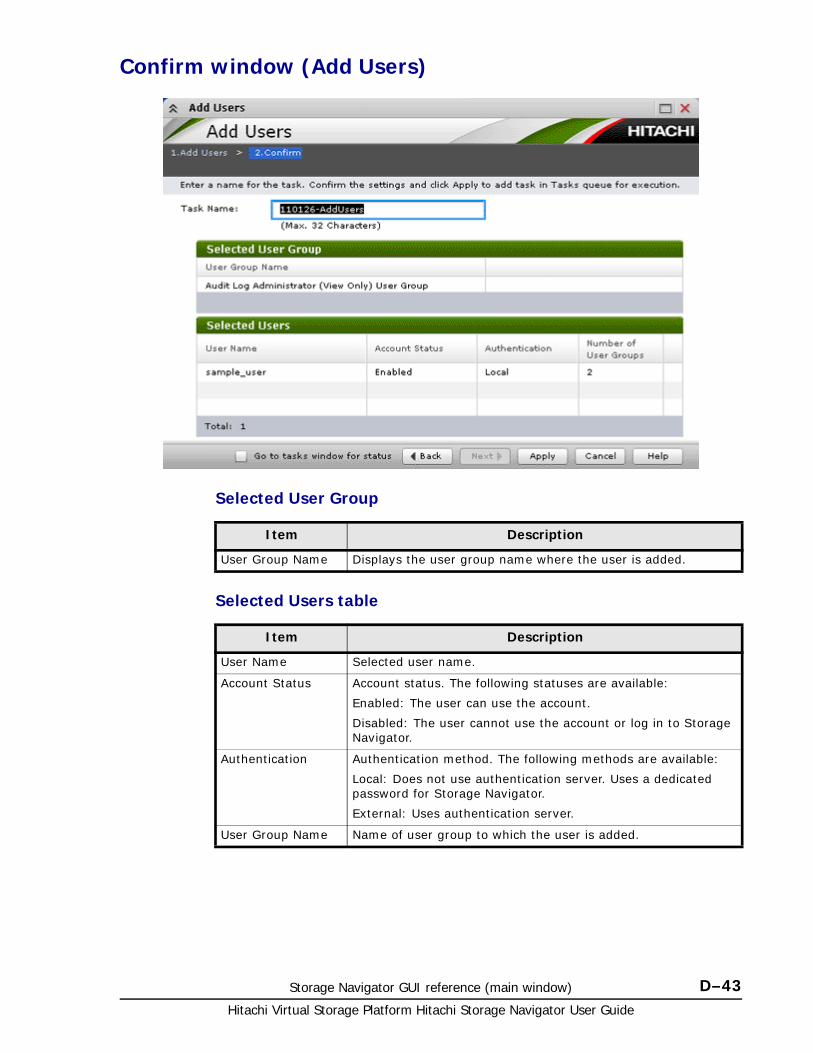
Storage Navigator GUI reference (main window) D–43Hitachi Virtual Storage Platform Hitachi Storage Navigator User Guide
Confirm window (Add Users)
Selected User Group
Selected Users table
Item Description
User Group Name Displays the user group name where the user is added.
Item Description
User Name Selected user name.
Account Status Account status. The following statuses are available:
Enabled: The user can use the account.
Disabled: The user cannot use the account or log in to Storage Navigator.
Authentication Authentication method. The following methods are available:
Local: Does not use authentication server. Uses a dedicated password for Storage Navigator.
External: Uses authentication server.
User Group Name Name of user group to which the user is added.

Hitachi Virtual Storage Platform Hitachi Storage Navigator User Guide
D–44 Storage Navigator GUI reference (main window)
Remove Users window
Selected User Group table
Selected Users table
Item Description
User Group Name Displays the name of the user group where the user is removed.
Item Description
User Name Selected user name.
Account Status Account status. the following statuses are available:
Enabled: The user can use the account.
Disabled: The user cannot use the account or log in to Storage Navigator.
Authentication Authentication method. The following methods are available:
Local: Does not use authentication server. Uses a dedicated password for Storage Navigator.
External: Uses authentication server.
Number of User Groups
Number of user group from which user is removed.
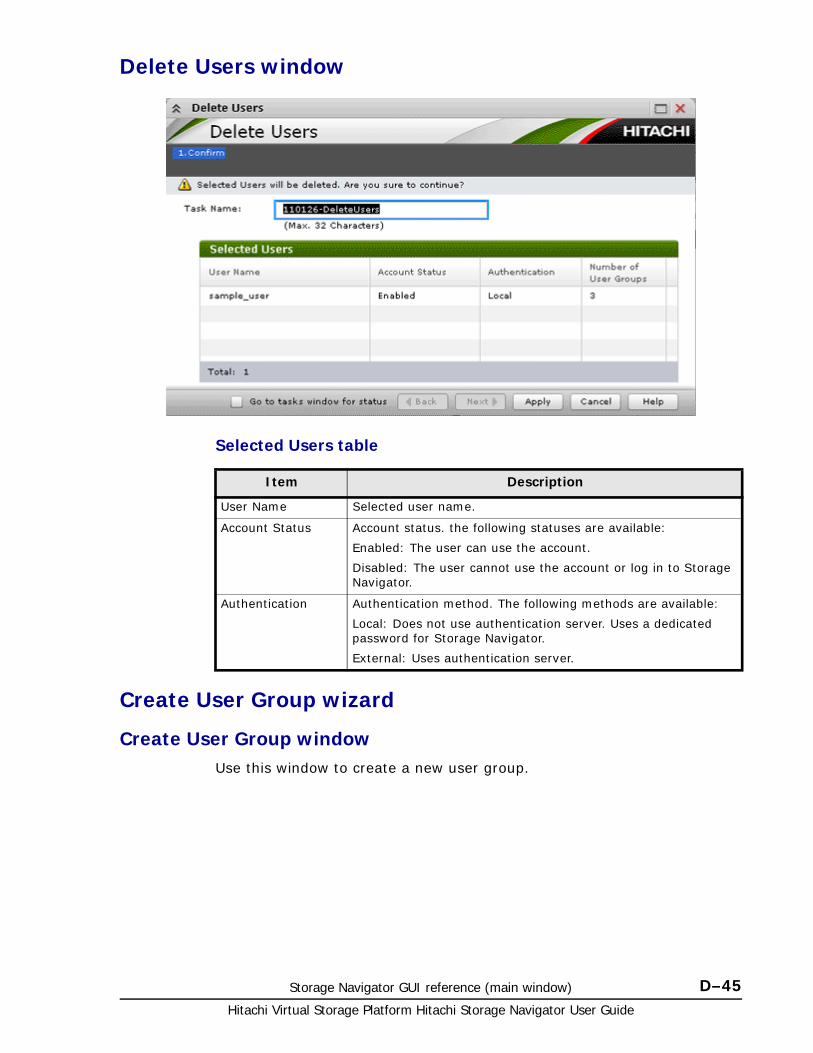
Storage Navigator GUI reference (main window) D–45Hitachi Virtual Storage Platform Hitachi Storage Navigator User Guide
Delete Users window
Selected Users table
Create User Group wizard
Create User Group windowUse this window to create a new user group.
Item Description
User Name Selected user name.
Account Status Account status. the following statuses are available:
Enabled: The user can use the account.
Disabled: The user cannot use the account or log in to Storage Navigator.
Authentication Authentication method. The following methods are available:
Local: Does not use authentication server. Uses a dedicated password for Storage Navigator.
External: Uses authentication server.
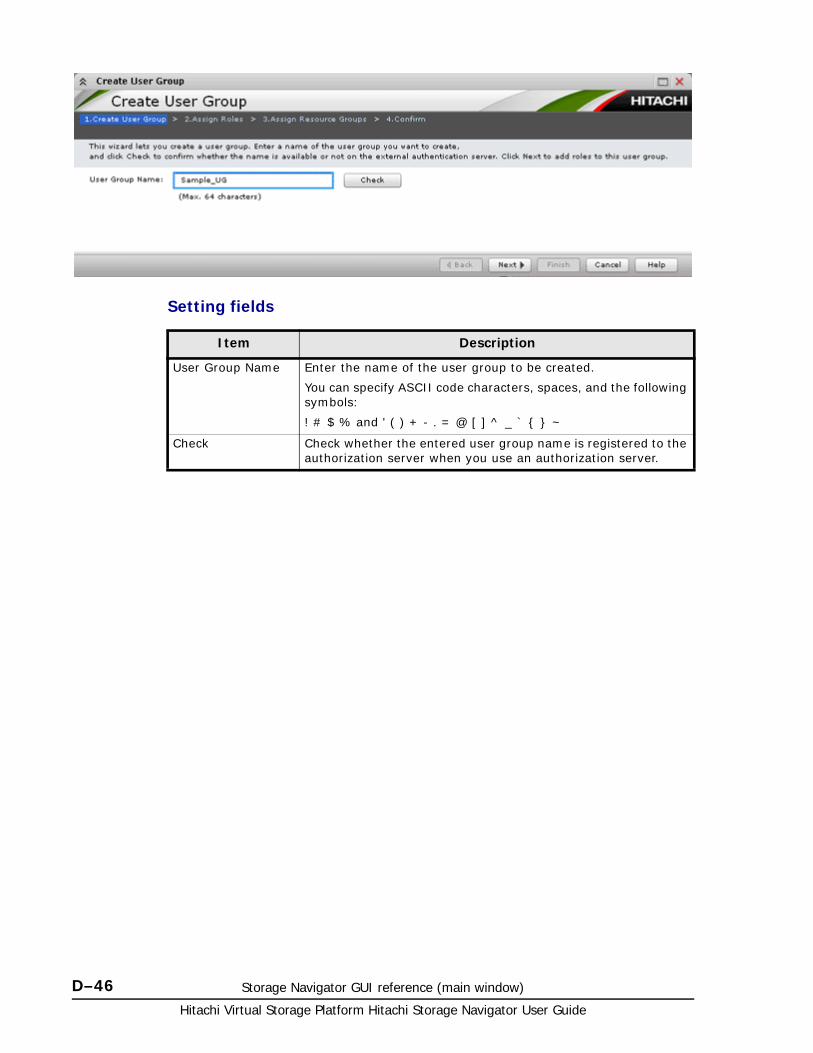
Hitachi Virtual Storage Platform Hitachi Storage Navigator User Guide
D–46 Storage Navigator GUI reference (main window)
Setting fields
Item Description
User Group Name Enter the name of the user group to be created.
You can specify ASCII code characters, spaces, and the following symbols:
! # $ % and ' ( ) + - . = @ [ ] ^ _ ` { } ~
Check Check whether the entered user group name is registered to the authorization server when you use an authorization server.
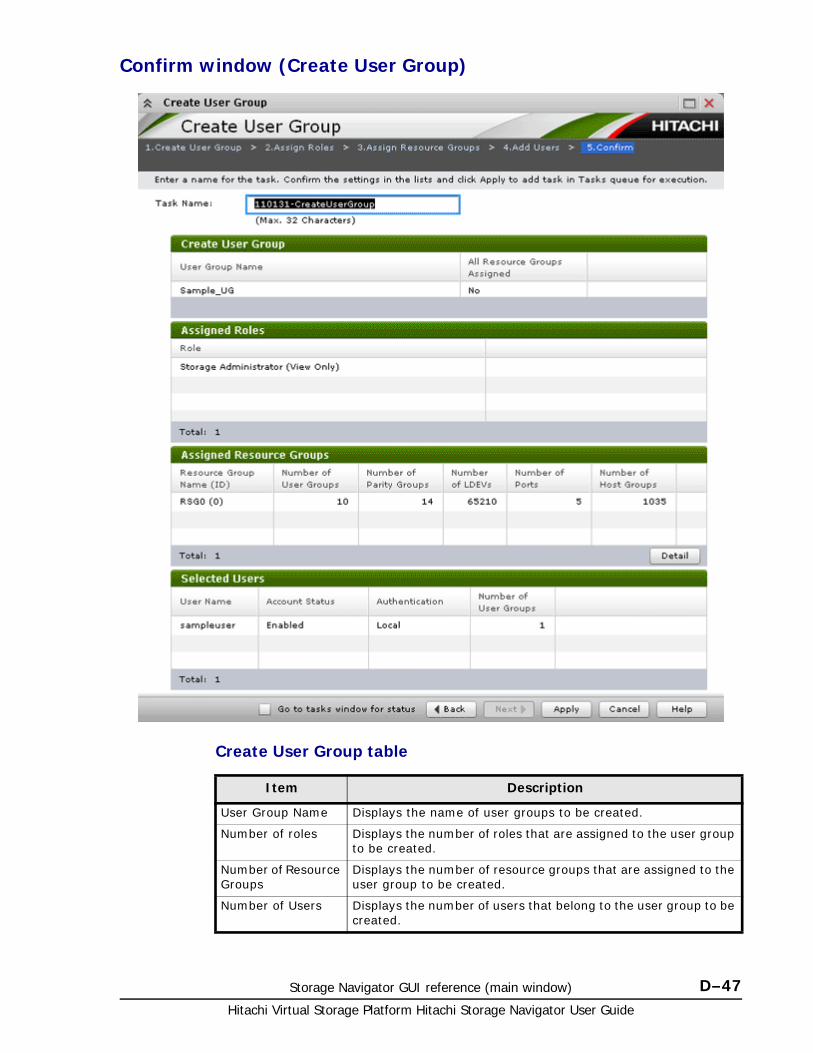
Storage Navigator GUI reference (main window) D–47Hitachi Virtual Storage Platform Hitachi Storage Navigator User Guide
Confirm window (Create User Group)
Create User Group table
Item Description
User Group Name Displays the name of user groups to be created.
Number of roles Displays the number of roles that are assigned to the user group to be created.
Number of Resource Groups
Displays the number of resource groups that are assigned to the user group to be created.
Number of Users Displays the number of users that belong to the user group to be created.
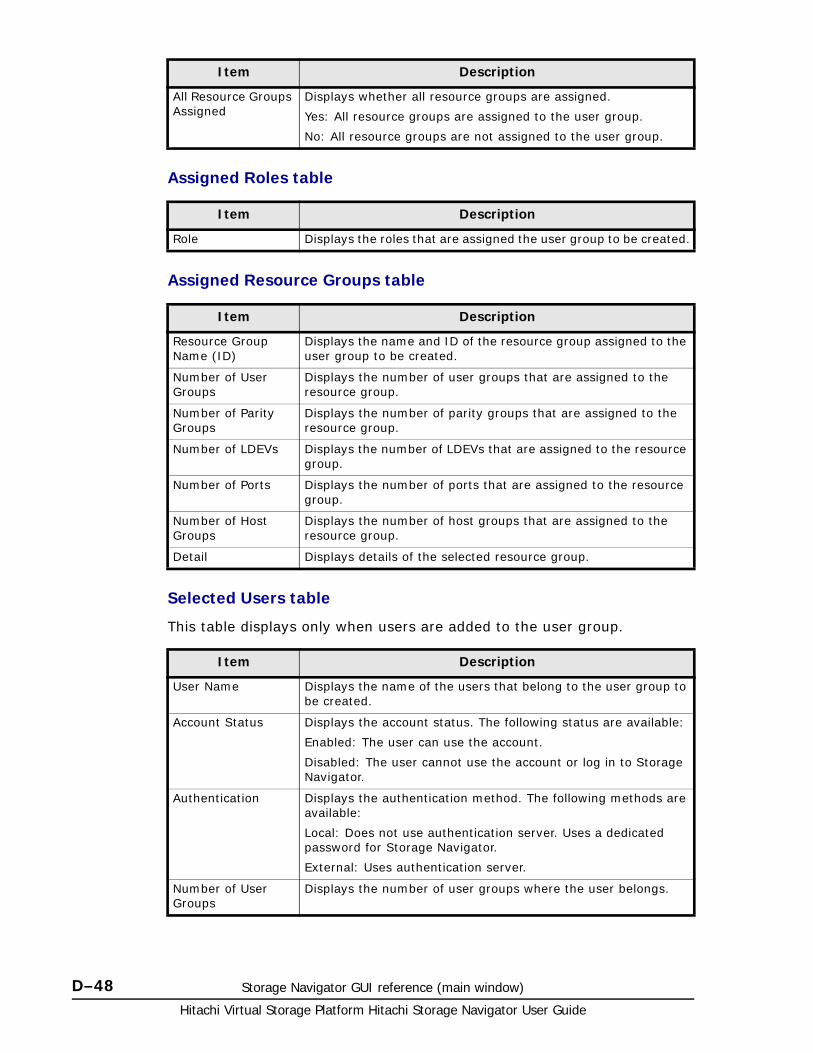
Hitachi Virtual Storage Platform Hitachi Storage Navigator User Guide
D–48 Storage Navigator GUI reference (main window)
Assigned Roles table
Assigned Resource Groups table
Selected Users table
This table displays only when users are added to the user group.
All Resource Groups Assigned
Displays whether all resource groups are assigned.
Yes: All resource groups are assigned to the user group.
No: All resource groups are not assigned to the user group.
Item Description
Item Description
Role Displays the roles that are assigned the user group to be created.
Item Description
Resource Group Name (ID)
Displays the name and ID of the resource group assigned to the user group to be created.
Number of User Groups
Displays the number of user groups that are assigned to the resource group.
Number of Parity Groups
Displays the number of parity groups that are assigned to the resource group.
Number of LDEVs Displays the number of LDEVs that are assigned to the resource group.
Number of Ports Displays the number of ports that are assigned to the resource group.
Number of Host Groups
Displays the number of host groups that are assigned to the resource group.
Detail Displays details of the selected resource group.
Item Description
User Name Displays the name of the users that belong to the user group to be created.
Account Status Displays the account status. The following status are available:
Enabled: The user can use the account.
Disabled: The user cannot use the account or log in to Storage Navigator.
Authentication Displays the authentication method. The following methods are available:
Local: Does not use authentication server. Uses a dedicated password for Storage Navigator.
External: Uses authentication server.
Number of User Groups
Displays the number of user groups where the user belongs.
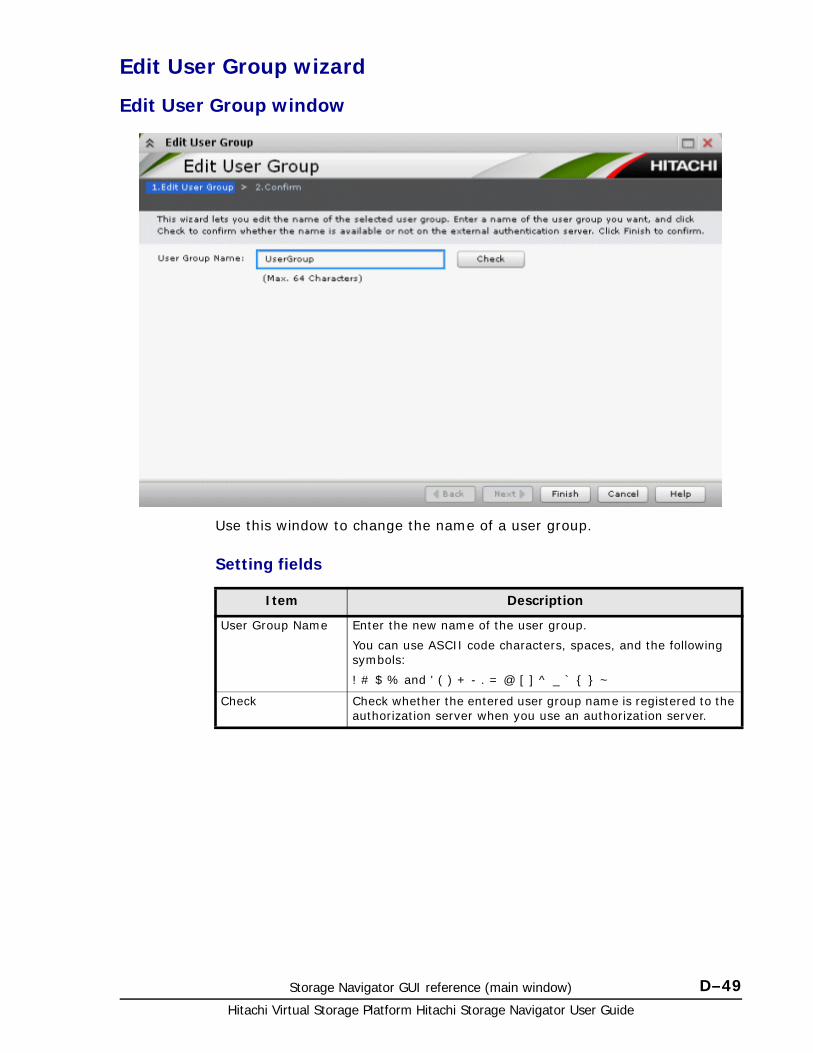
Storage Navigator GUI reference (main window) D–49Hitachi Virtual Storage Platform Hitachi Storage Navigator User Guide
Edit User Group wizard
Edit User Group window
Use this window to change the name of a user group.
Setting fields
Item Description
User Group Name Enter the new name of the user group.
You can use ASCII code characters, spaces, and the following symbols:
! # $ % and ' ( ) + - . = @ [ ] ^ _ ` { } ~
Check Check whether the entered user group name is registered to the authorization server when you use an authorization server.
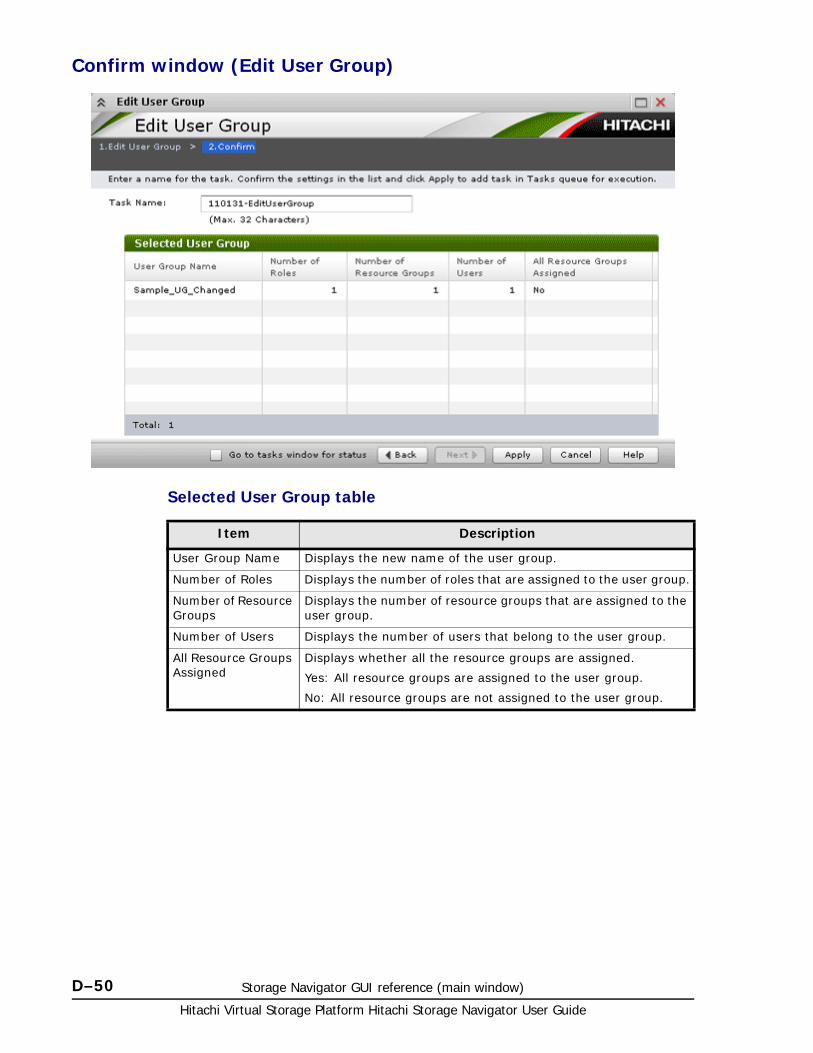
Hitachi Virtual Storage Platform Hitachi Storage Navigator User Guide
D–50 Storage Navigator GUI reference (main window)
Confirm window (Edit User Group)
Selected User Group table
Item Description
User Group Name Displays the new name of the user group.
Number of Roles Displays the number of roles that are assigned to the user group.
Number of Resource Groups
Displays the number of resource groups that are assigned to the user group.
Number of Users Displays the number of users that belong to the user group.
All Resource Groups Assigned
Displays whether all the resource groups are assigned.
Yes: All resource groups are assigned to the user group.
No: All resource groups are not assigned to the user group.
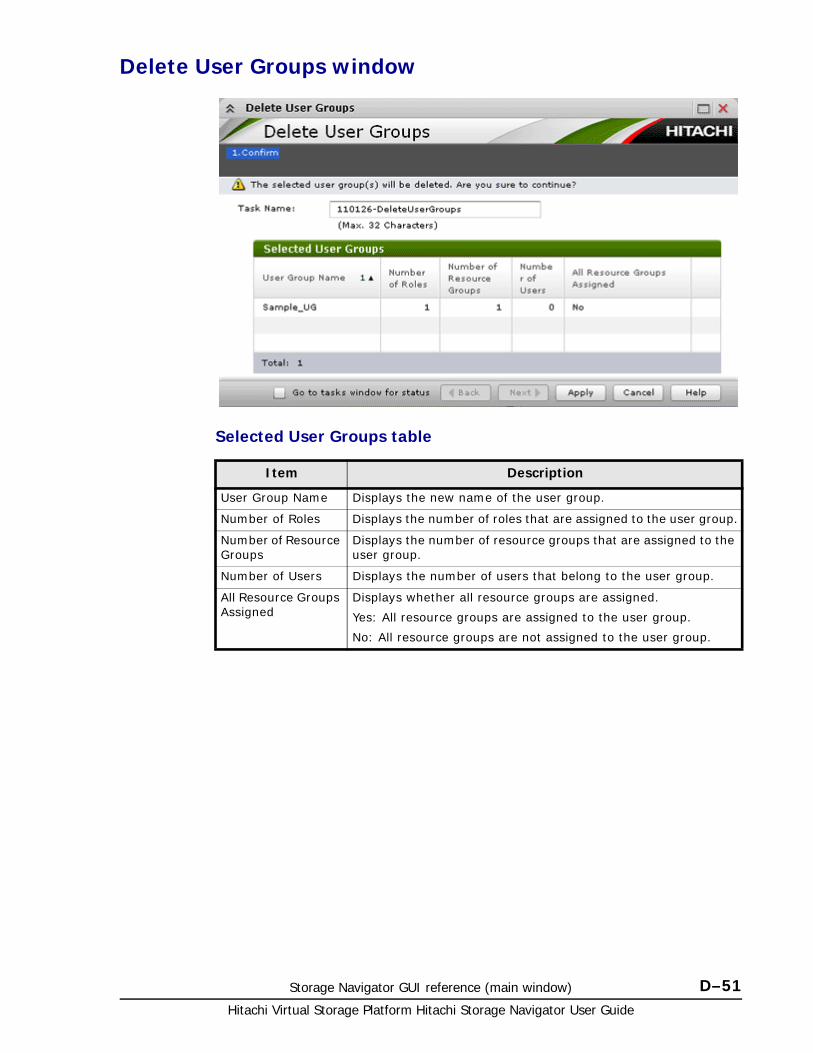
Storage Navigator GUI reference (main window) D–51Hitachi Virtual Storage Platform Hitachi Storage Navigator User Guide
Delete User Groups window
Selected User Groups table
Item Description
User Group Name Displays the new name of the user group.
Number of Roles Displays the number of roles that are assigned to the user group.
Number of Resource Groups
Displays the number of resource groups that are assigned to the user group.
Number of Users Displays the number of users that belong to the user group.
All Resource Groups Assigned
Displays whether all resource groups are assigned.
Yes: All resource groups are assigned to the user group.
No: All resource groups are not assigned to the user group.
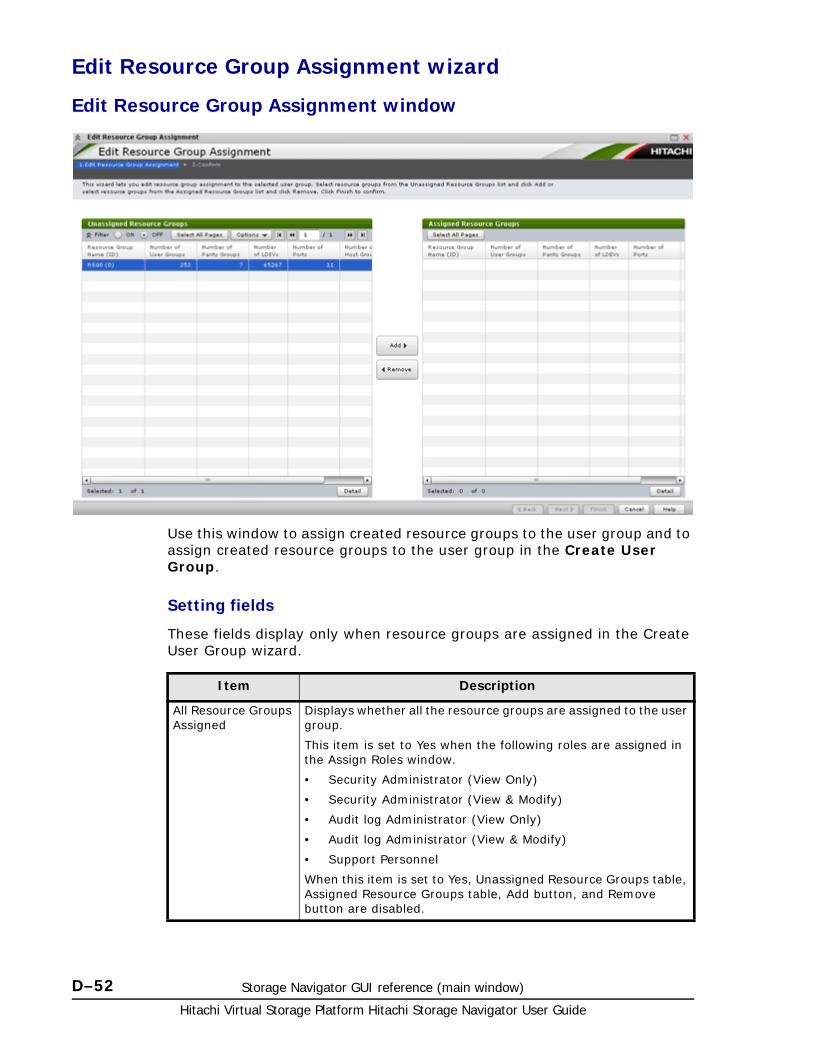
Hitachi Virtual Storage Platform Hitachi Storage Navigator User Guide
D–52 Storage Navigator GUI reference (main window)
Edit Resource Group Assignment wizard
Edit Resource Group Assignment window
Use this window to assign created resource groups to the user group and to assign created resource groups to the user group in the Create User Group.
Setting fields
These fields display only when resource groups are assigned in the Create User Group wizard.
Item Description
All Resource Groups Assigned
Displays whether all the resource groups are assigned to the user group.
This item is set to Yes when the following roles are assigned in the Assign Roles window.
• Security Administrator (View Only)
• Security Administrator (View & Modify)
• Audit log Administrator (View Only)
• Audit log Administrator (View & Modify)
• Support Personnel
When this item is set to Yes, Unassigned Resource Groups table, Assigned Resource Groups table, Add button, and Remove button are disabled.
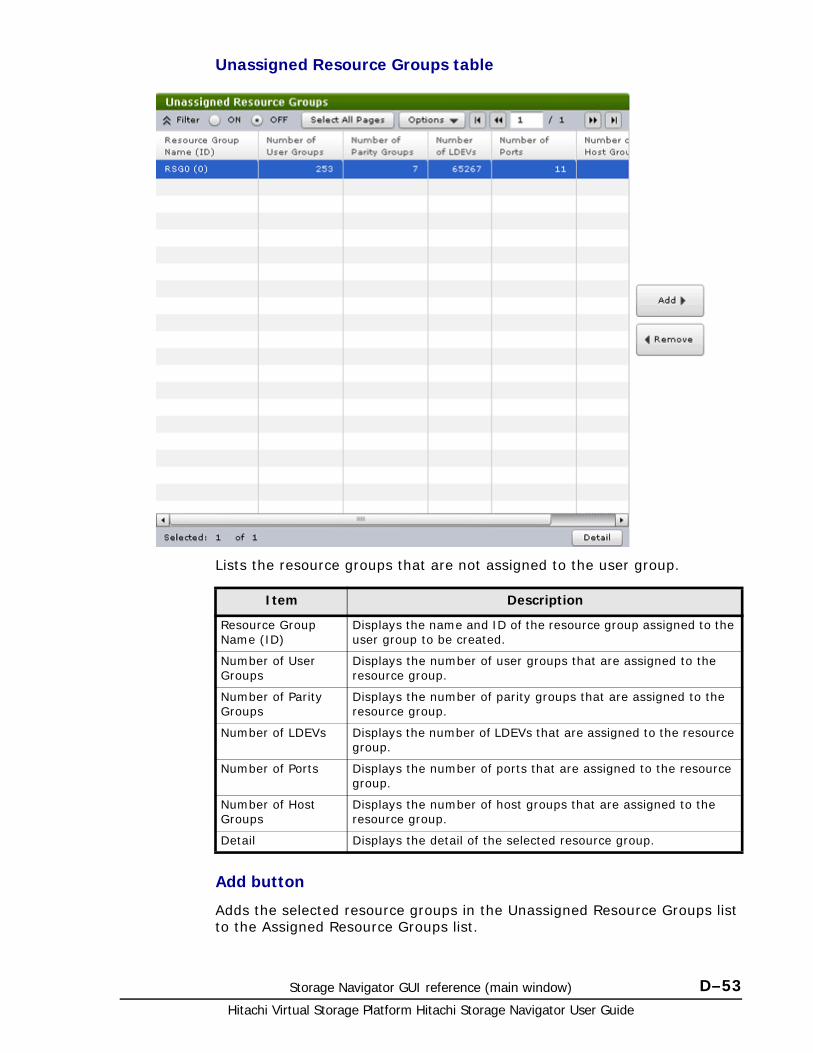
Storage Navigator GUI reference (main window) D–53Hitachi Virtual Storage Platform Hitachi Storage Navigator User Guide
Unassigned Resource Groups table
Lists the resource groups that are not assigned to the user group.
Add button
Adds the selected resource groups in the Unassigned Resource Groups list to the Assigned Resource Groups list.
Item Description
Resource Group Name (ID)
Displays the name and ID of the resource group assigned to the user group to be created.
Number of User Groups
Displays the number of user groups that are assigned to the resource group.
Number of Parity Groups
Displays the number of parity groups that are assigned to the resource group.
Number of LDEVs Displays the number of LDEVs that are assigned to the resource group.
Number of Ports Displays the number of ports that are assigned to the resource group.
Number of Host Groups
Displays the number of host groups that are assigned to the resource group.
Detail Displays the detail of the selected resource group.

Hitachi Virtual Storage Platform Hitachi Storage Navigator User Guide
D–54 Storage Navigator GUI reference (main window)
Remove button
Removes the selected resource groups from the Assigned Resource Groups list and relocates the resource groups to the Unassigned Resource Groups list.
Assigned Resource Groups table
Lists the resource groups to be assigned to the user group.
Item Description
Resource Group Name (ID)
Displays the name and ID of the resource group assigned to the user group to be created.
Number of User Groups
Displays the number of user groups that are assigned to the resource group.
Number of Parity Groups
Displays the number of parity groups that are assigned to the resource group.
Number of LDEVs Displays the number of LDEVs that are assigned to the resource group.
Number of Ports Displays the number of ports that are assigned to the resource group.
Number of Host Groups
Displays the number of host groups that are assigned to the resource group.
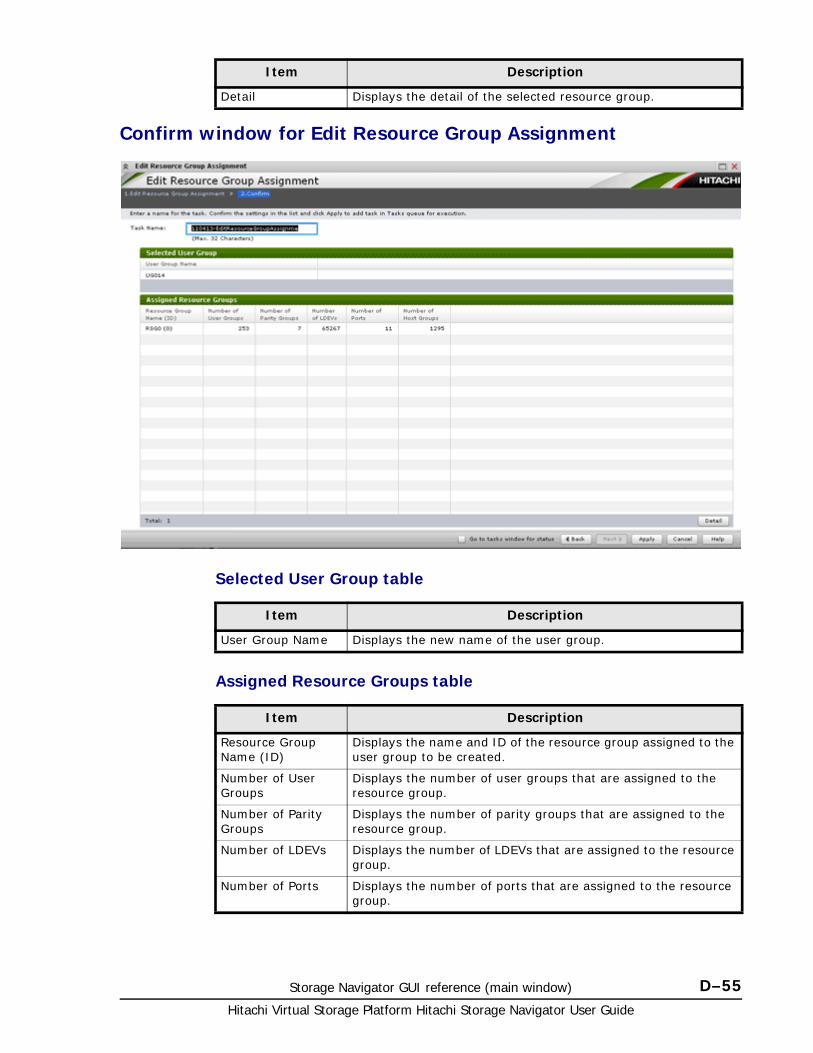
Storage Navigator GUI reference (main window) D–55Hitachi Virtual Storage Platform Hitachi Storage Navigator User Guide
Confirm window for Edit Resource Group Assignment
Selected User Group table
Assigned Resource Groups table
Detail Displays the detail of the selected resource group.
Item Description
Item Description
User Group Name Displays the new name of the user group.
Item Description
Resource Group Name (ID)
Displays the name and ID of the resource group assigned to the user group to be created.
Number of User Groups
Displays the number of user groups that are assigned to the resource group.
Number of Parity Groups
Displays the number of parity groups that are assigned to the resource group.
Number of LDEVs Displays the number of LDEVs that are assigned to the resource group.
Number of Ports Displays the number of ports that are assigned to the resource group.
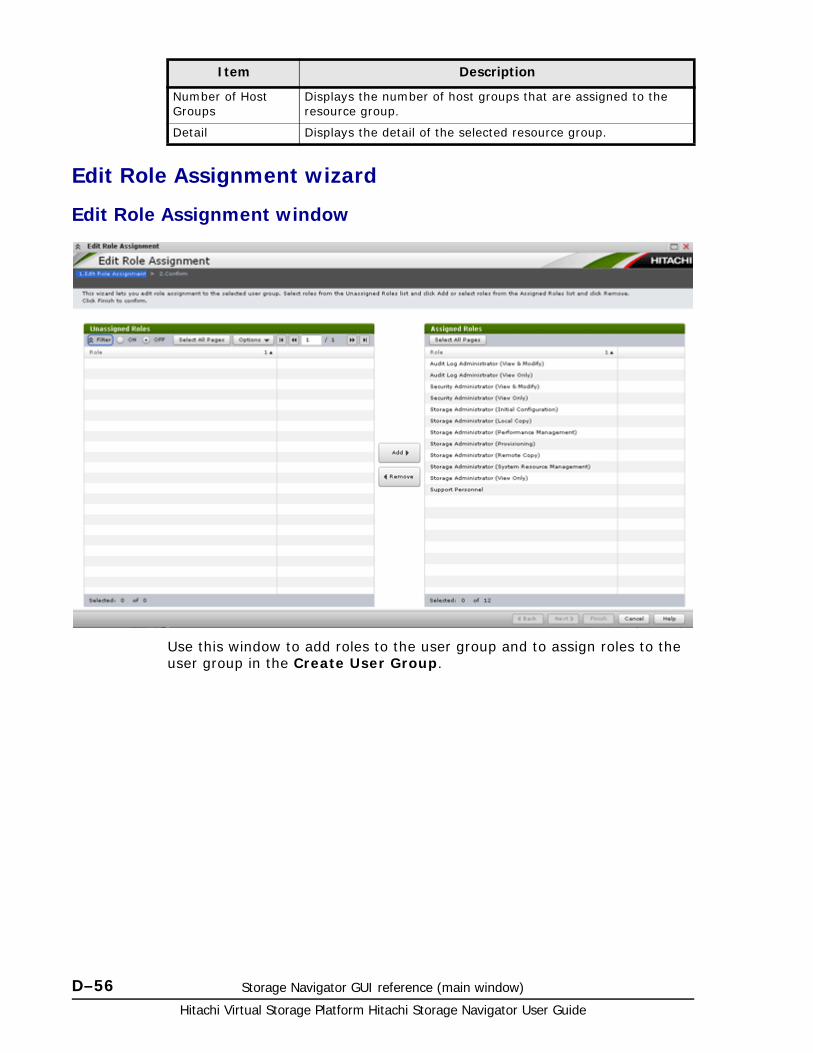
Hitachi Virtual Storage Platform Hitachi Storage Navigator User Guide
D–56 Storage Navigator GUI reference (main window)
Edit Role Assignment wizard
Edit Role Assignment window
Use this window to add roles to the user group and to assign roles to the user group in the Create User Group.
Number of Host Groups
Displays the number of host groups that are assigned to the resource group.
Detail Displays the detail of the selected resource group.
Item Description
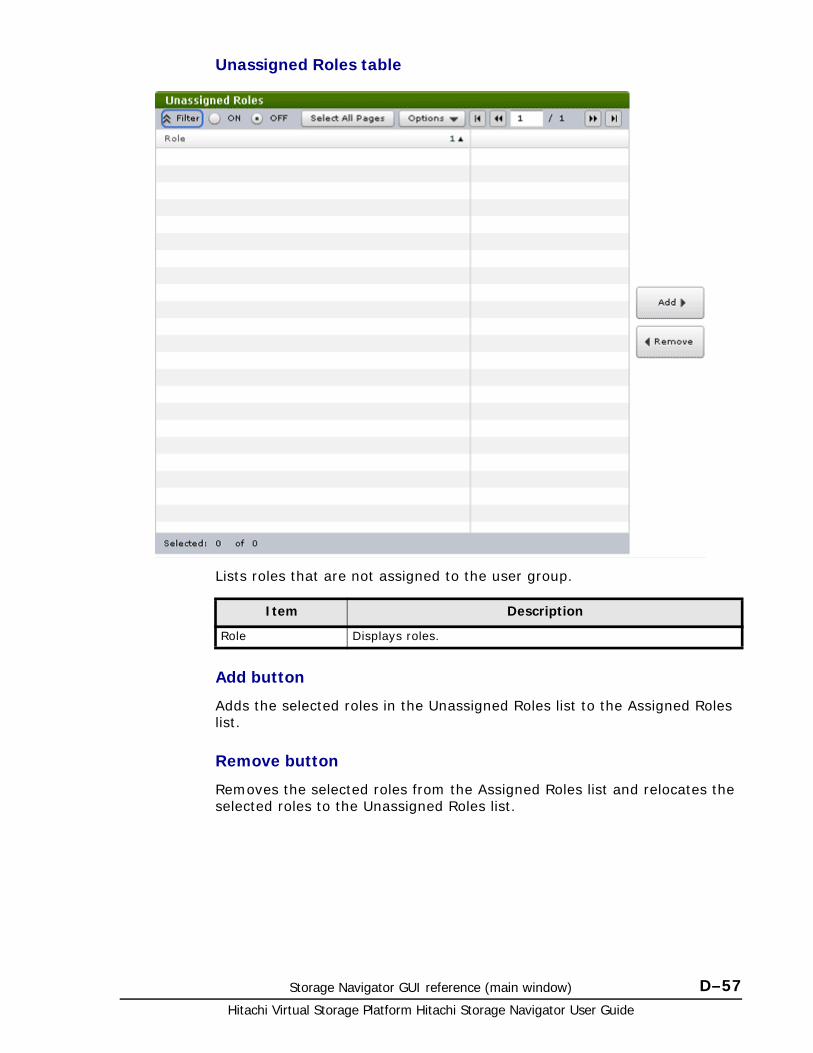
Storage Navigator GUI reference (main window) D–57Hitachi Virtual Storage Platform Hitachi Storage Navigator User Guide
Unassigned Roles table
Lists roles that are not assigned to the user group.
Add button
Adds the selected roles in the Unassigned Roles list to the Assigned Roles list.
Remove button
Removes the selected roles from the Assigned Roles list and relocates the selected roles to the Unassigned Roles list.
Item Description
Role Displays roles.

Hitachi Virtual Storage Platform Hitachi Storage Navigator User Guide
D–58 Storage Navigator GUI reference (main window)
Assigned Roles table
Lists roles to be assigned to the user group.
Item Description
Role Displays roles.
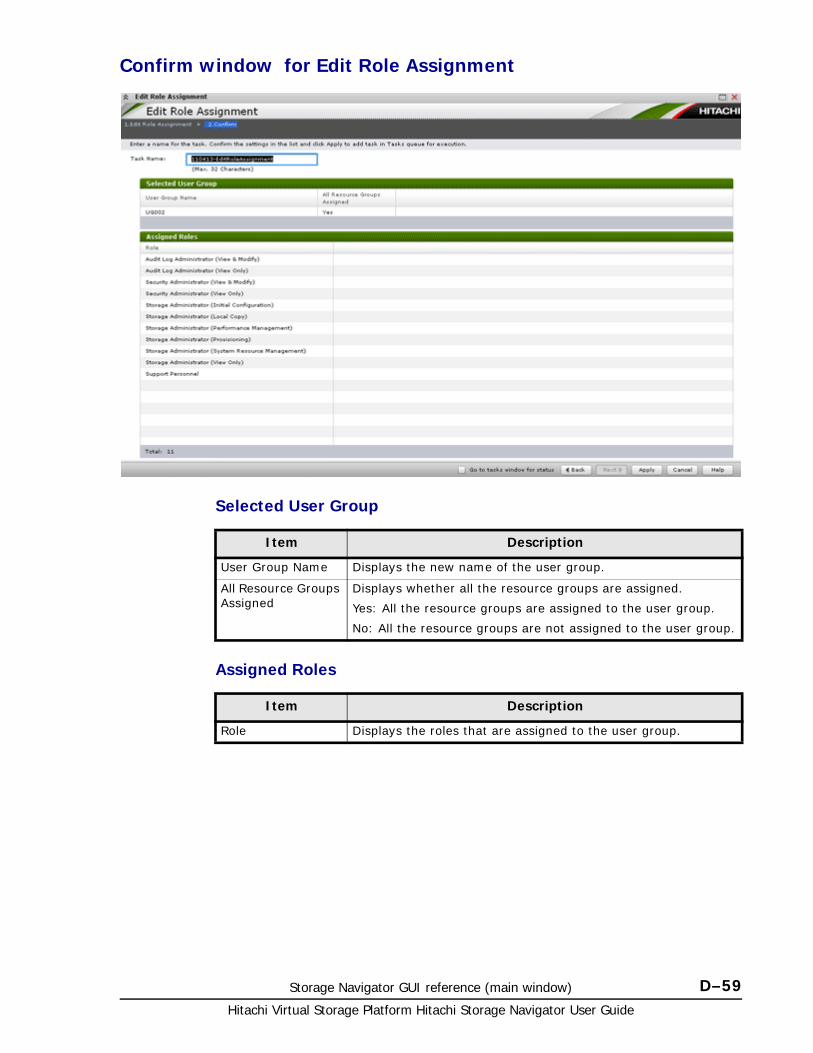
Storage Navigator GUI reference (main window) D–59Hitachi Virtual Storage Platform Hitachi Storage Navigator User Guide
Confirm window for Edit Role Assignment
Selected User Group
Assigned Roles
Item Description
User Group Name Displays the new name of the user group.
All Resource Groups Assigned
Displays whether all the resource groups are assigned.
Yes: All the resource groups are assigned to the user group.
No: All the resource groups are not assigned to the user group.
Item Description
Role Displays the roles that are assigned to the user group.
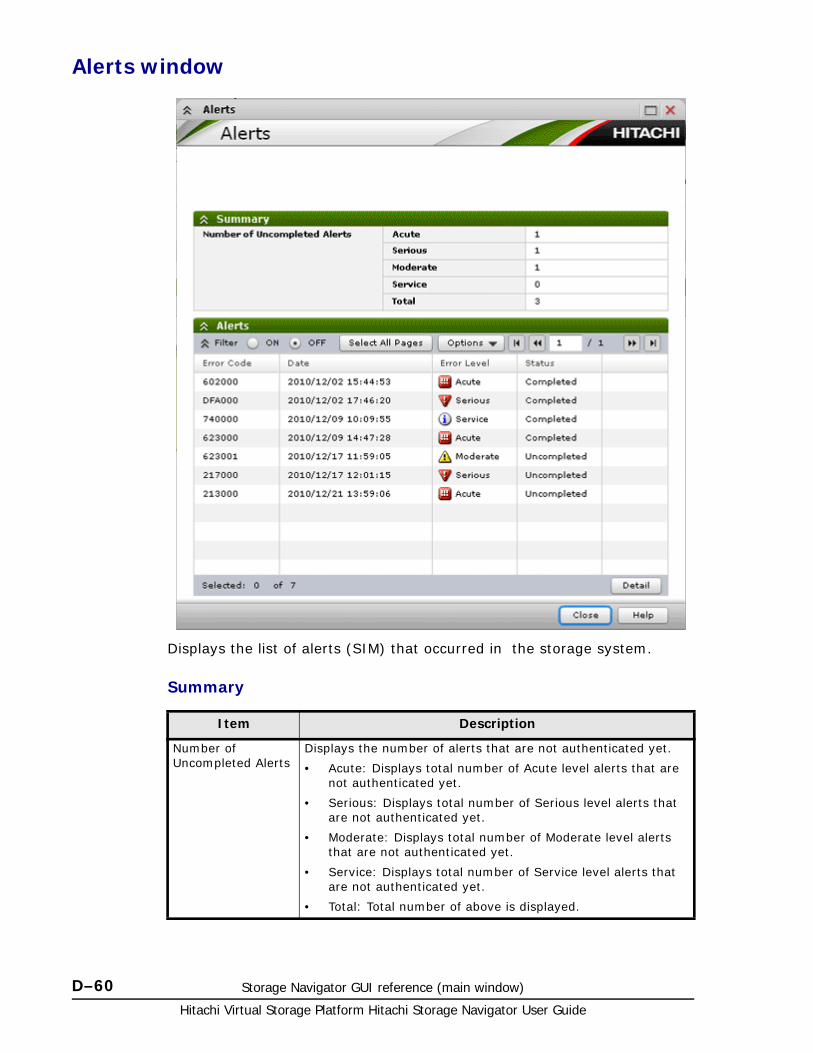
Hitachi Virtual Storage Platform Hitachi Storage Navigator User Guide
D–60 Storage Navigator GUI reference (main window)
Alerts window
Displays the list of alerts (SIM) that occurred in the storage system.
Summary
Item Description
Number of Uncompleted Alerts
Displays the number of alerts that are not authenticated yet.
• Acute: Displays total number of Acute level alerts that are not authenticated yet.
• Serious: Displays total number of Serious level alerts that are not authenticated yet.
• Moderate: Displays total number of Moderate level alerts that are not authenticated yet.
• Service: Displays total number of Service level alerts that are not authenticated yet.
• Total: Total number of above is displayed.
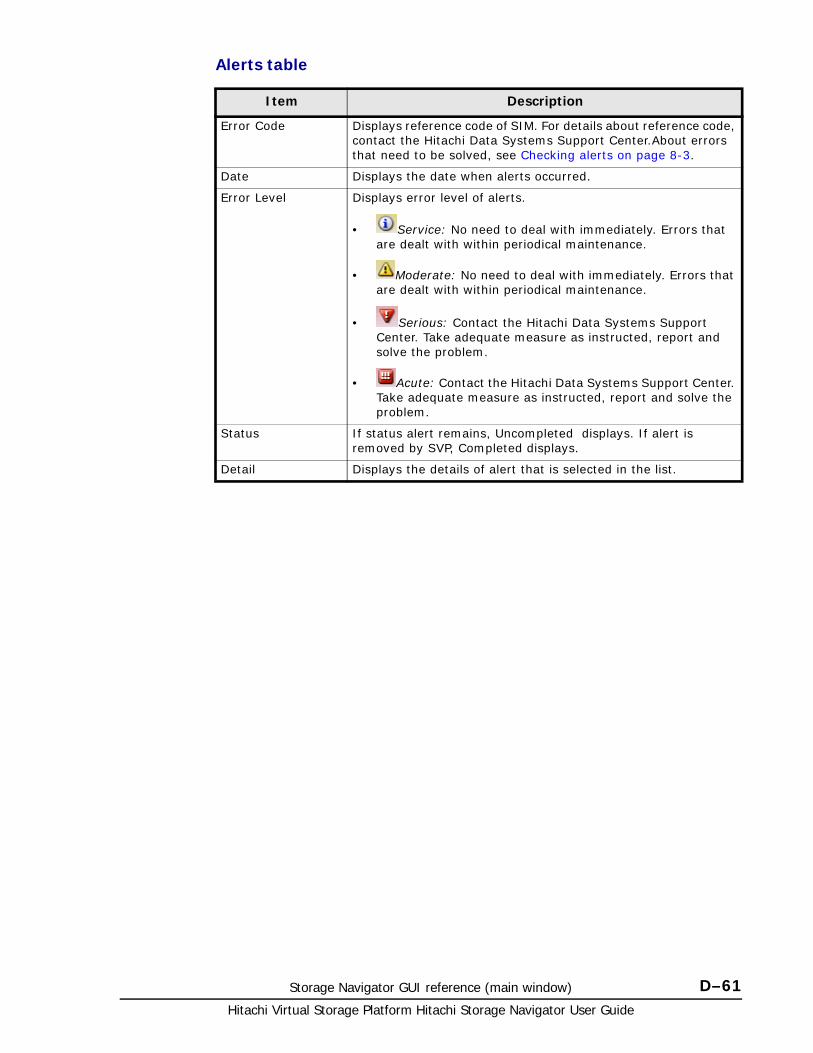
Storage Navigator GUI reference (main window) D–61Hitachi Virtual Storage Platform Hitachi Storage Navigator User Guide
Alerts table
Item Description
Error Code Displays reference code of SIM. For details about reference code, contact the Hitachi Data Systems Support Center.About errors that need to be solved, see Checking alerts on page 8-3.
Date Displays the date when alerts occurred.
Error Level Displays error level of alerts.
• Service: No need to deal with immediately. Errors that are dealt with within periodical maintenance.
• Moderate: No need to deal with immediately. Errors that are dealt with within periodical maintenance.
• Serious: Contact the Hitachi Data Systems Support Center. Take adequate measure as instructed, report and solve the problem.
• Acute: Contact the Hitachi Data Systems Support Center. Take adequate measure as instructed, report and solve the problem.
Status If status alert remains, Uncompleted displays. If alert is removed by SVP, Completed displays.
Detail Displays the details of alert that is selected in the list.

Hitachi Virtual Storage Platform Hitachi Storage Navigator User Guide
D–62 Storage Navigator GUI reference (main window)
Alert Properties window
Displays details of alert (SIM) that occurred in the storage system.
When you select multiple alerts in Alert window, click back and Next button to change alert that is displayed.
Alert properties
Item Description
Error Code Displays reference codes of SIM. For details about reference codes, contact the Hitachi Data Systems Support Center.About errors that need to be solved, see Checking alerts on page 8-3.
Date Displays the date when alerts occurred.
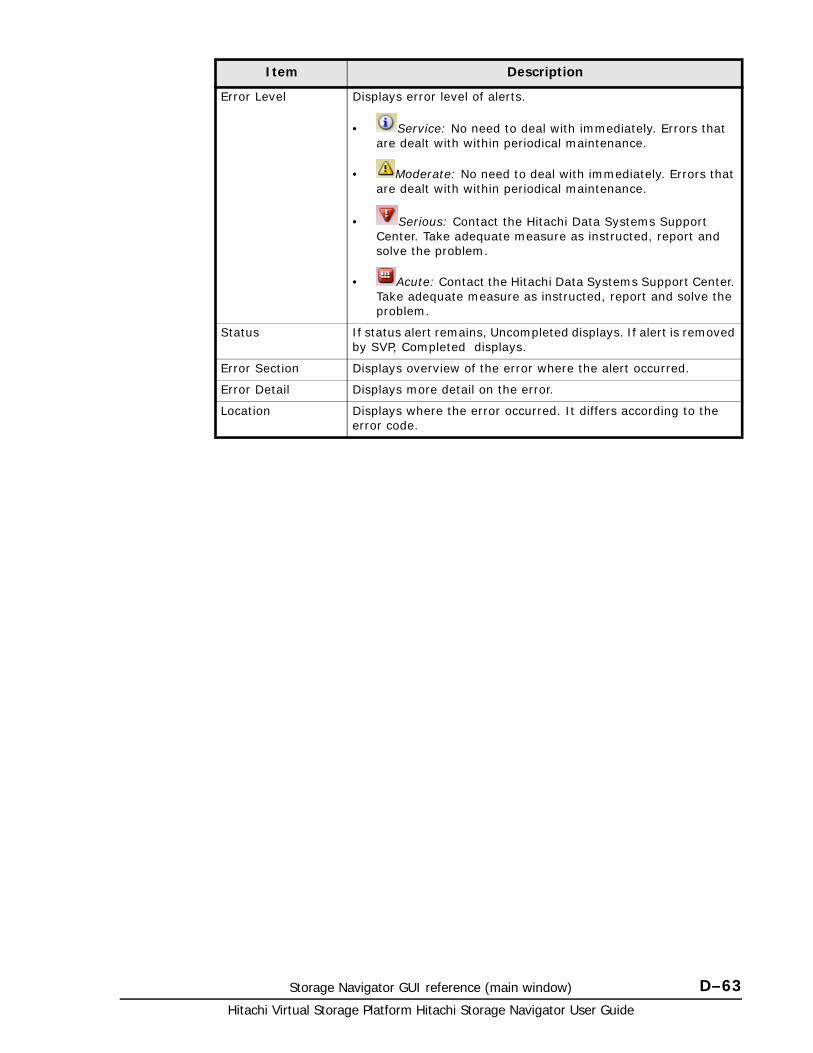
Storage Navigator GUI reference (main window) D–63Hitachi Virtual Storage Platform Hitachi Storage Navigator User Guide
Error Level Displays error level of alerts.
• Service: No need to deal with immediately. Errors that are dealt with within periodical maintenance.
• Moderate: No need to deal with immediately. Errors that are dealt with within periodical maintenance.
• Serious: Contact the Hitachi Data Systems Support Center. Take adequate measure as instructed, report and solve the problem.
• Acute: Contact the Hitachi Data Systems Support Center. Take adequate measure as instructed, report and solve the problem.
Status If status alert remains, Uncompleted displays. If alert is removed by SVP, Completed displays.
Error Section Displays overview of the error where the alert occurred.
Error Detail Displays more detail on the error.
Location Displays where the error occurred. It differs according to the error code.
Item Description
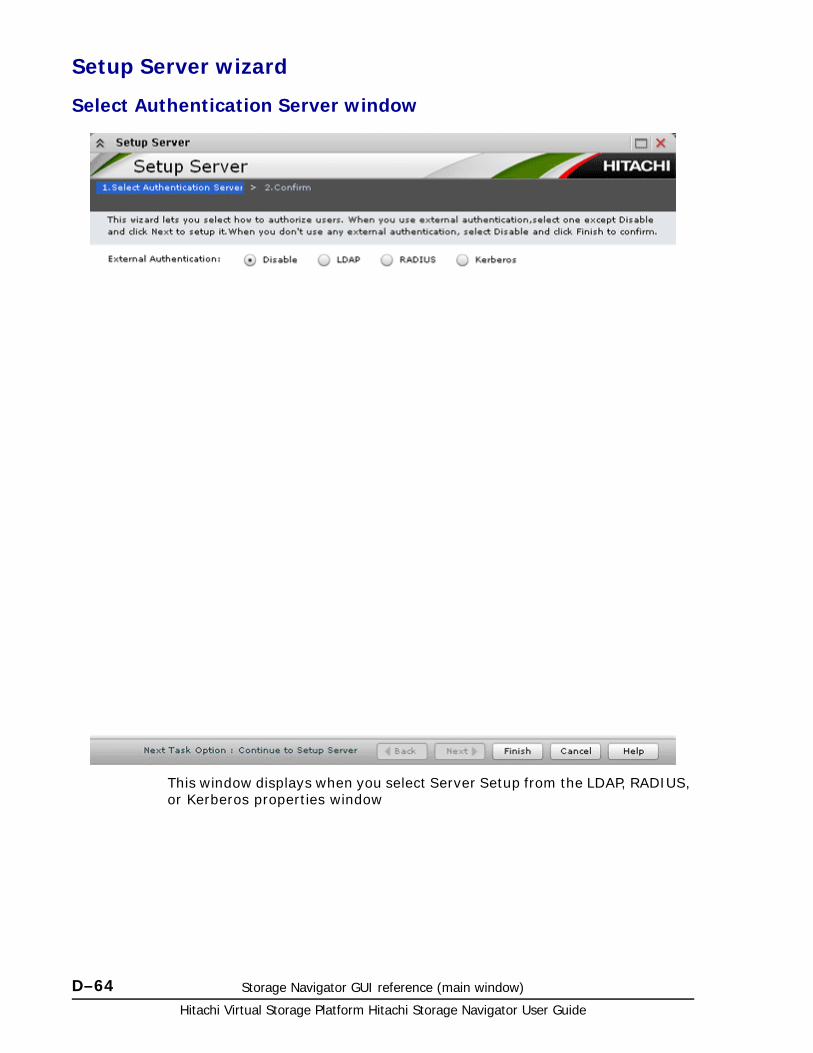
Hitachi Virtual Storage Platform Hitachi Storage Navigator User Guide
D–64 Storage Navigator GUI reference (main window)
Setup Server wizard
Select Authentication Server window
This window displays when you select Server Setup from the LDAP, RADIUS, or Kerberos properties window
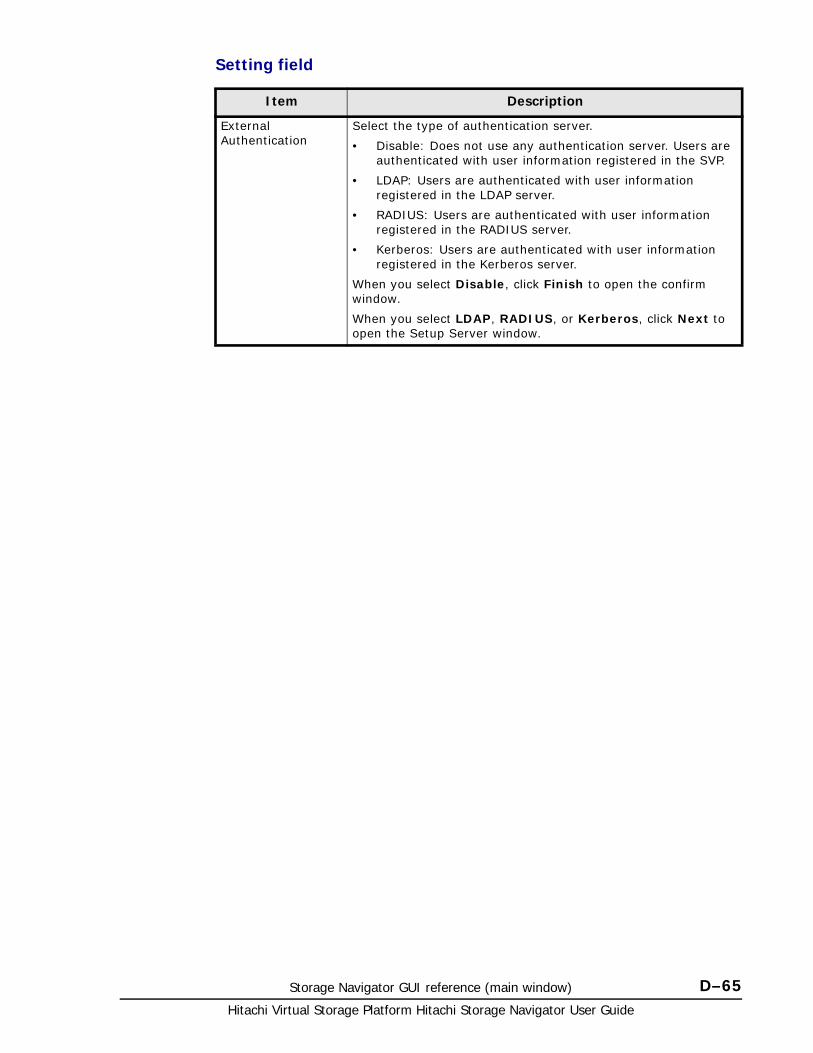
Storage Navigator GUI reference (main window) D–65Hitachi Virtual Storage Platform Hitachi Storage Navigator User Guide
Setting field
Item Description
External Authentication
Select the type of authentication server.
• Disable: Does not use any authentication server. Users are authenticated with user information registered in the SVP.
• LDAP: Users are authenticated with user information registered in the LDAP server.
• RADIUS: Users are authenticated with user information registered in the RADIUS server.
• Kerberos: Users are authenticated with user information registered in the Kerberos server.
When you select Disable, click Finish to open the confirm window.
When you select LDAP, RADIUS, or Kerberos, click Next to open the Setup Server window.
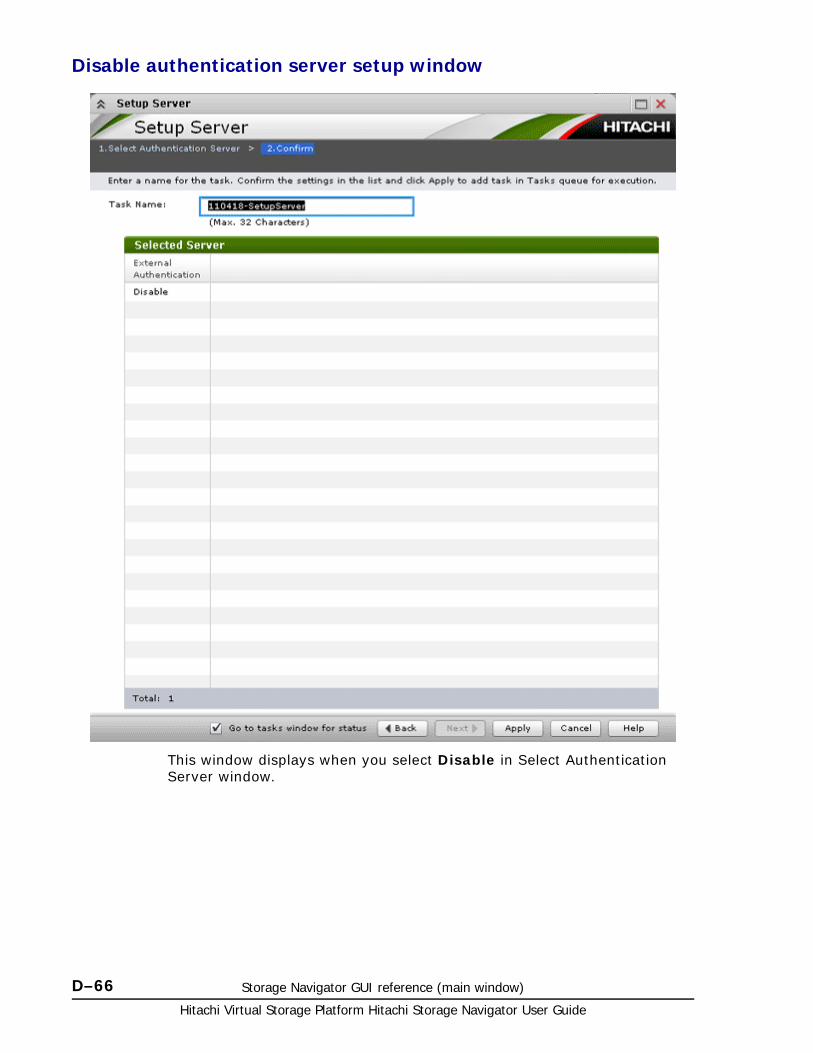
Hitachi Virtual Storage Platform Hitachi Storage Navigator User Guide
D–66 Storage Navigator GUI reference (main window)
Disable authentication server setup window
This window displays when you select Disable in Select Authentication Server window.
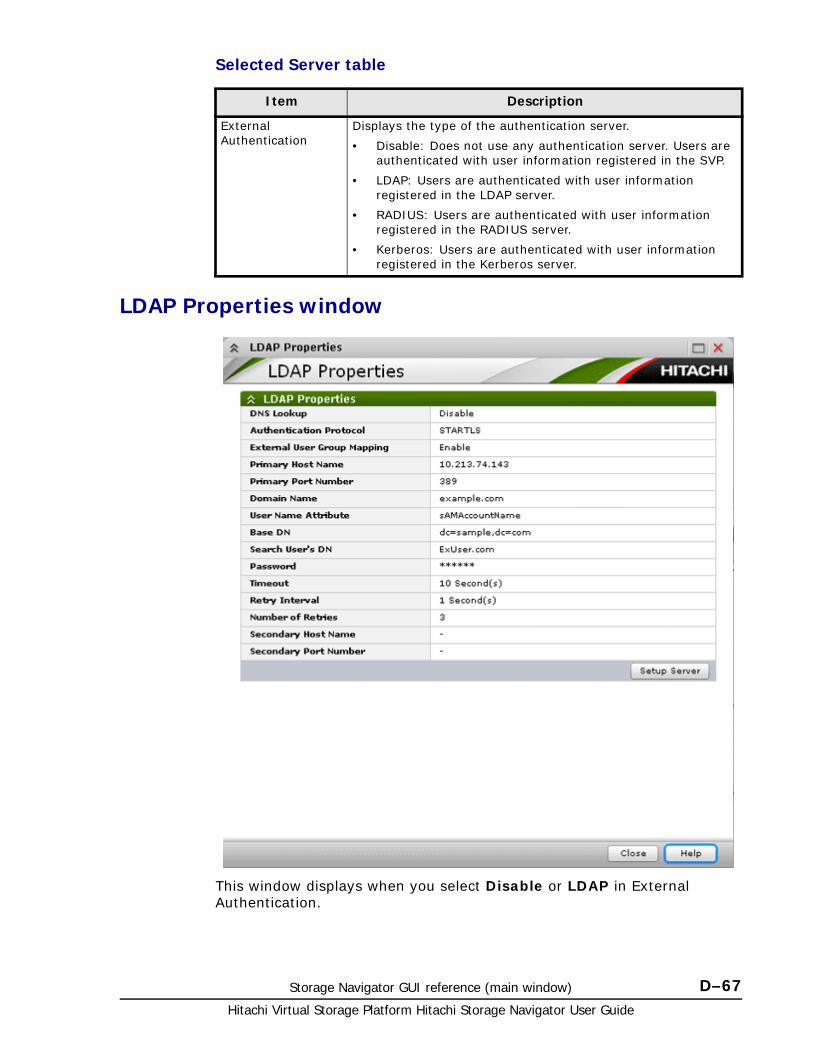
Storage Navigator GUI reference (main window) D–67Hitachi Virtual Storage Platform Hitachi Storage Navigator User Guide
Selected Server table
LDAP Properties window
This window displays when you select Disable or LDAP in External Authentication.
Item Description
External Authentication
Displays the type of the authentication server.
• Disable: Does not use any authentication server. Users are authenticated with user information registered in the SVP.
• LDAP: Users are authenticated with user information registered in the LDAP server.
• RADIUS: Users are authenticated with user information registered in the RADIUS server.
• Kerberos: Users are authenticated with user information registered in the Kerberos server.
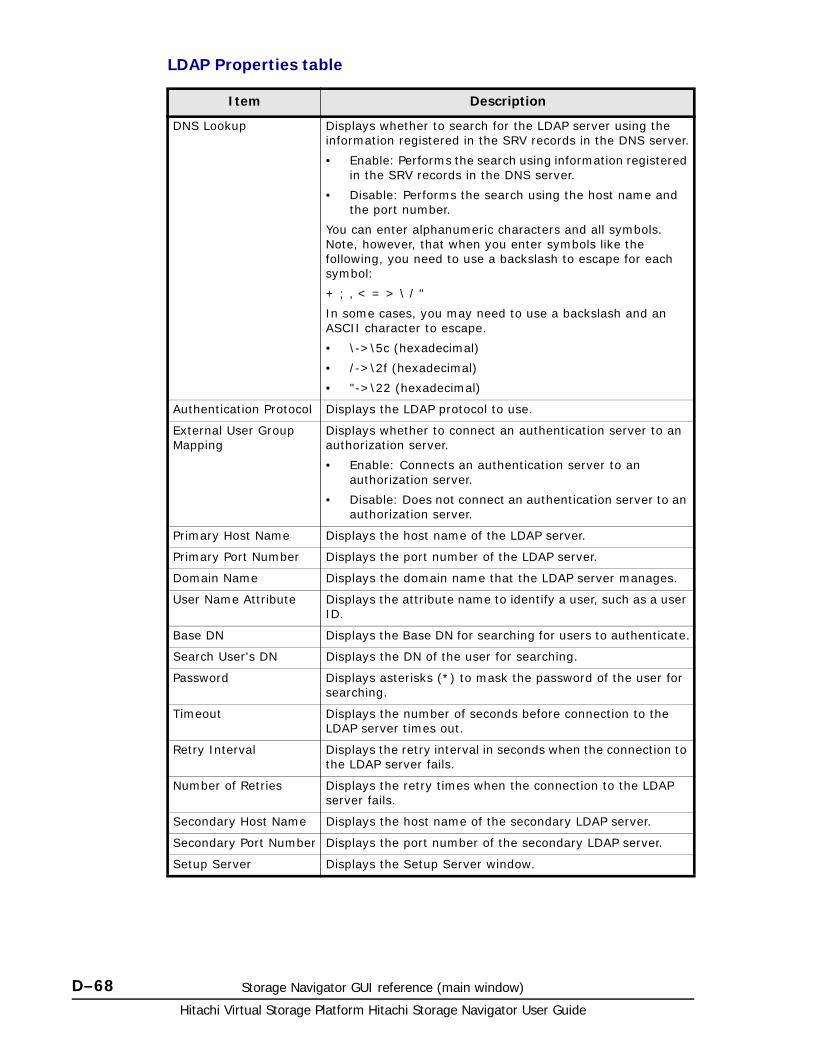
Hitachi Virtual Storage Platform Hitachi Storage Navigator User Guide
D–68 Storage Navigator GUI reference (main window)
LDAP Properties table
Item Description
DNS Lookup Displays whether to search for the LDAP server using the information registered in the SRV records in the DNS server.
• Enable: Performs the search using information registered in the SRV records in the DNS server.
• Disable: Performs the search using the host name and the port number.
You can enter alphanumeric characters and all symbols. Note, however, that when you enter symbols like the following, you need to use a backslash to escape for each symbol:
+ ; , < = > \ / "
In some cases, you may need to use a backslash and an ASCII character to escape.
• \->\5c (hexadecimal)
• /->\2f (hexadecimal)
• "->\22 (hexadecimal)
Authentication Protocol Displays the LDAP protocol to use.
External User Group Mapping
Displays whether to connect an authentication server to an authorization server.
• Enable: Connects an authentication server to an authorization server.
• Disable: Does not connect an authentication server to an authorization server.
Primary Host Name Displays the host name of the LDAP server.
Primary Port Number Displays the port number of the LDAP server.
Domain Name Displays the domain name that the LDAP server manages.
User Name Attribute Displays the attribute name to identify a user, such as a user ID.
Base DN Displays the Base DN for searching for users to authenticate.
Search User's DN Displays the DN of the user for searching.
Password Displays asterisks (*) to mask the password of the user for searching.
Timeout Displays the number of seconds before connection to the LDAP server times out.
Retry Interval Displays the retry interval in seconds when the connection to the LDAP server fails.
Number of Retries Displays the retry times when the connection to the LDAP server fails.
Secondary Host Name Displays the host name of the secondary LDAP server.
Secondary Port Number Displays the port number of the secondary LDAP server.
Setup Server Displays the Setup Server window.

Storage Navigator GUI reference (main window) D–69Hitachi Virtual Storage Platform Hitachi Storage Navigator User Guide
RADIUS Properties
This window displays when you select RADIUS in External Authentication.
RADIUS Properties table
Item Description
Authentication Protocol Displays the RADIUS protocol to use.
• PAP: Password authentication protocol that transmits plaintext user ID and password.
• CHAP: Challenge-handshake authentication protocol that transmits encrypted password.
Primary Host Name Displays the host name, the IPv4 address, or the IPv6 address of the RADIUS server.
Secret Displays asterisks (*) to mask the RADIUS secret key used for the PAP or CHAP authentication.
NAS Address Displays the identifier for the RADIUS server to find SVP.
Primary Port Number Displays the port number of the RADIUS server.
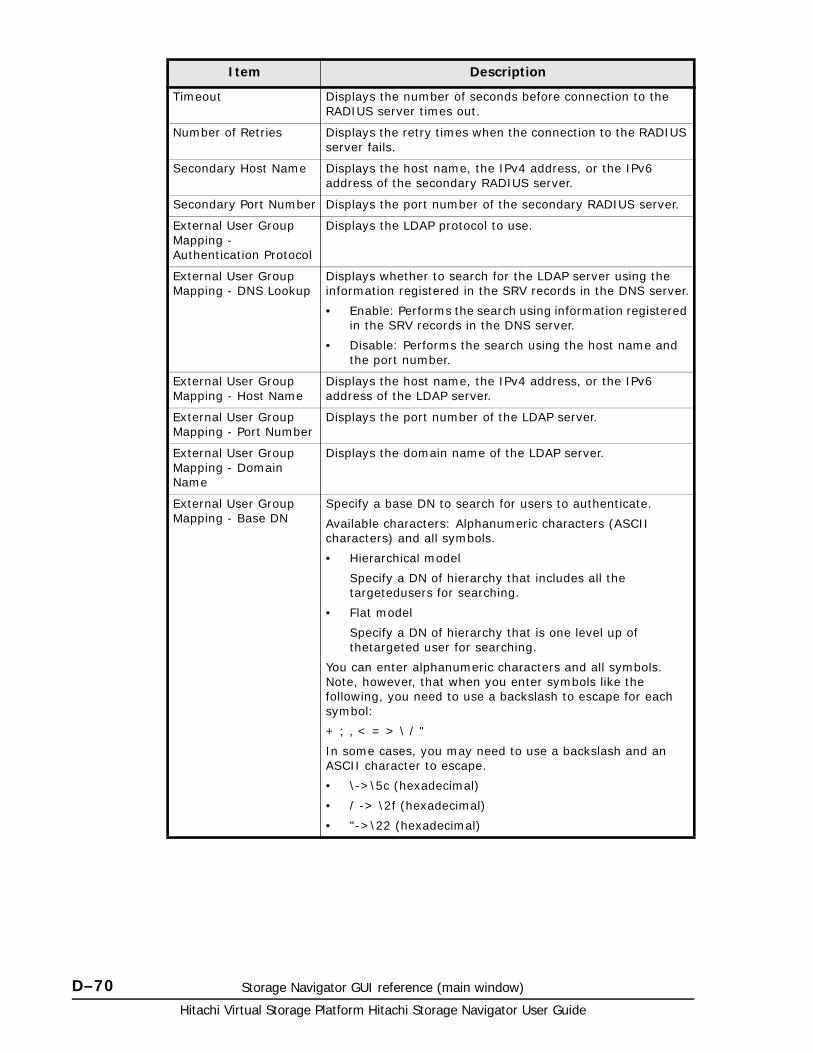
Hitachi Virtual Storage Platform Hitachi Storage Navigator User Guide
D–70 Storage Navigator GUI reference (main window)
Timeout Displays the number of seconds before connection to the RADIUS server times out.
Number of Retries Displays the retry times when the connection to the RADIUS server fails.
Secondary Host Name Displays the host name, the IPv4 address, or the IPv6 address of the secondary RADIUS server.
Secondary Port Number Displays the port number of the secondary RADIUS server.
External User Group Mapping - Authentication Protocol
Displays the LDAP protocol to use.
External User Group Mapping - DNS Lookup
Displays whether to search for the LDAP server using the information registered in the SRV records in the DNS server.
• Enable: Performs the search using information registered in the SRV records in the DNS server.
• Disable: Performs the search using the host name and the port number.
External User Group Mapping - Host Name
Displays the host name, the IPv4 address, or the IPv6 address of the LDAP server.
External User Group Mapping - Port Number
Displays the port number of the LDAP server.
External User Group Mapping - Domain Name
Displays the domain name of the LDAP server.
External User Group Mapping - Base DN
Specify a base DN to search for users to authenticate.
Available characters: Alphanumeric characters (ASCII characters) and all symbols.
• Hierarchical model
Specify a DN of hierarchy that includes all the targetedusers for searching.
• Flat model
Specify a DN of hierarchy that is one level up of thetargeted user for searching.
You can enter alphanumeric characters and all symbols. Note, however, that when you enter symbols like the following, you need to use a backslash to escape for each symbol:
+ ; , < = > \ / "
In some cases, you may need to use a backslash and an ASCII character to escape.
• \->\5c (hexadecimal)
• / -> \2f (hexadecimal)
• "->\22 (hexadecimal)
Item Description
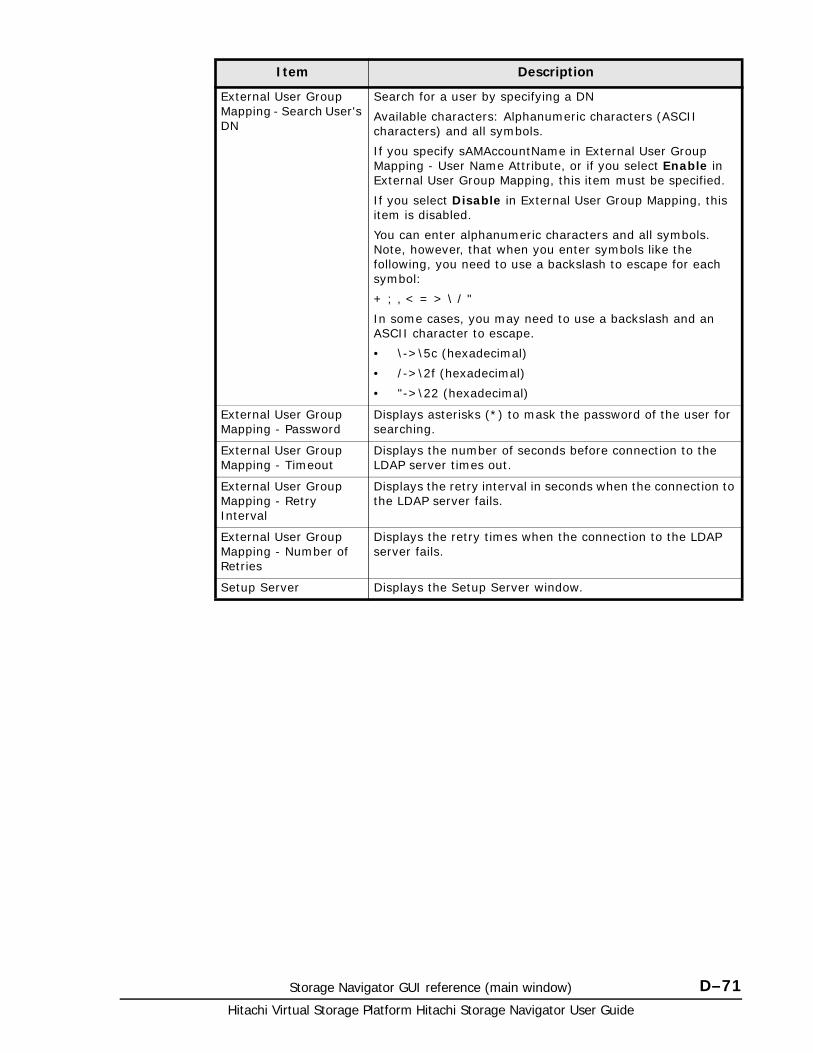
Storage Navigator GUI reference (main window) D–71Hitachi Virtual Storage Platform Hitachi Storage Navigator User Guide
External User Group Mapping - Search User's DN
Search for a user by specifying a DN
Available characters: Alphanumeric characters (ASCII characters) and all symbols.
If you specify sAMAccountName in External User Group Mapping - User Name Attribute, or if you select Enable in External User Group Mapping, this item must be specified.
If you select Disable in External User Group Mapping, this item is disabled.
You can enter alphanumeric characters and all symbols. Note, however, that when you enter symbols like the following, you need to use a backslash to escape for each symbol:
+ ; , < = > \ / "
In some cases, you may need to use a backslash and an ASCII character to escape.
• \->\5c (hexadecimal)
• /->\2f (hexadecimal)
• "->\22 (hexadecimal)
External User Group Mapping - Password
Displays asterisks (*) to mask the password of the user for searching.
External User Group Mapping - Timeout
Displays the number of seconds before connection to the LDAP server times out.
External User Group Mapping - Retry Interval
Displays the retry interval in seconds when the connection to the LDAP server fails.
External User Group Mapping - Number of Retries
Displays the retry times when the connection to the LDAP server fails.
Setup Server Displays the Setup Server window.
Item Description

Hitachi Virtual Storage Platform Hitachi Storage Navigator User Guide
D–72 Storage Navigator GUI reference (main window)
Kerberos Properties
This window displays when you select Kerberos in External Authentication.
Kerberos Properties table
Item Description
DNS Lookup Displays whether to search for the Kerberos server using the information registered in the SRV records in the DNS server.
• Enable: Performs the search using information registered in the SRV records in the DNS server.
• Disable: Performs the search using the host name and the port number.
Realm Name Displays the default realm name.
Primary Host Name Displays the name of the Kerberos server.
Primary Port Number Displays the port number of the Kerberos server.
Clock Skew Displays the acceptable range of time difference between the SVP and the Kerberos server.
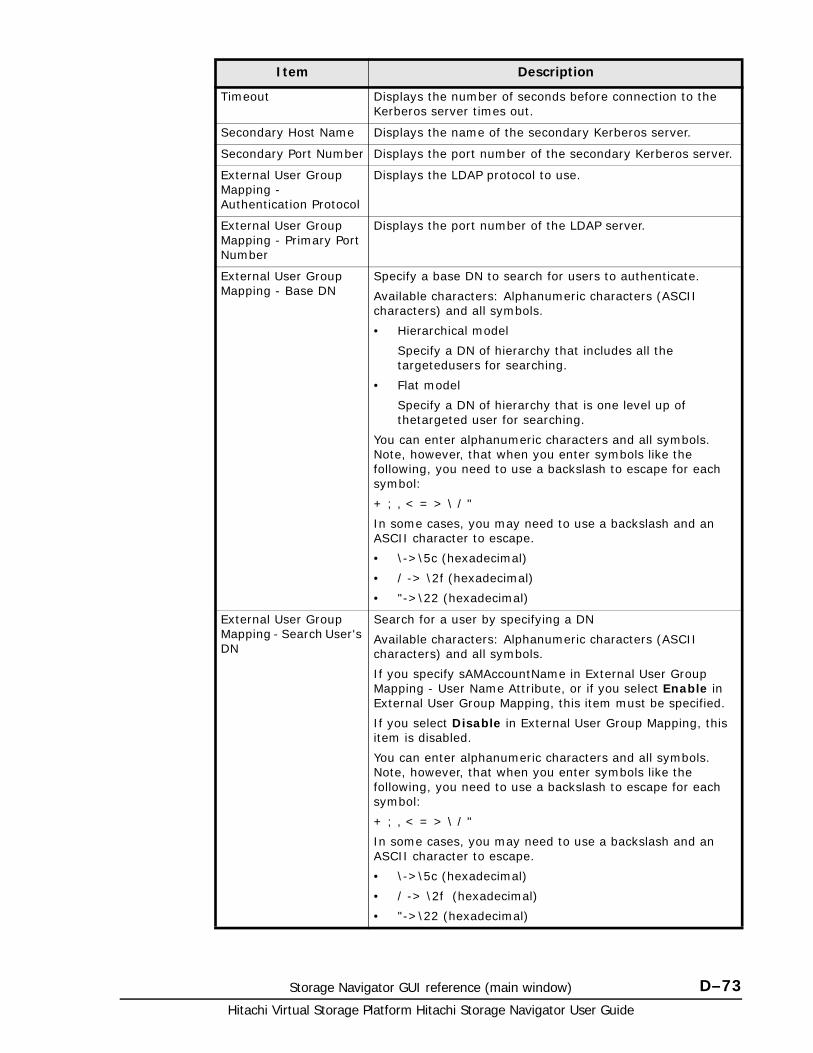
Storage Navigator GUI reference (main window) D–73Hitachi Virtual Storage Platform Hitachi Storage Navigator User Guide
Timeout Displays the number of seconds before connection to the Kerberos server times out.
Secondary Host Name Displays the name of the secondary Kerberos server.
Secondary Port Number Displays the port number of the secondary Kerberos server.
External User Group Mapping - Authentication Protocol
Displays the LDAP protocol to use.
External User Group Mapping - Primary Port Number
Displays the port number of the LDAP server.
External User Group Mapping - Base DN
Specify a base DN to search for users to authenticate.
Available characters: Alphanumeric characters (ASCII characters) and all symbols.
• Hierarchical model
Specify a DN of hierarchy that includes all the targetedusers for searching.
• Flat model
Specify a DN of hierarchy that is one level up of thetargeted user for searching.
You can enter alphanumeric characters and all symbols. Note, however, that when you enter symbols like the following, you need to use a backslash to escape for each symbol:
+ ; , < = > \ / "
In some cases, you may need to use a backslash and an ASCII character to escape.
• \->\5c (hexadecimal)
• / -> \2f (hexadecimal)
• "->\22 (hexadecimal)
External User Group Mapping - Search User's DN
Search for a user by specifying a DN
Available characters: Alphanumeric characters (ASCII characters) and all symbols.
If you specify sAMAccountName in External User Group Mapping - User Name Attribute, or if you select Enable in External User Group Mapping, this item must be specified.
If you select Disable in External User Group Mapping, this item is disabled.
You can enter alphanumeric characters and all symbols. Note, however, that when you enter symbols like the following, you need to use a backslash to escape for each symbol:
+ ; , < = > \ / "
In some cases, you may need to use a backslash and an ASCII character to escape.
• \->\5c (hexadecimal)
• / -> \2f (hexadecimal)
• "->\22 (hexadecimal)
Item Description
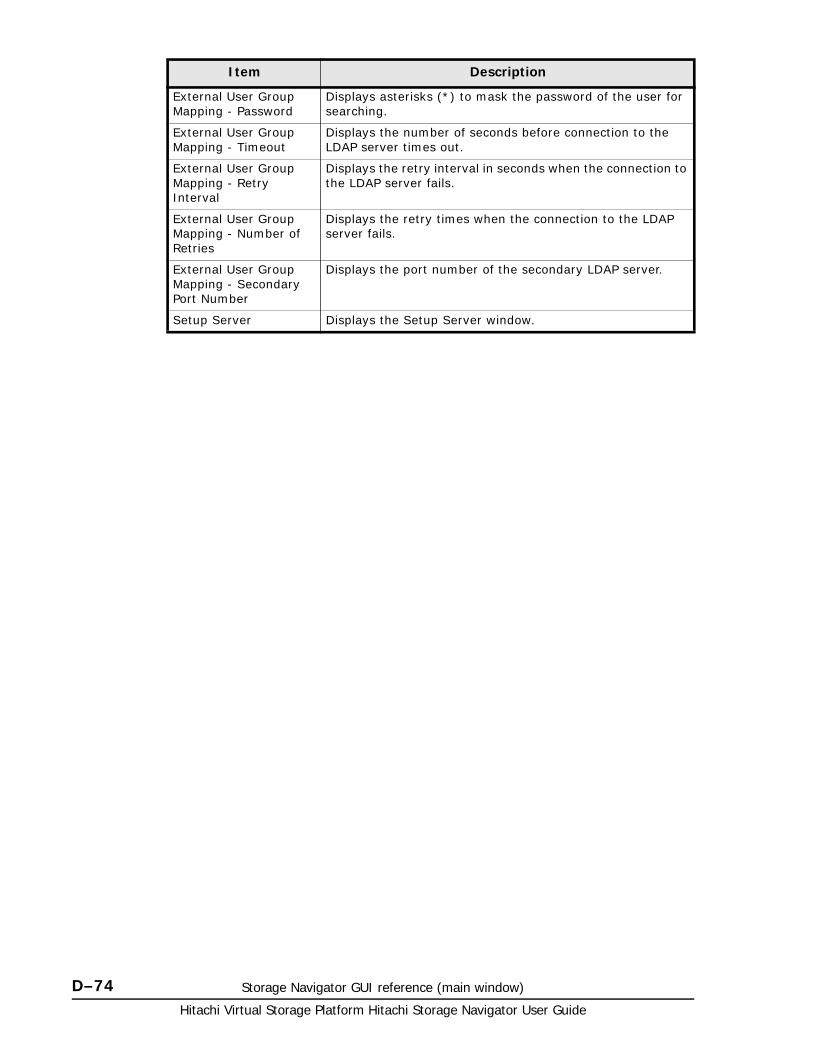
Hitachi Virtual Storage Platform Hitachi Storage Navigator User Guide
D–74 Storage Navigator GUI reference (main window)
External User Group Mapping - Password
Displays asterisks (*) to mask the password of the user for searching.
External User Group Mapping - Timeout
Displays the number of seconds before connection to the LDAP server times out.
External User Group Mapping - Retry Interval
Displays the retry interval in seconds when the connection to the LDAP server fails.
External User Group Mapping - Number of Retries
Displays the retry times when the connection to the LDAP server fails.
External User Group Mapping - Secondary Port Number
Displays the port number of the secondary LDAP server.
Setup Server Displays the Setup Server window.
Item Description
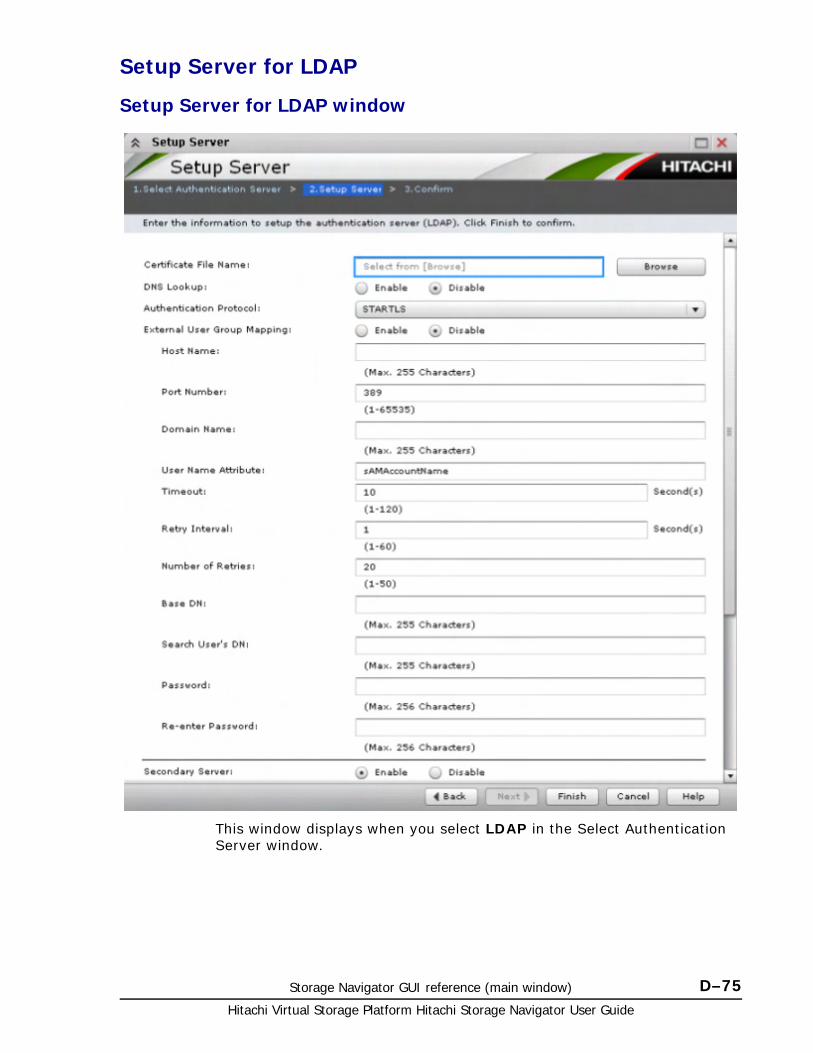
Storage Navigator GUI reference (main window) D–75Hitachi Virtual Storage Platform Hitachi Storage Navigator User Guide
Setup Server for LDAP
Setup Server for LDAP window
This window displays when you select LDAP in the Select Authentication Server window.
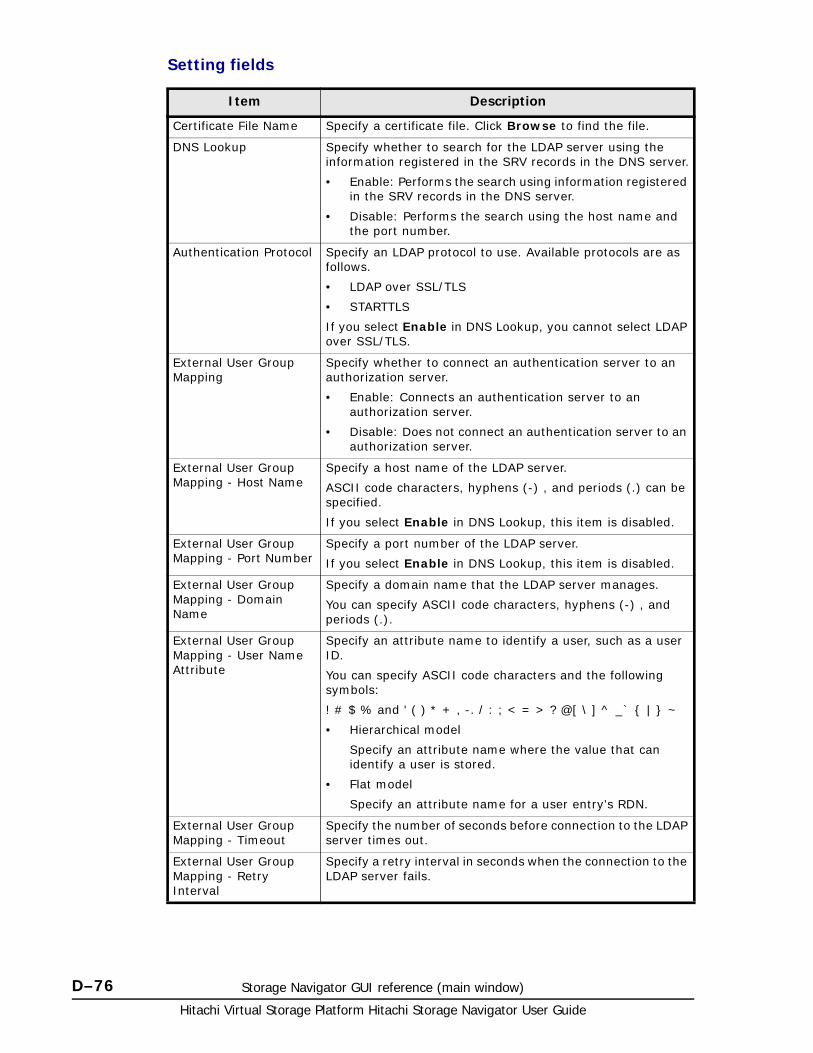
Hitachi Virtual Storage Platform Hitachi Storage Navigator User Guide
D–76 Storage Navigator GUI reference (main window)
Setting fields
Item Description
Certificate File Name Specify a certificate file. Click Browse to find the file.
DNS Lookup Specify whether to search for the LDAP server using the information registered in the SRV records in the DNS server.
• Enable: Performs the search using information registered in the SRV records in the DNS server.
• Disable: Performs the search using the host name and the port number.
Authentication Protocol Specify an LDAP protocol to use. Available protocols are as follows.
• LDAP over SSL/TLS
• STARTTLS
If you select Enable in DNS Lookup, you cannot select LDAP over SSL/TLS.
External User Group Mapping
Specify whether to connect an authentication server to an authorization server.
• Enable: Connects an authentication server to an authorization server.
• Disable: Does not connect an authentication server to an authorization server.
External User Group Mapping - Host Name
Specify a host name of the LDAP server.
ASCII code characters, hyphens (-) , and periods (.) can be specified.
If you select Enable in DNS Lookup, this item is disabled.
External User Group Mapping - Port Number
Specify a port number of the LDAP server.
If you select Enable in DNS Lookup, this item is disabled.
External User Group Mapping - Domain Name
Specify a domain name that the LDAP server manages.
You can specify ASCII code characters, hyphens (-) , and periods (.).
External User Group Mapping - User Name Attribute
Specify an attribute name to identify a user, such as a user ID.
You can specify ASCII code characters and the following symbols:
! # $ % and ' ( ) * + , -. / : ; < = > ? @[ \ ] ^ _` { | } ~
• Hierarchical model
Specify an attribute name where the value that can identify a user is stored.
• Flat model
Specify an attribute name for a user entry's RDN.
External User Group Mapping - Timeout
Specify the number of seconds before connection to the LDAP server times out.
External User Group Mapping - Retry Interval
Specify a retry interval in seconds when the connection to the LDAP server fails.
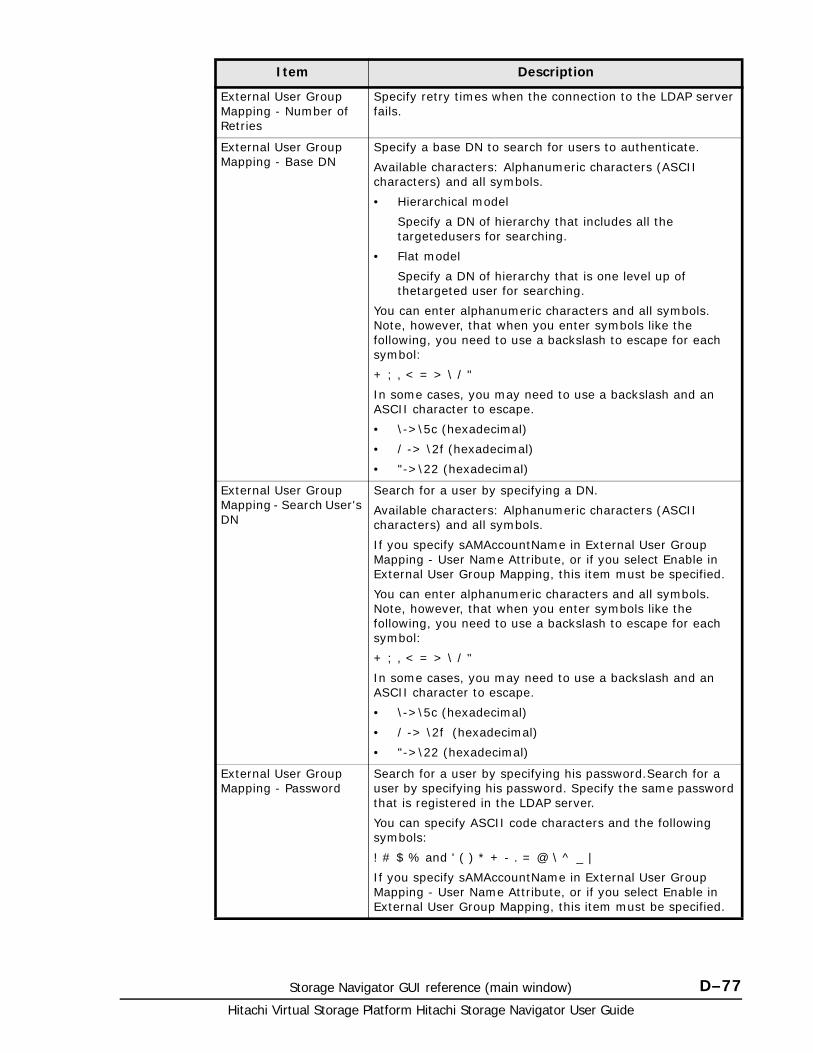
Storage Navigator GUI reference (main window) D–77Hitachi Virtual Storage Platform Hitachi Storage Navigator User Guide
External User Group Mapping - Number of Retries
Specify retry times when the connection to the LDAP server fails.
External User Group Mapping - Base DN
Specify a base DN to search for users to authenticate.
Available characters: Alphanumeric characters (ASCII characters) and all symbols.
• Hierarchical model
Specify a DN of hierarchy that includes all the targetedusers for searching.
• Flat model
Specify a DN of hierarchy that is one level up of thetargeted user for searching.
You can enter alphanumeric characters and all symbols. Note, however, that when you enter symbols like the following, you need to use a backslash to escape for each symbol:
+ ; , < = > \ / "
In some cases, you may need to use a backslash and an ASCII character to escape.
• \->\5c (hexadecimal)
• / -> \2f (hexadecimal)
• "->\22 (hexadecimal)
External User Group Mapping - Search User's DN
Search for a user by specifying a DN.
Available characters: Alphanumeric characters (ASCII characters) and all symbols.
If you specify sAMAccountName in External User Group Mapping - User Name Attribute, or if you select Enable in External User Group Mapping, this item must be specified.
You can enter alphanumeric characters and all symbols. Note, however, that when you enter symbols like the following, you need to use a backslash to escape for each symbol:
+ ; , < = > \ / "
In some cases, you may need to use a backslash and an ASCII character to escape.
• \->\5c (hexadecimal)
• / -> \2f (hexadecimal)
• "->\22 (hexadecimal)
External User Group Mapping - Password
Search for a user by specifying his password.Search for a user by specifying his password. Specify the same password that is registered in the LDAP server.
You can specify ASCII code characters and the following symbols:
! # $ % and ' ( ) * + - . = @ \ ^ _ |
If you specify sAMAccountName in External User Group Mapping - User Name Attribute, or if you select Enable in External User Group Mapping, this item must be specified.
Item Description

Hitachi Virtual Storage Platform Hitachi Storage Navigator User Guide
D–78 Storage Navigator GUI reference (main window)
External User Group Mapping - Re-enter Password
Re-enter the password of the user group you are searching for to confirm your entry.
You can specify ASCII code characters and the following symbols:
! # $ % and ' ( ) * + - . = @ \ ^ _ |
If you enter any password in External User Group Mapping - Password, you must specify this item.
Secondary Server Specify whether to use a secondary LDAP server.
• Enable: Uses a secondary LDAP server.
• Disable: Does not use a secondary LDAP server.
If you select Enable in DNS Lookup, this item is disabled.
Secondary Server - Host Name
Specify a host name of the secondary LDAP server.
You can specify ASCII code characters, hyphens (-) , and periods (.).
If you select Disable in Secondary Server, this item is disabled.
Secondary Server -Port Number
Specify a port number of the secondary LDAP server.
If you select Disable in Secondary Server, this item is disabled.
Test User Name Specify a user name for a server connection test.
You can specify ASCII code characters and the following symbols:
! # $ % and ' * + - . / = ? @ ^ _ `{ | } ~
Password Specify a password of the user name for a server connection test.
You can specify ASCII code characters and the following symbols:
! # $ % and ' ( ) * + , -. / : ; < = > ? @[ \ ] ^ _` { | } ~
Server Configuration Test
Click Check to conduct a server connection test for the authentication server and the authorization server based on the specified settings.
Server Configuration Test - Result
Displays a result of the server connection test for the authentication server and the authorization server.
Item Description
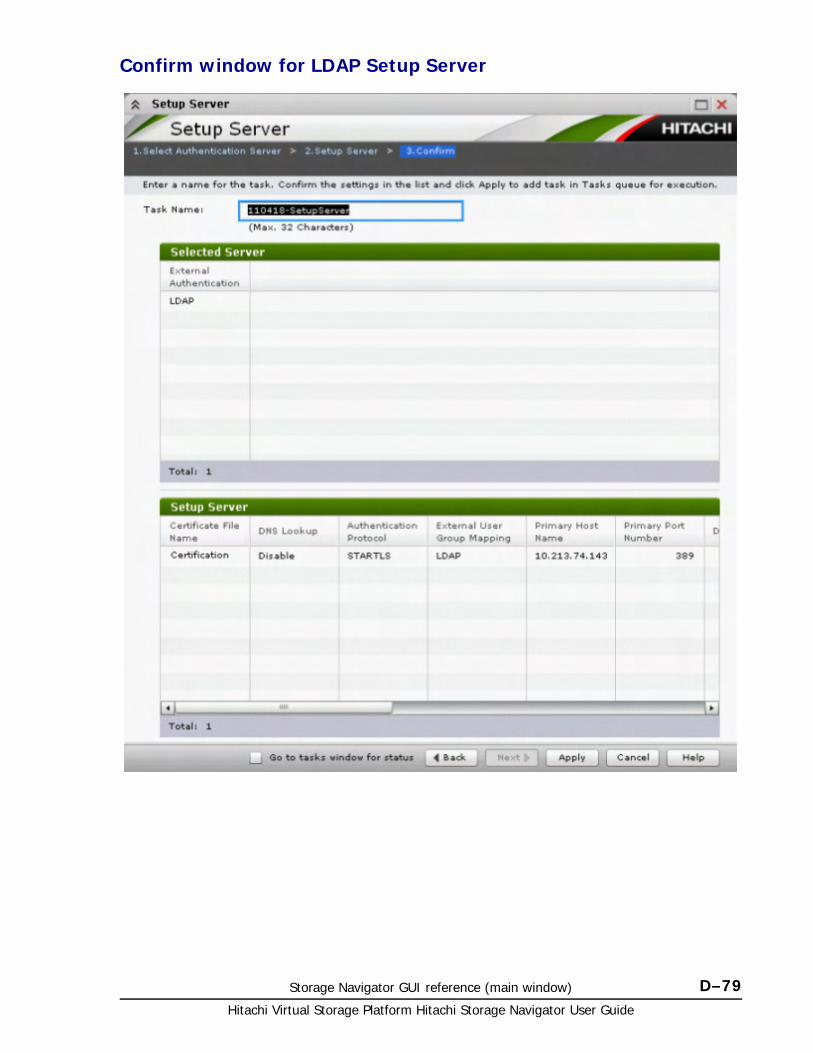
Storage Navigator GUI reference (main window) D–79Hitachi Virtual Storage Platform Hitachi Storage Navigator User Guide
Confirm window for LDAP Setup Server

Hitachi Virtual Storage Platform Hitachi Storage Navigator User Guide
D–80 Storage Navigator GUI reference (main window)
Selected Server table
Setup Server table
Item Description
External Authentication
Displays the type of the authentication server.
• Disable: Does not use any authentication server. Users are authenticated with user information registered in the SVP.
• LDAP: Users are authenticated with user information registered in the LDAP server.
• RADIUS: Users are authenticated with user information registered in the RADIUS server.
• Kerberos: Users are authenticated with user information registered in the Kerberos server.
Item Description
Certificate File Name
Displays the certificate file.
DNS Lookup Displays whether to search for the LDAP server using the information registered in the SRV records in the DNS server.
• Enable: Performs the search using information registered in the SRV records in the DNS server.
• Disable: Performs the search using the host name and the port number.
Authentication Protocol
Displays the LDAP protocol.
External User Group Mapping
Displays whether to connect an authentication server to an authorization server.
• Enable: Connects an authentication server to an authorization server.
• Disable: Does not connect an authentication server to an authorization server.
Primary Host Name Displays the host name of the LDAP server.
Primary Port Number
Displays the port number of the LDAP server.
Domain Name Displays the domain name that the LDAP server manages.
User Name Attribute Displays the attribute name to identify a user.
Base DN Displays the base DN for searching for users to authenticate.
Search User's DN Displays the DN of a user for searching.
Password Displays asterisks (*) to mask the password of the user for searching.
Timeout Displays the number of seconds before connection to the LDAP server times out.
Retry Interval Displays the retry interval in seconds when the connection to the LDAP server fails.
Number of Retries Displays the retry times when the connection to the LDAP server fails.
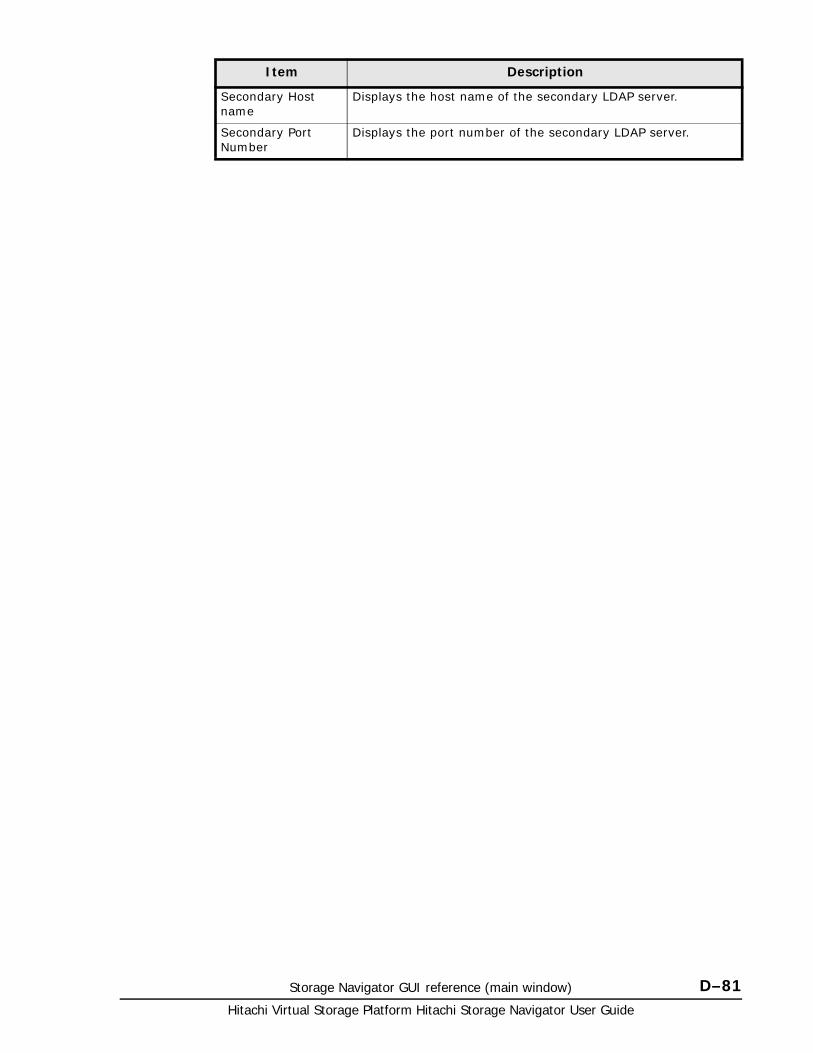
Storage Navigator GUI reference (main window) D–81Hitachi Virtual Storage Platform Hitachi Storage Navigator User Guide
Secondary Host name
Displays the host name of the secondary LDAP server.
Secondary Port Number
Displays the port number of the secondary LDAP server.
Item Description
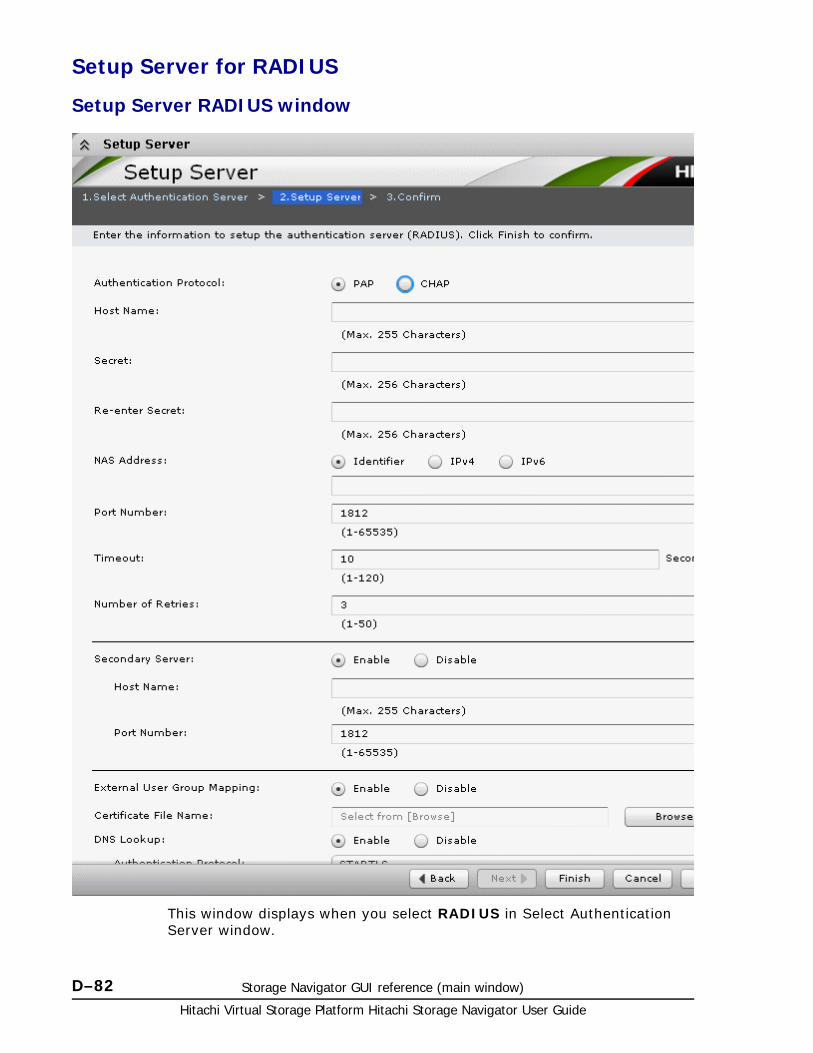
Hitachi Virtual Storage Platform Hitachi Storage Navigator User Guide
D–82 Storage Navigator GUI reference (main window)
Setup Server for RADIUS
Setup Server RADIUS window
This window displays when you select RADIUS in Select Authentication Server window.

Storage Navigator GUI reference (main window) D–83Hitachi Virtual Storage Platform Hitachi Storage Navigator User Guide
Setting fields
Item Description
Authentication Protocol
Specify a RADIUS protocol to use.
• PAP: Password authentication protocol that transmits plaintext user ID and password.
• CHAP: Challenge-handshake authentication protocol that transmits encrypted password.
Host Name Specify a name of the RADIUS server.
You can specify ASCII code characters, hyphens (-) , and periods (.).
Secret Specify a RADIUS secret key used for the PAP authentication or the CHAP authentication.
You can specify ASCII code characters and the following symbols:
! # $ % and ' ( ) * + - . = @ \ ^ _ |
Re-enter Secret Re-enter the RADIUS secret key to confirm your entry.
You can specify ASCII code characters and the following symbols:
! # $ % and ' ( ) * + - . = @ \ ^ _ |
NAS Address Specify an identifier for the RADIUS server to find SVP.
• To specify a host name, select Identifier and enter the host name.
You can specify ASCII code characters and the following symbols:
! " # $ % and ' ( ) * + , - . / ; : < > = ? @ [ \ ] ^ _ { } ~
• To specify an IPv4 address, select IPv4 and enter 4 numbers (0-255).
For example:
XXX.XXX.XXX.XXX (X indicates a digit)
Specify only numbers. Do not specify any periods.
• To specify an IPv6 address, select IPv6 and enter 8 hexadecimal numbers (0-FFFF).
For example:
YYYY:YYYY:YYYY:YYYY:YYYY:YYYY:YYYY:YYYY (Y indicates a hexadecimal digit)
Enter 0 to omit a segment.
Port Number Specify a port number of the RADIUS server.
Timeout Specify the number of seconds before connection to the RADIUS server times out.
Number of Retries Specify the retry times when the connection to the RADIUS server fails.
Secondary Server Specify whether to use a secondary RADIUS server and a secondary LDAP server.
• Enable: Uses secondary servers.
• Disable: Does not use secondary servers.
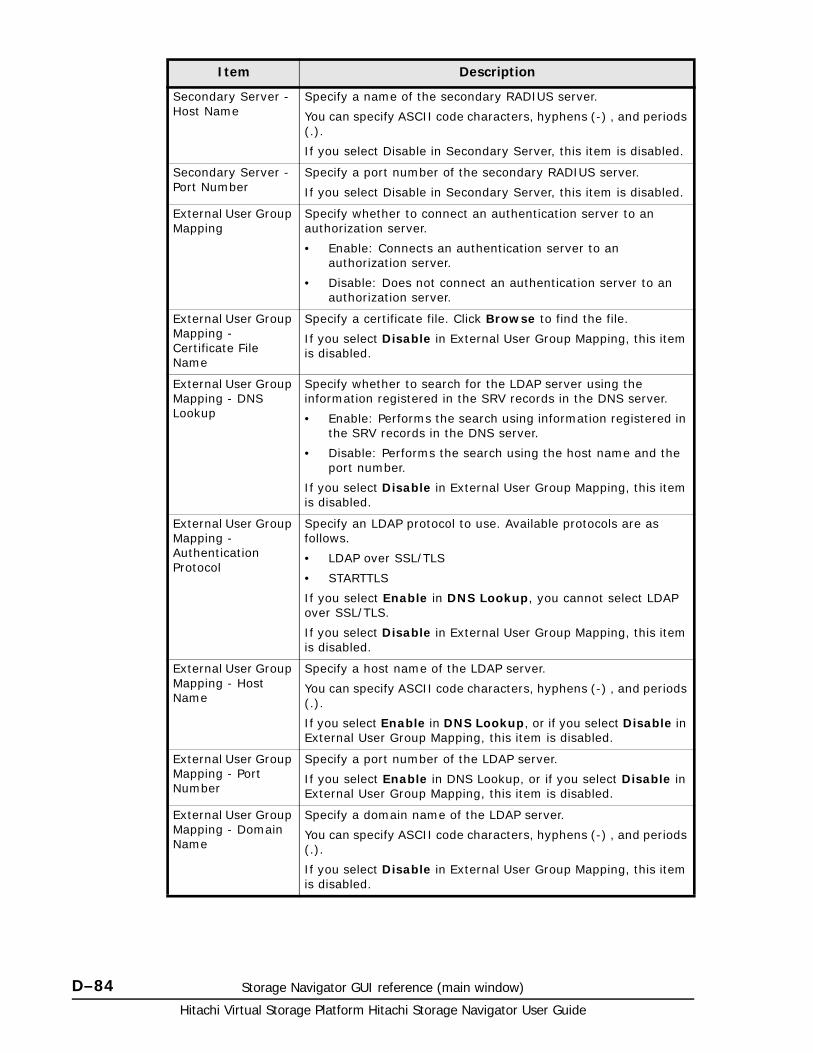
Hitachi Virtual Storage Platform Hitachi Storage Navigator User Guide
D–84 Storage Navigator GUI reference (main window)
Secondary Server - Host Name
Specify a name of the secondary RADIUS server.
You can specify ASCII code characters, hyphens (-) , and periods (.).
If you select Disable in Secondary Server, this item is disabled.
Secondary Server - Port Number
Specify a port number of the secondary RADIUS server.
If you select Disable in Secondary Server, this item is disabled.
External User Group Mapping
Specify whether to connect an authentication server to an authorization server.
• Enable: Connects an authentication server to an authorization server.
• Disable: Does not connect an authentication server to an authorization server.
External User Group Mapping - Certificate File Name
Specify a certificate file. Click Browse to find the file.
If you select Disable in External User Group Mapping, this item is disabled.
External User Group Mapping - DNS Lookup
Specify whether to search for the LDAP server using the information registered in the SRV records in the DNS server.
• Enable: Performs the search using information registered in the SRV records in the DNS server.
• Disable: Performs the search using the host name and the port number.
If you select Disable in External User Group Mapping, this item is disabled.
External User Group Mapping - Authentication Protocol
Specify an LDAP protocol to use. Available protocols are as follows.
• LDAP over SSL/TLS
• STARTTLS
If you select Enable in DNS Lookup, you cannot select LDAP over SSL/TLS.
If you select Disable in External User Group Mapping, this item is disabled.
External User Group Mapping - Host Name
Specify a host name of the LDAP server.
You can specify ASCII code characters, hyphens (-) , and periods (.).
If you select Enable in DNS Lookup, or if you select Disable in External User Group Mapping, this item is disabled.
External User Group Mapping - Port Number
Specify a port number of the LDAP server.
If you select Enable in DNS Lookup, or if you select Disable in External User Group Mapping, this item is disabled.
External User Group Mapping - Domain Name
Specify a domain name of the LDAP server.
You can specify ASCII code characters, hyphens (-) , and periods (.).
If you select Disable in External User Group Mapping, this item is disabled.
Item Description
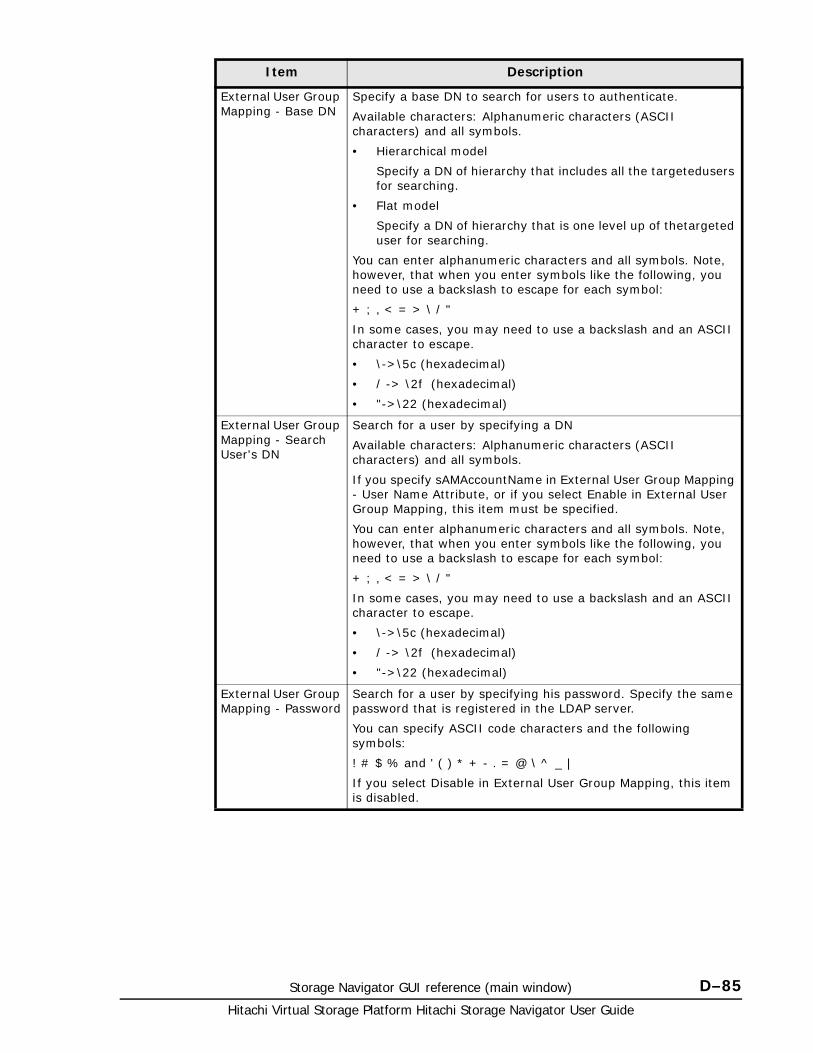
Storage Navigator GUI reference (main window) D–85Hitachi Virtual Storage Platform Hitachi Storage Navigator User Guide
External User Group Mapping - Base DN
Specify a base DN to search for users to authenticate.
Available characters: Alphanumeric characters (ASCII characters) and all symbols.
• Hierarchical model
Specify a DN of hierarchy that includes all the targetedusers for searching.
• Flat model
Specify a DN of hierarchy that is one level up of thetargeted user for searching.
You can enter alphanumeric characters and all symbols. Note, however, that when you enter symbols like the following, you need to use a backslash to escape for each symbol:
+ ; , < = > \ / "
In some cases, you may need to use a backslash and an ASCII character to escape.
• \->\5c (hexadecimal)
• / -> \2f (hexadecimal)
• "->\22 (hexadecimal)
External User Group Mapping - Search User's DN
Search for a user by specifying a DN
Available characters: Alphanumeric characters (ASCII characters) and all symbols.
If you specify sAMAccountName in External User Group Mapping - User Name Attribute, or if you select Enable in External User Group Mapping, this item must be specified.
You can enter alphanumeric characters and all symbols. Note, however, that when you enter symbols like the following, you need to use a backslash to escape for each symbol:
+ ; , < = > \ / "
In some cases, you may need to use a backslash and an ASCII character to escape.
• \->\5c (hexadecimal)
• / -> \2f (hexadecimal)
• "->\22 (hexadecimal)
External User Group Mapping - Password
Search for a user by specifying his password. Specify the same password that is registered in the LDAP server.
You can specify ASCII code characters and the following symbols:
! # $ % and ' ( ) * + - . = @ \ ^ _ |
If you select Disable in External User Group Mapping, this item is disabled.
Item Description
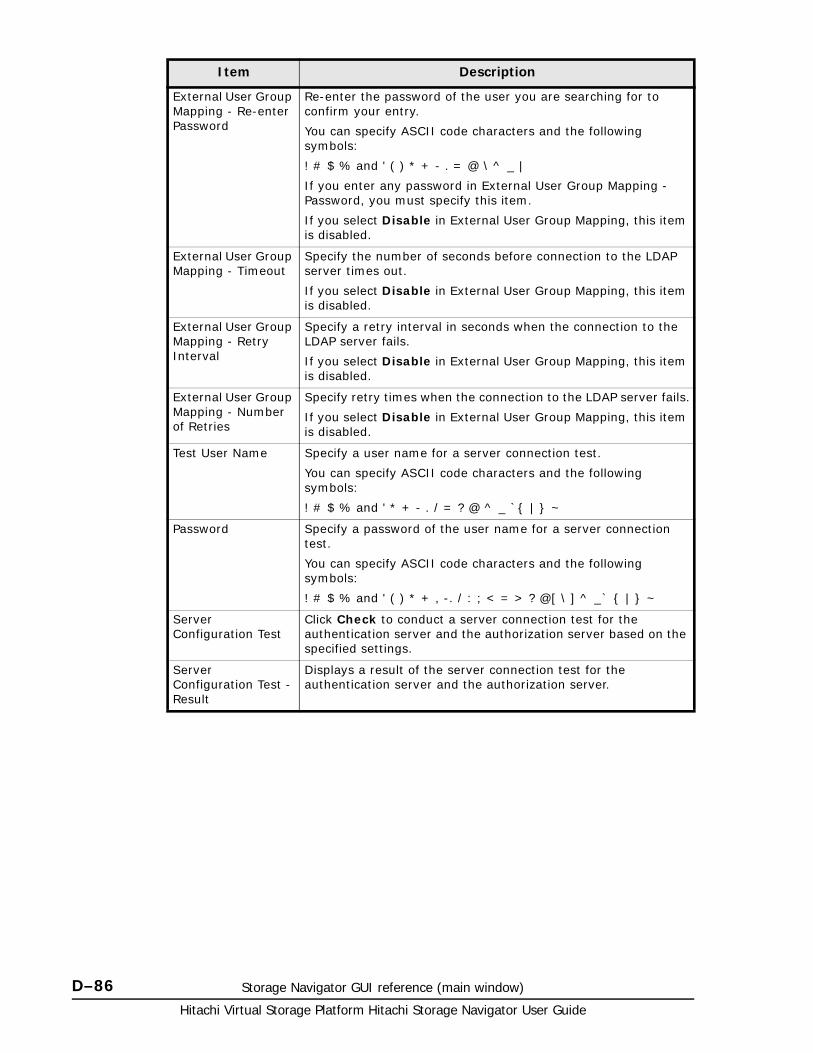
Hitachi Virtual Storage Platform Hitachi Storage Navigator User Guide
D–86 Storage Navigator GUI reference (main window)
External User Group Mapping - Re-enter Password
Re-enter the password of the user you are searching for to confirm your entry.
You can specify ASCII code characters and the following symbols:
! # $ % and ' ( ) * + - . = @ \ ^ _ |
If you enter any password in External User Group Mapping - Password, you must specify this item.
If you select Disable in External User Group Mapping, this item is disabled.
External User Group Mapping - Timeout
Specify the number of seconds before connection to the LDAP server times out.
If you select Disable in External User Group Mapping, this item is disabled.
External User Group Mapping - Retry Interval
Specify a retry interval in seconds when the connection to the LDAP server fails.
If you select Disable in External User Group Mapping, this item is disabled.
External User Group Mapping - Number of Retries
Specify retry times when the connection to the LDAP server fails.
If you select Disable in External User Group Mapping, this item is disabled.
Test User Name Specify a user name for a server connection test.
You can specify ASCII code characters and the following symbols:
! # $ % and ' * + - . / = ? @ ^ _ `{ | } ~
Password Specify a password of the user name for a server connection test.
You can specify ASCII code characters and the following symbols:
! # $ % and ' ( ) * + , -. / : ; < = > ? @[ \ ] ^ _` { | } ~
Server Configuration Test
Click Check to conduct a server connection test for the authentication server and the authorization server based on the specified settings.
Server Configuration Test - Result
Displays a result of the server connection test for the authentication server and the authorization server.
Item Description
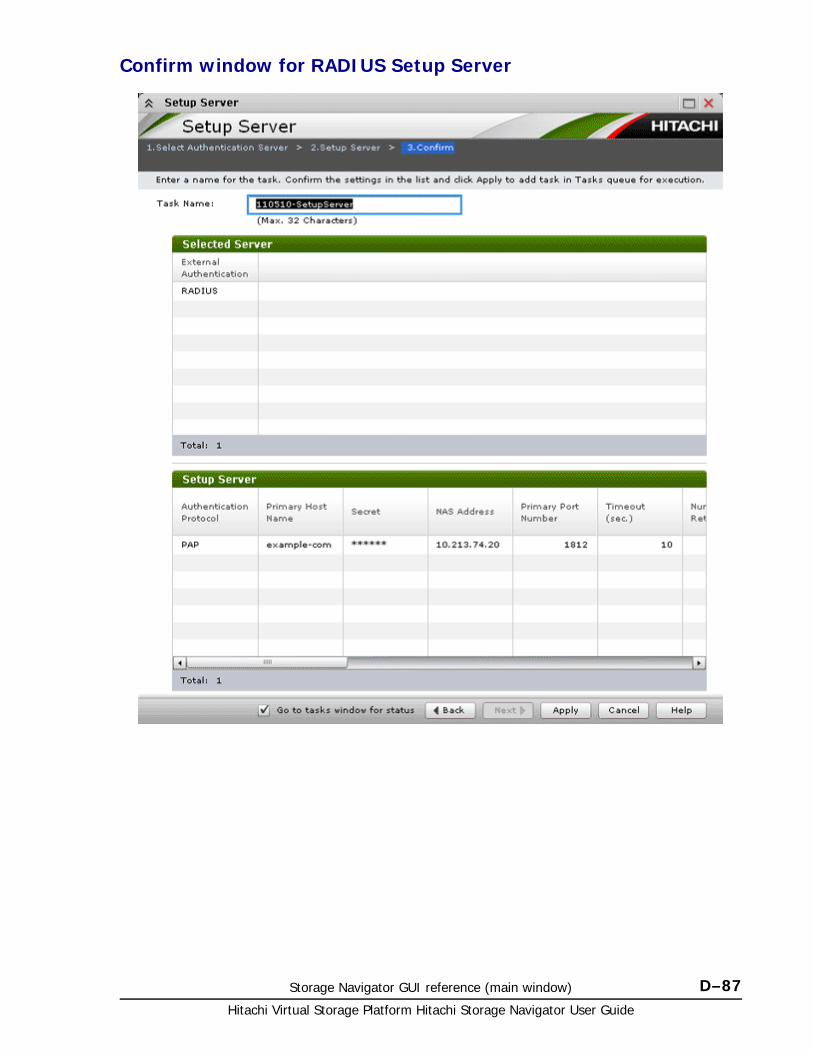
Storage Navigator GUI reference (main window) D–87Hitachi Virtual Storage Platform Hitachi Storage Navigator User Guide
Confirm window for RADIUS Setup Server
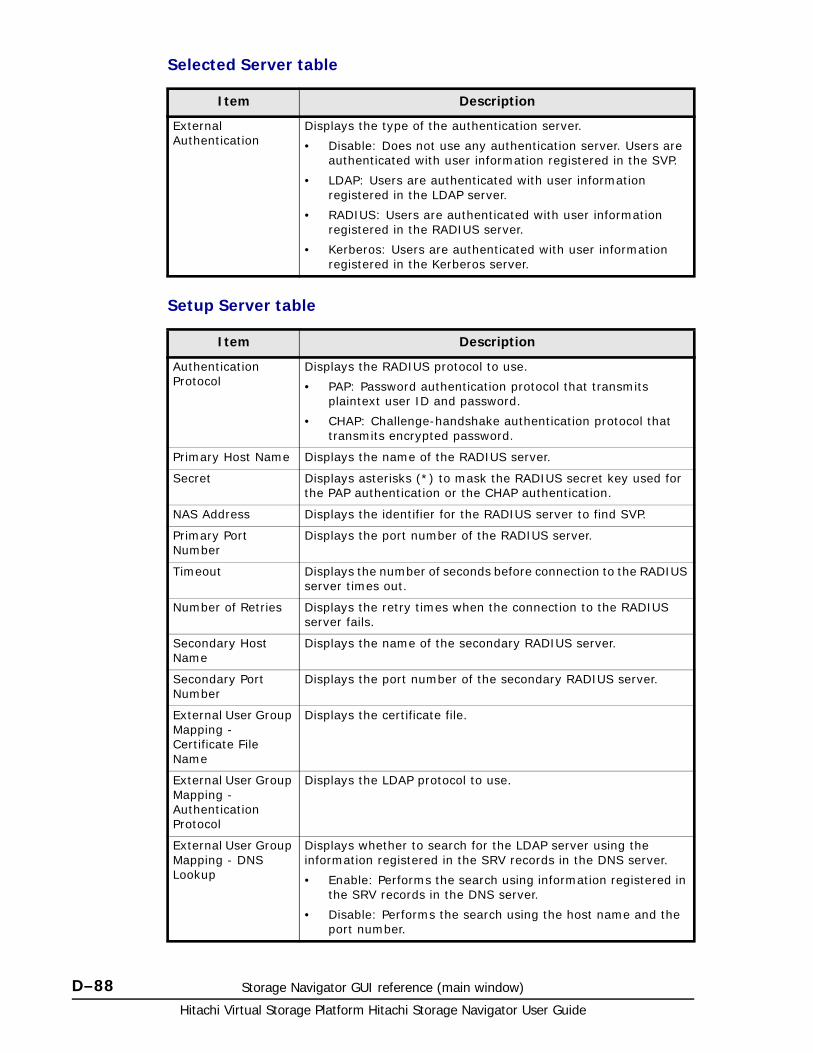
Hitachi Virtual Storage Platform Hitachi Storage Navigator User Guide
D–88 Storage Navigator GUI reference (main window)
Selected Server table
Setup Server table
Item Description
External Authentication
Displays the type of the authentication server.
• Disable: Does not use any authentication server. Users are authenticated with user information registered in the SVP.
• LDAP: Users are authenticated with user information registered in the LDAP server.
• RADIUS: Users are authenticated with user information registered in the RADIUS server.
• Kerberos: Users are authenticated with user information registered in the Kerberos server.
Item Description
Authentication Protocol
Displays the RADIUS protocol to use.
• PAP: Password authentication protocol that transmits plaintext user ID and password.
• CHAP: Challenge-handshake authentication protocol that transmits encrypted password.
Primary Host Name Displays the name of the RADIUS server.
Secret Displays asterisks (*) to mask the RADIUS secret key used for the PAP authentication or the CHAP authentication.
NAS Address Displays the identifier for the RADIUS server to find SVP.
Primary Port Number
Displays the port number of the RADIUS server.
Timeout Displays the number of seconds before connection to the RADIUS server times out.
Number of Retries Displays the retry times when the connection to the RADIUS server fails.
Secondary Host Name
Displays the name of the secondary RADIUS server.
Secondary Port Number
Displays the port number of the secondary RADIUS server.
External User Group Mapping - Certificate File Name
Displays the certificate file.
External User Group Mapping - Authentication Protocol
Displays the LDAP protocol to use.
External User Group Mapping - DNS Lookup
Displays whether to search for the LDAP server using the information registered in the SRV records in the DNS server.
• Enable: Performs the search using information registered in the SRV records in the DNS server.
• Disable: Performs the search using the host name and the port number.

Storage Navigator GUI reference (main window) D–89Hitachi Virtual Storage Platform Hitachi Storage Navigator User Guide
External User Group Mapping - Host Name
Displays the host name of the LDAP server.
External User Group Mapping - Port Number
Displays the port number of the LDAP server.
External User Group Mapping - Domain Name
Displays the domain name of the LDAP server.
External User Group Mapping - Base DN
Specify a base DN to search for users to authenticate.
Available characters: Alphanumeric characters (ASCII characters) and all symbols.
• Hierarchical model
Specify a DN of hierarchy that includes all the targetedusers for searching.
• Flat model
Specify a DN of hierarchy that is one level up of thetargeted user for searching.
You can enter alphanumeric characters and all symbols. Note, however, that when you enter symbols like the following, you need to use a backslash to escape for each symbol:
+ ; , < = > \ / "
In some cases, you may need to use a backslash and an ASCII character to escape.
• \->\5c (hexadecimal)
• / -> \2f (hexadecimal)
• "->\22 (hexadecimal)
External User Group Mapping - Search User's DN
Search for a user by specifying a DN
Available characters: Alphanumeric characters (ASCII characters) and all symbols.
If you specify sAMAccountName in External User Group Mapping - User Name Attribute, or if you select Enable in External User Group Mapping, this item must be specified.
If you select Disable in External User Group Mapping, this item is disabled.
You can enter alphanumeric characters and all symbols. Note, however, that when you enter symbols like the following, you need to use a backslash to escape for each symbol:
+ ; , < = > \ / "
In some cases, you may need to use a backslash and an ASCII character to escape.
• \->\5c (hexadecimal)
• / -> \2f (hexadecimal)
• "->\22 (hexadecimal)
External User Group Mapping - Password
Displays asterisks (*) to mask the password of the user for searching.
External User Group Mapping - Timeout
Displays the number of seconds before connection to the LDAP server times out.
Item Description

Hitachi Virtual Storage Platform Hitachi Storage Navigator User Guide
D–90 Storage Navigator GUI reference (main window)
External User Group Mapping - Retry Interval
Displays the retry interval in seconds when the connection to the LDAP server fails.
External User Group Mapping - Number of Retries
Displays the retry times when the connection to the LDAP server fails.
Item Description
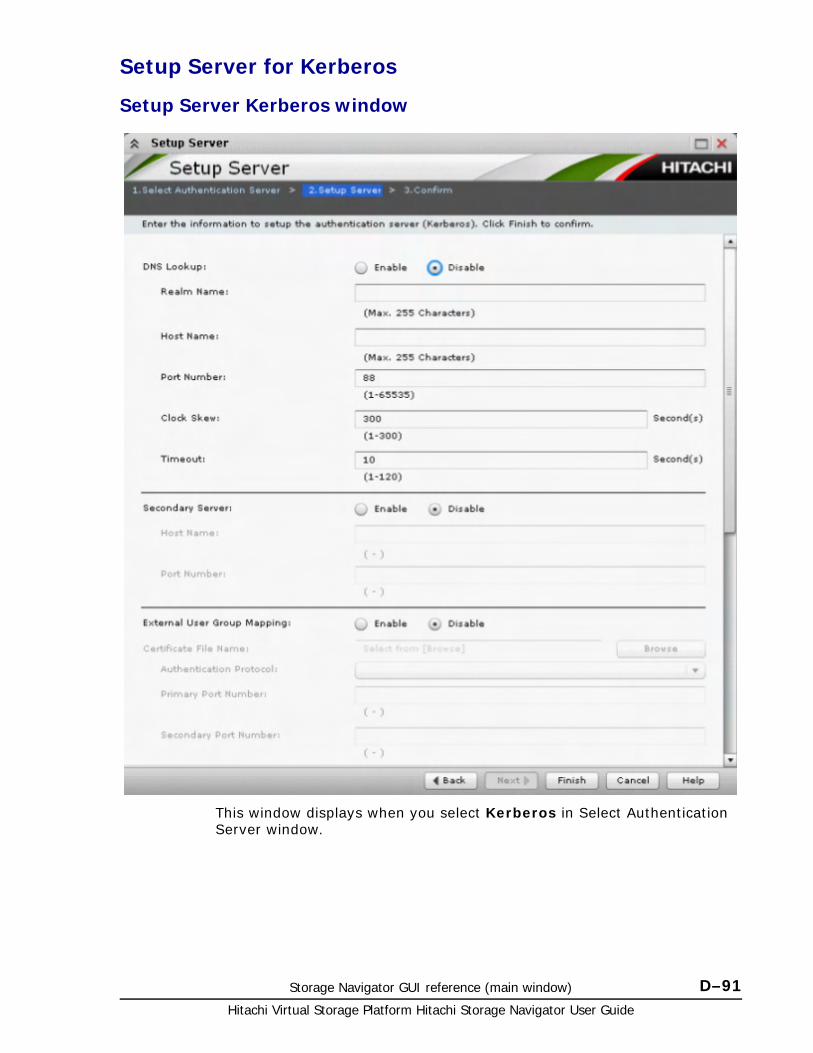
Storage Navigator GUI reference (main window) D–91Hitachi Virtual Storage Platform Hitachi Storage Navigator User Guide
Setup Server for Kerberos
Setup Server Kerberos window
This window displays when you select Kerberos in Select Authentication Server window.
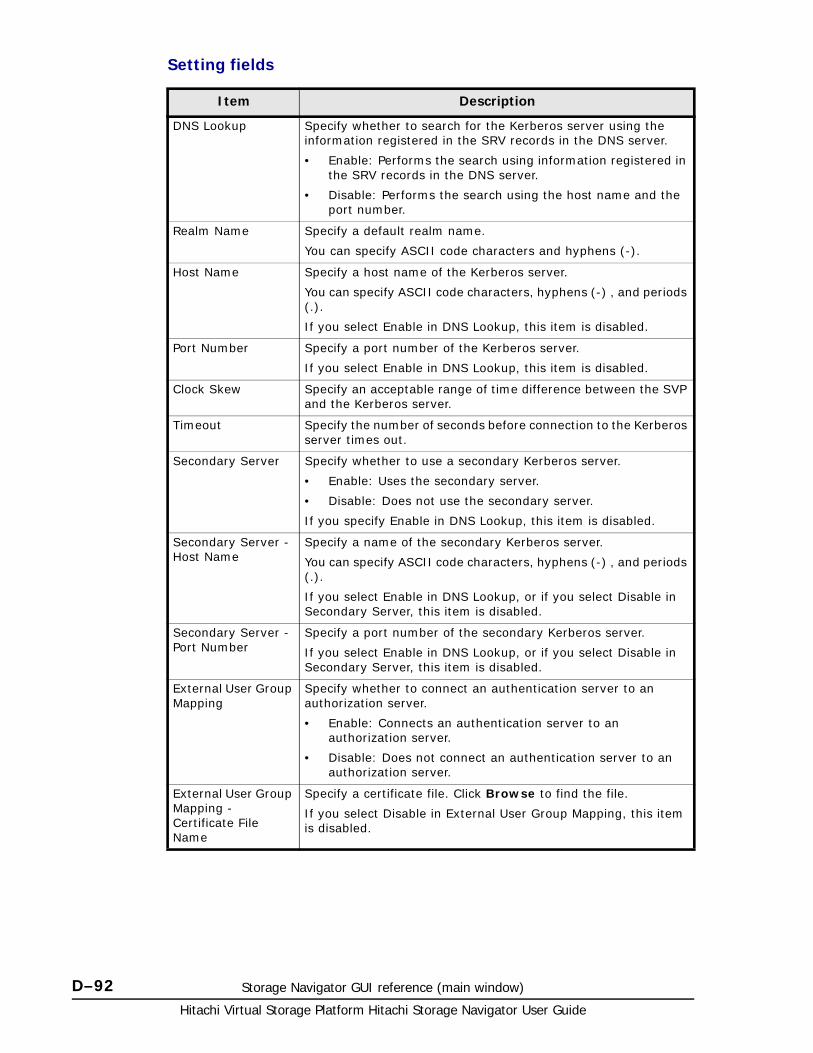
Hitachi Virtual Storage Platform Hitachi Storage Navigator User Guide
D–92 Storage Navigator GUI reference (main window)
Setting fields
Item Description
DNS Lookup Specify whether to search for the Kerberos server using the information registered in the SRV records in the DNS server.
• Enable: Performs the search using information registered in the SRV records in the DNS server.
• Disable: Performs the search using the host name and the port number.
Realm Name Specify a default realm name.
You can specify ASCII code characters and hyphens (-).
Host Name Specify a host name of the Kerberos server.
You can specify ASCII code characters, hyphens (-) , and periods (.).
If you select Enable in DNS Lookup, this item is disabled.
Port Number Specify a port number of the Kerberos server.
If you select Enable in DNS Lookup, this item is disabled.
Clock Skew Specify an acceptable range of time difference between the SVP and the Kerberos server.
Timeout Specify the number of seconds before connection to the Kerberos server times out.
Secondary Server Specify whether to use a secondary Kerberos server.
• Enable: Uses the secondary server.
• Disable: Does not use the secondary server.
If you specify Enable in DNS Lookup, this item is disabled.
Secondary Server - Host Name
Specify a name of the secondary Kerberos server.
You can specify ASCII code characters, hyphens (-) , and periods (.).
If you select Enable in DNS Lookup, or if you select Disable in Secondary Server, this item is disabled.
Secondary Server - Port Number
Specify a port number of the secondary Kerberos server.
If you select Enable in DNS Lookup, or if you select Disable in Secondary Server, this item is disabled.
External User Group Mapping
Specify whether to connect an authentication server to an authorization server.
• Enable: Connects an authentication server to an authorization server.
• Disable: Does not connect an authentication server to an authorization server.
External User Group Mapping - Certificate File Name
Specify a certificate file. Click Browse to find the file.
If you select Disable in External User Group Mapping, this item is disabled.
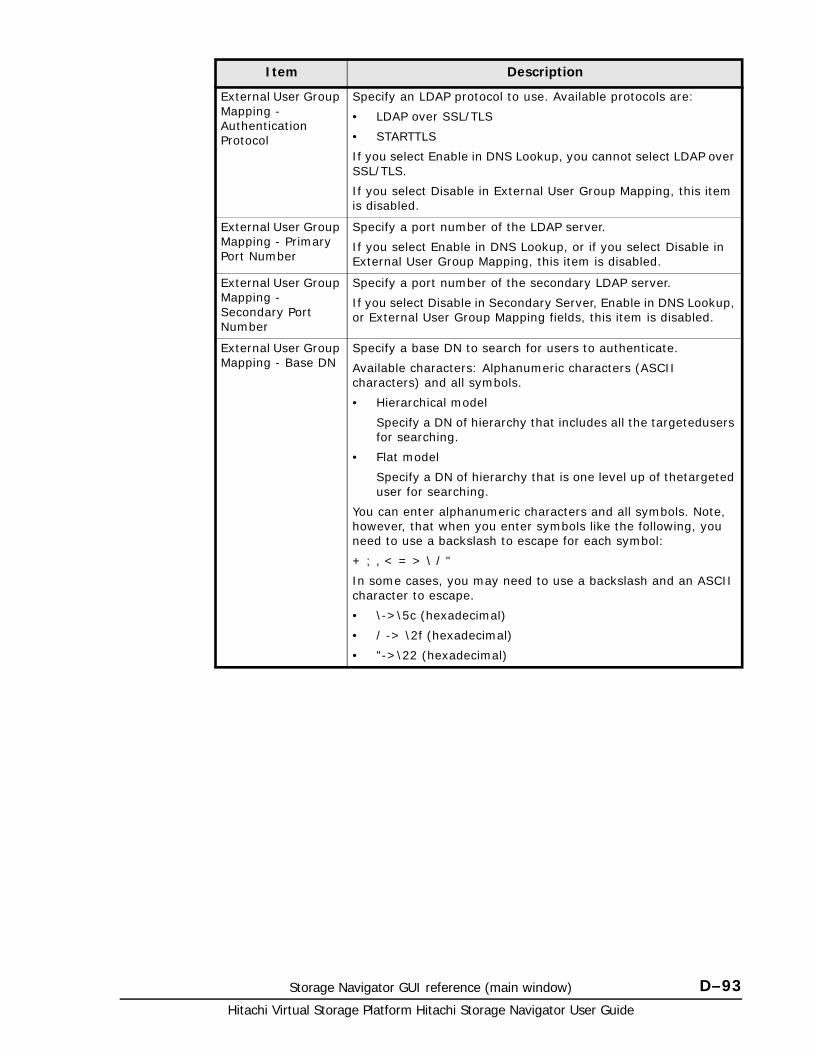
Storage Navigator GUI reference (main window) D–93Hitachi Virtual Storage Platform Hitachi Storage Navigator User Guide
External User Group Mapping - Authentication Protocol
Specify an LDAP protocol to use. Available protocols are:
• LDAP over SSL/TLS
• STARTTLS
If you select Enable in DNS Lookup, you cannot select LDAP over SSL/TLS.
If you select Disable in External User Group Mapping, this item is disabled.
External User Group Mapping - Primary Port Number
Specify a port number of the LDAP server.
If you select Enable in DNS Lookup, or if you select Disable in External User Group Mapping, this item is disabled.
External User Group Mapping - Secondary Port Number
Specify a port number of the secondary LDAP server.
If you select Disable in Secondary Server, Enable in DNS Lookup, or External User Group Mapping fields, this item is disabled.
External User Group Mapping - Base DN
Specify a base DN to search for users to authenticate.
Available characters: Alphanumeric characters (ASCII characters) and all symbols.
• Hierarchical model
Specify a DN of hierarchy that includes all the targetedusers for searching.
• Flat model
Specify a DN of hierarchy that is one level up of thetargeted user for searching.
You can enter alphanumeric characters and all symbols. Note, however, that when you enter symbols like the following, you need to use a backslash to escape for each symbol:
+ ; , < = > \ / "
In some cases, you may need to use a backslash and an ASCII character to escape.
• \->\5c (hexadecimal)
• / -> \2f (hexadecimal)
• "->\22 (hexadecimal)
Item Description
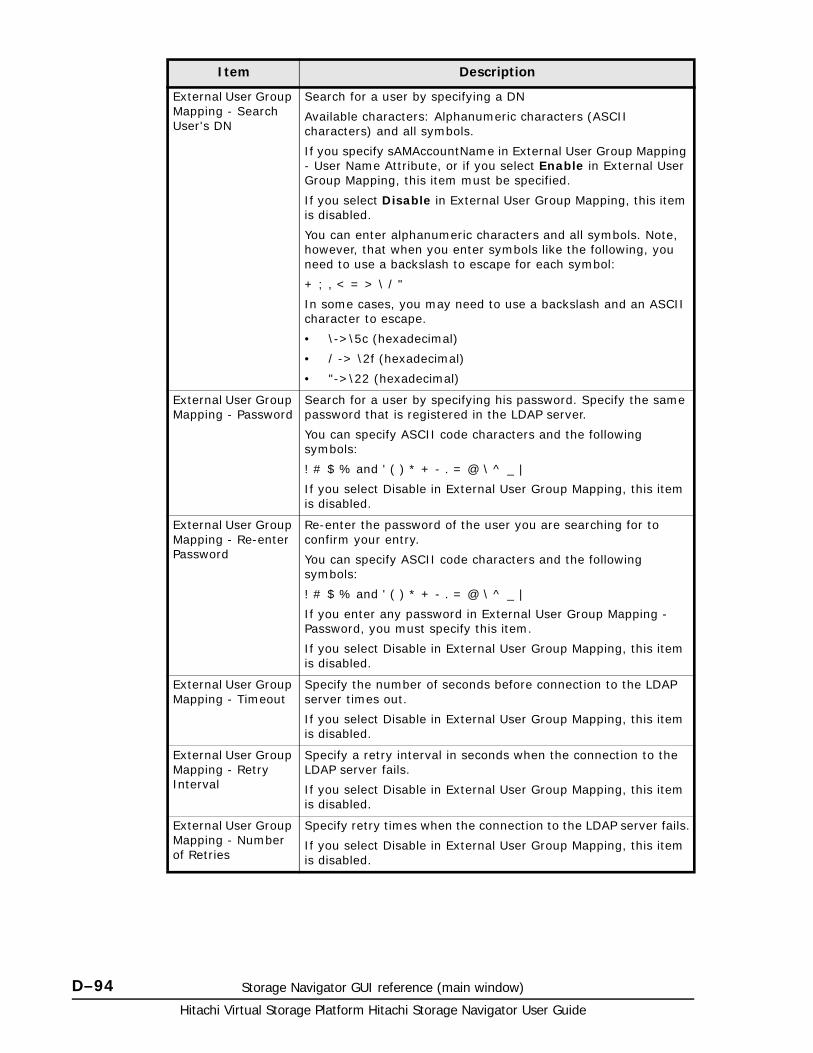
Hitachi Virtual Storage Platform Hitachi Storage Navigator User Guide
D–94 Storage Navigator GUI reference (main window)
External User Group Mapping - Search User's DN
Search for a user by specifying a DN
Available characters: Alphanumeric characters (ASCII characters) and all symbols.
If you specify sAMAccountName in External User Group Mapping - User Name Attribute, or if you select Enable in External User Group Mapping, this item must be specified.
If you select Disable in External User Group Mapping, this item is disabled.
You can enter alphanumeric characters and all symbols. Note, however, that when you enter symbols like the following, you need to use a backslash to escape for each symbol:
+ ; , < = > \ / "
In some cases, you may need to use a backslash and an ASCII character to escape.
• \->\5c (hexadecimal)
• / -> \2f (hexadecimal)
• "->\22 (hexadecimal)
External User Group Mapping - Password
Search for a user by specifying his password. Specify the same password that is registered in the LDAP server.
You can specify ASCII code characters and the following symbols:
! # $ % and ' ( ) * + - . = @ \ ^ _ |
If you select Disable in External User Group Mapping, this item is disabled.
External User Group Mapping - Re-enter Password
Re-enter the password of the user you are searching for to confirm your entry.
You can specify ASCII code characters and the following symbols:
! # $ % and ' ( ) * + - . = @ \ ^ _ |
If you enter any password in External User Group Mapping - Password, you must specify this item.
If you select Disable in External User Group Mapping, this item is disabled.
External User Group Mapping - Timeout
Specify the number of seconds before connection to the LDAP server times out.
If you select Disable in External User Group Mapping, this item is disabled.
External User Group Mapping - Retry Interval
Specify a retry interval in seconds when the connection to the LDAP server fails.
If you select Disable in External User Group Mapping, this item is disabled.
External User Group Mapping - Number of Retries
Specify retry times when the connection to the LDAP server fails.
If you select Disable in External User Group Mapping, this item is disabled.
Item Description
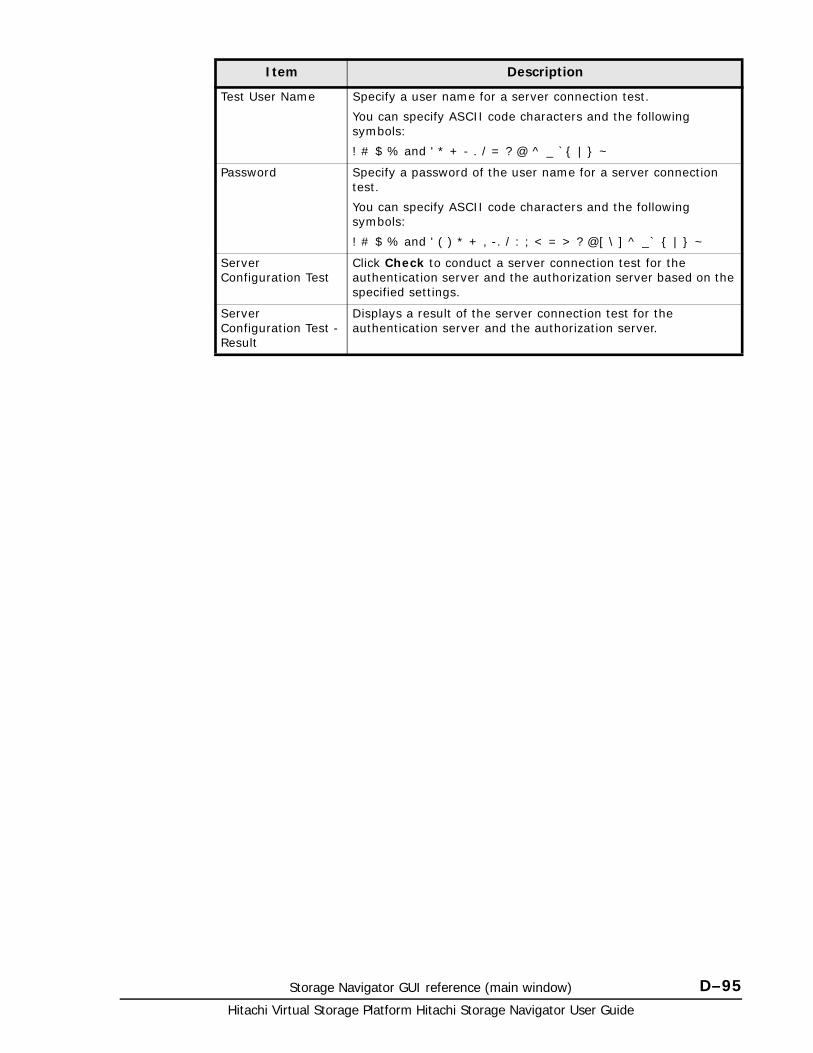
Storage Navigator GUI reference (main window) D–95Hitachi Virtual Storage Platform Hitachi Storage Navigator User Guide
Test User Name Specify a user name for a server connection test.
You can specify ASCII code characters and the following symbols:
! # $ % and ' * + - . / = ? @ ^ _ `{ | } ~
Password Specify a password of the user name for a server connection test.
You can specify ASCII code characters and the following symbols:
! # $ % and ' ( ) * + , -. / : ; < = > ? @[ \ ] ^ _` { | } ~
Server Configuration Test
Click Check to conduct a server connection test for the authentication server and the authorization server based on the specified settings.
Server Configuration Test - Result
Displays a result of the server connection test for the authentication server and the authorization server.
Item Description
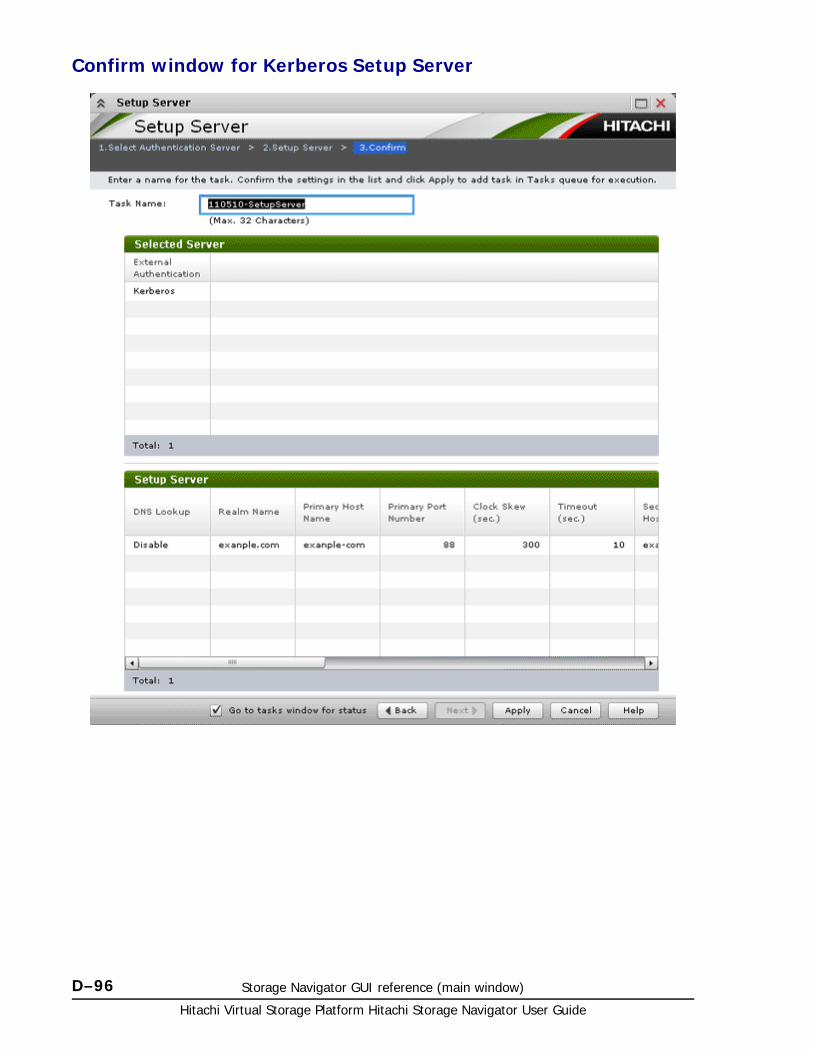
Hitachi Virtual Storage Platform Hitachi Storage Navigator User Guide
D–96 Storage Navigator GUI reference (main window)
Confirm window for Kerberos Setup Server
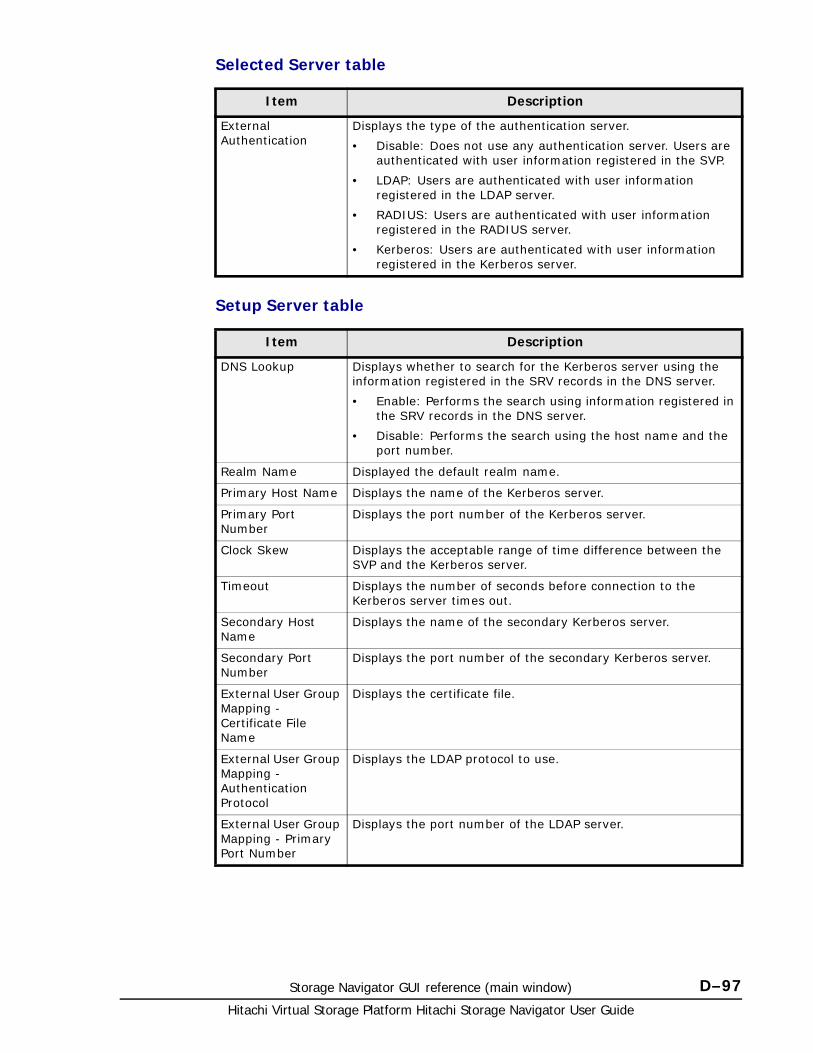
Storage Navigator GUI reference (main window) D–97Hitachi Virtual Storage Platform Hitachi Storage Navigator User Guide
Selected Server table
Setup Server table
Item Description
External Authentication
Displays the type of the authentication server.
• Disable: Does not use any authentication server. Users are authenticated with user information registered in the SVP.
• LDAP: Users are authenticated with user information registered in the LDAP server.
• RADIUS: Users are authenticated with user information registered in the RADIUS server.
• Kerberos: Users are authenticated with user information registered in the Kerberos server.
Item Description
DNS Lookup Displays whether to search for the Kerberos server using the information registered in the SRV records in the DNS server.
• Enable: Performs the search using information registered in the SRV records in the DNS server.
• Disable: Performs the search using the host name and the port number.
Realm Name Displayed the default realm name.
Primary Host Name Displays the name of the Kerberos server.
Primary Port Number
Displays the port number of the Kerberos server.
Clock Skew Displays the acceptable range of time difference between the SVP and the Kerberos server.
Timeout Displays the number of seconds before connection to the Kerberos server times out.
Secondary Host Name
Displays the name of the secondary Kerberos server.
Secondary Port Number
Displays the port number of the secondary Kerberos server.
External User Group Mapping - Certificate File Name
Displays the certificate file.
External User Group Mapping - Authentication Protocol
Displays the LDAP protocol to use.
External User Group Mapping - Primary Port Number
Displays the port number of the LDAP server.
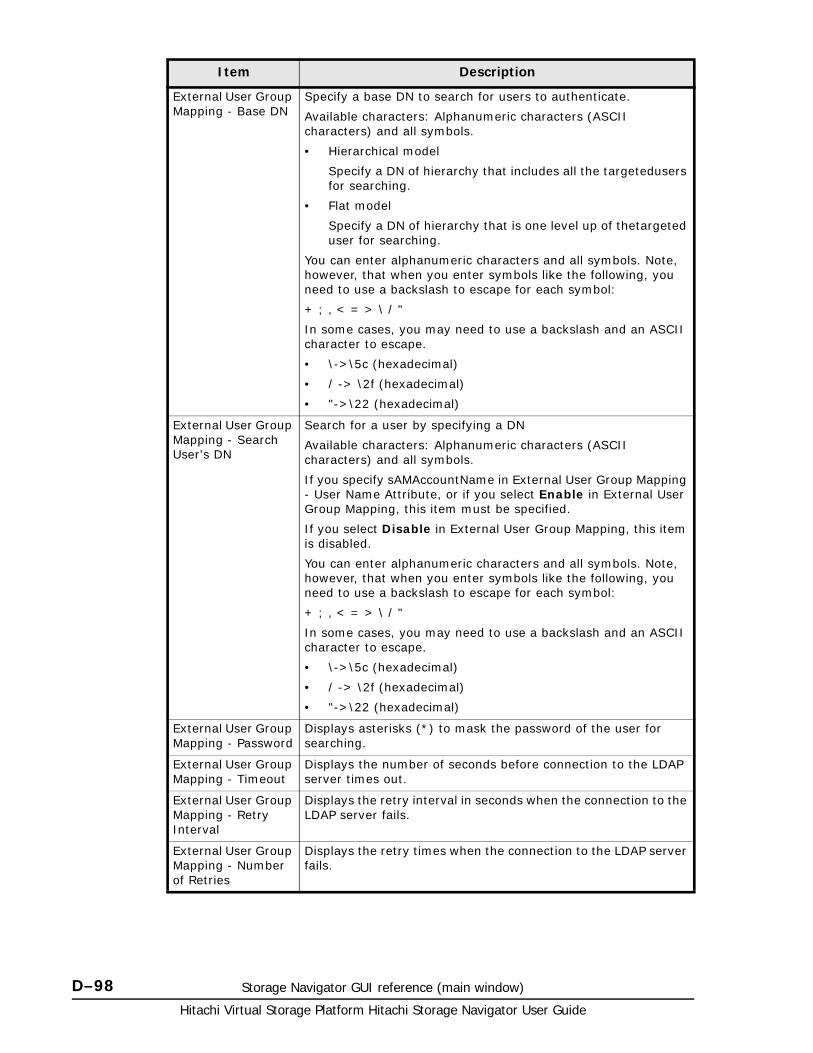
Hitachi Virtual Storage Platform Hitachi Storage Navigator User Guide
D–98 Storage Navigator GUI reference (main window)
External User Group Mapping - Base DN
Specify a base DN to search for users to authenticate.
Available characters: Alphanumeric characters (ASCII characters) and all symbols.
• Hierarchical model
Specify a DN of hierarchy that includes all the targetedusers for searching.
• Flat model
Specify a DN of hierarchy that is one level up of thetargeted user for searching.
You can enter alphanumeric characters and all symbols. Note, however, that when you enter symbols like the following, you need to use a backslash to escape for each symbol:
+ ; , < = > \ / "
In some cases, you may need to use a backslash and an ASCII character to escape.
• \->\5c (hexadecimal)
• / -> \2f (hexadecimal)
• "->\22 (hexadecimal)
External User Group Mapping - Search User's DN
Search for a user by specifying a DN
Available characters: Alphanumeric characters (ASCII characters) and all symbols.
If you specify sAMAccountName in External User Group Mapping - User Name Attribute, or if you select Enable in External User Group Mapping, this item must be specified.
If you select Disable in External User Group Mapping, this item is disabled.
You can enter alphanumeric characters and all symbols. Note, however, that when you enter symbols like the following, you need to use a backslash to escape for each symbol:
+ ; , < = > \ / "
In some cases, you may need to use a backslash and an ASCII character to escape.
• \->\5c (hexadecimal)
• / -> \2f (hexadecimal)
• "->\22 (hexadecimal)
External User Group Mapping - Password
Displays asterisks (*) to mask the password of the user for searching.
External User Group Mapping - Timeout
Displays the number of seconds before connection to the LDAP server times out.
External User Group Mapping - Retry Interval
Displays the retry interval in seconds when the connection to the LDAP server fails.
External User Group Mapping - Number of Retries
Displays the retry times when the connection to the LDAP server fails.
Item Description
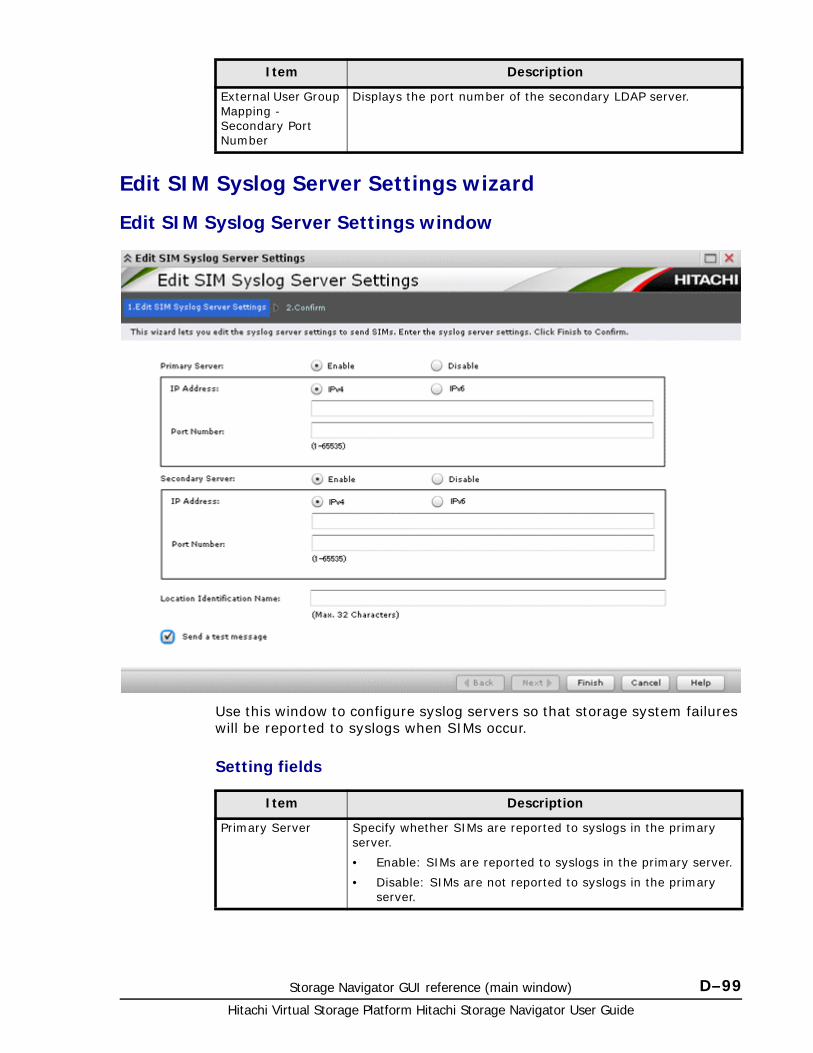
Storage Navigator GUI reference (main window) D–99Hitachi Virtual Storage Platform Hitachi Storage Navigator User Guide
Edit SIM Syslog Server Settings wizard
Edit SIM Syslog Server Settings window
Use this window to configure syslog servers so that storage system failures will be reported to syslogs when SIMs occur.
Setting fields
External User Group Mapping - Secondary Port Number
Displays the port number of the secondary LDAP server.
Item Description
Item Description
Primary Server Specify whether SIMs are reported to syslogs in the primary server.
• Enable: SIMs are reported to syslogs in the primary server.
• Disable: SIMs are not reported to syslogs in the primary server.
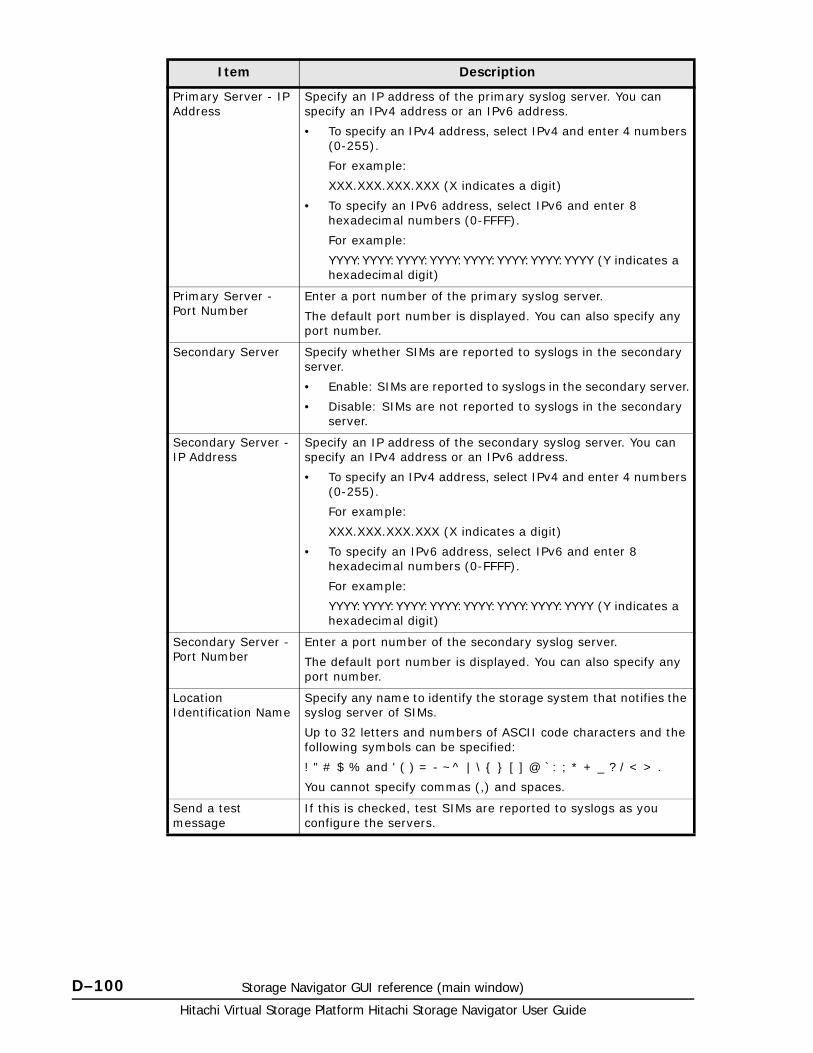
Hitachi Virtual Storage Platform Hitachi Storage Navigator User Guide
D–100 Storage Navigator GUI reference (main window)
Primary Server - IP Address
Specify an IP address of the primary syslog server. You can specify an IPv4 address or an IPv6 address.
• To specify an IPv4 address, select IPv4 and enter 4 numbers (0-255).
For example:
XXX.XXX.XXX.XXX (X indicates a digit)
• To specify an IPv6 address, select IPv6 and enter 8 hexadecimal numbers (0-FFFF).
For example:
YYYY:YYYY:YYYY:YYYY:YYYY:YYYY:YYYY:YYYY (Y indicates a hexadecimal digit)
Primary Server - Port Number
Enter a port number of the primary syslog server.
The default port number is displayed. You can also specify any port number.
Secondary Server Specify whether SIMs are reported to syslogs in the secondary server.
• Enable: SIMs are reported to syslogs in the secondary server.
• Disable: SIMs are not reported to syslogs in the secondary server.
Secondary Server - IP Address
Specify an IP address of the secondary syslog server. You can specify an IPv4 address or an IPv6 address.
• To specify an IPv4 address, select IPv4 and enter 4 numbers (0-255).
For example:
XXX.XXX.XXX.XXX (X indicates a digit)
• To specify an IPv6 address, select IPv6 and enter 8 hexadecimal numbers (0-FFFF).
For example:
YYYY:YYYY:YYYY:YYYY:YYYY:YYYY:YYYY:YYYY (Y indicates a hexadecimal digit)
Secondary Server - Port Number
Enter a port number of the secondary syslog server.
The default port number is displayed. You can also specify any port number.
Location Identification Name
Specify any name to identify the storage system that notifies the syslog server of SIMs.
Up to 32 letters and numbers of ASCII code characters and the following symbols can be specified:
! " # $ % and ' ( ) = - ~^ | \ { } [ ] @ `: ; * + _ ? / < > .
You cannot specify commas (,) and spaces.
Send a test message
If this is checked, test SIMs are reported to syslogs as you configure the servers.
Item Description
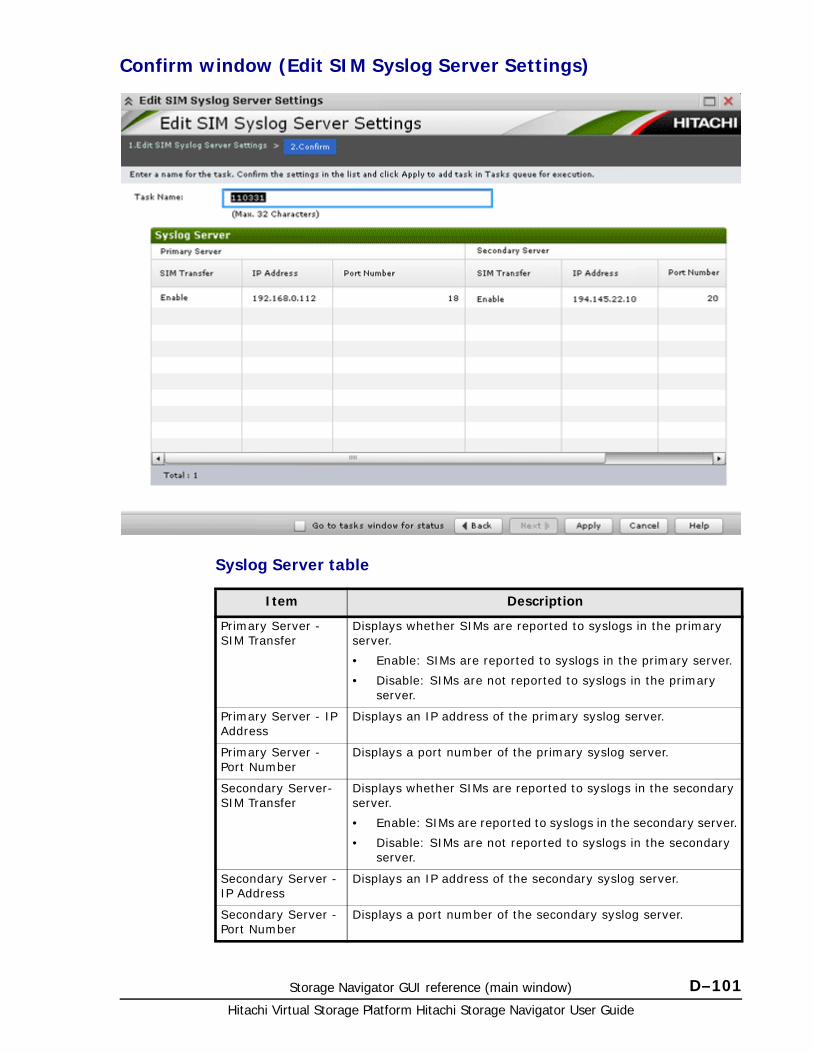
Storage Navigator GUI reference (main window) D–101Hitachi Virtual Storage Platform Hitachi Storage Navigator User Guide
Confirm window (Edit SIM Syslog Server Settings)
Syslog Server table
Item Description
Primary Server - SIM Transfer
Displays whether SIMs are reported to syslogs in the primary server.
• Enable: SIMs are reported to syslogs in the primary server.
• Disable: SIMs are not reported to syslogs in the primary server.
Primary Server - IP Address
Displays an IP address of the primary syslog server.
Primary Server - Port Number
Displays a port number of the primary syslog server.
Secondary Server- SIM Transfer
Displays whether SIMs are reported to syslogs in the secondary server.
• Enable: SIMs are reported to syslogs in the secondary server.
• Disable: SIMs are not reported to syslogs in the secondary server.
Secondary Server - IP Address
Displays an IP address of the secondary syslog server.
Secondary Server - Port Number
Displays a port number of the secondary syslog server.
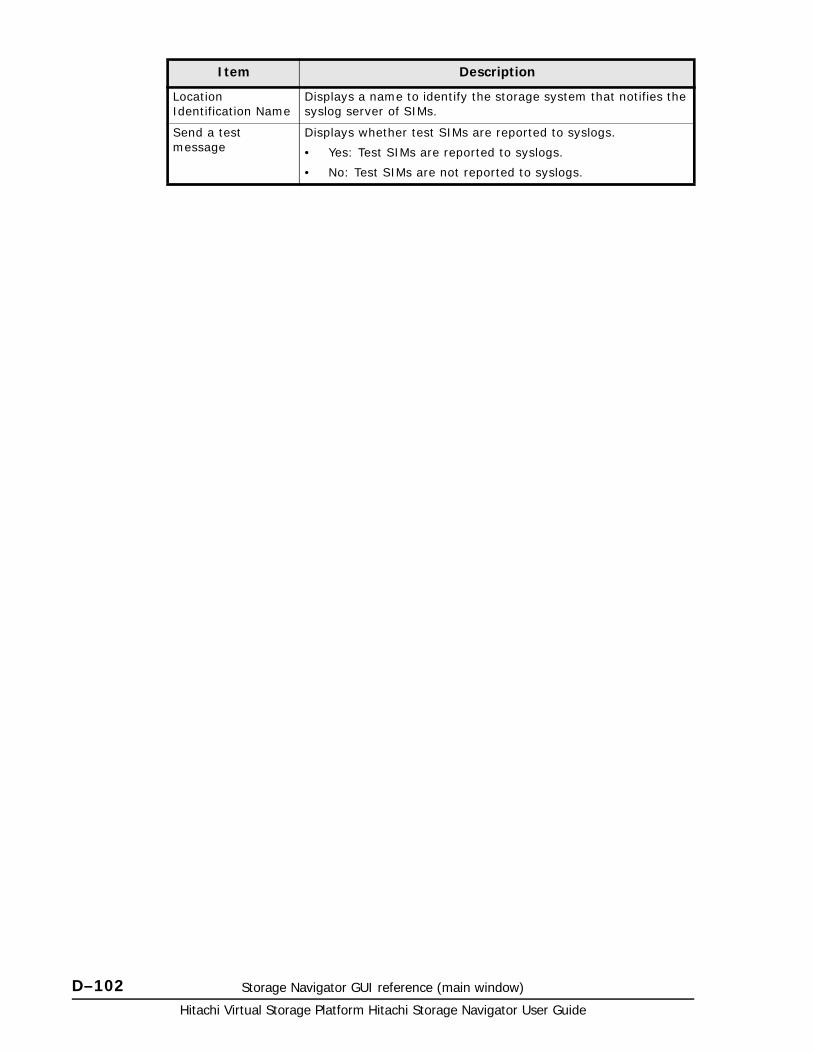
Hitachi Virtual Storage Platform Hitachi Storage Navigator User Guide
D–102 Storage Navigator GUI reference (main window)
Location Identification Name
Displays a name to identify the storage system that notifies the syslog server of SIMs.
Send a test message
Displays whether test SIMs are reported to syslogs.
• Yes: Test SIMs are reported to syslogs.
• No: Test SIMs are not reported to syslogs.
Item Description
E
Storage Navigator GUI reference (secondary windows) E–1Hitachi Virtual Storage Platform Hitachi Storage Navigator User Guide
Storage Navigator GUI reference(secondary windows)
This topic describes the Storage Navigator secondary windows.
□ Storage Navigator secondary window
□ About window
□ License Key window
□ Alerts window
□ Login Message window
□ E-mail Information window
□ Basic Information Display dialog box
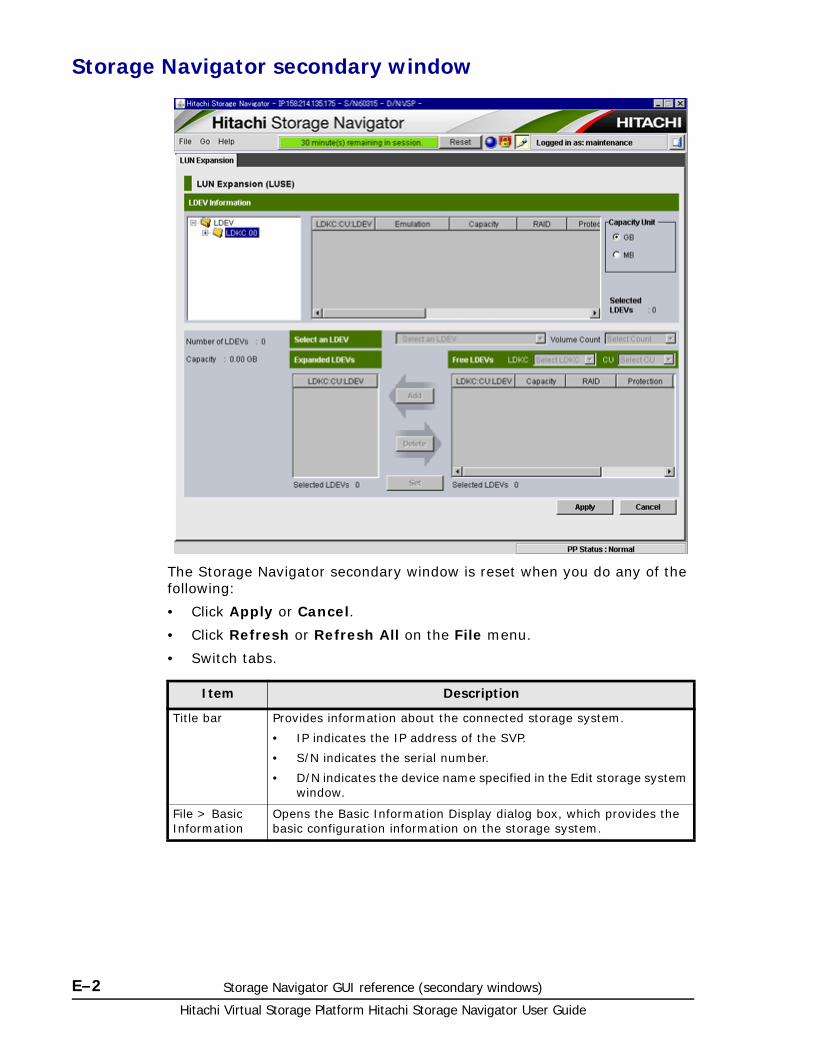
Hitachi Virtual Storage Platform Hitachi Storage Navigator User Guide
E–2 Storage Navigator GUI reference (secondary windows)
Storage Navigator secondary window
The Storage Navigator secondary window is reset when you do any of the following:
• Click Apply or Cancel.
• Click Refresh or Refresh All on the File menu.
• Switch tabs.
Item Description
Title bar Provides information about the connected storage system.
• IP indicates the IP address of the SVP.
• S/N indicates the serial number.
• D/N indicates the device name specified in the Edit storage system window.
File > Basic Information
Opens the Basic Information Display dialog box, which provides the basic configuration information on the storage system.

Storage Navigator GUI reference (secondary windows) E–3Hitachi Virtual Storage Platform Hitachi Storage Navigator User Guide
File > Refresh All
Updates the information on the SVP. All information displayed on the Storage Navigator secondary window is reacquired from the storage system. We recommend that you use this command only when error recovery is required.
• Takes time until the processing has been completed.
• While updating, other users are not allowed to perform any operation on the Storage Navigator windows. Maintenance of the storage system or the SVP operation by the service personnel is not allowed, either.
• Available only for the user with Storage Administrator (Initial Configuration) role.
• Available only when the user is in Modify mode.
• The information may not display correctly if SVP maintenance is in progress.
• Try this command if the configuration information displayed on the Storage Navigator differs from the actual configuration information that can be recognized from the host.
File > Refresh Displays the latest information on Storage Navigator.
The information might not display correctly when the exclusive lock is effective or SVP maintenance is in progress.
File > Close Closes the Storage Navigator secondary window
Go menu Indicates software names
Help menu About: Opens the About dialog box to show the version of the storage system.
Normal
Warning
Abnormal
Indicates the storage system error status by color (blue: normal, yellow: warning, red: abnormal) according to the host SIM status. If the SIM occurs but is not reported to the host, the status remains the same.
Unlocked
Locked
Indicates the current operational mode of Storage Navigator.
If all logged in users are currentlyworking in the view mode, the blue
unlocked-shaped icon ( ) appears. If any user is working in the
Modify mode, the red locked-shaped icon ( ) appears.
Note: The operational status might not be displayed correctly when the exclusive lock is effective or SVP maintenance is in progress.
View
Modify
Allows users to switch the operation mode between Modify and View. The button always shows the current user operation mode. To change the modes, click the button.
You cannot switch to the Modify mode while any other user is operating in the Modify mode. Make sure to confirm the exclusive lock icon before switching to the Modify mode.
Reset Reset the remaining time for the Modify mode. Appears only when you are in Modify mode.
Logged in as Shows the user ID of the currently logged-in user.
Logout Closes the Storage Navigator secondary window.
Item Description

Hitachi Virtual Storage Platform Hitachi Storage Navigator User Guide
E–4 Storage Navigator GUI reference (secondary windows)
Opening Storage Navigator secondary windowsSome Storage Navigator operations are performed through secondary windows that use a Java application. For this reason, whether you are using JRE 5.0 or 6.0, a message might appear and ask if you want to run a Java Application. You might see slightly different dialog boxes depending on your environment and configuration.
To use Storage Navigator, click Run in the following dialog box. If you select the Always trust content from this publisher option before clicking Run, Storage Navigator is always allowed to access the local files and you will not see this dialog box again.
Apply Implements all the changes or settings displayed in blue bold italics. This button is available only in Modify mode.
You can create and store up to 20,000 settings or operations before actually applying them to the storage system. To avoid a possible error, do not apply more than 20,000 settings at a time.
Cancel Cancels the changes or settings made on the window. This button is available only in Modify mode.
PP Status Displays the SIM severity level. PP Status appears if a SIM occurs related to a software license because the license is expired or the licensed capacity is insufficient. However only the storage administrator with the Storage Administrator role set to Enable will be able to see the display.
PP Status can display any of the following SIM severity level statuses:
• If PP Status: Normal appears, no SIM has occurred. If any other status appears, view either the License Key window or the Status window to identify which software has a problem. You may find that you need to consider purchasing the license.
• When multiple SIMs occur, only the SIM with the highest severity appears.
Item Description
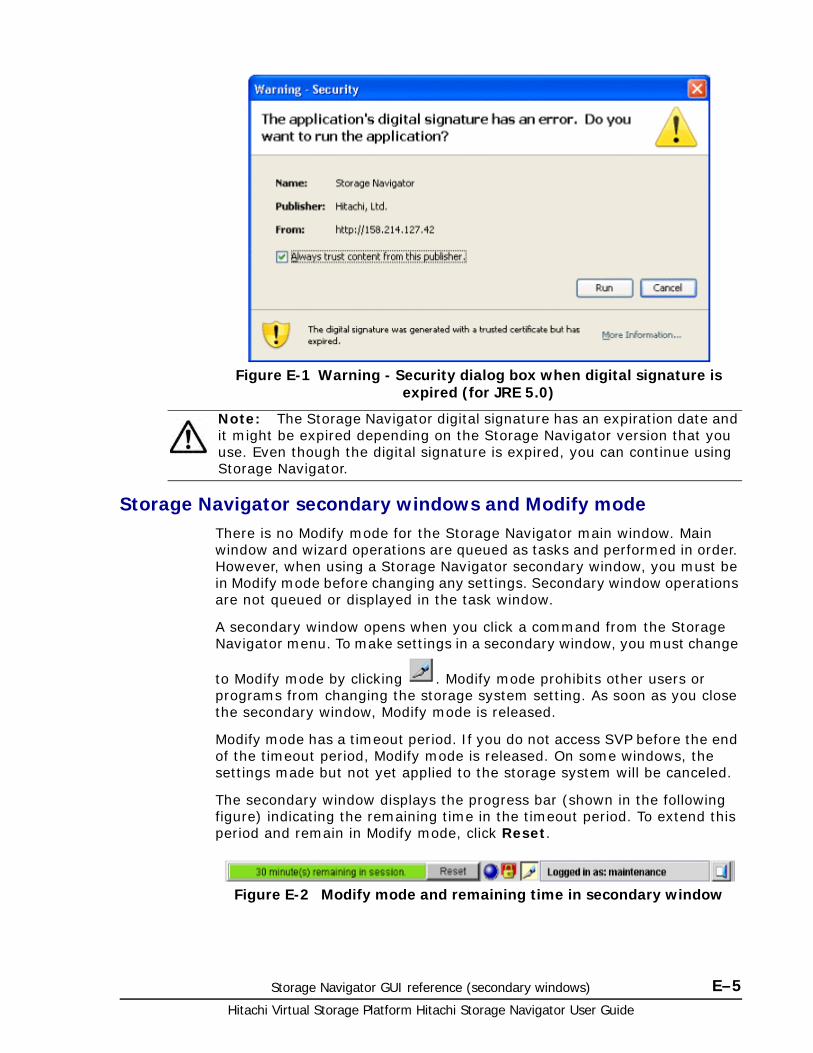
Storage Navigator GUI reference (secondary windows) E–5Hitachi Virtual Storage Platform Hitachi Storage Navigator User Guide
Storage Navigator secondary windows and Modify modeThere is no Modify mode for the Storage Navigator main window. Main window and wizard operations are queued as tasks and performed in order. However, when using a Storage Navigator secondary window, you must be in Modify mode before changing any settings. Secondary window operations are not queued or displayed in the task window.
A secondary window opens when you click a command from the Storage Navigator menu. To make settings in a secondary window, you must change
to Modify mode by clicking . Modify mode prohibits other users or programs from changing the storage system setting. As soon as you close the secondary window, Modify mode is released.
Modify mode has a timeout period. If you do not access SVP before the end of the timeout period, Modify mode is released. On some windows, the settings made but not yet applied to the storage system will be canceled.
The secondary window displays the progress bar (shown in the following figure) indicating the remaining time in the timeout period. To extend this period and remain in Modify mode, click Reset.
Figure E-1 Warning - Security dialog box when digital signature is expired (for JRE 5.0)
Note: The Storage Navigator digital signature has an expiration date and it might be expired depending on the Storage Navigator version that you use. Even though the digital signature is expired, you can continue using Storage Navigator.
Figure E-2 Modify mode and remaining time in secondary window

Hitachi Virtual Storage Platform Hitachi Storage Navigator User Guide
E–6 Storage Navigator GUI reference (secondary windows)
The Modify mode default timeout period is 30 minutes, but can be changed by modifying RMI time-out period for Modify.
If Modify mode is released due to a timeout, the current window will still be visible, but an error message is returned when you click Apply, or when you
try to refresh the window through File > Refresh All or Refresh View
.
About window
The About command provides storage system information.
Item Description
Storage System Type
Displays the product name of the connected storage system.
Serial Number Displays the serial number of the connected storage system.
IP Address Displays the IP address of the connected storage system (SVP).
Storage System Name
Displays the device name of the connected storage system.
Contact Displays the contact information of the administrator.
Location Displays the location of the connected storage system.
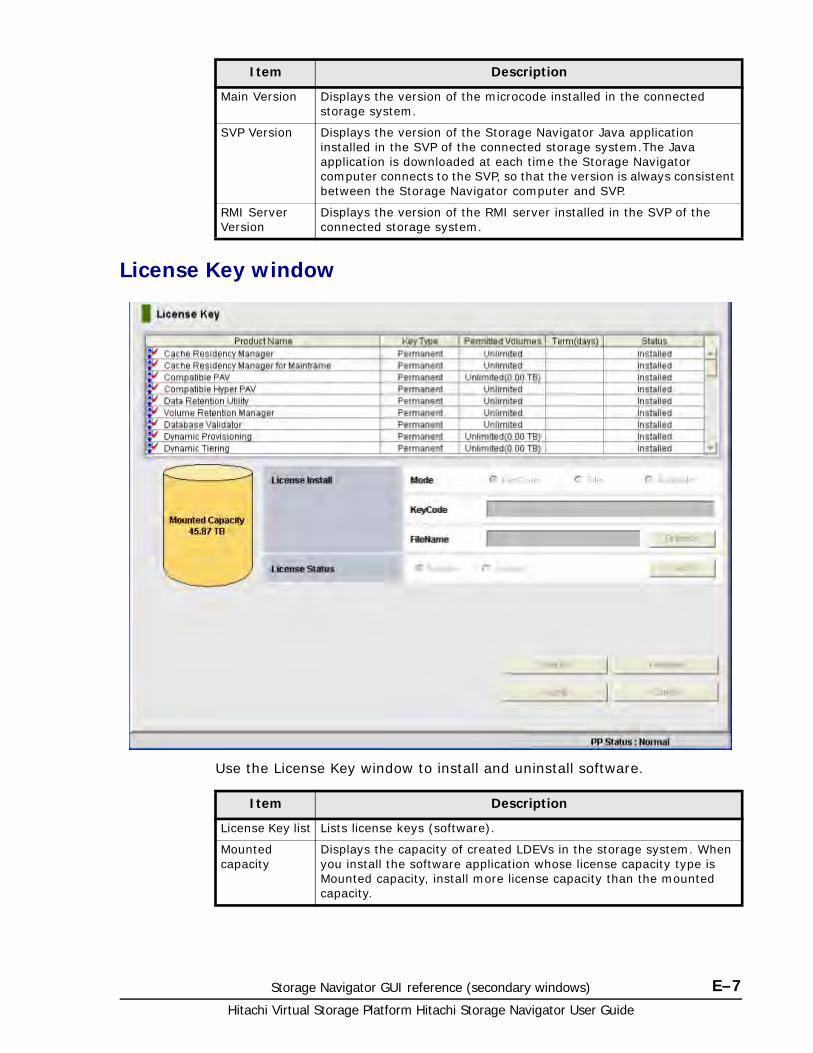
Storage Navigator GUI reference (secondary windows) E–7Hitachi Virtual Storage Platform Hitachi Storage Navigator User Guide
License Key window
Use the License Key window to install and uninstall software.
Main Version Displays the version of the microcode installed in the connected storage system.
SVP Version Displays the version of the Storage Navigator Java application installed in the SVP of the connected storage system.The Java application is downloaded at each time the Storage Navigator computer connects to the SVP, so that the version is always consistent between the Storage Navigator computer and SVP.
RMI Server Version
Displays the version of the RMI server installed in the SVP of the connected storage system.
Item Description
Item Description
License Key list Lists license keys (software).
Mounted capacity
Displays the capacity of created LDEVs in the storage system. When you install the software application whose license capacity type is Mounted capacity, install more license capacity than the mounted capacity.
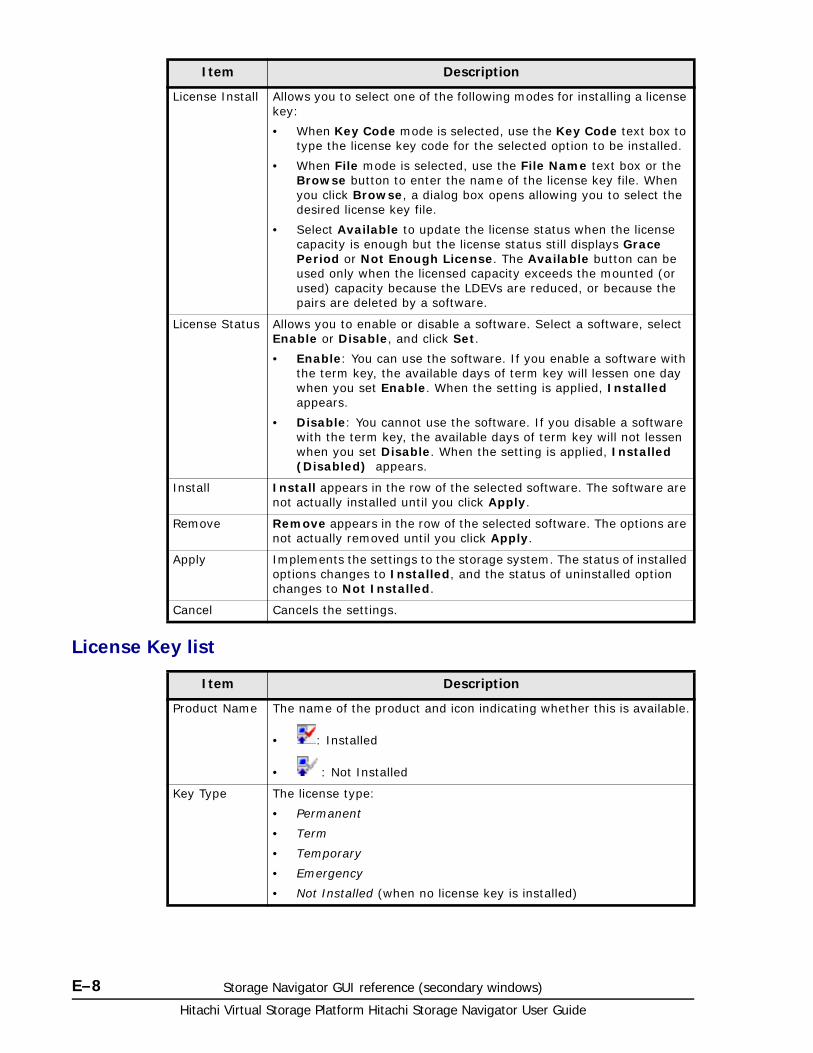
Hitachi Virtual Storage Platform Hitachi Storage Navigator User Guide
E–8 Storage Navigator GUI reference (secondary windows)
License Key list
License Install Allows you to select one of the following modes for installing a license key:
• When Key Code mode is selected, use the Key Code text box to type the license key code for the selected option to be installed.
• When File mode is selected, use the File Name text box or the Browse button to enter the name of the license key file. When you click Browse, a dialog box opens allowing you to select the desired license key file.
• Select Available to update the license status when the license capacity is enough but the license status still displays Grace Period or Not Enough License. The Available button can be used only when the licensed capacity exceeds the mounted (or used) capacity because the LDEVs are reduced, or because the pairs are deleted by a software.
License Status Allows you to enable or disable a software. Select a software, select Enable or Disable, and click Set.
• Enable: You can use the software. If you enable a software with the term key, the available days of term key will lessen one day when you set Enable. When the setting is applied, Installed appears.
• Disable: You cannot use the software. If you disable a software with the term key, the available days of term key will not lessen when you set Disable. When the setting is applied, Installed (Disabled) appears.
Install Install appears in the row of the selected software. The software are not actually installed until you click Apply.
Remove Remove appears in the row of the selected software. The options are not actually removed until you click Apply.
Apply Implements the settings to the storage system. The status of installed options changes to Installed, and the status of uninstalled option changes to Not Installed.
Cancel Cancels the settings.
Item Description
Product Name The name of the product and icon indicating whether this is available.
• : Installed
• : Not Installed
Key Type The license type:
• Permanent
• Term
• Temporary
• Emergency
• Not Installed (when no license key is installed)
Item Description
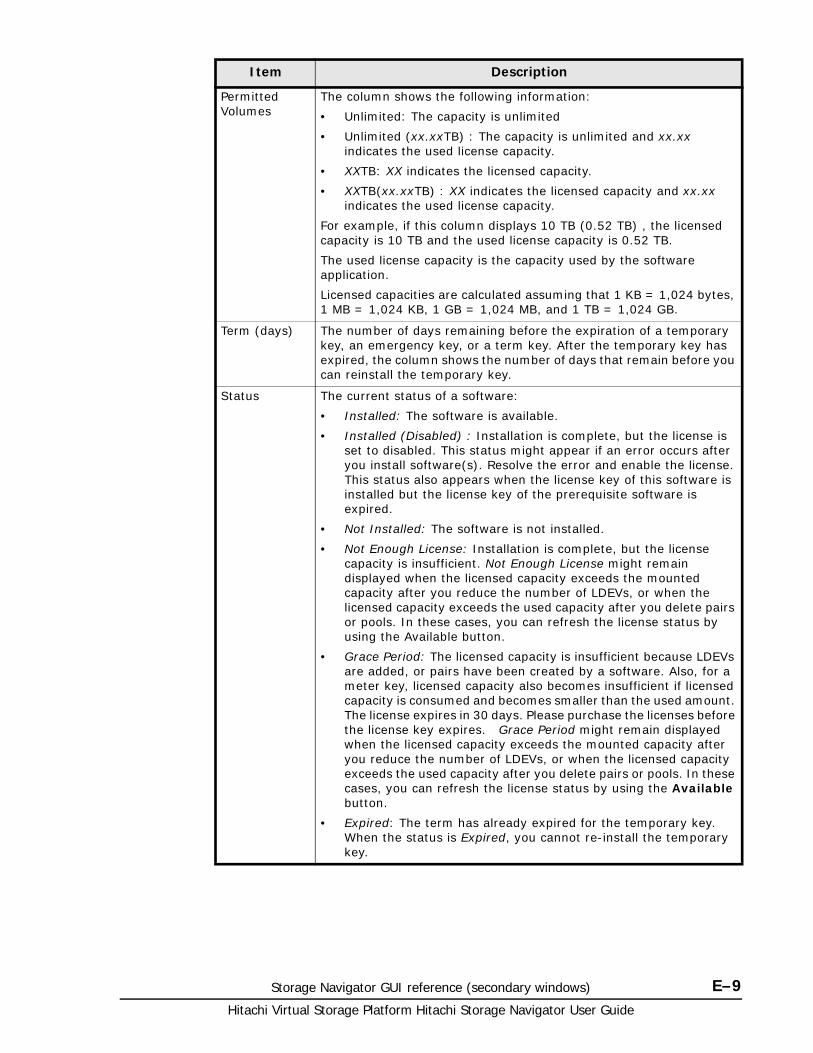
Storage Navigator GUI reference (secondary windows) E–9Hitachi Virtual Storage Platform Hitachi Storage Navigator User Guide
Permitted Volumes
The column shows the following information:
• Unlimited: The capacity is unlimited
• Unlimited (xx.xxTB) : The capacity is unlimited and xx.xx indicates the used license capacity.
• XXTB: XX indicates the licensed capacity.
• XXTB(xx.xxTB) : XX indicates the licensed capacity and xx.xx indicates the used license capacity.
For example, if this column displays 10 TB (0.52 TB) , the licensed capacity is 10 TB and the used license capacity is 0.52 TB.
The used license capacity is the capacity used by the software application.
Licensed capacities are calculated assuming that 1 KB = 1,024 bytes, 1 MB = 1,024 KB, 1 GB = 1,024 MB, and 1 TB = 1,024 GB.
Term (days) The number of days remaining before the expiration of a temporary key, an emergency key, or a term key. After the temporary key has expired, the column shows the number of days that remain before you can reinstall the temporary key.
Status The current status of a software:
• Installed: The software is available.
• Installed (Disabled) : Installation is complete, but the license is set to disabled. This status might appear if an error occurs after you install software(s). Resolve the error and enable the license. This status also appears when the license key of this software is installed but the license key of the prerequisite software is expired.
• Not Installed: The software is not installed.
• Not Enough License: Installation is complete, but the license capacity is insufficient. Not Enough License might remain displayed when the licensed capacity exceeds the mounted capacity after you reduce the number of LDEVs, or when the licensed capacity exceeds the used capacity after you delete pairs or pools. In these cases, you can refresh the license status by using the Available button.
• Grace Period: The licensed capacity is insufficient because LDEVs are added, or pairs have been created by a software. Also, for a meter key, licensed capacity also becomes insufficient if licensed capacity is consumed and becomes smaller than the used amount. The license expires in 30 days. Please purchase the licenses before the license key expires. Grace Period might remain displayed when the licensed capacity exceeds the mounted capacity after you reduce the number of LDEVs, or when the licensed capacity exceeds the used capacity after you delete pairs or pools. In these cases, you can refresh the license status by using the Available button.
• Expired: The term has already expired for the temporary key. When the status is Expired, you cannot re-install the temporary key.
Item Description
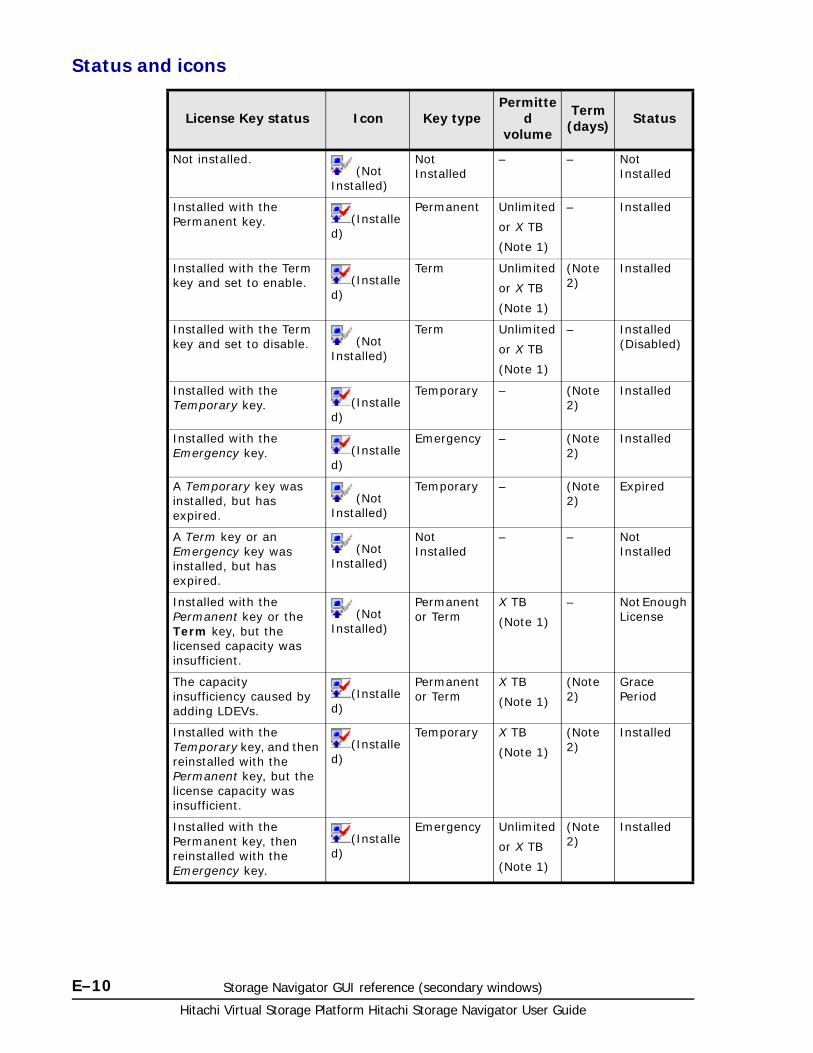
Hitachi Virtual Storage Platform Hitachi Storage Navigator User Guide
E–10 Storage Navigator GUI reference (secondary windows)
Status and icons
License Key status Icon Key typePermitte
d volume
Term (days) Status
Not installed.(Not
Installed)
Not Installed
– – Not Installed
Installed with the Permanent key. (Installe
d)
Permanent Unlimited
or X TB
(Note 1)
– Installed
Installed with the Term key and set to enable. (Installe
d)
Term Unlimited
or X TB
(Note 1)
(Note 2)
Installed
Installed with the Term key and set to disable. (Not
Installed)
Term Unlimited
or X TB
(Note 1)
– Installed (Disabled)
Installed with the Temporary key. (Installe
d)
Temporary – (Note 2)
Installed
Installed with the Emergency key. (Installe
d)
Emergency – (Note 2)
Installed
A Temporary key was installed, but has expired.
(Not Installed)
Temporary – (Note 2)
Expired
A Term key or an Emergency key was installed, but has expired.
(Not Installed)
Not Installed
– – Not Installed
Installed with the Permanent key or the Term key, but the licensed capacity was insufficient.
(Not Installed)
Permanent or Term
X TB
(Note 1)
– Not Enough License
The capacity insufficiency caused by adding LDEVs.
(Installed)
Permanent or Term
X TB
(Note 1)
(Note 2)
Grace Period
Installed with the Temporary key, and then reinstalled with the Permanent key, but the license capacity was insufficient.
(Installed)
Temporary X TB
(Note 1)
(Note 2)
Installed
Installed with the Permanent key, then reinstalled with the Emergency key.
(Installed)
Emergency Unlimited
or X TB
(Note 1)
(Note 2)
Installed
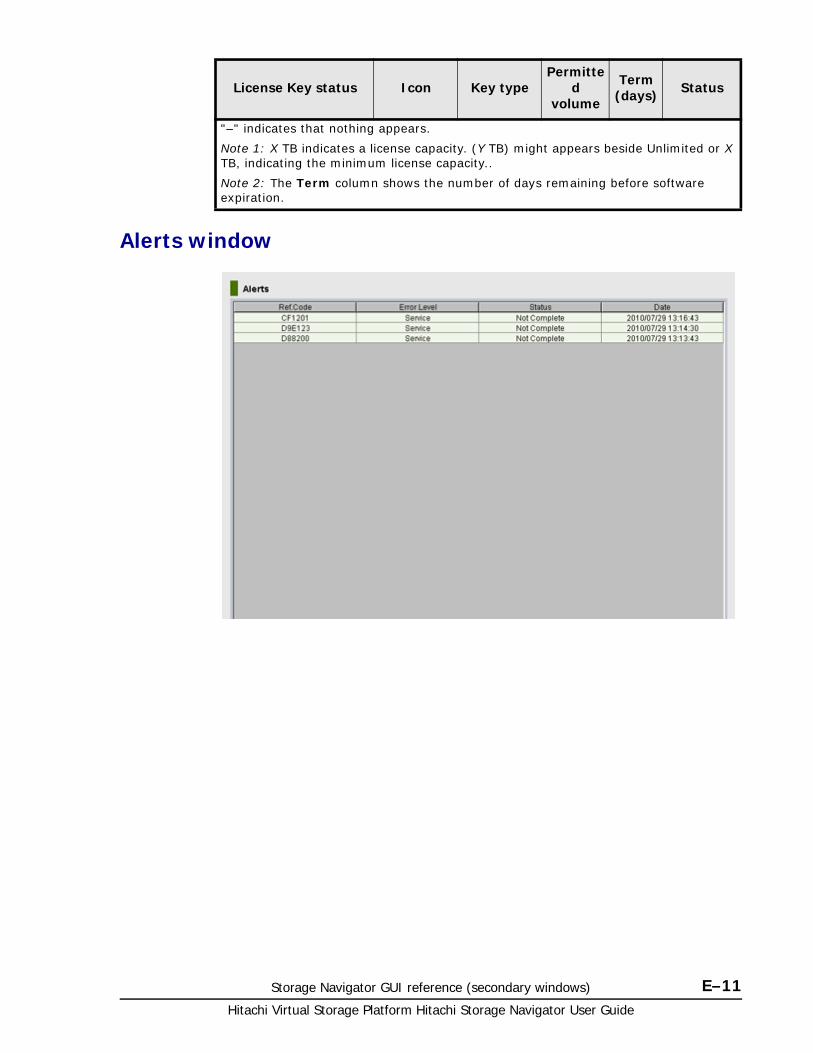
Storage Navigator GUI reference (secondary windows) E–11Hitachi Virtual Storage Platform Hitachi Storage Navigator User Guide
Alerts window
"–" indicates that nothing appears.
Note 1: X TB indicates a license capacity. (Y TB) might appears beside Unlimited or X TB, indicating the minimum license capacity..
Note 2: The Term column shows the number of days remaining before software expiration.
License Key status Icon Key typePermitte
d volume
Term (days) Status
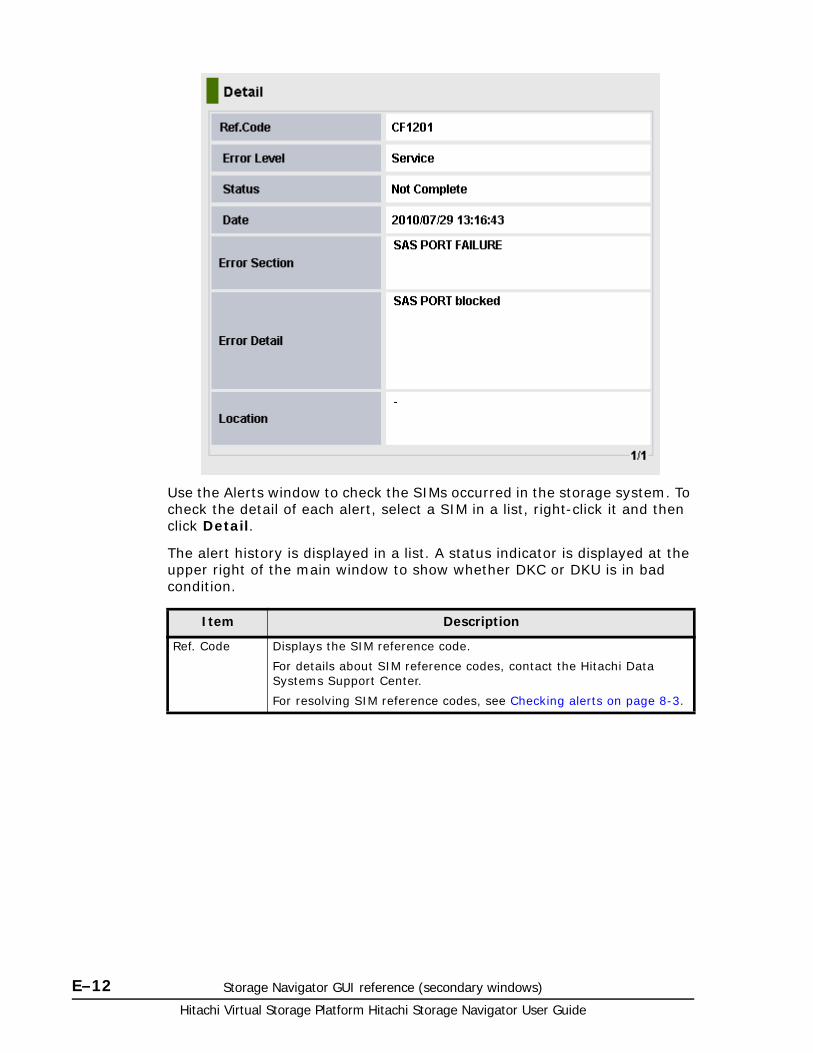
Hitachi Virtual Storage Platform Hitachi Storage Navigator User Guide
E–12 Storage Navigator GUI reference (secondary windows)
Use the Alerts window to check the SIMs occurred in the storage system. To check the detail of each alert, select a SIM in a list, right-click it and then click Detail.
The alert history is displayed in a list. A status indicator is displayed at the upper right of the main window to show whether DKC or DKU is in bad condition.
Item Description
Ref. Code Displays the SIM reference code.
For details about SIM reference codes, contact the Hitachi Data Systems Support Center.
For resolving SIM reference codes, see Checking alerts on page 8-3.
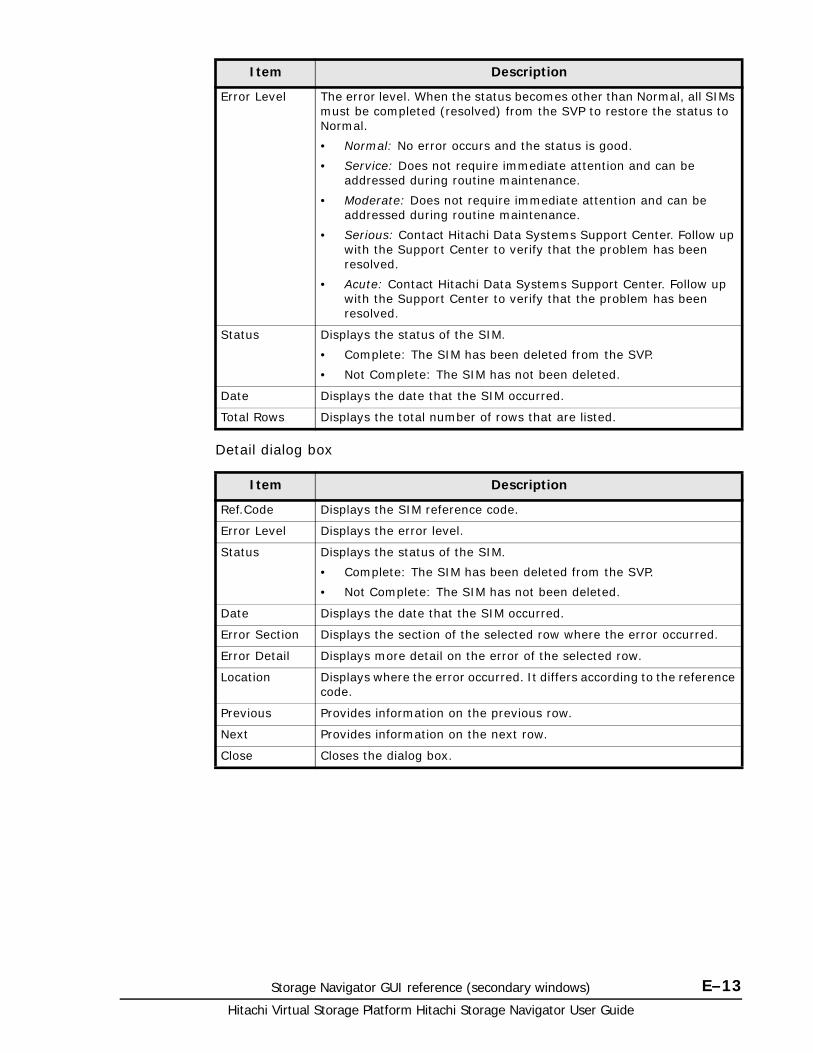
Storage Navigator GUI reference (secondary windows) E–13Hitachi Virtual Storage Platform Hitachi Storage Navigator User Guide
Detail dialog box
Error Level The error level. When the status becomes other than Normal, all SIMs must be completed (resolved) from the SVP to restore the status to Normal.
• Normal: No error occurs and the status is good.
• Service: Does not require immediate attention and can be addressed during routine maintenance.
• Moderate: Does not require immediate attention and can be addressed during routine maintenance.
• Serious: Contact Hitachi Data Systems Support Center. Follow up with the Support Center to verify that the problem has been resolved.
• Acute: Contact Hitachi Data Systems Support Center. Follow up with the Support Center to verify that the problem has been resolved.
Status Displays the status of the SIM.
• Complete: The SIM has been deleted from the SVP.
• Not Complete: The SIM has not been deleted.
Date Displays the date that the SIM occurred.
Total Rows Displays the total number of rows that are listed.
Item Description
Item Description
Ref.Code Displays the SIM reference code.
Error Level Displays the error level.
Status Displays the status of the SIM.
• Complete: The SIM has been deleted from the SVP.
• Not Complete: The SIM has not been deleted.
Date Displays the date that the SIM occurred.
Error Section Displays the section of the selected row where the error occurred.
Error Detail Displays more detail on the error of the selected row.
Location Displays where the error occurred. It differs according to the reference code.
Previous Provides information on the previous row.
Next Provides information on the next row.
Close Closes the dialog box.
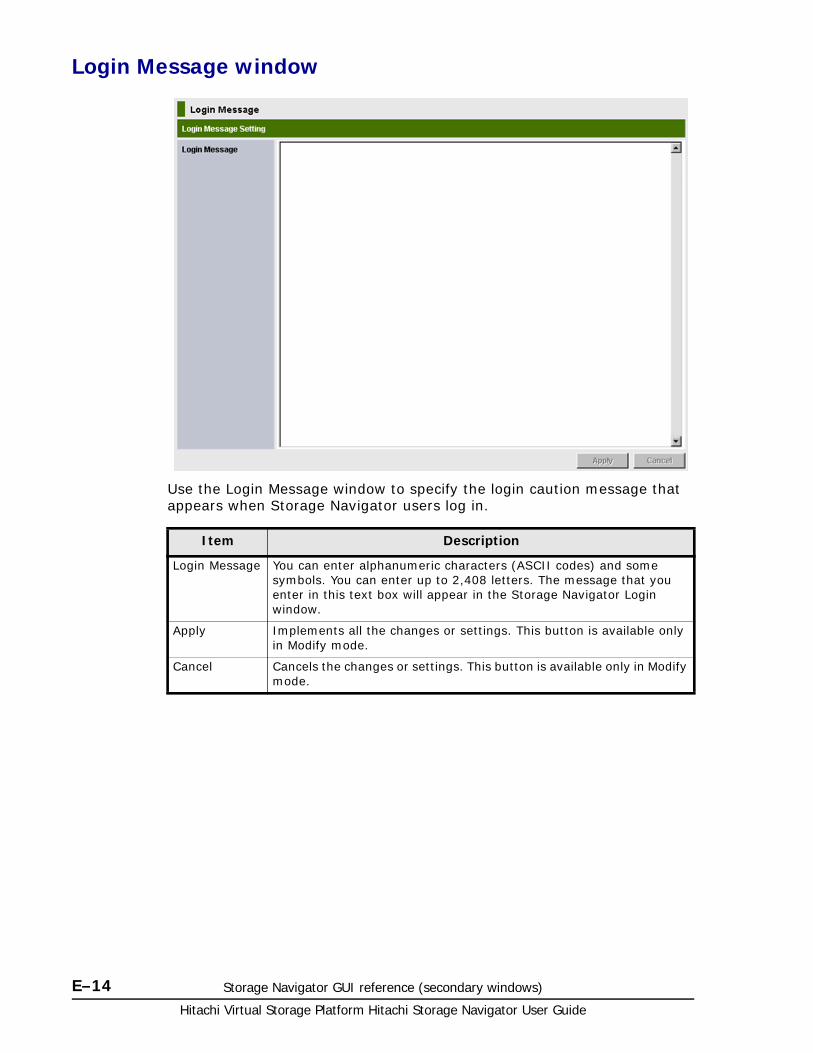
Hitachi Virtual Storage Platform Hitachi Storage Navigator User Guide
E–14 Storage Navigator GUI reference (secondary windows)
Login Message window
Use the Login Message window to specify the login caution message that appears when Storage Navigator users log in.
Item Description
Login Message You can enter alphanumeric characters (ASCII codes) and some symbols. You can enter up to 2,408 letters. The message that you enter in this text box will appear in the Storage Navigator Login window.
Apply Implements all the changes or settings. This button is available only in Modify mode.
Cancel Cancels the changes or settings. This button is available only in Modify mode.
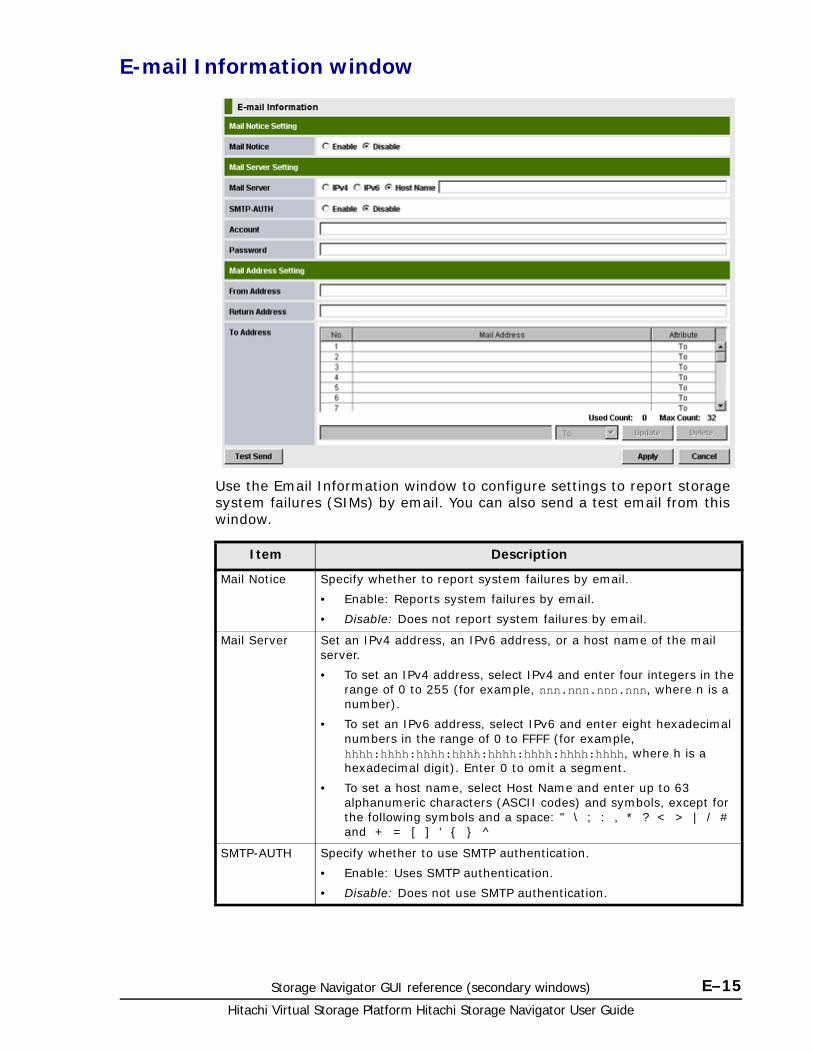
Storage Navigator GUI reference (secondary windows) E–15Hitachi Virtual Storage Platform Hitachi Storage Navigator User Guide
E-mail Information window
Use the Email Information window to configure settings to report storage system failures (SIMs) by email. You can also send a test email from this window.
Item Description
Mail Notice Specify whether to report system failures by email.
• Enable: Reports system failures by email.
• Disable: Does not report system failures by email.
Mail Server Set an IPv4 address, an IPv6 address, or a host name of the mail server.
• To set an IPv4 address, select IPv4 and enter four integers in the range of 0 to 255 (for example, nnn.nnn.nnn.nnn, where n is a number).
• To set an IPv6 address, select IPv6 and enter eight hexadecimal numbers in the range of 0 to FFFF (for example, hhhh:hhhh:hhhh:hhhh:hhhh:hhhh:hhhh:hhhh, where h is a hexadecimal digit). Enter 0 to omit a segment.
• To set a host name, select Host Name and enter up to 63 alphanumeric characters (ASCII codes) and symbols, except for the following symbols and a space: " \ ; : , * ? < > | / # and + = [ ] ' { } ^
SMTP-AUTH Specify whether to use SMTP authentication.
• Enable: Uses SMTP authentication.
• Disable: Does not use SMTP authentication.

Hitachi Virtual Storage Platform Hitachi Storage Navigator User Guide
E–16 Storage Navigator GUI reference (secondary windows)
Basic Information Display dialog box
The Basic Information Display dialog box provides the basic configuration information of the storage system. This dialog box opens separately from Storage Navigator window, so you can configure settings while viewing the dialog box.
To open the Basic Information Display dialog box, open the Storage Navigator secondary window, then click File > Basic Information.
Account and
Password
Set the account and password for SMTP authentication. Required when SMTP-AUTH is Enable. Enter up to 255 alphanumeric characters and symbols (ASCII codes) for user ID and password, except for the following symbols and a space:
" \ ; : , * ? < > | / # and + = [ ] ' { } ^
From Address Specify an email address of the sender. Enter up to 255 alphanumeric characters (ASCII codes) and symbols: ( ! # $ % and ` + - * / ' ^ { } _ . ).
Return Address
Specify a Reply-To address of email. If you specify this address, replies from the email receivers will be sent to this address. If you omit this address, replies from the email receivers will be sent to From Address. The available values are the same as those of From Address.
To Address Specify email addresses of the receivers and the attributes (To, Cc, or Bcc). Up to 32 addresses can be specified. The available values are the same as those of From Address.
Test Send When you click Test Send, test emails are sent to the email addresses of the receivers. This button is available only in Modify mode.
Apply Implements all the settings. This button is available only in Modify mode.
Cancel Cancels all the settings. This button is available only in Modify mode.
Item Description
Storage Navigator GUI reference (secondary windows) E–17Hitachi Virtual Storage Platform Hitachi Storage Navigator User Guide
The information provided in the Basic Information Display dialog box is updated:
• When the tab is clicked on the Basic Information Display dialog box and the displayed dialog box is changed.
• When the Refresh command is selected on the menu bar of the Storage Navigator main window.
• When the tab is clicked on the Storage Navigator windows during the operation of the product option and the displayed window is changed.
• When the Apply button is clicked on the Storage Navigator main window.
• When the operation mode is changed from the View mode to the Modify mode on the Storage Navigator main window.
Common elements
The Basic Information Display dialog box contains the following items:
• The title bar provides information about the connected storage system.
IP indicates the IP address of the SVP.
S/N indicates the serial number.
D/N indicates the device name specified in the Information window.
• To view the details about a LUSE volume in LUN or LDEV dialog box, select a LUSE volume, right-click, and click Detail Information. The detailed information of the LUSE volume appears. Items displayed in the dialog box are the same as the items displayed in the LDEV list.
• The LDEV ID column displays the LDKC number, the CU number, and the LDEV number. These numbers are separated by colons (:). The following symbols might appear at the end of the LDEV number:
# 00:00:01#) indicates that the LDEV is an external volume.
V (00:00:01V) indicates that the LDEV is a Thin Image or Copy-on-Write Snapshot virtual volume.
X (00:00:01X) indicates that the LDEV is a Dynamic Provisioning virtual volume.
M (00:00:01M) indicates that the LDEV is a migration volume.
The icons in the LDEV ID column have the following meaning:
Table E-1 Icons in the LDEV ID column
Icons Description
Normal LDEV
Expanded (LUSE) volume
Reserved Volume Migration volume
Variable-sized volume (CV)
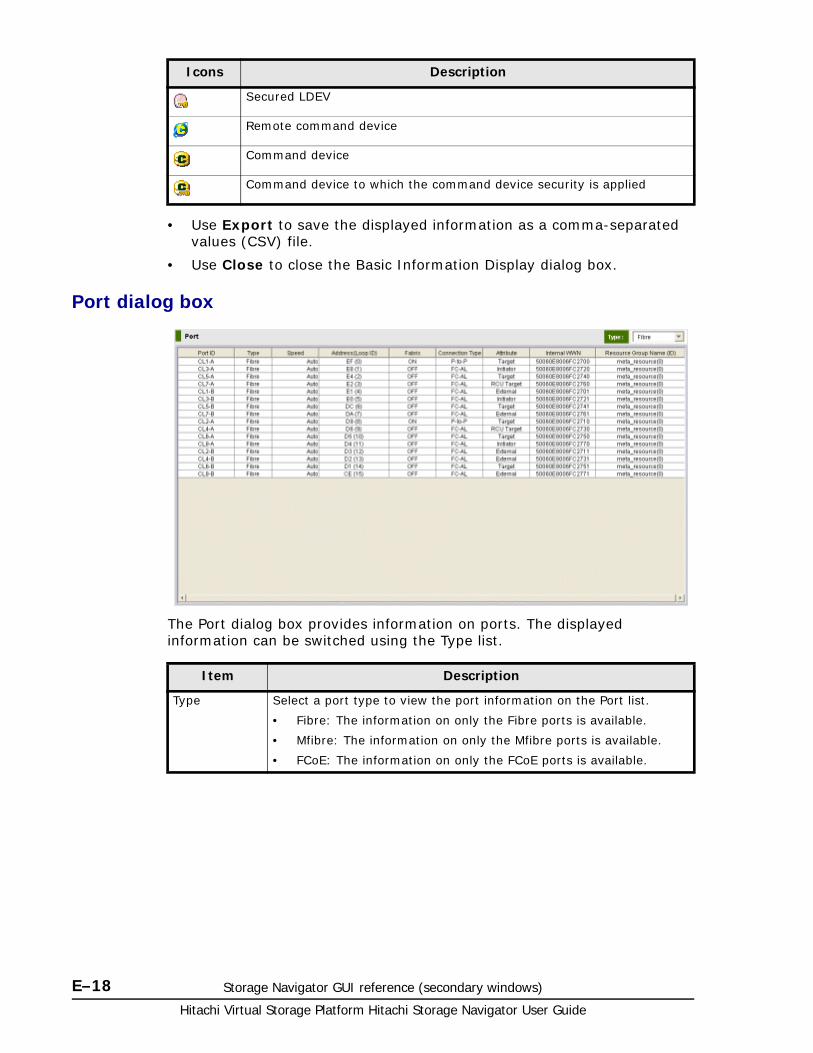
Hitachi Virtual Storage Platform Hitachi Storage Navigator User Guide
E–18 Storage Navigator GUI reference (secondary windows)
• Use Export to save the displayed information as a comma-separated values (CSV) file.
• Use Close to close the Basic Information Display dialog box.
Port dialog box
The Port dialog box provides information on ports. The displayed information can be switched using the Type list.
Secured LDEV
Remote command device
Command device
Command device to which the command device security is applied
Icons Description
Item Description
Type Select a port type to view the port information on the Port list.
• Fibre: The information on only the Fibre ports is available.
• Mfibre: The information on only the Mfibre ports is available.
• FCoE: The information on only the FCoE ports is available.
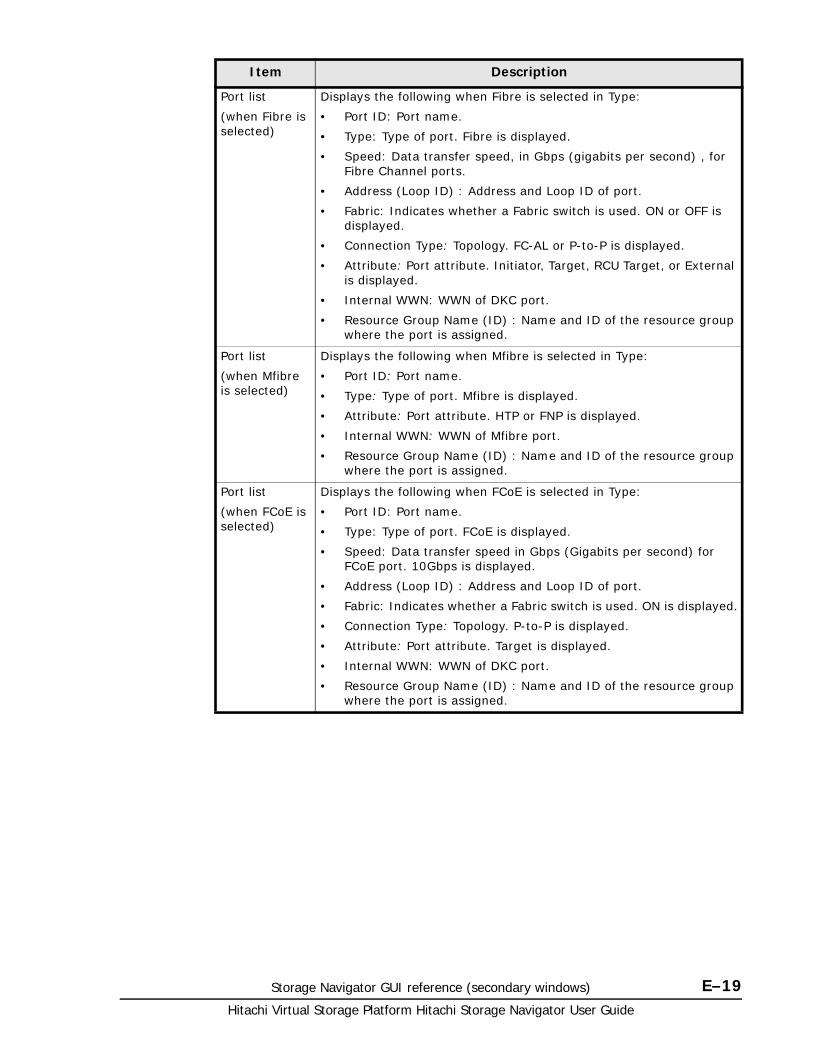
Storage Navigator GUI reference (secondary windows) E–19Hitachi Virtual Storage Platform Hitachi Storage Navigator User Guide
Port list
(when Fibre is selected)
Displays the following when Fibre is selected in Type:
• Port ID: Port name.
• Type: Type of port. Fibre is displayed.
• Speed: Data transfer speed, in Gbps (gigabits per second) , for Fibre Channel ports.
• Address (Loop ID) : Address and Loop ID of port.
• Fabric: Indicates whether a Fabric switch is used. ON or OFF is displayed.
• Connection Type: Topology. FC-AL or P-to-P is displayed.
• Attribute: Port attribute. Initiator, Target, RCU Target, or External is displayed.
• Internal WWN: WWN of DKC port.
• Resource Group Name (ID) : Name and ID of the resource group where the port is assigned.
Port list
(when Mfibre is selected)
Displays the following when Mfibre is selected in Type:
• Port ID: Port name.
• Type: Type of port. Mfibre is displayed.
• Attribute: Port attribute. HTP or FNP is displayed.
• Internal WWN: WWN of Mfibre port.
• Resource Group Name (ID) : Name and ID of the resource group where the port is assigned.
Port list
(when FCoE is selected)
Displays the following when FCoE is selected in Type:
• Port ID: Port name.
• Type: Type of port. FCoE is displayed.
• Speed: Data transfer speed in Gbps (Gigabits per second) for FCoE port. 10Gbps is displayed.
• Address (Loop ID) : Address and Loop ID of port.
• Fabric: Indicates whether a Fabric switch is used. ON is displayed.
• Connection Type: Topology. P-to-P is displayed.
• Attribute: Port attribute. Target is displayed.
• Internal WWN: WWN of DKC port.
• Resource Group Name (ID) : Name and ID of the resource group where the port is assigned.
Item Description
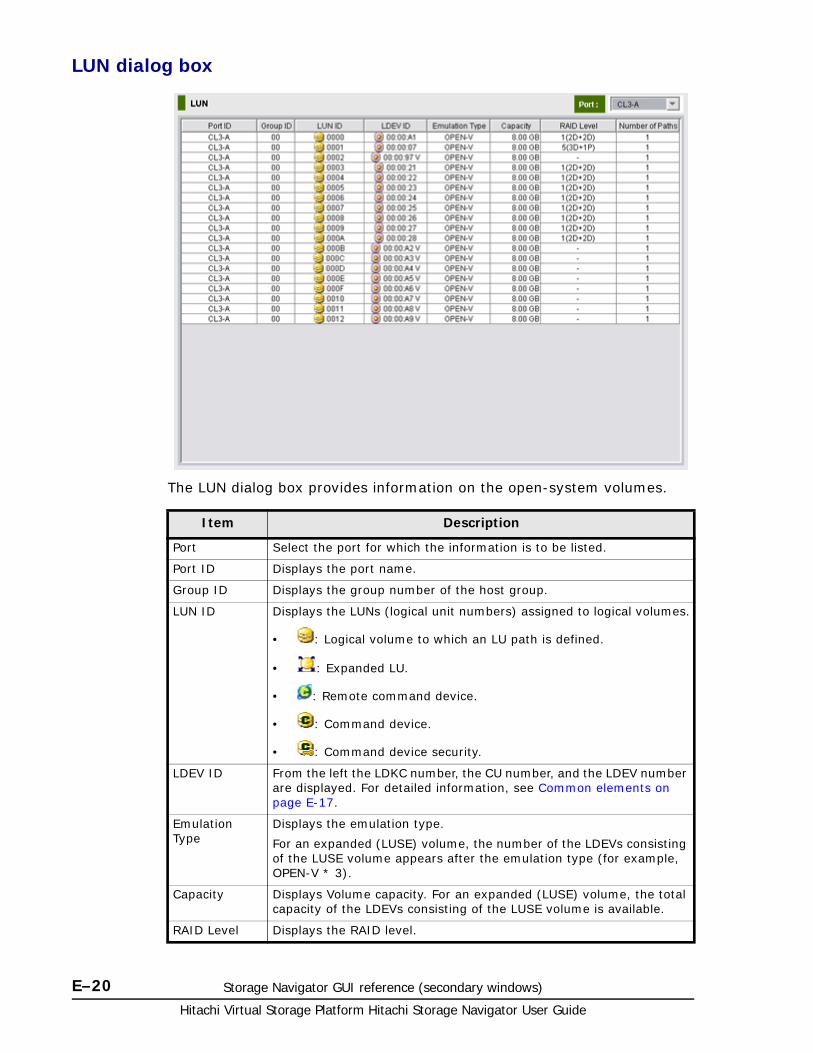
Hitachi Virtual Storage Platform Hitachi Storage Navigator User Guide
E–20 Storage Navigator GUI reference (secondary windows)
LUN dialog box
The LUN dialog box provides information on the open-system volumes.
Item Description
Port Select the port for which the information is to be listed.
Port ID Displays the port name.
Group ID Displays the group number of the host group.
LUN ID Displays the LUNs (logical unit numbers) assigned to logical volumes.
• : Logical volume to which an LU path is defined.
• : Expanded LU.
• : Remote command device.
• : Command device.
• : Command device security.
LDEV ID From the left the LDKC number, the CU number, and the LDEV number are displayed. For detailed information, see Common elements on page E-17.
Emulation Type
Displays the emulation type.
For an expanded (LUSE) volume, the number of the LDEVs consisting of the LUSE volume appears after the emulation type (for example, OPEN-V * 3).
Capacity Displays Volume capacity. For an expanded (LUSE) volume, the total capacity of the LDEVs consisting of the LUSE volume is available.
RAID Level Displays the RAID level.
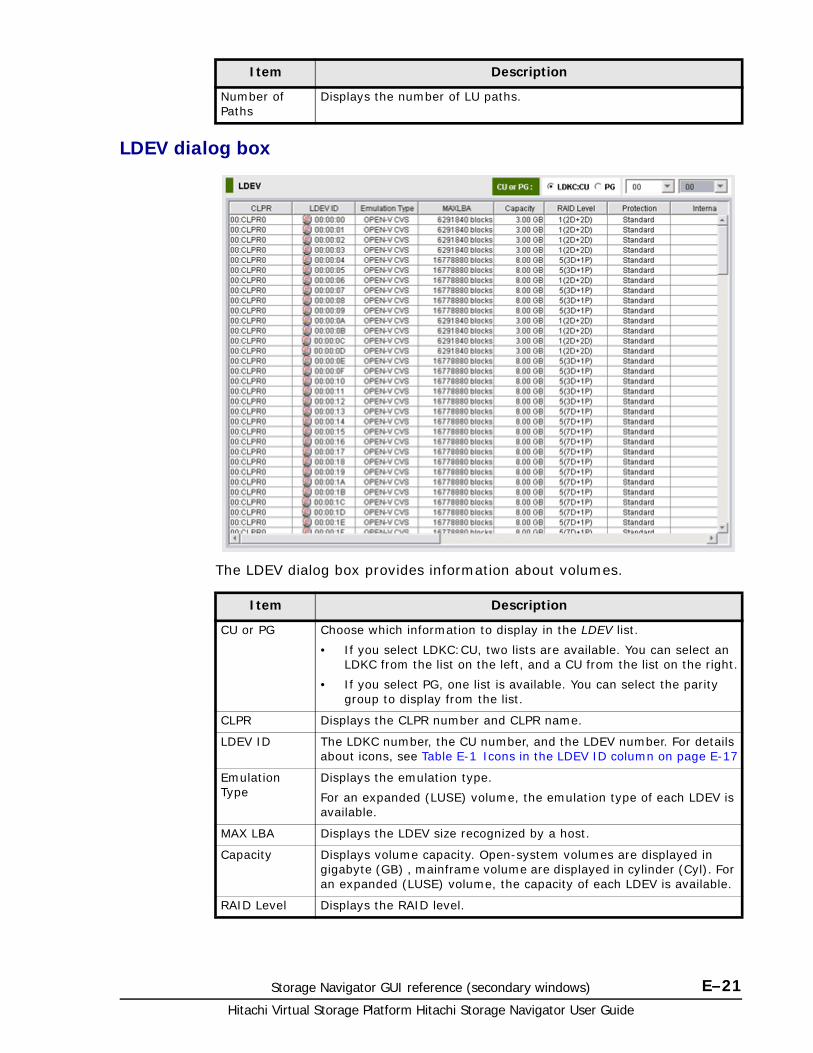
Storage Navigator GUI reference (secondary windows) E–21Hitachi Virtual Storage Platform Hitachi Storage Navigator User Guide
LDEV dialog box
The LDEV dialog box provides information about volumes.
Number of Paths
Displays the number of LU paths.
Item Description
Item Description
CU or PG Choose which information to display in the LDEV list.
• If you select LDKC:CU, two lists are available. You can select an LDKC from the list on the left, and a CU from the list on the right.
• If you select PG, one list is available. You can select the parity group to display from the list.
CLPR Displays the CLPR number and CLPR name.
LDEV ID The LDKC number, the CU number, and the LDEV number. For details about icons, see Table E-1 Icons in the LDEV ID column on page E-17
Emulation Type
Displays the emulation type.
For an expanded (LUSE) volume, the emulation type of each LDEV is available.
MAX LBA Displays the LDEV size recognized by a host.
Capacity Displays volume capacity. Open-system volumes are displayed in gigabyte (GB) , mainframe volume are displayed in cylinder (Cyl). For an expanded (LUSE) volume, the capacity of each LDEV is available.
RAID Level Displays the RAID level.
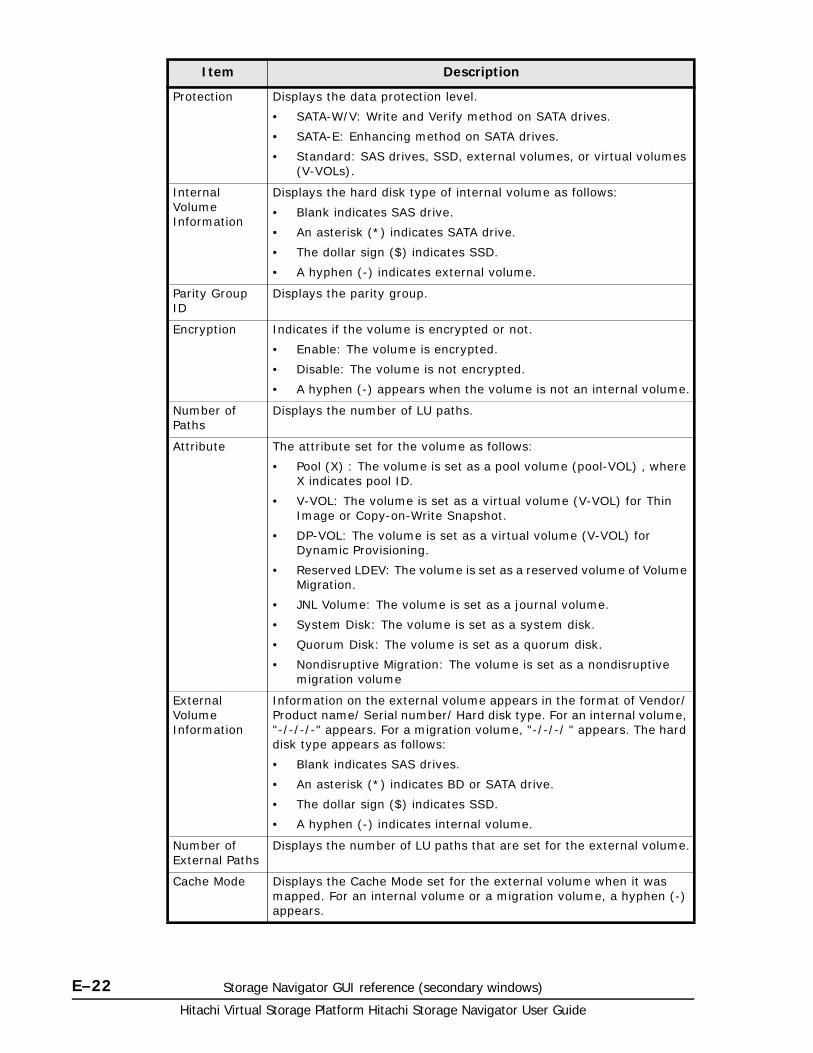
Hitachi Virtual Storage Platform Hitachi Storage Navigator User Guide
E–22 Storage Navigator GUI reference (secondary windows)
Protection Displays the data protection level.
• SATA-W/V: Write and Verify method on SATA drives.
• SATA-E: Enhancing method on SATA drives.
• Standard: SAS drives, SSD, external volumes, or virtual volumes (V-VOLs).
Internal Volume Information
Displays the hard disk type of internal volume as follows:
• Blank indicates SAS drive.
• An asterisk (*) indicates SATA drive.
• The dollar sign ($) indicates SSD.
• A hyphen (-) indicates external volume.
Parity Group ID
Displays the parity group.
Encryption Indicates if the volume is encrypted or not.
• Enable: The volume is encrypted.
• Disable: The volume is not encrypted.
• A hyphen (-) appears when the volume is not an internal volume.
Number of Paths
Displays the number of LU paths.
Attribute The attribute set for the volume as follows:
• Pool (X) : The volume is set as a pool volume (pool-VOL) , where X indicates pool ID.
• V-VOL: The volume is set as a virtual volume (V-VOL) for Thin Image or Copy-on-Write Snapshot.
• DP-VOL: The volume is set as a virtual volume (V-VOL) for Dynamic Provisioning.
• Reserved LDEV: The volume is set as a reserved volume of Volume Migration.
• JNL Volume: The volume is set as a journal volume.
• System Disk: The volume is set as a system disk.
• Quorum Disk: The volume is set as a quorum disk.
• Nondisruptive Migration: The volume is set as a nondisruptive migration volume
External Volume Information
Information on the external volume appears in the format of Vendor/ Product name/ Serial number/ Hard disk type. For an internal volume, "-/-/-/-" appears. For a migration volume, "-/-/-/ " appears. The hard disk type appears as follows:
• Blank indicates SAS drives.
• An asterisk (*) indicates BD or SATA drive.
• The dollar sign ($) indicates SSD.
• A hyphen (-) indicates internal volume.
Number of External Paths
Displays the number of LU paths that are set for the external volume.
Cache Mode Displays the Cache Mode set for the external volume when it was mapped. For an internal volume or a migration volume, a hyphen (-) appears.
Item Description
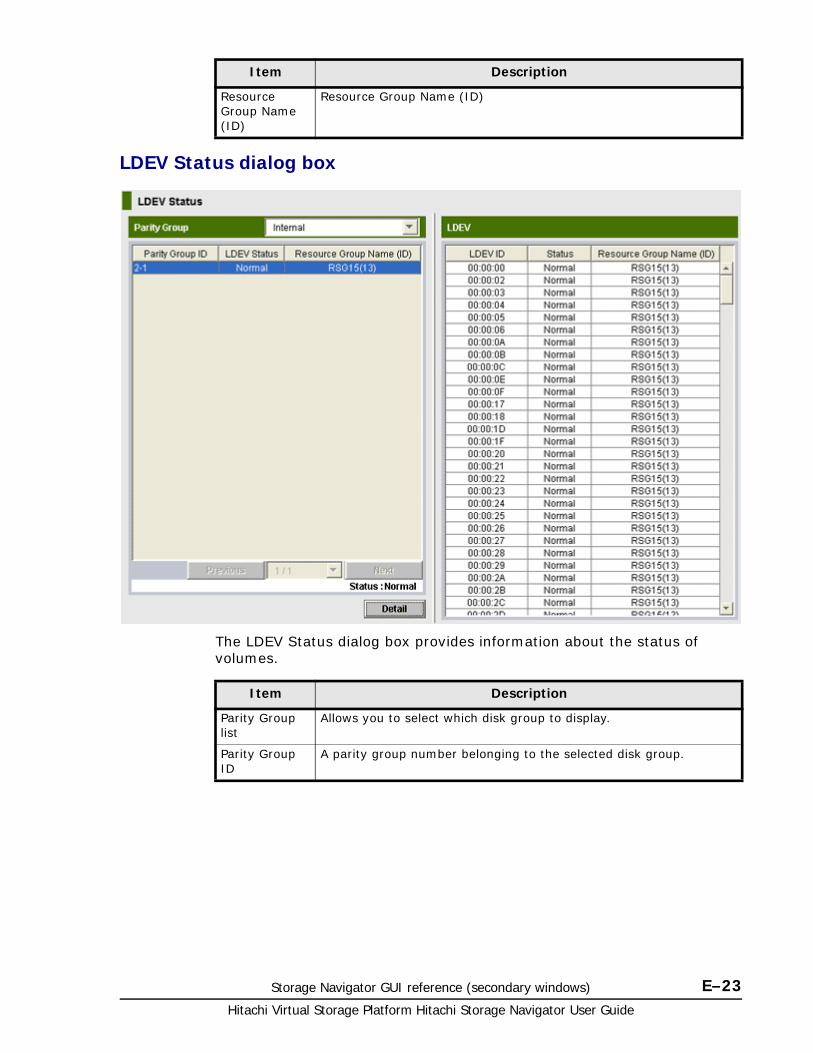
Storage Navigator GUI reference (secondary windows) E–23Hitachi Virtual Storage Platform Hitachi Storage Navigator User Guide
LDEV Status dialog box
The LDEV Status dialog box provides information about the status of volumes.
Resource Group Name (ID)
Resource Group Name (ID)
Item Description
Item Description
Parity Group list
Allows you to select which disk group to display.
Parity Group ID
A parity group number belonging to the selected disk group.

Hitachi Virtual Storage Platform Hitachi Storage Navigator User Guide
E–24 Storage Navigator GUI reference (secondary windows)
LDEV Status A status of all the volumes in the parity group.
• Normal: All volumes are in a normal status.
• Blocked: All volumes are in a blocked status.
• Format: All volumes are being formatted.
• Preparing Quick Format: All volumes are being prepared for Quick Format.
• Quick Formatting: Quick Format is in progress. When a parity group contains both the Normal and Normal (Quick Format) statuses, the list also displays Normal (Quick Format).
• Correction Access: Access attributes of all volumes are being changed.
• Copying: Data in all volumes is being copied.
• Read Only: Hosts can only read the volumes.
• Shredding: The shredding operation is in progress.
• Unknown: The system does not recognize the status of any volumes.
• Warning: Some volumes are not in a normal status.
• -: No volumes in the parity group.
Page Switching area
Displays up to 4,096 parity groups per page. When more parity groups are defined, use the following functions to see the entire list:
• Page Number: Displays the current page number. It also allows you to display the desired page.
• Previous: Displays the previous page.
• Next: Displays the next page.
Status area Displays the status of the disk group that you have selected in the Parity Group list.
• Normal: All volumes are in a normal status.
• Warning: Not all volumes are in a normal status.
Detail When you select a parity group in the list and click Detail, all the LDEVs in the parity group are displayed in the LDEV list on the right.
LDEV ID From the left the LDKC number, the CU number, and the LDEV number are displayed.
Status A status of a volume.
• Normal: All volumes are in a normal status.
• Blocked: All volumes are in a blocked status.
• Format: All volumes are being formatted.
• Preparing Quick Format: The volume is being prepared for Quick Format.
• Quick Formatting: Quick Format is in progress.
• Correction Access: The access attribute of the volume is being changed.
• Copying: Data in all volumes is being copied.
• Read Only: Hosts can only read the volume.
• Shredding: The shredding operation is in progress.
• Unknown: The system does not recognize the status of the volume.
Item Description
Storage Navigator GUI reference (secondary windows) E–25Hitachi Virtual Storage Platform Hitachi Storage Navigator User Guide
Resource Group Name (ID)
Displays the name and ID of the resource group where the LDEV is assigned.
Item Description

Hitachi Virtual Storage Platform Hitachi Storage Navigator User Guide
E–26 Storage Navigator GUI reference (secondary windows)
F
Tool Panel GUI Reference F–1Hitachi Virtual Storage Platform Hitachi Storage Navigator User Guide
Tool Panel GUI Reference
This describes the Tool Panel window windows and features.
□ Control Panel

Hitachi Virtual Storage Platform Hitachi Storage Navigator User Guide
F–2 Tool Panel GUI Reference
Control PanelThis section describes the Tool Panel windows and controls.
Environment Parameter windowThis section describes the Environment Parameter window features and controls.
Figure F-1 Environment Parameter window
Item Description
RMI time-out period This parameter specifies the time-out period for forcible logout when the user performs no operation for a certain period of time because of a network error, etc.
RMI time-out period for Modify This parameters specifies the time-out period for forcible release of Modify mode when the use is in Modify mode but does not make any changes that access the RMI server for a certain period of time.
Polling period for checking exclusive lock This parameter specifies the polling period for monitoring who is changing information while in Modify mode when other users are viewing the storage system information in View mode.
Polling period for checking obstacles This parameter specifies the time interval to monitor failure within the storage system.
Option to hide Alerts Window This parameter specifies the whether to display the Alerts window.
Submit Applies the environment parameters to the storage system.
Reset Resets the environment parameter settings
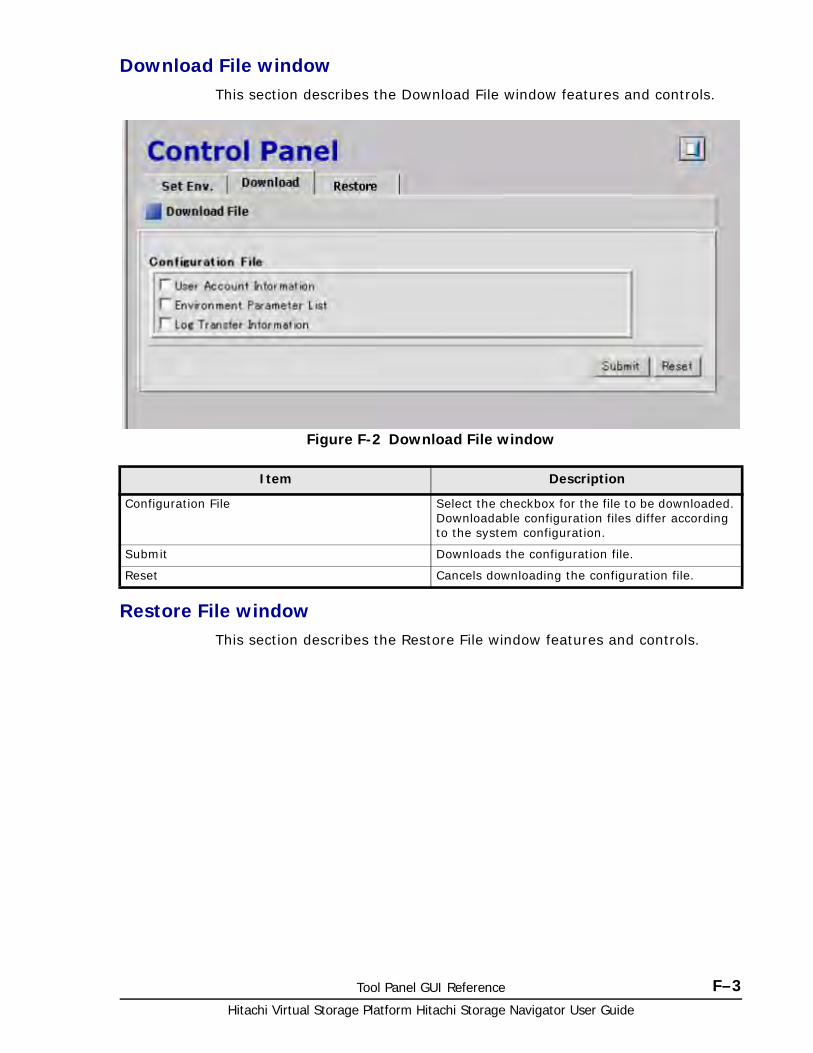
Tool Panel GUI Reference F–3Hitachi Virtual Storage Platform Hitachi Storage Navigator User Guide
Download File windowThis section describes the Download File window features and controls.
Restore File windowThis section describes the Restore File window features and controls.
Figure F-2 Download File window
Item Description
Configuration File Select the checkbox for the file to be downloaded. Downloadable configuration files differ according to the system configuration.
Submit Downloads the configuration file.
Reset Cancels downloading the configuration file.

Hitachi Virtual Storage Platform Hitachi Storage Navigator User Guide
F–4 Tool Panel GUI Reference
Download Dump Files windowThis section describes the Download Dump Files window features and controls.
Figure F-3 Restore File window
Item Description
Upload File (Archive File) Click Browse... and specify the configuration file you want to restore.
Submit Displays a window for confirming the configuration file to be restored.
Reset Cancels downloading the configuration file.

Tool Panel GUI Reference F–5Hitachi Virtual Storage Platform Hitachi Storage Navigator User Guide
Update Certificate Files windowThis section describes the Update Certificate Files window features and controls.
Figure F-4 Download Dump Files window
Item Description
Existing Dump Files Select this when you want to re-download a previously downloaded dump file. This item displays only when one or more compressed dump files exist. If you have not downloaded any dump files, this item does not display even though you have acquired dump files via the SVP.
Normal Dump Contains all information about the SVP and minimum information about the storage system. Select Normal Dump when there is no fatal problem such as a problem with the display of Storage Navigator.
Detail Dump Contains all information about the storage system in addition to the content of Normal Dump. Select this when you cannot start Storage Navigator or when you check for problems with the storage system.
Detail Dump (for DKC Performance) Contains information about I/O performance, such as collecting Performance Monitor information in addition to the content of Detail Dump. Select this when you check for problems with the I/O performance.
Next Displays a dialog box for confirm that the downloading of the dump file can start.
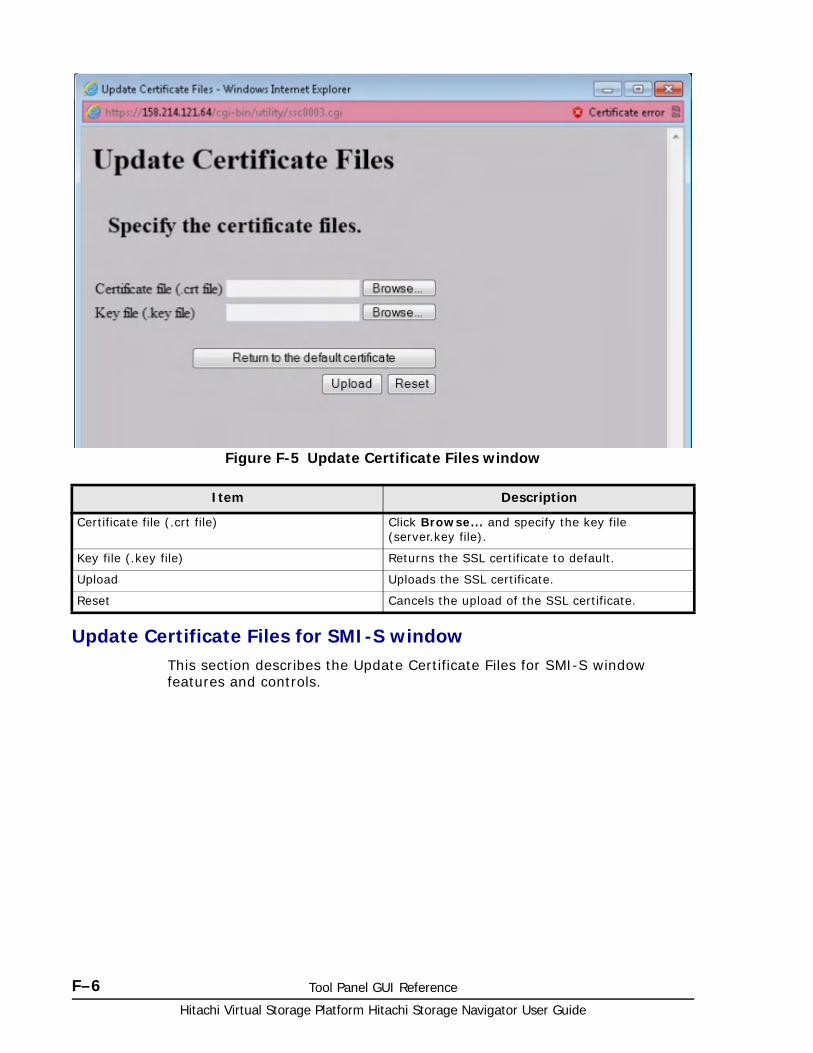
Hitachi Virtual Storage Platform Hitachi Storage Navigator User Guide
F–6 Tool Panel GUI Reference
Update Certificate Files for SMI-S windowThis section describes the Update Certificate Files for SMI-S window features and controls.
Figure F-5 Update Certificate Files window
Item Description
Certificate file (.crt file) Click Browse... and specify the key file (server.key file).
Key file (.key file) Returns the SSL certificate to default.
Upload Uploads the SSL certificate.
Reset Cancels the upload of the SSL certificate.
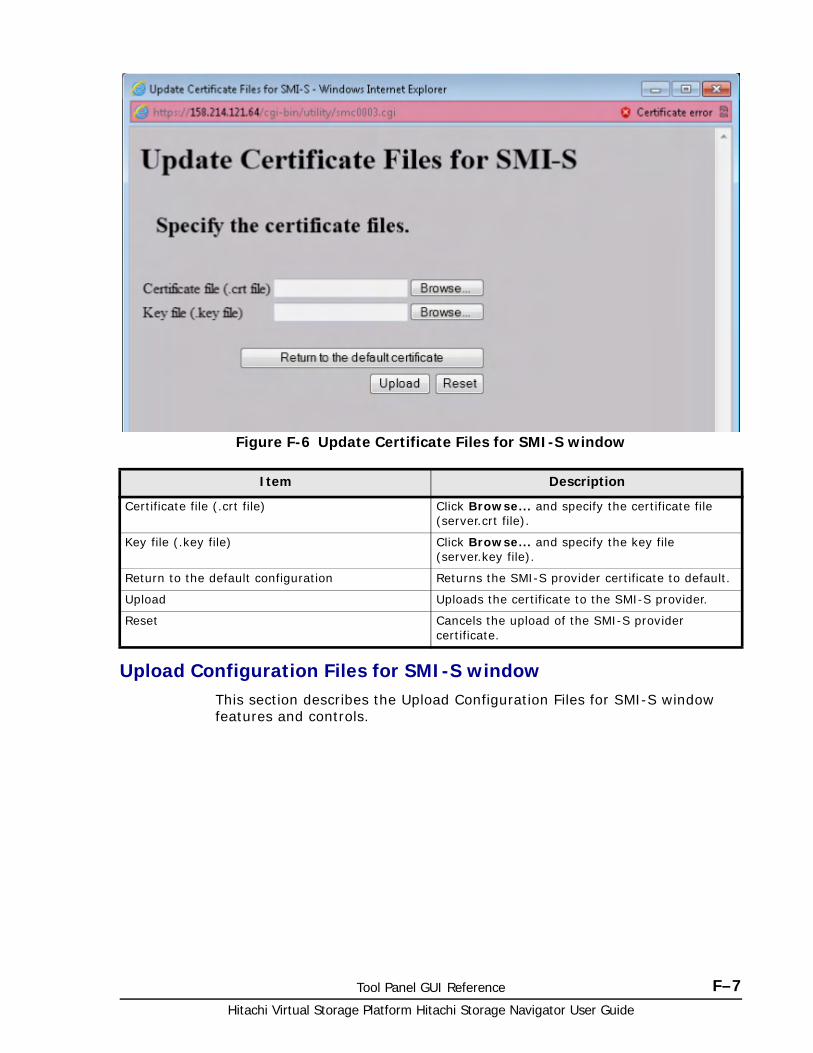
Tool Panel GUI Reference F–7Hitachi Virtual Storage Platform Hitachi Storage Navigator User Guide
Upload Configuration Files for SMI-S windowThis section describes the Upload Configuration Files for SMI-S window features and controls.
Figure F-6 Update Certificate Files for SMI-S window
Item Description
Certificate file (.crt file) Click Browse... and specify the certificate file (server.crt file).
Key file (.key file) Click Browse... and specify the key file (server.key file).
Return to the default configuration Returns the SMI-S provider certificate to default.
Upload Uploads the certificate to the SMI-S provider.
Reset Cancels the upload of the SMI-S provider certificate.
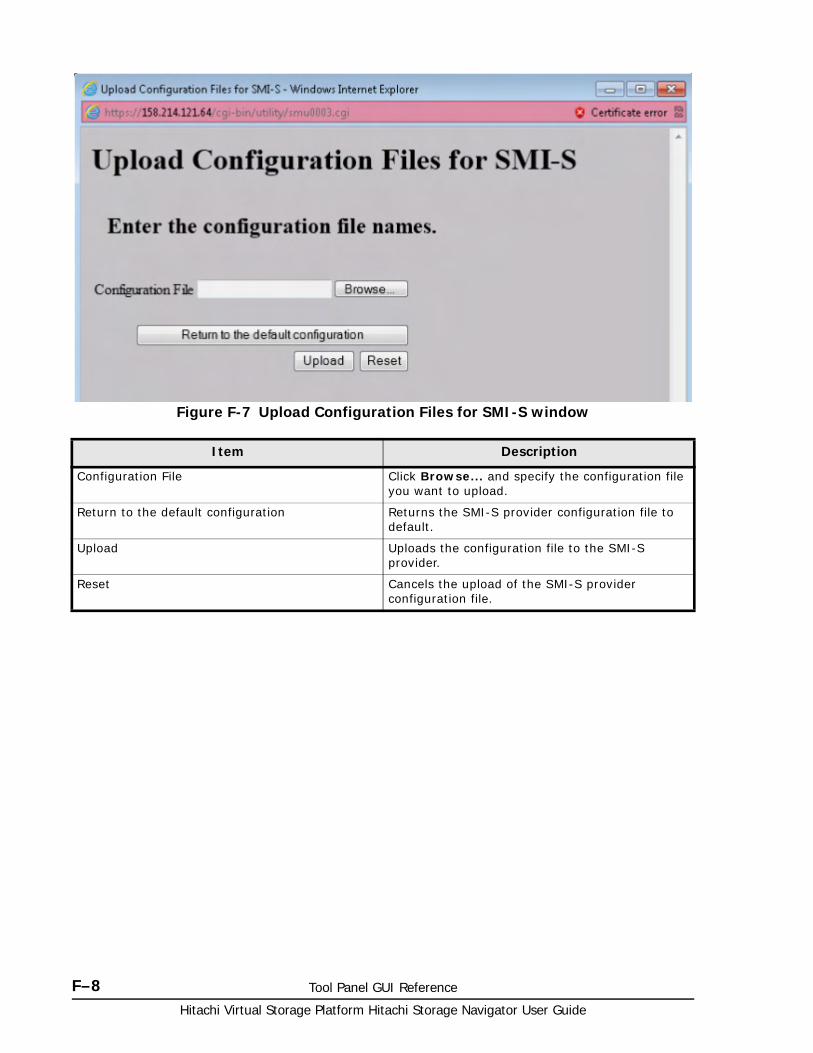
Hitachi Virtual Storage Platform Hitachi Storage Navigator User Guide
F–8 Tool Panel GUI Reference
Figure F-7 Upload Configuration Files for SMI-S window
Item Description
Configuration File Click Browse... and specify the configuration file you want to upload.
Return to the default configuration Returns the SMI-S provider configuration file to default.
Upload Uploads the configuration file to the SMI-S provider.
Reset Cancels the upload of the SMI-S provider configuration file.

CA KD E F G H I J L M N O P Q R S T U V W X Y# B Z# A B C D E F H I J K L M O P Q R S V
Glossary–1Hitachi Virtual Storage Platform Hitachi Storage Navigator User Guide
Glossary
This glossary defines the special terms used in this document. Click the letter links below to navigate.
#
2DC
two-data-center. Refers to the local and remote sites, or data centers, in which TrueCopy (TC) and Universal Replicator (UR) combine to form a remote replication configuration.
In a 2DC configuration, data is copied from a TC primary volume at the local site to the UR master journal volume at an intermediate site, then replicated to the UR secondary volume at the remote site. Since this configuration side-steps the TC secondary volume at the intermediate site, the intermediate site is not considered a data center.
3DC
three-data-center. Refers to the local, intermediate, and remote sites, or data centers, in which TrueCopy and Universal Replicator combine to form a remote replication configuration.
In a 3DC configuration, data is copied from a local site to an intermediate site and then to a remote site (3DC cascade configuration) , or from a local site to two separate remote sites (3DC multi-target configuration).
A
access attribute
The setting on a logical volume (mainframe or open-systems) that determines whether hosts can read and/or write to the volume.
APLB
active path load balancing
CA KD E F G H I J L M N O P Q R S T U V W X Y# B Z# A B C D E F H I J K L M O P Q R S V
Hitachi Virtual Storage Platform Hitachi Storage Navigator User Guide
Glossary–2
array
See disk array
audit log
Files that store a history of the operations performed from Storage Navigator and the commands that the storage system received from hosts, and data encryption operations.
B
back-end director (BED)
The hardware component that controls the transfer of data between the drives and cache. A BED feature consists of a pair of boards. A BED is also referred to as a disk adapter (DKA).
BED
See back-end director.
bind mode
In bind mode the Cache Residency Manager extents are used to hold read and write data for specific extent(s) on volume(s). Data written to the Cache Residency Manager bind area is not destaged to the drives. For bind mode, all targeted read and write data is transferred at host data transfer speed.
blade
A computer module, generally a single circuit board, used mostly in servers.
C
cache logical partition (CLPR)
Consists of virtual cache memory that is set up to be allocated to different hosts in contention for cache memory.
capacity
The amount of data storage space available on a physical storage device, usually measured in bytes (MB, GB, TB, etc.).
CCI
Command Control Interface
CHAP
challenge handshake authentication protocol
CA KD E F G H I J L M N O P Q R S T U V W X Y# B Z# A B C D E F H I J K L M O P Q R S V
Glossary–3Hitachi Virtual Storage Platform Hitachi Storage Navigator User Guide
CLPR
cache logical partition
cluster
Multiple-storage servers working together to respond to multiple read and write requests.
command device
A dedicated logical volume used only by Command Control Interface to interface with the storage system. Can be shared by several hosts.
controller
The component in a storage system that manages all storage functions. It is analogous to a computer and contains a processors, I/O devices, RAM, power supplies, cooling fans, and other sub-components as needed to support the operation of the storage system.
copy-on-write
Point-in-time snapshot copy of any data volume within a storage system. Copy-on-write snapshots only store changed data blocks, therefore the amount of storage capacity required for each copy is substantially smaller than the source volume.
copy pair
A pair of volumes in which one volume contains original data and the other volume contains the copy of the original. Copy operations can be synchronous or asynchronous, and the volumes of the copy pair can be located in the same storage system (local copy) or in different storage systems (remote copy).
A copy pair can also be called a volume pair, or just pair.
COW
copy-on-write
COW Snapshot
Hitachi Copy-on-Write Snapshot
custom volume (CV)
A custom-size volume whose size is defined by the user using Virtual LVI/Virtual LUN.
CV
See custom volume (CV) .

CA KD E F G H I J L M N O P Q R S T U V W X Y# B Z# A B C D E F H I J K L M O P Q R S V
Hitachi Virtual Storage Platform Hitachi Storage Navigator User Guide
Glossary–4
CVS
custom volume size
CXFS
clustered version of XFS file system
D
data drive
A physical data storage device that can be either a hard disk drive (HDD) or a flash drive (also called a solid-state device).
DBV
Hitachi Database Validator
DC
data center
delta resync
A disaster recovery solution in which TrueCopy and Universal Replicator systems are configured to provide a quick recovery using only differential data stored at an intermediate site.
device
A physical or logical unit with a specific function.
device emulation
Indicates the type of logical volume. Mainframe device emulation types provide logical volumes of fixed size, called logical volume images (LVIs) , which contain EBCDIC data in CKD format. Typical mainframe device emulation types include 3390-9 and 3390-M. Open-systems device emulation types provide logical volumes of variable size, called logical units (LUs) , that contain ASCII data in FBA format. The typical open-systems device emulation type is OPEN-V.
disaster recovery
A set of procedures to recover critical application data and processing after a disaster or other failure.
disk array
Disk array, or just array, is a complete storage system, including the control and logic devices, storage devices (HDD, SSD) , connecting cables, and racks
CA KD E F G H I J L M N O P Q R S T U V W X Y# B Z# A B C D E F H I J K L M O P Q R S V
Glossary–5Hitachi Virtual Storage Platform Hitachi Storage Navigator User Guide
disk controller (DKC)
The hardware component that manages front-end and back-end storage operations. The term DKC is sometimes used to refer to the entire RAID storage system.
DKC
disk controller. Can refer to the RAID storage system or the controller components.
DKCMAIN
disk controller main. Refers to the microcode for the VSP storage system.
DKU
disk unit. Refers to the cabinet (floor model) or rack-mounted hardware component that contains data drives and no controller components.
dump
A collection of data that is saved to a file when an error or crash occurs. The data is used by support personnel to determine the cause of the error or crash.
E
emulation
The operation of the RAID storage system to emulate the characteristics of a different storage system. For device emulation the mainframe host “sees” the logical devices on the RAID storage system as 3390-x devices. For controller emulation the mainframe host “sees” the control units (CUs) on the RAID storage system as 2105 or 2107 controllers.
RAID storage system system operates the same as the storage system being emulated.
emulation group
A set of device emulation types that can be intermixed within a RAID group and treated as a group.
external application
A software module that is used by a storage system but runs on a separate platform.
external volume
A logical volume whose data resides on drives that are physically located outside the storage system.
CA KD E F G H I J L M N O P Q R S T U V W X Y# B Z# A B C D E F H I J K L M O P Q R S V
Hitachi Virtual Storage Platform Hitachi Storage Navigator User Guide
Glossary–6
F
FC
fibre channel; FlashCopy
FC-AL
fibre-channel arbitrated loop
FCP
fibre-channel protocol
FCSP
fibre-channel security protocol
FD Dump Tool
Downloads Storage Navigator configuration information onto disk for backup and troubleshooting purposes.
FICON
Fibre Connectivity
flash drive
A data drive that uses a solid-state memory device instead of a rotating hard disk.
H
HBA
host bus adapter
HDD
hard disk drive
HDU
hard disk unit
head LDEV
See top LDEV.
host group
A group of hosts of the same operating system platform.
CA KD E F G H I J L M N O P Q R S T U V W X Y# B Z# A B C D E F H I J K L M O P Q R S V
Glossary–7Hitachi Virtual Storage Platform Hitachi Storage Navigator User Guide
host mode
Operational modes that provide enhanced compatibility with supported host platforms. Used with fibre-channel ports on RAID storage systems.
host mode option
Additional options for fibre-channel ports on RAID storage systems. Provide enhanced functionality for host software and middleware.
I
in-system replication
The original data volume and its copy are located in the same storage system. ShadowImage in-system replication provides duplication of logical volumes; Copy-on-Write Snapshot in-system replication provides “snapshots” of logical volumes that are stored and managed as virtual volumes (V-VOLs).
See also remote replication.
internal volume
A logical volume whose data resides on drives that are physically located within the storage system. See also external volume.
J
JNL
journal
journal volume
A volume that records and stores a log of all events that take place in another volume. In the event of a system crash, the journal volume logs are used to restore lost data and maintain data integrity.
In Universal Replicator, differential data is held in journal volumes on until it is copied to the S-VOL.
JRE
Java Runtime Environment
K
keypair
Two mathematically-related cryptographic keys: a private key and its associated public key.

CA KD E F G H I J L M N O P Q R S T U V W X Y# B Z# A B C D E F H I J K L M O P Q R S V
Hitachi Virtual Storage Platform Hitachi Storage Navigator User Guide
Glossary–8
L
LBA
logical block address
LCP
local control port; link control processor
LD
local directory; logical device
LDAP
lightweight directory access protocol
LDEV
logical device
LDKC
See logical disk controller (LDKC) .
LDM
Logical Disk Manager
license key
A specific set of characters that unlocks an application and allows it to be used.
local control port (LCP)
A serial-channel (ESCON) port configured to receive I/Os from a host or remote I/Os from a TrueCopy main control unit (MCU).
local copy
See in-system replication.
logical device (LDEV)
An individual logical data volume (on multiple drives in a RAID configuration) in the storage system. An LDEV may or may not contain any data and may or may not be defined to any hosts. Each LDEV has a unique identifier or “address” within the storage system composed of the logical disk controller (LDKC) number, control unit (CU) number, and LDEV number. The LDEV IDs within a storage system do not change.An LDEV formatted for use by mainframe hosts is called a logical volume image (LVI). An LDEV formatted for use by open-system hosts is called a logical unit (LU).
CA KD E F G H I J L M N O P Q R S T U V W X Y# B Z# A B C D E F H I J K L M O P Q R S V
Glossary–9Hitachi Virtual Storage Platform Hitachi Storage Navigator User Guide
logical disk controller (LDKC)
A group of 255 control unit (CU) images in the RAID storage system that is controlled by a virtual (logical) storage system within the single physical storage system. For example, the Hitachi Universal Storage Platform V storage system supports two LDKCs, LDKC 00 and LDKC 01.
logical partition (LPAR)
A subset of a system’s hardware resources that is virtualized as a separate system. For a storage system, logical partitioning can be applied to cache memory and/or storage capacity.
logical unit (LU)
A logical volume that is configured for use by open-systems hosts (for example, OPEN-V).
logical unit (LU) path
The path between an open-systems host and a logical unit.
logical volume
See volume.
logical volume image (LVI)
A logical volume that is configured for use by mainframe hosts (for example, 3390-9).
LU
See logical unit
LUN
See logical unit number
LUSE
LUN Size Expansion
LV
logical volume
LVI
See logical volume image (LVI) .
M
MF, M/F
mainframe
CA KD E F G H I J L M N O P Q R S T U V W X Y# B Z# A B C D E F H I J K L M O P Q R S V
Hitachi Virtual Storage Platform Hitachi Storage Navigator User Guide
Glossary–10
modify mode
The mode of operation of Storage Navigator that allows changes to the storage system configuration. See also view mode.
O
OPEN-V
A logical unit (LU) of user-defined size that is formatted for use by open-systems hosts.
OPEN-x
A logical unit (LU) of fixed size (for example, OPEN-3 or OPEN-9) that is used primarily for sharing data between mainframe and open-systems hosts using Hitachi Cross-OS File Exchange.
P
pair
Two logical volumes in a replication relationship in which one volume contains original data to be copied and the other volume contains the copy of the original data. The copy operations can be synchronous or asynchronous, and the pair volumes can be located in the same storage system (in-system replication) or in different storage systems (remote replication).
parity group
See RAID group.
PAV
Parallel Access Volume
PCB
printed circuit board
PDEV
physical device
PG
parity group. See RAID group.
physical device
See device.
CA KD E F G H I J L M N O P Q R S T U V W X Y# B Z# A B C D E F H I J K L M O P Q R S V
Glossary–11Hitachi Virtual Storage Platform Hitachi Storage Navigator User Guide
pool
A set of volumes that are reserved for storing Copy-on-Write Snapshot data or Dynamic Provisioning write data.
pool volume (pool-VOL)
A logical volume that is reserved for storing snapshot data for Copy-on-Write Snapshot operations or write data for Dynamic Provisioning.
port attribute
Indicates the type of fibre-channel port: target, RCU target, or initiator.
primary volume (P-VOL)
The volume in a copy pair that contains the original data to be replicated. The data on the P-VOL is duplicated synchronously or asynchronously on the secondary volume (S-VOL).
The following Hitachi products use the term P-VOL: Thin Image, Copy-on-Write Snapshot, ShadowImage, TrueCopy, Universal Replicator, Universal Replicator for Mainframe, and High Availability Manager.
See also secondary volume (S-VOL).
prio
priority mode. Used in Cache Residency Manager.
P-VOL
This term is used only in the earlier version of the Storage Navigator GUI (still in use) for the primary volumeSee primary volume (P-VOL) .
Q
quick format
The quick format feature in Virtual LVI/Virtual LUN in which the formatting of the internal volumes is done in the background. This allows system configuration (such as defining a path or creating a TrueCopy pair) before the formatting is completed. To execute quick formatting, the volumes must be in blocked status.
quick restore
A reverse resynchronization in which no data is actually copied: the primary and secondary volumes are swapped.
R
RAID
redundant array of independent disks. A disk array in which part of the physical storage space is used to store user data and parity information,
CA KD E F G H I J L M N O P Q R S T U V W X Y# B Z# A B C D E F H I J K L M O P Q R S V
Hitachi Virtual Storage Platform Hitachi Storage Navigator User Guide
Glossary–12
and another part is used to store a duplicate set of user data and parity information. This redundant configuration prevents data loss in case a disk drive within the RAID configuration fails, and enables regeneration of user data in the event that one of the array's member disks or the access path to it fails.
RAID group
A set of RAID disks that have the same capacity and are treated as one group for data storage and recovery. A RAID group contains both user data and parity information. This allows user data to be accessed in the event that one or more of the drives within the RAID group are not available. The RAID level of a RAID group determines the number of data drives and parity drives and how the data is “striped” across the drives. For RAID1, user data is duplicated within the RAID group, so there is no parity data for RAID1 RAID groups.
A RAID group can also be called an array group or a parity group.
RAID level
The type of RAID implementation. RAID levels include RAID0, RAID1, RAID2, RAID3, RAID4, RAID5 and RAID6.
RCU
See remote control unit (RCU) .
RCU target port
A fibre-channel port that is configured to receive remote I/Os from an initiator port on another storage system.
remote control unit (RCU)
A storage system at a secondary or remote site that is configured to receive remote I/Os from one or more storage systems at the primary or main site.
remote copy
See remote replication.
resync
resynchronize.
RMI
Remote Method Invocation

CA KD E F G H I J L M N O P Q R S T U V W X Y# B Z# A B C D E F H I J K L M O P Q R S V
Glossary–13Hitachi Virtual Storage Platform Hitachi Storage Navigator User Guide
S
SAS
serial-attached SCSI
secondary volume (S-VOL)
The volume in a copy pair that is the copy of the original data on the primary volume (P-VOL). The following Hitachi products use the term “secondary volume”:Thin Image, Copy-on-Write Snapshot, ShadowImage, TrueCopy, Universal Replicator, Universal Replicator for Mainframe, and High Availability Manager.
See also primary volume (P-VOL) .
service information message (SIM)
SIMs are generated by a VSP storage system when it detects an error or service requirement. SIMs are reported to hosts and displayed on Storage Navigator.
Service Processor
The computer in a VSP storage system that hosts the Storage Navigator software and is used to configure and maintain the storage system.
severity level
Applies to service information messages (SIMs) and Storage Navigator error codes.
SFP
small form-factor pluggable
shredding
See volume shredding.
SIM
See service information message
size
Generally refers to the storage capacity of a memory module or cache. Not usually used for storage of data on disk or flash drives.
SM
shared memory
SMTP
simple mail transfer protocol

CA KD E F G H I J L M N O P Q R S T U V W X Y# B Z# A B C D E F H I J K L M O P Q R S V
Hitachi Virtual Storage Platform Hitachi Storage Navigator User Guide
Glossary–14
snapshot
A point-in-time virtual copy of a Copy-on-Write Snapshot primary volume (P-VOL). The snapshot is maintained when the P-VOL is updated by storing pre-updated data (snapshot data) in a data pool.
SNMP
simple network management protocol
SOM
See system option mode
source volume (S-VOL)
Used only in the earlier version of the Storage Navigator GUI (still in use) , this is the volume in a mainframe copy pair containing the original data that is duplicated on the target volume (T-VOL). The following products use the term source volume: ShadowImage for Mainframe, Dataset Replication, and Compatible FlashCopy(R) V2.
In the current version of the GUI, "target volume" and "T-VOL" are replaced with "primary volume".
See also source volume (S-VOL) .
space
Generally refers to the data storage capacity of a disk drive or flash drive.
SRM
Storage Replication Manager
SSD
solid-state drive. Also called flash drive.
SSID
storage subsystem ID. SSIDs are used for reporting information from the CU to the mainframe operating system. Each group of 64 or 256 volumes requires one SSID, so there are one or four SSIDs per CU image. The user-specified SSIDs are assigned during storage system installation and must be unique to all connected host operating environments.
SSL
secure socket layer
storage cluster
See cluster.
CA KD E F G H I J L M N O P Q R S T U V W X Y# B Z# A B C D E F H I J K L M O P Q R S V
Glossary–15Hitachi Virtual Storage Platform Hitachi Storage Navigator User Guide
storage tiers
See tiered storage.
S-VOL
See secondary volume (S-VOL) or source volume (S-VOL) . When used for "secondary volume", "S-VOL" is only seen in the earlier version of the Storage Navigator GUI (still in use).
SVP
See Service Processor.
SVS
Storage Virtualization System
syslog
The file on the SVP that includes both syslog and audit log information, such as the date and time.
system disk
The volume from which an open-systems host boots.
system option mode (SOM)
Additional operational parameters for the RAID storage systems that enable the storage system to be tailored to unique customer operating requirements. SOMs are set on the service processor.
V
VDEV
See virtual device (VDEV) .
view mode
The mode of operation of Storage Navigator that allows viewing only of the storage system configuration. The two Storage Navigator modes are view mode and modify mode.
virtual device (VDEV)
A group of logical devices (LDEVs) in a RAID group. A VDEV typically consists of some fixed volumes (FVs) and some free space. The number of fixed volumes is determined by the RAID level and device emulation type.
Virtual LVI/LUN volume
A custom-size volume whose size is defined by the user using Virtual LVI/Virtual LUN. Also called a custom volume (CV).
CA KD E F G H I J L M N O P Q R S T U V W X Y# B Z# A B C D E F H I J K L M O P Q R S V
Hitachi Virtual Storage Platform Hitachi Storage Navigator User Guide
Glossary–16
virtual volume (V-VOL)
The secondary volume in a Copy-on-Write Snapshot pair. When in PAIR status, the V-VOL is an up-to-date virtual copy of the primary volume (P-VOL). When in SPLIT status, the V-VOL points to data in the P-VOL and to replaced data in the pool, maintaining the point-in-time copy of the P-VOL at the time of the split operation.
When a V-VOL is used with Dynamic Provisioning, it is called a DP-VOL.
VM
volume migration; volume manager
volume
A logical device (LDEV) , or a set of concatenated LDEVs in the case of LUSE, that has been defined to one or more hosts as a single data storage unit. A mainframe volume is called a logical volume image (LVI), and an open-systems volume is called a logical unit. (LU).
volume shredding
Deleting the user data on a volume by overwriting all data in the volume with dummy data.
VSP
Hitachi Virtual Storage Platform
V-VOL
virtual volume
Index–1Hitachi Virtual Storage Platform Hitachi Storage Navigator User Guide
Index
Symbolsaccount lock policy 4-18adding SVP to trusted zone 3-3Adobe Flash 2-21Alerts function 8-3authentication server, connecting to 4-2backing up Stor. Nav. settings 5-8Blocking HTTP communications 2-14cable connections 2-2Cache Memories report A-12capacity, calculating 6-7capacity, estimating for license 6-4certificates, acquiring 2-6changing a user's password 4-14changing permissions 4-15Channel Adapters report A-13clearing cache 8-14client computer
setup 2-16UNIX requirements 2-19Windows requirements 2-17
creating a report 2-29, 7-6creating a user group 4-11Data Retention Utility, removing 6-11deleting a report 7-6deleting a user account 4-16disabling a user account 4-15Disk Adapoters report A-2display errors 8-10downloading trace files,FD Dump Tool 8-15e-mail notifications
setting up 5-3testing 5-4
errorsclearing 8-14display 8-10Java 8-4logon 8-4miscellaneous 8-13no response 8-7UNIX 8-12
external volume, calculating capacity 6-8
FD Dump Tooldownloading trace files 8-15
Firefox problems on UNIX, troubleshooting 8-14firewall configuration 2-20GUI highlights 1-2Host Groups report A-3Hosts report A-4IPv6, configuring communications 2-2Java
clearing cache 8-14errors 8-4saving log and trace files 8-17
JREconfiguring 2-21versions for UNIX 2-19versions for Windows 2-17
license keyenabling or disabling 6-10estimating capacity 6-4expiration 6-12installing 6-9insufficient capacity 6-11removing 6-11types 6-2
Logical Device Expansions report A-4Logical Devices report A-5logon errors 8-4logon message, creating a 5-2LUNs report A-6MP Blade Details report A-7MP Blades report A-7online help 1-3overview 1-1Parity Groups report A-8password
changing a user's 4-14permissions, changing 4-15Physical View report A-14port locations 7-3Ports report A-9RADIUS server, accessing 4-4raidinf add report B-4raidinf command B-2
Hitachi Virtual Storage Platform Hitachi Storage Navigator User Guide
Index–2
raidinf delete report B-5, B-6raidinf get reportinfo B-7Report Configuration Tool Command
Reference B-1Report Viewer window 7-5reports
about 1-3Cache Memories A-12Channel Adapters A-13Disk Adapters A-2downloading 7-5Host Groups A-3Hosts A-4Logical Device Expansions A-4Logical Devices A-5LUNs A-6MP Blade Details A-7MP Blades A-7Parity Groups A-8Physical View A-14Ports A-9Spare Drives A-10Storage System Summary A-11using 7-5
requirements, client computer 2-17session timeout 4-18setting time periods 5-5setting up client computer 2-16setup workflow 2-2signed certificates 2-6SIMs, checking 8-3Spare Drives report A-10SSL-encrypted communications
blocking HTTP communications 2-14creating a private keypair 2-5creating a public keypair 2-5overview 2-3updating the certificate 2-7
stalled tasks 7-8status refresh interval 7-8status, port 7-3Storage Navigator
backing up settings 5-8browser restrictions 3-4client setup for 2-16creating a user group 4-11downloading settings 5-8help 1-3logon messages, creating 5-2reports 7-5saving changes 3-6setting time periods 5-5setup 2-2unsupported actions on Windows 3-6uses 1-2
Storage System Summary report A-11storage system, applying changes to 3-6storage system, viewing 7-2super-user 3-2
SVP, adding to trusted sites 3-3syslog notification 5-10tasks
about 7-6managing 7-7
temporary key expired 6-13term key expired 6-13term key, using 6-3time periods, setting 5-5troubleshooting 8-2UNIX
errors 8-12requirements 2-19
user accountsdeleting 4-16disabling 4-15
user group 4-7, 4-9creating 4-11
viewing a report 7-5Web browser
accepting certificates 2-10clearing cache 8-14configuring 2-20restrictions 3-4
Windows requirements 2-17Windows Server 2003/2008 computer,
configuring 2-20wizards 1-3

Hitachi Virtual Storage Platform Hitachi Storage Navigator User Guide

MK-90RD7027-15
Hitachi Data Systems
Corporate Headquarters2845 Lafayette StreetSanta Clara, California 95050-2639U.S.A.www.hds.com
Regional Contact Information
Americas+1 408 970 [email protected]
Europe, Middle East, and Africa+44 (0)1753 [email protected]
Asia Pacific+852 3189 [email protected]