The President of the Lower House of the States General The ...
Upload
khangminh22Category
view
2download
0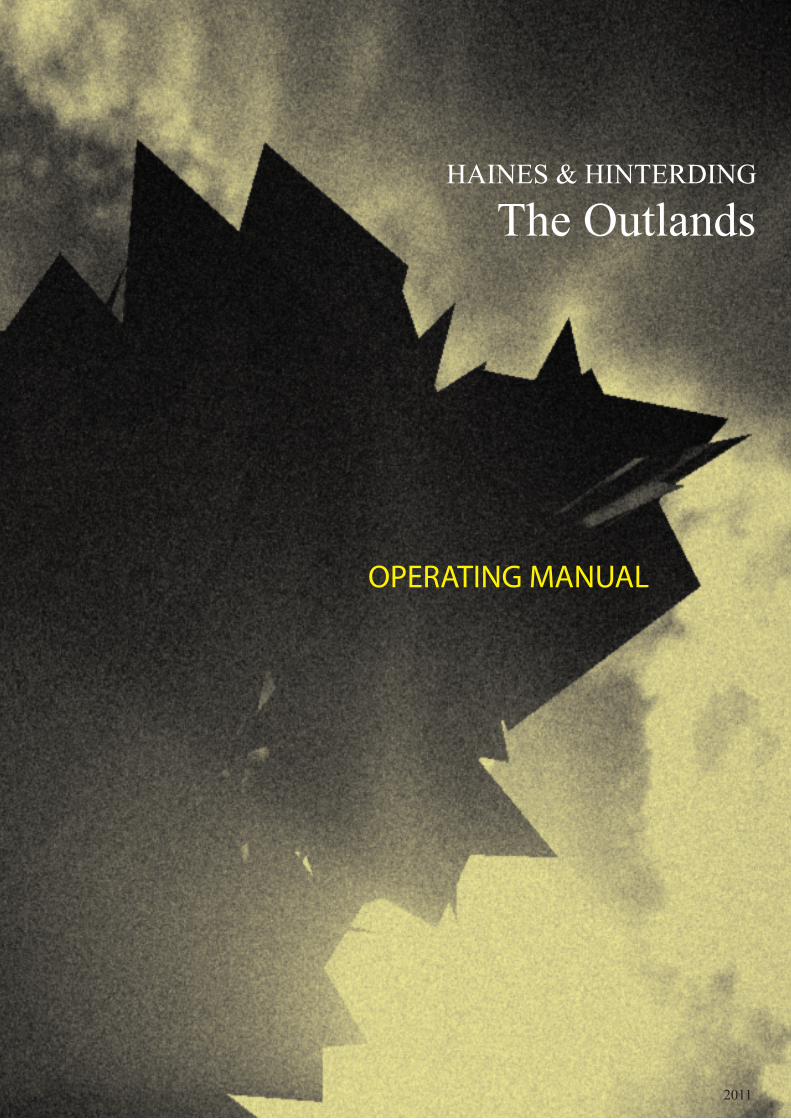
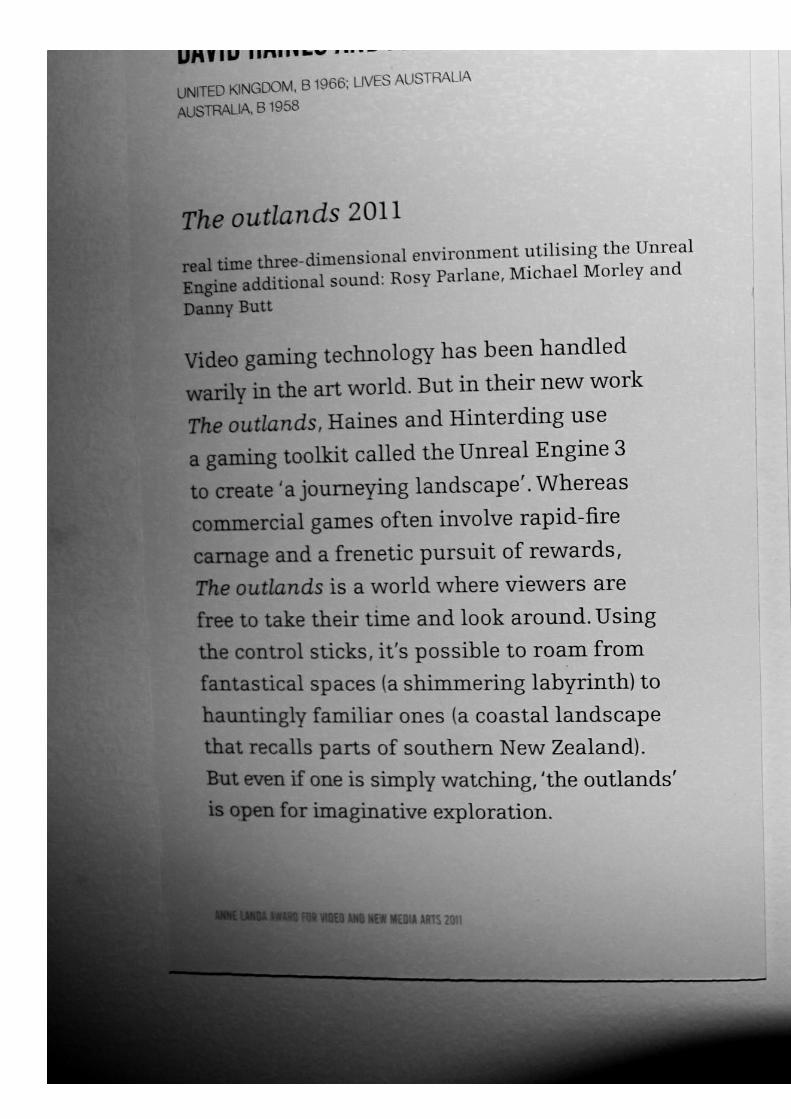
The Outlands HAINES & HINTERDING
2011
OPERATING MANUAL
THE FOLLOWING INSTRUCTIONS ARE ON THE DESKTOP SCREEN.
THE OUTLANDS : HAINES/HINTERDING 2011
To run THE OUTLANDS after START UP or REBOOT
1. Double Click the desktop icon named FIRST and a window will open
Click RUN and wait for STOP to appear.
2. Double CLick ICON named OUTLANDS on Desktop and the program will
load
3. To exit THE OUTLANDS hit esc on the keyboard.
For trouble shooting see the supplied operating manual
The Outlands HAINES & HINTERDING
2011
OPERATING MANUAL
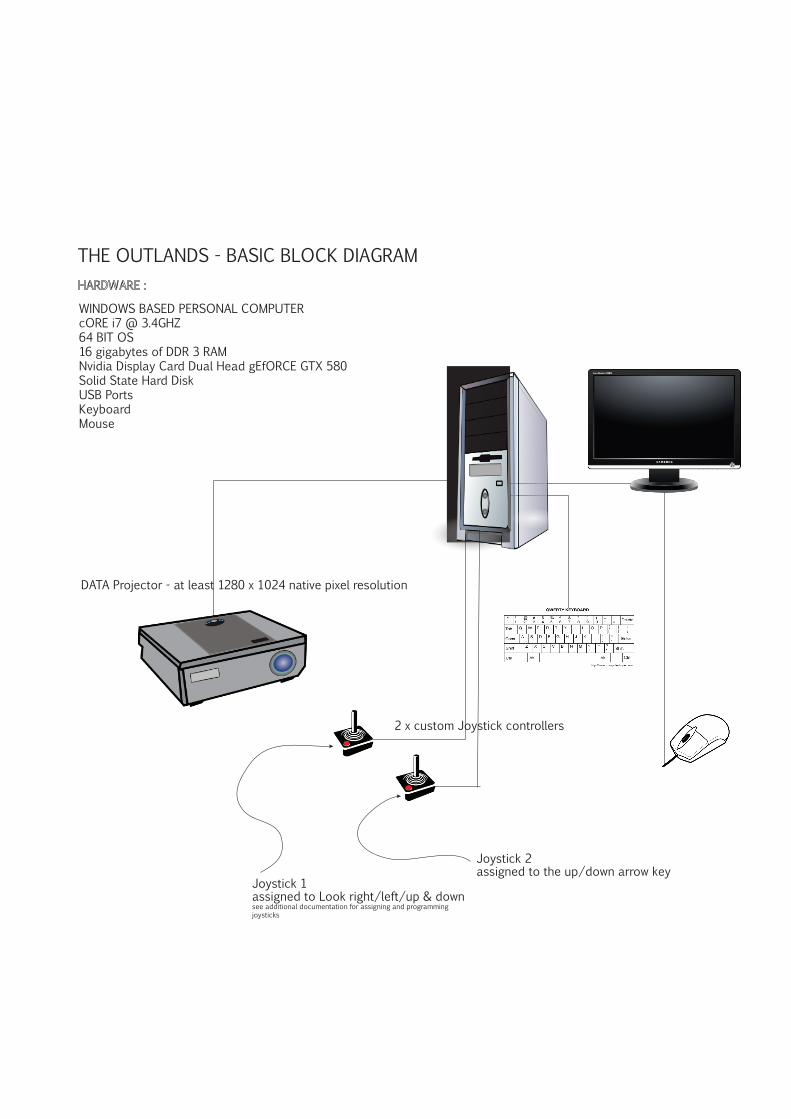
THE OUTLANDS - BASIC BLOCK DIAGRAM
WINDOWS BASED PERSONAL COMPUTERcORE i7 @ 3.4GHZ64 BIT OS16 gigabytes of DDR 3 RAM Nvidia Display Card Dual Head gEfORCE GTX 580Solid State Hard DiskUSB PortsKeyboardMouse
DATA Projector - at least 1280 x 1024 native pixel resolution
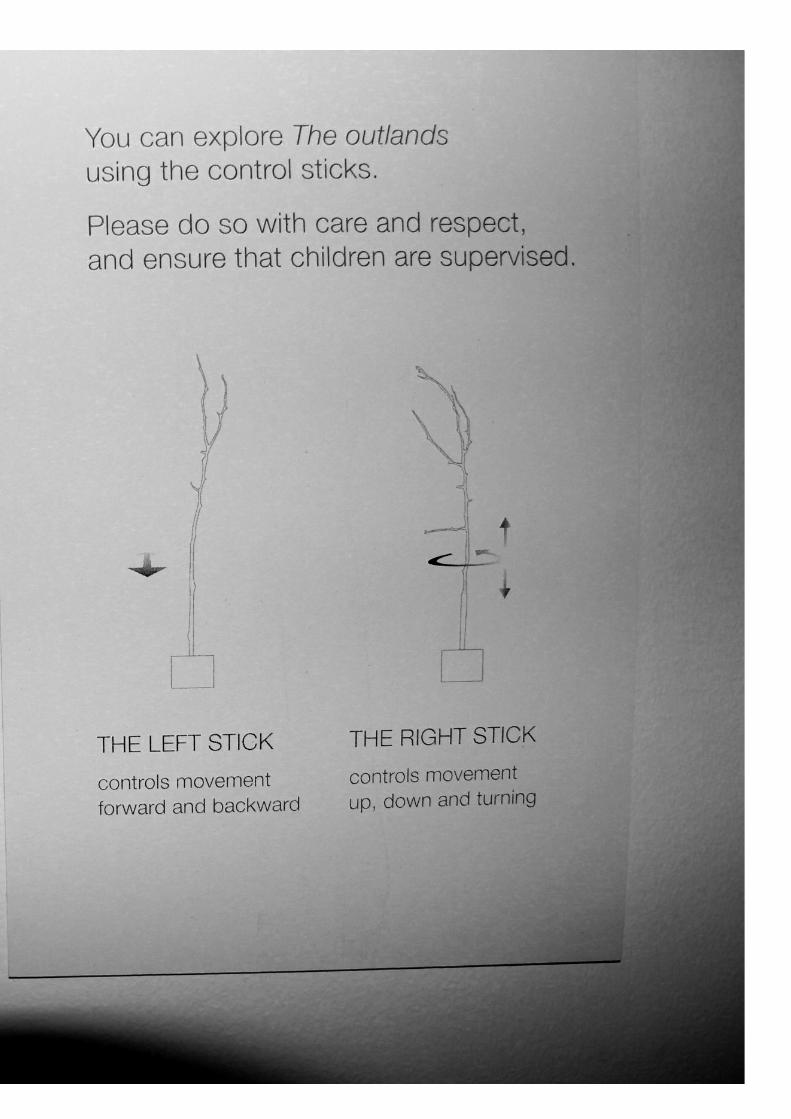
2 x custom Joystick controllers
assigned to the up/down arrow keyJoystick 2
assigned to Look right/left/up & downsee additional documentation for assigning and programming joysticks
Joystick 1
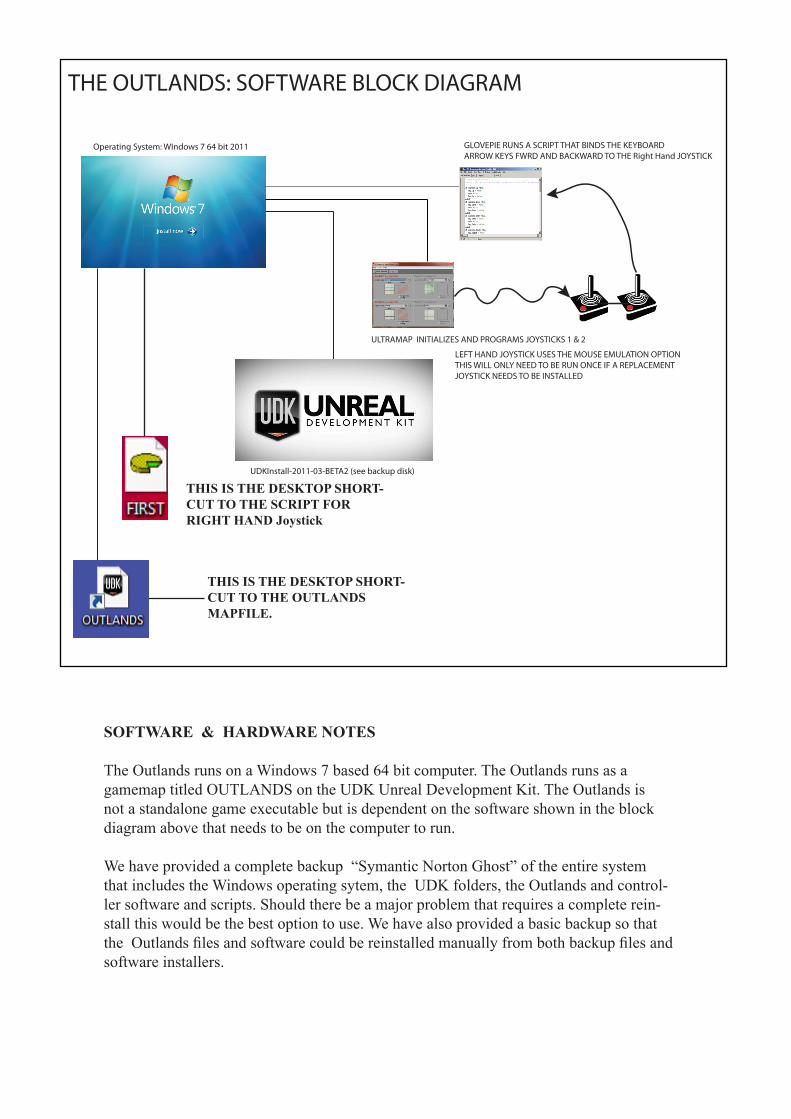
THE OUTLANDS: SOFTWARE BLOCK DIAGRAM
Operating System: WIndows 7 64 bit 2011
UDKInstall-2011-03-BETA2 (see backup disk)
ULTRAMAP INITIALIZES AND PROGRAMS JOYSTICKS 1 & 2
GLOVEPIE RUNS A SCRIPT THAT BINDS THE KEYBOARD ARROW KEYS FWRD AND BACKWARD TO THE Right Hand JOYSTICK
LEFT HAND JOYSTICK USES THE MOUSE EMULATION OPTIONTHIS WILL ONLY NEED TO BE RUN ONCE IF A REPLACEMENT JOYSTICK NEEDS TO BE INSTALLED
SOFTWARE & HARDWARE NOTES
The Outlands runs on a Windows 7 based 64 bit computer. The Outlands runs as a gamemap titled OUTLANDS on the UDK Unreal Development Kit. The Outlands is not a standalone game executable but is dependent on the software shown in the block diagram above that needs to be on the computer to run. We have provided a complete backup “Symantic Norton Ghost” of the entire system that includes the Windows operating sytem, the UDK folders, the Outlands and control-ler software and scripts. Should there be a major problem that requires a complete rein-stall this would be the best option to use. We have also provided a basic backup so that the Outlands files and software could be reinstalled manually from both backup files and software installers.
THIS IS THE DESKTOP SHORT-CUT TO THE OUTLANDS MAPFILE.
THIS IS THE DESKTOP SHORT-CUT TO THE SCRIPT FOR RIGHT HAND Joystick
USING : NORTONS GHOST to only replace OUTLANDS content and or UDK.
If there appears to be a minor problem and it looks as if something has gone wrong with the actual UDK program and or content and not the Windows operating system. It is possible to restore the original files with Nortons.
Go to
Click Norton Icon on taskbar - A window appears in the center of the screen click on recover my files. Type UDK into Find files to recover into text field and press search. Select all and press recover files. This will replace all the files in the udk install includ-ing the outlands MAP.
USING : NORTONS GHOST for a complete reinstall.
Put the OUTLANDS recovery DVD into the drive. Start the computer. You will be prompted to press any key to boot from cd/dvd. Once in the menu follow the instruc-tions.
You will be instructed to reinstall from a recovery point.
REINSTALLING OUTLANDS FILES MANUALLY
On the E drive are two folders one of which is OUTLANDS_FILEANDSOFTWARE BUP. The second folder is OUTLANDS001_GHOST_E is part of Nortans Ghost and can only be accessed through Nortans.
The first folder contains all the components to rebuild the system manually ( apart from the OS).
Instructions.
1. open OUTLANDS_FILEANDSOFTWARE BUP.2. There are three folders within - open OUTLANDS-SOFTWARE BUP2011-11-19double click UDK install-2011-03-BETA2
once this has installed 3. Go up a directory back to the root of OUTLANDS_FILEANDSOFTWARE BUP.4. Open OUTLANDS-UDK GAMEFOLDER BUP2011-11-19 . 5. Open the UDK Game folder. Select the config folder and copy.6. Go to the UDK folder on the C Drive Open UDK/2011-03/UDKGame and paste, that will overwrite the original Config Folder with the new one.
Do the same for the content folder and the cooked PCFolder - note all folders must be completely overwritten.
Beyond the OS and the Unreal Development Kit required to run the OUTLANDS Map there are two other critical pieces of software that make up the suite of software that we need to run the work - they are ULTRAMAP & GlovePie.
ULTRAMAP is the software needed for the two custom controllers to work and can be found in the Start Menu.
See the ADDENDUM for the complete ULTRAMAP documentation, however, this soft-ware does two things.
1. It registers to the computer the existence of two custom joystick controllers attached to the USB ports and provides a hardware ID for each controller. This only has to be done ONCE if replacemet controllers are being put onto the system for the first time. These ID’s are written to the controllers hardware from the computer and therefore sur-vive power off.
2. ULTRAMAP also allows one to load a custom map, in our case to the RIGHT HAND Joystick only that gives it the mouse pointer function.
The second LEFTHAND joystick controller does not require any mapping from within the ULTRAMAP software, beyond hardware ID registration it gets its special functions from the program GlovePie. GlovePie uses a custom script in its main window, to map the arrow key functions from the KEYBOARD to the LEFTHAND Joystick allowing one to move back and forward within the game.
GlovePie can see all Joysticks attached to the computer and in this case we assign from the menu the Joystick with an ID of 3 as the one GlovePie needs to send script info to. This might seem confusing at first, but basically the hardware ID to use is any joystick with a hardware ID greater than 1, since that will always be assigned to the RIGHT-HAND joystick.
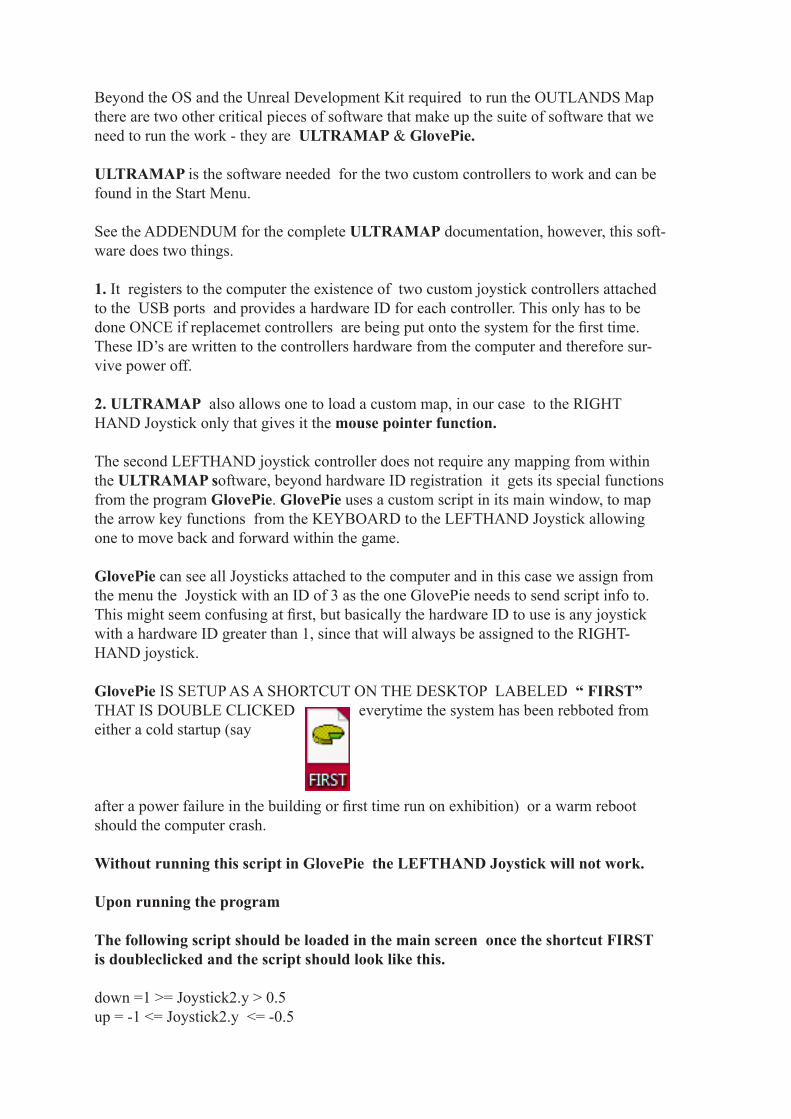
GlovePie IS SETUP AS A SHORTCUT ON THE DESKTOP LABELED “ FIRST” THAT IS DOUBLE CLICKED everytime the system has been rebboted from either a cold startup (say
after a power failure in the building or first time run on exhibition) or a warm reboot should the computer crash.
Without running this script in GlovePie the LEFTHAND Joystick will not work.
Upon running the program
The following script should be loaded in the main screen once the shortcut FIRST is doubleclicked and the script should look like this.
down =1 >= Joystick2.y > 0.5up = -1 <= Joystick2.y <= -0.5
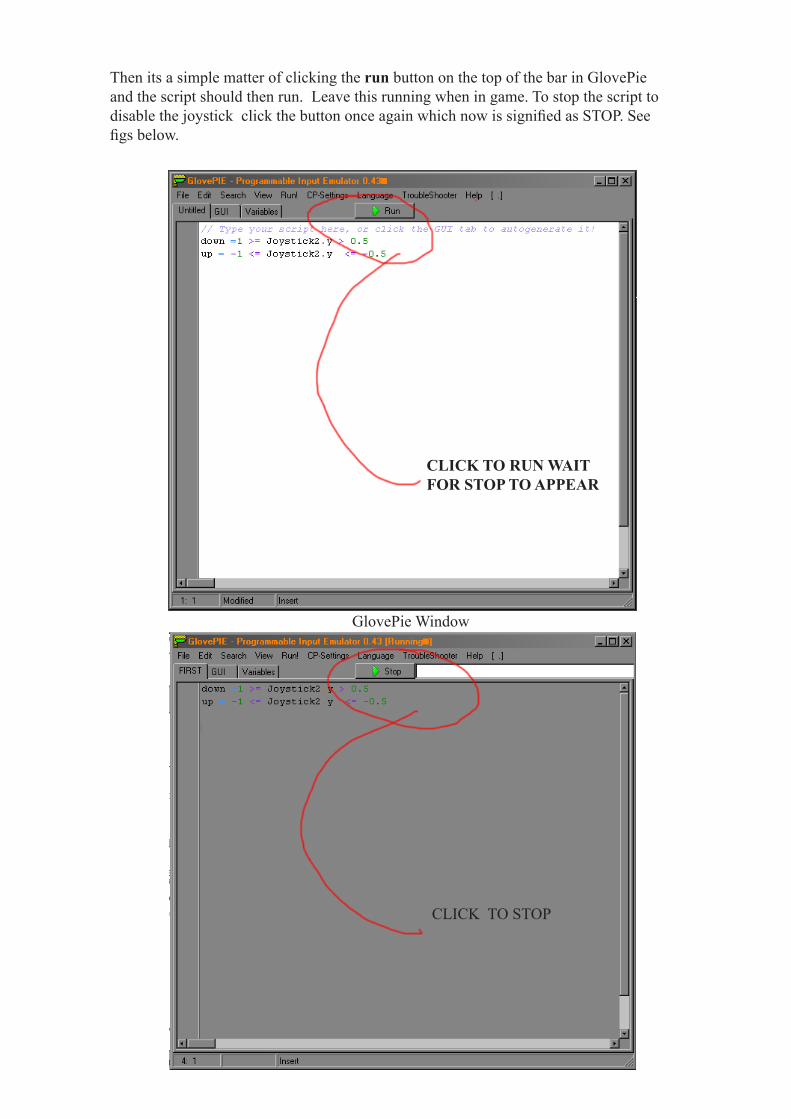
Then its a simple matter of clicking the run button on the top of the bar in GlovePie and the script should then run. Leave this running when in game. To stop the script to disable the joystick click the button once again which now is signified as STOP. See figs below.
CLICK TO RUN WAIT FOR STOP TO APPEAR
CLICK TO STOP
GlovePie Window
Once this script is running GlovePie can be minimised to the taskbar in the usual way and then the OUTLANDS shortcut can be double clicked and then once its loaded the game will run.
SUMMARY RUNNING SEQUENCE DURING EXHIBITION
Upon startup of the computer double click the desktop icon labeled FIRST which looks like this
a window will open click Run and wait till the run button changes to STOP this means the script is running.
Then double click the second desktop icon labeled OUTLANDS to run the work. TO Exit hit ESC on the Keyboard.
ADDITIONAL NOTES.
Screen Resolutions.
The OUTLANDS runs at 1920 x 1080 resolution, however we have also run it at 1280 x 1024we have bound the 1280 x1024 to the F1 key and the 1920 x 1080 to the F2 key as a way to conveniently change resolutions live during setup. An alternative way to get to a non standard resolution is to use the Console function once the work has loaded. To use console commands, bring up the console by pressing Tab or Tilde (~), type them in, and press Enter.
To change screen resolution from the console type egsetres 1280x1024 then return or whatever resolution is required
Other useful console commands are
FULLSCREENTOGGLEALLSCREENMESSAGES – Toggles the display of all onscreen messages or warnings.
To exit the console pressing Tab or Tilde (~), type them in, and press Enter.
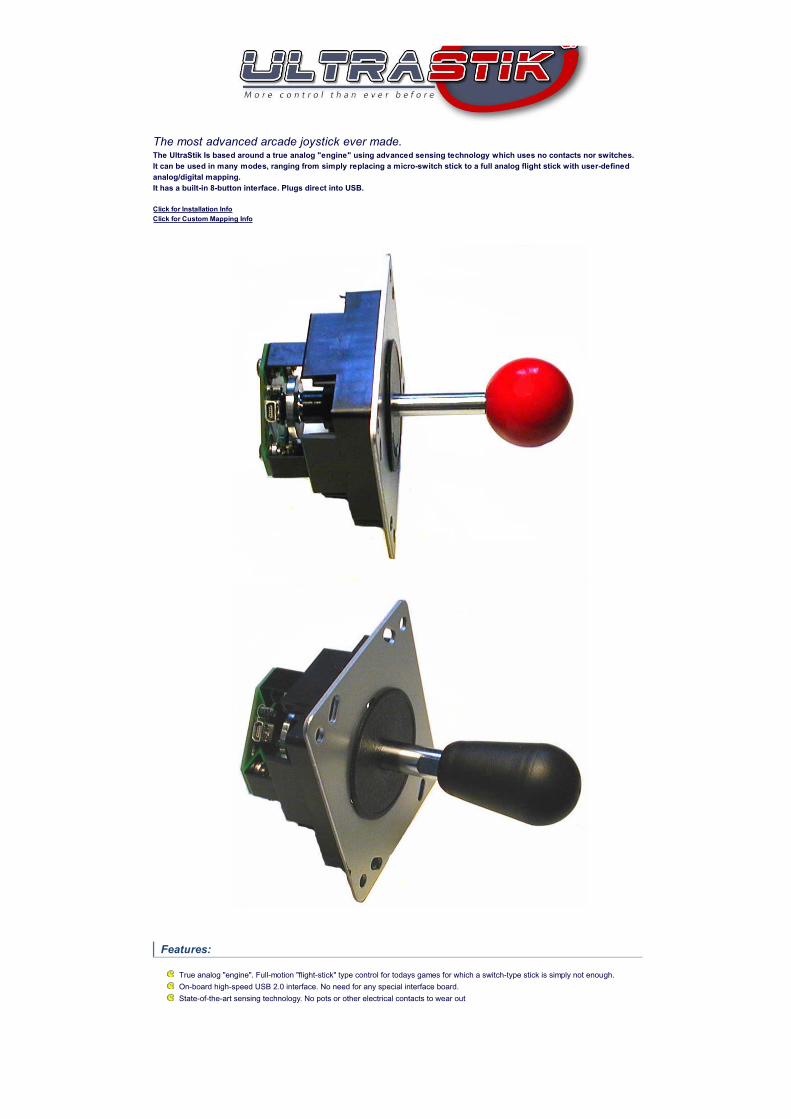
The most advanced arcade joystick ever made.The UltraStik Is based around a true analog "engine" using advanced sensing technology which uses no contacts nor switches.It can be used in many modes, ranging from simply replacing a micro-switch stick to a full analog flight stick with user-definedanalog/digital mapping.It has a built-in 8-button interface. Plugs direct into USB.
Click for Installation InfoClick for Custom Mapping Info
Features:
True analog "engine". Full-motion "flight-stick" type control for todays games for which a switch-type stick is simply not enough.On-board high-speed USB 2.0 interface. No need for any special interface board.State-of-the-art sensing technology. No pots or other electrical contacts to wear out
CLICK HERE !
UlraStick 360
Arcade VGA
I-Pac
OptiPAC
J-Pac
Controls
SpinTrak
Console
A-Pac
MiniPAC
UltraLux
U-Trak
USB LED Controller
USB Output DriverBoard
U-HID
Main Message Board
Arcadeinfo.de (German)
Gamoover.net (French)
Welcome to Ultimarc, the Ultimate in Arcade Controls. http://www.ultimarc.com/ultrastik_info.html
2 of 3 18/11/2011 2:59 PM
User-definable IDs allow 4 joysticks to be plugged into a PC and individually controlled.On-board interface which can optionally be used in two auto-detecting modes:Input mode: Allows connection of up to 8 buttons per joystick.Output mode: Allows joystick to be connected to an interface such as the I-PAC, to replace a standard switch-type joystick.Sends analog data via USB to the PC either alongside the above modes, or when the auxiliary interface is not used.User-definable mappings. 9 X 9-cell matrix ovelayed onto the analog motion allows 4-way, 8-way or any other maps to be created and storedsemi-permanently in flash ROM.Each cell can be set to any of 8 directions, centered, analog, or "sticky".Any number of maps can be created so you could have special mappings for different games if you wish.No need for any other stick as the UltraStik can operate in ANY mode, 4-way, 8-way, 2-way, 45 degree mode or any special mode you wishto define.Maps downloaded instantly to joystick via USB and this can be done in the background when starting a game.User-upgradeable firmware, downloadable via the web, for future updates.Advanced configuration program allows creation and storage of maps, assignment of ID, and has a test facility.Standard mounting hole pattern. Available with ball or bat-top handlesPolished chromium plated shafts.Fast on-board 24 Mhz processor performs automatic calibration, linearization and all other functions.14 bit analog-to-digital conversion for maximum resolution.Customize your stick! Two different mechanical restrictor plates can optionally be fitted, for mechanically-limited 4, 8 or "reduced travel"analog operation, for those who prefer a hardware-limited stick.Optional longer handles availableOptional extra-stiff spring available
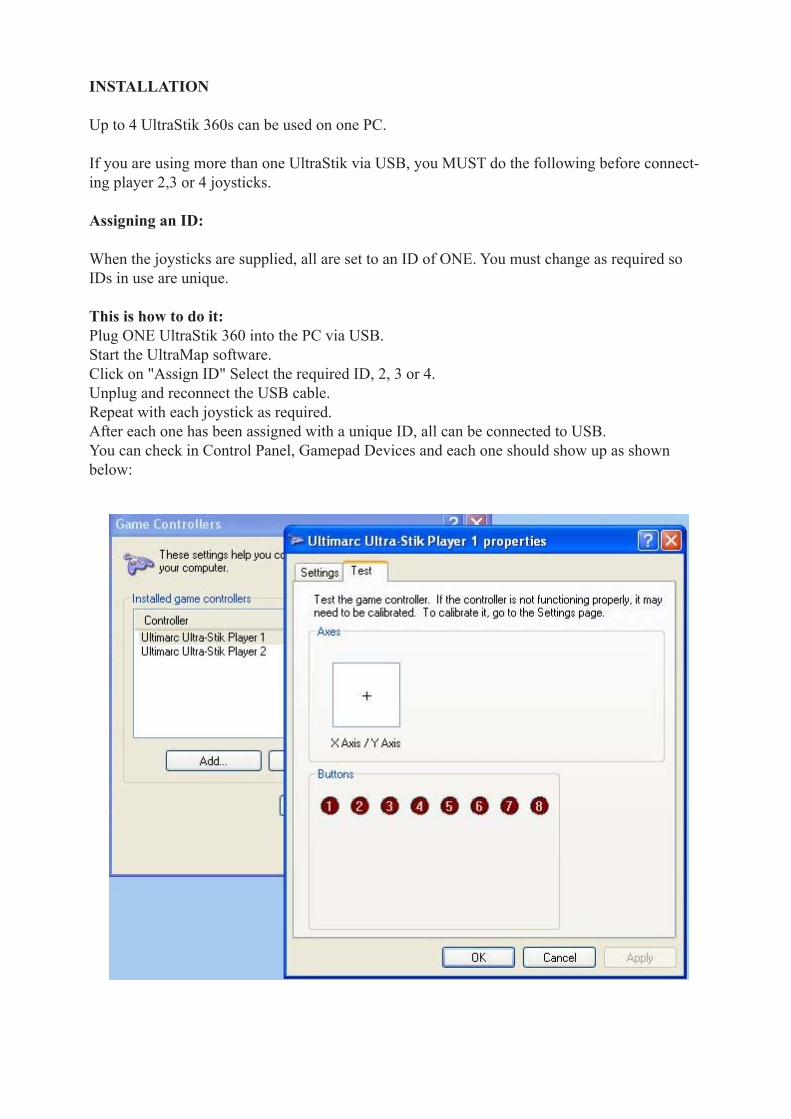
INSTALLATION
Up to 4 UltraStik 360s can be used on one PC.
If you are using more than one UltraStik via USB, you MUST do the following before connect-ing player 2,3 or 4 joysticks.
Assigning an ID:
When the joysticks are supplied, all are set to an ID of ONE. You must change as required so IDs in use are unique.
This is how to do it: Plug ONE UltraStik 360 into the PC via USB.Start the UltraMap software.Click on "Assign ID" Select the required ID, 2, 3 or 4.Unplug and reconnect the USB cable.Repeat with each joystick as required.After each one has been assigned with a unique ID, all can be connected to USB.You can check in Control Panel, Gamepad Devices and each one should show up as shown below:
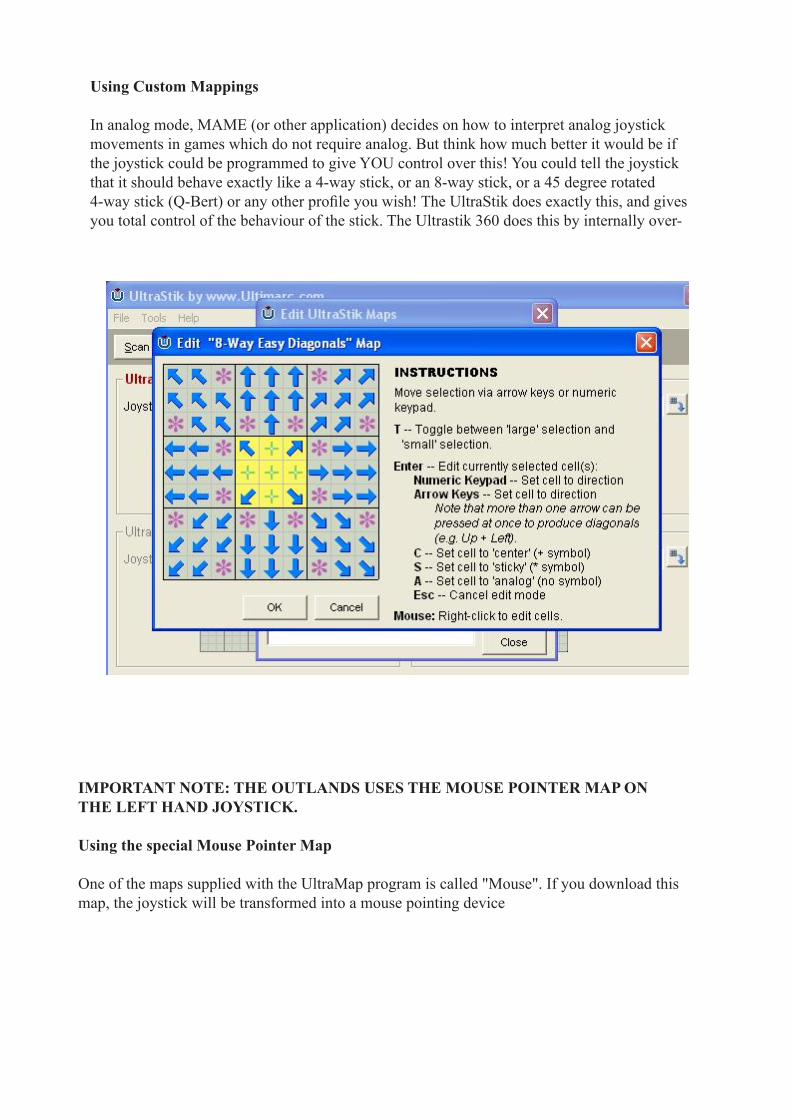
Using Custom Mappings
In analog mode, MAME (or other application) decides on how to interpret analog joystick movements in games which do not require analog. But think how much better it would be if the joystick could be programmed to give YOU control over this! You could tell the joystick that it should behave exactly like a 4-way stick, or an 8-way stick, or a 45 degree rotated 4-way stick (Q-Bert) or any other profile you wish! The UltraStik does exactly this, and gives you total control of the behaviour of the stick. The Ultrastik 360 does this by internally over-
IMPORTANT NOTE: THE OUTLANDS USES THE MOUSE POINTER MAP ON THE LEFT HAND JOYSTICK.
Using the special Mouse Pointer Map
One of the maps supplied with the UltraMap program is called "Mouse". If you download this map, the joystick will be transformed into a mouse pointing device
Fitting Long Handles and/or Replacement Spring:
There are two possible methods:If your stick is not yet fitted to a panel, remove the 4 screws on the front of the faceplate and remove the swivel assembly.If your stick is already fitted to a panel, remove the PCB by unscrewing the 4 screws.Lift off the magnet assembly from the end of the shaft. Remove the E-Ring. CARE: we advise to avoid spring-loaded parts being lost, place a cloth over the joystick when removing the E-ring. Swap the shafts and/or springs over and re-assemble.Locking the threaded handle top.
If problems are experienced with the handle unscrewing, there is a screwdriver slot available on the end of the shaft, to old the shaft stationary while tightening the handle. This is accessible by removing the PCB and the magnet assembly. After using this slot, check that no burring of the end of the shaft has occurred, which might prevent the magnet assembly from seating. Remove any burr using a fine file if necessary.
LED Indicator
The LED flashes to indicate correct operation. In the center of the travel, the LED should flicker slightly. As the joystick is moved away from center, each flash becomes longer. The axis which the LED monitors, is changed when the stick is moved to full travel in each axis.Firmware Upgrade
The UltraMap software can be used to download new firmware to the joystick. Firmware updates will be available for download.Calibration
The UltraStik 360 requires no calibration. In Analog mode, the setting of "dead zone" in MAME and also any calibration of gamepad joysticks in Windows, will affect the stick, so if you get any strange behaviour, check these are set to default settings.
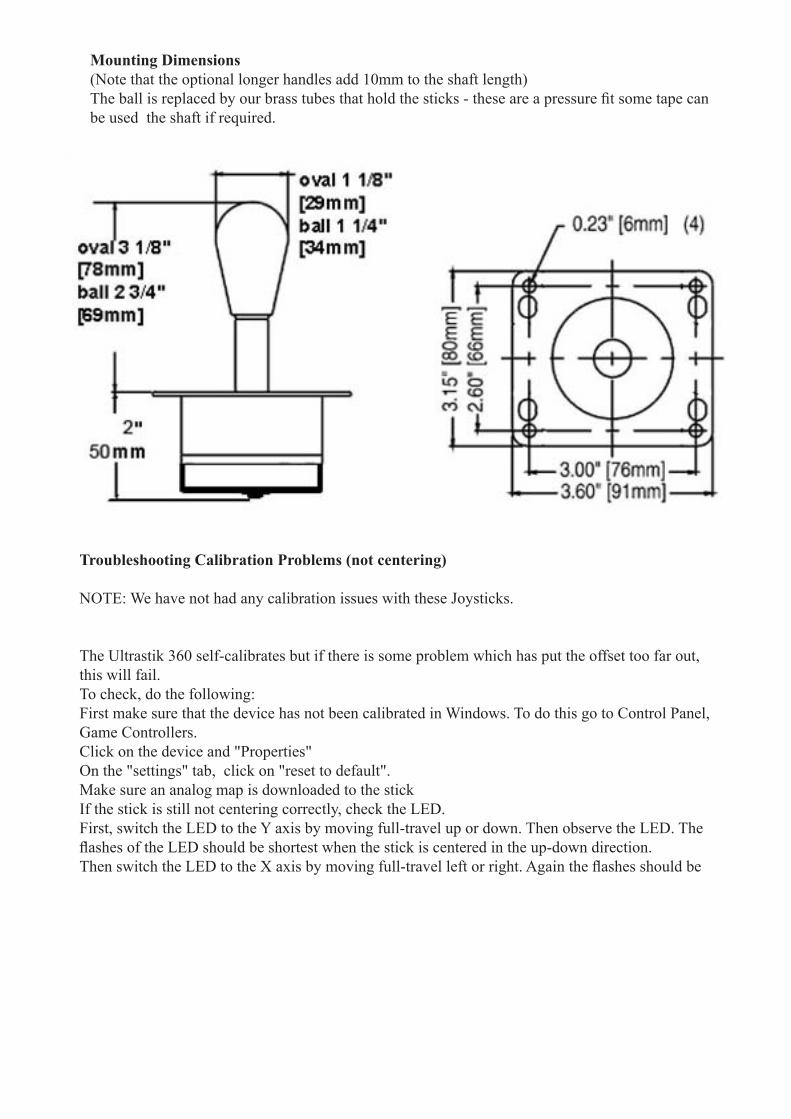
Mounting Dimensions(Note that the optional longer handles add 10mm to the shaft length)The ball is replaced by our brass tubes that hold the sticks - these are a pressure fit some tape can be used the shaft if required.
Troubleshooting Calibration Problems (not centering)
NOTE: We have not had any calibration issues with these Joysticks.
The Ultrastik 360 self-calibrates but if there is some problem which has put the offset too far out, this will fail.To check, do the following:First make sure that the device has not been calibrated in Windows. To do this go to Control Panel, Game Controllers.Click on the device and "Properties"On the "settings" tab, click on "reset to default".Make sure an analog map is downloaded to the stickIf the stick is still not centering correctly, check the LED.First, switch the LED to the Y axis by moving full-travel up or down. Then observe the LED. The flashes of the LED should be shortest when the stick is centered in the up-down direction.Then switch the LED to the X axis by moving full-travel left or right. Again the flashes should be
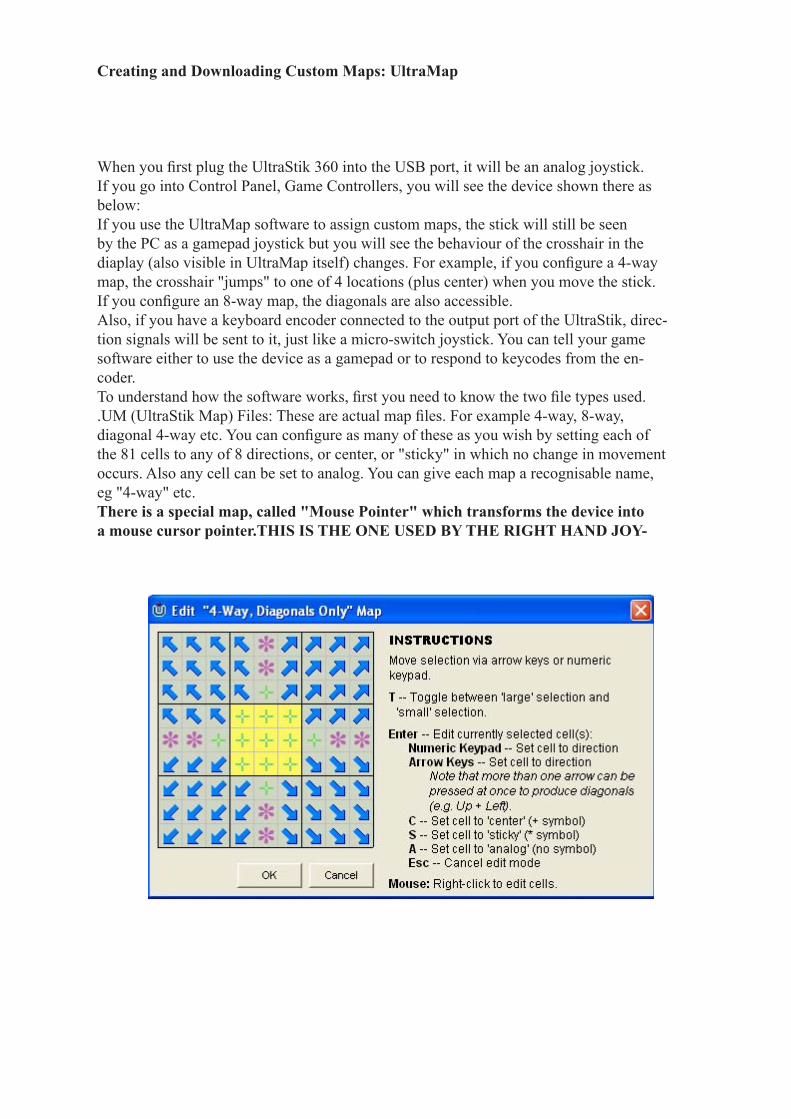
Creating and Downloading Custom Maps: UltraMap
When you first plug the UltraStik 360 into the USB port, it will be an analog joystick. If you go into Control Panel, Game Controllers, you will see the device shown there as below:If you use the UltraMap software to assign custom maps, the stick will still be seen by the PC as a gamepad joystick but you will see the behaviour of the crosshair in the diaplay (also visible in UltraMap itself) changes. For example, if you configure a 4-way map, the crosshair "jumps" to one of 4 locations (plus center) when you move the stick. If you configure an 8-way map, the diagonals are also accessible.Also, if you have a keyboard encoder connected to the output port of the UltraStik, direc-tion signals will be sent to it, just like a micro-switch joystick. You can tell your game software either to use the device as a gamepad or to respond to keycodes from the en-coder.To understand how the software works, first you need to know the two file types used..UM (UltraStik Map) Files: These are actual map files. For example 4-way, 8-way, diagonal 4-way etc. You can configure as many of these as you wish by setting each of the 81 cells to any of 8 directions, or center, or "sticky" in which no change in movement occurs. Also any cell can be set to analog. You can give each map a recognisable name, eg "4-way" etc.There is a special map, called "Mouse Pointer" which transforms the device into a mouse cursor pointer.THIS IS THE ONE USED BY THE RIGHT HAND JOY-
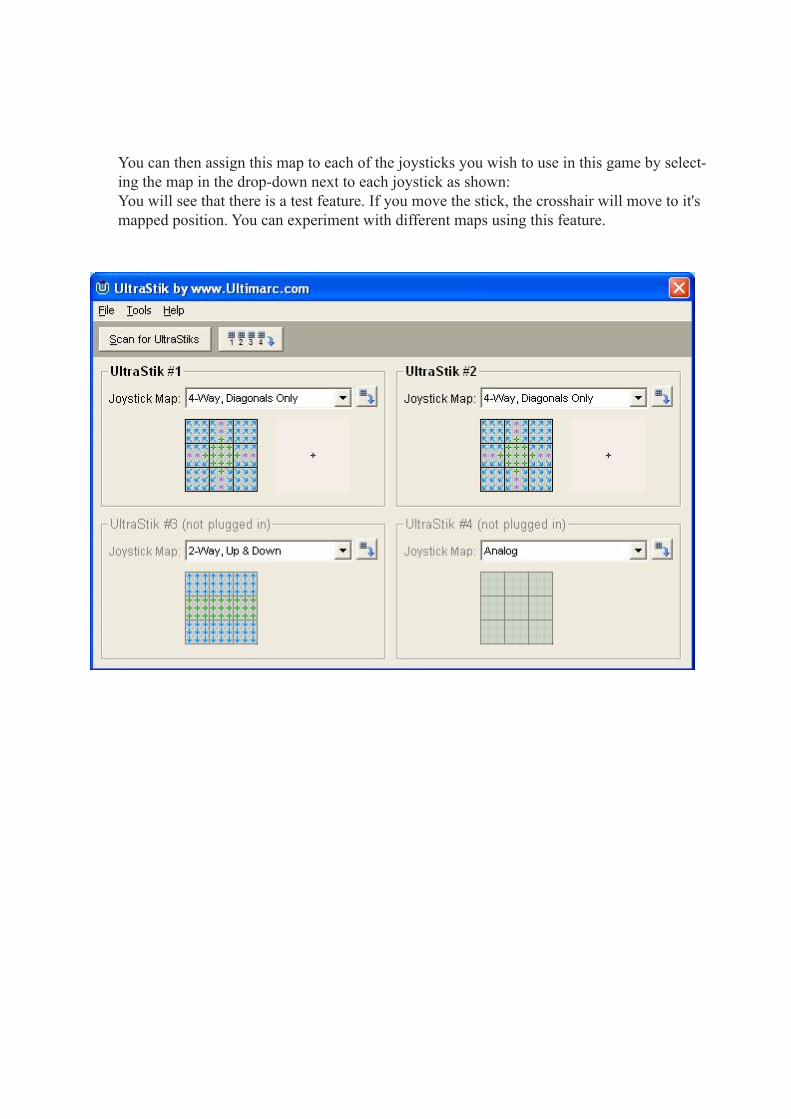
You can then assign this map to each of the joysticks you wish to use in this game by select-ing the map in the drop-down next to each joystick as shown:You will see that there is a test feature. If you move the stick, the crosshair will move to it's mapped position. You can experiment with different maps using this feature.

GlovePIE NOTES
http://glovepie.org/glovepie.php
GlovePIE stands for Glove Programmable Input Emulator. It doesn't have to be used with VR Gloves, but it was originally started as a system for emulating Joystick and Keyboard Input using the Essential Reality P5 Glove. Now it supports emulating all kinds of input, using all kinds of devices, including Polhemus, Intersense, Ascension, WorldViz, 5DT, and eMagin products. It can also control MIDI or OSC output.
In the GlovePIE window you type or load a simple script. For example to control the WASD keys with a glove:
W = glove.z > -50 cmS = glove.z < -70 cmA = glove.x < -10 cmD = glove.x > 10 cm
You can also use GlovePIE to play Joystick-only games without a joystick, or keyboard-only games with a joystick. Or you can use it to create macro buttons for complex key-strokes.
There is an extensive WIKI on GlovePie
http://glovepie.org/w/index.php?title=Preliminary_Documentation_v0.43
NORTONS GHOST Notes
Product Key/Subscription Key/Activation Code: 04-4401-0040-042867
Windows Activation Code
00359-0EM-890-3514-72739

Haines/Hinterding15 Sayers st, Lawson 2783, NSW Australia.
T: + 61 2 47591300M JH: +61 415 155 531M DH: +61 424 726 295
[email protected]@sunvalleyresearch.com www.sunvalleyresearch.net
Joyce Hinterding and David Haines are represented by
Level 3, 17–19 Alberta Street, Sydney NSW 2000 AustraliaT +61 2 9283 1113www.breenspace.com
Copyright © 2022 FDOKUMEN