
H2H-User-Guide.pdf - SA Housing Authority
198
updated April 2021 for H2H version 2.13 User Guide
-
Upload
khangminh22 -
Category
Documents
-
view
0 -
download
0
Transcript of H2H-User-Guide.pdf - SA Housing Authority

updated April 2021 for H2H version 2.13
User Guide

1
Assistance with H2H
Users who need help with H2H should first check the relevant section of this guide, read through the
supporting documentation on the support page (by clicking the H2H support link at the bottom of
every page of H2H), or ask a super user, or manager.
For technical help with any system errors please contact Operations support on 1300 885 912
(press 2) or email [email protected]
For assistance with training related enquiries, contact the H2H Support team on 1300 885 912
(press 3) or email [email protected]
Please note:
All client examples contained in this user guide are fictional and not based
on any true client information. Any similarity to true client records is
coincidental

updated April 2021 for H2H version 2.13
Table of Contents
ASSISTANCE WITH H2H .................................................... 1 TABLE OF CONTENTS ........................................................ 2
INTRODUCTION .................................................. 4
ABOUT THE HOMELESS2HOME SYSTEM ............................... 5 H2H SUPPORT PAGE ........................................................ 5 ABOUT THE SPECIALIST HOMELESSNESS SERVICES DATA
COLLECTION ................................................................... 6 GETTING ACCESS ............................................................. 6 SECURITY ....................................................................... 6 FREEDOM OF INFORMATION ............................................... 7 TIPS FOR NAVIGATING H2H ............................................... 8 LOGGING IN TO H2H FOR THE FIRST TIME .............................. 8 LEVELS OF ACCESS .......................................................... 10 USER ROLES AND FUNCTIONALITY ...................................... 11 THE HOMEPAGE ............................................................ 12 THE INBOX ................................................................... 14
SEARCHING AND ADDING CLIENTS..................... 16
SEARCHING IN H2H ....................................................... 17 ADDING A NEW CLIENT .................................................... 22
THE CLIENT MENU ............................................. 30
THE CLIENT MENU .......................................................... 31 HOUSING..................................................................... 32 RISK ASSESSMENT SCORES ............................................... 32 NOTES ........................................................................ 33 ASSIGNMENTS .............................................................. 35 ALERTS ....................................................................... 35 CONSENTS ................................................................... 36 THE CLIENT PATHWAY .................................................... 41 REFER CLIENT................................................................ 42 REFERRAL HISTORY ........................................................ 46 UNASSISTED HISTORY ..................................................... 47
THE INTAKE MENU ............................................. 49
INTAKE ............................................................... 50
NOTICE OF INFORMATION PROVISION ................................. 50 HOW THE INTAKE WORKS ................................................ 53 INTAKE DETAILS PANEL .................................................... 54 THE HOUSING PANEL ...................................................... 58 THE INCOME PANEL ....................................................... 68 THE EDUCATION PANEL ................................................... 72 THE PERSONAL DETAILS PANEL .......................................... 73 THE HEALTH AND WELLBEING PANEL .................................. 76 CONTACT DETAILS PANEL ................................................ 77 PRESENTING ISSUES PANEL ............................................... 78 SAVING THE INTAKE - INCOMPLETE ..................................... 79 COMPLETING THE INTAKE ................................................ 79
PRESENTING UNIT .............................................. 82
AIHW DEFINITION OF A PRESENTING UNIT .......................... 82 HOW TO RECORD A PRESENTING UNIT ................................. 82 REMOVING A PRESENTING UNIT MEMBER ............................ 85
INTAKE SERVICES ............................................... 86
WHEN TO ADD AN INTAKE SERVICE .................................... 86 THE DIFFERENT DELIVERY TYPES OF SERVICES ........................ 88 PROVIDED SERVICES ....................................................... 89 REFERRALS WITHIN H2H (INTERNAL REFERRALS) ................... 97 REFERRALS EXTERNAL TO H2H ........................................ 100 UNMET NEED ............................................................. 103
ASSESSMENT ................................................... 108
ABOUT THE ASSESSMENT ............................................... 109 STARTING AN ASSESSMENT ............................................. 109 THE ASSESSMENT MENU ................................................ 110 THE LIFE DOMAIN PAGE ................................................ 110 GOALS ...................................................................... 112 RISK INDICATOR ........................................................... 113 SAVING THE ASSESSMENT............................................... 114 VIEWING A SAVED ASSESSMENT ....................................... 115
CASE PLAN ....................................................... 117
PRIOR TO STARTING A CASE PLAN ..................................... 118 STARTING A CASE PLAN .................................................. 118 THE PLAN SUMMARY PAGE ............................................. 119 LIFE DOMAINS ............................................................. 121 STRENGTHS/ISSUES PAGES ............................................. 121 ADDING NEW STRENGTHS/ISSUES TO A CASE PLAN ............... 122 GOALS ...................................................................... 125 CASE PLAN SERVICES .................................................... 129 PROVIDED SERVICE....................................................... 132 CONSENTED SERVICES ................................................... 136 REFERRALS WITHIN H2H (INTERNAL REFERRALS) ................. 137 REFERRALS EXTERNAL TO H2H ........................................ 141 UNMET NEED – CASE PLAN ............................................. 143 OTHER FUNCTIONS ....................................................... 146 THE CASE PLAN COVER PAGE .......................................... 149 CASE NOTES AND SERVICE NOTES.................................... 150 CLOSING THE CASE PLAN ................................................ 155
SYSTEM CLOSE, END SUPPORT & CASE EXIT ..... 156
SYSTEM CLOSES ........................................................... 157 EXITING A CLIENT ......................................................... 157 DIFFERENCES BETWEEN END SUPPORT AND CASE EXIT ........... 157 STARTING AN END SUPPORT OR CASE EXIT .......................... 158 WORKING THROUGH AN END SUPPORT OR CASE EXIT ............ 159 FINALISING THE END SUPPORT OR CASE EXIT ....................... 166 POST CASE FOLLOW UPS ................................................ 168 CLOSING YOUR CASE PLAN .............................................. 169
AGENCY MANAGER FUNCTIONS ...................... 170
ABOUT THE AGENCY MANAGER ROLE ............................... 171 REMINDERS AND THE INBOX ........................................... 171 REFERRALS MENU ....................................................... 172 ASSIGNMENTS ............................................................. 177 SEARCH BY WORKER ..................................................... 179 UNASSIGNED CLIENTS LIST ............................................. 179 CLIENT NO ACTIVITY ...................................................... 181 CLIENT STATUS AND DEMOGRAPHIC .................................. 181 CASE PLANS ............................................................... 181

3
WORK LOAD ............................................................... 181 ASSIGNED/UNASSIGNED ............................................... 181 SENSITIVE AND LOCKED ................................................. 181 SET DECEASED ............................................................ 182
DEFINITIONS AND GLOSSARY OF TERMS .......... 185
SERVICE DEFINITIONS ................................................... 186 SERVICE ELEMENT DEFINITIONS ...................................... 186 ICONS IN H2H ............................................................ 191 GLOSSARY OF COMMON TERMS ..................................... 193

updated April 2021 for H2H version 2.13
Introduction

5
About the Homeless2Home System
The Homeless2Home Client & Case Management System (H2H) is a web-based application released
as part of South Australia’s implementation of the National Partnership Agreement on Homelessness
(NPAH) in 2011.
H2H was developed to provide a single, state- wide, case management and information
management system. H2H benefits both clients and agencies by:
• enabling clients to access assistance through any agency so there is no wrong door
• ensuring clients only tell their story once
• creating easier entry and referral pathway into the support sector for clients
• reducing the reporting burden for agencies
• providing a standardised framework for case management by agencies and;
• Supporting consistent support responses for clients.
This user guide is provided to assist you in understanding how to use H2H.
H2H support page
A support page for the H2H system can be found by clicking the H2H support link at the bottom of
every screen of H2H,
The H2H support page contains valuable information regarding:
• Updates to the system
• Training materials (including this manual)
• How to get access to H2H
• Information on client consent
• Forms
• Data collection information, and
• Where to find help
The H2H support page is updated with new information regularly and should be your starting point
for assistance.

6
About the Specialist Homelessness Services Data Collection
H2H is accredited as an approved client management system for the National Specialist
Homelessness Services collection (SHSC). All client data required for the SHSC is obtained from H2H.
Client information is depersonalised, and extracted for submission to the Australian Institute of
Health and Welfare (AIHW) at the specified date for transmission each month
For information on the SHSC, you can visit the AIHW’s website at www.aihw.gov.au/
Information from H2H is also utilised for State Reporting, managed by the South Australian Housing
Authority, allowing agencies to be provided with additional reports to aid in performance monitoring
processes. Agencies are provided with quarterly Key Performance Indicator and Contract
Management reports, in addition to statistical summaries provided by the AIHW.
Getting Access
Access to H2H is restricted to workers of agencies funded to provide specialist homelessness services
in South Australia. Due to the highly sensitive nature of client information on the H2H System, access
is controlled by the South Australian Housing Authority. For access, complete and return a New User
Agreement form found on the support page (by clicking the H2H support link at the bottom of every
page of H2H).
Security
As H2H stores sensitive information about clients, security measures are in place to prevent
unauthorised access and protect client information.
System security The web entry point for the H2H system is housed in the Department of Justice Web Vault,
protected by firewalls to prevent unauthorised access. Other parts of the system run on servers that
are housed behind Firewalls. All firewalls are monitored constantly and tested regularly. All data in
the H2H system is encrypted while stored and when transmitted.
User security All users complete a signed and authorised agreement, before being granted access to H2H. The
conditions for use of the system can be found on the user access form. These controls ensure that
no one has access to client information without the appropriate authorisation.
Access to H2H is password protected. A unique username and temporary password are provided to
you when the account is created.
Your password should never be shared with anyone to ensure client information is protected.
Passwords should not be stored in your web browser but should be typed into the system each time
you log on. Access to data within the system is audit logged to ensure the system administrator can
track who reads or updates client data. Data audits will be carried out at times to ensure all users are
using the system in line with conditions of use.
Client security Visibility of client personal information in H2H is dictated by a consent function. The information
that you can view on a client record where you do not have any consent is limited to:

7
• Client name
• Sex
• Date of Birth
• Any previous supporting agencies through the client ‘pathway’
• Consents
• Presenting unit
• Alerts
This restriction provides protection for client information held by your agency.
Consent and information sharing Clients must be provided with the Notice of Information provision at the start of their support. This document outlines the client's rights regarding their personal information. You can find a copy of this document by following the link on the intake screen, or by visiting the support page.
Freedom of information
Clients have a right to access the information held about them. Clients also have a right to request
the amendment of their client record if it is inaccurate, incomplete, irrelevant, out of date, or would
give a misleading impression. The agency that collected the information is responsible for providing
it to the client. If the agency is no longer operational the client can make a freedom of information
request to the South Australian Government.

8
Tips for Navigating H2H
Below is some general information about using H2H;
H2H Tips Single clicks All buttons and fields in H2H can be accessed with a single click. A double click
will load the page/field twice, slowing down system speed
Browser links A link to the logon screen can be saved in your web browser favourites for
quick access
Back button The ‘back’ button on an internet browser won't work in H2H. You will be
automatically logged out of H2H if you click the back button. This function
exists to protect the security of client information on H2H.
F11 To avoid accidental use of the ‘back’ button on your browser, you can enter full
screen by pressing the F11 key on your keyboard
Copy/Paste the ‘right click’ mouse menu functions to cut, copy and paste don't work in
H2H. To copy/paste information use the Ctrl C (copy) and Ctrl V (paste)
functions on your keyboard
20 Minute timeout There is a 20-minute timeout function in H2H. If the system is idle (no buttons
are selected) for 20 minutes, you will be automatically logged out. This
function exists to protect the security of client information on H2H.
Mandatory Fields A yellow field indicates that the field is mandatory. You will not be able to
proceed without entering valid information. Attempting to do so will result in a
red text error message at the top of the screen, telling you what has been
missed.
Tool Tips If you are unsure of the meaning of an icon in h2H you can hover over it and a
tip will be displayed
Information bubbles
Information bubbles can be hovered over for more information about the
question.
Logging in to H2H for the first time
Once you've been given access, you will receive a user name and a temporary password to start the
account activation process. User names and passwords are case sensitive.
On the logon screen, enter your user name and temporary password, and then select the ‘Login’
button, as seen below;

9
On the next screen you will be prompted to change your password.
Please Note:
User name and Passwords are case sensitive, always check that your caps
lock key is not on before logging in

10
Once you have saved your new password you will be prompted to select two security questions and
enter the answers.
These security questions can be used to reset your password if you forget it. Once you have
completed all required fields, select the save button. This will take you to the homepage for your
agency.
Levels of access
H2H has four levels of access. These levels control the information and functions you have access
too. Your manager will choose your access level, and it will not necessarily be the same as your job
title or role.
Other worker: You can perform the basic functions of adding, intaking, referring or closing a client record. This role
is suitable for workers such as administration and front desk workers within agencies.
Case worker: You can access most features of H2H however cannot open a case plan or add issues or goals within
a case plan.
Case manager: You can access all client features of H2H including the creation, management and closure of client
case plans.
Agency manager: You can access all features of H2H as well as the ability to assign clients to workers, access the
referral menu and the ability to view and print agency reports.

11
User roles and functionality
Oth
er
wo
rker
Cas
e w
ork
er
Cas
e M
anag
er
Age
ncy
Man
ager
BASIC FUNCTIONS
Search for a client ✓ ✓ ✓ ✓
Edit client personal details ✓ ✓ ✓ ✓
Add consent to a client ✓ ✓ ✓ ✓
Add notes to a client ✓ ✓ ✓ ✓
View the client pathway ✓ ✓ ✓ ✓
Set client as unassisted ✓ ✓ ✓ ✓
INTAKE
Complete an Intake ✓ ✓ ✓ ✓
Add/repeat a service ✓ ✓ ✓ ✓
Edit a Service ✓ ✓ ✓ ✓
Send a service referral (intake) ✓ ✓ ✓ ✓
Add a presenting unit ✓ ✓ ✓ ✓
ASSESSMENT
View an Assessment ✓ ✓ ✓ ✓
Complete an Assessment ✓ ✓ ✓
CASE PLAN
View/Open Case Plan ✓* ✓
Add an issue/strength to a Case Plan ✓* ✓
Add/repeat a service ✓* ✓* ✓
Send a service referral ✓* ✓* ✓
Edit/close a service ✓* ✓* ✓
Close an issue ✓* ✓
Create a Case Exit ✓* ✓
END SUPPORT
View an End Support ✓ ✓ ✓ ✓
Complete an End Support ✓ ✓ ✓ ✓
REFERRALS
Send a client referral ✓ ✓ ✓ ✓
View/accept/reject incoming referrals ✓
ADMIN TOOLS
View/Print reports ✓
Assign/Reassign workers to clients ✓
Set client as Sensitive/Locked ✓
Set client as deceased ✓
View unassigned clients list ✓
* The ability to perform these functions is based on worker assignments

12
The Homepage 1
2 3 4
9
14 13
12
11
10
7
8
5 6

13
The H2H Homepage 1 Agency Name Displays the Agency that the you are currently logged into
2 Home screen button Will return you to the home screen from anywhere in the system
3 Search screen Navigates to the search screen to search for a client record in the H2H system
4 Add Client screen Navigates to the create new client screen
5 Referrals screen Available only to Agency Managers. All incoming and outgoing service and
client referrals can be viewed and actioned from this page. Also contains a
referral search function
6 Reports screen Available only to Agency Managers. Several reports about client status,
workloads and other information can be downloaded from this screen
7 Draft clients Lists any client records for the agency that are still in draft status (add client
process has not been completed)
8 My clients menu Displays clients that are assigned to you as either case worker or case
manager
9 Reminders Displays reminders due today, and this week, where there are incomplete
actions for assigned clients, like intakes, assessments, or consents reaching
their end date. Agency managers will see reminders for all agency clients.
10 Edit profile and log
out/change agency
button
View and edit your profile details like security questions, email address and
password. The log out button logs you out of H2H. If you have access to more
than one agency, you can use this button to change between them.
11 Unassigned clients
list
Available only to Agency Managers. Displays all clients who are not currently
assigned to a worker
12 Inbox Displays information about all pending action for your assigned clients,
including unmet needs, pending referrals and consented services, case plan
review dates, post case reminders and clients without activity. Agency
managers will see information for all agency clients*
13 Version number Displays current version number information for H2H
14 SA.Gov links Links to copyright and privacy information on the SA.Gov website, and the
H2H support page where users can find help and training information
*more information about the inbox is located on the next page

14
The Inbox
In the inbox you can see information about all pending items for your assigned clients, including
unmet needs, pending referrals and consented services, case plan review dates, post case reminders
and clients without activity.
Each inbox menu item can be expanded and the items within can then be opened via the
hyperlinked client name.
The Inbox Pending client
referrals
Displays outgoing client referrals that have not been actioned by the receiving
agency
Pending service
referrals
Displays outgoing service referrals that have not been actioned by the receiving
agency
Pending consented
services
Displays services that you have provided as a consented agency, that have not
been acknowledged by the lead agency
In progress intakes Displays clients where an intake has been started but not completed.
Reminders will display when it has been more than 7 days since the intake was
started. An intake must be completed within 28 days from creation. If it is not
Please Note:
Information displayed in the inbox is determined by your access level.
Agency managers will see information for all clients of the agency, and
lower level workers will see only clients that are assigned to them.
Click within the row to view items, then
select underlined name to go to the item in
the client record

15
completed within this period, the intake will be closed as incomplete, and the
client record set to inactive.
Pending unmet need Displays clients who have a current unmet need for a service
In progress
assessments
Displays clients where an assessment has been started but not completed.
Reminders will display when it has been more than 7 days since the assessment
was started. An assessment must be completed within 28 days from its
creation.
Pending case plan
reviews
Displays clients with an upcoming case plan review scheduled. Review dates can
be set from the case plan cover page in the client record
Consent for
information sharing
expiring
Displays clients with an existing consent to share information, which is due to
expire
Clients without
activity
Displays client records with no activity this month. Two types of alerts appear in
this menu;
1. Casual or assessed clients with no activity for a full calendar month;
• At the end of the month, these clients will be automatically closed by
the system and their record set to inactive. This is known as a ‘System
Close’
2. Case managed (Active) clients, whose case plans have not been updated for
30 days
• An alert will display for case managed clients who have not had activity
recorded for a full calendar month.
• Activity consists of adding a service to the case plan
• These clients will not be automatically closed due to inactivity.

16
Searching and Adding Clients

17
Searching in H2H
A thorough search on H2H must be completed before adding a new record. Adding a client that is
already on H2H creates a duplicate record that in most instances can't be deleted.
Performing a search
When searching for a client use minimal information. The search function only returns search results
that match the exact combination of information you entered, so being too specific can prevent you
finding a possible match. Searching using minimal information is called the less is best rule.
The search function To perform a search, click the ‘search clients’ icon located in the top right-hand corner of the home
screen.
There are two options for completing a search on H2H. The Basic Search, which appears as follows;
Less is best rule:
Client John Smith, born 20/09/1967 has presented at your agency. Rather
than searching for all of these terms you should search using only the first
initial, and last name.
If this returned a large number of results you could then add in the full first
name to narrow the results.
If there were still a number of matching clients, you could then add the
year of birth to narrow the results down even further.

18
Or the Advanced Search;
Most existing client records can be successfully located using the Basic search function.
About the Search Screen Once you have entered your search terms, and selected the search button, the search results are
displayed. For example;

19
As shown in the example above, results are alphabetically listed, and client information can be seen
including name, sex, DOB, client status, most recent client pathway, and first and last dates of
contact.
Icons on the screen also give information about the client;
Search Screen Icons
Lead Agency Indicates that your agency is the current or most recent lead
agency.
Consented Agency Indicates that there is a current consent for your agency to view
parts of the client's record
Alert Indicates an alert exists on the client’s record. You can view the
alert by clicking on the record to open the client summary page.
See the ‘Alerts’ section to learn how to add an alert
Sensitive Client is set as sensitive. This icon (and client record) is only
visible if you are a lead or consented agency. See the ‘Sensitive
and locked’ section for more detail
Locked Client is set as locked. This icon (and client record) is only visible
to the Agency manager of the lead agency, and any worker (lead
or consented) who has been assigned to the client. See the
‘Sensitive and locked’ section for more detail
Add a draft client
based on this
clients’ record
Starts a new client record based on the details of this client’s
record. This function copies over information regarding country
of birth, surname and addresses to a new client record, saving
time for the user when adding multiple family members to h2H.
See the Adding a new client section for more detail
Search by Assigned Worker
For those users who have agency manager level of access, the search
function will also allow searching by assigned worker. See the Agency
Manager functions section for further detail

20
To open a client record to view, use a single click anywhere in the white sections of the search
results'
An underlined entry in the client pathway indicates that you have consent to view that
information. Clicking directly on an underlined item, e.g. Intake, Assessment, Case plan, will redirect
you to the cover page of that pathway entry to view further information.
Clicking on a pathway item where you do not have consent will direct you to the client summary
page, however visible details will be minimal.
The client status Every client record in H2H has a status, displayed alongside the client number, and in the status
column on the search results screen. The client status indicates what stage the client is at in their
pathway.

21
Client status definitions Draft A client is part way through the ‘add client’ process but has not yet been saved
New A client has been added to H2H but has not yet had any activity (Intake,
Assessment or Case Plan)
Casual A client has a completed Intake, but an assessment has not yet been done
Assessed A client has undergone an assessment but does not yet have a case plan
Active A client has an active case plan
Inactive A client's support has ended, and record closed using the end support or case
exit function
OR
The record has been auto-closed by the system due to inactivity
Unassisted A client has been recorded as unassisted after presenting to an agency and not
receiving a service.
Next steps after searching
Once you have completed follow the instructions below to continue.
Where to next? No records exist for the
client Continue to the Add client section
You found a match with
inactive or unassisted
status
Continue to the Intake section
You found a match with
casual, assessed or active
status
Contact the current lead agency to discuss

22
Adding a new client
Starting to add a client If a thorough search has not returned any client matches, you will need to create a new client
record. When adding a client to H2H you have the option to start the process from three different
places within the system. These are:
1. Add a client from the Search Screen.
• Select the button on the search clients screen (shown below). After completing a search of
H2H to ensure your client is not already on the system, you would click this button to begin
adding the new client using information you have already entered in your search
2. Add a client from the main menu
• Select the Add client button at the top right of any H2H screen (shown below). This option
should only be used if you have already completed a search and are confident that the client
is not already on H2H
3. Add a client based on another clients record
• Search for the exisiting client that you want to base your new client on, and locate the icon
on the search results page (shown below). This icon allows you to add a new client based on
an existing clients record. The existing clients cultural identity, contact information and
housing history is automatically transferred to the new client, saving users time completing
this information for the new client

23
Duplicate Checks The add client process has several built-in duplicate checks. A duplicate check involves the system
highlighting any potential matches to the new client, based on;
• Name
• Sex
• date of birth
• Centrelink and Medicare details (if available)
For example, below you can see a screenshot where draft client Richard Green, has returned several
potential matches.
The first match has identified that the surname and year of birth match for the draft client and the
existing listed client.
If you determine that an existing record is a match for the client being entered, you can select the
icon to discard your draft client, and use the selected client. If none of the listed clients match
your draft client, select the ‘Add client’ button at the bottom of the page to proceed.

24
Add client page The add client: client details page captures all the information needed to add a new client to the H2H
system. Yellow fields are mandatory and must be completed before you can proceed.
On this page you also have the ability to set your client record to sensitive or locked (Function only
available to users with agency manager level access).
Client personal details are captured here.
Pregnancy fields will only appear for client
record with sex selected as ‘female’ or
'other'
Client cultural identity details are captured here
Any external agencies that your client may be
involved with are recorded here
Client contact details are recorded here
Emergency contact details are recorded here
Clients housing history is recorded here
Note: additional addresses can be added
at the intake stage

25
Housing panel The housing panel is used to record your client’s addresses, both current and historical. All addresses
that are entered here are saved onto the client record and are carried though to intake. To enter an
address for a client you must record at minimum;
• House type
• Tenure
• Occupancy Condition
• Living arrangement
• Suburb
• Country
• Date moved in
There is no limit to the number of addresses that can be recorded in this panel.
It is not mandatory to enter client addresses at this stage; address details can also be added during
the intake process if needed.
Please note:
All information entered into the client details screen can be edited by the
lead agency at any stage in the client pathway. See the personal details
section for more information

26
To add an address within the housing panel, click the button. The following popup
will appear:
Selecting the icon will bring up the ‘Find a suburb’ tool, where you can search for all or part of a
suburb name, or select the checkbox to search all Australian suburbs. For example, a search for
suburbs containing the word ‘Green’ would appear as follows;

27
You can select the correct suburb with a single click anywhere on the search result line.
Once selected the suburb name, state and post code will be entered into the address, as seen below;
For each address you can also indicate whether this address was a permanent address ( Tenure in
a conventional dwelling for at least 3 months), and/or the current address ( select to indicate if this
is the client's current living situation). Once all mandatory fields have been completed the address
can be saved. The address will then appear in the housing panel.

28
Completing the client entry After completing all the mandatory (yellow) fields on the page you have the option to save and
continue or save as unassisted at the bottom of the page
• The save and continue button will take you to the confirmation page where you will finalise
adding the client record.
• The Save as unassisted button allows you to set your client status to unassisted. Go to the
unassisted history section for more information.
Add Client: Confirmation page The confirmation page is the final step in the add client process. If there are any possible client
matches to the client you are currently adding, they will be listed here, as the system completes one
final duplicate check. In the example below, you can see there are 3 potential matches;
If none of the listed client records match the client you are adding, click the complete client entry
button to finalise the add client process. This will change the client status to new and you will be
directed to the add intake page.
The cancel button will take you back to the previous page, and the discard draft client button will
delete all the information you have added so far and remove the draft from the system completely.
Click within a row to view
further client details

29
The use selected client button allows you to select that client record for use, and discard the
current client record you are adding. You will notice the use selected client button at the end of each
matching client row listed. Selecting this icon will bring up the following pop up;
• Selecting yes will discard the draft client and redirect to the selected client
• Selecting no will return you to the confirmation page
Clicking within any rows in the matching clients table will take you to that client’s summary page,
and the current record you are adding will be saved as draft.

30
The Client Menu

31
The client menu
• The information has already been added as part of
the add client process (such as housing information).
• An Intake, Case exit or End support is completed
(details entered on these functions save back to the
client pages); or
• Information is added to these pages directly.
Once a client is added to H2H, the client menu expands (as
shown right) to include all pages that are captured within
the client record.
Where no information has been recorded on a page then
the message ‘no details currently exist for this client’ will be
displayed. Each page will contain this message unless:
Please note:
If you will be proceeding to intake you do not need to enter information
manually into the client menu screens. It will be collected during the intake
process

32
The personal details, contact details, income, housing and risk assessment screens will all display the
most current information for the client. All of the information in these pages can be edited using the
‘edit’ button that appears at the bottom of each screen.
Housing
You can update your clients housing situation at any stage in the client pathway. All addresses are
kept in the housing screen, with the ability to record the duration of the client's stay at that address
using the moved in/moved out date fields.
The client's most recent current address (current checkbox selected, and no moved out date) will be
displayed at the top of this list in bold type. You can only have one open current address at a time.
To update the client housing situation, you will need to close the most recent current address by
adding a moved-out date, before you add the new address.
Previous current addresses are also displayed, to be able to review the historic housing situations for
the client, in order to assess outcomes over time.
Risk Assessment Scores
Users can record a risk assessment score for either Homelessness or Domestic Violence by selecting
the 'edit score' button, and entering a number between 0-999

33
The most recent score will be displayed if scores exist. Risk assessment scores can also be entered in
the relevant issues within assessment and case plan.
Notes
The notes screen in the client menu displays all notes entered on the client record, and includes a
button to add a new note, or to search existing notes.
• All notes in H2H will be date, time and author stamped once saved.
• Notes cannot be deleted from H2H once entered.
• All notes are displayed in reverse chronological order, with the most recent notes at the top
of the list.
Notes can also be searched by the following;
• Text (words or phrases that are contained with a note)
• Note type
• Author
• Agency
• Month or year created
Please note:
Notes are not a mandatory function in H2H. It is up to the discretion of the
individual agency to decide if they will use the notes function on H2H or
record notes elsewhere.

34
There are three types of notes in the H2H System, client, case and service notes.
1. Client Notes: These notes travel with the client record, and are visible by the current lead agency, and any agency
with a current consent. They are attached to the client record as a whole. Client notes can be added
by either a lead or consented agency.
2. Case Notes: These notes are part of the case plan and can only be added if a case plan exists for the client. They
can only be viewed by the lead agency that created the case plan and cannot be viewed by any other
agency on H2H at any stage. Setting consent to another agency will not give them access to view
case notes. If the client is picked up by another lead agency in the future, and another case plan is
opened, the new agency will not be able to access notes from any other agency’s case
plan. Historical case notes can be accessed through the client pathway.
3. Service notes: service notes are also part of the case plan, but are more specific than a case note, being attached to
a particular service within the case plan. Similar service notes can only be viewed by the lead agency
or where a consented agency has been referred an individual service, they will be able to add a
service note once the referral has been accepted, and both the lead and consented agency will be
able to view this. The consented agency will not be able to view any notes related to other services
in the case plan.
Adding a note
All 3 types of notes can be added from the notes screen in the client menu. Select the
button to add a new note, and the add note screen will open;
When adding a note, the date and time will be automatically prefilled, however these can be
backdated if required.
A contact type (e.g. phone call, meeting, SMS etc.), and person (e.g. client, 3rd party, etc) must be
selected.

35
Notes can be entered either by directly typing, or by copy pasting using keyboard shortcuts to a
maximum of 8000 characters.
• To complete the note, select the save & close button
• To save the note as it is and continue typing (to avoid the 20-minute timeout) select the save button. This will reset the 20-minute timer, and you can continue typing.
• To cancel the note without saving, select the cancel button.
Case and service notes can also be added from the case plan menu. For further information see the
Case/service notes section.
Assignments
This screen is visible only to those users with Agency Manager level of access. See the agency
manager functions section for instruction on use of this function.
Alerts
The purpose of an alert is to flag any health, safety and/or service issues that are essential for
workers to be aware of before working with a client. It is important to understand that:
• The placement of alerts on a client’s record should be where there is a clear health, safety or
service issue that is essential for staff to know before working with a client.
• Alerts can be placed on a client’s record for both worker benefit (e.g. “client refuses to work
with female staff”) or the client’s benefit (“client cannot read, do not send written
information”).
• Alerts are visible to all users on H2H, except where the client record has been set to sensitive
or locked.
To add an alert, go to the alert's menu, and select the add alert button, and then enter the alert
information and save, as seen below.
Once saved, the alert will appear as follows,
Note:
Once a note has been saved & closed, it cannot be edited or deleted

36
There is no limit to the number of alerts that can be added. Alert text and dates can be edited by
selecting the edit pencil icon.
Consents
Setting consent to another SHS that uses H2H will allow that agency to view client information in the
client, services and assessment menus. It will not allow that agency to view a case plan for that
client.
You can find a list of all current or historical consents for information sharing between agencies, and
a button for adding a new consent on the consent screen. From this screen, existing consents can
also be edited by the lead agency that created them to extend the expiry date if required.
There are two types of consents in H2H.
• An Internal (within NAHA) consent: consenting to share information with another specialist
homelessness service that uses H2H
• An external consent: a consent that allows the user to type in the consent manually for an
agency that does not use H2H.
Click to
view/edit the
consent
Click to add a
new consent

37
Adding a new consent Select the add consent button to add a new consent
To share information with another SHS, select ‘Within H2H (NAHA)’ as the Agency Type; then select
the lookup agency button;
Then select the region, and the agency(s) within the region that the client has consented to share
information with. You may select any number of agencies using this method, however you can only
select from one region at a time.
Note:
Prior to sharing information with other agencies via a consent, users
should ensure that the client has granted verbal or written permission, or
that they are covered by the Information Sharing Guidelines

38
Once the required agency(s) have been selected, click the select agency button (shown above) to
return to the consent screen and save the consent.
Selecting the save button will return you to the consents screen, where you can view the consents
that have now been added to the list.

39
Consents can also be added as part of the process of referring a service, or when referring a client to
another agency.
Setting consent on a child’s record When adding a consent to a child’s record, you will be asked two additional questions.
• Who granted consent? (e.g. Guardian, Child Protection Agency, other)
• Name of that person

40
The below chart sets out what is visible based on the setting of consent, by where you are in the
client pathway.
Consent and Information Sharing in H2H – Lead and Consented Agencies
Lead
Age
ncy
Co
nse
nte
d A
gen
cy
Man
age
r
Co
nse
nte
d A
gen
cy
oth
er
use
r ro
les
No
n-C
on
sen
ted
Age
ncy
Client Menu
Client Summary ✓ ✓ ✓ ✓
Personal Details ✓ ✓ ✓
Contact Details ✓ ✓ ✓
Income ✓ ✓ ✓
Housing ✓ ✓ ✓
Risk assessment scores ✓ ✓ ✓
Client notes – view ✓ ✓ ✓
Client notes – add ✓ ✓ ✓
Assignments ✓
Alerts ✓ ✓ ✓ ✓
Consents ✓ ✓ ✓ ✓
Client pathway ✓ ✓ ✓ ✓
Refer Client ✓
Referral History ✓
Unassisted History ✓ ✓ ✓ ✓
INTAKE
view completed intake ✓ ✓ ✓
Services – view ✓ ✓ ✓
Services – add provided ✓ ✓ ✓
Services – add referred, unmet need ✓
Presenting Unit view ✓ ✓ ✓ ✓
ASSESSMENT
View completed Assessment ✓ ✓ ✓
CASE PLAN
Cover page – view ✓ ✓* ✓**
Case notes – view ✓
Case notes – add ✓
Service notes – view ✓ ✓* ✓**
Service notes – add ✓ ✓* ✓**
Life domains – view ✓ ✓* ✓**
Issues – view ✓ ✓* ✓**
Issues – add/edit/close ✓
Services – (provided) add, edit, close ✓ ✓* ✓**
Services – (referred or unmet need) add, edit, close ✓
* The ability to view/edit this information is based on an existing service referral having been sent and
accepted
** The ability to view/edit this information is based on worker assignment and access level
and for consented agency workers, based on assignment by their manager
and access level

41
The Client Pathway
Each client created in H2H starts a client pathway. The client pathway is a record of when and where
a client has accessed a specialist homelessness service. An example of a client pathway is shown
below.
A person should only ever have one client record for the life of their involvement with the South
Australian SHS sector. Duplicate client entries interrupt the client pathway and impact recording of a
client’s journey through the homelessness sector.
Historical information can be accessed from the client pathway. An underlined pathway entry of
‘intake’, ‘assessment’ or ‘case plan’ can be clicked on to view that pathway item, where you can view
information that was entered.
Where appropriate consents exist, the following historical information can be viewed for each item1;
Historical information visible through client pathway Intake View intake information (cover page), and view all services provided or
referred including all detail, and copy of pdf referral form for referred services
Assessment View cover page and assessment details
Case Plan View cover page, case notes, plan summary, exit information and full
case plan issues, issues and services
1 Some items may be visible only to users with Agency Manager access level

42
The ‘Status’ column in the client pathway can also give you information about how the intake,
assessment or case plan progressed;
Pathway Item Status Definitions In progress Pathway item (e.g. intake, assessment or case plan) has been created,
and is still in progress with the listed agency
Closed Incomplete An intake was closed while it was in progress, either by an in-progress
intake closed by system close or adding an ‘unassisted’ to the record.
Complete The item was saved and completed (only applicable to intake or assessment)
Closed Complete The client record was closed off by daemon or end support after the item had been completed (applicable only to intake or assessment)
Closed The client has moved on to the next pathway item, or a case exit has been completed. (e.g. after saving and completing an intake, the status will be ‘complete’ if the user then creates an assessment, the intake status will change to ‘closed’)
Refer client
One of the primary functions of H2H is to facilitate the “No wrong door” principle, where a client can
present at any SHS in South Australia and be directed to the most appropriate agency for support,
according to their individual circumstances. The Refer Client function enables an electronic referral
to the appropriate agency, reducing the need for the client to provide their information repeatedly.
How to refer a client To refer a whole client record to another specialist homelessness service, follow the steps as
outlined below;
Open the client menu and select the ‘Refer client’ menu. A client must have a status of either
‘Casual’ or ‘Assessed’ to be referred to another lead agency
Note:
A client record cannot be referred to a new agency unless an intake has
been completed. See the intake section for instructions

43
In the Lookup agency pop up, select the region, and the agency within that region that the client is
being referred to.
Once the agency has been selected, click the select agency button (shown above) to return to the
add client referral screen, and complete the remaining fields.
Select the
‘lookup
agency’
button

44
Before the referral can be sent, consent must be added. To add consent, select either the icon in
the receiving agencies box, or alternatively, select the ‘Add Consent (s)’ button at the bottom of the
screen.
Please Note:
If the wrong agency has been accidentally selected it can be removed
from the receiving agencies list by selecting the icon. This can be done
before or after consent has been added.
Warm Referrals Where possible the user should also ensure that they have contacted the
new agency to discuss the referral prior to sending on H2H. This ensures
the receiving agency has all the information required in order for them to
accept the referral and provide the client with the services they require

45
The Add consent popup will then appear;
Once the consent has been saved, the receiving agency has been confirmed, the add consent button
will no longer be displayed. The referral can now be sent.
On selection of the ‘send referral’ button, the receiving agency will receive an email to the prefilled
email address, to alert them that a client referral has been received, and request that they either
Please Note:
The referral can be previewed before sending by selecting the pdf icon
or the button

46
accept or reject the referral. See the ‘Agency manager section’ for further detail on accepting and
rejecting referrals.
The details of the referral will now display;
Referral History
The referral history screen is only visible to the current lead agency. The referral history screen in
the client menu will display all historical client referrals, whether accepted, rejected or pending;
Historical referral details and pdf referral forms can be viewed by selecting the referral from the list
to open.
Client remains
with current lead
until referral has
been accepted
The referral can
be withdrawn if
needed
View the pdf
notification that
was emailed to
the receiving
agency

47
Unassisted History
Allows you to view all occasions where a client has been unable to be assisted by a SHS and add a
new unassisted event. Use the unassisted function if the client has presented but leaves or
disengages before being provided with a service. Read on for detail on how to add an unassisted
record. The unassisted history screen can be viewed by all users of H2H.
Add unassisted
The save as unassisted option can be found in 3 places within H2H:
1. At the bottom of the client details page when adding a new client.
2. On the unassisted history page within the client menu, (only available if no services or
assessment has been added).
3. On the services page within the intake menu (only available if no services or an assessment
has been added).
Selecting the save as unassisted button will direct you to the ‘Add unassisted client: unassisted
details’ screen; where you are required to complete the fields shown below;
You would use the unassisted function where the client did not accept the assistance offered,
disengaged or lost contact with client after commencing a new client record, or where an intake was
completed but the client received no services or referrals.
The AIHW defines an unassisted person as;
‘any person who seeks services from a specialist homelessness agency and
does not receive any services. Services include the provision, referral or
assessment of needs…’

48
Once the save and continue button is clicked the client status becomes unassisted. No further
support can be entered on the client’s record until the client is reactivated by completing a new
Intake.
Where the unassisted was created by another agency, the following is visible;
The agency that created the unassisted record will be able to access the record and view any
additional information that was entered at the time. For example;
Unassisted vs Inactive:
Functionally, the unassisted status is the same as inactive. Both indicate
that the record is closed and require a new intake to be re-opened again.

49
The Intake Menu

50
Intake The period of time that a client receives assistance from your agency is referred to as a support
period, and completing an intake is how the support period starts.
Throughout the intake, you will enter information about the client’s situation both at presentation
to your agency, and the week before presentation. Client outcomes are assessed by using the
information you provide about the client at intake, compared to information about the client when
you complete an end support or case exit. Missing information or ‘don’t know’ responses mean that
It may not be possible to determine if the client situation has improved as a result of working with
your agency, so it is very important for you to ensure the client intake is filled out as completely as
possible.
Notice of information provision
The first step in starting an intake is completing the Notice of information provision (NOIP) panel.
This is a mandatory step and no other intake panels appear until this section is complete. Before
client support details can be entered onto H2H, the client must be advised (either verbally or in
writing) of the details contained in the NOIP. See the following page for a copy of the NOIP.
Indicating that the NOIP has not been provided by selecting ‘no’, will prevent you from creating an
intake. It is your responsibility as a worker to ensure that the client understands what information is
being collected, and how it will be used.
The NOIP can be previewed via the link in H2H, and can be accessed on the H2H support page (by
clicking the H2H support link at the bottom of every page of H2H),
Once the NOIP has been provided either physically or verbally to the client, the client then has an
option to withhold some information from being sent as part of the Specialist Homeless Sector
Collection (SHSC). Select ‘yes’ if the client would like to prevent the listed information from being
included in the SHSC. Select ‘no’ if the client is happy for the information to be provided.
Note: Whether the client chooses to withhold information from reporting
or not, the information will still be collected in H2H

51
Once a response has been given in each of the mandatory fields (shown above) click the add intake
button to continue the intake. You will be presented with eight panels to complete to finalise the
intake.

52

53
How the intake works
The intake is divided up into a series of panels. If the client record has a status of new (an intake has
never been completed before) then most panels will have no information entered. If the client has
engaged with the homelessness sector before, then some panels will contain information for review
and update.
These panels can be expanded and collapsed by clicking on the + or – symbol in the top right-hand
corner of each panel (as shown below).
Once a panel has been filled in correctly, the button becomes available at the
bottom of the panel.
Once this button is clicked the panel changes to a view mode. In view mode the details cannot be
edited, and a green tick appears in the top right-hand corner (as shown below). You are then
automatically directed to the next panel. If you need to edit any of the details within a panel that has
been confirmed, you can click the edit button in the top right-hand corner. This will then change the
panel back to edit mode, so you can change details.
Once all panels are complete (all panels have a green tick in the top corner) the Complete intake
button will be available at the bottom of the page.
Note: if this button is greyed out, it means one or more panels have not
been completed.

54
Intake details panel
The first panel is the Intake details panel. This is where information is recorded about how the client
came to your agency and their homelessness history. This panel is broken up into two sections,
access questions, and homelessness history questions;
Access Questions You are required to enter a date and time of intake. The date of intake can be backdated to an
earlier date providing that:
• The date is within the current month,
• The intake date is not before the date of first contact
Next, specify the access type and access method. The access type is how the client presented to your
agency. The Access method is how initial contact was made with your agency. Definitions of when to
use the different responses are outlined below.
Homelessness questions
Access questions

55
Access type definitions Self-referral The client approached the agency without any referral from any other
person or agency.
Family/Friend referral The client heard about the agency from a family or friend, or a
family/friend contacted on the client’s behalf.
Formal Referral Another worker, group, or organisation formally referred the client to
your agency. This may have been another NAHA service or a non-NAHA
service by phone, fax or email.
No formal referral The client obtained your agency details from another worker, group or
organisation, but contacted your agency themselves and there was no
contact from the other worker, group or organisation.
Other - specify Any other form of referral that does not fit in the above categories.
Don’t know The client does not know or is unable to tell you how they came to
access your agency.
Access method definitions Walk in The client has presented to the agency with no preceding phone call or
booked appointment time.
Telephone The client has contacted the agency themselves via telephone.
Third Party Someone has contacted the agency on the client’s behalf i.e. they may
have been referred by the courts, police, or a friend or family member.
Outreach The first contact with the client occurred not in an office setting, e.g. an
agency that runs an outreach session at a community centre, or a client
who approaches whilst a worker is on a home visit with an existing
client.
Assertive Outreach This access method should only be selected by agencies that are funded
to provide assertive outreach and have contacted the client through an
assertive outreach program.
Early Intervention The first contact with the client occurred prior to them becoming
homeless, e.g. at a group session, through a school's program etc.

56
Homelessness Questions The last three questions in the intake details panel are in relation to the client’s homelessness
history. You will need to enter if the client has been homeless, and the type of homelessness, within
the last month, 12 months or more than 12 months ago. It is important to note that client
circumstances may require selection of more than one of the options provided in the ‘one month’
and ‘12 month’ categories.
Homelessness type definitions Sleeping rough or in non-conventional accommodation
The client has been living on the streets, sleeping in parks, squatting,
staying in cars or railway carriages, living in improvised dwellings or
living in the long grass.
Short-term or emergency accommodation, due to a lack of other options
The client has been living in any of the following situations;
- Refuges
- Crisis shelters
- Couch surfing
- Living temporarily with friends and relatives
- Insecure accommodation on a short-term basis
- emergency accommodation arranged in hotels, motels etc. by a
specialist homelessness agency
Not Homeless The client has not been homeless within the last month/12 months.
Don’t Know The information is not known, or the client has refused to provide the
information.
You will notice that if you select a homelessness type in the last month, H2H will pre-fill that
information into the last 12 months category. For example;
Please Note: the following short-term accommodation options are not
considered to be homeless;
• Hotels, motels, caravan parks and other temporary accommodation used when a person is on holiday or travelling.
• Custodial and care arrangements, e.g. prisons or hospitals.
• Temporary accommodation used by a person while renovating their usual residence or building a new residence (for example, weekenders, caravans)

57
This is because the last 12 months is inclusive of the last month, therefore if a person was homeless
in the last month, then they were by default homeless in the last 12 months.
When answering the question regarding a client’s homelessness more than 12 months ago, your
answer will be ‘yes’ if the client has been homeless at any time in their life up until 12 months ago.
Selecting the check
box above has
automatically
selected the same for
the next question

58
The Housing panel
Within the housing panel, you will be required to enter specific information regarding the clients
housing history, housing details at the time the client presented to your agency and a week before
the client presented to your agency. Information is also collected regarding history of stays in
facilities in the last 12 months.
The first information required is in relation to the client’s last permanent address.
‘Last permanent address’ section
‘Most recent address’ section, including presenting and week before questions
Presenting and week before tenure, occupancy and living arrangements questions
Facilities in the last 12 months questions

59
Any addresses previously saved on the client housing record from previous support periods or added
in the add client process will automatically appear in the housing tables within this panel.
If you need to add a new address to the housing panel, click the button. The
following popup will appear:
Complete all mandatory fields as required.
Permanent address: an address in a conventional dwelling, where the
client had some form of tenure, and resided at for at least 3 months
1. Select the
relevant radio
button
3. If the last
permanent
address is already
in the list, select it
using the radio
button
2. If needed,
select this
button to add a
new address to
the list
4. Select how long it has
been since the client lived
at their last permanent
address

60
Selecting the icon will bring up the ‘Find a suburb’ tool, where you can search for all or part of a
suburb name, or select the checkbox to search all Australian suburbs. For example, a search for
suburbs containing the word ‘Green’ would appear as follows;
You can select the correct suburb with a single click anywhere on the search result line.
Once selected the suburb name, state and postcode will be entered into the address, as seen below;
For each
address you
can also
indicate

61
whether this address was a permanent address ( Tenure in a conventional dwelling for at least 3
months), and/or the current address ( select to indicate if this is the client's current living situation).
Once all mandatory fields have been completed the address can be saved. The address will then
appear in the housing panel.
If you notice a mistake is made when adding an address, or an address previously entered is
incorrect you can edit it by clicking on the pencil icon in the corresponding row.
Next, you are required to enter the address at presentation to your agency and a week before
presentation. You will notice the two columns of radio buttons to select that correspond to
presenting (P) and week before (WB). Select the correct addresses from the ‘most recent address’
table or add an address if required by clicking the add address button and completing the pop-up
box as shown above.
Next you will be required to confirm the tenure, conditions of occupancy and living arrangements,
firstly for the address at presentation and then for the week before address (as shown on next
page). All these fields are prefilled from the address when you select it with the radio buttons
Please Note: an address that has been used in previous intakes cannot be
edited. This will be indicated by a greyed-out edit pencil.
Client’s address
week before
presentation
Client’s address
at presentation
Please note: information about address at presentation is extremely
important. The ‘house type’ field is used to establish whether a client was
homeless at the time they first presented to your agency or not. A ‘don’t
know’ response to this question will result in unknown housing status at
the start of support

62
Confirm the displayed information is correct, especially if using an existing address.
Definitions for tenure, conditions of occupancy and living arrangement responses can be found
below, or in the Specialist Homelessness Services Collection Manual.
Tenure type collects information on whether a dwelling is owned or rented, or whether the client
was living there rent-free. It also provides more detailed information on emergency accommodation
– including whether a client is paying a fee or not
Tenure Type Defintions Renter – private housing
A client renting a dwelling owned by a private individual(s) or a private
business.
It is NOT owned by a government body or a housing association,
housing cooperative or other not-for-profit community service
organisation
Renter – public housing A client renting a dwelling owned/controlled by a government body or
government authority
Renter – community housing
A client renting a dwelling owned/controlled by a housing association,
housing cooperative or other not-for-profit community service
organisation
Renter – transitional housing
A client renting accommodation provided through a government-
funded agency.
The accommodation is generally more stable and provided for longer
than crisis accommodation, and is linked to external support through
an agency
Renter – caravan park A client renting a cabin or caravan in a caravan park

63
Renter – boarding/rooming house
A client renting a room or rooms in a boarding or rooming house
Renter – emergency accommodation/night shelter/women’s refuge/youth shelter
a client paying rent for emergency accommodation, a night shelter,
women’s refuge or youth refuge
Other renter a client renting accommodation that is not included in the categories
above
Rent free-private housing
a client staying rent free at a dwelling owned by a private individual(s)
or a private business.
It is NOT owned by a government body or a housing association,
housing cooperative or other not-for-profit community service
organisation
Rent free – public housing
a client staying rent free at a dwelling owned/controlled by a
government body or government authority
Rent free – community housing
a client staying rent free at a dwelling owned/controlled by a housing
association, housing cooperative or other not-for-profit community
service organisation
Rent free – transitional housing
a client staying rent free at accommodation provided through a
government-funded agency.
The accommodation is generally more stable and provided for longer
than crisis accommodation, and is linked to external support through
an agency
Rent free – caravan park
a client staying rent free in a cabin or caravan in a caravan park
Rent free – boarding rooming house
a client staying rent free in a room or rooms in a boarding or rooming
house
Rent free - emergency accommodation/night shelter/women’s refuge/youth shelter
a client staying rent free in emergency accommodation, a night shelter,
women’s refuge or youth refuge
Other rent free a client staying rent free in accommodation that is not included in the
categories above
Life tenure scheme A client with a contract to live in the dwelling for the term of their life
but without the full rights of ownership and usually with limited or no

64
equity in the dwelling. This is a common arrangement in retirement
villages
Owner – shared equity or rent/buy scheme
A client who is purchasing a proportion of the equity in the dwelling,
and paying rent for the remainder
Owner – being purchased/with mortgage
the client owns their dwelling and is repaying a mortgage or loans
secured against the dwelling, regardless of the purpose of the
mortgage or secured loan
Owner –fully owned the client owns their dwelling and is not making any payments on
mortgages or loans secured against the dwelling.
A client who has repaid a loan, but technically not discharged the
associated mortgage
Other tenure type not elsewhere specified
A client with tenure that does not fit any of the above categories
includes clients who are house sitting or receiving payment in kind for a
specific service, such as a live-in nanny
No tenure The client is sleeping rough or does not have a legal right to occupy a
dwelling and can be asked to leave at any time
includes couch surfing, living on the streets, sleeping in parks,
squatting, using cars or railway carriages, improvised dwellings, or living
in the long grass
includes living in an institutional setting, such as a hospital, psychiatric
hospital/unit, disability support unit, rehabilitation facility, adult
correctional facility, youth/juvenile justice detention centre, boarding
school/residential college, aged care facility or immigration detention
centre
Don’t know the information is not known, or the client has refused to provide the
information
The conditions of occupancy questions provide more detailed information about a client’s tenure.
For example;
• If the client was renting in public housing, was their name on the lease?
• If the client’s tenure was rent free in public housing, were they couch surfing or living with a
relative fee free?
• If a client has been living rough, select not applicable for conditions of occupancy
65
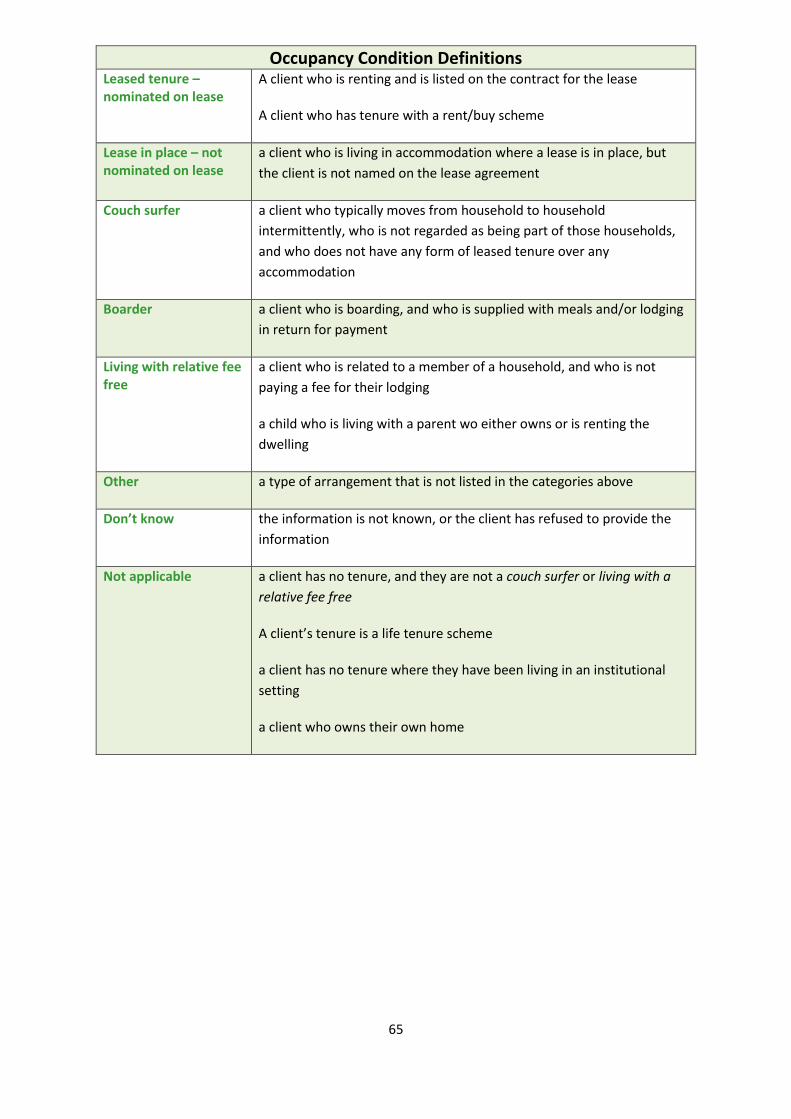
Occupancy Condition Definitions Leased tenure – nominated on lease
A client who is renting and is listed on the contract for the lease
A client who has tenure with a rent/buy scheme
Lease in place – not nominated on lease
a client who is living in accommodation where a lease is in place, but
the client is not named on the lease agreement
Couch surfer a client who typically moves from household to household
intermittently, who is not regarded as being part of those households,
and who does not have any form of leased tenure over any
accommodation
Boarder a client who is boarding, and who is supplied with meals and/or lodging
in return for payment
Living with relative fee free
a client who is related to a member of a household, and who is not
paying a fee for their lodging
a child who is living with a parent wo either owns or is renting the
dwelling
Other a type of arrangement that is not listed in the categories above
Don’t know the information is not known, or the client has refused to provide the
information
Not applicable a client has no tenure, and they are not a couch surfer or living with a
relative fee free
A client’s tenure is a life tenure scheme
a client has no tenure where they have been living in an institutional
setting
a client who owns their own home

66
Living arrangement information is used to indicate the group of people that the client lives with. You
should record the category that best describes this group of people. This should not be confused
with the presenting unit. Children should be recorded as the group that best describes their
situation; for example, if living with both parents, you would record couple with child(ren)
Living Arrangement Definitions Lone Person The client lives along. This includes living alone (without family) in an
institution
One parent with child(ren)
the client is a single parent living with their child(ren)
the client is a child living with a single parent
includes step and adopted parent/child relationships
Couple with child(ren) the client is a parent living with their spouse/partner and their
child(ren)
the client is a child living with both parents
includes step and adopted parent/child relationships
Couple without child(ren)
the client is living with their spouse/partner only
Other family includes all other groups with related individuals, including siblings and
families or more than two generations
Group includes two or more unrelated persons who live together
situations where boarders or lodgers live with a family
excludes persons living alone (without family) in institutions
Don’t know where you are unable to determine the living arrangements of the
client
Once you have completed the presentation and week before housing information, the last question
in the housing panel asks whether the client has previously lived in certain facilities in the last 12
months.

67
If known, select as many as apply from the list provided. Once every question in the housing panel is
completed, the Confirm housing button will become available. Click this to proceed to the next
panel. The information entered will now be visible in a view mode.

68
The Income panel
Within the income panel, you will find a series of questions about your client’s income and
employment status. Like in the housing panel, you will again be asked to provide information
relating to the client circumstances upon presentation(P) and week before presentation (WB).
The first question asks if the client has a source of income at presentation and the week before. If
you select yes, the income details field directly below this question becomes available. In this section
you can add a source of income or edit a source if one already exists.
If no income details currently exist, press the Add income button, and the following pop-up appears:
Employment questions
Income questions

69
Enter the relevant information and save. Once the pop-up has been saved, the income details will
now be displayed in the income table as shown below:
Next you will need to indicate whether the client has already registered for a government payment
but has not yet started receiving this payment. You will need to answer this question for both the
clients’ status upon Presentation to your agency, and week before presentation.
E.g. For a client who has recently become unemployed, and has applied
for a newstart payment, but has not started receiving the payment yet,
select yes, and enter the date the client first applied for the payment.
Please note: income amounts entered are not collected for reporting
purposes. The income amount can be estimated if you do not have an
exact amount.

70
Following this you will need to provide information on the client's labour force status (is the client
employed) and what type of employment they are involved in (part time or full time). You will notice
that the employment type question only becomes available if it is previously indicated that the client
is employed.
Whether a client is employed or not is an important indicator of socioeconomic status of a person,
and a key element in measuring whether provided supports were able to improve the employment
status of clients between start and end of support, an important outcome indicator.
Labour force definitions Employed Includes clients aged 15 years and over who during the reference week:
a) Worked for one hour or more for pay, profit, commission or payment
in kind in a job or business, or on a farm (comprising 'Employees',
'Employers' and 'Own Account Workers').
b) Worked for one hour or more without pay in a family business or on
a farm (i.e. ‘Contributing Family Worker'.)
c) Were 'Employees' who had a job but were not at work and were:
• on paid leave
• on leave without pay, for less than four weeks, up to the end of
the reference week
• stood down without pay because of bad weather or plant
breakdown at their place of employment, for less than four
weeks up to the end of the reference week
• on strike or locked out
• on workers' compensation and expected to be returning to
their job, or
• receiving wages or salary while undertaking full-time study.
d) Were 'Employers', 'Own Account Workers' or 'Contributing Family
Workers' who had a job, business or farm, but were not at work.
Unemployed Refers to clients who are aged 15 years and over, were not employed,
and:

71
a) Had actively looked for full-time or part-time work at any time in the
four weeks up to the end of the reference week and were available for
work in the reference week or would have been available except for
temporary illness (i.e. lasting for less than four weeks to the end of the
reference week).
b) Were waiting to start a new job within four weeks from the end of
the reference week and would have started in the reference week if the
job had been available then.
c) Were waiting to be called back to a full-time or part-time job from
which they had been stood down without pay for less than four weeks
up to the end of the reference week (including the whole of the
reference week) for reasons other than bad weather or plant
breakdown.
Not in the labour force Refers to clients aged 15 years and over who were not employed or
unemployed, as defined above.
Includes clients who were keeping house (unpaid), retired, voluntarily
inactive, permanently unable to work, in institutions (hospitals, gaols,
sanatoriums etc.), trainee teachers, members of contemplative religious
orders, and whose only activity during the reference week was jury
service or unpaid voluntary work for a charitable organisation.
Employment type definitions Full time The client usually works 35 hours or more in a week.
Part time Usually works less than 35 hours a week (in all paid jobs). (Add a link to
the SHS collection manual)

72
The Education panel
The education panel collects basic information about your client’s education and training status at
presentation to your agency (P) and one week before presentation (WB). If you select ‘yes’ that your
client is undertaking formal education or training, the education details panel becomes available.
If no education details already exist for this client, click the Add education button within the panel.
The ‘add education’ pop-up will then be displayed.
If education details already exist for this client, you can update them using the edit pencil icon as
shown below.
The ‘edit education’ pop-up allows you to change education type, enrolment status and provide
details of the facility and client’s student ID number. The education details table within the
education panel will automatically update to the latest client information that you enter here once
the save button has been clicked.

73
The Personal details panel
The personal details panel records information about Australian Defence force members (if the
client is over 18 years of age), disabilities the client has, pregnancy (if previously selected), and care
and protection orders (if the client is under 18 years of age).
Australian Defence Force
This panel relates to whether your client is a current or former Australian Defence Force member
(ADF). This does not include non-Australian defence forces, or reservists who have never served full
time in the ADF. Select a response of Yes, No, or don’t know as applicable for your client.
Disability or Assistance
This panel relates to your clients’ needs with self-care, mobility and communication, associated with
a long-term health condition (e.g. severe asthma, depression), or a disability, that restricts everyday
activities, and participation in the NDIS.
If you select ‘yes’ indicating your client has needs in one or more of these 3 areas, you will be
required to select the level of difficulty your client experiences within each area.

74
If you select that a client under 14 needs assistance in any of the three areas, you will be prompted
when saving the panel to confirm the question has been answered correctly.
Pregnancy questions
If your client sex has been recorded as female or other-please specify, and you have indicated on the
personal details page that your client is pregnant, a pregnant checkbox will appear. If ticked, it will
open 3 questions about the client’s pregnancy. Note: the additional pregnancy fields are not
mandatory.
Care or protection order (under 18yrs only)
If your client is under the age of 18 you will need to record whether the client was under a care of
protection order at presentation (P) and the week before (WB). If your client is under a care or
protection order at presentation, click the add care or protection order button to enter details.
Recording disability or assistance for children
If the child is developing normally for their age (does not have a long term
health condition or disabiltity), 'Has no difficulty' should be recorded for
the three areas

75
A pop-up box will now appear. From this box select the type of order from the drop-down menu;
enter any appropriate details and press ‘Save’. The details will now be displayed in the Care or
protection order table.
If you indicate the client was under a Care or protection order the week before presentation you will
also need to indicate the type of order this was from the next drop-down menu.

76
The Health and wellbeing panel
The Health and wellbeing panel captures information in relation to your client’s mental health.
If a ‘yes’ response is given to any of the 3 questions a corresponding question will be asked beneath.
The first question in the mental health section, should be answered from your perspective as agency
worker, and can be based on your observation of the client. Definitions for the response options are
below;
‘Information provided by’ Definitions Agency worker The client appears to the agency worker to have an undiagnosed mental
health condition
Health professional the client has been diagnosed with a mental health condition by a
doctor, nurse, or other health professional
Non-government agency
information is received from a non-government agency who offers
disability support programs, or from a local community support
program, whose target population includes those with a mental illness
Self-identified the client reports that they have a mental illness but does not have
contact with a specialised mental health service or other relevant
service providers currently
Other there is information to indicate that the client has a mental health
condition, but the source of information is not included in the list above
No information indicating mental illness
there is no information available to the agency worker to indicate that
the client currently has a mental health condition.

77
Contact details Panel
When entering the contact details panel within intake, it may already contain pre-filled information.
Any information already contained on the client record – on the ‘contact details’ page in the client
menu is carried across to this panel. Any contact details entered in the add client page are also
carried though to here.
If you have any prefilled details entered on this page that are incorrect you can correct the
information and press the Confirm contact details button.

78
Presenting issues panel
The final panel within the intake is the presenting issues panel. This is where you record the issues
that the client presented with at your agency.

79
It is also possible to type in your own issue if it does not already exist in the defined list. To do this,
tick the self reported issue box at the bottom of the panel and complete the drop downs as
required.
Saving the intake - incomplete
At any stage during the intake process you can ‘Save incomplete’ by pressing the button on the
bottom left of the page. This will save any already confirmed panels. To return to the intake later
you will need to open the client record, click the Intake menu and select cover page. You will then be
able to continue the intake.
Completing the intake
Once the intake is completed (each panel has been confirmed) the Complete intake button will be
available. If the button is greyed out it is an indication that a section of the intake has not been
completed correctly. If this is the case, review the intake panels to ensure they all have a green tick.
Any panels that still show the green circle require attention.
Once an Intake is saved through the Complete intake button it cannot be edited. Please ensure the
entered information is correct before finalising the intake.
Below: An intake that is completed, in view mode and with each panel collapsed. This intake is ready
to be confirmed by clicking the ‘Complete intake’ button.
note:
information in a saved incomplete intake will not be transferred back into
the individual screens in the client menu. This will not occur until the
intake has been saved and completed

80
On completing the intake, a pop up will appear asking if the client is presenting alone or not.
Select the appropriate response.
If the client is presenting alone, you can skip to the Services section of this manual. If the client is
part of a presenting unit, you will be directed to the presenting unit screen. Read on to the next
section for instructions on Presenting units.
Once an Intake is completed on a client
record the intake menu becomes available.
The user can now navigate to the services
page, the presenting unit page or view the
details of the intake through the cover page.

81
If you will not be proceeding with assisting the client you can close the record using either the add unassisted or end support function at this stage.

82
Presenting Unit The presenting unit function records the relationships between groups of people that present to
your agency for assistance.
A presenting unit can be a family, a group of friends, siblings or a grandparent and his/her
grandchildren.
AIHW Definition of a presenting unit
A presenting unit is a client or group of clients that present together to a specialist homelessness
agency. People who do not receive a service, and are therefore not clients, are not included in the
presenting unit. This may include children who present with a parent or guardian but do not receive
any services themselves.
Presenting units may be:
• A person alone
• A person with child(ren)
• A couple with child(ren)
• A couple without child(ren)
• Siblings
• Multigenerational family members
• A group including unrelated persons
How to record a presenting unit
The presenting unit section is found within the Intake menu. It can only be accessed after an intake
has been completed for all clients that will be members of the unit. If you have indicated during the
intake that the client is not presenting alone, you will be directed to the presenting unit screen to
assemble the unit.
Always assemble the unit from the record of the presenting unit head. The presenting unit head
should be the spokesperson of the group, and should have the earliest, or same, start date as the
other unit members.
Example:
Two friends who were house sharing together are evicted from their
property and present together at your agency for assistance. These two
friends would therefore be a presenting unit.

83
To add a member to the presenting unit, enter their details into the search fields on the presenting
unit screen, and select the search button, as shown in the screenshot below. A list of matches will
then appear.
You can find instructions on putting the unit together in the info bubble at the top of the screen;
In the list of search results, you will notice 2 icons. The orange ‘people’ icon indicates that that client
is already part of a presenting unit and therefore cannot be added to this unit.
Note:
All clients to be added to the presenting unit must already have a current
client record on H2H. The presenting unit function is a way of linking those
records together. If the client you wish to add to the unit does not have an
open record, follow the instructions in the info bubble on the presenting
unit screen unit screen.
Note:
Being the presenting unit head does not give one person a higher status
above another; it is simply a way of recording the spokesperson of the
group, and does not affect system functionality in any way

84
The green + icon is the ‘add client to presenting unit’ icon. Click this to add the client to the
presenting unit.
Identify the record you want to add to the presenting unit, select the ‘add client to presenting
unit’ icon.
This screen shows both the presenting unit head and member records. The first record is the client
record you are currently in and will become the presenting unit head. The second record is the
client you are adding to the presenting unit. In between the two blue client record boxes is the
relationships dropdown, from this menu choose the relationship between the two clients (as shown
above).
Select the relationship of the presenting unit member to the presenting unit head, click the save
button. This returns you to the ‘presenting unit’ page that now lists the client you have just added.
Already a member of a presenting unit
Add to presenting unit Click to find an existing client
Click to create a new draft client based on the record you are currently in (e.g. in this example, Brooke Estabrooks)

85
From this screen you can add another member to the presenting unit, or edit/remove the member
you just added by clicking the edit pencil.
Removing a presenting unit member
If you need to edit or removing members of a presenting unit, this can only be done from within the
presenting unit head’s record.
To remove members of the presenting unit, navigate to the ‘presenting unit’ page within the ‘intake’
menu. Click the edit pencil that corresponds to the client you want to remove. This takes you to the
‘edit presenting unit’ page.
You can change the relationship between the two clients by using the drop down or remove the
member from the presenting unit by clicking the remove member button.

86
Intake Services An intake service is a way of recording;
• The services and assistance your agency provided to a client
• Any services and assistance provided by another SHS or mainstream provider
• Any services and assistance the client needs, that cannot be provided or referred
Within H2H, there are two places where users can record services; within the Intake menu (service)
or within the case plan. All assistance provided to a client prior to a case plan is entered as an Intake
service, and all assistance provided to a client after a case plan has been opened is recorded as a
case plan service.
When to add an Intake Service
An intake service should be recorded each time a client is provided with direct assistance, is assisted
by another service provider, or an unmet need is identified.
It is important for H2H users to be mindful of what they enter as a service. To warrant a service
being recorded, the client must have directly received something from your agency.
The AIHW requires the capture of information about all services, whether provided, referred or an
unmet need for a client, and these services are broken into three categories;
• Housing and accommodation services
• General assistance and support
• Specialised services.
Those services and assistance listed in the ‘housing/accommodation’ and ‘general assistance and
support’ categories can be provided by Specialist Homelessness Services. Some of the service types
Examples of a provided service:
Jenny’s worker drove her to a doctor’s appointment - This is a provided
service of Transport
Case Manager Belinda completed and sent off an application for housing
for her client – This is a provided service of Advocacy/liaison on behalf of
client
Examples of what does NOT constitute a provided service:
Client Jenny found her own way to her doctor’s appointment
Case Manager Belinda drove to her client’s house for a visit, but her client
was not home

87
in the ‘specialised services’ category cannot be provided by an SHS, but are recorded through an
external referral to a mainstream agency (e.g. Child Protection Services, Mental Health Services, etc.)
Services and Assistance List Housing/Accommodation Assistance to sustain tenancy or prevent tenancy failure or eviction
Assistance to prevent foreclosures or for mortgage arrears
Short term or emergency accommodation
Medium term/transitional Housing
Long term Housing
General Assistance and Support
Advice/information
Advocacy/liaison on behalf of client
Assertive outreach for rough sleepers
Assistance for domestic/family violence – perpetrator support services
Assistance for domestic/family violence – victim support services
Assistance for incest/sexual assault
Assistance for trauma
Assistance to obtain/maintain government allowance
Assistance with challenging social/behavioural problems
Child Care
Child contact and residence arrangements
Court Support
Educational Assistance
Employment Assistance
Family/Relationship assistance
Financial information
Laundry/Shower facilities
Legal information
Living skills/personal development
Material aid/brokerage
Meals
Other basic assistance
Recreation
Retrieval/storage/removal of personal belongings
School liaison
Structured play/skills development
Training assistance
Transport
Specialised Services Assistance to connect culturally
Child protection services
Child specific specialist counselling services
Counselling for problem gambling
Culturally Specific Services
Drug/alcohol counselling
Family planning support
Financial advice and counselling
Health/Medical services
Interpreter services
Intellectual disability services

88
Mental health services
Other specialised services
Parenting skills education
Physical disability services
Pregnancy Assistance
Professional legal services
Psychological services
Psychiatric services
Specialist counselling services
Not all SHS in South Australia are funded to deliver the same types of assistance. Some options will
only be available to certain agencies for provision or referral, depending on funding arrangements
and service agreements.
Definitions of each specific service in the list above can be found in detail in the AIHW - SHS
collection manual accessible on the H2H support page.
The different delivery types of Services
Within H2H there are 3 different ‘delivery types’ available when recording a service. Services can be
entered as:
Delivery Type Definitions Provided Service • refers to a support service which is provided directly by your
agency
• All support provided should be recorded – even if the client
does not acknowledge a need for services
• Can be entered by either a lead or consented agency
• You should only record that accommodation has been provided
if you have provided the client with the actual accommodation
e.g. agencies that have onsite crisis accommodation or medium
term/transitional accommodation.
Referred service (within H2H or external to H2H)
Often a client needs a service that cannot be provided by your agency.
In the instances where you have arranged for a service to be provided
to your client by another agency, this is recorded as a Service Referral.
Within H2H, you can record referrals to internal agencies (those
Please note: A specific service type is not available to record ‘assistance to
obtain housing or accommodation’ in the SHSC. This is because general
assistance to obtain housing or accommodation is the fundamental role of
all specialist homelessness services, so all agencies will be providing this
service to all clients. Therefore it does not require a specific category on
the list of services and assistance.

89
agencies that use H2H), and external agencies (those agencies that do
not use H2H).
• You would enter a referred service if you refer a client to
another service provider AND that service provider accepts the
client for an appointment or interview
• Do not complete a service referral if the client is NOT accepted
for an appointment or interview. In that circumstance you
would enter an unmet need (see below)
• You only record that accommodation has been referred if you
referred the client to another service provider to provide the
actual accommodation
Unmet need Used to record instances where a client needs a type of assistance that
cannot be provided or referred.
• This refers to any services or assistance you assess the client as
needing, whether or not the client accepts or agrees to
participate in this support service.
• Even when a service cannot be provided, it is important to
record the client’s needs because this helps to identify unmet
need.
Provided Services
How to add a provided service To record a provided service, follow these steps.
On the services screen within the intake menu, click the add service button (as shown below)
Select Provide service from the delivery type drop down box

90
The Lookup service button now becomes available, click the lookup service button.
The ‘provided service lookup’ pop-up box now appears. Click on the relevant provided service, then
the service element and click the select button (as shown on next page).

91
This returns you to the ‘Add service’ screen with the details selected from the pop-up displayed in
the ‘provided service’ section
Note:
The list of service elements that are available for each agency is unique
and dependent upon which programs your agency is funded to provide,
and whether your agency is part of an alliance. If you are unsure which
service element to choose for the clients’ particular circumstance, speak to
your team leader or manager. You can find definitions for each service
element at the end of this user guide.

92
Next, you are required to enter;
• date that the client requested the service (this is pre-filled with today’s date);
• Response type – Crisis or Non-crisis;
• Responsibility – client or support worker
Now enter a service description. This field allows you to add the details of the provided service, as
you may need to look back at this information in the future; so, it is a good idea to write specific
information about the nature of the provided service.
Next select a start date and an end date for the service. Most provided services are delivered as one-
off services, such as transport, advice, advocacy etc. these would start and end on the same day.
Where a client is being provided with accommodation or is attending a set program, the end date
would be the day that the accommodation/program ends.
Details added by the ‘lookup service’ pop up

93
.
.
Note: it is possible to edit end dates in instances where a client stops attending programs or exits
accommodation. The next section explains how to edit a provided service.
Once you have completed all mandatory fields. Select the button to add the service.
You are then returned to the Services screen where you can view the service you have just entered,
and add further services.
Using the same start and end date indicates that this is a ‘once off’ service such as
driving a client to an appointment.
Example:
• You drive your client to her doctors appointment. The start and
end dates in this instance would be the same day
• A client is being provided with transitional accommodation and
has signed a 3 month lease with your organisation. In this
example the start and end dates would match the dates of the
lease term

94
Editing a provided service A service can be edited by clicking the edit pencil at the end of the relevant row. Only services which
are open (the end date has not passed) can be edited. The only information that can be edited once
a service has been saved is the following;
• Date requested
• Responsibilty
• Start date
• End date
To edit, select the edit pencil icon as indicated below.
Once a service has passed its end date it can no longer be edited but can now be repeated.
Repeating a service A service that is closed (the end date has passed) will display a repeat icon instead of an edit pencil.
Repeating a service is a quick way to record the services that have been provided to your client more
than once. Using this function pre-fills many of the fields that you would normally have to enter
when adding a new service.
Example: You provided transport to take your client to a doctors appointment on Monday. On
Wednesday your client requires transport again to a follow-up appointment.
Rather than entering a new service on Wednesday, you could click the repeat service button that
corresponds to Mondays transport service.

95
Deleting a provided service Intake services can be deleted providing they are still open (the end date has not passed). To delete
a service, you will need to locate the service on the Intake services page and click within the box of
that service (as shown below
Upon clicking within the box, the ‘view service’ screen appears – Note: this is different to the edit
service page that would appear if you had clicked the edit pencil

96
The delete service button is located at the bottom right of this screen.
Referred services
A service referral in H2H is recorded in a similar way to a provided service. You would use the service
referral function in instances where a service has been provided to your client, but not provided by
your agency.
There are two types of service referrals within H2H. They are:
1. Referral within H2H (NAHA) – to be used when referring to an agency that uses H2H (e.g.
other Specialist Homelessness and Domestic Violence Services)
2. Referral external to H2H – to be used when referring to an agency who does not use H2H
(e.g. mainstream services such as health, employment services, etc)

97
All referrals in H2H, including service referrals should be completed as a ‘warm referral’, meaning
that prior to sending the referral on H2H, you have contacted the agency you are referring to,
discussed the referral and ensured it is appropriate before sending.
Referrals within H2H (internal referrals)
Internal referrals are used to record where the client has been/or is going to be provided with
assistance by another SHS.
How to add an internal referral After selecting the ‘Referral within H2H’ option from the delivery type drop down box, press the
Lookup service button.
The ‘Referred service lookup’ pop-up box will then appear. Select the service you have referred or
are referring.
Next, select the agency from the list available in the lower box and press the select button.
Note:
Ensure you select the correct prefix for the agency you are referring to;
e.g. if you are referring your client to another generic service you would
select the ‘Gen’ prefix. If you were referring a client to a domestic
violence service for counselling, you would select the ‘DV’ prefix.

98
Having selected your responses from the pop-up box you will be returned to the ‘Add service’ screen
where you will need to enter:
• The Reason for referral
• The name and contact details of the agency that you are referring to
• The response type, responsibility and description of the service
• The requested, start and end dates of the referral
To be able to send the referral the client must provide consent to the referring agency. To add
consent, click the Add consent button located in the blue panel at the bottom of the screen.
Note:
If referring to an agency outside of your region (i.e your agency operates
in the southern metro but you are referring a client for a service in the
western metro), you will need to change the ‘my region’ drop down to ‘all’.

99
The following ‘Add consent’ pop-up box appears:
Select the consent as written or verbal. If written is selected, you will need to record where the
hardcopy is located. Next select if the client has agreed.
If the client record you are adding a service to is a child, the add consent will appear slightly
differently. Please refer to the consents section for guidance if needed.
Lastly enter an expiry date for the consent. The expiry date is automatically defaulted to 6 months
from todays date, however this can be altered.
Once you have completed this screen press the Save button.
You are then returned to the ‘Add service’ screen. Check that a green tick now appears in the
consent box at the bottom of the page;
You can now select the button. Once selected you will be returned to the services
screen and see the referral you just sent in the list of services (as shown below).
Note:
A client does not necessarily always need to agree to the consent. This
may include instances where information sharing is necessary for legal
reasons as outlined in the notice of information provision.

100
A referral shown within the services list will initially appear slightly different to provided services.
In the ‘action’ column the blue withdraw button can be seen. The service element column displays
“not assigned” as the service element is selected by the provider when the referral is accepted.
Currently this referral is still ‘pending’ meaning it has not yet been accepted by the other agency.
For information on how to accept a service referral please see the Agency manager functions section
Withdrawing internal referrals An internal referral can be withdrawn at any point before the referral is accepted. Once the referral
is accepted, the receiving agency selects a service element, assigns a case worker, and the withdraw
button disappears.
To withdraw a referral select the withdraw button as indicated below.
Referrals external to H2H cannot be withdrawn as they are accepted automatically once sent.
Referrals external to H2H
External referrals are used to record where the client receives assistance from an agency that does
not use H2H (e.g. mainstream services such as health, employment services, etc.)
How to add an external referral Select ‘Referral external to H2H’ from the delivery type drop down box.
Withdraw
button

101
Select an option from the ‘Service’ drop down box.
The next field is the ‘Provider’ field. If the agency you are referring to is listed choose the correct
option, if not choose the ‘-------not listed-------‘option.
Note:
This list contains previous referred agencies. If you have not sent any
referrals yet for this client, then no list will appear.
.
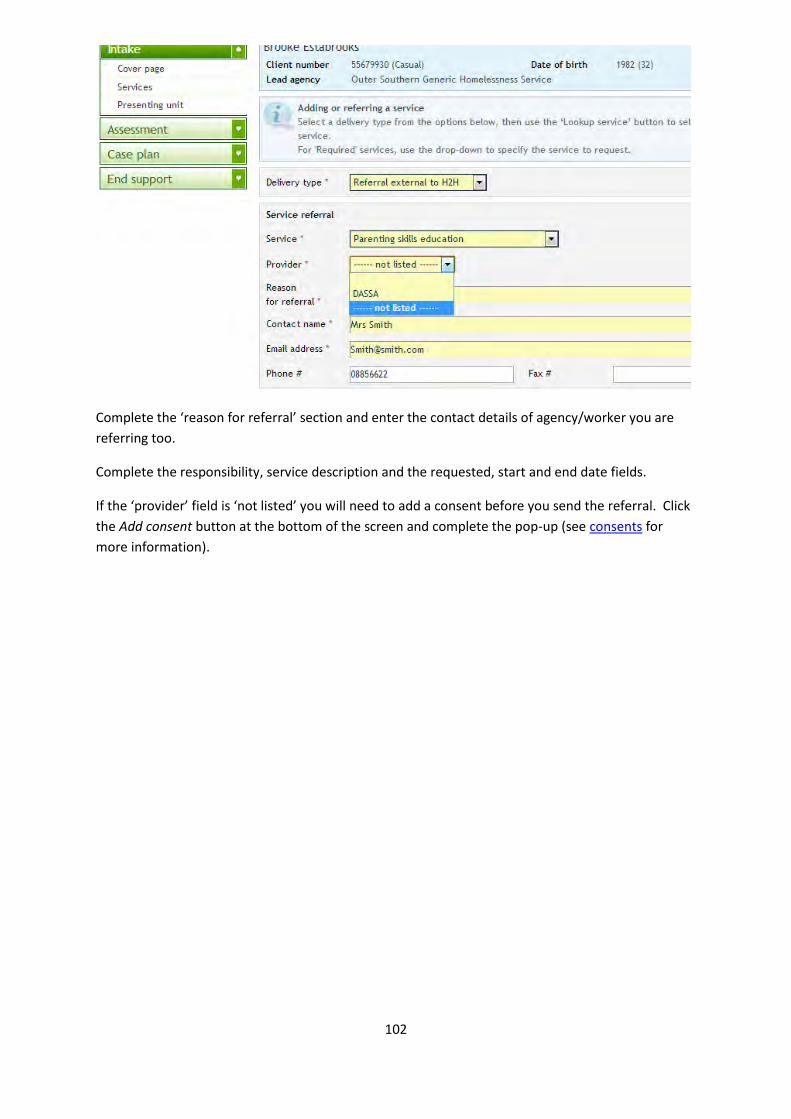
102
Complete the ‘reason for referral’ section and enter the contact details of agency/worker you are
referring too.
Complete the responsibility, service description and the requested, start and end date fields.
If the ‘provider’ field is ‘not listed’ you will need to add a consent before you send the referral. Click
the Add consent button at the bottom of the screen and complete the pop-up (see consents for
more information).

103
Once consent is added the referral is now ready to send. You will notice the send button says, ‘Send
and accept’ rather than just ‘send’. This is because you are sending an external referral to an agency
that does not use H2H and therefore has no way of accepting the referral within the H2H system. By
pressing the send and accept button you are acknowledging that the provider has already assisted,
or as has agreed to assist the client.
Unmet Need
You can also record services that a client may need but cannot be provided. This is referred to as an
Unmet Need. If the need can later be met, it can be converted to either a provided or a referred
service (see the converting an unmet need section for more detail)
When to record an unmet need An unmet need should be entered when it is identified that a client may need a particular service,
but that service cannot be provided, this can be due to the service being unavailable or the client not
accepting an offered service.
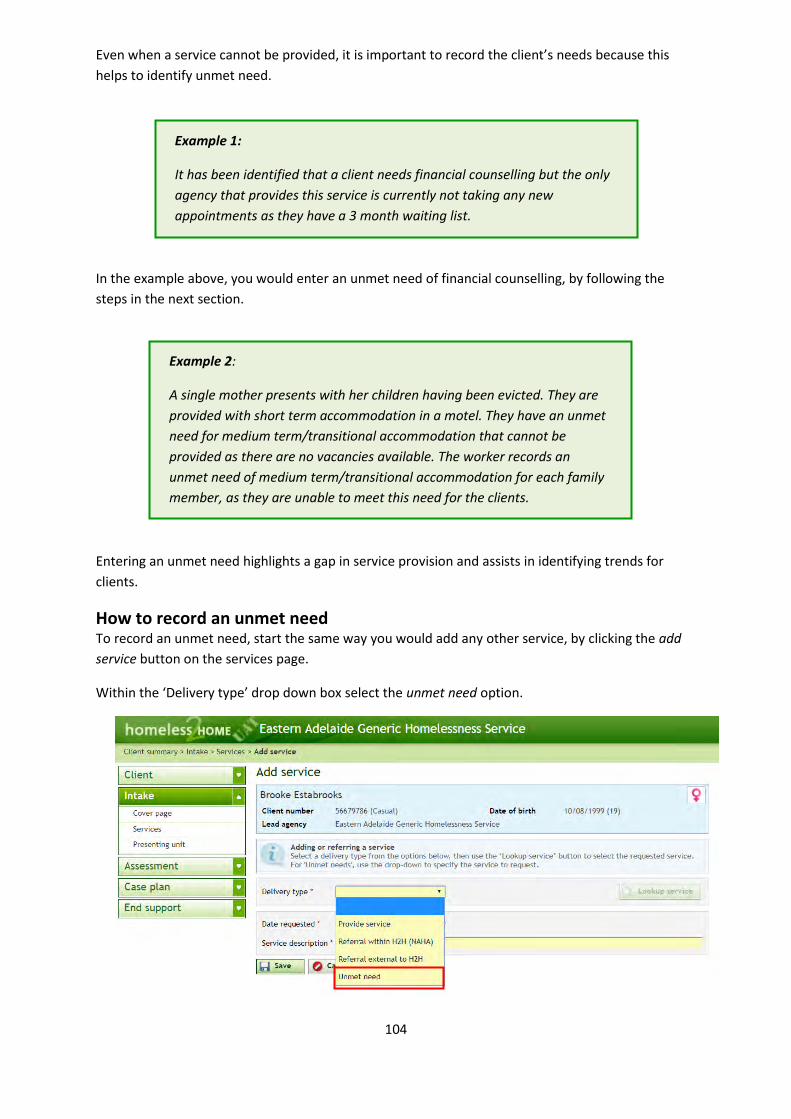
104
Even when a service cannot be provided, it is important to record the client’s needs because this
helps to identify unmet need.
In the example above, you would enter an unmet need of financial counselling, by following the
steps in the next section.
Entering an unmet need highlights a gap in service provision and assists in identifying trends for
clients.
How to record an unmet need To record an unmet need, start the same way you would add any other service, by clicking the add
service button on the services page.
Within the ‘Delivery type’ drop down box select the unmet need option.
Example 2:
A single mother presents with her children having been evicted. They are
provided with short term accommodation in a motel. They have an unmet
need for medium term/transitional accommodation that cannot be
provided as there are no vacancies available. The worker records an
unmet need of medium term/transitional accommodation for each family
member, as they are unable to meet this need for the clients.
Example 1:
It has been identified that a client needs financial counselling but the only
agency that provides this service is currently not taking any new
appointments as they have a 3 month waiting list.

105
You will need to select the unmet need for the client, followed by the prefix. If the unmet need is for
a service that your agency will eventually provide, select the prefix that matches your agency target
group. If another SHS or an external provider will be providing the service in the future, select their
corresponding prefix.
Example: if your client has just fled a Domestic Violence relationship, and requires emergeny
accommodation but none is available, you may choose to enter an unmet need of Short
term/emergency accommodation, with a prefix of DV
Complete the remaining mandatory fields, and select the save button. You will then be directed back
to the services page and the unmet need you entered will appear at the top of the page.
Note: Unmet needs that can be provided at a later point in time can be
converted. The ability to convert is largely dependant upon the prefix
chosen. Continue reading for further detail.
Click on the pencil to navigate to the ‘edit service’ screen where you can convert the unmet need, or delete it
Click inside the box (not on edit pencil) to navigate to the ‘view service screen’ where you can close the unmet need.

106
How to close an unmet need If you have recorded an unmet need that was incorrect, or is no longer needed by the client, close it
by clicking anywhere on the service to open it.
Select the 'close service' button and record the reason you are closing the unmet need.
Converting an unmet need to a provided or referred service If you are now able to meet the need for your client, you can convert the original unmet need to
either provided or referred. This indicates that a need that had once been unmet, is now met.
To convert an unmet need, click on the edit pencil at the end of its row on the services screen. This
will take you to the ‘edit service’ screen. This will enable you to convert the service using the
‘Delivery type’ drop down menu (as shown below).
When converting an unmet need, you may be restricted in your choice of delivery type. This is
indicated by a choice within the menu being greyed out (as shown in the screenshot below). A
delivery type might be greyed out if your agency does not provide this service.

107
Example: In the above scenario, it was entered that the client needed DV – Short term/emergency
accommodation. When attempting to convert this there is only the option to refer the service,
either internally or externally. It cannot be converted to a provided service because the current lead
agency is a generic (GEN) agency and not funded to provide DV services.
Once you have established the delivery type you will be converting to, select it from the delivery
type drop down, complete all mandatory fields, and save the service. You will be returned to the
services screen and see that the unmet need has been converted to the newly created provided or
referred service in the services list.
What can I do if I cannot convert the unmet need to a ‘provided service’? As in the example above, if you have entered an unmet need that you cannot covert to a provided service it means that you have chosen a service that your agency is not funded to provide. In this case, you can either:
• Delete the original unmet need and re-enter it with a Prefix that your agency provides (e.g. ‘Gen’ for generic funded agencies) or
• Convert it to a referral
Notice the ‘Provide service’ option is greyed out.

108
Assessment

109
About the Assessment
The assessment assesses the factors that have led to your client becoming homeless, or at risk of
homelessness. It provides opportunity for workers to record any existing strengths or support
networks for the client within each life domain. Every strength, support network or issue that you
record can be carried through to a client’s case plan.
Starting an assessment
To begin an assessment, click the Add assessment button on the Assessment Cover page and enter a
date and time that the assessment was conducted.
Note:
An intake must be completed before you can start an assessment. An
assessment can be backdated, but no earlier than the date of intake.
Assessments cannot be forward dated.

110
The assessment menu
Within the assessment, there are ten ‘life
domains’. Each life domain contains a list of
issues. Commencing an assessment takes you
to the first life domain (Behaviour).
If your client does not have any issues within
that life domain, you can use the menu to
navigate to another life domain.
Within the assessment you can navigate
between the life domains as often as needed
until the assessment is saved. Once an
assessment is saved using the save & complete
button on the last page it can no longer be
edited.
When issue is added to a life domain and the
life domain is saved, a green tick will appear in
the menu (as shown on the ‘Cultural’ page to
the right).
A green circle next to a life domain, indicates
an issue in that life domain was identified as
part of the Intake presenting issues, these
issues must be addressed before the
assessment can be completed.
You do not have to complete every life domain,
only complete the strengths, supports and
issues that are relevant to your client’s
circumstances.
The Life Domain page
Within each life domain you can add details about your client’s strengths, support networks and
issues. Each life domain page contains fields for identified strengths, support networks and a set list
of issues that can be selected. You can select as many as are relevant from this list.
Identifying and completing issues Where an issue in the life domain was identified as a presenting issue from the client’s intake this
will appear as already selected and expanded (as shown below).
The green circle indicates that
there is a ‘presenting issue’
identified on that page that must
be addressed.

111
To complete the life domain, select each relevent issue and complete the fields that appear.
Removing issues from an assessment Assessments can only be edited if they have not yet been saved. Once the Save & complete button
has been clicked it cannot be edited.
To remove an issue from an assessment in progress, open the life domain that contains the issue and
deselect the tick box that corresponds to the issue.
Other issues can be
selected as needed
Pre-selected as
identified as presenting
issue from Intake
Every life domain opens with
strengths and supports at top

112
Goals
Every time an issue is selected within the assessment, you have the option to set a goal.
Setting a goal To set a goal click the ‘lookup goal’ button in the bottom right hand corner of every issue (shown
below).
choose a goal from the pop-up box appears. You can use the scroll bar to view additional goals
To remove the
issue, deselect the
tick box
Click to select
a goal
note:
issues that were identified at intake as presenting issues cannot be
removed.

113
Removing a goal To remove a goal, click the Remove goal button at the bottom of the issue panel. You can now
remove the goal or choose a different one.
Risk indicator
Where a life domain has one or more issues selected you will see a risk indicator at the bottom of
the page. This indicates the person’s risk of homelessness for that life domain. The level of risk is
calculated automatically depending on the type(s) of issues selected and may be low, medium or
high. It can be changed by using the drop-down box and choosing another risk level.
Note:
It is optional to set goals in assessment. If you have not started setting
goals with your client yet, the goal can be left blank until case plan stage

114
Saving the assessment
Once you have finished assessing your client’s strengths, support networks and issues you need to
finalise the assessment. Ensure you have addressed all the life domains that show a green circle in
the menu, then navigate to the Save and complete screen in the Assessment menu.
There are two options for saving your assessment;
• Save and Complete
• Save Incomplete
If you select save the assessment as incomplete you have 30 days to complete it before it is
automatically closed. A reminder will appear on the home screen warning you if the assessment is
soon to be automatically closed.

115
Viewing a saved assessment
To view the details of a saved assessment, click on any of the life domains in the assessment menu.
Once saved, the assessment menu will only show the
life domains in which strengths, support networks or
issues have been identified.
Viewing historical assessments: Historical assessments as well as intakes and case plans can be viewed from the client pathway page (providing you have permission to access the information) by simply clicking the underlined item. If the item is not underlined, it means you do not have permission to view detail.
Note:
Once your assessment has been saved you will no longer be able to edit or
make any additions. Assessments are a ‘point in time’ assessment of the
client’s issues at the beginning of their support period

116

117
Case Plan

118
Prior to starting a case plan
Before you can start a Case plan, an Assessment must be completed and saved. Refer to the
‘Assessment’ section for instructions on how to do this.
A case manager must be assigned before a case plan can be created.
Only workers with agency manager access can assign case managers and caseworkers to clients. For
assistance with the assignments function, please see the assignments section of this manual.
Starting a case plan
To start a case plan, navigate to the case plan menu, click on the cover page, and click the add case
plan button (shown below).
You will then need to complete the fields shown below indicating the date, time of creation and the
client agreement.
IMPORTANT:
A client must agree to a case plan for one to be created. If your client does
not agree, you will not be able to add one. All support would continue to
be recorded under the intake services function.

119
If there are open services entered within the intake when you start a case plan, you will be
prompted to either exclude and close the services or include them in the case plan.
If you include the services (as shown above) you will need to assign each service to a life domain.
Clicking save and continue on the case plan cover page will take you to the case plan summary page.
The plan summary page
The plan summary page (shown below) gives an overview of your case plan. The page is divided into
life domains, under each life domain are the strengths, support networks and issues as identified
during assessment.
You can navigate around the case plan by clicking either on the life domains, or issues in the left-
hand menu, these can also be accessed from the case plan summary page.
For each issue a status an icon is displayed. For example, in the screenshot below you can see
services complete, no goal set and No services assigned next to corresponding issues.

120
The status icons at the end of each issue row give a visual representation as to the status of that
issue. See the chart below for an explanation of each icon.
Case Plan summary icon definitions
All services have been completed for this issue
Services entered for this issue are still open (incomplete)
All services have been completed and the goal has been closed
No goal has been set for this issue
The goal has been closed for this issue, but no services were added
Indicates an identified strength or support network
When you start your case plan, it contains only the life domains and issues that were entered at
assessment.
Click here to add new life
domains and strengths/
issues to your case plan
Life domains
Issues (sit within life
domains)
Current status of issue Status icon
(see below for
definition)
Life domains and
issues in menu appear
in same order as plan
summary page

121
Life domains
Within the case plan, each life domain displays the issues that sit within that life domain. Like the
plan summary page, you can add further issues or strengths to the case plan from this page.
Strengths/Issues pages
Every strength or issue within a case plan has its own page. These pages can be navigated to from
the plan summary page, life domain pages or from the case plan menu.
Issue / strength pages can be
navigated to directly through the
case plan menu
Issue / strength pages can
also be navigated to from
within a life domain page
Click here to add new
strengths/ issues

122
Adding new strengths/issues to a case plan
You can add new strengths or issues to a case plan by clicking the add strengths/issues button on the
plan summary page. Next, choose a life domain from the drop-down field and press select, as shown
below;
This will provide a list of issues within the life domain. The issues are set out in the same format as
the assessment. To add an issue, tick the issue you want (as shown on next page) and complete the
relevant fields.
You can add a goal for the issue via the lookup goal button. Setting a goal at this stage is not
mandator, but a goal must be set before services can be added.
Each life domain page has the risk indicator at the bottom of the page. For more information about
the risk indicator see the assessment section

123
When you have finished adding details to the issue, select save and new to continue adding further
issues or strengths to the case plan or save and close to return to the plan summary page.

124
The issue page
1 View the details of the issue by clicking more in the green banner
2
Add or change the set goal for this issue by clicking the add goal or change goal button
3 Remove the goal entirely by clicking the remove goal button
4
Record services provided, referred or unmet needs for the client by clicking the add service button
5 Close the issue by clicking the close and save issue button
1
5
4
3 2

125
Goals
In order to add services to an issue in the case plan, a goal must be selected from the goals list. If
there is no goal assigned to the issue, you will not be able to add services. This is indicated by the
‘add service' button appearing greyed out, as shown below;
Adding/ changing a goal A goal can be added or changed by clicking the select goal or change goal button within the issue
screen. Clicking this button brings up the select goal pop up screen (as shown below). To select a
goal, click the relevant choice. A goal can be changed an unlimited number of times.

126
Closing and saving an issue When an issue has been resolved or is no longer relevant to the client it can be closed. To do this
click the close and save issue button on the issue screen.
A pop-up box will then appear asking if the goal has been met and a description of the outcome.
Complete the relevant fields and click the Save and close issue button to finalise.
Re-opening an issue
To summarise:
• A goal must be set before services can be added to an issue
• All services must be closed before the issue can be closed
• Closed issues can be re-opened if needed
• When closing an issue that has not had any services entered, you are limited to no longer
relevant or not at all when recording if the goal has been met

127
To re-open an issue that has been previously closed, navigate to the issue page in question and click
the re-open issue button in the bottom corner (as shown below).

128
Case plan goal status At the end of each month, the case plan goal status is reported to the AIHW for all clients with an
open case plan.
The goal status is set by looking at the number of issues in the case plan, and their completion
status, to work out an overall achievement status of the case plan.
Examples of Case plan goal status during support
Not at all 0/6 goals achieved
Up to half 1-2/6 goals achieved
Half or more 3-5/6 goals achieved
All 6/6 goals achieved
For example, the case plan shown below, with 2/4 issues closed as 'goal met', would have an overall
goal completion status reported to the AIHW of goals achieved = half or more.

129
Case Plan Services
As with intake services, a case plan service is a way of recording the following;
• The services and assistance your agency provided to a client
• Any services and assistance provided by another SHS or mainstream provider
• Any services the client needs that cannot be provided (unmet needs)
The add service function in case plan operates in the same way to the services function found in
intake except for 3 features:
• Case plan services include a progress percentage that can be used if desired, a feature that
intake services do not have
• Case plan services are added to the life domain and issue the assistance related to; this is
different to intake services, which are collated in a single list
• Service notes can be added to an open case plan service
Once a case plan is opened all future services provided to a client are recorded as part of this case
plan and the ability to enter services under the intake menu is removed. Below is a table defining the
different types of icons that can be found on this issue screen.
Issue page icons and definitions
Edit service button.
The service is still open (has not yet been closed and end date has not passed).
The service is still open however it has passed its end date and requires closing.
Withdraw button. The service has been sent as a referral which has not yet been accepted and can be withdrawn if needed.
Service has been closed and saved as ‘completed’.
Service has been closed and saved as ‘entered in error’.
Repeat service button (only available when the service is closed).
Pending service referral that has not been accepted, or consented service notification not accepted by lead agency
Referred or consented service that has been rejected
Note:
An intake service and a case plan service are the same thing – a method of recording
assistance provided to a client, but added from different stages of the client pathway

130
When to add a case plan service A service should be recorded each time your client is provided with direct assistance, is assisted by
another service provider, or an unmet need is identified.
To warrant a service being recorded, the client must have directly received something from your
agency, another agency, or have an unmet need.
How to add a case plan service To add a service, navigate to the relevant issue page within the case plan and click the add service
button.
Note: the add service button is only available if a goal has been set for that issue.
the add service screen will appear (shown below). Case plan services are added the same way as
intake services.

131
As with intake services, there are three delivery types;
Delivery Type Definitions
Provided Service • refers to a support service which is provided directly by your
agency
• All support provided should be recorded – even if the client
does not acknowledge a need for services
• Can be entered by either a lead or consented agency
• You should only record that accommodation has been provided
if you have provided the client with the actual accommodation
e.g. agencies that have onsite crisis accommodation or medium
term/transitional accommodation.
Referred service (within H2H or external to H2H)
In the instances where you have arranged for a service to be provided
to your client by another agency, this is recorded as a Service Referral.
Referrals are either to internal agencies (those agencies that use H2H),
or external agencies (those agencies that do not use H2H).
• You would enter a referred service if you refer a client to
another service provider AND that service provider accepts the
client for an appointment or interview
• Do not complete a service referral if the client is NOT accepted
for an appointment or interview. In that circumstance you
would enter an ‘unmet need’ (see below)
• You only record that accommodation has been referred if you
referred the client to another service provider to provide the
actual accommodation
Unmet need Used to record instances where a client needs a type of assistance that
cannot be provided or referred.
• This refers to any services or assistance you assess the client as
needing, whether or not the client accepts or agrees to
participate in this support service.
• Even when a service cannot be provided, it is important to
record the client’s needs because this helps to identify unmet
need.

132
Provided Service
How to add a provided service Select the provide service from the delivery type drop down menu as shown below;
Next click the lookup service button (as shown above). The provided service lookup box will then
appear (as shown below). Make the relevant selection based upon the service and service element
you have provided and click the select button.

133
Note:
The list of service elements that are available for each agency is unique and
dependent upon which programs your agency is funded to provide, and whether
your agency is part of an alliance. If you are unsure which service element to
choose for the clients’ particular circumstance, speak to your team leader or
manager. You can find definitions for each service element at the end of this user
guide.
This will return you to the add service screen with the first four fields now pre-filled based upon the
information you selected (as shown below).

134
complete the remaining fields on the screen;
• To save the service but leave it open select the save button on the left as shown below. You
would do this if the service has an end date in the future
• The service will close automatically as 'fully completed' when it passes it's set end date
• To save the service and immediately close it as completed, selected the ‘save & close service
button on the right as shown below
Is it the clients or
workers responsibility
that this service is
followed through?
Write some specific information as
to the service that was provided e.g.
‘Spent time with client making
enquiries about…’
What date did this service end? Was it a
once off service (same start/end date) or
extended such as accommodation.
you may choose to
monitor progress using
this feature (not
mandatory) You can change the case
worker responsible for
this service if you need.

135
If you select to save & close the service the following pop up will appear; complete the closing
reason and end date to continue.
Closing and saving the service returns you to the issues page. The entered service will appear in the
service list (shown below).
Editing a provided service Open services can be edited by clicking the edit pencil at the end of the relevant row. Once a service
has passed its end date it can no longer be edited. The only information that can be edited once a
service has been added is the following;
• Date requested
• Responsibilty
• Start date
• End date
Repeating a service Closed services will display a repeat icon instead of an edit pencil.
status indicating this
service has been saved
and closed
status indicating this
service is still open

136
Repeating a service is a quick way to record any assistance that may have been provided to your
client more than once. Using this function pre-fills many of the fields that you enter when adding a
new service.
In the example above the service of ‘transport’ would have already been entered on Monday. Rather
than entering a new service on Wednesday, you could click the repeat service button that
corresponds to Mondays transport service.
Consented Services
Consented services allow agencies to record their co-case management. For the non-lead agency to
add a service to the lead agency's case plan, some initial steps must be completed first.
The lead agency should
• select which issue(s) the consented agency will be supporting the client in
• from that issue(s), complete an internal service referral to the consented agency
• the consented agency manager must then accept the referral, and assign to the worker who
will be assisting the client
• once this has been completed, the worker/agency manager will be able to add additional
provided services as needed
• each service generates a notification back to the lead agency, which must be accepted (see
referrals menu section for further detail)
Example:
You provided transport to take your client to a doctors appointment on
Monday. On Wednesday your client requires transport again to a follow-
up appointment.

137
Referrals within H2H (internal referrals)
Internal referrals are used to record where the client is provided with assistance by another SHS
agency.
How to add an internal referral To send a service referral to another agency that uses H2H, use the referral within H2H function. To
do this click into any issue page within the case plan and click the add service button. As discussed
earlier, the add service button is only available if a goal has been set for that issue.
On the add service screen, choose Referral within H2H from the Delivery type drop down field (as
shown below).

138
Click the lookup service button and the referred service lookup box will appear. Select the service you
are referring from the top section, and the agency you are sending the referral to in the bottom
section and click the select button.
You will then be returned to the add service screen. The contact name, email address and phone
number of receiving agency now pre-filled. These fields can be edited.
Complete the remaining fields and then click the add consent button located in the bottom right
hand corner of the screen.
The add consent pop-up box will then appear (as shown below). Complete the consent type,
agreement and expiry date fields and click the save button.
Service selection
Receiving agency selection
Note:
Ensure you select the correct prefix for the agency you are referring to;
e.g. if you were referring a client to a domestic violence service for
counselling, you would select the ‘DV’ prefix.

139
Once consent is added and all fields are completed, click the send button at the bottom of the page
(as shown below). This will return you to the issue page.

140
The service referral will appear in the list of services with a status of pending until it is accepted by
the receiving agency.
While the service is pending you can withdraw the referral by clicking the blue withdraw button in
the action column (as shown below).
Note:
Once a service referral has been accepted, it is the responsibility of the
provider (the consented agency) to save and close the service, or wait for
it to close automatically once the end date passes
Withdraw button

141
Referrals external to H2H
External referrals are used to record where the client is assisted by an agency who does not use H2H
(e.g. mainstream services such as health, employment services, etc.)
How to add an external referral Similar to service referrals to internal agencies, you can record referrals to external agencies.
External agencies are those that provide services to clients but do not use H2H and cannot accept
referrals or view information through H2H.
Firstly, select ‘Referral external to H2H’ from the delivery type drop down box.
select the type of service from the ‘Service’ drop down box, and complete the remaining fields;

142
The next field is the ‘Provider’ field. If the agency you are referring to is listed select the agency, if
not choose the ‘-------not listed-------‘option.
Complete the ‘reason for referral’ section and enter the contact details of agency/worker you are
referring to. Complete the responsibility, service description and the requested, start and end date
fields.
Sends referral
but leaves the
service open
(use if end date
is in the future)
Sends referral
and closes the
service (use if
end date is
today or in the
past)
Note:
The provider field will list any currently consented agencies. If you have
not sent any referrals yet for this client, then no list will appear.
.

143
If no current consent with the agency exists, click the Add consent button at the bottom of the
screen and complete the pop-up (see consents for more information).
The referral is now ready to send. The send button is labelled ‘Send and accept’ rather than just
‘send’. This is because you are sending an external referral to an agency that does not use H2H and
cannot the referral within the H2H system. By pressing the send and accept button you are
acknowledging that the provider has already assisted, or as has agreed to assist the client.
Unmet need – case plan
Aside from entering provided and referred services within H2H, you can record services that a client
may need, but cannot be provided. If an unmet need can later be provided it can be converted to
either a provided or a referred service.
Unmet need should not only be entered when a client needs a particular service, but also when the
client does not accept the offer of a particular service, e.g. a client with a drug issue who refuses
assistance.
For further information on unmet need see the section in Presenting unit and services.
How to record an unmet need in case plan Select the issue in the case plan where you wish to record the unmet need, then the add service
button. Within the Delivery type drop down box select the unmet need option.
You will need to select the unmet need for the client, followed by the prefix. If the unmet need is for
a service that your agency will eventually provide, select the prefix that matches your agency target
group. If another SHS or an external provider will be providing the service in the future, select their
corresponding prefix.
Example: if your client has just fled a violent relationship, and requires emergency accommodation
but none is available, you may choose to enter an unmet need of Short term/emergency
accommodation, with a prefix of DV
Note: Unmet needs that can be provided at a later point in time can be
converted. The ability to convert is dependant upon the prefix chosen.
Continue reading for further detail.

144
Complete the remaining mandatory fields, and select the save button. You will then be directed back
to the issues page and the unmet need you entered will appear at the top of the page.
How to close an unmet need If you have recorded an unmet need that was incorrect, or is no longer needed by the client, close it
by clicking anywhere on the service to open it.
Select the 'close and save' button and record the reason you are closing the unmet need.
Converting an unmet need to a provided or referred service If you are now able to meet the need for your client, you can convert the original unmet need to
either provided or referred. This indicates that a need that had once been unmet, is now met.
To convert an unmet need, click on the edit pencil at the end of its row on the issue screen. This will
take you to the ‘edit service’ screen. This will enable you to convert the service using the ‘Delivery
type’ drop down menu (as shown below).
This will take you to the edit service screen. Convert the service using the Delivery type drop down
menu.

145
When converting an unmet need, you may be restricted in your choice of delivery type. This is
indicated by a choice within the menu being greyed out (as shown in the screenshot below). A
delivery type might be greyed out if your agency does not provide this service.
Example: In the above scenario, the client needed assistance for family/domestic violence. When
attempting to convert the only option is to refer the service, either internally or externally. It cannot
be converted to a provided service because the current lead agency is a generic (GEN) agency and
not funded to provide DV services.
Once you have established the delivery type you will be converting to, select it from the delivery
type drop down, complete all mandatory fields, and save the service. You will be returned to the
issue page and see that the unmet need has been converted to the newly created provided or
referred service in the service list.
What can I do if I cannot convert the unmet need to a ‘provided service’? As in the example above, if you have entered an unmet need that you cannot covert to a provided service it means that you have chosen a service that your agency is not funded to provide. In this case, you can either:
• Delete the original unmet need and re-enter it with a Prefix that your agency provides (e.g. ‘Gen’ for generic funded agencies) or
• Convert it to a service referral

146
Other functions
Editing a service To edit any service or unmet need, click the issue screen that contains the relevant service and click
the corresponding edit pencil (as shown below).
Only open services can be edited. Referred services that are pending or closed services will show a
different icon.
Repeating a service Once a service is closed the repeat button becomes available. This button is a quick and simple way
to repeat a service that has been previously entered. To repeat a service, click the repeat icon

147
You will then be directed to a repeat service page. The page is pre-filled with most of the details of
the service being repeated. All that is required to complete is to add a service description and end
date and click save or save and close.

148
Service details
are pre-filled
You need to
add a service
description
You also need
to set an end
date

149
The Case plan Cover page
The case plan cover page allows you to view details regarding a case plan such as who created it and
the date and time it was created. From this page you can also print your case plan and case notes,
set review date reminders and create a case exit. Further details about exiting your client from case
plan can be found in the end support/case exit section.
Setting a review date To set a case plan review date, click the update button on the case plan cover page. You will notice
the screen change to include a date field and save and cancel buttons. Click the calendar icon, select
a date and press the save button (as shown below).
Setting a review date will prompt you to review your case plan by providing a reminder on your
home screen.
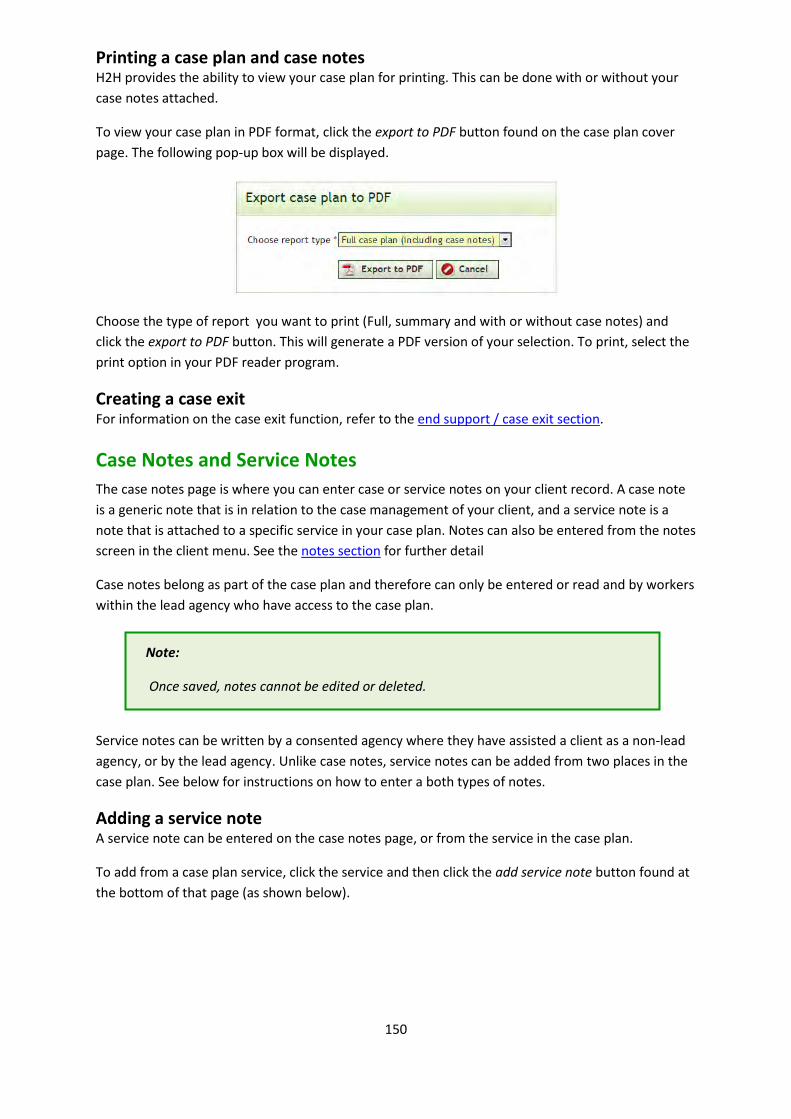
150
Printing a case plan and case notes H2H provides the ability to view your case plan for printing. This can be done with or without your
case notes attached.
To view your case plan in PDF format, click the export to PDF button found on the case plan cover
page. The following pop-up box will be displayed.
Choose the type of report you want to print (Full, summary and with or without case notes) and
click the export to PDF button. This will generate a PDF version of your selection. To print, select the
print option in your PDF reader program.
Creating a case exit For information on the case exit function, refer to the end support / case exit section.
Case Notes and Service Notes
The case notes page is where you can enter case or service notes on your client record. A case note
is a generic note that is in relation to the case management of your client, and a service note is a
note that is attached to a specific service in your case plan. Notes can also be entered from the notes
screen in the client menu. See the notes section for further detail
Case notes belong as part of the case plan and therefore can only be entered or read and by workers
within the lead agency who have access to the case plan.
Service notes can be written by a consented agency where they have assisted a client as a non-lead
agency, or by the lead agency. Unlike case notes, service notes can be added from two places in the
case plan. See below for instructions on how to enter a both types of notes.
Adding a service note A service note can be entered on the case notes page, or from the service in the case plan.
To add from a case plan service, click the service and then click the add service note button found at
the bottom of that page (as shown below).
Note:
Once saved, notes cannot be edited or deleted.

151
Next, set the date and time and write your note, press the save and close button to return to the
previous screen.
Saving your note – system timeout
For security reasons H2H has a 20 minute timeout feature. If no button within
H2H has been clicked for a period of 20 mins the timout feature will activate
and you will be logged out of the system. As a result any unsaved service and
case notes will be lost.

152
All service notes will appear in order underneath the service on the relevant view service screen (as
shown on next page). Service notes also appear in the notes list within the Case notes page, and on
the notes screen in the client menu.
Saves your note and allows you to
continue typing. Pressing this
button resets the 20-minute
timeout security feature.
Saves your note and returns you
to the previous screen. Notes
that are saved and closed are no
longer editable and cannot be
deleted.

153
Adding a case note Case notes are added through the case notes page in the case plan menu by clicking the add note
button.
Added service
notes will also
appear on the
case notes page

154
Enter the date/time, type of note, contact type and who was involved and write your note, press the
save and close button this, returns to the previous notes page. The same 20-minute timeout feature
applies to case notes as elsewhere in H2H therefore ensure you save your note often to avoid losing
your work.
Searching notes At the top of the case notes page there are various search fields that can be used to locate historical
notes previously entered onto H2H. You can use these fields to return search results based on your
criteria.
You can search by the type of note, author, agency and/or the month and year it was written.
Entered your search criteria, click the ‘search’ button. Search results will appear directly underneath.
If no search results are found, the screen will display ‘there are no notes for this client’
On the following page there is an example of the various fields that can be used for searching.
Adding a service note from the case notes screen
Service notes can also be added from the case notes screen by selecting service
note in the note type drop down box and joining it to a service by completing the
relevant fields that appear.
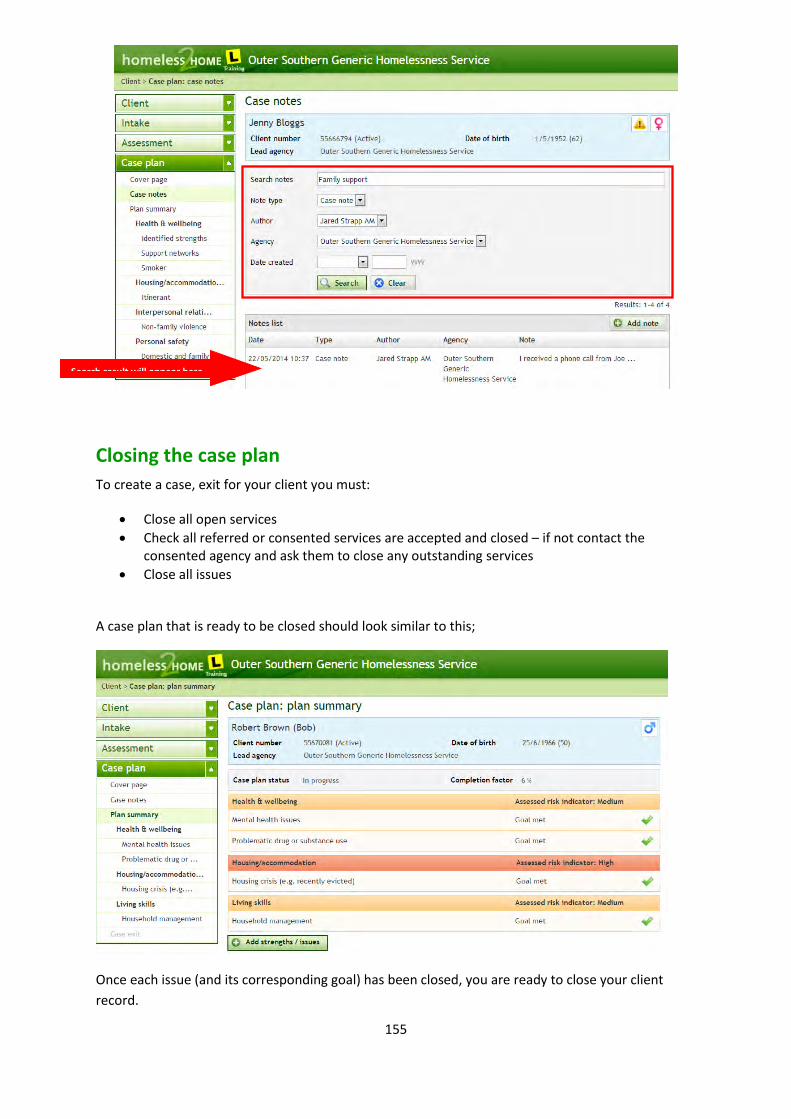
155
Closing the case plan
To create a case, exit for your client you must:
• Close all open services
• Check all referred or consented services are accepted and closed – if not contact the consented agency and ask them to close any outstanding services
• Close all issues
A case plan that is ready to be closed should look similar to this;
Once each issue (and its corresponding goal) has been closed, you are ready to close your client
record.
Search result will appear here

156
System Close, End Support & Case
Exit
157
System Closes
Clients records with no activity for more than one calendar month (over 30 days), are at risk of being
closed automatically by the System close function.
The system close function only operates on clients without a case plan, with a status of Casual or
assessed. At the end of the month, these clients will be automatically closed by the system and their
record set to inactive. This type of closure is known as a ‘System Close’
‘Activity’ consists of adding a service, or completing a pathway item (such as creation of an intake or
assessment)
You can avoid system closes by regularly check the 'clients without activity' item in your inbox
Exiting a client
Once support of a client has ended the client record on H2H needs to be closed off to make the
record inactive. You will need to update information about the client’s circumstances at the end of
support. To do this you need to either complete an ‘end support’ or ‘case exit’.
End support is used where the client has a status of either casual or assessed (they have had an
intake or assessment).
Case Exit is used to exit a client who has a case plan.
Differences between end support and case exit
The End support and Case exit functions are identical except for one question.
Note:
Always ensure you have as much detail as possible about your client’s
circumstances on exit. Accurate end support/case exit information is
crucial to rerecording outcomes for the client
Please Note:
For casual or assessed clients that are closed by ‘System close’, an exit will be
automatically completed. All fields within the exit will be set by default to ‘don’t know’.
These types of exits are visible in agency reporting outcomes and are monitored closely
as part of agency performance management. System closes should be avoided wherever
possible by monitoring the home page carefully.

158
Within an End support you are asked the reason why no case plan was created, in Case exit you are
asked to what extent were the clients goals achieved.
End Support Case Exit
Starting an end support or case exit
The end support can be completed at the following stages:
• After an Intake has been completed and one or more services provided (either by the Lead Agency or referred to another agency)
• After an Assessment has been completed regardless of whether a service was provided or not
When clicking on End support you will be taken to the cover page. On this screen the system will advise
you if there are any outstanding services or assessments in progress. If you choose to continue with
the end support all outstanding items will be closed.
The case exit function can be found at the bottom of the case plan cover page (as shown below).
Note:
If a client has a current case plan, the ‘End support’ function will not be
available. Instead, use the Case exit function

159
If you click the case exit button and receive a warning message advising that you have unclosed
issues or services return to the case plan and close the outstanding items before you can continue.
Working through an end support or case exit
Once you commence an end support or case exit you need to enter information on the client’s
circumstances at the end of the support period (the ‘end support’ panels). The information required
is similar to the intake, and includes the client’s homelessness status, housing, income, education,
personal details, and risk assessment scores. A case exit will also display a summary of the client's goal
achievement throughout the case plan.

160
The end support/case exit is divided into five sections, the first is ‘open’ while the remainder are
‘collapsed’. To open or collapse a section click on the + or – button (as shown on the next page).
Press these buttons to
expand and collapse
each section
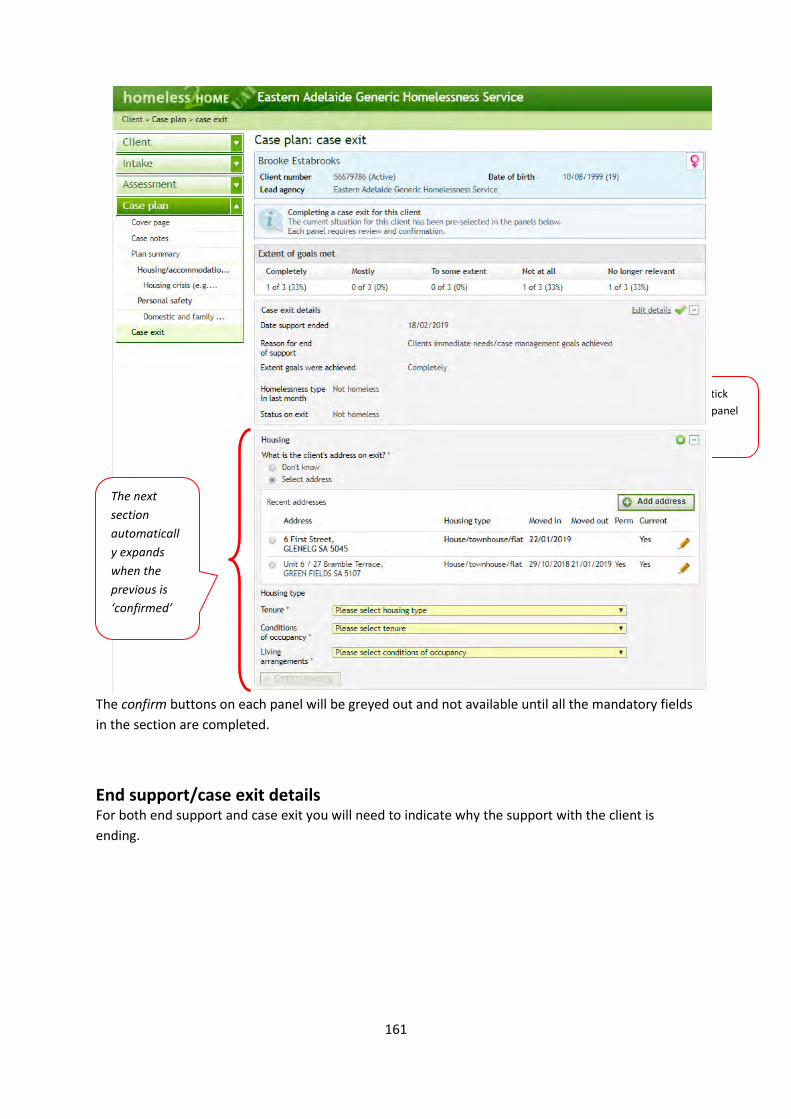
161
The confirm buttons on each panel will be greyed out and not available until all the mandatory fields
in the section are completed.
End support/case exit details For both end support and case exit you will need to indicate why the support with the client is
ending.
The green tick
shows the panel
has been
completed
The next
section
automaticall
y expands
when the
previous is
‘confirmed’

162
Reasons for end support definitions
client did not turn up the client had a further appointment with the agency and failed to show up
client incarcerated the client has been placed in a facility of which the main role is to detail and rehabilitate either adult prisoners, or youth/juveniles, and as a result the client no longer requires a service, or the service can no longer be provided to the client
client institutionalised the client has been placed in an institution, either voluntarily or involuntarily, such as a rehabilitation facility or psychiatric ward of a hospital, and as a result, the client no longer requires a service, or the service can no longer be provided to the client.
client no longer requested assistance
the client may have decided they no longer required assistance, or they may have moved from the state/territory or regions.
Do not select if the client was referred to another specialist homelessness agency.
client passed away the client died during the period they were receiving assistance from your agency
client referred to a mainstream agency
the client was referred to an agency other than a specialist homelessness agency and no longer requires support from your agency
client referred to another specialist homelessness service (available for case exit only)
the client was referred to another specialist homelessness agency
client immediate need/case management goals achieved
the client no longer requires support because their immediate needs have been met and/or case management goals have been achieved

163
lost contact with client the client may have moved on without notifying the agency. Close the support period if you have not been able to successfully contact the client
maximum service period reached
the agency ended a support period because the maximum time period for which they can provide a service has been reached. That is, an agency may have conditions placed on their services relating to how long they can provide support to a client
service withdrawn from client and no referral made
the agency ended the client’s support period because of inappropriate behaviour or breaking agency rules. Do not select if client was referred to another specialist homelessness agency
other – please specify the support period ended for a reason not covered by the categories above
don’t know the client left unexpectedly, and you have no knowledge about the reason
Once you have selected your reason for end support, complete the remaining fields and confirm the
panel. The housing panel will then automatically open.
The housing panel Within the housing section, you will see a list of previous addresses for your client. You can select one
of these addresses as the client’s current address or add a new address.
You have the option to edit an address using the corresponding pencil icon providing that address has
not been completed, by a moved-out date being set in the past.
Use the radio
button to
select an
address
Add a new
address here if
needed

164
If the client is not exiting to their most recent current address, you will need to complete their previous current address, by adding a moved-out date, before you can add a new one.
The income panel The income panel will automaticaly be pre-filled with income details that have been previously
added to the client (either in the intake, or during the support period). In this panel you can update
the existing information by clicking the edit pencil, or clicking the add income button if no income
information exists.
Complete the remaining fields and click the confirm income button. This will change the panel to
view mode, and open the eduction panel.
Note:
Completed addresses (where moved in/out dates are already set) cannot
be edited. If the client is returning to one of their old addresses, you will
need to add it again, so that accurates time periods can be recorded for
each separate stay at that location
Note:
House type, tenure, and conditions of occupancy information is used to
determine whether a client has had a successful housing outcome at exit.
Entering an ‘other;’ or ‘don’t know’ response into any of these fields may
result in the housing outcome for you client being recorded as an unknown

165
The education panel This contains the same education questions as the intake. As with the other panels, if details already
exist on the client record, they will appear here.
If no details currently exist and you select ‘yes’ on the question ‘Is the client undertaking formal
education or training’ you will be required to enter education details by pressing the Add education
button, completing the details in the pop-up box and pressing save. You will need to answer the
questions: education type and enrolment status.
The personal details panel Use this section to record any updated contact phone numbers for the client. If the client is under 18
you will have care and protection details shown. Check to see if these details are current and make
an necessary changes.
The risk assessment scores panel Here you can update at Risk scores already recorded (if relevant), to capture if a client's risk has
reduced since the score was last recorded.
Where a client has an identified issue of Domestic/Family Violence, but has not has a score
recorded, you will need to either add the risk score, or record the reason a risk assessment has not
been completed.
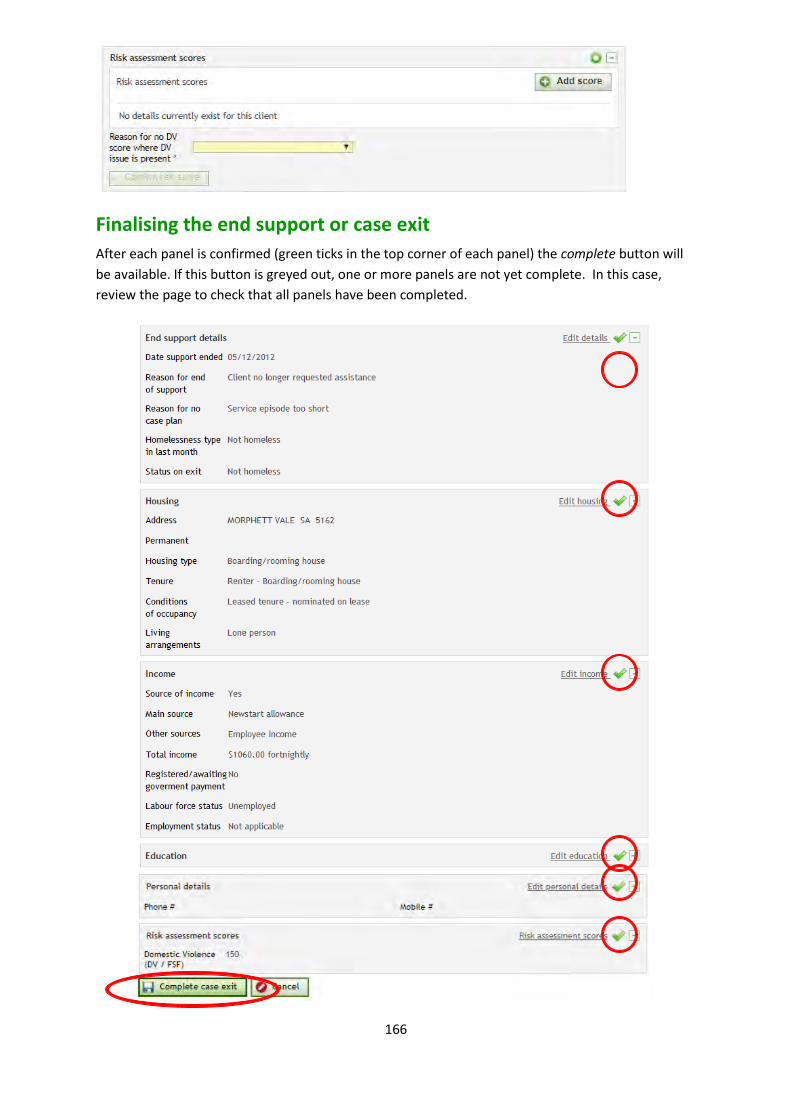
166
Finalising the end support or case exit
After each panel is confirmed (green ticks in the top corner of each panel) the complete button will
be available. If this button is greyed out, one or more panels are not yet complete. In this case,
review the page to check that all panels have been completed.

167
clicking the Complete button shows a summary of the end support/case exit information (as shown
below). The end support/case exit is no longer editable.

168
Post case follow ups
After completing the Case exit, the client status remains active to allow for post case reminder
follow-ups. (If you have completed an end support, your client status will have immediately changed
to inactive).
At 3- and 6-months post exit, you can follow up with the client, using the post case reminder fields
to enter any provided information.
To update, select the button as indicated below;
Then complete the pop up that appears, and save.
Post case reminders are not mandatory. You are not required to add dates to close the case plan.

169
Closing your case plan
After completing an ‘End support’ the client status immediately becomes ‘inactive’.
Closing a client after a ‘Case Exit’ is a two-step process.
After completing the Case exit (as explained above) the client status remains active to allow for post
case reminder follow-ups. To close the client record (make the client inactive) press the close case
plan button on the case plan cover page (as shown below) the client status will change to ‘inactive’.
The client record has now been closed.

170
Agency Manager Functions

171
About the Agency Manager role
Agency Manager is the highest level of access to the H2H system. The agency manager role is
responsible for monitoring activity, accepting and rejecting referrals, assigning clients to workers,
setting records as locked/sensitive/deceased and downloading reports.
It is up to the individual agency to determine which staff will be allocated the agency manager user
level. Some agencies elect to assign this role to multiple staff, and others nominate the role to those
in leadership positions.
Reminders and the inbox
For Agency Managers, reminders and inbox notifications will appear for all clients, rather than only
clients that are specifically assigned to the individual worker. This allows managers to monitor
activity across the agency and follow up with workers on expiring consents, pending referrals and
clients without activity.
Note:
It is recommended that there be at least two users with agency manager
level of access to ensure that referrals can be actioned in a timely manner
in the event of staff absence due to leave or illness
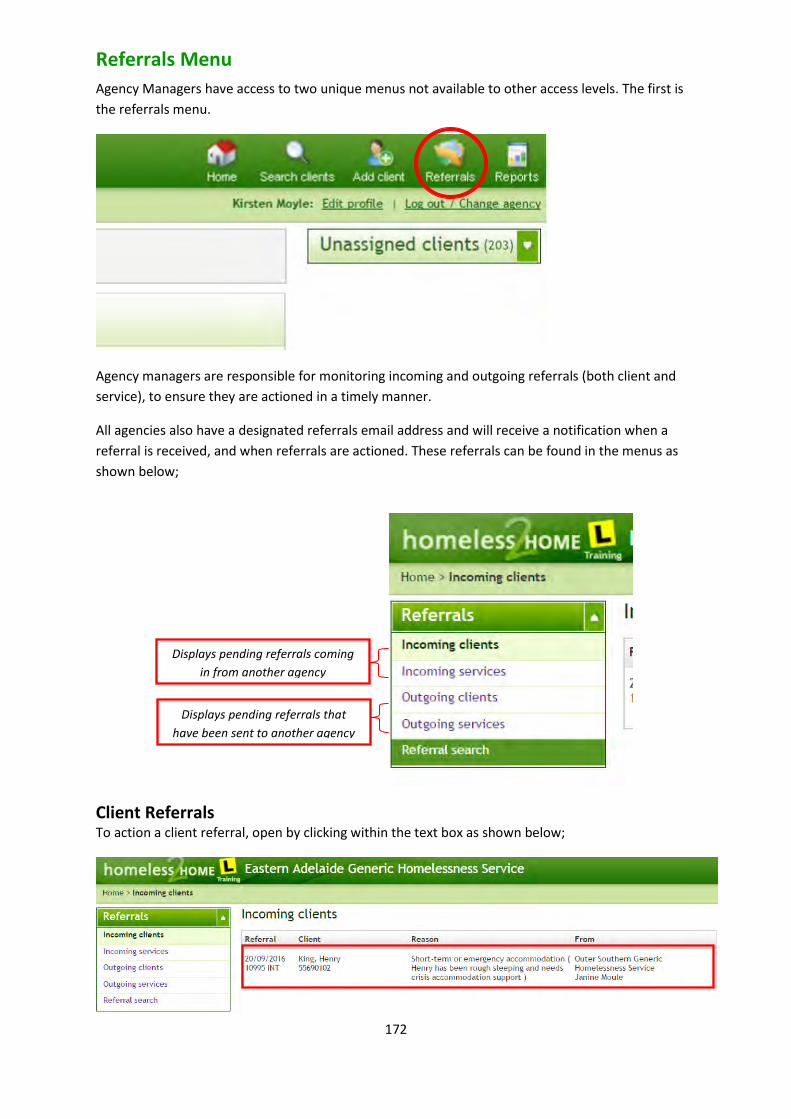
172
Referrals Menu
Agency Managers have access to two unique menus not available to other access levels. The first is
the referrals menu.
Agency managers are responsible for monitoring incoming and outgoing referrals (both client and
service), to ensure they are actioned in a timely manner.
All agencies also have a designated referrals email address and will receive a notification when a
referral is received, and when referrals are actioned. These referrals can be found in the menus as
shown below;
Client Referrals To action a client referral, open by clicking within the text box as shown below;
Displays pending referrals coming
in from another agency
Displays pending referrals that
have been sent to another agency

173
The receive referral page will appear;
On this page you can either accept or reject the referral and view the pdf referral form if required.
To accept, select the accept referral button, on this screen, and then again on the pop up that
appears to confirm;
On acceptance of the referral you will be re-directed to the personal details page.
To reject the client referral, select the reject referral button, then complete the reason for rejection
in the pop up that appears;
After rejecting a referral you will be returned to the incoming clients screen, and the referral will
have disappeared from the list.
Service Referrals and Consented Services Incoming service referrals are also accepted through the referral's menu. To action, go to the
incoming services screen;

174
This screen will list the following types of services;
• Services referred by another lead agency
• Consented services provided to your client by another agency with consent
• The type column will indicate whether the referral is an intake service or case plan service
• The category column will indicate whether it is a service referral or a consented service
To accept or reject a service referral, click on the text in the list to open, and then select the
appropriate button to either accept or reject. When accepting a service referral, you will need to
identify the appropriate service element, and assign a caseworker;
To finalise a service that has been provided to your client by another agency (a consented service),
open the consented service from the list;

175
This will open the ‘receive consented service’ page; where the notification can either be accepted or
rejected.
You can also review outgoing client or service referrals through the referral's menu.
The outgoing clients screen will display all clients that have been referred to another agency but are
still pending.
The outgoing services screen will display the following types of services;
• Services referred to another non-lead agency awaiting action
• Consented services provided to another agency’s client awaiting action
• The type column will indicate whether the referral is an intake service or case plan service
• The category column will indicate whether it is a service referral or a consented service

176
If required, any outgoing client or service referrals can be withdrawn by opening the referral from
the list and selecting the button.
Referral Search Agency managers are also able to search for a specific referral in the referral's menu;
Referrals can be searched by any combination of;
• Type – client or service
• Direction – incoming or outgoing
• Status – pending, accepted, rejected, withdrawn
• Time period
To use the search function, enter the selected criteria, and select search. Any matching referrals will
be displayed; Click on each referral to view further details.

177
Assignments
In order to complete some actions on a client record, a worker must be assigned to a client as either
a caseworker or case manager (depending on the user’s access level to the system). The
responsibility for assignments sits with the agency manager role.
In order to assign a worker to a client, the client must first have had an intake completed. If an
intake has not yet been completed, you will see a warning when trying to open the assignments
screen;
Once the client has reached at least a status of ‘casual’, you will be able to assign them to a worker.
To assign a case manager or case worker, click on the assignments page within the client menu and
then click the add assignment button. The following pop-up box then appears:
Complete the relevant fields to assign a worker and click the save assignment button.

178
Any currently assigned workers will be listed on the assignments page; and can be edited if required
by using the pencil icon as shown below;
Assignment Rules Summary case workers A case worker can be assigned either by an agency manager, or
automatically by the system through adding an intake service to the
client record or by being assigned a service referred from other
agencies during the referral acceptance process. As many case workers
as needed can be assigned to the client.
case managers Only one case manager can be assigned at a time. The case manager
must be assigned directly by an agency manager. A client must have a
case manager assigned before a case plan can be opened.
agency managers Agency managers can add services or make changes to a client’s case
plan without being assigned as a case worker or case manager.
Note:
A worker cannot be both a case worker and a case manager at the same
time. If a worker is already assigned as a case worker, and you wish to
make them a case manager, select the edit pencil and change their
assigned role in the pop up that appears

179
Search by worker
Agency managers can search client records by the assigned worker;
Agency managers can select a worker’s name from the list and select the search button to display all
clients who are assigned to that worker, whether as case worker, case manager, and as either a lead
or consented agency.
Additional search fields can also be completed if you wish to narrow the results down further, e.g.
selecting a status of ‘Active’ combined with an assigned worker’s name, will display all clients in case
plan assigned to that worker;
Unassigned Clients List
On the home page, agency managers will find the Unassigned clients list;

180
This list will display in alphabetical order, by surname, any client record with a status of new, casual,
or assessed, that has not been assigned to a case manager.
Clients who have had a case worker assigned will still appear in the unassigned clients list.
To remove a client from the unassigned client list they must either be assigned a case manager, or
either an end support or unassisted completed.
Reports
The operational reports function in H2H allows agency managers to download five types of pdf
reports

181
These reports are for the majority ‘point in time’ only, which means they will not return historical
information, only information ‘as of today’. You cannot add multiple reports together to get a total
for a certain period, as the reports can change daily to reflect the current client group.
Read on below for information about the different types of reports;
H2H Operational Reports Client no activity Displays clients who have had no activity in the current month
(completion of an intake, assessment, case plan, or addition of a
service are all considered ‘activity’)
Client status and
demographic
Point in time report of all clients where your agency is the current
or last lead agency. Includes client status, ATSI/Non ATSI, sex, age
range. Displays all clients
Case Plans Number of case plans that were open/closed during a selected
date range
Work load Point in time report displaying worker workload summary
including summaries for case managers, case workers, and
consented clients, broken down by open and closed services.
Assigned/Unassigned Point in time report of number of clients where you are the
current or last lead agency that are assigned or unassigned.
Sensitive and Locked
The sensitive and locked functions can be used to restrict the ability to view client records where
there is a risk to client safety. These functions can only be accessed by users with agency manager
access.
Workers should only add sensitive or locked status to a client in exceptional circumstances, where
there is real likelihood that the client is at risk of harm if someone with access to H2H could view
their information, or if there are pressing confidentiality concerns.
For example;
• a client presenting to a domestic violence service identifies that the perpetrator is employed
by another SHS
• a worker of an SHS has been homeless or experienced domestic violence in their past, and
does not want their colleagues to be able to view their support history
• a worker of an SHS is currently seeking assistance from another SHS and does not want their
colleagues to be aware of their situation
The locked and sensitive functions can be found at the top of the add client or personal details page
within the client menu when in edit mode.

182
Sensitive and Locked Definitions Sensitive Setting a client’s record to sensitive means that only workers
within the clients lead or consented agencies will be able to find
the record in a H2H search
Locked Setting a client’s record to locked means that only agency
managers and workers directly assigned to the client will have
access to the record (either as lead or consented agency). Locking
a client record even restricts your work colleagues from finding
the client in H2H, and should therefore only be used in
exceptional circumstances
Set Deceased
If a client has passed away, you will need to set the record to deceased. This function is only
available to users with agency manager access.
To set a client as deceased, go to the personal details screen within the client menu;
Note:
A client should be set as either locked OR sensitive, not both. The locked
function over-rides the sensitive function, so there is no purpose in setting
a client to both.

183
Scroll to the bottom of the screen and select the button.
Once in edit mode, you will find the button at the bottom of your screen.
Depending on the status of the client you may receive an alert when attempting to set deceased;
Note:
All client deaths need to be reported to your SA Housing Authority contract
manager. Please contact your contract manager to determine what
reporting may be required BEFORE setting the client record as deceased.

184
In order to set a client as deceased the record must be inactive, so you may need to complete an
end support or case exit. When you complete the ‘reason for end support’ ensure you select the
reason ‘client passed away’.
Once the client record is inactive, and you have printed any required documents, you will then be
able to set the record to deceased, by selecting the set deceased button and then completing the
pop up that appears;
Note:
Once the record has been set deceased it will no longer be visible on H2H.
If you wish to print a copy of the case plan or any notes you will need to do
this BEFORE setting the client record to deceased.

185
Definitions and Glossary of Terms

186
Service Definitions
Definitions of each specific service can be found in detail in the AIHW - SHS collection manual
accessible on the H2H support page.
Service Element Definitions
Service elements are used to determine what part of your program the client is being supported by.
The list of service elements that are available for each agency is unique and dependent upon which
programs your agency is funded to provide, and whether your agency operates as part of an
Alliance. If you are unsure which service element to choose for the clients’ circumstance, speak to
your team leader or manager.
You can find definitions for your agency service elements in the two charts below;
Service element definitions – Alliance Agencies
Accommodation
Accommodation provided directly by your agency, for example, on-site
crisis or transitional accommodation. This is used to collect data of
actual nights of accommodation that have been provided to a client.
Accommodation that has been paid for by an agency using brokerage
(i.e. an agency paying for a night’s motel accommodation for a client)
would be recorded using the ‘Accommodation – Brokerage’.
Accommodation - Brokerage
Where an Agency has paid for accommodation for a client using their
brokerage funding (i.e. an agency paying for a night’s motel
accommodation for a client), where other funding sources were not
available (e.g. Housing SA)
Adolescent brokerage
Provision of case management and brokerage support to young people
(16-20) who are unable to access mainstream or other funding sources
because they do not meet the required eligibility criteria.
Brokerage
Brokerage funds are allocated to purchase specialist services required
by clients. Specialist services are those services, or to overcome
geographical restrictions to service provision. Brokerage funds are
allocated for meeting crisis needs and implementing case plan goals.
Boarding house support
Support provided to clients residing in Boarding Houses in the
metropolitan area to help them sustain their accommodation and/or
access other more suitable forms of housing.
Early intervention/prevention
Initiatives which work to ensure people don’t
experience homelessness, or domestic and family violence. Early
intervention works to reduce the risk factors and increase the
protective factors associated with people experiencing homelessness,
or domestic and family violence.
General assistance and support
A wide range of support provided by an agency worker that is not a
specialised service. That is, the support is provided without the
expectation that the worker has completed formal, specialised training
in that area of assistance. General assistance may cover a range of

187
assistance from financial assistance/information, employment/training
assistance, to assistance for domestic/family violence and
family/relationship assistance.
Rough sleeper response
Provision of support for people who are rough sleeping to transition
into safe, stable and sustainable housing. Includes case management
support to access housing and manage their health care needs.
Motel support Services provided to clients placed in motel accommodation due to a
lack of alternative crisis accommodation options.
DV – Perpetrator response
Targeted responses and interventions for individuals who have
perpetrated domestic and/or family violence
Return to country
Outreach support and appropriate financial assistance to support
Aboriginal people experiencing, or at risk of experiencing
homelessness, to return to their home communities
Risk assessment
A structured and systematic approach for understanding and assessing risk which is linked to safety planning for people experiencing or at risk of experiencing domestic and family violence
Safe at home
Interventions, strategies, or programs that aim to support women and their children experiencing domestic and or/family violence to remain safely in their home or home of their choice, community, or community of their choice where it is safe to do so
DV – Safe transport
Safe transport supports for people escaping domestic and/or family
violence. It includes working in partnership with relevant agencies and
facilitating an assisted referral process to enable and safe and
connected transition for the client to appropriate services at their
destination
Safety planning
The process of supporting a client to identify what can be put in place
to help protect themselves and their children and make them feel
safer. It must be relevant to a client’s needs. Adapted if their situation
changes and be provided in a safe and supportive environment using
trauma-informed and strength-based approaches.
Specialised services
Assistance that can be provided only by a person with formal,
specialised training in that area of assistance. Specialised services may
range from psychological/psychiatric services to professional legal
services. Specialised services may be provided by agency workers or
may require an agency worker to assist the client in receiving external
services. This does not include assistance for family and domestic
violence.
Supportive housing packages
A funded package of support and case management to eligible
vulnerable people with complex needs, to support them to live
independently, and secure and maintain a tenancy. Housing SA and
Community Housing Providers (CHPs) provide and manage the
properties and tenancies.

188
Service element definitions – Directly Contracted Service Providers
Accommodation
Accommodation provided directly by your agency, for example, on-site
crisis or transitional accommodation. This is used to collect data of
actual nights of accommodation that have been provided to a client.
Accommodation that has been paid for by an agency using brokerage
(i.e. an agency paying for a night’s motel accommodation for a client)
would be recorded using the ‘Accommodation – Brokerage’.
Accommodation - Brokerage
Where an Agency has paid for accommodation for a client using their
brokerage funding (i.e. an agency paying for a night’s motel
accommodation for a client), where other funding sources were not
available (e.g. Housing SA)
Assertive outreach
Aims to provide pathways out of homelessness by delivering a housing
first response as an effective response to ending rough sleeping. To be
used only by agencies who have a specific assertive outreach
component included within their service agreement.
• Reduce the incidence of people sleeping rough by providing support to access appropriate accommodation and specialist case management support
• Establish an effective intake system for people sleeping rough, with appropriate risk and assessment tools to determine and record client needs
• Acknowledge and target individuals immediate and longer-term needs
• Provide a multi-disciplinary team approach to outreach work and case management practice,
Engage clients in the development of exit-oriented plans that enable
them to attain the necessary degree of independent living skills and
move into long term housing with outreach support where required.
Brokerage
Brokerage funds are allocated to purchase specialist services required
by clients. Specialist services are those services, or to overcome
geographical restrictions to service provision. Brokerage funds are
allocated for meeting crisis needs and implementing case plan goals.
Counselling (general counselling, DV and AFV specific, family mediation and therapy, sexual abuse specific)
Services provided to clients for counselling from an agency funded to
provide counselling assistance. This may be specific to Domestic
Violence, Aboriginal and family violence counselling, family mediation
and or therapy, youth or sexual abuse specific or non-specific
counselling.
Risk assessment Services provided to the client throughout the process of completing a
Domestic Violence Risk Assessment
Early intervention/prevention
Services to assist clients at risk of becoming homeless, also covers the
circumstances of ITS clients. ITS element is specific to ITS targets and
applies only to tenancy situations. Early intervention also covers

189
situations where the client owns the home or is living rent free with
family or partner and is experiencing domestic violence or abuse, or at
risk of defaulting on mortgage repayments, or experiencing family
breakdown, or where client is transitioning from custodial or care
arrangements.
Early intervention outreach
Services provided to support women and their children on an outreach
basis in identified community settings (e.g. courts) before they are
able or willing to engage fully with agencies.
Gateway – Domestic Violence Specific
Gateway for service functions that have been provided by the
Domestic Violence Gateway. See Gateway for Service for more detail
Gateway – Youth Specific
Gateway for service functions that have been provided by the Youth
Gateway. See Gateway for Service for more detail
Gateway for service
A client has presented to your agency and is either not eligible or
would be better placed with another agency and is subsequently
referred. E.g. If a client under the age of 16 presents to your agency
where the target group is adults, you would ‘Add Client’ and do an
Intake on H2H, then refer the client to a more appropriate agency.
In centre support
Support provided at the agencies premises and defined as:
1. One on one contact with a client
2. Group setting – e.g. if an agency runs a course (i.e. parenting course) and several different clients attend this course then this is defined as ‘In Centre Support’ for the purposes of reporting.
In home accommodation support
Specific to Adelaide Common Ground to record:
• Personal care (showering, grooming, dressing, toileting)
• Activities of daily living (assistance with budgeting, bill paying, reading correspondence, filling out forms, arranging and attending appointments)
• Mobility (transfers, use of equipment, transport arrangements)
• Community access – programs, community services, mainstream services, friends, family
• Communication (use of equipment and systems to ensure that clients can communicate their needs and develop social networks)
• Health care support (medication management, other)
• Behaviour management (as per behaviour management plans)
• Therapy support (as per programs from approved therapists e.g. physiotherapists, occupational therapists, speech therapists, etc.)
Intensive tenancy support
Services undertaken with ITS clients where ITS targets are included in
the agency’s service agreement.

190
Boarding house support
Support provided to clients residing in Boarding Houses in the
metropolitan area to help them sustain their accommodation and/or
access other more suitable forms of housing where your service
agreement includes targets for metropolitan boarding house support.
Outreach support Services provided to clients in an outreach setting.
Post Crisis Support Services to clients who have been stabilised and are at the stage
where agency support is being ended by the agency.
Support to engage
Specific to the Generic, Youth, and Domestic and Aboriginal Family
Violence Gateway Services. This service element involves telephone
support to clients to engage with the SHS, or DV&AFV sectors, and
other relevant government and non-government organisations.
Support to engage will continue until a referral has successfully
engaged with the Specialist Homelessness Sector, or a client no longer
needs gateway support.
Supportive housing packages
Services provided to clients living in Supportive Housing Package
properties provided by either a PGP or Housing SA where Supportive
Housing targets are included in your Service Agreement.
Motel support
Services provided to clients placed in motel accommodation due to a
lack of alternative crisis accommodation options. For further
information please refer to the Emergency Accommodation (PRAP
funded Motel/Hotel) Guidelines.
Waitlist support Support provided to any client who is awaiting accommodation, or a
case plan to be started.

191
Icons in H2H
Icon Definition Location
tool tip – hovering mouse over this icon will reveal a description or
definition for the relevant area it is placed
system wide
Found at the end of a row of a possible matching client record during
the duplicate check process. Selecting this icon discards your draft
client and redirects to the selected clients record
duplicate
check (add
client process)
indicates that a search result is a client of your lead agency, or you were
the last lead agency to work with the client
search clients
indicates an alert on the client record. Open the client summary page to
read the alert
search clients
when seen on a search result, indicates your agency is a consented
agency for this client
search clients
when seen in the intake, indicates that a panel has been completed intake
when seen in the case plan summary page, indicates that an issue has
been resolved
case plan
when seen in the end support or case exit, indicates that a panel has
been completed
end
support/case
exit
client record is set to sensitive search clients
client record is set to locked search clients
Found at the end of a row listing a client record. Selecting this button
creates a new draft client, based on this client’s details (useful when
adding multiple family members who have similar personal details)
search clients
Edit button. Selecting will open certain fields to be edited such as end dates, descriptions, personal details, etc.
system wide
Indicates that service is still open (end date has not passed/or has not been closed)
services
Indicates a consented service (a service provided by a non-lead agency) that is pending (has not been actioned by the lead agency)
services
Indicates that the service is still open, and it has passed its end date and requires closing. The service must be closed by the agency that provided it
services

192
Select to withdraw a client referral, an internal service referral, or a consented service. This button will only be available if the referral is in pending state
referrals
(client/service)
Indicates a service that has closed
services
indicates a service that has been closed and saved as ‘entered in error’. services
Repeat service button (only available when the service is closed). Clicking this icon will create a new service with most fields pre-populated
services
found when adding an address. Will bring up a suburb search tool to
locate suburbs and their postcode
Housing Panel
Pending service referral that has not been accepted, or consented service notification not accepted by lead agency
services
Referred or consented service that has been rejected services

193
Glossary of Common Terms
Common Terms Agency The physical location (or service outlet) where the funded program is
operated. It is possible to have one program operate from multiple
agencies and multiple programs operate from one agency.
AIHW Australian Institute of Health and Welfare is an independent statutory
authority set up by the Australian Government to provide reliable, regular
and relevant information and statistics on Australia’s health and welfare.
At risk of homelessness
A person is at risk of homelessness if they are at risk of losing their
accommodation or they are experiencing one or more of a range of factors
or triggers that can contribute to homelessness.
Risk factors include:
• Financial stress (including due to loss of income, low income, gambling, change of family circumstances)
• Housing affordability stress and housing crisis (pending evictions/ foreclosures, rental/ or mortgage arrears)
• Inadequate or inappropriate dwelling conditions, including accommodation which is unsafe, unsuitable or overcrowded
• Previous accommodation ended
• Relationship/family breakdown
• Child abuse, neglect or environments where child/ren are at risk
• Sexual abuse
• Domestic/ family violence
• Non-family violence
• Mental health issues or other health problems
• Problematic alcohol, drug or substance use
• Employment difficulties and unemployment
• Problematic gambling
• Transitions from custodial and care arrangements, including out of home care, independent living arrangements for children aged under 18, health and mental health facilities/ programs, juvenile / youth justice and correctional facilities
• Discrimination including racial discrimination (e.g. Aboriginal people in urban rental market)
• Disengagement with school or other education and training
• Involvement or exposure to criminal activities
• Antisocial behaviour
• Lack of family and/ or community support
• Staying in a boarding house for 12 weeks or more without security of tenure
Case management A collaborative process of assessment, planning and advocacy to meet an
individual’s needs.

194
Client A person of any age who receives a direct service from a Specialist
Homelessness agency.
Client referral The process by which the responsibility for the management of a client is
transferred from one agency to another.
Consented agency An agency that has been requested by the lead agency with the consent of
a client, to assist in providing support to a referred client that is case
managed at a lead agency.
De-identified
information
This is information that is gathered from people accessing SHS Agencies for
services. The information is carefully selected to ensure that an individual
providing the information cannot be identified in any way. It is not possible
to look at the information and know who provided it.
Homeless The AIHW define homelessness as:
A person is homeless if they are either:
• Living in non-conventional accommodation or ‘sleeping rough’, or
• Living in short-term or emergency accommodation due to a lack of
other options
Lead agency An agency where a client presents or is referred to for assistance with
homelessness.
The lead agency is responsible to provide a lead role in the support of a
client, in most instances through a case managed response.
Life domains Life domains are groups that separate common issues or behaviours that a
person may need assistance with into categories.
NAHA The National Affordable Housing Agreement provides the framework for
the Commonwealth and the States to work together to improve housing
affordability and homelessness outcomes for Australians.
NDCA National Data Collection Agency is the national information system that
combines information from both SHS Agencies and State/Territory and
Commonwealth funding departments.
Non-conventional
accommodation Non-conventional accommodation is defined as:
• Living on the streets
• Sleeping in parks
• Squatting
• Staying in cars or railway carriages
• Living in improvised dwellings
• Living in the long grass

195
This definition aligns closely with the cultural definition of primary
homelessness.
Organisation The legal entity that is funded to deliver a program and enters into the
Service Agreement with the Department of Human Services
Presenting unit A presenting unit is a client or group of clients that present together to a
Specialist Homelessness agency. People who do not receive a service, and
are therefore not clients, are not included in the presenting unit. This may
include children who present with a parent or guardian but do not receive
any services themselves.
Presenting units may be:
• A group including unrelated people
• A person alone
• A person with child/ren
• A couple with child/ren
• Siblings
• Multi-generational family
Presenting unit
head The spokesperson or main contact person of a presenting unit. To be able
to understand the composition of a group presenting to your agency it is
important to be able to relate people within the group. This is done by
relating the members of the group to a person who is nominated as the
presenting unit head. If there is a child/ren under 18 years old present the
presenting unit head is the spokesperson who is:
• The parent/ guardian representing any child/ren under 18 years old
• The most direct relation to any child/ren if there is no parent/ guardian present
• If there are no child/ren under 18 years old present the presenting unit head is the spokesperson who is:
• The spouse/ partner of another person within the presenting unit
• Related in some way to another person within the presenting unit
Service Referral A service referral occurs when a client needs a service that your agency is
not able to provide. A service referral is then sent to another agency to
provide that service.

196
Short-term or
emergency
accommodation
Short-term or emergency accommodation includes:
• Refuges
• Crisis shelter
• Couch surfing
• Living temporarily with friends and/or relatives
• Insecure accommodation on a short-term basis
• Emergency accommodation arranged by a Specialist Homelessness agency (e.g. hotels, motels etc.)
The following short-term accommodation options are not considered to be
homeless:
• Hotels, motels, caravan parks and other temporary accommodation used when a person is on holiday or travelling
• Custodial and care arrangements, such as prisons or hospitals
• Temporary accommodation utilised by a person while renovating usual residence or building a new residence (e.g. weekenders, caravans)
This definition aligns closely with the cultural definition of secondary
homelessness.
Specialist
Homelessness
Services Collection
(SHSC)
The SHSC provides information about all people, both adults and children,
who seek assistance from specialist homelessness agencies. It is comprised
of a client collection and an unassisted persons collection. The AIHW
manages the collection of data and produces reports on the data to all
stakeholders.
Support period The period a client receives services from your agency is referred to as a
support period. A support period starts on the day the client first receives
a service from your agency.
A support period ends when:
• The relationship between the client and your agency ends
• The client has reached their maximum amount of support your
agency can offer
• A client has not received any services from your agency for a
whole calendar month and there is no ongoing relationship
Where a client has an appointment with your agency which is more than
one calendar month in the future it is not necessary to close the support
period. This is because it is expected that there is an ongoing relationship
with the client. There may still be work undertaken in the intervening
period on the client’s behalf, such as checking on the client or updating
case notes, and this should be recorded as services provided.

197
The end of a support period is the day the client last received services from
your agency.
Unassisted person
An unassisted person is any person who seeks services from a Specialist
Homelessness agency and does not receive any services. A child who seeks
a service but does not receive a service would be considered an unassisted
person also.