Travelport Smart Buttons User Guide.pdf
99
TRAVELPORT SMART BUTTONS V.5.0 User Guide Version 4 / January 2021
-
Upload
khangminh22 -
Category
Documents
-
view
1 -
download
0
Transcript of Travelport Smart Buttons User Guide.pdf

TRAVELPORT
SMART BUTTONS V.5.0
User Guide
Version 4 / January 2021
Travelport Smart Buttons v.5.0 User Guide Page 2
CONTENTS
1. Introduction ........................................................................................................................................ 5
What is Travelport Smart Buttons? ........................................................................................................... 5
2. Level of Script Creation ..................................................................................................................... 5
Easy Mode ............................................................................................................................................... 6
Standard Mode ........................................................................................................................................ 7
3. Using Travelport Smart Buttons ..................................................................................................... 10
Travelport Smart Buttons Editor ............................................................................................................. 10
Setting up the Script ............................................................................................................................... 11
Adding the controls (xml elements) to your script ............................................................................... 11
Basic script structure .......................................................................................................................... 14
4. Types of collections used in Travelport Smart Buttons ................................................................... 15
What is a collection? .............................................................................................................................. 15
How can I create collection? .................................................................................................................. 15
What actions can I perform when I have collection? ............................................................................... 19
Why we are introducing new type of collection Value**Key? .................................................................. 20
What is Collection type: Value**Key? ..................................................................................................... 20
Which controls (xml elements) has been designed to work with Value**Key collection? ........................ 21
5. GDS Variables .................................................................................................................................. 21
What are GDS Variables? ...................................................................................................................... 21
How can I enter GDS Variable to my script? .......................................................................................... 22
Configurable GDS Variables .................................................................................................................. 23
Using Configurable GDS Variables ........................................................................................................ 25
6. Travelport Smart Buttons controls (xml elements) ........................................................................ 27
Text Field <TextBox> ............................................................................................................................. 27
Configuration of <TextBox> using GUI ............................................................................................... 27
Configuration of <TextBox> using xml code ....................................................................................... 29
Text input Validation .......................................................................................................................... 30
Text label <TextBlock> ........................................................................................................................... 31
Configuration of <TextBlock> using GUI ............................................................................................. 31
Drop-down list <ComboBox> ................................................................................................................. 32
Configuration of <ComboBox> using GUI ........................................................................................... 33
Date selector <DataPicker> ................................................................................................................... 34
Configuration of <DatePicker> using GUI ........................................................................................... 35
QuestionBlock <QuestionBlock> ............................................................................................................ 36
Configuration of <QuestionBlock> using xml code ............................................................................. 37
Travelport Smart Buttons v.5.0 User Guide Page 3
Example of script with <QuestionBlock>............................................................................................. 39
Run terminal command <RunCommand> .............................................................................................. 40
Configuration of <RunCommand> using GUI ..................................................................................... 40
Configuration of <RunCommand> using xml code ............................................................................. 41
Show Message <ShowMessage> .......................................................................................................... 42
Configuration of <ShowMessage> using GUI ..................................................................................... 43
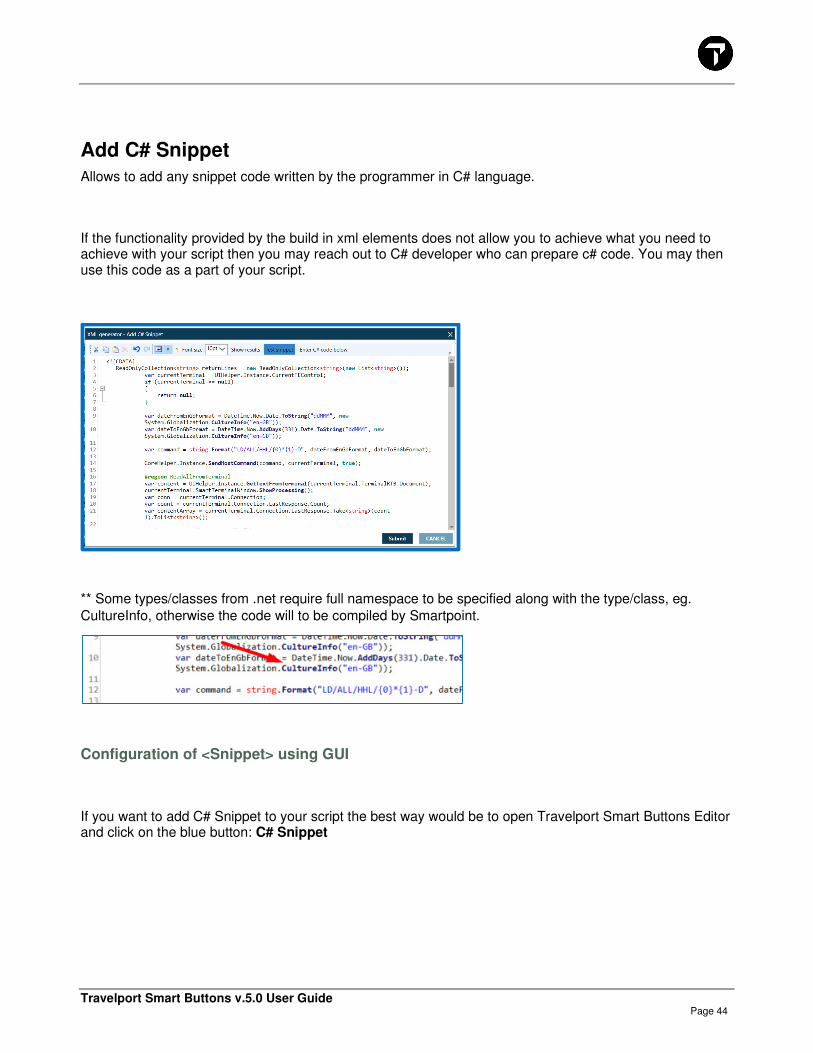
Add C# Snippet ...................................................................................................................................... 44
Configuration of <Snippet> using GUI ................................................................................................ 44
SB Variables to <Snippet> and back .................................................................................................. 45
Variable .................................................................................................................................................. 48
Configuration of <Variable> using GUI ............................................................................................... 48
Using Variables values ....................................................................................................................... 49
Run Application <RunExe> .................................................................................................................... 50
Configuration of <RunExe> using GUI ............................................................................................... 50
Run other button <RunOtherButton> ...................................................................................................... 52
Configuration of <RunOtherButton> using GUI ................................................................................... 52
Get text from terminal <GetString> ......................................................................................................... 53
Configuration of <GetString> using GUI ............................................................................................. 53
How to calculate column and row ....................................................................................................... 55
How to Search row by content ............................................................................................................ 56
Date / Time <DateTime> ........................................................................................................................ 58
Configuration of <DateTime> using GUI ............................................................................................. 58
Configuration of <DateTime> using xml code ..................................................................................... 59
Examples of how to use <DateTime> ................................................................................................. 59
Manage Collection <ManageCollection> ............................................................................................... 60
Configuration of <ManageCollection> using GUI ................................................................................ 60
Configuration of <ManageCollection> using xml code ........................................................................ 64
Examples on how to use <ManageCollection> control ....................................................................... 65
Run Code For Each Element <ForEach> ............................................................................................... 68
Configuration of <ForEach> using GUI ............................................................................................... 68
Configuration of <ForEach> using xml code ....................................................................................... 70
Examples on how to use <ForEach> control ...................................................................................... 71
Using <BreakForEach> control .......................................................................................................... 74
If then Else <ConditionalAction> ............................................................................................................ 75
Configuration of <ConditionalAction> using GUI ................................................................................. 76
Configuration of <ConditionalAction> using xml code ......................................................................... 78
Setting complex condition with OR and AND logical operator and groups .......................................... 79
Grouping conditions ........................................................................................................................... 80
Examples on how to use <ConditionalAction> control ........................................................................ 81
API Call <APICall> ................................................................................................................................. 82

Travelport Smart Buttons v.5.0 User Guide Page 4
Configuration of <APICall> using GUI ................................................................................................ 82
Configuration of <APICall> using xml code ........................................................................................ 85
Example of response from API that is accepted by Travelport Smart Buttons .................................... 86
Inspirations for APICall control usage ................................................................................................. 86
Read From Excel <ReadFromExcel> .................................................................................................... 87
Configuration of <ReadFromExcel> using GUI ................................................................................... 87
Configuration of <ReadFromExcel> using xml code ........................................................................... 89
Examples on how to use <ReadFromExcel> control .......................................................................... 90
ButtonConf <ButtonConf> ...................................................................................................................... 95
Beak script processing <Exit> ................................................................................................................ 96
7. Configuration of Office and Personal Buttons ............................................................................... 96
Managing Office Buttons ........................................................................................................................ 97
8. Troubleshooting ............................................................................................................................... 99
Travelport Smart Buttons v.5.0 User Guide Page 5
1. INTRODUCTION
What is Travelport Smart Buttons?
Travelport Smart Buttons is an intuitive, easy to configure scripting tool designed for a seamless integration with Travelport Smartpoint. It will automate the entries that you use in your day to day work environment, thereby increasing efficiency and cutting out unnecessary mistakes.
It has selection of varying levels of complexity, offering functional options based on agency requirements using XML language for script creation.
2. LEVEL OF SCRIPT CREATION
Travelport Smart Buttons have 2 levels of key creation available:
Easy Mode
Standard Mode
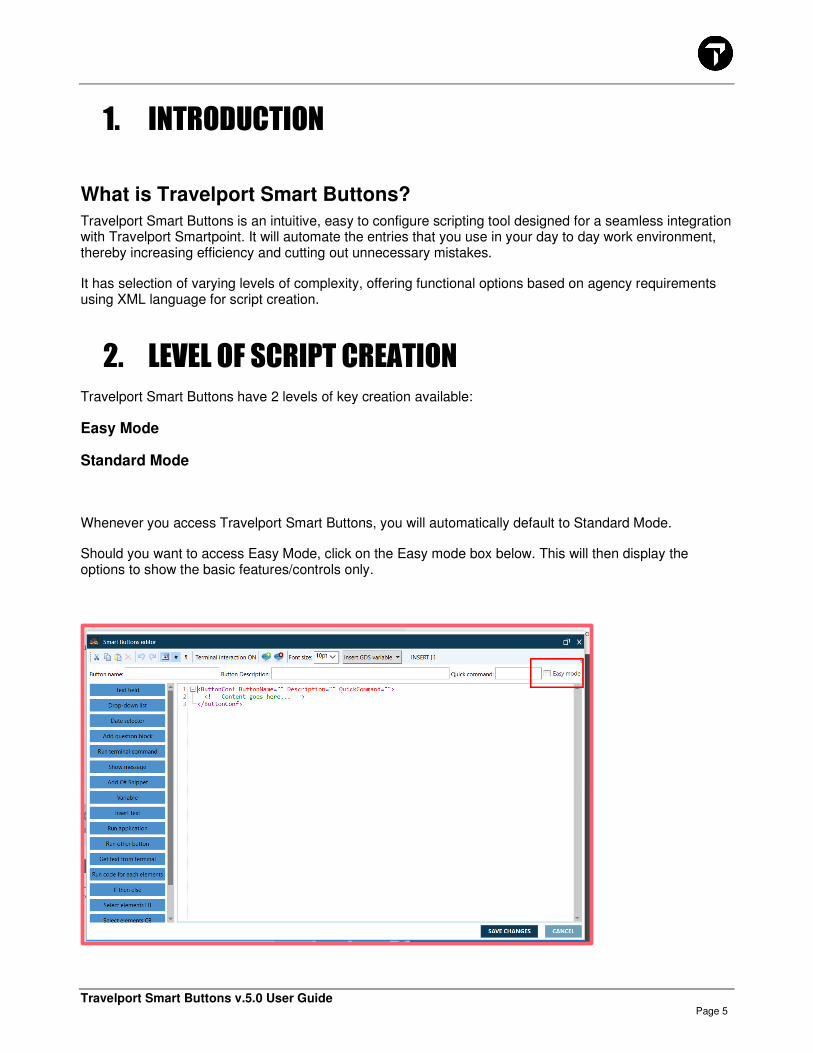
Whenever you access Travelport Smart Buttons, you will automatically default to Standard Mode.
Should you want to access Easy Mode, click on the Easy mode box below. This will then display the options to show the basic features/controls only.
Travelport Smart Buttons v.5.0 User Guide Page 6
Easy Mode
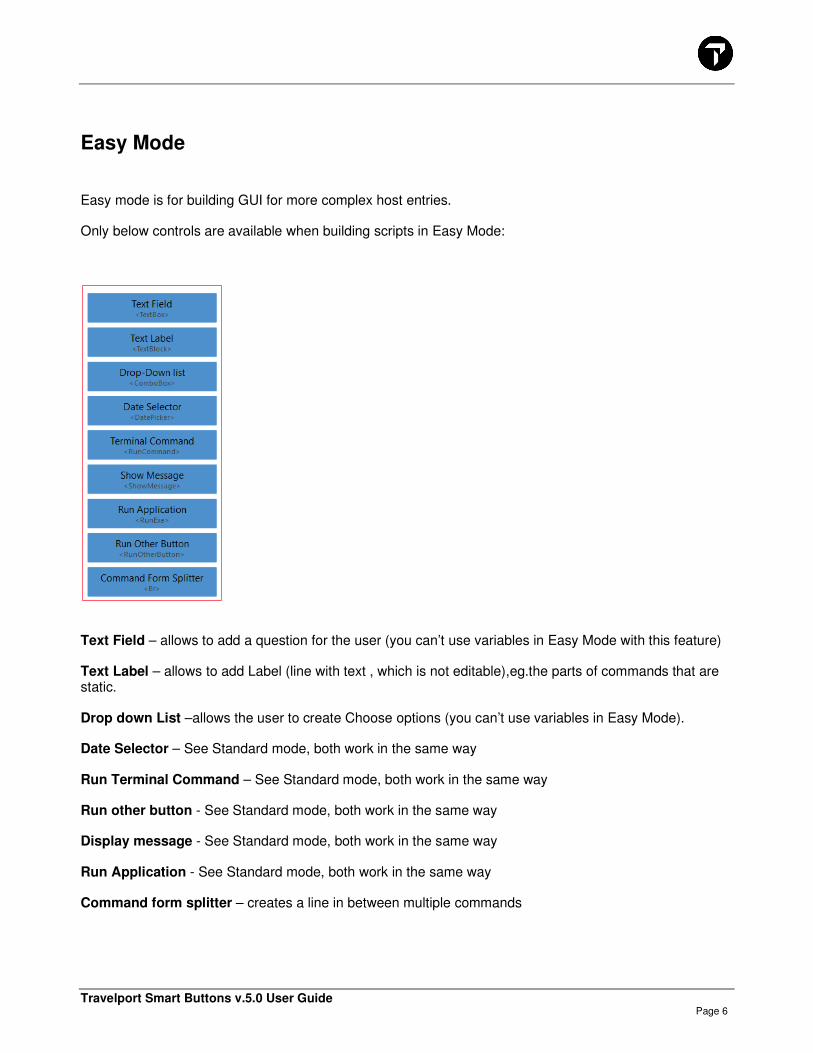
Easy mode is for building GUI for more complex host entries.
Only below controls are available when building scripts in Easy Mode:
Text Field – allows to add a question for the user (you can’t use variables in Easy Mode with this feature)
Text Label – allows to add Label (line with text , which is not editable),eg.the parts of commands that are static.
Drop down List –allows the user to create Choose options (you can’t use variables in Easy Mode).
Date Selector – See Standard mode, both work in the same way
Run Terminal Command – See Standard mode, both work in the same way
Run other button - See Standard mode, both work in the same way
Display message - See Standard mode, both work in the same way
Run Application - See Standard mode, both work in the same way
Command form splitter – creates a line in between multiple commands
Travelport Smart Buttons v.5.0 User Guide Page 7
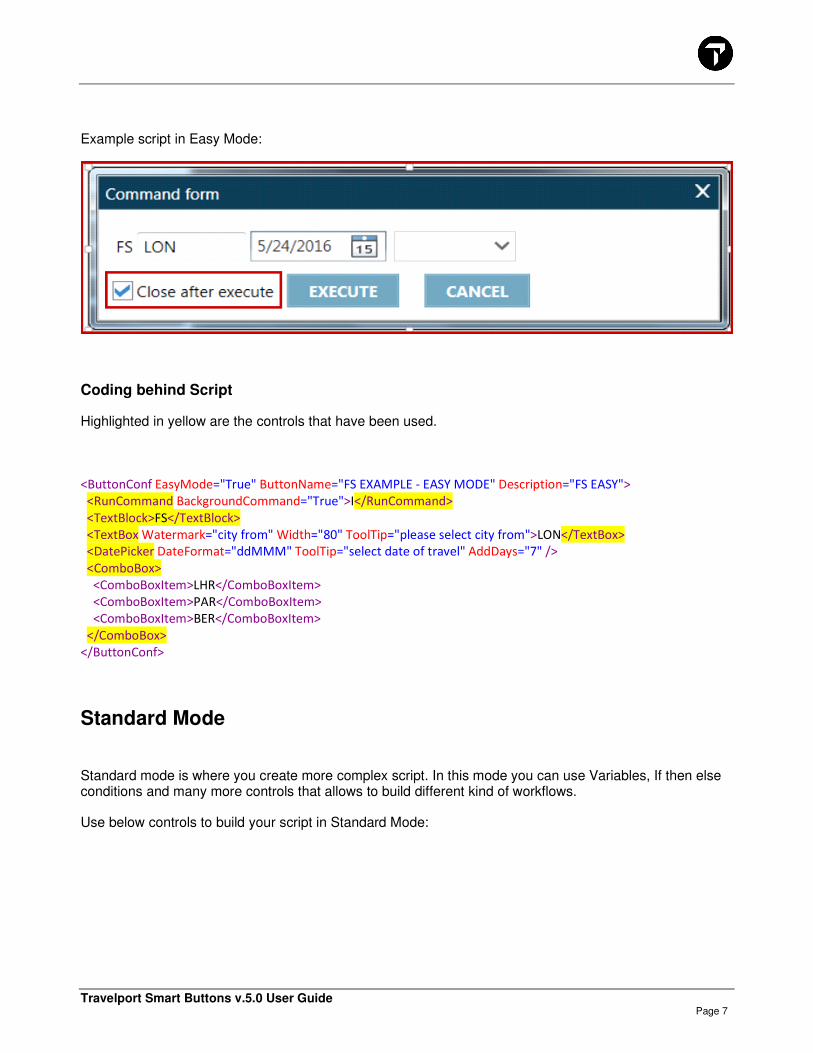
Example script in Easy Mode:
Coding behind Script
Highlighted in yellow are the controls that have been used.
<ButtonConf EasyMode="True" ButtonName="FS EXAMPLE - EASY MODE" Description="FS EASY">
<RunCommand BackgroundCommand="True">I</RunCommand>
<TextBlock>FS</TextBlock>
<TextBox Watermark="city from" Width="80" ToolTip="please select city from">LON</TextBox>
<DatePicker DateFormat="ddMMM" ToolTip="select date of travel" AddDays="7" />
<ComboBox>
<ComboBoxItem>LHR</ComboBoxItem>
<ComboBoxItem>PAR</ComboBoxItem>
<ComboBoxItem>BER</ComboBoxItem>
</ComboBox>
</ButtonConf>
Standard Mode
Standard mode is where you create more complex script. In this mode you can use Variables, If then else conditions and many more controls that allows to build different kind of workflows.
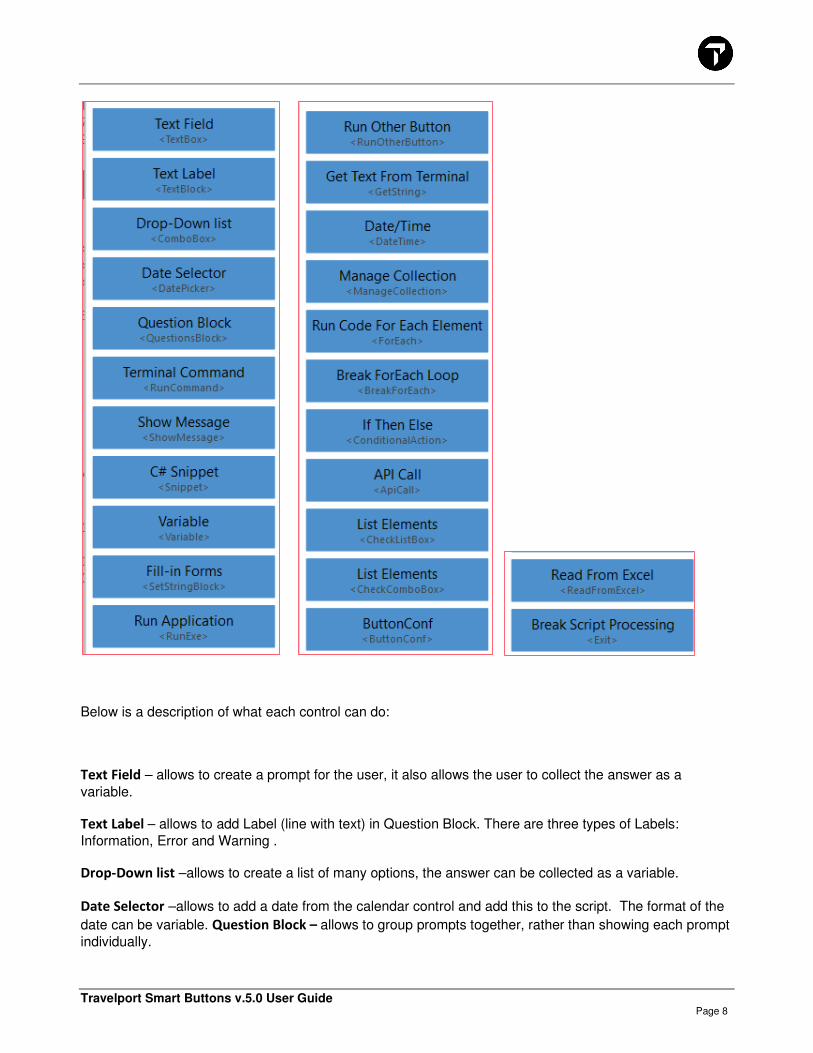
Use below controls to build your script in Standard Mode:
Travelport Smart Buttons v.5.0 User Guide Page 8
Below is a description of what each control can do:
Text Field – allows to create a prompt for the user, it also allows the user to collect the answer as a
variable.
Text Label – allows to add Label (line with text) in Question Block. There are three types of Labels:
Information, Error and Warning .
Drop-Down list –allows to create a list of many options, the answer can be collected as a variable.
Date Selector –allows to add a date from the calendar control and add this to the script. The format of the
date can be variable. Question Block – allows to group prompts together, rather than showing each prompt
individually.
Travelport Smart Buttons v.5.0 User Guide Page 9
Terminal Command – allows to run the cryptic terminal command in the GDS terminal.
Show Message – allows a message to be displayed, this appears as a splash screen or text message on
the Travelport Smartpoint screen.
C# Snippet – allows to add any snippet code written by the programmer in C# language (useful with more
complex scripts).
Variable –allows to create a variable item (store the value of the control).
Fill-in Forms – allows to fill out the GDS fill in formats with specific values.
Run Application – allows to launch a website or link to a document.
Run Other Button – allows to link another button to an existing script (one script can trigger another one).
Get Text From Terminal – allows you to grab text from Smartpoint screen and this can be used at a later
stage within a script.
Date/Time- allows to use current date and time within your script workflow.
Manage Collection – allows to extract with specific element out from your collection of elements or filter
your collection to include only unique elements.
Run Code For Each Element - allows to run the same action for each element from your collection.
Break ForEach Loop -allows to stop executing the action in a loop (<ForEach>) if condition is agreed.
If Then Else – allows you to set up if, then else options within a script.
API Call – allows to integrate and communicate with API (eg.back office system API).
List Elements - allows to display list of available answers with checkboxes.
Button Conf - It is a shell for all controls used in one script. Script will not work if this control is missing.
Read From Excel-allows to read information from Excel file.
Break Script Processing – allows to stop processing of the script.
Travelport Smart Buttons v.5.0 User Guide Page 10
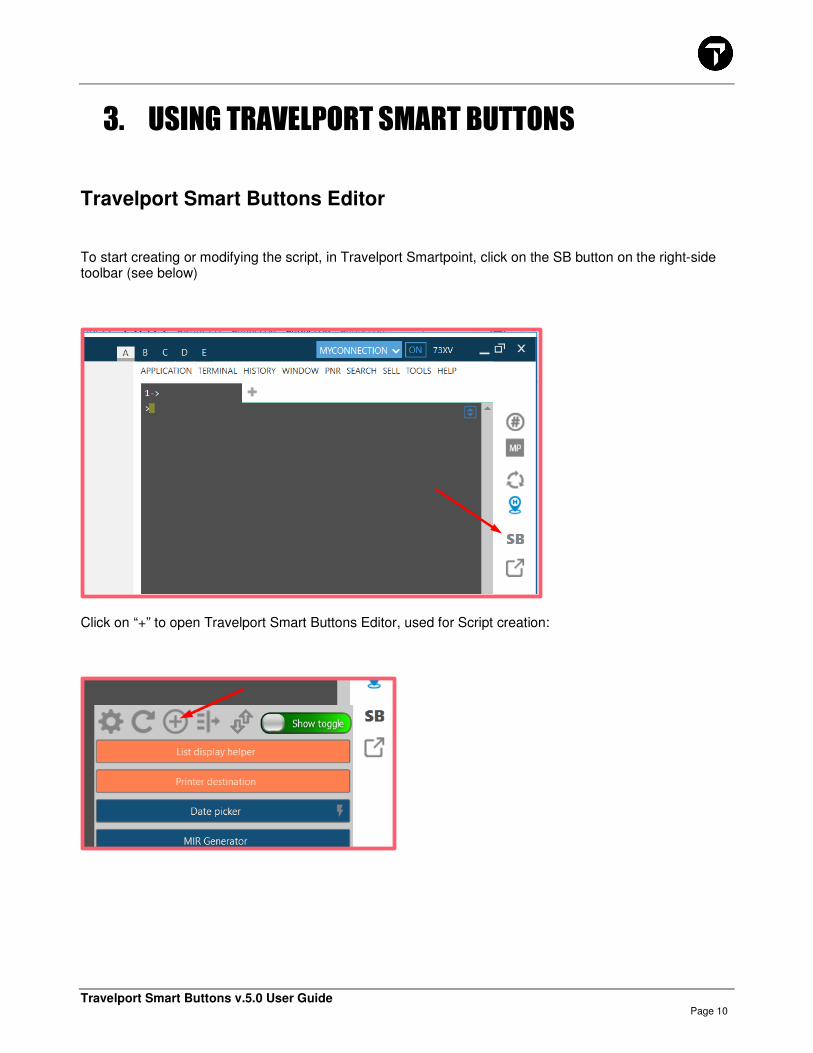
3. USING TRAVELPORT SMART BUTTONS
Travelport Smart Buttons Editor
To start creating or modifying the script, in Travelport Smartpoint, click on the SB button on the right-side toolbar (see below)
Click on “+” to open Travelport Smart Buttons Editor, used for Script creation:
Travelport Smart Buttons v.5.0 User Guide Page 11
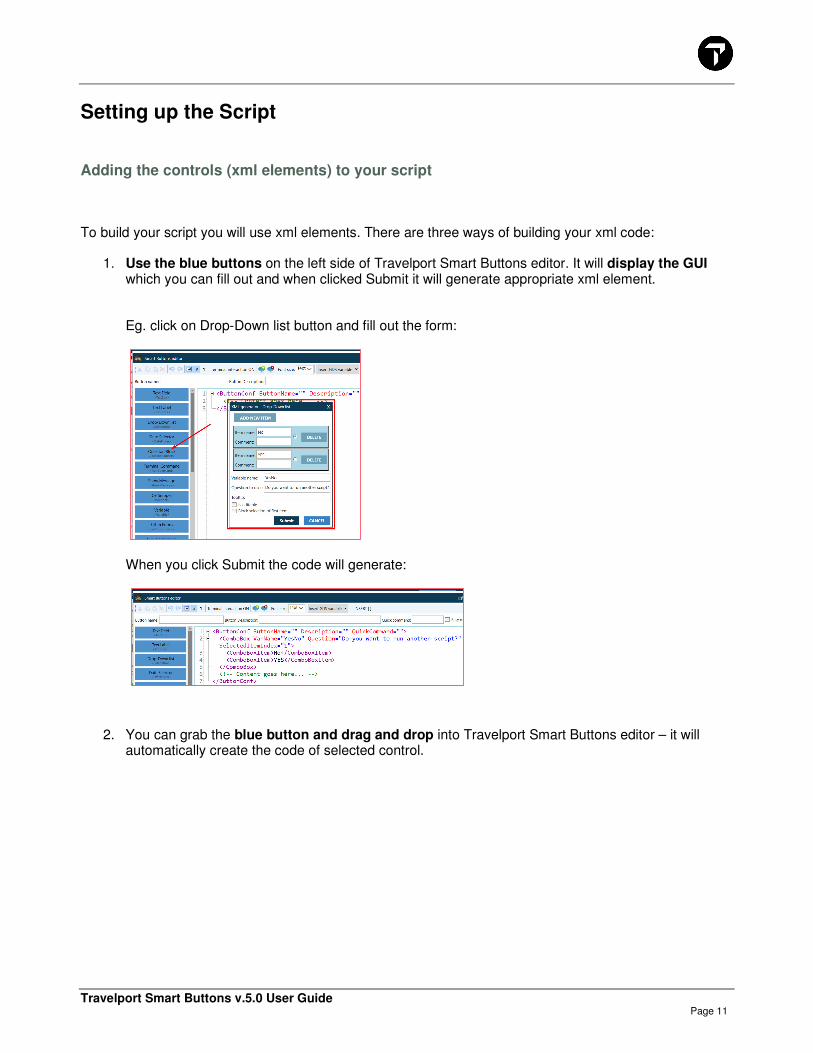
Setting up the Script
Adding the controls (xml elements) to your script
To build your script you will use xml elements. There are three ways of building your xml code:
1. Use the blue buttons on the left side of Travelport Smart Buttons editor. It will display the GUI which you can fill out and when clicked Submit it will generate appropriate xml element.
Eg. click on Drop-Down list button and fill out the form:
When you click Submit the code will generate:
2. You can grab the blue button and drag and drop into Travelport Smart Buttons editor – it will automatically create the code of selected control.

Travelport Smart Buttons v.5.0 User Guide Page 12
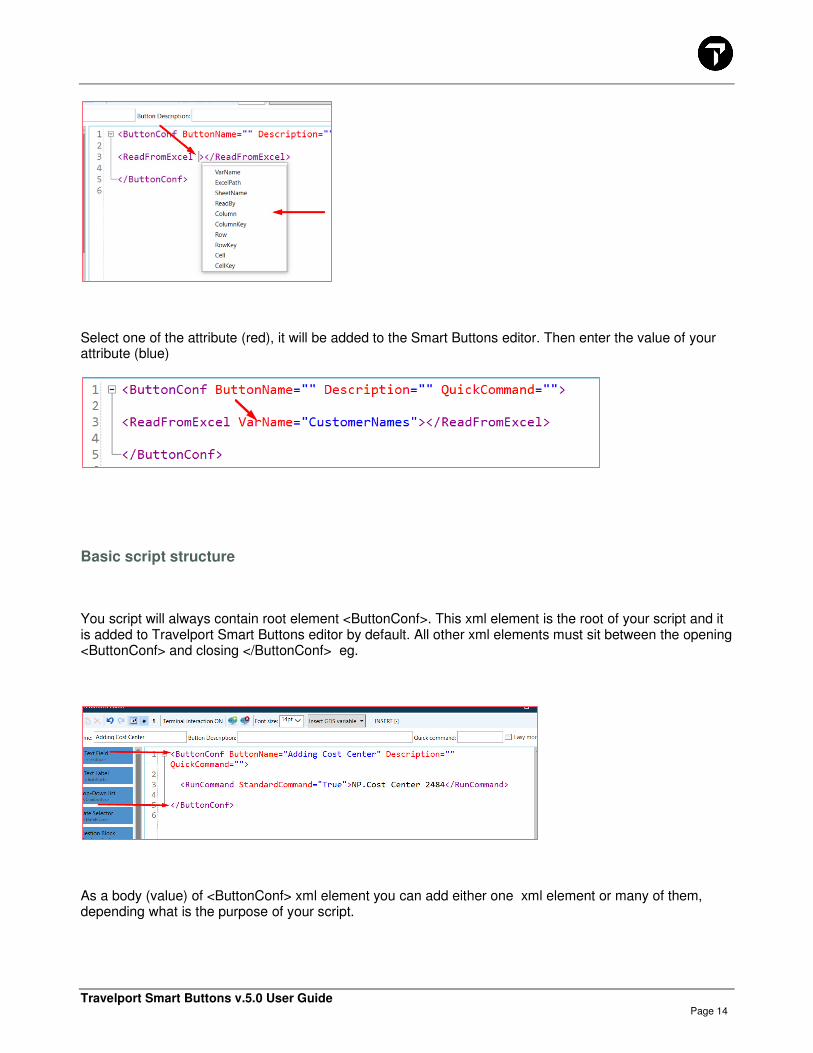
You can then add values of attributes which you want to use within that control:
3. You can start writing the code of your control directly in the Travelport Smart Buttons editor
Each xml element starts with Lest Than sign : <
When you enter < in Travelport Smart Buttons editor you will see a list of all possible xml elements you can use.

Travelport Smart Buttons v.5.0 User Guide Page 13
Select one and it will be added to Travelport SB editor:
Go inside of your xml element and you will see a list of all attributes you can use within that element:
Travelport Smart Buttons v.5.0 User Guide Page 14
Select one of the attribute (red), it will be added to the Smart Buttons editor. Then enter the value of your attribute (blue)
Basic script structure
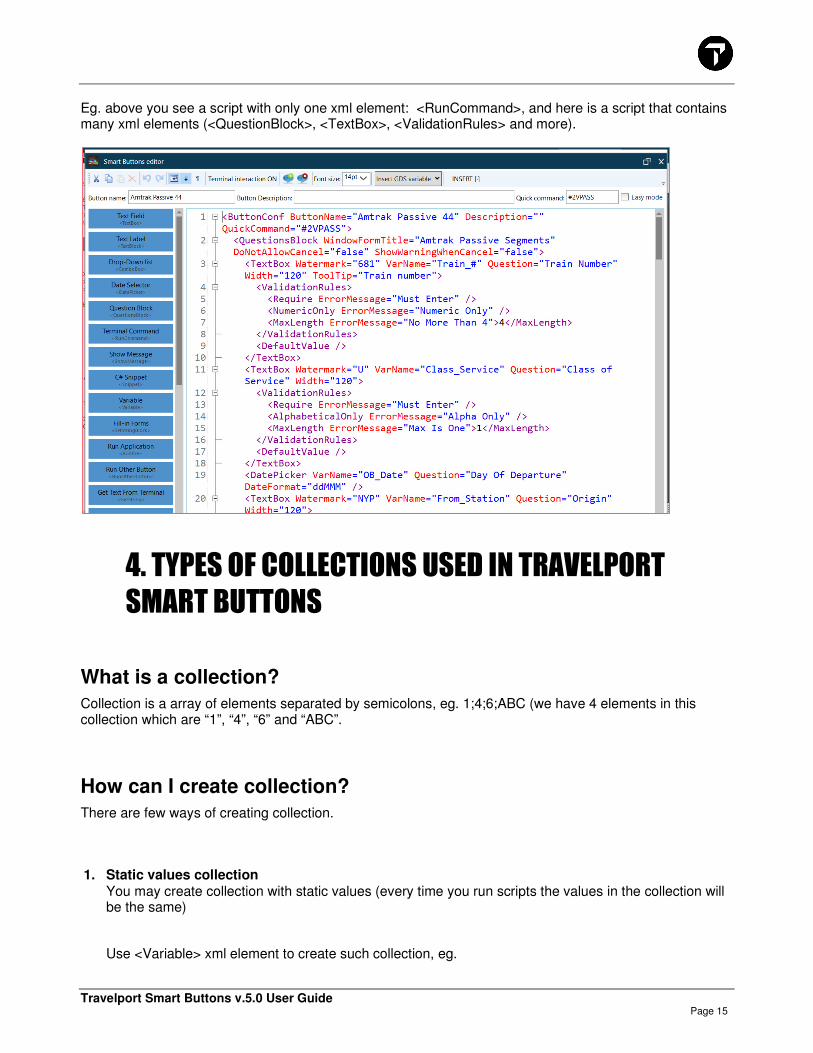
You script will always contain root element <ButtonConf>. This xml element is the root of your script and it is added to Travelport Smart Buttons editor by default. All other xml elements must sit between the opening <ButtonConf> and closing </ButtonConf> eg.
As a body (value) of <ButtonConf> xml element you can add either one xml element or many of them, depending what is the purpose of your script.
Travelport Smart Buttons v.5.0 User Guide Page 15
Eg. above you see a script with only one xml element: <RunCommand>, and here is a script that contains many xml elements (<QuestionBlock>, <TextBox>, <ValidationRules> and more).
4. TYPES OF COLLECTIONS USED IN TRAVELPORT
SMART BUTTONS
What is a collection?
Collection is a array of elements separated by semicolons, eg. 1;4;6;ABC (we have 4 elements in this collection which are “1”, “4”, “6” and “ABC”.
How can I create collection?
There are few ways of creating collection.
1. Static values collection You may create collection with static values (every time you run scripts the values in the collection will be the same)
Use <Variable> xml element to create such collection, eg.
Travelport Smart Buttons v.5.0 User Guide Page 16
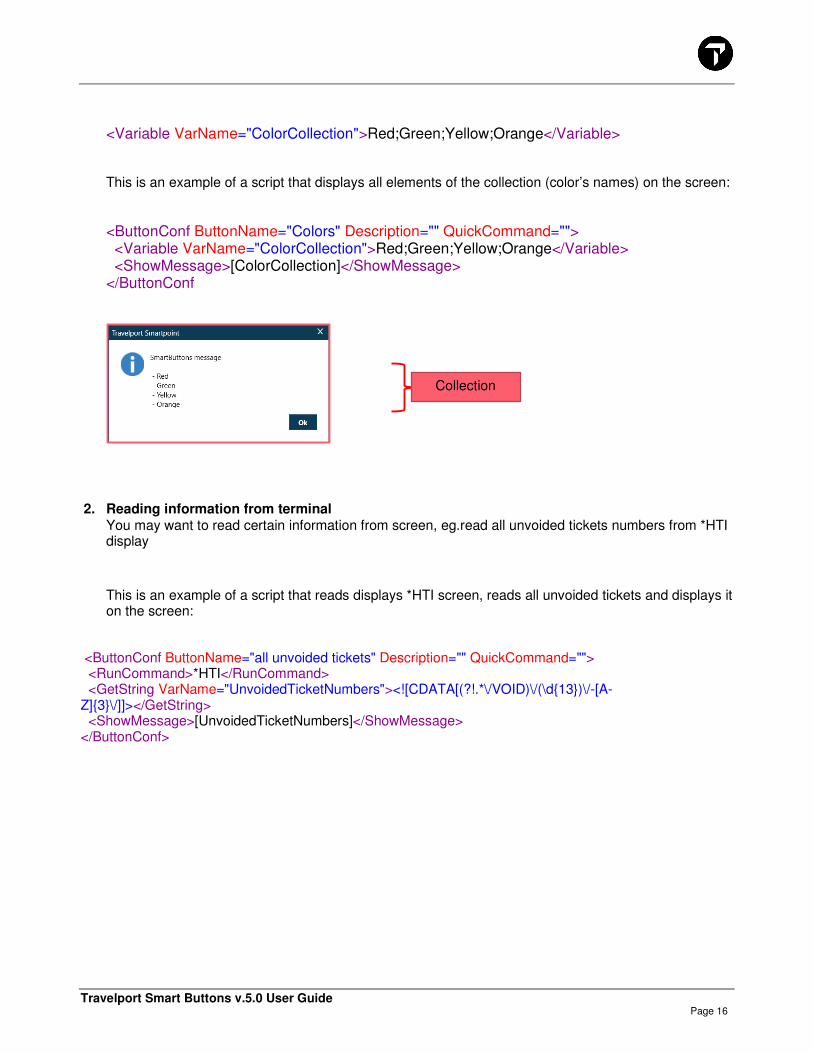
<Variable VarName="ColorCollection">Red;Green;Yellow;Orange</Variable>
This is an example of a script that displays all elements of the collection (color’s names) on the screen:
<ButtonConf ButtonName="Colors" Description="" QuickCommand=""> <Variable VarName="ColorCollection">Red;Green;Yellow;Orange</Variable> <ShowMessage>[ColorCollection]</ShowMessage> </ButtonConf
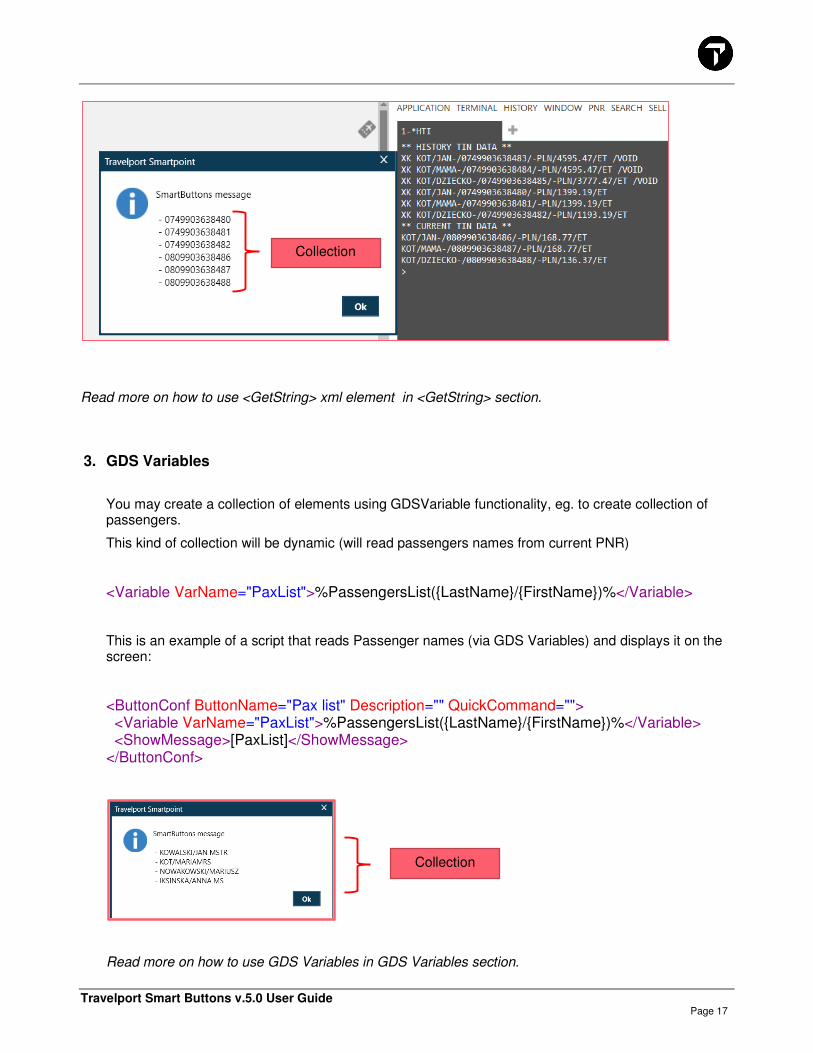
2. Reading information from terminal You may want to read certain information from screen, eg.read all unvoided tickets numbers from *HTI display
This is an example of a script that reads displays *HTI screen, reads all unvoided tickets and displays it on the screen:
<ButtonConf ButtonName="all unvoided tickets" Description="" QuickCommand=""> <RunCommand>*HTI</RunCommand> <GetString VarName="UnvoidedTicketNumbers"><![CDATA[(?!.*\/VOID)\/(\d{13})\/-[A-Z]{3}\/]]></GetString> <ShowMessage>[UnvoidedTicketNumbers]</ShowMessage> </ButtonConf>
Collection
Travelport Smart Buttons v.5.0 User Guide Page 17
Read more on how to use <GetString> xml element in <GetString> section.
3. GDS Variables
You may create a collection of elements using GDSVariable functionality, eg. to create collection of passengers.
This kind of collection will be dynamic (will read passengers names from current PNR)
<Variable VarName="PaxList">%PassengersList({LastName}/{FirstName})%</Variable>
This is an example of a script that reads Passenger names (via GDS Variables) and displays it on the screen:
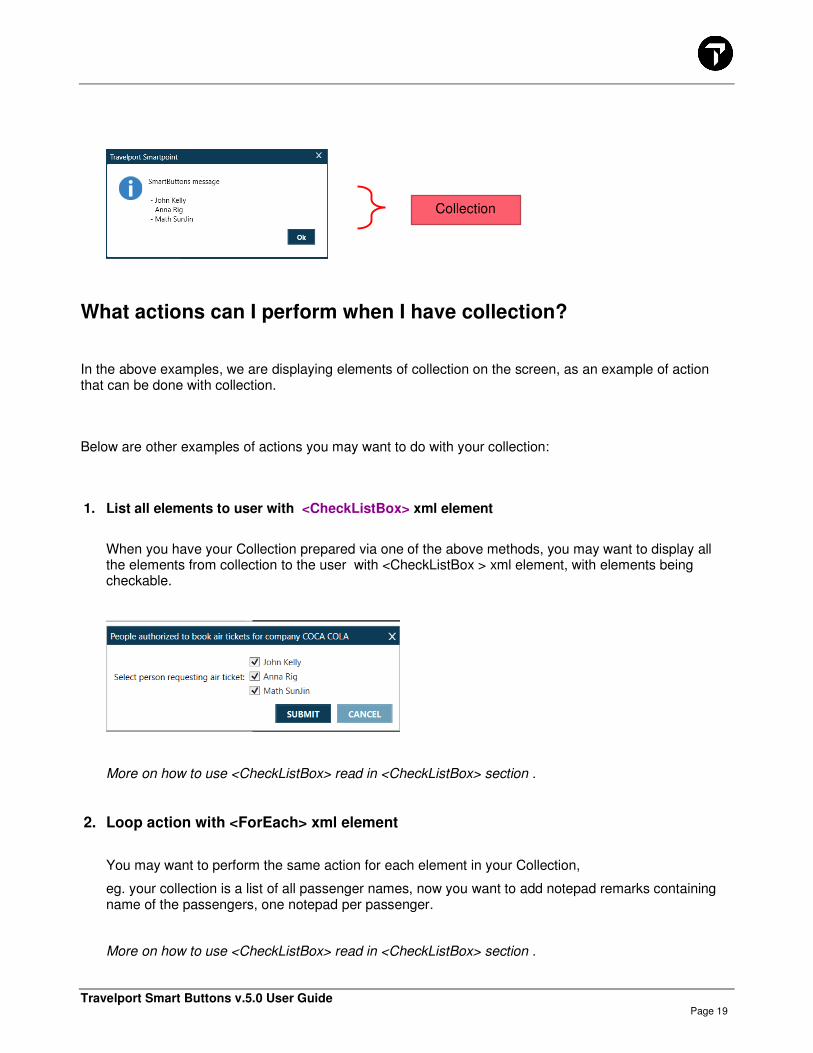
<ButtonConf ButtonName="Pax list" Description="" QuickCommand=""> <Variable VarName="PaxList">%PassengersList({LastName}/{FirstName})%</Variable> <ShowMessage>[PaxList]</ShowMessage> </ButtonConf>
Read more on how to use GDS Variables in GDS Variables section.
Collection
Collection

Travelport Smart Buttons v.5.0 User Guide Page 18
4. Read information from Excel
You may want to use <ReadFromExcel> xml element to read data from excel file, eg. you keep customer numbers in the excel file, and you want to read it from there. This will create collection of customer numbers.
Here is example of such script. It reads information (in this example: customer numbers) from Excel file and displays it on the screen:
<ButtonConf ButtonName="Excel example 4" Description="" QuickCommand=""> <ReadFromExcel VarName="CustomerNumbers" ExcelPath="C:\ Desktop\CustomerDataBase.xlsx" ReadBy="Column" Column="L" Row="3:11" />
<ShowMessage>[CustomerNumbers]</ShowMessage> </ButtonConf>
More on how to use ReadFromExcel control read in ReadFromExcel section.
5. API Call
You may also want to get information from outside database eg. from your mid office system.
Let say you keep there information about all people authorized to request ticket for specific companies.
With <APICall> xml element you would send information to mid office system eg. with company name, and you would receive back information with a list of all people authorized to request air tickets. The list would be our Collection.
<ButtonConf ButtonName="Colors" Description="" QuickCommand=""> <ApiCall VarName="AuthorizedRequestors" Url="https://backofficeAPI.com/api/AuthorizedTicketRequestors" Parameters="CustomerName" Method="GET" AuthType="Basic" AuthorizationHeaderValue="Basic QVBJMzI4OioqKioqKioqKioqKioqKio=" /> <ShowMessage>[AuthorizedRequestors]</ShowMessage> </ButtonConf>
Collection
Travelport Smart Buttons v.5.0 User Guide Page 19
What actions can I perform when I have collection?
In the above examples, we are displaying elements of collection on the screen, as an example of action that can be done with collection.
Below are other examples of actions you may want to do with your collection:
1. List all elements to user with <CheckListBox> xml element
When you have your Collection prepared via one of the above methods, you may want to display all the elements from collection to the user with <CheckListBox > xml element, with elements being checkable.
More on how to use <CheckListBox> read in <CheckListBox> section .
2. Loop action with <ForEach> xml element
You may want to perform the same action for each element in your Collection,
eg. your collection is a list of all passenger names, now you want to add notepad remarks containing name of the passengers, one notepad per passenger.
More on how to use <CheckListBox> read in <CheckListBox> section .
Collection

Travelport Smart Buttons v.5.0 User Guide Page 20
3. Use both <CheckListBox> and <ForEach>
You may want to combine both of the above, eg. display list of all elements in collection to the user, and then perform <ForEach> on the new collection (allow user to select some of the items from the collection eg. user would select 2 passenger names, and perform the same action for those two items in new collection).
4. Extract specific elements from Collection with <ManageCollection> xml element.
More on how to use <ManageCollection> read in <ManageCollection> section .
Why we are introducing new type of collection Value**Key?
With version of Smart Buttons 5.0 we introduce new type of collection: Value**Key.
Until now we were able to use and operate only on “Simple” collections eg.
Collection of customer numbers: 7987439;237879;872387;23;21113 or
Collection of ticket numbers: 080 7436823321;220 8393828321 or
Collection of passenger names: JOHNSON/KATE;JOHNSON/JOHN;PERRY/MATTHEW etc.
With this enhancement we introduce new type of Collection: “Value**Key” collection, that allows to create more advanced scripts, that operate on two-dimensions collections.
What is Collection type: Value**Key?
In this type of Collection each element contains two parts: Value and Key separated by **,
eg. Pax Name and Pax number: JOHNSON/JOHN**1;JOHNSON/GREG**2;SMITH/KATE**3
or
Customer Name and Customer Number: IVECOINC**938792;IBM**27632;COCACOLA**238782
where first part of the element until “**” is a Value and second part of the element is a Key .
Travelport Smart Buttons v.5.0 User Guide Page 21
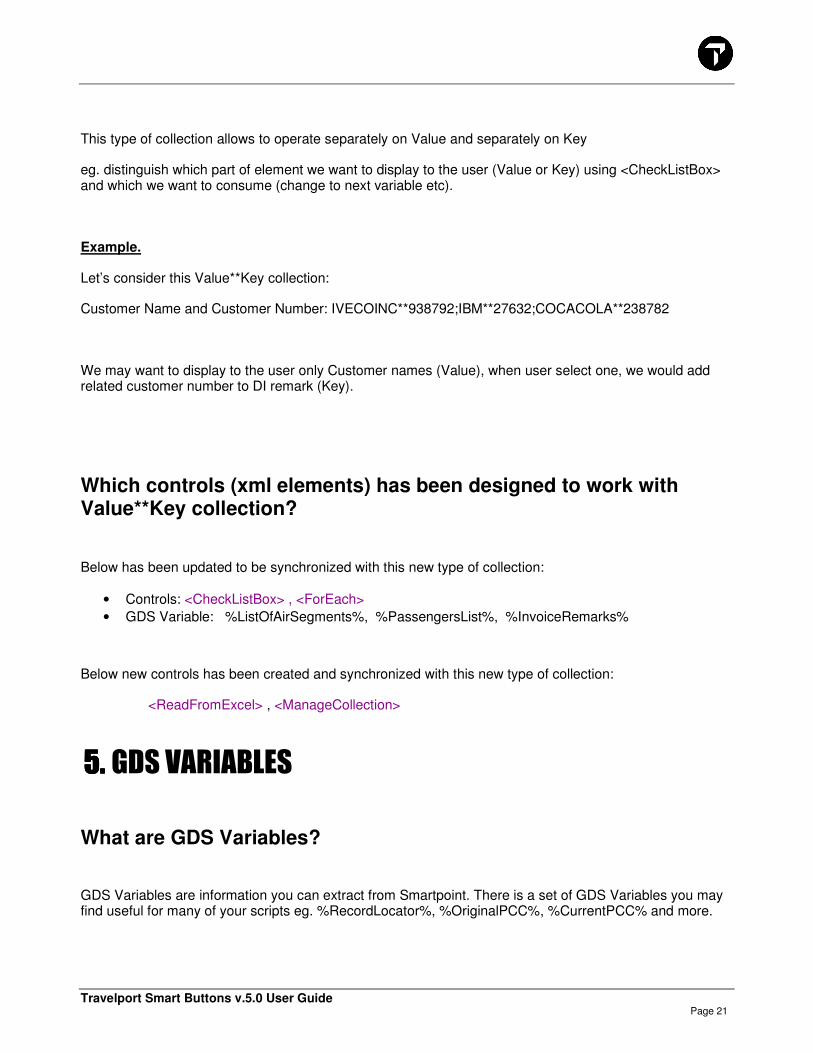
This type of collection allows to operate separately on Value and separately on Key
eg. distinguish which part of element we want to display to the user (Value or Key) using <CheckListBox> and which we want to consume (change to next variable etc).
Example.
Let’s consider this Value**Key collection:
Customer Name and Customer Number: IVECOINC**938792;IBM**27632;COCACOLA**238782
We may want to display to the user only Customer names (Value), when user select one, we would add related customer number to DI remark (Key).
Which controls (xml elements) has been designed to work with Value**Key collection?
Below has been updated to be synchronized with this new type of collection:
• Controls: <CheckListBox> , <ForEach>
• GDS Variable: %ListOfAirSegments%, %PassengersList%, %InvoiceRemarks%
Below new controls has been created and synchronized with this new type of collection:
<ReadFromExcel> , <ManageCollection>
5.5.5.5. GDS VARIABLES
What are GDS Variables?
GDS Variables are information you can extract from Smartpoint. There is a set of GDS Variables you may find useful for many of your scripts eg. %RecordLocator%, %OriginalPCC%, %CurrentPCC% and more.
Travelport Smart Buttons v.5.0 User Guide Page 22
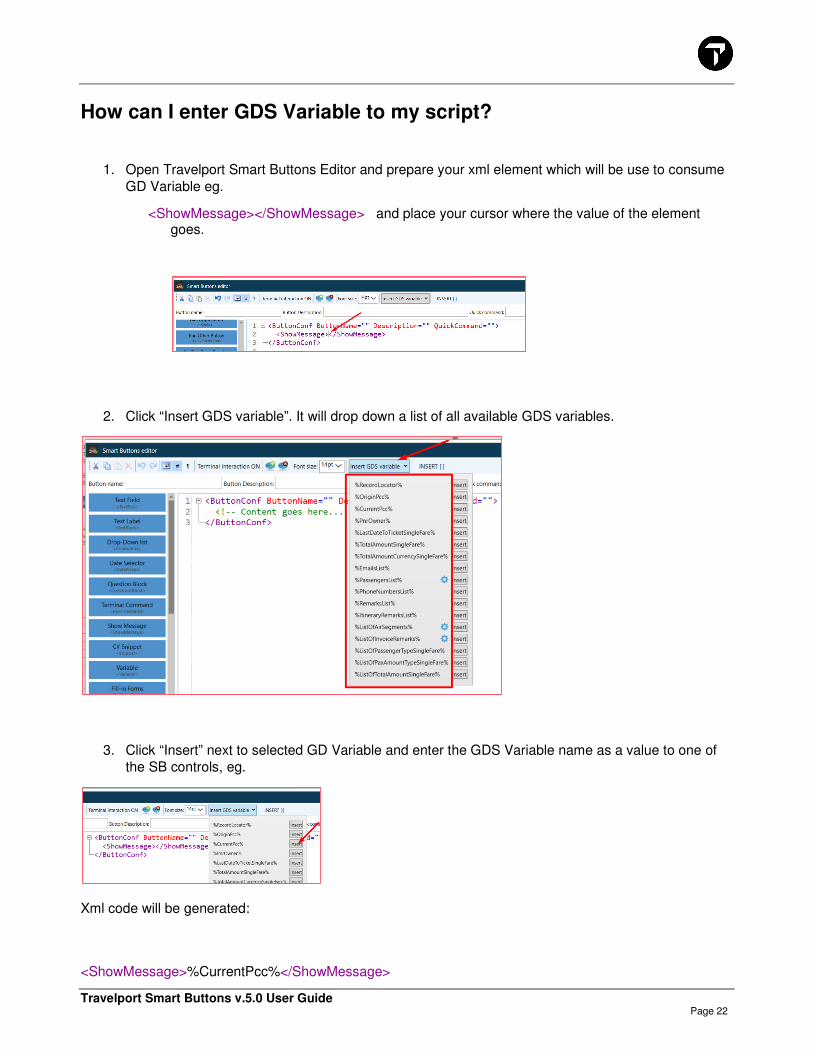
How can I enter GDS Variable to my script?
1. Open Travelport Smart Buttons Editor and prepare your xml element which will be use to consume
GD Variable eg.
<ShowMessage></ShowMessage> and place your cursor where the value of the element goes.
2. Click “Insert GDS variable”. It will drop down a list of all available GDS variables.
3. Click “Insert” next to selected GD Variable and enter the GDS Variable name as a value to one of
the SB controls, eg.
Xml code will be generated:
<ShowMessage>%CurrentPcc%</ShowMessage>
Travelport Smart Buttons v.5.0 User Guide Page 23
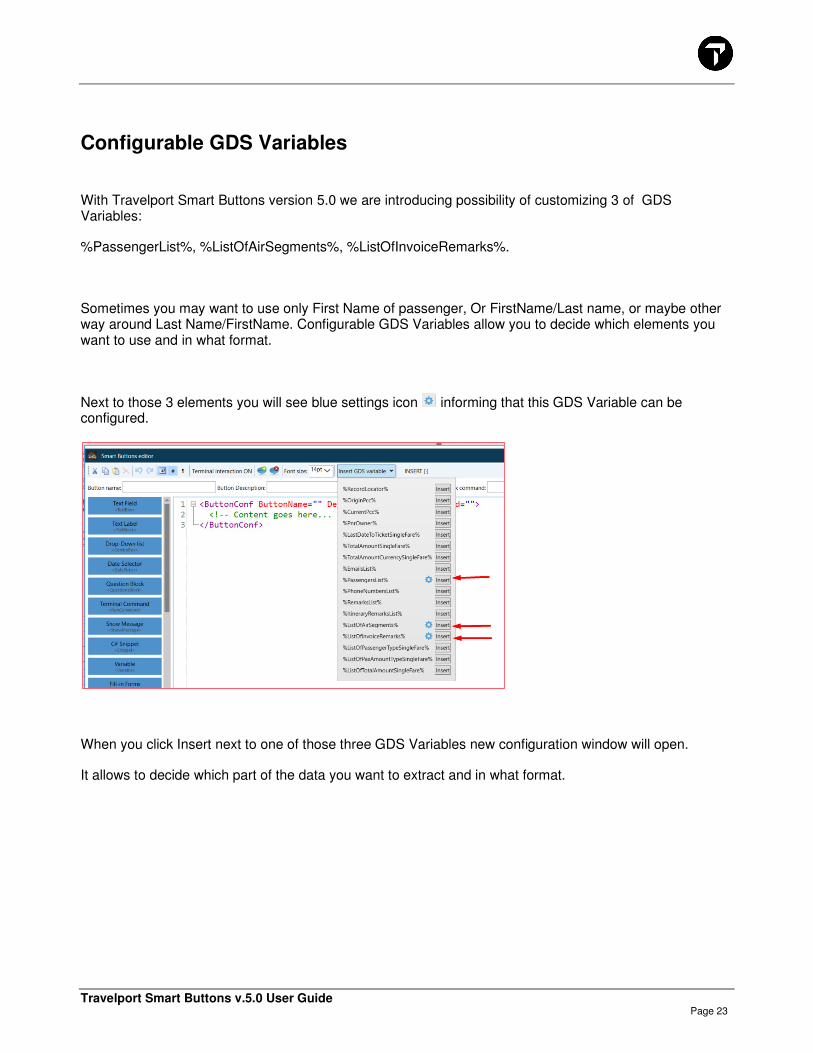
Configurable GDS Variables
With Travelport Smart Buttons version 5.0 we are introducing possibility of customizing 3 of GDS Variables:
%PassengerList%, %ListOfAirSegments%, %ListOfInvoiceRemarks%.
Sometimes you may want to use only First Name of passenger, Or FirstName/Last name, or maybe other way around Last Name/FirstName. Configurable GDS Variables allow you to decide which elements you want to use and in what format.
Next to those 3 elements you will see blue settings icon informing that this GDS Variable can be configured.
When you click Insert next to one of those three GDS Variables new configuration window will open.
It allows to decide which part of the data you want to extract and in what format.
Travelport Smart Buttons v.5.0 User Guide Page 24
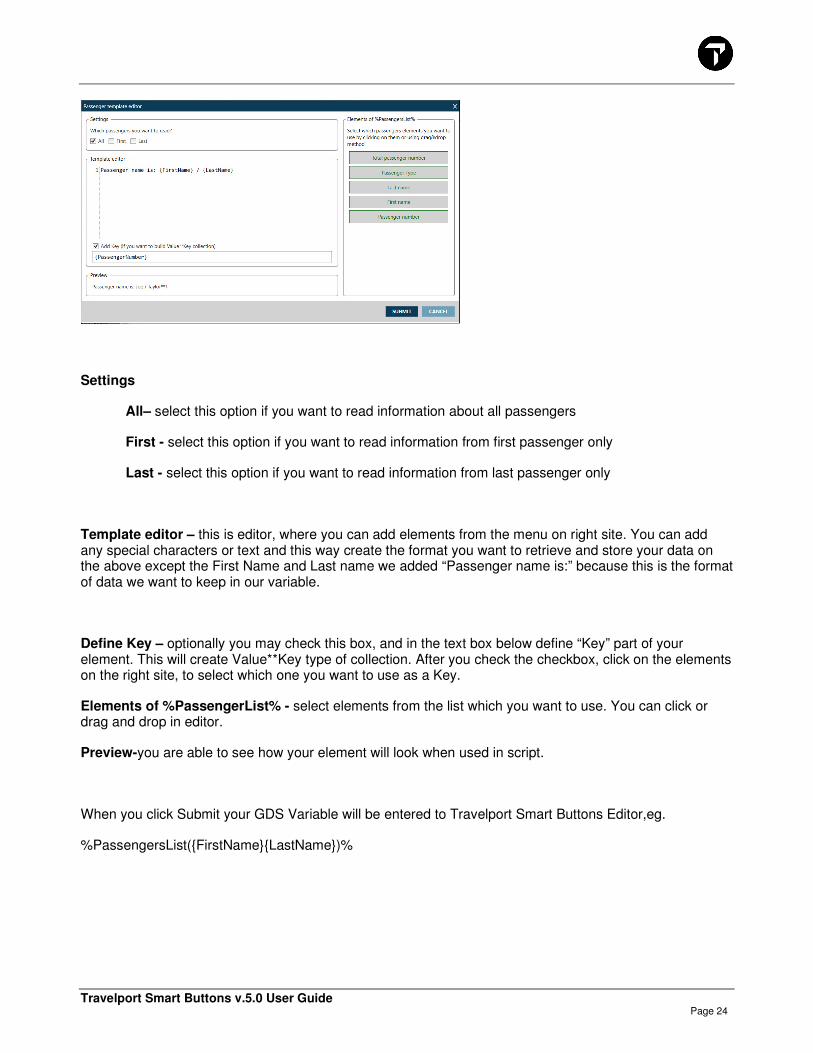
Settings
All– select this option if you want to read information about all passengers
First - select this option if you want to read information from first passenger only
Last - select this option if you want to read information from last passenger only
Template editor – this is editor, where you can add elements from the menu on right site. You can add any special characters or text and this way create the format you want to retrieve and store your data on the above except the First Name and Last name we added “Passenger name is:” because this is the format of data we want to keep in our variable.
Define Key – optionally you may check this box, and in the text box below define “Key” part of your element. This will create Value**Key type of collection. After you check the checkbox, click on the elements on the right site, to select which one you want to use as a Key.
Elements of %PassengerList% - select elements from the list which you want to use. You can click or drag and drop in editor.
Preview-you are able to see how your element will look when used in script.
When you click Submit your GDS Variable will be entered to Travelport Smart Buttons Editor,eg.
%PassengersList({FirstName}{LastName})%
Travelport Smart Buttons v.5.0 User Guide Page 25
This GDS Variable must be now entered as a value to some of the controls, eg:
1.
<Variable VarName="PaxNAme">%PassengersList({FirstName}{LastName})%</Variable>
2.
<ShowMessage>%PassengersList(first - {FirstName}/{LastName})%</ShowMessage>
3.
<CheckListBox Question="sadas" Width="200" SelectDefaultAll="True" VarName="PaxNames" IsRadioButton="False" SingleSelect="False"> %PassengersList({LastName}/{FirstName})% </CheckListBox>
4.
<ManageCollection VarName="NrOfPassengers" ActionType="Count"> %PassengersList({LastName}/{FirstName})%</ManageCollection>
5.
<QuestionsBlock> <TextBlock>%PassengersList({LastName}/{FirstName})%</TextBlock> </QuestionsBlock>
Using Configurable GDS Variables
Example 1.
You want to have a script that allows to request SSR: CKIN for selected passengers and segments. Use GDS Variable- %ListOfAirSegments% and configure which part of the air segments you want to use.
In our example we selected that as a Value we use: SegmentNumber, CarrierCode, FlightNumber, BookingClass, DepartureDateTime, OriginCityCode, DestinationCityCode, SegmentStatusCode and this will be displayed to the user ( Display="Value) and as a Key will use SegmentNumber which will be returned to variable SelectedSegments (Return="Key"). This variable is then use in <ForEach> loop.
<ButtonConf ButtonName="Segments" Description="" QuickCommand="">
<CheckListBox Question="For which segment do you want to book CKIN SSR?" Width="300" VarName="SelectedSegments" IsMandatory="True" Display="Value" Return="Key"> %ListOfAirSegments({SegmentNumber}. {CarrierCode} {FlightNumber} {BookingClass} {DepartureDateTime(ddMMM, en)} {OriginCityCode} {DestinationCityCode}
Travelport Smart Buttons v.5.0 User Guide Page 26
{SegmentStatusCode}**{SegmentNumber})% </CheckListBox>
<QuestionsBlock> <CheckListBox Question="Select passenger you want to send CKIN SSR" Width="200" VarName="PaxNr" IsRadioButton="True" SingleSelect="True" IsMandatory="True" Display="Value" Return="Key"> %PassengersList({PassengerNumber}.{LastName}/{FirstName}**{PassengerNumber})% </CheckListBox> <TextBox VarName="CKINText" Question="Enter free form text for CKIN SSR" Width="120"></TextBox> </QuestionsBlock>
<ForEach> <ElementsList>[SelectedSegments]</ElementsList> <Action> <RunCommand>SI.P[PaxNr]S[@]/CKIN*[CKINText]</RunCommand> </Action> </ForEach> </ButtonConf>
Example 2
You want to have a script that reads text of first DI remark, and if the value of this remark is 12345 then you want the script to remove that remark.
<ButtonConf ButtonName="Delete First DI remark" Description="" QuickCommand=""> <Variable VarName="FirstDIText">%ListOfInvoiceRemarks(first - {Text})%</Variable> <Variable VarName="myVar12345"> 12345</Variable> <ConditionalAction Condition="[FirstDIText]==[myVar12345]"> <True> <RunCommand>DI.1@</RunCommand> </True> <False> <ShowMessage>First DI is not 12345</ShowMessage> </False> </ConditionalAction> </ButtonConf>
Travelport Smart Buttons v.5.0 User Guide Page 27
6. TRAVELPORT SMART BUTTONS CONTROLS (XML
ELEMENTS)
Here you find descriptions of all the controls you can use to create your Script together with examples and some inspirations.
Text Field <TextBox>
The text field is a graphical control element which enables the user to input text information to be used by the program.
It allows you to ask a question to the user and collect the answer as a variable (Variables can only be used in Standard Mode).
Here is an example of text box which is presented to the user:
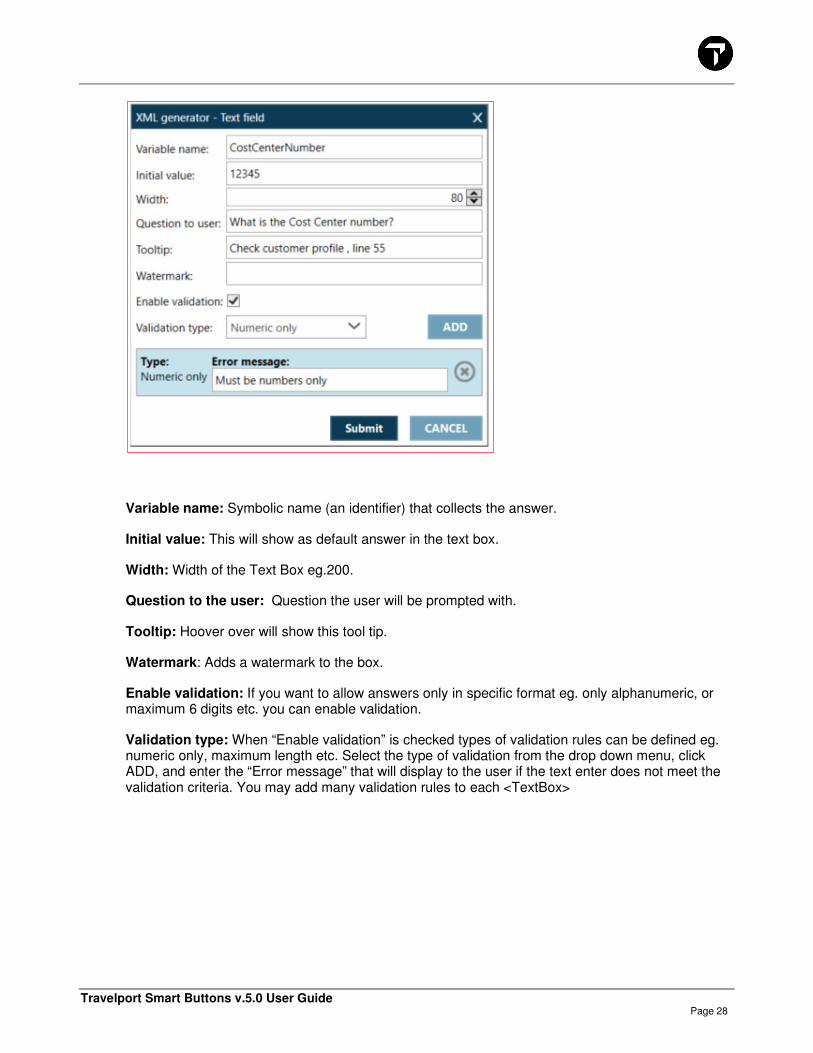
Configuration of <TextBox> using GUI
If you want to use <TextBox> functionality the best way would be to open Travelport Smart Buttons Editor and click on the blue button: Text Field
Travelport Smart Buttons v.5.0 User Guide Page 28
Variable name: Symbolic name (an identifier) that collects the answer.
Initial value: This will show as default answer in the text box.
Width: Width of the Text Box eg.200.
Question to the user: Question the user will be prompted with.
Tooltip: Hoover over will show this tool tip.
Watermark: Adds a watermark to the box.
Enable validation: If you want to allow answers only in specific format eg. only alphanumeric, or maximum 6 digits etc. you can enable validation.
Validation type: When “Enable validation” is checked types of validation rules can be defined eg. numeric only, maximum length etc. Select the type of validation from the drop down menu, click ADD, and enter the “Error message” that will display to the user if the text enter does not meet the validation criteria. You may add many validation rules to each <TextBox>
Travelport Smart Buttons v.5.0 User Guide Page 29
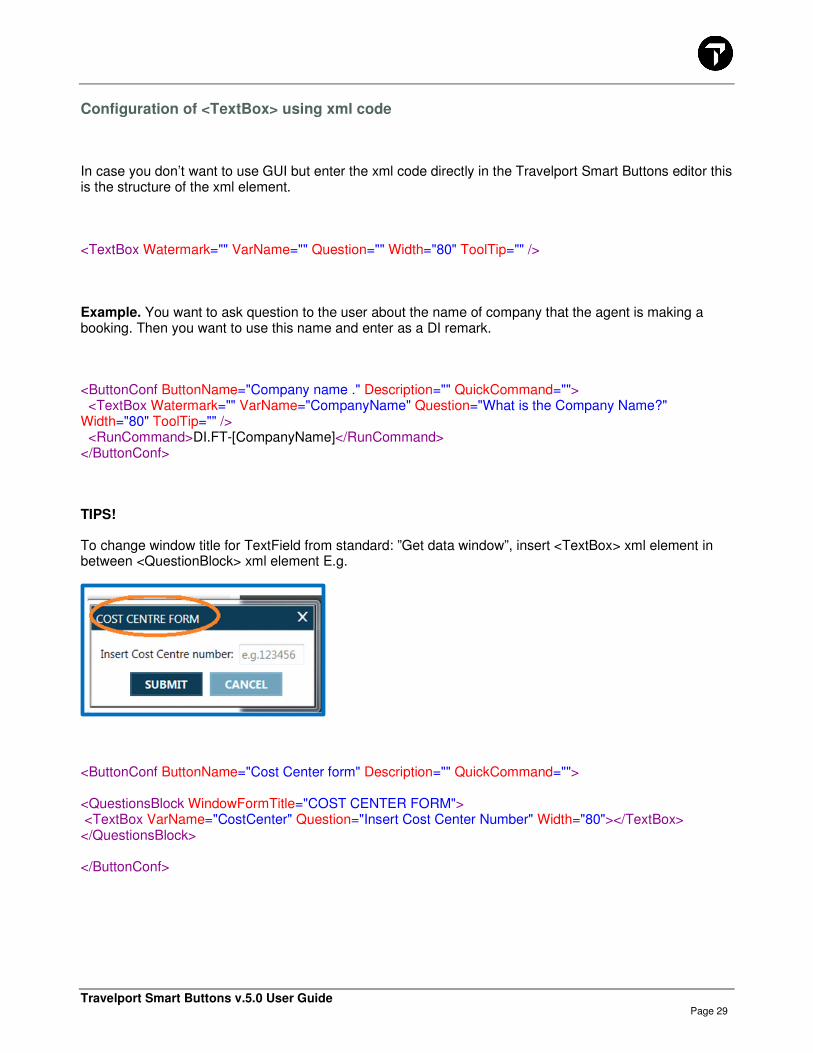
Configuration of <TextBox> using xml code
In case you don’t want to use GUI but enter the xml code directly in the Travelport Smart Buttons editor this is the structure of the xml element.
<TextBox Watermark="" VarName="" Question="" Width="80" ToolTip="" />
Example. You want to ask question to the user about the name of company that the agent is making a booking. Then you want to use this name and enter as a DI remark.
<ButtonConf ButtonName="Company name ." Description="" QuickCommand=""> <TextBox Watermark="" VarName="CompanyName" Question="What is the Company Name?" Width="80" ToolTip="" /> <RunCommand>DI.FT-[CompanyName]</RunCommand> </ButtonConf>
TIPS!
To change window title for TextField from standard: ”Get data window”, insert <TextBox> xml element in between <QuestionBlock> xml element E.g.
<ButtonConf ButtonName="Cost Center form" Description="" QuickCommand=""> <QuestionsBlock WindowFormTitle="COST CENTER FORM"> <TextBox VarName="CostCenter" Question="Insert Cost Center Number" Width="80"></TextBox> </QuestionsBlock> </ButtonConf>
Travelport Smart Buttons v.5.0 User Guide Page 30
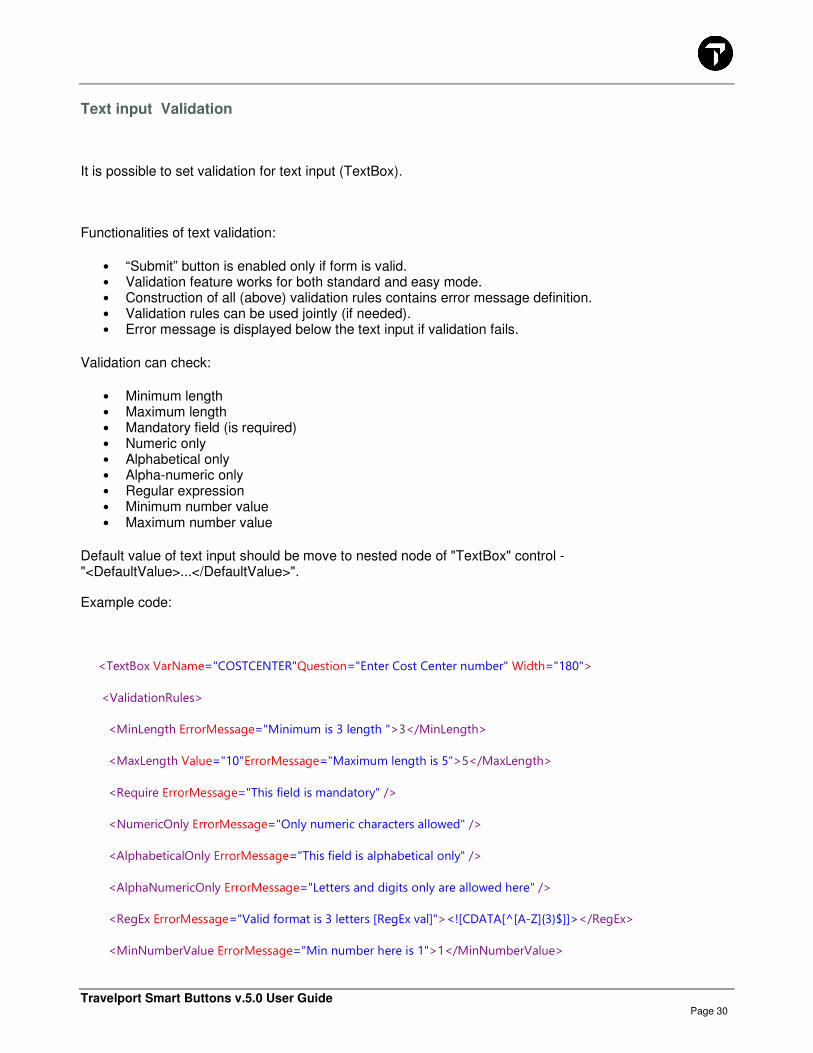
Text input Validation
It is possible to set validation for text input (TextBox).
Functionalities of text validation:
• “Submit” button is enabled only if form is valid. • Validation feature works for both standard and easy mode. • Construction of all (above) validation rules contains error message definition. • Validation rules can be used jointly (if needed). • Error message is displayed below the text input if validation fails.
Validation can check:
• Minimum length • Maximum length • Mandatory field (is required) • Numeric only • Alphabetical only • Alpha-numeric only • Regular expression • Minimum number value • Maximum number value
Default value of text input should be move to nested node of "TextBox" control - "<DefaultValue>...</DefaultValue>".
Example code:
<TextBox VarName="COSTCENTER"Question="Enter Cost Center number" Width="180">
<ValidationRules>
<MinLength ErrorMessage="Minimum is 3 length ">3</MinLength>
<MaxLength Value="10"ErrorMessage="Maximum length is 5">5</MaxLength>
<Require ErrorMessage="This field is mandatory" />
<NumericOnly ErrorMessage="Only numeric characters allowed" />
<AlphabeticalOnly ErrorMessage="This field is alphabetical only" />
<AlphaNumericOnly ErrorMessage="Letters and digits only are allowed here" />
<RegEx ErrorMessage="Valid format is 3 letters [RegEx val]"><![CDATA[^[A-Z]{3}$]]></RegEx>
<MinNumberValue ErrorMessage="Min number here is 1">1</MinNumberValue>
Travelport Smart Buttons v.5.0 User Guide Page 31
<MaxNumberValue ErrorMessage="Max number here is 22">22</MaxNumberValue>
</ValidationRules>
<DefaultValue>3897</DefaultValue>
</TextBox>
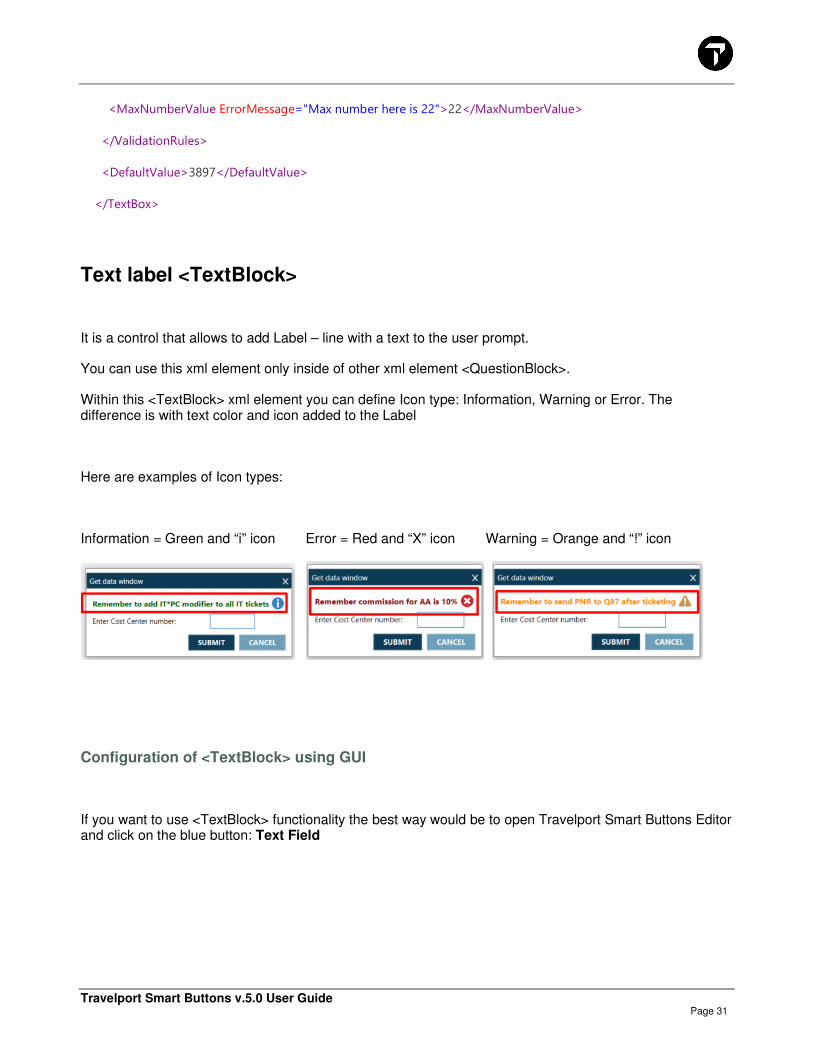
Text label <TextBlock>
It is a control that allows to add Label – line with a text to the user prompt.
You can use this xml element only inside of other xml element <QuestionBlock>.
Within this <TextBlock> xml element you can define Icon type: Information, Warning or Error. The difference is with text color and icon added to the Label
Here are examples of Icon types:
Information = Green and “i” icon Error = Red and “X” icon Warning = Orange and “!” icon
Configuration of <TextBlock> using GUI
If you want to use <TextBlock> functionality the best way would be to open Travelport Smart Buttons Editor and click on the blue button: Text Field

Travelport Smart Buttons v.5.0 User Guide Page 32
and then configure all attributes in GUI as per below instructions:
Text: Text to be displayed to the user.
Icon: Icon to be displayed to the user mapped with text color: Information (green text) – “i”, Warning (orange text)- “!”, Error (red text) - “X”
Max width: Maximal Width of the text line
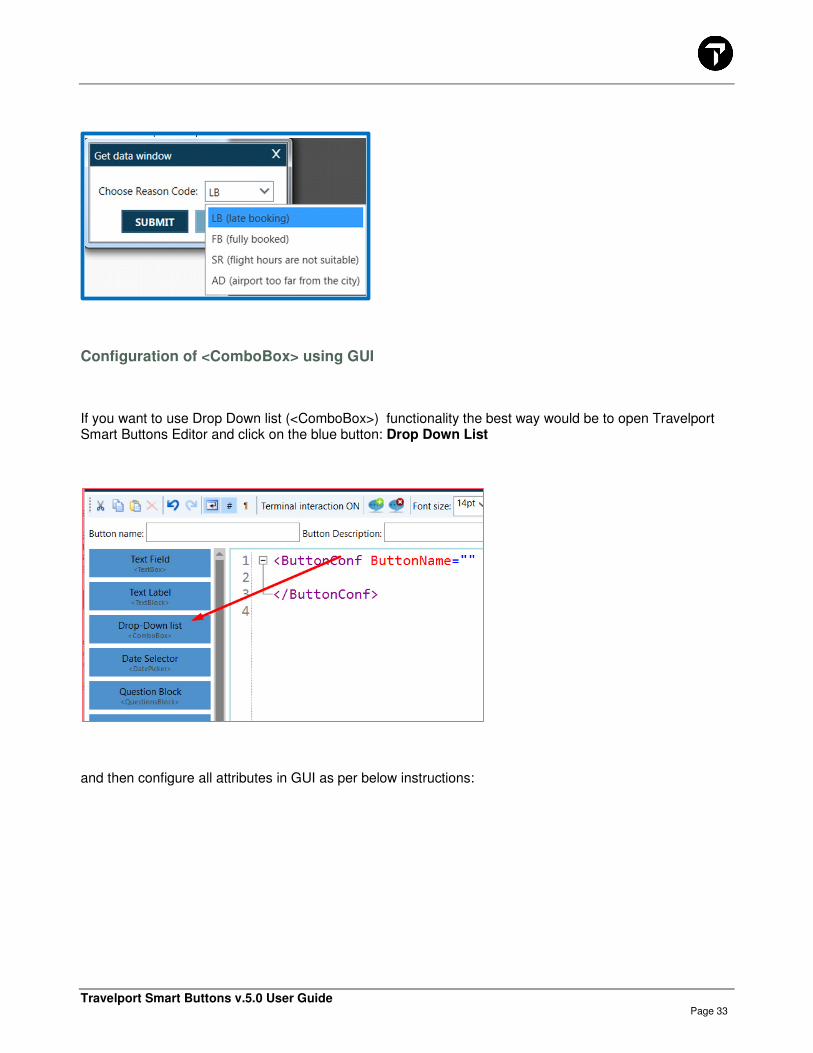
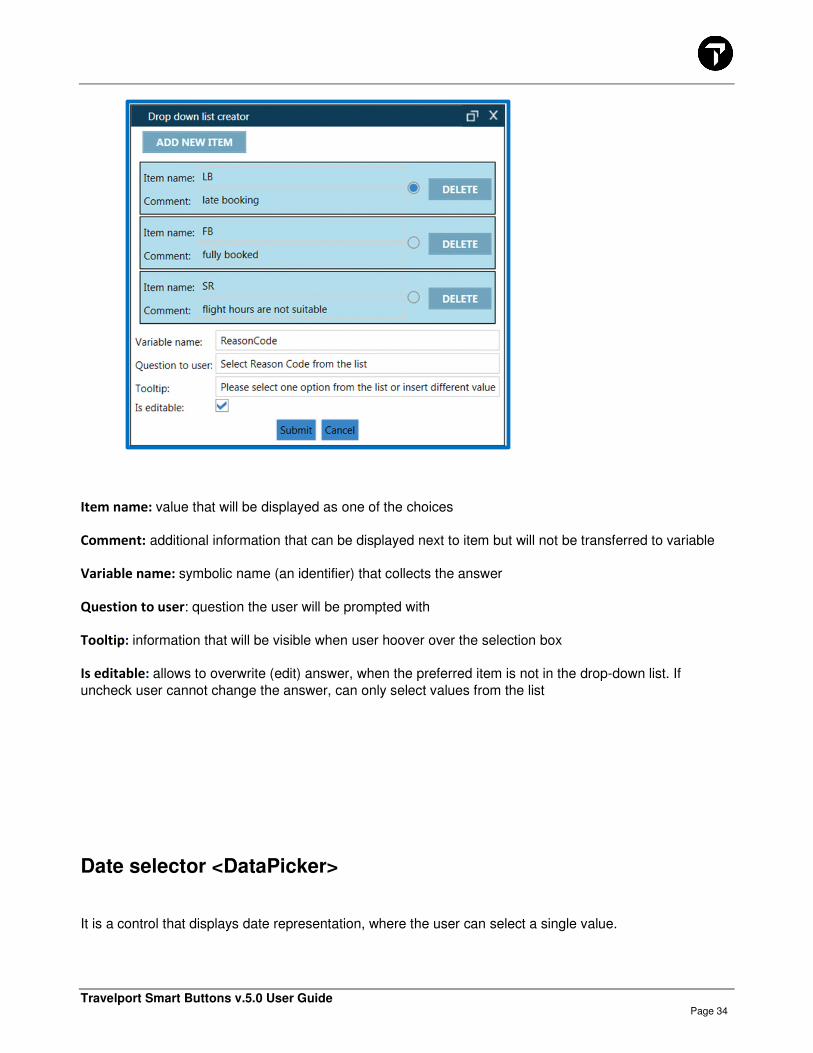
Drop-down list <ComboBox>
It is a control that allows the user to select a value from previously predefined answers.
Here is an example of Drop-down list:
Travelport Smart Buttons v.5.0 User Guide Page 33
Configuration of <ComboBox> using GUI
If you want to use Drop Down list (<ComboBox>) functionality the best way would be to open Travelport Smart Buttons Editor and click on the blue button: Drop Down List
and then configure all attributes in GUI as per below instructions:
Travelport Smart Buttons v.5.0 User Guide Page 34
Item name: value that will be displayed as one of the choices
Comment: additional information that can be displayed next to item but will not be transferred to variable
Variable name: symbolic name (an identifier) that collects the answer
Question to user: question the user will be prompted with
Tooltip: information that will be visible when user hoover over the selection box
Is editable: allows to overwrite (edit) answer, when the preferred item is not in the drop-down list. If
uncheck user cannot change the answer, can only select values from the list
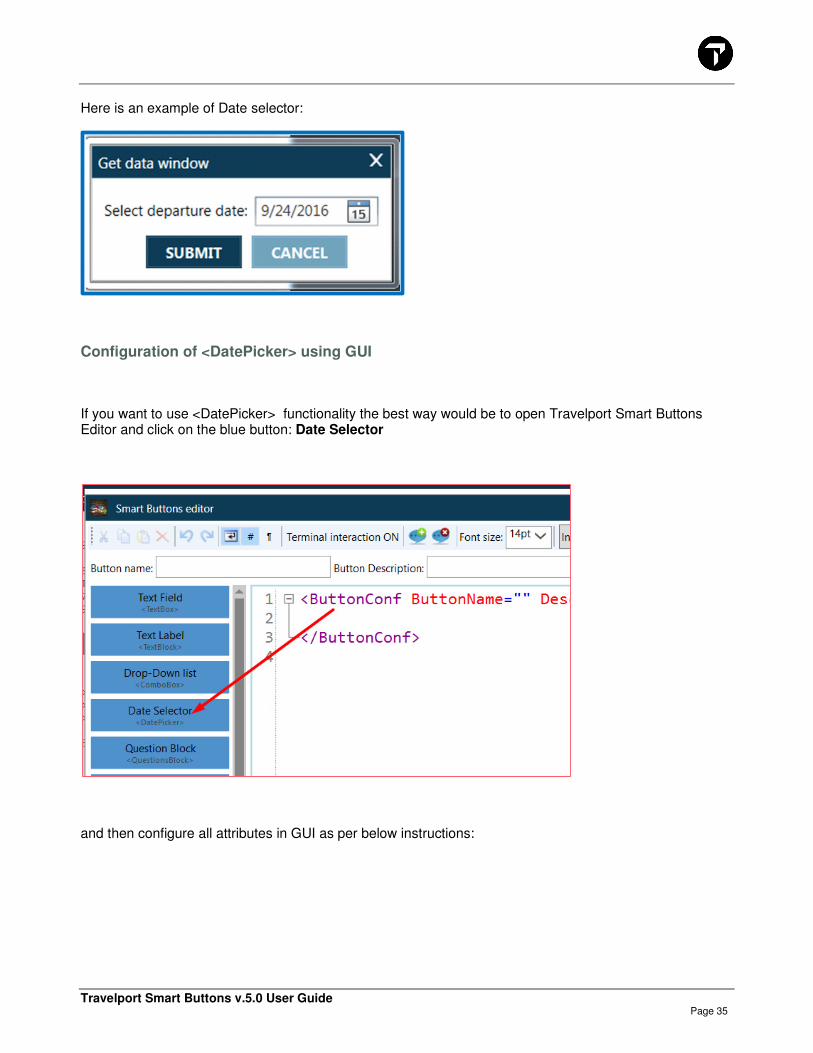
Date selector <DataPicker>
It is a control that displays date representation, where the user can select a single value.
Travelport Smart Buttons v.5.0 User Guide Page 35
Here is an example of Date selector:
Configuration of <DatePicker> using GUI
If you want to use <DatePicker> functionality the best way would be to open Travelport Smart Buttons Editor and click on the blue button: Date Selector
and then configure all attributes in GUI as per below instructions:
Travelport Smart Buttons v.5.0 User Guide Page 36
Date format: select date format that you want to storage your date
Custom date format- if the format of date or time is not on the Date format list, select this check box and
enter the format you want to storage your date in eg. MMMM (full month name only)
Fixed date: if checked, chosen date will be default date
Add or remove days: you can add or subtract specific number of days from default date (e.g. if you always
want the default date to be current date plus 10 days)
Variable name: symbolic name (an identifier) that collects the answer
Question to user: question the user will be prompted with
Tooltip: hoover over will show this tool tip
Null as default – When checked the default date will be empty, eg:
QuestionBlock <QuestionBlock>

Travelport Smart Buttons v.5.0 User Guide Page 37
The control allows you to group your prompts together on one screen. This control will not work if there are no other xml elements in its body.
Below you will find a list of xml elements that you can use inside of <QuestionBlock>:
- <TextBox> - <TextBlock> - <ComboBox> (DropDown list) - <DataPicker> - <CheckListBox>
Here is an example of Question block, containing Text label (<TextBlock>), two Text boxes (<TextBox>) and DataPicker (<DataPicker> ) :
Configuration of <QuestionBlock> using xml code
If you want to use <QuestionBlock> functionality the only way is to use the xml code by clicking on the blue button Question Block (there is no GUI to configure this control)
<QuestionsBlock WindowFormTitle="" DoNotAllowCancel="false" ShowWarningWhenCancel="false" SubmitButtonName="SUBMIT"> </QuestionsBlock>
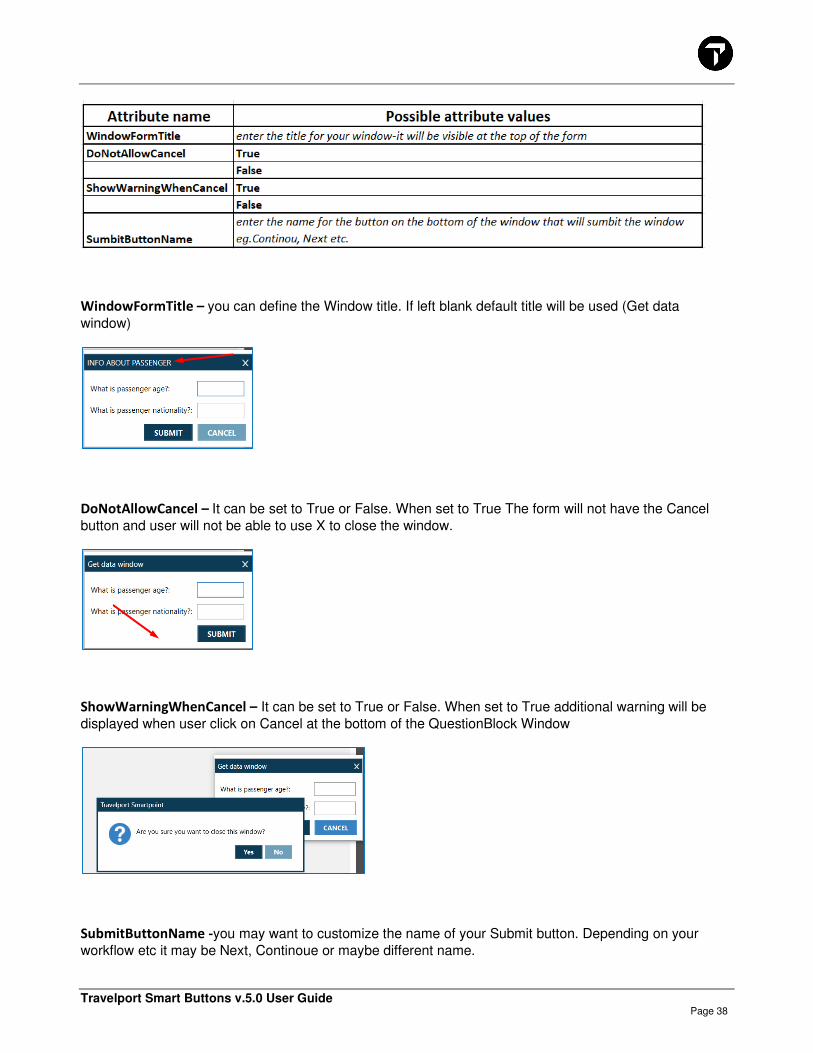
This are the possible attributes for that xml element:
Travelport Smart Buttons v.5.0 User Guide Page 38
WindowFormTitle – you can define the Window title. If left blank default title will be used (Get data
window)
DoNotAllowCancel – It can be set to True or False. When set to True The form will not have the Cancel
button and user will not be able to use X to close the window.
ShowWarningWhenCancel – It can be set to True or False. When set to True additional warning will be
displayed when user click on Cancel at the bottom of the QuestionBlock Window
SubmitButtonName -you may want to customize the name of your Submit button. Depending on your
workflow etc it may be Next, Continoue or maybe different name.
Travelport Smart Buttons v.5.0 User Guide Page 39
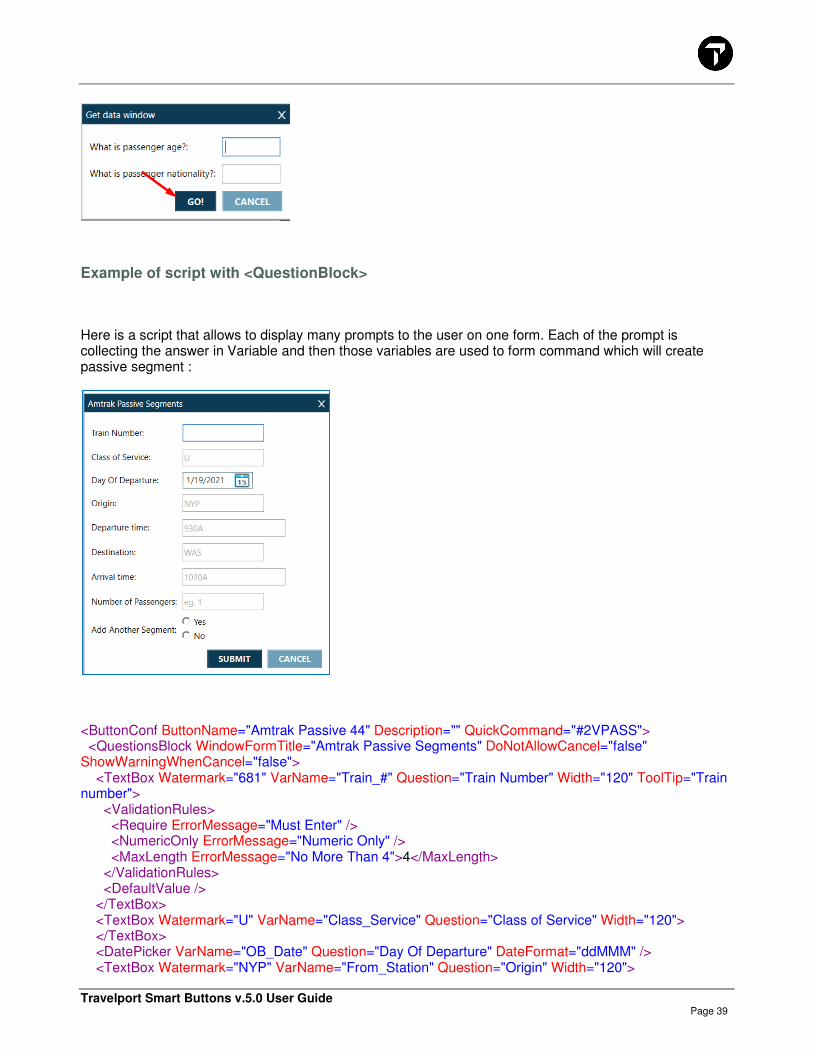
Example of script with <QuestionBlock>
Here is a script that allows to display many prompts to the user on one form. Each of the prompt is collecting the answer in Variable and then those variables are used to form command which will create passive segment :
<ButtonConf ButtonName="Amtrak Passive 44" Description="" QuickCommand="#2VPASS"> <QuestionsBlock WindowFormTitle="Amtrak Passive Segments" DoNotAllowCancel="false" ShowWarningWhenCancel="false"> <TextBox Watermark="681" VarName="Train_#" Question="Train Number" Width="120" ToolTip="Train number"> <ValidationRules> <Require ErrorMessage="Must Enter" /> <NumericOnly ErrorMessage="Numeric Only" /> <MaxLength ErrorMessage="No More Than 4">4</MaxLength> </ValidationRules> <DefaultValue /> </TextBox> <TextBox Watermark="U" VarName="Class_Service" Question="Class of Service" Width="120"> </TextBox> <DatePicker VarName="OB_Date" Question="Day Of Departure" DateFormat="ddMMM" /> <TextBox Watermark="NYP" VarName="From_Station" Question="Origin" Width="120">
Travelport Smart Buttons v.5.0 User Guide Page 40
</TextBox> <TextBox Watermark="930A" VarName="Dep_Time" Question="Departure time" Width="150"> </TextBox> <TextBox Watermark="WAS" VarName="To_Station" Question="Destination" Width="120"> </TextBox> <TextBox Watermark="1030A" VarName="Arr_Time" Question="Arrival time" Width="150"> </TextBox> <TextBox Watermark="eg. 1" VarName="PAX_Count" Question="Number of Passengers" Width="120"> <CheckListBox Question="Add Another Segment" ToolTip="" Width="200" VarName="AddAnother" IsRadioButton="True" SingleSelect="True" IsMandatory="False" Display="ValueKey" Return="ValueKey" SelectDefaultAll="True">Yes;No</CheckListBox> </QuestionsBlock> <RunCommand StandardCommand="True">02v[Train_#][Class_Service][OB_Date][From_Station][To_Station]ak[PAX_Count]/[Dep_Time][Arr_Time]</RunCommand> </ButtonConf>
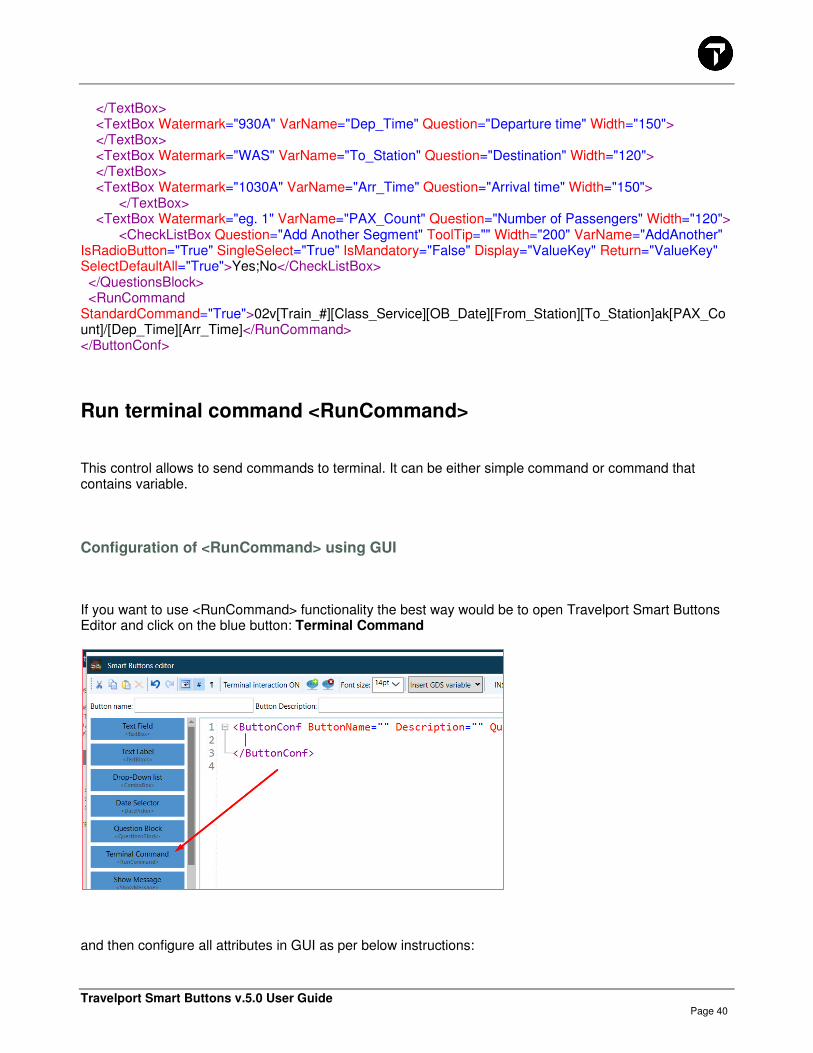
Run terminal command <RunCommand>
This control allows to send commands to terminal. It can be either simple command or command that contains variable.
Configuration of <RunCommand> using GUI
If you want to use <RunCommand> functionality the best way would be to open Travelport Smart Buttons Editor and click on the blue button: Terminal Command
and then configure all attributes in GUI as per below instructions:

Travelport Smart Buttons v.5.0 User Guide Page 41
Command-enter the command you want to send in terminal. You can use variables as a part of your
command. Always enter the variable in square brackets, eg. RI.Passenger name is [PaxName] .
Run standard command: Runs the standard Smartpoint terminal command. If unchecked the command will
be sent in native mode – similar to commands with semicolon eg.ALONNYC;
Clear Screen: This attribute will clear the screen before running a command.
ResponseAll : This attribute allows you to open all screens to the bottom. Example if you do: HMPR, you
will only see the first screen and you need to move down. If you set the key up as Response All, you will see the whole page and it will do the move down as well.
Run in new tab – when selected new window tab will be opened to run this command
Configuration of <RunCommand> using xml code
In case you don’t want to use GUI but enter the xml code directly in the Travelport Smart Buttons editor this is the structure of the xml element.
<RunCommand ResponseAll="False" ShowInNewTab="False" WithoutRefreshPnr="True" ClearScreen="True" Command="" />
Travelport Smart Buttons v.5.0 User Guide Page 42
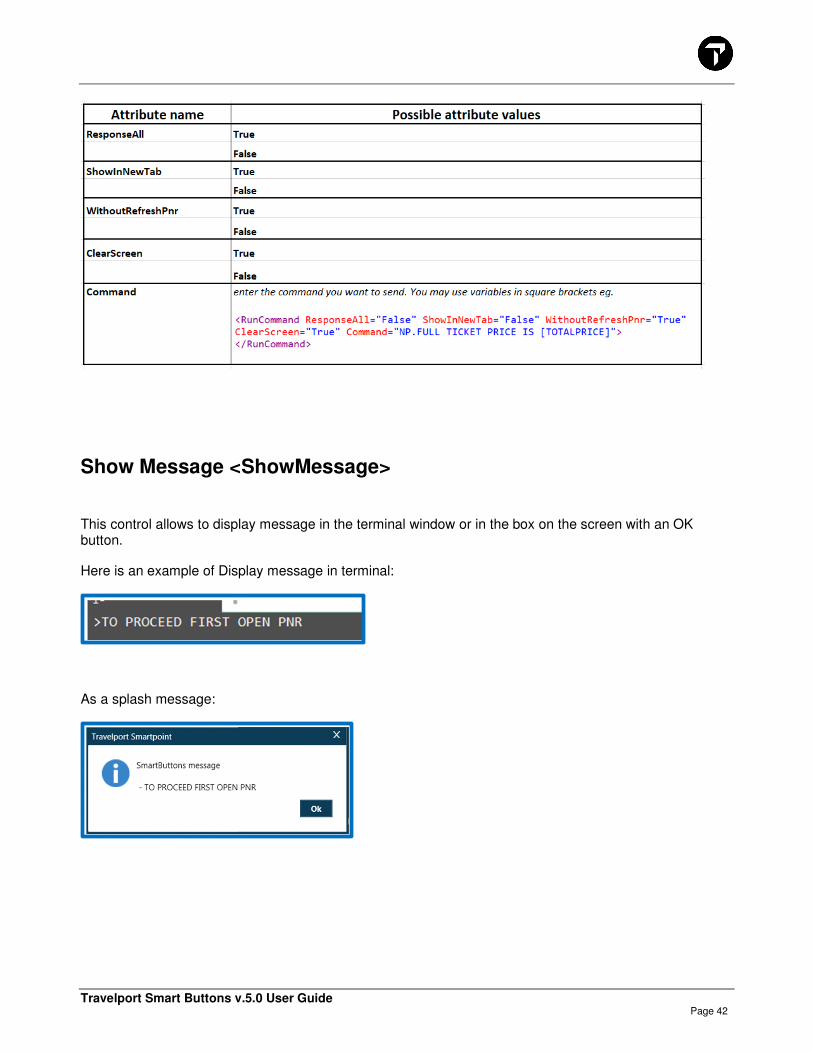
Show Message <ShowMessage>
This control allows to display message in the terminal window or in the box on the screen with an OK button.
Here is an example of Display message in terminal:
As a splash message:
Travelport Smart Buttons v.5.0 User Guide Page 43
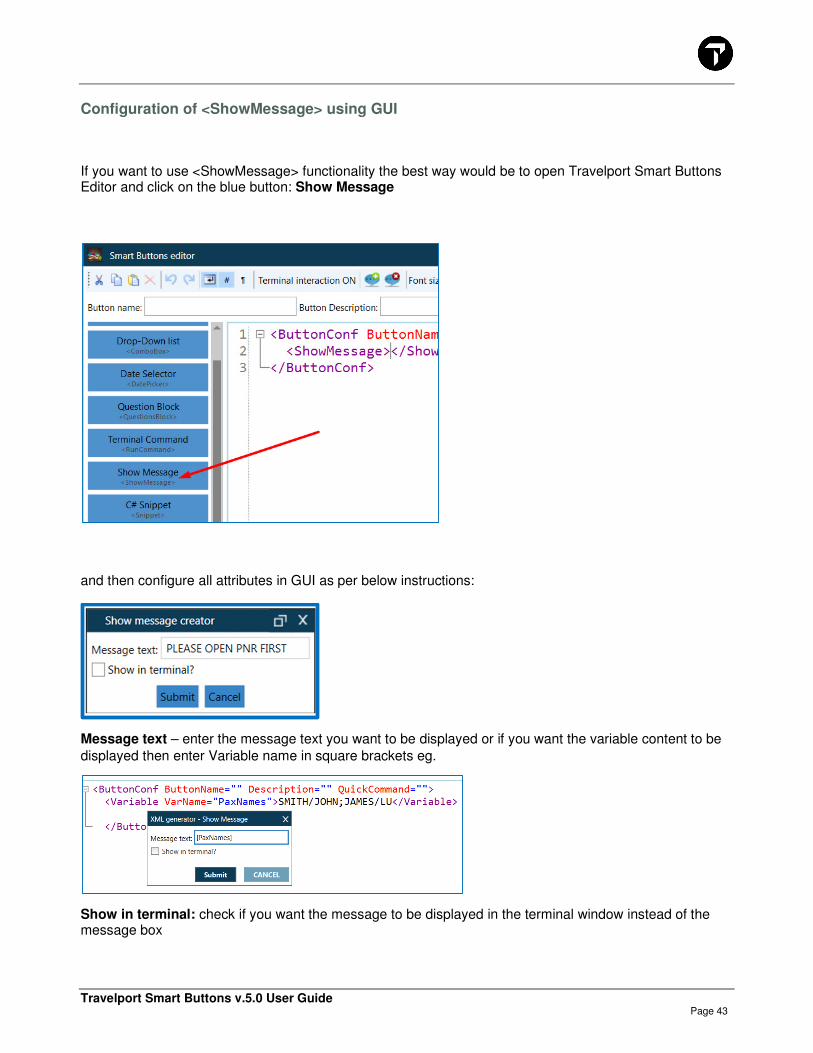
Configuration of <ShowMessage> using GUI
If you want to use <ShowMessage> functionality the best way would be to open Travelport Smart Buttons Editor and click on the blue button: Show Message
and then configure all attributes in GUI as per below instructions:
Message text – enter the message text you want to be displayed or if you want the variable content to be
displayed then enter Variable name in square brackets eg.
Show in terminal: check if you want the message to be displayed in the terminal window instead of the message box
Travelport Smart Buttons v.5.0 User Guide Page 44
Add C# Snippet
Allows to add any snippet code written by the programmer in C# language.
If the functionality provided by the build in xml elements does not allow you to achieve what you need to achieve with your script then you may reach out to C# developer who can prepare c# code. You may then use this code as a part of your script.
** Some types/classes from .net require full namespace to be specified along with the type/class, eg.
CultureInfo, otherwise the code will to be compiled by Smartpoint.
Configuration of <Snippet> using GUI
If you want to add C# Snippet to your script the best way would be to open Travelport Smart Buttons Editor and click on the blue button: C# Snippet
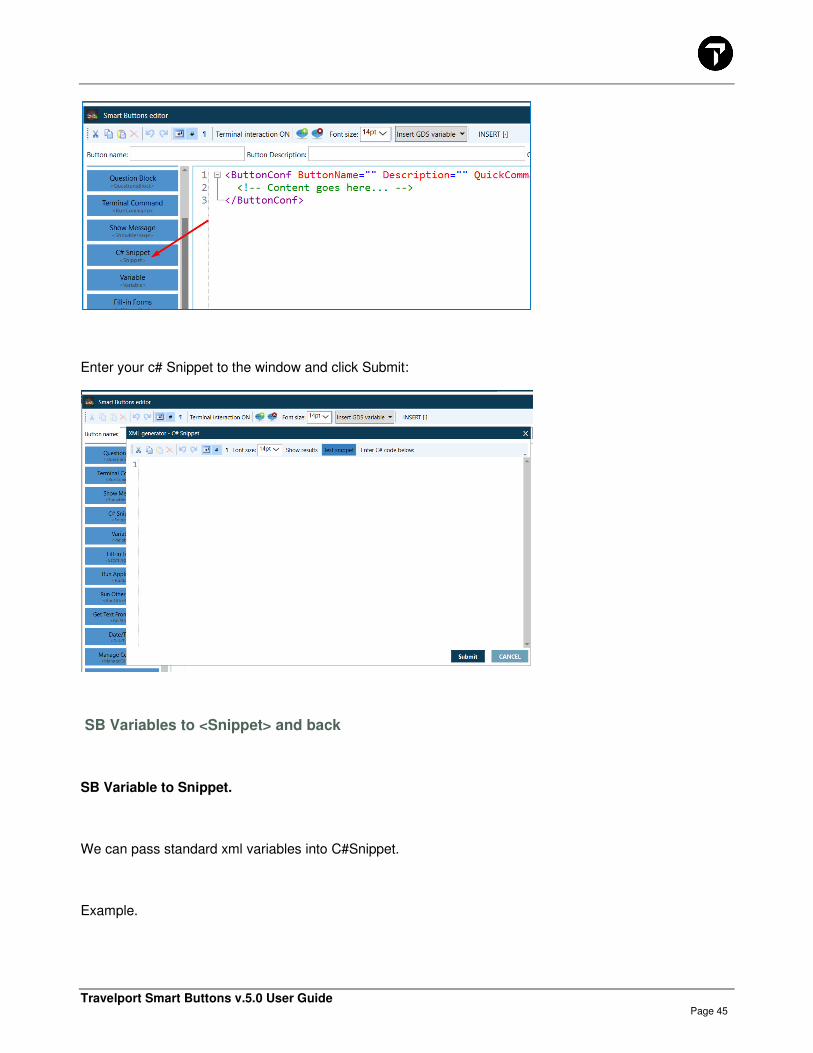
Travelport Smart Buttons v.5.0 User Guide Page 45
Enter your c# Snippet to the window and click Submit:
SB Variables to <Snippet> and back
SB Variable to Snippet.
We can pass standard xml variables into C#Snippet.
Example.

Travelport Smart Buttons v.5.0 User Guide Page 46
You need to pass the SB variable: [CurrentPCC] to your Snippet.
<Variable VarName="CurrentPCC">%CurrentPcc%</Variable>
This is how you do it:
var currentPccFromSBxml = "[CurrentPCC]"; UIHelper.Instance.ShowMessageBox(currentPccFromSBxml); return null;
Snippet variable to SB variable
var totalAmount = double.Parse("[FoundTotalAmount]"); var totalPlusFee = totalAmount + 50; return totalPlusFee.ToString();

Travelport Smart Buttons v.5.0 User Guide Page 47
To return multiple variables** from Snippet to SB variable use Dictionary, eg.
var multipleVariablesDic = new Dictionary<string, string>
{
{ "totalAmount", "605" },
{ "fee", "50" }
};
return multipleVariablesDic;
** When returning multiple variables from Snippet you need to remember the names of those variables as
hey will not be available in Travelport Smart Buttons editor on mouse right click menu.
Travelport Smart Buttons v.5.0 User Guide Page 48
Variable
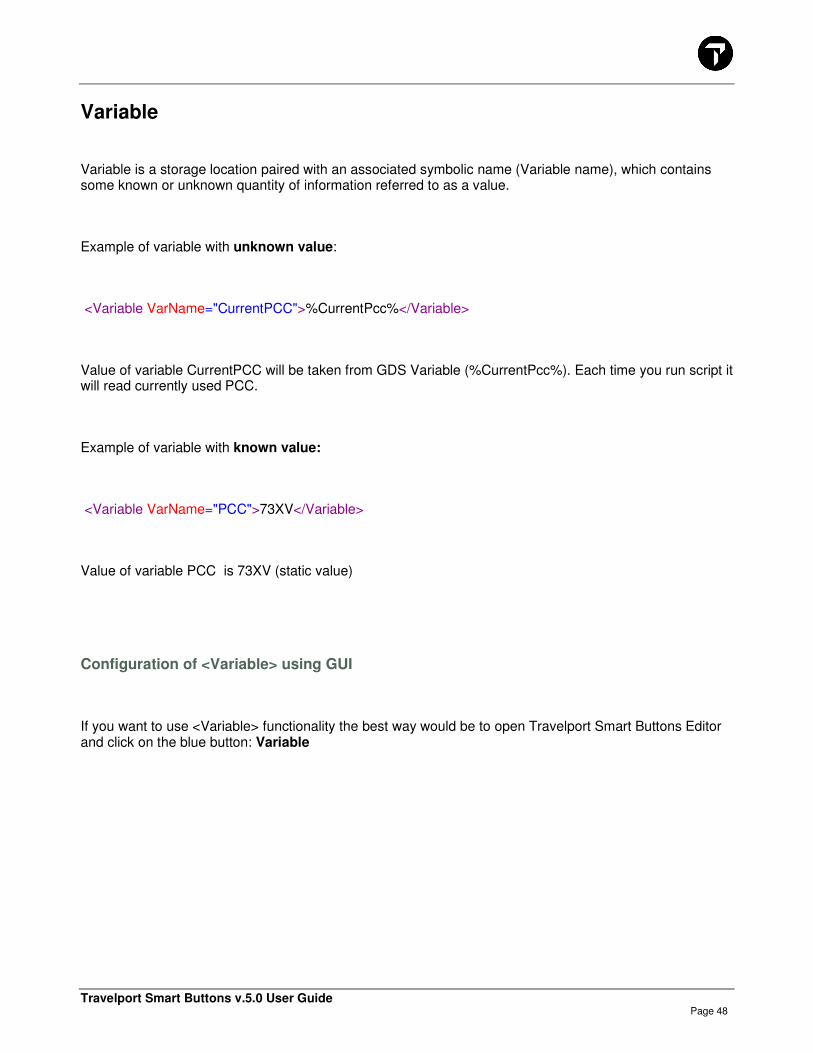
Variable is a storage location paired with an associated symbolic name (Variable name), which contains some known or unknown quantity of information referred to as a value.
Example of variable with unknown value:
<Variable VarName="CurrentPCC">%CurrentPcc%</Variable>
Value of variable CurrentPCC will be taken from GDS Variable (%CurrentPcc%). Each time you run script it will read currently used PCC.
Example of variable with known value:
<Variable VarName="PCC">73XV</Variable>
Value of variable PCC is 73XV (static value)
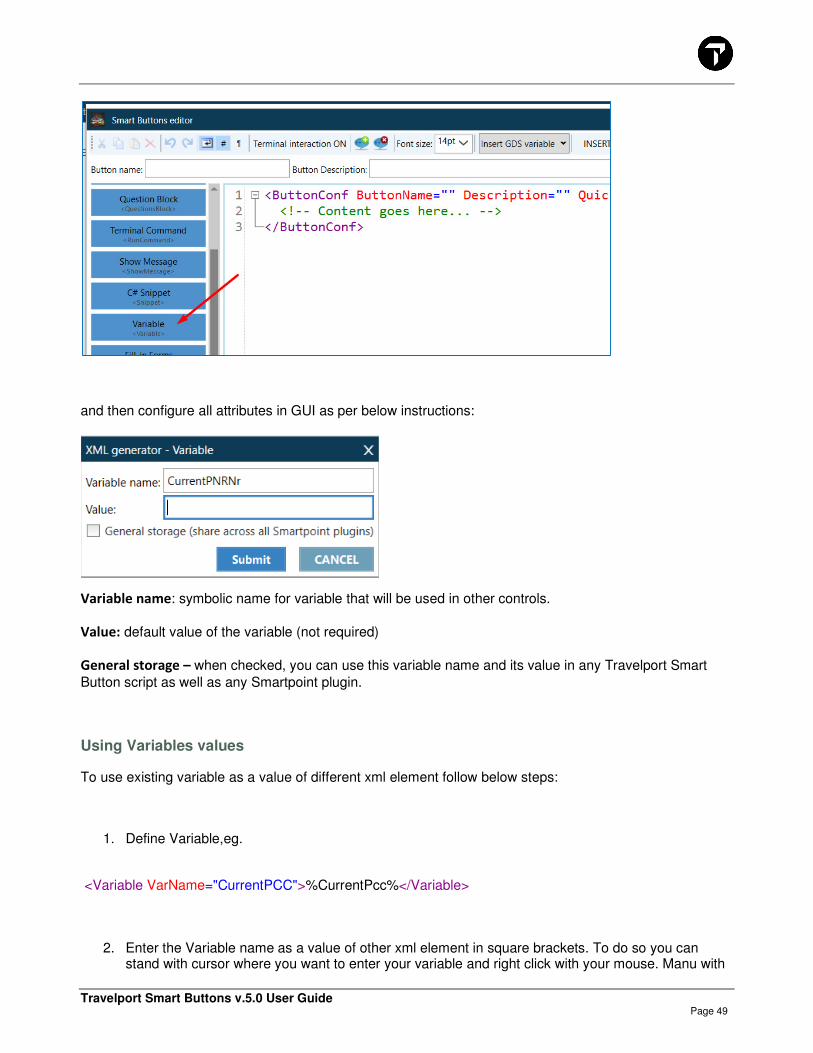
Configuration of <Variable> using GUI
If you want to use <Variable> functionality the best way would be to open Travelport Smart Buttons Editor and click on the blue button: Variable
Travelport Smart Buttons v.5.0 User Guide Page 49
and then configure all attributes in GUI as per below instructions:
Variable name: symbolic name for variable that will be used in other controls.
Value: default value of the variable (not required)
General storage – when checked, you can use this variable name and its value in any Travelport Smart
Button script as well as any Smartpoint plugin.
Using Variables values
To use existing variable as a value of different xml element follow below steps:
1. Define Variable,eg.
<Variable VarName="CurrentPCC">%CurrentPcc%</Variable>
2. Enter the Variable name as a value of other xml element in square brackets. To do so you can stand with cursor where you want to enter your variable and right click with your mouse. Manu with

Travelport Smart Buttons v.5.0 User Guide Page 50
defined variables will open, select the one you want to use, and it will be inserted with square brackets.
Eg. you want to have a script that reads the current PCC and display it as a message on the screen:
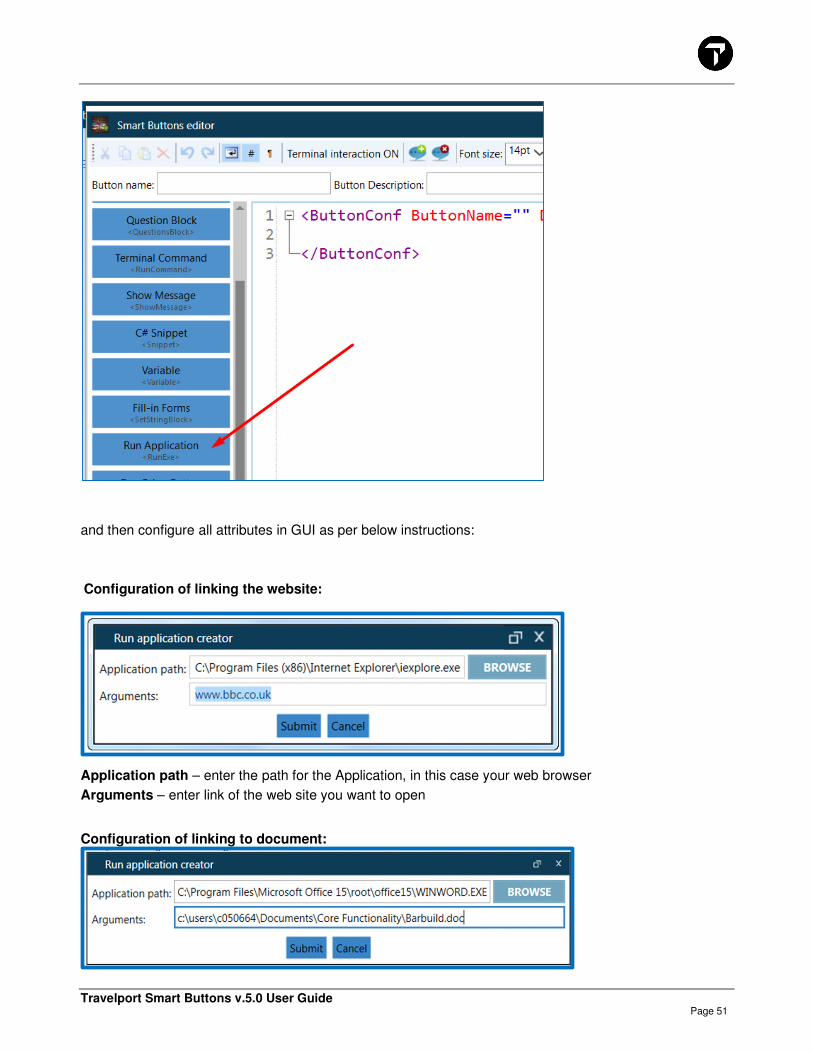
Run Application <RunExe>
This control allows you to add a link to a web site or document.
Configuration of <RunExe> using GUI
If you want to use <RunExe> functionality the best way would be to open Smart Buttons Editor and click on the blue button: Run Application
Travelport Smart Buttons v.5.0 User Guide Page 51
and then configure all attributes in GUI as per below instructions:
Configuration of linking the website:
Application path – enter the path for the Application, in this case your web browser
Arguments – enter link of the web site you want to open
Configuration of linking to document:
Travelport Smart Buttons v.5.0 User Guide Page 52
Application Path: enter the application path, in this case World or Excel exe file.
Arguments: enter the link to the file you want to open
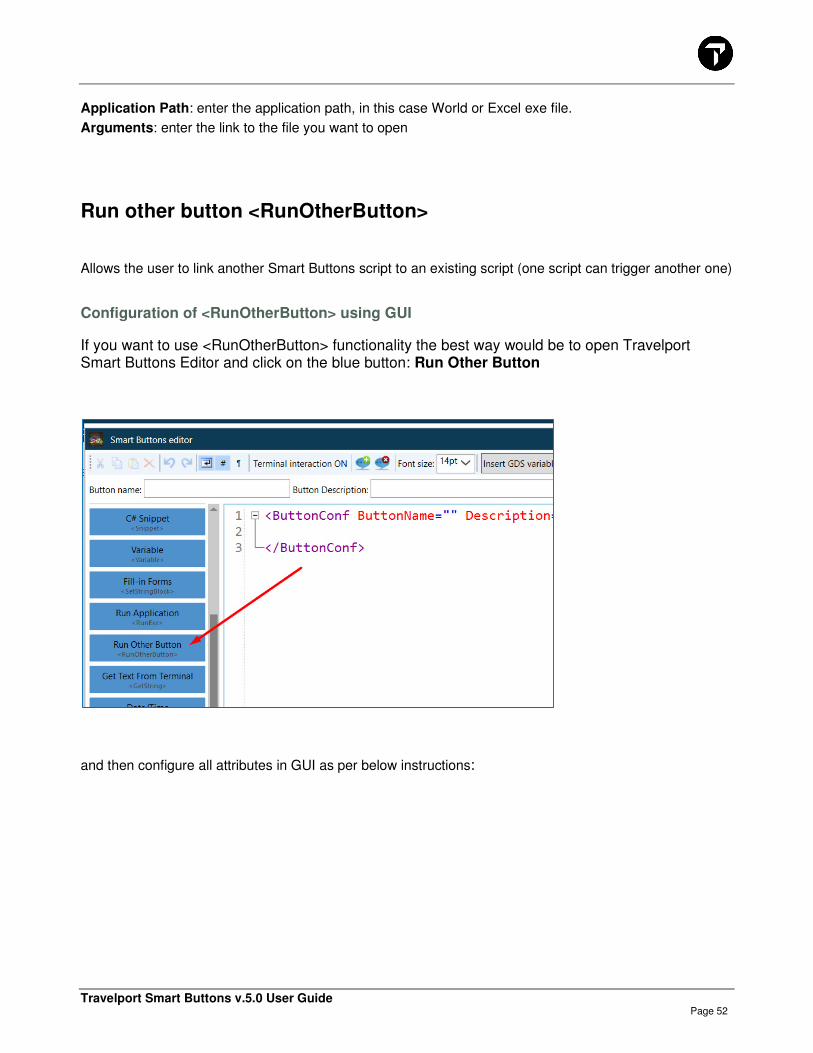
Run other button <RunOtherButton>
Allows the user to link another Smart Buttons script to an existing script (one script can trigger another one)
Configuration of <RunOtherButton> using GUI
If you want to use <RunOtherButton> functionality the best way would be to open Travelport Smart Buttons Editor and click on the blue button: Run Other Button
and then configure all attributes in GUI as per below instructions:
Travelport Smart Buttons v.5.0 User Guide Page 53
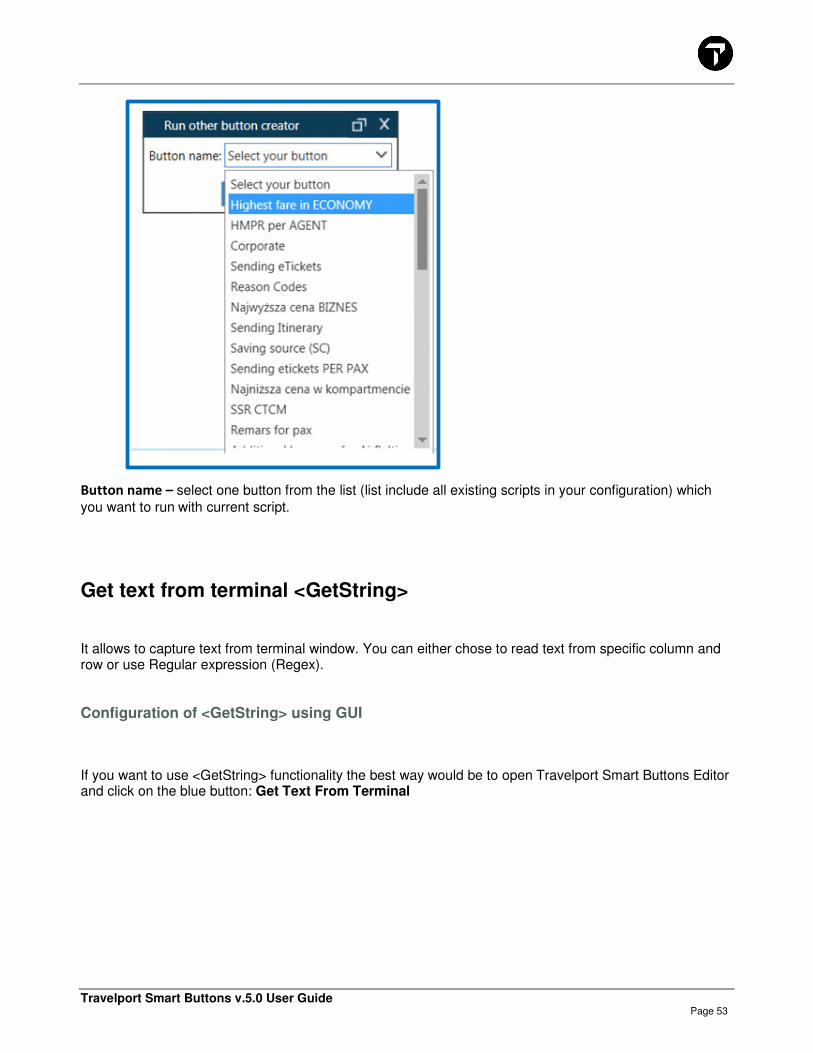
Button name – select one button from the list (list include all existing scripts in your configuration) which
you want to run with current script.
Get text from terminal <GetString>
It allows to capture text from terminal window. You can either chose to read text from specific column and row or use Regular expression (Regex).
Configuration of <GetString> using GUI
If you want to use <GetString> functionality the best way would be to open Travelport Smart Buttons Editor and click on the blue button: Get Text From Terminal
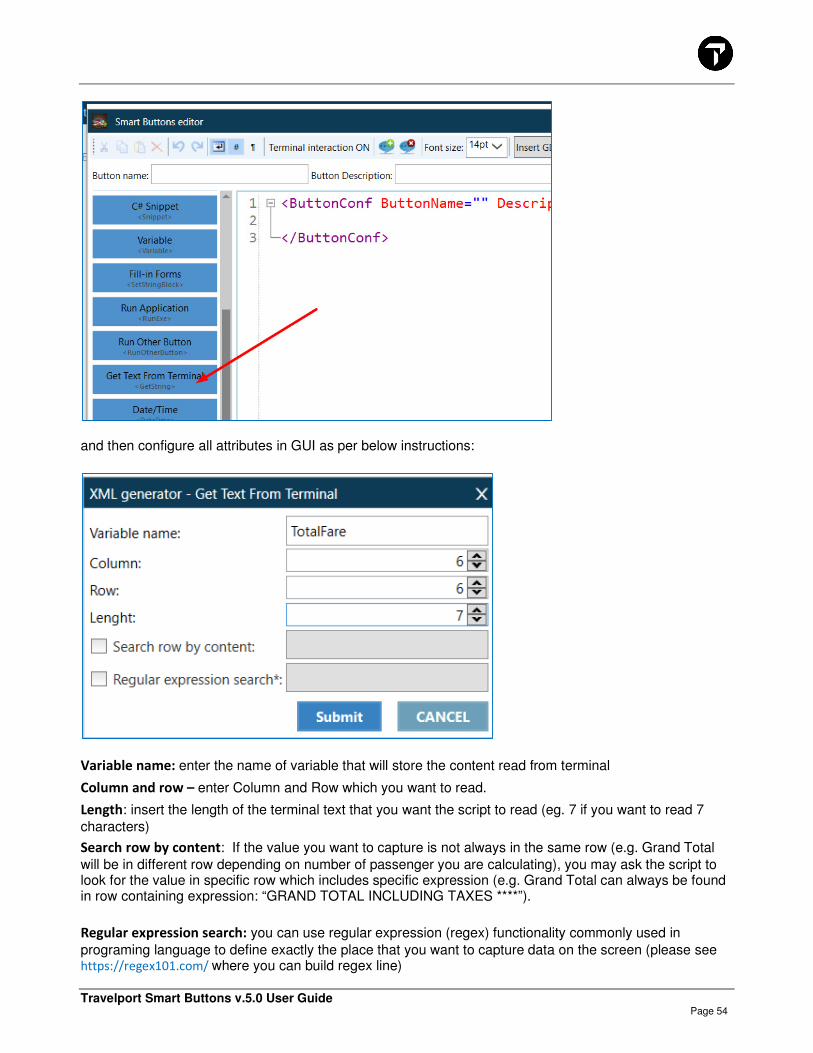
Travelport Smart Buttons v.5.0 User Guide Page 54
and then configure all attributes in GUI as per below instructions:
Variable name: enter the name of variable that will store the content read from terminal
Column and row – enter Column and Row which you want to read.
Length: insert the length of the terminal text that you want the script to read (eg. 7 if you want to read 7
characters)
Search row by content: If the value you want to capture is not always in the same row (e.g. Grand Total
will be in different row depending on number of passenger you are calculating), you may ask the script to look for the value in specific row which includes specific expression (e.g. Grand Total can always be found in row containing expression: “GRAND TOTAL INCLUDING TAXES ****”).
Regular expression search: you can use regular expression (regex) functionality commonly used in
programing language to define exactly the place that you want to capture data on the screen (please see https://regex101.com/ where you can build regex line)
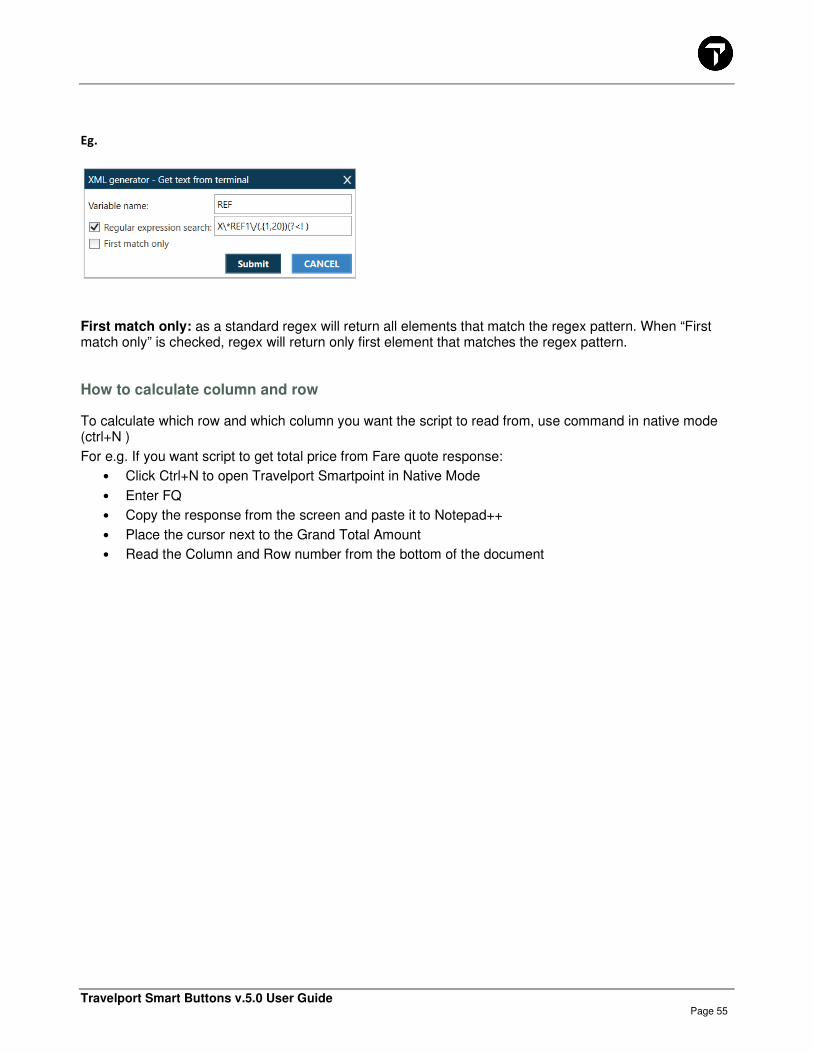
Travelport Smart Buttons v.5.0 User Guide Page 55
Eg.
First match only: as a standard regex will return all elements that match the regex pattern. When “First match only” is checked, regex will return only first element that matches the regex pattern.
How to calculate column and row
To calculate which row and which column you want the script to read from, use command in native mode (ctrl+N )
For e.g. If you want script to get total price from Fare quote response:
• Click Ctrl+N to open Travelport Smartpoint in Native Mode
• Enter FQ
• Copy the response from the screen and paste it to Notepad++
• Place the cursor next to the Grand Total Amount
• Read the Column and Row number from the bottom of the document

Travelport Smart Buttons v.5.0 User Guide Page 56
TIP!
When running „Run terminal command” (<RunCommand> )control preceding „Get text from terminal” control, do not check „Standard command” box, as this will not send the entry to the host, but only display it in Travelport Smartpoint (columns and rows in Smartpoint display and in host native system display may differ).
How to Search row by content
If the value you want to capture is not always in the same row (e.g. Grand Total will be in different row depending on number of passenger you are calculating), you may ask the script to look for the value in specific row which includes specific expression (e.g. Grand Total can always be found in row containing expression: “GRAND TOTAL INCLUDING TAXES ****”)
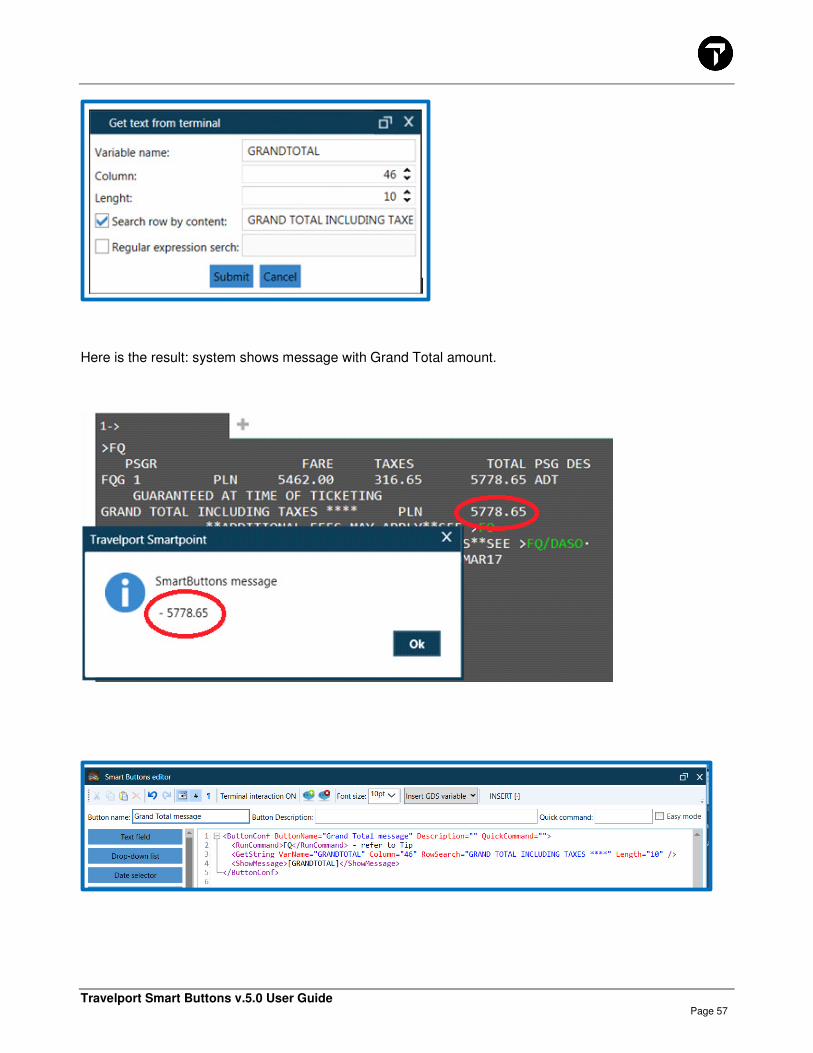
Travelport Smart Buttons v.5.0 User Guide Page 57
Here is the result: system shows message with Grand Total amount.

Travelport Smart Buttons v.5.0 User Guide Page 58
Date / Time <DateTime>
This control allows you to add date to your script. It can read current date, and you may set up specific number of days you want to subtract or add.
You can also select the language (for month translation) and time zone for which script will read the date.
Configuration of <DateTime> using GUI
If you want to use <DateTime> functionality the best way would be to open Travelport Smart Buttons Editor and click on the blue button: Date/Time
and then configure all attributes in GUI as per below instructions:
Variable name- name of your variable eg.CurrentDate
Date/Time format- select format you want to use for your Date/Time
Travelport Smart Buttons v.5.0 User Guide Page 59
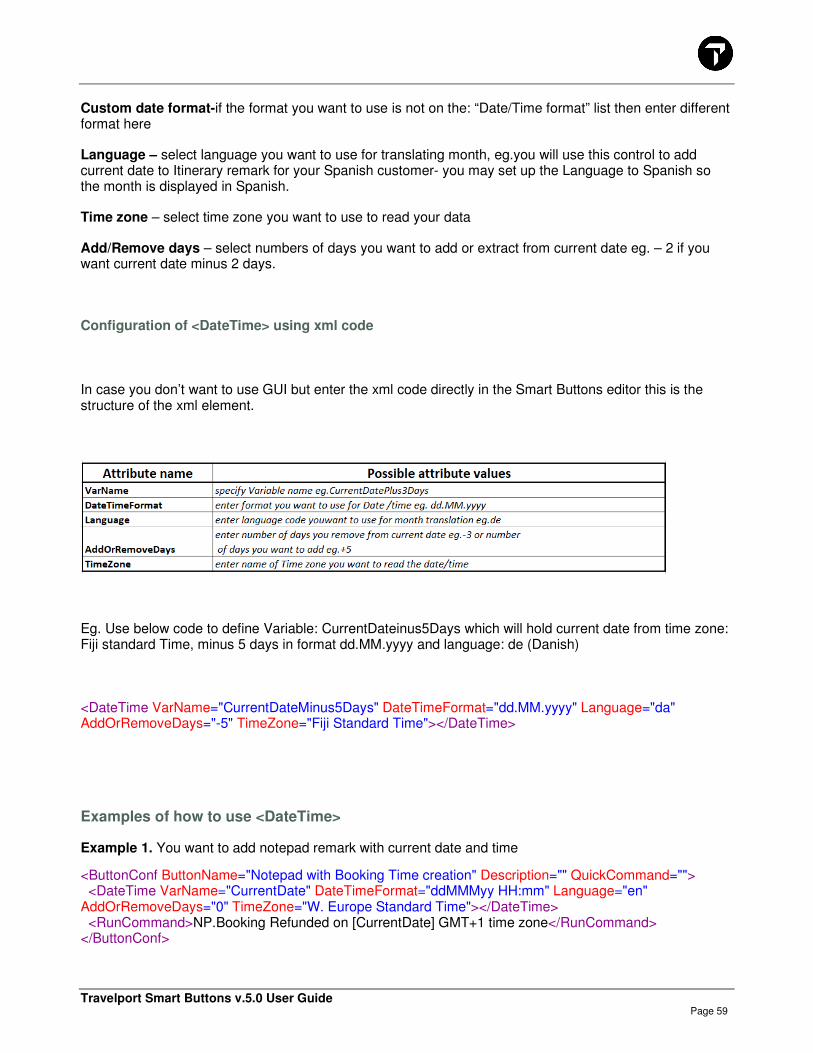
Custom date format-if the format you want to use is not on the: “Date/Time format” list then enter different format here
Language – select language you want to use for translating month, eg.you will use this control to add current date to Itinerary remark for your Spanish customer- you may set up the Language to Spanish so the month is displayed in Spanish.
Time zone – select time zone you want to use to read your data
Add/Remove days – select numbers of days you want to add or extract from current date eg. – 2 if you want current date minus 2 days.
Configuration of <DateTime> using xml code
In case you don’t want to use GUI but enter the xml code directly in the Smart Buttons editor this is the structure of the xml element.
Eg. Use below code to define Variable: CurrentDateinus5Days which will hold current date from time zone: Fiji standard Time, minus 5 days in format dd.MM.yyyy and language: de (Danish)
<DateTime VarName="CurrentDateMinus5Days" DateTimeFormat="dd.MM.yyyy" Language="da" AddOrRemoveDays="-5" TimeZone="Fiji Standard Time"></DateTime>
Examples of how to use <DateTime>
Example 1. You want to add notepad remark with current date and time
<ButtonConf ButtonName="Notepad with Booking Time creation" Description="" QuickCommand=""> <DateTime VarName="CurrentDate" DateTimeFormat="ddMMMyy HH:mm" Language="en" AddOrRemoveDays="0" TimeZone="W. Europe Standard Time"></DateTime> <RunCommand>NP.Booking Refunded on [CurrentDate] GMT+1 time zone</RunCommand> </ButtonConf>
Travelport Smart Buttons v.5.0 User Guide Page 60
Example 2.You want to display a message to the user reminding him to issue invoices if he is running the
script at 16 or later.
<ButtonConf ButtonName="Reminder" Description="" QuickCommand=""> <DateTime VarName="Time" DateTimeFormat="HH" Language="en" AddOrRemoveDays="0" TimeZone="W. Europe Standard Time"></DateTime> <ConditionalAction Condition="[Time]>=16"> <True> <ShowMessage>Remember to issue invoices for tickets issued today</ShowMessage> </True> </ConditionalAction> </ButtonConf>
Manage Collection <ManageCollection>
This controls allows to:
1. Extract 1 specific element from the collection (minimum number, maximum number, last element, first element);
2. Calculate number of elements in the collection or average of all numeric elements in collection (count);
3. Filter out the collection to include only unique elements.
Configuration of <ManageCollection> using GUI
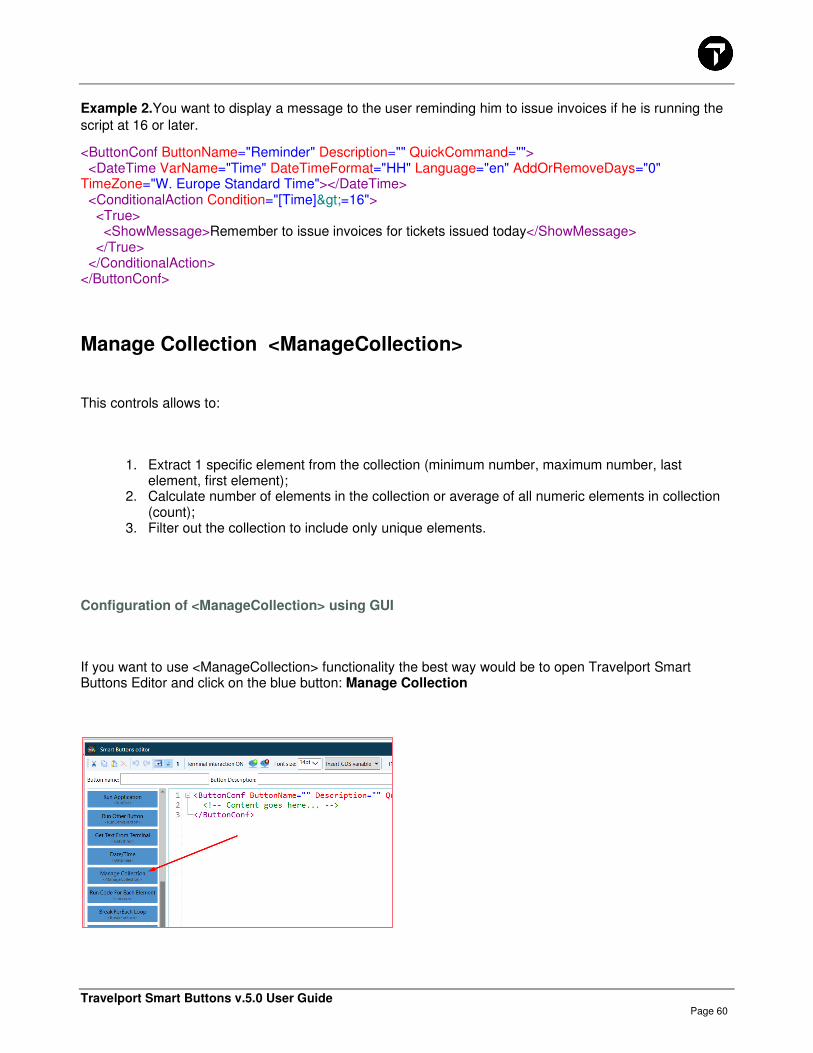
If you want to use <ManageCollection> functionality the best way would be to open Travelport Smart Buttons Editor and click on the blue button: Manage Collection
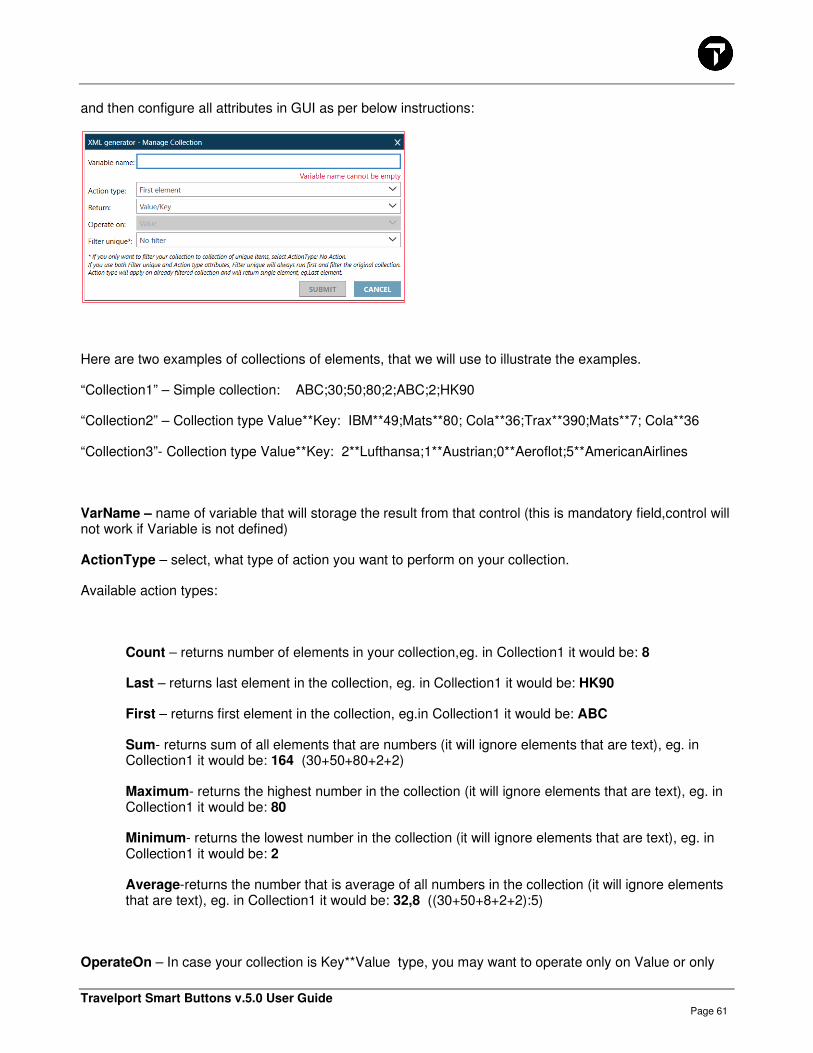
Travelport Smart Buttons v.5.0 User Guide Page 61
and then configure all attributes in GUI as per below instructions:
Here are two examples of collections of elements, that we will use to illustrate the examples.
“Collection1” – Simple collection: ABC;30;50;80;2;ABC;2;HK90
“Collection2” – Collection type Value**Key: IBM**49;Mats**80; Cola**36;Trax**390;Mats**7; Cola**36
“Collection3”- Collection type Value**Key: 2**Lufthansa;1**Austrian;0**Aeroflot;5**AmericanAirlines
VarName – name of variable that will storage the result from that control (this is mandatory field,control will not work if Variable is not defined)
ActionType – select, what type of action you want to perform on your collection.
Available action types:
Count – returns number of elements in your collection,eg. in Collection1 it would be: 8
Last – returns last element in the collection, eg. in Collection1 it would be: HK90
First – returns first element in the collection, eg.in Collection1 it would be: ABC
Sum- returns sum of all elements that are numbers (it will ignore elements that are text), eg. in Collection1 it would be: 164 (30+50+80+2+2)
Maximum- returns the highest number in the collection (it will ignore elements that are text), eg. in Collection1 it would be: 80
Minimum- returns the lowest number in the collection (it will ignore elements that are text), eg. in Collection1 it would be: 2
Average-returns the number that is average of all numbers in the collection (it will ignore elements that are text), eg. in Collection1 it would be: 32,8 ((30+50+8+2+2):5)
OperateOn – In case your collection is Key**Value type, you may want to operate only on Value or only
Travelport Smart Buttons v.5.0 User Guide Page 62
on Key, eg. you want to find the maximum number but only within Value part of the elements. By default complete element will be considered.
This attribute will not work with some of ActionTypes, as this has no logical sense – see table below
Value – operate only on element’s Value, eg.in Collection3 ActionType-Maximum +OperateOn-Value will return 5 (The maximum number within the Value part among all elements is 5)
Key- operate only on element’s Key, eg.in Collection2 ActionType-Sum +OperateOn-Key will return 598 (49+80+36+390+7+36)
*** Attribute “OperateOn” will only work if attribute “ActionType” is set up (see below table which ActionTypes work with OperateOn attribute). If “ActionType” is not set up “OperateOn” attribute will be ignored. ***
*** Attribute “OperateOn” will only work for Value**Key collection. For Simple collection it will be ignored***
Return- In case your collection is Key**Value type, you may want to return to your variable only Value or only Key.
ValueKey – return to variable entire element, eg.in Collection2 ActionType-Maximum +OperateOn-Key + Return-ValueKey will return Trax**390 (The highest (maximum) Key is 390, so it will return entire element Trax**390)
Key - return to variable Key, eg.in Collection3 ActionType-Minimum +OperateOn-Value+ Return-Key will return Aeroflot (Element with the lowest (minimum) Value part is 0**Aeroflot, so it will return it’s Key: Aeroflot)
Value - return to variable Value, eg.in Collection2 ActionType-First + Return-Value will return IBM (The first element in the collection is IBM**49, so it will return it’s Value part which is IBM)
*** Attribute “Return” will only work for Value**Key collection. For Simple collection it will be ignored***
FilterUnique – it will filter the collection and return only unique elements. In Collection1 unique elements would be: 30;50;80;2;ABC;HK90 (“ABC” and “2” appeared two times in the collection and has been filtered out).
NoChanges – if set up, no filtration will be done. To have the same result you may also remove “FilterUnique” attribute from the code.
Element – filter and return collection of unique elements (in case of Value**Key collection will read entire element Value+Key), eg.
in Collection 1 it would be: 30;50;80;2;ABC;HK90 (one “2” and “ABC” have been filtered out)
Travelport Smart Buttons v.5.0 User Guide Page 63
Key- in case of Value**Key collections you may want to filter out from your collection only elements that has the same Key, eg.
Original Collection: 1**KELLY;2**KELLY;2**JOHN;3;KATE
Collection after filtration by Key: 1**KELLY;2**JOHN;3;KATE (Second element 2**KELLY has been filtered out as the Key part is the same as in the first element)
Value- in case of Value**Key collections you may want to filter out from your collection only elements that has the same Value, eg.
Original Collection: IBM**49;Mats**80; IBM**54654;
Collection after filtration: IBM**49;Mats**80 ( last element IBM**54654 has been filtered out as it has the same Value part (IBM) as the first element in the collection)
Important to remember!
If you use both FilterUnique and ActionType attributes, FilterUnique will always run first, will filter the original collection, and then ActionType will work on already filtered collection,
eg.
Collection: APPLES;PEARS,KIWI;APPLES
ActionType:Last
+
FilterUnique:Element
=
Result: KIWI
(First filtration has been completed, last item: APPLES has been filtered out as duplicated and collection has been changed to APPLES;PEARS,KIWI and then ActionType has been performed (Last) and last item in the filtered collection is KIWI)
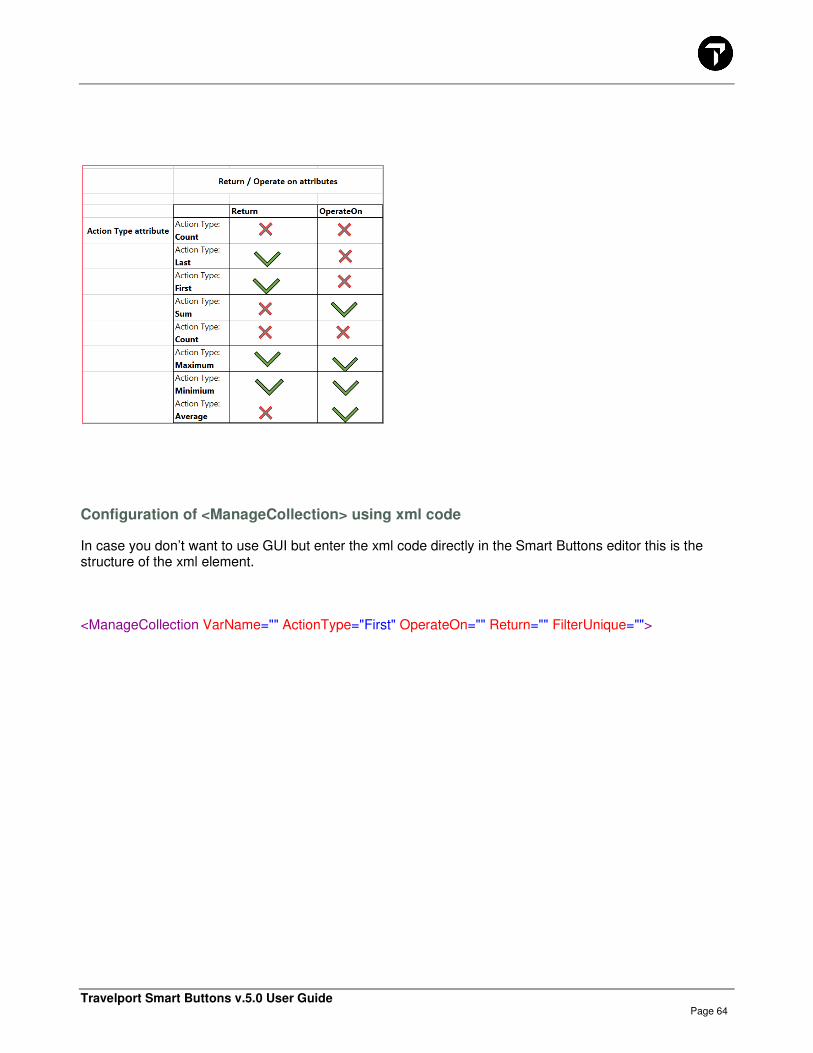
Important!
Attribute “ActionType” can be used with “Return” and “OperateOn” only as per below table,
eg. ActionType:Last and Return can be used together, but ActionType:Count and Return cannot be used together (attribute Return will be ignored).
Travelport Smart Buttons v.5.0 User Guide Page 64
Configuration of <ManageCollection> using xml code
In case you don’t want to use GUI but enter the xml code directly in the Smart Buttons editor this is the structure of the xml element.
<ManageCollection VarName="" ActionType="First" OperateOn="" Return="" FilterUnique="">

Travelport Smart Buttons v.5.0 User Guide Page 65
Examples on how to use <ManageCollection> control
Here is few examples of script where <ManageCollection> xml element is used.
Example 1. You need to extract the lowest number from your collection. The collection is Simple type and the values are static.
<ManageCollection VarName="LowestElement" ActionType="Minimum"> 213;10;8788;2902;892;ABC7</ManageCollection>
As you selected ActionType-Minimum, the control will return the lowest number (10), ignoring elements that are not numbers (in this example element: ABC7 is a text, not number as it contains both letters and number).
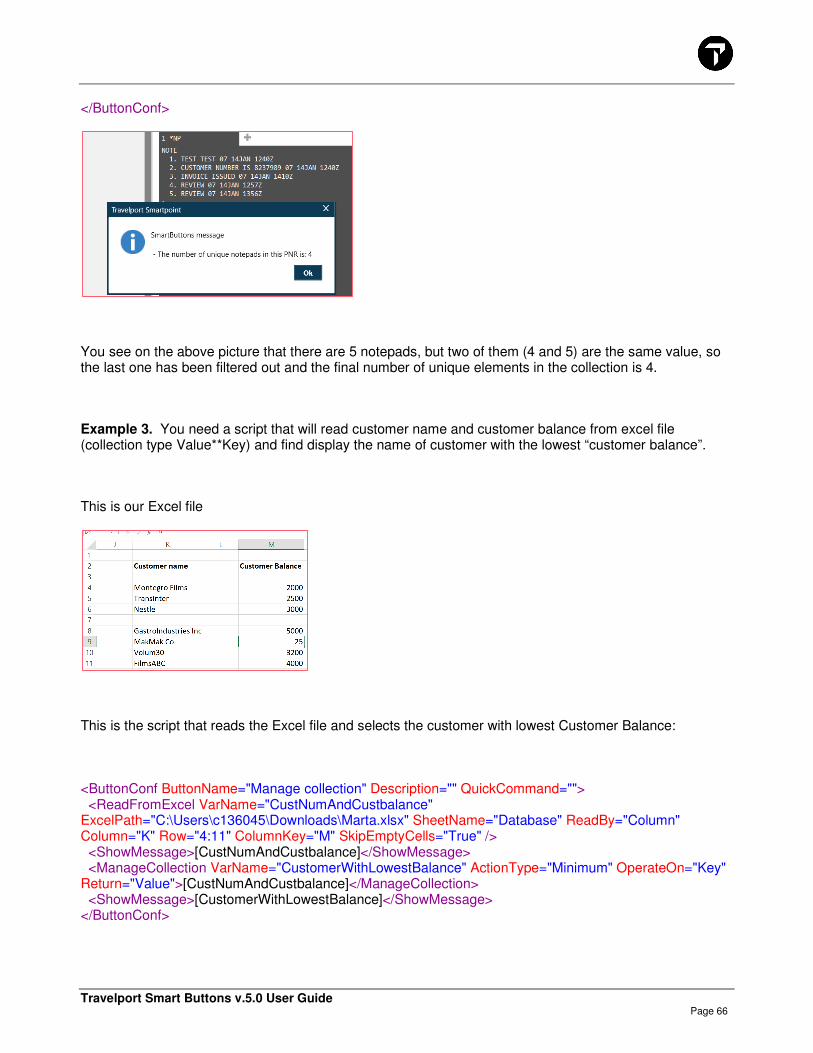
Example 2. You need want to know how many unique notepad remarks is in your booking file. Below script will create collection of all notepad remarks with <GetString> control, and then filter unique items (first) and count f elements in collection(2) with <ManageCollection> control:
<ButtonConf ButtonName="Notepads" Description="" QuickCommand=""> <RunCommand>*NP</RunCommand> <GetString VarName="AllNotepads"><![CDATA[\d\. (.*) (?:.{2} \d{2}[A-Z]{3} [0-9]{4}Z)]]></GetString> <ManageCollection VarName="NumberOfUniqueNotepads" ActionType="Count" FilterUnique="Element">[AllNotepads]</ManageCollection> <ShowMessage>The number of unique notepads in this PNR is: [NumberOfUniqueNotepads]</ShowMessage>
Travelport Smart Buttons v.5.0 User Guide Page 66
</ButtonConf>
You see on the above picture that there are 5 notepads, but two of them (4 and 5) are the same value, so the last one has been filtered out and the final number of unique elements in the collection is 4.
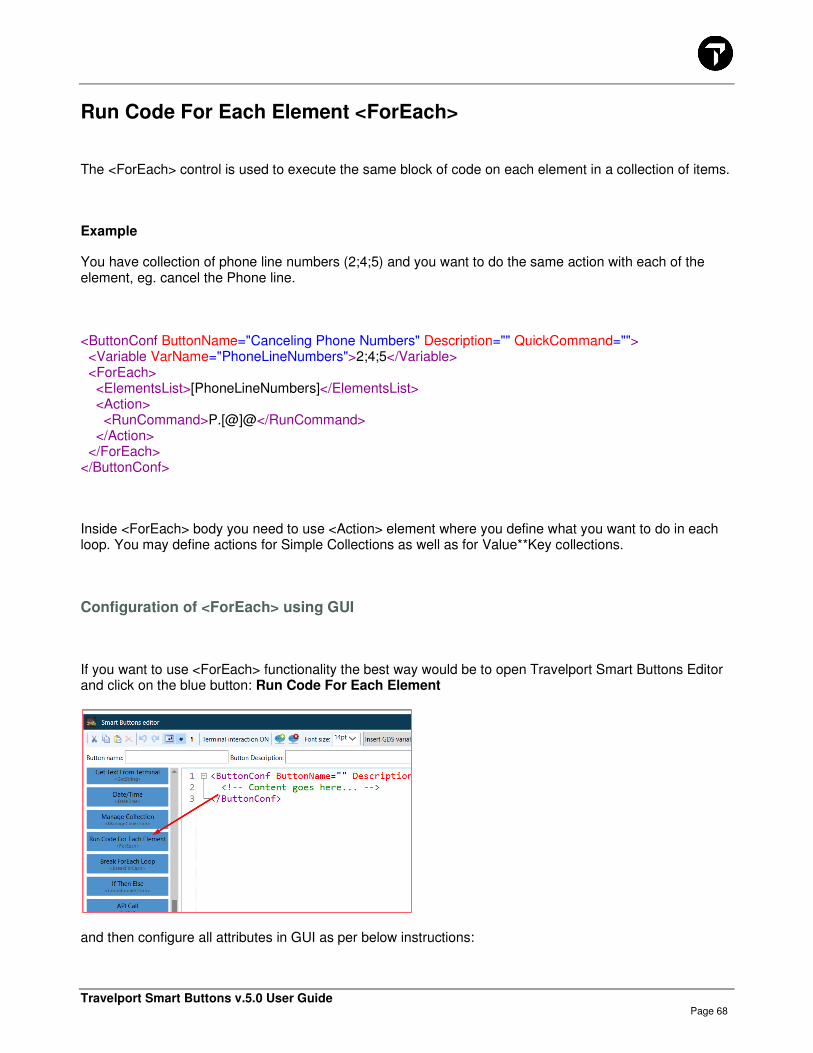
Example 3. You need a script that will read customer name and customer balance from excel file (collection type Value**Key) and find display the name of customer with the lowest “customer balance”.
This is our Excel file
This is the script that reads the Excel file and selects the customer with lowest Customer Balance:
<ButtonConf ButtonName="Manage collection" Description="" QuickCommand=""> <ReadFromExcel VarName="CustNumAndCustbalance" ExcelPath="C:\Users\c136045\Downloads\Marta.xlsx" SheetName="Database" ReadBy="Column" Column="K" Row="4:11" ColumnKey="M" SkipEmptyCells="True" /> <ShowMessage>[CustNumAndCustbalance]</ShowMessage> <ManageCollection VarName="CustomerWithLowestBalance" ActionType="Minimum" OperateOn="Key" Return="Value">[CustNumAndCustbalance]</ManageCollection> <ShowMessage>[CustomerWithLowestBalance]</ShowMessage> </ButtonConf>

Travelport Smart Buttons v.5.0 User Guide Page 67
First it reads the Excel file with <ReadFromExcel> xml element, then it shows the collection in a message box with <ShowMessage> xml element.
This is a Value**Key collection which means that each element of the collection contains two parts:
Value - Customer Name
Key - Customer Balance.
Next used xml element is <ManageCollection>. This control allows to decide on which part we now want to operate (OperateOn attribute). We want to operate only on Customer Balance (Calculate the minimum Customer Balance) that’s why we need to select OperateOn="Key".
With this control we only want to return not the Amount of Customer Balance, but the Name of the Customer (Value) with the lowest balance so we need to select Return="Value" .
And the last used control is <ShowMessage> that allows to display the final result - the Name of the Customer with the lowest Customer Balance:
Travelport Smart Buttons v.5.0 User Guide Page 68
Run Code For Each Element <ForEach>
The <ForEach> control is used to execute the same block of code on each element in a collection of items.
Example
You have collection of phone line numbers (2;4;5) and you want to do the same action with each of the element, eg. cancel the Phone line.
<ButtonConf ButtonName="Canceling Phone Numbers" Description="" QuickCommand=""> <Variable VarName="PhoneLineNumbers">2;4;5</Variable> <ForEach> <ElementsList>[PhoneLineNumbers]</ElementsList> <Action> <RunCommand>P.[@]@</RunCommand> </Action> </ForEach> </ButtonConf>
Inside <ForEach> body you need to use <Action> element where you define what you want to do in each loop. You may define actions for Simple Collections as well as for Value**Key collections.
Configuration of <ForEach> using GUI
If you want to use <ForEach> functionality the best way would be to open Travelport Smart Buttons Editor and click on the blue button: Run Code For Each Element
and then configure all attributes in GUI as per below instructions:
Travelport Smart Buttons v.5.0 User Guide Page 69
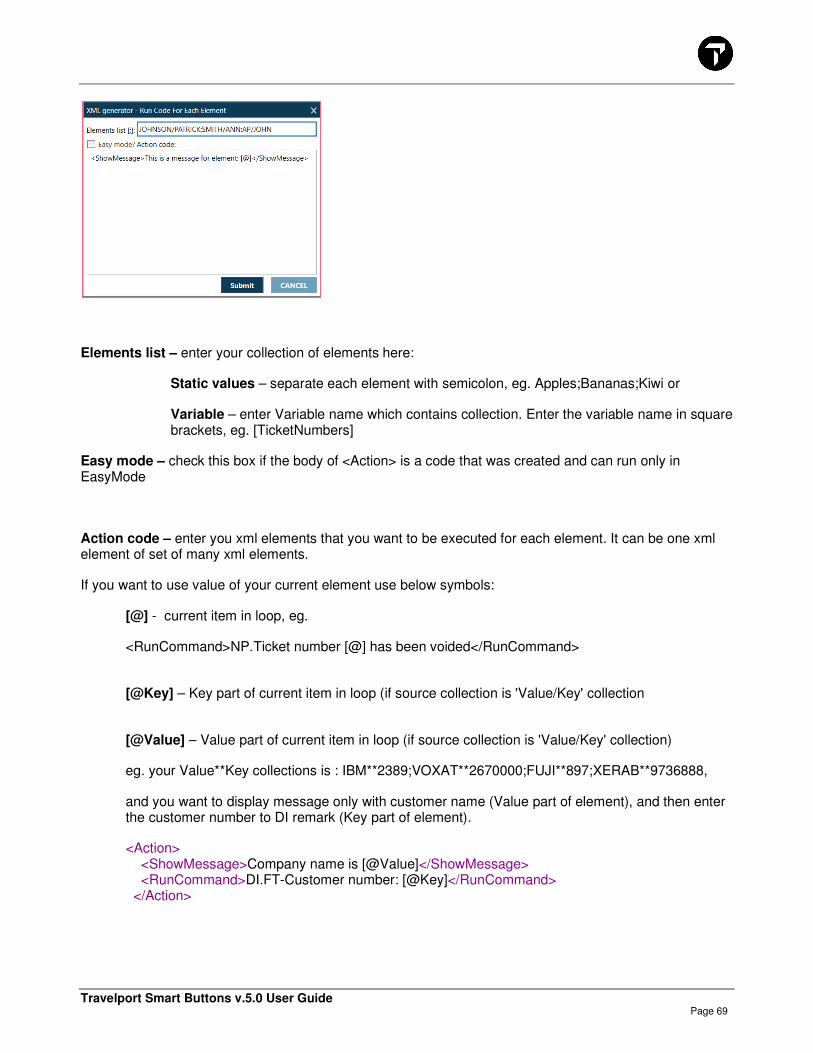
Elements list – enter your collection of elements here:
Static values – separate each element with semicolon, eg. Apples;Bananas;Kiwi or
Variable – enter Variable name which contains collection. Enter the variable name in square brackets, eg. [TicketNumbers]
Easy mode – check this box if the body of <Action> is a code that was created and can run only in EasyMode
Action code – enter you xml elements that you want to be executed for each element. It can be one xml element of set of many xml elements.
If you want to use value of your current element use below symbols:
[@] - current item in loop, eg.
<RunCommand>NP.Ticket number [@] has been voided</RunCommand>
[@Key] – Key part of current item in loop (if source collection is 'Value/Key' collection
[@Value] – Value part of current item in loop (if source collection is 'Value/Key' collection)
eg. your Value**Key collections is : IBM**2389;VOXAT**2670000;FUJI**897;XERAB**9736888,
and you want to display message only with customer name (Value part of element), and then enter the customer number to DI remark (Key part of element).
<Action> <ShowMessage>Company name is [@Value]</ShowMessage> <RunCommand>DI.FT-Customer number: [@Key]</RunCommand> </Action>

Travelport Smart Buttons v.5.0 User Guide Page 70
Configuration of <ForEach> using xml code
In case you don’t want to use GUI but enter the xml code directly in the Travelport Smart Buttons editor this is the structure of the xml element.
<ForEach ElementsList=""> <ElementsList> </ElementsList> <Action EasyMode="False"> </Action> </ForEach>
As you see this control is constructed from 3 xml elements: <ForEach>, inside are <ElementsList> and then <Action>.
1. <ForEach> has only one attribute ElementsList. Use it when your collection is in Variable, and
then you don’t need to use <ElementsList> xml element, eg.
<ForEach ElementsList="[TicketNumbers]"> <Action> <ShowMessage>[@]</ShowMessage> </Action> </ForEach>
2. <ElementsList>
If your collection is an array of static values use <ElementsList> xml element, eg.
<ForEach> <ElementsList> 2374678;3279,2,7 </ElementsList> <Action EasyMode="False"> <ShowMessage>[@]</ShowMessage> </Action> </ForEach>
Sometimes your collection may contains characters specific for xml language like: <, > etc. If you want SB to interpret it literally, as textual data, not as marked up content then you need to enter the collection in <ElementsList> xml, and use <![CDATA[ …… ]]> .
eg. those are elements of your collection: <1>;2xn2>;3;654 (See, some element contains “<” or “>”)
Travelport Smart Buttons v.5.0 User Guide Page 71
Incorrect way of adding such collection:
Correct way:
<ForEach ElementsList=""> <ElementsList> <![CDATA[<1>;<2>]]> </ElementsList>
<ElementsList> can also be used for collection under Variable name eg.
<ForEach> <ElementsList>[CustomerNumbers]</ElementsList> <Action> <ShowMessage>[@]</ShowMessage> </Action> </ForEach>
3. <Action>
As a value of this xml element enter any single or multiple controls that you want to be executed for each loop of <ForEach>. If some of your controls need to use te current element from the collection ten use below symbols:
[@] - current item in loop, eg.
<RunCommand>NP.Ticket number [@] has been voided</RunCommand>
[@Key] – Key part of current item in loop (if source collection is 'Value/Key' collection
[@Value] – Value part of current item in loop (if source collection is 'Value/Key' collection)
Examples on how to use <ForEach> control
Example 1.
You want to read all unvoided ticket from *HTI display, the ask the user which ticket to void, and then for all
Travelport Smart Buttons v.5.0 User Guide Page 72
selected tickets do the same action which is voiding the tickets.
<ButtonConf ButtonName="Void tickets"> <RunCommand>*HTI</RunCommand> <GetString VarName="UnvoidedTicketNumbers"><![CDATA[(?!.*\/VOID)\/(\d{13})\/-[A-Z]{3}\/]]></GetString> <CheckListBox Question="Select tickets you want to void" ToolTip="" Width="200" SelectDefaultAll="False" VarName="SelectedTicketsForVoid" IsRadioButton="False" SingleSelect="False" IsMandatory="False">[UnvoidedTicketNumbers] </CheckListBox> <ForEach> <ElementsList>[SelectedTicketsForVoid]</ElementsList> <Action> <RunCommand>TRV/[@]</RunCommand> <RunCommand>IR</RunCommand> </Action> </ForEach> <RunCommand>*HTI</RunCommand> </ButtonConf>
Example 2.
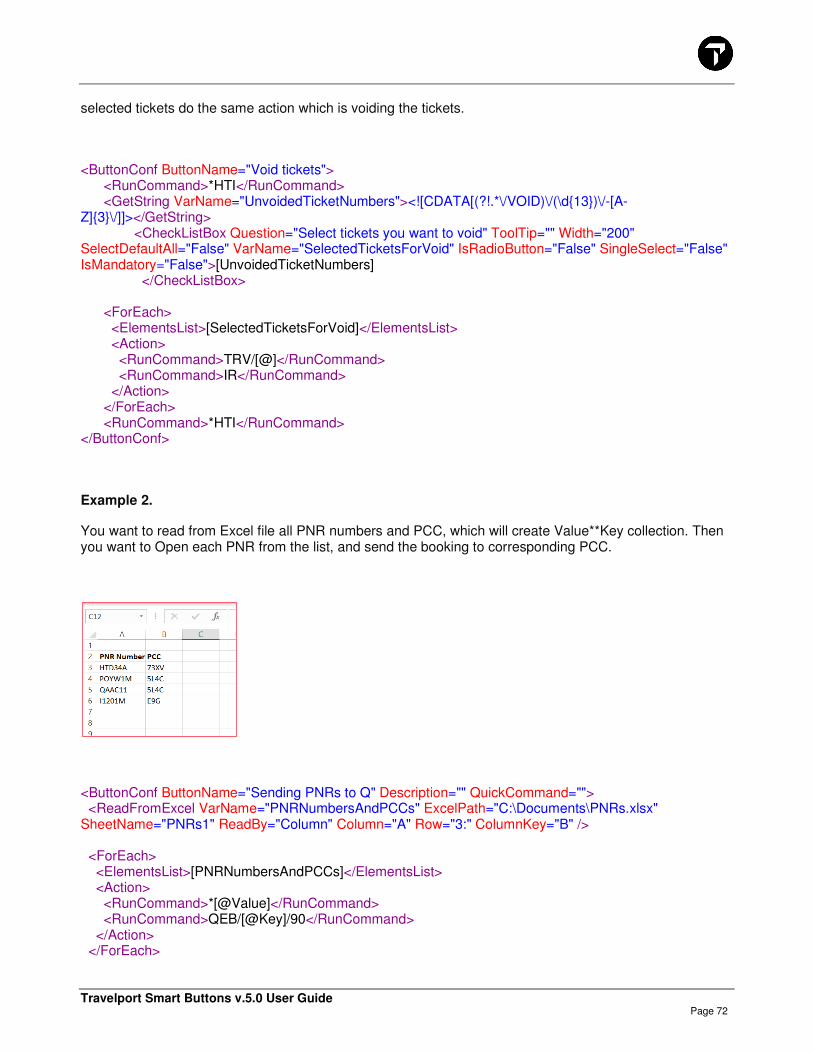
You want to read from Excel file all PNR numbers and PCC, which will create Value**Key collection. Then you want to Open each PNR from the list, and send the booking to corresponding PCC.
<ButtonConf ButtonName="Sending PNRs to Q" Description="" QuickCommand=""> <ReadFromExcel VarName="PNRNumbersAndPCCs" ExcelPath="C:\Documents\PNRs.xlsx" SheetName="PNRs1" ReadBy="Column" Column="A" Row="3:" ColumnKey="B" /> <ForEach> <ElementsList>[PNRNumbersAndPCCs]</ElementsList> <Action> <RunCommand>*[@Value]</RunCommand> <RunCommand>QEB/[@Key]/90</RunCommand> </Action> </ForEach>
Travelport Smart Buttons v.5.0 User Guide Page 73
</ButtonConf>
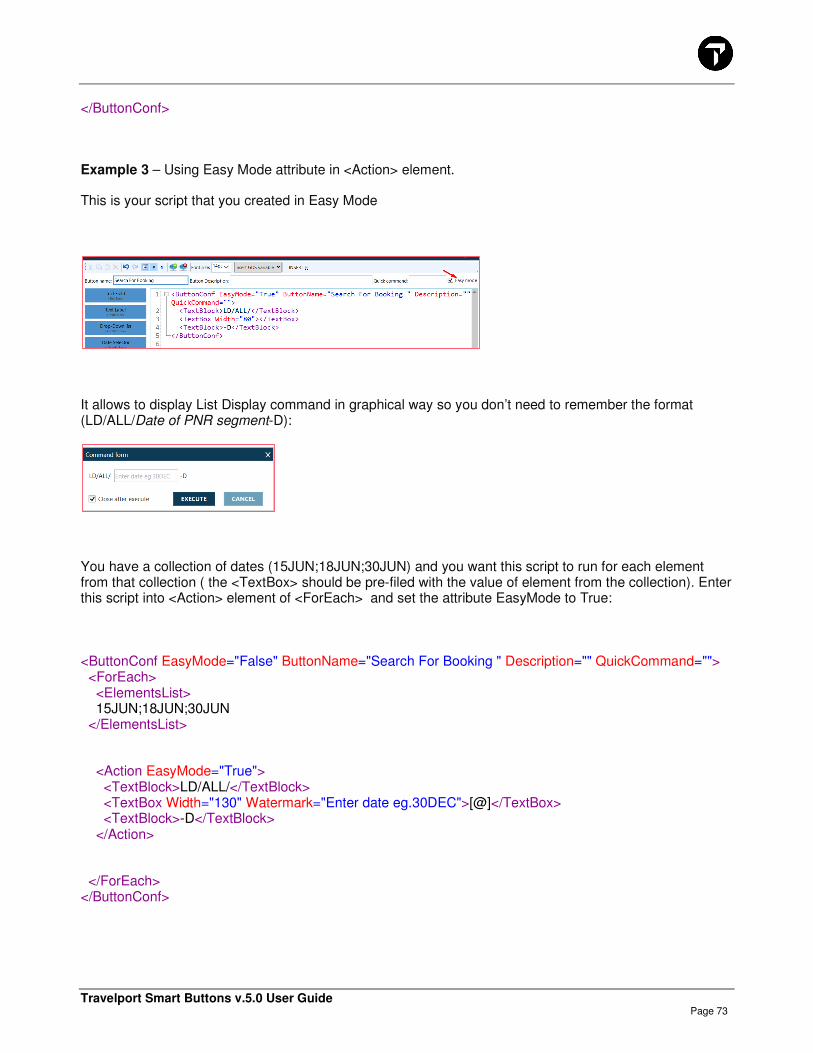
Example 3 – Using Easy Mode attribute in <Action> element.
This is your script that you created in Easy Mode
It allows to display List Display command in graphical way so you don’t need to remember the format (LD/ALL/Date of PNR segment-D):
You have a collection of dates (15JUN;18JUN;30JUN) and you want this script to run for each element from that collection ( the <TextBox> should be pre-filed with the value of element from the collection). Enter this script into <Action> element of <ForEach> and set the attribute EasyMode to True:
<ButtonConf EasyMode="False" ButtonName="Search For Booking " Description="" QuickCommand=""> <ForEach> <ElementsList> 15JUN;18JUN;30JUN </ElementsList>
<Action EasyMode="True"> <TextBlock>LD/ALL/</TextBlock> <TextBox Width="130" Watermark="Enter date eg.30DEC">[@]</TextBox> <TextBlock>-D</TextBlock> </Action>
</ForEach> </ButtonConf>

Travelport Smart Buttons v.5.0 User Guide Page 74
Using <BreakForEach> control
<BrakForEach> control, which may be only used inside of <Action> element, allows to break a loop.
If the <BreakForEach> element is used within the loop body and the Condition is agreed, it stops the loop iterations and goes immediately after the loop body.
Example:
1.You want to remove Notepad elements one by one, each time you want to ask user if he wants to remove first Notepad. If the user selects No you want to break the loop.
To do so, you need to create a fake collection. In this example we created collection of numbers from 1 to 20 (it can be anything eg. A;A;A;A etc). As you can see we are not using those numbers (elements’ values) anywhere in the <Action> element, but we need it for the <ForEach> to know what is the maximum number of loops. The <Action> will be executed 20 times in this example, if the user keep answering Yes. As soon as the user answers No, the loop will break.
<ButtonConf ButtonName="Brekak For each example" Description="" QuickCommand=""> <ForEach> <ElementsList> 1;2;3;4;5;6;7;8;9;10;11;12;13;14;15;16;17;18;19;20 </ElementsList> <Action> <RunCommand StandardCommand="True">*NP</RunCommand> <CheckListBox Question="Do you want remove first Notepad?" Width="100" VarName="YesNo" IsRadioButton="True" SingleSelect="True" IsMandatory="True">Yes;No</CheckListBox> <RunCommand StandardCommand="True">NP.1@</RunCommand> <RunCommand StandardCommand="True">*NP</RunCommand> <BreakForEach Condition="[YesNo]==No" /> </Action> </ForEach> </ButtonConf>
Example 2.
You want to add Itinerary Remark for first 3 passengers (you want to break the loop if passenger number is equal to 4)

Travelport Smart Buttons v.5.0 User Guide Page 75
<ButtonConf ButtonName="Itinerary remark"> <Variable VarName="Passengers">%PassengersList({FirstName}/{LastName}**{PassengerNumber})%</Variable> <ForEach> <ElementsList>[Passengers]</ElementsList> <Action> <BreakForEach Condition="[@Key]==4" /> <RunCommand>RI.PASSENGER NR [@Key] is [@Value]</RunCommand> </Action> </ForEach> </ButtonConf>
If then Else <ConditionalAction>
The <ConditionalAction> control (If Then Else) is the most basic flow statements. It tells your script to execute a certain section of code only if a particular test evaluates to true.
(If something is True, then do something, otherwise do something else).
Example.
You want to ask question on the screen to the user:
“Do you want to add Cost Center?”.
If the user selects: “Yes” you want to open dialog box , where the user will be able to enter the Cost Center, and the this Cost Center will be added to Booking File as a DI remark
otherwise you want to end the script.
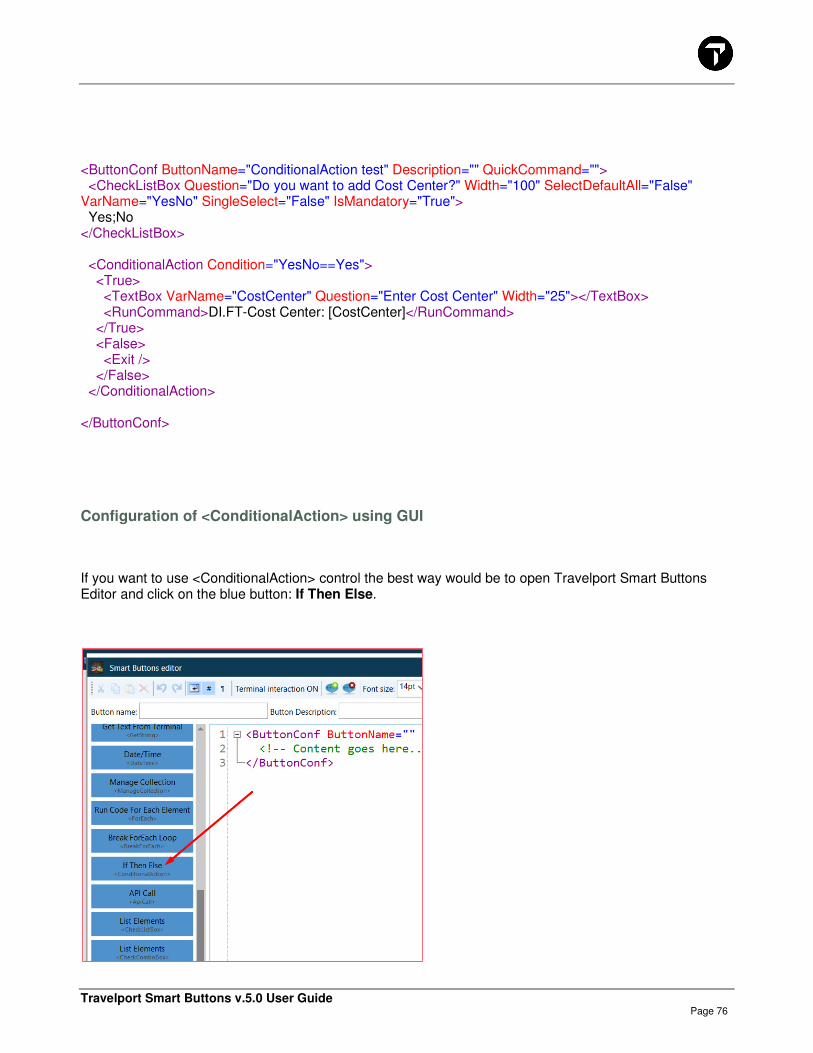
Travelport Smart Buttons v.5.0 User Guide Page 76
<ButtonConf ButtonName="ConditionalAction test" Description="" QuickCommand=""> <CheckListBox Question="Do you want to add Cost Center?" Width="100" SelectDefaultAll="False" VarName="YesNo" SingleSelect="False" IsMandatory="True"> Yes;No </CheckListBox> <ConditionalAction Condition="YesNo==Yes"> <True> <TextBox VarName="CostCenter" Question="Enter Cost Center" Width="25"></TextBox> <RunCommand>DI.FT-Cost Center: [CostCenter]</RunCommand> </True> <False> <Exit /> </False> </ConditionalAction> </ButtonConf>
Configuration of <ConditionalAction> using GUI
If you want to use <ConditionalAction> control the best way would be to open Travelport Smart Buttons Editor and click on the blue button: If Then Else.
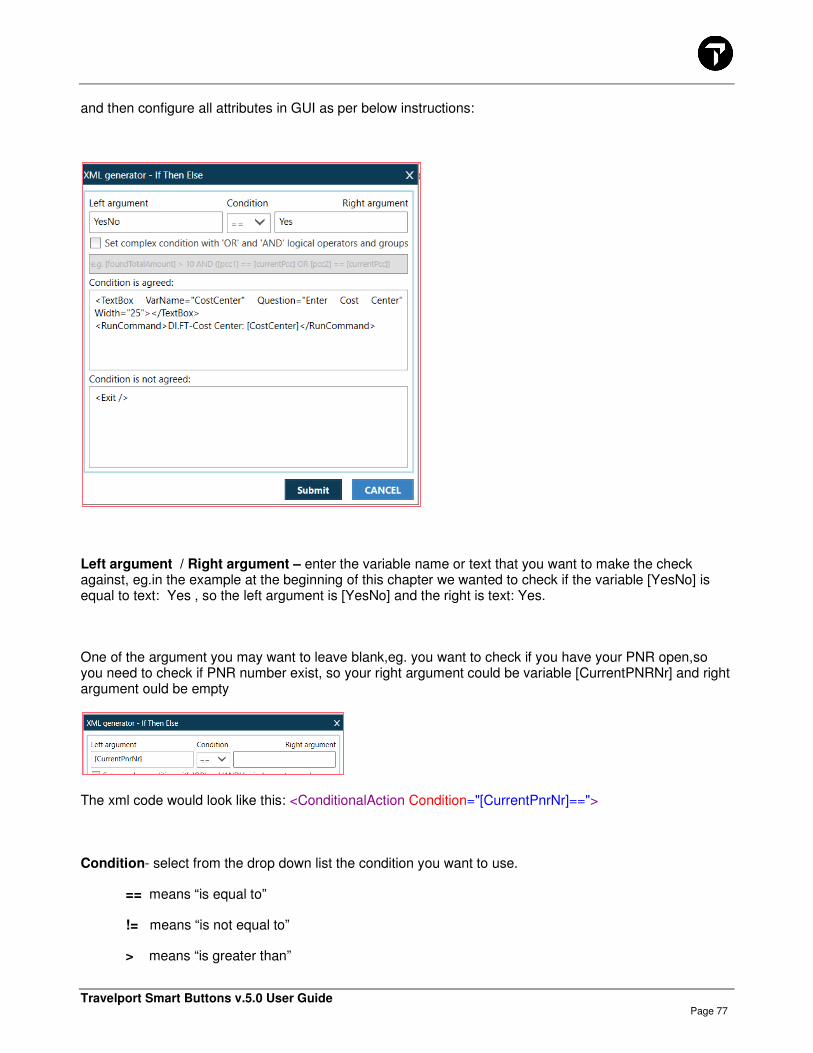
Travelport Smart Buttons v.5.0 User Guide Page 77
and then configure all attributes in GUI as per below instructions:
Left argument / Right argument – enter the variable name or text that you want to make the check against, eg.in the example at the beginning of this chapter we wanted to check if the variable [YesNo] is equal to text: Yes , so the left argument is [YesNo] and the right is text: Yes.
One of the argument you may want to leave blank,eg. you want to check if you have your PNR open,so you need to check if PNR number exist, so your right argument could be variable [CurrentPNRNr] and right argument ould be empty
The xml code would look like this: <ConditionalAction Condition="[CurrentPnrNr]==">
Condition- select from the drop down list the condition you want to use.
== means “is equal to”
!= means “is not equal to”
> means “is greater than”

Travelport Smart Buttons v.5.0 User Guide Page 78
< means “is less than”
>= means “is greater than or equal to”
<= means “is less than or equal to”
Set complex condition with OR and AND logical operator and groups – check this box if you want to use complex conditions that includes OR or AND operators. More below.
Condition is agreed – enter controls (xml elements) that you want to run when your condition is agreed (True). You may leave it empty, then if your condition is True, no action will be taken.
Condition is not agreed - enter controls (xml elements) that you want to run when your condition is not agreed (False). You may leave it empty, then if your condition is False, no action will be taken.
Configuration of <ConditionalAction> using xml code
In case you don’t want to use GUI but enter the xml code directly in the Travelport Smart Buttons editor this is the structure of the xml element (where the green elements are just comments that are there to guide you, you may delete them from the code if you want to).
<ConditionalAction Condition=""> <!-- for '>' sign use > --> <!-- for '<' sign use < --> <True> <!--XML code to run when condition will resolve positive--> </True> <False> <!--XML code to run when condition will NOT resolve positive--> </False> </ConditionalAction>
The only attribute that may be used in <ConditionalAction> xml element is “Condition”.
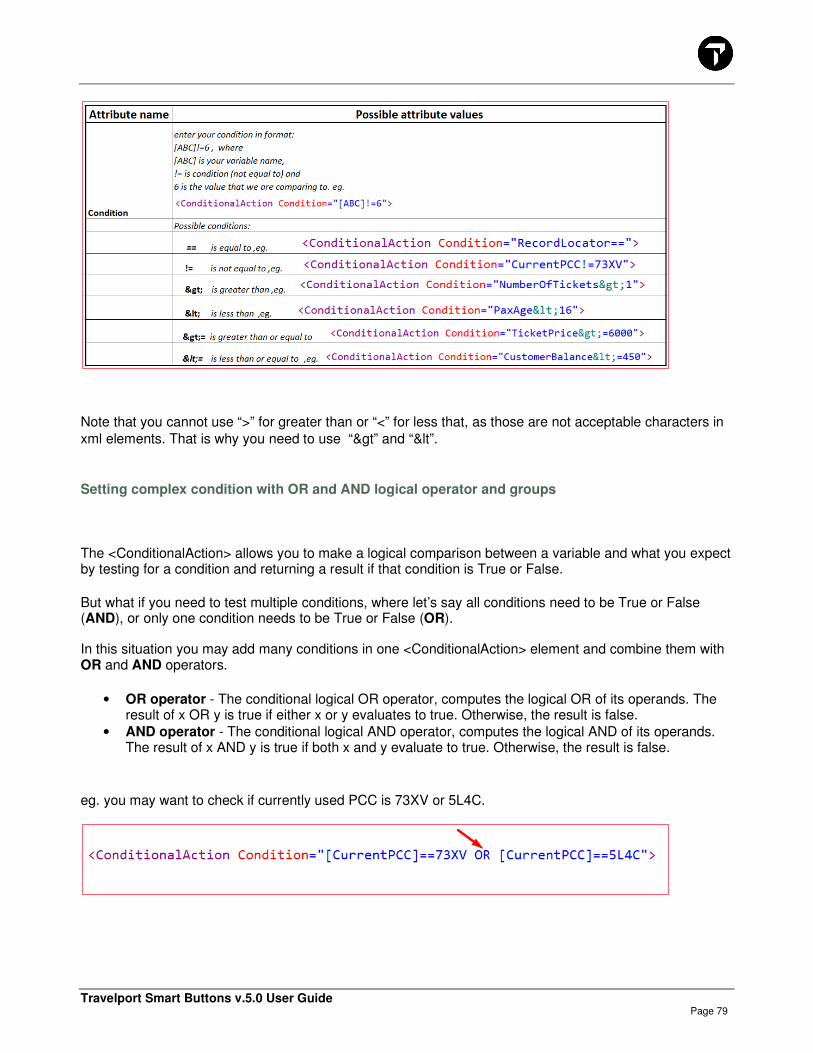
Travelport Smart Buttons v.5.0 User Guide Page 79
Note that you cannot use “>” for greater than or “<” for less that, as those are not acceptable characters in
xml elements. That is why you need to use “>” and “<”.
Setting complex condition with OR and AND logical operator and groups
The <ConditionalAction> allows you to make a logical comparison between a variable and what you expect by testing for a condition and returning a result if that condition is True or False.
But what if you need to test multiple conditions, where let’s say all conditions need to be True or False (AND), or only one condition needs to be True or False (OR).
In this situation you may add many conditions in one <ConditionalAction> element and combine them with OR and AND operators.
• OR operator - The conditional logical OR operator, computes the logical OR of its operands. The result of x OR y is true if either x or y evaluates to true. Otherwise, the result is false.
• AND operator - The conditional logical AND operator, computes the logical AND of its operands. The result of x AND y is true if both x and y evaluate to true. Otherwise, the result is false.
eg. you may want to check if currently used PCC is 73XV or 5L4C.

Travelport Smart Buttons v.5.0 User Guide Page 80
Grouping conditions
Use parentheses, (), to change the order of evaluation imposed by operator precedence.
Example of use:
You may want to check if currently used PCC is one out of those three: 73XV,5L4C,XYZ and [RecordLocator] is not empty
The same sets of variables but with or without parentheses can give different script results.
Below is a script with exactly the same code. The script will check 3 conditions:
- If variable MNO is equal to 1 (False)
- If variable ABC is equal to 1 (True)
- If variable XYZ is equal to 2. (True)
If the Condition is True it will display message: True if False it will display message: False.
The only difference between Script 1 and Script 2 are the parentheses in second script, which group the condition, and as you see the result of each script is different.
Script 1
<ConditionalAction Condition="[MNO]==1 AND [ABC]==1 OR [XYZ]==2">
•
•
Result:
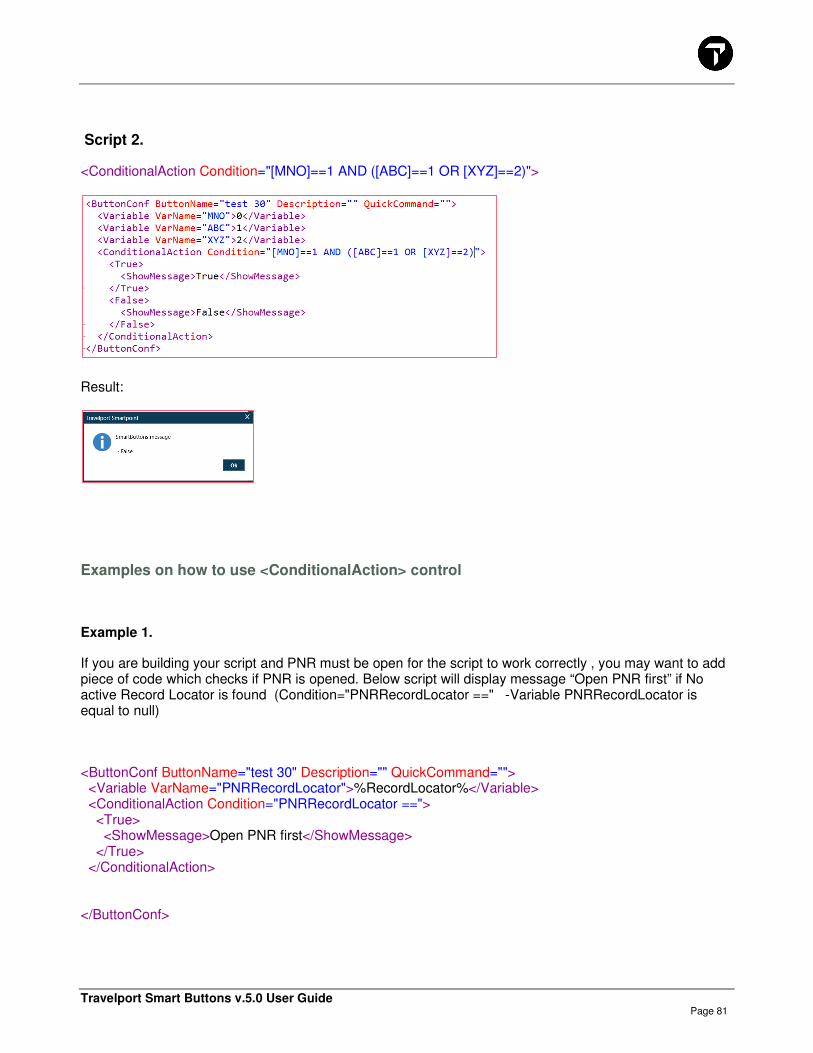
Travelport Smart Buttons v.5.0 User Guide Page 81
Script 2.
<ConditionalAction Condition="[MNO]==1 AND ([ABC]==1 OR [XYZ]==2)">
Result:
Examples on how to use <ConditionalAction> control
Example 1.
If you are building your script and PNR must be open for the script to work correctly , you may want to add piece of code which checks if PNR is opened. Below script will display message “Open PNR first” if No active Record Locator is found (Condition="PNRRecordLocator ==" -Variable PNRRecordLocator is equal to null)
<ButtonConf ButtonName="test 30" Description="" QuickCommand=""> <Variable VarName="PNRRecordLocator">%RecordLocator%</Variable> <ConditionalAction Condition="PNRRecordLocator =="> <True> <ShowMessage>Open PNR first</ShowMessage> </True> </ConditionalAction> </ButtonConf>
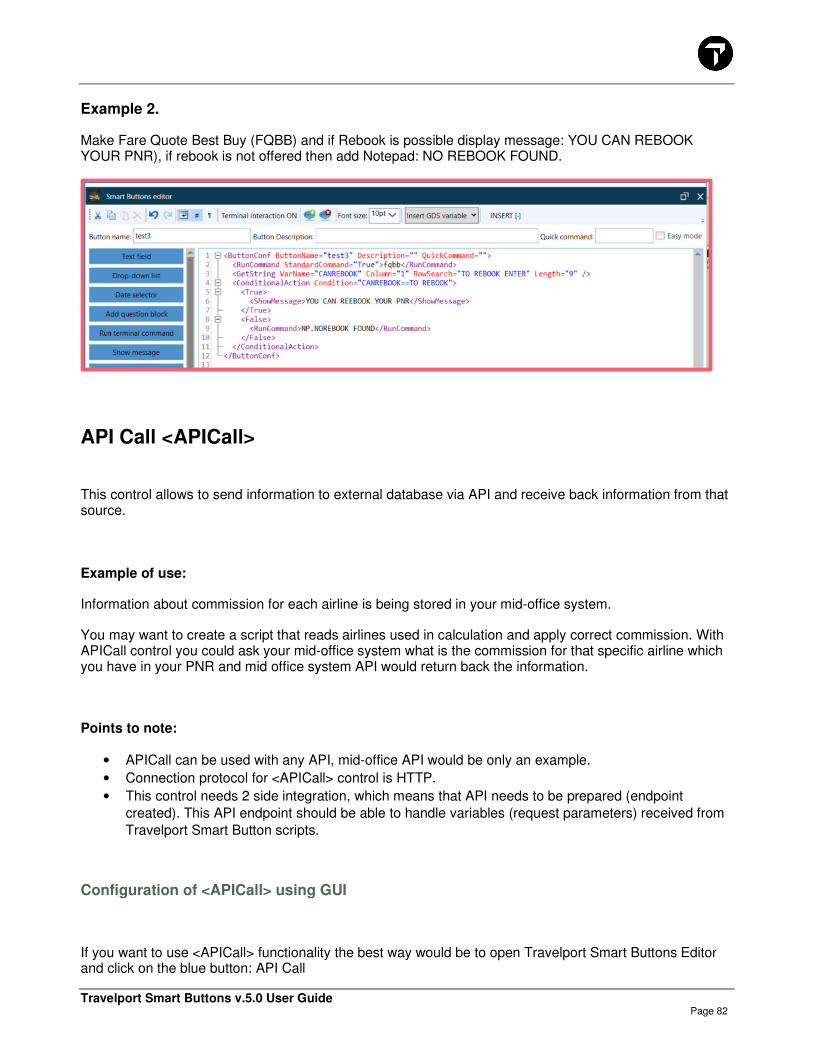
Travelport Smart Buttons v.5.0 User Guide Page 82
Example 2.
Make Fare Quote Best Buy (FQBB) and if Rebook is possible display message: YOU CAN REBOOK YOUR PNR), if rebook is not offered then add Notepad: NO REBOOK FOUND.
API Call <APICall>
This control allows to send information to external database via API and receive back information from that source.
Example of use:
Information about commission for each airline is being stored in your mid-office system.
You may want to create a script that reads airlines used in calculation and apply correct commission. With APICall control you could ask your mid-office system what is the commission for that specific airline which you have in your PNR and mid office system API would return back the information.
Points to note:
• APICall can be used with any API, mid-office API would be only an example.
• Connection protocol for <APICall> control is HTTP.
• This control needs 2 side integration, which means that API needs to be prepared (endpoint
created). This API endpoint should be able to handle variables (request parameters) received from
Travelport Smart Button scripts.
Configuration of <APICall> using GUI
If you want to use <APICall> functionality the best way would be to open Travelport Smart Buttons Editor and click on the blue button: API Call

Travelport Smart Buttons v.5.0 User Guide Page 83
and then configure all attributes in GUI as per below instructions:
Variable name – enter variable name that will hold the answer from API as a response from API.
Travelport Smart Buttons v.5.0 User Guide Page 84
Travelport Smart Buttons can only accept and consume response from API endpoint in below formats:
- String
- JSON array of strings
- JSON array of Value/Key pair (string Vs.string) (see example of response at the end of this chapter)
– see example of the file at the end of that chapter.
URL – enter API endpoint URL address
Variables (request parameters)- enter names of Variables that you want to send via API to external database. If more than one variable must be send then separate them with semicolon, eg.
PCC;Airline;PassengerName
or with square brackets:
[PCC];[Airline];[PassengerName]
HTTP method- select HTTP method you want to use for your request
GET – variables are passed as a query parameters
POST- variables are passed as a http content in specific format
Authorization – specify details of authorization to your API
Type – Select type of authorization
Basic – when user wants to send authentication credentials to the server when selected you need to specify Login and Password to your API Endpoint – when you submit the form , your login and password will be encrypted using a variant of Base64.
Header Key- when selected you must specify Header name and Header value.
Header name - when GUI used then the Header Value will be encrypted (not to show the value in xml code to the SB users), and it will displayed in curly brackets {} eg. KeyAuthHeaderValue="{a3Nrc2pmb2l1MzI5dTMyb2l1MzJ1Zmg1}".
If you don’t want to have it encrypted, don’t use GUI , just enter the KeyAuthHeaderValue attribute directly in the xml code, it will display unecripted, eg. KeyAuthHeaderValue="ABCYZV.3452ZDf"
Header value – enter the Header value, eg.AuthToken.
No authorization – if the API has no authorization select this option

Travelport Smart Buttons v.5.0 User Guide Page 85
Configuration of <APICall> using xml code
In case you don’t want to use GUI but enter the xml code directly in the Travelport Smart Buttons editor this is the structure of the xml element.
<ApiCall VarName="" Parameters="" Method="GET" AuthType="HeaderKey" KeyAuthHeaderName="" KeyAuthHeaderValue="" AuthorizationHeaderValue=""></ApiCall>
In the table below you can find all possible attributes and attributes values that you can use.
Example 1. APICall xml structure for HTTP Method: GET, Authorization Type: HeaderKey, code generated by APICall GUI (HeaderAuthHeaderValue is encrypted):
<ApiCall VarName="TotalBalance" Url="https://myAPI/API/CustomerBalance" Parameters="CustomerNumber;CurrentPCC;PNRNumber" Method="GET" AuthType="HeaderKey" KeyAuthHeaderName="AuthToken" KeyAuthHeaderValue="{OTM0NzA5MjM0ODA5MG5ramZkaGtzamZkaA==}" />
Example 2. APICall xml structure for Http Method:POST, Authorization Type: Basic, code generated by APICall GUI (AuthorizationHeaderValue is encrypted):
<ApiCall VarName="InvoiceYesNo" Url="https://myAPI/demo/CheckInvoice" Parameters="CustomerNumber" Method="POST" AuthType="Basic" AuthorizationHeaderValue="Basic VXNlcjIzNDppb2V1cm9pdWVv" />
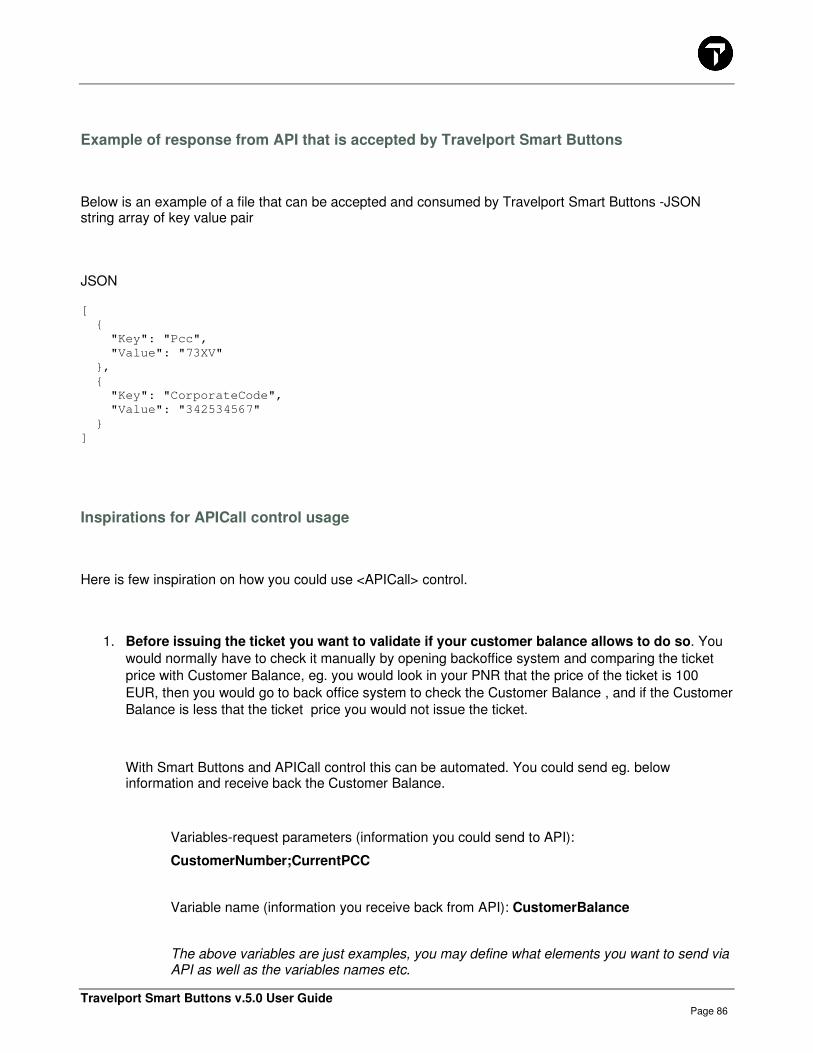
Travelport Smart Buttons v.5.0 User Guide Page 86
Example of response from API that is accepted by Travelport Smart Buttons
Below is an example of a file that can be accepted and consumed by Travelport Smart Buttons -JSON string array of key value pair
JSON
[
{
"Key": "Pcc",
"Value": "73XV"
},
{
"Key": "CorporateCode",
"Value": "342534567"
}
]
Inspirations for APICall control usage
Here is few inspiration on how you could use <APICall> control.
1. Before issuing the ticket you want to validate if your customer balance allows to do so. You
would normally have to check it manually by opening backoffice system and comparing the ticket
price with Customer Balance, eg. you would look in your PNR that the price of the ticket is 100
EUR, then you would go to back office system to check the Customer Balance , and if the Customer
Balance is less that the ticket price you would not issue the ticket.
With Smart Buttons and APICall control this can be automated. You could send eg. below information and receive back the Customer Balance.
Variables-request parameters (information you could send to API):
CustomerNumber;CurrentPCC
Variable name (information you receive back from API): CustomerBalance
The above variables are just examples, you may define what elements you want to send via API as well as the variables names etc.
Travelport Smart Buttons v.5.0 User Guide Page 87
2. You normally manually issue invoice in your back office system. This could be automated
with APICall.
Variables-request parameters: PaxName;CustomerNumber;FiledFareAmount;Airlines
Variable name: InvoiceNumber
As per above, with this control you could send eg.PaxName, CustomerNumber, FiledFareAmount and Airlines information , API would then issue the invoice and send back information with Invoice Number.
Read From Excel <ReadFromExcel>
This control allows to read information from specified Excel file.
This control allows to:
1. Read information from single cell;
2. Read information from single column or row, resulting in Simple collection;
3. Read information from 2 columns or 2 rows, resulting in Value**Key collection.
Important.
If you are using one of the Cloud Storage, eg. Google Drive, Microsoft OneDrive etc. then make sure your file is closed when script runs, otherwise you may encounter an error: Failed to open Workbook.
Configuration of <ReadFromExcel> using GUI
If you want to use <ReadFromExcel> functionality the best way would be to open Travelport Smart Buttons Editor and click on the blue button: Read From Excel
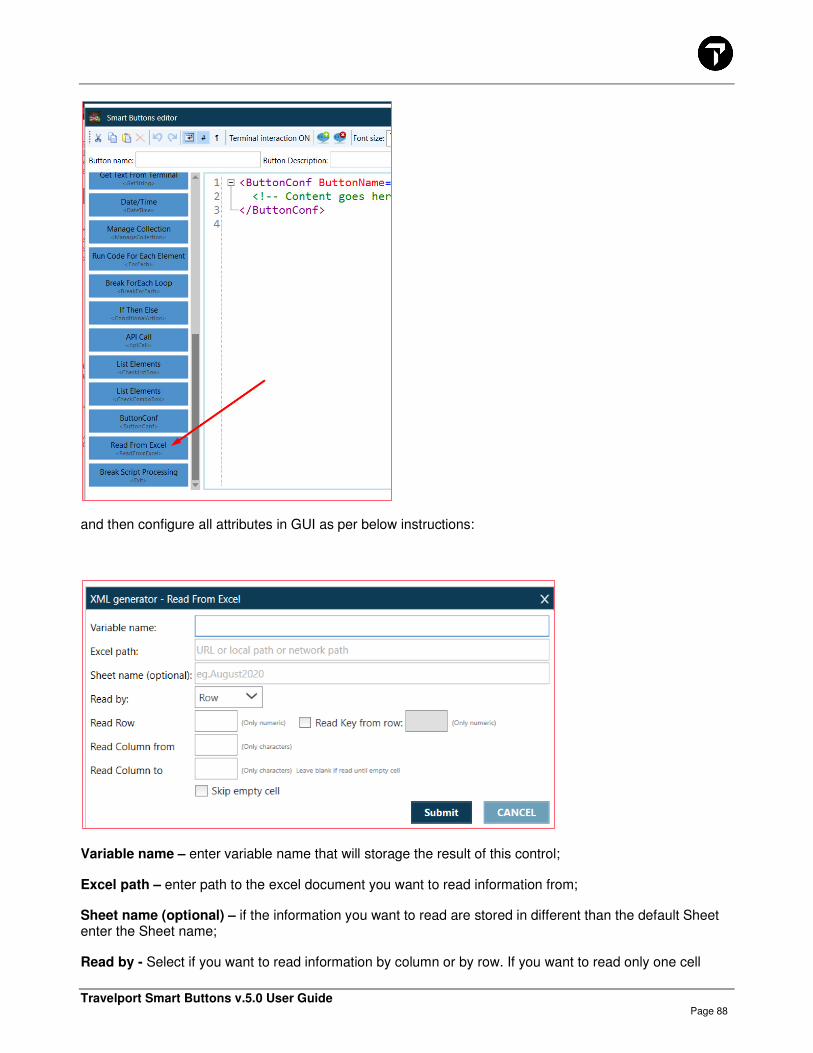
Travelport Smart Buttons v.5.0 User Guide Page 88
and then configure all attributes in GUI as per below instructions:
Variable name – enter variable name that will storage the result of this control;
Excel path – enter path to the excel document you want to read information from;
Sheet name (optional) – if the information you want to read are stored in different than the default Sheet enter the Sheet name;
Read by - Select if you want to read information by column or by row. If you want to read only one cell
Travelport Smart Buttons v.5.0 User Guide Page 89
select “Cell”;
Read Row- if Row was selected in “Read by” field, this field is activated. Enter row number you want to read eg.255 (only numbers are allowed);
Read Column – if Column was selected in “Read by” field, this field is activated. Enter Column you want to read eg. BA (only letters allowed);
Read Key from row- if you want to read information from 2 rows, enter the second row number here eg.256. It will result in creating collection Value**Key type (where Value comes from “ReadRow” fild and Key from “Read Key from row” field).
Read Key from column- if you want to read information from 2 columns, enter the second column number here. It will result in creating collection Value**Key type (where Value comes from “Read Column” field and Key from “Read Key from column” field).
Read Column from/ Read Column to - if you select “Row” in “Read by” field, then you need to specify column range that you want to read. Enter first column you want to read in “Read Column from” and enter last column in range in “Read Column to” field.
You may leave this field blank, system then will read all columns until it finds first empty cell (this is useful if you want to keep adding information to next columns).
Read Row from/ Read Row to - if you select “Column” in “Read by” field, then you need to specify rows range that you want to read. Enter first row you want to read in “Read Row from” and enter last row in range in “Read Row to” field.
You may leave this field blank, system then will read all rows until it finds first empty cell (this is useful if you want to keep adding information to next rows).
Skip empty cell-if your Excel file can contain empty rows or columns in between rows or columns you want to read, select “Skip empty cell” so that all empty rows and columns will be ignored.
Configuration of <ReadFromExcel> using xml code
In case you don’t want to use GUI but enter the xml code directly in the Travelport Smart Buttons editor this is the structure of the xml element.
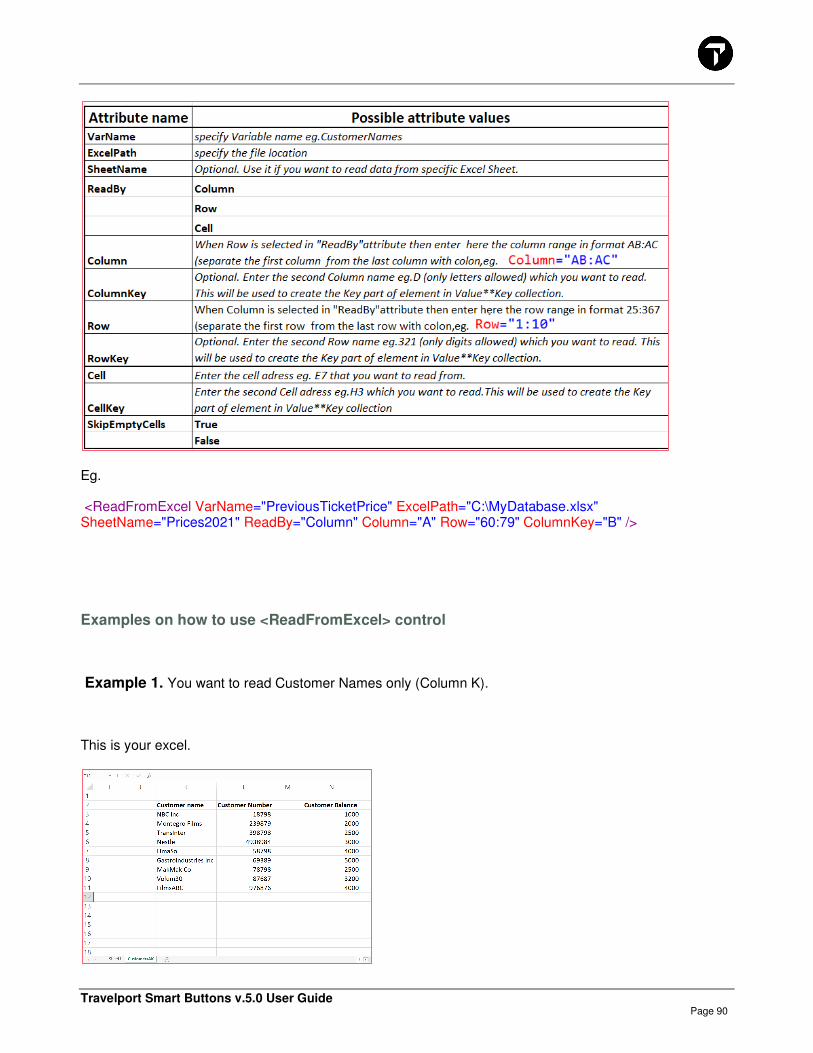
Travelport Smart Buttons v.5.0 User Guide Page 90
Eg.
<ReadFromExcel VarName="PreviousTicketPrice" ExcelPath="C:\MyDatabase.xlsx" SheetName="Prices2021" ReadBy="Column" Column="A" Row="60:79" ColumnKey="B" />
Examples on how to use <ReadFromExcel> control
Example 1. You want to read Customer Names only (Column K).
This is your excel.

Travelport Smart Buttons v.5.0 User Guide Page 91
1. Select Read From Excel control
2. Fill out the form
3. Click Submit
Below xml code will be generated:
<ReadFromExcel VarName="CustomerName" ExcelPath="C:\MyDocuments\CustomerDatabase.xlsx" ReadBy="Column" Column="K" Row="3:11" />
4. Name the script by typing script name in the “Button name” text field.
5. Add <ShowMessage> for testing purposes
Now if you want to test your script you may want to add <ShowMessage> xml element to display information that script is reading from excel. Inside the <ShowMessage> tag enter the Variable name used in <ReadFromExcel> (Variable always in square brackets)

Travelport Smart Buttons v.5.0 User Guide Page 92
6. Click on the script to test it
Script has read information from Excel and displayed it as a message.
Example 2.
You want to read Customer Names (Column K) and related Customer Numbers (Column L)
This is your excel.
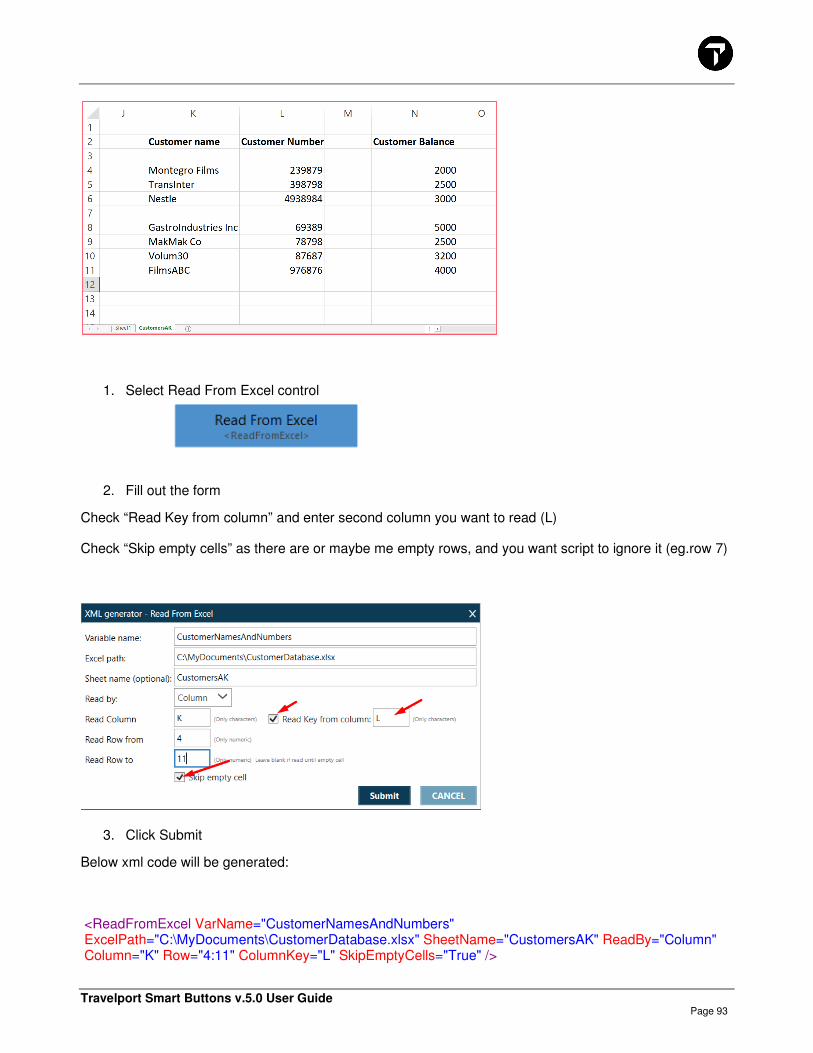
Travelport Smart Buttons v.5.0 User Guide Page 93
1. Select Read From Excel control
2. Fill out the form
Check “Read Key from column” and enter second column you want to read (L)
Check “Skip empty cells” as there are or maybe me empty rows, and you want script to ignore it (eg.row 7)
3. Click Submit
Below xml code will be generated:
<ReadFromExcel VarName="CustomerNamesAndNumbers" ExcelPath="C:\MyDocuments\CustomerDatabase.xlsx" SheetName="CustomersAK" ReadBy="Column" Column="K" Row="4:11" ColumnKey="L" SkipEmptyCells="True" />
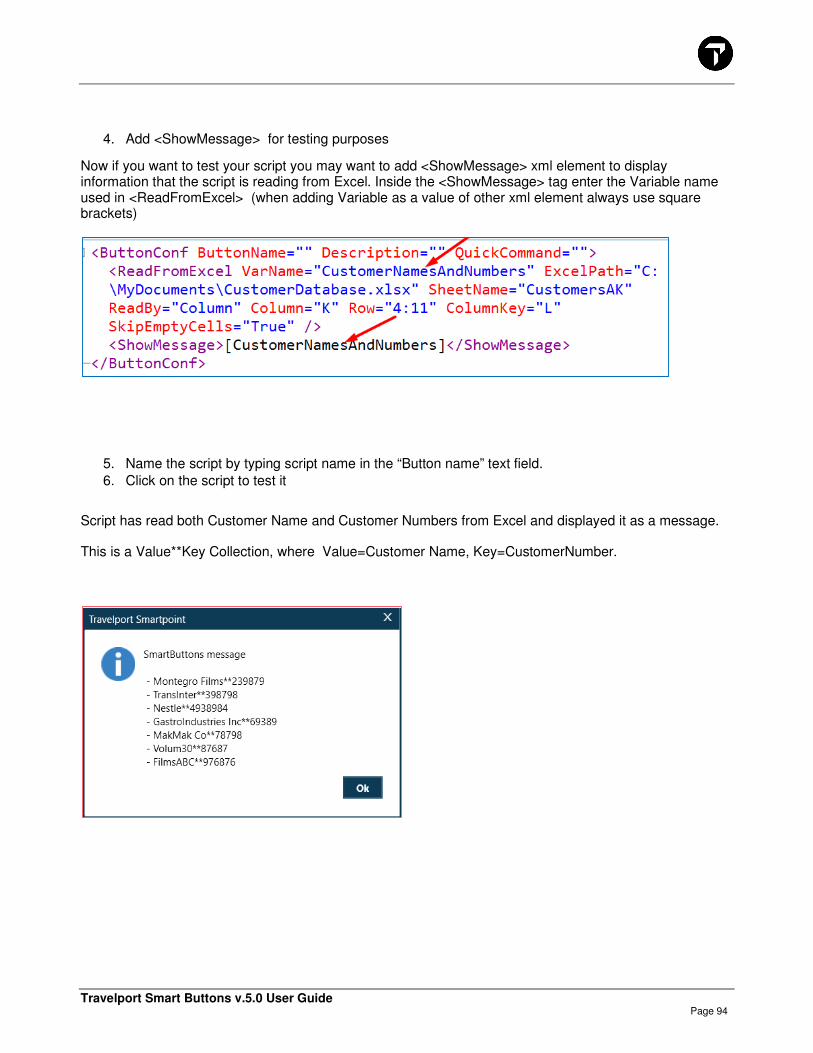
Travelport Smart Buttons v.5.0 User Guide Page 94
4. Add <ShowMessage> for testing purposes
Now if you want to test your script you may want to add <ShowMessage> xml element to display information that the script is reading from Excel. Inside the <ShowMessage> tag enter the Variable name used in <ReadFromExcel> (when adding Variable as a value of other xml element always use square brackets)
5. Name the script by typing script name in the “Button name” text field.
6. Click on the script to test it
Script has read both Customer Name and Customer Numbers from Excel and displayed it as a message.
This is a Value**Key Collection, where Value=Customer Name, Key=CustomerNumber.
Travelport Smart Buttons v.5.0 User Guide Page 95
ButtonConf <ButtonConf>
It is a root element, shell for all controls used in one script (root element). Script will not work if this control is missing.
<ButtonConf ButtonName="" Description="" QuickCommand="" TerminalInteraction="" EasyMode="" Hide="">
<!-- Content goes here... --> </ButtonConf>
Attributes within <ButtonConf>:
Description – allows to add description to the script.
QucikCommand - allows to define Quick command – terminal entry that can be used to trigger the script
TerminalInteraction- when set up to True, user while using this script will be able to interact with Smartpoint
EasyMode- when set up to True will create button in Easy mode.
Hide- This is used only for office buttons. When used in personal button it will have zero impact on the script.
When attribute Hide is set up to True this button will be invisible for the users.
- This is important in situations when we have master button A, and supporting button B. Only Master button A must be seen by the users (Button B is there only because it will be triggered by button A, but should not be used as a standalone script by the user).
- Button with attribute Hide set up to True will not run when Quick Command or Trigger is used - It allows to quickly hide specific office buttons for all users. Do not need to do it manually using
toggle functionality ( ) terminal by terminal, which may be time consuming if many terminals exist.
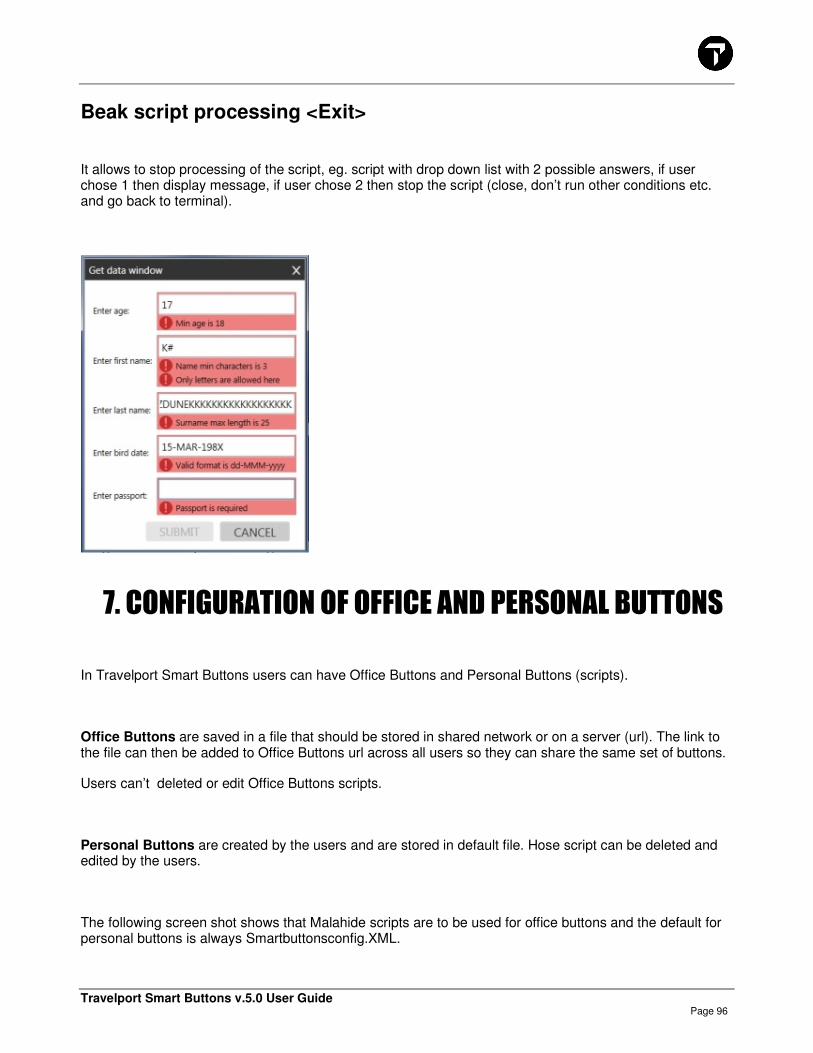
Travelport Smart Buttons v.5.0 User Guide Page 96
Beak script processing <Exit>
It allows to stop processing of the script, eg. script with drop down list with 2 possible answers, if user chose 1 then display message, if user chose 2 then stop the script (close, don’t run other conditions etc. and go back to terminal).
7. CONFIGURATION OF OFFICE AND PERSONAL BUTTONS
In Travelport Smart Buttons users can have Office Buttons and Personal Buttons (scripts).
Office Buttons are saved in a file that should be stored in shared network or on a server (url). The link to the file can then be added to Office Buttons url across all users so they can share the same set of buttons.
Users can’t deleted or edit Office Buttons scripts.
Personal Buttons are created by the users and are stored in default file. Hose script can be deleted and edited by the users.
The following screen shot shows that Malahide scripts are to be used for office buttons and the default for personal buttons is always Smartbuttonsconfig.XML.
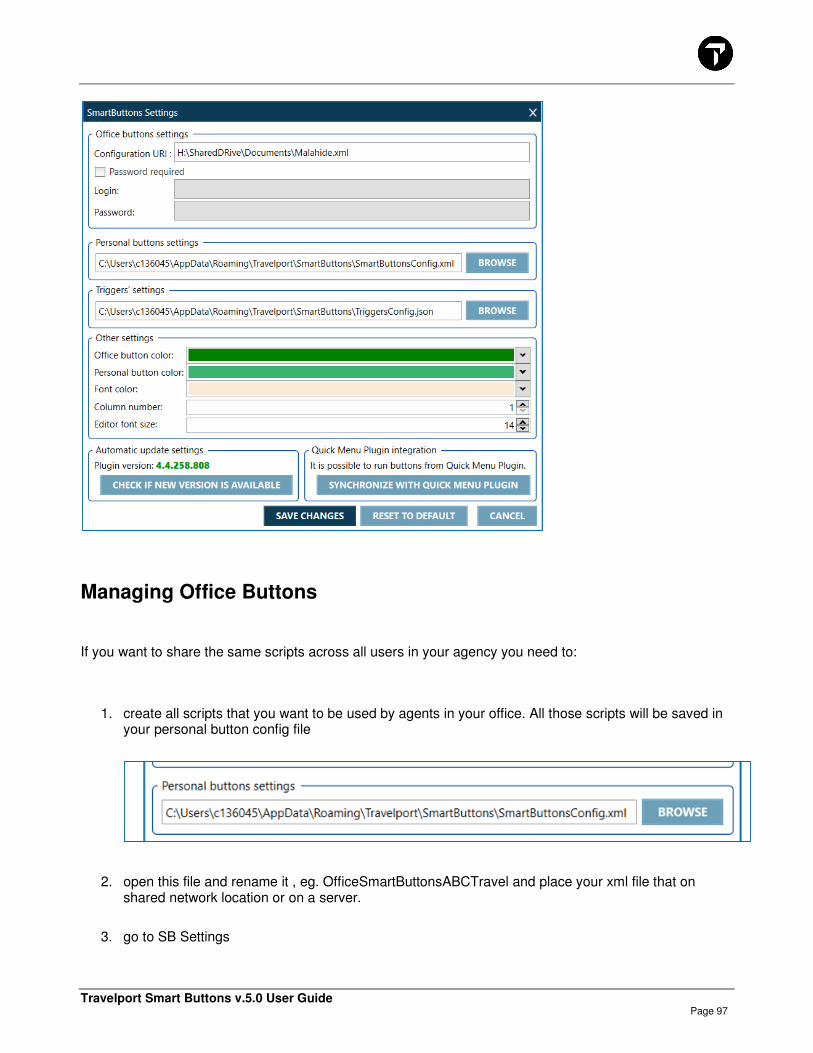
Travelport Smart Buttons v.5.0 User Guide Page 97
Managing Office Buttons
If you want to share the same scripts across all users in your agency you need to:
1. create all scripts that you want to be used by agents in your office. All those scripts will be saved in your personal button config file
2. open this file and rename it , eg. OfficeSmartButtonsABCTravel and place your xml file that on shared network location or on a server.
3. go to SB Settings

Travelport Smart Buttons v.5.0 User Guide Page 98
4. place the path where the XML file with all your scripts is located to Office button settings. If the file is located on the server and is protected with password please insert it here.
5. repeat step 4 for all users that you want to use this set of scripts.
6. if you need update any Office Buttons scripts place the xml file path to Personal button settings .
Travelport Smart Buttons v.5.0 User Guide Page 99
8. TROUBLESHOOTING
Scenario Recommendations
I have created my buttons however, when I go to Travelport Smartpoint I can’t see the ‘SB’ icon on the side bar.
In Travelport Smartpoint, type #DELETEPLUGINCACHE followed by #RESTART
My Account Manager just confirmed that my PCC is authorized to use SB but when opening Travelport Smartpoint I receive message that my PCC is not authorized for Travelport Smart Buttons
Restart your Travelport Smartpoint, use #RESTART