Training + Certification Guide.pdf - Microsoft Partner Community
Upload
khangminh22Category
view
0download
0

Revised – Jan. 29, 2013
Trademarks: NewTek, TriCaster, TriCaster 40,TriCaster XD, TCXD40, TCXD850, TCXD850 Extreme, TriCaster TCXD850 Extreme, TriCaster 850 Extreme, TriCaster Extreme, TriCaster 850, TCXD450, TCXD450 Extreme, TriCaster TCXD450 Extreme, TriCaster 450 Extreme, TriCaster Extreme, TriCaster 450, IsoCorder, TCXD300, TriCaster PRO, TriCaster STUDIO, TriCaster BROADCAST, TriCaster DUO, iVGA, SpeedEDIT, 3PLAY, 3PLAY 820, 3PXD820, LiveText, DataLink, LiveSet, LiveMatte, TimeWarp, VT, V[T5], Video Toaster, Toaster, 3D Arsenal, Aura, LightWave, LightWave 3D and LightWave CORE are trademarks of NEWTEK. All other brand names, product names, or trademarks belong to their respective holders.

i
TABLE OF CONTENTS
1 Introduction ........................................................................................................4
2 Getting Started ...................................................................................................5
2.1 Connections ..................................................................................................................................................5
2.1.1 Multiview ..............................................................................................................................................6
2.1.2 Network ................................................................................................................................................6
2.1.3 A/V IO ....................................................................................................................................................6
2.2 Registration ..................................................................................................................................................8
2.2.1 Startup and Windows® Activation ........................................................................................................8
2.2.2 TriCaster License and Registration .......................................................................................................8
2.2.3 Online Registration ...............................................................................................................................9
2.2.4 Registering by Telephone .....................................................................................................................9
2.3 Startup and Configuration ........................................................................................................................ 10
2.3.1 All About Sessions .............................................................................................................................. 10
2.3.2 Configure Sources .............................................................................................................................. 13
2.3.3 Configure Output ............................................................................................................................... 17
2.3.4 Internet Streaming ............................................................................................................................. 19
3 The Live Desktop ............................................................................................... 20
3.1 Overview ................................................................................................................................................... 20
3.1.1 Titlebar Tips ....................................................................................................................................... 20
3.2 Monitors .................................................................................................................................................... 21
3.2.1 Contextual Tools ................................................................................................................................ 22
3.2.2 Interactive Control ............................................................................................................................. 23
3.3 The Switcher .............................................................................................................................................. 23
3.3.1 The Program and Preview Rows ........................................................................................................ 23
3.3.2 The FX Row ........................................................................................................................................ 24
3.4 Transitions ................................................................................................................................................. 24
3.4.1 Video Layers ....................................................................................................................................... 24
3.4.2 Local Layer Controls ........................................................................................................................... 25
3.4.3 Main Layer Controls ........................................................................................................................... 26
3.5 Media Players ............................................................................................................................................ 27
3.5.1 Common Features ............................................................................................................................. 27
3.5.2 Speed ................................................................................................................................................. 30
3.5.3 Add (the Media Browser) .................................................................................................................. 31
3.5.4 Title Pages .......................................................................................................................................... 32
ii
3.6 Record, Grab ............................................................................................................................................. 34
3.6.1 Record Configuration ......................................................................................................................... 34
3.7 Grab .......................................................................................................................................................... 36
3.8 Virtual Inputs ............................................................................................................................................. 36
3.8.1 Positioner ........................................................................................................................................... 37
3.8.2 Overlay ............................................................................................................................................... 37
3.8.3 LiveSet Virtual Sets ............................................................................................................................ 37
3.9 Audio Control ............................................................................................................................................ 41
3.9.1 Audio Levels ....................................................................................................................................... 41
3.10 Desktop Options .................................................................................................................................... 43
3.11 Shutting Down ....................................................................................................................................... 43
3.11.1 Administrator Mode .......................................................................................................................... 43
4 Network Sources ............................................................................................... 47
4.1 iVGA .......................................................................................................................................................... 47
4.1.1 iVGA Clients ....................................................................................................................................... 47
4.2 LiveText™ .................................................................................................................................................. 49
4.3 3Play™ ....................................................................................................................................................... 49
4.4 AirPlay® ..................................................................................................................................................... 49
5 Streaming ......................................................................................................... 51
5.1 Streaming Configuration panel ................................................................................................................. 51
5.2 Web Browser ............................................................................................................................................. 52
5.3 Connection Options ................................................................................................................................... 53
5.3.1 Browser Based ................................................................................................................................... 54
5.3.2 Adobe Flash® ..................................................................................................................................... 54
5.3.3 Windows Media Pull .......................................................................................................................... 56
5.3.4 Windows Media Push ........................................................................................................................ 57
5.3.5 Bandwidth Considerations ................................................................................................................. 57
5.3.6 Audio Headroom ................................................................................................................................ 58
5.3.7 Other Resources ................................................................................................................................ 58
5.4 Capturing the Stream ................................................................................................................................ 58
5.5 Diagnostics and Troubleshooting .............................................................................................................. 59
5.5.1 Testing your stream ........................................................................................................................... 59
5.5.2 Port Forwarding ................................................................................................................................. 59
5.5.3 Firewalls ............................................................................................................................................. 60
5.5.4 Finding Your External IP number ....................................................................................................... 61

iii
6 Files and File Management ................................................................................ 62
6.1 Manage ..................................................................................................................................................... 62
6.1.1 Browse ............................................................................................................................................... 62
6.1.2 Import Media ..................................................................................................................................... 62
6.1.3 Backup Session................................................................................................................................... 63
6.2 Live File Operations ................................................................................................................................... 64
7 Care and Maintenance ...................................................................................... 65
7.1 Help ........................................................................................................................................................... 65
7.2 Add-Ons ..................................................................................................................................................... 65
7.3 Backup and Restore .................................................................................................................................. 66
7.3.1 Create a ‘User Backup’ Drive ............................................................................................................. 66
7.3.2 Restore TriCaster’s system Drive? ..................................................................................................... 66
7.4 TriCaster Tips ............................................................................................................................................. 67
7.4.1 User Interface .................................................................................................................................... 67
7.4.2 Virtual Sets ......................................................................................................................................... 67
7.4.3 Streaming ........................................................................................................................................... 68
7.4.4 Network Sources ................................................................................................................................ 68
7.4.5 IMAG and Latency .............................................................................................................................. 69
7.4.6 Third-Party Software .......................................................................................................................... 70
7.5 Contacting Customer Support ................................................................................................................... 70
A Keystroke Shortcuts .......................................................................................... 71
A.1 Switcher… .................................................................................................................................................. 71
A.2 T-Bar .......................................................................................................................................................... 71
A.3 Virtual Inputs ............................................................................................................................................. 71
A.4 Record and Grab ....................................................................................................................................... 72
A.5 Tabs ........................................................................................................................................................... 72
A.6 DDR ........................................................................................................................................................... 72
A.7 Graphics 1 ................................................................................................................................................. 73
A.8 Graphics 2 ................................................................................................................................................. 73
A.9 General ...................................................................................................................................................... 73
A.9.1 Selection and Navigation ................................................................................................................... 73
A.9.2 Misc. ................................................................................................................................................... 73

iv
1 INTRODUCTION
Thank you for purchasing this NewTek™ product! Your TriCaster™ 40 belongs to a large family of video systems and software with a remarkable heritage. NewTek is very proud of its record of innovation, design excellence, and product support, and we want you to get the very best we can offer.
TriCaster™ sets the standard for portable
live production systems. It provides a
powerful, reliable and efficient platform for
live production and web streaming, yet
requires very modest space and can be
operated by one person.
No matter what your live broadcast
ambitions might be TriCaster can help you
fulfill them. You can produce and distribute
live video programs from diverse sources
and materials in both Standard and High
Definition.
Use multiple cameras, recorded digital video,
PowerPoint® presentations on networked
laptops, live web pages, digital photos and graphics,
and much more. TriCaster also supports Apple’s AirPlay® protocol, allowing compatible off-the-shelf mobile
video devices (such as iPhone® and iPad®) to stream content wirelessly to TriCaster.
Your presentations can simultaneously be displayed by video projectors, television monitors, broadcast by
traditional means, and streamed in high quality on the Internet.
In addition, a number of other great products from NewTek including both add-on software and hardware
control surfaces are available to extend and enhance your productions.

5
2 GETTING STARTED
This chapter will tell you how to connect, configure and register your new TriCaster™ live production system. You’ll discover how to get both audio and video in and out of the system, and to adapt both input and output to suit your production environment and needs.
2.1 CONNECTIONS
Figure 1
Begin by connecting the A/C power cord to the three-prong
connections on TriCaster’s backplate, and plug the other end into an
external power receptacle (see Hint below). Continue on to connect
the mouse and keyboard to USB ports.
Connect the monitor you plan to use for the interface to a port (DVI
or HDMI to suit your monitor) on TriCaster’s backplate.
TriCaster’s interface requires a minimum screen resolution
of 1600x1050 or 1600x1200.
As for any ‘mission critical’ system, consider connecting your TriCaster™ and
related gear using an uninterruptable power supply (UPS). Likewise, consider A/C
“power conditioning”, especially in situations where local power is unreliable or ‘noisy’.
A word about UPS devices:
‘Modified sine wave’ UPS devices are
popular due to low manufacturing
costs. However, such units should
generally be viewed as being of low
quality and possibly inadequate to
fully protect the system from
abnormal power events..
For a modest added cost, consider a
"pure sine wave" UPS. These units
can be relied on to supply very clean
power, eliminating potential
problems, and are recommended for
applications demanding high
reliability.

6
Surge protection is especially important in some locales. Power conditioners can reduce wear on TriCaster’s
power supplies and other electronics, and provide a further measure of protection from surges, spikes, lightning
and high voltage.
2.1.1 MULTIVIEW
TriCaster’s Multiview output serves for subsidiary monitoring purposes or perhaps a projection system.
Connecting a display device to one of the unused monitor connectors on TriCaster’s backplate is usually all that
is needed for the system to recognize it. A variety of Multiview layouts can be selected at any time in the Output
Configuration panel in TriCaster’s Live Desktop.
Note: Only two of the monitor ports on TriCaster’s backplate can be used simultaneously. The port type options
available for Multiview will depend on which connection you used previously to connect the monitor the UI.
For best results, configure Multiview Output to the native resolution of the external display (monitor or projector)
connected.
2.1.2 NETWORK
TriCaster can include screens from networked computers running NewTek’s iVGA™ client software, network
output from applications such as LiveText™, or Apple® Airplay® media in your live productions. As well, an
internet connection can serve for registration and updates, and of course for live streaming purposes.
2.1.3 A/V IO
TriCaster lets you ‘live switch’ up to four HD (or SD) cameras or other analog inputs, along with internal and
network connected sources. You can even mix SD and HD sources. In addition, multiple external audio sources
can be added to your program.
Audio and video output options are also quite varied. Aside from Network inputs (Section 2.1.2), all external
media inputs along with Program and Auxiliary audio and video outputs are conveniently located on TriCaster’s
faceplate.
Input and output connectors for upstream audio and video sources are conveniently mounted on TriCaster’s
faceplate (Figure 2). Connectors are grouped and labeled, making it easy to see what should be connected and
where.
7
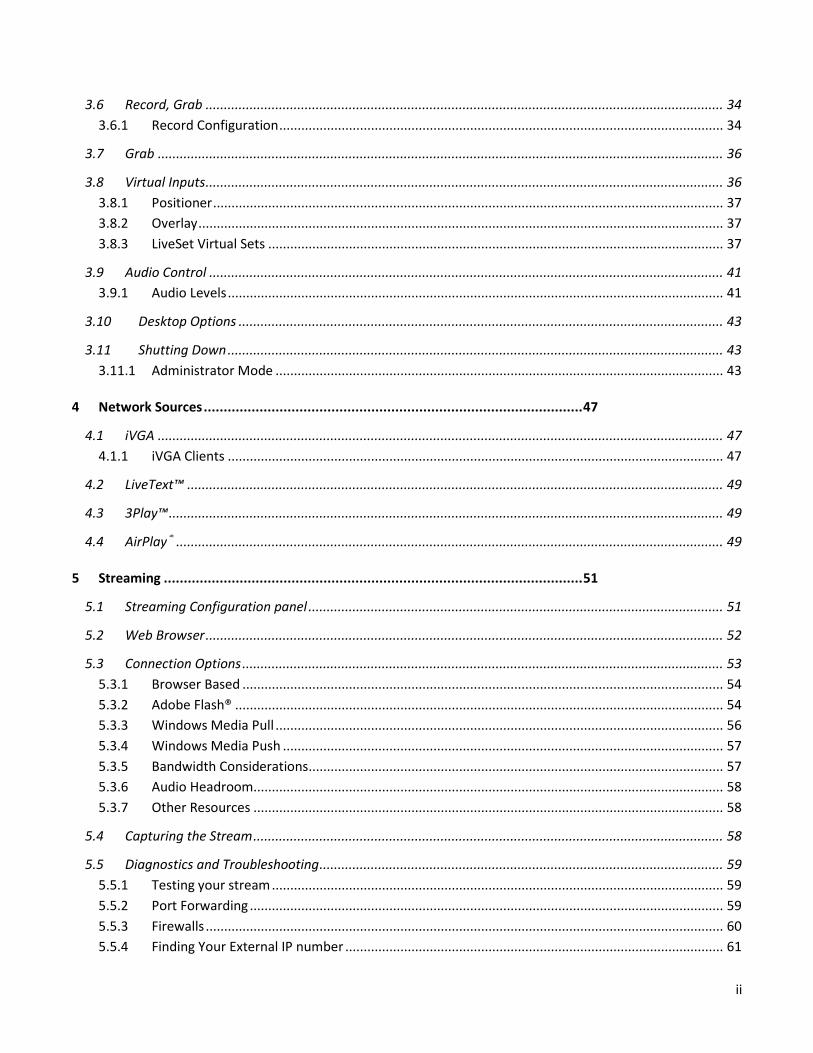
Figure 2
VIDEO IN
Cameras or other analog video sources are connected to inputs in the VIDEO IN group. Connectors are organized
in four columns supplying Switcher inputs numbered 1-4. Optional connection types for SD video source include
composite, Y/C (S-Video) and component (Y, Pb, Pr). For HD sources, an HD component connection is required.
VIDEO OUT
Two independent video outputs are supplied. These are numbered 1 and 2 in the VIDEO OUT group and supply
TriCaster’s Program (PGM) and Auxiliary (AUX) video outputs respectively.
Connection types available for Output 1 (PGM) are identical to those for video inputs, according to the session
(HD or SD). The forma t for Output 2 (AUX) is separately configurable. In SD format, its connectors can be
configured to supply composite, Y/C or component video.
AUDIO IN
Connect your audio sources using the RCA (cinch plug) and ¼” (6.35 mm) TRS jacks in the Audio In group on
TriCaster’s faceplate. The ¼” TRS jack (also known as a phone jack) is a mono connector typically used for a
microphone. You might supply the RCA connectors from an external mixer or other audio source such as a CD or
MP3 player.
AUDIO OUT
The connectors in Audio Out are similar, but you’ll note that the ¼” jack is labeled PHONES, hinting that it is
intended for a set of stereo headphones suitable for monitoring sound.

8
2.2 REGISTRATION
2.2.1 STARTUP AND WINDOWS® ACTIVATION
Turn on the computer monitor, and push the Power switch on TriCaster’s faceplate. The Power LED will
illuminate, and the hard drive activity light should flicker as the device boots up. (If this does not happen, check
your connections and retry).
1. Click Next at lower right.
2. Choose your time zone.
3. Accept the license agreement.
4. Enter your 25-digit key (on some models, the sticker is on the bottom of the case).
5. Decline automatic updates (by clicking “not right now”).
6. Give TriCaster a distinct computer name for networking.
You can authorize your Windows installation by network or by telephone. If you have connected TriCaster to a
network (see Section 2.1.2) with Internet access, this provides the fastest method of activation.
1. Click ‘Obtain IP and DNS automatically’.
2. Agree to activate Windows. This activation is permanent, and you won’t see these screens again.
(Registration with Microsoft is optional).
3. Assign a name to the administrator account. You may type your name, company, or perhaps simply
“TriCaster”.
4. Click Finish, and TriCaster will re-start.
2.2.2 TRICASTER LICENSE AND REGISTRATION
On launch, TriCaster presents an End User License Agreement
dialog. After you accept this, the Registration dialog shown in
Figure 3 is presented.
If necessary, enter the unique TriCaster Serial Number and
Product ID for your system. TriCaster’s video output will show a
watermark until the system is registered and unlocked (by
entering the registration code).
Figure 3

9
Hint: If the Serial number doesn’t appear automatically, and you can’t find it on your unit, you can obtain it from
the registration webpage mentioned in the next section, or from NewTek’s Customer Support Desk (open seven
days a week).
You can register and obtain your registration code either by telephone, or online (directly from TriCaster or
another system connected to the Internet) as described next.
2.2.3 ONLINE REGISTRATION
If you have connected TriCaster to a network with Internet access, simply click the button under Step 2 to visit
the Registration page (http://register.newtek.com) in the Customer Care section of NewTek’s website, where
you will find further directions.
Otherwise, you can visit the registration webpage from another system with Internet access. In either case,
after registering on the website, enter the resulting registration code into the field provided at Step 4 of the
dialog.
Hint: It’s a good idea to record the login name and password you choose for your website profile in a safe place.
Jot down registration code too; it could come in handy if you ever need to restore the TriCaster software to its as-
shipped state without access to the Internet.
Check your personal area of the site from time to time afterward; among other things, you’ll be able to
download any free software updates that are made available going forward.
2.2.4 REGISTERING BY TELEPHONE
NewTek’s Customer Care center also handles registration requests by telephone, if that is more convenient
(when opportunity permits, you should still visit the website to set up your account, allowing you to access to
software updates). Please have your Product ID (from the Registration dialog mentioned earlier) handy when
you call. The phone numbers for Customer Service follow:
Telephone: (US) 1-800-862-7837
(Outside US) +1-210-370-8000
Fax: 210-370-8001
Note: For Customer Support contact information, please see Section7.5.

10
2.3 STARTUP AND CONFIGURATION
Figure 4
With TriCaster registered, the Startup Screen appears. This is where you configure and manage TriCaster
sessions (other Startup features are discussed later in this text as they arise.)
2.3.1 ALL ABOUT SESSIONS
When working with TriCaster, you provide certain information about your production environment:
What broadcast standard is used in your locale? Is it PAL, common in Europe among other places, or
perhaps NTSC, standard throughout North American regions?
Are you using HD or SD cameras (or a mix of both)?
How are your cameras connected?
As you continue, you may make other adjustments:
You might calibrate your cameras using the Proc Amps.
For any greenscreen sources, you will adjust the LiveMatte settings for optimal keying.
You will select output device connection types and settings.
You might create playlists in Media Players.
During the course of your production you may add to the media content available:
You could grab a series of still images from Program Output.
And capture the network Stream output as a file.
The list of adjustments, activities and assets involved in a specific production goes on, but the point to grasp is
that the session is comprised of all of the above. Best of all, if you do not delete the session you created before
a production, all of your media and your session settings too are ready for immediate recall.

11
When you re-open a session, it’s just as if you were continuing the earlier event. Thus, if you return to the same
venue another day under more or less similar conditions, simply re-open your prior session and you are virtually
ready to go. (Of course, it’s the course of wisdom to test everything before actually beginning the event.)
Naturally, you can create and store multiple sessions, and re-load your sessions to continue working with them.
CREATING AND LAUNCHING SESSIONS
The primary Startup screen (the one encountered first after launching TriCaster) is the Home Page, which is
dominated by an icon ring (Figure 6).
When you click an icon it advances to the front position. For example, the first thing you will likely do on
launching a new TriCaster is create a session. Clicking the New icon updates the right-hand pane of the Home
Page to show session options (Figure 5; multi-standard TriCaster options shown).
Hint: You can also use the keyboard’s left and right arrows to cycle through the icons.
Select your local video standard (multi-standard model, select NTSC, PAL
or NTSC-J) and session format –1080i, 720p, 480/30i (16:9) or 480/30i
(4:3). Multi-standard
models offer PAL format
equivalents.
You will see a name for the
new session above the
options pane. You can click
the name field to edit it.
Beneath the name is a field
labeled Volume. Use the menu at right to choose which hard drive the
session (and its associated content) is created and stored on.
Note: External hard drives are not recommended for use as session drives.
FORMAT AND OUTPUT CONSIDERATIONS
Remember that for live production, TriCaster can supply SD output (for SD sessions), or both HD and SD in the
case of HD sessions. The format of video signal on Program and Aux outputs varies according to the session
type:
For all HD sessions, Program (Output 1) output is HD. For SD sessions, Program (Row 1) output is
likewise SD.
Figure 6
Figure 5

12
Aux (Output 2) – For an HD session, Aux output can be configured after launch as either 16:9 or a
cropped 4:3 display. SD sessions can be either16:9 or 4:3 aspect, and Aux output respects the SD session
format in that case.
Hint: The session settings determine the video format captured by TriCaster’s Record function when capturing
Program output (Aux format is independent of session format).
Having chosen session settings, click the Start Session button at lower right to advance to the Session Page. This page has a new icon ring with two icons – Live and Manage. Click Live, and then click Start Live Production at right to launch TriCaster’s Live Desktop.
THE LIVE DESKTOP
Figure 8
TriCaster’s Live Desktop is your heart of your live productions. We’ll discuss its features later (Chapter 3), but for now we’ll just visit briefly. Until you configure input devices or add content, the Live Desktop appears a bit barren. The first thing to do in a new session is to configure your external connections.
Figure 7

13
2.3.2 CONFIGURE SOURCES
Figure 9
TriCaster’s supports many different live audio and video source types. Let’s consider how to configure these (see Section2.1 for more information on connecting audio and video sources).
VIDEO
Generally, you choose settings for TriCaster inputs and outputs
in panels that you open by clicking conveniently located
Configure buttons, identified by a gear icon (Figure 9). These
buttons brighten when you move the mouse near them.
Move your mouse over the monitor for Camera 1 at upper left
on the Live Desktop. Notice the Configure button which appears
at right in the monitor’s titlebar. Click this button to open the
settings panel for Camera 1 (Figure 10).
Click the Connection Type menu to select the proper format for
the camera you connected to Input 1. (You can freely choose SD
or HD options in any session.)
Below this you’ll see Proc Amp controls that let you adjust the color characteristics of this source. Every
TriCaster video source has independent controls just like this. Of course internal sources, such as Media Players
do not require a Connection Type setting.
Hint: Network sources are selected right in their monitor’s titlebar, for quick access.
LIVEMATTE AND CROP
The Input Configuration panel has a second tabbed pane labeled LiveMatte and Crop. This tab contains settings
for TriCaster’s powerful realtime keying feature – LiveMatte. Every video source has similar controls and can
optionally be keyed, then displayed over other content.
Hint: Keyed sources are useful in the DSK (Down Stream Keyer) channels on the main Switcher or as layers in
Virtual Input compositions. These features are discussed in Chapter 3 .
Figure 10

14
Using LiveMatte is easy. Click on the Pick Color button in the Matte section of the panel, and keep the mouse button depressed. Drag the eye-dropper pointer over the green background in the DDR’s monitor, and then release it. This establishes the primary key Color, and turns the Enable LiveMatte switch on. Adjust the Tolerance slider value higher or lower to include more or less of the key color in the matte (transparent region).
The Smoothness control lets you blend the foreground smoothly into the transparent background. When overlaying the keyed source on another image, this helps produce a seamless composition. The Spill Suppression controls work in similar fashion, but operate on key color that is unintentionally reflected or ‘spilled’ onto the foreground subject. (It’s very common for a little green spill to occur on the shoulders of a person in a greenscreen shot, for example.)
It is also very common for a greenscreen shot to have unintentional inclusions that remain after the base
chromakey process is applied, but which need to be removed along with the background. Common examples
include microphones or lighting fixtures dangling from above, or perhaps a harsh crease, blemish or tear in the
background screen.
The Crop tools in this tab can be used to remove such unwanted ‘garbage’ from the scene, or for other creative
purposes. The four numeric controls in this group allow you to define independent margins for the frame.
Simply drag the mouse left or right on the number fields to adjust them, or double-click the field to type a new
value.
Notice that enabling Proc Amp, LiveMatte, or Crop settings for any source results in an
indicator being illuminated in the titlebar of its monitor. Click these ‘lights’ to toggle the
feature on or off without opening the larger configuration panel.
Configure all connected external video sources in this manner. Afterward, you should be able to view them on
their respective input monitors.
Figure 13
Figure 11
Figure 12

15
AUDIO
Audio input configuration is similar. Click the Audio Mixer tab to access the controls
for audio Inputs 1 and 2 (along with other audio sources).
Generally, consumer devices (such as a CD player or inexpensive audio mixer)
deliver ‘line level’ audio. TriCaster’s Input 1, representing the two ‘RCA’ (a.k.a.,
‘cinch plug’) inputs on the front panel is devoted to this type of audio source.
The Mic controls govern the microphone (unbalanced, mic level, ¼”) input. For this
source, a Trim knob is provided, allowing you to adjust the nominal level for
different microphones. Note that the sound from this input is ‘mono-ed’ (sent to
both internal audio channels) by default.
After establishing benchmark input levels, use the Gain slider knobs (next to the
vertical VU meters) to maintain suitable volume for your needs.
Note: In digital audio systems, signal levels exceeding allowable values are ‘clipped’ (uniformly assigned the maximum value), resulting in audible issues. The Audio Headroom setting In Record Configuration allows you to offset input signal levels to provide a safety margin. This greatly reduces the possibility of clipping in captured files. Beyond this, use Trim and Gain controls judiciously to avoid over-modulation.
MUTE
Notice that there one or more ‘speaker’ icons appear in the header of each audio control
group (Figure 15). These brighten when the mouse pointer is near; clicking them toggles
the sound for the associated channel on and off.
FOLLOW
Enabling the Follow switch for an audio source directs TriCaster to track switcher
operations for the related video source. This results in the audio for this source being completely muted until
the associated video source is displayed on Program Output – whether as the Switcher’s Program row selection,
via Overlay, or as Input A for a Virtual Input. (Audio Inputs 1 and 2 track Switcher operations affecting video
Inputs 1 and 2 when Follow is enabled.)
Hint: When Follow is enabled for a video source not displayed on Output, the VU meter display is a grayscale,
rather than full color.
TALK AND SOLO
For input two, the control group includes Talk and Solo switches. Talk is an abbreviation of “Talk Over”. Enabling
Talk causes the level for all other audio sources to drop off by 20dB, allowing the ‘talk source’ to dominate (very
useful for public address announcements). Enabling Solo for a source sends its (post-fader) sound to the
Figure 14
Figure 15
16
Headphones output. This will also remove all non-soloed sources from that output. Solo (i.e., all currently
soloed sources) is also an optional source for the Stream output.
Note: Soloed sources are not affected by Mute, except on Master output. The Solo switch state does not affect
Master or Stream audio output,
MONO AND BALANCE
Mono and Balance controls appear for Input 1 (and other multi-channel sources). Enabling the Mono switch
centers the audio source on both channels. Center the Balance knob to apply gain equally to the left and right
channels. Sliding the knob to the left decreases gain applied to the right channel (channel 2) and vice versa.
PAN
Figure 16
A Pan slider is provided for Input 2 only. Sliding the Pan knob left or right actually moves (or ‘pans’) the audio between audio channels on output.
Hint: In the default center position, the Pan control has exactly the same effect as clicking a Mono switch would
produce (this is why a Mono switch is not needed for Input 2.)
NETWORK
Figure 17
TriCaster’s network source features are very powerful. You can use NewTek’s iVGA client to include displays
from networked computers, selected NewTek 3Play™ instant replay systems, or an Apple AirPlay® source (such
as an iPad® or iPhone®) in your productions.
Or, connect to a networked laptop running LiveText™, NewTek’s powerful realtime title software, letting you
assign CG duties to another person.
Note: Gigabit networking is highly recommended, and should be considered mandatory for HD sessions in
particular.
Pan

17
TriCaster supports two simultaneous network sources. When TriCaster recognizes a network source it adds it to
the Source menu located above the Net 1 and Net 2 input monitors. Move your mouse pointer over the header
of a Net monitor and click the triangular button to select a network source. To receive an AirPlay® source, select
the first item (marked by an AirPlay® icon).
NETWORK AUDIO
Some network video sources (notably 3Play output and Apple® AirPlay® video clips) can include embedded
sound. The Net 1 and Net 2 control groups in the External Audio tab (discussed a bit earlier in this section) let
you the settings for these audio sources.
2.3.3 CONFIGURE OUTPUT
We discussed video output connections back in Section 2.1.3 but, as for input sources,
TriCaster provides configuration controls for its outputs right in the Live Desktop.
VIDEO
TriCaster provides several outputs downstream from the Switcher.
These are Program, Aux, and Multiview. The first two of these are
connected to BNC connectors in the VIDEO OUT group on
TriCaster’s front plate. Multiview is a supplementary monitoring
option supplied by one of the monitor ports on the rear. (See
Section 2.1 for more detail on making connections.)
Configuration settings for all three outputs are located in the
Output Configuration panel accessed by clicking the gear icon at the
top right corner above the main Program monitor.
Output 1 (Program)
We mentioned earlier that the video standard (multi-standard model)
and format supplied by the Program output is determined by the
session setting you decided on (see Section 2.3.1).
For an HD session, the only suitable connection is Component. However, SD sessions do support several
optional connection types.
Figure 18
Figure 19

18
The SD Analog Connections control group in the Output tab allows you to choose either Composite + Y/C (both
can be active at one time, using the appropriately marked connectors in the VIDEO OUT group) or, alternatively
a single Component connection.
AUX
Toward the middle of the Output tab, you’ll see controls that let you choose the source, screen aspect and
connection type for the Aux output (labeled Row 2 in the VIDEO OUT connector group on TriCaster’s front
panel). The Format menu determines what video format is supplied by the Aux output connectors. This setting
is independent of session format, and allows multiple formats to be transmitted (and recorded) simultaneously.
MULTIVIEW
The Output Configuration panel has another control group labeled Multiview. These settings govern the
secondary display port on TriCaster’s rear panel. You might use this output for subsidiary monitoring purposes,
or perhaps to supply a projection system. Controls in the tabbed panel determine what display is shown and
what resolution is supplied to the output.
The Screen Layout menu provides several optional displays, including Program, Preview or FX monitors. Set the
VGA Output Resolution for Multiview to the native resolution of the external device you plan to connect.
AUDIO
We introduced the Audio Mixer back in Section 2.3.3. TriCaster’s internal audio streams are also handled here.
Figure 20
MEDIA PLAYERS
All three Media Players in TriCaster 40 (DDR, GFX1 and GFX2) support playback of common audio file formats
such as MP3 or WAV. (The DDR also plays video clips with embedded sound). Each player has its own control

19
group in the Internal Audio tab. The controls and options for internal sources are similar to those we discussed
when considering Internal Audio (Section 2.3.3), so we won’t repeat that information here.
STREAM
The audio control group labeled Stream lets you control the audio you send to an online
audience.
There is a Source selection menu at the top of the Stream control group. This allows menu
you select individual Media Players by name, Internal (a mix-down of all Media Player
output), All (identical to the Master mix), or Solo (a mix of all soloed sources only). Other
Stream controls are the same as those discussed earlier and are familiar by now.
MASTER (AND HEADPHONES)
The Master volume slider and associated VU meters relate to TriCaster’s main audio output
level. Just above these, you’ll see a Balance slider, and above that again, a knob controlling
volume of audio sent to the Headphone jack. Generally, the Headphone audio mix is the same
as Master, but as discussed earlier, it is replaced by the Solo mix when any sources have that
switch enabled.
2.3.4 INTERNET STREAMING
One of TriCaster’s great strengths is its direct support for streaming your productions to the Internet, and in turn
to a potentially unlimited audience. Online broadcasting can be a simple matter or more complex depending on
your needs. Rather than give this important topic short shrift here, we’ve devoted the entirety of Chapter 5 to
the topic.
Figure 21
Figure 22
20
3 THE LIVE DESKTOP
TriCaster’s Live Desktop is really the production hub, home to the all of the controls, displays, modules and tools you will use to create and broadcast your live productions in realtime as events occur.
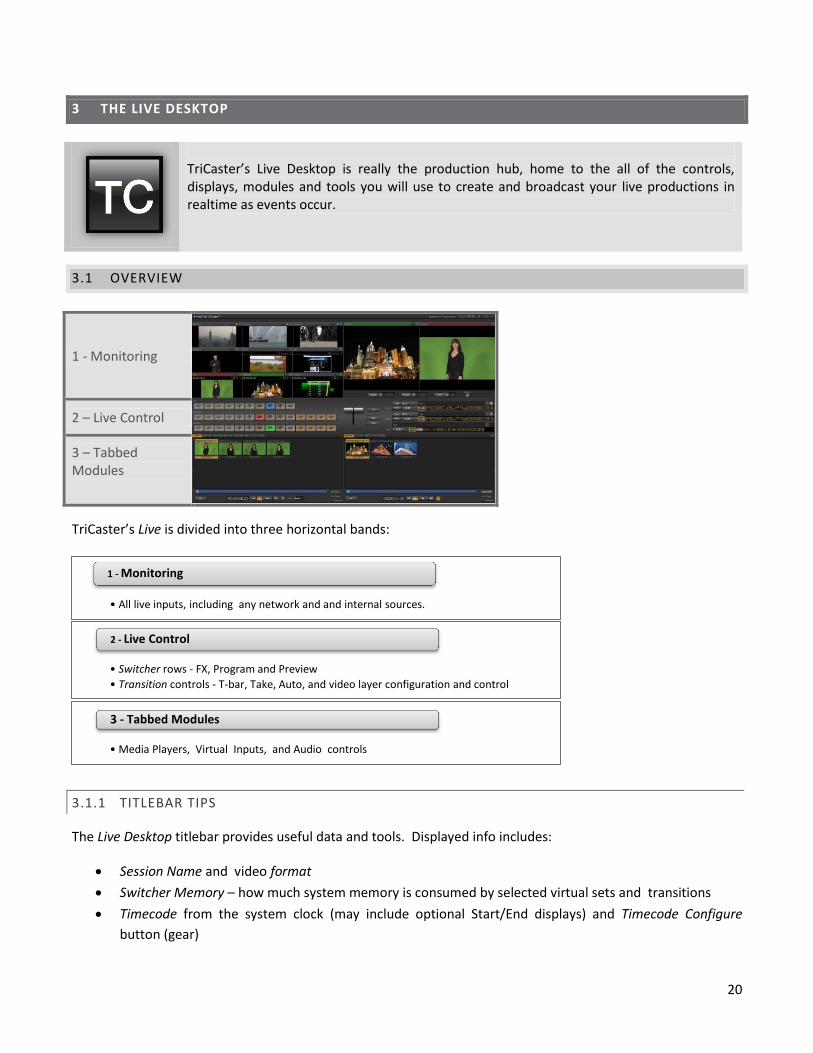
3.1 OVERVIEW
1 - Monitoring
2 – Live Control
3 – Tabbed Modules
TriCaster’s Live is divided into three horizontal bands:
3.1.1 TITLEBAR TIPS
The Live Desktop titlebar provides useful data and tools. Displayed info includes:
Session Name and video format
Switcher Memory – how much system memory is consumed by selected virtual sets and transitions
Timecode from the system clock (may include optional Start/End displays) and Timecode Configure
button (gear)
• All live inputs, including any network and and internal sources.
1 - Monitoring
• Switcher rows - FX, Program and Preview
• Transition controls - T-bar, Take, Auto, and video layer configuration and control
2 - Live Control
• Media Players, Virtual Inputs, and Audio controls
3 - Tabbed Modules

21
Figure 23
QR Code (Documentation) – click this button and scan a QR code with your mobile device (such as an
iPad® or Android® tablet) to download documentation.
Eject (removable storage media ) and [x] (Exit button)
STATUS BAR
Figure 24
Figure 25
An information display below the titlebar displays system including any cautionary indications.
3.2 MONITORS
By default, the upper third of the Live Desktop is covered with monitors. Large full-time Program and Preview
monitors occupy the right half of the upper (monitoring) section. Let’s discuss them first.
The Program monitor (at right in Figure 26)
displays the video output TriCaster is
currently sending to downstream devices
and ultimately, to your viewing audience.
The Preview monitor (at left in Error!
eference source not found.) displays the
output that would result from performing a
Take operation with the current source
selections.
Figure 26

22
Note that the use of a TriCaster 40CS control surface allows multiple sources to be switched simultaneously,
using its Delegate buttons. The Preview monitor display respects multi-delegate selections, too. We’ll discuss
Preview again momentarily in the context of switching (Section 3.3).
The Preview monitor shows interactive Proc Amp (etc.) indicators when appropriate, too, just like those we
discussed back in Section 2.3.2. Beneath these primary monitors are Stream, Record and Grab buttons, along
with their Configuration (gear) buttons and time/counter fields (we’ll look at these features in Sections 3.6 and
Chapter 4, respectively). A convenient Master Volume knob appears under Program, too.
Figure 27
At left, the monitoring section provides individual monitors for all available video sources, including camera and
network inputs and output from the internal Media Players.
The header of the monitor for the source currently selected on the Switcher’s Program row is highlighted in red.
The titlebar for the Preview row selection has a green tint, while the FX source titlebar is blue.
3.2.1 CONTEXTUAL TOOLS
We mentioned the yellow, green and blue titlebar switches (Proc Amp, LiveMatte and Crop) previously – see
Section 2.3.2.
Additional controls pop-up when you move your mouse pointer over the onscreen
monitors. The controls provided vary according to the source type represented by the
monitor. Camera monitors show Freeze and Configure buttons in the titlebar on mouse roll-
over.
Other controls appear if you roll-over the onscreen monitor for a Media Player. Stop and Play buttons are supplemented by Previous and Next (playlist item) buttons. As well, a timecode field is conveniently situated below the monitor label for Media Player modules (Figure 29). Right-click on to open a menu allowing you to Reverse Direction for the time counter, show or disable Warning Colors, or use the entire Playlist Duration for the timecode rather than just the time for the current item.
Figure 28
Figure 29

23
Roll the mouse pointer over a Network monitor and click the triangle button to
list available network video sources. The menu might list displays from other
computers on the network (via iVGA™), an AirPlay® stream, or perhaps the
output from a LiveText™ workstation. (Network sources are considered in more
depth in Chapter 4).
3.2.2 INTERACTIVE CONTROL
The small video source monitors are actually interactive; click an (unselected) monitor to send it to the
Switcher’s Preview row. Click it again to perform a Take, swapping it with the current Program row selection,
and sending it to Program Output. Or Shift + click the monitor for the Preview row source to perform a
Transition.
3.3 THE SWITCHER
The central band of TriCaster’s Live Desktop – between the upper monitoring section and the tabbed modules below – is taken up by the Switcher and related controls. These include the Main Transition controls, Local Layer Controls, and associated configuration features (Figure 31).
Switcher Transitions
FX, Program, Preview Selectors Main Transition
Controls Local Layer Controls
Figure 31
3.3.1 THE PROGRAM AND PREVIEW ROWS
From top to bottom, the three Switcher rows are labeled FX, Program and Preview. Clicking a button in the
Program or Preview row selects the active video source for that video layer.
The Program row selection determines the dominant video stream of the Background (BKGD) video
layer – the bottom layer of the composition on Program output.
Normally, the Preview row selection determines what is queued up for display in the Background layer
by the next (BKGD) Take or Transition operation.
Note: The Program and Preview rows are extended with buttons labeled V1 to either V4. These control display of
output from TriCaster’s Virtual Inputs (Section 3.8)
Figure 30
24
The Background (BKGD) layer
supplies the ‘bottom-most’ video
layer, seen behind any other layers
shown on Program Output.
At any given moment, BKGD may
consist of a mix of video streams
from Program and Preview rows, or
even a more complex composition
formed from the numerous sources
of one or even more Virtual Inputs.
3.3.2 THE FX ROW
The FX row selection supplies an auxiliary internal video channel which can serve in a variety of ways. For
example, it can supply the background scene for a Virtual Input, or be assigned to an Overlay or DSK channel
(see Section 3.4).
3.4 TRANSITIONS
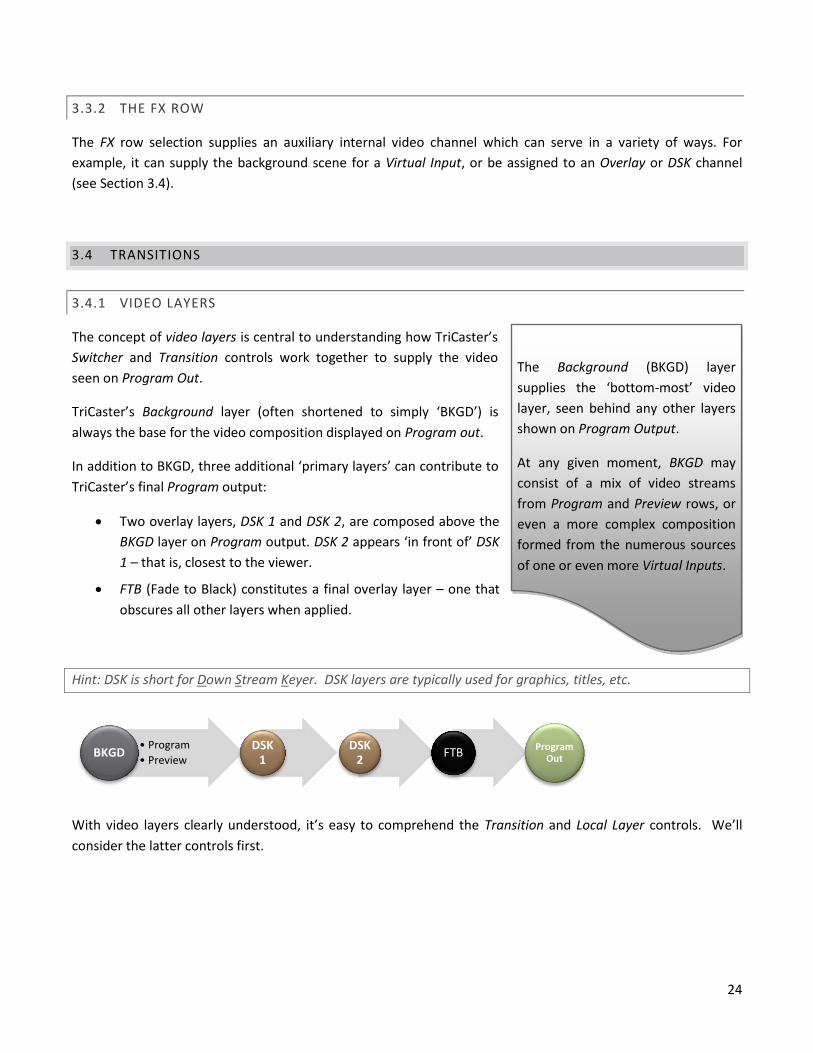
3.4.1 VIDEO LAYERS
The concept of video layers is central to understanding how TriCaster’s
Switcher and Transition controls work together to supply the video
seen on Program Out.
TriCaster’s Background layer (often shortened to simply ‘BKGD’) is
always the base for the video composition displayed on Program out.
In addition to BKGD, three additional ‘primary layers’ can contribute to
TriCaster’s final Program output:
Two overlay layers, DSK 1 and DSK 2, are composed above the
BKGD layer on Program output. DSK 2 appears ‘in front of’ DSK
1 – that is, closest to the viewer.
FTB (Fade to Black) constitutes a final overlay layer – one that
obscures all other layers when applied.
Hint: DSK is short for Down Stream Keyer. DSK layers are typically used for graphics, titles, etc.
With video layers clearly understood, it’s easy to comprehend the Transition and Local Layer controls. We’ll
consider the latter controls first.
• Program
• Preview BKGD
DSK 1
DSK 2
FTB Program Out
25
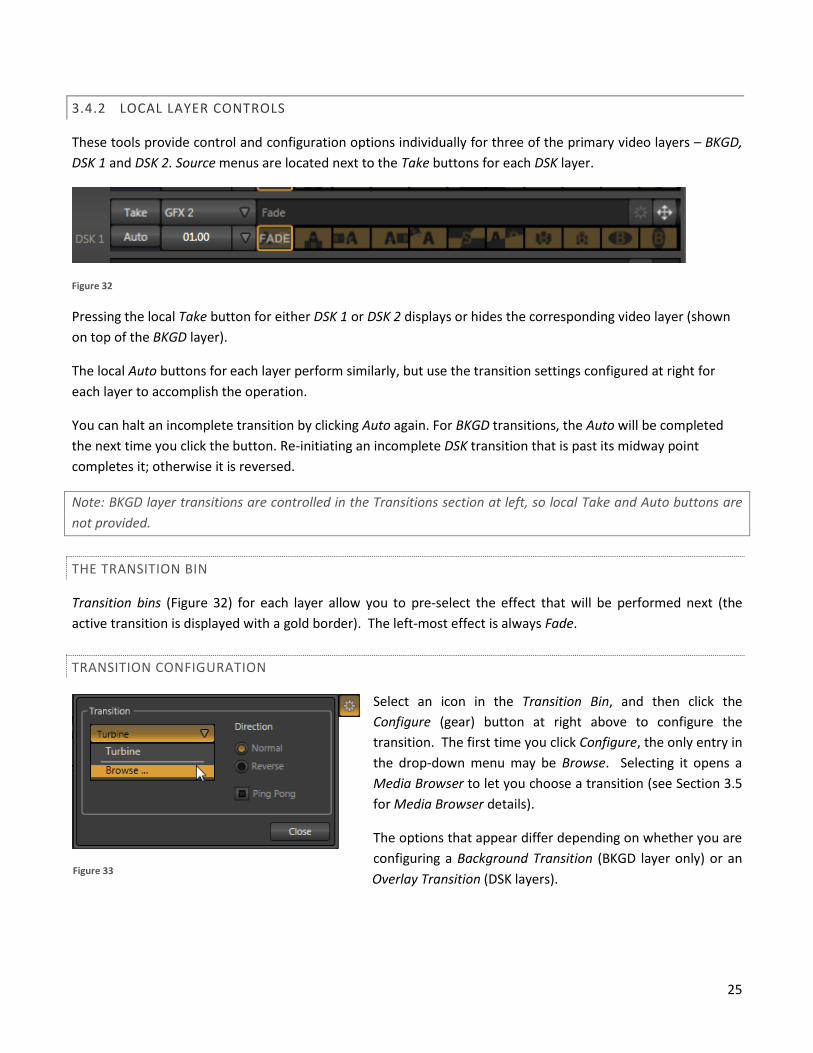
3.4.2 LOCAL LAYER CONTROLS
These tools provide control and configuration options individually for three of the primary video layers – BKGD,
DSK 1 and DSK 2. Source menus are located next to the Take buttons for each DSK layer.
Figure 32
Pressing the local Take button for either DSK 1 or DSK 2 displays or hides the corresponding video layer (shown
on top of the BKGD layer).
The local Auto buttons for each layer perform similarly, but use the transition settings configured at right for
each layer to accomplish the operation.
You can halt an incomplete transition by clicking Auto again. For BKGD transitions, the Auto will be completed
the next time you click the button. Re-initiating an incomplete DSK transition that is past its midway point
completes it; otherwise it is reversed.
Note: BKGD layer transitions are controlled in the Transitions section at left, so local Take and Auto buttons are
not provided.
THE TRANSITION BIN
Transition bins (Figure 32) for each layer allow you to pre-select the effect that will be performed next (the
active transition is displayed with a gold border). The left-most effect is always Fade.
TRANSITION CONFIGURATION
Select an icon in the Transition Bin, and then click the
Configure (gear) button at right above to configure the
transition. The first time you click Configure, the only entry in
the drop-down menu may be Browse. Selecting it opens a
Media Browser to let you choose a transition (see Section 3.5
for Media Browser details).
The options that appear differ depending on whether you are
configuring a Background Transition (BKGD layer only) or an
Overlay Transition (DSK layers).
Figure 33

26
Note: BKGD Transitions and Overlay (DSK) Transitions are slightly different. BKGD Transitions have Reverse and
Ping Pong options. Overlay Transitions always Ping Pong, so do not offer direction controls.
Duration menus appear beside the local Auto buttons. You can make a Duration
selection from the menu, drag the mouse pointer left or right over the numeric
display to set a custom time, or click the numeric field and type a value.
THE POSITIONER
DSK layers have independent Position settings. Click the button marked with a
double-headed arrow to open the Overlay Position panel.
Position settings are organized into two sections, Position and Scale. Click and drag
on the double-headed arrow to relocate the DSK source vertically or horizontally
within the frame.
Constrain movement to one axis by holding down the Ctrl key before dragging, or by dragging on either of the
two numeric controls below (click to enter a value by typing if you prefer).
Hint: DSK layers automatically appear (temporarily) on Preview when the Position panel is open. This frees you to
tinker with Positioning without disrupting Program output.
3.4.3 MAIN LAYER CONTROLS
Generally, TriCaster’s main Transition controls (Take, Auto and the T-Bar) behave
just like their local sidekicks.
Use the T-Bar to control transition progress manually.
FTB (FADE TO BLACK)
Remember that FTB (Fade to Black) is effectively the final video layer before output, and will hide all other layers
when active. Click this button to enable or disable FTB.
Note: As a reminder that FTB obscures all other output, the button pulses when FTB is active.
Figure 35
Figure 36
Figure 34

27
3.5 MEDIA PLAYERS
TriCaster’s Media Players permit you to use clips, stills, title pages and sound files in your live presentations. You
can display files sequentially as a playlist, or singly on demand. Media Players can even play, stop and advance
automatically in response to your Switcher operations.
Three different Media Players – the DDR, Graphics 1 and Graphics 2 – are located in tabbed panes at the bottom
of the Live Desktop. The main difference between Media Players is the file formats they play. Supported media
types include:
Video clips (including animations)
Still images – photos, graphics, etc.
Title Pages – ‘live editable’ CG pages from TriCaster’s integrated title system
Audio files – standard .wav or .mp3 files, and other common audio file types
Figure 37
Hint: All Media Browsers support most popular 32bit file formats (that is, files with an embedded ‘alpha’, or
transparency, channel).
The DDR (Digital Disk Recorder) can play all four of the file types listed in the previous section. It is unique in
being the only Media Player to play video clips. Graphics 1 and 2 can play all supported file types except video
clips. The only other significant difference between the DDR and Graphics modules is that the latter do not have
a Speed control.
3.5.1 COMMON FEATURES
Let’s look at the features and controls that are common to all Media Players.

28
PLAYLISTS
The dominant feature of all of TriCaster’s Media Players is a storyboard-style
playlist that is used to organize content for use during your live productions.
The playlist displays large thumbnail icons for each entry. A scrollbar at
right accommodates long playlists. Icons can quickly and easily be re-
ordered using the familiar drag and drop workflow.
The playlist can even be altered during playback (if the currently playing
item is removed. The filename of each item is displayed above its thumbnail, and its
playback duration is shown below.
Clicking an item select it, and sets the play position to its In Point. Shift + click and Ctrl + click multi-selection
operations are supported. Double-click an icon or click the Play button to begin playback. Note that still images
and static title pages added to the playlist are given a duration (the default is 15 seconds). This can be adjusted
singly or en masse (for multi-selected icons).
Hint: The duration shown is the play time after any trimming operations, and thus may at times be less than the
file length on disk. In and Out markers on the Scrub Bar (below the playlist) show the effect of trimming, and can
be dragged with the mouse to edit the n/Out points.
PRESET BIN
Another very useful feature shared by TriCaster’s Media Players is the Preset Bin, which provides quick and
convenient access to multiple playlists. Presets also store the state of various Media Player controls.
Figure 39
To display the preset bin, roll the mouse pointer to the edge of the screen in a tabbed Media Player (or the
Audio Mixer tab). When you change playlists it’s almost as though you are accessing another media player. To
populate a new preset, simply click a blank preset icon. Presets are named, and conveniently display a thumbnail
image. To modify the name, right-click the preset icon to open a menu, and select Rename. Other menu
options include Delete, Export and Import (the file will be saved with the extension ‘.pst’).
Figure 38

29
FILE OPERATIONS
Click Add to open a custom Media Browser.
Drag (appropriate type) file(s) from one module’s playlist to another module.
Right-click in the playlist pane to show a context menu with relevant items from the following list:
Cut
Copy
Paste
Remove
*Rename
Clone
Set Duration (Stills and titles)
Edit Title
Set Audio Level
Standard (system) Cut, Copy, Paste and Delete keystrokes are supported. Un-playable (missing, corrupt, or
unsupported) file icons are ‘ghosted’.
*Rename creates a local alias, or ‘playlist nickname’. It does not actually change the name of the file on
your hard drive. (Roll the mouse over the Alias in the icon header to see the filename.)
SCRUB BAR
Just beneath the playlist pane is a full-width Scrub Bar. Its width represents the full run time of the selected
item. Drag the knob left or right to change position in the file.
Figure 40
Initially, In and Out Point handles at opposite ends of the Scrub-Bar mark the full limits of the file on disk.
Dragging these handles edits the In and Out points (multi-selections are ignored). The (trimmed) duration is
displayed in a timecode field just to the right.
Hint: For longer durations, holding SHIFT while dragging In/Out handles increases precision.
CONTROLS
Transport controls and related features are located directly below the Scrub Bar.
Figure 41

30
TIME DISPLAY
A timecode field displays the Current Time for the item. Right-click the timecode to choose current time or
remaining time (Reverse Direction), enable Warning Colors, or Playlist Duration. Or click the timecode type a
value, and then press Enter to jump to it.
Hint: With Warning Colors enabled, ten seconds before the end of play for the current item, the digits in the time
display turn amber. When five seconds are left, the digits are red.
TRANSPORT CONTROLS
A simple set of controls beneath the playlist pane provides all playback-related functions:
Previous button – go to previous playlist entry
Stop (clicking Stop when already stopped goes to the first frame)
Play
Next button – go to next playlist entry
(Not shown) – Double-click an entry in the playlist pane to begin playback at the start of that playlist entry
Loop – repeat playback continuously (respecting the Single switch state)
SINGLE
Media Player playback is normally playlist style, each item playing back in succession until all are
played. In Single mode, playback stops when the Out Point of the current playlist item is reached
(unless Loop is also enabled).
AUTOPLAY
The Autoplay switch has several important effects. First, it automatically initiates playback when the associated
Media Player is placed on Program Out by a Switcher operation (or by displaying the Media Player in a DSK
channel or Virtual Input). The reverse transition occurs automatically as the end of play approaches. (In similar
fashion, for a media player with Autoplay enabled, performing an Overlay Effect automatically begins playback.)
Note: The reverse Overlay Transitions do not occur automatically as the end of play approaches.
Finally, if the media player is in Single mode, the play position advances to the next playlist item when playback
stops.
3.5.2 SPEED
The DDR provides a Speed control, which supports playback at speeds from 25% to 400%
(certain compressed video formats cannot successfully be played back faster than 200%).
Figure 42
Figure 43
31
Speed can even be adjusted during playback. Drag left or right to adjust the Speed value, or click the slider to
type a new value using the keyboard.
Hint: Press Shift while double-clicking Speed to quickly reset to the 100% default.
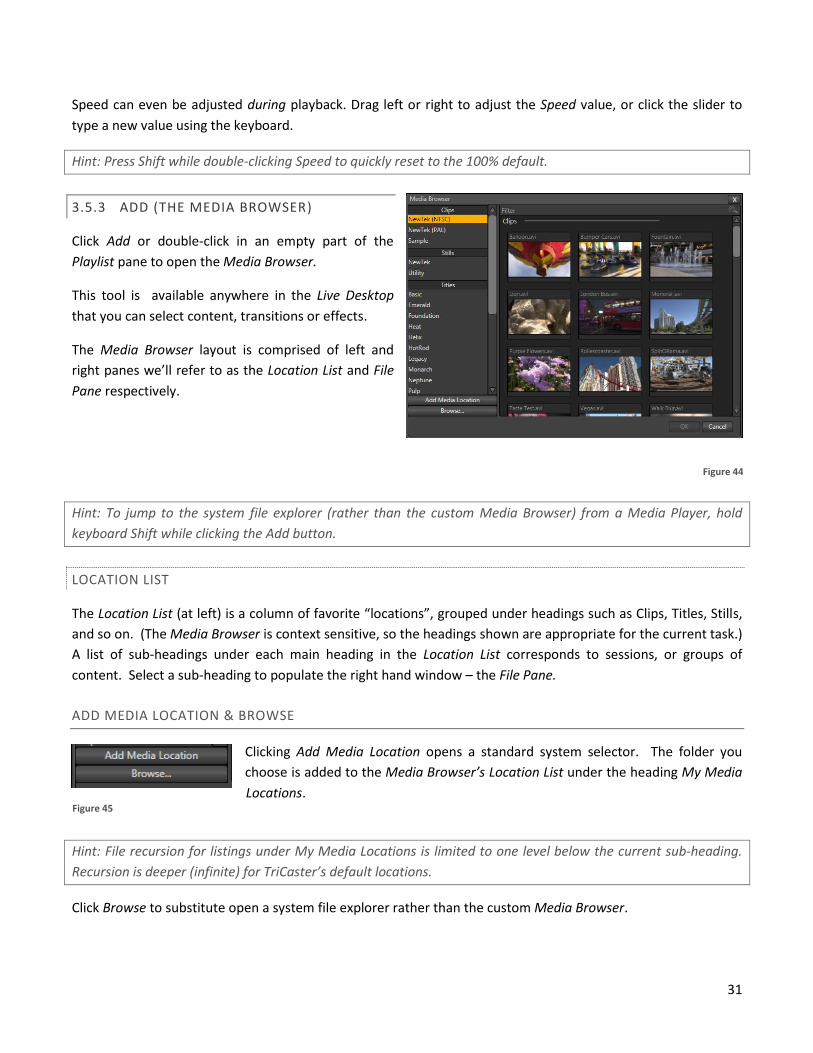
3.5.3 ADD (THE MEDIA BROWSER)
Click Add or double-click in an empty part of the
Playlist pane to open the Media Browser.
This tool is available anywhere in the Live Desktop
that you can select content, transitions or effects.
The Media Browser layout is comprised of left and
right panes we’ll refer to as the Location List and File
Pane respectively.
Hint: To jump to the system file explorer (rather than the custom Media Browser) from a Media Player, hold
keyboard Shift while clicking the Add button.
LOCATION LIST
The Location List (at left) is a column of favorite “locations”, grouped under headings such as Clips, Titles, Stills,
and so on. (The Media Browser is context sensitive, so the headings shown are appropriate for the current task.)
A list of sub-headings under each main heading in the Location List corresponds to sessions, or groups of
content. Select a sub-heading to populate the right hand window – the File Pane.
ADD MEDIA LOCATION & BROWSE
Clicking Add Media Location opens a standard system selector. The folder you
choose is added to the Media Browser’s Location List under the heading My Media
Locations.
Hint: File recursion for listings under My Media Locations is limited to one level below the current sub-heading.
Recursion is deeper (infinite) for TriCaster’s default locations.
Click Browse to substitute open a system file explorer rather than the custom Media Browser.
Figure 44
Figure 45

32
FILE PANE
Icons appear in the File Pane for content inside the sub-heading selected in the Locations List. (Files are grouped
under dividers named for sub-folders.)
Figure 46
FILE FILTERS
The File Pane is automatically filtered to show only relevant content. For example, when selecting LiveSets, the
browser only shows LiveSet files (.vsfx). An editable filter appears above the File Pane. Only files matching
criteria you enter are shown. For example, if you enter “wav”, the File Pane would display any file with the
filename extension “.wav” (WAVE audio file format), but also “wavingman.jpg” or “lightwave_render.avi”.
CONTEXT MENUS
Right-click a Location listed under My Media Locations to show a context menu with just one item in it. Remove
de-lists the location (but does not delete the folder and its contents from the hard drive).
Note: this menu is exclusively for use in the “My Media Location” section, and is not available for other headings
in the Location List.
Right-click a file icon to open a menu providing Rename and Delete options (Delete really does remove content
from your hard drive).
3.5.4 TITLE PAGES
TriCaster™ title pages can be used in any of the Media Players (other than Sound, of
course). Media Players can also display bitmap files exported from third-party graphics
applications. However, TriCaster’s native title pages can be edited, even while displayed
live (not possible with a simple bitmap image).
Title page icons display a configuration (gear) button when you move the mouse over
them. Click this button or select Edit Title in the context menu to open the Title Page Editor.
When you move the mouse over text in the Title Page Editor, a white bounding-box appears.
Click to select the text object for editing. An edit field opens to let you modify the text. Press Enter or click
outside the box to complete the editing operation.
Figure 47
33
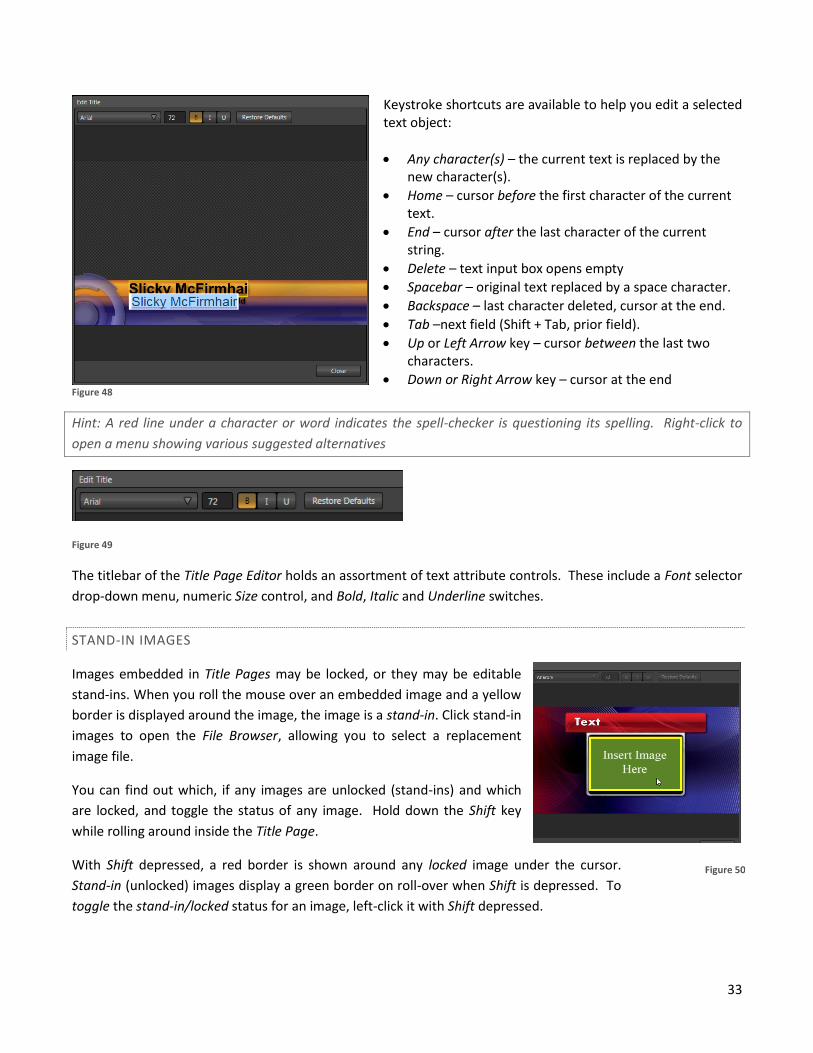
Figure 48
Keystroke shortcuts are available to help you edit a selected text object:
Any character(s) – the current text is replaced by the new character(s).
Home – cursor before the first character of the current text.
End – cursor after the last character of the current string.
Delete – text input box opens empty
Spacebar – original text replaced by a space character.
Backspace – last character deleted, cursor at the end.
Tab –next field (Shift + Tab, prior field).
Up or Left Arrow key – cursor between the last two characters.
Down or Right Arrow key – cursor at the end
Hint: A red line under a character or word indicates the spell-checker is questioning its spelling. Right-click to
open a menu showing various suggested alternatives
Figure 49
The titlebar of the Title Page Editor holds an assortment of text attribute controls. These include a Font selector
drop-down menu, numeric Size control, and Bold, Italic and Underline switches.
STAND-IN IMAGES
Images embedded in Title Pages may be locked, or they may be editable
stand-ins. When you roll the mouse over an embedded image and a yellow
border is displayed around the image, the image is a stand-in. Click stand-in
images to open the File Browser, allowing you to select a replacement
image file.
You can find out which, if any images are unlocked (stand-ins) and which
are locked, and toggle the status of any image. Hold down the Shift key
while rolling around inside the Title Page.
With Shift depressed, a red border is shown around any locked image under the cursor.
Stand-in (unlocked) images display a green border on roll-over when Shift is depressed. To
toggle the stand-in/locked status for an image, left-click it with Shift depressed.
Figure 50
34
Right-click images to access a menu providing optional methods of fitting the source image to its frame. Choose
Stretch to completely fill the frame. Fill Area retains the interested image’s original aspect, cropping if
necessary. Show All Image also retains the original image aspect, but may result in ‘pillar-boxing’ or ‘letter-
boxing’ within the target frame.
3.6 RECORD, GRAB
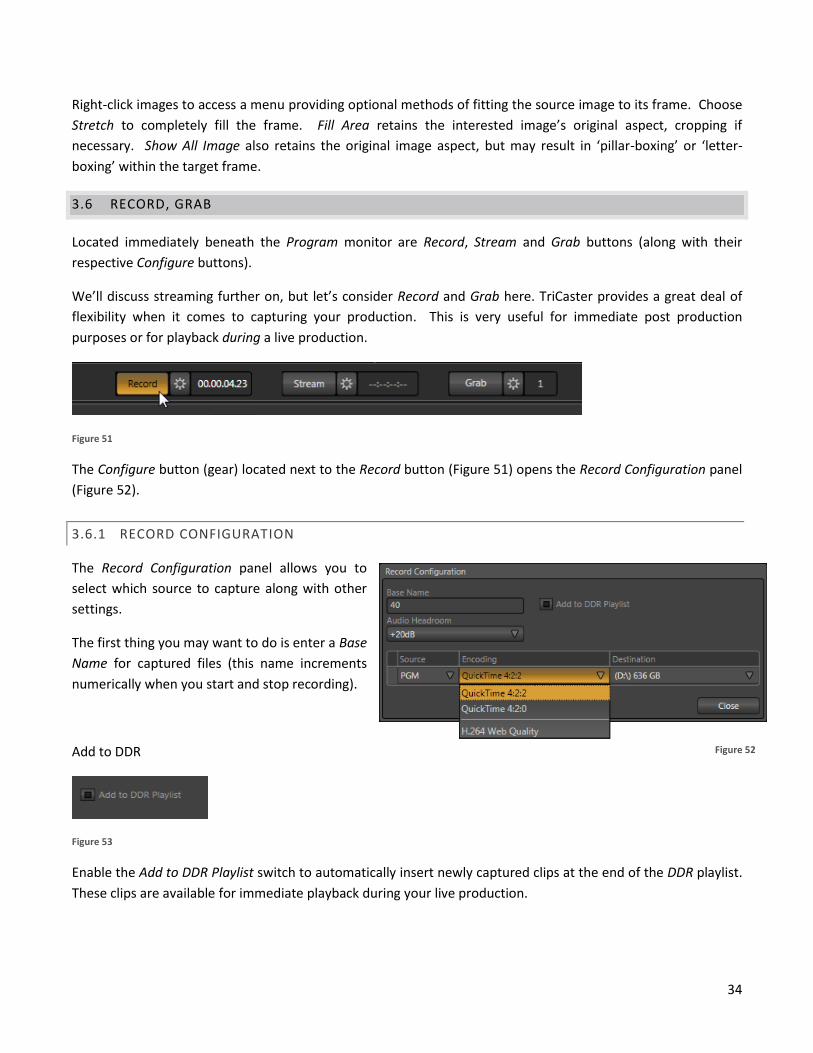
Located immediately beneath the Program monitor are Record, Stream and Grab buttons (along with their
respective Configure buttons).
We’ll discuss streaming further on, but let’s consider Record and Grab here. TriCaster provides a great deal of
flexibility when it comes to capturing your production. This is very useful for immediate post production
purposes or for playback during a live production.
Figure 51
The Configure button (gear) located next to the Record button (Figure 51) opens the Record Configuration panel
(Figure 52).
3.6.1 RECORD CONFIGURATION
The Record Configuration panel allows you to
select which source to capture along with other
settings.
The first thing you may want to do is enter a Base
Name for captured files (this name increments
numerically when you start and stop recording).
Add to DDR
Figure 53
Enable the Add to DDR Playlist switch to automatically insert newly captured clips at the end of the DDR playlist.
These clips are available for immediate playback during your live production.
Figure 52
35
AUDIO HEADROOM
In digital audio systems, signal levels exceeding allowable values are clipped
(uniformly assigned the maximum value), inevitably entailing audible issues.
TriCaster’s Record Configuration panel provides an Audio Headroom setting that
lets you choose an offset value (in decibels) between 0dB FS (the maximum allowable digital level) and the
benchmark ‘alignment level’.
Hint: When playing files located in TriCaster’s default ‘capture folders’, the DDR adjusts the audio level
automatically to produce an improved level match in playlists that include imported sounds or music.
SOURCE
A drop-down menu labeled Source permits you to choose which video stream to capture. TriCaster provides
two source options, PGM (Program output) and AUX (a particularly flexible option, since it can be set to a variety
of input sources and formats in Output Configuration). Note that direct input selections result in a recording that
respects the actual input format where possible, even if that differs from session format.
Hint: The FX Source option for Aux is particularly useful in connection with the use of a TimeWarp™ control
surface for instant replay applications.
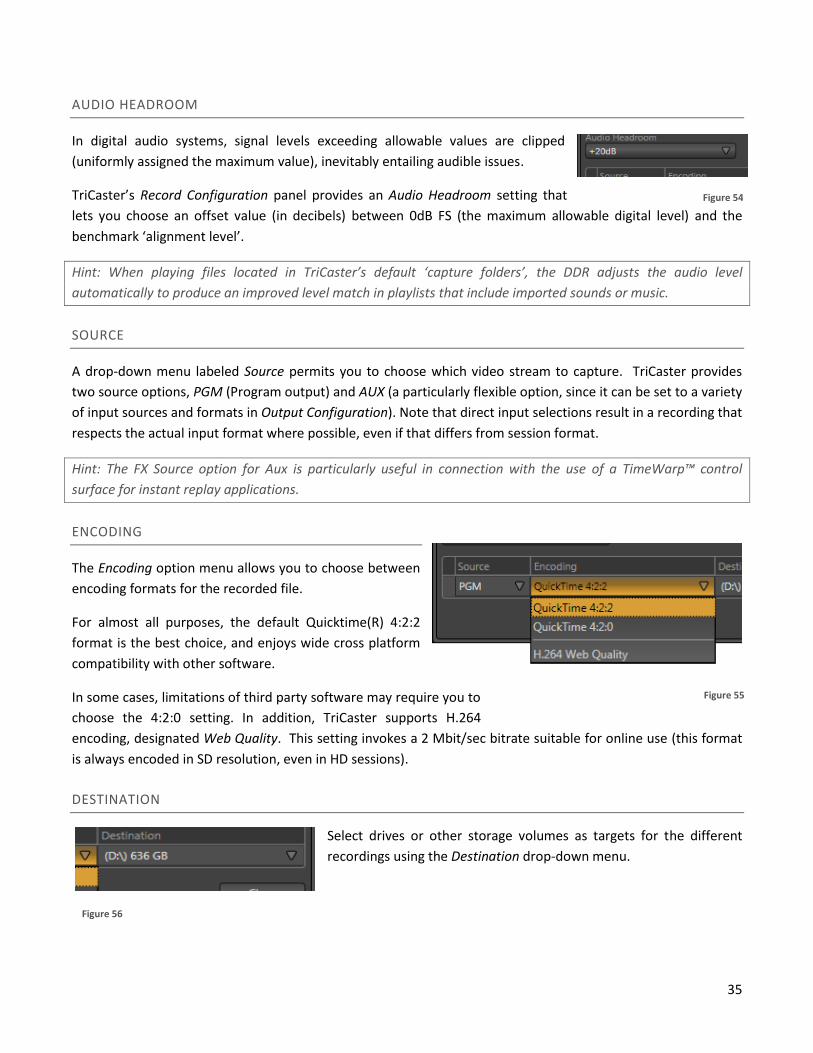
ENCODING
The Encoding option menu allows you to choose between
encoding formats for the recorded file.
For almost all purposes, the default Quicktime(R) 4:2:2
format is the best choice, and enjoys wide cross platform
compatibility with other software.
In some cases, limitations of third party software may require you to
choose the 4:2:0 setting. In addition, TriCaster supports H.264
encoding, designated Web Quality. This setting invokes a 2 Mbit/sec bitrate suitable for online use (this format
is always encoded in SD resolution, even in HD sessions).
DESTINATION
Select drives or other storage volumes as targets for the different
recordings using the Destination drop-down menu.
Figure 54
Figure 56
Figure 55

36
3.7 GRAB
At times, all you really want to capture is a still image from
the current Program Output video stream. This is the
purpose of TriCaster’s Grab function. Click the Configure
button (gear) next to Grab beneath the Program Output
monitor to open the Grab Still Configuration panel.
The options presented are similar to those of Record
Configuration, though a bit simpler. Again, enter a Base
Name. The name you supply which will be numerically
incremented as required. Enable the Add to Graphics 2
Playlist switch to automatically include newly captured clips at the end of the current Graphics 2 module playlist,
ready for immediate playback during the live production. Grabbed image files are stored in a folder named for
the session, inside the main Still folder.
Hint: During a session, the ‘grab counter’ situated beside the button keeps track of the number of images stored
for the current base name entry.
3.8 VIRTUAL INPUTS
Virtual Input buttons sit on TriCaster’s Switcher rows just like other video inputs, but in fact they possess very
powerful features. Much like the M/E (Mix/Effect) rows of a traditional video switcher, they permit a multi-layer
composition to be prepared from multiple sources. In addition to the two sources just considered (Inputs A and
B), Virtual Inputs provide an integrated Overlay channel, as well.
Figure 58
Virtual Inputs support two primary video sources. These two sources are labeled Input A and B. Selection is
made using buttons in the lower part of the tabbed panel, corresponding to TriCaster’s Switcher sources.
When a Virtual Input is displayed, Input A appears above (or, if you prefer, ‘in front of’) Input B by default. If
Input A is fully opaque it completely hides Input B. However, when LiveMatte settings for Input A result in
transparency, or the Input A source has transparency by virtue of being a 32bit file, or its active Position settings
mean it does not completely cover Input B, then Input B will appear through transparent regions in the result.
Figure 57
37
3.8.1 POSITIONER
Position controls for both Input A and Input B appear at right of their respective rows
(Figure 59). Click the double-headed arrow button to open the Positioner. The panel
that opens is identical to the DSK layer Positioner discussed back in Section 3.4.2.
3.8.2 OVERLAY
Figure 60
Another switcher-style source selector, labeled Overlay, is situated right above the Input A row. At right Just
above that you will also see local transition controls that are quite similar to those found in the Switcher’s
Transition pane. Really, the Virtual Input Overlay feature matches the DSK channels found in the Switcher’s main
Transition section in almost all respects.
Unlike the DSKs, though, its inclusion in Virtual Input tabs make it a ‘pre-Switcher’ video layer (along with Input A
and B). This means that the Overlay is applied before that composition is sent to the Switcher. Thus content in a
VI Overlay appears beneath anything displayed via the two (Switcher) DSK channels.
The Overlay selection and Position controls work just like their Input A and B cousins, discussed earlier (see
Section 3.8.1).
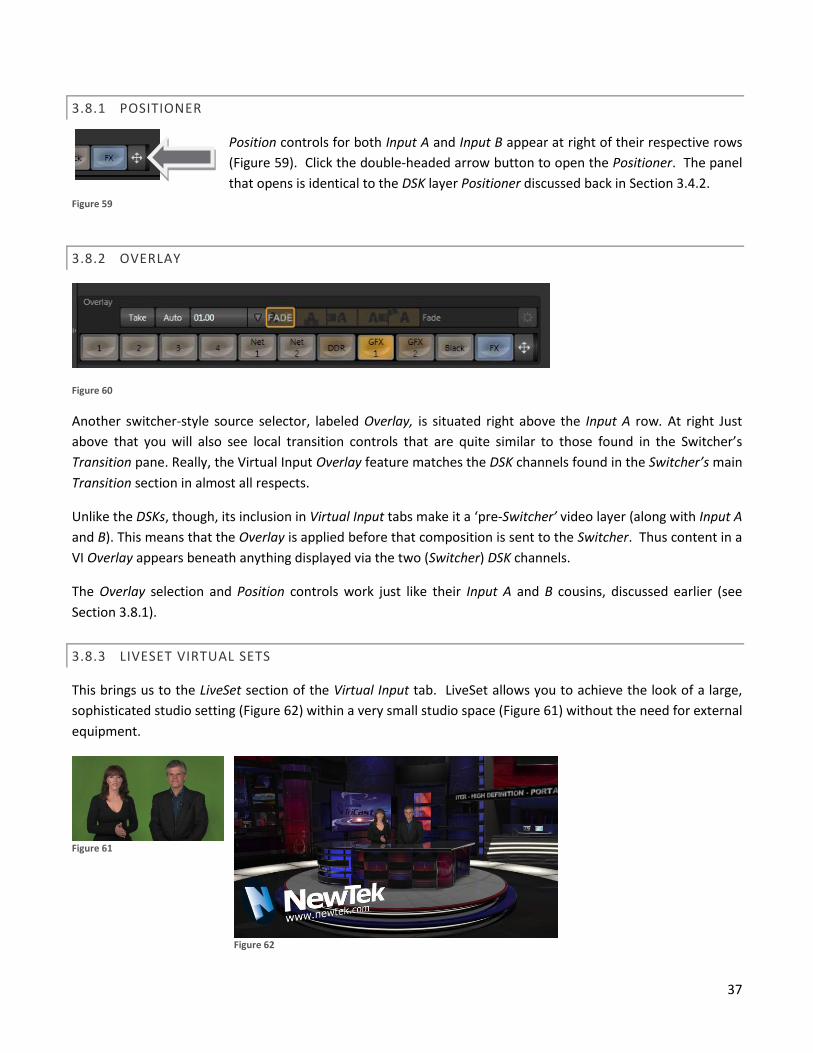
3.8.3 LIVESET VIRTUAL SETS
This brings us to the LiveSet section of the Virtual Input tab. LiveSet allows you to achieve the look of a large,
sophisticated studio setting (Figure 62) within a very small studio space (Figure 61) without the need for external
equipment.
Figure 61
Figure 62
Figure 59

38
LIVESET SELECTION
An information line at the top of the Virtual Input tab lists the current LiveSet (if any) for this Virtual Input. The
default LiveSet simply composites Input A over Input B (if any part of the image assigned to Input A is
transparent, Input B will show through).
Hint: Many virtual sets require LiveMatte settings to be applied to Input A. Input B does not support keying.
To select a different LiveSet, click the Add button at the right-hand end of this field line, opening a custom Media
Browser (Figure 63).
Figure 63
The Location List of the Media Browser lists any installed LiveSet groups under the heading “LiveSets”. Select an
entry beneath to show thumbnail icons in the Browser’s File Pane.
VIDEO SOURCES
Virtual Inputs provide LiveSet with a new standard of flexibility, allowing you to easily and flexibly assign inputs
from the Virtual Input tab(s), without Switcher involvement*.
*Hint: One special case is when you select FX as a LiveSet input. Conveniently, this allows you to use the Switcher
to change the input without either interfering with other common Switcher operations or accessing the
corresponding Virtual Input tab.
Figure 64

39
Virtual sets in the LiveSet system display video from either one or two different TriCaster sources. It will not
surprise you that these correspond to Input A and B, the primary video sources we discussed earlier. (Again as
you might expect, Input B is often assigned to secondary purposes, such as to supply the display for a ‘monitor’
in a virtual set.)
ZOOM PRESETS
Unlike earlier LiveSet implementations, LiveSet does not need multiple LiveSets to mimic different ‘virtual
camera distances’ (for a single camera angle). Making a single selection populates four Zoom Presets just below
(Figure 65).
Figure 65
Initially, these four presets represent default stops between the maximum and minimum distance for the
specific set - the ‘closest’ view is 100%. Click a preset thumbnail to jump to the camera view it represents. An
active Zoom Preset is shown with a gold border (a white border tracks your cursor when selecting presets).
Notice that a numeric slider is provided above right for each preset. These work the same as other numeric
sliders in TriCaster’s Live Desktop – drag to adjust the value, click to type directly into the field using the
keyboard, or press (keyboard) Shift and then double-click to restore the default value for that preset.
Note: Some LiveSets (e.g., double-box sets) do not support zooming. In such cases, the Zoom Presets and the
Zoom T-Bar are inactive.
ZOOM T-BAR
Figure 66
The Zoom T-Bar is located beside the Zoom Presets. Dragging it vertically adjusts the virtual ‘camera distance’
for the active LiveSet, between 0-100%.

40
When you click a Zoom Preset, the T-Bar updates to the new zoom level (displayed numerically above).
Conversely though, adjusting the T-Bar does not change the value for a preset. (When the current T-Bar position
does not correspond to any presets, none of them are shown with a white border.)
INPUT POSITION
We discussed the Position controls for video Inputs A and B back in Section 3.8.1. It’s worth adding here that
these controls, when active, do affect the scale, rotation and position for LiveSet video inputs (this is another
unique advantage of this LiveSet implementation).
You will find that you can often use Position controls to ensure a ‘good fit’ and natural appearance of talent or
other source appearing in your virtual sets (greatly reducing the need to fuss with physical camera positions to
do so).
ANIMATE ZOOM
Figure 67
As noted earlier, you can use the Zoom T-Bar to manually zoom in on most LiveSets, even when displayed on
Program Output. The Animate Zoom switch makes it possible to easily perform this realtime zoom automatically
with a single click. With Animate Zoom enabled, simply clicking a preset automatically zooms from the current
position to the virtual camera ‘distance’ represented by the preset. A built-in ease in/out is applied to ensure a
smooth zoom.
The duration for the animated zoom is controlled by a menu beside the Animate Zoom switch. This works just
like the similar Duration menu buttons in the Switcher’s Transitions section, providing instant access to three
preset durations. Alternatively, click and drag in the neighboring numeric field to set a custom duration – or
click the field once more to enter a value directly using the keyboard. The maximum duration for an animated
zoom is 120 seconds.
Hint: LiveSets each ‘zoom in’ on a predetermined target. A given group of LiveSets may offer variations on the
basic set that allow you to zoom in on an actor at center stage, or a ‘virtual monitor’ situated on a desk beside
the talent, or something else entirely. You will find many creative uses for the different versions of the LiveSet.

41
3.9 AUDIO CONTROL
The Audio Mixer tab (Figure 68) is home to all of the controls required to manage both audio input and output.
Controls are for each individual audio input, source, or output stream, whether external or internal.
Figure 68
External audio connections and configuration were discussed back in Section 2.3.2. These sources include
controls for the two analog audio inputs (Input 1 and Mic) along with controls for both Network inputs (such as
an Apple AirPlay® source).
Besides external audio sources, sounds played from TriCaster’s internal storage volumes (including removable
media such as external hard drives or ‘thumb’ drives) via the Media Players can be added to the output mix.
Separate sub-panels are provided to control audio added to TriCaster’s Program Output mix by the DDR and GFX
players.
3.9.1 AUDIO LEVELS
TriCaster’s analog audio conforms to SMPTE RP-155. The maximum input/output level is +24 dBu. Nominal
input level is +4 dBu (-20dB FS), and the sample rate is 48 kHz. Levels above 0dB are shown in red in the VU
meters, to caution you that overly high levels can result in clipping in recordings.
Hint: An error message appears in the Status Bar above the main Program output monitor to warn you if clipping
occurs.
VU METERS AND GAIN
A large portion part of both audio mixers is devoted to VU (Volume Unit) meters. These displays vary depending
on the source type. For Input 1, the meter displays the levels for the two analog input channels, controlled by a
single Gain knob, with a Balance control above. Other sources may display a single channel VU meter.

42
Confusion can sometimes arise because different calibration scales are common in various audio realms and
even for different device types and software. Typical analog mixers show levels on VU scales indexed in dB VU,
which places the nominal operating level at 0dB. In contrast, editing software and digital devices commonly
display levels in dBFS (Full Scale) indexing, with 0dBFS – the maximum signal that can be recorded – at the top of
the scale.
TriCaster’s VU meters have user-configurable indexing, and default to showing analog inputs
using a traditional dB VU scale, and meters for digital sources calibrated in dB FS. The
calibration shown for any individual meter can be changed to suit a need or preference.
Click the label above the current scale to open a small menu offering three options as
follows:
dBVU – most familiar to users of typical analog audio mixers
dBFS – dB ‘Full Scale’ – the digital standard; see notes under the heading.
dBu – based on a voltage of 0.775 VRMS (a shy scale rarely seen in public, supplied for completeness,
comparison, and the amusement of audiophiles)
Whatever scale you choose to use for your different VU meters, the key thing is to use Volume controls (and, for
the Mic input, the Gain control) to avoid over-modulation.
OUTPUT CONTROLS
Each of the audio sources discussed earlier provides its own contribution to TriCaster’s audio output mix.
Settings in the output control panels in take effect downstream from all sources, further governing audio levels
sent to TriCaster’s different output sections, including headphones and the Internet stream.
MASTER (AND PHONES)
The main Program outputs (labeled PGM on TriCaster’s faceplate) are controlled by the Gain knob and Balance
control in the Master sub-panel, located at far-right in the Audio Mixer tab. Just above this is a simple level
control for the Phones output.
Hint: Shift + double click Gain knobs to restore their default values (0dB).
STREAM
The Stream sub-panel provides a method of independently adjusting (stereo) audio levels sent to the network
when streaming is enabled. An important addition to this control group is the Source drop-down menu. This
allows you to supply sound to the Streaming output exclusively from one of the following selections:
DDR – audio from the DDR output is sent to the streaming output.
GFX 1 or 2 –audio from the corresponding player is sent to AUX output connectors.
Figure 69

43
Internal – All internal audio sources combined.
All –a supplementary program output channel with independent level control.
Solo – only sources with their Solo switches enabled are sent to the streaming output.
3.10 DESKTOP OPTIONS
Several very useful options are presented in the Desktop Options menu.
Open the menu by clicking the gear button at extreme right (just above
the large tabbed panes occupying the lower third of the Live Desktop).
Enable Tabs Follow Preview Row for All Inputs to cause the tabbed
control panel for all appropriate sources (VI, DDR, GFX, etc.) to be
displayed automatically when the source is newly selected on the
Switcher’s Preview row.
When Tabs Follow Preview for Virtual Inputs is checked, the tab shown updates only when you select a Virtual
Input on Preview.
Hint: Control surface operations can sometimes result in a tabbed module that you want to view being obscured
because related Desktop Options are enabled. Press the corresponding control surface Delegate button again to
re-display the tabbed pane you are interest in.
3.11 SHUTTING DOWN
When your production has ended, click the Close [X] button at right in the Live Desktop titlebar. This returns you
to the Session page, where you can manage content from the session, or click the large ‘back’ arrow to return to
the Home page.
Once on the home page, click the Shutdown icon and you’ll be shown a few options at right, including Shutdown
TriCaster and Restart TriCaster, which need no explanation. Another option labeled Administrator Mode
provides a number of important functions, discussed next.
3.11.1 ADMINISTRATOR MODE
Selecting Administrator Mode from the Shutdown menu on the Home Page icon ring exits TriCaster’s live
production environment, reboots, and takes you to a new screen that offers various functions and settings
having to do with TriCaster system maintenance and management.
Figure 70

44
Figure 71
Administrator Mode options are grouped under several headings, as discussed next.
BROWSE
Web – Opens the default system Internet browser.
Files on Disk – Opens a system file window.
SYSTEM UTILITIES
Register TriCaster – TriCaster shows a watermark on output before registration, so we encourage you to
register early. Among other reasons, doing so will serve to identify the unit to NewTek as yours in case
of theft, and will also allow you to check for software updates that may have been recently released.
(The steps in the registration process were outlined back in Section 2.2, so we won’t repeat them here.)
Update TriCaster – NewTek may periodically provide software updates for your TriCaster. Updates can
enhance performance, security or even add useful new features.
If TriCaster is connected to the Internet, clicking Update TriCaster will automatically check for a more
recent software version and offer to install it. This way you can be sure the very latest release version
of the software for your TriCaster is installed.
Alternatively, you can go to the NewTek web site, click My Account, and use the login details you
provided when registering your TriCaster to access your personal product page. Click the “my
downloads” link at the top of the page, and check the list shown.

45
If you find an update, you can install it manually as follows:
1. Locate a suitable update in “downloads” and click on it.
2. At the dialog popup, choose Run.
3. Comply with any onscreen prompts that follow.
Advance software releases are also sometime posted on the ‘downloads’ page for manual download and
installation. The versions, listed as “Latest” on the web page, will be newer than the automatic update
version, and (although not yet approved for final release) might be well worth trying if you encounter a
software issue.
Hint: If you wish, you can instead access the same webpage from a second computer connected to the
Internet, then transfer update files to TriCaster using a network connection or perhaps a USB thumb-
drive.
Defragment All Drives – Over the course of lengthy use, the section of TriCaster’s internal storage
devoted to audio and video storage can become fragmented. Eventually, this can degrade playback
performance. Defragmenting corrects this condition.
Hint: Defragmentation can sometimes take considerable time, so it’s not something you want to begin
just before an important event.
Backup or Restore System – A complete set of Backup and Restore features are available to help in the
event of an unforeseen problem. We strongly encourage you to protect against any unforeseen
occurrence by using the Backup feature soon after registering TriCaster. Please refer to Section 7.3
(Backup and Restore) for details.
Command Window – Open a system command line window, allowing you (among other things) to use
advanced commands to manage your system and network settings.
Swap Primary Monitor – reverse the monitor assignments currently in use for TriCaster’s interface and
Multiview displays.
SETTINGS
Regions and Language – Open the system language control panel.
Advanced Keyboard – Open the system keyboard controls panel.
Date and time – Open the system keyboard controls panel.
Configure Network – Open the system network controls panel.
Display – Open the system display controls panel (useful for configuring multiple monitors, among other
things).
Fonts –Open the system font management console to add a new font.
System Name – It can be very useful to rename your TriCaster, especially when more than one TriCaster
might be on the same network. The System Name feature opens the System Properties console’s
Computer Name tab. Click the Change button to modify the current name.

46
SHUTDOWN
Exit to Windows – Leave the Administration Mode screen, and display the standard system desktop.
Back to TriCaster – Exit Administration Mode, reboot, and return to TriCaster’s Startup screen and the
production environment.
47
4 NETWORK SOURCES
The network source features of your TriCaster™ are very useful. TriCaster supports two simultaneous network sources, so you can live switch displays from networked computers or appropriate mobile devices as part of your productions.
As discussed back in Section 2.3.2, a number of Network sources are directly available for selection on the
Switcher (and can of course be captured or streamed as well as included in your presentation).
4.1 iVGA
Perhaps you’d like to be able to add Microsoft PowerPoint® output, web pages, Skype® video calls, application
displays or other exotic content to your productions. Using the supplied iVGA™ client application, TriCaster
directly supports such displays (from computers on the same network) by means of the Network (1 and 2)
sources on the Switcher.
4.1.1 iVGA CLIENTS
1. For a Microsoft Windows® client system, copy the iVGA or iVGA PRO application from the Extras folder
(inside C:\TriCaster) to the sending computer (a readme in the folder explains why you might choose
one version over the other in your environment).
For OS X client systems, copy the appropriate iVGA.dmg.zip to your Mac system. Unzip it by double-
clicking it; mount the disk image (.dmg file) in the same manner, then drag the iVGA program icon into
Applications.
2. Connect TriCaster to the client computer via the local network.
3. Double-click the iVGA icon on the second computer to launch the application.
After agreeing to the NewTek license (and a moment or two for the network connection to be established) the
name of the remote computer is added (along any other networked systems with iVGA running on them) to the
iVGA client list.
Note: Gigabit networking is highly recommended, and should be considered mandatory for HD sessions in
particular.

48
Figure 72
When TriCaster recognizes qualified network sources, it adds them to a drop-down menu for quick selection
(Figure 72).
4. Move your mouse pointer over a Network monitor in the All Monitors tabbed view.
5. Click the triangular menu button above the monitor to select a networked source (or change the current
selection) from the menu that appears.
Hint: iVGA places a red-green-blue status icon on the client system. For a Windows-based system, the icon is in
the task tray; on Macintosh systems, it is shown in the dock. This indicates this computer’s display is ready to
send to TriCaster. The icon is animated when iVGA is selected as the active Network source in TriCaster.
Right-click the iVGA icon on the (OS X) dock or (Windows) Task Bar to open a menu with several options, as
follows.
OS X
Engaging Privacy Mode prevents the client display from appearing when you don’t want it to.
Keynote Mode allows the iVGA client to update the screen even if Keynote® is running. (This also can be
used with some games, though the framerate may be quite low.)
You can set iVGA to show either desktop monitor when you have more than one attached using the
Monitor 1 or Monitor 2 options in the menu.
The Options list contains settings for Open at Login, Remove from Dock, and Show in Finder.
WINDOWS
The Video Source menu allows you to choose between monitors on a dual-screen system.
You can also decide whether or not to Show Mouse Cursor in the display.
In the older iVGA version, you can set the transfer speed your network can safely handle directly. iVGA
PRO lets you handle this using the quality setting in the menu that opens when you click the gear icon.
Gigabit network connections provide the best transfer rates. Slower connections may drop frames, and
should be considered unsuitable especially for HD sessions (in extreme cases, where network capability
is low or unreliable because of other traffic, iVGA would still be useful for static displays).

49
Hint: The original iVGA application has a Lower Hardware Acceleration option that may help in cases
where a client application uses display technology that would otherwise not work with iVGA.
In iVGA PRO‘s Region mode, use the marquee to magnify an area of the Windows display, which helps
when fine detail is important for an application display on the screen. If you want your zoomed view to
move with the mouse cursor, you can unlock the marquee position using the Follow Mouse switch in the
iVGA PRO control panel (or toggle it with a hotkey — Right Ctrl + Numpad 9).
Privacy mode allows the client some discretion if they need to check e-mail, or perhaps view or arrange
something without risk of the audience observing. When selected, this will display a large “Privacy
Mode” banner in TriCaster’s preview monitors, so the operator is aware this source is temporarily off-
line. The client icon also has a ‘P’ across the face, to remind the client that privacy mode is active.
4.2 LIVETEXT™
As noted earlier, a companion workstation on your TriCaster network with LiveText™ standalone installed can
serve as a dedicated CG and title solution for your live presentations.
When running and connected, LiveText will be listed in TriCaster’s Net 1 and Net 2 drop-down menus, similar to
an iVGA source. For more information on installing and using LiveText, please refer to its manual.
4.3 3PLAY™
3Play’s Output A and Output B are available as Switcher sources to TriCaster. They
appear in the source selector menu for TriCaster’s network inputs as “3Play(A)” and
“3Play(B),” where “3Play” is the name for the system.
Conveniently, the output includes embedded audio, freeing up multiple TriCaster a/v
inputs for other purposes.
4.4 AIRPLAY®
AirPlay® is Apple’s protocol for getting audio and video from ‘here’ to ‘there’ – specifically, from an AirPlay
source (which may be an Apple® computer, or a mobile device such as iPad®, iPod®, or iPhone®) to a second
device.
You select the AirPlay® icon at the top of the Source menu for Net 1 or Net 2, just as you would select an iVGA or
LiveText source. (Unlike iVGA, embedded audio with level control is supported for AirPlay sources.) TriCaster
identifies itself as a network client for AirPlay apps/applications, and you can then designate TriCaster as the
output device for content played on the device. AirPlay streams audio, video, or both from the device to the
local network, and on to TriCaster.
Figure 73

50
Here are a few hints that may help if you encounter issues in connection with using AirPlay® sources:
The first time you connect to a network with the TriCaster, you must choose a network location. This is a
standard Windows® process that automatically configures appropriate firewall and security settings for
the type of network that you connect to.
You will be presented with 3 options: Home, Work, and Public. If TriCaster’s active network has
inadvertently been set to Public, AirPlay® will not connect. Be sure this is set to either Home or Work.
Make sure you are connected to the correct network, especially for Wi-Fi. iOS® connects to known
networks by default. If multiple Wi-Fi connections are available, it may connect automatically to a
previously known network. For a wireless AirPlay® source such as iPad®, follow these steps:
o Tap Settings > Wi-Fi. If Wi-Fi is off, turn it on by tapping the on/off icon.
o Available Wi-Fi networks appear under Choose a Network...
o Locate and tap the Wi-Fi network that TriCaster is connected to.
By default, the Windows® Firewall is disabled on TriCaster. If your AirPlay® device does not recognize
TriCaster after enabling AirPlay, make sure the firewall has not been inadvertently enabled. If you must
use it, have your network administrator set up an exception for it using the information in the table
below:
Port Protocol Name
80 TCP HTTP
443 TCP HTTPS
554 TCP/UDP RTSP
3689 TCP DAAP
5353 UDP mDNS (Bonjour)

51
5 STREAMING
Live webcasting has dramatically altered the broadcast landscape. Information can be shared among audiences around the world with very small transmission costs, providing many creative and profitable opportunities. When it comes to taking advantage of this new medium, TriCaster™ places you in the forefront of all the excitement.
Internet streaming connections involve a wide variety of attributes. At times, too, account login details may be
required for your streaming service (or CDN – content delivery network).
Hint: One of the best approaches when beginning (to stream your productions) is to establish a relationship with
a commercial streaming media provider. A good provider can guide you past firewalls, provide public addresses
for everyone to view your stream, and provide no end of valuable guidance. And it may not be as expensive as
you think. Some services based on an advertising model will even host your stream free.
5.1 STREAMING CONFIGURATION PANEL
Figure 74
TriCaster’s Streaming Configuration panel (Figure 74) lets you store configuration settings for a Connection in a
preset that is easily accessed afterward from a convenient drop-down me.
This panel also has a built-in web browser, permitting you to both view your stream from the remote site (just as
your audience will see it) and use webpage based controls as required. To open the Configure Stream
Connection panel, click the Configure button (gear) beside the Stream button, just below the Stream (on/off)
button monitor.
The panel is arranged in three horizontal bands:
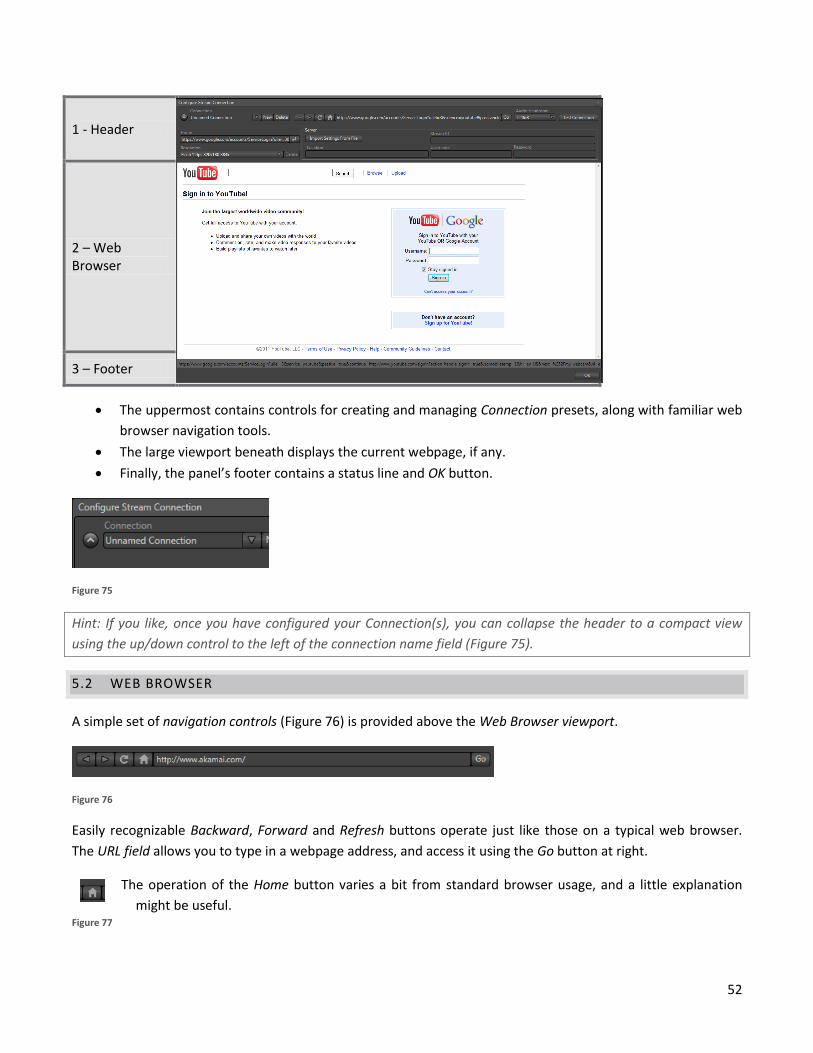
52
1 - Header
2 – Web Browser
3 – Footer
The uppermost contains controls for creating and managing Connection presets, along with familiar web
browser navigation tools.
The large viewport beneath displays the current webpage, if any.
Finally, the panel’s footer contains a status line and OK button.
Figure 75
Hint: If you like, once you have configured your Connection(s), you can collapse the header to a compact view
using the up/down control to the left of the connection name field (Figure 75).
5.2 WEB BROWSER
A simple set of navigation controls (Figure 76) is provided above the Web Browser viewport.
Figure 76
Easily recognizable Backward, Forward and Refresh buttons operate just like those on a typical web browser.
The URL field allows you to type in a webpage address, and access it using the Go button at right.
The operation of the Home button varies a bit from standard browser usage, and a little explanation
might be useful. Figure 77

53
Figure 78
Recall that this is not a general-purpose web browser. It is here to let you access the main account page you use
for a specific Connection, rather than a ‘landing page’ for everyday browsing. The Home Page for one Connection
will often be different than that of another.
Figure 79
The URL field above the viewport always displays the current URL (web page address). A second URL field
(labeled Home) is located below. This is the Home Page for the current Connection. (To copy the address for the
currently displayed webpage into the Home field for the Connection, click the Return button at right of the Home
field – Figure 79). Afterward, clicking the Home button in the navigation control group at upper center will
return you to this location.
5.3 CONNECTION OPTIONS
The process of configuring a Connection (preset) begins with clicking New to create it. This opens a dialog
entitled Choose Configuration Type. The options available are as shown in Figure 80.
Figure 80
After selecting a Connection Type and clicking OK, the Name field in the main Configure Stream Connection panel
is highlighted, to encourage you to supply a descriptive name for the preset.

54
5.3.1 BROWSER BASED
The basic Browser Based connection option can perhaps be considered the least demanding approach to
streaming, in terms of learning curve for the new operator. The only local setting required beyond the initial
Connection Type selection is the URL of the Home field (see Section 5.2) for the streaming service you intend to
use.
Note: The steps involved in creating an account with a streaming service provider and configuring the stream
vary widely, and cannot be dealt with in depth here. Generally, though, providers offer step by step information
and support. And, of course, NewTek’s own TriCaster™ forum membership can generally be relied upon for
helpful hands-on experience and advice.
Many of the organizations providing streaming services offer free accounts with limited capabilities and options.
This can be just what you need to get started with live streaming. (Many providers also offer paid-for accounts,
with benefits including removing ads and advanced streaming options (such as higher bitrate and resolutions or
multi-bitrate streaming), two-way live chat, and so-on.
Once configured on the remote site, audition your streaming broadcast by pushing the Test button in the
Configure Stream Connection panel. After leaving this panel, the Stream button underneath the Program Out
monitor on the Live Desktop toggles streaming on and off (note that when you start streaming with the Test
button, then close the Configure Stream Connection panel, streaming continues uninterrupted.)
Hint: If you do not wish to archive your test stream, disable the Archive File switch (located in the Server control
group) beforehand – but remember to re-enable it later if desired. Also, note that some services may show you
what they are receiving from TriCaster when you press Test or Stream, but do not actually broadcast that stream
until you indicate that you are ready to go ‘on air’, using controls on the website.
For Browser Based streaming, the encoding of your program into a stream for transmission to the service
provider (and ultimately beyond, to your Internet audience) is performed by an applet running on the website.
As mentioned before, however, this arrangement often doesn’t give you as much control or as many options as
you might want. Other Connection Type options are more hands-on in this respect, but require you to manually
select related settings, as discussed next for each type.
5.3.2 ADOBE FLASH®
TriCaster can encode and stream using Adobe Flash®, and this is
a very popular choice.
When you select Adobe Flash as the Connection Type, the
controls presented in the header of the Configure Stream
Connection panel update accordingly.
Figure 81

55
Figure 82
The first thing you might notice is the Resolution menu at left beneath the Home field (Figure 82). This selector
lets you choose from a list of streaming profiles labeled to show their respective frame rate (fps), resolution and
bandwidth settings.
Figure 83
At right is the Server control group (Figure 83) where you enter the parameters required by your streaming
service (or CDN – Content Delivery Network). Let’s consider the information you need to complete this
successfully.
The Username and Password are supplied to you by the streaming service, and are specific to your account.
Location (also referred to as the Server Address) is the address TriCaster will send the stream to (this is supplied
to you by the service provider). The Stream ID may or may not be provided, depending on the service provider;
in some cases you can simply enter a custom ID number.
Many service providers will supply you with a streaming profile in the form of an XML file for use with Flash
Media Encoder. If this is the case, click the Import Settings From File button, navigate to and select the XML file,
and TriCaster will automatically import the Location and Stream ID values for the Connection.
Note: By design, the Import feature does not automatically change the Resolution profile you have selected at
left. You should ensure that this setting is compatible with your service.
BROWSE (IMPORT A CUSTOM PROFILE)
A related function involves the ability to directly import a custom
Resolution profile. You might create such a profile for a specific purpose,
using either the Adobe Flash Live Media Encoder® or Windows Media
Encoder® application installed on your TriCaster).
The Browse item at the top of the Resolution menu (Figure 84) allows
you to select an appropriate file in a system file explorer, which is then
copied to the correct location for it to be listed in the menu for your use
in future. Figure 84

56
Note: the nearby Delete button allows you to dispose of unused imports of this type. The default Resolution
profiles cannot be deleted, however.
5.3.3 WINDOWS MEDIA PULL
If you are streaming internally (to people in your building or inside your own corporate firewall), Pull streaming
may well provide the easiest approach. (Be aware that since your stream may be constrained by lower
bandwidth than a commercial streaming service typically offers, Pull streaming may falter when more than a few
users are viewing the stream.)
For a Pull Connection Type, the Location field attempts to automatically display the Internet address you would
provide viewers (or your streaming service provider. This the IP (Internet Protocol) address of your computer on
the network. This information will be provided as ‘punctuated’ numeric value.
IMPORTANT NOTE: To avoid malicious external access, routers mask the details of systems connected to them. If
TriCaster is connected to the network by a router the IP number in the location field is only valid for viewers on
the same side of the router as your TriCaster. This is a local number assigned by the router, not accessible to the
world at large. To find out how to provide external access to your stream in this configuration, please see Section
5.5, Diagnostics and Troubleshooting, for information on routers and “port forwarding”.
You can provide your clients or streaming providers this address. Entering this address into the File menu of
Windows Media Player® (using copy, and pasting it into the Open URL window) will direct the player to show
the stream from your system on client computer system(s) connected to the Internet.
Figure 85
The first time you configure a Flash stream, a webpage applet may pop-up up a
configuration dialog (Figure 85) asking you to permit Flash to access your
TriCaster audio and video devices. Click Allow, and checkmark Remember, too.
Then click the ‘microphone’ and ‘webcam’ buttons, selecting TriCaster’s audio
and video devices from the drop down menus provided. (If you ever need to
open this panel again, you can get to the settings by right-clicking on a flash

57
Hint: Most web browsers can be also configured to invoke a compatible player when required as well, but using
WMP directly in this fashion may save some steps.
Beyond this, simply select a suitable profile from the Resolution menu for your need. Once you set up the
connection, click OK to close the panel. Your live program stream will be sent continuously to the network while
the Stream button is enabled.
5.3.4 WINDOWS MEDIA PUSH
A Push Connection Type is often the most convenient method, especially in cases where TriCaster is connected
behind a firewall, as when you need to stream from major venues (such as corporate offices, hotels, or
convention centers).
The program stream passes quietly out through any firewalls or routers between the facility and your streaming
server. Also, once your streaming provider has provided you the connection specifics, you can resume the
stream at any time without intervention from the server. When a Push profile is chosen, the Server control
group updates to allow entry of the (pre-arranged) host web address (Location), Username and Password.
Note: The publishing point is placed at the end of the URL, following a forward slash (i.e.,
http://225.21.1.4:8080/NewTek).
Enabling the Stream button then “pushes” the stream from your location, logging into the pre-arranged web
address using the username and password you provided. The streaming service then re-transmits your stream
for all to see.
5.3.5 BANDWIDTH CONSIDERATIONS
You’ll often hear the term ‘bitrate’ in connection with streaming video. This refers to data throughput per
second (measured in Kilobits per second, or Kbps.)
For reliable performance, try to ensure the potential upload bandwidth from your system to the net is around
twice the bitrate you choose. You can broadcast at a rate closer to your actual ceiling, but reliable performance
cherishes headroom.
Even if you can supply good output bandwidth, flow may be constricted elsewhere, such as by the download
connection of your audience. A safety margin of around 1.5x the stream bitrate is desirable. This may mean you
need to consider using a lower resolution, or lower framerate for your stream – but doing so when required will
generally deliver a smoother result (nothing turns viewers off quicker than a stuttering stream).

58
5.3.6 AUDIO HEADROOM
TriCaster provides an Audio Headroom setting that provides the ability to choose how far below 0dB FS (the
maximum allowable digital level) to set the nominal level for your streaming audio.
Figure 86
This lets you customize your streaming audio headroom level separately to make sure your audience hears
sound at an appropriate level, while still eliminating any possibility of audio clipping in captured streaming files.
5.3.7 OTHER RESOURCES
If you’re still struggling with the differences between Push and Pull streaming methods, you can find lots of
online resources (in addition to excellent information available in NewTek’s user forums!)
The popular web resource Wikipedia® hosts many articles on the subject, notably these two:
http://en.wikipedia.org/wiki/Push_technology and http://en.wikipedia.org/wiki/Pull_technology
Microsoft even hosts an animation on the subject at:
www.microsoft.com/windows/windowsmedia/knowledgecenter/wminaction/streaming_pushpull.asx
(Ignore the detailed discussion of configuring the encoder, and just enjoy the pretty pictures – your TriCaster
makes that part easy for you!)
5.4 CAPTURING THE STREAM
Enable the Archive File switch in the Server control group, and supply a file name in the adjoining field. A folder
is automatically created (at D:\Media\Clips\sessionname\SavedStreams) to receive the captured stream file.
(Note, this option is not shown for Browser-based connections since archival service is commonly offered by the
CDN in that case.)
Hint: If you’re not intent on live streaming, but wish to capture a live switching session, you would likely record at
full resolution using the Record button (rather than Stream). The high quality captured files can then be used
later in TriCaster’s DDR, edited in SpeedEDIT™, or even be transferred to another computer (even on a different
platform) for external processing or editing.
Important note: F4V format files written by Adobe® Flash Media Encoder are incompatible with most video
playback applications (even those from Adobe). The developer has explained the situation at the URL below:

59
http://helpx.adobe.com/adobe-media-server/kb/mpeg-4-f4v-files-recorded.html
Unconverted F4V files imported will not play in TriCaster’s DDR either. Conveniently, TriCaster can automate the
conversion for you to a degree. If you locate the folder named Media\Clips\sessionname\SavedStreams on your
primary session drive, you will see the “raw” (unprocessed) streaming file(s) and a batch file (.bat) that can be
used to convert all files in that folder. Simply double-click the .bat file to initiate processing. (Note that
processing can take some time, so don’t do this just before a production.) Output files will be placed in the
same folder after conversion.
Hint: The .bat file supports several additional features if employed with command line switches. A readme file
located in the same folder provides details of these alternatives.
If you prefer to perform this post-processing on another computer, you can transfer the raw files to it and use
the Adobe F4V Post Processor tool, available from the URL below (requires an account to login):
https://www.adobe.com/cfusion/entitlement/index.cfm?event=custom&sku=FS0000522&e=fms35
5.5 DIAGNOSTICS AND TROUBLESHOOTING
Video streaming can involve a lot of different standards and diverse environments. TriCaster gives you the
necessary tools, but there are still some common problems you may encounter.
5.5.1 TESTING YOUR STREAM
When it comes to using your TriCaster in a live production environment, failure to test beforehand is not merely
unwise - it can be professional suicide. Keep in mind that onsite testing under real world circumstances can be
very revealing, is most useful when performed well before ‘zero hour.’ Set up and enable a test program stream
from your TriCaster. Can someone outside the local environment connect to it over the Internet? Remember
that if you are simply Pull streaming from ‘behind’ a router, the IP number shown in the TriCaster’s Location
field will only be valid for other systems behind the router. You will need to derive the true external IP address
to pass to your viewers (or service provider.)
Hint: Again, consider Push streaming with the aid of a Content Delivery Network (a commercial service), as this is
generally free of firewall and router woes that often require a friendly system administrator to resolve otherwise.
For Push streaming, you will also need to enable “port forwarding” on the router, as discussed next.
5.5.2 PORT FORWARDING
If you are streaming from behind a router, to preserve a reasonable level of security while allowing outside
computers to connect to your system you will need to ‘port forward’ your router. Port forwarding permits a sort
of ‘blind hand-off’ between external clients (your viewers) and a local transaction port which you manually
specify. (The router will pass requests to view the stream through to the TriCaster, without exposing the
internal IP routing.)

60
To enable port forwarding, you need three pieces of information:
The login information for the router. Your router’s manual will have this information, which typically
involves entering a specific IP number into your web browsers URL field, and perhaps also a password.
The specific IP local number that the router has assigned to your TriCaster. You can read this right from
TriCaster’s Location display. It will comprise the entire string of punctuated numbers before the colon
(the colon separates the port number you chose for your stream).
The port number just mentioned (the part after the colon).
Although the steps vary a bit by brand and model, generally you would proceed as follows:
1. Log into the router, so it shows its control panel in your web browser.
2. Select the port forwarding page of the router controls. These options may be found in an obscure place,
such as the router’s “Applications and Gaming” page (since online gaming often requires port
forwarding).
3. Enter an Application name, if required (this is for your own recognition purposes, so use anything you
like).
4. Enter the Start and End port values – you can use the same port number in both fields, but of course it
must be the one you set in TriCaster’s Port field.
5. If possible, select Both for Protocol (or select UDP).
6. Enter the full (punctuated numeric) local IP address shown in the Location field of your TriCaster after
you enable the stream.
7. Checkmark Enable.
Some routers may have other security settings that need to be modified for your Pull stream to be visible from
the outside. For example, Linksys® routers may have a setting in its “Security” page named “Block Anonymous
Internet Requests”. While this may be a great idea normally, it’s not going to help much when outside
computers want your system to let them Pull the stream.
There are countless makes and models of routers – for information on various models, and a great deal of help
on port forwarding generally, we can recommend the following site:
http://www.portforward.com/english/routers/port_forwarding/routerindex.htm
5.5.3 FIREWALLS
You may also run into software firewalls. Generally, these can be configured in similar to permit exceptions to
the firewall policy, permitting specific ports or applications to be opened to the world. Information on
exceptions in the Microsoft Windows® Firewall can be found in its Help system.
61
5.5.4 FINDING YOUR EXTERNAL IP NUMBER
Again, the numbers assigned behind your router only work locally. In a Pull scenario, you need to supply the
true external IP number (and port) for your TriCaster to viewers outside the LAN (Local Area Network.) You can
find this number in several ways. For example, your router will display it as its “IP Address” in its Status page.
Or, you may want to use one of several handy websites that will quickly supply your current IP number (one
such is http://www.whatismyip.com). Simply go to the website in your browser and read the IP number from
the screen. Append a colon and the port number you are using to this number and you’ve got everything you
need for your viewers to connect.

62
6 FILES AND FILE MANAGEMENT
This chapter will tell you how to connect, configure and register your new TriCaster™ live production system. You’ll discover how to get both audio and video in and out of the system, and to adapt both input and output to suit your production environment and needs.
File management features appear in several locations in TriCaster. Since content is generally associated with a
specific TriCaster session (see Section 2.3.1), the Session page of Startup provides a number of related features.
A few added file tools appear in the Live Desktop and also the Administrator Mode screen (see Section 3.11.1).
6.1 MANAGE
We considered the Home page in Startup much earlier, when
learning how to create a TriCaster session, but skipped over the
Manage icon on the Session page’s icon ring when doing so.
This is where TriCaster’s principal file management tools are
located. Click the Manage icon to reveal the menu list show in
Figure 88.
6.1.1 BROWSE
Under the label Browse, you will see links to the folders for Clips,
Stills, and other content associated with the session.
Clicking a link opens a file pane, which lets you use familiar features
(Cut, Copy, Paste, Rename, Delete and so-on) to manage the session
content.
Hint: You can open several folders simultaneously, and navigate to other locations as well. This method can be
used to copy captured still images or video files to portable or networked media for external use.
Several other important features are found in Manage, including Import Media.
6.1.2 IMPORT MEDIA
Clicking Import Media opens a custom import panel offering batch import of files for use in TriCaster’s Media
Players. It even allows you to transcode files to appropriate high quality TriCaster-friendly file formats at the
same time if you wish. Import Media’s quick processing makes this the fastest and most convenient way to pre-
load a session with production assets.
Figure 87
Figure 88

63
Figure 89
Click Add to open a file window, and select (or multi-select) items to build a list in the Import Media file pane.
Some highly compressed video files may not be well suited to live playback. Enable switches in the Transcode
column for files you wish to convert to a friendlier format on import. Re-order files by dragging entries up or
down, or removed them from the list by highlighting them and clicking Remove.
Once the batch import list is prepared, click Import to complete the operation. Files are processed quickly, and
are automatically added to their proper locations (according to type) for easy access during live production.
6.1.3 BACKUP SESSION
Clicking the Backup Session button opens a file explorer that you can use to assign a storage location for the
backup files. Backup operations can take some time, depending on the amount of content in the session. For
obvious reasons, then, it would be wise not to begin a major backup operation shortly before a scheduled live
production. A progress gauge is displayed during processing, and if necessary you may Cancel the operation. Of
course, the session to be backed up is the current session (to back up a different session, return to the Home
Page and Open a different session.
The backup operation feature will determine whether all media used in the session is local (i.e., located in
folders named for that session), or whether some content is external – stored in other places on your system,
and included in the session using Add Media Location, or from folders belonging to other sessions. If all session
media is local the backup proceeds without further interruption.
When external media is used in the session, a dialog is presented stating "The following files are external to the
session. Would you like to import these files?" The optional actions in the dialog are:
Backup without importing
Import and Backup
Cancel Backup

64
6.2 LIVE FILE OPERATIONS
It is preferable to import content for use in a live session while ‘off the air’, to avoid interfering with TriCaster’s
vital access to system resources. In a pinch, however, remember that you can import media files directly into
Media Player playlists even during live production, as described in Section 3.5.1. (We do not recommend
importing large video clips, either across a network or from external drives).

65
7 CARE AND MAINTENANCE
This chapter will help you keep your TriCaster in tiptop shape, always ready to provide peak performance. As well as covering some utilitarian information, you’ll find a few helpful tips in its pages.
A number of useful tools and features are located on the Home page in TriCaster’s Startup section. Others are
located in the Administrator Mode screen (see Section 3.11.1).
7.1 HELP
Figure 90
Select the Help icon to reveal links to open TriCaster manuals. Documentation for optional Control Surfaces and
Add-ons appears here as well.
Click the License Agreement link to review the TriCaster license requirements, or the About TriCaster link to list
software version information, credits and acknowledgments.
7.2 ADD-ONS
As time goes on, NewTek offers additional software to extend the power of your TriCaster.
Figure 91
The icon labeled Add-Ons on the Home Page provides access to these tools. When you select it, links are
displayed for installed software applications, allowing you to launch them (for example, Figure 91 shows a link to
the Virtual Set Editor™ demo)

66
7.3 BACKUP AND RESTORE
This feature provides substantial protection against software issues and even hard drive problems. TriCaster
ships with a complete (hidden) restore partition, permitting you to return it to ‘as-shipped’ state at any time.
In addition, you can create ‘custom backups’ on another hard drive you connect, effectively cloning the entire
system drive. A ‘user backup drive’ of this type can be accessed by the Restore feature later to copy this drive
image back to the internal drive should you wish.
7.3.1 CREATE A ‘USER BACKUP’ DRIVE
The Backup and Restore system permits you to create a bootable clone of TriCaster’s system drive on another
(same size) hard drive connected externally for this purpose. The clone operation includes:
The hidden, factory-prepared Restore partition
The complete C partition (uncompressed)
The D partition and its content (uncompressed)
Afterward, the backup drive can be disconnected and stored, to be used later if necessary to i) restore the
internal drive should, or ii) in the case of a catastrophic drive failure, to be connected internally (by an
authorized technician) to completely replace the original drive.
Note: Since opening TriCaster’s case is a breach of warranty, please call Customer Service to obtain direction
before proceeding with an internal drive replacement.
7.3.2 RESTORE TRICASTER ’S SYSTEM DRIVE?
We firmly expect you will never need it, but isn’t it good to know that a complete TriCaster Restore function is
available in the event of an unforeseen problem? You can use one of two methods to restore your system,
depending on your situation.
To restore your TriCaster system software after the system launches normally:
1. Click the Shut Down icon on the Home Page of the Startup Screen.
2. Click the Administrator Mode link at right to exit the TriCaster environment.
3. In the Administrator Mode screen, select the link labeled Backup or Restore System, and follow prompts.
If TriCaster should ever fail to boot up properly, you may need to try a different approach to restoring your
TriCaster system software, as follows:
1. Select the menu item labeled Backup or Restore TriCaster from the black boot screen that appears
shortly after powering TriCaster up. (If this screen does not automatically appear, reboot and press F8 a
few times in quick succession, say once per second, immediately after powering up.)

67
2. Follow prompts to complete the process:
a. If you have previously created a custom backup drive image on another hard drive, you can
select Restore System Partition from User Backup Drive.
b. Otherwise, the option Restore System Partition to Factory Defaults will overwrite the C partition
(only) on the existing system drive from the disk image stored on its (hidden) ‘Restore partition’.
This procedure restores your system drive (“C:”) to its ‘as-shipped’ state. The "D:" drive, which
holds content and sessions won't be modified. However any TriCaster software updates
(possibly including optional TriCaster expansion packs) will be overwritten, so use this function
only if you truly find it necessary (a call to NewTek’s excellent Customer Support first may often
be fruitful; see Section 7.5). When you do restore, remember to update the TriCaster software
afterward.
Note: If you restore TriCaster to factory defaults (as opposed to a custom user backup made after system
registration), the Windows® system software must be re-activated. To do this, you will need the operating
system serial number, which you will find on a sticker affixed inside the front panel of your TriCaster.
7.4 TRICASTER TIPS
7.4.1 USER INTERFACE
Hold down the keyboard Shift key and double-click most controls to reset the associated value to its
factory default.
Numeric sliders often offer increased precision (10x) if you hold down the Ctrl key while dragging the
mouse pointer over them.
Remember that the Desktop Option menu provides some settings that can make life easier during live
operations (Section 3.10).
Double-click a blank spot in the Playlist pane of a Media Player to open the Media Browser.
Shift + double-click as above to use the system file explorer instead.
7.4.2 VIRTUAL SETS
To restore the default LiveSet in a Virtual Input tab, click the ellipsis button [...] to the right of the
current LiveSet name to open the Media Browser. Click the “NewTek” heading (beneath the “LiveSets”
heading) in the locations list at left. Click the A over B icon in the “Default” group in the file pane at right.
An optional, user-friendly, tool called TriCaster Virtual Set Editor is available. This tool makes it easy to
modify LiveSets to suit your specific needs. A demo version of this tool can be accessed from TriCaster’s
Startup section by clicking the Add-Ons icon.

68
7.4.3 STREAMING
The streaming profiles shown in the drop-down Resolution menu in the Configure Stream Connection panel are
drawn from the folder C:\TriCaster\Streaming Profiles. These files are organized according to whether they are
WMV or Flash profiles, NTSC or PAL versions (Multi-standard models only), and finally 4x3, 16x9 (Standard
Definition profiles), and HD. (Note that profiles in the various sub-folders only appear in the Stream Type List for
the corresponding session type.)
The easiest method of creating a custom profile is to modify an existing profile and then store it using a new
name, using either the Windows® or Flash® media encoder as appropriate.
Note: It is possible to create streaming profiles that place very high demands on system resources, or are
impractical for streaming over most networks. The default profiles are suitable for most purposes, and should not
interfere with other operations.
IMPORTING A CUSTOM PROFILE USING ‘BROWSE’
Flash Media Encoder profiles are XML files, while Windows Media Encoder uses a .prx file extension for its
profiles. If you already have a prepared custom profile and wish to import it, follow these steps:
1. Open the Configure Stream Connection panel, by clicking the Configure button (gear) next to the Stream
button on the Live Desktop.
2. Click New (Connection)
3. Select the option appropriate to the profile you wish to import in the popup Choose Connection Type
panel.
4. Click the Resolution drop down menu, and slide the pointer all the way down to the bottom to select
Browse.
5. Navigate to the custom profile, select it and click Open.
7.4.4 NETWORK SOURCES
If you have multiple TriCasters connected to your network, it is very helpful to give them unique names.
See Section 2.2.1 for details.
Although iVGA is highly efficient, it does require significant system resources. Do not to install and run
the iVGA client software directly on a TriCaster itself.
iVGA benefits from the fastest possible network connections between remote clients and TriCaster;
wherever possible, use gigabit network connections.
When connecting TriCaster to a network, the operating systems sets the connection to one of three
types: Home, Work, and Public. AirPlay® will not connect when the network has been set to Public.
Choose either Home or Work. (See Section 4.4 for more tips.)
NewTek’s optional LiveText titling software offers a great way to offload management of titling chores
to a second operator using a satellite workstation, and can even connect directly to many sports
scoreboard systems.

69
NewTek’s 3Play instant replay system can send output directly to TriCaster’s Switcher across a network,
freeing up analog video inputs for other purposes.
Some antivirus software can interfere with certain iVGA PRO features. In such cases, try disabling your
protection briefly. If the problem goes away, consider using a different anti-malware product.
If iVGA PRO’s connection to TriCaster seems intermittent, make sure only one network path exists
between the two systems, to prevent the PC from switching back and forth between connections.
Some systems deliberately restrict access to system sound (for DRM reasons), preventing the system
‘Stereo Mix’ from appearing as an audio source option for iVGA PRO. Several workarounds exist; as a
starting point, try an Internet search for terms like “audio loopback software”.
7.4.5 IMAG AND LATENCY
“IMAG” is a compression of the expression “image magnification.” Typically in modern IMAG applications, video
cameras supply live imagery to projection systems, magnifying performers to give audience members in large
venues a better view.
IMAG is a very tricky task at the best of times, one that calls for excellent planning, and where possible, testing.
Those designing an IMAG installation have, not just one, but two inter-related broadcasts to consider –the audio
and video streams.
If audio and video travelled at the same speed, wherever you were seated in the audience, the sound and video
image from the front of the auditorium would reach your ears and your retinas at precisely the same moment.
This is not the case, however. Even in relatively small venues sound reaches those in the rear of the audience
noticeably later than those in the front, while the image arrives effectively instantaneously.
In this context, “latency” refers to the time it takes for the video signal to transit one part of the IMAG path,
from camera lens to final display. It’s desirable to keep video latency to an agreeable minimum – but put away
any notion of ‘zero latency’ as being ideal, since this would result in only those very near the front of the
audience enjoying acceptable lip-sync.
It is common for each device in the production pipeline - even the cameras and monitors - to contribute to the
combined total latency. TriCaster’s portion is well within acceptable standards for devices of this sort – roughly
between 1.5 and 2.5 frames. Here are some points to consider when designing and connecting your system:
If you use Multiview output from the TriCaster to the projector, match the resolution sent from the
TriCaster to the native resolution of the projector.
Try supplying the projector with analog video.
Certain projectors provide a ‘low latency mode’ to disable features of the unit that carry a heavy toll in
latency.
Some cameras include features that add extra latency, such as image stabilization. Disable anything of
that sort that you can.
Latency may be slightly lower for progressive sessions.

70
7.4.6 THIRD-PARTY SOFTWARE
TriCaster is not a ‘general purpose’ computer. The installed software suite is finely tuned to provide reliable
performance and amazing features. Anything you install apart from official TriCaster updates places these
important goals at risk. Doing so is strongly discouraged.
Some third-party software (such as Adobe® Flash Live Media Encoder) is preinstalled. Do not update
these packages to newer versions manually. It is quite likely that doing so will have unintended results.
Virus and malware protection applications can dramatically impact system performance. You should
always take sensible precautions to avoid introducing infected files into TriCaster by rigorously virus-
checking media you plan to connect or import beforehand. If you really feel you must install virus
protection, switch all ‘active scanning’ operations off. Then, only when you need to do so (perhaps on a
daily or weekly schedule), perform a manual scan.
Regarding codecs, TriCaster supports the vast majority of popular image, audio and video formats. If a
file you would like to use does not play back well (or at all), consider converting it to a friendlier format
using TriCaster’s Import Media feature (Section 6.1.2).
7.5 CONTACTING CUSTOMER SUPPORT
Visit the NewTek Website, at www.newtek.com and click the Support link in the main menu at the top of the
page. This page lists the hours of operation and contact details.
In North America, contact Customer Support Monday to Friday from 8:30am to 7:00pm CST, or Saturday and
Sunday from 10:00am to 2:00pm CST at the phone numbers or email address below:
Telephone: (US) 800-862-7837 (Outside US) +1-210-370-8452
Fax: 210-370-8001 )24-hrs day)
Email: [email protected]

71
A KEYSTROKE SHORTCUTS
A.1 SWITCHER…
FX Row, Inputs 1 to Input 9 Alt + (1 – 0)
Program Row, Inputs 1 to Input 14 F1 – F12 plus [Shift + F1-F2]
Preview Row, Inputs 1 to Input 14 1 – 0, -, =, and [Shift + 1-2]
FTB (Fade to Black) Ctrl + b
Transition Overlay 1 On/Off f
Transition Overlay 2 On/Off Shift + f
Take Overlay 1 On/Off d
Take Overlay 2 On/Off Shift + d
Select Transition (prev/next) , and . (comma and period)
Select Fade Transition Ctrl + f
Restore Last Transition Shift + Ctrl + f
Transition – Slow … Medium … Fast z…x… c
Transition – Increase Speed Shift + c
Transition – Decrease Speed Shift + z
Toggle Reverse Transition On/Off e
Ping Pong Transition (off/on) Alt + e
A.2 T-BAR
Take Return Key
Take T-Bar Back to Top Shift + Return
Transition … Go/Pause. Spacebar
Auto Reverse Shift + Spacebar
Adjust T-Bar… Down/Up t / Shift + t (faster add Alt)
Halfway T-Bar… Take h
A.3 VIRTUAL INPUTS
Activate Zoom Preset 1 for Virtual Input selected on Program
Alt + F1
Activate Zoom Preset 2 for Virtual Input selected on Program
Alt + F2
Activate Zoom Preset 3 for Virtual Input selected on Program
Alt + F3

72
Activate Zoom Preset 4 for Virtual Input selected on Program
Alt + F4
Activate Zoom Preset 1 for Virtual Input selected on Preview
Alt + F5
Activate Zoom Preset 2 for Virtual Input selected on Preview
Alt + F6
Activate Zoom Preset 3 for Virtual Input selected on Preview
Alt + F7
Activate Zoom Preset 4 for Virtual Input selected on Preview
Alt + F8
A.4 RECORD AND GRAB
Record on/off r/ Shift + r
Grab (still image) p
A.5 TABS
Show DDR tab Ctrl + F1
Show V1-V4 tab Ctrl + F2-F5
Show Graphics 1 tab Ctrl + Shift + F2
Show Graphics 2 tab Ctrl + Shift + F3
Show Sounds tab Ctrl + Shift + F4
Show Audio tab Ctrl + Shift + F10
A.6 DDR
Stop k
Play l (lower case L)
Go to previous playlist item j
Go to next playlist item ; (semi colon)
Autoplay On/Off u
Loop On/Off ‘ (apostrophe)
Single On/Off q
Navigate through Playlist items Up/Down/Left/Right Arrows
Set In Point for current Playlist Item (Clip or Audio file) i
Set Out Point for current Playlist Item (Clip or Audio file) o

73
A.7 GRAPHICS 1
Stop Shift + k
Play Shift + l (L)
Go to previous playlist item Shift + j (J)
Go to next playlist item Shift + ; (:, colon)
Autoplay On/Off Shift + u (U)
Loop On/Off Shift + ‘ (“, quotation)
Single On/Off Shift + 1 (Q)
A.8 GRAPHICS 2
Stop Ctrl + k
Play Ctrl + l (lower case L)
Go to previous playlist item Ctrl + j
Go to next playlist item Ctrl +; (semi colon)
Autoplay On/Off Ctrl + u
Loop On/Off Ctrl + ‘ (apostrophe)
Single On/Off Ctrl + q
A.9 GENERAL
A.9.1 SELECTION AND NAVIGATION
Select All Ctrl + a
First/Last Item Home/End
Navigate through Playlist items Up/Down/Left/Right Arrows
Select All Previous/Following Items Shift + Home/End
Playlist - select to Top/Bottom Shift + Home/End
Playlist – add to selection (Up/Down) Shift + Up/Down arrow
A.9.2 MISC.
Cut Ctrl + x
Copy Ctrl + c
Paste Ctrl + v
Delete Delete Key
74
INDEX
A
Add-Ons, 65
Administrator Mode, 43
Apple AirPlay™, 49
B
Backup TriCaster. See TriCaster: Backup
D
Defragment. See TriCaster: Defragment
E
EULA. See TriCaster: Register
F
Files
Export, 28
Import, 28
I
IMAG, 69
Images, Stand-in. See Live Desktop: Media Player:Title Pages
iVGA. See Network
L
Live Desktop, 12
Audio Mixer, 41
Output, 42
Phones Output, 42
Program Output, 42
Stream Output, 42
VU Meters, 41
Grab, 36
Media Browser, 31
Add Media Location, 31
Filter, 32
Menus, 32
Media Player
Autoplay, 30
Presets, 28
Single, 30
Speed, 30
Title Pages, 32
Editing, 33
Stand-In Images, 33
Options Menu
Tabs Follow Preview Row, 43
Tabs Follow Preview Row for Virtual Input, 43
Overlay
Position, 26
Record, 58
Switcher, 23
Take, 23
LiveSet, 37
Source Positioning, 40
Sources, 39
Zoom Presets, 39
Zoom T-Bar, 39
LiveText
Standalone, 49
N
Network
3Play™, 49
Connecting, 47, 56, 59
iVGA, 6, 23, 47, 68
Port Forwarding, 59
Testing, 59
P
Pause, 71
Play, Pause, & Stop, 71
Pull. See Streaming:Pull
Push. See Streaming:Push
R
Register. See TriCaster: Register
Restore TriCaster, 66, See TriCaster: Restore
S
Sessions
Backup/Restore, 63
Shutdown, 46
Exit to Windows, 46
Spell Check, 33
Startup Screen
System Utilities

75
Restore TriCaster, 66
Stop, 71
Streaming
Bitrate, 57
Capture, 58
Flash, 70
Port Forwarding, 59
Providers, 51, 56
Pull, 56, 59
Push, 56, 57
WME, 70
Support, 70
T
Technical Support, 70
Titlebar, 20
TriCaster
Backup, 45
Defragment, 45
Register, 8, 44
Restore, 45
V
Virtual Input
Overlay, 37
Position, 37
Sources, 36
W
Windows(R), 46

76
CREDITS
Acknowledgments: Tim Jenison, Jim Plant
Engineering: Andrew Cross, Alvaro Suarez, Bennie Pierce, Bob Peene, Brian Brice, Cary Tetrick, Charles Steinkuehler, Dan
Fletcher, Greg Heine, James Killian, Jan Uribe, Jarrod Davis, Jeremy Brosius, Jeremy Wiseman, John Perkins, Karen Zipper,
Kevin Nations, Kevin Rouviere, Kirk Morger, Kristen Perez, Mahdi Mohajer, Masaaki Konno, Menghua Wang, Michael Joiner,
Michael Watkins, Mike Murphy, Nathan Kovner, Naveen Jayakumar, Robert Sitton, Ryan Hansberger, Shawn Wisniewski,
Steve Bowie, Todd Bryant, Troy Stevenson
Design Consultants: Kris Gurrad
Additional thanks to:
NewTek Marketing and Sales
NewTek Customer Support
NewTek Business Development
This product uses the following libraries, licensed under the LGPL license (see link below). For the source, and the ability to
change and recompile these components, please visit the links provided:
FreeImage library http://freeimage.sourceforge.net/
LAME library http://lame.sourceforge.net/
FFMPEG library http://ffmpeg.org/
For a copy of the LGPL licence, please look in the folder c:\TriCaster\LGPL\
Portions use Microsoft Windows Media Technologies. Copyright (c)1999-2008 Microsoft Corporation. All Rights reserved.
VST PlugIn Spec. by Steinberg Media Technologies GmbH.
This product uses Inno Setup. Copyright (C) 1997-2010 Jordan Russell. All rights reserved. Portions Copyright (C) 2000-2010
Martijn Laan. All rights reserved. Inno Setup is provided subject to its license, which can be found at:
http://www.jrsoftware.org/files/is/license.txt Inno Setup is distributed WITHOUT ANY WARRANTY; without even the
implied warranty of MERCHANTABILITY of FITNESS FOR A PARTICULAR PURPOSE.
All other software with the TriCaster not expressly noted as free is proprietary and subject to NewTek's copyright rights or those of its licensors. Trademarks: NewTek, TriCaster, TriCaster XD, TCXD850, TCXD850 Extreme, TriCaster TCXD850 Extreme, TriCaster 850 Extreme, TriCaster Extreme, TriCaster 850, TCXD450, TCXD450 Extreme, TriCaster TCXD450 Extreme, TriCaster 450 Extreme, TriCaster Extreme, TriCaster 450, IsoCorder, TCXD300, TriCaster PRO, TriCaster STUDIO, TriCaster BROADCAST, TriCaster DUO, iVGA, SpeedEDIT, 3PLAY, 3PLAY 820, 3PXD820, LiveText, DataLink, LiveSet, LiveMatte, TimeWarp, VT, V[T5], Video Toaster, Toaster, 3D Arsenal, Aura, LightWave, LightWave 3D and LightWave CORE are trademarks of NEWTEK. All other brand names, product names, or trademarks belong to their respective holders.


78
Copyright © 2022 FDOKUMEN