frSIP Web Portal User Guide.pdf - itsc, hkust
27
The Hong Kong University of Science and Technology Telephone Web Portal User Guide The HKUST IP phone system is enhanced to support many advanced features. This user guide walks through the most useful features on the Telephone web portal. The guide covers the following topics: A. Login the Telephone Web Portal B. Telephone Web Portal Layout C. Voicemail Deactivation during Vacation D. Forward Calls When No Answer E. Call Forward When the Line is Busy F. Personal Phonebook G. User Speed Dial H. Call Alert Box and Call Panels I. Access to Voicemails J. Send Fax K. Change Telephone Web Portal Password and Voicemail PIN L. Reset Telephone Web Portal Password and Voicemail PIN M. Check Call History N. Logout
-
Upload
khangminh22 -
Category
Documents
-
view
4 -
download
0
Transcript of frSIP Web Portal User Guide.pdf - itsc, hkust

The Hong Kong University of Science and Technology
Telephone Web Portal User Guide
The HKUST IP phone system is enhanced to support many advanced features. This user guide walks
through the most useful features on the Telephone web portal.
The guide covers the following topics:
A. Login the Telephone Web Portal
B. Telephone Web Portal Layout
C. Voicemail Deactivation during Vacation
D. Forward Calls When No Answer
E. Call Forward When the Line is Busy
F. Personal Phonebook
G. User Speed Dial
H. Call Alert Box and Call Panels
I. Access to Voicemails
J. Send Fax
K. Change Telephone Web Portal Password and Voicemail PIN
L. Reset Telephone Web Portal Password and Voicemail PIN
M. Check Call History
N. Logout
A. Login the Telephone Web Portal
1. Enter the URL https://frsip.ust.hk
2. Enter your 4-digit telephone extension and the telephone web portal password
3. Click the “Login” button
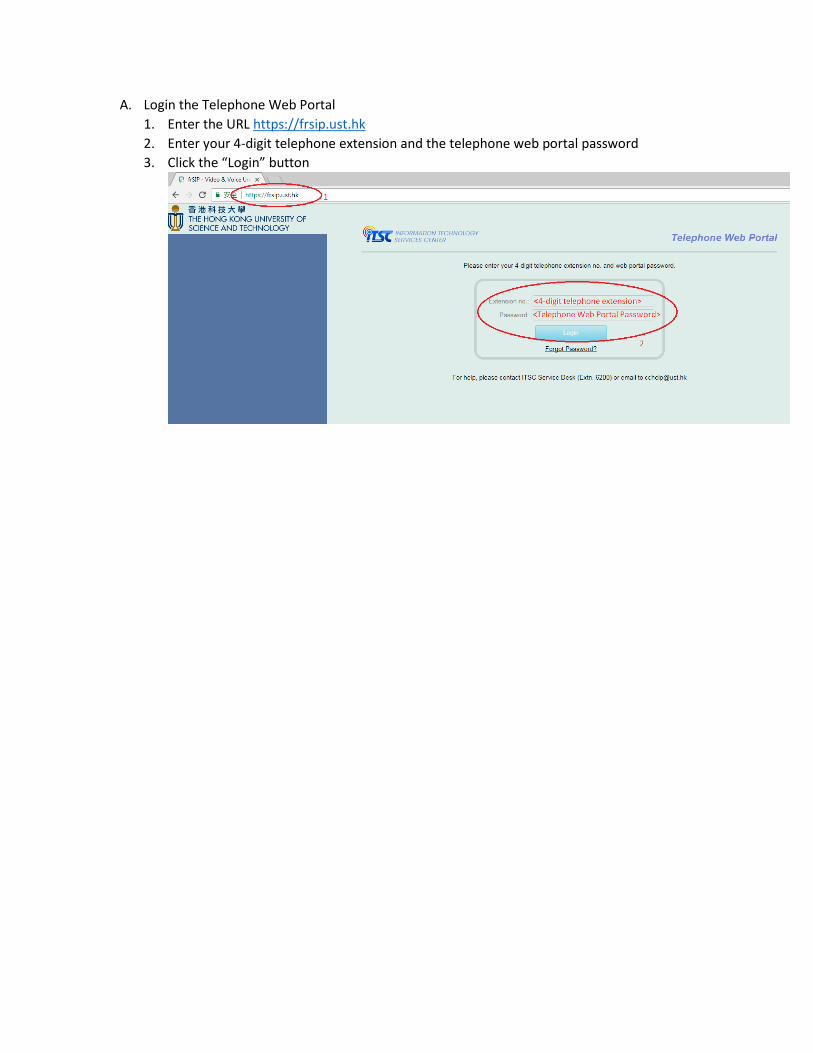
B. Telephone Web Portal Layout
1. If this is the first time you logon the web portal, a tutorial is run automatically to guide you
the basic features. You can follow the guide to learn the basics, or you may click “Skip
Tutorial” on upper-right corner to skip it.
2. The default screen layout looks like this:
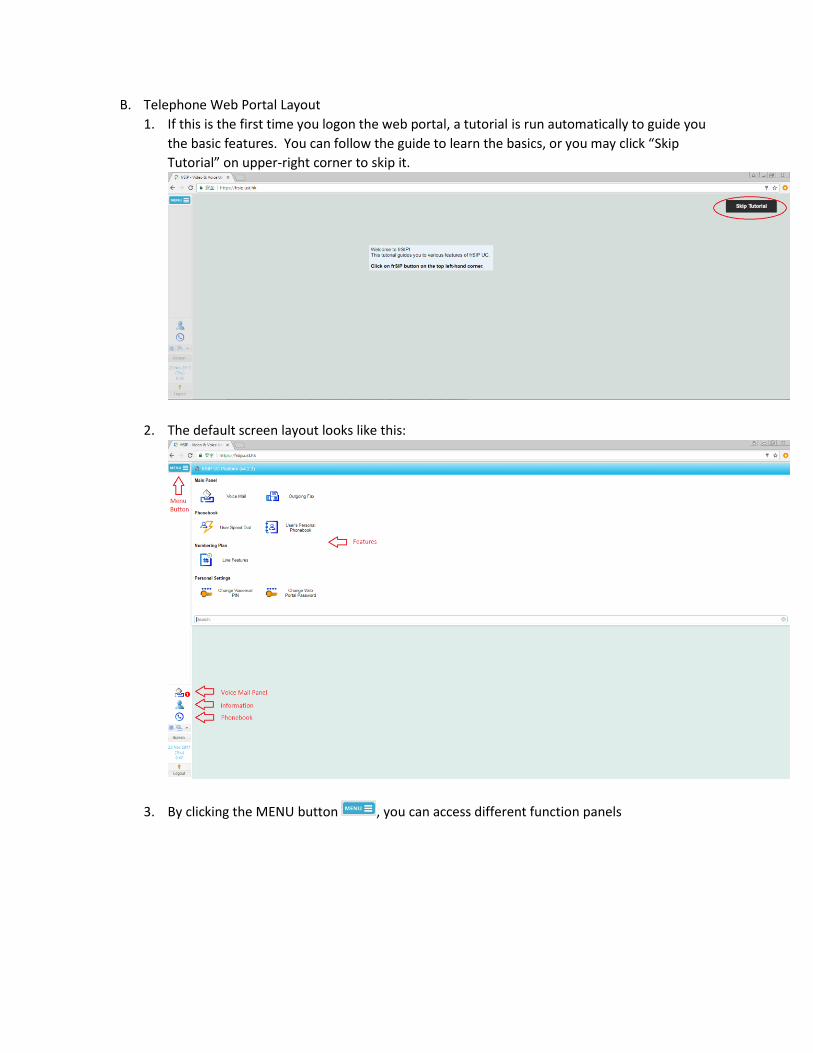
3. By clicking the MENU button , you can access different function panels
4. There are 3 shortcut keys on the bottom left corner:
Voice Mail Panel Quick access to the voicemail box
Information Quick access to set call forwarding or to disable voicemail
Phonebook Quick access to dial a number in personal phonebook
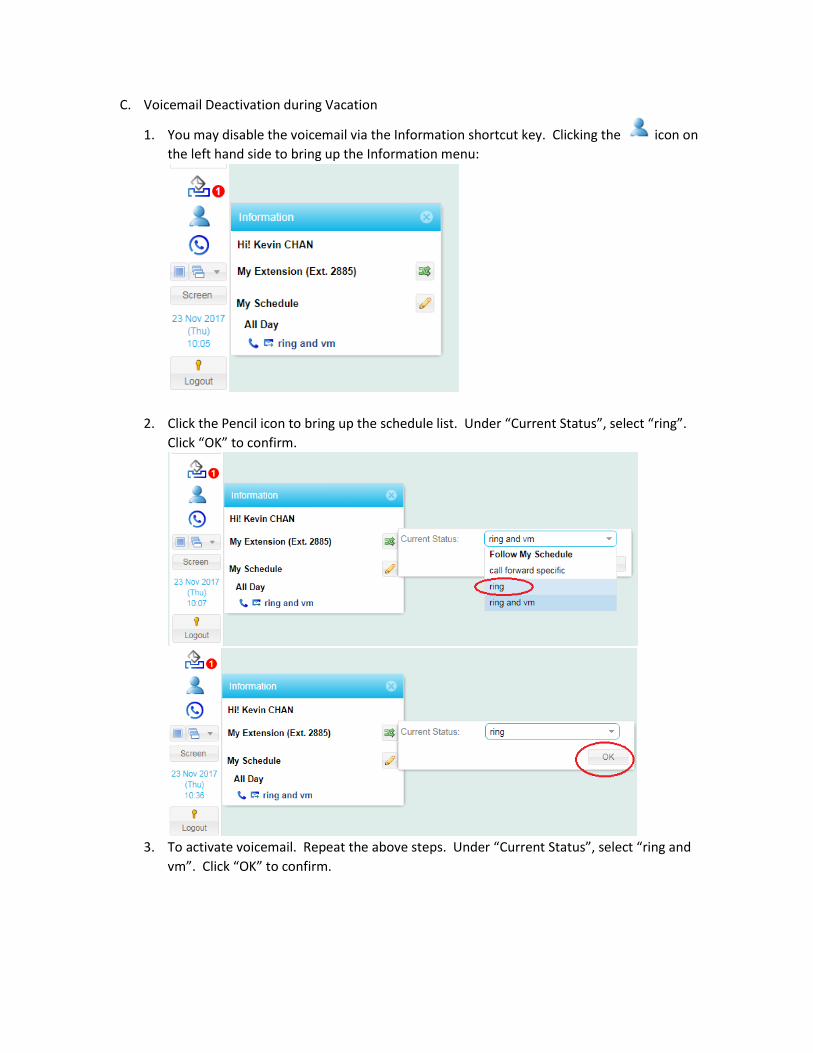
C. Voicemail Deactivation during Vacation
1. You may disable the voicemail via the Information shortcut key. Clicking the icon on
the left hand side to bring up the Information menu:
2. Click the Pencil icon to bring up the schedule list. Under “Current Status”, select “ring”.
Click “OK” to confirm.
3. To activate voicemail. Repeat the above steps. Under “Current Status”, select “ring and
vm”. Click “OK” to confirm.

D. Forward Calls When No Answer
1. By default, when no one answers the incoming call, the call is redirected to the voicemail
system. You can change to forward unanswered calls to other colleague.
2. Click “Line Features”.
3. Click the pencil icon of the status “call forward specific”.
4. Click the pencil icon of the step “2 Forward to mailbox owned by this user”.
5. In the “Routing Step Settings” window:
a. Tick the “Ring the following for” radio button.
b. Enter 20 for the seconds.
c. Select without Call Screening”

d. Tick the “Other Number” box
e. Type in the phone number to redirect the call.
f. Click OK to confirm
6. Click icon on the left hand side to bring up the Information menu:
7. Click the Pencil icon to bring up the schedule list. Under “Current Status”, select “call
forward specific”. Click “OK” to confirm.

8. To reset to default, repeat steps 6 and 7. Under “Current Status”, select “ring and vm”.
Click “OK” to confirm.

E. Forward Calls When the Line is Busy
1. By default, call waiting is enabled. You can change to forward the waiting call to other
colleague when the line is busy.
2. Click “Line Features”.
3. Click the pencil icon of the status “call forward specific”.
4. Click “Busy Routing” tab.
5. In the “Number Status Settings” window:
a. Tick the “Enable this conditional routing” check box.
b. Click “Add Step” to bring up the next window.
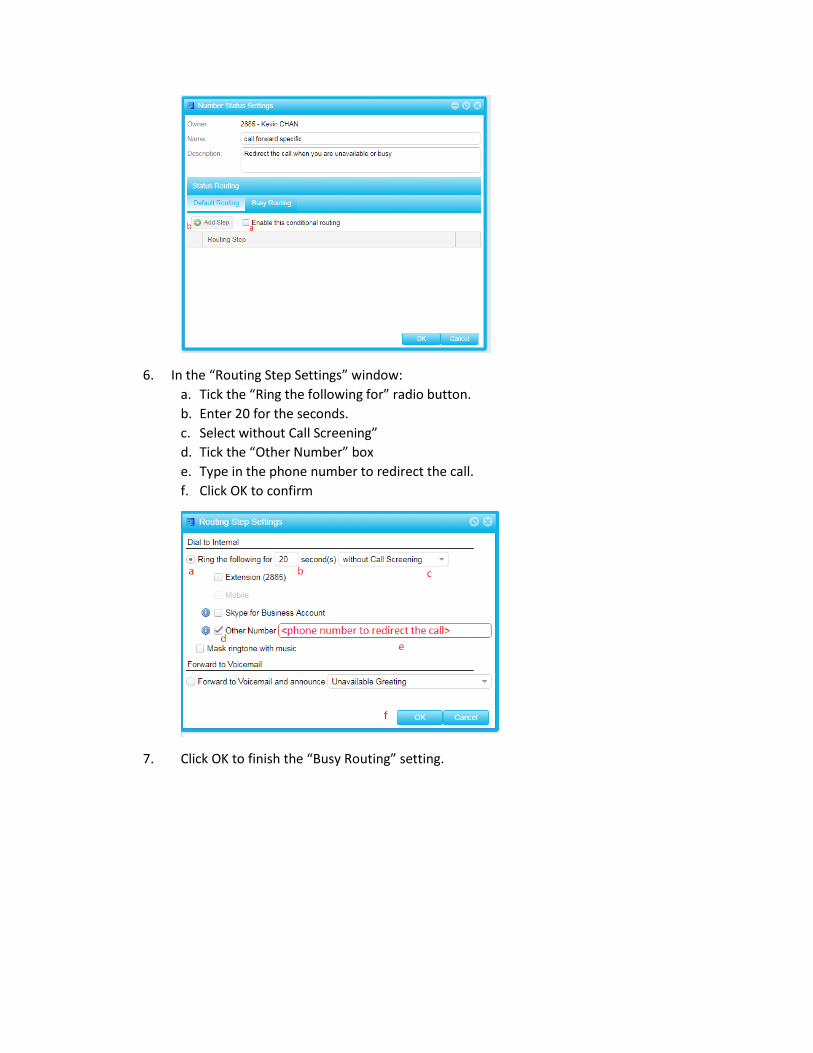
6. In the “Routing Step Settings” window:
a. Tick the “Ring the following for” radio button.
b. Enter 20 for the seconds.
c. Select without Call Screening”
d. Tick the “Other Number” box
e. Type in the phone number to redirect the call.
f. Click OK to confirm
7. Click OK to finish the “Busy Routing” setting.

8. Click icon on the left hand side to bring up the Information menu:
9. Click the Pencil icon to bring up the schedule list. Under “Current Status”, select “call
forward specific”. Click “OK” to confirm.

10. To reset to default, repeat steps 8 and 9. Under “Current Status”, select “ring and vm”.
Click “OK” to confirm.

F. Personal Phonebook
1. You may click the Phonebook shortcut key to dial a number in the personal phonebook.
2. You can access the full version of personal phonebook by clicking “User’s Personal
Phonebook”.

3. The personal phonebook looks like this:
4. To add a new contact, press and then fill in the contact details. Press at the
bottom when finish.
5. The system will ask you to reboot the phone. Select “No”.


G. User Speed Dial
1. To access the user speed dial, click “User Speed Dial”.
2. Click the pencil icon to bring up the list of speed dial numbers.
3. To add a speed dial from the phonebook entry, click the “Add Speed Dial” button and then
select “From exist Contact”. Select the phonebook entry to add.
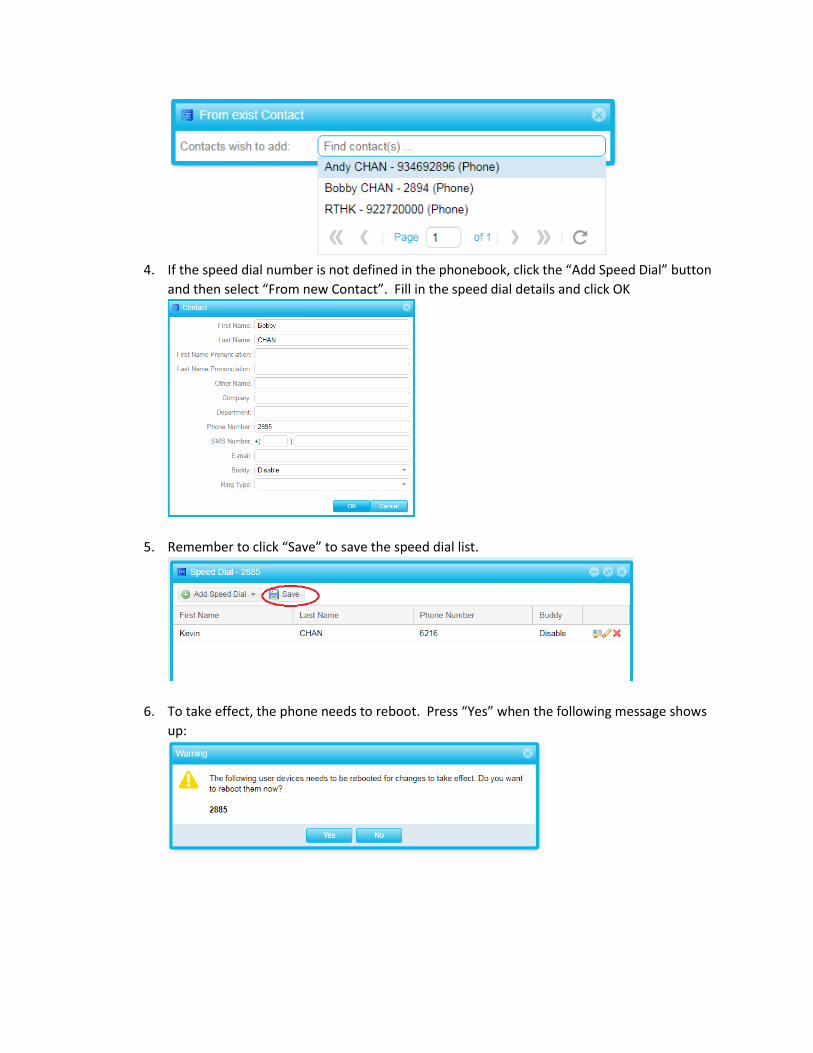
4. If the speed dial number is not defined in the phonebook, click the “Add Speed Dial” button
and then select “From new Contact”. Fill in the speed dial details and click OK
5. Remember to click “Save” to save the speed dial list.
6. To take effect, the phone needs to reboot. Press “Yes” when the following message shows
up:

H. Call Alert Box and Call Panels
1. When the phone rings, an alert box pops up on the bottom right corner. Via the alert box,
you can:
- Answer the call
- Immediate divert the call to voicemail system
- Terminate the call without diverting the call to voicemail system
- Transfer the call
2. The Call Panel shows the details of current call:

I. Access to Voicemails
1. The “Voice Mail” panel lists the voicemails. You can listen to the voicemails, download them
or delete them.
J. Send Fax
Note:
a) The fax file must be one of the following formats:
PDF, JPG, JPEG, PNG, TIF or TIFF
b) Departments may obtain an eFax Extn. From ITSC, so as to receive fax through a dedicated
ITSC network account.
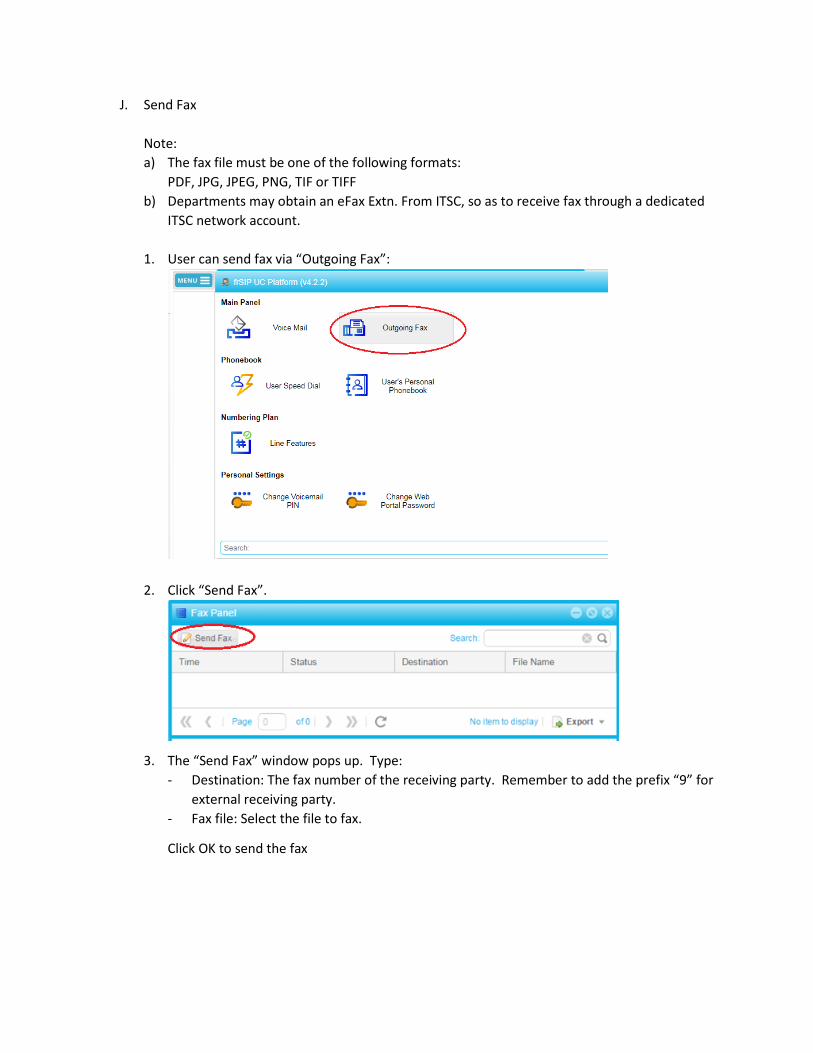
1. User can send fax via “Outgoing Fax”:
2. Click “Send Fax”.
3. The “Send Fax” window pops up. Type:
- Destination: The fax number of the receiving party. Remember to add the prefix “9” for
external receiving party.
- Fax file: Select the file to fax.
Click OK to send the fax

4. Click OK again to acknowledge the notice
5. The Fax Panel shows the fax request is under processing.
6. When the fax has sent, the status changes to “Successful”.
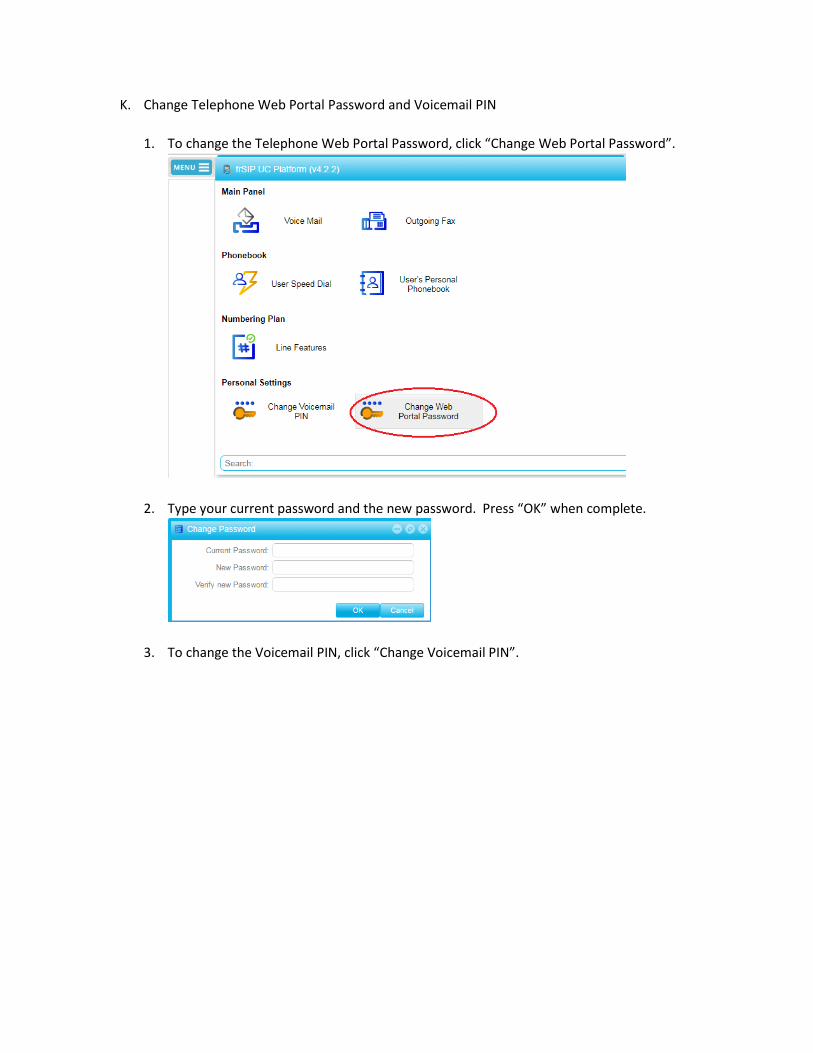
K. Change Telephone Web Portal Password and Voicemail PIN
1. To change the Telephone Web Portal Password, click “Change Web Portal Password”.
2. Type your current password and the new password. Press “OK” when complete.
3. To change the Voicemail PIN, click “Change Voicemail PIN”.

4. Type in your new PIN. Press “OK” when complete.
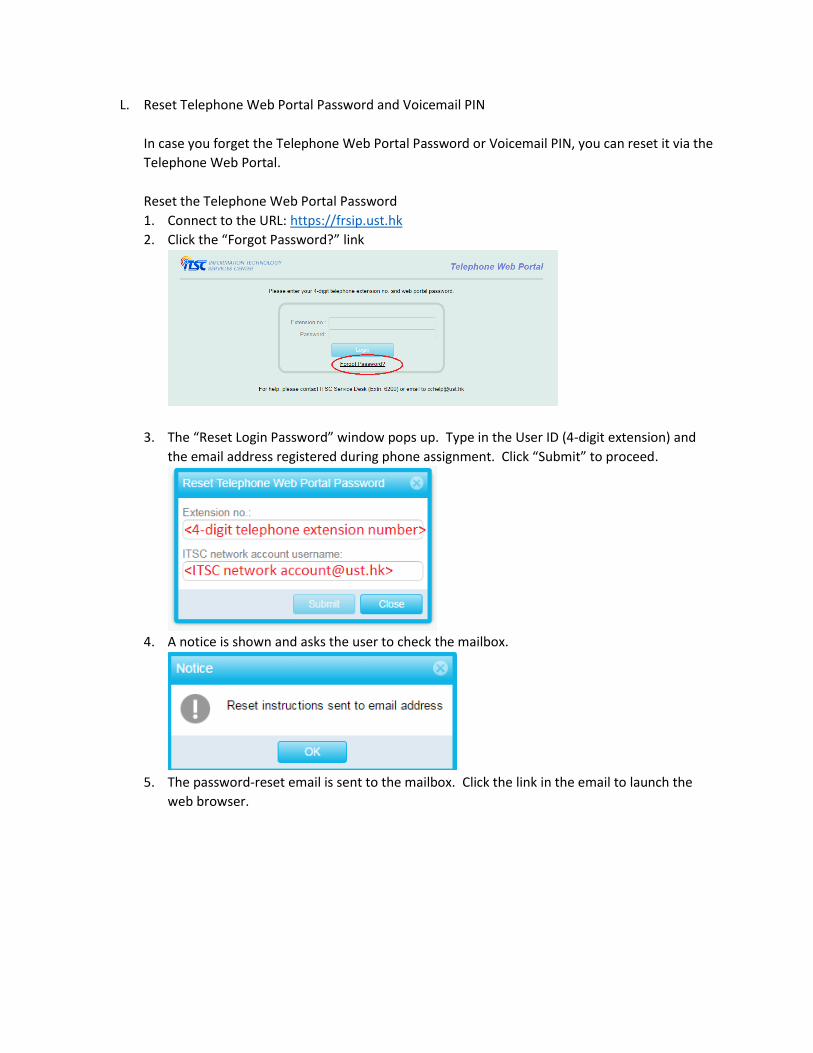
L. Reset Telephone Web Portal Password and Voicemail PIN
In case you forget the Telephone Web Portal Password or Voicemail PIN, you can reset it via the
Telephone Web Portal.
Reset the Telephone Web Portal Password
1. Connect to the URL: https://frsip.ust.hk
2. Click the “Forgot Password?” link
3. The “Reset Login Password” window pops up. Type in the User ID (4-digit extension) and
the email address registered during phone assignment. Click “Submit” to proceed.
4. A notice is shown and asks the user to check the mailbox.
5. The password-reset email is sent to the mailbox. Click the link in the email to launch the
web browser.

6. The new password is shown in the new browser:
7. You can use the new password to logon the Telephone Web Portal. After that, you can
change the Telephone Web Portal Password by clicking “Change Web Portal Password”
(please refer to the section “Change Password and PIN”).
Reset the Voicemail PIN
1. To reset the Voicemail PIN, click “Change Voicemail PIN”.
2. Type in your new Voicemail PIN. Press “OK” when complete.

M. Check Call History
1. To check the call history, click “Call History Panel”.
2. The Call History Panel shows up.

N. Logout
1. Click the button at the lower left corner.
2. A window pops up to confirm. Press “Yes” to logout.