GNATbench for Eclipse User's Guide - Documentation
313
GNATbench for Eclipse User’s Guide Release 22.0.20210305.w AdaCore Mar 06, 2021
-
Upload
khangminh22 -
Category
Documents
-
view
0 -
download
0
Transcript of GNATbench for Eclipse User's Guide - Documentation

GNATbench for Eclipse User’s GuideRelease 22.0.20210305.w
AdaCore
Mar 06, 2021

CONTENTS
1 Getting Started 11.1 Prior Required Tool Installations . . . . . . . . . . . . . . . . . . . . . . . . . . . . . . . . . . . . . 11.2 Conflicting Plug-In Removal . . . . . . . . . . . . . . . . . . . . . . . . . . . . . . . . . . . . . . . 11.3 Installing GNATbench . . . . . . . . . . . . . . . . . . . . . . . . . . . . . . . . . . . . . . . . . . 11.4 Before Browsing and Navigating the Code . . . . . . . . . . . . . . . . . . . . . . . . . . . . . . . 21.5 Verifying Correct GNATbench Installation . . . . . . . . . . . . . . . . . . . . . . . . . . . . . . . 21.6 Introduction . . . . . . . . . . . . . . . . . . . . . . . . . . . . . . . . . . . . . . . . . . . . . . . 31.7 Intended Audience . . . . . . . . . . . . . . . . . . . . . . . . . . . . . . . . . . . . . . . . . . . . 31.8 Scope . . . . . . . . . . . . . . . . . . . . . . . . . . . . . . . . . . . . . . . . . . . . . . . . . . . 41.9 For Additional Information and Help . . . . . . . . . . . . . . . . . . . . . . . . . . . . . . . . . . 41.10 Creating and Building A Basic Native Project . . . . . . . . . . . . . . . . . . . . . . . . . . . . . . 4
1.10.1 Creating and Configuring the Project . . . . . . . . . . . . . . . . . . . . . . . . . . . . . . 41.10.2 Building the Project . . . . . . . . . . . . . . . . . . . . . . . . . . . . . . . . . . . . . . . 101.10.3 Congratulations! . . . . . . . . . . . . . . . . . . . . . . . . . . . . . . . . . . . . . . . . 12
1.11 Creating and Building An Embedded Computer Project . . . . . . . . . . . . . . . . . . . . . . . . 121.11.1 Creating and Configuring the Project . . . . . . . . . . . . . . . . . . . . . . . . . . . . . . 121.11.2 Modifying the GNAT Project File . . . . . . . . . . . . . . . . . . . . . . . . . . . . . . . 211.11.3 Importing the Script and Sources . . . . . . . . . . . . . . . . . . . . . . . . . . . . . . . . 221.11.4 Adding A Command . . . . . . . . . . . . . . . . . . . . . . . . . . . . . . . . . . . . . . 241.11.5 Invoking the User-Defined Command . . . . . . . . . . . . . . . . . . . . . . . . . . . . . 251.11.6 Building the Project . . . . . . . . . . . . . . . . . . . . . . . . . . . . . . . . . . . . . . . 271.11.7 Congratulations! . . . . . . . . . . . . . . . . . . . . . . . . . . . . . . . . . . . . . . . . 28
1.12 Using GPRbuild To Build An Embedded Computer Project . . . . . . . . . . . . . . . . . . . . . . 291.12.1 Creating and Configuring the Project . . . . . . . . . . . . . . . . . . . . . . . . . . . . . . 291.12.2 Modifying the GNAT Project File . . . . . . . . . . . . . . . . . . . . . . . . . . . . . . . 351.12.3 The Source Files . . . . . . . . . . . . . . . . . . . . . . . . . . . . . . . . . . . . . . . . 371.12.4 Modifying the Main Subprogram Source File . . . . . . . . . . . . . . . . . . . . . . . . . 381.12.5 Building the Project . . . . . . . . . . . . . . . . . . . . . . . . . . . . . . . . . . . . . . . 391.12.6 Congratulations! . . . . . . . . . . . . . . . . . . . . . . . . . . . . . . . . . . . . . . . . 40
2 Concepts 412.1 GNAT Pro . . . . . . . . . . . . . . . . . . . . . . . . . . . . . . . . . . . . . . . . . . . . . . . . 41
2.1.1 GNAT Projects . . . . . . . . . . . . . . . . . . . . . . . . . . . . . . . . . . . . . . . . . 412.1.2 Foreign Ada Source Files . . . . . . . . . . . . . . . . . . . . . . . . . . . . . . . . . . . . 412.1.3 Project Files . . . . . . . . . . . . . . . . . . . . . . . . . . . . . . . . . . . . . . . . . . . 422.1.4 GNAT Project Manager . . . . . . . . . . . . . . . . . . . . . . . . . . . . . . . . . . . . . 432.1.5 Scenario Variables . . . . . . . . . . . . . . . . . . . . . . . . . . . . . . . . . . . . . . . 44
2.2 GNATbench . . . . . . . . . . . . . . . . . . . . . . . . . . . . . . . . . . . . . . . . . . . . . . . 462.2.1 Ada Perspective . . . . . . . . . . . . . . . . . . . . . . . . . . . . . . . . . . . . . . . . . 462.2.2 Ada Perspective Menus . . . . . . . . . . . . . . . . . . . . . . . . . . . . . . . . . . . . . 47
i
2.2.3 Ada Perspective Wizards . . . . . . . . . . . . . . . . . . . . . . . . . . . . . . . . . . . . 512.2.4 GNATbench Project File Editor . . . . . . . . . . . . . . . . . . . . . . . . . . . . . . . . 572.2.5 GNAT Project Properties Editor . . . . . . . . . . . . . . . . . . . . . . . . . . . . . . . . 602.2.6 Outline View . . . . . . . . . . . . . . . . . . . . . . . . . . . . . . . . . . . . . . . . . . 622.2.7 Scenario Variables View . . . . . . . . . . . . . . . . . . . . . . . . . . . . . . . . . . . . 632.2.8 Call Hierarchy View . . . . . . . . . . . . . . . . . . . . . . . . . . . . . . . . . . . . . . 642.2.9 GNAT Project Explorer . . . . . . . . . . . . . . . . . . . . . . . . . . . . . . . . . . . . . 652.2.10 Metrics View . . . . . . . . . . . . . . . . . . . . . . . . . . . . . . . . . . . . . . . . . . 732.2.11 Opening GNATbench Views . . . . . . . . . . . . . . . . . . . . . . . . . . . . . . . . . . 742.2.12 Ada Build Console . . . . . . . . . . . . . . . . . . . . . . . . . . . . . . . . . . . . . . . 75
2.3 Allocating Enough Memory and Solving OutOfMemoryErrors . . . . . . . . . . . . . . . . . . . . . 76
3 Setting Preferences 773.1 GNATbench Preferences . . . . . . . . . . . . . . . . . . . . . . . . . . . . . . . . . . . . . . . . . 773.2 Builder Targets . . . . . . . . . . . . . . . . . . . . . . . . . . . . . . . . . . . . . . . . . . . . . . 78
3.2.1 The Targets Tree . . . . . . . . . . . . . . . . . . . . . . . . . . . . . . . . . . . . . . . . 783.2.2 The Properties Dialog . . . . . . . . . . . . . . . . . . . . . . . . . . . . . . . . . . . . . . 793.2.3 The Command Line Dialog . . . . . . . . . . . . . . . . . . . . . . . . . . . . . . . . . . . 81
3.3 Syntax Coloring . . . . . . . . . . . . . . . . . . . . . . . . . . . . . . . . . . . . . . . . . . . . . 813.4 Editors’ Font . . . . . . . . . . . . . . . . . . . . . . . . . . . . . . . . . . . . . . . . . . . . . . . 823.5 Coding Style . . . . . . . . . . . . . . . . . . . . . . . . . . . . . . . . . . . . . . . . . . . . . . . 833.6 Editor . . . . . . . . . . . . . . . . . . . . . . . . . . . . . . . . . . . . . . . . . . . . . . . . . . . 843.7 General Preferences . . . . . . . . . . . . . . . . . . . . . . . . . . . . . . . . . . . . . . . . . . . 85
3.7.1 Multi-language Builder . . . . . . . . . . . . . . . . . . . . . . . . . . . . . . . . . . . . . 863.7.2 Fast Project Loading . . . . . . . . . . . . . . . . . . . . . . . . . . . . . . . . . . . . . . 873.7.3 Removal Policy When Fixing Code . . . . . . . . . . . . . . . . . . . . . . . . . . . . . . 87
3.8 GNATbench Trace Log . . . . . . . . . . . . . . . . . . . . . . . . . . . . . . . . . . . . . . . . . . 873.9 Toolchains . . . . . . . . . . . . . . . . . . . . . . . . . . . . . . . . . . . . . . . . . . . . . . . . 883.10 External Commands . . . . . . . . . . . . . . . . . . . . . . . . . . . . . . . . . . . . . . . . . . . 893.11 Tools . . . . . . . . . . . . . . . . . . . . . . . . . . . . . . . . . . . . . . . . . . . . . . . . . . . 90
4 Creating and Configuring Projects 934.1 Importing Existing GNAT Projects . . . . . . . . . . . . . . . . . . . . . . . . . . . . . . . . . . . 934.2 Creating New Projects . . . . . . . . . . . . . . . . . . . . . . . . . . . . . . . . . . . . . . . . . . 99
4.2.1 Invoking the New-Project Wizard . . . . . . . . . . . . . . . . . . . . . . . . . . . . . . . 994.2.2 Walking Through the Wizard Pages . . . . . . . . . . . . . . . . . . . . . . . . . . . . . . 99
4.3 Creating New Ada Source Files . . . . . . . . . . . . . . . . . . . . . . . . . . . . . . . . . . . . . 1134.3.1 Invoking the New-File Wizards . . . . . . . . . . . . . . . . . . . . . . . . . . . . . . . . . 1134.3.2 New Ada Source File Wizard . . . . . . . . . . . . . . . . . . . . . . . . . . . . . . . . . . 1144.3.3 Linked Source Files . . . . . . . . . . . . . . . . . . . . . . . . . . . . . . . . . . . . . . . 1154.3.4 Header Text Insertion . . . . . . . . . . . . . . . . . . . . . . . . . . . . . . . . . . . . . . 1154.3.5 File Naming Conformance . . . . . . . . . . . . . . . . . . . . . . . . . . . . . . . . . . . 116
4.4 Creating New Ada Source Folders . . . . . . . . . . . . . . . . . . . . . . . . . . . . . . . . . . . . 1174.4.1 Invoking the New-Folder Wizards . . . . . . . . . . . . . . . . . . . . . . . . . . . . . . . 1174.4.2 New Ada Source Folder Wizard . . . . . . . . . . . . . . . . . . . . . . . . . . . . . . . . 117
4.5 Converting Existing Projects To GNATbench . . . . . . . . . . . . . . . . . . . . . . . . . . . . . . 1184.6 Using Non-Default Ada Source File Names . . . . . . . . . . . . . . . . . . . . . . . . . . . . . . . 121
4.6.1 Specifying the Naming Scheme In the Project File . . . . . . . . . . . . . . . . . . . . . . . 1214.6.2 Associating the File Name Extension with the Ada Editor . . . . . . . . . . . . . . . . . . . 126
5 Browsing and Navigation 1315.1 Crucial Setup Requirement . . . . . . . . . . . . . . . . . . . . . . . . . . . . . . . . . . . . . . . . 131
5.1.1 The cross-reference database . . . . . . . . . . . . . . . . . . . . . . . . . . . . . . . . . . 1315.1.2 Cross-references and partially compiled projects . . . . . . . . . . . . . . . . . . . . . . . . 132
ii

5.2 Browsing via Source Code Hyperlinks . . . . . . . . . . . . . . . . . . . . . . . . . . . . . . . . . 1325.2.1 Configuring C/C++ Source Code Hyperlinks navigation . . . . . . . . . . . . . . . . . . . . 137
5.3 Editor Tooltips . . . . . . . . . . . . . . . . . . . . . . . . . . . . . . . . . . . . . . . . . . . . . . 1375.4 Visiting Declarations and Bodies . . . . . . . . . . . . . . . . . . . . . . . . . . . . . . . . . . . . 1385.5 Visiting Declaration and Body Files . . . . . . . . . . . . . . . . . . . . . . . . . . . . . . . . . . . 1405.6 Traversing Within Source Files . . . . . . . . . . . . . . . . . . . . . . . . . . . . . . . . . . . . . 1425.7 Browsing via Reference Searching . . . . . . . . . . . . . . . . . . . . . . . . . . . . . . . . . . . . 142
5.7.1 Advanced Options . . . . . . . . . . . . . . . . . . . . . . . . . . . . . . . . . . . . . . . 144
6 Developing Ada Source Code 1476.1 Language-Sensitive Editing . . . . . . . . . . . . . . . . . . . . . . . . . . . . . . . . . . . . . . . 147
6.1.1 Invoking the Ada Language-Sensitive Editor . . . . . . . . . . . . . . . . . . . . . . . . . . 1476.1.2 Syntax Coloring . . . . . . . . . . . . . . . . . . . . . . . . . . . . . . . . . . . . . . . . . 1486.1.3 Formatting Source Code . . . . . . . . . . . . . . . . . . . . . . . . . . . . . . . . . . . . 1506.1.4 Block Folding . . . . . . . . . . . . . . . . . . . . . . . . . . . . . . . . . . . . . . . . . . 1596.1.5 Managing Comments . . . . . . . . . . . . . . . . . . . . . . . . . . . . . . . . . . . . . . 1606.1.6 Parentheses Highlighting . . . . . . . . . . . . . . . . . . . . . . . . . . . . . . . . . . . . 1646.1.7 Automatic Construct Closing . . . . . . . . . . . . . . . . . . . . . . . . . . . . . . . . . . 1646.1.8 Smart Enter Key . . . . . . . . . . . . . . . . . . . . . . . . . . . . . . . . . . . . . . . . 1656.1.9 Smart Space Key . . . . . . . . . . . . . . . . . . . . . . . . . . . . . . . . . . . . . . . . 1666.1.10 Smart Tab Key . . . . . . . . . . . . . . . . . . . . . . . . . . . . . . . . . . . . . . . . . 1726.1.11 Smart Home Key . . . . . . . . . . . . . . . . . . . . . . . . . . . . . . . . . . . . . . . . 1736.1.12 Smart End Key . . . . . . . . . . . . . . . . . . . . . . . . . . . . . . . . . . . . . . . . . 174
6.2 Code Assist . . . . . . . . . . . . . . . . . . . . . . . . . . . . . . . . . . . . . . . . . . . . . . . . 1756.2.1 Code Assist . . . . . . . . . . . . . . . . . . . . . . . . . . . . . . . . . . . . . . . . . . . 1756.2.2 Enabling Code Assist . . . . . . . . . . . . . . . . . . . . . . . . . . . . . . . . . . . . . . 1756.2.3 Invoking Code Assist . . . . . . . . . . . . . . . . . . . . . . . . . . . . . . . . . . . . . . 1766.2.4 Simple Name Completion . . . . . . . . . . . . . . . . . . . . . . . . . . . . . . . . . . . 1776.2.5 Dotted Name Completion . . . . . . . . . . . . . . . . . . . . . . . . . . . . . . . . . . . . 1776.2.6 Formal Parameter Completion . . . . . . . . . . . . . . . . . . . . . . . . . . . . . . . . . 1806.2.7 Limitations . . . . . . . . . . . . . . . . . . . . . . . . . . . . . . . . . . . . . . . . . . . 1826.2.8 Ada Templates . . . . . . . . . . . . . . . . . . . . . . . . . . . . . . . . . . . . . . . . . 183
6.3 Quick Fix . . . . . . . . . . . . . . . . . . . . . . . . . . . . . . . . . . . . . . . . . . . . . . . . . 183
7 Building 1877.1 Project Builder Command Menus . . . . . . . . . . . . . . . . . . . . . . . . . . . . . . . . . . . . 187
7.1.1 Project Menu . . . . . . . . . . . . . . . . . . . . . . . . . . . . . . . . . . . . . . . . . . 1877.1.2 Contextual Menus . . . . . . . . . . . . . . . . . . . . . . . . . . . . . . . . . . . . . . . . 188
7.2 Project Builder Command Semantics . . . . . . . . . . . . . . . . . . . . . . . . . . . . . . . . . . 1897.2.1 Standard Eclipse Build Commands . . . . . . . . . . . . . . . . . . . . . . . . . . . . . . . 1907.2.2 GNATbench Project-Specific Builder Commands . . . . . . . . . . . . . . . . . . . . . . . 190
7.3 Project Builder Key Bindings . . . . . . . . . . . . . . . . . . . . . . . . . . . . . . . . . . . . . . 1917.4 About the Build Automatically Option. . . . . . . . . . . . . . . . . . . . . . . . . . . . . . . . . . . 1927.5 Ada Build Console . . . . . . . . . . . . . . . . . . . . . . . . . . . . . . . . . . . . . . . . . . . . 1937.6 Compiling Individual Files . . . . . . . . . . . . . . . . . . . . . . . . . . . . . . . . . . . . . . . . 194
7.6.1 Within the Ada Editor . . . . . . . . . . . . . . . . . . . . . . . . . . . . . . . . . . . . . . 1947.6.2 Within the GNAT Project Explorer . . . . . . . . . . . . . . . . . . . . . . . . . . . . . . . 196
7.7 Analyzing Individual Files . . . . . . . . . . . . . . . . . . . . . . . . . . . . . . . . . . . . . . . . 1987.8 Removing Compilation Artifacts . . . . . . . . . . . . . . . . . . . . . . . . . . . . . . . . . . . . . 2007.9 Building Projects with Scenarios . . . . . . . . . . . . . . . . . . . . . . . . . . . . . . . . . . . . . 2007.10 Cross Compiling . . . . . . . . . . . . . . . . . . . . . . . . . . . . . . . . . . . . . . . . . . . . . 2037.11 Using Multiple Toolchains . . . . . . . . . . . . . . . . . . . . . . . . . . . . . . . . . . . . . . . . 2047.12 Building with Makefiles . . . . . . . . . . . . . . . . . . . . . . . . . . . . . . . . . . . . . . . . . 206
7.12.1 Modifying the “make” utility name . . . . . . . . . . . . . . . . . . . . . . . . . . . . . . . 207
iii

7.12.2 Modifying the Makefile . . . . . . . . . . . . . . . . . . . . . . . . . . . . . . . . . . . . . 2077.12.3 Makefile Name and Location . . . . . . . . . . . . . . . . . . . . . . . . . . . . . . . . . . 208
7.13 User-Defined Builder Commands . . . . . . . . . . . . . . . . . . . . . . . . . . . . . . . . . . . . 2097.13.1 Defining Commands . . . . . . . . . . . . . . . . . . . . . . . . . . . . . . . . . . . . . . 2097.13.2 Invoking User-Defined Commands . . . . . . . . . . . . . . . . . . . . . . . . . . . . . . . 210
7.14 Build Mode . . . . . . . . . . . . . . . . . . . . . . . . . . . . . . . . . . . . . . . . . . . . . . . . 2117.15 Build Menu . . . . . . . . . . . . . . . . . . . . . . . . . . . . . . . . . . . . . . . . . . . . . . . . 211
7.15.1 Check Syntax . . . . . . . . . . . . . . . . . . . . . . . . . . . . . . . . . . . . . . . . . . 2117.15.2 Check Semantic . . . . . . . . . . . . . . . . . . . . . . . . . . . . . . . . . . . . . . . . . 2117.15.3 Compile File . . . . . . . . . . . . . . . . . . . . . . . . . . . . . . . . . . . . . . . . . . 2117.15.4 Project . . . . . . . . . . . . . . . . . . . . . . . . . . . . . . . . . . . . . . . . . . . . . . 2127.15.5 Clean . . . . . . . . . . . . . . . . . . . . . . . . . . . . . . . . . . . . . . . . . . . . . . 2127.15.6 Run . . . . . . . . . . . . . . . . . . . . . . . . . . . . . . . . . . . . . . . . . . . . . . . 212
7.16 Troubleshooting Builder Problems . . . . . . . . . . . . . . . . . . . . . . . . . . . . . . . . . . . . 2137.16.1 Eclipse and CDT Version Mismatch or Missing . . . . . . . . . . . . . . . . . . . . . . . . 2137.16.2 Conflicting Plug-Ins . . . . . . . . . . . . . . . . . . . . . . . . . . . . . . . . . . . . . . . 213
8 Executing 2158.1 Creating Launch Configurations for Native Ada Applications . . . . . . . . . . . . . . . . . . . . . 215
8.1.1 Creating A C++ Launch Configuration . . . . . . . . . . . . . . . . . . . . . . . . . . . . . 2158.1.2 Creating an External Tools Launch Configuration . . . . . . . . . . . . . . . . . . . . . . . 218
8.2 Executing Native Ada Applications . . . . . . . . . . . . . . . . . . . . . . . . . . . . . . . . . . . 2238.2.1 Using A C++ Launch Configuration . . . . . . . . . . . . . . . . . . . . . . . . . . . . . . 2248.2.2 Using An External Tool Launch Configuration . . . . . . . . . . . . . . . . . . . . . . . . . 226
8.3 Executing Embedded Ada Applications . . . . . . . . . . . . . . . . . . . . . . . . . . . . . . . . . 228
9 Debugging 2299.1 Introduction to Debugging with GNATbench . . . . . . . . . . . . . . . . . . . . . . . . . . . . . . 229
9.1.1 Preparing to Debug . . . . . . . . . . . . . . . . . . . . . . . . . . . . . . . . . . . . . . . 2299.1.2 Other Resources . . . . . . . . . . . . . . . . . . . . . . . . . . . . . . . . . . . . . . . . . 2299.1.3 Overview . . . . . . . . . . . . . . . . . . . . . . . . . . . . . . . . . . . . . . . . . . . . 230
9.2 Creating A Debug Configuration . . . . . . . . . . . . . . . . . . . . . . . . . . . . . . . . . . . . . 2329.2.1 Quick Configuration Creation . . . . . . . . . . . . . . . . . . . . . . . . . . . . . . . . . 237
9.3 Launching A Debug Session . . . . . . . . . . . . . . . . . . . . . . . . . . . . . . . . . . . . . . . 2409.3.1 Potential Trouble . . . . . . . . . . . . . . . . . . . . . . . . . . . . . . . . . . . . . . . . 2429.3.2 Build Prior to Launch . . . . . . . . . . . . . . . . . . . . . . . . . . . . . . . . . . . . . . 243
9.4 Setting Breakpoints . . . . . . . . . . . . . . . . . . . . . . . . . . . . . . . . . . . . . . . . . . . 2449.5 Breaking On Exceptions . . . . . . . . . . . . . . . . . . . . . . . . . . . . . . . . . . . . . . . . . 2469.6 Controlling Execution . . . . . . . . . . . . . . . . . . . . . . . . . . . . . . . . . . . . . . . . . . 2489.7 Examining Data . . . . . . . . . . . . . . . . . . . . . . . . . . . . . . . . . . . . . . . . . . . . . 251
9.7.1 Examining Variables Declared in Subprograms and Tasks . . . . . . . . . . . . . . . . . . . 2539.7.2 Examining Variables Declared in Packages . . . . . . . . . . . . . . . . . . . . . . . . . . 254
9.8 Debugging Tasks . . . . . . . . . . . . . . . . . . . . . . . . . . . . . . . . . . . . . . . . . . . . . 2569.9 Ending A Debug Session . . . . . . . . . . . . . . . . . . . . . . . . . . . . . . . . . . . . . . . . . 2579.10 Using the GNAT Studio Debugger . . . . . . . . . . . . . . . . . . . . . . . . . . . . . . . . . . . . 2589.11 Troubleshooting . . . . . . . . . . . . . . . . . . . . . . . . . . . . . . . . . . . . . . . . . . . . . 259
10 Tool Integrations 26110.1 Pretty Printer . . . . . . . . . . . . . . . . . . . . . . . . . . . . . . . . . . . . . . . . . . . . . . . 26110.2 Metrics Analysis . . . . . . . . . . . . . . . . . . . . . . . . . . . . . . . . . . . . . . . . . . . . . 262
10.2.1 Controls . . . . . . . . . . . . . . . . . . . . . . . . . . . . . . . . . . . . . . . . . . . . . 26410.2.2 Results . . . . . . . . . . . . . . . . . . . . . . . . . . . . . . . . . . . . . . . . . . . . . 264
10.3 Style Checking . . . . . . . . . . . . . . . . . . . . . . . . . . . . . . . . . . . . . . . . . . . . . . 26610.3.1 Controls . . . . . . . . . . . . . . . . . . . . . . . . . . . . . . . . . . . . . . . . . . . . . 267
iv
10.3.2 Results . . . . . . . . . . . . . . . . . . . . . . . . . . . . . . . . . . . . . . . . . . . . . 268
11 Using AJIS 27111.1 Creating and Building an AJIS Project . . . . . . . . . . . . . . . . . . . . . . . . . . . . . . . . . 271
11.1.1 Audience . . . . . . . . . . . . . . . . . . . . . . . . . . . . . . . . . . . . . . . . . . . . 27111.1.2 Before You Begin . . . . . . . . . . . . . . . . . . . . . . . . . . . . . . . . . . . . . . . . 27111.1.3 Create an Ada Project for AJIS . . . . . . . . . . . . . . . . . . . . . . . . . . . . . . . . . 27211.1.4 Final Project Setup Steps . . . . . . . . . . . . . . . . . . . . . . . . . . . . . . . . . . . . 27911.1.5 Building the Ada Project . . . . . . . . . . . . . . . . . . . . . . . . . . . . . . . . . . . . 285
11.2 Using AJIS Examples . . . . . . . . . . . . . . . . . . . . . . . . . . . . . . . . . . . . . . . . . . 28811.2.1 Before You Begin . . . . . . . . . . . . . . . . . . . . . . . . . . . . . . . . . . . . . . . . 28811.2.2 Import AJIS examples for GNATbench projects into workspace . . . . . . . . . . . . . . . 28811.2.3 Build AJIS examples for GNATbench projects . . . . . . . . . . . . . . . . . . . . . . . . . 29011.2.4 Run or Debug AJIS examples for GNATbench projects . . . . . . . . . . . . . . . . . . . . 290
11.3 Using the AJIS Integration . . . . . . . . . . . . . . . . . . . . . . . . . . . . . . . . . . . . . . . . 29111.3.1 Installing the Required Tools . . . . . . . . . . . . . . . . . . . . . . . . . . . . . . . . . . 29111.3.2 Creating a Library and Sources . . . . . . . . . . . . . . . . . . . . . . . . . . . . . . . . . 29111.3.3 Using the Library and Java Sources . . . . . . . . . . . . . . . . . . . . . . . . . . . . . . 292
11.4 Manual Configuration of Java Build Path . . . . . . . . . . . . . . . . . . . . . . . . . . . . . . . . 29211.4.1 Setup . . . . . . . . . . . . . . . . . . . . . . . . . . . . . . . . . . . . . . . . . . . . . . 29211.4.2 Teardown . . . . . . . . . . . . . . . . . . . . . . . . . . . . . . . . . . . . . . . . . . . . 294
11.5 Usage Notes . . . . . . . . . . . . . . . . . . . . . . . . . . . . . . . . . . . . . . . . . . . . . . . 29511.5.1 Versions . . . . . . . . . . . . . . . . . . . . . . . . . . . . . . . . . . . . . . . . . . . . . 29511.5.2 Modifying the Ada Sources . . . . . . . . . . . . . . . . . . . . . . . . . . . . . . . . . . . 29511.5.3 Exporting the Java Project . . . . . . . . . . . . . . . . . . . . . . . . . . . . . . . . . . . 29511.5.4 Optional additional arguments to ada2java . . . . . . . . . . . . . . . . . . . . . . . . . 29711.5.5 Cleaning . . . . . . . . . . . . . . . . . . . . . . . . . . . . . . . . . . . . . . . . . . . . . 29711.5.6 Limitations . . . . . . . . . . . . . . . . . . . . . . . . . . . . . . . . . . . . . . . . . . . 297
12 Developping QNX Ada projects 29912.1 Creating QNX projects containing Ada code . . . . . . . . . . . . . . . . . . . . . . . . . . . . . . 299
12.1.1 Audience . . . . . . . . . . . . . . . . . . . . . . . . . . . . . . . . . . . . . . . . . . . . 29912.1.2 Before You Begin . . . . . . . . . . . . . . . . . . . . . . . . . . . . . . . . . . . . . . . . 29912.1.3 Create the Empty QNX Project that will contain Ada code . . . . . . . . . . . . . . . . . . 30012.1.4 Convert the empty QNX project to use Ada language . . . . . . . . . . . . . . . . . . . . . 303
v

vi

CHAPTER
ONE
GETTING STARTED
1.1 Prior Required Tool Installations
Before you can use GNATbench you must install the required environments and tools.
The GNATbench plug-in for Eclipse requires the following to be installed prior to installing GNATbench itself:
For 64-bit Linux or Windows one of the following versions Eclipse 2018-09 (4.9) Eclipse 2019-06 (4.12) Eclipse2019-12 (4.14) Eclipse 2020-03 (4.15) Eclipse 2020-06 (4.16)
The C/C++ Development Tools (CDT) plug-in for Eclipse, compatible with the version of Eclipse chosen. This shouldbe the version released along with the version of Eclipse you are installing, or any compatible updates for it.
The official JRE from Oracle or Open JDK. GNATbench was not tested on IBM Java. Eclipse 2018-09 (4.9) requiresJER-8. All others supported Eclipse versions requires JRE-8 or JRE-11.
Specifically, you must install Eclipse, the C/C++ Development Tools (CDT), and the AdaCore compilation tool-setbefore installing the GNATbench plug-in. For the CDT, install the version required by the version of Eclipse you areusing. The easiest and most reliable approach is to install the Eclipse bundle that automatically includes the CDT,however you can also install them individually.
1.2 Conflicting Plug-In Removal
In all probability, you must remove or completely disable any other Ada development plug-in that includes the func-tionality that GNATbench provides. In particular, any plug-in that defines a project builder for Ada source code willlikely prevent correct operation of GNATbench, and vice versa.
1.3 Installing GNATbench
The file gnatbench-<version>-<platform>-bin.zip is an archive to be installed through the regular Eclipse installationmechanism.
Open Eclipse or Workbench and select ‘Help -> Install New Software’ (if this menu is not available, it can be addedthrough the Eclipse perspective customization panel).
Click on the ‘Add’ button to add a repository. Select ‘Archive’ and navigate to the zip file downloaded from AdaCore.The Location field will then reference that file. You can optionally enter a repository name for future reference, suchas “GNATbench” (without the quotes). Click ‘OK’.
The Eclipse installer will then offer the choice of different versions of GNATbench for installation. For Eclipse, select‘AdaCore Plugins for Eclipse/CDT’. Be certain to NOT also select an other version!
1
GNATbench for Eclipse User’s Guide, Release 22.0.20210305.w
Click ‘Next’ and follow the installation wizard to completion. During the installation process, a dialog can be raisedasking if you trust the AdaCore certificates. Check the mark next to the GNATbench certificate and press ‘OK’.
Note: the GNATbench Ada Development User Guide could be accessed after installation, with all other User Guides,via the “Help -> Help Contents” menu entry.
1.4 Before Browsing and Navigating the Code
You need to compile the code for full functionality, such as Ada editor hyper-links, to be available. Only partialsupport will be available until that occurs. Please see the ‘Crucial Setup Requirement’ section in the ‘Browsing andNavigation’ chapter of the GNATbench User Guide for details.
1.5 Verifying Correct GNATbench Installation
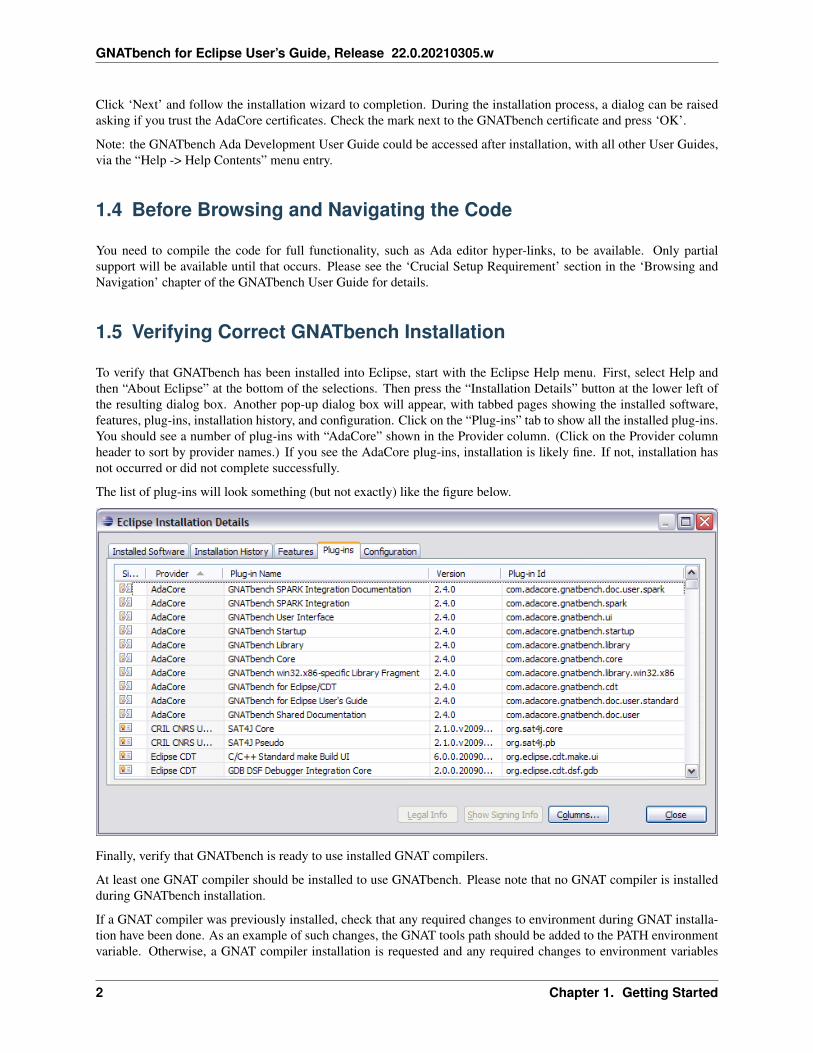
To verify that GNATbench has been installed into Eclipse, start with the Eclipse Help menu. First, select Help andthen “About Eclipse” at the bottom of the selections. Then press the “Installation Details” button at the lower left ofthe resulting dialog box. Another pop-up dialog box will appear, with tabbed pages showing the installed software,features, plug-ins, installation history, and configuration. Click on the “Plug-ins” tab to show all the installed plug-ins.You should see a number of plug-ins with “AdaCore” shown in the Provider column. (Click on the Provider columnheader to sort by provider names.) If you see the AdaCore plug-ins, installation is likely fine. If not, installation hasnot occurred or did not complete successfully.
The list of plug-ins will look something (but not exactly) like the figure below.
Finally, verify that GNATbench is ready to use installed GNAT compilers.
At least one GNAT compiler should be installed to use GNATbench. Please note that no GNAT compiler is installedduring GNATbench installation.
If a GNAT compiler was previously installed, check that any required changes to environment during GNAT installa-tion have been done. As an example of such changes, the GNAT tools path should be added to the PATH environmentvariable. Otherwise, a GNAT compiler installation is requested and any required changes to environment variables
2 Chapter 1. Getting Started
GNATbench for Eclipse User’s Guide, Release 22.0.20210305.w
must be performed. When a new compiler is installed, a workbench restart may be required to use the latest environ-ment.
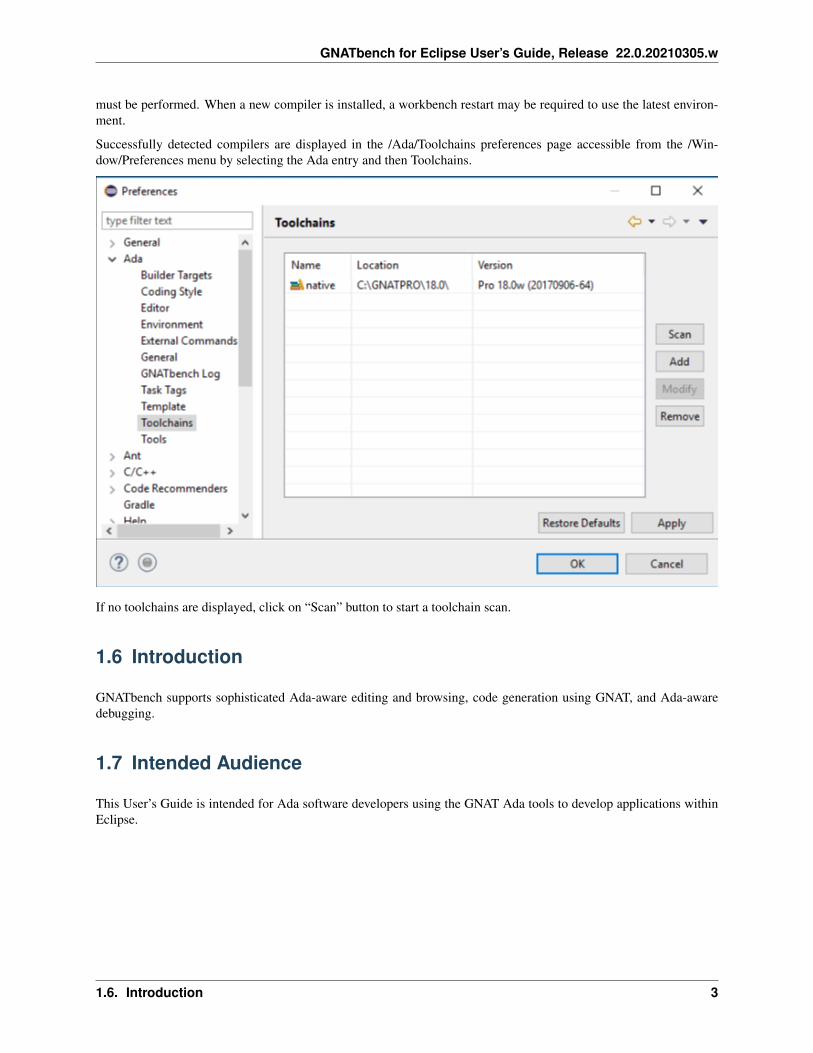
Successfully detected compilers are displayed in the /Ada/Toolchains preferences page accessible from the /Win-dow/Preferences menu by selecting the Ada entry and then Toolchains.
If no toolchains are displayed, click on “Scan” button to start a toolchain scan.
1.6 Introduction
GNATbench supports sophisticated Ada-aware editing and browsing, code generation using GNAT, and Ada-awaredebugging.
1.7 Intended Audience
This User’s Guide is intended for Ada software developers using the GNAT Ada tools to develop applications withinEclipse.
1.6. Introduction 3

GNATbench for Eclipse User’s Guide, Release 22.0.20210305.w
1.8 Scope
This User’s Guide describes how to use the GNATbench Ada plug-in for Eclipse. Specific help is provided for config-uring projects, building systems, and debugging; please see the corresponding sections for details.
For help with the GNAT compiler and associated tools themselves, see the GNAT documentation corresponding to thespecific compiler used.
1.9 For Additional Information and Help
Additional help and information is available online from AdaCore via the GNAT Tracker web interface.
1.10 Creating and Building A Basic Native Project
In this tutorial we will create and build a fully executable simple “Hello World” project.
Creating a new project for Ada development is easy with GNATbench. The wizard will create and configure the projectfor us, and invoking the builder is simply a matter of selecting a command.
1.10.1 Creating and Configuring the Project
The first step is to invoke the wizard to create a new Ada project. Using the Ada toolbar addition, click on the “NewAda Project” icon, as shown in the following figure:
The first page of the new-project wizard (shown in the next figure) will appear. Enter the name of the new project. Wehave named this one “hello”. We have the option of locating the new project in the default workspace or elsewhere inthe file system. We’ll take the default. Press Next.
4 Chapter 1. Getting Started

GNATbench for Eclipse User’s Guide, Release 22.0.20210305.w
The next page asks us to specify the unit name of the GNAT project (not the file name), that is, the name within thegpr file.
Unlike the Eclipse project name, the GNAT project unit name must be a legal Ada identifier. The wizard will try tomake a legal Ada name from the Eclipse project name, for example, by substituting underscores for dashes. If theEclipse project name is already a legal Ada identifier that name is used unchanged, as in this case:
1.10. Creating and Building A Basic Native Project 5

GNATbench for Eclipse User’s Guide, Release 22.0.20210305.w
In the next page we enter the name of the Ada main subprogram – not the file name – and have the wizard generatethe file containing that unit. We arbitrarily name the unit “hello” and have it generated as a program that prints “HelloWorld!” when executed.
6 Chapter 1. Getting Started

GNATbench for Eclipse User’s Guide, Release 22.0.20210305.w
On the next page we then choose the locations for our source files and object files. The defaults, as shown below, willhave all source files in the “src” folder, all object and “ali” files in the “obj” folder, and the executable also in the “obj”folder.
1.10. Creating and Building A Basic Native Project 7

GNATbench for Eclipse User’s Guide, Release 22.0.20210305.w
On the next page we choose the specific toolchain. The default native compiler is already selected, as shown below.
8 Chapter 1. Getting Started

GNATbench for Eclipse User’s Guide, Release 22.0.20210305.w
Press Finish. The new project will be created and you will see it in the GNAT Project Explorer, as in the followingimage. Note that we have expanded the “src” directory to show the source file within.
1.10. Creating and Building A Basic Native Project 9

GNATbench for Eclipse User’s Guide, Release 22.0.20210305.w
The source file contains the main subprogram. This file will have the name we specified, “hello.adb”, and will containa procedure with that unit name:
In a real application we would alter the content of the main subprogram. It is a buildable subprogram, though, withoutany changes, so for the purpose of this tutorial we can leave it as it is.
1.10.2 Building the Project
Now that the setup has completed we are ready to do the full build. In the GNAT Project Explorer, right-click on theproject node and select “Build Project”.
10 Chapter 1. Getting Started

GNATbench for Eclipse User’s Guide, Release 22.0.20210305.w
A successful build will appear in the Console view:
1.10. Creating and Building A Basic Native Project 11
GNATbench for Eclipse User’s Guide, Release 22.0.20210305.w
1.10.3 Congratulations!
That’s it! You have created and built a project using GNATbench for Eclipse.
1.11 Creating and Building An Embedded Computer Project
In this tutorial we will create and build a fully executable (simple) project. We have chosen to create a project for anembedded computer because it highlights some of the additional capabilities provided by GNATbench; the process isalmost exactly the same for creating executables for native execution on the host computer.
Creating a new project for Ada development is easy with GNATbench. The wizard will create and configure the projectfor us, and invoking the builder is simply a matter of selecting a command.
1.11.1 Creating and Configuring the Project
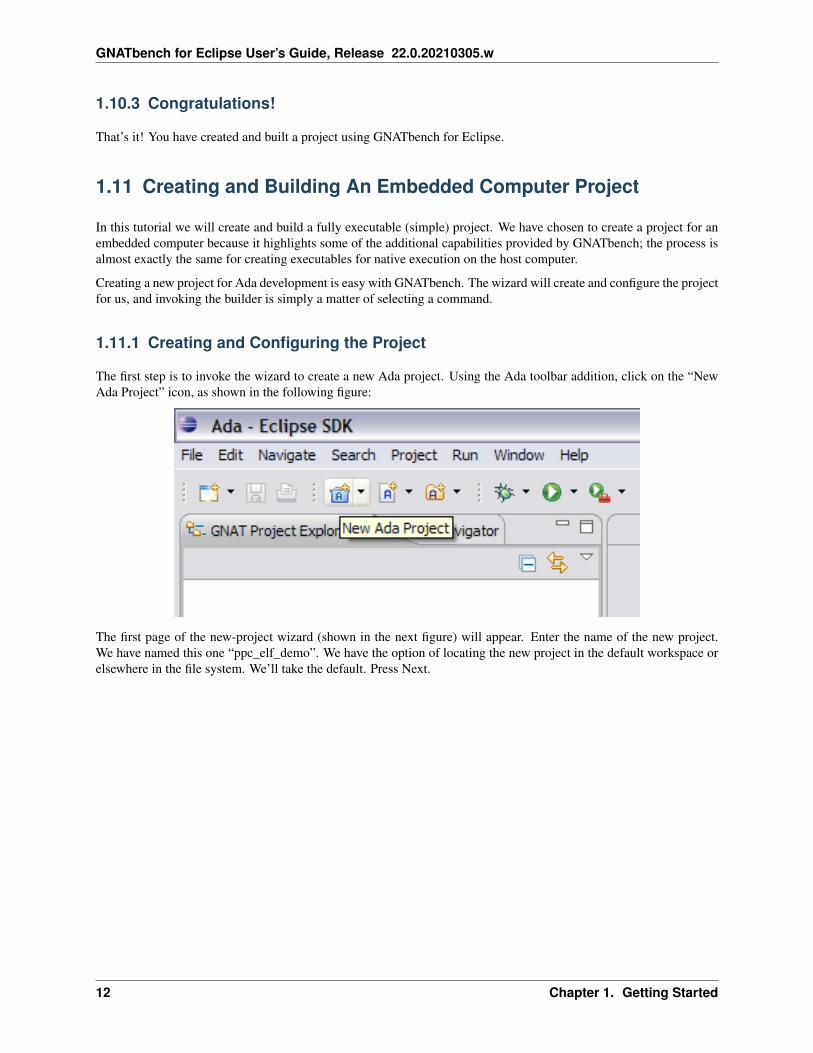
The first step is to invoke the wizard to create a new Ada project. Using the Ada toolbar addition, click on the “NewAda Project” icon, as shown in the following figure:
The first page of the new-project wizard (shown in the next figure) will appear. Enter the name of the new project.We have named this one “ppc_elf_demo”. We have the option of locating the new project in the default workspace orelsewhere in the file system. We’ll take the default. Press Next.
12 Chapter 1. Getting Started

GNATbench for Eclipse User’s Guide, Release 22.0.20210305.w
The next page asks us to specify the unit name of the GNAT project (not the file name), that is, the name within thegpr file.
Unlike the Eclipse project name, the GNAT project unit name must be a legal Ada identifier. The wizard will try tomake a legal Ada name from the Eclipse project name, by substituting underscores for dashes for example. If theEclipse project name is already a legal Ada identifier that name is used unchanged, as in this case:
1.11. Creating and Building An Embedded Computer Project 13

GNATbench for Eclipse User’s Guide, Release 22.0.20210305.w
In the next page we enter the name of the Ada main subprogram – not the file name – and have the wizard generatethe file containing that unit. We arbitrarily name the unit “hello” and have it generated as a program that prints “HelloWorld!” when executed.
14 Chapter 1. Getting Started

GNATbench for Eclipse User’s Guide, Release 22.0.20210305.w
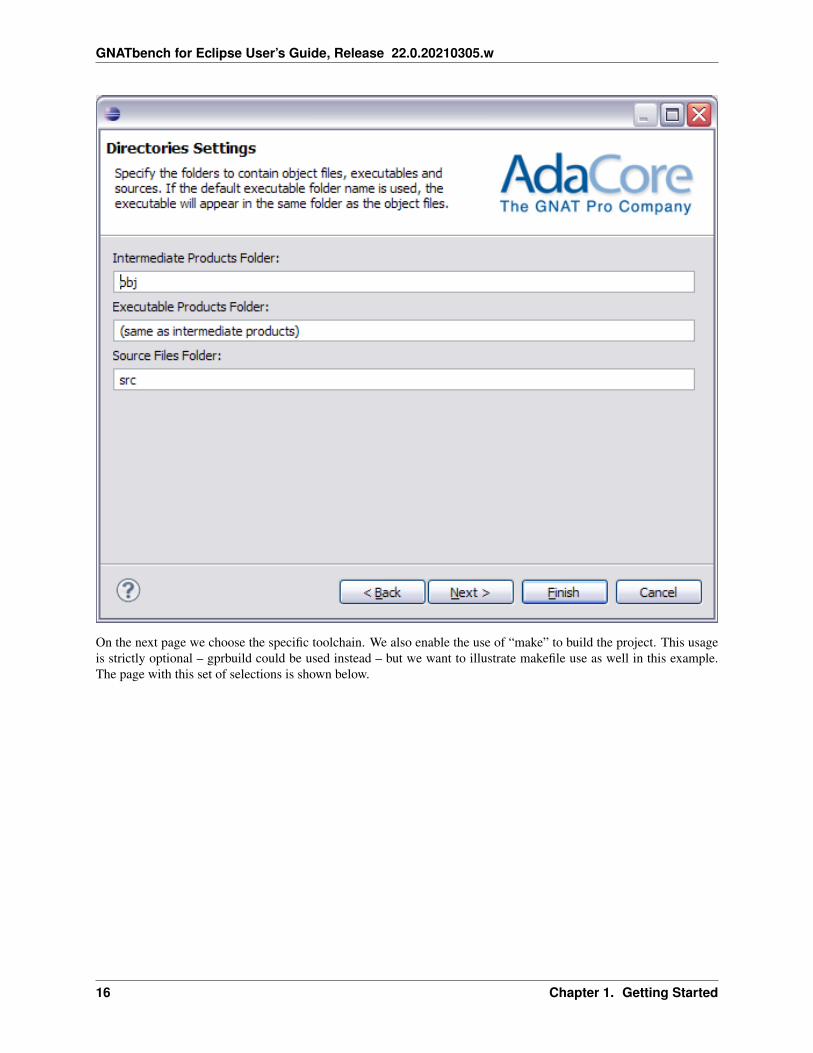
On the next page we then choose the locations for our source files and object files. The defaults, as shown below, willhave all source files in the “src” folder, all object and “ali” files in the “obj” folder, and the executable also in the “obj”folder.
1.11. Creating and Building An Embedded Computer Project 15
GNATbench for Eclipse User’s Guide, Release 22.0.20210305.w
On the next page we choose the specific toolchain. We also enable the use of “make” to build the project. This usageis strictly optional – gprbuild could be used instead – but we want to illustrate makefile use as well in this example.The page with this set of selections is shown below.
16 Chapter 1. Getting Started

GNATbench for Eclipse User’s Guide, Release 22.0.20210305.w
Press Finish. The new project will be created and you will see it in the GNAT Project Explorer, like so:
1.11. Creating and Building An Embedded Computer Project 17

GNATbench for Eclipse User’s Guide, Release 22.0.20210305.w
If you see files with names beginning with a dot, such as “.project”, you can hide them by customizing the view. First,select the Customize View menu by clicking on the View Menu icon (the down-pointing arrow head at the far right ofthe GNAT Project Explorer view):
18 Chapter 1. Getting Started

GNATbench for Eclipse User’s Guide, Release 22.0.20210305.w
In the Customize View dialog, put a check-mark next to the “.* resources” option to hide all resources with namesbeginning with a dot, like so:
As a result, all files with that naming scheme will be hidden in the view.
In the view of the project (see the figure below), note the presence of the files named “Makefile” and“ppc_elf_demo.gpr”. These are the makefile and GNAT project file, respectively. These files may be edited butthey must not be deleted.
1.11. Creating and Building An Embedded Computer Project 19

GNATbench for Eclipse User’s Guide, Release 22.0.20210305.w
Also note the file containing the main subprogram underneath the source folder (we expanded it to show the file). Thisfile will have the name we specified, “hello.adb”, and will contain a procedure with that unit name:
In a real application we would alter the content of the main subprogram. It is a buildable subprogram, though, withoutany changes, so for the purpose of this tutorial we can leave it as it is.
20 Chapter 1. Getting Started
GNATbench for Eclipse User’s Guide, Release 22.0.20210305.w
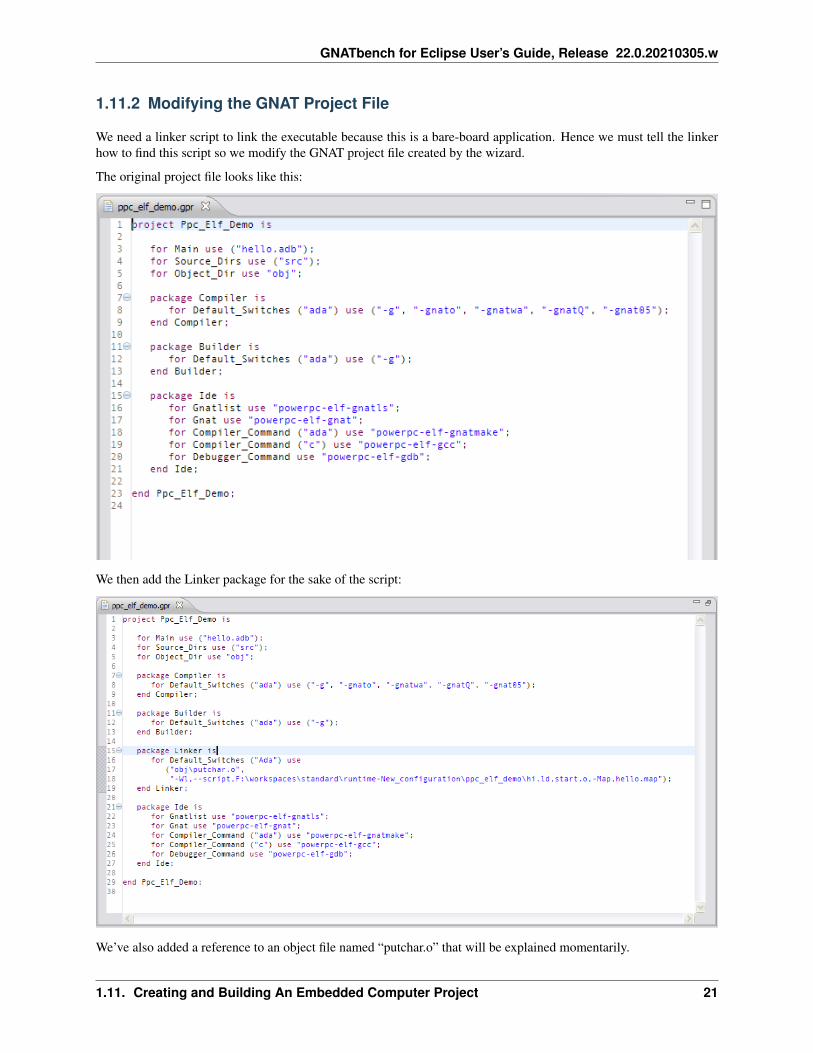
1.11.2 Modifying the GNAT Project File
We need a linker script to link the executable because this is a bare-board application. Hence we must tell the linkerhow to find this script so we modify the GNAT project file created by the wizard.
The original project file looks like this:
We then add the Linker package for the sake of the script:
We’ve also added a reference to an object file named “putchar.o” that will be explained momentarily.
1.11. Creating and Building An Embedded Computer Project 21

GNATbench for Eclipse User’s Guide, Release 22.0.20210305.w
1.11.3 Importing the Script and Sources
We also have to insert this script into the workspace project. We have a stored copy on disk so an easy way to get itinto the project is to use the Import. . . wizard from the Navigator and get the script from the file system.
We also need to import an assembly language source file. This assembly source file contains startup code necessaryfor the application to run on the bare machine.
Similarly, we need the source files for an Ada procedure that defines how to output a character using the hardware onthe bare board. That Ada procedure is the “putchar” routine mentioned earlier in the Linker package. The source filesare located in the “extra_rtl” subdirectory.
We import all of them by selecting “File System” under the “General” category and pressing Next.
22 Chapter 1. Getting Started

GNATbench for Eclipse User’s Guide, Release 22.0.20210305.w
After browsing to the location and selecting the two individual files required, we also select the directory named“extra_rtl” so that the putchar sources will be imported too. Then simply press Finish and the files will be importedinto the project.
After importing the files, the project will now look like this:
1.11. Creating and Building An Embedded Computer Project 23

GNATbench for Eclipse User’s Guide, Release 22.0.20210305.w
1.11.4 Adding A Command
Now that we have the files, we need to compile them, once, before building the entire application. We will add a newcommand and name it “setup” since we only need to compile the source files once. In practice we would have theMakefile automatically invoke this command when necessary, but we will do it manually for the sake of this tutorial.
Therefore, we modify our “Makefile” file to add a “setup” command. This command will be added to the bottom ofthe Makefile:
24 Chapter 1. Getting Started

GNATbench for Eclipse User’s Guide, Release 22.0.20210305.w
Note the comment above the target name. This comment will appear in a dialog box to serve as a reminder of whatthe new command does.
1.11.5 Invoking the User-Defined Command
We can now invoke the Project menu (or the Explorer’s contextual menu) and choose “Invoke Makefile Target” to getthe list of user-defined target commands available. Select the name “setup” among the listed build target names andpress Invoke.
1.11. Creating and Building An Embedded Computer Project 25

GNATbench for Eclipse User’s Guide, Release 22.0.20210305.w
Command execution will be displayed in the console.
If we then expand the “obj” directory in the GNAT Project Explorer we see the resulting files:
26 Chapter 1. Getting Started

GNATbench for Eclipse User’s Guide, Release 22.0.20210305.w
1.11.6 Building the Project
Now that the setup has completed we are ready to do the full build. In the Eclipse menubar, open the Project menuand select “Build Project”.
1.11. Creating and Building An Embedded Computer Project 27

GNATbench for Eclipse User’s Guide, Release 22.0.20210305.w
A successful build will appear in the Console view:
1.11.7 Congratulations!
That’s it! You have created and built a project for an embedded computer using GNATbench for Eclipse.
28 Chapter 1. Getting Started
GNATbench for Eclipse User’s Guide, Release 22.0.20210305.w
1.12 Using GPRbuild To Build An Embedded Computer Project
In this tutorial we will create and build a fully executable bare-board project using GPRbuild. In particular, we willbuild the executable from sources in Ada, C, and assembler.
Creating a new project for Ada development is easy with GNATbench. The wizard will create and configure the projectfor us, and invoking the builder is simply a matter of selecting a command.
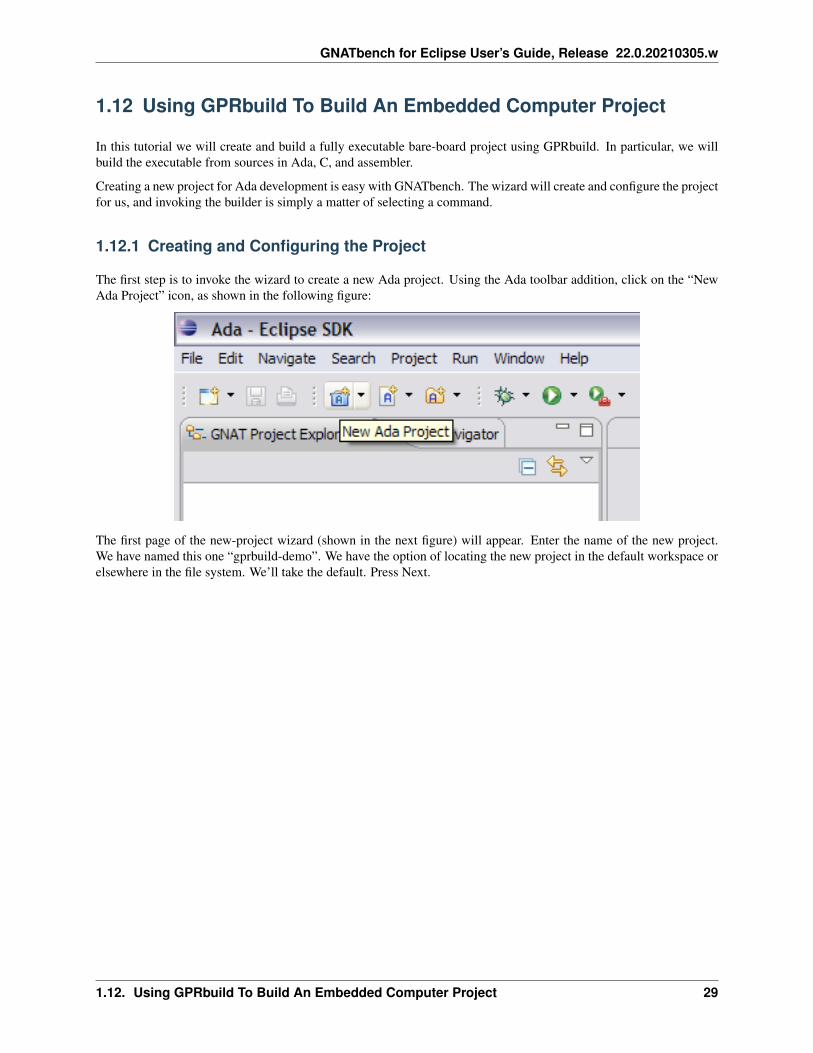
1.12.1 Creating and Configuring the Project
The first step is to invoke the wizard to create a new Ada project. Using the Ada toolbar addition, click on the “NewAda Project” icon, as shown in the following figure:
The first page of the new-project wizard (shown in the next figure) will appear. Enter the name of the new project.We have named this one “gprbuild-demo”. We have the option of locating the new project in the default workspace orelsewhere in the file system. We’ll take the default. Press Next.
1.12. Using GPRbuild To Build An Embedded Computer Project 29

GNATbench for Eclipse User’s Guide, Release 22.0.20210305.w
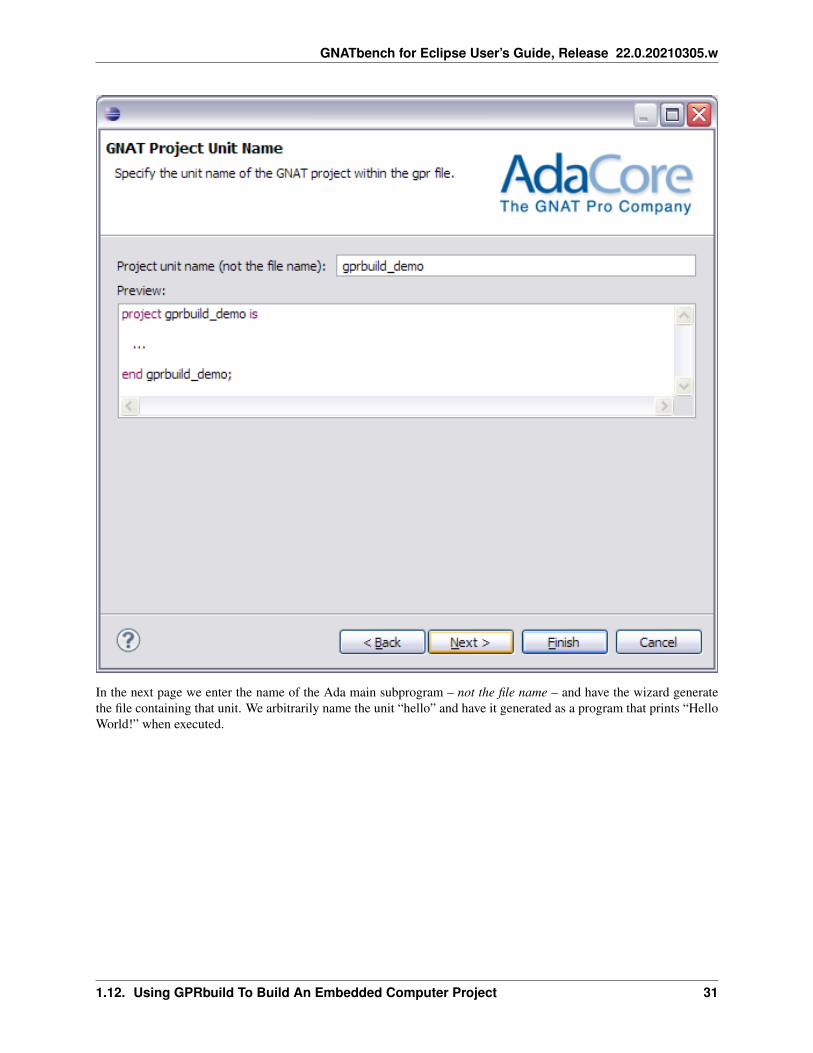
The next page asks us to specify the unit name of the GNAT project (not the file name), that is, the name within thegpr file.
Unlike the Eclipse project name, the GNAT project unit name must be a legal Ada identifier. The wizard will try tomake a legal Ada name from the Eclipse project name, by substituting underscores for dashes for example. (If theEclipse project name is already a legal Ada identifier that name is used unchanged.) In this case the wizard changedthe single dash to an underscore so we have a legal Ada name for the project:
30 Chapter 1. Getting Started
GNATbench for Eclipse User’s Guide, Release 22.0.20210305.w
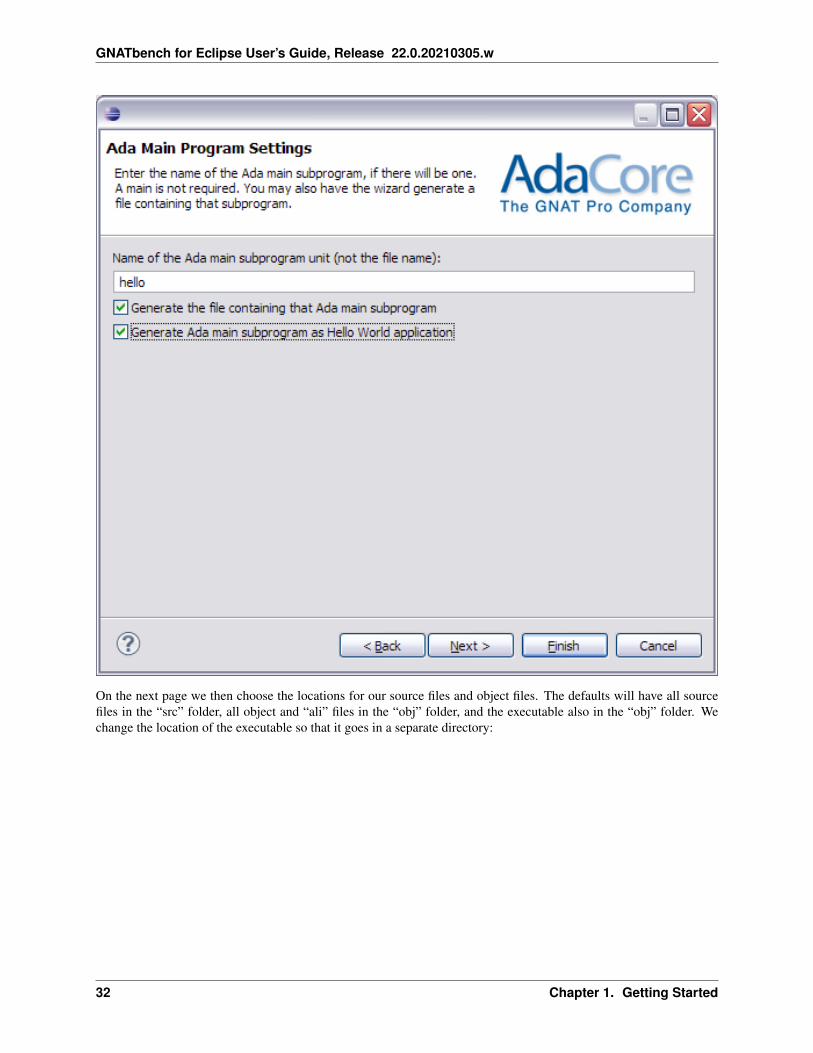
In the next page we enter the name of the Ada main subprogram – not the file name – and have the wizard generatethe file containing that unit. We arbitrarily name the unit “hello” and have it generated as a program that prints “HelloWorld!” when executed.
1.12. Using GPRbuild To Build An Embedded Computer Project 31
GNATbench for Eclipse User’s Guide, Release 22.0.20210305.w
On the next page we then choose the locations for our source files and object files. The defaults will have all sourcefiles in the “src” folder, all object and “ali” files in the “obj” folder, and the executable also in the “obj” folder. Wechange the location of the executable so that it goes in a separate directory:
32 Chapter 1. Getting Started

GNATbench for Eclipse User’s Guide, Release 22.0.20210305.w
On the next page we choose the specific toolchain. We want the PowerPC-Elf toolchain for this demonstration, asshown below.
1.12. Using GPRbuild To Build An Embedded Computer Project 33

GNATbench for Eclipse User’s Guide, Release 22.0.20210305.w
Press Finish. The new project will be created and you will see it in the GNAT Project Explorer, like so:
34 Chapter 1. Getting Started

GNATbench for Eclipse User’s Guide, Release 22.0.20210305.w
In the view of the project (see the figure above), note the presence of the file named “gprbuild_demo.gpr”. This is theGNAT project file. This file may be edited but it must not be deleted.
Also note the file containing the main subprogram underneath the source folder (we expanded it to show the file). Thisfile will have the name we specified, “hello.adb”, and will contain a procedure with that unit name:
We will alter the content of the main subprogram momentarily.
1.12.2 Modifying the GNAT Project File
We must modify the GNAT project file created by the wizard. The original project file looks like this:
1.12. Using GPRbuild To Build An Embedded Computer Project 35
GNATbench for Eclipse User’s Guide, Release 22.0.20210305.w
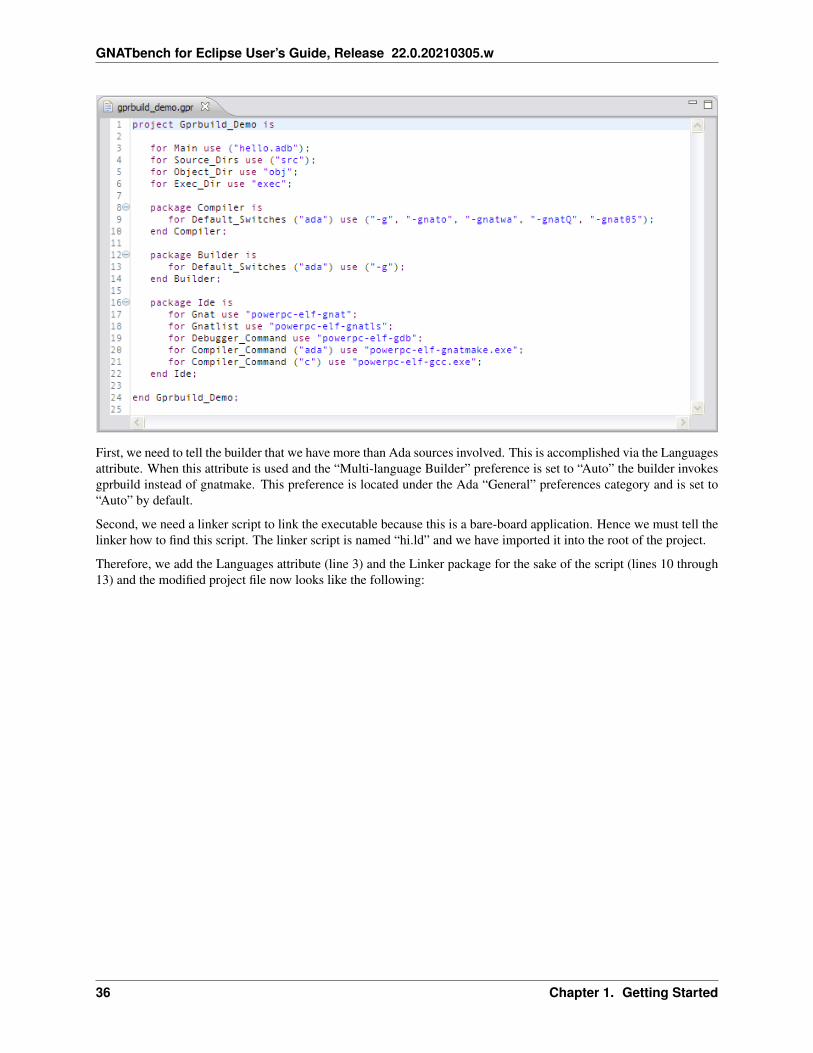
First, we need to tell the builder that we have more than Ada sources involved. This is accomplished via the Languagesattribute. When this attribute is used and the “Multi-language Builder” preference is set to “Auto” the builder invokesgprbuild instead of gnatmake. This preference is located under the Ada “General” preferences category and is set to“Auto” by default.
Second, we need a linker script to link the executable because this is a bare-board application. Hence we must tell thelinker how to find this script. The linker script is named “hi.ld” and we have imported it into the root of the project.
Therefore, we add the Languages attribute (line 3) and the Linker package for the sake of the script (lines 10 through13) and the modified project file now looks like the following:
36 Chapter 1. Getting Started

GNATbench for Eclipse User’s Guide, Release 22.0.20210305.w
1.12.3 The Source Files
As mentioned earlier we have sources in Ada, assembly, and C. You could have written these directly or importedthem from the file system. We imported them in this case. We have expanded the src directory to show them in theproject:
1.12. Using GPRbuild To Build An Embedded Computer Project 37

GNATbench for Eclipse User’s Guide, Release 22.0.20210305.w
The assembly source file (“start.s”) is a short initialization sequence that has to be included in the final image.
The C function is a simple function just for illustration purposes.
1.12.4 Modifying the Main Subprogram Source File
We have altered the main subprogram so that it calls the C function. It also has a with-clause so that the implementationof the putchar routine is included in the executable. (The body of Putchar is referenced by the run-time libraryimplementation of the GNAT.IO package. We call Putchar indirectly, via procedure Put_Line.)
38 Chapter 1. Getting Started

GNATbench for Eclipse User’s Guide, Release 22.0.20210305.w
1.12.5 Building the Project
Now that the setup has completed we are ready to do the full build. In the GNAT Project Explorer, open the contextualmenu and select “Build Project”.
A successful build will appear in the Console view:
Note the invocations of the compiler for the main subprogram (“hello.adb”), the assembly code routine (“start.s”), theC function (“hi.c”), and the other Ada file (“putchar.adb”).
1.12. Using GPRbuild To Build An Embedded Computer Project 39
GNATbench for Eclipse User’s Guide, Release 22.0.20210305.w
1.12.6 Congratulations!
That’s it! You have created and built a project for an embedded computer using GPRbuild.
40 Chapter 1. Getting Started
CHAPTER
TWO
CONCEPTS
2.1 GNAT Pro
2.1.1 GNAT Projects
A “GNAT project” is a specific set of values specifying compilation properties, including the switches to be applied,the source files, their directories, their file naming scheme, the name of the executable (if any), and many other aspects.
A GNAT project is described by one or more “project files”, text files that contain specifications for the propertiesto be set. Project files can be used individually but can also be arranged into hierarchical subsystems, where builddecisions are delegated to the subsystem level, and thus different compilation environments (switch settings) can beused for different subsystems.
Project files can be used on the command line and in scripts (e.g., makefiles). Using project files considerably simplifiescommand line and script usage because some or all of the switches are specified by the project file and, therefore, neednot be written as explicit tool invocation arguments.
The settings specified by a project file become effective when using the GNAT Project Manager. The Project Managerinterprets the content of the project file and applies all the corresponding settings when the tools are invoked.
The Project Explorer project presentation is oriented around GNAT projects and displays their sources accordingly.The source files or a project are made available for editing and it is these Ada source files that the Builder will buildinto an executable.
Because GNAT Project Files and the GNAT Project Manager control what is displayed to the user as well as whatand how executables are built, they form the conceptual foundation for development using GNATbench and should beunderstood by the user.
See the GNAT User’s Guide, section 11 “GNAT Project Manager”, for full details of the Project Manager and projectfiles.
2.1.2 Foreign Ada Source Files
A file containing Ada source code must be part of a GNATbench project in order for the relevant capabilities ofGNATbench to function properly. For example, navigation based on the Ada constructs within the file cannot succeedif the file is not part of a GNATbench project.
Being “part of a GNATbench project” means that it is located in a “source directory”, i.e., one specified, directly orindirectly, in the Source_Dirs attribute of a project managed by GNATbench. All other Ada source files are “foreign”and will not be processed by GNATbench, except for the most basic of functions. Foreign files are not included in aproject build, for example, and navigation and cross referencing for such files will also fail to operate properly.
41

GNATbench for Eclipse User’s Guide, Release 22.0.20210305.w
Foreign files are an issue because there are ways within Eclipse to open arbitrary files, including files containing Adasource code, located either inside or outside the Eclipse workspace. Although the Ada editor will be opened for sucha file, and will be able to function somewhat for editing, other functionality will fail.
When such files are intended to be part of GNATbench they should be located in a source directory specified in theSource_Dirs attribute of an existing GNATbench project. There are various ways to do so, including importing thecontaining folder from the file system via the “Import. . . ” wizard and then ensuring it is in the list of directories in theSource_Dirs attribute. Alternatively, you can import an entire external GNAT (not GNATbench) project into Eclipse,so that it becomes a GNATbench project too. You could even simply copy the file to an existing source directory, butone way or the other, the directory containing the file in question must be a “source directory.”
2.1.3 Project Files
Project file are text files written in a syntax close to that of Ada, using familiar notions such as packages, contextclauses, declarations, default values, assignments, and inheritance.
Packages within project files correspond to individual tools and are thus defined not by the user but by AdaCore.For example, there is a package Compiler, a package Naming_Scheme, a package Builder, and so forth. Users setthe values of switches for a given tool by defining the property settings within the corresponding package. Globalproperties may also be defined within a project file, for example the name of the directory to contain all intermediatebuild products (object files and .ali files).
Property values in project files are either strings or lists of strings. Properties that are not explicitly set receive defaultvalues. A project file may interrogate the values of “external variables” (user-defined command-line switches orenvironment variables), and it may specify property settings conditionally, based on the value of such variables.
Users have available both a GUI interface and a syntax-driven text editor to specify the property values within projectfiles. The following figure shows a simple project file inside the editor (see the corresponding Help files for the detailsof the GUI and this syntax-driven editor). In this case all defaults are taken for the tools and only global propertiesare defined. Specifically, the file name of the main subprogram is specified, the executable is directed to the samedirectory containing the project file itself, and all intermediate products are directed to a directory named “objs”located immediately underneath the directory containing the project file.
Project hierarchies are formed when the so-called “root” project file imports other GNAT project files via “withclauses”, as illustrated in the first line of the following project file:
42 Chapter 2. Concepts

GNATbench for Eclipse User’s Guide, Release 22.0.20210305.w
2.1.4 GNAT Project Manager
The Project Manager is invoked along with a specific tool and applies the properties of a project file to that tool. Thespecific project file to be applied is specified by the “-P” argument when the tool invoked.
For example, suppose we want to invoke the “gnatmake” tool to do a complete build of everything necessary togenerate an executable for some main subprogram. If the project file “myproject.gpr” specifies the name of the mainsubprogram file, all we have to do is invoke gnatmake with the -P switch and specify the name of that project file:
gnatmake -P myproject.gpr
GNATbench will apply the -P switch for you when the builder is invoked, specifying automatically the project file thatcorresponds to the Ada project to be built. You can see the application of the -P switch when watching the build outputin the Builder Console.
2.1. GNAT Pro 43

GNATbench for Eclipse User’s Guide, Release 22.0.20210305.w
2.1.5 Scenario Variables
GNAT project files can define “scenario variables” that allow conditional specifications and external dependencies,among other capabilities.
For example, scenario variables could be used to define two build scenarios in which different switch settings areapplied: one for a debugging release and one for a production release. The debugging release would enable debugginginformation, reduce optimizations for the sake of debugging, and turn on other checks. The production release would,in contrast, disable debugging information and enable extensive optimizations.
External dependencies are possible because the values of scenario variables can be read from environment variablesdefined at the operating system level. Access to the environment variables is via a function named external.
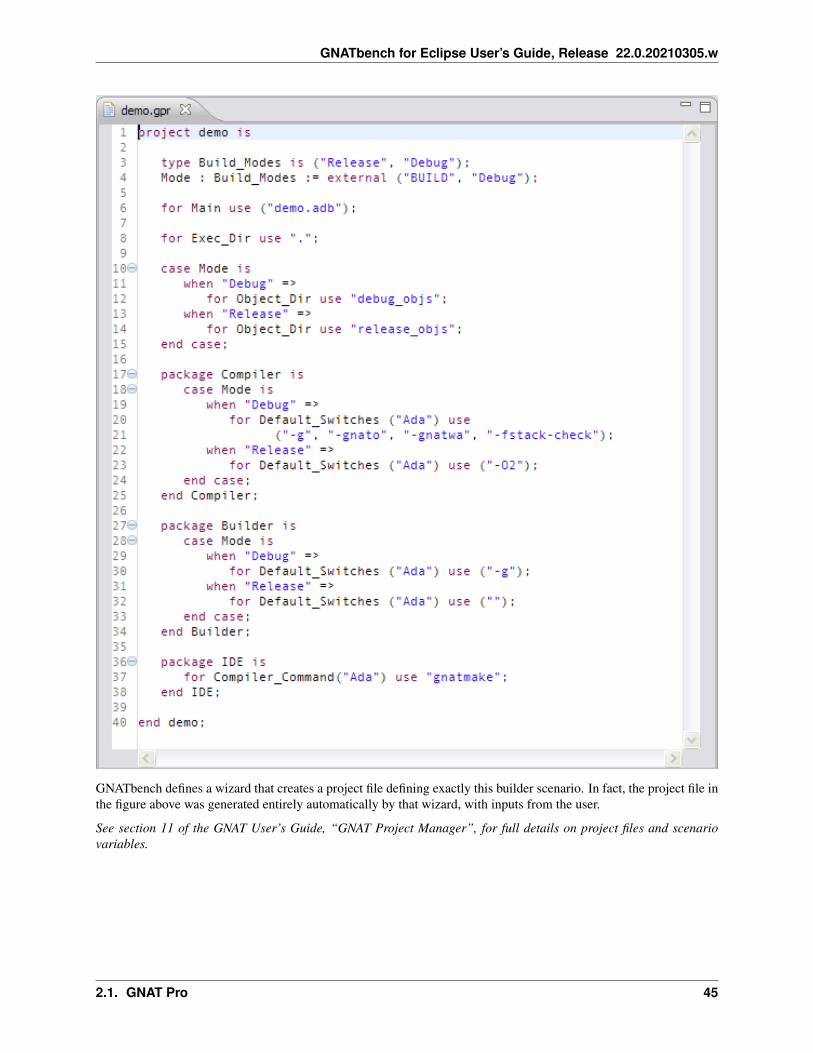
In the following figure, one scenario variable defines the two debug/release build scenarios described above. First, thetype Build_modes defines two possible values (line 3). The a scenario variable of that type named Mode is declared(line 4). The initial value of Mode is from the function external that reads the value of an environment variablenamed “BUILD”, with a default value of “Debug” corresponding to one of the two values that Mode can take on.The value of Mode is then used to further control switch settings. On line 10, for example, the location of the objectdirectory is determined. On line 17 the default compilation switch settings are defined for the two builder modes: lines19-21 specify the “Debug” mode compilation settings, whereas lines 22-23 do so for the “Release” mode compilationsettings.
44 Chapter 2. Concepts
GNATbench for Eclipse User’s Guide, Release 22.0.20210305.w
GNATbench defines a wizard that creates a project file defining exactly this builder scenario. In fact, the project file inthe figure above was generated entirely automatically by that wizard, with inputs from the user.
See section 11 of the GNAT User’s Guide, “GNAT Project Manager”, for full details on project files and scenariovariables.
2.1. GNAT Pro 45

GNATbench for Eclipse User’s Guide, Release 22.0.20210305.w
2.2 GNATbench
2.2.1 Ada Perspective
GNATbench defines a perspective dedicated to the Ada language. The icon representing this perspective (see the figurebelow) has the letter ‘A’ in the upper right, with standard Eclipse symbols denoting packages, types, and tasks in thecenter.
You can select this perspective by clicking on the Ada perspective icon at the upper right of the Eclipse window if theperspective is already opened. In the figure below, the Ada perspective icon is shown immediately to the right of theWorkbench “open perspective” icon:
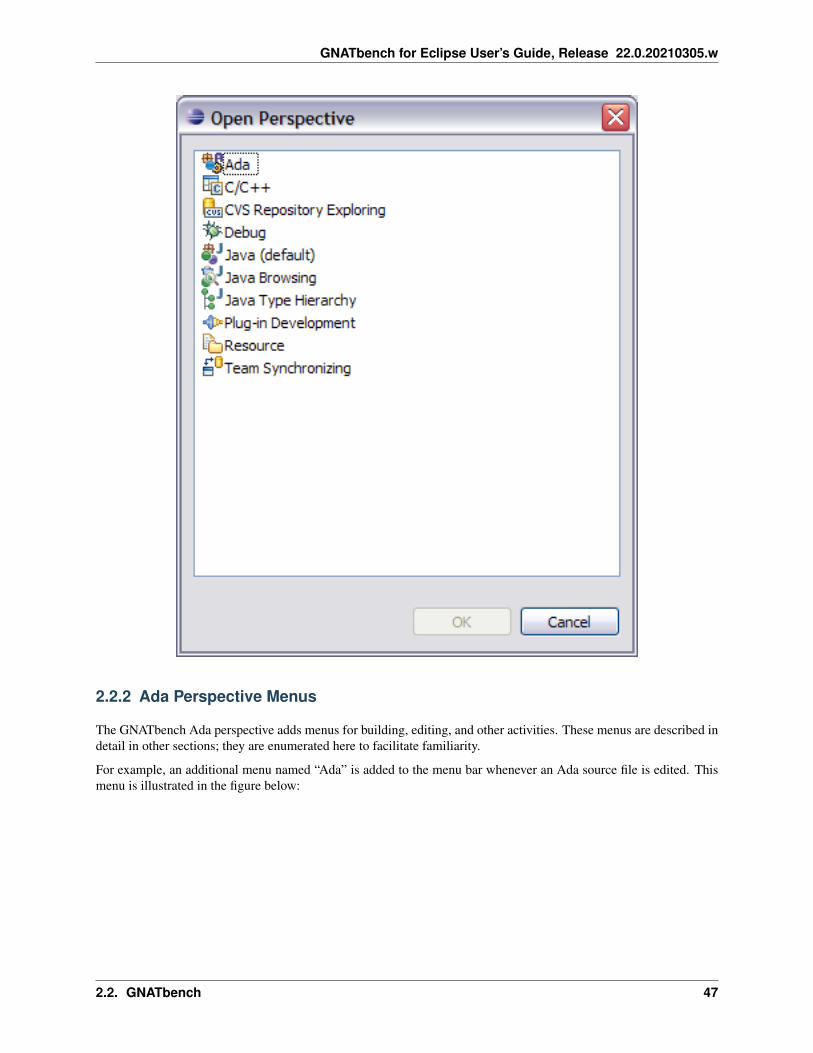
If it is not open already, you can activate the Ada perspective by clicking on the “open perspective” icon and choosing“Other. . . ” and then Ada from the dialog box listing the perspectives. Alternatively, you can use the menu “Window->Open Perspective-> Other. . . ” to open that dialog box. The dialog box appears as follows:
46 Chapter 2. Concepts
GNATbench for Eclipse User’s Guide, Release 22.0.20210305.w
2.2.2 Ada Perspective Menus
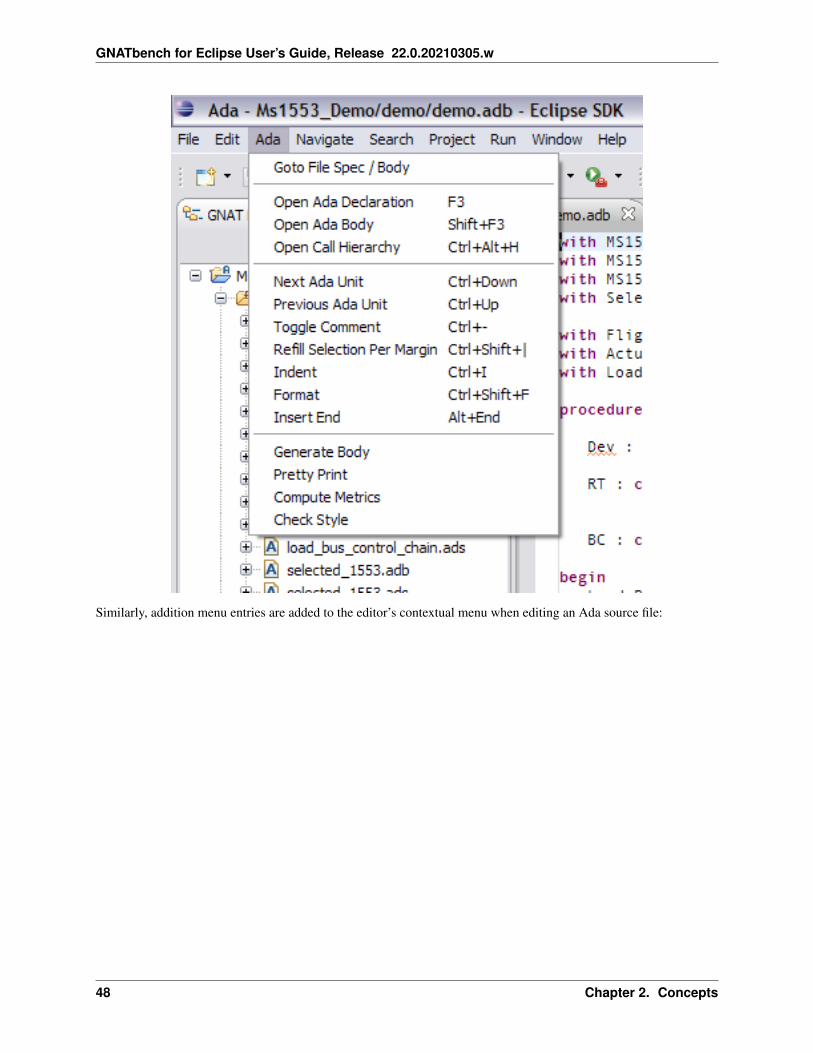
The GNATbench Ada perspective adds menus for building, editing, and other activities. These menus are described indetail in other sections; they are enumerated here to facilitate familiarity.
For example, an additional menu named “Ada” is added to the menu bar whenever an Ada source file is edited. Thismenu is illustrated in the figure below:
2.2. GNATbench 47
GNATbench for Eclipse User’s Guide, Release 22.0.20210305.w
Similarly, addition menu entries are added to the editor’s contextual menu when editing an Ada source file:
48 Chapter 2. Concepts

GNATbench for Eclipse User’s Guide, Release 22.0.20210305.w
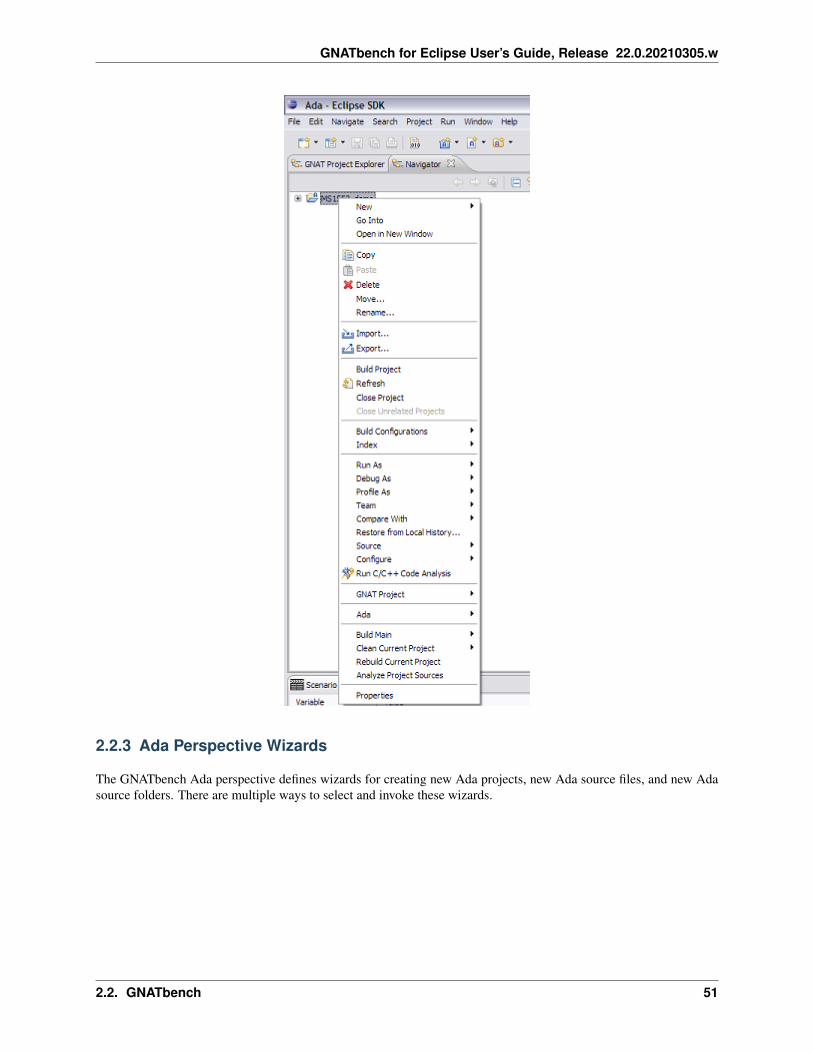
Finally, builder commands are added to the Project menu on the menu bar and the GNAT Project Explorer contextualmenu:
2.2. GNATbench 49

GNATbench for Eclipse User’s Guide, Release 22.0.20210305.w
50 Chapter 2. Concepts
GNATbench for Eclipse User’s Guide, Release 22.0.20210305.w
2.2.3 Ada Perspective Wizards
The GNATbench Ada perspective defines wizards for creating new Ada projects, new Ada source files, and new Adasource folders. There are multiple ways to select and invoke these wizards.
2.2. GNATbench 51

GNATbench for Eclipse User’s Guide, Release 22.0.20210305.w
Using the File Menu
You can use the menu bar and select “File” and then “New”, or use the contextual menu and select “New”. In eithercase you can then select one of the wizards offered:
You could alternatively select “Other. . . ”, as shown in the figure above. This choice will bring up a dialog box showingall the “new” wizards, organized by category, so that you can choose which one to invoke. Note the “Ada” category.
52 Chapter 2. Concepts

GNATbench for Eclipse User’s Guide, Release 22.0.20210305.w
Expand the “Ada” category, if necessary, and choose between the wizards offered there.
2.2. GNATbench 53

GNATbench for Eclipse User’s Guide, Release 22.0.20210305.w
Using the Contextual Menu
You can also use the contextual menu of the GNAT Project Explorer:
54 Chapter 2. Concepts

GNATbench for Eclipse User’s Guide, Release 22.0.20210305.w
The contextual menu of the Navigator also provides these wizards:
2.2. GNATbench 55

GNATbench for Eclipse User’s Guide, Release 22.0.20210305.w
Using the Toolbar
GNATbench also provides additions to the Eclipse toolbar, for creating new Ada projects (highlighted by the tool-tipin this case), new Ada source files, and new Ada source folders (automatically added to the GNAT project file):
Finally, you can use the standard “New” button on the Eclipse toolbar:
56 Chapter 2. Concepts

GNATbench for Eclipse User’s Guide, Release 22.0.20210305.w
2.2.4 GNATbench Project File Editor
GNATbench provides a simple syntax-oriented editor for GNAT Project Files. Although the GUI interface discussedelsewhere is likely more convenient initially, eventually you may want to edit the file directly.
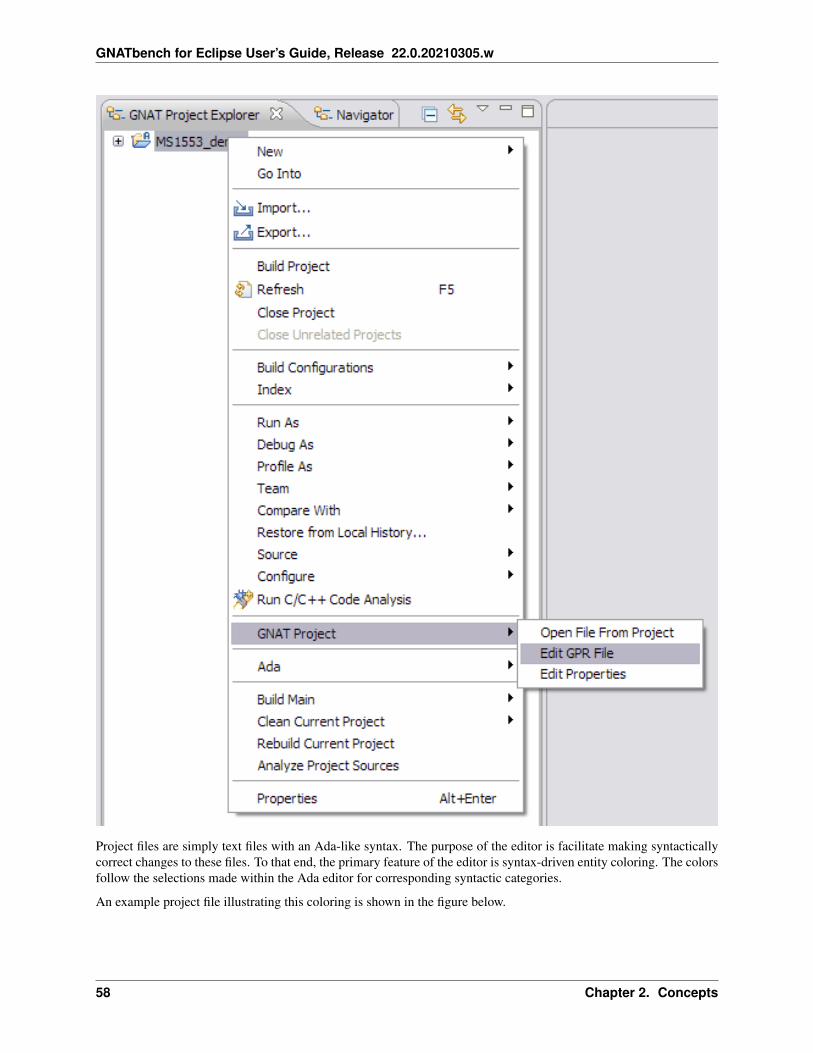
The editor is associated with files having an extension of “.gpr” (standing for “Gnat PRoject”) and is thus invokedby double-clicking on the project file within the various viewers, such as the GNAT Project Explorer. (If the defaultsystem editor is invoked, you can reassign the GNATbench editor by selecting “Open With -> GNAT Project FileEditor” in the contextual menu.)
Note also that you can invoke the editor on a project file even when the file is not visible within one of the viewers.This could be the case when the project file is not resident in the project root, for example. In this case, the viewer’scontextual menu can be used, as shown below:
2.2. GNATbench 57
GNATbench for Eclipse User’s Guide, Release 22.0.20210305.w
Project files are simply text files with an Ada-like syntax. The purpose of the editor is facilitate making syntacticallycorrect changes to these files. To that end, the primary feature of the editor is syntax-driven entity coloring. The colorsfollow the selections made within the Ada editor for corresponding syntactic categories.
An example project file illustrating this coloring is shown in the figure below.
58 Chapter 2. Concepts

GNATbench for Eclipse User’s Guide, Release 22.0.20210305.w
Additionally, the project file editor supports some of the same editor capabilities as the Ada source editor. Specifically,the comment toggle, text refill, smart indenting tab key, and construct closing commands are supported.
The Outline view is also supported for packages, variables, and types.
2.2. GNATbench 59

GNATbench for Eclipse User’s Guide, Release 22.0.20210305.w
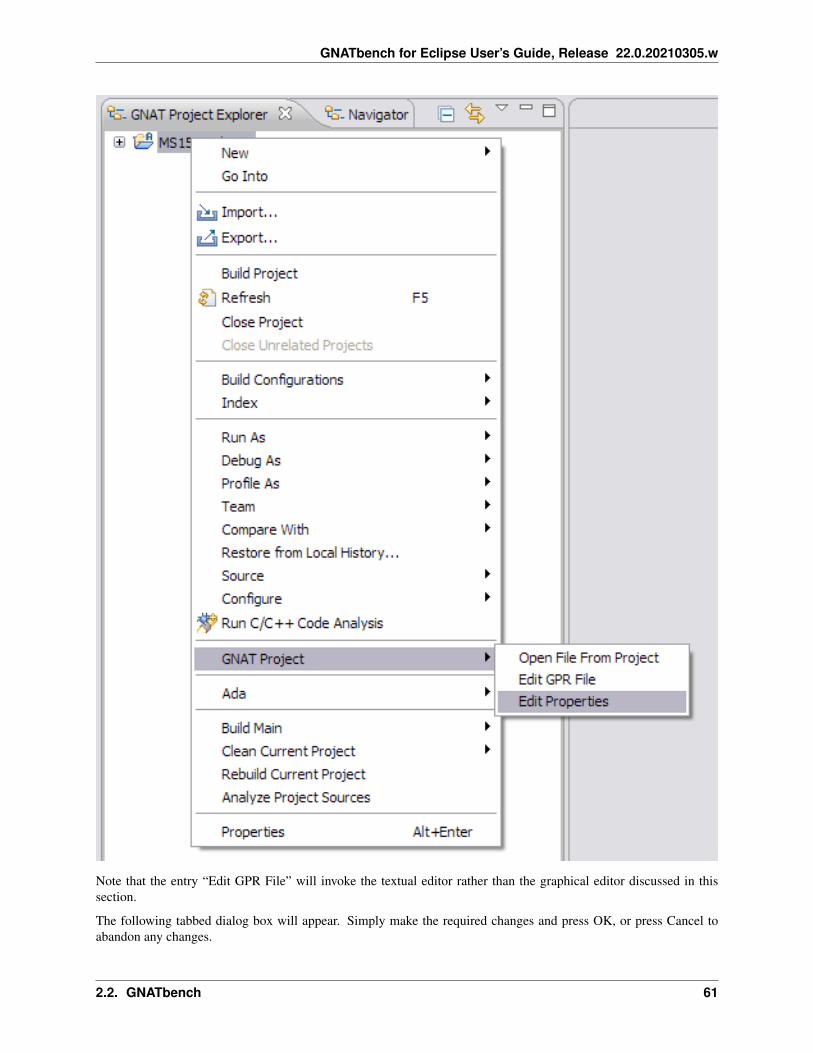
2.2.5 GNAT Project Properties Editor
In addition to manually editing the project file, the GNAT project properties can be also manipulated using a multi-tabbed properties dialog. This dialog box is invoked by right-clicking on the project node in the Project View andselecting “GNAT Project -> Edit Properties” from the contextual menu.
60 Chapter 2. Concepts
GNATbench for Eclipse User’s Guide, Release 22.0.20210305.w
Note that the entry “Edit GPR File” will invoke the textual editor rather than the graphical editor discussed in thissection.
The following tabbed dialog box will appear. Simply make the required changes and press OK, or press Cancel toabandon any changes.
2.2. GNATbench 61

GNATbench for Eclipse User’s Guide, Release 22.0.20210305.w
2.2.6 Outline View
The Ada plugin supports the standard Workbench Outline view, such that a high-level view of the code is available tofacilitate program comprehension and development.
62 Chapter 2. Concepts

GNATbench for Eclipse User’s Guide, Release 22.0.20210305.w
Specifically, the Outline view presents a hierarchy of entity declarations in the file and annotates the presentation withindicators of entity visibility. Green icons indicate “public” entities and red icons indicate “private” entities. For Adaentities that can appear in both public and private sections, such as the partial and full views of private types, the publicsection icon will be green and the private section icon will be red.
Entities displayed in the Outline view can be ordered by type, visibility, and name. Additionally, all private entitiescan be hidden so that only the public interfaces are presented.
Clicking on an entry of the outline will traverse to the corresponding location in the source file.
2.2.7 Scenario Variables View
You can view and modify the scenario variables currently defined by any GNAT project using the Scenario Variablesview.
This view depicts the external scenario variables defined by all GNAT projects, allowing you to chose the values toapply to them. The external names of the variables appear underneath their defining project names, with the possiblevalues for each variable in the corresponding pull-down list. You can click on the value to invoke the pull-down list,or click on the down-arrow at the right of the value.
If a given project does not define any scenario variables, none will appear underneath the project name. Projects thatare not Ada projects will not appear in the view at all, nor will those Ada projects that are not root projects.
2.2. GNATbench 63

GNATbench for Eclipse User’s Guide, Release 22.0.20210305.w
2.2.8 Call Hierarchy View
The GNATbench Ada plugin also supports the Call Hierarchy View. This view shows all the invocations of a givensubprogram or, alternatively, all subprograms invoked by that selected subprogram.
The view is opened by selecting the subprogram in question, right-clicking to invoke the contextual menu, and thenselecting Open Call Hierarchy in that menu.
Alternatively, pressing control+alt+H will open the view on the subprogram currently selected.
The following is a Call Hierarchy View for a procedure named Display, showing the routines it invokes.
64 Chapter 2. Concepts

GNATbench for Eclipse User’s Guide, Release 22.0.20210305.w
2.2.9 GNAT Project Explorer
The GNAT Project Explorer provides a GNAT-specific view of the project, including a contextual menu, without theadditional information provided by the Navigator (for example) that might be extraneous in normal use. Projects thatare not configured as GNATbench projects are given the standard resource layout with no changes. With the GNATProject Explorer you will not need to use the Eclipse Navigator except for a few Eclipse resource-oriented activities.
In this view, GNATbench projects contain four kind of entries: the source directories, the run-time library, the objectdirectory, and finally the resources present in the project but not managed through the GNAT project file.
The source directories are listed at the beginning of the project. Their content is the exact sources of the project,filtering out non-source files.
The run-time library entry gives access to the run-time files currently used by the project.
The object directory contains the object code files and the ali files generated by the compilation process. Unless youspecify otherwise, this directory will also contain the executable image, but as shown below the executable can be ina dedicated directory as well.
A sample project in the GNAT Project Explorer is shown in the figure below.
Enabling the GNAT Project Explorer
In the Ada perspective you can open the view by using the Window menu entry and selecting the shortcut to the view:
2.2. GNATbench 65

GNATbench for Eclipse User’s Guide, Release 22.0.20210305.w
Otherwise you can use the Window menu entry and select “Show View” -> “Other. . . ” to bring up the dialog boxshown below. Expand the “Ada” category and select “GNAT Project Explorer”.
66 Chapter 2. Concepts

GNATbench for Eclipse User’s Guide, Release 22.0.20210305.w
Press OK and the Explorer will open.
Source Folders and Source Files
“Source folders” are those folders specified in the GNAT project file via the “Source_Dirs” attribute. Similarly, “bi-nary folders” are those folders defined to contain compilation products, such as object files and executables, via the“Object_Dir” and “Exec_Dir” attributes. The figure below illustrates two of these attributes:
“Source files” are files that are both located within “source folders” and are of recognized languages defined by GNATand the GNAT project file. The next figure shows a typical definition of the Languages attribute in a project file:
The GNAT Project Explorer only shows the “source files” within a “source folder”. If you want to maintain other filesin folders, you should create additional folders to contain them rather than use a “source folder” for that purpose.
2.2. GNATbench 67
GNATbench for Eclipse User’s Guide, Release 22.0.20210305.w
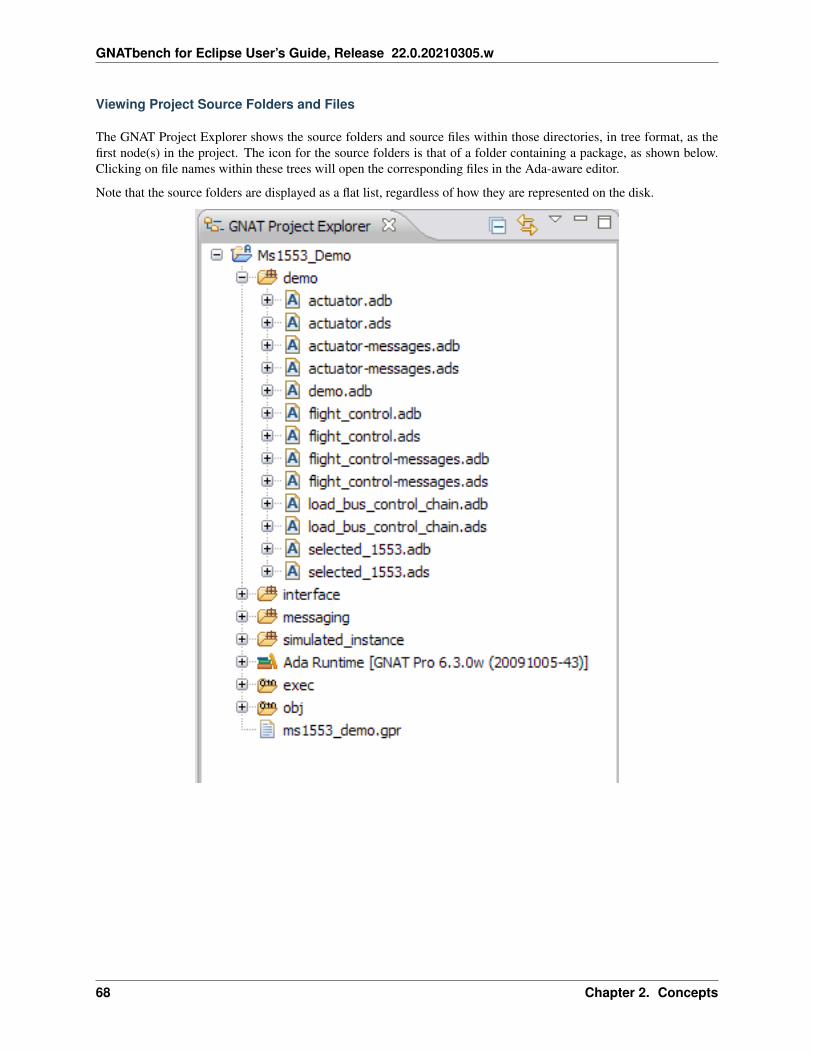
Viewing Project Source Folders and Files
The GNAT Project Explorer shows the source folders and source files within those directories, in tree format, as thefirst node(s) in the project. The icon for the source folders is that of a folder containing a package, as shown below.Clicking on file names within these trees will open the corresponding files in the Ada-aware editor.
Note that the source folders are displayed as a flat list, regardless of how they are represented on the disk.
68 Chapter 2. Concepts

GNATbench for Eclipse User’s Guide, Release 22.0.20210305.w
Browsing Unit Content
Additionally, the GNAT Project Explorer includes browser functionality similar to that of the Outline View. In partic-ular, if you expand a given file node you will see icons for the language-specific contents of the file. Clicking on oneof these entities in the Project Explorer will take you to the source code for that entity, opening the file in an editor ifnot already open.
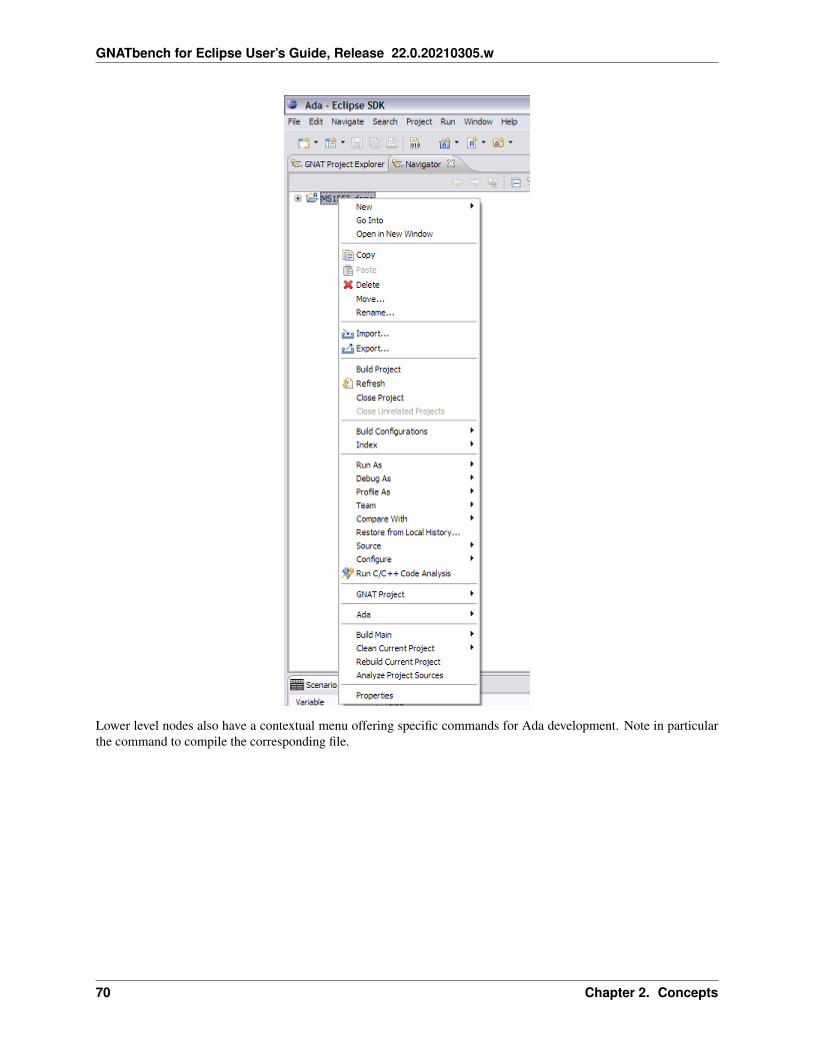
Contextual Menus
Project nodes within the GNAT Project Explorer have a contextual menu offering specific commands for Ada devel-opment, as well as some general capabilities. Additional menu entries for other external tools will also appear, inparticular SPARK and CodePeer, if they are installed.
2.2. GNATbench 69
GNATbench for Eclipse User’s Guide, Release 22.0.20210305.w
Lower level nodes also have a contextual menu offering specific commands for Ada development. Note in particularthe command to compile the corresponding file.
70 Chapter 2. Concepts

GNATbench for Eclipse User’s Guide, Release 22.0.20210305.w
Viewing Run-Time Library Files
The run-time library entry gives access to the run-time files currently used by the project. You can open any of thesefiles in the editor for browsing. You should not alter these files unless you intend to recompile the library.
Note that the run-time library files include the GNAT-provided utility packages in the GNAT.* hierarchy.
Note also that the displayed content may change if you install a new version of the compiler or if you change thesettings of the project file to use a different compiler or run-time library.
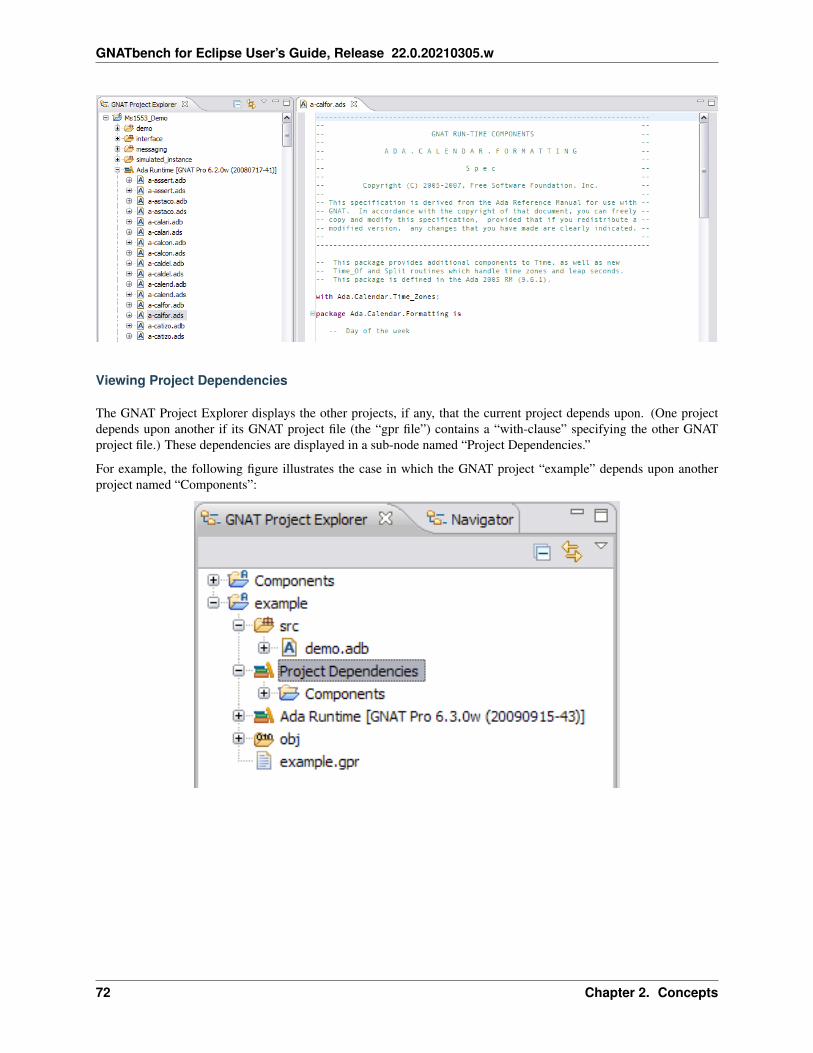
In the following figure we have expanded the run-time library node to show the source files and have opened the specfor package Ada.Calendar.Formatting in the file named “a-calfor.ads”
2.2. GNATbench 71
GNATbench for Eclipse User’s Guide, Release 22.0.20210305.w
Viewing Project Dependencies
The GNAT Project Explorer displays the other projects, if any, that the current project depends upon. (One projectdepends upon another if its GNAT project file (the “gpr file”) contains a “with-clause” specifying the other GNATproject file.) These dependencies are displayed in a sub-node named “Project Dependencies.”
For example, the following figure illustrates the case in which the GNAT project “example” depends upon anotherproject named “Components”:
72 Chapter 2. Concepts

GNATbench for Eclipse User’s Guide, Release 22.0.20210305.w
2.2.10 Metrics View
The Metrics view shows the results of performing a metrics analysis on Ada source files using several different metricquantifiers. See Metrics Analysis for the details.
Results are shown in a tree format, with an overall project summary provided first. Results for each file then follow theproject summary. In the figure below, the view has been maximized to show more of the results, and both the summaryand the results for one of the subprograms have been expanded.
The Metrics view will be opened automatically after the analysis completes. You can open the view manually, usingthe shortcut:
2.2. GNATbench 73
GNATbench for Eclipse User’s Guide, Release 22.0.20210305.w
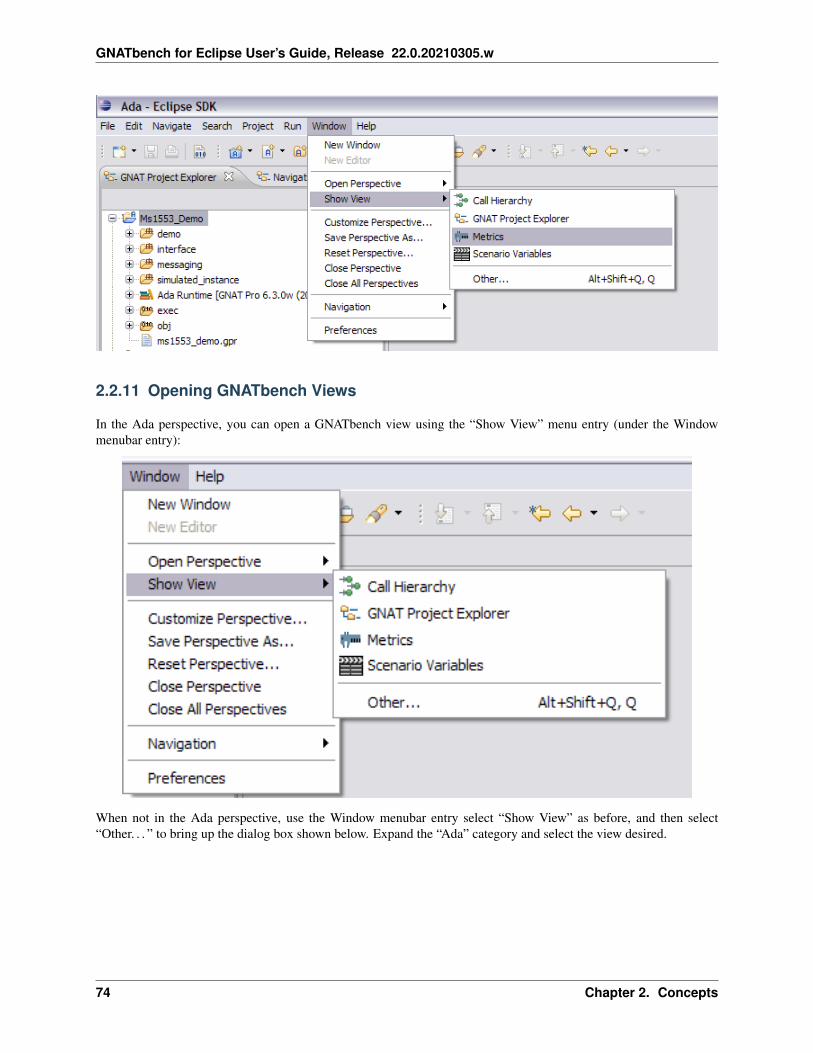
2.2.11 Opening GNATbench Views
In the Ada perspective, you can open a GNATbench view using the “Show View” menu entry (under the Windowmenubar entry):
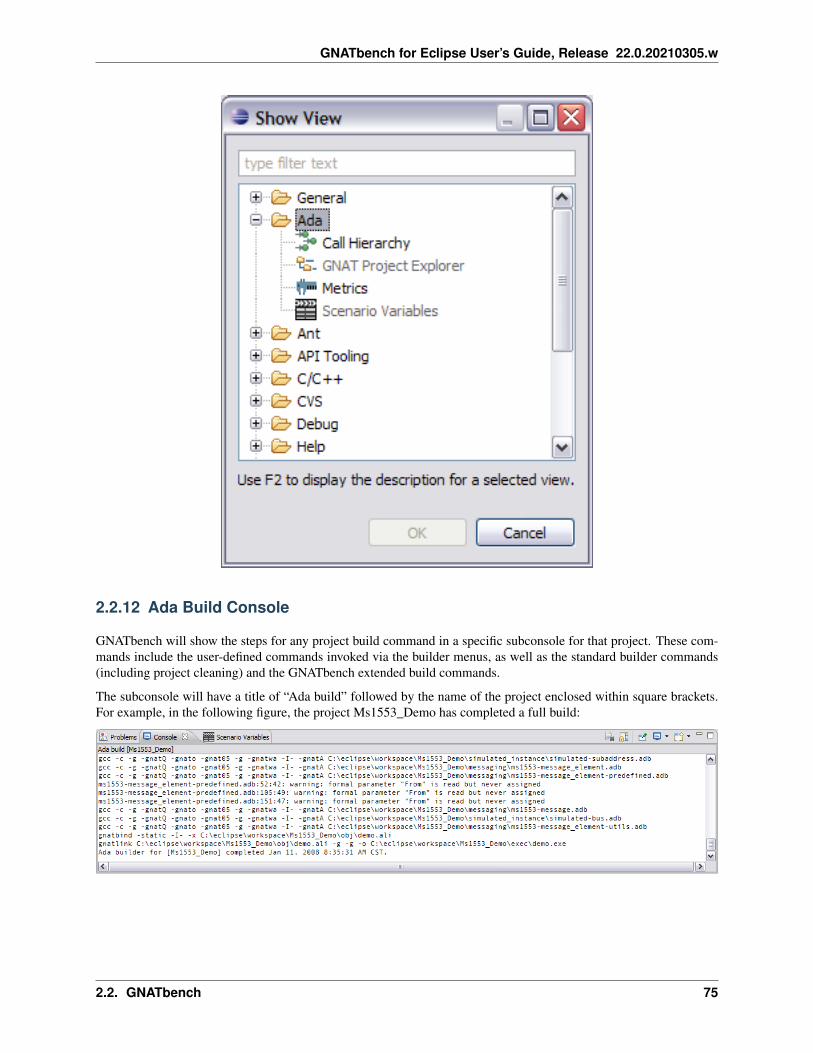
When not in the Ada perspective, use the Window menubar entry select “Show View” as before, and then select“Other. . . ” to bring up the dialog box shown below. Expand the “Ada” category and select the view desired.
74 Chapter 2. Concepts
GNATbench for Eclipse User’s Guide, Release 22.0.20210305.w
2.2.12 Ada Build Console
GNATbench will show the steps for any project build command in a specific subconsole for that project. These com-mands include the user-defined commands invoked via the builder menus, as well as the standard builder commands(including project cleaning) and the GNATbench extended build commands.
The subconsole will have a title of “Ada build” followed by the name of the project enclosed within square brackets.For example, in the following figure, the project Ms1553_Demo has completed a full build:
2.2. GNATbench 75

GNATbench for Eclipse User’s Guide, Release 22.0.20210305.w
2.3 Allocating Enough Memory and Solving OutOfMemoryErrors
With GNATbench installed, you may get OutOfMemoryErrors raised by Eclipse. If this happens, it’s likely the casethat your Java Virtual Machine doesn’t reserve enough memory for Eclipse. There are two ways of solving thisproblem. If the error is raised at startup, you may want to increase the initial amount of memory reserved by thevirtual machine. By default, Eclipse will allocate up to 256 megabytes. But it allows you to pass arguments directlyto the Java VM using the -vmargs command line argument, which must follow all other Eclipse specific arguments.Thus, to increase the available heap memory, you would typically use:
eclipse -vmargs -Xmx<memory size>
with the <memory size> value set to greater than “256M” (256 megabytes – the default).
When using a Sun VM, you may also need to increase the size of the permanent generation memory. The defaultmaximum is 64 megabytes The maximum permanent generation size is increased using the -XX:MaxPermSize= ar-gument:
eclipse -vmargs -XX:MaxPermSize=<memory size>
This argument may not be available for all VM versions and platforms; consult your VM documentation for moredetails.
Note that specifying memory sizes larger than the amount of available physical memory on your machine will causeJava to “thrash” as it copies objects back and forth to virtual memory, which will severely degrade your performance.
76 Chapter 2. Concepts

CHAPTER
THREE
SETTING PREFERENCES
3.1 GNATbench Preferences
GNATbench allows the user to control a number of behaviors and presentation formats. This section introduces andsummarizes the preferences providing those controls.
Most of these preferences are described in detail in the other sections specific to the preference (e.g., automaticindentation is discussed in the Editing section).
In all cases these preferences are initially accessed via the “Window” menu entry and the “Preferences” submenu entrythat brings up the preferences dialog box.
77

GNATbench for Eclipse User’s Guide, Release 22.0.20210305.w
3.2 Builder Targets
GNATbench provides an interface for launching operations like building projects, compiling individual files, perform-ing syntax or semantic checks, and so on. All these operations involve launching an external command and parsing theoutput for error messages. These operations are called “Targets” and can be configured through this preference page.
3.2.1 The Targets Tree
The Targets Tree contains a list of targets organized by category. In the figure above, we have expanded the categoriesto show the individual targets currently defined.
To the right of the tree are several buttons:
• The Add button creates a new target.
• The Remove button removes the currently selected target. Note that only user-defined targets can be removed,the default targets created by GNATbench cannot be removed.
• The Clone button creates a new user-defined target which is identical to the currently selected target.
78 Chapter 3. Setting Preferences

GNATbench for Eclipse User’s Guide, Release 22.0.20210305.w
• The Revert button resets all target settings to their original value.
• The Properties and the Command buttons invoke the dialogs described below.
At the bottom of the tree are the following buttons:
• The Restore Defaults button delete all user-added targets, and revert the others.
• The Apply button saves the modifications and applies them to the platform.
• The OK button stores the modifications in the current workspace and closes the preference page.
• The Cancel button closes the preferences page without saving any further changes.
Note that any modifications saved as a result of previously pressing the Apply button will be retained, they are notundone by Cancel.
3.2.2 The Properties Dialog
The Properties dialog allows you to control how the individual command is presented and how it interacts with theuser.
On top of the dialog one can select the Target model. The Model determines the graphical options available in the“Command line” frame.
3.2. Builder Targets 79

GNATbench for Eclipse User’s Guide, Release 22.0.20210305.w
The “Target Options” frame contains a number of options that are available for all Targets.
• The Launch mode indicates the way the target is launched:
– Manually: the target is launched when clicking on the corresponding icon in the toolbar, or when activatingthe corresponding menu item. In the latter case, a dialog is displayed, allowing last-minute modificationsof the command line.
– Manually with dialog: same as Manually, but the dialog is always displayed, even when clicking on thetoolbar icon.
– Manually with no dialog: same as Manually, but the dialog is never displayed, even when activating themenu item.
– On file save: the Target is launched automatically by GNATbench when a file is saved. The dialog is neverdisplayed.
– In background: the Target is launched automatically in the background after each modification in thesource editor.
• Icon: the icon to use for representing this target in the menus and in the toolbar.
• Target type: type of target described. If empty, or set to Normal, represents a simple target. If set to anothervalue, represents multiple subtargets. For example, if set to main, each subtarget corresponds to a Main sourceas defined in the currently loaded project.
The “Display” frame indicates where the launcher for this target should be visible.
• in the toolbar: when active, a button is displayed in the main toolbar, allowing to quickly launch a Target.
• in the main menu: whether to display a menu item corresponding to the Target in the build menu. By default,Targets in the “File” category are listed directly in the Build menu, and Targets in other categories are listed ina submenu corresponding to the name of the category.
• in contextual menus for projects: whether to display an item in the contextual menu for projects in the ProjectView
• in contextual menus for files: whether to display an item in the contextual menus for files, for instance in fileitems in the Project View or directly on source file editors.
80 Chapter 3. Setting Preferences

GNATbench for Eclipse User’s Guide, Release 22.0.20210305.w
3.2.3 The Command Line Dialog
The “Command Line” dialog contains a graphical interface for some configurable elements of the Target that arespecific to the Model of this Target.
The full command line is displayed at the bottom. Note that it may contain Macro Arguments. For instance if thecommand line contains the string “%PP”, GNATbench will expand this to the full path to the current project.
3.3 Syntax Coloring
The colors for various Ada constructs can be specified via the “General/Appearance/Colors and Fonts” preferencespage. In the resulting scrollable tree panel on the right, expand the “Ada” category to see the constructs that can becontrolled, as shown in the following figure. To change a color, select the construct category and press the coloredbutton on the upper right of the dialog box. The color of the button indicates the current color selection for thatconstruct category.
3.3. Syntax Coloring 81
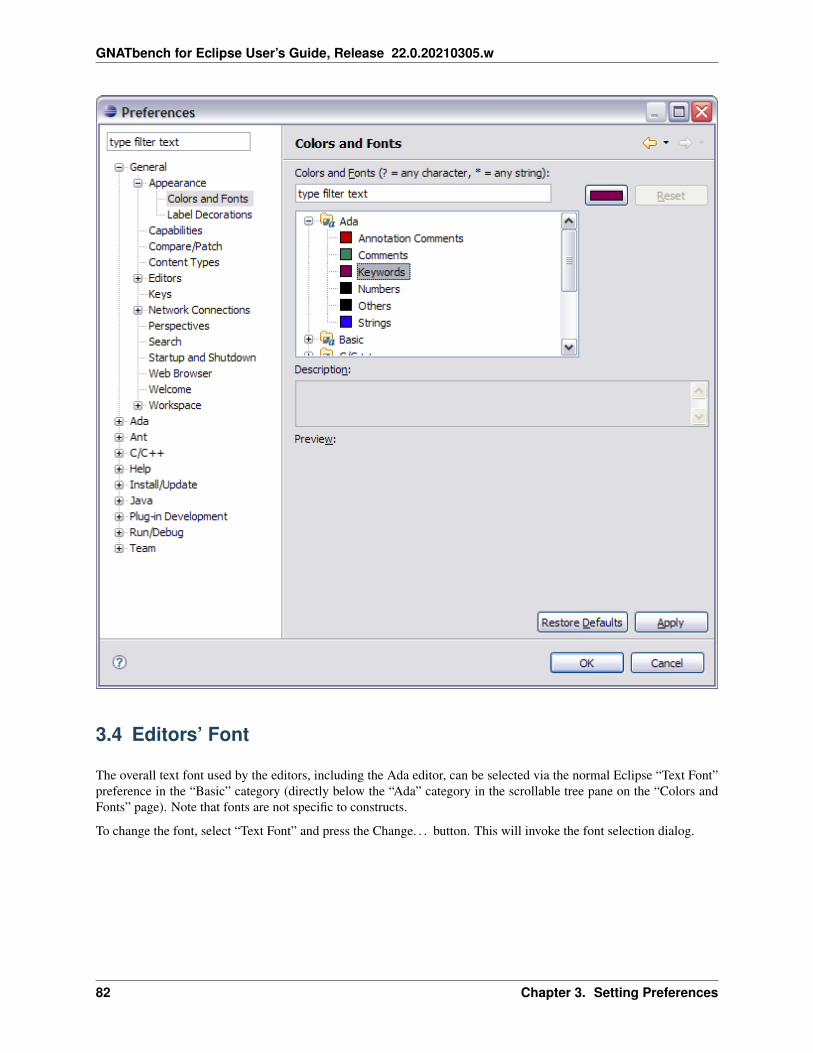
GNATbench for Eclipse User’s Guide, Release 22.0.20210305.w
3.4 Editors’ Font
The overall text font used by the editors, including the Ada editor, can be selected via the normal Eclipse “Text Font”preference in the “Basic” category (directly below the “Ada” category in the scrollable tree pane on the “Colors andFonts” page). Note that fonts are not specific to constructs.
To change the font, select “Text Font” and press the Change. . . button. This will invoke the font selection dialog.
82 Chapter 3. Setting Preferences

GNATbench for Eclipse User’s Guide, Release 22.0.20210305.w
3.5 Coding Style
The many style and formatting preferences, including for example automatic indentation and letter casing preferences,are described in the Editing chapter and are controlled by the preferences page shown below. The default values are asshown.
3.5. Coding Style 83
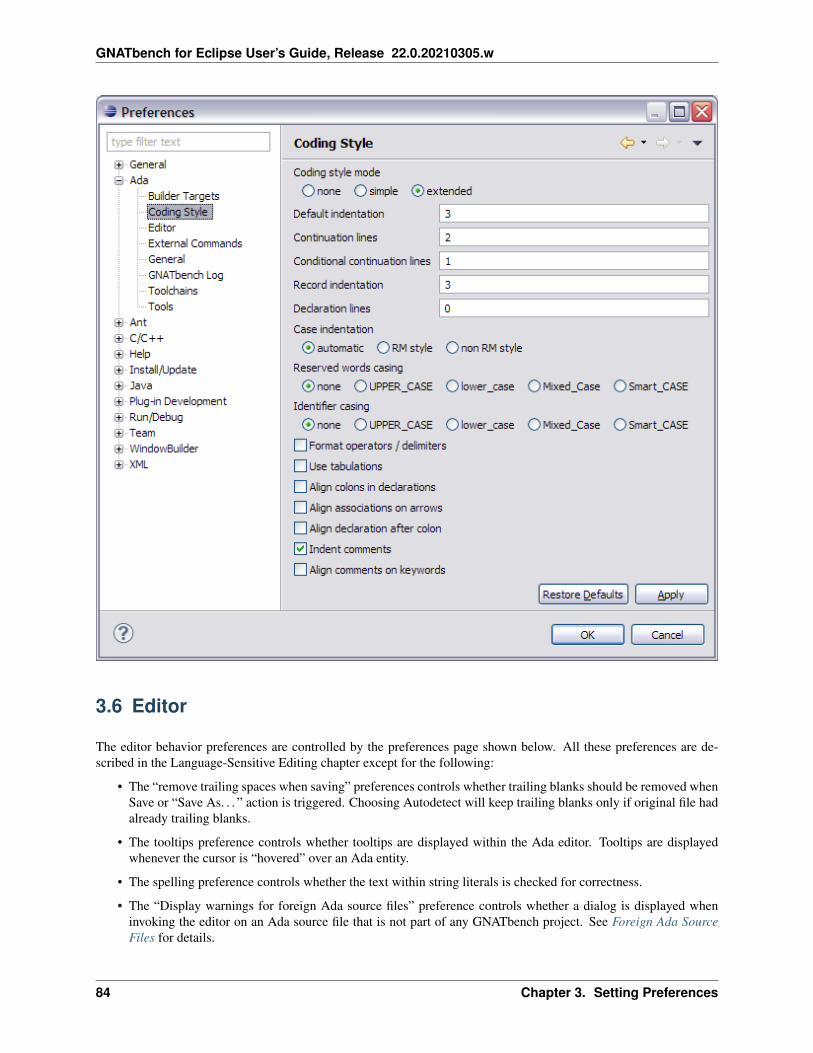
GNATbench for Eclipse User’s Guide, Release 22.0.20210305.w
3.6 Editor
The editor behavior preferences are controlled by the preferences page shown below. All these preferences are de-scribed in the Language-Sensitive Editing chapter except for the following:
• The “remove trailing spaces when saving” preferences controls whether trailing blanks should be removed whenSave or “Save As. . . ” action is triggered. Choosing Autodetect will keep trailing blanks only if original file hadalready trailing blanks.
• The tooltips preference controls whether tooltips are displayed within the Ada editor. Tooltips are displayedwhenever the cursor is “hovered” over an Ada entity.
• The spelling preference controls whether the text within string literals is checked for correctness.
• The “Display warnings for foreign Ada source files” preference controls whether a dialog is displayed wheninvoking the editor on an Ada source file that is not part of any GNATbench project. See Foreign Ada SourceFiles for details.
84 Chapter 3. Setting Preferences

GNATbench for Eclipse User’s Guide, Release 22.0.20210305.w
3.7 General Preferences
General purpose preferences for Ada are controlled by the dialog page in the following figure. The correspondingpreferences dialog page is selected via the “General” page under the “Ada” category. The details of each preferenceare provided after the figure.
3.7. General Preferences 85

GNATbench for Eclipse User’s Guide, Release 22.0.20210305.w
3.7.1 Multi-language Builder
This preference controls the builder to be invoked when building a project containing sources written in languagesother than, or in addition to, Ada.
By default, gprbuild will be used. Alternatively, its prototype gprmake can be selected to help transition togprbuild. General use of gprmake is not recommended.
To select gnatmake you can use the gnatmake setting, even for a project containing non-Ada sources, but notethat gnatmake will only process Ada source files, ignoring all others. Use in a multi-lingual project is therefore notrecommended.
Finally, to always use gprbuild, even when Ada is the only language involved, you can select the gprbuild_alwayssetting.
86 Chapter 3. Setting Preferences

GNATbench for Eclipse User’s Guide, Release 22.0.20210305.w
3.7.2 Fast Project Loading
If enabled, the %eL token is replaced by -eL “Follow symbolic links when processing project files” when expandingbuilder commands. Symbolic links should not be used in the project. More precisely, you can only have symboliclinks that point to files outside of the project, but not to files in the project.
3.7.3 Removal Policy When Fixing Code
This preference controls the way Quick Fix works when parts of the source code must be removed as part of the fix.Always_Remove means that the code will be removed. Always_Comment means that the code will always becommented out. Propose_Both_Choices will propose a menu with both choices.
3.8 GNATbench Trace Log
A “trace” log can be enabled for debugging GNATbench itself. (You will not need to enable this feature in normaloperation.) This feature prints internal state information to a file (specified via this panel) and/or to the Eclipse consolelog. When AdaCore personnel ask you to enable this tracing, please also set the “Debug trace flush limit” preferenceto 0 to overcome any buffering of the information. See the figure below for these preference controls.
3.8. GNATbench Trace Log 87

GNATbench for Eclipse User’s Guide, Release 22.0.20210305.w
If you want the trace information to go to the Eclipse console log, the log can be enabled (if necessary) by adding the“-consolelog” option to the Eclipse invocation.
3.9 Toolchains
The toolchains presented to the user are stored and persist across sessions. These toolchains are presented by thewizard when creating a new project, for example, and in the properties page. You can manage the list with thispreference page.
88 Chapter 3. Setting Preferences

GNATbench for Eclipse User’s Guide, Release 22.0.20210305.w
Note especially that you can update the list of known toolchains by pressing the Scan button, which will locate allGNAT compilers on the path.
3.10 External Commands
GNAT Studio can be invoked as an editor but is especially useful as an Ada-aware debugger and graphical interface.This preference specifies how to invoke GNAT Studio. The preference should only be changed at the suggestion ofAda personnel if a problem is encountered.
Execute command preference defines the program used to execute commands externally.
Make command preference defines the ‘make’ utility.
3.10. External Commands 89

GNATbench for Eclipse User’s Guide, Release 22.0.20210305.w
3.11 Tools
This page of preferences allows the user to configure the way the tools behave.
90 Chapter 3. Setting Preferences

GNATbench for Eclipse User’s Guide, Release 22.0.20210305.w
For example, you can disable the automatic scanning of the toolchains’ run-time libraries for the symbols used byCode Assist. This scanning can take a long time and can therefore be disabled.
Similarly, Code Assist can be considered intrusive by touch-typists, so the facility can be entirely disabled, or ifautomatic invocation is enabled, the interval to delay can be specified.
3.11. Tools 91

GNATbench for Eclipse User’s Guide, Release 22.0.20210305.w
92 Chapter 3. Setting Preferences

CHAPTER
FOUR
CREATING AND CONFIGURING PROJECTS
4.1 Importing Existing GNAT Projects
Importing existing GNAT projects (i.e., those defined by a GNAT project file) is accomplished using a GNATbenchwizard. The wizard handles all the configuration details required to make the existing GNAT project into a GNATbenchproject.
Note that the GNATbench project import wizard cannot handle absolutely any arbitrary existing GNAT project. Theremay be complex configurations controlled by scenario variables, for example, that prevent a full import. In such a casethe best approach is to import the project with the Eclipse project importing wizard, do any manual setup steps nothandled by that wizard, and then convert the project to a GNATbench project using the Converting Existing ProjectsTo GNATbench .
To invoke the wizard you may use either the “File” menu and select “Import. . . ”, or use the contextual menu in theNavigator and again select “Import. . . ” The first approach is illustrated below.
93

GNATbench for Eclipse User’s Guide, Release 22.0.20210305.w
A new wizard page will appear (shown below), allowing you to choose which import wizard to apply. Workbenchdefines a number of import wizards so you may need to expand the “Ada” category. Select “Existing GNAT Project”and press Next.
94 Chapter 4. Creating and Configuring Projects

GNATbench for Eclipse User’s Guide, Release 22.0.20210305.w
The next wizard page appears (see the following figure) and requests the location of the GNAT project file definingthe project to be imported. You may either enter the path manually or browse to it via the “Browse” button to the rightof the text entry pane.
4.1. Importing Existing GNAT Projects 95

GNATbench for Eclipse User’s Guide, Release 22.0.20210305.w
On that same page you also choose whether to import the GNAT project into an existing Eclipse project or into a newEclipse project. Typically you will create a new project rather than import it into an existing project.
That page also offers the choice of whether to copy the files and folders of the GNAT project into the Eclipse projector only create links to the existing files and folders. Creating links does not make a copy of the files, but rather, createstransparent references to all the project resources in the file system outside of the Eclipse workspace. Changes to thefiles, compilation, and deletion within Eclipse will directly affect the files and folders in the external file system whenthe linking option is taken.
96 Chapter 4. Creating and Configuring Projects

GNATbench for Eclipse User’s Guide, Release 22.0.20210305.w
Additionally, you can select the toolchain to be used by the imported project. This selection may be required for thesake of proper handling of “dependent projects” – other projects referenced by the imported project via “with clauses”.If no dependencies exist, or they will be found by default, the toolchain can be left unspecified here.
Press Finish after making all these choices. The new project will be created for you.
Note that you may have to modify the GNAT project file created by the wizard. For example, you might need to re-specify the location of the executable (a directory) if the original GNAT project file specified it with an absolute path.Similarly, the GNAT project file might specify multiple main programs or other properties that should be changed.
You might also need to use the Eclipse-defined import wizards to import additional folders and files. Use the “FileSystem” option under the “General” wizard category to invoke these wizards:
4.1. Importing Existing GNAT Projects 97

GNATbench for Eclipse User’s Guide, Release 22.0.20210305.w
98 Chapter 4. Creating and Configuring Projects
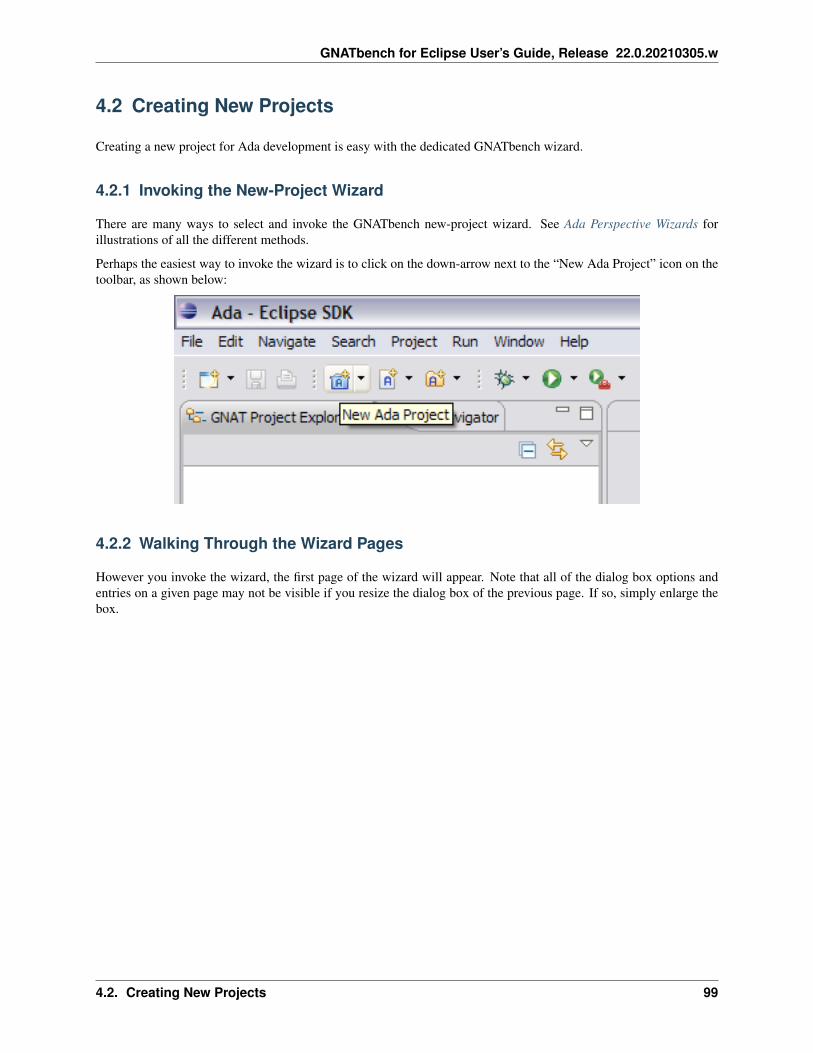
GNATbench for Eclipse User’s Guide, Release 22.0.20210305.w
4.2 Creating New Projects
Creating a new project for Ada development is easy with the dedicated GNATbench wizard.
4.2.1 Invoking the New-Project Wizard
There are many ways to select and invoke the GNATbench new-project wizard. See Ada Perspective Wizards forillustrations of all the different methods.
Perhaps the easiest way to invoke the wizard is to click on the down-arrow next to the “New Ada Project” icon on thetoolbar, as shown below:
4.2.2 Walking Through the Wizard Pages
However you invoke the wizard, the first page of the wizard will appear. Note that all of the dialog box options andentries on a given page may not be visible if you resize the dialog box of the previous page. If so, simply enlarge thebox.
4.2. Creating New Projects 99

GNATbench for Eclipse User’s Guide, Release 22.0.20210305.w
Create New Ada Project page
In the first page you always specify the name of the new project and choose where the new project will reside. Typicallythis location will be the workspace so you can take the default, but otherwise you can specify an external location onthe file system.
GNAT Project Unit Name page
In the next wizard page you specify:
1. the unit name of the GNAT project. This is not the name of the file, also known as the “gpr file.” Rather, it is thename of the unit inside the gpr file. The name you enter is displayed within a project unit declaration in a textframe, as you enter it, to make clear the use for the name requested.
2. the GNAT project type. It can be a single project or a library project if you want to generate a static or dynamic(relocatable) library.
100 Chapter 4. Creating and Configuring Projects

GNATbench for Eclipse User’s Guide, Release 22.0.20210305.w
The unit name need not be the same as the Eclipse project name, but it must be a legal Ada identifier. An error isindicated in the wizard page if this is not the case for the name you enter. The wizard will attempt to convert theEclipse project name into a legal Ada identifier but might not succeed. In that case you must manually change thename, but, again, the unit name can be different from the Eclipse project name.
If you ask to create a library project, pressing Next will take you to the Ada Library Settings page.
4.2. Creating New Projects 101

GNATbench for Eclipse User’s Guide, Release 22.0.20210305.w
If you ask to create a single project, pressing Next will take you to the page shown below, where you specify informa-tion about the Ada main subprogram and make source code generation choices.
102 Chapter 4. Creating and Configuring Projects

GNATbench for Eclipse User’s Guide, Release 22.0.20210305.w
Ada Main Program Settings page
First comes the text entry box where you specify the unit name of the Ada main subprogram, if there is to be one. Notethat this is the name of the subprogram, not the name of the file, so an extension is neither expected nor allowed. Thefield is not required because a main subprogram is not required for an Ada project. For example, if you are creating alibrary project a main unit is not expected.
The first option offered on the page is whether you want the wizard to generate a file containing the main subprogramon your behalf. If you do, the wizard will generate it with the unit name you specify. If no unit name is specified theoption is disabled.
The next option, enabled if the first option is chosen, specifies whether this generated main subprogram implementsthe “hello world” application. This capability is purely for your convenience so that you can immediately have an“interesting” program to build and debug immediately after creating a new project. If chosen, the subprogram willlook like the following (assuming the unit name is “mymain”):
4.2. Creating New Projects 103

GNATbench for Eclipse User’s Guide, Release 22.0.20210305.w
If you do not enable the “hello world” option, the generated main subprogram will have a null statement body.
Pressing Next will take you to the Directories Settings page
Ada Library Settings page
This page allows to configure the following library project attributes:
• Library_Name
• Library_Dir
• Library_Kind
• Library_ALI_Dir
• Library_Version
• Externally_Built
Use tooltips to get documentation about these attributes or open GPRbuild and GPR Companion Tools User’s GuideA copy should be available in “GNATbench Additional Guides” from Help contents menu.
104 Chapter 4. Creating and Configuring Projects

GNATbench for Eclipse User’s Guide, Release 22.0.20210305.w
Pressing Next will take you to the page shown below to finish to configure the library.
Ada Stand-alone Library Settings page
This page allows to configure the following library project attributes:
• Library_Standalone
• Library_Auto_Init
• Library_Src_Dir
• Library_Interface or Interfaces
Set Stand-alone Library Kind to no if your library should not be stand-alone.
Keeping “Generate the files(s) of the interface” checked generates empty specification files.
package demo ispragma Pure;
end demo;
4.2. Creating New Projects 105
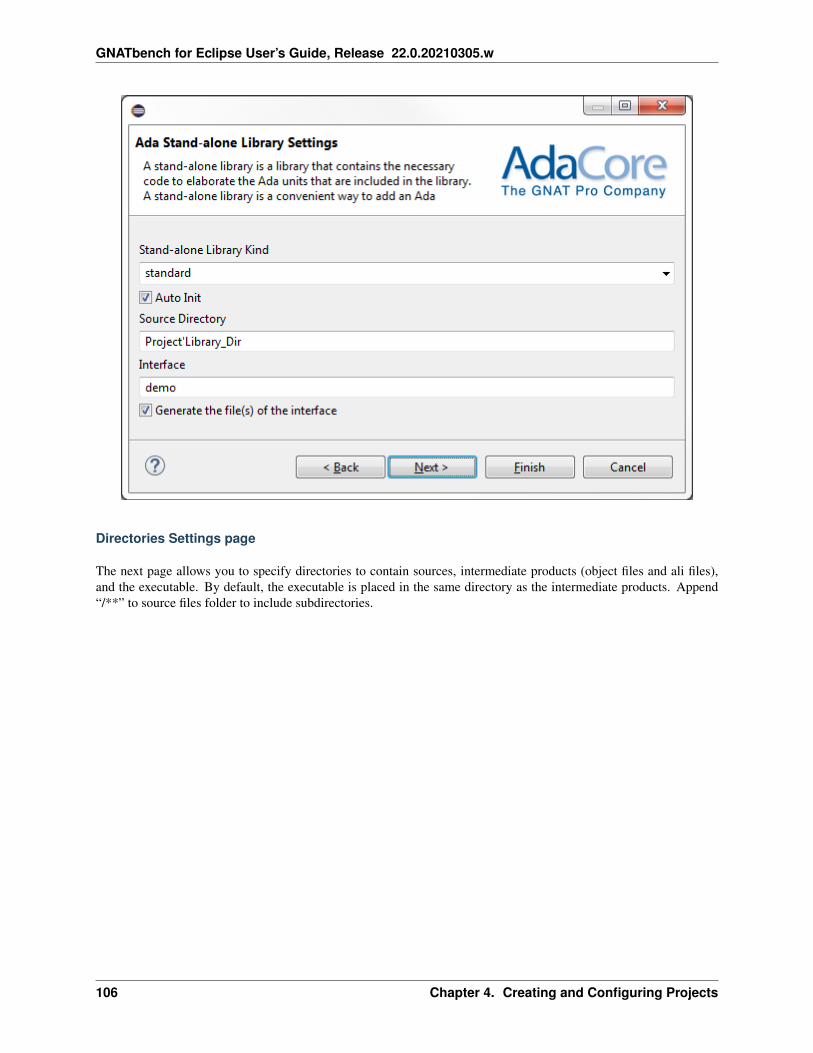
GNATbench for Eclipse User’s Guide, Release 22.0.20210305.w
Directories Settings page
The next page allows you to specify directories to contain sources, intermediate products (object files and ali files),and the executable. By default, the executable is placed in the same directory as the intermediate products. Append“/**” to source files folder to include subdirectories.
106 Chapter 4. Creating and Configuring Projects

GNATbench for Eclipse User’s Guide, Release 22.0.20210305.w
Ada Builder Settings page
The next page is dedicated to the builder.
4.2. Creating New Projects 107

GNATbench for Eclipse User’s Guide, Release 22.0.20210305.w
The first of these configuration choices concerns whether you want to compile using Ada 2012, Ada 2005 or Ada 95.
The next configuration choice determines whether to define two different build scenarios: one scenario for debuggingand one for production. If enabled, a scenario variable will be defined to support these two situations, with appropriateswitches set in the generated project file.
The next configuration choice determines whether the “make” utility, and associated Makefile, will be used to drivethe build. If not enabled, no Makefile will be generated and none will be used to drive the build.
The name of the “make” utility can be changed using the “Ada - External Commands” preferences page. The prefer-ences dialog is accessible via the Window->Preferences menu group.
Next you select the Ada toolchain to use. You select the name from the list of currently installed GNAT toolchainsrecognized by GNATbench, or you can define a toolchain manually.
The list of currently installed builders may be incomplete when the dialog box is first displayed so you may need toupdate the list. To do so, press the “Scan” button. A notification dialog box will appear while GNATbench scansthe machine for installed GNAT toolchains. When the notification disappears the list will have been updated with allinstalled GNAT toolchains. Put a check-mark next to the required toolchain, if it is not already selected, and pressFinish.
Note that you can select multiple toolchains for a given project simply by placing a check-mark next to each requiredtoolchain.
However, instead of selecting one of these toolchains you can create a new one, either by selecting from a predeter-mined list or by defining a completely new one “from scratch.” To do so, press the “Add” button, which will result inanother dialog box appearing, as shown below:
108 Chapter 4. Creating and Configuring Projects

GNATbench for Eclipse User’s Guide, Release 22.0.20210305.w
You can select a toolchain from the pull-down list and, in that case, the other fields will be filled in automatically (andcannot be changed), as indicated by the following figure:
4.2. Creating New Projects 109
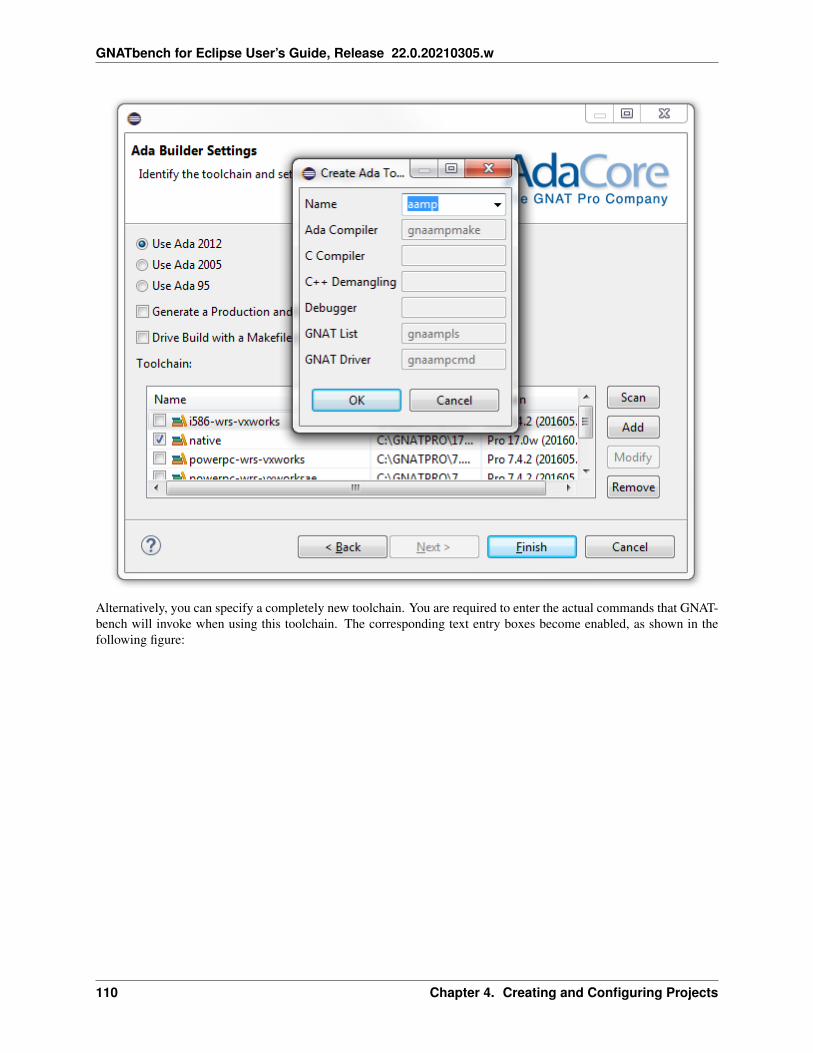
GNATbench for Eclipse User’s Guide, Release 22.0.20210305.w
Alternatively, you can specify a completely new toolchain. You are required to enter the actual commands that GNAT-bench will invoke when using this toolchain. The corresponding text entry boxes become enabled, as shown in thefollowing figure:
110 Chapter 4. Creating and Configuring Projects
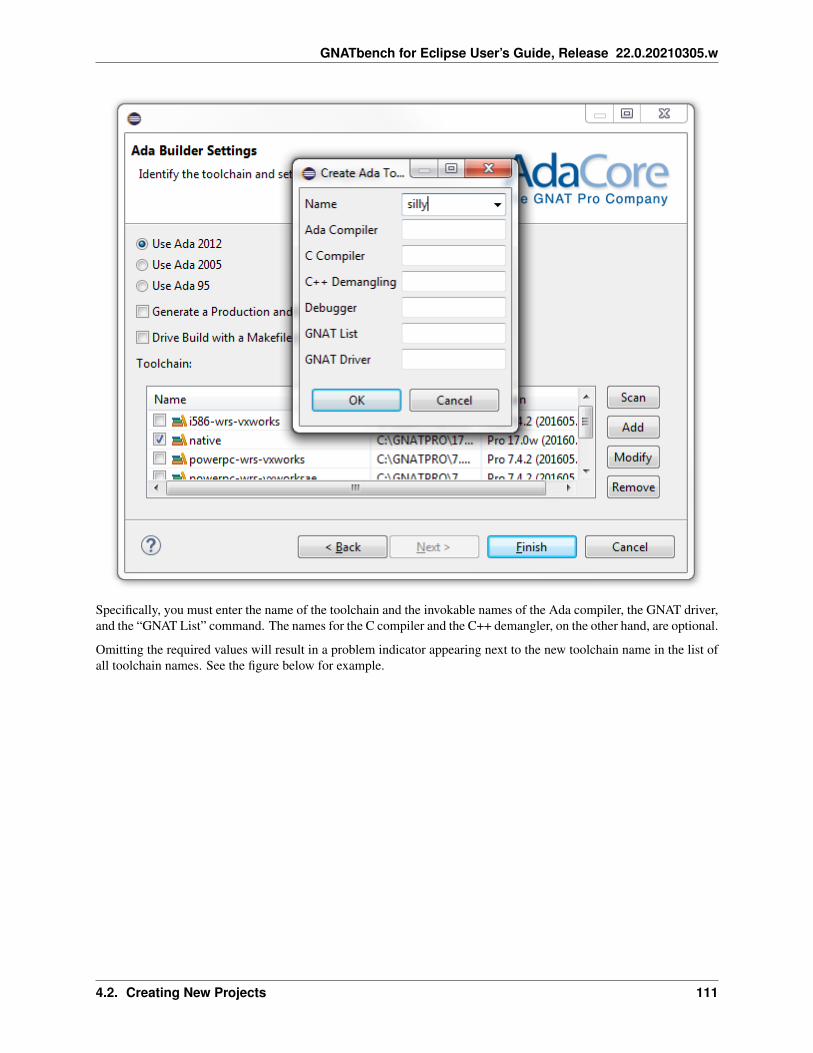
GNATbench for Eclipse User’s Guide, Release 22.0.20210305.w
Specifically, you must enter the name of the toolchain and the invokable names of the Ada compiler, the GNAT driver,and the “GNAT List” command. The names for the C compiler and the C++ demangler, on the other hand, are optional.
Omitting the required values will result in a problem indicator appearing next to the new toolchain name in the list ofall toolchain names. See the figure below for example.
4.2. Creating New Projects 111

GNATbench for Eclipse User’s Guide, Release 22.0.20210305.w
Note that you can modify a user-defined toolchain using the “Modify” button.
Toolchain definitions persist. You can remove them via the “Remove” button.
Once all the required entries are made you can then press Finish and the new project will be created for you.
At any time after the new project wizard completes, you retain the option of selecting and modifying the selectedtoolchains for the project. To do so, select the Properties menu entry for the project and then select the “GNATbenchProperties” page. There you will see a similar interface to the last page of the wizard:
112 Chapter 4. Creating and Configuring Projects

GNATbench for Eclipse User’s Guide, Release 22.0.20210305.w
4.3 Creating New Ada Source Files
There are two wizards defined for creating new files. One wizard creates a new Ada source file and (optionally) insertsa header comment block at the top. Another wizard creates a “basic” file and in fact this wizard is just the standardEclipse “new-file” wizard, provided here for convenience. We describe the Ada Source File wizard below.
4.3.1 Invoking the New-File Wizards
There are many ways to select and invoke the GNATbench wizards. See Ada Perspective Wizards for illustrations ofall the different methods.
Perhaps the easiest way to invoke one of these new-file wizards is to click on the down-arrow next to the GNATbenchnew-file icon on the toolbar, as shown below, and select from the list. Clicking directly on the icon will invoke the“Ada Source File” wizard.
4.3. Creating New Ada Source Files 113
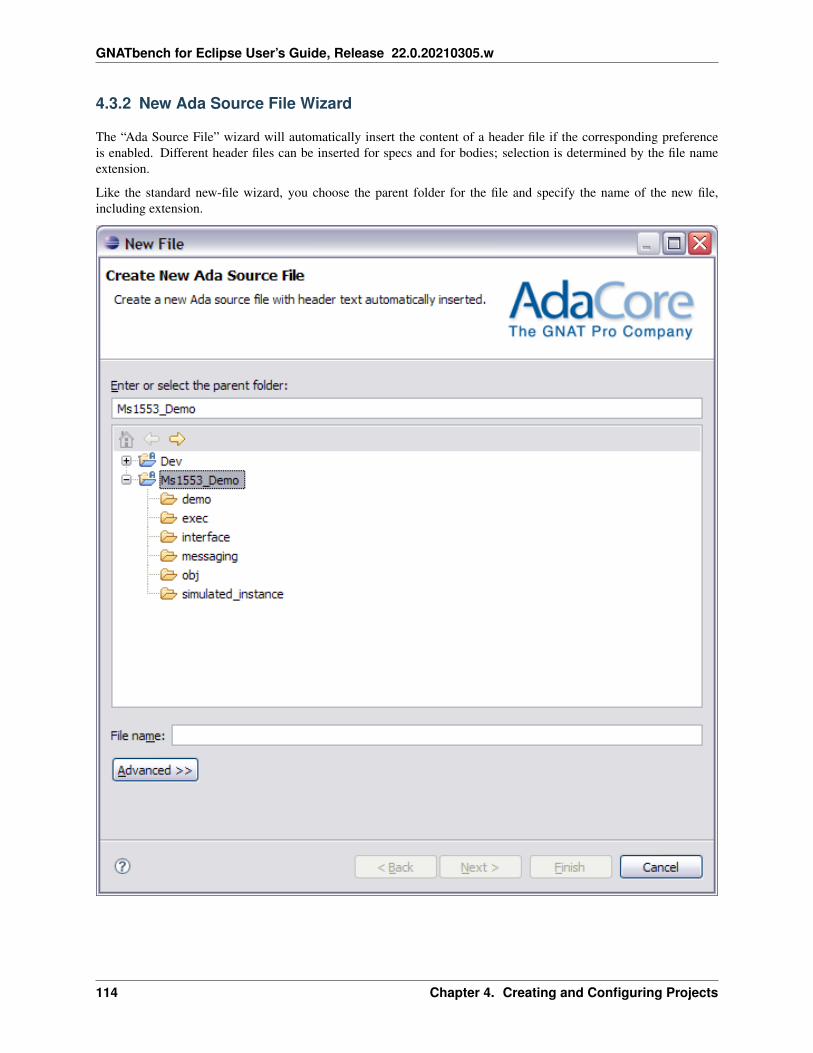
GNATbench for Eclipse User’s Guide, Release 22.0.20210305.w
4.3.2 New Ada Source File Wizard
The “Ada Source File” wizard will automatically insert the content of a header file if the corresponding preferenceis enabled. Different header files can be inserted for specs and for bodies; selection is determined by the file nameextension.
Like the standard new-file wizard, you choose the parent folder for the file and specify the name of the new file,including extension.
114 Chapter 4. Creating and Configuring Projects

GNATbench for Eclipse User’s Guide, Release 22.0.20210305.w
4.3.3 Linked Source Files
In the figure above, the “Advanced” button expands the dialog box to allow creating a source file that is linked to anexisting file in the file system. This option is not currently supported and should not be used. (Linked folders aresupported, however.)
4.3.4 Header Text Insertion
See the Editor preference page for the preference controlling whether the header text is inserted and for the paths tothe files containing the text. The preference is disabled by default.
The header file preferences are intended to designate regular text files containing text capable of being processed byan Eclipse text editor.
Separate text headers are possible for declaration and body files because separate file paths are provided in the pref-erences. However, there is no requirement that they be different so you can simply specify the same file in bothpreferences to have the same header text inserted.
When the preference to insert the header is enabled but no file(s) containing the header text is also specified, the file isstill created but the following dialog box will pop up, explaining why no text was inserted (this sample is for specs):
Note that if the overall enabling preference is checked, both file preferences must be specified (one each for both specand body files). However, if only one kind of file should have a header inserted, simply specify the name of an existingempty file for the other preference.
4.3. Creating New Ada Source Files 115

GNATbench for Eclipse User’s Guide, Release 22.0.20210305.w
4.3.5 File Naming Conformance
The wizard ensures that the new file’s proposed extension is valid for the given project’s source file naming scheme.For example, the following figure shows the error message displayed when the default GNAT naming scheme is ineffect for the given project. Once a valid name is specified, the Finish button will be enabled.
116 Chapter 4. Creating and Configuring Projects
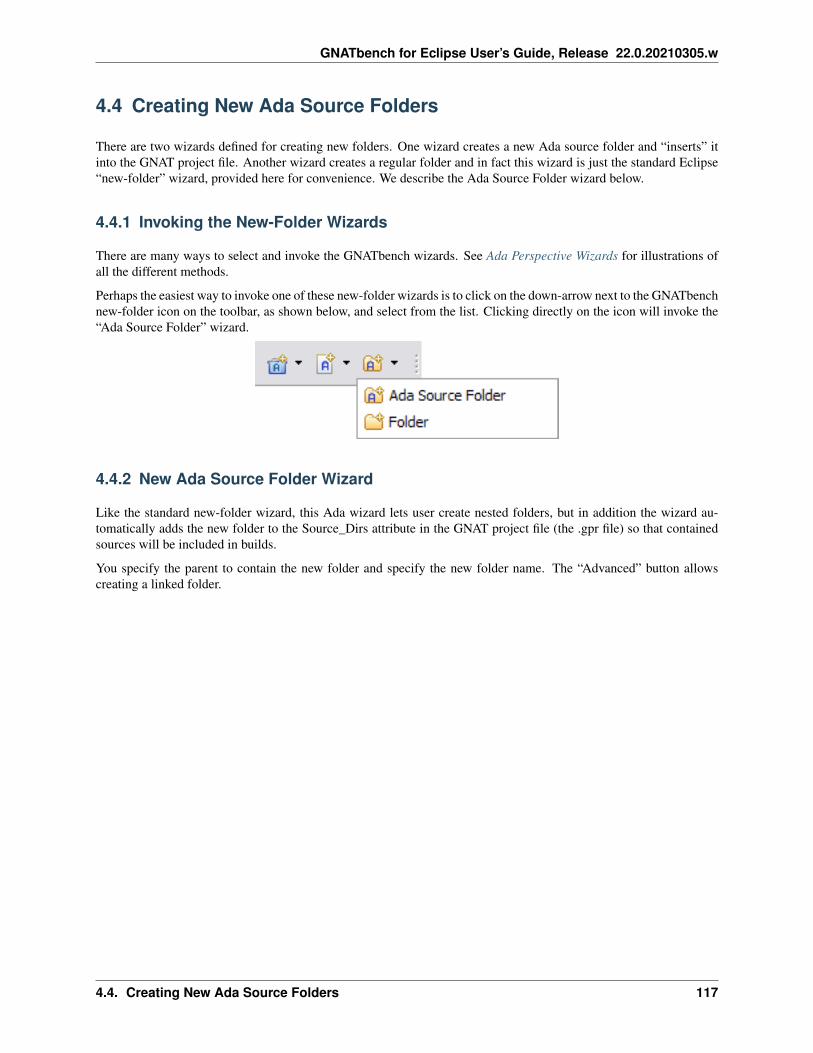
GNATbench for Eclipse User’s Guide, Release 22.0.20210305.w
4.4 Creating New Ada Source Folders
There are two wizards defined for creating new folders. One wizard creates a new Ada source folder and “inserts” itinto the GNAT project file. Another wizard creates a regular folder and in fact this wizard is just the standard Eclipse“new-folder” wizard, provided here for convenience. We describe the Ada Source Folder wizard below.
4.4.1 Invoking the New-Folder Wizards
There are many ways to select and invoke the GNATbench wizards. See Ada Perspective Wizards for illustrations ofall the different methods.
Perhaps the easiest way to invoke one of these new-folder wizards is to click on the down-arrow next to the GNATbenchnew-folder icon on the toolbar, as shown below, and select from the list. Clicking directly on the icon will invoke the“Ada Source Folder” wizard.
4.4.2 New Ada Source Folder Wizard
Like the standard new-folder wizard, this Ada wizard lets user create nested folders, but in addition the wizard au-tomatically adds the new folder to the Source_Dirs attribute in the GNAT project file (the .gpr file) so that containedsources will be included in builds.
You specify the parent to contain the new folder and specify the new folder name. The “Advanced” button allowscreating a linked folder.
4.4. Creating New Ada Source Folders 117

GNATbench for Eclipse User’s Guide, Release 22.0.20210305.w
4.5 Converting Existing Projects To GNATbench
Converting an existing Eclipse project for Ada development with GNATbench is easy with the GNATbench projectconversion wizard.
The wizard offers three alternative conversion approaches. You can apply a GNAT project file (a “gpr file”) foundwithin the existing Eclipse project being converted, you can import an existing GNAT project file located elsewhere,or you can create a new GNAT project file and GNATbench resources as part of the existing Eclipse project. The lattertwo approaches invoke the GNATbench import and new-project wizards, respectively.
To invoke the conversion wizard, right-click on the existing project node in the GNAT Project Explorer, choose “New”and then “Convert to an Ada project.” In the figure below, a “general” Eclipse project has been created and is now
118 Chapter 4. Creating and Configuring Projects

GNATbench for Eclipse User’s Guide, Release 22.0.20210305.w
being converted:
In the resulting page you select the existing Eclipse project to be converted. By default the previously selected projectis already specified. You also select the GNAT project file (the “gpr file”) to be used once the project is converted.
4.5. Converting Existing Projects To GNATbench 119

GNATbench for Eclipse User’s Guide, Release 22.0.20210305.w
Your choice for the GNAT project file determines whether more wizard invocations are required.
If you choose to apply an existing GNAT project file located in the project being converted, once you have specifiedthe file (in the text entry pane) you can then simply press Finish. The existing local project file will be applied andthe conversion wizard completes. This might be the situation when an Eclipse project is first checked out from aconfiguration management system, for example.
Alternatively, you can choose to import an external GNAT project file. In that case, when you press Finish the GNATproject import wizard will execute. The imported GNAT project file and associated resources will be used in theconverted project. See Importing Existing GNAT Projects for the details of that wizard. As noted there, you shouldonly use the import wizard for comparatively simple GNAT projects. For GNAT projects that are too complex to beimported successfully, you should do the manual setup yourself and then use one of the other two conversion optionspresented here.
Finally, you can choose to create a new GNAT project file. In that case when you press Finish the GNATbench NewAda Project wizard will execute. See Creating New Projects for the details of that wizard. The newly created GNATproject file and other resources (such as source and object folders) will be created as part of the existing project beingconverted.
120 Chapter 4. Creating and Configuring Projects
GNATbench for Eclipse User’s Guide, Release 22.0.20210305.w
4.6 Using Non-Default Ada Source File Names
By default, GNAT compilers require a specific Ada source file naming convention. In this default convention, “spec”files (those containing declarations) have an extension of “.ads” and “body” files (those containing completions) havean extension of “.adb” (i.e., ‘s’ for “spec” and ‘b’ for “body”).
GNATbench uses the convention for a given project when displaying and operating upon source files. For example,double-clicking on a file invokes the Ada language-sensitive editor only if the file has an extension indicating that itis indeed a source file. Similarly, only those files recognized as source files are displayed in source folders within theGNAT Project Explorer.
You can change the default Ada source file naming convention used by any given project.
To make the change requires two steps:
• You must specify the new naming scheme in the GNAT project file (the “gpr file”), and
• You must associate the file extension with the AdaCore language-sensitive editor within Eclipse itself.
4.6.1 Specifying the Naming Scheme In the Project File
For the first step, you can use the GUI dialog to specify the naming scheme in the project properties. To invokethe dialog, right-click on the project node in the GNAT Project Explorer, select “GNAT Project”, then select “EditProperties” as shown below. Note that the first time you invoke the dialog it may take a little while to appear.
4.6. Using Non-Default Ada Source File Names 121

GNATbench for Eclipse User’s Guide, Release 22.0.20210305.w
In the resulting dialog, select the Naming tab:
122 Chapter 4. Creating and Configuring Projects

GNATbench for Eclipse User’s Guide, Release 22.0.20210305.w
There are a few alternative naming schemes already defined. Active the pull-down menu to see these alternatives. Ifone of them matches your scheme you simply select that scheme and press OK to finish. Press OK when asked if youwant to save the project file changes.
4.6. Using Non-Default Ada Source File Names 123
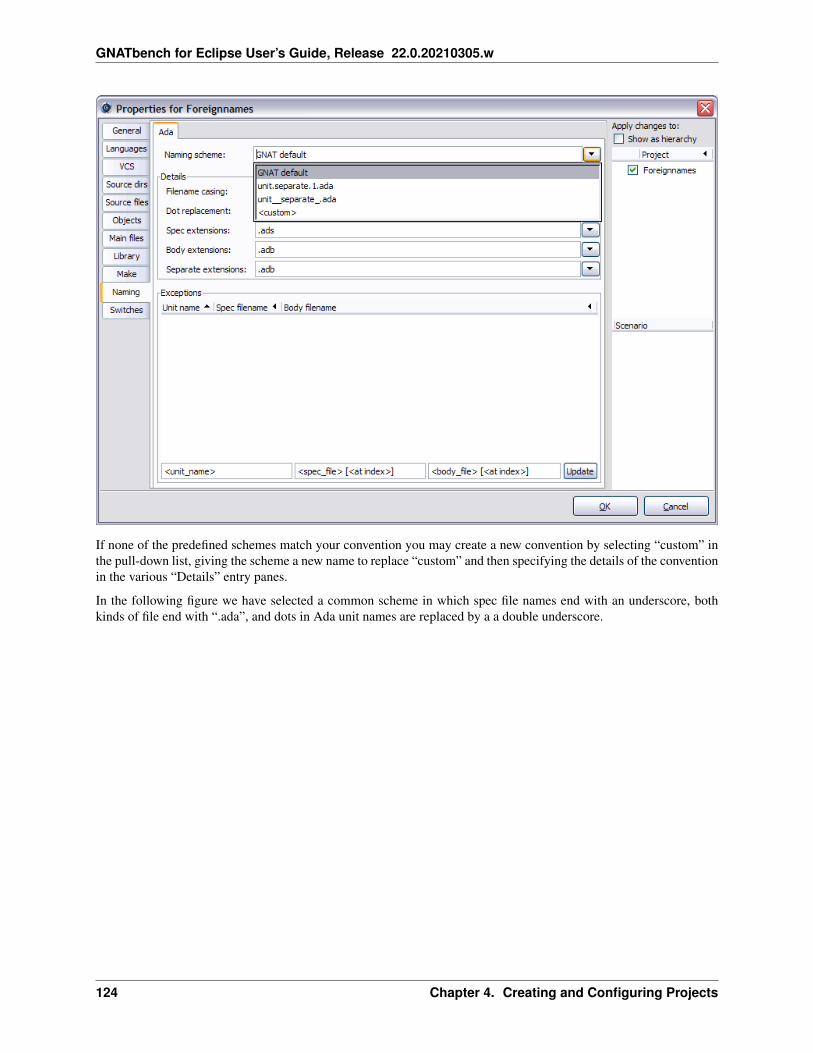
GNATbench for Eclipse User’s Guide, Release 22.0.20210305.w
If none of the predefined schemes match your convention you may create a new convention by selecting “custom” inthe pull-down list, giving the scheme a new name to replace “custom” and then specifying the details of the conventionin the various “Details” entry panes.
In the following figure we have selected a common scheme in which spec file names end with an underscore, bothkinds of file end with “.ada”, and dots in Ada unit names are replaced by a a double underscore.
124 Chapter 4. Creating and Configuring Projects
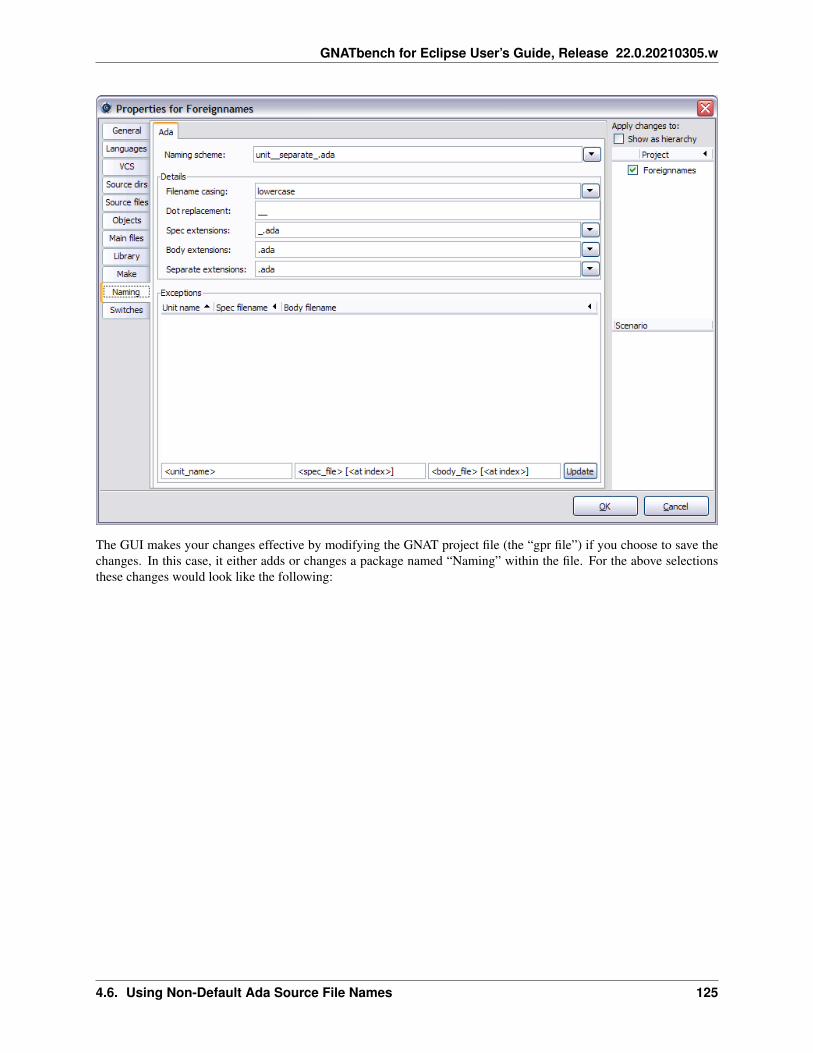
GNATbench for Eclipse User’s Guide, Release 22.0.20210305.w
The GUI makes your changes effective by modifying the GNAT project file (the “gpr file”) if you choose to save thechanges. In this case, it either adds or changes a package named “Naming” within the file. For the above selectionsthese changes would look like the following:
4.6. Using Non-Default Ada Source File Names 125

GNATbench for Eclipse User’s Guide, Release 22.0.20210305.w
As an alternative to the GUI, you may also simply edit the gpr file manually and insert the package Naming and itscontents.
4.6.2 Associating the File Name Extension with the Ada Editor
For the second step, you set the file associations via Eclipse preferences. Specifically, invoke the Window menu andselect Preferences to invoke the dialog. Then expand the General and Editors categories. You should now see a choice“File Associations” underneath the Editors category. Click it to open that page.
126 Chapter 4. Creating and Configuring Projects

GNATbench for Eclipse User’s Guide, Release 22.0.20210305.w
In that page you will see a list of file name extensions on the upper part of the page, and associated editors in thelower part. If your extension is not defined, click the Add button to open a new dialog and specify your extension(e.g., “*.ada”, but without the quotes). For example, the following figure illustrates the Add button dialog with “*.ada”specified:
4.6. Using Non-Default Ada Source File Names 127

GNATbench for Eclipse User’s Guide, Release 22.0.20210305.w
Press OK to close the Add extension dialog.
Then, back in the File Associations page of the original dialog, select your new extension in the upper part of the pageand press the other Add button, the one for the editors in the lower part of the page. Another popup will appear, inwhich you will select “AdaCore’s Ada Editor”:
128 Chapter 4. Creating and Configuring Projects

GNATbench for Eclipse User’s Guide, Release 22.0.20210305.w
Press OK to close the editor selection dialog. The completed association will appear in the File Associations page:
4.6. Using Non-Default Ada Source File Names 129

GNATbench for Eclipse User’s Guide, Release 22.0.20210305.w
Press OK again to close the Preferences dialog and you’re done.
130 Chapter 4. Creating and Configuring Projects

CHAPTER
FIVE
BROWSING AND NAVIGATION
5.1 Crucial Setup Requirement
Unlike Ada-aware editing, which will work for any properly-named Ada source file, browsing and navigating requiresome processing prior to use. Specifically, these facilities require the Ada source code to be in a GNATbenchproject and to have been analyzed by the GNAT Pro compiler. Failure to meet these requirements will result ineither unsuccessful invocations or missing menu entries in some menus.
Being “in” a GNATbench project means that the source code is in a file residing within one of the directories specifiedby the Source_Dirs attribute of a GNATbench project file (the project “gpr file”). Implicit inclusion by residencewithin the same directory as the project file will also suffice.
Analysis by the GNAT Pro compiler happens either automatically, as a result of normal compilation, or explicitly, bymanual invocation of the compiler in a special mode to perform the analysis.
Therefore, building the entire project will make all the sources navigable. Of course, those Ada files not in a GNAT-bench project are not compiled when building the project so they are not analyzed. That means they will not supportnavigation and browsing, even though the Ada editor will open them.
You can compile individual files via the Ada editor’s contextual menu. Manually compiling some of the files willmake some of the files navigable.
Analysis results are stored in a cross-reference database. By default this database is named ‘gnatinspect.db’ and islocated in the project’s object directory.
For your convenience, GNATbench attempts to support navigation prior to the corresponding files’ analysis, but toensure full functionality you must use the compiler to analyze the sources. When the functionality is not possible adialog box will notify you of that fact, suggesting the cause of the problem.
Also for your convenience, GNATbench attempts to support navigation even in the face of changes to the source code.Such changes can invalidate any previous analysis, however, so ensuring accurate navigation functionality requiresthat you re-analyze the code.
5.1.1 The cross-reference database
GNATbench parses the cross-reference information generated by the compiler (the .ali and .gli) files into ansqlite database. This database can become quite large and should preferably be on a fast local disk.
By default, GNATbench places this database in the object directory of the currently-loaded root project. Override thischoice by adding an attribute Xref_Database in the IDE package of your project file, either as an absolute path or apath relative to the location of the project file. We recommend this path be specific to each use, and to each projectthis user might be working on, as in the following examples:
131
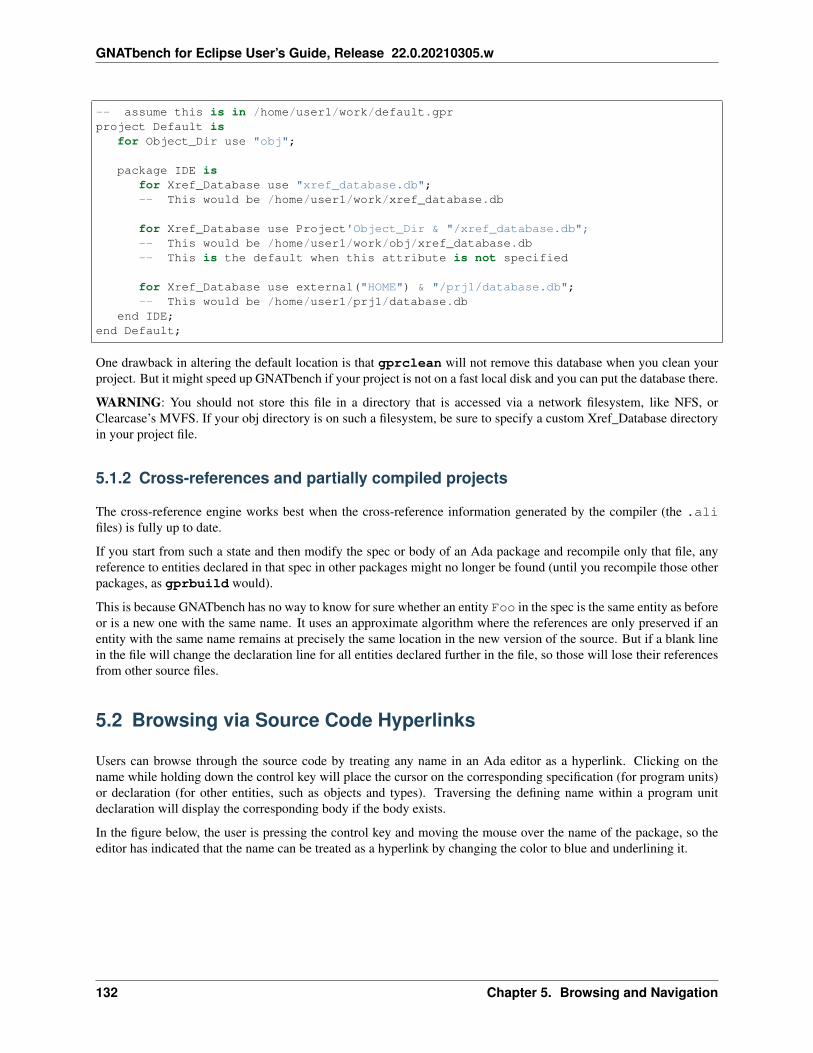
GNATbench for Eclipse User’s Guide, Release 22.0.20210305.w
-- assume this is in /home/user1/work/default.gprproject Default is
for Object_Dir use "obj";
package IDE isfor Xref_Database use "xref_database.db";-- This would be /home/user1/work/xref_database.db
for Xref_Database use Project'Object_Dir & "/xref_database.db";-- This would be /home/user1/work/obj/xref_database.db-- This is the default when this attribute is not specified
for Xref_Database use external("HOME") & "/prj1/database.db";-- This would be /home/user1/prj1/database.db
end IDE;end Default;
One drawback in altering the default location is that gprclean will not remove this database when you clean yourproject. But it might speed up GNATbench if your project is not on a fast local disk and you can put the database there.
WARNING: You should not store this file in a directory that is accessed via a network filesystem, like NFS, orClearcase’s MVFS. If your obj directory is on such a filesystem, be sure to specify a custom Xref_Database directoryin your project file.
5.1.2 Cross-references and partially compiled projects
The cross-reference engine works best when the cross-reference information generated by the compiler (the .alifiles) is fully up to date.
If you start from such a state and then modify the spec or body of an Ada package and recompile only that file, anyreference to entities declared in that spec in other packages might no longer be found (until you recompile those otherpackages, as gprbuild would).
This is because GNATbench has no way to know for sure whether an entity Foo in the spec is the same entity as beforeor is a new one with the same name. It uses an approximate algorithm where the references are only preserved if anentity with the same name remains at precisely the same location in the new version of the source. But if a blank linein the file will change the declaration line for all entities declared further in the file, so those will lose their referencesfrom other source files.
5.2 Browsing via Source Code Hyperlinks
Users can browse through the source code by treating any name in an Ada editor as a hyperlink. Clicking on thename while holding down the control key will place the cursor on the corresponding specification (for program units)or declaration (for other entities, such as objects and types). Traversing the defining name within a program unitdeclaration will display the corresponding body if the body exists.
In the figure below, the user is pressing the control key and moving the mouse over the name of the package, so theeditor has indicated that the name can be treated as a hyperlink by changing the color to blue and underlining it.
132 Chapter 5. Browsing and Navigation

GNATbench for Eclipse User’s Guide, Release 22.0.20210305.w
If the user then clicks on the package name, the editor opens the file containing the corresponding package body andplaces the cursor on that line, as shown in this figure:
5.2. Browsing via Source Code Hyperlinks 133

GNATbench for Eclipse User’s Guide, Release 22.0.20210305.w
Hyperlinks work for the visible and private parts of packages so the full declaration of a private type can be visitedfrom the partial view, and vice versa.
134 Chapter 5. Browsing and Navigation
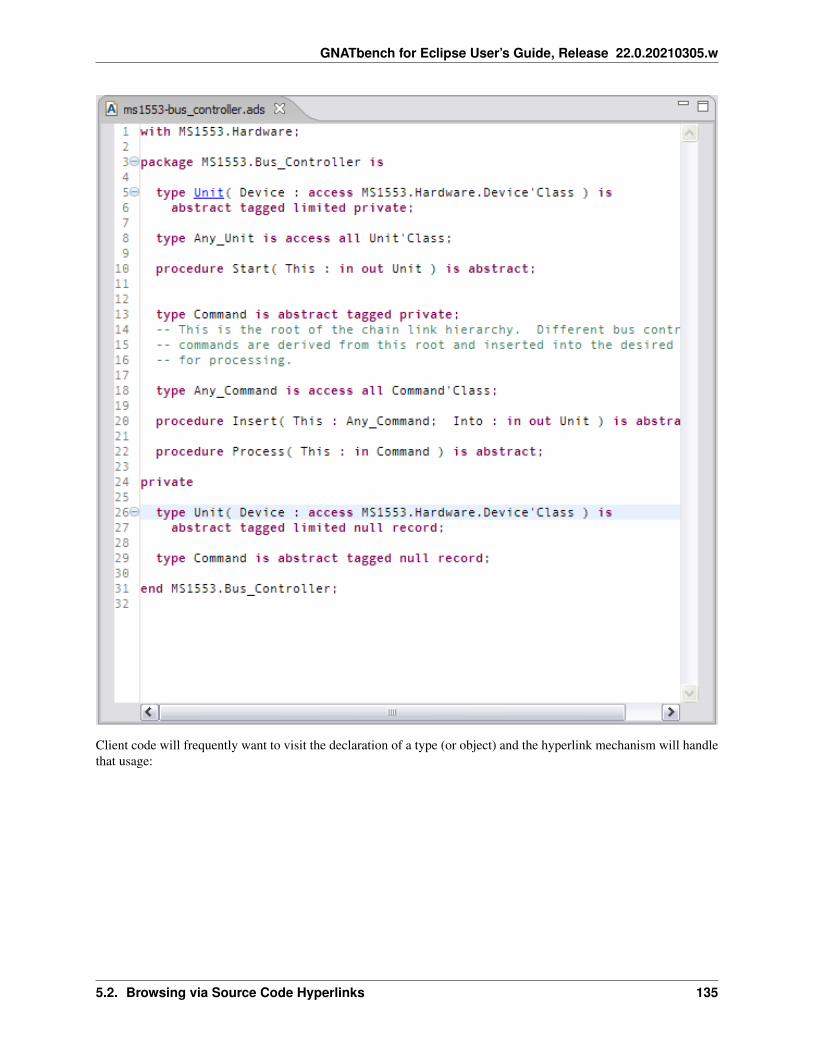
GNATbench for Eclipse User’s Guide, Release 22.0.20210305.w
Client code will frequently want to visit the declaration of a type (or object) and the hyperlink mechanism will handlethat usage:
5.2. Browsing via Source Code Hyperlinks 135

GNATbench for Eclipse User’s Guide, Release 22.0.20210305.w
When clicked, the editor then takes the user to the corresponding declaration:
136 Chapter 5. Browsing and Navigation
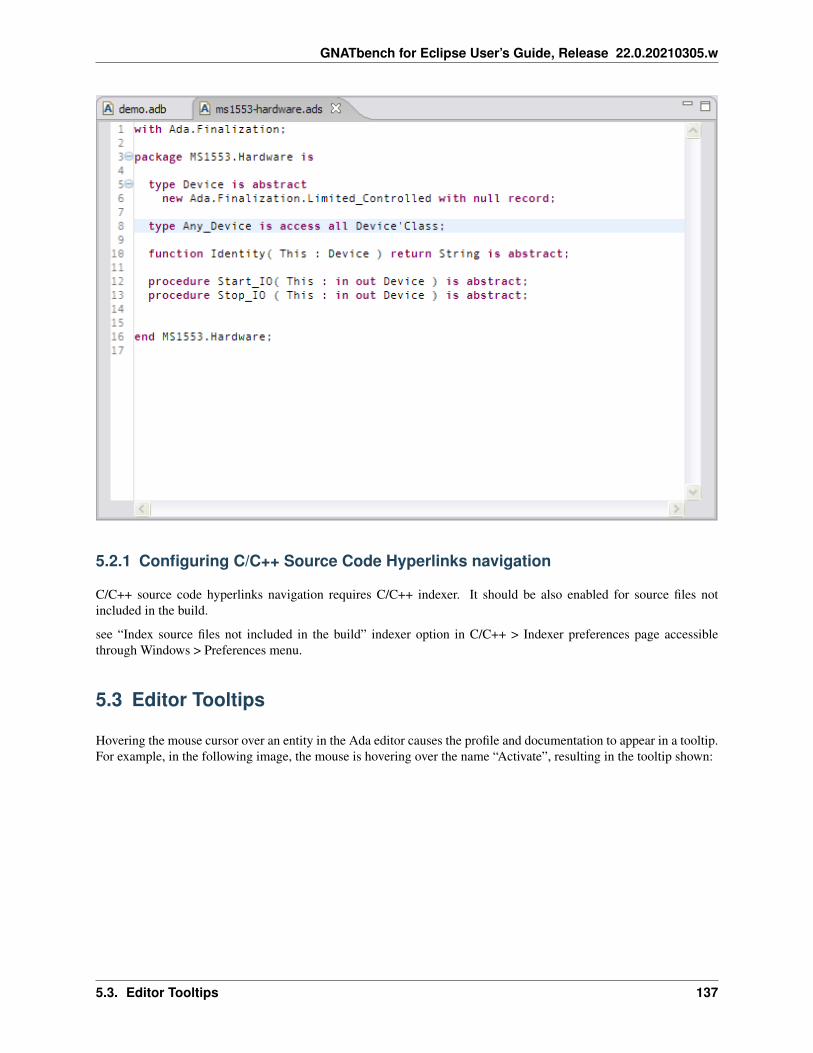
GNATbench for Eclipse User’s Guide, Release 22.0.20210305.w
5.2.1 Configuring C/C++ Source Code Hyperlinks navigation
C/C++ source code hyperlinks navigation requires C/C++ indexer. It should be also enabled for source files notincluded in the build.
see “Index source files not included in the build” indexer option in C/C++ > Indexer preferences page accessiblethrough Windows > Preferences menu.
5.3 Editor Tooltips
Hovering the mouse cursor over an entity in the Ada editor causes the profile and documentation to appear in a tooltip.For example, in the following image, the mouse is hovering over the name “Activate”, resulting in the tooltip shown:
5.3. Editor Tooltips 137

GNATbench for Eclipse User’s Guide, Release 22.0.20210305.w
Note the green dot symbol indicating that this is a visible procedure, as is employed elsewhere such as the Outline view.Note also the text describing the purpose of the procedure, taken from a comment next to the procedure declaration.The formal parameters, if any, are also indicated.
These tooltips can be disabled via the Ada Editor preferences page.
5.4 Visiting Declarations and Bodies
The Ada language-sensitive editor supports navigation and browsing via menu entries in the contextual menu. Givenan existing identifier, you may visit the corresponding declaration or body.
You may either left-click on the target and press F3, or right-click and select Open Declaration (or Open Body) fromthe editor’s contextual menu. If the cursor is not on an entity when visitation is requested, GNATbench will attempt todetermine the enclosing program unit and visit the corresponding declaration or body.
138 Chapter 5. Browsing and Navigation

GNATbench for Eclipse User’s Guide, Release 22.0.20210305.w
The declarations and bodies of packages, protected types, tasks, procedures, and functions can be visited. In addition,you can navigate from an Ada declaration directly to its C or C++ implementation if the Ada declaration is completedby a pragma Import specifying convention C or CPP.
The declarations of types and objects may also be visited, in addition to the program units listed above. For example,given the use of a type in an object declaration, you may go to the declaration of that type using this interface.
Note that language-defined types declared in package Standard are not supported because there is no actual packageStandard. However, language-defined types in other language-defined packages, such as System and Interfaces, arephysically represented and are, therefore, supported.
Eclipse maintains a list of files visited in the editor and allows you revisit them using the yellow “Forward” and“Back” navigation arrows on the toolbar. (The left-arrow with an asterisk next to it, to the left of the Forward and
5.4. Visiting Declarations and Bodies 139

GNATbench for Eclipse User’s Guide, Release 22.0.20210305.w
Back buttons, visits the last location at which an actual editing change was made.) GNATbench is fully integrated withthese navigation controls. Clicking one of these buttons visits the next or previous location visited, linearly. You mayjump directly to any specific location in the list by clicking on the black down-arrow controls next to the buttons andselecting a file from the resulting list. The following figure shows a sample list:
5.5 Visiting Declaration and Body Files
In addition to navigating and browsing by selecting individual entities in a source file, you can also navigate backand forth in terms of the files themselves, without first selecting the entity name. To do so, simply place the cursoranywhere within the file containing the declaration or body and invoke “Goto File Spec / Body”, in either the Adamenubar entry or the Ada menu in the editor contextual menu. The file containing the corresponding declaration orbody will open.
In the following figure the cursor is in the file but is past the end of the package when the contextual menu is invoked.The corresponding body file will be opened as a result of the invocation.
140 Chapter 5. Browsing and Navigation
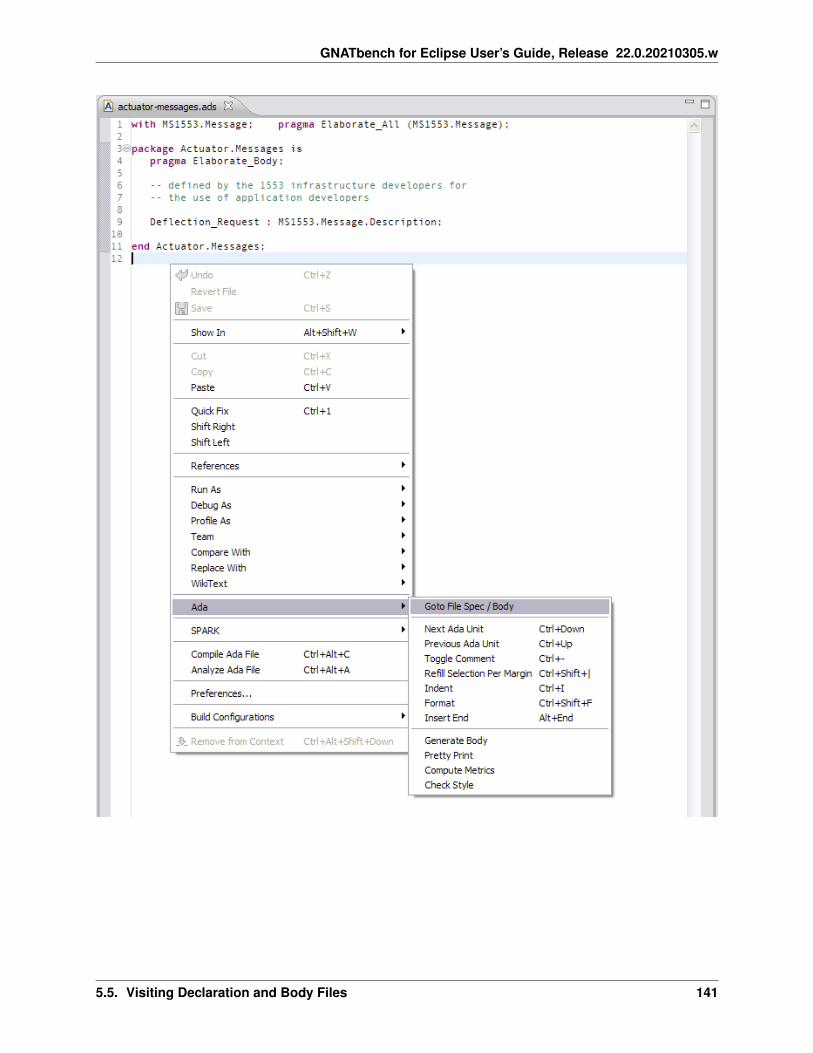
GNATbench for Eclipse User’s Guide, Release 22.0.20210305.w
5.5. Visiting Declaration and Body Files 141

GNATbench for Eclipse User’s Guide, Release 22.0.20210305.w
5.6 Traversing Within Source Files
You may visit the next or previous unit within an Ada source file using the “Goto Next Unit” and “Goto Previous Unit”commands. These commands will skip to the next/previous procedure, function, or entry in the file. Both declarationsand bodies for these units in a given file will be visited.
By default these editor actions are bound to the Ctrl+Up_arrow and Ctrl+Down_arrow keys (for visiting the previousand next units, respectively). You may change these bindings if desired, as usual.
The commands are also available via the Ada menu on the menubar and the editor’s contextual menu.
If there is no next or previous unit, these actions have no effect.
5.7 Browsing via Reference Searching
In addition to browsing by navigating along the hyperlinks of individual Ada entities, you can also browse the code ina more “global” manner by searching for all references to a selected entity.
When the editor cursor (not the mouse cursor) is over a given entity in the Ada editor, or when the entity is selected,right-clicking with the mouse invokes a contextual menu that allows you to request a display of all references to thatentity. (The menu entry is named “References”.)
142 Chapter 5. Browsing and Navigation

GNATbench for Eclipse User’s Guide, Release 22.0.20210305.w
You control the scope of the search by selecting either “Project” or “Workspace” (or “Project Hierarchy”). Typicallyyou will want to search within a single project but you can search all open projects by selecting “Workspace”.
The search results appear in the Search view. Clicking on one of these entries will traverse to the reference in thecorresponding file, opening the file in the Ada editor if necessary. Within the editor, links to these references are addedto the overview ruler and arrows are added to the annotation ruler.
The following figure illustrates the result of searching for the entity “Standard_Integer” in an Ada file. The Search viewshows that the entity is declared in package “MS1553.Message_Element.Predefined” because of the icon appearing asa green circle with a ‘T’ in the middle. It further shows that “Standard_Integer” is referenced in a subprogram named“Pack” in that package. We have clicked on that Search entry so the editor has opened that file and highlighted the oc-currences. Other references to “Standard_Integer” occur in three other packages and we could visit those occurrencesin the same manner.
5.7. Browsing via Reference Searching 143

GNATbench for Eclipse User’s Guide, Release 22.0.20210305.w
5.7.1 Advanced Options
You can refine the parameters of the references search in terms of Ada language features.
To do so, select “Advanced. . . ” under the “References” submenu. Doing so will bring up the following dialog box,allowing you to select additional criteria for the search. You can also specify the same options as you would havewithout choosing the advanced options entry, namely the extent of the search itself (project, workspace, or projecthierarchy).
144 Chapter 5. Browsing and Navigation

GNATbench for Eclipse User’s Guide, Release 22.0.20210305.w
5.7. Browsing via Reference Searching 145

GNATbench for Eclipse User’s Guide, Release 22.0.20210305.w
146 Chapter 5. Browsing and Navigation

CHAPTER
SIX
DEVELOPING ADA SOURCE CODE
6.1 Language-Sensitive Editing
6.1.1 Invoking the Ada Language-Sensitive Editor
Simply double-click on an Ada file in either the GNAT Project Explorer or the Navigator to invoke the GNATbenchlanguage-sensitive editor. You can also right-click on the file in the Navigator and select “Open” from the contextualmenu.
If opening an Ada source file does not invoke the GNATbench editor by default, there are two options available. Thefirst is to right-click on the file icon in the Project Navigator, select “Open With” in the contextual menu, and thenselect “AdaCore’s Ada Editor”. This approach, however, must be followed each time a file is to be edited.
The much more convenient alternative is to associate the GNATbench editor with Ada files by default. This effectis achieved by associating the editor with the appropriate file name extensions, as illustrated below. Note that in theillustration we are associating the editor with the GNAT default Ada file name extensions; other extensions are equallypossible.
147

GNATbench for Eclipse User’s Guide, Release 22.0.20210305.w
6.1.2 Syntax Coloring
Using the Syntax Coloring, users specify the colors displayed for reserved words, comments, annotation comments,string literals, numeric literals, character literals, and user-defined text. The defaults are as shown below, in which thereserved words are in magenta, string and character literals are in blue, numeric literals are in black, comments are inlight green, and user-defined text is in black.
148 Chapter 6. Developing Ada Source Code

GNATbench for Eclipse User’s Guide, Release 22.0.20210305.w
Annotation Comments
Annotation comments are Ada comments recognized by the editor as having additional meaning and therefore to becolored distinctly from regular comments. By default, these comments are colored red.
Lexically, annotation comments are those that have a non-whitespace or non-alphanumeric character immediatelyfollowing the initial “–”, other than another dash. All annotation comments appear in the same color.
For example, the SPARK language defines annotation comments as starting with the sequence “–#”, as in the followingexample taken from John Barnes’ High Integrity Software: The SPARK Approach to Safety and Security:
6.1. Language-Sensitive Editing 149

GNATbench for Eclipse User’s Guide, Release 22.0.20210305.w
6.1.3 Formatting Source Code
The GNATbench Ada language-sensitive editor provides a large number of built-in formatting controls that can beapplied manually or automatically. These formatting controls are described in this chapter.
Note that you can format an entire file using the external pretty printer tool. See Pretty Printer for details.
Specific aspects of formatting are controlled by the Coding Style preference page.
Each of these formatting controls is applied when the formatting command is invoked, but in general they can beindividually configured to have no effect if that is the desired behavior.
Manual Invocation
The formatter is manually invoked by pressing Ctrl+Shift+F, or by selecting “Format” under the Ada menubar entryand the editor’s Ada contextual menu. This command corrects applies the formatting options, including indentation.
Individual lines can also be formatted: if no selection is active when the command is invoked, only the current line isformatted.
In addition, indentation can be manually corrected by pressing Ctrl+I, or by selecting “Indent” under the Ada menubarentry and the editor’s Ada contextual menu. No other formatting options are applied in this case.
Automatic Invocation
The editor can format code automatically as you press the Enter key, depending on the value of the “Coding stylemode” preference on the “Coding Style” preference page.
Selecting the mode “None” means no formatting will be applied; the cursor will simply go column 1 of the new line.
The “Simple” mode means that the indentation from the previous line will be used for the next line; the beginning ofthe new line will be indented to the same amount as the line containing the cursor when the Enter key was pressed. Noother formatting is applied.
For example, in the following figure the mode is “Simple” and the Enter key is about to be pressed:
150 Chapter 6. Developing Ada Source Code

GNATbench for Eclipse User’s Guide, Release 22.0.20210305.w
After the Enter key is pressed, a new line is opened and indented to the same amount as the line above:
In the “Extended” mode, the line is automatically formatted. The formatter indents the new line as you would indent ityourself, based on the context. For example, if you start a new sequence of statements with the reserved word “begin”and press the Enter key, the new line after the “begin” will be indented to the next level. All other formatting optionsare also applied.
See Smart Enter Key for an example.
Formatting Selected Lines
When a number of lines of source are selected, the selected code will be formatted based on an analysis of the selectionas well as the surrounding code. In particular, the selection will be indented relative to that of the surrounding code.
In this initial figure, the lines for the task body are incorrectly indented (in an admittedly unlikely extreme).
6.1. Language-Sensitive Editing 151

GNATbench for Eclipse User’s Guide, Release 22.0.20210305.w
We select those lines that require reformatting in the next figure. In this case all of the task body is selected:
152 Chapter 6. Developing Ada Source Code

GNATbench for Eclipse User’s Guide, Release 22.0.20210305.w
The following figure shows the result after formatting. The selection itself is now properly indented but, in addition,its indentation is consistent with the surrounding code.
6.1. Language-Sensitive Editing 153

GNATbench for Eclipse User’s Guide, Release 22.0.20210305.w
Indenting Continuation Lines
The numeric preference value “Continuation lines” specifies the amount to indent when the Enter key is pressedbefore the end of a line, thereby continuing that line on a new line below. This new line is indented by the valueof the preference. In the following example, the Enter key was pressed on line 10, just before the semicolon of theassignment operation. All text to the right of the cursor was then moved down to a new line, now line 11, with theindentation preference value applied.
154 Chapter 6. Developing Ada Source Code

GNATbench for Eclipse User’s Guide, Release 22.0.20210305.w
Indenting Declaration Lines
The numeric preference value “Declaration lines” specifies the amount to indent multiple-line declarations. For ex-ample, using a value of 3, the following figure illustrates how three variables declared with one declaration would beindented:
Indenting Conditional Continuation Lines
The numeric preference value “Conditional continuation lines” specifies the amount to indent multiple-line conditionalexpressions within parentheses.
For example, when this preference is set to 1, continuation lines are indented based on the previous parenthesis plusone space:
When this preference is set to 3, this gives:
Indenting Record Definitions
The numeric preference value “Record indentation” specifies the amount to indent record definitions when the reservedword “record” appears on its own line.
For example, when this preference is set to 3, the following sample will be indented as shown:
6.1. Language-Sensitive Editing 155
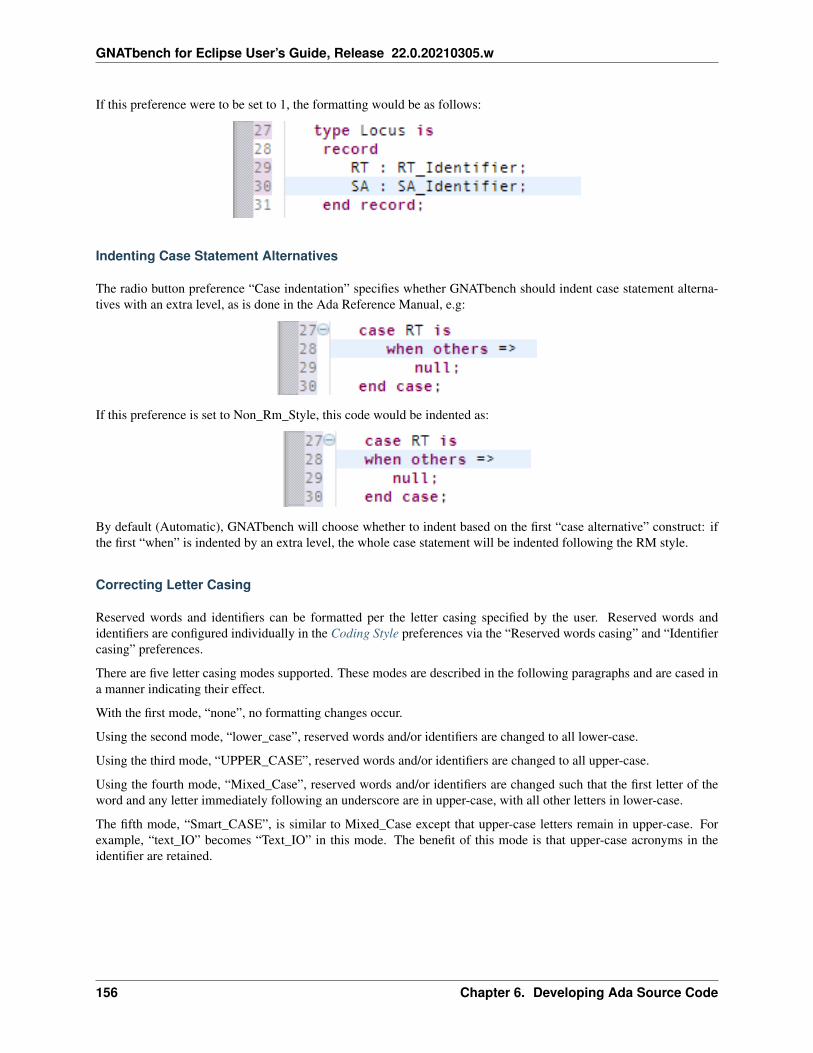
GNATbench for Eclipse User’s Guide, Release 22.0.20210305.w
If this preference were to be set to 1, the formatting would be as follows:
Indenting Case Statement Alternatives
The radio button preference “Case indentation” specifies whether GNATbench should indent case statement alterna-tives with an extra level, as is done in the Ada Reference Manual, e.g:
If this preference is set to Non_Rm_Style, this code would be indented as:
By default (Automatic), GNATbench will choose whether to indent based on the first “case alternative” construct: ifthe first “when” is indented by an extra level, the whole case statement will be indented following the RM style.
Correcting Letter Casing
Reserved words and identifiers can be formatted per the letter casing specified by the user. Reserved words andidentifiers are configured individually in the Coding Style preferences via the “Reserved words casing” and “Identifiercasing” preferences.
There are five letter casing modes supported. These modes are described in the following paragraphs and are cased ina manner indicating their effect.
With the first mode, “none”, no formatting changes occur.
Using the second mode, “lower_case”, reserved words and/or identifiers are changed to all lower-case.
Using the third mode, “UPPER_CASE”, reserved words and/or identifiers are changed to all upper-case.
Using the fourth mode, “Mixed_Case”, reserved words and/or identifiers are changed such that the first letter of theword and any letter immediately following an underscore are in upper-case, with all other letters in lower-case.
The fifth mode, “Smart_CASE”, is similar to Mixed_Case except that upper-case letters remain in upper-case. Forexample, “text_IO” becomes “Text_IO” in this mode. The benefit of this mode is that upper-case acronyms in theidentifier are retained.
156 Chapter 6. Developing Ada Source Code
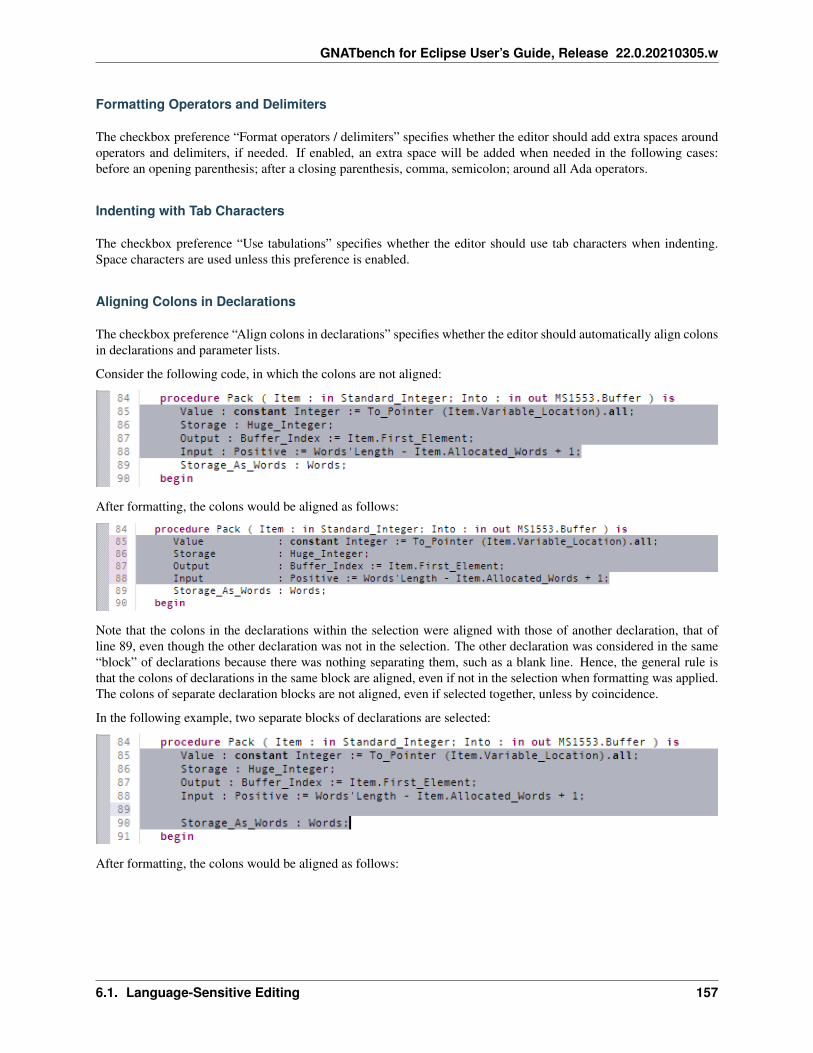
GNATbench for Eclipse User’s Guide, Release 22.0.20210305.w
Formatting Operators and Delimiters
The checkbox preference “Format operators / delimiters” specifies whether the editor should add extra spaces aroundoperators and delimiters, if needed. If enabled, an extra space will be added when needed in the following cases:before an opening parenthesis; after a closing parenthesis, comma, semicolon; around all Ada operators.
Indenting with Tab Characters
The checkbox preference “Use tabulations” specifies whether the editor should use tab characters when indenting.Space characters are used unless this preference is enabled.
Aligning Colons in Declarations
The checkbox preference “Align colons in declarations” specifies whether the editor should automatically align colonsin declarations and parameter lists.
Consider the following code, in which the colons are not aligned:
After formatting, the colons would be aligned as follows:
Note that the colons in the declarations within the selection were aligned with those of another declaration, that ofline 89, even though the other declaration was not in the selection. The other declaration was considered in the same“block” of declarations because there was nothing separating them, such as a blank line. Hence, the general rule isthat the colons of declarations in the same block are aligned, even if not in the selection when formatting was applied.The colons of separate declaration blocks are not aligned, even if selected together, unless by coincidence.
In the following example, two separate blocks of declarations are selected:
After formatting, the colons would be aligned as follows:
6.1. Language-Sensitive Editing 157

GNATbench for Eclipse User’s Guide, Release 22.0.20210305.w
Aligning Associations on Arrow Symbols
The checkbox preference “Align associations on arrows” specifies whether the editor should automatically align arrowsin associations (e.g., aggregates or function calls).
Consider the following code, in which the arrow symbols are not aligned on lines 10 through 13:
With this preference enabled, this code would be indented as:
Aligning Declarations After the Colon
The checkbox preference “Align declarations after colon” specifies whether the editor should align continuation linesin variable declarations based on the colon character.
Consider the following declaration, in which the initial (only) value in the continuation line is in the column beforethat of the colon:
With this preference enabled, it will be indented as follows:
158 Chapter 6. Developing Ada Source Code

GNATbench for Eclipse User’s Guide, Release 22.0.20210305.w
Indenting Comments
The checkbox preference “Indent comments” specifies whether to indent lines containing only comments and blanks,or to keep the indentation of these lines unchanged.
Aligning Comments on Keywords
The checkbox preference “Align comments on keywords” specifies whether to align comment lines following thereserved words “record” and “is” immediately, with no extra space.
Note that the “Indent comment” preference must be enabled before comments are formatted.
Consider the following source code, in which the comment is indented relative to the line above. This would be theeffect of formatting the code with the preference disabled:
With this preference enabled (and with the “Indent comment” preference enabled), formatting the code would resultin the following:
6.1.4 Block Folding
To facilitate comprehension of the program, blocks of text can be elided so that they do not appear. Each constructthat spans more than one line has a control on the left of the screen that allows the user to expand or collapse thecorresponding text.
The following illustration shows the folding control (the blue “lozenge” with a dash inside) to the left of procedureProcess, prior to the user invoking the elision.
6.1. Language-Sensitive Editing 159

GNATbench for Eclipse User’s Guide, Release 22.0.20210305.w
By clicking on the dash, the user elides the procedure Process, as the following illustration shows. Note the dashbecomes a plus sign, indicating that the control will now expand the unit if invoked. Note also the elision marker atthe end of the elided declaration of Process.
6.1.5 Managing Comments
The Ada language-sensitive editor makes it easy to convert existing text to comments, to convert comments back tonon-comment text, and to format comments so that they adhere to margin constraints.
Toggling Comments
The current non-comment source code selection will be converted to comments by pressing control+- (control dash).Similarly, comment lines are converted back to regular code by the same key sequence. Alternatively, the transforma-tion can be achieved by invoking the “Toggle Comment” command available under the Ada menubar entry and theeditor’s Ada contextual menu. using the contextual menu invoked by right-clicking in the source file and selectingToggle Comment.
The following figure illustrates a selection of non-comment code about to be converted into comments:
160 Chapter 6. Developing Ada Source Code

GNATbench for Eclipse User’s Guide, Release 22.0.20210305.w
After invoking the command the selected lines are commented, as the following figure shows.
6.1. Language-Sensitive Editing 161

GNATbench for Eclipse User’s Guide, Release 22.0.20210305.w
Reformatting Comments
Comment lines as well as lines of arbitrary text within an Ada source file can be adjusted so that none of the text flowspast the Eclipse “print margin” boundary. Comment lines remain as comments after this reformatting; non-commentlines remain non-comments.
The action can be applied to individual lines or to a selection of lines within an Ada source file. If no selection is activewhen the command is invoked, only the line containing the cursor will be reformatted.
The command is invoked by simultaneously pressing the Alt+Shift+| keys, or by invoking the “Refill Selection toMargin” command available under the Ada menubar entry and the editor’s Ada contextual menu.
If the Eclipse print margin margin is not enabled no reformatting will occur. You can tell if the margin is set by theappearance of a colored vertical line in the editor immediately after the column corresponding to the margin. Use theGeneral/Editors/Text Editors preference page and look for the “Show print margin” check-box. On that page you alsospecify the column for the margin and can control the color of the resulting line.
The figures below illustrate the application of the editor action. In the first figure, a block of comments that goes pastthe print margin is selected. The margin is indicated by the vertical gray line to the right inside the editor box.
162 Chapter 6. Developing Ada Source Code

GNATbench for Eclipse User’s Guide, Release 22.0.20210305.w
The command is then invoked and the text is refilled so that none of the text goes past the print margin:
6.1. Language-Sensitive Editing 163

GNATbench for Eclipse User’s Guide, Release 22.0.20210305.w
6.1.6 Parentheses Highlighting
Moving the cursor after a parenthesis highlights the corresponding parenthesis.
In the following figure, the cursor is immediately after the inner parenthesis on line 10. Note the box highlighting thematching parenthesis on line 13.
You may enable or disable this action as well as control the color of the highlighting box using the “Highlight matchingbrackets” preference on the Editor page.
6.1.7 Automatic Construct Closing
While editing Ada source files, you can invoke the “Insert End” command to insert the required text to close a construct.
The editor command is bound to the Alt+End key sequence and is also available via the Ada menu on the menubarand the editor’s contextual menu.
For constructs without an associated name, such as record type definitions and if-statements, the Insert End commandwill insert the corresponding simple completion.
For example, the following figure shows an incomplete record type definition with the Insert End command about tobe invoked:
After invocation, the closing “end record;” sequence has been inserted and properly indented relative to the word“record”:
For the end of a program unit’s sequence of statements, the action will insert the “end” followed by the name of theunit.
For example, the next figure shows a procedure Demo without the closing “end”. Note that the cursor is indented as ifanother statement is about to be entered:
164 Chapter 6. Developing Ada Source Code

GNATbench for Eclipse User’s Guide, Release 22.0.20210305.w
After invocation, the closing “end Demo;” sequence has been inserted and properly indented:
Constructs with labels are completed in a similar manner.
6.1.8 Smart Enter Key
The Smart Enter key will automatically format the code of the current line if the “Coding style mode” preference isset to “extended” in the Coding Style preferences page. The effect is as if manually applying the Format command tothe line.
See Formatting Source Code for the details of the formatting applied.
In this initial figure, assume the “Coding style mode” is set to “extended”. Also assume that reserved words are to bein lower-case, identifiers are to be Smart_CASED, and that the default indentation is 3. The cursor is at the end of theline:
6.1. Language-Sensitive Editing 165

GNATbench for Eclipse User’s Guide, Release 22.0.20210305.w
When we press the Enter key, the line is automatically formatted and the cursor is automatically indented to theappropriate location for the sequence of statements within the if-statement:
Note that, after the line is formatted, the identifier appears as “Rt” even though it appears as “RT” elsewhere. Since theidentifier was “rt” before formatting and the casing policy was “Smart_CASED”, it becomes “Rt” after formatting.
6.1.9 Smart Space Key
The Smart Space Key will expand abbreviations for Ada reserved words and will, for those constructs that take a nameor a label on the “end”, also expand those abbreviations into partially-complete constructs with the correspondingname or label included.
Expansions follow the user’s letter casing preferences for reserved words and identifiers.
The Smart Space Key is disabled by default and is controlled by preferences on the Editor preference page.
If the action is enabled, the additional relevant preference is the length of words considered as candidate abbreviationsto be expanded. The default length is three characters, meaning that only words three characters or longer will beconsidered. Thus the facility is minimally intrusive and, moreover, the degree of intrusion is under your control.
If the preference is disabled, pressing the space key will insert one space, as usual.
166 Chapter 6. Developing Ada Source Code

GNATbench for Eclipse User’s Guide, Release 22.0.20210305.w
Reserved Word Expansion
If an abbreviation of a reserved word is either on a line by itself or follows only a label, that abbreviation is expandedinto the full spelling. Note that not all reserved words are candidates for expansion: they must be long enough forexpansion to be of use in the first place.
For example, in the following figure the word “proc” has been entered and the space key is about to be pressed:
After the space key is pressed the abbreviation has been expanded to the full reserved word (and a trailing space hasbeen inserted):
A reserved word that is fully spelled does not require expansion itself, but, for the sake of minimal intrusion, alsodoes not invoke the construct expansion described below. Thus a user who types everything will not be intruded uponexcept for the case in which a user-defined identifier matches an abbreviation for a reserved word. To mitigate thiseffect the minimum abbreviation length may be set to a larger value by altering the preference.
Note that “for” is treated specially. It is a complete reserved word but is nonetheless expanded. Also, “for” is the startof an attribute definition clause so it will not expand unless it appears in a sequence of statements.
6.1. Language-Sensitive Editing 167

GNATbench for Eclipse User’s Guide, Release 22.0.20210305.w
Begin-End Pair Expansion
Begin-end pairs for program units are expanded to include the corresponding unit name. Nested declarations areignored such that the correct name is used in the expansion.
For example, in the following figure the abbreviation “beg” has been entered on line 20 and the space key is about tobe pressed:
After the space key is pressed the abbreviation for “begin” has been expanded to the full begin-end par with the nameof the procedure included. The cursor is placed inside the sequence of statements at the initial indentation level, to adepth specified by the indentation preference:
168 Chapter 6. Developing Ada Source Code

GNATbench for Eclipse User’s Guide, Release 22.0.20210305.w
Named Statement Expansion
Constructs that require a trailing name are expanded to include that name. These include named block statements,named basic loops, named while-loops, and named for-loops.
For example, a named loop is required to have the loop name follow the “end loop”. In the following figure the nameand loop abbreviation have been entered and the space key is about to be pressed:
After the space key is pressed the loop has been expanded with the name of the loop included. The cursor is placedinside the sequence of statements at the initial indentation level, to a depth specified by the indentation preference:
Note also that the user-specified letter casing has been applied to the name (in this example the “Smart_CASED”policy was in force) and the reserved words are similarly formatted (with the “lowercase” policy in this instance).
6.1. Language-Sensitive Editing 169
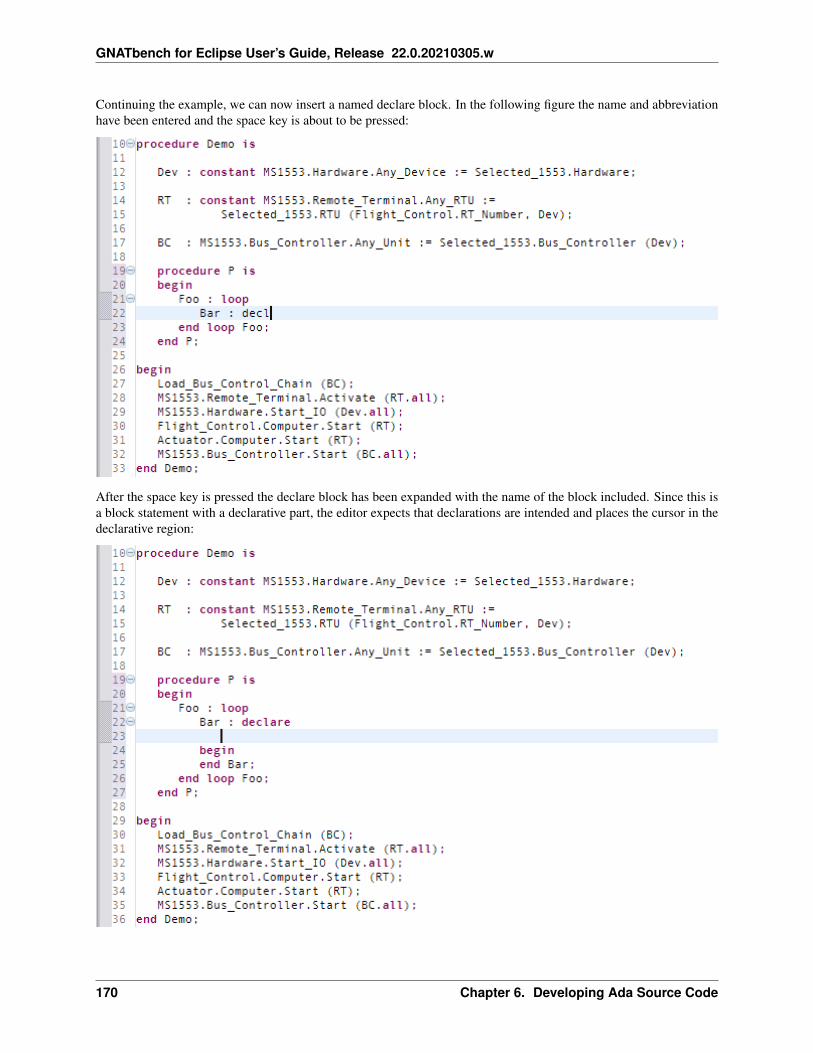
GNATbench for Eclipse User’s Guide, Release 22.0.20210305.w
Continuing the example, we can now insert a named declare block. In the following figure the name and abbreviationhave been entered and the space key is about to be pressed:
After the space key is pressed the declare block has been expanded with the name of the block included. Since this isa block statement with a declarative part, the editor expects that declarations are intended and places the cursor in thedeclarative region:
170 Chapter 6. Developing Ada Source Code
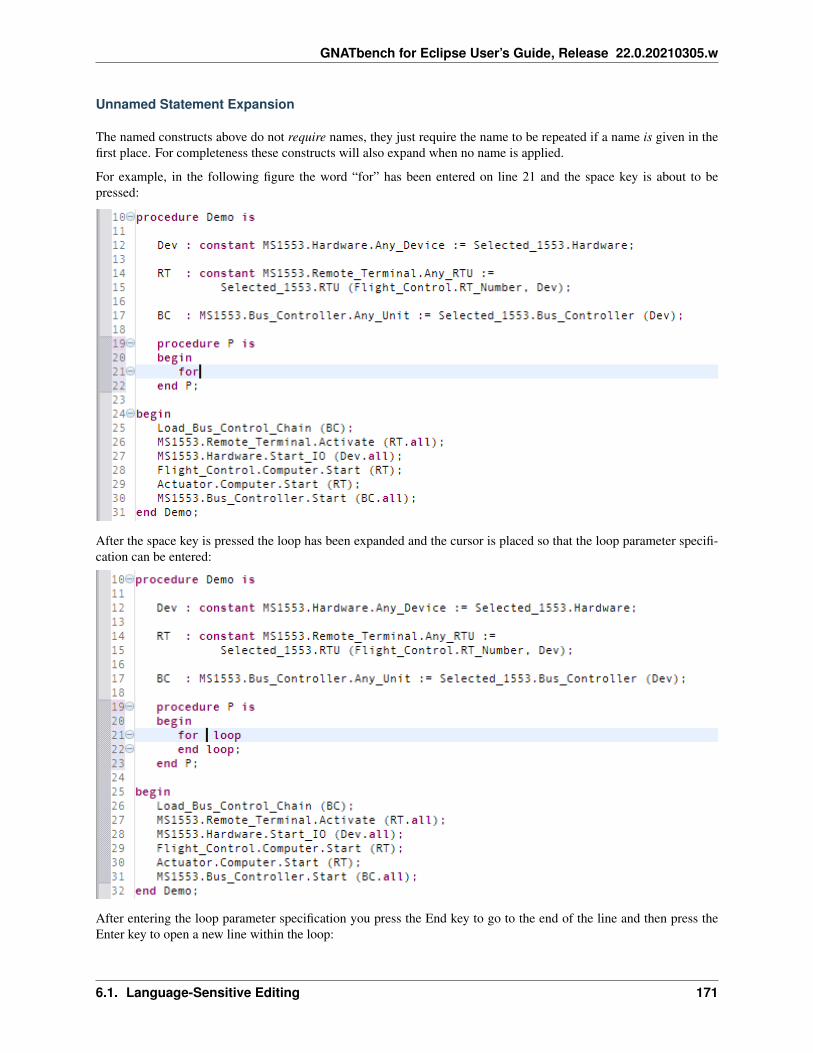
GNATbench for Eclipse User’s Guide, Release 22.0.20210305.w
Unnamed Statement Expansion
The named constructs above do not require names, they just require the name to be repeated if a name is given in thefirst place. For completeness these constructs will also expand when no name is applied.
For example, in the following figure the word “for” has been entered on line 21 and the space key is about to bepressed:
After the space key is pressed the loop has been expanded and the cursor is placed so that the loop parameter specifi-cation can be entered:
After entering the loop parameter specification you press the End key to go to the end of the line and then press theEnter key to open a new line within the loop:
6.1. Language-Sensitive Editing 171

GNATbench for Eclipse User’s Guide, Release 22.0.20210305.w
6.1.10 Smart Tab Key
Pressing the Smart Tab key will indent to the next “logical indentation” column on the line. It does so by insertingspaces, but only the required number of spaces are inserted so that this next position is reached, rather than alwaysinserting a fixed number of spaces.
The “logical indentation” columns are determined by the numeric “Default indentation” preference on the CodingStyle preference page. The first “logical indentation” position is at column 1. Each subsequent position is calculatedby adding the value of the “Default indentation” preference to the previous position.
The Smart Tab Key is enabled by default and is controlled by the “Use smart tab key” preference on the Editorpreference page.
If the preference is disabled, pressing the tab key will insert the number of spaces specified by the “Default indentation”preference.
For the following example, assume the “Default indentation” value is 3. As a result, the logical indentation positionsare 1, 4, 7, 10, and so on.
In this first figure the cursor is on column 1. We have included a comment indicating the column numbers for the sakeof illustration:
Pressing the Smart Tab key indents to column 4:
172 Chapter 6. Developing Ada Source Code

GNATbench for Eclipse User’s Guide, Release 22.0.20210305.w
If we enter a space character, the cursor will then be on column 5.
Pressing the Smart Tab key again now inserts only two spaces to get to the next “logical indentation” column, i.e.,column 7:
Pressing the Smart Tab key again inserts three spaces to get to column 10:
6.1.11 Smart Home Key
When first pressed on a given line, the Smart Home key will place the cursor on the column containing the first non-blank character of that line. Subsequent presses will cause the cursor to toggle back and forth between column 1 andthe column of the first non-blank character.
In the following figure, the cursor is in the middle of a line of Ada source code:
If you press the Smart Home key, the cursor moves to the column of the first non-blank character on that line:
6.1. Language-Sensitive Editing 173
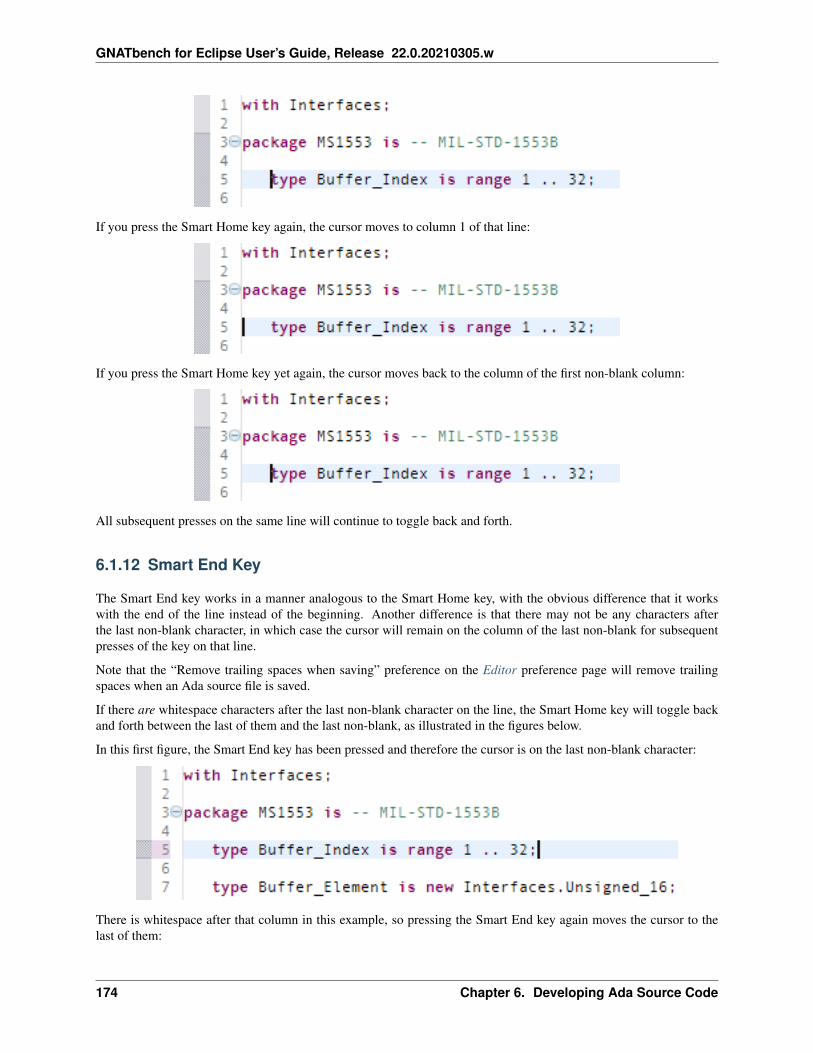
GNATbench for Eclipse User’s Guide, Release 22.0.20210305.w
If you press the Smart Home key again, the cursor moves to column 1 of that line:
If you press the Smart Home key yet again, the cursor moves back to the column of the first non-blank column:
All subsequent presses on the same line will continue to toggle back and forth.
6.1.12 Smart End Key
The Smart End key works in a manner analogous to the Smart Home key, with the obvious difference that it workswith the end of the line instead of the beginning. Another difference is that there may not be any characters afterthe last non-blank character, in which case the cursor will remain on the column of the last non-blank for subsequentpresses of the key on that line.
Note that the “Remove trailing spaces when saving” preference on the Editor preference page will remove trailingspaces when an Ada source file is saved.
If there are whitespace characters after the last non-blank character on the line, the Smart Home key will toggle backand forth between the last of them and the last non-blank, as illustrated in the figures below.
In this first figure, the Smart End key has been pressed and therefore the cursor is on the last non-blank character:
There is whitespace after that column in this example, so pressing the Smart End key again moves the cursor to thelast of them:
174 Chapter 6. Developing Ada Source Code

GNATbench for Eclipse User’s Guide, Release 22.0.20210305.w
Pressing the Smart Home key again moves the cursor back to the last non-blank character:
All subsequent presses on the same line will continue to toggle back and forth in that manner.
6.2 Code Assist
6.2.1 Code Assist
Code Assist is an editing capability provided by programming-language-oriented editors in Eclipse that completesidentifiers based on semantic analysis and context. Simple identifiers, subprogram formal parameters, and entitiesnamed using the “dot notation” are candidates for completion. GNATbench implements Code Assist for Ada 83, Ada95, and Ada 2005.
When invoked, Code Assist displays the candidate completions in a pop-up window (the “smart completion window”),including information about each candidate to facilitate selection. The specific information displayed depends on thecandidate. For example, the type of a candidate variable will be displayed, as well as documentation extracted fromcomments surrounding the declaration of the candidate. Similarly, if the completion candidate is a subprogram invo-cation, the formal parameters will also be displayed so that you can choose among possibly overloaded subprogramchoices.
GNATbench keeps track of your previous selections and will put them at the top of the list of proposals when they areaccurate.
No pop-up window is displayed when, based on the current partial entry, no candidates are available.
6.2.2 Enabling Code Assist
Code Assist for Ada can offer completion candidates from the entire project. To do so, an entity database must beloaded. This loading occurs in the background, asynchronously, and does not force you to wait. However, if you wantto disable this loading, simply disable the Code Assist preference. The preference is enabled initially, and, as a result,by default the entity database is loaded when GNATbench starts.
6.2. Code Assist 175

GNATbench for Eclipse User’s Guide, Release 22.0.20210305.w
6.2.3 Invoking Code Assist
Code Assist for identifiers is invoked by pressing the control+space key combination inside any Ada source file. Thisis the default key binding for all Eclipse editors that support the feature but users can change the key binding, asalways.
To use this feature for simple identifiers, begin to type a name inside an Ada source file. This identifier must bedeclared either in the current file (and prior to the cursor location) or in one of the packages of the project loaded. Withthe cursor right after the last character of the incomplete identifier, press the Code Assist key sequence. Eclipse willopen the Smart Completion window displaying all the known identifiers beginning with the prefix you typed. You canthen browse among the various proposals using the Up and Down keys or using the scrollbar. Typing additional lettersof the identifier will reduce the range of proposals as long as possible candidates remain.
Once you’ve selected the intended completion you can apply it by pressing Enter. The identifier will be completedwith that selection and you can continue to enter further text.
You may reject the list of candidates and terminate Code Assist by pressing the Escape key.
Code Assist is automatically invoked when entering dotted names and when entering parameters for a subprogramcall. The Smart Completion window will open when the dot or the open (i.e., left) parenthesis is entered. Code Assist
176 Chapter 6. Developing Ada Source Code

GNATbench for Eclipse User’s Guide, Release 22.0.20210305.w
is not invoked if another character is entered in a short amount of time, so that touch typists are not inconvenienced.
When entering parameters for a subprogram call, you can manually invoke Code Assist after entering some of theparameters to see proposals for the remaining parameters, if any.
6.2.4 Simple Name Completion
Much like the name completion provided by the alt+/ key binding, Code Assist will complete the name of an identifierby itself. It need not be a part of some other name or a formal parameter. Just press the Code Assist key sequence andany candidates will be presented.
In the following figure we invoke Code Assist in the middle of entering the text “Comm” so we get all possiblecompletions starting with that character sequence. Note the descriptive text in the window for Commanded_Deflection.This description comes from the comment(s) following the declaration of the object.
6.2.5 Dotted Name Completion
Any identifier that immediately follows a dot can be completed by Code Assist, particularly entities declared withinpackages and within record objects. For example, if you type “with Ada.” the smart completion window will appearautomatically, listing all the child and nested packages of Ada. You can also write the beginning of the package, e.g.:entering “with Ada.Text” and pressing the Code Assist key will offer you “Text_IO”.
In the following figure, we invoke Code Assist after entering the name of the package MS1553. The completionwindow then proposes candidates consisting of the entities declared within the package as well as child packagesrooted at MS1553. Note the icons indicating the kinds of entity proposed. In this case types and child packages aredepicted:
6.2. Code Assist 177

GNATbench for Eclipse User’s Guide, Release 22.0.20210305.w
Code Assist is proposing the components of a record object in the following figure. Here, the object WOW is of typetype Discrete, a record type containing the four components indicated in the smart completion window:
Code Assist can handle derived record types too, and will include in the smart completion window all inherited recordcomponents that are visible at the point of the invocation.
178 Chapter 6. Developing Ada Source Code

GNATbench for Eclipse User’s Guide, Release 22.0.20210305.w
In keeping with the Ada visibility rules, components of private types are not proposed if they are not visible. In thisnext figure we declare type Discrete as a private extension so outside the package the components are not visible(except to child units):
Then, when we invoke Code Assist outside the package, only the visible components are proposed:
6.2. Code Assist 179

GNATbench for Eclipse User’s Guide, Release 22.0.20210305.w
6.2.6 Formal Parameter Completion
Code Assist can suggest the possible formal parameters of a subprogram call you’re currently writing. For example,the figure below shows a call to a procedure declared as folows:
procedure Send( This_SA : in out Transceiver'Class; This_Msg : in MS1553.Message.Description; Result : out Status'Class );
After you type the opening parenthesis, Code Assist will automatically propose a completion consisting of all theformal parameters, as well as proposing each formal as an individual completion. That is the case in the followingexample:
Selecting “params of. . . ” inserts all the (remaining) formal parameters using the named parameter association format,and places the cursor where the first actual parameter will go:
180 Chapter 6. Developing Ada Source Code

GNATbench for Eclipse User’s Guide, Release 22.0.20210305.w
You can, of course, also select an individual formal parameter candidate and it will be inserted next, again using thenamed association format.
Alternatively, only the remaining formals are proposed if you manually invoke Code Assist in the middle of enteringthe actual parameters. Thus you can either choose a completion containing all the remaining formal parameters, orindividual completions from the remaining formals. Continuing the example, invoking Code Assist after the commain the following situation:
Send( Xmitter.all,
would cause the completion engine to propose parameters This_Msg and Result but not This_SA, as well as all thoseremaining:
When multiple subprograms are overloaded the parameters for each subprogram are indicated, separated into theircorresponding groups. In the following figure there are two procedures named Send. We have selected the formal
6.2. Code Assist 181

GNATbench for Eclipse User’s Guide, Release 22.0.20210305.w
parameters of the procedure with four formals instead of three:
6.2.7 Limitations
Code Assist does not take into account the association between generic formal parameter types and generic actualparameter types when attempting to complete a reference via the formal.
For example, in the following figure, the generic formal type T is matched during the instantiation with generic actualtype R. Type R has record components, but these components are not available as candidates via objects viewed as oftype T. Therefore, in the figure we can request a completion of P. and the engine will propose the function name F,but there is no further completion proposed for P.F. because P.F returns a value of type T and the components are notknown to the engine via that type name.
182 Chapter 6. Developing Ada Source Code

GNATbench for Eclipse User’s Guide, Release 22.0.20210305.w
6.2.8 Ada Templates
Templates are a structured description of coding patterns that occur frequently in source code. The Ada editor supportsthe use of templates to fill in commonly used source patterns. Templates are inserted using content assist (Ctrl+Space).
For example, a common coding pattern is to iterate over elements of an array using a for loop that indexes into thearray. By using a template for this pattern, you can avoid typing in the complete code for the loop. Invoking contentassist after typing the word for will present you a possible template. Please select the template and the editor willinsert the code into the editor and position the cursor so that you can edit the details.
Templates can contain template variables. Variables mark the editable locations. To edit the next variables press Tabkey. When you have terminated to edit the variables, press Enter key to go to the location defined by the ${cursor}variable.
Many common templates (e.g. procedure,function,for,while,do,if . . . ) are already defined. These can be viewed withthe Window -> Preferences -> Ada -> Template preference page. This preference page allows to create your owntemplates or edit the existing ones. Below is a list of the buttons and the descriptions.
• The New button opens the Template dialog to create a new template.
• The Edit button opens the Template dialog to edit the currently selected template.
• The Remove button removes all selected templates.
• The Restore Removed button restores any pre-configured templates that have been removed.
• The Revert to Default button restores any pre-configured templates to their default. This does not modify usercreated templates.
• The Import button imports templates from the file system.
• The Export button exports all selected templates to the file system.
6.3 Quick Fix
The GNATbench language-sensitive editor may be able to propose corrections for problems identified by the compiler.This possibility is indicated by the “light bulb” shown in the editor marker bar, opposite the source line containing theproblem. Note that Quick Fix is under the control of a preference on the Ada Tools preference page and is enabled bydefault.
To see the correction proposals use the Quick Fix action. Simply click on the light bulb in the editor marker bar and awindow containing the proposed fix (or fixes) will appear, as illustrated below:
6.3. Quick Fix 183
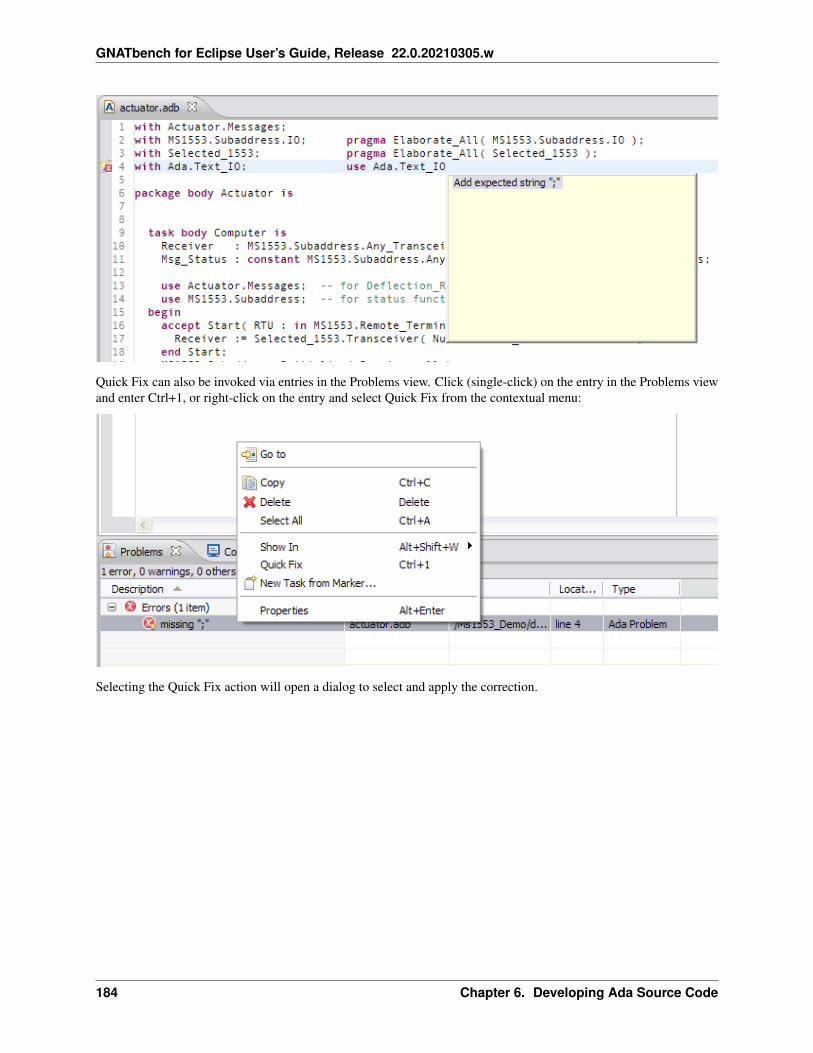
GNATbench for Eclipse User’s Guide, Release 22.0.20210305.w
Quick Fix can also be invoked via entries in the Problems view. Click (single-click) on the entry in the Problems viewand enter Ctrl+1, or right-click on the entry and select Quick Fix from the contextual menu:
Selecting the Quick Fix action will open a dialog to select and apply the correction.
184 Chapter 6. Developing Ada Source Code

GNATbench for Eclipse User’s Guide, Release 22.0.20210305.w
Note that the light bulb is only a hint. It is possible that even with the light bulb shown that no corrections can beoffered.
6.3. Quick Fix 185
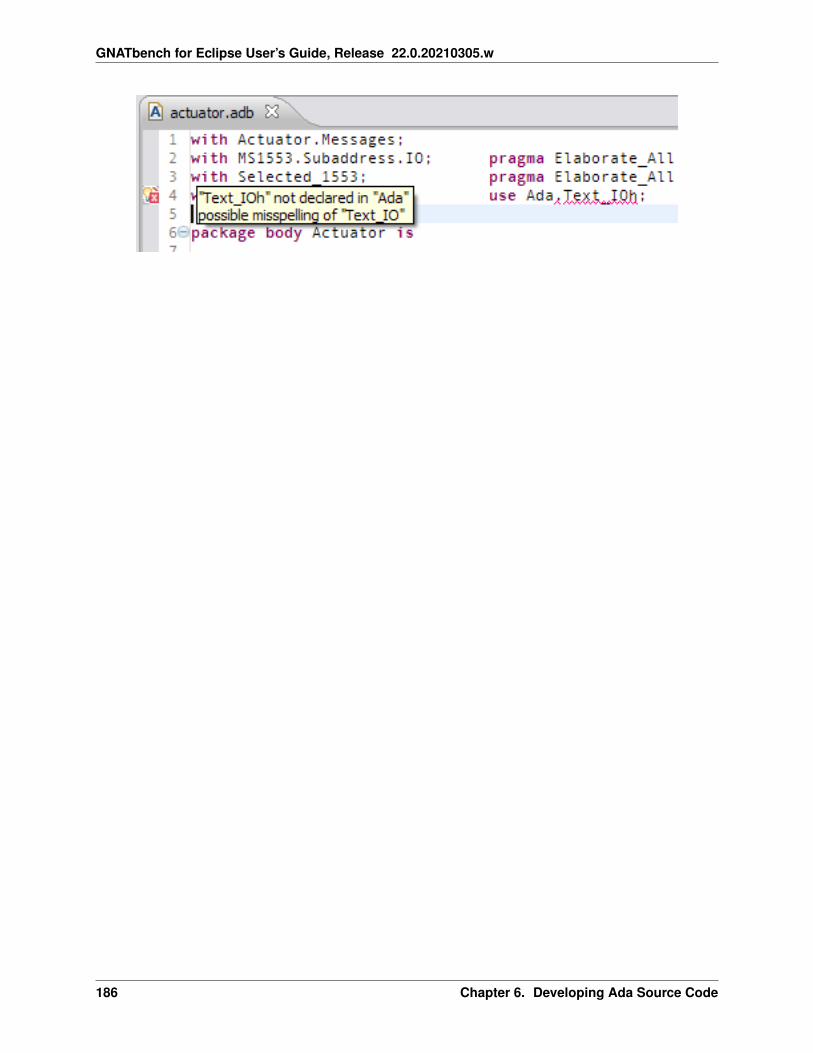
GNATbench for Eclipse User’s Guide, Release 22.0.20210305.w
186 Chapter 6. Developing Ada Source Code

CHAPTER
SEVEN
BUILDING
7.1 Project Builder Command Menus
GNATbench provides project-level builder commands in two menus: the Project menu and the project contextualmenus of the GNAT Project Explorer and the Navigator. These commands include the standard project builder com-mands defined by Eclipse, with additional builder commands defined by GNATbench. Other “builder” commands arealso included, such as those that clean the project of compilation products.
We describe the semantics of the standard and additional commands in Project Builder Command Semantics. Thissection describes the menu entry locations.
7.1.1 Project Menu
The Project menu on the menubar defines the standard Eclipse project build commands, Build All through BuildAutomatically, as shown in the following figure. The GNATbench project-specific builder extensions appear furtherdown.
187

GNATbench for Eclipse User’s Guide, Release 22.0.20210305.w
7.1.2 Contextual Menus
The contextual menu of the GNAT Project Explorer (and the Navigator) includes the standard Build Project command,as shown below. It appears in the standard “project” section of the menu, just below the import/export menu entries.This is the same command as in the Project menu on the menubar so it will also be disabled when Eclipse considers abuild unnecessary.
Note that you must right-click on the name of the project itself to get to the menu with the project builder commands,not on some entity within the project.
The GNATbench extensions to the project contextual menus of the GNAT Project Explorer and the Navigator appearnear the bottom of the contextual menus. These extensions include those added to the Project menu as well as twoadditional builder commands that are less frequently used.
188 Chapter 7. Building

GNATbench for Eclipse User’s Guide, Release 22.0.20210305.w
7.2 Project Builder Command Semantics
GNATbench provides the standard project builder commands defined by Eclipse, with some changes for the sake ofbuilding in the context of a distinct linking phase, and augments them with builder commands specific to a givenproject. All these commands display their execution in the Console view and any compilation warnings and errors arereported in the Problems View. The builder commands defined by GNATbench are typically used in preference to theEclipse-defined commands.
The project builder commands build the project based on the definition within the GNAT project file (*.gpr file)controlling the GNATbench project. For example, if one or more main programs are defined by the GNAT project file,building the project creates the executables corresponding to those main subprograms. As an alternative example, theGNAT project file may describe a library project, in which case the library is created when the project is built.
GNAT project files may define a project hierarchy, when the so-called “root” project imports other GNAT project filesvia “with clauses”. When a root project is built, all the imported projects will also be built, as necessary, using thecompilation switches defined by the root project. Thus, for example, an imported library project might be built alongwith executable images requiring that library in the root project.
See GNAT Projects for a description of GNAT projects and project files.
Note that Eclipse projects may reference other Eclipse projects. Since a GNATbench project is also an Eclipse project,project hierarchies need not be contained within one Eclipse project.
7.2. Project Builder Command Semantics 189

GNATbench for Eclipse User’s Guide, Release 22.0.20210305.w
Build steps and resulting messages are displayed on the standard Eclipse Console view in a subconsole specific to thecommand. You can show this view using the standard Eclipse Window -> Show View command if the Console is notalready open. See Ada Build Console for the details of using the builders’ subconsoles.
The progress indicator at the lower right of the Eclipse window will show the command as it runs, including thepercentage complete. You can also interrupt build commands using the Progress view controls.
Note that Ada source files are saved automatically when a project is built if they are within that specific project and ifthey have been altered but not yet saved. This effect is controlled by a preference and is enabled by default. See theEditor preference page for the location of the controlling preference.
7.2.1 Standard Eclipse Build Commands
The Project menu and the GNAT Project Explorer contextual menu provide the standard Eclipse project commandsand GNATbench implements the standard semantics. These are the menu entries “Build All” through “Build Auto-matically” in the Project menu and “Build Project” in the contextual menu. See Project Builder Command Menus forthe locations and content of these menus.
The various build commands and the “Clean. . . ” command operate based on the build history, that is, they performtheir action only if Eclipse believes them necessary. Indeed, the build commands will be disabled whenever a buildpreviously succeeded and nothing has changed to make Eclipse believe another build is necessary.
Build Project and Build All
The commands “Build Project” and “Build All” will invoke the GNAT builder for the GNAT toolchain specified bythe user when creating the project. Alternatively, if a user-defined toolchain is specified during project creation, thecorresponding command specified by the user will be invoked.
Clean. . .
Similarly, the Eclipse “Clean. . . ” command in the Project menu will invoke the GNAT cleaner for the GNAT toolchainspecified by the user when creating the project. (The “Clean. . . ” command offers the option to clean all projects orjust a subset of selected projects.)
Build Automatically
We describe the semantics of “Build Automatically” in a separate section of this chapter. See About the Build Auto-matically Option. . . for the details.
7.2.2 GNATbench Project-Specific Builder Commands
GNATbench defines additional builder commands that provide the convenience of operating specifically on the cur-rently selected project. These enhancements appear in the next section down in the Project menu and at the bottom ofthe GNAT Project Explorer project-level contextual menu.
190 Chapter 7. Building

GNATbench for Eclipse User’s Guide, Release 22.0.20210305.w
Clean Current Project
The “Clean Current Project” command removes compilation products from the project. Like the standard Eclipse“Clean. . . ” command, it calls the cleaner (gnatclean or gprclean) for the toolchain defined for the project, but can alsoclean project hierarchies.
If a user-defined toolchain is specified during project creation the user-defined command will be invoked.
See Removing Compilation Artifacts for the details.
Rebuild Current Project
The “Rebuild Current Project” command first “cleans” the root project and then invokes the builder. A full build of theroot project is thus performed. Note that rebuilding an entire project hierarchy requires first cleaning the entire projecttree using the Clean Current Project/Tree command.
Analyze Project Sources
The “Analyze Project Sources” command will check all the sources in the project, including those that have notchanged, for syntax and semantic errors. Any warnings and errors are sent to the problems view as usual. Note thatthis command does not create an executable.
The “Analyze Project Sources” command will also generate the required information to support those browsing andnavigation commands that require it, without also producing object code.
Note that you can analyze individual Ada source files instead of analyzing the entire project. See Analyzing IndividualFiles.
Invoke Makefile In Target
The “Invoke Makefile In Target” command allows you to invoke user-defined builder commands. We cover the detailsof this command in a separate part of this “Building” chapter. See User-Defined Builder Commands for the details.
Note that there is no compelling reason to use “Invoke Makefile In Target” to invoke the builder commands predefinedby Eclipse and GNATbench, unless, of course, those commands have been changed by the user in the makefile. Thismenu entry is primarily intended for invoking user-defined builder commands that GNATbech and Eclipse do notinvoke.
7.3 Project Builder Key Bindings
The GNATbench builder commands do not have keys bound to them, as shown in the figure below. Eclipse itselfbinds Ctrl-B to the Build All project command and it will indeed build all GNATbench projects in addition to anyother non-Ada projects. Note the additional project-specific commands further down in the menu that are added byGNATbench.
7.3. Project Builder Key Bindings 191
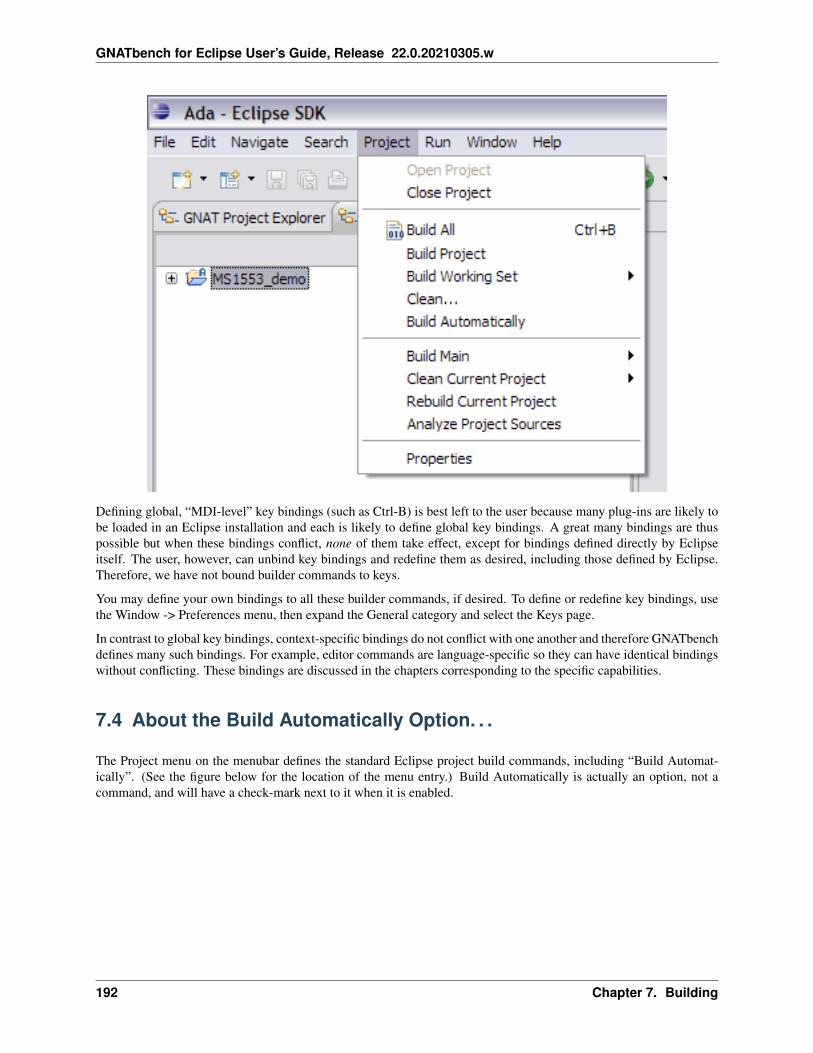
GNATbench for Eclipse User’s Guide, Release 22.0.20210305.w
Defining global, “MDI-level” key bindings (such as Ctrl-B) is best left to the user because many plug-ins are likely tobe loaded in an Eclipse installation and each is likely to define global key bindings. A great many bindings are thuspossible but when these bindings conflict, none of them take effect, except for bindings defined directly by Eclipseitself. The user, however, can unbind key bindings and redefine them as desired, including those defined by Eclipse.Therefore, we have not bound builder commands to keys.
You may define your own bindings to all these builder commands, if desired. To define or redefine key bindings, usethe Window -> Preferences menu, then expand the General category and select the Keys page.
In contrast to global key bindings, context-specific bindings do not conflict with one another and therefore GNATbenchdefines many such bindings. For example, editor commands are language-specific so they can have identical bindingswithout conflicting. These bindings are discussed in the chapters corresponding to the specific capabilities.
7.4 About the Build Automatically Option. . .
The Project menu on the menubar defines the standard Eclipse project build commands, including “Build Automat-ically”. (See the figure below for the location of the menu entry.) Build Automatically is actually an option, not acommand, and will have a check-mark next to it when it is enabled.
192 Chapter 7. Building

GNATbench for Eclipse User’s Guide, Release 22.0.20210305.w
When the Build Automatically option is enabled and an Ada source file is changed and saved (or after the overallproject is cleaned), the builder is automatically invoked.
If the project is clean (or has never been built in the first place), Eclipse invokes a full build and an executable will begenerated if possible.
However, a full build is not invoked when Eclipse does not consider it to be required. For example, after a full build,changing a single file invokes an incremental build. In this mode the compiler will perform syntax and semanticanalysis on the unit in the changed source file and all of its dependent units, transitively, but the binder or linker phasesare not performed. Errors are thus detected as early as possible but without the expense of a full build.
Note that the Ada editor has a preference, enabled by default, to save altered project source files before a build begins.If multiple source files are altered but not yet saved and the Build Automatically option is enabled, saving any one ofthose files will invoke the builder and thus all of the altered source files in that project will be saved as well.
7.5 Ada Build Console
When the builder is invoked (including when cleaning), the Console view is made visible and a project-specific builder“subconsole” is shown. The focus is not given to the Console view, the view is just made visible so that work in anotherview or editor can continue uninterrupted. Build steps and any resulting messages are displayed in the subconsole asthe command executes.
The subconsole will have a title of “Ada build” followed by the name of the project enclosed within square brackets.For example, in the following figure, the project Ms1553_Demo has completed a full build:
7.5. Ada Build Console 193

GNATbench for Eclipse User’s Guide, Release 22.0.20210305.w
You can use the standard contextual menu within the subconsole to copy the contents, clear it, and so forth.
There may be multiple build subconsoles within the Console view since multiple projects can exist and be builtindependently. You can choose among these subconsoles by clicking on the down-arrow next to the “Console” iconand selecting from those that appear in the popup menu. The Console icon is the fourth from the left in the followingfigure and looks like a computer monitor. This figure also shows the console selection popup menu containing twoopen subconsole names. Note that the Console icon will be disabled if no other subconsoles exist to be selected.
You can traverse through the various open subconsoles by simply clicking directly on the Console icon.
Note that if another view within the same group containing the Console view already has the focus, for example if theProblems view or the Scenario Variables view is being examined, the specific project’s build subconsole is not broughtto the front so that working with the other view in that group is not interrupted.
7.6 Compiling Individual Files
GNATbench defines menu entries for compiling individual files in addition to building complete projects.
Compilation steps and messages are displayed on the standard Console view in a subconsole specific to the command.You can show this view using the standard Eclipse Window -> Show View command if the Console is not alreadyopen. See Ada Build Console for the details of using the builders’ subconsoles.
The progress indicator at the lower right of the Eclipse window will show the command as it runs, including thepercentage complete.
7.6.1 Within the Ada Editor
The GNATbench Ada editor extends the contextual menu with an entry “Compile Ada File” (shown in the figurebelow) that will attempt to compile the compilation unit in that file. Note the key binding in this context.
194 Chapter 7. Building
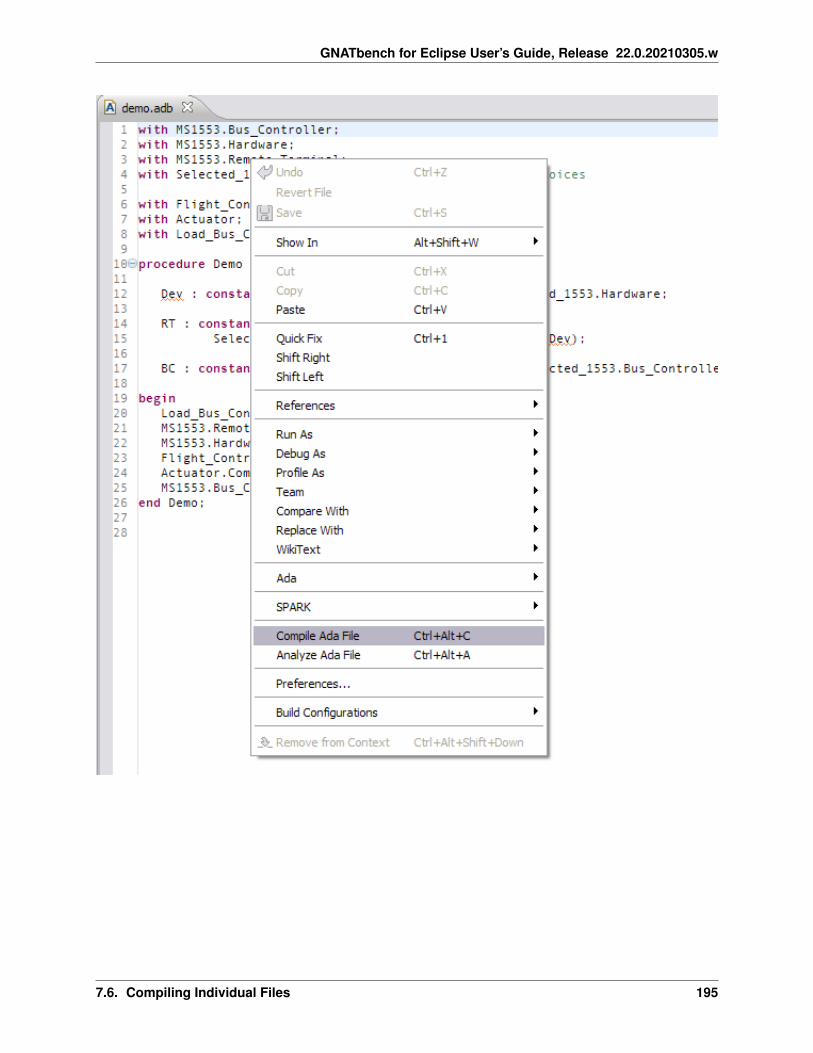
GNATbench for Eclipse User’s Guide, Release 22.0.20210305.w
7.6. Compiling Individual Files 195

GNATbench for Eclipse User’s Guide, Release 22.0.20210305.w
7.6.2 Within the GNAT Project Explorer
You can also compile individual Ada source files using the contextual menu of the file nodes in the GNAT ProjectExplorer. The menu command is “Compile Ada File(s)”.
Right-click on a file node in the Project Explorer to get the file-specific contextual menu, as opposed to the project-levelcontextual menu.
In addition, you can compile multiple Ada source files by selecting several nodes before invoking the command. Thefigure below illustrates selecting several files within the GNAT Project Explorer for compilation.
196 Chapter 7. Building

GNATbench for Eclipse User’s Guide, Release 22.0.20210305.w
7.6. Compiling Individual Files 197

GNATbench for Eclipse User’s Guide, Release 22.0.20210305.w
7.7 Analyzing Individual Files
GNATbench provides a capability to analyze an individual source file as an alternative to analyzing all the source filesin the project. Like the project-level command, this command checks syntax and semantics but will also generatethe required information to support those browsing and navigation commands that require it, without also producingobject code or an executable.
Analysis results are displayed on the standard Eclipse Console view in a subconsole specific to the command. You canshow this view using the standard Eclipse Window -> Show View command if the Console is not already open. See
Ada Build Console for the details of using the builders’ subconsoles.
The command is in the contextual menu of the Ada editor and is named “Analyze Ada File” (as shown in the figurebelow). Note the key binding.
198 Chapter 7. Building
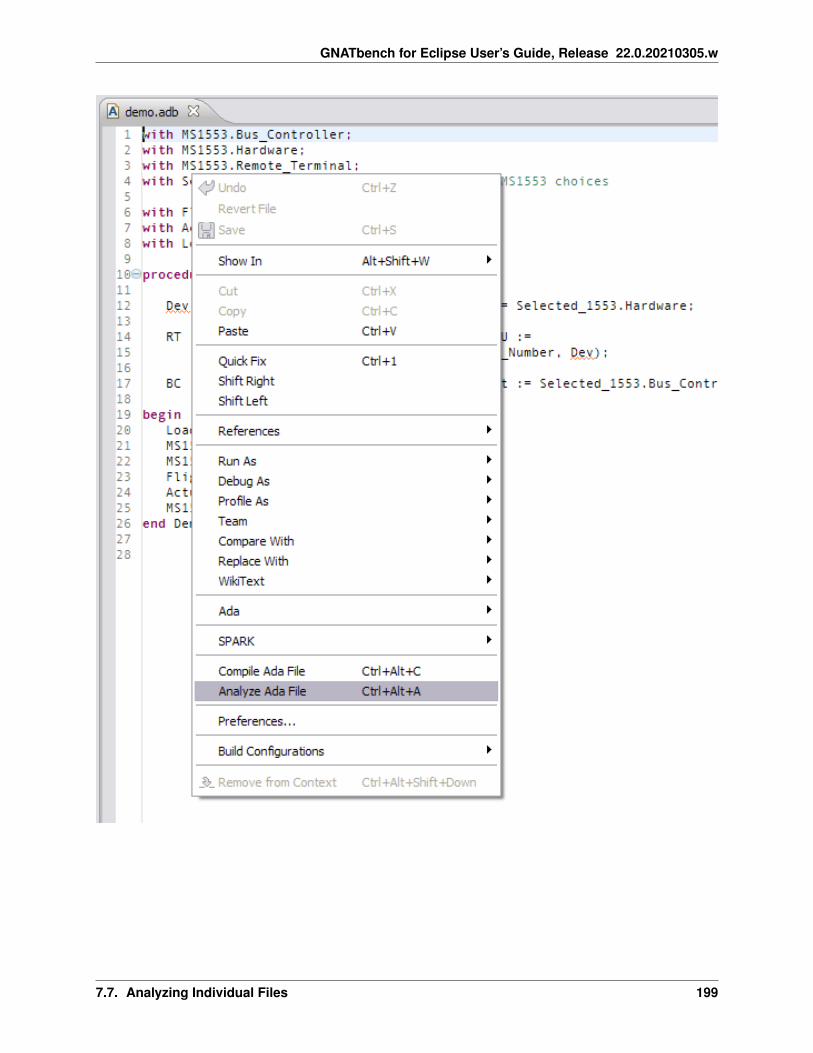
GNATbench for Eclipse User’s Guide, Release 22.0.20210305.w
7.7. Analyzing Individual Files 199

GNATbench for Eclipse User’s Guide, Release 22.0.20210305.w
7.8 Removing Compilation Artifacts
All compilation products specified implicitly or explicitly by the GNAT project file (*.gpr file) can be removed usingthe project cleaning menu defined by the Project menu and the contextual menus of the GNAT Project Explorer andNavigator. Specifically, the object files (*.o), “ali” files (*.ali), and executable images (e.g., *.exe on Windows) can beremoved.
The menu entry is named “Clean Current Project” and is actually two submenus: one to clean the currently selectedproject root, and one to clean the root as well as the “tree” of projects imported by the root project. (Imported projectsare those named in “with clauses” in a project’s GNAT project file.) These two submenu entries are shown in thefollowing figure:
7.9 Building Projects with Scenarios
GNAT project files have the concept of scenario variables that allow considerable flexibility in controlling how thetools build an executable, among other possible uses. (See Scenario Variables for details on scenario variables, andGNAT Projects for the details of GNAT project files.) You can define, for example, different scenarios for debuggingand releases, in which optimization and symbolic information are either present or not, respectively.
GNATbench provides the Scenario View for managing scenario variables. The idea is that you can view and controlthe build by changing the values of the scenario variables within this view. (See Scenario Variables View for details.)
Note that scenario variable settings persist across Workbench sessions so there is no need to set them again wheneverWorkbench is started or a closed project is re-opened.
The wizard that created our new project also created the corresponding GNAT project file for us. It is shown below.Note the scenario variable named “Mode”.
200 Chapter 7. Building

GNATbench for Eclipse User’s Guide, Release 22.0.20210305.w
The variable Mode has two possible values because of its type: “Release” and “Debug”. (These values are case-sensitive because they are strings.) As you have guessed, these two values represent two different build scenarios.“Release” corresponds to the scenario in which you build for actual delivery. The “Debug” scenario is for developmentand testing. Therefore, these scenarios require different switches to be applied and this fact is reflected in the contentof the project file. Note in particular the switches set in the package Compiler depending on the value of Mode. Youwill see these switches applied in the build console.
The initial value of Mode is “Debug” because that is the default:
7.9. Building Projects with Scenarios 201
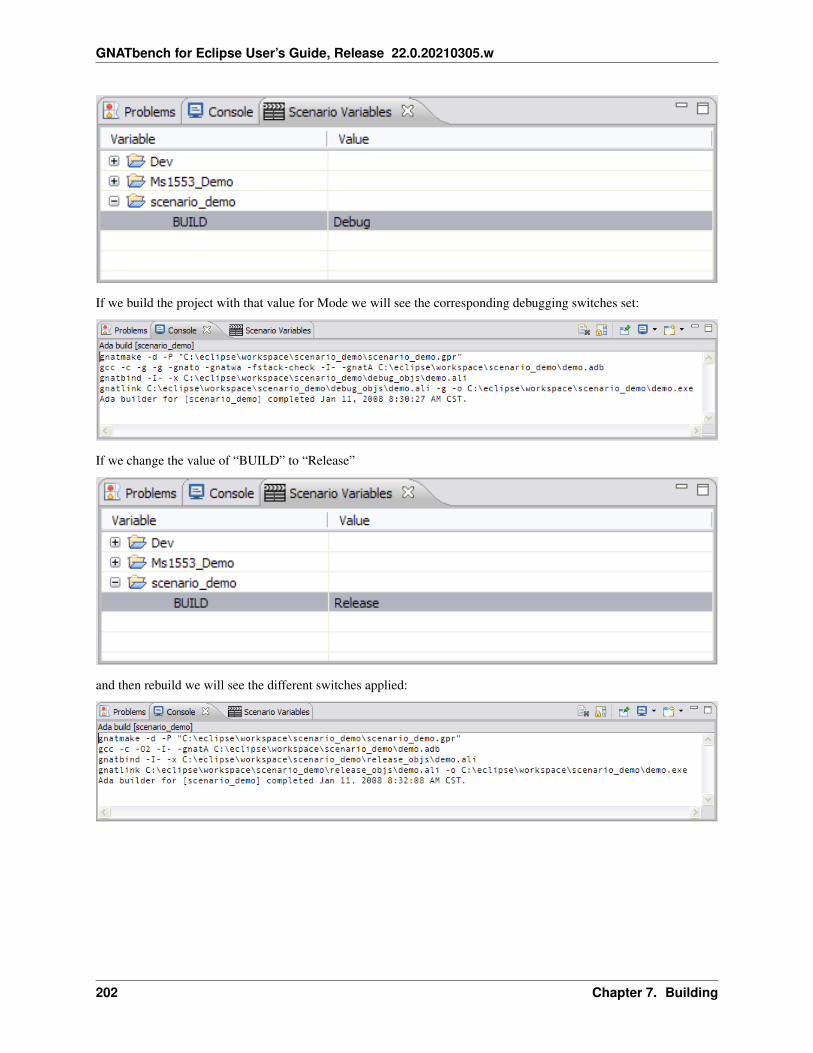
GNATbench for Eclipse User’s Guide, Release 22.0.20210305.w
If we build the project with that value for Mode we will see the corresponding debugging switches set:
If we change the value of “BUILD” to “Release”
and then rebuild we will see the different switches applied:
202 Chapter 7. Building

GNATbench for Eclipse User’s Guide, Release 22.0.20210305.w
7.10 Cross Compiling
GNATbench supports building systems for execution on the host machine as well as on an embedded computer. Thedifference is merely a matter of selecting the appropriate cross compiler when creating the project.
In particular, the new-project wizard requires you to specify the toolchain, by either selecting from a predefined list orby manually entering the name and commands for a new toolchain. Multiple native and cross toolchains may be in thelist, as depicted in the figure below (not all appear):
See Creating New Projects for the details of selecting toolchains when creating projects.
7.10. Cross Compiling 203
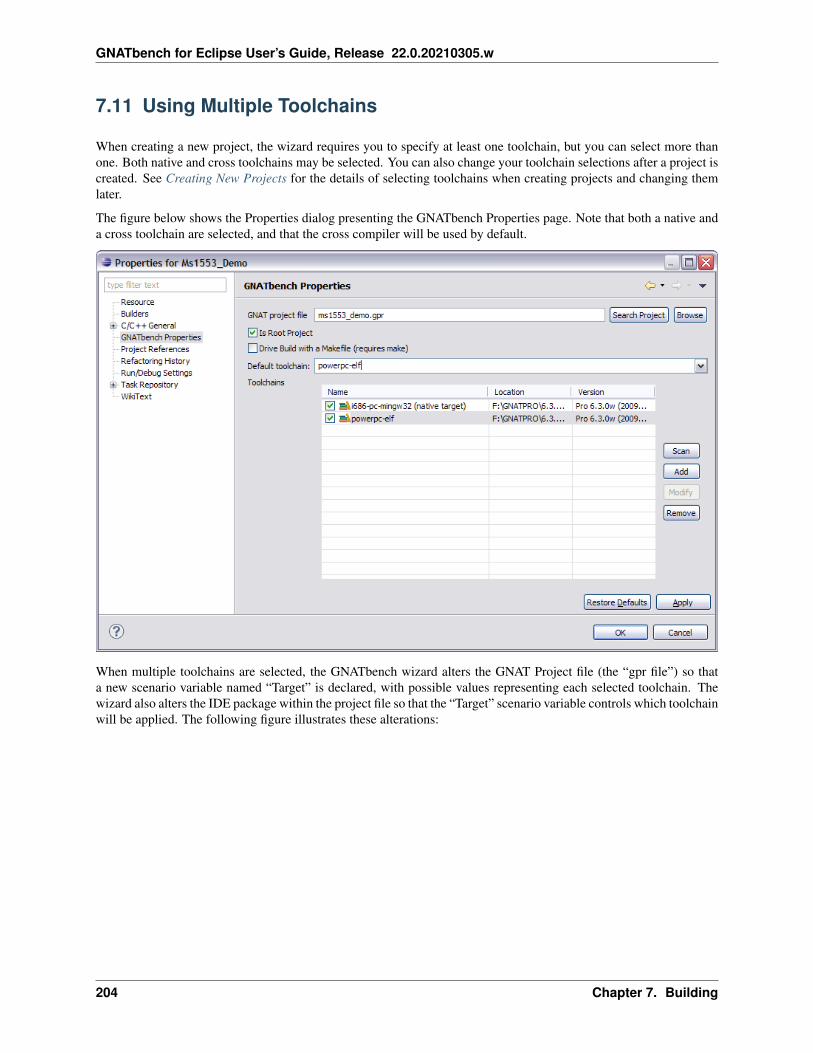
GNATbench for Eclipse User’s Guide, Release 22.0.20210305.w
7.11 Using Multiple Toolchains
When creating a new project, the wizard requires you to specify at least one toolchain, but you can select more thanone. Both native and cross toolchains may be selected. You can also change your toolchain selections after a project iscreated. See Creating New Projects for the details of selecting toolchains when creating projects and changing themlater.
The figure below shows the Properties dialog presenting the GNATbench Properties page. Note that both a native anda cross toolchain are selected, and that the cross compiler will be used by default.
When multiple toolchains are selected, the GNATbench wizard alters the GNAT Project file (the “gpr file”) so thata new scenario variable named “Target” is declared, with possible values representing each selected toolchain. Thewizard also alters the IDE package within the project file so that the “Target” scenario variable controls which toolchainwill be applied. The following figure illustrates these alterations:
204 Chapter 7. Building
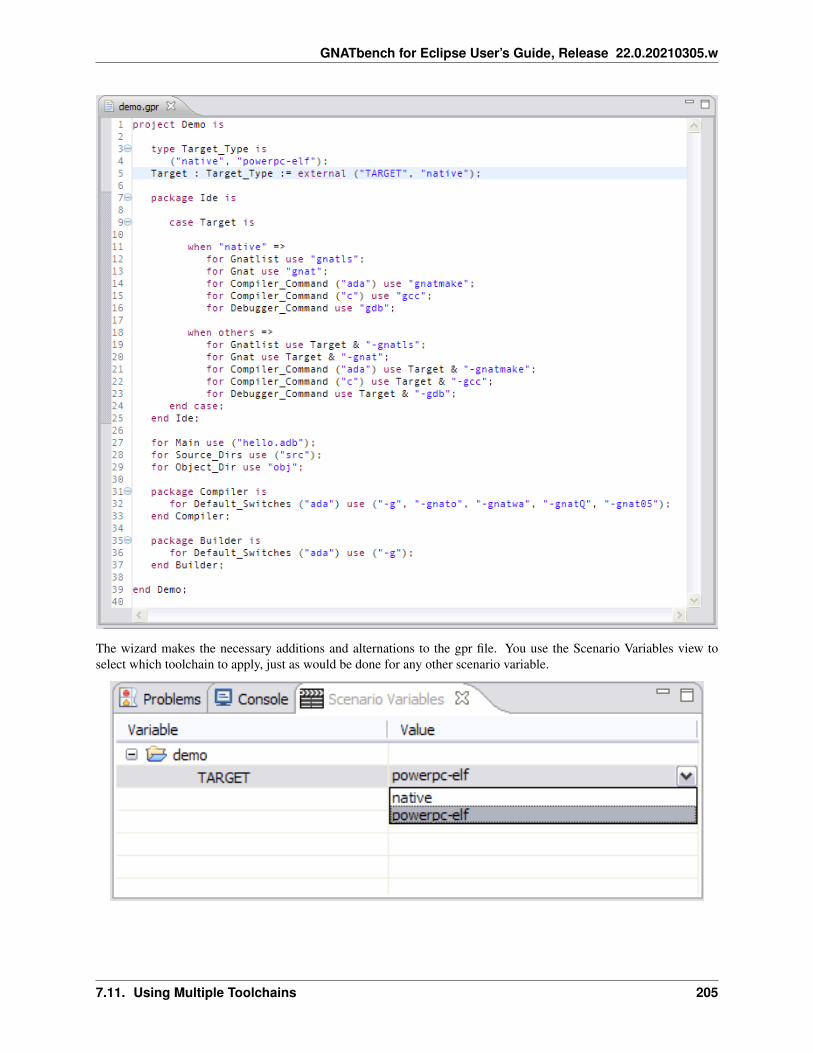
GNATbench for Eclipse User’s Guide, Release 22.0.20210305.w
The wizard makes the necessary additions and alternations to the gpr file. You use the Scenario Variables view toselect which toolchain to apply, just as would be done for any other scenario variable.
7.11. Using Multiple Toolchains 205

GNATbench for Eclipse User’s Guide, Release 22.0.20210305.w
7.12 Building with Makefiles
When requested by the user, GNATbench can use a project-specific makefile to drive project builds. The makefile iscreated by the wizard when creating the project. (See Creating New Projects for the details of creating a new project.)
Naturally, driving the build with a makefile requires the ‘make’ utility to be installed and on the path. GNATbenchdoes not include the ‘make’ utility. You are responsible for installing it if you choose to use it.
You can revisit the choice of whether to drive the build with a makefile, after a project is created, by editing theproject properties. To do so, invoke the Properties menu entry for the given project and then select the “GNATbenchProperties” page. There is a check-box controlling the option:
Although GNATbench does not require a makefile and the corresponding make utility, there are two primary reasonsto allow makefiles to be used. The first reason is that developers can use a script to build their executables. A scriptis a means of demonstrating repeatable executable image construction, a typical requirement, for example, of high-integrity applications. Developers can reference the makefile as part of their demonstration. The second reason toallow a makefile is so that project-specific user-defined build commands can be defined. These commands might berequired, for example, to do some extra setup steps not known to the GNAT compiler. We illustrate this situation inUser-Defined Builder Commands.
206 Chapter 7. Building
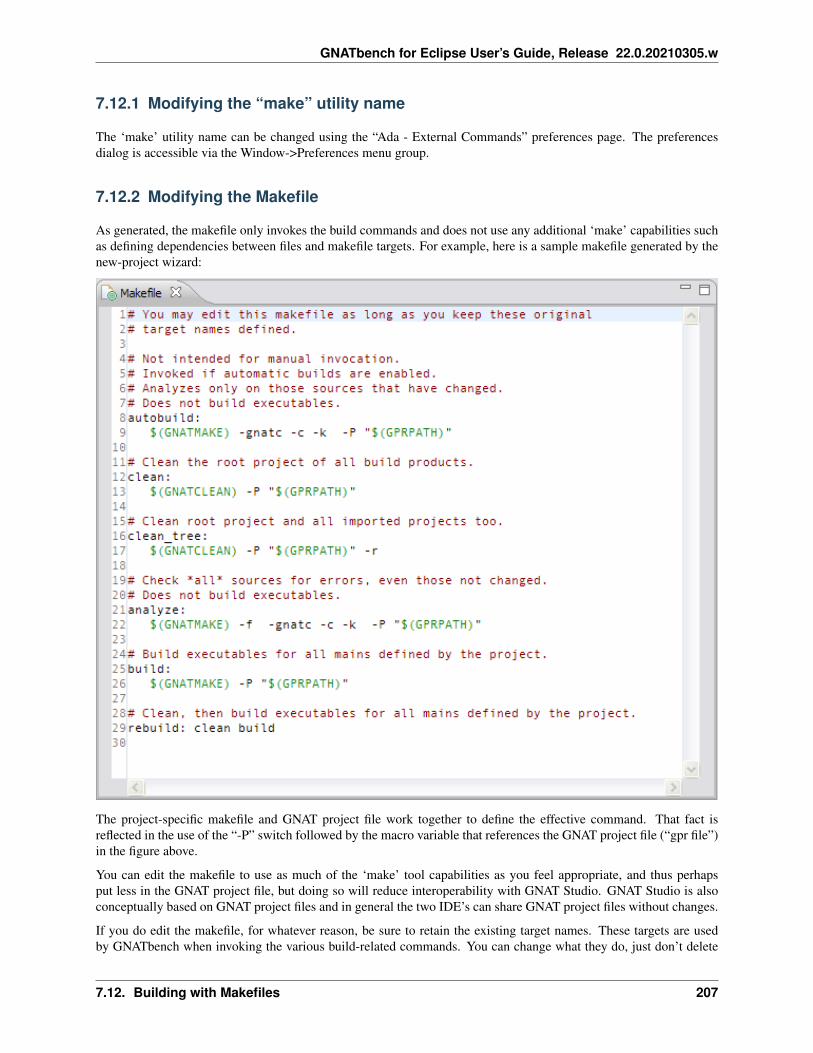
GNATbench for Eclipse User’s Guide, Release 22.0.20210305.w
7.12.1 Modifying the “make” utility name
The ‘make’ utility name can be changed using the “Ada - External Commands” preferences page. The preferencesdialog is accessible via the Window->Preferences menu group.
7.12.2 Modifying the Makefile
As generated, the makefile only invokes the build commands and does not use any additional ‘make’ capabilities suchas defining dependencies between files and makefile targets. For example, here is a sample makefile generated by thenew-project wizard:
The project-specific makefile and GNAT project file work together to define the effective command. That fact isreflected in the use of the “-P” switch followed by the macro variable that references the GNAT project file (“gpr file”)in the figure above.
You can edit the makefile to use as much of the ‘make’ tool capabilities as you feel appropriate, and thus perhapsput less in the GNAT project file, but doing so will reduce interoperability with GNAT Studio. GNAT Studio is alsoconceptually based on GNAT project files and in general the two IDE’s can share GNAT project files without changes.
If you do edit the makefile, for whatever reason, be sure to retain the existing target names. These targets are usedby GNATbench when invoking the various build-related commands. You can change what they do, just don’t delete
7.12. Building with Makefiles 207

GNATbench for Eclipse User’s Guide, Release 22.0.20210305.w
them.
7.12.3 Makefile Name and Location
GNATbench will read the Make package of the GNAT Project file, if present, to determine the name and location of themakefile to use. If the makefile name is not specified, ‘make’ will be launched without a makefile file name argument,in which case the default name “Makefile” will be used. Also by default, the file is assumed to be in the same locationas the GNAT Project (gpr) file.
The following figure contains an example Make package in a project file. Here we have specified that the makefile fileis named “mymakefile” and that it is located in a folder named “control”. Note that any name other than “Makefile”will not be recognized by the Outline view as a genuine makefile, although it will be properly processed as such by‘make’.
When a builder command is invoked, the specified makefile is named explicitly as a parameter to make, as shownin the following figure (in which the “rebuild” command has been issued). Note in particular the second line, where‘make’ is invoked with the “-f” switch naming the user-specified makefile.
208 Chapter 7. Building

GNATbench for Eclipse User’s Guide, Release 22.0.20210305.w
7.13 User-Defined Builder Commands
GNATbench can optionally use a project-specific makefile to drive project builds. (See Building with Makefiles for thedetails.) User-defined builder commands are defined in these makefiles.
7.13.1 Defining Commands
You create a user-defined command by adding a new makefile target and associated tool invocation to an existingmakefile. In the following figure, we have added a command that assembles a small file written in assembly languageand compiles an Ada source file. This new command (makefile target) is named “setup” and appears at the end of themakefile.
We could have used the ‘make’ dependency capability to have this command executed automatically when necessary,but in this simple example the user will invoke the command when first building the project.
7.13. User-Defined Builder Commands 209

GNATbench for Eclipse User’s Guide, Release 22.0.20210305.w
7.13.2 Invoking User-Defined Commands
The “Invoke Makefile Target” command allows you to invoke the low-level commands represented by the makefiletargets. All targets defined by the makefile are presented as submenu entries, including user-defined targets. Forexample, the following figure illustrates selection of the user-defined target named “setup”:
Simply select the name of the target to invoke it. The command execution and any resulting messages will be displayedin the project-specific console.
210 Chapter 7. Building
GNATbench for Eclipse User’s Guide, Release 22.0.20210305.w
7.14 Build Mode
GNATbench provides an easy way to build your project with different options, through the Mode selection, located inthe main toolbar. It can be displayed enabling “GNATbench Build Mode Menu” command group through Window ->Customize Perspective. . . -> Command Groups Availability menus.
When the Mode selection is set to default, the build is done using the switches defined in the project. When the Modeselection is set to another value, then specialized parameters are passed to the builder. For instance, the gcov Modeadds all the compilation parameters needed to instrument the produced objects and executables to work with the gcovtool.
In addition to changing the build parameters, the Mode selection has the effect of changing the output directory forobjects and executables. For instance, objects produced under the debug mode will be located in the debug subdirec-tories of the object directories defined by the project. This allows switching from one Mode to another without havingto erase the objects pertaining to a different Mode.
Note that the Build Mode affects only builds done using recent versions of gnatmake and gprbuild. The Mode selectionhas no effect on builds done through Targets that launch other builders.
7.15 Build Menu
The build menu gives access to capabilities related to checking, parsing and compiling files, as well as creating andrunning executables. Note that this menu is fully configurable via the Ada Builder Targets preference page,so what is documented in this manual are the default menus. Use “GNATbench Build Toolbar, Contextual or MenubarMenus’ command groups through “Window -> Customize Perspective.. -> Command Groups Availability” menu toenable these menus visibility.
See the Builder Targets Editor
7.15.1 Check Syntax
Check the syntax of the current source file. Display an error message dialog if no file is currently selected.
7.15.2 Check Semantic
Check the semantic of the current source file. Display an error message dialog if no file is currently selected.
7.15.3 Compile File
Compile the current file. Display an error dialog if no file is selected.
If errors or warnings occur during the compilation, the corresponding locations will appear in the Problems View.
7.14. Build Mode 211
GNATbench for Eclipse User’s Guide, Release 22.0.20210305.w
7.15.4 Project
Build <main>
The menu will list of all mains defined in your project hierarchy. Each menu item will build the selected main.
Build All
Build and link all main units defined in your project. If no main unit is specified in your project, build all files definedin your project and subprojects recursively.
For a library project file, compile sources and recreate the library when needed.
Compile All Sources
Compile all source files defined in the top level project.
Build <current file>
Consider the currently selected file as a main file, and build it.
Custom Build. . .
Display a text entry where you can enter any external command. This menu is very useful when you already haveexisting build scripts, make files, . . . and want to invoke them from GNATbench.
7.15.5 Clean
Clean All
Remove all object files and other compilation artifacts associated to all projects related to the current one. It allows torestart a complete build from scratch.
Clean Root
Remove all object files and other compilation artifacts associated to the root project. It does not clean objects fromother related projects.
7.15.6 Run
main
For each main source file defined in your top level project, an entry is listed to run the executable associated with thismain file. Running an application will first open a dialog where you can specify command line arguments to yourapplication, if needed. You can also specify whether the application should be run within GNATbench (the default),or using an external terminal.
When running an application within GNATbench, the Messages [$PROJECT] console is displayed in the Console view.It is where inputs and outputs of the launched application are handled. This window is never closed automatically,
212 Chapter 7. Building
GNATbench for Eclipse User’s Guide, Release 22.0.20210305.w
even when the application terminates, so that you can still have access to the application’s output. If you explicitlyclose the Console view while an application is still running, the application will still run in background. To terminateit use to Cancel Operation button of this job in the Progress view. The Progress view can be displayed using “Windows/Show View / Other. . . / General / Progress” menu or clicking the “Shows background operations in Progress view”button displayed the the right of the status bar.
When using an external terminal, GNATbench launches an external terminal utility that will take care of the execu-tion and input/output of your application. This external utility can be configured in the preferences dialog (ExternalCommands->Execute command).
The GNATbench execution Messages in Console view have several limitations compared to external terminals. Inparticular, it displays only the latest launched application user interface and it do not handle signals like <ctrl-z> and<control-c>. In general, if you are running an interactive application, we strongly encourage you to run in an externalterminal.
Similarly, the Run contextual menu accessible from a project entity contains the same entries.
Custom. . .
Similar to the entry above, except that you can run any arbitrary executable.
7.16 Troubleshooting Builder Problems
7.16.1 Eclipse and CDT Version Mismatch or Missing
You must install the latest versions of Eclipse, the corresponding version of the C/C++ Development Tools (CDT),and the AdaCore compilation toolset *before* installing the GNATbench plug-in. If these tools are not installed, withthe proper versions, behavior is generally unpredictable.
See Prior Required Tool Installations for the current versions required.
7.16.2 Conflicting Plug-Ins
In all probability, you must remove or completely disable any other Ada development plug-in that includes the func-tionality that GNATbench provides. In particular, any plug-in that defines a project builder for Ada source code willlikely prevent correct operation of GNATbench, and vice versa.
7.16. Troubleshooting Builder Problems 213
GNATbench for Eclipse User’s Guide, Release 22.0.20210305.w
214 Chapter 7. Building

CHAPTER
EIGHT
EXECUTING
8.1 Creating Launch Configurations for Native Ada Applications
Ada applications can be executed natively by creating and applying either an External Tools launch configuration ora C++ Application launch configuration. Remember that launch configurations can be reused indefinitely; they neednot be created anew each time a given application is to be executed.
Although not mandatory, building your project beforehand will facilitate creating the corresponding launch configu-ration. In particular, it will make it possible to browse and search for some of the required entries instead of manuallyentering the values.
8.1.1 Creating A C++ Launch Configuration
First, open the Run configuration dialog. Select “Run Configurations. . . ” from the Run menu, or click on the down-arrow next to the Run button on the toolbar and make the same selection there.
The following dialog box will appear. (In this figure there are no existing user-defined launch configurations; yoursmay have some already.)
215
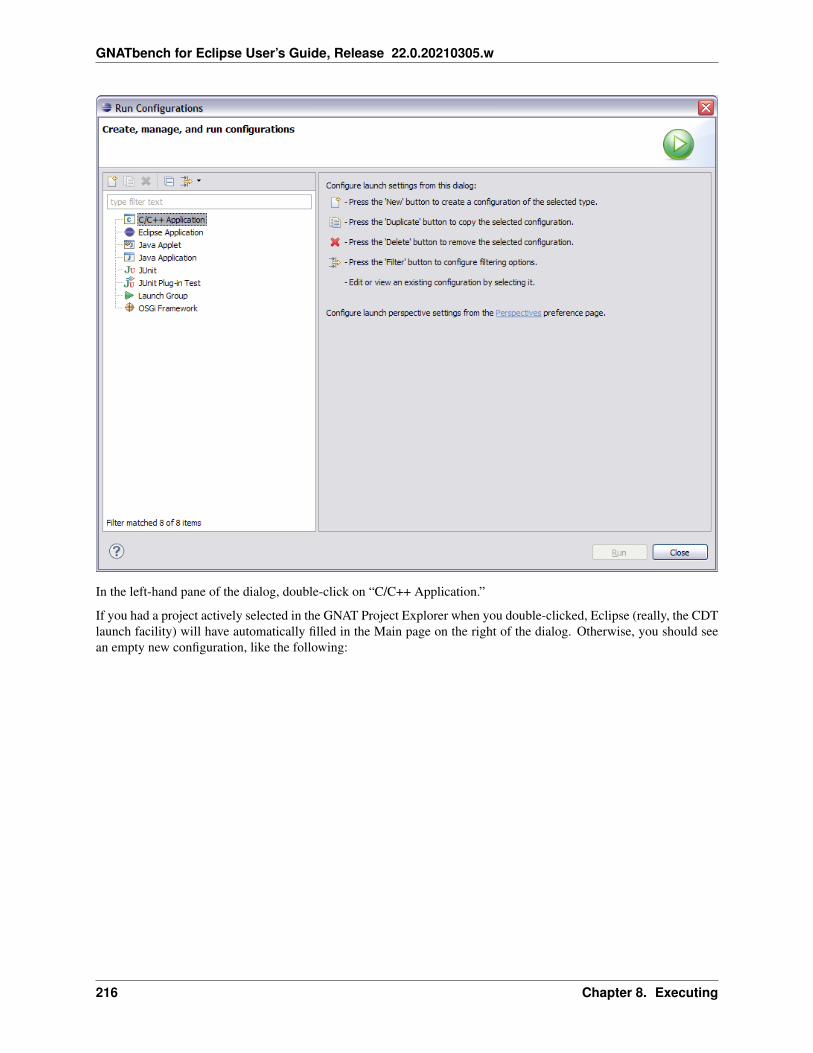
GNATbench for Eclipse User’s Guide, Release 22.0.20210305.w
In the left-hand pane of the dialog, double-click on “C/C++ Application.”
If you had a project actively selected in the GNAT Project Explorer when you double-clicked, Eclipse (really, the CDTlaunch facility) will have automatically filled in the Main page on the right of the dialog. Otherwise, you should seean empty new configuration, like the following:
216 Chapter 8. Executing

GNATbench for Eclipse User’s Guide, Release 22.0.20210305.w
Using the tabbed dialog on the right, you will specify various different configuration options. For instance you specifythe name of the configuration, the executable you wish to run, the arguments you wish to pass to it when it’s launched,if any, the environment under which it will run, and so on.
When everything necessary is correctly specified, press Apply. The new launch configuration name will appear in thelist of known configurations and the page will appear similar to the figure below. You can now press Close to exit thedialog; the new launch configuration is ready to use. Alternatively, you can launch the application by pressing Run.We discuss launching in Executing Native Ada Applications
8.1. Creating Launch Configurations for Native Ada Applications 217

GNATbench for Eclipse User’s Guide, Release 22.0.20210305.w
8.1.2 Creating an External Tools Launch Configuration
To create a new External Tools launch configuration, use the External Tools dialog, which can be invoked using eitherthe Run menu or the External Tools button and selecting the Open External Tools Dialog. . . entry. The followingfigure illustrates use of the Run menu:
218 Chapter 8. Executing

GNATbench for Eclipse User’s Guide, Release 22.0.20210305.w
Using the External Tools button on the button bar is shown in this figure:
Once invoked, the External Tools dialog page will pop up. Initially, when no launch configurations have yet beencreated, it will appear as follows. Note the buttons above the list of configurations on the left of the page. Theirdescriptions are on the right side of the page.
Create a new configuration by selecting the “Program” category and then pressing the “New launch configuration”button above the category list. This will invoke the wizard to walk you through the creation steps. The initial newconfiguration page will appear as follows:
8.1. Creating Launch Configurations for Native Ada Applications 219

GNATbench for Eclipse User’s Guide, Release 22.0.20210305.w
Change the name of the configuration to something meaningful, unless you do not intend to save and reuse thisconfiguration. Then, in the “Main” tab, either enter the location of the executable or browse to it. Similarly, specify thepath to the directory in which the executable should be launched. You may also specify any command line parametersto apply when invoking the executable.
Once you have entered the information for the “Main” tab, press the Apply button to save the information. The othertabs (“Refresh”, etc.) can be left unchanged in typical usage.
The sample configuration for our Mil-Std-1553 demonstration application is shown below, prior to pressing Apply(because the configuration is still named “New_configuration” in the list of all known Program configurations).
220 Chapter 8. Executing

GNATbench for Eclipse User’s Guide, Release 22.0.20210305.w
You can also specify other aspects of the configuration, including whether the enclosing project (or workspace, etc.)is built prior to each launch execution. The image below shows the Build page, for example. By default, the entireworkspace is built prior to execution. You may want to build only the project containing the executable associatedwith the specific launch.
8.1. Creating Launch Configurations for Native Ada Applications 221
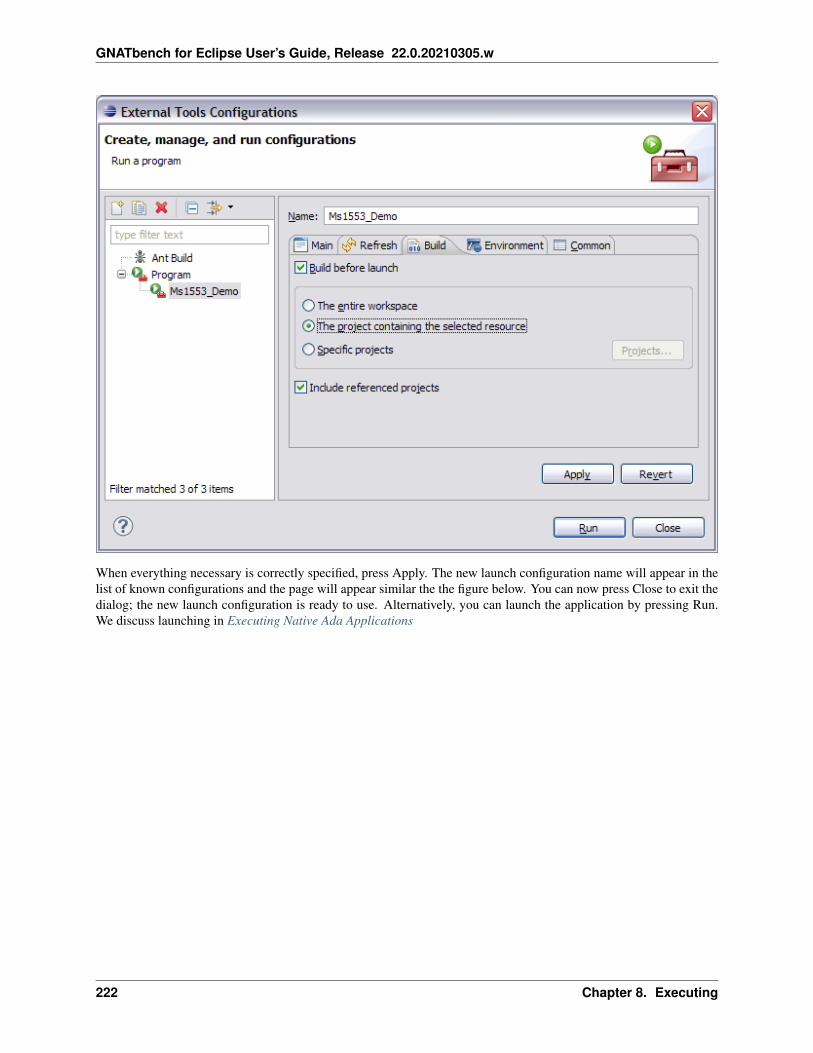
GNATbench for Eclipse User’s Guide, Release 22.0.20210305.w
When everything necessary is correctly specified, press Apply. The new launch configuration name will appear in thelist of known configurations and the page will appear similar the the figure below. You can now press Close to exit thedialog; the new launch configuration is ready to use. Alternatively, you can launch the application by pressing Run.We discuss launching in Executing Native Ada Applications
222 Chapter 8. Executing
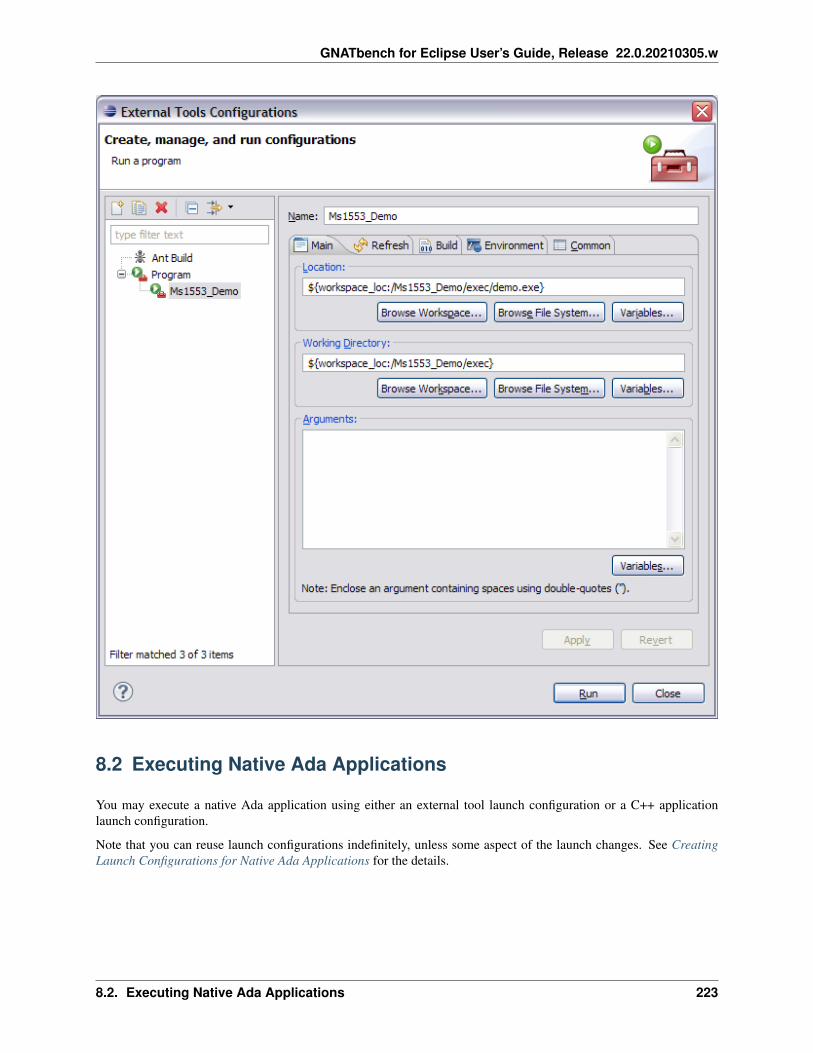
GNATbench for Eclipse User’s Guide, Release 22.0.20210305.w
8.2 Executing Native Ada Applications
You may execute a native Ada application using either an external tool launch configuration or a C++ applicationlaunch configuration.
Note that you can reuse launch configurations indefinitely, unless some aspect of the launch changes. See CreatingLaunch Configurations for Native Ada Applications for the details.
8.2. Executing Native Ada Applications 223

GNATbench for Eclipse User’s Guide, Release 22.0.20210305.w
8.2.1 Using A C++ Launch Configuration
You can execute a native Ada application as if it is a C++ application, thereby reusing the CDT facilities. To do so,you apply an existing C++ launch configuration.
Select the launch configuration using the Run. . . dialog, which can be invoked using either the Run menu or the Runbutton on the toolbar, and then select the Run Configurations. . . entry. The following figure illustrates use of the Runmenu:
The resulting dialog will list all the known launch configurations. Select the intended configuration and press Run.
224 Chapter 8. Executing

GNATbench for Eclipse User’s Guide, Release 22.0.20210305.w
Execution will commence and any output will appear in a dedicated console in the Console view. You can use theconsole controls to terminate the execution if required.
Once you have applied a given launch configuration, Eclipse places it into the Run menu so it is easy to apply it again.From then on you can launch the application from the menu without having to invoke the dialog. You may also includethe configuration in your “launch favorites” and it will then be available in the menu until you remove it.
For example, the following figure illustrates our Mil-Std-1553 demo launch configuration within the Run menu:
8.2. Executing Native Ada Applications 225

GNATbench for Eclipse User’s Guide, Release 22.0.20210305.w
8.2.2 Using An External Tool Launch Configuration
To execute a native Ada application as an external tool, apply an existing External Tools launch configuration.
Select the launch configuration using the External Tools dialog, which can be invoked using either the Run menu orthe External Tools button and selecting the Open External Tools Dialog. . . entry. The following figure illustrates useof the Run menu:
Using the External Tools button on the button bar is shown in this figure:
The resulting dialog will list all the known launch configurations. Select the intended configuration and press Run.
226 Chapter 8. Executing

GNATbench for Eclipse User’s Guide, Release 22.0.20210305.w
Execution will commence and any output will appear in a dedicated console in the Console view. You can use theconsole controls to terminate the execution if required.
8.2. Executing Native Ada Applications 227

GNATbench for Eclipse User’s Guide, Release 22.0.20210305.w
Once you have applied a given launch configuration, Eclipse places it into the External Tools menu so it is easy toapply it again. From then on you can launch the application from the menu without having to invoke the ExternalTools dialog. You may also include the configuration in your “launch favorites” and it will then be available in themenu until you remove it.
For example, the following figure illustrates our Mil-Std-1553 demo launch configuration within the External Toolsmenu:
8.3 Executing Embedded Ada Applications
GNATbench supports development of both native and embedded applications. For example, a cross compiler can justas easily be used as a native compiler. Execution in an embedded context, however, involves a number of differences,such as debugger probes, emulators, and so forth, that are beyond the scope of this general User’s Guide. Please referto the specific documentation supplied with your cross development system for the details of remote execution.
228 Chapter 8. Executing

CHAPTER
NINE
DEBUGGING
9.1 Introduction to Debugging with GNATbench
Debugging Ada applications is supported via the GDB debugger, tailored for Ada by AdaCore, and the CDT interactivedebugging perspective.
The screenshots in this section use the project “sdc.gpr” from the GNAT Studio tutorial. That project and its associatedcode can be found under the GNAT installation in the directory share/examples/gnatstudio/tutorial.
9.1.1 Preparing to Debug
Before you begin to debug your project, make sure your project has built properly and you can see the executable inthe GNAT Project Explorer. In particular, make sure to apply the “-g” switch when building.
9.1.2 Other Resources
We provide an overview of some of the material, delving into the details only when they pertain to debugging Adaapplications. You can find details about the CDT debugger interface in the C/C++ Developer User Guide. All the UserGuides are available via the Eclipse Help menu, under “Help Contents”.
229

GNATbench for Eclipse User’s Guide, Release 22.0.20210305.w
9.1.3 Overview
The following figure shows the result of selecting Run and allowing the debugger to halt at a breakpoint.
230 Chapter 9. Debugging

GNATbench for Eclipse User’s Guide, Release 22.0.20210305.w
To the right, a tabbed dialog presents various views for inspecting local variables, breakpoints, and registers. Thesetabs provide a variety of different tools for exploring information about the state of your halted application.
Eclipse provides additional optional views through the Window -> Show View menu item. In the screenshot, the“Expressions” view has been added by clicking Window -> Show View -> Expressions. In this example, a watchpointexpression has been added by double-clicking inside the expressions window and adding an entry for the local variable“Last.”
A tabbed dialog in the middle of the perspective provides a number of editor windows, in which the point at which thedebugger is currently halted is shown by an arrow in the left gray border.
At the bottom of the screen, a tabbed dialog provides access to the console for the process being debugged. Thiswindow allows text input and allows the user to provide input to a process that expects to read text input for theconsole. Additional entries provide interfaces for working with tasks and inspecting the state of memory.
9.1. Introduction to Debugging with GNATbench 231

GNATbench for Eclipse User’s Guide, Release 22.0.20210305.w
9.2 Creating A Debug Configuration
Eclipse allows you to maintain configuration options and preferences from debug session to session via the “debugconfiguration” mechanism. The first step in debugging under Eclipse is to create such a configuration. You can thenreuse the configuration indefinitely unless/until some aspect changes.
Although not mandatory, compiling your project beforehand will facilitate creating the corresponding debug launchconfiguration. In particular, it will make it possible to browse and search for some of the required entries insteadof manually entering the values. Also, it is most convenient to first select a project before creating a new launchconfiguration for that project because much of the required information will be filled in automatically.
See Quick Configuration Creation below for a convenient way to create a new debugger launch configuration for anAda application.
First, open the Debug launch dialog. Select “Debug Configurations. . . ” from the Run menu, or click on the down-arrow next to the Debug button on the toolbar and make the same selection there. The following dialog box willappear. (In this figure there are no existing user-defined launch configurations; yours may have some already.)
In the left-hand pane of the dialog, double-click on “Ada Application.”
If you had a project actively selected in the GNAT Project Explorer when you started, Eclipse (really, the CDT launchfacility) will have automatically filled in the name of the new configuration and the information for the “Main” tab onthe right of the dialog. Otherwise, you should see an empty new configuration, like the following:
232 Chapter 9. Debugging

GNATbench for Eclipse User’s Guide, Release 22.0.20210305.w
Using the tabbed dialog on the right, you will specify various different configuration options. For example, you canspecify the name of the configuration, the executable you wish to debug, the arguments you wish to pass to it whenit’s launched, if any, the environment under which it will run, the debugger to use, and so forth.
Enter the name for the new configuration at the top of the page. Then, in the “Main” tab, first enter the project nameand then the location of the executable. You can manually enter the project name and executable location or you canbrowse for them. For example, clicking on the “Search Project. . . ” button will invoke this dialog box:
9.2. Creating A Debug Configuration 233

GNATbench for Eclipse User’s Guide, Release 22.0.20210305.w
Once filled in, the “Main” tab content will appear something like this:
234 Chapter 9. Debugging
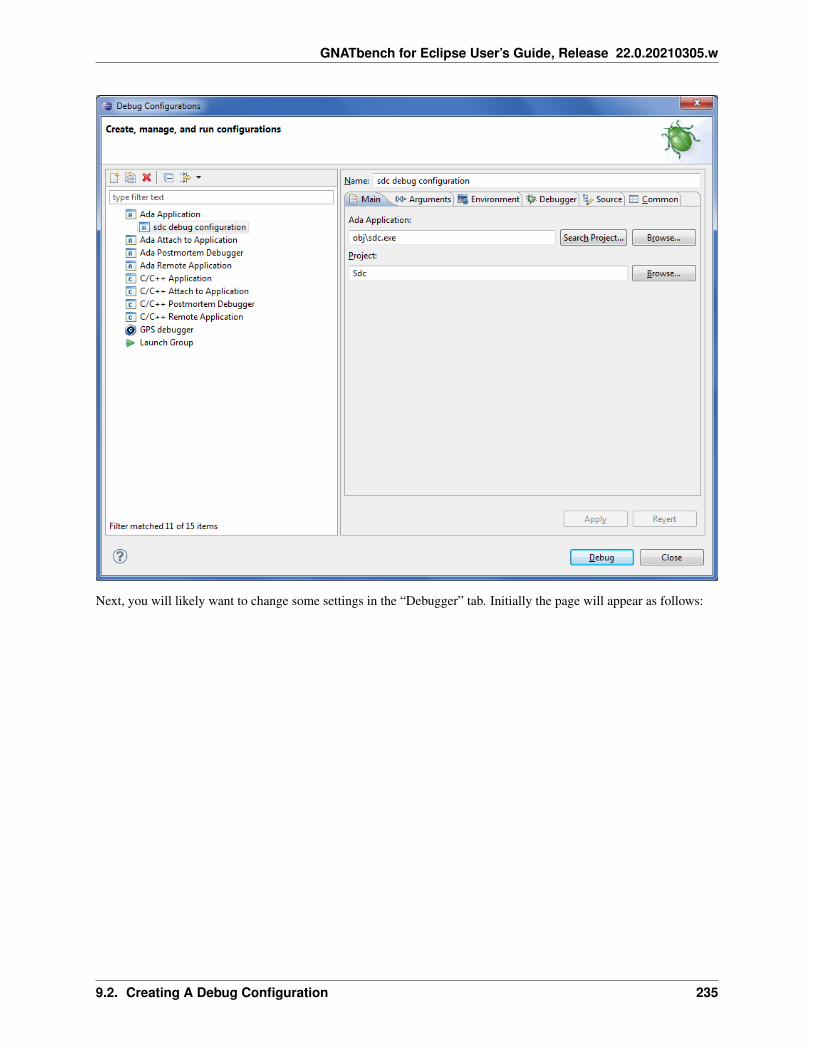
GNATbench for Eclipse User’s Guide, Release 22.0.20210305.w
Next, you will likely want to change some settings in the “Debugger” tab. Initially the page will appear as follows:
9.2. Creating A Debug Configuration 235

GNATbench for Eclipse User’s Guide, Release 22.0.20210305.w
If you want to debug library unit elaboration, leave the entry point name in the text pane labeled “Stop on startup at:”set to “main”. You can then step through the elaboration of all the library units.
Typically, however, you will want to stop at (the elaboration of) the main subprogram, in which case you will replace“main” with the name of the Ada main subprogram unit. In this example the name would be “sdc”.
Once filled in, the “Debugger” page will appear something like this:
236 Chapter 9. Debugging

GNATbench for Eclipse User’s Guide, Release 22.0.20210305.w
Generally you can leave the other tabs with their contents unchanged.
Press the Apply button to save the changes, and then press either Close or Debug, depending upon whether or not youwant to use the configuration immediately.
9.2.1 Quick Configuration Creation
You can quickly create a new Ada debug configuration in several convenient ways. Note, however, that not all thesettings described above are automatically specified. For example, the entry point will remain set to “main” ratherthan the name of your actual Ada main procedure.
In all cases, you first select the node for an Ada project or an Ada executable in the GNAT Project Explorer. This stepis essential. Next, either:
• right-click to get the contextual menu and select the “Debug As” menu entry;
• use the “Debug” toolbar icon;
• use the “Run -> Debug” menu entry.
For example, in the following figure we have right-clicked on the executable:
9.2. Creating A Debug Configuration 237

GNATbench for Eclipse User’s Guide, Release 22.0.20210305.w
If instead you use the “Run -> Debug” menu entry, you must then specify how to debug the application. Choose “LocalAda Application” and press OK, as shown below:
238 Chapter 9. Debugging

GNATbench for Eclipse User’s Guide, Release 22.0.20210305.w
Finally, select the “gdb/mi” debug configuration to finish the launch configuration process. Press OK to launch thedebugger.
9.2. Creating A Debug Configuration 239

GNATbench for Eclipse User’s Guide, Release 22.0.20210305.w
9.3 Launching A Debug Session
See
Creating A Debug Configuration for the details of the creating new debugger launch configurations.
Once you have created a debug configuration, you can launch it from the Debug dialog (assuming it is still open) byclicking the “Debug” button. Alternatively, if you have an existing configuration you can re-apply it in various waysto launch the debugger. If you have only one such configuration you can simply press the Debug toolbar icon. Usuallyyou will have more than one launch configuration so perhaps the easiest way is by clicking on the down-arrow next tothe Debug button on the toolbar and selecting the desired configuration from the list.
240 Chapter 9. Debugging

GNATbench for Eclipse User’s Guide, Release 22.0.20210305.w
If you are not in the Debug perspective when launching a debug configuration, Eclipse will ask whether you to wantto switch to that perspective. (Eclipse will remember your answer if you tell it to do so, and in that case will not askagain.) Once in the Debug perspective you will see your application in the debugger.
The upper left pane contains the debugger controls and stacks view. At the upper right are the variables and breakpointsviews, among others. The source files appear in the middle on the left, with the Outline view to the right. The debuggerConsole view is on the bottom.
The source view will initially show the source file containing the next line to execute, which in this case will be theelaboration of the main subprogram (if that is the entry point specified in the launch configuration). The green line andblue arrow highlight that line, as shown in the figure below.
9.3. Launching A Debug Session 241

GNATbench for Eclipse User’s Guide, Release 22.0.20210305.w
9.3.1 Potential Trouble
When the debugger first comes up you might see an error indicating that no source is available for the first code entered(on Windows XP, in particular, due to Windows code that is initially required). In that situation the source file anddebugger pane will look something like the following:
242 Chapter 9. Debugging
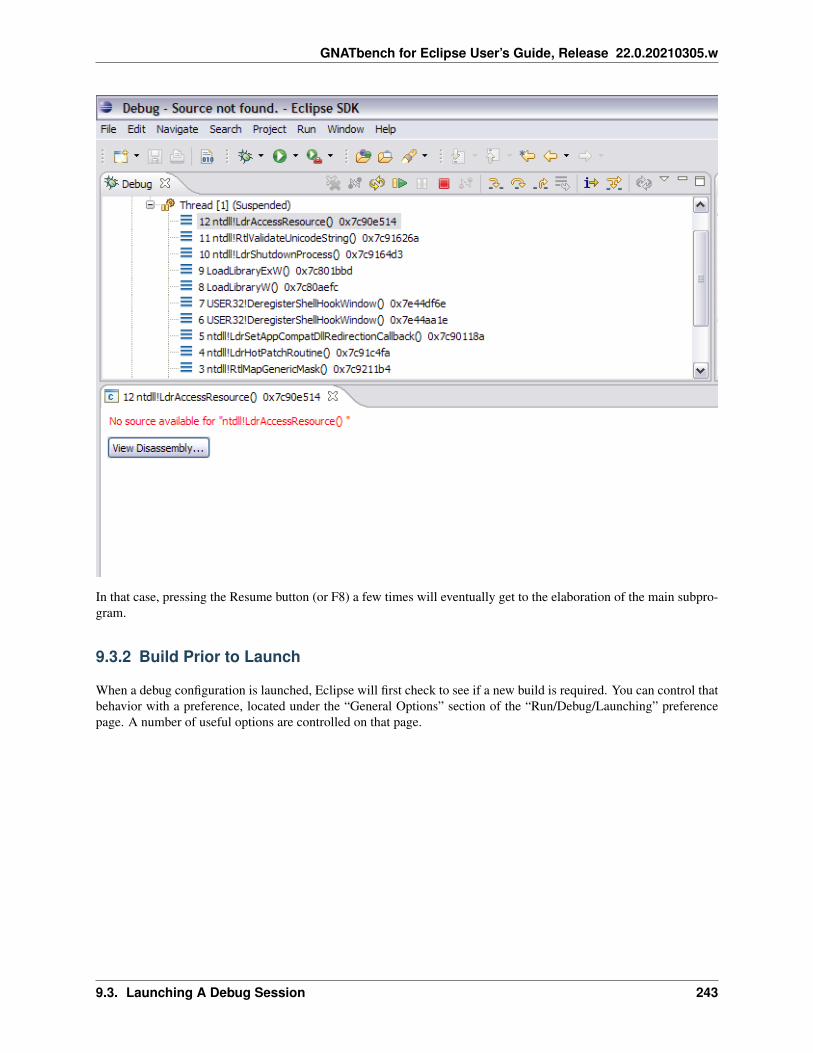
GNATbench for Eclipse User’s Guide, Release 22.0.20210305.w
In that case, pressing the Resume button (or F8) a few times will eventually get to the elaboration of the main subpro-gram.
9.3.2 Build Prior to Launch
When a debug configuration is launched, Eclipse will first check to see if a new build is required. You can control thatbehavior with a preference, located under the “General Options” section of the “Run/Debug/Launching” preferencepage. A number of useful options are controlled on that page.
9.3. Launching A Debug Session 243

GNATbench for Eclipse User’s Guide, Release 22.0.20210305.w
9.4 Setting Breakpoints
You can create breakpoints in the source editor by double clicking in the gray column on the left-hand side of theeditor window, to the left of the line numbers. A blue dot will appear there.
In the following figure two breakpoints have been set: one on line 15 and one on line 30:
244 Chapter 9. Debugging

GNATbench for Eclipse User’s Guide, Release 22.0.20210305.w
Note that you may need to switch back and forth between the Debug and Ada perspectives because the Ada perspectivedisplays the source files for editing. Setting breakpoints in an open file is the easiest method of setting breakpoints.
You can enable line numbers in the source view by a preference. Use the Window menu entry and select “Prefer-ences. . . ”, then expand the “General/Editors/Text Editors” nodes and select “Show line numbers.”
Also note that you can create breakpoints in this fashion before beginning your debug session. You may also switchback and forth between the Debug and Ada perspectives at any time by clicking on the “Ada” and “Debug” perspectiveicons in the top right-hand corner of the display.
When a breakpoint has been hit the source view will highlight it:
9.4. Setting Breakpoints 245
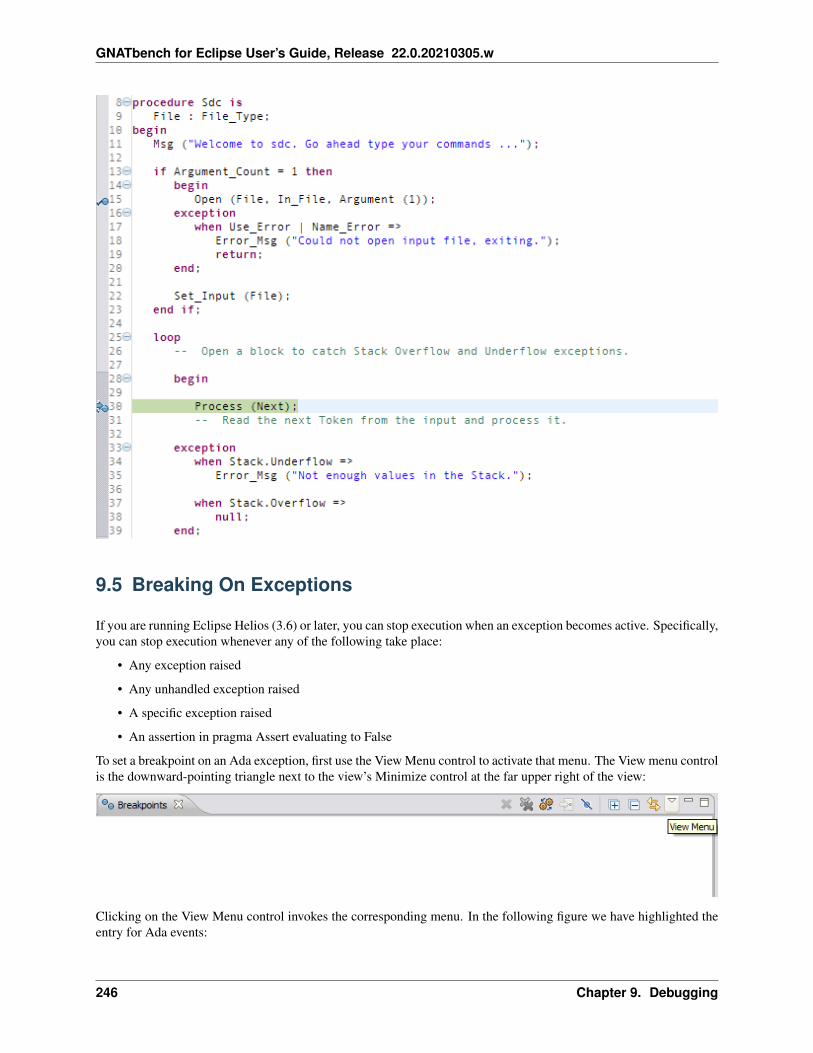
GNATbench for Eclipse User’s Guide, Release 22.0.20210305.w
9.5 Breaking On Exceptions
If you are running Eclipse Helios (3.6) or later, you can stop execution when an exception becomes active. Specifically,you can stop execution whenever any of the following take place:
• Any exception raised
• Any unhandled exception raised
• A specific exception raised
• An assertion in pragma Assert evaluating to False
To set a breakpoint on an Ada exception, first use the View Menu control to activate that menu. The View menu controlis the downward-pointing triangle next to the view’s Minimize control at the far upper right of the view:
Clicking on the View Menu control invokes the corresponding menu. In the following figure we have highlighted theentry for Ada events:
246 Chapter 9. Debugging
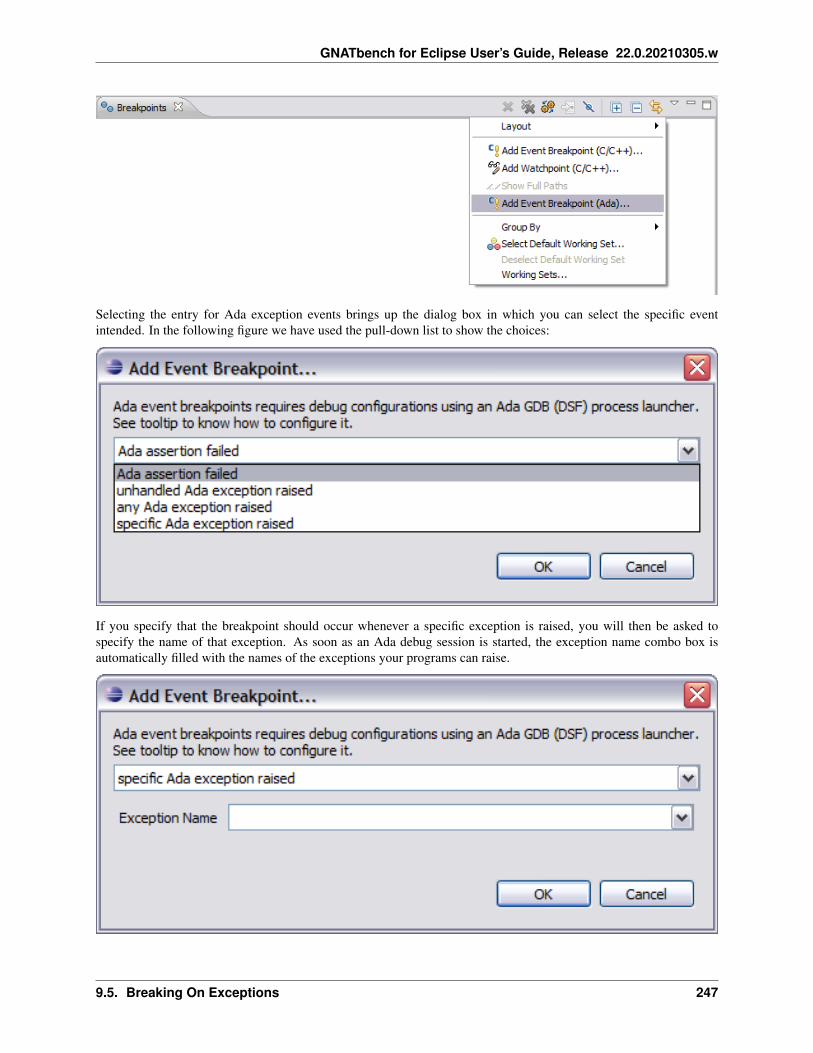
GNATbench for Eclipse User’s Guide, Release 22.0.20210305.w
Selecting the entry for Ada exception events brings up the dialog box in which you can select the specific eventintended. In the following figure we have used the pull-down list to show the choices:
If you specify that the breakpoint should occur whenever a specific exception is raised, you will then be asked tospecify the name of that exception. As soon as an Ada debug session is started, the exception name combo box isautomatically filled with the names of the exceptions your programs can raise.
9.5. Breaking On Exceptions 247

GNATbench for Eclipse User’s Guide, Release 22.0.20210305.w
Once you have specified the event, the breakpoint will appear in the list of known breakpoints, along with any others:
9.6 Controlling Execution
In the upper left hand corner you will find the “Debug” view.
From this view you may control overall execution, navigate between debugging sessions, navigate between threads ina given session, and traverse up and down the call stack, among other actions.
For example, the figure below shows two debugger sessions active. You can control either session by clicking onthe corresponding entries in the Debug view. The other views will automatically reflect the selected application andthread.
248 Chapter 9. Debugging

GNATbench for Eclipse User’s Guide, Release 22.0.20210305.w
The tool bar in the Debug view includes buttons for running, halting, and stepping your application. In the figurebelow the mouse cursor is over the “Step Over” button so the tooltip is displayed. Note the key binding.
The “Step Over” button will go to the next Ada statement in the same call frame. In other words, if the next statementis a subprogram call, the debugger will not step into the code for that subprogram.
To the left of the “Step Over” button is the “Step Into” button. The “Step Into” button will step into the code for asubprogram call (when a call is the next statement).
Moving further left, the red box is the “Terminate” button that terminates execution of the debugging session:
Next to the “Terminate” button is the “Suspend” button, which in this case is disabled because the debugger is alreadysuspended (on a breakpoint).
To the left of the “Suspend” button is the “Resume” button, a green-tipped arrow.
These are the primary buttons for controlling the program’s execution. See the C/C++ Developer Guide for furtherdetails of the Debug view controls. Note the call stack in the Debug view, and the corresponding source code displayedin the source window:
9.6. Controlling Execution 249
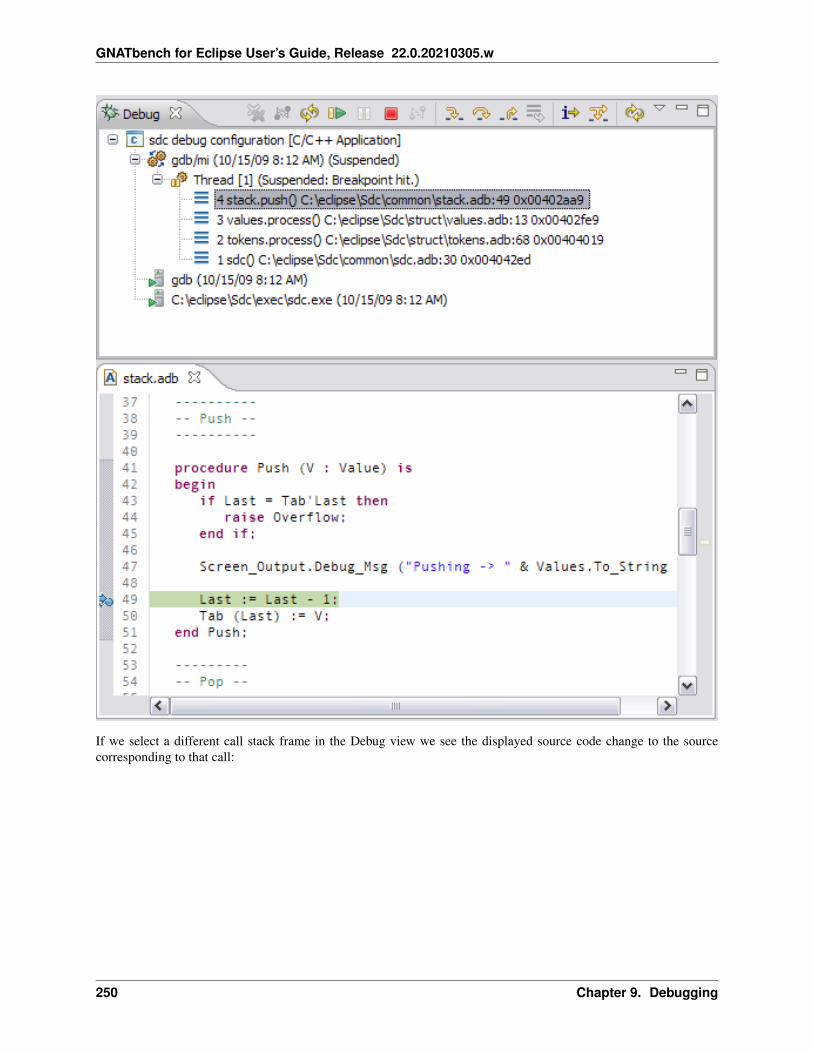
GNATbench for Eclipse User’s Guide, Release 22.0.20210305.w
If we select a different call stack frame in the Debug view we see the displayed source code change to the sourcecorresponding to that call:
250 Chapter 9. Debugging
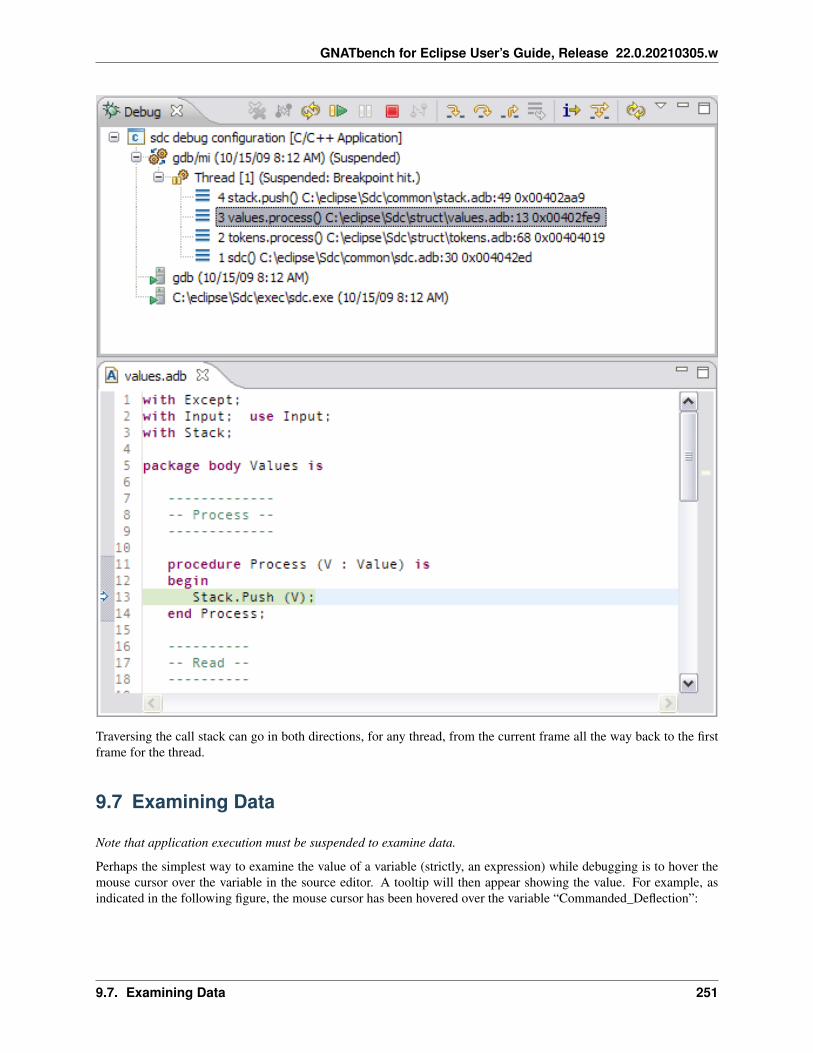
GNATbench for Eclipse User’s Guide, Release 22.0.20210305.w
Traversing the call stack can go in both directions, for any thread, from the current frame all the way back to the firstframe for the thread.
9.7 Examining Data
Note that application execution must be suspended to examine data.
Perhaps the simplest way to examine the value of a variable (strictly, an expression) while debugging is to hover themouse cursor over the variable in the source editor. A tooltip will then appear showing the value. For example, asindicated in the following figure, the mouse cursor has been hovered over the variable “Commanded_Deflection”:
9.7. Examining Data 251

GNATbench for Eclipse User’s Guide, Release 22.0.20210305.w
You can see that the earlier value of 0.0 has been replaced by subsequent execution.
As usual with Eclipse, moving the mouse over the tooltip will make it persist so that you can resize and reposition it.In addition, when made persistent, you can traverse to the corresponding declaration and body (if extant) using iconspresented at the bottom left of the tooltip pane. For example, the following figure shows the persistent tooltip resultingfrom hovering the mouse over the call to procedure Send:
Note the two Ada “file” icons at the bottom left. Clicking on the leftmost icon will open the declaration for procedureSend, whereas clicking on the icon to the right will open the corresponding body.
More sophisticated facilities are also available. In the Debug perspective, a tabbed dialog presents various views forinspecting local variables, breakpoints, and registers. These tabs provide a variety of different tools for exploringinformation about the state of your application.
The tabbed dialogs can be repositioned within the perspective. In the figure below the Variables view has been moveddown and then to the right of the source view. The perspective provides additional, optional debugger views availablevia the Window -> Show View menu item. The “Expressions” view has been added in the same figure. The Variablesand Expressions views are the two primary views for examining Ada objects.
Note that the CDT debugger interface is responsible for displaying the values of variables, but it does not understandhow to display values of every possible Ada type. As a result, some variables may not be displayed. The commontypes are fully supported.
252 Chapter 9. Debugging

GNATbench for Eclipse User’s Guide, Release 22.0.20210305.w
9.7.1 Examining Variables Declared in Subprograms and Tasks
Variables declared within the declarative regions of subprograms and tasks are most easily examined using the Vari-ables view. These variables will appear automatically when the execution frame is currently selected. In the figureabove, the call frame for the call to Stack.Push is currently selected so the formal parameter “V” appears in the Vari-ables view.
Note that in the current version of the CDT debugger perspective, names are mapped to lower case.
The variable V is an object of an access type so the value displayed in the Variables view is an address literal. We candereference the address by clicking on the expansion control next to the variable name in the Variables view. In thiscase we see that V designates a record with a component named “E” having a value of two.
9.7. Examining Data 253
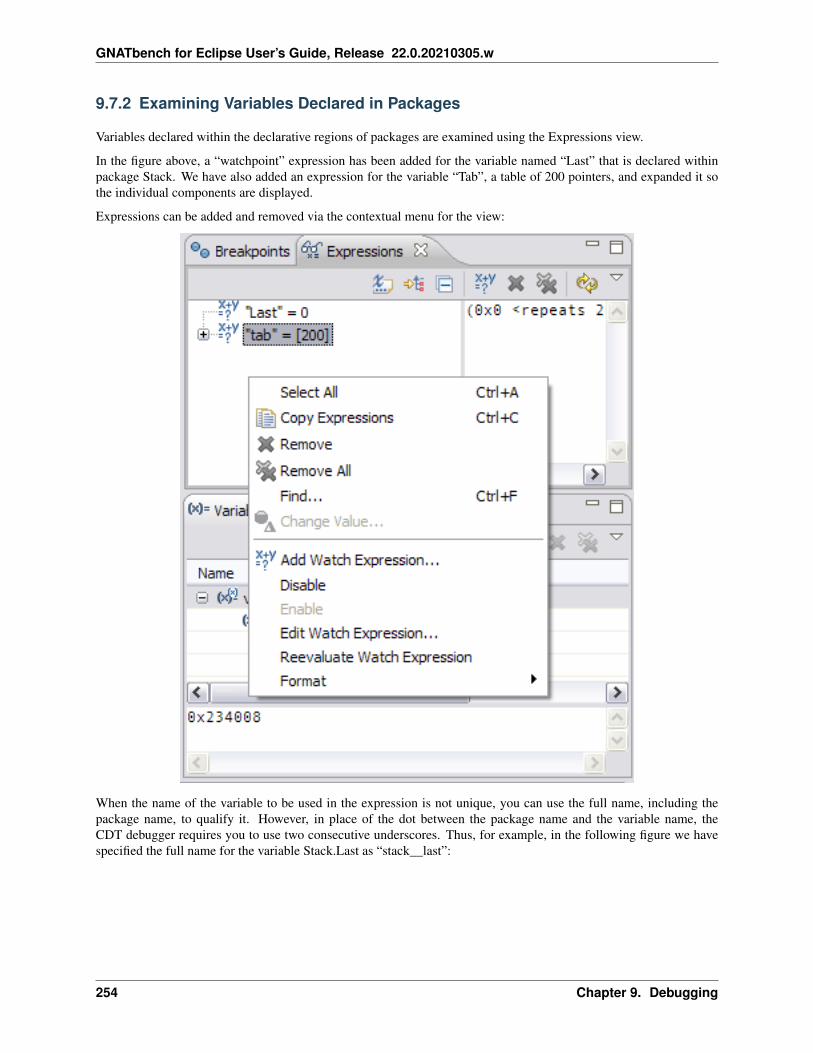
GNATbench for Eclipse User’s Guide, Release 22.0.20210305.w
9.7.2 Examining Variables Declared in Packages
Variables declared within the declarative regions of packages are examined using the Expressions view.
In the figure above, a “watchpoint” expression has been added for the variable named “Last” that is declared withinpackage Stack. We have also added an expression for the variable “Tab”, a table of 200 pointers, and expanded it sothe individual components are displayed.
Expressions can be added and removed via the contextual menu for the view:
When the name of the variable to be used in the expression is not unique, you can use the full name, including thepackage name, to qualify it. However, in place of the dot between the package name and the variable name, theCDT debugger requires you to use two consecutive underscores. Thus, for example, in the following figure we havespecified the full name for the variable Stack.Last as “stack__last”:
254 Chapter 9. Debugging

GNATbench for Eclipse User’s Guide, Release 22.0.20210305.w
Note that the Variables and Expressions view, like all views, can be maximized to make it easier for large amounts ofdata to be visible in the view:
9.7. Examining Data 255

GNATbench for Eclipse User’s Guide, Release 22.0.20210305.w
9.8 Debugging Tasks
It is possible to debug a multitasking application with GNATbench and the CDT debugger GUI. The version of GDBthat comes with the GNAT compiler is Ada-aware and is therefore strongly suggested. Note also that a recent versionof GDB is required for the task information enhancements shown in the Debug view.
To debug individual tasks set breakpoints in those tasks using the source view.
After hitting a breakpoint you should see something similar to the figure below.
Instead of seeing one task and one stack in the Debug view, we now have a number of them displayed in a tree. Youcan navigate from thread to thread and up and down the threads’ individual stacks. This allows you to view localvariables or evaluate expressions in the context of the thread and stack frame of your choosing. In the figure above wehave clicked in the stack frame of thread 3, so the corresponding source for that task at that line is displayed.
Note that the call stack frames for the underlying run-time library and operating systems calls are displayed but arenot traversable (unless you make the corresponding sources available to the debugger).
In addition to the lower-level thread-oriented information, the thread data also include higher-level Ada-oriented taskinformation. For example, the following figure shows three threads in the application. Task 1 is the main procedurecalled by the environment task and is thus named “main_task” automatically. It is at priority 15 and is runnable. Tasks2 and 3 are both suspended in either an accept statement (which is actually the case) or select-or-terminate alternative.Both have priority 15 as well. Both tasks are indicated as “computer” because that is the actual task object name inthe source code. (Each is declared in a separate package so the same name could be used, such as “Flight.Computer”
256 Chapter 9. Debugging

GNATbench for Eclipse User’s Guide, Release 22.0.20210305.w
and “Actuator.Computer” but only the object name is shown). Note that the thread number and the task number neednot be identical, but are the same in this example.
9.9 Ending A Debug Session
To finish your debug session, either allow your application to run to completion or halt it using the square red buttonin the debug tool bar.
If you had more than one session active, the other sessions will remain active and the terminated session will indicatethe terminated status:
9.9. Ending A Debug Session 257

GNATbench for Eclipse User’s Guide, Release 22.0.20210305.w
You can go back to the Ada perspective (or any other) by clicking on the Ada perspective icon at the upper right of theEclipse window. You can close the Debug perspective or leave it open, as you wish. Leaving it open does not make itvisible. To close it, right-click on the “Debug” perspective icon and then click on “Close” to close the perspective.
9.10 Using the GNAT Studio Debugger
As an alternative to using the GNATbench debugger, you have the option of launching the GNAT Studio debuggerfrom Eclipse. This option may be attractive for users who are more familiar with or prefer the GNAT Studio debugger.
To debug your application under GNAT Studio, you need to create a new debug configuration, just as if you weregoing to use the built-in debugger. Select “Debug Configurations. . . ” from the Run menu, or click on the down-arrownext to the Debug button on the toolbar and make the same selection there.
Next, in the left hand pane of the resulting Debug dialog, double click on “GNAT Studio debugger.” You will thenneed to configure the name of the project to use and executable to run. You should see something like the followingafter pressing the Apply button:
258 Chapter 9. Debugging

GNATbench for Eclipse User’s Guide, Release 22.0.20210305.w
You can now launch a GNAT Studio debug session by pressing “Apply” (if you have not already done so) and then“Debug”.
9.11 Troubleshooting
If your GNAT Studio debugger session does not open the file in the source editor and instead indicates a strange filename in the GNAT Studio debugger console for the “file” command, it may be that you have one or more blanks inthe path to the file. This is an easy situation to get into on Windows because of the blanks in the actual pathnames forthe Desktop, “My Documents”, and so on. For example, the typical pathname used for items located on the Windowsdesktop is “C:\Documents and Settings\*user-name*\Desktop\*item-name*”.
For that same reason you may instead see a simple error dialog box pop up, titled “Launching”, when you attempt tolaunch a GNAT Studio configuration. In this case GNAT Studio is not even started.
Assuming that removing these blanks is difficult, the alternative is to invoke GNAT Studio externally and select(browse to) the GNAT project file, then enter the debug mode from within GNAT Studio. (See the GNAT StudioUser’s Guide for details regarding the GNAT Studio debugger.)
9.11. Troubleshooting 259

GNATbench for Eclipse User’s Guide, Release 22.0.20210305.w
260 Chapter 9. Debugging

CHAPTER
TEN
TOOL INTEGRATIONS
10.1 Pretty Printer
The command “Pretty Print” allows you to format Ada source files using a number of language-specific options. Thecommand is provided in the Ada menu on the menubar and in the contextual menus of the editor and the GNAT ProjectExplorer.
Note that in addition to formatting individual files, you can format all the files in an entire project by selecting theproject node in the GNAT Project Explorer.
The actual formatting is provided by the external tool “gnatpp”, with switches specified in the GNAT project file. Youcan either edit the project file manually, as usual, or use the GNAT Project GUI properties editor to set them.
If you edit the GNAT project file manually, the package corresponding to the tool is named “Pretty_Printer” and it usesthe Default_Switches attribute for language “Ada”. The following GNAT project file fragment provides an example:
As usual it will be easier to use the interactive dialog to set the switches. To invoke the dialog, select GNAT Project ->Edit Properties from the GNAT Project Explorer’s contextual menu. The dialog will appear as follows:
261
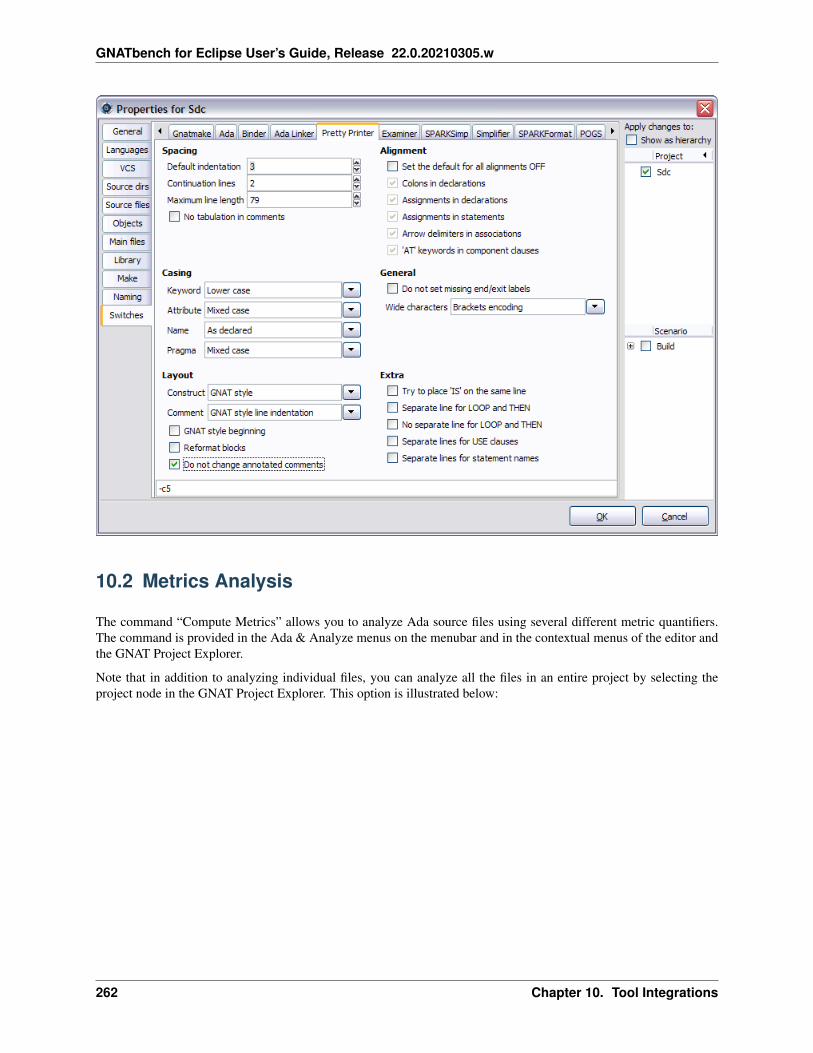
GNATbench for Eclipse User’s Guide, Release 22.0.20210305.w
10.2 Metrics Analysis
The command “Compute Metrics” allows you to analyze Ada source files using several different metric quantifiers.The command is provided in the Ada & Analyze menus on the menubar and in the contextual menus of the editor andthe GNAT Project Explorer.
Note that in addition to analyzing individual files, you can analyze all the files in an entire project by selecting theproject node in the GNAT Project Explorer. This option is illustrated below:
262 Chapter 10. Tool Integrations
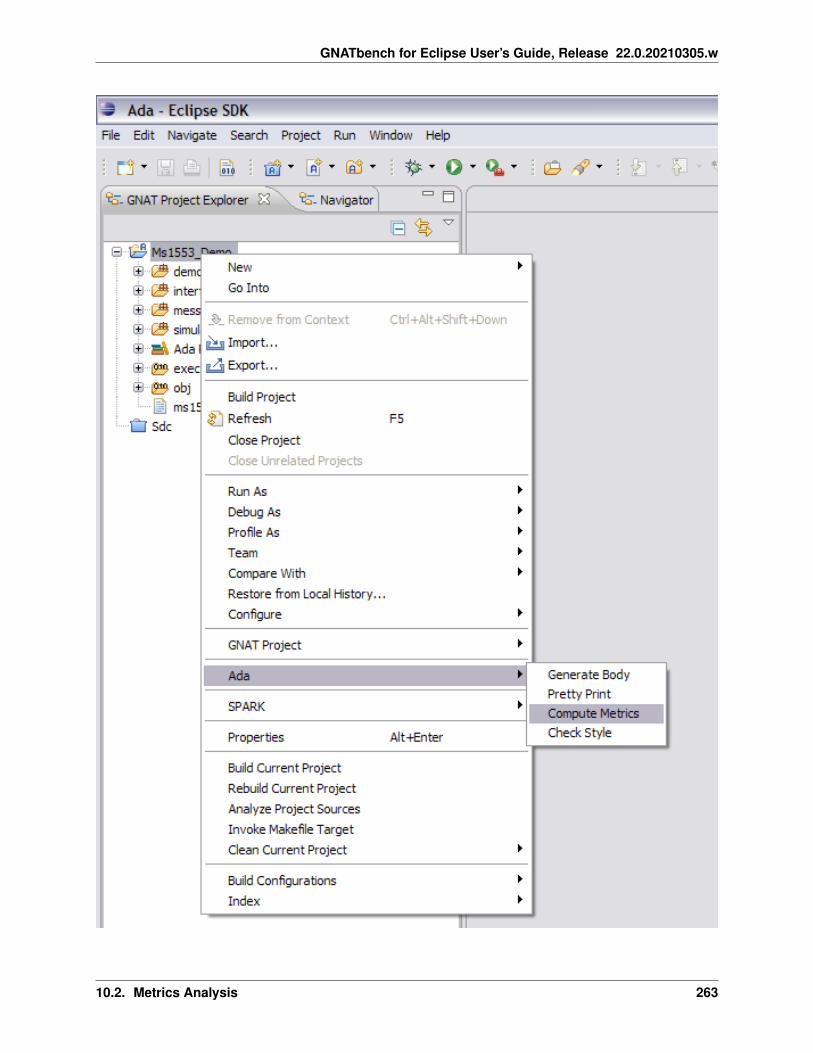
GNATbench for Eclipse User’s Guide, Release 22.0.20210305.w
10.2. Metrics Analysis 263

GNATbench for Eclipse User’s Guide, Release 22.0.20210305.w
10.2.1 Controls
The actual analysis is provided by the external tool “gnatmetric”. See the GNAT User’s Guide for the details of usingthe tool. The specific switches applied are controlled via the “Metrics” package in the project’s GNAT project file (the“gpr file”).
Note that re-issuing the command only performs the analysis again if necessary; specifically, if the GNAT project filehas changed or if there are no prior results in the first place.
10.2.2 Results
Analysis results are displayed in the Metrics view, with an overall summary in the Console view.
The Metrics view shows the results in a tree format, with an overall project summary provided first. Results for eachfile then follow the project summary. In the figure below, the view has been maximized to show more of the results,and both the summary and the results for one of the subprograms have been expanded.
264 Chapter 10. Tool Integrations

GNATbench for Eclipse User’s Guide, Release 22.0.20210305.w
The Metrics view will be opened automatically after the analysis completes. You can open the view manually, usingthe shortcut:
10.2. Metrics Analysis 265
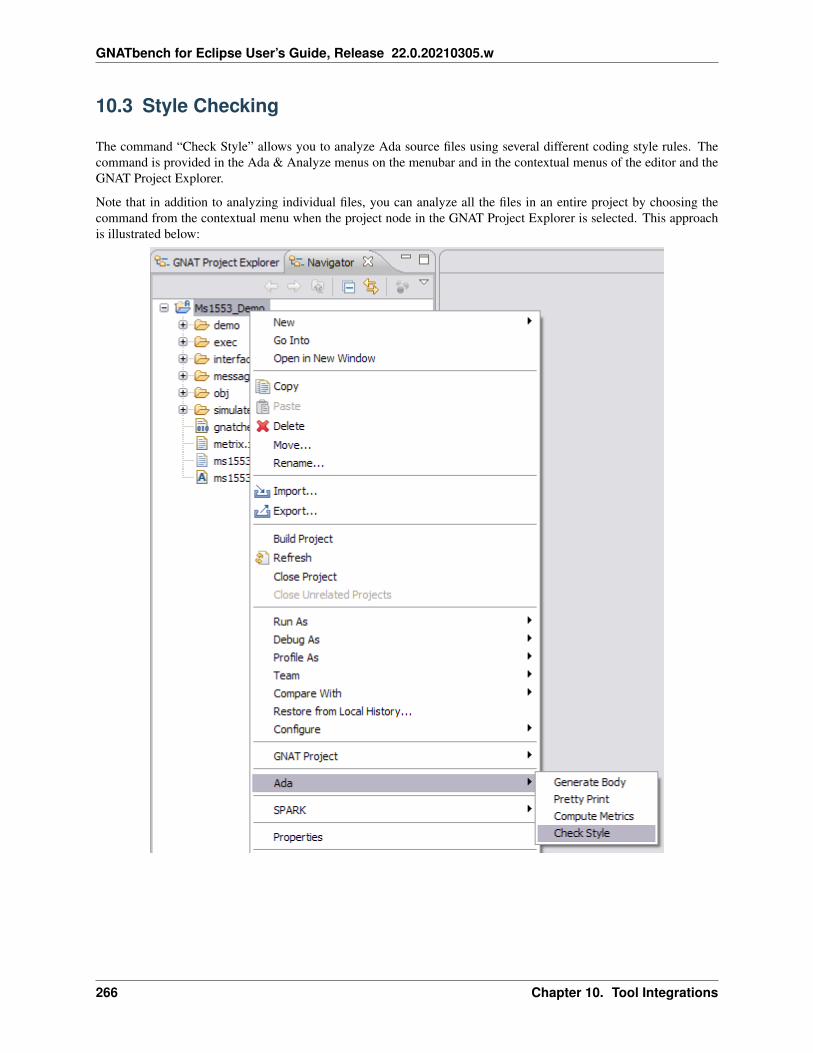
GNATbench for Eclipse User’s Guide, Release 22.0.20210305.w
10.3 Style Checking
The command “Check Style” allows you to analyze Ada source files using several different coding style rules. Thecommand is provided in the Ada & Analyze menus on the menubar and in the contextual menus of the editor and theGNAT Project Explorer.
Note that in addition to analyzing individual files, you can analyze all the files in an entire project by choosing thecommand from the contextual menu when the project node in the GNAT Project Explorer is selected. This approachis illustrated below:
266 Chapter 10. Tool Integrations

GNATbench for Eclipse User’s Guide, Release 22.0.20210305.w
10.3.1 Controls
The actual analysis is provided by the external tool “gnatcheck”. See the GNAT User’s Guide for the details of usingthe tool.
The specific switches applied are controlled by means of a “rules” file. The name and location of this file can bespecified in the package Check in the GNAT project file. The various switches may be specified there as well.
To specify the rules files, within the package Check specify the Default_Switches attribute for language “Ada”. Inthat attribute, you must specify both the “-rules” switch as well as the name of the rules file itself using the “-from=”switch. For example, in the following GNAT project file fragment we specify the switch file name “ms1553.rules”:
If you don’t specify a rules file in the project file, the command will open a dialog box to prompt you for the file nameand location:
In addition to setting the individual rules switches manually in the project file, you can also set the rules switches via amultipage graphical editor. The editor will be opened whenever you double-click on a file with the extension “rules”,such as “ada.rules” or any similarly named file. To create a new rules file, just use the new-file wizard to create a filewith an extension of “.rules” and the editor will open for it automatically.
In the following, the file “ms1553.rules” has been opened:
10.3. Style Checking 267

GNATbench for Eclipse User’s Guide, Release 22.0.20210305.w
Note the tabs at the bottom. The rules are separated into logical sections, based in part on their point of origin (e.g., theAda 95 Quality and Style Guide, or the GNAT style warnings provided by the compiler). Each tabbed page containsoptions to be enabled or disabled by check-boxes, except for the last page on the far right. That page, labeled with thefile name itself, contains the file in textual form.
10.3.2 Results
The results of the analysis appear in a text file. By default the file is named “gnatcheck.out”, but you can specify thename in the GNAT project file.
268 Chapter 10. Tool Integrations

GNATbench for Eclipse User’s Guide, Release 22.0.20210305.w
10.3. Style Checking 269

GNATbench for Eclipse User’s Guide, Release 22.0.20210305.w
270 Chapter 10. Tool Integrations

CHAPTER
ELEVEN
USING AJIS
11.1 Creating and Building an AJIS Project
11.1.1 Audience
This document is intended for users already somewhat familiar with Eclipse, the JDT, and GNATbench. Some famil-iarity with AJIS may be useful.
11.1.2 Before You Begin
Install AJIS (remember to set the path and classpath). Make sure that the version of AJIS matches the compiler dateand the minimum requirements for the GNATbench AJIS integration.
Install the “make” utility if it is not already installed. Windows users can download the GNU version via the “Miscel-laneous/Utils” section of the “Downloads” page on GNAT Tracker. The file to download is named “gnumake-3.79.1-pentium-mingw32msv.exe” or something similar (i.e., the version number could be different). Once downloaded,rename the file to “make.exe” and put it somewhere on your path.
Consider disabling automatic builds, at least until the new Ada project has been fully configured.
Optionally, set Eclipse to refresh resources on access (as of Eclipse 3.7). This is a workspace preference. It ischanged via the Window -> Preferences menu; the specific property is on the General / Workspace page.Occasionally you will still need to manually refresh the Java projects that have corresponding Ada interfaces generated,but this preference can help.
Important
Before you create an Ada project for use with Java and AJIS, first create a new client Java project using the JDT.This Java project will be used for primary Java development. Prior project creation is not strictly required but will beconvenient because the Ada new-project wizard can automatically make the modifications to the client Java projectrequired for the sake of the Ada project. Otherwise, you will have to modify the Java project yourself.
271

GNATbench for Eclipse User’s Guide, Release 22.0.20210305.w
11.1.3 Create an Ada Project for AJIS
Once the client Java project exists, you are ready to create the new Ada AJIS project.
First, open the New Project Wizard with File -> New -> Project, then select “Ada Project for AJIS” under theAda category.
In the resulting wizard page, name the new Eclipse project:
272 Chapter 11. Using AJIS
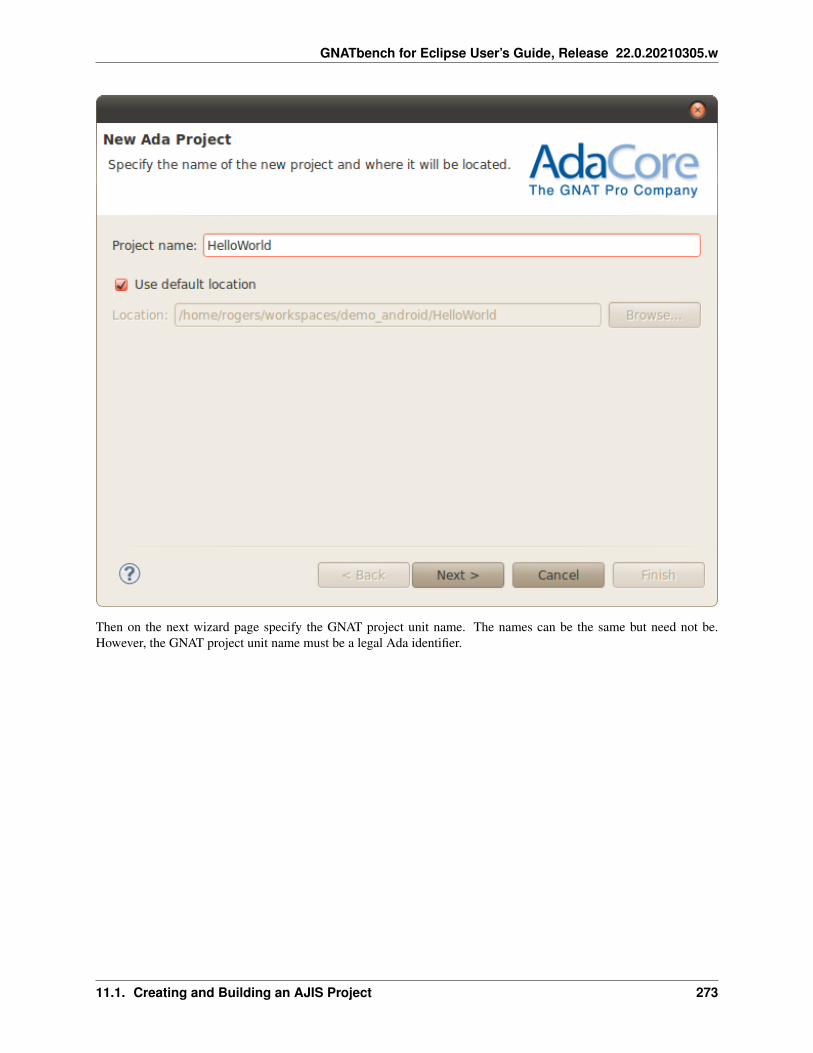
GNATbench for Eclipse User’s Guide, Release 22.0.20210305.w
Then on the next wizard page specify the GNAT project unit name. The names can be the same but need not be.However, the GNAT project unit name must be a legal Ada identifier.
11.1. Creating and Building an AJIS Project 273

GNATbench for Eclipse User’s Guide, Release 22.0.20210305.w
On the next page, specify the name for the dynamic library that will contain your Ada code. This dynamic library willbe produced when the Ada project is built, and is used by the client Java project.
274 Chapter 11. Using AJIS
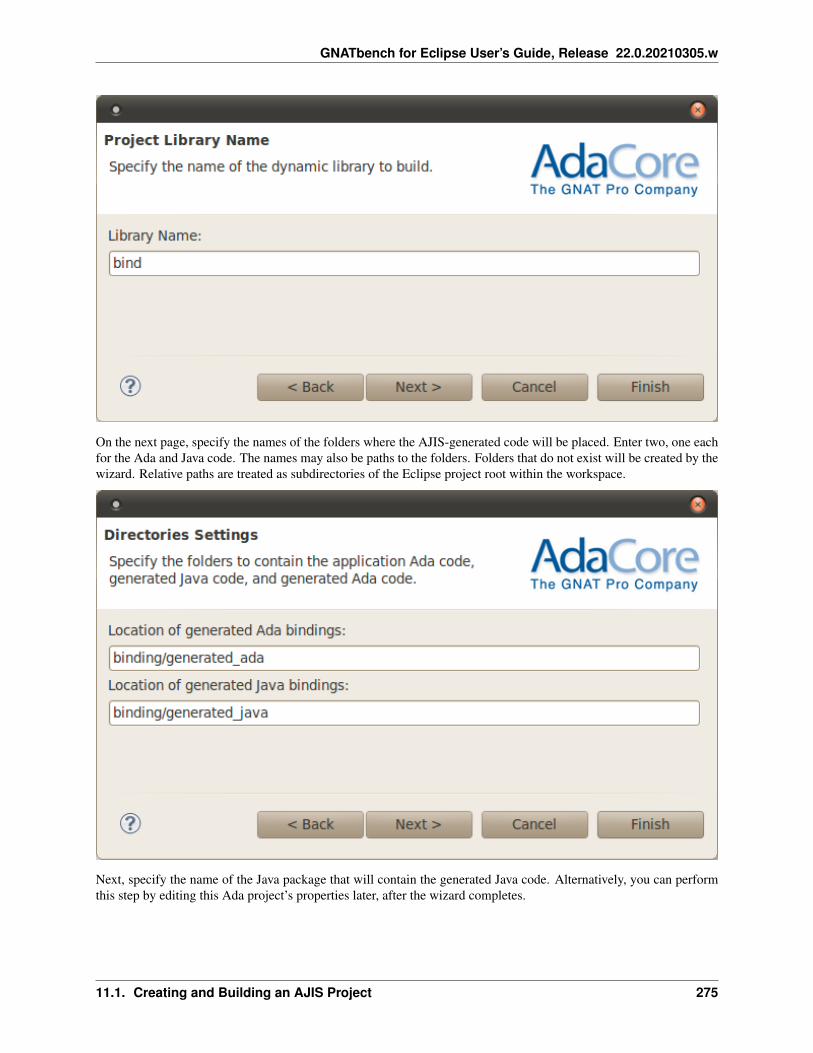
GNATbench for Eclipse User’s Guide, Release 22.0.20210305.w
On the next page, specify the names of the folders where the AJIS-generated code will be placed. Enter two, one eachfor the Ada and Java code. The names may also be paths to the folders. Folders that do not exist will be created by thewizard. Relative paths are treated as subdirectories of the Eclipse project root within the workspace.
Next, specify the name of the Java package that will contain the generated Java code. Alternatively, you can performthis step by editing this Ada project’s properties later, after the wizard completes.
11.1. Creating and Building an AJIS Project 275

GNATbench for Eclipse User’s Guide, Release 22.0.20210305.w
Then select the toolchain used to build the project. Presumably you will want the native Ada toolchain.
276 Chapter 11. Using AJIS
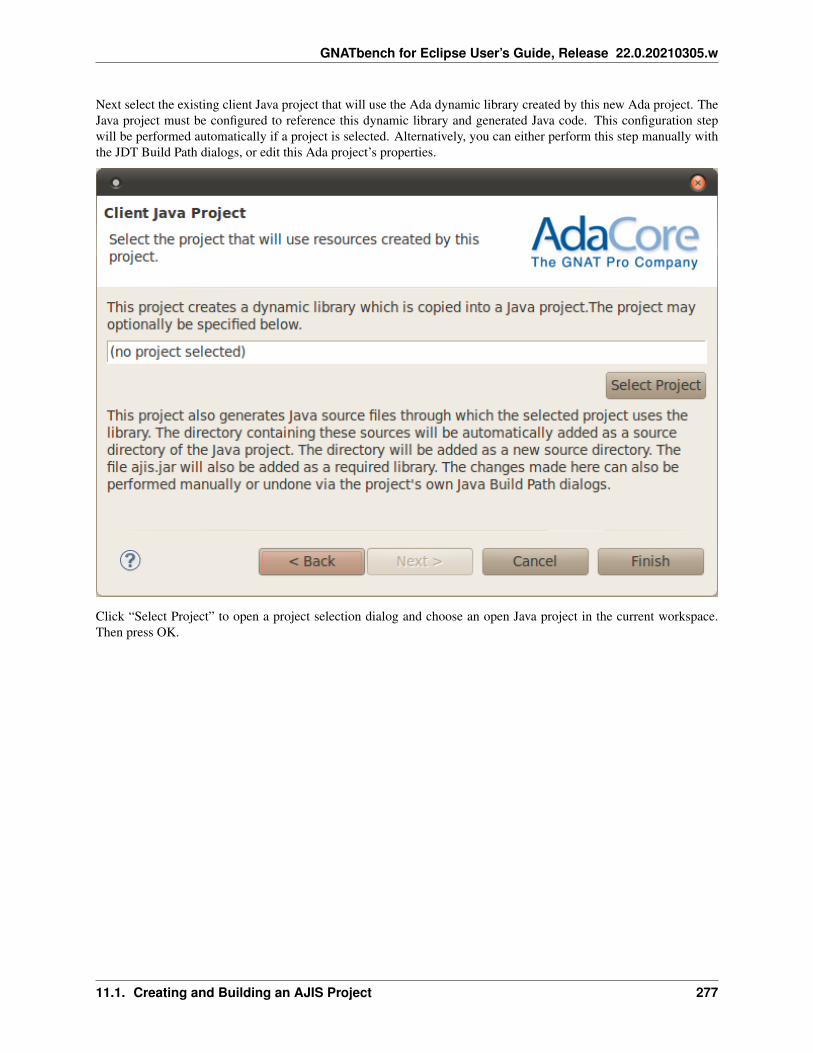
GNATbench for Eclipse User’s Guide, Release 22.0.20210305.w
Next select the existing client Java project that will use the Ada dynamic library created by this new Ada project. TheJava project must be configured to reference this dynamic library and generated Java code. This configuration stepwill be performed automatically if a project is selected. Alternatively, you can either perform this step manually withthe JDT Build Path dialogs, or edit this Ada project’s properties.
Click “Select Project” to open a project selection dialog and choose an open Java project in the current workspace.Then press OK.
11.1. Creating and Building an AJIS Project 277

GNATbench for Eclipse User’s Guide, Release 22.0.20210305.w
The selected project will then appear in the wizard dialog page.
278 Chapter 11. Using AJIS

GNATbench for Eclipse User’s Guide, Release 22.0.20210305.w
(If the AJIS jar file is not found on the system classpath the user is asked to select the file. Note that this should havebeen set as part of the AJIS installation.)
Press Finish and the wizard will complete. At this point, the new Ada project is almost, but not quite, ready to bebuilt. Ada sources must be specified so that the corresponding Java interfaces can be generated by AJIS. These Adasources don’t necessarily exist yet – certainly not within the project we just created – so we specify them after thewizard completes.
11.1.4 Final Project Setup Steps
The last steps to be taken are to 1) populate the project with Ada sources, and 2) select a subset of them to be used asinterfaces for the client Java code. These interface packages will be passed to AJIS (ada2java) during the Ada projectbuild so that corresponding Java code is produced to call the Ada code.
11.1. Creating and Building an AJIS Project 279

GNATbench for Eclipse User’s Guide, Release 22.0.20210305.w
Populating with Ada Sources
The wizard creates an empty directory named “src” to contain Ada source files. Use of this directory is optional;you could use others, or just use the project root. We suggest using explicit source directories, however, for thesake of keeping everthing simple. New source directories can be created via the GNATbench New Source Foldertoolbar button. Using that facility will automatically update the GNAT project file contents so that the resulting sourcedirectories are known to the builder.
Once the source folders are to your liking you may use the editor to create the Ada source files. Alternatively, existingsource directories and files outside the workspace may be imported through the Eclipse Import wizard. Importedsource directories must be specified manually in the GNAT project file since the New Source Folder wizard is not usedto create them.
This example describes how to import two existing source files into the default source folder.
Right-click the “src” directory of the project and select “Import” and then “File System.”
Select a directory containing source files. Check the boxes corresponding to the necesssary files.
280 Chapter 11. Using AJIS

GNATbench for Eclipse User’s Guide, Release 22.0.20210305.w
After you press “Finish” the project should look something like this (although some names will vary). Note the twosource files under “src” that have been imported.
11.1. Creating and Building an AJIS Project 281

GNATbench for Eclipse User’s Guide, Release 22.0.20210305.w
In this example, the source files are hello.ads:
package Hello is
function Greeting (Item : in Integer) return String;
end Hello;
and hello.adb:
with Ada.Characters.Latin_1;with Ada.Numerics.Long_Elementary_Functions;
package body Hello is
function Greeting (Item : in Integer) return String isbegin
return "Hello from Ada! Java passed "& Integer'Image (Item)& Ada.Characters.Latin_1.LF& "which has square root "
(continues on next page)
282 Chapter 11. Using AJIS

GNATbench for Eclipse User’s Guide, Release 22.0.20210305.w
(continued from previous page)
& Long_Float'Image(Ada.Numerics.Long_Elementary_Functions.Sqrt
(Long_Float (Item)));end Greeting;
end Hello;
Selecting Interface Files
The user must select which Ada specification files will be used by the Java application in the client Java project. TheAJIS tools create Java source files corresponding to the selected Ada specification files. Select only the files which areneeded directly in Java, as specified by the AJIS documentation.
To do so, open the Project Properties for the project. (Right-Click -> Properties or Alt+Enter). Expandthe category “GNATbench Properties” and select “Ada/Java Interface Files”.
Click “Add File” and an operating-system-dependent file selection dialog will appear. Navigate to the location of theAda specification files.
11.1. Creating and Building an AJIS Project 283
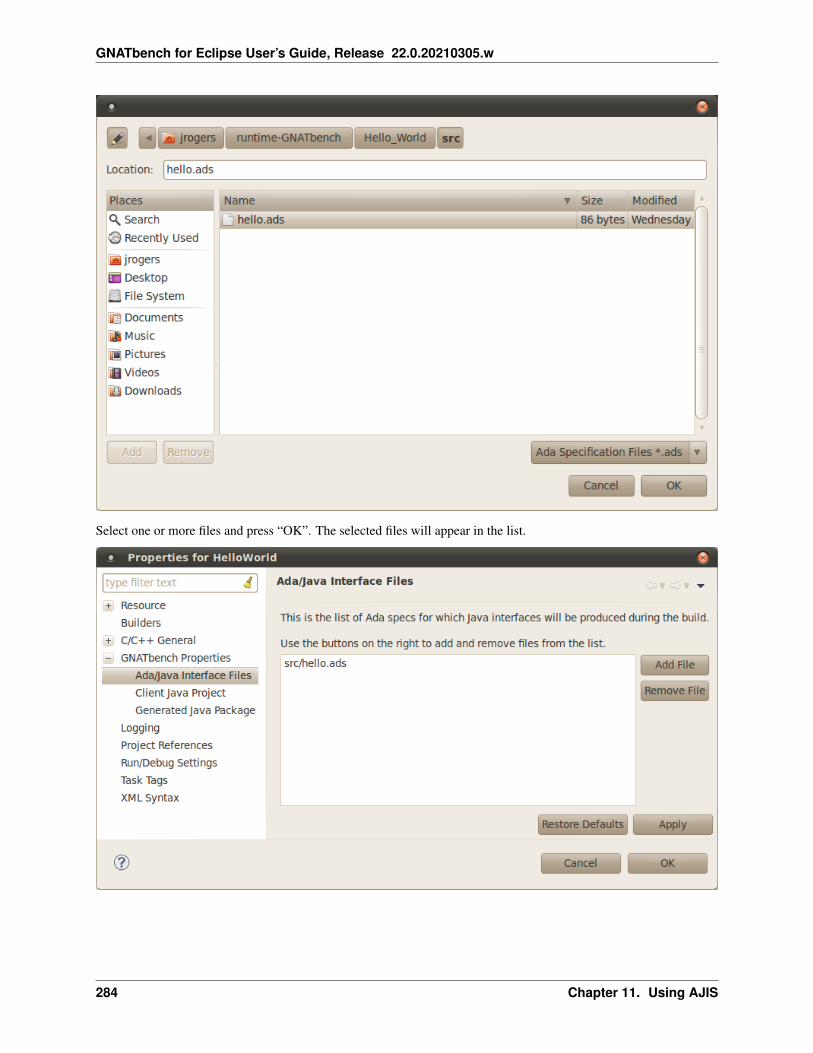
GNATbench for Eclipse User’s Guide, Release 22.0.20210305.w
Select one or more files and press “OK”. The selected files will appear in the list.
284 Chapter 11. Using AJIS
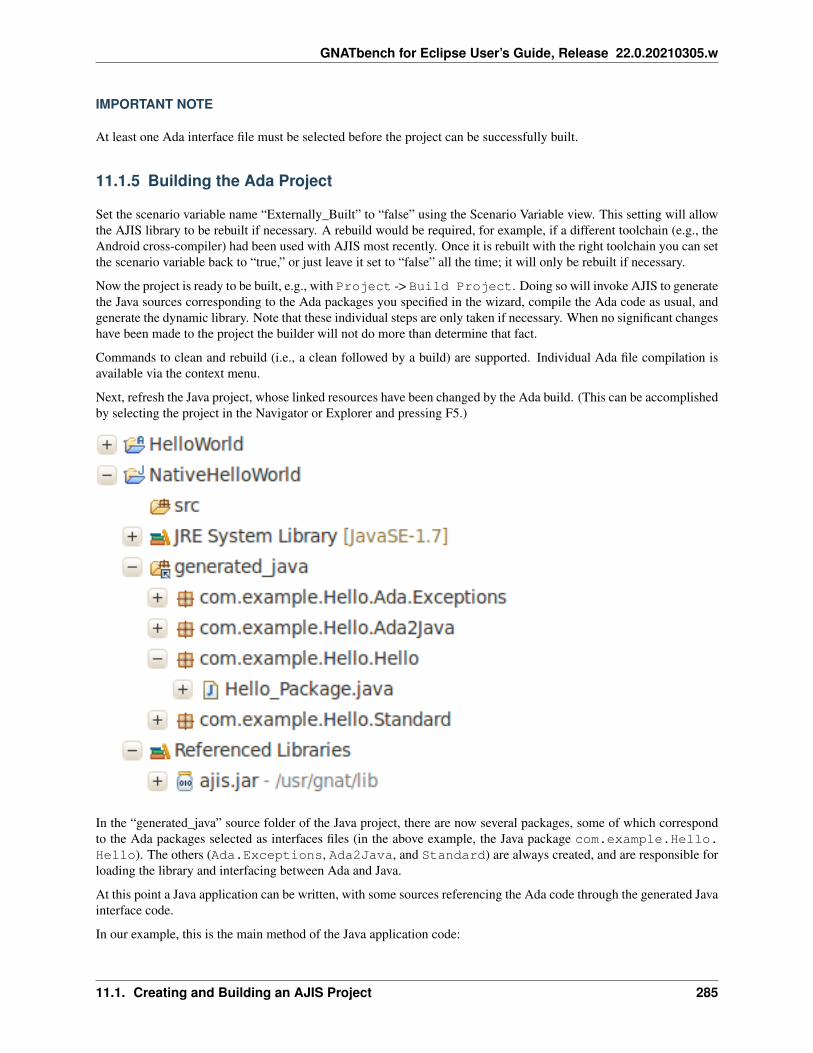
GNATbench for Eclipse User’s Guide, Release 22.0.20210305.w
IMPORTANT NOTE
At least one Ada interface file must be selected before the project can be successfully built.
11.1.5 Building the Ada Project
Set the scenario variable name “Externally_Built” to “false” using the Scenario Variable view. This setting will allowthe AJIS library to be rebuilt if necessary. A rebuild would be required, for example, if a different toolchain (e.g., theAndroid cross-compiler) had been used with AJIS most recently. Once it is rebuilt with the right toolchain you can setthe scenario variable back to “true,” or just leave it set to “false” all the time; it will only be rebuilt if necessary.
Now the project is ready to be built, e.g., with Project -> Build Project. Doing so will invoke AJIS to generatethe Java sources corresponding to the Ada packages you specified in the wizard, compile the Ada code as usual, andgenerate the dynamic library. Note that these individual steps are only taken if necessary. When no significant changeshave been made to the project the builder will not do more than determine that fact.
Commands to clean and rebuild (i.e., a clean followed by a build) are supported. Individual Ada file compilation isavailable via the context menu.
Next, refresh the Java project, whose linked resources have been changed by the Ada build. (This can be accomplishedby selecting the project in the Navigator or Explorer and pressing F5.)
In the “generated_java” source folder of the Java project, there are now several packages, some of which correspondto the Ada packages selected as interfaces files (in the above example, the Java package com.example.Hello.Hello). The others (Ada.Exceptions, Ada2Java, and Standard) are always created, and are responsible forloading the library and interfacing between Ada and Java.
At this point a Java application can be written, with some sources referencing the Ada code through the generated Javainterface code.
In our example, this is the main method of the Java application code:
11.1. Creating and Building an AJIS Project 285
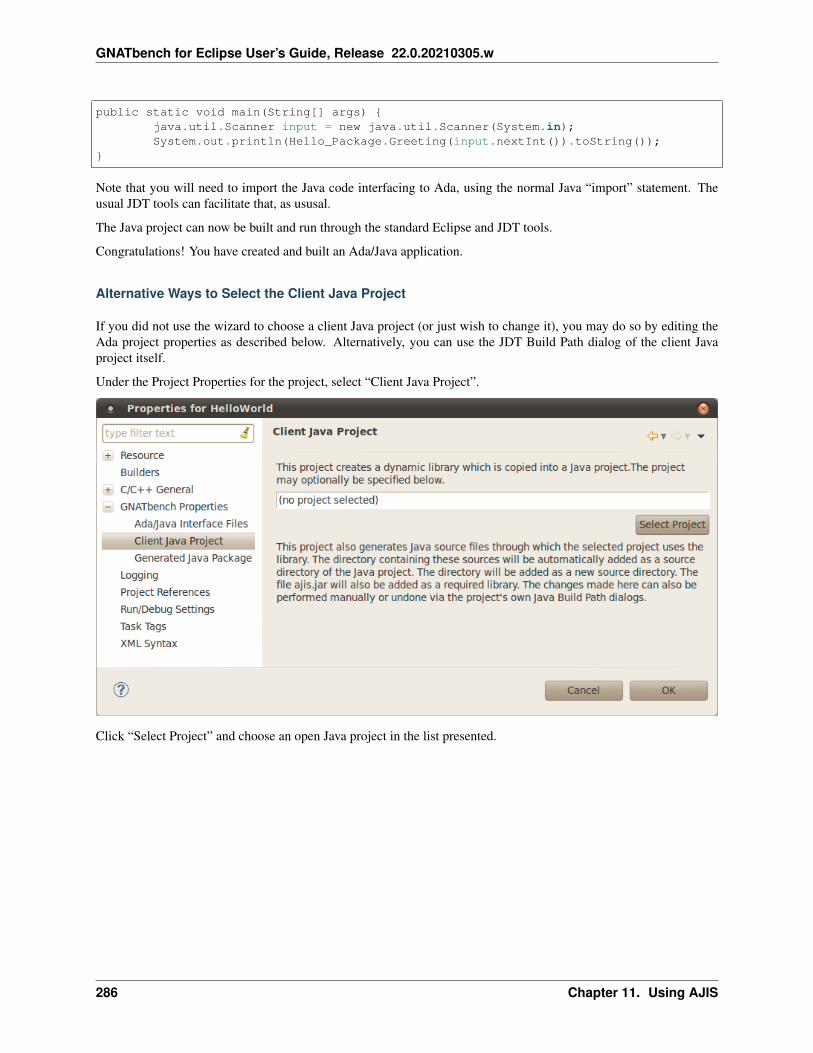
GNATbench for Eclipse User’s Guide, Release 22.0.20210305.w
public static void main(String[] args) {java.util.Scanner input = new java.util.Scanner(System.in);System.out.println(Hello_Package.Greeting(input.nextInt()).toString());
}
Note that you will need to import the Java code interfacing to Ada, using the normal Java “import” statement. Theusual JDT tools can facilitate that, as ususal.
The Java project can now be built and run through the standard Eclipse and JDT tools.
Congratulations! You have created and built an Ada/Java application.
Alternative Ways to Select the Client Java Project
If you did not use the wizard to choose a client Java project (or just wish to change it), you may do so by editing theAda project properties as described below. Alternatively, you can use the JDT Build Path dialog of the client Javaproject itself.
Under the Project Properties for the project, select “Client Java Project”.
Click “Select Project” and choose an open Java project in the list presented.
286 Chapter 11. Using AJIS

GNATbench for Eclipse User’s Guide, Release 22.0.20210305.w
Once the selection is made press OK to return to the properties page.
Press OK to close the page. As a result, the properties editor does three things to the Java project:
a. It creates a link to the generated Java code so that the Java project can build with those sources included.
b. It configures the Java project’s build path to use the dynamic library. (This is a per-source-foldersetting.)
c. It configures the Java project’s build path to reference ajis.jar, a library necessary for buildingagainst the generated Java code. If the file is not found on the system classpath, which should have beenset after the AJIS installation, the user will be asked to select the file.
11.1. Creating and Building an AJIS Project 287

GNATbench for Eclipse User’s Guide, Release 22.0.20210305.w
IMPORTANT NOTE
The user may return to this property and change the selected project. Changes to the previously selected project willnot be undone. The user should modify or remove that project so that it does not contain its links to the Ada project.
11.2 Using AJIS Examples
GNAT-AJIS version 17.0 or later contains a GNATbench version of the examples at <GNAT-AJIS-INSTALL-PATH>/share/examples/ajis/GNATbench.
If you have such version installed, you can follow this procedure to have the examples available in your workspace.
11.2.1 Before You Begin
Install AJIS (remember to set the path and classpath). Make sure that the version of AJIS matches the compiler dateand the minimum requirements for the GNATbench AJIS integration.
Install the “make” utility if it is not already installed. Windows users can download the GNU version via the “Miscel-laneous/Utils” section of the “Downloads” page on GNAT Tracker. The file to download is named “gnumake-3.79.1-pentium-mingw32msv.exe” or something similar (i.e., the version number could be different). Once downloaded,rename the file to “make.exe” and put it somewhere on your path.
Consider enabling automatic builds (see menu Project > Build Automatically), to have the AJIS examples for GNAT-bench projects automatically built after import.
11.2.2 Import AJIS examples for GNATbench projects into workspace
First, run File > Import. . . menu. Select Ada/AJIS Examples import wizard.
288 Chapter 11. Using AJIS

GNATbench for Eclipse User’s Guide, Release 22.0.20210305.w
Click Next > button
The AJIS Examples page will display the operation to process during the import operation.
If AJIS examples folders are found in workspace, a warning is displayed. You can overwrite or reset these folders.Press Cancel if you want to keep the folders unchanged and cancel import operation.
Click Finish button to import the projects
11.2. Using AJIS Examples 289

GNATbench for Eclipse User’s Guide, Release 22.0.20210305.w
11.2.3 Build AJIS examples for GNATbench projects
If automatic build is enabled (see menu Project > Build Automatically), all the imported projects will be built auto-matically.
Otherwise select all imported AJIS examples Ada projects in Project Explorer view, and then run Project > Clean. . .menu. Ask to clean only selected projects, and to start immediately a build of the selected projects.
Then, do the same for all imported AJIS examples Java projects
11.2.4 Run or Debug AJIS examples for GNATbench projects
All the examples have Run or Debug configurations. (*.launch files)
Select a launch configuration and select Run (Ctrl+F11) or Debug (F11) command.
290 Chapter 11. Using AJIS
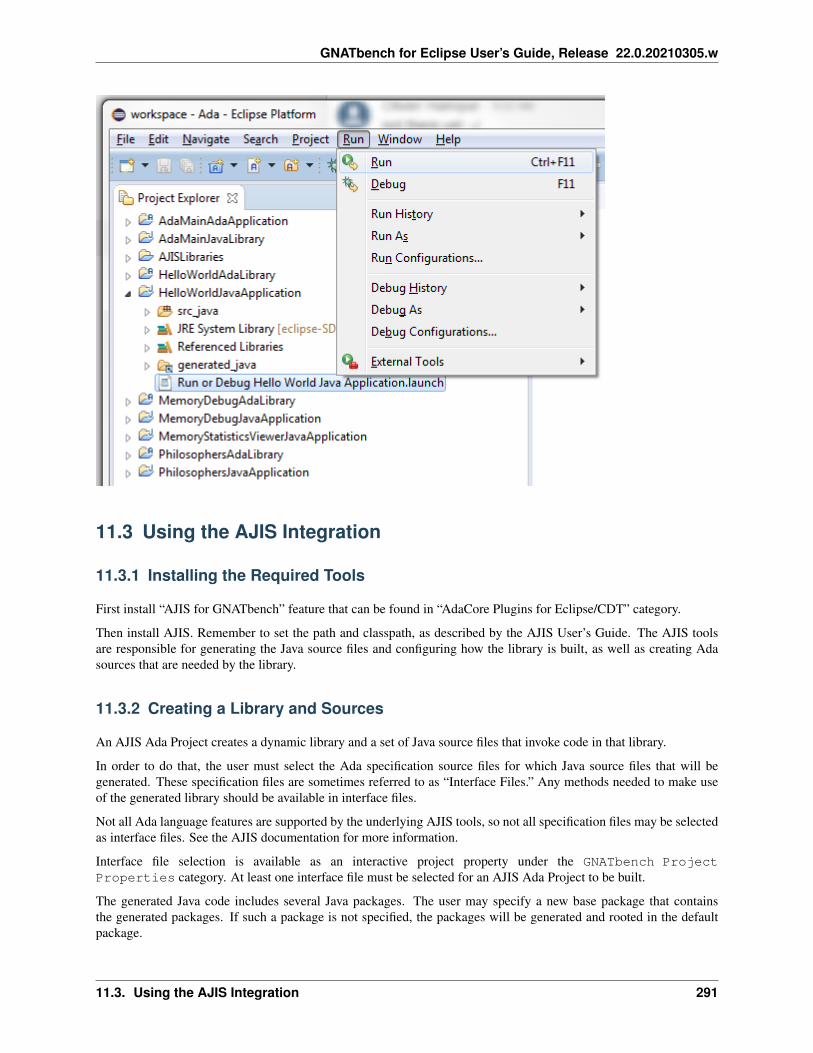
GNATbench for Eclipse User’s Guide, Release 22.0.20210305.w
11.3 Using the AJIS Integration
11.3.1 Installing the Required Tools
First install “AJIS for GNATbench” feature that can be found in “AdaCore Plugins for Eclipse/CDT” category.
Then install AJIS. Remember to set the path and classpath, as described by the AJIS User’s Guide. The AJIS toolsare responsible for generating the Java source files and configuring how the library is built, as well as creating Adasources that are needed by the library.
11.3.2 Creating a Library and Sources
An AJIS Ada Project creates a dynamic library and a set of Java source files that invoke code in that library.
In order to do that, the user must select the Ada specification source files for which Java source files that will begenerated. These specification files are sometimes referred to as “Interface Files.” Any methods needed to make useof the generated library should be available in interface files.
Not all Ada language features are supported by the underlying AJIS tools, so not all specification files may be selectedas interface files. See the AJIS documentation for more information.
Interface file selection is available as an interactive project property under the GNATbench ProjectProperties category. At least one interface file must be selected for an AJIS Ada Project to be built.
The generated Java code includes several Java packages. The user may specify a new base package that containsthe generated packages. If such a package is not specified, the packages will be generated and rooted in the defaultpackage.
11.3. Using the AJIS Integration 291

GNATbench for Eclipse User’s Guide, Release 22.0.20210305.w
For example, if the base package is com.example, and an Ada package named devices is an interface file, thenthe generated Java would be in package com.example.devices.
Java base package selection is available as an interactive project property under the GNATbench ProjectProperties category.
11.3.3 Using the Library and Java Sources
A Java project that uses the library must be configured to use the generated sources as well. This Java project is calledthe “client” project.
The directory containing the generated Java sources must be on the classpath. In Eclipse, this is done by creating anew source folder that contains the generated Java code.
The generated Java sources depend on a Java library distributed with AJIS; it is named ajis.jar. The full path tothis jar (not just the directory containing it) must also be found on the classpath. In Eclipse, this is done by adding thejar as an External Jar on the Java build path.
The directory containing the dynamic library must be on the java.library.path property. In Eclipse, the prop-erty is set when the source folder has a “Native library location” set.
When the client Java project is run, Eclipse will calculate the classpath and library path automatically.
Although these operations can be performed manually using the Java Build Path dialogs, all three can be performedautomatically by the Ada AJIS Project tools. The feature is available both at the end of the New Project wizard and asa project property named Client Java Project under the GNATbench Project Properties category .
When a Java project is selected there, GNATbench attempts to modify the Java project’s Build Path settings such thatit:
• Contains a new source folder that is linked to the folder containing the generated Java
• Specifies the directory containing the dynamic library as that source folder’s “Native library location”
• References ajis.jar. It checks the system’s classpath to determine the jar’s location; if the classpath has notbeen set, it asks the user for the location.
However, there is no way to automatically undo the above configuration steps. If desired, the user must invoke the JavaBuild Path dialogs to either undo the settings or change them to use a different project. The automatic configurationwill fail if a previous automatic configuration has not been undone.
11.4 Manual Configuration of Java Build Path
11.4.1 Setup
1. Link the source folder
Under the Java Project Properties, select “Java Build Path” and then the “Source” tab.
a. Click “Link Source” and navigate to the generated Java directory in the Ada project.
b. Expand the generated directory and select the Native library location. Edit it and select the directorycontaining your native library (usually the “lib” directory of the generated Ada directory).
292 Chapter 11. Using AJIS
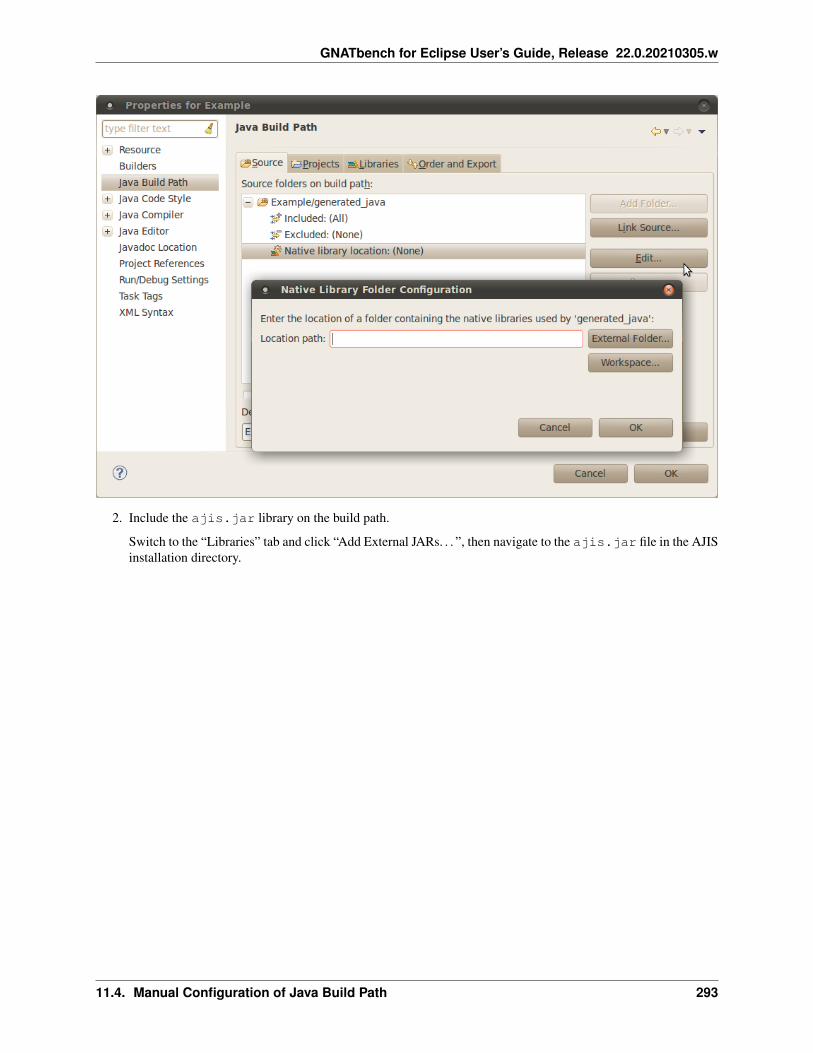
GNATbench for Eclipse User’s Guide, Release 22.0.20210305.w
2. Include the ajis.jar library on the build path.
Switch to the “Libraries” tab and click “Add External JARs. . . ”, then navigate to the ajis.jar file in the AJISinstallation directory.
11.4. Manual Configuration of Java Build Path 293

GNATbench for Eclipse User’s Guide, Release 22.0.20210305.w
Hint: You might have put it on the system classpath per the AJIS installation instructions.
11.4.2 Teardown
1. Remove the source folder from the build path.
Under the Java Project Properties, select “Java Build Path” and then the “Source” tab.
Remove the generated Java source directory from the build path by selecting it and using the button on the right.
2. Remove the ajis.jar library from the build path.
Switch to the “Libraries” tab, select ajis.jar, and click the “Remove” button. Click “OK” to close the “JavaBuild Path” dialog and confirm the changes.
3. Delete the linked source folder from the client Java project.
294 Chapter 11. Using AJIS

GNATbench for Eclipse User’s Guide, Release 22.0.20210305.w
11.5 Usage Notes
11.5.1 Versions
The installed version of the AJIS tools should be gnat-ajis-7.1.0w-20120611-* or later (although some earlier versionsmay work).
AJIS must be used with a compiler from the same date.
Install the “make” utility if it is not already installed. Windows users can download the GNU version via the “Miscel-laneous/Utils” section of the “Downloads” page on GNAT Tracker. The file to download is named “gnumake-3.79.1-pentium-mingw32msv.exe” or something similar (i.e., the version number could be different). Once downloaded,rename the file to “make.exe” and put it somewhere on your path.
11.5.2 Modifying the Ada Sources
The user may change the Ada source files. If changes are made to any of the Ada source files which are selected asinterface files, the generated Java sources will be automatically changed by the next build of the Ada project.
This allows the user to make changes as necessary.
11.5.3 Exporting the Java Project
The Java project may be deployed outside of Eclipse using the normal JDT tools. Both ajis.jar and the generatedlibrary will still be required to run the project, but the ajis.jar library can be bundled in with the Java sources.These steps describe how to ensure that ajis.jar is included in the application jar.
1. Export the Java Project as a Runnable Jar.
11.5. Usage Notes 295
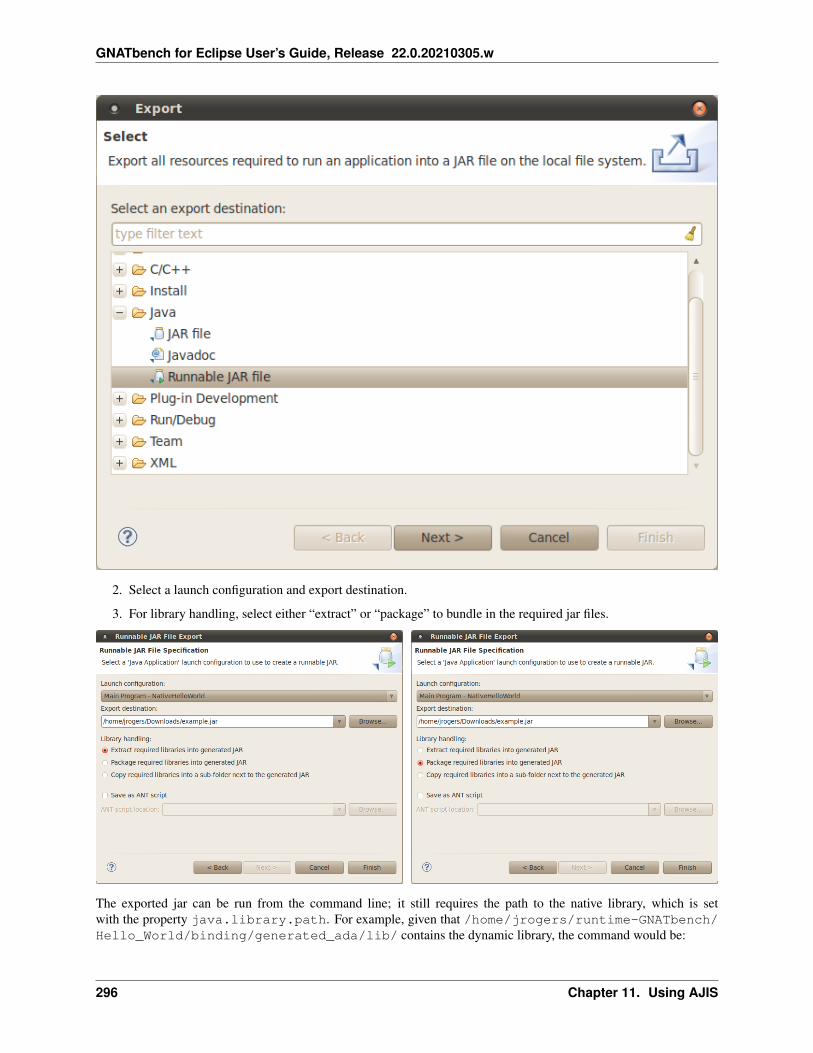
GNATbench for Eclipse User’s Guide, Release 22.0.20210305.w
2. Select a launch configuration and export destination.
3. For library handling, select either “extract” or “package” to bundle in the required jar files.
The exported jar can be run from the command line; it still requires the path to the native library, which is setwith the property java.library.path. For example, given that /home/jrogers/runtime-GNATbench/Hello_World/binding/generated_ada/lib/ contains the dynamic library, the command would be:
296 Chapter 11. Using AJIS

GNATbench for Eclipse User’s Guide, Release 22.0.20210305.w
$ java -Djava.library.path=/home/jrogers/runtime-GNATbench/Hello_World/binding/↪→generated_ada/lib/ -jar example.jar
Note: Do not directly set the java.library.path property when running the application in Eclipse; this is doneby Java tools. Instead, use the Java Build Path page of the Project Properties or specify a Target Project from the Adaproject properties.
11.5.4 Optional additional arguments to ada2java
ada2java is the executable that generates the source files used to interface between Ada and Java. It has a numberof options, some of which may be useful to clients.
These Ada projects are makefile-driven, so the makefile calls ada2java. If the user would like to pass additional optionsto ada2java, the macro named CUSTOM_OPTIONS in “config.mk” may be changed. “config.mk” is imported by theMakefile and is not modified by GNATbench. $(CUSTOM_OPTIONS) is appended to the end of the call to ada2java.It defaults to the empty string, but it may contain some options allowed by ada2java. It should not contain interfacefiles or include options that conflict with options already specified in the project’s Makefile.
Several options relating to aliasing and memory may be of interest in some cases.
11.5.5 Cleaning
Note that cleaning the Ada project removes the compilation objects (*.ali and *.o files) but also the generated Javafiles.
11.5.6 Limitations
At present, only one AJIS project can be used per Java project.
Operating Systems
Linux and Unix-like operating systems are supported. Windows users must install Cygwin for equivalent functionality.
The .gpr file
The gpr file should not be manually modified except to change the Source_Dirs, which can be done using the GNAT-bench toolbar and menu.
The gpr file may not have additional dependencies beyond the defaults (AJIS and JNI). Rather than reference anotherproject, simply add its sources to the Source_Dirs attribute.
11.5. Usage Notes 297

GNATbench for Eclipse User’s Guide, Release 22.0.20210305.w
Scenarios
The project contains several scenario variables by default. No new scenarios may be added.
Build may be set to either Production or Debug.
External_Build should be set to true. If it is set to false the AJIS and JNI libraries are rebuilt. In most casesthis is unnecessary.
OS is referenced when AJIS and JNI are built, and does not affect the library built by this project.
LIBRARY_KIND is a scenario variable referenced by AJIS and JNI. By default its value is ignored and static librariesare produced and included in the encapsulated dynamic library created by this project.
If the user does not wish to create an encapsulated dynamic library,
1. Unset the macro variable FORCE_ENCAPSULATED in the Makefile.
2. Set External_Build to false. AJIS and JNI will be built as static libraries.
3. Clean and build (or rebuild). The AJIS and JNI libraries will be rebuilt as dynamic libraries. The project’slibrary will be dynamic but not encapsulated.
The GNATbench integration features only support encapsulated dynamic libraries by default.
Interface files
The AJIS tools do not support all Ada language features. This restricts which files may be used as interface files. Seethe AJIS documentation for more information.
Supported builders
This makefile must use gprbuild. It does not respect the setting that uses gnatmake instead. This is because otherlibraries are needed to provide the Ada runtime, AJIS, and JNI. These libraries are included in the dynamic libraryusing the encapsulated library functionality of gprbuild; gnatmake does not support this feature at the time of thiswriting.
298 Chapter 11. Using AJIS

CHAPTER
TWELVE
DEVELOPPING QNX ADA PROJECTS
12.1 Creating QNX projects containing Ada code
12.1.1 Audience
This document is intended for users already somewhat familiar with QNX Momentics, and GNATbench. Some famil-iarity with GNAT cross compilers may also be useful.
12.1.2 Before You Begin
Install Ada cross-compiler toolchain for QNX.
On linux at the end of the install process, you’ll be asked to update your environment, to add cross compiler binariespath to PATH variable for example. Update your environment, prior to launch QNX Momentics and use GNATbenchmenus.
You can check correct cross compiler installation displaying Ada/Toolchains preferences page. QNX installedtoolchains should be displayed without any error decorator.
At startup GNATbench automatically create and fill “Ada runtime libraries for QNX” project. The libraries copied inthis project will be automatically uploaded into QNX target when a QNX project linked dynamically to Ada runtimeis launched on the target.
This project creation/update can be disabled through Ada/QNX preferences page.
If Ada runtime libraries are not made visible to QNX loader ‘ldd:FATAL: Could not load library libgnat-19.so’ errorswill be reported when launching such QNX executables.
Important
You cannot create directly a QNX project containing Ada code. You need first to create an empty QNX project, andthen convert it to a QNX executable or shared/static library project using “Ada/Convert an empty QNX Project to useAda Language” wizard.
299
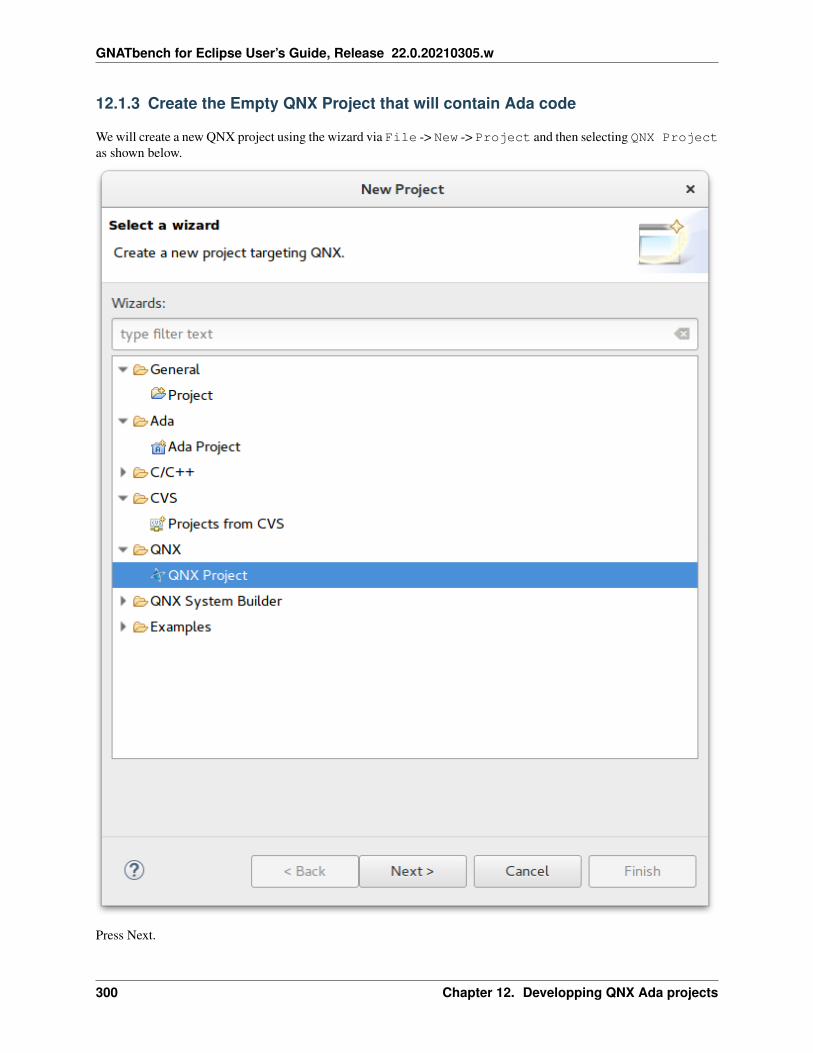
GNATbench for Eclipse User’s Guide, Release 22.0.20210305.w
12.1.3 Create the Empty QNX Project that will contain Ada code
We will create a new QNX project using the wizard via File -> New -> Project and then selecting QNX Projectas shown below.
Press Next.
300 Chapter 12. Developping QNX Ada projects

GNATbench for Eclipse User’s Guide, Release 22.0.20210305.w
This brings up the first wizard page. As shown below, we have selected “Empty QNX Project” template.
Press Next.
This brings up the last wizard page. As shown below, we have provided a name for the empty QNX project we willcreate. Select C++ language if you plan to put C++ code in your project, otherwise you can keep C language selection.Select the CPU variant of the cross compilers you have installed.
12.1. Creating QNX projects containing Ada code 301
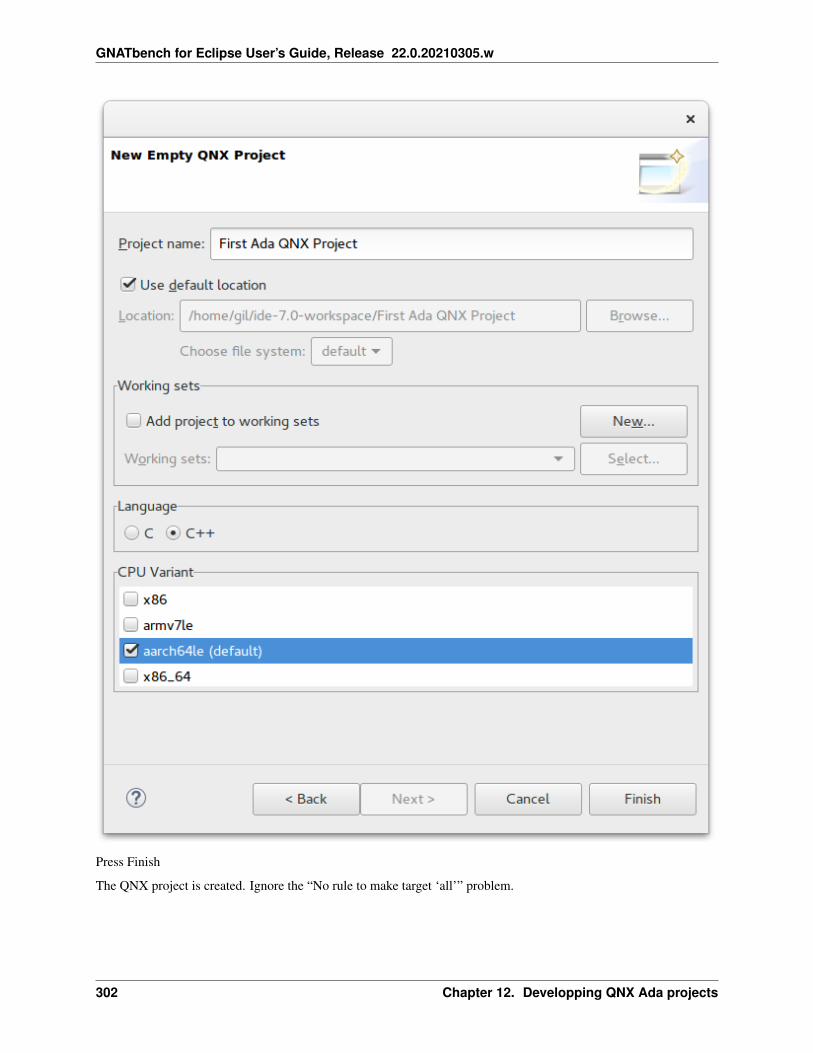
GNATbench for Eclipse User’s Guide, Release 22.0.20210305.w
Press Finish
The QNX project is created. Ignore the “No rule to make target ‘all’” problem.
302 Chapter 12. Developping QNX Ada projects
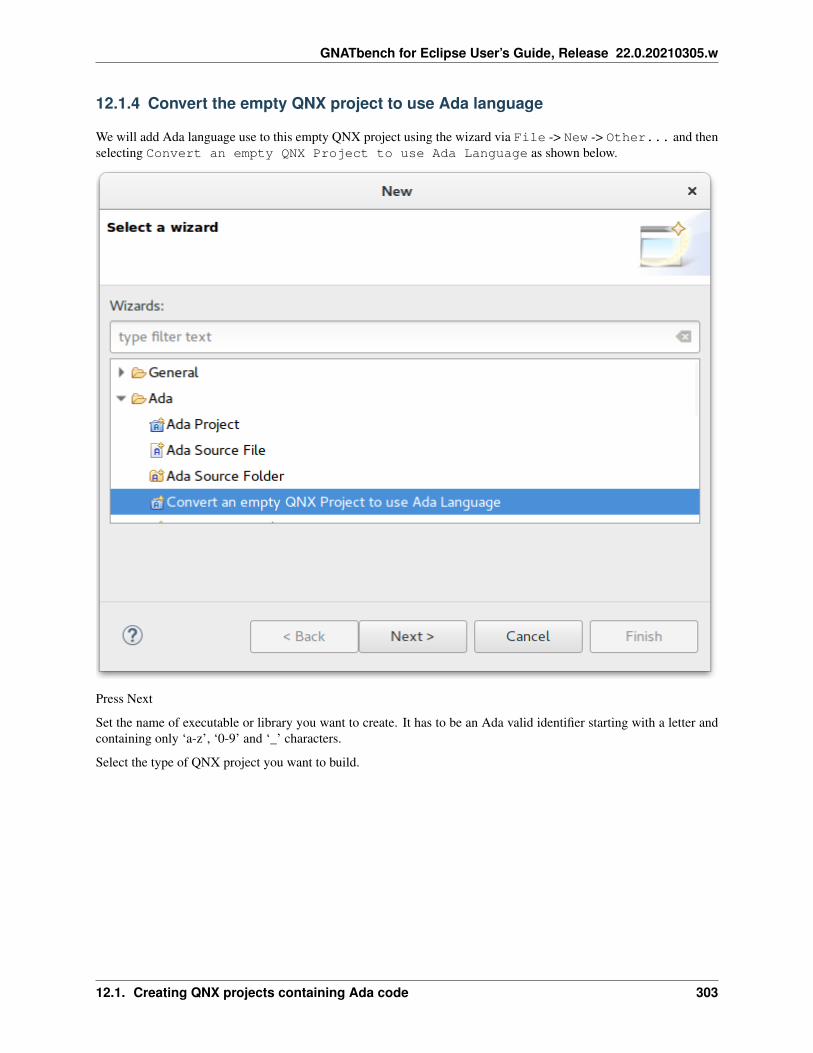
GNATbench for Eclipse User’s Guide, Release 22.0.20210305.w
12.1.4 Convert the empty QNX project to use Ada language
We will add Ada language use to this empty QNX project using the wizard via File -> New -> Other... and thenselecting Convert an empty QNX Project to use Ada Language as shown below.
Press Next
Set the name of executable or library you want to create. It has to be an Ada valid identifier starting with a letter andcontaining only ‘a-z’, ‘0-9’ and ‘_’ characters.
Select the type of QNX project you want to build.
12.1. Creating QNX projects containing Ada code 303

GNATbench for Eclipse User’s Guide, Release 22.0.20210305.w
Press Finish to launch project conversion.
Once created, run Build Project menu to verify that the project can be built.
If you have asked for a QNX executable, you can run it on your QNX target. The ‘Hello World!’ string is displayed inthe Console view
Version 22.0.20210305.w
304 Chapter 12. Developping QNX Ada projects

GNATbench for Eclipse User’s Guide, Release 22.0.20210305.w
Date: 2021-03-06
Copyright (c) 2006-2021 AdaCore
This document may be copied, in whole or in part, in any form or by any means, as is or with alterations, provided that(1) alterations are clearly marked as alterations and (2) this copyright notice is included unmodified in any copy.
12.1. Creating QNX projects containing Ada code 305