Glass Patterns Quarterly
66
Painting Spring 2017 Volume 33 • No. 1 Q U A R T E R L Y GLASS PATTERNS Fused Glass Glass in the Garden Stained Glass DON’T MISS Our 16 - Page Pattern Sheet Volume 33 No. 1 $6.00 U.S. $7.50 Canada www.GlassPatterns.com Combining Lead and Foil Daffodil Panel Lamp Reinforcement Garden Fairies Florida Coasters Stringer Designs Birdbath Daisy Bouquet Gallery Pendant Designer Eggs
-
Upload
khangminh22 -
Category
Documents
-
view
0 -
download
0
Transcript of Glass Patterns Quarterly

Painting
Spring 2017 Volume 33 • No. 1 Q U A R T E R L Y
GLASS PATTERNS
Fused Glass
Glass in the GardenStained Glass
DON’T MISS Our 16 - Page Pattern Sheet
Volume 33 No. 1$6.00 U.S. $7.50 Canada
www.GlassPatterns.com
Combining Lead and FoilDaffodil PanelLamp Reinforcement
Garden FairiesFlorida CoastersStringer DesignsBirdbathDaisy BouquetGallery Pendant
Designer Eggs

Ideas...
The Kiln
Amplified
“I love my GM1414! I have used them for years in my workshops, and other studio environments. They are well built, dependable workhors-es with some great features. I do a variety of kiln forming techniques as well as production work and the size, depth and versatility of this model allow me to realize nearly all of what I set out to accomplish.”
Blue Ribbon Livin’201314 ft. x 10 ft. Kiln-formed glass, aluminum and copperWashington State Arts Commissionin partnership with Valley School District
The ArtistMichael Dupille is one of the early pioneers in the kiln formed art glass movement that began in the 1980s. He creates large scale piec-es as murals or individual elements using fused crushed glass. He calls his style “Soft Surrealism” due to its representational imagery that in-corporates imaginative twists to embellish the narrative. Find out more about Michael and his work at: www.skutt.com/Dupille
We help you make great things!
Michael Dupile Install.indd 1 1/12/17 2:03 PM

3
From the Editor
GLASS PATTERNS QUARTERLY/Spring 2017
Spring LogicThe March Equinox marks the moment when the sun shines di-
rectly on the equator and the length of day and night is nearly equal signifying the first day of spring. The March equinox has long been celebrated as a time of rebirth in the Northern Hemisphere. Due to this phenomenon of nature, we start planting metaphoric and botani-cal seeds, which in turn renews many areas of our life. That is why Glass in the Garden is one of Glass Patterns Quarterly’s favorite magazine themes. I am proud to serve up a snapshot of what you’ll be anticipating with spring, such as decorative eggs, daffodils, and even dandelions plus much, much more.
Be ready to anticipate fresh colors, new textures, and the latest ideas. In the winter season, we tend to be in a protective mode, depending on where we live, and tend to shelter ourselves from the elements and anticipate how the weather will affect our days. Now it’s time to rake away the dry leaves and pine needles to see what is ready to sprout. I think you’ll be pleased with our collective lineup of stained glass, fused glass, and painted enamels in this issue.
If you plan to attend the Glass Craft and Bead Expo in Las Vegas, stop by our booth during the exhibit portion starting March 31 and ending April 2 at the South Point Hotel and Casino. I really mean that! This is the highlight of the year as far as feedback to the magazine is concerned. We will have issues of Glass Patterns Quarterly, Glass Art, and The Flow magazines, as well as information on Glass Expert Webinars™. You can pick up some back issues, see what’s new, and chat for a while. We get to put a face with our subscriber’s names and hear real-time comments.
Class registration for the Glass Craft and Bead Expo is open, and classes are filling up quickly. I’m proud to say that I’m also teaching a class, How to Get Published in the Glass Business on Thursday evening of the Expo. I hope to present some insider information on publishing your glass projects and patterns and answer your burning questions.
Speaking of burning questions, our contact information has changed, since we no longer have an 800 number. To contact Glass Patterns Quarterly, Glass Art magazine, or The Flow magazine, please call 502.222.5631 or e-mail [email protected], [email protected], or [email protected]. Our office hours are 9:00 a.m. to 5:00 p.m. EST, Monday through Thursday.
Happy Glassing,
Delynn EllisManaging Editor
Upcoming Submission Deadlines Summer 2017 Slice of Summer - A Nostalgic Look at Scenes of Summer Past and PresentEditorial March 20, 2017Ad Closing April 20, 2017Ad Materials April 30, 2017
Fall 2017 Autumn, Halloween, Christmas, and Holiday OrnamentsEditorial June 20, 2017Ad Closing July 20, 2017Ad Materials July 30, 2017
Publisher ~ Maureen James
Editor ~ Delynn Ellis
Graphic Artists ~ Dave Burnett,
Mark Waterbury
Accounting ~ Rhonda Sewell
Circulation Manager ~ Kathy Gentry
Copy Editor ~ Darlene Welch
Advertising ~ Maureen James
Contributing Designers and Writers
Jean Beaulieu, Denny Berkery
Margot Clark, Delynn Ellis
Marcia Fox, Glass By Appointment Studio
Mary Harris, Arnold Howard
Petra Kaiser, David Kennedy
Ann Madsen, Jim Matthews
Susan McGarry, Kelley Mc Hugh
Chantal Paré, Lisa Vogt
Darlene Welch, Deverie Wood
Nancy Wright-Clapson
GlaSS PatterNS Quarterly
Issn 1041-6684, is published quarterly
by Glass Patterns Quarterly, Inc.
POSTMASTER Send address
changes to Glass Patterns Quarterly,
8300 Hidden Valley Road,
P.O. Box 69, Westport, KY 40077
Telephone 502-222-5631
Facsimile 502-222-4527
E-Mail [email protected]
Graphic Transfer
Website GlassPatterns.com
Subscriptions $24 for one year,
$43 for two years, and $61 for three years
Sample issues U.S., $8 Outside U.S., $12
Sample issues Airmail, $14
Kentucky residents, add 6% state sales tax.
Outside the U.S., add $5 per year
for international postage.
All subscriptions must be paid in U.S. dollars
with an international money order or
with a check drawn on a U.S. bank.
Periodicals Postage Paid
at Westport, KY 40077 and additional
mailing offices. Back issues $6
plus shipping and handling.
©2017 Glass Patterns Quarterly, Inc.
Glass Patterns Quarterly does not stand
sponsorship for opinions or facts of authors. Un-
solicited material will be handled with care, but
the magazine assumes no responsibility for it.
Fused Birdbath by Jim Matthews

Active and Voting Members of
Table of ContentsSpring 2017 Volume 33 Number 1
Like us on Facebook. Also pin us on Pinterest.
Glass Patterns QuarterlyGlass Patterns Quarterly 3 From the Editor Spring Logic by Delynn Ellis
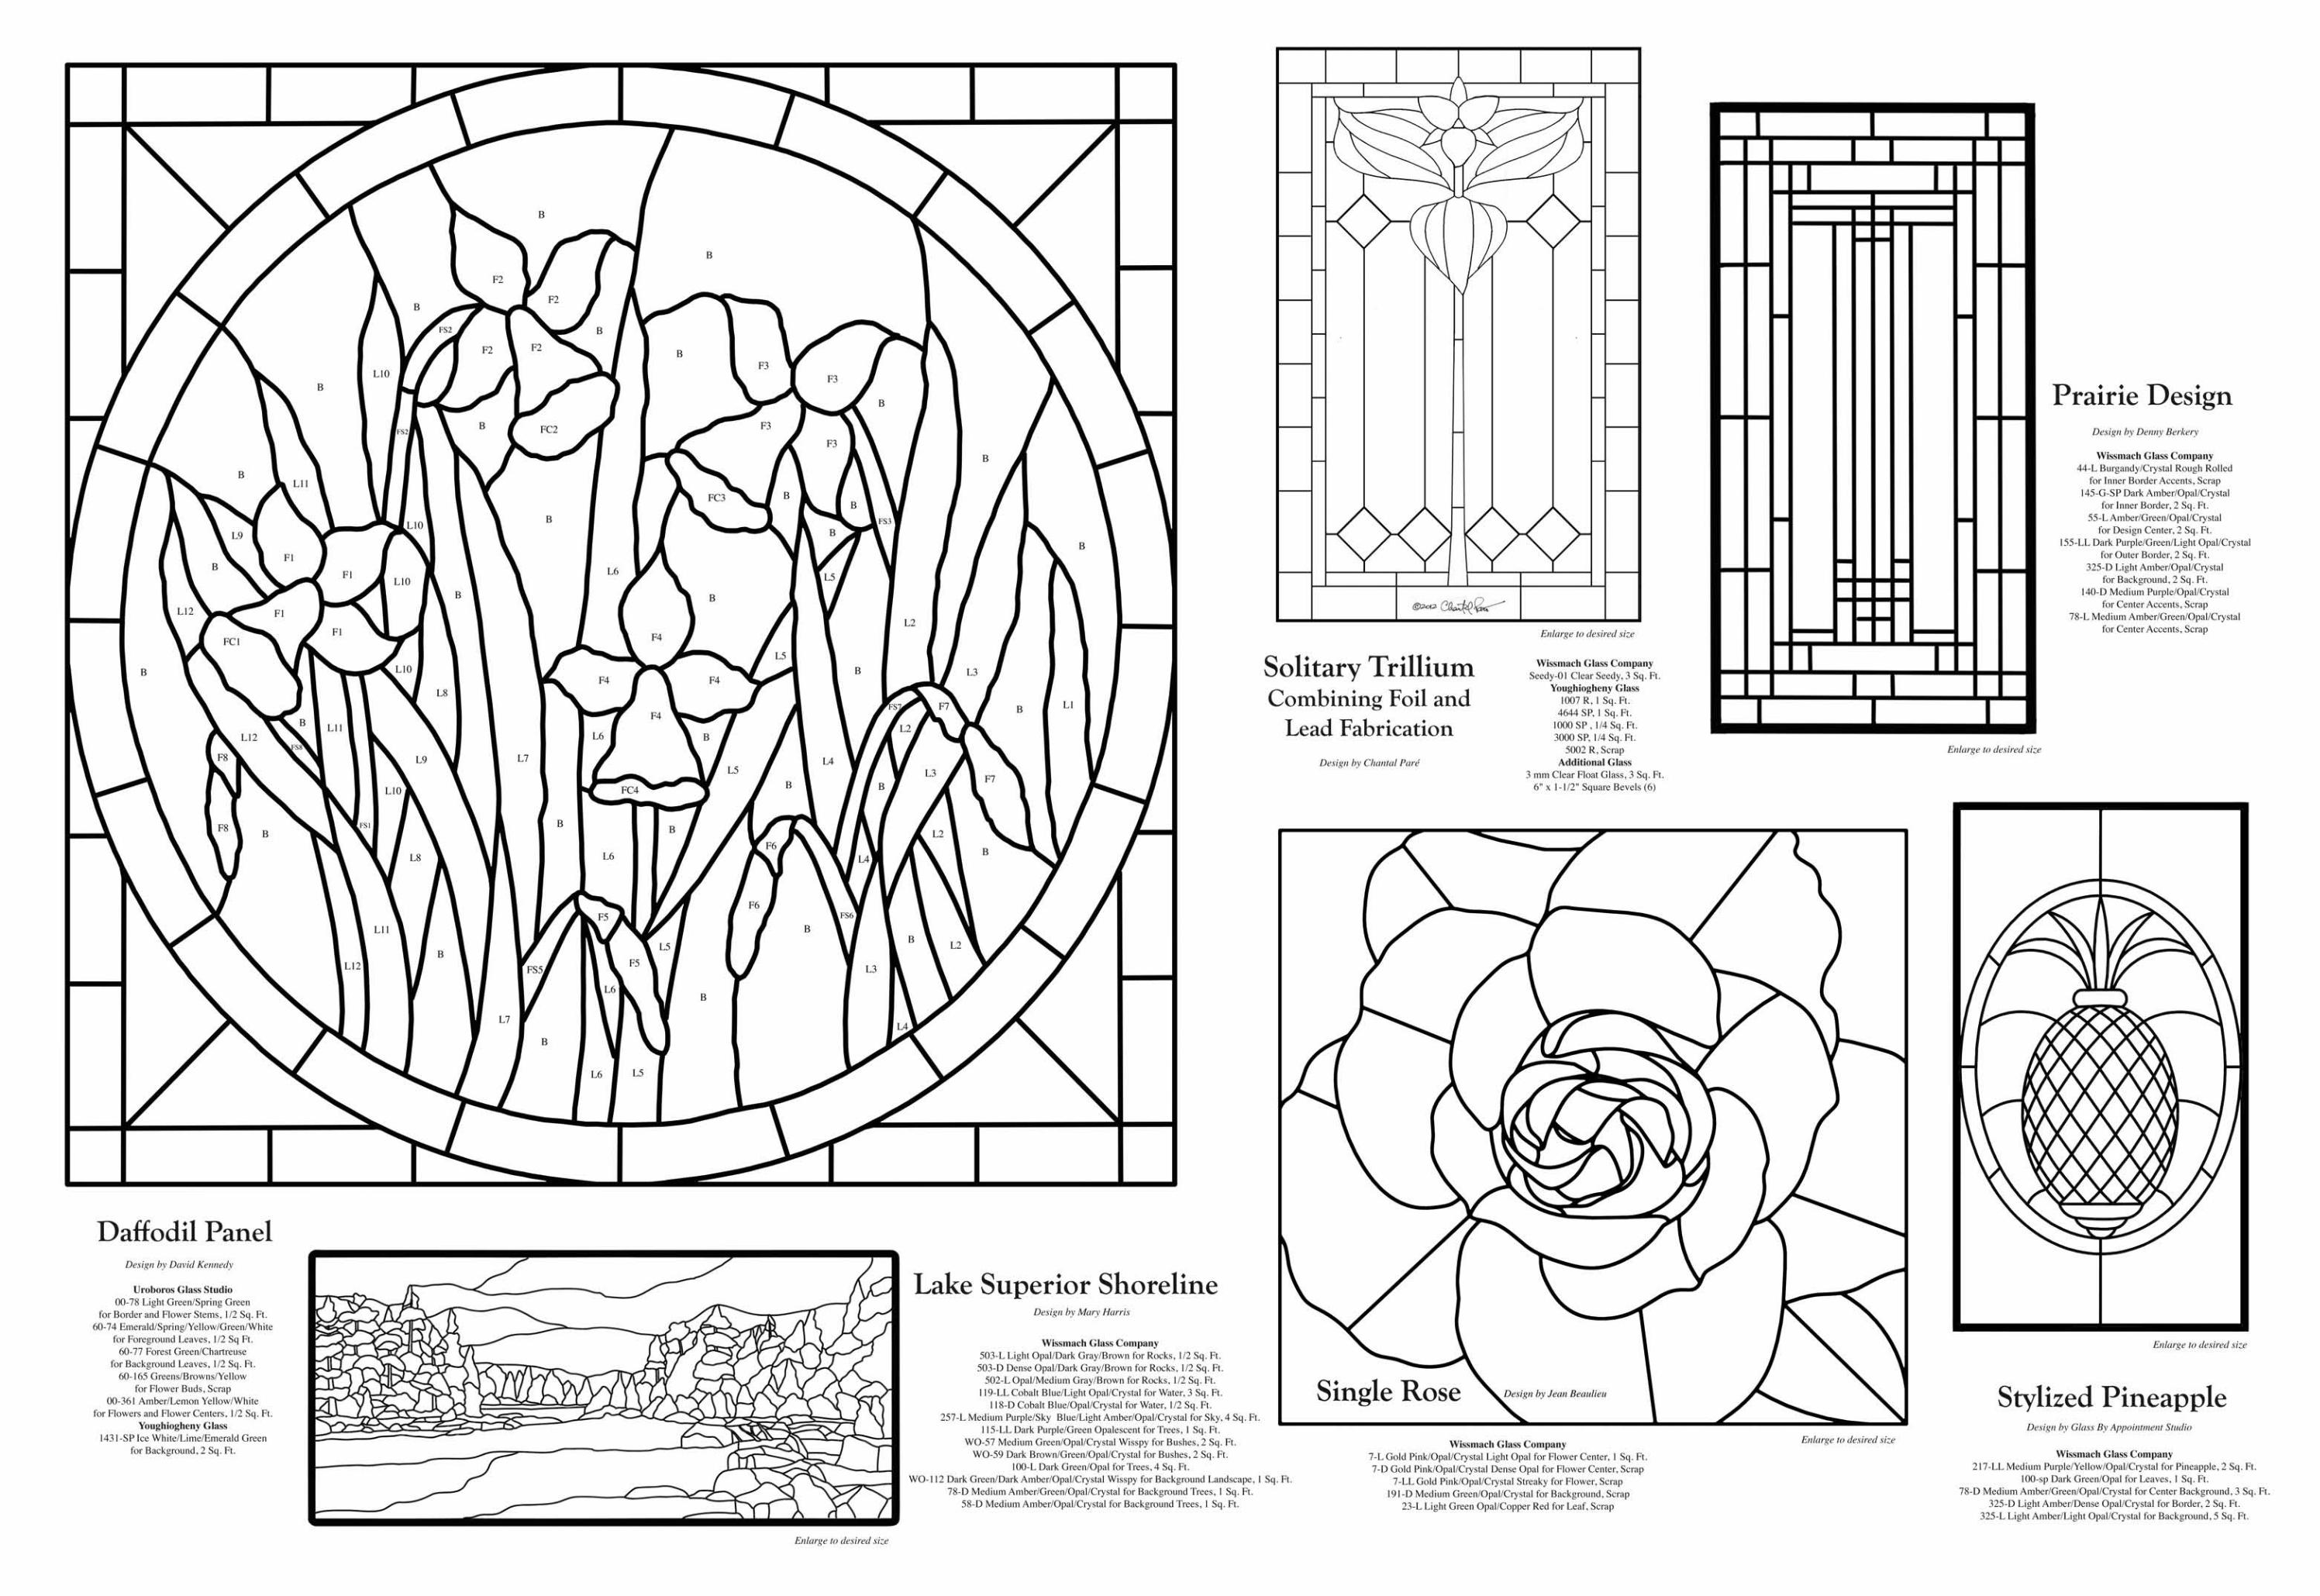
6 Solitary Trillium Combining Foil and Lead Fabrication Design by Chantal Paré
10 Daffodil Panel An Introduction to Stained Glass Design by David Kennedy
16 Prairie Design Design by Denny Berkery
18 Egyptian Revival Art Deco Lamp Design by Nancy Wright-Clapson
24 Stylized Pineapple Design by Glass by Appointment Studio
26 Fanciful Garden Fairies Design by Lisa Vogt
30 Daisy Bouquet Design by Kelley Mc Hugh
33–48 16-Page Full-Size Pattern Section
49 Beveled Cross Design by Deverie Wood
50 Somebirdy Needs a Bath! Design by Jim Matthews
54 What’s New
56 Designer Eggs Created with MUD Design by Margot Clark
62 Gallery Pendant Two Pendants in One by Susan McGarry
64 Single Rose Design by Jean Beaulieu
66 Florida Coasters and Night-Lights Creating Reverse Carving and Drape Molds with Kaiser Lee Board Design by Petra Kaiser
69 Ruby-Throated Hummingbird Design by Ann Madsen
70 Designing Dandelions with Stringers Design by Marcia Fox
73 Lake Superior Shoreline Design by Mary Harris
74 Stained Glass Supply Shops
77 Kiln Corner Kiln Wash Basics by Arnold Howard
78 Advertisers’ Index
GLASS PATTERNS QUARTERLY/Spring 20174


GLASS PATTERNS QUARTERLY/Spring 20176
1Make two copies of the template and cut out all the individual pieces of one template inside the black lines.
Use ordinary or pattern shears for this task.
Solitary TrilliumCombining Foil and Lead Fabrication
Design, Fabrication, and Text by Chantal Paré
Wissmach Glass CompanySeedy-01 Clear Seedy, 3 Sq. Ft.
youghiogheny Glass1007 R, 1 Sq. Ft.4644 SP, 1 Sq. Ft.
1000 SP, 1/4 Sq. Ft.3000 SP, 1/4 Sq. Ft.
5002 R, ScrapAdditional Glass
3 mm Clear Float Glass, 3 Sq. Ft.6" x 1-1/2" Square Bevels (6)
Tools and Materials14-Gauge Pretinned Copper Wire
3/16" or 5/32" Black-Backed Copper Foil60/40 Solder Flux Flux Brush
Masking or Electrical Tape3/4" U-Came Zinc
3/16" Flat H-Lead Came5/32" Round H-Lead Came
Calcium Carbonate (Whiting)Horseshoe Nails Burnishing Brush
Lead Knife or Tin Cutter Soft Mallet14-Gauge Pretinned Copper Wire
Carpenter’s Square
Thriving in great numbers in the undergrowth of mature maple and hickory forests of North
America, the trillium is emblematic of the warm days of the month of May. Every year, their majestic display of lush green leaves and luminous white pet-als blankets the previous autumn’s fallen leaves and is much anticipated by woodland hikers. Waves of trilliums are lit up by patches of sunlight that make their way through the apple green, still expanding leaves of the canopy above. Each bloom nods in the gentle breeze with stately grace.
These flowers are the inspiration for this Victorian-style depiction of a single trillium plant, which emphasizes its striking three-fold symmetry. A variety of Youghiogheny stipple and reproduction glass creates a rich yet subtle watercolor effect that is supported by delicately textured Wissmach seedy and plain clear float glass. A striking pink frame adds cheer to the understated elegance of the trillium.

GLASS PATTERNS QUARTERLY/Spring 2017 7
2
4
3
5
6
7
8
10
9
Trace each paper piece onto the glass on the smooth side where the sides are not even.
Score and break the glass, keeping the glass cutting wheel inside the marker lines.
Grind the green glass and check for a good fit with the paper template.
Wrap the edges of the green glass only with the black-backed copper foil.
Burnish the edges with a fid or the blunt side of scissors. I am using 5/32" foil because I want fine lead lines, but the more common 3/16" foil can also be used.
Solder each leaf individually without beading all the way to the leaves’ outer edges in order to allow room for the came.
Prepare a 2-sided jig to contain the project as you lead it, using a carpenter’s square to ensure perfect corner angles.
Cut out a frame from the 3/4" U-came zinc with a miter saw. Cut and place the glass pieces and the lead segments, securing their placement with horseshoe nails. Gently tap the glass into place us-ing a soft mallet, working your way from top to bottom and from left to right.
Solder each leaf individually as if it were a complete copper foil project, without worrying about the outer edges.
Each of the three leaves now becomes like a single glass piece that you insert into the lead as if it were any ordinary single piece of glass. Insert the presoldered copper foil leaves into the lead came.
Mask the areas around each solder joint on the zinc framework, then solder.
Remember that zinc takes a bit more flux and heat than lead. When that’s done, lightly tack-solder each lead line to the zinc framework where both touch.
Solder the piece, front and back.

GLASS PATTERNS QUARTERLY/Spring 20178
KEYNOTE SPEAKER: Maureen James - Art Glass Educator and Publisher will review her unique understanding of today’s issues and offer some exciting future possibilities.
SPEAKER PRESENTATIONS: Multi-media talks designed to inform and promote the spread of great ideas from leading art glass thinkers and innovators such as: Peter McGrain, Lisa Vogt, Leslie Perlis, Tony Glander, Phil Materio and Randy Wardell. The positive enthusiasm driving these dynamic presenters is contagious.
GALLERY EXHIBITIONS: Our presenters will have their work in our gallery and will be available for you to meet, talk, and pick the brains of these prolific idea-generators.
ROUNDTABLE DIALOGUE: Participate in a ‘round-the-table’ moderated discussion of art glass as an art form, a craft, a business and a culture, to discover ways to adapt, and adopt to the changing needs of the times.
MANUFACTURERS: We will have some of the industry’s most innovative manufacturers on hand to demonstrate, show you what they’re working on, answer any questions and enable you to make purchases.
VIP COCKTAIL RECEPTION: A private tour and cocktail reception hosted at Habatat Galleries of contemporary glass. Get up close and personal with some of the most remarkable state-of-the-art glass creations available anywhere.
CANE PULLING EXPERIENCE: Sunday morning breakfast, hosted by Jen Ken Kilns. With multiple Vitragraph kilns enabling each participant to pull twisted cane to take home.
JOIN THE QUEST: A full weekend of education and engagement. Learn from brilliant teachers and glass visionaries and network in the evolving world of art glass
GLASSQUEST DATES: May 26th, 27th & 28th 2017 in beautiful downtown West Palm Beach, Florida. For more details about the event and to register go to:
An Awesome Art Glass Experience
Lisa Vogt
Leslie Perlis
Phil Materio
Peter McGrain
Jen Ken Kilns
Register here: www.Glassquest2017.eventbrite.comor call: 561-585-9011 or 954-557-5589
ARDELLPRODUCTSBooks, eBooks, Molds & Workshops for the Art Glass Community
.com
Glass Quest 2017 is Produced by:
www.Glassquest2017.eventbrite.com
Tony Glander
A decade ago, Chantal Paré quit the fast-paced world of molecular biology to devote herself to the full-time pursuit of glass. She’s liable to melt it, blow it, break it, paint it, or cast it, sometimes just to show it who’s boss. Nothing else comes close to creating an object through which light can pass the same way it does through water. In her free time, Chantal draws patterns in a variety of styles ranging from Victorian to geometric and self-publishes them on the Internet. Lately, she’s concentrating her efforts on glass painting.
© Copyright 2017 by Glass Patterns Quarterly.All rights reserved.
GPQ
12
11
13
Solder the joints on the first side of the project. Apply flux to each joint in a small area with a brush and cover with 60/40 solder. Gently turn the project over lengthwise, making sure not to apply torsional forces that could crack the glass, and solder the second side.
Make hooks by folding over the pretinned 14-gauge copper wire and solder into the two upper corners.
Squeeze putty under the came on both sides of the project with a putty knife or your gloved hands.
Give the panel a final cleaning with whiting and a burnishing brush, followed by a domestic window cleaner.
Throw a fistful of whiting on the puttied window and brush vigorously with a burnishing brush, along and against the lead lines. Move the brush in a circular motion until the zinc shines and the lead turns dark gray. Wash, scrape off any excess putty, and clean again.


Design, Fabrication, and Text by David Kennedy
Daffodil PanelAn Introduction to Stained Glass
“I wandered lonely as a cloudThat floats on high o’er vales and hills,When all at once I saw a crowd,A host, of golden daffodils.” Henry Wordsworth
The excerpt above was taken from one of the most famous works by poet Henry Wordsworth, I Wandered Lonely as a Cloud. It
was inspired by a group of daffodils that he stumbled upon during a walk with his sister in the early 1800s.
While this must have been a stunning but short-lived sight, you can recreate the beauty of the delicate daffodil permanently in glass. The lovely round display can be placed on a stand as shown here, or you can add chain for hanging in a window. Either way, the cheery colors of yellow and green are sure to make your day.
GLASS PATTERNS QUARTERLY/Spring 201710

2
1
4
3
5
6
7
8
Photography by Sharon Kennedy
Make two copies of the pattern, one for cutting out the pieces and one for using as a template.
Prepare a 15"- diameter round jig for building the panel.
I am using the jig, because I want to place the finished panel in a metal table stand.
Using the Uroboros 00-78, cut a section of three border pieces as a pattern, then cut 7 of the three-piece sections.
There will be 20 border pieces altogether
Uroboros Glass Studio00-78 Light Green/Spring Green
for Border and Flower Stems, 1/2 Sq. Ft.60-74 Emerald/Spring/Yellow/Green/White
for Foreground Leaves, 1/2 Sq. Ft.60-77 Forest Green/Chartreuse
for Background Leaves, 1/2 Sq. Ft.60-165 Greens/Browns/Yellow
for Flower Buds, Scrap00-361 Amber/Lemon Yellow/White
for Flowers and Flower Centers, 1/2 Sq. Ft.youghiogheny Glass
1431-SP Ice White/Lime/Emerald Green for Background, 2 Sq. Ft.
Tools and Materials7/32" Copper Foil Burnishing Tool
50/50 Solder 60/40 Solder4 x 4 C- or U-Channel Lead Came
3/4" Grinding Bit Water Soluble FluxBand Saw Permanent Marker Pen
Firelite Forms 15"-Diameter Metal StandSmall Paintbrush Stiff BrushDish Detergent Black Patina
Cut the individual border pieces from each section and fit them on the template pattern.
When the border is complete, add the leaves in the foreground using the Uroboros 60-74.
Before cutting the background leaves, make a separate pattern to ensure continuity of the glass pieces.
Cut the background leaves from the Uroboros 60-77, making the L10 pattern piece the darkest one.
Use a band saw to cut out the tricky inside curves.
11GLASS PATTERNS QUARTERLY/Spring 2017

GLASS PATTERNS QUARTERLY/Spring 201712
12
11
15
14
13
17
16
18
10
9Once all of the leaves are cut, add the flower buds F8, F6, F5, and F7 with the Uroboros 60-165.
At the same time, add the flower stems using the Uroboros 00-78.
Add the flowers and flower centers with the Uroboros 00-36, picking out the ring mottles for maximum effect.
Transfer the pattern onto the glass for the background pieces with a permanent marker.
Try to keep the darker shades in the glass toward the base of the panel. Once the pieces are marked, cut the glass using a band saw.
As you cut and place the background glass pieces, add the remaining flower petals as well.
The panel will now start to come to life.
Once all the pieces are cut, begin to foil the glass.
It’s best to always start foiling the border on a panel like this one. There is no need to foil the outside edge, since the lead came will cover it. Remove the pieces from the template to apply the foil and replace them one piece at a time. Make any needed adjustments as you proceed.
Burnish the foil.
Make sure the foil is burnished onto the glass well. I find that a putty knife is excellent for this purpose.
When all of the border pieces are foiled, start on the inner pieces, again making adjustments as necessary.
When all of the pieces have been foiled, apply flux to the seams and solder them flat using 50/50 solder.
Remove the panel from the jig and repeat the fluxing and solder-ing process on the reverse side.
Frame the panel with C- or U-channel lead.
Stretch a length of 4 x 4 C- or U-channel lead came and cut a length approximately 4 feet for a 15"-diameter panel. This can now be eased around the edges to provide a nice, neat finish.
Complete the soldering, reapply flux to the seams, and bead- solder the panel using 60/40 on both sides of the panel.

2011 South Town East Blvd.Mesquite, Texas 75149-1122800-876-4328 / [email protected]
Introducing the Paragon CS-5630clamshell kiln with quartz tubes
Deluxe quartz tubesImagine the huge glass pieces you
could make inside the new ParagonCS-5630. Enjoy complete access to yourartwork from the sides and front. Adddelicate stringers or frit without having tomove the shelf into the kiln later.
The roof elements are protected in 10quartz tubes for a cleaner kiln interior.There is less dust in the kiln, becausethere are no element grooves in the top.Heat from the top, walls, and floor
The CS-5630 is 56” x 30” x 17” high.With elements in the floor, walls, androof, you will enjoy unsurpassed heat dis-tribution. The digital controller usesPower Ratio technology to vary the heatoutput between the top and bottom ele-ments.Extra insulation and woven gasket
Lift the kiln top section with handles inthe front and sides and with assistancefrom gas springs. The roof is 3” thick ce-ramic fiber, and the walls are 3” firebrickbacked by 1” of ceramic fiber board (4” oftotal wall thickness). The extra insulationhelps to maintain even temperatures. Awoven gasket between the kiln top andfloor helps to hold in the heat. The floor
surface is a convenient 30” high fromground level. The 4 ½” thick firebrickfloor includes two expansion joints.
Watch the glass through 2” x 3” peep-holes mounted in the left and right sides.The kiln includes locking casters.Motorized vent for firing molds
If you fire molds, you will welcome themotorized Orton Vent Master, which ismounted in the back wall of the kiln. Thevent, mounted on rubber isolators to pre-vent vibration, removes moisture fromthe kiln to reduce rust. The vent is stan-dard on the CS-5630 and plugs into anauxiliary output in the back of the kiln.This allows you to turn on the ventthrough the digital controller.Low maintenance
Deluxe, long-lasting mercury relaysare standard. Gain convenient access tothe electrical components by removing asingle panel. The kiln includes accesspanels for replacing quartz tubes.Rugged
The CS-5630 is the very picture ofruggedness. A ledge in front of the kilnprotects the brick floor from damagecaused by leaning into the kiln. The digi-tal controller is mounted away from the
heat for long life. The kiln base is weldedfrom 2” x 2” steel tubing; the upper kilnframe is welded from 1” x 1” steel tubing.Optional touch screen controller
Order your CS-5630with the optional Senti-nel Smart Touch con-troller. The Sentinelcan check the voltageand amperage and canbe programmed witheasy-to-follow screendescriptions.
For more details, please visit ourwebsite or call 800-876-4328. We lookforward to hearing from you.
CS-5630 Dimensions– Exterior with top closed: 70 ½”
W x 53” D x 52” H– Exterior with top raised: 70 ½”
W x 63” D x 76” H– Interior: 56” x 30” x 17” (15 ½”
deep when measuring fromquartz tube surface)
– Flat load floor, 30" from groundlevel
Constantly findingways to makebetter kilns.
GLASS PATTERNS QUARTERLY/Spring 201714
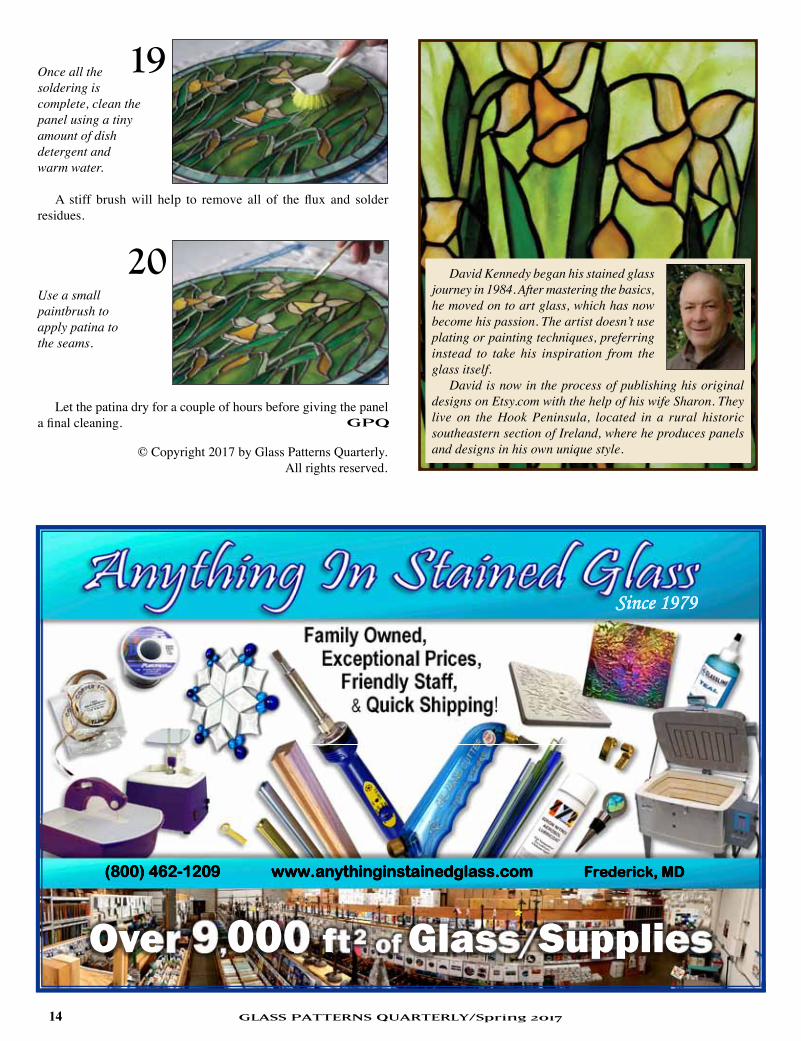
20
19
© Copyright 2017 by Glass Patterns Quarterly.All rights reserved.
GPQ
David Kennedy began his stained glass journey in 1984. After mastering the basics, he moved on to art glass, which has now become his passion. The artist doesn’t use plating or painting techniques, preferring instead to take his inspiration from the glass itself.
David is now in the process of publishing his original designs on Etsy.com with the help of his wife Sharon. They live on the Hook Peninsula, located in a rural historic southeastern section of Ireland, where he produces panels and designs in his own unique style.
Once all the soldering is complete, clean the panel using a tiny amount of dish detergent and warm water.
A stiff brush will help to remove all of the flux and solder residues.
Use a small paintbrush to apply patina to the seams.
Let the patina dry for a couple of hours before giving the panel a final cleaning.

GLASS PATTERNS QUARTERLY/Spring 2017 15
Products of Quality Since 1978
Made in the USA. The Brand You Trust.
(800)423-5635 • Tel (818)341-0301 F(818)998-2078 • [email protected]
JewelryHead
BeadReamer
GREAT TOOLS, PRODUCT EXPERTISE & CUSTOMER SERVICE YOU CAN ALWAYS COUNT ON.
Glastar Corporation • glastar.com8425 Canoga Ave Canoga Park, CA 91304
SpecialtyHeads Heads
Call us or your local dealer to request for catalogs and more info.
SPRING SPECIAL*Free EZ-GrindTM Coolant 1 oz. and a Molded Eye Shield from
March - April with a Diamond StarTM grinder purchase.
FREE!*
VISITBOOTH
#727 AT THE GLASS
CRAFT & BEAD EXPO !
GPQSpring17_SGNSummer2014 1/24/17 2:52 PM Page 1
an Diego artist and author Leslie Perlis combines fused glass and mosaic
in her life-size art. Her glass cutter is a Toyo Custom Grip Supercutter® with Tap-Wheel® technology.
For more information, visit: glassaccessories.com
Glass Accessories International

GLASS PATTERNS QUARTERLY/Spring 201716
GPQ
Prairie Design
© Copyright 2017 by Glass Patterns Quarterly.
All rights reserved.
Design by Denny Berkery, Text by Delynn Ellis
Prairie designs, which were made popular by American architect, interior designer,
and educator Frank Lloyd Wright, are usu-ally expressed in rectangles, squares, and straight lines. He once said, “The nature of the glass is taken into account in prairie designs. Most of them are treated as metal ‘grilles’ with inserted glass forming a simple rhythmic arrangement of straight lines and squares made as cunning as possible so long as the result is quiet.”
Denny Berkery has drawn upon his many years of experience as a stained glass artisan to create a series of custom designs that will fill a cabinet door or suit to fit a similar sized window. This 12" x 24" panel comes from his book, 300 Stained Glass Cabinet Door Designs. You will find pat-terns from contemporary to historic in his book. This geometric design captures the essences of the prairie–mission–arts & crafts style. You can see more of Denny’s work at www.vineryglass.com.
Wissmach Glass Company44-L Burgandy/Crystal Rough Rolled
for Inner Border Accents, Scrap145-G-SP Dark Amber/Opal/Crystal
for Inner Border, 2 Sq. Ft.55-L Amber/Green/Opal/Crystal
for Design Center, 2 Sq. Ft.155-LL Dark Purple/Green/Light Opal/Crystal
for Outer Border, 2 Sq. Ft.325-D Light Amber/Opal/Crystal
for Background, 2 Sq. Ft.140-D Medium Purple/Opal/Crystal
for Center Accents, Scrap78-L Medium Amber/Green/Opal/Crystal
for Center Accents, ScrapTools and Materials
7/32" Copper Foil Flux SolderBlack Patina 1/2" U-Channel Lead
GLASS PATTERNS QUARTERLY/Spring 201716

GLASS PATTERNS QUARTERLY/Spring 2017 17
CREATIVITY
His Glassworks, Inc.20 0 0 R iverside Dr ive, Sui te 19A shev i l le , NC 2880 4 USAp 828 25 4 2559t f 80 0 914 74 63w w w.hisglassworks.com
KNOWLEDGE
POWERIS
FREEDOMIS
Ana-Maria Nava

Design, Fabrication, and Text by Nancy Wright-Clapson
Egyptian Revival Art Deco Lamp
A striking art deco–style panel lamp can add an in-
teresting element to any home decor. The subtleties of Youghiogheny’s Beige stipple glass used for this lamp design offers a warm glow to the geometric design and glass elements when the lamp is lit. Adding a timer to come on at dusk or just before dawn is a great idea for adding an ambient charm for the observer. This medium-size shade can be used either as a table lamp or a hanging fixture.
Reinforcing the corners and lower edge with wiring is essential to hold everything in place. In this article, I will show you an economical way to solder the outside seams with the aid of a broomstick, a tech-nique I still like to use whenever I create panel shades.
youghiogheny Glass5002 Stipple Glass, 1/2 Sq. Ft.5409 Stipple Glass, 1 Sq. Ft.Kokomo Opalescent Glass
113, Scrap18DDD Hammered Glass, Scrap
111, Scrap142LL-SPLV, Scrap
Wissmach Glass Company134 Medium Purple Cord, Scrap
WO-29 Dark Red/Opal/Crystal, Scrap
GLASS PATTERNS QUARTERLY/Spring 201718

2
1
5
4
3
Plan the design.
You can use the Glass Eye 2000 program to make this model, or create a design of your own using the measurements shown in the photo. The most important measurement is at the top where the vase cap fits on. Make sure that it measures no more than 2-3/8" in width.
If you create your own design, you can adjust the height and lower width of the shade to suit your project. The general ratio rule for fitting a lamp shade to a base is 3:1, with the height of the shade being 1/3 of the total height of the lamp. The remaining two-thirds would be for the exposed height of the base. For this tutorial, I made the height of the shade 7" and the lower width of one panel 9-3/4" across.
Set up the metal layout strips on the pattern to help with assembling the pieces for the panels.
Once you’ve added the pattern numbers and directional arrows for the glass placement onto the cartoon, lay a double layer of newsprint on a 16" x 16" section of homosote board. A large ceiling tile or gyp rock with the edges taped can also function as a working base substitute.
Place the cartoon on top of the newsprint and add the metal layout strips around the perimeter of the design. Make sure that the pushpins are flat against the metal strips to prevent any move-ment. Leave the layout strips in place until you have all four panels completed. This will ensure all of the panels will be the same size.
Number, cut, and foil the glass pieces for all four panels.
You can use a light table to check the glass color selections and grain before foiling.
Assemble the foiled glass pieces for each of the four panels.
Begin by fitting the two outer sections of the panel. Use a 6" layout strip to help line up the edges to make each side section the same size. Once all of the sections are done, remove the two center 6" layout strips and proceed to fit in the glass pieces for the center section of each panel. Foil and tack-solder the panel seams before removing them from the layout strip jig.
Review the panels before assembly, checking to make sure that each panel is the same length and the connecting lines match at the corners.
Flux and solder the seams for all four panels, front and back. Lightly tin the foiled outer edges of each side as well as the upper and lower foil edges, front and back. Remove the white and black numbers from the glass with acetone or other paint remover such as Goo-Gone or Goof-Off.
Tools And MaterialsPrinter Paper Card Stock Transparent Tape
White and Black Marking Pens X-Acto Knife®
Grozer, Running, and Needle Nose Pliers60/40 Solder Flux 7/32" Copper Foil
18-Gauge Wire Wire Cutters Black PatinaAcetone or Other Paint Remover
16" x 16" Homosote Board 16 Metal PushpinsLayout Strips 12" (1), 6" (4), and 3" (1)
Newspaper 2' Steel Square 2 Foam Wedgies2-3/4" Square Vase Cap 7" Harp Finial
9" Lamp Base Small Level 25-Watt Light BulbLong-Handled Broomstick Round ContainerDawn Dish Soap White Scrubby Sponge
Glass Wax Soft Polishing Towel Cotton SwabsGlass Eye 2000 (optional) Lamp Leveler (optional)
19GLASS PATTERNS QUARTERLY/Spring 2017

11
10
9Tack-solder the first two panels.
Place two of the panels up against a steel square with the inside edge of the panel corners touching. Lightly tack-solder the two panels at the top end, the seam connections, and bottom corner. You can work from your homosote board and use a few pushpins to hold the square in place as you work.
Tack-solder the two remaining panels.
Place the third panel against the second panel side, with the inside edges touching, and lightly tack-solder the corner seam. Add the fourth panel, aligning the first and third sides to it. Electrical tape can be used to hold the panels in place, but I haven’t found the need to do that when I use this steel square technique. You can leave the attached panels with the square in place to add the wires.
Apply the 18-gauge wire into the four corners of the shade.
Make a small 1/2" right-angle bend with the 18-gauge wire, having it rest flat on the upper edge of the panel, and tack-solder into place. Continue to tack-solder the wire down the full length of the outside corner groove to the bottom of the shade, then cut the wire when you reach the end of the seam. Do the same for the next two corners.
For the fourth corner, once you’ve tack-soldered down the full length of the shade, do not cut to length. Instead, leave the wire long enough to continue around the total bottom edge of the shade. Overlap the wire 1/2" around the last corner and cut.
6
7
8
Square up the shade panels.
Using a round shape will actually square up a panel shade. This is a good way to true up a paneled shade, no matter how many sides it has.
Place the shade inside a round container that is at least 6" in diameter with the bottom end of the shade facing up. Make sure that all four of the outside corners are touching the edge of the container. You can set your work at a more comfortable height by placing the container on something such as a tall wooden stool, and continue to tack-solder the wire to the bottom edge of the shade.
Continue applying the corner wire along the lower edge of the shade.
Try to tack-solder the wire onto the center of the foiled edge of the glass.
Make sure that the wire on the lower edge of the shade is lying flat.
Lightly tap the wire to the edge of the foiled glass. Use the metal end of your pliers or a lightweight hammer as you tack so that the wire will lie perfectly flat against the lower edge of the shade. Tack-solder with one hand while holding the wire flat in place with the pliers in your other hand. Shape the wire around the corners using your needle nose pliers and tack-solder into place.
Make a raised bead to cover the wire. Lower the temperature of your iron until the solder “pulls up” when you run your bead. If your iron is too hot, it will make the solder run off the edge. You may have to go around the lower edge a couple of times to completely hide the wire and get a nice, smooth line. Don’t forget—flux is your friend when doing this procedure.
GLASS PATTERNS QUARTERLY/Spring 201720

GLASS PATTERNS QUARTERLY/Spring 2017 21
Gryphon CorporationOur 55th Year!
www.gryphoncorp.com
®
Gryphon Zephyr+ Two 7” blades included • Less maintenance
Choose the glass saw that’s
right forYOU!
Gryphon C-40Now available in a new taller version ideal for cutting bottles
Band Saw
Wire SawGryphon Omni 2+Most reliable /least expensive operationSix blades included
Ring Saw
Compare all the features at your dealer or on our website
Serving kiln forming, torchworking, stained glass artists and stores since 1974
D&L Art Glass Supply®Denver, CO
Wholesale Pricing & Quantity Discounts
800.525.0940
303.449.8737dlartglass.com
• Aisles of Glass• On-line Ordering• Superior Service • Domestic and International • State-of-the-Art Classroom
®
Ask to see them at your favorite retailer! Or call 1-800-250-1790
Stained Glass Made Easy, From Cookies to Cutters!
New Websitewww.TableFoiler.com

12
15
14
13
17
16
18
© Copyright 2017 by Glass Patterns Quarterly. All rights reserved.
Tin the vase cap and place it on top of the shade.
Make sure that the cap is sitting level before tack-soldering the shade to the cap at the four outside corners.
Solder the inside corner seams to the vase cap.
Now that the vase cap has been attached, the shade will feel more rigid. Place two foam wedgies or other props alongside the shade and tack-solder the inside corners of the vase cap to the shade.
Solder a raised bead along the inside corner seams.
Tack-solder the vase cap to the solder joints of the shade.
Place the shade on a wooden dowel, such as a long-handled broomstick, while soldering the shade.
This provides a level surface for completing the solder work. Place a weight on top of the brush end of the broom to secure it, then slip the shade onto the other end. A level isn’t really necessary, but using one can help assure you that the whole setup is indeed level.
Finish-solder the shade to conceal the wire.
Make sure that the tinned foil of the side seams is lying flat against the glass before soldering, then make a nice, rounded solder bead on the outer corners to conceal the wire.
Add decorative solder to the corners and flat side of the shade.
Reposition the shade on the wooden handle to make the surface level if you add decorative soldering to the flat panel sections.
Clean the shade before applying the patina and wax, then give it a final buffing.
Wash well with warm water and a white scrubby. Apply patina to the warmed solder seams and wash off patina residue with cold water, soap, and sponge. Dry the shade well and wax. Allow the wax to dry before buffing with a soft cloth. It may be necessary to clean into the small corners with cotton swabs. Place completed shade onto the harp and attach the finial. You can use a timer with your lamp to come on each evening or in the early morning. GPQ
19
Nancy Wright-Clapson of Classy Glass Studios loves the way colored, textured glass reacts with light and has been working full time with her creations since 2004 at her studio in Douglastown, Quebec, Canada. She enjoys creating lamp shades, custom panel work, and various styles of kaleidoscopes and other 3-D objects, which she exhibits in art galleries along the Gaspe coast. Nancy also does commissioned work and repairs, offers classes, and has a retail shop where sheet glass and supplies are available for her clients and students.
GLASS PATTERNS QUARTERLY/Spring 201722

GLASS PATTERNS QUARTERLY/Spring 2017 23
Innovating the Future Of Coldworking Equipment
Manufactured In Redlands California
Call or E-mail Us For a Quote Today! Toll Free (877) 793-6636 or [email protected]
Subscribe on iTunes or Stitcher today!www.glassartmagazine.com
Peter McGrainEpisode 20
Award winning artist/designer Peter McGrain has been working with stained glass for over 30 years. During that time he has handled every type of stained glass project imaginable, ranging in scope from intimate experimental panels to large-scale architectural installations. The book Uncommon Stained Glass charts McGrain’s journey from crafter to award-winning artist.
Since the development of McGrain’s Vitri-Fusáille process, a hybrid of glass fusing and traditional glass painting, demand for his workshops has been on the rise along with increased gallery interest. His piece Man with Fish appeared in New Glass Review 26, the Corning Museum’s annual survey of avant-garde glass. In 2012, McGrain proved to himself and the world that Vitri-Fusáille could also be used in the creation of architectural work as seen in his commission for the Jewish Home in Rochester, New York, his home town.
Podcasts featuring interviews with world-renowned glass artists and respected experts in hot, warm, and cold glass
GPQ
© Copyright 2017 by Glass Patterns Quarterly. All rights reserved.
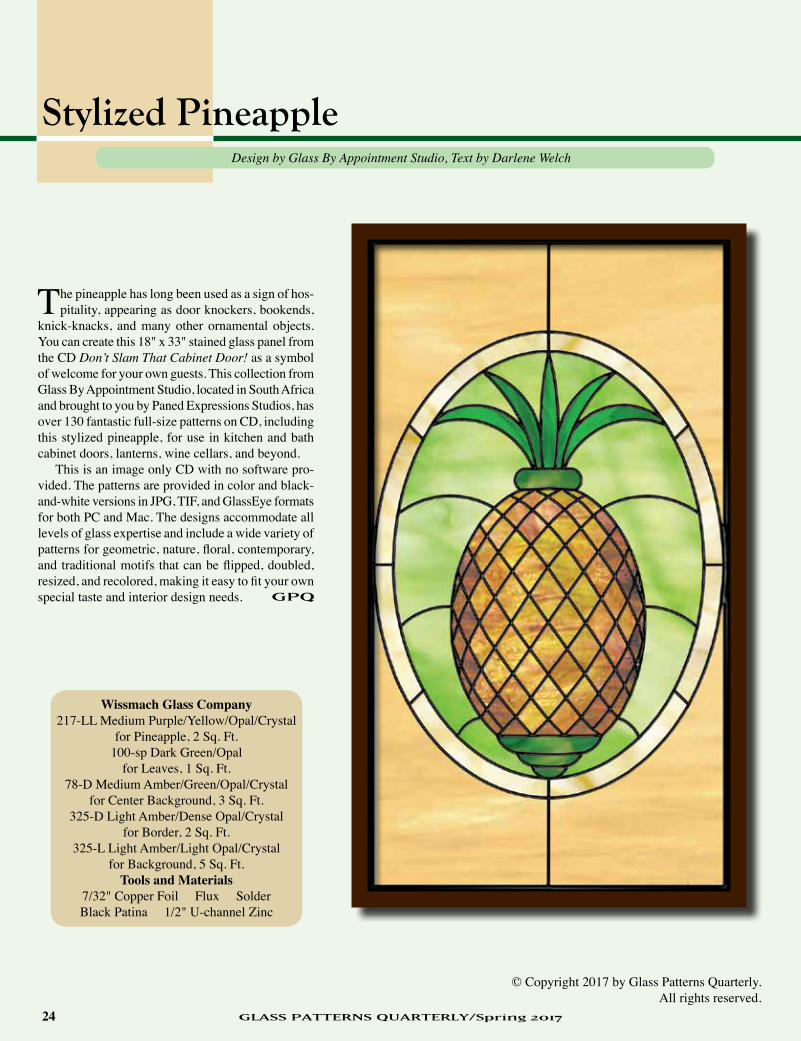
Stylized Pineapple
Wissmach Glass Company217-LL Medium Purple/Yellow/Opal/Crystal
for Pineapple, 2 Sq. Ft.100-sp Dark Green/Opal
for Leaves, 1 Sq. Ft.78-D Medium Amber/Green/Opal/Crystal
for Center Background, 3 Sq. Ft.325-D Light Amber/Dense Opal/Crystal
for Border, 2 Sq. Ft.325-L Light Amber/Light Opal/Crystal
for Background, 5 Sq. Ft.Tools and Materials
7/32" Copper Foil Flux SolderBlack Patina 1/2" U-channel Zinc
The pineapple has long been used as a sign of hos-pitality, appearing as door knockers, bookends,
knick-knacks, and many other ornamental objects. You can create this 18" x 33" stained glass panel from the CD Don’t Slam That Cabinet Door! as a symbol of welcome for your own guests. This collection from Glass By Appointment Studio, located in South Africa and brought to you by Paned Expressions Studios, has over 130 fantastic full-size patterns on CD, including this stylized pineapple, for use in kitchen and bath cabinet doors, lanterns, wine cellars, and beyond.
This is an image only CD with no software pro-vided. The patterns are provided in color and black-and-white versions in JPG, TIF, and GlassEye formats for both PC and Mac. The designs accommodate all levels of glass expertise and include a wide variety of patterns for geometric, nature, floral, contemporary, and traditional motifs that can be flipped, doubled, resized, and recolored, making it easy to fit your own special taste and interior design needs.
Design by Glass By Appointment Studio, Text by Darlene Welch
GLASS PATTERNS QUARTERLY/Spring 201724

GLASS PATTERNS QUARTERLY/Spring 2017 25
Friday, March 31, 2017
11:00 a.m. Randy Wardell – How to Add a Cast Foot to a Bowl, Platter, or Vase in a Fusing Kiln12:00 p.m. Poppy Mussallem – Hang Your Glass1:00 p.m. Margaret Zinser – Borosilicate Monarch Pendant2:00 p.m. Jackie Truty – Art Clay Silver Torch Fired Beads3:00 p.m. Susan Hirsch – Images in Glass Using Sandblasting and Enameling with Rayzist Photo Mask4:00 p.m. Rosalind Stanton – Creating Glass Art with Stainless Steel, Alcohol Ink, and Clear Glass5:00 p.m. Glass Cutting Contest
Saturday, April 1, 2017
11:00 p.m. Margot Clark – Glass Painting in Layers12:00 p.m. Lisa St. Martin – Dichroic Glass Beads1:00 p.m. Petra Kaiser – Fuse It with Wissmach Glass and KLB Molds2:00 p.m. Jeri Warhaftig – Hollow Beads on a Puffy Mandrel3:00 p.m. Filip Vogelpohl, Boise Art Glass – How to Make a Honey Pot4:00 p.m. Jennifer Walkovich – Stamp It, Fuse It & Use It
Sunday, April 2, 2017
11:00 a.m. Dennis Brady – Working with Mica12:00 p.m. Auction1:00 p.m. Auction2:00 p.m. Awards Presentation Poppy Mussallem
Margaret Zinser
Jackie Truty
Lisa St. Martin
Jeri Warhaftig
Filip Vogelpohl
Petra Kaiser
Jennifer Walkovich
Susan Hirsch
Dennis BradyRosalind Stanton
Margot Clark
Randy Wardell
Glass Craft & Bead Expo 2017Live Demonstration Stage Sponsored by Glass Patterns Quarterly, Glass Art, and The Flow Magazines
Glass Craft & Bead Expo 2017Live Demonstration Stage Sponsored by Glass Patterns Quarterly, Glass Art, and The Flow Magazines

GLASS PATTERNS QUARTERLY/Spring 201726
Design, Fabrication, and Text by Lisa Vogt
Uroboros System 96®
60-61-56-96IR Thin Iridized Black for Base, 1 Sq. Ft.Coatings By Sandburg
Cyan Red on Clear for Fairy Dresses and Skin, 1/4 SheetRainbow Splatter for Fairy Wings, 1/4 Sheet
Tools and MaterialsSilver Sharpie® Marker Lip Balm
1/4" O.D. Refrigeration Grade Copper Tubing E6000 Adhesive Wire CuttersGlass Saw (optional) Hammer
Fanciful Garden Fairies
Whatever the season, gardens and other outdoor sanctuaries have a magical attraction year round. When nature is the
hostess, we’re promised ever-changing landscapes and enchanting treasures awaiting our discovery. Such inviting settings are even more special with a little bling tucked in among the foliage, and some glitzy dichroic fairies are sure to dazzle and delight.
These three flying fairies are made with two layers of glass. The base layer is cut out of iridized black, while the second design layer is cut out of dichroic-coated clear glass. The iridized side of the base layer is placed face down and in contact with the kiln shelf during the fusing process. This gives the backside of the finished fairies a subtle shimmer, making them a bit more interesting. Of course, you can substitute flat black glass for the iridized black.

GLASS PATTERNS QUARTERLY/Spring 2017 27
2
1
48
7
3
5
6Trace the fairy pattern onto the black base glass with a silver Sharpie marker.
Cut around the outside of the fairy by hand.
Coat the silver Sharpie lines with lip balm to keep the lines from washing away while making detail cuts with the saw.
Use the saw to cut the design’s intricate curves and deep cutouts.
If you don’t have a saw, the base can be made up of pieces and fit together to form the desired shape.
Cut out the fairy pieces for the second layer of glass from the dichroic-coated clear glass.
Lay the cut dichroic pieces on the black base and check for fit.
Grind the dichroic glass pieces to fine-tune the shapes and smooth the edges to ensure a tight, accurate fit.
Stack the two layers of glass in the kiln and fire the assembled glass to a full-fuse temperature.
Here is the schedule I used, but remember that all kilns fire dif-ferently. You may need to make some adjustments in the schedule to fit your own kiln.
Full Fuse Firing ScheduleFor projects 8" or smaller with 2 layers of glass
Segment 1: Ramp 300°F/hr to 1300°F and hold 60 min.Segment 2: Ramp 500°F/hr to 1465°F and hold 10 min.Segment 3: Ramp 1000°F/hr to 960°F and hold 40 min.Segment 4: Ramp 150°F/hr to 800°F and hold 10 min.
Let cool to room temperature undisturbed.
Cut pieces of refrigerator grade copper tubing to the appropriate length for the plant stakes and shape them as desired.
Making the plant stakes for the fairies is easy. Measure a 20" length of 1/4" copper tubing. Grip the tubing firmly with wire cut-ters and bend it back and forth until it breaks in two. It’s okay to crush the tubing, since the flattened end keeps the tube from rotating when it’s pushed into dirt. Cut a second 20" piece and a 24" length of tubing in the same way.
The tubing is very malleable, so you can use your hands to bend the three cut pieces of tubing into graceful curves. You can also loosely wrap the tubing around a PVC pipe or other object to get different looks. Using a hammer, flatten a 3" length of bent tubing on one end. Flatten a 1" length of tubing on the other end.

GLASS PATTERNS QUARTERLY/Spring 201728
Take advantage of this exceptional opportunity to have your company listed in Glass Art Magazine’s 2017–2018 Directory to Industry Supplies.
Our New Online Directory is linked from our sister publica-tions’ websites and is linked to our Glass Art Website. The Direc-tory will be part of the September/October 2017 issue and will be mailed to Active Buyers who will use this resource to locate and purchase products and services during the next year! You may advertise in the Magazine Directory to Industry Supplies or Online Directory for only $75 or in both the Magazine and the Online Industry Directory for $120.
DeaDlINe FOR DIreCtOry lIStING SubmISSION:
June 28, 2017
Advertising Space Reservations for September/October 2017 are:
Closing July 20, 2017
Materials Due: July 30, 2017
Contact Rhonda Sewell or Kathy Gentry at
(502) 222-5631 Fax: (502) 222-4527 E-mail: [email protected]
DIRECTORY TO INDUSTRY SUPPLIES
Keep a eye out for this form coming in the mail in May.
© Copyright 2017 by Glass Patterns Quarterly. All rights reserved.
Lisa Vogt discovered glass while pursuing an education in fine art. For more than twenty-five years, this award-winning artist has drawn upon her fine arts background and own sense of style, drama, and whimsy to combine this his-toric medium with innovative glass tech-niques for limitless design possibilities. Her work has been on exhibit in major cities throughout the United States.
Lisa is the author of fourteen design books and a series of instructional videos in addition to frequent articles for industry magazines and fiction for publication. She also lectures at na-tional and regional seminars and has been a featured artist on HGTV, PBS, and Glass Patterns Quarterly Webinars. A huge supporter of public art, Lisa regularly contributes artwork for auction to benefit local, regional, and national charities. Her home and studio are located north of Tampa Bay in Wesley Chapel, Florida, where she resides with her husband and two daughters. Visit www.LisaVogt.net to find out more about her work and seminars.
GPQ
Attach the copper tubing to the glass fairies.
Glue the 3" flattened area of the copper tubing to the back side of the fused glass fairies with E6000 or other appropriate, indoor/outdoor waterproof adhesive. Allow the glue to dry before moving the fairies. Now you can simply push the copper tubing with the affixed fairies into soft dirt around the base of a plant and enjoy the company of these flashy little woodland creatures year round.
9

GLASS PATTERNS QUARTERLY/Spring 2017 29
Unique Glass Colors Manufacturers of Kiln Fired Glass Colors,
MUD, Glass Separator, FREE , ACCENTS and Layering Mix!
Add UGC color over built up frit or create custom frit colors and then fire just once!
[email protected] uniqueglasscolors.com 407.261.0900 Fax: 407.331.0900
The ISGB is the leading organization for the promotion, education, and appreciation of the art of glass beadmaking for wearable, sculptural and functional art.
Glass Bead Evolution is a quarterly digital magazine, included in ISGB membership.
Back issues are available for purchase at www.isgb.org
Join today to begin your subscription and take advantage of other member benefits like vendor discounts.
www.isgb.org | 614.222.2243

GLASS PATTERNS QUARTERLY/Spring 201730
1
2
Design, Fabrication, and Text by Kelley Mc Hugh
Daisy Bouquet
Creating the Flowers
Spray the LF104 mold with the ZYP Boron Nitride Mold Release Spray.
If you do not have the tools needed to drill a hole in the fused daisy, use fiber paper to create a void where you want the hole to be.
System 96® COE Glass FritF1-200-96 White Powder
F1-355-96 Marigold PowderF2-2382-96 Fine Alpine BlueF2-2602-96 Yellow Opal Fine
F2-200-96 White FineF3-00-96 Clear MediumCreative Paradise, Inc.
LF104 Daisy MoldGM48 Ripple Drape
GM51 Slump with HumpGM192 Large Organic SlumpGM195 Organic Control Drop
Tools and MaterialsRespirator Mask Fiber Paper
Bullseye ThinFire PaperPowder Sifter Scotch® TapeContainer Water Sponge1/4" Diamond Core Drill Bit
Handheld Drill or Dremel ToolFlex Shaft or Drill Press Safety Glasses
#6 or #8 Plastic Anchor with Screws1/4"-Diameter Copper Tubing
Screwdriver 2 Washers1"-long #8 Sheet Metal Screw
2 Pounds Oil-Based Modeling Clay4" x 5" Clay Pot 9 Pounds Plaster of Paris3 Quarts Water Bucket Mixing Spoon
Hobby Store Spanish Moss
A bouquet of daisies is sure to make someone’s day. Now you can cre-
ate some fused floral cheer to enjoy all year round. We are creating a spray of flowers in yellow and alpine blue, but you can make them in the colors of your choosing. Using Creative Paradise’s CPI LF104 Daisy Mold and frit, it’s easy to make colorful varieties.

Cut a piece of 1-1/2" x 3-1/2" fiber paper. Roll the fiber paper tightly in a roll and wrap it in a 1/2" x 2" piece of ThinFire Paper. Tape them together with Scotch tape. Place the roll in the center of the flower before you add any frit to the mold. It is essential that you wear a respiratory mask any time you are working with frit to avoid inhaling any of the glass powders and frits.
Using your fingers, place some F1 White Powder into the center of the daisy.
Put some F2 Fine Alpine Blue on top of the F1 White Powder in the center of the mold.
If desired, cast a few pieces of the Alpine Blue into the petal area to create speckles.
Use a powder sifter to sift some F1 Marigold Powder into the petals of the daisy to create contrasting color tones.
Cover all of the frit and any raised lines in the bottom of the mold with F2 Fine Yellow Opal.
5
6
3
7
8
4
Fill up the rest of the mold with F3 Medium Clear until the mold holds a total of 290 grams of frit.
Fuse the daisy using the following suggested schedule. Remem-ber that all kilns fire differently, so you may have to adjust the firing schedule to fit your own kiln.
Fusing ScheduleSegment 1: Ramp 275°F/hr to 1000°F and hold 5 min.Segment 2: Ramp 275°F/hr to 1225°F and hold 10 min.Segment 3: Ramp 250°F/hr to 1300°F and hold 5 min.Segment 4: Ramp 275°F/hr to 1465°F and hold 5 min.Segment 5: Ramp 9999 (AFAP*) to 960°F and hold 60 min.Segment 6: Ramp 100°F/hr to 800°F and hold 1 min.*as fast as possible
Slump the daisies using the following schedule, again adjusting as necessary for your own kiln.
In this tutorial, we used four different slumping molds to create a different look for each flower.
Slumping ScheduleSegment 1: Ramp 275°F/hr to 1000°F and hold 5 min.Segment 2: Ramp 275°F/hr to 1225°F and hold 15 min.Segment 3: Ramp 250°F/hr to 1250°F and no hold.Segment 4: Ramp 275°F/hr to 960°F and hold 90 min.Segment 5: Ramp 9999 (AFAP*) to 825°F and hold 5 min.Segment 6: Ramp 100°F/hr to 500°F and no hold.*as fast as possible
31GLASS PATTERNS QUARTERLY/Spring 2017

GLASS PATTERNS QUARTERLY/Spring 201732
© Copyright 2017 by Glass Patterns Quarterly. All rights reserved.
GPQ
Kelley Mc Hugh earned her degree in journalism from Griffith College in Cork, Ireland. She has lived in the Middle East, Ireland, and England, and now resides in Kansas.
Kelley is the social media and website content manager for Creative Paradise, Inc., and helps to cre-ate projects and write tutorials using Creative Paradise molds. Visit www.creativeparadiseglass.com for more tutorials and important firing notes.
Adding the StemsIn order to add stems to the daisies so they can be displayed,
you will need to drill a hole in the flowers. If you used the optional method for maintaining a hole in the center of the flower in step 2 above, remove the fiber paper at this time.
Find a container that is large enough for the flower head to rest in with 2" of water. Place a sponge in the water, then place the flower on top of the sponge with the bottom of the flower resting on the sponge.
Put a 1/4" diamond-crusted core drill bit in a handheld drill or a Dremel tool with a flex shaft or drill press. Find the center of the flower with the drill bit and carefully drill the hole in the flower, holding the flower steady while drilling.
Prepare the center of the flower for adding the stem.
Once the hole has been drilled in the center of the flower, push a #6 or #8 plastic anchor into the end of the 1/4" copper tubing. Use a screwdriver head or threader to widen the hole in the copper tubing, if necessary, before putting in the anchor.
Begin to assemble the hardware for attaching the stem.
Position a washer on each side of the daisy’s center hole. Place the screw that came with the anchor (or other #8 screw with thread-ing that runs the entire length of the screw) through the washer and hole in the center of the flower.
Seat the screw in the plastic anchor on the other side.
Tighten the screw until the glass is held firmly by the screw. Be careful to not overtighten the screw.
Hide the screw head, if desired.
Paint some glue onto the center of the screw and cover it with the F2 White frit.
9
10
11
12
Creating a Daisy DisplayHere are the steps for creating a sturdy display as pictured.
• Place about 2 pounds of oil-based modeling clay in the bottom center of a large 4" x 5" clay pot.
• Cut copper tubing to the desired height of each of the dai-sies using a pipe/tube cutter and push them into the clay, arranging them without the daisies attached.
• Pour 3 quarts of water into a bucket, add 9 pounds of plas-ter of paris, and stir constantly for 3 minutes.
• Pour the mixed plaster over the clay and allow the plaster to harden. The plaster will fill the bottom of the pot and cover the clay with at least 2 inches of plaster, setting the copper tubes in place and giving the pot enough weight to counterbalance the heavy flowers.
• Place some Spanish moss over the plaster in the pot to give the arrangement a finished look.


© Copyright 2017 by Glass Patterns Quarterly.All rights reserved.
GPQ
Beveled CrossDesign by Deverie Wood, Text by Darlene Welch
There are many religious philosophies from around the globe. If we look at them all,
there is one continuing theme throughout—peace. This beautiful 16" x 19-1/2" free-form beveled cross is one of the designs created by Deverie Wood for her book, We Are One, to celebrate that common thread. Included are 19 full-size patterns featuring this cross as well as a Peace Dove, the Star of David, Tree of Life, Lotus, Mandala, Ohm sign, Yin/Yang, an angel with planet earth, and many others. All skill levels are represented in this collection, and each finished project is shown in a full-color photo. Visit www.deveriewood.com to view more of her work and patterns.
Spectrum Glass Company543-2W Grape Waterglass®
for Star Bevel Accents, Scrap591-1W Pink Champagne Waterglass®
for Cross Border, 1/2 Sq. Ft.100GG Clear Crystal Ice
for Cross Interior, 1 Sq. Ft.I/100W Clear Waterglass® Iridescent
for Circle Background, 1 Sq. Ft.Additional Glass4 Navette Jewels
(30 mm x 15 mm, 20 mm, and 40 mm)3 Bevel Diamonds, 1-3/4" x 3"
1 Bevel Diamond, 2" x 6"1 Square Bevel, 2" x 2"
4 Star Bevels, 2-3/8" radiusTools and Materials
7/32" Copper Foil Flux SolderBlack Patina 1/4" U-Channel Zinc
49GLASS PATTERNS QUARTERLY/Spring 2017

Somebirdy Needs a Bath!Design, Fabrication, and Text by Jim Matthews
System 96®
Sheet Glass100SF Clear, 8" circle
All colored glass cut from scrap151SF Cherry Red
161SF Yellow171SF Orange
533-1SF Sky Blue110.8SF Medium Amber
538-2SF Light Steel528-2SF Light Olive543-1SF Light Grape121SF Light Green60-7312-96 Lime
FritF5-00-96-IR Clear Iridescent
Tools and MaterialsFiring Paper Bailing WireHanging Chain S-HookFirelite Forms #693 Round
Deep Bowl Mold
I always thought of a birdbath as balanced on top of a pedestal or mounted on the
end of a pole and stuck in the ground, which precluded me giving much thought to making one. Then I saw a hanging birdbath and got the idea for this colorful fused glass project.
The design is made up of a clear in-ner circle and a perimeter of transparent, organic shaped pieces. For sparkle, a layer of coarse iridescent clear adds texture to the inner bowl. One contour fuse and one slump complete the firings. Then, if you do it my way, it’s not even necessary to drill any holes.
This project is great for using your scrap glass and adapts to almost any bowl shaped mold you have around. Don’t use anything too deep, however. A birdbath should mimic a rain puddle, not a rain barrel. Also avoid using white glass. Birds are attracted to color, but white is their danger signal. Above all, have fun with this!
GLASS PATTERNS QUARTERLY/Spring 201750

1
4
5
6
2
3
Prepare the firing paper and clear glass circle.
Trace the perimeter of the slumping mold onto firing paper and place the paper onto a kiln shelf. Because it won’t be portable after assembly, it’s important to build this project on the shelf.
Cut a clear circle that is approximately 3-1/2" smaller than the diameter of the mold. My mold is 11-1/2", so I cut an 8" inner circle. Center the inner circle inside the drawn perimeter, leaving about 1-3/4" of border area on all sides.
Use nippers or a saw to create varying sizes of organic shapes from light, transparent colors.
If you like, roughen up the edge of the inner circle as well.
Lay the shapes out to fill the border area without any overlap of adjacent pieces or on the inner circle.
Stay largely within the drawn perimeter. Open spaces are natural and desirable.
Connect everything together by placing additional pieces of glass on top.
One piece on top can connect a few of the border pieces to each other and to the inner circle. Make sure there are no “floaters.” Every piece needs to be attached to other pieces as well and either directly or indirectly to the inner circle.
Spread a layer of iridescent clear frit, either coarse or mosaic grade, across the flat of the inner circle.
Carefully transfer the kiln shelf and assembled project into the kiln. Fire to a contour fuse following the schedule suggested here. Remember, however, that each kiln fires differently, so you may have to make some adjustments to fit your own particular kiln.
Contour Fuse ScheduleSegment 1: Ramp 300°F/hr to 1050°F and hold 30 min.Segment 2: Ramp 300°F/hr to 1385°F and hold 5 min.Segment 3: Ramp 9999 (AFAP*) to 950°F and hold 60 min.Segment 4: Ramp 150°F/hr 775°F and hold 10 min.Segment 5: Ramp 200°F/hr to 200°F and no hold.*as fast as possible
Once the fuse firing is complete, carefully center the fused project on the slumping mold and fire a second time, following the suggested schedule.
Slumping ScheduleSegment 1: Ramp 225°F/hr to 1050°F and hold 30 min.Segment 2: Ramp 200°F/hr to 1225°F and hold 12 min.Segment 3: Ramp 9999 (AFAP*) to 950°F and hold 60 min.Segment 4: Ramp 150°F/hr to 775°F and hold 10 min.Segment 5: Ramp 200°F/hr to 200°F and hold 0 min.*as fast as possible
Wind a length of bailing wire around a bottle to create three loops about 2" in diameter.
You can also use other stiff, formable wire if you prefer.
7
51GLASS PATTERNS QUARTERLY/Spring 2017

GLASS PATTERNS QUARTERLY/Spring 201752
© Copyright 2017 by Glass Patterns Quarterly.All rights reserved.
GPQ
Snip each loop of wire so that it forms a hoop with about 1/2" of overlap at both ends.
Fold each end back on itself to form 2 hooks that will intersect together and easily disconnect.
Attach the hoop to the bowl.
Jim Matthews spent his entire career with Spec-trum Glass Company in all aspects of sales, marketing, and business development. He was an instrumental contributor to the company’s progress and their many art glass innovations across 34 years from 1978 to 2012.
In 2015, Jim launched the popular website and blog, Glasshoppa.com, and began producing and publishing free video glass projects for novice and intermediate glass fusers. Jim lives in Woodinville, Washington, with the best woman ever, a totally awesome son, and a so-so cat named Fred.
11
8
9
10
To attach each hoop to the bowl, feed one end through an open space in the border, then link its two hooked ends into each other and close with pliers. Position the three wire hoops more or less equidistant from each other around the rim of the bowl.
Attach the hanging chain to the birdbath.
Cut three lengths of hanging chain, each about 20" long. Attach one end of each chain to one of the wire hoops and connect the loose ends with an S-hook where they meet at the apex.
Stained Glass SchoolStained Glass SchoolStained Glass SchoolStained Glass School 2017 Class Raytown, Missouri
SGS: Stained Glass 101SGS: Stained Glass 101SGS: Stained Glass 101SGS: Stained Glass 101 Introduction to Cold and Warm Glass Fabrication Techniques

Live Two-Hour Webinars with Renowned Glass ArtistsNo Traveling Required!
Glass Expert Webinars™
Visit the Glass Expert Webinars™ link under “What’s New” at www.GlassPatterns.com for more details and local times.
Josh MazetMarble Making and Boro Critters March 7
Dennis BradyGlass Weaving March 9
Barbara Becker SimonHollow Flameworked Beads March 16
Gil ReynoldsFlow Bar and Advanced Pattern Bars
March 23
Stephanie O'TooleLet's Spoon! April 11 and 13
Gil ReynoldsFused Glass Breakthroughs April 18
Margot ClarkCreating Accents and Artisans April 25
Gil ReynoldsHow to Change the Shape of Glass in a Kiln Lecture
April 27
Lisa VogtCreative Slumping May 9
Dennis BradySimply Super Sandblasting May 11
Barry KaiserImages on Glass May 16
Cathy ClaycombCopper Foil Overlay May 18
Dennis BradyColdworking May 23
Richard La LondeLiquid Glass Line Lecture May 25
GLASS PATTERNS QUARTERLY/Spring 201754
What’s New
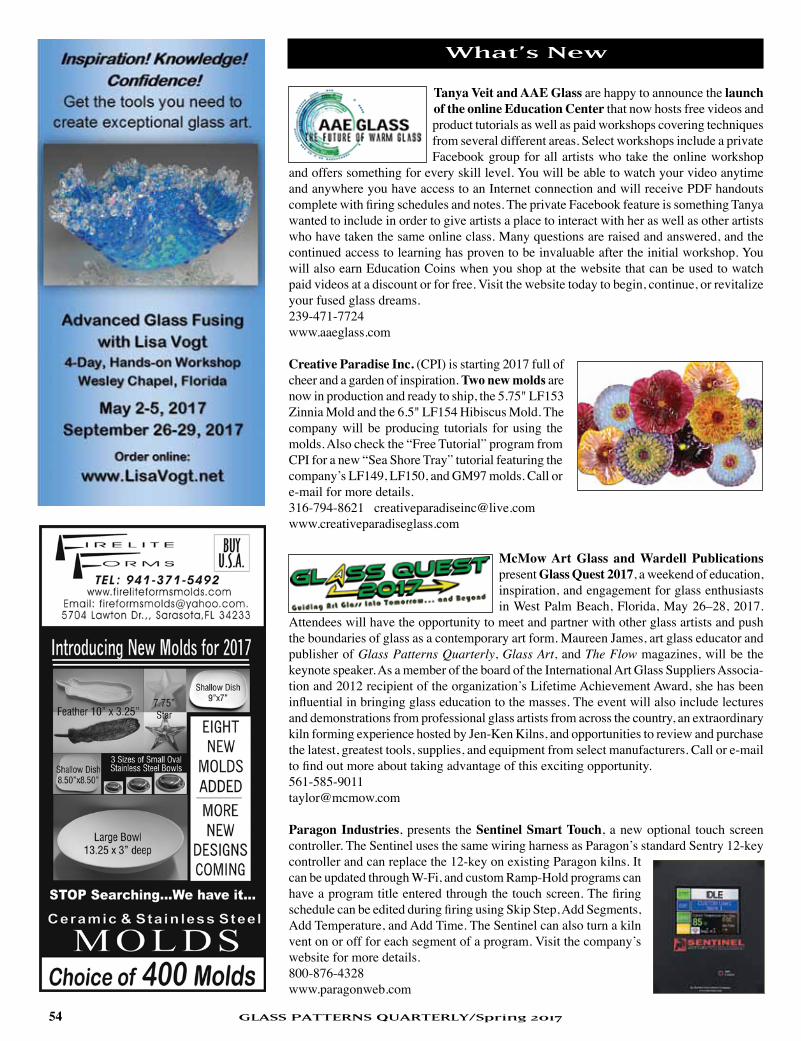
Tanya Veit and AAE Glass are happy to announce the launch of the online Education Center that now hosts free videos and product tutorials as well as paid workshops covering techniques from several different areas. Select workshops include a private Facebook group for all artists who take the online workshop
and offers something for every skill level. You will be able to watch your video anytime and anywhere you have access to an Internet connection and will receive PDF handouts complete with firing schedules and notes. The private Facebook feature is something Tanya wanted to include in order to give artists a place to interact with her as well as other artists who have taken the same online class. Many questions are raised and answered, and the continued access to learning has proven to be invaluable after the initial workshop. You will also earn Education Coins when you shop at the website that can be used to watch paid videos at a discount or for free. Visit the website today to begin, continue, or revitalize your fused glass dreams.239-471-7724www.aaeglass.com
Creative Paradise Inc. (CPI) is starting 2017 full of cheer and a garden of inspiration. Two new molds are now in production and ready to ship, the 5.75" LF153 Zinnia Mold and the 6.5" LF154 Hibiscus Mold. The company will be producing tutorials for using the molds. Also check the “Free Tutorial” program from CPI for a new “Sea Shore Tray” tutorial featuring the company’s LF149, LF150, and GM97 molds. Call or e-mail for more details.316-794-8621 [email protected]
McMow Art Glass and Wardell Publications present Glass Quest 2017, a weekend of education, inspiration, and engagement for glass enthusiasts in West Palm Beach, Florida, May 26–28, 2017.
Attendees will have the opportunity to meet and partner with other glass artists and push the boundaries of glass as a contemporary art form. Maureen James, art glass educator and publisher of Glass Patterns Quarterly, Glass Art, and The Flow magazines, will be the keynote speaker. As a member of the board of the International Art Glass Suppliers Associa-tion and 2012 recipient of the organization’s Lifetime Achievement Award, she has been influential in bringing glass education to the masses. The event will also include lectures and demonstrations from professional glass artists from across the country, an extraordinary kiln forming experience hosted by Jen-Ken Kilns, and opportunities to review and purchase the latest, greatest tools, supplies, and equipment from select manufacturers. Call or e-mail to find out more about taking advantage of this exciting [email protected]
Paragon Industries, presents the Sentinel Smart Touch, a new optional touch screen controller. The Sentinel uses the same wiring harness as Paragon’s standard Sentry 12-key controller and can replace the 12-key on existing Paragon kilns. It can be updated through W-Fi, and custom Ramp-Hold programs can have a program title entered through the touch screen. The firing schedule can be edited during firing using Skip Step, Add Segments, Add Temperature, and Add Time. The Sentinel can also turn a kiln vent on or off for each segment of a program. Visit the company’s website for more details.800-876-4328www.paragonweb.com

GLASS PATTERNS QUARTERLY/Spring 2017 55
Glass Patterns Quarterly8300 Hidden Valley road,
P.O. box 69, Westport, Ky 40077 [email protected]
Due date for Summer 2017april 20, 2017
Send your What’s New information to
GPQ
Three Dimensional Kits
Each kit contains a solid cast body that accepts copper, antique patina or paint, and a full-size pattern with instructions.
Available at your local stained glass supplier
“Flight Into Fantasy” kits offer Hummingbirds, angels, Cardinals, eagles, Ducks, rooster, Dragons, elf & Santa Faces, Dove, moths,Flowers, Fairy lady, butterflies,
macaw, Parrot, and Victoria.
“Flight into Fantasy”Coatings By Sandberg (CBS) is sponsoring its 12th Annual Dichroic by Design Contest using Dichroic glass in an artistic or functional piece. The company will be accepting photographs of
artwork and placing the winning pieces on its website so the world can see what its talented customers have created with CBS quality Dichroic Glass Coatings. Prizes include a first place $500 gift certificate for CBS Dichroic glass, a second place $250 CBS gift certificate, and a third place $200 CBS gift certificate. Runners-up and honorable mention awards will also receive Dichroic certificates. Categories are included for Professional and Emerging (Beginning) Artists in Dichroic Extract, Blown Glass, Lampworked Glass, Fused Glass, Glass Jewelry, Sculpture, Glass Marbles, Architectural Glass, and Miscellaneous Glass. Entries must be submitted by November 17, 2017. Visit the “Contest” drop-down on the CBS website home page for more details on how to submit.714-538-0888www.cbs-dichroic.com
His Glassworks is now offering two different 3M Buttercut sandblast resists in the 45 mil 507 and 35 mil models. Both are excellent for sandblasting and acid etching on your glass. The 507 material is available in 12 inch by 10 yard and 24 inch by 10 yard rolls as well as by the square foot. The 1532 material is available in 15 inch by 10 yard and 30 inch by 10 yard rolls. These products and the new 2017 catalog are available online or by phone.8009147463 8282542559www.hisglassworks.com
Glass Craft & bead expo will be presenting Margot Clark, Peggy Pettigrew Stewart, and Dennis Brady in an open-forum discussion on Sunday, April 2, 2017, from 8:30 to 9:50 a.m. during the upcoming Expo to learn more about how to work with float glass, also known as window glass, to create glass art. Bring your questions and join our exchange on how to add color to float glass with paints, enamels, mic, and even inks
and dyes. Coffee and donuts will be provided by Unique Glass Colors and Victorian Art Glass. The forum is free but seating is limited, so you must sign up for Class SU-03 at the Expo website.800-217-4527 [email protected]
Uroboros Glass will find a new home in 2017. The sale of the Uroboros Glass name, equipment, technology, and formulas has been completed, and all current colors and product lines, including System 96® and FX90 fusible products plus traditional art glass and contracted custom-produced glass products, are expected to be available again in the months ahead. The new owner, Oceanside Glasstile (OGT), headquartered in Carlsbad, California, has 25 years of experience in decorative glass tile design and manufacturing with a proven track record of developing and dependably supplying aesthetically superior, responsibly made colored glass products. Over the next few months, production at Uroboros in Portland will begin shutdown to prepare for the move. Eric Lovell, founder and president of Uroboros, and several long-term Uroboros employees will be closely involved with the start-up of production in Mexico and will continue to be involved with the Uroboros brand. Remaining inventory and new production should be available from Uroboros/OGT starting mid-May 2017, with remaining inventory and new production for frit, stringer, noodles, rods, and other accessory items available in early June. Current Uroboros distributors are encouraged to contact OGT for initial product inquiries and [email protected]

Design, Fabrication, and Text by Margot Clark
Designer Eggs Created with MUD
unique Glass ColorsDeluxe MUD Kit
Optional Unique Materials701 Brass ACCENTS
10/0 Margot’s Script Liner Brush1962 Mint Green NTTools and MaterialsCeramic Bisque Eggs
Turquoise Matte Glaze (optional)Oval Template White Chalk Pencil
Non- or Low-Graphite PencilWax Free White GraphiteWax Free Gray Graphite
I love to give students lots of options when I teach a class, so I’d like to do that same thing in this article. You’ll learn how to create a
basic design, then I’ll show photos of how to change it to fit different surfaces and techniques. Since this is springtime I am using egg shapes, but these techniques can be done on flat glass, porcelain—any surface that can fire to 1400°F. You can also use MUD, both Black and White, for unfired decoration.
The MUD kit contains both Black and White MUD, as well as all of the tools you will need to complete this project. Prepare the MUD by filling both disposable decorating bags—one with Black MUD and one with White—according to the directions in the MUD Kit. Be sure to keep the sponge moist at all times and keep the metal tips inserted into the damp sponge when they are not in use.
The basic design will be created on one of the ceramic bisque eggs. You can use either a white ceramic bisque egg or a ceramic bisque egg with a turquoise matte glaze applied and fired prior to applying the MUD design.
I like to practice a bit first before going on to my “real” surface. However, the practice piece can still be used as a finished item. Try not to get any of the Black MUD on the surface of the bisque since it will stain, but if you do, use fine sandpaper to sand off the stain.
This project uses three design elements—a “dribble, catch, and pull” technique, dots, and lines. Everything I create in this MUD Technique on anything I create is based on these same three design elements. You will see how they can become so many things as we progress.
GLASS PATTERNS QUARTERLY/Spring 201756

2
1
4
3
5Draw an oval on the surface of the egg.
Use an oval template or draw freehand using a non- or low-graphite pencil on the bisque egg. If you’re using a bisque egg with a glazed surface, use a white graphite or chalk pencil to draw the oval. Transfer the scroll pattern or create it freehand.
Apply the MUD scroll lines to the egg.
Practice the lines a bit on some paper first to get the feel of the MUD coming out of the decorator bag. Light pressure is all that is needed.
Using the tip on the decorating bag, begin with the outer line. Come just to where the scroll will be located and use the end of the scroll lines to continue the outside line. This will help the design flow and make sure there is no heavy buildup of MUD along the outer edge. Let the MUD dry.
Begin to cross over the inside of the scroll sections.
Let the MUD dry before creating the lines that cross over.
Cross over in the opposite direction.
The scroll lines are done. Let the piece dry.
Using the Margot’s Miracle Brush, practice the leaves then add them to the opening of the scrolls.
The leaves are created using the “dribble, catch, and pull” stroke. What this means is that you are going to dribble along the outer edge of the leaf using the metal tip, then switch to the flattened brush and catch the top of the dribble. Using a light touch, you will then gently pull the MUD toward where the center vein line would be located. Note that you only come about halfway down the outer edges with the MUD so that there is no excess MUD at the bottom end of the leaves.
Dampen the brush in water and flatten it in a bit of Medium. Use the flat side if you want smooth leaves or the sharp, chiseled edge if you want a more serrated leaf, or do some of both! Your choice. Note that both the brush and Medium are included in the MUD Kit. Let the piece dry.
Add the dot clusters.
The next addition will be what I call Dot Clusters, even though sometimes there is only one! These can be new growth, decoration, stamens, snowflakes, daisies, or other things. It all depends on where they are in the design as to their function.
Squeeze out three dots with one of them higher in the center. Really flatten the brush in a bit of Medium. Using the brush on its chiseled edge, barely touch the corner of the brush into the middle dot. Staying on the very end hairs on the brush edge, cut down to form the bottom of the stroke. If you are creating a stroke that curves, roll the brush in your fingers to stay on the chisel edge. Add Dot Clusters to the beginning lines of each of the scrolls, cutting into the existing outer edges of the scrolls to complete the stroke.
I have a video snippet that you may want to watch so you can see this technique in action. Go to Vimeo.com/margotclark and look for “MUD Three Dot Clusters.” There are other videos there as well on loading the bag and other techniques to further aid you in your MUDDING experience.
6
57GLASS PATTERNS QUARTERLY/Spring 2017

GLASS PATTERNS QUARTERLY/Spring 201758
12
13
11
10
9
7
8
Add some cluster strokes inside the oval following the curve of the scroll sections.
Remember to roll the brush in your fingers to keep the fine end-ing to the stroke. The scrolls are now complete.
Create the flowers using the “dribble, catch, and pull” technique.
Like the leaves, you are going to dribble along the outer edge of the petal using the metal tip. Then switching to the flattened brush, you will catch the top of the dribble and pull it to where the petals attach to the stem.
Bisque is very absorbent, so I found that stroking over the area with a bit of Medium before beginning the dribble and keeping a bit more Medium in the brush made it much easier to pull down the stroke. You can vary the strength of the MUD this way too, since a bit more Medium will give the petals some translucency.
Place a tiny dot of MUD at the center of the flower. The distance that you start away from that center will determine the size of the flower. Add a flower at each end of the scrollwork.
Place a dot out as far as you want the size of the petals to be. By painting them in the order shown, you will end up with great spacing, since you are not using any pattern for this. Do not stress if they are not all the same size. Close is good enough. Try to make the outer edges uneven, since that looks the best. Let dry.
Add two more flowers to the sides of the oval and let dry.
On the bottom of each flower add two leaves, tucking them close to the edge of the oval.
Add two more flowers to each side, placing them between the first flowers.
Let dry and add one more flower. Allow for drying time so you don’t smudge the wet MUD.
Apply more leaves wherever you like, then add the flower centers.
Add a dot in the middle and one to each side, then add two more to each side to round out the center of the flowers. Don’t let the dots touch one another, or they will form one big dot! If you want more dots, allow the first ones to dry before adding more.
Fire the MUD decorations.
Here are all the samples before and after firing. They were fired at the same time using the following schedule. All of these samples look pretty much the same, except that the Black MUD fires darker. Unfired, it is a dark charcoal color.

GLASS PATTERNS QUARTERLY/Spring 2017 59
• Excellent Quality• Exact Tolerance• Dead Soft Copper• Best Tack and Adhesive• Black Coated & Silver Coated• Vinyl & Paper Sandblast Resist
• All copper foil can be cut 1/8" up to 35".• Customer names can be printed on the bags of foil free of charge. • All of our sandblast resist can be slit from 1/8" up to 24".• Wider rolls of copper can be cut with craft shears for different designs.
EDCO COPPER FOIL
HOLDING IT TOGETHER FOR GENERATIONS TO COME!
(866) 397-4777 (718) 788-8108
Look for the gold circle blue letters and it’s
in the bag.
For More Information Contact:Glass Patterns Quarterly, Inc.
P.O. Box 69 • Westport, KY 40077502-222-5631
Fax: 502-222-4527www.GlassPatterns.com
E-mail: [email protected]
Beads & Jewelry
On this Bead & Jewelry CD you’ll find a
collection of fifty-two bead and jewelry
projects in PDF format. These articles are selected from over
twenty years of Glass Patterns Quarterly
archives.
ww
w.GlassPatterns.com
Nothing stops Diann!Nothing stops Diann’s creativity from flowing because she has the equipment to get any size project accomplished. Surrounded by Olympic kilns – big, small and in-between sizes – Diann knows she will get all of her customers’ projects done, as well as her own.
Get your creativity flowing – visit us at www.greatkilns.com to find your kiln for fusing, casting, slumping and more.
Diann Reina, owner of Stained Glass Crafters Workbench, San Antonio, Texas. Visit www.sgcbench.com for
glass art courses, custom glass work and supplies.
www.greatkilns.com
Olympic Kilns800-241-4400 • www.greatkilns.com

GLASS PATTERNS QUARTERLY/Spring 201760
14
About the lowest temperature at which MUD can be fired is 1380°F. The hotter it is fired, up to 1550°F, the shinier and flatter it becomes, so you have a lot of options for how you want the finished design to appear. I want the matte look, keeping most of my texture.
Firing ScheduleSegment 1: Ramp 750°F/hr to 1400°F and hold 10 min.Segment 2: Ramp 9999 (AFAP*) to 850°F and hold 10 min.Segment 3: Ramp 9999 (AFAP*) to 1000°F and hold 20 min.Segment 4: Ramp 9999 (AFAP*) to 300°F and hold 5 min.*as fast as possible
Last but not least, create a spray of leaves, let dry, and fire using the same schedule as for step 13.
I used 1962 Mint Green NT color to create some strokes with a 10/0 script liner brush, but any color of NT colors would work. Then a layer of Brass ACCENTS were applied over each of the leaves, one at a time, and allowed to dry so the color wouldn’t run.
An additional possibility that isn’t shown is to apply metal leafing over the whole design after firing for a beautiful, raised, textured design. My article on metal leafing, “Gilded Partridge in a Pear Tree,” can be found in the Fall 2016 Holiday Issue of Glass Patterns Quarterly. There is also a great Glass Expert Webinar, Texture, Dimension, and Color, on my MUDDING techniques available from GPQ.
I hope this article has given you a lot of knowledge and inspira-tion to go beyond the actual technique shown. Let me encourage you to try these techniques and experiment yourself to discover all the things you can do with MUD.
Margot Clark is co-owner of Unique Glass Colors (UGC) along with Harold Clark and Saulius Jankauskas, MD. UGC manufactures kiln fired glass color and MUD so “working” at UGC involves lots of “playing” with color! Margot teaches art in all forms and mediums, but glass is her passion. She participates in local art exhibits, her work is in private collections worldwide, and she has works that are part of permanent museum collections.
© Copyright 2017 by Glass Patterns Quarterly.All rights reserved.
GPQ
If you’re searching for ways to make your glass art business more profitable, look no further than the pages of Glass Art. Each issue is filled with inspiration from studio artists and retailers who share innovative ways to flourish in the exciting world of glass.
The Magazine for the Creative Professional Working in Hot, Warm, and Cold Glass
The March/April 2017 issue features the work of outstanding artists including Judith Schaechter, Nancy Gong, Dana Boussard, and Richard Parrish, and so much more. Visit www.GlassArtMagazine.com to subscribe today.
Richard Parrish, Prismatic Tapestry Bowl detail. Photo by Jessie Moore.
www.GlassArtMagazine.com

GLASS PATTERNS QUARTERLY/Spring 2017 61
Complete step-by-step fusing instructions!
502-222-5631www.GlassPatterns.com
Glass Patterns QuarterlyBooks now available from
Fused FantasiesFused Fantasies
Twenty-One Inspirational Patterns by Karen Stephenson
502-222-5631 www.GlassPatterns.com
TheIllustrated Word
in Stained Glass Patterns

GLASS PATTERNS QUARTERLY/Spring 201762
Stack and fire the glass.
Stack the glass pieces for the different layers as follows:Bottom Layer: Place the 1" x 1" etched pattern, dichroic glass
down first, with the etched pattern on the bottom facing down and the clear side facing up.
Layer 2: Place the thin black on top of the etched glass.Layer 3: Place the opaque Light Cyan glass and the black-backed
dichroic glass next.Top Layer: Place the thin clear glass on top. You can use a drop
of glue to hold the glass in place if you’d like, but it’s not necessary.Fire the glass to a full fuse by ramping 500ºF per hour to 1460ºF,
then hold for 10 minutes. Cool to room temperature.
Use the ring saw to trim the glass down to just under 1" x 1" to allow the glass to fit in the gallery pendant after the fire polish.
1
Gallery PendantTwo Pendants in One
Design, Fabrication, and Text by Susan McGarry
If you need a fast gift, then this is the project for you. By using this unique sterling silver plated bail you can give
two gifts in one. The glass is two-sided, and the bail has an opening to easily flip the glass to the second side or add an entirely new piece. The bail frames the glass perfectly, mak-ing it an elegant gift for someone you love or for yourself.
DichroicInc.com#036 Rainbow A Etched Pattern on Thin Dichroic Glass
on Clear for Pendant Side A, 1" x 1"Aurora Borealis Candy Apple Dichroic on Ripple
for Pendant Side B, 1" x 1/2"bullseye Glass Co.
#216 Light Cyan for Pendant Side B, 1" x 1/2"#1101-0050 Clear Thin, 1" x 1"#100-0050 Black Thin, 1" x 1"
artifill.comGPSSS Sterling Silver Gallery Pendant Bail
Tools and MaterialsTaurus Ring Saw or Wet Tile Saw
Glass Cutter Breakers 6 Head PinsSmall Wire Cutters Small Round Nose Pliers
Variety of Beads and CrystalsSilver Chain Black Glassline Paint
Toothpick or Fine Paintbrush
2
Cut all of the glass pieces.
Cut the Light Cyan glass and the Cyan Red black-backed ripple glass each to 1" x 1/2". I like using ripple glass for this project, because it looks like the edge of ocean cliffs. It’s not important that the 2 pieces match up perfectly, because the thin black glass under it will fill in any gaps during fusing. Cut the Thin Black, Thin Clear, and the Etched Pattern on the Thin Dichroic Glass on Clear each to 1" x 1".
The etched glass is perfect for this project. It has been coated with the dichroic coating before the pattern is etched into the glass. When it’s fired face down, the pattern is highlighted.
3

GLASS PATTERNS QUARTERLY/Spring 2017 63
4
5
6
Use the Glassline paint and a toothpick or fine paintbrush to add one or two birds in the Light Cyan section.
Place the glass back into the kiln, with the painted Light Cyan glass and the wavy dichroic glass face up, then fire-polish. Ramp 500ºF per hour to 1360° and hold for 10 minutes, then cool to room temperature. Adjust the temperature given here to fire-polish in your own kiln as necessary. You want the glass to get just to the point of starting to look wet but not so hot or fired so long that you loose the square edges.
Add dangles to the gallery pendant.
Since the face is removable, it’s easy to add the beaded dangles. Place one head pin through one of the three holes in the bottom of the gallery pendant. Create a loop with the round nose pliers and trim off the excess wire.
Repeat this on the other 2 holes. Use the 3 remaining head pins to make 3 beaded dangles with the crystals and beads. Make a loop in the top of the dangle using the round nose pliers and trim off the excess wire. Attach the dangles to the loops in the bottom of the gallery pendant.
Assemble the gallery pendant.
Slide the front frame of the gallery pendant onto the pendant back. Slide the glass into place, then add a chain and it’s done. When you are ready for a change, remove the chain, flip the glass over, and . . . Voilà! You have a new piece of jewelry.
This is a beautiful and easy pendant to make, and the results are gorgeous. Whether it’s for yourself or a friend, you can make additional pieces of glass for each special occasion.
© Copyright 2017 by Glass Patterns Quarterly.All rights reserved.
GPQ
Susan McGarry has been passion-ate about glass since her first glass class. Since then she has participated
in classes and workshops in fusing, flameworking, sculpture, and design. She has exhibited her fused glass jewelry and artwork in shops throughout the United States and Ireland. In 2012 she started her business ARTiFILL manufacturing molds and jewelry findings for artists and crafters.
Susan was born and raised in Southern California. Her home and glass studio are now in the San Francisco Bay area. She devotes all of her time to glass and shares her love of fused glass fractals in her classes. Her book, Fused Glass Jewelry, can be found on Amazon, and her molds and jewelry findings can be found at www.artifill.com or at local retailers.

GPQ
© Copyright 2017 by Glass Patterns Quarterly.All rights reserved.
Single RoseDesign by Jean Beaulieu, Text by Delynn Ellis
The rose is the most popular flower of all. A single pink rose is known as an elegant way of thanking someone. If you
make this beauty in glass, your recipient will have endless years of enjoyment.
This stunning 10" x 9-1/2" design from Jean Beaulieu high-lights the delicate striations of the Wissmach glass. Also consider this project for a mosaic glass panel by gluing and grouting the cut glass to a substrate, either for a wall hanging or tabletop art. Jean has also interpreted many of his glass designs into greeting cards for all occasions, which might present an added approach for your own creation.
This pattern was chosen from Jean’s book, Lovely Flowers, Illustrated Designs of Nature’s Treasures. The book contains 15 designs for the hobbyist or professional, as well as full-size patterns for panels and free-form projects. You can purchase the book online at www.jeanbeaulieu.com.
Wissmach Glass Company7-L Gold Pink/Opal/Crystal Light Opal for Flower Center, 1 Sq. Ft.7-D Gold Pink/Opal/Crystal Dense Opal for Flower Center, Scrap
7-LL Gold Pink/Opal/Crystal Streaky for Flower, Scrap191-D Medium Green/Opal/Crystal for Background, Scrap
23-L Light Green Opal/Copper Red for Leaf, ScrapTools and Materials
7/32" Copper Foil Flux SolderBlack Patina 1/2" U-Channel Zinc
GLASS PATTERNS QUARTERLY/Spring 201764

GLASS PATTERNS QUARTERLY/Spring 2017 65
Live Two-Hour Webinars with Renowned Glass Artists!No Traveling Required!
Visit the Glass Expert Webinars™ link under “What’s New” at www.GlassPatterns.com
for more details and local times.
Participants from around the world are raving about the Webinars available from
GPQ. In case you missed one, they are available as Data DVDs for vewing on computers and now some are available in Movie Versions that can be viewed on most DVD players.
Glass Expert Webinars™
6512 - 23rd Ave NW, Suite 329, Seattle, WA 98117 206.382.1305 www.glassart.org [email protected]
GLASS ART SOCIET Y
JOIN US in NORFOLK, VAFor the Glass Art Society conference, June 1-3, 2017Reflections from the Edge: Glass, Art, and Performance The Chrysler Museum of Art and its Perry Glass Studio will host the 46th annual GAS conference. Attendees will experience glass demonstrations, lectures, and special events such as a local Gallery Hop, International Student Exhibition, Live and Silent Auction, and groundbreaking theatrical glass performances. Conference registration opens December 1, 2016.
VISIT GLASSART.ORG TODAY TO LEARN MORE ABOUT GAS MEMBERSHIP.
The Chrysler Museum of Art
1422 MacArthur Rd.Madison, WI
608-244-9900
Full of great pa erns for the beginner!
Pattern Books by
The Vinery
Come and Visit Us at The Studio!Where you’ll nd one of the largest selec ons
of glass and supplies in the Midwest.
The Vinery offers classes in:• Stained Glass • Fused Glass • Mosaics • Flameworking
Available at your favorite retailer.

GLASS PATTERNS QUARTERLY/Spring 201766
Design, Fabrication, and Text by Petra Kaiser
There is so much you can do with just a little piece of Kaiser Lee Board (KLB), even create your own draping, slumping,
and casting molds. KLB can also be engraved to provide interest-ing, embossed designs. We’ll be using it here to make reversed kiln carving molds for creating coaster dishes and draping molds for night-lights.
Coasters and DishesSince the bottom side of the glass will be the top of the coaster
or dish when it’s finished, these projects are ideal for use with Wissmach Luminescent™ coated glass. You can use any color glass you like. That’s the idea behind the reverse fusing mold. You’ll also notice that when you rest a glass on these coasters, you will not get any suction, and the condensed moisture will run off of the coaster.
This project is for those of you who would like to try Kaiser Lee Board but are afraid to cut into a big piece. Here is a way to practice some cutting and carving on a smaller scale.
Florida Coasters and Night-LightsCreating Reverse Carving and Drape Molds with Kaiser Lee Board
Wissmach Glass CompanyLuminescent™ Coated Glass for Coasters, 4" x 4"
96-17 Garden Green Luminescent™ for Night-Light, 4" x 4"Dichroic Glass for Decoration, Scrap
White Opal Glass for Hiding the Light Fixture, ScrapTools and Materials
Kaiser Lee Board, 4" x 4" x 1"Carving Tool Sanding Block
Pencil, Pattern, or TemplateKiln Wash Powder Nylon Stocking
Night-Light Fixture GlueThinFire Paper

GLASS PATTERNS QUARTERLY/Spring 2017 67
2
1
4
3
5
Make the carving tool from scrap glass.
When you design a kiln carved coaster or dish, you need to make sure that your carvings are evenly deep all over the KLB. We made a little tool with scrap glass that has just the right width and a bigger piece in the back that acts as a stop for the depth of the carving.
Cut a strip of glass 1/2" wide and 6" long plus another strip that is 1/4" wide and 61/2" long. Place the second strip on top of the first and fuse them together. The bigger piece in the back acts as a stop to create the even depth that you need for carving.
Use a putty knife to cut a piece of KLB into a 4" x 4" square.
Here I have cut an 8" square of KLB into four 4" squares.
Bevel the sides of the KLB with a sanding block about 1/4" all the way around.
Hold a sanding block on an angle as you carve the sides of the KLB. It is important to do this before you add the design. Make sure you do not place the pattern too close to the edge.
Transfer the design onto the KLB square.
There are many ways to transfer a design onto the KLB. You can use a template or draw a design with a pencil directly onto the board. In our sample, we placed the printed logo on the board and transferred it with a needle.
Your design should not be bigger than 2.9", and it should not be too intricate. Here, for example, we used only the outer circle of the design plus the W, but not the inner circle or the small letters. You will be able to use the design elements countless times if the board between the design elements is at least 1/4" wide.
Design the decor layer for your coaster and carve the design into the KLB with the carving tool.
I’m a big fan of single layer glass dishes. These coasters look better, however, with a decor layer that can count as a second layer of glass. The second faux layer can be blue stripes on clear or pieces of other colors on a Clear Luminescent coated base layer. That makes this a nice project for using up some smaller pieces of glass from your glass remnant collection. You’ll find some suggestions for additional design elements at the end of the tutorial.
Be careful to not place the carved lines too close to each other. You will be able to use the same design countless times if the original surface of the KLB between the design elements is at least 1/4" wide.
Firing the ProjectsBefore you place your Wissmach Luminescent glass on the KLB
mold with the coated side down, add some dry kiln wash powder or a piece of ThinFire paper on top of the mold. Fire using this sug-gested schedule. However, each kiln fires differently, so you might have to adjust it to allow for the way your own kiln fires.
Segment 1: Ramp 900°F/hr to 1000°F and hold 10 min.Segment 2: Ramp 9999 (AFAP*) to 1430°F and hold 10 min.Segment 3: Ramp 9999 (AFAP*) to 950°F and hold 30 min.Segment 4: Cool to room temperature*as fast as possible
Release Tip: In order to get the best relief on your coaster or dish, I recommend that you use Primo Primer kiln wash. The Wissmach Luminescent coating does not act like a release on fiber paper in the same way that iridescent glass does.
Mix the first coat with 1 part primer to 6 parts water. The board will soak up the primer, so you will need to prefire the primer at 500°F. After firing, you can go over the mold with a thin solution of Primo Primer of 1 part primer to 8 parts water. Just let it dry and use it over and over again.
Night-lightsAs you can see, even a little piece of KLB can have many func-
tions. You can turn over the piece of KLB used for the coaster and make it into another coaster mold with a different design or carve it in a different way to create a Night-Light mold. The difference between the two molds is that the coaster mold is a “reverse” fusing mold, while the other is a regular slump/drape mold.

GLASS PATTERNS QUARTERLY/Spring 201768
Petra Kaiser, internationally renowned kiln formed glass artist and instructor, has a distinctive style that captures Florida sun, light, and water in sculptures, functional glassware, and wearable designs. She is always drawn to 3-D sculp-tures and abstract shapes, and when first introduced to glass fusing in 1997, she found the available mold options rather limiting. This gave birth to Kaiser Lee Board, a perfect casting medium developed by Petra and husband Wolfgang, that is easy to cut and form into any shape for fusing molds.
Petra loves to teach and shares her cutting-edge tech-niques and designs with students in her Fuse It Studio and all over the world, and is a regular instructor at the Glass Craft & Bead Expo, BIG Arts, and Edison State College. She has also shared her innovative ideas in three books from Wardell Publications as well as through numerous articles in various international glass magazines. Visit www.kaiserlee.com to learn more about Petra’s glass art and workshops.
© Copyright 2017 by Glass Patterns Quarterly.
All rights reserved.
GPQ
The reverse fusing molds are ideal for the Wissmach Lumines-cent glass, especially the opal and darker luminescent-coated types, where the luminescence does not shine up through the top. To keep the luminescent coating intact, it always has to be fired with the luminescent side down toward the mold or shelf. In a reverse fusing mold, you will turn over the fired piece to see the top. Therefore, your shiny side will be up.
The night-light shown here was made with Wissmach Garden Green Luminescent coated glass. To create a night-light mold, bevel only the left and the right sides of the Kaiser Lee Board and carve a design into it to add interest to the project.
Important Note: Make sure not to have any carvings in a place where you need to glue on the fixture. I like translucent glass for the night-light, but I fuse a strip of white opal in the back of the light to hide the fixture.
Additional Design ElementsYou can prefuse some design elements to use with your
coasters. Here are just a few ideas.• make some thin vitrigraph stringers. Be sure you use
only thin stringers, so that your coaster won’t wobble on the table. That is actually true for any design element you will be using, since the top side will be the bottom of the finished piece. If you haven’t made vitrigraph stringers before, take a look at the chapter on page 84 of my book, Fuse It.
• Create some “frit lace.” Place a 4" x 4" piece of shelf paper on your kiln shelf, place a 2 mm to 3 mm layer of fine frit on it, and fuse with only one segment: Ramp 9999 (as fast as possible) to 1430°F and hold for 10 min-utes, turn off the kiln, and let the kiln cool naturally. Use the frit lace on a piece of lighter colored Luminescent such as Clear, Light Blue, Light Amber, or other similar colors.
• Use a carved piece of KLB to create wavy glass ele-ments. Cut 1/4"-wide strips of glass and place them on a kiln wash–dusted, carved KLB mold. This technique also has only one firing segment, but this time take the tem-perature to only 1300°F. You can place these elements directly on the kiln floor, so I would recommend that you take your clay shelves out of the kiln and fire quickly
using this schedule: Ramp 9999 (as fast as possible) to 1300°F, hold for 10 minutes, turn off the kiln, and let it cool naturally.• Place some strips of glass on the back. This is, of course, the easiest way to create a faux second layer. It also looks good if you use a piece of glass that is about 3" x 4" in any color you like, then cut that piece into 4" x 1/4" strips and place them with a small gap between them on top of the base piece.
“The handiest little hanger for all your metal-framed panels and small fused glass art”

GPQ
Ruby-Throated Hummingbird
© Copyright 2017 by Glass Patterns Quarterly.All rights reserved.
Design by Ann Madsen, Text by Darlene Welch
Hummingbirds are one of the most fascinating birds
around, and birdwatchers count it good fortune to catch sight of these delightful creatures. Some are so small that if one flies by, it’s hard to tell whether you’ve seen a small bird or a large insect. Ann Madsen captures this little fellow perfectly in this 9" x 10" panel as he feeds from the flower’s nectar. Using copper wire for the plant stems allows the design elements to live in the open space inside the panel’s border, adding a feeling of depth to the panel, as if the bird is actually hovering close by.
The ruby-throated humming-bird is just one of many species of these sought-after birds. With a little research or just sheer imagination, you can change the colors of the bird and flower to let your creativity soar and make this project your very own.
Wissmach Glass CompanyAll design pieces cut from scrap glass
25-LL Orange/Green/Opal/Crystal for Flower100-SP Dark Green/Opal for Leaves2-D Yellow/Opal/Crystal for Beak
16 Copper Red for Throat243-LL Dark Blue/Yellow Green for Bird Body and Head
WO-702 Medium Green/Dark Blue for Tail and Head197-L Dark Blue/Medium Green/Opal/Crystal for Wings
256-L Pastel Green/Blue/Red for Border161 Salem Green for Border Corners
Tools and Materials7/32" Copper Foil Flux Solder
Black Patina 1/4" U-Channel ZincCopper Wire Sheet Foil
69GLASS PATTERNS QUARTERLY/Spring 2017

1Design your composition.
The design I chose consists of one yellow dandelion and two white dandelions with seeds that are ready to fly. Don’t be afraid, however, to experiment and create your own design.
Cut the Spectrum PAPYROS Kiln Shelf Paper to fit the kiln shelf and continue to create your piece step by step until you are happy with the design. This project will stay on the kiln shelf until it is completed before removing it.
Designing Dandelions with StringersDesign, Fabrication, and Text by Marcia Fox
System 96®
220-76SF Dark Green Opalescent for Background, 12" x 13"60-93-96 Rootbeer/Cream Specialty Sheet Glass
for Dandelion Bases, ScrapVarious Shades of Green, Brown, and Ivory
for Frit Balls, ScrapYellow and White Stringers
Yellow, Brown, White, Ivory, and Clear Frit BallsWhite, Yellow, and Green Frit
Tools and MaterialsSpectrum PAPYROS® Kiln Shelf Paper
Basic Glass Cutting Tools Frit Making ToolsGlasTac Fuser’s Glue Toothpicks
The image of dandelion seeds blowing in the wind is a sure sign that spring
is here. While dandelions aren’t always a welcome sight as they randomly pop up in gardens and sidewalk cracks, their yellow beauty and seed spreading phe-nomenon are images that are better fused in glass than popping up in your lawn.
Having recently retired after work-ing the past forty years as a registered nurse, I contemplated how I was going to fill up my days, how to keep myself busy. Already an established artist in the community, I was looking for something new and creative when I unexpectedly discovered the art of stained glass.
The variety of glass, texture, and patterns was overwhelming at first, and trying to decide what to create was diffi-cult. There is an endless amount of ideas to try. After making many stained glass pieces, my interest changed direction and my focus turned to fusing.
Being an oil/acrylic painter, I found that fusing wasn’t much different. The artist must come up with a good compo-sition and create an original design. I ex-plored different groups on Facebook and Pinterest and found beautiful creations by different artists that influenced me in making this design. I’ve also discovered that including stringers in a design is fun and exciting.
GLASS PATTERNS QUARTERLY/Spring 201770

2
5
4
3
7
6
Gather all of the glass, tools, and supplies together.
Cut a 12" x 13" piece of 220-76SF System 96 Dark Green Opalescent glass for the background and select the 96 COE scrap in your choice of greens, browns, and ivory. You will also need a variety of frit balls plus yellow and white stringers, as well as white and yellow frit.
Create your own frit balls or purchase what you need for the panel.
You can purchase premade frit balls, which come in a variety of sizes and colors, but you can also make your own, which is easy to do. Just take a variety of colors of scrap glass and cut the scrap into small squares. You can also use pieces of course frit if you have that.
Place the glass pieces in your kiln on the Spectrum PAPYROS Kiln Shelf Paper, making sure that there is space around each piece. Fire the glass using the Frit Ball Firing Schedule at the end of the tutorial. When you open the kiln, you will find rounded pieces of glass with a small flat spot where they were touching the kiln shelf.
Cut out the two circles and one larger half circle from the Rootbeer/Cream glass.
Create the inner base layer of the dandelions by using a variety of different colors and lengths of scrap 96 COE glass and stringer.
For the first layer of glass on top of the background, there are two white dandelions. After breaking the stringers that will be used to add the petals and seed fluff for them to the desired length, lay this lowest layer of stringers flat along the edges of the circles on the dandelions.
Do the same for the yellow dandelion, which is still in the com-pact flower stage, using yellow stringer instead of white. Since it is still fully bloomed, also add a few yellow stringers on top of the circle. Position the two green leaves cut from scrap glass near the bottom of the panel.
Carefully put a few drops of GlasTac Fuser’s Glue over the stringers and let the glue dry. This will enable the GlasTac to do its job, which is to prevent any movement of the stringers when they are placed in the kiln. Full-fuse this lowest layer of the panel to create the base for your composition using the firing schedule at the end of the tutorial.
After the full fuse is completed, add additional stringer and frit balls to build up the design.
For the next layer, add more stringers to create petals on top of the dandelions. Also add frit balls to represent seeds flying in the wind and place different colored frit balls on each dandelion as well. Overlap more stringers on top of the already fully fused stringers and begin to bring the stringers more into the dandelion, breaking them off to a shorter length.
By using drops of Glastac on the glass, you can easily move the stringers around with a toothpick to the desired location. Place the project in the kiln and fire to a contour fuse using the suggested schedule at the end of the tutorial.
Apply a final layering of stringers, especially on the yellow dandelion in the center, for a fuller effect.
Add more white and yellow stringers on all of the dandelions plus shorter yellow stringers for the center of the yellow dandelion. Sprinkle Yellow and White Transparent Glass Frit Medium over various areas of the dandelion stringers to finish off the dandelions.
71GLASS PATTERNS QUARTERLY/Spring 2017
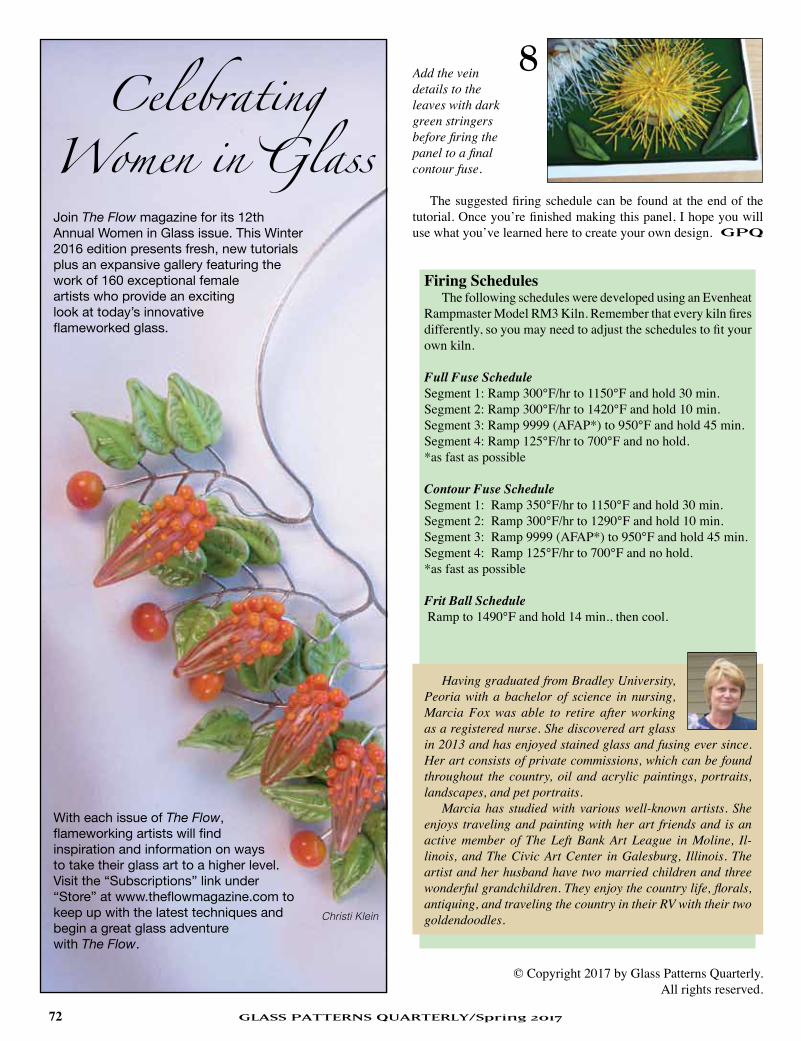
GLASS PATTERNS QUARTERLY/Spring 201772
GPQ
© Copyright 2017 by Glass Patterns Quarterly.All rights reserved.
Add the vein details to the leaves with dark green stringers before firing the panel to a final contour fuse.
The suggested firing schedule can be found at the end of the tutorial. Once you’re finished making this panel, I hope you will use what you’ve learned here to create your own design.
8
Firing SchedulesThe following schedules were developed using an Evenheat
Rampmaster Model RM3 Kiln. Remember that every kiln fires differently, so you may need to adjust the schedules to fit your own kiln.
Full Fuse ScheduleSegment 1: Ramp 300°F/hr to 1150°F and hold 30 min.Segment 2: Ramp 300°F/hr to 1420°F and hold 10 min.Segment 3: Ramp 9999 (AFAP*) to 950°F and hold 45 min.Segment 4: Ramp 125°F/hr to 700°F and no hold.*as fast as possible
Contour Fuse ScheduleSegment 1: Ramp 350°F/hr to 1150°F and hold 30 min.Segment 2: Ramp 300°F/hr to 1290°F and hold 10 min.Segment 3: Ramp 9999 (AFAP*) to 950°F and hold 45 min.Segment 4: Ramp 125°F/hr to 700°F and no hold.*as fast as possible
Frit Ball Schedule Ramp to 1490°F and hold 14 min., then cool.
Having graduated from Bradley University, Peoria with a bachelor of science in nursing, Marcia Fox was able to retire after working as a registered nurse. She discovered art glass in 2013 and has enjoyed stained glass and fusing ever since. Her art consists of private commissions, which can be found throughout the country, oil and acrylic paintings, portraits, landscapes, and pet portraits.
Marcia has studied with various well-known artists. She enjoys traveling and painting with her art friends and is an active member of The Left Bank Art League in Moline, Il-linois, and The Civic Art Center in Galesburg, Illinois. The artist and her husband have two married children and three wonderful grandchildren. They enjoy the country life, florals, antiquing, and traveling the country in their RV with their two goldendoodles.
Join The Flow magazine for its 12th Annual Women in Glass issue. This Winter 2016 edition presents fresh, new tutorials plus an expansive gallery featuring the work of 160 exceptional female artists who provide an exciting look at today’s innovative flameworked glass.
With each issue of The Flow, flameworking artists will find inspiration and information on ways to take their glass art to a higher level. Visit the “Subscriptions” link under “Store” at www.theflowmagazine.com to keep up with the latest techniques and begin a great glass adventure with The Flow.
Celebrating Women in Glass
Christi Klein

GPQ
© Copyright 2017 by Glass Patterns Quarterly.All rights reserved.
Lake Superior Shoreline
Wissmach Glass Company503-L Light Opal/Dark Gray/Brown for Rocks, 1/2 Sq. Ft.503-D Dense Opal/Dark Gray/Brown for Rocks, 1/2 Sq. Ft.
502-L Opal/Medium Gray/Brown for Rocks, 1/2 Sq. Ft.119-LL Cobalt Blue/Light Opal/Crystal for Water, 3 Sq. Ft.
118-D Cobalt Blue/Opal/Crystal for Water, 1/2 Sq. Ft.257-L Medium Purple/Sky Blue/Light Amber/Opal/Crystal
for Sky, 4 Sq. Ft.115-LL Dark Purple/Green Opalescent for Trees, 1 Sq. Ft.
WO-57 Medium Green/Opal/Crystal Wisspy for Bushes, 2 Sq. Ft.WO-59 Dark Brown/Green/Opal/Crystal for Bushes, 2 Sq. Ft.
100-L Dark Green/Opal for Trees, 4 Sq. Ft.WO-112 Dark Green/Dark Amber/Opal/Crystal Wisspy
for Background Landscape, 1 Sq. Ft.78-D Medium Amber/Green/Opal/Crystal
for Background Trees, 1 Sq. Ft.58-D Medium Amber/Opal/Crystal
for Background Trees, 1 Sq. Ft.Tools and Materials
7/32" Copper Foil Flux SolderBlack Patina 1/2" U-Channel Zinc
Design by Mary Harris, Text by Darlene Welch
Of the five bodies of water known as the Great Lakes, which are situated along the eastern half
of the border between the United Stated and Canada, Lake Superior is by far the largest. Considered to be the largest lake in the world by surface area, it is bordered by the province of Ontario, Canada, to the north and by the states of Minnesota, Wisconsin, and Michigan to the south. Henry Wadsworth Longfel-low referred to it as “Gitche Gumee” in his famous poem, The Song of Hiawatha, after the name given to it by the Ojibwe that meant “be a great sea.”
Inspired by a photograph sent to her by one of her clients, Mary Harris has captured the beautiful and often rugged shoreline of Lake Superior in this 30" x 18" stained glass panel. Careful selection and placement of the glass color and grain help to create the look of depth and realism for the rocks, trees, and water. This and other designs by Mary can be found at www.bestglasspatterns.com.
73GLASS PATTERNS QUARTERLY/Spring 2017

GLASS PATTERNS QUARTERLY/Spring 201774
arr
ange
d a
lpha
betic
ally
by
Stat
e, th
en C
itySta
in
ed
an
d G
la
ss A
rt S
up
ply S
ho
ps
74 GLASS PATTERNS QUARTERLY/Spring 2017
Victorian House
408 E Main St
Mahomet, IL 61853
217-586-4834
INDIaNa
The OP Shop
Kokomo Opalescent Glass Co
1310 S Market St
Kokomo, IN 46902
765-457-1829
www.kog.com
KaNSaS
Rayer’s Bearden Stained Glass Supply6205 W Kellogg Dr
Wichita, KS 67209
800-228-4101
www.rayersinc.com
lOuISIaNa
Carousel Stained Glass1602 Eastwood
Slidell, LA 70458
985-643-2515
Email: [email protected]
maINe
Prism Works555 Portland Rd
Bridgton, ME 04009
207-647-8322
Phoenix Studio
630 Forest Ave
Portland, ME 04101
800-773-4154
www.phoenixstudio.com
McMow Art Glass701 N Dixie HwyLake Worth, FL 33460561-585-9011www.mcmow.com
Art Glass Design Studio1329 S 14th StLeesburg, FL 34748352-365-6699
D & l Stained Glass Inc2625 N Harbor City Blvd (US 1)Melbourne, FL 32935321-242-6017www.DLSGLASS.com
Stained Glass For Less2755 Vista Parkway Ste 1-9West Palm Beach, FL 32935561-557-7713 / 844-SGF-LESSwww.stainedglassforless.com
IDaHO
Legacy Glass Art6431 W Fairview AveBoise, ID 83704208-336-3040www.LegacyGlassArt.com
IllINOIS
Suevel Studios870 S Arthur Ave Arlington Heights, IL 60005224-735-2376www.suevelstudios.com
Art Glass Studio of Belleville1600 East A StBelleville, IL 62221618-235-9638
O’Reilly’s Stained Glass58 N William St Downtown Crystal Lake, IL 60014815-444-1797www.oreillysstainedglass.com
arIZONa
The Stained Glass Shop6232 W Bell Rd Ste 101Glendale, AZ 85308602-504-0553www.stainedglass-shop.com
Tumbleweed Stained Glass2636 W Baseline RdMesa, AZ 85202888-261-7091www.TumbleweedStainedGlass.com
Kachina Stained Glass1762 S Greenfield RdMesa, AZ 85206480-655-2000www.kachinastainedglass.com
CalIFOrNIa
Stained Glass of Marin1001 Mirabella AveNovato, CA 94945415-893-9000
COLORADO
The Dragons Cache1109 7th StGreeley, CO 80631970-353-1051
CONNeCtICut
The Stained Glass Apple496 Glen Brook RdStamford, CT 06906203-358-8700
FlOrIDa
Glassic Arts Stained Glass320 S Spring Garden Ave Ste EDeland, FL 32720386-738-1008www.glassicarts.net

GLASS PATTERNS QUARTERLY/Spring 2017 75
Sta
in
ed
an
d G
la
ss A
rt S
up
ply S
ho
ps
arranged a
lphabetically by State, then City
75GLASS PATTERNS QUARTERLY/Spring 2017
Lansing Art Glass2320 E Michigan AveLansing, MI 48912517-484-8875
Stallings Stained Glass8011 Miller RdSwartz Creek, MI 48473810-630-9103www.stallingsglass.com
Linden Art Glass37655 Ford RoadWestland, MI 48185734-728-7767
mINNeSOta
Flamingo Glass205 W Lincoln AveFergus Falls, MN 56537www.flamingoglass.com
Glass Endeavors2716 E 31st StMinneapolis, MN 55406612-721-9553www.glassendeavors.com
Michael’s Stained Glass Studio720 Osseo Ave SSt Cloud, MN 56301800-250-2330 (MN only)www.michaelsstainedglass.com
Sleepy Eye Stained Glass135 Main St ESleepy Eye, MN 56085507-794-6449www.sestainedglass.com
mISSISSIPPI
Seraphim Studios LLC104 S 10th AveHattiesburg, MS 39401601-550-4137www.seraphimglass.com
Treehouse Glass Studio12 Murch RdSebago, ME 04029207-787-3626
marylaND
Timeless Tiffany1769 W Pulaski HwyElkton, MD 21921410-287-3900www.timelesstiffany.com
Anything in Stained Glass5104 Pegasus Ct Ste FFrederick, MD 21704-8323800-462-1209www.anythinginstainedglass.com
Glass by Grammy4733 Snow Hill RdSalisbury, MD 21804410-548-2589www.glassbygrammy.com
MASSACHUSETTS
The Stained Glass Emporium69 Fall River Ave Rt 6Rehoboth, MA 02769508-336-5455karensge@comcast.netwww.stainedglassemporium.net
mICHIGaN
Straits Area Glass Co10994 N Straits HwyCheboygan, MI 49721231-627-4426
Delphi Creativity Center3380 E Jolly RdLansing, MI 48910800-248-2048www.delphiglass.comFree color catalog150+ classes - see schedule online
mISSOurI
Stained Glass Station236 NW Oldham PkwyLees Summit, MO 64081816-525-8088www.stainedglassteacher.comClasses, Extensive selection of glass, sup-plies, and fusing
NeVaDa
Glass art Studio Inc4310 Cameron St #3Las Vegas, NV 89103702-227-9794www.glassartinclv.com
NOrtH CarOlINa
The Glass Angel224 E Front StBurlington, NC 27215336-227-1231Full line of supplies and classeswww.theglassangel.com
mystical reflections Stained Glass9974 Traders LaneCalabash, NC 28467910-575-3503www.firedup4glass.com
OHIO
Leaded Glass Design1755 State RdCuyahoga Falls, OH 44223330-929-4514www.leadedglassdesign.com
Glass Creations6786 State Route 128Miamitown, OH 45041513-353-4455
GLASS PATTERNS QUARTERLY/Spring 201776
arr
ange
d a
lpha
betic
ally
by
Stat
e, th
en C
itySta
in
ed
an
d G
la
ss A
rt S
up
ply S
ho
ps
76 GLASS PATTERNS QUARTERLY/Spring 2017
�
WaSHINGtON
Glass expressions
648 SW 152nd
Burien, WA 98166
206-242-2860
WISCONSIN
The Glass Garden LLC
25 W Milwaukee St
Janesville, WI 53548
608-754-3718
www.eglassgarden.com
The Vinery1422 MacArthur Rd
Madison, WI 53714
608-271-2490
www.vineryglass.com
Hearts Desire Stained Glass and Beads234 A Marina Ct
Waterford, WI 53185
262-763-6733
www.heartsdesirestainedglass.com
CaNaDa
Alphabetically arranged by
province, city, then store name
Glass expressions2925 Comox Road
Courtenay, BC Canada V9N 3P7
250-339-7739
Cranberry Stained Glass102 Chain Lake Dr
Vantage Point 1A
Halifax, NS Canada B3S 1A7
902-876-5167 / 866-377-5167
www.cranberrystainedglass.com
Huronia Art Glass
680 Bay View Dr Unit 3
Barrie, ON Canada L4N 9A6
705-721-1323
www.huroniaartglass.com
Artistry in Glass
#105 - 1674 Hyde Park Rd
London, ON Canada N6H 5L7
519-641-0443 / 877-386-1116
www.artistryinglass.on.ca
Glasscraft
159 Broadway
Orangeville, ON Canada L9W 1K2
519-941-2505
www.glasscraftcanada.ca
Canadian Stained Glass Warehouse
1017 3rd Ave
Quebec City, QC Canada G1L 2X3
418-648-0969
www.canadianstainedglasswarehouse.com
�
Join others who have gifted their favorite instructor and storefront by purchasing a directory listing. In doing so, you can help secure their business success. Contact us to find out how your store can be included.
Our retail directory is an affordable means of advertising your storefront to potential new customers. You can advertise your store hours, special events, new classes, and website.
advertise your Shop InGPQ’s Stained and
Glass Art Supply Shops Directory
Call 1-502-222-5631.
teNNeSSee
Fountain City Stained Glass LLC
1328 Buchanan Ave
Knoxville, TN 37917
865-688-3333
Email: [email protected]
TEXAS
Blue Moon Glassworks
108 W 43rd St
Austin, TX 78751
512-380-0770
www.austinbluemoon.com
Merry Go Round
Stained Glass Center
3021 Lackland Rd
Fort Worth, TX 76116
817-763-0589
www.merry-go-roundstainedglass.com
Stained Glass Crafters Workbench
7515 Eckhert Rd
San Antonio, TX 78240
210-647-7475
www.sgcworkbench.com
VIrGINIa
Laurel Gallery
2805 Hungary Rd
Richmond, VA 23228
804-672-6804
www.laurelgallery.net
Bluebird Stained Glass Studio
2163 Jefferson Davis Hwy #103
Stafford, VA 22554
540-720-4296
www.bluebirdstainedglass.com

GLASS PATTERNS QUARTERLY/Spring 2017 77
GPQ
by Arnold Howard
Photography Courtesy of Paragon Industries, L.P.
© Copyright 2017 by Glass Patterns Quarterly.All rights reserved.
Kiln CornerKiln Wash Basics
Though Arnold Howard works for Paragon Industries, L.P., the in-formation here applies to all brands of glass kilns. Feel free to send questions for this column no matter what brand of kiln you own.
Arnold Howard writes instruction manuals and advertise-ments for Paragon Industries, L.P. His hobbies are glass fusing and karate. He also enjoys studying history and watching classic movies. You can reach Arnold at [email protected] with questions for future columns. Sign up for his kiln newsletter at www.paragonweb.com.
Hot glass can embed into bare kiln shelves. Since kiln wash, also called glass separator, does not melt at high temperatures, it
forms a protective barrier between kiln shelves, the firebrick kiln bottom, and glass.
How do you avoid bubbles when applying kiln wash to shelves?Before applying kiln wash, heat the shelves in the kiln to around
150°F/65°C for an hour or two. (Separate the shelves in the kiln with posts.) Kiln wash flows smoothly onto warm shelves without forming small bubbles. Preheating shelves also speeds drying and lessens the chance of cracking the kiln wash.
Let the kiln wash dry before firing the kiln. The kiln washed shelves are still wet if they are cool to the touch.Should kiln wash be sprayed or brushed onto the kiln floor?
We don’t recommend spraying kiln wash onto the firebrick floor. That is because airborne kiln wash particles could land in an ele-ment groove, burning out an element. Instead, brush the kiln wash on with a haik brush or paint brush.
Coating the firebrick floor or kiln shelf should take only a few minutes, because you don’t have to let the kiln wash dry completely between coats. Brush on the kiln wash, allow it to dry for a few minutes, then brush on the next coat.Is it ever necessary to recoat the kiln bottom with kiln wash? If so, how often? The kiln wash on the shelf deteriorates pretty quickly.
The kiln wash adheres to the firebricks better than it does to shelves, because the firebricks are porous. Therefore, it is rarely necessary to apply more kiln wash after the first application when the kiln is new. Apply more kiln wash to bare areas after removing glass that has stuck to the firebrick bottom.I live in an apartment. Does a kiln normally produce unpleasant smells during firing?
Glass alone does not produce a strong odor, but paints or decals fired onto glass and shelf paper under the glass produce odors. Be-cause of the shelf paper odor, I prefer kiln wash, which is odorless.I have come to realize that some cracking of glass during slumping is due to being too close to the heating elements. For tall pieces, I gain over an inch of height by removing the kiln shelf and posts from under the slumping mold. Do I still need to use kiln wash?
A shelf offers partial protection to the kiln bottom from a glass overfire. You can certainly slump glass into a mold without a shelf. However, you should coat the firebrick bottom with kiln wash if you’re not using a shelf.
Glaze has eaten into a shelf, and scraping the glaze off the shelf has left a low spot. Can the shelf be repaired?
Yes, in some cases. Coat the shelf with kiln wash. Apply several coats to the low area where you removed the melted glaze. The kiln wash will fill in the depression. However, this is only a temporary repair.
Start the brush stroke an inch or so from the edge of the shelf and work toward the opposite side. This avoids buildup of kiln wash on the edges.
If glass sticks to the shelf, scrape it off with a putty knife at a sharp angle. Wear safety glasses, since
sometimes chipped glass becomes airborne.

GLASS PATTERNS QUARTERLY/Spring 201778
Advertisers’ Index
AAE Glass www.aaeglass.com 29
Aanraku (650) 372-0527 www.abasg.com 9
Anything in Stained Glass (800) 462-1209 www.anythinginstainedglass.com 14
ArtiFill www.Artifill.com 63
Covington Engineering Corp. (877) 793-6636 www.covington-engineering.com 23
Cress Manufacturing (800) 423-4584 www.cresskilns.com 79
D & L Art Glass Supply (800) 525-0940 www.dlartglass.com 21
Edco Supply Corporation (866) 397-4777 [email protected] 59
Evenheat Kiln, Inc. (989) 856-2281 www.evenheat-kiln.com 17
Firelite Forms (888) 800-3901 www.fireliteforms.com 54
Flight Into Fantasy Ask Your Local Supplier 55
Franklin Art Glass (800) 848-7683 www.franklinartglass.com 17
Flow, The (502) 222-5631 www.TheFlowMagazine.com 72
Fused Fantasies (502) 222-5631 www.GlassPatterns.com 61
Gemini (310) 891-0288 www.geminisaw.com 61
Glass Accessories International www.glassaccessories.com 15
Glass Art (502) 222-5631 www.GlassArtMagazine.com 23/28/60
Glass Art Society (206) 382-1305 www.glassart.org 65
Glass Craft & Bead Expo (800) 217-4527 www.glasscraftexpo.com 25/78
Glass Expert Webinars™ (502) 222-5631 www.GlassPatterns.com 53/65
Glass Patterns Quarterly (502) 222-5631 www.GlassPatterns.com 59
Glass Quest (561) 585-9011 www.Glassquest2017.eventbrite.com 8
Glastar (800) 423-5635 www.glastar.com 15
Gryphon Corporation (818) 890-7770 www.gryphoncorp.com 21
Hakko USA www.HakkoUSA.com 5
Handy Hanger www.HandyHanger.net 68
His Glassworks, Inc. (828) 254-2559 www.hisglassworks.com 17
Illustrated Word, The (502) 222-5631 www.GlassPatterns.com 61
ISGB (812) 222-2243 www.isgb.org 29
KWC, LLC Table Foiler (800) 250-1790 www.tablefoiler.com 21
Lisa Vogt (608) 271-2490 www.LisaVogt.net 54
Morton Glass Works (800) 635-2113 www.mortonglass.com 61
Olympic Kilns (800) 241-4400 www.greatkilns.com 59
Paned Expressions Studios (410) 676-1248 www.panedexpressions.com 15/17
Paragon Industries (800) 876-4328 www.paragonweb.com 13
Paul Wissmach Glass Co., Inc. (304) 337-2253 www.wissmachglass.com 80
SGAA (800) 438-9581 www.stainedglass.org 52
Skutt Kilns (503) 774-6000 www.skutt.com 2
Unique Glass Colors (407) 261-0900 www.uniqueglasscolors.com 29
Whittemore-Durgin (800) 262-1790 www.whittemoredurgin.com 55
Vinery, The (608) 244-9900 www.vineryglass.com 65
Advertiser Contact Info Page

GLASS PATTERNS QUARTERLY/Spring 2017 79
Minimal heat loss and fast temperature recovery for virtually any firing project
• Jewelry• Slumping
• Raking• Vitrograph
• Enameling• Low-Fire Ceramics
• Raku
Model
GK1
GK2
Volts
120
240/208
Amps
15
18/16
Max Temp
2000˚
2000˚
Chamber Opening
8”x8”x6.75” H
12”x12”x9” H
Outside Dimensions
15.5”x14.5”x17.5” H
25”x25”x39” H
Fuse Size
20
20
Ship Weight
70
180
Wire Size
12
10
CALL TODAY FOR YOUR CLOSEST DEALER AND A FREE CATALOG800.423.4584 775.884.2777 WWW.CRESSMFG.COM
THE LATEST INNOVATION IN KILN TECHNOLOGY
Introducing...
By: Cress Manufacturing
TH
E
GK1
GK2
Professionals and hobbyists alike are enthusiastic about the ease and safety of manipulating hot glass in the new GK Series Drop Bottom Kilns
NOWAVAILABLE
IN TWOCONVENIENT
SIZES
GK2
ety
NOWBLEAVAILABLETIN TWO
NVENIENTSIZES
CO
imal heat losimal heat losimalimal heatheat loslos
• Jewe Jew•• Slum
nd nd ffast temast temppeendnd fastfast tempetempe
g• Raki• Vitro
ure recoveryure recoveryureure recoveryrecovery
h• Enam• Lo Low-
uually any firally any firii
mimics• Raku
C
M
Y
CM
MY
CY
CMY
K
Intro_GK2A FullPageAD.ai 5/10/2011 1:50:09 PM