
GIAC - Perimeter Defense-in-Depth with Cisco ASA
86
Global Information Assurance Certification Paper Copyright SANS Institute Author Retains Full Rights This paper is taken from the GIAC directory of certified professionals. Reposting is not permited without express written permission.
-
Upload
khangminh22 -
Category
Documents
-
view
0 -
download
0
Transcript of GIAC - Perimeter Defense-in-Depth with Cisco ASA

Global Information Assurance Certification Paper
Copyright SANS InstituteAuthor Retains Full Rights
This paper is taken from the GIAC directory of certified professionals. Reposting is not permited without express written permission.

© SANS Institute 2009, Author retains full rights.
© S
ANS
Inst
itute
200
9
, Aut
hor r
etai
ns fu
ll rig
hts.
Key fingerprint = AF19 FA27 2F94 998D FDB5 DE3D F8B5 06E4 A169 4E46
Perimeter Defense-in-Depth with Cisco ASA
Michael P. Simone 1
Perimeter Defense-in-Depth with Cisco ASA
GCFW Gold Certification
Author: Michael P. Simone, [email protected]
Advisor: Brent Deterding
Accepted: Not yet

© SANS Institute 2009, Author retains full rights.
© S
ANS
Inst
itute
200
9
, Aut
hor r
etai
ns fu
ll rig
hts.
Key fingerprint = AF19 FA27 2F94 998D FDB5 DE3D F8B5 06E4 A169 4E46
Perimeter Defense-in-Depth with Cisco ASA
Michael P. Simone 2
Outline
Contents
1 Introduction...............................................................................................................3
2 Firewall .....................................................................................................................6
2.1 Border Considerations....................................................................................6
2.2 Interface and Management Configuration.....................................................11
2.3 NAT and Spoofing ........................................................................................18
2.4 Packet Filtering.............................................................................................22
2.5 URL and Content Filtering ............................................................................29
3 Intrusion Detection / Prevention .............................................................................35
3.1 ASA and Intrusion Prevention Systems........................................................35
3.2 Application Inspection...................................................................................35
3.3 Signature-based IPS ....................................................................................53
4 Virtual Private Networking ......................................................................................58
© SANS Institute 2009, Author retains full rights.
© S
ANS
Inst
itute
200
9
, Aut
hor r
etai
ns fu
ll rig
hts.
Key fingerprint = AF19 FA27 2F94 998D FDB5 DE3D F8B5 06E4 A169 4E46
Perimeter Defense-in-Depth with Cisco ASA
Michael P. Simone 3
5 Conclusions............................................................................................................76
6 Appendix A: Cisco ASA IP Audit Signature List......................................................77
7 References .............................................................................................................84
1 Introduction
No matter how tightly locked down one keeps one’s internal systems, how religiously
the system administrators apply patches, and how well educated about network threats the
user base becomes, a weak perimeter security system turns an otherwise secure system into
a castle with an empty moat. The challenges of securing this system expand geometrically
when faced with shrinking IT budgets and a demand from upper management to accomplish
more with less. No longer can one deploy separate VPN, IDS and firewall modules; costs for
rack space, power consumption, and the equipment itself spiral ever upwards. Many vendors
recognize this issue, especially during a shrinking economy. Cisco’s solution to this is the
Adaptive Security Appliance (ASA), “[i]ncorporating all of these solutions into Cisco ASA
secures the network without the need for extra overlay equipment or network
alterations”(Frahim and Santos, 2006, p. 33).
Over the course of this document, the reader will learn what to do to use the ASA

© SANS Institute 2009, Author retains full rights.
© S
ANS
Inst
itute
200
9
, Aut
hor r
etai
ns fu
ll rig
hts.
Key fingerprint = AF19 FA27 2F94 998D FDB5 DE3D F8B5 06E4 A169 4E46
Perimeter Defense-in-Depth with Cisco ASA
Michael P. Simone 4
security device for perimeter security, why these choices would be made, what best practices
are, and business justifications for each of these decisions. By the end, a network security
engineer should be able to successfully deploy a Cisco ASA to harden the perimeter of the
network, and reduce the threat profile of the business. This document assumes basic
understanding of networking and concepts. It further assumes that an ASA is protecting the
border of the network in its basic “out of the box” configuration, including an IP address on
each the inside, outside, and a DMZ network, static routing to the Internet, and no ingress or
egress filters in place. Figure 1-1 shows the network diagram that will be the basis for the
examples.
Figure 1-1 – SANSecure network topology

© SANS Institute 2009, Author retains full rights.
© S
ANS
Inst
itute
200
9
, Aut
hor r
etai
ns fu
ll rig
hts.
Key fingerprint = AF19 FA27 2F94 998D FDB5 DE3D F8B5 06E4 A169 4E46
Perimeter Defense-in-Depth with Cisco ASA
Michael P. Simone 5
There are multiple phases to configuring the ASA to be the center of the perimeter
security puzzle. The three main topics will be firewall, intrusion detection / prevention system
(IPS), and virtual private network concentrator (VPN).

© SANS Institute 2009, Author retains full rights.
© S
ANS
Inst
itute
200
9
, Aut
hor r
etai
ns fu
ll rig
hts.
Key fingerprint = AF19 FA27 2F94 998D FDB5 DE3D F8B5 06E4 A169 4E46
Perimeter Defense-in-Depth with Cisco ASA
Michael P. Simone 6
2 Firewall
2.1 Border Considerations
Before embarking on establishing a secure firewall, a hardened perimeter must begin
at the border router. One must remember that there are three parts to the security triad:
confidentiality, integrity, and availability. While most of the works on security focus on the first
two, without the latter, they are not as useful. Therefore, one must prepare against Denial of
Service (DoS) and Distributed Denial of Service (DDoS) attacks. Working with one’s ISP, it is
possible to diminish greatly the potential for damage due to DDoS attacks. While there are
tools in the ASA that will help with DoS attacks, the fight against them must begin at the ISP.
One should encourage one’s ISPs to enact RFC 2827 filtering on all of their upstream
devices, “it will prohibit an attacker within the originating network from launching an attack of
this nature using forged source addresses that do not conform to ingress filtering rules”
(Ferguson, 2000). Furthermore, as more ISPs enable RFC 2827 filtering on their network, an
additional benefit arises, as noted in the RFC, “An additional benefit of implementing this
type of filtering is that it enables the originator to be easily traced to its true source, since the
attacker would have to use a valid, and legitimately reachable, source address” (Ferguson,

© SANS Institute 2009, Author retains full rights.
© S
ANS
Inst
itute
200
9
, Aut
hor r
etai
ns fu
ll rig
hts.
Key fingerprint = AF19 FA27 2F94 998D FDB5 DE3D F8B5 06E4 A169 4E46
Perimeter Defense-in-Depth with Cisco ASA
Michael P. Simone 7
2000).
The business case for this is almost self-evident. Encouraging the upstream ISP to
filter out obviously false IP addresses can prevent aspects of a DoS without waiting to flood
the incoming pipe and filter at the border router. If enough of their clients request it, they can
become leaders in Internet security by providing this service by default; this helps to reduce
threats to their clients, and therefore they can charge a premium. It reduces the bandwidth
requirements of the individual businesses, as spoofed traffic cannot make it as far as the CPE
in the first place.
To implement RFC 2827 filtering, one must start by eliminating inbound traffic from
RFC 1918 addresses. These are private, non-routable IP addresses that should never appear
on the outside interface of a router. These are defined as follows:
• 10.0.0.0/8
• 172.16.0.0/12
• 192.168.0.0/16
(Rekhter, Moskowitz, Karrenburg, de Groot, & Lear, 1996). Further limitation on inbound IP
addresses can be found in RFC 2365, and prevents spoofed multicast from the “private”
range of 239.0.0.0/8 (Meyer, 1998). These addresses should never cross administrative

© SANS Institute 2009, Author retains full rights.
© S
ANS
Inst
itute
200
9
, Aut
hor r
etai
ns fu
ll rig
hts.
Key fingerprint = AF19 FA27 2F94 998D FDB5 DE3D F8B5 06E4 A169 4E46
Perimeter Defense-in-Depth with Cisco ASA
Michael P. Simone 8
boundaries, so a multicast address in that range coming inbound must be spoofed. Finally,
one can also eliminate any IANA reserved addresses (IANA, 2009). These IP addresses
include the following:
• 0.0.0.0/8
• 127.0.0.0/8
• 169.254.0.0
• 192.0.2.0/24
Unless there is a compelling reason, the multicast range of 224.0.0.0/8 should also be
blocked at the ISP, or, if they will not, at the border router. Lastly, the broadcast address of
255.255.255.255 should be blocked, to prevent certain kinds of DoS attacks. This covers the
“standard” IP addresses that should be blocked on the ISP routers. There is one last line that
needs to be included in the access list, however, and that is a line that prevents any traffic
with a source that is the same as the destination network from traversing the router, as this is
also, quite obviously, spoofed.
One might ask how preventing these networks from reaching the CPE would prevent a
DoS or DDoS attack. One feature in many DoS attacks is exhaustion of resources; a Web
server, for example, can only accept so many half-open TCP connections before it fails
© SANS Institute 2009, Author retains full rights.
© S
ANS
Inst
itute
200
9
, Aut
hor r
etai
ns fu
ll rig
hts.
Key fingerprint = AF19 FA27 2F94 998D FDB5 DE3D F8B5 06E4 A169 4E46
Perimeter Defense-in-Depth with Cisco ASA
Michael P. Simone 9
(known as a SYN Flood attack) (Cole, 2002). However, if a SYN packet is sent with a spoofed
source that will respond with a TCP RST to a received, unsolicited SYN-ACK, then the DoS
will not work, because that resource will be freed up. Therefore, many DoS tools prefer to use
reserved addresses for the spoofed sources; thus the effectiveness of the RFC 2827 filter.
The command syntax for applying this filter to the CPE border router is listed below
(assuming a Cisco router on the border). The external IP address range is taken from figure
1-1, to illustrate. One caveat is that, depending on the design of one’s network, it may be
required to permit access from the upstream router in the same network as the advertised
network, to prevent loss of connectivity from the ISP. That exception would be near the top of
the access list.

© SANS Institute 2009, Author retains full rights.
© S
ANS
Inst
itute
200
9
, Aut
hor r
etai
ns fu
ll rig
hts.
Key fingerprint = AF19 FA27 2F94 998D FDB5 DE3D F8B5 06E4 A169 4E46
Perimeter Defense-in-Depth with Cisco ASA
Michael P. Simone 10
Example 2-1: Anti-Bogon Access List
access-list 199 deny ip 0.0.0.0 255.255.255.255 any log access-list 199 deny ip 10.0.0.0 0.255.255.255 any log access-list 199 deny ip 127.0.0.0 0.255.255.255 any log access-list 199 deny ip 172.16.0.0 0.15.255.255 any log access-list 199 deny ip 169.254.0.0 0.0.255.255 any log access-list 199 deny ip 192.0.2.0 0.0.0.255 any log access-list 199 deny ip 192.168.0.0 0.0.255.255 any log access-list 199 deny ip 224.0.0.0 0.0.0.255 any log access-list 199 deny ip 239.0.0.0 0.255.255.255 any log access-list 199 deny ip 255.255.255.255 0.0.0.0 any log access-list 199 deny ip 173.0.0.0 0.0.0.255 any log access-list 199 permit ip any any
Once the access list is created, it must be applied to the outside interface of the border
router (or to the non-customer facing interfaces of the ISP router, if one’s ISP is amenable to
such protection for its clients.) As an example, this will be placed on the S0/0 interface of the
border router for the SANSecure network.
Example 2-2: Configuring an Access List on an Interface
interface s0/0 ip access-group 199 in

© SANS Institute 2009, Author retains full rights.
© S
ANS
Inst
itute
200
9
, Aut
hor r
etai
ns fu
ll rig
hts.
Key fingerprint = AF19 FA27 2F94 998D FDB5 DE3D F8B5 06E4 A169 4E46
Perimeter Defense-in-Depth with Cisco ASA
Michael P. Simone 11
This applies the access list in the inbound direction of the outside interface, preventing known
spoofed traffic from entering the network.
2.2 Interface and Management Configuration
Every interface on the ASA can have a different security level. These security levels
can reflect the level of trust assigned to an interface (Frahim & Santos, 2006, p. 60). By
default, traffic from a higher security (more trusted) interface to a lower security (less trusted)
interface can flow freely, unless an access list is enabled to deny it. The ASA also allows for
information to flow between two interfaces of the same security level using the same-security-
traffic permit inter-interface command.
One often-overlooked interface, however, is the management interface. Frequently,
implementers will simply use the Inside interface as the management interface, since it is
already reachable by internal means. The management interface (M0/0), however, is the
better choice for this. This interface does not route, and it will only accept traffic destined to
the device itself, not traffic destined for other networks (Frahim & Santos, 2006, p.65). This
interface can support routing protocols, however, so that it can be set as a peer with other
routers in the network – this is especially useful in a well-designed network which has a
separate management VLAN that is used to access administrative functions for all network

© SANS Institute 2009, Author retains full rights.
© S
ANS
Inst
itute
200
9
, Aut
hor r
etai
ns fu
ll rig
hts.
Key fingerprint = AF19 FA27 2F94 998D FDB5 DE3D F8B5 06E4 A169 4E46
Perimeter Defense-in-Depth with Cisco ASA
Michael P. Simone 12
devices in the enterprise.
When configuring the management interface, it’s also a good plan to take this time to
lock down available protocols and hosts for managing the device. Ideally, all management
would take place from a single station on the network (a “jump server” situated in the
management network) which requires strong authentication and allows for limited access to it.
In figure 1-1, that is the workstation, and its IP, for the purposes of this document, is
192.168.254.2, with the management IP of the ASA being 192.168.254.1. Ideally, when one
speaks of management protocols allowed to the ASA, one needs to be aware of the inherent
insecurity involved in some of these. The first problem we encounter is telnet – it transmits all
communications in clear text, including usernames and passwords. Therefore, we need to
disable telnet completely. The next issue we face is weaknesses in SSH1 which allow for
possible cryptographic exploitation. Lastly, anyone who has used Cisco equipment for a long
time is familiar with the need for TFTP and the vulnerabilities inherent within, including clear
text transfer of data – not a useful item when one is trying to back up or restore the
configuration of a firewall. Fortunately, these can all be mitigated.
The ASA allows management through three protocols to alleviate these symptoms.
First, one can manage the device over HTTPS using the Adaptive Security Module (ADSM).
This friendly, helpful GUI is the antithesis of previous incarnations of Cisco GUIs in that it is

© SANS Institute 2009, Author retains full rights.
© S
ANS
Inst
itute
200
9
, Aut
hor r
etai
ns fu
ll rig
hts.
Key fingerprint = AF19 FA27 2F94 998D FDB5 DE3D F8B5 06E4 A169 4E46
Perimeter Defense-in-Depth with Cisco ASA
Michael P. Simone 13
useful and powerful. Other portions of this document will explain its use. This communication
is secured through an SSL connection, and a self-signed certificate. The next mitigation is
the use of SSH v2, which removes many of the insecurities of the previous version. Lastly,
one can use secure copy (SCP) rather than TFTP to transfer files to and from the ASA,
including the OS and config files (Abelar, 2005).
In order to limit these activities, one would use the commands in example 2-3 below. In
this example, we demonstrate the creation of a 2048-bit RSA key (used to encrypt
communications for an SSH tunnel), enabling SSH version 2, enabling SCP, limiting the time
an SSH session can be idle, locking down access to permit only the management station for
SSH and HTTPS, and disabling telnet.
Example 2-3: Configuring Management Security
crypto key generate rsa modulus 2048 ssh version 2 ssh scopy enable ssh timeout 5 ssh 192.168.254.2 255.255.255.255 management http 192.168.254.2 255.255.255.255 management
This effectively limits administrative control over the device to a single workstation, by a pair

© SANS Institute 2009, Author retains full rights.
© S
ANS
Inst
itute
200
9
, Aut
hor r
etai
ns fu
ll rig
hts.
Key fingerprint = AF19 FA27 2F94 998D FDB5 DE3D F8B5 06E4 A169 4E46
Perimeter Defense-in-Depth with Cisco ASA
Michael P. Simone 14
of protocols. As mentioned previously, one can also backup and restore configurations via the
SCP method, alleviating the worry of interceptions of TFTP transit.
Ensuring proper login authentication, authorization, and accounting becomes the next
sequence of events with which one must contend. ASA’s can use multiple different sources
for AAA services, Cisco’s preference being the use of Cisco Access Control Server, and the
TACACS+ protocol. While each environment is different, the one constant is that one must
not use the default username (pix) and default enable passwords for management of one’s
perimeter device. The examples in this document will focus on using the local user database
inside the ASA; however, an ideal situation involves pairing up with a TACACS+ or RADIUS
server, as that allows for integration with the enterprise’s authentication databases.
In order to use AAA, one must create users, and then determine their level of access.
The minimum requirement for best practices states that all users must log on with a unique
username and all access must be logged. (Logging will be covered later in this document.)
While different access levels can have different commands assigned to them, the only two
command levels that come pre-defined in the ASA are level 1 (which cannot even enter
enable mode) and level 15 (which has full administrative access). Each individual user in the
database can be set at one of these levels (or any others that the administrator cares to
define), and all actions will be logged with that person’s username. In order to secure the

© SANS Institute 2009, Author retains full rights.
© S
ANS
Inst
itute
200
9
, Aut
hor r
etai
ns fu
ll rig
hts.
Key fingerprint = AF19 FA27 2F94 998D FDB5 DE3D F8B5 06E4 A169 4E46
Perimeter Defense-in-Depth with Cisco ASA
Michael P. Simone 15
environment, we must use the aaa authentication command, as follows demonstrated in
example 2-4.
Example 2-4: Configuring AAA Authentication
username SANS password Pe<gJp6v privilege 15 aaa authentication ssh console LOCAL aaa authentication serial console LOCAL aaa authentication http console LOCAL aaa authentication enable console LOCAL
The console LOCAL designation delineates that the local user database is to be queried for
any authentication request. Multiple authentication methods can be used if they are defined,
and they will cascade down in the event of error (not authentication failure) from the
authentication server. For example, if a TACACS+ server is defined, and one uses aaa
authentication enable console TACACS+ LOCAL, then the local user database would only be
polled if the TACACS+ server were unreachable (Morgan & Lovering, 2008, p.502).
The final management concern of the ASA is proper logging configuration. This is best
accomplished through Syslog for the vast majority of alerts, with some specialized alerts
being sent via Email to administrators in the case of emergencies, to reduce time before
discovery of the issue. Obviously, some sort of Syslog message receiver needs to be in
place. Ideally, one would contract with a managed security service provider (MSSP) to

© SANS Institute 2009, Author retains full rights.
© S
ANS
Inst
itute
200
9
, Aut
hor r
etai
ns fu
ll rig
hts.
Key fingerprint = AF19 FA27 2F94 998D FDB5 DE3D F8B5 06E4 A169 4E46
Perimeter Defense-in-Depth with Cisco ASA
Michael P. Simone 16
aggregate and correlate the received logs, as it is more cost efficient to outsource log analysis
to such a firm.
The first piece of the logging puzzle is ensuring proper timestamps on the device. To
do this, one should configure NTP, using the appropriate nearest interface as the source
address. If the NTP server requires authentication, an authentication key can be configured.
When using a common Internet time server, however, trust is not configured. It is preferable
to use a time server located in the enterprise’s internal network, to ensure that all clocks are
synchronized at the same stratum. Example 2-5 demonstrates connecting to a Microsoft
Windows domain controller for network time, with no authentication, as it is not supported by
the Microsoft Windows time server.
Example 2-5: Configuring an NTP Server
ntp server 10.0.1.1 source inside prefer
If the enterprise is running an NTP server that uses a newer version of NTP that can use MD5
authentication, it is highly recommended to do so. In such a case, example 2-6 would
configure such a key (Frahim & Santos, 2006, p.74). The time updates will be stamped with
an MD5 hash, to ensure authenticity.

© SANS Institute 2009, Author retains full rights.
© S
ANS
Inst
itute
200
9
, Aut
hor r
etai
ns fu
ll rig
hts.
Key fingerprint = AF19 FA27 2F94 998D FDB5 DE3D F8B5 06E4 A169 4E46
Perimeter Defense-in-Depth with Cisco ASA
Michael P. Simone 17
Example 2-6: Configuring NTP Authentication
ntp authentication-key 123 md5 cisco123 ntp authenticate ntp server 10.0.1.2 source inside key 123
Once NTP is enabled, the device is ready to begin logging. The things that the
enterprise must decide are the recipient host, the method of transmission, and which logs to
email to administrators. The logging host command dictates the device which will receive the
logs. The device uses UDP port 514 for Syslog by default, however, should one decide to use
TCP Syslog, the device can do that, as well. Because there is a possibility of TCP
connections jamming up, the recommendation is to stick with UDP Syslog if the packets will
remain on a secure network. (Note: TCP Syslog will not automatically encrypt the packets, but
it will obfuscate them somewhat.) It is considered a best practice to set the log level to debug,
and have a very good back-end parsing system for the logs (or hire an MSSP), so that
important logs are not missed.
Example 2-7: Configuring Syslog
logging enable logging host management 192.168.254.3 logging trap debug
Next, email alerts need to be configured. These are for emergencies that cannot wait for an
analyst to receive the event and parse it. A logging list is used to determine the types of logs

© SANS Institute 2009, Author retains full rights.
© S
ANS
Inst
itute
200
9
, Aut
hor r
etai
ns fu
ll rig
hts.
Key fingerprint = AF19 FA27 2F94 998D FDB5 DE3D F8B5 06E4 A169 4E46
Perimeter Defense-in-Depth with Cisco ASA
Michael P. Simone 18
to be sent. In example 2-7, a logging list called Email_Alerts is created to send Error and
higher level events via email for selected event classes. A full list of logging classes can be
located at
http://www.cisco.com/en/US/docs/security/asa/asa80/command/reference/l2.html#wp175468
3.
Example 2-8: Configuring Email Logging
smtp-server 10.0.0.4 logging list Email_Alerts level error class auth logging list Email_Alerts level error class config logging list Email_Alerts level error class ha logging list Email_Alerts level error class np logging list Email_Alerts level error class sys logging from-address [email protected] logging recipient-address [email protected] level informational logging mail Email_Alerts
This configuration will send the error level or above alerts regarding authentication,
configuration, failover, network processor, and system events to the incident handlers at
SANsecure for immediate attention.
2.3 NAT and Spoofing
The ASA grew out of the old Cisco PIX, which required address translations for any
traversal of an interface. While identity NAT could be used (with the nat (interface) 0

© SANS Institute 2009, Author retains full rights.
© S
ANS
Inst
itute
200
9
, Aut
hor r
etai
ns fu
ll rig
hts.
Key fingerprint = AF19 FA27 2F94 998D FDB5 DE3D F8B5 06E4 A169 4E46
Perimeter Defense-in-Depth with Cisco ASA
Michael P. Simone 19
command), there was no way to, by default allow packets to route through the firewall un-
translated. Starting with the ASA (and PIX 7.x), one can turn off NAT control, allowing
packets to traverse the network unaltered. This is useful if one does not wish to use RFC
1918 addresses on DMZ servers, instead using the globally routable network addresses on
the boxes themselves, or if the enterprise is using globally routable IP addresses throughout
the network, a practice that this author strongly discourages. There are two directions for
translation – from lower security interface to a higher one, and the reverse.
When arriving on an interface destined for a higher security interface, a packet must be
statically translated. The static command uses the following syntax:
static (real_interface,mapped_interface) {mapped_IP} {real_IP [netmask mask]} [dns]
[norandomseq] [[tcp] [max_conns [embryonic_limit]] [udp udp_max_conns]
This is best served up with an example, as in 2-8.
Example 2-9: Configuring a Static Translation
static (dmz,outside) 173.0.0.4 172.27.1.4 netmask 255.255.255.255 dns tcp 1000 100 udp 1000
With this example, a DMZ server at 172.27.1.4 is translated to 173.0.0.4 on the globally

© SANS Institute 2009, Author retains full rights.
© S
ANS
Inst
itute
200
9
, Aut
hor r
etai
ns fu
ll rig
hts.
Key fingerprint = AF19 FA27 2F94 998D FDB5 DE3D F8B5 06E4 A169 4E46
Perimeter Defense-in-Depth with Cisco ASA
Michael P. Simone 20
routable network. DNS replies matching that IP address that come through the firewall are
automatically translated, to prevent the need for split-brain DNS. (Since traffic cannot re-enter
the interface that it exits, if the DNS for www.sansecure.fake was 173.0.0.4, and an internal
user wanted to access it, the request would fail. With DNS rewrite, the DNS packet coming
back from an external DNS server would change the response to say 172.27.1.4, and the
internal host would be able to route to it.) Furthermore, it sets a maximum number of 1000
TCP and UDP connections to the device, with 100 “half-open” TCP connections, which have
not yet received an ACK back from the SYN-ACK. This helps prevent denial of service attacks
by reducing resource usage on half-open connections. The norandomseq option is potentially
insecure, and should only be used if the expected protocol traversing the connection is hostile
to the idea of randomized sequence numbers, such as BGP (Frahim & Santos, 2006, p. 160).
Outbound NAT works similarly. As stated earlier, it is assumed that the device is
already passing traffic, so there is already a nat and global statement at work in the
configuration. Best practices state that the outside interface of the firewall is not to be used
as the global hide NAT, to help ensure the stealth of the firewall. Instead, one should create
different NATs for each specified group attempting to reach the lower security network.
Example 2-9 demonstrates this.

© SANS Institute 2009, Author retains full rights.
© S
ANS
Inst
itute
200
9
, Aut
hor r
etai
ns fu
ll rig
hts.
Key fingerprint = AF19 FA27 2F94 998D FDB5 DE3D F8B5 06E4 A169 4E46
Perimeter Defense-in-Depth with Cisco ASA
Michael P. Simone 21
Example 2-10: Configuring NAT
nat (inside) 1 0.0.0.0 0.0.0.0 nat (dmz) 2 0.0.0.0 0.0.0.0 global (outside) 1 173.0.0.2 global (outside) 2 173.0.0.3
Note that the designation on the global statement corresponds to the numerical designator on
the nat statement. This configuration allows for Internal and DMZ networks to be PATted to
different IP addresses, preventing overlap and confusion. Furthermore, it helps to narrow
down the culprits if there is a networking issue to solve – if the IP address being reported is
173.0.0.3, one knows that it is a host on the DMZ network causing the issue, and
investigation of the logs can be further refined.
Once it is decided how traffic will traverse the firewall, it is important to determine which
networks should be allowed to hit which interfaces. While the border router is going to control
some of the spoofing, it is important that the firewall observe proper anti-spoofing rules as
well. For example, if one had two DMZ networks, one with 172.16.0.0/24 and one with
172.16.1.0/24, a B2B partner on the 172.16.1.0/24 network could, conceivably, spoof the
172.16.0.0/24 network, and compromise security and information if the anti-spoofing is not
properly configured. Fortunately, the ASA can handle this natively. The ip verify reverse-path
interface command controls this (Understanding Unicast Reverse Path Forwarding, 2007). It

© SANS Institute 2009, Author retains full rights.
© S
ANS
Inst
itute
200
9
, Aut
hor r
etai
ns fu
ll rig
hts.
Key fingerprint = AF19 FA27 2F94 998D FDB5 DE3D F8B5 06E4 A169 4E46
Perimeter Defense-in-Depth with Cisco ASA
Michael P. Simone 22
is considered a best practice to enable this on all interfaces. The following example shows
the configuration of the SANSecure ASA:
Example 2-11: Configuring Reverse Path Verification
ip verify reverse-path interface inside ip verify reverse-path interface outside ip verify reverse-path interface dmz
The ASA consults the routing table on any inbound packet, to determine whether or not the
packet is spoofed. Regardless of whether the routing table is populated through static or
dynamic protocols, the incoming packet is examined to determine if the interface on which it
was received is the same as the interface that the firewall would use to route back to that
network. If these do not match, the packet is discarded, regardless of the filtering rules. As
this feature is not enabled by default, it is prudent for the network administrator to enable it.
2.4 Packet Filtering
An ASA without access lists defined is essentially a very expensive router. Granted,
the default configuration automatically secures a network against malicious inbound packets,
but there are far more dangers on the Internet than simply blocking inbound traffic can avoid.
Ingress filtering is fairly obvious and straightforward. By default, all ASA access lists
end with an implicit “deny all” statement – anything that is not explicitly permitted earlier in the

© SANS Institute 2009, Author retains full rights.
© S
ANS
Inst
itute
200
9
, Aut
hor r
etai
ns fu
ll rig
hts.
Key fingerprint = AF19 FA27 2F94 998D FDB5 DE3D F8B5 06E4 A169 4E46
Perimeter Defense-in-Depth with Cisco ASA
Michael P. Simone 23
access list is dropped. (This is known as a “default-deny” model.) Unfortunately, from an
analysis perspective, that implicit deny all is not helpful when determining if someone is
“rattling the doorknobs” to attempt reconnaissance scanning. Therefore, all access lists
should end with the line access-list listname deny ip any any. This will cause the implicit deny
at the end of the access list to become an explicit deny, and will send a log to whichever log
receiver is configured for the device.
The basic tenets of ingress filtering are simple: one must determine which services one
wishes to expose to the Internet. For a web server, that may be HTTP and HTTPS, for a mail
server, it may only be SMTP. Best practices dictate that one should create a list of all servers
in the DMZ, which services one will expose, and only allow those ports and protocols inbound
to explicitly those machines. The effort involved in this information gathering is trivial, the
impact is enormous. Furthermore, best practices further dictate that there is never a direct
inbound connection originating from the Internet to an internal host. In keeping with the
default-deny model, one adds the access list elements that will be permitted explicitly to the
list above the deny all statement, and a fairly locked-down ingress-filter is created.
Egress filtering is a far more complicated situation, and, consequently, is frequently
ignored by businesses in today’s environment. Sadly, this leads to many compromises which
could otherwise have been avoided. For example, if a Web server in the DMZ is not allowed

© SANS Institute 2009, Author retains full rights.
© S
ANS
Inst
itute
200
9
, Aut
hor r
etai
ns fu
ll rig
hts.
Key fingerprint = AF19 FA27 2F94 998D FDB5 DE3D F8B5 06E4 A169 4E46
Perimeter Defense-in-Depth with Cisco ASA
Michael P. Simone 24
to connect outbound at all, then an attacker running a remote buffer overflow exploit which
allows them to connect outbound, pull down a bot, and start spamming or worse becomes
moot. Certainly the remote exploit may cause a denial of service against the service being
exploited, but the enterprise gains two advantages with the egress filter: logs generated
showing that one of the web servers is attempting to connect outbound (which should raise a
red flag for the analysts), and prevention of liability caused by one’s network being used as a
jump-off point in an attack (Distler, 2008). Preventing one’s company from leaking
information, being used in a Denial of Service attack, or being part of a botnet are all strong
financial motivators for management to approve the time investment in correctly configuring
egress filtering. Methodology for determining the types of packets which will be allowed
through the egress filter is beyond the scope of this work; for a more in-depth analysis,
consult Dennis Distler’s 2008 paper, “Understanding Egress Filtering.”
Once one has a list of the hosts, protocols, and ports that will be allowed in and out,
one must then start building the access control list that will determine the packet’s ability to
traverse the firewall. Again, this document assumes some familiarity with the ASA, so the
majority of features in the access list command will not be covered in detail here. The syntax
for the access-list statement is as follows:
access-list id [line line-number] [extended] [line line-number] {deny | permit} {protocol | object-group

© SANS Institute 2009, Author retains full rights.
© S
ANS
Inst
itute
200
9
, Aut
hor r
etai
ns fu
ll rig
hts.
Key fingerprint = AF19 FA27 2F94 998D FDB5 DE3D F8B5 06E4 A169 4E46
Perimeter Defense-in-Depth with Cisco ASA
Michael P. Simone 25
protocol_obj_grp_id} {src_ip mask | interface ifc_name | object-group network_obj_grp_id} [operator
port | object-group service_obj_grp_id] {dest_ip mask | interface ifc_name | object-group
network_obj_grp_id} [operator port | object-group service_obj_grp_id | object-group
icmp_type_obj_grp_id] [log [[level] [interval secs] | disable | default]] [inactive | time-range
time_range_name]
One can easily see that the access list can quickly become complicated. To alleviate this,
one can employ several methods. The first, and best, is the object-group method. One
creates object groups for every possible grouping that makes sense. For example, if one has
multiple web servers, create a network-object type for them. If there’s a certain set of ports
going to a single server, or group of servers, create a service group for those. In the past,
service object groups could not mix – one needed a separate group for ICMP, TCP, UDP, and
IP protocols. More recent versions of the ASA code allow for mixed type groups, such as in
the following example.
Example 2-12: Service Group Objects
object-group service DNS service-object udp eq 53 service-object tcp eq 53
The best practice is to use groups almost exclusively, adding a host object to a rule where all

© SANS Institute 2009, Author retains full rights.
© S
ANS
Inst
itute
200
9
, Aut
hor r
etai
ns fu
ll rig
hts.
Key fingerprint = AF19 FA27 2F94 998D FDB5 DE3D F8B5 06E4 A169 4E46
Perimeter Defense-in-Depth with Cisco ASA
Michael P. Simone 26
the ports match, or adding a port to a rule where all the hosts match. The problem with this
approach is that it soon becomes unwieldy. Fortunately, recent versions of ASA use the
ASDM (Adaptive Security Device Manager) – a marked departure from the old PDM (PIX
Device Manager) in that it is user-friendly, powerful, and effective. Using the ASDM firewall
rules screen, one can view rule sets graphically, seeing which rules have the highest levels of
activity, which rules might need to be deleted, and view the comments on each rule. Notice
that in Figure 2-1, each service can easily be seen, and to and from which hosts the services
are allowed. There are also markings for the “top 10” most used rules – this allows for
rulebase optimization and tuning – the most frequently used rules should appear at the top of
the list, providing that moving it doesn’t nullify anything it was intended to secure, so that the
load on the processor is decreased. It is important to note that the “top 10” designation is over
the previous hour, not since the last time the firewall was rebooted; it is incumbent upon the
firewall administrator to determine the appropriate weight to give each rule based on the time
of day and expected usage.

© SANS Institute 2009, Author retains full rights.
© S
ANS
Inst
itute
200
9
, Aut
hor r
etai
ns fu
ll rig
hts.
Key fingerprint = AF19 FA27 2F94 998D FDB5 DE3D F8B5 06E4 A169 4E46
Perimeter Defense-in-Depth with Cisco ASA
Michael P. Simone 27
Figure 2-1: Rulebase in ASDM
One important, but often overlooked, aspect of filtering is ICMP filtering. For all of its
importance in the Internet, and the TCP/IP protocol suite in general, relatively few network
engineers have a solid understanding of ICMP filtering. “ICMP security can be a very lengthy
discussion because lots of nasty things can be done with ICMP messages when scanning
networks or trying to gain a covert channel” (Convery, 2004). There are a few message types
which should be allowed to traverse your network; the rest, however, can safely be dropped
at the perimeter.
© SANS Institute 2009, Author retains full rights.
© S
ANS
Inst
itute
200
9
, Aut
hor r
etai
ns fu
ll rig
hts.
Key fingerprint = AF19 FA27 2F94 998D FDB5 DE3D F8B5 06E4 A169 4E46
Perimeter Defense-in-Depth with Cisco ASA
Michael P. Simone 28
The first ICMP protocols which must be enabled are echo-request and echo-reply. The
caveat to this is that echo-reply messages must be allowed to return through the perimeter
firewall if and only if there is a corresponding echo request sent outbound. This is completed
with the ip inspect command, covered in section three; for now, it is an acceptable practice to
allow ICMP echo-request outbound through the filter, and allow the protocol fixups to handle
the returning echo-reply.
The next category of ICMP messages contains the various “unreachable” codes.
Sadly, ASA code, as of this writing, does not differentiate between the various unreachables;
one must allow all or none. It is best to allow at the border router any “fragmentation needed
but DF bit set” with the command access-list 199 permit icmp any any packet-too-big
(assuming that the egress filtering ACL on the border router is numbered 199), and allow the
unreachables through the ASA. This way, an internal router requiring fragmentation can tell
upstream hosts to shrink the MTU on the packet, while, at the same time, preventing the
transmission of reconnaissance data to a potentially malicious host (Convery, 2004). All other
ICMP should be dropped at the ASA and the border router.
While the Cisco ACL schema can be a powerful tool, there is a strong possibility for the
access lists to become confusing quickly. Scanning through thousands of lines of ACLs,
filtering large groups to determine proper membership, examining rule order – these things

© SANS Institute 2009, Author retains full rights.
© S
ANS
Inst
itute
200
9
, Aut
hor r
etai
ns fu
ll rig
hts.
Key fingerprint = AF19 FA27 2F94 998D FDB5 DE3D F8B5 06E4 A169 4E46
Perimeter Defense-in-Depth with Cisco ASA
Michael P. Simone 29
can leave a firewall administrator disoriented and annoyed. The best workaround for this is to
use the ASDM. It borrows heavily from the Check Point GUI model which allows one to drag
and drop hosts, and list the services separately in the same rule. While the back-end system
will still treat the rulebase as it always has, this allows for much more readable rulebases for
the administrator to manage.
2.5 URL and Content Filtering
The Cisco ASA cannot natively filter URLs; it must rely on the services of WebSense or
N2H2 for that. However, it can be configured to send packets to the filter based on the
ruleset, and drop the appropriate connections. Best practices dictate that an organization
must have a URL filtering server, to prevent employees from creating a hostile work
environment by visiting sites which are against company policy, and to reduce the amount of
time that employees spend in non-work-related web surfing.
To configure URL filtering, one must first define a URL server. The syntax for this is as
follows:
url-server (if_name) vendor websense host local_ip [timeout seconds] [protocol
TCP|UDP [version 1|4] [connections num_conns]]
url-server (if_name) vendor smartfilter|n2h2 host local_ip [port number] [timeout
seconds] [protocol TCP|UDP [connections num_conns]]

© SANS Institute 2009, Author retains full rights.
© S
ANS
Inst
itute
200
9
, Aut
hor r
etai
ns fu
ll rig
hts.
Key fingerprint = AF19 FA27 2F94 998D FDB5 DE3D F8B5 06E4 A169 4E46
Perimeter Defense-in-Depth with Cisco ASA
Michael P. Simone 30
The organization should select the appropriate vendor’s implementation, and configure the
URL server with that line. In the SANSecure example, the WebSense server hangs off of the
management network at 192.68.254.12, and would be configured as in example 2-12.
Example 2-13: Configuring a WebSense Filter Server
url-server (management) vendor websense host 192.168.254.12 timeout 30 protocol TCP
version 4
Once a filtering server is defined, then it becomes necessary to enable it to start handling
requests. When the ASA receives an acceptance response from the filtering server, it
forwards the response from the HTTP or FTP server to the client host. If the filtering server
denies the connection or content, the response from the server is dropped, and redirects the
HTTP connection to a “blocked” page, or returns “code 550: Directory not found” to an FTP
client (Frahim & Santos, 2006). The commands filter url, filter https, and filter ftp are used to
enable the ASA to use the configured filter server for URL and content filtering. The syntax for
the three commands are as follows (Cisco ASA Command Reference, 2008):
filter url <port> [-<port>] | except <local_ip> <mask> <foreign_ip> <foreign_mask> [allow] [cgi-truncate] [longurl-truncate | longurl-deny] [proxy-block]
filter https <port> [-<port>] | except <local_ip> <mask> <foreign_ip> <foreign_mask> [allow]

© SANS Institute 2009, Author retains full rights.
© S
ANS
Inst
itute
200
9
, Aut
hor r
etai
ns fu
ll rig
hts.
Key fingerprint = AF19 FA27 2F94 998D FDB5 DE3D F8B5 06E4 A169 4E46
Perimeter Defense-in-Depth with Cisco ASA
Michael P. Simone 31
filter ftp <port> [-<port>] | except <local_ip> <mask> <foreign_ip> <foreign_mask> [allow] [interact-block]
There are a few pieces of note in the syntax, the following table will explain further (Frahim &
Santos, 2006).
Table 2-1: Syntax of Filter Command
Syntax Description
filter Keyword used to enable content filtering
url Keyword to enable HTTP filtering
port[-port] TCP port number(s) for URL filtering. The security appliance inspects packets on this port(s). This can be either a single port or a range of ports.
local_ip IP/subnet address of the inside hosts where the connection originated. Can use the shorthand 0 to select all hosts.
local_mask Subnet mask of the local IP/Subnet address.
foreign_ip IP/Subnet address of the outside servers to which the connection is made. Shorthand of 0 to select all hosts.
foreign_mask Subnet mask of the foreign IP/Subnet address
allow Allows the response from the content server if the filtering server is not available.

© SANS Institute 2009, Author retains full rights.
© S
ANS
Inst
itute
200
9
, Aut
hor r
etai
ns fu
ll rig
hts.
Key fingerprint = AF19 FA27 2F94 998D FDB5 DE3D F8B5 06E4 A169 4E46
Perimeter Defense-in-Depth with Cisco ASA
Michael P. Simone 32
Syntax Description
proxy-block Denies requests going to the proxy server.
longurl-truncate Truncates URLs that are longer than the maximum allowed length before sending the request to the filtering server
longurl-deny Denies outbound connection if the URL’s are longer than the maximum allowed length.
cgi-truncate Truncates long CGI URLs before sending the request to the filtering server to save memory resources and improve firewall performance
https Keyword to enable https filtering
ftp Keyword to enable FTP filtering
interact-block Denies interactive FTP sessions that do not provide the entire directory path.
except Creates an exception for a previous rule.
On the SANSecure network, the enterprise would like to filter any request that is going
to pass through to the Internet, but bypass filtering for all DMZ web servers. To do this,
example 2-14 is used.

© SANS Institute 2009, Author retains full rights.
© S
ANS
Inst
itute
200
9
, Aut
hor r
etai
ns fu
ll rig
hts.
Key fingerprint = AF19 FA27 2F94 998D FDB5 DE3D F8B5 06E4 A169 4E46
Perimeter Defense-in-Depth with Cisco ASA
Michael P. Simone 33
Example 2-14: Configuring Filtering in the SANSecure Network
filter url 80 0 0 0 0 allow longurl-deny cgi-truncate
filter url 80 except 0 0 172.17.0.0 255.255.0.0 allow
filter https 443 10 0 0 0 0 allow
filter ftp 20-21 0 0 0 0 allow
The line containing the except keyword allows the traffic headed for the DMZ to pass
unmolested. In the event that the filtering server is unavailable, the allow keyword is
configured so that web browsing is not stopped. This is left to the discretion of the individual
organization’s security policies.
Lastly, we come to content filtering. The ASA can detect, natively, ActiveX and Java
applets, and render them harmless. The firewall administrator can configure certain applets
as trusted, and allow those through, and drop all others, thus protecting the users from
harmful or malicious code, by commenting out the <OBJECT> and <applet> tags in the HTML
headers. The syntax for those is listed below; they work very similarly to the URL filtering
headers above.
filter java {[port[-port] | except } local_ip local_mask foreign_ip foreign_mask]

© SANS Institute 2009, Author retains full rights.
© S
ANS
Inst
itute
200
9
, Aut
hor r
etai
ns fu
ll rig
hts.
Key fingerprint = AF19 FA27 2F94 998D FDB5 DE3D F8B5 06E4 A169 4E46
Perimeter Defense-in-Depth with Cisco ASA
Michael P. Simone 34
filter activex | java <port> [-<port>] | except <local_ip> <mask> <foreign_ip> <foreign_mask>
It is sound security policy to filter all unknown java and ActiveX controls, until a security
administrator can approve them. Creating an exception in the filtering list will allow for known
benign applets to be downloaded. Example 2-15 demonstrates ActiveX and Java filtering for
the SANSecure network.
Example 2-15: ActiveX and Java Filtering on the SANSEcure network
filter java 80 0 0 0 0
filter activex 80 0 0 0 0
filter java 80 except 0 0 172.17.0.0 255.255.0.0
filter activex 80 except 0 0 172.17.0.0 255.255.0.0
Using this example, one can see that all ActiveX and Java applets from the DMZ will be
allowed, but applets from the Internet will be blocked. Multiple exceptions can be added as
new safe applets are discovered.

© SANS Institute 2009, Author retains full rights.
© S
ANS
Inst
itute
200
9
, Aut
hor r
etai
ns fu
ll rig
hts.
Key fingerprint = AF19 FA27 2F94 998D FDB5 DE3D F8B5 06E4 A169 4E46
Perimeter Defense-in-Depth with Cisco ASA
Michael P. Simone 35
3 Intrusion Detection / Prevention
3.1 ASA and Intrusion Prevention Systems
The Cisco ASA code allows for two ways to block malicious traffic. All ASA models
have a built-in rule set, and various application inspection protocols. ASA models 5510 and
up, however, offer the option of installing and using a separate intrusion prevention system
(IPS) blade – the AIP-SSM module. The AIP-SSM works exactly like any other Cisco network-
based IPS (NIPS), with the exception that, instead of requiring that SPAN ports be configured,
or a device be placed in the physical path of the network, the AIP-SSM inspects traffic on the
backplane of the firewall while the traffic is still traversing it, giving faster response, and the
ability to filter traffic on all networks with a single device. Since tuning the IPS is beyond the
scope of this document, focus will remain on the application inspection and smaller database
of signature-based rules in the standard ASA code.
3.2 Application Inspection
The ASA uses stateful packet inspection as a filtering technology, with the additional
ability to employ layer-7 packet examination. The ability to reject packets that are out of state,
instead of solely looking at source and destination is why one would use a firewall rather than

© SANS Institute 2009, Author retains full rights.
© S
ANS
Inst
itute
200
9
, Aut
hor r
etai
ns fu
ll rig
hts.
Key fingerprint = AF19 FA27 2F94 998D FDB5 DE3D F8B5 06E4 A169 4E46
Perimeter Defense-in-Depth with Cisco ASA
Michael P. Simone 36
rely on packet filtering ACL’s on a border router. Unfortunately, many older, insecure
protocols from the early inception of the Internet, before the advent of stateful packet
inspection firewalls, such as FTP, are still in use today. The ASA has the ability to peer into
the application layer of the packet, and make appropriate dynamic changes to the ACL, to
permit return traffic (Frahim & Santos, 2006). Cisco took this further when they added the
concept of state to protocols that are essentially stateless – ICMP and UDMP. With ICMP
inspection, an echo-reply will be connected to an outbound echo-request; with RTSP
inspection, information about the TCP control channel creates the dynamic openings for the
incoming streaming UDP. The following table lists the protocols that can be inspected with the
ASA application inspection feature. One can clearly see that there is an expansive list of
protocols on which the ASA can perform application inspection. Furthermore, each of them
can be configured to inspect the legitimacy of the packets within the protocol, to help defray
the possibility of malicious traffic.
Table 3-1: Supported Application List
Protocol Name Protocol Source Port Destination Port
CTIQBE TCP Any 2748 DNS UDP Any 53 FTP TCP Any 21 GTP UDP 2123, 3386 2123, 3386 H.323 H225 TCP Any 1720

© SANS Institute 2009, Author retains full rights.
© S
ANS
Inst
itute
200
9
, Aut
hor r
etai
ns fu
ll rig
hts.
Key fingerprint = AF19 FA27 2F94 998D FDB5 DE3D F8B5 06E4 A169 4E46
Perimeter Defense-in-Depth with Cisco ASA
Michael P. Simone 37
Protocol Name Protocol Source Port Destination Port
H.323 RAS UDP Any 1718-1719 HTTP TCP Any 80 ICMP ICMP -- -- ILS TCP Any 389 MGCP UDP 2427, 2727 2427, 2727 NetBIOS UDP Any 137-138 SUNRPC UDP Any 111 RSH TCP Any 514 RTSP TCP Any 554 SIP TCP, UDP Any 5060 Skinny TCP Any 2000 SMTP/ESMTP TCP Any 25 SQLNet TCP Any 1521 TFTP UDP Any 69 XDMCP UDP Any 177
There are three steps required to configure traffic for application inspection. The first is
to create a class map, which determines the traffic that will be defined as interesting. One
can choose to inspect all traffic, or limited traffic, or the default-inspection-traffic, which would
be all of the traffic classes in table 3-1 on their native ports. Since most networks use the
native ports for most protocols, it is considered acceptable to use the default-inspection-traffic
class for the inspection.
Example 3-1: Matching Default Inspection Traffic
class-map inspection_default match default-inspection-traffic
Should the network administrator choose, it is possible to use match with an ACL, the
keyword any, or a port number. (There are other things which can be matched, but those are
only used for QoS, which is beyond the scope of this document.) Remember, this section is

© SANS Institute 2009, Author retains full rights.
© S
ANS
Inst
itute
200
9
, Aut
hor r
etai
ns fu
ll rig
hts.
Key fingerprint = AF19 FA27 2F94 998D FDB5 DE3D F8B5 06E4 A169 4E46
Perimeter Defense-in-Depth with Cisco ASA
Michael P. Simone 38
only defining the traffic that the application inspection will hand over for processing; it does
not enable inspection on any of the traffic at this point.
Once the class map is created, one needs to create a policy based on that class. This
is the point at which the administrator tells the firewall on which packets to act. The default
inspection policy includes several members of the default inspection class, but not all. One
creates a policy-map, and gives it a name, calls the class defined earlier, and then proceeds
to add statements regarding which protocol features to inspect.
Example 3-2: Default Inspects
policy-map global_policy class inspection_default inspect dns maximum-length 512 inspect ftp inspect h323 h225 inspect h323 ras inspect netbios inspect rsh inspect rtsp inspect skinny inspect esmtp inspect sqlnet inspect sunrpc inspect tftp

© SANS Institute 2009, Author retains full rights.
© S
ANS
Inst
itute
200
9
, Aut
hor r
etai
ns fu
ll rig
hts.
Key fingerprint = AF19 FA27 2F94 998D FDB5 DE3D F8B5 06E4 A169 4E46
Perimeter Defense-in-Depth with Cisco ASA
Michael P. Simone 39
inspect sip inspect xdmcp
One can see that there are a lot of protocols being inspected, which can lead to a lot of
excess CPU overhead if traffic is passing on those ports, but is not actually of that protocol.
Best practices dictate that traffic which will not be passing through the ASA not be on the
inspect list; this prevents each packet from having to be matched against the inspection list at
all. (This becomes even more important if the class-map has the match all option selected.)
For example, the perimeter firewall, which will also serve to break away the DMZ, should
never be passing NetBIOS or RSH, so those two inspects can be disabled. Ideally, TFTP will
not be used anywhere, but it may need to be used to transfer configurations to and from
Cisco routers and switches. Leaving that enabled is up to the discretion of the network
administrator, based on the environment. Likewise, the VOIP protocols can be disabled
where no VOIP is in use, further saving processor cycles, and preventing opportunity for a
potential future remote exploitation of an error in the protocol parser. (While it is nice to
dream that these things never happen, the fact is that new exploits are found every day.
Reducing the threat profile by preventing application inspection for an application that is not
being used is one way to increase security.)
Deeper packet inspection is applied to certain protocols by calling a secondary policy-
map within the inspect line. For example, if a secondary policy-map for DNS named

© SANS Institute 2009, Author retains full rights.
© S
ANS
Inst
itute
200
9
, Aut
hor r
etai
ns fu
ll rig
hts.
Key fingerprint = AF19 FA27 2F94 998D FDB5 DE3D F8B5 06E4 A169 4E46
Perimeter Defense-in-Depth with Cisco ASA
Michael P. Simone 40
DNS_Inspection is configured, then the line to call it from the global inspection policy is
inspect dns DNS_Inspection. The secondary policy map is created by defining the ID, and
then using the parameters statement to set the various minimums and maximums allowed by
the protocol. Each one is different, and best practices will be covered on a per-protocol basis.
The figure below shows the inspect engines that can be configured.
Figure 3-1: Available Deep Inspection Types
gateway(config)# policy-map type inspect ? configure mode commands/options: dcerpc Configure a policy-map of type DCERPC dns Configure a policy-map of type DNS esmtp Configure a policy-map of type ESMTP ftp Configure a policy-map of type FTP gtp Configure a policy-map of type GTP h323 Configure a policy-map of type H.323 http Configure a policy-map of type HTTP im Configure a policy-map of type IM ipsec-pass-thru Configure a policy-map of type IPSEC-PASS-THRU mgcp Configure a policy-map of type MGCP netbios Configure a policy-map of type NETBIOS radius-accounting Configure a policy-map of type Radius Accounting rtsp Configure a policy-map of type RTSP sip Configure a policy-map of type SIP skinny Configure a policy-map of type Skinny

© SANS Institute 2009, Author retains full rights.
© S
ANS
Inst
itute
200
9
, Aut
hor r
etai
ns fu
ll rig
hts.
Key fingerprint = AF19 FA27 2F94 998D FDB5 DE3D F8B5 06E4 A169 4E46
Perimeter Defense-in-Depth with Cisco ASA
Michael P. Simone 41
One inspection that is turned on by default is DNS inspection. It helps to prevent
spoofing of DNS replies by ensuring that each DNS reply matches the ID of a DNS request,
and helps prevent buffer overflow attacks by reassembling DNS packets to ensure that the
length is below a prescribed maximum. Best practices state that it’s best to expand that to
1,024 bytes, as there are several applications that use larger responses than 512 bytes
(Frahim and Santos, 2006). Newer versions allow ID randomization, which is described in
CERT Vulnerability Note VU#800113 (CERT, 2008). Example 3-3 demonstrates the
command sequence to secure DNS replies.
Example 3-3:
policy-map type inspect dns DNS_Secure parameters message-length maximum 1024 id-randomization id-mismatch count 10 duration 5 action log policy-map global_policy class inspection_default ! <output omitted> ! inspect dns DNS_Secure

© SANS Institute 2009, Author retains full rights.
© S
ANS
Inst
itute
200
9
, Aut
hor r
etai
ns fu
ll rig
hts.
Key fingerprint = AF19 FA27 2F94 998D FDB5 DE3D F8B5 06E4 A169 4E46
Perimeter Defense-in-Depth with Cisco ASA
Michael P. Simone 42
The next default inspection that is recommended for all sites is ESMTP inspection.
This “protects against SMTP-based attacks by restricting the types of SMTP commands that
can pass through the Cisco ASA” (Frahim and Santos, 2006). The inspection allows the
following commands:
• AUTH
• DATA
• EHLO
• ETRN
• HELO
• HELP
• NOOP
• QUIT
• RCPT
• RSET
• SAML
• SEND
• SOML

© SANS Institute 2009, Author retains full rights.
© S
ANS
Inst
itute
200
9
, Aut
hor r
etai
ns fu
ll rig
hts.
Key fingerprint = AF19 FA27 2F94 998D FDB5 DE3D F8B5 06E4 A169 4E46
Perimeter Defense-in-Depth with Cisco ASA
Michael P. Simone 43
• VRFY
When faced with a command that is not allowed by the inspection, the firewall modifies the
SMTP packet and forwards it, causing the server to respond with a “500 (command not
recognized)” response, and tears down the connection.
Accepted commands can be subjected to even deeper packet inspection, with an
inspect type class. For example, if one is using a Microsoft Exchange server, then it becomes
important that the ASA not obscure the SMTP banner, or else it cannot properly send and
receive email. To create a deep inspection type, one would follow example 3-4. By default,
the ASA will block email to and from an Exchange server, one must enable the deep packet
inspection of ESMTP traffic, or mail will break.

© SANS Institute 2009, Author retains full rights.
© S
ANS
Inst
itute
200
9
, Aut
hor r
etai
ns fu
ll rig
hts.
Key fingerprint = AF19 FA27 2F94 998D FDB5 DE3D F8B5 06E4 A169 4E46
Perimeter Defense-in-Depth with Cisco ASA
Michael P. Simone 44
Example 3-4: Deeper SMTP Inspection
policy-map type inspect esmtp Mail parameters no mask-banner special-character action drop-connection log match MIME filename length gt 255 drop-connection log match cmd line length gt 512 drop-connection log match cmd RCPT count gt 100 drop-connection log match body line length gt 998 drop-connection log match sender-address length gt 320 drop-connection log match cmd verb VRFY mask log
This, of course, is simply an example, as there are hundreds of options available for SMTP
inspection. For this, it is really recommended that one use the ASDM to configure the SMTP
inspection, as the menus make it far easier to see what is available. To access this in ASDM,
select Configuration, then Firewall, then expand Inspect Maps, and select ESMTP, as shown
in Figure 3-2.

© SANS Institute 2009, Author retains full rights.
© S
ANS
Inst
itute
200
9
, Aut
hor r
etai
ns fu
ll rig
hts.
Key fingerprint = AF19 FA27 2F94 998D FDB5 DE3D F8B5 06E4 A169 4E46
Perimeter Defense-in-Depth with Cisco ASA
Michael P. Simone 45
Figure 3-2: Inspect Maps in ASDM
Example 3-4 inspects incoming SMTP traffic, and performs the following actions:
• Unmasks the banner (to allow MS Exchange to work properly)
• Drops the connection and generates a log if
o any special characters appear in the commands
o any MIME filename of greater length than 255 characters attempts to pass

© SANS Institute 2009, Author retains full rights.
© S
ANS
Inst
itute
200
9
, Aut
hor r
etai
ns fu
ll rig
hts.
Key fingerprint = AF19 FA27 2F94 998D FDB5 DE3D F8B5 06E4 A169 4E46
Perimeter Defense-in-Depth with Cisco ASA
Michael P. Simone 46
o any command line is greater than 512 characters
o the recipient count on the email is greater than 100 users
o the body line length is greater than 998 characters
o the sender address is greater than 320 characters
• Masks the command (resulting in a 500 error) for any attempts to run the VRFY
command.
These commands increase the security of inbound email by preventing many malicious SMTP
tricks from traversing the firewall, and by preventing data leakage with the VRFY command.
(The VRFY command confirms the existence and full name of a user on the box, which could
later be used in a social engineering attack (RAD University, 2008).)
Continuing through the list of default inspections, we next encounter FTP. While, in a
truly secure world, FTP would not be used at all, it is still prevalent in many enterprises to this
day, and FTP inspection needs to be enabled. Not only will it match the control and data
connections as established connections, but it can perform deep packet inspection. One
difference in calling the deep inspection map is that there is the opportunity to request strict
FTP inspection, using the line inspect ftp strict ftp-map-name. The strict modifier is optional. If

© SANS Institute 2009, Author retains full rights.
© S
ANS
Inst
itute
200
9
, Aut
hor r
etai
ns fu
ll rig
hts.
Key fingerprint = AF19 FA27 2F94 998D FDB5 DE3D F8B5 06E4 A169 4E46
Perimeter Defense-in-Depth with Cisco ASA
Michael P. Simone 47
enabled, however, the connection must adhere to the exact requirements of the RFC,
otherwise the connection will be reset. The ftp-map will deny requests to perform certain
actions during an FTP connection. Figure 3-3 lists the available commands and what they do
(Frahim & Santos, 2006).
Figure 3-3
Option Description
All Denies all supported FTP commands
appe Denies the ability to append to a file
cdup Denies a user request to change to parent of current directory
help Restricts the user to access the help information from the FTP server
get User is not allowed to retrieve files
mkd User is not allowed to create directories
put User is not allowed to upload files
retr Denies the retrieval of a file from the FTP server
rnfr User is not allowed to rename from a filename
rnto User is not allowed to rename to a specific filename
site User is not allowed to specify a server-specific command
stor Denies the user permission to store a file

© SANS Institute 2009, Author retains full rights.
© S
ANS
Inst
itute
200
9
, Aut
hor r
etai
ns fu
ll rig
hts.
Key fingerprint = AF19 FA27 2F94 998D FDB5 DE3D F8B5 06E4 A169 4E46
Perimeter Defense-in-Depth with Cisco ASA
Michael P. Simone 48
Option Description
stou Denies the user permission to store a file with a unique name
Further options in an FTP inspect map include file type filtering based off of a regex string,
masking of banners, and masking replies to the SYST command. At the very least, a secure
site should be masking the banners. Example 3-5 shows the commands required to make this
effective.
Example 3-5
policy-map type inspect ftp FTP_Secure parameters mask-banner mask-syst-reply match request-command rnfr rnto site reset log policy-map global_policy class inspection_default inspect ftp strict FTP_Secure
These inspections are enabled by default. The other default inspections, as stated
earlier, can be turned on or off or tuned to the requirements of the local security policy, and no
best practices document can adequately address the myriad configuration issues involved

© SANS Institute 2009, Author retains full rights.
© S
ANS
Inst
itute
200
9
, Aut
hor r
etai
ns fu
ll rig
hts.
Key fingerprint = AF19 FA27 2F94 998D FDB5 DE3D F8B5 06E4 A169 4E46
Perimeter Defense-in-Depth with Cisco ASA
Michael P. Simone 49
with all of them. However, there are two inspections that are not enabled by default; one
should use the HTTP and ICMP inspections.
ICMP inspection has only one option: whether or not to inspect ICMP error messages.
Simply turning on ICMP inspection will allow for matching echo requests with replies. Turning
on error inspection causes the ASA to inspect the data portion of the error message and
ensure that it is present and correct. Without having ICMP inspection turned on, PING testing
through the ASA will fail, causing frustration to the network administrator who is trying to
diagnose network issues.
HTTP inspection, like SMTP and FTP, contains dozens of options; it is recommended
that the basic outline of HTTP inspection be completed in ASDM. The ASDM comes with a
large number of tunneled IM, P2P, and tunneled remote access protocols. It is recommended
that, at the very least, the defaults are all disabled, as are potentially unsafe methods. The
best way to do this is through the ASDM.
1. Click on Service Policy Rules
2. Select the service policy that will contain the HTTP inspection (usually the
inspection_default)
3. Select Rule Actions

© SANS Institute 2009, Author retains full rights.
© S
ANS
Inst
itute
200
9
, Aut
hor r
etai
ns fu
ll rig
hts.
Key fingerprint = AF19 FA27 2F94 998D FDB5 DE3D F8B5 06E4 A169 4E46
Perimeter Defense-in-Depth with Cisco ASA
Michael P. Simone 50
4. Check HTTP, and click Configure
5. Click Select an HTTP map
6. Click Add to create a new Inspect Map.
7. Change the security level to Medium. This will cause the following actions:
a. Drop connections with protocol violations
b. Drop connections for unsafe methods, only allowing GET, HEAD and POST
8. Select Details
9. Select Inspections
10. Click Add
11. Select Request Method as the criterion
12. Click Regular Expression Class and click Manage
13. Click Add
14. Give it a useful name, like “All_Tunneled_Traffic”
15. Select all the regex defaults and click Add
16. Click OK three times. We select drop because reset causes a TCP reset to be sent,
which frees up the resource on the violating machine too quickly. Using drop causes it
to wait until it times out.
17. Click add again.
18. Select Request Body as the Criterion.

© SANS Institute 2009, Author retains full rights.
© S
ANS
Inst
itute
200
9
, Aut
hor r
etai
ns fu
ll rig
hts.
Key fingerprint = AF19 FA27 2F94 998D FDB5 DE3D F8B5 06E4 A169 4E46
Perimeter Defense-in-Depth with Cisco ASA
Michael P. Simone 51
19. Select Regular Expression class, and find All_Tunneled_Traffic in the drop-down list
20. Click OK twice.
21. Click Apply
This will protect against some dangerous methods, and also block instant messenger traffic
being tunneled over HTTP. One can work with one’s MSSP to help develop regex signatures
for even more classes of tunneled traffic, and add them to the inspection class as one learns
of them. For those who wish not to use the ASDM, the commands that match the above are
shown in example 3-6.
Example 3-6
class-map type regex match-any All_Tunneled_Traffic description All IM, P2P and Remote Access tunneled over HTTP match regex _default_aim-messenger match regex _default_yahoo-messenger match regex _default_GoToMyPC-tunnel match regex _default_gator match regex _default_firethru-tunnel_2 match regex _default_firethru-tunnel_1 match regex _default_msn-messenger match regex _default_x-kazaa-network match regex _default_GoToMyPC-tunnel_2 match regex _default_icy-metadata match regex _default_gnu-http-tunnel_uri match regex _default_httport-tunnel

© SANS Institute 2009, Author retains full rights.
© S
ANS
Inst
itute
200
9
, Aut
hor r
etai
ns fu
ll rig
hts.
Key fingerprint = AF19 FA27 2F94 998D FDB5 DE3D F8B5 06E4 A169 4E46
Perimeter Defense-in-Depth with Cisco ASA
Michael P. Simone 52
match regex _default_windows-media-player-tunnel match regex _default_gnu-http-tunnel_arg match regex _default_http-tunnel match regex _default_shoutcast-tunneling-protocol class-map type inspect http match-all asdm_medium_security_methods match not request method head match not request method post match not request method get policy-map type inspect http SecureHTTP parameters protocol-violation action drop-connection match request body regex class All_Tunneled_Traffic drop-connection log match request method regex class All_Tunneled_Traffic drop-connection log policy-map global_policy class inspection_default inspect http SecureHTTP
Obviously, before enabling this globally, it is good to check with the business units to
determine if some of these commands or protocols are allowed and necessary.
The last phase of implementing application inspection is determining whether to have it
inspect on a global or an interface level. Since it is good to have these protocols inspected
whenever they traverse the firewall, enabling globally is a good plan, but there will be times
when an interface may need some extra attention. In that case, one would create a new class

© SANS Institute 2009, Author retains full rights.
© S
ANS
Inst
itute
200
9
, Aut
hor r
etai
ns fu
ll rig
hts.
Key fingerprint = AF19 FA27 2F94 998D FDB5 DE3D F8B5 06E4 A169 4E46
Perimeter Defense-in-Depth with Cisco ASA
Michael P. Simone 53
map, a new policy map, and apply that service policy to only the selected interface. To enable
the default_inspection_policy globally, use the command service-policy
default_inspection_policy global. To enable a policy called DMZ_policy on the DMZ interface,
one would issue the service-policy DMZ_policy interface dmz. This activates the service
policy, and begins the protocol inspection on the device.
3.3 Signaturebased IPS
Application inspection can only offer a certain level of protection. Many attacks that
propagate through the network do not violate protocols, or use unsafe methods; they simply
exploit a weakness in the programming of an application or service. While monitoring logs has
its uses, there are instances when the delay between the time of an attack and the time that
an analyst can detect the attack means that the damage is already done. This is why Cisco
implemented their intrusion detection system (IDS) and intrusion prevention system (IPS) into
the Cisco ASA.
Cisco has certain standards for their IDS/IPS devices. As Kaeo states,
[A] good intrusion system should have the following characteristics • It must run continuously without human supervision. The system must be
reliable enough to allow it to run in the background of the system being observed.
• It must be fault tolerant in the sense that it must survive a system crash

© SANS Institute 2009, Author retains full rights.
© S
ANS
Inst
itute
200
9
, Aut
hor r
etai
ns fu
ll rig
hts.
Key fingerprint = AF19 FA27 2F94 998D FDB5 DE3D F8B5 06E4 A169 4E46
Perimeter Defense-in-Depth with Cisco ASA
Michael P. Simone 54
and not require its knowledge base to be rebuilt at restart. • It must resist subversion. The system can monitor itself to ensure that it
has not been subverted. • It must impose minimal overhead on the system. A system that slows a
computer to a crawl will simply not be used. • It must observe deviations from normal behavior and immediately alert
someone to the event of abnormal behavior. • It must cope with changing system behavior over time as new
applications are being added. All of these requirements are fully met with the ip audit feature native to the Cisco ASA code.
It is a signature-based IPS, with capability to drop packets, or shun hosts; the signatures are
built into the ASA code and don’t need to be re-learned; unless the firewall is completely
compromised, the system cannot be subverted; and the overhead is small. This meets or
exceeds all of Cisco’s requirements for an IDS/IPS system.
The ASA, in version 8.0(4), contains 51 signatures for different network based threats.
Leaving all of them enabled can lead to overload of the analysts’ event queue, disabling too
many of them can lead to missed attacks. As with all IPS tuning, there remains a great deal of
art to the science of maintaining the balance. The signatures are broken into two different
categories: informational and attack. Informational signatures detect reconnaissance, such
as ping sweeps; attack signatures look for actual threats, such as Ping of Death (Owe, 2008).
The complete signature list is included in Appendix A, for completeness.
The first thing to consider is which signatures to disable, if any. If one is going to

© SANS Institute 2009, Author retains full rights.
© S
ANS
Inst
itute
200
9
, Aut
hor r
etai
ns fu
ll rig
hts.
Key fingerprint = AF19 FA27 2F94 998D FDB5 DE3D F8B5 06E4 A169 4E46
Perimeter Defense-in-Depth with Cisco ASA
Michael P. Simone 55
establish a strict IP audit policy, then one must disable three signatures – 2000, ICMP Echo-
Reply, 2001, ICMP Echo-Request, and 2004, ICMP Unreachable. If these signatures are
disabled, it is imperative that one use the ICMP inspection from the previous section, to
prevent against attacks by tools such as Loki (Cole, 2002). Best practices dictate that all other
signatures remain enforced, unless there is a documented business need for that traffic to
pass. Example 3-7 demonstrates disabling these three signatures.
Example 3-7: Disabling Echo Request, Echo Reply, and ICMP Unreachable Signatures
ip audit signature 2000 disable ip audit signature 2001 disable ip audit signature 2004 disable
When configuring the ip audit function, one can select one or more of three options for
response to the presence of a packet matching an enabled signature – alarm, which sends an
alert to the logging server and management console, or drop, which will delete the packet
without sending it on to the destination host, or reset, which sends a TCP RST packet to both
ends of the connection. Since most of the informational signatures can indicate an attacker
trying to bypass routing or IDS, it is best to tune them to drop and alert, while the attacks
should alert, drop and reset.
To configure the IP Audit function, one must first create two profiles, one for attack

© SANS Institute 2009, Author retains full rights.
© S
ANS
Inst
itute
200
9
, Aut
hor r
etai
ns fu
ll rig
hts.
Key fingerprint = AF19 FA27 2F94 998D FDB5 DE3D F8B5 06E4 A169 4E46
Perimeter Defense-in-Depth with Cisco ASA
Michael P. Simone 56
packets, and one for informational packets. These use the ip audit name command. The
syntax for this command is
ip audit name audit_name {info|attack} [action [alarm] [drop] [reset]]
Example 3-8 demonstrates configuring the Attacker and Snooper ip audit profiles. It is prudent
to have differing levels of response, based on whether the attacker is inside or outside.
Example 3-8: Configuring IP Audit Profiles
ip audit name Snooper info action alarm drop ip audit name Attacker attack action alarm drop reset ip audit name Internal_Info info action alarm ip audit name Internal_Malicious attack action alarm drop
Finally, one must apply the profile to an interface. The more stringent profiles should be
applied to the outside interface, with a more lenient one on the inside, as demonstrated in
Example 3-9.
Example 3-9: Applying profiles to Interfaces
ip audit interface inside Internal_Info ip audit interface inside Internal_Malicious ip audit interface dmz Internal_Info ip audit interface dmz Internal_Malicious ip audit interface outside Snooper ip audit interface outside Attacker

© SANS Institute 2009, Author retains full rights.
© S
ANS
Inst
itute
200
9
, Aut
hor r
etai
ns fu
ll rig
hts.
Key fingerprint = AF19 FA27 2F94 998D FDB5 DE3D F8B5 06E4 A169 4E46
Perimeter Defense-in-Depth with Cisco ASA
Michael P. Simone 57
This allows an enterprise network to extend the capabilities of the firewall to protect against
some known, common threats. Obviously, this is not a comprehensive list of signatures; in
order to have the most up-to-date signature list and tuning, one must install the AIP-SSM
blade, and regularly download signatures. Also, it is important to have constant review of the
logs, to determine if there are compromises within one’s network; for that, it is recommended
that the enterprise secure the services of an MSSP with log analysis services.

© SANS Institute 2009, Author retains full rights.
© S
ANS
Inst
itute
200
9
, Aut
hor r
etai
ns fu
ll rig
hts.
Key fingerprint = AF19 FA27 2F94 998D FDB5 DE3D F8B5 06E4 A169 4E46
Perimeter Defense-in-Depth with Cisco ASA
Michael P. Simone 58
4 Virtual Private Networking
One of the most powerful features of the Cisco ASA device is its ability to maintain site-
to-site and remote access VPN tunnels. The advantages of having the VPNs terminate on the
firewall include:
• Reduced number of hardware devices in the datacenter
• Reduced cost of licensing
• Failover capability
• Better security, as traffic is decrypted and then examined by the ASA. This
prevents decryption outside of the firewall, where traffic must pass in clear text
before being examined, and it prevents malicious traffic from passing through
the firewall encrypted to an internal VPN concentrator.
• Ability to use client-based or clientless VPNs.
This does not mean that it is without disadvantages. Using the firewall as a VPN termination
device does require more processing power and memory, and it sometimes requires a special
license; this may make one select a more powerful (and therefore expensive) model than
initial estimates would have suggested.

© SANS Institute 2009, Author retains full rights.
© S
ANS
Inst
itute
200
9
, Aut
hor r
etai
ns fu
ll rig
hts.
Key fingerprint = AF19 FA27 2F94 998D FDB5 DE3D F8B5 06E4 A169 4E46
Perimeter Defense-in-Depth with Cisco ASA
Michael P. Simone 59
The details of how encryption methods work is beyond the scope of this document. For an
excellent treatment on encryption protocols, public and shared key security, and hashing
algorithms consult Designing Network Security, listed in the bibliography.
Authentication of the remote peer is the first important consideration for a VPN. For an
L2L VPN, one can use IP address or a certificate, for RA, a group name provides the identity.
The certificate method is considerably more scalable, especially for RA VPN’s, as there’s no
need to adjust the pre-shared key in the event that an employee leaves. The downside of the
public-key infrastructure (PKI) is that the enrollment and certificate revocation list servers
must be reachable from outside of the network, and require considerable time and effort to
configure. If one wishes to use globally recognized root certificate authorities, then services
must be contracted through a vendor like Verisign or Baltimore UniCERT. Once they are up,
and reachable, the ASA can be configured to use them to obtain its certificate, and use that to
authenticate itself during phase 1 negotiations.
Assuming that there is a PKI in place, the first step is to generate the RSA key that will
be used on the device. Since that should have been completed in part two above, it’s a
simple matter of entering the show crypto key mypubkey rsa. This will display the default RSA
key that was generated on the device.
The next step is to configure a trustpoint. A trustpoint is the server from which

© SANS Institute 2009, Author retains full rights.
© S
ANS
Inst
itute
200
9
, Aut
hor r
etai
ns fu
ll rig
hts.
Key fingerprint = AF19 FA27 2F94 998D FDB5 DE3D F8B5 06E4 A169 4E46
Perimeter Defense-in-Depth with Cisco ASA
Michael P. Simone 60
enrollment will take place; all of the necessary certificate parameters will be configured here.
Table 4-1 lists the available parameters for the trustpoint command (Frahim & Santos, 2006).
Example 4-1
Subcommand Description
accept-subordinates Allows the Cisco ASA to accept subordinate CA certificates
crl CRL options
default Returns enrollment parameters to their default parameters
email Used to enter the email address to be used in the enrollment request
enrollment Enrollment parameters; • retry – Polling retry count and period. • self – Enrollment will generate a self-
signed certificate • terminal – Used for manual enrollment
(cut-and-paste method) • url – the URL of the CA server
fqdn Includes fully qualified domain name
id-cert-issuer Accepts ID certificates
ip-address Includes IP address
keypair Specifies the key pair whose public key is to be certified
password Returns password
serial-number Includes serial number

© SANS Institute 2009, Author retains full rights.
© S
ANS
Inst
itute
200
9
, Aut
hor r
etai
ns fu
ll rig
hts.
Key fingerprint = AF19 FA27 2F94 998D FDB5 DE3D F8B5 06E4 A169 4E46
Perimeter Defense-in-Depth with Cisco ASA
Michael P. Simone 61
Subcommand Description subject-name Subject name
support_user_cert_validation Validates remote user certificates using the configuration from this trustpoint, provided that this trustpoint is authenticated to the CA that issued the remote certificate.
Example 4-1 demonstrates configuring an internal domain controller running Microsoft
Certificate Services.
Example 4-2: Configuring a Trustpoint
SANSecureASA(config)# crypto ca trustpoint CISCO SANSecureASA(ca-trustpoint)# enrollment url http://10.0.1.2/certsrv/mscep/mscep.dll SANSecureASA(ca-trustpoint)# enrollment retry count 3 SANSecureASA(ca-trustpoint)# enrollment retry period 5 SANSecureASA(ca-trustpoint)# fqdn SANSecureASA.sansecure.fake SANSecureASA(ca-trustpoint)# exit
Once the trustpoint is configured, then one simply runs the command crypto ca enroll
CISCO, to cause it to pull the certificate from the trustpoint. (Obviously, if the trustpoint
requires authentication, then the earlier example would need to include a subject name and a
password.)
Once a certificate is enabled on the device, one should allow for the possibility that

© SANS Institute 2009, Author retains full rights.
© S
ANS
Inst
itute
200
9
, Aut
hor r
etai
ns fu
ll rig
hts.
Key fingerprint = AF19 FA27 2F94 998D FDB5 DE3D F8B5 06E4 A169 4E46
Perimeter Defense-in-Depth with Cisco ASA
Michael P. Simone 62
some VPNs may connect using pre-shared keys, and others will connect using their
certificates. To enable this, one uses the command isakmp identity auto. This will allow the
ASA to determine by the request of the peer which method of authentication to use.
Pre-shared keys, on the other hand, are fairly easy and straightforward to configure on
the ASA. One creates a tunnel-group for each remote peer, and configures the attributes, as
demonstrated in example 4-2. SANSecure is creating a pre-shared key partnership with a
host at IP address 1.2.3.4. In this example, ISAKMP dead peer detection will send a
keepalive packet after 30 seconds of inactivity, and send 5 packets until the peer responds, or
it will consider the tunnel dead.
Example 4-3: Configuring a Tunnel-Group for L2L VPN
SANSecureASA(config)# tunnel-group 1.2.3.4 type ipsec-l2l SANSecureASA(config)# tunnel-group 1.2.3.4 ipsec-attributes SANSecureASA(config-ipsec)# pre-shared-key 500p3r533kr3t@54N5! SANSecureASA(config-ipsec)# isakmp keepalive threshold 30 retry 5
This creates a partnership agreement between the two VPN peers.
The next step is to define the ISAKMP phase 1 policies. Each policy has a priority
number, the lower the number, the earlier in the list one will encounter it. The highest security
policies should have the lowest ID number, to ensure that they are selected first, where
available. There are five available attributes: authentication type, encryption, Diffie-Hellman

© SANS Institute 2009, Author retains full rights.
© S
ANS
Inst
itute
200
9
, Aut
hor r
etai
ns fu
ll rig
hts.
Key fingerprint = AF19 FA27 2F94 998D FDB5 DE3D F8B5 06E4 A169 4E46
Perimeter Defense-in-Depth with Cisco ASA
Michael P. Simone 63
group, hash, and lifetime. Every attribute on both sides must match. While all five attributes
do not need to be defined explicitly, as the ASA will substitute the default value, the defaults
may not always be the most secure choice. Example 4-4 demonstrates the ISAKMP policies
enabled on the SANSecure perimeter ASA.
Example 4-4: SANSecure Phase 1 Policies
isakmp policy 5 authentication rsa-sig isakmp policy 5 encryption aes-256 isakmp policy 5 group 5 isakmp policy 5 hash sha isakmp policy 5 lifetime 86400 isakmp policy 6 authentication rsa-sig isakmp policy 6 encryption 3des isakmp policy 6 group 2 isakmp policy 6 hash sha isakmp policy 6 lifetime 86400 isakmp policy 15 authentication pre-share isakmp policy 15 encryption aes-256 isakmp policy 15 group 5 isakmp policy 15 hash sha isakmp policy 15 lifetime 86400 isakmp policy 16 authentication pre-share isakmp policy 16 encryption 3des

© SANS Institute 2009, Author retains full rights.
© S
ANS
Inst
itute
200
9
, Aut
hor r
etai
ns fu
ll rig
hts.
Key fingerprint = AF19 FA27 2F94 998D FDB5 DE3D F8B5 06E4 A169 4E46
Perimeter Defense-in-Depth with Cisco ASA
Michael P. Simone 64
isakmp policy 16 group 2 isakmp policy 16 hash sha isakmp policy 16 lifetime 86400 isakmp enable outside
This example demonstrates preferring public key authentication to pre-shared keys, and
preferring aes-256 encryption to 3des. The lower security quintet of each authentication type
is to support older devices which may not be able to cope with AES or DH group 5. Notice
that there is room in between to put in different hashing values or Diffie-Hellman groups. The
best practices rule of thumb is to keep the highest security levels nearest the top of the list, so
that they are used.
Once phase one negotiation is complete, it is time to configure the phase two
encryption parameters. This is done by creating a transform-set, which is very similar to the
phase one parameters. The syntax for creating a transform set is
crypto ipsec transform-set transform-set-name { esp-3des | esp-aes | esp-aes-192 | esp-aes-
256 | esp-des } {esp-md5-hmac | esp-null | esp-sha-hmac}
There are three parts to the transform set. The transform set name, the encryption algorithm,
and the hashing algorithm. Obviously, since this is the data portion of the encryption, security

© SANS Institute 2009, Author retains full rights.
© S
ANS
Inst
itute
200
9
, Aut
hor r
etai
ns fu
ll rig
hts.
Key fingerprint = AF19 FA27 2F94 998D FDB5 DE3D F8B5 06E4 A169 4E46
Perimeter Defense-in-Depth with Cisco ASA
Michael P. Simone 65
is just as important as the key exchange, but processor load comes into consideration here. If
at all possible, it is best to use AES-256 and SHA-1 as the hashing algorithm, as there have
been recent collisions detected in MD5 (Stevens et. al., 2008). Example 4-5 demonstrates the
transform sets enabled on the SANSecure ASA.
Example 4-5: Transform Sets on SANSecureASA
crypto ipsec transform-set ESP-A256-SHA esp-aes-256 esp-sha-hmac
crypto ipsec transform-set ESP-3DES-SHA esp-3des esp-sha-hmac
The next step is to identify interesting traffic. Interesting traffic is defined as traffic that should
pass through the VPN tunnel. This is not the place to define access control lists to determine
which ports and protocols are allowed, as many VPN devices do not understand port based
ACLs. This step solely identifies the networks that can communicate with one another through
the tunnel. One major caveat to keep in mind is that, when configuring a VPN with a non-
Cisco device, this can be the tricky part. For example, when connecting to a Check Point, one
must select the “support key exchange for subnets” in the Check Point GUI, or else the way
the ASA parses the access list will cause phase 2 to drop. In the SANSecure example, users
on subnet 10.0.50.0/24 are allowed to connect via the VPN to a business partner named
ParterCorp, whose internal network is 172.31.24.0/24.

© SANS Institute 2009, Author retains full rights.
© S
ANS
Inst
itute
200
9
, Aut
hor r
etai
ns fu
ll rig
hts.
Key fingerprint = AF19 FA27 2F94 998D FDB5 DE3D F8B5 06E4 A169 4E46
Perimeter Defense-in-Depth with Cisco ASA
Michael P. Simone 66
Example 4-6: Defining Interesting Traffic
access-list PartnerCorp permit ip 10.0.50.0 255.255.255.0 172.31.24.0 255.255.255.0
Note that this defines all traffic from both of those subnets as interesting. This sounds
potentially insecure, but it is not – the filtering has yet to take place.
If both sides of the connection are going to define filtering based off of the actual IP
addresses of the devices, it is important to ensure that no NAT takes place from one network
to the other. In this case, one creates a NoNAT access list, and applies it with the nat 0
command, as shown in example 4-7.
Example 4-7: NoNAT Access List
access-list NoNAT permit ip 10.0.50.0 255.255.255.0 172.31.24.0 255.255.255.0
nat (inside) 0 access-list NoNAT
Note that no matter how many connections to other companies an enterprise has, while there
will be a separate ACL to determine interesting traffic to for that tunnel, there will only ever be
one NoNAT ACL, to which each network pair must be added.
The penultimate stage of creating an L2L VPN is creating the crypto map statement.
There can be only one crypto map applied to an interface, so each separate VPN connection
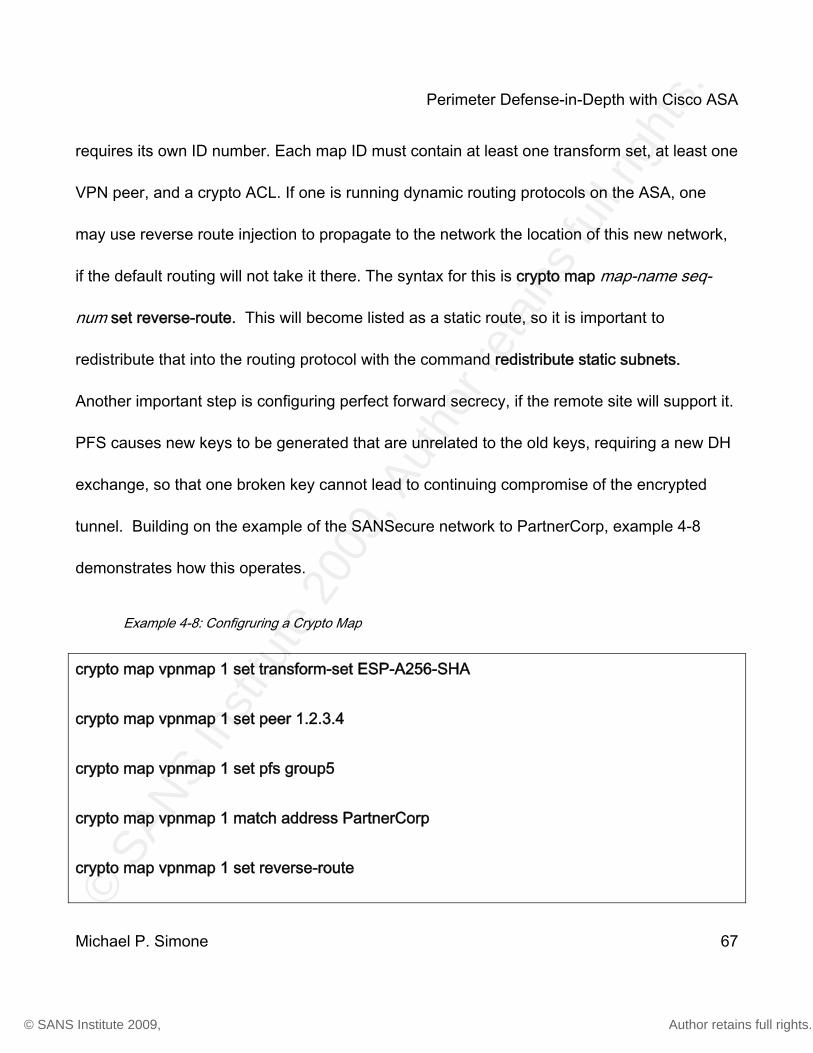
© SANS Institute 2009, Author retains full rights.
© S
ANS
Inst
itute
200
9
, Aut
hor r
etai
ns fu
ll rig
hts.
Key fingerprint = AF19 FA27 2F94 998D FDB5 DE3D F8B5 06E4 A169 4E46
Perimeter Defense-in-Depth with Cisco ASA
Michael P. Simone 67
requires its own ID number. Each map ID must contain at least one transform set, at least one
VPN peer, and a crypto ACL. If one is running dynamic routing protocols on the ASA, one
may use reverse route injection to propagate to the network the location of this new network,
if the default routing will not take it there. The syntax for this is crypto map map-name seq-
num set reverse-route. This will become listed as a static route, so it is important to
redistribute that into the routing protocol with the command redistribute static subnets.
Another important step is configuring perfect forward secrecy, if the remote site will support it.
PFS causes new keys to be generated that are unrelated to the old keys, requiring a new DH
exchange, so that one broken key cannot lead to continuing compromise of the encrypted
tunnel. Building on the example of the SANSecure network to PartnerCorp, example 4-8
demonstrates how this operates.
Example 4-8: Configruring a Crypto Map
crypto map vpnmap 1 set transform-set ESP-A256-SHA
crypto map vpnmap 1 set peer 1.2.3.4
crypto map vpnmap 1 set pfs group5
crypto map vpnmap 1 match address PartnerCorp
crypto map vpnmap 1 set reverse-route

© SANS Institute 2009, Author retains full rights.
© S
ANS
Inst
itute
200
9
, Aut
hor r
etai
ns fu
ll rig
hts.
Key fingerprint = AF19 FA27 2F94 998D FDB5 DE3D F8B5 06E4 A169 4E46
Perimeter Defense-in-Depth with Cisco ASA
Michael P. Simone 68
crypto map vpnmap interface outside
Those statements will cause a VPN tunnel to come up once interesting traffic attempts to
traverse the network (assuming, of course, that the mirror image of the VPN is enabled on the
remote side (Morgan and Lovering, 2008). Finally, one must decide which traffic to
filter. Cisco allows the option of permitting any tunneled traffic through the firewall using the
sysopt connect permit-ipsec command, but that, then, defeats the purpose of using the ASA
as a VPN termination point. Instead, one needs to modify the access list of the interface on
which the VPN terminates. Usually, this is the outside interface. Here is where one would
enable the ports and protocols that one wishes to see traversing the network. For example, if
SANSecure only wanted HTTP and HTTPS traffic to come through from PartnerCorp, the
following lines would be added to the appropriate part of the outside_access_in access-list on
the outside interface.
Example 4-9: Filtering VPN Traffic
object-group service VPNHTTP port eq 80 port eq 443 access-list outside_access_in extended line 5 permit 172.31.24.0 255.255.255.0 host
10.0.50.2 object-group VPNHTTP

© SANS Institute 2009, Author retains full rights.
© S
ANS
Inst
itute
200
9
, Aut
hor r
etai
ns fu
ll rig
hts.
Key fingerprint = AF19 FA27 2F94 998D FDB5 DE3D F8B5 06E4 A169 4E46
Perimeter Defense-in-Depth with Cisco ASA
Michael P. Simone 69
All traffic that does not match the access-list, or that hits an explicit deny earlier in the ACL,
will be dropped, providing security to the network. Conversely, outbound filtering is handled
by the egress filter already in place on the appropriate interface.
Remote access VPNS are very similar to L2L VPNs. One can continue to use the
same ISAKMP policies, and the same transform sets. The difference is in the authentication
and user policies.
There are three places where a user’s policies may be enabled – default group-policy,
user group-policy, and user policy. This is a hierarchical policy structure, which means that
anything from the default flows to the user groups, which flow to the users. Therefore, the
more general policies apply to the default properties, and the most specific apply to a single
user. The group attributes that can be set are listed in Table 4-1.
Table 4-1: Group Policy Subcommands
Subcommand Attribute
address-pools Configure list of up to 6 address pools to assign addresses from
backup-servers Configure list of backup servers to be usedby the remote client

© SANS Institute 2009, Author retains full rights.
© S
ANS
Inst
itute
200
9
, Aut
hor r
etai
ns fu
ll rig
hts.
Key fingerprint = AF19 FA27 2F94 998D FDB5 DE3D F8B5 06E4 A169 4E46
Perimeter Defense-in-Depth with Cisco ASA
Michael P. Simone 70
Subcommand Attribute
banner Configure a banner, or welcome text to be displayed on the VPN remote client
client-access-rule Specify rules permitting/denying access to specific client types and versions
client-firewall Configure the firewall requirements for users in this group policy
default-domain Configure the default domain name given to users of this group
dhcp-network-scope Specify the range of IP addresses to indicate to the DHCP server for address assignment
dns-server Configure the primary and secondary DNS servers
group-lock Enter the name of an existing tunnel-group that users are required to connect with
intercept-dhcp Enable this command to use group policy for clients requesting Microsoft DHCP
ip-comp Enter this command to enable IP compression (LZS)
ip-phone-bypass Configure to allow Ciscco IP phones behind hardware clients to bypass the Individual User Authentication process
ipsec-udp Enter this command to allow a client to operate through a NAT device using UDP encapsulation
ipsec-udp-port Enter the UDP port to be used by the client for IPSec through NAT

© SANS Institute 2009, Author retains full rights.
© S
ANS
Inst
itute
200
9
, Aut
hor r
etai
ns fu
ll rig
hts.
Key fingerprint = AF19 FA27 2F94 998D FDB5 DE3D F8B5 06E4 A169 4E46
Perimeter Defense-in-Depth with Cisco ASA
Michael P. Simone 71
Subcommand Attribute
ipv6-address-pools Configure list of up to 6 ipv6 address pools to assign addresses from
ipv6-vpn-filter Enter name of a configured IPv6 ACL to apply to users
leap-bypass Enable/disable LEAP packets from Cisco wireless devices to bypass the individual user authentication process. This setting applies only to HW clients
msie-proxy Enter this command to configure MSIE Browser Proxy settings for a client system
nac-settings Configure the name of the nac-policy
nem Configure hardware clients to use network extension mode. This setting applies only to HW clients.
password-storage Enable/disable storage of the login password on the client system
pfs Enter this command to indicate that the remote client needs to perform PFS.
re-xauth Enter this command to enable reauthentication of user on IKE rekey.
secure-unit-authentication Configure interactive authentication. This setting applies only to HW clients
smartcard-removal-disconnect Configure client action for smart card removal
split-dns Configure list of domains to be resolved through the split tunnel

© SANS Institute 2009, Author retains full rights.
© S
ANS
Inst
itute
200
9
, Aut
hor r
etai
ns fu
ll rig
hts.
Key fingerprint = AF19 FA27 2F94 998D FDB5 DE3D F8B5 06E4 A169 4E46
Perimeter Defense-in-Depth with Cisco ASA
Michael P. Simone 72
Subcommand Attribute
split-tunnel-network-list Configure the name of access-list for split tunnel configuration
split-tunnel-policy Select split tunneling method to be used by the remote client
user-authentication Configure individual user authentication. This setting applies only to HW clients
user-authentication-idle-timeout Configure the idle timeout period in minutes. If there is no communication in this period, the system terminates the connection. This setting applies only to HW clients.
vlan Specify the VLAN onto which VPN traffic for this group will be forwarded
vpn-access-hours Enter the name of a configured time-range policy
vpn-filter Enter name of a configured ACL to apply to users
vpn-idle-timeout Enter idle timeout period in minutes, enter none to disable
vpn-session-timeout Enter maximum user connection time in minutes, enter none for unlimited time.
vpn-simultaneous-logins Enter the number of simultaneous logins allowed
vpn-tunnel-protocol Enter permitted tunneling protocols
webvpn Configure group policy for WebVPN
wins-server Configure the primary and secondary WINS servers

© SANS Institute 2009, Author retains full rights.
© S
ANS
Inst
itute
200
9
, Aut
hor r
etai
ns fu
ll rig
hts.
Key fingerprint = AF19 FA27 2F94 998D FDB5 DE3D F8B5 06E4 A169 4E46
Perimeter Defense-in-Depth with Cisco ASA
Michael P. Simone 73
While most of these settings will be dictated by the topology of the network, the most
important best practice to which to adhere is disabling split-tunneling. This forces all user
traffic to pass through the ASA, allowing the organization to dictate content and URL filtering,
enables application inspection, and enables firewall rules to be enacted on the passing traffic.
To edit the default group policy, one enters the command group-policy DfltGrpPolicy
attributes. This leads to where each of the subcommands listed in Table 4-1 to be entered. At
SANSecure, all of the remote access users share the majority of the configuration, so most of
this is configured in the following example.
Example 4-10: Default Group Policy Attributes
ip local pool VPNPool 172.28.1.0 mask 255.255.255.0
group-policy DfltGrpPolicy attributes
vpn-simultaneous-logins 3
ip-comp enable
split-tunnel-policy tunnelall
address-pools value VPNPool
default-domain sansecure.fake
client-firewall req
dns-server 10.0.1.24

© SANS Institute 2009, Author retains full rights.
© S
ANS
Inst
itute
200
9
, Aut
hor r
etai
ns fu
ll rig
hts.
Key fingerprint = AF19 FA27 2F94 998D FDB5 DE3D F8B5 06E4 A169 4E46
Perimeter Defense-in-Depth with Cisco ASA
Michael P. Simone 74
ipsec-udp
ipsec-udp-port 4500
The next step is to determine user groups. An internal group means that all attributes are
stored on the local ASA, an external group means that all attributes are stored on an external
authentication server, like a RADIUS or TACACS+ server. For individual, local users, such as
the ones defined in section two, one uses the user username attributes, and sets the user
attributes, such as their vpn-group-policy, vpn-framed-ip-address and vpn-filter, allowing for
individual users to have their own specified IP address and ACL, while inheriting properties
from the group.
The following step is to define the tunnel type, just as demonstrated in the L2L VPN.
This time, however, the type will be set to ipsec-ra. Configure the tunnel group IPSec
attributes just like with the L2L VPN. User authentication, however, comes from the general-
attributes submode of the tunnel-group command. The authentication server is specified
there, as demonstrated in the example below.
Example 4-11: Configuring Phase 1
SANSecureASA(config)# tunnel-group RAVPN type ipsec-ra SANSecureASA(config)# tunnel-group RAVPN ipsec-attributes SANSecureASA(config-ipsec)# pre-share key Uc@n7gu355m3

© SANS Institute 2009, Author retains full rights.
© S
ANS
Inst
itute
200
9
, Aut
hor r
etai
ns fu
ll rig
hts.
Key fingerprint = AF19 FA27 2F94 998D FDB5 DE3D F8B5 06E4 A169 4E46
Perimeter Defense-in-Depth with Cisco ASA
Michael P. Simone 75
SANSecureASA(config-ipsec)# exit SANSecureASA(config)# username msimonevpn password l1k31dt3llu SANSecureASA(config)# username msimone attributes SANSecureASA(config-username)# vpn-framed-ip-address 192.168.50.1 255.255.255.255 SANSecureASA(config-username)# vpn-filter value 102 SANSecureASA(config-username)# exit SANSecureASA(config)# tunnel-group RAVPN general-attributes SANSecureASA(config-group-policy)# authentication-server-group LOCAL
This will allow phase one to complete.
For phase two, many of the same steps are needed for an RA VPN as there were for
an L2L VPN. One can use the same transform-sets that were created earlier. The main
difference lies in creating a dynamic map to connect the RAVPN users. This is achieved with
the command crypto dynamic-map mapname seq-num attribute. This dynamic map gets
appended to the tail end of the crypto map that is already present on the outside interface
from the PartnerCorp L2L VPN. Continuing on from the earlier crypto map for our L2L VPN,
example 4-12 shows this configuration, in which SANSecure configures a dynamic map,
allows for ISAKMP NAT traversal, and appends the dynamic map to the existing crypto map.

© SANS Institute 2009, Author retains full rights.
© S
ANS
Inst
itute
200
9
, Aut
hor r
etai
ns fu
ll rig
hts.
Key fingerprint = AF19 FA27 2F94 998D FDB5 DE3D F8B5 06E4 A169 4E46
Perimeter Defense-in-Depth with Cisco ASA
Michael P. Simone 76
Example 4-12: Dynamic Crypto Map
crypto dynamic-map dynmap 10 set transform-set ESP-A256-SHA
crypto dynamic-map dynmap 10 set reverse-route
crypto dynamic-map dynmap 10 set pfs group5
crypto map vpnmap 65535 ipsec-isakmp dynamic dynmap
Once the VPN clients are configured, the users should be able to log on and use network
resources according to the configured access-control lists.
5 Conclusions
The Cisco ASA demonstrates itself to be a powerful, robust network security engine,
capable of protecting the network with filtering, intrusion prevention, and encryption. By
combining into a single box, network administrators are capable of delivering more service for
less money; the failover capability of the ASA allows for redundancy of all of these services to
enable high availability, the compact nature of the device uses less rack space and small
power consumption, and the ease of integration for those already running Cisco networking
gear makes it a low total-cost-of-ownership solution for today’s networked world. As a
perimeter device, it achieves all of the security goals of the border, without onerous
configuration or need for multiple administrators. The Cisco ASA is defense-in-depth in a
single box.

© SANS Institute 2009, Author retains full rights.
© S
ANS
Inst
itute
200
9
, Aut
hor r
etai
ns fu
ll rig
hts.
Key fingerprint = AF19 FA27 2F94 998D FDB5 DE3D F8B5 06E4 A169 4E46
Perimeter Defense-in-Depth with Cisco ASA
Michael P. Simone 77
6 Appendix A: Cisco ASA IP Audit Signature List
Source: Cisco ADSM User Guide, by Mary Owe, 2008.
Signature ID
Message Number Signature Title
Signature Type Description
1000 400000 IP options-Bad Option List
Informational Triggers on receipt of an IP datagram where the list of IP options in the IP datagram header is incomplete or malformed. The IP options list contains one or more options that perform various network management or debugging tasks.
1001 400001 IP options-Record Packet Route
Informational Triggers on receipt of an IP datagram where the IP option list for the datagram includes option 7 (Record Packet Route).
1002 400002 IP options-Timestamp
Informational Triggers on receipt of an IP datagram where the IP option list for the datagram includes option 4 (Timestamp).
1003 400003 IP options-Security
Informational Triggers on receipt of an IP datagram where the IP option list for the datagram includes option 2 (Security options).
1004 400004 IP options-Loose Source Route
Informational Triggers on receipt of an IP datagram where the IP option list for the datagram includes option 3 (Loose Source Route).
1005 400005 IP options-SATNET ID
Informational Triggers on receipt of an IP datagram where the IP option list for the datagram includes option 8 (SATNET stream identifier).

© SANS Institute 2009, Author retains full rights.
© S
ANS
Inst
itute
200
9
, Aut
hor r
etai
ns fu
ll rig
hts.
Key fingerprint = AF19 FA27 2F94 998D FDB5 DE3D F8B5 06E4 A169 4E46
Perimeter Defense-in-Depth with Cisco ASA
Michael P. Simone 78
Signature ID
Message Number Signature Title
Signature Type Description
1006 400006 IP options-Strict Source Route
Informational Triggers on receipt of an IP datagram in which the IP option list for the datagram includes option 2 (Strict Source Routing).
1100 400007 IP Fragment Attack
Attack Triggers when any IP datagram is received with an offset value less than 5 but greater than 0 indicated in the offset field.
1102 400008 IP Impossible Packet
Attack Triggers when an IP packet arrives with source equal to destination address. This signature will catch the so-called Land Attack.
1103 400009 IP Overlapping Fragments (Teardrop)
Attack Triggers when two fragments contained within the same IP datagram have offsets that indicate that they share positioning within the datagram. This could mean that fragment A is being completely overwritten by fragment B, or that fragment A is partially being overwritten by fragment B. Some operating systems do not properly handle fragments that overlap in this manner and may throw exceptions or behave in other undesirable ways upon receipt of overlapping fragments, which is how the Teardrop attack works to create a DoS.
2000 400010 ICMP Echo Reply
Informational Triggers when a IP datagram is received with the protocol field of the IP header set to 1 (ICMP) and the type field in the ICMP header set to 0 (Echo Reply).
2001 400011 ICMP Host Unreachable
Informational Triggers when an IP datagram is received with the protocol field of the IP header set to 1 (ICMP) and the type field in the ICMP header set to 3 (Host Unreachable).

© SANS Institute 2009, Author retains full rights.
© S
ANS
Inst
itute
200
9
, Aut
hor r
etai
ns fu
ll rig
hts.
Key fingerprint = AF19 FA27 2F94 998D FDB5 DE3D F8B5 06E4 A169 4E46
Perimeter Defense-in-Depth with Cisco ASA
Michael P. Simone 79
Signature ID
Message Number Signature Title
Signature Type Description
2002 400012 ICMP Source Quench
Informational Triggers when an IP datagram is received with the protocol field of the IP header set to 1 (ICMP) and the type field in the ICMP header set to 4 (Source Quench).
2003 400013 ICMP Redirect Informational Triggers when a IP datagram is received with the protocol field of the IP header set to 1 (ICMP) and the type field in the ICMP header set to 5 (Redirect).
2004 400014 ICMP Echo Request
Informational Triggers when a IP datagram is received with the protocol field of the IP header set to 1 (ICMP) and the type field in the ICMP header set to 8 (Echo Request).
2005 400015 ICMP Time Exceeded for a Datagram
Informational Triggers when a IP datagram is received with the protocol field of the IP header set to 1 (ICMP) and the type field in the ICMP header set to 11(Time Exceeded for a Datagram).
2006 400016 ICMP Parameter Problem on Datagram
Informational Triggers when a IP datagram is received with the protocol field of the IP header set to 1 (ICMP) and the type field in the ICMP header set to 12 (Parameter Problem on Datagram).
2007 400017 ICMP Timestamp Request
Informational Triggers when a IP datagram is received with the protocol field of the IP header set to 1 (ICMP) and the type field in the ICMP header set to 13 (Timestamp Request).
2008 400018 ICMP Timestamp Reply
Informational Triggers when a IP datagram is received with the protocol field of the IP header set to 1 (ICMP) and the type field in the ICMP header set to 14 (Timestamp Reply).

© SANS Institute 2009, Author retains full rights.
© S
ANS
Inst
itute
200
9
, Aut
hor r
etai
ns fu
ll rig
hts.
Key fingerprint = AF19 FA27 2F94 998D FDB5 DE3D F8B5 06E4 A169 4E46
Perimeter Defense-in-Depth with Cisco ASA
Michael P. Simone 80
Signature ID
Message Number Signature Title
Signature Type Description
2009 400019 ICMP Information Request
Informational Triggers when a IP datagram is received with the protocol field of the IP header set to 1 (ICMP) and the type field in the ICMP header set to 15 (Information Request).
2010 400020 ICMP Information Reply
Informational Triggers when a IP datagram is received with the protocol field of the IP header set to 1 (ICMP) and the type field in the ICMP header set to 16 (ICMP Information Reply).
2011 400021 ICMP Address Mask Request
Informational Triggers when a IP datagram is received with the protocol field of the IP header set to 1 (ICMP) and the type field in the ICMP header set to 17 (Address Mask Request).
2012 400022 ICMP Address Mask Reply
Informational Triggers when a IP datagram is received with the protocol field of the IP header set to 1 (ICMP) and the type field in the ICMP header set to 18 (Address Mask Reply).
2150 400023 Fragmented ICMP Traffic
Attack Triggers when a IP datagram is received with the protocol field of the IP header set to 1 (ICMP) and either the more fragments flag is set to 1 (ICMP) or there is an offset indicated in the offset field.
2151 400024 Large ICMP Traffic
Attack Triggers when a IP datagram is received with the protocol field of the IP header set to 1(ICMP) and the IP length > 1024.
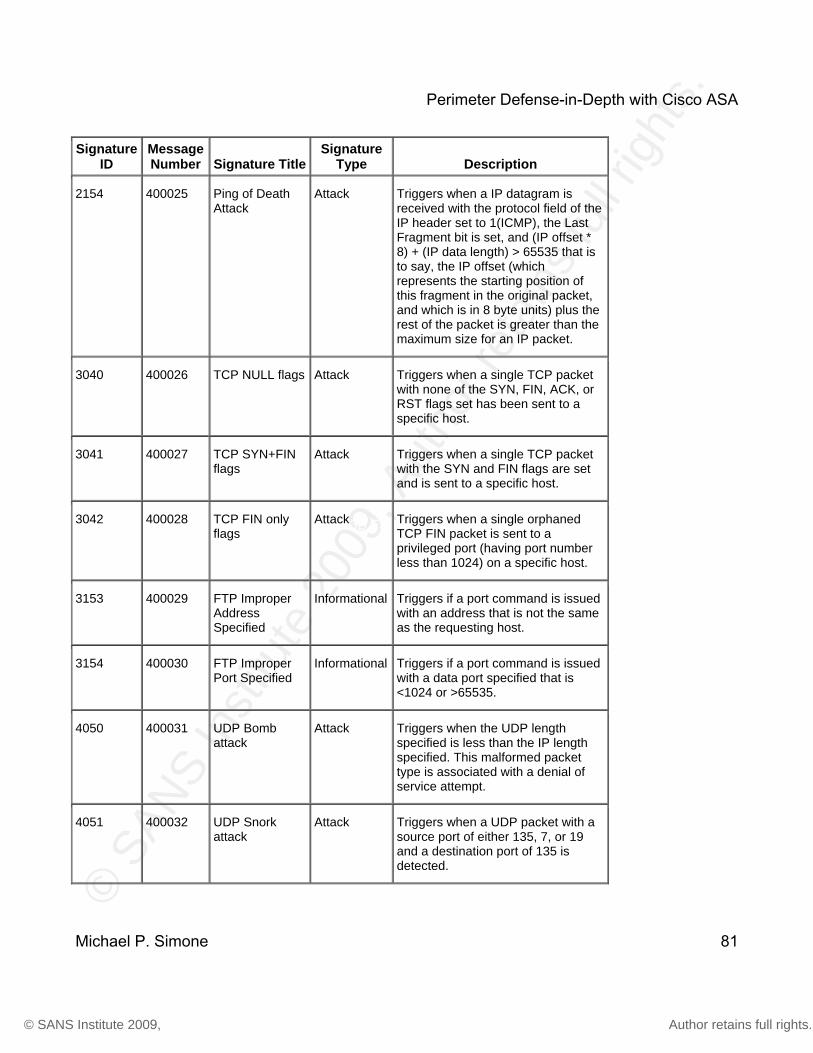
© SANS Institute 2009, Author retains full rights.
© S
ANS
Inst
itute
200
9
, Aut
hor r
etai
ns fu
ll rig
hts.
Key fingerprint = AF19 FA27 2F94 998D FDB5 DE3D F8B5 06E4 A169 4E46
Perimeter Defense-in-Depth with Cisco ASA
Michael P. Simone 81
Signature ID
Message Number Signature Title
Signature Type Description
2154 400025 Ping of Death Attack
Attack Triggers when a IP datagram is received with the protocol field of the IP header set to 1(ICMP), the Last Fragment bit is set, and (IP offset * 8) + (IP data length) > 65535 that is to say, the IP offset (which represents the starting position of this fragment in the original packet, and which is in 8 byte units) plus the rest of the packet is greater than the maximum size for an IP packet.
3040 400026 TCP NULL flags Attack Triggers when a single TCP packet with none of the SYN, FIN, ACK, or RST flags set has been sent to a specific host.
3041 400027 TCP SYN+FIN flags
Attack Triggers when a single TCP packet with the SYN and FIN flags are set and is sent to a specific host.
3042 400028 TCP FIN only flags
Attack Triggers when a single orphaned TCP FIN packet is sent to a privileged port (having port number less than 1024) on a specific host.
3153 400029 FTP Improper Address Specified
Informational Triggers if a port command is issued with an address that is not the same as the requesting host.
3154 400030 FTP Improper Port Specified
Informational Triggers if a port command is issued with a data port specified that is <1024 or >65535.
4050 400031 UDP Bomb attack
Attack Triggers when the UDP length specified is less than the IP length specified. This malformed packet type is associated with a denial of service attempt.
4051 400032 UDP Snork attack
Attack Triggers when a UDP packet with a source port of either 135, 7, or 19 and a destination port of 135 is detected.

© SANS Institute 2009, Author retains full rights.
© S
ANS
Inst
itute
200
9
, Aut
hor r
etai
ns fu
ll rig
hts.
Key fingerprint = AF19 FA27 2F94 998D FDB5 DE3D F8B5 06E4 A169 4E46
Perimeter Defense-in-Depth with Cisco ASA
Michael P. Simone 82
Signature ID
Message Number Signature Title
Signature Type Description
4052 400033 UDP Chargen DoS attack
Attack This signature triggers when a UDP packet is detected with a source port of 7 and a destination port of 19.
6050 400034 DNS HINFO Request
Informational Triggers on an attempt to access HINFO records from a DNS server.
6051 400035 DNS Zone Transfer
Informational Triggers on normal DNS zone transfers, in which the source port is 53.
6052 400036 DNS Zone Transfer from High Port
Informational Triggers on an illegitimate DNS zone transfer, in which the source port is not equal to 53.
6053 400037 DNS Request for All Records
Informational Triggers on a DNS request for all records.
6100 400038 RPC Port Registration
Informational Triggers when attempts are made to register new RPC services on a target host.
6101 400039 RPC Port Unregistration
Informational Triggers when attempts are made to unregister existing RPC services on a target host.
6102 400040 RPC Dump Informational Triggers when an RPC dump request is issued to a target host.
6103 400041 Proxied RPC Request
Attack Triggers when a proxied RPC request is sent to the portmapper of a target host.
6150 400042 ypserv (YP server daemon) Portmap Request
Informational Triggers when a request is made to the portmapper for the YP server daemon (ypserv) port.
6151 400043 ypbind (YP bind daemon) Portmap Request
Informational Triggers when a request is made to the portmapper for the YP bind daemon (ypbind) port.

© SANS Institute 2009, Author retains full rights.
© S
ANS
Inst
itute
200
9
, Aut
hor r
etai
ns fu
ll rig
hts.
Key fingerprint = AF19 FA27 2F94 998D FDB5 DE3D F8B5 06E4 A169 4E46
Perimeter Defense-in-Depth with Cisco ASA
Michael P. Simone 83
Signature ID
Message Number Signature Title
Signature Type Description
6152 400044 yppasswdd (YP password daemon) Portmap Request
Informational Triggers when a request is made to the portmapper for the YP password daemon (yppasswdd) port.
6153 400045 ypupdated (YP update daemon) Portmap Request
Informational Triggers when a request is made to the portmapper for the YP update daemon (ypupdated) port.
6154 400046 ypxfrd (YP transfer daemon) Portmap Request
Informational Triggers when a request is made to the portmapper for the YP transfer daemon (ypxfrd) port.
6155 400047 mountd (mount daemon) Portmap Request
Informational Triggers when a request is made to the portmapper for the mount daemon (mountd) port.
6175 400048 rexd (remote execution daemon) Portmap Request
Informational Triggers when a request is made to the portmapper for the remote execution daemon (rexd) port.
6180 400049 rexd (remote execution daemon) Attempt
Informational Triggers when a call to the rexd program is made. The remote execution daemon is the server responsible for remote program execution. This may be indicative of an attempt to gain unauthorized access to system resources.
6190 400050 statd Buffer Overflow
Attack Triggers when a large statd request is sent. This could be an attempt to overflow a buffer and gain access to system resources.

© SANS Institute 2009, Author retains full rights.
© S
ANS
Inst
itute
200
9
, Aut
hor r
etai
ns fu
ll rig
hts.
Key fingerprint = AF19 FA27 2F94 998D FDB5 DE3D F8B5 06E4 A169 4E46
Perimeter Defense-in-Depth with Cisco ASA
Michael P. Simone 84
7 References
Frahim, J, & Santos, O (2006). Cisco ASA: All-in-One Firewall, IPS and VPN Adaptive Security Appliance.
Indianapolis, IN: Cisco Press.
Ferguson, P (2000, May). Network Ingress Filtering: Defeating Denial of Service Attacks which Employ IP
Source Address Spoofing. Retrieved January 14, 2009, from FAQs.org Web site:
http://tools.ietf.org/html/rfc2827
Rekhter, Y., Moskowitz, B., Karrenberg, D., de Groot, G. J., & Lear, E. (1996). RFC1918 - Address Allocation for
Private Internets. Retrieved January 14, 2009, from IETF Web site: http://tools.ietf.org/html/rfc1918
Meyer, D (1998). Administratively Scoped IP Multicast. Retrieved January 14, 2009, from Administratively
Scoped IP Multicast Web site: http://www.isi.edu/in-notes/rfc2365.txt
IANA (2009, January 13). IANA Assigned Addresses. Retrieved January 14, 2009, from IANA.org Web site:
http://www.iana.org/assignments/ipv4-address-space/
Cole, Eric (2002). Hackers Beware: Defending Your Network from the Wiley Hacker. Indianapolis, IN: New
Riders Publishing.
Abelar, Greg (2005). Securing Your Business with Cisco ASA and PIX Firewalls. Indianapolis, IN: Cisco Press.
Morgan, B, & Lovering, N (2008). CCNP ISCW Official Exam Certification Guide. Indianapolis, IN: Cisco Press.
Understanding Unicast Reverse Path Forwarding. (2007). Retrieved January 19, 2009 from Cisco Security
Center: http://www.cisco.com/web/about/security/intelligence/unicast-rpf.html.
Distler, Dennis (2008). Performing Egress Filtering. Retrieved January 19, 2009, from SANS Institute Web site:
http://www.giac.org/certified_professionals/practicals/gcfw/816.php
Convery, Sean (2004). Network Security Architectures. Indianapolis, IN: Cisco Press.

© SANS Institute 2009, Author retains full rights.
© S
ANS
Inst
itute
200
9
, Aut
hor r
etai
ns fu
ll rig
hts.
Key fingerprint = AF19 FA27 2F94 998D FDB5 DE3D F8B5 06E4 A169 4E46
Perimeter Defense-in-Depth with Cisco ASA
Michael P. Simone 85
US CERT, (2008, July 08). Vulnerability Note VU#800113: Multiple DNS Implementations Vulnerable to Cache
Poisoning. Retrieved January 19, 2009, from US-CERT Web site: http://www.kb.cert.org/vuls/id/800113
RAD University, (2008). SMTP Tutorial. Retrieved January 20, 2009, from RAD University Web site:
http://www2.rad.com/networks/2006/smtp/commands/vrfy.htm
Kaeo, Merike (2004). Desigining Network Security. Indianapolis, IN: Cisco Press.
Cisco Systems, (2008). Cisco ASA 5580 Adaptive Security Appliance Command Reference, Version 8.1.
Retrieved January 20, 2009, from Cisco Systems Web site:
http://www.cisco.com/en/US/docs/security/asa/asa81/command/ref/ef.html#wp1933061
Sotirov, A., Stevens, M., Applebaum, J., Lenstra, A., Molnar, D., Osvik, D.A., de Weger, B. (2008, Dec 30). MD5
considered harmful today. Retrieved January 20, 2009, Web site: http://www.win.tue.nl/hashclash/rogue-
ca/#sec71