
Getting Started with IDE Programming - MGN Public School
138
INFORMATICS PRACTICES 57 4 Learning Objectives v v v v v v v After studying this lesson the students will be able to: create a project create a new form appreciate the concept and importance of a Graphical User Interface and an Integrated Development Environment understand the need and use of components like Button, Text Field, Labels, Password Field, Text Area and Radio Buttons. add components to the form and change the properties of the components attach code with components of the form develop small applications involving simple calculations with integers and decimal numbers. In our day to day life, we have to give information innumerable times like fill up bank deposit slips to deposit money or type in username and password to sign in to our mail account and many more. Forms are means to accept data (input) from us and respond as soon as we perform an action like clicking on a button or submitting the form. Have you ever wondered how they are created and wanted to create them yourselves? Well, our journey is a quest in this direction. This chapter deals with teaching the basic process of designing forms in Netbeans and using them to perform simple manipulations using Java. Observe Figure 4.1 carefully. We all may have come across some of the following but have we ever given a thought about what these are? Let us try and analyze their utility. The Google window displayed returns names of websites matching the search text entered by the user in the input area. The Gmail window displayed helps one to log in to Introduction Getting Started with IDE Programming
-
Upload
khangminh22 -
Category
Documents
-
view
4 -
download
0
Transcript of Getting Started with IDE Programming - MGN Public School
INFORMATICS PRACTICES 57
4Learning Objectives
v
v
v
v
v
v
v
After studying this lesson the students will be able to:
create a project
create a new form
appreciate the concept and importance of a Graphical User Interface and an
Integrated Development Environment
understand the need and use of components like Button, Text Field, Labels,
Password Field, Text Area and Radio Buttons.
add components to the form and change the properties of the components
attach code with components of the form
develop small applications involving simple calculations with integers and
decimal numbers.
In our day to day life, we have to give information innumerable times like fill up bank
deposit slips to deposit money or type in username and password to sign in to our mail
account and many more. Forms are means to accept data (input) from us and respond as
soon as we perform an action like clicking on a button or submitting the form. Have you
ever wondered how they are created and wanted to create them yourselves? Well, our
journey is a quest in this direction. This chapter deals with teaching the basic process of
designing forms in Netbeans and using them to perform simple manipulations using Java.
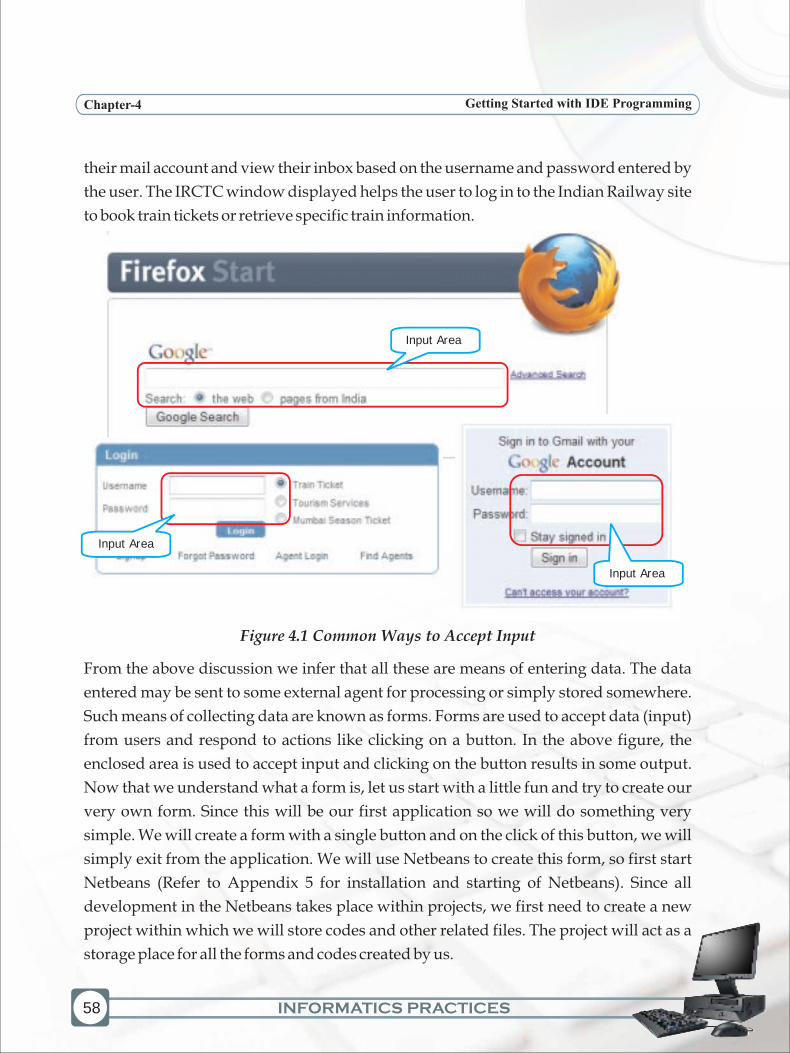
Observe Figure 4.1 carefully. We all may have come across some of the following but
have we ever given a thought about what these are? Let us try and analyze their utility.
The Google window displayed returns names of websites matching the search text
entered by the user in the input area. The Gmail window displayed helps one to log in to
Introduction
Getting Started with IDE Programming
INFORMATICS PRACTICES
Chapter-4 Getting Started with IDE Programming
58
their mail account and view their inbox based on the username and password entered by
the user. The IRCTC window displayed helps the user to log in to the Indian Railway site
to book train tickets or retrieve specific train information.
Figure 4.1 Common Ways to Accept Input
From the above discussion we infer that all these are means of entering data. The data
entered may be sent to some external agent for processing or simply stored somewhere.
Such means of collecting data are known as forms. Forms are used to accept data (input)
from users and respond to actions like clicking on a button. In the above figure, the
enclosed area is used to accept input and clicking on the button results in some output.
Now that we understand what a form is, let us start with a little fun and try to create our
very own form. Since this will be our first application so we will do something very
simple. We will create a form with a single button and on the click of this button, we will
simply exit from the application. We will use Netbeans to create this form, so first start
Netbeans (Refer to Appendix 5 for installation and starting of Netbeans). Since all
development in the Netbeans takes place within projects, we first need to create a new
project within which we will store codes and other related files. The project will act as a
storage place for all the forms and codes created by us.
Input Area
Input Area
Input Area

INFORMATICS PRACTICES
Chapter-4 Getting Started with IDE Programming
59
Creating a new Project
Creating a new Form
To create a new application project called "Book":
1. Choose File > New Project. Alternately, click the New Project icon in the
toolbar.
2. From the Categories pane select Java and in the Projects pane, choose Java
Application. Click Next.
3. Enter a name (in this case Book) in the Project Name field and specify the
project location by clicking on the Browse button. By default the project is
saved in the NetBeansProjects folder in My Documents and so this is the
default Project location displayed in this field.
4. Ensure that the Set as Main Project checkbox is selected and clear the Create
Main Class field.
5. Click Finish.
Netbeans creates the Book folder on your system in the designated location. This folder
will contain all of the associated files of the project. The next step is to create a form. To
proceed with building our form, we need to create a container within which we will
place the other required components of the form like a button. For all our applications we
will choose the JFrame Form as the container to place other components.
To create a JFrame Form container:
1. In the Projects window, right-click the Book node and choose New > JFrame
Form as shown in Figure 4.2.
2. Enter Form Example 1 as the Class Name. This will be the name of your form.
3. Enter Book as the package. This should be the name given while creating the
Project.
4. Click Finish.

INFORMATICS PRACTICES
Chapter-4 Getting Started with IDE Programming
60
Figure 4.2 Adding a new JFrame Form
Netbeans creates The Form Example1 form within the application and opens the form in
the Builder. Now we are ready to add components to our form.
We want to add a button so follow the given steps to add a JButton to the form:
1. In the Palette window, select the JButton component from the Swing Controls
category (displayed in Figure 4.3).
2. Move the cursor over the Form. When the guidelines appear (as displayed in
Figure 4.3) indicating that the JButton is positioned in the desired location,
click to place the button.
The JButton is added to the form as displayed in Figure 4.3. Note that as soon as the
button is added on the form, a corresponding node representing the component is added
to the Inspector window.
Adding a Button Component to a Form

INFORMATICS PRACTICES
Chapter-4 Getting Started with IDE Programming
61
Figure 4.3 Adding a Button and Understanding the Different Windows
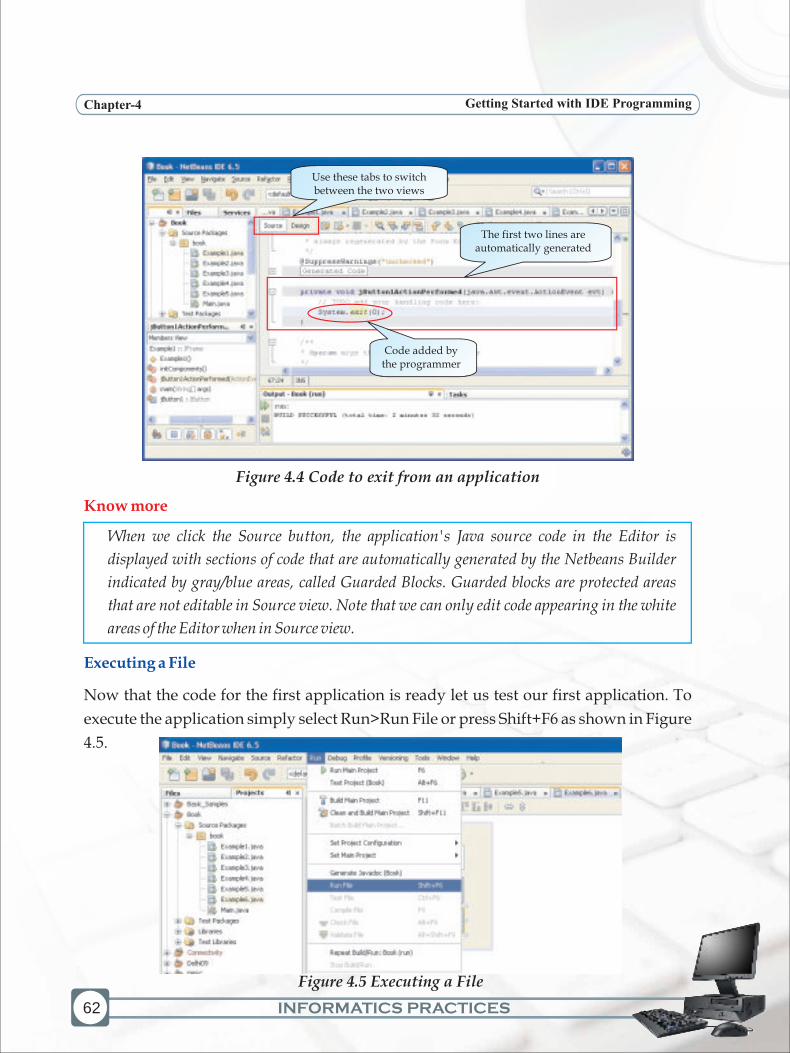
After placing the button, the next step is to write a code to exit from the application on the
click of this button. To do the same, double click on the button to attach a code with the
event i.e. click of the button. Double clicking on the component opens up the source
window and places the cursor on the point where code is to be added. Note that certain
code is pre generated and cannot be changed. In the Source window add the single code
line as shown in Figure 4.4.
Attaching Code to a Form Component
n
The Inspector window displays a tree hierarchy of all components contained in the
currently opened form. Displayed items include visual components and containers,
such as buttons, labels, menus, and panels, as well as non-visual components such as timers
The Design Area is the place where we add
all the components of the form like the button
The Swing Controls Palette contains all the components that can be added to the form
The Projects window shows a logical view of important project contents. Note that
single project can have multiple forms
The jButto
Guidelines
INFORMATICS PRACTICES
Chapter-4 Getting Started with IDE Programming
62
Figure 4.4 Code to exit from an application
When we click the Source button, the application's Java source code in the Editor is
displayed with sections of code that are automatically generated by the Netbeans Builder
indicated by gray/blue areas, called Guarded Blocks. Guarded blocks are protected areas
that are not editable in Source view. Note that we can only edit code appearing in the white
areas of the Editor when in Source view.
Now that the code for the first application is ready let us test our first application. To
execute the application simply select Run>Run File or press Shift+F6 as shown in Figure
4.5.
Know more
Executing a File
The first two lines are automatically generated
Use these tabs to switch between the two views
Code added by the programmer
Figure 4.5 Executing a File

INFORMATICS PRACTICES
Chapter-4 Getting Started with IDE Programming
63
On executing the first example, the window shown in Figure 4.6 will appear. Click on the
button and observe the result.
Figure 4.6 Simple Button Application
As soon as we click on the button, the application ends and we return back to the
Netbeans design window. So what did we learn? We learnt that the one line of code
system.exit(0) causes the application to terminate successfully.
Every object placed on a form supports one or more events that recognize when anything
happens to the object. For example, a button placed on the form can be clicked, can be double
clicked, can be activated or can be deactivated. To know more about the events associated
with the different objects refer to Appendix1.
Isn't it simple? Just one button and one line of code and a wonderful achievement -
Closing an application. Did you ever think it was that simple? Well now you know that
programming is not really tough. Let us test our observation. Go back and carefully
observe Figures 4.3 and 4.4 once again. What do you notice? Did you notice that the
window in which the form has been designed is different from the window in which we
have written the code? Let us understand this carefully. The window in which we have
designed our form is called the Design window and the window in which we have
written the code is called the Source window. We can easily switch between the two
views by simply clicking on the relevant tab as displayed in Figure 4.4.
We have had an interesting start towards building our very first form and also learnt to
write code.Now let us quickly recap the basic steps used while developing the above
application before moving on.
Know more
INFORMATICS PRACTICES
Chapter-4 Getting Started with IDE Programming
64
Quick Recap - Steps for developing a Simple application
Step 1: Create a new Project
Step 2: Add a JFrame form
Step 3: Add the desired component from the Palette window using drag and drop
feature
Step 4: Associate code with the component by double clicking the component.
Step 5: Add the source code.
Step 6: Test the form by pressing Shift+F6.
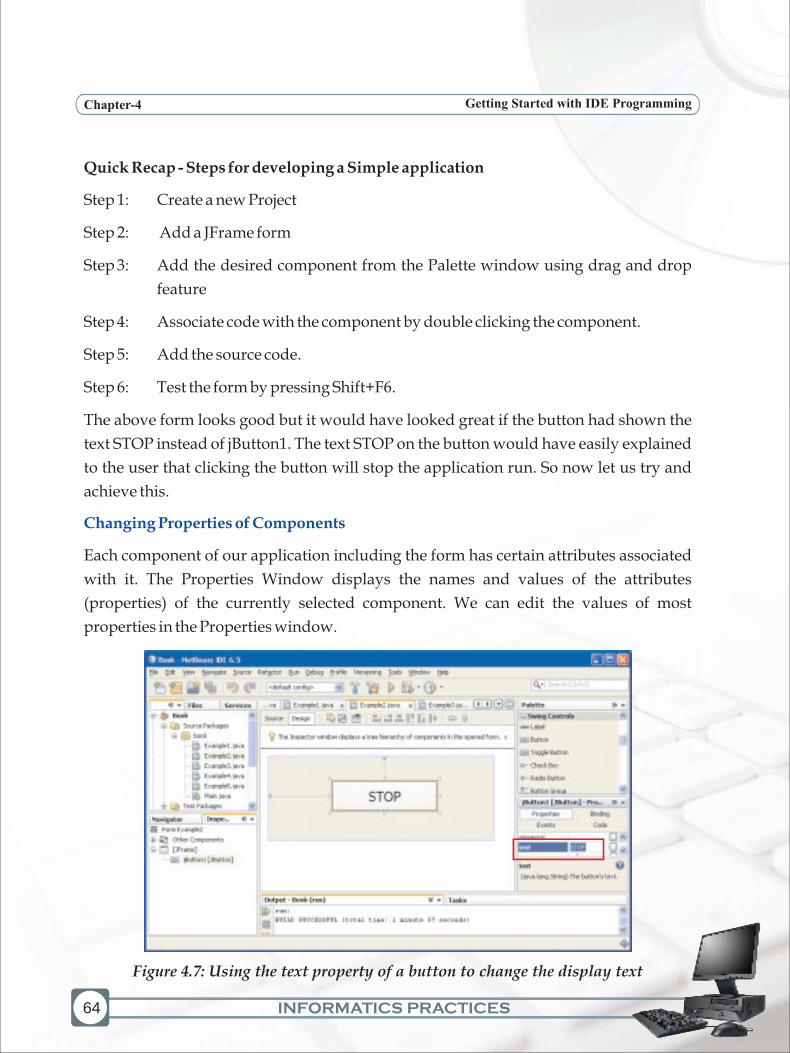
The above form looks good but it would have looked great if the button had shown the
text STOP instead of jButton1. The text STOP on the button would have easily explained
to the user that clicking the button will stop the application run. So now let us try and
achieve this.
Each component of our application including the form has certain attributes associated
with it. The Properties Window displays the names and values of the attributes
(properties) of the currently selected component. We can edit the values of most
properties in the Properties window.
Changing Properties of Components
Figure 4.7: Using the text property of a button to change the display text
INFORMATICS PRACTICES
Chapter-4 Getting Started with IDE Programming
65
We want to change the text displayed on the button. There are four ways of doing the
same in the design view:
Select the button component by clicking on it. In the Properties window
highlight the text property and type STOP in the textbox adjacent to it as
displayed in Figure 4.7.
Alternatively select the object. Left click on the button to highlight the display
text. Type STOP and press Enter.
Select the object > Press F2 - to make the display text editable. Type in the new
text and press Enter.
Right click on the button component and select Edit Text from the Drop down menu to
make the display text editable. Type in the new text and press Enter.
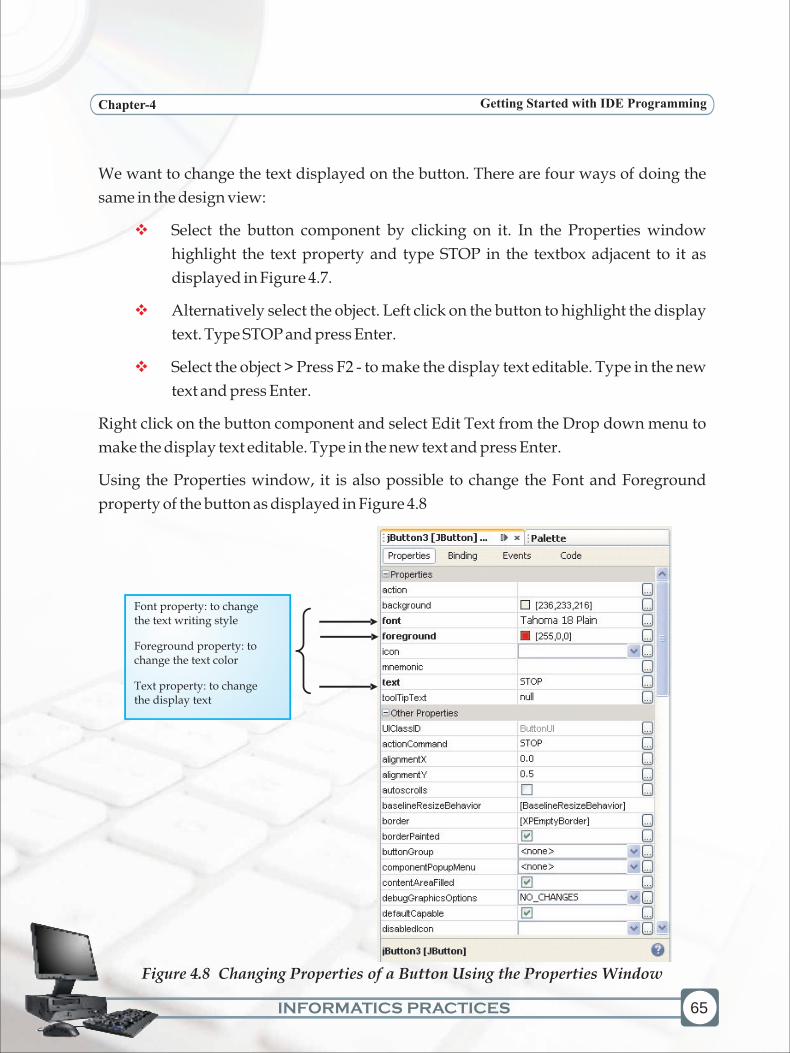
Using the Properties window, it is also possible to change the Font and Foreground
property of the button as displayed in Figure 4.8
v
v
v
Font property: to change the text writing style
Foreground property: to change the text color
Text property: to change the display text
Figure 4.8 Changing Properties of a Button Using the Properties Window
INFORMATICS PRACTICES
Chapter-4 Getting Started with IDE Programming
66
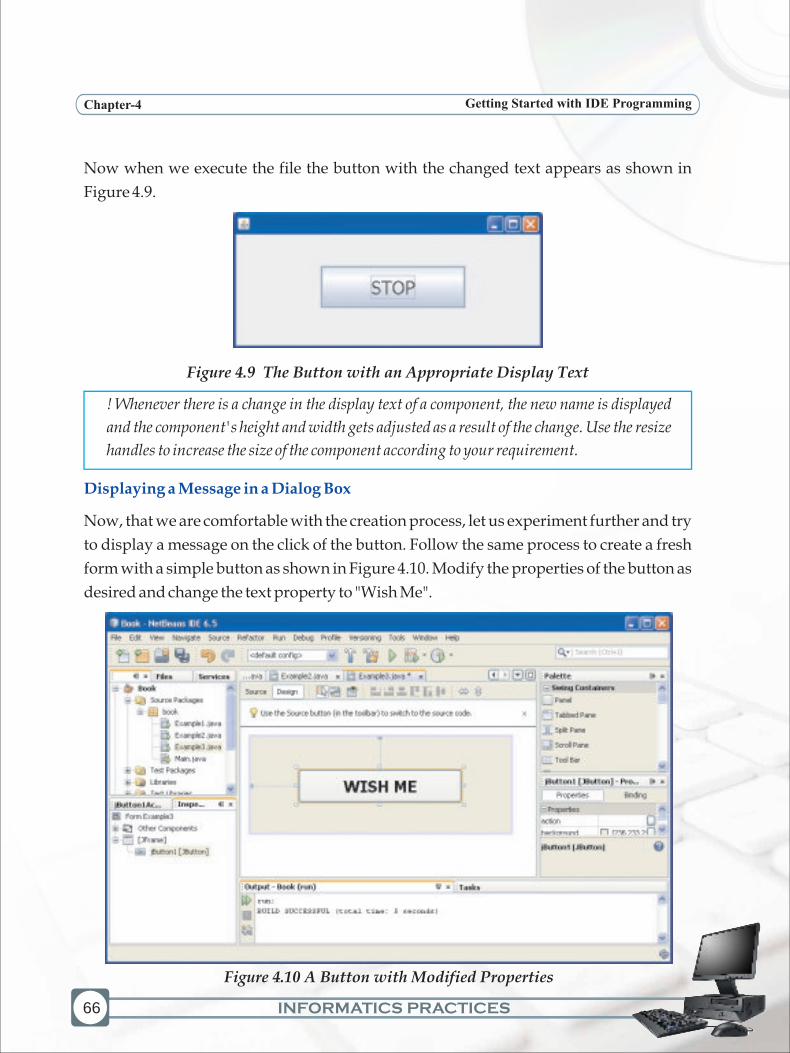
Now when we execute the file the button with the changed text appears as shown in
Figure 4.9.
Figure 4.9 The Button with an Appropriate Display Text
! Whenever there is a change in the display text of a component, the new name is displayed
and the component's height and width gets adjusted as a result of the change. Use the resize
handles to increase the size of the component according to your requirement.
Now, that we are comfortable with the creation process, let us experiment further and try
to display a message on the click of the button. Follow the same process to create a fresh
form with a simple button as shown in Figure 4.10. Modify the properties of the button as
desired and change the text property to "Wish Me".
Displaying a Message in a Dialog Box
Figure 4.10 A Button with Modified Properties

INFORMATICS PRACTICES
Chapter-4 Getting Started with IDE Programming
67
Know more
In graphical user interfaces, a dialog box is a special window, used in user interfaces to
display information to the user, or to get a response if needed. They are so-called because
they form a dialog between the computer and the user - either informing the user of
something, or requesting input from the user, or both. It provides controls that allows the
programmer to specify how to carry out an action.
Switch to the source window and add the single line code as shown in Figure 4.11.
Figure 4.11 Code to Display a Message on the Click of a Button
As soon as you enter the single line code given above, an error indicator and the error
message "cannot find symbol" will be displayed. This error simply means that the
JOptionPane component is missing from our application. To fix this error we need to add
this component. Left click on the error indicator to display a menu with 3 different
options and select the option Add import for javax.swing.JOptionPane from the menu as
shown in Figure 4.12.

INFORMATICS PRACTICES
Chapter-4 Getting Started with IDE Programming
Error Indicator
Select the option to add the JOptionPane component
The error message regarding the missing component
68
Figure 4.12 Adding the JOptionPane Component
Now execute the file by pressing Shift+F6. Click on the button to see the message. The
execution is shown in Figure 4.13
Figure 4.13 Displaying a Message in a dialog Box on the Click of a Button
In this example we learnt that the showMessageDialog method can be used to display a
specified message in a Dialog box. Till now we have learnt how to use:
the Design Window to create a Form and add components to it
the Palette to add Swing Controls on the form
the Inspector window to view the hierarchical relation among the different
components
the Properties Window to change the attributes of a selected component
v
v
v
v

INFORMATICS PRACTICES
Chapter-4 Getting Started with IDE Programming
69
So before proceeding further, let us take a minute to further familiarize ourselves with
these different parts of the Netbeans Builder interface. It is important to familiarize
ourselves with the Netbeans Interface as it allows us to communicate with the different
parts of Netbeans easily and makes our task easier.
As experienced above, Netbeans is a GUI. A GUI is an acronym for the term Graphical
User Interface. It is known as a GUI as it allows us to interact with the various
components through visual elements including pictures, graphical icons, symbols and
visual indicators. For example to add a button we simply have to drag the button icon
from the Swing Controls tab in the Palette. Similarly as we are writing code, small visual
indicators appear informing us about the errors in the code. The Netbeans GUI Builder's
various windows include four main components as displayed in Figure 4.14. These
components are explained below:
1. Design Area. The GUI Builder's primary window for creating and editing
Java GUI forms. The toolbar's Source and Design toggle buttons enable us to
view the source code or a graphical view of its GUI components. The
additional toolbar buttons provide convenient access to common commands,
such as aligning components, setting component auto-resizing behaviour,
and previewing forms.
2. Inspector. Provides a graphic representation of all the components, both
visual and non-visual, in our application as a tree hierarchy. The Inspector
also provides visual feedback about what component in the tree is currently
being edited in the GUI Builder as well as allows us to organize components in
the available panels.
3. Palette. Contains a customizable list of available components containing tabs
for JFC/Swing, AWT, and JavaBeans components, as well as layout
managers. In addition, we can create, remove, and rearrange the categories
displayed in the Palette using the customizer.
4. Properties Window. Displays the properties of the component currently
selected in the GUI Builder, Inspector window, Projects window, or Files
window.
Familiarizing with the Netbeans GUI Interface

INFORMATICS PRACTICES
Chapter-4 Getting Started with IDE Programming
70
Figure 4.14 Netbeans GUI Interface
The GUI Builder makes it possible to build professional-looking GUIs without an
intimate understanding of layout managers. We can lay out our forms by simply placing
components where we want them. Another interesting feature of Netbeans is that it
provides comprehensive facilities for software development. It is very helpful as it
maximizes the programmer productivity by providing tightly-knit components with
similar user interfaces. This kind of an environment where all the tools required for
developing an application are available in a single place is known as an Integrated
Development Environment or simply IDE. Using an Integrated Development
Environment (IDE) for developing applications saves our time by managing windows,
settings, and data. In addition, an IDE can store repetitive tasks through macros and
abbreviations. Drag-and-drop features make creating graphical user interface (GUI)
components or accessing databases easy, and highlighted code and debugging features
alert us to errors in our code.
12 34
Components: 1. Design Area 2. Inspector Window 3. Palette 4. Properties Window
INFORMATICS PRACTICES
Chapter-4 Getting Started with IDE Programming
71
Know more
Because the NetBeans IDE is open source, it is undergoing continual improvement, you
may notice slight differences between the screen captures in this book and the latest
download. This book is based on NetBeans 6.5 and may vary slightly from later versions as
they become available. You can download the latest version from http://netbeans.org/
Great, now that we are comfortable with the interface, let us get back to the
programming journey. In the last example we had displayed a message on the click of a
button. Now what next? All the previous examples had only one component. Let us now
delve further and try adding more than one component to our form. Adding more
components means that we will have multiple code lines. So, first let us try and add more
of similar components i.e. more buttons. So we will design a application with 3 separate
buttons and display a different message on the click of all the three buttons.
Think what should be the first step?
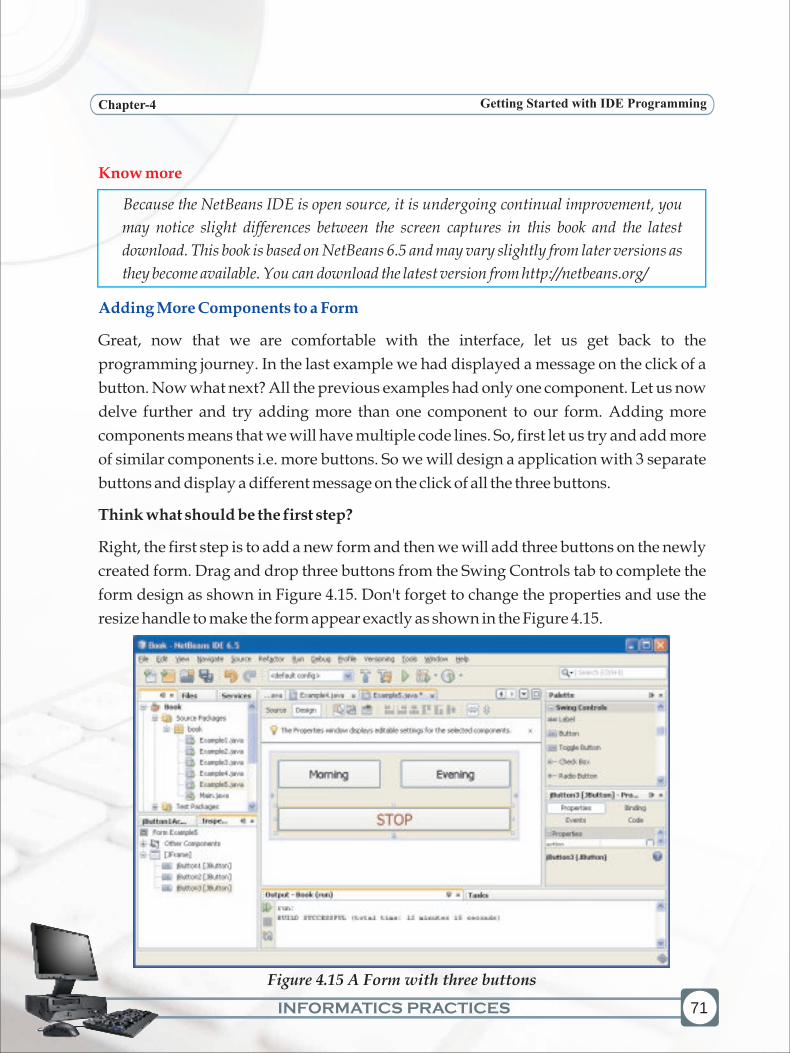
Right, the first step is to add a new form and then we will add three buttons on the newly
created form. Drag and drop three buttons from the Swing Controls tab to complete the
form design as shown in Figure 4.15. Don't forget to change the properties and use the
resize handle to make the form appear exactly as shown in the Figure 4.15.
Adding More Components to a Form
Figure 4.15 A Form with three buttons

INFORMATICS PRACTICES
Chapter-4 Getting Started with IDE Programming
72
Now, just think how to associate different code with each of the three buttons.
Remember, double clicking on a particular button opens up the source window with the
cursor placed at the point where code is to be added. So just do the same for all three
buttons. Double click on each of the three buttons one by one and keep on adding the
relevant code for each one of them. We are going to use the commands we have already
learnt in our previous examples to:
Display the message "Good Morning" on the click of the Morning button
Display the message "Good Evening" on the click of the Evening button
End the application on the click of the STOP button.
The complete code for all three buttons is displayed in Figure 4.16
Figure 4.16 Code to Add Functionality to the Form designed in Figure 4.15
Now execute the Example and observe the result of clicking Morning and Evening
Buttons. One of the outputs is displayed in Figure 4.17
v
v
v

INFORMATICS PRACTICES
Chapter-4 Getting Started with IDE Programming
73
Figure 4.17 Clicking on the Morning button displays the message "Good Morning"
! As we create applications and add to them new objects such as buttons and textboxes, they
are automatically assigned names such as jButton1, jButton2 and so on by the IDE. But it is
good practice to give names that better match the functionality, such as BExit and
BMorning. Remember that objects on the same form cannot have same name, but two forms
might contain objects with the same name.
Using a Text Field Component to Display Messages
Text Field displaying the message
Clicking on the Morning button displays the
message in the text field
Three buttons on the form
Figure 4.18 Display message in a Text Field on the click of a button

INFORMATICS PRACTICES
Chapter-4 Getting Started with IDE Programming
74
In all the above examples we have displayed all the messages in dialog boxes. But In real
life applications we might have to display messages in Text fields too. So we will try and
learn about the text field component in our next example. The Text Field component is a
text input field in which users can enter single line of text.
We will make a slight modification to the above example by displaying the message in a
text field rather than in the dialog window. First, make an attempt to design the form
displayed in Figure 4.18 by dragging a Text Field component from the Swing Control
Palette to our previous form. Now changing the strategy a bit, let us first look at the
sample run of the form designed as shown in Figure 4.18. On the click of the Morning
button, the message "Good Morning" should be displayed in the Text Field and similarly
on the click of the Evening button, the message "Good Evening" should be displayed in
the Text Field.
Think how to achieve this. Don't worry we are providing the solution in the Figure 4.19.
But giving a thought and trying is important.
Let us break the suspense and look at the coding given below:
Figure 4.19: Code to Display message in a Text Field on the click of a Button
The above code introduces us to a new method called setText(). This method is used to
change the display text of a component (label, text field or button) during run time. The
syntax of this method is given below:
INFORMATICS PRACTICES
Chapter-4 Getting Started with IDE Programming
75
Syntax:
component.setText("text")
The "text" is the display text to be shown for the mentioned component.
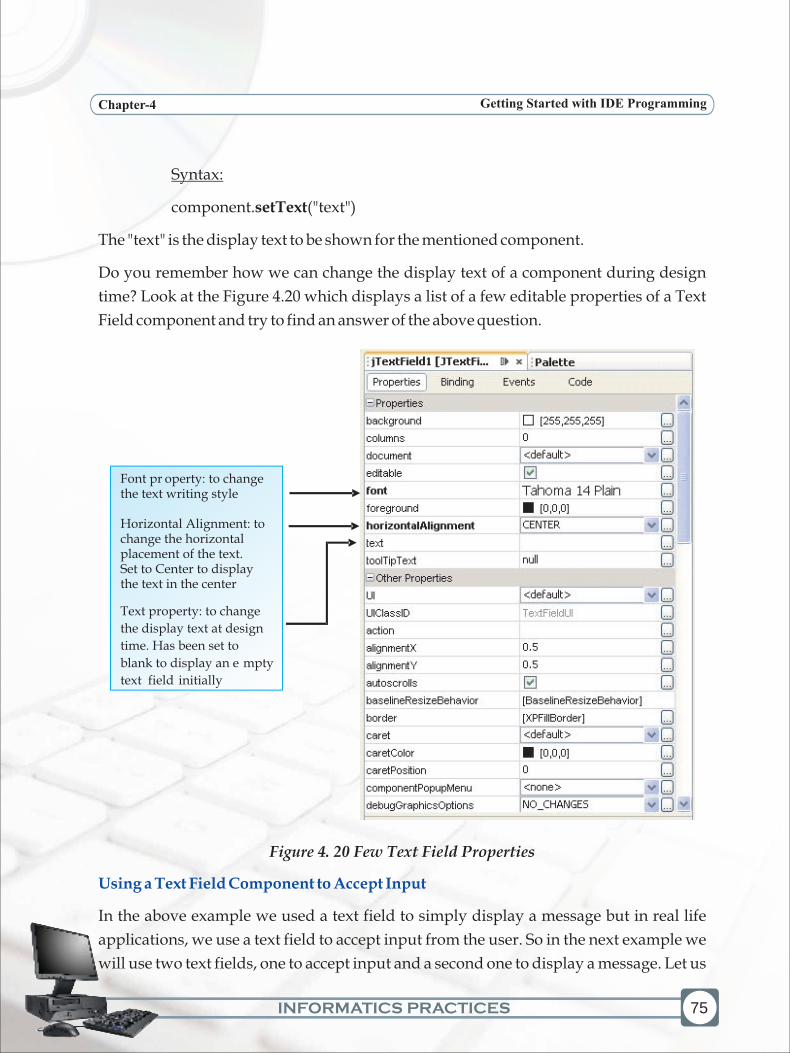
Do you remember how we can change the display text of a component during design
time? Look at the Figure 4.20 which displays a list of a few editable properties of a Text
Field component and try to find an answer of the above question.
Figure 4. 20 Few Text Field Properties
In the above example we used a text field to simply display a message but in real life
applications, we use a text field to accept input from the user. So in the next example we
will use two text fields, one to accept input and a second one to display a message. Let us
Using a Text Field Component to Accept Input
Font pr operty: to change the text writing style
Horizontal Alignment: to change the horizontal placement of the text. Set to Center to display the text in the center
Text property: to change
the display text at design
time. Has been set to
blank to display an e mpty
text field initially

INFORMATICS PRACTICES
Chapter-4 Getting Started with IDE Programming
76
first design the form as displayed in the Figure 4.21. The purpose of this form is to accept
the name of the user in the Text Field placed at the top and then display a personalized
greeting (greeting along with the name of the user) in the Text Field placed at the bottom.
Just like there is the setText() method to change the display text of a component at run
time, there is a getText() method to retrieve the display text of a component (label, text
field or button) at run time. Think how we can make use of this method in our above
stated problem.
Figure 4.21 Form Design to Display a Personalized Time Based Greeting on the Click
of a Button
Observe the Figure 4.21 carefully. What is new for us in this form? First we have used a
new component - a label and second is the difference between the two text fields. A label
is a component which is used to display simple text or as a label for another component.
Can you spot what is the difference between the two text fields? One of them has a white
background while the other has the same background colour as the form. The difference
in the background colour tells us that one of the text field is editable while the other is not.
In simple words editable means that the user can change the text displayed in the text
field at run time. The text field at the top has to accept the name of the user and the text
field at the bottom has to display the greeting. So which one should be editable?
ButtonsLabels
Text Fields

INFORMATICS PRACTICES
Chapter-4 Getting Started with IDE Programming
77
Obviously the one which has to accept the input should be editable. So, the one with the
white background is editable while the other is not. Figure 4.22 displays the properties of
both the text fields. Can you guess which property is used to control the editing nature of
a text field?
Figure 4.22 Setting Text Field Properties
The editable property is used to control the editing nature of a text field at run time.
Therefore the first text Field's check box is selected (indicating that it can be edited at run
time) while the second one is non-editable. Now select the label components one by one
and change their properties using the Properties window as shown in Figure 4.23
Figure 4.23 Few Properties of the Label Component
Font property: to change the text writing style
Horizontal Alignment: to change the horizontal placement of the text. Set to Center to display the text in the center of the label
Text property: to change the display text at design time.
INFORMATICS PRACTICES
Chapter-4 Getting Started with IDE Programming
78
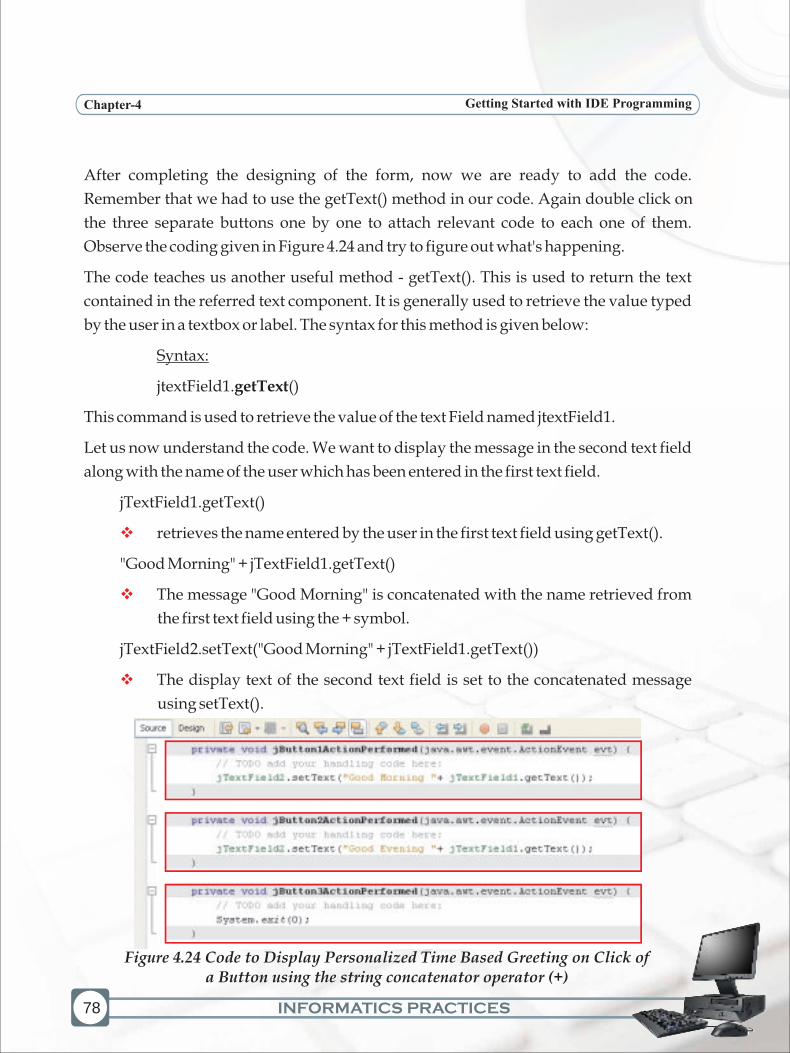
After completing the designing of the form, now we are ready to add the code.
Remember that we had to use the getText() method in our code. Again double click on
the three separate buttons one by one to attach relevant code to each one of them.
Observe the coding given in Figure 4.24 and try to figure out what's happening.
The code teaches us another useful method - getText(). This is used to return the text
contained in the referred text component. It is generally used to retrieve the value typed
by the user in a textbox or label. The syntax for this method is given below:
Syntax:
jtextField1.getText()
This command is used to retrieve the value of the text Field named jtextField1.
Let us now understand the code. We want to display the message in the second text field
along with the name of the user which has been entered in the first text field.
jTextField1.getText()
retrieves the name entered by the user in the first text field using getText().
"Good Morning" + jTextField1.getText()
The message "Good Morning" is concatenated with the name retrieved from
the first text field using the + symbol.
jTextField2.setText("Good Morning" + jTextField1.getText())
The display text of the second text field is set to the concatenated message
using setText().
v
v
v
Figure 4.24 Code to Display Personalized Time Based Greeting on Click of a Button using the string concatenator operator (+)
INFORMATICS PRACTICES
Chapter-4 Getting Started with IDE Programming
79
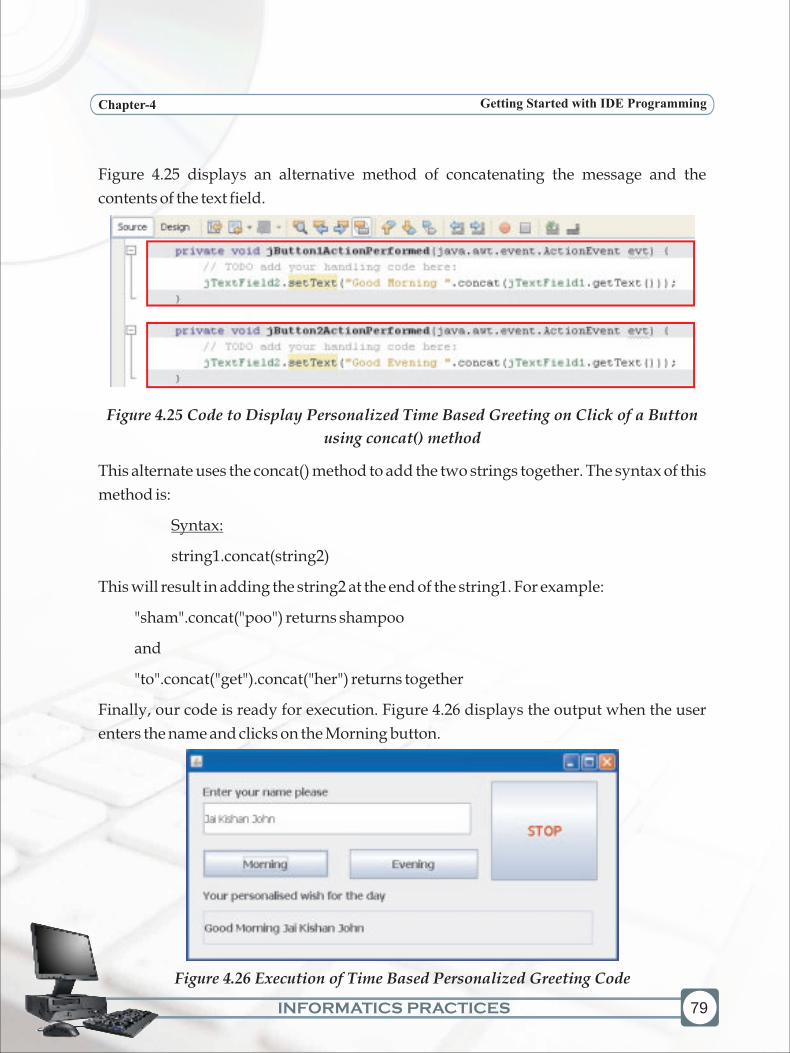
Figure 4.25 displays an alternative method of concatenating the message and the
contents of the text field.
Figure 4.25 Code to Display Personalized Time Based Greeting on Click of a Button
using concat() method
This alternate uses the concat() method to add the two strings together. The syntax of this
method is:
Syntax:
string1.concat(string2)
This will result in adding the string2 at the end of the string1. For example:
"sham".concat("poo") returns shampoo
and
"to".concat("get").concat("her") returns together
Finally, our code is ready for execution. Figure 4.26 displays the output when the user
enters the name and clicks on the Morning button.
Figure 4.26 Execution of Time Based Personalized Greeting Code

INFORMATICS PRACTICES
Chapter-4 Getting Started with IDE Programming
80
Handling the Radio Button Component
By now we have completely familiarized ourselves with the working of text field,
buttons, labels and message box. Let us now delve further and try to explore the utility of
other components. Let us first try and modify the above example a bit. Supposing
instead of displaying a message, we need to display the title of the user (Mr. or Ms.) along
with the name input in the textbox. How to go about it? The simple answer would be to
accept the title in a separate textbox and then concatenate it with the name. But do you
think it is the right approach? Using the textbox for accepting the title will cause
ambiguity thereby making the code complex as we will have to cater to the different
inputs. Different users will have different ways of entering the title. Some might write
MR. or some might write Mr. or some might write MR (without the dot). Then how do we
avoid this ambiguity? A simple solution is to use a radio button component to accept the
gender input. Radio buttons are groups of buttons in which, by convention, only one
button at a time can be selected. First design the form with the following components:
one editable text field to accept the name
a group of 2 radio buttons to accept the gender
one non-editable text field to display the name along with the title
appropriate labels to direct the user
As a first step drag a text field from the Swing Control tab of the Palette. Next drag and
place two radio buttons as shown in the following figure. Remember that out of several
radio buttons belonging to a group, only one can be selected. Therefore, the next step is to
associate the two radio buttons to each other. This is achieved by linking both the radio
buttons with a ButtonGroup. For each group of radio buttons, we need to create a
ButtonGroup instance and add each radio button to it. It is necessary to associate all the
radio buttons in a group to one ButtonGroup. The ButtonGroup takes care of unselecting
the previously selected button when the user selects another button in the group. So drag
a Button Group component from the Swing Controls tab and drop it anywhere on the
form. This is an invisible component which is just used to associate several radio buttons.
Now to associate them to same button group, select the first radio button and edit the
buttonGroup property of this radio button using the Properties Window as shown in
Figure 4.27. Repeat the same procedure for the second radio button of this group to
associate them to same button group. Select the same Button Group from the drop down
menu in the buttonGroup property for the second radio button.
v
v
v
v
INFORMATICS PRACTICES
Chapter-4 Getting Started with IDE Programming
81
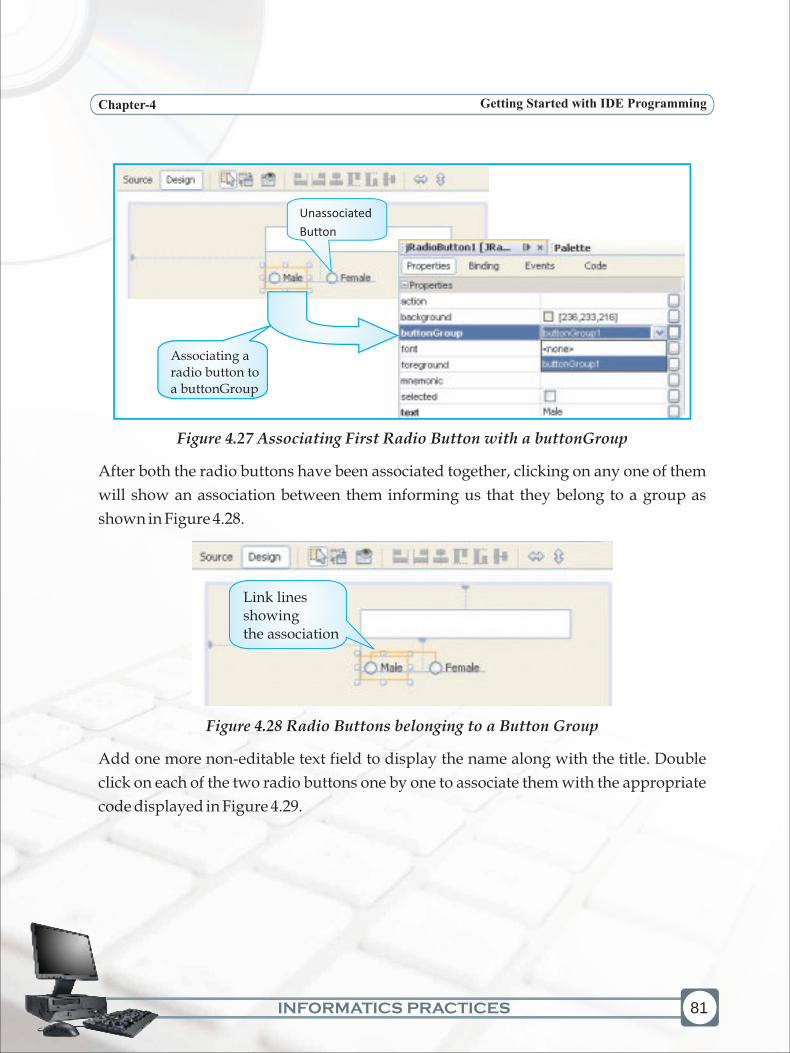
Figure 4.27 Associating First Radio Button with a buttonGroup
After both the radio buttons have been associated together, clicking on any one of them
will show an association between them informing us that they belong to a group as
shown in Figure 4.28.
Figure 4.28 Radio Buttons belonging to a Button Group
Add one more non-editable text field to display the name along with the title. Double
click on each of the two radio buttons one by one to associate them with the appropriate
code displayed in Figure 4.29.
Unassociated
Button
Associating a radio button to a buttonGroup
Link lines showing the association

INFORMATICS PRACTICES
Chapter-4 Getting Started with IDE Programming
82
Figure 4.29 Associating Code with the Radio Buttons
Now execute the program and see the output. One sample output is shown in Figure 4.30
Figure 4.30 Sample Execution of Displaying Name with Title
! We should generally initialize a group of radio buttons so that one is selected. However,
there is no compulsion regarding this rule - a group of radio buttons can have no initial
selection. Once the user has made a selection, exactly one button is selected from then on.
The text field allows the user to enter a single line of text only. If we want to accept
multiline input or want to display multiline output, then what do we do? The Text Area
component is a solution for this problem. This component allows us to accept multiline
input from the user or display multiple lines of information. This component
automatically adds vertical or horizontal scroll bars as and when required during run
time. Utilizing the concept of Text Area, let us design an application which accepts
names of two people and displays a short message about Friendship or Colleagues
depending upon which button is clicked.
Using the Text Area Component

INFORMATICS PRACTICES
Chapter-4 Getting Started with IDE Programming
83
Design the form shown in Figure 4.32(a). One new component - the Text Area has been
added while the rest of the components are familiar.
Write the code as shown in Figure 4.31 for the two buttons. Add the code for the STOP
button.
Figure 4.31 Code for displaying Multiline Text in a Text Area on the click of a Button
Now observe the Figures 4.32 (a), (b) and (c) carefully. These figures show the sample
output of the code given in Figure 4.31. Try to point out the difference in the output
pattern.
Text Area
Figure 4.32(a) First Sample Run of the Text Area Application

INFORMATICS PRACTICES
Chapter-4 Getting Started with IDE Programming
84
The main difference in the three sample output windows is about the way the text has
been displayed. In the first sample, the text is displayed without any wrapping and so
only part of the message is visible. To see the remaining part of the message, the user will
have to use the scrollbars. In the second sample, the text is displayed using line wrap
without any word wrap. Due to this words are broken although the entire message is
visible.
Figure 4.32(b) Second Sample Run of the Text Area Application
In the third sample, the text is
displayed using both line wrap
and word wrap which ensures that
no words are broken and also all
the lines are neatly wrapped. Let
us first understand the exact
meaning of line wrap and word
wrap and then we will learn how
to change these properties. In text
display, line wrap is the feature of
continuing on a new line when a
line is full, such that each line fits in
the viewable window, allowing
text to be read from top to bottom
without any horizontal scrolling.
Figure 4.32(c) Third Sample Run of
the Text Area Application

INFORMATICS PRACTICES
Chapter-4 Getting Started with IDE Programming
85
On the other hand, Word wrap is a feature which allows text to be carried over to the next
line so that it will stay within a set of defined margins without breaking the words. These
properties can be set at design time using the Properties Window as shown in Figure 4.33
The '\n' is a non printable character that is used to cause explicit line breaks. It can be used
with any of the methods which are used to display text like setText() and
showMessageDialog.
Know more
Both properties selected results in proper word and line wrap and as a result the entire text is visible Figure 4.32(c)
Only line wrap being selected results in
broken words being displayed as lines are
adjusted in the margins Figure
Both properties not selected results in no wrap and as a result the entire text is not visible Figure 4.32(a)
Figure 4.33 Setting the lineWrap and wrapStyleWord Properties to Study their Effect

INFORMATICS PRACTICES
Chapter-4 Getting Started with IDE Programming
86
Handling a Password Field Component
Now the question arises that what should be done if we want that the text input by the
user should not be displayed as characters but as special characters (so that it is not
readable by anyone)? The answer is simple. Use the Password Field instead of the
normal text field. This component allows confidential input like passwords which are
single line. Let us design a simple application which displays a simple message when the
user inputs a user name and password. Figure 4.34 displays the sample run of the
application. Remember that no checking is being done, rather a simple message is to be
displayed on the click of the LOGIN button and the application should be terminated on
the click of the CANCEL button. (Validations will be dealt with in Class XII).
Figure 4.34 Sample run of the Password Application
Figure 4.35 displays the code to display the message on the click of the LOGIN button.
Add the code for the CANCEL button also yourself.
Figure 4.34 Sample run of the Password Application
Text Field
INFORMATICS PRACTICES
Chapter-4 Getting Started with IDE Programming
87
Writing Code for Performing Simple Calculations Involving Integers
Hope all the components explained above are clear along with their usage and
properties. In all the previous examples we have been doing text manipulation. Let us
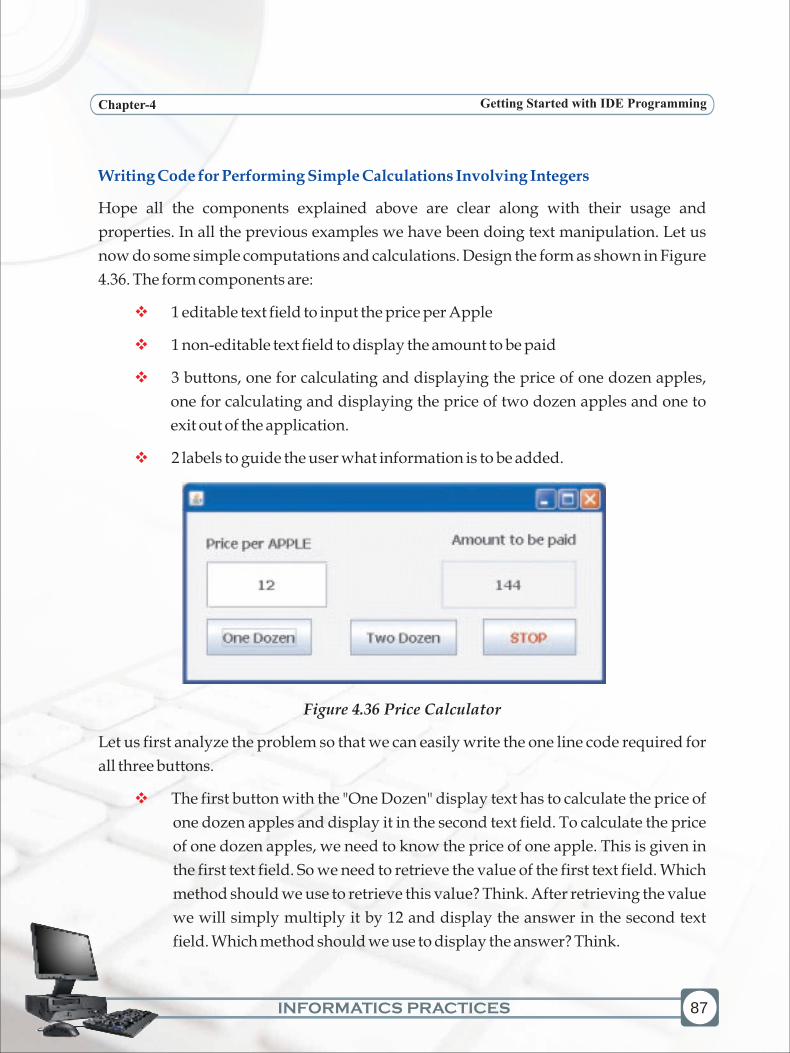
now do some simple computations and calculations. Design the form as shown in Figure
4.36. The form components are:
1 editable text field to input the price per Apple
1 non-editable text field to display the amount to be paid
3 buttons, one for calculating and displaying the price of one dozen apples,
one for calculating and displaying the price of two dozen apples and one to
exit out of the application.
2 labels to guide the user what information is to be added.
Figure 4.36 Price Calculator
Let us first analyze the problem so that we can easily write the one line code required for
all three buttons.
The first button with the "One Dozen" display text has to calculate the price of
one dozen apples and display it in the second text field. To calculate the price
of one dozen apples, we need to know the price of one apple. This is given in
the first text field. So we need to retrieve the value of the first text field. Which
method should we use to retrieve this value? Think. After retrieving the value
we will simply multiply it by 12 and display the answer in the second text
field. Which method should we use to display the answer? Think.
v
v
v
v
v

INFORMATICS PRACTICES
Chapter-4 Getting Started with IDE Programming
88
v
v
v
v
v
v
The second button with the "Two Dozen" display text has to calculate the price
of two dozen apples and display it in the second text field. So the process
remains similar to the first button but only while calculating we will multiply
the price of one apple by 24 and display the answer in the second text field.
The third button with the "STOP" display text has to simply end the
application. Which method should we use for this purpose?
If you have been able to give an answer for the above three questions then enter the code
for each button separately as shown in Figure 4.37 else go back and try to revise a little.
Figure 4.37 Code for the Price Calculator Application
The code has introduced us to two new methods:
Integer.toString() - used to convert an Integer value to String type
Integer.parseInt() - to convert a value to Integer type
We are already familiar with setText() and getText() so now we are ready to understand
the code.
jTextField1.getText()
retrieves the value entered by the user in the first text field using getText().
This value by default is treated as a string i.e. a group of characters and not as a
number
12 * Integer.parseInt( jTextField1.getText())
The string value needs to be converted to an integer number and this is
achieved using the parseInt() method. After converting it to a number it is
multiplied by 12

INFORMATICS PRACTICES
Chapter-4 Getting Started with IDE Programming
89
Integer.toString(12 * Integer.parseInt( jTextField1.getText()))
The value calculated is a number which is to be displayed in a text field. So
before displaying it needs to be converted to a string type and this is achieved
using the toString() method.
jTextField2.setText(Integer.toString(12 * Integer.parseInt( jTextField1.getText())))
The converted value needs to be displayed in the second text field. This is
achieved using the setText() method.
Now test your code and enjoy the result of your hardwork. A sample run is shown in
Figure 4.36.
Let us now do some simple calculations involving numbers with decimals (called double
in java). Design the form as shown in Figure 4.38.
Figure 4.38 Amount Calculator using Numbers with Decimals
The form components are:
2 editable text fields to input the price and quantity
1 non-editable text field to display the amount to be paid
2 buttons, one for calculating and displaying the amount payable and one to
exit out of the application.
3 labels to guide the user what information is to be input and displayed
Let us first analyze the problem so that we can easily write the single line code required
for the Calculate Amount button.
v
v
v
v
v
v
Writing Code for Performing Simple Calculations Involving Numbers with decimals

INFORMATICS PRACTICES
Chapter-4 Getting Started with IDE Programming
90
v
v
v
The first button with the "Calculate Amount" display text has to calculate the
total amount to be paid and display it in the third text field at the bottom of the
screen. To calculate the amount, we need to know the price of one item and
also the quantity of the item purchased. These values are given in the first and
the second text field respectively. So we need to retrieve these value from the
two text fields. Remember that these values will be by default string type so
we need to convert them to a suitable type (in this case double) so as to be able
to perform calculations on them. After retrieving the value we will simply
multiply the two values and convert the value so obtained to string and
display the answer in the third text field.
Now add the code for the first button as given in the Figure 4.39
Figure 4.39 Code for the Amount Calculator Using Numbers with Decimals
The code has introduced us to one new method:
Double.parseDouble() - to convert a value to Double type
We are already familiar with setText(), getText()and toString() so now we are ready to
understand the code.
jTextField1.getText() and jTextField2.getText()
retrieves the value entered by the user in the first and second text fields
respectively using getText(). These values by default are treated as strings i.e.
a group of characters and not as numbers
Double.parseDouble( jTextField1.getText()) and
Double.parseDouble( jTextField2.getText())
INFORMATICS PRACTICES
Chapter-4 Getting Started with IDE Programming
91
v
v
v
The string values need to be converted to numbers with decimals and this is
achieved using the parseDouble() method. After converting both the values
they are multiplied to get the total amount payable.
Double.toString(Double.parseDouble( jTextField1.getText())
* Double.parseDouble( jTextField2.getText()))
The value calculated is a number with decimals which is to be displayed in a
text field. So before displaying it needs to be converted to a string type and
this is achieved using the toString() method.
jTextField3.setText(Double.toString(Double.parseDouble( jTextField1.getText())
* Double.parseDouble( jTextField2.getText()))
The converted value is displayed in the third text field using the setText()
method.
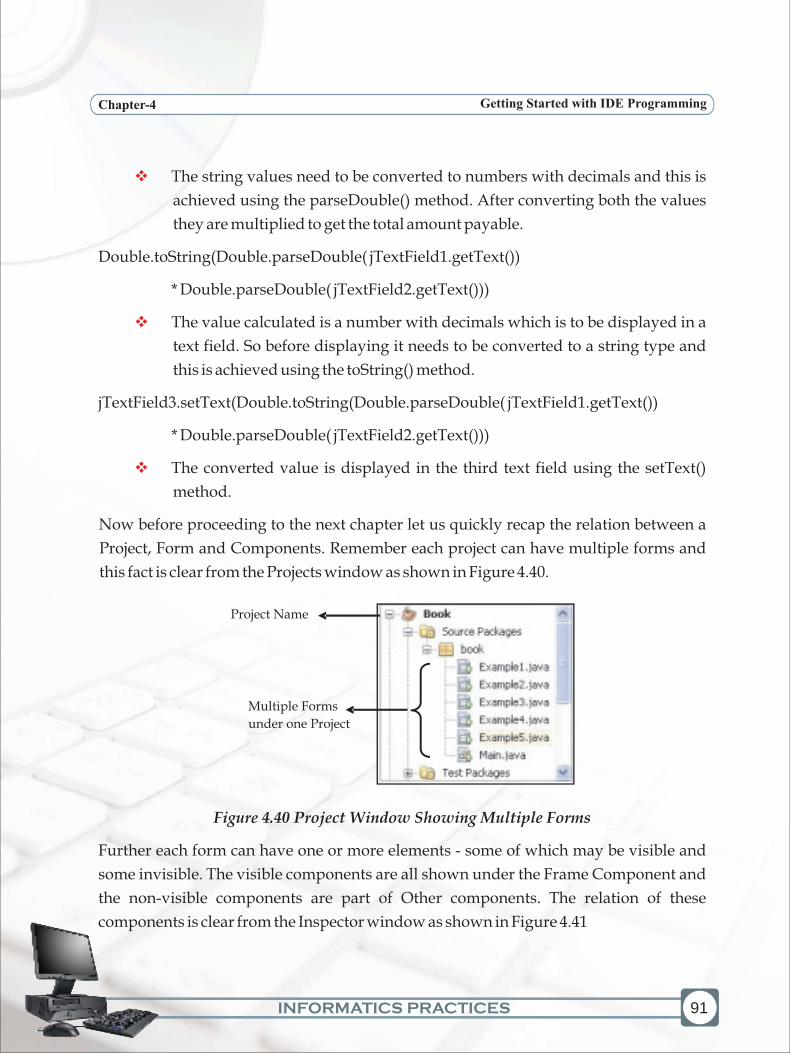
Now before proceeding to the next chapter let us quickly recap the relation between a
Project, Form and Components. Remember each project can have multiple forms and
this fact is clear from the Projects window as shown in Figure 4.40.
Figure 4.40 Project Window Showing Multiple Forms
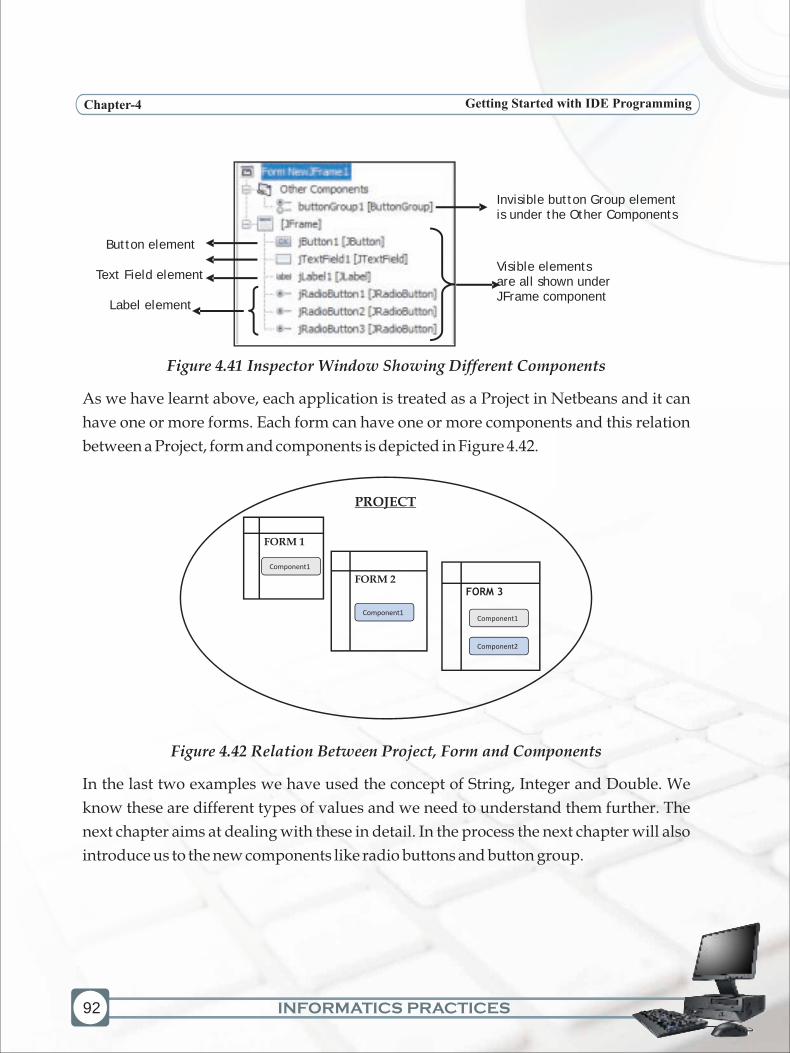
Further each form can have one or more elements - some of which may be visible and
some invisible. The visible components are all shown under the Frame Component and
the non-visible components are part of Other components. The relation of these
components is clear from the Inspector window as shown in Figure 4.41
Multiple Forms
under one Project
Project Name
INFORMATICS PRACTICES
Chapter-4 Getting Started with IDE Programming
Button element
Text Field element
Label element
Invisible button Group elementis under the Other Components
Visible elementsare all shown under JFrame component
92
Figure 4.41 Inspector Window Showing Different Components
As we have learnt above, each application is treated as a Project in Netbeans and it can
have one or more forms. Each form can have one or more components and this relation
between a Project, form and components is depicted in Figure 4.42.
Figure 4.42 Relation Between Project, Form and Components
In the last two examples we have used the concept of String, Integer and Double. We
know these are different types of values and we need to understand them further. The
next chapter aims at dealing with these in detail. In the process the next chapter will also
introduce us to the new components like radio buttons and button group.
FORM 1
FORM 2FORM 3
PROJECT
Component1
Component1
Component2
Component1
INFORMATICS PRACTICES
Chapter-4 Getting Started with IDE Programming
93
Summary
v
v
v
v
v
v
v
v
v
v
v
v
Forms are used to accept data (input) and submit data to an external agent for
processing.
A project in Netbeans acts as a storage place for all the forms and codes created
in one application
A JFrame Form acts as a container to place other components like the button,
text field and text area
The Palette Window contains a customizable list of available components
containing tabs for JFC/Swing, AWT, and JavaBeans components, as well as
layout managers.
The Swing Controls can be differentiated from other components as they are
preceded with a 'j' like jButton and jTextField
The Source tab is used to view the Java source code
The Design tab is used to design the form
The Properties Window is used to display and edit the attributes of the
currently selected component
To execute a single file of an application press Shift +F6 or select Run>Run
File
GUI is an acronym for Graphical User Interface which is an interface that
allows us to interact with the various components through visual elements
including pictures, graphical icons, symbols and visual indicators
The Netbeans IDE consists of The Design Area, the Inspector Window, the
Palette and the Properties Window
IDE is an acronym for Integrated Development Environment which is a work
environment that integrates all tools necessary for Application Development
and makes them available as part of one environment
INFORMATICS PRACTICES
Chapter-4 Getting Started with IDE Programming
94
v
v
v
v
v
v
A Desktop application creates a template that provides basic application
infrastructure such as a menu bar, persisting of window state, and status bar.
With this template, you can also generate code to create a GUI interface for a
database table (which we will learn in class XII).
The various swing components learnt include a button, text field, label, text
area, radio button, password field
All radio buttons working together must be associated with a single
ButtonGroup. The ButtonGroup is an invisible component
The general syntax of executing any method is:
object.method(arguments)
For example:
1. Integer.parseInt("10")
In this example Integer is the object, parseInt() the method and 10 is the
argument supplied.
2. jTextField1.setText("Welcome")
In this example jTextField1 is the object, setText() the method and "Welcome"
is the argument supplied.
The concat() method or the string concatenation symbol(+) may be used to
add two strings together
A brief summary of all the methods learnt in this chapter is given in the table
below:

INFORMATICS PRACTICES
Chapter-4 Getting Started with IDE Programming
95
Method Syntax Usage
exit() System.exit(0) To successfully terminate an
application
showMessageDialog() JOptionPane.showMessageDialog To display a specified message
(parentComponent,message) in a dialog box
setText() component.setText("text") To change the display text of a
component (label, text field or
button) during run time
getText() component.getText() To retrieve the display text of a
component (label, text field or
button) at run time
concat() string1.concat(string2) To concatenate (add) string2 at
the end of the string1
toString() Integer.toString(number) To convert an Integer value to
String type
parseInt() Integer.parseInt(string) To convert a string value to
Integer type
parseDouble() Double.parseDouble(string) To convert a string value to type
Double

INFORMATICS PRACTICES
Chapter-4 Getting Started with IDE Programming
96
Multiple Choice Questions
1. The Form is designed in the
a) Inspector window
b) Design window
c) Palette window
d) Properties window
2. The Swing Controls components are contained in the
a) Design window
b) Inspector window
c) Properties window
d) Palette window
3. The most suitable component to accept multiline text is:
a) Text Field
b) Password Field
c) Text Area
d) All of the above
4. What will be the output of the following command?
Learning.concat("Java")
a) Learning Java
b) LearningJava
c) JavaLearning
d) Java Learning
e) Will result in an error
INFORMATICS PRACTICES
Chapter-4 Getting Started with IDE Programming
97
5. What will be the output of the following command?
"Learning".concat("Java")
a) Learning Java
b) LearningJava
c) JavaLearning
d) Java Learning
1. Explain the following terms:
a) IDE
b) Inspector Window
c) Form
2. Explain the usage of the following methods with the help of an example:
a) setText()
b) toString()
c) concat()
3. Differentiate between:
a) Text field and Text area components
b) Text field and Password field components
c) parseInt() and parseDouble() methods
d) Design and Source tabs
a) Design a GUI desktop application in java to accept the name and favourite
sport in two text fields and display an appropriate message including the
name and favourite sport in a dialog box using the concat() method. The
application must have an exit button to end the application and appropriate
labels.
Exercises
Lab Exercises

INFORMATICS PRACTICES
Chapter-4 Getting Started with IDE Programming
98
b) Design a GUI desktop application in java to accept age category using radio
buttons and display an appropriate age based message in a text area on
selection of a radio button. The application must have an exit button to end
the application and appropriate labels.
c) Design a GUI desktop application in java to accept weight in Kilograms in a
text field and convert it into grams and milligrams on the click of two separate
buttons. Display the result in a second text field. The application must have an
exit button to end the application and appropriate labels.
d) Design a GUI desktop application in java to accept temperature in Celsius in a
text field and display temperature in Fahrenheit in another text field on the
click of a button. The application must have an exit button to end the
application and appropriate labels.
INFORMATICS PRACTICES 99
5Learning Objectives
v
v
v
v
v
After studying this lesson the students will be able to:
declare, initialize and assign values to variables.
write simple applications using variables.
understand the concept and usage of different data types.
appreciate the importance and usage of Arithmetic and Assignment
operators.
develop simple applications using different data types,
In the previous chapter, we developed GUI applications with some simple arithmetic
operations. Now, we will introduce the concept of variables, which will simplify our efforts
of performing complex arithmetic operations. Variables, as the name suggests are those
identifiers, which can vary, i.e. can have different values. In programming, variables help
us to hold values for some input coming from the user or to hold intermediate result of
some calculation or the final result of an operation. In simple terms, variables are like
containers that can be used to store whatever values are needed for a specific computation.
However, as different materials require different containers, similarly different data types
are required to associate the variables to store different types of values. This chapter will
give us a good idea of variables and various data types.
Programming Fundamentals

INFORMATICS PRACTICES
Programming FundamentalsChapter-5
100
Variables
Observe the form given in Figure 5.1 carefully and try to analyze the problem.
Figure 5.1 A Simple Form to Calculate Total Number of Fruits
After observing the above form, it is clear that we are accepting the number of apples,
bananas and oranges in three separate text fields and calculating the total number of
fruits by simply adding the three values on the click of a button. The total number of
fruits is then displayed in a separate text field. The single line code for this simple
application is given in Figure 5.2.
Figure 5.2 Code to Add Values Accepted in Three Text Fields and Display Result in
Fourth Text Field
The Title property of
the JFrame has been
set to Fruit Calculator
jTextField4.setText ( Integer.toString ( Integer.parseInt(jTextField1.getText()) +Integer.parseInt(jTextField2.getText()) +Integer.parseInt(jTextField3.getText()) ));
This code can be written in a single line but has been
written in 3 lines for better readability and understanding

INFORMATICS PRACTICES
Now imagine a situation where we have to calculate the total of 20 such fruits. Our one
line of code will become very cumbersome and difficult to understand. To avoid such
cumbersome code we need to use some containers, which can store the values entered by
the user in the different text fields. These values need to be stored only till we add them
up. So we need to modify the code given above. To test the same we first need to design
the form and then associate code with the click of the button.
Let us first talk about the design of the form. Add a new JFrame form. Go to the
Properties tab in the Palette Window and change the title property of the Form as shown
in the Figure 5.3.
Figure 5.3 Changing the Properties of the JFrame Form Component
Now add the following components on the form:
three editable text fields to accept the number of apples, bananas and oranges
two buttons - one to calculate & display the total number of fruits and one to
exit from the application
one non-editable text field to display the total number of fruits
appropriate labels to direct the user
Change the properties of the components as learnt in the previous chapter so that the
form looks exactly like the one displayed in Figure 5.1. The next step is to associate code
with the button with display text "Number of Fruits". Double click on the button in the
design window to reach the point in the source window where the code needs to be
written. Rewrite the code given in Figure 5.2 using the concept of containers as shown in
Figure 5.4.
v
v
v
v
101
defaultCloseOperation property: is used to set the action to be performed when the user attempts to close the form
title property: is used to change the text displayed in the Title bar of the form window
Chapter-5 Programming Fundamentals
INFORMATICS PRACTICES
Programming FundamentalsChapter-5
102
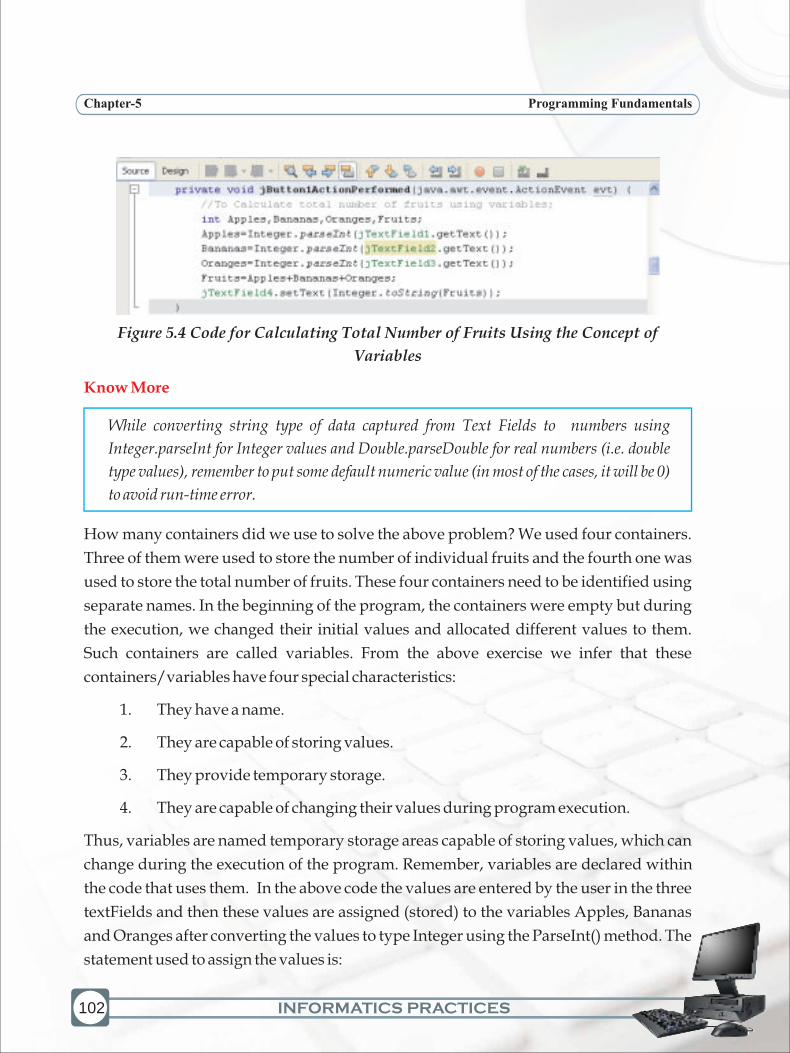
Figure 5.4 Code for Calculating Total Number of Fruits Using the Concept of
Variables
While converting string type of data captured from Text Fields to numbers using
Integer.parseInt for Integer values and Double.parseDouble for real numbers (i.e. double
type values), remember to put some default numeric value (in most of the cases, it will be 0)
to avoid run-time error.
How many containers did we use to solve the above problem? We used four containers.
Three of them were used to store the number of individual fruits and the fourth one was
used to store the total number of fruits. These four containers need to be identified using
separate names. In the beginning of the program, the containers were empty but during
the execution, we changed their initial values and allocated different values to them.
Such containers are called variables. From the above exercise we infer that these
containers/variables have four special characteristics:
1. They have a name.
2. They are capable of storing values.
3. They provide temporary storage.
4. They are capable of changing their values during program execution.
Thus, variables are named temporary storage areas capable of storing values, which can
change during the execution of the program. Remember, variables are declared within
the code that uses them. In the above code the values are entered by the user in the three
textFields and then these values are assigned (stored) to the variables Apples, Bananas
and Oranges after converting the values to type Integer using the ParseInt() method. The
statement used to assign the values is:
Know More

INFORMATICS PRACTICES
Chapter-5 Programming Fundamentals
Apples=Integer.ParseInt(jTextField1.getText());
In this case the value entered in jTextField1 is assigned to variable Apples. Similarly,
values entered in jTextField2 is stored in the variables called Bananas and value entered
in jTextField3 is stored in the variables called Oranges. The sum total is stored in the
variable Fruits using the statement:
Fruits = Apples + Bananas + Oranges;
Again observe the code given in Figure 5.4 closely and try to find out one extra
characteristic about the variables. Note that they all have been used to store numbers
without decimals. What if we change the application above to find the total marks
obtained by a student? In that case the variables will store numbers with decimals. What
if we change the above application to accept the first name, middle name and last name
of the user and want to display the full name in the fourth text field? In that case the
variables will have to store groups of characters. What do we learn from this? We learn a
new characteristic of these variables - each variable can store a specific type of data. The
type of data that a variable is capable of storing guides us about how to handle that
particular variable and also informs us about what can be done with these variables. So
each variable has a specific data type, which determines the kind of value they can store,
and also specifies what can be done with these variables. Each programming language
has a set of data types that can be used according to the need of the programmer. Now
that we are clear about the facts why we need variables and the use of data types, let us
try and understand the different data types available in java. In the above example all
four variables- Apples, Bananas, Oranges and Fruits are integer type variables as they
are storing numbers without decimals. In the code given in Figure 5.4 can you point out
the keyword, which identifies these variables as integer numbers?
The keyword used to identify the variables as integers is int. These are variables without
decimals. Similarly we have data types for handling other varieties of data. The different
types of data that we enter need different type of handling. These different types of data
can be manipulated through specific data types. The data types that we have used till
now can be classified as Numeric data types. Java offers us with other types of data as
enumerated below:
Data type states the way the values of that type are stored, and the range for that type.
Data Types
103

INFORMATICS PRACTICES
Programming FundamentalsChapter-5
104
i) Numeric Data Types: These data types are used to store integer values only i.e.
whole numbers only. The storage size and range is listed in Figure 5.5 below :
7 7 8byte 1 byte(8 bits) -128 to 127(-2 to +(2 -1)) (2 ) = 256 byte rollno;
15 15 16short 2 bytes(16 bits) -32768 to 32767(-2 to +(2 -1)) (2 )= 65,536 short rate;
31 31 32int 4 bytes(32 bits) -2 to +(2 -1) (2 ) = int num1;
42,94,967,296
63 63 64long 8 bytes (64 bits) -2 to +(2 -1) (2 ) = long
1.84467441 amount;19× 10
Figure 5.5 Numeric Data Types
The decision about which numeric data type to use should be based on the range of
values that a variable can take. For example, to store small values like roll number
of students in a class, we should use byte whereas to store admission number of the
students in a primary school we may use short as there will be more than 128
students. Similarly, to store large numbers like Roll number of students sitting for a
public exam, we should use int. The value assigned to any variable must be in the
correct range; otherwise we will receive an error. This means that if we assign a
value lower than -128 or higher than 127 to a byte variable, the program will result
in an error.
ii) Floating Data Types: These data types are used to store numbers having decimal
points i.e. they can store numbers having fractional values.
-38float Single precision 4 bytes (3.4x10 ) to float average;-38 floating point (32 bits) +(3.4x10 )
-38double Double precision 8 bytes (1.8x10 ) to double principal;-38floating point (64 bits) +(1.8x10 )
Figure 5.6 Floating Data Types
Name Size Range Values Example
Name Description Size Range Example
INFORMATICS PRACTICES
Chapter-5 Programming Fundamentals
Though both float and double are used to store numbers having fractional values but for
better accuracy, we normally use double instead of float.
! All numeric data types can store negative as well as positive numbers.
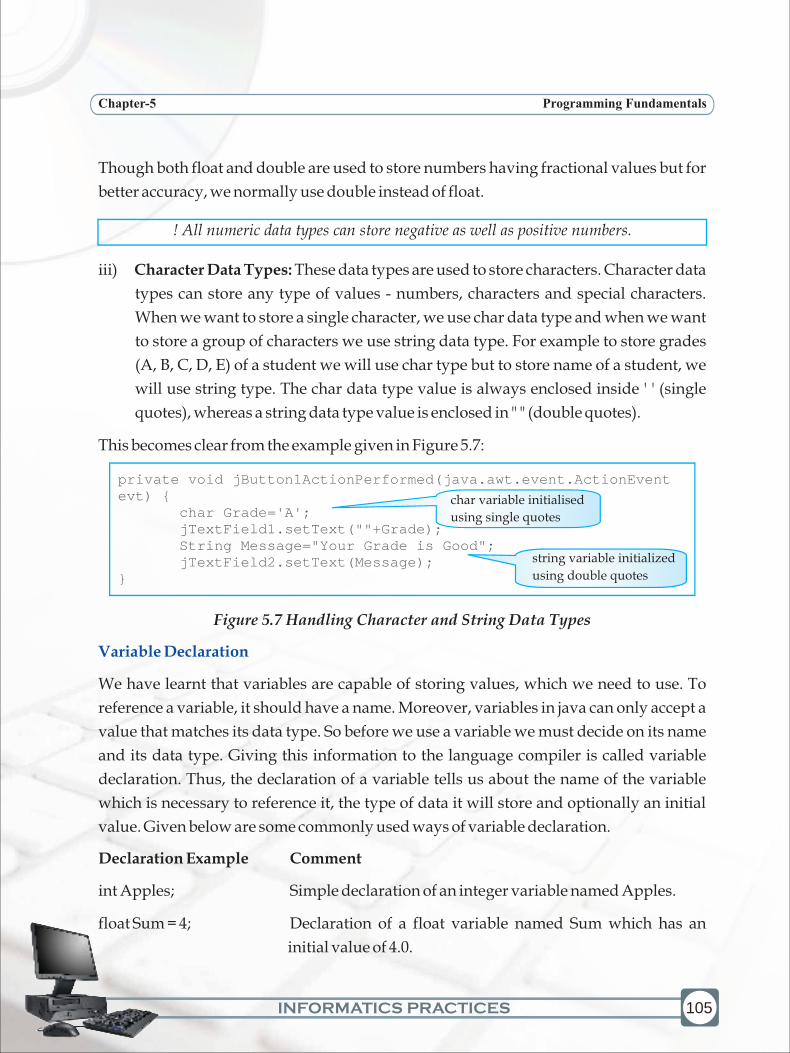
iii) Character Data Types: These data types are used to store characters. Character data
types can store any type of values - numbers, characters and special characters.
When we want to store a single character, we use char data type and when we want
to store a group of characters we use string data type. For example to store grades
(A, B, C, D, E) of a student we will use char type but to store name of a student, we
will use string type. The char data type value is always enclosed inside ' ' (single
quotes), whereas a string data type value is enclosed in " " (double quotes).
This becomes clear from the example given in Figure 5.7:
Figure 5.7 Handling Character and String Data Types
We have learnt that variables are capable of storing values, which we need to use. To
reference a variable, it should have a name. Moreover, variables in java can only accept a
value that matches its data type. So before we use a variable we must decide on its name
and its data type. Giving this information to the language compiler is called variable
declaration. Thus, the declaration of a variable tells us about the name of the variable
which is necessary to reference it, the type of data it will store and optionally an initial
value. Given below are some commonly used ways of variable declaration.
Declaration Example Comment
int Apples; Simple declaration of an integer variable named Apples.
float Sum = 4; Declaration of a float variable named Sum which has an
initial value of 4.0.
Variable Declaration
105
private void jButton1ActionPerformed(java.awt.event.ActionEvent evt) { char Grade='A'; jTextField1.setText(""+Grade); String Message="Your Grade is Good"; jTextField2.setText(Message);}
char variable initialised
using single quotes
string variable initialized
using double quotes
INFORMATICS PRACTICES
Programming FundamentalsChapter-5
106
Variable Naming Conventions
As mentioned above, each variable needs to have a name so that it can be referenced
anywhere during the application. Each programming language has its own set of rules
for naming variables. The rules and conventions for naming variables in Java are
summarized below:
Variable names are case sensitive.
Keywords or words, which have special meaning in java, should not be used
as the variable names.
Variable names should be short and meaningful.
All variable names must begin with a letter, an underscore(_) or a dollar
sign($). The convention is to always use a letter and avoid starting variable
names with underscore (_) and dollar sign ($).
After the first initial letter, variable names may contain letters and digits (0 to
9) and (_,$), but no spaces or special characters are allowed.
Using the above conventions and rules following is an indicative list of acceptable and
unacceptable variable names.
Acceptable Variable Names - Grade, Test_Grade, TestGrade
Unacceptable Variable Names - Grade(Test), 2ndTestGrade, Test Grade, Grade_Test#2
Try to justify why these variable names are unacceptable.
! Java variable names are case sensitive, so sum1 and SUM1 aren't the same variable.
Let us quickly recap the concepts learnt above:
To store values temporarily we need special containers called variables.
Each variable must have a name, a data type and a value of the specific type.
Each variable must be declared before it can be used.
The name of the variable should be decided according to specific rules and
conventions.
The data type should be decided depending upon the type of the value a
variable has to store.
v
v
v
v
v
v
v
v
v
v

INFORMATICS PRACTICES
Chapter-5 Programming Fundamentals
Simple Applications Using the Concept of Variables
Now, let us get back to developing applications to practically understand all the
concepts learnt above. First let us develop a simple application to learn the use and
handling of char data type. Suppose we want to display the message entered by the user
surrounded by four different characters. See the sample execution of the application as
shown in Figure 5.8.
Figure 5.8 Handling Character Variables
As is clear from the sample run, we need to concatenate the message and the selected
character depending upon the button clicked by the user. Let us now design the
application:
First add a new JFrame form and set its title property to "Magic Text". Design the form as
shown in Figure 5.8 with the following components:
one editable text field to accept the message
five buttons - four to concatenate message with different characters and one to
exit from the application
one non-editable text field to display the concatenated message
appropriate labels to direct the user
Change the properties of the components as learnt in the previous chapter so that the
form looks exactly like the one displayed in Figure 5.8. The next step is to associate code
with the all the buttons. Double click on the buttons one by one in the design window to
v
v
v
v
107
Message surrounded by the selected character –‘#’on click of the
appropriate button

INFORMATICS PRACTICES
Programming FundamentalsChapter-5
108
reach at the point in the source window where the code needs to be written. Add the code
for each of the buttons as shown in Figure 5.9.
Now try to develop a similar application with four buttons to perform the basic
mathematical operations of addition, subtraction, multiplication and division of any
two numbers entered by the user. First design the form with the following components:
two editable text fields to accept the two numbers .
four buttons to decide the operation, one button to reset the fields and one
button to exit out of the application.
one non-editable text field to display the result.
appropriate labels to direct the user.
v
v
v
v
private void jButton1ActionPerformed(java.awt.event.ActionEvent evt) { // Concatenate * to the text in jtextField1: char Star; Star='*'; jTextField2.setText(Star+jTextField1.getText()+Star);}
private void jButton2ActionPerformed(java.awt.event.ActionEvent evt) { // Concatenate # to the text in jtextField1: char Hash; Hash='#'; jTextField2.setText(Hash+jTextField1.getText()+Hash);}
private void jButton3ActionPerformed(java.awt.event.ActionEvent evt) { // Concatenate % to the text in jtextField1: char Percent; Percent='%'; jTextField2.setText(Percent+jTextField1.getText()+Percent);}
private void jButton4ActionPerformed(java.awt.event.ActionEvent evt) { // Concatenate “ to the text in jtextField1: char Quotes; Quotes='"'; jTextField2.setText(Quotes+jTextField1.getText()+Quotes);}
private void jButton5ActionPerformed(java.awt.event.ActionEvent evt) { //To STOP the application: System.exit(0);}

INFORMATICS PRACTICES
Chapter-5 Programming Fundamentals
When the user enters two numbers and
clicks on the + button, the sum of the
numbers is displayed in the jtextField3
which has been disabled (by setting its
editable property to false) as shown in
Figure 5.10.
When the user clicks on the RESET
button the contents of all the Text Fields
are cleared.
Figure 5.10 A Simple Calculator Showing Addition of Two Numbers
When the user enters two numbers and
clicks on the X button, the product of the
numbers is displayed in the jtextField3
as shown figure 5.11.
Similarly try out the effect of clicking on
the other two buttons.
Now write the code for each button of
the basic calculator as shown in Figure
5.12
Figure 5.11 A Simple Calculator Showing Product of Two Numbers
109
private void jButton1ActionPerformed(java.awt.event.ActionEvent evt) { // Code to add Number1 and Number2: double Number1,Number2,Result; Number1=Double.parseDouble(jTextField1.getText()); Number2=Double.parseDouble(jTextField2.getText()); Result=Number1+Number2; jTextField3.setText(Double.toString(Result));}

INFORMATICS PRACTICES
Programming FundamentalsChapter-5
110
private void jButton2ActionPerformed(java.awt.event.ActionEvent evt) { // Code to subtract Number2 from Number1: double Number1,Number2,Result; Number1=Double.parseDouble(jTextField1.getText()); Number2=Double.parseDouble(jTextField2.getText()); Result=Number1-Number2; jTextField3.setText(Double.toString(Result));}
private void jButton3ActionPerformed(java.awt.event.ActionEvent evt) { // Code to multiply Number1 and Number2: double Number1,Number2,Result; Number1=Double.parseDouble(jTextField1.getText()); Number2=Double.parseDouble(jTextField2.getText()); Result=Number1*Number2; jTextField3.setText(Double.toString(Result));}
private void jButton4ActionPerformed(java.awt.event.ActionEvent evt) { // Code to divide Number1 by Number2: double Number1,Number2,Result; Number1=Double.parseDouble(jTextField1.getText()); Number2=Double.parseDouble(jTextField2.getText()); Result=Number1/Number2; jTextField3.setText(Double.toString(Result));}
private void jButton5ActionPerformed(java.awt.event.ActionEvent evt) { // Code to clear the contents of the text field: jTextField1.setText(""); jTextField2.setText(""); jTextField3.setText("");}
private void jButton6ActionPerformed(java.awt.event.ActionEvent evt) { System.exit(0);}
Figure 5.12 Code for Basic Calculator
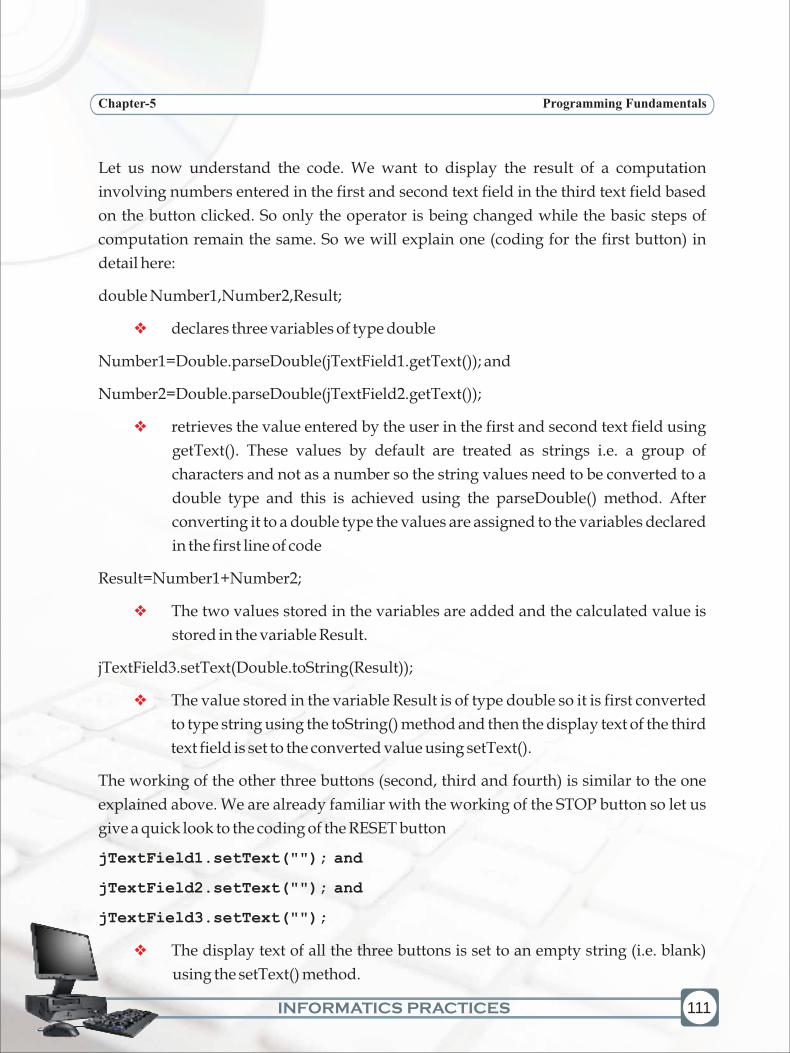
INFORMATICS PRACTICES
Chapter-5 Programming Fundamentals
Let us now understand the code. We want to display the result of a computation
involving numbers entered in the first and second text field in the third text field based
on the button clicked. So only the operator is being changed while the basic steps of
computation remain the same. So we will explain one (coding for the first button) in
detail here:
double Number1,Number2,Result;
declares three variables of type double
Number1=Double.parseDouble(jTextField1.getText()); and
Number2=Double.parseDouble(jTextField2.getText());
retrieves the value entered by the user in the first and second text field using
getText(). These values by default are treated as strings i.e. a group of
characters and not as a number so the string values need to be converted to a
double type and this is achieved using the parseDouble() method. After
converting it to a double type the values are assigned to the variables declared
in the first line of code
Result=Number1+Number2;
The two values stored in the variables are added and the calculated value is
stored in the variable Result.
jTextField3.setText(Double.toString(Result));
The value stored in the variable Result is of type double so it is first converted
to type string using the toString() method and then the display text of the third
text field is set to the converted value using setText().
The working of the other three buttons (second, third and fourth) is similar to the one
explained above. We are already familiar with the working of the STOP button so let us
give a quick look to the coding of the RESET button
jTextField1.setText(""); and
jTextField2.setText(""); and
jTextField3.setText("");
The display text of all the three buttons is set to an empty string (i.e. blank)
using the setText() method.
v
v
v
v
v
111
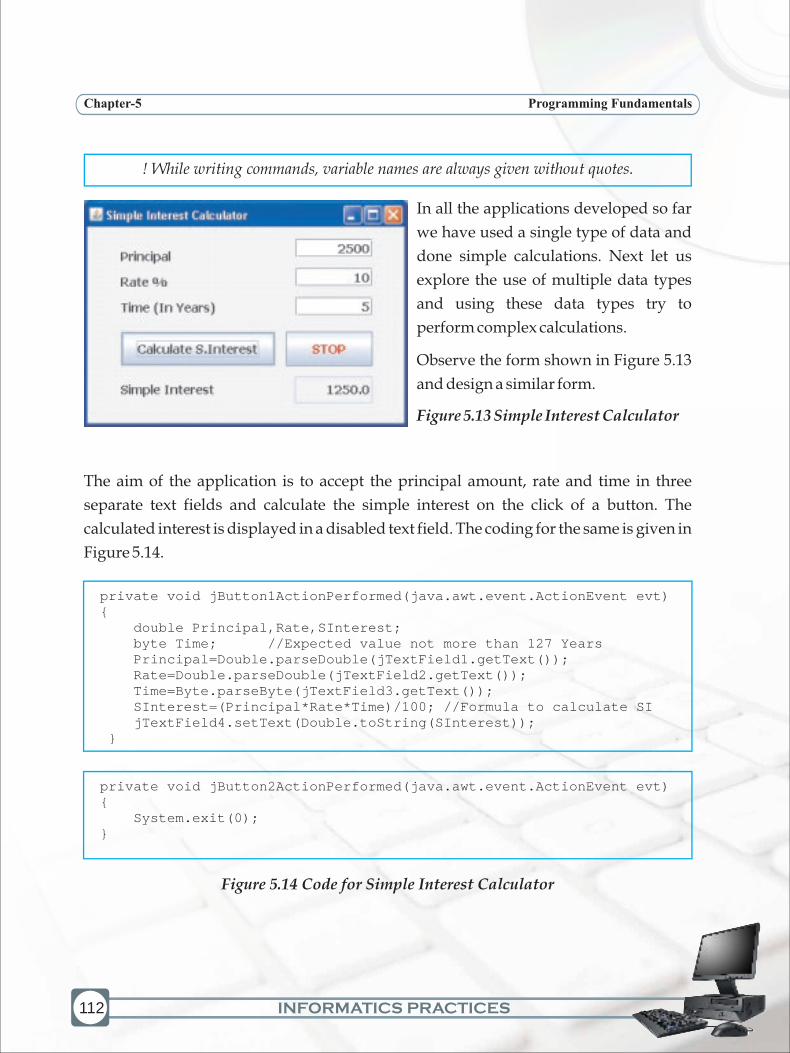
INFORMATICS PRACTICES
Programming FundamentalsChapter-5
112
! While writing commands, variable names are always given without quotes.
In all the applications developed so far
we have used a single type of data and
done simple calculations. Next let us
explore the use of multiple data types
and using these data types try to
perform complex calculations.
Observe the form shown in Figure 5.13
and design a similar form.
Figure 5.13 Simple Interest Calculator
The aim of the application is to accept the principal amount, rate and time in three
separate text fields and calculate the simple interest on the click of a button. The
calculated interest is displayed in a disabled text field. The coding for the same is given in
Figure 5.14.
private void jButton1ActionPerformed(java.awt.event.ActionEvent evt) { double Principal,Rate,SInterest; byte Time; //Expected value not more than 127 Years Principal=Double.parseDouble(jTextField1.getText()); Rate=Double.parseDouble(jTextField2.getText()); Time=Byte.parseByte(jTextField3.getText()); SInterest=(Principal*Rate*Time)/100; //Formula to calculate SI jTextField4.setText(Double.toString(SInterest)); }
private void jButton2ActionPerformed(java.awt.event.ActionEvent evt) { System.exit(0);}
Figure 5.14 Code for Simple Interest Calculator

INFORMATICS PRACTICES
Chapter-5 Programming Fundamentals
The above example introduces us to the usage of multiple data types like byte and
double in a single application and also teaches us how to handle complex calculations
like multiplying Principal, Rate and Time and dividing the result by 100. Did you
observe anything common in all the programs we have developed in this chapter?
Think.
In all the programs we have done till now we have used various symbols such as +, - *, /
and =. Each of these are used to perform specific operations like addition, subtraction,
multiplication, division and assignment. Such symbols that perform specific operations
on data are called operators. Operators are symbols that manipulate, combine or
compare variables. Each programming language has a specific set of operators. We are
going to study about two types of operators here: arithmetic operators and assignment
operators.
One of the most common operator is the assignment operator "=" which is used to assign
a value to a variable. We assign the value given on the right hand side to the variable
specified on the left hand side. The value on the right hand side can be a number or an
arithmetic expression. For example:
int sum = 0;
int prime = 4*5;
These operators perform addition, subtraction, multiplication, and division. These
symbols are similar to mathematical symbols. The only symbol that is different is "%",
which divides one operand by another and returns the remainder as its result.
+ additive operator (also used for String concatenation explained in Chapter 4)
- subtraction operator
* multiplication operator
/ division operator
% remainder operator
Operators
Assignment Operator
Arithmetic Operators
113
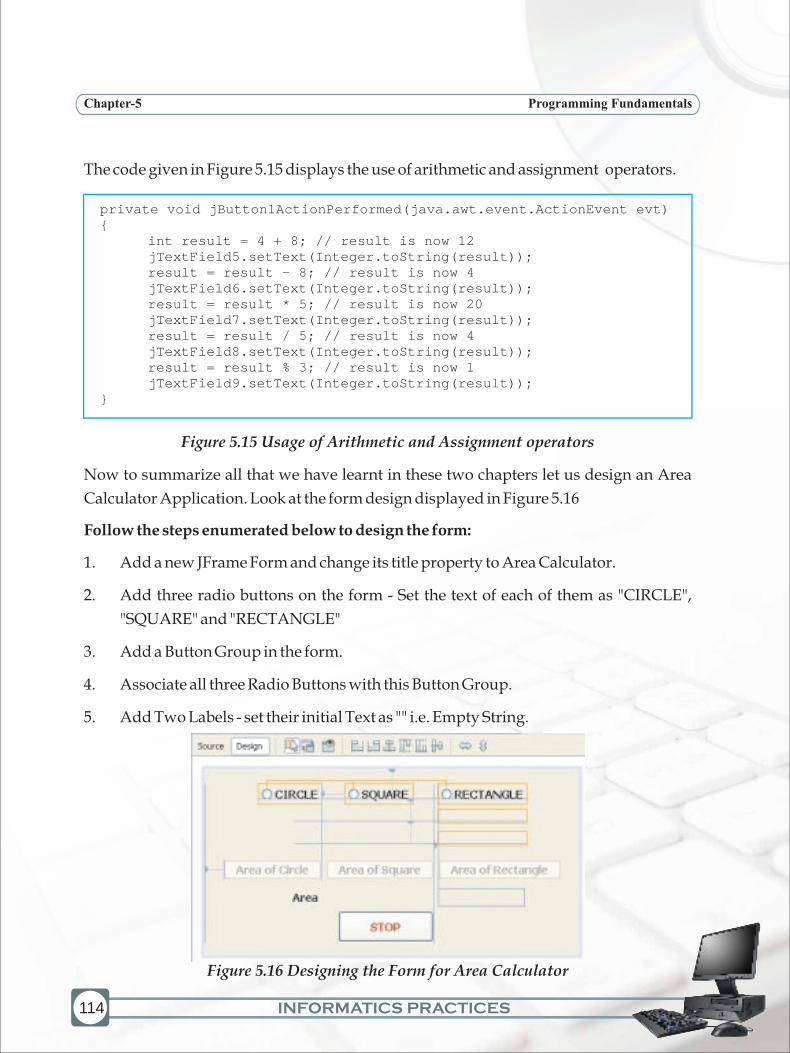
INFORMATICS PRACTICES
Programming FundamentalsChapter-5
114
The code given in Figure 5.15 displays the use of arithmetic and assignment operators.
Figure 5.15 Usage of Arithmetic and Assignment operators
Now to summarize all that we have learnt in these two chapters let us design an Area
Calculator Application. Look at the form design displayed in Figure 5.16
Follow the steps enumerated below to design the form:
1. Add a new JFrame Form and change its title property to Area Calculator.
2. Add three radio buttons on the form - Set the text of each of them as "CIRCLE",
"SQUARE" and "RECTANGLE"
3. Add a Button Group in the form.
4. Associate all three Radio Buttons with this Button Group.
5. Add Two Labels - set their initial Text as "" i.e. Empty String.
private void jButton1ActionPerformed(java.awt.event.ActionEvent evt) {
int result = 4 + 8; // result is now 12jTextField5.setText(Integer.toString(result));result = result – 8; // result is now 4jTextField6.setText(Integer.toString(result));result = result * 5; // result is now 20jTextField7.setText(Integer.toString(result));result = result / 5; // result is now 4jTextField8.setText(Integer.toString(result));result = result % 3; // result is now 1jTextField9.setText(Integer.toString(result));
}
Figure 5.16 Designing the Form for Area Calculator

INFORMATICS PRACTICES
Chapter-5 Programming Fundamentals
6. Add Two TextFields - set their initial Text as "", Set Editable property as false, Set
Border property as "(No Border)" by selecting the option from the menu that pops
up by clicking on the option button(..)as shown in Figure 5.17.
Figure 5.17 Setting the Border Property of a Text Field
7. Add Three Buttons - Set the text of each of them as "Area of CIRCLE", "Area of
SQUARE" and "Area of RECTANGLE" and Set their Enable property as false.
8. Add third Label - Set its Text as "Area".
9. Add third TextField - Set its Text as "" i.e. Empty String and Set its Editable property
as false.
10. One by one click on all the three radio buttons to associate code with them:
a. Click on the Radio Button 1 (CIRCLE) and write the CODE as mentioned in
Radio Button1 Code shown in Figure 5.18.
115
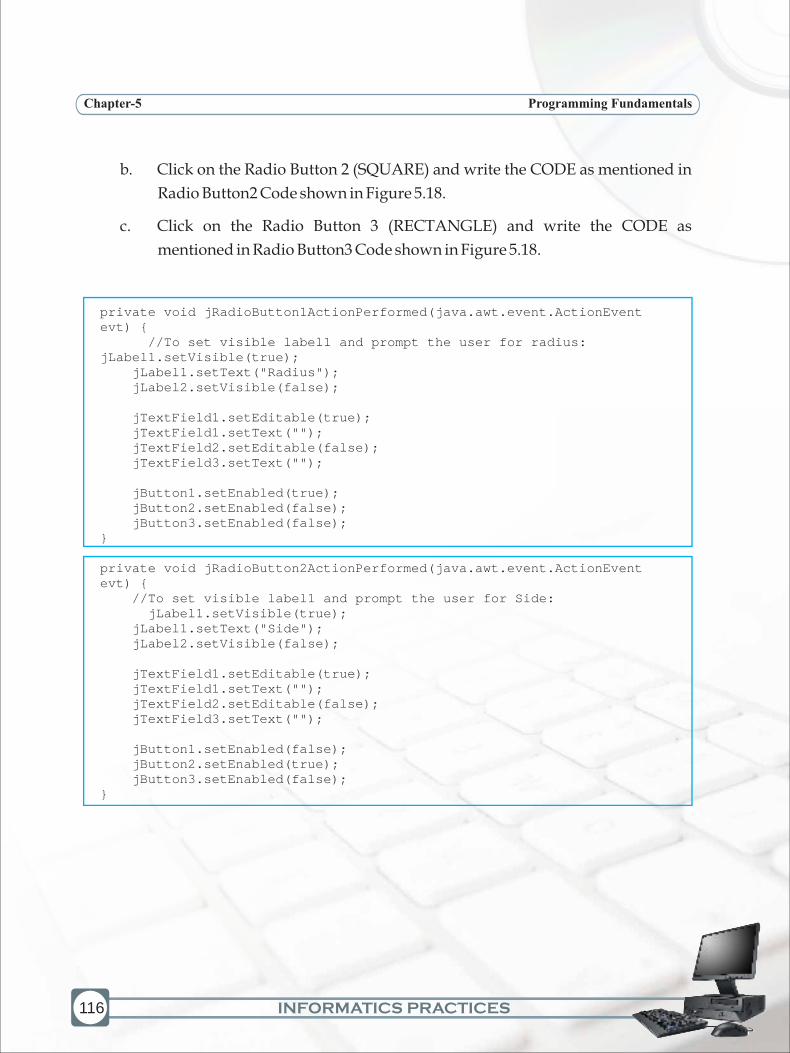
INFORMATICS PRACTICES
Programming FundamentalsChapter-5
116
b. Click on the Radio Button 2 (SQUARE) and write the CODE as mentioned in
Radio Button2 Code shown in Figure 5.18.
c. Click on the Radio Button 3 (RECTANGLE) and write the CODE as
mentioned in Radio Button3 Code shown in Figure 5.18.
private void jRadioButton1ActionPerformed(java.awt.event.ActionEvent evt) { //To set visible label1 and prompt the user for radius: jLabel1.setVisible(true); jLabel1.setText("Radius"); jLabel2.setVisible(false);
jTextField1.setEditable(true); jTextField1.setText(""); jTextField2.setEditable(false); jTextField3.setText("");
jButton1.setEnabled(true); jButton2.setEnabled(false); jButton3.setEnabled(false);}
private void jRadioButton2ActionPerformed(java.awt.event.ActionEvent evt) { //To set visible label1 and prompt the user for Side:
jLabel1.setVisible(true); jLabel1.setText("Side"); jLabel2.setVisible(false); jTextField1.setEditable(true); jTextField1.setText(""); jTextField2.setEditable(false); jTextField3.setText("");
jButton1.setEnabled(false); jButton2.setEnabled(true); jButton3.setEnabled(false);}
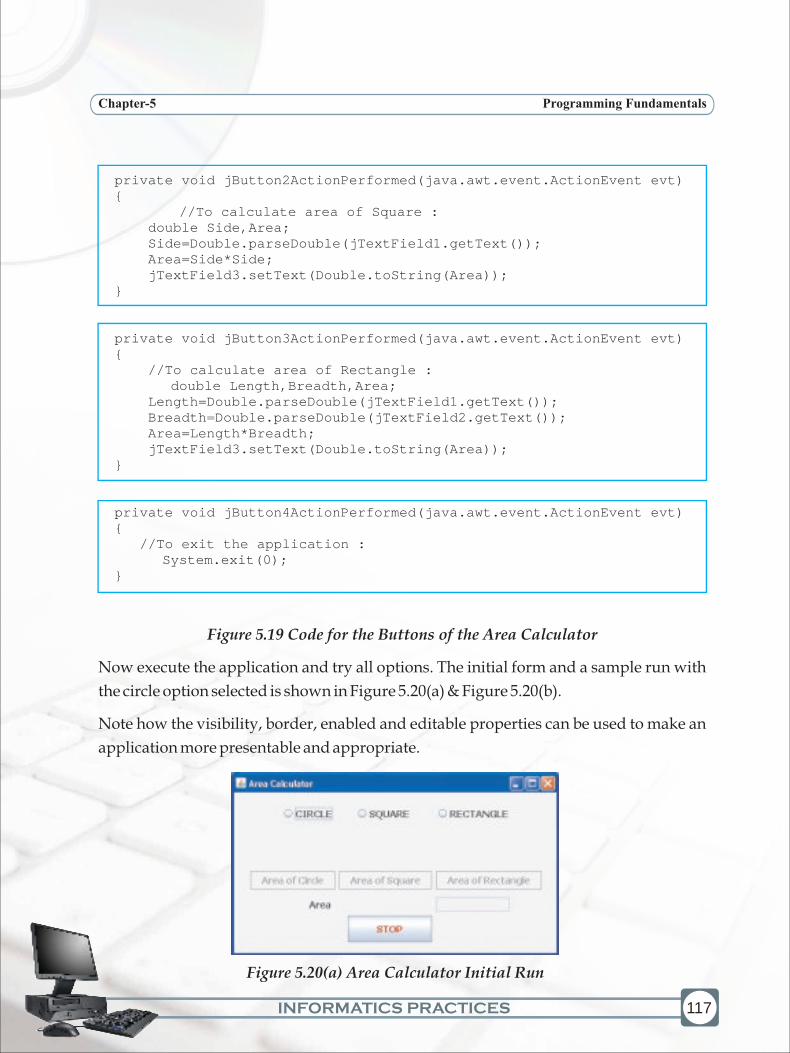
INFORMATICS PRACTICES
Chapter-5 Programming Fundamentals
117
Figure 5.19 Code for the Buttons of the Area Calculator
Now execute the application and try all options. The initial form and a sample run with
the circle option selected is shown in Figure 5.20(a) & Figure 5.20(b).
Note how the visibility, border, enabled and editable properties can be used to make an
application more presentable and appropriate.
private void jButton2ActionPerformed(java.awt.event.ActionEvent evt) {
//To calculate area of Square : double Side,Area; Side=Double.parseDouble(jTextField1.getText()); Area=Side*Side; jTextField3.setText(Double.toString(Area));}
private void jButton3ActionPerformed(java.awt.event.ActionEvent evt) { //To calculate area of Rectangle :
double Length,Breadth,Area; Length=Double.parseDouble(jTextField1.getText()); Breadth=Double.parseDouble(jTextField2.getText()); Area=Length*Breadth; jTextField3.setText(Double.toString(Area));}
private void jButton4ActionPerformed(java.awt.event.ActionEvent evt) { //To exit the application :
System.exit(0);}
Figure 5.20(a) Area Calculator Initial Run

INFORMATICS PRACTICES
Programming FundamentalsChapter-5
118
Figure 5.18 Code for the Radio Buttons of the Area Calculator
11. One by one click on all the three buttons to associate code with them:
a. Click on the Button 1 (Area of CIRCLE) and write the CODE as mentioned in
Button1 Code shown in Figure 5.19
b. Click on the Button 2 (Area of SQUARE) and write the CODE as mentioned in
Button2 Code shown in Figure 5.19
c. Click on the Button 3 (Area of RECTANGLE) and write the CODE as
mentioned in Button3 Code shown in Figure 5.19
d. Click on the Button 4 (STOP) and write the CODE as mentioned in Button4
Code shown in Figure 5.19.
private void jRadioButton3ActionPerformed(java.awt.event.ActionEvent evt) { //To set visible label1 and prompt the user for length & breadth:
jLabel1.setVisible(true); jLabel1.setText("Length"); jLabel2.setVisible(true); jLabel2.setText("Breadth");
jTextField1.setEditable(true); jTextField1.setText(""); jTextField2.setEditable(true); jTextField2.setText(""); jTextField3.setText(""); jButton1.setEnabled(false); jButton2.setEnabled(false); jButton3.setEnabled(true); }
private void jButton1ActionPerformed(java.awt.event.ActionEvent evt) {
//To calculate area of Circle : double Radius,Area; Radius=Double.parseDouble(jTextField1.getText()); Area=3.1416*Radius*Radius; jTextField3.setText(Double.toString(Area));}
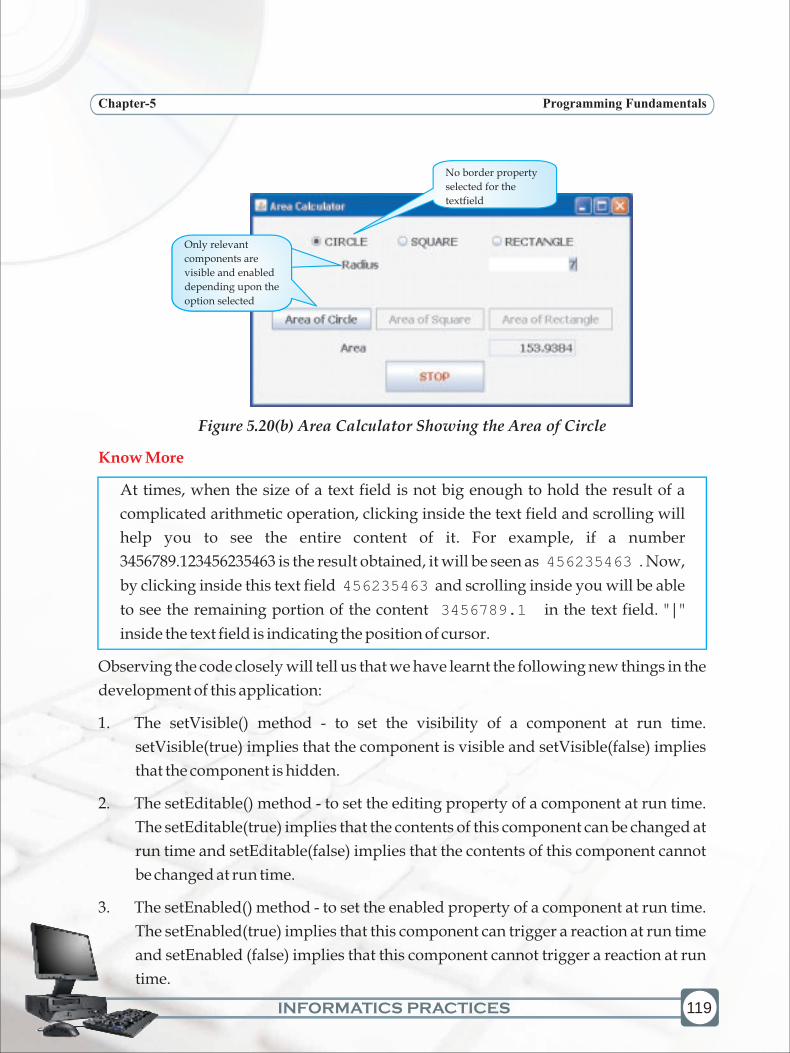
INFORMATICS PRACTICES
Chapter-5 Programming Fundamentals
Figure 5.20(b) Area Calculator Showing the Area of Circle
At times, when the size of a text field is not big enough to hold the result of a
complicated arithmetic operation, clicking inside the text field and scrolling will
help you to see the entire content of it. For example, if a number
3456789.123456235463 is the result obtained, it will be seen as 456235463 . Now,
by clicking inside this text field 456235463 and scrolling inside you will be able
to see the remaining portion of the content 3456789.1 in the text field. "|"
inside the text field is indicating the position of cursor.
Observing the code closely will tell us that we have learnt the following new things in the
development of this application:
1. The setVisible() method - to set the visibility of a component at run time.
setVisible(true) implies that the component is visible and setVisible(false) implies
that the component is hidden.
2. The setEditable() method - to set the editing property of a component at run time.
The setEditable(true) implies that the contents of this component can be changed at
run time and setEditable(false) implies that the contents of this component cannot
be changed at run time.
3. The setEnabled() method - to set the enabled property of a component at run time.
The setEnabled(true) implies that this component can trigger a reaction at run time
and setEnabled (false) implies that this component cannot trigger a reaction at run
time.
Know More
119
No border property
selected for the
textfield
Only relevant
components are
visible and enabled
depending upon the
option selected

INFORMATICS PRACTICES
Programming FundamentalsChapter-5
120
In both the previous chapters we have been executing all the part of the code associated
with a component in sequence- as they appear one after the other. What happens when
we do not want the code to be executed in sequence or do not want certain code to be
executed at all? The following chapter will help us in understanding how to achieve this.
Variables are named temporary storage locations.
Variable names in java are case sensitive. That means in the same application
Sum and SUM can be treated as two different variables.
Data Types define the way the values are stored, the range of the values and
the operations that can be performed on that type.
Numeric data types can store positive as well as negative values.
Assignment operator is used to assign a value.
Arithmetic operators are used to perform addition, subtraction,
multiplication and division.
Some of the components for which the setVisible() method is applicable are
button, textArea, textField, label, CheckBox, RadioButton, ListBox and
Hidden.
A brief summary about all the methods learnt in this lesson is given in the
table below:
Summary
v
v
v
v
v
v
v
v

INFORMATICS PRACTICES
Chapter-5 Programming Fundamentals
Method Syntax Usage
setVisible() component.setVisible(boolean) To set the visibility of a
component at run time.
setVisible(true) implies that
the component is visible and
setVisible(false) implies that
the component is hidden.
setEditable() component.setEditable(boolean) To set the editing property of a
component at run time. The
setEditable(true) implies that
the contents of this component
can be changed at run time
and setEditable(false) implies
that the contents of this
component cannot be changed
at run time.
setEnabled() component.setEnabled(boolean) To set the enabled property of
a component at run time. The
setEnabled(true) implies that
this component can trigger a
reaction at run time and
setEnabled (false) implies that
this component cannot trigger
a reaction at run time.
121
INFORMATICS PRACTICES
Programming FundamentalsChapter-5
122
Multiple Choice Questions
1. The storage provided by variables is:
a) temporary
b) permanent
c) volatile
d) none of the above
2. Which of the following is a valid variable name:
a) 3firstname
b) Integer
c) Char
d) Number1
3. Which of the following statements refer to the same variable name?
i) Amount=20 ii) amount=20 iii) Amount="20" iv) Amount=20
a) Both i) & ii)
b) Both i) & iv)
c) Both ii) & iii)
d) All of the above
4. What will be the output of the following code segment:
String firstName = "Johua ";
String lastName = "Yacomo";
String fullName = firstName + lastName;
jTextField1.setText("Full Name: ");
jTextField2.setText (fullName);
a) Full Name:

INFORMATICS PRACTICES
Chapter-5 Programming Fundamentals
b) Full Name
Johua Yacomo
c) Johua Yacomo
fullName
d) Full Name:
JohuaYacomo
5. To print the value of a variable "x" of type int, which of the following expressions
can be used:
i ) jTextField1.setText("x = " + x);
ii) jTextField1.setText ("x = " + "x"));
iii) jTextField1.setText ("x = " + Integer.toString(x));
iv) jTextField1.setText (x = +"x");
a) Both i) & ii)
b) Only i)
c) Both i) and iii)
d) Only iii)
1. What is a Variable?
2. Why are data types important?
3. Explain Numeric data types with the help of an example.
4. How are keywords different from variable names?
5. Is Java case sensitive? What is meant by case sensitive?
6. Is a string containing a single character same as a char?
7. Explain the use of different operators with the help of an example.
Exercises
123

INFORMATICS PRACTICES
Programming FundamentalsChapter-5
124
Lab Exercises
a) Design a GUI desktop application in java to accept the side of a square in a text field
and calculate the area and perimeter of the square. Display the results in two
separate text fields. Add appropriate labels and an exit button to end the
application.
b) Design a GUI desktop application in java to accept marks in 5 subjects in five text
fields and calculate the total and average marks. Display the results in separate text
fields, which are disabled. Add appropriate labels and an exit button to end the
application.
c) Design a GUI desktop application in java to accept sales of a company for four
quarters in text fields. Calculate the total yearly sale and display the same in a
dialog box. Add appropriate labels and an exit button to end the application.
d) Design a GUI desktop application in java to accept length in kilometers in a text
field and display the converted length in meters in a second text field which is
disabled. Add appropriate labels and an exit button to end the application.
e) Design a GUI desktop application in java to accept two numbers in a in a text field
and interchange the values of first number and second number using a temporary
variable. Add appropriate labels and an exit button to end the application.
f) Write the code for the following application
[Hint :Tc = (5/9)*(Tf-32) and Tf = (9/5)*Tc+32 where Tc = temperature in degrees
Celsius, Tf = temperature in degrees Fahrenheit]

INFORMATICS PRACTICES
Chapter-5 Programming Fundamentals
g) Write the code for the following application :
[Hint : Area of Rectangle=Length*Breadth and Perimeter of
Rectangle=2*(Length+Breadth)]
h) Write the code for the following application:
[Hint : SI [Interest] = (P×R×T)/100 and Amount = Principle + SI]
125
INFORMATICS PRACTICES
6 Control Structures
Learning Objectives
v
v
v
v
v
v
After studying this lesson the students will be able to:
understand the concept and usage of selection and Iteration statements.
appreciate the need and use of Relational and Logical operators.
analyze the problem, decide and evaluate conditions.
understand the need to use the Check Box, List and Combo Box
components.
design simple applications using the various selection control structures
in an application.
develop applications integrating GUI components and iterative control
structures.
In all the applications that we have designed so far, the execution of the programs followed
a sequence. All the commands or statements were executed from the beginning to the end,
one after the other. But if we want to govern the flow of control in a program then we will
require control statements. Control statements control the order in which the statements
are executed. This chapter will introduce us to the two main categories of control
statements namely Selection statements and Iteration statements
126

INFORMATICS PRACTICES
Chapter-6 Control Structures
Selection Statements
Observe the form execution given in Figure 6.1 carefully and try to analyze the problem.
Figure 6.1 Sample Run of The Vote Eligibility Checker Application
Observing the sample run of the above application, it is clear that we have designed an
application where we are accepting the age from the user and we want to validate
whether the person is eligible to vote or not. We are accepting the age of the user in a text
field and testing whether the age entered by the user is greater than 18 or not. If the age is
greater than 18 then the message "You are eligible to VOTE" is displayed. In such
situations when we have to take action on the basis of outcome of a condition, we need to
use a Selection statement. Design the form and set the properties of the components so
that the form looks exactly like the one displayed in figure 6.1.
Let us now try to write the code for the "Check Eligibility To Vote" button as given in
Figure 6.2. The code for the STOP button is the same as learnt in previous chapters.
Figure 6.2 Code for the Vote Eligibility Checker Application
Let us now understand the single line code in detail.
Integer.parseInt(jTextField1.getText())
private void jButton1ActionPerformed(java.awt.event.ActionEvent evt)
{
// Code to check eligibility to vote: if (Integer.parseInt(jTextField1.getText())>=18) JOptionPane.showMessageDialog(null,"You are eligible To VOTE");}
127

INFORMATICS PRACTICES
Control StructuresChapter-6
128
retrieves the value entered by the user in the text field using getText().This
value by default is treated as a string and not as a number so it needs to be
converted to an integer type and this is achieved using the parseInt() method.
if (Integer.parseInt(jTextField1.getText()) >=18)
check whether the value retrieved from the text field is greater than or equal to
18 or not. The if statement is used to check the condition and if the condition
evaluates to true then we specify what action is to be taken
if (Integer.parseInt(jTextField1.getText()) >=18)
JOptionPane.showMessageDialog(null, "You are eligible to VOTE")
This if statement is used to check whether the value retrieved from the text
field is greater than or equal to 18 or not and if it is then it displays the message
"You are eligible to VOTE" using the showMessageDialog() method.
Can you guess what will happen if the condition evaluates to false in the above
application? Understanding the if statement completely will help us answer this
question.
The if statement allows selection (decision making) depending upon the outcome of a
condition. If the condition evaluates to true then the statement immediately following if
will be executed and otherwise if the condition evaluates to false then the statements
following the else clause will be executed. Thus, if statement is a selection construct as
the execution of statements is based on a test condition. The selection statements are also
called conditional statements or decision control statements.
The syntax of if statement is as shown below:
Syntax:
if (conditional expression)
{
Statement Block;
}
else
v
v
v
Simple if Statement

INFORMATICS PRACTICES
Chapter-6 Control Structures
{
Statement Block;
}
! Do not use a semicolon after the parenthesis of the conditional expression of the if statement.
There are certain points worth remembering about the if statement as outlined below:
The conditional expression is always enclosed in parenthesis.
The conditional expression may be a simple expression or a compound
expression.
Each statement block may have a single or multiple statements to be executed.
In case there is a single statement to be executed then it is not mandatory to
enclose it in curly braces ({}) but if there are multiple statements then they
must be enclosed in curly braces ({})
The else clause is optional and needs to be included only when some action is
to be taken if the test condition evaluates to false.
After familiarizing with the if statement, can you now understand what will happen in
the above application if the Age entered by the user is less than 18? Well in that case, the
user will not get any message because we have not included the else clause in our code
above. So, let us re-write the program to take care of both the cases i.e. Age>= 18 as well
as Age <18. The modified code for this application is given in Figure 6.3.
Figure 6.3 Code for the Vote Eligibility Checker Application (with else Condition)
v
v
v
v
private void jButton1ActionPerformed(java.awt.event.ActionEvent
evt) {
// Code to check eligibility to vote with else condition: if (Integer.parseInt(jTextField1.getText())>=18) JOptionPane.showMessageDialog(null,"You are eligible To VOTE"); else JOptionPane.showMessageDialog(null,"You are NOT eligible To VOTE");}
129

INFORMATICS PRACTICES
Control StructuresChapter-6
130
Now, if the user enters the Age as 12, which is less than 18, then the message "You are
NOT eligible To VOTE" gets displayed as shown in Figure 6.4.
Figure 6.4 Sample Run of The Eligibility Checker Application when condition
evaluates to false
Observe the following line extracted from the above code carefully:
if(Integer.parseInt(jTextField1.getText())>=18)
In the above application we have used an operator >= to establish a relation between the
value input by the user and the number 18. Such operators are called relational
operators.
! if statement requires curly parenthesis {} for writing more than one number of statements
in a statement block.
If your are comparing two values for equality and one is a constant, put the constant on the
left side of the boolean statement. This will prevent accidental assigning of the constant
value to the other variable if a single "=" is typed instead of the intended "==". The
compilers often do not catch this error and it can lead to very strange problems that are very
difficult to track down as shown in the following example.
if(x=true) // assigns the value true to the variable x. The true clause is always
// executed, not what was intended.
if(true=x) // Always generates a compiler error like "attempt to assign value to a
// constant", error caught right away.
Know more
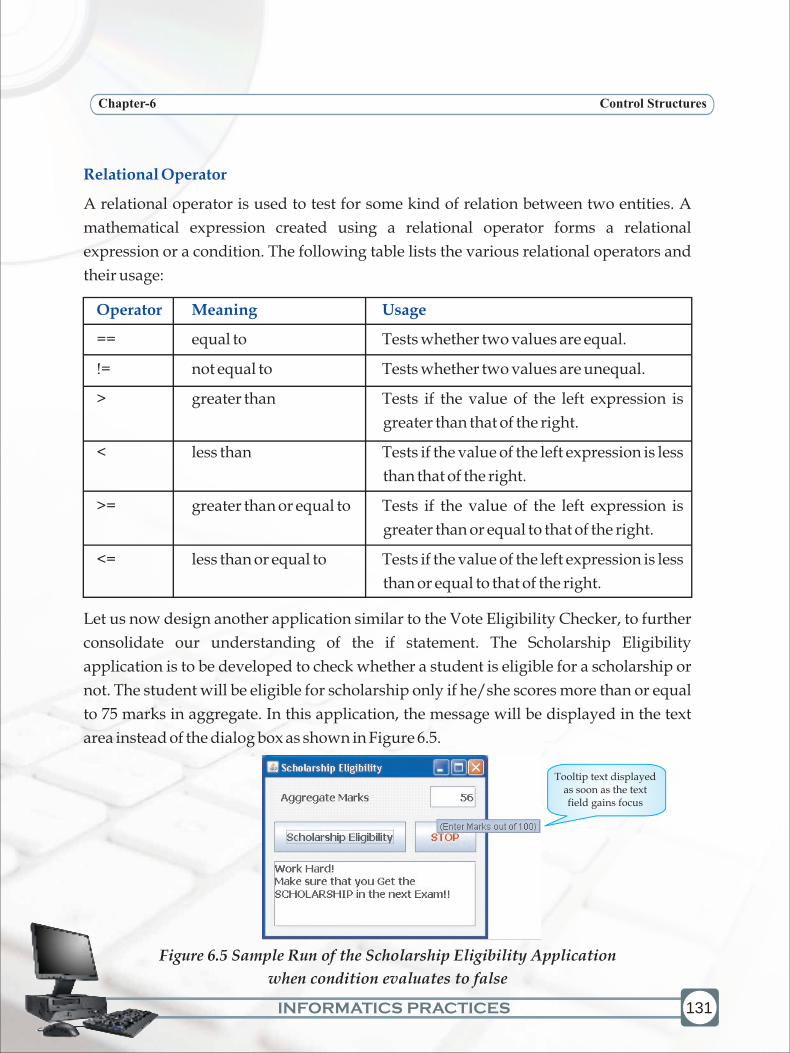
INFORMATICS PRACTICES
Chapter-6 Control Structures
131
Relational Operator
Operator Meaning Usage
A relational operator is used to test for some kind of relation between two entities. A
mathematical expression created using a relational operator forms a relational
expression or a condition. The following table lists the various relational operators and
their usage:
== equal to Tests whether two values are equal.
!= not equal to Tests whether two values are unequal.
> greater than Tests if the value of the left expression is
greater than that of the right.
< less than Tests if the value of the left expression is less
than that of the right.
>= greater than or equal to Tests if the value of the left expression is
greater than or equal to that of the right.
<= less than or equal to Tests if the value of the left expression is less
than or equal to that of the right.
Let us now design another application similar to the Vote Eligibility Checker, to further
consolidate our understanding of the if statement. The Scholarship Eligibility
application is to be developed to check whether a student is eligible for a scholarship or
not. The student will be eligible for scholarship only if he/she scores more than or equal
to 75 marks in aggregate. In this application, the message will be displayed in the text
area instead of the dialog box as shown in Figure 6.5.
Tooltip text displayed as soon as the text field gains focus
Figure 6.5 Sample Run of the Scholarship Eligibility Application
when condition evaluates to false

INFORMATICS PRACTICES
Control StructuresChapter-6
132
In Figure 6.5 we can see that a message (Enter Marks out of 100) is displayed when we
execute the application. To guide the user about the type of input that is required from
them, the toolTipText property of the jTextField has been used.
The showMessageDialog() method can use null as well as this as the first parameter. Using
this ensures that the message window is displayed on top of the window executing the
method. On the other hand using null ensures that the message window is displayed in the
centre of the screen irrespective of the window executing the method. Try doing it yourself.
The tooltip text is the text that appears when the user moves the cursor over a
component, without clicking it. The tooltip generally appears in a small "hover box" with
information about the component being hovered over. The property can be set using the
Properties Window of the jTextField component as displayed in Figure 6.6
Know more
ToolTip Text
Font property: to change the text writing style
Horizontal Alignment: to change the horizontal placement of the text. Set to Right to display the number being input in the right
toolTipText property: specify
or change the tooltip text
Figure 6.6 Changing the Properties of the JTextField Component

INFORMATICS PRACTICES
Chapter-6 Control Structures
133
The code for the application is as given below in Figure 6.7:
Figure 6.7 Code for the Scholarship Eligibility Application
Let us now understand the code in detail.
If (Integer.parseInt(jTextField1.getText()) >=75)
jTextArea1.setText("Congratulation!\n You Get the SCHOLARSHIP!!")
check whether the value retrieved from the text field is greater than or equal to
75 or not. The if statement is used to check the condition and if the condition
evaluates to true then the message is displayed in the text area using the
setText() method. The '\n' is used to explicitly insert a line break.
else
jTextArea1.setText("Work Hard!\n" +
"Make sure that you Get the SCHOLARSHIP in the next Exam!!")
if the test condition evaluates to false i.e. in case aggregate marks are less than
75, then two messages - "Work Hard!" and "Make sure that you Get the
SCHOLARSHIP in the next Exam!!" are concatenated (using + operator) and
displayed in the text area using the setText() method. The '\n' is used to
explicitly insert a line break.
private void jButton1ActionPerformed(java.awt.event.ActionEvent evt)
{
// Code to check eligibility for scholarship: if (Integer.parseInt(jTextField1.getText())>=75) jTextArea1.setText("Congratulation!\nYou Get the SCHOLARSHIP!!"); else jTextArea1.setText("Work Hard!\n" + "Make sure that you Get the SCHOLARSHIP in the next Exam!!");}
v
v

INFORMATICS PRACTICES
Control StructuresChapter-6
134
After understanding the code clearly, we can easily predict that on entering aggregate
marks as 89 the message "Congratulation! You Get the SCHOLARSHIP" gets displayed
in the text area as shown in Figure 6.8.
Figure 6.8 Sample Run of the Scholarship Eligibility Application when condition
evaluates to true.
In both the applications above, a single test condition was taken based on the input
accepted in a text field. What will we do if there are multiple conditions to be checked?
Let us now develop another application called the Week Day Finder in which we will
learn how to use if statement when we have multiple test conditions. The Week Day
Finder will display the name of the week in a disabled text field depending upon the day
selected by the user. The days are displayed as radio button options, which have to be
selected. So, the form will have 7 radio buttons and depending on the button selected the
day of the week will be displayed.
Selecting Day One results in displaying Monday in the text Field
Figure 6.9 Sample Run of the Week Day Finder
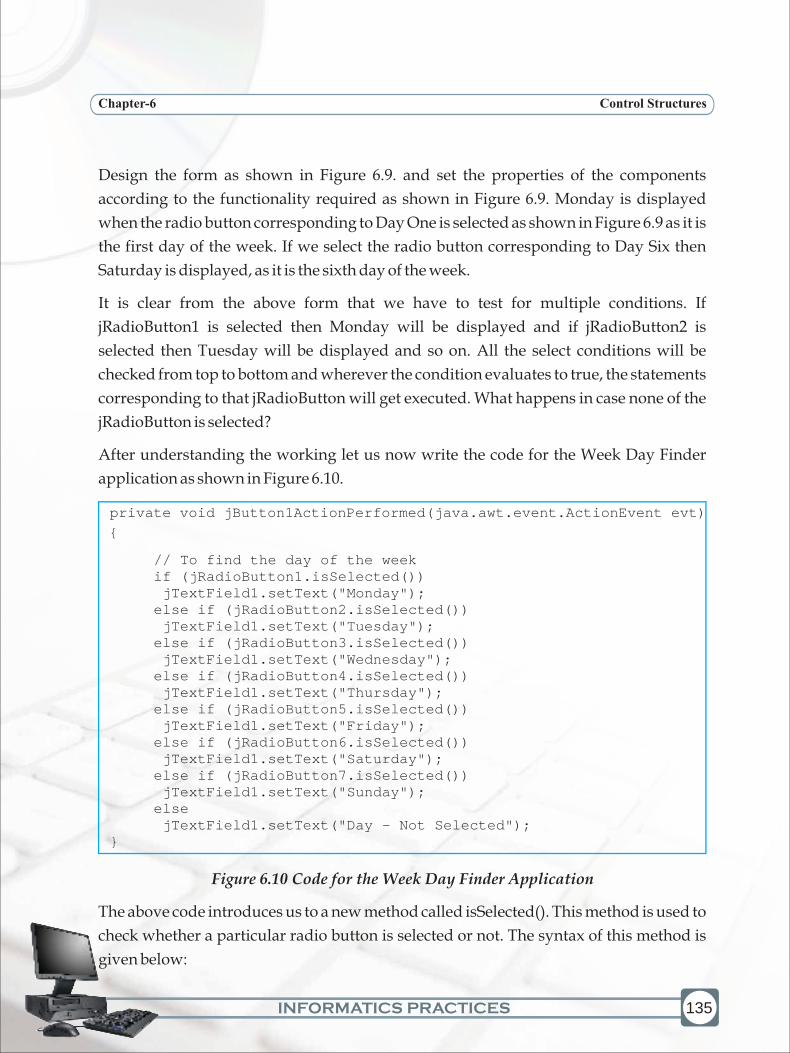
INFORMATICS PRACTICES
Chapter-6 Control Structures
Design the form as shown in Figure 6.9. and set the properties of the components
according to the functionality required as shown in Figure 6.9. Monday is displayed
when the radio button corresponding to Day One is selected as shown in Figure 6.9 as it is
the first day of the week. If we select the radio button corresponding to Day Six then
Saturday is displayed, as it is the sixth day of the week.
It is clear from the above form that we have to test for multiple conditions. If
jRadioButton1 is selected then Monday will be displayed and if jRadioButton2 is
selected then Tuesday will be displayed and so on. All the select conditions will be
checked from top to bottom and wherever the condition evaluates to true, the statements
corresponding to that jRadioButton will get executed. What happens in case none of the
jRadioButton is selected?
After understanding the working let us now write the code for the Week Day Finder
application as shown in Figure 6.10.
Figure 6.10 Code for the Week Day Finder Application
The above code introduces us to a new method called isSelected(). This method is used to
check whether a particular radio button is selected or not. The syntax of this method is
given below:
private void jButton1ActionPerformed(java.awt.event.ActionEvent evt)
{
// To find the day of the week if (jRadioButton1.isSelected()) jTextField1.setText("Monday"); else if (jRadioButton2.isSelected()) jTextField1.setText("Tuesday"); else if (jRadioButton3.isSelected()) jTextField1.setText("Wednesday"); else if (jRadioButton4.isSelected()) jTextField1.setText("Thursday"); else if (jRadioButton5.isSelected()) jTextField1.setText("Friday"); else if (jRadioButton6.isSelected()) jTextField1.setText("Saturday"); else if (jRadioButton7.isSelected()) jTextField1.setText("Sunday"); else jTextField1.setText("Day - Not Selected");}
135

INFORMATICS PRACTICES
Control StructuresChapter-6
136
Syntax:
jRadioButton.isSelected()
This method returns a boolean value i.e. true or false. The true indicates that the radio
button is selected and false indicates that the radio button is not selected.
Let us now understand the code in detail. Since the code in each subsequent else is almost
the same except the display text, so we will try and understand the first three lines.
if (jRadioButton1.isSelected())
check whether the first radio button is selected or not
if (jRadioButton1.isSelected())
jTextField1.setText("Monday")
Display "Monday" in the text field if the first radio button is selected
if (jRadioButton1.isSelected())
jTextField1.setText("Monday")
else if (jRadioButton2.isSelected())
If the first radio button is not selected then check whether the second radio
button is selected or not
Note that to handle multiple conditions, we have used a series of if-else statements. Such
a if else statement is called nested if else statement. In this form the if statement checks
each of the conditions one by one from top to bottom until it finds one that is true. In case
none of the conditions are true then the statement corresponding to the last else is
executed. Therefore, in case none of the jRadioButton is selected then "Day - Not
Selected" will be displayed.
Nested if else
These control structures are used to test for multiple conditions as against the simple if
statement which can be used to test a single condition. The syntax of nested if else is as
follows:
v
v
v
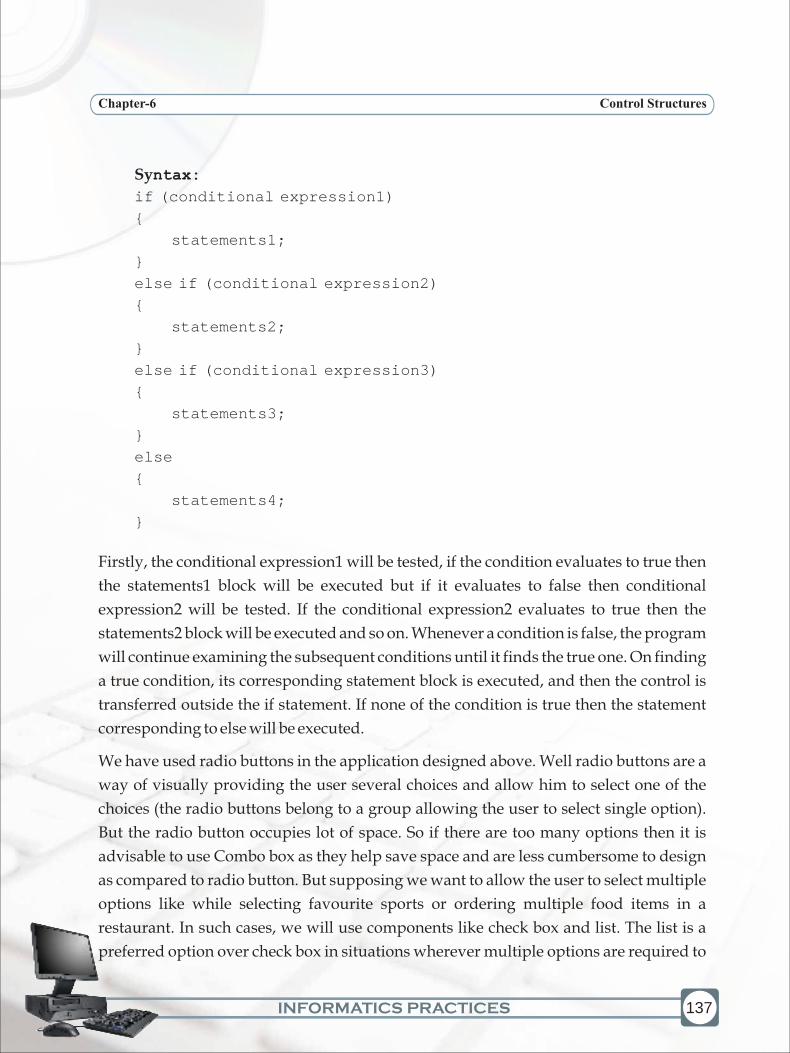
INFORMATICS PRACTICES
Chapter-6 Control Structures
Syntax:
if (conditional expression1)
{
statements1;
}
else if (conditional expression2)
{
statements2;
}
else if (conditional expression3)
{
statements3;
}
else
{
statements4;
}
Firstly, the conditional expression1 will be tested, if the condition evaluates to true then
the statements1 block will be executed but if it evaluates to false then conditional
expression2 will be tested. If the conditional expression2 evaluates to true then the
statements2 block will be executed and so on. Whenever a condition is false, the program
will continue examining the subsequent conditions until it finds the true one. On finding
a true condition, its corresponding statement block is executed, and then the control is
transferred outside the if statement. If none of the condition is true then the statement
corresponding to else will be executed.
We have used radio buttons in the application designed above. Well radio buttons are a
way of visually providing the user several choices and allow him to select one of the
choices (the radio buttons belong to a group allowing the user to select single option).
But the radio button occupies lot of space. So if there are too many options then it is
advisable to use Combo box as they help save space and are less cumbersome to design
as compared to radio button. But supposing we want to allow the user to select multiple
options like while selecting favourite sports or ordering multiple food items in a
restaurant. In such cases, we will use components like check box and list. The list is a
preferred option over check box in situations wherever multiple options are required to
137

INFORMATICS PRACTICES
Control StructuresChapter-6
138
be selected from a large number of known set of options as they help save space and are
less cumbersome to design as compared to check boxes. Now we will study each of these
three components (Check Box, List and Combo box) one by one and side by side design
applications to understand the working of each.
Check boxes are similar to radio buttons but their selection model is different. Each
Check box component works independently of each other and so the user can select any
number of check boxes from an interface. A group of radio buttons, on the other hand,
can have only one button selected. A Check box can be added from the Swing Control
menu as shown in Figure 6.11.
Figure 6.11 Check Box Element of the Swing Control
! The Add() Property is used to add a button (radio button or check box) to the button group
at run time.
The properties window is used to change the properties of a Checkbox as shown in
Figure 6.12.
Check Box
font Property: to change
the writing style
buttonGroup Property: to
associate different check
box to a single g roup
selected Property: to by
default select a check box
Figure 6.12 Common Properties of the JCheckBox Component
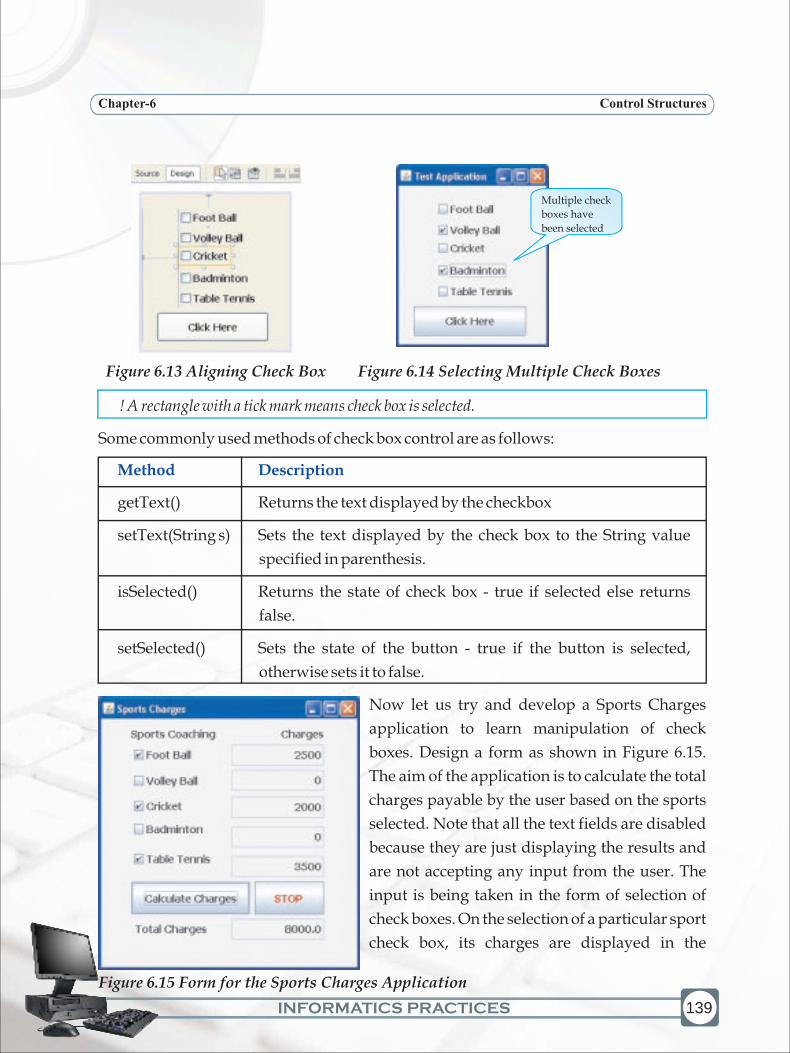
INFORMATICS PRACTICES
Chapter-6 Control Structures
! A rectangle with a tick mark means check box is selected.
Some commonly used methods of check box control are as follows:
getText() Returns the text displayed by the checkbox
setText(String s) Sets the text displayed by the check box to the String value
specified in parenthesis.
isSelected() Returns the state of check box - true if selected else returns
false.
setSelected() Sets the state of the button - true if the button is selected,
otherwise sets it to false.
Now let us try and develop a Sports Charges
application to learn manipulation of check
boxes. Design a form as shown in Figure 6.15.
The aim of the application is to calculate the total
charges payable by the user based on the sports
selected. Note that all the text fields are disabled
because they are just displaying the results and
are not accepting any input from the user. The
input is being taken in the form of selection of
check boxes. On the selection of a particular sport
check box, its charges are displayed in the
Method Description
139
Multiple check
boxes have
been selected
Figure 6.13 Aligning Check Box Figure 6.14 Selecting Multiple Check Boxes
Figure 6.15 Form for the Sports Charges Application

INFORMATICS PRACTICES
Control StructuresChapter-6
140
adjacent text field and on the click of the Calculate Charges button, the charges for all the
selected sports are added and displayed in the text field.
! The check box components by default work independent of each other and so the user can
select any number of checkboxes on an interface. But if the check boxes are grouped together
under one single ButtonGroup then the check box component works like a radio button
allowing only one single selection.
Now double click on the two buttons and enter the code as shown in Figure 6.16
private void jButton1ActionPerformed(java.awt.event.ActionEvent
evt) { double Amount=0; if (jCheckBox1.isSelected())//Foot Ball Charges { jTextField1.setText("2500"); Amount=Amount+2500; } if (jCheckBox2.isSelected())//Volley Ball Charges { jTextField2.setText("1500"); Amount=Amount+1500; } if (jCheckBox3.isSelected())//Cricket Charges { jTextField3.setText("2000"); Amount=Amount+2000; } if (jCheckBox4.isSelected())//Badminton Charges { jTextField4.setText("3000"); Amount=Amount+3000; } if (jCheckBox5.isSelected())//Table Tennis Charges { jTextField5.setText("3500"); Amount=Amount+3500; } jTextField6.setText(Double.toString(Amount)); }

INFORMATICS PRACTICES
Chapter-6 Control Structures
private void jButton2ActionPerformed(java.awt.event.ActionEvent
evt) {
System.exit(0);
}
Figure 6.16 Code for the Sports Charges Application
Let us now understand the code in detail. Since the code in each if is almost the same
except the amount being added, so we will understand a single if block.
double Amount=0;
Declare a variable named Amount of type double and initialize it to 0.
if (jCheckBox1.isSelected())
check whether the first check box is selected or not
if (jCheckBox1.isSelected())
{ jTextField1.setText("2500");
Amount=Amount+2500; }
If the first checkbox is selected then display the coaching charges for the
selected sport in the adjacent text field using the setText() method and then
add these charges to the variable amount to calculate the total amount
payable.
jTextField6.setText(Double.toString(Amount))
The variable Amount contains the total amount which is a number. To display
it in the text field, it needs to be converted to a string. This is achieved using the
toString() method. It is then displayed in the text field using the setText()
method. The calculated Amount is displayed outside all the if statements
because we want to display it only once after the user has selected all the
possible options. If we want to display the total amount after each selection
then we need to include this statement inside each if statement.
The expression [Amount = Amount + 3500;] can also be written as [Amount+=3500;]. In
the same way -=, *= and /= can also be used to simplify the expressions
v
v
v
v
Know more
141

INFORMATICS PRACTICES
Control StructuresChapter-6
142
List
A List(also called list box) component displays a list of
values/options from which single or multiple
values/items can be selected. When we place a list on
JFrame form the default model property of the list
(default values in the list) has values as Item1, Item2
and so on as shown in Figure 6.17. The selectionMode
property is set to MULTIPLE_INTERVAL by default
ensuring that a user can select multiple items from the
list. These properties can be changed using the
properties window as shown in Figure 6.18
Figure 6.18 Common Properties of the List Component
As shown in the figure 6.18, the selectionMode property has three possible values. The
usage of each of these values is explained below:
SINGLE implies that List box will allow only a single value to be selected.
SINGLE_INTERVAL implies that List box allows single continuous selection
of options using shift key of keyboard (i.e. values which occur in succession).
MULTIPLE_INTERVAL implies that List box allows multiple selections of
options using ctrl key of keyboard.
The model property is used to change the choices displayed in the list. The values can be
updated by clicking on the ellipsis(..) next to the property in the properties window as
displayed in Figure 6.19 .
v
v
v
Figure 6.17 Default Values
of a List
font Property: to change the text writing style
model Property: to change the choices displayed in the list
selectionMode Property:to change the selection mode to specify whether single or multiple selections are allowed
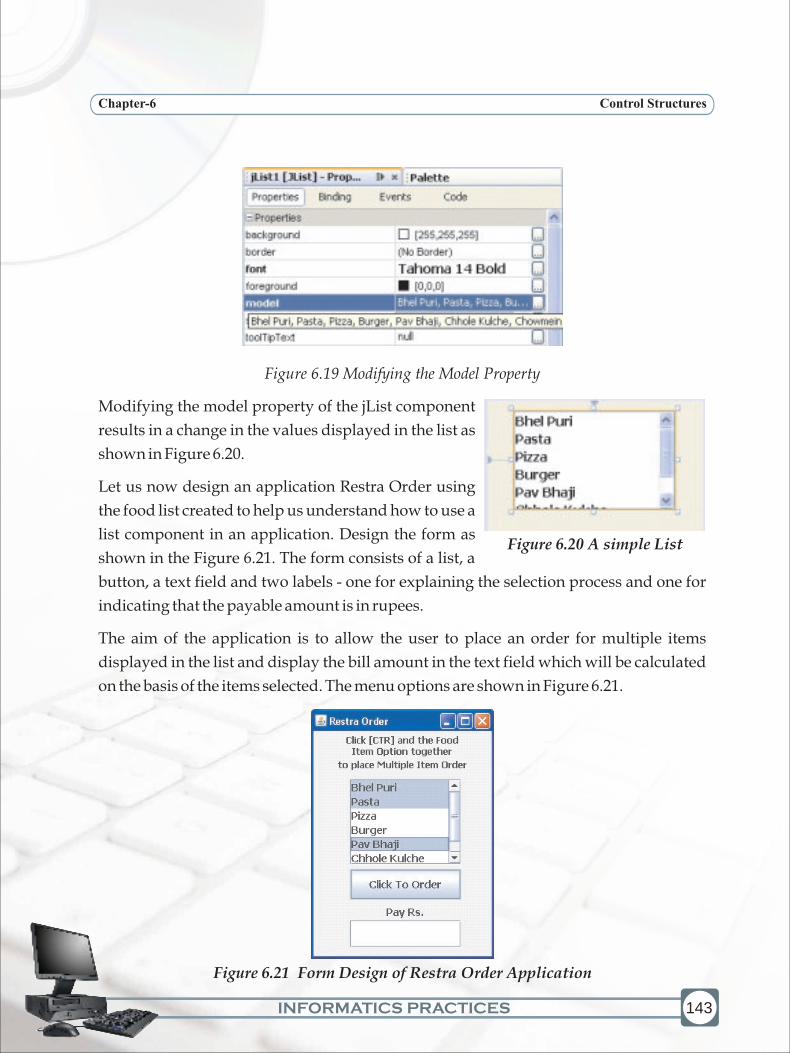
INFORMATICS PRACTICES
Chapter-6 Control Structures
Figure 6.19 Modifying the Model Property
Modifying the model property of the jList component
results in a change in the values displayed in the list as
shown in Figure 6.20.
Let us now design an application Restra Order using
the food list created to help us understand how to use a
list component in an application. Design the form as
shown in the Figure 6.21. The form consists of a list, a
button, a text field and two labels - one for explaining the selection process and one for
indicating that the payable amount is in rupees.
The aim of the application is to allow the user to place an order for multiple items
displayed in the list and display the bill amount in the text field which will be calculated
on the basis of the items selected. The menu options are shown in Figure 6.21.
143
Figure 6.20 A simple List
Figure 6.21 Form Design of Restra Order Application
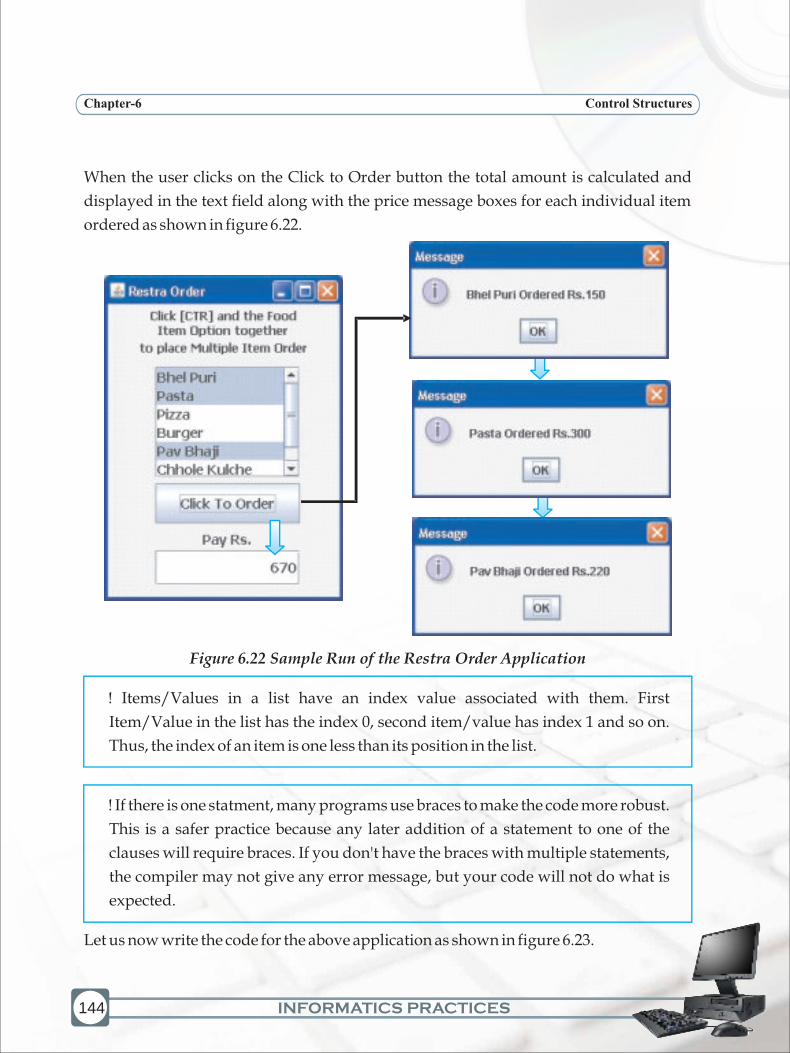
INFORMATICS PRACTICES
Control StructuresChapter-6
144
When the user clicks on the Click to Order button the total amount is calculated and
displayed in the text field along with the price message boxes for each individual item
ordered as shown in figure 6.22.
Figure 6.22 Sample Run of the Restra Order Application
! Items/Values in a list have an index value associated with them. First
Item/Value in the list has the index 0, second item/value has index 1 and so on.
Thus, the index of an item is one less than its position in the list.
! If there is one statment, many programs use braces to make the code more robust.
This is a safer practice because any later addition of a statement to one of the
clauses will require braces. If you don't have the braces with multiple statements,
the compiler may not give any error message, but your code will not do what is
expected.
Let us now write the code for the above application as shown in figure 6.23.

INFORMATICS PRACTICES
Chapter-6 Control Structures
private void jButton1ActionPerformed(java.awt.event.ActionEvent
evt) {
int Total=0;
//Bhel Puri, Pasta, Pizza, Burger, Pav Bhaji, Chhole Kulche,
Chowmein
if (jList1.isSelectedIndex(0)==true)
{
Total=Total+150;
JOptionPane.showMessageDialog(this,"Bhel Puri Ordered
Rs.150");
}
if (jList1.isSelectedIndex(1)==true)
{
Total=Total+300;
JOptionPane.showMessageDialog(this,"Pasta Ordered
Rs.300");
}
if (jList1.isSelectedIndex(2)==true)
{
Total=Total+200;
JOptionPane.showMessageDialog(this,"Pizza Ordered
Rs.200");
}
if (jList1.isSelectedIndex(3)==true)
{
Total=Total+180;
JOptionPane.showMessageDialog(this,"Burger Ordered
Rs.180");
}
if (jList1.isSelectedIndex(4)==true)
{
Total=Total+220;
JOptionPane.showMessageDialog(this,"Pav Bhaji Ordered
Rs.220");
}
if (jList1.isSelectedIndex(5)==true)
{
145

INFORMATICS PRACTICES
Control StructuresChapter-6
146
Total=Total+260;
JOptionPane.showMessageDialog(this,
"Chhole Kulche Ordered
Rs.260");
}
if (jList1.isSelectedIndex(6)==true)
{
Total=Total+260;
JOptionPane.showMessageDialog(this,"Chowmein Ordered
Rs.260");
}
jTextField1.setText(Integer.toString(Total));
Figure 6.23 Code for the Restra Order Application
The above code introduces us to a new method - isSelectedIndex() method. This method
is used to check whether the index specified in the parenthesis has been selected or not.
The syntax of this method is given below:
Syntax:
jList.isSelectedIndex(int num)
The num is an integer value and represents the index value to be checked. The index
numbering starts at 0. This method returns a boolean value i.e. true or false. The true
indicates that the value at the specified index is selected and false indicates that the value
is not selected.
Now let us understand the code in detail. The code for checking the List items selection is
similar so we will concentrate on understanding one of them and the last line.
int Total=0
Declare a variable of type integer to store the total amount payable by the user
and initialize it to 0. This variable has been initialized to 0 as initially the user
has not selected any item and so the total amount payable by him is 0.
if (jList1.isSelectedIndex(0)==true)
check whether the first option in the list is selected or not
if (jList1.isSelectedIndex(0)==true)
v
v

INFORMATICS PRACTICES
Chapter-6 Control Structures
{
Total=Total+150;
JOptionPane.showMessageDialog(this,"Bhel Puri Ordered Rs.150");
}
If the first option in the list is selected, then the rate of the selected item is
added to the total rate. A message is then displayed with the name of the
selected item and its rate.
jTextField1.setText(Integer.toString(Total));
After the check is evaluated for all the items, the total amount to be paid by the
customer is displayed in the text field using the setText() method. The total
amount is an integer value so before displaying the value it is converted to a
string type using the toString() method.
Commonly used methods of List control are as follows:
getSelectedValue() Returns the selected value when only a single item
is selected. If multiple items are selected then it
returns the first selected value. Returns null in
case no item is selected
isSelectedIndex(int index) Returns true if specified index is selected.
This control is used to display a list of choices from which the user can choose a single
option. The difference between combo box and list box control is that a list box control
allows user to make one or more selections whereas a combo box control allows the user
to make single selection.
Figure 6.24 A simple Combo Box
v
v
Method Description
Combo Box
147
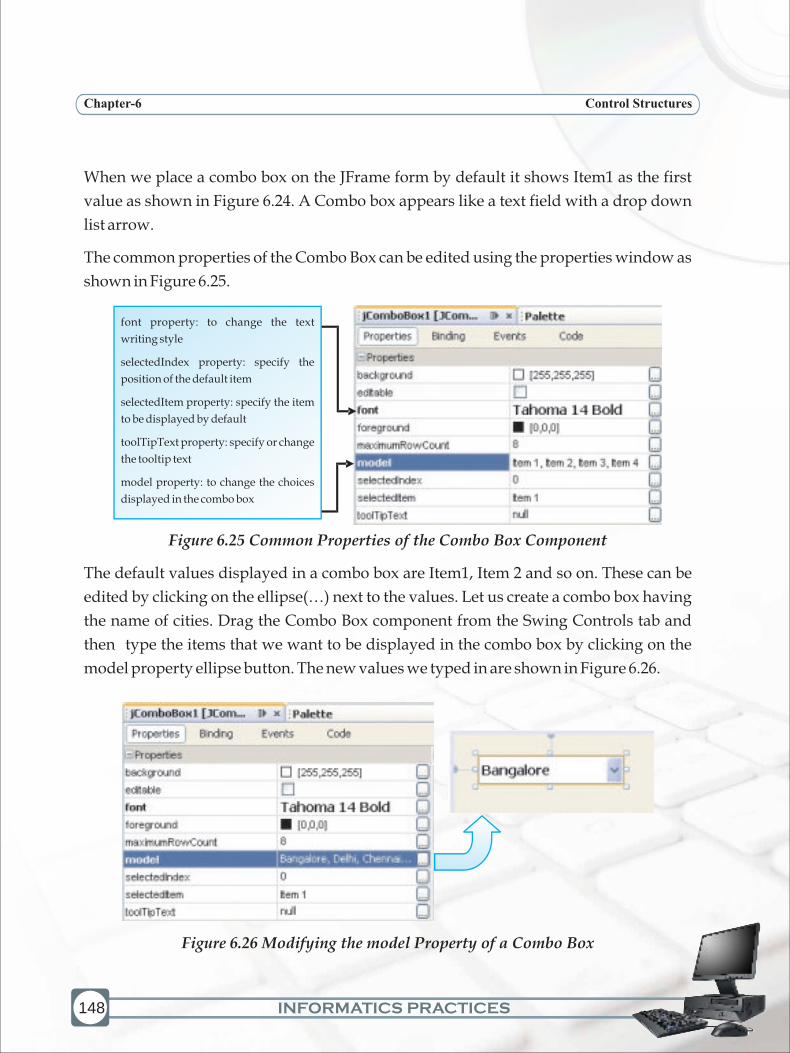
INFORMATICS PRACTICES
Control StructuresChapter-6
148
When we place a combo box on the JFrame form by default it shows Item1 as the first
value as shown in Figure 6.24. A Combo box appears like a text field with a drop down
list arrow.
The common properties of the Combo Box can be edited using the properties window as
shown in Figure 6.25.
Figure 6.25 Common Properties of the Combo Box Component
The default values displayed in a combo box are Item1, Item 2 and so on. These can be
edited by clicking on the ellipse(…) next to the values. Let us create a combo box having
the name of cities. Drag the Combo Box component from the Swing Controls tab and
then type the items that we want to be displayed in the combo box by clicking on the
model property ellipse button. The new values we typed in are shown in Figure 6.26.
font property: to change the text
writing style
selectedIndex property: specify the
position of the default item
selectedItem property: specify the item
to be displayed by default
toolTipText property: specify or change
the tooltip text
model property: to change the choices
displayed in the combo box
Figure 6.26 Modifying the model Property of a Combo Box

INFORMATICS PRACTICES
Chapter-6 Control Structures
Now Bangalore is the first value in the model property therefore on the form Bangalore
will be displayed with a drop down list arrow as shown in Figure 6.27.
Let us design an application called City Highlights to learn the usage of combo box.
Design a simple form with a combo box (containing names of 5 cities) and a button with
display text as "Know More". The required functionality is that on executing the
application City Highlights, the user should select a particular city and click on the
button to view some additional information about the city. Sample run of the application
is shown in Figure 6.27.
Figure 6.27 Sample Run of the City Highlights Application
149

INFORMATICS PRACTICES
Control StructuresChapter-6
150
The code for the City Highlights application is as shown in Figure 6.28.
private void jButton1ActionPerformed
(java.awt.event.ActionEvent evt) {
if (jComboBox1.getSelectedIndex()==0)
JOptionPane.showMessageDialog(this,jComboBox1.getSelectedIte
m()+
" - Known as Silicon Valley of
India");
else if (jComboBox1.getSelectedIndex()==1)
JOptionPane.showMessageDialog(this,jComboBox1.getSelectedI
tem()+
" - Capital City of India");
else if (jComboBox1.getSelectedIndex()==2)
JOptionPane.showMessageDialog(this,jComboBox1.getSelectedI
tem()+
" - Known for broad Industrial
Base");
else if (jComboBox1.getSelectedIndex()==3)
JOptionPane.showMessageDialog(this,
jComboBox1.getSelectedItem()+
" - Known for literary, artistic and revolutionary heritage");
else if (jComboBox1.getSelectedIndex()==4)
JOptionPane.showMessageDialog(this,jComboBox1.getSelectedI
tem()+
" - Known for hub of Bollywood");
}
Figure 6.28 Code for the City Highlights Application using if else if
This code introduces us to two new methods, the getSelectedIndex() method and the
getSelectedItem() method. The syntax and usage of each of these methods is explained
below:

INFORMATICS PRACTICES
Chapter-6 Control Structures
1. getSelectedIndex() - This method is used to return the index of the selected item. If
an item is selected only then will the getSelectedIndex method return a value else it
returns -1. The syntax of this method is given below:
Syntax:
jComboBox.getSelectedIndex()
2. getSelectedItem() - This method is used to return the selected item. The syntax of
this methos is given below:
Syntax:
jComboBox.getSelectedItem()
Now let us understand the code in detail.
if (jComboBox1.getSelectedIndex()==0)
Checks whether the item stored at the first position is selected or not using the
getSelectedIndex() method
if (jComboBox1.getSelectedIndex()==0)
JOptionPane.showMessageDialog(this, jComboBox1.getSelectedItem()+
" - Known as Silicon Valley of India");
If the item stored at the first position is selected then the name of the item is
retrieved using the getSelectedItem() method and is concatenated with a
message using the concatenation operator(+). The concatenated message is
then displayed in a dialog box using the showMessageDialog() method.
if (jComboBox1.getSelectedIndex()==0)
JOptionPane.showMessageDialog(this,jComboBox1.getSelectedItem()+
" - Known as Silicon Valley of India");
else if (jComboBox1.getSelectedIndex()==1)
If the item stored in first position is not selected then it checks for the item
stored in the second position and follows the same procedure.
v
v
v
151

INFORMATICS PRACTICES
Control StructuresChapter-6
152
As is clear from the previous two applications, the nested if else becomes difficult to read
and understand as the number of testing conditions goes on increasing. So we introduce
a new selection statement - the switch statement. Figure 6.29 shows the code of City
Highlights application using switch statement. Observe the code carefully and try to
understand the code.
! While deciding between using an if statement and a switch statement always remember
that although switch is easier to read but it can only be used to test for equality. The if
statement on the other hand can test for equality as well as inequality
private void jButton1ActionPerformed(java.awt.event.ActionEvent
evt) {
switch (jComboBox1.getSelectedIndex())
{
case 0:JOptionPane.showMessageDialog(this,
jComboBox1.getSelectedItem()+
" - Known as Silicon Valley of India");
break;
case 1:JOptionPane.showMessageDialog(this,
jComboBox1.getSelectedItem()+
" - Capital City of India");
break;
case 2:JOptionPane.showMessageDialog(this,
jComboBox1.getSelectedItem()+
" - Known for broad Industrial Base");
break;
case 3:JOptionPane.showMessageDialog(this,
jComboBox1.getSelectedItem()+
" - Known for literary, artistic and revolutionary
heritage");
break;
case 4:JOptionPane.showMessageDialog(this,
jComboBox1.getSelectedItem()+
" - Known for hub of Bollywood");
break;
default:JOptionPane.showMessageDialog(this,"No City Selected");
}
}
Figure 6.29 Code for the City Highlights Application using switch
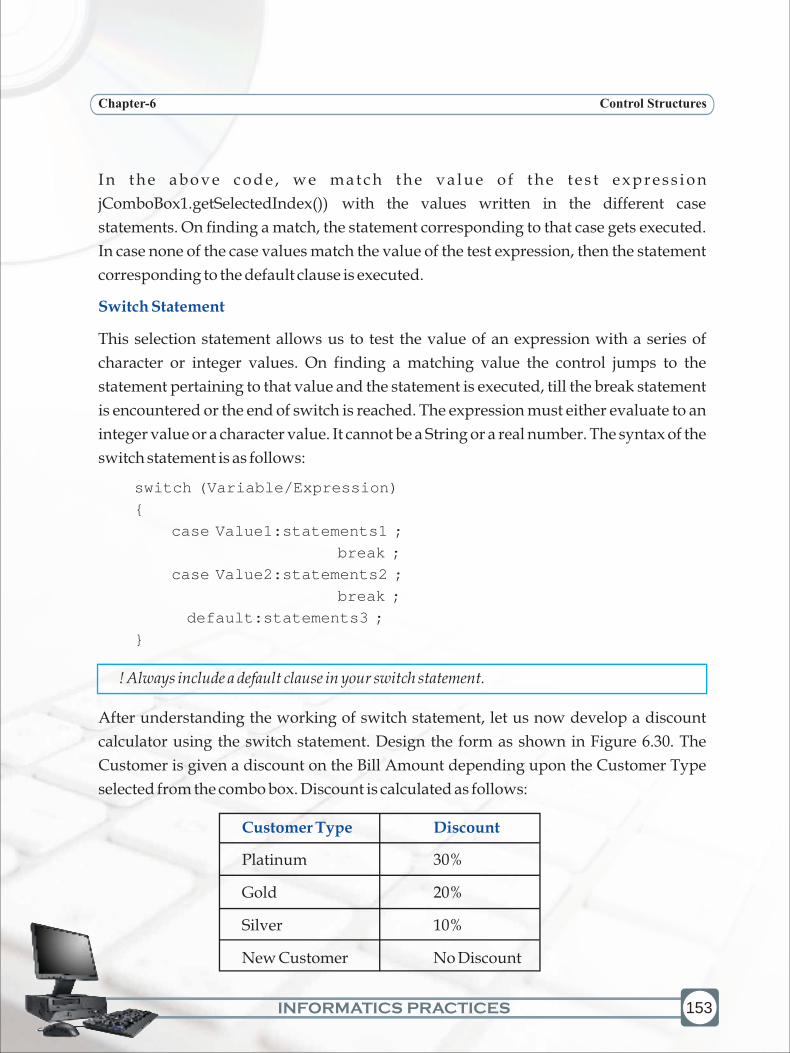
INFORMATICS PRACTICES
Chapter-6 Control Structures
I n t h e a b o v e c o d e , w e m a t c h t h e v a l u e o f t h e t e s t e x p r e s s i o n
jComboBox1.getSelectedIndex()) with the values written in the different case
statements. On finding a match, the statement corresponding to that case gets executed.
In case none of the case values match the value of the test expression, then the statement
corresponding to the default clause is executed.
This selection statement allows us to test the value of an expression with a series of
character or integer values. On finding a matching value the control jumps to the
statement pertaining to that value and the statement is executed, till the break statement
is encountered or the end of switch is reached. The expression must either evaluate to an
integer value or a character value. It cannot be a String or a real number. The syntax of the
switch statement is as follows:
switch (Variable/Expression)
{
case Value1:statements1 ;
break ;
case Value2:statements2 ;
break ;
default:statements3 ;
}
! Always include a default clause in your switch statement.
After understanding the working of switch statement, let us now develop a discount
calculator using the switch statement. Design the form as shown in Figure 6.30. The
Customer is given a discount on the Bill Amount depending upon the Customer Type
selected from the combo box. Discount is calculated as follows:
Platinum 30%
Gold 20%
Silver 10%
New Customer No Discount
Switch Statement
Customer Type Discount
153

INFORMATICS PRACTICES
Control StructuresChapter-6
154
When the application is executed the discount amount is deducted from the Bill Amount
depending upon the Customer Type selected by the user.
When Customer Type is Silver the customer gets a discount of 10% as shown in figure
6.30.
When Customer Type is Gold the customer gets a discount of 20% and when Customer
Type is Platinum the customer gets a discount of 30% on the Bill Amount.
Figure 6.30 Discount of 10% for Customer Type Silver
Let us now write the code for the discount calculator as shown in 6.31.
private void jButton1ActionPerformed(java.awt.event.ActionEvent evt)
{
// Code to calculate discount depending upon customer type:
double FinalAmount=0;
double BillAmount = Double.parseDouble(jTextField1.getText());
switch(jComboBox1.getSelectedIndex())
{
case 0: FinalAmount=BillAmount; //No Discount for new customer
break;
case 1: FinalAmount=0.90*BillAmount; //10% Discount for silver
break;
case 2: FinalAmount=0.80*BillAmount; //20% Discount for gold
break;
case 3: FinalAmount=0.70*BillAmount;//30% Discountfor platinum
break;
default:FinalAmount=BillAmount;
}
jTextField2.setText(Double.toString(FinalAmount));
}
Selected Customer
Type is Silver and
therefore only 10%
discount is given

INFORMATICS PRACTICES
Chapter-6 Control Structures
private void jButton2ActionPerformed(java.awt.event.ActionEvent evt)
{
// To exit the application:
System.exit(0);
}
Figure 6.31 Code for Discount Calculator Using switch Statement
Now let us understand the code in detail.
double FinalAmount=0;
Declare a variable FinalAmount of type double and initialize it to 0.
double BillAmount = Double.parseDouble(jTextField1.getText());
Declare a variable BillAmount of type double and initialize it with the value
retrieved from the text field (using the getText() method) after converting it to
type double (using the parseDouble() method)
switch(jComboBox1.getSelectedIndex())
The index of the selected item is retrieved using the getSelectedIndex()
method and on the basis of this value the control is transferred using switch
statement
case 1: FinalAmount=0.90*BillAmount;
If the second value in the combo box is selected then the FinalAmount is
calculated by multiplying the BillAmount by 0.90 (to give a discount of 10%)
break;
Stop the execution of the switch statement and transfer the control to the
statement immediately following the closing brace of the switch statement. It
has to be included as the last statement of each case.
default:FinalAmount= BillAmount
When getSelectedIndex() is not equal to either 1,2 or 3 then the code moves to
default statement and no discount is given to the customer.
In all the above applications, the test condition was a simple expression. Now let us
develop another application, the Grade Calculator Application, where we will learn
v
v
v
v
v
v
155

INFORMATICS PRACTICES
Control StructuresChapter-6
156
how to handle a complex test condition. We will calculate grade and check eligibility for
an Achiever's Award. If marks in General Knowledge and Analytical Skills are greater
than 90 then the child is eligible for Achiever's award. The rules for finding grade are as
follows:
Above 80 A
Between 79.9 and 70 B
Between 69.9 and 60 C
Between 59.9 and 50 D
Below 50 E
The first step is to design a form as shown in Figure 6.32 with the following components:
3 enabled text fields to accept the marks in 3 subjects with appropriate labels
3 disabled text fields to display the total, the grade and an indicator for
achievers award
2 enabled buttons, one to calculate the Total marks and one to exit from the
application
1 disabled button to find the grade which will be enabled during run time
when the total is calculated.
Marks Grade
v
v
v
v
Note that the
jButton2 is by
default disabled
Figure6.32 Design of the Grade Calculator Application

INFORMATICS PRACTICES
Chapter-6 Control Structures
Observe the sample executions of the Grade Calculator to understand the functionality
required before writing the code.
When the application is executed and the
user enters marks greater than 100 either for
English, Analytical Skills or General
Knowledge, a message box asking the user
to re-enter the marks is to be displayed as
shown in Figure 6.33.
When the user enters valid marks, and clicks
on the Calculate Total button, the total is
displayed in the adjacent text field and the
Find Grade button is enabled as shown in
Figure 6.34.
Figure 6.34 Effect of Clicking on the Calculate Total Button of the Grade Calculator
On clicking the Find Grade button, firstly a check is performed to find out whether the
child is eligible for Achiever's award and an appropriate message is displayed and a * is
displayed in the text field adjacent to the EXIT button as shown in Figure 6.35. Then the
grade is calculated according to the criteria mentioned above and is displayed in the
adjacent text field.
157
Figure 6.33 Error Handling Message
On clicking the Calculate Total button, the Total is displayed
On clicking the
Calculate Total
button, the Find
Grade button is
enabled

INFORMATICS PRACTICES
Control StructuresChapter-6
158
On clicking the EXIT button the application will terminate.
Figure 6.35 Grade and eligibility for Achiever's award displayed
Since the code requires us to join many conditions so we will use a few operators like ||
and &&. Let us understand their usage briefly before writing the code.
if (English>100 || ASkills>100 || GK>100)
JOptionPane.showMessageDialog(this,"Re-Enter Marks (Out of 100)");
Check if the marks input by the user for any of the subjects are greater than 100
or not an if they are then display the message "Re-Enter Marks (Out of 100).
Since we have to display the error message if the marks of even one subject are
out of limit so we have used the || operator which means OR. So in simple
english it means if marks of English are >100 or marks of ASkills >100 or
marks of GK > 100, then display the error message. So the message will be
displayed even if only one condition evaluates to true.
if (ASkills>=90 && GK>=90 )
{
JOptionPane.showMessageDialog(this,"** Selected for Achiever's Award **");
jTextField6.setText("*");
}
v

INFORMATICS PRACTICES
Chapter-6 Control Structures
Check if the marks of ASkills and GK are both >= 90 or not. If they are then
display the message "** Selected for Achiever's Award **" and also display a
"*" in the text field. Since we have to check that both the marks should be
greater than 90 so we have use the && operator which in simple English
means AND. So the condition will evaluate to true only if both the conditions
are satisfied.
Let us now write the code for the Grade calculator application as shown in Figure 6.38
private void jButton1ActionPerformed(java.awt.event.ActionEvent
evt) {
// Variable Declaration and assignment operations
int Total,English,ASkills,GK;
English=Integer.parseInt(jTextField1.getText());
ASkills=Integer.parseInt(jTextField2.getText());
GK=Integer.parseInt(jTextField3.getText());
//Validation of Entered Marks
if (English>100 || ASkills>100 || GK>100)
JOptionPane.showMessageDialog
(this,"Re-Enter Marks (Out of 100)");
else
{
Total=English+ASkills+GK;
jTextField4.setText(Integer.toString(Total));
jButton2.setEnabled(true);
}
}
private void jButton2ActionPerformed(java.awt.event.ActionEvent
evt) {
// Variable Declaration and assignment operations
char Grade;
int ASkills,GK,Total;
ASkills=Integer.parseInt(jTextField2.getText());
GK=Integer.parseInt(jTextField3.getText());
Total=Integer.parseInt(jTextField1.getText());
v
159
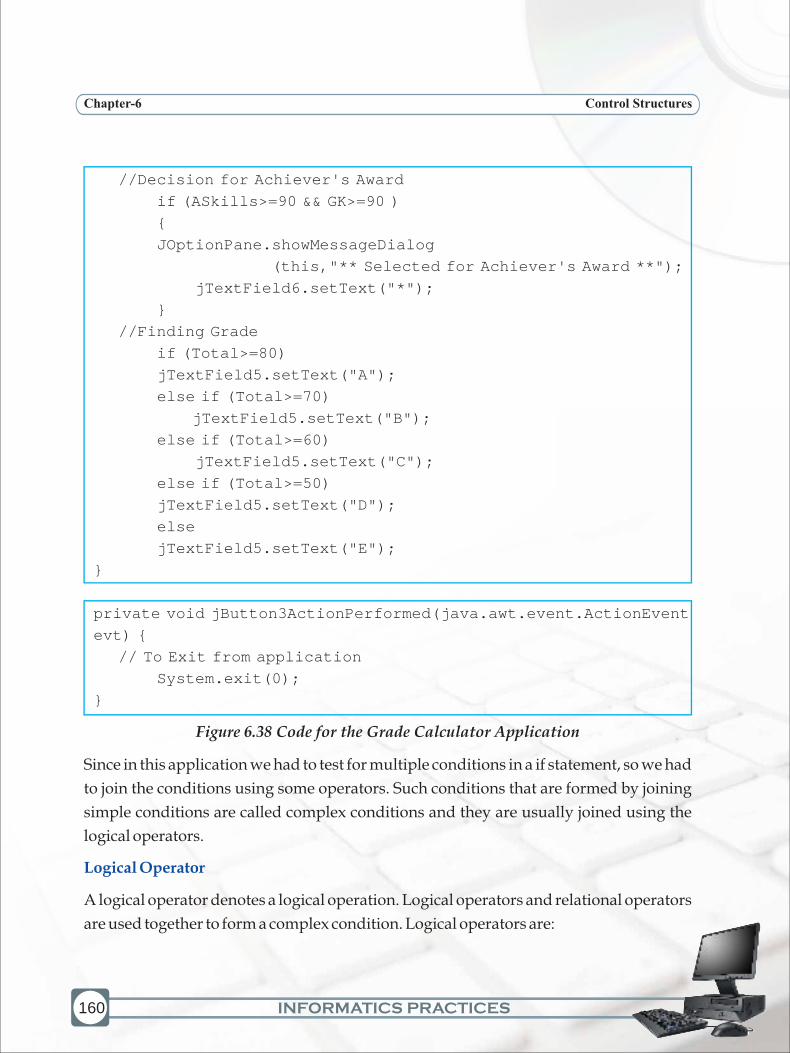
INFORMATICS PRACTICES
Control StructuresChapter-6
160
//Decision for Achiever's Award
if (ASkills>=90 && GK>=90 )
{
JOptionPane.showMessageDialog
(this,"** Selected for Achiever's Award **");
jTextField6.setText("*");
}
//Finding Grade
if (Total>=80)
jTextField5.setText("A");
else if (Total>=70)
jTextField5.setText("B");
else if (Total>=60)
jTextField5.setText("C");
else if (Total>=50)
jTextField5.setText("D");
else
jTextField5.setText("E");
}
private void jButton3ActionPerformed(java.awt.event.ActionEvent
evt) {
// To Exit from application
System.exit(0);
}
Figure 6.38 Code for the Grade Calculator Application
Since in this application we had to test for multiple conditions in a if statement, so we had
to join the conditions using some operators. Such conditions that are formed by joining
simple conditions are called complex conditions and they are usually joined using the
logical operators.
A logical operator denotes a logical operation. Logical operators and relational operators
are used together to form a complex condition. Logical operators are:
Logical Operator
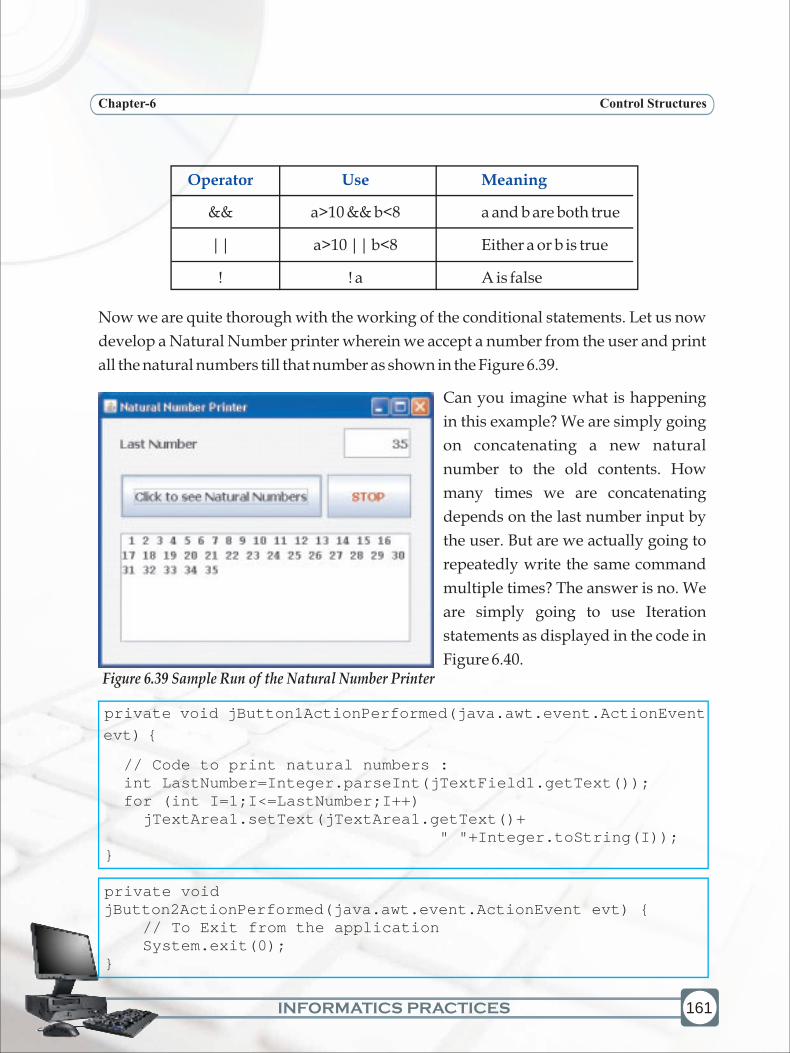
INFORMATICS PRACTICES
Chapter-6 Control Structures
&& a>10 && b<8 a and b are both true
|| a>10 || b<8 Either a or b is true
! ! a A is false
Now we are quite thorough with the working of the conditional statements. Let us now
develop a Natural Number printer wherein we accept a number from the user and print
all the natural numbers till that number as shown in the Figure 6.39.
Can you imagine what is happening
in this example? We are simply going
on concatenating a new natural
number to the old contents. How
many times we are concatenating
depends on the last number input by
the user. But are we actually going to
repeatedly write the same command
multiple times? The answer is no. We
are simply going to use Iteration
statements as displayed in the code in
Figure 6.40.
private void jButton1ActionPerformed(java.awt.event.ActionEvent
evt) {
// Code to print natural numbers : int LastNumber=Integer.parseInt(jTextField1.getText()); for (int I=1;I<=LastNumber;I++) jTextArea1.setText(jTextArea1.getText()+ " "+Integer.toString(I));}
private void jButton2ActionPerformed(java.awt.event.ActionEvent evt) { // To Exit from the application System.exit(0);}
Operator Use Meaning
161
Figure 6.39 Sample Run of the Natural Number Printer

INFORMATICS PRACTICES
Control StructuresChapter-6
162
Figure 6.40 Code for the Natural Number Printer Application using for loop
In this example we have used the Iteration statement - for loop which is the only new
concept introduced in this code. Let us understand the code in detail and later we will
look at the working and complete syntax of the for loop.
int LastNumber=Integer.parseInt(jTextField1.getText());
A variable named LastNumber is declared which is of type integer. This
variable needs to contain the last number of the series which has been input by
the user. The value input by the user in the text field is retrieved using the
getText() method. This value is a string and so is converted to an integer value
using the parseInt() method. After conversion it is assigned to the variable
LastNumber.
for (int I=1;I<=LastNumber;I++)
The loop control variable is defined and initialized to 1 (int I=1). The loop
iterates till the test condition I<=LastNumber evaluates to true and each time
at the end of the loop, the loop control variable is incremented by 1 (due to
I++).
for (int I=1;I<=LastNumber;I++)
jTextArea1.setText(jTextArea1.getText() + " " + Integer.toString(I));
Every time the loop executes we convert the number I to a string using the
toString() method. This is concatenated with the previous contents of the text
area which are retrieved using the getText() method. The empty string (" ") is
concatenated in between the two contents to leave a blank space between each
consecutive number displayed. Finally the concatenated string is displayed
in the text area using the setText() method.
! When you declare a variable inside a for loop, there is one important point to remember:
the scope of that variable ends when the for statement ends. (That is, the scope of the
variable is limited to the scope of for loop.)
Now let us look at the syntax and working of the for loop in detail.
v
v
v
INFORMATICS PRACTICES
Chapter-6 Control Structures
Iteration Statements
These statements are used to perform a set of instructions repeatedly until the condition
is fulfilled. Iteration statements are also called looping statements.
for loop
The for loop operates as follows. The loop starts, with the execution of the initialization
portion. This sets the value of the loop control variable, which acts as a counter that
controls the loop. Then the condition is evaluated, wherein the loop control variable is
checked with a target value. If this expression evaluates to true, then the body of the loop
is executed. If it is false, the loop terminates. After one execution of the loop, the iteration
portion of the loop is executed. This is usually an expression which increments or
decrements the loop control variable. The loop then iterates, until the controlling
expression evaluates to false. The syntax of the for loop is:
Syntax
for( initialization; test exp; increment/decrement exp)
{
statements;
}
The loop has four different elements that have different purposes. These elements are:
a) Initialization expression: Before entering in a loop, its variables must be
initialized. The initialization expression helps to initialize loop variable with
its initial value. The initialization expression is executed only once in the
beginning of the loop.
b) Test Expression: The test expression decides whether the loop body will be
executed or not. If the test condition is true, the loop body gets executed
otherwise the loop is terminated. Test expression gets checked every time
before entering in the body of the loop.
c) Increment/Decrement Expression: The Increment/Decrement expression
changes the value of the loop variable. The increment/decrement expression
is executed every time after executing the loop body.
163
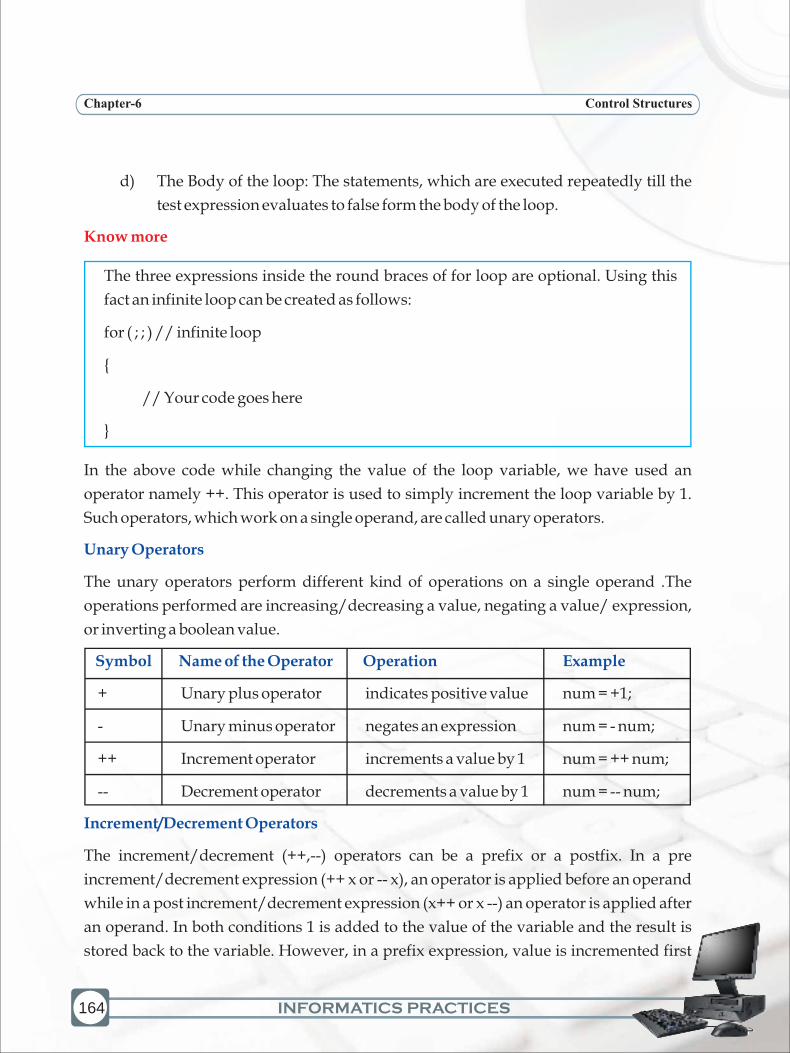
INFORMATICS PRACTICES
Control StructuresChapter-6
164
d) The Body of the loop: The statements, which are executed repeatedly till the
test expression evaluates to false form the body of the loop.
The three expressions inside the round braces of for loop are optional. Using this
fact an infinite loop can be created as follows:
for ( ; ; ) // infinite loop
{
// Your code goes here
}
In the above code while changing the value of the loop variable, we have used an
operator namely ++. This operator is used to simply increment the loop variable by 1.
Such operators, which work on a single operand, are called unary operators.
The unary operators perform different kind of operations on a single operand .The
operations performed are increasing/decreasing a value, negating a value/ expression,
or inverting a boolean value.
+ Unary plus operator indicates positive value num = +1;
- Unary minus operator negates an expression num = - num;
++ Increment operator increments a value by 1 num = ++ num;
-- Decrement operator decrements a value by 1 num = -- num;
The increment/decrement (++,--) operators can be a prefix or a postfix. In a pre
increment/decrement expression (++ x or -- x), an operator is applied before an operand
while in a post increment/decrement expression (x++ or x --) an operator is applied after
an operand. In both conditions 1 is added to the value of the variable and the result is
stored back to the variable. However, in a prefix expression, value is incremented first
Know more
Unary Operators
Symbol Name of the Operator Operation Example
Increment/Decrement Operators

INFORMATICS PRACTICES
Chapter-6 Control Structures
then this new value is restored back to the variable. In postfix expression the current
value is assigned to a variable then it is incremented by 1 and restored back to the original
variable. The working of the pre increment and post increment is illustrated in Figure
6.41
int Number=1000;
Number++; //Post increment in an independent statement
OR
int Number=1000;
++Number; //Pre increment in an independent statement
//will have the same meaning
------------------------------------------------------------
int Total=50,Number=10;
Total=Total + Number++; //post increment -
//first the Total is increased by the
//current value of Number and then
//Number is incremented by 1
//So, after execution of the expression
//Total will be 60 and Number will be 11
------------------------------------------------------------
int Total=50,Number=10;
Total=Total + ++Number; //pre-increment -
//first the Number gets incremented
//by 1 and then gets added to Total
//So, after execution of the expression
//Total will be 61 and Number will be 11
Figure 6.41 Working of pre increment and post increment
165
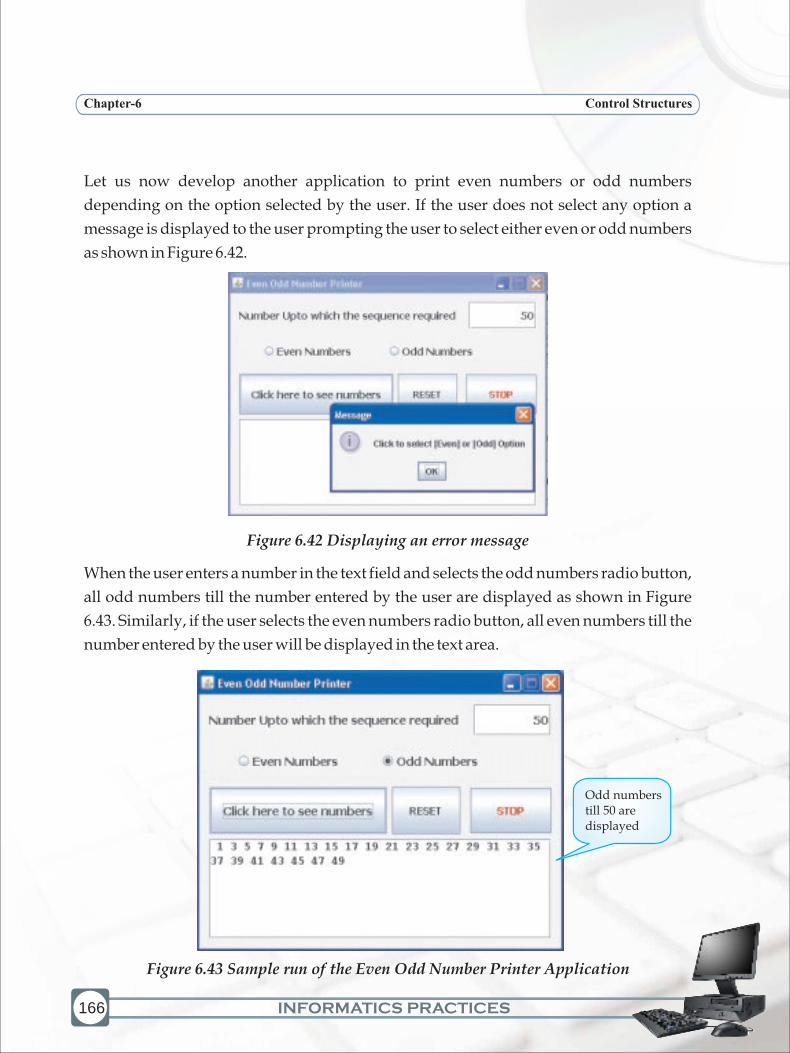
INFORMATICS PRACTICES
Control StructuresChapter-6
166
Let us now develop another application to print even numbers or odd numbers
depending on the option selected by the user. If the user does not select any option a
message is displayed to the user prompting the user to select either even or odd numbers
as shown in Figure 6.42.
Figure 6.42 Displaying an error message
When the user enters a number in the text field and selects the odd numbers radio button,
all odd numbers till the number entered by the user are displayed as shown in Figure
6.43. Similarly, if the user selects the even numbers radio button, all even numbers till the
number entered by the user will be displayed in the text area.
Odd numbers till 50 are displayed
Figure 6.43 Sample run of the Even Odd Number Printer Application
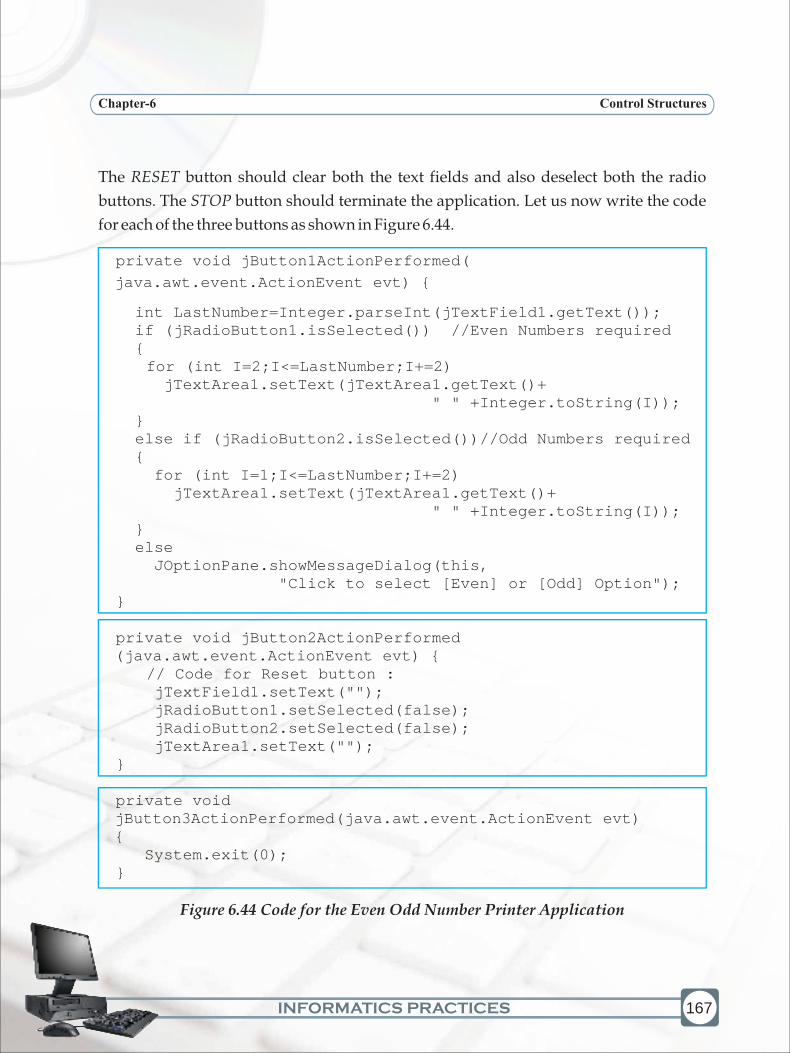
INFORMATICS PRACTICES
Chapter-6 Control Structures
The RESET button should clear both the text fields and also deselect both the radio
buttons. The STOP button should terminate the application. Let us now write the code
for each of the three buttons as shown in Figure 6.44.
private void jButton1ActionPerformed(
java.awt.event.ActionEvent evt) {
int LastNumber=Integer.parseInt(jTextField1.getText()); if (jRadioButton1.isSelected()) //Even Numbers required {
for (int I=2;I<=LastNumber;I+=2) jTextArea1.setText(jTextArea1.getText()+ " " +Integer.toString(I)); } else if (jRadioButton2.isSelected())//Odd Numbers required { for (int I=1;I<=LastNumber;I+=2) jTextArea1.setText(jTextArea1.getText()+ " " +Integer.toString(I)); } else JOptionPane.showMessageDialog(this, "Click to select [Even] or [Odd] Option");}
private void jButton2ActionPerformed (java.awt.event.ActionEvent evt) {
// Code for Reset button : jTextField1.setText(""); jRadioButton1.setSelected(false); jRadioButton2.setSelected(false); jTextArea1.setText("");}
private void jButton3ActionPerformed(java.awt.event.ActionEvent evt) { System.exit(0);}
Figure 6.44 Code for the Even Odd Number Printer Application
167

INFORMATICS PRACTICES
Control StructuresChapter-6
168
The above code introduces us to a new method setSelected(). This method is used to set
the selection status of a radio button or a check box. The syntax for this method is given
below:
Syntax
jRadioButton.setSelected(Boolean b)
Since the method has to set the state so it needs a boolean value to be supplied. The value
b should be true if the button is to be selected and false if the button is to be deselected.
Also note the way in which the loop control variable has been incremented. The
statement used is I +=2 which is equivalent to writing I = I + 2. This simply means that the
loop control variable is incremented by 2 each time and this has been done to reach the
successive odd or even number. The explanation of each line of the above code is left as
an exercise.
Now we will learn another two loop statements named while loop and do while loop.
The working of both these loops is similar though there is a slight difference between.
Observe the code given in Figure 6.40 for the Natural Number Printer Application and
then observe the codes given below in Figure 6.45 and Figure 6.46 for the same
application.
private void jButton1ActionPerformed
(java.awt.event.ActionEvent evt) {
int LastNumber=Integer.parseInt(jTextField1.getText()); int i=1 ; // loop variable initialized while(i<=LastNumber) { jTextArea1.setText(jTextArea1.getText()+""+Integer.toString(I)); i=i+1; }}private void jButton2ActionPerformed(java.awt.event.ActionEvent evt) { System.exit(0);}
Figure 6.45 Code for Natural Number Application using while Loop
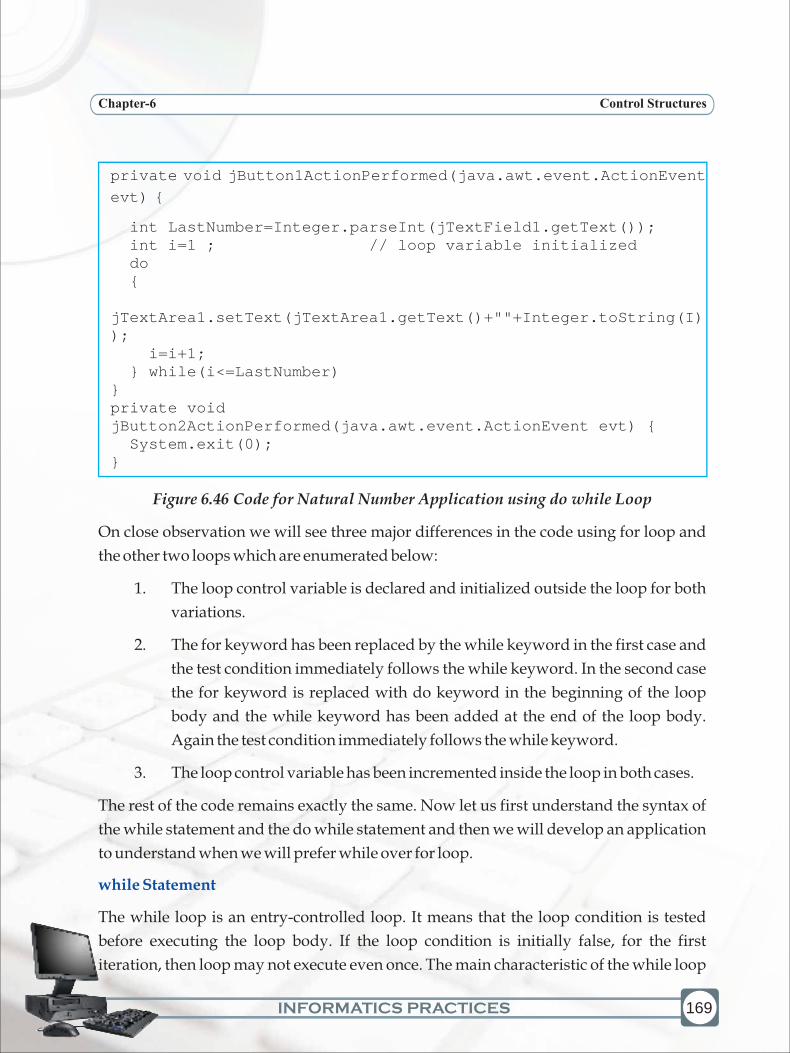
INFORMATICS PRACTICES
Chapter-6 Control Structures
private void jButton1ActionPerformed(java.awt.event.ActionEvent
evt) {
int LastNumber=Integer.parseInt(jTextField1.getText()); int i=1 ; // loop variable initialized do { jTextArea1.setText(jTextArea1.getText()+""+Integer.toString(I)); i=i+1; } while(i<=LastNumber)}private void jButton2ActionPerformed(java.awt.event.ActionEvent evt) { System.exit(0);}
Figure 6.46 Code for Natural Number Application using do while Loop
On close observation we will see three major differences in the code using for loop and
the other two loops which are enumerated below:
1. The loop control variable is declared and initialized outside the loop for both
variations.
2. The for keyword has been replaced by the while keyword in the first case and
the test condition immediately follows the while keyword. In the second case
the for keyword is replaced with do keyword in the beginning of the loop
body and the while keyword has been added at the end of the loop body.
Again the test condition immediately follows the while keyword.
3. The loop control variable has been incremented inside the loop in both cases.
The rest of the code remains exactly the same. Now let us first understand the syntax of
the while statement and the do while statement and then we will develop an application
to understand when we will prefer while over for loop.
The while loop is an entry-controlled loop. It means that the loop condition is tested
before executing the loop body. If the loop condition is initially false, for the first
iteration, then loop may not execute even once. The main characteristic of the while loop
while Statement
169

INFORMATICS PRACTICES
Control StructuresChapter-6
170
is that it can be used in both cases i.e. when the number of iterations is known as well as
when it is unknown. The syntax of the while loop is as follows:
Syntax
while(test expression)
{
loop body
}
The loop-body can contain a single statement, a compound statement or an empty
statement. The loop iterates till the test expression evaluates to true. When the
expression becomes false, the program control passes to the statement following the
loop. Remember that in while loop, a loop control variable should be initialized before
the loop begins and the loop variable should be updated inside the body of the while
loop (else it will become an endless loop).
In the do while loop, the test occurs at the end of the loop. This ensures that the do while
loop executes the statements included in the loop body at least once. After the first
execution of the statement, it evaluates the test expression. If the expression evaluates to
true, then it executes the statements of the loop body again. It will go on executing the
statements as long as the condition is true. Once the condition becomes false, the loop
will terminate. Do while loop is an exit controlled loop. Like if and while statements, the
condition being checked must be included between parenthesis. The do while statement
must end with a semicolon. The syntax of the loop is as follows:
Syntax
do
{
loop body
}while (test expression);
do while Statement

INFORMATICS PRACTICES
Chapter-6 Control Structures
The difference between do-while and while is that do-while evaluates its expression at
the end of the loop instead of at the beginning. Therefore, the statements within the do
block are always executed at least once.
Let us now develop a Member Counter application in which we accept names from the
user and display these names in the text area on the click of a button as shown in Figure
6.47. The first step is to analyze the problem. When the user clicks on the button Click to
START an input dialog box prompts the user to enter the Member Name. After entering
the member name, when the user clicks on OK the member name is added to the text area
and the total number of the members is displayed in the Members Counter text field as
shown in Figure 6.48. The user is then asked to confirm whether he wants to continue or
not. If the user clicks on Yes then the Enter Member Name dialog box again prompts the
user for a new member name. The Member name entered is then appended in the Text
Area as shown in Figure 6.48.
171
Figure 6.48 Sample Run of Member Counter Explaining the Flow of Operation

INFORMATICS PRACTICES
Control StructuresChapter-6
172
The process continues till the user terminates by clicking on the No button in the "More
Names" dialog box.
Now think, Can we use for loop for this application? The answer is no because for is a
deterministic loop in which the number of iterations should be pre known. So we may
use the while loop or the do while instead. Since we want the application to run atleast
once so we will use the do while loop.
Let us enter the code for the Click to START button as shown in Figure 6.49.
Figure 6.49 Code for the Members Counter Application
The above code introduces us to two new methods namely, showInputDialog() and
showConfirmDialog(). The use of both the methods is explained below:
showInputDialog() - This method is used to accept a value from the user using a Dialog
Window along with an appropriate message to guide the user about what has to be
private void jButton1ActionPerformed(java.awt.event.ActionEvent evt)
{ int More,CountName=0; String Name; do { //Asking the User to Enter Name of new member Name=JOptionPane.showInputDialog("Enter Member Name"); //Adding New Name in the List Name=Name+"\n"+jTextArea1.getText();
//Displaying new List of Names in TextArea jTextArea1.setText(Name);
//Incrementing in the count of members CountName=CountName+1;
//Re-Displaying the count of Members jTextField1.setText(Integer.toString(CountName));
//Confirm if more names to added or not More=JOptionPane.showConfirmDialog(this, "More Names","Confirm",JOptionPane.YES_NO_OPTION); } while (More==0);}

INFORMATICS PRACTICES
Chapter-6 Control Structures
entered. The method returns the value input by the user and so can be used on the right
side of an assignment statement.
Name=JOptionPane.showInputDialog("Enter Member Name");
showConfirmDialog() - This method is used to display a message in a Dialog window
and prompts the user to select [YES] or [NO]. The method returns 0 if the user clicks on
Yes and returns 1 if the user clicks on No in the Dialog Window.
More=JOptionPane.showConfirmDialog(this,
"More Names","Confirm",JOptionPane.YES_NO_OPTION);
Let us now understand the code in detail.
int More, CountName=0;
Declare two integer variables named More (which stores whether the user
wishes to continue or not) and CountName (which stores the total number of
members) and initialize CountName to 0.
String Name;
Declare a string variable called Name to store the name input by the user.
(Later this same variable is used to store all the names of the text area)
Name=JOptionPane.showInputDialog("Enter Member Name");
The name accepted from the user using a dialog box is stored in the variable
name
Name=Name+"\n"+jTextArea1.getText();
Retrieve the value of the text area using the getText() method (The text area
contains all the previous member names) . Then concatenate this value with
the name accepted from the user. The "\n" is used so that each name appears
on a separate line.
jTextArea1.setText(Name);
The concatenated string containing all the member names (variable Name) is
displayed in the text area using the setText() method
CountName=CountName+1;
v
v
v
v
v
173
INFORMATICS PRACTICES
Control StructuresChapter-6
174
The counter variable containing the total member count is incremented by one
jTextField1.setText(Integer.toString(CountName));
The variable CountName is a numeric value so it is converted to a string using
the toString() method and then the value is displayed in the text field using the
setText() method
More=JOptionPane.showConfirmDialog(null,
"More Names","Confirm",JOptionPane.YES_NO_OPTION);
Ask the user to confirm if the application is to continue
while (More==0);
Continue the iteration till the user selects No from the confirm dialog box.
When the user selects No, value returned is 1 and so the variable More
becomes one, thereby terminating the loop
A program statement can execute in three ways: sequence, selection, iteration.
Selection statements test conditions and selectively execute code depending
on the outcome of the test condition.
The if statement tests a condition. If the condition evaluates to true, the
statements in the if part are executed. If the condition is false then the
statements in else part get executed.
Nested if statements - These statements are used to test multiple conditions.
RadioButton control is used to give user a facility to select or deselect an
option. RadioButton controls are dependent on each other (when used as a
part of single ButtonGroup), so user can have an option to select only one
RadioButton, which are part of the same ButtonGroup. Remember,
ButtonGroups when dragged into the form, are invisible swing controls on
the form, we require to make RadioButton part of a ButtonGroup from the
property window.
Check box control is used to give user facility to select or deselect one or more
v
v
v
v
Summary
v
v
v
v
v
v
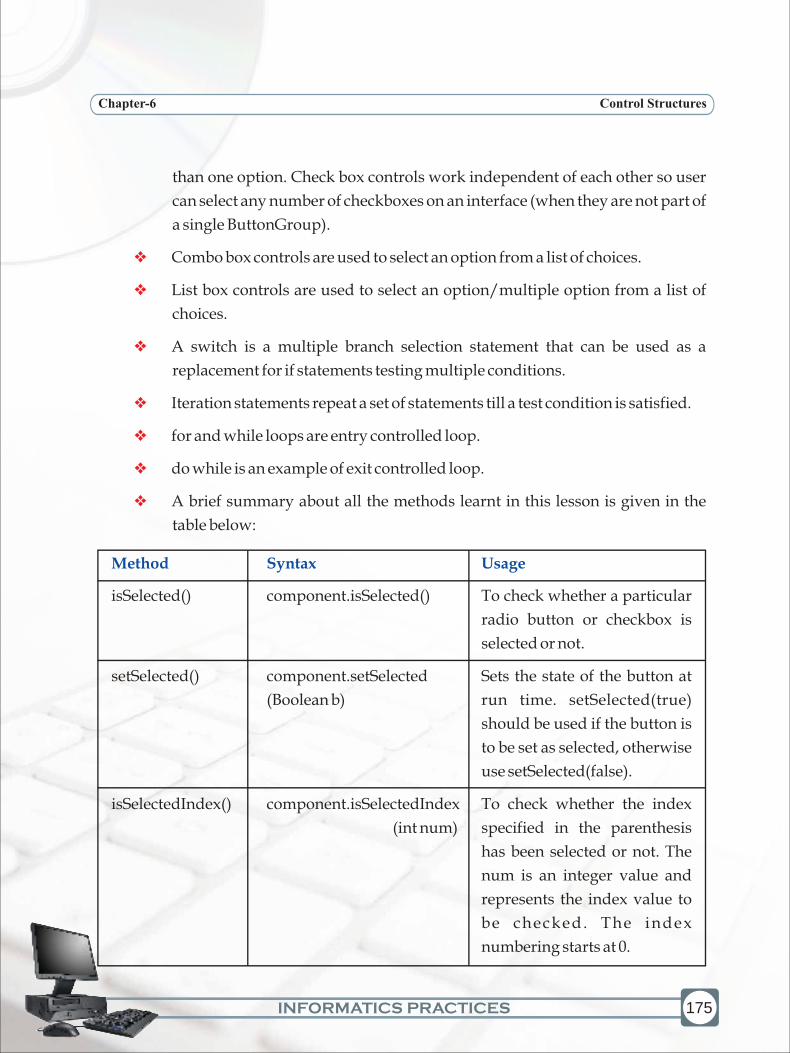
INFORMATICS PRACTICES
Chapter-6 Control Structures
than one option. Check box controls work independent of each other so user
can select any number of checkboxes on an interface (when they are not part of
a single ButtonGroup).
Combo box controls are used to select an option from a list of choices.
List box controls are used to select an option/multiple option from a list of
choices.
A switch is a multiple branch selection statement that can be used as a
replacement for if statements testing multiple conditions.
Iteration statements repeat a set of statements till a test condition is satisfied.
for and while loops are entry controlled loop.
do while is an example of exit controlled loop.
A brief summary about all the methods learnt in this lesson is given in the
table below:
isSelected() component.isSelected() To check whether a particular
radio button or checkbox is
selected or not.
setSelected() component.setSelected Sets the state of the button at
(Boolean b) run time. setSelected(true)
should be used if the button is
to be set as selected, otherwise
use setSelected(false).
isSelectedIndex() component.isSelectedIndex To check whether the index
(int num) specified in the parenthesis
has been selected or not. The
num is an integer value and
represents the index value to
be checked. The index
numbering starts at 0.
v
v
v
v
v
v
v
Method Syntax Usage
175
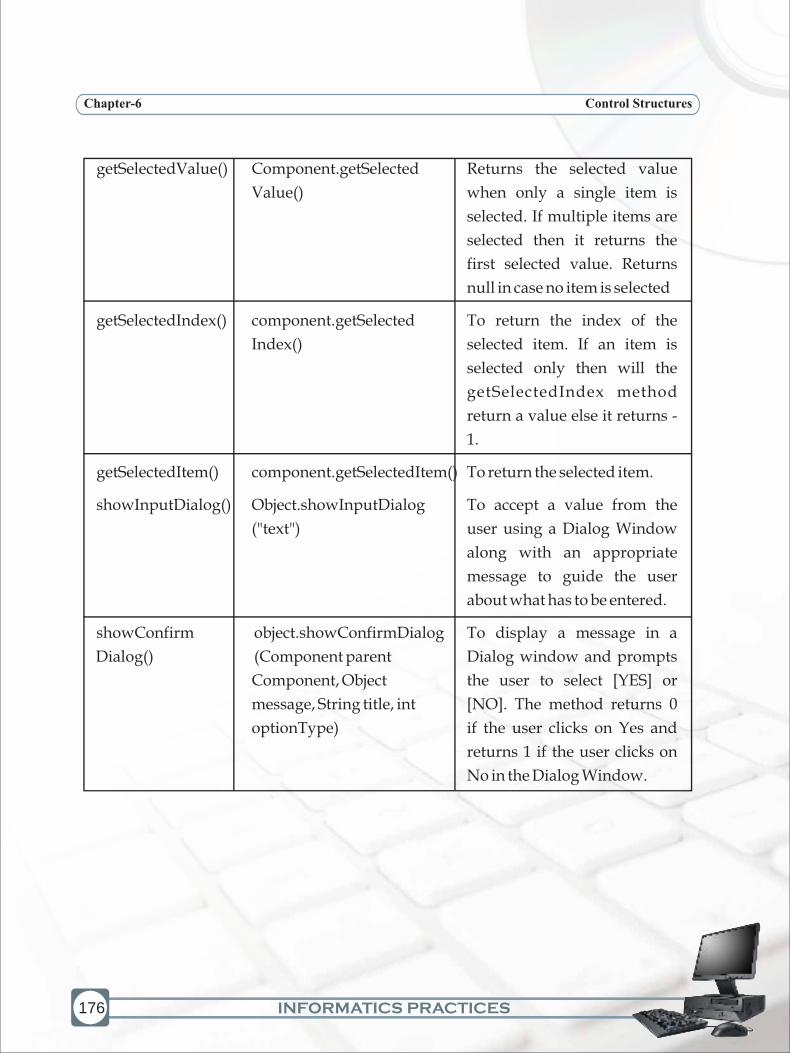
INFORMATICS PRACTICES
Control StructuresChapter-6
176
getSelectedValue() Component.getSelected Returns the selected value
Value() when only a single item is
selected. If multiple items are
selected then it returns the
first selected value. Returns
null in case no item is selected
getSelectedIndex() component.getSelected To return the index of the
Index() selected item. If an item is
selected only then will the
getSelectedIndex method
return a value else it returns -
1.
getSelectedItem() component.getSelectedItem() To return the selected item.
showInputDialog() Object.showInputDialog To accept a value from the
("text") user using a Dialog Window
along with an appropriate
message to guide the user
about what has to be entered.
showConfirm object.showConfirmDialog To display a message in a
Dialog() (Component parent Dialog window and prompts
Component, Object the user to select [YES] or
message, String title, int [NO]. The method returns 0
optionType) if the user clicks on Yes and
returns 1 if the user clicks on
No in the Dialog Window.
INFORMATICS PRACTICES
Chapter-6 Control Structures
Multiple Choice Questions
1. Which of the following is a selection construct ?
a. do while Loop b. for Loop
c. while Loop d. None of these
2. If there are two or more possible options then we can use:
a. simple if statement b. nested if statement
c. while loop d. None of the above
3. A loop that never ends is called a :
a. continue loop b. infinite loop
c. circle loop d. None of these
4. Statements in a block statement are enclosed in:
a. ( ) Round braces b. [ ] square braces
c. { } Curly braces d. None of these
5. A group of statements which get executed based on a condition is called:
a. selection b. sequential
c. iteration d. none of these
6. Which of the following is an exit controlled loop?
a. for loop b. do while Loop
c. while loop d. none of these
7. How many times, the following loop gets executed?
i=0;
while (i> 20)
{
//Statements
}
177

INFORMATICS PRACTICES
Control StructuresChapter-6
178
a. Zero number of times b. Infinite number of times
c. Once d. none of these
8. How many times, the following loop gets executed?
i=0;
do
{
//Statements
}while (i> 20);
a. Zero number of times b. Infinite number of times
c. Once d. none of these
1. What is the difference between selection and repetition?
2. What is the purpose of if statement? Describe the different forms of if statement.
3. What is the purpose of default clause in a switch statement?
4. What is the main difference between a while loop and a do while loop?
5. What will be the content of jTextField1 after executing the following code:
int Num = 6;
Num = Num + 1;
if ( Num > 5)
jTextField1.setText(Integer.toString(Num));
else
jTextField1.setText(Integer.toString(Num+5));
6. What will be the corresponding outputs of the following code segment if the
possible inputs in the jTextField1 are:
(i) 10 (ii) 20 (iii) 30 (iv) 40 (v) 50
Exercises
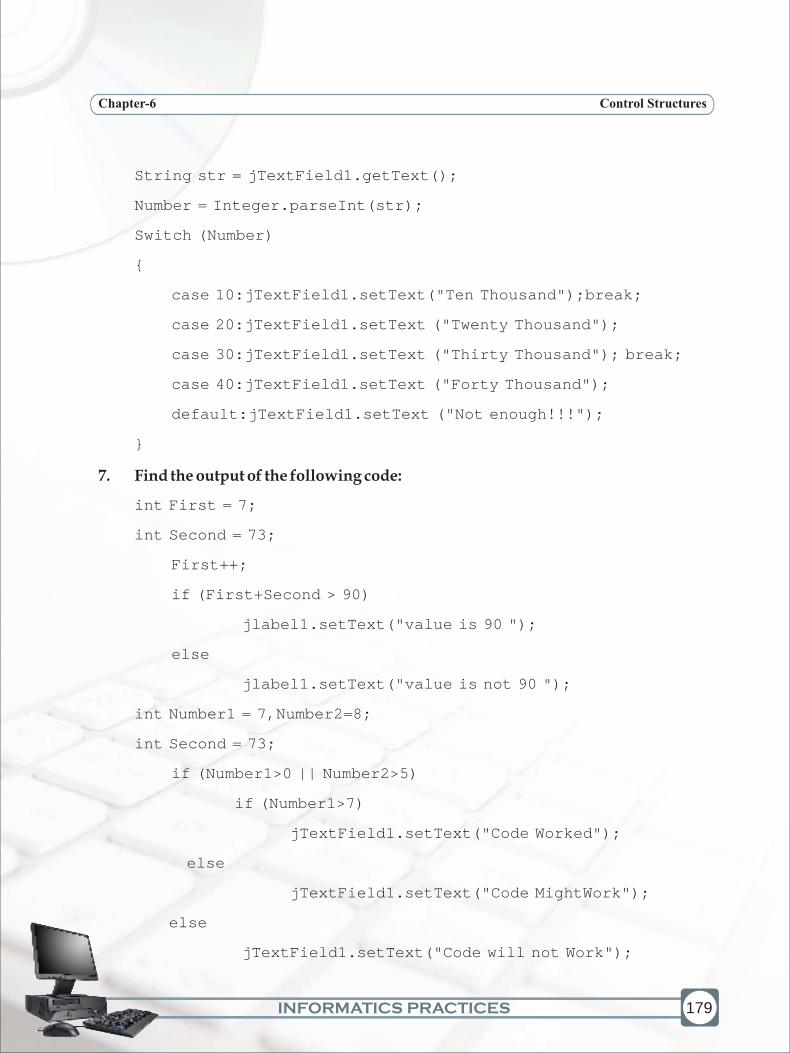
INFORMATICS PRACTICES
Chapter-6 Control Structures
String str = jTextField1.getText();
Number = Integer.parseInt(str);
Switch (Number)
{
case 10:jTextField1.setText("Ten Thousand");break;
case 20:jTextField1.setText ("Twenty Thousand");
case 30:jTextField1.setText ("Thirty Thousand"); break;
case 40:jTextField1.setText ("Forty Thousand");
default:jTextField1.setText ("Not enough!!!");
}
7. Find the output of the following code:
int First = 7;
int Second = 73;
First++;
if (First+Second > 90)
jlabel1.setText("value is 90 ");
else
jlabel1.setText("value is not 90 ");
int Number1 = 7,Number2=8;
int Second = 73;
if (Number1>0 || Number2>5)
if (Number1>7)
jTextField1.setText("Code Worked");
else
jTextField1.setText("Code MightWork");
else
jTextField1.setText("Code will not Work");
179

INFORMATICS PRACTICES
Control StructuresChapter-6
180
8. What is the main difference between a combo box and a list box?
9. How many times will the following loop get executed?
x = 5;
y = 36;
while ( x <= y)
{
x+=6;
}
10. What will be the content of the jTextArea1 after executing the following code?
int Num = 1;
do
{
jTextArea1.setText(Integer.toString(++Num) + "\n");
Num = Num + 1;
}while(Num<=10)
11. Explain the use of for statement along with its syntax.
12. What are relational operators? Explain with the help of suitable examples.
Design GUI applications for the following:
1. Develop an application to take input from user in a radio button out of the two
referring to Area or Perimeter of a circle. Print the Area or Perimeter in a TextField
for the value of Radius entered in another TextField.
2. Develop an application to take an input in TextField for a number. If the number is
even then Display its square otherwise its cube in a MessageBox.
3. Develop an application to calculate area of a circle, a rectangle or a triangle
depending upon the user's choice (from a set of Radio Buttons). Accept the desired
input Radius OR Length-Bredth OR Side as per the option selected by the user.
Lab Exercises
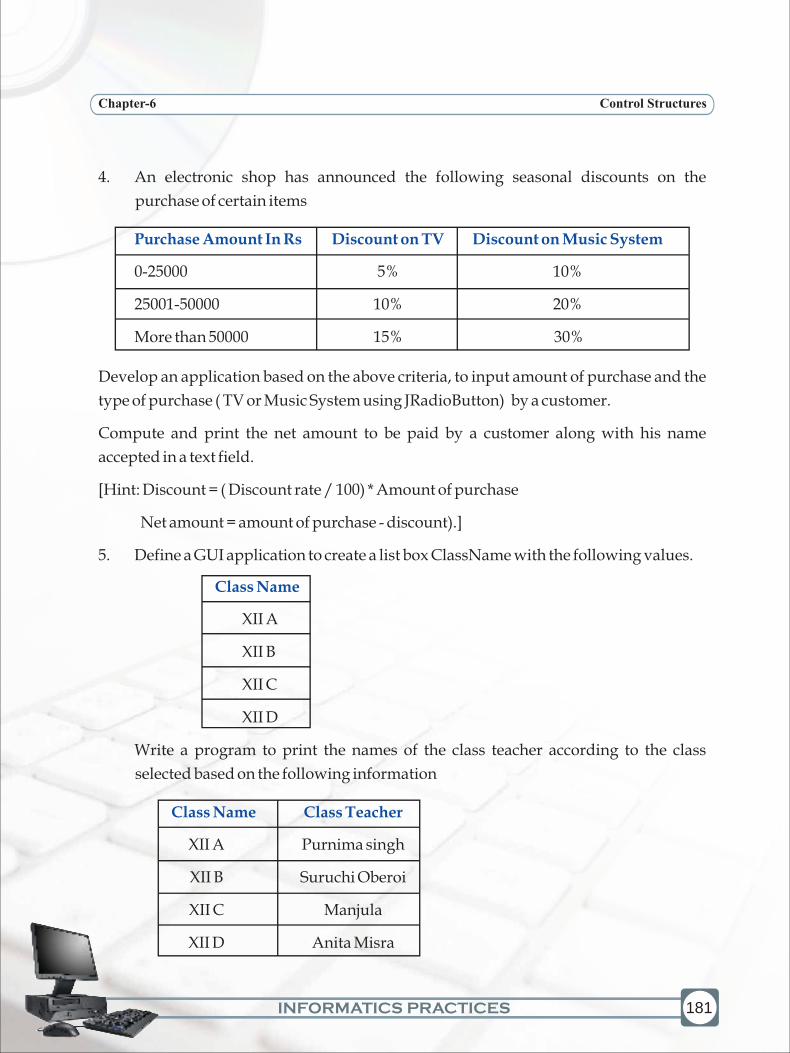
INFORMATICS PRACTICES
Chapter-6 Control Structures
4. An electronic shop has announced the following seasonal discounts on the
purchase of certain items
0-25000 5% 10%
25001-50000 10% 20%
More than 50000 15% 30%
Develop an application based on the above criteria, to input amount of purchase and the
type of purchase ( TV or Music System using JRadioButton) by a customer.
Compute and print the net amount to be paid by a customer along with his name
accepted in a text field.
[Hint: Discount = ( Discount rate / 100) * Amount of purchase
Net amount = amount of purchase - discount).]
5. Define a GUI application to create a list box ClassName with the following values.
XII A
XII B
XII C
XII D
Write a program to print the names of the class teacher according to the class
selected based on the following information
XII A Purnima singh
XII B Suruchi Oberoi
XII C Manjula
XII D Anita Misra
Purchase Amount In Rs Discount on TV Discount on Music System
Class Name
Class Name Class Teacher
181

INFORMATICS PRACTICES
Control StructuresChapter-6
182
6. Design a GUI application as shown below: On selecting the radio button and
clicking the Set Alignment button the alignment of the text on the button gets
changed to Left, Right or Centre.
[Hint use the setHorizontalAlignment method. To set the alignment to right we can
use setHorizontalAlignment(SwingConstants.RIGHT).

INFORMATICS PRACTICES 183 INFORMATICS PRACTICES
7 Programming Guidelines
Learning Objectives
v
v
v
v
v
After studying this lesson the students will be able to:
appreciate the importance of understanding and analyzing a problem
appropriately before beginning with the application development.
understand about some of the GUI application guidelines.
demonstrate efficient program development practices.
be familiar with and understand the stages of application development.
identify different types of errors.
GUI Programming uses a simplified approach to programming. In GUI Programming,
most of the components are predefined in a generic way to be adapted and incorporated
according to the needs or requirements of the application. It provides a very comfortable feel
to the programmer to develop applications without getting into complicated and
cumbersome logic and commands. Most of the GUI tools are developed to provide
simplified approach to programming and provide enormous inbuilt functionality to the
programmer. This chapter will help the readers to learn how to utilize GUI tools to develop
programs for various applications in efficient and effective manner.
Some good application development guidelines are:
1. Understand the need of the application
before starting the development.
2. Find out all possible inputs, which are
required to produce the desired result or
results.
GUI Application Development Guidelines
Figure 7.1 Ambiguities caused in
User Input due to a Textfield

INFORMATICS PRACTICES
Programming GuidelinesChapter-7
184
3. Make sure that the user provides appropriate information with minimum
efforts to avoid ambiguity in data. The same can be done by appropriately
deciding on the various input components - maximize use of radio button,
checkbox, combo box, and list. Wherever possible avoid use of text field and
text area for accepting inputs from the user to reduce ambiguity.
4. Radio Button should be used wherever one of the
option out of limited number of known set of
options are required to be taken from the user. For
example, for accepting gender (Male or Female),
marital status (Single or Married), for accepting
membership type (Monthly, Annual or Lifetime)
etc.
5. Checkbox should be used wherever multiple
options are required to be selected from a limited
number of known set of options. For example, for
accepting multiple hobbies (Swimming, Singing,
Dancing, Debating), for accepting food order in a
restaurant (Pizza, Burger, Channa Kulcha, Pao
Bhaji, Chowmein) etc.
6. Combo box should be used wherever only one of
the option from a large number of known set of
options is required to be taken from the user. For
example, selecting state, selecting marital status,
selecting schools etc.
Figure 7.2 Avoiding Ambiguity by using Combo Box
Figure 7.3 Radio button
Figure 7.4 Checkbox
Figure 7.5 Combobox
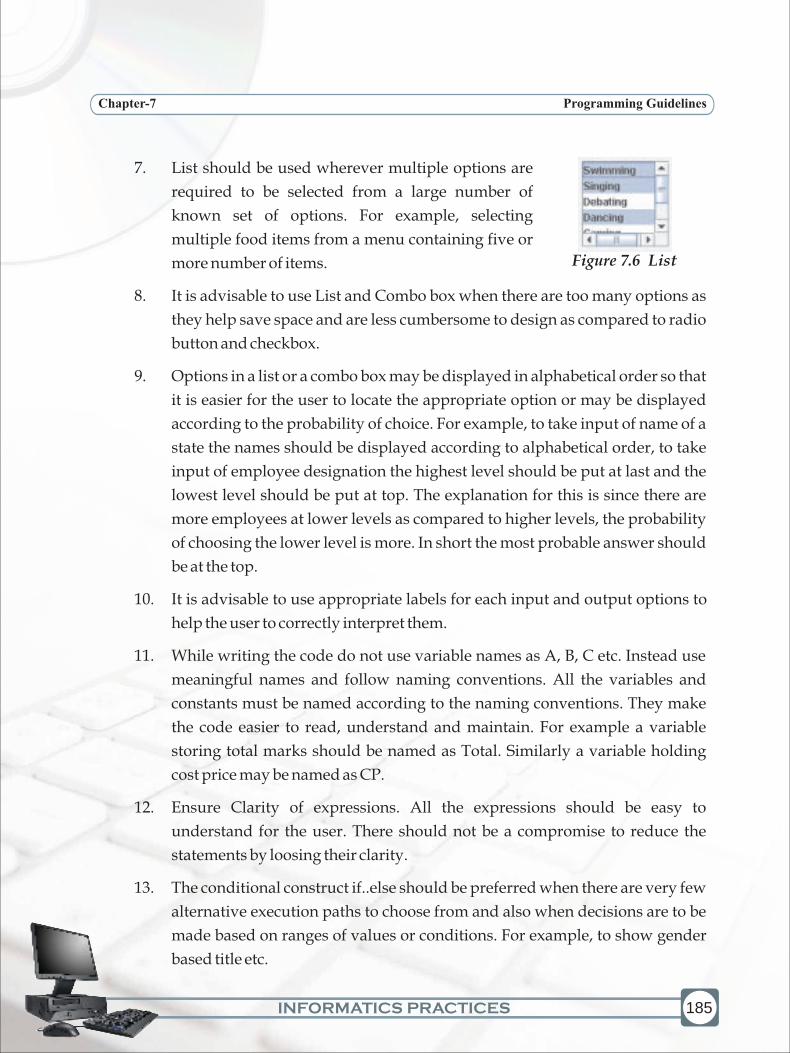
INFORMATICS PRACTICES
7. List should be used wherever multiple options are
required to be selected from a large number of
known set of options. For example, selecting
multiple food items from a menu containing five or
more number of items.
8. It is advisable to use List and Combo box when there are too many options as
they help save space and are less cumbersome to design as compared to radio
button and checkbox.
9. Options in a list or a combo box may be displayed in alphabetical order so that
it is easier for the user to locate the appropriate option or may be displayed
according to the probability of choice. For example, to take input of name of a
state the names should be displayed according to alphabetical order, to take
input of employee designation the highest level should be put at last and the
lowest level should be put at top. The explanation for this is since there are
more employees at lower levels as compared to higher levels, the probability
of choosing the lower level is more. In short the most probable answer should
be at the top.
10. It is advisable to use appropriate labels for each input and output options to
help the user to correctly interpret them.
11. While writing the code do not use variable names as A, B, C etc. Instead use
meaningful names and follow naming conventions. All the variables and
constants must be named according to the naming conventions. They make
the code easier to read, understand and maintain. For example a variable
storing total marks should be named as Total. Similarly a variable holding
cost price may be named as CP.
12. Ensure Clarity of expressions. All the expressions should be easy to
understand for the user. There should not be a compromise to reduce the
statements by loosing their clarity.
13. The conditional construct if..else should be preferred when there are very few
alternative execution paths to choose from and also when decisions are to be
made based on ranges of values or conditions. For example, to show gender
based title etc.
185
Chapter-7 Programming Guidelines
Figure 7.6 List
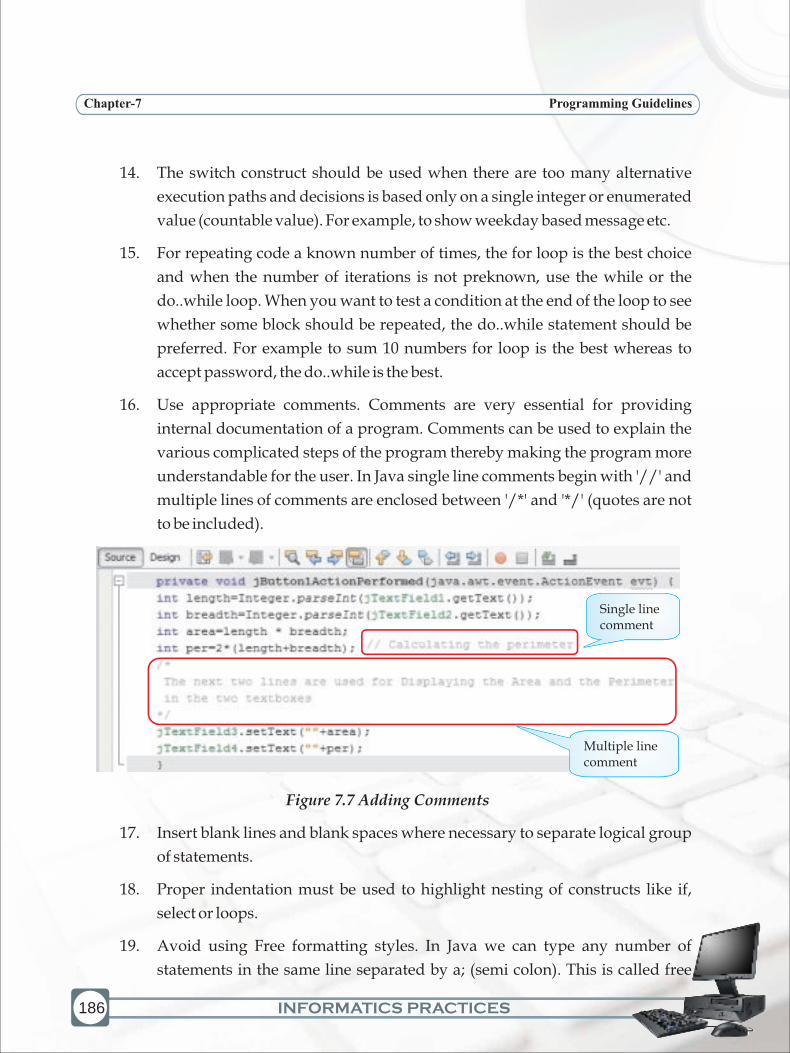
INFORMATICS PRACTICES
Programming GuidelinesChapter-7
186
14. The switch construct should be used when there are too many alternative
execution paths and decisions is based only on a single integer or enumerated
value (countable value). For example, to show weekday based message etc.
15. For repeating code a known number of times, the for loop is the best choice
and when the number of iterations is not preknown, use the while or the
do..while loop. When you want to test a condition at the end of the loop to see
whether some block should be repeated, the do..while statement should be
preferred. For example to sum 10 numbers for loop is the best whereas to
accept password, the do..while is the best.
16. Use appropriate comments. Comments are very essential for providing
internal documentation of a program. Comments can be used to explain the
various complicated steps of the program thereby making the program more
understandable for the user. In Java single line comments begin with '//' and
multiple lines of comments are enclosed between '/*' and '*/' (quotes are not
to be included).
Figure 7.7 Adding Comments
17. Insert blank lines and blank spaces where necessary to separate logical group
of statements.
18. Proper indentation must be used to highlight nesting of constructs like if,
select or loops.
19. Avoid using Free formatting styles. In Java we can type any number of
statements in the same line separated by a; (semi colon). This is called free
Single line comment
Multiple line comment
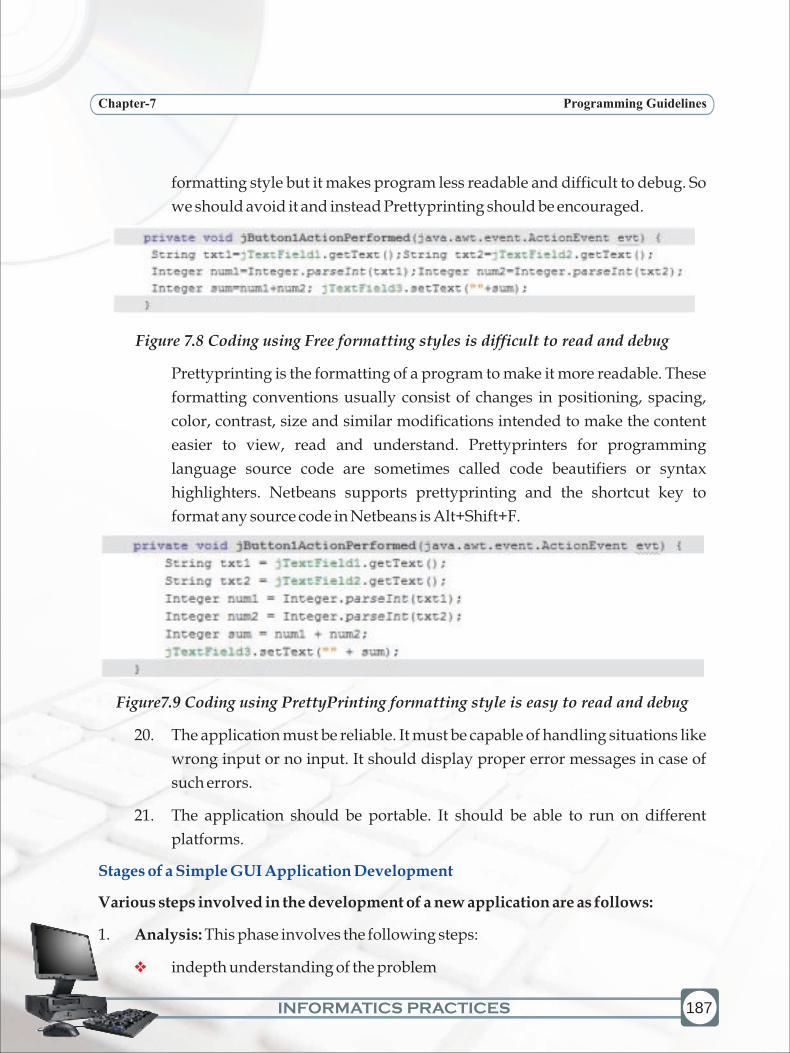
INFORMATICS PRACTICES
Chapter-7 Programming Guidelines
formatting style but it makes program less readable and difficult to debug. So
we should avoid it and instead Prettyprinting should be encouraged.
Figure 7.8 Coding using Free formatting styles is difficult to read and debug
Prettyprinting is the formatting of a program to make it more readable. These
formatting conventions usually consist of changes in positioning, spacing,
color, contrast, size and similar modifications intended to make the content
easier to view, read and understand. Prettyprinters for programming
language source code are sometimes called code beautifiers or syntax
highlighters. Netbeans supports prettyprinting and the shortcut key to
format any source code in Netbeans is Alt+Shift+F.
Figure7.9 Coding using PrettyPrinting formatting style is easy to read and debug
20. The application must be reliable. It must be capable of handling situations like
wrong input or no input. It should display proper error messages in case of
such errors.
21. The application should be portable. It should be able to run on different
platforms.
Various steps involved in the development of a new application are as follows:
1. Analysis: This phase involves the following steps:
indepth understanding of the problem
Stages of a Simple GUI Application Development
v
187

INFORMATICS PRACTICES
Programming GuidelinesChapter-7
188
deciding the requirements from the new system
jotting down possible inputs and outputs that are required for obtaining the
desired solution.
For example, to make the Member Counter Application in Chapter 6 we first
performed a detailed analysis about what is expected from the application. Next
we noted down the possible inputs and outputs i.e. we understood that the user has
to input a name which is to be appended to the contents of a text area. After one run,
the user is again to be asked if he wishes to continue and the application should
terminate only when the user wants to.
2. Design: This phase involves planning of step-by-step procedures required to solve
a given problem. At this stage a detailed design of the following components is to be
completed:
Inputs: involves defining the kind (data type) of data to enter into the
application. In this stage we should also decide on the type of input
components to minimize ambiguity and inconsistency.
Outputs: decide on the possible data to be displayed from the application and
also how, where and when it is to be displayed.
User Interface (Forms): involves designing of the screen the user will see and
use to enter data or display data. The placement of various input-output
components on the form in an aesthetic and visually appealing manner is a
major step in this phase.
Modular Components: involves breaking of complex steps into simple ones
to attain the target. Depending on the user interface this step will involve
deciding on the functionality required from each component placed on the
form to obtain the desired output.
Algorithms: involves creating a simple solution in the form of steps called an
algorithm and it helps in making the coding process easier.
For example, after completing the analysis stage in the Member Counter
Application we proceed to the design stage where we first decide on the type of
input and output required based on the requirement of the application i.e. we
decide that the input will be accepted using a dialog box (to give the user a choice of
v
v
v
v
v
v
v

INFORMATICS PRACTICES
Chapter-7 Programming Guidelines
adding or cancelling) and the output will be displayed in a text area (so that lots of
names can be displayed). Each input and output type is decided based on the
analysis done in stage 1. Next step is to design the user interface or the Form and
place the relevant components as we did in the case of our Member Counter
Application.
3. Coding: This phase involves actual writing of programs using appropriate
programming languages. A good programmer will make an optimum code, which
is readable, easy to understand and maintain with appropriate error handling,
comments and indentation.
For example, after designing the form, we wrote the actual code using java
programming language.
4. Testing and Debugging: Virtually all applications have defects in them called
'bugs' and these need to be eliminated. Bugs can arise from errors in the logic of the
program specification or errors in the programming code created by a
programmer. Testing means the process of executing the application with possible
set of input data in order to find probable errors. Debugging means correction of
those errors in the application. In the testing and debugging stage, we should try
out all possible inputs in order to make our application error free.
For example, in our Member Calculator Application, what will happen if we input
numbers instead of a Name in the dialog box? Trying out and fixing up all such
errors is the aim of this stage of application development.
5. Documentation: Documentation means the instructions and information about the
usage of the application. Providing the documentation makes it easier for the end
user to understand the functionality of the application.
For example, giving appropriate comments in all our applications is part of
documentation as it clearly tells the user and the programmer about what a
particular part of the code is doing.
6. Application Delivery and Maintenance: The completed software is packaged
with full documentation and delivered to the end users. When the end users use the
software, bugs that were not found during testing may appear. The maintenance
involves the rectification of previously undetected errors and changes that are to be
189

INFORMATICS PRACTICES
Programming GuidelinesChapter-7
190
made for the enhancement of the functionality of the application. An updated
version of the software with the reported bugs corrected and enhancements is then
sent as a replacement to the end user.
Figure 7.10 Stages of Simple GUI Application Development
Please note that the single-sided arrow on the right side of the stage indicates that we
should proceed to the next stage only when the preceding phase is completed and
perfected.
This model is known as the waterfall model of Application development. There are several
other modifications of the model explained above.
The different types of errors encountered while developing any application are
explained below:
1. Syntax Errors: Formal set of rules defined for writing any statement in a language is
known as syntax. Syntax errors occur when syntax rules of any programming
language are violated. These errors occur during compilation of the application but
Know more
Types of Errors
ANALYSIS
DESIGN
CODING
TESTING and DEBUGGING
DOCUMENTATION
DELIVERY and MAINTENANCE

INFORMATICS PRACTICES
Chapter-7 Programming Guidelines
in Netbeans these errors are highlighted in design stage itself using the error
indicator as shown in Figure 7.11. Some of the common examples of syntax errors
are missing semicolon, missing parenthesis and using incompatible data types.
Figure 7.11 Common Syntax Errors
2. Run time errors: If an application is syntactically correct then it is compiled and
translated into machine language and is ready to be executed. Run time errors
occur during the execution of an application. These errors will result in abnormal
termination of the application. Some common examples of runtime errors are
Division by zero, trying to convert to number (int or double) from an empty
jTextField etc.
3. Logical errors: In case the application is not giving any compilation or runtime
error but still giving a incorrect output, it is due to logical errors. These Errors occur
due to mistakes on part of the programmer. They are the most difficult errors to
find and debug. One such common example of logical error is using a wrong
formula as Eng+Maths+GK/3 instead of (Eng+Maths+GK)/3 for calculating
average of 3 subject marks. A very effective technique to locate logical errors is
placing output statements (for example using jMessageDialog) to print
intermediate values at strategic places in your code to track down the cause of the
191
Missing semicolon
results in a syntax error
Not converting the value to
an integer type results in a
syntax error
Error
Indicator

INFORMATICS PRACTICES
Programming GuidelinesChapter-7
192
error during testing phase. Once tested with sample data, these output statements
must be removed.
Run time errors are also called exceptions, and handling such errors in the application is
called exception handling. In java exception handling is done using try{ } and catch{ }
blocks. Statements that can raise an error are placed inside the try{ } block and its
handling code is written inside the catch{ } block.
While designing the form for a GUI, make sure that the user provides appropriate
information with minimum efforts to avoid ambiguity in data.
Decide on the type of input components and constructs carefully after
understanding the need of the application
Use blank lines, appropriate comments and proper indentation to make a program
more readable
Prefer prettyprinting formatting style over free formatting styles
Stages of a GUI application development includes Analysis, Design, Coding,
Testing and Debugging, Documentation and Application Delivery and
Maintenance
Common types of errors encountered in an application are syntax errors, run time
errors and logical errors
Run time errors are also called exceptions
Writing code to handle run time errors in a java application is called exception
handling
Exception Handling
Summary
v
v
v
v
v
v
v
v
INFORMATICS PRACTICES
Chapter-7 Programming Guidelines
Multiple Choice Questions
1. ____________ is the process of translating a task into a series of commands that a
computer will use to perform that task.
A. Project design
B. Installation
C. Systems Analysis
D. Coding
2. Translating the problem statement into a series of sequential steps describing
what the application must do is known as:
A. Coding.
B. Debugging.
C. Creating the algorithm.
D. Writing the documentation
3. Which of the following component is the best suited to accept the country of the
user?
A. List
B. Combo box
C. Radio button
D. Check box
4. Which type of loop is best suited to check whether the password input by the
user is correct and display an error message?
A. for
B. do..while
C. while
D. All of the above
193

INFORMATICS PRACTICES
Programming GuidelinesChapter-7
194
5. Which construct will you use to find the sum of the first 10 natural numbers?
A. switch statement
B. for loop
C. if..else statement
D. None of the above
6. Which of the following is not a good programming guideline?
A. Adding lots of comments
B. Using prettyprinting
C. Using text fields to accept input of marital status
D. Designing visually appealing forms
1. Excessive comments add time to the execution of your program. (True/False).
Justify your answer.
2. Differentiate between compile time and run time errors.
3. Which error is harder to locate and why?
4. Explain the following terms:
a) Exception handling
b) Syntax
c) Portability
d) Prettyprinting
e) Syntax error
5. The code given below will give an error on execution if the value entered in t2 is 0.
Identify the type of the error and modify the code to handle such an error.
int a,b,c;
a= Intger.parseInt(t1.getText());
b= Intger.parseInt(t2.getText());
c= a / b;
Exercises